Embed Size (px)
Citation preview
TABLE OF CONTENTSIntroduction 2Game Scale 2Contents 2Glossary 2Components 31.F The Fate Cards 31.S The Strategy Cards 32. The Maps 43. The Formations 54. The Track Display 6
Core Rules 85. Sequence of Play 86. Game Time 87. Victory Conditions 88. Stacking 99. Initiative 1010. Line of Sight (LOS) 1011. Weapons 1212. Telephones 1213. Suppression 12
Orders 12O14. General Rules 12O15. Pass (Discard) 13
O16. Advance 13O17. Air Assault 13O18. Artillery Denied 14O19. Artillery Request 14O20. Command Confusion 16O21. Fire 16O22. HMG Suppress 18O23. Move 18O24. Offensive 19O25. Recover 19O26. Rout 20O27. Runner 20
Actions (A26) 20listed alphabetically (A29-A55)
Events (A56) 23listed alphabetically (E57-E97)
Strategy Cards 25S98. General Rules
Terrain 27listed alphabetically (T100-T124)
Fortifications 30listed alphabetically (F126-F131)
Index 32
RULEBOOK
Hexasim SARL ©2019
VERSION 1.1Items in blue text indicate functional changes from the first edition of this rulebook.

2 Hexasim SARL ©2019
INTRODUCTIONGreat War Commander (GWC) is a series of card-driven board games covering tactical combat in World War I. GMT’s Combat Commander, created by Chad Jensen, is the model and inspiration for the game. In this first volume, covering most aspects of Western Front warfare, one player assumes the role of Imperial Germany while another player commands the Entente (America and/or France [Great Britain will be covered in the next expansion]). The players will take turns playing Fate cards in order to activate Formations on the mapboard for various military functions. In certain scenarios, three players may participate.Victory is achieved by inflicting casualties to the enemy, occupying geographical objectives and exiting friendly Formations off the opponent’s map edge. The game takes place over a variable number of player Turns involving constant player interaction.Events, both good and bad, occur at random intervals to add uncertainty and disrupt “perfect plans”.
GAME SCALEEach hex measures approximately 164 feet across (50 meters or so). Each complete player Turn represents an arbitrary segment of game Time; with each measure of game Time abstractly representing several minutes of real time.Formations represent either a single Leader, a Runner, a 10 to 15 man Team, a 50 to 65 man Platoon, or a Tank.Artillery communication Telephones and individual Weapons (those larger than a rifle or pistol) are represented by their own counters.
CONTENTSGreat War Commander includes:
● 6 back-printed 17˝ x 24˝ game maps (twelve maps total)
● 256 large (⅝˝) die-cut counters ● 36 double large (1.25”x5/8”) die-cut
counters ● 160 small (½˝) die-cut counters ● 245 cards ● 4 double sided player aid sheets ● 8 back printed scenario sheets ● one 32-page Rulebook ● one 24-page Playbook
GLOSSARYAction—The ability listed just below the photo on every Fate card (and above, in the case of the “Fire” Order/Action). Actions may be played during either player’s Turn. [A28]Activate—A Formation or player may normally only be “activated” for one Order per Turn.Active—The player currently taking his Turn. Any Formation or marker belonging to that player.Adjacent—Two hexes sharing a common hexside are considered adjacent to one another. Formations and markers in one of those hexes are adjacent to Formations and markers in the other.Break/Broken—A Formation, Weapon or Telephone with its reverse side face-up is “broken”. A Weapon/Telephone cannot be used while it is broken. A broken Formation can perform most abilities, albeit at a reduced capacity. An unbroken piece that “breaks” becomes broken (flipped over); a broken piece that breaks again is eliminated. [3.2]Cohesion— A Unit is In Cohesion if it is within the Command Radius of any friendly Leader; or if it is located on any hex along the friendly board edge, in a friendly Objective hex, or in possession of an unbroken Weapon. Certain Units (e.g., Runners, Stosstruppen), however, are always In Cohesion [3.3.2]. All other Units are Out of Cohesion and become suppressed at the end of any player’s Turn [3.3.2.1].Command—One of five base stats found only on Leaders. Command is a measure of how well a Leader can control the friendly Formations around him. [3.3.1]Cover—A number associated with each terrain/Fortification. A hex’s best Cover is added directly to the Morale of every Unit and Leader occupying that hex. Multiple Covers are not cumulative. [T99.3]Die Roll (DR)—The six-sided “dice” on the bottom right of every Fate card. Die Rolls can never be performed directly from a player’s hand, only off the top of a player’s Fate Deck. [1.9]Enemy—A Formation, Weapon or Telephone under your opponent’s control. A hex occupied by an enemy Formation. An Objective hex [2.3] under your opponent’s control and not containing a friendly Formation. Fortifications are never “enemy”.Event—Events are listed just below the Action on every Fate card. Events can never be performed directly from a player’s hand, only off the top of a player’s Fate Deck due to an Event trigger. [1.9.1.1]Formation—Any large (⅝˝) counter with an illustration of one or more soldiers or vehicles. [3]Forward Artillery Observer (FAO) —The target symbol on a player’s friendly map edge represents his FAO, an off-map observation post from which long range artillery fire is directed. FAOs are abstracted, and not represented by a formation on the map [2.4]. Concerning LOS, they are considered to be at level 2 [O19.2.1.1]. They can be activated with an Artillery Request Order.[O19]
FP / Firepower—One of five base stats. FP is a measure of how much damage a piece can inflict on enemy Formations. [3.1.1]Friendly—A Formation, Weapon or Telephone under your control. A hex occupied by a friendly Formation. An Objective hex [2.3] under your control and not containing an enemy Formation. Fortifications are never “friendly”. Functioning Weapon—A functioning Weapon is a Weapon that is not broken and is possessed by a Good Order [3.2.1] Unit.Good order—A Good Order Formation is unbroken and unsuppressed. [3.2.1]Highest ranking Leader—At any one moment during play each side can have one (and only one) Leader on the map designated as Highest-ranking Leader [3.3.1.2]. The procedure to determine a side’s Highest-ranking Leader is based on rank and stats [3.3.1.3]. The Highest-ranking Leader on the map can activate both friendly Units and other friendly Leaders within his Command Radius, irrespective of ranks, hereby originating a “command chain” [3.3.1.2].Hindrance—Terrain that affects attacks going through its hex – never into or out of it (except for Smoke). Hindrances are not cumulative. [10.3]HMG—Heavy Machine Gun. HMGs are the German MG 08, the French Saint Étienne, the French and US Hotchkiss.Inactive—The player not currently taking his Turn. Any Formation or marker belonging to that player. If a game situation calls for or allows both players to do something simultaneously, the inactive player always goes first.LMG—Light Machine Gun. LMGs are: MG 08/15, Bergman (available in a later expansion of GWC) for Germany, Chauchat for France and the USA.Leader—A Leader is represented by a counter with one human silhouette and a black hex on its right side [3]. Leaders are not considered Units.LOS—Line of Sight. Generally, a Formation in hex A has a LOS to hex B if a string, drawn taut and touching both hex’s center dots, does not run through a hex containing blocking terrain or does not touch the physical depiction of a Building [10].Marker—Any counter (usually ½˝) without a soldier illustration (e.g. Weapons, Wire, Control, Sudden Death, Spotting Round). MG—Machine Gun.Morale—One of five base stats. A measure of how much punishment a Formation can take before being rendered “combat ineffective”. [3.1.4]Movement—One of five base stats. Movement is a measure of how efficiently a Formation can move across the battlefield. [3.1.3]MP—Movement Point.Obstacle—A type of terrain that blocks LOS through it; never into or out of it. [10.2]On map—Any element of the game located in any hex of the mapboard.
Letters/Numbers found within brackets– such as [O16.4] –indicate to the reader an important reference to another rule. Rules preceded by an “O” are for Orders; “A” Actions; “E” Events; “S” Strategy Cards; “T” Terrain; and “F” Fortifications.
3Hexasim SARL ©2019
Op(portunity) Fire—The ability to play a Fire Action in order to repeatedly fire at the opponent’s Moving Formations. [A42]Order—The ability listed across the top of every Fate card. Orders may only be played during a player’s own Turn. [O14]Ordnance—Any Weapon with a white bar highlighting its stats. Ordnance must first hit its intended target before making a Fire Attack against it; cannot be part of a Fire Group; cannot participate in Op Fire; and cannot have its stats increased by a friendly Leader in the same hex. [O21.2]Piece—A Formation, Weapon, Telephone or Fortification.Platoon—Any Unit represented by a counter with four human silhouettes. [3].Posture—Attack(er), Defend(er) or Recon. Posture determines a player’s hand size [1.1] and can be paired in any combination (though Attack vs Defend is most common).Random Hex—The letter/number combination on the bottom left of every Fate card used to randomly determine where Snipers and certain Events will occur. The number is also used to determine whether broken Weapons might be fixed or eliminated. [1.8]Range—One of five base stats. A measure of how far a piece can effectively shoot-to-kill whilst in the heat of battle. [3.1.2]Runner—Any Unit represented by a counter with one human silhouette and no black hex on its right side [3]. Runners include French Agent de Liaison and German Bote.SC—Strategy Card [1S] [S98]SR—Spotting Round marker. [O19.2.1.1]Suppressed— A Formation with a Suppressed marker on it has -1 FP, -1 Range, -1 Movement and -1 Morale and cannot fire any Weapon it possesses. [13]. Tank Leader—A Tank Formation with a red number within a hex along the right hand side of its counter. [3.3.1.6]Team— Any Unit represented by a counter with two human silhouettes [3]. Teams include French Spécialistes and German Abteilung.(die) Trigger—A game effect associated with (“triggered by”) certain die rolls. [1.9.1]Turn—One player performing one or more
Orders or discarding zero or more Fate cards. [5]Unit—Any large (⅝˝) counter with an illustration of one or more soldiers. This includes Platoons, Teams, and Runners, but not Leaders. [3]VP—Victory Point. [7]Weapon—Any small (½”) counter with a Weapon illustration such as a machine gun or mortar. Weapons have a FP and a Range. [11]
IMPORTANT: In Great War Commander, the motto “a rule means exactly what it says” should be the order of the day. In other words: “Do not infer or imagine more to a rule than is stated in it. When in doubt, interpret strictly”.Example A: Portage [11.2] states “Each Unit may “carry” one Weapon…”. It doesn’t say “Formation”, only Unit; so it means that only Units can possess Weapons, Leaders, and Tanks cannot.Example B: The rule for the “Jammed” die trigger [1.9.1.2] says to break all firing Weapons. That’s it. It doesn’t say that the fire attack is then cancelled, so it isn’t. Having said that, however, these rules cannot possibly hope to cover the myriad situations that may arise during game play—so in those instances when an oddball situation surfaces, a healthy dose of common sense coupled with an existing rule or two should suffice to see you through.
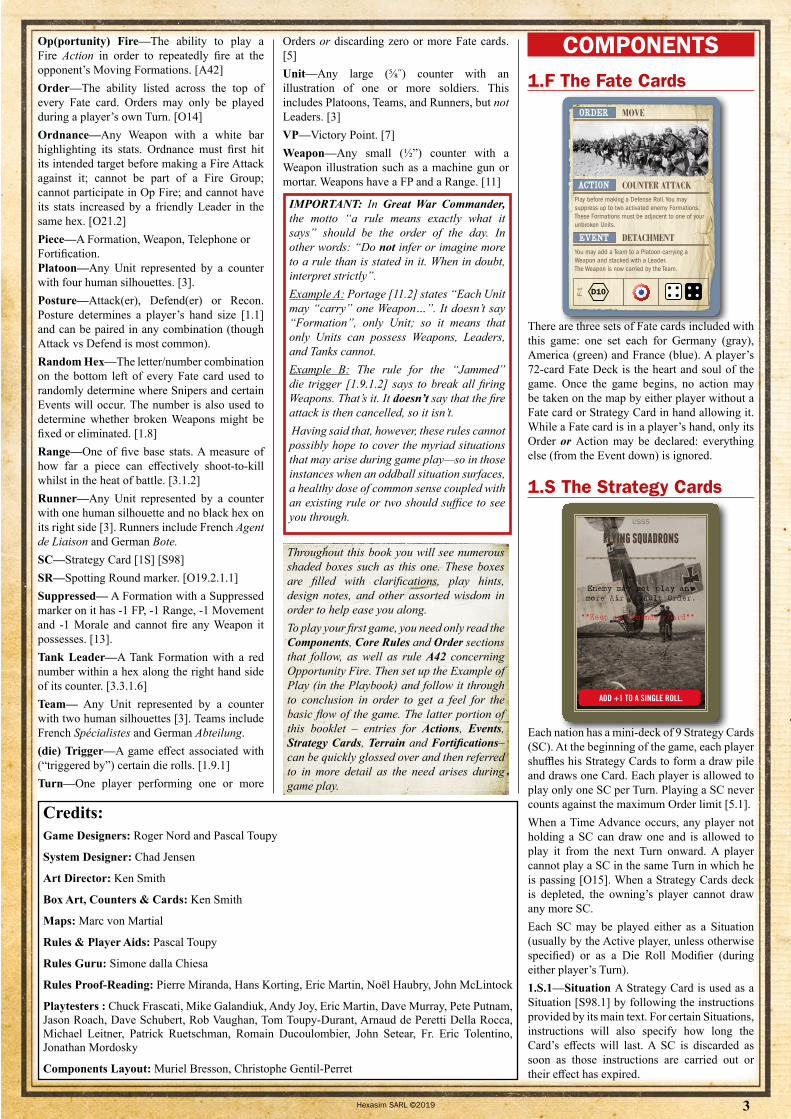
COMPONENTS1.F The Fate Cards
EVENT
ACTION
ORDER MOVE
COUNTER ATTACK
DETACHMENT
F-1 D10
Play before making a Defense Roll. You may suppress up to two activated enemy Formations. These Formations must be adjacent to one of your unbroken Units.
You may add a Team to a Platoon carrying a Weapon and stacked with a Leader. The Weapon is now carried by the Team.
There are three sets of Fate cards included with this game: one set each for Germany (gray), America (green) and France (blue). A player’s 72-card Fate Deck is the heart and soul of the game. Once the game begins, no action may be taken on the map by either player without a Fate card or Strategy Card in hand allowing it. While a Fate card is in a player’s hand, only its Order or Action may be declared: everything else (from the Event down) is ignored.
1.S The Strategy Cards
ADD +1 TO A SINGLE ROLL.
FLYING SQUADRONS
Enemy may not play any more Air Assault Order.
””Keep as Reminder Card””
USS5
Each nation has a mini-deck of 9 Strategy Cards (SC). At the beginning of the game, each player shuffles his Strategy Cards to form a draw pile and draws one Card. Each player is allowed to play only one SC per Turn. Playing a SC never counts against the maximum Order limit [5.1].When a Time Advance occurs, any player not holding a SC can draw one and is allowed to play it from the next Turn onward. A player cannot play a SC in the same Turn in which he is passing [O15]. When a Strategy Cards deck is depleted, the owning’s player cannot draw any more SC. Each SC may be played either as a Situation (usually by the Active player, unless otherwise specified) or as a Die Roll Modifier (during either player’s Turn).1.S.1—Situation A Strategy Card is used as a Situation [S98.1] by following the instructions provided by its main text. For certain Situations, instructions will also specify how long the Card’s effects will last. A SC is discarded as soon as those instructions are carried out or their effect has expired.
Throughout this book you will see numerous shaded boxes such as this one. These boxes are filled with clarifications, play hints, design notes, and other assorted wisdom in order to help ease you along.To play your first game, you need only read the Components, Core Rules and Order sections that follow, as well as rule A42 concerning Opportunity Fire. Then set up the Example of Play (in the Playbook) and follow it through to conclusion in order to get a feel for the basic flow of the game. The latter portion of this booklet – entries for Actions, Events, Strategy Cards, Terrain and Fortifications– can be quickly glossed over and then referred to in more detail as the need arises during game play.
Credits:Game Designers: Roger Nord and Pascal Toupy
System Designer: Chad Jensen
Art Director: Ken Smith
Box Art, Counters & Cards: Ken Smith
Maps: Marc von Martial
Rules & Player Aids: Pascal Toupy
Rules Guru: Simone dalla Chiesa
Rules Proof-Reading: Pierre Miranda, Hans Korting, Eric Martin, Noël Haubry, John McLintock
Playtesters : Chuck Frascati, Mike Galandiuk, Andy Joy, Eric Martin, Dave Murray, Pete Putnam, Jason Roach, Dave Schubert, Rob Vaughan, Tom Toupy-Durant, Arnaud de Peretti Della Rocca, Michael Leitner, Patrick Ruetschman, Romain Ducoulombier, John Setear, Fr. Eric Tolentino, Jonathan Mordosky
Components Layout: Muriel Bresson, Christophe Gentil-Perret
4 Hexasim SARL ©2019
1.S.2—Die Roll ModifierA SC can be used to add [+1] to any one Die Roll [S98.2] except a Sudden Death roll [6.2.2]. The card is discarded right after applying the DR modifier. Adding [+1] to any Die Roll doesn’t cancel or postpone any trigger [1.9.1].
IMPORTANT: The Initiative Card [9] as well as the Strategy Cards are not Fate cards and are not considered to be part of a player’s hand. Furthermore, whenever a rule refers to a “card” without an identifier, it will always be in reference to a Fate card—never the Initiative Card or a Strategy Card (which will always be identified as such and capitalized).
1.0 Golden RuleSome card effects conflict with one or more rules within this booklet (for example, the Captured Papers [E62] event conflicting with rule 1.2, below). When this occurs, the card effect always takes precedence.
1.1 Hand SizeA player’s Hand Size depends on his Posture: either Attack (6 cards), Recon (5 cards) or Defend (4 cards). This determines both the number of Fate cards that player will begin the game with and how many he will draw up to at the end of each of his Turns.
1.2 Card KnowledgeA player’s hand and the SC he holds (if any) are kept secret from his opponent. Fate cards and Strategy Cards in their respective draw piles are kept face-down and secret from both players. Fate cards and SC in a player’s discard piles are open knowledge and may be examined by either player at any time.
1.3 Revealing CardsWhenever a player is instructed to “reveal” a card – during an Event trigger, for example [1.9.1.1] – the top card of that player’s Fate Deck is turned face up then placed on top of his discard pile for both players to see.
1.4 ReshuffleDuring each Game Time Advance [6.1.2], one player will be instructed to shuffle the cards occupying both his Fate card discard and Fate card draw piles together in order to form a new draw pile.
1.5 OrdersThese are listed across the top of each Fate card. A player may only play a card for its Order during his own Turn, and may never announce more Orders in a Turn than his Order Capability [5.1]. If a card is played for its Order, it is immediately placed into that player’s discard pile—the Action on that card then could not be played until the next time it is drawn into the player’s hand.
1.6 ActionsActions are listed just below the photo on each Fate card or, in the case of (Opportunity) Fire [A42], across the top of the card. A player may play a card for its Action at any time during either player’s Turn, so long as its prerequisite is met. If a card is played for its Action, it is immediately placed into that player’s discard
pile—the Order on that card then could not be played until the next time it is drawn into the player’s hand.
1.7 EventsEvents are listed below the Action on every Fate card. Events are never played from the hand, voluntarily or otherwise—only off the top of the draw pile, and only at random intervals due to certain Die Rolls [1.9.1.1].
1.8 Random Hexes
EVENT
ACTION
ORDER MOVE
BARRAGE
SAPPERS
US
-1 F4
lf you have called for a Standing Barrage or a Creeping Barrage, play before a Fire for Effect roll to add +2 to this roll.
You may place or remove a Wire marker in a hex that is both free of enemy Formations and adjacent to a good order friendly Unit.
This is the colored “hex” in the lower left of each Fate card. Snipers [1.9.1.3] and some Events will call for a Random Hex to be determined and, if so, the top card of that player’s Fate Deck is revealed and this “hex” is consulted. The letter/number combination within the “hex” will correspond to one specific hex on the map, where the Sniper/Event will take place. Revealing a Random Hex can also affect broken Weapons in play [11.4].
1.9 Die Rolls
EVENT
ACTION
ORDER MOVE
BARRAGE
SAPPERS
US
-1 F4
lf you have called for a Standing Barrage or a Creeping Barrage, play before a Fire for Effect roll to add +2 to this roll.
You may place or remove a Wire marker in a hex that is both free of enemy Formations and adjacent to a good order friendly Unit.
This is the pair of six-sided dice in the lower right corner of every Fate card. “Real” dice are not used in Great War Commander: Instead, whenever a “roll” is called for, that player reveals the top card of his Fate deck and only the two dice are consulted: everything else on the card is ignored. When such a roll is made, the two dice are added together to arrive at a sum total (exception: during a Targeting Roll, the dice are instead multiplied [O21.2.1.1]).1.9.1 Die TriggersMany Die Rolls are enclosed within a thick red box with the word “Event”, “Jammed”, “Sniper” or “Time”; these are called “triggers”. These four triggers immediately and temporarily pause normal game play in order to perform a specific task. Normal game play resumes after the trigger has been dealt with in its entirety.IMPORTANT—Any non-Time trigger that occurs via the last card of a player’s draw pile will resolve after a Time Marker Advancement [6.1.2].IMPORTANT—Any roll made while resolving a trigger (such as the Reinforcements Event that requires a roll on a Support Table; or a Sudden Death Roll during a “Time” trigger) cannot itself produce a die trigger.In other words, any die roll made during a trigger must ignore any Jammed, Event, Sniper or Time trigger associated with it.
IMPORTANT—Each of the four triggers explained below are always performed in their entirety before any results of the Die Roll that triggered them are implemented. In other words, the roll itself locks in a result but that result is not implemented until after the die trigger is resolved.
So a “Time” trigger that comes up while trying to Rout an opposing Formation could end the game due to Sudden Death before the actual Retreat took place.
1.9.1.1 Event TriggerWhenever a player makes a Die Roll and that roll is surrounded by a red box with the word “Event” inside it, normal game play pauses in order to execute that Event: The player rolling the Event trigger reveals the top card of his Fate deck and, ignoring everything else, reads aloud and then executes the Event on that card [E56–E97]. Unless otherwise stated, any decisions required by the Event are made by the player reading it.1.9.1.2 Jammed TriggerWhenever a player makes a Fire Attack Roll [O21.3.6]; (only; no other roll will trigger a Jammed, including Targeting [O21.2]) and that roll is surrounded by a red box with the word “Jammed” inside, all firing Weapons become broken[11.4].Note that Telephones [12] are not Weapons.
1.9.1.3 Sniper TriggerWhenever a player makes a Die Roll and that roll is surrounded by a red box with the word “Sniper” inside it, normal game play pauses in order to resolve that Sniper: The player rolling the Sniper trigger reveals the top card of his draw pile and, ignoring everything else, reads aloud the Random Hex on that card. That player may then select one Formation in or adjacent to that hex and break it.In GWC, a Sniper result represents a lot more than just a patient man with a scoped rifle: this mechanism is also used to represent combat occurrences such as friendly fire, panic, shell shock, snake bite, despair, dehydration, fatigue, a stray shell, falling down, dirt-in the-eye, etc.
1.9.1.4 Time TriggerWhenever a player makes a die roll and that roll is surrounded by a red box with the word “Time” inside, normal game play pauses in order to perform a Time Marker Advancement [6.1.2].
2. The Maps2.1 The BattlefieldSuperimposed over each map board is a hex grid which is used to regulate movement and combat. Each hex contains:
● a specific type of terrain [T99–T124] which can affect movement as well as attacks into or through it;
● a white center dot used for determining Line of Sight [10];
● a unique letter-number identifier – such as “C7” – used for determining where Snipers and certain Events will take place.
● four hexes on the map edges (A6, O6, H1, H11) contain a target symbol. These represent artillery observers [2.4].
5Hexasim SARL ©2019
2.2 Map Border2.2.1—The upper left of each map contains its map number which is used to identify which map is used for a particular scenario.2.2.2— Under each map number is a six sided ‘compass’ matching the orientation of the map board hexes. The compass is generally used for the initial orientation of the map during setup and to determine a random direction during artillery strikes [O19.2.1.2], as well as for various Events.On the compass, 1 points to the “top” of the map; 4 to the bottom; 2 and 3 to the right side; and 5 and 6 to the left side.
2.2.3— The upper right corner of each map contains also Artillery Boxes used for holding each player’s Telephone marker [12].
2.3 Objectives
Each map contains five “Objectives”— gold circles containing a white number between 1 and 5. An Objective is worth a variable number of VPs to the last side to have sole control over it [7.3.1], the amount being determined by the specific Objective chits in play [7.3.2].
2.4 Forward Artillery Observers (FAO)Each map has four hexes (A6, O6, H1, H11) containing a target symbol. These are used to represent off-map Forward Artillery Observers (FAOs). A player’s FAO is the hex with the target symbol along his friendly map-edge. FAOs are an abstract notion, not on-map Formations, and as such can never be targeted or eliminated. However, they can be activated by Artillery Request Orders [O19].Artillery Observers were responsible for directing artillery fire onto a target.
3. The Formations
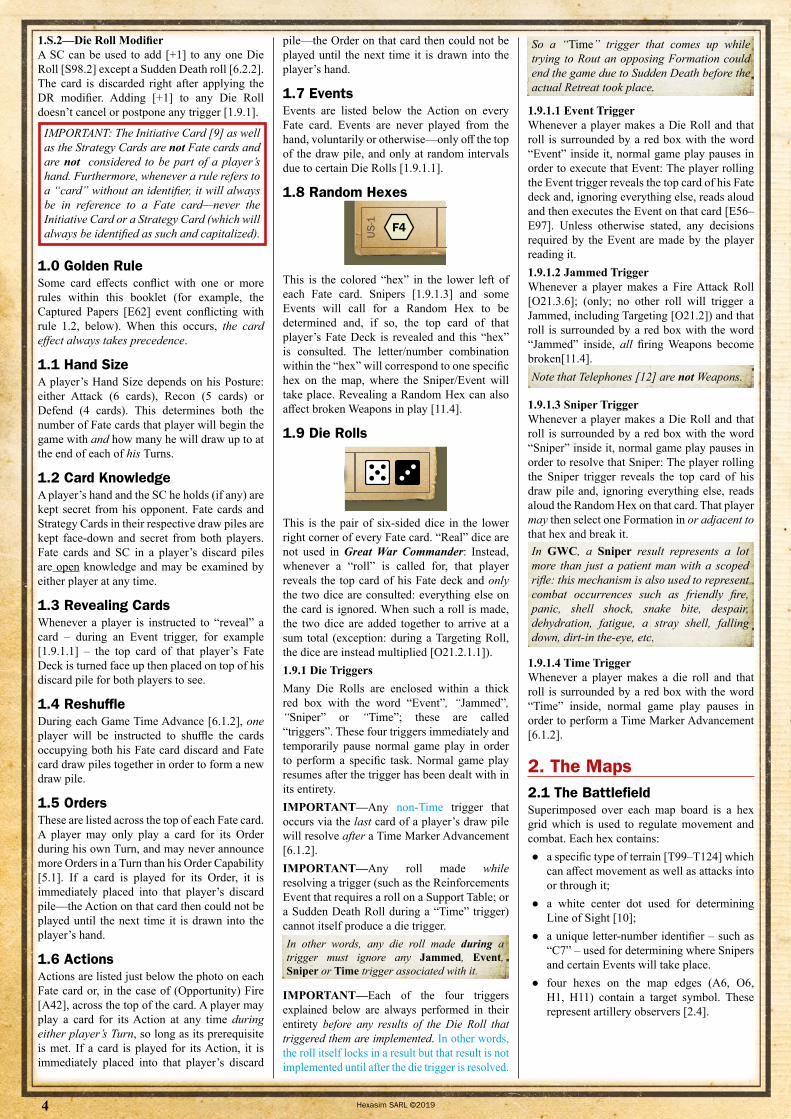
Name/Rank—The name of any Formation is used solely for identification purposes. The historical rank names found on all infantry Leaders is for command and Leader seniority purposes see [3.3.1.2]. Figures—All Formations have an illustration of one, two or four soldier figures, or one vehicle
figure (in this first game of GWC the only vehicles pictured are Tanks) to denote their relative size: one figure is a Leader, or a Runner, representing a single man, or a Tank a single vehicle; two figures represent a 10 to 15 man Team and four figures is a 50 to 65 man Platoon.In Great War Commander
● a Leader Formation (later called Leader) is always represented by a counter with one single man silhouette with a black hex on its right side.
● a Unit Formation (later called Unit) is always represented by a counter with one to four human silhouettes and no black hex on its right side.
● a Tank Leader Formation (later called Tank Leader) is always represented by a counter with one single Tank silhouette with a hex on its right side.
● a Tank Formation (later simply called Tank) is always represented by a counter with one single Tank.
3.1 Formation StatsFormations always have one number in their upper right corner and three numbers (or up to six in the case of Tanks) printed along the bottom. Sometimes these numbers might be expressed by “0” or “-“. Leaders and certain Tanks considered Tank Leaders (only) also have a number within a hex centered along the right side of their counter. This number is their Command [3.1.5]; [3.1.6].3.1.1 Firepower (FP)—This is the first number along the bottom, and is a Formation’s base strength when in Melee [O16.4] or when firing [O21 & A42]. Certain Tank Formations may have two such numbers, one within a white box, representing their main Gun FP, and one representing their secondary armament (an MG). An asterisk “*” after a Tank’s FP is a reminder of the fact that the FP is increased by 2 whenever that Tank fires at an adjacent hex.3.1.2 Range—This is the second number along the bottom, and is the maximum number of hexes away at which it may use its FP to Fire at enemy Formations [O21 & A42]. Again, certain Tank Formations may have two such numbers, one within a white box representing the Range of their main Gun, and one representing the Range of their secondary armament (an MG). 3.1.3 Movement (MP)— This is the third, rightmost number along the bottom. This is the total number of Movement Points (“MPs”) the Formation can spend while Moving [O23] from hex to hex across the map. Vehicles (including Tanks) have a smaller number added as an exponent to the right of their MP number. This is their Bog number. [O23.5.2] 3.1.4 Morale —This is the number in the upper right corner, and is a Formation’s base strength when defending against an enemy fire attack, or when attempting to Recover [O25] or Rout [O26], among other things. A Formation’s Morale (except for Tanks) is always directly modified by the Cover [T99.3] of the hex it currently occupies.Note: A broken Formation [3.2] is identified by having a red bar across the top of the counter and its Morale number in white instead of black.
3.1.5 Infantry Command—This is the black number within a hex along the right hand side of all Leader counters. Infantry Command serves to activate additional Formations (except Tanks) during Orders and Op Fire [3.3.1.1], as well as adding to the stats of certain other Units and Weapons stacked with it [3.3.1.3-3.3.1.5].Note: Infantry Leaders never command Tanks, and Tank Leader Formations can only command other Tanks.
3.1.6 Tank Command—This is the red number within a hex along the right hand side of a Tank Leader counter. Tank Command serves to activate additional Tanks only during Advance and Move Orders [O16 & O23], as long as no friendly Tank has yet been eliminated. As soon as one friendly Tank has been eliminated, the Tank Leader can only command itself. Tank Command is never added to the stats of other Formations and Weapons.3.1.7 Early War—The counters used with the 1914 scenarios have a national stripe in the right upper corner.As GWC spans the complete First World War, we wanted the players to feel the evolution of warfare of this conflict while playing the game: among those evolutions: weapons, armament, uniforms, tactics, and bombardment strategy. This is why the scenarios are organized in a chronological order. This is why there are counters for the early war showing the reminiscence of the 19th Century colorful uniforms. They display a national stripe to be easily spotted when setting up as these named Formations also exist in late war uniforms.
Engineers 9
4 5 5
3.1.8 Boxed Stats—Some Formations have their FP, Range and/or Movement enclosed within a square. With the exception of boxed FP giving +1 strength in Melee [O16.4], boxed stats have
no intrinsic meaning other than to allow certain Actions to be played for that Formation [A31, A41 and A54].3.1.9 Engineers—Engineers Units (Génie/Pionier/Engineers) have all their stats boxed also as a reminder of a “special power”: an unbroken [3.2.1] Engineer Unit can be individually activated by any Order [O14] (except Command Confusion) to either place a Foxholes marker [F127] in its hex or to remove a Wire marker [F131] from it.
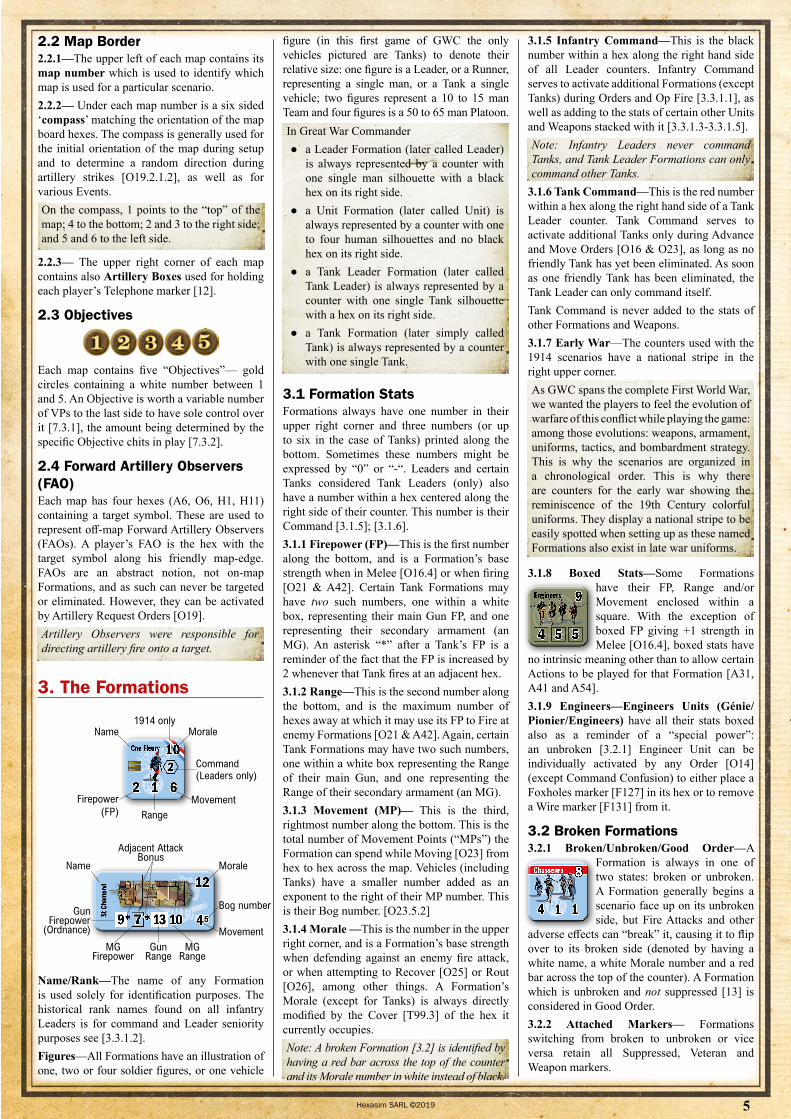
3.2 Broken Formations
44 11 11
88Chasseurs
3.2.1 Broken/Unbroken/Good Order—A Formation is always in one of two states: broken or unbroken. A Formation generally begins a scenario face up on its unbroken side, but Fire Attacks and other
adverse effects can “break” it, causing it to flip over to its broken side (denoted by having a white name, a white Morale number and a red bar across the top of the counter). A Formation which is unbroken and not suppressed [13] is considered in Good Order.3.2.2 Attached Markers— Formations switching from broken to unbroken or vice versa retain all Suppressed, Veteran and Weapon markers.
4 5
12
9* 10137*St C
ham
ond
Morale
Bog number
MovementMG
RangeGun
RangeMG
Firepower
Gun Firepower
(Ordnance)
Name
Adjacent AttackBonus
2
Cne Fleury 10
2 1 6
1914 onlyMoraleName
MovementRange
Firepower(FP)
Command(Leaders only)
6 Hexasim SARL ©2019
3.2.3 Attached Weapons—Broken Formations cannot Fire Weapons. A Weapon does not break or unbreak solely because its controlling Formation does, and vice versa.3.2.4 Elimination—Any broken Formation that breaks again is eliminated: award its VP value to the opponent [7.1] after placing it on the Casualty Track [4.3].3.2.5 Rallying—When a broken Formation is instructed to “Rally”, it is flipped back over to its unbroken side. This usually occurs due to a successful Die Roll during a Recover Order [O25] or via various Events.
3.3 Leaders3.3.1 Command3.3.1.1 Command Radius—Normally, an Order [O14.1] or Op Fire Action [A42] will only activate a single Formation. When a Leader is activated, however, he has the ability to further activate all, some or none of the friendly Units within his Command’s “Radius” to perform the same Order/Op Fire. Command Radius is counted in hexes radiating outward from that Leader’s hex, and is identical to the Command value.A Leader with “2” Command can activate friendly Units up to two hexes away— even across impassable terrain or past an enemy Unit. A “1” Command Leader can activate friendly Units in or adjacent to its own hex. A Leader with “0” Command can only activate Units in its own hex.
3.3.1.2 Highest-ranking Leader—At any one moment during play, one (and only one) of each side’s on-map Leaders must be designated as having the status of “Highest -ranking Leader” for that side. The procedure for determining the Highest-ranking Leader is detailed in [3.3.1.4]. The Highest -ranking Leader may activate both friendly Units and any other non-activated friendly Leader(s) within his Command Radius. A Leader activated by the Highest-ranking Leader may in turn activate any other non-activated friendly Leader(s) (irrespective of rank) and/or Unit(s) within his Command Radius. All the Leaders activated by the effect of the original activation of their Highest-ranking Leader may so “pass” their activation to further and further friendly Leaders and Units, thereby creating an “activation chain”. All pieces activated in this way are activated for the rest of the Turn and are considered activated by the same Leader as part of a single Order or Op Fire Action [A.42] (so that they can form a Fire Group [O21.3.1]).Throughout these rules, the term Captain is shorthand for a US Captain, a French Capitaine, a German Hauptmann. Similarly the term Lieutenant refers either to a US Lieutenant, a French Lieutenant or a German Leutnant.3.3.1.3 Determining the Highest-ranking Leader—There are only three ranks of leaders in Great War Commander. Their denominations and abbreviations are listed top to bottom in the table below. At any one moment, one side’s Highest-ranking Leader is the on-map Leader belonging to the highest rank listed in the table (but see [3.3.1.4])
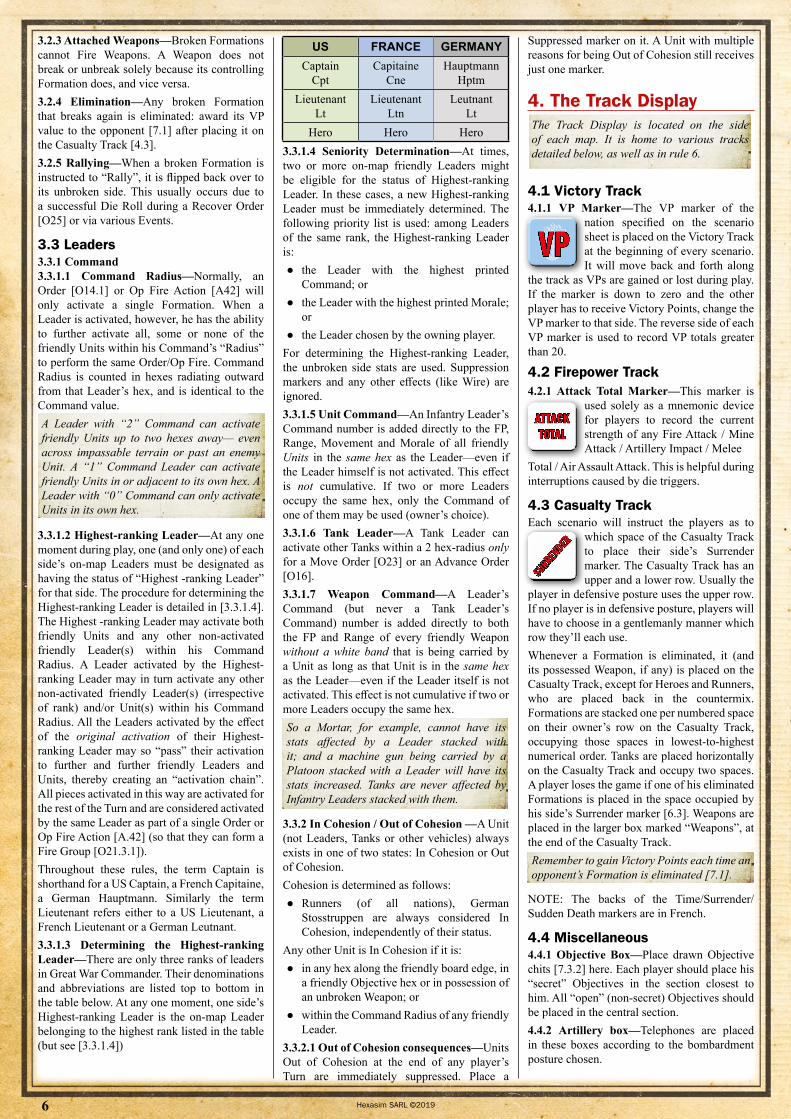
US FRANCE GERMANYCaptain
CptCapitaine
CneHauptmann
HptmLieutenant
LtLieutenant
LtnLeutnant
LtHero Hero Hero
3.3.1.4 Seniority Determination—At times, two or more on-map friendly Leaders might be eligible for the status of Highest-ranking Leader. In these cases, a new Highest-ranking Leader must be immediately determined. The following priority list is used: among Leaders of the same rank, the Highest-ranking Leader is:
● the Leader with the highest printed Command; or
● the Leader with the highest printed Morale; or
● the Leader chosen by the owning player.For determining the Highest-ranking Leader, the unbroken side stats are used. Suppression markers and any other effects (like Wire) are ignored.3.3.1.5 Unit Command—An Infantry Leader’s Command number is added directly to the FP, Range, Movement and Morale of all friendly Units in the same hex as the Leader—even if the Leader himself is not activated. This effect is not cumulative. If two or more Leaders occupy the same hex, only the Command of one of them may be used (owner’s choice).3.3.1.6 Tank Leader—A Tank Leader can activate other Tanks within a 2 hex-radius only for a Move Order [O23] or an Advance Order [O16]. 3.3.1.7 Weapon Command—A Leader’s Command (but never a Tank Leader’s Command) number is added directly to both the FP and Range of every friendly Weapon without a white band that is being carried by a Unit as long as that Unit is in the same hex as the Leader—even if the Leader itself is not activated. This effect is not cumulative if two or more Leaders occupy the same hex.So a Mortar, for example, cannot have its stats affected by a Leader stacked with it; and a machine gun being carried by a Platoon stacked with a Leader will have its stats increased. Tanks are never affected by Infantry Leaders stacked with them.
3.3.2 In Cohesion / Out of Cohesion —A Unit (not Leaders, Tanks or other vehicles) always exists in one of two states: In Cohesion or Out of Cohesion.Cohesion is determined as follows:
● Runners (of all nations), German Stosstruppen are always considered In Cohesion, independently of their status.
Any other Unit is In Cohesion if it is: ● in any hex along the friendly board edge, in
a friendly Objective hex or in possession of an unbroken Weapon; or
● within the Command Radius of any friendly Leader.
3.3.2.1 Out of Cohesion consequences—Units Out of Cohesion at the end of any player’s Turn are immediately suppressed. Place a
Suppressed marker on it. A Unit with multiple reasons for being Out of Cohesion still receives just one marker.
4. The Track DisplayThe Track Display is located on the side of each map. It is home to various tracks detailed below, as well as in rule 6.
4.1 Victory Track
VP4.1.1 VP Marker—The VP marker of the
nation specified on the scenario sheet is placed on the Victory Track at the beginning of every scenario. It will move back and forth along
the track as VPs are gained or lost during play. If the marker is down to zero and the other player has to receive Victory Points, change the VP marker to that side. The reverse side of each VP marker is used to record VP totals greater than 20.
4.2 Firepower Track
ATTACKTOTAL
4.2.1 Attack Total Marker—This marker is used solely as a mnemonic device for players to record the current strength of any Fire Attack / Mine Attack / Artillery Impact / Melee
Total / Air Assault Attack. This is helpful during interruptions caused by die triggers.
4.3 Casualty Track
SURR
ENDER
Each scenario will instruct the players as to which space of the Casualty Track to place their side’s Surrender marker. The Casualty Track has an upper and a lower row. Usually the
player in defensive posture uses the upper row. If no player is in defensive posture, players will have to choose in a gentlemanly manner which row they’ll each use.Whenever a Formation is eliminated, it (and its possessed Weapon, if any) is placed on the Casualty Track, except for Heroes and Runners, who are placed back in the countermix. Formations are stacked one per numbered space on their owner’s row on the Casualty Track, occupying those spaces in lowest-to-highest numerical order. Tanks are placed horizontally on the Casualty Track and occupy two spaces. A player loses the game if one of his eliminated Formations is placed in the space occupied by his side’s Surrender marker [6.3]. Weapons are placed in the larger box marked “Weapons”, at the end of the Casualty Track.Remember to gain Victory Points each time an opponent’s Formation is eliminated [7.1].
NOTE: The backs of the Time/Surrender/Sudden Death markers are in French.
4.4 Miscellaneous4.4.1 Objective Box—Place drawn Objective chits [7.3.2] here. Each player should place his “secret” Objectives in the section closest to him. All “open” (non-secret) Objectives should be placed in the central section.4.4.2 Artillery box—Telephones are placed in these boxes according to the bombardment posture chosen.
7Hexasim SARL ©2019
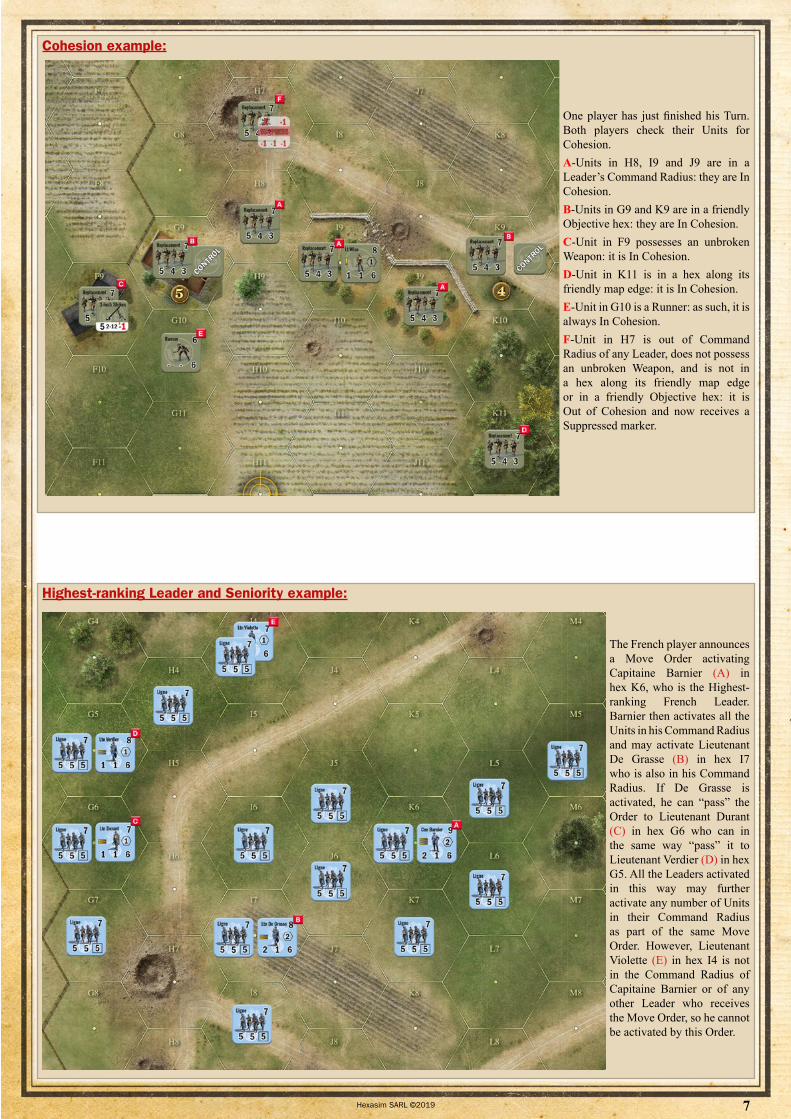
Cohesion example:
One player has just finished his Turn. Both players check their Units for Cohesion.A-Units in H8, I9 and J9 are in a Leader’s Command Radius: they are In Cohesion.B-Units in G9 and K9 are in a friendly Objective hex: they are In Cohesion.C-Unit in F9 possesses an unbroken Weapon: it is In Cohesion.D-Unit in K11 is in a hex along its friendly map edge: it is In Cohesion.E-Unit in G10 is a Runner: as such, it is always In Cohesion.F-Unit in H7 is out of Command Radius of any Leader, does not possess an unbroken Weapon, and is not in a hex along its friendly map edge or in a friendly Objective hex: it is Out of Cohesion and now receives a Suppressed marker.
Highest-ranking Leader and Seniority example:
The French player announces a Move Order activating Capitaine Barnier (A) in hex K6, who is the Highest-ranking French Leader. Barnier then activates all the Units in his Command Radius and may activate Lieutenant De Grasse (B) in hex I7 who is also in his Command Radius. If De Grasse is activated, he can “pass” the Order to Lieutenant Durant (C) in hex G6 who can in the same way “pass” it to Lieutenant Verdier (D) in hex G5. All the Leaders activated in this way may further activate any number of Units in their Command Radius as part of the same Move Order. However, Lieutenant Violette (E) in hex I4 is not in the Command Radius of Capitaine Barnier or of any other Leader who receives the Move Order, so he cannot be activated by this Order.
8 Hexasim SARL ©2019
CORE RULES 5. Sequence of PlayA game of Great War Commander begins with one of the players (as specified by the scenario being played) performing the first “Turn”. That player is called the active player, while his opponent is the inactive player. When the active player is finished – and draws up to his Hand Size [1.1] – the opposing player takes his first Turn. These Turns are then alternated until a Sudden Death Roll or other occurrence [6.3] ends the game.A Turn consists of a player choosing to either:
● perform one or more Orders by playing cards from his hand [O14] (possibly in combination with playing a Strategic Card [1S] [S98]) or
● discard any number of Fate cards [O15]
5.1 Order CapabilityIn Great War Commander, no player may give an Order without the play of a card from his hand. The maximum number of Orders a player may perform each Turn will be indicated by the scenario. Orders do not need to be predesignated—they are played from the hand, and then executed one at a time. A player may observe the results of one Order before deciding whether to play another. The different Orders that may be given by a player are explained in rules O16–O27.
5.2 Action CapabilityAs with Orders, no player may announce an Action without the play of a card from his hand. Players may perform Actions whenever they deem appropriate provided the prerequisite, if any, within the Action itself is met. There is no limit to the number of Actions a player may perform during either player’s Turn other than the number of cards in hand. The different Actions that may be taken by a player are explained in rules A28–A55.
5.3 Discard CapabilityIf a player chooses to perform no Orders in his Turn, he may instead discard [O15] any number of cards up to but not exceeding his discard capability indicated by the scenario. If he does so, he may not play a Strategic Card this Turn.
5.4 Hand RefillAt the end of every Turn, the active player (only) must draw Fate cards off the top of his Fate deck until the number of cards in his hand equals his Hand Size [1.1]. A Hand Refill may be temporarily interrupted by a Time Marker Advancement [6.1.2] if the last card of that player’s deck is drawn—in this case, the Hand Refill recommences after the Time Marker Advancement procedure has been completed (and his discard pile has been reshuffled to form a new draw pile).
6. Game Time6.1 Time Marker
TIME
6.1.1 Placement—Each scenario indicates on which space of the Time Track (located on the Track Display alongside the map) the Time marker is placed.
6.1.2 Advancement—The Time marker is advanced one space forward along the Time Track whenever a “Time” trigger is rolled or whenever a player reveals/draws the last card in his Fate card draw pile, treat such an occurence exactly if a Time trigger had been rolled.It is only advanced once – not twice – if the last card in a player’s deck is revealed for a die roll resulting in a Time trigger.
Immediately after advancing the Time marker, normal play pauses and the following steps are executed in the order shown:1) The player triggering the Time Advance (only) shuffles his Fate deck and Fate card discard pile together to form a new draw pile;2) The triggering player makes a Sudden Death Roll if appropriate [6.2.2]. Then, if the game did not end due to Sudden Death, perform the following steps in the order shown:3) The Defender (only) gains 1 VP;4) The triggering player (only) must remove two Smoke markers (remember that there are no Smoke markers in this first game of Great War Commander) and two Gas markers from the map;5) If there are one or more Formations and/or Fortifications in the space now occupied by the Time marker, the owning player(s) (inactive player first) brings them into play as reinforcements by placing them in any hex(es) along the friendly map edge, or, concerning reentering Tanks [7.2.1.1], in any hexes along the opponent’s edge. Stacking limits [8] must be observed. Any reinforcement Telephone is placed into that player’s Artillery Box, replacing his Telephone if already there;6) Both players may play “Dig In” Actions [A39].7) Any player without a Strategy Card in hand draws one from his Strategy Card deck.Normal play then resumes at the point it left off.
6.2 Sudden Death Marker
SUDDENDEATH
6.2.1 Placement—Each scenario indicates on which space of the Time Track the
Sudden Death marker is placed.
6.2.2 Procedure—Whenever the Time marker advances into or beyond the space occupied by the Sudden Death marker, the triggering player must make a roll—this is done after that player shuffles his Fate deck and discard pile together to form a new draw pile. If the result is less than the number in the space currently occupied by the Time marker (not the Sudden Death marker itself), the game immediately ends [6.3, below]. Otherwise, play proceeds as normal.
6.3 Game EndA game of Great War Commander will generally end in one of four ways:1) A player is forced to place one of his eliminated Formations in the space of the Casualty Track occupied by his Surrender marker;2) A player’s last remaining Formation on the map is eliminated3) A player’s last remaining Formation on the map voluntary exits the map [7.2.1];4) A Sudden Death Roll [6.2.2] is made that is less than the number in the space currently occupied by the Time marker.6.3.1—If the first or second situation above occurs, that player immediately and automatically loses the game regardless of the VP total. If both players simultaneously lose in this manner, the player holding the Initiative Card breaks the tie and wins the game [9.2].6.3.2—If the third or fourth situation above occurs and the first two situations do not apply, players must reveal any secret Objective chits and award their VPs to the currently controlling player. Then, the player with the higher VP total wins the game. If the VP marker is in the “0” space, the player holding the Initiative Card wins the game.
7. Victory ConditionsA player will usually win the game by having more VPs than his opponent when the game ends [6.3]. VPs are earned in one of four ways:● Elimination of enemy Formations;● Exiting friendly Formations off the opponent’s map edge;● Exiting friendly Runner off own map edge● Control of map board Objectives.
7.1 Elimination Victory PointsWhen a Formation is eliminated – for any reason: via Order, Action or Event – the opponent is awarded a certain number of VPs for it.
Victory Point Values ● A Platoon (4 soldier silhouettes counter) is
worth 2 VPs ● A Team (2 soldier silhouettes counter) is
worth 1 VP ● A Runner (1 soldier silhouette counter) is
worth 1 VP [but see 7.2.1] ● A Leader (1 soldier silhouette counter) is
worth 1+X VPs (X=Command) ● A Hero (1 soldier silhouette counter) is
worth 0 VP ● A Tank (1 Tank silhouette counter) is worth
3 VPs
7.2 Exit Victory PointsA Formation may never exit the map off the right or left flank. However, the edges of the map nearest each player can be exited by Formations in play (as if the brown border were another hex).
9Hexasim SARL ©2019
7.2.1 Voluntary Exit—A Formation under an Advance [O16], Move [O23] or Offensive [O24] Order may exit the map – at a MP cost of “1” – off the opponent’s map edge. As an exception, Runner Formations exit only off your own map edge.The owning player is immediately awarded VPs for the exited Formation (see the Formation Victory Point Values [7.1]).That Formation is then placed on any future space of the Time Track the owning player wishes (exception Runner [O27.2.1]). A Tank counter will occupy two spaces of the Time Track and may return to play when the Time marker reaches either space. A Formation is always placed on the Time Track in Good Order, even if it was broken as it exited. A Formation retains possession of any Weapon it was carrying – again becoming unbroken if it was broken when exited – but does lose any Veteran or Suppressed marker that may have been attached.Such a Formation is now considered to be a new and completely different “reinforcement” Formation.
7.2.1.1—Each Tank can only exit the map once. We found it useful to place the Reentered Tanks facing owner’s map edge as a reminder.
7.2.2 Involuntary Exit—A Retreating [O26.3] Formation may be forced to exit off the map along its own friendly map edge, being eliminated in the process. Such a Formation is placed on the next empty space of the Casualty Track (except Runners and Heroes which are placed back in the countermix) after awarding the opponent VPs for it (see the Formation Victory Point Values [7.1]). The eliminated Formation does not retain possession of its Weapon – which is placed, unbroken, in the “Weapon” section of the Casualty Track – nor does it retain any Veteran or Suppressed marker that may have been attached.
7.3 Objective Victory PointsEach of the five Objectives on every map can be worth one or more VPs, depending on which Objective Chits are in play. Objectives are otherwise worth zero VPs by default (exception: Tanks [7.3.1.2]).7.3.1 Control of Objectives—The double-sided Control markers are used to indicate which side currently controls each Objective [2.3]. During initial setup, the scenario will specify which Objectives begin under each player’s control. In some cases, Objectives may begin the game uncontrolled by either side: these should not contain any Control marker. Otherwise, once play commences, the last player to have solely occupied an Objective controls it. Place/flip the Control marker accordingly.7.3.1.1 Building Objectives—An Objective located in a Building hex is considered to be that entire Building if it spans more than one hex. In such a case, every hex of that Building must be devoid of enemy Formations in order for a player to take control of it.7.3.1.2 Tanks and Objectives—The instant a Tank takes control of an Objective, the controlling side is awarded 1 VP, in addition to any VP possibly awarded by the Objective Chit(s).
If a French Tank takes control of Objective 3 which is presently worth 0 VP, the French side immediately receives 1 VP. Later on, if a German non-Tank Formation recaptures Objective 3, which is still worth 0 VP, the German side receives no VP.
7.3.1.3 Runners and Objectives—Runners cannot take control of an Objective.7.3.2 Objective Chits—There are 20 Objective markers – or ‘chits’– included with the game. Objective chits are usually drawn at random, and are used to determine specific additional victory conditions for each scenario, usually in the form of assigning a VP value to one or more map board Objectives [2.3]. Objective chits are cumulative.Each Objective chit drawn will show a victory condition on its “non secret” side. Most of these will be in the form of:
XOBJECTIVE
=YVP
Showing that Objective X is worth Y VPs to its controller. These values are cumulative with other Objective chits.
If all three chits for Objective 3 were in play (C, G and K), Objective 3 would be worth 6 VPs total (1 + 2 + 3).
Several Objective chits show:
OBJECTIVE EACH=XVP
This means that the five Objectives on the map are worth X VPs each. These values are cumulative with other Objective chits. The two specialized Objective chits labeled
(OPEN)OBJECTIVE Z
+1ELIM. POINTS
(OPEN)OBJECTIVE Y
+1EXIT POINTS
indicate, respectively, that:● The opposing player is immediately awarded one more VP [7.1] for each eliminated Formation ● The owning player is immediately awarded one more VP [7.2] for each exited Formation Some Objectives may be worth nothing at the end of the game. Players should still try to take control of all Objectives on a map in case the opponent’s secret Objective includes one or more valuable ones.
7.3.3 Secret and Non-Secret Objectives—Non-secret Objective chits – as well as secret ones that have been revealed during play [E62] should be placed with their “non-secret” sides face up in the center of the Objective Box. Secret Objective chits should be kept face down in the Objective Box—only that player may look at the hidden side of the chit.Note that a few of the Objective chits have no “secret” side—if a player draws one of these as their secret Objective, tough luck: it must be revealed as a non-secret Objective.
Non-secret Objectives award their VPs immediately during play of the game, whereas secret Objectives usually award VPs at game end (or whenever they are revealed).
When a non-secret Objective changes ownership on the map, remember to first subtract its value from its former controller before adding its value to the new controller’s Victory Points—in this manner, an Objective worth 4 VPs would cause an eight point swing when it changes hands.
8. StackingPlacing more than one Formation or marker in the same hex is called “stacking”.GWC’s oversized hexes allow for up to four Formation counters to sit comfortably within it. Even though these pieces may not physically be “stacked” upon one another, they are considered to be “stacked together” in a single hex for game purposes.
8.1 Marker StackingStacking limits are enforced for all markers immediately after placement. There is no limit to the number of markers that may occupy a single location except as follows:8.1.1 Formation Markers—Each Formation in play may have a maximum of one of each of the following markers stacked upon it:
● Suppressed ● Veteran ● Weapon (Leaders, Tanks and Runners may
not carry any Weapon)8.1.2 Telephones—Only two Telephones may be stacked in each of the Artillery Boxes: one per player. 8.1.3 Fortifications—Only one Fortification marker can ever occupy a hex. 8.1.4 Smoke—Only one Smoke marker can stack in a hex. The one with the largest Hindrance takes precedence. Smoke is available from 1916 onward.8.1.5 Gas—Only one Gas marker can stack in a hex8.1.6 Blaze—Only one Blaze marker can ever occupy a hex. While a Blaze marker is in a hex, no other marker or Formation may exist there.
8.2 Formation StackingThe number of friendly Formations that can legally stack in a hex is based upon the number of soldier figures on those counters: a number of friendly Formations totaling up to seven figures can be stacked in the same hex without penalty. Any hex containing friendly Formations with a total of eight or more soldier figures is in violation of the stacking limit and is considered “over stacked”.Formation stacking limits are enforced at the end of every Turn. At that time, the owning player must eliminate sufficient Formations in order to bring any over stacked hex back into compliance.
8.2.1—For stacking purposes, Tanks count as 3 figures, but two Tanks can never stack in the same hex.
10 Hexasim SARL ©2019
Example: The German player finds that he has two broken German Platoons in a single hex at the end of the French player’s Turn (following a bold move and an Opportunity Fire for example). He has to eliminate one of those Platoons. You are always free to violate stacking limits during a Turn – in order to Advance extra Formations into a Melee situation, or load up an objective hex, for example – but must figure out a way to remedy the situation by the end of the Turn or face cardboard calamity.
9. InitiativeThere are two Initiative Cards, one for games opposing French forces to German forces, and the other one for games opposing American forces to German forces. The scenario indicates which side begins the game with the Initiative Card. IMPORTANT: The Initiative Card is never part of a player’s hand and therefore does not count against his hand size limit.
9.1 Re-RollAt any time during the game, the player currently in control of the Initiative Card may choose to cancel all effects of the last Die Roll – including any die triggers associated with it – and cause it to be re-rolled. This decision must be made prior to any trigger/results of that roll being implemented.When a player calls for a re-roll in this manner, he must give the Initiative Card to his opponent, who will then control it unless and until he performs a re-roll option, thus passing it back to the first player. This passing of the Initiative can occur an unlimited number of times during the game; even during the same series of Die Rolls.
9.2 Tie GameWhen a scenario ends in a tie – “0” VPs after Sudden Death or both players Surrendering simultaneously, for example – the player holding the Initiative Card wins the game.The Initiative Card thus acts as a sort of balancing mechanism to temper those wild strings of luck inherent in any game with cards or dice. Initiative will generally pass back and forth between the two players as the fortunes of war play out, though this isn’t mandatory—it is possible, however unlikely, that a player could refrain from using it throughout an entire game.
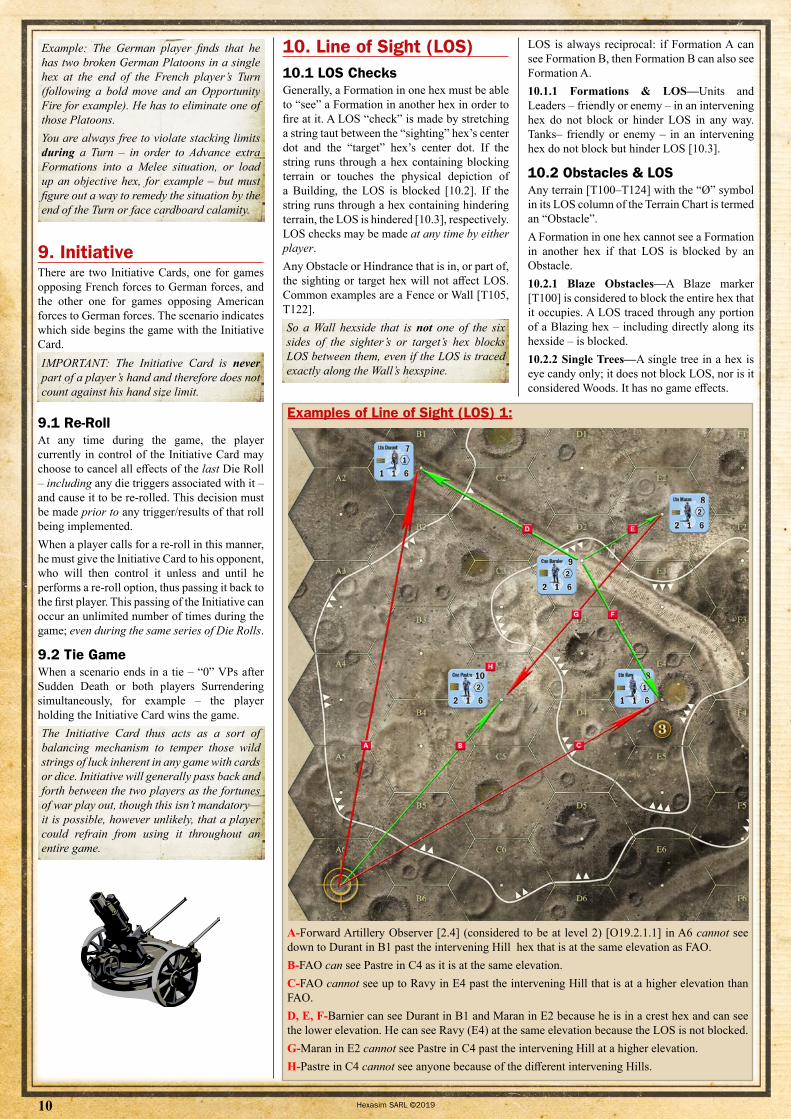
10. Line of Sight (LOS)10.1 LOS ChecksGenerally, a Formation in one hex must be able to “see” a Formation in another hex in order to fire at it. A LOS “check” is made by stretching a string taut between the “sighting” hex’s center dot and the “target” hex’s center dot. If the string runs through a hex containing blocking terrain or touches the physical depiction of a Building, the LOS is blocked [10.2]. If the string runs through a hex containing hindering terrain, the LOS is hindered [10.3], respectively. LOS checks may be made at any time by either player.Any Obstacle or Hindrance that is in, or part of, the sighting or target hex will not affect LOS. Common examples are a Fence or Wall [T105, T122].So a Wall hexside that is not one of the six sides of the sighter’s or target’s hex blocks LOS between them, even if the LOS is traced exactly along the Wall’s hexspine.
LOS is always reciprocal: if Formation A can see Formation B, then Formation B can also see Formation A.10.1.1 Formations & LOS—Units and Leaders – friendly or enemy – in an intervening hex do not block or hinder LOS in any way. Tanks– friendly or enemy – in an intervening hex do not block but hinder LOS [10.3].
10.2 Obstacles & LOSAny terrain [T100–T124] with the “Ø” symbol in its LOS column of the Terrain Chart is termed an “Obstacle”.A Formation in one hex cannot see a Formation in another hex if that LOS is blocked by an Obstacle.10.2.1 Blaze Obstacles—A Blaze marker [T100] is considered to block the entire hex that it occupies. A LOS traced through any portion of a Blazing hex – including directly along its hexside – is blocked.10.2.2 Single Trees—A single tree in a hex is eye candy only; it does not block LOS, nor is it considered Woods. It has no game effects.
Examples of Line of Sight (LOS) 1:
A-Forward Artillery Observer [2.4] (considered to be at level 2) [O19.2.1.1] in A6 cannot see down to Durant in B1 past the intervening Hill hex that is at the same elevation as FAO.B-FAO can see Pastre in C4 as it is at the same elevation.C-FAO cannot see up to Ravy in E4 past the intervening Hill that is at a higher elevation than FAO.D, E, F-Barnier can see Durant in B1 and Maran in E2 because he is in a crest hex and can see the lower elevation. He can see Ravy (E4) at the same elevation because the LOS is not blocked.G-Maran in E2 cannot see Pastre in C4 past the intervening Hill at a higher elevation.H-Pastre in C4 cannot see anyone because of the different intervening Hills.
11Hexasim SARL ©2019
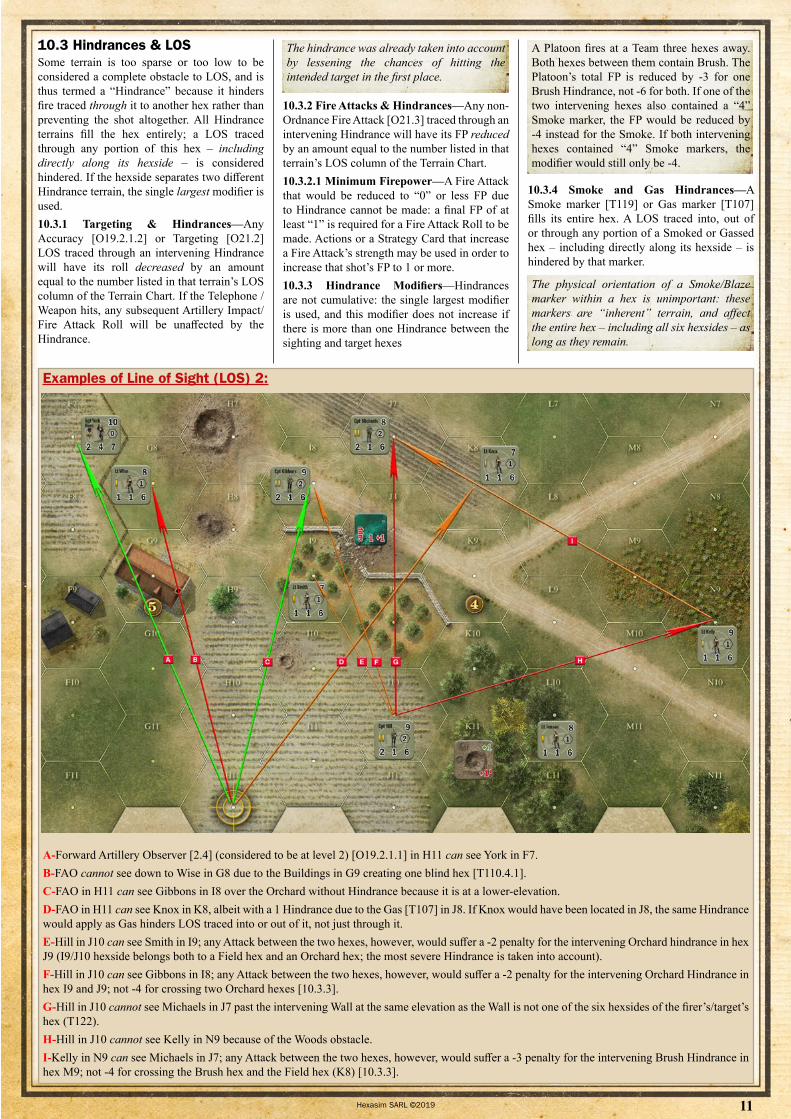
10.3 Hindrances & LOSSome terrain is too sparse or too low to be considered a complete obstacle to LOS, and is thus termed a “Hindrance” because it hinders fire traced through it to another hex rather than preventing the shot altogether. All Hindrance terrains fill the hex entirely; a LOS traced through any portion of this hex – including directly along its hexside – is considered hindered. If the hexside separates two different Hindrance terrain, the single largest modifier is used.10.3.1 Targeting & Hindrances—Any Accuracy [O19.2.1.2] or Targeting [O21.2] LOS traced through an intervening Hindrance will have its roll decreased by an amount equal to the number listed in that terrain’s LOS column of the Terrain Chart. If the Telephone / Weapon hits, any subsequent Artillery Impact/Fire Attack Roll will be unaffected by the Hindrance.
The hindrance was already taken into account by lessening the chances of hitting the intended target in the first place.
10.3.2 Fire Attacks & Hindrances—Any non-Ordnance Fire Attack [O21.3] traced through an intervening Hindrance will have its FP reduced by an amount equal to the number listed in that terrain’s LOS column of the Terrain Chart.10.3.2.1 Minimum Firepower—A Fire Attack that would be reduced to “0” or less FP due to Hindrance cannot be made: a final FP of at least “1” is required for a Fire Attack Roll to be made. Actions or a Strategy Card that increase a Fire Attack’s strength may be used in order to increase that shot’s FP to 1 or more.10.3.3 Hindrance Modifiers—Hindrances are not cumulative: the single largest modifier is used, and this modifier does not increase if there is more than one Hindrance between the sighting and target hexes
A Platoon fires at a Team three hexes away. Both hexes between them contain Brush. The Platoon’s total FP is reduced by -3 for one Brush Hindrance, not -6 for both. If one of the two intervening hexes also contained a “4” Smoke marker, the FP would be reduced by -4 instead for the Smoke. If both intervening hexes contained “4” Smoke markers, the modifier would still only be -4.
10.3.4 Smoke and Gas Hindrances—A Smoke marker [T119] or Gas marker [T107] fills its entire hex. A LOS traced into, out of or through any portion of a Smoked or Gassed hex – including directly along its hexside – is hindered by that marker.
The physical orientation of a Smoke/Blaze marker within a hex is unimportant: these markers are “inherent” terrain, and affect the entire hex – including all six hexsides – as long as they remain.
Examples of Line of Sight (LOS) 2:
A-Forward Artillery Observer [2.4] (considered to be at level 2) [O19.2.1.1] in H11 can see York in F7.B-FAO cannot see down to Wise in G8 due to the Buildings in G9 creating one blind hex [T110.4.1]. C-FAO in H11 can see Gibbons in I8 over the Orchard without Hindrance because it is at a lower-elevation.D-FAO in H11 can see Knox in K8, albeit with a 1 Hindrance due to the Gas [T107] in J8. If Knox would have been located in J8, the same Hindrance would apply as Gas hinders LOS traced into or out of it, not just through it.E-Hill in J10 can see Smith in I9; any Attack between the two hexes, however, would suffer a -2 penalty for the intervening Orchard hindrance in hex J9 (I9/J10 hexside belongs both to a Field hex and an Orchard hex; the most severe Hindrance is taken into account).F-Hill in J10 can see Gibbons in I8; any Attack between the two hexes, however, would suffer a -2 penalty for the intervening Orchard Hindrance in hex I9 and J9; not -4 for crossing two Orchard hexes [10.3.3].G-Hill in J10 cannot see Michaels in J7 past the intervening Wall at the same elevation as the Wall is not one of the six hexsides of the firer’s/target’s hex (T122).H-Hill in J10 cannot see Kelly in N9 because of the Woods obstacle.I-Kelly in N9 can see Michaels in J7; any Attack between the two hexes, however, would suffer a -3 penalty for the intervening Brush Hindrance in hex M9; not -4 for crossing the Brush hex and the Field hex (K8) [10.3.3].
12 Hexasim SARL ©2019
10.4 Map Edges and Off-map
hexesWhenever the hex on the edge of the map is blocking or hindering terrain, the “virtual hex” expanding off-map would be of the same nature concerning LOS.
11. Weapons
7 12 -2
Hotchkiss
1 - 510 - 11
Hotchkiss
11.1 EffectsWeapons have both a FP and a Range – sometimes boxed – and possibly a detrimental modifier (in bold red, like in the sample above) to the carrying Unit’s Movement. Whenever a Unit is activated [O14.1], any Weapon it is carrying is activated along with it. Only a Good Order (unbroken, unsuppressed) [3.2.1] Unit may fire its Weapon, and may do so either separately or as part of a Fire Group [O21.3.1]. Ordnance, which is the Weapon with the white bar, may not join in a Fire Group.
11.2 PortageEach Unit may “carry” one Weapon, denoted by having the Weapon physically placed atop that Unit. Any Weapon acquired via that Nation’s Support Table must be given to the Unit listed with that Weapon. Only a Team can carry a Flamethrower.Weapons fit comfortably on a Unit counter when offset a bit up and to the left, leaving all of the Unit’s stats visible.
11.3 Removal & TransferA Weapon may only be transferred from a Platoon to a Team (not to any other Formation) via the expenditure of 1 MP during a Move Order [O23], or for free when a Platoon detaches [E64].A Weapon may be voluntarily eliminated by its current owner at any time, except when the Unit is eliminated.If a Unit with a Weapon is eliminated, its Weapon goes to the Weapons Section on the Casualty Track.A Weapon carried by a Unit that exits the map remains with its Unit.
11.4 Broken WeaponsWhen a Weapon breaks, it is flipped over to its “Broken” side. A broken Weapon that breaks again is eliminated. Whenever a player checks for a Random Hex [1.8] – either via Sniper or due to certain Events – the hex number is compared to that on every broken Weapon present on the map. This happens before the result of the Event/Sniper itself is implemented.
● If the number falls within that Weapon’s “Fix” range (green numbers), it is flipped back over to its unbroken side, available for immediate use.
● If the number falls within that Weapon’s “Elim” range (red numbers), it is eliminated.
● With all other numbers, the Weapon remains broken.
11.5 Functioning Weapon A functioning Weapon is a Weapon that is not broken and is possessed by a Good Order [3.2.1] Unit.
11.6 OrdnanceSome Weapons – identified with a white bar behind their stats or with their FP number inscribed in a white box– are termed “Ordnance”. The Gun possessed by most Tanks [3.1.1] is also considered ordnance for all Fire purposes [O21.3.1.1 and O21.3.2].
6 2-14 -2
Crapouillot
1 - 410 - 11
Crapouillot
Ordnance:● must first secure a hit via Targeting before making a Fire Attack Roll [O21.2];● cannot participate in a Fire Group [O21.3.1];● cannot be used during Opportunity Fire [A42];
11.7 Specialized WeaponsA Flamethrower automatically sets its target’s Cover [T99.3] to “0”, with no modifications possible and can only be possessed by a Team.
12. TelephonesTelephones are markers representing off-map artillery batteries. Each has a FP of between 8 and 10. If a player acquires a Telephone, it is placed in the Artillery Box of his choice or dictated by Special Scenario Rules. Each player may have only one Telephone in play at a time. A Telephone is not a Weapon. See O18 and O19 for rules on Telephone usage.
13. Suppression13.1 PlacementA Suppressed marker can be placed on a Formation via some Events, some Actions, the effect of some Orders or due to a “tie” result during a Fire Defense [O21.3.7], Rally [O25.3] or Rout [O26.2] Roll.]
13.2 EffectA Formation with a Suppressed marker on it has -1 FP, -1 Range, -1 Movement and -1 Morale. Command and the determination of the Highest-ranking Leader are unaffected by being Suppressed. Weapons themselves cannot become Suppressed, but a Suppressed Unit cannot fire any Weapon it possesses.The weapon symbol in the upper left corner of a Suppressed marker is there as a reminder.
13.3 RemovalA Suppressed marker can only be removed from a Formation at the beginning of a Recover Order, or if the Formation is eliminated or it exits the map, or under the provisions of certain Orders, Actions and Events.
ORDERSO14. General RulesO14.1 ActivationNo Order may be given without the play of a Fate card from the hand and with that Order’s name listed across the top. To give an Order, the active player (only) reveals a card from his hand, announces that he is performing the listed Order (exceptions [3.1.9], [O20], [O27]), and places the card in the player’s Fate discard pile. Then the player designates and activates one friendly Formation or player (as appropriate for the Order—since Recover [O25] and Rout [O26] activate players, not Formations) that has not yet been activated that Turn to perform the Order.
O14.2 LeaderWhenever a Leader is activated, it may in turn activate all, some or none of the friendly Platoons and Teams within its Command Radius [3.3.1.1] to perform the same Order. In case an activation “chain” is started by the Highest-ranking Leader, a Leader can “pass” the activation to other Leader(s) [3.3.1.2]. All Formations to be activated for an Order must be identified before the Order is carried out.O14.2.1 Tank leader—Only a Tank Leader may activate other Tanks within its Command Radius, to perform a Move or Advance Order (and no other Orders). All Tanks under a Tank Leader-activated Order must be identified before the Order is carried out. A Tank Leader never activates Units or other Leaders.
O14.3 One Order at a TimeAn announced Order must be performed in its entirety before the next Order is given or before the player announces the end of his Turn. This includes any Actions requiring that Order to be in effect.You cannot activate two Formations to Move, move one, and play a Rout Order on your opponent to get an enemy Formation out of the way, then come back and move the other Formation.
O14.4 Actions and Events during OrdersAny number of Actions may be announced by either player during an Order as long as the prerequisites for those Actions are met. Any number of Events could also occur at random during an Order.If you activated a Leader and a Platoon to Move, the Platoon could move first and play one or more Engineering Works [A41] Actions before the Leader begins moving.
O14.5 MandatoryOnce an Order is given, at least one of the Formations activated for that Order must physically carry it out.If a Move Order is given, at least one activated Formation must physically cross a hexside into another hex—you couldn’t give a Move Order for the sole purpose of playing an Assault Fire Action [A31], for example.
13Hexasim SARL ©2019
O15. Pass (Discard)If a player chooses to give no Orders during his Turn, he may instead discard any number of cards, up to his nationality’s Discard Limit (as shown on the scenario sheet).The various Orders are described hereunder, and are listed in alphabetical order for ease of reference.
O16. AdvanceO16.1 ProcedureA Formation that is activated to Advance can enter an adjacent hex, where it must stop. This can be done even if the hex is enemy-occupied.This is the most reliable way to enter into Melee with opposing Formations.
MPs and terrain Move Costs are ignored during an Advance. In addition, the inactive player cannot use Op Fire [A42] against advancing Formations.You only get to go one hex and you are immune to Fire Attacks as you do so.
O16.2 AbilitiesAdvancing Formations starting the Order in the same hex may Advance one-by-one or together as a stack.An Advancing Formation may:
● enter an enemy-occupied hex; ● exit off the enemy map edge (except
Runners); ● an advancing Runner (only) may exit off
the friendly map edge.
O16.3 RestrictionsAn advancing Formation may not:
● enter an impassable hex [T100; T124]; ● enter or exit a Bridge hex [T102] across
anything other than its Road/Rail hexsides; ● exit off the left or right map edge; ● exit off the friendly map edge (exception:
Runners may only exit off the friendly map edge).
O16.3.1 Engine Failure— A broken Tank with “–“ move factor cannot move nor advance.
O16.4 MeleeAt the conclusion of any Order or die Trigger – though most likely after an Advance Order – that causes a hex to contain Formations belonging to both sides, a Melee ensues in that hex. If more than one hex contains a Melee, the active player selects the order in which they will be resolved, one at a time.O16.4.1 Melee Strength—If one side has only a Runner present in the hex, it is automatically eliminated granting 1 VP to the opponent, and the Melee ends. No Actions nor Strategy Cards can be played.In all other cases, after both players have played and resolved any Action card (including Ambush Action [A30]) and/or any Strategy Cards usable in Melee, each player totals the current FP from his remaining Formations– not Weapons – in the Melee hex, then adds +1 for each of those Formations with a boxed FP, to arrive at his “Melee FP”. A Tank uses the lower FP number when two FP numbers are written on its counter.If, due to Ambush Action(s), one or both sides have no Formations remaining, the Melee ends with no further effect.O16.4.2 Melee Roll—The inactive player makes a Die Roll and adds it to his Melee FP to arrive at his “Melee Total”. Then the active player makes a Die Roll and adds it to his Melee FP to arrive at his Melee Total. The rolls – while ostensibly simultaneous– are staggered in order to facilitate die Triggers and possible use of the Initiative Card after each one.
If, due to a Trigger during a Melee Roll, one or both sides have no Formations remaining in the hex, the Melee ends with no further effect.O16.4.3 Melee Result—The side with the lower Melee Total has all of its participating Formations eliminated. In case of a tie, both sides are eliminated unless one player began the Melee in a Blockhaus [F126] or Pillbox [F129]: in which case, only the other side is eliminated.
O17. Air Assault
O17.1 Procedure1) Draw a Random Hex, place the aircraft marker in it so that it clearly faces one of the six compass directions, (i.e. the nose of the aircraft is aligned along a hexside and visually traces out a hex row).2) If Bombing, choose one occupied hex in the hex row, suppress all Units in that hex and attack it using the aircraft’s Bombing FP.
3) If Strafing, choose any 2 adjacent hexes in the hex row, suppress all Units in those hexes and attack them using the aircraft’s Strafing FP. A separate Strafing roll is made against each occupied hex.4) Determine the proper aerial attack strength on the basis of the following chart. Bombing FP increases over the course of the war. Strafing FP only becomes available later on:Bombing FP—British, French, US and German: 3 in 1914, 6 in subsequent years.Strafing— British and French: (available from February 1916 only) 5; German: (available from August 1915 only) and US: 5.5) For each hex so attacked, the Bombing FP or the Strafing FP (as chosen by the attacking player) is added to a Fire Attack Roll to arrive at an Attack Total, which is answered by a Defense Total for each Formation present in the targeted hex. Ground targets do not fire back at the assaulting aircraft.6) Remove the aircraft from the map and set it aside for possible later use in a new Air Assault Order.
O17.2 EfficiencyHindrances [10.3], Obstacles [10.2] and blocking hexes don’t affect Air Assault. Air Assault attacks do not enjoy Height Advantage [T110.2].
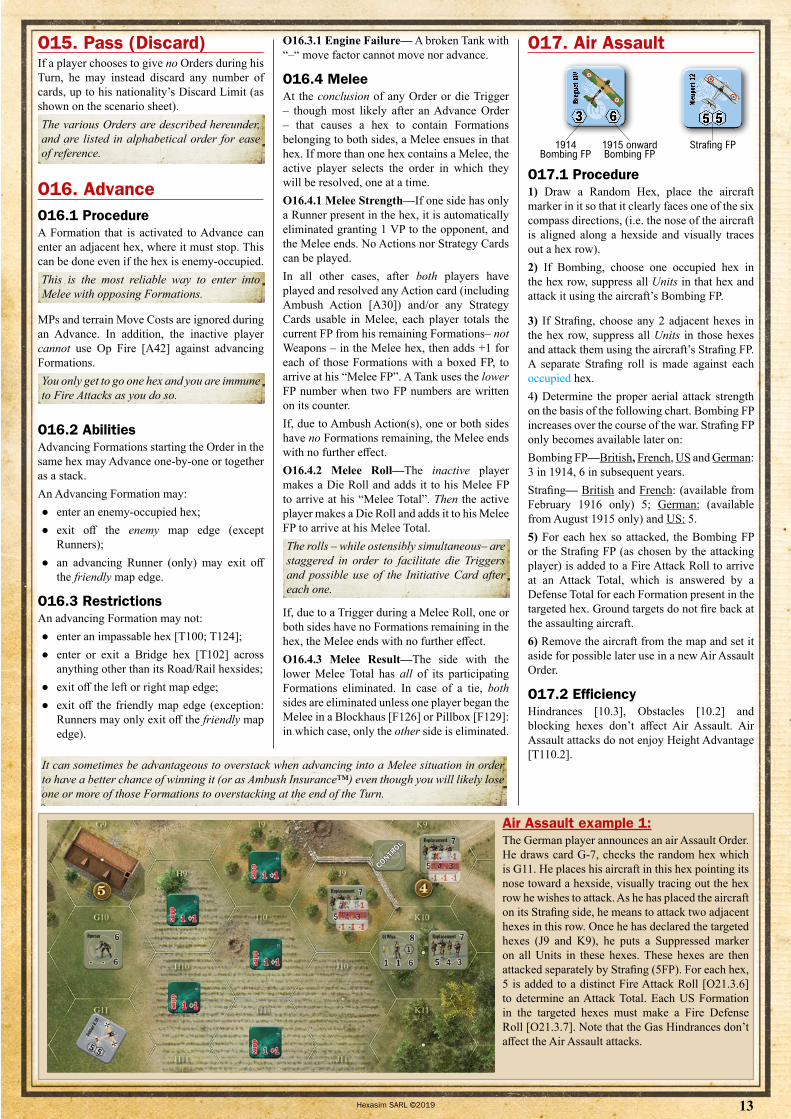
Air Assault example 1:The German player announces an air Assault Order. He draws card G-7, checks the random hex which is G11. He places his aircraft in this hex pointing its nose toward a hexside, visually tracing out the hex row he wishes to attack. As he has placed the aircraft on its Strafing side, he means to attack two adjacent hexes in this row. Once he has declared the targeted hexes (J9 and K9), he puts a Suppressed marker on all Units in these hexes. These hexes are then attacked separately by Strafing (5FP). For each hex, 5 is added to a distinct Fire Attack Roll [O21.3.6] to determine an Attack Total. Each US Formation in the targeted hexes must make a Fire Defense Roll [O21.3.7]. Note that the Gas Hindrances don’t affect the Air Assault attacks.
It can sometimes be advantageous to overstack when advancing into a Melee situation in order to have a better chance of winning it (or as Ambush Insurance™) even though you will likely lose one or more of those Formations to overstacking at the end of the Turn.
Strafing FP1915 onwardBombing FP
1914Bombing FP
33 5555

14 Hexasim SARL ©2019
O18. Artillery DeniedWhen an Artillery Denied Order is given, that player causes his opponent’s Telephone [12] to break. If the Telephone was already broken, eliminate it instead. An eliminated Telephone is always placed back into the counter mix rather than on the Casualty Track. Nothing is activated during an Artillery Denied Order.A Telephone doesn’t ‘break’ per se—an eliminated or broken Telephone more likely represents the momentary disruption of lines or the inability of battery commanders far behind the front to support your battle at this particular point in time.
O18.1 When a Telephone “breaks”, immediately remove the Spotting Round and Artillery Impact markers of that player’s side present on the map.
O19. Artillery RequestWhen an Artillery Request Order is given, that player must choose to perform one of either “Battery Access” or “Fire for Effect”. Battery Access may only be chosen if he has a broken Telephone [12] in play. Fire for Effect may only be chosen if he has an unbroken Telephone in play.
O19.1 Battery AccessIf the Telephone is broken, the active player flips the Telephone back to its unbroken side and places it in the Artillery box of his choice (according to period restrictions [O19.2]).
O19.2 Fire for Effect CREEPING
orSTANDINGBARRAGE
LOCALBARRAGE LOCALBARRAGE
If the Telephone is unbroken, the active player places his Telephone in the Artillery box in one of the allowed spaces: Local Barrage, Standing/Creeping Barrage, or Gas Attack (See the Table below for bombardment availability).
The player then activates his Highest- ranking Leader or his Forward Artillery Observer (FAO), (personified by a target symbol on the player’s map edge). The leader or the FAO will act as the “Spotter” for the ensuing bombardment. In order for the Leader to spot, he must be unbroken and not yet been activated this Turn. In order for the FAO to spot, he must not have been activated to spot previously this Turn.
Local BarrageAlways
Standing/Creeping BarrageJanuary 1915 onward
Gas Attack*Germany: June 1915 onward
France: July 1915 onwardGreat Britain: July 1915 onward
US: entry in war onward
*The first official Gas Attack on the Western Front occurred on April 22, 1915, but it was not a bombardment; German gas was released out of gas projectors and was drifted wind-blown to the enemy frontline.
O19.2.1 Initial Bombardment Procedure—If the active player’s Spotting Round marker is not yet on the map, he performs the following three steps, in the exact order given:1) Spotting;2) Accuracy;3) Impact.Each step is explained in detail below.An Artillery Request represents a Leader or FAO calling for a “Fire for Effect” in order to bring down several hexes’ worth of bombardment. Pending new Artillery Request Orders, a Telephone operator spends time seeking, observing and correcting spotting rounds.
O19.2.1.1 Spotting—First, place the Spotting Round (SR) into any hex within the LOS of the Spotter (the FAO is considered to be at level 2 for LOS purposes [10]): this will indicate the intended center of the artillery bombardment. This hex can be an otherwise impassable hex (such as a Blaze or Water Barrier). The SR must be placed on map showing the bombardment pattern chosen by the player according to the Artillery box containing his Telephone: “Local Barrage” or “Creeping or Standing Barrage”. If the player announces a Gas Attack, the “Local Barrage” side of the SR is displayed.O19.2.1.2 Accuracy—Gas attack ability is available to any Telephone provided the scenario occurs in a period in which Gas Attacks are available (see the Table above). If the active player wishes to use Gas, he must announce it prior to making the Accuracy attempt. Once the SR has been placed, make a normal Targeting Roll [O21.2.1.1] using the range between the Spotter and the SR hex. This roll is modified by any Hindrances along the way, as usual [10.3.1]. If the Spotter is the FAO and the SR is placed in the FAO’s very hex, range is considered to be 1.O19.2.1.2.1 Hit—If the Targeting Roll secures a ‘hit,’ the Artillery is accurate: reveal the top card of the Fate deck and ignore everything except the two dice (this is NOT a roll, so no die triggers). Using the hex-compass on the map, each die will give the direction in which the SR will err: the SR moves one hex in the white die’s direction, next it moves one hex in the colored die’s direction.Yes, this could bring the SR right back into the same hex—good shot!
O19.2.1.2.2 Miss—If the Targeting Roll is a ‘miss,’ the Artillery is inaccurate: reveal the top card of the Fate deck and ignore everything except the two dice (this is NOT a roll, so no die triggers). Using the hex-compass on the map, the first (white) die gives the direction in which the SR will err. The second (colored) die is the distance in hexes the SR will travel in that direction.Yes, this could bring the SR right back on top of your own troops—bad shot!
O19.2.1.2.3 Off-Map—Any SR that errs off the map – even if just briefly – is removed with no further effect and the Order ends. And, due to artillery’s 7-hex blast radius (see below), a SR can occupy an otherwise impassable hex (such as a Blaze or Water Barrier).O19.2.1.3 Impact and Gas Attack—The hex into which the SR finally lands becomes the center hex of the activated Telephone’s artillery impact area. If the player has declared a Gas Attack, the SR’s hex and each adjacent hex will be affected. The active player places seven Gas markers on the map, one into the hex occupied by the SR and one in each adjacent hex. No Impact Roll is made. In each of those hexes, the Gas attack inflicts the following damage:
● Break all Formations that have a Suppressed marker on them. The Suppressed marker is retained.
● Place a Suppressed marker on all unsuppressed Formations.
Air Assault example 2:The German player announces an air Assault Order. He draws card G-7 and checks the random hex, which is G11. He places his aircraft in this hex pointing its nose toward a hexside, visually tracing out the hex row he wishes to attack. As he has placed the plane on its Bombing side, he means to attack one hex in this row. He declares it to be G8 and he puts a Suppressed marker on all Units in that hex. This hex is then attacked by bombing FP of 6 (as it is a 1918 scenario). This number is added to a Fire Attack Roll [O21.3.6] to determine an Attack Total. Each US Formation in the targeted hex must now make a Fire Defense Roll [O21.3.7].

15Hexasim SARL ©2019
This ends the Order, the SR is removed and all Gas markers remain on the map.O19.2.1.4 Impact and Artillery Barrage—The hex into which the SR finally lands becomes the center hex of the activated Telephone’s artillery impact area:
● If the player has chosen Local Barrage Attack, the SR’s hex and each adjacent hex will be affected.
● If the player has chosen Standing/Creeping Barrage Attack, the seven hexes in a straight row of adjacent hexes having as its middle the SR hex will be affected. The active player places one Artillery Impact marker in each of the three hexes radiating from two opposite sides of the SR hex, so as to form a perfectly straight row.
O19.2.1.4.1 Vacant hexes—Vacant hexes (containing no Formations) are attacked first. Only one single Impact Roll is made against all these hexes. An Artillery Impact Roll follows the same rules and restrictions as a Fire Attack Roll [O21.3.6], but, because Telephones are not Weapons, a “Jammed” trigger will not break the Telephone.All Terrain (except impassable Terrain and Shellhole) has a “vulnerability” of 18. If the Artillery Impact total equals or beats a terrain’s vulnerability [T99.5], a Shellhole marker or a Rubble marker (depending on Terrain in the hex [T99-T124]) is placed in the hex.All Fortifications (except Blockhaus [F126] or Pillbox [F129]) have a “vulnerability” of 18. If the Artillery Impact total equals or beats a Fortification’s vulnerability [F125.3], the Fortification is immediately downgraded [T99.5].No Artillery Impact Roll is made against a vacant hex already containing a Shellhole marker.
Earlier barrages have already done their dirty work; empty ground can only take so much rearranging.
O19.2.1.4.2 Occupied hexes—Secondly, the active player determines the order in which the hexes containing Formations are attacked. For each hex:
● one Impact Roll (only) is made. This Artillery Impact Roll also follows the same rules and restrictions as a Fire Attack Roll [O21.3.6] but, because Telephones are not Weapons, a “Jammed” trigger will not break the Telephone.
● the vulnerability of the Terrain or the Fortification (if any) in the hex is compared with the Artillery Impact total [T99.5]. Fortifications are downgraded or Shellhole markers placed in the hex as in the case of attacks made against vacant hexes.
● Formation(s) in that hex will now defend against the Artillery Impact Roll using the current Cover in the hex.
This ends the Order. The SR and all Artillery Impact markers are left on the map if this is a “Standing/Creeping Barrage” attack.O19.2.2 Subsequent Bombardment Procedure—In a Turn in which the active player has already performed a Bombardment, his Telephone is unbroken and one Spotter is unactivated, he may start a new Bombardment by playing another Artillery Request Order. If the player wants to target a new map area, he removes the SR and Impact markers (but not the Gas markers already on the map), places his Telephone in the Artillery box of his choice and follows the entire Spotting/Accuracy/Impact procedure as described above.
While a player may fire artillery often over the course of the battle, he will never have more than one active Bombardment area at a time.
If he wants to continue hitting the same area as the previous Artillery attack and the currently chosen Bombardment type is Standing/Creeping Barrage, he leaves the SR in place and performs the new Order skipping Spotting and Accuracy (the guns have become registered to the target area). However, he still must activate his Spotter, who requires LOS to the SR hex during the whole Bombardment procedure.O19.2.2.1 Registered Standing Barrage—If the Telephone is in the Standing/Creeping Barrage space of the Artillery box, the SR and all six Artillery Impact markers remain in place and the regular Impact procedure occurs.At the end of the Order, the SR and all six Artillery Impact markers are left on the map.O19.2.2.2 Registered Creeping Barrage—If the Telephone is in the Standing/Creeping Barrage space of the Artillery box, the SR and all six Artillery Impact markers shift one hex in the same direction (active player’s choice). If any marker shifts off-map, it is removed and placed back into the counter mix. Next the regular Impact step occurs. At the end of the Order, the SR and all six Artillery Impact markers are left on the map.
Registered Creeping Barrage example: In this 1917 scenario, the German player announces an Artillery Request Order activating Hptm Nehring in hex F6. As the German Telephone is already in the Standing/Creeping Barrage space of the Artillery box and the SR and all six Artillery Impact markers are on map, he shifts all of them one hex in the same direction of his choice, as long as the activated spotter (Hptm Nehring) has LOS on the SR marker. Then the regular Impact step occurs.

16 Hexasim SARL ©2019
O20. Command ConfusionThis card acts as a ‘dud’ and cannot be played for an Order, except in one special case: if the player has a Runner in the same hex as his Highest-ranking Leader, both are not yet activated for the Turn, and a functioning Telephone is present in his box, he may use this card as a regular Artillery Request Order [O19], activating both his Highest- ranking Leader and his Runner. Targeting range is determined from their hex.
O21. Fire O21.1 Finding TargetsFor a Fire Order to be announced, at least one of the activated Formations (or a Weapon) must have an enemy Formation within both its LOS and Range.You can activate Leader A to fire, who then activates Unit B. This is legal if B is the only one of the two with both LOS and Range to an enemy Formation. You could also activate a 2-Range Team to fire even if the nearest enemy Formation is three or more hexes away if that Team was carrying a Weapon capable of firing at that enemy Formation.
O21.2 Ordnance & TargetingOrdnance Weapons [11.6] must first secure a hit against the targeted hex before making a Fire Attack Roll against it.All other Weapons – and all Formations (except some Tanks, see below)– need not perform a Targeting Roll and proceed directly to the next step [O21.3] when firing. Some Tanks have two types of armament. If the FP is displayed on a white square, it is Ordnance and must secure a hit before making a Fire Attack Roll too.
Initially, the range between the firing Ordnance and the target hex is determined, then a Targeting Roll is made to see if the Weapon or Tank armament hits and, if so, a Fire Attack Roll [O21.3.6] follows, using that Weapon’s or Tank’s Ordnance’s FP.Leaders do not spot for ordnance Weapons. Stats within a white band are never modified by a friendly Leader’s Command number [3.3.1.7].
O21.2.1 Targeting RangeDetermine the range by counting the number of hexes from the firing Formation to its target hex– including the target hex but excluding the firing Formation’s hex. If this range is greater than the printed Range on the firing Weapon, the shot cannot be attempted.Note that Mortars also have a minimum range at which they can fire. For example, the French Light mortar “Crapouillot” has a Range of “2-14”, so it cannot fire at an adjacent hex.
O21.2.1.1 Targeting Roll—Once the range is determined, the active player makes a die roll and multiplies the two dice together (rather than adding them together as with other rolls). The resulting product has to exceed the range in order to hit the targeted hex. Any other result is a miss and the attack is cancelled with no further effect.
So a Targeting Roll of 1x6 equals “6” and misses at range 6 or more. This roll would hit if the range was 5 or less. A Targeting Roll of 6x6 is “36” and hits anything, while a roll of 1x1 is “1” and misses everything.
O21.2.1.2 Targeting & Hindrances—Range in Targeting Rolls is always modified by any relevant Hindrance along the way [10.3.1]. Only the largest hindrance modifier is used [10.3.3].An example would be ordnance firing at a target 5 hexes away with one or more Brush hexes in between (each a Hindrance of -3). The Targeting Roll must yield 9 or more to hit, instead of 6 or more.
O21.3 Fire AttackEach piece that is activated to Fire may take one shot (except Tanks [O21.3.2]) at any hex within both its Range and LOS, either alone or as part of a Fire Group [O21.3.1]. And there must be at least one enemy Formation in a targeted hex for the shot to occur.IMPORTANT— Units and Leaders, (friendly or enemy) in an intervening hex do not hinder or block any Fire Attack that passes through their hex. Tanks do not block, but they give a “1” hindrance. Formations (friendly or enemy) in an intervening hex are not affected by any Fire Attack that passes through their hex.Generally, a Formation’s FP – modified by Command, by any Hindrances between itself and the target, and by any relevant Action cards and Strategy Cards played – is added to a “Fire Attack Roll” to arrive at an “Attack Total”.Then each defending Formation in the targeted hex adds its Morale – modified by Command/Cover and any relevant Action cards and Strategy Cards – to a “Fire Defense Roll” to arrive at a “Defense Total”. If the firer’s Attack Total beats a Formation’s Defense Total, that Formation breaks [3.2]. If the Totals are tied, a Moving target breaks while a non-Moving target becomes Suppressed [13]. Any other result will have no effect.This is how we make moving a bit more dangerous than remaining stationary: if the active player’s Moving Formations are being shot at via Opportunity Fire [A42], they will break on a tied result rather than just becoming Suppressed.
New defense rolls continue until all targeted Formations in the hex have responded to the one Fire Attack Roll.O21.3.1 Fire Groups—Two or more activated Units, Leaders and non-ordnance Weapons may fire together by combining into a Fire Group. Tanks and other vehicles, and ordnance Weapons may never be part of a Fire Group. Every piece in a Fire Group must have been activated by the same Leader, must have an unobstructed LOS to the target hex and be within Range of that hex for the Fire Attack Roll to be made.Furthermore, when pieces in a Fire Group occupy more than one hex, each such hex must be adjacent to at least one other (so that it forms a “chain” of adjacent firing pieces).
O21.3.1.1 Ordnance—Weapons with a white band or with their FP inscribed in a white box must always fire alone and thus can never be assigned as part of a Fire Group.Fire Groups are never mandatory —the player could choose to fire smaller or larger groups, or no groups at all and instead fire all pieces separately at the player’s discretion. A Unit and its Weapon may even fire separately; and at the same or different hexes.
O21.3.1.2 Group FP—The total FP of a Fire Group is X+Y, where X is the FP of one firing piece and Y is the number of other firing pieces [see “C” and “F” in the Fire Attack example on the following page].O21.3.2 Tank Fire—A Tank may fire its armament (ordnance and non-ordnance) at the same target hex or at different target hexes. Tanks may never participate in Fire Groups. Tank Leaders do not add their Command to the FP fire of any Formations.The FP of an unbroken Tank firing at an adjacent hex is always increased by 2. (Tank counters show a * next to the Tank FP as a reminder). O21.3.3 Fire Attack Against Tanks—Tanks can only be attacked by Weapons, Artillery and other Tanks.O21.3.4 Attack Actions—Actions supporting Fire Attacks are played by the active player before Hindrances are calculated [O21.3.5] and the Fire Attack Roll [O21.3.6] is made. The effects of all such Actions are cumulative.O21.3.5 Attack Hindrances—If the LOS from any non ordnance firing piece and the target hex is hindered [10.3], that shot’s FP is reduced by the highest such Hindrance. If this would modify the attack’s total FP to zero or less, the shot cannot even be attempted; though the firing piece(s) could still attempt a different shot with a lesser (or no) Hindrance.Recall that Actions such as Live Forever [A48] or Marksmanship [A50] can increase a Fire Attack’s strength to greater than 0, thus allowing a hindered shot to occur.
O21.3.6 Fire Attack Roll—Once the final FP is determined, the firing player makes a roll and adds it to the final FP to arrive at an “Attack Total”.O21.3.6.1 Jammed Trigger—If a Fire Attack Roll results in a Jammed trigger, all firing Weapons break. This does not cancel the attack nor otherwise reduce its effectiveness. Tanks don’t “possess” weapons, they have armament; so they are never affected by Jammed triggers.Massing machine guns in one grand attack is nice but risks a crippling Jammed roll for all. Here poorly trained crews, overheating, and bad maintenance would come together and dog the unlucky guns.
O21.3.7 Fire Defense Roll—A player has to make a Fire Defense Roll – one at a time in any order desired – for each of his Formations that were in a hex at the moment that a Fire Attack Roll was made against it. All Fire Defense Rolls for one attack must be made before the next attack is announced, even if that same hex will be targeted again.
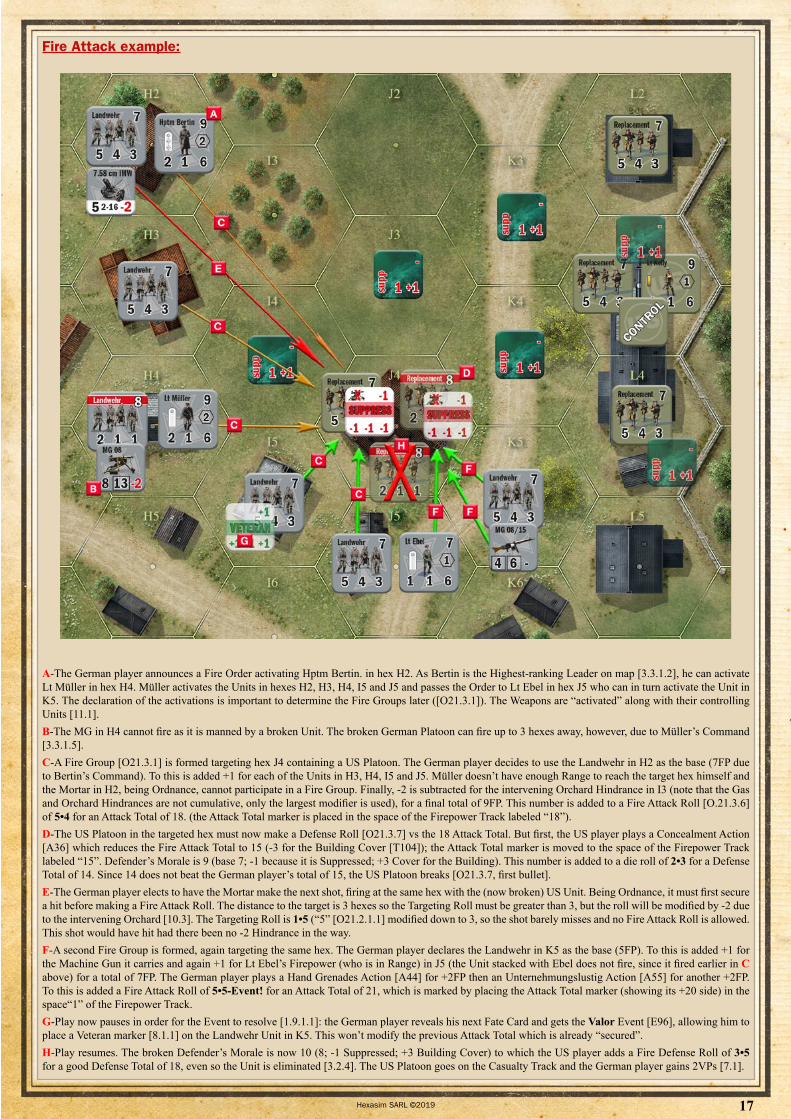
17Hexasim SARL ©2019
Fire Attack example:
A-The German player announces a Fire Order activating Hptm Bertin. in hex H2. As Bertin is the Highest-ranking Leader on map [3.3.1.2], he can activate Lt Müller in hex H4. Müller activates the Units in hexes H2, H3, H4, I5 and J5 and passes the Order to Lt Ebel in hex J5 who can in turn activate the Unit in K5. The declaration of the activations is important to determine the Fire Groups later ([O21.3.1]). The Weapons are “activated” along with their controlling Units [11.1].B-The MG in H4 cannot fire as it is manned by a broken Unit. The broken German Platoon can fire up to 3 hexes away, however, due to Müller’s Command [3.3.1.5].C-A Fire Group [O21.3.1] is formed targeting hex J4 containing a US Platoon. The German player decides to use the Landwehr in H2 as the base (7FP due to Bertin’s Command). To this is added +1 for each of the Units in H3, H4, I5 and J5. Müller doesn’t have enough Range to reach the target hex himself and the Mortar in H2, being Ordnance, cannot participate in a Fire Group. Finally, -2 is subtracted for the intervening Orchard Hindrance in I3 (note that the Gas and Orchard Hindrances are not cumulative, only the largest modifier is used), for a final total of 9FP. This number is added to a Fire Attack Roll [O.21.3.6] of 5•4 for an Attack Total of 18. (the Attack Total marker is placed in the space of the Firepower Track labeled “18”).D-The US Platoon in the targeted hex must now make a Defense Roll [O21.3.7] vs the 18 Attack Total. But first, the US player plays a Concealment Action [A36] which reduces the Fire Attack Total to 15 (-3 for the Building Cover [T104]); the Attack Total marker is moved to the space of the Firepower Track labeled “15”. Defender’s Morale is 9 (base 7; -1 because it is Suppressed; +3 Cover for the Building). This number is added to a die roll of 2•3 for a Defense Total of 14. Since 14 does not beat the German player’s total of 15, the US Platoon breaks [O21.3.7, first bullet].E-The German player elects to have the Mortar make the next shot, firing at the same hex with the (now broken) US Unit. Being Ordnance, it must first secure a hit before making a Fire Attack Roll. The distance to the target is 3 hexes so the Targeting Roll must be greater than 3, but the roll will be modified by -2 due to the intervening Orchard [10.3]. The Targeting Roll is 1•5 (“5” [O21.2.1.1] modified down to 3, so the shot barely misses and no Fire Attack Roll is allowed. This shot would have hit had there been no -2 Hindrance in the way.F-A second Fire Group is formed, again targeting the same hex. The German player declares the Landwehr in K5 as the base (5FP). To this is added +1 for the Machine Gun it carries and again +1 for Lt Ebel’s Firepower (who is in Range) in J5 (the Unit stacked with Ebel does not fire, since it fired earlier in C above) for a total of 7FP. The German player plays a Hand Grenades Action [A44] for +2FP then an Unternehmungslustig Action [A55] for another +2FP. To this is added a Fire Attack Roll of 5•5-Event! for an Attack Total of 21, which is marked by placing the Attack Total marker (showing its +20 side) in the space“1” of the Firepower Track.G-Play now pauses in order for the Event to resolve [1.9.1.1]: the German player reveals his next Fate Card and gets the Valor Event [E96], allowing him to place a Veteran marker [8.1.1] on the Landwehr Unit in K5. This won’t modify the previous Attack Total which is already “secured”.H-Play resumes. The broken Defender’s Morale is now 10 (8; -1 Suppressed; +3 Building Cover) to which the US player adds a Fire Defense Roll of 3•5 for a good Defense Total of 18, even so the Unit is eliminated [3.2.4]. The US Platoon goes on the Casualty Track and the German player gains 2VPs [7.1].
18 Hexasim SARL ©2019
Since a broken Leader has a Command of 0, you generally want to roll Defense for a Leader last (in case it breaks) in order for the other Formations in the hex to gain the Morale boost from his Command.
A targeted Formation’s Morale – modified by Cover [T99.3], Command [3.3.1] and by the effect of Action cards and Strategy Cards –is added to a die roll in order to arrive at a “Defense Total”:
● If the Defense Total is less than the Attack Total, the Formation breaks [3.2].
● If the Defense Total is equal to the Attack Total, the Formation becomes Suppressed [13] unless it is currently activated to Move [O23]—in which case it breaks instead of Suppressing. A suppressed Formation cannot be suppressed a second time.
● If the Defense Total is greater than the Attack Total, the Formation is unaffected.
O21.3.7.1 Fire defense Roll for Tanks—Tanks never benefit from Cover [T99.3] or Command [3.3.1] when rolling for defense.
O22. HMG Suppress A functioning heavy machine gun (HMG) “pins down” all the enemy Formations in one or two target hex(es). Suppression markers are placed on all the targeted enemy Formations. No die roll is made, but the HMG and the Unit possessing it are considered activated and done for the Turn.
O22.1 Eligible MGsTo be eligible for MG Suppression, an unbroken HMG must be possessed by a Good Order, unactivated Unit and must be within LOS and range of at least one hex containing Enemy Formation(s) and cannot be in a Wire or Water hex. The Weapon and the Unit possessing it are considered activated for the Turn.
O22.2 Suppression MechanicsThe active player performs all of the following steps in the order given:
● Determine an eligible HMG ● Declare HMG Suppression, thereby
activating the chosen machine gun for the Turn.
● Choose one or two target hexes. All target hexes must contain enemy Formations and must be in LOS and range of the activated HMG. If two target hexes are chosen, they must be adjacent;
● Place a Suppression marker on all the enemy Formations in the target hex(es).
No die roll is performed.
O23. MoveFormations that are activated to Move can move from hex to hex across the map, expending Movement Points (MPs) in each new hex that they enter. A Formation has as many MPs to spend during a Move Order as its current Movement number, which can be increased by Command (Units only) [3.3.1.5] or by having entered a Road hex [T116], among other things.
O23.1 Movement CostsEach terrain lists a “Move Cost”. In order to enter an adjacent hex during a Move Order, an activated Formation must spend a number of MPs equal to the Move Cost of the terrain in that hex. Additional costs may be assessed if the Formation crosses certain hexsides (a Wall, for example) or moves to a higher elevation.IMPORTANT: A Formation may not enter a hex unless it has at least as many MPs remaining as the total cost to enter that hex.Formations without enough MPs to move even one hex – perhaps they are broken or carrying a heavy Weapon – will have to wait for an Advance (or Rout!) Order to get going.
O23.1.1 Weapon Transfer—A Unit activated to Move may transfer its Weapon to a friendly Team stacked with it for a MP cost of “1”. The receiving Team need not be activated to Move to acquire such a Weapon [11], but it cannot already possess a Weapon (no weapons trading).
O23.2 Formations Moving TogetherThe movement of one Formation must be completed in its entirety before another activated Formation can begin moving. The one exception is that activated Formations that begin a Move Order in the same hex may be moved together as a stack provided those Formations remain together throughout the entirety of that Move Order.Those Formations will therefore always end their movement in the same hex, and the Formation with the smallest modified Movement number will determine how far the group as a whole can travel. If one of these Formations breaks or is eliminated along the way, it will most likely stop the entire group dead in its tracks.
O23.3 Opportunity Fire & MovementThe inactive player may use Op Fire [A42] against the active player’s moving Formations each time they enter a new hex. See the Op Fire example on page 22.
O23.4 Movement RestrictionsA moving Formation may never:
● enter an enemy-occupied hex; ● enter an impassable hex [T100; T124]; ● enter or exit a Bridge hex across anything
other than its Road/Rail hexsides [T102]; ● exit off the left or right map edge; ● exit a friendly map edge (except a Runner);
and ● a moving Runner may never exit off the
enemy map edge. However, exiting any other Formation off the enemy map edge is permitted and will gain you Victory Points [7.2.1].
O23.5 Tank Movement and AdvanceO23.5.1 Movement Group—Tanks are activated individually for Movement and Advance. However, when a Tank Leader is activated by a Move or Advance Order, it
has the ability to further activate all, some or none of the friendly Tanks (but not other Tank Leaders) within its Command Radius to perform the same Order, provided no friendly Tank has yet been eliminated. As soon as the first friendly Tank is eliminated, Tank Leaders immediately lose this ability, and from now on all Tank formations have to be activated individually.O23.5.2 Immobilization—When roaming the battlefield, a Tank is in danger of being slowed down or bogged down and immobilized by difficult terrain. Immobilization may happen every time a Tank Formation enters a hex containing one of the following Terrain or Fortifications as part of a Move or Offensive or Advance Order:
● Gully [T108] ● any hex at a different elevation [T110.1.1 ]
(whether higher or lower) ● Rubble [T117] ● Trench [F130] ● Foxhole [F127]
Immobilization may occur also when a Tank enters a Shellhole [T118], but only the first time it enters a Shellhole hex as part of a single Move, Offensive or Advance Order (see detailed procedure below).Exceptions: Hexes containing friendly Units [O23.5.6].O23.5.3 Single Test—Only one Immobilization Check is performed when a Tank enters a hex containing a combination of more than one bogging-down Terrain/Fortification.O23.5.4 Detailed procedure for non-Shellhole hexes—When a Tank enters one of the above non-Shellhole hexes as part of a Move, Offensive or Advance Order, it must immediately check for Immobilization. This check takes precedence over any other Action of effect, and thus is performed before Op Fire attacks, Mine attacks etc. would be declared or resolved.In order to conduct the check, the active player makes a Die Roll:● If the roll totals more than the bog number (exponent number in upper right of movement factor), the Tank is not immobilized. Actions may be played now, next the Tank can proceed with the current Order. This check is made each time the Tank enters a bogging-down hex.● If the number equals or is less than the bog number, the Tank stops and flips over to its broken side. Actions may be played now. The Tank may not proceed any further. If it is in an enemy-occupied hex, Melee ensues regularly.O23.5.5 Detailed procedure for Shellhole hexes—The first time (only) a Tank intends to enter a Shellhole hex as part of a single Move or Offensive Order, it must pay 1 additional MP.When a Tank enters a Shellhole hex for the first time as part of an Advance Order or of a single Move / Offensive Order, it must immediately check for Immobilization. This check takes precedence over any other Action of effect, and thus is performed before Op Fire attacks, Mine attacks etc. would be declared or resolved.In order to conduct the check, the active player makes a die roll:

19Hexasim SARL ©2019
● If the roll totals more than the bog number (exponent number in upper right of movement factor), the Tank is not immobilized. Actions may be played now. Next the Tank can proceed with carrying out the rest of the current Order. Upon entering again a Shellhole hex during the current Move / Offensive Order, the Tank will not be required to check for Immobilization any more.
● If the number equals or is less than the bog number, the Tank stops and flips over to its broken side. Actions may be played now. The Tank may not proceed any further. If it is in an enemy-occupied hex, Melee ensues regularly.
O23.5.6 Friendly Guides Exception—A friendly Unit in a potential bog-down hex negates the need to check for immobilization. Tanks may freely enter and halt, or pass through hexes containing friendly Units (beware of overstacking [8.2]!).O23.5.7 Wire Hexes—When a Tank enters a hex containing a Wire marker as part of a Move, Offensive or Advance Order:
● the Wire marker is immediately removed; ● the Tank stops in the hex and cannot Move
any further during the current Order; ● since the Wire marker has been removed,
terrain type and elevation once again control whether an Immobilization Check has to be made [O23.5.2].
O23.5.8 Restricted Terrain—A Tank can only enter a Stream [T120] hex if a Bridge is present. It can only enter a Woods [T124] hex if a Road [T116] is present. It can only enter a Building [T104] hex if the Building depiction does not cover the center dot of the hex or if a Road is present.O23.5.9 Engine Failure— A broken Tank with a “–“ move number cannot Move nor Advance.
O23.6 Movement EtiquetteEach time the active player moves a Formation or group of Formations into a new hex, he should clearly announce the cumulative MP expenditure up to that point, then pause for a second or two. This allows the inactive player
a short time in which to decide whether to announce an Op Fire into that hex (or, if the Defender, to play a Defender Action like Hidden Wire [A45.4]).Furthermore, it should be incumbent upon the inactive player to pay attention and say “Stop!” whenever he may have an Action to play or Fire Attack to make in response to the active player’s movement.Moving players may want to get in the habit of asking “Anything?” :or “Actions?” after each hex entered; or maybe just pausing to make brief eye contact with the opponent.
O23.7 Timing & MovementAfter each MP expenditure, the inactive player may play all Actions that he wishes before the active player may play his first one.As an example, if the moving player wanted to play an “Assault Fire” Action after entering a new hex, the inactive player would always be allowed to play a “Hidden Wire” Action first, and/or get to perform an Op Fire into that hex.
O24. OffensiveThe Offensive Order is a unique blend of movement then fire meant to simulate a WW1 era “human wave”.
O24.1 Eligible UnitsAll Formations not previously activated that Turn are eligible for activation for an Offensive Order. At least two Formations, in any combination of types, must be activated (no upper limit); one of them must be a Leader (not a Tank Leader). To be activated by an Offensive Order, Formations must be unbroken and adjacent to at least one other Formation activated by the same Order (so forming a “line of offensive” consisting of adjacent Formations).
O24.2 Activation An Offensive Order is carried out in two steps:1) Movement step: Formations on an Offensive Order are considered activated for Moving, under all the provisions of the Move rules
[O23]. As such, they can be targeted by Op Fire [A42] and Crossfire [A38] Actions. However, unlike Formations on a Move Order, Formations activated for Offensive cannot use Assault Fire Actions [A31]. Moreover, no overstacking is allowed at any time during the execution of an Offensive Order. A Formation moving during an Offensive Order may not enter a hex previously occupied by the formation during the Move (the Formation may not re-enter the original hex where the Formation started).2) Fire attack: Once the Movement step is completed, the activated Unit(s) and Leader(s) that have physically entered a new hex may make one Fire Attack. All ordinary Fire rules [O21.3] (including Fire Group rule [O21.3.1]) apply. However, among the activated Formations, only one Leader and all the Units in his Command Radius may participate in the Fire Group. Weapons (of any type) and Tanks cannot fire.The movement part of an Offensive Order is an exception to O14.2 as the notion of Command Radius is ignored. Formations must be unbroken and adjacent to be activated, and one of these Formations must be a Leader.
O25. RecoverO25.1 ActivationWhen a Recover Order is announced, that player selects himself to be “activated”, provided he has at least one friendly broken and/or Suppressed Formation in play and he has not been activated for a Recover or Rout Order [O26] previously in the same Turn.IMPORTANT—The broken/Suppressed Formations themselves are not activated during a Recover Order: only the player himself is.Thus no more than one Recover Order could be played per Turn, as the player will have already been activated. Also, a Formation affected by a Recover Order could be activated for that player’s next Order, or vice versa.
Offensive example:
A-The French player announces an Offensive Order activating the Formations in hexes I9, J9, K10, L10 and L9 as they form a continuous line of adjacent Formations and an unbroken Leader is present.B-Formations in F9, G10 and H9 cannot be activated by the same Order because the Unit (C) in H9 is broken and interrupts the continuous line.NOTE-Instead of activating the Formations mentioned (A), the player could have activated the Formations in F9 and G10; a matter of tactical choice!
20 Hexasim SARL ©2019
O25.2 Recover ProcedureFirst, the player issuing the Recover Order removes all Suppressed markers from his friendly Formations (except Formations stacked with a Gas marker [8.1.5]). Then, he makes a separate Rally Roll for each friendly Formation that was broken at the time the Order was announced. Formations that become broken due to Events during a Recover Order don’t get to make a Rally Roll.If the active player has more than one broken Formation, he chooses the order in which those Formations will be affected.
O25.3 Rally RollA Rally Roll can have one of three effects on a broken Formation:
● if the roll is less than its Morale, Rally it [3.2.5];
● if the roll is equal to its current Morale, it becomes Suppressed [13] and remains broken;
● if the roll is greater than its current Morale, there is no effect and the Formation simply remains broken.
So for a broken Formation with a current Morale of 7 – having already taken into account any Command and/or Cover modifiers – a Rally Roll of 5 would cause it to rally; a Rally Roll of 7 would simply Suppress it; and a Rally Roll of 9 would have no effect.
You usually want to roll for your broken Leaders first-if they Rally, their increased Command will make Rally more likely for the broken Units in the same hex.
O26. RoutO26.1 ActivationWhen a Rout Order is announced, that player selects a player to be “activated” (either himself or his opponent) provided the chosen player has at least one broken Unit or Leader in play [3.2] and that player has not been activated for a Recover [O25] or Rout Order previously in the same Turn.IMPORTANT—The broken Formations themselves are not activated during a Rout Order: only the player himself is.No more than two Rout Orders may be played per Turn—one targeting each player. Also, a friendly Formation that just had a Rout Roll made for it could be activated for that player’s next Order, or vice versa.
O26.2 Rout RollsThe active player makes a roll for each Formation (except Tanks) belonging to the chosen player that was broken at the time the Order was announced. Formations that become broken due to Events during a Rout Order cannot have a Rout Roll made for them.If the chosen player has more than one broken Formation, the active player chooses the order in which those Formations will be affected.A Rout Roll can have one of three effects on a broken Formation:
● if the roll is less than its Morale, there is no
effect and the Formation remains where it is; ● if the roll is equal to its current Morale, it
becomes Suppressed [13] if not already; ● if the roll is greater than its current Morale,
it must “Retreat” a number of hexes equal to the difference.
So for a broken Formation (except a Tank) with a current Morale of 7 – having already taken into account any Command and/or Cover modifiers – a Rout Roll of 9 means a Retreat of two hexes; a Rout Roll of 7 would simply Suppress it; and a Rout Roll of 5 would have no effect.
O26.3 Retreating PathWhen a Rout Roll is greater than the broken Formation’s Morale, it must Retreat a number of hexes equal to the difference. A player always Retreats his own Formations, even if his opponent gave the Rout Order. Each hex Retreated into must be closer to the controlling player’s map edge than the one it just left.(in other words, there must be fewer intervening hexes between the Formation and its friendly board edge in the hex it Retreats into than there are for the hex it Retreats out of). When a Formation reaches its friendly map edge with one or more unfulfilled retreat hexes, it is eliminated, giving up Victory Points (VP).O26.3.1 Terrain—MPs are not counted during a Retreat, so all terrain Move Costs are ignored.O26.3.2 Opportunity Fire—Op Fire is not permitted against Retreating Formations.O26.3.3 Wire—A Retreat is allowed into and out of Wire without having to stop.O26.3.4 Elimination—A Retreating Formation is immediately eliminated if it is forced to Retreat:
● Off its owner’s friendly map edge; ● Into an enemy-occupied hex (it surrenders
to them); ● Into an impassable hex [T100; T123].
O26.4 Poison GasWhen a Rout roll is made against a Formation that is stacked with a Gas marker, that Formation’s Morale is not modified by the cover provided by the Terrain or Fortification in the hex, except Wire.
O26.5 Tanks ExceptionTanks are not affected by a Rout Order.
O27. RunnerWhen a Runner Order is announced, that player can either:
● Place a Runner from the countermix in the hex of his Highest-ranking Leader [3.3.1.2]; or
● Move an existing Runner ; or ● Declare an Artillery Request Order [O19]:
if the player has a Runner stacked with his Highest- ranking Leader and a functioning Telephone is present. The Leader does the targeting from the Leader’s hex. Both the Leader and Runner have now been activated and are done for the Turn.
O27.1 PlacementWhen a Runner is placed on the map, it is considered activated and done for the rest of the Turn. Overstacking has to be checked as usual at the end of the Turn.
O27.2 MovementWhen moving pursuant to a Runner Order, a Runner moves alone--per the normal movement rules and is done for the Turn. Alternatively, a Runner may move pursuant to a Move Order like other Units do.O27.2.1 Exiting—A Moving or Advancing Runner who exits off the friendly map edge rewards this player 1VP. This is not considered a VP exit into enemy territory, hence the “exit points” of the Objective Y marker has no effect. The exited Runner returns to the countermix for later use. An active player may do more than one such exit per game.O27.2.2 Objectives—If a Runner is the first friendly Formation to enter an Objective devoid of enemy Formations, it will not take control of it for his side. Only Tanks, Leaders, Platoons or Teams can take control of an Objective. However, once an Objective is under a side’s control, that side can maintain control of it by “occupying” it with a Runner.
ACTIONSA28. General RulesA28.1—Actions may be announced by either player at any time via a Fate card played from the hand as long as that Action’s listed condition or prerequisite is met. Multiple Actions may be conducted in response to the same game situation. All effects of consecutively played Actions are cumulative.
A28.2 TimingIf both players wish to perform one or more Actions (including Op Fire) at the same time, the inactive player performs any or all of his Actions first.
A28.3 ActivationWith the sole exception of Op Fire [A42], Actions that affect Formations do not activate those Formations like an Order would. Conversely, a Formation that has already been activated by an Order/Op Fire Action can be the target of any number of (non-Op Fire) Actions.Except for [A42] Opportunity Fire, the following rules for individual Actions [A28–A55] need not be read and memorized your first time through the rules: most Actions are self-explanatory on the cards themselves. So this section can be safely ignored until the need arises for a clarification during actual game play. Actions are listed in alphabetical order for ease of reference.
A29. Ach Komm!This card cannot be played for an Action.Hope that you have a decent Order on this card.
21Hexasim SARL ©2019
A30. AmbushAmbush may only be played before dice are rolled during a Melee, and are played (and executed) one at a time.Effect—The opponent must select one of his Formations that is participating in the Melee and break it [3.2].IMPORTANT—All Ambush effects are resolved before Melee FP is calculated.Note that both players can announce Ambush Actions. It is even possible for both sides to be entirely eliminated via Ambush before the Melee Rolls would otherwise have been made.When total elimination happens in an objective hex, the side last occupying before the melee still controls it.
A31. Assault FireAssault Fire may only be played if at least one Formation currently activated to Move (or its Weapon) has boxed FP and has an enemy Formation within its current Range and LOS at which to shoot.Effect—Each Assault Fire Action allows a single Fire Attack to be made. This attack may form a Fire Group (Tanks can never be part of a Fire Group) using any or all moving Formations and/or their Weapons that have boxed FP. The attack must adhere to all rules and restrictions pertaining to a regular Fire Attack as if made during a Fire Order [O21].Note that you may announce an Assault Fire Action before, during, or after any physical movement has been carried out—the firing pieces need only be activated to Move to utilize the Action.
A32. BarrageBarrage is played before a Fire for Effect roll if the active player’s unbroken Telephone is in his Standing/Creeping Barrage box. Early War restrictions: This Action cannot be played before January 1915.Effect— Increase the Artillery Attack’s FP by +2.
A33. Bayonets / Grenade bundleBayonets/Grenade Bundle may be played just prior to the player making a Melee Roll, or German (only) Weapon(s) making a Fire Attack Roll against an adjacent Tank.Effect— Increase the Melee Roll or the Fire Attack’s FP by +2
A34. Bore SightingBore Sighting may only be played by the scenario Defender – never an Attack or Recon player – and only just prior to making a Fire Attack Roll involving a firing Weapon with a printed FP of at least “5” (before any modifications).Effect—Increase the Fire Attack’s FP by +2.
A35. ChargeCharge may only be played just prior to the player making a Melee Roll. A friendly Leader must be present in the melee hex.Effect— The player adds +2 to the Melee Roll. Allied troops have extra incentive to win back territory and leader losses can mount. Their commitment to close action helps at a price.
A36. ConcealmentConcealment may only be played just prior to the player making a Defense Roll.Effect—Determine the Cover in the targeted hex and reduce the Fire Attack Total by that amount. All Cover modifiers – such as for Roads [T116] – are taken into consideration before reducing.Yes, Concealment is used after the targeted player knows the Attack Total. Maybe the firer only thought he saw gun flashes between those trees…
A37. CounterattackCounterattack may only be played just prior to the player making a Defense Roll, under the following two conditions:
● the defensive die roll is caused by a Fire Attack performed by enemy Formation(s) and/or their Weapons; and
● the defending player has at least one unbroken Unit adjacent to an enemy Weapon or Formation activated for the current Fire attack.
Effect—The defending player places Suppressed markers on one or two of the activated Formations that are adjacent to any of his unbroken Unit.IMPORTANT—A Runner Unit adjacent to the enemy activated Formations by himself cannot qualify for Counterattack.
A38. CrossfireCrossfire may only be played just prior to the player making a Fire Attack Roll, and only when firing at one or more moving [O23] Formations.Effect—Increase the Fire Attack’s FP by +2.
A39. Dig InDig In may only be played at the end of a Game Time Advancement [6.1.2].Effect—Place a Foxholes marker [F127] into a hex containing a friendly Formation (except Tanks). The hex cannot be Water Terrain, and cannot already contain a Blaze or another Fortification of any type.
A40. ÉlanÉlan may only be played just prior to the player making a Melee Roll or a Fire Attack Roll.Effect— Increase the Fire Attack’s FP or the Melee Roll by +2.
A41. Engineering worksEngineering works may only be played if at least one friendly Formation with boxed movement is currently activated to Move.
Effect—At any moment during the Move order, the active player can remove one Wire either in an adjacent hex or in the same hex as a friendly moving Formation with boxed Movement, thereby negating all Wire effects.
A42. Fire (Opportunity Fire)A42.1 PrerequisiteA Fire Action may only be played during an opponent’s Move Order, and only just after the expenditure of one or more MPs as a moving Formation enters a new hex. This type of reactionary fire is termed “Op Fire”.Note that Fire Actions are listed across the top of any Fate card that has one, in the same position as for a Fire Order. As a reminder of its dual capability, the word “Fire” will, when appearing along the top of a Fate card, always be preceded by the words “Order/Action”.
A42.2 Op Fire ProcedureGenerally, when the active player is performing a Move Order, he should count aloud his Formations’ accumulated MP expenditure in each hex as it is entered. Each time such an expenditure is made, the inactive player has the option to call out “Wait!” and temporarily halt movement. If he does, he may choose to do either or both of the following:• play a Fire Action from his hand and activate
one or more Formations to fire at that hex (exactly as if he were activating Formations for a Fire Order [O14.1 & O21.1]); and/or
• make one Fire Attack against that hex with any of his Formations that were activated for Op Fire at any point during this same Move Order.
After any such Fire Attack is made – or the opportunity to do so is declined (“never mind; keep moving”) – the active player may continue with his Move Order.
A42.3 Op Fire ExceptionsFormations (and their Weapons) that are activated for Op Fire follow all normal rules for a Fire Order [O21], with three important exceptions:1) An Ordnance Weapon [11.6] cannot utilize Opportunity Fire (though the Formation possessing it may fire normally). In the same way, a Tank cannot use its ordnance armament (FP in white square) to op Fire.2) They are not limited to only firing once, and so remain activated and eligible to fire at moving targets for the entirety of that Move Order (only).Note that Formations are activated for Op Fire, so they could not be activated for Op Fire again in that same Turn if the active player announced another Move Order.
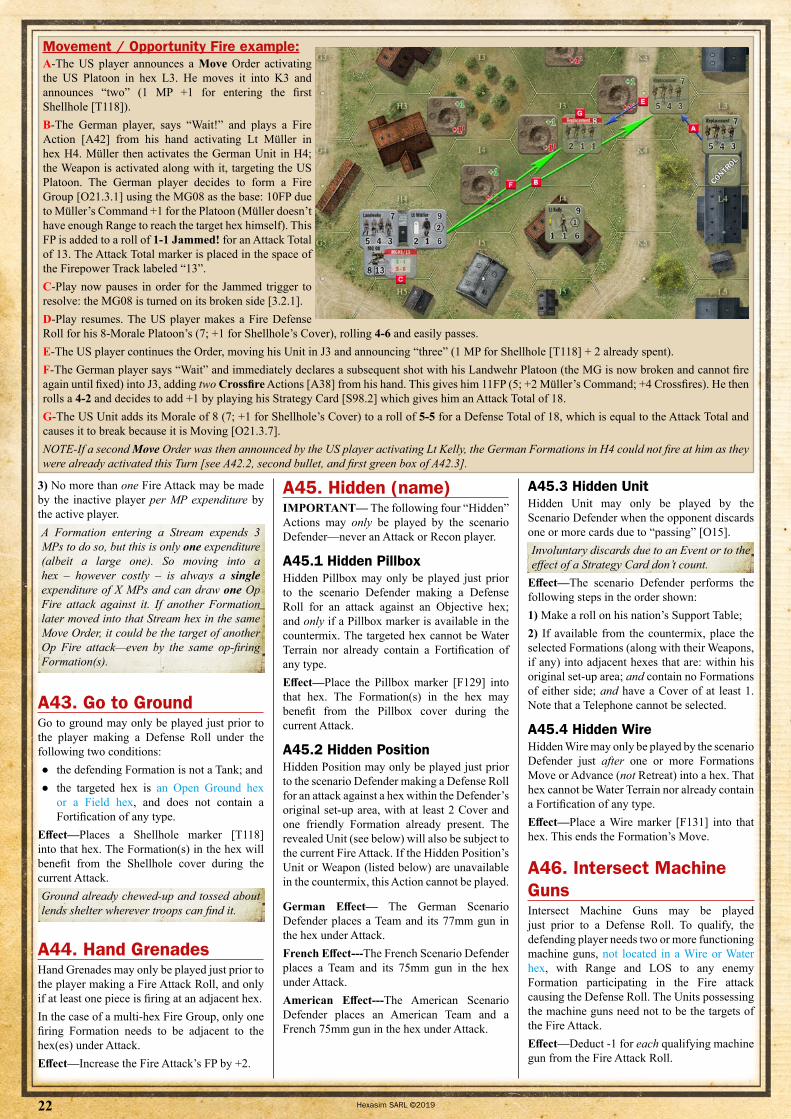
22 Hexasim SARL ©2019
3) No more than one Fire Attack may be made by the inactive player per MP expenditure by the active player.A Formation entering a Stream expends 3 MPs to do so, but this is only one expenditure (albeit a large one). So moving into a hex – however costly – is always a single expenditure of X MPs and can draw one Op Fire attack against it. If another Formation later moved into that Stream hex in the same Move Order, it could be the target of another Op Fire attack—even by the same op-firing Formation(s).
A43. Go to GroundGo to ground may only be played just prior to the player making a Defense Roll under the following two conditions:
● the defending Formation is not a Tank; and ● the targeted hex is an Open Ground hex
or a Field hex, and does not contain a Fortification of any type.
Effect—Places a Shellhole marker [T118] into that hex. The Formation(s) in the hex will benefit from the Shellhole cover during the current Attack.Ground already chewed-up and tossed about lends shelter wherever troops can find it.
A44. Hand GrenadesHand Grenades may only be played just prior to the player making a Fire Attack Roll, and only if at least one piece is firing at an adjacent hex.In the case of a multi-hex Fire Group, only one firing Formation needs to be adjacent to the hex(es) under Attack.Effect—Increase the Fire Attack’s FP by +2.
A45. Hidden (name)IMPORTANT— The following four “Hidden” Actions may only be played by the scenario Defender—never an Attack or Recon player.
A45.1 Hidden PillboxHidden Pillbox may only be played just prior to the scenario Defender making a Defense Roll for an attack against an Objective hex; and only if a Pillbox marker is available in the countermix. The targeted hex cannot be Water Terrain nor already contain a Fortification of any type.Effect—Place the Pillbox marker [F129] into that hex. The Formation(s) in the hex may benefit from the Pillbox cover during the current Attack.
A45.2 Hidden PositionHidden Position may only be played just prior to the scenario Defender making a Defense Roll for an attack against a hex within the Defender’s original set-up area, with at least 2 Cover and one friendly Formation already present. The revealed Unit (see below) will also be subject to the current Fire Attack. If the Hidden Position’s Unit or Weapon (listed below) are unavailable in the countermix, this Action cannot be played.
German Effect— The German Scenario Defender places a Team and its 77mm gun in the hex under Attack.French Effect---The French Scenario Defender places a Team and its 75mm gun in the hex under Attack.American Effect---The American Scenario Defender places an American Team and a French 75mm gun in the hex under Attack.
A45.3 Hidden UnitHidden Unit may only be played by the Scenario Defender when the opponent discards one or more cards due to “passing” [O15].Involuntary discards due to an Event or to the effect of a Strategy Card don’t count.
Effect—The scenario Defender performs the following steps in the order shown:1) Make a roll on his nation’s Support Table;2) If available from the countermix, place the selected Formations (along with their Weapons, if any) into adjacent hexes that are: within his original set-up area; and contain no Formations of either side; and have a Cover of at least 1. Note that a Telephone cannot be selected.
A45.4 Hidden WireHidden Wire may only be played by the scenario Defender just after one or more Formations Move or Advance (not Retreat) into a hex. That hex cannot be Water Terrain nor already contain a Fortification of any type.Effect—Place a Wire marker [F131] into that hex. This ends the Formation’s Move.
A46. Intersect Machine GunsIntersect Machine Guns may be played just prior to a Defense Roll. To qualify, the defending player needs two or more functioning machine guns, not located in a Wire or Water hex, with Range and LOS to any enemy Formation participating in the Fire attack causing the Defense Roll. The Units possessing the machine guns need not to be the targets of the Fire Attack.Effect—Deduct -1 for each qualifying machine gun from the Fire Attack Roll.
Movement / Opportunity Fire example:A-The US player announces a Move Order activating the US Platoon in hex L3. He moves it into K3 and announces “two” (1 MP +1 for entering the first Shellhole [T118]).B-The German player, says “Wait!” and plays a Fire Action [A42] from his hand activating Lt Müller in hex H4. Müller then activates the German Unit in H4; the Weapon is activated along with it, targeting the US Platoon. The German player decides to form a Fire Group [O21.3.1] using the MG08 as the base: 10FP due to Müller’s Command +1 for the Platoon (Müller doesn’t have enough Range to reach the target hex himself). This FP is added to a roll of 1-1 Jammed! for an Attack Total of 13. The Attack Total marker is placed in the space of the Firepower Track labeled “13”.C-Play now pauses in order for the Jammed trigger to resolve: the MG08 is turned on its broken side [3.2.1].D-Play resumes. The US player makes a Fire Defense Roll for his 8-Morale Platoon’s (7; +1 for Shellhole’s Cover), rolling 4-6 and easily passes.E-The US player continues the Order, moving his Unit in J3 and announcing “three” (1 MP for Shellhole [T118] + 2 already spent).F-The German player says “Wait” and immediately declares a subsequent shot with his Landwehr Platoon (the MG is now broken and cannot fire again until fixed) into J3, adding two Crossfire Actions [A38] from his hand. This gives him 11FP (5; +2 Müller’s Command; +4 Crossfires). He then rolls a 4-2 and decides to add +1 by playing his Strategy Card [S98.2] which gives him an Attack Total of 18.G-The US Unit adds its Morale of 8 (7; +1 for Shellhole’s Cover) to a roll of 5-5 for a Defense Total of 18, which is equal to the Attack Total and causes it to break because it is Moving [O21.3.7].NOTE-If a second Move Order was then announced by the US player activating Lt Kelly, the German Formations in H4 could not fire at him as they were already activated this Turn [see A42.2, second bullet, and first green box of A42.3].
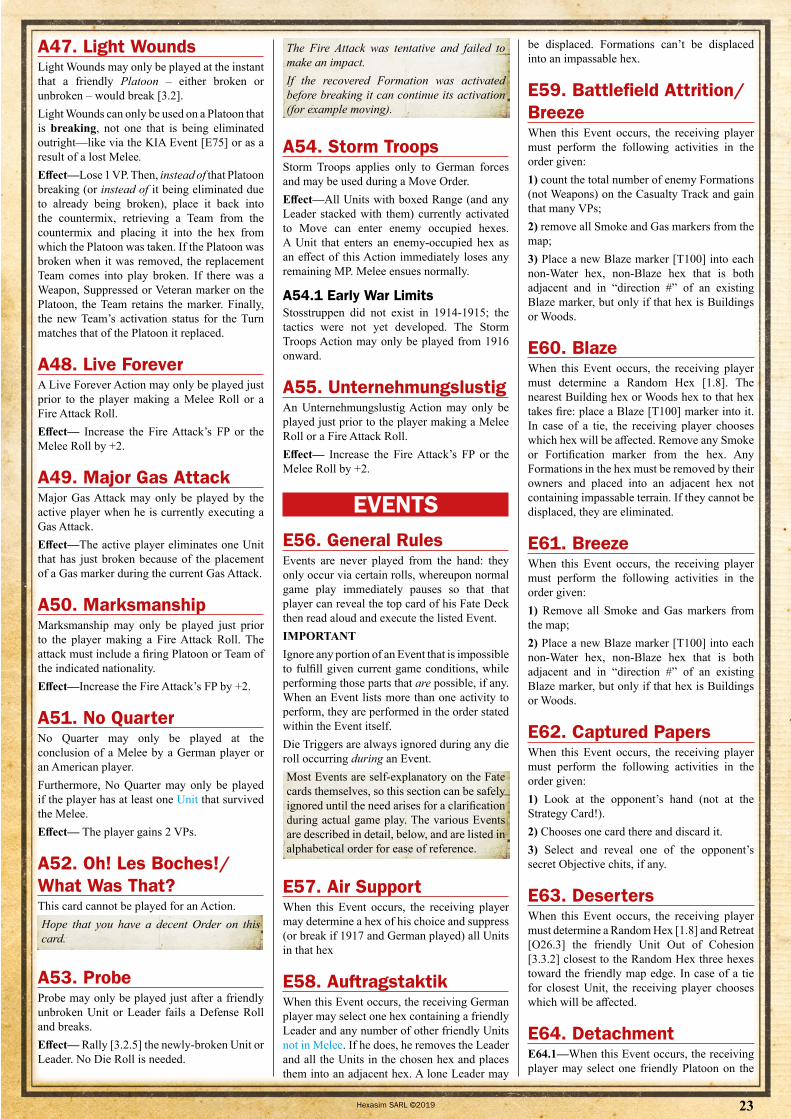
23Hexasim SARL ©2019
A47. Light WoundsLight Wounds may only be played at the instant that a friendly Platoon – either broken or unbroken – would break [3.2].Light Wounds can only be used on a Platoon that is breaking, not one that is being eliminated outright—like via the KIA Event [E75] or as a result of a lost Melee.Effect—Lose 1 VP. Then, instead of that Platoon breaking (or instead of it being eliminated due to already being broken), place it back into the countermix, retrieving a Team from the countermix and placing it into the hex from which the Platoon was taken. If the Platoon was broken when it was removed, the replacement Team comes into play broken. If there was a Weapon, Suppressed or Veteran marker on the Platoon, the Team retains the marker. Finally, the new Team’s activation status for the Turn matches that of the Platoon it replaced.
A48. Live ForeverA Live Forever Action may only be played just prior to the player making a Melee Roll or a Fire Attack Roll.Effect— Increase the Fire Attack’s FP or the Melee Roll by +2.
A49. Major Gas AttackMajor Gas Attack may only be played by the active player when he is currently executing a Gas Attack.Effect—The active player eliminates one Unit that has just broken because of the placement of a Gas marker during the current Gas Attack.
A50. MarksmanshipMarksmanship may only be played just prior to the player making a Fire Attack Roll. The attack must include a firing Platoon or Team of the indicated nationality.Effect—Increase the Fire Attack’s FP by +2.
A51. No QuarterNo Quarter may only be played at the conclusion of a Melee by a German player or an American player.Furthermore, No Quarter may only be played if the player has at least one Unit that survived the Melee.Effect— The player gains 2 VPs.
A52. Oh! Les Boches!/ What Was That?This card cannot be played for an Action.Hope that you have a decent Order on this card.
A53. ProbeProbe may only be played just after a friendly unbroken Unit or Leader fails a Defense Roll and breaks. Effect— Rally [3.2.5] the newly-broken Unit or Leader. No Die Roll is needed.
The Fire Attack was tentative and failed to make an impact.If the recovered Formation was activated before breaking it can continue its activation (for example moving).
A54. Storm TroopsStorm Troops applies only to German forces and may be used during a Move Order. Effect—All Units with boxed Range (and any Leader stacked with them) currently activated to Move can enter enemy occupied hexes. A Unit that enters an enemy-occupied hex as an effect of this Action immediately loses any remaining MP. Melee ensues normally.
A54.1 Early War LimitsStosstruppen did not exist in 1914-1915; the tactics were not yet developed. The Storm Troops Action may only be played from 1916 onward.
A55. UnternehmungslustigAn Unternehmungslustig Action may only be played just prior to the player making a Melee Roll or a Fire Attack Roll.Effect— Increase the Fire Attack’s FP or the Melee Roll by +2.
EVENTSE56. General RulesEvents are never played from the hand: they only occur via certain rolls, whereupon normal game play immediately pauses so that that player can reveal the top card of his Fate Deck then read aloud and execute the listed Event.IMPORTANTIgnore any portion of an Event that is impossible to fulfill given current game conditions, while performing those parts that are possible, if any. When an Event lists more than one activity to perform, they are performed in the order stated within the Event itself.Die Triggers are always ignored during any die roll occurring during an Event.Most Events are self-explanatory on the Fate cards themselves, so this section can be safely ignored until the need arises for a clarification during actual game play. The various Events are described in detail, below, and are listed in alphabetical order for ease of reference.
E57. Air SupportWhen this Event occurs, the receiving player may determine a hex of his choice and suppress (or break if 1917 and German played) all Units in that hex
E58. AuftragstaktikWhen this Event occurs, the receiving German player may select one hex containing a friendly Leader and any number of other friendly Units not in Melee. If he does, he removes the Leader and all the Units in the chosen hex and places them into an adjacent hex. A lone Leader may
be displaced. Formations can’t be displaced into an impassable hex.
E59. Battlefield Attrition/BreezeWhen this Event occurs, the receiving player must perform the following activities in the order given:1) count the total number of enemy Formations (not Weapons) on the Casualty Track and gain that many VPs;2) remove all Smoke and Gas markers from the map; 3) Place a new Blaze marker [T100] into each non-Water hex, non-Blaze hex that is both adjacent and in “direction #” of an existing Blaze marker, but only if that hex is Buildings or Woods.
E60. BlazeWhen this Event occurs, the receiving player must determine a Random Hex [1.8]. The nearest Building hex or Woods hex to that hex takes fire: place a Blaze [T100] marker into it. In case of a tie, the receiving player chooses which hex will be affected. Remove any Smoke or Fortification marker from the hex. Any Formations in the hex must be removed by their owners and placed into an adjacent hex not containing impassable terrain. If they cannot be displaced, they are eliminated.
E61. BreezeWhen this Event occurs, the receiving player must perform the following activities in the order given:1) Remove all Smoke and Gas markers from the map;2) Place a new Blaze marker [T100] into each non-Water hex, non-Blaze hex that is both adjacent and in “direction #” of an existing Blaze marker, but only if that hex is Buildings or Woods.
E62. Captured PapersWhen this Event occurs, the receiving player must perform the following activities in the order given:1) Look at the opponent’s hand (not at the Strategy Card!).2) Chooses one card there and discard it.3) Select and reveal one of the opponent’s secret Objective chits, if any.
E63. DesertersWhen this Event occurs, the receiving player must determine a Random Hex [1.8] and Retreat [O26.3] the friendly Unit Out of Cohesion [3.3.2] closest to the Random Hex three hexes toward the friendly map edge. In case of a tie for closest Unit, the receiving player chooses which will be affected.
E64. DetachmentE64.1—When this Event occurs, the receiving player may select one friendly Platoon on the
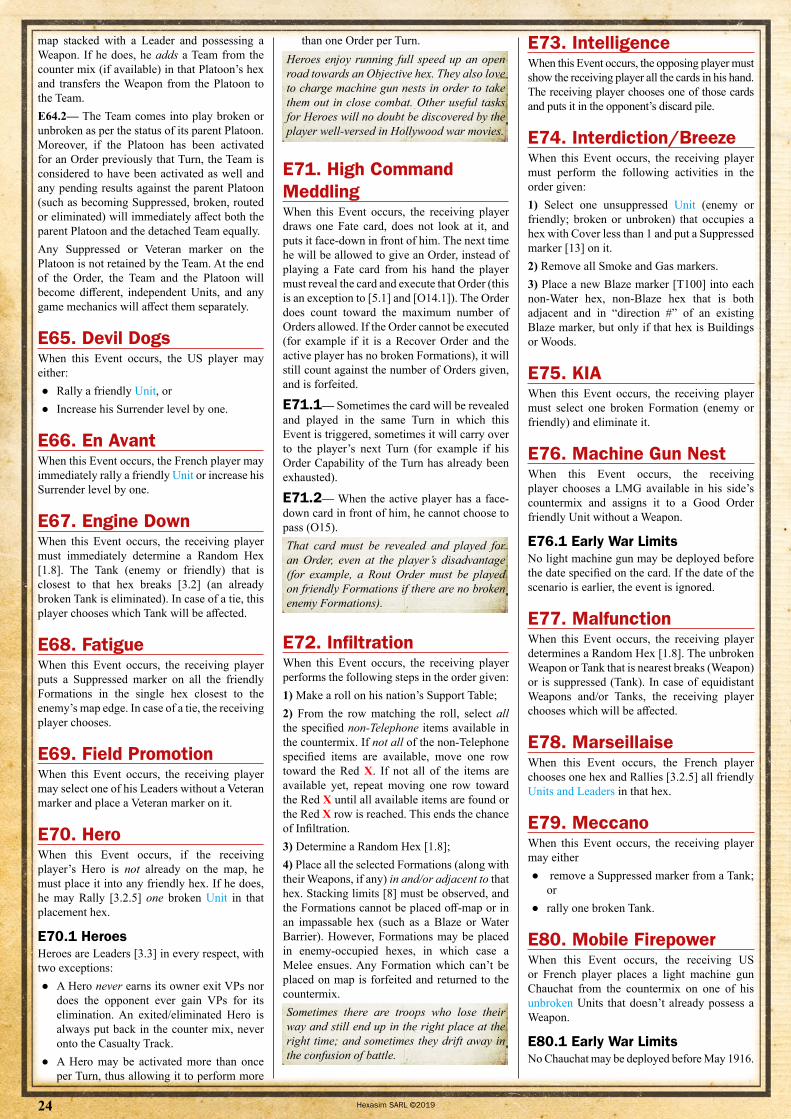
24 Hexasim SARL ©2019
map stacked with a Leader and possessing a Weapon. If he does, he adds a Team from the counter mix (if available) in that Platoon’s hex and transfers the Weapon from the Platoon to the Team. E64.2— The Team comes into play broken or unbroken as per the status of its parent Platoon. Moreover, if the Platoon has been activated for an Order previously that Turn, the Team is considered to have been activated as well and any pending results against the parent Platoon (such as becoming Suppressed, broken, routed or eliminated) will immediately affect both the parent Platoon and the detached Team equally.Any Suppressed or Veteran marker on the Platoon is not retained by the Team. At the end of the Order, the Team and the Platoon will become different, independent Units, and any game mechanics will affect them separately.
E65. Devil DogsWhen this Event occurs, the US player may either:
● Rally a friendly Unit, or ● Increase his Surrender level by one.
E66. En AvantWhen this Event occurs, the French player may immediately rally a friendly Unit or increase his Surrender level by one.
E67. Engine DownWhen this Event occurs, the receiving player must immediately determine a Random Hex [1.8]. The Tank (enemy or friendly) that is closest to that hex breaks [3.2] (an already broken Tank is eliminated). In case of a tie, this player chooses which Tank will be affected.
E68. FatigueWhen this Event occurs, the receiving player puts a Suppressed marker on all the friendly Formations in the single hex closest to the enemy’s map edge. In case of a tie, the receiving player chooses.
E69. Field PromotionWhen this Event occurs, the receiving player may select one of his Leaders without a Veteran marker and place a Veteran marker on it.
E70. HeroWhen this Event occurs, if the receiving player’s Hero is not already on the map, he must place it into any friendly hex. If he does, he may Rally [3.2.5] one broken Unit in that placement hex.
E70.1 HeroesHeroes are Leaders [3.3] in every respect, with two exceptions:
● A Hero never earns its owner exit VPs nor does the opponent ever gain VPs for its elimination. An exited/eliminated Hero is always put back in the counter mix, never onto the Casualty Track.
● A Hero may be activated more than once per Turn, thus allowing it to perform more
than one Order per Turn.Heroes enjoy running full speed up an open road towards an Objective hex. They also love to charge machine gun nests in order to take them out in close combat. Other useful tasks for Heroes will no doubt be discovered by the player well-versed in Hollywood war movies.
E71. High Command MeddlingWhen this Event occurs, the receiving player draws one Fate card, does not look at it, and puts it face-down in front of him. The next time he will be allowed to give an Order, instead of playing a Fate card from his hand the player must reveal the card and execute that Order (this is an exception to [5.1] and [O14.1]). The Order does count toward the maximum number of Orders allowed. If the Order cannot be executed (for example if it is a Recover Order and the active player has no broken Formations), it will still count against the number of Orders given, and is forfeited.
E71.1— Sometimes the card will be revealed and played in the same Turn in which this Event is triggered, sometimes it will carry over to the player’s next Turn (for example if his Order Capability of the Turn has already been exhausted).
E71.2— When the active player has a face-down card in front of him, he cannot choose to pass (O15). That card must be revealed and played for an Order, even at the player’s disadvantage (for example, a Rout Order must be played on friendly Formations if there are no broken enemy Formations).
E72. InfiltrationWhen this Event occurs, the receiving player performs the following steps in the order given:1) Make a roll on his nation’s Support Table;2) From the row matching the roll, select all the specified non-Telephone items available in the countermix. If not all of the non-Telephone specified items are available, move one row toward the Red X. If not all of the items are available yet, repeat moving one row toward the Red X until all available items are found or the Red X row is reached. This ends the chance of Infiltration.3) Determine a Random Hex [1.8];4) Place all the selected Formations (along with their Weapons, if any) in and/or adjacent to that hex. Stacking limits [8] must be observed, and the Formations cannot be placed off-map or in an impassable hex (such as a Blaze or Water Barrier). However, Formations may be placed in enemy-occupied hexes, in which case a Melee ensues. Any Formation which can’t be placed on map is forfeited and returned to the countermix.Sometimes there are troops who lose their way and still end up in the right place at the right time; and sometimes they drift away in the confusion of battle.
E73. IntelligenceWhen this Event occurs, the opposing player must show the receiving player all the cards in his hand. The receiving player chooses one of those cards and puts it in the opponent’s discard pile.
E74. Interdiction/BreezeWhen this Event occurs, the receiving player must perform the following activities in the order given:1) Select one unsuppressed Unit (enemy or friendly; broken or unbroken) that occupies a hex with Cover less than 1 and put a Suppressed marker [13] on it.2) Remove all Smoke and Gas markers.3) Place a new Blaze marker [T100] into each non-Water hex, non-Blaze hex that is both adjacent and in “direction #” of an existing Blaze marker, but only if that hex is Buildings or Woods.
E75. KIAWhen this Event occurs, the receiving player must select one broken Formation (enemy or friendly) and eliminate it.
E76. Machine Gun NestWhen this Event occurs, the receiving player chooses a LMG available in his side’s countermix and assigns it to a Good Order friendly Unit without a Weapon.
E76.1 Early War LimitsNo light machine gun may be deployed before the date specified on the card. If the date of the scenario is earlier, the event is ignored.
E77. MalfunctionWhen this Event occurs, the receiving player determines a Random Hex [1.8]. The unbroken Weapon or Tank that is nearest breaks (Weapon) or is suppressed (Tank). In case of equidistant Weapons and/or Tanks, the receiving player chooses which will be affected.
E78. Marseillaise When this Event occurs, the French player chooses one hex and Rallies [3.2.5] all friendly Units and Leaders in that hex.
E79. MeccanoWhen this Event occurs, the receiving player may either
● remove a Suppressed marker from a Tank; or
● rally one broken Tank.
E80. Mobile FirepowerWhen this Event occurs, the receiving US or French player places a light machine gun Chauchat from the countermix on one of his unbroken Units that doesn’t already possess a Weapon.
E80.1 Early War LimitsNo Chauchat may be deployed before May 1916.

25Hexasim SARL ©2019
E81. New Mission When this Event occurs, the receiving player draws one secret Objective chit at random and a Strategy Card if he has none.
E82. Pétard-RaquetteWhen this Event occurs, the French player breaks any one enemy Formation adjacent to a friendly Unit in Good Order.
E83. RaidWhen this Event occurs, the receiving player may either
● place a Suppression marker on two enemy Units; or
● break one enemy Unit.The affected enemy Units must be within two hexes of a friendly Good Order Unit stacked with a Leader.
E84. Raid PrisonersWhen this Event occurs, the receiving player eliminates one enemy Unit that is Out of Cohesion [3.3.2] and is adjacent to one of his unbroken Units.
E85. Recall LeaderOne friendly Leader is temporarily recalled for debriefing. When this Event occurs, the receiving player removes the friendly Leader nearest to his map edge and puts him on the next space of the Time Track, in Good Order and without any marker stacked. In case of a tie, the receiving player chooses which Leader is affected.
E86. ReconnaissanceWhen this Event occurs, the receiving player selects and reveals one of the opponent’s secret Objective chit, if any. The revealed chit becomes a non-secret Objective for the remainder of the game.Any VPs corresponding to that chit’s map board Objective(s) are awarded to their current controller immediately.
E87. ReinforcementsWhen this Event occurs, the receiving player performs the following steps in the order given:1) Make a roll on his nation’s Support Table;2) From the row matching the roll, select all the specified items available in the countermix. If not all of the specified items are available, move one row toward the Red X. If not all of the items are available yet, repeat moving one row toward the Red X until all available items are found or the Red X row is reached. This ends the chance of receiving reinforcements! 3) A selected Telephone is placed in the friendly Artillery Box, replacing a Telephone already there, if any. Replaced telephones are returned to the countermix. Selected Formations are placed (along with their Weapon, if any) in any hex(es) along the friendly map edge. Stacking limits [8] must be observed, and the selected item(s) cannot be placed off-map or in an impassable hex (such as a Blaze or Water Barrier). However, Formations may be placed in enemy-occupied hexes, in which case a Melee
ensues at the end of the current Order. Any Formation which can’t be placed is forfeited and returned to the countermix.
E88. RunnerWhen this Event occurs, the receiving player may place a Runner in the same hex as his Highest-ranking Leader. Stacking limits [8] must be observed.
E89. SappersWhen this Event occurs, the receiving player may place or remove a Wire marker in a hex that is both free of enemy Formations and adjacent to a friendly Good Order Unit.
E90. ScroungeWhen this Event occurs, the receiving player may select one of their own eliminated Weapons from the Casualty Track and return that Weapon to play under the control of one of his Units currently without a Weapon.
E91. Stragglers When this Event occurs, the receiving player performs the following steps in the order given:1) Make a roll on his nation’s Support Table;2) From the row matching the roll, select all the specified non-Telephone items available in the countermix. If not all of the non-Telephone specified items are available, move one row toward the Red X. If not all of the items are available yet, repeat moving one row toward the Red X until all available items are found or the Red X row is reached. This ends the chance of Stragglers.3) Determine a Random Hex [1.8];4) Place all the selected Formations (along with their Weapons, if any) in and/or adjacent to that hex. Stacking limits [8] must be observed, and the Formations cannot be placed off-map or in an impassable hex (such as a Blaze or Water Barrier). However, Formations may be placed in enemy-occupied hexes, in which case a Melee ensues (at the end of the current Order). Any formation which can’t be placed on map is forfeited and returned to the countermix.5) Put a Suppressed marker on all the newly placed Formations.
E92. Suppressing FireWhen this Event occurs, the receiving player suppresses one enemy Unit or Tank within Range and LOS of a friendly functioning machine gun not located in a Wire or Water hex.
E93. SurrenderWhen this Event occurs, the receiving player eliminates one broken friendly Unit adjacent to an enemy Unit.
E94. Telephone Wires CutWhen this Event occurs, the receiving player flips the active enemy Telephone marker to its broken side. If the enemy Telephone marker was already broken, it is eliminated.If an Artillery Attack is going on while this event occurs, run it to conclusion.
E95.TrommelfeuerWhen this Event occurs, the receiving player performs the following steps in the order given:1) Determine a Random Hex;2) Eliminate all Tanks and break all Units in this hex and in two hexes adjacent to it (receiving player’s choice).3) Downgrade all Buildings, Fortifications and Terrain (except Water hexes) in those hexes. Buildings and Pillbox become Rubble, Trenches become Foxholes, Foxholes and other terrain become Shellholes. Put the corresponding markers in those hexes, replacing the existing markers if any.
E96.ValorWhen this Event occurs, the receiving player places a Veteran marker on a friendly Unit adjacent to an enemy Formation.
E97. Walking WoundedWhen this Event occurs, the receiving player must perform the following steps in the order given:1) Select one eliminated Unit or Leader (enemy or friendly) on the Casualty Track;2) Determine a Random Hex; and3) Place the selected Formation in or adjacent to that hex, broken [3.2]. Stacking limits [8] must be observed, and the Formation cannot be placed in an impassable hex (such as a Blaze or Water Barrier).The Formation may be placed in enemy-occupied hexes, in which case a Melee ensues.
STRATEGY CARDSS98. General RulesEach nation has a mini deck of 9 Strategy Cards. Before play, the players shuffle their SC deck to form a face-down draw pile. At the beginning of the game, when a player draws his initial hand of Fate cards, he also draws one SC. Once play commences, players are not allowed to reshuffle their SC draw pile unless expressly instructed to do so. A player can play only one SC per Turn, in either of two ways:
● As a Situation following the main text written on it (usually when he is the Active player) [S98.1]
● as a Die Roll modifier (during either player’s Turn) [S98.2]
SC are discarded after use. The SC held by a player is not part of his hand and does not count against his maximum hand size limit. Moreover, playing a SC is not considered to be giving an Order or an Action, and does not count against the maximum Order limit [5.1]. If a player decides to Pass [O15], his Turn is over and he cannot play a SC that Turn.When a Time Advance is triggered, if a player is not currently holding a SC he can draw one and is allowed to play it from the next Turn onward. When a Strategy Cards deck is depleted, the owning player will not draw any more Strategy Cards.

26 Hexasim SARL ©2019
S98.1 SituationsThe main text on a SC informs the player on how to use that Card as a Situation, sometimes also limiting the use of the Card to the scenarios happening in certain years only. If not otherwise specified, a player can use a SC as a Situation any time during his Turn (only). The Situation text instructs the player to perform certain actions, to be carried out in the exact order they are listed. When multiple choices are given, the player can use that SC in only one of the possible ways listed on it.S98.1.1 Reminder CardsCertain SC show “Keep as Reminder Card” in red under their Situation text. When a player plays one such Card as a Situation, he places that Card face-up on the table and leaves it there for the game’s duration or as long as indicated. The Card is discarded as soon as its validity expires.A Reminder Card face-up on the table is no longer considered to be held by the player who played it. That player can therefore draw a new Strategy Card at the next Time Advance.S98.1.2 Period limitationsThe use of some SCs is limited to certain historical periods. These Cards can be played for a Situation exclusively in those scenarios fought in the period specified. Check the actual date of each scenario to conform to these restrictions.
S98.2 Die Roll ModifierA SC may also be used any time a Die Roll has been made (except Sudden Death roll [6.2.2]), right after either player has had the opportunity to announce the use of the Initiative Card to cancel it. The player may then announce the use of his SC as a [+1] Die Roll Modifier, Inactive player first. Modifying a Die Roll does not negate or postpone any trigger [1.9.1]. After the modifier is applied, the used Cards are discarded.The following rules for Strategy Card situations [S98.3–S98.5] need not be read and memorized your first time through the rules: most situations are self-explanatory on the cards themselves. So this section can be safely ignored until the need arises for a clarification during actual game play. Actions are listed by nation and in alphabetical order for ease of reference.
S98.3 French Strategy CardsS98.3.1 Aerial ReconnaissanceThis Card can be used in one of the following ways:
● Perform an Artillery Request Order with the Forward Artillery Observer.
● Discard the SC held by your opponent (if any) and secretly look at the topmost Card in each player’s SC draw pile. Return those Cards face-down to the top of their respective draw piles.
● Discard all your opponent’s Reminder Cards presently face-up on the table.
● Draw two SC, keep one, and return the other one to the bottom of your SC draw pile, face-down.
S98.3.2 Air Dominance
This Card can be used in one of the following ways:
● Cancel an Air Assault Order during your opponent’s Turn.
● Perform 2 free consecutive Air Assault Orders. These Orders do not require the play of a Fate card and do not count against the maximum Order limit.
S98.3.3 Anti-Gas Strategy1916-1918 Scenarios only. Any friendly Formation that would break because of a Gas attack [O19.2.1.3] or because of entering a hex with a Gas marker [T107.1] ignores that effect.*Keep as Reminder Card.*S98.3.4 AssaultsPlay anytime during a friendly Move Order. The Moving Units and Leaders can enter enemy-occupied hexes as part of their Movement. Once in an enemy-occupied hex they immediately become Suppressed and lose any remaining MP.S98.3.5 Field ReportsYour opponent discards all the Fate cards in his hand and his Strategy Card (if any). He then redraws 3 Fate cards (only) and reveals all his Secret Objective chits (if any).S98.3.6 French 75’sBreak an enemy unbroken Telephone and immediately remove your opponent’s Spotting Round marker and all his Artillery Impact Markers (if any) from the map.S98.3.7 Gabions et Fascines1915-1917 Scenarios only. When rolling for Defense, all your friendly Formations in Trenches and Foxholes receive an extra +1 Cover modifier for the rest of the game.”Keep as Reminder Card.”S98.3.8 La Force NoireSame as Ambush [A30].S98.3.9 Under ShotDisplace your opponent’s on map SR and Artillery Impact markers 2 hexes in the direction of his map edge. Then proceed with regular Artillery Impact Rolls except that you draw for this Attack.
S98.4 German Strategy CardsS98.4.1 Anti-Gas Strategy1916-1918 Scenarios only. Any friendly Formation that would break because of a Gas attack [O19.2.1.3] or because of entering a hex with a Gas marker [T107.1] ignores that effect.*Keep as Reminder Card.*S98.4.2 Dog FightsThis Card can be used in one of the following ways:
● Cancel an Air Assault Order during your opponent’s Turn.
● Perform one Air Assault Order. This Order does not require the play of a Fate card and does not count against the maximum Order limit.
S98.4.3 DrachenThis Card can be used in one of the following ways:
● Perform an Artillery Request Order with the Forward Artillery Observer.
● Discard the SC held by your opponent (if
any) and secretly look at the topmost Card in each player’s SC draw pile. Return those Cards face-down to the top of their respective draw piles.
● Discard all your opponent’s Reminder Cards presently face-up on the table.
● Draw two SC, keep one, and return the other one to the bottom of your SC draw pile, face-down.
S98.4.4 Forward ObserverUse while performing an Artillery Request Order when spotting with the Forward Artillery Observer. If the Targeting Roll for Accuracy [O19.2.1.2] secures a hit, proceed directly with Impact [O19.2.1.3], using the SR hex as the center hex of the impact area.S98.4.5 Red Trousers1914 Scenarios only. Play immediately after any French Formation has been activated to perform an Offensive Order: Cancel that Order and Suppress one-half (rounded-up) of the activated Units. The cancelled Order does not count against the maximum Order limit and the activated French Formations revert to unactivated status.S98.4.6 Sturmabteilung Vor1916-1918 Scenarios only. Play immediately after your opponent has activated any Formation to perform an Op Fire Action [A42]. Cancel that Action and discard its card. No enemy Formation is considered to have been activated.S98.4.7 SturmtruppenFrom 1916 onward. Play any time during a friendly Move Order in either of the following ways:
● The Moving Units and Leaders ignore all Wire effects until the end of the Order.
● The Moving Units and Leaders can enter enemy-occupied hexes as part of their Movement. Once in an enemy-occupied hex they immediately lose any remaining MP.
S98.4.8 Under ShotDisplace your opponent’s on map SR and Artillery Impact markers 2 hexes in the direction of his map edge. Then proceed with regular Artillery Impact Rolls except that you draw for this Attack.S98.4.9 Walter RathenauThis Card can be used in one of the following ways:
● Exchange your current unbroken Telephone for another German Telephone from the countermix.
● Discard all your opponent’s Reminder Cards presently face-up on the table.
S98.5 American Strategy CardsS98.5.1 Anti-Gas Strategy1916-1918 Scenarios only. Any friendly Formation that would break because of a Gas attack [O19.2.1.3] or because of entering a hex with a Gas marker [T107.1] ignores that effect.*Keep as Reminder Card.*S98.5.2 Battle MoraleRally [3.2.5] a friendly Leader and all Units within his Command Radius.S98.5.3 Doughboy SurgePlay any time while performing an Offensive
Action Listings
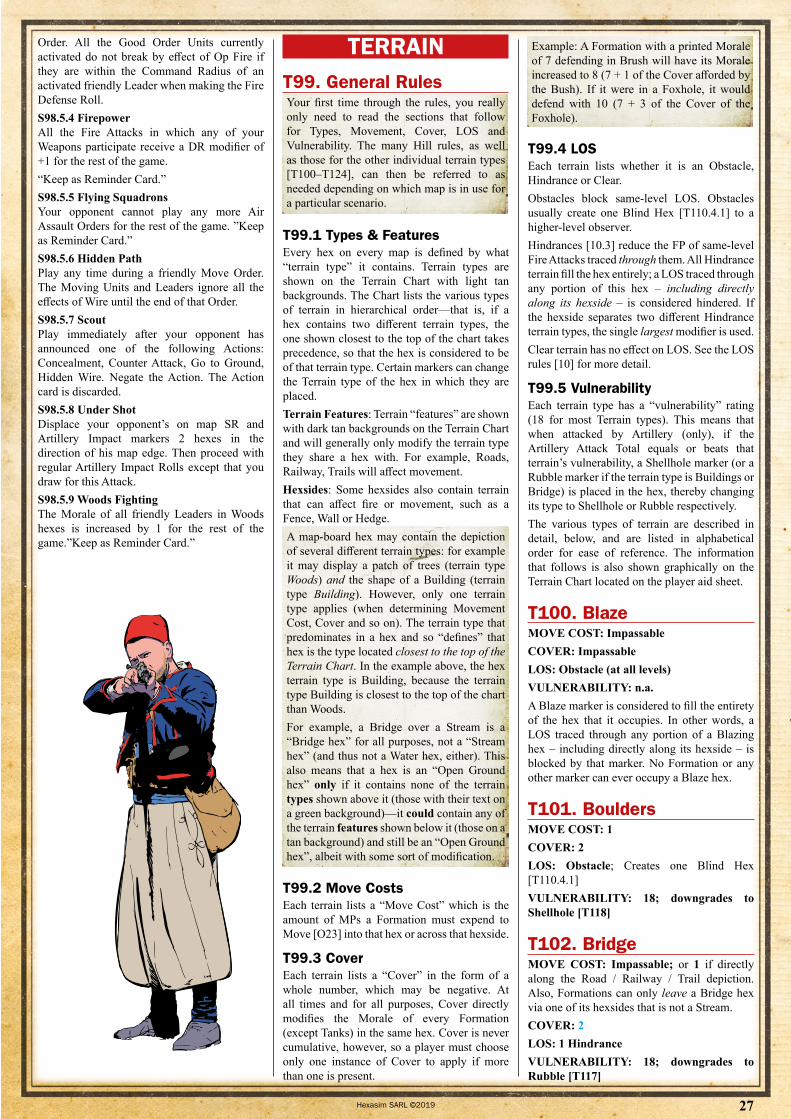
27Hexasim SARL ©2019
Order. All the Good Order Units currently activated do not break by effect of Op Fire if they are within the Command Radius of an activated friendly Leader when making the Fire Defense Roll.S98.5.4 FirepowerAll the Fire Attacks in which any of your Weapons participate receive a DR modifier of +1 for the rest of the game.“Keep as Reminder Card.”S98.5.5 Flying SquadronsYour opponent cannot play any more Air Assault Orders for the rest of the game. ”Keep as Reminder Card.”S98.5.6 Hidden PathPlay any time during a friendly Move Order. The Moving Units and Leaders ignore all the effects of Wire until the end of that Order.S98.5.7 ScoutPlay immediately after your opponent has announced one of the following Actions: Concealment, Counter Attack, Go to Ground, Hidden Wire. Negate the Action. The Action card is discarded.S98.5.8 Under ShotDisplace your opponent’s on map SR and Artillery Impact markers 2 hexes in the direction of his map edge. Then proceed with regular Artillery Impact Rolls except that you draw for this Attack.S98.5.9 Woods FightingThe Morale of all friendly Leaders in Woods hexes is increased by 1 for the rest of the game.”Keep as Reminder Card.”
TERRAINT99. General RulesYour first time through the rules, you really only need to read the sections that follow for Types, Movement, Cover, LOS and Vulnerability. The many Hill rules, as well as those for the other individual terrain types [T100–T124], can then be referred to as needed depending on which map is in use for a particular scenario.
T99.1 Types & FeaturesEvery hex on every map is defined by what “terrain type” it contains. Terrain types are shown on the Terrain Chart with light tan backgrounds. The Chart lists the various types of terrain in hierarchical order—that is, if a hex contains two different terrain types, the one shown closest to the top of the chart takes precedence, so that the hex is considered to be of that terrain type. Certain markers can change the Terrain type of the hex in which they are placed.Terrain Features: Terrain “features” are shown with dark tan backgrounds on the Terrain Chart and will generally only modify the terrain type they share a hex with. For example, Roads, Railway, Trails will affect movement.Hexsides: Some hexsides also contain terrain that can affect fire or movement, such as a Fence, Wall or Hedge.A map-board hex may contain the depiction of several different terrain types: for example it may display a patch of trees (terrain type Woods) and the shape of a Building (terrain type Building). However, only one terrain type applies (when determining Movement Cost, Cover and so on). The terrain type that predominates in a hex and so “defines” that hex is the type located closest to the top of the Terrain Chart. In the example above, the hex terrain type is Building, because the terrain type Building is closest to the top of the chart than Woods.For example, a Bridge over a Stream is a “Bridge hex” for all purposes, not a “Stream hex” (and thus not a Water hex, either). This also means that a hex is an “Open Ground hex” only if it contains none of the terrain types shown above it (those with their text on a green background)—it could contain any of the terrain features shown below it (those on a tan background) and still be an “Open Ground hex”, albeit with some sort of modification.
T99.2 Move CostsEach terrain lists a “Move Cost” which is the amount of MPs a Formation must expend to Move [O23] into that hex or across that hexside.
T99.3 CoverEach terrain lists a “Cover” in the form of a whole number, which may be negative. At all times and for all purposes, Cover directly modifies the Morale of every Formation (except Tanks) in the same hex. Cover is never cumulative, however, so a player must choose only one instance of Cover to apply if more than one is present.
Example: A Formation with a printed Morale of 7 defending in Brush will have its Morale increased to 8 (7 + 1 of the Cover afforded by the Bush). If it were in a Foxhole, it would defend with 10 (7 + 3 of the Cover of the Foxhole).
T99.4 LOSEach terrain lists whether it is an Obstacle, Hindrance or Clear.Obstacles block same-level LOS. Obstacles usually create one Blind Hex [T110.4.1] to a higher-level observer.Hindrances [10.3] reduce the FP of same-level Fire Attacks traced through them. All Hindrance terrain fill the hex entirely; a LOS traced through any portion of this hex – including directly along its hexside – is considered hindered. If the hexside separates two different Hindrance terrain types, the single largest modifier is used.Clear terrain has no effect on LOS. See the LOS rules [10] for more detail.
T99.5 VulnerabilityEach terrain type has a “vulnerability” rating (18 for most Terrain types). This means that when attacked by Artillery (only), if the Artillery Attack Total equals or beats that terrain’s vulnerability, a Shellhole marker (or a Rubble marker if the terrain type is Buildings or Bridge) is placed in the hex, thereby changing its type to Shellhole or Rubble respectively.The various types of terrain are described in detail, below, and are listed in alphabetical order for ease of reference. The information that follows is also shown graphically on the Terrain Chart located on the player aid sheet.
T100. BlazeMOVE COST: ImpassableCOVER: ImpassableLOS: Obstacle (at all levels)VULNERABILITY: n.a.A Blaze marker is considered to fill the entirety of the hex that it occupies. In other words, a LOS traced through any portion of a Blazing hex – including directly along its hexside – is blocked by that marker. No Formation or any other marker can ever occupy a Blaze hex.
T101. BouldersMOVE COST: 1COVER: 2LOS: Obstacle; Creates one Blind Hex [T110.4.1]VULNERABILITY: 18; downgrades to Shellhole [T118]
T102. BridgeMOVE COST: Impassable; or 1 if directly along the Road / Railway / Trail depiction. Also, Formations can only leave a Bridge hex via one of its hexsides that is not a Stream.COVER: 2LOS: 1 HindranceVULNERABILITY: 18; downgrades to Rubble [T117]
28 Hexasim SARL ©2019
If there is a Bridge depiction in a hex, the entire hex including its hexsides is considered Bridge for Hindrance purposes..
T103. BrushMOVE COST: 2COVER: 1LOS: 3 HindranceVULNERABILITY: 18; downgrades to Shellhole [T118]If there is a Brush depiction in a hex, the entire hex (including its hexsides) is considered Brush.
T104. BuildingMOVE COST: 2COVER: 3LOS: Obstacle; Creates one Blind Hex [T110.4.1]VULNERABILITY: 18; downgrades to Rubble [T117]A Tank can only enter a Building hex if the Building depiction does not cover the center dot of the hex or if a Road is present.Building Objectives—If a map board Objective [2.3] occupies a Building hex, and that Building spans two or more hexes, the “Objective” is considered to be the entirety of that Building (that is, every hex that it occupies), not just the hex containing the Objective number.
T105. FenceMOVE COST: +1 when crossing.COVER: NoneLOS: 1 Hindrance; or Clear if the Fence is one of the six hexsides of the sighting or target hex.VULNERABILITY: n.a.
T106. FieldMOVE COST: 1COVER: 0LOS: 1 HindranceIf there is a Field depiction in a hex, the entire hex including its hexsides is considered Field.VULNERABILITY: 18; downgrades to Shellhole [T118]
T107. GasMOVE COST: +1; 1 MP is added to the move cost of other Terrain in the hex.COVER: Depends on other terrain in the hex (see below for exception).LOS: 1 Hindrance into or out of or through [10.3.4], including hexsides.VULNERABILITY: n.a.
T107.1 Lingering PoisonAny unsuppressed Formation that enters a hex with a Gas marker is immediately Suppressed. If already Suppressed, it breaks.When a Recover Order is issued, the Suppressed markers are not removed from friendly Formations stacked with a Gas marker.
Furthermore, when a Rout roll is made against a Formation that is stacked with a Gas marker, that Formation’s Morale will not receive any positive modifier from the Cover offered by the Terrain or Fortification present (the negative modifier of Wire does apply).
T107.2 VolatilityTwo Gas markers are removed from the map during Time Advance (triggering player’s choice [6.1.2]).
T108. GullyMOVE COST: 2COVER: 1; Though a Formation in a Gully cannot be seen except from an adjacent hex or a hex at a higher elevation [T110], and vice versa.LOS: ClearVULNERABILITY: 18; downgrades to Shellhole [T118]
T108.1 Tank Immobilization Every time a Tank enters a Gully hex as part of a Move / Offensive or Advance Order it must halt and check for Immobilization. [O.23.5.3].
T109. HedgeMOVE COST: +1 when crossing.COVER: None; or 1 if a Fire Attack crossed the Hedge as it entered the target hex (not applicable when defending against Mortars or Artillery).LOS: Obstacle; or Clear if the Hedge is one of the six hexsides of the sighting or target hex.VULNERABILITY: n.a.
T110. HillsThe standard Open Ground hex in Great War Commander is said to be at level “0” or “ground level”. Hills are level 1 (▲), 2 (▲▲), 3 (▲▲▲), or 4 (▲▲▲▲).On the map, Hills are identified by a Crestline (a white line contour) and each Hill hex along the Crestline displays one or more white triangles indicating the up slope direction (tip of triangles) and the level of the higher ground on that side of the Crestline (number of triangles).Therefore, a Formation on a Hill is above any terrain occupying either a ground-level hex or a Hill hex of a lower level. A Hill hex functions exactly like any other ground level hex except as modified below.All of the following Hill rules are based upon the premise that in Great War Commander each Hill elevation is taller than a map board Obstacle, and every map board Obstacle is taller than a map board Hindrance.
T110.1 Uphill MovementA moving Formation must expend +1 MP in order to enter a hex at a higher elevation than the one it is leaving, except when travelling along a Road (i.e. the moving Formation crosses a Road hexside as it enters the hex).
For example, a Formation moving from a level 1 Hill hex containing Woods to a level 2 Hill hex containing Woods must expend 3 MPs (2 for the Woods plus 1 for the change in elevation). The reverse “downhill” move would cost only 2 MP.
T110.1.1 Tank ImmobilizationWhen a Tank crosses the white line contour of a Hill (either uphill or downhill) as part of a Move / Offensive or Advance Order it must halt and check for Immobilization. [O.23.5.3] Exception: no check is required if a friendly Unit is present in the hex [O23.5.6] or when the Tank is travelling along a Road depiction (that is the moving or advancing Tank crosses a Road hexside as it enters the hex). Only one check is performed if the entered hex also contains Terrain or a Fortification that can cause a bog-down.
T110.2 Height AdvantageA Fire Attack suffers -1 FP if the target hex is at a higher elevation than any one firing piece. Conversely, a Fire Attack gains +1 FP if the target hex is at a lower elevation than any one firing piece.
T110.3 Hills & LOST110.3.1 Military Crest LinesA hex showing more than one level is termed a “Crest” hex. The level at which a Crest hex’s center dot lies is its actual level, which is also indicated by the number of triangle symbols in the hex. In every Crest hex, the physical edge of the higher-level Hill is termed the “Crest Line”.T110.3.2 Vertical LOSA Formation may only trace a LOS into the initial Crest hex of each elevation above it. Likewise, a Formation on a Hill may trace a LOS to a hex at a lower elevation only if that LOS never passes through a Crest Line of equal or greater height in an intervening hex.Formation A on a Hill can see Formation B at a lower elevation only if the LOS from Formation A both:
● crosses a Crest Line before it crosses a hexside; and
● never again crosses a Crest Line of the same or higher elevation.
T110.3.3 Hills as “Obstacles”A Hill itself blocks LOS traced between any two hexes of lower elevation.A Formation on a level 2 Hill can see past an intervening level 2 Hill only to another Hill of height 2, 3 or 4. If that intervening Hill were level 3 instead, the target hex would have to be at level 4 to be seen (and even then it would have to be a level 4 Crest).
T110.4 Hills & ObstaclesThe LOS to or from a Hill hex is blocked only if it runs through a hex containing blocking terrain or does touch the physical depiction of a Building at the same or higher elevation as that Hill hex. In other words, LOS to or from a Hill hex is not blocked by Obstacles that lie at a lower elevation (exception: see Blind Hexes, below).
29Hexasim SARL ©2019
A Formation on a level 1 Hill can see past (over) an intervening Building at level 0 to another Formation on a distant level 1 Hill. If the Building were also on a Hill, however, that LOS would be blocked.
A Blaze marker, however, always blocks LOS through its hex, regardless of the sighter’s or target’s elevation.The obstacle that a Blaze marker creates is considered to be at a height sufficient enough to affect any possible LOS that can be represented in the game.
T110.4.1 Blind HexesA Formation on a Hill can see into a lower-level Woods, Destroyed Woods, Boulders or Building hex, but cannot see into the next hex beyond it if that next hex is also at or lower than the Woods/Destroyed Woods/Boulders Building hex’s elevation [EXC. LOS extends 2 hexes into Destroyed Woods], and respecting the LOS rules [10.2]. In other words, a lower-level Woods, Boulders, second Destroyed Woods or Building creates a one-hex blind zone behind it to an observer at a higher elevation if the LOS of that observer runs through the hex containing Woods/Boulders/second Destroyed Woods or does touch the physical depiction of the Building—all hexes beyond this blind zone are visible from the Hill (barring further Woods/Destroyed Woods/Boulders/Buildings along the way).When a Formation on a Hill cannot see into a blind hex, the Formation in the blind hex cannot see the Hill Formation either.A Formation on a level 1 Hill can see past a level 0 Building except into the level 0 hex directly behind it. Conversely, a Unit on a level 1 Hill could see past an intervening level 1 Building to a Unit at level 2 or higher unless that Building was in the first intervening hex along that LOS.
T110.5 Hills & HindrancesAny map board Hindrance terrain that is at a lower level does not hinder LOS to or from a Hill hex. A Hindrance on a Hill does hinder LOS between two other Hill hexes at the same level as that Hindrance. A Smoke or Gas marker, however, always hinders LOS through its hex, regardless of the sighter’s or target’s elevation. The hindrance that a Smoke or Gas marker creates is considered to be at a height sufficient enough to affect any possible LOS.
T111. MarshMOVE COST: 3COVER: 0LOS: 1 HindranceVULNERABILITY: n.a.If there is a Marsh depiction in a hex, the entire hex (including its hexsides) is considered Marsh.WATER TERRAIN: No Weapon may fire from a Marsh hex. No Blaze, Smoke or Fortification may ever occupy a Marsh hex.
T112. Open GroundMOVE COST: 1COVER: 0LOS: ClearVULNERABILITY: 18; downgrades to Shellhole [T118]
T113. OrchardMOVE COST: 1COVER: 1LOS: 2 HindranceVULNERABILITY: 18; downgrades to Shellhole [T118]If there is an Orchard depiction in a hex, the entire hex (including its hexsides) is considered Orchard.
T114.QuarryMOVE COST: 2 or 1 if from Quarry hex to Quarry hexCOVER: 1; Though a Formation in a Quarry cannot be seen except from an adjacent hex or a hex at a higher elevation [T110], and vice versa.LOS: ClearVULNERABILITY: 18; downgrades to Shellhole [T118]
T115. RailwayMOVE COST: 1 if travelling along the Railway depiction (i.e. the moving Formation crossed a Railway hexside as it entered the hex); otherwise depends on other terrain in the hex.COVER: Depends on other terrain in the hex.LOS: 1 Hindrance; or Clear if the LOS proceeds directly along the Railway depiction.VULNERABILITY: Depends on other terrain in the hex.
T116. RoadMOVE COST: 1 if travelling along the Road depiction (i.e. the moving Formation crossed a Road hexside as it entered the hex); otherwise refer to the other terrain in the hex.A Formation gains +1 to its Movement number as long as it entered a hex containing a Road at any point during a Move Order. This bonus ceases at the conclusion of that Move Order. The Formation need not have entered the Road hex via a road hexside to gain the bonus.Note that a moving Formation does not expend +1 MP in order to enter a hex at a higher elevation if it crossed a Road hexside as it entered the hex.COVER: The Cover of a hex containing a Road is decreased by 1 if the Terrain type of the hex is Open Ground.LOS: Clear if the LOS proceeds directly along the Road depiction; otherwise depends on the other terrain in the hex.VULNERABILITY: Depends on other terrain in the hex.
So a Building hex with a Road going through it still has a Cover of 3.A Formation with a printed Morale of 7 in an Open Ground hex containing a Road will be at “-1” Cover and therefore have 6 Morale for all purposes. If Foxholes [F127] were later placed in that hex, it would have a Morale of 9 (7; +3 Foxholes; -1 Road).A Formation with a printed Morale of 7 in a Woods [T124] hex containing a Road will be at “2” Cover and therefore have 9 Morale for all purposes. Roads are easily distinguished from Trails as they are wider and always feature wheel tracks.
T117. RubbleMOVE COST: 2COVER: 2LOS: 2 HindranceVULNERABILITY: 18; downgrades to Shellhole [T118]If there is a Rubble depiction in a hex, the entire hex (including its hexsides) is considered Rubble.
T117.1 Tank ImmobilizationEvery time a Tank enters a Rubble hex as part of a Move / Offensive or Advance Order it must halt and check for Immobilization. [O.23.5.3] Exception: If a friendly Unit is present in the hex. [O23.5.6].
T118. ShellholeMOVE COST: 1; +1 when entering the first Shellhole as part of a Move or Offensive OrderCOVER: 1 LOS: ClearVULNERABILITY: n.a. (no further downgrading is possible)
T118.1 Tank ImmobilizationThe first time a Tank enters a Shellhole as part of a single Move / Offensive or Advance Order, the Active player halts the Tank temporarily and checks for immobilization.[O.23.5.3].Exception: No check is required if a friendly Unit is present in the hex [O23.5.6].
T118.2 ExceptionTrail [T121] negates the additional Move cost and Immobilization Check when present in a printed on map Shellhole hex.
T118.3 Printed ShellholesOn-map printed Shellholes exist if the center dot of the hex is inside a Shellhole depiction. Please note that all map 10’s and nearly all map 11’s hexes are Shellholes.
T119. SmokeSmoke is available from 1916 onward.NOTE: Before beginning play, all of the Smoke markers should be placed into an opaque cup so that they may be drawn at random when called for during play. The actual hindrance value of Smoke is printed on the individual markers.
30 Hexasim SARL ©2019
MOVE COST: Depends on other terrain in the hex.COVER: Depends on other terrain in the hex.LOS: 1, 2, 3, 4, 5, 6, 7 or 8 Hindrance 1, 2, 3, 4, 5, 6, 7 or 8 into or out of or through [10.3.4], including hexsides. VULNERABILITY: n.a.
T120. StreamMOVE COST: 3 (except Tanks, see below)COVER: -1LOS: ClearVULNERABILITY: n.a.Tanks cannot enter Stream hexes except where a Bridge is present.WATER TERRAIN: No Weapon may fire from a Stream hex. No Blaze, Smoke or Fortification may ever occupy a Stream hex.
T121. TrailMOVE COST: 1 if traveling along the Trail depiction (i.e. the moving Formation crossed a Trail hexside as it entered the hex); otherwise depends on the other terrain in the hex.COVER: Depends on other terrain in the hex.LOS: Depends on other terrain in the hex.VULNERABILITY: Depends on other terrain in the hex.NOTE: Trails negate the additional Move cost and Immobilization Check when present in a printed on map Shellhole hex.T121.1. Vulnerability Exception: When a Trail is present in a Shellhole hex printed on the map, it has an inherent Vulnerability of 18. If hit by Artillery [O19.2.1.4], a Shellhole marker is placed in its hex, negating the benefits of Trail for the rest of the game.
T122. WallMOVE COST: +1 when crossing.COVER: none; or 2 if a Fire Attack crossed the Wall as it entered the target hex (not applicable when firing Mortars or Artillery).LOS: Obstacle; or Clear if the Wall is one of the six hexsides of the sighting or target hex.VULNERABILITY: n.a.
T122.1 Destroyed Wall Same as T122 except:MOVE COST: +0 when crossing
T123. Water BarrierMOVE COST: ImpassableCOVER: n.a.LOS: ClearVULNERABILITY: n.a.IMPASSABLE WATER TERRAIN: No Formation, Blaze, Smoke or Fortification marker may ever occupy a Water Barrier hex.
T124. WoodsMOVE COST: 2 (except Tanks, see below)COVER: 2LOS: Obstacle; Creates one Blind Hex [T110.4.1]
VULNERABILITY: 18; downgrades to Shellhole [T118]Tanks cannot enter Woods except via a Road..AIRBURSTS: The Fire Attack Total of any Mortar or Artillery attack against a Woods hex is always increased by 2.Air Assault attacks don’t qualify for airburst advantage.So a 7-FP Mortar (German 25 cm MinenWerfer) that fires into a Woods hex and makes a Fire Attack Roll of 9 would have an Attack Total of 18 instead of 16. As the Woods vulnerability number has been reached a Shellhole marker is placed in the hex. Now if a Unit is present in the hex, it will make a Fire Defense Roll with its Morale modified by Command if any and by the Cover of the Shellhole, hence 1.Shells fired at a high altitude – such as from mortars and distant artillery batteries – had a tendency to explode in the treetops. When this happened, the troops below would be subject to flying splinters and tree branches in addition to the shell blast that was not muffled by contact with the earth.
T124.1 Destroyed WoodsMOVE COST: 1; +1 when entering the first Destroyed Woods hex as part of a Move or Offensive Order (except Tanks, see below)COVER: 2LOS: Extends only 2 hexes into. Creates one Blind Hex [T110.4.1] after the second hex.VULNERABILITY: 18; downgrades to Shellhole [T118]Tanks cannot enter Destroyed Woods
FORTIFICATIONSF125. General RulesThe following sections [F125–F131] need not be read and memorized: they can be safely ignored until a Fortification actually enters play—players can then simply look up the rules for that particular marker.
F125.1 AcquisitionThere are six types of “Fortifications” markers in the game: Foxholes, Trenches, Mines, Wire, Blockhaus and Pillboxes. A Fortification is normally brought into play at the beginning of a scenario, though they can also enter play during the game due to various Actions and Events.
F125.2 RemovalFortifications may normally only be eliminated during play via various Events, the “Engineering Works” Action [A41], or an Artillery Impact Roll [O19.2.1.4].
F125.3 VulnerabilityAll Fortifications have a “vulnerability” number indicated in the upper left corner of the marker. This means that when a Fortification is attacked by Artillery (only) and the Artillery Attack Total equals or beats the Fortification’s vulnerability, it will downgrade and its marker will be replaced by another Fortification, a
Shellhole [T118] or a Rubble marker [T117].
F125.4 StackingNo more than one Fortification marker of any type may ever occupy a single hex. The first Fortification placed in a hex will never be substituted by another Fortification marker except in the case of downgrading. No Fortification may ever occupy a Water hex (i.e. Marsh, Stream or Water Barrier with no Bridge).Furthermore, any Cover provided by a Fortification is not cumulative with other Cover in the hex.The various Fortifications are described in detail below, listed in alphabetical order for ease of reference.
F126. BlockhausVULNERABILITY: 20; downgrades to Rubble [T117]Blockhaus will be featured in future expansions of Great War Commander.A Blockhaus gives the hex it occupies a Cover of “6”.During Melee, the side that was the last sole occupant of a Blockhaus hex wins if the Melee totals are tied.
F127. FoxholesVULNERABILITY: 18; downgrades to Shellhole [T118] or Rubble [T117] (if in Building or Bridge hex)A Foxholes marker gives the hex it occupies a Cover of “3”.
F127.1 Tank ImmobilizationEvery time a Tank enters a hex containing a Foxhole as part of a Move / Offensive or Advance Order it must halt and check for Immobilization. [O.23.5.3] Exception: No check is required if a friendly Unit is present in the hex. [O23.5.6]NOTE: Foxholes markers are available in two sizes but all have the same effect.
F128. MinesVULNERABILITY: 18; downgrades to Shellhole [T118] or Rubble [T117] (if in Building or Bridge hex).
F128.1 General RulesA Mines marker occupying a hex will attack any Formation (enemy or friendly) that Moves, Advances or Retreats into or out of that hex.Formations Moving/Advancing together are attacked with a single roll; otherwise a separate Mine Attack should be made against each Formation as it enters, or is about to exit, a hex containing Mines.
F128.2 Mine AttackThe strength of a Mine Attack is 9 FP against Vehicles (boxed yellow as a reminder) and 6 FP against all other Formations.Cover for a Mine Attack is automatically set to “0”, and cannot be modified by any means.A Mine Attack Roll follows the same general rules as for a Fire Attack Roll [O21.3] except
31Hexasim SARL ©2019
that only the moving/advancing/retreating Formations in the hex need make a Fire Defense Roll. The player controlling such a Formation makes its Defense Roll whereas his opponent makes the Mine Attack Roll.IMPORTANT—A Formation that becomes broken [3.2] while leaving a Mined hex is placed in the hex it was entering.
F129. PillboxVULNERABILITY: 20; downgrades to Rubble [T117]A Pillbox gives the hex it occupies a Cover of “5”.During Melee, the side that was the last sole occupant of a Pillbox hex wins if the Melee totals are tied.
F130. TrenchVULNERABILITY: 18; downgrades to Foxhole [F127]
F130.1 General RulesA Trench marker gives the hex it occupies a Cover of “4”.
F130.2 Trenches & MovementA non-Tank Formation moving from one hex containing a Trench into an adjacent hex containing a Trench, Blockhaus or Pillbox (or vice versa) expends only 1 MP to do so, regardless of the terrain in the two hexes. This applies even if the Formation is moving uphill or is crossing a hexside that would normally increase its movement cost. Furthermore, that Formation cannot be the target of Op Fire [A42] in the hex moved into.
F130.3 Tank ImmobilizationEvery time a Tank enters a hex containing a Trench as part of a Move / Offensive or Advance Order it must halt and check for Immobilization. [O.23.5.3] Exception: No check is required if a friendly Unit is present in the hex. [O23.5.6]
F131. WireVULNERABILITY: 18; downgrades to Shellhole [T118] or Rubble [T117] (if in Building or Bridge hex)
F131.1 General RulesA Wire marker sharing a hex with a Formation affects that Formation by reducing its FP, Range and Morale numbers by -1 each. Command and Highest ranking Leader determination [3.3.1.3] are unaffected by Wire.
F131.2 Wire & MovementA moving Formation loses all of its remaining MPs immediately after entering or exiting a hex containing Wire.Formations can Advance or Retreat into and out of a Wire hex normally, as MPs are not utilized during these activities.
F131.3 Wire & Fire AttacksFormations in a hex containing Wire cannot form a Fire Group [O21.3.1] with pieces outside the hex. No Weapon may be fired from a Wire hex.
F131.4 Wire & TanksWhen a Tank enters a hex containing a Wire marker as part of a Move or Offensive or Advance Order:
● the Wire marker is immediately removed; ● the Tank stops in the hex and loses any
remaining MP, if any; ● once the Wire marker disappears, terrain
type once again controls whether an Immobilization Check has to be made.
DESIGN NOTESRoger NordAlmost from the moment it came to market, gamers have taken to Combat Commander (CC) and expressed interest in different expansions. They have mentioned Korea, Vietnam, and even a zombie version. Somewhere in the process I picked up on their interest, turning my attention toward WW1.The War--- called the Great War until World War 2 came along and people attached numbers to them--- had long been a major design focus for me in previous games. The gamers’ interest in CC expansions and my earlier focus naturally converged. I decided to do Great War Commander (GWC), based on the system of CC, but adapted to the feel of the earlier conflict. Hexasim, through the fine efforts of Pascal Toupy, accepted the design. Hexasim received GMT’s clearance to use CC as a model, so GWC began to take final shape. Extensive playtesting followed, both in France and in the U.S. In the final product, GWC presents many aspects different from the WW2 era.While the GWC map scale approximates CC’s, an extra hex row is added to accommodate at least in part the broader battlefield scope of the War, as well as the larger size of units. Platoon-size units operate rather than squads, to reflect the higher command structure that dominated the War. In this way, heavier weapons are more likely to appear, since the Great War did not yet integrate them down into smaller units as WW2 had done later. The platoon size also brings in higher officers. Instead of privates, corporals, and sergeants, GWC relies on Lieutenants and Captains. There is the senior commander rule, reflecting orders passed down the chain of command. The War had a top-heavy and somewhat rigid command structure .Often burdened with distant preset orders out of touch with the actual situation on the ground; local officers could only call on poor communications, mainly messengers, to react to battle conditions and see their units through. Telephone links often were hit or miss. Units out of position could suppress.High command meddling at times tried to fill in poorly for effective command. GWC incorporates this as events. Occasionally high
command found ways to help in strategic situations, which are shown in the Strategy Cards, adding another dimension to game play absent in CC. Alternatively, Strategy Cards can offer a (+1) to die rolls, to help win an important roll and/or avoid giving up the prized Initiative Card.Even with preset orders, the forces on the Western Front did their best to innovate and test new weapons, equipment and ordnance. Hoping to end stalemate, both sides made considerable advances over time; so GWC has light and heavy machine guns, various mortars, gas, flamethrowers and artillery calibers, depending on the period of time in the War. Armies eventually developed tanks and stronger airplanes. With the increased technology came improved tactics modeled in GWC, like orders for different barrages, HMG Suppress and Offensive; and actions like Probe, Gas, Go to Ground, Stormtroops, and Counterattack. National force variations appear in GWC countermixes and scenarios. In general the Germans are best in organization; they are more consistent in morale and better-stocked in weapons. The Americans have larger divisions usually at full-strength, as shown in stronger FP; however American Leaders have the lowest average command radius, reflective of their newness to the War. The French are comparable to the Germans, and what they lack in Formation morale, they make up in Leaders and actions like élan. Leaders ratings overall are close, with an edge to the French in command radius. Colonel Driant for the French is the lone “3” super Leader, well-deserved historically. To reflect innovativeness in the Great War as contrasted with WW2, differences between GWC and CC show up in the broader range of actions for GWC (27 vs. 17) and in the broader range of events (41 vs. 24). One particular innovation was the tank, deserving of more attention. I had included limited tank action for the Americans since they were not prevalent in this type of warfare. Pascal wisely added new historical scenarios for the French tanks to complete GWC’s initial playbook. Together we sorted out their specifications and operation abilities. Our tank work sets the stage for more tank actions in the upcoming Commonwealth Expansion currently in play testing.Dedicated to my Father, Gust Nord, Private, 76th Field Artillery, 3rd Division, who served at Chateau Thierry and St. Mihiel, and was wounded at Meuse-Argonne.
Pascal Toupy’s design notes can be found in the playbook.
32 Hexasim SARL ©2019
INDEXAction Listings pp 20-23Actions glossary; 1.6; A28
● capability..........................................................5.2 ● during Orders.............................................O14.4 ● movement timing.........................................O23.7
Advance O16Air Assault O17Artillery
● Denied O 1 8 ● Request O 1 9
o Accuracy….O19.2.1.2o Impact.....O19.2.1.3/4o Spotting......O19.2.1.1
Blaze 8.1.6; 10.2.1; T100 ● creation of E 6 0 ● spreading E 6 1
Broken ● Formations 3 . 2 ● Telephone. O18; O19.1 ● Weapons 11 .4
Blockhaus F126; Fortification ChartCards 1F; 1S; 1
● discarding 5.3; O15 ● drawing 5 . 4 ● hand size (Posture) 1 . 1
Casualty Track 4.3Cohesion glossary; 3.3.2Command 3.1.5; 3.1.6; 3.3.1
● Radius 3.3.1.1 ● and Units 3.3.1.5 ● and Weapons 3.3.1.7
Command Confusion O20Compass 2.2.2Cover T99.3Creeping Barrage O19.2Crest line T110.3.1Engineers 3.1.9Event Listings pp 23-25Events glossary; 1.7; E56
● Event! trigger 1.9.1.1Exiting the Map 7.2
● involuntarily 7.2.2; O26.3.4 ● voluntarily 7.2.1; O16.2; O23.4 ● and Runner 7.2.2 ● and Tank 7.2.1.1
Fire O21 ● Fire Attack O21.3 ● Fire Defense O21.3.7 ● Fire Groups O21.3.1 ● Ordnance Targeting O21.2
Firepower (FP) ● on Formation..................................................3.1.1 ● on Telephone......................................................12 ● on Weapon...................................................... 11.1
Flamethrower 11.7Formations glossary; 3Fortification Listings pp 30-31; chartForward Artillery Observer (FAO) 2.4
Foxholes F127; Fortification Chart ● placement A39;
Functioning Weapon 11.5Hand size 1.1; 5.4
Game End 6.3Gas T107
● and Rout O26.4Gas Attack O19.2; O19.2.1.3Good Order 3.2.1Heroes E70Highest-ranking Leader 3.3.1.2Hills T110
● and blind hexes T110.4.1Hindrances 10.3
● and Fire Attacks O21.3.5 ● and Hills T110.5 ● and Targeting O21.2.3
HMG Suppress O22Immobilization Check O23.5.3Initiative 9Jammed! trigger 1.9.1.2; O21.3.6.1
● NA during Artillery Impact. O19.2.1.4.1
Leaders 3.3Line of Sight (LOS) 10Maps 2Melee O16.4Mines F128; Fortification ChartMorale 3.1.4Move O23
● and Op Fire O23.3 ● and Weapon transfer O23.1.1 ● and Wire F131.2 ● as a stack O21.2 ● costs O23.1; Terrain Chart
Movement number ● on Formation 3.1.3 ● on Weapon 11 .1
Objectives 2.3 ● chits 7.3.2 ● multi-hex buildings 7.3.1.1 ● VP value 7 . 3 ● and Runners 7.3.1.3 ● and Tanks 7.3.1.2
Obstacles 10.2 ● and Hills T110.3.3
Offensive O24Opportunity Fire A42
● NA vs. Advancing Formations O16.1 ● NA vs. Retreating Formations O26.3.2
Order Listings pp 13-20Orders glossary; 1.5; O14
● Capability 5 . 1Ordnance 11.6Pillbox F129; Fortification ChartPosture glossary; 1.1Rally 3.2.5Random Hex glossary; 1.8
● and broken Weapons 11 .4 ● and Snipers 1.9.1.3
Range ● and Targeting O21.2.1 ● on Formation 3.1.2 ● on Weapon 11 .1
Recover O25Reinforcing Formations 6.1.2 step #5Retreating O26.3
Revealing cards 1.3Rout O26Runner O20; O27; E88
● and Melee O16.4.1Sequence of Play 5Smoke 8.1.4; 10.3.4; T119Sniper! trigger 1.9.1.3Spotting Round (SR) glossary; O19.2.1.1Stacking 8Standing Barrage O19.2Strategy Card (SC) 1S ; S98Sudden Death 6.2; 6.3.2Suppressed 13
● removal 13.3; O22.2Surrender 4.3; 6.3.1Tank glossary
● and Command 3.1.6 ● and Fire O21.3.2 ● Fire Attack against O21.3.2 ● Fire Defense Roll O21.3.7.1 ● Immobilization O23.5.2 ● Movement and Advance O23.5 ● and Rout O26.5
Tank Leader 3.3.1.6; O14.2.1Telephone 12Targeting O21.2Terrain Listings pp 27-30; chartTime (and the Time Track) 6
● Time! trigger 1.9.1.4Track Display 4Trench F130; Fortification ChartTurn glossary; 1.1; 1.5Veteran E69; E96Victory Points (VP) 7Victory Track 4.1Weapons 11
● elimination of 4.3; 11.3 ● NA in Melee O16.4.1 ● and Command 3.3.1.3 ● and Fire Groups O21.3.1.1 ● stacking & portage 8.1.1; 11.2 ● on Suppressed Formations 11.1; 13.2 ● transfer of O23.1.1 ● and Water Terrain T111; T120
Wire F131; Fortification Chart ● and Retreating O26.3.3


