Embed Size (px)
Citation preview
SAILOR 6120/30/40/50User manual

SAILOR 6120/30/40/50
User manual
Document number: 98-131590-C
Release date: September 17, 2015
i

Disclaimer
Any responsibility or liability for loss or damage in connection with the use of this product and the accompanying documentation is disclaimed by Thrane & Thrane A/S. The information in this manual is provided for information purposes only, is subject to change without notice and may contain errors or inaccuracies. Manuals issued by Thrane & Thrane A/S are periodically revised and updated. Anyone relying on this information should acquire the most current version e.g. from www.cobham.com/communications-and-connectivity/satcom, Service and support, or from the distributor. Thrane & Thrane A/S is not responsible for the content or accuracy of any translations or reproductions, in whole or in part, of this manual from any other source. In the event of any discrepancies, the English version shall be the governing text.
Thrane & Thrane A/S is trading as Cobham SATCOM.
Copyright
© 2015 Thrane & Thrane A/S. All rights reserved.
GPL notification
The software included in this product contains copyrighted software that is licensed under the GPL/LGPL. A copy of those licenses is included in this document in the last appendix.
You may obtain the complete corresponding source code from us for a period of three years after our last shipment of this product, by sending a money order or check for DKK 50 to:
SW Technology/GPL Compliance,Cobham SATCOM (Thrane & Thrane A/S),Lundtoftegaardsvej 93D2800 Kgs. LyngbyDENMARK
Write "source for <product name>" in the memo line of your payment (replace <product name> with the name of your product, e.g. “SAILOR 3027 SSA Terminal”). This offer is valid to anyone in receipt of this information.
http://www.cobham.com/about-cobham/communications-and-connectivity/about-us/satcom/free-and-open-source-software-(foss).aspx
ii
Warranties
Any attempt to install or execute software not supplied by Cobham SATCOM on the devices in this system will result in the warranty being void. Any attempt to modify the software on these devices in a way not specified by Cobham SATCOM will result in the warranty being void.
Trademark Acknowledgements
• Inmarsat is a registered trademark of the International Maritime Satellite Organisation (IMSO) and is licensed by IMSO to Inmarsat Limited and Inmarsat Ventures plc.
• SAILOR is a registered trademark of Thrane & Thrane A/S in the European Union, the United States and other countries.
• Other product and company names mentioned in this manual may be trademarks or trade names of their respective owners.
iii

iv
Safety summary
The following general safety precautions must be observed during all phases of operation, service and repair of this equipment. Failure to comply with these precautions or with specific warnings elsewhere in this manual violates safety standards of design, manufacture and intended use of the equipment. Thrane & Thrane A/S assumes no liability for the customer's failure to comply with these requirements.
Observe marked areasUnder extreme heat conditions do not touch areas of the units that are marked with this symbol, as it may result in injury.
Microwave radiation hazardsDuring transmission the antenna in this system radiates Microwave Power. This radiation may be hazardous to humans close to the antenna. When the system is powered, make sure that nobody gets closer than the recommended minimum safety distance of 0.3 m (1 ft.).
Dangers de rayonnements micro-ondesLors de transmissions, l'antenne émet des rayons micro-ondes puissants. Ce rayonnement peut être dangereux pour les personnes à proximité de l'antenne. Lorsque le système est sous tension, assurez-vous que personne ne s’approche à moins de 0,3 m (1 pi.) de l’antenne, la distance de sécurité minimale recommandée.
Keep away from live circuitsOperating personnel must not remove equipment covers. Only qualified maintenance personal must make component replacement and internal adjustment. Under certain conditions, dangerous voltages may exist even with the cable removed. To avoid injuries, always disconnect power and discharge circuits before touching them.
Compass safe distanceMinimum safety distance: 5 m from the SAILOR 3027.
About the manual
Naming conventions
This manual covers four different types of system. For information that applies to all four types, the following naming conventions are used:
Intended readers
This manual is a user manual for the SAILOR 6120/30/40/50 systems. The manual is intended for anyone who is using or intends to use any of these four systems. No specific skills are required to operate the mini-C system. However, it is important that you observe all safety requirements listed in the beginning of this manual, and operate the system according to the guidelines in this manual.
Manual overview
Note that this manual does not cover installation of the system. For information on installation and initial configuration, refer to SAILOR 6120/30/40/50, Installation manual [1]. Part numbers for related manuals are listed in the next section.
This manual has the following chapters:
• Introduction contains an overview of the mini-C system and a brief description of each unit in the system.
Common name Used for
mini-C system SAILOR 6120 SSA System
SAILOR 6130 LRIT System
SAILOR 6140 Maritime System
SAILOR 6150 Non-SOLAS System
SAILOR 3027 SAILOR 3027 SSA Terminal
SAILOR 3027 LRIT Terminal
SAILOR 3027 Maritime Terminal
SAILOR 3027 Non-SOLAS Terminal
v
• Getting started explains how start up the system. It also contains a short guide to the most important functions.
• Using easyMail explains how to set up and use the system with the easyMail 2 application from a connected computer.
• Using Distress and SSA buttons explains how to use connected Distress buttons and SSA buttons.
• Service contains information on software update and a short troubleshooting guide and explains how to check the status of the system.
Related documents
Typography
In this manual, typography is used as indicated below:
Bold is used for the following purposes:
• To emphasize words. Example: “Do not touch the antenna”.
• To indicate what the user should select in the user interface. Example: “Select SETTINGS > LAN”.
Italic is used to emphasize the paragraph title in cross-references.
Example: “For further information, see Connecting Cables on page...”.
Ref Title and description Document no.
[1] SAILOR 6120/30/40/50, Installation manual
98-131589
[2] SAILOR 6110 mini-C GMDSS, User manual
98-130753
[3] SAILOR 6006 and SAILOR 6007 Message Terminal, Installation manual
98-130088
[4] SAILOR 6194 Terminal Control Unit, Installation and user manual
98-131593
[5] Software Interface Reference Manual for the TT-3027C/D/M/LT/SSA mini-C transceiver
98-147405
vi
Contents
Chapter 1 Introduction
Welcome ................................................................................................... 1
System overview ................................................................................... 2
System units ............................................................................................ 4
User interfaces ....................................................................................... 5
The Inmarsat C services .................................................................... 8
Chapter 2 Getting started
Registration .......................................................................................... 13
User interfaces .................................................................................... 14
Starting up the system .................................................................... 17
Chapter 3 Using easyMail
Overview of easyMail ...................................................................... 22
Distress functions (only SAILOR 6150) ................................... 25
Working with messages .................................................................. 30
Position reporting .............................................................................. 42
Receiving EGCs ................................................................................... 44
Network status and settings ......................................................... 46
Viewing system details ................................................................... 48
Viewing or changing position information ........................... 49
Viewing status and Info log .......................................................... 50
Setting up the default ISP and default LESes ....................... 51
Setting up reception of EGCs ...................................................... 52
vii
Contents
Setting up ENIDs ................................................................................ 53
Setting up the Land Earth Stations (LES) ................................ 54
Setting up Inmarsat Service Providers (ISP) ......................... 56
Entering the mobile number ........................................................ 58
Setting the local time ...................................................................... 59
Setting up password protection ................................................. 60
Setting the language ........................................................................ 60
Setting up PC communication with the SAILOR 3027 .... 61
Setting up easyMail .......................................................................... 63
Chapter 4 Using Distress and SSA buttons
To send a Distress Alert (SAILOR 6150 only) ....................... 65
To send a Ship Security Alert (SAILOR 6120 only) ........... 69
Chapter 5 Service
Getting support .................................................................................. 71
Updating software ............................................................................ 72
Troubleshooting guide .................................................................... 75
Status signalling in easyMail ........................................................ 77
Status signalling in SAILOR 6006 ............................................... 78
Service and repair .............................................................................. 80
viii
Contents
App. A Conformity
App. B GNU License texts
Glossary ..................................................................................................................... 97
Index .................................................................................................................. 101
ix

Contents
x
Chapter 11111
Intr
oduc
tion
Introduction 1
Welcome
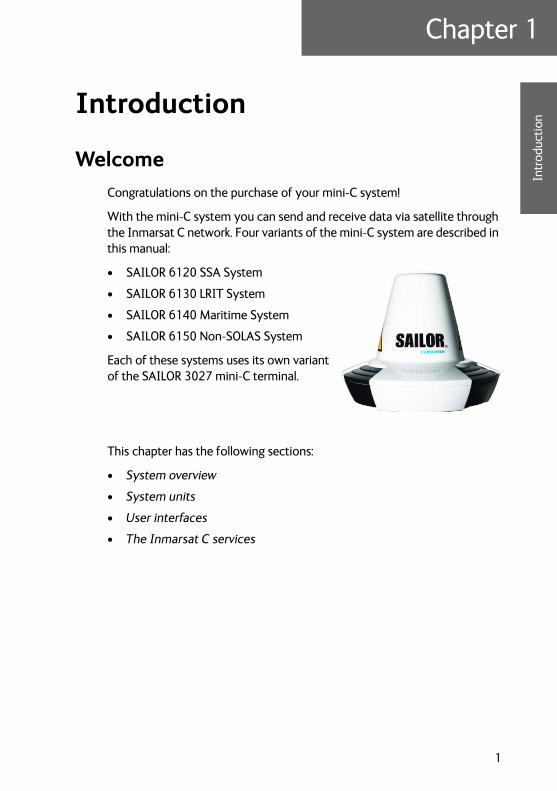
Congratulations on the purchase of your mini-C system!
With the mini-C system you can send and receive data via satellite through the Inmarsat C network. Four variants of the mini-C system are described in this manual:
• SAILOR 6120 SSA System
• SAILOR 6130 LRIT System
• SAILOR 6140 Maritime System
• SAILOR 6150 Non-SOLAS System
Each of these systems uses its own variant of the SAILOR 3027 mini-C terminal.
This chapter has the following sections:
• System overview
• System units
• User interfaces
• The Inmarsat C services
1
Chapter 1: Introduction
System overview
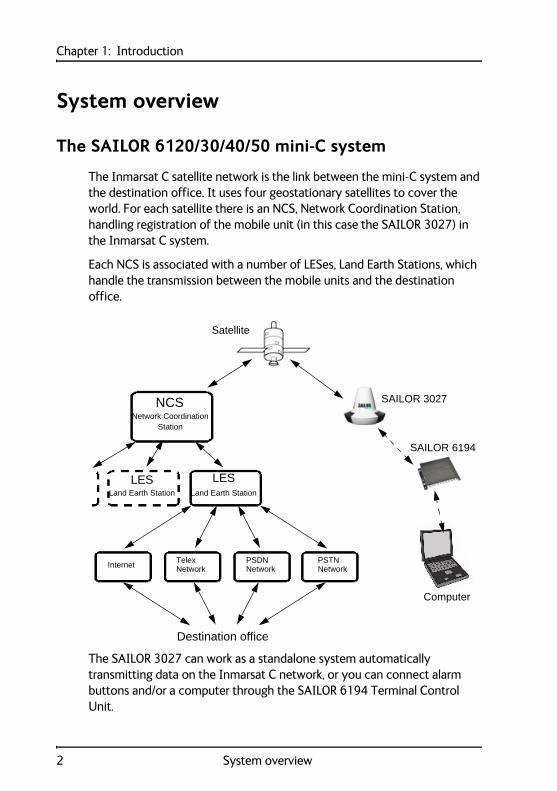
The SAILOR 6120/30/40/50 mini-C system
The Inmarsat C satellite network is the link between the mini-C system and the destination office. It uses four geostationary satellites to cover the world. For each satellite there is an NCS, Network Coordination Station, handling registration of the mobile unit (in this case the SAILOR 3027) in the Inmarsat C system.
Each NCS is associated with a number of LESes, Land Earth Stations, which handle the transmission between the mobile units and the destination office.
The SAILOR 3027 can work as a standalone system automatically transmitting data on the Inmarsat C network, or you can connect alarm buttons and/or a computer through the SAILOR 6194 Terminal Control Unit.
NCSNetwork Coordination
Station
LES LESLand Earth Station Land Earth Station
InternetTelexNetwork
PSDNNetwork
PSTNNetwork
Destination office
Satellite
SAILOR 3027
Computer
SAILOR 6194
2 System overview
Chapter 1: Introduction1111
Intr
oduc
tion
The SAILOR 3027 can be connected to a SAILOR 6006 Message Terminal, where you can read and write messages and send Distress Alerts (SAILOR 6150 only). This communication is transmitted via the SAILOR 3027 to/from the Inmarsat C satellite network.
Scripting
The SAILOR 6194 Terminal Control Unit supports simple scripting, using Lua language. Scripting can be used e.g. for automatically reacting on events registered in the multipurpose input/output pins of the SAILOR 6194. With the Script option you can run custom-designed scripts dedicated to specific applications with the SAILOR 3027.
Typically a script monitors and controls the SAILOR 3027 by using commands via the command shell interface. The scripts are run from an SD memory card installed in the SD card slot of the SAILOR 6194. For further information on scripting, see the manual for the SAILOR 6194 Terminal Control Unit.
System overview 3
Chapter 1: Introduction
System units
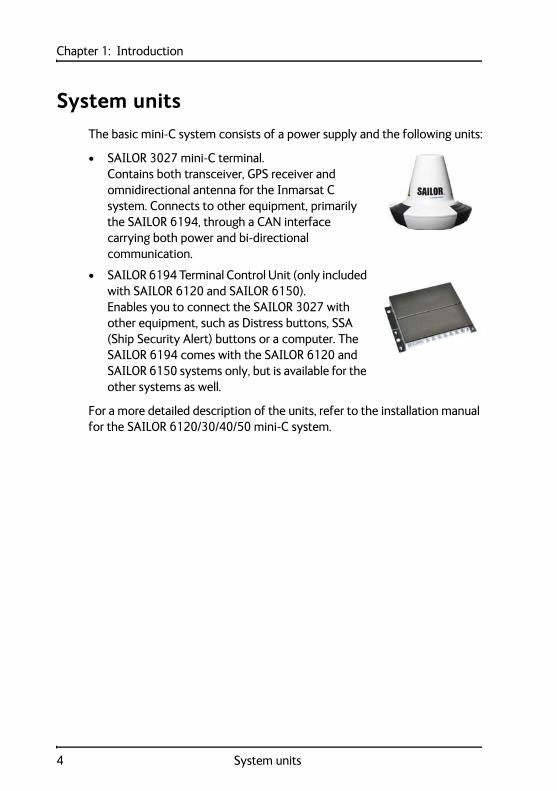
The basic mini-C system consists of a power supply and the following units:
• SAILOR 3027 mini-C terminal. Contains both transceiver, GPS receiver and omnidirectional antenna for the Inmarsat C system. Connects to other equipment, primarily the SAILOR 6194, through a CAN interface carrying both power and bi-directional communication.
• SAILOR 6194 Terminal Control Unit (only included with SAILOR 6120 and SAILOR 6150).Enables you to connect the SAILOR 3027 with other equipment, such as Distress buttons, SSA (Ship Security Alert) buttons or a computer. The SAILOR 6194 comes with the SAILOR 6120 and SAILOR 6150 systems only, but is available for the other systems as well.
For a more detailed description of the units, refer to the installation manual for the SAILOR 6120/30/40/50 mini-C system.
4 System units
Chapter 1: Introduction1111
Intr
oduc
tion
User interfaces
The basic mini-C system does not have a dedicated user interface. To have a user interface you must use one of the following options:
• a SAILOR 6194 Terminal Control Unit and a computer with the easyMail application installed. For details, refer to SAILOR 6120/30/40/50, Installation manual [1].
• a SAILOR 6006 Message Terminal connected to the system through the CAN interface. The SAILOR 6006 has a built-in user interface.
For overall system status, diagnostics and live logging you may use the ThraneLINK Management System (TMA). For details on the TMA, see The ThraneLINK Management Application on page 72.
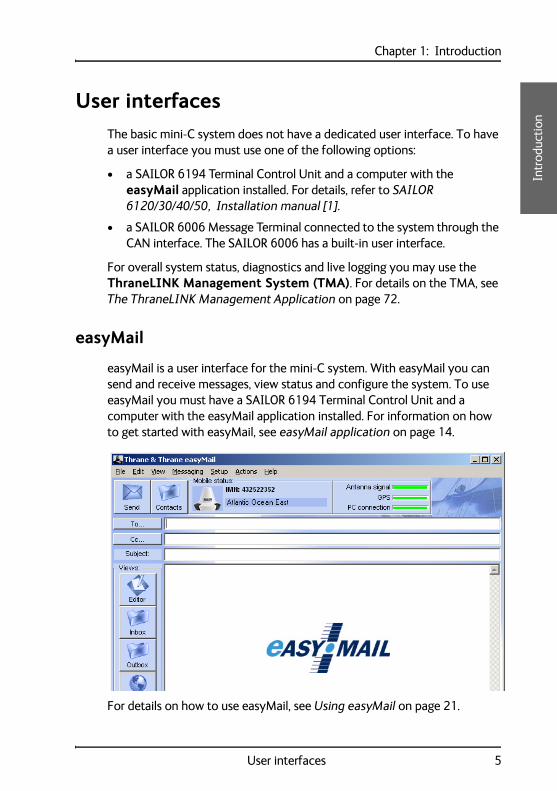
easyMail
easyMail is a user interface for the mini-C system. With easyMail you can send and receive messages, view status and configure the system. To use easyMail you must have a SAILOR 6194 Terminal Control Unit and a computer with the easyMail application installed. For information on how to get started with easyMail, see easyMail application on page 14.
For details on how to use easyMail, see Using easyMail on page 21.
User interfaces 5
Chapter 1: Introduction
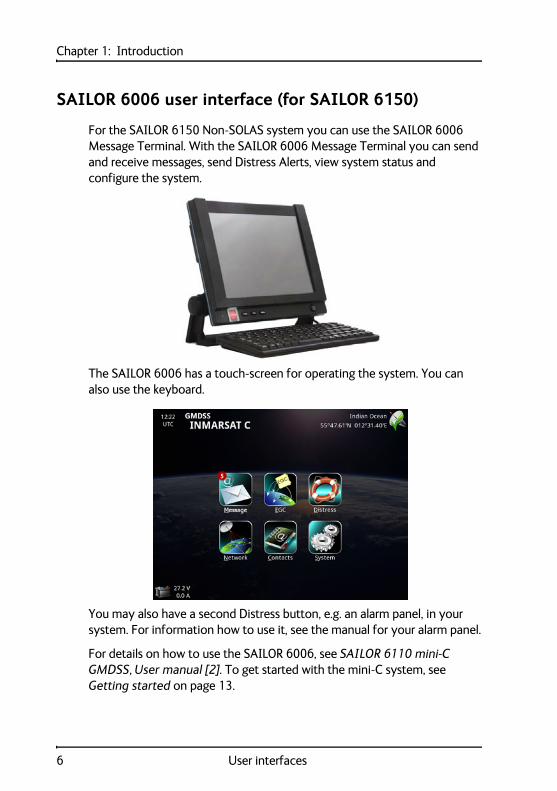
SAILOR 6006 user interface (for SAILOR 6150)
For the SAILOR 6150 Non-SOLAS system you can use the SAILOR 6006 Message Terminal. With the SAILOR 6006 Message Terminal you can send and receive messages, send Distress Alerts, view system status and configure the system.
The SAILOR 6006 has a touch-screen for operating the system. You can also use the keyboard.
You may also have a second Distress button, e.g. an alarm panel, in your system. For information how to use it, see the manual for your alarm panel.
For details on how to use the SAILOR 6006, see SAILOR 6110 mini-C GMDSS, User manual [2]. To get started with the mini-C system, see Getting started on page 13.
6 User interfaces
Chapter 1: Introduction1111
Intr
oduc
tion
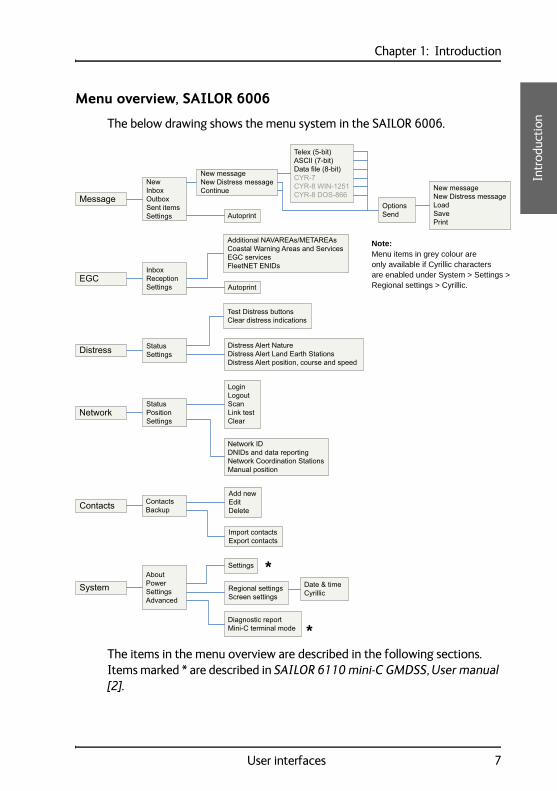
Menu overview, SAILOR 6006
The below drawing shows the menu system in the SAILOR 6006.
The items in the menu overview are described in the following sections. Items marked * are described in SAILOR 6110 mini-C GMDSS, User manual [2].
Menu items in grey colour areonly available if Cyrillic charactersare enabled under System > Settings >Regional settings > Cyrillic.
Note:
*
*
User interfaces 7
Chapter 1: Introduction
The Inmarsat C services
The mini-C system supports the following services through the Inmarsat C system. For a description of these services, see the next sections.
Distress alerting and Distress priority messaging
Enhanced Group Calling (EGC)
Message transmission
Position reporting
Data reporting and polling
Distress alerting and Distress priority messaging
If a ship or a crew is in grave and imminent danger, maritime Inmarsat C and some mini-C models are used to send a Distress Alert by pushing a dedicated Distress button.
The alert contains information on the ship's identity (Inmarsat C mobile number), ship's position (latitude and longitude), ship's course and speed, nature of Distress, date / time when the alert was sent and time when the ship's position was last updated.
All Distress Alerts are automatically routed through the addressed LES to an associated Maritime Rescue Coordination Centre (MRCC), which will establish communication with the ship and launch the search and rescue (SAR) operation the ship may need.
After sending the initial Distress Alert, if time permits, it is possible to send a more detailed Distress priority message to give more details about the Distress event and ask for the required assistance.
The Distress priority message should be sent via the same LES as the Distress Alert, to ensure that it is delivered automatically to the same MRCC.
8 The Inmarsat C services
Chapter 1: Introduction1111
Intr
oduc
tion
Enhanced Group Calling (EGC)
The Inmarsat C system has a special capability known as Enhanced Group Call (EGC), which enables authorised information providers to broadcast messages to selected groups of ships. Reception by ships that are fitted with Inmarsat C or mini-C terminals is automatic. A special header is added by the system to the EGC message to indicate the group of mobile terminals or the geographical area to which the message is to be sent.
Two EGC services are available:
• EGC SafetyNET - the international safety service, which allows authorised maritime safety information (MSI) providers, such as meteorological offices, hydrographic officers and MRCCs to broadcast messages to all ships in certain geographical areas.
MSI includes navigational and meteorological warnings, meteorological forecasts and other urgent safety-related information, which is addressed to all ships in NAVAREA / METAREA, user-defined circular or rectangular area or coastal area.
Reception of SafetyNET messages is a mandatory function of the GMDSS equipment that is required to be carried in certain ships under the provision of the International Maritime Organisation's Safety Of Life At Sea (SOLAS) convention.
• EGC FleetNET - the international commercial service, which allows authorised information providers, such as commercial subscription services, shipping companies or governments to broadcast messages to selected groups of vessels, each of which has registered with the information provider and been added to a FleetNET closed group / network. The mobile terminals on these groups of vessels are identified by an ENID (EGC Network IDentification) common to the group.
For further information on EGC via Inmarsat C read the Inmarsat Maritime Communications Handbook, Chapter 6, or visit the Inmarsat Maritime Safety Services website at www.inmarsat.com.
The Inmarsat C services 9

Chapter 1: Introduction
Message transmission
Ship to shore: Text and data from Inmarsat C and mini-C terminals can be sent to:
• An e-mail address
• Any telex or fax (text, one way only) number
• Any computer connected to the public telephone and data networks (PSTN and PSDN), using a telephone modem number
• Another Inmarsat C / mini-C terminal
• A Short (or Special) Access Code (SAC).
The maximum message size is 10 kb for the SAILOR 3027.
Shore to ship: Text and data can be sent via telex, e-mail and the data and telephone (PSDN / PSTN) networks. To be able to send messages to ships, a shore-based message originator needs to be registered (to have a commercial service agreement) with an Inmarsat C service provider of their choice.
Ship to ship: Messages can also be sent in a ship-to-ship direction from one Inmarsat C / mini-C terminal to another.
Position reporting
Most of Inmarsat C and mini-C models are integrated with Global Navigational Satellite System (GNSS) receivers, such as GPS, to provide highly reliable, round-the-clock position information of a ship, which can be used for position reporting.
The position reporting service is based on using the data reporting and polling protocol and allows a shore-based subscriber (base station or shipping company) to request position information from a vessel, as a single report or automatic reception at fixed intervals, e.g. every six hours.
A ship's terminal can also be programmed to send regular position reports to any desired destination.
The position report includes ship's identity, latitude, longitude, course, speed, date / time of the position report and time of the last position update.
10 The Inmarsat C services
Chapter 1: Introduction1111
Intr
oduc
tion
In the mini-C system, the report is sent to a DNID (Data Network IDentifier) that is effectively a mailbox created on some LESes. The SAILOR 3027 sends its reports to this mailbox and other tracking systems can then access and empty the mailbox. The mini-C system supports up to 64 DNIDs.
Up to 255 mobile terminals can use the same DNID, and the specific terminal is identified by a member number between 1 and 255.
The DNID must be created on the LES before the position-reporting feature can be used. Once the DNID account is created, the LES can download the DNID information to the desired terminals, thereby enabling them to send reports to the DNID.
Data reporting and polling
Inmarsat C users may need to acquire information (short data reports) from vessels, or to collect data automatically at fixed or variable intervals.
The data reporting service allows for the transmission of information, in packets of up to 32 bytes on request or at prearranged intervals from Inmarsat C or mini-C terminals, to shore-based customers.
Polling allows shore-based customers to interrogate an Inmarsat C or mini-C terminal or group of terminals by sending a special polling command. The polling command instructs a terminal or group of terminals to send a data report immediately, start sending regular reports, change transmission schedule of reports or perform another task of the polled terminal(s).
The Inmarsat C services 11
Chapter 1: Introduction
12 The Inmarsat C services
Chapter 222
22
Get
ting
sta
rted
Getting started 2
This chapter explains how to register, start up and log on your mini-C system. It has the following sections:
• Registration
• Starting up the system
• User interfaces
Registration
Before using the SAILOR 3027 mini-C terminal on the Inmarsat-C system you must register the terminal to the system. In most cases the distributor has already filled in the Service Activation Registration Form (SARF) for your SAILOR 3027 when you receive your mini-C system.
For details on registration, see the Installation manual for the mini-C system.
After registration you must use a computer with the easyMail 2 application or a SAILOR 6006 Message Terminal to set up the mobile number in the SAILOR 3027. See Entering the mobile number on page 58 (easyMail) or Setting the mobile number in the TT-3027A on page 70 (SAILOR 6006).
13
Chapter 2: Getting started
User interfaces
If you are going to use your mini-C system for anything other than automatically transmitting reports, you should have a user interface for accessing the mini-C system. In Non-SOLAS Distress systems a user interface is mandatory, because of the need for safety communication.
You can control the mini-C system in two ways:
• Using the easyMail 2 application installed on a computer. The computer must be connected via the LAN interface in the SAILOR 6194 Terminal Control Unit to the mini-C system.
• Using a SAILOR 6006 Message Terminal. The SAILOR 6006 must be connected to the CAN interface of the system.
easyMail application
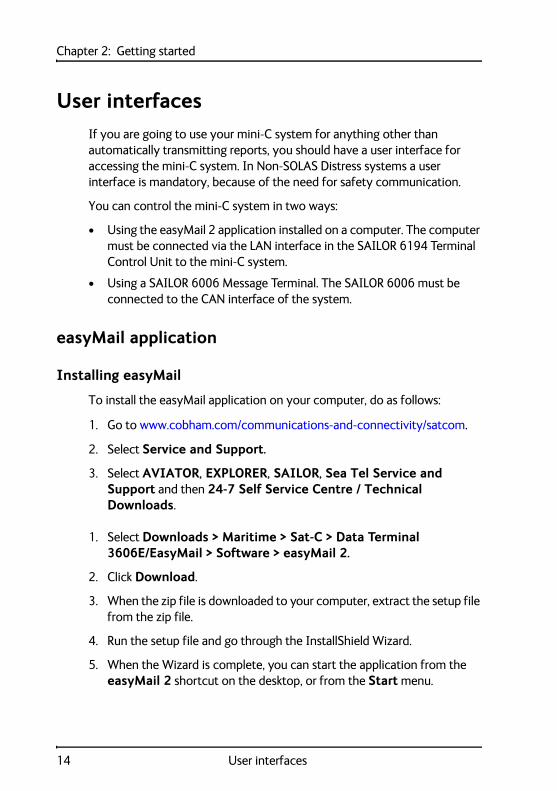
Installing easyMail
To install the easyMail application on your computer, do as follows:
1. Go to www.cobham.com/communications-and-connectivity/satcom.
2. Select Service and Support.
3. Select AVIATOR, EXPLORER, SAILOR, Sea Tel Service and Support and then 24-7 Self Service Centre / Technical Downloads.
1. Select Downloads > Maritime > Sat-C > Data Terminal 3606E/EasyMail > Software > easyMail 2.
2. Click Download.
3. When the zip file is downloaded to your computer, extract the setup file from the zip file.
4. Run the setup file and go through the InstallShield Wizard.
5. When the Wizard is complete, you can start the application from the easyMail 2 shortcut on the desktop, or from the Start menu.
14 User interfaces
Chapter 2: Getting started2
22
2
Get
ting
sta
rted
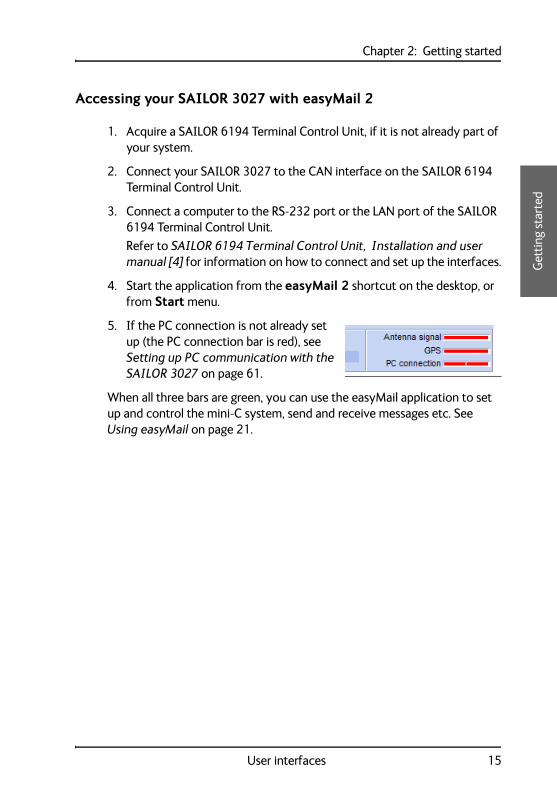
Accessing your SAILOR 3027 with easyMail 2
1. Acquire a SAILOR 6194 Terminal Control Unit, if it is not already part of your system.
2. Connect your SAILOR 3027 to the CAN interface on the SAILOR 6194 Terminal Control Unit.
3. Connect a computer to the RS-232 port or the LAN port of the SAILOR 6194 Terminal Control Unit.
Refer to SAILOR 6194 Terminal Control Unit, Installation and user manual [4] for information on how to connect and set up the interfaces.
4. Start the application from the easyMail 2 shortcut on the desktop, or from Start menu.
5. If the PC connection is not already set up (the PC connection bar is red), see Setting up PC communication with the SAILOR 3027 on page 61.
When all three bars are green, you can use the easyMail application to set up and control the mini-C system, send and receive messages etc. See Using easyMail on page 21.
User interfaces 15
Chapter 2: Getting started
SAILOR 6006 Message Terminal
The SAILOR 6006 has its own built-in user interface. If you are using a SAILOR 6006 with your SAILOR 6150 Non-SOLAS system, you must config-ure the SAILOR 6006 before using it for the first time.
For configuration you must have a keyboard connected to the SAILOR 6006.
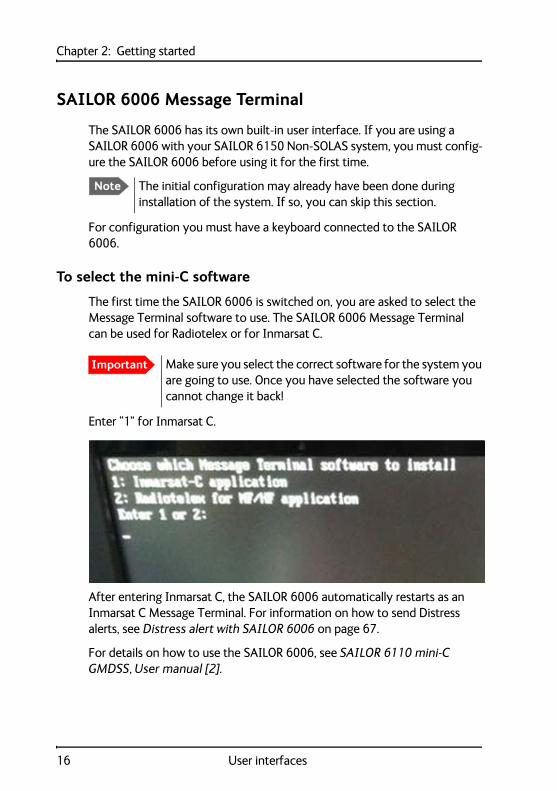
To select the mini-C software
The first time the SAILOR 6006 is switched on, you are asked to select the Message Terminal software to use. The SAILOR 6006 Message Terminal can be used for Radiotelex or for Inmarsat C.
Enter “1” for Inmarsat C.
After entering Inmarsat C, the SAILOR 6006 automatically restarts as an Inmarsat C Message Terminal. For information on how to send Distress alerts, see Distress alert with SAILOR 6006 on page 67.
For details on how to use the SAILOR 6006, see SAILOR 6110 mini-C GMDSS, User manual [2].
Note The initial configuration may already have been done during installation of the system. If so, you can skip this section.
Important Make sure you select the correct software for the system you are going to use. Once you have selected the software you cannot change it back!
16 User interfaces
Chapter 2: Getting started2
22
2
Get
ting
sta
rted
Starting up the system
easyMail
When the power source is on, the SAILOR 3027 automatically starts up and logs on to the satellite network.
You can see the logon status on screen on a connected computer with easyMail 2 installed.
SAILOR 6006 (for SAILOR 6150 Non-SOLAS system)
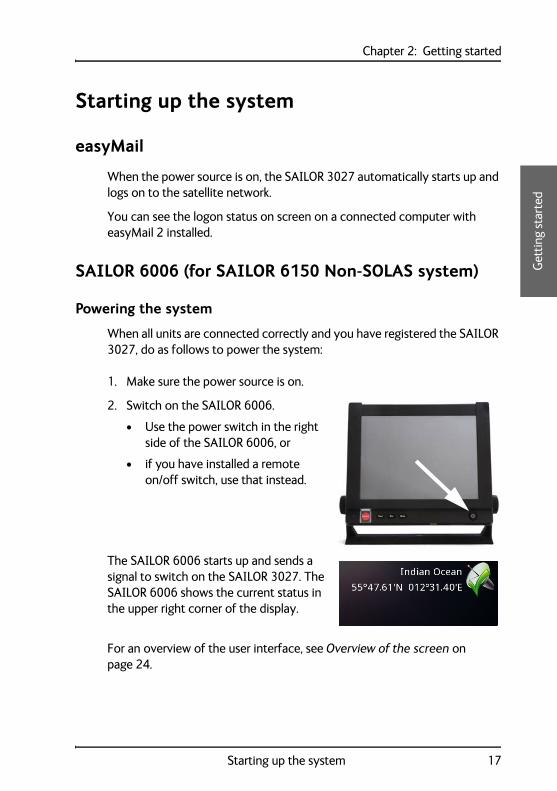
Powering the system
When all units are connected correctly and you have registered the SAILOR 3027, do as follows to power the system:
1. Make sure the power source is on.
2. Switch on the SAILOR 6006.
• Use the power switch in the right side of the SAILOR 6006, or
• if you have installed a remote on/off switch, use that instead.
The SAILOR 6006 starts up and sends a signal to switch on the SAILOR 3027. The SAILOR 6006 shows the current status in the upper right corner of the display.
For an overview of the user interface, see Overview of the screen on page 24.
Starting up the system 17
Chapter 2: Getting started
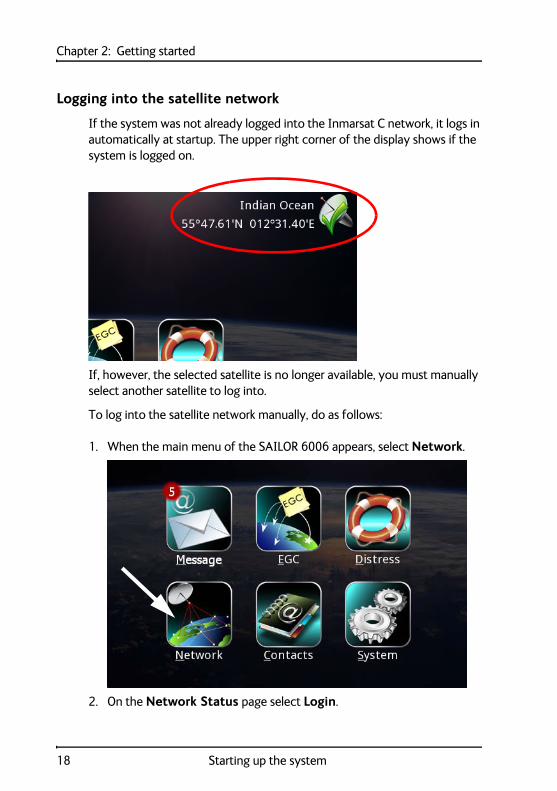
Logging into the satellite network
If the system was not already logged into the Inmarsat C network, it logs in automatically at startup. The upper right corner of the display shows if the system is logged on.
If, however, the selected satellite is no longer available, you must manually select another satellite to log into.
To log into the satellite network manually, do as follows:
1. When the main menu of the SAILOR 6006 appears, select Network.
2. On the Network Status page select Login.
18 Starting up the system
Chapter 2: Getting started2
22
2
Get
ting
sta
rted
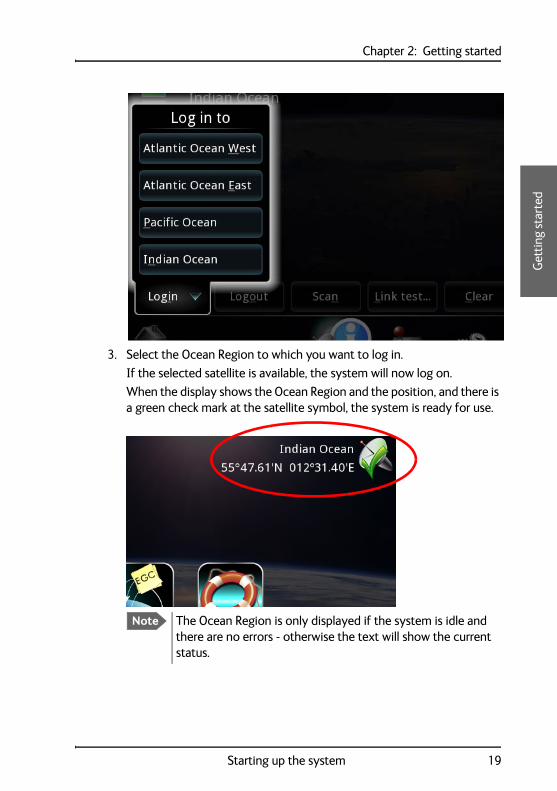
3. Select the Ocean Region to which you want to log in.
If the selected satellite is available, the system will now log on.
When the display shows the Ocean Region and the position, and there is a green check mark at the satellite symbol, the system is ready for use.
Note The Ocean Region is only displayed if the system is idle and there are no errors - otherwise the text will show the current status.
Starting up the system 19
Chapter 2: Getting started
20 Starting up the system

Chapter 333
33
Usi
ng e
asyM
ail
Using easyMail 3
This chapter describes how to operate the mini-C system using the easyMail 2 application. It has the following sections:
• Overview of easyMail
• Distress functions (only SAILOR 6150)
• Working with messages
• Position reporting
• Receiving EGCs
• Network status and settings
• Viewing system details
• Viewing or changing position information
• Viewing status and Info log
• To see the Info log
• Setting up the default ISP and default LESes
• To set up the default LESes
• Setting up reception of EGCs
• Setting up ENIDs
• Setting up the Land Earth Stations (LES)
• Setting up Inmarsat Service Providers (ISP)
• Entering the mobile number
• Setting the local time
• Setting up password protection
• Setting the language
• Setting up PC communication with the SAILOR 3027
• Setting up easyMail
21
Chapter 3: Using easyMail
Overview of easyMail
For information on how to install and start up easyMail 2, see easyMail application on page 14.
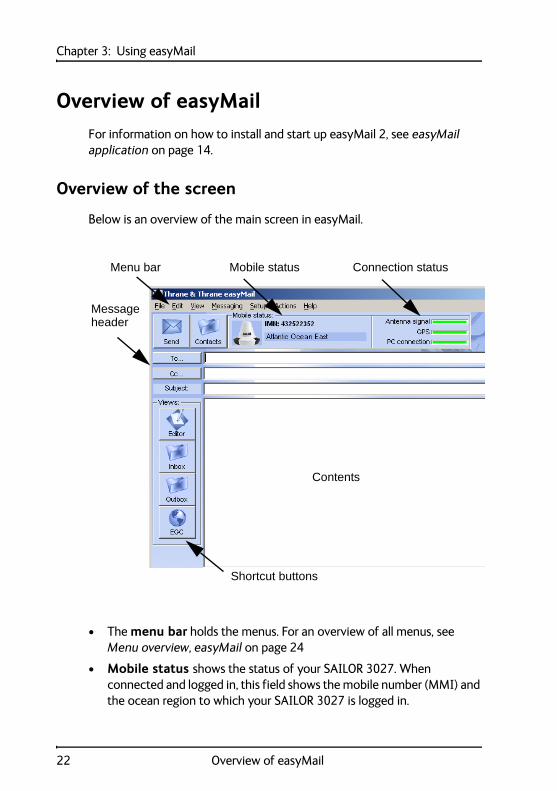
Overview of the screen
Below is an overview of the main screen in easyMail.
• The menu bar holds the menus. For an overview of all menus, see Menu overview, easyMail on page 24
• Mobile status shows the status of your SAILOR 3027. When connected and logged in, this field shows the mobile number (MMI) and the ocean region to which your SAILOR 3027 is logged in.
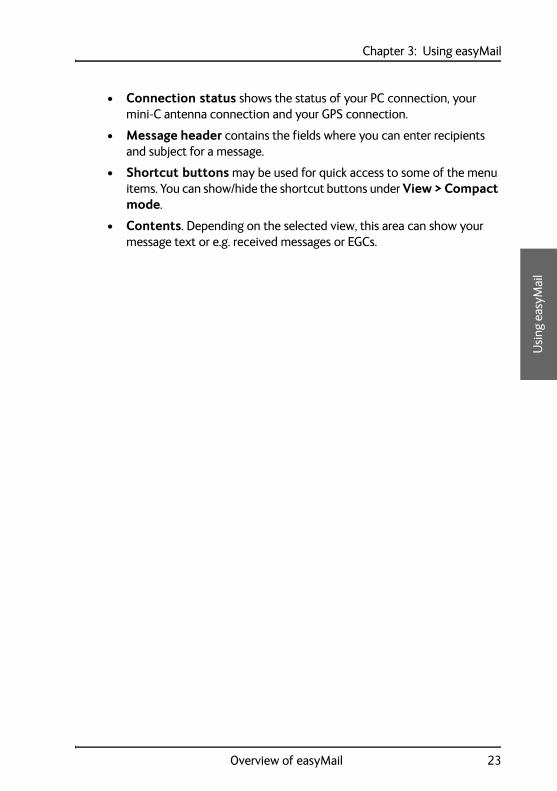
Menu bar Connection statusMobile status
Shortcut buttons
Contents
Messageheader
22 Overview of easyMail
Chapter 3: Using easyMail 33
33
Usi
ng e
asyM
ail
• Connection status shows the status of your PC connection, your mini-C antenna connection and your GPS connection.
• Message header contains the fields where you can enter recipients and subject for a message.
• Shortcut buttons may be used for quick access to some of the menu items. You can show/hide the shortcut buttons under View > Compact mode.
• Contents. Depending on the selected view, this area can show your message text or e.g. received messages or EGCs.
Overview of easyMail 23
Chapter 3: Using easyMail
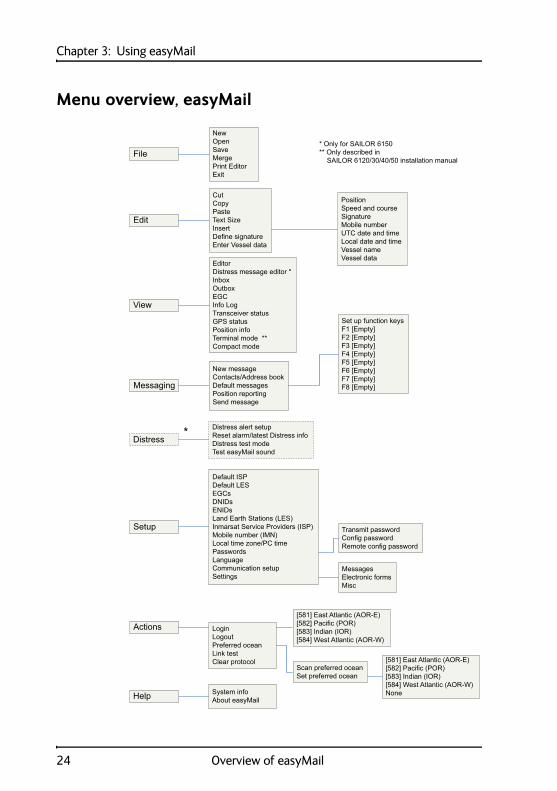
Menu overview, easyMail
24 Overview of easyMail
Chapter 3: Using easyMail 33
33
Usi
ng e
asyM
ail
Distress functions (only SAILOR 6150)
Writing a Distress priority message
To write a Distress priority message, do as follows:
1. From the menu bar, select View > Distress message editor.
A warning appears.
2. Click Yes and then OK to continue to the Distress message editor.
The position and mobile number of your SAILOR 3027 is automatically inserted at the beginning of the Distress message, together with the data you have entered under Vessel data (if any).
3. Type a subject for the message.
4. Type your message, describing the nature of the Distress.
5. Click Send.
Setting up Distress alert
You can temporarily change the settings for your Distress function.
For information on how to use the Distress button to send a Distress alert, see To send a Distress Alert (SAILOR 6150 only) on page 65.
Default settings:
• Distress Alert Nature: Unspecified.
• Distress Alert Land Earth Stations: LES automatically selected by mobile. (the SAILOR 3027 selects the LES with the best signal).
• Distress Alert Position, Course and Speed: Always use latest position from GPS.
Note Distress priority messages are sent to the MRCC only.
Distress priority messages must be written in English.
Important The Subject field is important - some messages may not be received correctly if the subject is missing.
Distress functions (only SAILOR 6150) 25
Chapter 3: Using easyMail
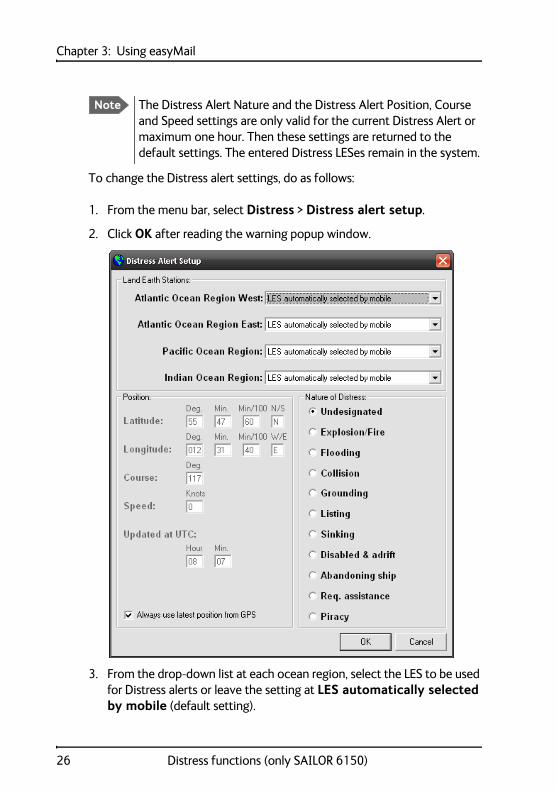
To change the Distress alert settings, do as follows:
1. From the menu bar, select Distress > Distress alert setup.
2. Click OK after reading the warning popup window.
3. From the drop-down list at each ocean region, select the LES to be used for Distress alerts or leave the setting at LES automatically selected by mobile (default setting).
Note The Distress Alert Nature and the Distress Alert Position, Course and Speed settings are only valid for the current Distress Alert or maximum one hour. Then these settings are returned to the default settings. The entered Distress LESes remain in the system.
26 Distress functions (only SAILOR 6150)
Chapter 3: Using easyMail 33
33
Usi
ng e
asyM
ail
4. If necessary, change the position, course and speed.
5. Select the nature of the Distress.
6. Click OK.
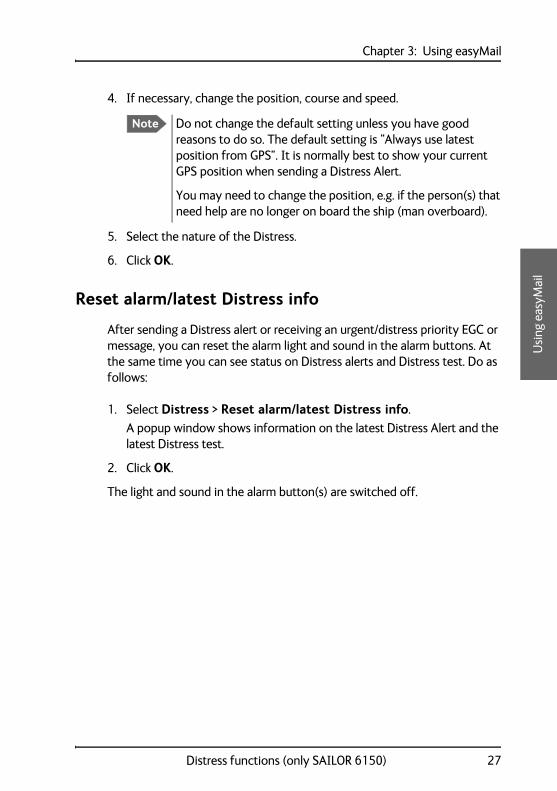
Reset alarm/latest Distress info
After sending a Distress alert or receiving an urgent/distress priority EGC or message, you can reset the alarm light and sound in the alarm buttons. At the same time you can see status on Distress alerts and Distress test. Do as follows:
1. Select Distress > Reset alarm/latest Distress info.
A popup window shows information on the latest Distress Alert and the latest Distress test.
2. Click OK.
The light and sound in the alarm button(s) are switched off.
Note Do not change the default setting unless you have good reasons to do so. The default setting is “Always use latest position from GPS”. It is normally best to show your current GPS position when sending a Distress Alert.
You may need to change the position, e.g. if the person(s) that need help are no longer on board the ship (man overboard).
Distress functions (only SAILOR 6150) 27
Chapter 3: Using easyMail
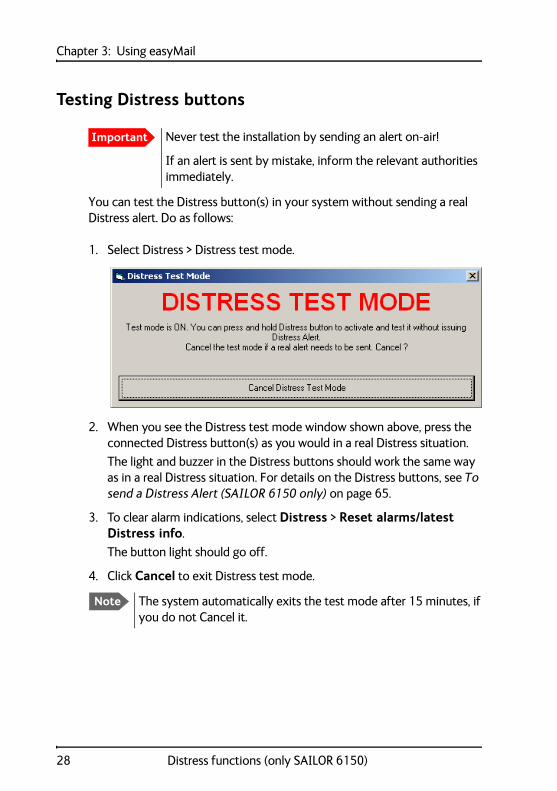
Testing Distress buttons
You can test the Distress button(s) in your system without sending a real Distress alert. Do as follows:
1. Select Distress > Distress test mode.
2. When you see the Distress test mode window shown above, press the connected Distress button(s) as you would in a real Distress situation.
The light and buzzer in the Distress buttons should work the same way as in a real Distress situation. For details on the Distress buttons, see To send a Distress Alert (SAILOR 6150 only) on page 65.
3. To clear alarm indications, select Distress > Reset alarms/latest Distress info.
The button light should go off.
4. Click Cancel to exit Distress test mode.
Important Never test the installation by sending an alert on-air!
If an alert is sent by mistake, inform the relevant authorities immediately.
Note The system automatically exits the test mode after 15 minutes, if you do not Cancel it.
28 Distress functions (only SAILOR 6150)
Chapter 3: Using easyMail 33
33
Usi
ng e
asyM
ail
Testing easyMail alarm sound
To test the alarm sound in easyMail, do as follows:
1. Select Distress > Test easyMail sound.
2. Click Start to hear the sound on your computer.
Your computer will now play the same sound that you will hear when a Distress alert is sent or an urgent/distress priority EGC or message is received.
3. Click Stop to stop the sound.
4. When you have finished testing, click Cancel or close the window.
Distress functions (only SAILOR 6150) 29
Chapter 3: Using easyMail
Working with messages
Preparing the system
Before you can send a message:
• The recipient of the message must be listed in the Address book. For details, see Managing the list of Contacts on page 38.
• The SAILOR 3027 must be logged in to an Ocean Region.Normally the SAILOR 3027 logs in automatically. If it is logged out, see Logging into and out of the network on page 46.
• The default ISP must be set.
See Setting up the default ISP and default LESes on page 51.
• Default LESes must be set for all Ocean Regions.
See To set up the default LESes on page 51.
• The mobile number must be configured in the SAILOR 3027.
This is normally set up during installation. If not, see Entering the mobile number on page 58.
30 Working with messages
Chapter 3: Using easyMail 33
33
Usi
ng e
asyM
ail
Writing a routine priority message
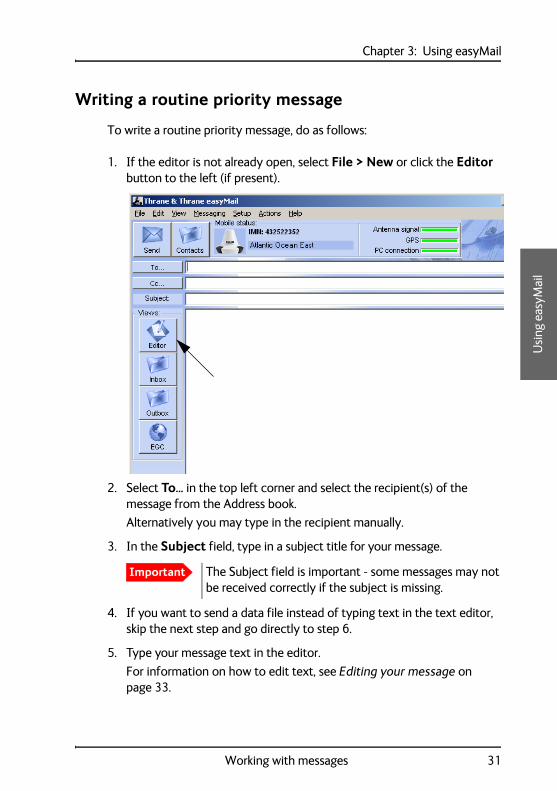
To write a routine priority message, do as follows:
1. If the editor is not already open, select File > New or click the Editor button to the left (if present).
2. Select To... in the top left corner and select the recipient(s) of the message from the Address book.
Alternatively you may type in the recipient manually.
3. In the Subject field, type in a subject title for your message.
4. If you want to send a data file instead of typing text in the text editor, skip the next step and go directly to step 6.
5. Type your message text in the editor.
For information on how to edit text, see Editing your message on page 33.
Important The Subject field is important - some messages may not be received correctly if the subject is missing.
Working with messages 31
Chapter 3: Using easyMail
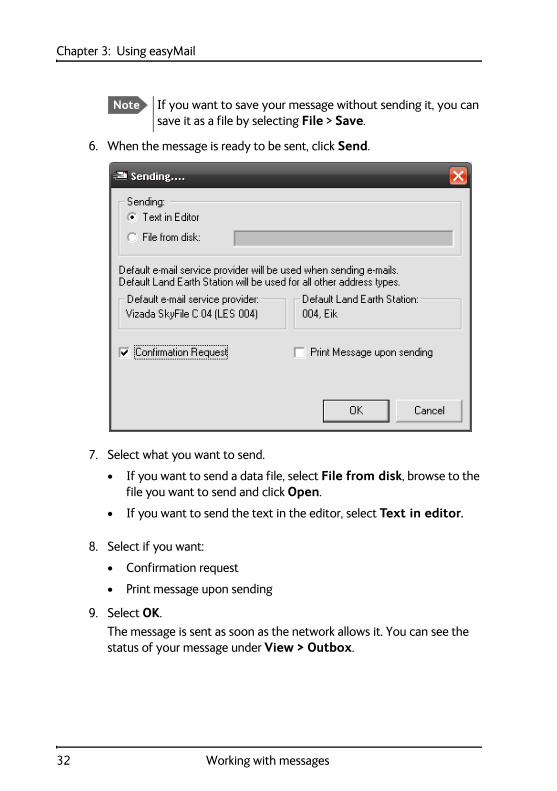
6. When the message is ready to be sent, click Send.
7. Select what you want to send.
• If you want to send a data file, select File from disk, browse to the file you want to send and click Open.
• If you want to send the text in the editor, select Text in editor.
8. Select if you want:
• Confirmation request
• Print message upon sending
9. Select OK.
The message is sent as soon as the network allows it. You can see the status of your message under View > Outbox.
Note If you want to save your message without sending it, you can save it as a file by selecting File > Save.
32 Working with messages
Chapter 3: Using easyMail 33
33
Usi
ng e
asyM
ail
Options for writing and sending messages
In the File menu, you have the following options:
• New. Opens a new message.
• Open. Allows you to select a text file to be opened in the editor.
• Save. Allows you to save the message for later use.
• Merge. Allows you to insert the contents from a text file into your message at the cursor position.
• Print editor. Prints the message on a connected printer.
• Exit. Closes easyMail.
Editing your message
When writing a message you have some editing options, described in the next subsections.
To cut, copy and paste
In the Edit menu you can select Cut, Copy and Paste as in a normal editor.
To change text size
To change the text size, press Ctrl+F1 (smaller) and Ctrl+F2 (larger), or select Edit > Text size > + Ctrl+F2 or - Ctrl+F1.
Working with messages 33
Chapter 3: Using easyMail
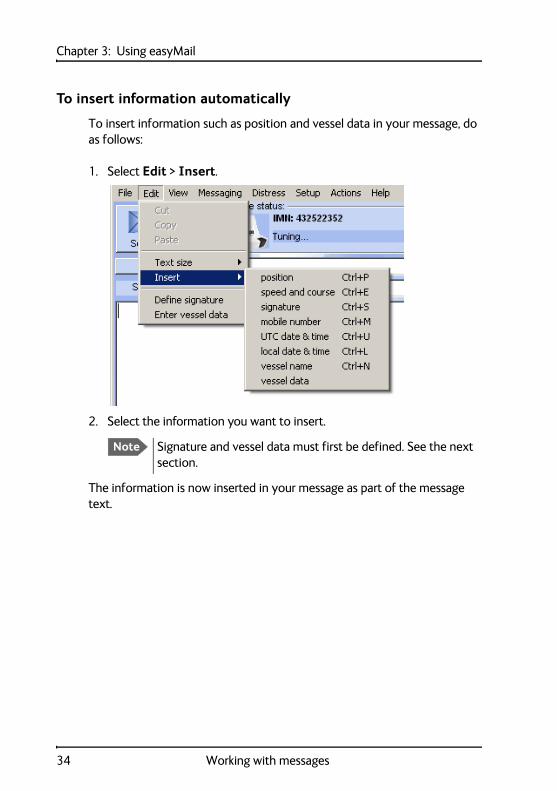
To insert information automatically
To insert information such as position and vessel data in your message, do as follows:
1. Select Edit > Insert.
2. Select the information you want to insert.
The information is now inserted in your message as part of the message text.
Note Signature and vessel data must first be defined. See the next section.
34 Working with messages
Chapter 3: Using easyMail 33
33
Usi
ng e
asyM
ail
To enter signature and vessel data
You can enter a signature and your vessel data for later automatic insertion in your messages (see previous section). To define your signature, do as follows:
1. Select Edit > Define signature.
2. Type in your signature and click OK.
The signature is now saved for later use with Edit > Insert.
To enter your vessel data, do as follows:
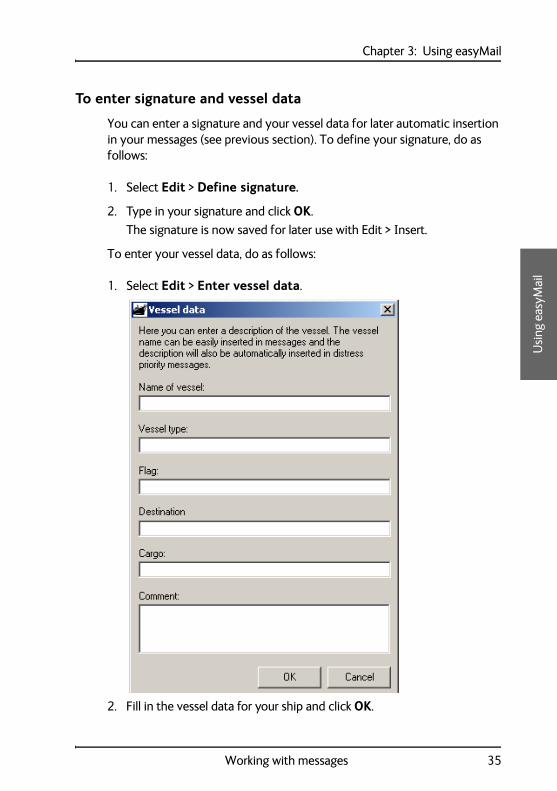
1. Select Edit > Enter vessel data.
2. Fill in the vessel data for your ship and click OK.
Working with messages 35
Chapter 3: Using easyMail
Using default messages
You can write a default message that you can recall and send by pressing one of the F-keys F1 to F8.
Creating a default message
To create a default message, do as follows:
1. Open the message editor.
2. Type in your message.
3. Select Messaging > Default messages.
4. Select the F-key you want to use for the message.
5. Type a name for the message.
6. Click Save and close.
Sending a default message
To recall and send the message, fill in the message recipient and a subject in the editor To... field and press the F-key you selected above.
Important
The Subject field is important - some messages may not be received correctly if the subject is missing.
36 Working with messages

Chapter 3: Using easyMail 33
33
Usi
ng e
asyM
ail
Viewing messages in the Inbox
To view the messages in the Inbox, do as follows:
1. Select View > Inbox.
2. Double-click the message you want to read.
From within the message you have the following options:
• Print. The message is printed on the connected printer.
• Save. You can browse to a location and save the message (.txt file)
• Forward. The message text is inserted into the editor so you can forward it to a new recipient.
• Wrap text. When selected, the text is wrapped to fit the window size.
3. Click OK or Cancel to close the message.
4. To delete one or more messages, right-click the message(s) and select Delete message)
Working with messages 37
Chapter 3: Using easyMail
Viewing sent messages (Outbox)
After writing a message and selecting Send, you can see the message and the status of the message in the Outbox. To view messages in the Outbox, select View > Outbox.
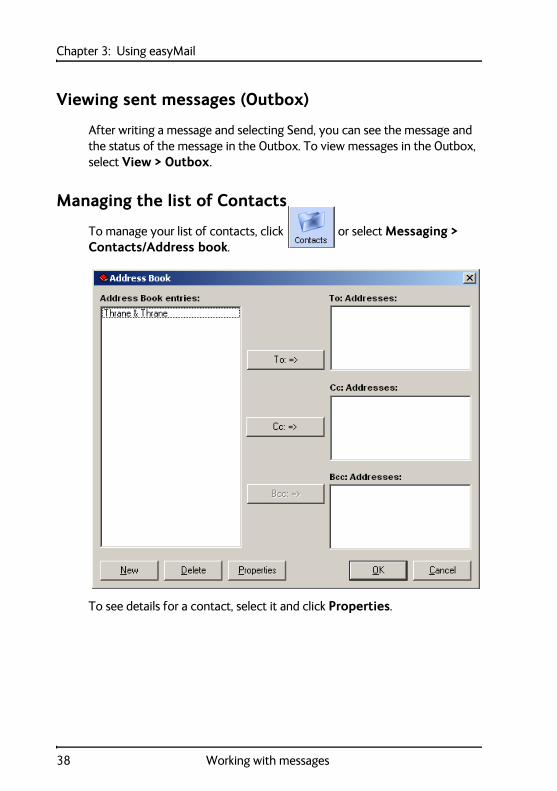
Managing the list of Contacts
To manage your list of contacts, click or select Messaging > Contacts/Address book.
To see details for a contact, select it and click Properties.
38 Working with messages
Chapter 3: Using easyMail 33
33
Usi
ng e
asyM
ail
To add a new contact
Do as follows:
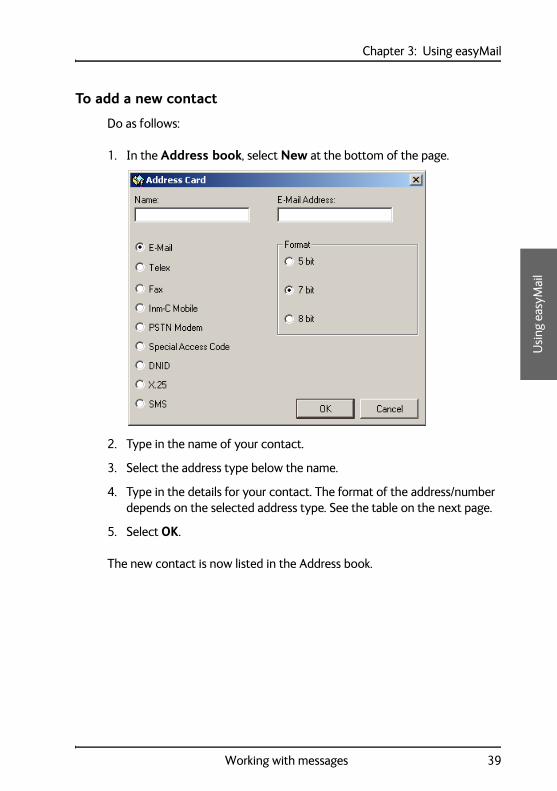
1. In the Address book, select New at the bottom of the page.
2. Type in the name of your contact.
3. Select the address type below the name.
4. Type in the details for your contact. The format of the address/number depends on the selected address type. See the table on the next page.
5. Select OK.
The new contact is now listed in the Address book.
Working with messages 39
Chapter 3: Using easyMail
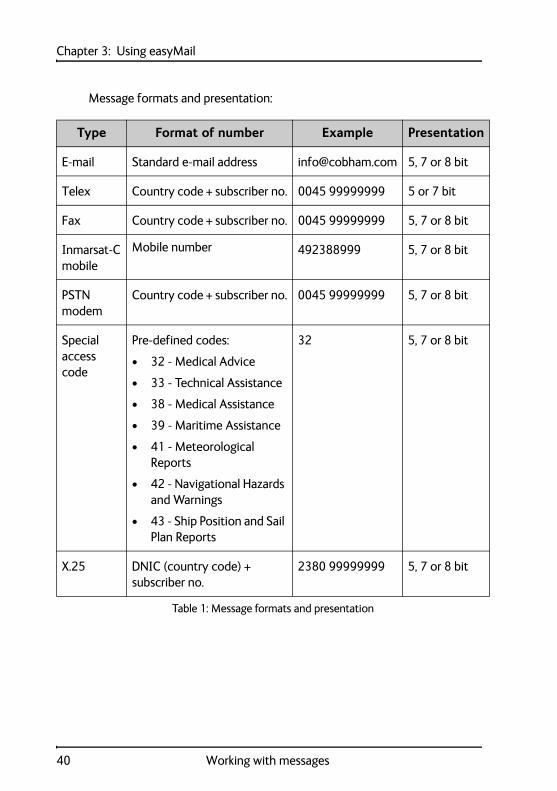
Message formats and presentation:
Type Format of number Example Presentation
E-mail Standard e-mail address [email protected] 5, 7 or 8 bit
Telex Country code + subscriber no. 0045 99999999 5 or 7 bit
Fax Country code + subscriber no. 0045 99999999 5, 7 or 8 bit
Inmarsat-C mobile
Mobile number 492388999 5, 7 or 8 bit
PSTN modem
Country code + subscriber no. 0045 99999999 5, 7 or 8 bit
Special access code
Pre-defined codes:
• 32 - Medical Advice
• 33 - Technical Assistance
• 38 - Medical Assistance
• 39 - Maritime Assistance
• 41 - Meteorological Reports
• 42 - Navigational Hazards and Warnings
• 43 - Ship Position and Sail Plan Reports
32 5, 7 or 8 bit
X.25 DNIC (country code) + subscriber no.
2380 99999999 5, 7 or 8 bit
Table 1: Message formats and presentation
40 Working with messages
Chapter 3: Using easyMail 33
33
Usi
ng e
asyM
ail
To edit a contact
Do as follows:
1. In the Address book, select the contact.
2. Select Properties.
3. Edit the details.
See the previous section for information on the contact details.
4. Select OK.
To delete a contact
Do as follows:
1. In the Address book, select the contact.
2. Select Delete.
3. Select Yes to confirm.
4. Select OK to leave the Address book.
Working with messages 41
Chapter 3: Using easyMail
Position reporting
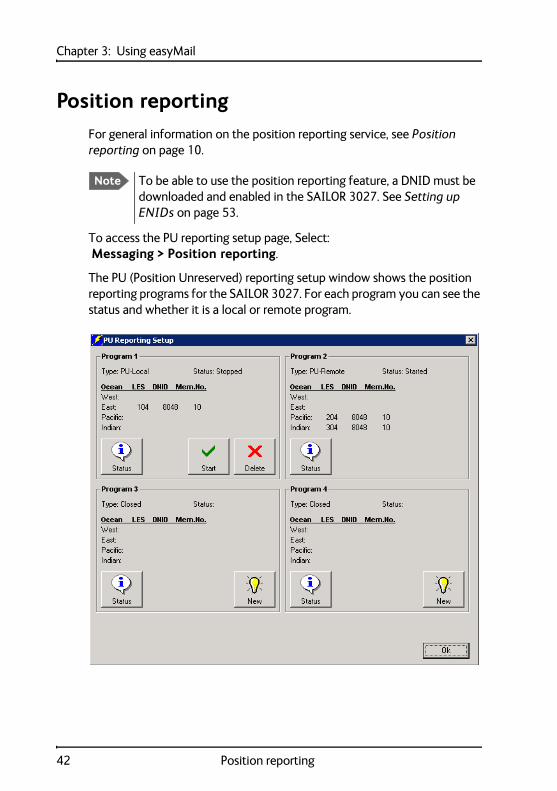
For general information on the position reporting service, see Position reporting on page 10.
To access the PU reporting setup page, Select: Messaging > Position reporting.
The PU (Position Unreserved) reporting setup window shows the position reporting programs for the SAILOR 3027. For each program you can see the status and whether it is a local or remote program.
Note To be able to use the position reporting feature, a DNID must be downloaded and enabled in the SAILOR 3027. See Setting up ENIDs on page 53.
42 Position reporting
Chapter 3: Using easyMail 33
33
Usi
ng e
asyM
ail
To start a local position reporting program
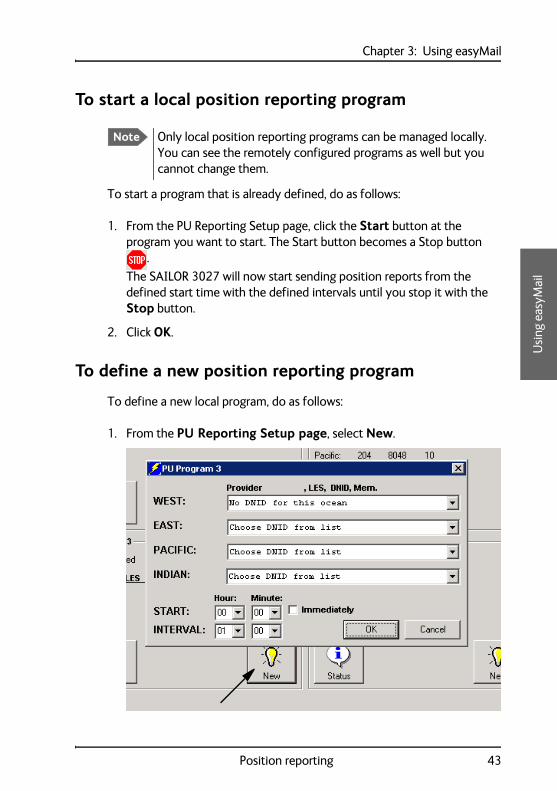
To start a program that is already defined, do as follows:
1. From the PU Reporting Setup page, click the Start button at the program you want to start. The Start button becomes a Stop button
.
The SAILOR 3027 will now start sending position reports from the defined start time with the defined intervals until you stop it with the Stop button.
2. Click OK.
To define a new position reporting program
To define a new local program, do as follows:
1. From the PU Reporting Setup page, select New.
Note Only local position reporting programs can be managed locally. You can see the remotely configured programs as well but you cannot change them.
Position reporting 43
Chapter 3: Using easyMail
2. Select the DNID information (provider, LES, DNID and member number) for each ocean region.
3. Select the time to start the position reporting or select Immediately.
4. Select the interval between the position reports.
5. Click OK.
The program is now set up and you can start and stop it with the buttons as described in the previous section.
6. Click OK again to exit the PU Reporting Setup page.
Receiving EGCs
You can receive various types of EGCs in easyMail. For details about how to set up which EGCs to receive, see Setting up reception of EGCs on page 52.
Note To be able to receive FleetNET EGCs, an ENID must be downloaded and enabled in the SAILOR 3027. See Setting up ENIDs on page 53.
Note When the EGC Inbox is full, the oldest EGCs are automatically deleted.
44 Receiving EGCs
Chapter 3: Using easyMail 33
33
Usi
ng e
asyM
ail
Viewing incoming EGCs
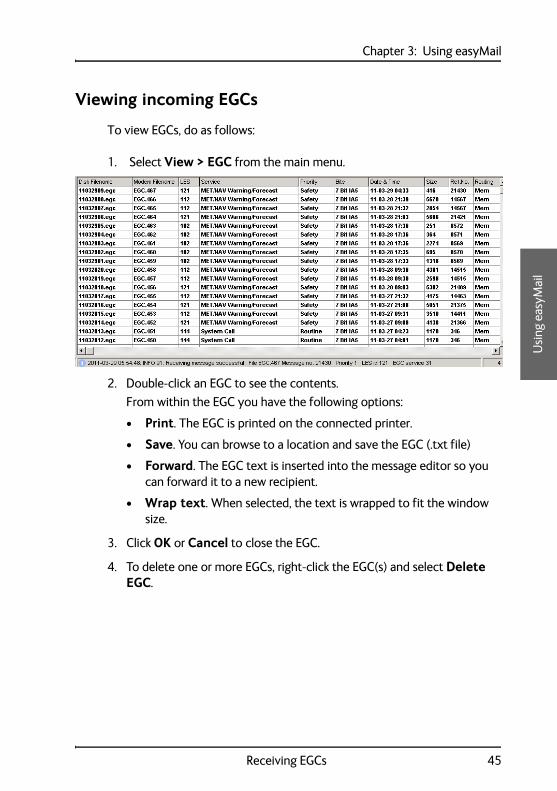
To view EGCs, do as follows:
1. Select View > EGC from the main menu.
2. Double-click an EGC to see the contents.
From within the EGC you have the following options:
• Print. The EGC is printed on the connected printer.
• Save. You can browse to a location and save the EGC (.txt file)
• Forward. The EGC text is inserted into the message editor so you can forward it to a new recipient.
• Wrap text. When selected, the text is wrapped to fit the window size.
3. Click OK or Cancel to close the EGC.
4. To delete one or more EGCs, right-click the EGC(s) and select Delete EGC.
Receiving EGCs 45
Chapter 3: Using easyMail
Network status and settings
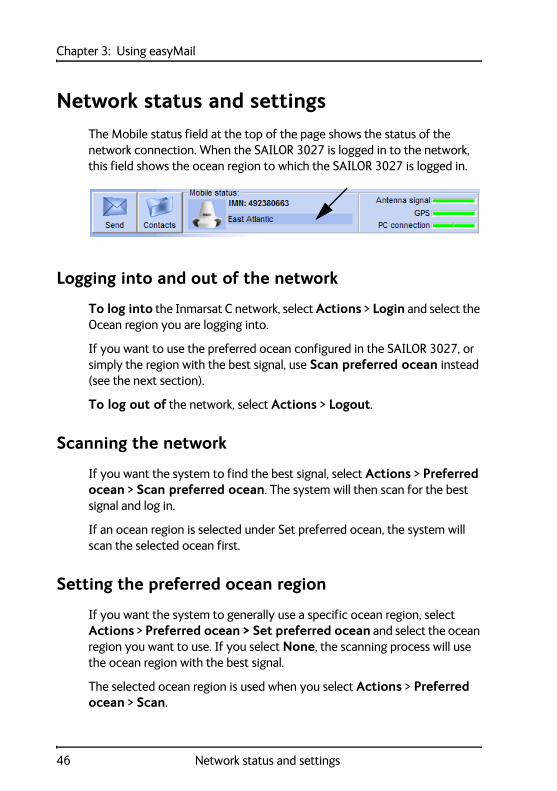
The Mobile status field at the top of the page shows the status of the network connection. When the SAILOR 3027 is logged in to the network, this field shows the ocean region to which the SAILOR 3027 is logged in.
Logging into and out of the network
To log into the Inmarsat C network, select Actions > Login and select the Ocean region you are logging into.
If you want to use the preferred ocean configured in the SAILOR 3027, or simply the region with the best signal, use Scan preferred ocean instead (see the next section).
To log out of the network, select Actions > Logout.
Scanning the network
If you want the system to find the best signal, select Actions > Preferred ocean > Scan preferred ocean. The system will then scan for the best signal and log in.
If an ocean region is selected under Set preferred ocean, the system will scan the selected ocean first.
Setting the preferred ocean region
If you want the system to generally use a specific ocean region, select Actions > Preferred ocean > Set preferred ocean and select the ocean region you want to use. If you select None, the scanning process will use the ocean region with the best signal.
The selected ocean region is used when you select Actions > Preferred ocean > Scan.
46 Network status and settings
Chapter 3: Using easyMail 33
33
Usi
ng e
asyM
ail
Link test
If you still want to make a link test, do as follows:
1. In the easyMail application, click Actions > Link test.
After the Link test is requested, the NCS assigns a LES for performing the Link test. This can take a while.
2. When the Linktest window appears, click Execute to start the test.
A popup window informs you that the test has started. When the test has ended another popup window informs you that the test was completed successfully or that it failed.
Stop Transmission
If you want the system to immediately stop transmitting, select Actions > Clear protocol.
The current protocol is then cleared, and any ongoing transmission is stopped.
Note To test basic system connectivity, we recommend that you send a short message to yourself instead of using the link test. For details on how to send a message, see Writing a routine priority message on page 31.
Note Because the link test has low priority in the network it can take a long time for the system to complete the link test, and during this time the system has limited functionality.
Network status and settings 47
Chapter 3: Using easyMail
Viewing system details
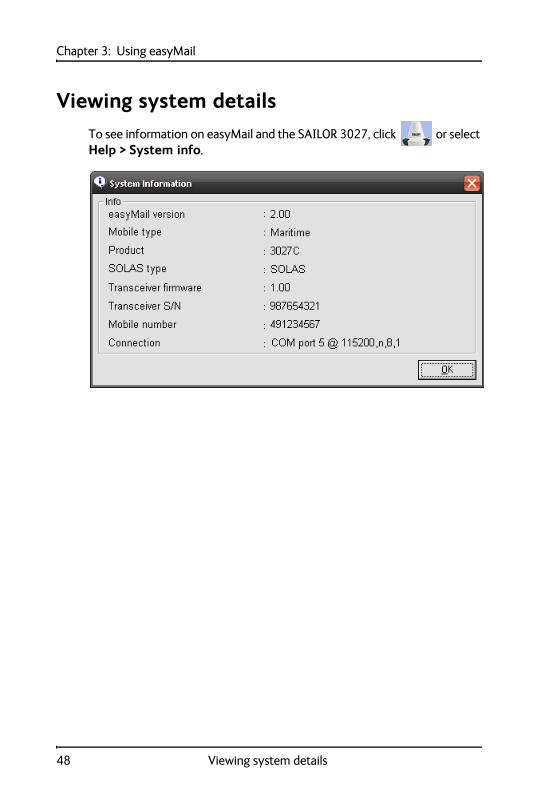
To see information on easyMail and the SAILOR 3027, click or select Help > System info.
48 Viewing system details
Chapter 3: Using easyMail 33
33
Usi
ng e
asyM
ail
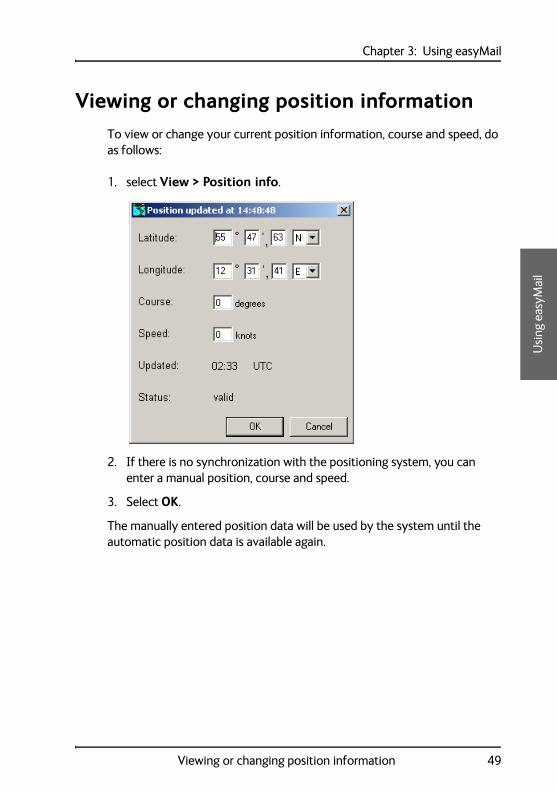
Viewing or changing position information
To view or change your current position information, course and speed, do as follows:
1. select View > Position info.
2. If there is no synchronization with the positioning system, you can enter a manual position, course and speed.
3. Select OK.
The manually entered position data will be used by the system until the automatic position data is available again.
Viewing or changing position information 49
Chapter 3: Using easyMail
Viewing status and Info log
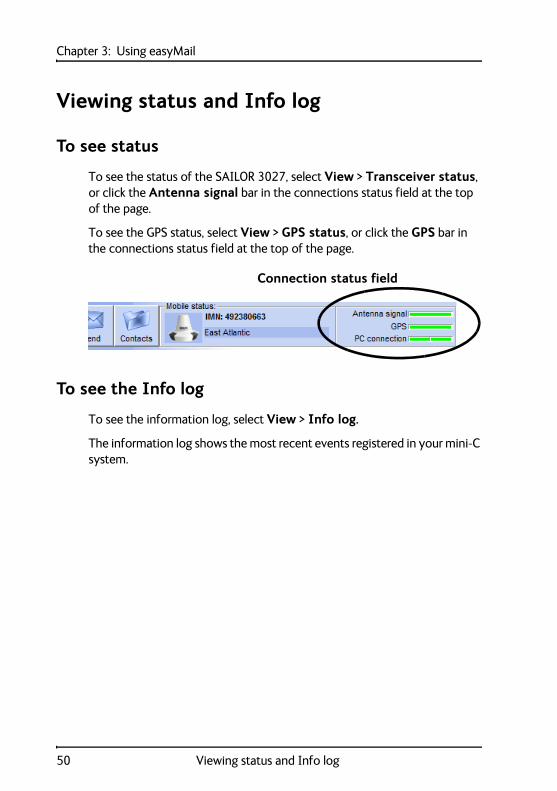
To see status
To see the status of the SAILOR 3027, select View > Transceiver status, or click the Antenna signal bar in the connections status field at the top of the page.
To see the GPS status, select View > GPS status, or click the GPS bar in the connections status field at the top of the page.
To see the Info log
To see the information log, select View > Info log.
The information log shows the most recent events registered in your mini-C system.
Connection status field
50 Viewing status and Info log

Chapter 3: Using easyMail 33
33
Usi
ng e
asyM
ail
Setting up the default ISP and default LESes
To set up the default ISP
To set up a default ISP, do as follows:
1. Select Setup > Default ISP.
2. Select the default ISP from the list.
3. Select Set Default LESes to ISP settings if you want to use the default ISP with the Default LESes.
4. Click OK.
To set up the default LESes
To set up the default LESes, do as follows:
1. Select Setup > Default LES.
2. Select the default LES for each ocean region.
3. Click OK.
Setting up the default ISP and default LESes 51
Chapter 3: Using easyMail
Setting up reception of EGCs
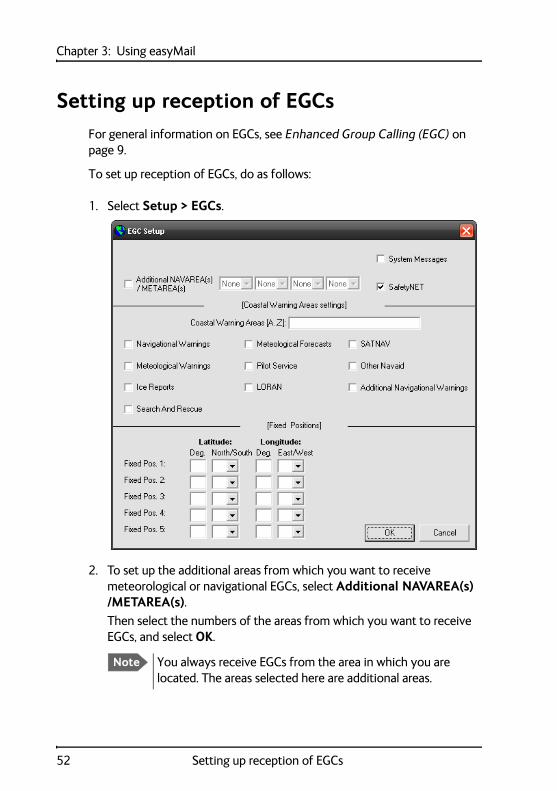
For general information on EGCs, see Enhanced Group Calling (EGC) on page 9.
To set up reception of EGCs, do as follows:
1. Select Setup > EGCs.
2. To set up the additional areas from which you want to receive meteorological or navigational EGCs, select Additional NAVAREA(s) /METAREA(s).Then select the numbers of the areas from which you want to receive EGCs, and select OK.
Note You always receive EGCs from the area in which you are located. The areas selected here are additional areas.
52 Setting up reception of EGCs
Chapter 3: Using easyMail 33
33
Usi
ng e
asyM
ail
3. Select whether you want to receive System Messages or SafetyNET messages or both.
4. To change the Coastal Warning Areas, type in the new areas under Coastal Warning Areas [A..Z].
5. Select the types of EGC service you want to receive.
6. If you want to receive EGCs at specific positions on your route, select Fixed positions and fill in the position information for each point on the route.
7. Click OK.
Setting up ENIDs
ENIDs (EGC Network IDentification) are used for identifying the SAILOR 3027 on the network in order for the terminal to receive FleetNET EGCs.
ENIDs must be set up with your LES operator and downloaded to your SAILOR 3027 before you can use them.
To set up the ENIDs, do as follows:
1. Select Setup > ENIDs.
The ENIDs are listed with provider, ENID and status.
2. Select the ENIDs you want to enable.
3. Click OK.
Setting up ENIDs 53
Chapter 3: Using easyMail
Setting up the Land Earth Stations (LES)
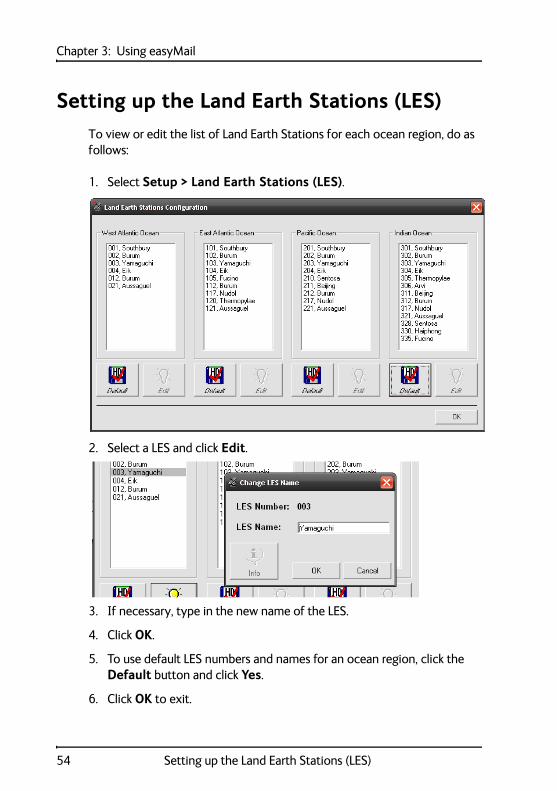
To view or edit the list of Land Earth Stations for each ocean region, do as follows:
1. Select Setup > Land Earth Stations (LES).
2. Select a LES and click Edit.
3. If necessary, type in the new name of the LES.
4. Click OK.
5. To use default LES numbers and names for an ocean region, click the Default button and click Yes.
6. Click OK to exit.
54 Setting up the Land Earth Stations (LES)
Chapter 3: Using easyMail 33
33
Usi
ng e
asyM
ail
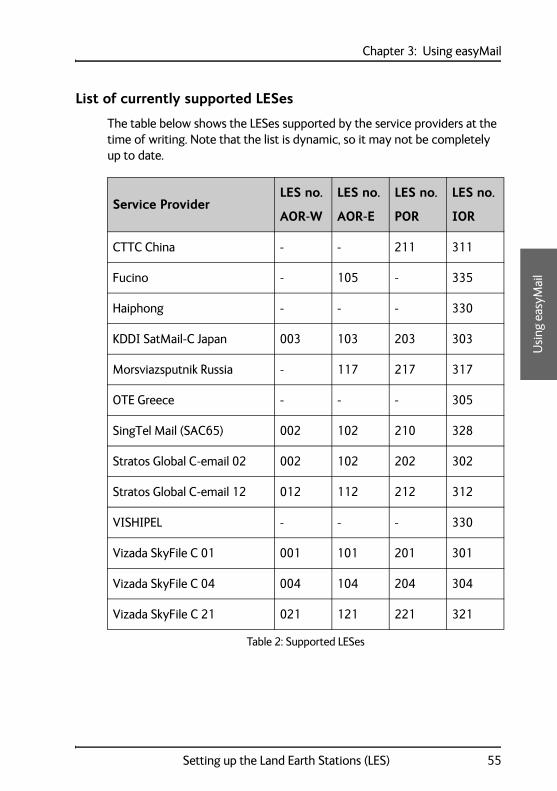
List of currently supported LESes
The table below shows the LESes supported by the service providers at the time of writing. Note that the list is dynamic, so it may not be completely up to date.
Service ProviderLES no.
AOR-W
LES no.
AOR-E
LES no.
POR
LES no.
IOR
CTTC China - - 211 311
Fucino - 105 - 335
Haiphong - - - 330
KDDI SatMail-C Japan 003 103 203 303
Morsviazsputnik Russia - 117 217 317
OTE Greece - - - 305
SingTel Mail (SAC65) 002 102 210 328
Stratos Global C-email 02 002 102 202 302
Stratos Global C-email 12 012 112 212 312
VISHIPEL - - - 330
Vizada SkyFile C 01 001 101 201 301
Vizada SkyFile C 04 004 104 204 304
Vizada SkyFile C 21 021 121 221 321
Table 2: Supported LESes
Setting up the Land Earth Stations (LES) 55
Chapter 3: Using easyMail
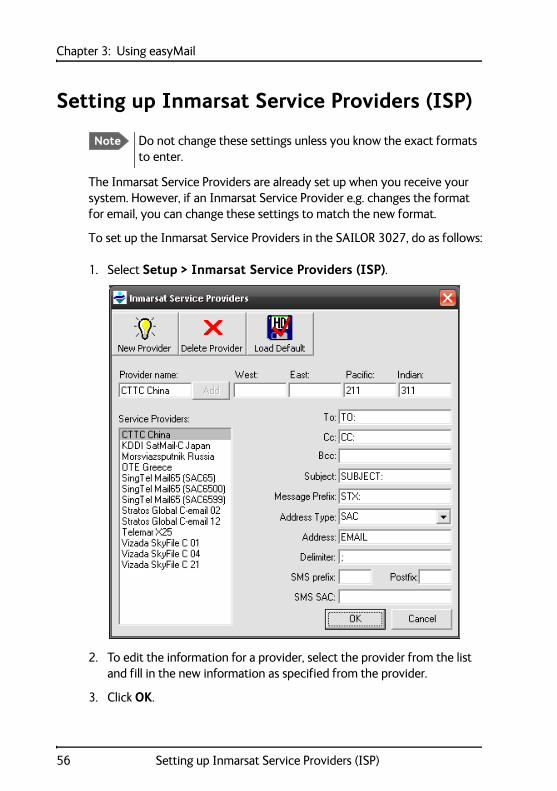
Setting up Inmarsat Service Providers (ISP)
The Inmarsat Service Providers are already set up when you receive your system. However, if an Inmarsat Service Provider e.g. changes the format for email, you can change these settings to match the new format.
To set up the Inmarsat Service Providers in the SAILOR 3027, do as follows:
1. Select Setup > Inmarsat Service Providers (ISP).
2. To edit the information for a provider, select the provider from the list and fill in the new information as specified from the provider.
3. Click OK.
Note Do not change these settings unless you know the exact formats to enter.
56 Setting up Inmarsat Service Providers (ISP)
Chapter 3: Using easyMail 33
33
Usi
ng e
asyM
ail
To add a new provider
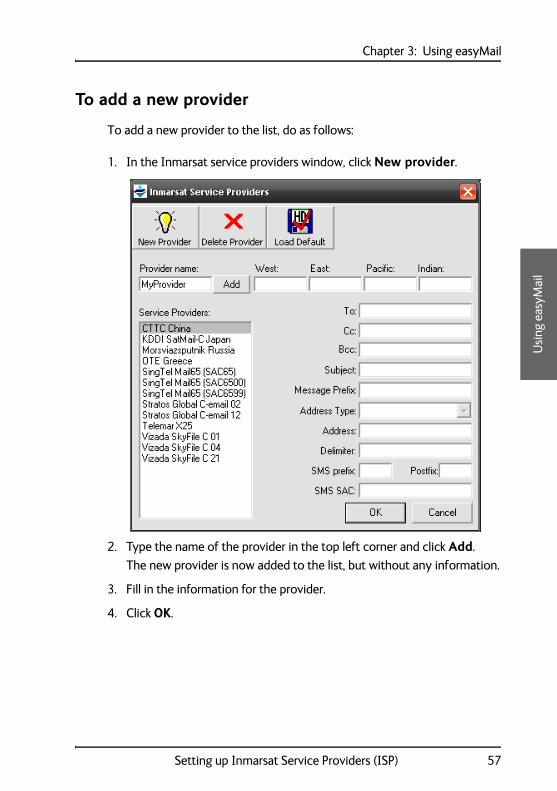
To add a new provider to the list, do as follows:
1. In the Inmarsat service providers window, click New provider.
2. Type the name of the provider in the top left corner and click Add.
The new provider is now added to the list, but without any information.
3. Fill in the information for the provider.
4. Click OK.
Setting up Inmarsat Service Providers (ISP) 57
Chapter 3: Using easyMail
Entering the mobile number
Before you can use the SAILOR 3027 on the Inmarsat C network you must configure the mobile number from your service provider in the SAILOR 3027.
To enter the mobile number, do as follows:
1. Select Setup > Mobile number (IMN).
2. Type in the mobile number from your service provider.
3. Click OK.
The number is now stored in the SAILOR 3027 and can be used to access the SAILOR 3027 on the Inmarsat C network.
58 Entering the mobile number
Chapter 3: Using easyMail 33
33
Usi
ng e
asyM
ail
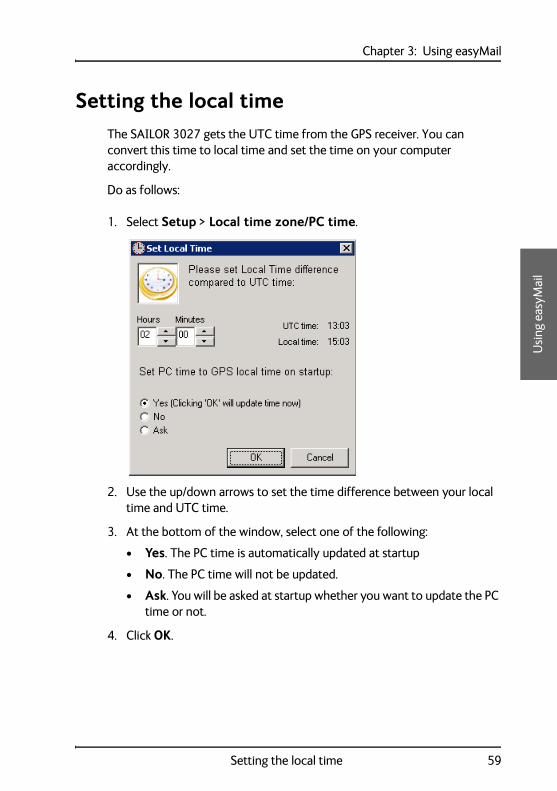
Setting the local time
The SAILOR 3027 gets the UTC time from the GPS receiver. You can convert this time to local time and set the time on your computer accordingly.
Do as follows:
1. Select Setup > Local time zone/PC time.
2. Use the up/down arrows to set the time difference between your local time and UTC time.
3. At the bottom of the window, select one of the following:
• Yes. The PC time is automatically updated at startup
• No. The PC time will not be updated.
• Ask. You will be asked at startup whether you want to update the PC time or not.
4. Click OK.
Setting the local time 59
Chapter 3: Using easyMail
Setting up password protection
You can add password protection to three different actions: Transmission, configuration and remote configuration.
To add password protection, do as follows:
1. Select Setup > Passwords.
2. Select the password you want to add or change.
3. Type in the old password (leave empty if there was no password protection).
4. Type in the new password under New password and again under Confirm password.
5. Click OK and close easyMail.
With the password protection, easyMail will ask for a password when a person tries to access the password protected areas (transmit a message, configure the system or configure the system remotely).
To remove the password, repeat the above procedure and leave the fields with the new password empty.
Setting the language
To change the language in easyMail, do as follows:
1. Select Setup > Language.
2. Select the language you want in easyMail.
3. Select at the bottom whether you want to show the language selection at startup.
4. Click OK.
60 Setting up password protection
Chapter 3: Using easyMail 33
33
Usi
ng e
asyM
ail
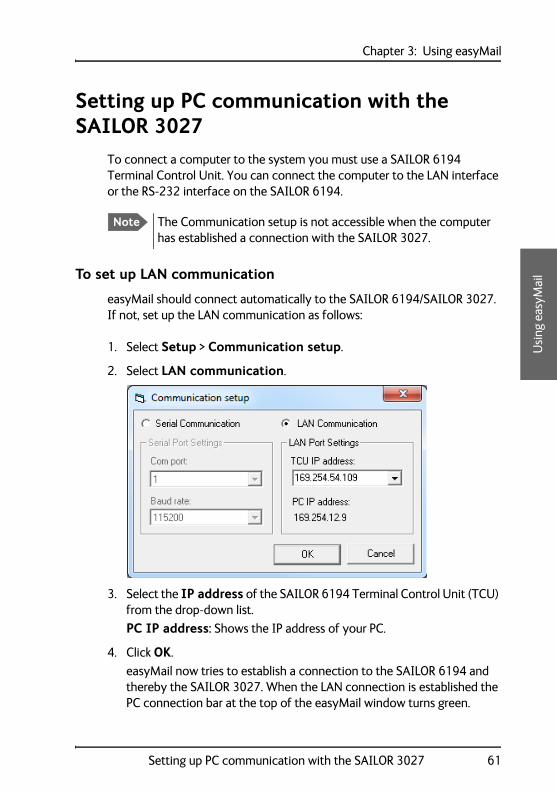
Setting up PC communication with the SAILOR 3027
To connect a computer to the system you must use a SAILOR 6194 Terminal Control Unit. You can connect the computer to the LAN interface or the RS-232 interface on the SAILOR 6194.
To set up LAN communication
easyMail should connect automatically to the SAILOR 6194/SAILOR 3027. If not, set up the LAN communication as follows:
1. Select Setup > Communication setup.
2. Select LAN communication.
3. Select the IP address of the SAILOR 6194 Terminal Control Unit (TCU) from the drop-down list.
PC IP address: Shows the IP address of your PC.
4. Click OK.
easyMail now tries to establish a connection to the SAILOR 6194 and thereby the SAILOR 3027. When the LAN connection is established the PC connection bar at the top of the easyMail window turns green.
Note The Communication setup is not accessible when the computer has established a connection with the SAILOR 3027.
Setting up PC communication with the SAILOR 3027 61
Chapter 3: Using easyMail
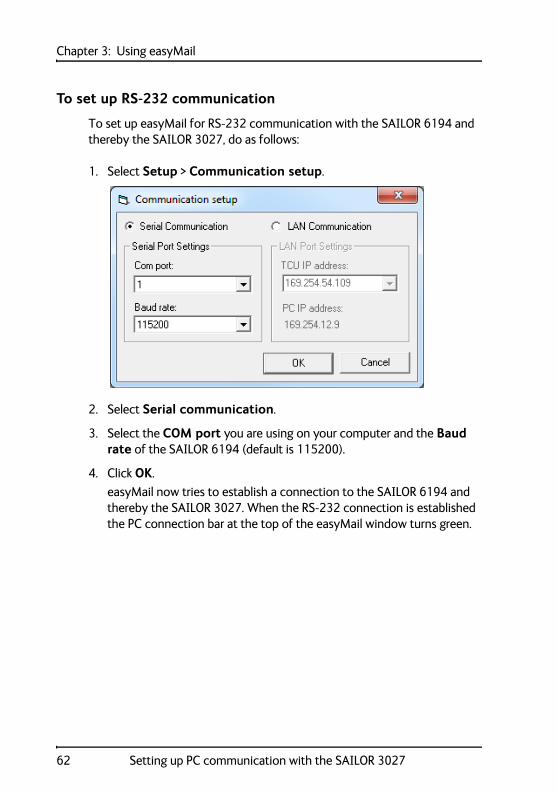
To set up RS-232 communication
To set up easyMail for RS-232 communication with the SAILOR 6194 and thereby the SAILOR 3027, do as follows:
1. Select Setup > Communication setup.
2. Select Serial communication.
3. Select the COM port you are using on your computer and the Baud rate of the SAILOR 6194 (default is 115200).
4. Click OK.
easyMail now tries to establish a connection to the SAILOR 6194 and thereby the SAILOR 3027. When the RS-232 connection is established the PC connection bar at the top of the easyMail window turns green.
62 Setting up PC communication with the SAILOR 3027
Chapter 3: Using easyMail 33
33
Usi
ng e
asyM
ail
Setting up easyMail
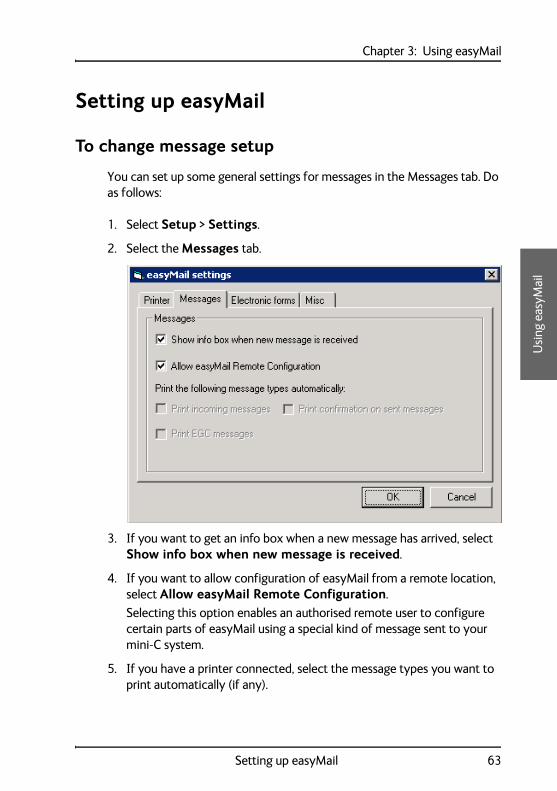
To change message setup
You can set up some general settings for messages in the Messages tab. Do as follows:
1. Select Setup > Settings.
2. Select the Messages tab.
3. If you want to get an info box when a new message has arrived, select Show info box when new message is received.
4. If you want to allow configuration of easyMail from a remote location, select Allow easyMail Remote Configuration.
Selecting this option enables an authorised remote user to configure certain parts of easyMail using a special kind of message sent to your mini-C system.
5. If you have a printer connected, select the message types you want to print automatically (if any).
Setting up easyMail 63
Chapter 3: Using easyMail
To use electronic forms
Some users have a need for a specific layout, e.g. for fishery catch reporting. The files for this layout must be downloaded to the system before selecting the formats on this page.
Miscellaneous settings
In Harbour Button
Select Setup > Settings > Misc > In Harbour Button to select whether or not you want to show an In Harbour Button in easyMail. The In Harbour button is used for setting a longer reporting interval when the ship is in harbour.
Reset HotList
The HotList is a list of the last used commands on the SAILOR 3027. To see the list, press F12.
To reset the HotList, select Setup > Settings > Misc > Reset HotList.
64 Setting up easyMail
Chapter 44
44
4
Usi
ng D
istr
ess
and
SSA
Using Distress and SSA buttons 4
This chapter describes how to send Distress alerts with the SAILOR 3042E Non-SOLAS Alarm Panel or the SAILOR 6006 Message Terminal, and how to send a Ship Security Alert with the SSA buttons.
It has the following sections:
• To send a Distress Alert (SAILOR 6150 only)
• To send a Ship Security Alert (SAILOR 6120 only)
To send a Distress Alert (SAILOR 6150 only)
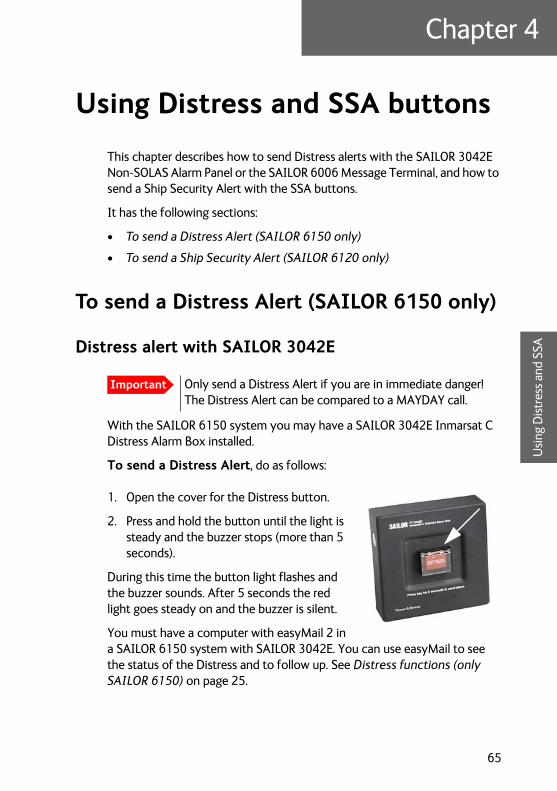
Distress alert with SAILOR 3042E
With the SAILOR 6150 system you may have a SAILOR 3042E Inmarsat C Distress Alarm Box installed.
To send a Distress Alert, do as follows:
1. Open the cover for the Distress button.
2. Press and hold the button until the light is steady and the buzzer stops (more than 5 seconds).
During this time the button light flashes and the buzzer sounds. After 5 seconds the red light goes steady on and the buzzer is silent.
You must have a computer with easyMail 2 in a SAILOR 6150 system with SAILOR 3042E. You can use easyMail to see the status of the Distress and to follow up. See Distress functions (only SAILOR 6150) on page 25.
Important Only send a Distress Alert if you are in immediate danger! The Distress Alert can be compared to a MAYDAY call.
65
Chapter 4: Using Distress and SSA buttons
For information on how to send a Distress message, see Writing a Distress priority message on page 25.
The MRCC may also send Distress EGCs to other ships in the area to request assistance (typically as Distress Relay or SAR Coordination request).
See also Setting up Distress alert on page 25.
To clear Distress indications
If you want to turn off all Distress indications while a Distress Alert is still active, you can use easyMail: Select Distress > Reset alarm/Latest Distress info. For details, see Reset alarm/latest Distress info on page 27.
Important The MRCC normally sends a message to the alerting unit to gather more information about the situation.
If possible, respond to such messages with a Distress message sent to the same LES that was used for the Distress Alert.
Note This function will only turn off the visual and audible indications on board. It will not cancel the transmission of the Distress Alert.
66 To send a Distress Alert (SAILOR 6150 only)
Chapter 4: Using Distress and SSA buttons 44
44
Usi
ng D
istr
ess
and
SSA
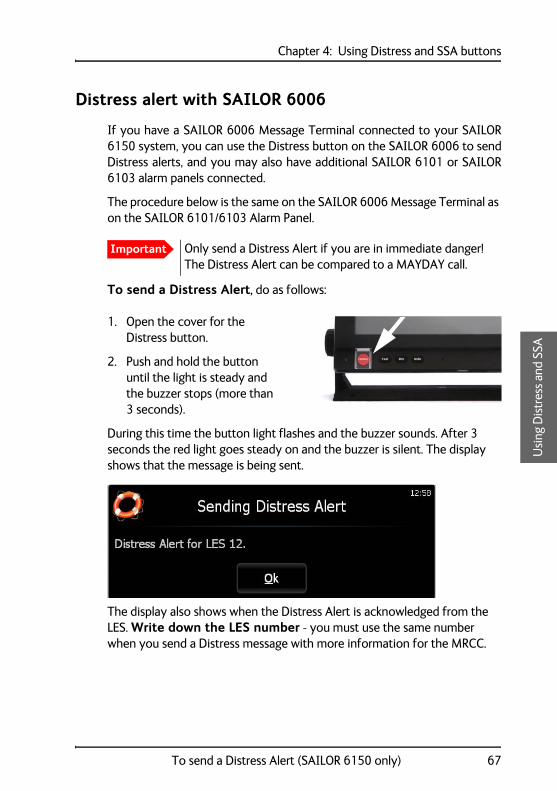
Distress alert with SAILOR 6006
If you have a SAILOR 6006 Message Terminal connected to your SAILOR6150 system, you can use the Distress button on the SAILOR 6006 to sendDistress alerts, and you may also have additional SAILOR 6101 or SAILOR6103 alarm panels connected.
The procedure below is the same on the SAILOR 6006 Message Terminal as on the SAILOR 6101/6103 Alarm Panel.
To send a Distress Alert, do as follows:
1. Open the cover for the Distress button.
2. Push and hold the button until the light is steady and the buzzer stops (more than 3 seconds).
During this time the button light flashes and the buzzer sounds. After 3 seconds the red light goes steady on and the buzzer is silent. The display shows that the message is being sent.
The display also shows when the Distress Alert is acknowledged from the LES. Write down the LES number - you must use the same number when you send a Distress message with more information for the MRCC.
Important Only send a Distress Alert if you are in immediate danger! The Distress Alert can be compared to a MAYDAY call.
To send a Distress Alert (SAILOR 6150 only) 67
Chapter 4: Using Distress and SSA buttons
The below table shows the behavior of the Distress button on the SAILOR 6006.
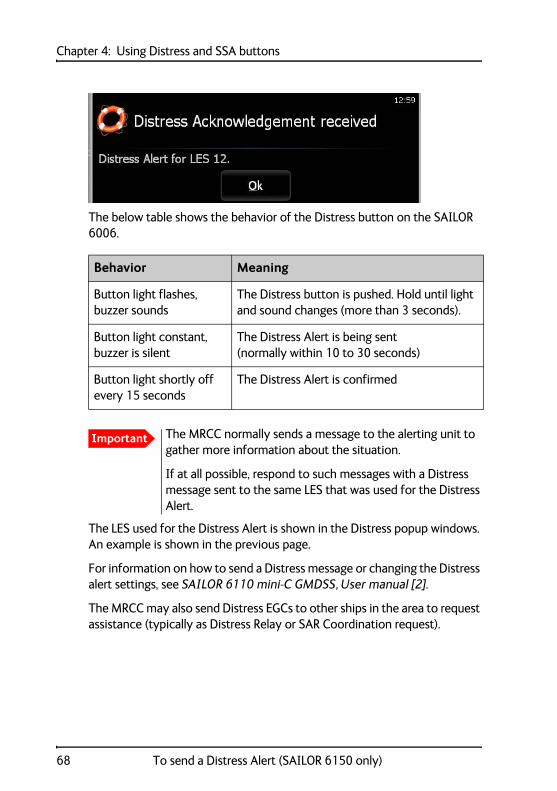
The LES used for the Distress Alert is shown in the Distress popup windows. An example is shown in the previous page.
For information on how to send a Distress message or changing the Distress alert settings, see SAILOR 6110 mini-C GMDSS, User manual [2].
The MRCC may also send Distress EGCs to other ships in the area to request assistance (typically as Distress Relay or SAR Coordination request).
Behavior Meaning
Button light flashes, buzzer sounds
The Distress button is pushed. Hold until light and sound changes (more than 3 seconds).
Button light constant, buzzer is silent
The Distress Alert is being sent(normally within 10 to 30 seconds)
Button light shortly off every 15 seconds
The Distress Alert is confirmed
Important The MRCC normally sends a message to the alerting unit to gather more information about the situation.
If at all possible, respond to such messages with a Distress message sent to the same LES that was used for the Distress Alert.
68 To send a Distress Alert (SAILOR 6150 only)
Chapter 4: Using Distress and SSA buttons 44
44
Usi
ng D
istr
ess
and
SSA
To clear distress indications
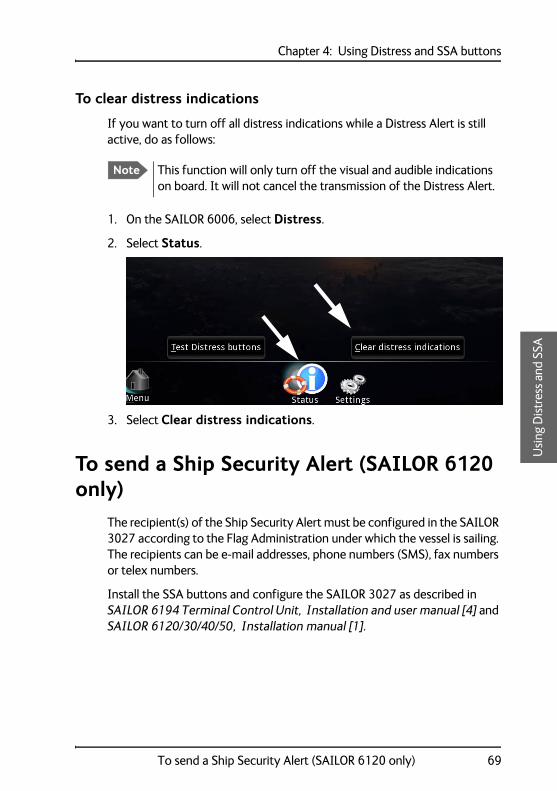
If you want to turn off all distress indications while a Distress Alert is still active, do as follows:
1. On the SAILOR 6006, select Distress.
2. Select Status.
3. Select Clear distress indications.
To send a Ship Security Alert (SAILOR 6120 only)
The recipient(s) of the Ship Security Alert must be configured in the SAILOR 3027 according to the Flag Administration under which the vessel is sailing. The recipients can be e-mail addresses, phone numbers (SMS), fax numbers or telex numbers.
Install the SSA buttons and configure the SAILOR 3027 as described in SAILOR 6194 Terminal Control Unit, Installation and user manual [4] and SAILOR 6120/30/40/50, Installation manual [1].
Note This function will only turn off the visual and audible indications on board. It will not cancel the transmission of the Distress Alert.
To send a Ship Security Alert (SAILOR 6120 only) 69
Chapter 4: Using Distress and SSA buttons
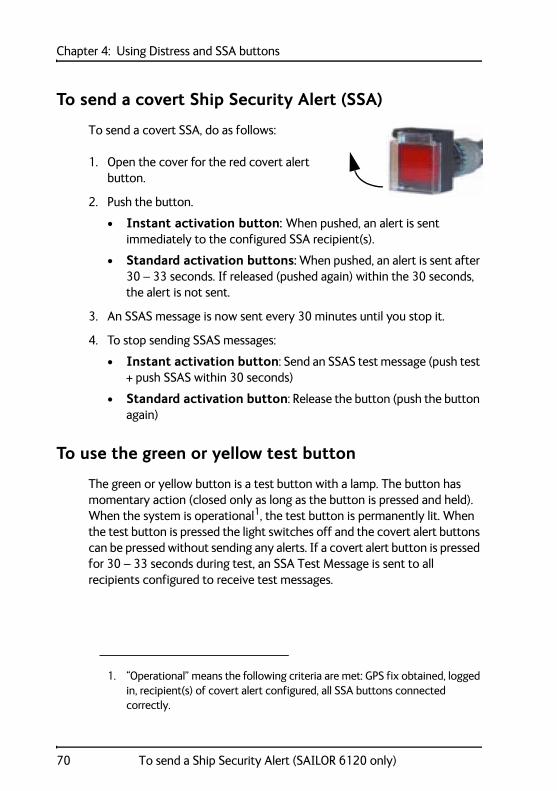
To send a covert Ship Security Alert (SSA)
To send a covert SSA, do as follows:
1. Open the cover for the red covert alert button.
2. Push the button.
• Instant activation button: When pushed, an alert is sent immediately to the configured SSA recipient(s).
• Standard activation buttons: When pushed, an alert is sent after 30 – 33 seconds. If released (pushed again) within the 30 seconds, the alert is not sent.
3. An SSAS message is now sent every 30 minutes until you stop it.
4. To stop sending SSAS messages:
• Instant activation button: Send an SSAS test message (push test + push SSAS within 30 seconds)
• Standard activation button: Release the button (push the button again)
To use the green or yellow test button
The green or yellow button is a test button with a lamp. The button has momentary action (closed only as long as the button is pressed and held). When the system is operational1, the test button is permanently lit. When the test button is pressed the light switches off and the covert alert buttons can be pressed without sending any alerts. If a covert alert button is pressed for 30 – 33 seconds during test, an SSA Test Message is sent to all recipients configured to receive test messages.
1. “Operational” means the following criteria are met: GPS fix obtained, logged in, recipient(s) of covert alert configured, all SSA buttons connected correctly.
70 To send a Ship Security Alert (SAILOR 6120 only)
Chapter 55
55
Serv
ice
Service 5
This chapter gives guidelines for updating software and for troubleshooting and provides an overview of the different means of status signalling. It has the following sections:
• Getting support
• Updating software
• Troubleshooting guide
Getting support
If this manual does not provide the remedies to solve your problem, you may want to contact your Airtime Provider or your local distributor.
To help with the troubleshooting, please generate a diagnostic report as described in the next page, and enclose the diagnostic report file when asking for support.
Airtime support
If you need assistance from your Airtime Provider, check your Airtime subscription documents for a contact number to call.
System support
Lists of certified partners and distributors are available on www.cobham.com/communications-and-connectivity/satcom. Select Service and Support from the top menu bar and then AVIATOR, EXPLORER, SAILOR, Sea Tel Service and Support. Then select one of the dealers or partners lists shown.
71
Chapter 5: Service
Updating software
Before updating software
Tool for software update
To update software in the mini-C system units (e.g. the SAILOR 3027 and/or the SAILOR 6101/03 Alarm Panel), use the TMA (ThraneLINK Management Application). For information on how to install the TMA, see the next sections.
The ThraneLINK Management Application
The ThraneLINK Management Application (TMA) is a Windows program that provides monitoring and software update of connected Cobham SATCOM devices with ThraneLINK support. The devices must be on the same LAN.
Installing the TMA
PC requirements
• Standard PC with Windows 7, 8, 10, Vista or XP, and Ethernet connection.
• Make sure that you have administrator rights for the PC.
Installation
To install the TMA, do as follows:
1. Go to www.cobham.com/communications-and-connectivity/satcom.
2. Select Service and Support.
3. Select AVIATOR, EXPLORER, SAILOR, Sea Tel Service and Support and then 24-7 Self Service Centre / Technical Downloads.
4. Select Downloads > Maritime > ThraneLINK Management Application > Software.
5. Locate the TMA software package and download it to your PC.
72 Updating software
Chapter 5: Service5
55
Serv
ice
6. Extract the files from the zip file.
7. Click setup.exe to start the installation wizard.
On Windows Vista/7/8/10, when prompted, select Yes to allow the installation to make changes to the computer.
8. Follow the instructions in the wizard.
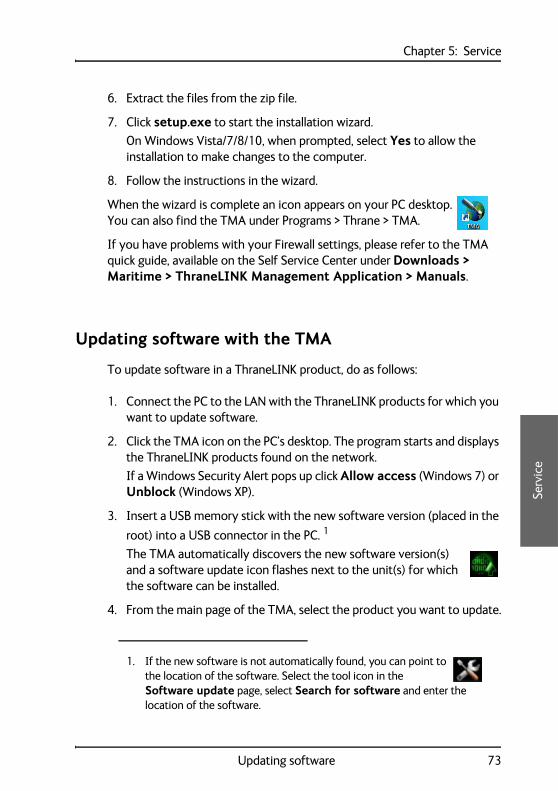
When the wizard is complete an icon appears on your PC desktop. You can also find the TMA under Programs > Thrane > TMA.
If you have problems with your Firewall settings, please refer to the TMA quick guide, available on the Self Service Center under Downloads > Maritime > ThraneLINK Management Application > Manuals.
Updating software with the TMA
To update software in a ThraneLINK product, do as follows:
1. Connect the PC to the LAN with the ThraneLINK products for which you want to update software.
2. Click the TMA icon on the PC’s desktop. The program starts and displays the ThraneLINK products found on the network.
If a Windows Security Alert pops up click Allow access (Windows 7) or Unblock (Windows XP).
3. Insert a USB memory stick with the new software version (placed in the
root) into a USB connector in the PC. 1
The TMA automatically discovers the new software version(s) and a software update icon flashes next to the unit(s) for which the software can be installed.
4. From the main page of the TMA, select the product you want to update.
1. If the new software is not automatically found, you can point to the location of the software. Select the tool icon in the Software update page, select Search for software and enter the location of the software.
Updating software 73
Chapter 5: Service
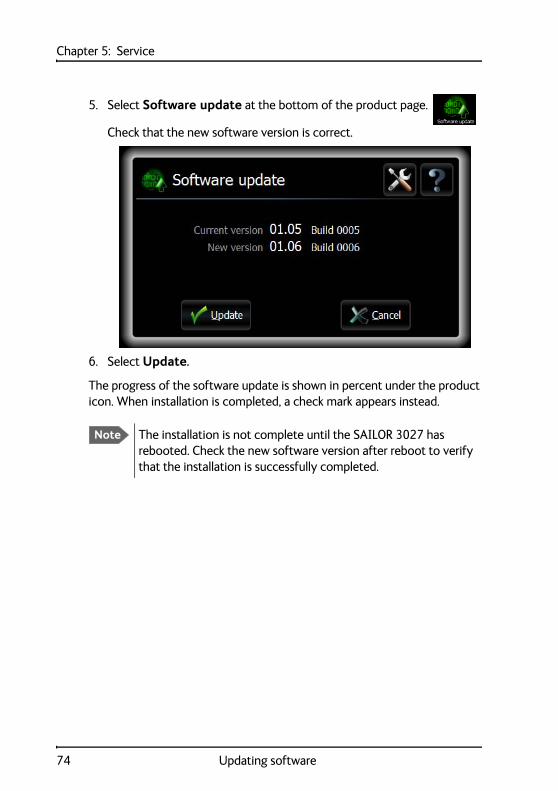
5. Select Software update at the bottom of the product page.
Check that the new software version is correct.
6. Select Update.
The progress of the software update is shown in percent under the product icon. When installation is completed, a check mark appears instead.
Note The installation is not complete until the SAILOR 3027 has rebooted. Check the new software version after reboot to verify that the installation is successfully completed.
74 Updating software
Chapter 5: Service5
55
Serv
ice
Troubleshooting guide
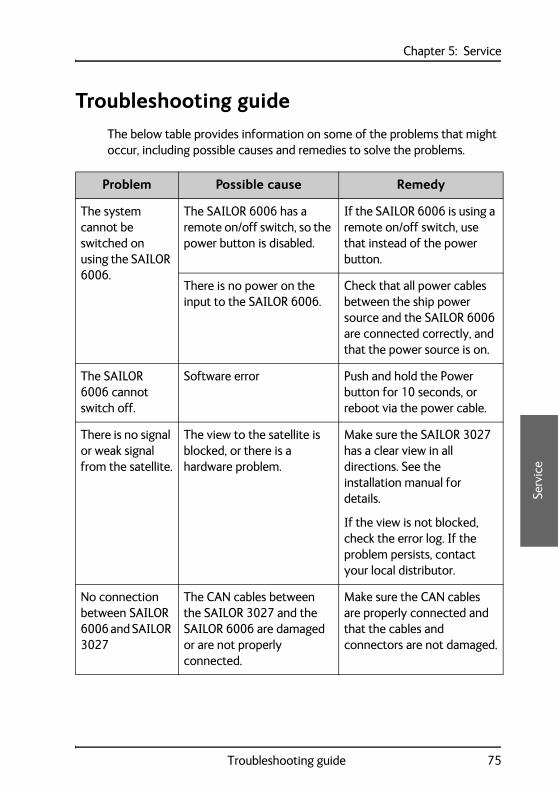
The below table provides information on some of the problems that might occur, including possible causes and remedies to solve the problems.
Problem Possible cause Remedy
The system cannot be switched on using the SAILOR 6006.
The SAILOR 6006 has a remote on/off switch, so the power button is disabled.
If the SAILOR 6006 is using a remote on/off switch, use that instead of the power button.
There is no power on the input to the SAILOR 6006.
Check that all power cables between the ship power source and the SAILOR 6006 are connected correctly, and that the power source is on.
The SAILOR 6006 cannot switch off.
Software error Push and hold the Power button for 10 seconds, or reboot via the power cable.
There is no signal or weak signal from the satellite.
The view to the satellite is blocked, or there is a hardware problem.
Make sure the SAILOR 3027 has a clear view in all directions. See the installation manual for details.
If the view is not blocked, check the error log. If the problem persists, contact your local distributor.
No connection between SAILOR 6006 and SAILOR 3027
The CAN cables between the SAILOR 3027 and the SAILOR 6006 are damaged or are not properly connected.
Make sure the CAN cables are properly connected and that the cables and connectors are not damaged.
Troubleshooting guide 75
Chapter 5: Service
No connection between easyMail and SAILOR 3027
The PC connection to the SAILOR 3027 is not set up properly.
For information on how to set up the PC connection, see Setting up PC communication with the SAILOR 3027 on page 61.
The units in the mini-C system do not appear in the TMA (ThraneLINK Management Application).
The computer running the TMA is set up with a fixed IP address that does not match the local network with the mini-C system units.
Enable DHCP on your computer.
If you need to have a fixed IP address on your computer, there must be a DHCP server in the network, and the IP address of your computer must be within the range provided by the DHCP server.
Problem Possible cause Remedy
76 Troubleshooting guide

Chapter 5: Service5
55
Serv
ice
Status signalling in easyMail
Status information
The top of the display shows the most important status information.
You can click each status area to get details, or use the View menu to enter the status pages.
Information of events
Popup windows
When an event requires your attention, a popup window appears.
When you have read the text, select OK to close the window. The latest event is shown in the info bar at the bottom of the page and is added to the information log.
Information log
To see the information log, select View > Info log.
The log shows the events that are registered in your mini-C system.
Status signalling in easyMail 77
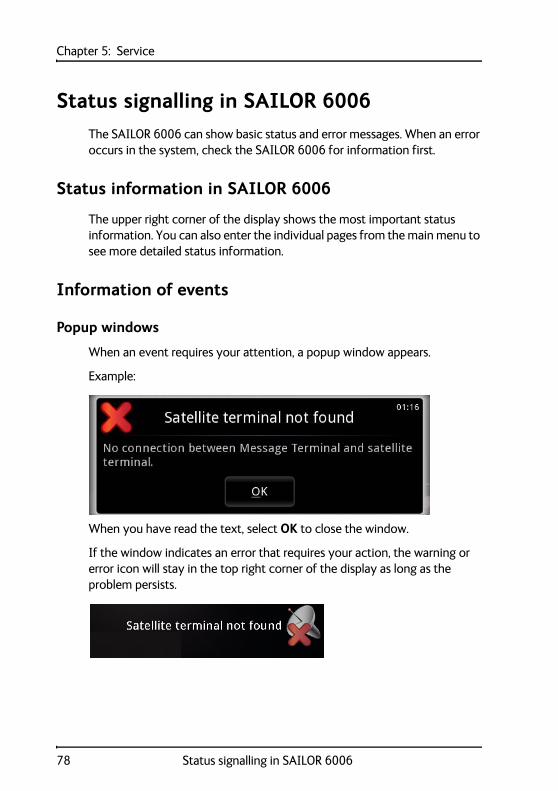
Chapter 5: Service
Status signalling in SAILOR 6006
The SAILOR 6006 can show basic status and error messages. When an error occurs in the system, check the SAILOR 6006 for information first.
Status information in SAILOR 6006
The upper right corner of the display shows the most important status information. You can also enter the individual pages from the main menu to see more detailed status information.
Information of events
Popup windows
When an event requires your attention, a popup window appears.
Example:
When you have read the text, select OK to close the window.
If the window indicates an error that requires your action, the warning or error icon will stay in the top right corner of the display as long as the problem persists.
78 Status signalling in SAILOR 6006
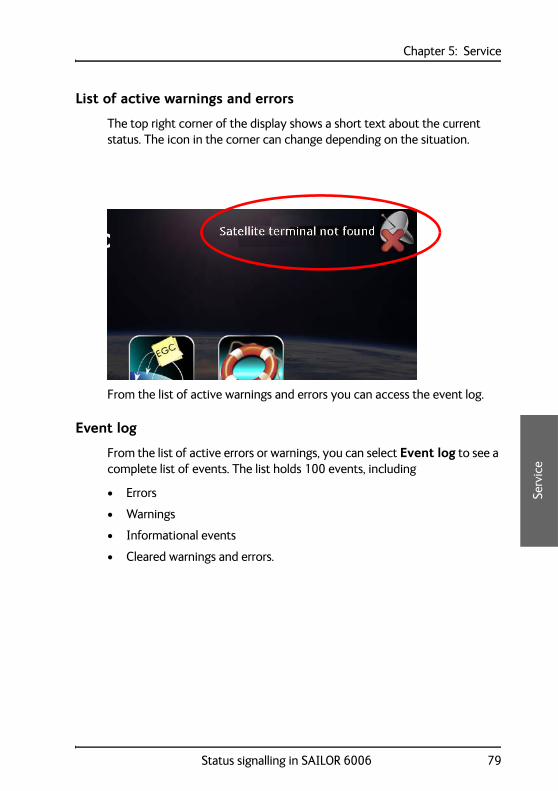
Chapter 5: Service5
55
Serv
ice
List of active warnings and errors
The top right corner of the display shows a short text about the current status. The icon in the corner can change depending on the situation.
From the list of active warnings and errors you can access the event log.
Event log
From the list of active errors or warnings, you can select Event log to see a complete list of events. The list holds 100 events, including
• Errors
• Warnings
• Informational events
• Cleared warnings and errors.
Status signalling in SAILOR 6006 79
Chapter 5: Service
Service and repair
Should your Cobham SATCOM product fail, please contact your dealer or installer, or the nearest Cobham SATCOM partner. You will find the partner details on www.cobham.com/communications-and-connectivity/satcom where you also find the Cobham SATCOM Self Service Center web-portal, which may help you solve the problem. Your dealer, installer or Cobham SATCOM partner will assist you whether the need is user training, technical support, arranging on-site repair or sending the product for repair. Your dealer, installer or Cobham SATCOM partner will also take care of any warranty issue.
Repacking for shipment
Should you need to send the product for repair, please read the below information before packing the product.
The shipping cartons for the mini-C system have been carefully designed to protect the equipment during shipment. The cartons and their associated packing material should be used when repacking for shipment. Attach a tag indicating the type of service required, return address, model number and full serial number. Mark the carton “FRAGILE” to ensure careful handling.
Note Correct shipment is the customer’s own responsibility.
80 Service and repair
Appendix AAAAA
Con
form
ity
Conformity A
The mini-C systems SAILOR 6120, SAILOR 6130, SAILOR 6140 and SAILOR 6150 are CE certified (R&TTE directive) as stated in “Declaration of Conformity with R&TTE Directive”, enclosed in electronic copy on the next pages (one declaration for each system).
81
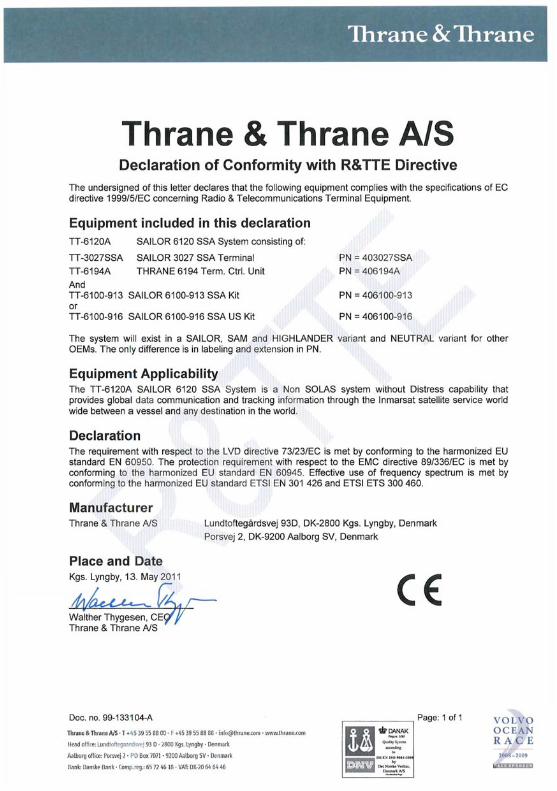


Appendix A: Conformity
86
Appendix BBB
BB
GN
U L
icen
se te
xts
GNU License texts B
GNU General Public License
Version 2, June 1991Copyright (C) 1989, 1991 Free Software Foundation, Inc., 51 Franklin Street, Fifth Floor, Boston, MA 02110-1301 USA.Everyone is permitted to copy and distribute verbatim copies of this license document, but changing it is not allowed.
PreambleThe licenses for most software are designed to take away your freedom to share and change it. By contrast, the GNU General Public License is intended to guarantee your freedom to share and change free software--to make sure the software is free for all its users. This General Public License applies to most of the Free Software Foundation's software and to any other program whose authors commit to using it. (Some other Free Software Foundation software is covered by the GNU Lesser General Public License instead.) You can apply it to your programs, too.When we speak of free software, we are referring to freedom, not price. Our General Public Licenses are designed to make sure that you have the freedom to distribute copies of free software (and charge for this service if you wish), that you receive source code or can get it if you want it, that you can change the software or use pieces of it in new free programs; and that you know you can do these things.To protect your rights, we need to make restrictions that forbid anyone to deny you these rights or to ask you to surrender the rights. These restrictions translate to certain responsibilities for you if you distribute copies of the software, or if you modify it.For example, if you distribute copies of such a program, whether gratis or for a fee, you must give the recipients all the rights that you have. You must make sure that they, too, receive or can get the source code. And you must show them these terms so they know their rights.We protect your rights with two steps: (1) copyright the software, and (2) offer you this license which gives you legal permission to copy, distribute and/or modify the software.Also, for each author's protection and ours, we want to make certain that everyone understands that there is no warranty for this free software. If the software is modified by someone else and passed on, we want its recipients to know that what they have is not the original, so that any problems introduced by others will not reflect on the original authors' reputations.Finally, any free program is threatened constantly by software patents. We wish to avoid the danger that redistributors of a free program will individually obtain patent licenses, in effect making the program proprietary. To prevent this, we have made it clear that any patent must be licensed for everyone's free use or not licensed at all.The precise terms and conditions for copying, distribution and modification follow.
GNU GENERAL PUBLIC LICENSETERMS AND CONDITIONS FOR COPYING, DISTRIBUTION AND MODIFICATION
0. This License applies to any program or other work which contains a notice placed by the copyright holder saying it may be distributed under the terms of this General Public License. The "Program", below, refers to any such program or work, and a "work based on the Program" means either the Program or any derivative work under copyright law: that is to say, a work containing the Program or a portion of it, either verbatim or with modifications and/or translated into another language. (Hereinafter, translation is included without limitation in the term "modification".) Each licensee is addressed as "you".Activities other than copying, distribution and modification are not covered by this License; they are outside its scope. The act of running the Program is not restricted, and the output from the Program is covered only if its contents constitute a work based on the Program (independent of having been made by running the Program).
87
Appendix B: GNU License texts
Whether that is true depends on what the Program does.1. You may copy and distribute verbatim copies of the Program's source code as you receive it, in any medium, provided that you conspicuously and appropriately publish on each copy an appropriate copyright notice and disclaimer of warranty; keep intact all the notices that refer to this License and to the absence of any warranty; and give any other recipients of the Program a copy of this License along with the Program.You may charge a fee for the physical act of transferring a copy, and you may at your option offer warranty protection in exchange for a fee.2. You may modify your copy or copies of the Program or any portion of it, thus forming a work based on the Program, and copy and distribute such modifications or work under the terms of Section 1 above, provided that you also meet all of these conditions:
a) You must cause the modified files to carry prominent notices stating that you changed the files and the date of any change.b) You must cause any work that you distribute or publish, that in whole or in part contains or is derived from the Program or any part thereof, to be licensed as a whole at no charge to all third parties under the terms of this License.c) If the modified program normally reads commands interactively when run, you must cause it, when started running for such interactive use in the most ordinary way, to print or display an announcement including an appropriate copyright notice and a notice that there is no warranty (or else, saying that you provide a warranty) and that users may redistribute the program under these conditions, and telling the user how to view a copy of this License. (Exception: if the Program itself is interactive but does not normally print such an announcement, your work based on the Program is not required to print an announcement.)
These requirements apply to the modified work as a whole. If identifiable sections of that work are not derived from the Program, and can be reasonably considered independent and separate works in themselves, then this License, and its terms, do not apply to those sections when you distribute them as separate works. But when you distribute the same sections as part of a whole which is a work based on the Program, the distribution of the whole must be on the terms of this License, whose permissions for other licensees extend to the entire whole, and thus to each and every part regardless of who wrote it.Thus, it is not the intent of this section to claim rights or contest your rights to work written entirely by you; rather, the intent is to exercise the right to control the distribution of derivative or collective works based on the Program.In addition, mere aggregation of another work not based on the Program with the Program (or with a work based on the Program) on a volume of a storage or distribution medium does not bring the other work under the scope of this License.3. You may copy and distribute the Program (or a work based on it, under Section 2) in object code or executable form under the terms of Sections 1 and 2 above provided that you also do one of the following:
a) Accompany it with the complete corresponding machine-readable source code, which must be distributed under the terms of Sections 1 and 2 above on a medium customarily used for software interchange; or,b) Accompany it with a written offer, valid for at least three years, to give any third party, for a charge no more than your cost of physically performing source distribution, a complete machine-readable copy of the corresponding source code, to be distributed under the terms of Sections 1 and 2 above on a medium customarily used for software interchange; or,c) Accompany it with the information you received as to the offer to distribute corresponding source code. (This alternative is allowed only for noncommercial distribution and only if you received the program in object code or executable form with such an offer, in accord with Subsection b above.)
The source code for a work means the preferred form of the work for making modifications to it. For an executable work, complete source code means all the source code for all modules it contains, plus any associated interface definition files, plus the scripts used to control compilation and installation of the executable. However, as a special exception, the source code distributed need not include anything that is normally distributed (in either source or binary form) with the major components (compiler, kernel, and so on) of the operating system on which the executable runs, unless that component itself accompanies the executable.If distribution of executable or object code is made by offering access to copy from a designated place, then offering equivalent access to copy the source code from the same place counts as distribution of the source code, even though third parties are not compelled to copy the source along with the object code. 4. You may not copy, modify, sublicense, or distribute the Program except as expressly provided under this License. Any attempt otherwise to copy, modify, sublicense or distribute the Program is void, and will automatically
88

Appendix B: GNU License textsB
BB
B
GN
U L
icen
se te
xts
terminate your rights under this License. However, parties who have received copies, or rights, from you under this License will not have their licenses terminated so long as such parties remain in full compliance.5. You are not required to accept this License, since you have not signed it. However, nothing else grants you permission to modify or distribute the Program or its derivative works. These actions are prohibited by law if you do not accept this License. Therefore, by modifying or distributing the Program (or any work based on the Program), you indicate your acceptance of this License to do so, and all its terms and conditions for copying, distributing or modifying the Program or works based on it.6. Each time you redistribute the Program (or any work based on the Program), the recipient automatically receives a license from the original licensor to copy, distribute or modify the Program subject to these terms and conditions. You may not impose any further restrictions on the recipients' exercise of the rights granted herein. You are not responsible for enforcing compliance by third parties to this License.7. If, as a consequence of a court judgment or allegation of patent infringement or for any other reason (not limited to patent issues), conditions are imposed on you (whether by court order, agreement or otherwise) that contradict the conditions of this License, they do not excuse you from the conditions of this License. If you cannot distribute so as to satisfy simultaneously your obligations under this License and any other pertinent obligations, then as a consequence you may not distribute the Program at all. For example, if a patent license would not permit royalty-free redistribution of the Program by all those who receive copies directly or indirectly through you, then the only way you could satisfy both it and this License would be to refrain entirely from distribution of the Program.If any portion of this section is held invalid or unenforceable under any particular circumstance, the balance of the section is intended to apply and the section as a whole is intended to apply in other circumstances.It is not the purpose of this section to induce you to infringe any patents or other property right claims or to contest validity of any such claims; this section has the sole purpose of protecting the integrity of the free software distribution system, which is implemented by public license practices. Many people have made generous contributions to the wide range of software distributed through that system in reliance on consistent application of that system; it is up to the author/donor to decide if he or she is willing to distribute software through any other system and a licensee cannot impose that choice.This section is intended to make thoroughly clear what is believed to be a consequence of the rest of this License.8. If the distribution and/or use of the Program is restricted in certain countries either by patents or by copyrighted interfaces, the original copyright holder who places the Program under this License may add an explicit geographical distribution limitation excluding those countries, so that distribution is permitted only in or among countries not thus excluded. In such case, this License incorporates the limitation as if written in the body of this License.9. The Free Software Foundation may publish revised and/or new versions of the General Public License from time to time. Such new versions will be similar in spirit to the present version, but may differ in detail to address new problems or concerns.Each version is given a distinguishing version number. If the Program specifies a version number of this License which applies to it and "any later version", you have the option of following the terms and conditions either of that version or of any later version published by the Free Software Foundation. If the Program does not specify a version number of this License, you may choose any version ever published by the Free Software Foundation.10. If you wish to incorporate parts of the Program into other free programs whose distribution conditions are different, write to the author to ask for permission. For software which is copyrighted by the Free Software Foundation, write to the Free Software Foundation; we sometimes make exceptions for this. Our decision will be guided by the two goals of preserving the free status of all derivatives of our free software and of promoting the sharing and reuse of software generally.
NO WARRANTY11. BECAUSE THE PROGRAM IS LICENSED FREE OF CHARGE, THERE IS NO WARRANTY FOR THE PROGRAM, TO THE EXTENT PERMITTED BY APPLICABLE LAW. EXCEPT WHEN OTHERWISE STATED IN WRITING THE COPYRIGHT HOLDERS AND/OR OTHER PARTIES PROVIDE THE PROGRAM "AS IS" WITHOUT WARRANTY OF ANY KIND, EITHER EXPRESSED OR IMPLIED, INCLUDING, BUT NOT LIMITED TO, THE IMPLIED WARRANTIES OF MERCHANTABILITY AND FITNESS FOR A PARTICULAR PURPOSE. THE ENTIRE RISK AS TO THE QUALITY AND PERFORMANCE OF THE PROGRAM IS WITH YOU. SHOULD THE PROGRAM PROVE DEFECTIVE, YOU ASSUME THE COST OF ALL NECESSARY SERVICING, REPAIR OR CORRECTION.12. IN NO EVENT UNLESS REQUIRED BY APPLICABLE LAW OR AGREED TO IN WRITING WILL ANY COPYRIGHT HOLDER, OR ANY OTHER PARTY WHO MAY MODIFY AND/OR REDISTRIBUTE THE PROGRAM AS PERMITTED ABOVE, BE LIABLE TO YOU FOR DAMAGES, INCLUDING ANY GENERAL, SPECIAL, INCIDENTAL OR CONSEQUENTIAL
89

Appendix B: GNU License texts
DAMAGES ARISING OUT OF THE USE OR INABILITY TO USE THE PROGRAM (INCLUDING BUT NOT LIMITED TO LOSS OF DATA OR DATA BEING RENDERED INACCURATE OR LOSSES SUSTAINED BY YOU OR THIRD PARTIES OR A FAILURE OF THE PROGRAM TO OPERATE WITH ANY OTHER PROGRAMS), EVEN IF SUCH HOLDER OR OTHER PARTY HAS BEEN ADVISED OF THE POSSIBILITY OF SUCH DAMAGES.
END OF TERMS AND CONDITIONS
How to apply these terms to your new programsIf you develop a new program, and you want it to be of the greatest possible use to the public, the best way to achieve this is to make it free software which everyone can redistribute and change under these terms.To do so, attach the following notices to the program. It is safest to attach them to the start of each source file to most effectively convey the exclusion of warranty; and each file should have at least the "copyright" line and a pointer to where the full notice is found.
Copyright (C) This program is free software; you can redistribute it and/or modify it under the terms of the GNU General Public License as published by the Free Software Foundation; either version 2 of the License, or (at your option) any later version.This program is distributed in the hope that it will be useful, but WITHOUT ANY WARRANTY; without even the implied warranty of MERCHANTABILITY or FITNESS FOR A PARTICULAR PURPOSE. See the GNU General Public License for more details.You should have received a copy of the GNU General Public License along with this program; if not, write to the Free Software Foundation, Inc., 51 Franklin Street, Fifth Floor, Boston, MA 02110-1301 USA.
Also add information on how to contact you by electronic and paper mail. If the program is interactive, make it output a short notice like this when it starts in an interactive mode:
Gnomovision version 69, Copyright (C) year name of authorGnomovision comes with ABSOLUTELY NO WARRANTY; for details type `show w'.This is free software, and you are welcome to redistribute it under certain conditions; type `show c' for details.
The hypothetical commands `show w' and `show c' should show the appropriate parts of the General Public License. Of course, the commands you use may be called something other than `show w' and `show c'; they could even be mouse-clicks or menu items--whatever suits your program.You should also get your employer (if you work as a programmer) or your school, if any, to sign a "copyright disclaimer" for the program, if necessary. Here is a sample; alter the names:
Yoyodyne, Inc., hereby disclaims all copyright interest in the program `Gnomovision' (which makes passes at compilers) written by James Hacker.
signature of Ty Coon, 1 April 1989Ty Coon, President of Vice
This General Public License does not permit incorporating your program into proprietary programs. If your program is a subroutine library, you may consider it more useful to permit linking proprietary applications with the library. If this is what you want to do, use the GNU Lesser General Public License instead of this License.
90
Appendix B: GNU License textsB
BB
B
GN
U L
icen
se te
xts
GNU Lesser General Public License
Version 2.1, February 1999Copyright (C) 1991, 1999 Free Software Foundation, Inc., 51 Franklin Street, Fifth Floor, Boston, MA 02110-1301 USA.Everyone is permitted to copy and distribute verbatim copies of this license document, but changing it is not allowed.[This is the first released version of the Lesser GPL. It also counts as the successor of the GNU Library Public License, version 2, hence the version number 2.1.]
PreambleThe licenses for most software are designed to take away your freedom to share and change it. By contrast, the GNU General Public Licenses are intended to guarantee your freedom to share and change free software--to make sure the software is free for all its users.This license, the Lesser General Public License, applies to some specially designated software packages--typically libraries--of the Free Software Foundation and other authors who decide to use it. You can use it too, but we suggest you first think carefully about whether this license or the ordinary General Public License is the better strategy to use in any particular case, based on the explanations below.When we speak of free software, we are referring to freedom of use, not price. Our General Public Licenses are designed to make sure that you have the freedom to distribute copies of free software (and charge for this service if you wish); that you receive source code or can get it if you want it; that you can change the software and use pieces of it in new free programs; and that you are informed that you can do these things.To protect your rights, we need to make restrictions that forbid distributors to deny you these rights or to ask you to surrender these rights. These restrictions translate to certain responsibilities for you if you distribute copies of the library or if you modify it.For example, if you distribute copies of the library, whether gratis or for a fee, you must give the recipients all the rights that we gave you. You must make sure that they, too, receive or can get the source code. If you link other code with the library, you must provide complete object files to the recipients, so that they can relink them with the library after making changes to the library and recompiling it. And you must show them these terms so they know their rights.We protect your rights with a two-step method: (1) we copyright the library, and (2) we offer you this license, which gives you legal permission to copy, distribute and/or modify the library.To protect each distributor, we want to make it very clear that there is no warranty for the free library. Also, if the library is modified by someone else and passed on, the recipients should know that what they have is not the original version, so that the original author's reputation will not be affected by problems that might be introduced by others.Finally, software patents pose a constant threat to the existence of any free program. We wish to make sure that a company cannot effectively restrict the users of a free program by obtaining a restrictive license from a patent holder. Therefore, we insist that any patent license obtained for a version of the library must be consistent with the full freedom of use specified in this license.Most GNU software, including some libraries, is covered by the ordinary GNU General Public License. This license, the GNU Lesser General Public License, applies to certain designated libraries, and is quite different from the ordinary General Public License. We use this license for certain libraries in order to permit linking those libraries into non-free programs.When a program is linked with a library, whether statically or using a shared library, the combination of the two is legally speaking a combined work, a derivative of the original library. The ordinary General Public License therefore permits such linking only if the entire combination fits its criteria of freedom. The Lesser General Public License permits more lax criteria for linking other code with the library.We call this license the "Lesser" General Public License because it does Less to protect the user's freedom than the ordinary General Public License. It also provides other free software developers Less of an advantage over competing non-free programs. These disadvantages are the reason we use the ordinary General Public License for many libraries. However, the Lesser license provides advantages in certain special circumstances.For example, on rare occasions, there may be a special need to encourage the widest possible use of a certain library, so that it becomes a de-facto standard. To achieve this, non-free programs must be allowed to use the library. A more frequent case is that a free library does the same job as widely used non-free libraries. In this
91
Appendix B: GNU License texts
case, there is little to gain by limiting the free library to free software only, so we use the Lesser General Public License.In other cases, permission to use a particular library in non-free programs enables a greater number of people to use a large body of free software. For example, permission to use the GNU C Library in non-free programs enables many more people to use the whole GNU operating system, as well as its variant, the GNU/Linux operating system.Although the Lesser General Public License is Less protective of the users' freedom, it does ensure that the user of a program that is linked with the Library has the freedom and the wherewithal to run that program using a modified version of the Library.The precise terms and conditions for copying, distribution and modification follow. Pay close attention to the difference between a "work based on the library" and a "work that uses the library". The former contains code derived from the library, whereas the latter must be combined with the library in order to run.
GNU LESSER GENERAL PUBLIC LICENSETERMS AND CONDITIONS FOR COPYING, DISTRIBUTION AND MODIFICATION
0. This License Agreement applies to any software library or other program which contains a notice placed by the copyright holder or other authorized party saying it may be distributed under the terms of this Lesser General Public License (also called "this License"). Each licensee is addressed as "you".A "library" means a collection of software functions and/or data prepared so as to be conveniently linked with application programs (which use some of those functions and data) to form executables. The "Library", below, refers to any such software library or work which has been distributed under these terms. A "work based on the Library" means either the Library or any derivative work under copyright law: that is to say, a work containing the Library or a portion of it, either verbatim or with modifications and/or translated straightforwardly into another language. (Hereinafter, translation is included without limitation in the term "modification".)"Source code" for a work means the preferred form of the work for making modifications to it. For a library, complete source code means all the source code for all modules it contains, plus any associated interface definition files, plus the scripts used to control compilation and installation of the library.Activities other than copying, distribution and modification are not covered by this License; they are outside its scope. The act of running a program using the Library is not restricted, and output from such a program is covered only if its contents constitute a work based on the Library (independent of the use of the Library in a tool for writing it). Whether that is true depends on what the Library does and what the program that uses the Library does.1. You may copy and distribute verbatim copies of the Library's complete source code as you receive it, in any medium, provided that you conspicuously and appropriately publish on each copy an appropriate copyright notice and disclaimer of warranty; keep intact all the notices that refer to this License and to the absence of any warranty; and distribute a copy of this License along with the Library.You may charge a fee for the physical act of transferring a copy, and you may at your option offer warranty protection in exchange for a fee.2. You may modify your copy or copies of the Library or any portion of it, thus forming a work based on the Library, and copy and distribute such modifications or work under the terms of Section 1 above, provided that you also meet all of these conditions:
a) The modified work must itself be a software library.b) You must cause the files modified to carry prominent notices stating that you changed the files and the date of any change.c) You must cause the whole of the work to be licensed at no charge to all third parties under the terms of this License.d) If a facility in the modified Library refers to a function or a table of data to be supplied by an application program that uses the facility, other than as an argument passed when the facility is invoked, then you must make a good faith effort to ensure that, in the event an application does not supply such function or table, the facility still operates, and performs whatever part of its purpose remains meaningful.(For example, a function in a library to compute square roots has a purpose that is entirely well-defined independent of the application. Therefore, Subsection 2d requires that any application-supplied function or table used by this function must be optional: if the application does not supply it, the square root function must still compute square roots.)
These requirements apply to the modified work as a whole. If identifiable sections of that work are not derived from the Library, and can be reasonably considered independent and separate works in themselves, then this
92
Appendix B: GNU License textsB
BB
B
GN
U L
icen
se te
xts
License, and its terms, do not apply to those sections when you distribute them as separate works. But when you distribute the same sections as part of a whole which is a work based on the Library, the distribution of the whole must be on the terms of this License, whose permissions for other licensees extend to the entire whole, and thus to each and every part regardless of who wrote it.Thus, it is not the intent of this section to claim rights or contest your rights to work written entirely by you; rather, the intent is to exercise the right to control the distribution of derivative or collective works based on the Library.In addition, mere aggregation of another work not based on the Library with the Library (or with a work based on the Library) on a volume of a storage or distribution medium does not bring the other work under the scope of this License.3. You may opt to apply the terms of the ordinary GNU General Public License instead of this License to a given copy of the Library. To do this, you must alter all the notices that refer to this License, so that they refer to the ordinary GNU General Public License, version 2, instead of to this License. (If a newer version than version 2 of the ordinary GNU General Public License has appeared, then you can specify that version instead if you wish.) Do not make any other change in these notices.Once this change is made in a given copy, it is irreversible for that copy, so the ordinary GNU General Public License applies to all subsequent copies and derivative works made from that copy.This option is useful when you wish to copy part of the code of the Library into a program that is not a library.4. You may copy and distribute the Library (or a portion or derivative of it, under Section 2) in object code or executable form under the terms of Sections 1 and 2 above provided that you accompany it with the complete corresponding machine-readable source code, which must be distributed under the terms of Sections 1 and 2 above on a medium customarily used for software interchange.If distribution of object code is made by offering access to copy from a designated place, then offering equivalent access to copy the source code from the same place satisfies the requirement to distribute the source code, even though third parties are not compelled to copy the source along with the object code.5. A program that contains no derivative of any portion of the Library, but is designed to work with the Library by being compiled or linked with it, is called a "work that uses the Library". Such a work, in isolation, is not a derivative work of the Library, and therefore falls outside the scope of this License.However, linking a "work that uses the Library" with the Library creates an executable that is a derivative of the Library (because it contains portions of the Library), rather than a "work that uses the library". The executable is therefore covered by this License. Section 6 states terms for distribution of such executables.When a "work that uses the Library" uses material from a header file that is part of the Library, the object code for the work may be a derivative work of the Library even though the source code is not. Whether this is true is especially significant if the work can be linked without the Library, or if the work is itself a library. The threshold for this to be true is not precisely defined by law.If such an object file uses only numerical parameters, data structure layouts and accessors, and small macros and small inline functions (ten lines or less in length), then the use of the object file is unrestricted, regardless of whether it is legally a derivative work. (Executables containing this object code plus portions of the Library will still fall under Section 6.)Otherwise, if the work is a derivative of the Library, you may distribute the object code for the work under the terms of Section 6. Any executables containing that work also fall under Section 6, whether or not they are linked directly with the Library itself.6. As an exception to the Sections above, you may also combine or link a "work that uses the Library" with the Library to produce a work containing portions of the Library, and distribute that work under terms of your choice, provided that the terms permit modification of the work for the customer's own use and reverse engineering for debugging such modifications.You must give prominent notice with each copy of the work that the Library is used in it and that the Library and its use are covered by this License. You must supply a copy of this License. If the work during execution displays copyright notices, you must include the copyright notice for the Library among them, as well as a reference directing the user to the copy of this License. Also, you must do one of these things:
a) Accompany the work with the complete corresponding machine-readable source code for the Library including whatever changes were used in the work (which must be distributed under Sections 1 and 2 above); and, if the work is an executable linked with the Library, with the complete machine-readable "work that uses the Library", as object code and/or source code, so that the user can modify the Library and then relink to produce a modified executable containing the modified Library. (It is understood that the user who changes the
93
Appendix B: GNU License texts
contents of definitions files in the Library will not necessarily be able to recompile the application to use the modified definitions.)b) Use a suitable shared library mechanism for linking with the Library. A suitable mechanism is one that (1) uses at run time a copy of the library already present on the user's computer system, rather than copying library functions into the executable, and (2) will operate properly with a modified version of the library, if the user installs one, as long as the modified version is interface-compatible with the version that the work was made with.c) Accompany the work with a written offer, valid for at least three years, to give the same user the materials specified in Subsection 6a, above, for a charge no more than the cost of performing this distribution.d) If distribution of the work is made by offering access to copy from a designated place, offer equivalent access to copy the above specified materials from the same place.e) Verify that the user has already received a copy of these materials or that you have already sent this user a copy.
For an executable, the required form of the "work that uses the Library" must include any data and utility programs needed for reproducing the executable from it. However, as a special exception, the materials to be distributed need not include anything that is normally distributed (in either source or binary form) with the major components (compiler, kernel, and so on) of the operating system on which the executable runs, unless that component itself accompanies the executable.It may happen that this requirement contradicts the license restrictions of other proprietary libraries that do not normally accompany the operating system. Such a contradiction means you cannot use both them and the Library together in an executable that you distribute.7. You may place library facilities that are a work based on the Library side-by-side in a single library together with other library facilities not covered by this License, and distribute such a combined library, provided that the separate distribution of the work based on the Library and of the other library facilities is otherwise permitted, and provided that you do these two things:
a) Accompany the combined library with a copy of the same work based on the Library, uncombined with any other library facilities. This must be distributed under the terms of the Sections above.b) Give prominent notice with the combined library of the fact that part of it is a work based on the Library, and explaining where to find the accompanying uncombined form of the same work.
8. You may not copy, modify, sublicense, link with, or distribute the Library except as expressly provided under this License. Any attempt otherwise to copy, modify, sublicense, link with, or distribute the Library is void, and will automatically terminate your rights under this License. However, parties who have received copies, or rights, from you under this License will not have their licenses terminated so long as such parties remain in full compliance.9. You are not required to accept this License, since you have not signed it. However, nothing else grants you permission to modify or distribute the Library or its derivative works. These actions are prohibited by law if you do not accept this License. Therefore, by modifying or distributing the Library (or any work based on the Library), you indicate your acceptance of this License to do so, and all its terms and conditions for copying, distributing or modifying the Library or works based on it.10. Each time you redistribute the Library (or any work based on the Library), the recipient automatically receives a license from the original licensor to copy, distribute, link with or modify the Library subject to these terms and conditions. You may not impose any further restrictions on the recipients' exercise of the rights granted herein. You are not responsible for enforcing compliance by third parties with this License.11. If, as a consequence of a court judgment or allegation of patent infringement or for any other reason (not limited to patent issues), conditions are imposed on you (whether by court order, agreement or otherwise) that contradict the conditions of this License, they do not excuse you from the conditions of this License. If you cannot distribute so as to satisfy simultaneously your obligations under this License and any other pertinent obligations, then as a consequence you may not distribute the Library at all. For example, if a patent license would not permit royalty-free redistribution of the Library by all those who receive copies directly or indirectly through you, then the only way you could satisfy both it and this License would be to refrain entirely from distribution of the Library.If any portion of this section is held invalid or unenforceable under any particular circumstance, the balance of the section is intended to apply, and the section as a whole is intended to apply in other circumstances.It is not the purpose of this section to induce you to infringe any patents or other property right claims or to contest validity of any such claims; this section has the sole purpose of protecting the integrity of the free software distribution system which is implemented by public license practices. Many people have made generous
94
Appendix B: GNU License textsB
BB
B
GN
U L
icen
se te
xts
contributions to the wide range of software distributed through that system in reliance on consistent application of that system; it is up to the author/donor to decide if he or she is willing to distribute software through any other system and a licensee cannot impose that choice.This section is intended to make thoroughly clear what is believed to be a consequence of the rest of this License.12. If the distribution and/or use of the Library is restricted in certain countries either by patents or by copyrighted interfaces, the original copyright holder who places the Library under this License may add an explicit geographical distribution limitation excluding those countries, so that distribution is permitted only in or among countries not thus excluded. In such case, this License incorporates the limitation as if written in the body of this License.13. The Free Software Foundation may publish revised and/or new versions of the Lesser General Public License from time to time. Such new versions will be similar in spirit to the present version, but may differ in detail to address new problems or concerns.Each version is given a distinguishing version number. If the Library specifies a version number of this License which applies to it and "any later version", you have the option of following the terms and conditions either of that version or of any later version published by the Free Software Foundation. If the Library does not specify a license version number, you may choose any version ever published by the Free Software Foundation.14. If you wish to incorporate parts of the Library into other free programs whose distribution conditions are incompatible with these, write to the author to ask for permission. For software which is copyrighted by the Free Software Foundation, write to the Free Software Foundation; we sometimes make exceptions for this. Our decision will be guided by the two goals of preserving the free status of all derivatives of our free software and of promoting the sharing and reuse of software generally.
NO WARRANTY15. BECAUSE THE LIBRARY IS LICENSED FREE OF CHARGE, THERE IS NO WARRANTY FOR THE LIBRARY, TO THE EXTENT PERMITTED BY APPLICABLE LAW. EXCEPT WHEN OTHERWISE STATED IN WRITING THE COPYRIGHT HOLDERS AND/OR OTHER PARTIES PROVIDE THE LIBRARY "AS IS" WITHOUT WARRANTY OF ANY KIND, EITHER EXPRESSED OR IMPLIED, INCLUDING, BUT NOT LIMITED TO, THE IMPLIED WARRANTIES OF MERCHANTABILITY AND FITNESS FOR A PARTICULAR PURPOSE. THE ENTIRE RISK AS TO THE QUALITY AND PERFORMANCE OF THE LIBRARY IS WITH YOU. SHOULD THE LIBRARY PROVE DEFECTIVE, YOU ASSUME THE COST OF ALL NECESSARY SERVICING, REPAIR OR CORRECTION.16. IN NO EVENT UNLESS REQUIRED BY APPLICABLE LAW OR AGREED TO IN WRITING WILL ANY COPYRIGHT HOLDER, OR ANY OTHER PARTY WHO MAY MODIFY AND/OR REDISTRIBUTE THE LIBRARY AS PERMITTED ABOVE, BE LIABLE TO YOU FOR DAMAGES, INCLUDING ANY GENERAL, SPECIAL, INCIDENTAL OR CONSEQUENTIAL DAMAGES ARISING OUT OF THE USE OR INABILITY TO USE THE LIBRARY (INCLUDING BUT NOT LIMITED TO LOSS OF DATA OR DATA BEING RENDERED INACCURATE OR LOSSES SUSTAINED BY YOU OR THIRD PARTIES OR A FAILURE OF THE LIBRARY TO OPERATE WITH ANY OTHER SOFTWARE), EVEN IF SUCH HOLDER OR OTHER PARTY HAS BEEN ADVISED OF THE POSSIBILITY OF SUCH DAMAGES.
END OF TERMS AND CONDITIONS
How to apply these terms to your new librariesIf you develop a new library, and you want it to be of the greatest possible use to the public, we recommend making it free software that everyone can redistribute and change. You can do so by permitting redistribution under these terms (or, alternatively, under the terms of the ordinary General Public License).To apply these terms, attach the following notices to the library. It is safest to attach them to the start of each source file to most effectively convey the exclusion of warranty; and each file should have at least the "copyright" line and a pointer to where the full notice is found.
Copyright (C)This library is free software; you can redistribute it and/or modify it under the terms of the GNU Lesser General Public License as published by the Free Software Foundation; either version 2.1 of the License, or (at your option) any later version.This library is distributed in the hope that it will be useful, but WITHOUT ANY WARRANTY; without even the implied warranty of MERCHANTABILITY or FITNESS FOR A PARTICULAR PURPOSE. See the GNU Lesser General Public License for more details.You should have received a copy of the GNU Lesser General Public License along with this library; if not, write to the Free Software Foundation, Inc., 51 Franklin Street, Fifth Floor, Boston, MA 02110-1301 USA
Also add information on how to contact you by electronic and paper mail.
95

Appendix B: GNU License texts
You should also get your employer (if you work as a programmer) or your school, if any, to sign a "copyright disclaimer" for the library, if necessary. Here is a sample; alter the names:
Yoyodyne, Inc., hereby disclaims all copyright interest in the library `Frob' (a library for tweaking knobs) written by James Random Hacker.
signature of Ty Coon, 1 April 1990Ty Coon, President of Vice
96
GlossaryCC
Glossary CCC
Glo
ssar
y
C
CAN Controller-Area Network. A message based protocol designed to allow microcontrollers and devices to communicate with each other within a vehicle without a host computer.
D
DNIC Data Network Identification Code
DNID Data reporting Network IDentification code. An address code to an electronic mailbox at the Land Earth Station.
E
EGC Enhanced Group Call. The system for broadcasting messages via the mobile satellite communications system operated by Inmarsat. EGC is part of the Inmarsat C system and supports two services: SafetyNET and FleetNET
ENID EGC Network IDentification code. An identification code for a group of EGC receivers. When an EGC message is sent using the ENID, all members of a group with that ENID receive the same message.
G
GMDSS Global Maritime Distress and Safety System. The GMDSS system is intended to perform the following functions: alerting (including position determination of the unit in distress), search and rescue coordination, locating (homing), maritime safety information broadcasts, general communications, and bridge-to-bridge communications.
GNSS Global Navigational Satellite System
97
Glossary
GNU GNU’s Not Unix. A Unix-like computer operating system developed by the GNU project, ultimately aiming to be a "complete Unix-compatible software system" composed wholly of free software
GPL General Public License
GPS Global Positioning System. A system of satellites, computers, and receivers that is able to determine the latitude and longitude of a receiver on Earth by calculating the time difference for signals from different satellites to reach the receiver.
I
IMN Inmarsat Mobile Number
IMSO International Mobile Satellite Organisation. An intergovernmental organisation that oversees certain public satellite safety and security communication services provided via the Inmarsat satellites.
ISP Inmarsat Service Provider. The company providing the Inmarsat services.
L
LAN Local Area Network. A computer network covering a small physical area, like a home, office, school or airport. The defining characteristics of LANs, in contrast to wide-area networks (WANs), include their usually higher data-transfer rates, smaller geographic area, and lack of a need for leased telecommunication lines.
LES Land Earth Station
LGPL Lesser General Public License
98
Glossary CC
CC
Glo
ssar
y
LRIT Long Range Identification and Tracking. A system established by the IMO applying to all passenger ships, cargo ships > 300 gross tonnage and mobile offshore drilling units. These ships/units must automatically report their position to their Flag Administration at least 4 times a day. Other contracting governments may request information about vessels in which they have a legitimate interest under the regulation.
Lua A lightweight multi-paradigm programming language designed as a scripting language with extensible semantics as a primary goal.
M
METAREA A geographical area established for the purpose of coordinating the broadcast of marine meteorological information.
Mobile Mobile terminal. In this context the mini-C terminal
MRCC Maritime Rescue Coordination Centre
MSI Maritime Safety Information. Navigational and meteorological warnings, meteorological forecasts and other urgent safety-related messages broadcast to ships.
N
NAVAREA A geographical area established for the purpose of coordinating the broadcast of navigational warnings
NCS Network Coordination Station
P
PSDN Public Switched Data Network
99
Glossary
PSTN Public Switched Telephone Network. The network of the world’s public circuit-switched telephone networks. It consists of telephone lines, fibre-optic cables, microwave transmission links, cellular networks, communications satellites, and undersea telephone cables all inter-connected by switching centres which allows any telephone in the world to communicate with any other.
PU Position Unreserved
S
SAC Short Access Code
SAR Search And Rescue
SARF Service Activation Registration Form. A form used to register your mobile equipment for activation of the services you are going to use.
SOLAS (International Convention for the) Safety Of Life At Sea. Generally regarded as the most important of all international treaties concerning the safety of merchant ships.
SSA Ship Security Alert. The ship security alert system is provided to a vessel for the purpose of transmitting a security alert to the shore (not to other vessel!) to indicate to a competent authority that the security of the ship is under threat or has been compromised.
T
TCU Terminal Control Unit
TMA ThraneLINK Management Application. An application used to monitor and control products connected in a ThraneLINK network.
100
IndexD
Index D
DD
D
Inde
x
A
activation of service, 13alert
Ship Security Alert, 69auto-print
EGCs and messages, 63
B
buttonsDistress, using SAILOR 3042E, 65Distress, using SAILOR 6006, 67SSA, using, 69
C
clear protocol, 47configuration of SAILOR 6006
mini-C software or Radiotelex, 16conformity, 81contacts, 38
D
data file, send, 32data reporting and polling
description of service, 11deleting
EGC, 45message, 37
Distressalert with SAILOR 3042E, 65alert with SAILOR 6006, 67button test (easyMail), 28clear indications (easyMail), 66clear indications (SAILOR 6006), 69description of service, 8message, 25settings, 25
Distress LES (SAILOR 6006), 67Distress position, 27document number
this manual, i
E
easyMailmenu overview, 24using LAN, 61using RS-232, 62
EGCauto-print, 63deleting, 45description of service, 9receiving, 44setup, 52
event log, 77, 79
G
GNU General Public License, 87GNU Lesser General Public License, 91
I
Inbox, 37
101
Index
info log, 77
L
LANsetup with easyMail, 61
LES numberDistress (SAILOR 6006), 67list of supported, 55
link test, 47login, 46Lua
script language, 3
M
manualdocument number, i
menu overview, 24menu overview (SAILOR 6006), 7message
auto-print, 63deleting, 37Distress, 25Inbox, 37options, 33Outbox, 38sent items, 38writing, 31
Message Terminalmenu overview, 7
messagingdescription of service, 10
mobile numberentering, 58
102
N
networklogin, 46scan, 46view status, 46
O
Outbox, 38
P
positionfor Distress, 27viewing, 49
position information, 11position reporting
description of service, 10powering the system, 17protocol, clear, 47
R
receiving EGCs, 44registration, 13reporting position, 11RS-232
communication with easyMail, 62
S
safety summary, ivSAILOR 3042E
sending Distress alert, 65
Index DD
DD
Inde
x
SAILOR 6006menu overview, 7sending Distress alert, 67
scan, 46script
introduction, 3Lua, 3
sent items, 38serial communication with easyMail,62service activation, 13services
data reporting and polling, 11Distress, 8EGC, 9Inmarsat C details, 8messaging, 10position reporting, 10
Ship Security Alertsend, 69
software in SAILOR 6006select mini-C or Radiotelex, 16
software update, 72sound
testing, 29special access codes, 40SSA buttons
using, 69starting up, 17status
network, 46signalling, 77, 78
support, 71system overview
total, 2system units, 4
T
ThraneLINK Management Application,72TMA, 72
installing, 72transmission stop, 47troubleshooting, 71typography used in this manual, vi
U
units in the system, 4update software, 72user interface, 5
W
warranty, 80writing messages, 31
103

98-131590-C
www.cobham.com/satcom