Embed Size (px)
Citation preview
SAP PP/QM
Configuration Pack Published by Team of SAP
Consultants at SAPTOPJOBS
Visit us at www.sap-topjobs.com
Copyright 2010-12 SAPTOPJOBS
All rights reserved. No part of this publication may be reproduced, stored in a
retrieval system, or transmitted in any form, or by any means electronic or
mechanical including photocopying, recording or any information storage and
retrieval system without permission in writing from SAPTOPJOBS
A Ware Welcome To You All! We are really excited to offer the
complete SAP PP/QM configuration pack to the SAP community. This
was a much- awaited pack and we are happy to present that to
you… As you are aware that our SAP FICO, S D and MM/WM have
already achieved the best selling status and have received lots of
accolades and really helped the consultants take their SAP knowledge
and career to the next level …I am very confident that PP/QM
configuration package will go a step forward and do much more than
that……….
For those who have been on our list and who have bought from us
earlier you all know that we have over-delivered on each of our
configuration packs and we want to do the same thing with SAP
PP/QM config pack too… For those who have visited our site for the
first time I would like to welcome you to our site and promise you
that we would do our best to ensure that your life at the clients place
would be very comfortable…
What I have done here is given you a brief of around 74+ pages of
content in PP/QM pack so that you can have a feel of what it would be
like in terms of structure. The whole pack is extremely voluminous, step
by step guide this is just a feeler… So I hope you enjoy this…. So lets
dive right in….

OVER VIEW INDEX
1. 1.1
1.2
1.3
1.4
1.5
1.6
1.7
1.8
1.9
2. 2.1
2.2
2.3
2.4
2.5
2.6
2.7
3. 3.1
3.2
3.3
3.4
Master Data Configuration ............................................ 3 Define Bill Of Materials (BOM) Usage .................................................... 3
Define BOM Status ....................................................................................... 7
Define Item Category.................................................................................. 10
Define Application....................................................................................... 13
Define Work center Category................................................................... 16
Define Parameters....................................................................................... 19
Define Standard Value .............................................................................. 23
Define Shift Sequence................................................................................ 25
Define Routing Selection – Automatic.................................................. 30
MRP Related configuration settings ..............................33 Plant parameters ......................................................................................... 33
Define MRP controller................................................................................ 36
MRP Plant Parameter – Float (Schedule Margin Key) ..................... 39
MRP Plant Parameter – Special Procurement Key ........................... 42
Activating MRP and Planning file entries............................................ 46
MRP type ........................................................................................................ 48
MRP Plant Parameter – Conversion ...................................................... 52
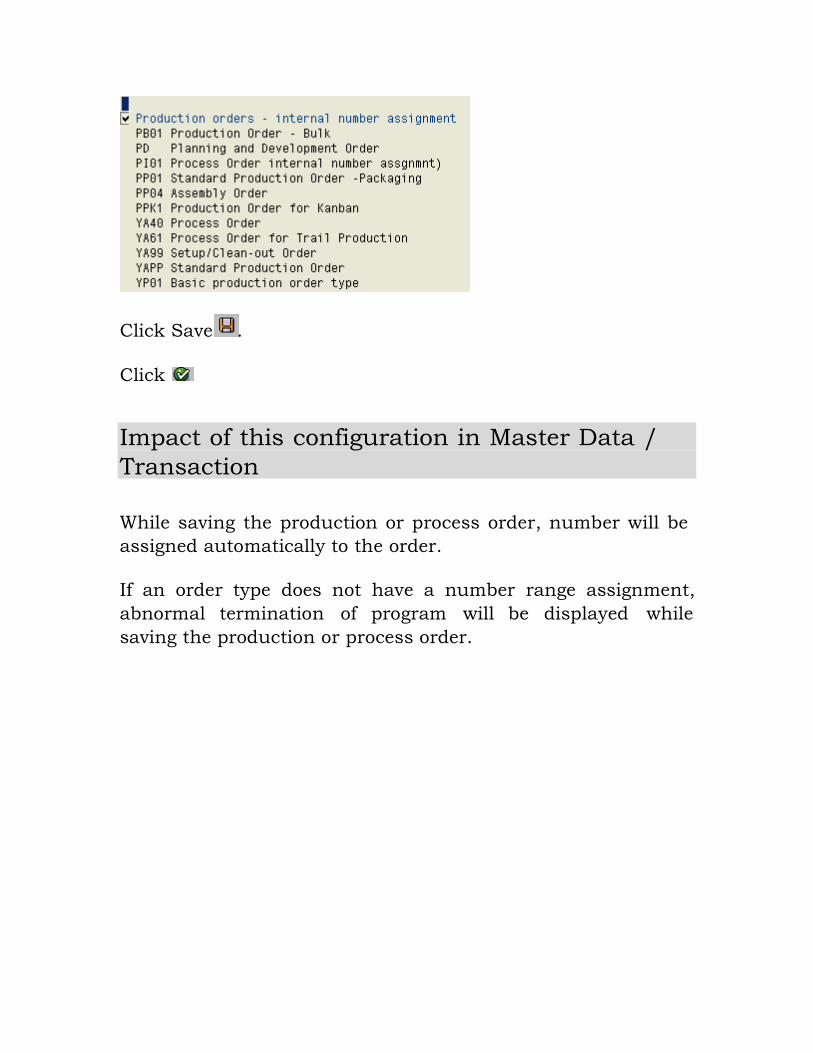
PRODUCTION EXECUTION..........................................54 Define Order Type ....................................................................................... 54
Define Number Range for Order type ................................................... 57
Define Scheduling Parameter for order type ...................................... 60
Define confirmation parameters ............................................................ 64
Define Default Values 70
In the following pages we will run through a summary of Master Data
Configuration, MRP and Production execution parameter. This is just a
summary and a small snapshot to enable you to understand the way we
have laid out the whole pack of our best-selling PP/QM pack.
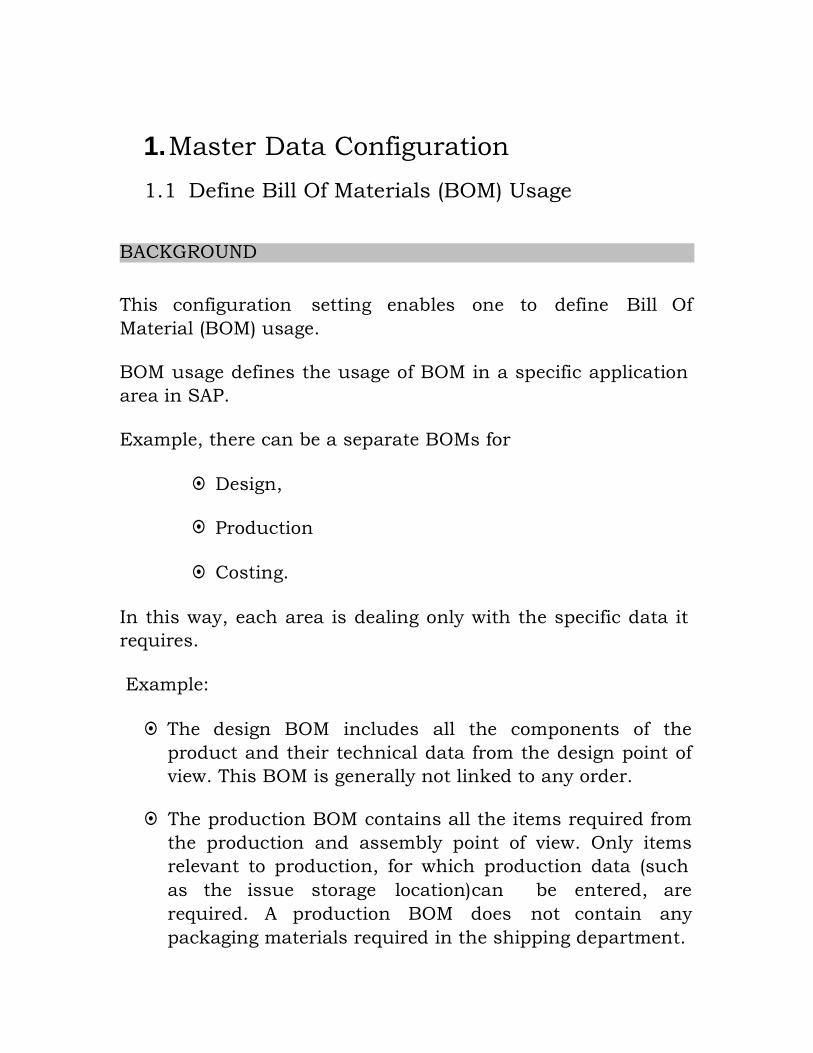
1. Master Data Configuration
1.1 Define Bill Of Materials (BOM) Usage
BACKGROUND
This configuration setting enables one to define Bill Of
Material (BOM) usage.
BOM usage defines the usage of BOM in a specific application
area in SAP.
Example, there can be a separate BOMs for
Design,
Production
Costing.
In this way, each area is dealing only with the specific data it
requires.
Example:
The design BOM includes all the components of the
product and their technical data from the design point of
view. This BOM is generally not linked to any order.
The production BOM contains all the items required from
the production and assembly point of view. Only items
relevant to production, for which production data (such
as the issue storage location)can be entered, are
required. A production BOM does not contain any
packaging materials required in the shipping department.

SCENARIO
Create new BOM usage.
Note:-
Standard BOM usage available with SAP is sufficient. However
any new BOM usage can be created.
INSTRUCTIONS
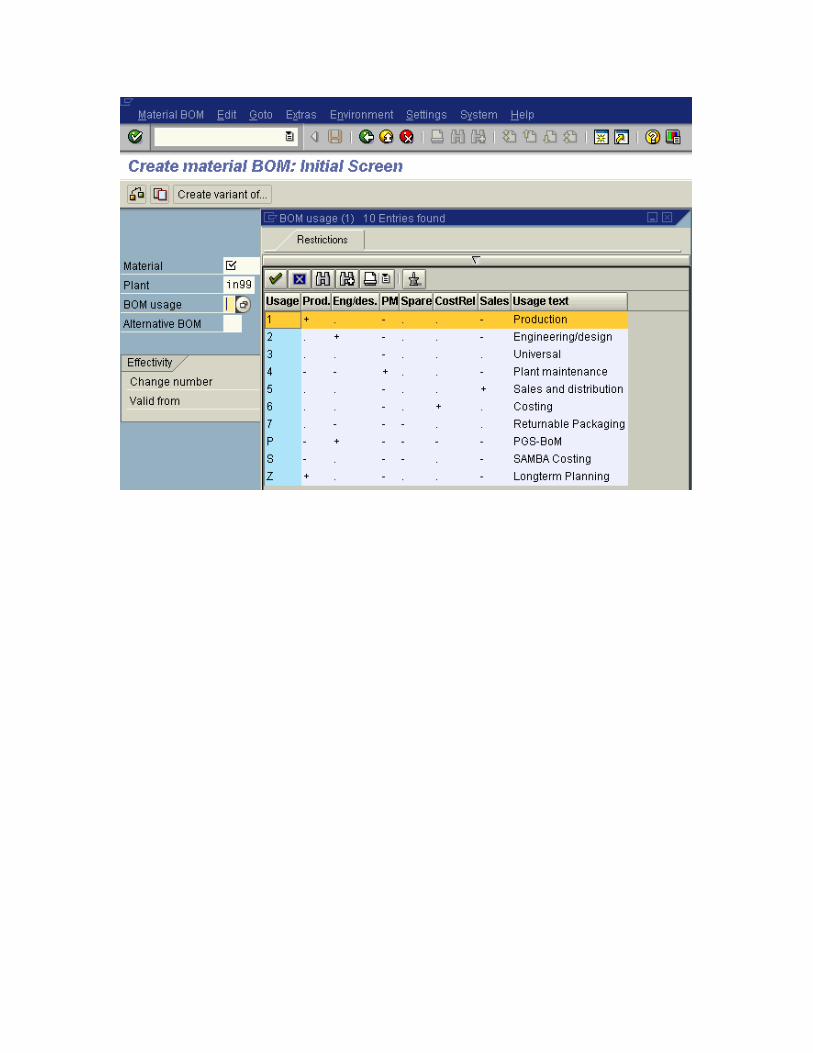
Follow the Menu Path: IMG Production Basic data Bill
of materials
Usage
1. Click
2. Click
General data BOM Usage Define BOM
3. Enter usage value; it can be either numeric or alphabet.
It is suggested to be numeric.
4. Select +,- or . to indicate to which area this BOM is
meant for like Production, Engineering, Spare, Plant
Maintenance, Sales or for costing relevancy.
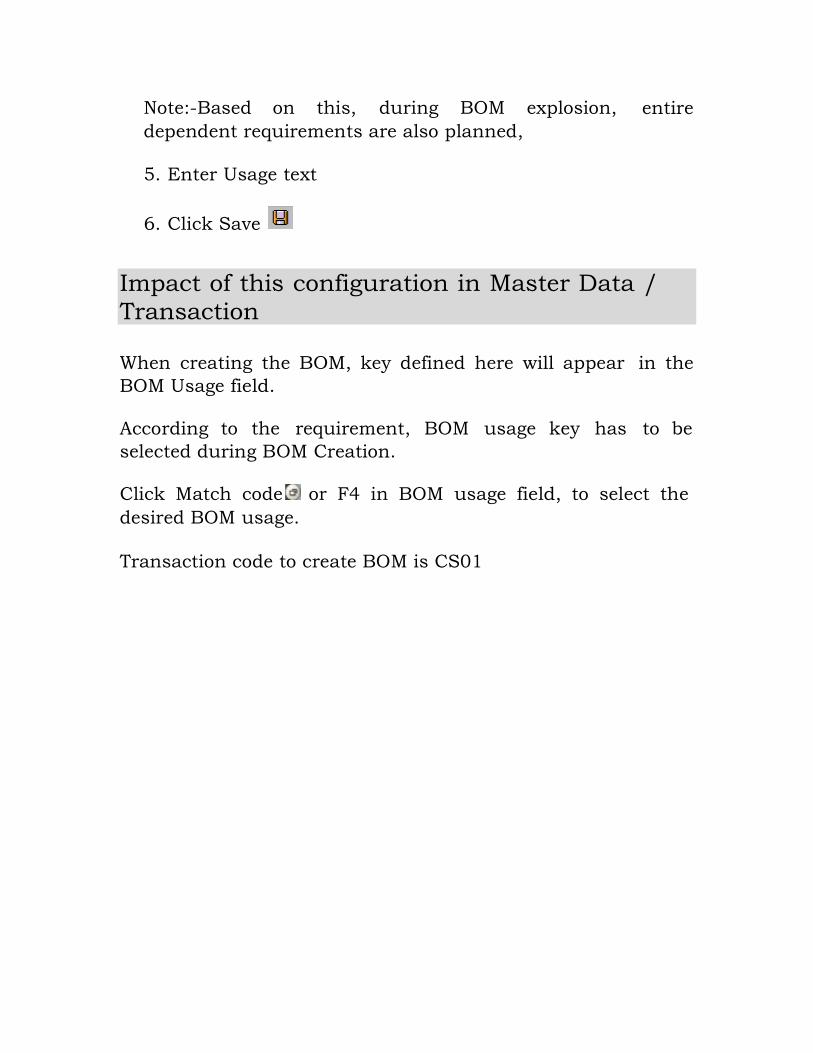
Note:-Based on this, during BOM explosion,
dependent requirements are also planned,
entire
5. Enter Usage text
6. Click Save
Impact of this configuration in Master Data / Transaction
When creating the BOM, key defined here will appear
BOM Usage field.
in the
According to the requirement, BOM usage key has
selected during BOM Creation.
to be
Click Match code or F4 in BOM usage field, to select the
desired BOM usage.
Transaction code to create BOM is CS01
1.2 Define BOM Status
BACKGROUND
This configuration setting enables to define BOM status.
BOM status is used to define whether the BOM can be used by
any application area or not.
Example: -
In the costing areas in a company, the BOM is exploded
according to the application. While defining the BOM
status, usage in costing area will be defined.
In MRP, the following indicators are checked directly from
the definition of the BOM status:
- Explosion in MRP
- Released for orders
MRP only reads BOMs whose BOM status has at least one of
these indicators.
BOM status defines whether
The BOM is active or inactive.
SCENARIO
BOM need to be created for certain for product whose BOM
can be finalized only after some trial and error.
While it is in preparation it is required not to be used by any
application. Status “In preparation” has to be created.
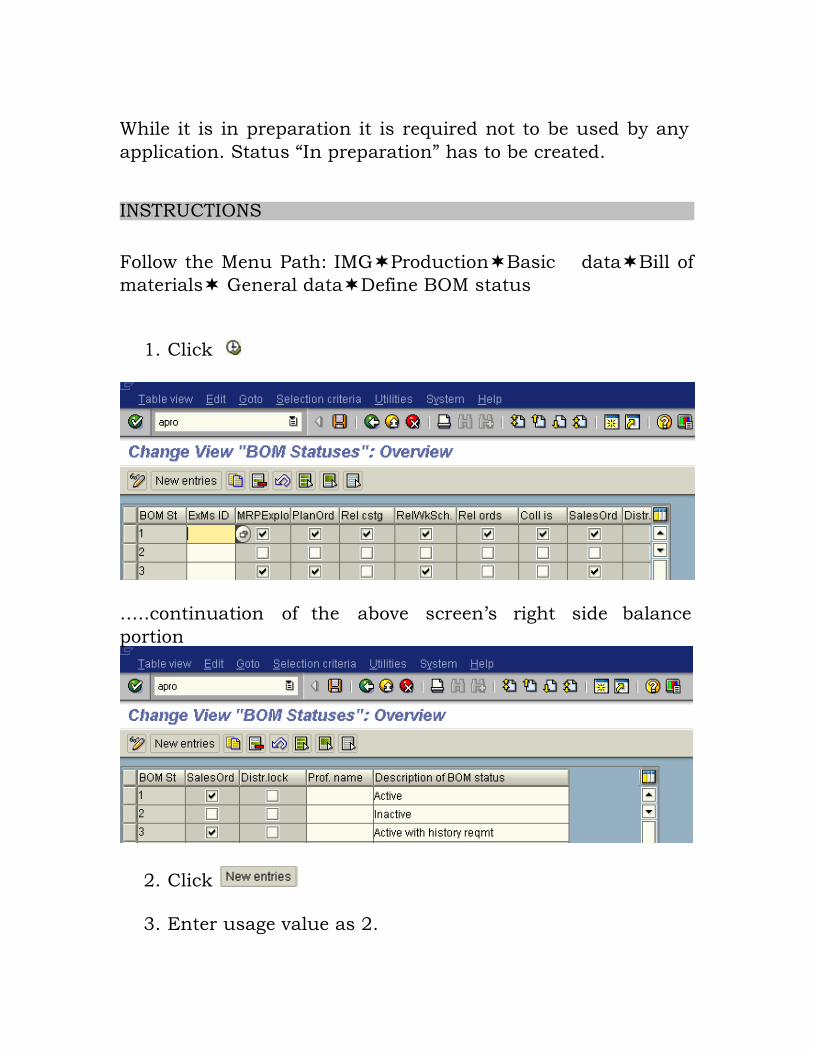
INSTRUCTIONS
Follow the Menu Path: IMGProductionBasic
materials General dataDefine BOM status
dataBill of
1. Click
…..continuation
portion
of the above screen’s right side balance
2. Click
3. Enter usage value as 2.

4. Leave all the check box EMPTY, i.e. do not tick any check
box.
5. Mention description as “In preparation”
6. Click Save .
Impact of this configuration in Master Data / Transaction
BOM with status 2 can not be used for any application.
1.3 Define Item Category
BACKGROUND
This configuration setting enables to define item category.
The item category defines the attributes
BOM item. It controls field and screen
screens in BOM maintenance.
and functions of a
selection for detail
BOM can contain different type of items related to
manufacture the finished product. There are
Pipeline items – i.e. items which are received
through a pipeline from supplier not related to
inventory
Stock items – i.e. materials are always issued from
stock which are relate to inventory
Document item – i.e. Documents are referred in the
BOM as a item trough the Document Management
System (DMS)
Text item – i.e. brief note about the material usage
can be maintained as a Text item. This will be
useful in a long BOM to indicate any specific
assembly.
The above
the BOM.
different items are defined through item category in
SCENARIO
Define item category.
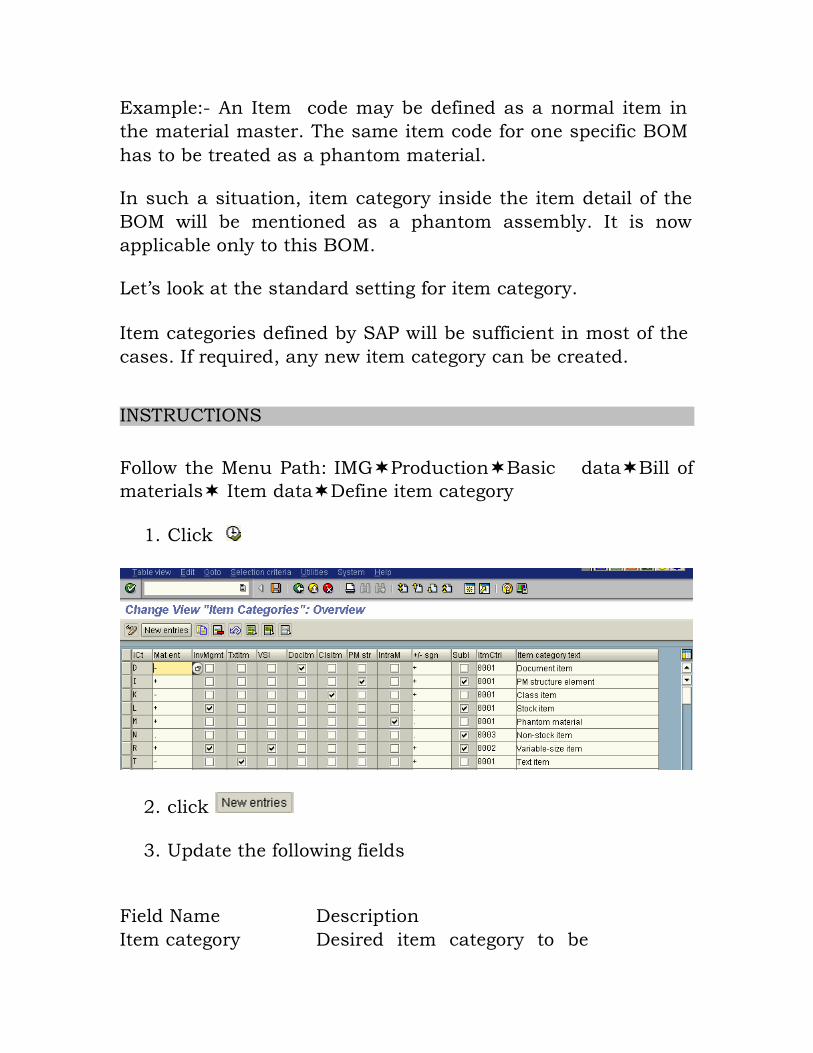
Example:- An Item code may be defined as a normal item in
the material master. The same item code for one specific BOM
has to be treated as a phantom material.
In such a situation, item category inside the item detail of the
BOM will be mentioned as a phantom assembly. It is now
applicable only to this BOM.
Let’s look at the standard setting for item category.
Item categories defined by SAP will be sufficient in most of the
cases. If required, any new item category can be created.
INSTRUCTIONS
Follow the Menu Path: IMGProductionBasic dataBill of
materials Item dataDefine item category
1. Click
2. click
3. Update the following fields
Field Name
Item category
Description
Desired item category to be
mentioned in the BOM
Inv.Mgmt Relevant to
management
Inventory
TxtItem
Vsl
Document Item
Cls Item
PM Str
IntraM
+/- sign
SubI
Item Ctrl
It is text item Variable size item
To mention Document
To mention as Class item,
used in Variant configuration
To mention as PM structure
element
To mention Intra Material
normally used in Master
Recipe-PPPI
Negative value allowed in the
BOM or not? This is required
to indicate the by product.
To indicate sub items are
supported.
Sequence of Item detail
4. Select check requirement
boxes according to the business
5. Mention Item category Text
6. Click Save .
Impact of this configuration in Master Data / Transaction
While creating the BOM, required item category can be
selected.
1.4 Define Application
BACKGROUND
This configuration setting enables to define BOM Application.
BOM application controls use of BOM in a specific area.
Example:- MRP run and cost estimate calculation will use the
BOM of its own respective BOM application.
SCENARIO
BOM
done
only
display at multiple levels (transaction code CS12) can be
for different BOM application. It is required to display
the costing BOM to certain users. Separate BOM application to be created
costing. to display the BOM related only to
Note: - BOM with usage for costing should be available. i.e. with the right usage for costing.
INSTRUCTIONS
Follow the Menu Path: IMGProductionBasic dataBill of
materials Alternative determinationDefine order of priority
for BOM usage.
1. Click
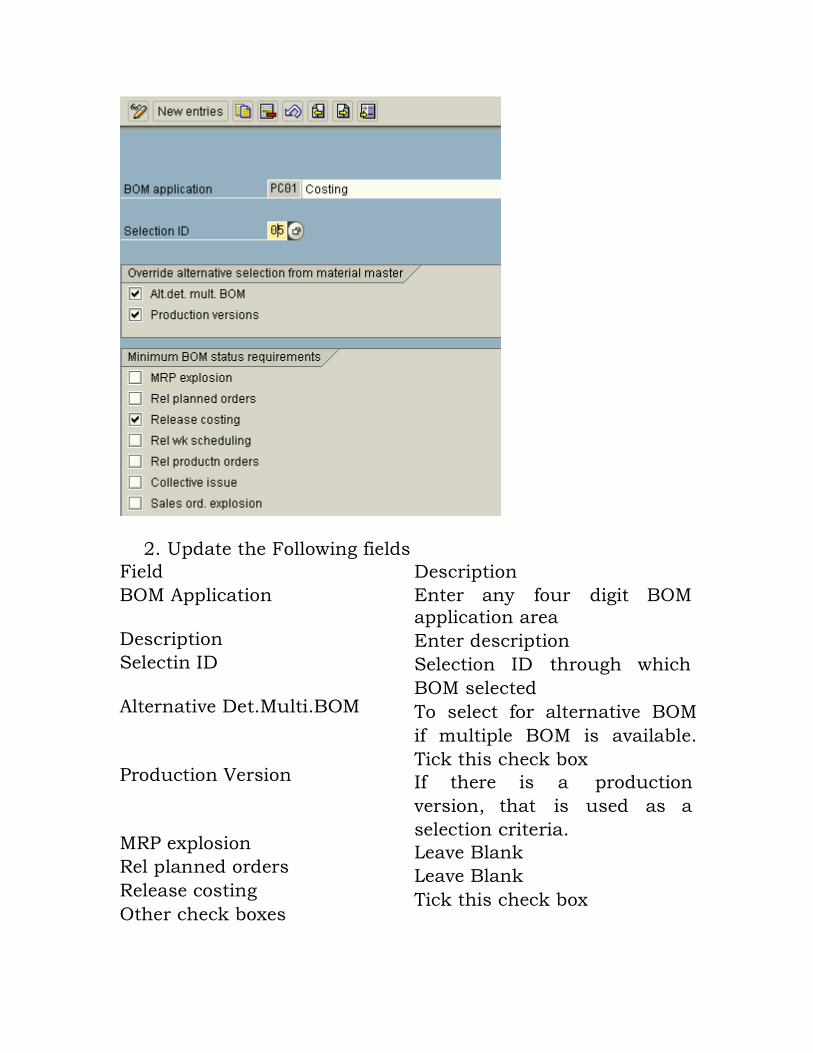
2. Update the Following fields
Field
BOM Application
Description
Selectin ID
Alternative Det.Multi.BOM
Production Version
MRP explosion
Rel planned orders
Release costing
Other check boxes
Description
Enter any four digit BOM
application area
Enter description
Selection ID through which
BOM selected
To select for alternative BOM
if multiple BOM is available.
Tick this check box
If there is a production
version, that is used as a
selection criteria.
Leave Blank
Leave Blank
Tick this check box
3. Click Save .
Impact of this configuration in Master Data /
Transaction
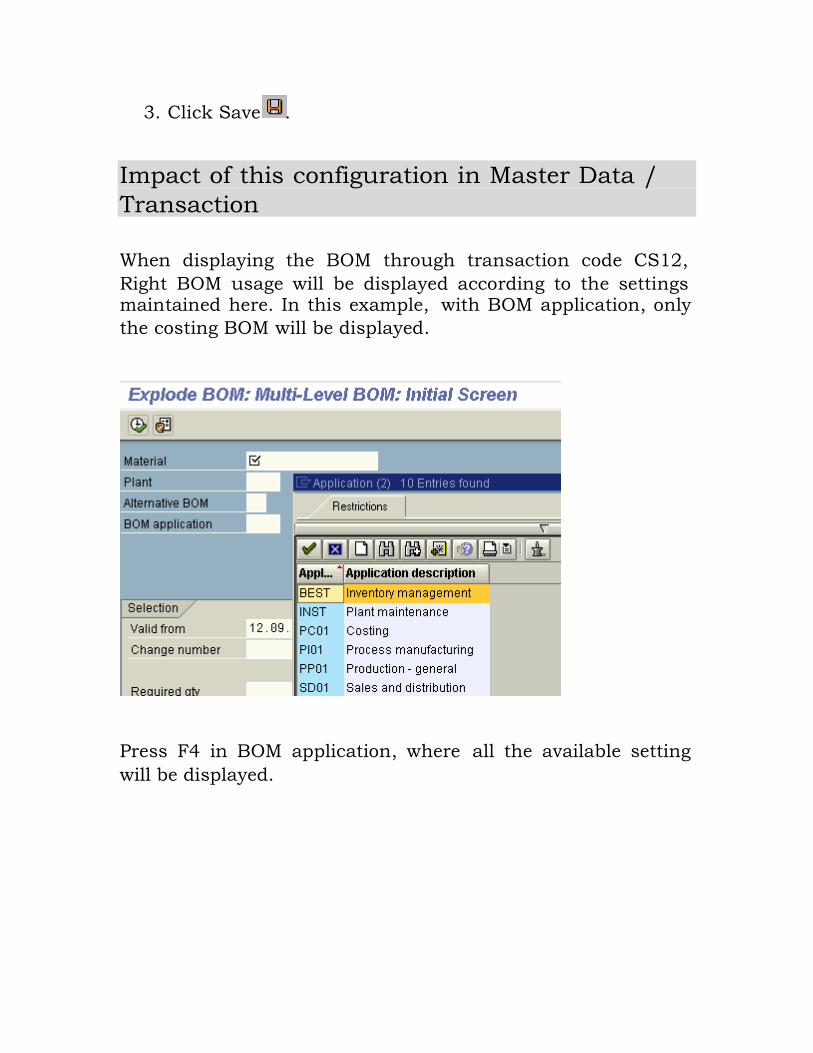
When displaying the BOM through transaction code CS12,
Right BOM usage will be displayed according to the settings maintained here. In this example,
the costing BOM will be displayed.
with BOM application, only
Press F4 in BOM application, where all the available setting
will be displayed.
1.5 Define Work center Category
BACKGROUND
This configuration setting enables to define work center
category.
Work center category is the major classification of work center
by SAP. E.g. Machine, processing unit, labor are defined as a
different work center category. Work center category controls the field selection inside the
work center. SCENARIO
Create a work center category to mention skilled labor work
center category.
INSTRUCTIONS
Follow the Menu Path: IMGProductionBasic dataWork
center General Data Define work center category.
1. Click
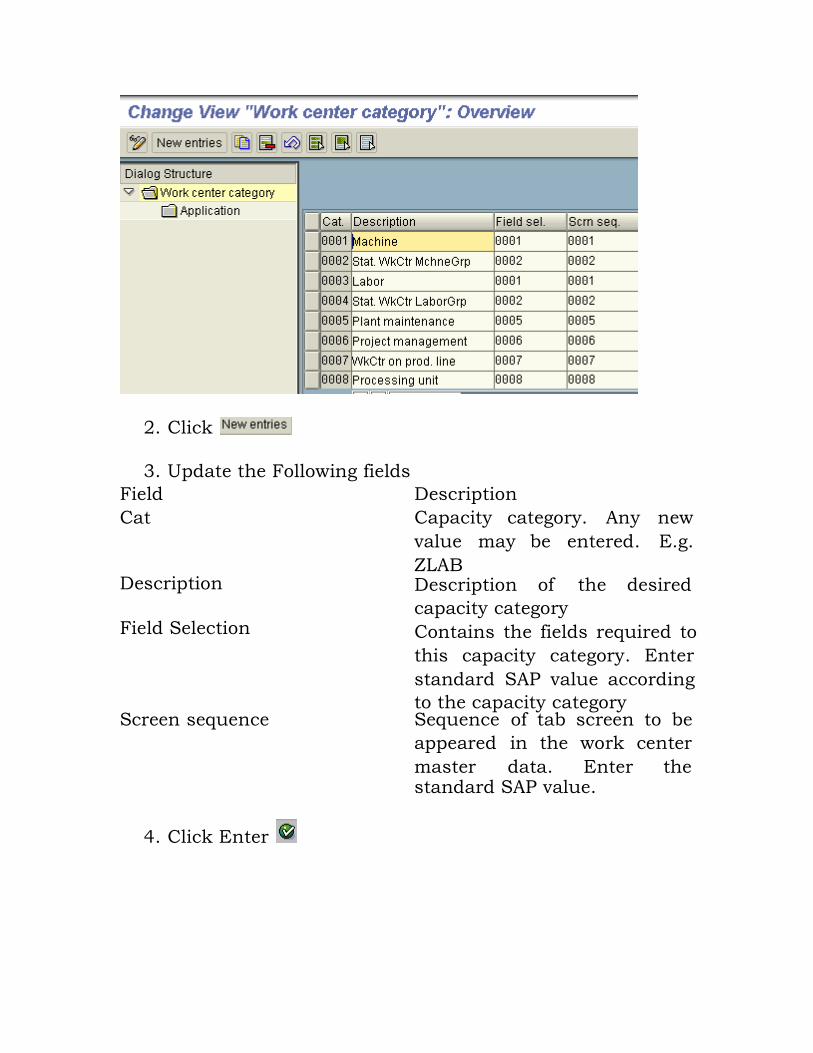
2. Click
3. Update the Following fields
Field
Cat
Description
Field Selection
Description
Capacity category. Any new
value may be entered. E.g.
ZLAB Description of the desired
capacity category
Contains the fields required to
this capacity category. Enter
standard SAP value according
to the capacity category Screen sequence Sequence
appeared
master
of tab screen to be
in the work center
data. Enter the
4. Click Enter
standard SAP value.

5. Select Created capacity category
6. Double Click
7. Click
8. Enter Application – Area in SAP where this work center
category can be used. E.g. P – Routing; C - Master
Recipe; Q - Quality task list etc.
9. Note:- If this work center category is to be applicable to
all, maintain all the entry in this application field.
10. Click .
Impact of this configuration in Master Data / Transaction
When creating the work center for skilled labor, work center
category is to be mentioned as it is a mandatory entry.
1.6 Define Parameters
BACKGROUND
This configuration setting enables to define Parameter
(activities) for formula.
Parameter is one of the required settings to calculate the
conversion cost incurred in the
manufacturing.
Work center during
Example for activities:-
Work center while in use can consume
Power
Labour
Setup time
Depreciation
Steam etc.
The above costs incurred during conversion will be captured
through the activity. Parameter is the structure to capture this
activity.
Link to the Master data is established as below:-
Parameter will be assigned to the standard value
key.
Standard value key will be assigned in the work
center.
Work center will be assigned to the task list
(Routing or Master Recipe).
Data of planned duration of these activities will be
maintained in the task list (Routing or Master
recipe)
SCENARIO
Create a Parameter. Note: - Standard SAP setting is sufficient.
Let us discuss the creation of new parameter.
INSTRUCTIONS
Follow the Menu Path: IMGProductionBasic dataWork
center General Data Standard ValueDefine Parameters.
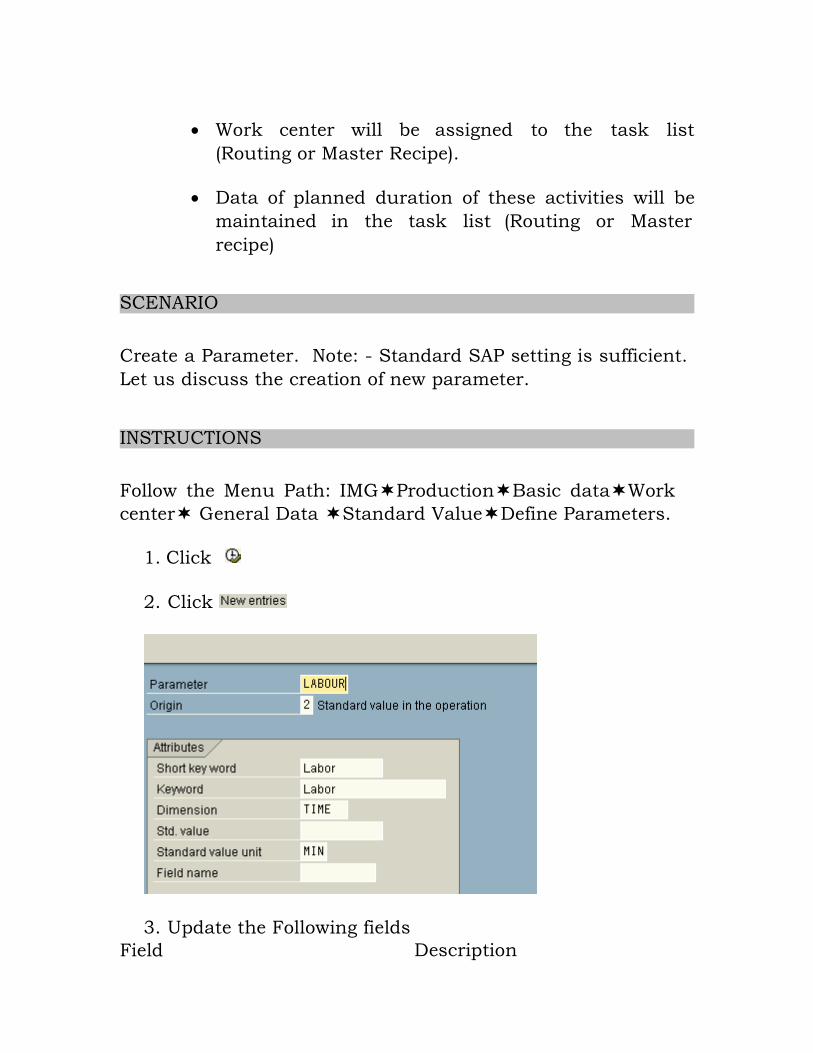
1. Click
2. Click
3. Update the Following fields
Field
Description
Parameter Parameter to hold the value.
Any alphanumeric six digit
may be entered. E.g. LABOUR Origin
Short key word
Key work
Dimension
Standard Value Unit
Note: - If any parameter
mentioned as no unit.
4. Click Save .
Place where from the value is
to be taken. E.g. To indicate
value to be taken from task
list maintain 2 in this field.
Short description
Key word to identify
Dimension of the parameter.
E.g. Any thing related to
Duration may have TIME as
dimension.
Unit of this parameter. E.g.
Time dimension may have
for which there is no unit, it may be
Impact of this configuration in Master Data /
Transaction
Link between the parameter and the master data is as below.
a. This parameter will be assigned to the standard value
key.
b. Standard value key will be attached with the work center.
c. Work center will be attached in the task list. I.e. in the
routing or in the master recipe.
d. Standard value (i.e. duration of labour hours required)
will be maintained in the task list as a master data.

1.7 Define Standard Value
BACKGROUND
This configuration setting enables to define the standard value
key.
Standard value key is very essential to capture the cost
incurred in the work center.
Standard value key will contain the activities. One standard
value key can contain up to six activities. Each activity refers
to the cost.
Example:-
Production cost
Set up cost
Labour cost
Quality Cost
Power cost
Steam cost
One work center can have only one standard value key.
SCENARIO
Create a standard value key to have the activities of setup,
machine, labor, and over head.
INSTRUCTIONS
Follow the Menu Path: IMGProductionBasic dataWork
center General Data Standard ValueDefine standard
value key.
1. Click
2. Click
3. Update the Following fields
Field Description
Standard value key Enter any alpha numeric to
indicate standard value key.
E.g. STD1 Description Maintain standard
description.
value key
E.g. setup/machine/labor/overhead
Parameter Maintain the parameters. Up to
six parameters can be
maintained.
4. Click Save .
Impact of this configuration in Master Data /
Transaction
When creating the work center, standard value key will be
assigned to the work center.
1.8 Define Shift Sequence
BACKGROUND
This configuration setting enables to define shift sequence.
Shift sequence is used to define the specific working pattern.
I.e. weekly holidays, number of shift and working hours of
each shift. Work center capacity is calculated from its working hours
defined in the capacity header details of the work center.
There are mainly three ways to define capacity for each work
center.
Normal capacity
Available Interval capacity
Interval and shifts
Normal capacity is defined through the working hrs and break
in the capacity header
Available interval capacity is the capacity available for any
specific duration; it is defined at the capacity header detail
Interval and shifts is defining the shifts in which the machine
or industry works. SCENARIO
Create a shift sequence with two shifts a day and Thursday
and Friday as weekly holiday.
INSTRUCTIONS
Follow the Menu Path: IMGProductionBasic dataWork
center Capacity Planning Available capacity Define shift
sequence
1. Click
2. Click
3. Update the Following fields
Field Description
Grouping Enter shifting grouping. E.g.
SG
Description Enter description E.g. Special
Grouping
4. Click
5. Select the Grouping
6. Double Click
7. Click
8. Update the Following fields Field Description
Break Enter the Break name. E.g. IND6
Break Number Enter the break number E.g. 1
Description Description of break. E.g.
First shift break Start Break start time End Break end time
9. Click
10. Select Break 1 line
11. Double click
12. Click
13. Update the Following fields
Field Description
Shift Enter shift name. E.g.1SHF
Shift text Enter shift definition. E.g.
First shift Start date Starting date of the shift End date End date of the shift Start time Starting time of the shift End Time End time of the shift Break Enter the Break schedule. E.g.
IND6
14. Click
15. Select the 1SHT line
16. Double click
17. Click
18. Update the Following fields
Field Description
Sequence Enter the sequence No. E.g
01 Shift No. Shift number in the sequence.
E.g. 1 Description Description of the shift
sequence. E.g. Two shift per
day Day1 to Day 7 Maintain
definition
the desired shift
the day to follow. E.g. 1SHT and 2SHT in all
days except Thursday and
Friday.
19. Click
20.
Click Save
.
Impact of this configuration in Master Data /
Transaction
This shift sequence can be maintained as an interval of
available capacity.
This can be maintained in the work center capacity header
detail.
Once this is assigned, working days and hours to this work
center will be as per this shift sequence.
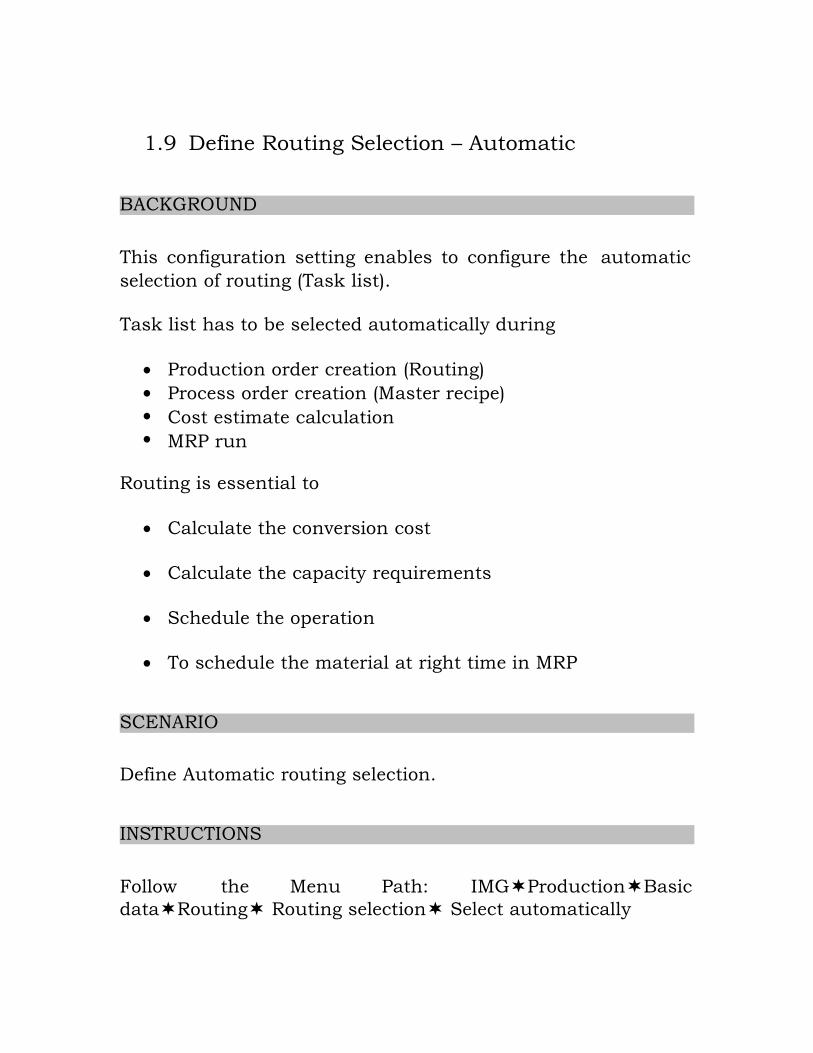
1.9 Define Routing Selection – Automatic
BACKGROUND
This configuration setting enables to configure the automatic
selection of routing (Task list).
Task list has to be selected automatically during
Production order creation (Routing)
Process order creation (Master recipe)
Cost estimate calculation MRP run
Routing is essential to
Calculate the conversion cost
Calculate the capacity requirements
Schedule the operation
To schedule the material at right time in MRP
SCENARIO
Define Automatic routing selection.
INSTRUCTIONS
Follow the Menu Path: IMGProductionBasic
dataRouting Routing selection Select automatically
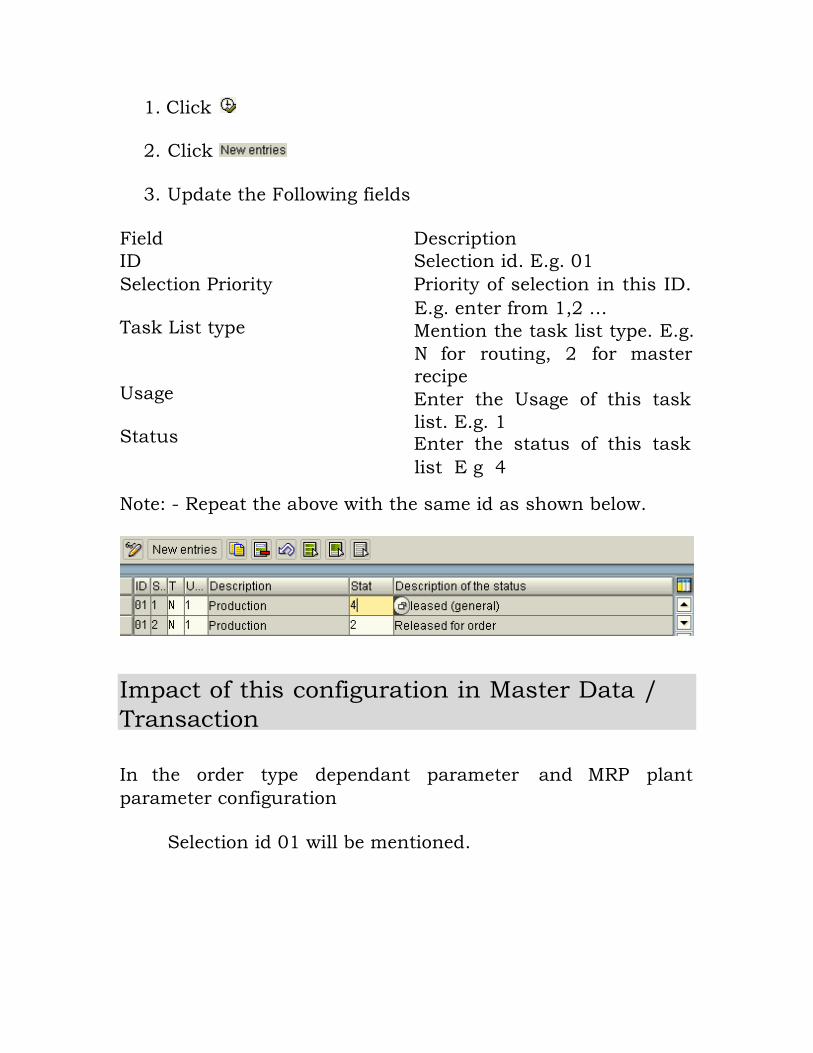
1. Click
2. Click
3. Update the Following fields
Field Description
ID Selection id. E.g. 01
Selection Priority Priority of selection in this ID.
E.g. enter from 1,2 … Task List type Mention the task list type. E.g.
N for routing, 2 for master
recipe Usage Enter the Usage of this task
list. E.g. 1 Status Enter the status of this task
list E g 4
Note: - Repeat the above with the same id as shown below.
Impact of this configuration in Master Data /
Transaction
In the order type dependant parameter and MRP plant
parameter configuration
Selection id 01 will be mentioned.
While performing the transaction (creation of process order or
production order or MRP run), automatic selection of routing
will be performed in the following sequence:
First system will search task list type routing as per the
sequence 1
System will search for routing with usage 1
System will search for routing with status 4
If the above search fails, system will go to the next sequence in
the same selection id. I.e. sequence no. 2 in our above shown
screen shot.
system will search task list type routing as per the
sequence 2
System will search for routing with usage 1
System will search for routing with status 2
2. MRP Related configuration settings
2.1 Plant parameters
BACKGROUND
This configuration setting enables to configure the plant
parameter for Materials Requirement Planning (MRP).
MRP will ensure
Availability of right material at right time.
Calculate the capacity requirements.
Following MRP related parameters must be configured to
perform MRP.
Frequency of planning,
How to explode the BOM,
Order type to be used when converting planned order
Planning horizon
Scheduling
Apart from above there are more parameters to be configured,
which we shall discuss.
When creating plant by copying from one plant, many plant
parameters are copied, however it is required to maintain
plant specific parameters.
SCENARIO
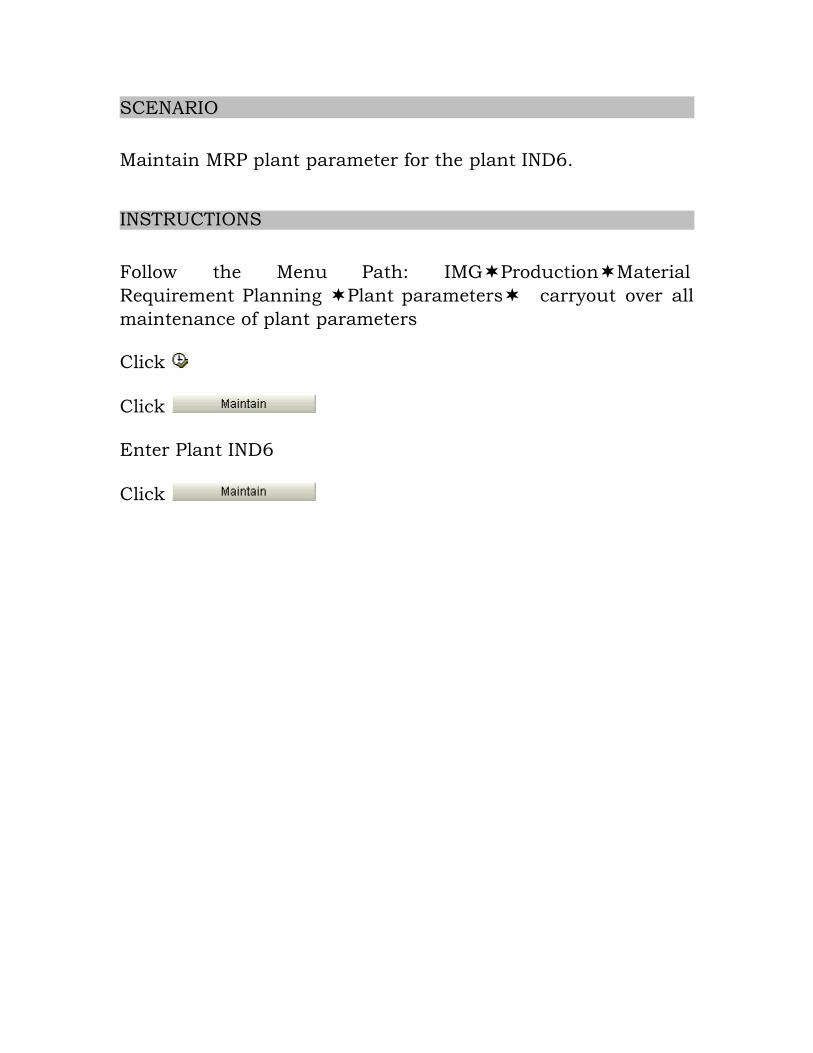
Maintain MRP plant parameter for the plant IND6.
INSTRUCTIONS
Follow the Menu Path: IMGProductionMaterial
Requirement Planning Plant parameters carryout over all
maintenance of plant parameters Click
Click
Enter Plant IND6
Click
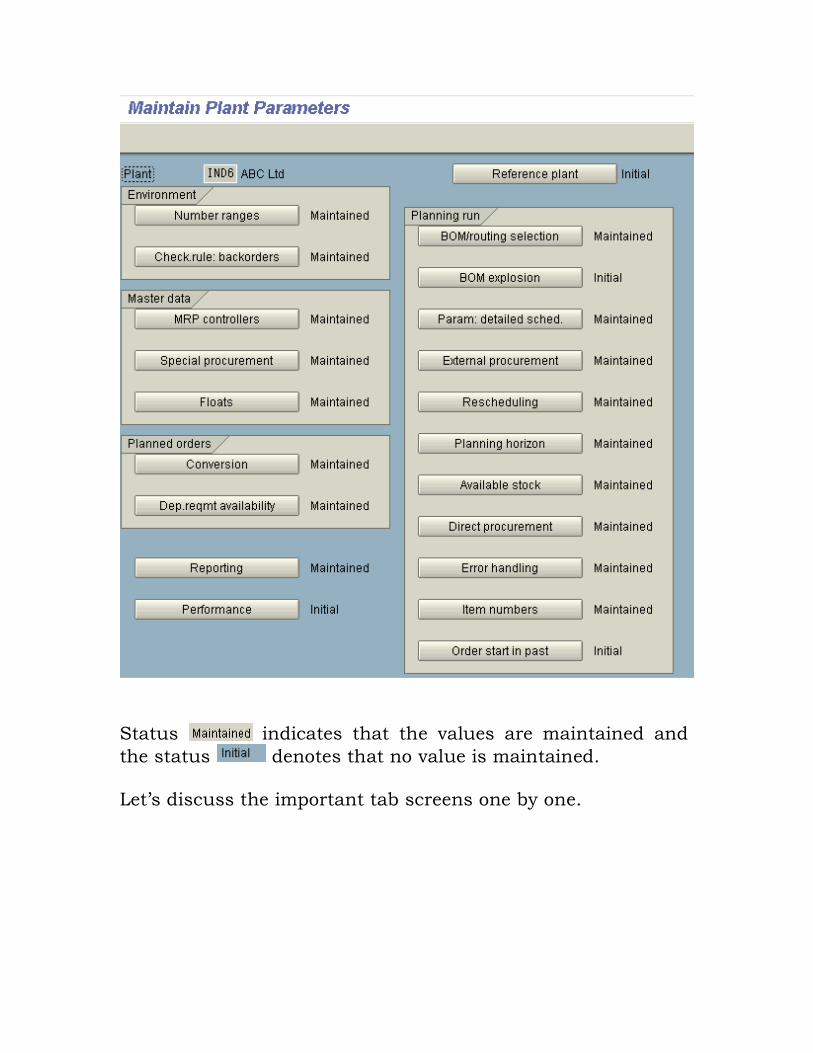
Status indicates that the values are maintained and
the status denotes that no value is maintained.
Let’s discuss the important tab screens one by one.
2.2 Define MRP controller
BACKGROUND
This configuration setting enables to configure MRP controller
specific to a plant.
MRP controller will
Material availability for production.
Confirm the purchase request generated by MRP run.
Schedule the production.
Initiate action for shortage items and avoid shortages.
SCENARIO
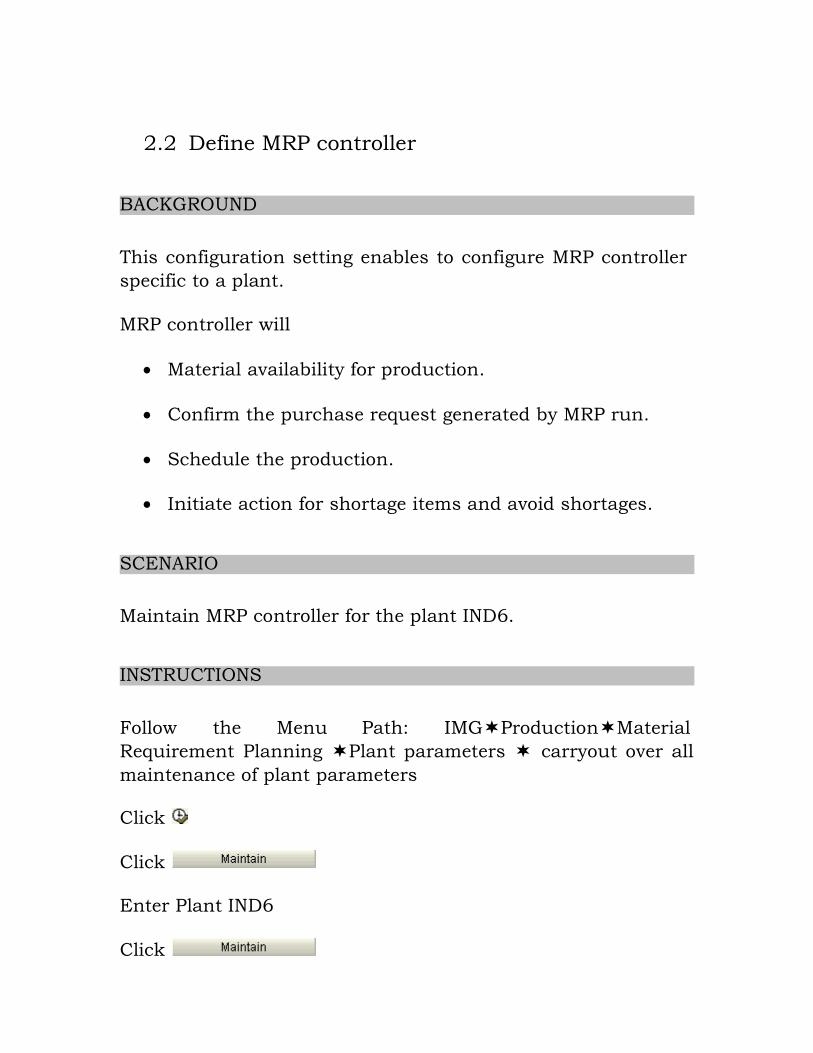
Maintain MRP controller for the plant IND6.
INSTRUCTIONS
Follow the Menu Path: IMGProductionMaterial
Requirement Planning Plant parameters carryout over all
maintenance of plant parameters Click
Click
Enter Plant IND6
Click
Click
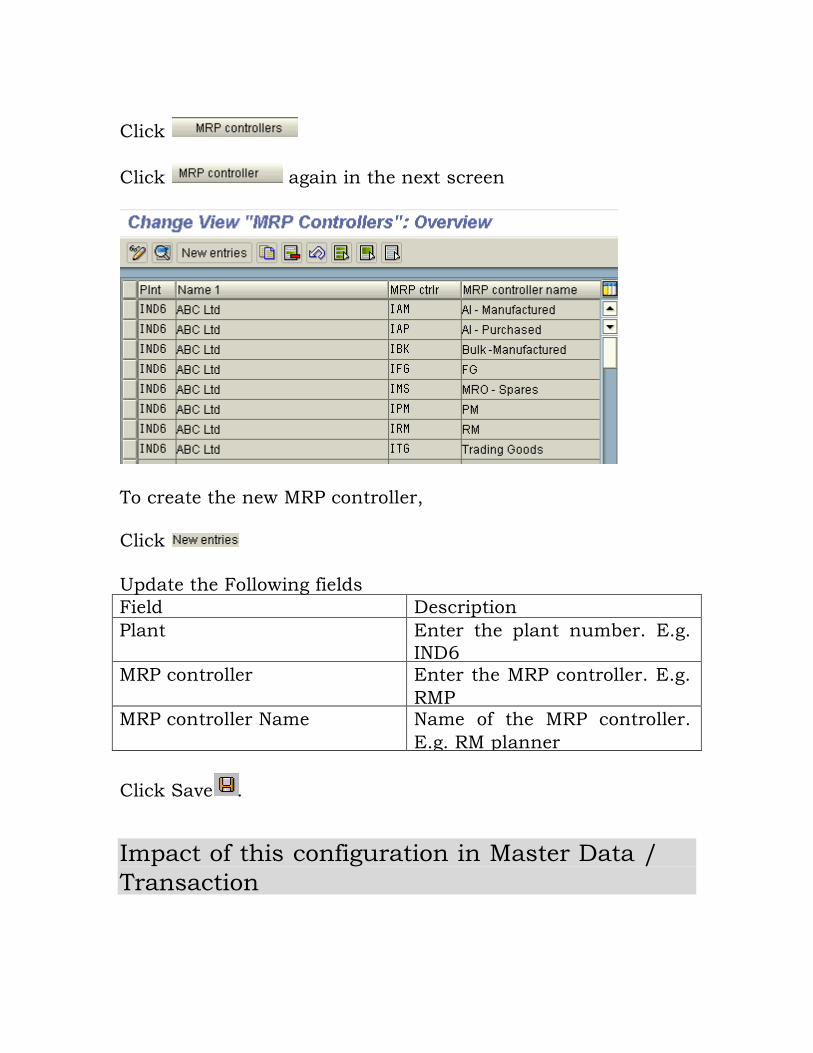
Click again in the next screen
To create the new MRP controller,
Click
Update the Following fields
Field Description
Plant Enter the plant number. E.g.
IND6
MRP controller Enter the MRP controller. E.g.
RMP
MRP controller Name Name of the MRP controller.
E.g. RM planner
Click Save .
Impact of this configuration in Master Data /
Transaction

MRP controller has to be maintained in the material master
MRP1 view.
2.3 MRP Plant Parameter – Float (Schedule Margin Key)
BACKGROUND
This configuration setting enables to define the float for
production.
It is used to schedule the production or process order. Float is
the cushioning durations in days before and after the actual
production date. It is also called as schedule margin key. Cushioning period covers the days
Before production
After production
In order to take care of any unforeseen situation during
manufacturing and to make the committed date of production
safer, the extra days are defined here. These extra days defined here will be added in the start date of
production and in the end date of production.
SCENARIO
Create schedule margin key for plant IND6
INSTRUCTIONS
Follow the Menu Path: IMGProductionMaterial
Requirement Planning Plant parameters carryout over all
maintenance of plant parameters
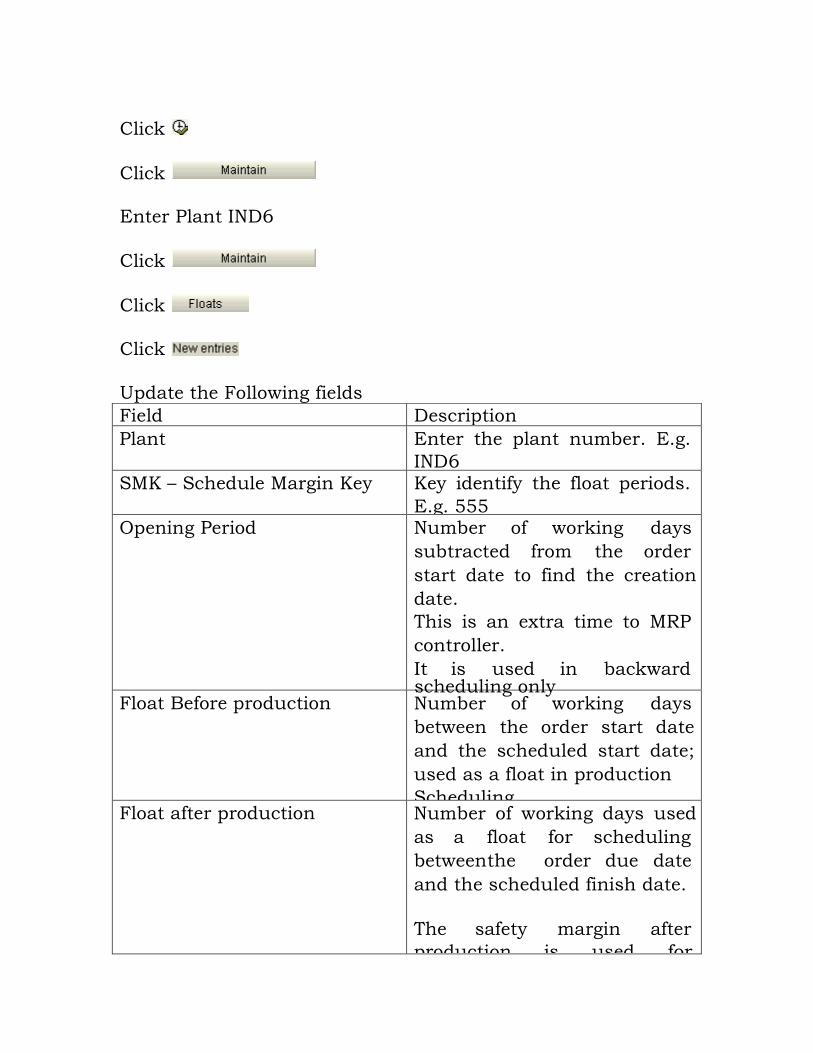
Field Description
Plant Enter the plant number. E.g.
IND6
SMK – Schedule Margin Key Key identify the float periods.
E.g. 555
Opening Period Number of working days
subtracted from the order
start date to find the creation
date.
This is an extra time to MRP
controller.
It is used in backward
Float Before production Number of working days
between the order start date
and the scheduled start date;
used as a float in production
Scheduling. Float after production Number of working days used
as a float for scheduling
betweenthe order due date
and the scheduled finish date.
The safety margin after
production is used for
Click
Click
Enter Plant IND6
Click
Click
Click
Update the Following fields
scheduling only
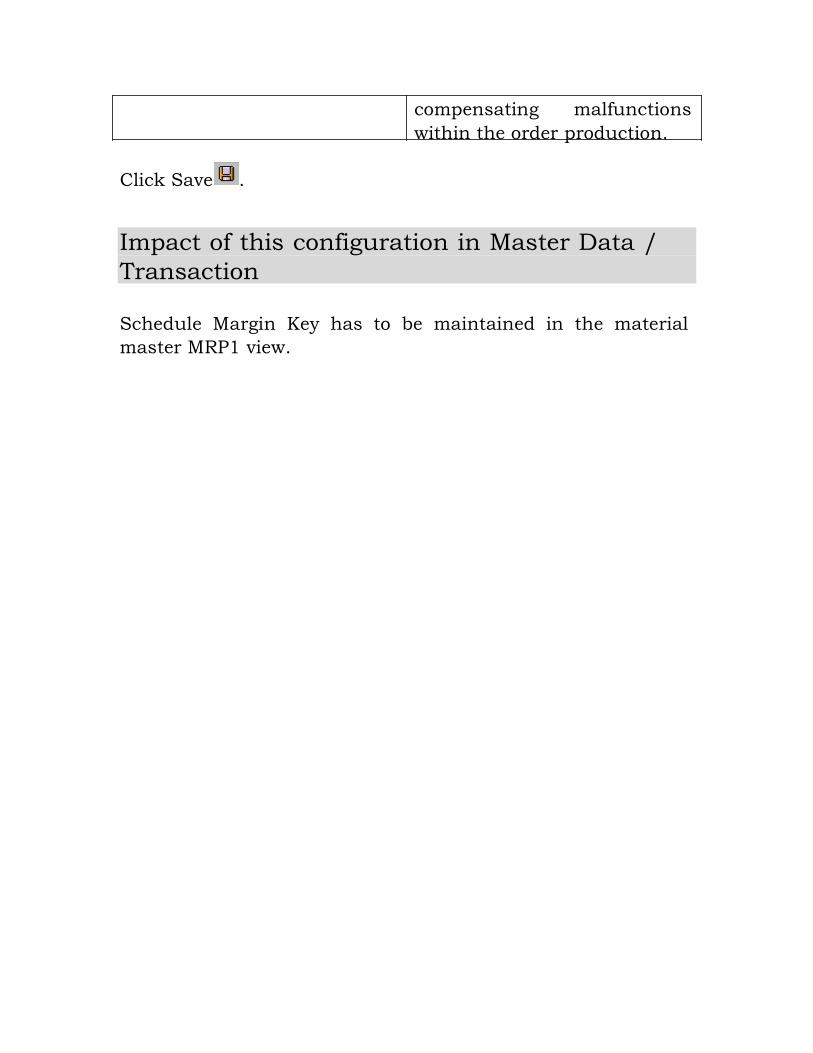
Click Save .
compensating malfunctions
within the order production.
Impact of this configuration in Master Data /
Transaction
Schedule Margin Key has to be maintained in the material
master MRP1 view.

2.4 MRP Plant Parameter – Special Procurement Key
BACKGROUND
This configuration setting enables to define the special
procurement key.
Special procurement key used to
Transfer requirements from one plant to another plant.
Make material issue from another plant
Create the direct process order in another plant or in own
plant
Define the phantom item. I.e. item not exist physically
but planning will be done.
To calculate standard cost estimate in one plant referring
the BOM and Task list data from another plant.
SCENARIO
Define the special procurement key for plant IND6
INSTRUCTIONS
Follow the Menu Path: IMGProductionMaterial
Requirement Planning Plant parameters carryout over all
maintenance of plant parameters
Click
Click
Enter Plant IND6
Click
Click
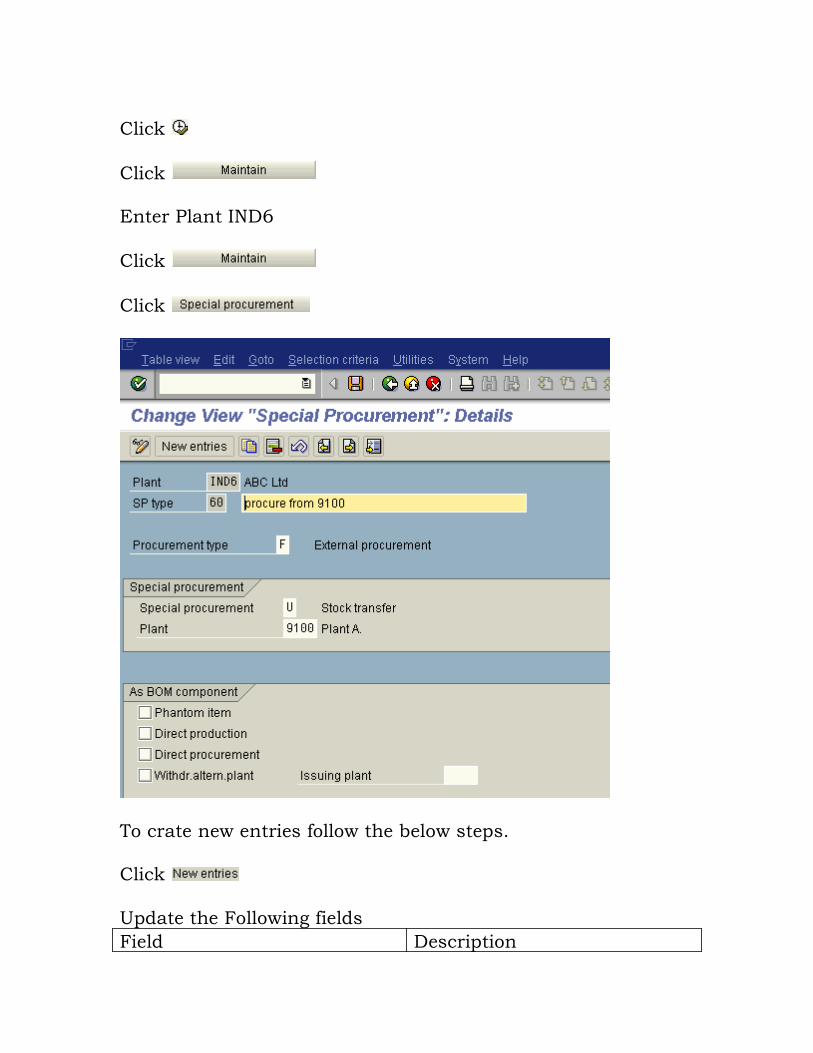
To crate new entries follow the below steps.
Click
Update the Following fields
Field Description
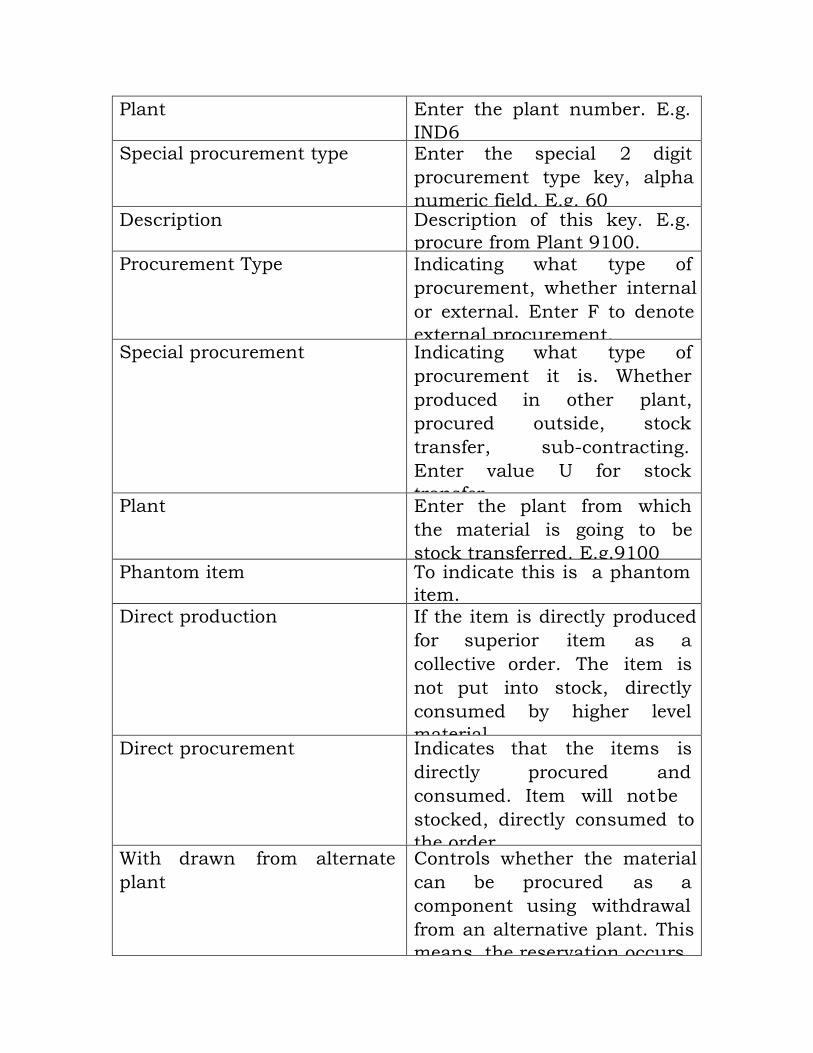
Plant Enter the plant number. E.g.
IND6
Special procurement type Enter the special 2 digit
procurement type key, alpha
numeric field. E.g. 60
Description Description of this key. E.g.
procure from Plant 9100.
Procurement Type Indicating what type of
procurement, whether internal
or external. Enter F to denote
external procurement. Special procurement Indicating what type of
procurement it is. Whether
produced in other plant,
procured outside, stock
transfer, sub-contracting.
Enter value U for stock
transfer Plant Enter the plant from which
the material is going to be
stock transferred. E.g.9100
Phantom item To indicate this is a phantom
item.
Direct production If the item is directly produced
for superior item as a
collective order. The item is
not put into stock, directly
consumed by higher level
material. Direct procurement Indicates that the items is
directly procured and
consumed. Item will notbe
stocked, directly consumed to
the order. With drawn from alternate
plant
Controls whether the material
can be procured as a
component using withdrawal
from an alternative plant. This
means, the reservation occurs

at an alternative plant if
dependent requirements exist.
Issuing Plant If the check box of with drawn
from alternate plant is
selected, it is mandatory to
mention issuing plant.
Click Save .
Impact of this configuration in Master Data /
Transaction
When the material is to be stock transferred from another
plant, maintain the special procurement key in MRP2 view of
the material master.
In this configuration example, if the special procurement key
60 is maintained, stock transfer PR will be generated
indicating the supplying plant as 9100.
2.5 Activating MRP and Planning file entries
BACKGROUND
This configuration setting enables to activate or deactivate the
MRP single item multilevel.
MRP single item multi level is used to run MRP for a specific
material at any given point of time.
Single item multi level MRP run can be done to check the
planning result of a specific material after changing the plan.
Planning file is the internal file in SAP. Items which undergo
any change will be maintained in the planning file internally
by the system automatically.
Items maintained in the planning file will be considered in the
next net change MRP run.
SCENARIO
Activate MRP in the Plant IND6.
INSTRUCTIONS
Follow the Menu Path: IMGProductionMaterial
Requirement Planning Planning file entries Activate MRP
and setup planning file entries Click
Click

Update the Following fields
Field Description
Plant Select the Plant from the
display. E.g. IND6
Activate Requirement
Planning
Check box to be ticked to
activate single item multilevel
MRP run. E.g. Ensure the
check box is ticked.
Click Save .
Impact of this configuration in Master Data /
Transaction
Transaction codes MD01 and MD02 can be performed only
with this configuration setting.
Error message will be generated if this is not configured.
2.6 MRP type
BACKGROUND
This configuration setting enables to define the MRP type.
MRP type determines the type of planning to be employed to a
material.
Important types of Planning are
Material Requirement Planning (MRP)
Consumption Based Planning
Forecast based planning
Parameter which are defined in the MRP types are
MRP procedure or MPS procedure
Basis for planning
Reorder point and consumption method
Lot size procedure Forecast Not to plan the material at all
Above types of planning are governed through the MRP type.
SCENARIO
Create a MRP type ZD with forecast and to plan regularly.
INSTRUCTIONS
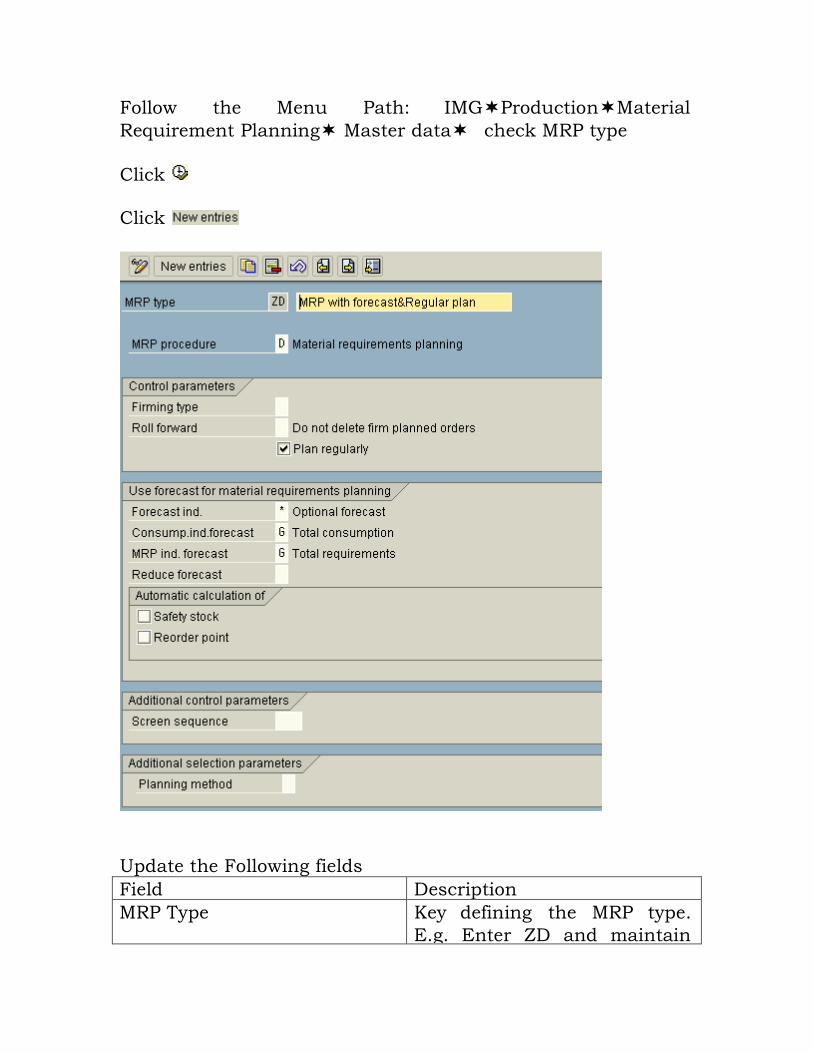
Follow the Menu Path: IMGProductionMaterial
Requirement Planning Master data check MRP type
Click
Click
Update the Following fields
Field Description
MRP Type Key defining the MRP type.
E.g. Enter ZD and maintain

description.
MRP Procedure SAP internally identified key
to do the planning according
to the internal control. E.g.
Enter D for MRP
Firming type Confirming the order
proposal. Leave it blank here.
Roll forward To delete or not the old
planned orders. Leave it blank
Plan Regularly (Check box) Planning takes place only if
any change happened to the
material, other wise it is not
planned, if this check box is
ticked, material will be
planned in every MRP
irrespective of any changes
happening to it.
Forecast Indicator To consider the forecast
requirement. E.g. Enter * to
make it as optional forecast.
Forecast requirement
consideration become
optional. Consumption Indicator
forecast
Defines, which consumption
are relevant for forecast. E.g.
Enter G to indicate Total
consumption
MRP indicator forecast To define whether the forecast
requirements are to be
considered in MRP. E.g. Enter
G to consider total
requirement in MRP run. Reduce forecast Indicates how the forecast
requirements are to
be reduced. E.g.
Leave blank to reduce
forecast value by Safety stock (Check box) To calculate safety stock
E g Tick this check box

automatically, tick this check
box. E.g. Leave it blank
Reorder Point To calculate Reorder point
automatically, tick this check
box. E.g. Leave it blank
Click Save .
Impact of this configuration in Master Data /
Transaction
Assign this MRP type ZD to the material master MRP1 view.
This material will be planned regularly irrespective any
changes happening to this material.
If is required Forecast can be run and those forecast
requirements will be considered in MRP.
2.7 MRP Plant Parameter – Conversion
BACKGROUND
This configuration setting enables to define the order types
while converting the planned order in to process order or
production order. Order type is a mandatory entry while creating the process
order or production order. Order type controls the creation of
order and responsible for entire production or process order
processing.
MRP run will create the planned order for the net required
quantity after considering the stocks and receipts. Planned
order will be converted to process order if it is produced in-
house or into the purchase request if it is procured from
outside.
SCENARIO
Maintain the conversion parameter to convert planned order
into the production order or into the process order.
INSTRUCTIONS
Follow the Menu Path: IMGProductionMaterial
Requirement Planning Plant parameters carryout over all
maintenance of plant parameters Click
Click
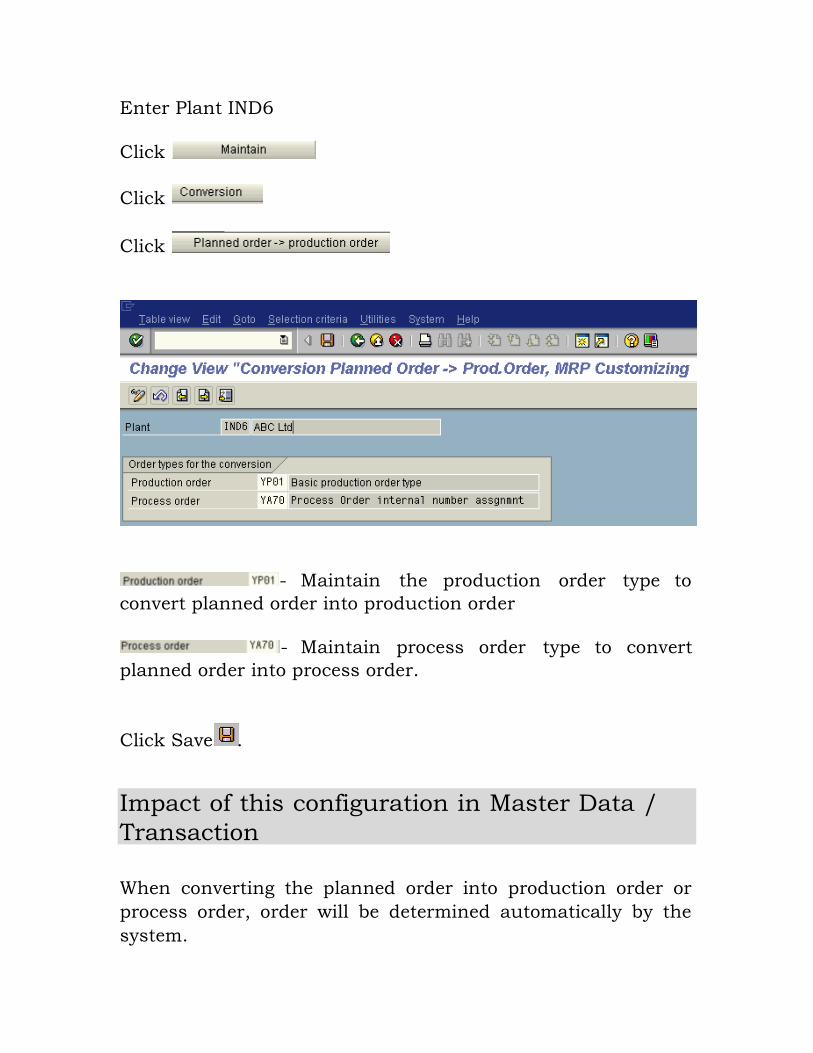
Enter Plant IND6
Click
Click
Click
- Maintain the production order type to
convert planned order into production order
- Maintain process order type to convert
planned order into process order.
Click Save .
Impact of this configuration in Master Data /
Transaction
When converting the planned order into production order or
process order, order will be determined automatically by the
system.
3. PRODUCTION EXECUTION
3.1 Define Order Type
BACKGROUND
This configuration setting enables to define order type.
Order type governs the parameters relevant to controlling and
defines what type of master data are to be picked up during
the production or process order creation.
There can be more than one order type for different production
method. E.g. one order type for regular production and
another order type for rework processing.
SCENARIO
Create order type YP01 for plant IND6
INSTRUCTIONS
Follow the Menu Path: Production shop floor control
Master Data Order Define order types.
Click
Click
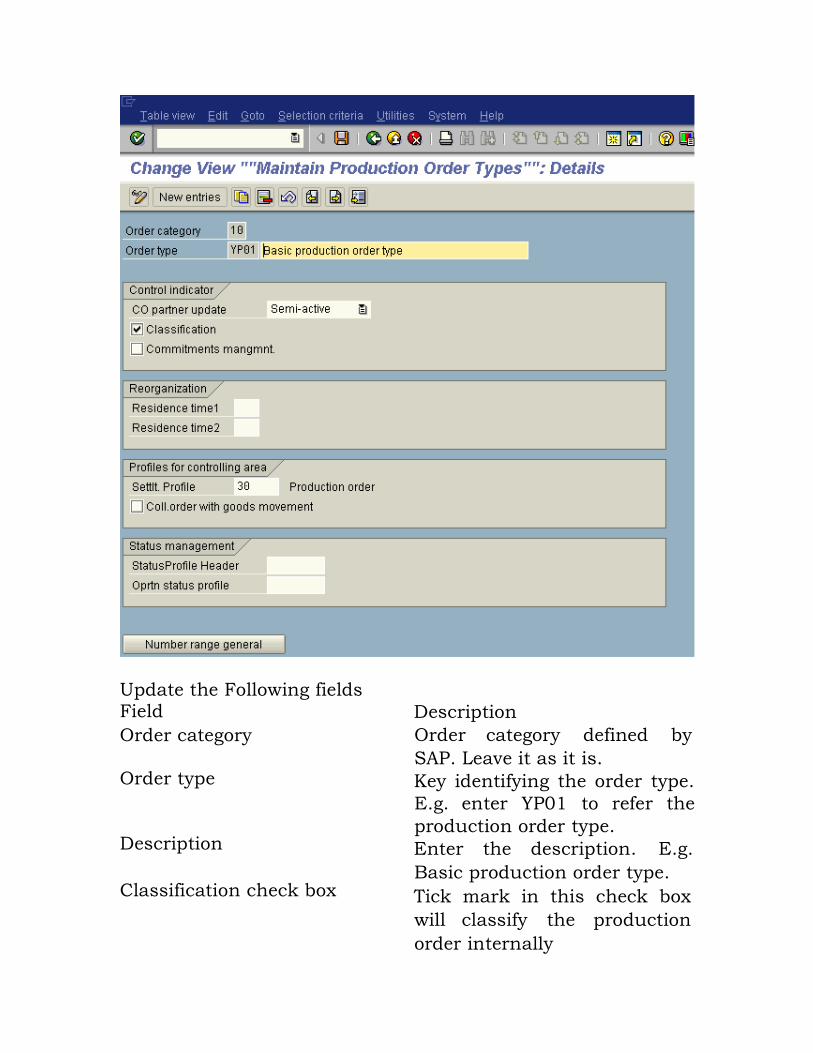
Update the Following fields Field Description
Order category Order category defined by
SAP. Leave it as it is. Order type Key identifying the order type.
E.g. enter YP01 to refer the
production order type. Description Enter the description. E.g.
Basic production order type. Classification check box Tick mark in this check box
will classify the production
order internally
Resident time 1 and 2 Related to Archiving the
object. It indicates, there
should be one month gap
between deletion indicator
setting and deletion flag. E.g.
Enter 1 in Resident time 1
and in resident time 2. Settlement profile Profile defining how the order
is to be settled. Related to
costing. E.g. enter 30 Status profile Header User created status profile
Operation Status profile applicable to this order type.
User created status profile for
operation applicable to this
Click Save .
Impact of this configuration in Master Data /
Transaction
Order type is a mandatory entry while creating production or
process order.
Number range and controlling parameter (settlement rule) are
picked during creation of production or process order
according to the configuration setting defined in the order
type.
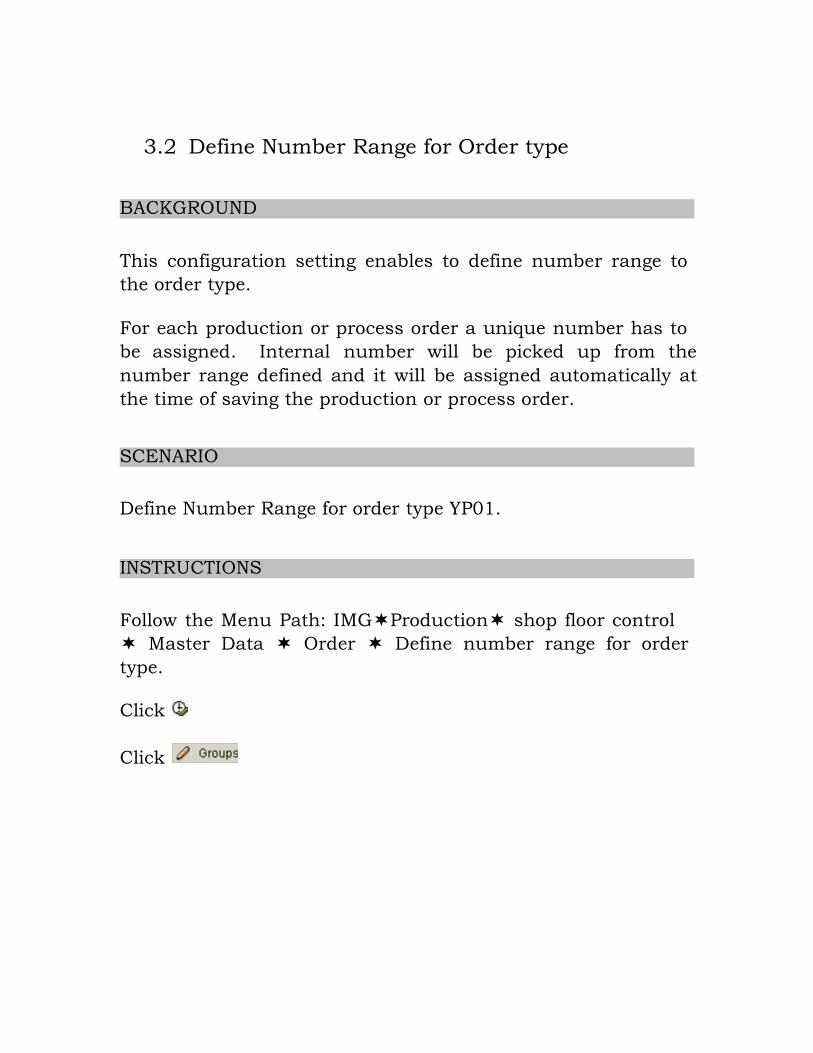
3.2 Define Number Range for Order type
BACKGROUND
This configuration setting enables to define number range to
the order type.
For each production or process order a unique number has to
be assigned. Internal number will be picked up from the
number range defined and it will be assigned automatically at
the time of saving the production or process order.
SCENARIO
Define Number Range for order type YP01.
INSTRUCTIONS
Follow the Menu Path: IMGProduction shop floor control
Master Data Order Define number range for order
type. Click
Click
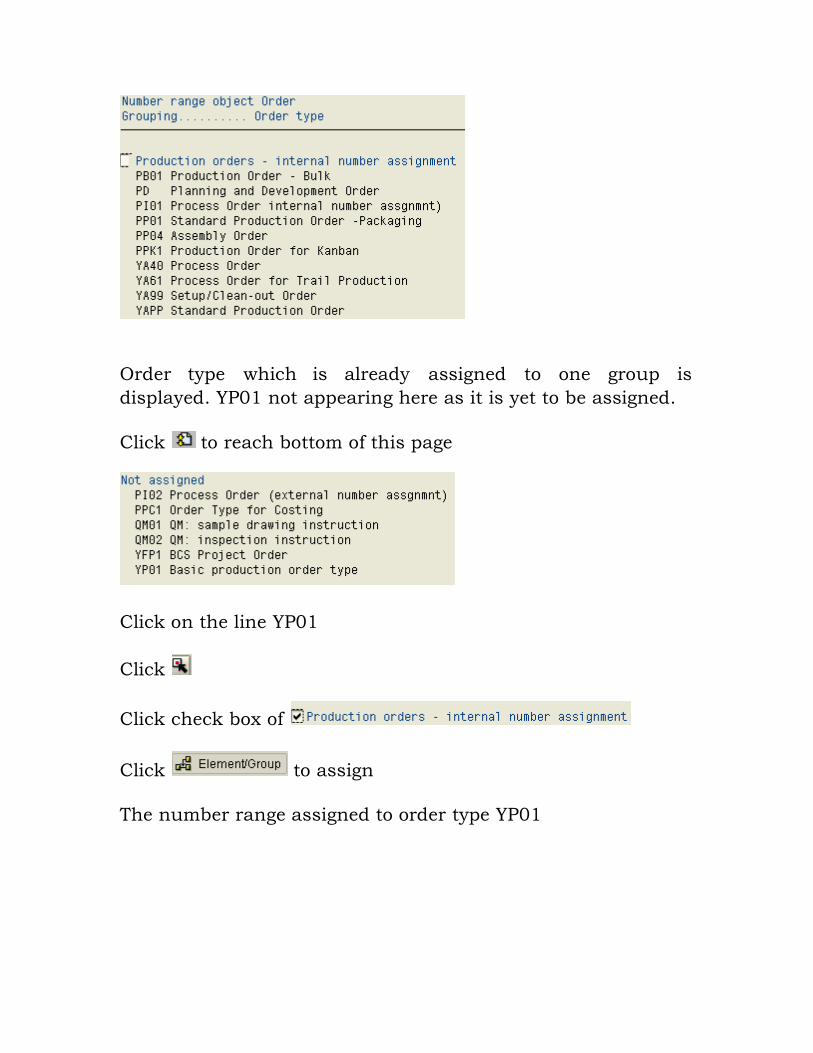
Order type which is already assigned to one group is
displayed. YP01 not appearing here as it is yet to be assigned.
Click to reach bottom of this page
Click on the line YP01
Click
Click check box of
Click to assign
The number range assigned to order type YP01
Click Save .
Click
Impact of this configuration in Master Data /
Transaction
While saving the production or process order, number will be
assigned automatically to the order.
If an order type does not have a number range assignment,
abnormal termination of program will be displayed while
saving the production or process order.
3.3 Define Scheduling Parameter for order type
BACKGROUND
This configuration setting enables to define the scheduling
parameter for production or process order type.
Scheduling parameter is essential to schedule the production
order according to the Task list data. I.e. to determine the
start date and end date for the order and to the each
operation.
Scheduling data for specific order type defines
How to schedule production order
Whether to generate capacity requirements
How to adjust order dates while scheduling
SCENARIO
Define scheduling parameter for order type YP01 in plant
IND6.
INSTRUCTIONS
Follow the Menu Path:- IMGProduction Shop floor
control Operation Scheduling Define scheduling
parameters for production orders
Click
Click
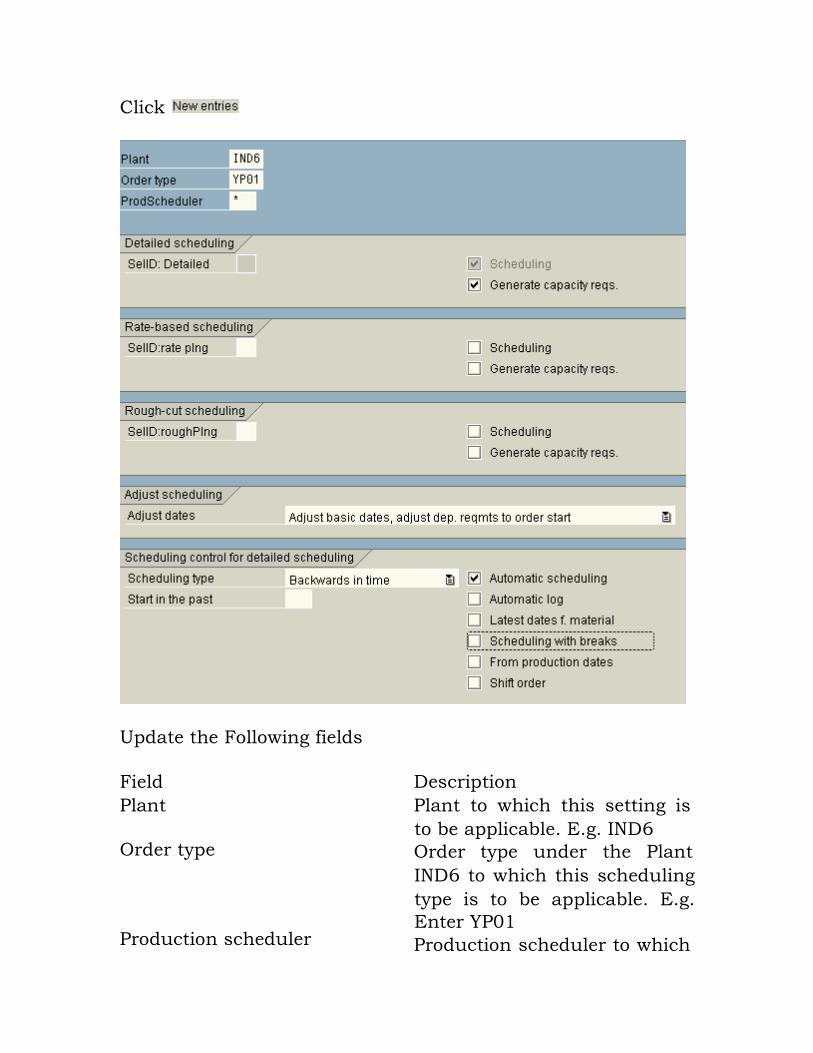
Update the Following fields
Field Description
Plant Plant to which this setting is
to be applicable. E.g. IND6 Order type Order type under the Plant
IND6 to which this scheduling
type is to be applicable. E.g.
Enter YP01 Production scheduler Production scheduler to which
this setting is applicable. E.g.
* to indicate applicable to all
production scheduler in the
plant IND6.
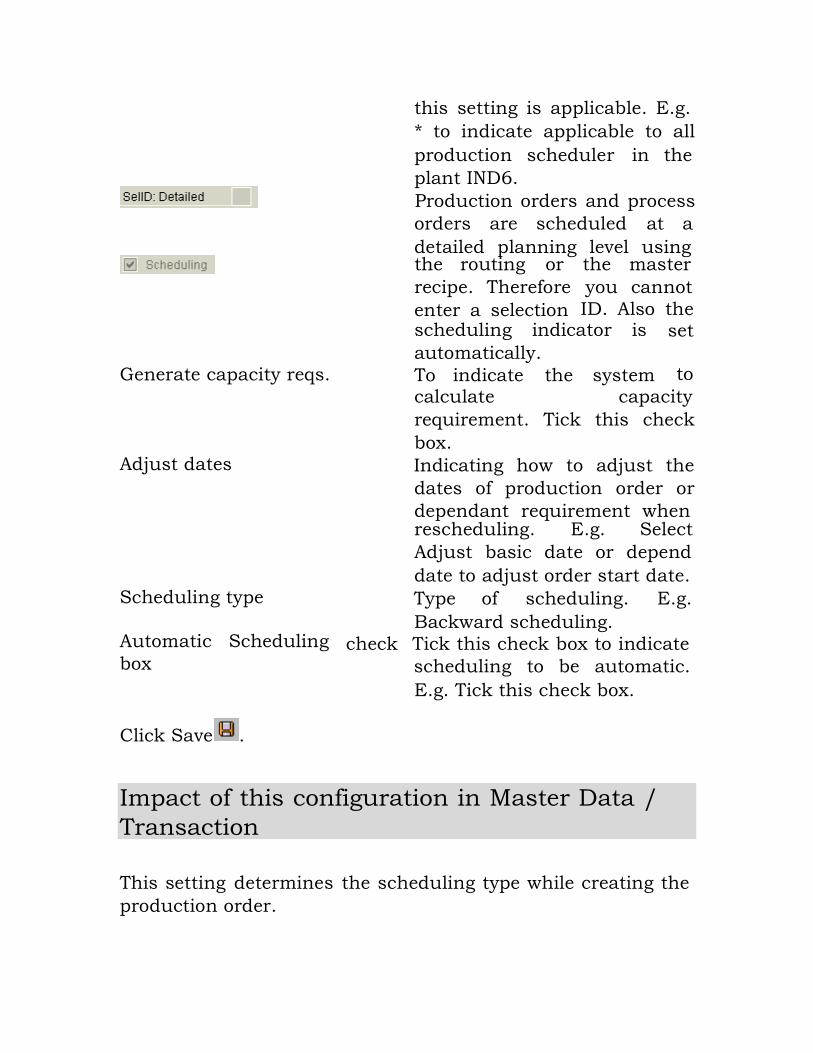
Production orders and process
orders are scheduled at a
detailed planning level using the routing or the master
recipe. Therefore you cannot
enter a selection ID. Also the scheduling indicator is set
automatically.
Generate capacity reqs. To indicate the system to
calculate capacity
requirement. Tick this check
box. Adjust dates Indicating how to adjust the
dates of production order or
dependant requirement when rescheduling. E.g. Select
Adjust basic date or depend
date to adjust order start date. Scheduling type Type of scheduling. E.g.
Backward scheduling. Automatic Scheduling check Tick this check box to indicate box scheduling to be automatic.
E.g. Tick this check box.
Click Save .
Impact of this configuration in Master Data /
Transaction
This setting determines the scheduling type while creating the
production order.
If it is backward scheduling, it is required to enter only order
finish date while creating the production or process order.
3.4 Define confirmation parameters
BACKGROUND
This configuration setting enables to define the confirmation
parameter to the order type in specific plant.
Through confirmation transaction, completion of production
will be reported in the system. Confirmation parameter to each
order type is essential to perform the confirmation. Confirmation parameter defines
To propose partial confirmation, or full confirmation
To propose value of activity
To calculate the activity value according to the quantity
change
Confirmation sequence is to be adhered to or not
To display all component irrespective back-flush
indicator
SCENARIO
Define confirmation parameter for order type YP01 in Plant
IND6.
INSTRUCTIONS
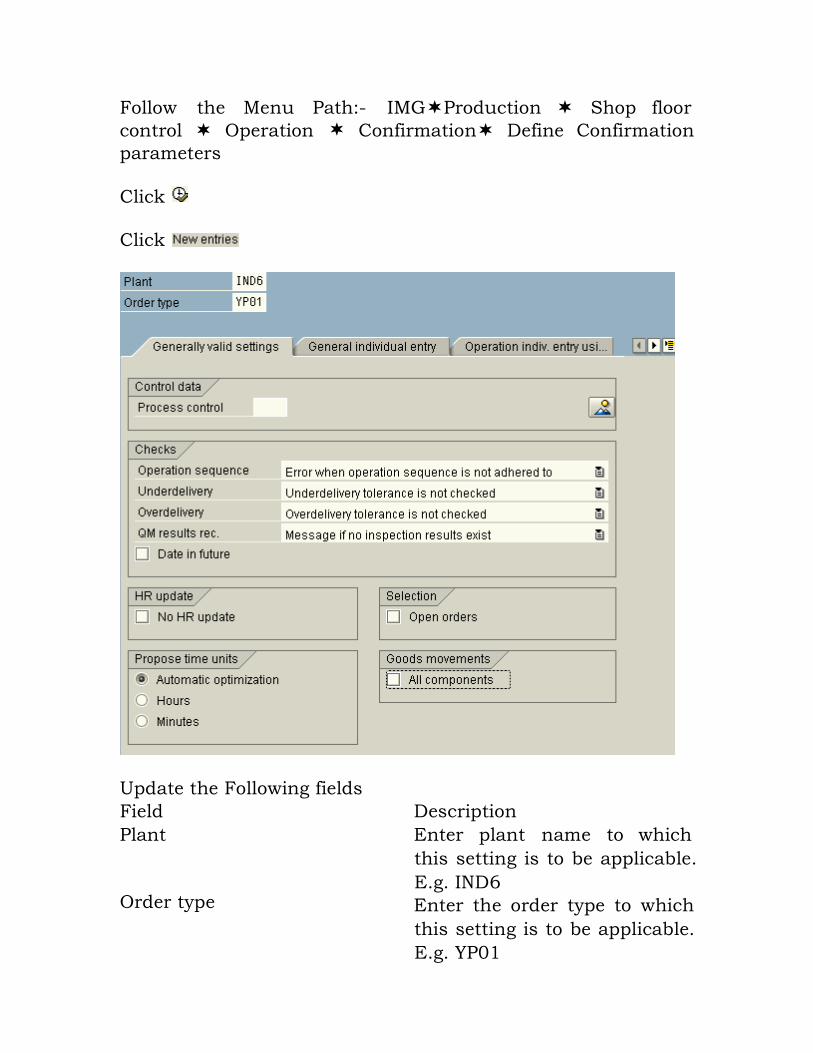
Follow the Menu Path:- IMGProduction Shop floor
control Operation Confirmation Define Confirmation
parameters
Click
Click
Update the Following fields
Field Description
Plant Enter plant name to which
this setting is to be applicable.
E.g. IND6 Order type Enter the order type to which
this setting is to be applicable.
E.g. YP01
Operation sequence While confirming, whether
operation sequence is to be
followed as per routing or not.
Select as shown above. Under delivery While confirming, if the yield
quantity is less than the
tolerance limit maintained in
the work scheduling view of
material master how the system to behave. Select as
above Over delivery While confirming, if the yield
quantity is more than the
tolerance limit maintained in
the work scheduling view of
material master how the system to behave. Select as
above.
QM Result rec. Operation contains the quality
characteristics and if that
operation has to be confirmed,
how the system to behave
when that confirmation by QC
is not done.
E.g. Select as shown above
Leave this blank if only the back-flush components are to
be proposed during the
confirmation. If this indicator
is set, system will propose all
the components assigned to
Click tab
screen
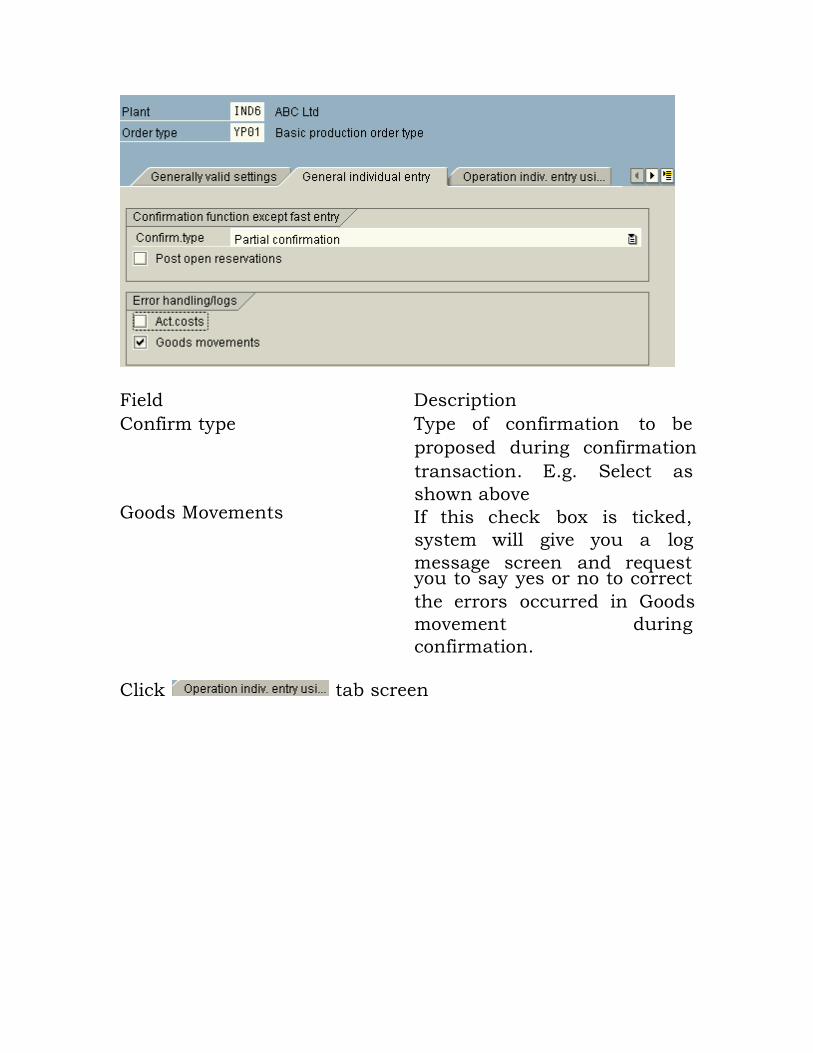
Field Description
Confirm type Type of confirmation to be
proposed during confirmation
transaction. E.g. Select as
shown above Goods Movements If this check box is ticked,
system will give you a log
message screen and request you to say yes or no to correct
the errors occurred in Goods
movement during
confirmation.
Click tab screen
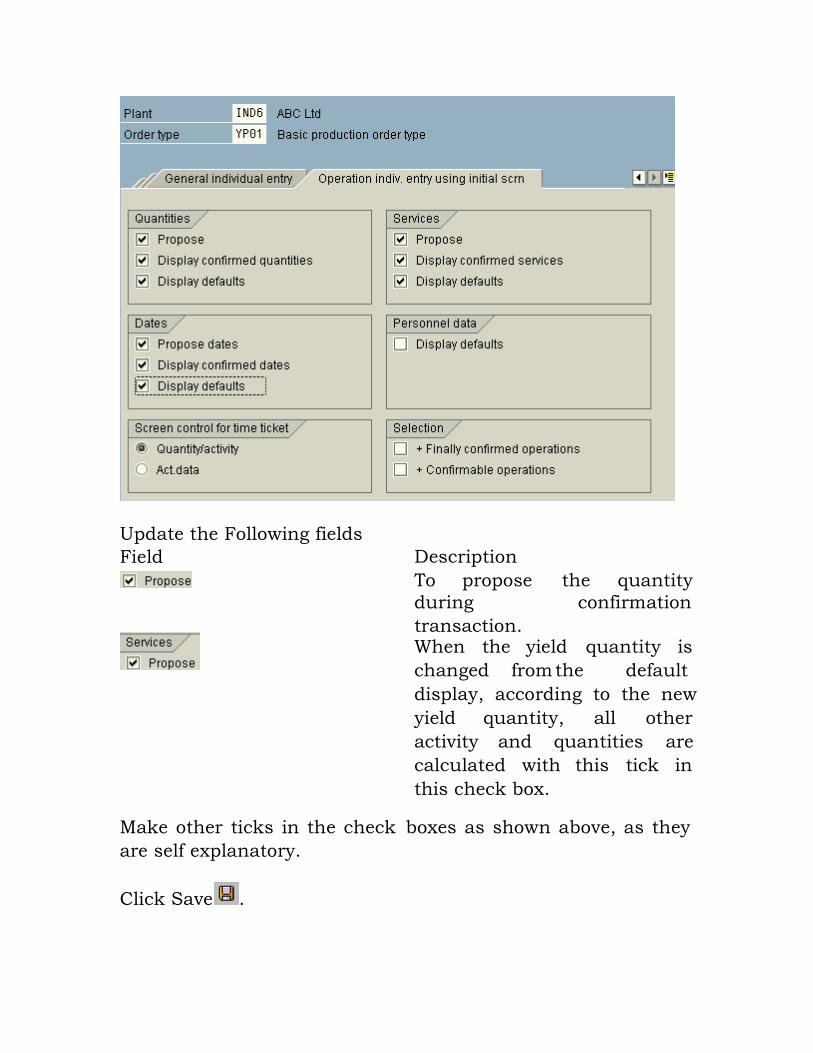
Update the Following fields
Field
Description
To propose the quantity
during confirmation
transaction. When the yield quantity is
changed from the default
display, according to the new
yield quantity, all other
activity and quantities are
calculated with this tick in
this check box. Make other ticks in the check boxes as shown above, as they
are self explanatory.
Click Save .
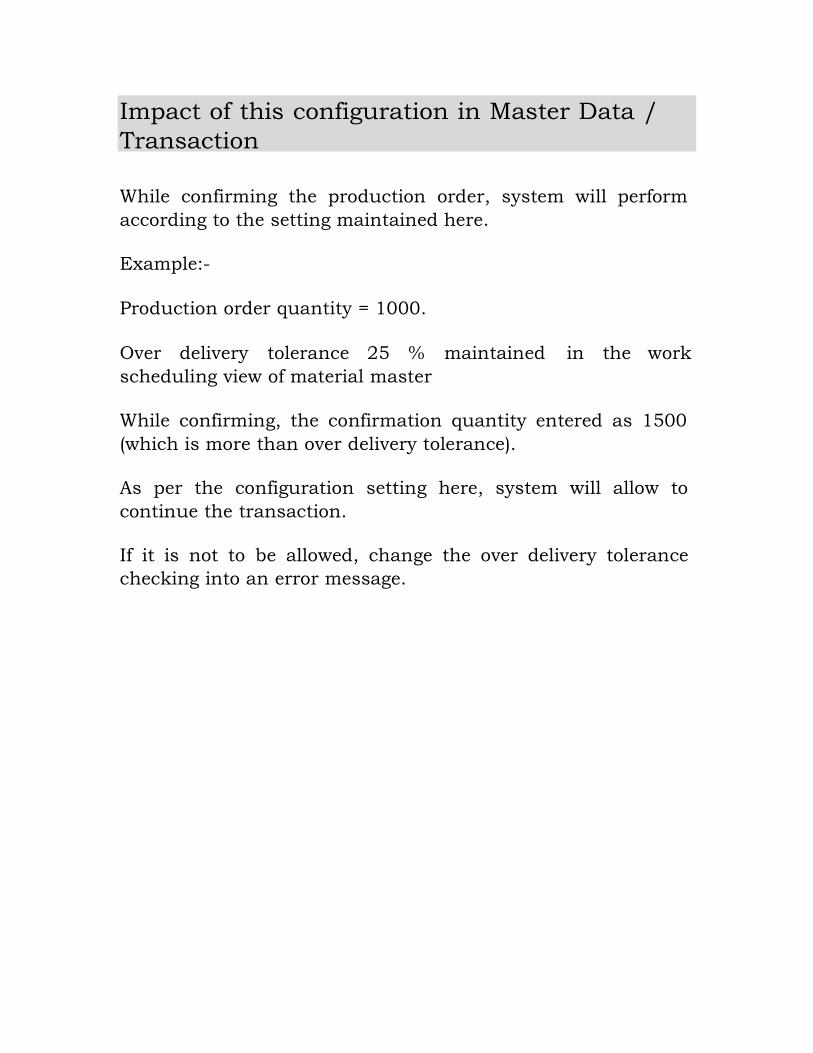
Impact of this configuration in Master Data /
Transaction
While confirming the production order, system will perform
according to the setting maintained here.
Example:-
Production order quantity = 1000.
Over delivery tolerance 25 % maintained in the work
scheduling view of material master
While confirming, the confirmation quantity entered as 1500
(which is more than over delivery tolerance).
As per the configuration setting here, system will allow to
continue the transaction.
If it is not to be allowed, change the over delivery tolerance
checking into an error message.
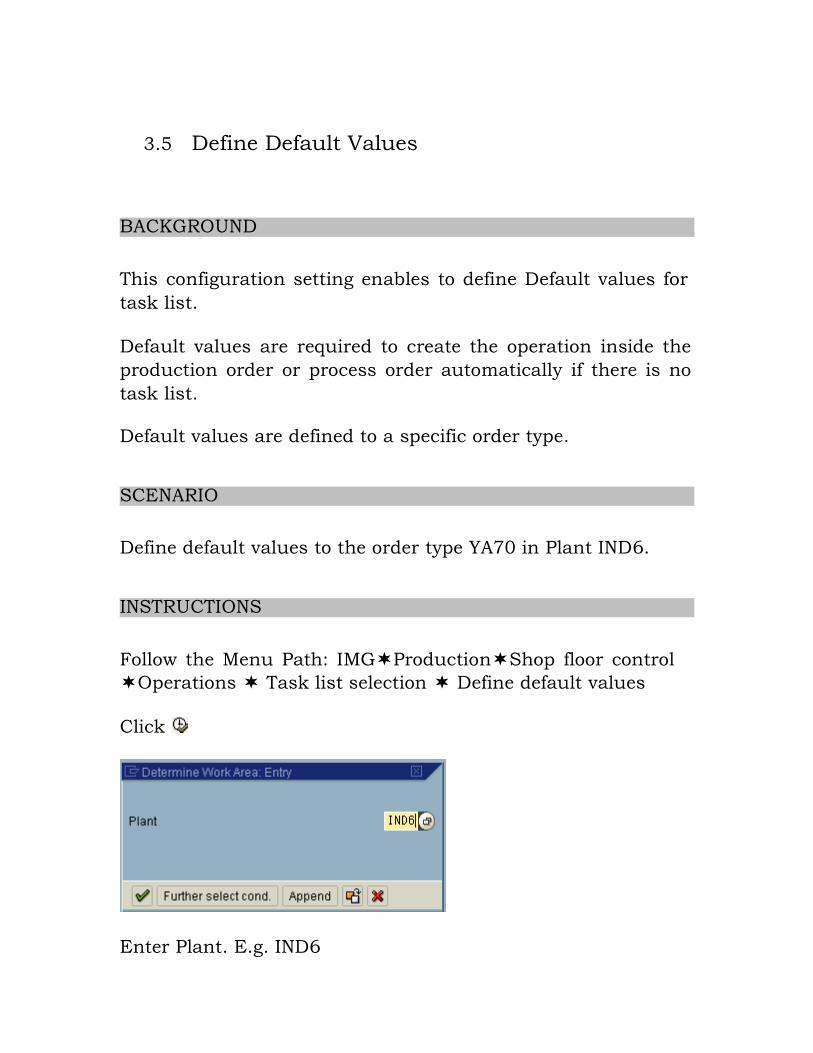
3.5 Define Default Values
BACKGROUND
This configuration setting enables to define Default values for
task list.
Default values are required to create the operation inside the
production order or process order automatically if there is no
task list. Default values are defined to a specific order type.
SCENARIO
Define default values to the order type YA70 in Plant IND6.
INSTRUCTIONS
Follow the Menu Path: IMGProductionShop floor control
Operations Task list selection Define default values
Click
Enter Plant. E.g. IND6
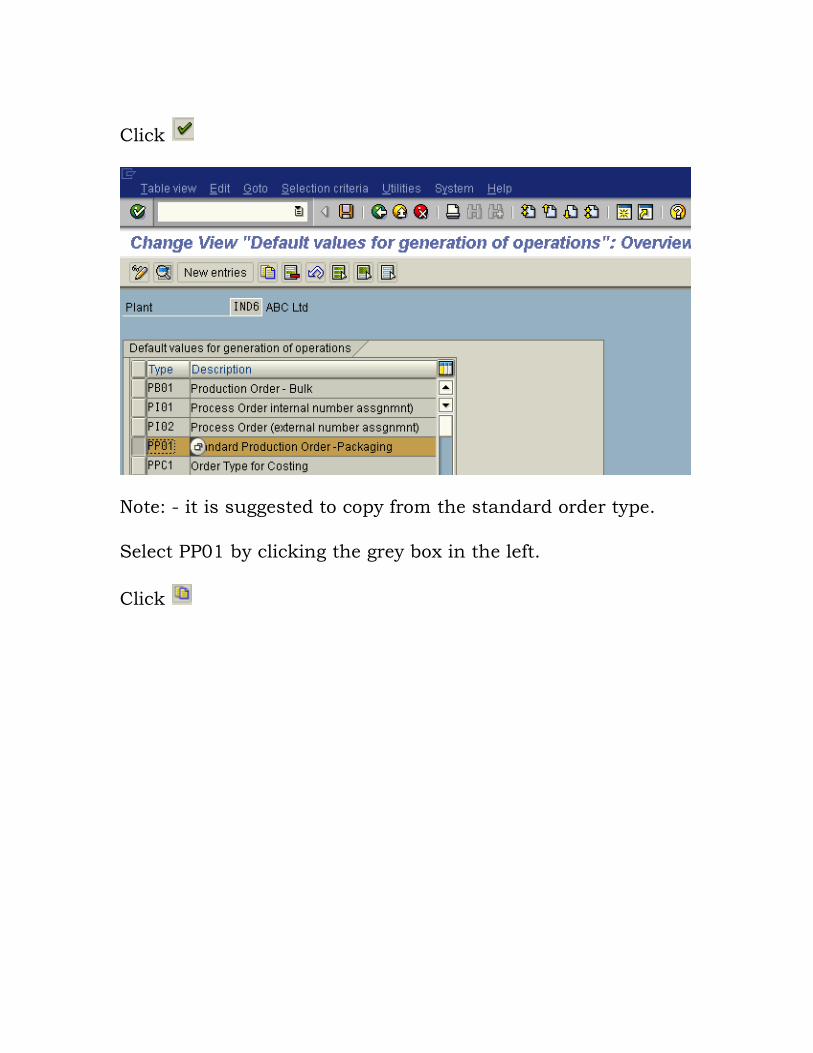
Click
Note: - it is suggested to copy from the standard order type.
Select PP01 by clicking the grey box in the left.
Click
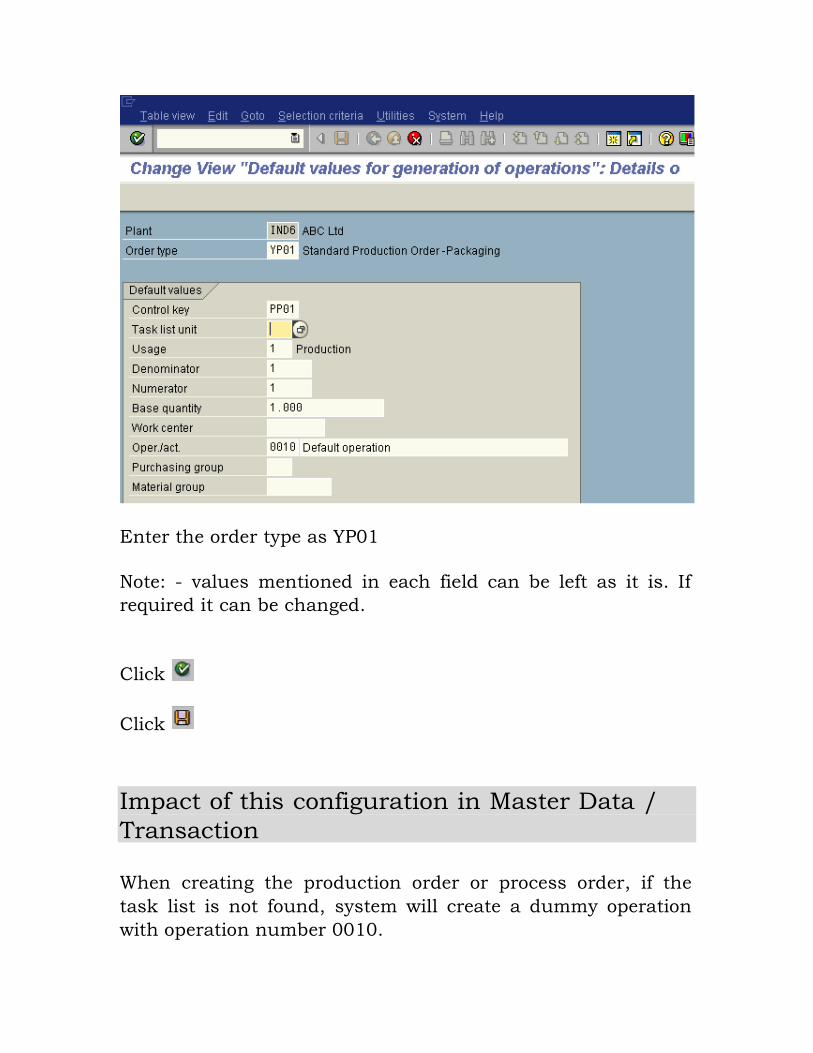
Enter the order type as YP01
Note: - values mentioned in each field can be left as it is. If
required it can be changed.
Click
Click
Impact of this configuration in Master Data /
Transaction
When creating the production order or process order, if the
task list is not found, system will create a dummy operation
with operation number 0010.
The above is only a sample presented. To get hold of the full
SAP PP/QM pack with the entire configuration, end user
documents and power point plus all the bonuses of PP
Questionsnd Answers, Resume Builder,Networking Audio an
the very special CO Product Costing and Million Dollar SAP
PP-CO Integration report click on the below link
http://www.sap-topjobs.com/SpecialPP/8431654645.html
All our packs are shipped thru FedEx and reaches you in three days time. One more thing this configuration pack is compatible with version 4.7, version 5.0 and 6.0 So you really do have to worry about the version at all.. We have taken care of that… Also all future version changes will be provided as free updates to you. So you can sit back relax and play the music ….
Your o. rder will be shipped through FedEx and will reach you
What I want from you now is to do yourself a favour by bringing the
brains and wisdom of SAP PP/QM Experts with more than 12+yrs of
implementation experience to your drawing room today. Do it right now my
dear friend and take your SAP career to the next level…. You will love it I
promise you….
http://www.sap-topjobs.com/SpecialPP/8431654645.html
www.sap-topjobs.com


