Embed Size (px)
Citation preview
2021 © Amazon Services Europe. All rights reserved
Selling on Amazon Getting Started Guide
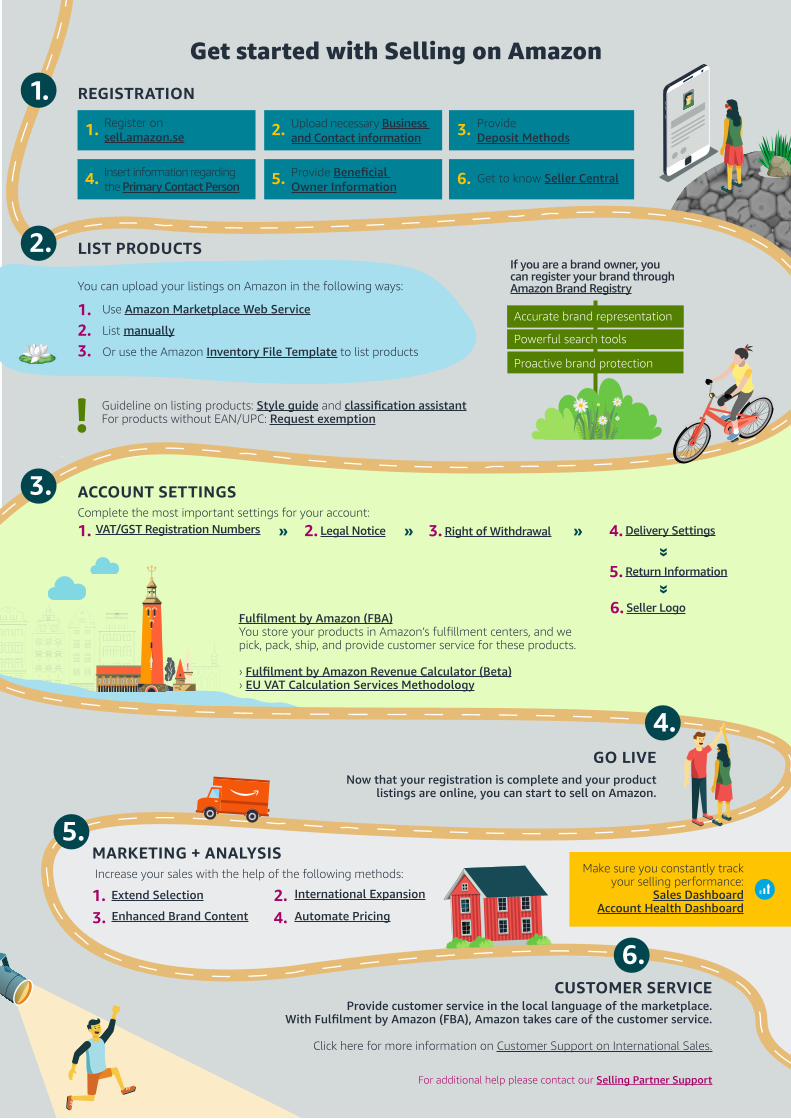
Get started with Selling on Amazon
If you are a brand owner, you can register your brand through Amazon Brand Registry
Accurate brand representation
Powerful search tools
Proactive brand protection
You can upload your listings on Amazon in the following ways:
Increase your sales with the help of the following methods:
Guideline on listing products: Style guide and classification assistantFor products without EAN/UPC: Request exemption
Fulfilment by Amazon (FBA)You store your products in Amazon’s fulfillment centers, and we pick, pack, ship, and provide customer service for these products.
› Fulfilment by Amazon Revenue Calculator (Beta)› EU VAT Calculation Services Methodology
Now that your registration is complete and your product listings are online, you can start to sell on Amazon.
Provide customer service in the local language of the marketplace.With Fulfilment by Amazon (FBA), Amazon takes care of the customer service.
Click here for more information on Customer Support on International Sales.
For additional help please contact our Selling Partner Support
Complete the most important settings for your account:
LIST PRODUCTS
MARKETING + ANALYSIS
CUSTOMER SERVICE
ACCOUNT SETTINGS
GO LIVE
REGISTRATION1.
2.
3.
4.
6.
5.
Register onsell.amazon.se1. Upload necessary Business
and Contact information2. ProvideDeposit Methods3.
Provide Beneficial Owner Information5.4. Insert information regarding
the Primary Contact Person 6. Get to know Seller Central
Use Amazon Marketplace Web Service1.List manually2.Or use the Amazon Inventory File Template to list products3.
VAT/GST Registration Numbers1. Legal Notice2. Right of Withdrawal3. Delivery Settings4.
Return Information5.
Seller Logo6.
» » »
»»
Extend Selection1. International Expansion2.Enhanced Brand Content3. Automate Pricing4.
Make sure you constantly track your selling performance:
Sales DashboardAccount Health Dashboard
2021 © Amazon Services Europe. All rights reserved
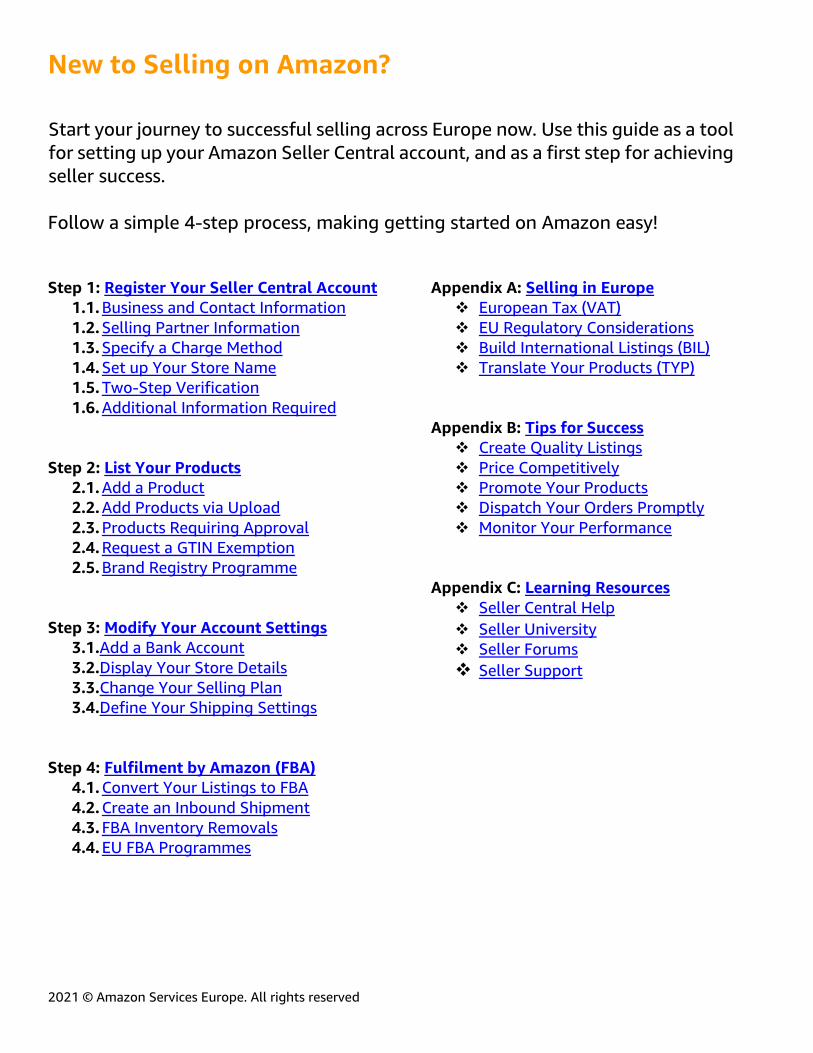
New to Selling on Amazon?
Start your journey to successful selling across Europe now. Use this guide as a tool
for setting up your Amazon Seller Central account, and as a first step for achieving
seller success.
Follow a simple 4-step process, making getting started on Amazon easy!
Step 1: Register Your Seller Central Account
1.1. Business and Contact Information
1.2. Selling Partner Information
1.3. Specify a Charge Method
1.4. Set up Your Store Name
1.5. Two-Step Verification
1.6. Additional Information Required
Step 2: List Your Products
2.1. Add a Product
2.2. Add Products via Upload
2.3. Products Requiring Approval
2.4. Request a GTIN Exemption
2.5. Brand Registry Programme
Step 3: Modify Your Account Settings
3.1.Add a Bank Account
3.2.Display Your Store Details
3.3.Change Your Selling Plan
3.4.Define Your Shipping Settings
Step 4: Fulfilment by Amazon (FBA)
4.1. Convert Your Listings to FBA
4.2. Create an Inbound Shipment
4.3. FBA Inventory Removals
4.4. EU FBA Programmes
Appendix A: Selling in Europe
European Tax (VAT)
EU Regulatory Considerations
Build International Listings (BIL)
Translate Your Products (TYP)
Appendix B: Tips for Success
Create Quality Listings
Price Competitively
Promote Your Products
Dispatch Your Orders Promptly
Monitor Your Performance
Appendix C: Learning Resources
Seller Central Help
Seller University
Seller Forums
Seller Support
2021 © Amazon Services Europe. All rights reserved 1
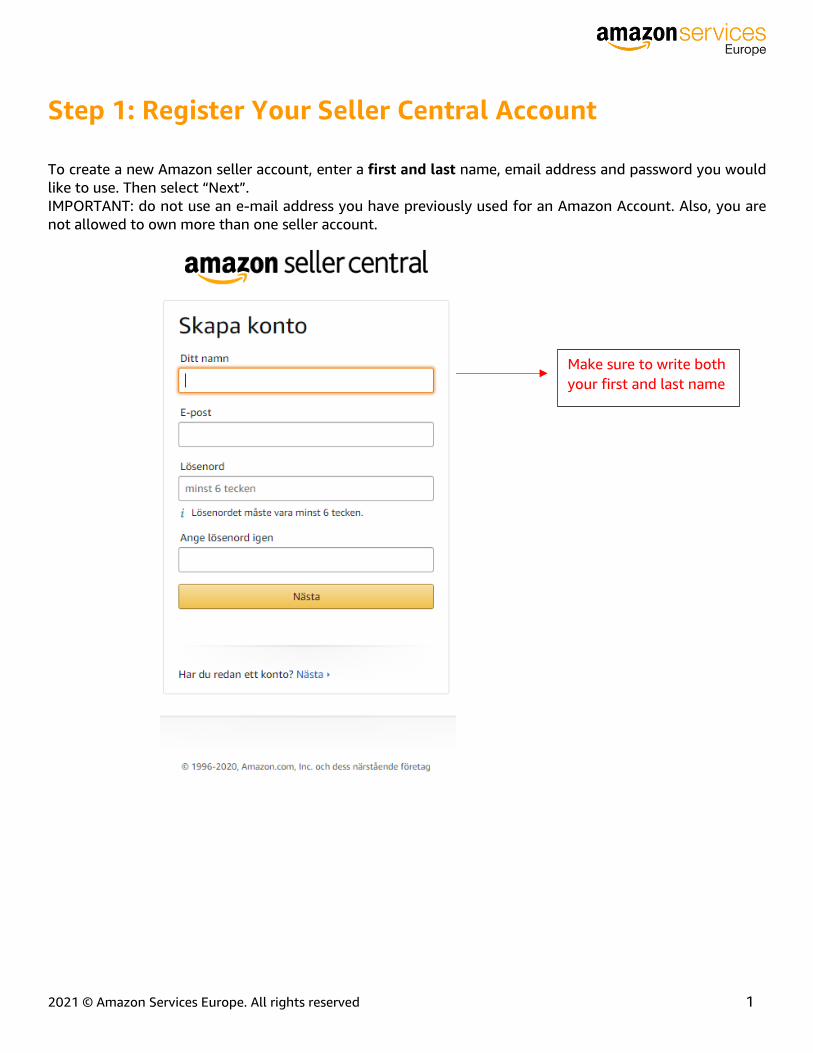
Step 1: Register Your Seller Central Account
To create a new Amazon seller account, enter a first and last name, email address and password you would
like to use. Then select “Next”.
IMPORTANT: do not use an e-mail address you have previously used for an Amazon Account. Also, you are
not allowed to own more than one seller account.
Make sure to write both
your first and last name
2021 © Amazon Services Europe. All rights reserved 2
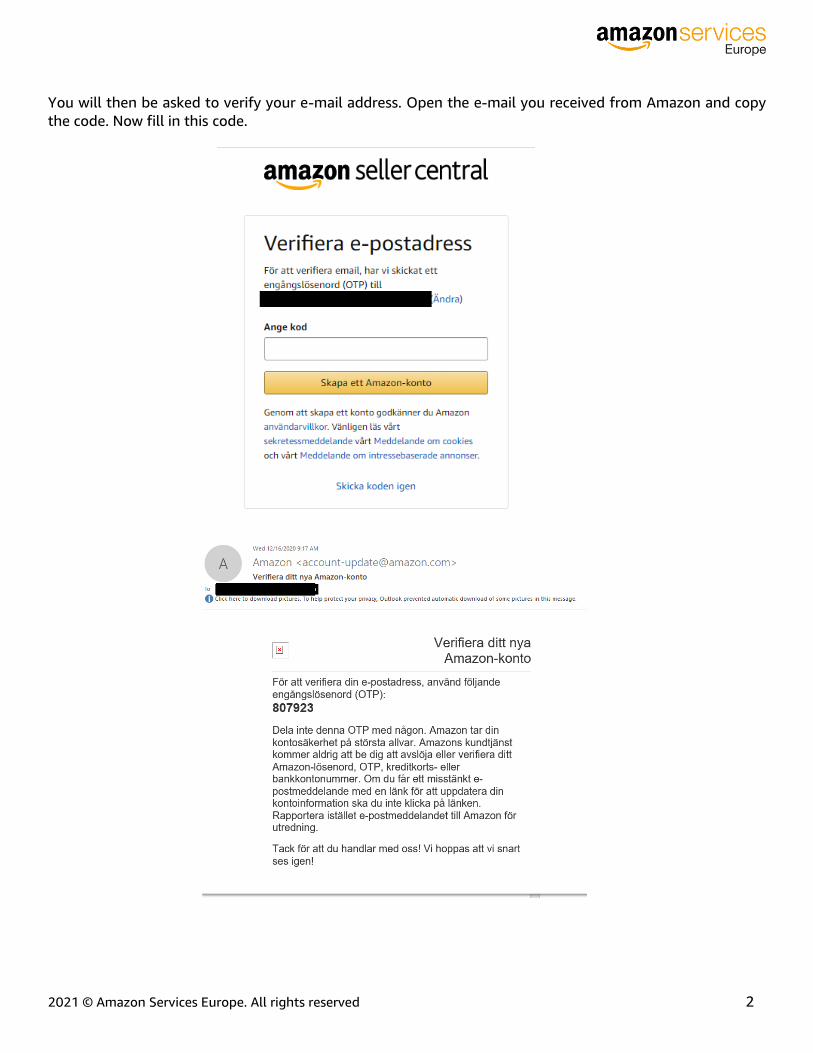
You will then be asked to verify your e-mail address. Open the e-mail you received from Amazon and copy
the code. Now fill in this code.
2021 © Amazon Services Europe. All rights reserved 3
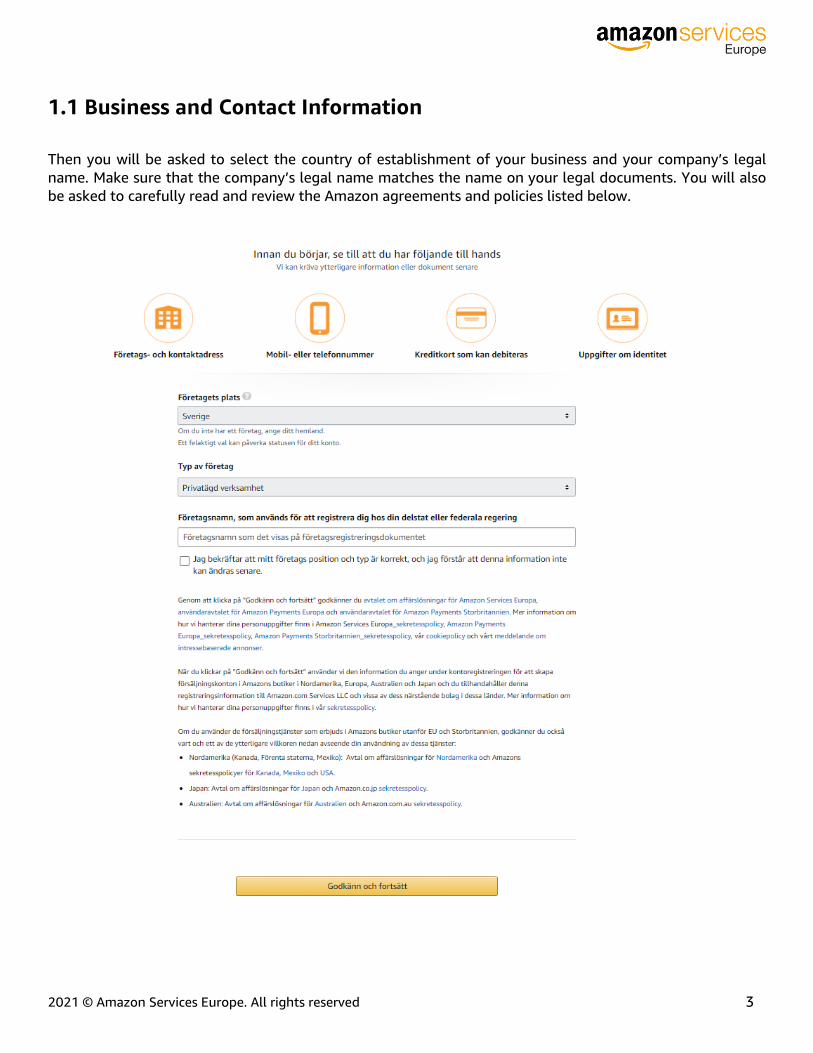
1.1 Business and Contact Information
Then you will be asked to select the country of establishment of your business and your company’s legal
name. Make sure that the company’s legal name matches the name on your legal documents. You will also
be asked to carefully read and review the Amazon agreements and policies listed below.
2021 © Amazon Services Europe. All rights reserved 4
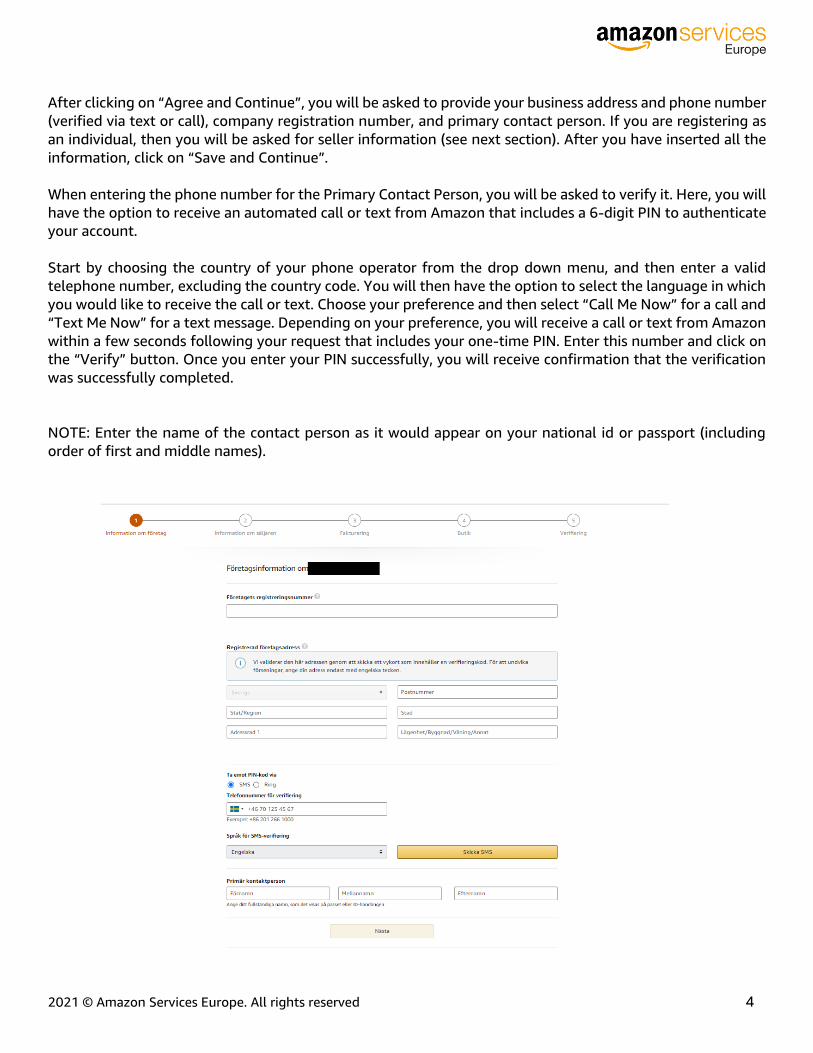
After clicking on “Agree and Continue”, you will be asked to provide your business address and phone number
(verified via text or call), company registration number, and primary contact person. If you are registering as
an individual, then you will be asked for seller information (see next section). After you have inserted all the
information, click on “Save and Continue”.
When entering the phone number for the Primary Contact Person, you will be asked to verify it. Here, you will
have the option to receive an automated call or text from Amazon that includes a 6-digit PIN to authenticate
your account.
Start by choosing the country of your phone operator from the drop down menu, and then enter a valid
telephone number, excluding the country code. You will then have the option to select the language in which
you would like to receive the call or text. Choose your preference and then select “Call Me Now” for a call and
“Text Me Now” for a text message. Depending on your preference, you will receive a call or text from Amazon
within a few seconds following your request that includes your one-time PIN. Enter this number and click on
the “Verify” button. Once you enter your PIN successfully, you will receive confirmation that the verification
was successfully completed.
NOTE: Enter the name of the contact person as it would appear on your national id or passport (including
order of first and middle names).
2021 © Amazon Services Europe. All rights reserved 5
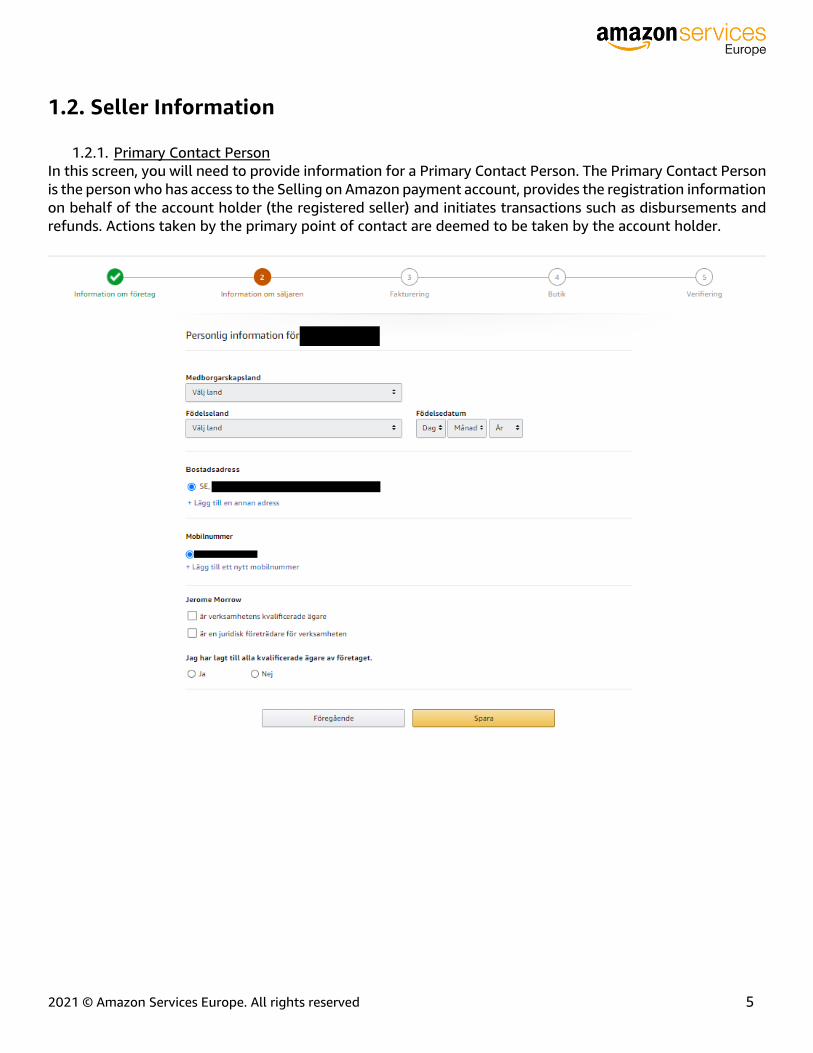
1.2. Seller Information
1.2.1. Primary Contact Person
In this screen, you will need to provide information for a Primary Contact Person. The Primary Contact Person
is the person who has access to the Selling on Amazon payment account, provides the registration information
on behalf of the account holder (the registered seller) and initiates transactions such as disbursements and
refunds. Actions taken by the primary point of contact are deemed to be taken by the account holder.
2021 © Amazon Services Europe. All rights reserved 6
At this point, you will also have the opportunity to specify if the Primary Contact Person is a beneficial owner
of the business and/or a legal representative of the business.
1.2.2. Beneficial Owner Information
After that, you will have the option to specify beneficial owner information. Beneficial owners are natural
persons who own or control the business through direct or indirect ownership over 25% or more of the shares
or voting rights of the business or any natural person who otherwise exercises control of the management of
the business.
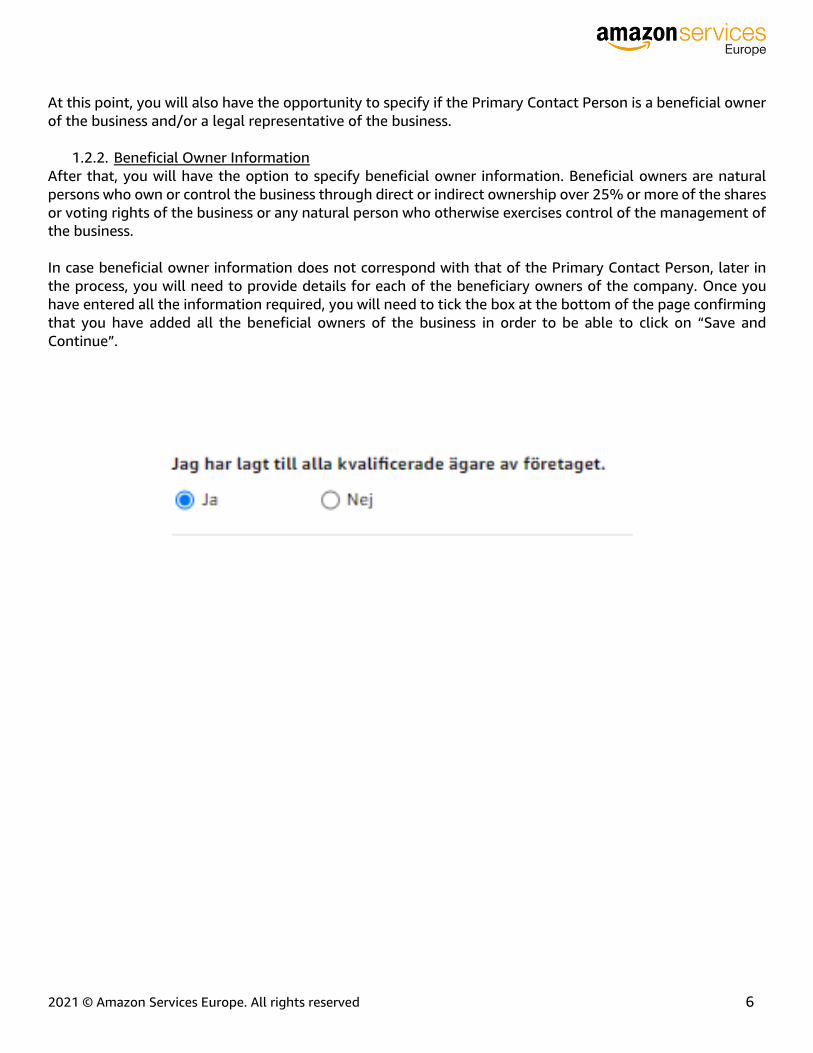
In case beneficial owner information does not correspond with that of the Primary Contact Person, later in
the process, you will need to provide details for each of the beneficiary owners of the company. Once you
have entered all the information required, you will need to tick the box at the bottom of the page confirming
that you have added all the beneficial owners of the business in order to be able to click on “Save and
Continue”.
2021 © Amazon Services Europe. All rights reserved 7
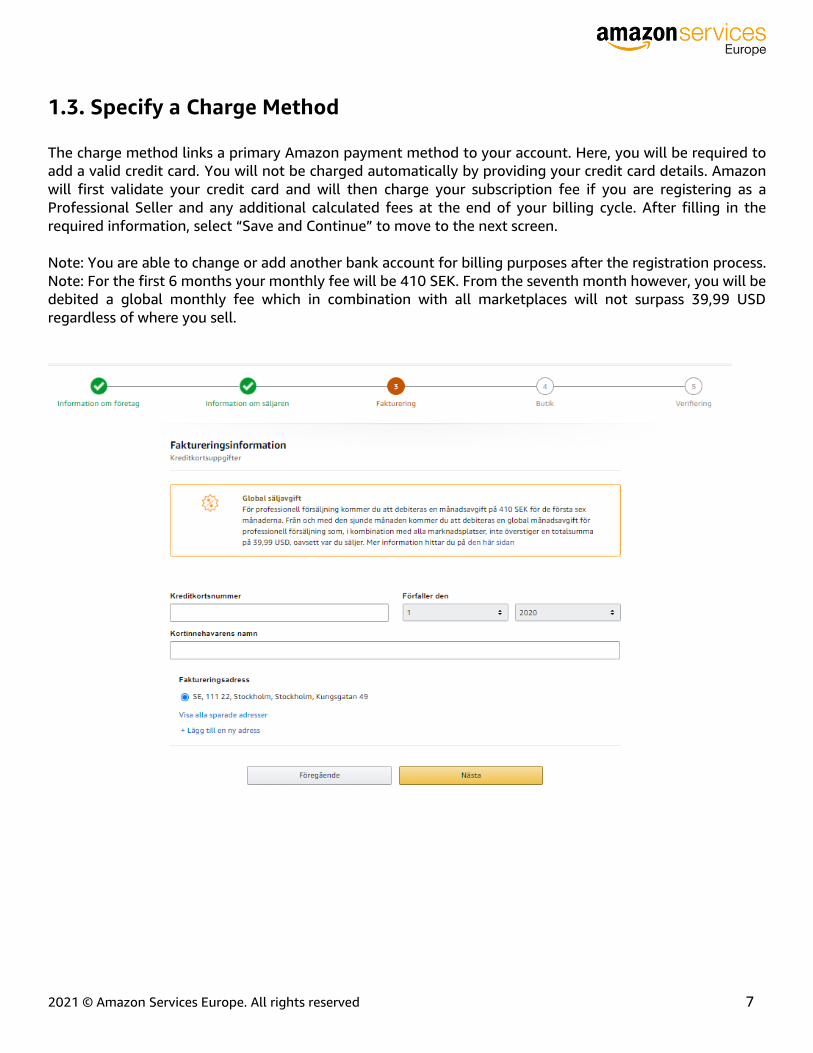
1.3. Specify a Charge Method The charge method links a primary Amazon payment method to your account. Here, you will be required to
add a valid credit card. You will not be charged automatically by providing your credit card details. Amazon
will first validate your credit card and will then charge your subscription fee if you are registering as a
Professional Seller and any additional calculated fees at the end of your billing cycle. After filling in the
required information, select “Save and Continue” to move to the next screen.
Note: You are able to change or add another bank account for billing purposes after the registration process.
Note: For the first 6 months your monthly fee will be 410 SEK. From the seventh month however, you will be
debited a global monthly fee which in combination with all marketplaces will not surpass 39,99 USD
regardless of where you sell.
2021 © Amazon Services Europe. All rights reserved 8
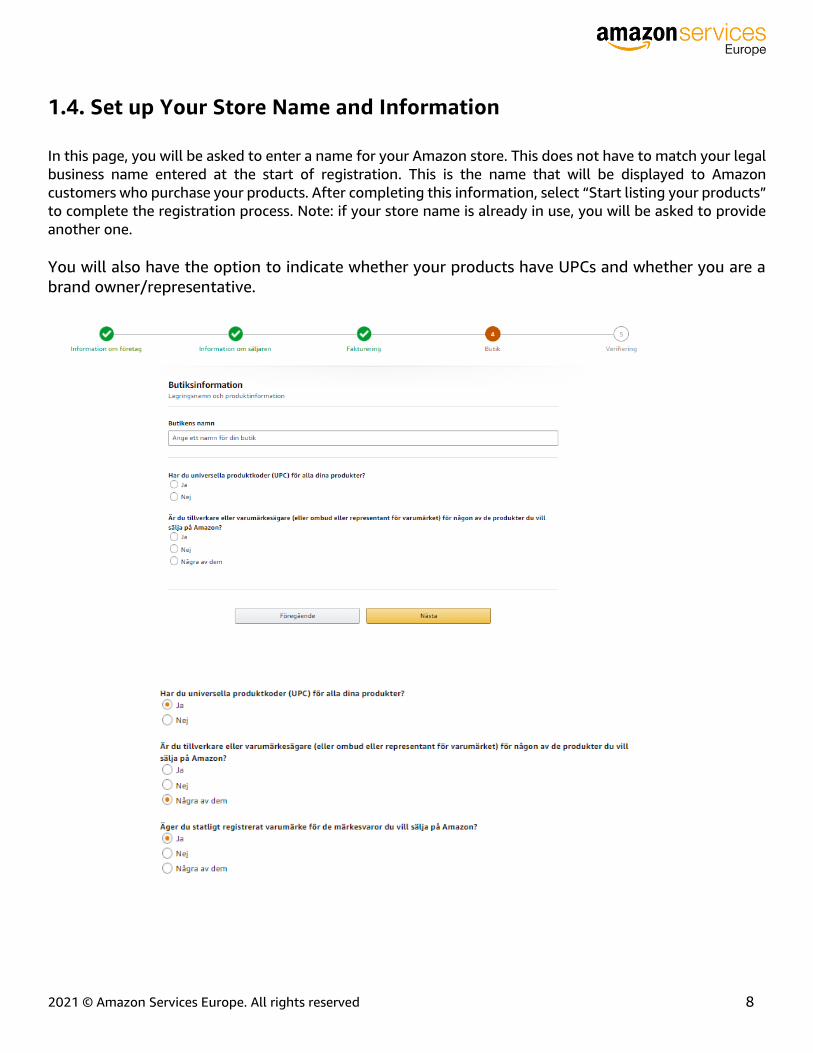
1.4. Set up Your Store Name and Information
In this page, you will be asked to enter a name for your Amazon store. This does not have to match your legal
business name entered at the start of registration. This is the name that will be displayed to Amazon
customers who purchase your products. After completing this information, select “Start listing your products”
to complete the registration process. Note: if your store name is already in use, you will be asked to provide
another one.
You will also have the option to indicate whether your products have UPCs and whether you are a
brand owner/representative.
2021 © Amazon Services Europe. All rights reserved 9
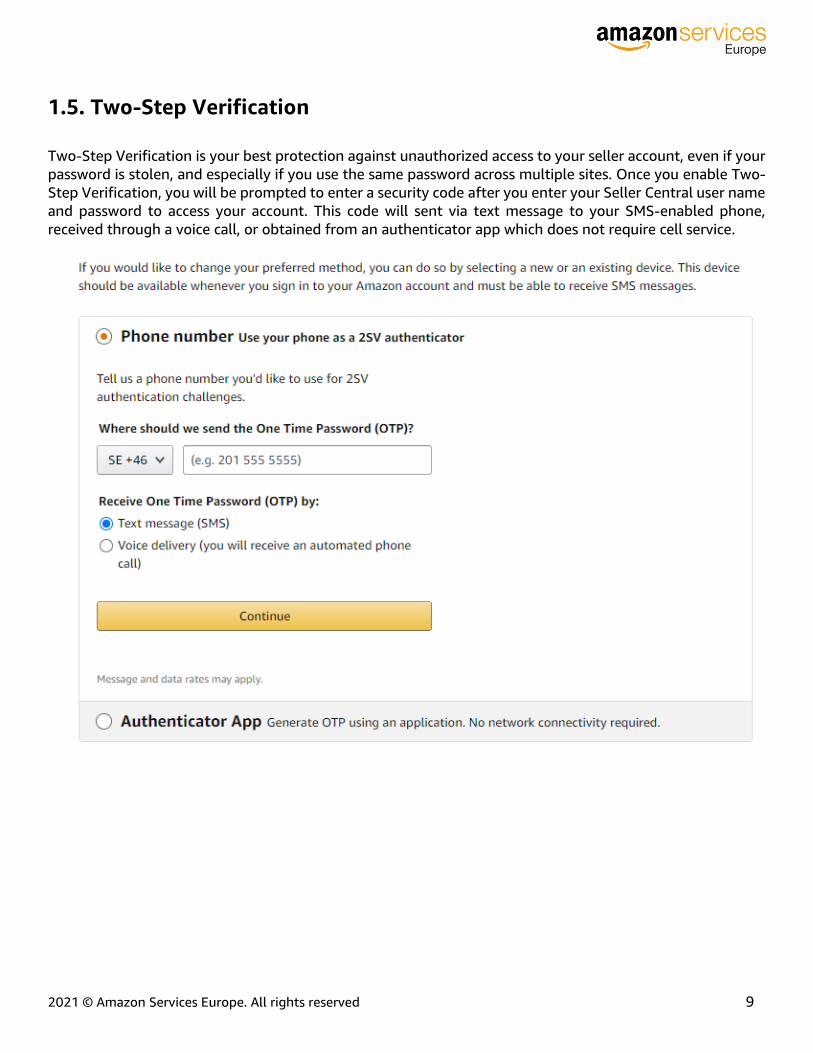
1.5. Two-Step Verification
Two-Step Verification is your best protection against unauthorized access to your seller account, even if your
password is stolen, and especially if you use the same password across multiple sites. Once you enable Two-
Step Verification, you will be prompted to enter a security code after you enter your Seller Central user name
and password to access your account. This code will sent via text message to your SMS-enabled phone,
received through a voice call, or obtained from an authenticator app which does not require cell service.

2021 © Amazon Services Europe. All rights reserved 10
1.6. Additional Information Required
In accordance with EU regulations, Amazon Payments Europe requires sellers to provide information about
themselves and their business so that they can begin to sell on Amazon and receive the proceeds of their
transactions on Amazon EU marketplaces. This means that Amazon may require to verify the information you
provide during the account registration process by requesting specific documentation such as personal
identification documents, business license and/or bank statements as proof of ownership. You will receive
notification when this verification is needed.
IMPORTANT: make sure the information you provide exactly matches your legal documents. Make sure to not
cover your BSN number on your identification document.
2021 © Amazon Services Europe. All rights reserved 11
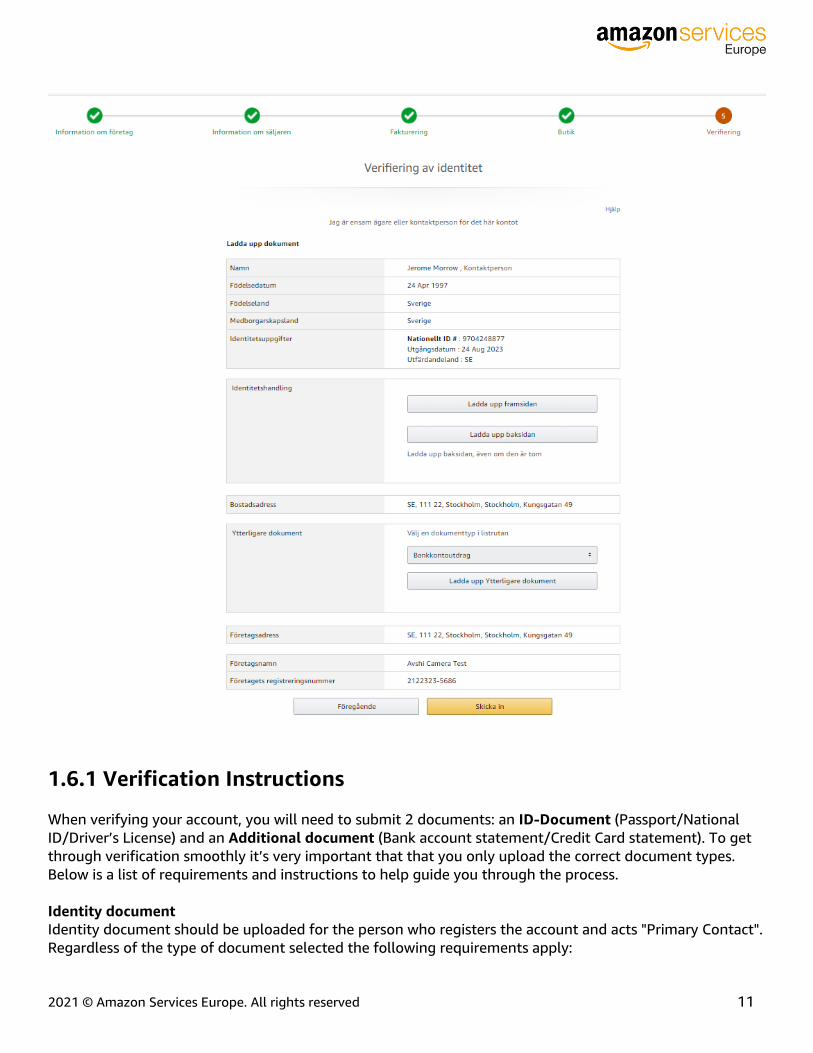
1.6.1 Verification Instructions When verifying your account, you will need to submit 2 documents: an ID-Document (Passport/National
ID/Driver’s License) and an Additional document (Bank account statement/Credit Card statement). To get
through verification smoothly it’s very important that that you only upload the correct document types.
Below is a list of requirements and instructions to help guide you through the process.
Identity document
Identity document should be uploaded for the person who registers the account and acts "Primary Contact".
Regardless of the type of document selected the following requirements apply:
2021 © Amazon Services Europe. All rights reserved 12
Document must still be valid (not expired/closed/revoked)
Display matching information (such as your ID number or name) that you use to register to sell on
Amazon.
It is also important that the entire document is visible, meaning that all 4 corners are included in the
provided image/scanned document.
the submitted document should be high-quality, in color, and unobstructed (not angled, blurry, or
cropped)
Approved documents (SE):
Passport
o Entered as Passport
o ID number is "Pass Nr./Passport No."
National ID Card
o Entered as National ID
o ID number is “Kortnummer / Card No.”
Driving license
o Entered as National ID
o ID number is in field "5" on the driver's license (personnummer)
Additional document
The additional document can either be a bank statement or a credit card statement and should belong to
the company or person that is registered.
Approved documents:
Bank account statement or credit card statements
o May only be a bank/loan/savings account statement with transaction activity_ for the
company/person registering the account (an extract of transactions for a set period of time)
or _a credit card statement with transaction activity_. No other types of documents (eg. bank
letter/account information page/picture of credit card) will be accepted.
o If the bank account is in the name of your business, the bank account name on the document
must be the name of your business. However, if you have a sole proprietorship, the bank
account name on the document must be the sole proprietor's name
o Must match the name of the business or point of contact provided during registration
o Bank logo, bank account number and business name or point of contact (name of person to
contact on behalf of the business) must be clearly visible.
o Must show transaction activity, but you can cover individual transactions. When doing so, you
should only cover individual numbers. If you cover larger areas or the transactions section as
a whole, the document will be considered illegible.
o The document must not be a screenshot. Please download the statement as a PDF, scan a
physical copy of the statement or take a photo of a physical copy of the statement.
o Must be dated within 180 days.
o Must be in color (black and white not accepted)
o Approved languages for the documents are: Swedish, Dutch, Polish, Chinese, English, French,
German, Italian, Japanese, Portuguese, or Spanish.

2021 © Amazon Services Europe. All rights reserved 13
FAQ
ID-Document
1. Q: What should I do if my ID-document has expired?
A: If the ID-document you planned on submitting is out of date, please consider one of the
alternative types of ID-document. I.e. if your passport has expired, please consider uploading a
Driver’s license or National ID instead. If you do not have a valid ID-document at hand, you will need
to apply for one and continue the verification process once receiving it.
2. Q: My passport has been rejected because it does not match the information that I registered on
Amazon, but I can’t find the discrepancy
A: First ensure that you have submitted the document in the correct slot, ie. a passport in the
passport slot or a Driver’s license in the Driver’s license slot. If you haven’t, simply upload the same
document again and change to the correct slot. Another common pitfall is that the names are not in
the exact same order/format as in the ID-document. Also ensure that the ID-number given in Seller
Central matches the uploaded ID-document ("Pass Nr./Passport No."/ “Kortnummer / Card No.”/5.
for passport/national id-card/driver’s license. )
Additional Documents
1. Q: What should I do if I can’t find a bank/credit card statement which matches all the requirements?
A: All banks should be able to provide an acceptable bank account statement. If you have
Handelsbanken/Swedbank/Nordea then please refer to our instructions on how to extract a
compliant bank account statement from your online portal. If you are unable to extract the
statement yourself, please contact your bank and ask to be sent a physical copy of a regular bank
statement with transactions (kontoutdrag)
2. Q: What constitutes a bank statement or credit card statement?
A: The bank/loans/savings or credit card statement should be an extract of transactions for a set
period of time. Letters from the bank staff/account information pages/certifications and other
documents do not qualify as bank statements.
3. Q: Are there any alternative documents I can upload instead of a bank statement or credit card
statement?
A: No. The only types of documents that will be accepted are bank statements or credit card
statements. Uploading bank letters/certification/pictures of credit ´cards or any other type of
document like that will not be approved.
4. Q. Why is my bank statement/credit card statement being rejected for being a screenshot even
though I downloaded it as a PDF/printed it.
2021 © Amazon Services Europe. All rights reserved 14
A: This can be caused by the presence of 'digital elements' on the extract. Examples of digital
elements are drop-down menus or buttons or calendars. If you do not have the opportunity to
download or print an extract without digital elements, we recommend that you order a statement in
a physical format from your bank.
5. Q: I am not able to extract a bank statement or credit card statement in any of the approved
languages, what should I do?
A: In this case you have the option to submit a notarized (have the signature on a document attested
to by a notary) translation of the document in one of the supported languages.
Bank Account Statement Guide (Handelsbanken/Swedbank/Nordea/SEB)
As of August 2021.
If the below instructions do not work, please search on your bank’s website for instructions or call your
counselor.
Swedbank:
1. Go to ‘Accounts’
2. Choose your personal or business account
3. Filter by date (eg 01/06 - 30/06)
4. Click on 'search'
5. Click on 'export'
6. Select PDF
7. Save the PDF file and upload to the Amazon registration under Additional Document in Seller
Central.
Handelsbanken:
1. Go to ‘Inbox’
2. Select Inbox and Mail
3. Select an Account Statement for ‘Account Name XXX XXX XXX First Name Last Name’ Example:
“Allkonto 456 876 306 Bertil Nilsson”
4. Click on the hyperlink at the bottom of the message under "Link to bank statement:"
5. The account statement should be downloaded in PDF format
6. Upload the PDF file under Additional Document in Seller Central.
Nordea:
1. Log in to the Internet bank and select "Accounts & account events" under the tab "Finance".
2. Select the account from which you want to print your bank statement and click "Print".
3. Choose to print as PDF and print / save.
4. Upload the PDF or scan the printed excerpt and upload under Additional Document in Seller Central.
SEB:
1. Log into your internet bank and choose “Account and cards – account summary)
2021 © Amazon Services Europe. All rights reserved 15
2. Choose the account you want to extract a statement for and select it
3. Select Kontoutdrag for your selected account
4. Save it as a PDF
5. Upload PDF under Additional Document in Seller Central.
2021 © Amazon Services Europe. All rights reserved 16
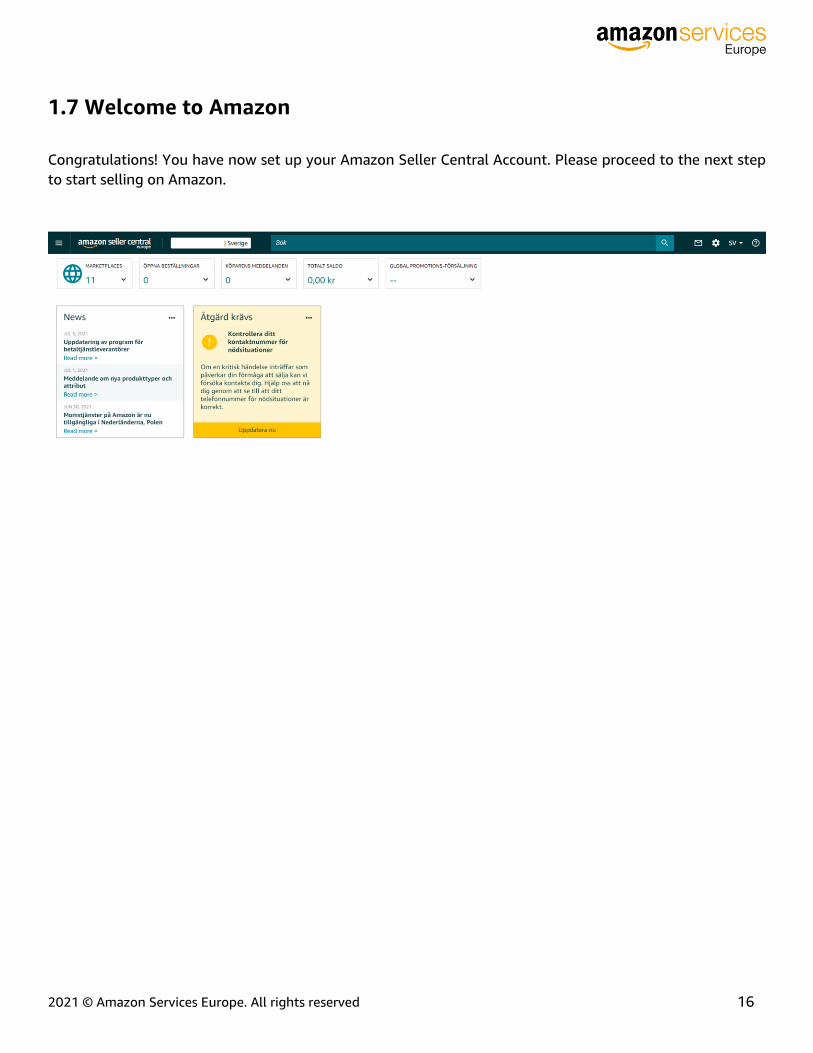
1.7 Welcome to Amazon
Congratulations! You have now set up your Amazon Seller Central Account. Please proceed to the next step
to start selling on Amazon.
2021 © Amazon Services Europe. All rights reserved 17
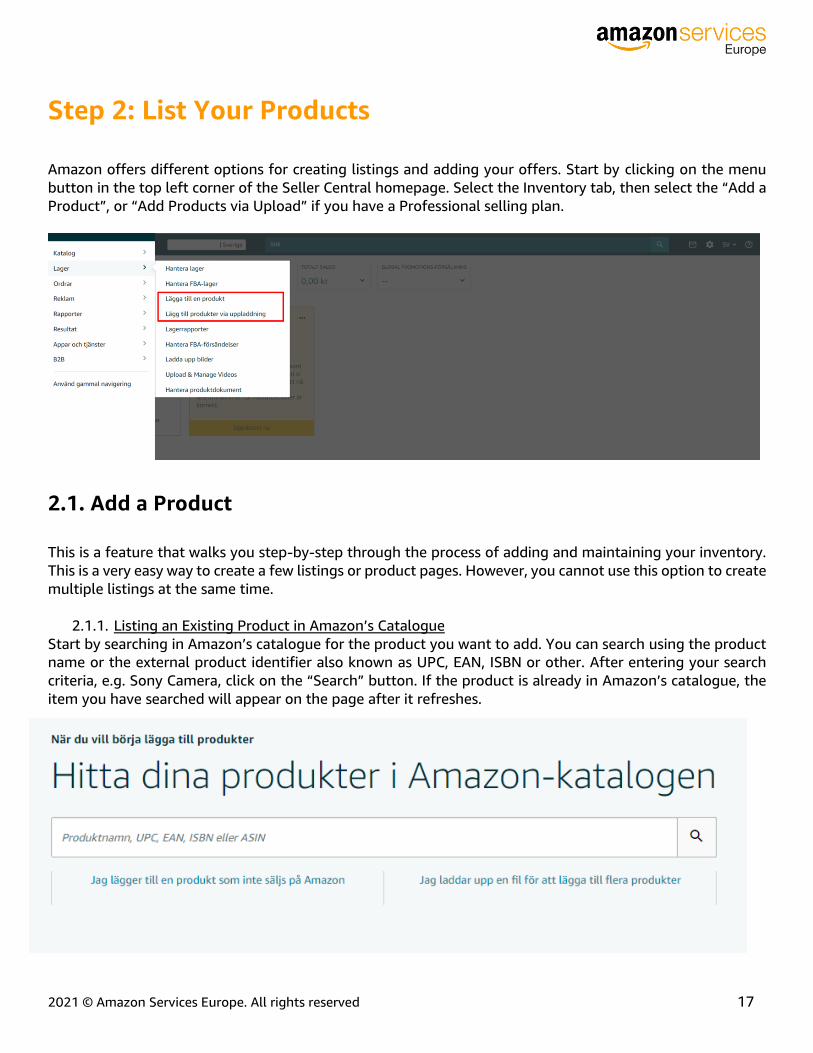
Step 2: List Your Products
Amazon offers different options for creating listings and adding your offers. Start by clicking on the menu
button in the top left corner of the Seller Central homepage. Select the Inventory tab, then select the “Add a
Product”, or “Add Products via Upload” if you have a Professional selling plan.
2.1. Add a Product
This is a feature that walks you step-by-step through the process of adding and maintaining your inventory.
This is a very easy way to create a few listings or product pages. However, you cannot use this option to create
multiple listings at the same time.
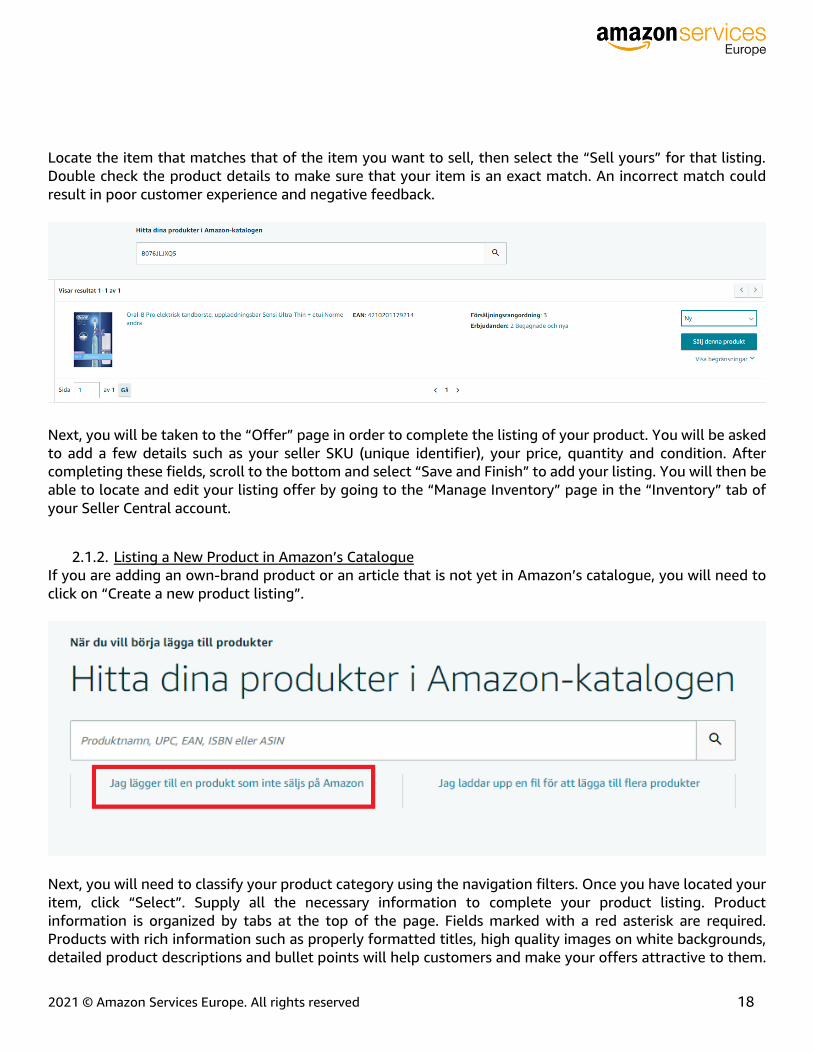
2.1.1. Listing an Existing Product in Amazon’s Catalogue
Start by searching in Amazon’s catalogue for the product you want to add. You can search using the product
name or the external product identifier also known as UPC, EAN, ISBN or other. After entering your search
criteria, e.g. Sony Camera, click on the “Search” button. If the product is already in Amazon’s catalogue, the
item you have searched will appear on the page after it refreshes.
2021 © Amazon Services Europe. All rights reserved 18
Locate the item that matches that of the item you want to sell, then select the “Sell yours” for that listing.
Double check the product details to make sure that your item is an exact match. An incorrect match could
result in poor customer experience and negative feedback.
Next, you will be taken to the “Offer” page in order to complete the listing of your product. You will be asked
to add a few details such as your seller SKU (unique identifier), your price, quantity and condition. After
completing these fields, scroll to the bottom and select “Save and Finish” to add your listing. You will then be
able to locate and edit your listing offer by going to the “Manage Inventory” page in the “Inventory” tab of
your Seller Central account.
2.1.2. Listing a New Product in Amazon’s Catalogue
If you are adding an own-brand product or an article that is not yet in Amazon’s catalogue, you will need to
click on “Create a new product listing”.
Next, you will need to classify your product category using the navigation filters. Once you have located your
item, click “Select”. Supply all the necessary information to complete your product listing. Product
information is organized by tabs at the top of the page. Fields marked with a red asterisk are required.
Products with rich information such as properly formatted titles, high quality images on white backgrounds,
detailed product descriptions and bullet points will help customers and make your offers attractive to them.
2021 © Amazon Services Europe. All rights reserved 19
Failure to supply the correct product data could result in quality alerts and your products being suppressed
from Amazon’s catalogue.
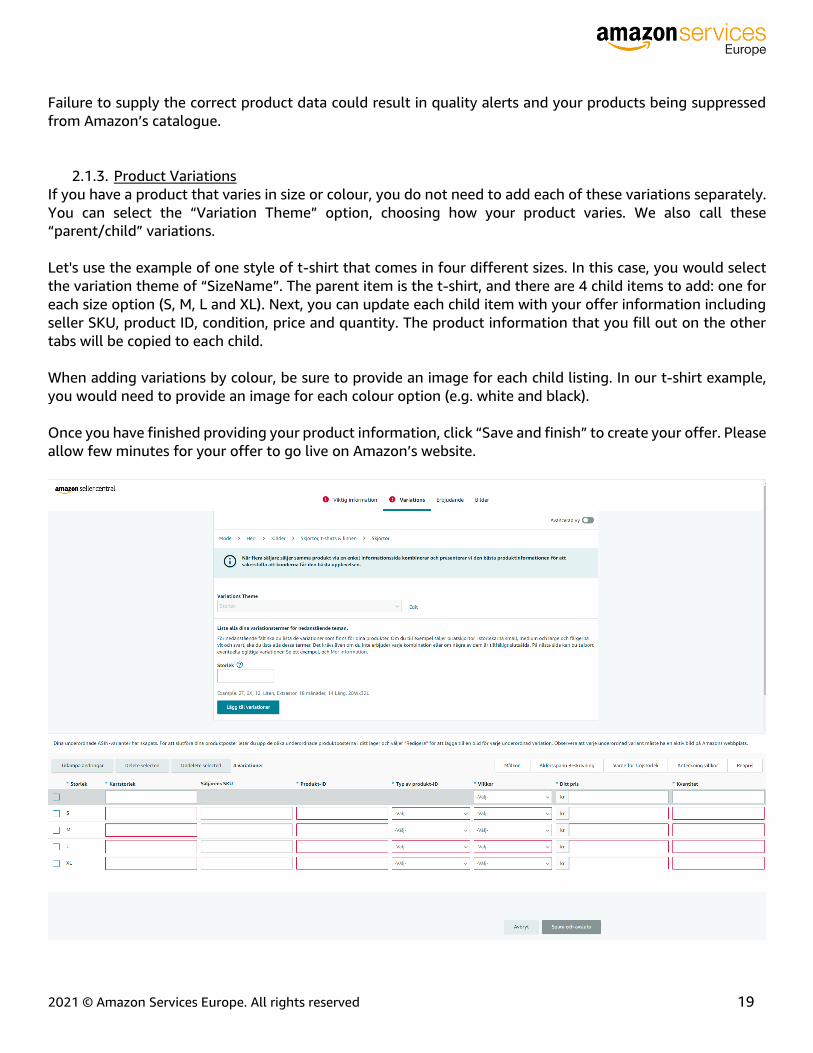
2.1.3. Product Variations
If you have a product that varies in size or colour, you do not need to add each of these variations separately.
You can select the “Variation Theme” option, choosing how your product varies. We also call these
“parent/child” variations.
Let's use the example of one style of t-shirt that comes in four different sizes. In this case, you would select
the variation theme of “SizeName”. The parent item is the t-shirt, and there are 4 child items to add: one for
each size option (S, M, L and XL). Next, you can update each child item with your offer information including
seller SKU, product ID, condition, price and quantity. The product information that you fill out on the other
tabs will be copied to each child.
When adding variations by colour, be sure to provide an image for each child listing. In our t-shirt example,
you would need to provide an image for each colour option (e.g. white and black).
Once you have finished providing your product information, click “Save and finish” to create your offer. Please
allow few minutes for your offer to go live on Amazon’s website.
2021 © Amazon Services Europe. All rights reserved 20
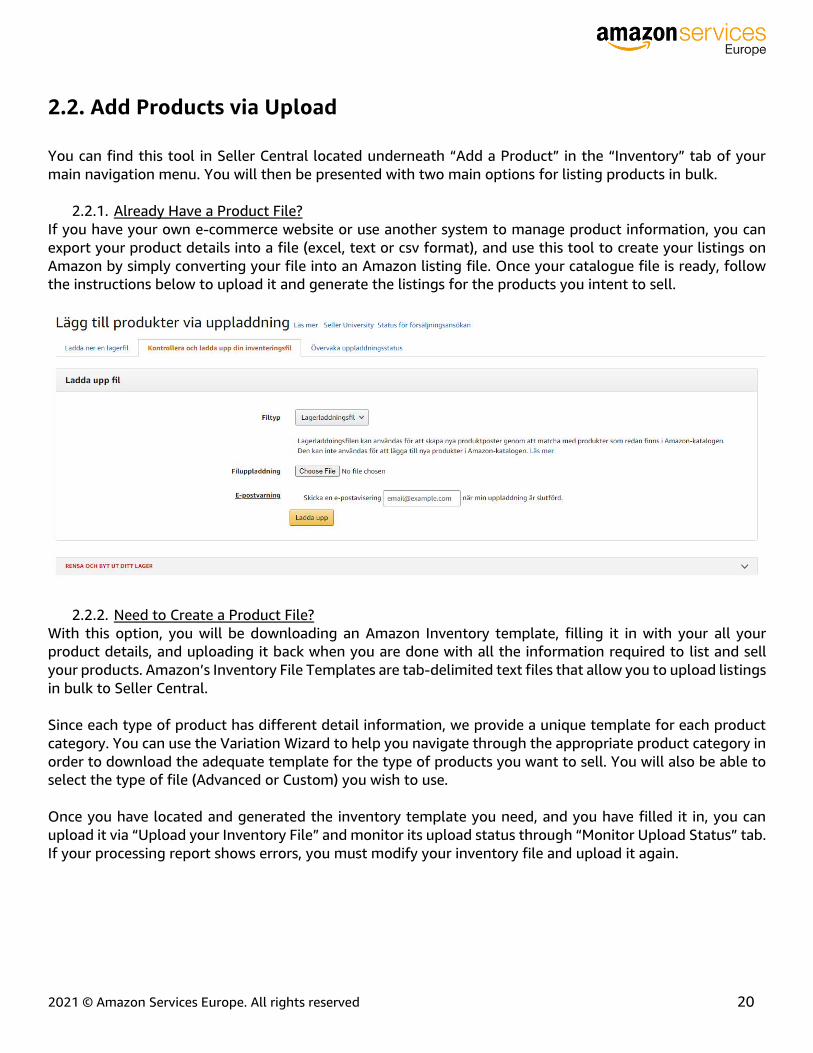
2.2. Add Products via Upload
You can find this tool in Seller Central located underneath “Add a Product” in the “Inventory” tab of your
main navigation menu. You will then be presented with two main options for listing products in bulk.
2.2.1. Already Have a Product File?
If you have your own e-commerce website or use another system to manage product information, you can
export your product details into a file (excel, text or csv format), and use this tool to create your listings on
Amazon by simply converting your file into an Amazon listing file. Once your catalogue file is ready, follow
the instructions below to upload it and generate the listings for the products you intent to sell.
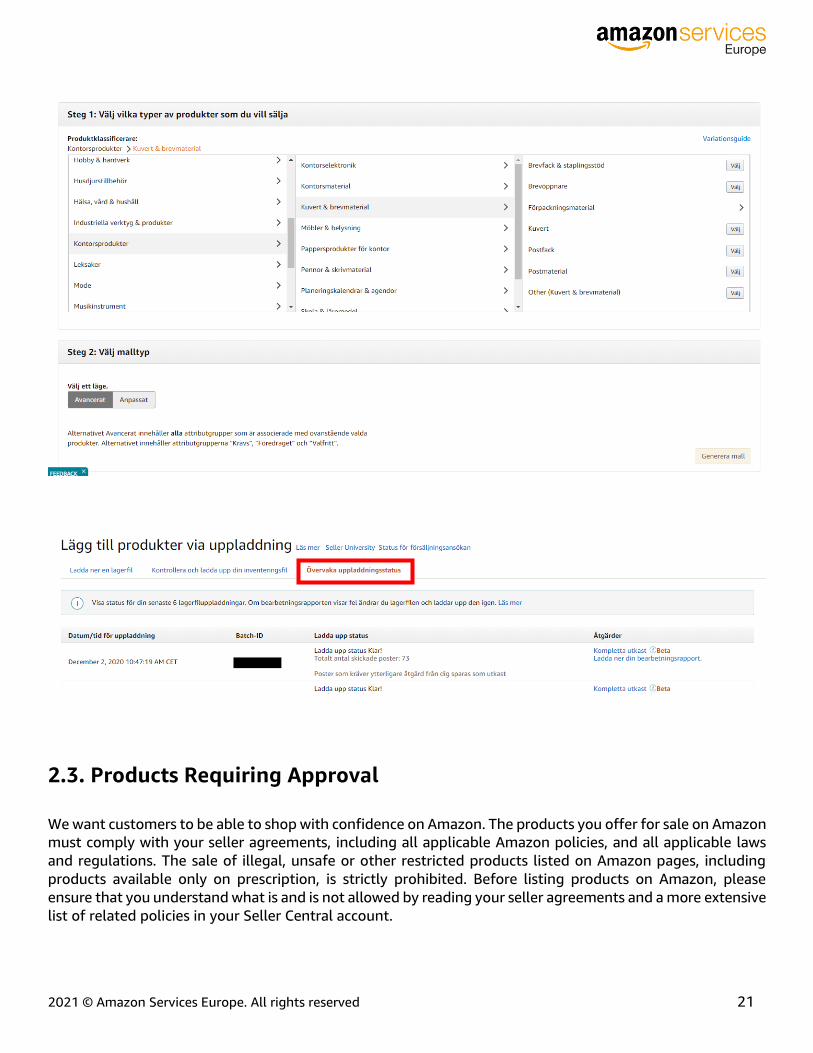
2.2.2. Need to Create a Product File?
With this option, you will be downloading an Amazon Inventory template, filling it in with your all your
product details, and uploading it back when you are done with all the information required to list and sell
your products. Amazon’s Inventory File Templates are tab-delimited text files that allow you to upload listings
in bulk to Seller Central.
Since each type of product has different detail information, we provide a unique template for each product
category. You can use the Variation Wizard to help you navigate through the appropriate product category in
order to download the adequate template for the type of products you want to sell. You will also be able to
select the type of file (Advanced or Custom) you wish to use.
Once you have located and generated the inventory template you need, and you have filled it in, you can
upload it via “Upload your Inventory File” and monitor its upload status through “Monitor Upload Status” tab.
If your processing report shows errors, you must modify your inventory file and upload it again.
2021 © Amazon Services Europe. All rights reserved 21
2.3. Products Requiring Approval
We want customers to be able to shop with confidence on Amazon. The products you offer for sale on Amazon
must comply with your seller agreements, including all applicable Amazon policies, and all applicable laws
and regulations. The sale of illegal, unsafe or other restricted products listed on Amazon pages, including
products available only on prescription, is strictly prohibited. Before listing products on Amazon, please
ensure that you understand what is and is not allowed by reading your seller agreements and a more extensive
list of related policies in your Seller Central account.

2021 © Amazon Services Europe. All rights reserved 22
For certain products and categories, sellers are required to obtain approval from Amazon before listing. To
check if a product has restrictions, click on “Request approval” to go to the Selling applications tool. You will
be then required to submit specific documentation.
Please note that you may be asked to submit officially translated documents if they are not in any of the
following languages: Swedish, Dutch, English, German, French, Spanish or Italian. This will be notified to you
by our verification team. To check the status of an application, click the Selling application status link.

2021 © Amazon Services Europe. All rights reserved 23
2.4. Request a GTIN Exemption
You must have Global Trade Item Numbers (GTIN) such as UPC, EAN, JAN or ISBN for products that you want
to list on Amazon. If your products do not have a GTIN, you can submit a request for GTIN exemption. There
is specific criteria you will need to meet in order to obtain approval. The below Seller Central form enables
you to request a GTIN exemption and check its status.
2021 © Amazon Services Europe. All rights reserved 24
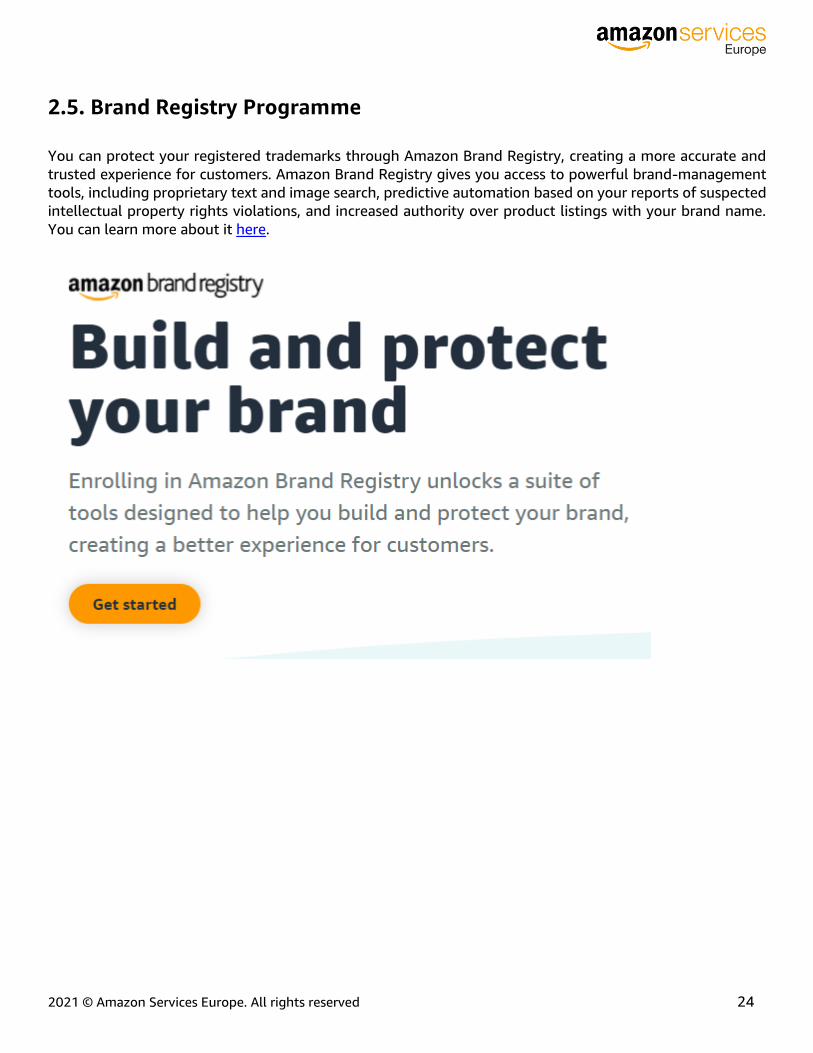
2.5. Brand Registry Programme
You can protect your registered trademarks through Amazon Brand Registry, creating a more accurate and
trusted experience for customers. Amazon Brand Registry gives you access to powerful brand-management
tools, including proprietary text and image search, predictive automation based on your reports of suspected
intellectual property rights violations, and increased authority over product listings with your brand name.
You can learn more about it here.
2021 © Amazon Services Europe. All rights reserved 25
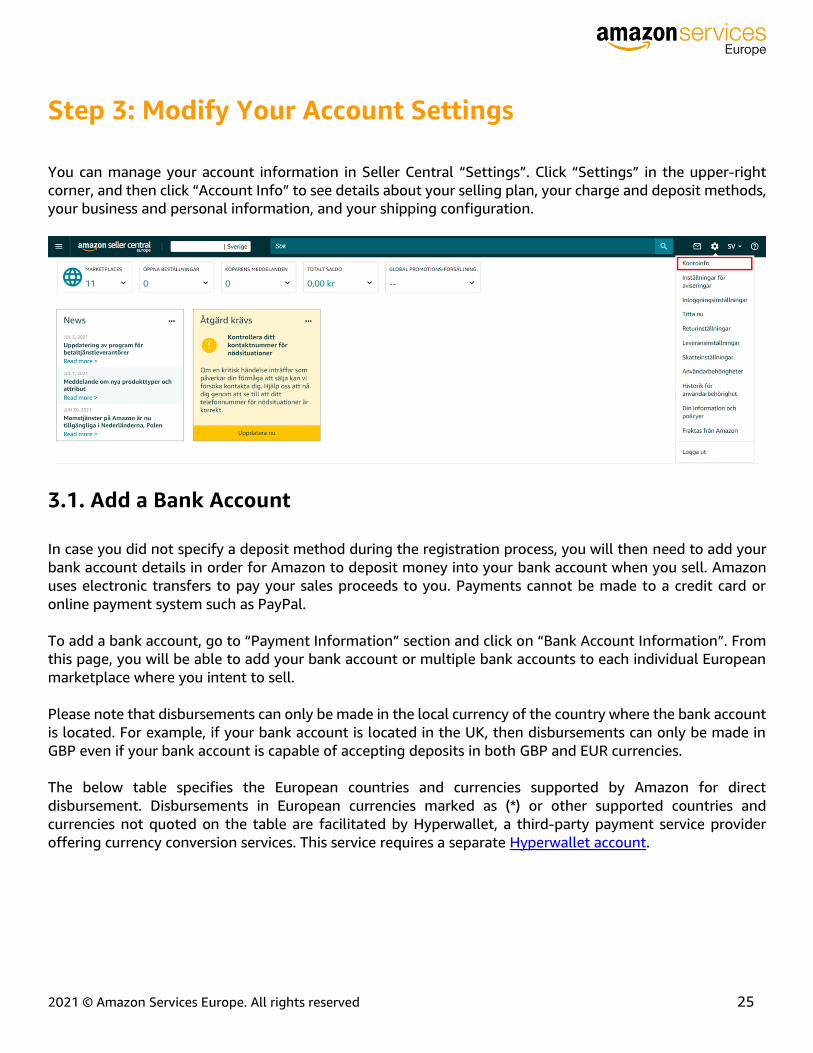
Step 3: Modify Your Account Settings
You can manage your account information in Seller Central “Settings”. Click “Settings” in the upper-right
corner, and then click “Account Info” to see details about your selling plan, your charge and deposit methods,
your business and personal information, and your shipping configuration.
3.1. Add a Bank Account
In case you did not specify a deposit method during the registration process, you will then need to add your
bank account details in order for Amazon to deposit money into your bank account when you sell. Amazon
uses electronic transfers to pay your sales proceeds to you. Payments cannot be made to a credit card or
online payment system such as PayPal.
To add a bank account, go to “Payment Information” section and click on “Bank Account Information”. From
this page, you will be able to add your bank account or multiple bank accounts to each individual European
marketplace where you intent to sell.
Please note that disbursements can only be made in the local currency of the country where the bank account
is located. For example, if your bank account is located in the UK, then disbursements can only be made in
GBP even if your bank account is capable of accepting deposits in both GBP and EUR currencies.
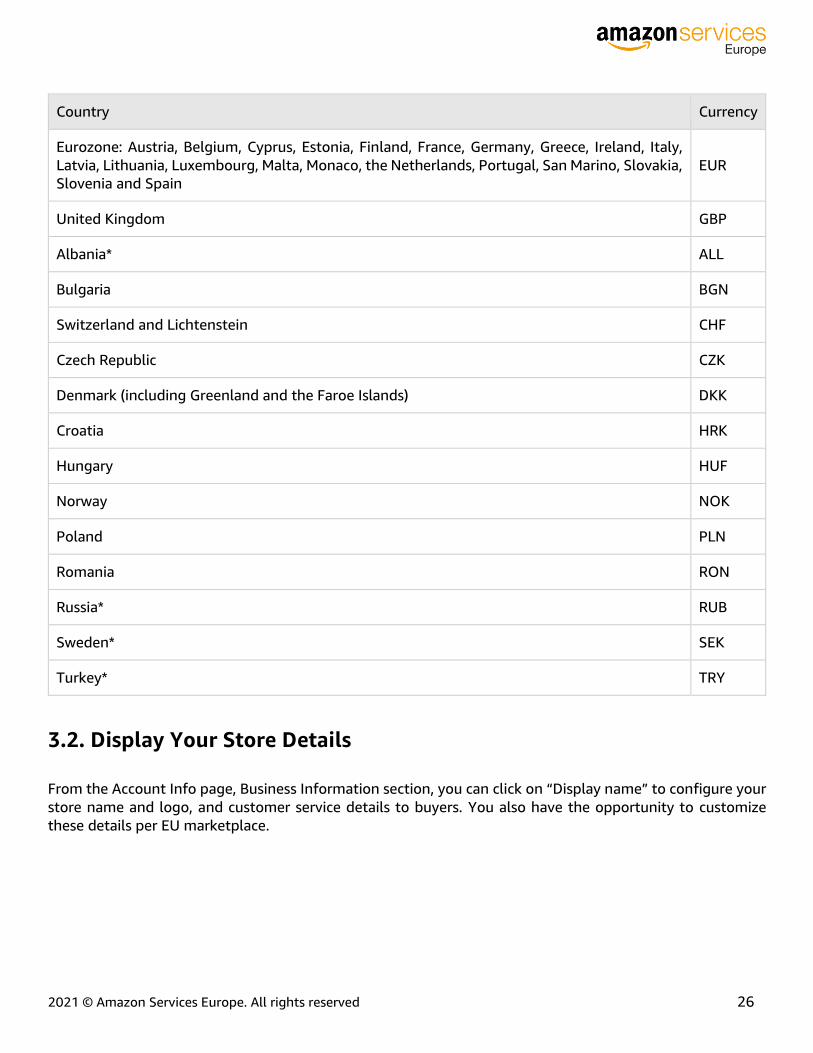
The below table specifies the European countries and currencies supported by Amazon for direct
disbursement. Disbursements in European currencies marked as (*) or other supported countries and
currencies not quoted on the table are facilitated by Hyperwallet, a third-party payment service provider
offering currency conversion services. This service requires a separate Hyperwallet account.
2021 © Amazon Services Europe. All rights reserved 26
Country Currency
Eurozone: Austria, Belgium, Cyprus, Estonia, Finland, France, Germany, Greece, Ireland, Italy,
Latvia, Lithuania, Luxembourg, Malta, Monaco, the Netherlands, Portugal, San Marino, Slovakia,
Slovenia and Spain
EUR
United Kingdom GBP
Albania* ALL
Bulgaria BGN
Switzerland and Lichtenstein CHF
Czech Republic CZK
Denmark (including Greenland and the Faroe Islands) DKK
Croatia HRK
Hungary HUF
Norway NOK
Poland PLN
Romania RON
Russia* RUB
Sweden* SEK
Turkey* TRY
3.2. Display Your Store Details
From the Account Info page, Business Information section, you can click on “Display name” to configure your
store name and logo, and customer service details to buyers. You also have the opportunity to customize
these details per EU marketplace.
2021 © Amazon Services Europe. All rights reserved 27
3.3. Change Your Selling Plan
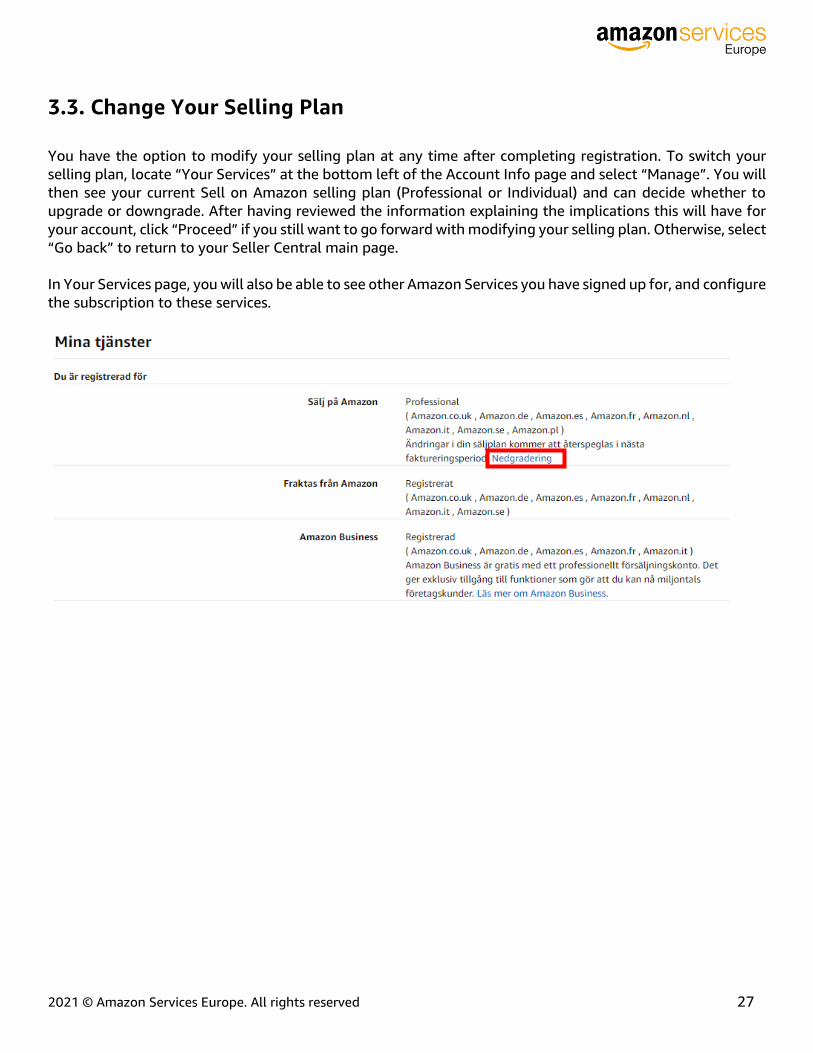
You have the option to modify your selling plan at any time after completing registration. To switch your
selling plan, locate “Your Services” at the bottom left of the Account Info page and select “Manage”. You will
then see your current Sell on Amazon selling plan (Professional or Individual) and can decide whether to
upgrade or downgrade. After having reviewed the information explaining the implications this will have for
your account, click “Proceed” if you still want to go forward with modifying your selling plan. Otherwise, select
“Go back” to return to your Seller Central main page.
In Your Services page, you will also be able to see other Amazon Services you have signed up for, and configure
the subscription to these services.
2021 © Amazon Services Europe. All rights reserved 28
3.4. Define Your Shipping Settings
If you choose to fulfil customer orders yourself, you are responsible for the delivery, customer service and
returns experience you provide to Amazon customers. Your service should include prompt delivery, customer
support in the language of each marketplaces where you decide to sell, and return policies that are at least
as favourable as Amazon return policies. These variables will affect your seller performance ratings and your
ability to continue selling on Amazon successfully. It is therefore important to configure your shipping and
returns settings in your Seller Central account after registration.
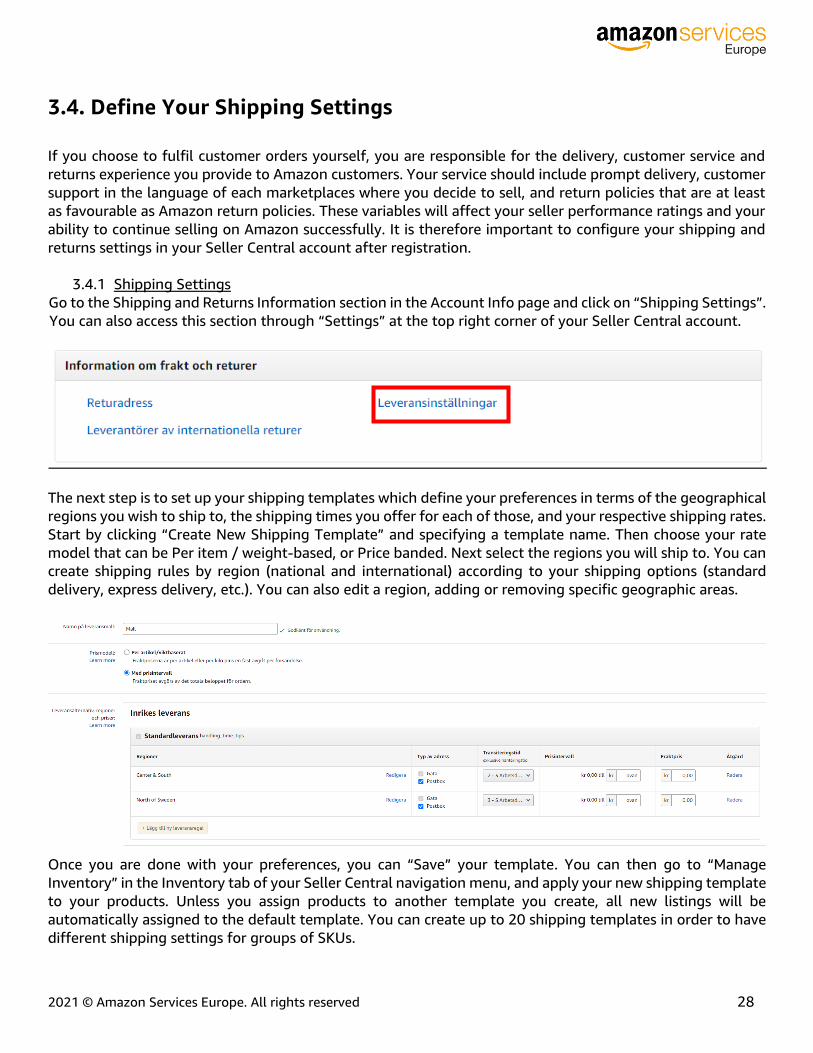
3.4.1 Shipping Settings
Go to the Shipping and Returns Information section in the Account Info page and click on “Shipping Settings”.
You can also access this section through “Settings” at the top right corner of your Seller Central account.
The next step is to set up your shipping templates which define your preferences in terms of the geographical
regions you wish to ship to, the shipping times you offer for each of those, and your respective shipping rates.
Start by clicking “Create New Shipping Template” and specifying a template name. Then choose your rate
model that can be Per item / weight-based, or Price banded. Next select the regions you will ship to. You can
create shipping rules by region (national and international) according to your shipping options (standard
delivery, express delivery, etc.). You can also edit a region, adding or removing specific geographic areas.
Once you are done with your preferences, you can “Save” your template. You can then go to “Manage
Inventory” in the Inventory tab of your Seller Central navigation menu, and apply your new shipping template
to your products. Unless you assign products to another template you create, all new listings will be
automatically assigned to the default template. You can create up to 20 shipping templates in order to have
different shipping settings for groups of SKUs.

2021 © Amazon Services Europe. All rights reserved 29
3.4.2 Returns Settings
You can access your returns settings through the Shipping and Returns Information section in the Account
Info page, or alternatively through the “Settings” section at the top right corner of your Seller Central account.
You can then define your customer returns preferences for authorizing requests and generating postage
labels. You can also configure a return address for each European marketplace in your “Return Address
Settings” tab.
Providing a trouble-free returns experience is essential for maintaining customer trust. Note that your
Shipping and Returns Information section in the Account Info page also provides a list of international return
providers in Europe who can offer money-saving services such as returns consolidation, set up of addresses
in marketplace countries as well as parcel forwarding.
2021 © Amazon Services Europe. All rights reserved 30
Step 4: Fulfilment by Amazon (FBA)
With FBA, choose which products you want to send to our Fulfilment Centres and we will store your inventory,
and pick, pack and ship it across Europe when customers order. FBA provides Amazon’s world-class logistics
resources, fast and free delivery options for buyers, as well as trusted and acclaimed customer service in the
local language. With FBA, there are no minimum quantity requirements, setup charges or subscription fees.
You only pay fulfilment and storage fees for the services you use. You can also decide to use a mixture of
seller self-fulfilment and FBA for your products.
4.1. Convert Your Listings to FBA
4.1.1. While Creating Listings
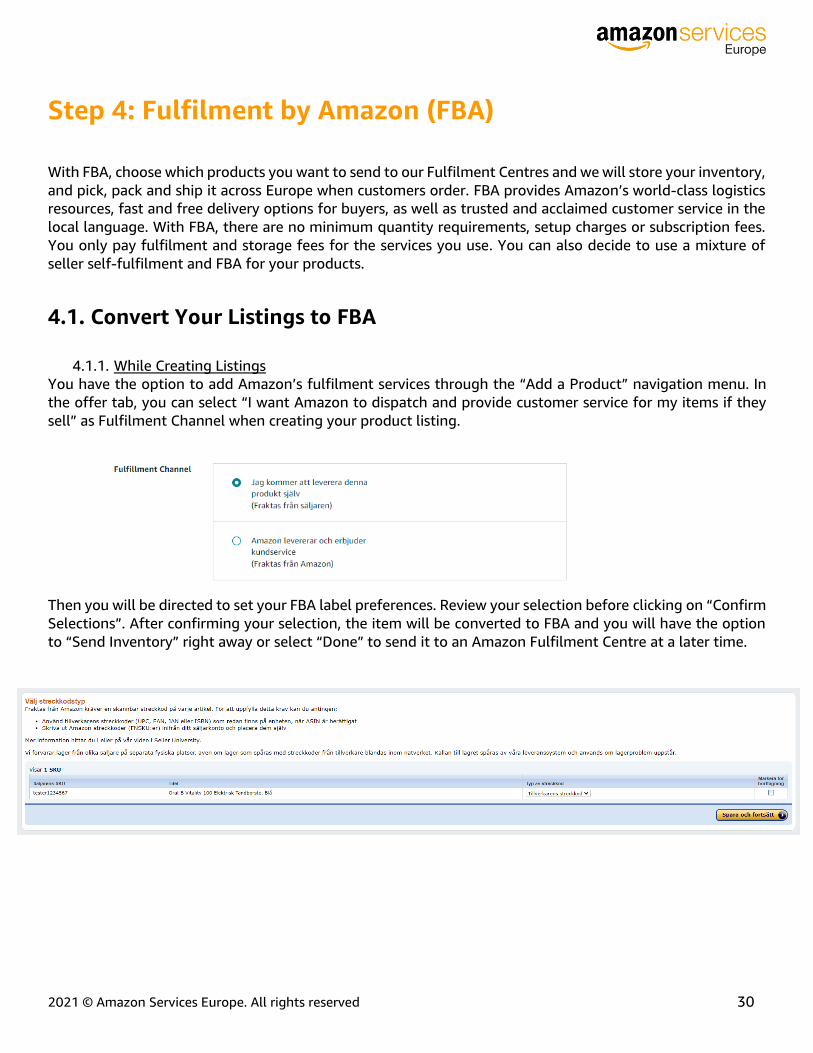
You have the option to add Amazon’s fulfilment services through the “Add a Product” navigation menu. In
the offer tab, you can select “I want Amazon to dispatch and provide customer service for my items if they
sell” as Fulfilment Channel when creating your product listing.
Then you will be directed to set your FBA label preferences. Review your selection before clicking on “Confirm
Selections”. After confirming your selection, the item will be converted to FBA and you will have the option
to “Send Inventory” right away or select “Done” to send it to an Amazon Fulfilment Centre at a later time.
2021 © Amazon Services Europe. All rights reserved 31
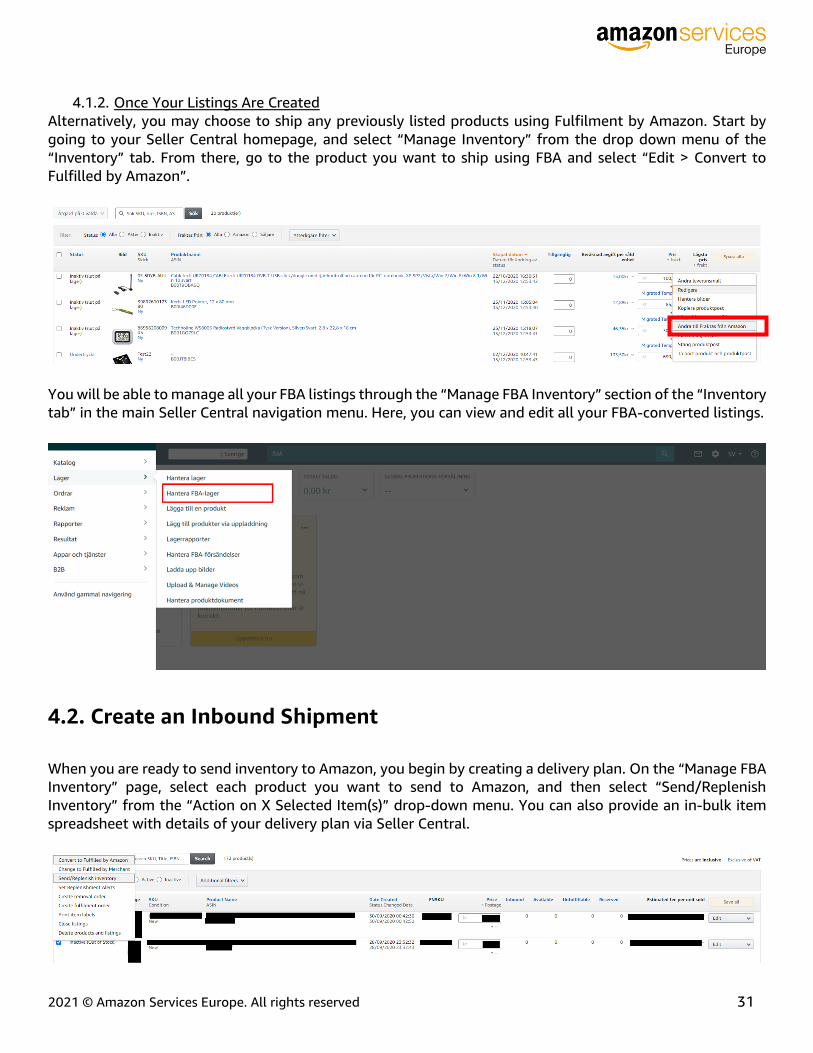
4.1.2. Once Your Listings Are Created
Alternatively, you may choose to ship any previously listed products using Fulfilment by Amazon. Start by
going to your Seller Central homepage, and select “Manage Inventory” from the drop down menu of the
“Inventory” tab. From there, go to the product you want to ship using FBA and select “Edit > Convert to
Fulfilled by Amazon”.
You will be able to manage all your FBA listings through the “Manage FBA Inventory” section of the “Inventory
tab” in the main Seller Central navigation menu. Here, you can view and edit all your FBA-converted listings.
4.2. Create an Inbound Shipment
When you are ready to send inventory to Amazon, you begin by creating a delivery plan. On the “Manage FBA
Inventory” page, select each product you want to send to Amazon, and then select “Send/Replenish
Inventory” from the “Action on X Selected Item(s)” drop-down menu. You can also provide an in-bulk item
spreadsheet with details of your delivery plan via Seller Central.
2021 © Amazon Services Europe. All rights reserved 32
You will then be asked to specify the quantity you want to send of each product, whether you want to prep
and label your items yourself or have Amazon do it for you, and the delivery method and carrier details.
4.2.1. Prepare Your Products
FBA has product preparation requirements that must be followed in order for units to be received at Amazon
Fulfilment Centres. Please carefully review these requirements in your Seller Central account. If you do not
want to perform product prep yourself, Amazon can do it for a fee. For that, you must first enable the FBA
Preparation Service in your account settings. For products that we prepare for you, we will provide an
estimated fee based on the activities you assign to the product when you create your inbound plan. The actual
fees charged will be based on the prep activity that we will provide for each unit as determined by Amazon
standards.
4.2.2. Label Your Products
Amazon's systems are barcode-driven. Each product that you send to Amazon Fulfilment Centres requires a
barcode so that it can be tracked throughout the fulfilment process. By selecting the “Labelling required”
filter on the Label Products page, you can view the products in your shipping plan that require labels. You
have several options for printing product labels: through the Label Products page, from the “Amazon-Fulfilled
Inventory” page, from the “Manage Inventory page”. Otherwise you can use FBA Label Service by selecting
"Amazon" in the “Who labels?” column on the Label Products page. Labelling fees will apply to all units that
Amazon labels.
4.2.3. Prepare Your Outbound Shipment
The Prepare Shipment page will walk you through the process of creating your outbound shipment(s) to
Amazon’s Fulfilment Centres. The steps required to complete a shipment may vary depending on what you
choose.
Once you have sent your inventory to Amazon, you can track your shipment as it progresses through the
fulfilment network via your Seller Central account.
4.3. FBA Inventory Removals
You can request inventory you have stored in Amazon's Fulfilment Centres to be returned to you or disposed
of. In that case, you will need to request a removal order (return or disposal) of product units via Seller Central.
Removal fees are charged per item removed.
4.4. EU FBA Programmes
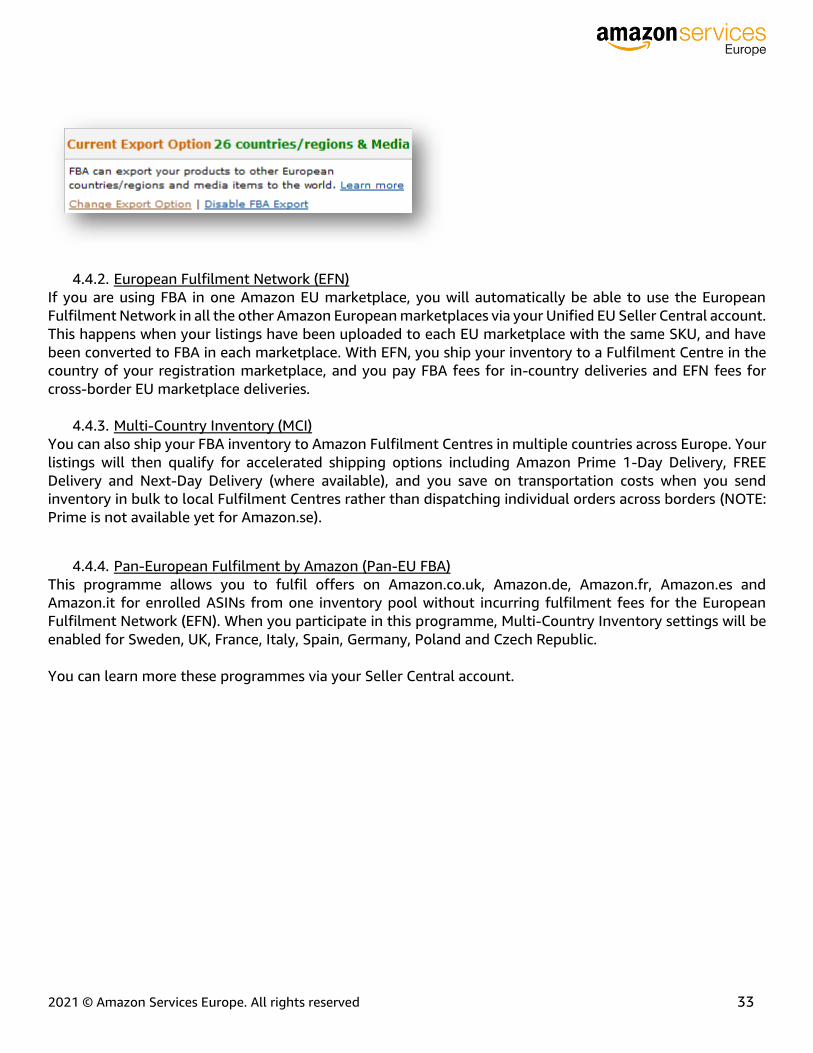
4.4.1. FBA Export
This option enables you to fulfil orders of eligible products to customers across all Europe and worldwide who
are purchasing from the Amazon marketplace where you have listed your offers (NOTE: not available from
Amazon.se yet). For example, a Swedish-based customer can purchase your offer on Amazon.de if you have
activated FBA Export on Amazon’s German marketplace where you sell. FBA Export settings are Amazon EU
marketplace-specific, and there are no extra fees to sellers for enabling FBA export.
2021 © Amazon Services Europe. All rights reserved 33
4.4.2. European Fulfilment Network (EFN)
If you are using FBA in one Amazon EU marketplace, you will automatically be able to use the European
Fulfilment Network in all the other Amazon European marketplaces via your Unified EU Seller Central account.
This happens when your listings have been uploaded to each EU marketplace with the same SKU, and have
been converted to FBA in each marketplace. With EFN, you ship your inventory to a Fulfilment Centre in the
country of your registration marketplace, and you pay FBA fees for in-country deliveries and EFN fees for
cross-border EU marketplace deliveries.
4.4.3. Multi-Country Inventory (MCI)
You can also ship your FBA inventory to Amazon Fulfilment Centres in multiple countries across Europe. Your
listings will then qualify for accelerated shipping options including Amazon Prime 1-Day Delivery, FREE
Delivery and Next-Day Delivery (where available), and you save on transportation costs when you send
inventory in bulk to local Fulfilment Centres rather than dispatching individual orders across borders (NOTE:
Prime is not available yet for Amazon.se).
4.4.4. Pan-European Fulfilment by Amazon (Pan-EU FBA)
This programme allows you to fulfil offers on Amazon.co.uk, Amazon.de, Amazon.fr, Amazon.es and
Amazon.it for enrolled ASINs from one inventory pool without incurring fulfilment fees for the European
Fulfilment Network (EFN). When you participate in this programme, Multi-Country Inventory settings will be
enabled for Sweden, UK, France, Italy, Spain, Germany, Poland and Czech Republic.
You can learn more these programmes via your Seller Central account.
2021 © Amazon Services Europe. All rights reserved 34
Appendix A: Selling in Europe Selling internationally is a chance to grow your business rapidly, but understanding tax and product
regulations while creating effective listings can be complex when expanding business across borders. Amazon
makes selling in Europe simple and easy. With your Unified EU account, you can sell across all five Amazon’s
European marketplaces (Amazon.co.uk, Amazon.de, Amazon.fr, Amazon.it and Amazon.es), and to over 340
million online buyers all across Europe, paying no additional subscription fees.
European Tax (VAT)
VAT (Value Added Tax) is a tax on consumer expenditure collected on business transactions, imports and
goods that move between EU countries. Whilst each Amazon seller is solely responsible for making sure that
they are VAT compliant, Amazon can provide resources such as a list of third-party tax advisory services in
Europe. For more information, you can also visit our VAT Knowledge Centre.
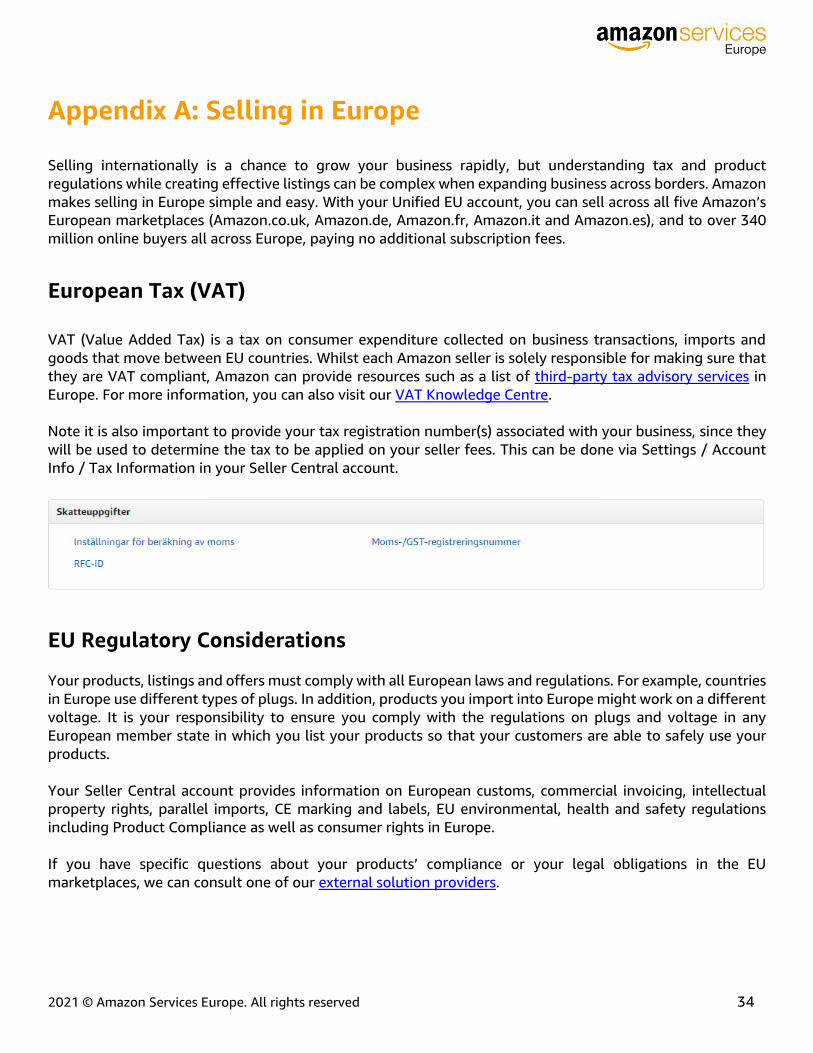
Note it is also important to provide your tax registration number(s) associated with your business, since they
will be used to determine the tax to be applied on your seller fees. This can be done via Settings / Account
Info / Tax Information in your Seller Central account.
EU Regulatory Considerations
Your products, listings and offers must comply with all European laws and regulations. For example, countries
in Europe use different types of plugs. In addition, products you import into Europe might work on a different
voltage. It is your responsibility to ensure you comply with the regulations on plugs and voltage in any
European member state in which you list your products so that your customers are able to safely use your
products.
Your Seller Central account provides information on European customs, commercial invoicing, intellectual
property rights, parallel imports, CE marking and labels, EU environmental, health and safety regulations
including Product Compliance as well as consumer rights in Europe.
If you have specific questions about your products’ compliance or your legal obligations in the EU
marketplaces, we can consult one of our external solution providers.
2021 © Amazon Services Europe. All rights reserved 35
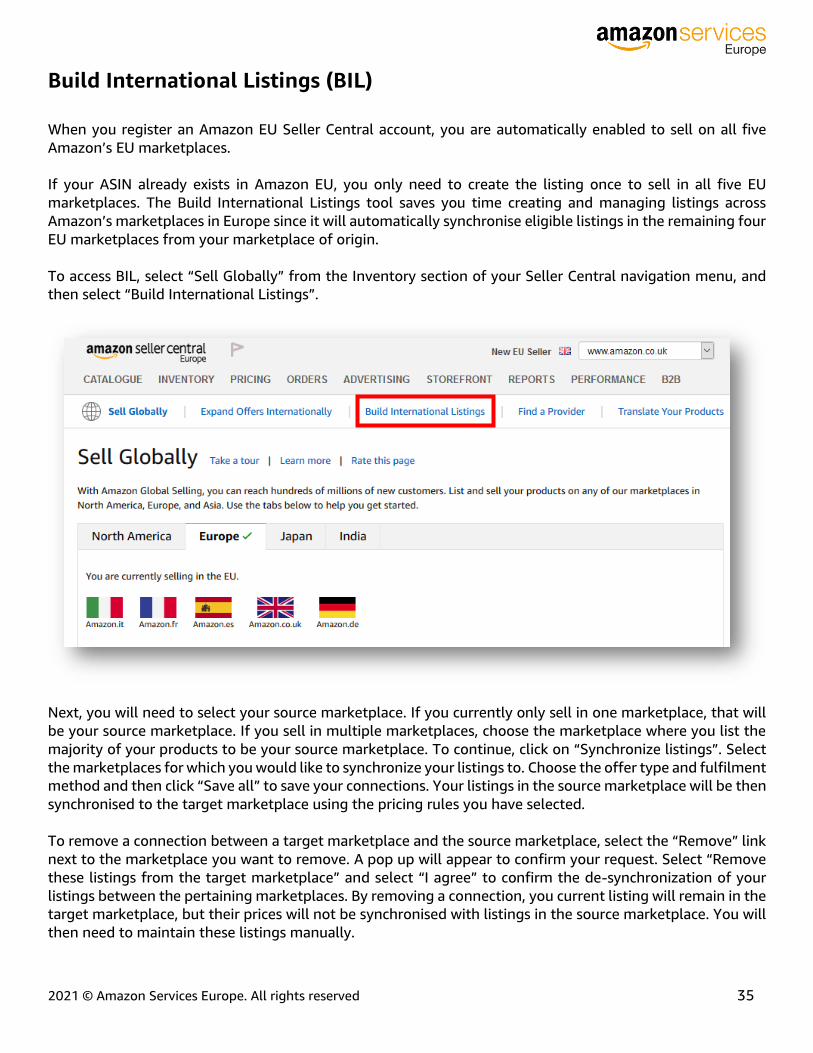
Build International Listings (BIL)
When you register an Amazon EU Seller Central account, you are automatically enabled to sell on all five
Amazon’s EU marketplaces.
If your ASIN already exists in Amazon EU, you only need to create the listing once to sell in all five EU
marketplaces. The Build International Listings tool saves you time creating and managing listings across
Amazon’s marketplaces in Europe since it will automatically synchronise eligible listings in the remaining four
EU marketplaces from your marketplace of origin.
To access BIL, select “Sell Globally” from the Inventory section of your Seller Central navigation menu, and
then select “Build International Listings”.
Next, you will need to select your source marketplace. If you currently only sell in one marketplace, that will
be your source marketplace. If you sell in multiple marketplaces, choose the marketplace where you list the
majority of your products to be your source marketplace. To continue, click on “Synchronize listings”. Select
the marketplaces for which you would like to synchronize your listings to. Choose the offer type and fulfilment
method and then click “Save all” to save your connections. Your listings in the source marketplace will be then
synchronised to the target marketplace using the pricing rules you have selected.
To remove a connection between a target marketplace and the source marketplace, select the “Remove” link
next to the marketplace you want to remove. A pop up will appear to confirm your request. Select “Remove
these listings from the target marketplace” and select “I agree” to confirm the de-synchronization of your
listings between the pertaining marketplaces. By removing a connection, you current listing will remain in the
target marketplace, but their prices will not be synchronised with listings in the source marketplace. You will
then need to maintain these listings manually.
2021 © Amazon Services Europe. All rights reserved 36
Appendix B: Tips for Success
Create Quality Listings When shopping on Amazon, customers discover and learn about your products from the Product Detail Page.
If the Product Detail Page is incomplete or incorrect, it can be difficult for customers to find your product or
it can impact your seller feedback and sales. Thus high-quality Detail Pages can help you build and manage
your brand image on Amazon. They require good product titles, white-background product-only images –
clearly identifying what is being sold, brief descriptive bullet points that summarize specific details of the
product, and an extensive and well-structured product description – providing detailed product information.
Additionally, make your products easy to find by classifying them accurately when listing them as well as by
assigning key Search Keywords to them. You can manage all details of your Product Detail Pages through the
Catalogue menu in your Seller Central account.
Price Competitively The Buy Box is the box on a Product Detail Page where customers begin their purchasing process by adding
items to their shopping cart. You have higher chances of becoming eligible to win the Buy Box by pricing your
items competitively. Since customers trust that they will find low prices on Amazon, we suggest that you
search for other products and offers before deciding on the price. Competitive pricing is one of the key
elements that helps you generate more sales. You can manage pricing of your products, fix pricing alerts,
automate pricing rules and establish fee discounts through the Pricing view of your Seller Central account.
Promote Your Products Sponsored Products is a pay-per-click advertising solution for brand owners to promote their products with
targeted ads. Sponsored Products helps customers discover your products by giving you the opportunity to
display your listings on the first page of search results, helping increasing your sales. Getting started with
Sponsored Products is simple. Choose the products to advertise, decide how much to spend, and launch your
first campaign within minutes. Sponsored Products campaigns can be set up through the Advertising /
Campaign Manager functionality in your Seller Central account (NOTE: Not available on Amazon.se yet).
Dispatch Your Orders Promptly We recommend you checking for orders daily in Seller Central. Under the Orders tab in your Seller Central
account, you can view and manage the self-fulfilled orders you receive while setting up automatic order
reports. This account section also enables you to manage customer order returns. Customers who submit
orders for products that turn out not to be in stock are likely to leave negative feedback. This is why we
recommend you to regularly keep an eye on the quantity of inventory you have in stock, especially if you sell
through multiple channels. If you get into the situation of getting a customer order for an item out of stock,
the best thing to do is to inform your customer promptly and, if appropriate, offer to compensate them for
the inconvenience.
2021 © Amazon Services Europe. All rights reserved 37
Monitor Your Performance We strongly encourage you to monitor your performance regularly on the Performance section of your Seller
Central account. This section provides data on all of your performance metrics as a seller so you can easily see
if you are meeting our customer satisfaction targets. Customers pay close attention to seller ratings and so
does Amazon. The A-to-Z Guarantee is designed to handle situations where a customer either never received
a product or received a product that differs from what the customer ordered or expected. In order to avoid
claims and chargebacks, follow best practices such as describing products accurately, responding promptly to
customer emails, shipping with care while confirming dispatches with tracking information for self-fulfilled
orders, and refunding customers proactively as needed.
2021 © Amazon Services Europe. All rights reserved 38
Appendix C: Learning Resources
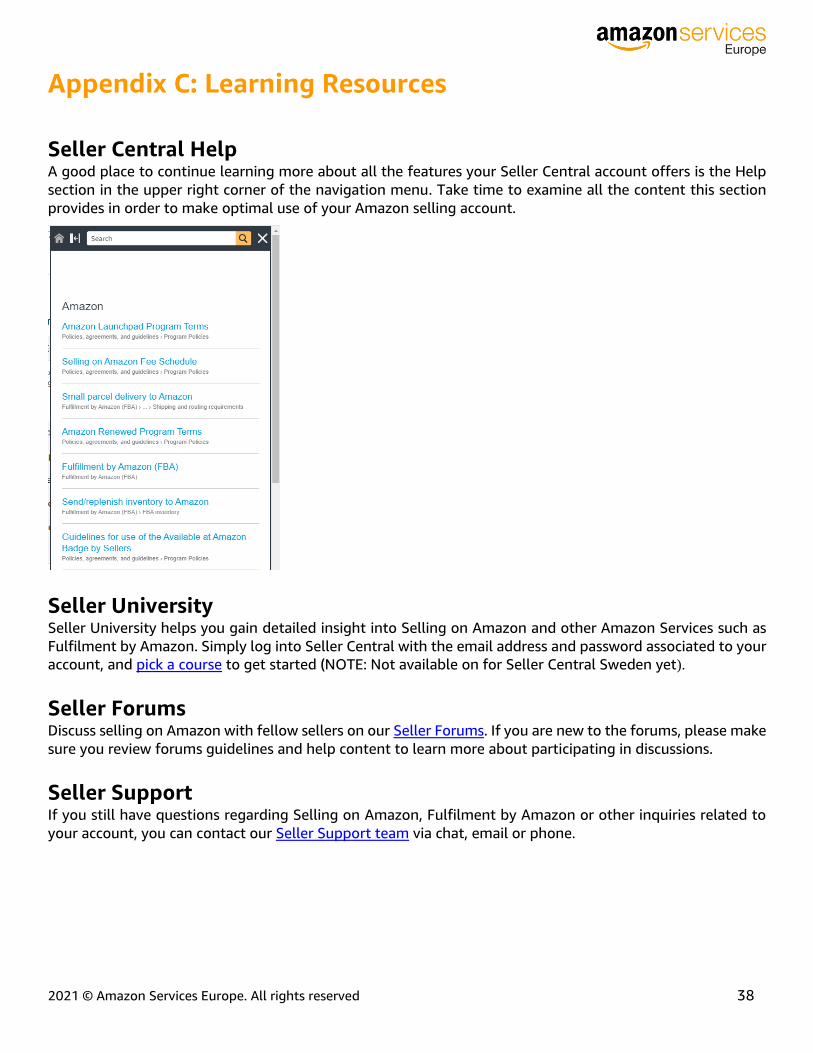
Seller Central Help A good place to continue learning more about all the features your Seller Central account offers is the Help
section in the upper right corner of the navigation menu. Take time to examine all the content this section
provides in order to make optimal use of your Amazon selling account.
Seller University Seller University helps you gain detailed insight into Selling on Amazon and other Amazon Services such as
Fulfilment by Amazon. Simply log into Seller Central with the email address and password associated to your
account, and pick a course to get started (NOTE: Not available on for Seller Central Sweden yet).
Seller Forums Discuss selling on Amazon with fellow sellers on our Seller Forums. If you are new to the forums, please make
sure you review forums guidelines and help content to learn more about participating in discussions.
Seller Support If you still have questions regarding Selling on Amazon, Fulfilment by Amazon or other inquiries related to
your account, you can contact our Seller Support team via chat, email or phone.


