Embed Size (px)
Citation preview
GUIDE
STORMSHIELD ENDPOINT SECURITY
ADMINISTRATION GUIDEVersion 7.2
Date: November 30, 2017
Reference: ses-en-administration_guide-v7.2

Table of contentsPreface 10
Thanks! 10What is the target audience? 10Contact 10
1. Use environment 111.1 Recommendations on security watch 111.2 Recommendations on keys and certificates 111.3 Recommendations on algorithms 111.4 Recommendations on administrators 111.5 Recommendations on workstations 111.6 Recommendations on administration workstations 121.7 Certification and qualification environment 12
2. Stormshield Endpoint Security Overview 132.1 Added value of Stormshield Endpoint Security 13
2.1.1 Concept 1: Integrated security 132.1.2 Concept 2: Proactive protection 132.1.3 Concept 3: Adaptive control 142.1.4 Concept 4: Flexible policy control 142.1.5 Concept 5: Application of policies based on the organization's directory 142.1.6 Concept 6: Information feedback 142.1.7 Concept 7: Data encryption 14
2.2 Protection mechanisms 142.2.1 Overview 142.2.2 Rule-based protection 152.2.3 Automatic protections 152.2.4 Profile-based protection 16
2.3 Stormshield Endpoint Security architecture 162.3.1 Concepts 162.3.2 Stormshield Endpoint Security components 17
2.4 Packages, option and licenses 202.4.1 Packages 202.4.2 AVP option 222.4.3 Licenses 23
3. Stormshield Endpoint Security Installation and Uninstallation 303.1 Downloading the Stormshield Endpoint Security software 30
3.1.1 Downloading from the client area 303.1.2 Checking software authenticity 30
3.2 System prerequisites for Stormshield Endpoint Security under Windows 313.2.1 Active Directory prerequisites 313.2.2 Stormshield Endpoint Securityserver prerequisites 313.2.3 Stormshield Endpoint Securitydatabase prerequisites 323.2.4 Management console prerequisites 363.2.5 Stormshield Endpoint Security agent prerequisites 37
3.3 Stormshield Endpoint Security installation 393.3.1 Prerequisites 393.3.2 Procedure 393.3.3 About Stormshield Endpoint Security 51
SES - ADMINISTRATION GUIDE - V 7.2
Page 2/424 ses-en-administration_guide-v7.2 - 11/30/2017
3.4 Downloading certificates 523.4.1 Certificate validity period 523.4.2 Login and password for downloading certificates 523.4.3 Compatibility with system cloning tools 53
3.5 Post-installation tests 533.5.1 Component tests 53
3.6 Possible changes 543.6.1 Changing a Stormshield Endpoint Security server IP address 543.6.2 Changing the database server IP address 553.6.3 Changing the server TCP ports for HTTP and SSL services 55
3.7 Uninstalling components 563.7.1 Uninstalling the server and the console 563.7.2 Uninstalling the agent 563.7.3 Removing the databases 57
4. Migrating and Updating Stormshield Endpoint Security 594.1 Migrating StormShield 6.0 to version Stormshield Endpoint Security 7.2 59
4.1.1 Complete migration 594.1.2 Partial migration 65
4.2 Migrating StormShield 7.1 to Stormshield Endpoint Security 7.2 734.2.1 Complete migration 734.2.2 Partial migration 78
4.3 Updating Stormshield Endpoint Security 7.2 864.3.1 Prerequisites 864.3.2 Procedure 88
5. Management Console Configuration 945.1 Getting started with the console 94
5.1.1 Connection with an internal account 945.1.2 Connection with a Windows account 94
5.2 Console overview 955.2.1 "Environment Manager" section 955.2.2 "Monitoring" section 1055.2.3 "Console Manager" section 1065.2.4 "Devices" section 1105.2.5 Status bar 110
6. Stormshield Endpoint Security Server Configuration 1116.1 Stormshield Endpoint Security Server list 1116.2 Adding an additional Stormshield Endpoint Security server 111
6.2.1 Declaring an additional server 1116.2.2 Configuring an additional server 112
6.3 Creating a server configuration policy 1136.4 Editing a server configuration policy 113
6.4.1 Server roles 1146.4.2 Agent connexions management 1146.4.3 Deploying policies on agents and collecting logs 1156.4.4 Log Monitoring Configuration 1176.4.5 Syslog Configuration 1176.4.6 SMTP Configuration 1176.4.7 Encryption 1176.4.8 Antivirus update 1186.4.9 Software Updates Settings 119
SES - ADMINISTRATION GUIDE - V 7.2
Page 3/424 ses-en-administration_guide-v7.2 - 11/30/2017
6.4.10 Authentication service 1196.5 Applying a server configuration policy 120
7. Stormshield Endpoint Security Agent Configuration 1217.1 Creating a Dynamic Agent Configuration Policy 1217.2 Editing the dynamic agent configuration policy 121
7.2.1 Agent Configuration 1217.2.2 Temporary Web Access 1257.2.3 Learning 1297.2.4 Antivirus Configuration 130
7.3 Applying a dynamic agent configuration policy to an object of the directory 1317.4 Creating a Static Agent Configuration Policy 1327.5 Editing a Static Agent Configuration Policy 132
7.5.1 Challenges 1327.5.2 Manage update 137
7.6 Applying a static agent configuration policy to an object of the directory 1387.7 Stopping the agent 138
7.7.1 If the "Stop Agent" option is set to Allowed 1387.7.2 If the "Stop Agent" option is set to "Denied" 1397.7.3 If the user wants to uninstall the Stormshield Endpoint Security agent 142
7.8 Information about the configuration of the agent in the registry base 1437.8.1 Availability and location 1437.8.2 Keys and values added to the registry base 143
8. Protection Mechanisms 1458.1 Protection mechanisms 145
8.1.1 Profile-based protection 1458.1.2 Automatic protections 1458.1.3 Rule-based protection 1458.1.4 Order used to apply protection mechanisms 146
8.2 Profile-based protection 1468.2.1 Principles 1468.2.2 Automatic trust level assignment 1468.2.3 Correlation and weighting 1468.2.4 Learning 1478.2.5 Profile-based protection parameters 147
8.3 Automatic protections 1478.3.1 Principles 1478.3.2 Accessing automatic protections parameters 1488.3.3 Configuring automatic protections 148
8.4 Rule-based protection 1488.4.1 Rule categories 1488.4.2 Whitelists and blacklists 1498.4.3 Combining whitelists and blacklists 1498.4.4 Rule management 149
9. Security Policies 1539.1 Application identifiers 153
9.1.1 Types of application identifiers 1539.1.2 Creating application identifiers 154
9.2 Importing signature certificates 1589.3 Creating a security policy 1589.4 Importing security policies 159
SES - ADMINISTRATION GUIDE - V 7.2
Page 4/424 ses-en-administration_guide-v7.2 - 11/30/2017
9.4.1 Import a new policy 1599.4.2 Importing a policy from an existing policy 159
9.5 Editing a security policy 1609.5.1 System Behavior 1609.5.2 Device Control 1689.5.3 Network Security Control 1809.5.4 Application Control 193
9.6 Applying a security policy to an object of the directory 208
10. Scripts 20910.1 Overview 209
10.1.1 Scripts feature 20910.1.2 Scripts 20910.1.3 Script Resources 211
10.2 Tests 21210.2.1 Overview 21210.2.2 Statements 21310.2.3 Built-in tests 21310.2.4 User-defined tests 22110.2.5 Creating a test script 221
10.3 Actions 22210.3.1 Overview 22210.3.2 Built-in actions 22310.3.3 User-defined actions 22510.3.4 Creating an action 225
10.4 Scripts 22610.4.1 Overview 22610.4.2 True/False results 22610.4.3 Creating and applying a script to an object of the directory 227
10.5 Transferring files towards the agents 23210.5.1 Overview 23210.5.2 Procedure 233
11. Removable Device Administration 23511.1 Overview 23511.2 Preparation of the removable device enrollment 23511.3 Delegation of the removable device administration 237
11.3.1 Overview 23711.3.2 Device administration permissions 23711.3.3 Enrolled devices display 23711.3.4 Device enrollment and revocation 23911.3.5 Pre-enrollment of removable devices 240
12. Removable Device Encryption 24212.1 Overview 242
12.1.1 Purpose 24212.1.2 Characteristics 24212.1.3 Supported operating systems 24212.1.4 What can be encrypted 24312.1.5 Unencrypted partitions 24312.1.6 Encryption key 24312.1.7 Synchronization 24312.1.8 Symbology 244
SES - ADMINISTRATION GUIDE - V 7.2
Page 5/424 ses-en-administration_guide-v7.2 - 11/30/2017
12.2 Creating an encryption policy to be applied to a group of devices 24412.2.1 Encryption settings 244
12.3 Connecting a removable device 24512.3.1 Password 24512.3.2 Synchronization 24512.3.3 Access to the device without password 24612.3.4 Access to encrypted data 24612.3.5 Behavior when deactivating removable device encryption 24612.3.6 Using encrypted devices on other computers 24712.3.7 Removing SD cards 247
12.4 Decrypting a removable device 24712.4.1 Administrator side 24712.4.2 Agent side 248
12.5 Passwords 24912.5.1 Administrator side 24912.5.2 Agent side 252
12.6 Repairing a corrupted encryption key 256
13. Encryption 25713.1 Data encryption overview 257
13.1.1 Purpose 25713.1.2 Characteristics 25713.1.3 Supported system, hardware and software 25813.1.4 Interoperability with versions previous to the certified 7.2.06 version 259
13.2 Encryption types 25913.2.1 File encryption 25913.2.2 Full disk encryption 259
13.3 Creating an encryption policy 26013.3.1 Graphical interface 26013.3.2 Procedure 261
13.4 File encryption features 26213.4.1 Multi-user security 26213.4.2 Data erasure security 26213.4.3 File encryption options 26313.4.4 Password creation and user logon 26313.4.5 Synchronizing 26413.4.6 Synchronization with multiple users 265
13.5 Encryption parameters 26613.5.1 General Settings 26613.5.2 File Encryption Parameters 26913.5.3 Full Disk Encryption Parameters 275
13.6 Applying an encryption policy to an object of the directory 27913.7 Recovery 280
13.7.1 Password recovery when using file encryption 28013.7.2 Recovering data from encrypted files (decryption) 28413.7.3 Password recovery when using full disk encryption 28613.7.4 Recovering an encrypted disk on removable media 289
13.8 Uninstalling Stormshield Endpoint Security agents 29313.8.1 Decryption before uninstallation 293
13.9 Changing a user account on a machine 294
14. SURT 29514.1 Overview 295
SES - ADMINISTRATION GUIDE - V 7.2
Page 6/424 ses-en-administration_guide-v7.2 - 11/30/2017

14.2 Encrypting a file 29614.2.1 Procedure 296
14.3 Decrypting a file 29714.3.1 Procedure 29714.3.2 Progress bar 298
14.4 Reference menu 29814.4.1 Graphical interface 29814.4.2 Options 299
14.5 Removable device encryption and SURT 29914.5.1 Removable device encryption settings 29914.5.2 SURT settings 30014.5.3 Removable device encrypted with the agent and decrypted with SURT 300
14.6 Recovering data encrypted via the data encryption feature 30214.6.1 Prerequisites 30214.6.2 Procedure 302
15. Antivirus 30415.1 Overview 30415.2 Antivirus integration 304
15.2.1 Stormshield Endpoint Security Server 30415.2.2 Stormshield Endpoint Security Agent 305
15.3 Creating an antivirus policy 30615.3.1 General Settings 30715.3.2 Real-Time Protection Parameters 30815.3.3 Web Protection Parameters 31315.3.4 Mail Protection Parameters 31515.3.5 Scanner Parameters 31615.3.6 Password Parameters 320
15.4 Applying an antivirus policy to an object of the directory 32115.5 Graphical user interface 322
15.5.1 Symbology 32215.5.2 Menu 32215.5.3 Administering quarantine 32315.5.4 Stopping the antivirus temporarily 324
15.6 Migrating to Avira 2015 (from SES 7.2.13 onwards) 325
16. Activity Monitoring 32616.1 Overview 32616.2 Agent monitoring 326
16.2.1 Graphical interface 32616.2.2 Presence/absence of the agent on a workstation 329
16.3 Dashboard 33116.3.1 Overview 33116.3.2 Log monitoring graphical interface 333
16.4 Log monitoring 33616.5 Log Manager 337
16.5.1 Overview 33716.5.2 Graphical interface 339
16.6 Exporting logs to an external system (SMTP or Syslog) 34316.6.1 Exporting logs via SMTP 34316.6.2 Exporting logs via Syslog 344
16.7 Console monitoring 34616.7.1 Overview 346
SES - ADMINISTRATION GUIDE - V 7.2
Page 7/424 ses-en-administration_guide-v7.2 - 11/30/2017
16.7.2 Graphical interface 347
17. Agent Logs and Alerts 35117.1 Introduction 35117.2 Information logs about agents 351
17.2.1 Software Logs 35117.2.2 System logs 35717.2.3 Network logs 36017.2.4 Device Logs 362
17.3 Certificate server logs 36817.4 Antivirus protection logs 369
17.4.1 Server installation and update 36917.4.2 Agent installation and update 36917.4.3 Detected virus 370
17.5 Sending logs customized by the user 371
18. Stormshield Endpoint Security Reporting 37318.1 Overview 373
18.1.1 Prerequisites 37418.1.2 Report path 374
18.2 Graphical interface 37518.2.1 Menu bar 37518.2.2 Display settings 375
18.3 "Graphical" reports 37718.3.1 Servers and agents 37718.3.2 Workstation integrity 37918.3.3 System security 38218.3.4 Devices 38418.3.5 Antivirus 387
18.4 "Table" reports 39018.4.1 Agent status 39018.4.2 Stormshield Endpoint Security configuration changes 39018.4.3 Stopped agents 39118.4.4 Agents' configuration 39118.4.5 Agents' policies 39118.4.6 Policy Violations by User and Agent 39118.4.7 Blocked files 39418.4.8 Devices accesses 394
19. Troubleshooting 39619.1 Certificates 396
19.1.1 The console cannot communicate with the server 39619.1.2 The agent cannot download its certificate 39619.1.3 Unable to download certificates manually 397
19.2 Configurations 39719.2.1 Unable to apply the configuration 397
19.3 Miscellaneous 39819.3.1 Incorrect installation of the Stormshield Endpoint Security agent 39819.3.2 Agent fails to be remotely deployed 39919.3.3 Hardware conflicts 39919.3.4 Degraded performance 39919.3.5 StopAgent does not work and/or Stormshield Endpoint Security cannot be updated 39919.3.6 Tracing on the agent and server 400
SES - ADMINISTRATION GUIDE - V 7.2
Page 8/424 ses-en-administration_guide-v7.2 - 11/30/2017
Appendix A. Protocols 403
Appendix B. Files Exempted from Encryption 410
Appendix C. Date and time format strings 412C.1 Standard date and time format strings 412C.2 Custom date and time format strings 412
Appendix D. White list 414
Appendix E. Logs Tables Schema 418E.1 Main tables of the Stormshield Endpoint Security database 418
Table dbo.db_identification 418Table dbo.db_username 418Table dbo.db_SystemLog 419Table dbo.db_SoftwareLog 419Table dbo.db_MediaID 420Table dbo.db_MediaLog 420Table dbo.db_NetworkLog 420
E.2 Examples of how to use tables 421Retrieving all system logs and searching machines and users identifiers 421Retrieving all software logs and searching machines and users identifiers 421Retrieving all network logs and searching machines and users identifiers 421Retrieving all device logs and searching machines and users identifiers 421Retrieving all antivirus logs related to "attacks" 421Retrieving antivirus software events 422
Appendix F. WiFi authentication modes 423
In the documentation, Stormshield Endpoint Security is referred to in its short form: SES.
SES - ADMINISTRATION GUIDE - V 7.2
Page 9/424 ses-en-administration_guide-v7.2 - 11/30/2017
Preface
Thanks!
Dear Client,
Thank you for choosing Stormshield Endpoint Security from Stormshield.
Our proven, award-winning Security Suite provides consistent, powerful, 360-degree protection,via a single agent installed on user workstations and managed from a central console.
With just a single agent, Stormshield Endpoint Security allows companies to protect their entirepopulation of desktop and mobile workstations from known or unknown attacks, and theft ofcritical data, without disrupting user activity.
What is the target audience?
This documentation is intended for System Administrators who will deploy and manage theStormshield Endpoint Security solution.
It contains all of the technical information necessary to install and operate the product on yoursystem and network environment.
This technical documentation comes with Release Notes for the version of Stormshield EndpointSecurity that you are using.
Contact
Should you need further information on our products or professional services, do not hesitate to:
• call us at +33 9 69 32 96 29
• send us an e-mail through our website http://www.stormshield.eu/.
SES - ADMINISTRATION GUIDE - V 7.2PREFACE
Page 10/424 ses-en-administration_guide-v7.2 - 11/30/2017

1. Use environmentTo use Stormshield Endpoint Security under the conditions of the Common Criteria evaluation andof the french qualification at standard level, it is essential to observe the following guidelines.
1.1 Recommendations on security watch
1. Regularly check the Stormshield products security advisories provided onhttps://advisories.stormshield.eu.
2. Always apply a software update if it contains a security breach correction. These updatesare available on MyStormshield website.
1.2 Recommendations on keys and certificates
1. RSA keys of workstations and certification authorities must be a minimum size of 2048 bits,with a public exponent strictly greater than 65536, for a use not exceeding the year 2020.
2. For a use beyond the year 2020, the minimum size of an RSA key is 4096 bits.
1.3 Recommendations on algorithms
1. Stormshield Endpoint Security recommends using AES 256.
1.4 Recommendations on administrators
1. The security administrator responsible for defining the security policy of StormshieldEndpoint Security is considered as trusted.
2. The system administrator is also considered as trusted. He/She is responsible for theinstallation and maintenance of the application and workstation (operating system,protection software, desktop and engineering software, etc.). He/She applies the securitypolicy defined by the security administrator.
3. The product user must respect the security policy in force in the company.
1.5 Recommendations on workstations
1. The workstation on which the SES agent is installed must be healthy. There must be aninformation system security policy whose requirements are met on the workstations. Thispolicy shall verify the installed software is regularly updated and the system is protectedagainst viruses and spyware or malware (firewall properly configured, antivirus updates,etc.).
2. At the installation of the agent, the SES server must be available so that the agent be able todownload the security policy defined by the administrator. The installation shall take placeon a trusted network environment such as a local network properly set up and protected bya firewall.
3. Access to administrative functions of the workstation system is restricted to systemadministrators only.
SES - ADMINISTRATION GUIDE - V 7.21. USE ENVIRONMENT
Page 11/424 ses-en-administration_guide-v7.2 - 11/30/2017
4. The operating system must manage the event logs generated by the product in accordancewith the security policy of the company. It must for example restrict read access to theselogs to only those explicitly permitted.
5. The local folder in which the SES agent is installed must not be shared with writing accesson the network.
6. The user must ensure that a potential attacker can not see or access the workstation when itis started.
7. The user must ensure that the access to the workstation is not possible after shutdownduring a few seconds.
1.6 Recommendations on administration workstations
The workstations on which the SES console and server and the database are installed must meetthe following requirements:
1. These workstations are protected against virus and spyware.
2. Access to these workstations is restricted to administrators only (system administrator ordatabase administrator).
3. Software installation and update must be supervised by the administrator.
4. Installed software is updated on a regular basis.
1.7 Certification and qualification environment
The features evaluated in the context of the EAL 3+ Common Criteria Certification and of thequalification of Stormshield Endpoint Security are:
1. Full disk encryption.
2. Encryption keys and recovery passwords drawing.
3. Security policy download from the SES server and the application of this policy.
4. Events logging and uploading to the SES server.
5. Disk recovery which allows modifying the password or decrypting an encrypted disk thanksto a support (CD, USB drive) created from the management console.
However the management console is beyond the evaluation scope.
SES - ADMINISTRATION GUIDE - V 7.21. USE ENVIRONMENT
Page 12/424 ses-en-administration_guide-v7.2 - 11/30/2017
2. Stormshield Endpoint Security Overview
2.1 Added value of Stormshield Endpoint Security
In an ever more interconnected world, IT organizations have to introduce ever more complexsecurity measures to face threats.
At present, there are few really satisfactory security solutions implemented on workstations.Security service providers mostly offer specialized solutions (hard disk encryption, antivirus,personal firewall).
Let us consider the examples of a firewall and an antivirus software which prove to be highlyefficient against external threats. Their value, though, is limited when you install them on laptopslocated outside of your company’s defense perimeter.Security flaws can also be exploited when network analysis and filtering fail to identify or counterthreats.
In order to protect and ease workstation security management, Stormshield Endpoint Securitycan rely on the workstation organization of your company's Active Directory if it has one.
NOTEStormshield Endpoint Security only reads the Active Directory's data. It does not modifythem.
Stormshield Endpoint Security 's approach encompasses seven basic concepts to make up forthese deficiencies.
2.1.1 Concept 1: Integrated security
This concept provides, all through a single agent, consistent security policies that encompass:
• Users.
• System-level security.
• Data protection.
• Network connectivity.
2.1.2 Concept 2: Proactive protection
This concept provides security policies relying on intelligent behavior-based ( unknown threats)and signature-based ( known threats) technologies. This eliminates the need for IT teams toperiodically check and update PCs for compliance and remove unauthorized applications.
Unfortunately, new types of attacks are launched every day. Security measures based onsignatures which must know what the threat is before its identification and prevention, no longerprovide sufficient protection against new variants of viruses or against the spread of newmalicious software.
Besides, antivirus software is unable to block an attack targeted at a specific organization. Theseprogrammed stealth attacks never lead to a signature being issued since antivirus solutionvendors remain unaware of them.
Should a virus succeed in installing itself on a workstation, its operation will be neutralized byStormshield Endpoint Security until the time when an antivirus signature becomes available tocompletely clean the workstation.
SES - ADMINISTRATION GUIDE - V 7.22. STORMSHIELD ENDPOINT SECURITY OVERVIEW
Page 13/424 ses-en-administration_guide-v7.2 - 11/30/2017
2.1.3 Concept 3: Adaptive control
This concept offers security and user control policies that change dynamically depending on thelevel of risk associated with the use of the endpoint (workstation, laptop, PDA, etc.) or theenvironment (WiFi).
For example, applications installed directly by users for personal use may present both asecurity threat and a source of lost productivity. Stormshield Endpoint Security provides the toolsto apply different levels of control over how any individual or group may use their workstations.
2.1.4 Concept 4: Flexible policy control
This concept gives IT the ability to secure endpoints through both quickly deployed automaticprotections built into the security suite and fine-grained, customizable configurations thataddress your organization’s specific security and policy requirements.
2.1.5 Concept 5: Application of policies based on the organization's directory
To ease configuration and administration of workstation security, Stormshield Endpoint Securityrelies on the existing organization's Active Directory or on an internal directory. Policies defined inStormshield Endpoint Security are applied to Active Directory objects or to agent groups of theinternal directory. Active Directory objects can be organizational units, computer groups, or singlecomputers.
2.1.6 Concept 6: Information feedback
Stormshield Endpoint Security provides a wide range of information on dangerous or suspectoperations affecting the client workstation. This information forms an essential complement to thedata from the network monitoring systems in the context of overall IT system protection.
2.1.7 Concept 7: Data encryption
To help you protect your systems and data, Stormshield Endpoint Security provides acombination of full-disk encryption before booting and file encryption after booting.
Your data is protected at all time, regardless of the workstation user. The encryption policy whichis managed from a centralized console, can be applied to:
• Any user.
• Any workstation.
• The whole hard disk.
• Removable devices.
• Specific files/folders.
2.2 Protection mechanisms
2.2.1 Overview
Stormshield Endpoint Security includes three protection mechanisms to provide the highestpossible level of workstation security:
• Rule-based protection.
SES - ADMINISTRATION GUIDE - V 7.22. STORMSHIELD ENDPOINT SECURITY OVERVIEW
Page 14/424 ses-en-administration_guide-v7.2 - 11/30/2017
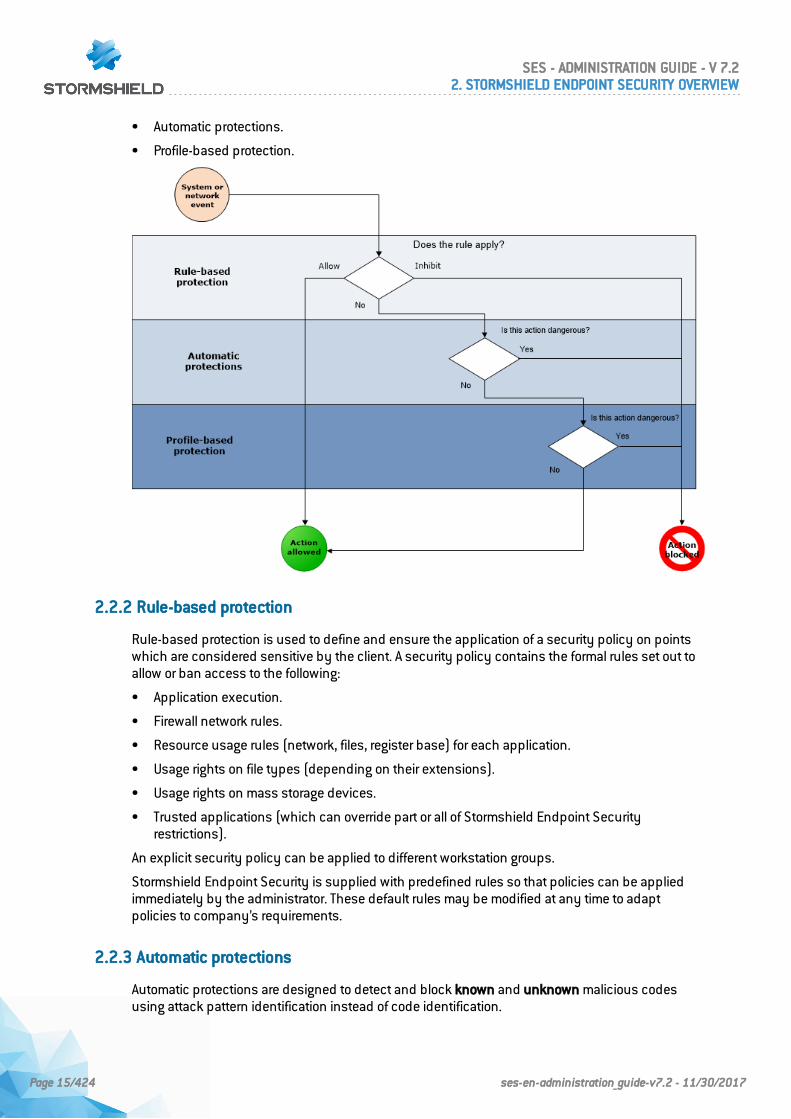
• Automatic protections.
• Profile-based protection.
2.2.2 Rule-based protection
Rule-based protection is used to define and ensure the application of a security policy on pointswhich are considered sensitive by the client. A security policy contains the formal rules set out toallow or ban access to the following:
• Application execution.
• Firewall network rules.
• Resource usage rules (network, files, register base) for each application.
• Usage rights on file types (depending on their extensions).
• Usage rights on mass storage devices.
• Trusted applications (which can override part or all of Stormshield Endpoint Securityrestrictions).
An explicit security policy can be applied to different workstation groups.
Stormshield Endpoint Security is supplied with predefined rules so that policies can be appliedimmediately by the administrator. These default rules may be modified at any time to adaptpolicies to company’s requirements.
2.2.3 Automatic protections
Automatic protections are designed to detect and block known and unknown malicious codesusing attack pattern identification instead of code identification.
SES - ADMINISTRATION GUIDE - V 7.22. STORMSHIELD ENDPOINT SECURITY OVERVIEW
Page 15/424 ses-en-administration_guide-v7.2 - 11/30/2017
Automatic protections do not require any configuring by the administrator. The administrator can,however, adjust these mechanisms to specify the level of how Stormshield Endpoint Securityreacts to different events. For more information, see Configuring automatic protections.
Two major categories of automatic protection mechanisms are built into Stormshield EndpointSecurity:
• The first category covers application and system activities.
This serves to protect the workstation against attempts to corrupt executable files and accesssensitive system services or data.
• The second category comprises an Intrusion Detection System (IDS) so that the workstationcan protect itself from attacks from the network.
The mechanisms applied for detecting system or network attacks by the automatic protectionsystem remain active on a permanent basis. Stormshield Endpoint Security’s treatment ofthese events can be controlled by the administrator. Depending on the type of event thatoccurs, the system will send an alert or apply automatic counter measures as defined by theadministrator.
2.2.4 Profile-based protection
Profile-based protection relies on an advanced capacity to monitor the system calls made byeach application. During a learning phase, application behavior is monitored.
The learning phase is used to collect essential information on the actions performed whileapplications are running on your workstation. System calls are memorized to form a standardapplication profile. After this phase, the actions performed by the application while it is runningare compared with its standard profile so as to detect any deviations that may occur. StormshieldEndpoint Security ’s exclusive technology means that these deviations can be handledintelligently by correlating and weighing them.
Stormshield Endpoint Security will detect any application behavior departing from its standardprofile and will react according to the parameters set by the administrator.
Profile-based protection therefore constitutes a third line of defense that is especially suited totargeted attacks and to new high speed worms. Any attempted attacks based on corruptingapplications or operating system services will be blocked, even if no signature or othermechanism is available for defending the system against them.
2.3 Stormshield Endpoint Security architecture
Stormshield Endpoint Security is a distributed protection system that covers all of theworkstations belonging to an organization.
Its architecture is based on a multi-tier model and on deployment techniques that allow it to bequickly integrated into the organization’s Active Directory if the company uses one.
2.3.1 Concepts
Inter-component communication
Communications between all components are authenticated and encrypted using TLS v1 andX509 v3 certificates. Mutual authentication is used between every component to reinforcesolution security.
SES - ADMINISTRATION GUIDE - V 7.22. STORMSHIELD ENDPOINT SECURITY OVERVIEW
Page 16/424 ses-en-administration_guide-v7.2 - 11/30/2017
Workstation protection
Each workstation is protected by a software module called Stormshield Endpoint Securityagent.
The agent communicates with the deployment server, whose role is to distribute security policiesto each agent and collect data concerning workstation security from them.
This data is stored by the server in a dedicated database which can also be accessed by themanagement console (Stormshield Endpoint Security management console).
Scalability and high availability
Stormshield Endpoint Security responds to the scalability and high availability requirements ofthe most demanding business environments.High availability is based on load balancing and failover mechanisms, distributed over a numberof deployment servers.
For more information, see section Stormshield Endpoint Security components.
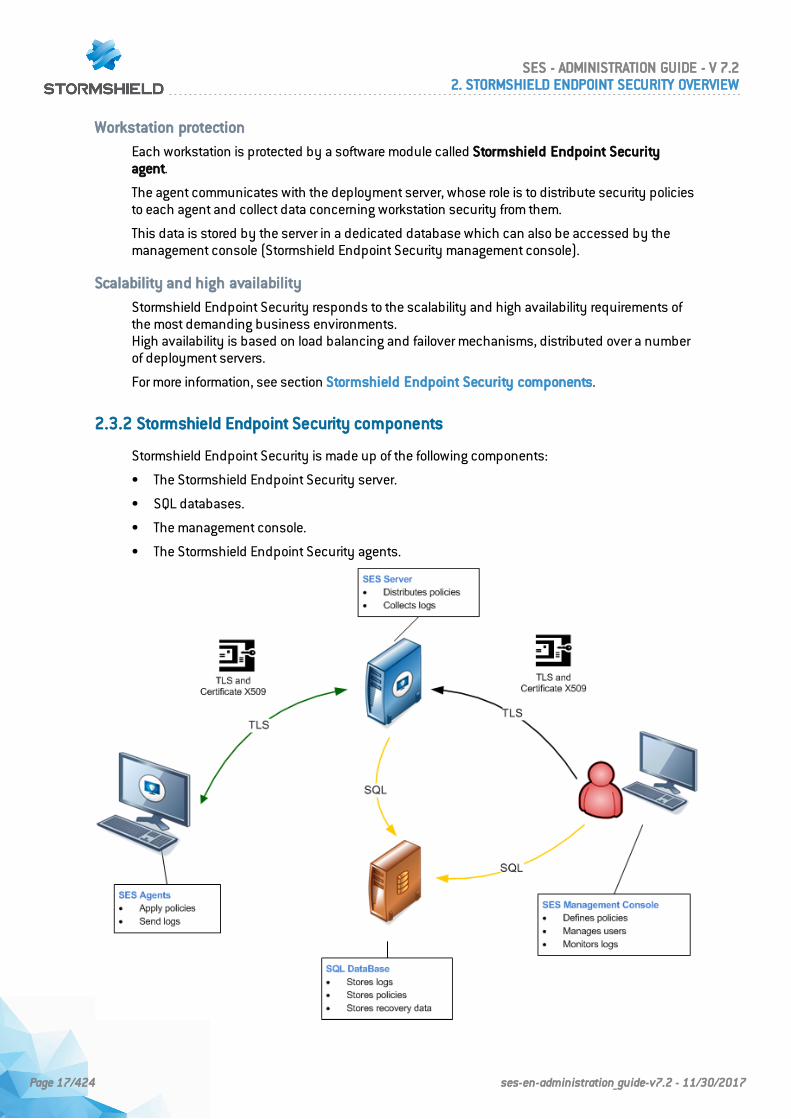
2.3.2 Stormshield Endpoint Security components
Stormshield Endpoint Security is made up of the following components:
• The Stormshield Endpoint Security server.
• SQL databases.
• The management console.
• The Stormshield Endpoint Security agents.
SES - ADMINISTRATION GUIDE - V 7.22. STORMSHIELD ENDPOINT SECURITY OVERVIEW
Page 17/424 ses-en-administration_guide-v7.2 - 11/30/2017
Stormshield Endpoint Security Server
The server is used to distribute security policies and collect logs.
Any Stormshield Endpoint Security agent deployment requires at least one deployment server.There must be at least one server at each geographical site.
After being installed, additional servers can be added from the Stormshield Endpoint Securityservers panel. They can be used as failover backups and for load distribution.
Policies and configurations information and their application to the Active Directory are shared byall servers.
In the case of an environment based on an internal directory, policies and configurationsinformation and their application to the agents groups are only shared by servers assigned to oneinternal directory.
The management console communicates with all available servers. The console sendsconfigurations to the servers only if they are not up-to-date. It also detects certificatesinconsistencies between servers of an environment.
If a server is down when the console sends information, it will not be updated. It will be updatedduring the next application of changes to the environment performed from the console, if theconnection is restored between the console and the server primary IP address.The Stormshield Endpoint Security servers panel displays information about the serversupdate statuses.
Several IP addresses can be defined for one server. The console updates the server via the mainIP address defined in the console. Communication between the agents and the server isperformed via the other IP addresses defined in the console. This mechanism presents a specificinterest if the workstations on which the agent is installed are out of the company network.
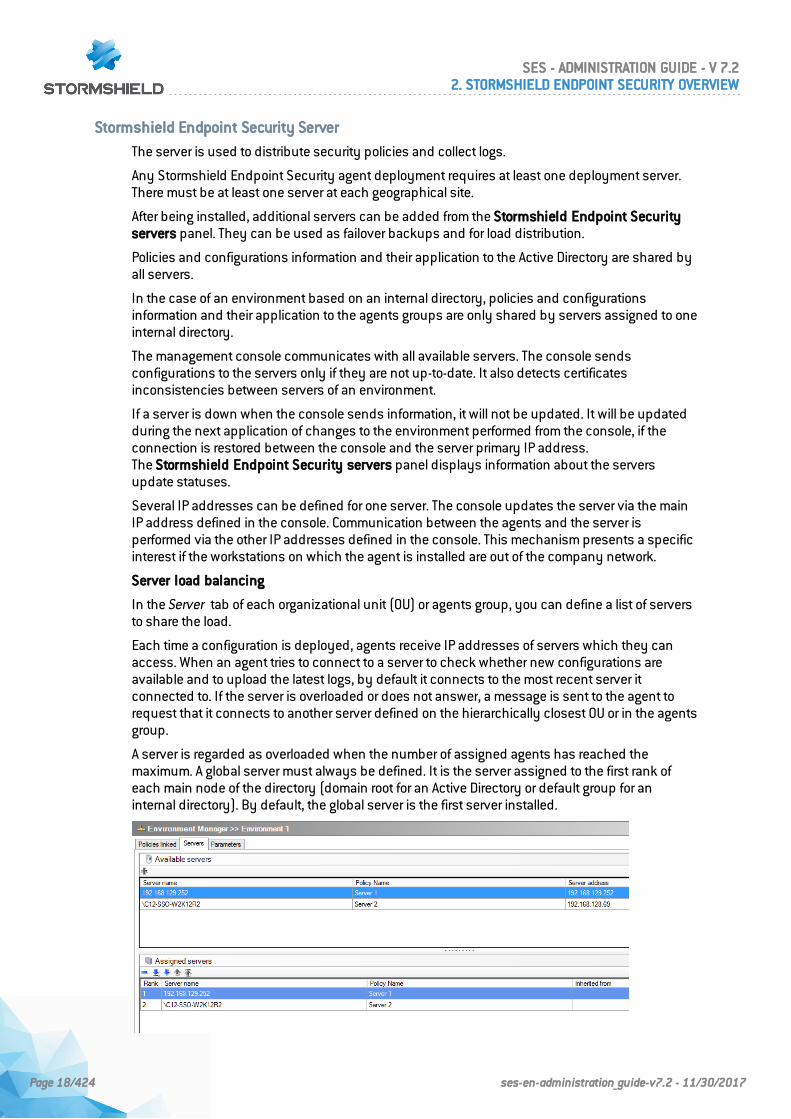
Server load balancing
In the Server tab of each organizational unit (OU) or agents group, you can define a list of serversto share the load.
Each time a configuration is deployed, agents receive IP addresses of servers which they canaccess. When an agent tries to connect to a server to check whether new configurations areavailable and to upload the latest logs, by default it connects to the most recent server itconnected to. If the server is overloaded or does not answer, a message is sent to the agent torequest that it connects to another server defined on the hierarchically closest OU or in the agentsgroup.
A server is regarded as overloaded when the number of assigned agents has reached themaximum. A global server must always be defined. It is the server assigned to the first rank ofeach main node of the directory (domain root for an Active Directory or default group for aninternal directory). By default, the global server is the first server installed.
SES - ADMINISTRATION GUIDE - V 7.22. STORMSHIELD ENDPOINT SECURITY OVERVIEW
Page 18/424 ses-en-administration_guide-v7.2 - 11/30/2017
Failover to another server
The agent tries to connect to the first server in the list of assigned servers. If the server does notanswer, it tries to connect to the following server in the list and so on, until it finds a respondingserver. The agent thus communicates with the first available server. If no server is available, itconnects to the global server.
SQL databases
Databases allow storing different elements:
• The "srkey" database stores all encryption information, which can be related to full-disk or fileencryption, or to exchanges between modules.
• The "stormshield" database stores logs collected by agents.
• The "stormshield3" database stores the management console configuration, includingpolicies, scripts and files to be dispatched to agents.
• The "urd" database stores all data related to agents status monitoring.
In case of backup and restore, the StormShield environment only needs the "srkey" and"stormshield3" databases content to work properly.
A single database server can be assigned to several Stormshield Endpoint Security consoles (ifnecessary).
Management console
The management console is used to:
• Define policies and configurations.
• Monitor logs sent by Stormshield Endpoint Security agents.
• Manage console users.
The features of the management console depend on the license of your organization.
For more information, see the section Packages, option and licenses .
Stormshield Endpoint Security Agent
The agents installed on your workstations are used to apply security policies and send logs tothe Stormshield Endpoint Security server.
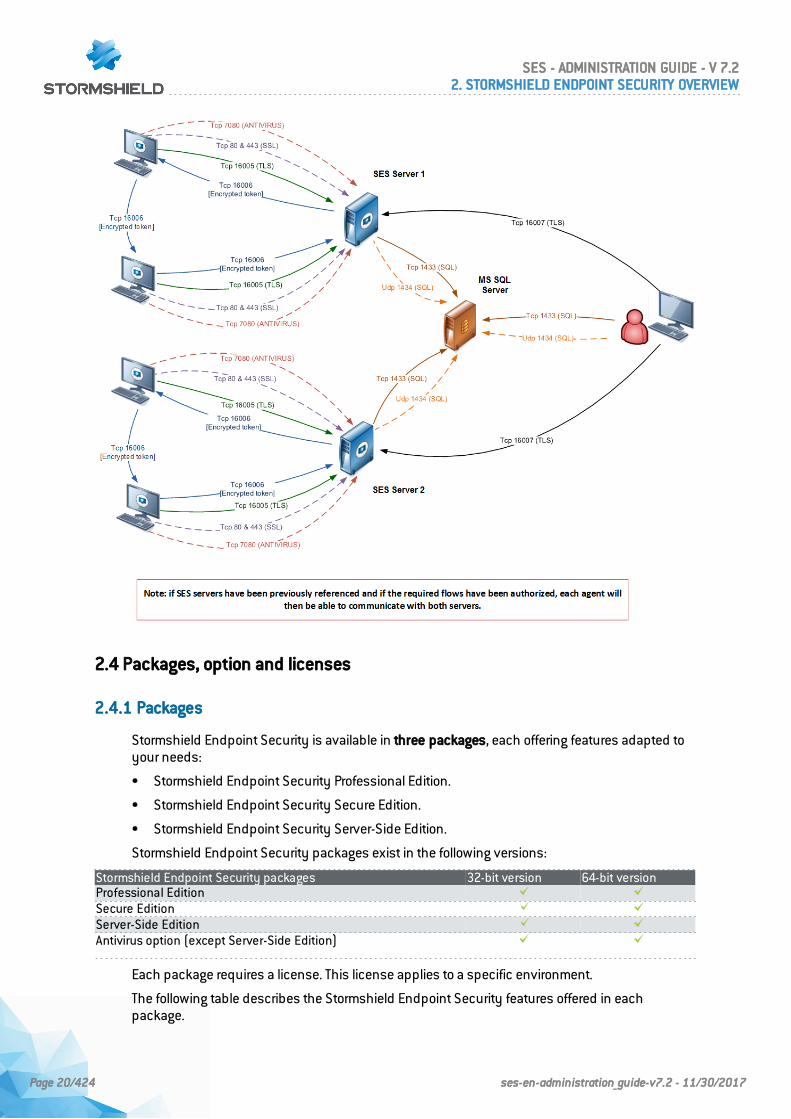
Communication ports between components
The following diagram shows communications ports used between the various components ofStormshield Endpoint Security:
SES - ADMINISTRATION GUIDE - V 7.22. STORMSHIELD ENDPOINT SECURITY OVERVIEW
Page 19/424 ses-en-administration_guide-v7.2 - 11/30/2017
2.4 Packages, option and licenses
2.4.1 Packages
Stormshield Endpoint Security is available in three packages, each offering features adapted toyour needs:
• Stormshield Endpoint Security Professional Edition.
• Stormshield Endpoint Security Secure Edition.
• Stormshield Endpoint Security Server-Side Edition.
Stormshield Endpoint Security packages exist in the following versions:
Stormshield Endpoint Security packages 32-bit version 64-bit versionProfessional EditionSecure EditionServer-Side EditionAntivirus option (except Server-Side Edition)
Each package requires a license. This license applies to a specific environment.
The following table describes the Stormshield Endpoint Security features offered in eachpackage.
SES - ADMINISTRATION GUIDE - V 7.22. STORMSHIELD ENDPOINT SECURITY OVERVIEW
Page 20/424 ses-en-administration_guide-v7.2 - 11/30/2017
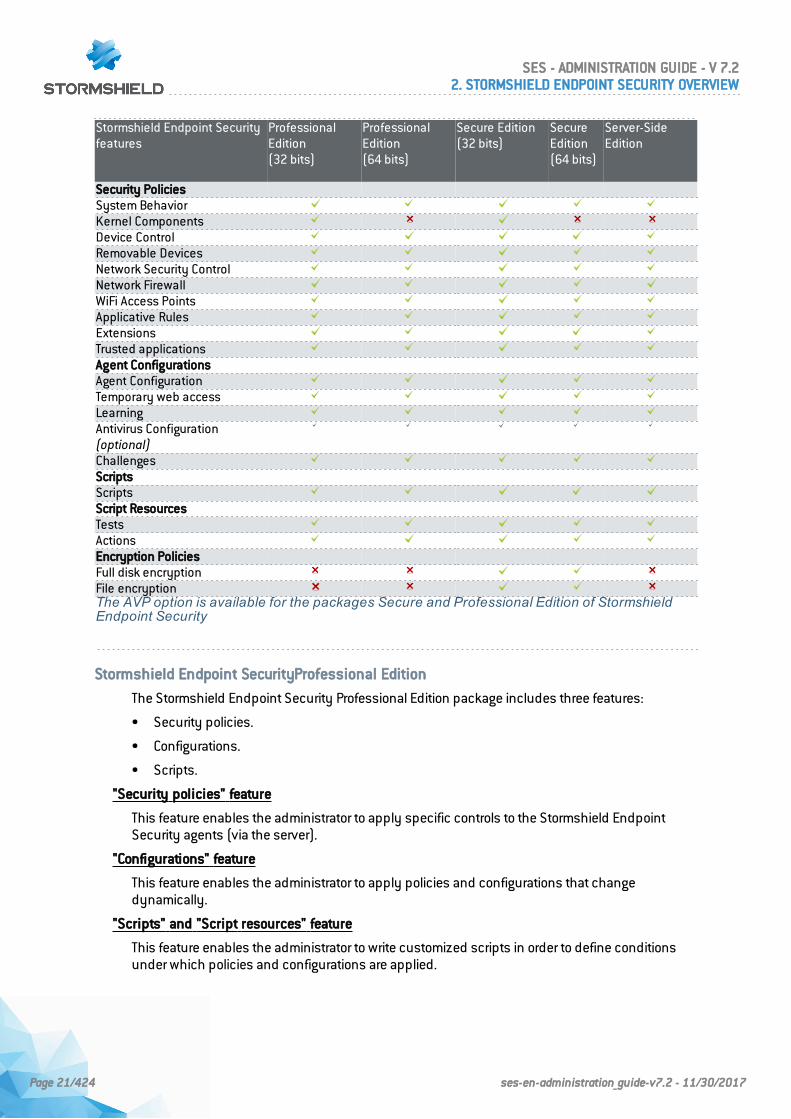
Stormshield Endpoint Securityfeatures
ProfessionalEdition(32 bits)
ProfessionalEdition(64 bits)
Secure Edition(32 bits)
SecureEdition(64 bits)
Server-SideEdition
Security PoliciesSystem BehaviorKernel ComponentsDevice ControlRemovable DevicesNetwork Security ControlNetwork FirewallWiFi Access PointsApplicative RulesExtensionsTrusted applicationsAgent ConfigurationsAgent ConfigurationTemporary web accessLearningAntivirus Configuration(optional)ChallengesScriptsScriptsScript ResourcesTestsActionsEncryption PoliciesFull disk encryptionFile encryptionThe AVP option is available for the packages Secure and Professional Edition of StormshieldEndpoint Security
Stormshield Endpoint SecurityProfessional Edition
The Stormshield Endpoint Security Professional Edition package includes three features:
• Security policies.
• Configurations.
• Scripts.
"Security policies" feature
This feature enables the administrator to apply specific controls to the Stormshield EndpointSecurity agents (via the server).
"Configurations" feature
This feature enables the administrator to apply policies and configurations that changedynamically.
"Scripts" and "Script resources" feature
This feature enables the administrator to write customized scripts in order to define conditionsunder which policies and configurations are applied.
SES - ADMINISTRATION GUIDE - V 7.22. STORMSHIELD ENDPOINT SECURITY OVERVIEW
Page 21/424 ses-en-administration_guide-v7.2 - 11/30/2017
Stormshield Endpoint Security Secure Edition
The Stormshield Endpoint Security Secure Edition package includes the three StormshieldEndpoint Security Professional Edition features as well as the "Encryption Policies" feature.
"Encryption policies" feature
This additional feature enables the administrator to create encryption policies for local hard disksand files.
Stormshield Endpoint Security Server-Side Edition
The Stormshield Endpoint Security Server-Side Edition package is meant for servers running onthese operation systems:
• Windows Server 2003 SP2 32 bits.
• Windows Server 2003 R2 SP2 32 bits.
• Windows Server 2008 R2 64 bits
• Windows Server 2012 R2 64 bits
WARNINGThe Stormshield Endpoint Security server and the Stormshield Endpoint Security agentmust not be installed on the same workstation.
The Stormshield Endpoint Security Server-Side Edition package includes the 64-bit StormshieldEndpoint Security Professional Edition’s features.
WARNINGThe Stormshield Endpoint SecurityServer‐Side Edition package is not compatible with the
Server Core installation option in Windows Server 2008 R2.
For more information, refer to the table Stormshield Endpoint Security features.
2.4.2 AVP option
The AntiVirus Protection (AVP) option is available for Secure and Professional Edition packages.
The AVP option scans:
• Any driver on your workstation.
• Internet access to block unauthorized downloads.
• Incoming/outgoing emails.
• Modified files on your workstation or on the network.
Here is the detailed Antivirus Policies option on the management console:
• General Settings.
• Real-Time Protection Parameters:
Checks any file modified on the workstation or network, when it is opened.
• Web Protection Parameters:
Scans contents opened with a web browser (javascripts, ActiveX controls, downloads, etc.).
• Mail Protection Parameters scans incoming/outgoing emails and their attachments.
• Scanner Parameters scans files, boot sectors, etc.
• Password Parameters.
SES - ADMINISTRATION GUIDE - V 7.22. STORMSHIELD ENDPOINT SECURITY OVERVIEW
Page 22/424 ses-en-administration_guide-v7.2 - 11/30/2017
WARNINGStormshield Endpoint Security with the Antivirus option is compatible with MicrosoftWindows 10 only from version 7.2.13.
2.4.3 Licenses
Updating your licenses
A license is dedicated to a specific environment. It can only be applied to this environment.
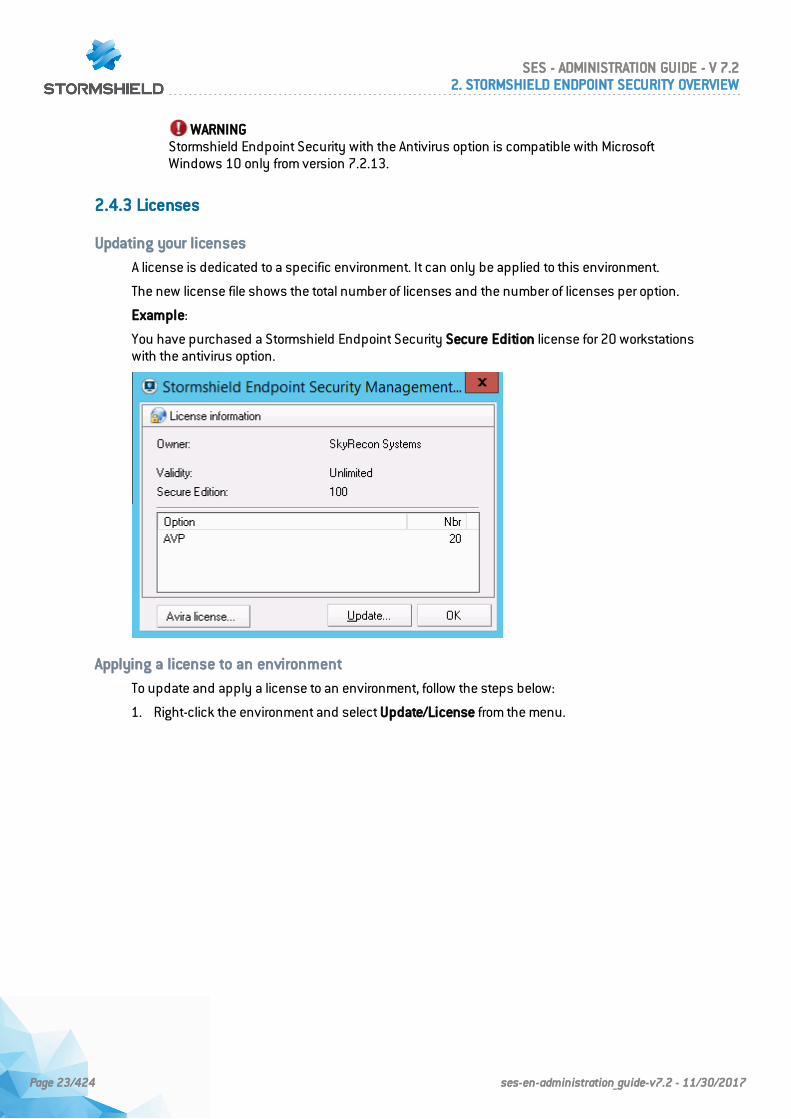
The new license file shows the total number of licenses and the number of licenses per option.
Example:
You have purchased a Stormshield Endpoint Security Secure Edition license for 20 workstationswith the antivirus option.
Applying a license to an environment
To update and apply a license to an environment, follow the steps below:
1. Right-click the environment and select Update/License from the menu.
SES - ADMINISTRATION GUIDE - V 7.22. STORMSHIELD ENDPOINT SECURITY OVERVIEW
Page 23/424 ses-en-administration_guide-v7.2 - 11/30/2017
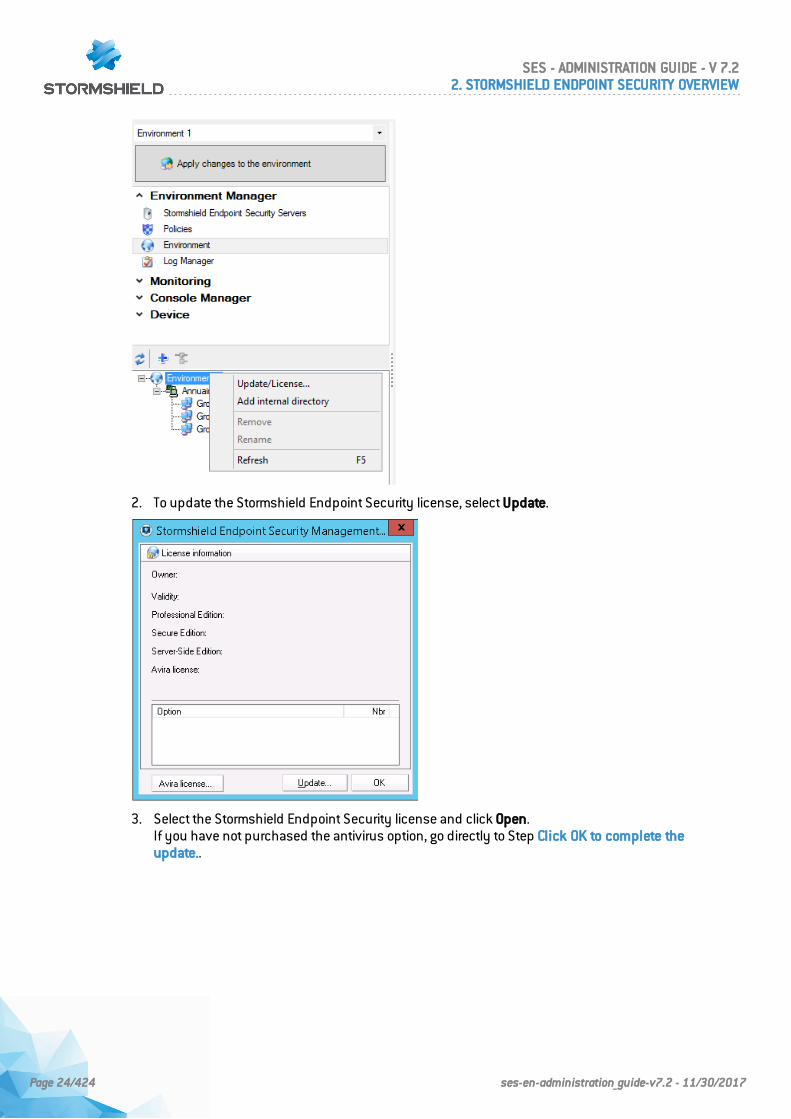
2. To update the Stormshield Endpoint Security license, select Update.
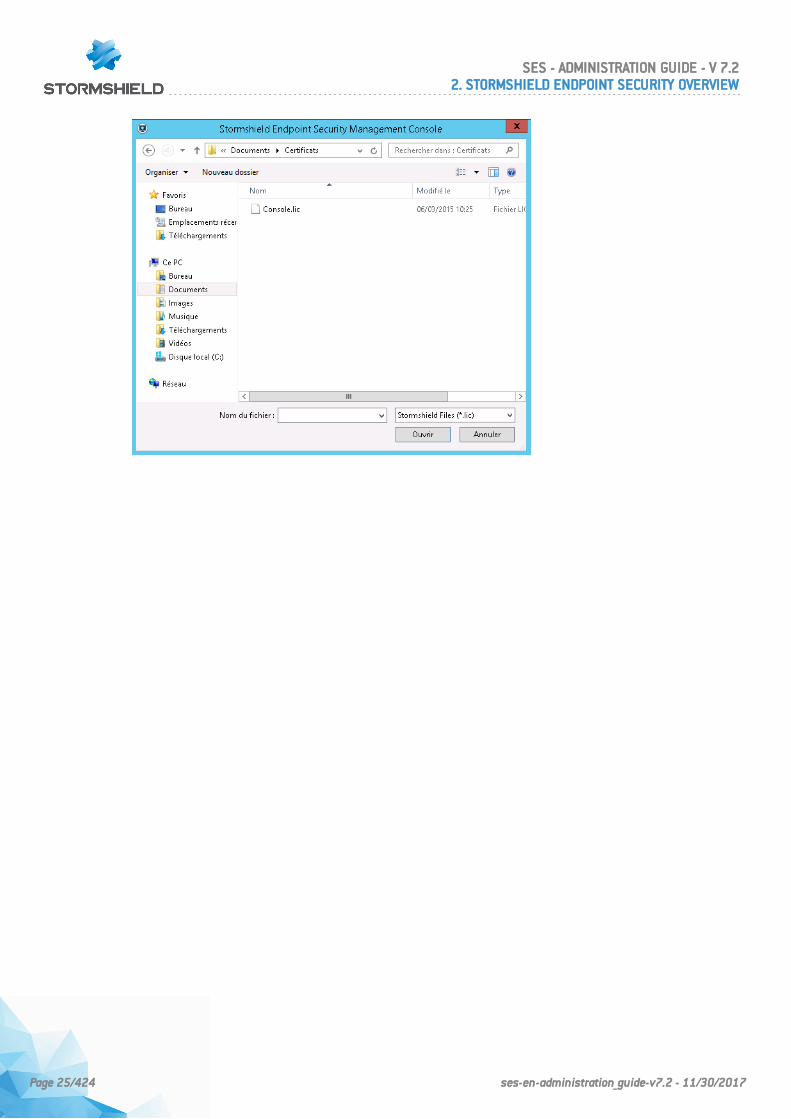
3. Select the Stormshield Endpoint Security license and click Open.If you have not purchased the antivirus option, go directly to Step Click OK to complete theupdate..
SES - ADMINISTRATION GUIDE - V 7.22. STORMSHIELD ENDPOINT SECURITY OVERVIEW
Page 24/424 ses-en-administration_guide-v7.2 - 11/30/2017
SES - ADMINISTRATION GUIDE - V 7.22. STORMSHIELD ENDPOINT SECURITY OVERVIEW
Page 25/424 ses-en-administration_guide-v7.2 - 11/30/2017
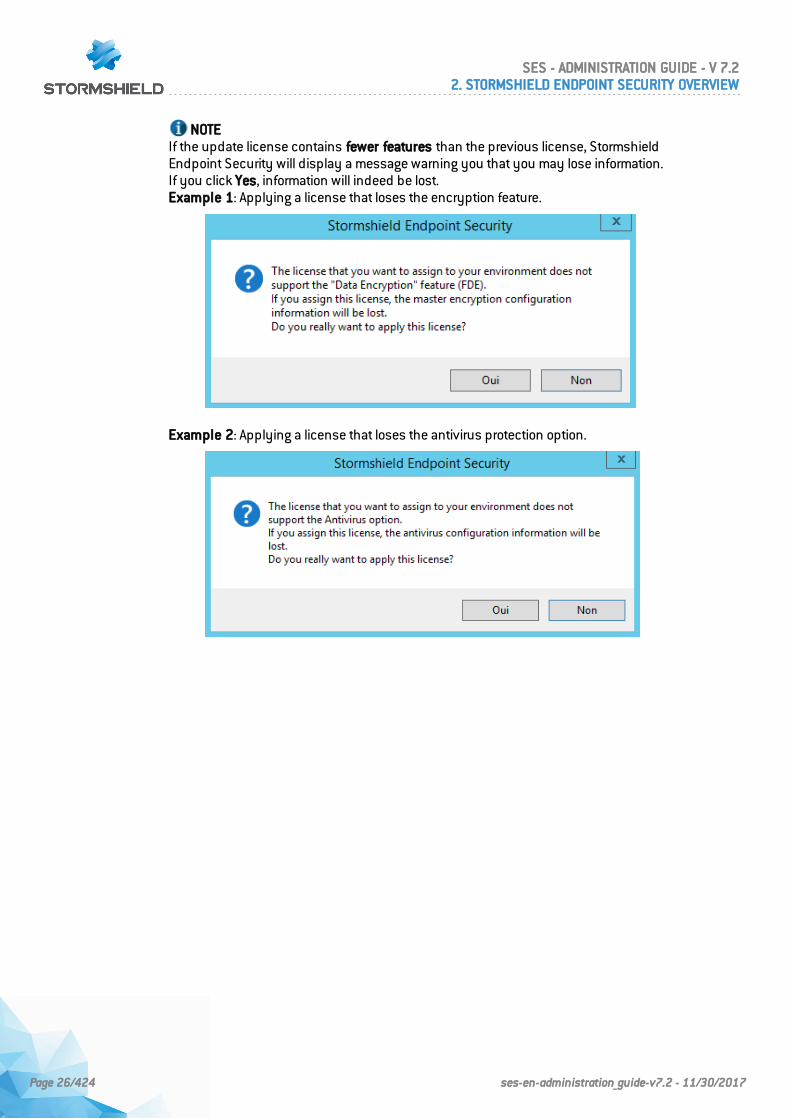
NOTEIf the update license contains fewer features than the previous license, StormshieldEndpoint Security will display a message warning you that you may lose information.If you click Yes, information will indeed be lost.Example 1: Applying a license that loses the encryption feature.
Example 2: Applying a license that loses the antivirus protection option.
SES - ADMINISTRATION GUIDE - V 7.22. STORMSHIELD ENDPOINT SECURITY OVERVIEW
Page 26/424 ses-en-administration_guide-v7.2 - 11/30/2017
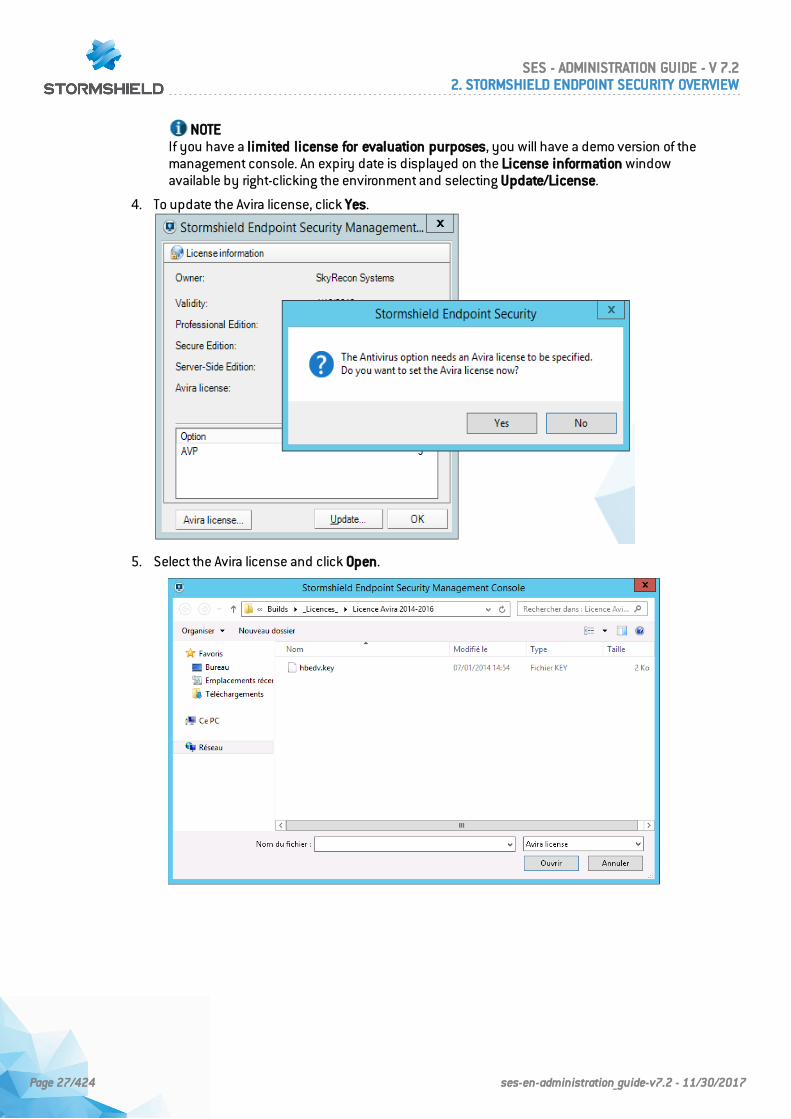
NOTEIf you have a limited license for evaluation purposes, you will have a demo version of themanagement console. An expiry date is displayed on the License information windowavailable by right-clicking the environment and selecting Update/License.
4. To update the Avira license, click Yes.
5. Select the Avira license and click Open.
SES - ADMINISTRATION GUIDE - V 7.22. STORMSHIELD ENDPOINT SECURITY OVERVIEW
Page 27/424 ses-en-administration_guide-v7.2 - 11/30/2017
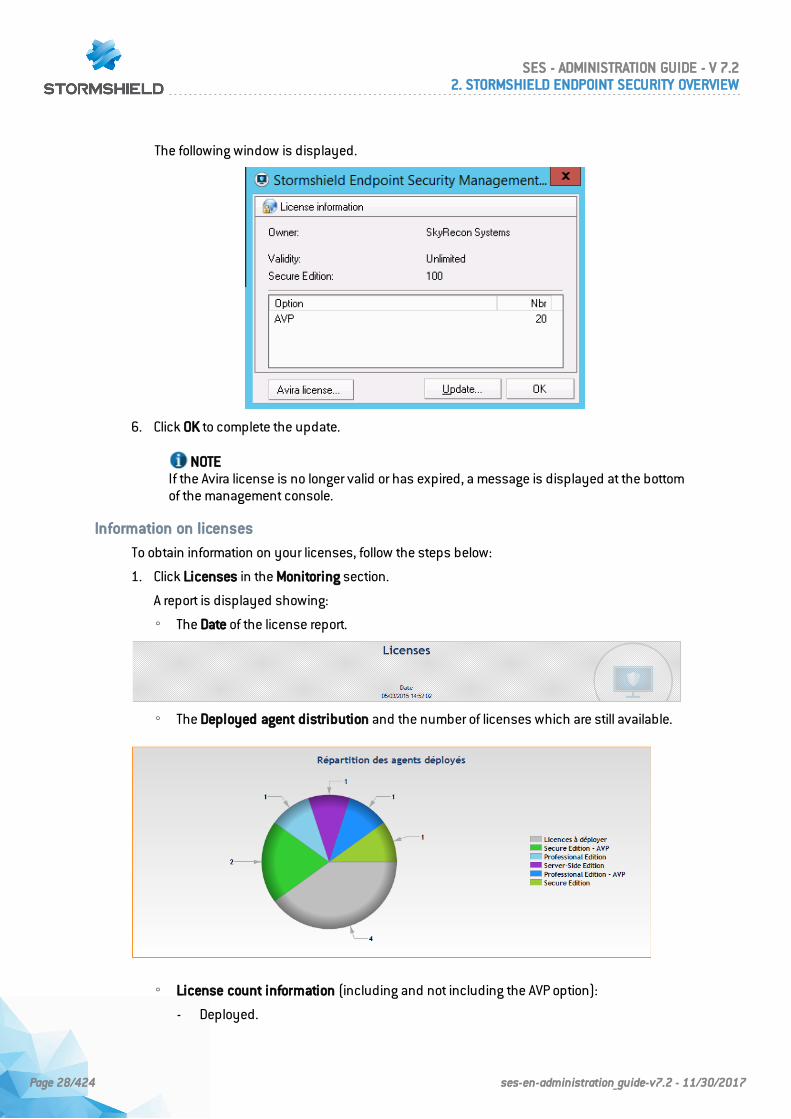
The following window is displayed.
6. Click OK to complete the update.
NOTEIf the Avira license is no longer valid or has expired, a message is displayed at the bottomof the management console.
Information on licenses
To obtain information on your licenses, follow the steps below:
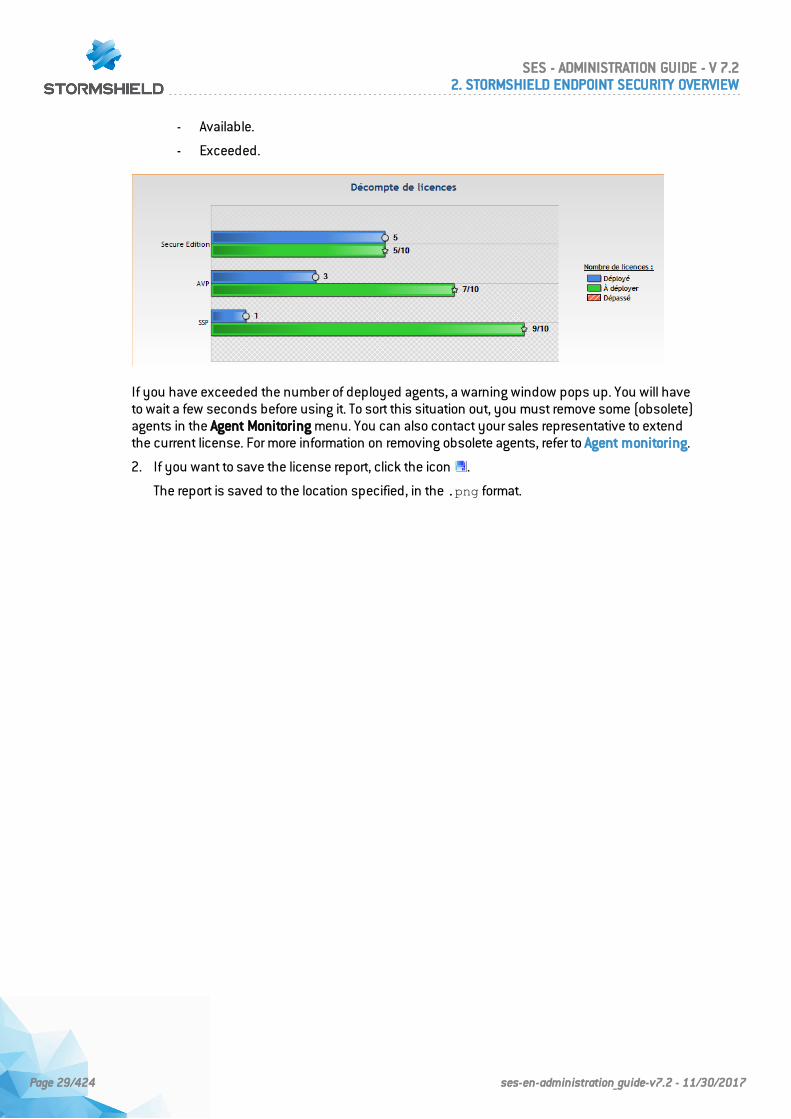
1. Click Licenses in the Monitoring section.
A report is displayed showing:
◦ The Date of the license report.
◦ The Deployed agent distribution and the number of licenses which are still available.
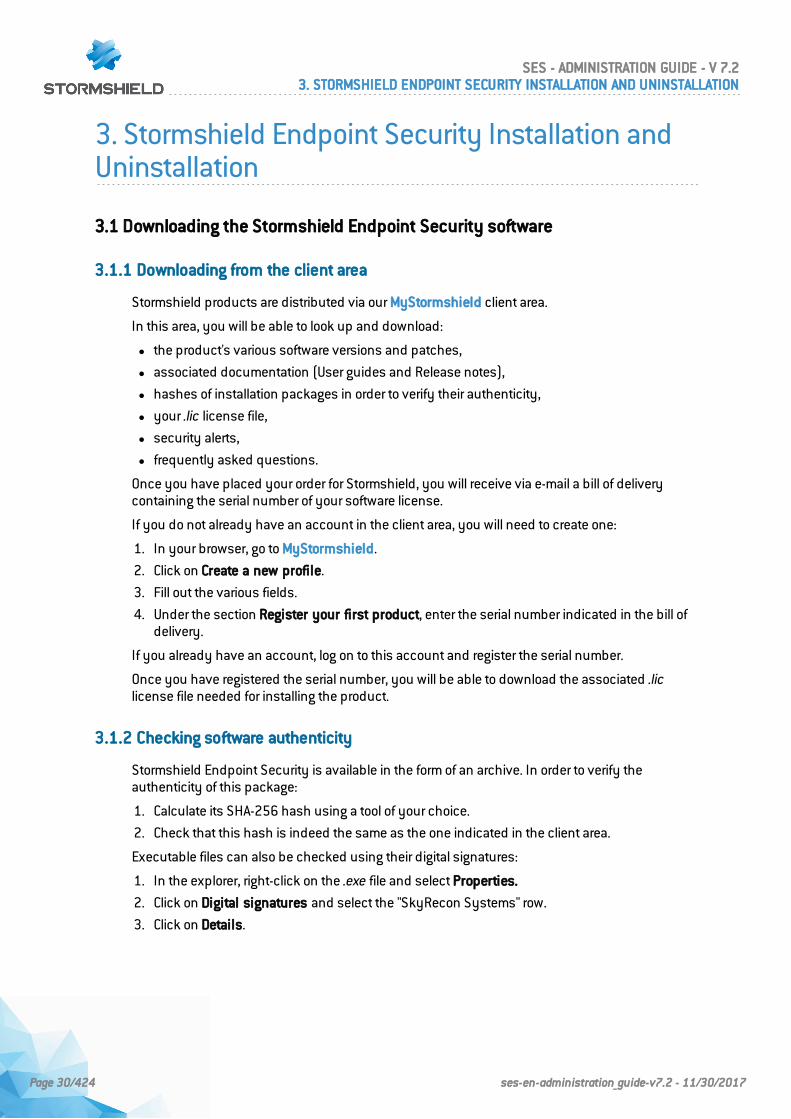
◦ License count information (including and not including the AVP option):
- Deployed.
SES - ADMINISTRATION GUIDE - V 7.22. STORMSHIELD ENDPOINT SECURITY OVERVIEW
Page 28/424 ses-en-administration_guide-v7.2 - 11/30/2017
- Available.
- Exceeded.
If you have exceeded the number of deployed agents, a warning window pops up. You will haveto wait a few seconds before using it. To sort this situation out, you must remove some (obsolete)agents in the Agent Monitoring menu. You can also contact your sales representative to extendthe current license. For more information on removing obsolete agents, refer to Agent monitoring.
2. If you want to save the license report, click the icon .
The report is saved to the location specified, in the .png format.
SES - ADMINISTRATION GUIDE - V 7.22. STORMSHIELD ENDPOINT SECURITY OVERVIEW
Page 29/424 ses-en-administration_guide-v7.2 - 11/30/2017
3. Stormshield Endpoint Security Installation andUninstallation
3.1 Downloading the Stormshield Endpoint Security software
3.1.1 Downloading from the client area
Stormshield products are distributed via our MyStormshield client area.
In this area, you will be able to look up and download:
l the product's various software versions and patches,
l associated documentation (User guides and Release notes),
l hashes of installation packages in order to verify their authenticity,
l your .lic license file,
l security alerts,
l frequently asked questions.
Once you have placed your order for Stormshield, you will receive via e-mail a bill of deliverycontaining the serial number of your software license.
If you do not already have an account in the client area, you will need to create one:
1. In your browser, go to MyStormshield.
2. Click on Create a new profile.
3. Fill out the various fields.
4. Under the section Register your first product, enter the serial number indicated in the bill ofdelivery.
If you already have an account, log on to this account and register the serial number.
Once you have registered the serial number, you will be able to download the associated .liclicense file needed for installing the product.
3.1.2 Checking software authenticity
Stormshield Endpoint Security is available in the form of an archive. In order to verify theauthenticity of this package:
1. Calculate its SHA-256 hash using a tool of your choice.
2. Check that this hash is indeed the same as the one indicated in the client area.
Executable files can also be checked using their digital signatures:
1. In the explorer, right-click on the .exe file and select Properties.
2. Click on Digital signatures and select the "SkyRecon Systems" row.
3. Click on Details.
SES - ADMINISTRATION GUIDE - V 7.23. STORMSHIELD ENDPOINT SECURITY INSTALLATION AND UNINSTALLATION
Page 30/424 ses-en-administration_guide-v7.2 - 11/30/2017
3.2 System prerequisites for Stormshield Endpoint Security under Windows
3.2.1 Active Directory prerequisites
In the case of an Active Directory installation, all Stormshield Endpoint Security agents must beinstalled on workstations belonging to a same forest of the Active Directory. Stormshield EndpointSecurity servers may not necessarily belong to the same forest of the Active Directory.Stormshield Endpoint Security 7.2 supports Active Directory on MS Server 2008 R2 and MSServer 2012 R2.
NOTEWorkstations must belong to an Organizational Unit (OU). Sub-domains are not supported,i.e. domains must all be at the same level.
3.2.2 Stormshield Endpoint Securityserver prerequisites
To install and use Stormshield Endpoint SecurityVersion 7.2 under Windows, you must at leastsatisfy the following Server environment prerequisites:
l Dual-core processor: 2 GHz.
l Memory: 2 GB minimum.
l Hard disk space: 1 GB minimum without antivirus.
l Hard disk space required for a server with antivirus: 3 GB minimum.
l Operating systems:o Windows Server 2008 R2 64 bits
o Windows Server 2012 R2 64 bits
o Windows Server 2016 (64 bits)
l Static IP address of the machine where the server is installed.
l Incoming communication (Stormshield Endpoint Security server):o TCP port 16004.o TCP port 16005.o TCP port 16006.o TCP port 16007.
l Outgoing communication (Stormshield Endpoint Security server):o TCP port 16006.o TCP port 80.o TCP port 1433 (customizable).o UDP port 1434 (customizable).
l Incoming communication (Web server):o TCP port 80 (customizable).o TCP port 443 (customizable).
You will have to choose other ports if they are already used by a Web server installed on theserver machine.
TCP ports 80 and 443 will be used by the Web server to deploy the agents installed with theserver.
SES - ADMINISTRATION GUIDE - V 7.23. STORMSHIELD ENDPOINT SECURITY INSTALLATION AND UNINSTALLATION
Page 31/424 ses-en-administration_guide-v7.2 - 11/30/2017
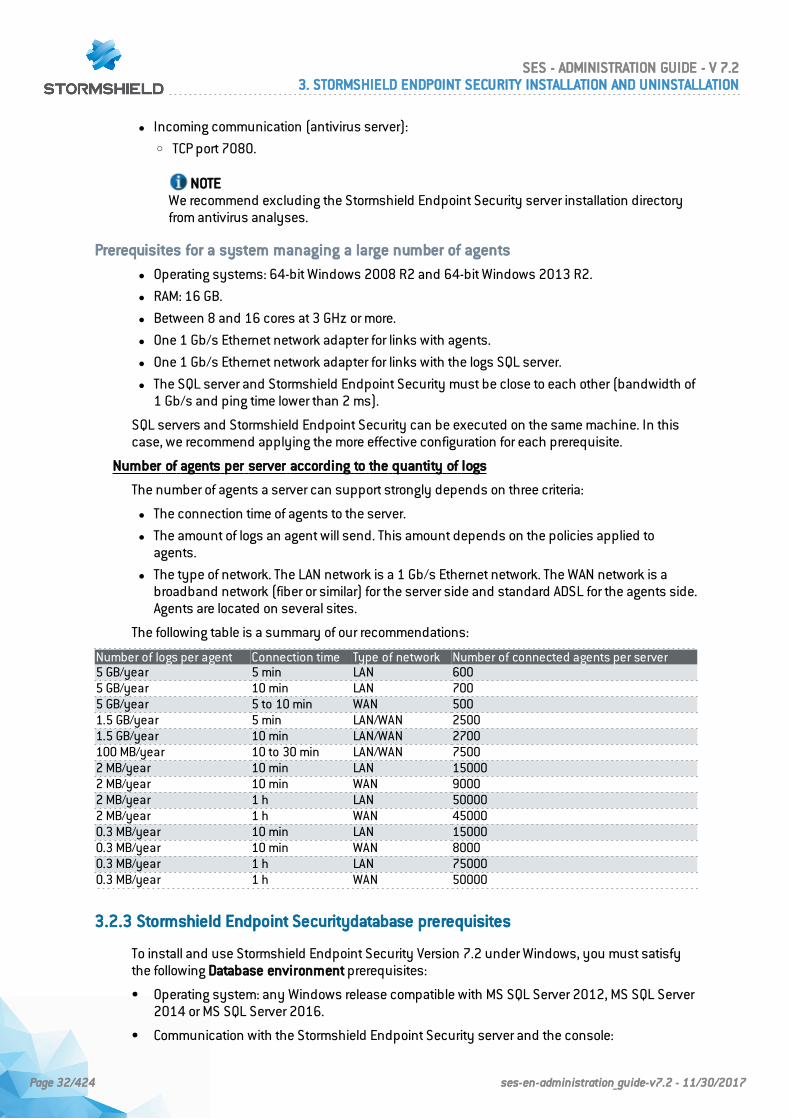
l Incoming communication (antivirus server):o TCP port 7080.
NOTEWe recommend excluding the Stormshield Endpoint Security server installation directoryfrom antivirus analyses.
Prerequisites for a system managing a large number of agents
l Operating systems: 64-bit Windows 2008 R2 and 64-bit Windows 2013 R2.
l RAM: 16 GB.
l Between 8 and 16 cores at 3 GHz or more.
l One 1 Gb/s Ethernet network adapter for links with agents.
l One 1 Gb/s Ethernet network adapter for links with the logs SQL server.
l The SQL server and Stormshield Endpoint Security must be close to each other (bandwidth of1 Gb/s and ping time lower than 2 ms).
SQL servers and Stormshield Endpoint Security can be executed on the same machine. In thiscase, we recommend applying the more effective configuration for each prerequisite.
Number of agents per server according to the quantity of logs
The number of agents a server can support strongly depends on three criteria:
l The connection time of agents to the server.
l The amount of logs an agent will send. This amount depends on the policies applied toagents.
l The type of network. The LAN network is a 1 Gb/s Ethernet network. The WAN network is abroadband network (fiber or similar) for the server side and standard ADSL for the agents side.Agents are located on several sites.
The following table is a summary of our recommendations:
Number of logs per agent Connection time Type of network Number of connected agents per server5 GB/year 5 min LAN 6005 GB/year 10 min LAN 7005 GB/year 5 to 10 min WAN 5001.5 GB/year 5 min LAN/WAN 25001.5 GB/year 10 min LAN/WAN 2700100 MB/year 10 to 30 min LAN/WAN 75002 MB/year 10 min LAN 150002 MB/year 10 min WAN 90002 MB/year 1 h LAN 500002 MB/year 1 h WAN 450000.3 MB/year 10 min LAN 150000.3 MB/year 10 min WAN 80000.3 MB/year 1 h LAN 750000.3 MB/year 1 h WAN 50000
3.2.3 Stormshield Endpoint Securitydatabase prerequisites
To install and use Stormshield Endpoint Security Version 7.2 under Windows, you must satisfythe following Database environment prerequisites:
• Operating system: any Windows release compatible with MS SQL Server 2012, MS SQL Server2014 or MS SQL Server 2016.
• Communication with the Stormshield Endpoint Security server and the console:
SES - ADMINISTRATION GUIDE - V 7.23. STORMSHIELD ENDPOINT SECURITY INSTALLATION AND UNINSTALLATION
Page 32/424 ses-en-administration_guide-v7.2 - 11/30/2017
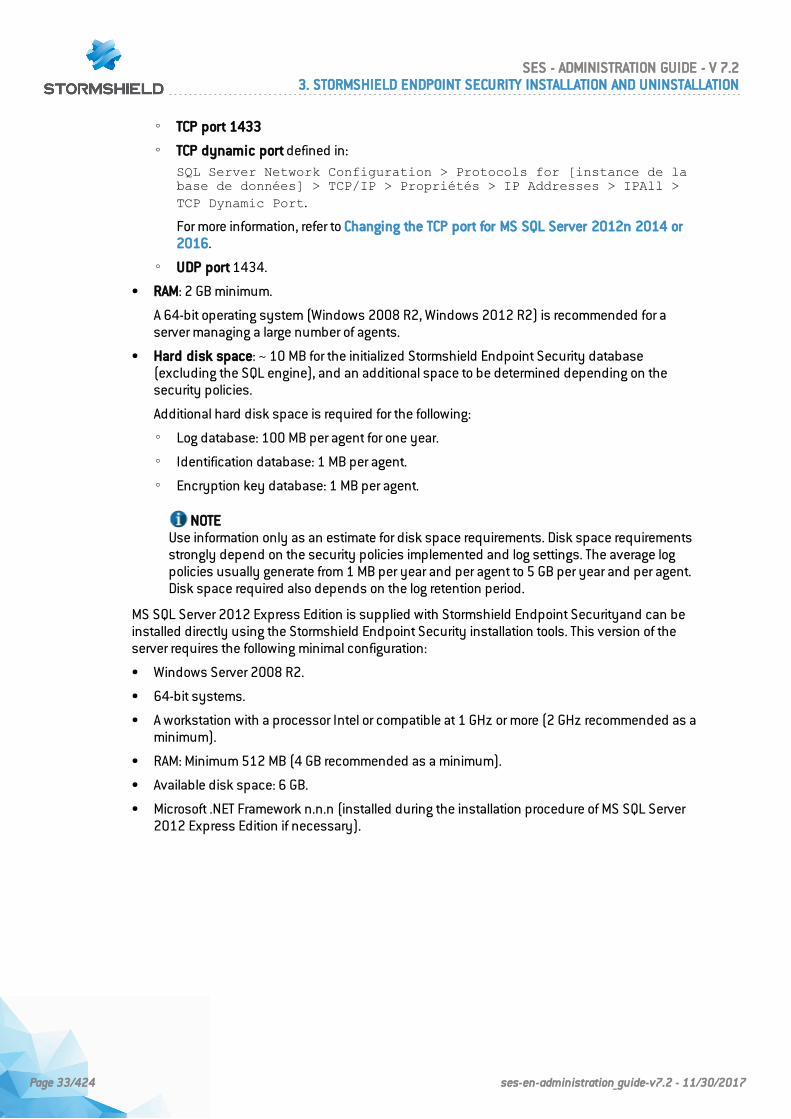
◦ TCP port 1433
◦ TCP dynamic port defined in:SQL Server Network Configuration > Protocols for [instance de labase de données] > TCP/IP > Propriétés > IP Addresses > IPAll >TCP Dynamic Port.
For more information, refer to Changing the TCP port for MS SQL Server 2012n 2014 or2016.
◦ UDP port 1434.
• RAM: 2 GB minimum.
A 64-bit operating system (Windows 2008 R2, Windows 2012 R2) is recommended for aserver managing a large number of agents.
• Hard disk space: ~ 10 MB for the initialized Stormshield Endpoint Security database(excluding the SQL engine), and an additional space to be determined depending on thesecurity policies.
Additional hard disk space is required for the following:
◦ Log database: 100 MB per agent for one year.
◦ Identification database: 1 MB per agent.
◦ Encryption key database: 1 MB per agent.
NOTEUse information only as an estimate for disk space requirements. Disk space requirementsstrongly depend on the security policies implemented and log settings. The average logpolicies usually generate from 1 MB per year and per agent to 5 GB per year and per agent.Disk space required also depends on the log retention period.
MS SQL Server 2012 Express Edition is supplied with Stormshield Endpoint Securityand can beinstalled directly using the Stormshield Endpoint Security installation tools. This version of theserver requires the following minimal configuration:
• Windows Server 2008 R2.
• 64-bit systems.
• A workstation with a processor Intel or compatible at 1 GHz or more (2 GHz recommended as aminimum).
• RAM: Minimum 512 MB (4 GB recommended as a minimum).
• Available disk space: 6 GB.
• Microsoft .NET Framework n.n.n (installed during the installation procedure of MS SQL Server2012 Express Edition if necessary).
SES - ADMINISTRATION GUIDE - V 7.23. STORMSHIELD ENDPOINT SECURITY INSTALLATION AND UNINSTALLATION
Page 33/424 ses-en-administration_guide-v7.2 - 11/30/2017
NOTEWhen installing the database, use the Mixed Mode authentication mode.
WARNINGYou must use Case-Insensitive collations in MS SQL Server 2012, 2014 or 2016 otherwisethe scripts necessary to install the Stormshield Endpoint Security database will not besupported.
WARNINGMS SQL Server 2012 Express Edition provided with Stormshield Endpoint Security islimited to 4 GB of data per database, which corresponds to 9 million logs.
Prerequisites for a system managing a large number of agents
• Operating systems: Windows 2008 R2 and Windows 2012 R2.
• SQL 2012 64-bit version, SQL 2014 64-bit version or SQL 2016 64-bit version (standard orenterprise).
• RAM: 16 to 32 GB.
• Between 8 and 16 cores at 3 GHz or more.
• One 1 Gb/s Ethernet network adapter for links with the Stormshield Endpoint Securityserver.
• The SQL server and Stormshield Endpoint Security must be close to each other (bandwidth of1 Gb/s and ping time lower than 2 ms).
• SSD disks can be useful but need to be properly set up (refer to the Microsoft documentationabout using SQL Server on SSD disks).
• The SQL Server license must match the number of cores of the workstation.
Stormshield Endpoint Security makes the most out of the features in SQL Server 2012 and higherto optimize performance. Configurations based on a previous version or express edition of MS SQLServer are less optimized.
Each time it starts, the Stormshield Endpoint Security server detects the configuration of the SQLserver. If you change the configuration of the SQL server (connection to a new base or hardwaremodification), we recommend that you restart the Stormshield Endpoint Securityserver.
Using an existing database
A mixed (NT and SQL) authentication mode and TCP connectivity are required.
Changing connection parameters to MS SQL Server 2012, 2014 or 2016
To change connection parameters (local or remote access) to MS SQL Server 2012, 2014 or 2016,use Microsoft SQL Server Management Studio.
SES - ADMINISTRATION GUIDE - V 7.23. STORMSHIELD ENDPOINT SECURITY INSTALLATION AND UNINSTALLATION
Page 34/424 ses-en-administration_guide-v7.2 - 11/30/2017
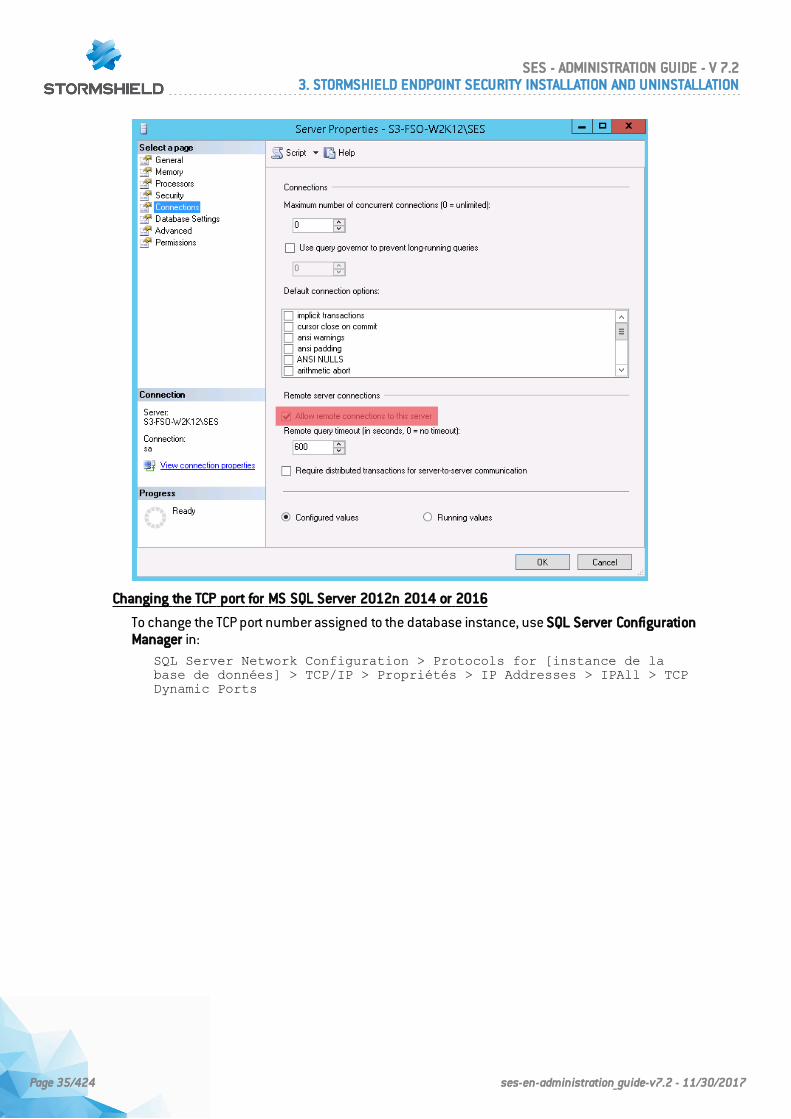
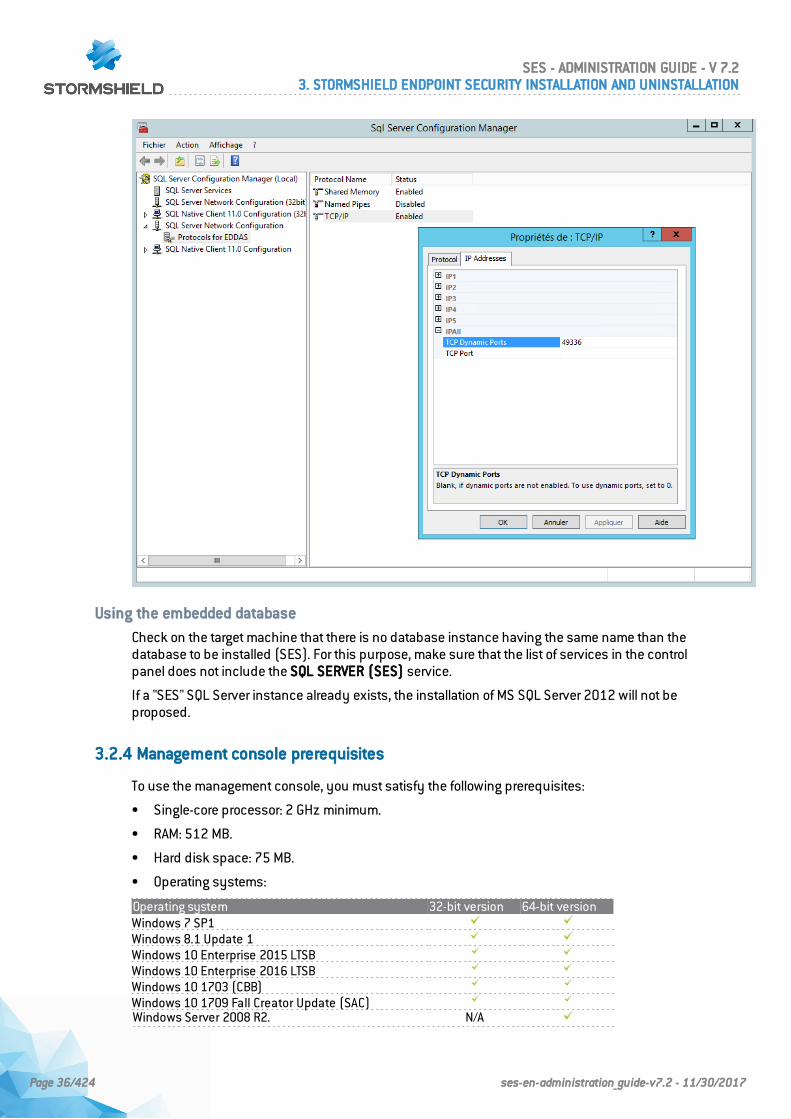
Changing the TCP port for MS SQL Server 2012n 2014 or 2016
To change the TCP port number assigned to the database instance, use SQL Server ConfigurationManager in:
SQL Server Network Configuration > Protocols for [instance de labase de données] > TCP/IP > Propriétés > IP Addresses > IPAll > TCPDynamic Ports
SES - ADMINISTRATION GUIDE - V 7.23. STORMSHIELD ENDPOINT SECURITY INSTALLATION AND UNINSTALLATION
Page 35/424 ses-en-administration_guide-v7.2 - 11/30/2017
Using the embedded database
Check on the target machine that there is no database instance having the same name than thedatabase to be installed (SES). For this purpose, make sure that the list of services in the controlpanel does not include the SQL SERVER (SES) service.
If a "SES" SQL Server instance already exists, the installation of MS SQL Server 2012 will not beproposed.
3.2.4 Management console prerequisites
To use the management console, you must satisfy the following prerequisites:
• Single-core processor: 2 GHz minimum.
• RAM: 512 MB.
• Hard disk space: 75 MB.
• Operating systems:
Operating system 32-bit version 64-bit versionWindows 7 SP1Windows 8.1 Update 1Windows 10 Enterprise 2015 LTSBWindows 10 Enterprise 2016 LTSBWindows 10 1703 (CBB)Windows 10 1709 Fall Creator Update (SAC)Windows Server 2008 R2. N/A
SES - ADMINISTRATION GUIDE - V 7.23. STORMSHIELD ENDPOINT SECURITY INSTALLATION AND UNINSTALLATION
Page 36/424 ses-en-administration_guide-v7.2 - 11/30/2017
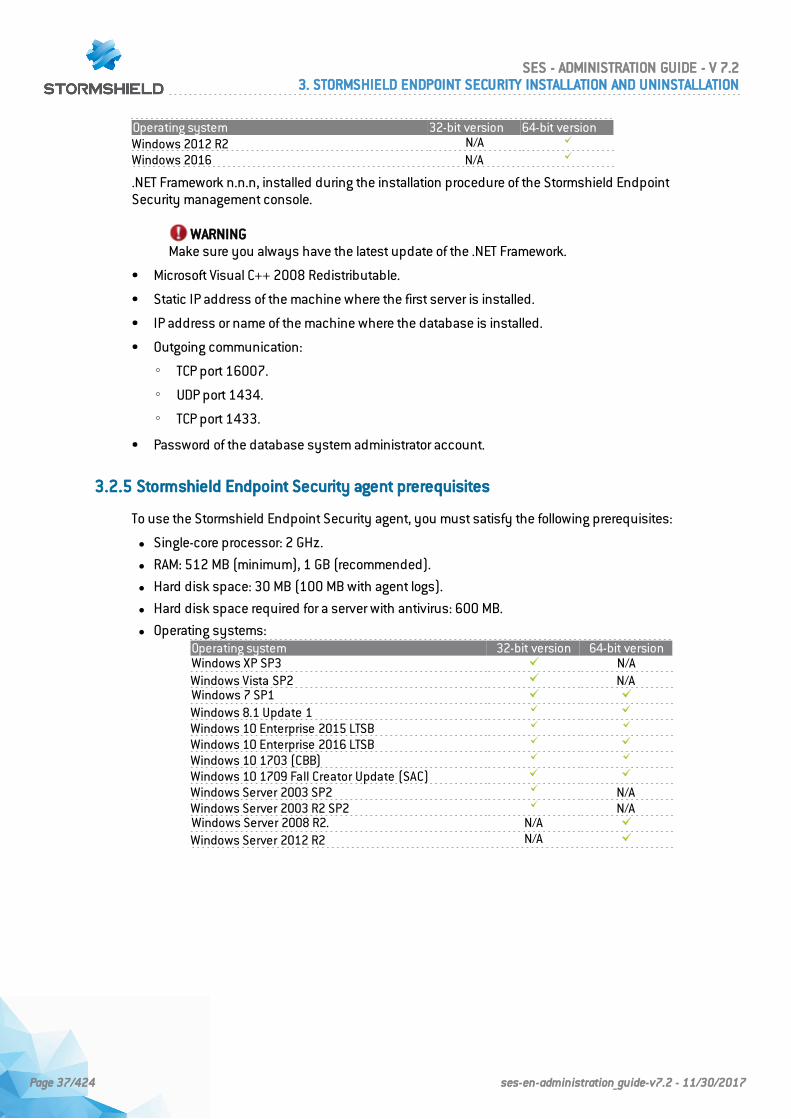
Operating system 32-bit version 64-bit versionWindows 2012 R2 N/AWindows 2016 N/A
.NET Framework n.n.n, installed during the installation procedure of the Stormshield EndpointSecurity management console.
WARNINGMake sure you always have the latest update of the .NET Framework.
• Microsoft Visual C++ 2008 Redistributable.
• Static IP address of the machine where the first server is installed.
• IP address or name of the machine where the database is installed.
• Outgoing communication:
◦ TCP port 16007.
◦ UDP port 1434.
◦ TCP port 1433.
• Password of the database system administrator account.
3.2.5 Stormshield Endpoint Security agent prerequisites
To use the Stormshield Endpoint Security agent, you must satisfy the following prerequisites:
l Single-core processor: 2 GHz.
l RAM: 512 MB (minimum), 1 GB (recommended).
l Hard disk space: 30 MB (100 MB with agent logs).
l Hard disk space required for a server with antivirus: 600 MB.
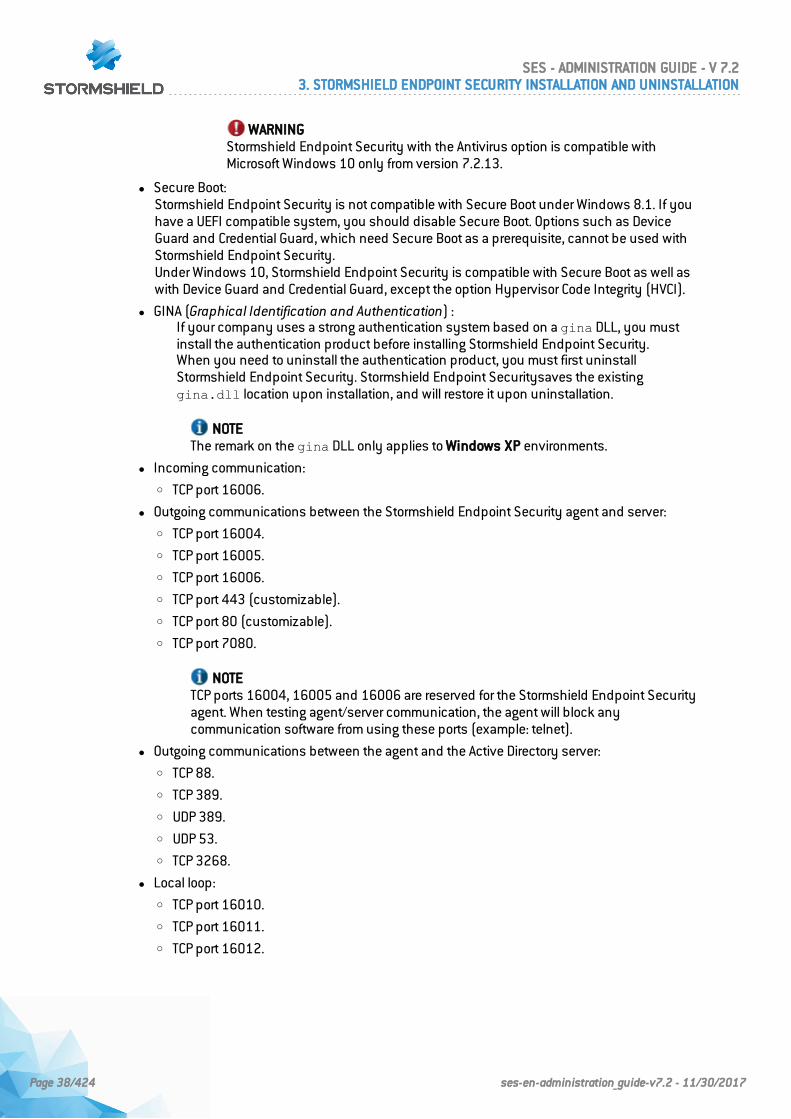
l Operating systems:Operating system 32-bit version 64-bit versionWindows XP SP3 N/AWindows Vista SP2 N/AWindows 7 SP1Windows 8.1 Update 1Windows 10 Enterprise 2015 LTSBWindows 10 Enterprise 2016 LTSBWindows 10 1703 (CBB)Windows 10 1709 Fall Creator Update (SAC)Windows Server 2003 SP2 N/AWindows Server 2003 R2 SP2 N/AWindows Server 2008 R2. N/AWindows Server 2012 R2 N/A
SES - ADMINISTRATION GUIDE - V 7.23. STORMSHIELD ENDPOINT SECURITY INSTALLATION AND UNINSTALLATION
Page 37/424 ses-en-administration_guide-v7.2 - 11/30/2017
WARNINGStormshield Endpoint Security with the Antivirus option is compatible withMicrosoft Windows 10 only from version 7.2.13.
l Secure Boot:Stormshield Endpoint Security is not compatible with Secure Boot under Windows 8.1. If youhave a UEFI compatible system, you should disable Secure Boot. Options such as DeviceGuard and Credential Guard, which need Secure Boot as a prerequisite, cannot be used withStormshield Endpoint Security.Under Windows 10, Stormshield Endpoint Security is compatible with Secure Boot as well aswith Device Guard and Credential Guard, except the option Hypervisor Code Integrity (HVCI).
l GINA (Graphical Identification and Authentication) :If your company uses a strong authentication system based on a gina DLL, you mustinstall the authentication product before installing Stormshield Endpoint Security.When you need to uninstall the authentication product, you must first uninstallStormshield Endpoint Security. Stormshield Endpoint Securitysaves the existinggina.dll location upon installation, and will restore it upon uninstallation.
NOTEThe remark on the gina DLL only applies to Windows XP environments.
l Incoming communication:o TCP port 16006.
l Outgoing communications between the Stormshield Endpoint Security agent and server:o TCP port 16004.o TCP port 16005.o TCP port 16006.o TCP port 443 (customizable).o TCP port 80 (customizable).o TCP port 7080.
NOTETCP ports 16004, 16005 and 16006 are reserved for the Stormshield Endpoint Securityagent. When testing agent/server communication, the agent will block anycommunication software from using these ports (example: telnet).
l Outgoing communications between the agent and the Active Directory server:o TCP 88.o TCP 389.o UDP 389.o UDP 53.o TCP 3268.
l Local loop:o TCP port 16010.o TCP port 16011.o TCP port 16012.
SES - ADMINISTRATION GUIDE - V 7.23. STORMSHIELD ENDPOINT SECURITY INSTALLATION AND UNINSTALLATION
Page 38/424 ses-en-administration_guide-v7.2 - 11/30/2017
WARNINGIf a firewall is enabled on the workstation (the Windows Firewall for example), you need toset rules to authorize the above network flows.
3.3 Stormshield Endpoint Security installation
3.3.1 Prerequisites
Before installing Stormshield Endpoint Security, check that the following files/folders are present:
• The bin folder including the following files:◦ server.exe
◦ console.exe
• The resources_x64 (64-bit version) folder including the following files:
◦ dotnetfx40_Full_x86_x64.exe (Microsoft .NET Framework n.n.n)
◦ MSXML6.msi (Microsoft MSXML 6.0 Parser).
◦ SQLEXPR_x64_ENU.exe (Microsoft SQL Server 2012 Express Edition).
◦ vcredist.exe (Microsoft Visual C++ 2008 SP1 Redistributable).
◦ WindowsInstaller.exe (Microsoft Windows Installer 4.5).
◦ wic_x64_enu.exe (Windows Imaging Component).
• The setup.exe file (Stormshield Endpoint Security).
3.3.2 Procedure
Stormshield Endpoint Security is installed in four stages using the following wizards on the mainserver:
1. Installation WizardStormshield Endpoint Security
2. Database setup wizard
3. Environment configuration wizard.
4. Agent deployment wizard.
Additional servers are installed using the server installation wizard. See section Installingadditional servers.
Agents can also be directly installed from the client workstation. See section Installing the agentfrom the client workstation.
Installing the management console, the server(s) and databases in a trusted zone isrecommended.
Installation WizardStormshield Endpoint Security
To install Stormshield Endpoint Security, follow the steps below:
1. Double-click setup.exe.
2. Select a language.
3. Define your settings:
SES - ADMINISTRATION GUIDE - V 7.23. STORMSHIELD ENDPOINT SECURITY INSTALLATION AND UNINSTALLATION
Page 39/424 ses-en-administration_guide-v7.2 - 11/30/2017
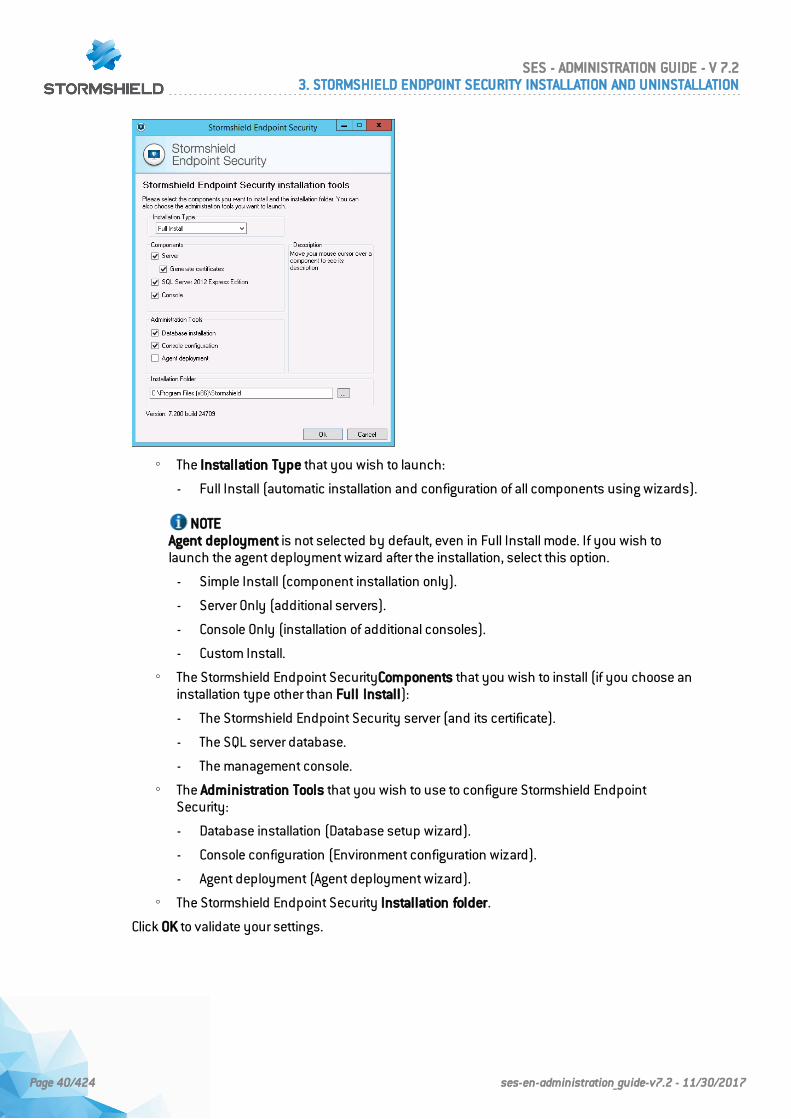
◦ The Installation Type that you wish to launch:
- Full Install (automatic installation and configuration of all components using wizards).
NOTEAgent deployment is not selected by default, even in Full Install mode. If you wish tolaunch the agent deployment wizard after the installation, select this option.
- Simple Install (component installation only).
- Server Only (additional servers).
- Console Only (installation of additional consoles).
- Custom Install.
◦ The Stormshield Endpoint SecurityComponents that you wish to install (if you choose aninstallation type other than Full Install):
- The Stormshield Endpoint Security server (and its certificate).
- The SQL server database.
- The management console.
◦ The Administration Tools that you wish to use to configure Stormshield EndpointSecurity:
- Database installation (Database setup wizard).
- Console configuration (Environment configuration wizard).
- Agent deployment (Agent deployment wizard).
◦ The Stormshield Endpoint Security Installation folder.
Click OK to validate your settings.
SES - ADMINISTRATION GUIDE - V 7.23. STORMSHIELD ENDPOINT SECURITY INSTALLATION AND UNINSTALLATION
Page 40/424 ses-en-administration_guide-v7.2 - 11/30/2017
NOTEIf you wish to install the agent and the console on the same workstation, install the agentfirst and then the console.
4. To launch the full installation of Stormshield Endpoint Security, select Full Install and clickNext in the installation wizard.
5. In the Stormshield Endpoint SecurityServer step, enter the IP address of the StormshieldEndpoint Security server and click Next.
For a first installation, the default backup directory for certificates generation is[ProgramData]\Stormshield Endpoint Security Certificates. It is only for the console certificate.
If you change the backup directory, it only applies to the console certificate.
By default the server certificates are in the following directory: [ProgramFiles]\Stormshield\Stormshield Endpoint Security Server.
6. In the Certificates step, enter the new console certificate password.
Click Next.
NOTEIf you have selected Server and Generate certificates in the Components section (SeeDefine your settings:), the Generate certificates settings in the window above will begrayed out and cannot be used.
7. In the Random number generation step, move the mouse in order to increase random for thegeneration of encryption keys for full disk encryption. The Next button displays after themouse has been moved enough.
8. In the SQL Server 2012 step, select Windows authentication or authentication via the SAMSSQL (super-administrator) account.
WARNINGAccording to Microsoft guidelines, choose Windows authentication to limit exposure tosecurity vulnerabilities.The SA account is then renamed, deactivated and has a random password assigned.
9. If you choose the SA MSSQL account, enter and confirm the new password.
NOTEThe password must observe the complexity criteria defined on the machine and/ordomain.
Click Next.
10. The following window is displayed. It summarizes the settings that you have just defined.
Click Next.
11. Wait until the installation procedure is completed.
12. The window below shows that the components have been properly installed. Click Finish.
Database setup wizard
In the case of a full installation, the database setup wizard launches automatically after serverinstallation.
In the case of a simple installation, relaunch setup.exe and tick the database setup wizard toconfigure the database.
To configure the Stormshield Endpoint Security database, follow the steps below:
SES - ADMINISTRATION GUIDE - V 7.23. STORMSHIELD ENDPOINT SECURITY INSTALLATION AND UNINSTALLATION
Page 41/424 ses-en-administration_guide-v7.2 - 11/30/2017
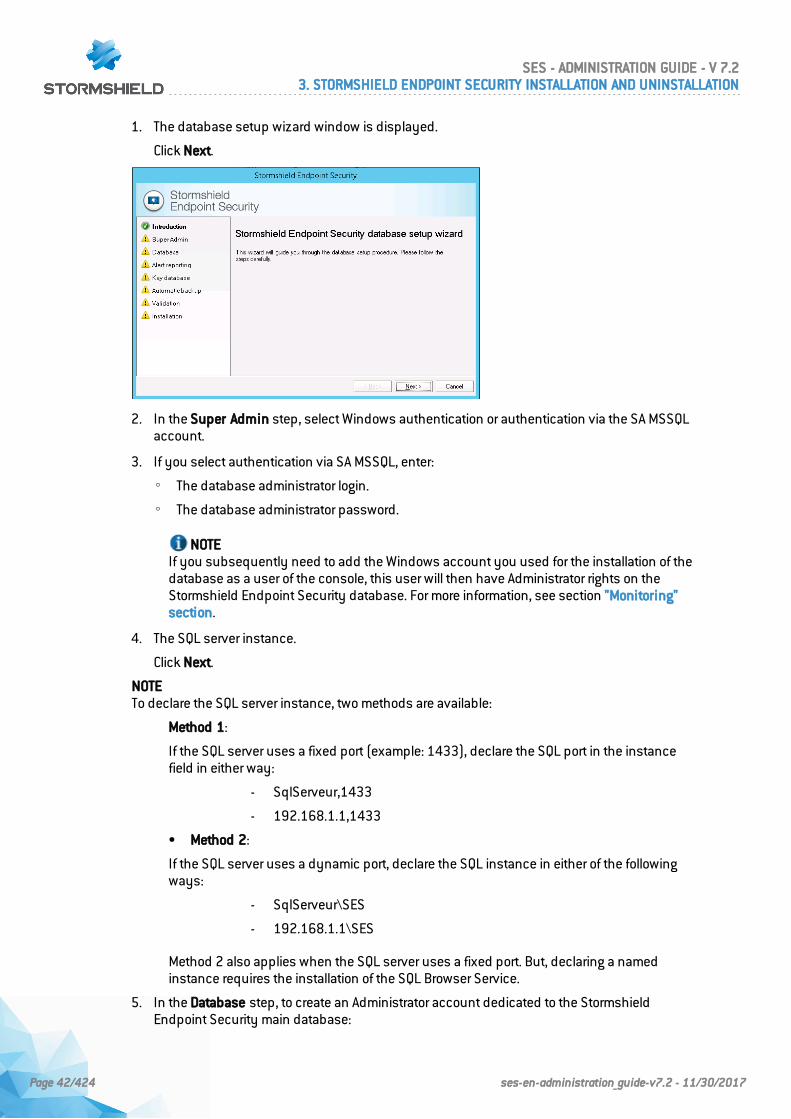
1. The database setup wizard window is displayed.
Click Next.
2. In the Super Admin step, select Windows authentication or authentication via the SA MSSQLaccount.
3. If you select authentication via SA MSSQL, enter:
◦ The database administrator login.
◦ The database administrator password.
NOTEIf you subsequently need to add the Windows account you used for the installation of thedatabase as a user of the console, this user will then have Administrator rights on theStormshield Endpoint Security database. For more information, see section "Monitoring"section.
4. The SQL server instance.
Click Next.
NOTETo declare the SQL server instance, two methods are available:
Method 1:
If the SQL server uses a fixed port (example: 1433), declare the SQL port in the instancefield in either way:
- SqlServeur,1433
- 192.168.1.1,1433
• Method 2:
If the SQL server uses a dynamic port, declare the SQL instance in either of the followingways:
- SqlServeur\SES
- 192.168.1.1\SES
Method 2 also applies when the SQL server uses a fixed port. But, declaring a namedinstance requires the installation of the SQL Browser Service.
5. In the Database step, to create an Administrator account dedicated to the StormshieldEndpoint Security main database:
SES - ADMINISTRATION GUIDE - V 7.23. STORMSHIELD ENDPOINT SECURITY INSTALLATION AND UNINSTALLATION
Page 42/424 ses-en-administration_guide-v7.2 - 11/30/2017
◦ Check Install Main Database.
◦ Enter the password.
◦ Confirm the password.
◦ Click Next.
6. In the Alert Database step, to enable reporting alerts to the Stormshield Endpoint Securityserver:
◦ Check Install Alert Database.
◦ Enter the password.
◦ Confirm the password.
◦ Click Next.
7. In the Key Database step, to activate the database account:
◦ Check Install Key Database.
◦ Check Use same password as for the alert database account.
◦ Click Next.
NOTEIf needed, you can select a different password for the key database. If so, uncheck Usesame password as for the alert database account.
8. In the Automatic backup step, to automatically save the main database on the server, followthe steps below:
◦ Check Automatic Database Backup.
◦ Enter the backup file path.
◦ Select the backup frequency.
◦ Click Next.
NOTEThis feature is available only if you have access to the SQL SERVER AGENT [SES] service.This feature is not available with MS SQL Express Edition.
WARNINGTo enable automatic backup, it is necessary to start the SQL SERVER AGENT service beforefinishing this step.
NOTETo back up your database in a directory other than the default directory (example:.\Mssql\Backup), assign Read/Write rights to the security groupSQLServer2005MSSQLUser$ServerName$SQLInstance.
9. The following window is displayed. It summarizes the settings that you have just defined.
Click Next to validate your settings.
10. Wait until the installation procedure is completed.
11. Complete the configuration by clicking Finish.
Environment configuration wizard
In the case of a full installation, the environment configuration wizard automatically launchesafter database configuration.
SES - ADMINISTRATION GUIDE - V 7.23. STORMSHIELD ENDPOINT SECURITY INSTALLATION AND UNINSTALLATION
Page 43/424 ses-en-administration_guide-v7.2 - 11/30/2017
In the case of a simple installation, relaunch setup.exe and select the environmentconfiguration wizard.
In this step, you must choose between an environment based on an Active Directory or anenvironment based on an internal directory.
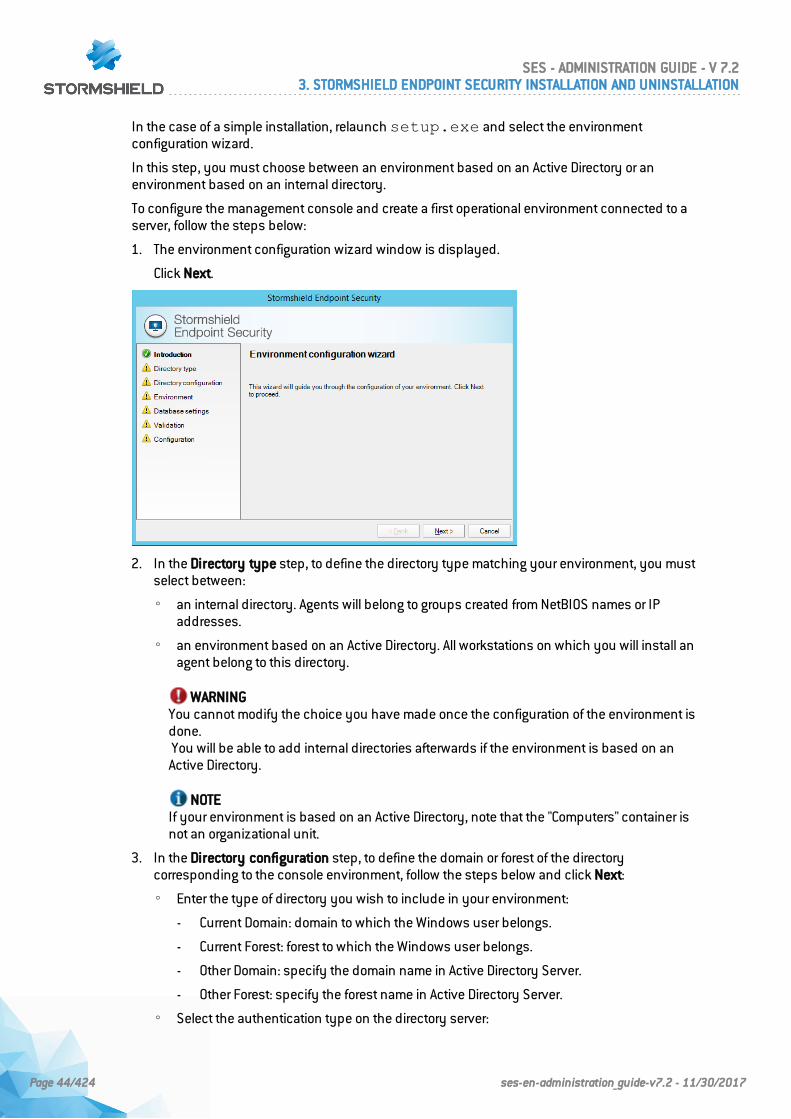
To configure the management console and create a first operational environment connected to aserver, follow the steps below:
1. The environment configuration wizard window is displayed.
Click Next.
2. In the Directory type step, to define the directory type matching your environment, you mustselect between:
◦ an internal directory. Agents will belong to groups created from NetBIOS names or IPaddresses.
◦ an environment based on an Active Directory. All workstations on which you will install anagent belong to this directory.
WARNINGYou cannot modify the choice you have made once the configuration of the environment isdone.You will be able to add internal directories afterwards if the environment is based on an
Active Directory.
NOTEIf your environment is based on an Active Directory, note that the "Computers" container isnot an organizational unit.
3. In the Directory configuration step, to define the domain or forest of the directorycorresponding to the console environment, follow the steps below and click Next:
◦ Enter the type of directory you wish to include in your environment:
- Current Domain: domain to which the Windows user belongs.
- Current Forest: forest to which the Windows user belongs.
- Other Domain: specify the domain name in Active Directory Server.
- Other Forest: specify the forest name in Active Directory Server.
◦ Select the authentication type on the directory server:
SES - ADMINISTRATION GUIDE - V 7.23. STORMSHIELD ENDPOINT SECURITY INSTALLATION AND UNINSTALLATION
Page 44/424 ses-en-administration_guide-v7.2 - 11/30/2017
- Anonymous.
- Windows session: uses the Windows user login.
- Specific account: enter the login and password you wish to use.
◦ Check the directory connection by clicking the Test connection button.
NOTEThis button checks the connection to the directory. The directory must be accessible to goto the next step.
4. In the Environment step, follow the steps below to define the console environment and clickNext:
◦ Enter the environment name.
◦ Select the license file using .
◦ Enter the Stormshield Endpoint Securityserver configuration policy name.
◦ Enter the IP address of the Stormshield Endpoint Security server on which the serverconfiguration policy will be applied.
◦ Select the output directory for console certificates using .
◦ Enter the passphrase associated with the console certificates generated when installingStormshield Endpoint Security.
5. In the Database settings step, to configure the connection between the database and theconsole, enter the database passwords defined when installing Stormshield EndpointSecurity:
◦ Alert database.
◦ Key database.
Click Next.
6. The following window is displayed. It summarizes the settings that you have just defined.
Click Next to validate your settings. The window below shows that the configuration is inprogress.
7. The window below shows that your environment has been properly configured. Click Finishto exit the environment configuration wizard.
NOTEThe Launch the console when finished box is checked by default. You can uncheck it ifneeded.
8. The management console is displayed if the Launch the console when finished box ischecked.
NOTEThe agent deployment wizard launches behind the management console window.Minimize the window to proceed with the installation.
WARNINGBefore installing an agent or continuing the agent installation procedure, you need to applychanges to the server: from the console, click Apply changes to the environment.
Agent deployment wizard
To deploy agents, follow the steps below:
SES - ADMINISTRATION GUIDE - V 7.23. STORMSHIELD ENDPOINT SECURITY INSTALLATION AND UNINSTALLATION
Page 45/424 ses-en-administration_guide-v7.2 - 11/30/2017
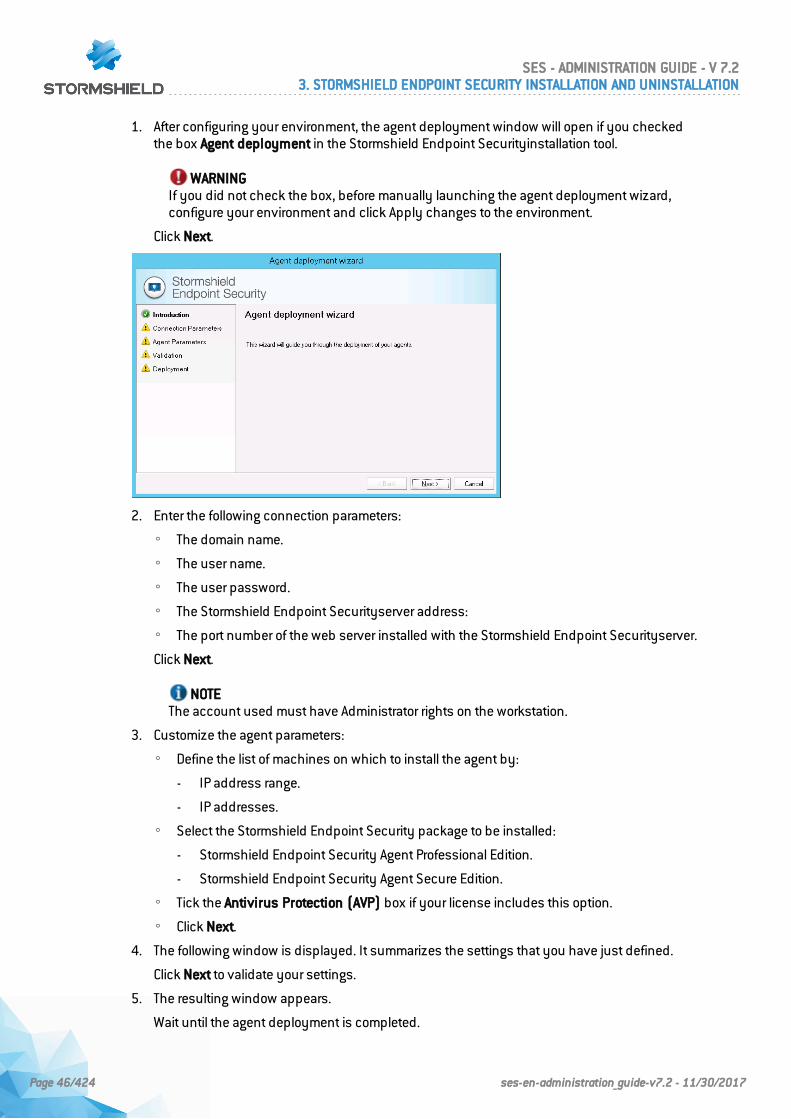
1. After configuring your environment, the agent deployment window will open if you checkedthe box Agent deployment in the Stormshield Endpoint Securityinstallation tool.
WARNINGIf you did not check the box, before manually launching the agent deployment wizard,configure your environment and click Apply changes to the environment.
Click Next.
2. Enter the following connection parameters:
◦ The domain name.
◦ The user name.
◦ The user password.
◦ The Stormshield Endpoint Securityserver address:
◦ The port number of the web server installed with the Stormshield Endpoint Securityserver.
Click Next.
NOTEThe account used must have Administrator rights on the workstation.
3. Customize the agent parameters:
◦ Define the list of machines on which to install the agent by:
- IP address range.
- IP addresses.
◦ Select the Stormshield Endpoint Security package to be installed:
- Stormshield Endpoint Security Agent Professional Edition.
- Stormshield Endpoint Security Agent Secure Edition.
◦ Tick the Antivirus Protection (AVP) box if your license includes this option.
◦ Click Next.
4. The following window is displayed. It summarizes the settings that you have just defined.
Click Next to validate your settings.
5. The resulting window appears.
Wait until the agent deployment is completed.
SES - ADMINISTRATION GUIDE - V 7.23. STORMSHIELD ENDPOINT SECURITY INSTALLATION AND UNINSTALLATION
Page 46/424 ses-en-administration_guide-v7.2 - 11/30/2017
Click Finish.
NOTEIn order to use the agent deployment wizard, make sure that:
- The Web service of the Stormshield Endpoint Security server can be accessed byany machine on which the agent is going to be deployed.
- Administrative Tools can be accessed by workstations.If another application or a user already accesses Administrative Tools on themachine on which the agent is going to be deployed, deployment fails.
If problems arise, check that access is not blocked by a firewall and that simple file sharingis disabled.
Installing additional servers
Additional servers are optional. They are used to distribute the load of requests between agentsand servers and ensure high availability of servers.
The agent load is distributed among the servers assigned to the agent, which are at the closesthierarchical level among its parent OUs. Moreover, when the principal server encounters aproblem, an agent automatically establishes the communication with an additional server.
Number of additional servers
The number of additional servers depends on:
• The number of agents deployed.
• The network speed.
• The configuration size.
• The number of alerts and logs returned. For information on how communication is distributedamong servers and agents, see section Deploying policies on agents and collecting logs.
Procedure
To install an additional server, follow the steps below:
1. Double-click setup.exe.
2. Select a language and click OK.
3. Define the following parameters:
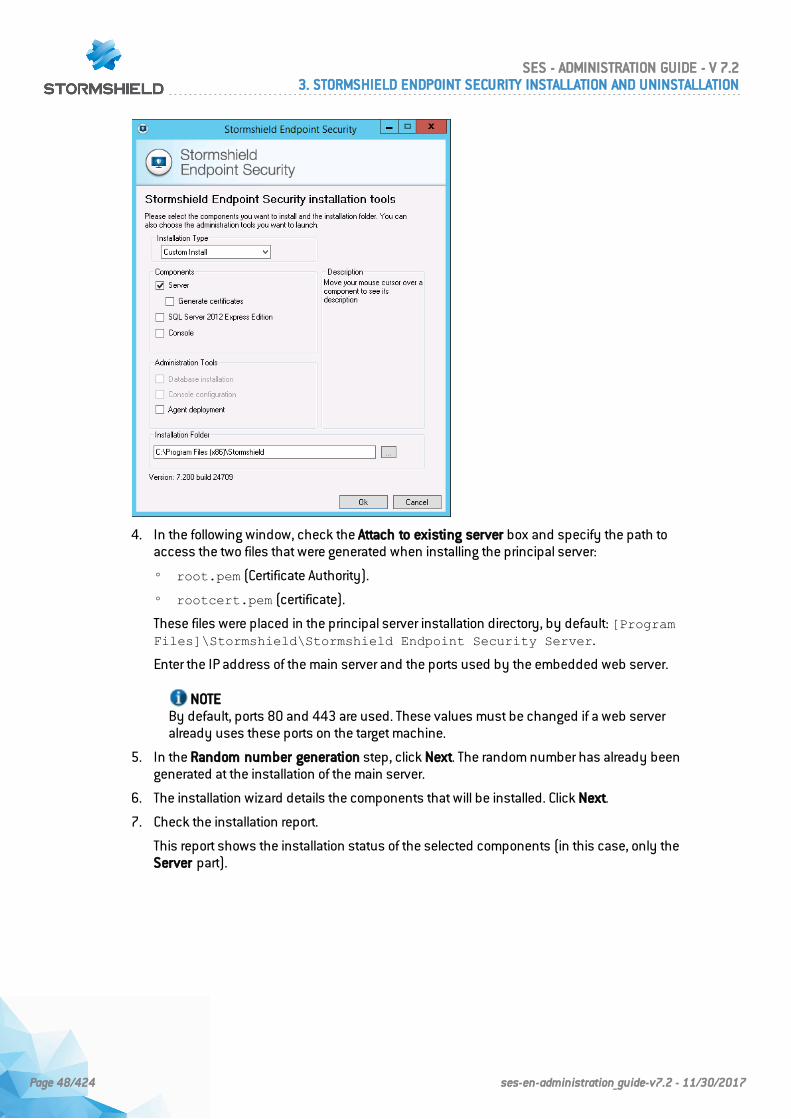
◦ In Installation type, select Server Only.
◦ Uncheck Generate certificates as these refer to console certificates that were generatedwhen the principal server was installed (Installation type switches to Custom Install).
◦ Define the server installation path on the target machine.
◦ Click OK to validate your settings.
SES - ADMINISTRATION GUIDE - V 7.23. STORMSHIELD ENDPOINT SECURITY INSTALLATION AND UNINSTALLATION
Page 47/424 ses-en-administration_guide-v7.2 - 11/30/2017
4. In the following window, check the Attach to existing server box and specify the path toaccess the two files that were generated when installing the principal server:
◦ root.pem (Certificate Authority).
◦ rootcert.pem (certificate).
These files were placed in the principal server installation directory, by default: [ProgramFiles]\Stormshield\Stormshield Endpoint Security Server.
Enter the IP address of the main server and the ports used by the embedded web server.
NOTEBy default, ports 80 and 443 are used. These values must be changed if a web serveralready uses these ports on the target machine.
5. In the Random number generation step, click Next. The random number has already beengenerated at the installation of the main server.
6. The installation wizard details the components that will be installed. Click Next.
7. Check the installation report.
This report shows the installation status of the selected components (in this case, only theServer part).
SES - ADMINISTRATION GUIDE - V 7.23. STORMSHIELD ENDPOINT SECURITY INSTALLATION AND UNINSTALLATION
Page 48/424 ses-en-administration_guide-v7.2 - 11/30/2017
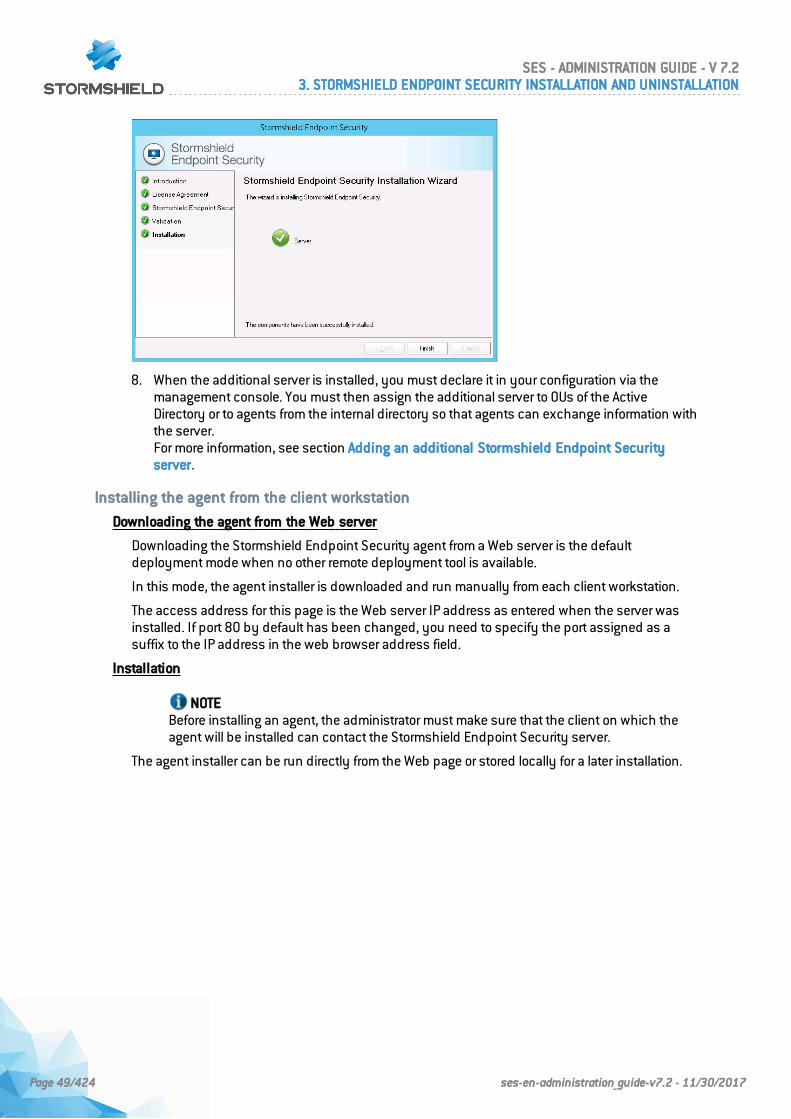
8. When the additional server is installed, you must declare it in your configuration via themanagement console. You must then assign the additional server to OUs of the ActiveDirectory or to agents from the internal directory so that agents can exchange information withthe server.For more information, see section Adding an additional Stormshield Endpoint Securityserver.
Installing the agent from the client workstation
Downloading the agent from the Web server
Downloading the Stormshield Endpoint Security agent from a Web server is the defaultdeployment mode when no other remote deployment tool is available.
In this mode, the agent installer is downloaded and run manually from each client workstation.
The access address for this page is the Web server IP address as entered when the server wasinstalled. If port 80 by default has been changed, you need to specify the port assigned as asuffix to the IP address in the web browser address field.
Installation
NOTEBefore installing an agent, the administrator must make sure that the client on which theagent will be installed can contact the Stormshield Endpoint Security server.
The agent installer can be run directly from the Web page or stored locally for a later installation.
SES - ADMINISTRATION GUIDE - V 7.23. STORMSHIELD ENDPOINT SECURITY INSTALLATION AND UNINSTALLATION
Page 49/424 ses-en-administration_guide-v7.2 - 11/30/2017
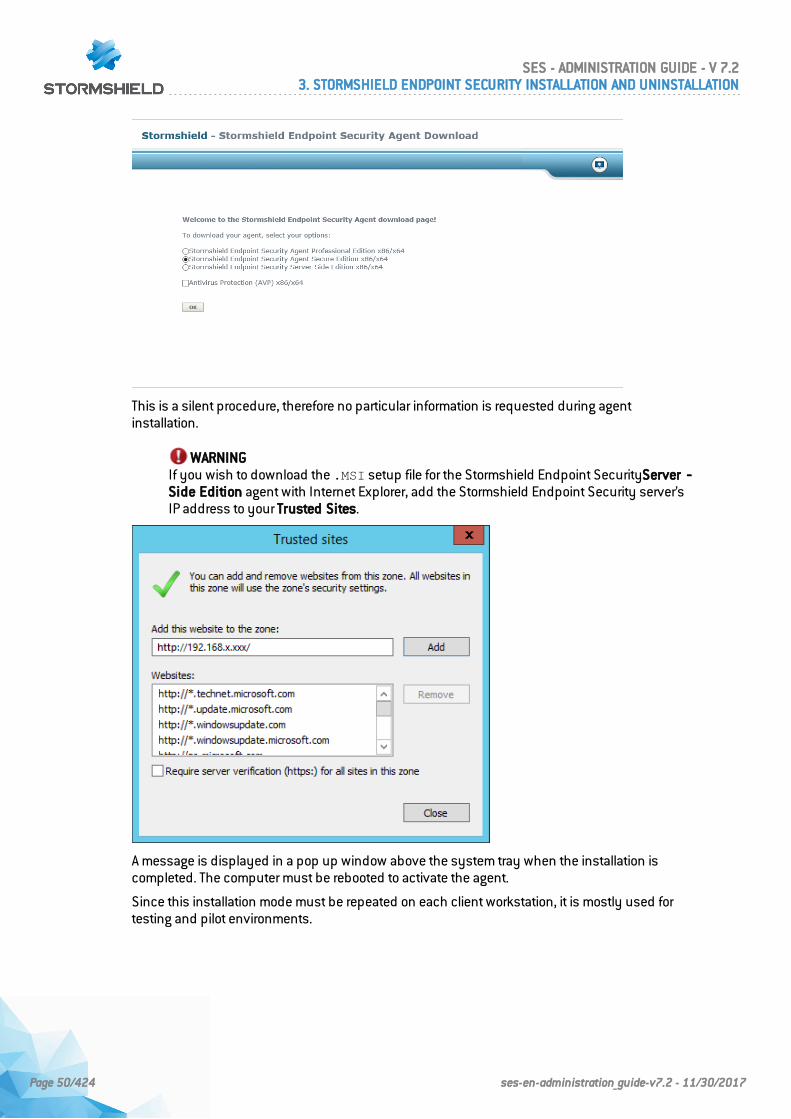
This is a silent procedure, therefore no particular information is requested during agentinstallation.
WARNINGIf you wish to download the .MSI setup file for the Stormshield Endpoint SecurityServer‐Side Edition agent with Internet Explorer, add the Stormshield Endpoint Security server’sIP address to your Trusted Sites.
A message is displayed in a pop up window above the system tray when the installation iscompleted. The computer must be rebooted to activate the agent.
Since this installation mode must be repeated on each client workstation, it is mostly used fortesting and pilot environments.
SES - ADMINISTRATION GUIDE - V 7.23. STORMSHIELD ENDPOINT SECURITY INSTALLATION AND UNINSTALLATION
Page 50/424 ses-en-administration_guide-v7.2 - 11/30/2017
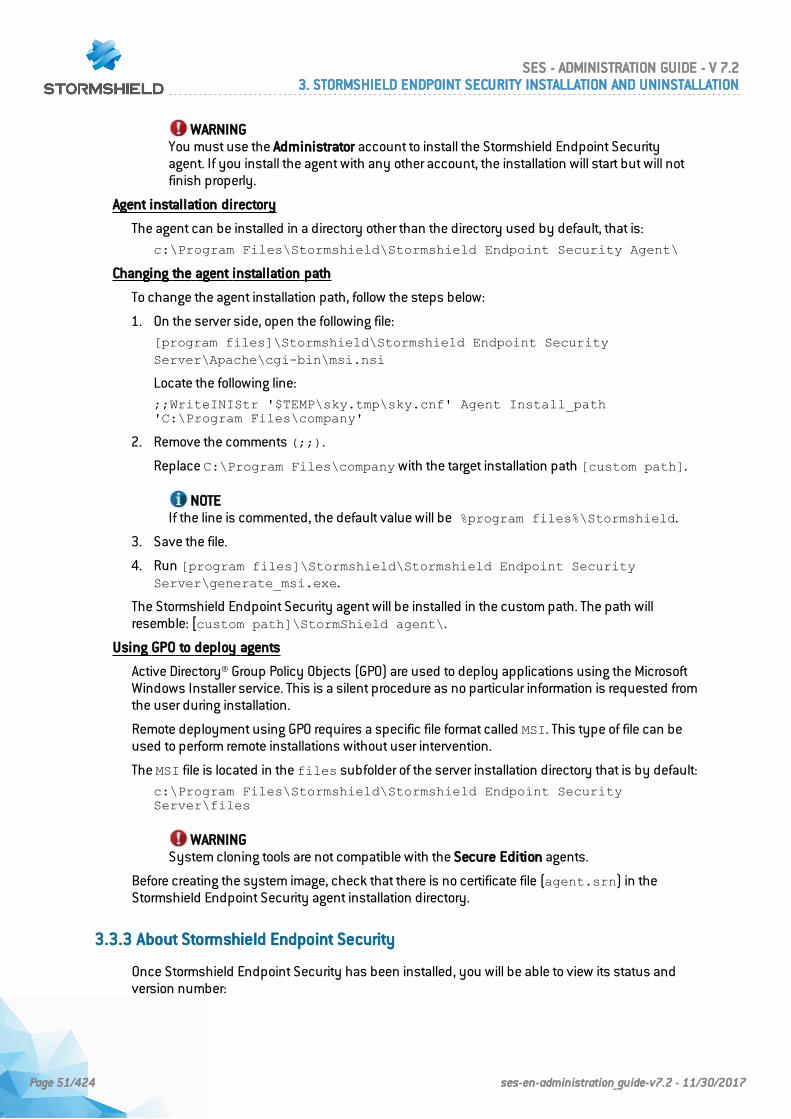
WARNINGYou must use the Administrator account to install the Stormshield Endpoint Securityagent. If you install the agent with any other account, the installation will start but will notfinish properly.
Agent installation directory
The agent can be installed in a directory other than the directory used by default, that is:c:\Program Files\Stormshield\Stormshield Endpoint Security Agent\
Changing the agent installation path
To change the agent installation path, follow the steps below:
1. On the server side, open the following file:[program files]\Stormshield\Stormshield Endpoint SecurityServer\Apache\cgi-bin\msi.nsi
Locate the following line:;;WriteINIStr '$TEMP\sky.tmp\sky.cnf' Agent Install_path'C:\Program Files\company'
2. Remove the comments (;;).
Replace C:\Program Files\company with the target installation path [custom path].
NOTEIf the line is commented, the default value will be %program files%\Stormshield.
3. Save the file.
4. Run [program files]\Stormshield\Stormshield Endpoint SecurityServer\generate_msi.exe.
The Stormshield Endpoint Security agent will be installed in the custom path. The path willresemble: [custom path]\StormShield agent\.
Using GPO to deploy agents
Active Directory® Group Policy Objects (GPO) are used to deploy applications using the MicrosoftWindows Installer service. This is a silent procedure as no particular information is requested fromthe user during installation.
Remote deployment using GPO requires a specific file format called MSI. This type of file can beused to perform remote installations without user intervention.
The MSI file is located in the files subfolder of the server installation directory that is by default:c:\Program Files\Stormshield\Stormshield Endpoint SecurityServer\files
WARNINGSystem cloning tools are not compatible with the Secure Edition agents.
Before creating the system image, check that there is no certificate file (agent.srn) in theStormshield Endpoint Security agent installation directory.
3.3.3 About Stormshield Endpoint Security
Once Stormshield Endpoint Security has been installed, you will be able to view its status andversion number:
SES - ADMINISTRATION GUIDE - V 7.23. STORMSHIELD ENDPOINT SECURITY INSTALLATION AND UNINSTALLATION
Page 51/424 ses-en-administration_guide-v7.2 - 11/30/2017
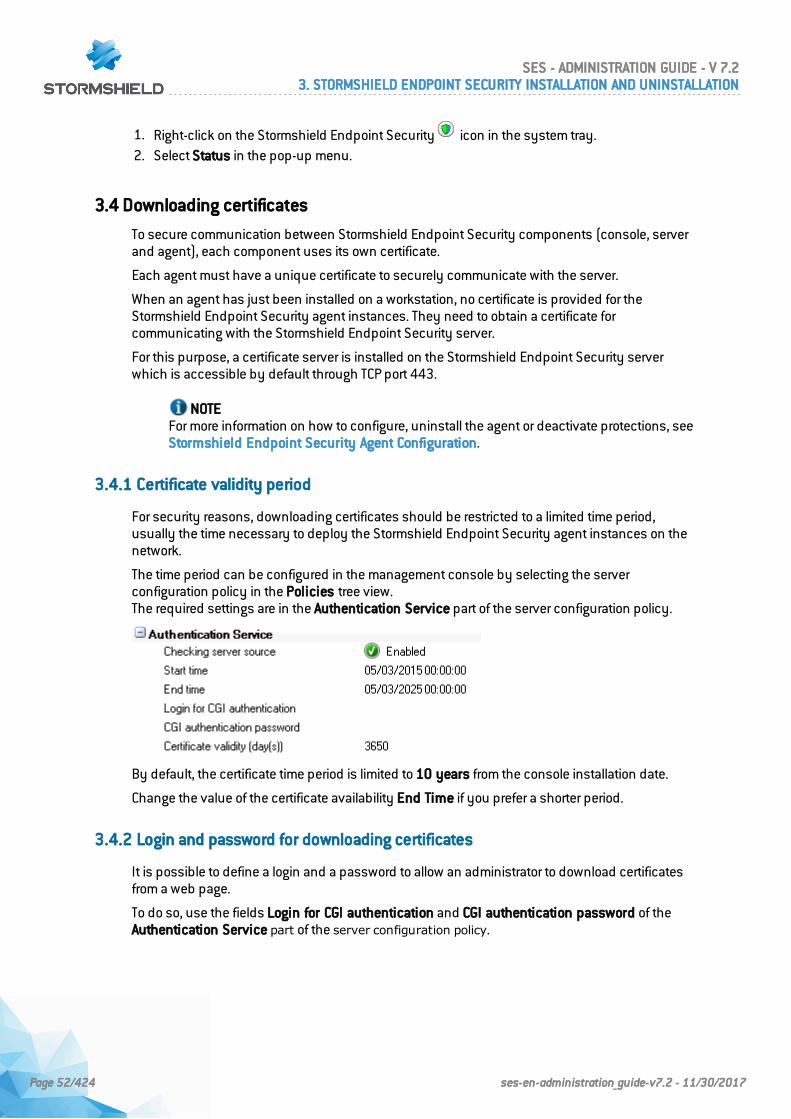
1. Right-click on the Stormshield Endpoint Security icon in the system tray.2. Select Status in the pop-up menu.
3.4 Downloading certificates
To secure communication between Stormshield Endpoint Security components (console, serverand agent), each component uses its own certificate.
Each agent must have a unique certificate to securely communicate with the server.
When an agent has just been installed on a workstation, no certificate is provided for theStormshield Endpoint Security agent instances. They need to obtain a certificate forcommunicating with the Stormshield Endpoint Security server.
For this purpose, a certificate server is installed on the Stormshield Endpoint Security serverwhich is accessible by default through TCP port 443.
NOTEFor more information on how to configure, uninstall the agent or deactivate protections, seeStormshield Endpoint Security Agent Configuration.
3.4.1 Certificate validity period
For security reasons, downloading certificates should be restricted to a limited time period,usually the time necessary to deploy the Stormshield Endpoint Security agent instances on thenetwork.
The time period can be configured in the management console by selecting the serverconfiguration policy in the Policies tree view.The required settings are in the Authentication Service part of the server configuration policy.
By default, the certificate time period is limited to 10 years from the console installation date.
Change the value of the certificate availability End Time if you prefer a shorter period.
3.4.2 Login and password for downloading certificates
It is possible to define a login and a password to allow an administrator to download certificatesfrom a web page.
To do so, use the fields Login for CGI authentication and CGI authentication password of theAuthentication Service part of the server configuration policy.
SES - ADMINISTRATION GUIDE - V 7.23. STORMSHIELD ENDPOINT SECURITY INSTALLATION AND UNINSTALLATION
Page 52/424 ses-en-administration_guide-v7.2 - 11/30/2017
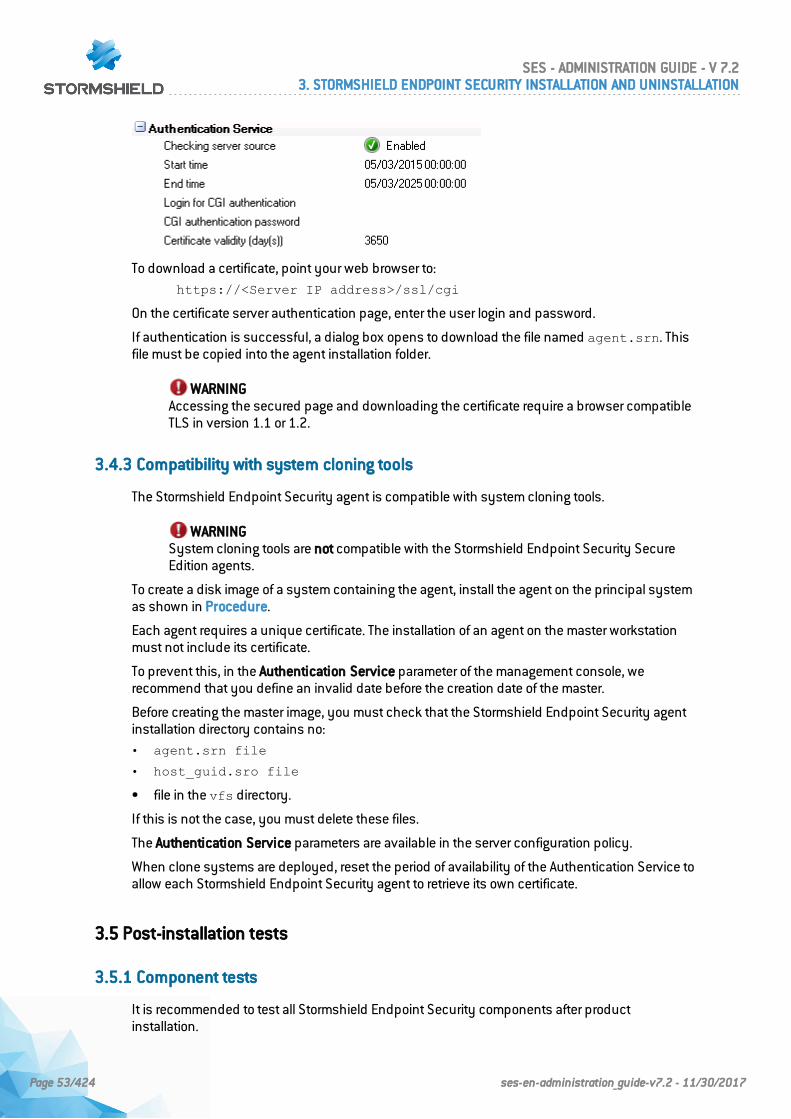
To download a certificate, point your web browser to:https://<Server IP address>/ssl/cgi
On the certificate server authentication page, enter the user login and password.
If authentication is successful, a dialog box opens to download the file named agent.srn. Thisfile must be copied into the agent installation folder.
WARNINGAccessing the secured page and downloading the certificate require a browser compatibleTLS in version 1.1 or 1.2.
3.4.3 Compatibility with system cloning tools
The Stormshield Endpoint Security agent is compatible with system cloning tools.
WARNINGSystem cloning tools are not compatible with the Stormshield Endpoint Security SecureEdition agents.
To create a disk image of a system containing the agent, install the agent on the principal systemas shown in Procedure.
Each agent requires a unique certificate. The installation of an agent on the master workstationmust not include its certificate.
To prevent this, in the Authentication Service parameter of the management console, werecommend that you define an invalid date before the creation date of the master.
Before creating the master image, you must check that the Stormshield Endpoint Security agentinstallation directory contains no:• agent.srn file
• host_guid.sro file
• file in the vfs directory.
If this is not the case, you must delete these files.
The Authentication Service parameters are available in the server configuration policy.
When clone systems are deployed, reset the period of availability of the Authentication Service toallow each Stormshield Endpoint Security agent to retrieve its own certificate.
3.5 Post-installation tests
3.5.1 Component tests
It is recommended to test all Stormshield Endpoint Security components after productinstallation.
SES - ADMINISTRATION GUIDE - V 7.23. STORMSHIELD ENDPOINT SECURITY INSTALLATION AND UNINSTALLATION
Page 53/424 ses-en-administration_guide-v7.2 - 11/30/2017
Follow the steps below to test the whole Stormshield Endpoint Security operating sequence:
1. Identify a target machine through the network description.
2. Define a simple and easily testable configuration.
3. A simple configuration example consists in preventing the NotePad application from openingany text file with a .txt extension.For more information, see Security Policies.
4. Send the configuration (and deploy the agent on the target machine if this has not alreadybeen done).
5. Check that the rule set out is applied on the target machine.
6. Check access to the events stored in the database.
Should a problem arise, see Troubleshooting.
3.6 Possible changes
3.6.1 Changing a Stormshield Endpoint Security server IP address
After installing and configuring Stormshield Endpoint Security, you may at some point need tochange the IP address of a Stormshield Endpoint Security server (hosting the web server used forinstalling new agents).
To do so, you must have at least one other server on which all agents can connect to when theserver is not available with the former IP address.
With an environment based on an Active Directory, you do not need to configure anything in themanagement console. All changes automatically apply when the Active Directory resolves theDNS name of the principal server.
With an environment based on an internal directory:
1. Add a server with the new IP address in the Stormshield Endpoint Security servers panel inthe console.
2. Assign the new server to the same agents groups.
3. Apply changes to the environment.
4. Once every agent has been updated:
◦ Remove the server with the former IP address from the Stormshield Endpoint Securityservers panel in the console.
◦ Change the IP address on the server.
5. Apply again changes to the environment.
If the server is also the antivirus server, change the antivirus server IP address in the AntivirusConfiguration part of the dynamic agent configuration. For more information, see sectionAntivirus Configuration.
You must also update the agent installer so that new agents can use the same IP address.
To do so, follow the steps below:
1. Go to the installation directory of the principal server.
2. Update all references to the IP address in the following file:
[install directory]\Apache\cgi-bin\conf.srx
SES - ADMINISTRATION GUIDE - V 7.23. STORMSHIELD ENDPOINT SECURITY INSTALLATION AND UNINSTALLATION
Page 54/424 ses-en-administration_guide-v7.2 - 11/30/2017
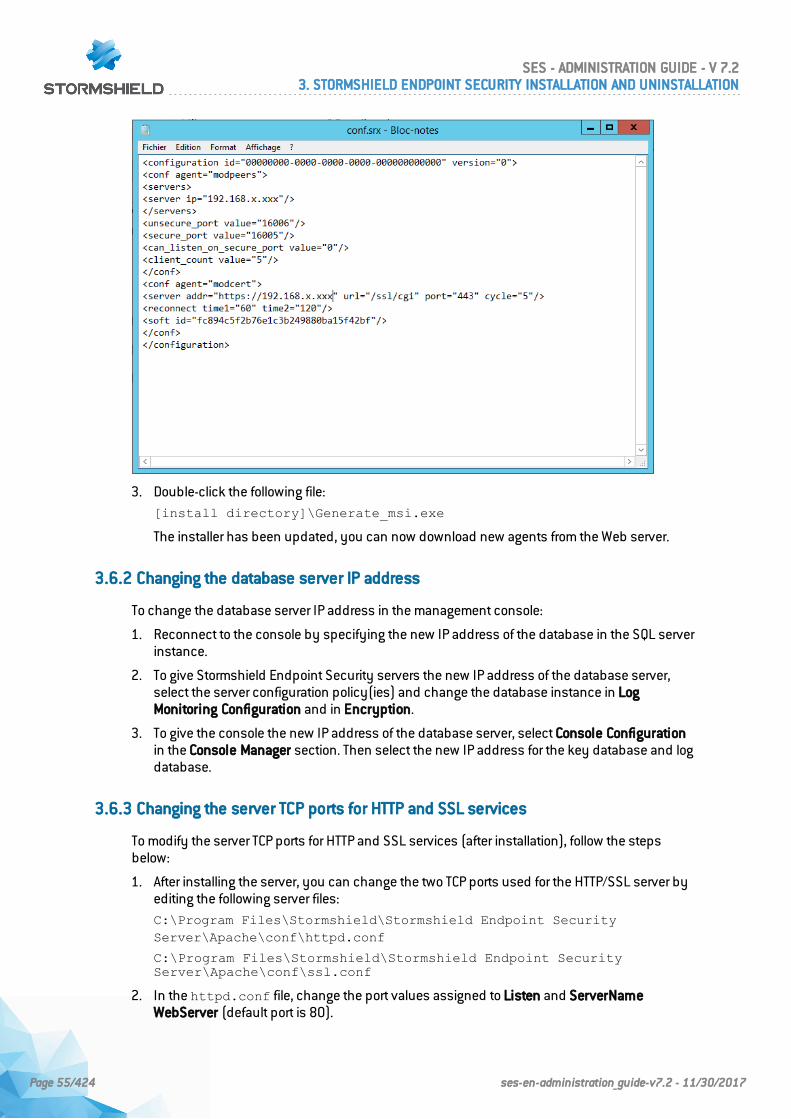
3. Double-click the following file:[install directory]\Generate_msi.exe
The installer has been updated, you can now download new agents from the Web server.
3.6.2 Changing the database server IP address
To change the database server IP address in the management console:
1. Reconnect to the console by specifying the new IP address of the database in the SQL serverinstance.
2. To give Stormshield Endpoint Security servers the new IP address of the database server,select the server configuration policy(ies) and change the database instance in LogMonitoring Configuration and in Encryption.
3. To give the console the new IP address of the database server, select Console Configurationin the Console Manager section. Then select the new IP address for the key database and logdatabase.
3.6.3 Changing the server TCP ports for HTTP and SSL services
To modify the server TCP ports for HTTP and SSL services (after installation), follow the stepsbelow:
1. After installing the server, you can change the two TCP ports used for the HTTP/SSL server byediting the following server files:C:\Program Files\Stormshield\Stormshield Endpoint SecurityServer\Apache\conf\httpd.conf
C:\Program Files\Stormshield\Stormshield Endpoint SecurityServer\Apache\conf\ssl.conf
2. In the httpd.conf file, change the port values assigned to Listen and ServerNameWebServer (default port is 80).
SES - ADMINISTRATION GUIDE - V 7.23. STORMSHIELD ENDPOINT SECURITY INSTALLATION AND UNINSTALLATION
Page 55/424 ses-en-administration_guide-v7.2 - 11/30/2017

3. In the ssl.conf file, change the port values assigned to Listen, ServerName WebServerand VirtualHost (default port is 443).
4. Restart the server.
Now, you must update the agent installer for it to take into account the new TCP ports of theserver.
1. Go to the default installation directory of the server:C:\Program Files\Stormshield\Stormshield Endpoint SecurityServer\Apache\cgi-bin\
2. In the conf.srx file, change the TCP port value (default port is 443).
3. Double-click the following file:C:\Program Files\Stormshield\Stormshield Endpoint SecurityServer\Generate_msi.exe
The installer has been updated, you can now download new agents from the Web server.
3.7 Uninstalling components
3.7.1 Uninstalling the server and the console
The management console and the Stormshield Endpoint Security servers can be uninstalledusing the uninstall tools accessible from:
• The Start menu on the systems that host these components.
• The Windows Add/Remove Programs service accessible via the control panel.
3.7.2 Uninstalling the agent
The Stormshield Endpoint Security agent can be uninstalled using the program file SRend.exelocated in the installation directory.
SES - ADMINISTRATION GUIDE - V 7.23. STORMSHIELD ENDPOINT SECURITY INSTALLATION AND UNINSTALLATION
Page 56/424 ses-en-administration_guide-v7.2 - 11/30/2017
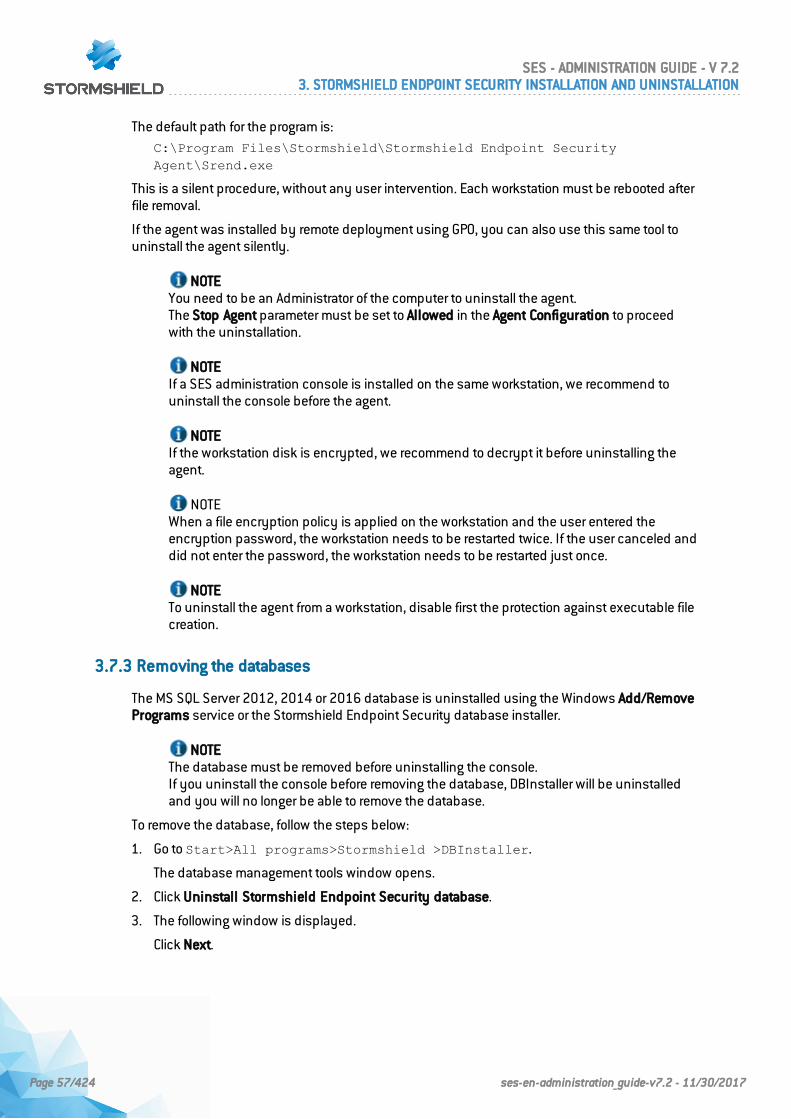
The default path for the program is:C:\Program Files\Stormshield\Stormshield Endpoint SecurityAgent\Srend.exe
This is a silent procedure, without any user intervention. Each workstation must be rebooted afterfile removal.
If the agent was installed by remote deployment using GPO, you can also use this same tool touninstall the agent silently.
NOTEYou need to be an Administrator of the computer to uninstall the agent.The Stop Agent parameter must be set to Allowed in the Agent Configuration to proceedwith the uninstallation.
NOTEIf a SES administration console is installed on the same workstation, we recommend touninstall the console before the agent.
NOTEIf the workstation disk is encrypted, we recommend to decrypt it before uninstalling theagent.
NOTEWhen a file encryption policy is applied on the workstation and the user entered theencryption password, the workstation needs to be restarted twice. If the user canceled anddid not enter the password, the workstation needs to be restarted just once.
NOTETo uninstall the agent from a workstation, disable first the protection against executable filecreation.
3.7.3 Removing the databases
The MS SQL Server 2012, 2014 or 2016 database is uninstalled using the Windows Add/RemovePrograms service or the Stormshield Endpoint Security database installer.
NOTEThe database must be removed before uninstalling the console.If you uninstall the console before removing the database, DBInstaller will be uninstalledand you will no longer be able to remove the database.
To remove the database, follow the steps below:
1. Go to Start>All programs>Stormshield >DBInstaller.
The database management tools window opens.
2. Click Uninstall Stormshield Endpoint Security database.
3. The following window is displayed.
Click Next.
SES - ADMINISTRATION GUIDE - V 7.23. STORMSHIELD ENDPOINT SECURITY INSTALLATION AND UNINSTALLATION
Page 57/424 ses-en-administration_guide-v7.2 - 11/30/2017
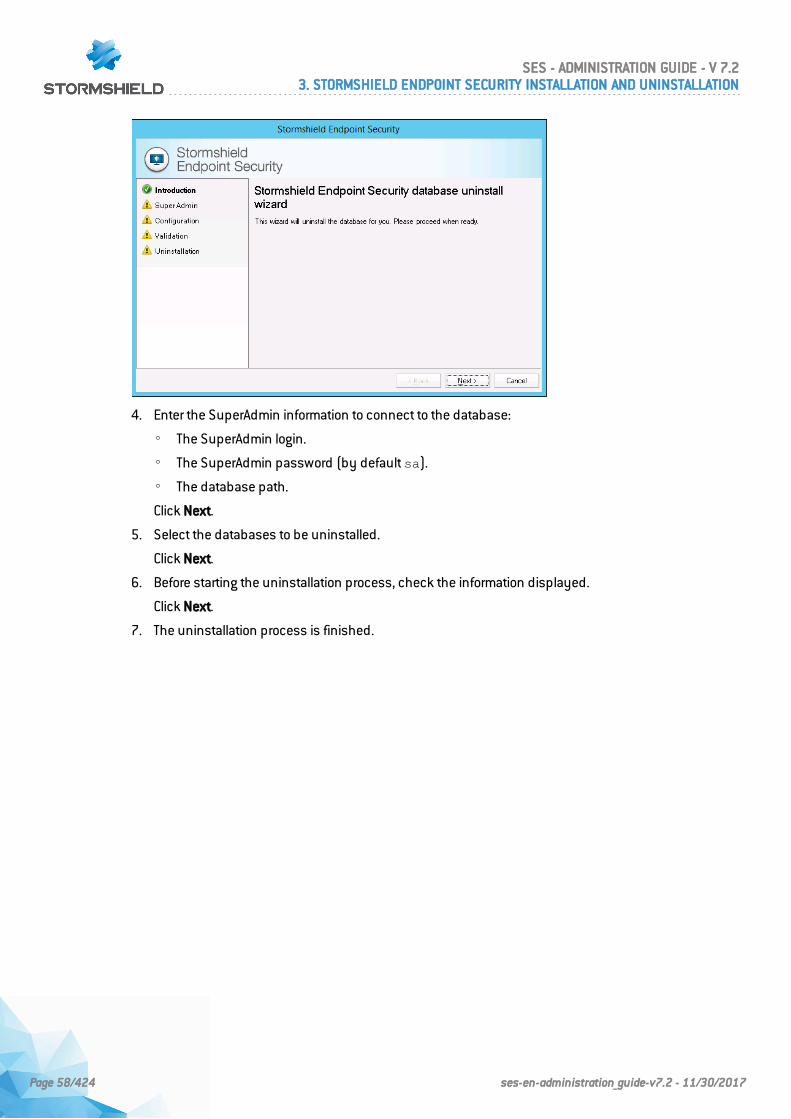
4. Enter the SuperAdmin information to connect to the database:
◦ The SuperAdmin login.
◦ The SuperAdmin password (by default sa).
◦ The database path.
Click Next.
5. Select the databases to be uninstalled.
Click Next.
6. Before starting the uninstallation process, check the information displayed.
Click Next.
7. The uninstallation process is finished.
SES - ADMINISTRATION GUIDE - V 7.23. STORMSHIELD ENDPOINT SECURITY INSTALLATION AND UNINSTALLATION
Page 58/424 ses-en-administration_guide-v7.2 - 11/30/2017

4. Migrating and Updating Stormshield EndpointSecurity
This chapter describes the procedures for migrating from StormShield 6.0 and StormShield 7.1 toStormshield Endpoint Security 7.2 and the procedures for updating Stormshield EndpointSecurity 7.2:
If you need to migrate StormShield from a version lower than version 6.0/10, the automatic policymigration will not be able to import all settings. You are strongly advised to manually recreate thevarious policies and configurations in the version 7.2.
You need a MS SQL Server 2012, 2014 or 2016 server for your 7.2 database. Then you needeither to update your version of MS SQL Server, or install a new server.
NOTEThe version 7.2 of Stormshield Endpoint Security is the first version named with the brandStormshield. The software installation paths have been thus updated.Stormshield Endpoint Security 7.2 is installed by default in the directories:-C:\Program Files\Stormshield\Stormshield Endpoint Security Server-C:\Program Files\Stormshield\Stormshield Endpoint Security Management Console-C:\Program Files\Stormshield\Stormshield Endpoint Security Agent
If migrating from previous versions, directories remained the same as they cannot bemoved. A version 7.2 updated from version 7.1 remains in the directories:- C:\Program Files\SkyRecon\StormShield Server- C:\Program Files\SkyRecon\SkyRecon Management Console- C:\Program Files\SkyRecon\StormShield Agent
4.1 Migrating StormShield 6.0 to version Stormshield Endpoint Security 7.2
4.1.1 Complete migration
This migration mode allows migrating every agent from a 6.0 environment to the version 7.2.
As the configuration of the console may take some time (7.2 environment setting), werecommend that you continue using an operational 6.0 console in the meantime so that you canupdate the policies and configurations applied to the agents during the migration if needed.
Until the 7.2 server and agent updates are sent to the Stormshield Endpoint Security servers, the6.0 console will be able to update policies applied on the agents of the existing organization.
SES - ADMINISTRATION GUIDE - V 7.24. MIGRATING AND UPDATING STORMSHIELD ENDPOINT SECURITY
Page 59/424 ses-en-administration_guide-v7.2 - 11/30/2017
WARNINGWe recommend you to backup each database before migrating StormShield. TheStormshield Endpoint Security configuration wizard allows backing up configuration andkey databases with the maintenance menus.
SES - ADMINISTRATION GUIDE - V 7.24. MIGRATING AND UPDATING STORMSHIELD ENDPOINT SECURITY
Page 60/424 ses-en-administration_guide-v7.2 - 11/30/2017
WARNINGOnce the 7.2 console is installed, the DBInstaller will not allow backing up/restoring theconfiguration database of the 6.0 environment. To do this, you will need to use a 6.0console depending on the previous migrated version. The DBInstaller provided with the 7.2console only allows performing maintenance operations on the configuration databasefrom the 7.2 environment. The 6.0 database must be therefore be backed up beforemigrating the console.
SES - ADMINISTRATION GUIDE - V 7.24. MIGRATING AND UPDATING STORMSHIELD ENDPOINT SECURITY
Page 61/424 ses-en-administration_guide-v7.2 - 11/30/2017
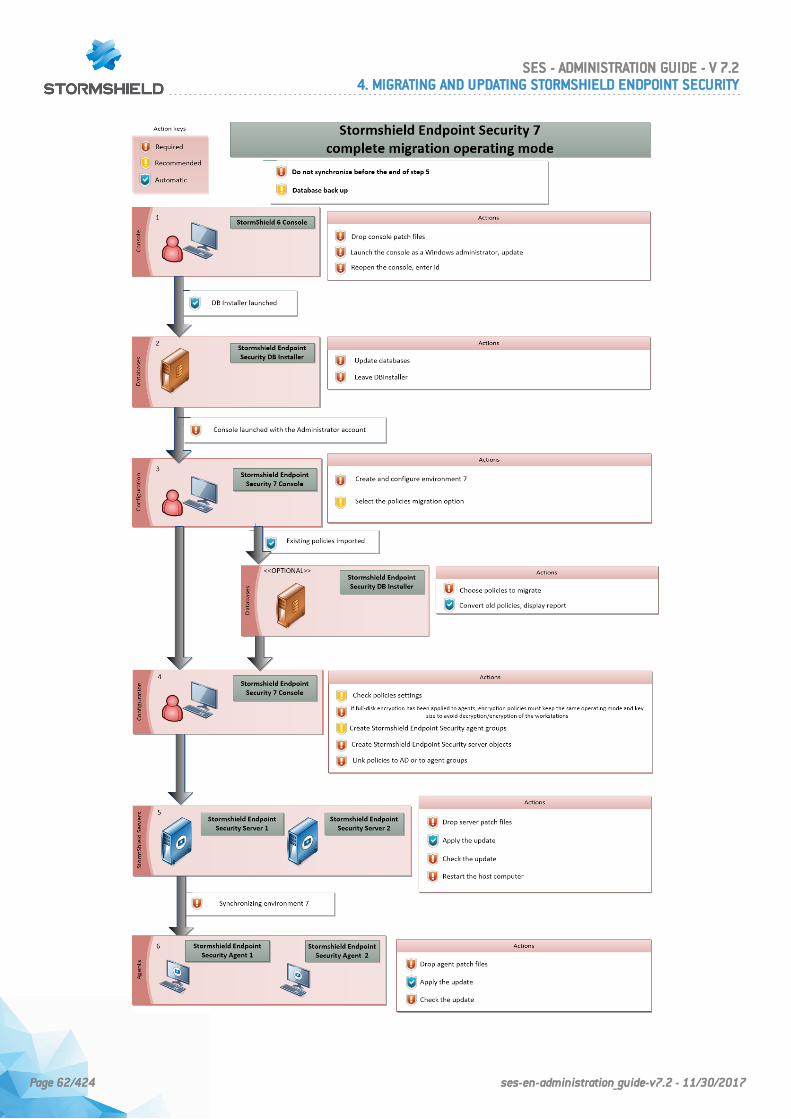
SES - ADMINISTRATION GUIDE - V 7.24. MIGRATING AND UPDATING STORMSHIELD ENDPOINT SECURITY
Page 62/424 ses-en-administration_guide-v7.2 - 11/30/2017
Migrating the management console
The complete migration process starts with the installation of one or more 7.2 managementconsoles. To install management consoles, you can either reinstall the existing consoles, updatethe consoles or install a new console.
Reinstalling
This option consists in uninstalling the console already deployed on the workstation first, andthen installing a console the normal way with the Stormshield Endpoint Security setup bychecking the Console only box as the installation type.
Updating
This option consists of using the console update mechanism by dropping the two files below inthe patchs folder of the Stormshield Endpoint Security server (XXX being the current version):skyreconconsole_win32_7.XXX.srh
skyreconconsole_win32_7.XXX.sru
After that, you need to restart the console as an administrator (administrator rights are required toinstall the update), click the "?" menu, select the update search and accept the proposedinstallation.
New installation
Install the console as usual on a new workstation by using the Stormshield Endpoint Securitysetup and checking the Console Only option as the installation type.
WARNINGThe 7.2 management console uses .NET Framework n.n.n: Ensure that it is installed beforethe console is updated.
Migrating databases and the environment
When the console has been updated, open it again. A user must log in. The databaseconfiguration wizard automatically opens.
Database setup wizard
The database setup wizard allows setting up and applying updates of the structure and contentof the configuration, alerts and keys databases.
For more information on installing the 7.2 environment, refer to section Updating StormshieldEndpoint Security databases
When updating databases, all the users from the 6.0 console will be migrated to the newconfiguration database. As roles are not compatible with 7.2roles, all users other than the mainadministrator will then take on the public role.
New 7.2 environment configuration
After the configuration of the databases, restart the console in order to configure the new 7.2environment.
For more information on installing the 7.2 environment, refer to section Environmentconfiguration wizard.
Migrating 6.0 policies to the new configuration database
After configuring the console, you will be able to migrate policies and configurations created inversion 6.0. All settings from the different policies will then be preserved.
SES - ADMINISTRATION GUIDE - V 7.24. MIGRATING AND UPDATING STORMSHIELD ENDPOINT SECURITY
Page 63/424 ses-en-administration_guide-v7.2 - 11/30/2017
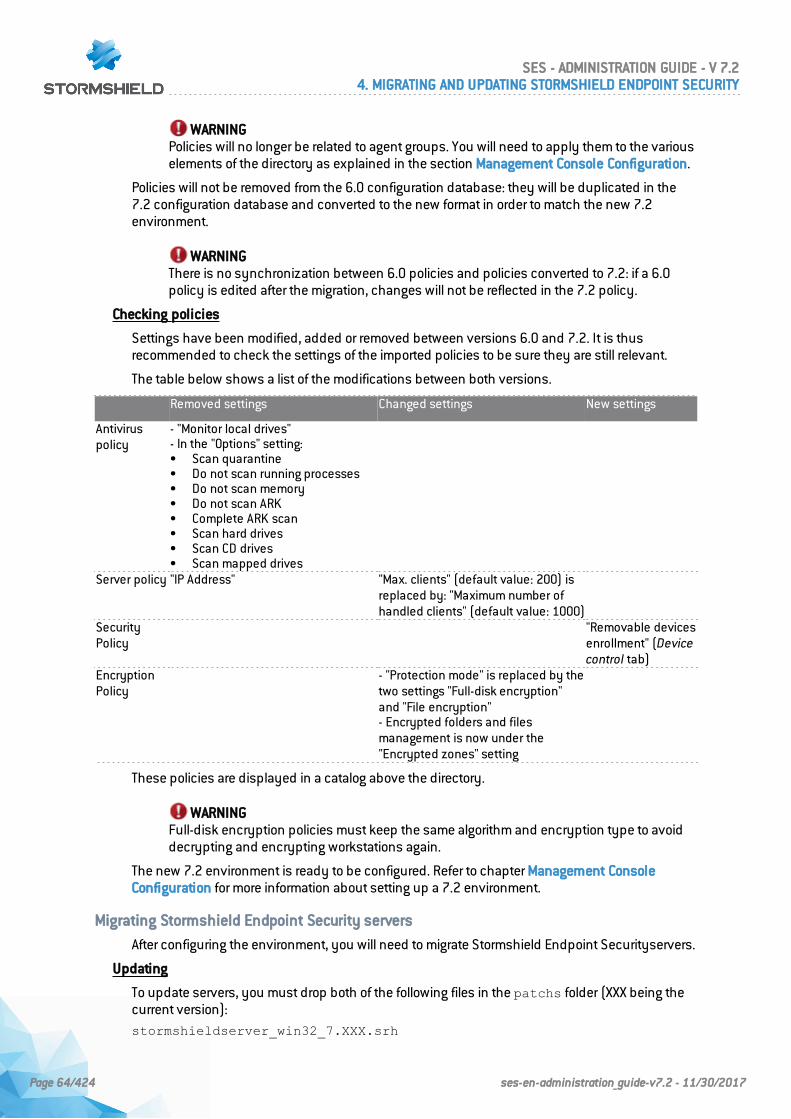
WARNINGPolicies will no longer be related to agent groups. You will need to apply them to the variouselements of the directory as explained in the section Management Console Configuration.
Policies will not be removed from the 6.0 configuration database: they will be duplicated in the7.2 configuration database and converted to the new format in order to match the new 7.2environment.
WARNINGThere is no synchronization between 6.0 policies and policies converted to 7.2: if a 6.0policy is edited after the migration, changes will not be reflected in the 7.2 policy.
Checking policies
Settings have been modified, added or removed between versions 6.0 and 7.2. It is thusrecommended to check the settings of the imported policies to be sure they are still relevant.
The table below shows a list of the modifications between both versions.
Removed settings Changed settings New settings
Antiviruspolicy
- "Monitor local drives"- In the "Options" setting:• Scan quarantine• Do not scan running processes• Do not scan memory• Do not scan ARK• Complete ARK scan• Scan hard drives• Scan CD drives• Scan mapped drives
Server policy "IP Address" "Max. clients" (default value: 200) isreplaced by: "Maximum number ofhandled clients" (default value: 1000)
SecurityPolicy
"Removable devicesenrollment" (Devicecontrol tab)
EncryptionPolicy
- "Protection mode" is replaced by thetwo settings "Full-disk encryption"and "File encryption"- Encrypted folders and filesmanagement is now under the"Encrypted zones" setting
These policies are displayed in a catalog above the directory.
WARNINGFull-disk encryption policies must keep the same algorithm and encryption type to avoiddecrypting and encrypting workstations again.
The new 7.2 environment is ready to be configured. Refer to chapter Management ConsoleConfiguration for more information about setting up a 7.2 environment.
Migrating Stormshield Endpoint Security servers
After configuring the environment, you will need to migrate Stormshield Endpoint Securityservers.
Updating
To update servers, you must drop both of the following files in the patchs folder (XXX being thecurrent version):stormshieldserver_win32_7.XXX.srh
SES - ADMINISTRATION GUIDE - V 7.24. MIGRATING AND UPDATING STORMSHIELD ENDPOINT SECURITY
Page 64/424 ses-en-administration_guide-v7.2 - 11/30/2017
stormshieldserver_win32_7.XXX.sru
The server will update after the period of time defined in the Check update interval setting in theserver configuration.
You can also drop these two files in the folder defined in the Updates download folder parameterduring the configuration of the server. You need to create a file named version.srowhich onlycontains the version number of updates to download, in a “7.216” format.
Checking version
During the server update, the file update.sro is created in the patchs folder of the server. Thefile is deleted at the end of the configuration.
To check the server version, open the version.sro file in the conf folder. You can also see theserver version in the Dashboard > Software logs panel of the management console. A logdisplays with the status 'SERVER_VERSION'.
Restarting
Once the update is completed, shut down and restart the machine hosting the server. The rebootis required for the update of the Stormshield Endpoint Security server service(srservice.exe).
Application of changes to the environment
After updating and restarting the servers, restart the management console and apply changes tothe environment so that the policies will be properly applied to all the agents. This is a veryimportant step to be sure that the latest policies are applied to the agents.
Updating agents
When the Stormshield Endpoint Security servers are updated and when changes are applied,you need to update the agents currently deployed to end the migration process.
To update agents, drop the two files below in the patchs folder of the servers (XXX is the currentversion):stormshieldagent_win32_7.XXX.srh
stormshieldagent_win32_7.XXX.sru
The server will then propose the update to the agents connected to the server. The update will beapplied after each agent restart.
Checking version
To check whether the agent was successfully updated, open the agent interface by double-clicking the Stormshield Endpoint Security icon in the taskbar and check the version number atthe bottom right.
Update successes or failures are also recorded in the logs available from the interface.
Specificity for encrypted agents (full disk encryption)
When migrating from a version 7.2.06 or higher, you have to change the USER password onencrypted workstations. If any, GUEST and AUTOBOOT accounts are automatically disabled onthese workstations and the password of the ADMIN account is changed.
4.1.2 Partial migration
This migration mode enables to progressive migration of agents from 6.0 to 7.2.
You will be able to keep both 6.0 and 7.2 environments during the migration period.
To perform a partial migration, the workstation must be new.
SES - ADMINISTRATION GUIDE - V 7.24. MIGRATING AND UPDATING STORMSHIELD ENDPOINT SECURITY
Page 65/424 ses-en-administration_guide-v7.2 - 11/30/2017

WARNINGWe recommend you to backup each database before migrating StormShield. TheStormshield Endpoint Security configuration wizard allows backing up configuration andkey databases with the maintenance menus.
SES - ADMINISTRATION GUIDE - V 7.24. MIGRATING AND UPDATING STORMSHIELD ENDPOINT SECURITY
Page 66/424 ses-en-administration_guide-v7.2 - 11/30/2017
WARNINGOnce the 7.2 console is installed, the DBInstaller will not allow backing up/restoring theconfiguration database of the 6.0 environment. To do this, you will need to use a 6.0console. The DBInstaller provided with the 7.2 console only allows performing maintenanceoperations on the configuration database from the 7.2 environment. The 6.0 database mustbe backed up before migrating the console.
SES - ADMINISTRATION GUIDE - V 7.24. MIGRATING AND UPDATING STORMSHIELD ENDPOINT SECURITY
Page 67/424 ses-en-administration_guide-v7.2 - 11/30/2017
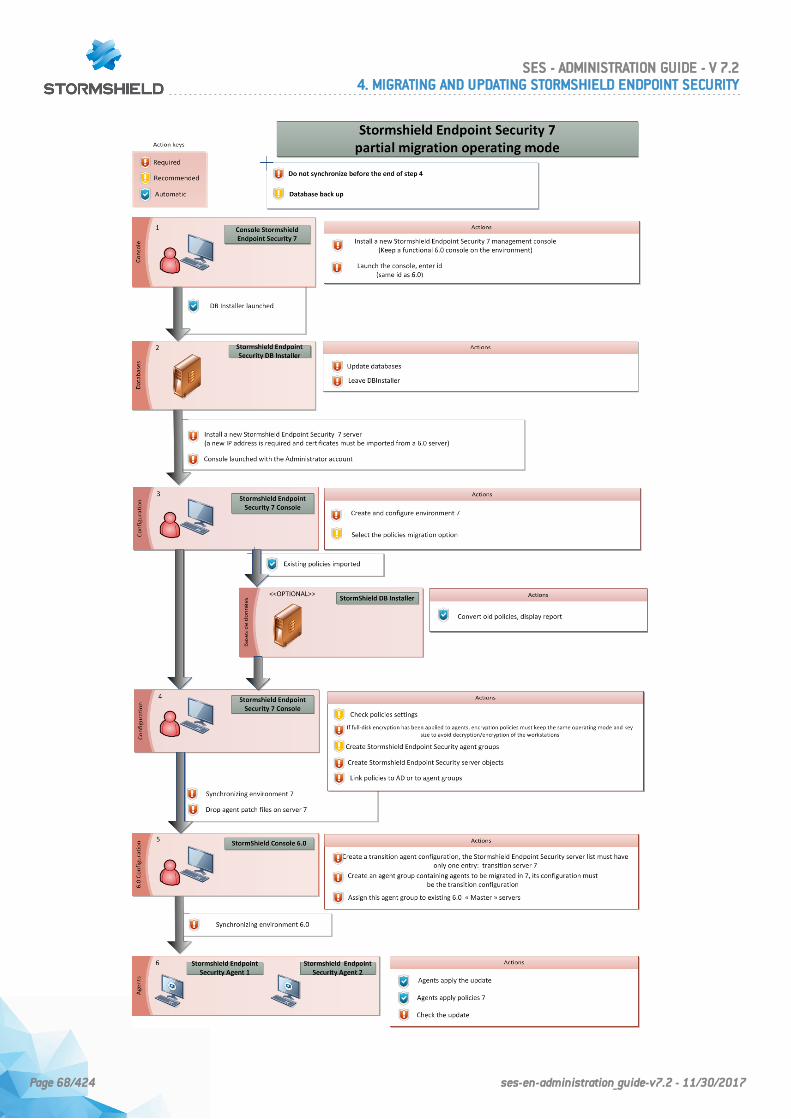
SES - ADMINISTRATION GUIDE - V 7.24. MIGRATING AND UPDATING STORMSHIELD ENDPOINT SECURITY
Page 68/424 ses-en-administration_guide-v7.2 - 11/30/2017
Migrating the management console
The partial migration process starts with the installation of one or more 7.2 management consoles.To install management consoles, you can either reinstall the existing consoles, update theconsoles or install a new console.
WARNINGFor a partial migration, make sure your 6.0 environment is functional. You need at least one6.0 management console.
Reinstalling
This option consists in uninstalling the console already deployed on the workstation first, andthen installing a console the normal way with the Stormshield Endpoint Security setup bychecking the Console only box as the installation type.
Updating
This option consists of using the console update mechanism by dropping the two files below inthe patchs folder of the Stormshield Endpoint Security server (XXX being the current version):skyreconconsole_win32_7.XXX.srh
skyreconconsole_win32_7.XXX.sru
After that, you need to restart the console, click the "?" menu, select the update search andaccept the proposed installation.
New installation
Install the console as usual on a new workstation by using the Stormshield Endpoint Securitysetup and checking the Console Only option as the installation type.
WARNINGThe 7.2 management console uses .NET Framework n.n.n: Ensure that it is installed beforethe console is updated.
Migrating databases
When the console has been updated, open it again. A user must log in. The databasesetup/installation wizard automatically opens.
Database setup wizard
The database setup wizard allows setting up and applying updates of the structure and contentof the configuration, alerts and keys databases.
For more information on installing the 7.2 environment, refer to section Updating StormshieldEndpoint Security databases
When updating databases, all the users from the 6.0 console are migrated to the newconfiguration database.
WARNINGThe console users' roles other than the main administrator role (shown in bold in the list ofusers) will not be kept. All console users will have the public role in the 7.2 environment.The main administrator is required to create new 7.2 roles and to assign users to theseroles.
Migrating Stormshield Endpoint Security servers
After updating databases, you need to install a new 7.2 server, which is a "transition" server, inorder to continue the partial migration process.
SES - ADMINISTRATION GUIDE - V 7.24. MIGRATING AND UPDATING STORMSHIELD ENDPOINT SECURITY
Page 69/424 ses-en-administration_guide-v7.2 - 11/30/2017
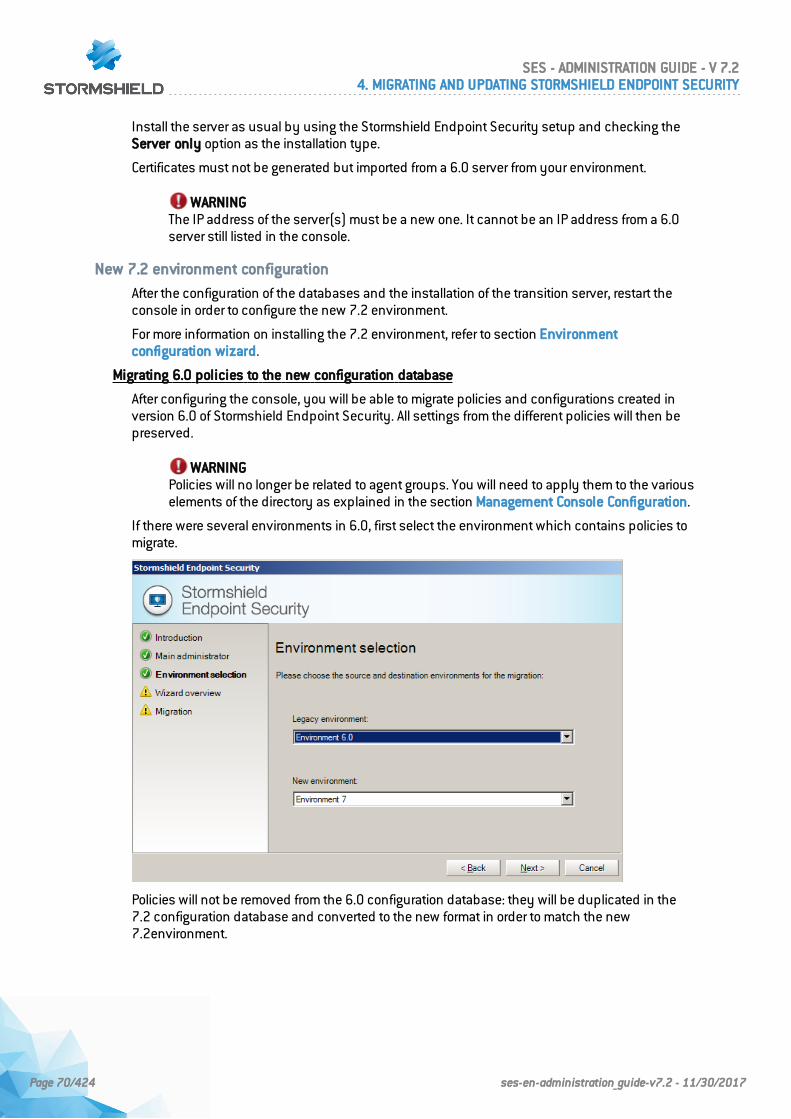
Install the server as usual by using the Stormshield Endpoint Security setup and checking theServer only option as the installation type.
Certificates must not be generated but imported from a 6.0 server from your environment.
WARNINGThe IP address of the server(s) must be a new one. It cannot be an IP address from a 6.0server still listed in the console.
New 7.2 environment configuration
After the configuration of the databases and the installation of the transition server, restart theconsole in order to configure the new 7.2 environment.
For more information on installing the 7.2 environment, refer to section Environmentconfiguration wizard.
Migrating 6.0 policies to the new configuration database
After configuring the console, you will be able to migrate policies and configurations created inversion 6.0 of Stormshield Endpoint Security. All settings from the different policies will then bepreserved.
WARNINGPolicies will no longer be related to agent groups. You will need to apply them to the variouselements of the directory as explained in the section Management Console Configuration.
If there were several environments in 6.0, first select the environment which contains policies tomigrate.
Policies will not be removed from the 6.0 configuration database: they will be duplicated in the7.2 configuration database and converted to the new format in order to match the new7.2environment.
SES - ADMINISTRATION GUIDE - V 7.24. MIGRATING AND UPDATING STORMSHIELD ENDPOINT SECURITY
Page 70/424 ses-en-administration_guide-v7.2 - 11/30/2017
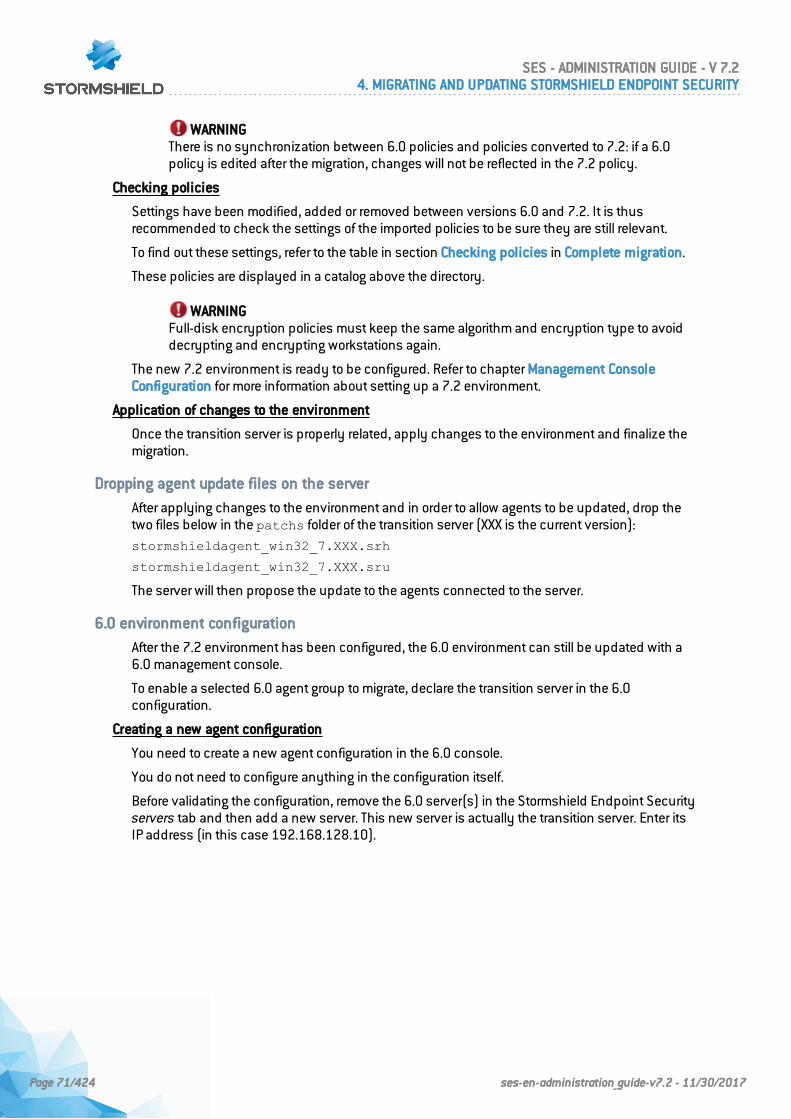
WARNINGThere is no synchronization between 6.0 policies and policies converted to 7.2: if a 6.0policy is edited after the migration, changes will not be reflected in the 7.2 policy.
Checking policies
Settings have been modified, added or removed between versions 6.0 and 7.2. It is thusrecommended to check the settings of the imported policies to be sure they are still relevant.
To find out these settings, refer to the table in section Checking policies in Complete migration.
These policies are displayed in a catalog above the directory.
WARNINGFull-disk encryption policies must keep the same algorithm and encryption type to avoiddecrypting and encrypting workstations again.
The new 7.2 environment is ready to be configured. Refer to chapter Management ConsoleConfiguration for more information about setting up a 7.2 environment.
Application of changes to the environment
Once the transition server is properly related, apply changes to the environment and finalize themigration.
Dropping agent update files on the server
After applying changes to the environment and in order to allow agents to be updated, drop thetwo files below in the patchs folder of the transition server (XXX is the current version):stormshieldagent_win32_7.XXX.srh
stormshieldagent_win32_7.XXX.sru
The server will then propose the update to the agents connected to the server.
6.0 environment configuration
After the 7.2 environment has been configured, the 6.0 environment can still be updated with a6.0 management console.
To enable a selected 6.0 agent group to migrate, declare the transition server in the 6.0configuration.
Creating a new agent configuration
You need to create a new agent configuration in the 6.0 console.
You do not need to configure anything in the configuration itself.
Before validating the configuration, remove the 6.0 server(s) in the Stormshield Endpoint Securityservers tab and then add a new server. This new server is actually the transition server. Enter itsIP address (in this case 192.168.128.10).
SES - ADMINISTRATION GUIDE - V 7.24. MIGRATING AND UPDATING STORMSHIELD ENDPOINT SECURITY
Page 71/424 ses-en-administration_guide-v7.2 - 11/30/2017
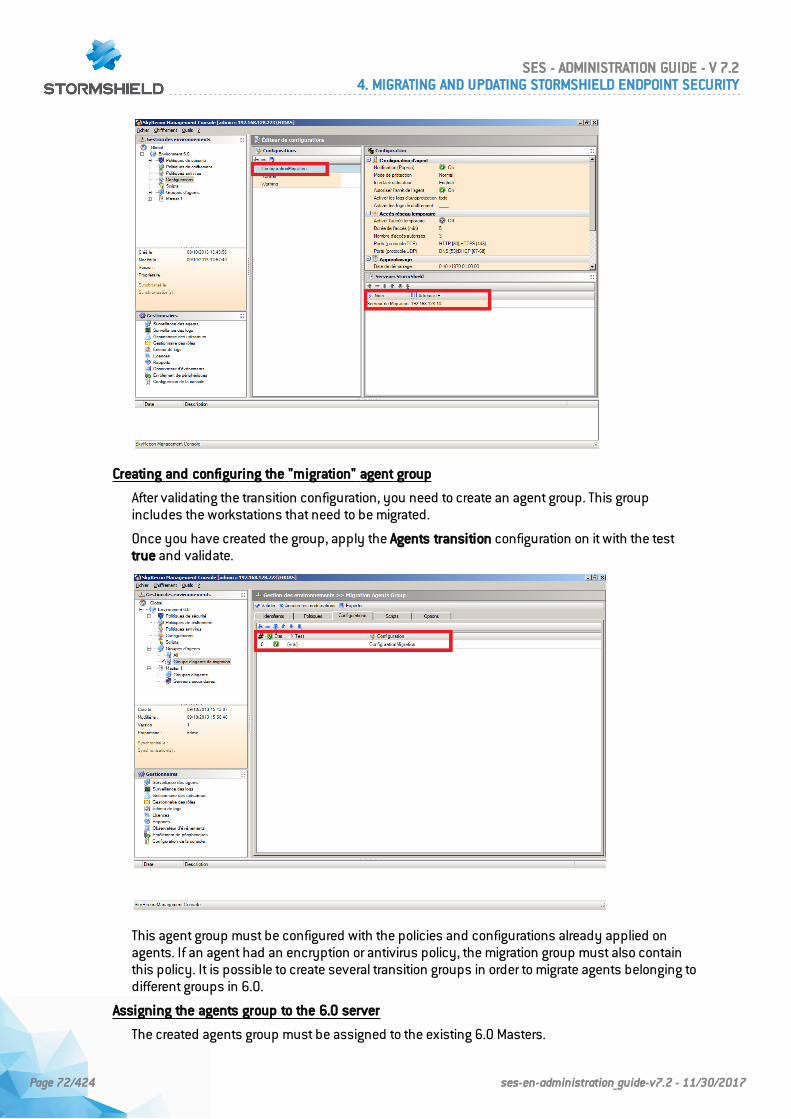
Creating and configuring the "migration" agent group
After validating the transition configuration, you need to create an agent group. This groupincludes the workstations that need to be migrated.
Once you have created the group, apply the Agents transition configuration on it with the testtrue and validate.
This agent group must be configured with the policies and configurations already applied onagents. If an agent had an encryption or antivirus policy, the migration group must also containthis policy. It is possible to create several transition groups in order to migrate agents belonging todifferent groups in 6.0.
Assigning the agents group to the 6.0 server
The created agents group must be assigned to the existing 6.0 Masters.
SES - ADMINISTRATION GUIDE - V 7.24. MIGRATING AND UPDATING STORMSHIELD ENDPOINT SECURITY
Page 72/424 ses-en-administration_guide-v7.2 - 11/30/2017
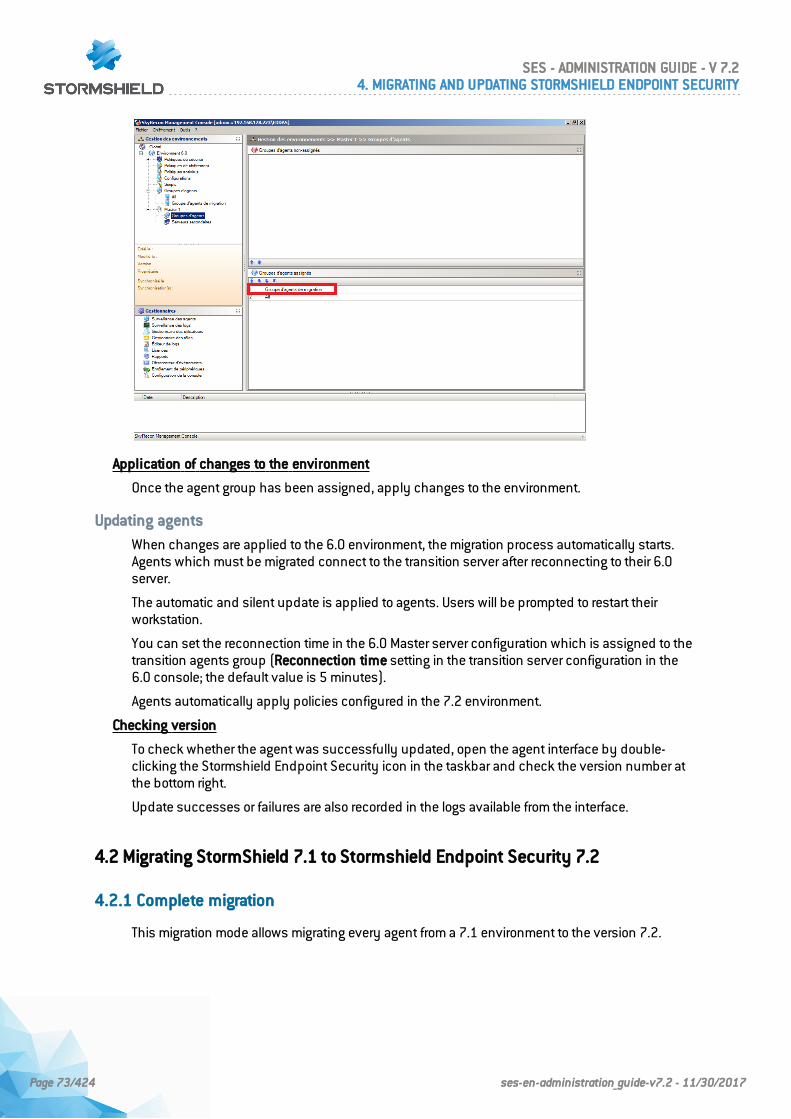
Application of changes to the environment
Once the agent group has been assigned, apply changes to the environment.
Updating agents
When changes are applied to the 6.0 environment, the migration process automatically starts.Agents which must be migrated connect to the transition server after reconnecting to their 6.0server.
The automatic and silent update is applied to agents. Users will be prompted to restart theirworkstation.
You can set the reconnection time in the 6.0 Master server configuration which is assigned to thetransition agents group (Reconnection time setting in the transition server configuration in the6.0 console; the default value is 5 minutes).
Agents automatically apply policies configured in the 7.2 environment.
Checking version
To check whether the agent was successfully updated, open the agent interface by double-clicking the Stormshield Endpoint Security icon in the taskbar and check the version number atthe bottom right.
Update successes or failures are also recorded in the logs available from the interface.
4.2 Migrating StormShield 7.1 to Stormshield Endpoint Security 7.2
4.2.1 Complete migration
This migration mode allows migrating every agent from a 7.1 environment to the version 7.2.
SES - ADMINISTRATION GUIDE - V 7.24. MIGRATING AND UPDATING STORMSHIELD ENDPOINT SECURITY
Page 73/424 ses-en-administration_guide-v7.2 - 11/30/2017

WARNINGWe recommend you to backup each database before migrating StormShield. TheStormshield Endpoint Security configuration wizard allows backing up configuration andkey databases with the maintenance menus.
SES - ADMINISTRATION GUIDE - V 7.24. MIGRATING AND UPDATING STORMSHIELD ENDPOINT SECURITY
Page 74/424 ses-en-administration_guide-v7.2 - 11/30/2017

SES - ADMINISTRATION GUIDE - V 7.24. MIGRATING AND UPDATING STORMSHIELD ENDPOINT SECURITY
Page 75/424 ses-en-administration_guide-v7.2 - 11/30/2017
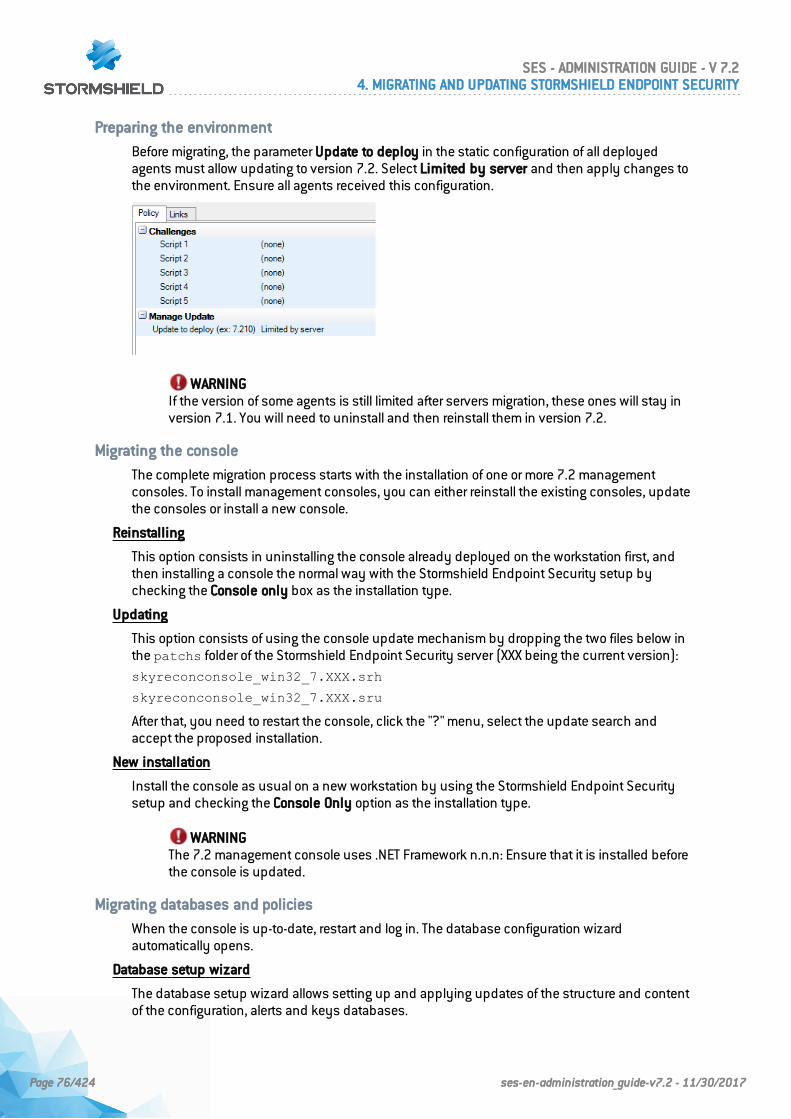
Preparing the environment
Before migrating, the parameter Update to deploy in the static configuration of all deployedagents must allow updating to version 7.2. Select Limited by server and then apply changes tothe environment. Ensure all agents received this configuration.
WARNINGIf the version of some agents is still limited after servers migration, these ones will stay inversion 7.1. You will need to uninstall and then reinstall them in version 7.2.
Migrating the console
The complete migration process starts with the installation of one or more 7.2 managementconsoles. To install management consoles, you can either reinstall the existing consoles, updatethe consoles or install a new console.
Reinstalling
This option consists in uninstalling the console already deployed on the workstation first, andthen installing a console the normal way with the Stormshield Endpoint Security setup bychecking the Console only box as the installation type.
Updating
This option consists of using the console update mechanism by dropping the two files below inthe patchs folder of the Stormshield Endpoint Security server (XXX being the current version):skyreconconsole_win32_7.XXX.srh
skyreconconsole_win32_7.XXX.sru
After that, you need to restart the console, click the "?" menu, select the update search andaccept the proposed installation.
New installation
Install the console as usual on a new workstation by using the Stormshield Endpoint Securitysetup and checking the Console Only option as the installation type.
WARNINGThe 7.2 management console uses .NET Framework n.n.n: Ensure that it is installed beforethe console is updated.
Migrating databases and policies
When the console is up-to-date, restart and log in. The database configuration wizardautomatically opens.
Database setup wizard
The database setup wizard allows setting up and applying updates of the structure and contentof the configuration, alerts and keys databases.
SES - ADMINISTRATION GUIDE - V 7.24. MIGRATING AND UPDATING STORMSHIELD ENDPOINT SECURITY
Page 76/424 ses-en-administration_guide-v7.2 - 11/30/2017
For more information on installing the 7.2 environment, refer to section Updating StormshieldEndpoint Security databases
WARNINGThe console's users and roles other than the main administrator role will not be kept. Themain administrator will have to define again new 7.2 users and roles and assign users tothese roles.
Migrating policies
The format of policies has changed between versions 7.1 and 7.2. Once databases are up-to-date, restart the console in order to proceed with the migration of policies.
The migration wizard will automatically open and will guide you through the steps.
When all policies are up-to-date, carefully check the settings of imported policies.
WARNINGFull-disk encryption policies must keep the same algorithm and encryption type to avoiddecrypting and encrypting workstations again.
Migrating Stormshield Endpoint Security server(s)
To update servers:
1. Copy the server update files in the patchs folder located by default in the StormshieldEndpoint Security main server installation directory in: C:\ProgramFiles\Stormshield\Stormshield Endpoint Security Server.
2. The server will automatically update according to the settings defined in EnvironmentManager > Server configuration > Software Updates Settings.
3. When the server begins the automatic update, the updater.sro file appears in the patchsfolder. The update runs in background mode and takes about five minutes. When the updateis completed:
l The updater.sro file is removed.
l The log.txt file is created in the Log folder which is located at the root of the server.
l The main server sends updates to additional servers which then also update.
4. Restart the main server. The reboot can be postponed but the update of the StormshieldEndpoint Security server service (srservice.exe) is required.
5. After restarting, apply changes to the 7.2 environment.
Updating agents
When the Stormshield Endpoint Security servers are updated and when changes are applied,you need to update the agents currently deployed to end the migration process.
To update agents, drop the two files below in the patchs folder of the server (XXX is the currentversion):stormshieldagent_win32_7.XXX.srh
stormshieldagent_win32_7.XXX.sru
For more information about this procedure, refer to the section Updating the StormshieldEndpoint Securityagent.
Checking version
To check whether an agent was successfully updated, open the agent interface by double-clicking the Stormshield Endpoint Security icon in the task bar and check the version number atthe bottom right.
SES - ADMINISTRATION GUIDE - V 7.24. MIGRATING AND UPDATING STORMSHIELD ENDPOINT SECURITY
Page 77/424 ses-en-administration_guide-v7.2 - 11/30/2017
Update successes or failures are also recorded in the logs available from the interface.
When the update is done, a warning prompts the user to restart the workstation. Ensure you waitfor the warning before restarting.
4.2.2 Partial migration
This migration mode enables to progressive migration of agents from 7.1 to 7.2.
To perform a partial migration, you need a transition server (new computer) and a temporarydatabase instance.
Prerequisites:
l Using Microsoft SQL Management Studio.
l Being able to access the 7.1 database instance and being allowed to save the stormshield3database.
l Installing a new computer (new IP address) for the transition server.
l Using a temporary database SQL instance. You can use the transition server to host thetemporary database. The Microsoft Windows account used must have the required rights toinstall a new database instance on a server.
SES - ADMINISTRATION GUIDE - V 7.24. MIGRATING AND UPDATING STORMSHIELD ENDPOINT SECURITY
Page 78/424 ses-en-administration_guide-v7.2 - 11/30/2017

WARNINGWe recommend you to backup each database before migrating StormShield. TheStormshield Endpoint Security configuration wizard allows backing up configuration andkey databases with the maintenance menus.
SES - ADMINISTRATION GUIDE - V 7.24. MIGRATING AND UPDATING STORMSHIELD ENDPOINT SECURITY
Page 79/424 ses-en-administration_guide-v7.2 - 11/30/2017
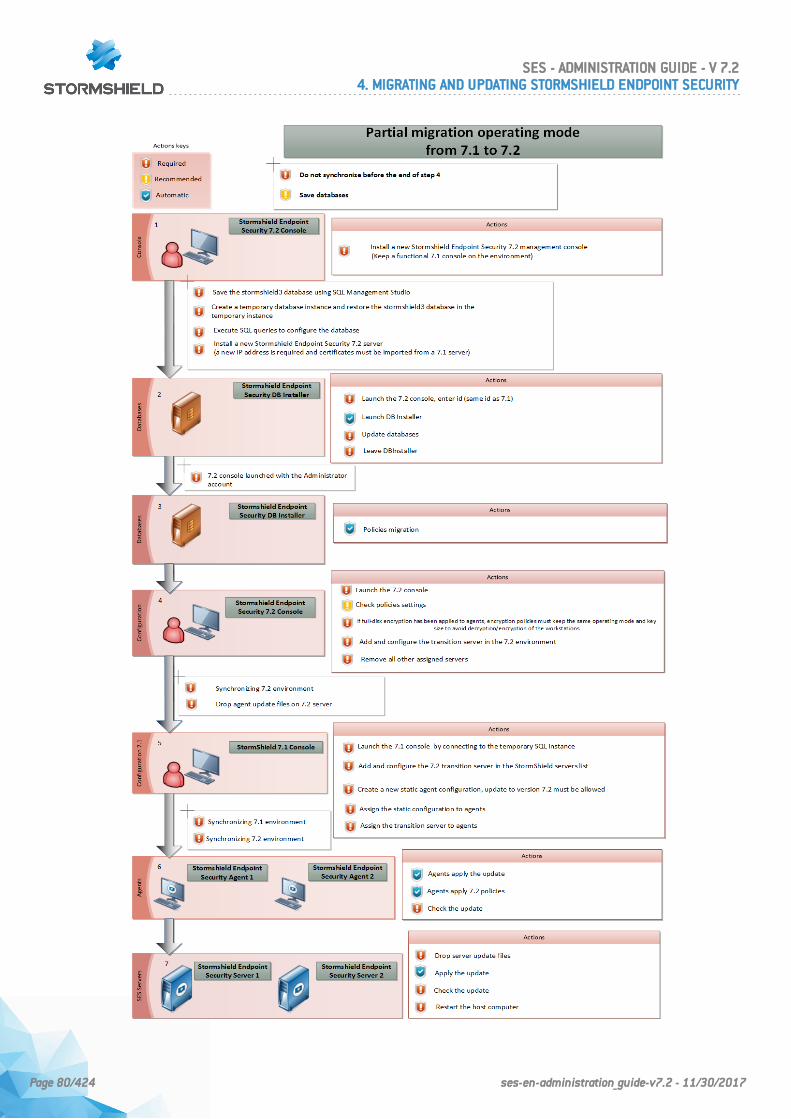
SES - ADMINISTRATION GUIDE - V 7.24. MIGRATING AND UPDATING STORMSHIELD ENDPOINT SECURITY
Page 80/424 ses-en-administration_guide-v7.2 - 11/30/2017
Migrating the management console
WARNINGYou must keep a 7.1 management console in order to keep an operating 7.1 environment.
The partial migration process starts with the installation of one or more 7.2 management consoles.To install management consoles, you can either reinstall the existing consoles, update theconsoles or install a new console.
Reinstalling
This option consists in uninstalling the console already deployed on the workstation first, andthen installing a console the normal way with the Stormshield Endpoint Security setup bychecking the Console only box as the installation type.
If you are reinstalling the console, you need to import the console certificate from the 7.1environment.
Updating
This option consists in using the console update mechanism by dropping the two files below inthe patchs folder of the Stormshield Endpoint Security server (XXX is the current version):skyreconconsole_win32_7.XXX.srh
skyreconconsole_win32_7.XXX.sru
After that, you need to restart the console, click the "?" menu, select the update search andaccept the proposed installation.
New installation
Install the console as usual on a new workstation by using the Stormshield Endpoint Securitysetup and checking the Console Only option as the installation type.
If you are reinstalling the console, you need to import the console certificate from the 7.1environment.
WARNINGThe 7.2 management console uses .NET Framework n.n.n: Ensure that it is installed beforethe console is updated.
Saving the 7.1 environment
Save the current 7.1 environment on a new temporary database instance in order to keep the 7.1environment operating during all the migration process. The current database will be migrated toversion 7.2.
To save the 7.1 database, use Microsoft SQL Management Studio:
1. Connect to the 7.1 database instance.
2. Carry out a full backup of the stormshield3 base.
SES - ADMINISTRATION GUIDE - V 7.24. MIGRATING AND UPDATING STORMSHIELD ENDPOINT SECURITY
Page 81/424 ses-en-administration_guide-v7.2 - 11/30/2017
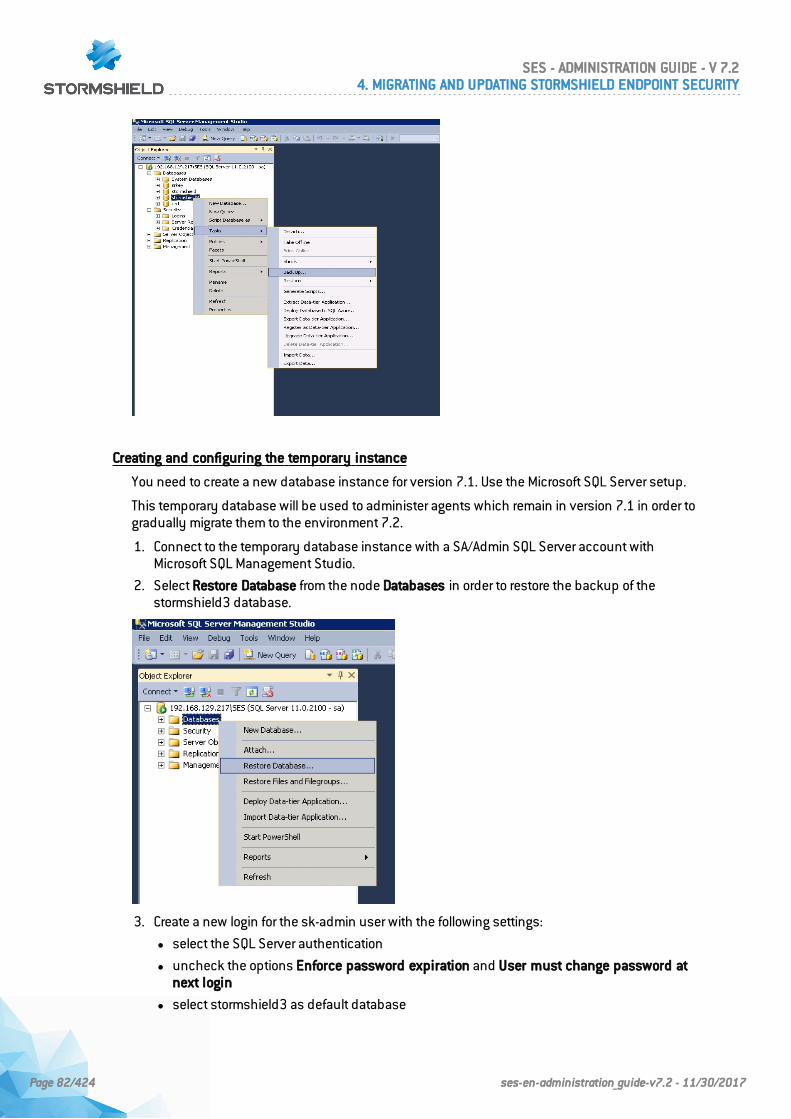
Creating and configuring the temporary instance
You need to create a new database instance for version 7.1. Use the Microsoft SQL Server setup.
This temporary database will be used to administer agents which remain in version 7.1 in order togradually migrate them to the environment 7.2.
1. Connect to the temporary database instance with a SA/Admin SQL Server account withMicrosoft SQL Management Studio.
2. Select Restore Database from the node Databases in order to restore the backup of thestormshield3 database.
3. Create a new login for the sk-admin user with the following settings:
l select the SQL Server authentication
l uncheck the options Enforce password expiration and User must change password atnext login
l select stormshield3 as default database
SES - ADMINISTRATION GUIDE - V 7.24. MIGRATING AND UPDATING STORMSHIELD ENDPOINT SECURITY
Page 82/424 ses-en-administration_guide-v7.2 - 11/30/2017
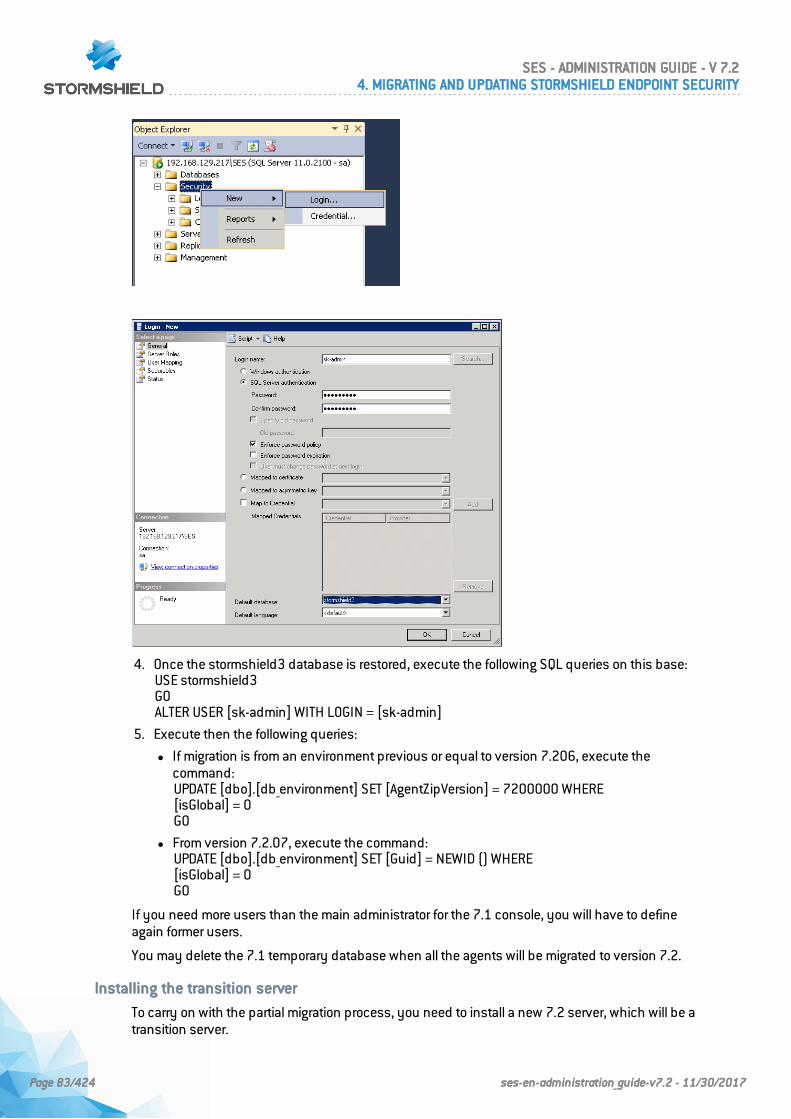
4. Once the stormshield3 database is restored, execute the following SQL queries on this base:USE stormshield3GOALTER USER [sk-admin] WITH LOGIN = [sk-admin]
5. Execute then the following queries:
l If migration is from an environment previous or equal to version 7.206, execute thecommand:UPDATE [dbo].[db_environment] SET [AgentZipVersion] = 7200000 WHERE[isGlobal] = 0GO
l From version 7.2.07, execute the command:UPDATE [dbo].[db_environment] SET [Guid] = NEWID () WHERE[isGlobal] = 0GO
If you need more users than the main administrator for the 7.1 console, you will have to defineagain former users.
You may delete the 7.1 temporary database when all the agents will be migrated to version 7.2.
Installing the transition server
To carry on with the partial migration process, you need to install a new 7.2 server, which will be atransition server.
SES - ADMINISTRATION GUIDE - V 7.24. MIGRATING AND UPDATING STORMSHIELD ENDPOINT SECURITY
Page 83/424 ses-en-administration_guide-v7.2 - 11/30/2017
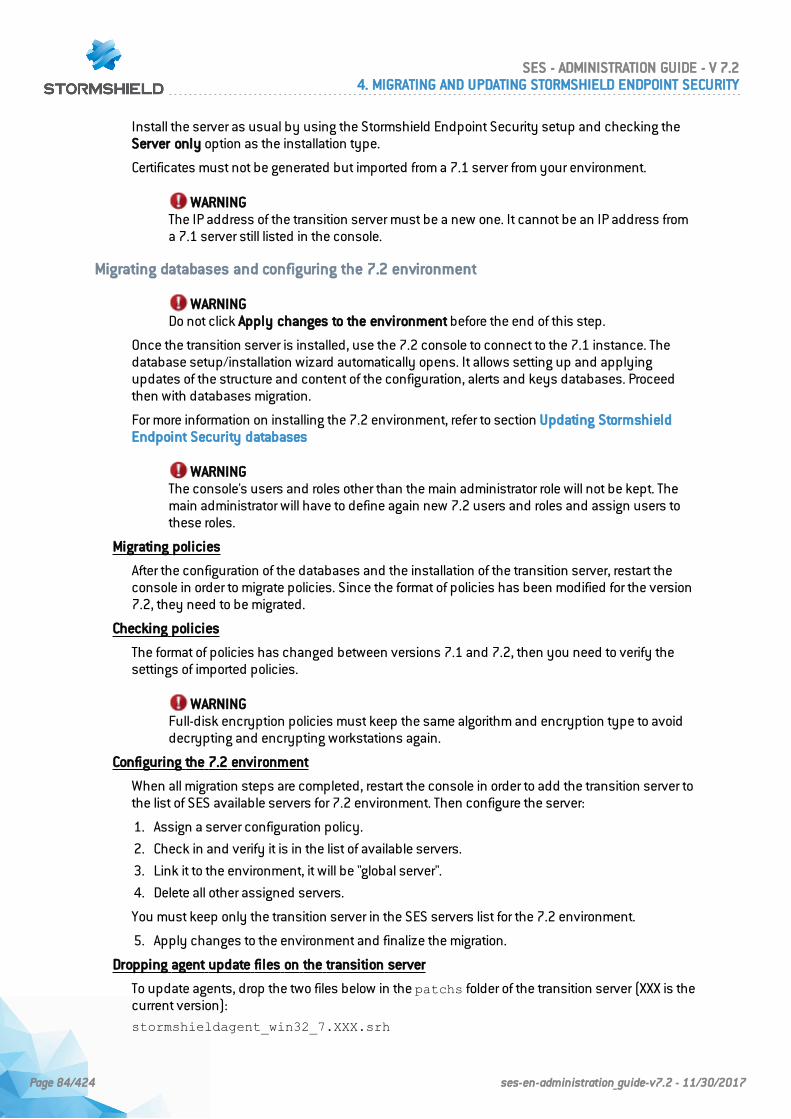
Install the server as usual by using the Stormshield Endpoint Security setup and checking theServer only option as the installation type.
Certificates must not be generated but imported from a 7.1 server from your environment.
WARNINGThe IP address of the transition server must be a new one. It cannot be an IP address froma 7.1 server still listed in the console.
Migrating databases and configuring the 7.2 environment
WARNINGDo not click Apply changes to the environment before the end of this step.
Once the transition server is installed, use the 7.2 console to connect to the 7.1 instance. Thedatabase setup/installation wizard automatically opens. It allows setting up and applyingupdates of the structure and content of the configuration, alerts and keys databases. Proceedthen with databases migration.
For more information on installing the 7.2 environment, refer to section Updating StormshieldEndpoint Security databases
WARNINGThe console's users and roles other than the main administrator role will not be kept. Themain administrator will have to define again new 7.2 users and roles and assign users tothese roles.
Migrating policies
After the configuration of the databases and the installation of the transition server, restart theconsole in order to migrate policies. Since the format of policies has been modified for the version7.2, they need to be migrated.
Checking policies
The format of policies has changed between versions 7.1 and 7.2, then you need to verify thesettings of imported policies.
WARNINGFull-disk encryption policies must keep the same algorithm and encryption type to avoiddecrypting and encrypting workstations again.
Configuring the 7.2 environment
When all migration steps are completed, restart the console in order to add the transition server tothe list of SES available servers for 7.2 environment. Then configure the server:
1. Assign a server configuration policy.
2. Check in and verify it is in the list of available servers.
3. Link it to the environment, it will be "global server".
4. Delete all other assigned servers.
You must keep only the transition server in the SES servers list for the 7.2 environment.
5. Apply changes to the environment and finalize the migration.
Dropping agent update files on the transition server
To update agents, drop the two files below in the patchs folder of the transition server (XXX is thecurrent version):stormshieldagent_win32_7.XXX.srh
SES - ADMINISTRATION GUIDE - V 7.24. MIGRATING AND UPDATING STORMSHIELD ENDPOINT SECURITY
Page 84/424 ses-en-administration_guide-v7.2 - 11/30/2017
stormshieldagent_win32_7.XXX.sru
Configuring the 7.1 environment
After the 7.2 environment has been configured, the 7.1 environment can still be updated with a7.1 management console.
To update the agents required, connect to the temporary SQL instance with a 7.1 managementconsole.
Add then the 7.2 transition server to the SES servers list and apply a server configuration policy.
Creating a new agent configuration
1. In the 7.1 console, create a new static agent configuration. This configuration must allowupdate to version 7.2.
2. Apply this configuration to the agents which will be migrated.
Assigning the transition server to agents
After applying the static configuration to agents, link the transition server to the agents group, tothe AD group or to the OU containing the relevant agents.
WARNINGDo not assign the transition server to OU, AD groups or agents groups which staticconfiguration does not allow updating to version 7.2.
Application of changes to the environment
Apply changes to the 7.1 environment and connect to the 7.2 instance with the 7.2 managementconsole.
During the whole partial migration process, each time you apply changes to the 7.1 environment,you have to apply changes to the 7.2 environment in order to apply the 7.2 configuration.
Updating agents
When changes are applied to the 7.1 environment, the update process automatically starts.Agents which must be updated connect to the transition server after reconnecting to their 7.1server.
The automatic and silent update is applied to agents. Users will be prompted to restart theirworkstation.
Agents automatically apply policies configured in the 7.2 environment.
Checking version
To check whether an agent was successfully updated, open the agent interface by double-clicking the Stormshield Endpoint Security icon in the task bar and check the version number atthe bottom right.
Update successes or failures are also recorded in the logs available from the interface.
Migrating Stormshield Endpoint Security servers
When all agents are in version 7.2, server(s) can be migrated.
Migrating
To update servers, you must drop both of the following files in the patchs folder (XXX being thecurrent version):stormshieldserver_win32_7.XXX.srh
stormshieldserver_win32_7.XXX.sru
SES - ADMINISTRATION GUIDE - V 7.24. MIGRATING AND UPDATING STORMSHIELD ENDPOINT SECURITY
Page 85/424 ses-en-administration_guide-v7.2 - 11/30/2017
The server will update after the period of time defined in the Check update interval setting in theserver configuration.
You can also drop these two files in the folder defined in the Updates download folder parameterduring the configuration of the server. You need to create a file named version.srowhich onlycontains the version number of updates to download, in a “7.216” format.
WARNINGDo not migrate the last 7.1 server as long as there still are 7.1 agents.
Checking version
During the server update, the file update.sro is created in the patchs folder of the server. The fileis deleted at the end of the configuration.
To check the server version, open the version.sro file in the conf folder. You can also see theserver version in the Dashboard > Software logs panel of the management console. Look up thelog with the status 'SERVER_VERSION'.
Restarting
Once the update is completed, shut down and restart the machine hosting the server. The rebootis required for the update of the Stormshield Endpoint Security server service (srservice.exe).
Application of changes to the environment
When all servers are up-to-date and rebooted, start again the 7.2 management console, add themigrated servers if needed and apply changes to the environment.
Deleting the temporary SQL instance and the transition server
Once changes are applied to the 7.2 environment containing all servers and once all agents aremigrated, you can uninstall the temporary SQL instance.
Before deleting the transition server, you must ensure that all agents in version 7.2 are able tocommunicate with another server:
1. In the 7.2 environment, at least one server migrated from the 7.1 environment must beconfigured as the global server (linked to the environment). This server must be linked to thesame agents than the transition server.
2. Apply changes to the 7.2 environment.
3. In the Agent Monitoring panel, check that all agent have migrated to version 7.2: the columnAgent version of all agents must display the value 7.2.x.
4.3 Updating Stormshield Endpoint Security 7.2
4.3.1 Prerequisites
Saving databases
NOTEThe Stormshield Endpoint Security databases include:
- The configuration databases.
- Log and monitoring databases.
- Encryption key databases.
SES - ADMINISTRATION GUIDE - V 7.24. MIGRATING AND UPDATING STORMSHIELD ENDPOINT SECURITY
Page 86/424 ses-en-administration_guide-v7.2 - 11/30/2017
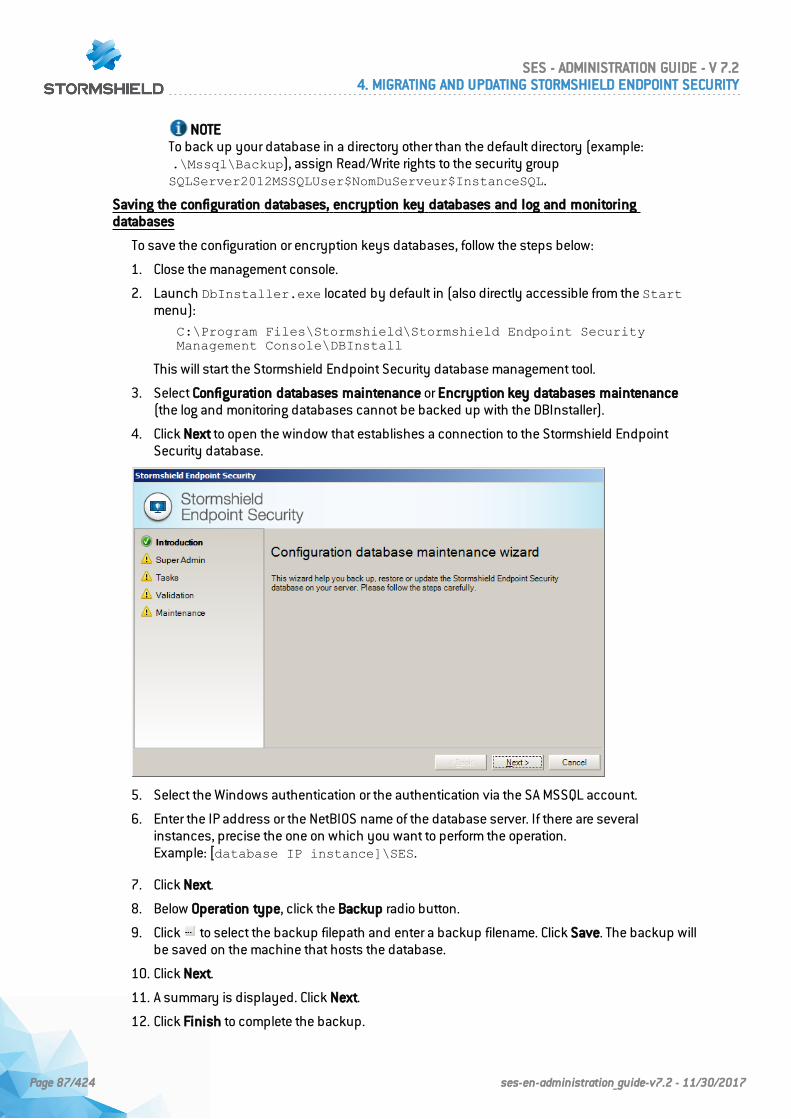
NOTETo back up your database in a directory other than the default directory (example:.\Mssql\Backup), assign Read/Write rights to the security groupSQLServer2012MSSQLUser$NomDuServeur$InstanceSQL.
Saving the configuration databases, encryption key databases and log and monitoringdatabases
To save the configuration or encryption keys databases, follow the steps below:
1. Close the management console.
2. Launch DbInstaller.exe located by default in (also directly accessible from the Startmenu):
C:\Program Files\Stormshield\Stormshield Endpoint SecurityManagement Console\DBInstall
This will start the Stormshield Endpoint Security database management tool.
3. Select Configuration databases maintenance or Encryption key databases maintenance(the log and monitoring databases cannot be backed up with the DBInstaller).
4. Click Next to open the window that establishes a connection to the Stormshield EndpointSecurity database.
5. Select the Windows authentication or the authentication via the SA MSSQL account.
6. Enter the IP address or the NetBIOS name of the database server. If there are severalinstances, precise the one on which you want to perform the operation.Example: [database IP instance]\SES.
7. Click Next.
8. Below Operation type, click the Backup radio button.
9. Click to select the backup filepath and enter a backup filename. Click Save. The backup willbe saved on the machine that hosts the database.
10. Click Next.
11. A summary is displayed. Click Next.
12. Click Finish to complete the backup.
SES - ADMINISTRATION GUIDE - V 7.24. MIGRATING AND UPDATING STORMSHIELD ENDPOINT SECURITY
Page 87/424 ses-en-administration_guide-v7.2 - 11/30/2017
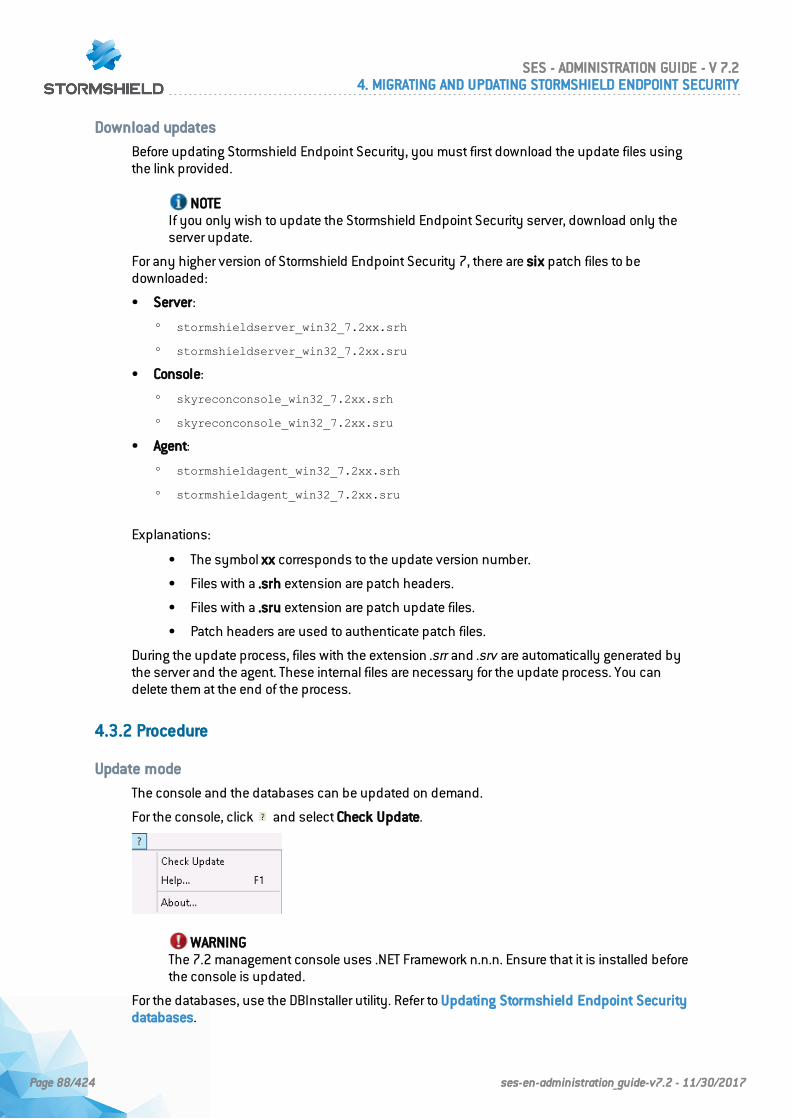
Download updates
Before updating Stormshield Endpoint Security, you must first download the update files usingthe link provided.
NOTEIf you only wish to update the Stormshield Endpoint Security server, download only theserver update.
For any higher version of Stormshield Endpoint Security 7, there are six patch files to bedownloaded:
• Server:
◦ stormshieldserver_win32_7.2xx.srh
◦ stormshieldserver_win32_7.2xx.sru
• Console:
◦ skyreconconsole_win32_7.2xx.srh
◦ skyreconconsole_win32_7.2xx.sru
• Agent:
◦ stormshieldagent_win32_7.2xx.srh
◦ stormshieldagent_win32_7.2xx.sru
Explanations:
• The symbol xx corresponds to the update version number.
• Files with a .srh extension are patch headers.
• Files with a .sru extension are patch update files.
• Patch headers are used to authenticate patch files.
During the update process, files with the extension .srr and .srv are automatically generated bythe server and the agent. These internal files are necessary for the update process. You candelete them at the end of the process.
4.3.2 Procedure
Update mode
The console and the databases can be updated on demand.
For the console, click and select Check Update.
WARNINGThe 7.2 management console uses .NET Framework n.n.n. Ensure that it is installed beforethe console is updated.
For the databases, use the DBInstaller utility. Refer to Updating Stormshield Endpoint Securitydatabases.
SES - ADMINISTRATION GUIDE - V 7.24. MIGRATING AND UPDATING STORMSHIELD ENDPOINT SECURITY
Page 88/424 ses-en-administration_guide-v7.2 - 11/30/2017
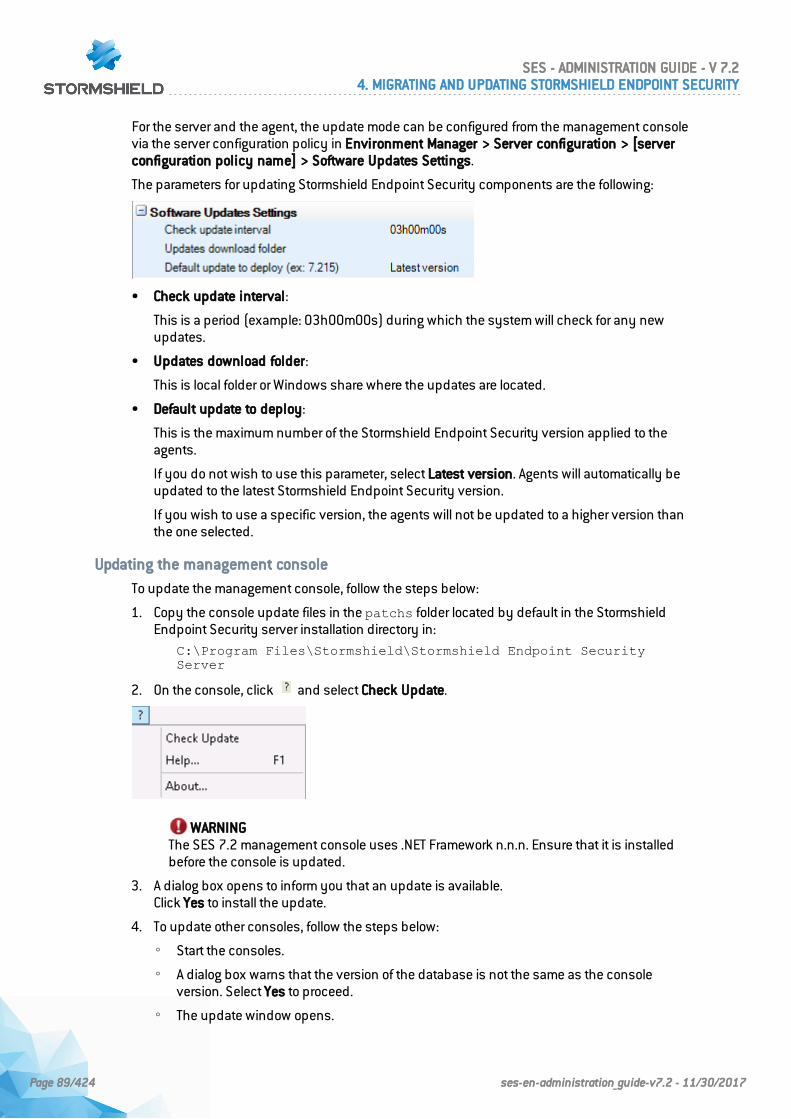
For the server and the agent, the update mode can be configured from the management consolevia the server configuration policy in Environment Manager > Server configuration > [serverconfiguration policy name] > Software Updates Settings.
The parameters for updating Stormshield Endpoint Security components are the following:
• Check update interval:
This is a period (example: 03h00m00s) during which the system will check for any newupdates.
• Updates download folder:
This is local folder or Windows share where the updates are located.
• Default update to deploy:
This is the maximum number of the Stormshield Endpoint Security version applied to theagents.
If you do not wish to use this parameter, select Latest version. Agents will automatically beupdated to the latest Stormshield Endpoint Security version.
If you wish to use a specific version, the agents will not be updated to a higher version thanthe one selected.
Updating the management console
To update the management console, follow the steps below:
1. Copy the console update files in the patchs folder located by default in the StormshieldEndpoint Security server installation directory in:
C:\Program Files\Stormshield\Stormshield Endpoint SecurityServer
2. On the console, click and select Check Update.
WARNINGThe SES 7.2 management console uses .NET Framework n.n.n. Ensure that it is installedbefore the console is updated.
3. A dialog box opens to inform you that an update is available.Click Yes to install the update.
4. To update other consoles, follow the steps below:
◦ Start the consoles.
◦ A dialog box warns that the version of the database is not the same as the consoleversion. Select Yes to proceed.
◦ The update window opens.
SES - ADMINISTRATION GUIDE - V 7.24. MIGRATING AND UPDATING STORMSHIELD ENDPOINT SECURITY
Page 89/424 ses-en-administration_guide-v7.2 - 11/30/2017
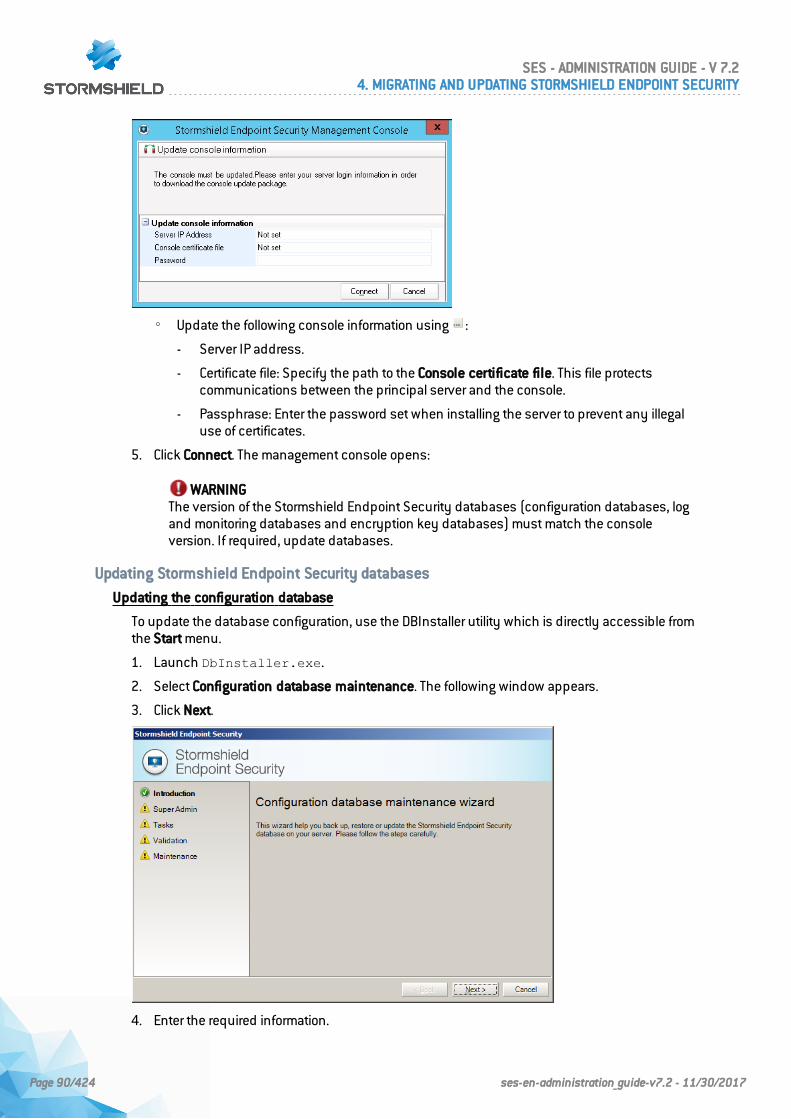
◦ Update the following console information using :
- Server IP address.
- Certificate file: Specify the path to the Console certificate file. This file protectscommunications between the principal server and the console.
- Passphrase: Enter the password set when installing the server to prevent any illegaluse of certificates.
5. Click Connect. The management console opens:
WARNINGThe version of the Stormshield Endpoint Security databases (configuration databases, logand monitoring databases and encryption key databases) must match the consoleversion. If required, update databases.
Updating Stormshield Endpoint Security databases
Updating the configuration database
To update the database configuration, use the DBInstaller utility which is directly accessible fromthe Start menu.
1. Launch DbInstaller.exe.
2. Select Configuration database maintenance. The following window appears.
3. Click Next.
4. Enter the required information.
SES - ADMINISTRATION GUIDE - V 7.24. MIGRATING AND UPDATING STORMSHIELD ENDPOINT SECURITY
Page 90/424 ses-en-administration_guide-v7.2 - 11/30/2017
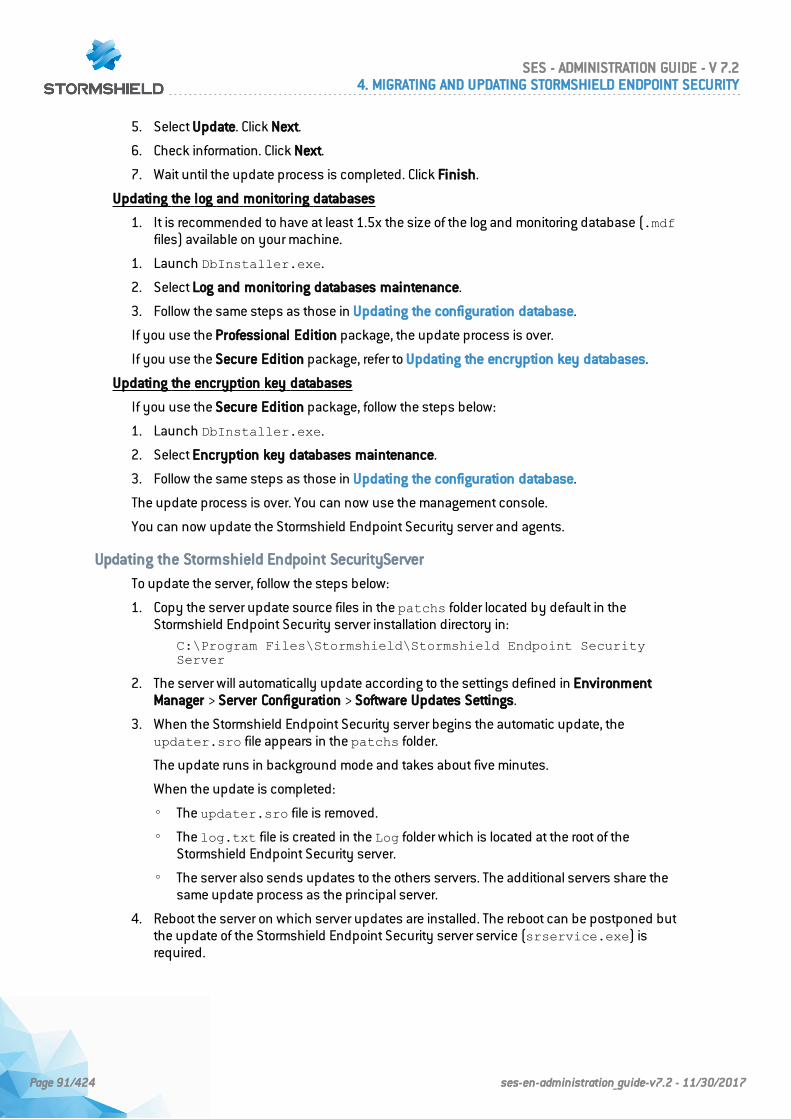
5. Select Update. Click Next.
6. Check information. Click Next.
7. Wait until the update process is completed. Click Finish.
Updating the log and monitoring databases
1. It is recommended to have at least 1.5x the size of the log and monitoring database (.mdffiles) available on your machine.
1. Launch DbInstaller.exe.
2. Select Log and monitoring databases maintenance.
3. Follow the same steps as those in Updating the configuration database.
If you use the Professional Edition package, the update process is over.
If you use the Secure Edition package, refer to Updating the encryption key databases.
Updating the encryption key databases
If you use the Secure Edition package, follow the steps below:
1. Launch DbInstaller.exe.
2. Select Encryption key databases maintenance.
3. Follow the same steps as those in Updating the configuration database.
The update process is over. You can now use the management console.
You can now update the Stormshield Endpoint Security server and agents.
Updating the Stormshield Endpoint SecurityServer
To update the server, follow the steps below:
1. Copy the server update source files in the patchs folder located by default in theStormshield Endpoint Security server installation directory in:
C:\Program Files\Stormshield\Stormshield Endpoint SecurityServer
2. The server will automatically update according to the settings defined in EnvironmentManager > Server Configuration > Software Updates Settings.
3. When the Stormshield Endpoint Security server begins the automatic update, theupdater.sro file appears in the patchs folder.
The update runs in background mode and takes about five minutes.
When the update is completed:
◦ The updater.sro file is removed.
◦ The log.txt file is created in the Log folder which is located at the root of theStormshield Endpoint Security server.
◦ The server also sends updates to the others servers. The additional servers share thesame update process as the principal server.
4. Reboot the server on which server updates are installed. The reboot can be postponed butthe update of the Stormshield Endpoint Security server service (srservice.exe) isrequired.
SES - ADMINISTRATION GUIDE - V 7.24. MIGRATING AND UPDATING STORMSHIELD ENDPOINT SECURITY
Page 91/424 ses-en-administration_guide-v7.2 - 11/30/2017
NOTEThe configuration of the Apache server is not updated when the Stormshield EndpointSecurity server is updated from a version previous to 6.0.18 or 7.2.06. You can manuallyapply updates by executing «skyapache.exe --update» located in ProgramFiles\Stormshield\Stormshield Endpoint Security Server\Apache\conffrom an administrator command line. The former configuration files are renamedhttpd.conf.old and ssl.conf.old. Restart the Stormshield Endpoint Security server to applythese modifications.
Updating the Stormshield Endpoint Securityagent
There are two ways to update the Stormshield Endpoint Security agent:
• Automatic update.
• Manual update.
Automatic update
Copy the agent update files in the patchs folder located by default in the Stormshield EndpointSecurity server installation directory in:
C:\Program Files\Stormshield\Stormshield Endpoint Security Server
NOTEIf an agent connects to an additional server, the server will download the updates from theprincipal server in order to distribute them to the connected agents.
If the version of the update available in the server directory is lower or equal to the limit specifiedin the static agent configuration or in the server configuration (if there is no limit specified in thestatic agent configuration), agents will download the update and install it automatically. The userdoes not need to do anything.
The update is applied only after the agent has been rebooted. However, Stormshield EndpointSecurity continues to protect the computer until it reboots.
Manual update
WARNINGThe agent must be able to connect to the Stormshield Endpoint Security server to bemanually updated.
To manually update the server, follow the steps below:
1. Check the agent version by opening the version.sro file located in:C:\Program Files\Stormshield\Stormshield Endpoint SecurityAgent\Srend.exe
2. Rename the update file by changing the version number to match the agent version currentlyinstalled.
For example, if you are updating from version 7.2.01 to version 7.2.08, rename the update:
◦ stormshieldagent_win32_7.208.srh with stormshieldagent_win32_7.201.srh
◦ stormshieldagent_win32_7.208.sru with stormshieldagent_win32_7.201.sru
3. Copy the agent update files in the patchs folder located by default in the agent installationdirectory in:
SES - ADMINISTRATION GUIDE - V 7.24. MIGRATING AND UPDATING STORMSHIELD ENDPOINT SECURITY
Page 92/424 ses-en-administration_guide-v7.2 - 11/30/2017
c:\Program Files\Stormshield\Stormshield Endpoint SecurityAgent\
4. To update immediately, force the agent to connect to the server:
◦ Right-click the Stormshield Endpoint Security icon in the system tray.
◦ Go to Other operations > Reconnect to server.
A notification and a message in the Stormshield Endpoint Security agent's user interface willbe displayed when the update is completed.
Changes made to the agent will be applied after reboot.
5. Reboot the computer when receiving the reboot notification issued when the update iscompleted.
SES - ADMINISTRATION GUIDE - V 7.24. MIGRATING AND UPDATING STORMSHIELD ENDPOINT SECURITY
Page 93/424 ses-en-administration_guide-v7.2 - 11/30/2017
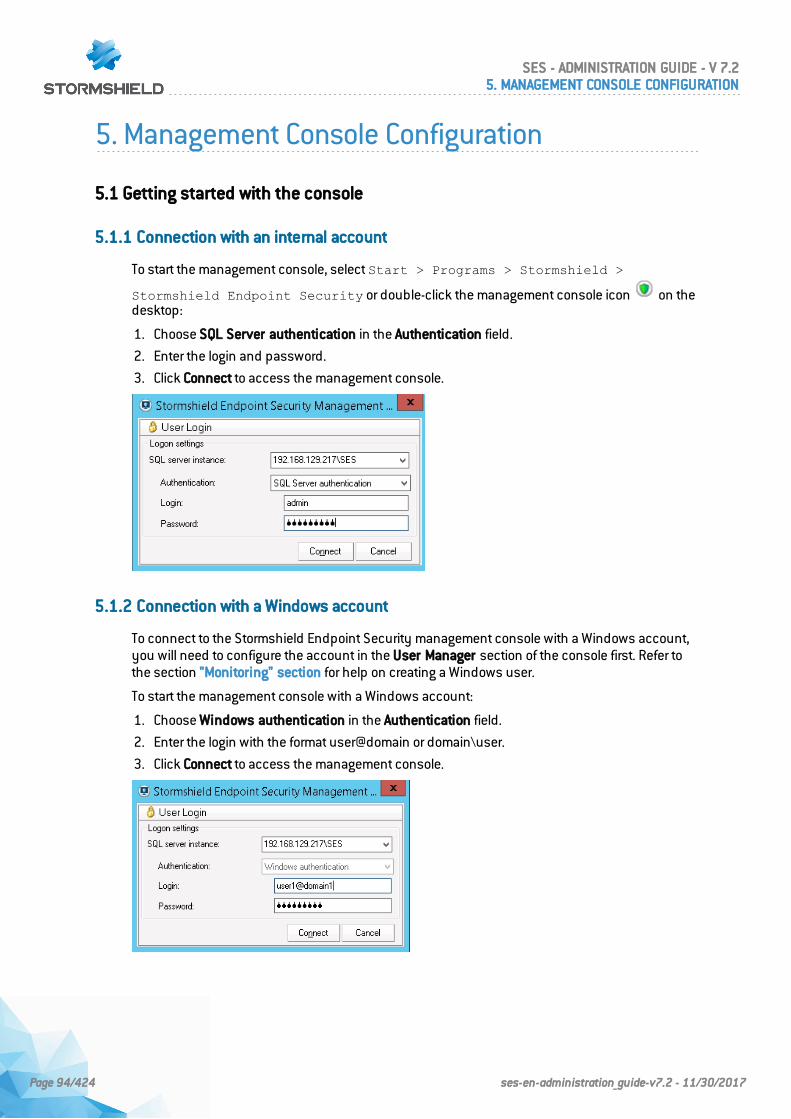
5. Management Console Configuration
5.1 Getting started with the console
5.1.1 Connection with an internal account
To start the management console, select Start > Programs > Stormshield >
Stormshield Endpoint Security or double-click the management console icon on thedesktop:
1. Choose SQL Server authentication in the Authentication field.
2. Enter the login and password.
3. Click Connect to access the management console.
5.1.2 Connection with a Windows account
To connect to the Stormshield Endpoint Security management console with a Windows account,you will need to configure the account in the User Manager section of the console first. Refer tothe section "Monitoring" section for help on creating a Windows user.
To start the management console with a Windows account:
1. Choose Windows authentication in the Authentication field.
2. Enter the login with the format user@domain or domain\user.
3. Click Connect to access the management console.
SES - ADMINISTRATION GUIDE - V 7.25. MANAGEMENT CONSOLE CONFIGURATION
Page 94/424 ses-en-administration_guide-v7.2 - 11/30/2017
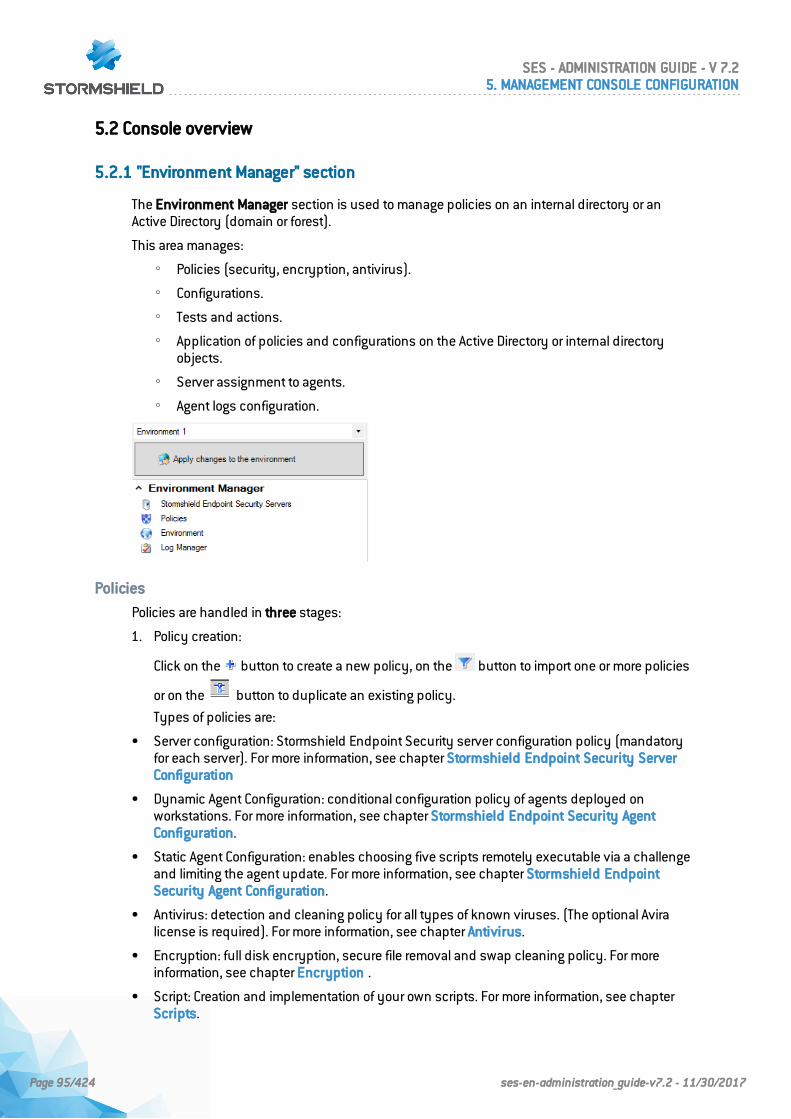
5.2 Console overview
5.2.1 "Environment Manager" section
The Environment Manager section is used to manage policies on an internal directory or anActive Directory (domain or forest).
This area manages:
◦ Policies (security, encryption, antivirus).
◦ Configurations.
◦ Tests and actions.
◦ Application of policies and configurations on the Active Directory or internal directoryobjects.
◦ Server assignment to agents.
◦ Agent logs configuration.
Policies
Policies are handled in three stages:
1. Policy creation:
Click on the button to create a new policy, on the button to import one or more policies
or on the button to duplicate an existing policy.
Types of policies are:
• Server configuration: Stormshield Endpoint Security server configuration policy (mandatoryfor each server). For more information, see chapter Stormshield Endpoint Security ServerConfiguration
• Dynamic Agent Configuration: conditional configuration policy of agents deployed onworkstations. For more information, see chapter Stormshield Endpoint Security AgentConfiguration.
• Static Agent Configuration: enables choosing five scripts remotely executable via a challengeand limiting the agent update. For more information, see chapter Stormshield EndpointSecurity Agent Configuration.
• Antivirus: detection and cleaning policy for all types of known viruses. (The optional Aviralicense is required). For more information, see chapter Antivirus.
• Encryption: full disk encryption, secure file removal and swap cleaning policy. For moreinformation, see chapter Encryption .
• Script: Creation and implementation of your own scripts. For more information, see chapterScripts.
SES - ADMINISTRATION GUIDE - V 7.25. MANAGEMENT CONSOLE CONFIGURATION
Page 95/424 ses-en-administration_guide-v7.2 - 11/30/2017
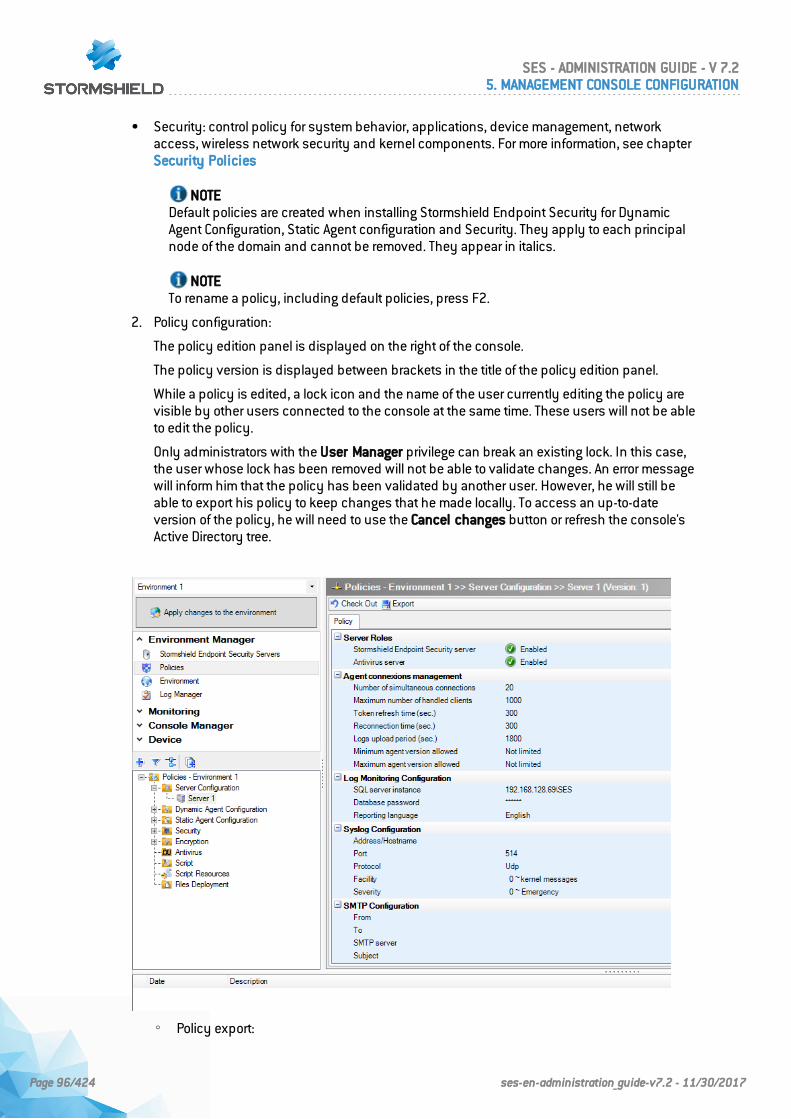
• Security: control policy for system behavior, applications, device management, networkaccess, wireless network security and kernel components. For more information, see chapterSecurity Policies
NOTEDefault policies are created when installing Stormshield Endpoint Security for DynamicAgent Configuration, Static Agent configuration and Security. They apply to each principalnode of the domain and cannot be removed. They appear in italics.
NOTETo rename a policy, including default policies, press F2.
2. Policy configuration:
The policy edition panel is displayed on the right of the console.
The policy version is displayed between brackets in the title of the policy edition panel.
While a policy is edited, a lock icon and the name of the user currently editing the policy arevisible by other users connected to the console at the same time. These users will not be ableto edit the policy.
Only administrators with the User Manager privilege can break an existing lock. In this case,the user whose lock has been removed will not be able to validate changes. An error messagewill inform him that the policy has been validated by another user. However, he will still beable to export his policy to keep changes that he made locally. To access an up-to-dateversion of the policy, he will need to use the Cancel changes button or refresh the console'sActive Directory tree.
◦ Policy export:
SES - ADMINISTRATION GUIDE - V 7.25. MANAGEMENT CONSOLE CONFIGURATION
Page 96/424 ses-en-administration_guide-v7.2 - 11/30/2017
You can export a policy into a file in order to store its configuration. The Export button isavailable at the top of the policy edition panel. The generated file has the .sczp(Stormshield Console Zipped Policy) or .scep (StormShield Console Exported Policy)extensions.
A security policy uses external resources (identifiers and digital signature certificates. Formore information, see chapter Security Policies). As such, simply exporting settings is notenough, unlike other policies. Two options are suggested when exporting the security policy:
l export the policy only: allows exporting only the policy settings, without including the variousidentifiers that the policy uses. The policy must be imported into the same environment andthe identifiers used in the policy must not be removed from the console in the intervalbetween the export and import.
l export the policy with its resources: allows creating a full backup of the policy with theidentifiers and certificates used in the applicative rules. The policy will be exported in SCZPformat.
◦ Policy import:
It is also possible to import a policy. The Import button is available at the top of the policyedition panel. For more information, refer to the section Importing security policies.
It is also possible to import policies exported by a previous version of StormShield (fromversion 6.0 onwards). The extension of exported policies is .scep.
A conversion is required because of format differences between versions. A dialog boxreminds the administrator of the version of the imported policy and the expected one. Afterthe conversion, a report is displayed. It contains:
◦ The settings which became obsolete.
◦ The new settings (with the default values).
◦ The number of dependencies on other policies, which may have been lost if the otherpolicies are missing.
◦ Errors on settings.
◦ The success or failure of the conversion.
When the conversion is complete, it is still possible to cancel the policy import. If theconversion is validated, a file containing a copy of this report is recorded in the user directoryfor future reference (the complete path is displayed in the console log).
When an action, test or script is imported, some references may be invalid or missing. Suchreferences are displayed in red and must be resolved before checking in the policy.
3. Policy application:
Policies must be applied to Active Directory or internal directory objects displayed in theEnvironment menu of the Environment Manager section.
To apply a policy, select the object on which you want to apply the policy. Select the Policieslinked tab and select a policy.
Click Apply changes to the environment to update servers.
Active Directory environment management
In Active Directory mode, when an object is selected in the Active Directory tree view, Policieslinked, Servers and Group tabs are displayed on the right of the console.
For more information about the Policies linked and Servers tab, see sections Exporting agentgroups and Servers tab.
SES - ADMINISTRATION GUIDE - V 7.25. MANAGEMENT CONSOLE CONFIGURATION
Page 97/424 ses-en-administration_guide-v7.2 - 11/30/2017
Active Directory environment tree view
Stormshield Endpoint Security servers, whether or not they belong to the Active Directory, are
listed in the Stormshield Endpoint Security servers panel .
The Active directory tree view enables viewing the organizational units of the domain or forestselected when installing Stormshield Endpoint Security, as well as the Stormshield Endpoint
Security groups. Organizational units are shown with the icon , domain nodes with the icon
and Stormshield Endpoint Security groups with the icon .
You can also display computers belonging to organizational units by clicking .
In the tree view, computers appear with different icons:
• : Stormshield Endpoint Security server
• : computer on which the Stormshield Endpoint Security agent is installed
• : computer on which the Stormshield Endpoint Security agent is not installed
Stormshield Endpoint Security group management
You can apply policies to Active Directory groups rather than to organizational units.
If a computer or Stormshield Endpoint Security group belongs to a Stormshield EndpointSecurityparent group, policies of the parent group apply. A computer or Stormshield EndpointSecurity group can only belong to one Stormshield Endpoint Security parent group. The Grouptab allows viewing the parent of each Stormshield Endpoint Security group.
For more information about the Group tab, refer to Group tab.
Stormshield Endpoint Security groups do not inherit policies applied to the organizational unit inwhich they have been created.
To select groups, click . The window Active Directory Groups opens.
SES - ADMINISTRATION GUIDE - V 7.25. MANAGEMENT CONSOLE CONFIGURATION
Page 98/424 ses-en-administration_guide-v7.2 - 11/30/2017
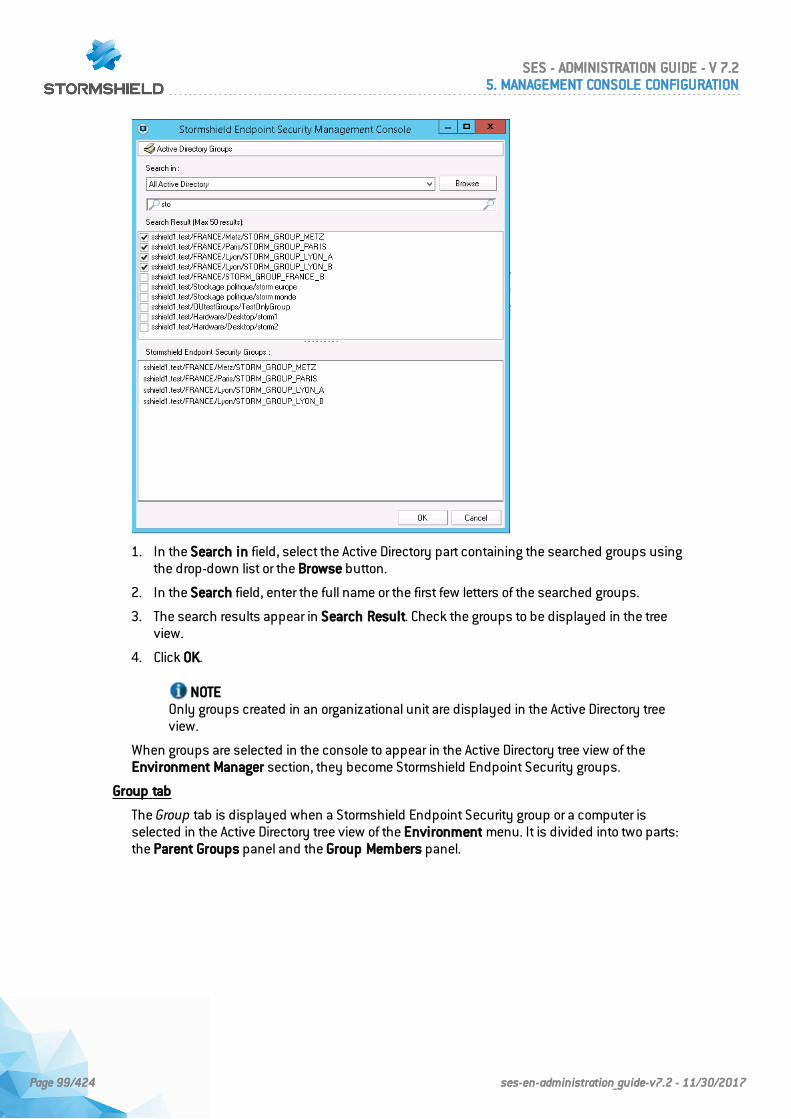
1. In the Search in field, select the Active Directory part containing the searched groups usingthe drop-down list or the Browse button.
2. In the Search field, enter the full name or the first few letters of the searched groups.
3. The search results appear in Search Result. Check the groups to be displayed in the treeview.
4. Click OK.
NOTEOnly groups created in an organizational unit are displayed in the Active Directory treeview.
When groups are selected in the console to appear in the Active Directory tree view of theEnvironment Manager section, they become Stormshield Endpoint Security groups.
Group tab
The Group tab is displayed when a Stormshield Endpoint Security group or a computer isselected in the Active Directory tree view of the Environment menu. It is divided into two parts:the Parent Groups panel and the Group Members panel.
SES - ADMINISTRATION GUIDE - V 7.25. MANAGEMENT CONSOLE CONFIGURATION
Page 99/424 ses-en-administration_guide-v7.2 - 11/30/2017

To consult characteristics of another Stormshield Endpoint Security group of the Parent Groupsor Group Members list, click on the group from the Group tab. It is highlighted in the ActiveDirectory tree view of the Environment menu.
Internal directory environment management
In internal directory mode, when an object is selected in the directory tree view, Group, Policieslinked and Servers tab are displayed on the right of the console.
For more information about the Policies linked and Servers tab, see sections Exporting agentgroups and Servers tab.
Internal directory environment tree view
Stormshield Endpoint Security servers, whether or not they belong to the internal directory, are
listed in the Stormshield Endpoint Security servers panel .
The internal directory tree view shows the agent groups represented by the icon .
To add an agent group, click to create a new one or to duplicate an existing group in thetool bar above the directory view.
An internal directory can be renamed if it is not currently being edited by another user.
Create as many internal directories as you need by right-clicking the tree view environment node.However the directories cannot have Stormshield Endpoint Security servers in common.
You may consider using several internal directories only if rules by IP addresses or NetBiosnames do not allow handling agents precisely enough.
Managing agent groups
Agent groups are defined by two rule types: rules based on IP addresses and rules based onNetBios names. You are allowed to add, remove and rename agent groups.
Rules based on IP addresses allow defining:
• standard addresses (IPv4).
• address ranges (defined by a start address and an end address).
SES - ADMINISTRATION GUIDE - V 7.25. MANAGEMENT CONSOLE CONFIGURATION
Page 100/424 ses-en-administration_guide-v7.2 - 11/30/2017
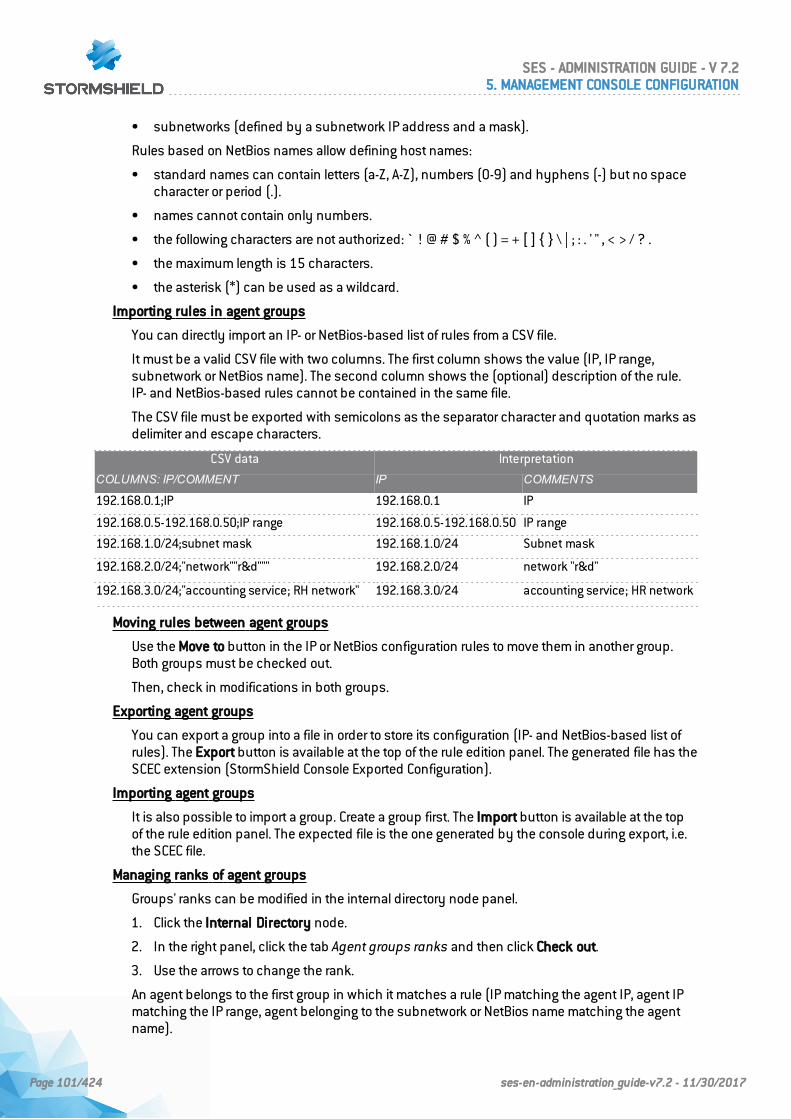
• subnetworks (defined by a subnetwork IP address and a mask).
Rules based on NetBios names allow defining host names:
• standard names can contain letters (a-Z, A-Z), numbers (0-9) and hyphens (-) but no spacecharacter or period (.).
• names cannot contain only numbers.
• the following characters are not authorized: ` ! @ # $ % ^ ( ) = + [ ] { } \ | ; : . ' " , < > / ? .
• the maximum length is 15 characters.
• the asterisk (*) can be used as a wildcard.
Importing rules in agent groups
You can directly import an IP- or NetBios-based list of rules from a CSV file.
It must be a valid CSV file with two columns. The first column shows the value (IP, IP range,subnetwork or NetBios name). The second column shows the (optional) description of the rule.IP- and NetBios-based rules cannot be contained in the same file.
The CSV file must be exported with semicolons as the separator character and quotation marks asdelimiter and escape characters.
CSV data Interpretation
COLUMNS: IP/COMMENT IP COMMENTS
192.168.0.1;IP 192.168.0.1 IP
192.168.0.5-192.168.0.50;IP range 192.168.0.5-192.168.0.50 IP range
192.168.1.0/24;subnet mask 192.168.1.0/24 Subnet mask
192.168.2.0/24;"network""r&d""" 192.168.2.0/24 network "r&d"
192.168.3.0/24;"accounting service; RH network" 192.168.3.0/24 accounting service; HR network
Moving rules between agent groups
Use the Move to button in the IP or NetBios configuration rules to move them in another group.Both groups must be checked out.
Then, check in modifications in both groups.
Exporting agent groups
You can export a group into a file in order to store its configuration (IP- and NetBios-based list ofrules). The Export button is available at the top of the rule edition panel. The generated file has theSCEC extension (StormShield Console Exported Configuration).
Importing agent groups
It is also possible to import a group. Create a group first. The Import button is available at the topof the rule edition panel. The expected file is the one generated by the console during export, i.e.the SCEC file.
Managing ranks of agent groups
Groups' ranks can be modified in the internal directory node panel.
1. Click the Internal Directory node.
2. In the right panel, click the tab Agent groups ranks and then click Check out.
3. Use the arrows to change the rank.
An agent belongs to the first group in which it matches a rule (IP matching the agent IP, agent IPmatching the IP range, agent belonging to the subnetwork or NetBios name matching the agentname).
SES - ADMINISTRATION GUIDE - V 7.25. MANAGEMENT CONSOLE CONFIGURATION
Page 101/424 ses-en-administration_guide-v7.2 - 11/30/2017
The directory contains all the agents which do not belong to any group.
Managing multi-console edition
A lock system guarantees data integrity when several users edit the agent groups configurationat the same time.
There are two types of locks:
• Directory lock: prevents ranks from being edited and adding/removing agent groups.
• Agent group lock: prevents editing of agent group names and manipulation of its data (IPaddresses, IP address ranges, etc.).
When User A is editing the directory, User B cannot edit group ranks or add/remove agent groupsat the same time.
When User A is editing an agent group, User B cannot edit the same group at the same time, i.e.edit the group name or data.
Moreover, when User A locks the directory, User B cannot edit the agent groups of this directory.User A can continue editing any agent group.
Finally, when User A locks an agent group, User B cannot edit the directory but he/she can editother agent groups (not locked).
While User A is editing a directory or agent group, a lock icon appears for other users indicatingthat the directory or agent group is currently being edited and the name of User A is shownbetween brackets next to the name of the edited element.
Stormshield Endpoint Security servers management
All Stormshield Endpoint Security servers are listed in the Stormshield Endpoint Securityservers panel. This menu indicates the status of each server.
It is possible to define other IP addresses for each server (agent synchronization IP). This way,agents contact them via an IP address different to the one used by the console for updates. Thispanel also enables choosing the server configuration policy to apply to each server.
Each server can belong to only one internal directory and/or Active Directory.
The directories to which a server belongs (if any) is displayed in the Directory column and isread-only.
When the Stormshield Endpoint Security administration console relies on an Active Directory, it ispossible to add one or more internal directories to complete agent management.
It is thus possible to manage agents (whether they are in the Active Directory or not) through theirIP address or NetBIOS name.
If you need to manage two agents with the same IP address and/or NETBIOS name in an internaldirectory, you have to create a second internal directory and assign a dedicated server to it.
Be careful to take into account this difference when installing agents. Each agent must beinstalled with the package generated by one of its assigned servers.
After a server has been assigned to a directory (internal or Active Directory) and has beensynchronized, it must not be reassigned to another directory to avoid directing agents from theformer directory to the new one.
Policies linked tab
The list of policies assigned to the environment, to a directory, to an Active Directory object or toan agent group is displayed by policy type.
SES - ADMINISTRATION GUIDE - V 7.25. MANAGEMENT CONSOLE CONFIGURATION
Page 102/424 ses-en-administration_guide-v7.2 - 11/30/2017
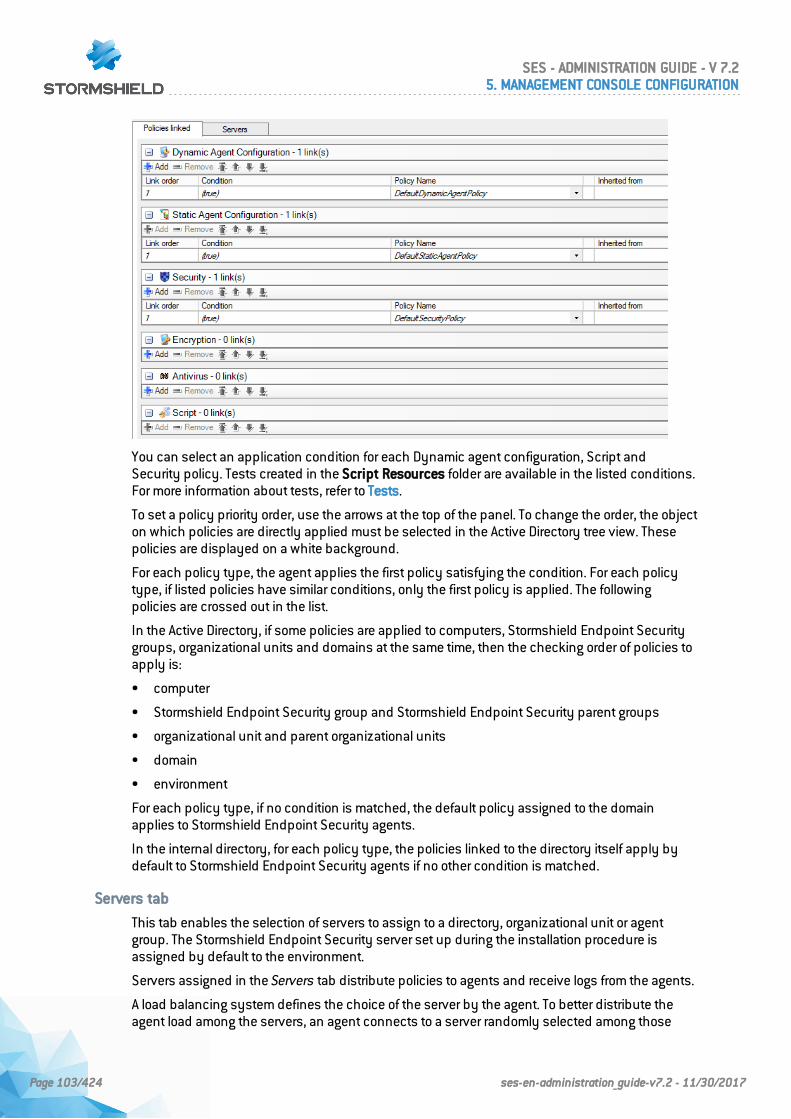
You can select an application condition for each Dynamic agent configuration, Script andSecurity policy. Tests created in the Script Resources folder are available in the listed conditions.For more information about tests, refer to Tests.
To set a policy priority order, use the arrows at the top of the panel. To change the order, the objecton which policies are directly applied must be selected in the Active Directory tree view. Thesepolicies are displayed on a white background.
For each policy type, the agent applies the first policy satisfying the condition. For each policytype, if listed policies have similar conditions, only the first policy is applied. The followingpolicies are crossed out in the list.
In the Active Directory, if some policies are applied to computers, Stormshield Endpoint Securitygroups, organizational units and domains at the same time, then the checking order of policies toapply is:
• computer
• Stormshield Endpoint Security group and Stormshield Endpoint Security parent groups
• organizational unit and parent organizational units
• domain
• environment
For each policy type, if no condition is matched, the default policy assigned to the domainapplies to Stormshield Endpoint Security agents.
In the internal directory, for each policy type, the policies linked to the directory itself apply bydefault to Stormshield Endpoint Security agents if no other condition is matched.
Servers tab
This tab enables the selection of servers to assign to a directory, organizational unit or agentgroup. The Stormshield Endpoint Security server set up during the installation procedure isassigned by default to the environment.
Servers assigned in the Servers tab distribute policies to agents and receive logs from the agents.
A load balancing system defines the choice of the server by the agent. To better distribute theagent load among the servers, an agent connects to a server randomly selected among those
SES - ADMINISTRATION GUIDE - V 7.25. MANAGEMENT CONSOLE CONFIGURATION
Page 103/424 ses-en-administration_guide-v7.2 - 11/30/2017
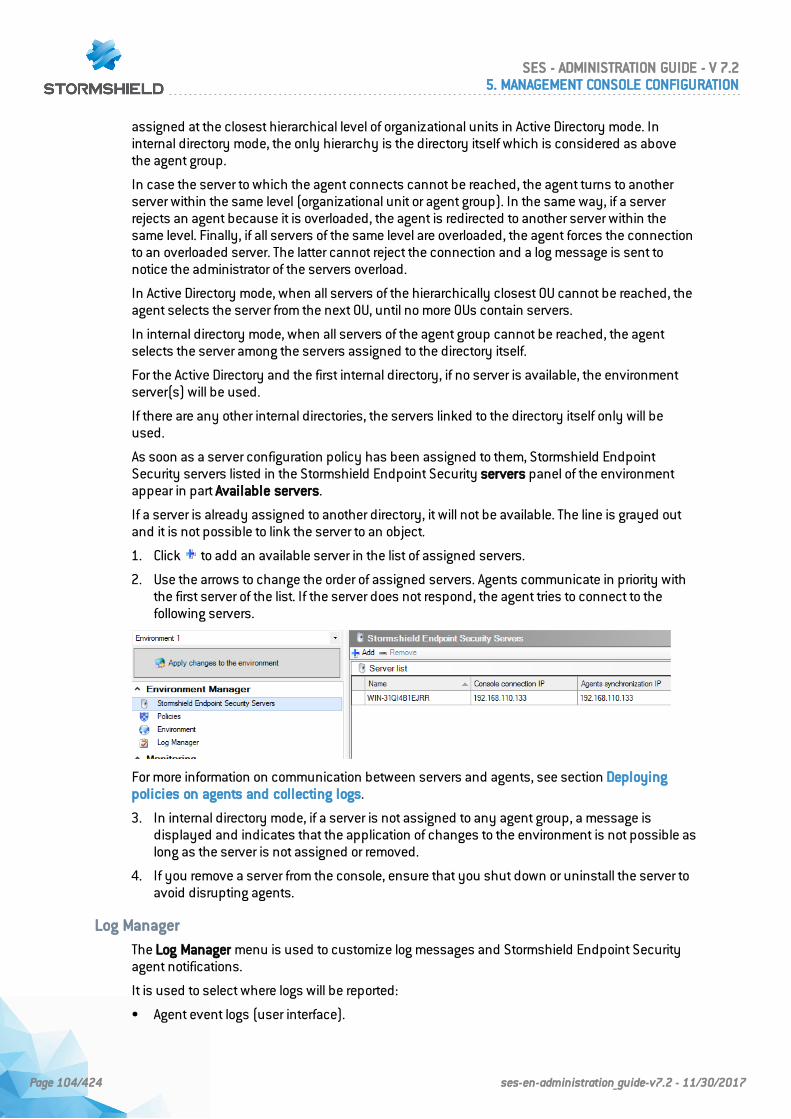
assigned at the closest hierarchical level of organizational units in Active Directory mode. Ininternal directory mode, the only hierarchy is the directory itself which is considered as abovethe agent group.
In case the server to which the agent connects cannot be reached, the agent turns to anotherserver within the same level (organizational unit or agent group). In the same way, if a serverrejects an agent because it is overloaded, the agent is redirected to another server within thesame level. Finally, if all servers of the same level are overloaded, the agent forces the connectionto an overloaded server. The latter cannot reject the connection and a log message is sent tonotice the administrator of the servers overload.
In Active Directory mode, when all servers of the hierarchically closest OU cannot be reached, theagent selects the server from the next OU, until no more OUs contain servers.
In internal directory mode, when all servers of the agent group cannot be reached, the agentselects the server among the servers assigned to the directory itself.
For the Active Directory and the first internal directory, if no server is available, the environmentserver(s) will be used.
If there are any other internal directories, the servers linked to the directory itself only will beused.
As soon as a server configuration policy has been assigned to them, Stormshield EndpointSecurity servers listed in the Stormshield Endpoint Security servers panel of the environmentappear in part Available servers.
If a server is already assigned to another directory, it will not be available. The line is grayed outand it is not possible to link the server to an object.
1. Click to add an available server in the list of assigned servers.
2. Use the arrows to change the order of assigned servers. Agents communicate in priority withthe first server of the list. If the server does not respond, the agent tries to connect to thefollowing servers.
For more information on communication between servers and agents, see section Deployingpolicies on agents and collecting logs.
3. In internal directory mode, if a server is not assigned to any agent group, a message isdisplayed and indicates that the application of changes to the environment is not possible aslong as the server is not assigned or removed.
4. If you remove a server from the console, ensure that you shut down or uninstall the server toavoid disrupting agents.
Log Manager
The Log Manager menu is used to customize log messages and Stormshield Endpoint Securityagent notifications.
It is used to select where logs will be reported:
• Agent event logs (user interface).
SES - ADMINISTRATION GUIDE - V 7.25. MANAGEMENT CONSOLE CONFIGURATION
Page 104/424 ses-en-administration_guide-v7.2 - 11/30/2017
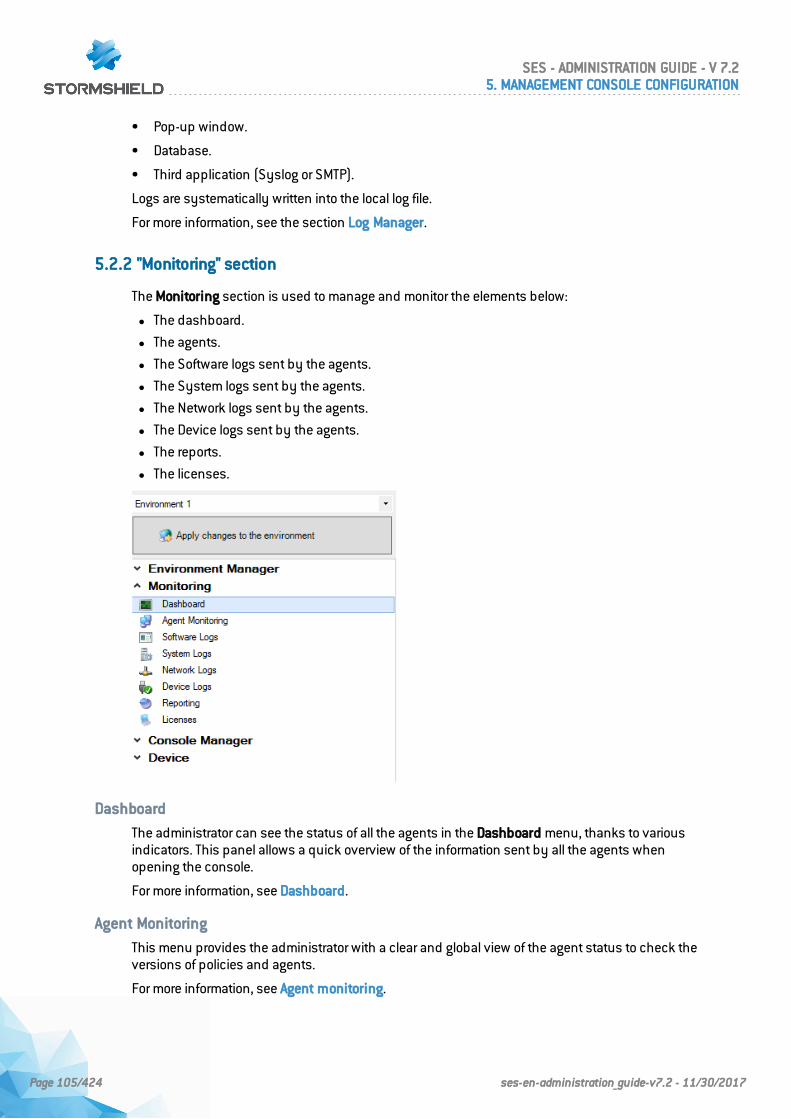
• Pop-up window.
• Database.
• Third application (Syslog or SMTP).
Logs are systematically written into the local log file.
For more information, see the section Log Manager.
5.2.2 "Monitoring" section
The Monitoring section is used to manage and monitor the elements below:
l The dashboard.
l The agents.
l The Software logs sent by the agents.
l The System logs sent by the agents.
l The Network logs sent by the agents.
l The Device logs sent by the agents.
l The reports.
l The licenses.
Dashboard
The administrator can see the status of all the agents in the Dashboard menu, thanks to variousindicators. This panel allows a quick overview of the information sent by all the agents whenopening the console.
For more information, see Dashboard.
Agent Monitoring
This menu provides the administrator with a clear and global view of the agent status to check theversions of policies and agents.
For more information, see Agent monitoring.
SES - ADMINISTRATION GUIDE - V 7.25. MANAGEMENT CONSOLE CONFIGURATION
Page 105/424 ses-en-administration_guide-v7.2 - 11/30/2017

Software Logs
The Software logs menu displays any activity of the agents related to their action on client andserver workstations.
System Logs
The System logs menu displays any activity of the agents on client and server workstationsrelated to the protection of the operating system and the corresponding reaction of theStormshield Endpoint Security agent.
Network Logs
The Network logs menu displays any activity of the agents on client and server workstationsrelated to the protection of the network firewall part and of the intrusion detection system and thecorresponding reaction of the Stormshield Endpoint Security agent.
Device Logs
The Device logs menu displays any activity of the agents on client and server workstationsrelated to the devices control and to the WIFI and the corresponding reaction of the StormshieldEndpoint Security agent.
Reporting
The Reporting menu displays real-time and historical reports. These reports are used to collectand consult information on:
• Agents.
• Servers.
• Policies.
• Configurations.
• Removable devices.
• Antivirus.
For more information, see Stormshield Endpoint Security Reporting.
Licenses
The Licenses menu is used to display information on:
• The number of agents deployed (taking into account the Stormshield Endpoint Securitypackage that you have installed).
• The number of licenses that are still available.
5.2.3 "Console Manager" section
The Console Manager section is used to manage the elements below:
l The console.
l The console users.
l The roles.
l The events.
SES - ADMINISTRATION GUIDE - V 7.25. MANAGEMENT CONSOLE CONFIGURATION
Page 106/424 ses-en-administration_guide-v7.2 - 11/30/2017
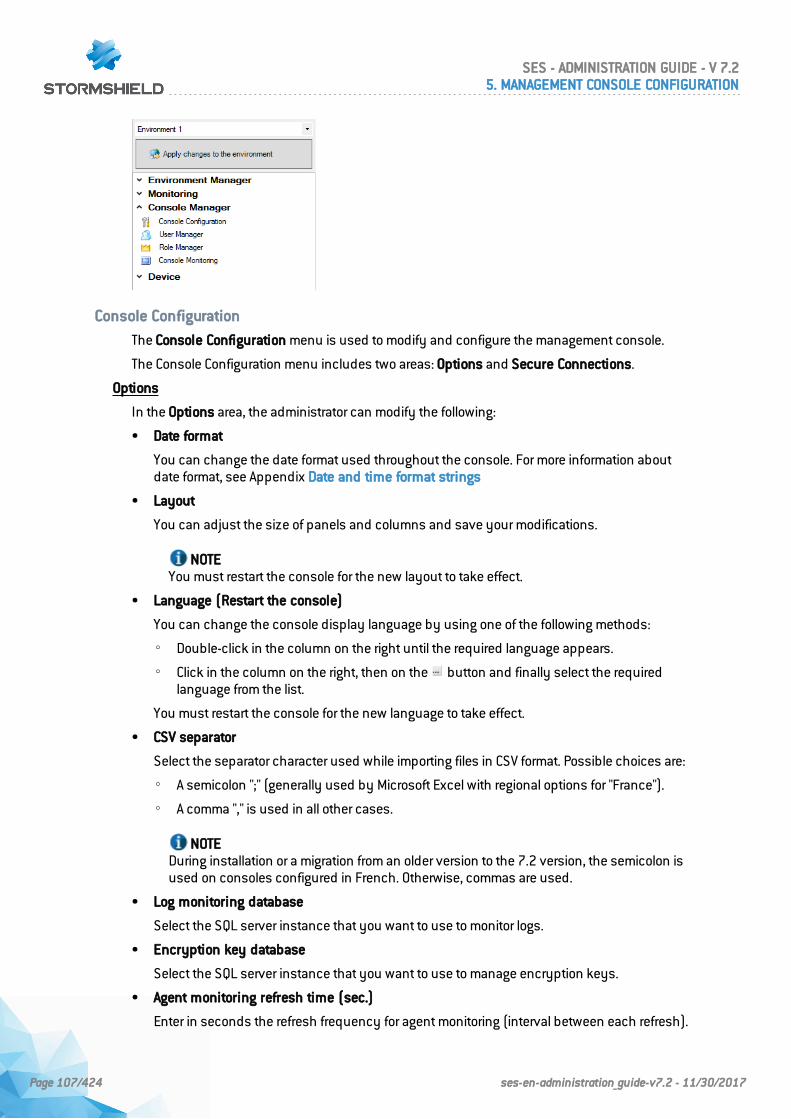
Console Configuration
The Console Configuration menu is used to modify and configure the management console.
The Console Configuration menu includes two areas: Options and Secure Connections.
Options
In the Options area, the administrator can modify the following:
• Date format
You can change the date format used throughout the console. For more information aboutdate format, see Appendix Date and time format strings
• Layout
You can adjust the size of panels and columns and save your modifications.
NOTEYou must restart the console for the new layout to take effect.
• Language (Restart the console)
You can change the console display language by using one of the following methods:
◦ Double-click in the column on the right until the required language appears.
◦ Click in the column on the right, then on the button and finally select the requiredlanguage from the list.
You must restart the console for the new language to take effect.
• CSV separator
Select the separator character used while importing files in CSV format. Possible choices are:
◦ A semicolon ";" (generally used by Microsoft Excel with regional options for "France").
◦ A comma "," is used in all other cases.
NOTEDuring installation or a migration from an older version to the 7.2 version, the semicolon isused on consoles configured in French. Otherwise, commas are used.
• Log monitoring database
Select the SQL server instance that you want to use to monitor logs.
• Encryption key database
Select the SQL server instance that you want to use to manage encryption keys.
• Agent monitoring refresh time (sec.)
Enter in seconds the refresh frequency for agent monitoring (interval between each refresh).
SES - ADMINISTRATION GUIDE - V 7.25. MANAGEMENT CONSOLE CONFIGURATION
Page 107/424 ses-en-administration_guide-v7.2 - 11/30/2017
• Log monitoring refresh time (sec.)
Enter in seconds the refresh frequency for log monitoring (interval between each refresh).
Secure Connections
In the Secure Connections area, you can modify:
• The filepath used for the security certificates that protect communications between theconsole and the Stormshield Endpoint Security server.
• The certificate password set when installing the server to prevent any illegal use of thecertificates.
User Manager
This area is used to define the users who can access the management console, and the rolesassigned to them.
To add an internal user (SQL) or a Windows user (Active Directory), follow the steps below:
1. Click User Manager.
2. Click on the button at the top of the window.
3. Select the user type: SQL user or Active Directory user.
SQL user
1. Fill in the Login and Password fields.
NOTEA user name must not contain the special characters "\" and "@".
2. Select the role to be assigned to the user.
3. Select the environment to be assigned to the user (if necessary).
4. Edit the console configuration settings if needed.
Active Directory user
The following requirements must be met so that a user with a Windows account can use theStormshield Endpoint Security administration console:
• If the user belongs to a domain other than the SQL server, a trust relationship must beestablished between both domains.
• If the user belongs to a domain other than the console, a trust relationship must beestablished between both domains.
NOTEIn general, any user who can "Run as..." on the workstation hosting the StormshieldEndpoint Security SQL instance can be added.
1. Click Search.
◦ If the user to be added belongs to the Active Directory configured during the installation ofthe management console, the window Active Directory Search opens. Search and selectthe user name.
◦ If the environment is based on an internal directory or if the user belongs to anotherActive Directory domain, the AD Credentials window opens:
- Fill in the AD credentials and click on OK.
- Select the user search DN to add.
- Click on OK.
SES - ADMINISTRATION GUIDE - V 7.25. MANAGEMENT CONSOLE CONFIGURATION
Page 108/424 ses-en-administration_guide-v7.2 - 11/30/2017

- The window Active Directory Search opens.
- Search and select the user name.
2. Click on OK. The Login field is automatically filled in.
3. Enter the user’s password and confirm.
4. Select the role to be assigned to the user.
5. Select the environment to be assigned to the user (if necessary).
6. Edit the console configuration settings if needed.
Role Manager
This area is used to create the roles assigned to management console users. These roles are thenassigned through the User Manager.
The roles by default are the following:
• Administrator:
Access rights to all operations in the management console.
• Public:
Read-only access rights to some panels of the management console.
The Role Manager is used to create and name the users to which roles and environments areassigned.
To add a role, follow the steps below:
1. Click Role Manager.
2. Click .
3. Enter the Name of the new role and validate.
SES - ADMINISTRATION GUIDE - V 7.25. MANAGEMENT CONSOLE CONFIGURATION
Page 109/424 ses-en-administration_guide-v7.2 - 11/30/2017

4. Click the role name in the Role column and check the appropriate boxes.
WARNINGGranting too many permissions to a user may compromise security. Make sure you give arole only the required rights for performing the requested operations.
Console monitoring
The Console Monitoring menu displays the actions performed by an administrator of themanagement console.
Actions such as the following are displayed:
• Sending configurations to the server.
• Assigning policies to a directory object.
• Updating policies.
For more information, see the section Console monitoring.
5.2.4 "Devices" section
The Device Enrollment menu allows enrolling devices which could then be switched to a"trusted" status by a Stormshield Endpoint Security agent.
These "enrolled" and "trusted" statuses allow managing a set of USB drives and checking thecontents of removable devices.
For more information, see chapter Removable Device Administration.
5.2.5 Status bar
This bar displays the Date and Description of the status messages related to the operationsperformed by the console.
SES - ADMINISTRATION GUIDE - V 7.25. MANAGEMENT CONSOLE CONFIGURATION
Page 110/424 ses-en-administration_guide-v7.2 - 11/30/2017
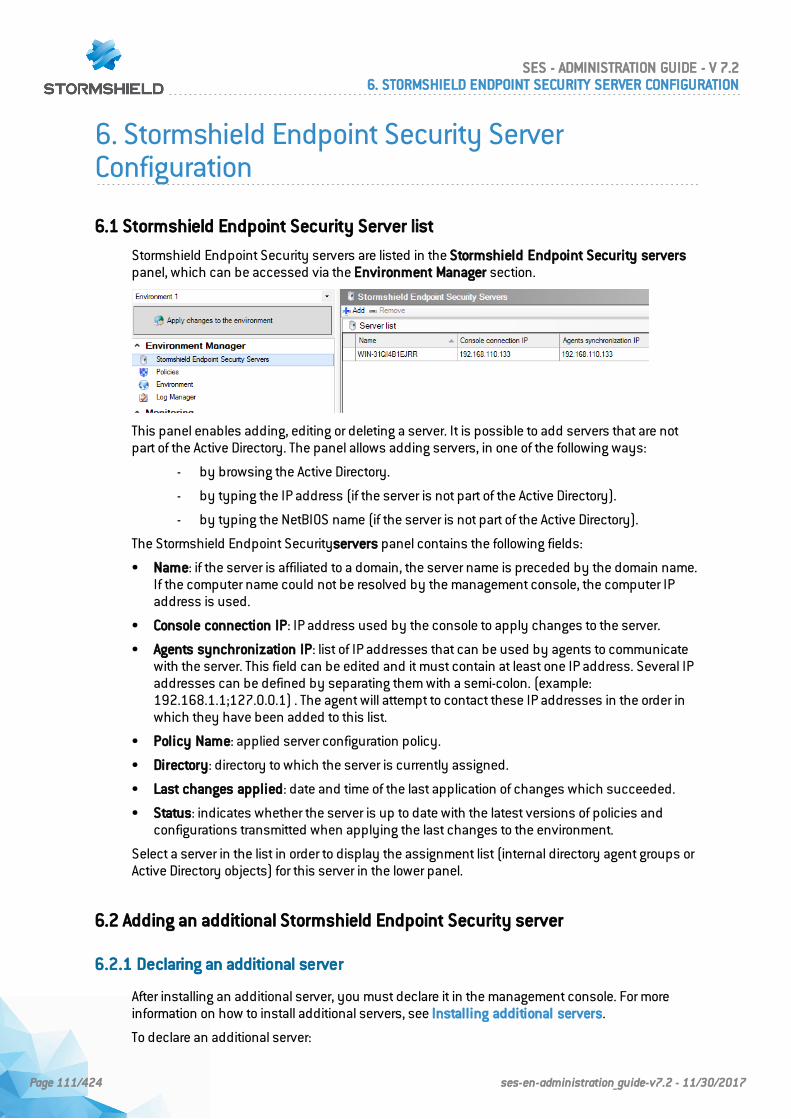
6. Stormshield Endpoint Security ServerConfiguration
6.1 Stormshield Endpoint Security Server list
Stormshield Endpoint Security servers are listed in the Stormshield Endpoint Security serverspanel, which can be accessed via the Environment Manager section.
This panel enables adding, editing or deleting a server. It is possible to add servers that are notpart of the Active Directory. The panel allows adding servers, in one of the following ways:
- by browsing the Active Directory.
- by typing the IP address (if the server is not part of the Active Directory).
- by typing the NetBIOS name (if the server is not part of the Active Directory).
The Stormshield Endpoint Securityservers panel contains the following fields:
• Name: if the server is affiliated to a domain, the server name is preceded by the domain name.If the computer name could not be resolved by the management console, the computer IPaddress is used.
• Console connection IP: IP address used by the console to apply changes to the server.
• Agents synchronization IP: list of IP addresses that can be used by agents to communicatewith the server. This field can be edited and it must contain at least one IP address. Several IPaddresses can be defined by separating them with a semi-colon. (example:192.168.1.1;127.0.0.1) . The agent will attempt to contact these IP addresses in the order inwhich they have been added to this list.
• Policy Name: applied server configuration policy.
• Directory: directory to which the server is currently assigned.
• Last changes applied: date and time of the last application of changes which succeeded.
• Status: indicates whether the server is up to date with the latest versions of policies andconfigurations transmitted when applying the last changes to the environment.
Select a server in the list in order to display the assignment list (internal directory agent groups orActive Directory objects) for this server in the lower panel.
6.2 Adding an additional Stormshield Endpoint Security server
6.2.1 Declaring an additional server
After installing an additional server, you must declare it in the management console. For moreinformation on how to install additional servers, see Installing additional servers.
To declare an additional server:
SES - ADMINISTRATION GUIDE - V 7.26. STORMSHIELD ENDPOINT SECURITY SERVER CONFIGURATION
Page 111/424 ses-en-administration_guide-v7.2 - 11/30/2017
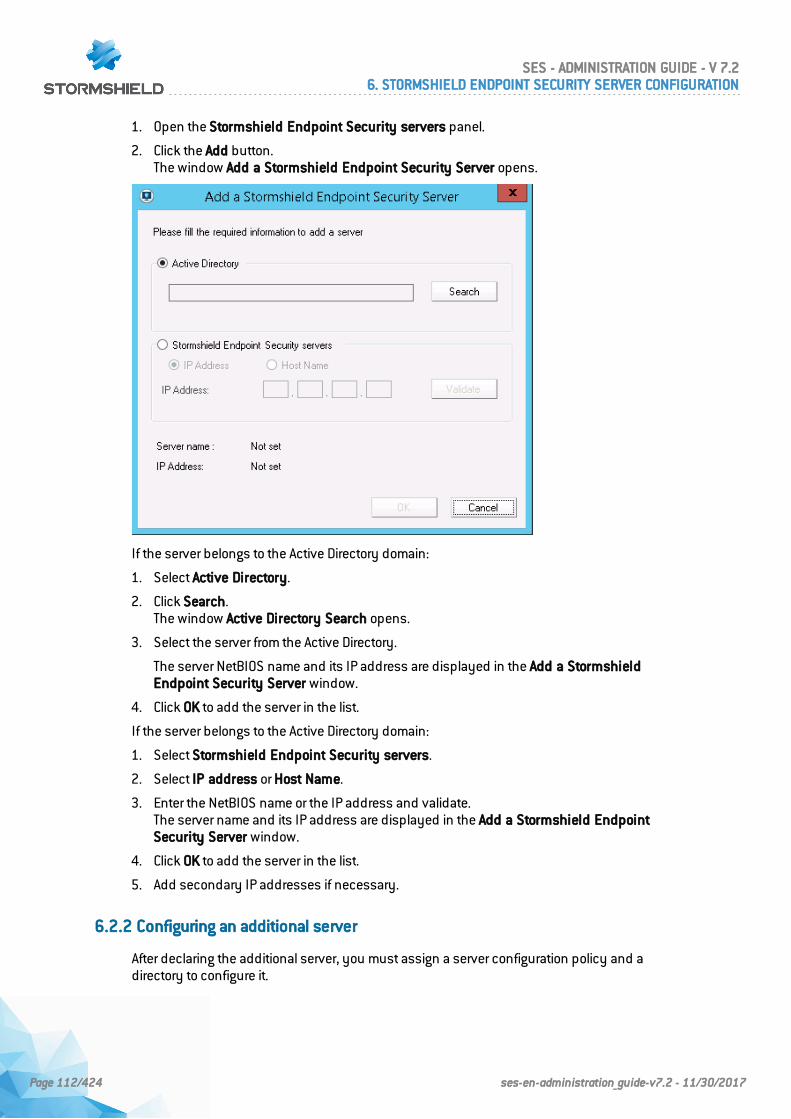
1. Open the Stormshield Endpoint Security servers panel.
2. Click the Add button.The window Add a Stormshield Endpoint Security Server opens.
If the server belongs to the Active Directory domain:
1. Select Active Directory.
2. Click Search.The window Active Directory Search opens.
3. Select the server from the Active Directory.
The server NetBIOS name and its IP address are displayed in the Add a StormshieldEndpoint Security Server window.
4. Click OK to add the server in the list.
If the server belongs to the Active Directory domain:
1. Select Stormshield Endpoint Security servers.
2. Select IP address or Host Name.
3. Enter the NetBIOS name or the IP address and validate.The server name and its IP address are displayed in the Add a Stormshield EndpointSecurity Server window.
4. Click OK to add the server in the list.
5. Add secondary IP addresses if necessary.
6.2.2 Configuring an additional server
After declaring the additional server, you must assign a server configuration policy and adirectory to configure it.
SES - ADMINISTRATION GUIDE - V 7.26. STORMSHIELD ENDPOINT SECURITY SERVER CONFIGURATION
Page 112/424 ses-en-administration_guide-v7.2 - 11/30/2017
Assigning a server configuration policy
From the Stormshield Endpoint Security servers panel, select the server configuration policy inthe column Policy Name.
To create the server configuration policy, see section Creating a server configuration policy.
Assigning a directory
If the installation is based on an Active Directory, the additional server can be assigned to thewhole domain or to an organizational unit (OU).
If the installation is based on an internal directory, the additional server can be assigned to all thedirectory or to a particular group of agents.
To assign a directory to the additional server:
1. In the directory tree view (internal or AD), click on the node concerned.
2. Open the Servers tab.
3. In the list of available servers, assign the additional server with the icon .
The added server displays in the list of the assigned servers.
6.3 Creating a server configuration policy
1. Click Policies and the button. The window Create a new policy opens.
2. Enter a policy name and select the policy type Server Configuration.
3. Click OK. The policy edition window opens.
6.4 Editing a server configuration policy
The server configuration policy includes the following areas:
• Server Roles.
• Agent connexions management.
• Log Monitoring Configuration.
• Syslog Configuration.
• SMTP Configuration.
• Encryption.
• Antivirus Update.
• Software Updates Settings.
• Authentication Service.
SES - ADMINISTRATION GUIDE - V 7.26. STORMSHIELD ENDPOINT SECURITY SERVER CONFIGURATION
Page 113/424 ses-en-administration_guide-v7.2 - 11/30/2017
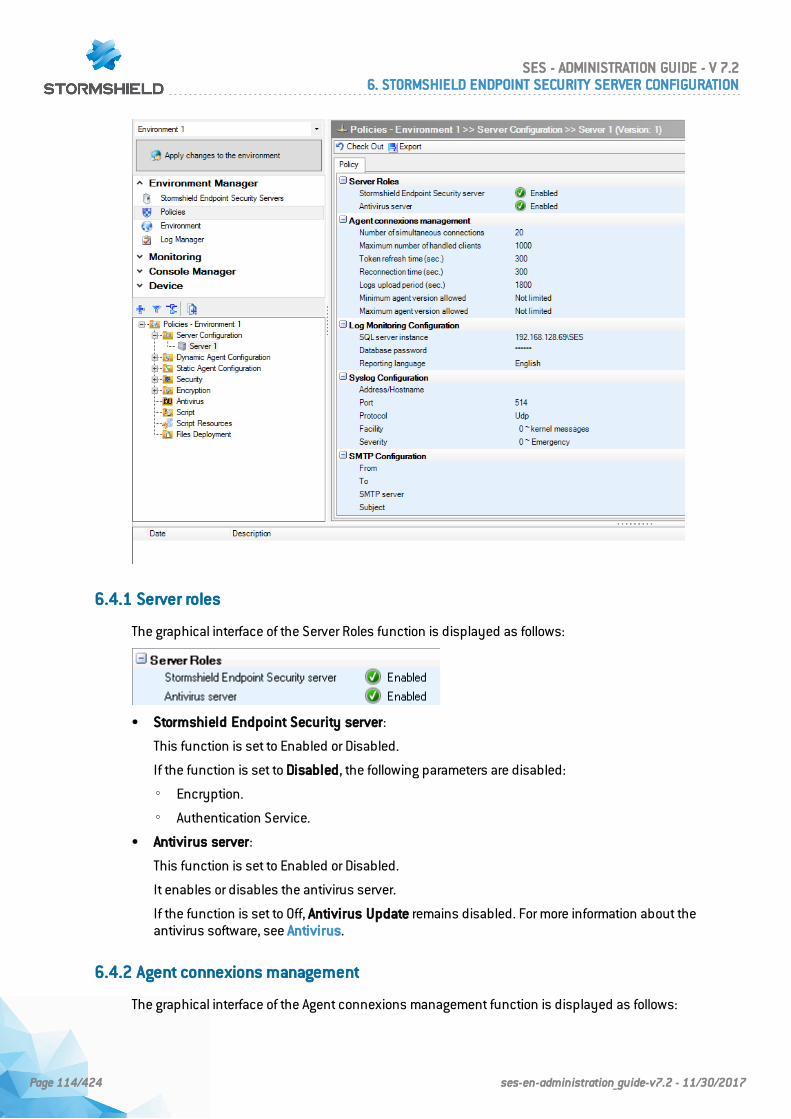
6.4.1 Server roles
The graphical interface of the Server Roles function is displayed as follows:
• Stormshield Endpoint Security server:
This function is set to Enabled or Disabled.
If the function is set to Disabled, the following parameters are disabled:
◦ Encryption.
◦ Authentication Service.
• Antivirus server:
This function is set to Enabled or Disabled.
It enables or disables the antivirus server.
If the function is set to Off, Antivirus Update remains disabled. For more information about theantivirus software, see Antivirus.
6.4.2 Agent connexions management
The graphical interface of the Agent connexions management function is displayed as follows:
SES - ADMINISTRATION GUIDE - V 7.26. STORMSHIELD ENDPOINT SECURITY SERVER CONFIGURATION
Page 114/424 ses-en-administration_guide-v7.2 - 11/30/2017
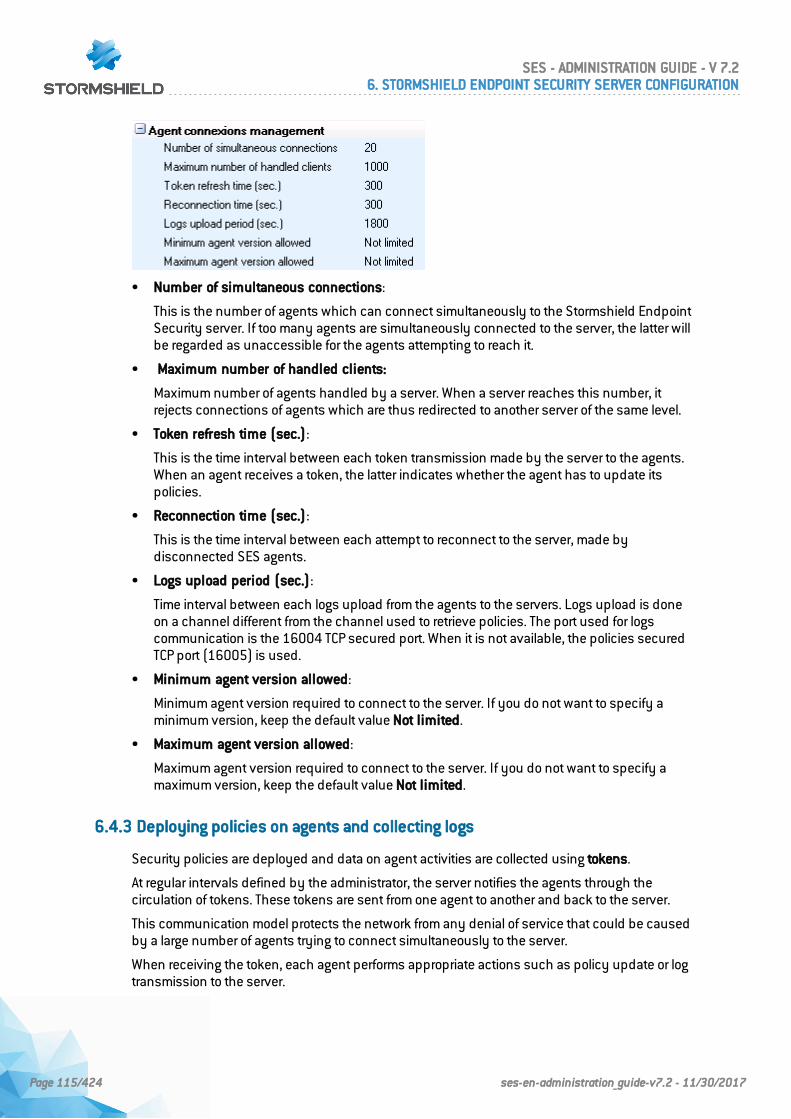
• Number of simultaneous connections:
This is the number of agents which can connect simultaneously to the Stormshield EndpointSecurity server. If too many agents are simultaneously connected to the server, the latter willbe regarded as unaccessible for the agents attempting to reach it.
• Maximum number of handled clients:
Maximum number of agents handled by a server. When a server reaches this number, itrejects connections of agents which are thus redirected to another server of the same level.
• Token refresh time (sec.):
This is the time interval between each token transmission made by the server to the agents.When an agent receives a token, the latter indicates whether the agent has to update itspolicies.
• Reconnection time (sec.):
This is the time interval between each attempt to reconnect to the server, made bydisconnected SES agents.
• Logs upload period (sec.):
Time interval between each logs upload from the agents to the servers. Logs upload is doneon a channel different from the channel used to retrieve policies. The port used for logscommunication is the 16004 TCP secured port. When it is not available, the policies securedTCP port (16005) is used.
• Minimum agent version allowed:
Minimum agent version required to connect to the server. If you do not want to specify aminimum version, keep the default value Not limited.
• Maximum agent version allowed:
Maximum agent version required to connect to the server. If you do not want to specify amaximum version, keep the default value Not limited.
6.4.3 Deploying policies on agents and collecting logs
Security policies are deployed and data on agent activities are collected using tokens.
At regular intervals defined by the administrator, the server notifies the agents through thecirculation of tokens. These tokens are sent from one agent to another and back to the server.
This communication model protects the network from any denial of service that could be causedby a large number of agents trying to connect simultaneously to the server.
When receiving the token, each agent performs appropriate actions such as policy update or logtransmission to the server.
SES - ADMINISTRATION GUIDE - V 7.26. STORMSHIELD ENDPOINT SECURITY SERVER CONFIGURATION
Page 115/424 ses-en-administration_guide-v7.2 - 11/30/2017
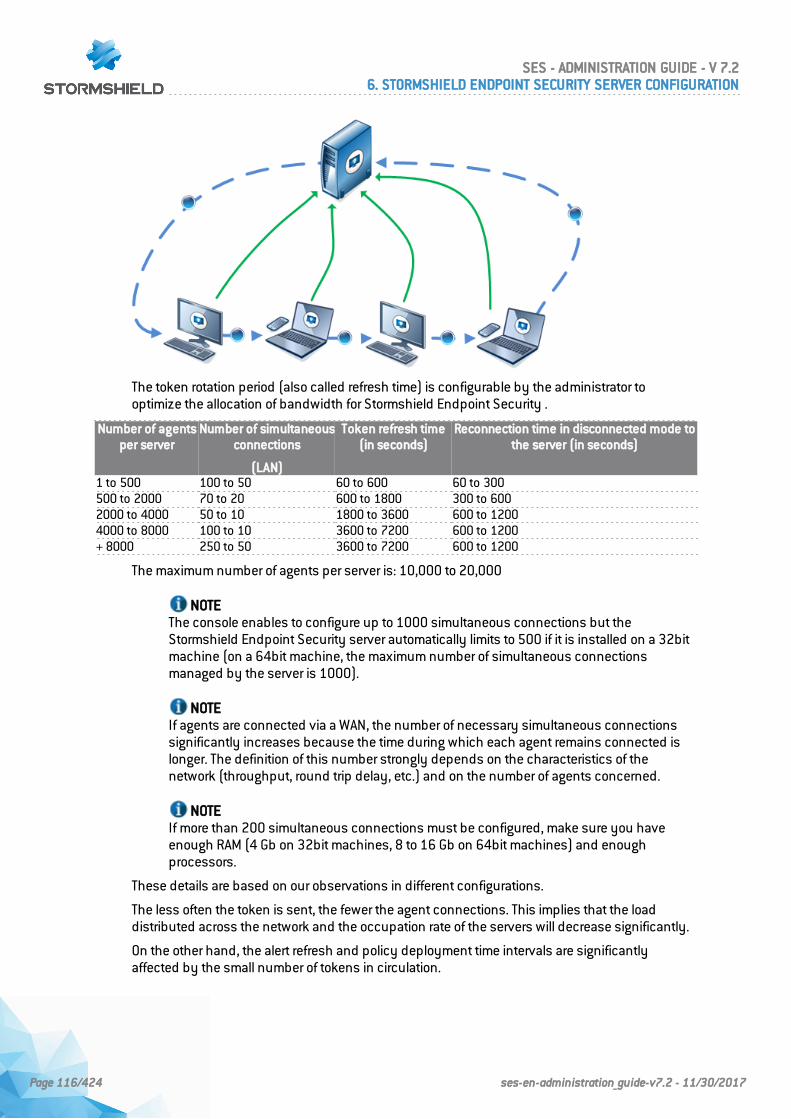
The token rotation period (also called refresh time) is configurable by the administrator tooptimize the allocation of bandwidth for Stormshield Endpoint Security .
Number of agentsper server
Number of simultaneousconnections
(LAN)
Token refresh time(in seconds)
Reconnection time in disconnected mode tothe server (in seconds)
1 to 500 100 to 50 60 to 600 60 to 300500 to 2000 70 to 20 600 to 1800 300 to 6002000 to 4000 50 to 10 1800 to 3600 600 to 12004000 to 8000 100 to 10 3600 to 7200 600 to 1200+ 8000 250 to 50 3600 to 7200 600 to 1200
The maximum number of agents per server is: 10,000 to 20,000
NOTEThe console enables to configure up to 1000 simultaneous connections but theStormshield Endpoint Security server automatically limits to 500 if it is installed on a 32bitmachine (on a 64bit machine, the maximum number of simultaneous connectionsmanaged by the server is 1000).
NOTEIf agents are connected via a WAN, the number of necessary simultaneous connectionssignificantly increases because the time during which each agent remains connected islonger. The definition of this number strongly depends on the characteristics of thenetwork (throughput, round trip delay, etc.) and on the number of agents concerned.
NOTEIf more than 200 simultaneous connections must be configured, make sure you haveenough RAM (4 Gb on 32bit machines, 8 to 16 Gb on 64bit machines) and enoughprocessors.
These details are based on our observations in different configurations.
The less often the token is sent, the fewer the agent connections. This implies that the loaddistributed across the network and the occupation rate of the servers will decrease significantly.
On the other hand, the alert refresh and policy deployment time intervals are significantlyaffected by the small number of tokens in circulation.
SES - ADMINISTRATION GUIDE - V 7.26. STORMSHIELD ENDPOINT SECURITY SERVER CONFIGURATION
Page 116/424 ses-en-administration_guide-v7.2 - 11/30/2017
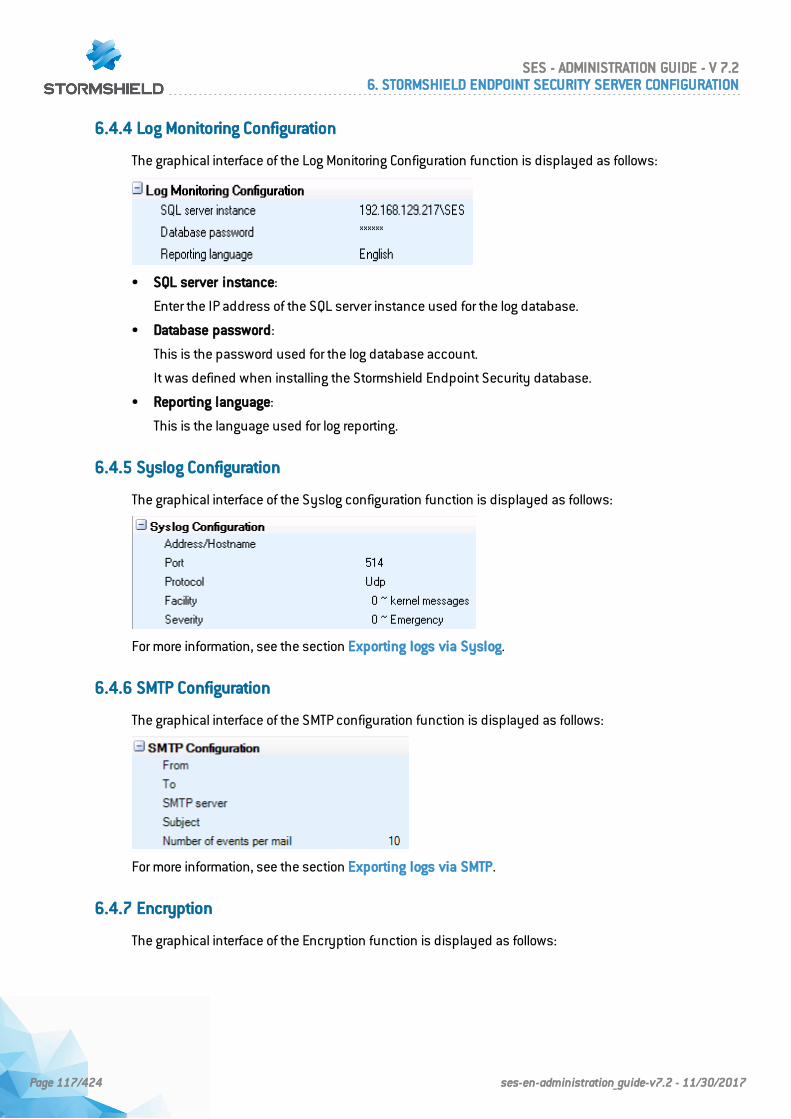
6.4.4 Log Monitoring Configuration
The graphical interface of the Log Monitoring Configuration function is displayed as follows:
• SQL server instance:
Enter the IP address of the SQL server instance used for the log database.
• Database password:
This is the password used for the log database account.
It was defined when installing the Stormshield Endpoint Security database.
• Reporting language:
This is the language used for log reporting.
6.4.5 Syslog Configuration
The graphical interface of the Syslog configuration function is displayed as follows:
For more information, see the section Exporting logs via Syslog.
6.4.6 SMTP Configuration
The graphical interface of the SMTP configuration function is displayed as follows:
For more information, see the section Exporting logs via SMTP.
6.4.7 Encryption
The graphical interface of the Encryption function is displayed as follows:
SES - ADMINISTRATION GUIDE - V 7.26. STORMSHIELD ENDPOINT SECURITY SERVER CONFIGURATION
Page 117/424 ses-en-administration_guide-v7.2 - 11/30/2017
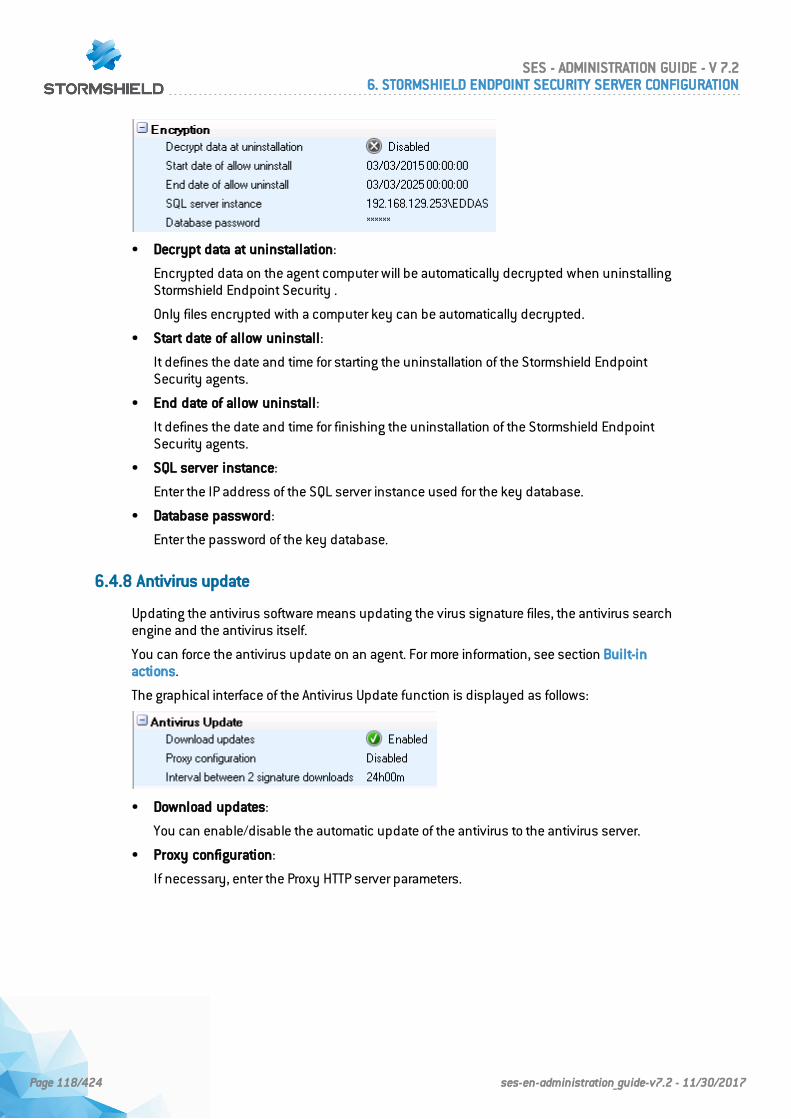
• Decrypt data at uninstallation:
Encrypted data on the agent computer will be automatically decrypted when uninstallingStormshield Endpoint Security .
Only files encrypted with a computer key can be automatically decrypted.
• Start date of allow uninstall:
It defines the date and time for starting the uninstallation of the Stormshield EndpointSecurity agents.
• End date of allow uninstall:
It defines the date and time for finishing the uninstallation of the Stormshield EndpointSecurity agents.
• SQL server instance:
Enter the IP address of the SQL server instance used for the key database.
• Database password:
Enter the password of the key database.
6.4.8 Antivirus update
Updating the antivirus software means updating the virus signature files, the antivirus searchengine and the antivirus itself.
You can force the antivirus update on an agent. For more information, see section Built-inactions.
The graphical interface of the Antivirus Update function is displayed as follows:
• Download updates:
You can enable/disable the automatic update of the antivirus to the antivirus server.
• Proxy configuration:
If necessary, enter the Proxy HTTP server parameters.
SES - ADMINISTRATION GUIDE - V 7.26. STORMSHIELD ENDPOINT SECURITY SERVER CONFIGURATION
Page 118/424 ses-en-administration_guide-v7.2 - 11/30/2017
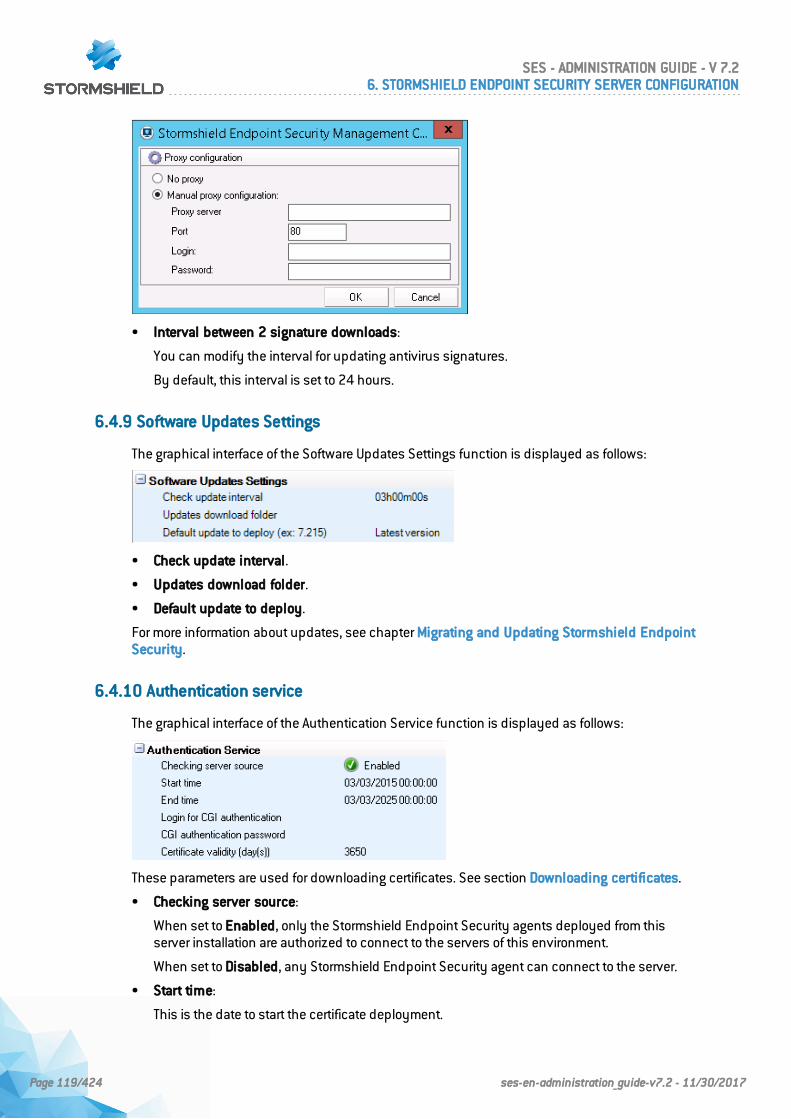
• Interval between 2 signature downloads:
You can modify the interval for updating antivirus signatures.
By default, this interval is set to 24 hours.
6.4.9 Software Updates Settings
The graphical interface of the Software Updates Settings function is displayed as follows:
• Check update interval.
• Updates download folder.
• Default update to deploy.
For more information about updates, see chapter Migrating and Updating Stormshield EndpointSecurity.
6.4.10 Authentication service
The graphical interface of the Authentication Service function is displayed as follows:
These parameters are used for downloading certificates. See section Downloading certificates.
• Checking server source:
When set to Enabled, only the Stormshield Endpoint Security agents deployed from thisserver installation are authorized to connect to the servers of this environment.
When set to Disabled, any Stormshield Endpoint Security agent can connect to the server.
• Start time:
This is the date to start the certificate deployment.
SES - ADMINISTRATION GUIDE - V 7.26. STORMSHIELD ENDPOINT SECURITY SERVER CONFIGURATION
Page 119/424 ses-en-administration_guide-v7.2 - 11/30/2017
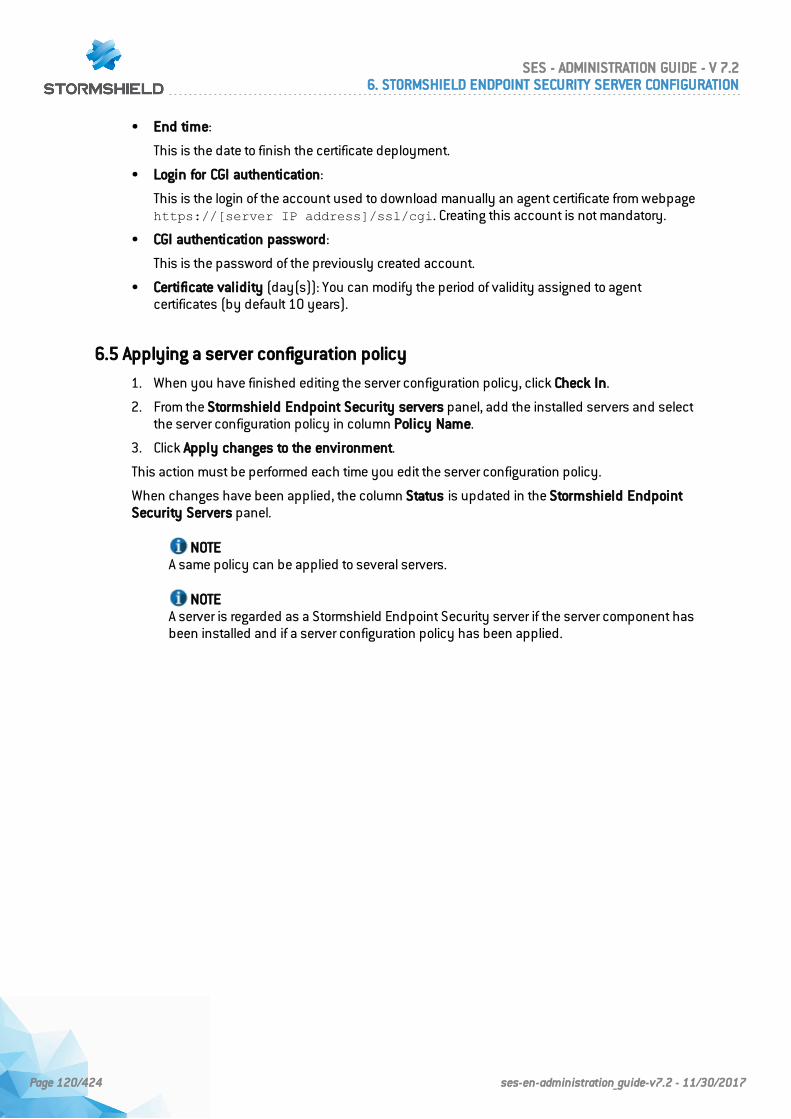
• End time:
This is the date to finish the certificate deployment.
• Login for CGI authentication:
This is the login of the account used to download manually an agent certificate from webpagehttps://[server IP address]/ssl/cgi. Creating this account is not mandatory.
• CGI authentication password:
This is the password of the previously created account.
• Certificate validity (day(s)): You can modify the period of validity assigned to agentcertificates (by default 10 years).
6.5 Applying a server configuration policy
1. When you have finished editing the server configuration policy, click Check In.
2. From the Stormshield Endpoint Security servers panel, add the installed servers and selectthe server configuration policy in column Policy Name.
3. Click Apply changes to the environment.
This action must be performed each time you edit the server configuration policy.
When changes have been applied, the column Status is updated in the Stormshield EndpointSecurity Servers panel.
NOTEA same policy can be applied to several servers.
NOTEA server is regarded as a Stormshield Endpoint Security server if the server component hasbeen installed and if a server configuration policy has been applied.
SES - ADMINISTRATION GUIDE - V 7.26. STORMSHIELD ENDPOINT SECURITY SERVER CONFIGURATION
Page 120/424 ses-en-administration_guide-v7.2 - 11/30/2017
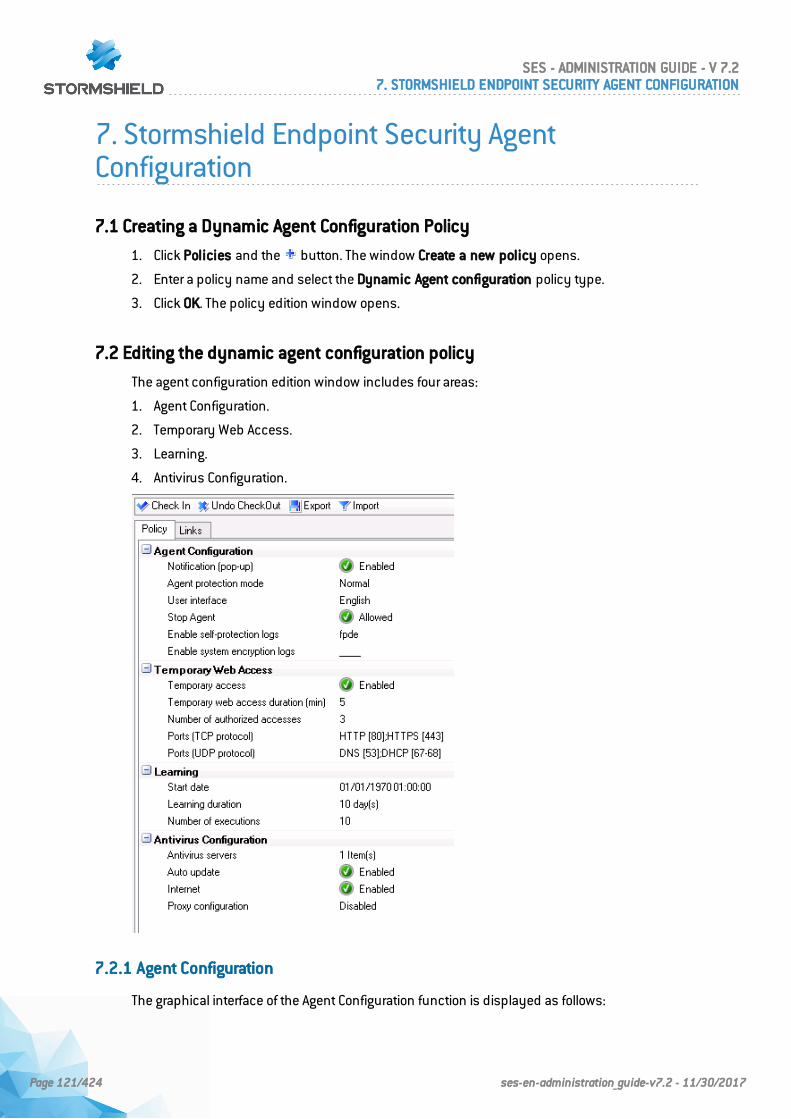
7. Stormshield Endpoint Security AgentConfiguration
7.1 Creating a Dynamic Agent Configuration Policy
1. Click Policies and the button. The window Create a new policy opens.
2. Enter a policy name and select the Dynamic Agent configuration policy type.
3. Click OK. The policy edition window opens.
7.2 Editing the dynamic agent configuration policy
The agent configuration edition window includes four areas:
1. Agent Configuration.
2. Temporary Web Access.
3. Learning.
4. Antivirus Configuration.
7.2.1 Agent Configuration
The graphical interface of the Agent Configuration function is displayed as follows:
SES - ADMINISTRATION GUIDE - V 7.27. STORMSHIELD ENDPOINT SECURITY AGENT CONFIGURATION
Page 121/424 ses-en-administration_guide-v7.2 - 11/30/2017
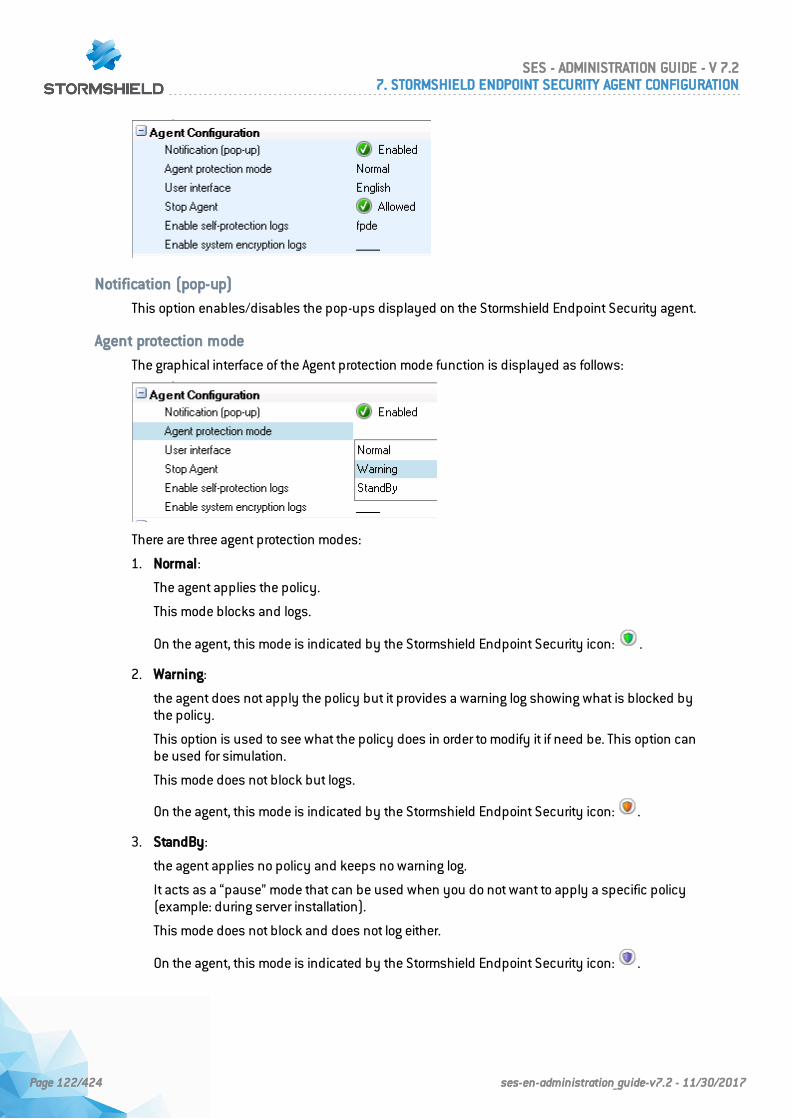
Notification (pop-up)
This option enables/disables the pop-ups displayed on the Stormshield Endpoint Security agent.
Agent protection mode
The graphical interface of the Agent protection mode function is displayed as follows:
There are three agent protection modes:
1. Normal:
The agent applies the policy.
This mode blocks and logs.
On the agent, this mode is indicated by the Stormshield Endpoint Security icon: .
2. Warning:
the agent does not apply the policy but it provides a warning log showing what is blocked bythe policy.
This option is used to see what the policy does in order to modify it if need be. This option canbe used for simulation.
This mode does not block but logs.
On the agent, this mode is indicated by the Stormshield Endpoint Security icon: .
3. StandBy:
the agent applies no policy and keeps no warning log.
It acts as a “pause” mode that can be used when you do not want to apply a specific policy(example: during server installation).
This mode does not block and does not log either.
On the agent, this mode is indicated by the Stormshield Endpoint Security icon: .
SES - ADMINISTRATION GUIDE - V 7.27. STORMSHIELD ENDPOINT SECURITY AGENT CONFIGURATION
Page 122/424 ses-en-administration_guide-v7.2 - 11/30/2017
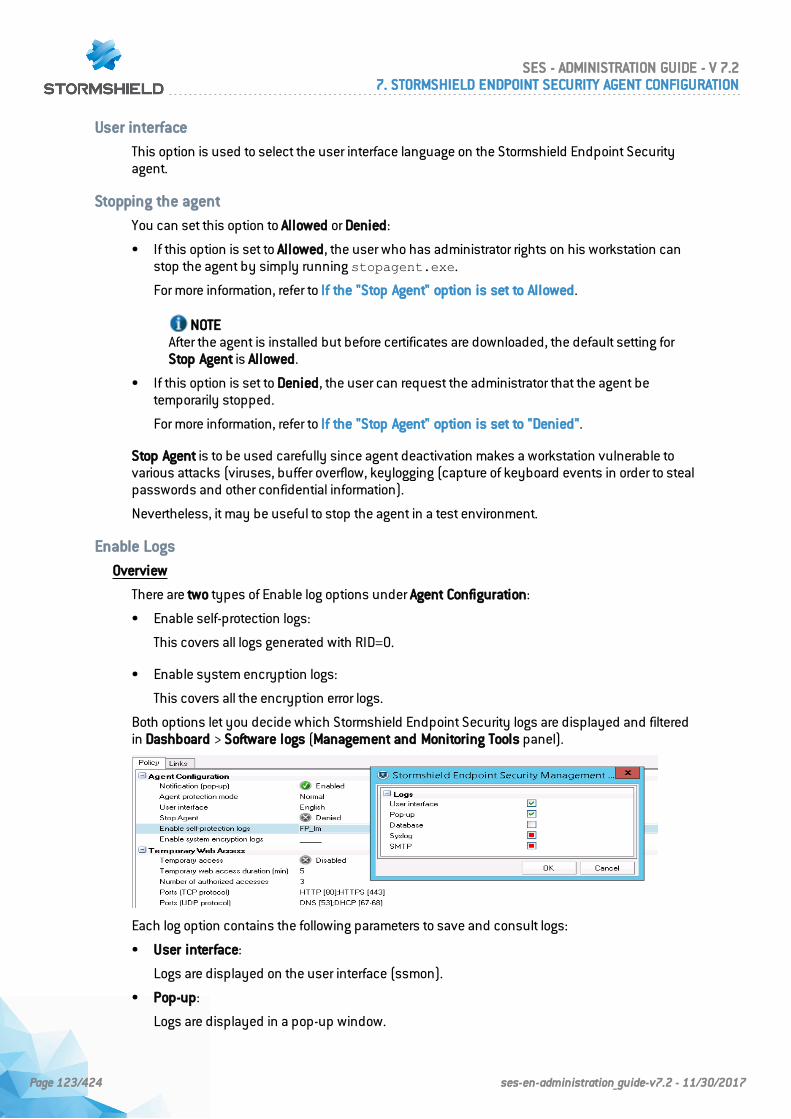
User interface
This option is used to select the user interface language on the Stormshield Endpoint Securityagent.
Stopping the agent
You can set this option to Allowed or Denied:
• If this option is set to Allowed, the user who has administrator rights on his workstation canstop the agent by simply running stopagent.exe.
For more information, refer to If the "Stop Agent" option is set to Allowed.
NOTEAfter the agent is installed but before certificates are downloaded, the default setting forStop Agent is Allowed.
• If this option is set to Denied, the user can request the administrator that the agent betemporarily stopped.
For more information, refer to If the "Stop Agent" option is set to "Denied".
Stop Agent is to be used carefully since agent deactivation makes a workstation vulnerable tovarious attacks (viruses, buffer overflow, keylogging (capture of keyboard events in order to stealpasswords and other confidential information).
Nevertheless, it may be useful to stop the agent in a test environment.
Enable Logs
Overview
There are two types of Enable log options under Agent Configuration:
• Enable self-protection logs:
This covers all logs generated with RID=0.
• Enable system encryption logs:
This covers all the encryption error logs.
Both options let you decide which Stormshield Endpoint Security logs are displayed and filteredin Dashboard > Software logs (Management and Monitoring Tools panel).
Each log option contains the following parameters to save and consult logs:
• User interface:
Logs are displayed on the user interface (ssmon).
• Pop-up:
Logs are displayed in a pop-up window.
SES - ADMINISTRATION GUIDE - V 7.27. STORMSHIELD ENDPOINT SECURITY AGENT CONFIGURATION
Page 123/424 ses-en-administration_guide-v7.2 - 11/30/2017
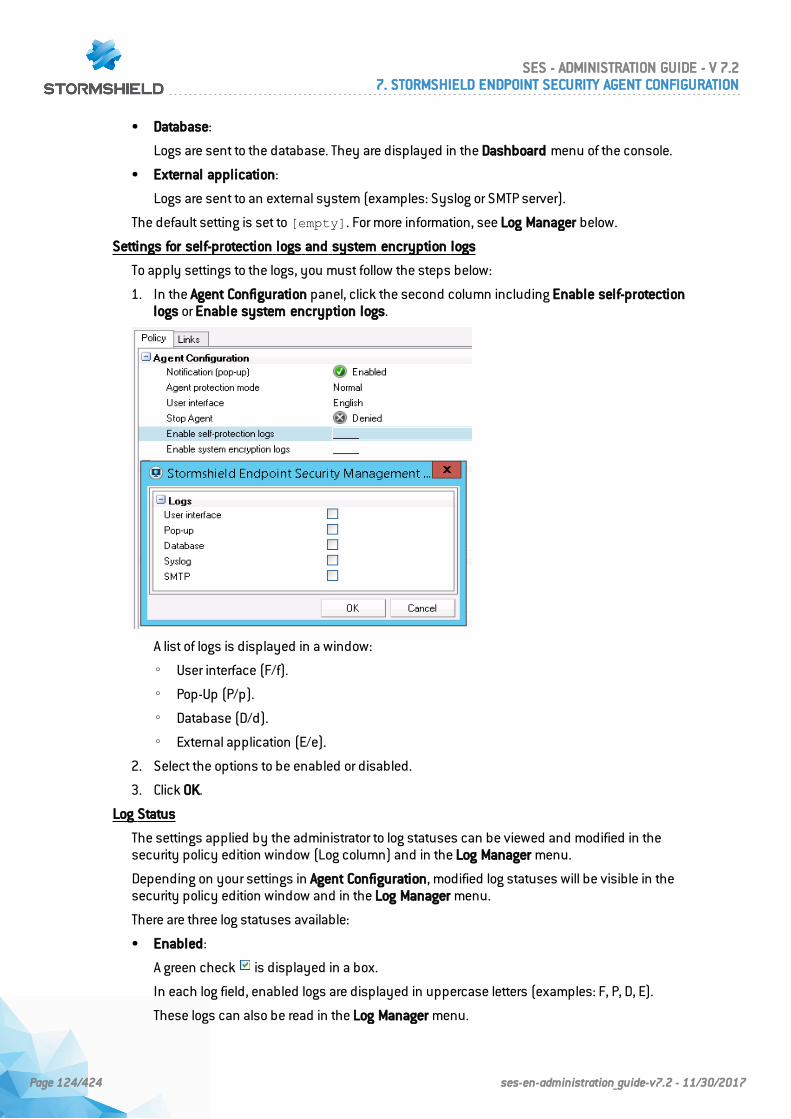
• Database:
Logs are sent to the database. They are displayed in the Dashboard menu of the console.
• External application:
Logs are sent to an external system (examples: Syslog or SMTP server).
The default setting is set to [empty]. For more information, see Log Manager below.
Settings for self-protection logs and system encryption logs
To apply settings to the logs, you must follow the steps below:
1. In the Agent Configuration panel, click the second column including Enable self-protectionlogs or Enable system encryption logs.
A list of logs is displayed in a window:
◦ User interface (F/f).
◦ Pop-Up (P/p).
◦ Database (D/d).
◦ External application (E/e).
2. Select the options to be enabled or disabled.
3. Click OK.
Log Status
The settings applied by the administrator to log statuses can be viewed and modified in thesecurity policy edition window (Log column) and in the Log Manager menu.
Depending on your settings in Agent Configuration, modified log statuses will be visible in thesecurity policy edition window and in the Log Manager menu.
There are three log statuses available:
• Enabled:
A green check is displayed in a box.
In each log field, enabled logs are displayed in uppercase letters (examples: F, P, D, E).
These logs can also be read in the Log Manager menu.
SES - ADMINISTRATION GUIDE - V 7.27. STORMSHIELD ENDPOINT SECURITY AGENT CONFIGURATION
Page 124/424 ses-en-administration_guide-v7.2 - 11/30/2017

• Disabled:
A red box is displayed.
In each log field, disabled logs are displayed in lowercase letters (examples: f, p, d, e).
These logs cannot be read in the Log Manager menu.
• Empty:
If the box is left empty , the administrator can select a log to be displayed in the LogManager menu.
In each log field, a line in the form of an “underscore” is displayed (example: _pde).
If the log is empty, the behavior will be the one defined in the Log Manager menu.
For more information, see the section Log Manager.
7.2.2 Temporary Web Access
When a network access is denied, Temporary Web Access allows temporarily opening ports thatcould be blocked by the security policy (example: http/https).
You can customize the ports enabled by this feature.
Example: A user working outside the company network will be able to use a WiFi HotSpot toconnect to the company’s VPN SSL server.
Configuration from the console
To deny access to WiFi access points and allow use of HotSpots, the administrator mustconfigure the security policy as follows:
1. Edit the security policy. Go to Network security control > General Settings > WiFiEncryption and Authentication.
2. Set WiFi connections to Allowed.
3. Under WiFi Access Points, deny access by creating a rule. To do so, follow the steps below:
◦ Edit the security policy.
◦ Add a rule by clicking .
◦ Enter the following parameters:
- SSID value: *.
- Action: Block.
SES - ADMINISTRATION GUIDE - V 7.27. STORMSHIELD ENDPOINT SECURITY AGENT CONFIGURATION
Page 125/424 ses-en-administration_guide-v7.2 - 11/30/2017
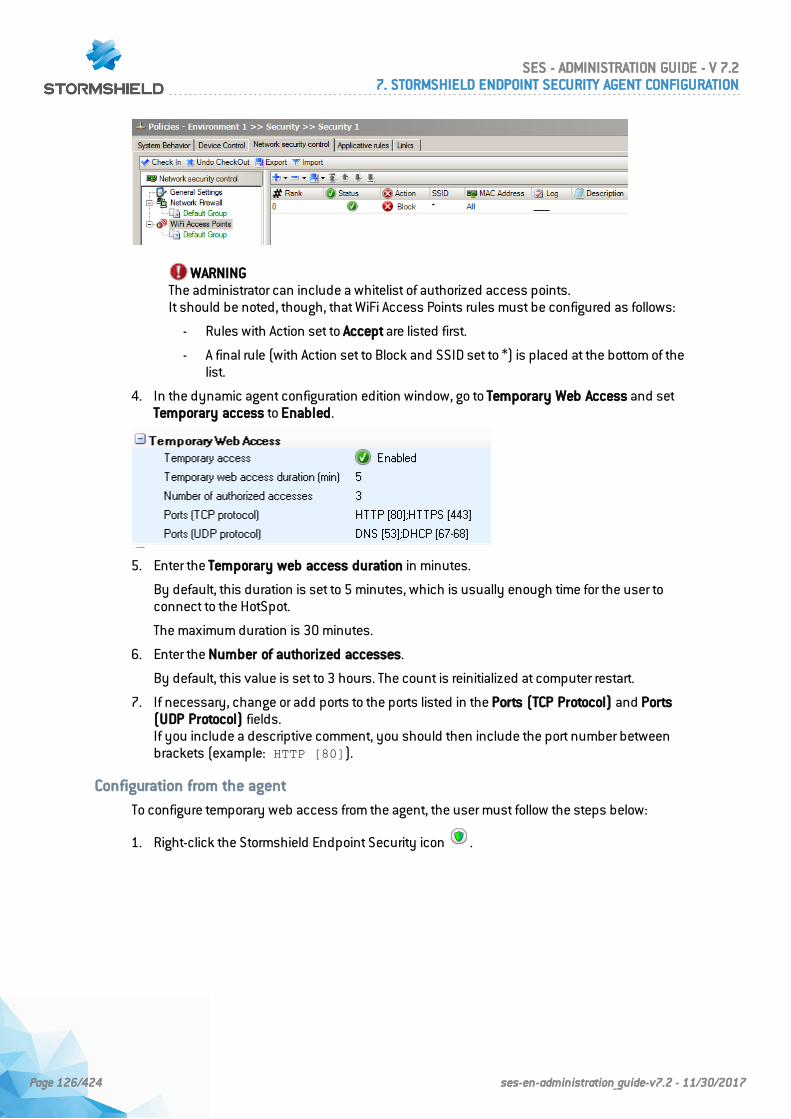
WARNINGThe administrator can include a whitelist of authorized access points.It should be noted, though, that WiFi Access Points rules must be configured as follows:
- Rules with Action set to Accept are listed first.
- A final rule (with Action set to Block and SSID set to *) is placed at the bottom of thelist.
4. In the dynamic agent configuration edition window, go to Temporary Web Access and setTemporary access to Enabled.
5. Enter the Temporary web access duration in minutes.
By default, this duration is set to 5 minutes, which is usually enough time for the user toconnect to the HotSpot.
The maximum duration is 30 minutes.
6. Enter the Number of authorized accesses.
By default, this value is set to 3 hours. The count is reinitialized at computer restart.
7. If necessary, change or add ports to the ports listed in the Ports (TCP Protocol) and Ports(UDP Protocol) fields.If you include a descriptive comment, you should then include the port number betweenbrackets (example: HTTP [80]).
Configuration from the agent
To configure temporary web access from the agent, the user must follow the steps below:
1. Right-click the Stormshield Endpoint Security icon .
SES - ADMINISTRATION GUIDE - V 7.27. STORMSHIELD ENDPOINT SECURITY AGENT CONFIGURATION
Page 126/424 ses-en-administration_guide-v7.2 - 11/30/2017
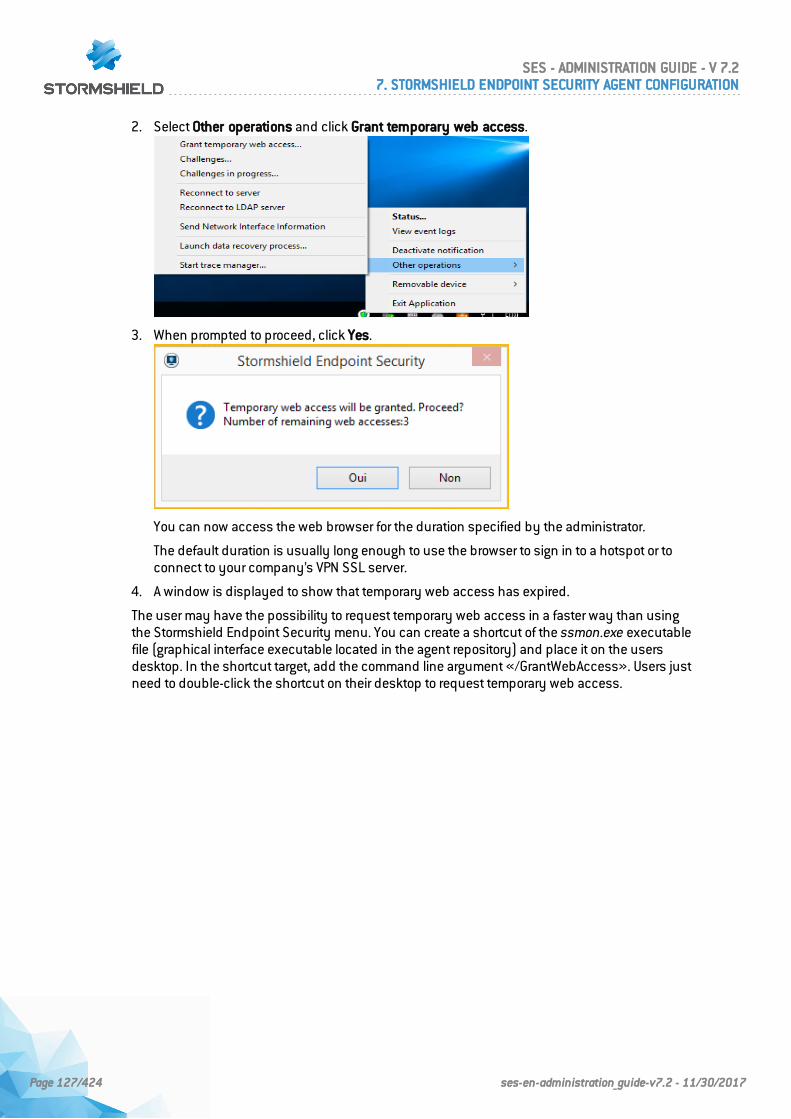
2. Select Other operations and click Grant temporary web access.
3. When prompted to proceed, click Yes.
You can now access the web browser for the duration specified by the administrator.
The default duration is usually long enough to use the browser to sign in to a hotspot or toconnect to your company’s VPN SSL server.
4. A window is displayed to show that temporary web access has expired.
The user may have the possibility to request temporary web access in a faster way than usingthe Stormshield Endpoint Security menu. You can create a shortcut of the ssmon.exe executablefile (graphical interface executable located in the agent repository) and place it on the usersdesktop. In the shortcut target, add the command line argument «/GrantWebAccess». Users justneed to double-click the shortcut on their desktop to request temporary web access.
SES - ADMINISTRATION GUIDE - V 7.27. STORMSHIELD ENDPOINT SECURITY AGENT CONFIGURATION
Page 127/424 ses-en-administration_guide-v7.2 - 11/30/2017
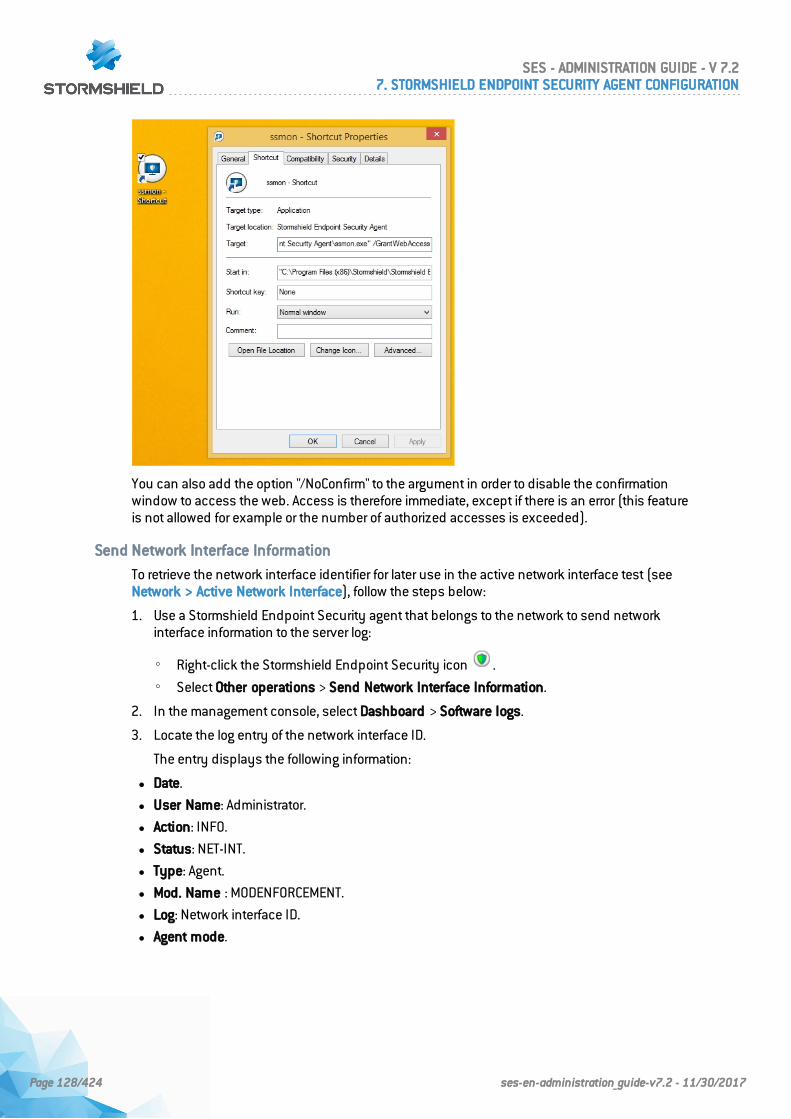
You can also add the option "/NoConfirm" to the argument in order to disable the confirmationwindow to access the web. Access is therefore immediate, except if there is an error (this featureis not allowed for example or the number of authorized accesses is exceeded).
Send Network Interface Information
To retrieve the network interface identifier for later use in the active network interface test (seeNetwork > Active Network Interface), follow the steps below:
1. Use a Stormshield Endpoint Security agent that belongs to the network to send networkinterface information to the server log:
◦ Right-click the Stormshield Endpoint Security icon .
◦ Select Other operations > Send Network Interface Information.
2. In the management console, select Dashboard > Software logs.
3. Locate the log entry of the network interface ID.
The entry displays the following information:
l Date.
l User Name: Administrator.
l Action: INFO.
l Status: NET-INT.
l Type: Agent.
l Mod. Name : MODENFORCEMENT.
l Log: Network interface ID.
l Agent mode.
SES - ADMINISTRATION GUIDE - V 7.27. STORMSHIELD ENDPOINT SECURITY AGENT CONFIGURATION
Page 128/424 ses-en-administration_guide-v7.2 - 11/30/2017
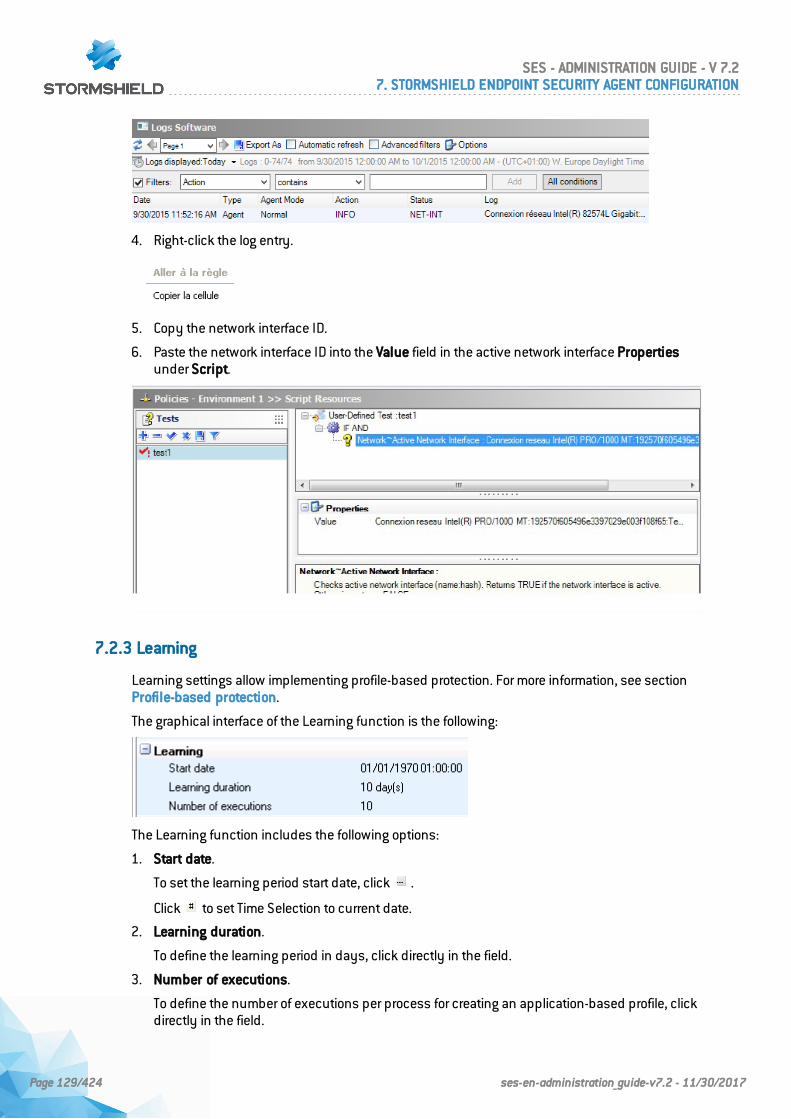
4. Right-click the log entry.
5. Copy the network interface ID.
6. Paste the network interface ID into the Value field in the active network interface Propertiesunder Script.
7.2.3 Learning
Learning settings allow implementing profile-based protection. For more information, see sectionProfile-based protection.
The graphical interface of the Learning function is the following:
The Learning function includes the following options:
1. Start date.
To set the learning period start date, click .
Click to set Time Selection to current date.
2. Learning duration.
To define the learning period in days, click directly in the field.
3. Number of executions.
To define the number of executions per process for creating an application-based profile, clickdirectly in the field.
SES - ADMINISTRATION GUIDE - V 7.27. STORMSHIELD ENDPOINT SECURITY AGENT CONFIGURATION
Page 129/424 ses-en-administration_guide-v7.2 - 11/30/2017
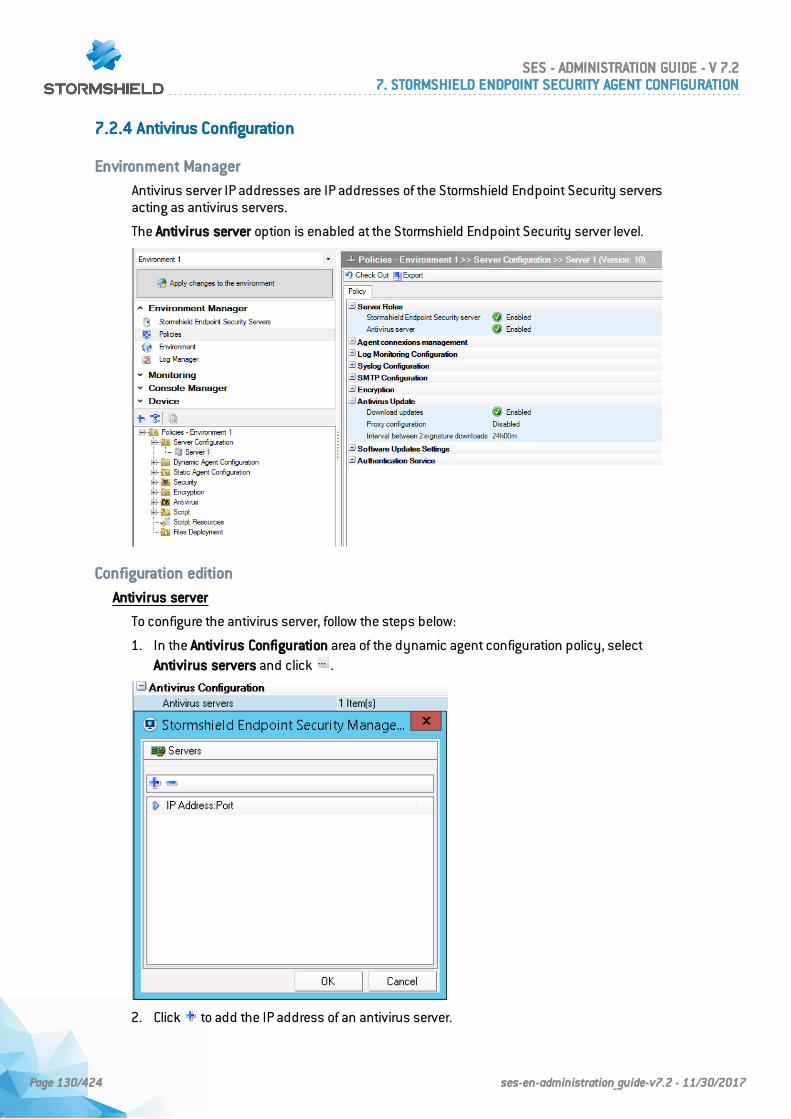
7.2.4 Antivirus Configuration
Environment Manager
Antivirus server IP addresses are IP addresses of the Stormshield Endpoint Security serversacting as antivirus servers.
The Antivirus server option is enabled at the Stormshield Endpoint Security server level.
Configuration edition
Antivirus server
To configure the antivirus server, follow the steps below:
1. In the Antivirus Configuration area of the dynamic agent configuration policy, selectAntivirus servers and click .
2. Click to add the IP address of an antivirus server.
SES - ADMINISTRATION GUIDE - V 7.27. STORMSHIELD ENDPOINT SECURITY AGENT CONFIGURATION
Page 130/424 ses-en-administration_guide-v7.2 - 11/30/2017
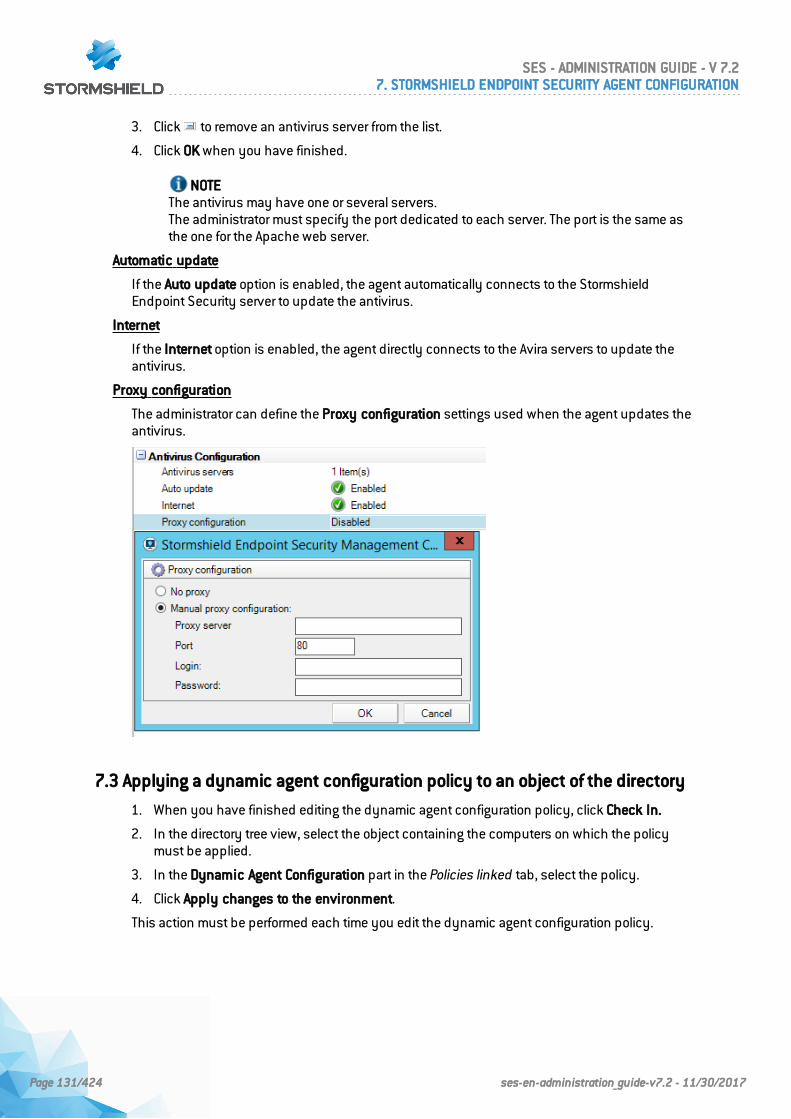
3. Click to remove an antivirus server from the list.
4. Click OK when you have finished.
NOTEThe antivirus may have one or several servers.The administrator must specify the port dedicated to each server. The port is the same asthe one for the Apache web server.
Automatic update
If the Auto update option is enabled, the agent automatically connects to the StormshieldEndpoint Security server to update the antivirus.
Internet
If the Internet option is enabled, the agent directly connects to the Avira servers to update theantivirus.
Proxy configuration
The administrator can define the Proxy configuration settings used when the agent updates theantivirus.
7.3 Applying a dynamic agent configuration policy to an object of the directory
1. When you have finished editing the dynamic agent configuration policy, click Check In.
2. In the directory tree view, select the object containing the computers on which the policymust be applied.
3. In the Dynamic Agent Configuration part in the Policies linked tab, select the policy.
4. Click Apply changes to the environment.
This action must be performed each time you edit the dynamic agent configuration policy.
SES - ADMINISTRATION GUIDE - V 7.27. STORMSHIELD ENDPOINT SECURITY AGENT CONFIGURATION
Page 131/424 ses-en-administration_guide-v7.2 - 11/30/2017
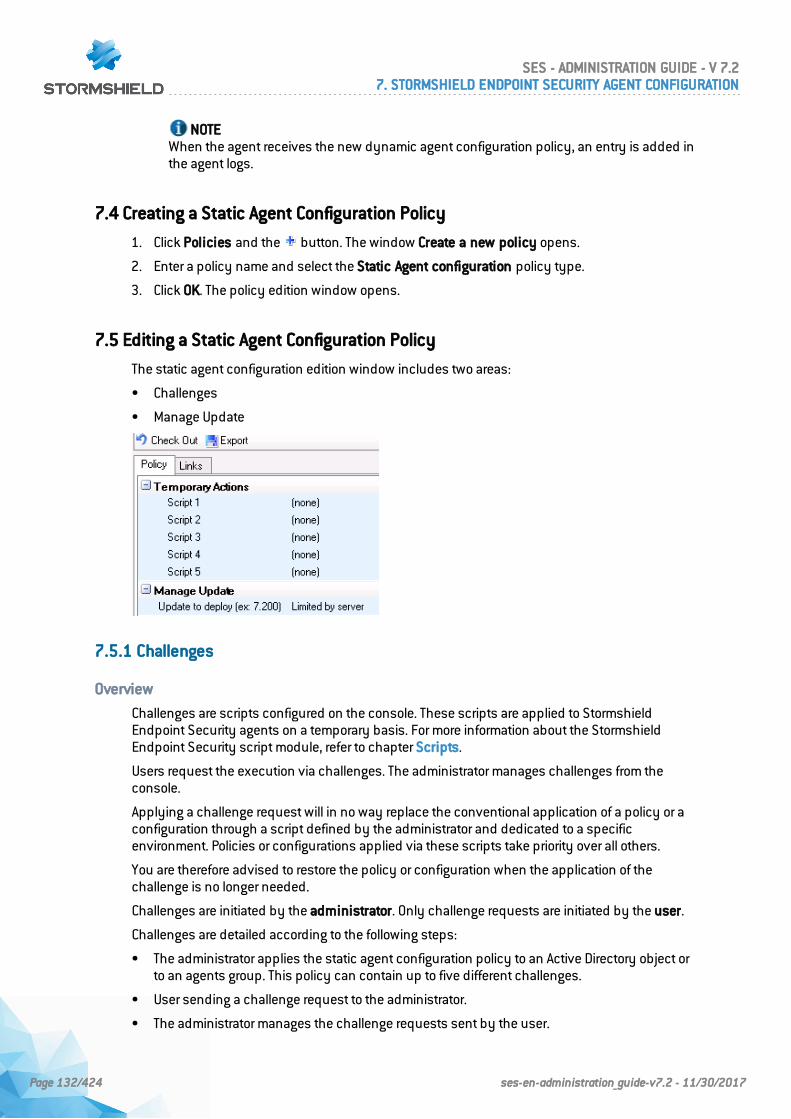
NOTEWhen the agent receives the new dynamic agent configuration policy, an entry is added inthe agent logs.
7.4 Creating a Static Agent Configuration Policy
1. Click Policies and the button. The window Create a new policy opens.
2. Enter a policy name and select the Static Agent configuration policy type.
3. Click OK. The policy edition window opens.
7.5 Editing a Static Agent Configuration Policy
The static agent configuration edition window includes two areas:
• Challenges
• Manage Update
7.5.1 Challenges
Overview
Challenges are scripts configured on the console. These scripts are applied to StormshieldEndpoint Security agents on a temporary basis. For more information about the StormshieldEndpoint Security script module, refer to chapter Scripts.
Users request the execution via challenges. The administrator manages challenges from theconsole.
Applying a challenge request will in no way replace the conventional application of a policy or aconfiguration through a script defined by the administrator and dedicated to a specificenvironment. Policies or configurations applied via these scripts take priority over all others.
You are therefore advised to restore the policy or configuration when the application of thechallenge is no longer needed.
Challenges are initiated by the administrator. Only challenge requests are initiated by the user.
Challenges are detailed according to the following steps:
• The administrator applies the static agent configuration policy to an Active Directory object orto an agents group. This policy can contain up to five different challenges.
• User sending a challenge request to the administrator.
• The administrator manages the challenge requests sent by the user.
SES - ADMINISTRATION GUIDE - V 7.27. STORMSHIELD ENDPOINT SECURITY AGENT CONFIGURATION
Page 132/424 ses-en-administration_guide-v7.2 - 11/30/2017
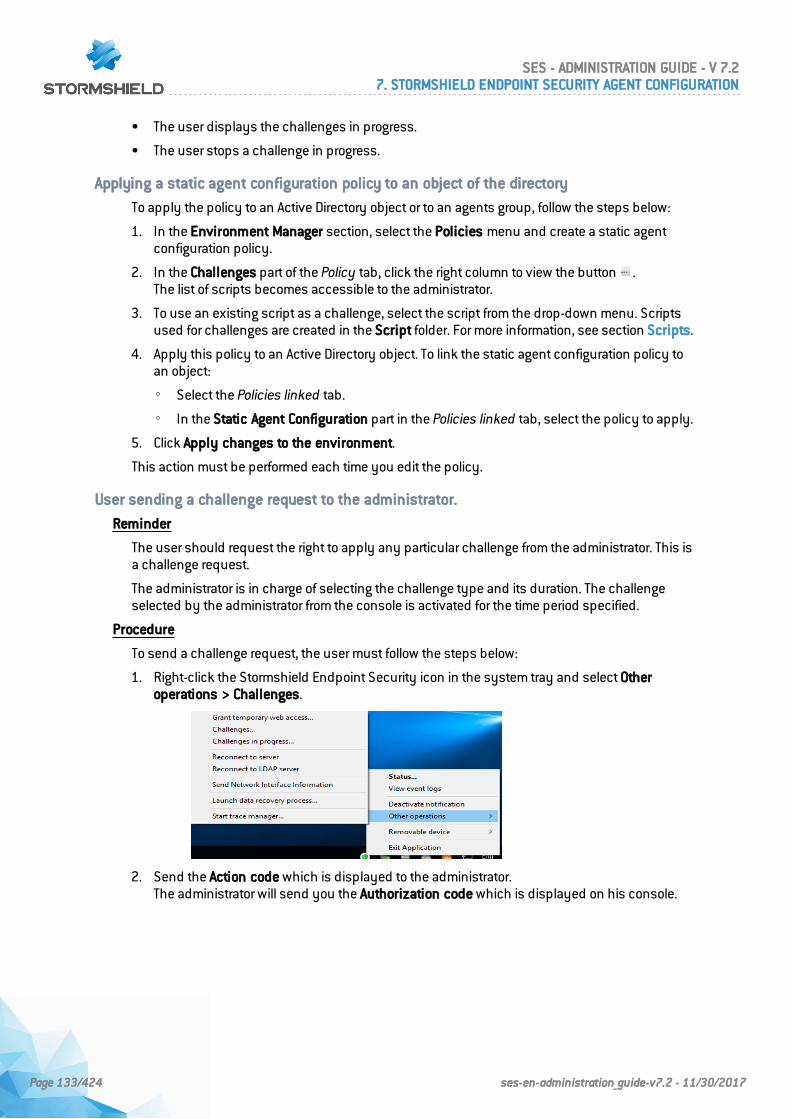
• The user displays the challenges in progress.
• The user stops a challenge in progress.
Applying a static agent configuration policy to an object of the directory
To apply the policy to an Active Directory object or to an agents group, follow the steps below:
1. In the Environment Manager section, select the Policies menu and create a static agentconfiguration policy.
2. In the Challenges part of the Policy tab, click the right column to view the button .The list of scripts becomes accessible to the administrator.
3. To use an existing script as a challenge, select the script from the drop-down menu. Scriptsused for challenges are created in the Script folder. For more information, see section Scripts.
4. Apply this policy to an Active Directory object. To link the static agent configuration policy toan object:
◦ Select the Policies linked tab.
◦ In the Static Agent Configuration part in the Policies linked tab, select the policy to apply.
5. Click Apply changes to the environment.
This action must be performed each time you edit the policy.
User sending a challenge request to the administrator.
Reminder
The user should request the right to apply any particular challenge from the administrator. This isa challenge request.
The administrator is in charge of selecting the challenge type and its duration. The challengeselected by the administrator from the console is activated for the time period specified.
Procedure
To send a challenge request, the user must follow the steps below:
1. Right-click the Stormshield Endpoint Security icon in the system tray and select Otheroperations > Challenges.
2. Send the Action code which is displayed to the administrator.The administrator will send you the Authorization code which is displayed on his console.
SES - ADMINISTRATION GUIDE - V 7.27. STORMSHIELD ENDPOINT SECURITY AGENT CONFIGURATION
Page 133/424 ses-en-administration_guide-v7.2 - 11/30/2017
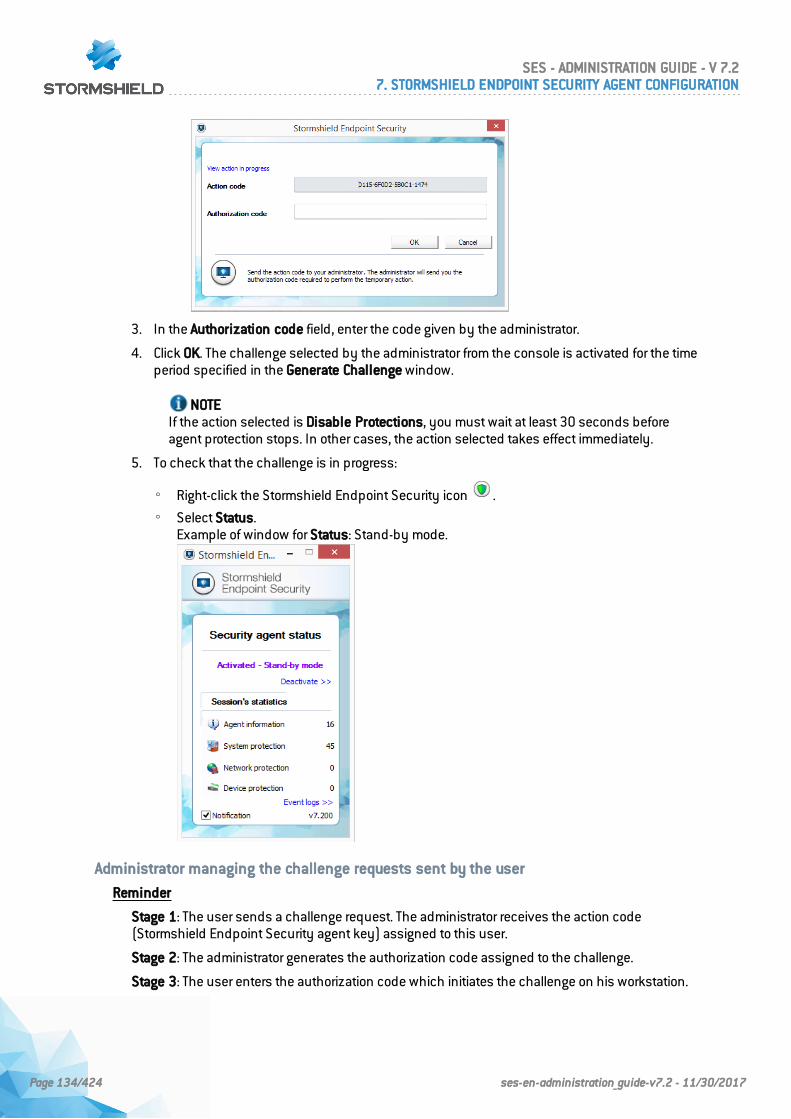
3. In the Authorization code field, enter the code given by the administrator.
4. Click OK. The challenge selected by the administrator from the console is activated for the timeperiod specified in the Generate Challenge window.
NOTEIf the action selected is Disable Protections, you must wait at least 30 seconds beforeagent protection stops. In other cases, the action selected takes effect immediately.
5. To check that the challenge is in progress:
◦ Right-click the Stormshield Endpoint Security icon .
◦ Select Status.Example of window for Status: Stand-by mode.
Administrator managing the challenge requests sent by the user
Reminder
Stage 1: The user sends a challenge request. The administrator receives the action code(Stormshield Endpoint Security agent key) assigned to this user.
Stage 2: The administrator generates the authorization code assigned to the challenge.
Stage 3: The user enters the authorization code which initiates the challenge on his workstation.
SES - ADMINISTRATION GUIDE - V 7.27. STORMSHIELD ENDPOINT SECURITY AGENT CONFIGURATION
Page 134/424 ses-en-administration_guide-v7.2 - 11/30/2017
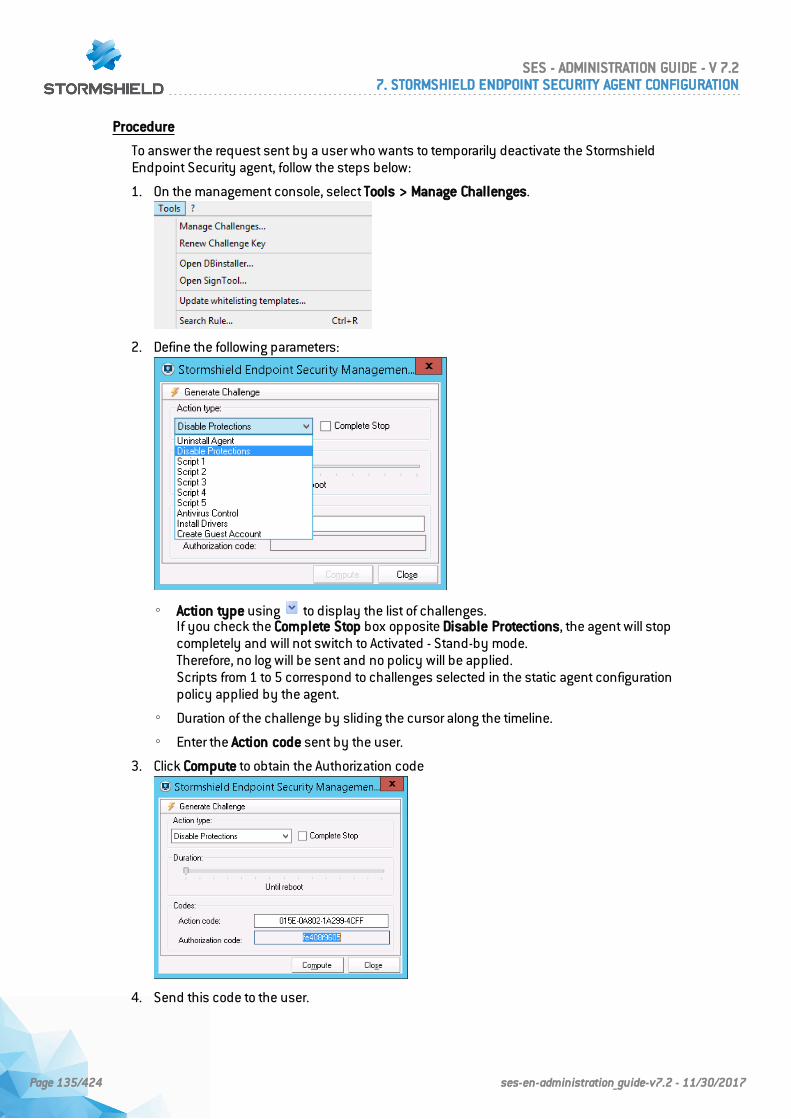
Procedure
To answer the request sent by a user who wants to temporarily deactivate the StormshieldEndpoint Security agent, follow the steps below:
1. On the management console, select Tools > Manage Challenges.
2. Define the following parameters:
◦ Action type using to display the list of challenges.If you check the Complete Stop box opposite Disable Protections, the agent will stopcompletely and will not switch to Activated - Stand-by mode.Therefore, no log will be sent and no policy will be applied.Scripts from 1 to 5 correspond to challenges selected in the static agent configurationpolicy applied by the agent.
◦ Duration of the challenge by sliding the cursor along the timeline.
◦ Enter the Action code sent by the user.
3. Click Compute to obtain the Authorization code
4. Send this code to the user.
SES - ADMINISTRATION GUIDE - V 7.27. STORMSHIELD ENDPOINT SECURITY AGENT CONFIGURATION
Page 135/424 ses-en-administration_guide-v7.2 - 11/30/2017
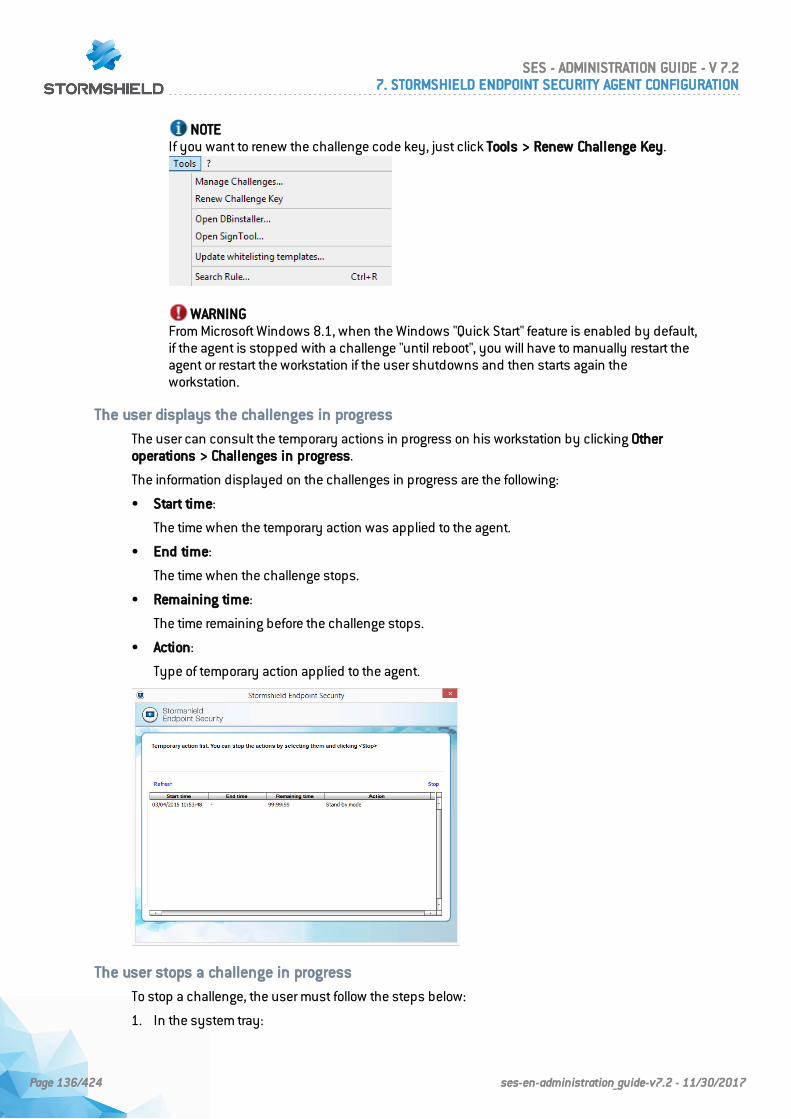
NOTEIf you want to renew the challenge code key, just click Tools > Renew Challenge Key.
WARNINGFrom Microsoft Windows 8.1, when the Windows "Quick Start" feature is enabled by default,if the agent is stopped with a challenge "until reboot", you will have to manually restart theagent or restart the workstation if the user shutdowns and then starts again theworkstation.
The user displays the challenges in progress
The user can consult the temporary actions in progress on his workstation by clicking Otheroperations > Challenges in progress.
The information displayed on the challenges in progress are the following:
• Start time:
The time when the temporary action was applied to the agent.
• End time:
The time when the challenge stops.
• Remaining time:
The time remaining before the challenge stops.
• Action:
Type of temporary action applied to the agent.
The user stops a challenge in progress
To stop a challenge, the user must follow the steps below:
1. In the system tray:
SES - ADMINISTRATION GUIDE - V 7.27. STORMSHIELD ENDPOINT SECURITY AGENT CONFIGURATION
Page 136/424 ses-en-administration_guide-v7.2 - 11/30/2017
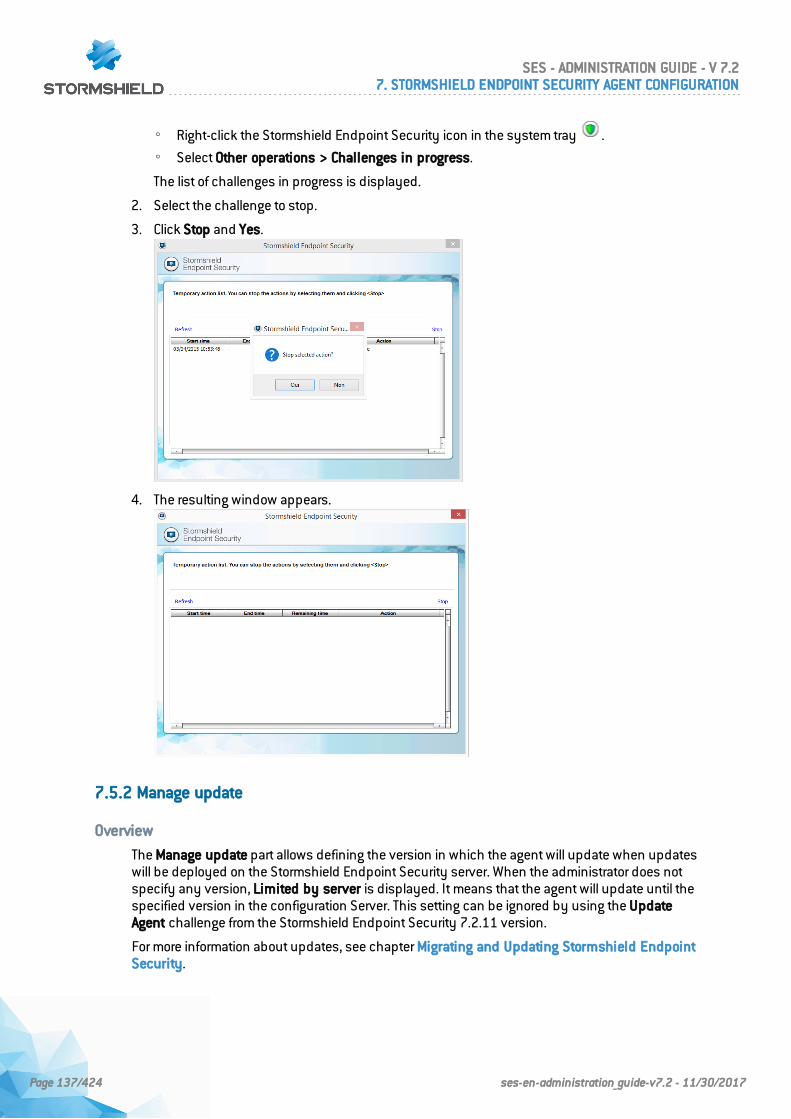
◦ Right-click the Stormshield Endpoint Security icon in the system tray .
◦ Select Other operations > Challenges in progress.
The list of challenges in progress is displayed.
2. Select the challenge to stop.
3. Click Stop and Yes.
4. The resulting window appears.
7.5.2 Manage update
Overview
The Manage update part allows defining the version in which the agent will update when updateswill be deployed on the Stormshield Endpoint Security server. When the administrator does notspecify any version, Limited by server is displayed. It means that the agent will update until thespecified version in the configuration Server. This setting can be ignored by using the UpdateAgent challenge from the Stormshield Endpoint Security 7.2.11 version.
For more information about updates, see chapter Migrating and Updating Stormshield EndpointSecurity.
SES - ADMINISTRATION GUIDE - V 7.27. STORMSHIELD ENDPOINT SECURITY AGENT CONFIGURATION
Page 137/424 ses-en-administration_guide-v7.2 - 11/30/2017
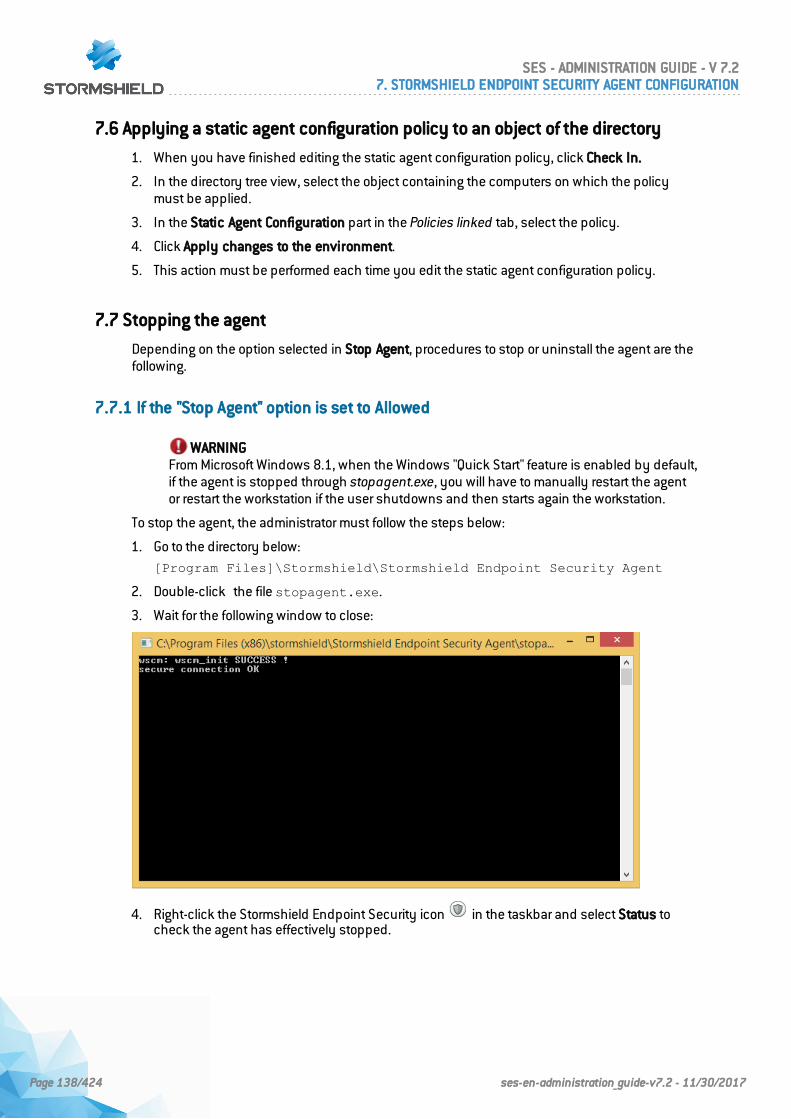
7.6 Applying a static agent configuration policy to an object of the directory
1. When you have finished editing the static agent configuration policy, click Check In.
2. In the directory tree view, select the object containing the computers on which the policymust be applied.
3. In the Static Agent Configuration part in the Policies linked tab, select the policy.
4. Click Apply changes to the environment.
5. This action must be performed each time you edit the static agent configuration policy.
7.7 Stopping the agent
Depending on the option selected in Stop Agent, procedures to stop or uninstall the agent are thefollowing.
7.7.1 If the "Stop Agent" option is set to Allowed
WARNINGFrom Microsoft Windows 8.1, when the Windows "Quick Start" feature is enabled by default,if the agent is stopped through stopagent.exe, you will have to manually restart the agentor restart the workstation if the user shutdowns and then starts again the workstation.
To stop the agent, the administrator must follow the steps below:
1. Go to the directory below:[Program Files]\Stormshield\Stormshield Endpoint Security Agent
2. Double-click the file stopagent.exe.
3. Wait for the following window to close:
4. Right-click the Stormshield Endpoint Security icon in the taskbar and select Status tocheck the agent has effectively stopped.
SES - ADMINISTRATION GUIDE - V 7.27. STORMSHIELD ENDPOINT SECURITY AGENT CONFIGURATION
Page 138/424 ses-en-administration_guide-v7.2 - 11/30/2017
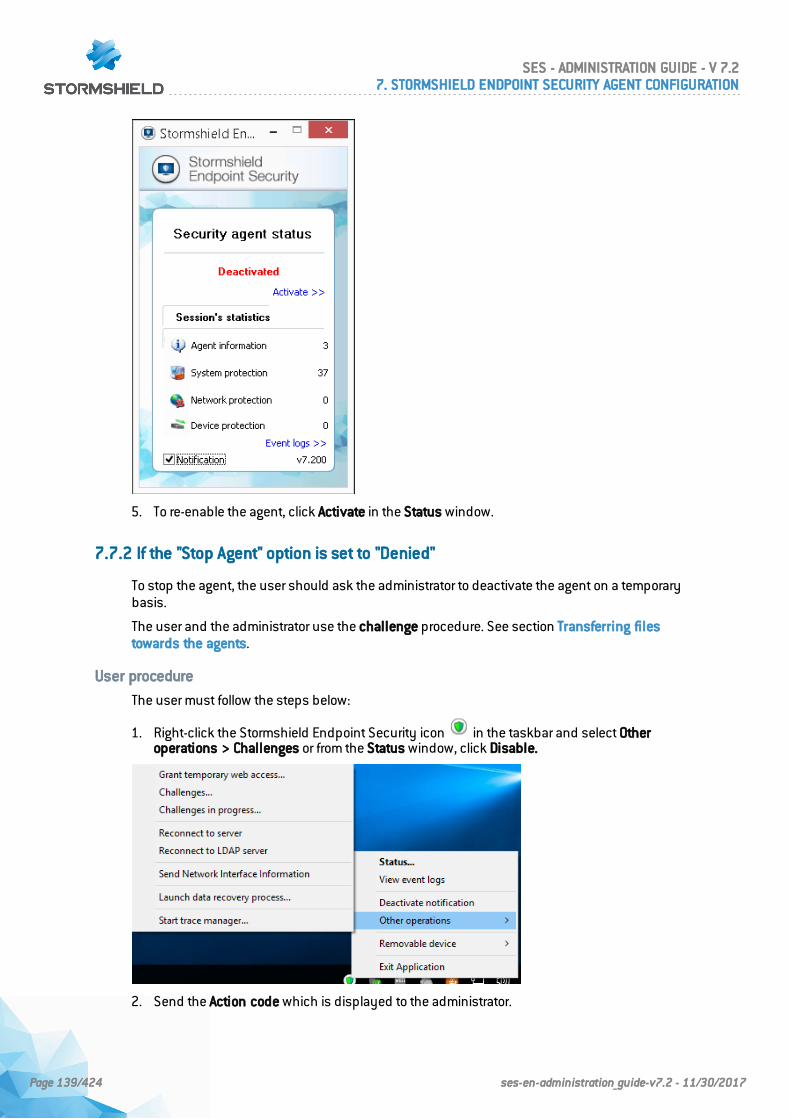
5. To re-enable the agent, click Activate in the Status window.
7.7.2 If the "Stop Agent" option is set to "Denied"
To stop the agent, the user should ask the administrator to deactivate the agent on a temporarybasis.
The user and the administrator use the challenge procedure. See section Transferring filestowards the agents.
User procedure
The user must follow the steps below:
1. Right-click the Stormshield Endpoint Security icon in the taskbar and select Otheroperations > Challenges or from the Status window, click Disable.
2. Send the Action code which is displayed to the administrator.
SES - ADMINISTRATION GUIDE - V 7.27. STORMSHIELD ENDPOINT SECURITY AGENT CONFIGURATION
Page 139/424 ses-en-administration_guide-v7.2 - 11/30/2017
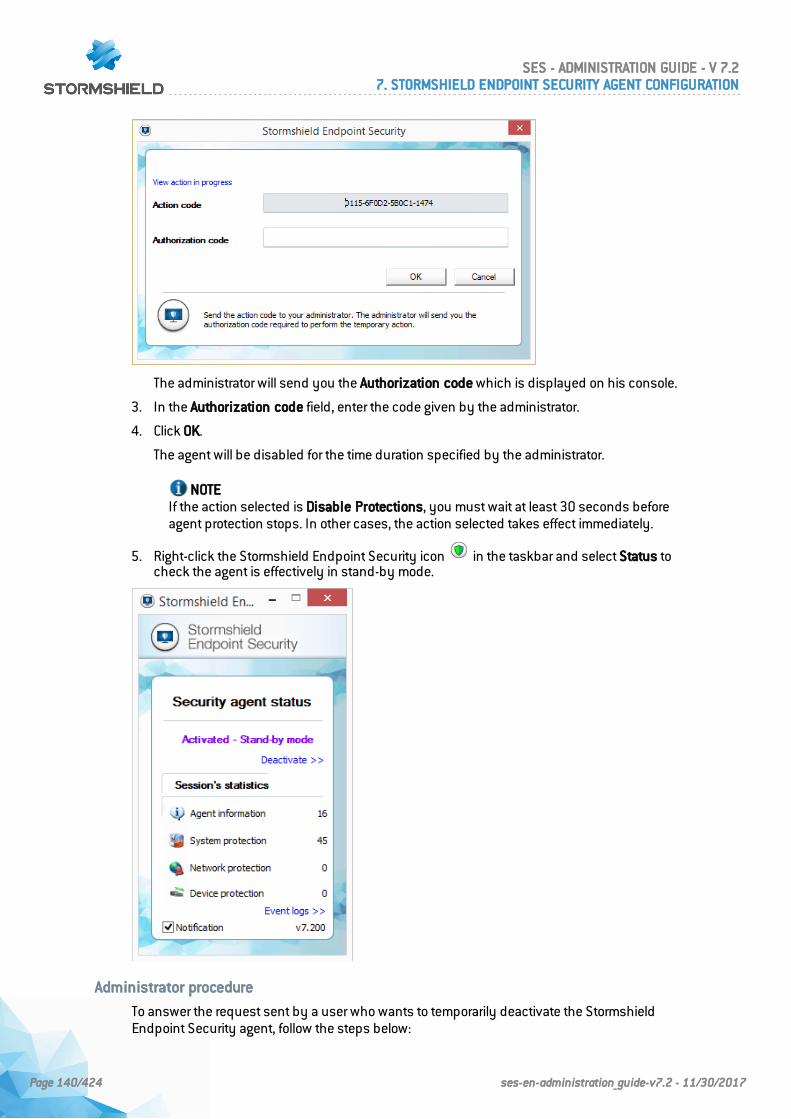
The administrator will send you the Authorization code which is displayed on his console.
3. In the Authorization code field, enter the code given by the administrator.
4. Click OK.
The agent will be disabled for the time duration specified by the administrator.
NOTEIf the action selected is Disable Protections, you must wait at least 30 seconds beforeagent protection stops. In other cases, the action selected takes effect immediately.
5. Right-click the Stormshield Endpoint Security icon in the taskbar and select Status tocheck the agent is effectively in stand-by mode.
Administrator procedure
To answer the request sent by a user who wants to temporarily deactivate the StormshieldEndpoint Security agent, follow the steps below:
SES - ADMINISTRATION GUIDE - V 7.27. STORMSHIELD ENDPOINT SECURITY AGENT CONFIGURATION
Page 140/424 ses-en-administration_guide-v7.2 - 11/30/2017
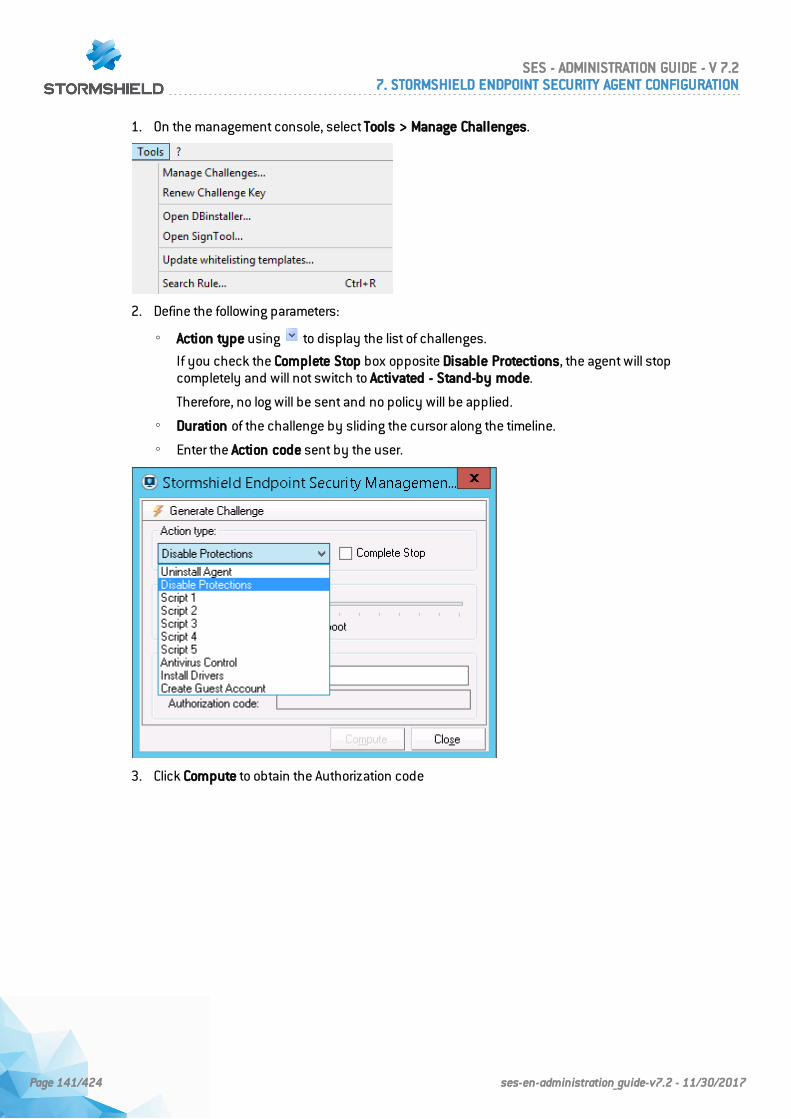
1. On the management console, select Tools > Manage Challenges.
2. Define the following parameters:
◦ Action type using to display the list of challenges.
If you check the Complete Stop box opposite Disable Protections, the agent will stopcompletely and will not switch to Activated - Stand-by mode.
Therefore, no log will be sent and no policy will be applied.
◦ Duration of the challenge by sliding the cursor along the timeline.
◦ Enter the Action code sent by the user.
3. Click Compute to obtain the Authorization code
SES - ADMINISTRATION GUIDE - V 7.27. STORMSHIELD ENDPOINT SECURITY AGENT CONFIGURATION
Page 141/424 ses-en-administration_guide-v7.2 - 11/30/2017
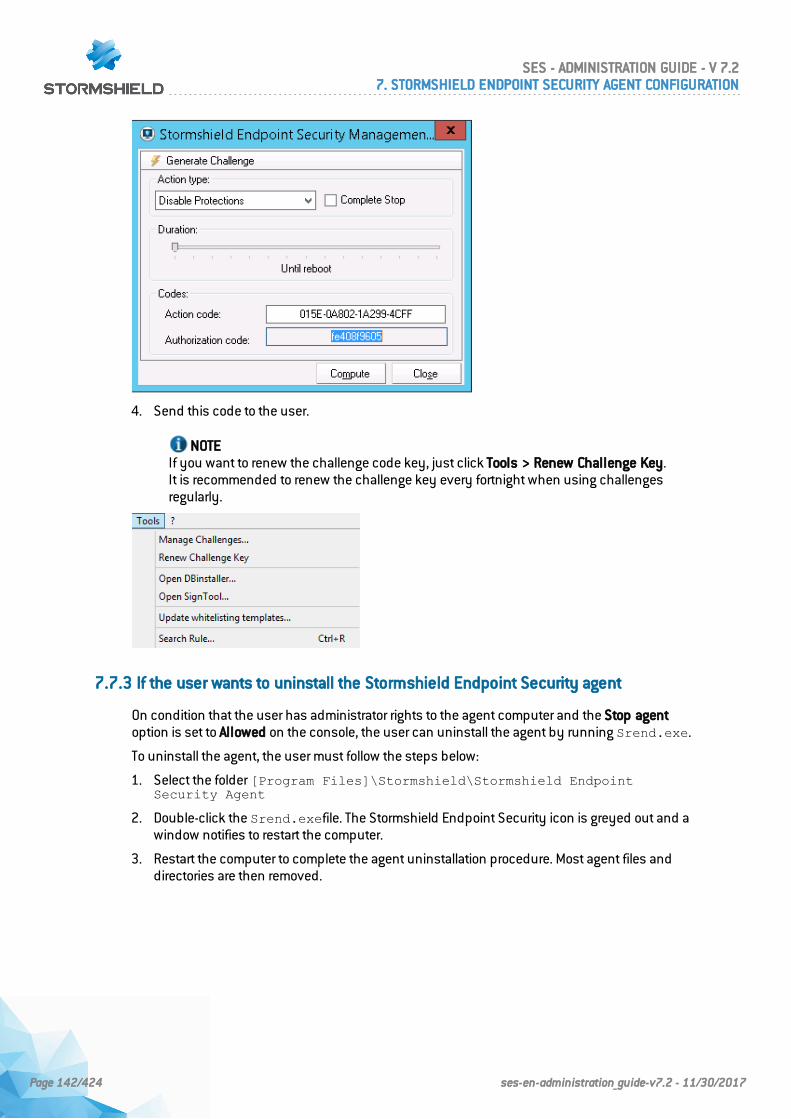
4. Send this code to the user.
NOTEIf you want to renew the challenge code key, just click Tools > Renew Challenge Key.It is recommended to renew the challenge key every fortnight when using challengesregularly.
7.7.3 If the user wants to uninstall the Stormshield Endpoint Security agent
On condition that the user has administrator rights to the agent computer and the Stop agentoption is set to Allowed on the console, the user can uninstall the agent by running Srend.exe.
To uninstall the agent, the user must follow the steps below:
1. Select the folder [Program Files]\Stormshield\Stormshield EndpointSecurity Agent
2. Double-click the Srend.exefile. The Stormshield Endpoint Security icon is greyed out and awindow notifies to restart the computer.
3. Restart the computer to complete the agent uninstallation procedure. Most agent files anddirectories are then removed.
SES - ADMINISTRATION GUIDE - V 7.27. STORMSHIELD ENDPOINT SECURITY AGENT CONFIGURATION
Page 142/424 ses-en-administration_guide-v7.2 - 11/30/2017
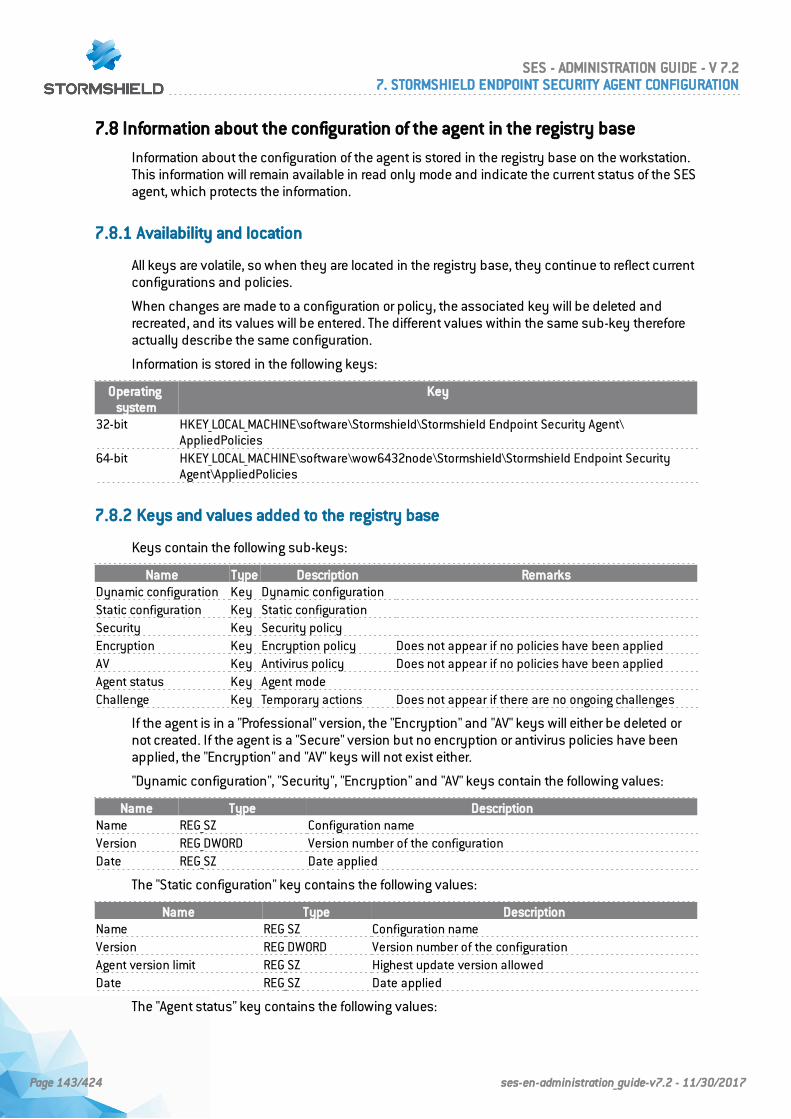
7.8 Information about the configuration of the agent in the registry base
Information about the configuration of the agent is stored in the registry base on the workstation.This information will remain available in read only mode and indicate the current status of the SESagent, which protects the information.
7.8.1 Availability and location
All keys are volatile, so when they are located in the registry base, they continue to reflect currentconfigurations and policies.
When changes are made to a configuration or policy, the associated key will be deleted andrecreated, and its values will be entered. The different values within the same sub-key thereforeactually describe the same configuration.
Information is stored in the following keys:
Operatingsystem
Key
32-bit HKEY_LOCAL_MACHINE\software\Stormshield\Stormshield Endpoint Security Agent\AppliedPolicies
64-bit HKEY_LOCAL_MACHINE\software\wow6432node\Stormshield\Stormshield Endpoint SecurityAgent\AppliedPolicies
7.8.2 Keys and values added to the registry base
Keys contain the following sub-keys:
Name Type Description RemarksDynamic configuration Key Dynamic configurationStatic configuration Key Static configurationSecurity Key Security policyEncryption Key Encryption policy Does not appear if no policies have been appliedAV Key Antivirus policy Does not appear if no policies have been appliedAgent status Key Agent modeChallenge Key Temporary actions Does not appear if there are no ongoing challenges
If the agent is in a "Professional" version, the "Encryption" and "AV" keys will either be deleted ornot created. If the agent is a "Secure" version but no encryption or antivirus policies have beenapplied, the "Encryption" and "AV" keys will not exist either.
"Dynamic configuration", "Security", "Encryption" and "AV" keys contain the following values:
Name Type DescriptionName REG_SZ Configuration nameVersion REG_DWORD Version number of the configurationDate REG_SZ Date applied
The "Static configuration" key contains the following values:
Name Type DescriptionName REG_SZ Configuration nameVersion REG_DWORD Version number of the configurationAgent version limit REG_SZ Highest update version allowedDate REG_SZ Date applied
The "Agent status" key contains the following values:
SES - ADMINISTRATION GUIDE - V 7.27. STORMSHIELD ENDPOINT SECURITY AGENT CONFIGURATION
Page 143/424 ses-en-administration_guide-v7.2 - 11/30/2017
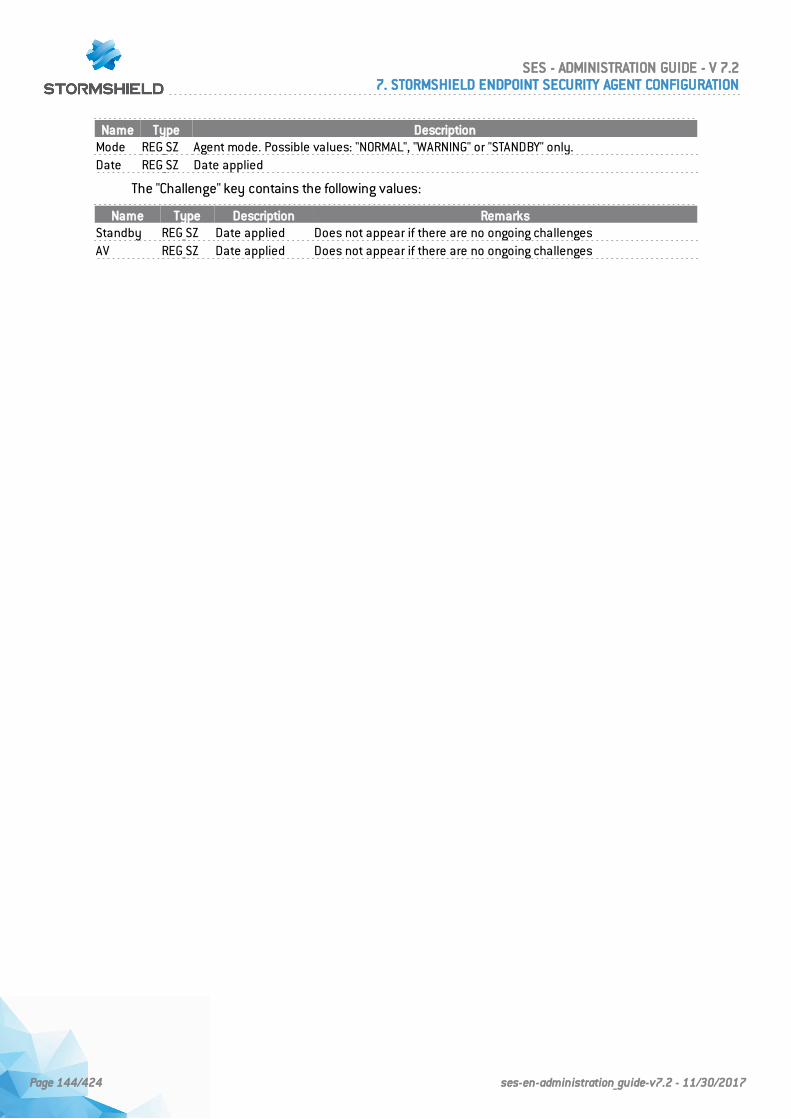
Name Type DescriptionMode REG_SZ Agent mode. Possible values: "NORMAL", "WARNING" or "STANDBY" only.Date REG_SZ Date applied
The "Challenge" key contains the following values:
Name Type Description RemarksStandby REG_SZ Date applied Does not appear if there are no ongoing challengesAV REG_SZ Date applied Does not appear if there are no ongoing challenges
SES - ADMINISTRATION GUIDE - V 7.27. STORMSHIELD ENDPOINT SECURITY AGENT CONFIGURATION
Page 144/424 ses-en-administration_guide-v7.2 - 11/30/2017
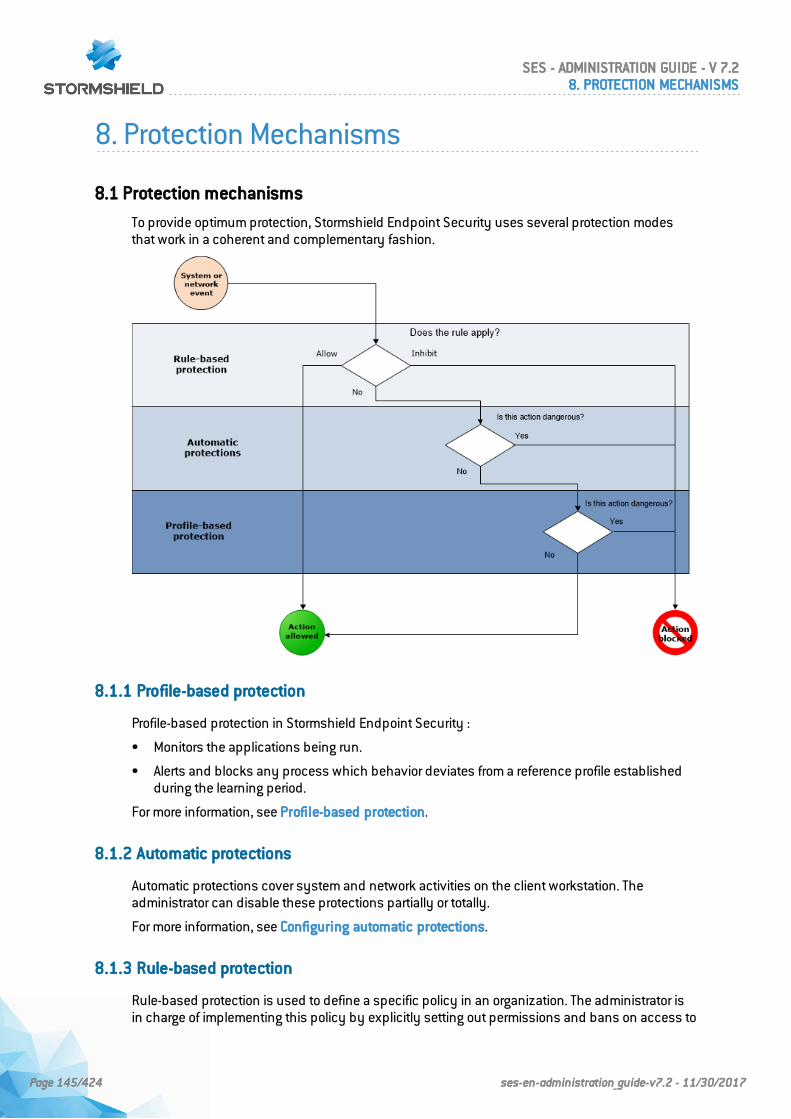
8. Protection Mechanisms
8.1 Protection mechanisms
To provide optimum protection, Stormshield Endpoint Security uses several protection modesthat work in a coherent and complementary fashion.
8.1.1 Profile-based protection
Profile-based protection in Stormshield Endpoint Security :
• Monitors the applications being run.
• Alerts and blocks any process which behavior deviates from a reference profile establishedduring the learning period.
For more information, see Profile-based protection.
8.1.2 Automatic protections
Automatic protections cover system and network activities on the client workstation. Theadministrator can disable these protections partially or totally.
For more information, see Configuring automatic protections.
8.1.3 Rule-based protection
Rule-based protection is used to define a specific policy in an organization. The administrator isin charge of implementing this policy by explicitly setting out permissions and bans on access to
SES - ADMINISTRATION GUIDE - V 7.28. PROTECTION MECHANISMS
Page 145/424 ses-en-administration_guide-v7.2 - 11/30/2017
the client workstation resources.
For more information, see Security Policies.
8.1.4 Order used to apply protection mechanisms
The three protection modes are applied in a specific order:
1. Rule-based protection.
2. Automatic protections.
3. Profile-based protection.
This order of precedence gives priority to the policy explicitly defined by the administrator (rule-based protection). Consequently, any ban or formal authorization expressed by the administratoris always applied. Human control always takes precedence over automation.
8.2 Profile-based protection
8.2.1 Principles
Profile-based protection consists in evaluating application behavior by comparing it with areference profile. Behavior analysis is based on monitoring the calls made by an application tothe system:
• Opening ports.
• Accessing shared memory.
• Loading libraries.
• Reading registry keys, etc.
During the learning period, these calls are memorized to form an application standard profile. Afterthis phase, the actions performed by the application while it is running are compared with itsprofile so as to detect any deviations that occur.
Learning is automatically restarted after:
• Any authorized modification to the application executable.
• Changing the learning period (date selected in the future).
8.2.2 Automatic trust level assignment
When a process is started, a trust level is automatically assigned. This trust level changes overtime, depending on the deviations observed between the standard profile and true activity.
8.2.3 Correlation and weighting
A slight deviation between the standard profile and the true activity of an application does notsuffice to classify a code as dangerous. This is why profile-based protection also resorts tocorrelation and weighting mechanisms.
Correlation is used to compare several deviations (pertaining to different categories) so that thetrust level can be changed accordingly. For example, injecting an unknown process correlatedwith the opening of a new port will indicate high attack risk.
SES - ADMINISTRATION GUIDE - V 7.28. PROTECTION MECHANISMS
Page 146/424 ses-en-administration_guide-v7.2 - 11/30/2017
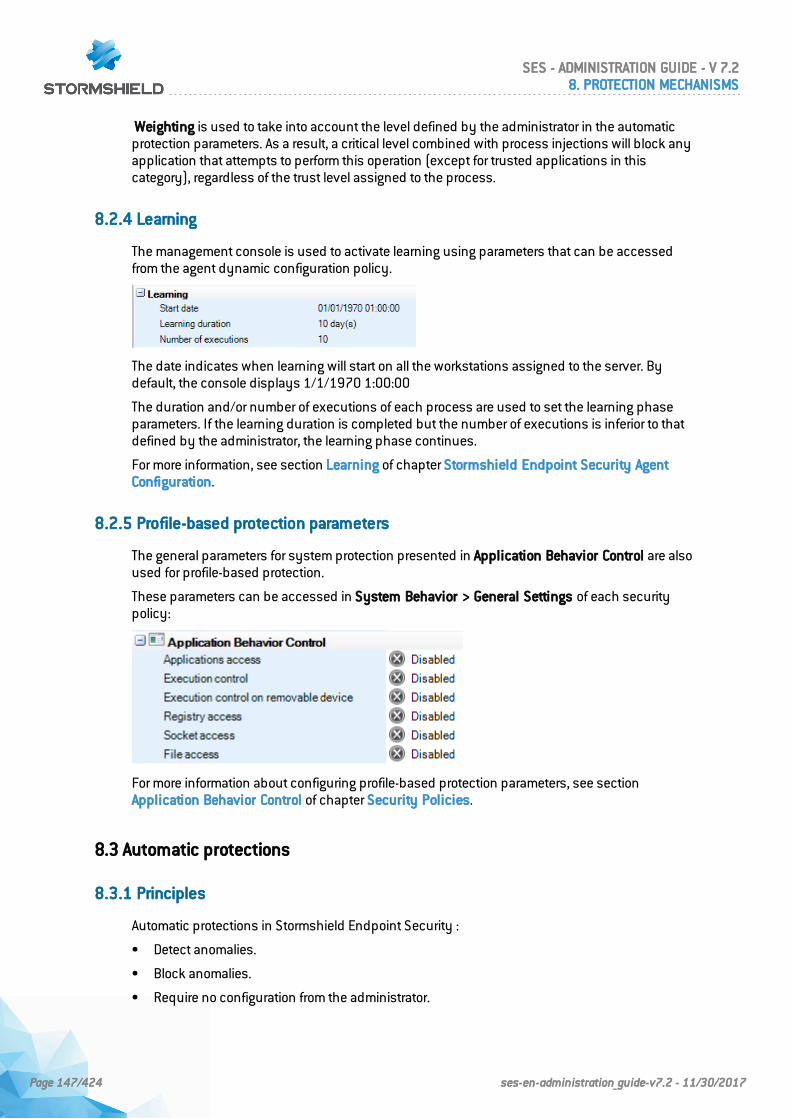
Weighting is used to take into account the level defined by the administrator in the automaticprotection parameters. As a result, a critical level combined with process injections will block anyapplication that attempts to perform this operation (except for trusted applications in thiscategory), regardless of the trust level assigned to the process.
8.2.4 Learning
The management console is used to activate learning using parameters that can be accessedfrom the agent dynamic configuration policy.
The date indicates when learning will start on all the workstations assigned to the server. Bydefault, the console displays 1/1/1970 1:00:00
The duration and/or number of executions of each process are used to set the learning phaseparameters. If the learning duration is completed but the number of executions is inferior to thatdefined by the administrator, the learning phase continues.
For more information, see section Learning of chapter Stormshield Endpoint Security AgentConfiguration.
8.2.5 Profile-based protection parameters
The general parameters for system protection presented in Application Behavior Control are alsoused for profile-based protection.
These parameters can be accessed in System Behavior > General Settings of each securitypolicy:
For more information about configuring profile-based protection parameters, see sectionApplication Behavior Control of chapter Security Policies.
8.3 Automatic protections
8.3.1 Principles
Automatic protections in Stormshield Endpoint Security :
• Detect anomalies.
• Block anomalies.
• Require no configuration from the administrator.
SES - ADMINISTRATION GUIDE - V 7.28. PROTECTION MECHANISMS
Page 147/424 ses-en-administration_guide-v7.2 - 11/30/2017
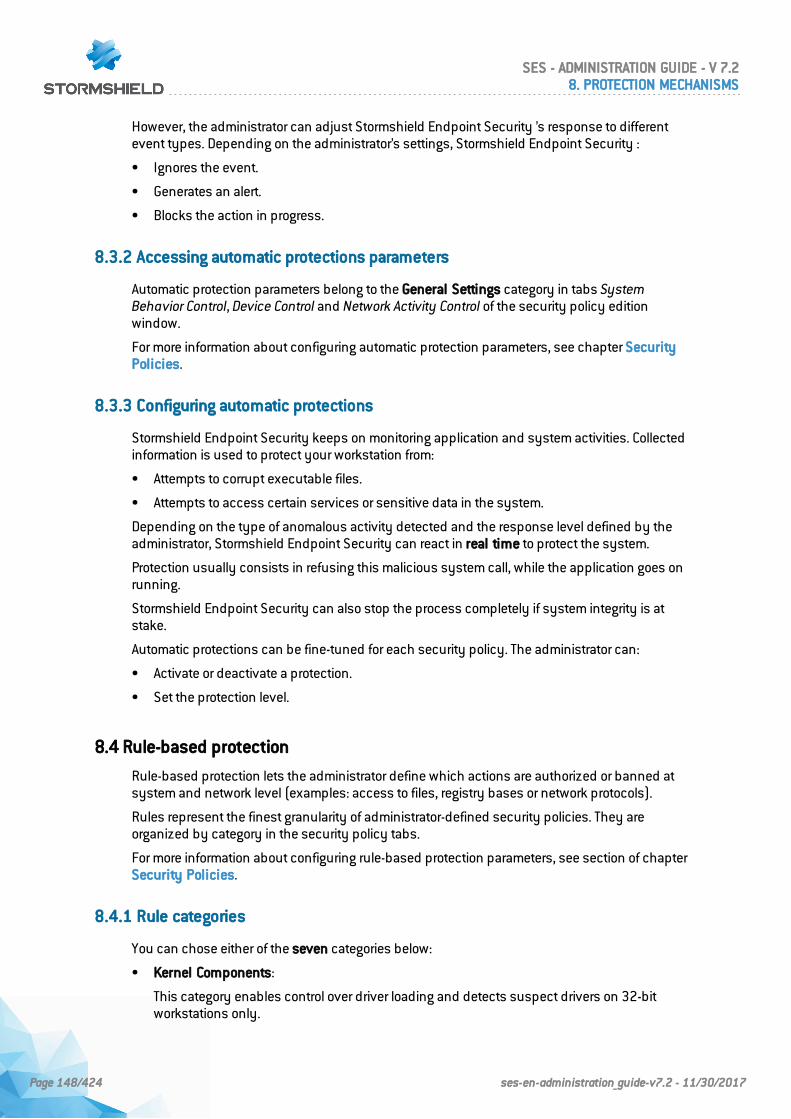
However, the administrator can adjust Stormshield Endpoint Security ’s response to differentevent types. Depending on the administrator’s settings, Stormshield Endpoint Security :
• Ignores the event.
• Generates an alert.
• Blocks the action in progress.
8.3.2 Accessing automatic protections parameters
Automatic protection parameters belong to the General Settings category in tabs SystemBehavior Control, Device Control and Network Activity Control of the security policy editionwindow.
For more information about configuring automatic protection parameters, see chapter SecurityPolicies.
8.3.3 Configuring automatic protections
Stormshield Endpoint Security keeps on monitoring application and system activities. Collectedinformation is used to protect your workstation from:
• Attempts to corrupt executable files.
• Attempts to access certain services or sensitive data in the system.
Depending on the type of anomalous activity detected and the response level defined by theadministrator, Stormshield Endpoint Security can react in real time to protect the system.
Protection usually consists in refusing this malicious system call, while the application goes onrunning.
Stormshield Endpoint Security can also stop the process completely if system integrity is atstake.
Automatic protections can be fine-tuned for each security policy. The administrator can:
• Activate or deactivate a protection.
• Set the protection level.
8.4 Rule-based protection
Rule-based protection lets the administrator define which actions are authorized or banned atsystem and network level (examples: access to files, registry bases or network protocols).
Rules represent the finest granularity of administrator-defined security policies. They areorganized by category in the security policy tabs.
For more information about configuring rule-based protection parameters, see section of chapterSecurity Policies.
8.4.1 Rule categories
You can chose either of the seven categories below:
• Kernel Components:
This category enables control over driver loading and detects suspect drivers on 32-bitworkstations only.
SES - ADMINISTRATION GUIDE - V 7.28. PROTECTION MECHANISMS
Page 148/424 ses-en-administration_guide-v7.2 - 11/30/2017
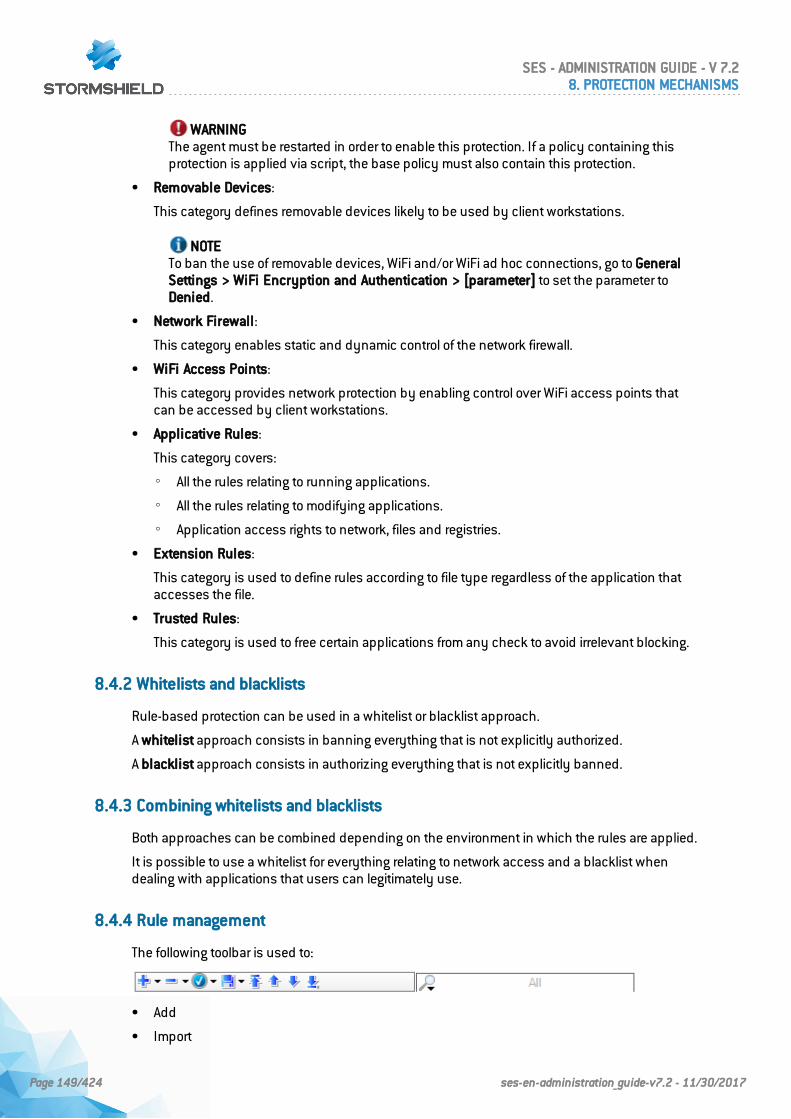
WARNINGThe agent must be restarted in order to enable this protection. If a policy containing thisprotection is applied via script, the base policy must also contain this protection.
• Removable Devices:
This category defines removable devices likely to be used by client workstations.
NOTETo ban the use of removable devices, WiFi and/or WiFi ad hoc connections, go to GeneralSettings > WiFi Encryption and Authentication > [parameter] to set the parameter toDenied.
• Network Firewall:
This category enables static and dynamic control of the network firewall.
• WiFi Access Points:
This category provides network protection by enabling control over WiFi access points thatcan be accessed by client workstations.
• Applicative Rules:
This category covers:
◦ All the rules relating to running applications.
◦ All the rules relating to modifying applications.
◦ Application access rights to network, files and registries.
• Extension Rules:
This category is used to define rules according to file type regardless of the application thataccesses the file.
• Trusted Rules:
This category is used to free certain applications from any check to avoid irrelevant blocking.
8.4.2 Whitelists and blacklists
Rule-based protection can be used in a whitelist or blacklist approach.
A whitelist approach consists in banning everything that is not explicitly authorized.
A blacklist approach consists in authorizing everything that is not explicitly banned.
8.4.3 Combining whitelists and blacklists
Both approaches can be combined depending on the environment in which the rules are applied.
It is possible to use a whitelist for everything relating to network access and a blacklist whendealing with applications that users can legitimately use.
8.4.4 Rule management
The following toolbar is used to:
• Add
• Import
SES - ADMINISTRATION GUIDE - V 7.28. PROTECTION MECHANISMS
Page 149/424 ses-en-administration_guide-v7.2 - 11/30/2017
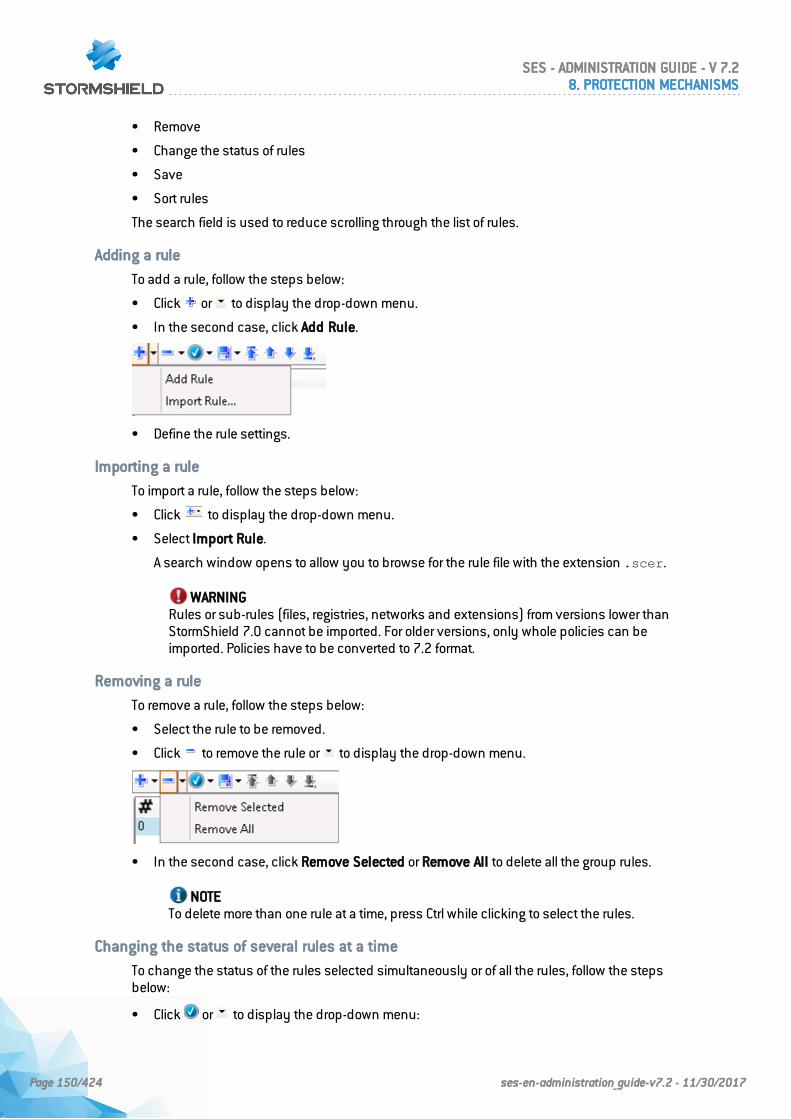
• Remove
• Change the status of rules
• Save
• Sort rules
The search field is used to reduce scrolling through the list of rules.
Adding a rule
To add a rule, follow the steps below:
• Click or to display the drop-down menu.
• In the second case, click Add Rule.
• Define the rule settings.
Importing a rule
To import a rule, follow the steps below:
• Click to display the drop-down menu.
• Select Import Rule.
A search window opens to allow you to browse for the rule file with the extension .scer.
WARNINGRules or sub-rules (files, registries, networks and extensions) from versions lower thanStormShield 7.0 cannot be imported. For older versions, only whole policies can beimported. Policies have to be converted to 7.2 format.
Removing a rule
To remove a rule, follow the steps below:
• Select the rule to be removed.
• Click to remove the rule or to display the drop-down menu.
• In the second case, click Remove Selected or Remove All to delete all the group rules.
NOTETo delete more than one rule at a time, press Ctrl while clicking to select the rules.
Changing the status of several rules at a time
To change the status of the rules selected simultaneously or of all the rules, follow the stepsbelow:
• Click or to display the drop-down menu:
SES - ADMINISTRATION GUIDE - V 7.28. PROTECTION MECHANISMS
Page 150/424 ses-en-administration_guide-v7.2 - 11/30/2017
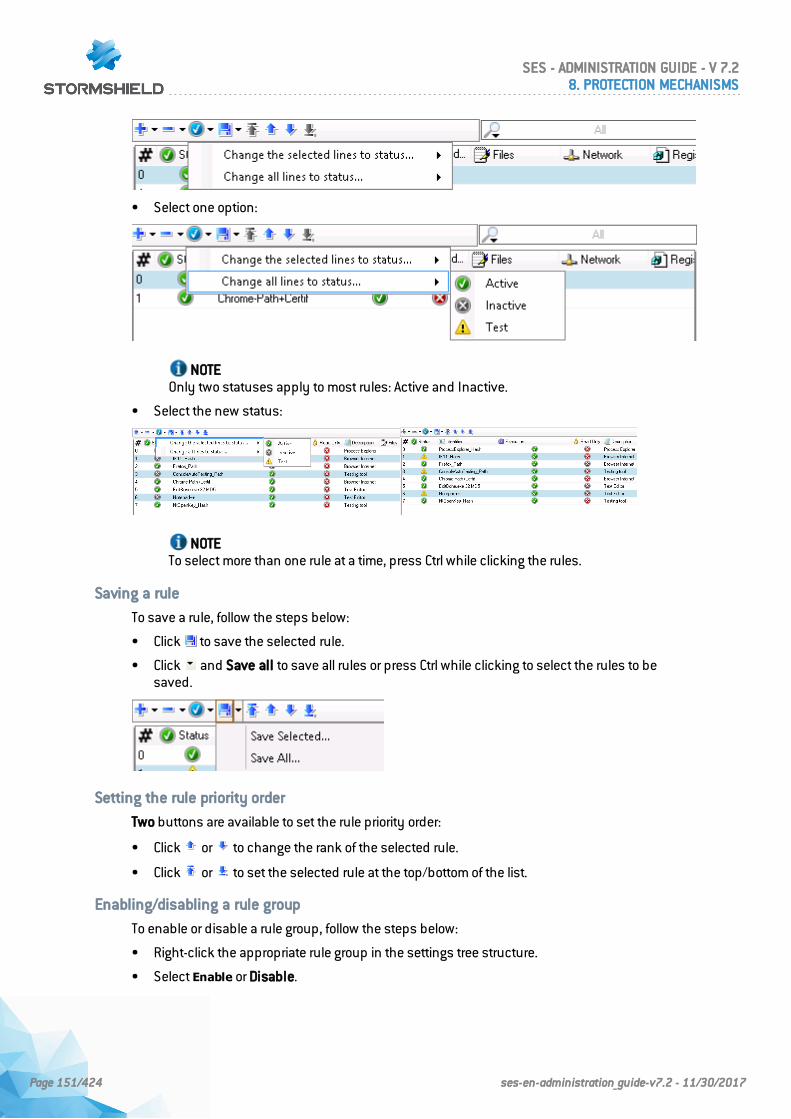
• Select one option:
NOTEOnly two statuses apply to most rules: Active and Inactive.
• Select the new status:
NOTETo select more than one rule at a time, press Ctrl while clicking the rules.
Saving a rule
To save a rule, follow the steps below:
• Click to save the selected rule.
• Click and Save all to save all rules or press Ctrl while clicking to select the rules to besaved.
Setting the rule priority order
Two buttons are available to set the rule priority order:
• Click or to change the rank of the selected rule.
• Click or to set the selected rule at the top/bottom of the list.
Enabling/disabling a rule group
To enable or disable a rule group, follow the steps below:
• Right-click the appropriate rule group in the settings tree structure.
• Select Enable or Disable.
SES - ADMINISTRATION GUIDE - V 7.28. PROTECTION MECHANISMS
Page 151/424 ses-en-administration_guide-v7.2 - 11/30/2017
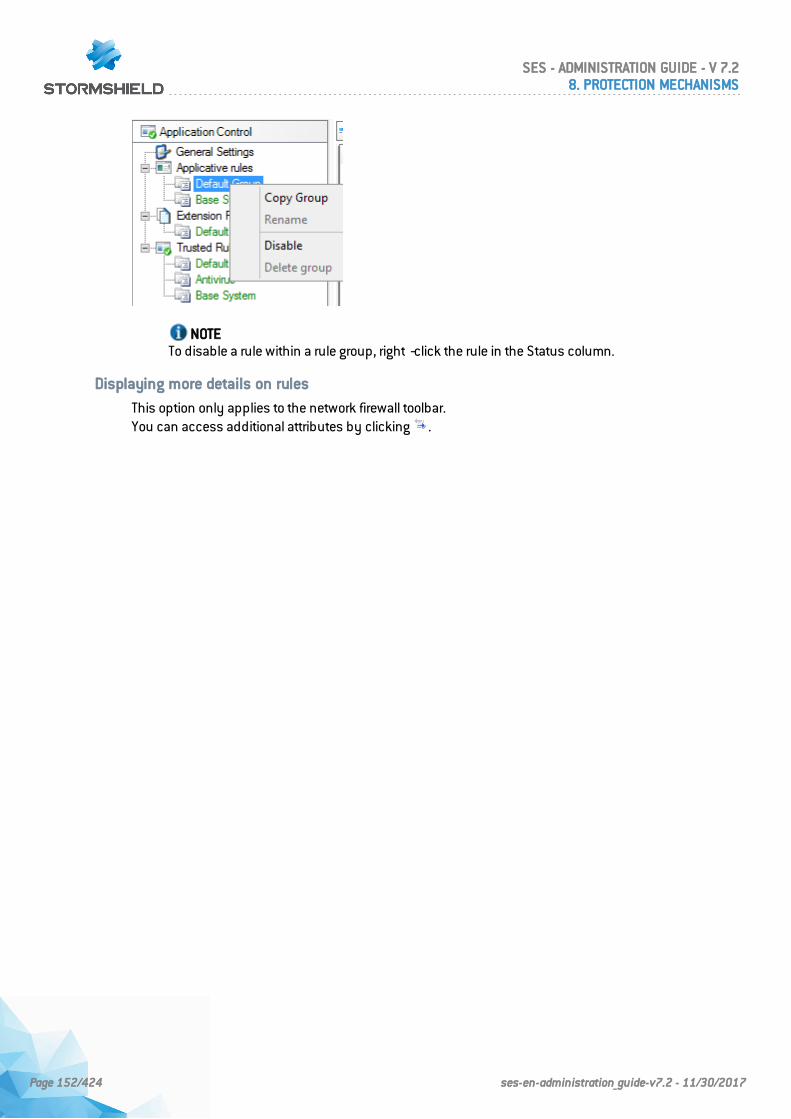
NOTETo disable a rule within a rule group, right‐click the rule in the Status column.
Displaying more details on rules
This option only applies to the network firewall toolbar.You can access additional attributes by clicking .
SES - ADMINISTRATION GUIDE - V 7.28. PROTECTION MECHANISMS
Page 152/424 ses-en-administration_guide-v7.2 - 11/30/2017
9. Security Policies
9.1 Application identifiers
Before creating a security policy and implementing application control, you will need to createapplication identifiers. For more information on creating security policies, please refer to thesections Creating a security policy and Application Control.
Application control relies on the concept of application identifiers, which matches the target towhich the rule must apply. The first step in generating an applicative rule is therefore to create atleast an identifier in the Application identifier panel of the security policy.
9.1.1 Types of application identifiers
Each identifier comprises a limited number of entries. Each entry allows identifying applicationsby several criteria:
l A partial or full path to the executable file.
l An MD5 or SHA-1 hash of the executable file.
l A digital signature by a specific certificate.
l A combination of a path (full or partial) to the executable file and its digital signature.
Path
Advantages
Identifying an application by its full or partial path provides the advantage of not being affectedby changes made to the targeted executable file. This facilitates adaptation when there areseveral versions of the same application in an environment, for example. Moreover, with partialpaths, differences in folders on different workstations (e.g. the "Program Files" folder on 32-bit or64-bit systems) would not be an issue.
This filtering mode is operational as soon as Windows starts.
Disadvantages
The main drawback of such rules is the need for prior knowledge of the name of the executablefile and the guarantee that it would not change after the application is updated. Furthermore, forall executable files received from an external source (Internet, for example), their names may berandom, making even partial path identification ineffective. This type of identification may bedangerous if it is used for the purpose of exclusion, especially if a partial path is used.Stormshield Endpoint Security will not prevent the user from adding executable files to a folderthat has been excluded in trusted applications, thereby making it possible to execute anyapplication outside the scope of the agent's protection.
Hash
Advantages
Identifying an application by its SHA-1 or MD5 hash provides the advantage of relying not on thepath of the executable file, but on its contents. This method is particularly effective in preventingthe execution of known malicious executable files, regardless of how they are named and wherethey are located on the workstation.
An application's hash is calculated when it is executed. It will then be compared against thesecurity policy applied to the workstation in order to ensure that it is not subject to any specificrule. If the execution of the application is prohibited, it will not be loaded.
SES - ADMINISTRATION GUIDE - V 7.29. SECURITY POLICIES
Page 153/424 ses-en-administration_guide-v7.2 - 11/30/2017
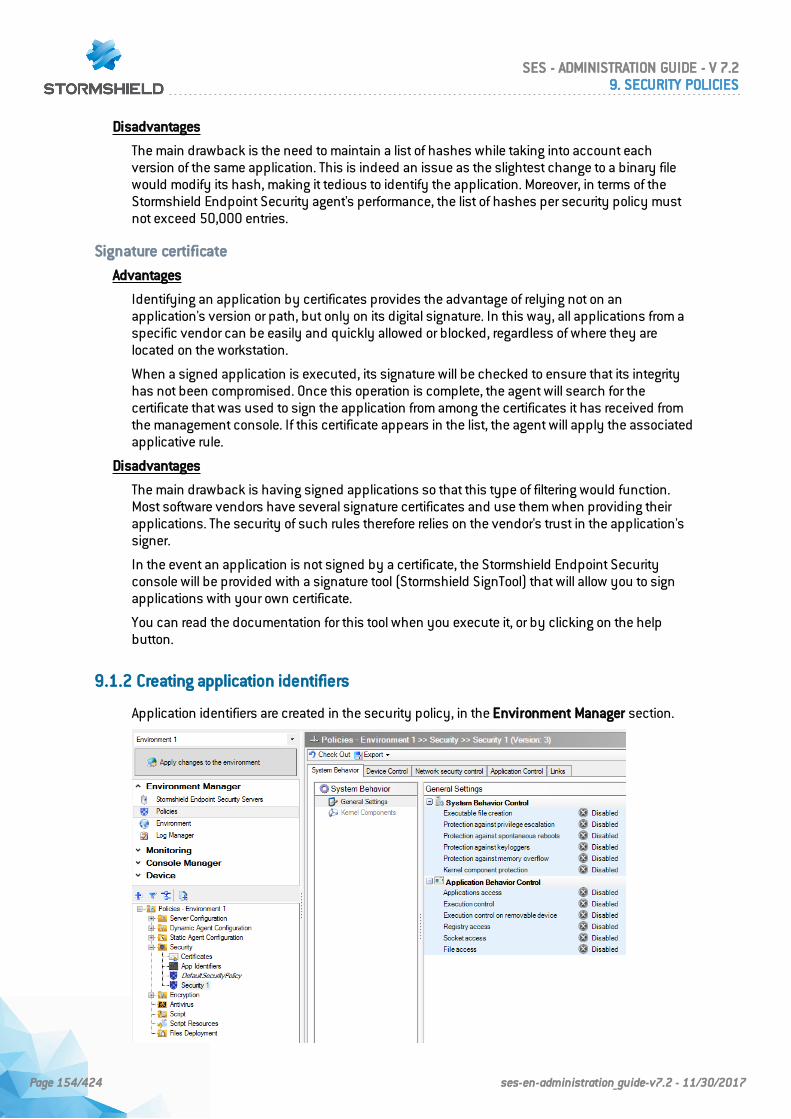
Disadvantages
The main drawback is the need to maintain a list of hashes while taking into account eachversion of the same application. This is indeed an issue as the slightest change to a binary filewould modify its hash, making it tedious to identify the application. Moreover, in terms of theStormshield Endpoint Security agent's performance, the list of hashes per security policy mustnot exceed 50,000 entries.
Signature certificate
Advantages
Identifying an application by certificates provides the advantage of relying not on anapplication's version or path, but only on its digital signature. In this way, all applications from aspecific vendor can be easily and quickly allowed or blocked, regardless of where they arelocated on the workstation.
When a signed application is executed, its signature will be checked to ensure that its integrityhas not been compromised. Once this operation is complete, the agent will search for thecertificate that was used to sign the application from among the certificates it has received fromthe management console. If this certificate appears in the list, the agent will apply the associatedapplicative rule.
Disadvantages
The main drawback is having signed applications so that this type of filtering would function.Most software vendors have several signature certificates and use them when providing theirapplications. The security of such rules therefore relies on the vendor's trust in the application'ssigner.
In the event an application is not signed by a certificate, the Stormshield Endpoint Securityconsole will be provided with a signature tool (Stormshield SignTool) that will allow you to signapplications with your own certificate.
You can read the documentation for this tool when you execute it, or by clicking on the helpbutton.
9.1.2 Creating application identifiers
Application identifiers are created in the security policy, in the Environment Manager section.
SES - ADMINISTRATION GUIDE - V 7.29. SECURITY POLICIES
Page 154/424 ses-en-administration_guide-v7.2 - 11/30/2017
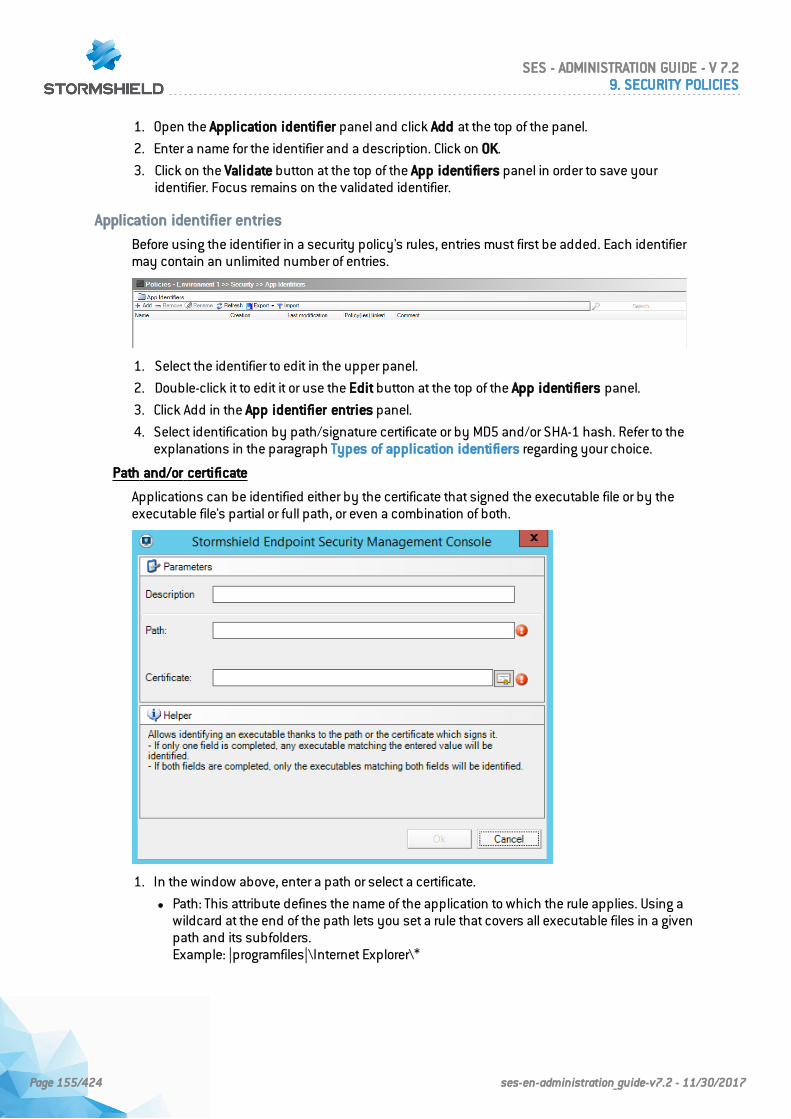
1. Open the Application identifier panel and click Add at the top of the panel.
2. Enter a name for the identifier and a description. Click on OK.
3. Click on the Validate button at the top of the App identifiers panel in order to save youridentifier. Focus remains on the validated identifier.
Application identifier entries
Before using the identifier in a security policy's rules, entries must first be added. Each identifiermay contain an unlimited number of entries.
1. Select the identifier to edit in the upper panel.
2. Double-click it to edit it or use the Edit button at the top of the App identifiers panel.
3. Click Add in the App identifier entries panel.
4. Select identification by path/signature certificate or by MD5 and/or SHA-1 hash. Refer to theexplanations in the paragraph Types of application identifiers regarding your choice.
Path and/or certificate
Applications can be identified either by the certificate that signed the executable file or by theexecutable file's partial or full path, or even a combination of both.
1. In the window above, enter a path or select a certificate.
l Path: This attribute defines the name of the application to which the rule applies. Using awildcard at the end of the path lets you set a rule that covers all executable files in a givenpath and its subfolders.Example: |programfiles|\Internet Explorer\*
SES - ADMINISTRATION GUIDE - V 7.29. SECURITY POLICIES
Page 155/424 ses-en-administration_guide-v7.2 - 11/30/2017
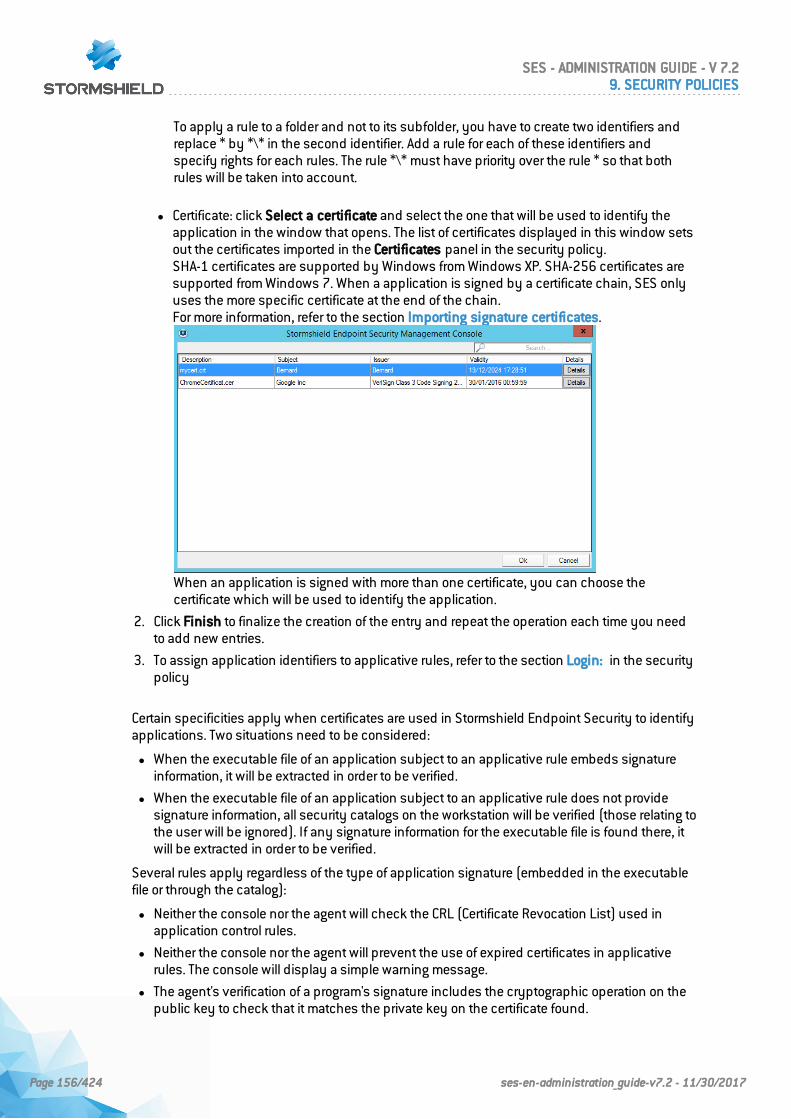
To apply a rule to a folder and not to its subfolder, you have to create two identifiers andreplace * by *\* in the second identifier. Add a rule for each of these identifiers andspecify rights for each rules. The rule *\* must have priority over the rule * so that bothrules will be taken into account.
l Certificate: click Select a certificate and select the one that will be used to identify theapplication in the window that opens. The list of certificates displayed in this window setsout the certificates imported in the Certificates panel in the security policy.SHA-1 certificates are supported by Windows from Windows XP. SHA-256 certificates aresupported from Windows 7. When a application is signed by a certificate chain, SES onlyuses the more specific certificate at the end of the chain.For more information, refer to the section Importing signature certificates.
When an application is signed with more than one certificate, you can choose thecertificate which will be used to identify the application.
2. Click Finish to finalize the creation of the entry and repeat the operation each time you needto add new entries.
3. To assign application identifiers to applicative rules, refer to the section Login: in the securitypolicy
Certain specificities apply when certificates are used in Stormshield Endpoint Security to identifyapplications. Two situations need to be considered:
l When the executable file of an application subject to an applicative rule embeds signatureinformation, it will be extracted in order to be verified.
l When the executable file of an application subject to an applicative rule does not providesignature information, all security catalogs on the workstation will be verified (those relating tothe user will be ignored). If any signature information for the executable file is found there, itwill be extracted in order to be verified.
Several rules apply regardless of the type of application signature (embedded in the executablefile or through the catalog):
l Neither the console nor the agent will check the CRL (Certificate Revocation List) used inapplication control rules.
l Neither the console nor the agent will prevent the use of expired certificates in applicativerules. The console will display a simple warning message.
l The agent's verification of a program's signature includes the cryptographic operation on thepublic key to check that it matches the private key on the certificate found.
SES - ADMINISTRATION GUIDE - V 7.29. SECURITY POLICIES
Page 156/424 ses-en-administration_guide-v7.2 - 11/30/2017
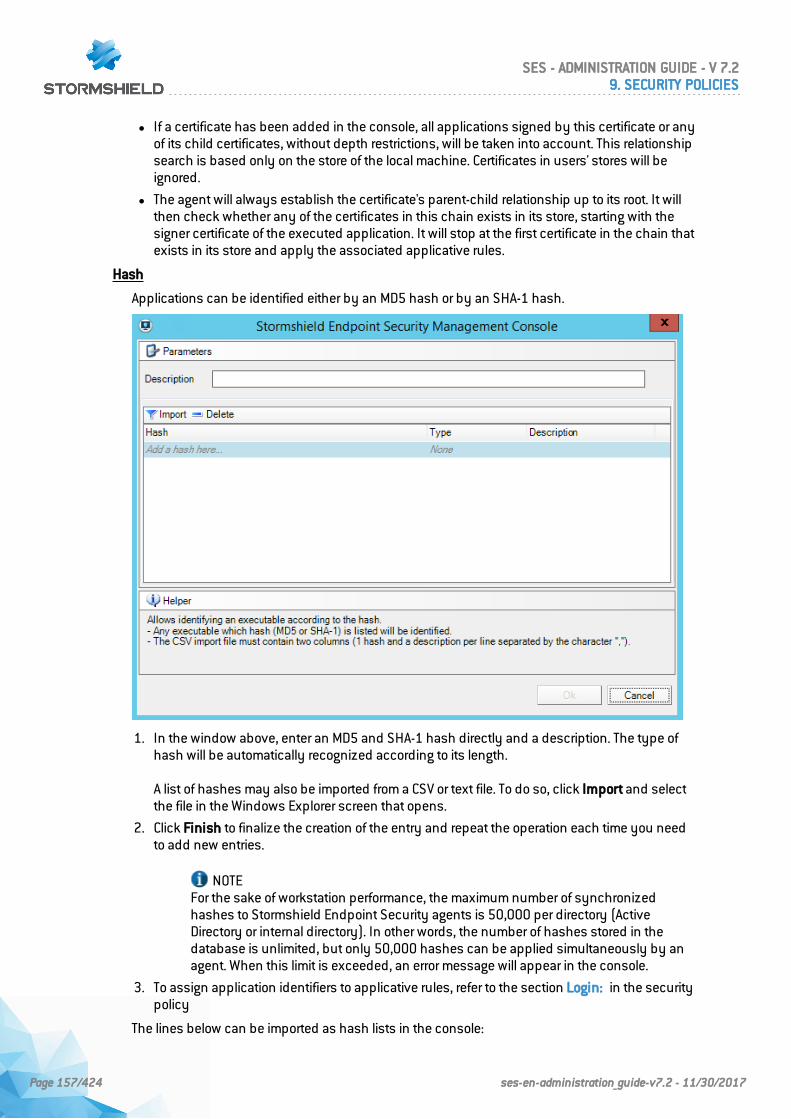
l If a certificate has been added in the console, all applications signed by this certificate or anyof its child certificates, without depth restrictions, will be taken into account. This relationshipsearch is based only on the store of the local machine. Certificates in users' stores will beignored.
l The agent will always establish the certificate's parent-child relationship up to its root. It willthen check whether any of the certificates in this chain exists in its store, starting with thesigner certificate of the executed application. It will stop at the first certificate in the chain thatexists in its store and apply the associated applicative rules.
Hash
Applications can be identified either by an MD5 hash or by an SHA-1 hash.
1. In the window above, enter an MD5 and SHA-1 hash directly and a description. The type ofhash will be automatically recognized according to its length.
A list of hashes may also be imported from a CSV or text file. To do so, click Import and selectthe file in the Windows Explorer screen that opens.
2. Click Finish to finalize the creation of the entry and repeat the operation each time you needto add new entries.
NOTEFor the sake of workstation performance, the maximum number of synchronizedhashes to Stormshield Endpoint Security agents is 50,000 per directory (ActiveDirectory or internal directory). In other words, the number of hashes stored in thedatabase is unlimited, but only 50,000 hashes can be applied simultaneously by anagent. When this limit is exceeded, an error message will appear in the console.
3. To assign application identifiers to applicative rules, refer to the section Login: in the securitypolicy
The lines below can be imported as hash lists in the console:
SES - ADMINISTRATION GUIDE - V 7.29. SECURITY POLICIES
Page 157/424 ses-en-administration_guide-v7.2 - 11/30/2017
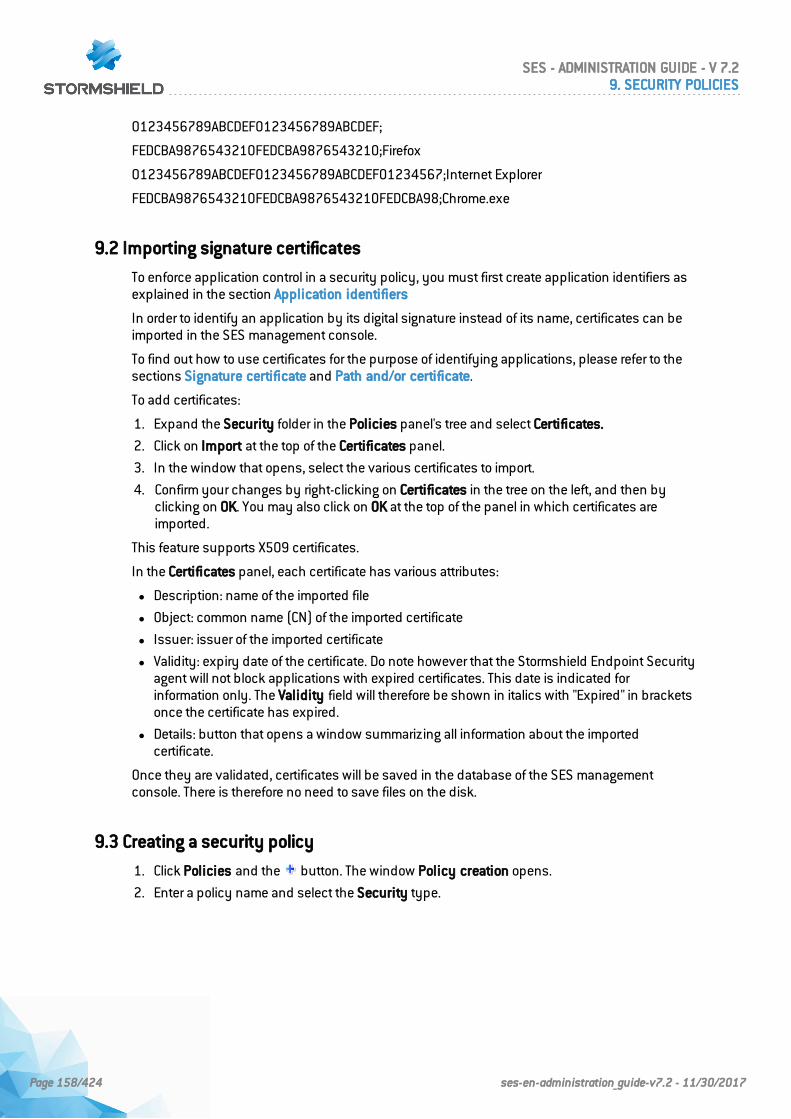
0123456789ABCDEF0123456789ABCDEF;
FEDCBA9876543210FEDCBA9876543210;Firefox
0123456789ABCDEF0123456789ABCDEF01234567;Internet Explorer
FEDCBA9876543210FEDCBA9876543210FEDCBA98;Chrome.exe
9.2 Importing signature certificates
To enforce application control in a security policy, you must first create application identifiers asexplained in the section Application identifiers
In order to identify an application by its digital signature instead of its name, certificates can beimported in the SES management console.
To find out how to use certificates for the purpose of identifying applications, please refer to thesections Signature certificate and Path and/or certificate.
To add certificates:
1. Expand the Security folder in the Policies panel's tree and select Certificates.
2. Click on Import at the top of the Certificates panel.
3. In the window that opens, select the various certificates to import.
4. Confirm your changes by right-clicking on Certificates in the tree on the left, and then byclicking on OK. You may also click on OK at the top of the panel in which certificates areimported.
This feature supports X509 certificates.
In the Certificates panel, each certificate has various attributes:
l Description: name of the imported file
l Object: common name (CN) of the imported certificate
l Issuer: issuer of the imported certificate
l Validity: expiry date of the certificate. Do note however that the Stormshield Endpoint Securityagent will not block applications with expired certificates. This date is indicated forinformation only. The Validity field will therefore be shown in italics with "Expired" in bracketsonce the certificate has expired.
l Details: button that opens a window summarizing all information about the importedcertificate.
Once they are validated, certificates will be saved in the database of the SES managementconsole. There is therefore no need to save files on the disk.
9.3 Creating a security policy
1. Click Policies and the button. The window Policy creation opens.
2. Enter a policy name and select the Security type.
SES - ADMINISTRATION GUIDE - V 7.29. SECURITY POLICIES
Page 158/424 ses-en-administration_guide-v7.2 - 11/30/2017
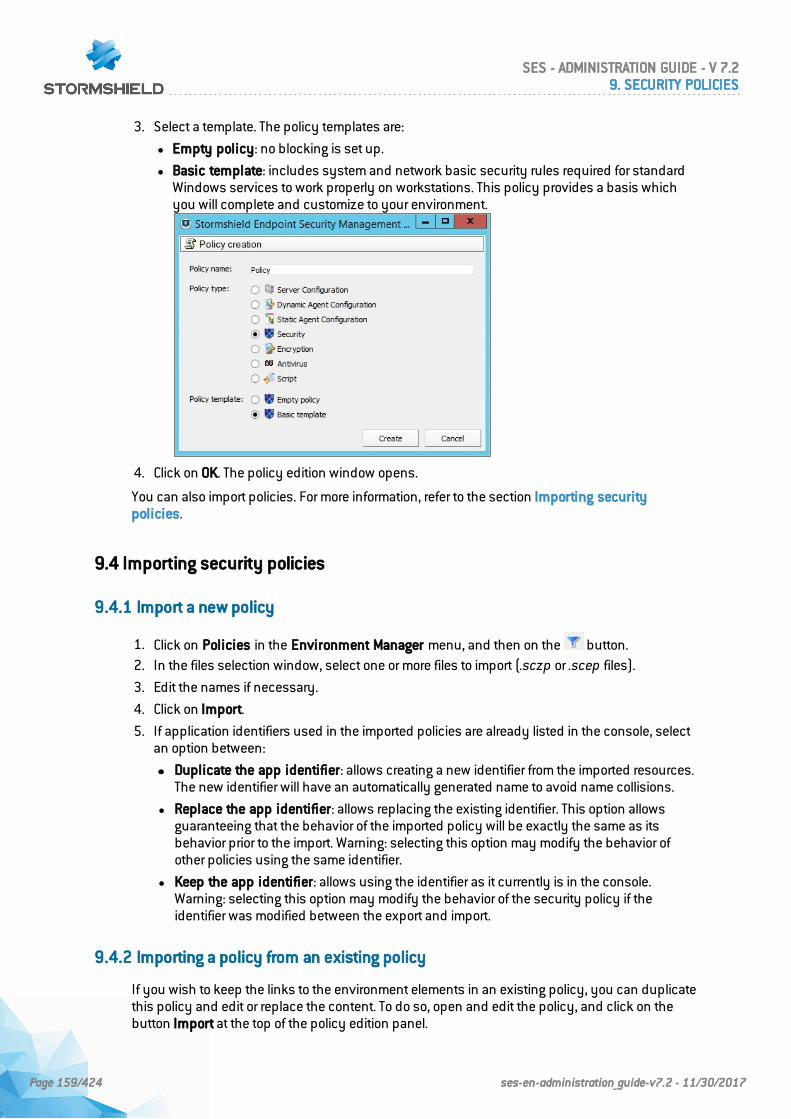
3. Select a template. The policy templates are:
l Empty policy: no blocking is set up.
l Basic template: includes system and network basic security rules required for standardWindows services to work properly on workstations. This policy provides a basis whichyou will complete and customize to your environment.
4. Click on OK. The policy edition window opens.
You can also import policies. For more information, refer to the section Importing securitypolicies.
9.4 Importing security policies
9.4.1 Import a new policy
1. Click on Policies in the Environment Manager menu, and then on the button.2. In the files selection window, select one or more files to import (.sczp or .scep files).
3. Edit the names if necessary.
4. Click on Import.
5. If application identifiers used in the imported policies are already listed in the console, selectan option between:
ll Duplicate the app identifier: allows creating a new identifier from the imported resources.The new identifier will have an automatically generated name to avoid name collisions.
l Replace the app identifier: allows replacing the existing identifier. This option allowsguaranteeing that the behavior of the imported policy will be exactly the same as itsbehavior prior to the import. Warning: selecting this option may modify the behavior ofother policies using the same identifier.
l Keep the app identifier: allows using the identifier as it currently is in the console.Warning: selecting this option may modify the behavior of the security policy if theidentifier was modified between the export and import.
9.4.2 Importing a policy from an existing policy
If you wish to keep the links to the environment elements in an existing policy, you can duplicatethis policy and edit or replace the content. To do so, open and edit the policy, and click on thebutton Import at the top of the policy edition panel.
SES - ADMINISTRATION GUIDE - V 7.29. SECURITY POLICIES
Page 159/424 ses-en-administration_guide-v7.2 - 11/30/2017
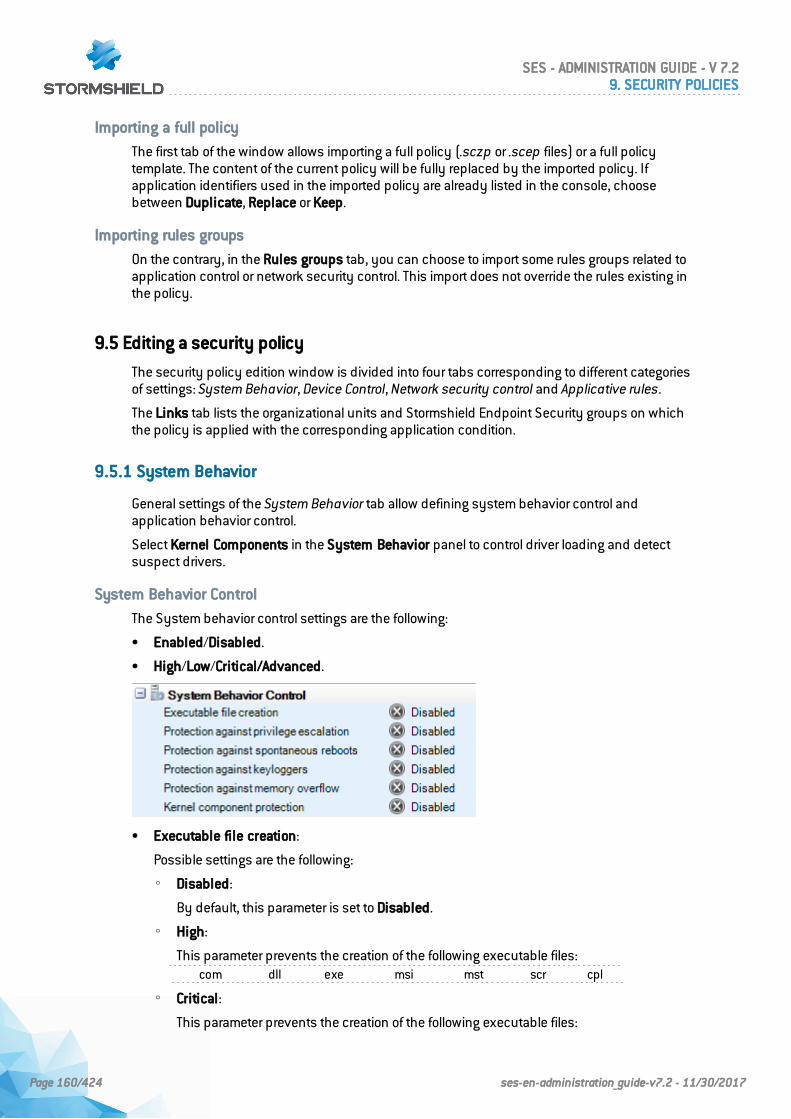
Importing a full policy
The first tab of the window allows importing a full policy (.sczp or .scep files) or a full policytemplate. The content of the current policy will be fully replaced by the imported policy. Ifapplication identifiers used in the imported policy are already listed in the console, choosebetween Duplicate, Replace or Keep.
Importing rules groups
On the contrary, in the Rules groups tab, you can choose to import some rules groups related toapplication control or network security control. This import does not override the rules existing inthe policy.
9.5 Editing a security policy
The security policy edition window is divided into four tabs corresponding to different categoriesof settings: SystemBehavior, Device Control, Network security control and Applicative rules.
The Links tab lists the organizational units and Stormshield Endpoint Security groups on whichthe policy is applied with the corresponding application condition.
9.5.1 System Behavior
General settings of the SystemBehavior tab allow defining system behavior control andapplication behavior control.
Select Kernel Components in the System Behavior panel to control driver loading and detectsuspect drivers.
System Behavior Control
The System behavior control settings are the following:
• Enabled/Disabled.
• High/Low/Critical/Advanced.
• Executable file creation:
Possible settings are the following:
◦ Disabled:
By default, this parameter is set to Disabled.
◦ High:
This parameter prevents the creation of the following executable files:com dll exe msi mst scr cpl
◦ Critical:
This parameter prevents the creation of the following executable files:
SES - ADMINISTRATION GUIDE - V 7.29. SECURITY POLICIES
Page 160/424 ses-en-administration_guide-v7.2 - 11/30/2017
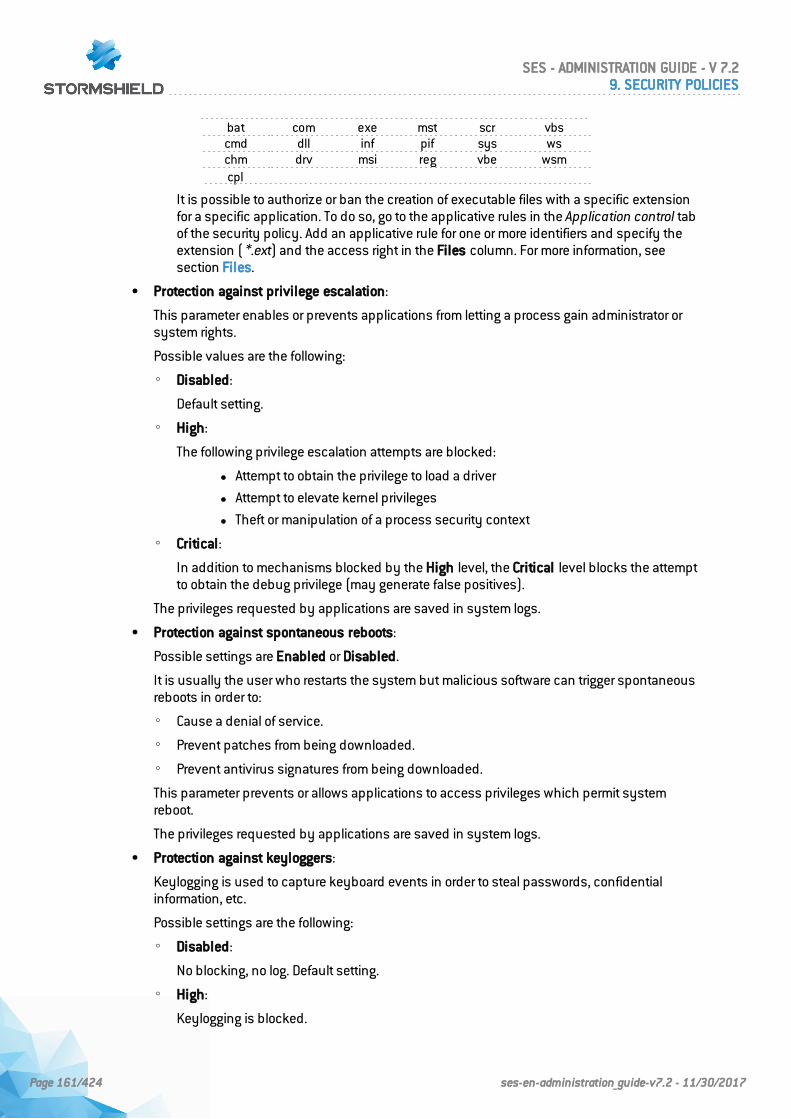
bat com exe mst scr vbscmd dll inf pif sys wschm drv msi reg vbe wsmcpl
It is possible to authorize or ban the creation of executable files with a specific extensionfor a specific application. To do so, go to the applicative rules in the Application control tabof the security policy. Add an applicative rule for one or more identifiers and specify theextension ( *.ext) and the access right in the Files column. For more information, seesection Files.
• Protection against privilege escalation:
This parameter enables or prevents applications from letting a process gain administrator orsystem rights.
Possible values are the following:
◦ Disabled:
Default setting.
◦ High:
The following privilege escalation attempts are blocked:
l Attempt to obtain the privilege to load a driver
l Attempt to elevate kernel privileges
l Theft or manipulation of a process security context
◦ Critical:
In addition to mechanisms blocked by the High level, the Critical level blocks the attemptto obtain the debug privilege (may generate false positives).
The privileges requested by applications are saved in system logs.
• Protection against spontaneous reboots:
Possible settings are Enabled or Disabled.
It is usually the user who restarts the system but malicious software can trigger spontaneousreboots in order to:
◦ Cause a denial of service.
◦ Prevent patches from being downloaded.
◦ Prevent antivirus signatures from being downloaded.
This parameter prevents or allows applications to access privileges which permit systemreboot.
The privileges requested by applications are saved in system logs.
• Protection against keyloggers:
Keylogging is used to capture keyboard events in order to steal passwords, confidentialinformation, etc.
Possible settings are the following:
◦ Disabled:
No blocking, no log. Default setting.
◦ High:
Keylogging is blocked.
SES - ADMINISTRATION GUIDE - V 7.29. SECURITY POLICIES
Page 161/424 ses-en-administration_guide-v7.2 - 11/30/2017
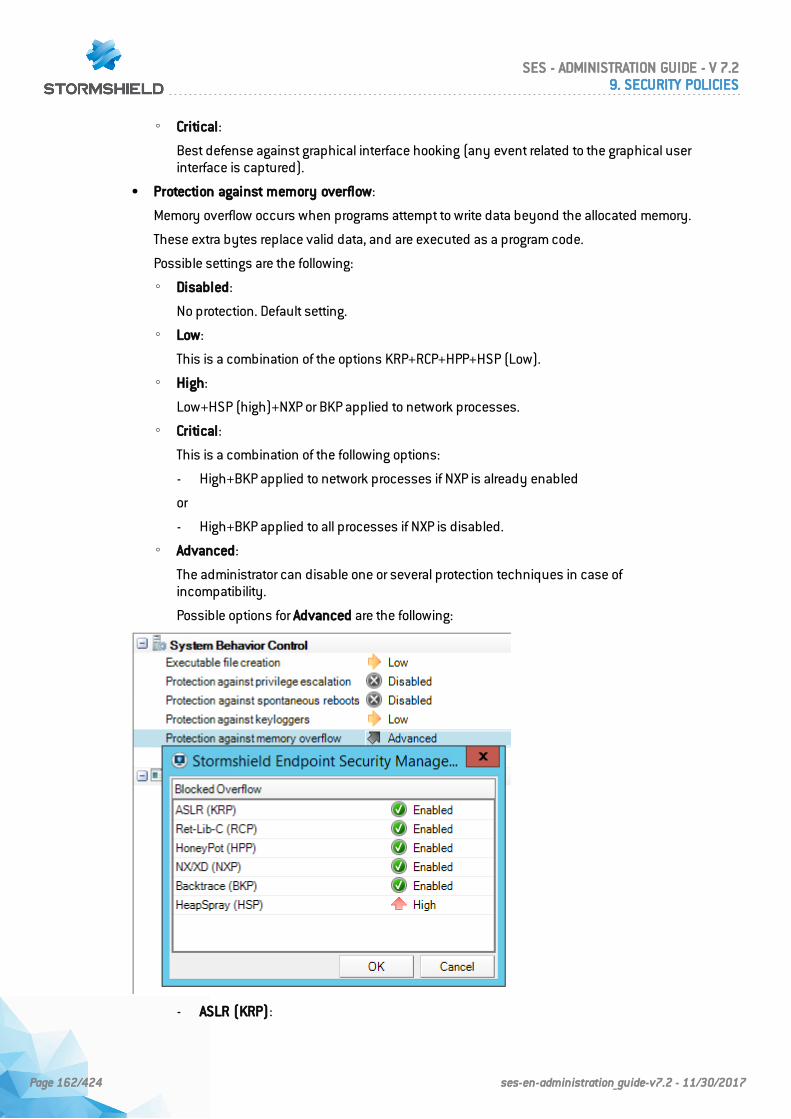
◦ Critical:
Best defense against graphical interface hooking (any event related to the graphical userinterface is captured).
• Protection against memory overflow:
Memory overflow occurs when programs attempt to write data beyond the allocated memory.
These extra bytes replace valid data, and are executed as a program code.
Possible settings are the following:
◦ Disabled:
No protection. Default setting.
◦ Low:
This is a combination of the options KRP+RCP+HPP+HSP (Low).
◦ High:
Low+HSP (high)+NXP or BKP applied to network processes.
◦ Critical:
This is a combination of the following options:
- High+BKP applied to network processes if NXP is already enabled
or
- High+BKP applied to all processes if NXP is disabled.
◦ Advanced:
The administrator can disable one or several protection techniques in case ofincompatibility.
Possible options for Advanced are the following:
- ASLR (KRP):
SES - ADMINISTRATION GUIDE - V 7.29. SECURITY POLICIES
Page 162/424 ses-en-administration_guide-v7.2 - 11/30/2017
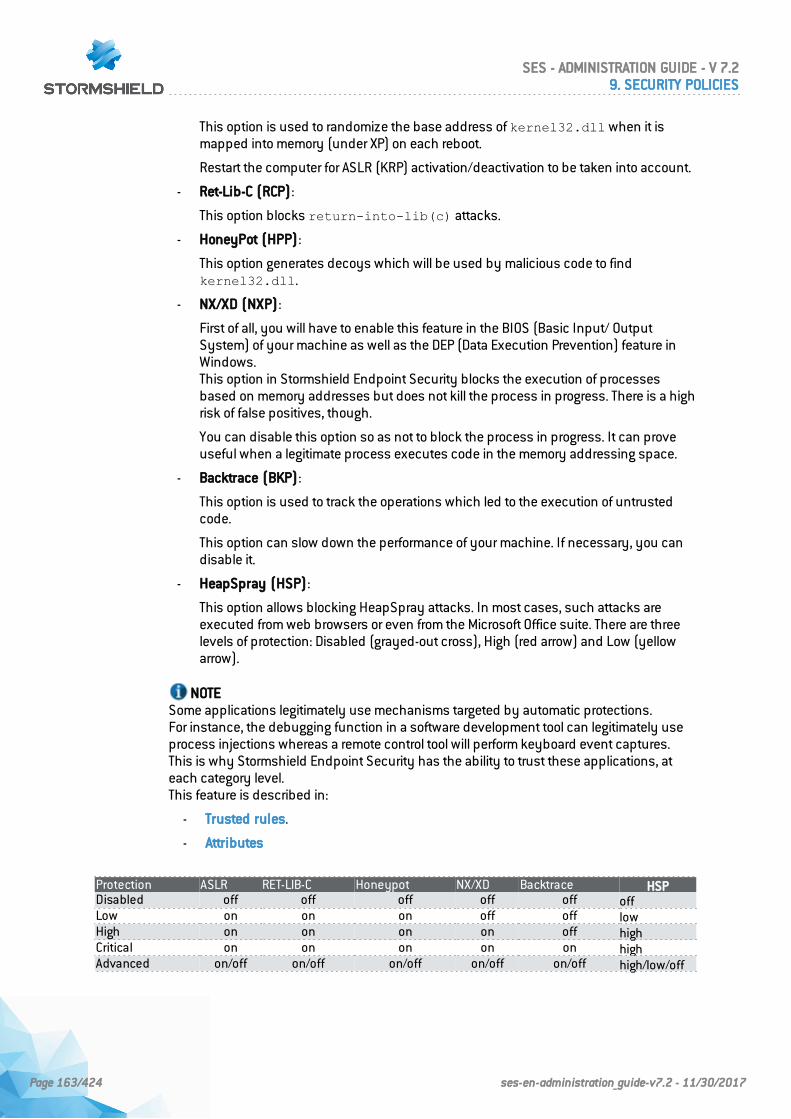
This option is used to randomize the base address of kernel32.dll when it ismapped into memory (under XP) on each reboot.
Restart the computer for ASLR (KRP) activation/deactivation to be taken into account.
- Ret-Lib-C (RCP):
This option blocks return-into-lib(c) attacks.
- HoneyPot (HPP):
This option generates decoys which will be used by malicious code to findkernel32.dll.
- NX/XD (NXP):
First of all, you will have to enable this feature in the BIOS (Basic Input/ OutputSystem) of your machine as well as the DEP (Data Execution Prevention) feature inWindows.This option in Stormshield Endpoint Security blocks the execution of processesbased on memory addresses but does not kill the process in progress. There is a highrisk of false positives, though.
You can disable this option so as not to block the process in progress. It can proveuseful when a legitimate process executes code in the memory addressing space.
- Backtrace (BKP):
This option is used to track the operations which led to the execution of untrustedcode.
This option can slow down the performance of your machine. If necessary, you candisable it.
- HeapSpray (HSP):
This option allows blocking HeapSpray attacks. In most cases, such attacks areexecuted from web browsers or even from the Microsoft Office suite. There are threelevels of protection: Disabled (grayed-out cross), High (red arrow) and Low (yellowarrow).
NOTESome applications legitimately use mechanisms targeted by automatic protections.For instance, the debugging function in a software development tool can legitimately useprocess injections whereas a remote control tool will perform keyboard event captures.This is why Stormshield Endpoint Security has the ability to trust these applications, ateach category level.This feature is described in:
- Trusted rules.
- Attributes
Protection ASLR RET-LIB-C Honeypot NX/XD Backtrace HSPDisabled off off off off off offLow on on on off off lowHigh on on on on off highCritical on on on on on highAdvanced on/off on/off on/off on/off on/off high/low/off
SES - ADMINISTRATION GUIDE - V 7.29. SECURITY POLICIES
Page 163/424 ses-en-administration_guide-v7.2 - 11/30/2017
WARNINGIn case of incompatibility between an application and the memory overflow protection, it isrecommended to check that the application is running properly by disabling onlyprotection options NX/XP (NXP) and Backtrace (BKP).Should the problem persist, add a rule in Trusted Rules from the Applicative rules tab.
NOTENX/XD and Backtrace:
- When the NX/XD option is disabled or not present on your computer, the Backtraceoption will then be enabled.
- The Backtrace option is always enabled when Protection against memory overflow isset to Critical.
• Kernel component protection
This parameter enables the administrator to activate or deactivate the detection of driverdownloads (only for 32-bit operating systems).
A learning period enables the kernel component protection to establish a list of legitimatedrivers. After the learning period has expired, new drivers and suspect drivers will be blockedaccording to the protection level selected in the security policy (Enabled, Disabled, High, Lowor Critical).
Possible settings are the following:
◦ Disabled:
Kernel driver detection is disabled. No log event has been created on the StormshieldEndpoint Securityserver.
◦ Low:
New drivers and suspect drivers will not be blocked. They will only be detected. If thesecurity policy prohibits certain drivers from being downloaded, these drivers will beblocked.
◦ High:
New drivers and suspect drivers are blocked on next boot. The drivers installed byWindows Update are automatically trusted.
◦ Critical:
Unknown drivers and suspect drivers are blocked on next boot. The drivers installed byWindows Update are automatically trusted.
NOTEBlocking of new drivers can be temporarily suspended with the challenge Install drivers.
NOTEAfter enabling kernel component protection, workstations equipped with agents need to berestarted to take the change into account.
Application Behavior Control
Application Behavior Control parameters can be set to Low, High or Critical.
The protection level selected by the administrator may have a direct impact on the agent behaviorand on profile-based protection.
For more information, see section Profile-based protection
SES - ADMINISTRATION GUIDE - V 7.29. SECURITY POLICIES
Page 164/424 ses-en-administration_guide-v7.2 - 11/30/2017
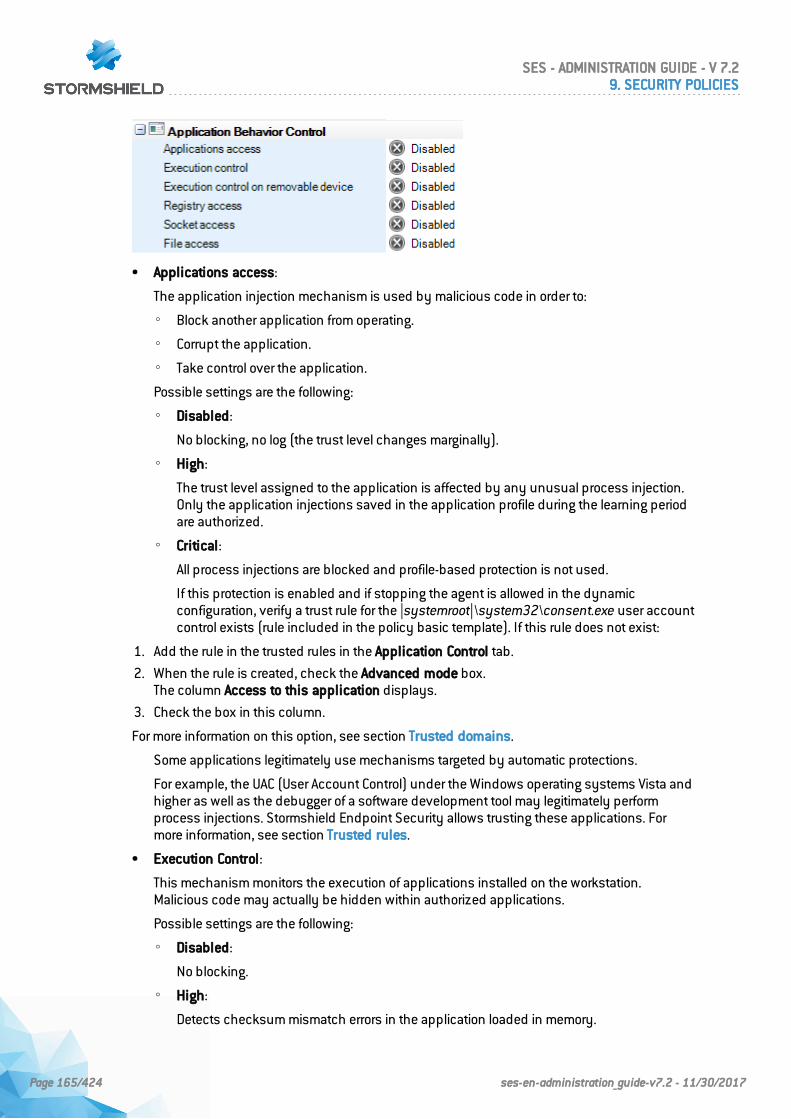
• Applications access:
The application injection mechanism is used by malicious code in order to:
◦ Block another application from operating.
◦ Corrupt the application.
◦ Take control over the application.
Possible settings are the following:
◦ Disabled:
No blocking, no log (the trust level changes marginally).
◦ High:
The trust level assigned to the application is affected by any unusual process injection.Only the application injections saved in the application profile during the learning periodare authorized.
◦ Critical:
All process injections are blocked and profile-based protection is not used.
If this protection is enabled and if stopping the agent is allowed in the dynamicconfiguration, verify a trust rule for the |systemroot|\system32\consent.exe user accountcontrol exists (rule included in the policy basic template). If this rule does not exist:
1. Add the rule in the trusted rules in the Application Control tab.
2. When the rule is created, check the Advanced mode box.The column Access to this application displays.
3. Check the box in this column.
For more information on this option, see section Trusted domains.
Some applications legitimately use mechanisms targeted by automatic protections.
For example, the UAC (User Account Control) under the Windows operating systems Vista andhigher as well as the debugger of a software development tool may legitimately performprocess injections. Stormshield Endpoint Security allows trusting these applications. Formore information, see section Trusted rules.
• Execution Control:
This mechanism monitors the execution of applications installed on the workstation.Malicious code may actually be hidden within authorized applications.
Possible settings are the following:
◦ Disabled:
No blocking.
◦ High:
Detects checksum mismatch errors in the application loaded in memory.
SES - ADMINISTRATION GUIDE - V 7.29. SECURITY POLICIES
Page 165/424 ses-en-administration_guide-v7.2 - 11/30/2017
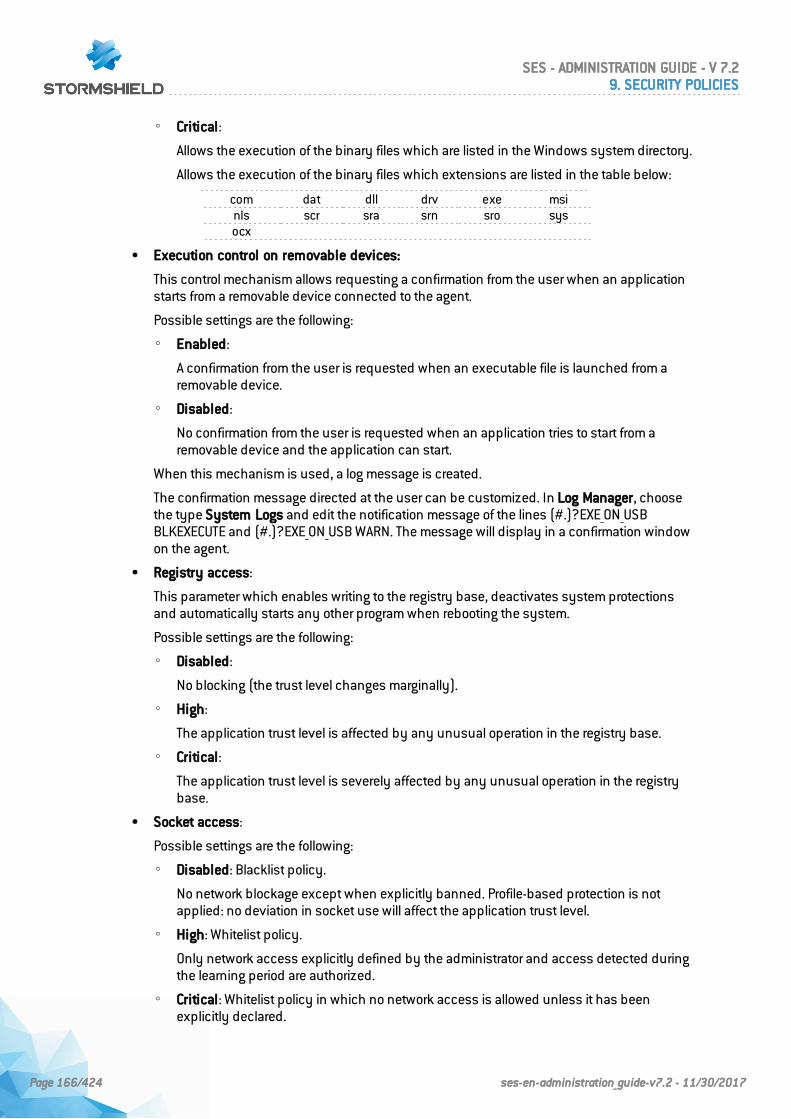
◦ Critical:
Allows the execution of the binary files which are listed in the Windows system directory.
Allows the execution of the binary files which extensions are listed in the table below:
com dat dll drv exe msinls scr sra srn sro sysocx
• Execution control on removable devices:
This control mechanism allows requesting a confirmation from the user when an applicationstarts from a removable device connected to the agent.
Possible settings are the following:
◦ Enabled:
A confirmation from the user is requested when an executable file is launched from aremovable device.
◦ Disabled:
No confirmation from the user is requested when an application tries to start from aremovable device and the application can start.
When this mechanism is used, a log message is created.
The confirmation message directed at the user can be customized. In Log Manager, choosethe type System Logs and edit the notification message of the lines (#.)?EXE_ON_USBBLKEXECUTE and (#.)?EXE_ON_USB WARN. The message will display in a confirmation windowon the agent.
• Registry access:
This parameter which enables writing to the registry base, deactivates system protectionsand automatically starts any other program when rebooting the system.
Possible settings are the following:
◦ Disabled:
No blocking (the trust level changes marginally).
◦ High:
The application trust level is affected by any unusual operation in the registry base.
◦ Critical:
The application trust level is severely affected by any unusual operation in the registrybase.
• Socket access:
Possible settings are the following:
◦ Disabled: Blacklist policy.
No network blockage except when explicitly banned. Profile-based protection is notapplied: no deviation in socket use will affect the application trust level.
◦ High: Whitelist policy.
Only network access explicitly defined by the administrator and access detected duringthe learning period are authorized.
◦ Critical: Whitelist policy in which no network access is allowed unless it has beenexplicitly declared.
SES - ADMINISTRATION GUIDE - V 7.29. SECURITY POLICIES
Page 166/424 ses-en-administration_guide-v7.2 - 11/30/2017
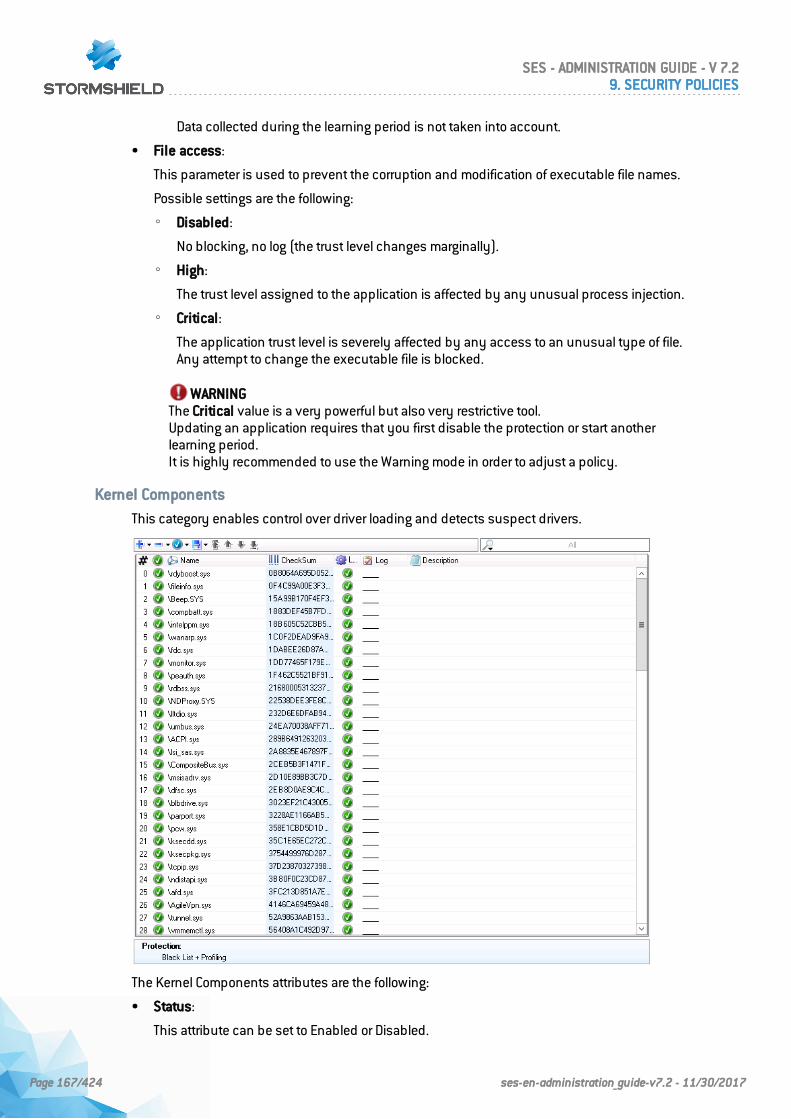
Data collected during the learning period is not taken into account.
• File access:
This parameter is used to prevent the corruption and modification of executable file names.
Possible settings are the following:
◦ Disabled:
No blocking, no log (the trust level changes marginally).
◦ High:
The trust level assigned to the application is affected by any unusual process injection.
◦ Critical:
The application trust level is severely affected by any access to an unusual type of file.Any attempt to change the executable file is blocked.
WARNINGThe Critical value is a very powerful but also very restrictive tool.Updating an application requires that you first disable the protection or start anotherlearning period.It is highly recommended to use the Warning mode in order to adjust a policy.
Kernel Components
This category enables control over driver loading and detects suspect drivers.
The Kernel Components attributes are the following:
• Status:
This attribute can be set to Enabled or Disabled.
SES - ADMINISTRATION GUIDE - V 7.29. SECURITY POLICIES
Page 167/424 ses-en-administration_guide-v7.2 - 11/30/2017
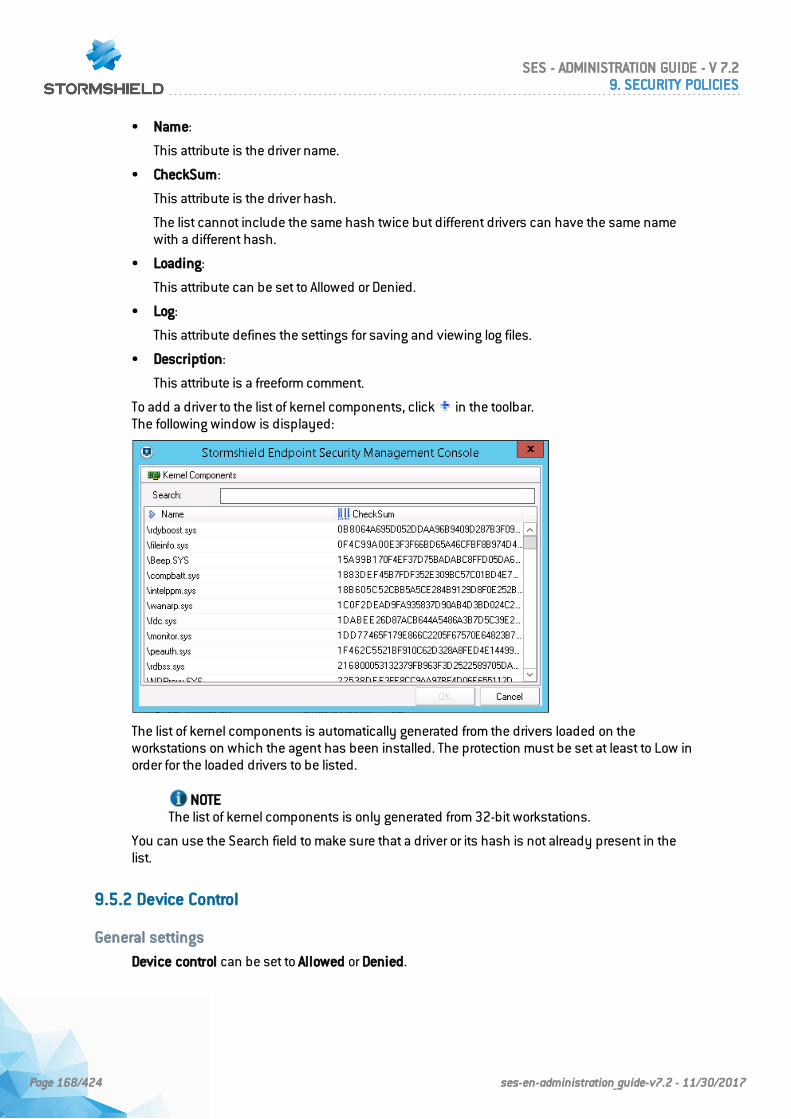
• Name:
This attribute is the driver name.
• CheckSum:
This attribute is the driver hash.
The list cannot include the same hash twice but different drivers can have the same namewith a different hash.
• Loading:
This attribute can be set to Allowed or Denied.
• Log:
This attribute defines the settings for saving and viewing log files.
• Description:
This attribute is a freeform comment.
To add a driver to the list of kernel components, click in the toolbar.The following window is displayed:
The list of kernel components is automatically generated from the drivers loaded on theworkstations on which the agent has been installed. The protection must be set at least to Low inorder for the loaded drivers to be listed.
NOTEThe list of kernel components is only generated from 32-bit workstations.
You can use the Search field to make sure that a driver or its hash is not already present in thelist.
9.5.2 Device Control
General settings
Device control can be set to Allowed or Denied.
SES - ADMINISTRATION GUIDE - V 7.29. SECURITY POLICIES
Page 168/424 ses-en-administration_guide-v7.2 - 11/30/2017
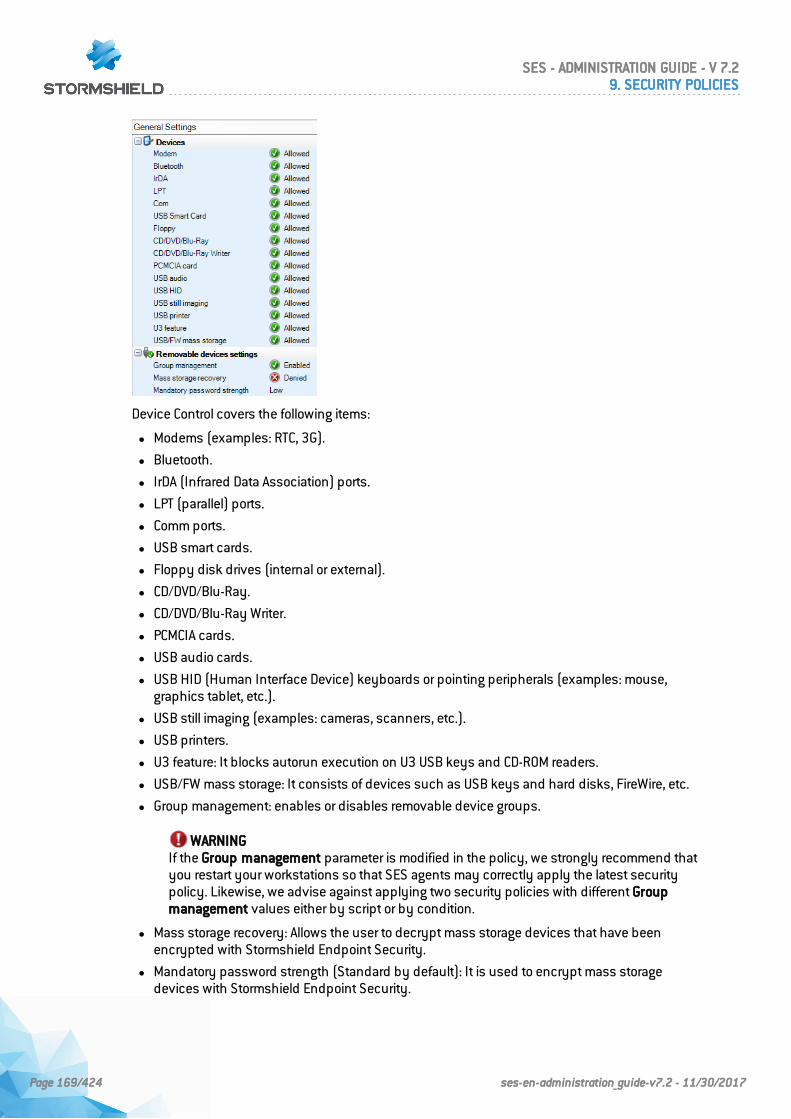
Device Control covers the following items:
l Modems (examples: RTC, 3G).
l Bluetooth.
l IrDA (Infrared Data Association) ports.
l LPT (parallel) ports.
l Comm ports.
l USB smart cards.
l Floppy disk drives (internal or external).
l CD/DVD/Blu-Ray.
l CD/DVD/Blu-Ray Writer.
l PCMCIA cards.
l USB audio cards.
l USB HID (Human Interface Device) keyboards or pointing peripherals (examples: mouse,graphics tablet, etc.).
l USB still imaging (examples: cameras, scanners, etc.).
l USB printers.
l U3 feature: It blocks autorun execution on U3 USB keys and CD-ROM readers.
l USB/FW mass storage: It consists of devices such as USB keys and hard disks, FireWire, etc.
l Group management: enables or disables removable device groups.
WARNINGIf the Group management parameter is modified in the policy, we strongly recommend thatyou restart your workstations so that SES agents may correctly apply the latest securitypolicy. Likewise, we advise against applying two security policies with different Groupmanagement values either by script or by condition.
l Mass storage recovery: Allows the user to decrypt mass storage devices that have beenencrypted with Stormshield Endpoint Security.
l Mandatory password strength (Standard by default): It is used to encrypt mass storagedevices with Stormshield Endpoint Security.
SES - ADMINISTRATION GUIDE - V 7.29. SECURITY POLICIES
Page 169/424 ses-en-administration_guide-v7.2 - 11/30/2017
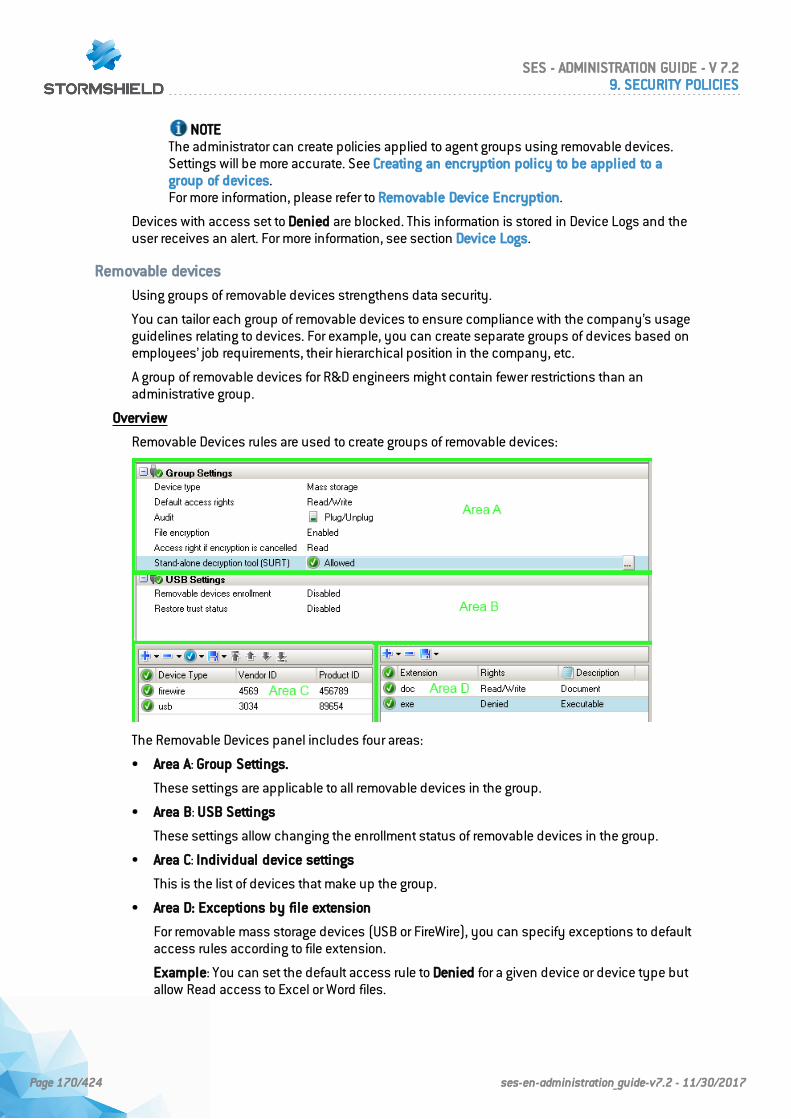
NOTEThe administrator can create policies applied to agent groups using removable devices.Settings will be more accurate. See Creating an encryption policy to be applied to agroup of devices.For more information, please refer to Removable Device Encryption.
Devices with access set to Denied are blocked. This information is stored in Device Logs and theuser receives an alert. For more information, see section Device Logs.
Removable devices
Using groups of removable devices strengthens data security.
You can tailor each group of removable devices to ensure compliance with the company’s usageguidelines relating to devices. For example, you can create separate groups of devices based onemployees’ job requirements, their hierarchical position in the company, etc.
A group of removable devices for R&D engineers might contain fewer restrictions than anadministrative group.
Overview
Removable Devices rules are used to create groups of removable devices:
The Removable Devices panel includes four areas:
• Area A: Group Settings.
These settings are applicable to all removable devices in the group.
• Area B: USB Settings
These settings allow changing the enrollment status of removable devices in the group.
• Area C: Individual device settings
This is the list of devices that make up the group.
• Area D: Exceptions by file extension
For removable mass storage devices (USB or FireWire), you can specify exceptions to defaultaccess rules according to file extension.
Example: You can set the default access rule to Denied for a given device or device type butallow Read access to Excel or Word files.
SES - ADMINISTRATION GUIDE - V 7.29. SECURITY POLICIES
Page 170/424 ses-en-administration_guide-v7.2 - 11/30/2017
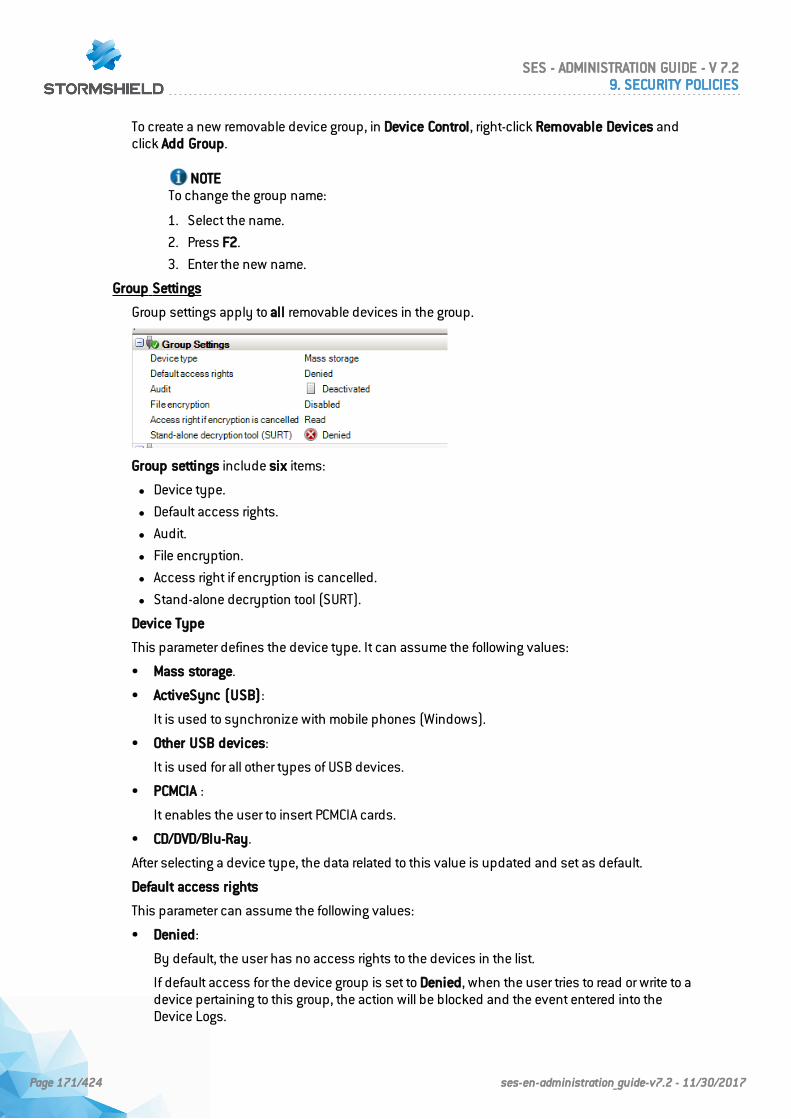
To create a new removable device group, in Device Control, right-click Removable Devices andclick Add Group.
NOTETo change the group name:
1. Select the name.
2. Press F2.
3. Enter the new name.
Group Settings
Group settings apply to all removable devices in the group.
Group settings include six items:
l Device type.
l Default access rights.
l Audit.
l File encryption.
l Access right if encryption is cancelled.
l Stand-alone decryption tool (SURT).
Device Type
This parameter defines the device type. It can assume the following values:
• Mass storage.
• ActiveSync (USB):
It is used to synchronize with mobile phones (Windows).
• Other USB devices:
It is used for all other types of USB devices.
• PCMCIA :
It enables the user to insert PCMCIA cards.
• CD/DVD/Blu-Ray.
After selecting a device type, the data related to this value is updated and set as default.
Default access rights
This parameter can assume the following values:
• Denied:
By default, the user has no access rights to the devices in the list.
If default access for the device group is set to Denied, when the user tries to read or write to adevice pertaining to this group, the action will be blocked and the event entered into theDevice Logs.
SES - ADMINISTRATION GUIDE - V 7.29. SECURITY POLICIES
Page 171/424 ses-en-administration_guide-v7.2 - 11/30/2017
• Read:
By default, the user has read access rights to the devices in the list.
If the user tries to write to any device listed, the action will be blocked and the event enteredinto the Device Logs.
• Read/Write:
By default, the user has both read and write access rights to all devices in the list.
NOTEYou can add a list of files that will be excluded from the Default access rights settings.This list is defined in Area C called Exceptions by file extension.
Difference between Access Denied from General Settings and from Removable Devices
When access to a removable device is denied from the security policy under Device Control >General Settings, the volume appears on your workstation but not its content.
When access to a removable device is denied from Device Control > Removable Devices, thevolume appears on your workstation.However, you can list the volume files and folders even if access is denied. Creating emptyfolders is also possible but not new files.
Audit
This parameter is used to enable the audit of a specific group of mass storage devices.
This parameter allows you to track device use without blocking device actions. You can gatherinformation on how devices are being used. Whenever an audit is enabled, it is recorded inDevice Logs.
The Stormshield Endpoint Security agent does not notify the user when an audit is triggered.However, the user can view auditing activity in the Dashboard > Device logs panel.
It can assume the following values:
• Disabled:
Auditing is disabled.
• Plug/Unplug:
An audit entry is written into Device Logs when a device in the list is plugged into orunplugged from the computer. This entry includes the device size and storage capacity.
• File access:
An audit entry is generated into Device Logs when:
◦ A device in the list is plugged into or unplugged from the computer.
◦ A file on the device is either created, renamed or deleted.
• Write access:
An audit entry is generated into Device Logs when:
◦ A device in the list is plugged into or unplugged from the computer.
◦ A file on the device is either created, renamed, modified or deleted.
• Read-only access:
An audit entry is generated into Device Logs when:
◦ A device in the list is plugged into or unplugged from the computer.
◦ A file on the device can either be created, renamed, open for reading, modified or deleted.
SES - ADMINISTRATION GUIDE - V 7.29. SECURITY POLICIES
Page 172/424 ses-en-administration_guide-v7.2 - 11/30/2017
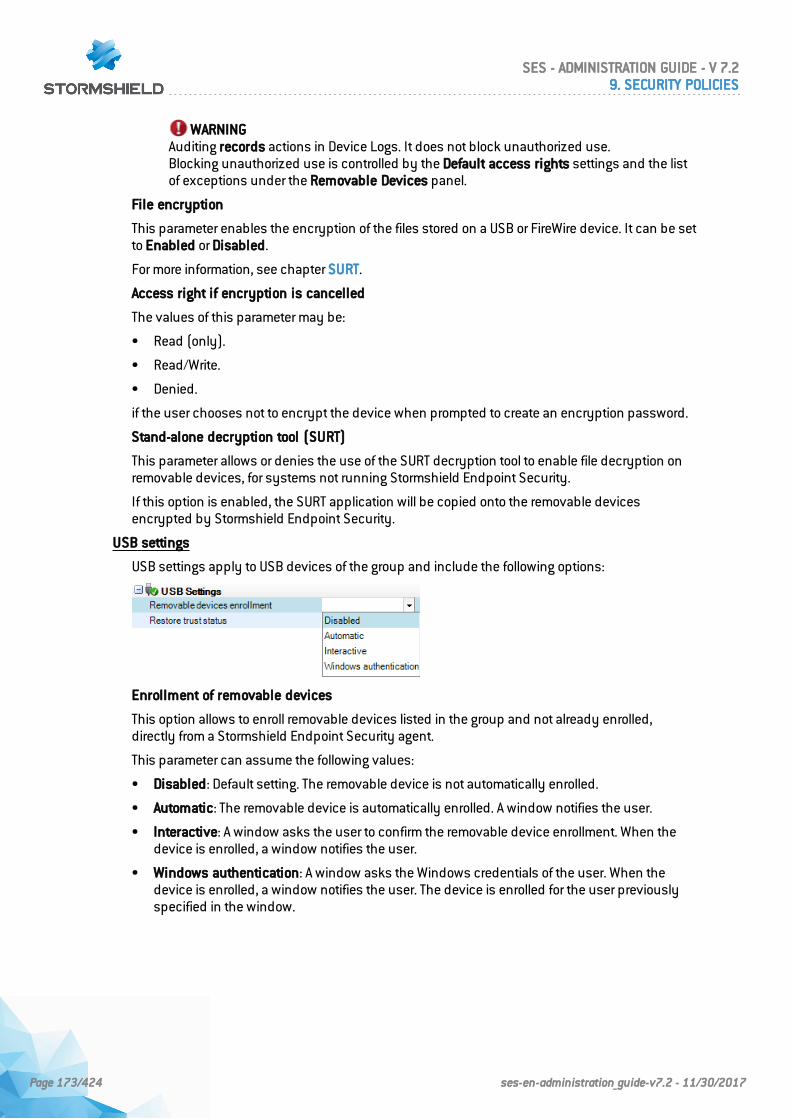
WARNINGAuditing records actions in Device Logs. It does not block unauthorized use.Blocking unauthorized use is controlled by the Default access rights settings and the listof exceptions under the Removable Devices panel.
File encryption
This parameter enables the encryption of the files stored on a USB or FireWire device. It can be setto Enabled or Disabled.
For more information, see chapter SURT.
Access right if encryption is cancelled
The values of this parameter may be:
• Read (only).
• Read/Write.
• Denied.
if the user chooses not to encrypt the device when prompted to create an encryption password.
Stand-alone decryption tool (SURT)
This parameter allows or denies the use of the SURT decryption tool to enable file decryption onremovable devices, for systems not running Stormshield Endpoint Security.
If this option is enabled, the SURT application will be copied onto the removable devicesencrypted by Stormshield Endpoint Security.
USB settings
USB settings apply to USB devices of the group and include the following options:
Enrollment of removable devices
This option allows to enroll removable devices listed in the group and not already enrolled,directly from a Stormshield Endpoint Security agent.
This parameter can assume the following values:
• Disabled: Default setting. The removable device is not automatically enrolled.
• Automatic: The removable device is automatically enrolled. A window notifies the user.
• Interactive: A window asks the user to confirm the removable device enrollment. When thedevice is enrolled, a window notifies the user.
• Windows authentication: A window asks the Windows credentials of the user. When thedevice is enrolled, a window notifies the user. The device is enrolled for the user previouslyspecified in the window.
SES - ADMINISTRATION GUIDE - V 7.29. SECURITY POLICIES
Page 173/424 ses-en-administration_guide-v7.2 - 11/30/2017
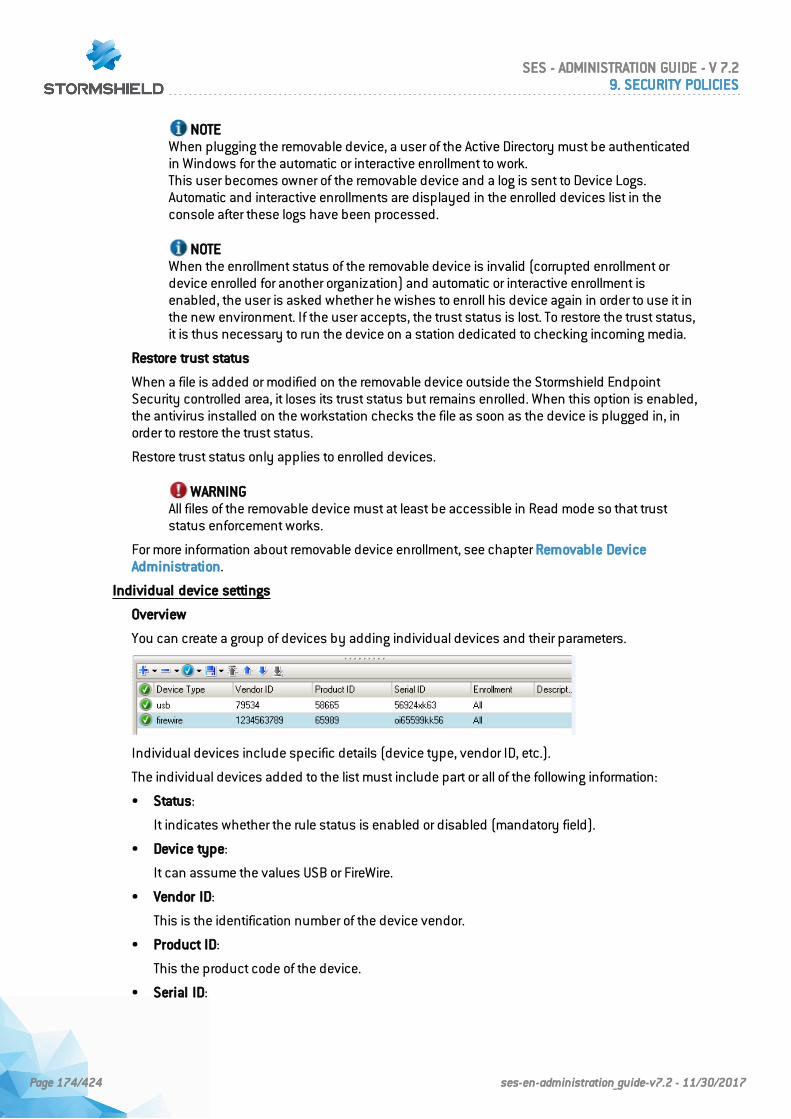
NOTEWhen plugging the removable device, a user of the Active Directory must be authenticatedin Windows for the automatic or interactive enrollment to work.This user becomes owner of the removable device and a log is sent to Device Logs.Automatic and interactive enrollments are displayed in the enrolled devices list in theconsole after these logs have been processed.
NOTEWhen the enrollment status of the removable device is invalid (corrupted enrollment ordevice enrolled for another organization) and automatic or interactive enrollment isenabled, the user is asked whether he wishes to enroll his device again in order to use it inthe new environment. If the user accepts, the trust status is lost. To restore the trust status,it is thus necessary to run the device on a station dedicated to checking incoming media.
Restore trust status
When a file is added or modified on the removable device outside the Stormshield EndpointSecurity controlled area, it loses its trust status but remains enrolled. When this option is enabled,the antivirus installed on the workstation checks the file as soon as the device is plugged in, inorder to restore the trust status.
Restore trust status only applies to enrolled devices.
WARNINGAll files of the removable device must at least be accessible in Read mode so that truststatus enforcement works.
For more information about removable device enrollment, see chapter Removable DeviceAdministration.
Individual device settings
Overview
You can create a group of devices by adding individual devices and their parameters.
Individual devices include specific details (device type, vendor ID, etc.).
The individual devices added to the list must include part or all of the following information:
• Status:
It indicates whether the rule status is enabled or disabled (mandatory field).
• Device type:
It can assume the values USB or FireWire.
• Vendor ID:
This is the identification number of the device vendor.
• Product ID:
This the product code of the device.
• Serial ID:
SES - ADMINISTRATION GUIDE - V 7.29. SECURITY POLICIES
Page 174/424 ses-en-administration_guide-v7.2 - 11/30/2017
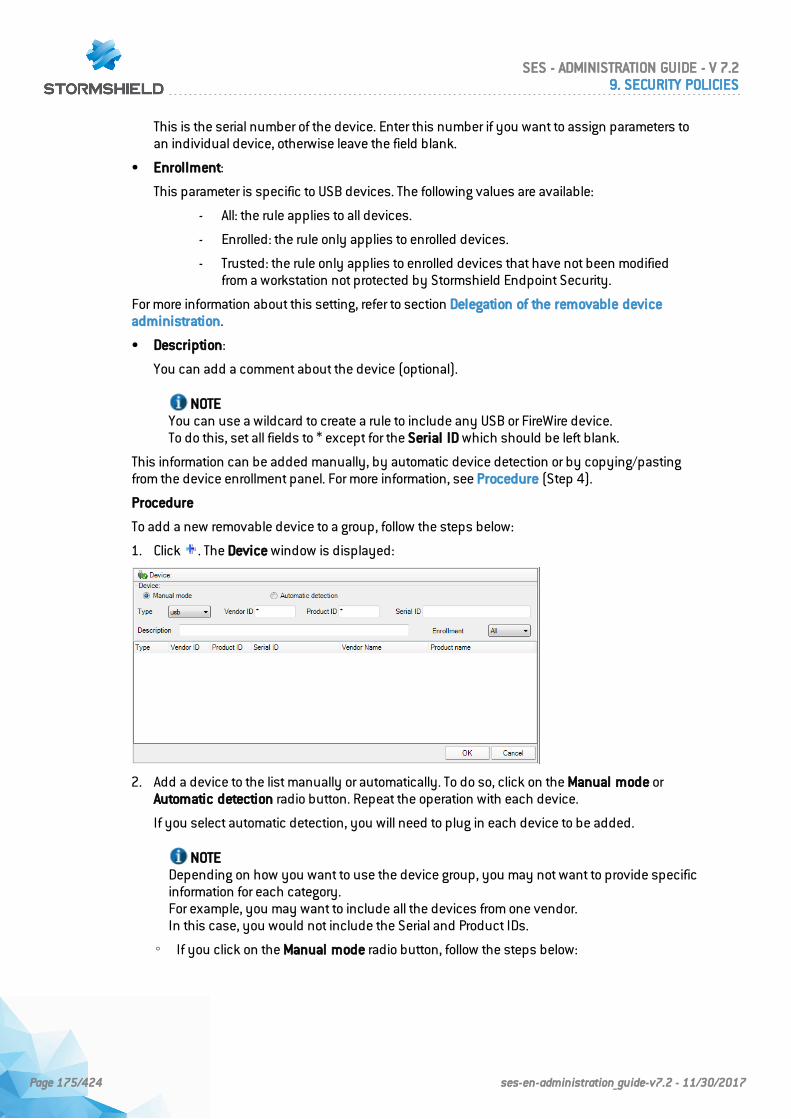
This is the serial number of the device. Enter this number if you want to assign parameters toan individual device, otherwise leave the field blank.
• Enrollment:
This parameter is specific to USB devices. The following values are available:
- All: the rule applies to all devices.
- Enrolled: the rule only applies to enrolled devices.
- Trusted: the rule only applies to enrolled devices that have not been modifiedfrom a workstation not protected by Stormshield Endpoint Security.
For more information about this setting, refer to section Delegation of the removable deviceadministration.
• Description:
You can add a comment about the device (optional).
NOTEYou can use a wildcard to create a rule to include any USB or FireWire device.To do this, set all fields to * except for the Serial ID which should be left blank.
This information can be added manually, by automatic device detection or by copying/pastingfrom the device enrollment panel. For more information, see Procedure (Step 4).
Procedure
To add a new removable device to a group, follow the steps below:
1. Click . The Device window is displayed:
2. Add a device to the list manually or automatically. To do so, click on the Manual mode orAutomatic detection radio button. Repeat the operation with each device.
If you select automatic detection, you will need to plug in each device to be added.
NOTEDepending on how you want to use the device group, you may not want to provide specificinformation for each category.For example, you may want to include all the devices from one vendor.In this case, you would not include the Serial and Product IDs.
◦ If you click on the Manual mode radio button, follow the steps below:
SES - ADMINISTRATION GUIDE - V 7.29. SECURITY POLICIES
Page 175/424 ses-en-administration_guide-v7.2 - 11/30/2017
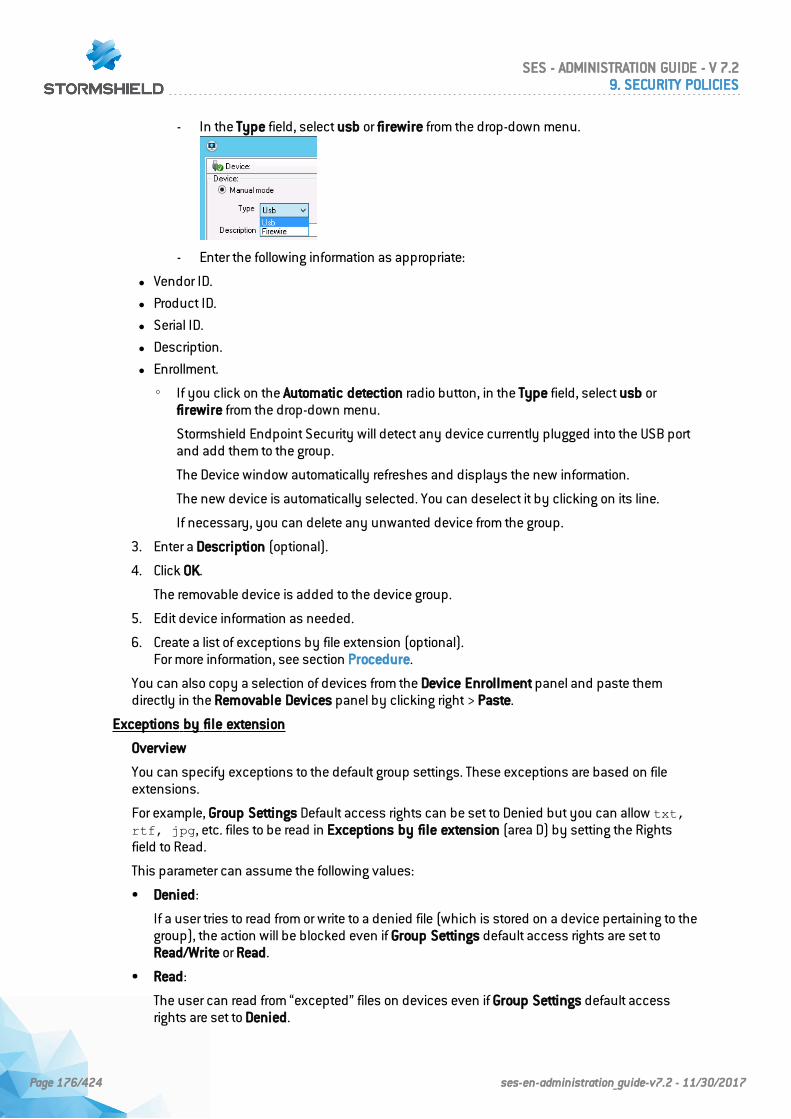
- In the Type field, select usb or firewire from the drop-down menu.
- Enter the following information as appropriate:
l Vendor ID.
l Product ID.
l Serial ID.
l Description.
l Enrollment.
◦ If you click on the Automatic detection radio button, in the Type field, select usb orfirewire from the drop-down menu.
Stormshield Endpoint Security will detect any device currently plugged into the USB portand add them to the group.
The Device window automatically refreshes and displays the new information.
The new device is automatically selected. You can deselect it by clicking on its line.
If necessary, you can delete any unwanted device from the group.
3. Enter a Description (optional).
4. Click OK.
The removable device is added to the device group.
5. Edit device information as needed.
6. Create a list of exceptions by file extension (optional).For more information, see section Procedure.
You can also copy a selection of devices from the Device Enrollment panel and paste themdirectly in the Removable Devices panel by clicking right > Paste.
Exceptions by file extension
Overview
You can specify exceptions to the default group settings. These exceptions are based on fileextensions.
For example, Group Settings Default access rights can be set to Denied but you can allow txt,rtf, jpg, etc. files to be read in Exceptions by file extension (area D) by setting the Rightsfield to Read.
This parameter can assume the following values:
• Denied:
If a user tries to read from or write to a denied file (which is stored on a device pertaining to thegroup), the action will be blocked even if Group Settings default access rights are set toRead/Write or Read.
• Read:
The user can read from “excepted” files on devices even if Group Settings default accessrights are set to Denied.
SES - ADMINISTRATION GUIDE - V 7.29. SECURITY POLICIES
Page 176/424 ses-en-administration_guide-v7.2 - 11/30/2017
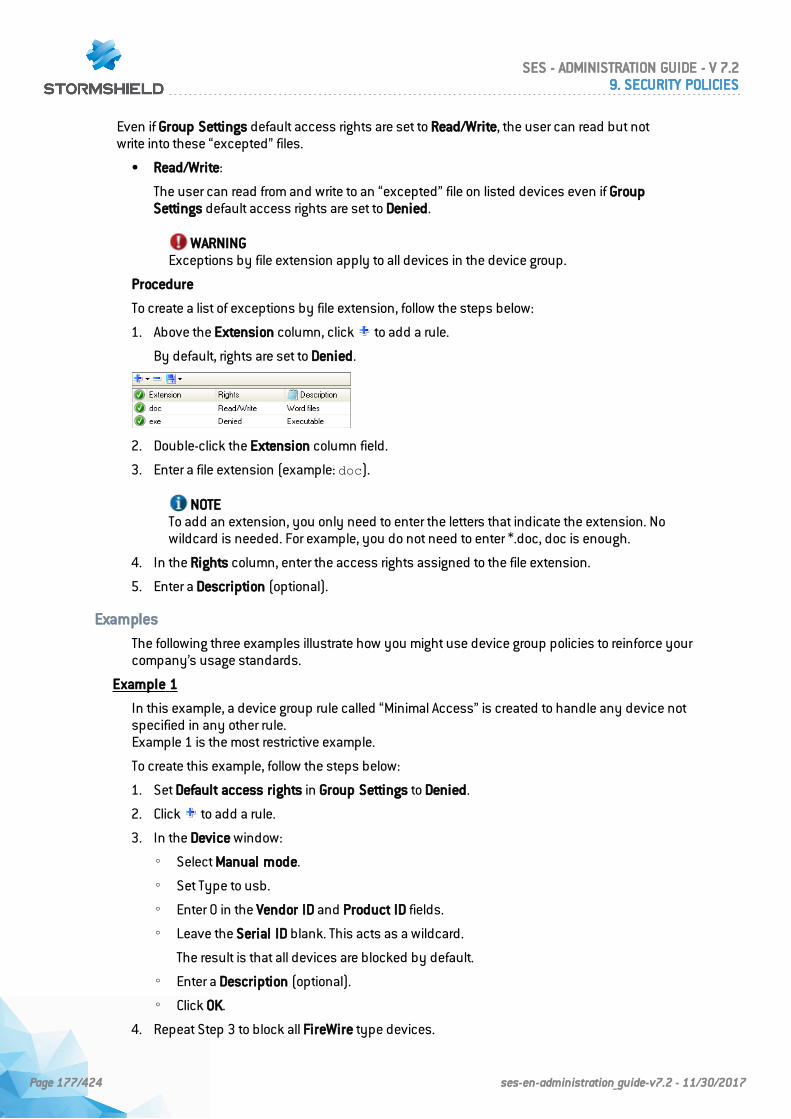
Even if Group Settings default access rights are set to Read/Write, the user can read but notwrite into these “excepted” files.
• Read/Write:
The user can read from and write to an “excepted” file on listed devices even if GroupSettings default access rights are set to Denied.
WARNINGExceptions by file extension apply to all devices in the device group.
Procedure
To create a list of exceptions by file extension, follow the steps below:
1. Above the Extension column, click to add a rule.
By default, rights are set to Denied.
2. Double-click the Extension column field.
3. Enter a file extension (example: doc).
NOTETo add an extension, you only need to enter the letters that indicate the extension. Nowildcard is needed. For example, you do not need to enter *.doc, doc is enough.
4. In the Rights column, enter the access rights assigned to the file extension.
5. Enter a Description (optional).
Examples
The following three examples illustrate how you might use device group policies to reinforce yourcompany’s usage standards.
Example 1
In this example, a device group rule called “Minimal Access” is created to handle any device notspecified in any other rule.Example 1 is the most restrictive example.
To create this example, follow the steps below:
1. Set Default access rights in Group Settings to Denied.
2. Click to add a rule.
3. In the Device window:
◦ Select Manual mode.
◦ Set Type to usb.
◦ Enter 0 in the Vendor ID and Product ID fields.
◦ Leave the Serial ID blank. This acts as a wildcard.
The result is that all devices are blocked by default.
◦ Enter a Description (optional).
◦ Click OK.
4. Repeat Step 3 to block all FireWire type devices.
SES - ADMINISTRATION GUIDE - V 7.29. SECURITY POLICIES
Page 177/424 ses-en-administration_guide-v7.2 - 11/30/2017
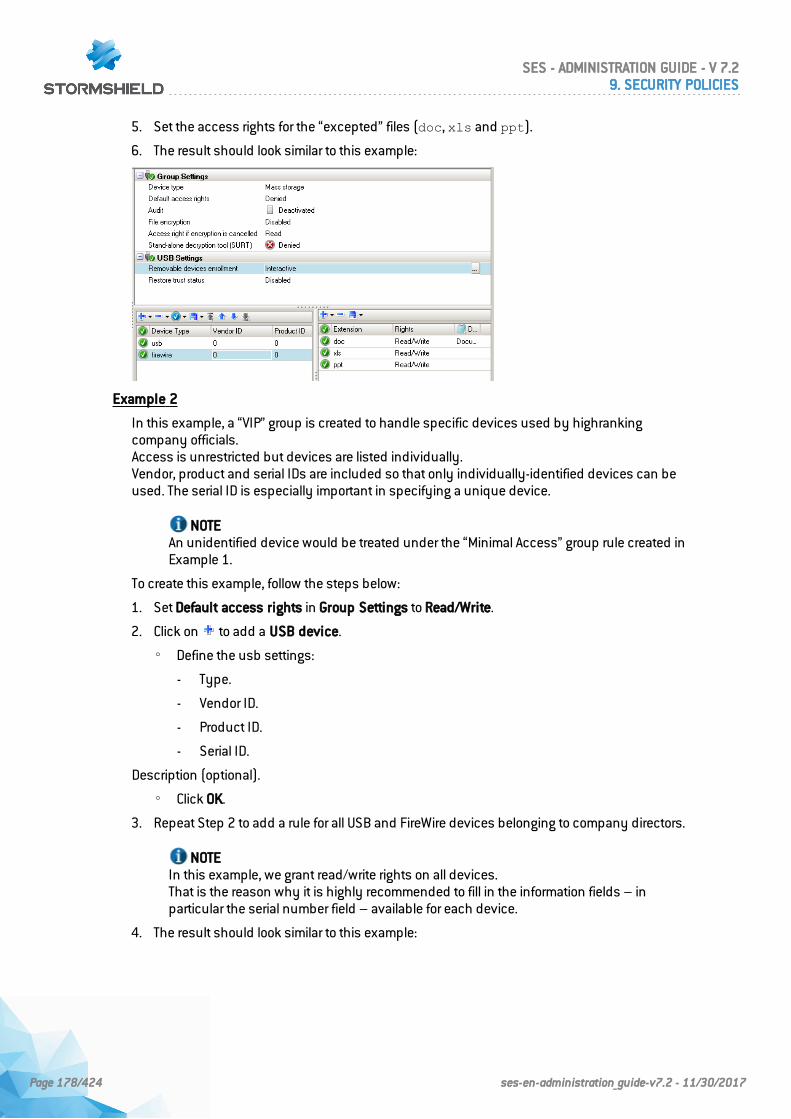
5. Set the access rights for the “excepted” files (doc, xls and ppt).
6. The result should look similar to this example:
Example 2
In this example, a “VIP” group is created to handle specific devices used by highrankingcompany officials.Access is unrestricted but devices are listed individually.Vendor, product and serial IDs are included so that only individually-identified devices can beused. The serial ID is especially important in specifying a unique device.
NOTEAn unidentified device would be treated under the “Minimal Access” group rule created inExample 1.
To create this example, follow the steps below:
1. Set Default access rights in Group Settings to Read/Write.
2. Click on to add a USB device.
◦ Define the usb settings:
- Type.
- Vendor ID.
- Product ID.
- Serial ID.
Description (optional).
◦ Click OK.
3. Repeat Step 2 to add a rule for all USB and FireWire devices belonging to company directors.
NOTEIn this example, we grant read/write rights on all devices.That is the reason why it is highly recommended to fill in the information fields – inparticular the serial number field – available for each device.
4. The result should look similar to this example:
SES - ADMINISTRATION GUIDE - V 7.29. SECURITY POLICIES
Page 178/424 ses-en-administration_guide-v7.2 - 11/30/2017
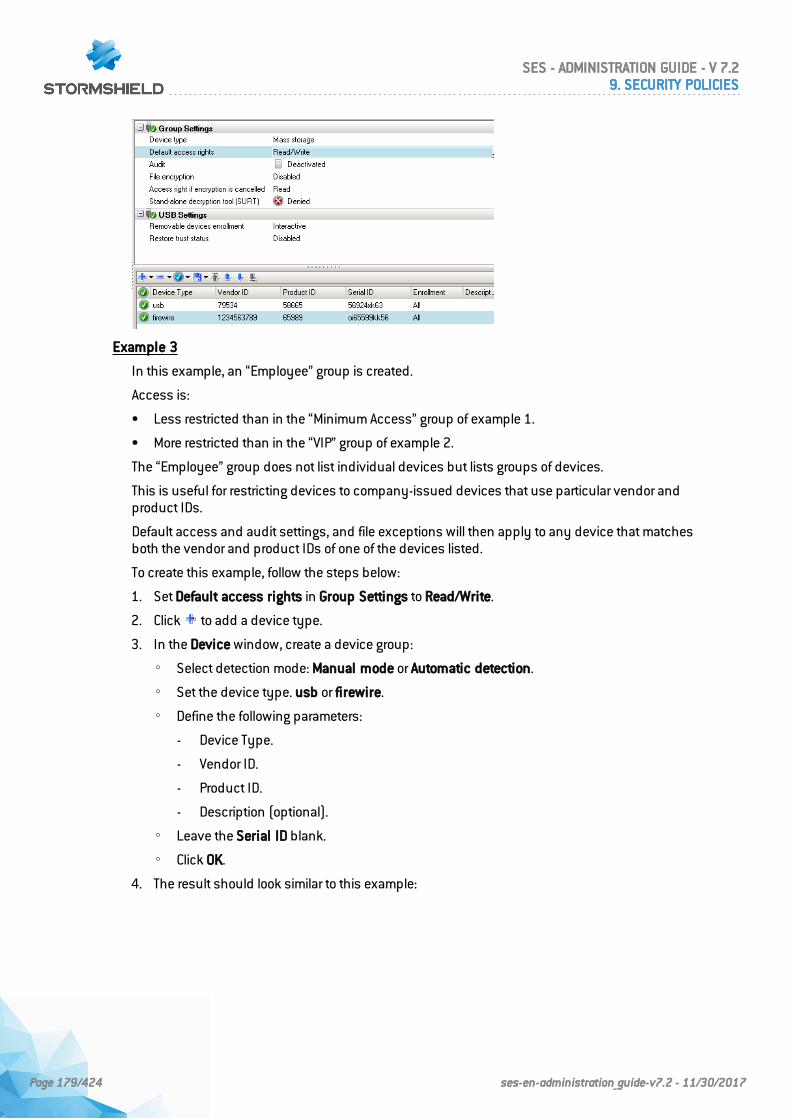
Example 3
In this example, an “Employee” group is created.
Access is:
• Less restricted than in the “Minimum Access” group of example 1.
• More restricted than in the “VIP” group of example 2.
The “Employee” group does not list individual devices but lists groups of devices.
This is useful for restricting devices to company-issued devices that use particular vendor andproduct IDs.
Default access and audit settings, and file exceptions will then apply to any device that matchesboth the vendor and product IDs of one of the devices listed.
To create this example, follow the steps below:
1. Set Default access rights in Group Settings to Read/Write.
2. Click to add a device type.
3. In the Device window, create a device group:
◦ Select detection mode: Manual mode or Automatic detection.
◦ Set the device type. usb or firewire.
◦ Define the following parameters:
- Device Type.
- Vendor ID.
- Product ID.
- Description (optional).
◦ Leave the Serial ID blank.
◦ Click OK.
4. The result should look similar to this example:
SES - ADMINISTRATION GUIDE - V 7.29. SECURITY POLICIES
Page 179/424 ses-en-administration_guide-v7.2 - 11/30/2017
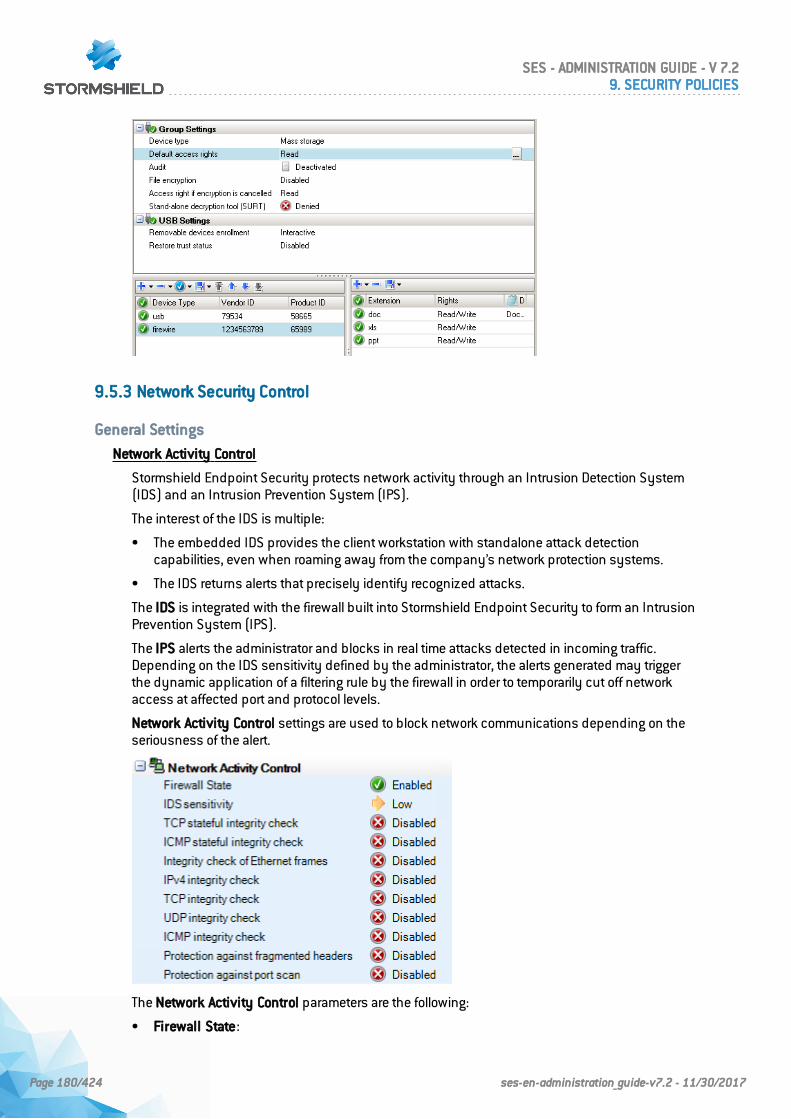
9.5.3 Network Security Control
General Settings
Network Activity Control
Stormshield Endpoint Security protects network activity through an Intrusion Detection System(IDS) and an Intrusion Prevention System (IPS).
The interest of the IDS is multiple:
• The embedded IDS provides the client workstation with standalone attack detectioncapabilities, even when roaming away from the company’s network protection systems.
• The IDS returns alerts that precisely identify recognized attacks.
The IDS is integrated with the firewall built into Stormshield Endpoint Security to form an IntrusionPrevention System (IPS).
The IPS alerts the administrator and blocks in real time attacks detected in incoming traffic.Depending on the IDS sensitivity defined by the administrator, the alerts generated may triggerthe dynamic application of a filtering rule by the firewall in order to temporarily cut off networkaccess at affected port and protocol levels.
Network Activity Control settings are used to block network communications depending on theseriousness of the alert.
The Network Activity Control parameters are the following:
• Firewall State:
SES - ADMINISTRATION GUIDE - V 7.29. SECURITY POLICIES
Page 180/424 ses-en-administration_guide-v7.2 - 11/30/2017
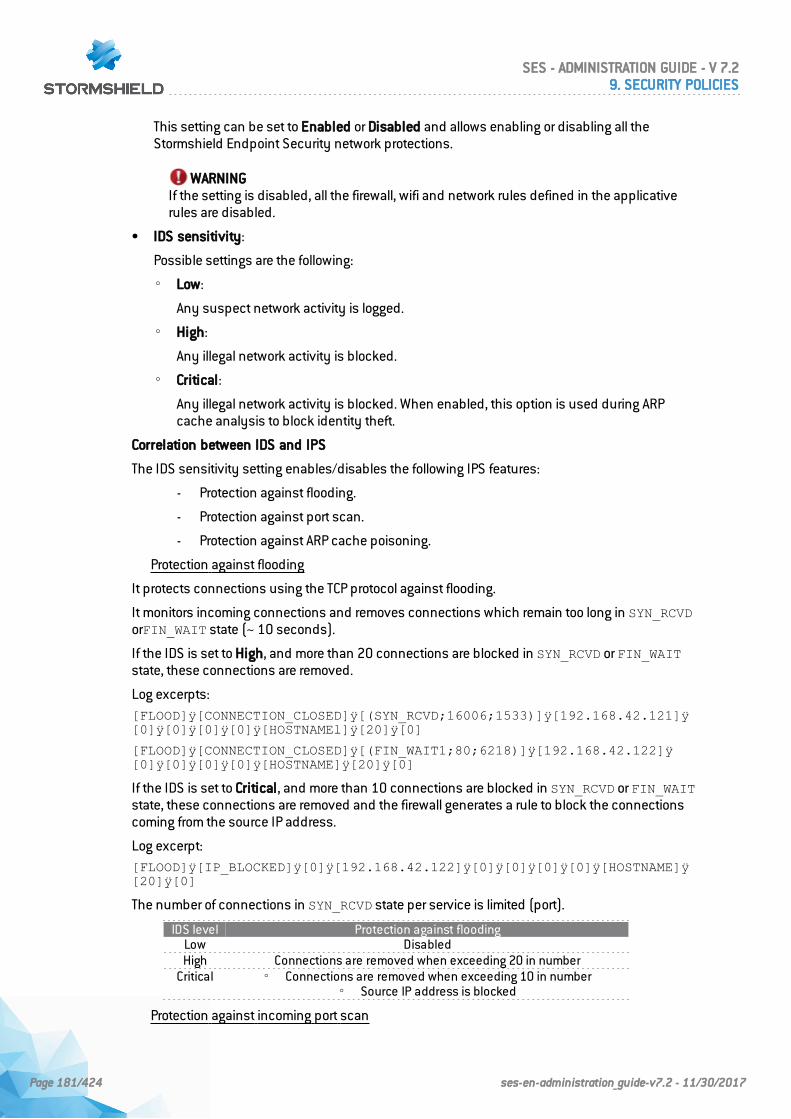
This setting can be set to Enabled or Disabled and allows enabling or disabling all theStormshield Endpoint Security network protections.
WARNINGIf the setting is disabled, all the firewall, wifi and network rules defined in the applicativerules are disabled.
• IDS sensitivity:
Possible settings are the following:
◦ Low:
Any suspect network activity is logged.
◦ High:
Any illegal network activity is blocked.
◦ Critical:
Any illegal network activity is blocked. When enabled, this option is used during ARPcache analysis to block identity theft.
Correlation between IDS and IPS
The IDS sensitivity setting enables/disables the following IPS features:
- Protection against flooding.
- Protection against port scan.
- Protection against ARP cache poisoning.
Protection against flooding
It protects connections using the TCP protocol against flooding.
It monitors incoming connections and removes connections which remain too long in SYN_RCVDorFIN_WAIT state (~ 10 seconds).
If the IDS is set to High, and more than 20 connections are blocked in SYN_RCVD or FIN_WAITstate, these connections are removed.
Log excerpts:[FLOOD]ÿ[CONNECTION_CLOSED]ÿ[(SYN_RCVD;16006;1533)]ÿ[192.168.42.121]ÿ[0]ÿ[0]ÿ[0]ÿ[0]ÿ[HOSTNAMEl]ÿ[20]ÿ[0]
[FLOOD]ÿ[CONNECTION_CLOSED]ÿ[(FIN_WAIT1;80;6218)]ÿ[192.168.42.122]ÿ[0]ÿ[0]ÿ[0]ÿ[0]ÿ[HOSTNAME]ÿ[20]ÿ[0]
If the IDS is set to Critical, and more than 10 connections are blocked in SYN_RCVD or FIN_WAITstate, these connections are removed and the firewall generates a rule to block the connectionscoming from the source IP address.
Log excerpt:[FLOOD]ÿ[IP_BLOCKED]ÿ[0]ÿ[192.168.42.122]ÿ[0]ÿ[0]ÿ[0]ÿ[0]ÿ[HOSTNAME]ÿ[20]ÿ[0]
The number of connections in SYN_RCVD state per service is limited (port).
IDS level Protection against floodingLow DisabledHigh Connections are removed when exceeding 20 in number
Critical ◦ Connections are removed when exceeding 10 in number◦ Source IP address is blocked
Protection against incoming port scan
SES - ADMINISTRATION GUIDE - V 7.29. SECURITY POLICIES
Page 181/424 ses-en-administration_guide-v7.2 - 11/30/2017
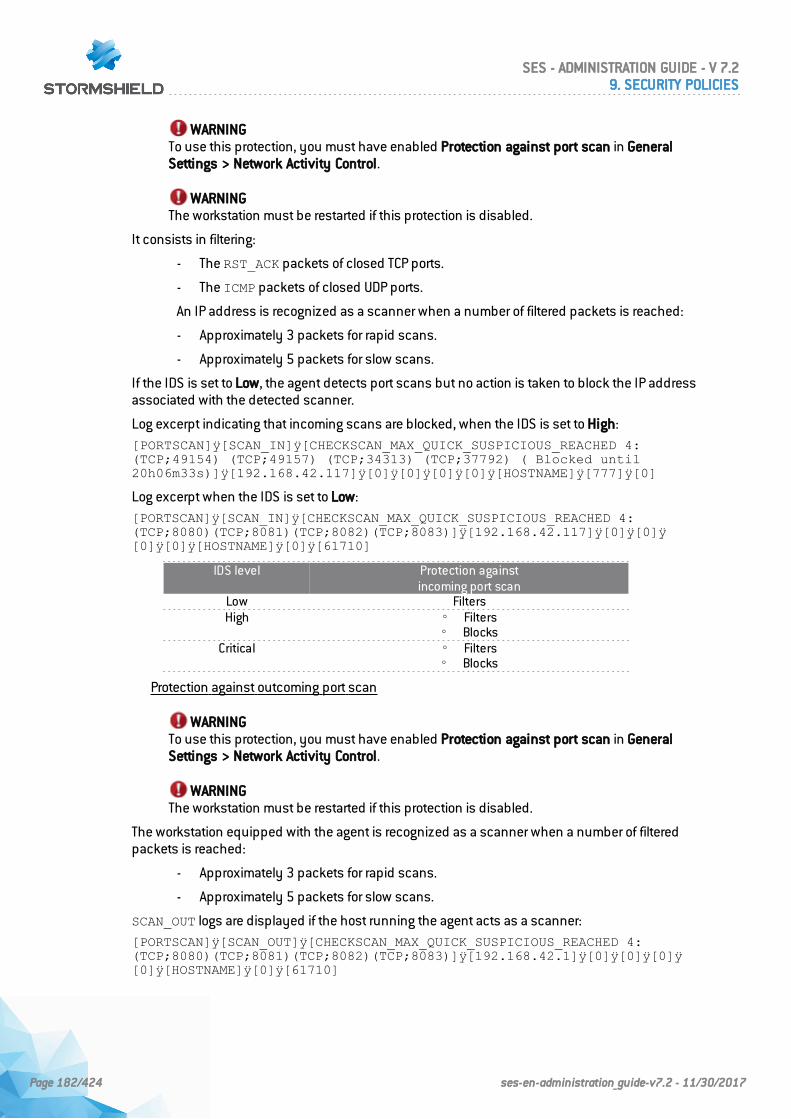
WARNINGTo use this protection, you must have enabled Protection against port scan in GeneralSettings > Network Activity Control.
WARNINGThe workstation must be restarted if this protection is disabled.
It consists in filtering:
- The RST_ACK packets of closed TCP ports.
- The ICMP packets of closed UDP ports.
An IP address is recognized as a scanner when a number of filtered packets is reached:
- Approximately 3 packets for rapid scans.
- Approximately 5 packets for slow scans.
If the IDS is set to Low, the agent detects port scans but no action is taken to block the IP addressassociated with the detected scanner.
Log excerpt indicating that incoming scans are blocked, when the IDS is set to High:[PORTSCAN]ÿ[SCAN_IN]ÿ[CHECKSCAN_MAX_QUICK_SUSPICIOUS_REACHED 4:(TCP;49154) (TCP;49157) (TCP;34313) (TCP;37792) ( Blocked until20h06m33s)]ÿ[192.168.42.117]ÿ[0]ÿ[0]ÿ[0]ÿ[0]ÿ[HOSTNAME]ÿ[777]ÿ[0]
Log excerpt when the IDS is set to Low:[PORTSCAN]ÿ[SCAN_IN]ÿ[CHECKSCAN_MAX_QUICK_SUSPICIOUS_REACHED 4:(TCP;8080)(TCP;8081)(TCP;8082)(TCP;8083)]ÿ[192.168.42.117]ÿ[0]ÿ[0]ÿ[0]ÿ[0]ÿ[HOSTNAME]ÿ[0]ÿ[61710]
IDS level Protection againstincoming port scan
Low FiltersHigh ◦ Filters
◦ BlocksCritical ◦ Filters
◦ Blocks
Protection against outcoming port scan
WARNINGTo use this protection, you must have enabled Protection against port scan in GeneralSettings > Network Activity Control.
WARNINGThe workstation must be restarted if this protection is disabled.
The workstation equipped with the agent is recognized as a scanner when a number of filteredpackets is reached:
- Approximately 3 packets for rapid scans.
- Approximately 5 packets for slow scans.
SCAN_OUT logs are displayed if the host running the agent acts as a scanner:[PORTSCAN]ÿ[SCAN_OUT]ÿ[CHECKSCAN_MAX_QUICK_SUSPICIOUS_REACHED 4:(TCP;8080)(TCP;8081)(TCP;8082)(TCP;8083)]ÿ[192.168.42.1]ÿ[0]ÿ[0]ÿ[0]ÿ[0]ÿ[HOSTNAME]ÿ[0]ÿ[61710]
SES - ADMINISTRATION GUIDE - V 7.29. SECURITY POLICIES
Page 182/424 ses-en-administration_guide-v7.2 - 11/30/2017
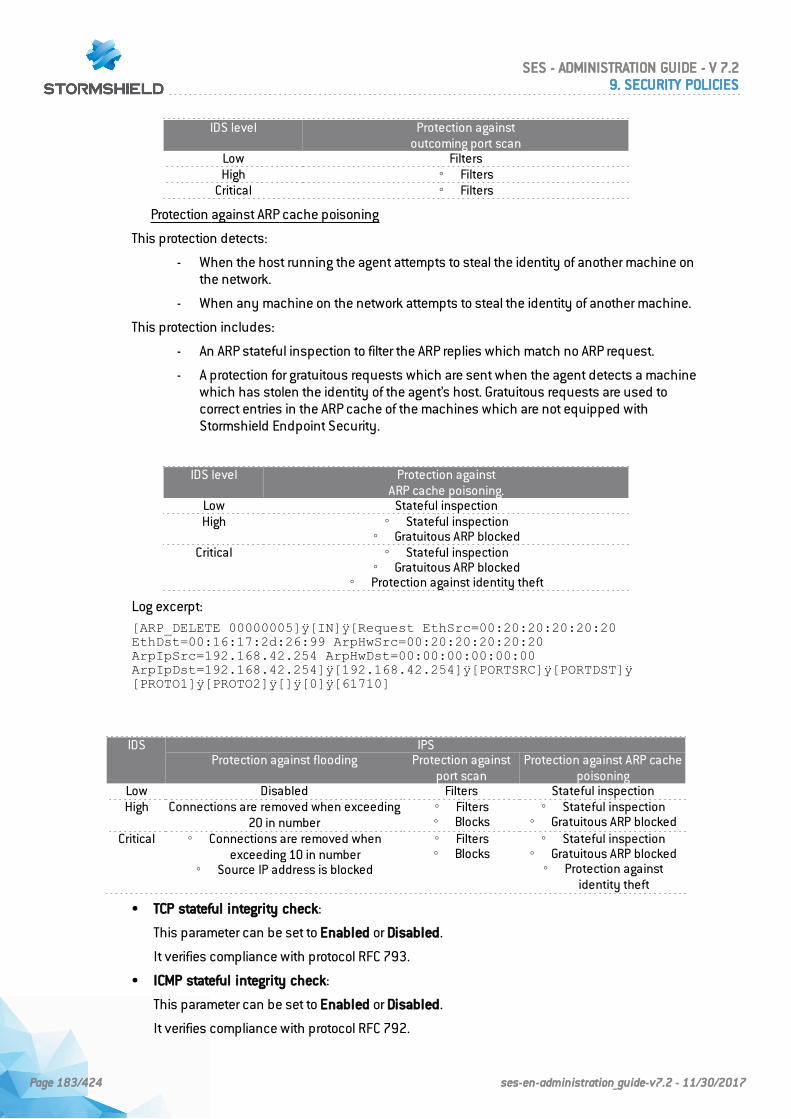
IDS level Protection againstoutcoming port scan
Low FiltersHigh ◦ Filters
Critical ◦ Filters
Protection against ARP cache poisoning
This protection detects:
- When the host running the agent attempts to steal the identity of another machine onthe network.
- When any machine on the network attempts to steal the identity of another machine.
This protection includes:
- An ARP stateful inspection to filter the ARP replies which match no ARP request.
- A protection for gratuitous requests which are sent when the agent detects a machinewhich has stolen the identity of the agent’s host. Gratuitous requests are used tocorrect entries in the ARP cache of the machines which are not equipped withStormshield Endpoint Security.
IDS level Protection againstARP cache poisoning.
Low Stateful inspectionHigh ◦ Stateful inspection
◦ Gratuitous ARP blockedCritical ◦ Stateful inspection
◦ Gratuitous ARP blocked◦ Protection against identity theft
Log excerpt:[ARP_DELETE 00000005]ÿ[IN]ÿ[Request EthSrc=00:20:20:20:20:20EthDst=00:16:17:2d:26:99 ArpHwSrc=00:20:20:20:20:20ArpIpSrc=192.168.42.254 ArpHwDst=00:00:00:00:00:00ArpIpDst=192.168.42.254]ÿ[192.168.42.254]ÿ[PORTSRC]ÿ[PORTDST]ÿ[PROTO1]ÿ[PROTO2]ÿ[]ÿ[0]ÿ[61710]
IDS IPSProtection against flooding Protection against
port scanProtection against ARP cache
poisoningLow Disabled Filters Stateful inspectionHigh Connections are removed when exceeding
20 in number◦ Filters◦ Blocks
◦ Stateful inspection◦ Gratuitous ARP blocked
Critical ◦ Connections are removed whenexceeding 10 in number
◦ Source IP address is blocked
◦ Filters◦ Blocks
◦ Stateful inspection◦ Gratuitous ARP blocked◦ Protection against
identity theft
• TCP stateful integrity check:
This parameter can be set to Enabled or Disabled.
It verifies compliance with protocol RFC 793.
• ICMP stateful integrity check:
This parameter can be set to Enabled or Disabled.
It verifies compliance with protocol RFC 792.
SES - ADMINISTRATION GUIDE - V 7.29. SECURITY POLICIES
Page 183/424 ses-en-administration_guide-v7.2 - 11/30/2017
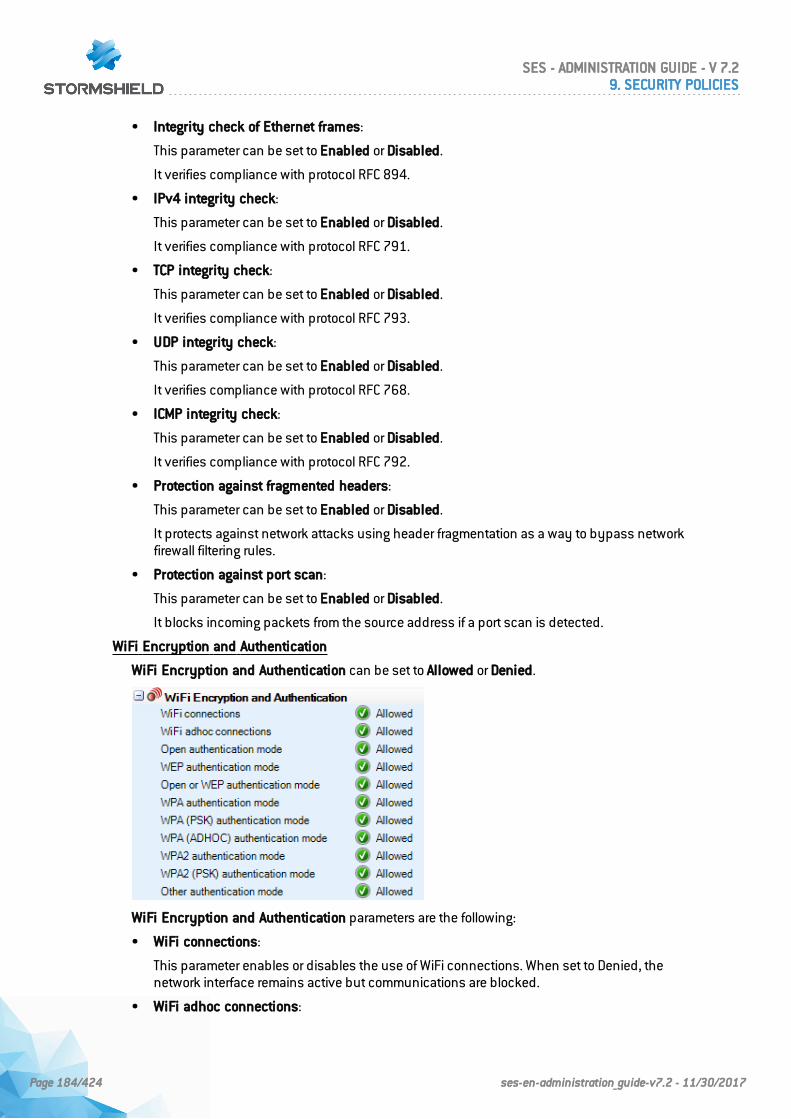
• Integrity check of Ethernet frames:
This parameter can be set to Enabled or Disabled.
It verifies compliance with protocol RFC 894.
• IPv4 integrity check:
This parameter can be set to Enabled or Disabled.
It verifies compliance with protocol RFC 791.
• TCP integrity check:
This parameter can be set to Enabled or Disabled.
It verifies compliance with protocol RFC 793.
• UDP integrity check:
This parameter can be set to Enabled or Disabled.
It verifies compliance with protocol RFC 768.
• ICMP integrity check:
This parameter can be set to Enabled or Disabled.
It verifies compliance with protocol RFC 792.
• Protection against fragmented headers:
This parameter can be set to Enabled or Disabled.
It protects against network attacks using header fragmentation as a way to bypass networkfirewall filtering rules.
• Protection against port scan:
This parameter can be set to Enabled or Disabled.
It blocks incoming packets from the source address if a port scan is detected.
WiFi Encryption and Authentication
WiFi Encryption and Authentication can be set to Allowed or Denied.
WiFi Encryption and Authentication parameters are the following:
• WiFi connections:
This parameter enables or disables the use of WiFi connections. When set to Denied, thenetwork interface remains active but communications are blocked.
• WiFi adhoc connections:
SES - ADMINISTRATION GUIDE - V 7.29. SECURITY POLICIES
Page 184/424 ses-en-administration_guide-v7.2 - 11/30/2017
This parameter allows or denies the use of WiFi adhoc connections. This type of connectionrequires no base workstation and is limited to the duration of the session.
• Open authentication mode:
When set to Allowed, no checks are performed during IEEE 802.11 OpenSystemauthentication.
• WEP authentication mode:
When set to Allowed, this mode uses specified IEEE 802.11 Shared Key authentication. Thismode requires the use of a pre-shared Wired Equivalent Privacy (WEP) key for 802.11authentication.
• Open or WEP authentication mode:
When set to Allowed, this mode enables auto-switch mode. When using autoswitch mode, thedevice tries to use IEEE 802.11 Shared Key authentication. If Shared Key authentication fails,the device tries to use IEEE 802.11 OpenSystem authentication.
• WPA authentication mode:
When set to Allowed, this mode enables the use of WPA version 1 Security for Infrastructuremode. Authentication is performed between the supplicant, authenticator and authenticationservers via IEEE 802.1X.
Encryption keys are dynamic and derived through the authentication process. While inauthentication mode, the device will only associate with an access point whose beacon orprobe response contains an (802.1X) authentication suite of type 1 within the WPAinformation element.
• WPA (PSK) authentication mode:
When set to Allowed, this mode enables the use of WPA version 1 Security for Infrastructuremode. Authentication is performed between the supplicant, authenticator and authenticationservers via IEEE 802.1X.
Encryption keys are dynamic and derived through a pre-shared key used both by thesupplicant and the authenticator.
In this mode, the device only associates with an access point whose beacon or proberesponse contains the authentication suite of type 2 (pre-shared key) within the WPAinformation element.
• WPA (ADHOC) authentication mode:
When set to Allowed, this mode enables the use of WPA version 1 Security for adhoc mode.This setting specifies the use of a pre-shared key without IEEE 802.1X authentication.Encryption keys are static and derived through the pre-shared key. This mode is no longersupported by Windows. It remains for the compatibility with old access points.
• WPA2 authentication mode:
When set to Allowed, this mode enables the use of WPA version 2 Security for Infrastructuremode. Authentication is performed between the supplicant, authenticator and theauthentication server via IEEE 802.1X.
Encryption keys are dynamic and derived through the authentication process.
In this mode, the device only associates with an access point whose beacon or proberesponse contains the authentication suite of type 1 (802.1X) within the RSN informationelement.
• WPA2 (PSK) authentication mode:
SES - ADMINISTRATION GUIDE - V 7.29. SECURITY POLICIES
Page 185/424 ses-en-administration_guide-v7.2 - 11/30/2017
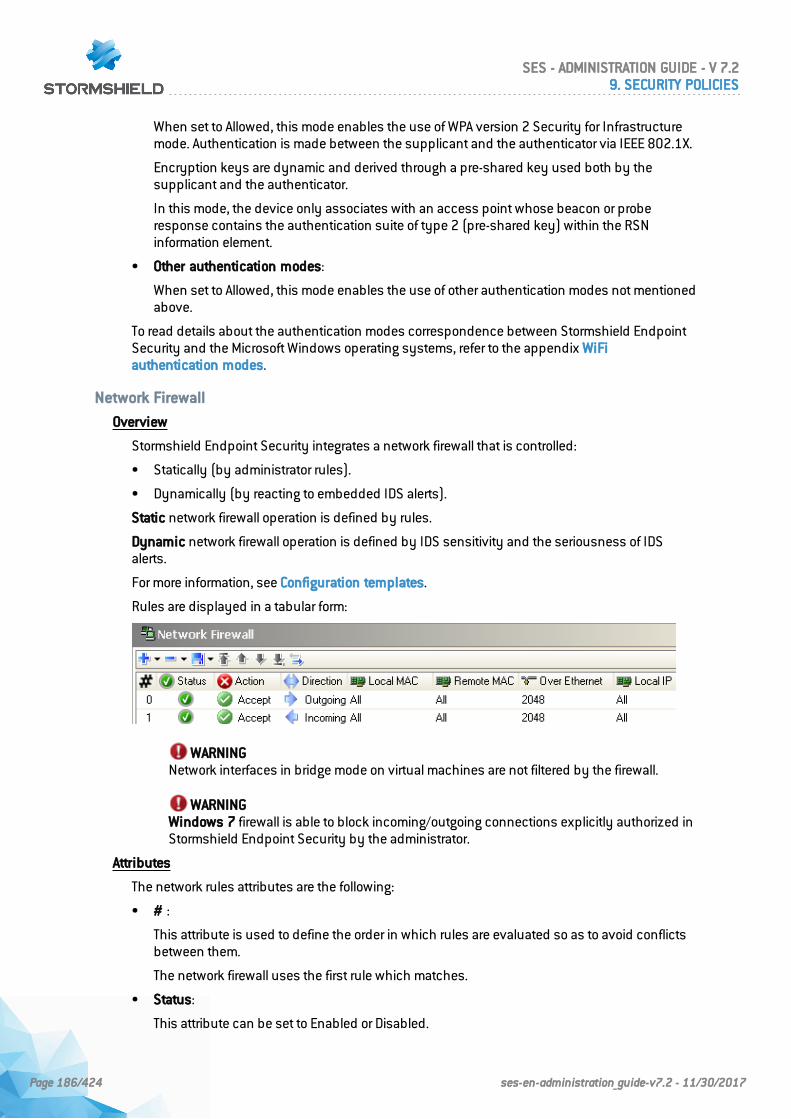
When set to Allowed, this mode enables the use of WPA version 2 Security for Infrastructuremode. Authentication is made between the supplicant and the authenticator via IEEE 802.1X.
Encryption keys are dynamic and derived through a pre-shared key used both by thesupplicant and the authenticator.
In this mode, the device only associates with an access point whose beacon or proberesponse contains the authentication suite of type 2 (pre-shared key) within the RSNinformation element.
• Other authentication modes:
When set to Allowed, this mode enables the use of other authentication modes not mentionedabove.
To read details about the authentication modes correspondence between Stormshield EndpointSecurity and the Microsoft Windows operating systems, refer to the appendix WiFiauthentication modes.
Network Firewall
Overview
Stormshield Endpoint Security integrates a network firewall that is controlled:
• Statically (by administrator rules).
• Dynamically (by reacting to embedded IDS alerts).
Static network firewall operation is defined by rules.
Dynamic network firewall operation is defined by IDS sensitivity and the seriousness of IDSalerts.
For more information, see Configuration templates.
Rules are displayed in a tabular form:
WARNINGNetwork interfaces in bridge mode on virtual machines are not filtered by the firewall.
WARNINGWindows 7 firewall is able to block incoming/outgoing connections explicitly authorized inStormshield Endpoint Security by the administrator.
Attributes
The network rules attributes are the following:
• # :
This attribute is used to define the order in which rules are evaluated so as to avoid conflictsbetween them.
The network firewall uses the first rule which matches.
• Status:
This attribute can be set to Enabled or Disabled.
SES - ADMINISTRATION GUIDE - V 7.29. SECURITY POLICIES
Page 186/424 ses-en-administration_guide-v7.2 - 11/30/2017
A disabled rule is retained in the configuration but not evaluated when processing thenetwork event.
The Enabled icon is . .
The Disabled icon is . .
• Action:
This attribute blocks or accepts the data flow.
The Accept icon is . .
The Block icon is . .
• Direction:
This attribute is used to define whether the data flow is filtered on the way in or on the wayout.
Rules on TCP, ICMP and UDP traffic are stateful. This means that only the direction of the firstpacket needs to be defined. A rule to allow response data to flow will be dynamicallygenerated by the firewall. In other cases (non-stateful), the administrator needs to define tworules: one rule for the way in and one rule for the way out.
• Remote IP:
This attribute is used to restrict the data flow's destination address.
This address can be:
◦ An IP address.
◦ An IP address list.
◦ An IP address range.
By default, no host is specified. This means that the rule applies to all addresses.
• Over IP:
This attribute defines to which IP protocol the rule is applied.
• Stateful:
This attribute activates/deactivates the stateful processing of TCP, UDP or ICMP flows.
Stateful rules retain the communication session status while the firewall automaticallygenerates the rule required by the response data flow.
• Local Port:
This attribute defines the local host service port number (for TCP and UDP) or the local code(for ICMP).
The administrator can define:
◦ A port number.
◦ A port list.
◦ A port range.
• Remote Port:
This attribute defines the remote host port number (for TCP and UDP) or code (ICMP).
The administrator can define:
◦ A port number.
◦ A port list.
◦ A port range.
SES - ADMINISTRATION GUIDE - V 7.29. SECURITY POLICIES
Page 187/424 ses-en-administration_guide-v7.2 - 11/30/2017
• Log:
This attribute defines the settings for saving and viewing log files.
• Description:
This attribute is a freeform comment.
• Group:
This attribute shows the group which the rule belongs to. (example: Base Network). Thisindication is only visible in the root overview mode of each category.
Additional attributes
The administrator has access to additional attributes by clicking on the network firewalltoolbar. Additional columns are displayed.
The additional rule attributes are the following:
• Local MAC:
This attribute is used to restrict the data flow source address.
This address can be:
◦ A MAC address.
◦ A MAC address list.
◦ A MAC address range.
By default, no host is specified. This means that the rule applies to all addresses.
• Remote MAC:
This attribute is used to restrict the data flow's destination address.
This address can be:
◦ A MAC address.
◦ A MAC address list.
◦ A MAC address range.
By default, no host is specified. This means that the rule applies to all addresses.
• Over Ethernet:
This attribute defines the protocol over Ethernet to which the rule applies.
• Local IP:
This attribute is used to restrict the data flow source address.
This address can be an IP address or an IP address list.
By default, no host is specified. This means that the rule applies to all addresses.
Attribute configuration
Graphical interface
By default, the network firewall settings are set to All and Status is set to Accept.
You can select the columns to be displayed by right-clicking any header.
Choose the headers you wish to display from the list.
The way of displaying some attributes can be customized to be read easily. For example selectthe option multiline to display information on several lines.
SES - ADMINISTRATION GUIDE - V 7.29. SECURITY POLICIES
Page 188/424 ses-en-administration_guide-v7.2 - 11/30/2017
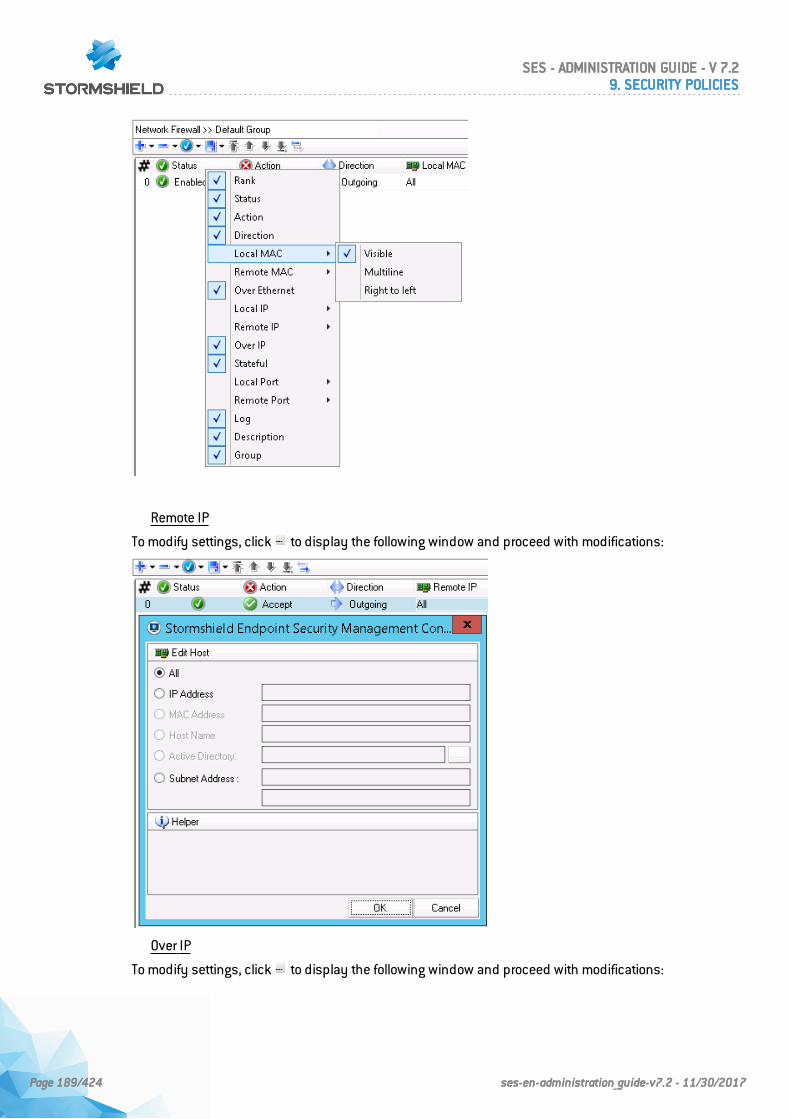
Remote IP
To modify settings, click to display the following window and proceed with modifications:
Over IP
To modify settings, click to display the following window and proceed with modifications:
SES - ADMINISTRATION GUIDE - V 7.29. SECURITY POLICIES
Page 189/424 ses-en-administration_guide-v7.2 - 11/30/2017
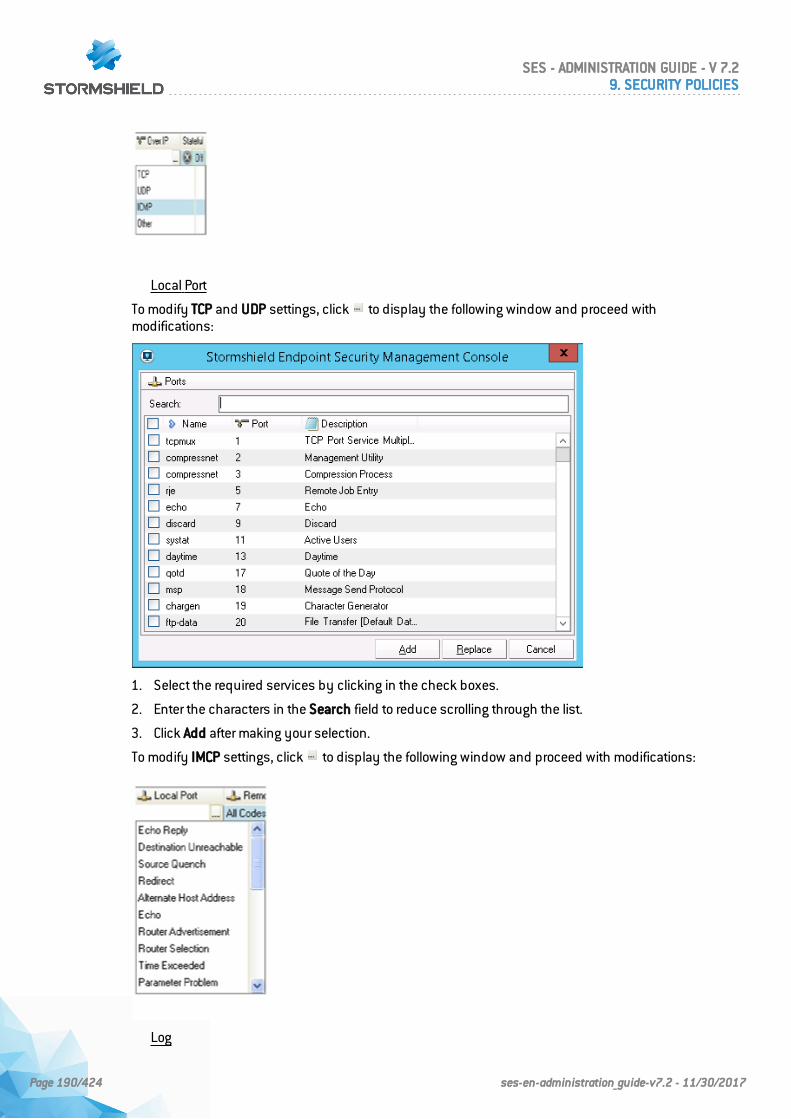
Local Port
To modify TCP and UDP settings, click to display the following window and proceed withmodifications:
1. Select the required services by clicking in the check boxes.
2. Enter the characters in the Search field to reduce scrolling through the list.
3. Click Add after making your selection.
To modify IMCP settings, click to display the following window and proceed with modifications:
Log
SES - ADMINISTRATION GUIDE - V 7.29. SECURITY POLICIES
Page 190/424 ses-en-administration_guide-v7.2 - 11/30/2017

To modify settings, click to display the following window and proceed with modifications:
Local MAC
To modify settings, click to display the following window and proceed with modifications:
Over Ethernet
To modify default settings, click to display the following window and proceed withmodifications:
SES - ADMINISTRATION GUIDE - V 7.29. SECURITY POLICIES
Page 191/424 ses-en-administration_guide-v7.2 - 11/30/2017
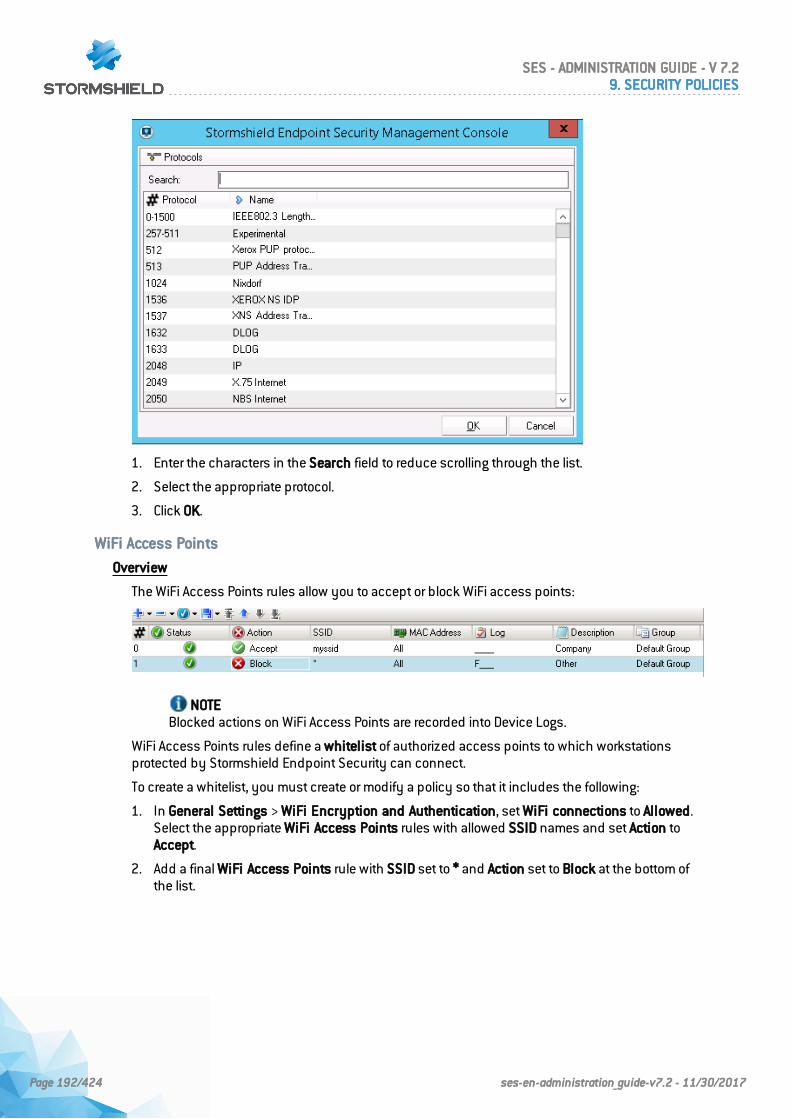
1. Enter the characters in the Search field to reduce scrolling through the list.
2. Select the appropriate protocol.
3. Click OK.
WiFi Access Points
Overview
The WiFi Access Points rules allow you to accept or block WiFi access points:
NOTEBlocked actions on WiFi Access Points are recorded into Device Logs.
WiFi Access Points rules define a whitelist of authorized access points to which workstationsprotected by Stormshield Endpoint Security can connect.
To create a whitelist, you must create or modify a policy so that it includes the following:
1. In General Settings > WiFi Encryption and Authentication, set WiFi connections to Allowed.Select the appropriate WiFi Access Points rules with allowed SSID names and set Action toAccept.
2. Add a final WiFi Access Points rule with SSID set to * and Action set to Block at the bottom ofthe list.
SES - ADMINISTRATION GUIDE - V 7.29. SECURITY POLICIES
Page 192/424 ses-en-administration_guide-v7.2 - 11/30/2017
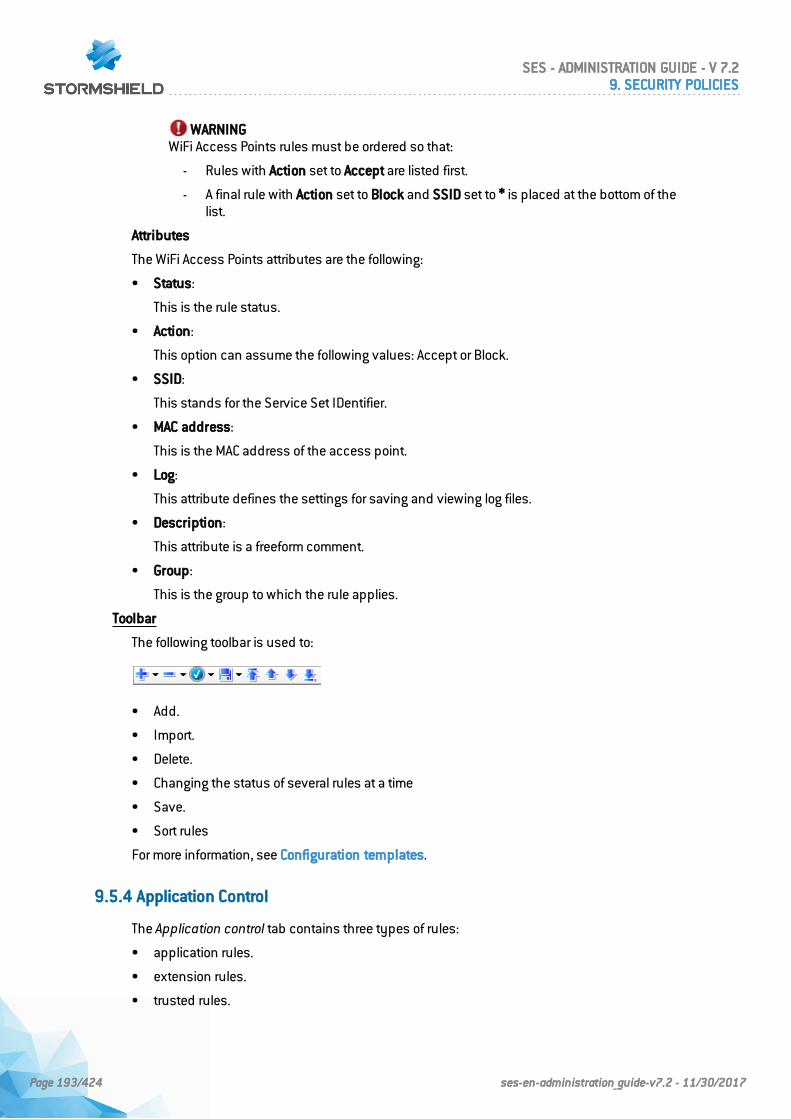
WARNINGWiFi Access Points rules must be ordered so that:
- Rules with Action set to Accept are listed first.
- A final rule with Action set to Block and SSID set to * is placed at the bottom of thelist.
Attributes
The WiFi Access Points attributes are the following:
• Status:
This is the rule status.
• Action:
This option can assume the following values: Accept or Block.
• SSID:
This stands for the Service Set IDentifier.
• MAC address:
This is the MAC address of the access point.
• Log:
This attribute defines the settings for saving and viewing log files.
• Description:
This attribute is a freeform comment.
• Group:
This is the group to which the rule applies.
Toolbar
The following toolbar is used to:
• Add.
• Import.
• Delete.
• Changing the status of several rules at a time
• Save.
• Sort rules
For more information, see Configuration templates.
9.5.4 Application Control
The Application control tab contains three types of rules:
• application rules.
• extension rules.
• trusted rules.
SES - ADMINISTRATION GUIDE - V 7.29. SECURITY POLICIES
Page 193/424 ses-en-administration_guide-v7.2 - 11/30/2017
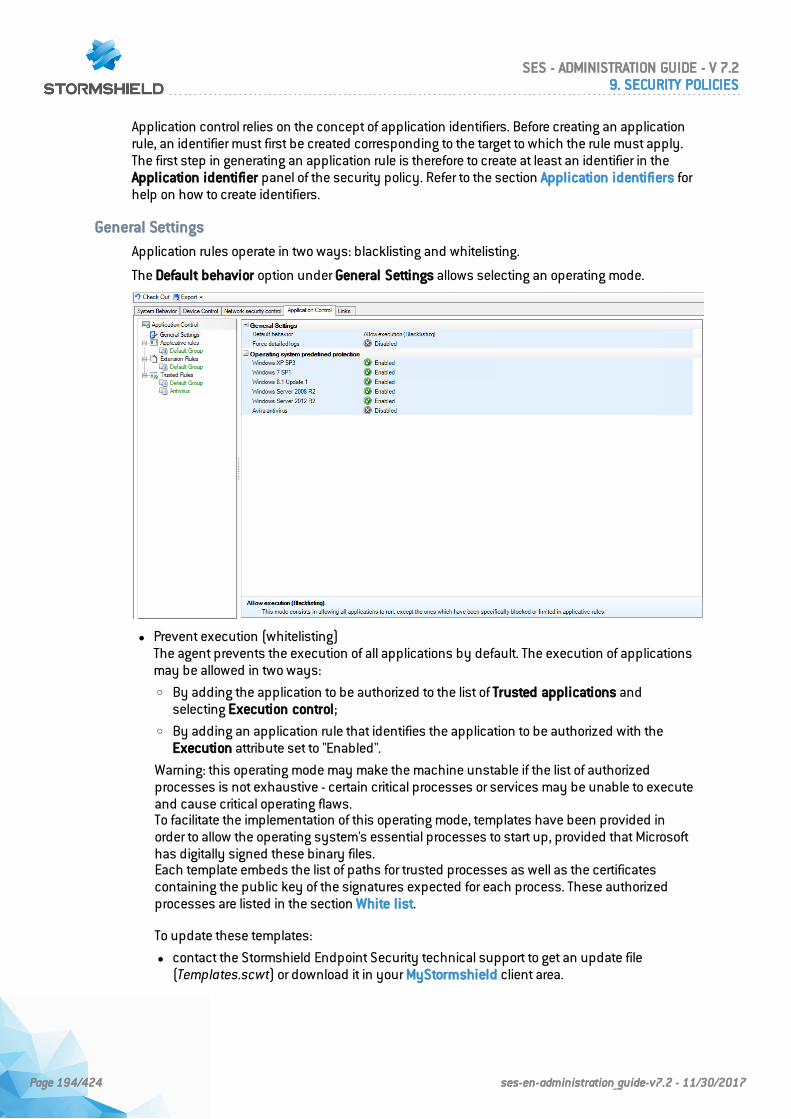
Application control relies on the concept of application identifiers. Before creating an applicationrule, an identifier must first be created corresponding to the target to which the rule must apply.The first step in generating an application rule is therefore to create at least an identifier in theApplication identifier panel of the security policy. Refer to the section Application identifiers forhelp on how to create identifiers.
General Settings
Application rules operate in two ways: blacklisting and whitelisting.
The Default behavior option under General Settings allows selecting an operating mode.
l Prevent execution (whitelisting)The agent prevents the execution of all applications by default. The execution of applicationsmay be allowed in two ways:o By adding the application to be authorized to the list of Trusted applications and
selecting Execution control;o By adding an application rule that identifies the application to be authorized with the
Execution attribute set to "Enabled".
Warning: this operating mode may make the machine unstable if the list of authorizedprocesses is not exhaustive - certain critical processes or services may be unable to executeand cause critical operating flaws.To facilitate the implementation of this operating mode, templates have been provided inorder to allow the operating system's essential processes to start up, provided that Microsofthas digitally signed these binary files.Each template embeds the list of paths for trusted processes as well as the certificatescontaining the public key of the signatures expected for each process. These authorizedprocesses are listed in the section White list.
To update these templates:
l contact the Stormshield Endpoint Security technical support to get an update file(Templates.scwt) or download it in your MyStormshield client area.
SES - ADMINISTRATION GUIDE - V 7.29. SECURITY POLICIES
Page 194/424 ses-en-administration_guide-v7.2 - 11/30/2017
l open the menu Tools > Update whitelisting templates and select the provided file. It is inthe Templates directory of the SES administration console by default.
Windows extension components that are not essential to the system loading process, suchas Internet Explorer or Microsoft Paint, will not be allowed to execute.All templates are enabled by default. However, each template may be disabled individually.This involves reproducing equivalent behavior in the Trusted applications and Applicationrules in order to allow the relevant operating system to run properly.Note: For certain system processes that execute very early in the Windows startup phase,identification via certificate may fail. A mechanism allows subsequently checking that:o processes that had been executed during this critical period were legitimately executed
(in compliance with the rules of the current security policy). If this is not the case, aspecific log will be recorded (see System logs): [INVALID-EXECUTE]) ;
o processes that had been blocked during this critical period were legitimately blocked (incompliance with the rules of the current security policy). If this is not the case, a specificlog will be recorded (see System logs): [INVALID-BLKEXECUTE]).
Logs of this type must warrant an update of rules. This technical limitation does not affectpath or hash identification. The offending hash-based or path-based applications thereforeneed to be identified.Applications that have been blocked by the whitelist will be shown in the agent's logs. If aproblem occurs, they must be checked directly on the agent or by monitoring themanagement console and the identifiers and the necessary corresponding rules must becreated.
l Allow execution (Blacklisting)The agent does not deny any access by default and as a result, allows the execution of allapplications. For applications listed in the security policy, the application rule associatedwith them will then apply with its own restrictions and authorizations.
NOTEIn this operating mode, a combined whitelist/blacklist mode can be created with theappropriate rules.
The second option under General Settings makes it possible to Force detailed logs. By default,the agent calculates the hash and signature information of processes only when necessary asthis has an impact on performance and the logs generated. Therefore:
l When the policy makes no reference to any hashes or certificates, the agent will then leaveout the calculation of processes' hashes and certificates. In this case, performance will beoptimal, but logs will not contain any hash/certificate information.
l When the policy only refers to hashes, the hashes of each process will then be calculated. Inthis case, performance will be slightly affected, and logs will contain the hash information ofbinary files.
l When the policy refers to certificates (with or without hashes), the agent will calculate thehashes and certificates of each process. In this case, the generated logs will becomprehensive.
In the event an administrator requires hash and certificate information in preparation of a switchto whitelist mode for example, and the security policy refers to neither hashes nor digitalsignatures, the agent can be forced to produce comprehensive logs by enabling the Forcedetailed logs option.
SES - ADMINISTRATION GUIDE - V 7.29. SECURITY POLICIES
Page 195/424 ses-en-administration_guide-v7.2 - 11/30/2017
Application rules
Attributes
The Application rule attributes are the following:
• Status:
This attribute can be set to Enabled, Disabled or Test.
A disabled rule is retained in the configuration but not evaluated when processing the systemevent.
A rule in Test mode enables an administrator to test the behavior of a new rule and to be awareof the impacts before activating the rule and deploying it. The rule is assessed whenprocessing the system event: a log is generated as if the rule was enabled but the rule doesnot block anything.
We recommend you to configure the backup of logs in the database or in an externalapplication (Syslog or SMTP) to make the Test mode useful. For more information, refer to LogManager and Exporting logs to an external system (SMTP or Syslog).
• Login:
Defines the list of selected identifiers to which the rule must apply.
A rule may have an unlimited number of identifiers. Once an identifier has been linked to oneapplication rule, it cannot be deleted. Its assignment to executed application rules must first beremoved. You cannot assign the same identifier to several application rules.
• Execution:
This attribute allows or denies access to the application.
• Files:
This attribute controls the application rights to access the files:
• Network:
This attribute controls the application's right to access the network.
WARNINGIf the Firewall State setting is disabled in the Network security control tab of the securitypolicy, these rules will not apply.
• Registry:
This attribute controls the application rights to access the registry base.
• Log:
This attribute defines the settings for saving and viewing log files.
• Description:
This attribute is a freeform comment.
• Group:
This attribute shows the group to which the rule belongs.
Toolbar
The following toolbar is used to:
SES - ADMINISTRATION GUIDE - V 7.29. SECURITY POLICIES
Page 196/424 ses-en-administration_guide-v7.2 - 11/30/2017
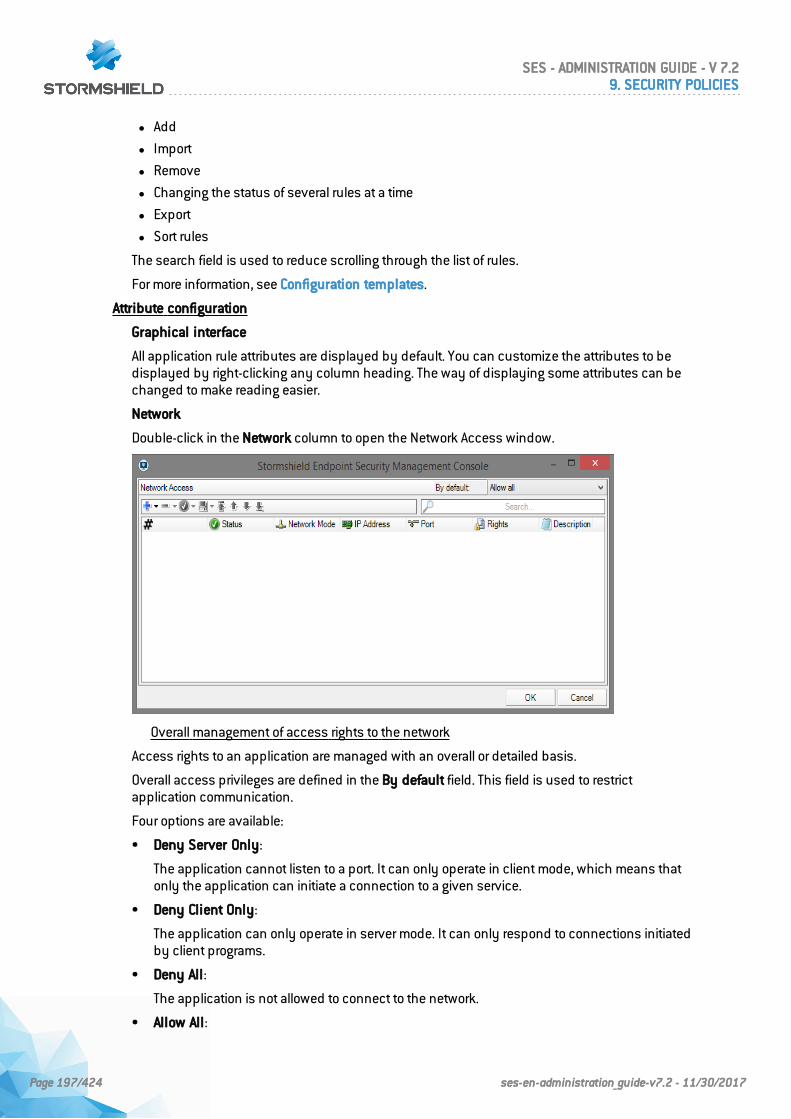
l Add
l Import
l Remove
l Changing the status of several rules at a time
l Export
l Sort rules
The search field is used to reduce scrolling through the list of rules.
For more information, see Configuration templates.
Attribute configuration
Graphical interface
All application rule attributes are displayed by default. You can customize the attributes to bedisplayed by right-clicking any column heading. The way of displaying some attributes can bechanged to make reading easier.
Network
Double-click in the Network column to open the Network Access window.
Overall management of access rights to the network
Access rights to an application are managed with an overall or detailed basis.
Overall access privileges are defined in the By default field. This field is used to restrictapplication communication.
Four options are available:
• Deny Server Only:
The application cannot listen to a port. It can only operate in client mode, which means thatonly the application can initiate a connection to a given service.
• Deny Client Only:
The application can only operate in server mode. It can only respond to connections initiatedby client programs.
• Deny All:
The application is not allowed to connect to the network.
• Allow All:
SES - ADMINISTRATION GUIDE - V 7.29. SECURITY POLICIES
Page 197/424 ses-en-administration_guide-v7.2 - 11/30/2017
Nothing is blocked by default. The behavior is the one defined by the global security level(High, Low or Critical) and associated rules.
NOTENetwork access control application rules involve TCP and UDP.
NOTELocal sockets are not controlled by network access rules.
Detailed management of access rights to the network
The network access attributes are the following:
• Status:
Possible values are Active, Inactive or Test.
Just like other items that require activation:
◦ an inactive access right is retained in the configuration but not evaluated whenprocessing the system event.
◦ the Test mode enables the administrator to try new rights and to test the impacts beforeputting them into production.
• Network Mode:
Possible values are the following:
◦ Client.
◦ Server.
◦ Client and Server.
• IP address:
This attribute is used to restrict the data flow's destination address.
This list of addresses corresponds to:
◦ An IP address.
◦ A series of addresses (separated by semicolons ";").
◦ An IP address range (separated by dashes "-").
◦ An IP address network in the form of "a.b.c.d/mask".
By default, no address has been specified. It means that the rule applies to all addresses.
• Port:
Use the selection button to choose from the list of predefined services. You can define portlists and ranges.
SES - ADMINISTRATION GUIDE - V 7.29. SECURITY POLICIES
Page 198/424 ses-en-administration_guide-v7.2 - 11/30/2017
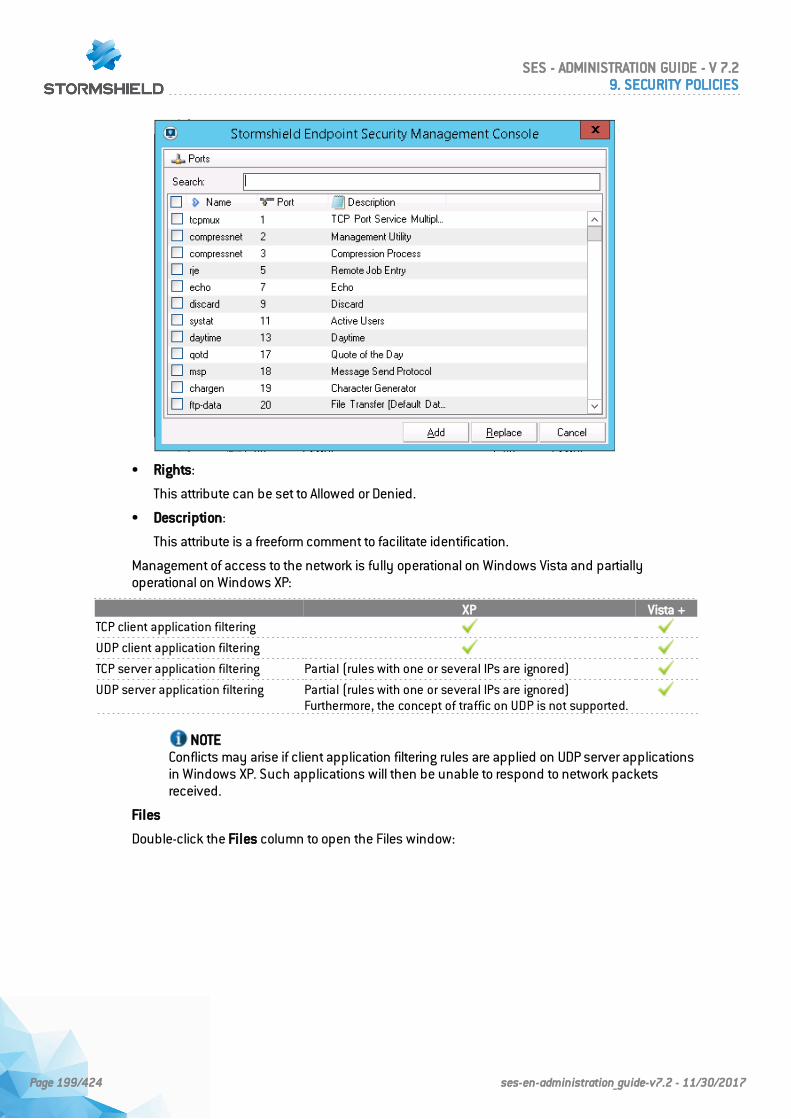
• Rights:
This attribute can be set to Allowed or Denied.
• Description:
This attribute is a freeform comment to facilitate identification.
Management of access to the network is fully operational on Windows Vista and partiallyoperational on Windows XP:
XP Vista +TCP client application filtering
UDP client application filtering
TCP server application filtering Partial (rules with one or several IPs are ignored)
UDP server application filtering Partial (rules with one or several IPs are ignored)Furthermore, the concept of traffic on UDP is not supported.
NOTEConflicts may arise if client application filtering rules are applied on UDP server applicationsin Windows XP. Such applications will then be unable to respond to network packetsreceived.
Files
Double-click the Files column to open the Files window:
SES - ADMINISTRATION GUIDE - V 7.29. SECURITY POLICIES
Page 199/424 ses-en-administration_guide-v7.2 - 11/30/2017
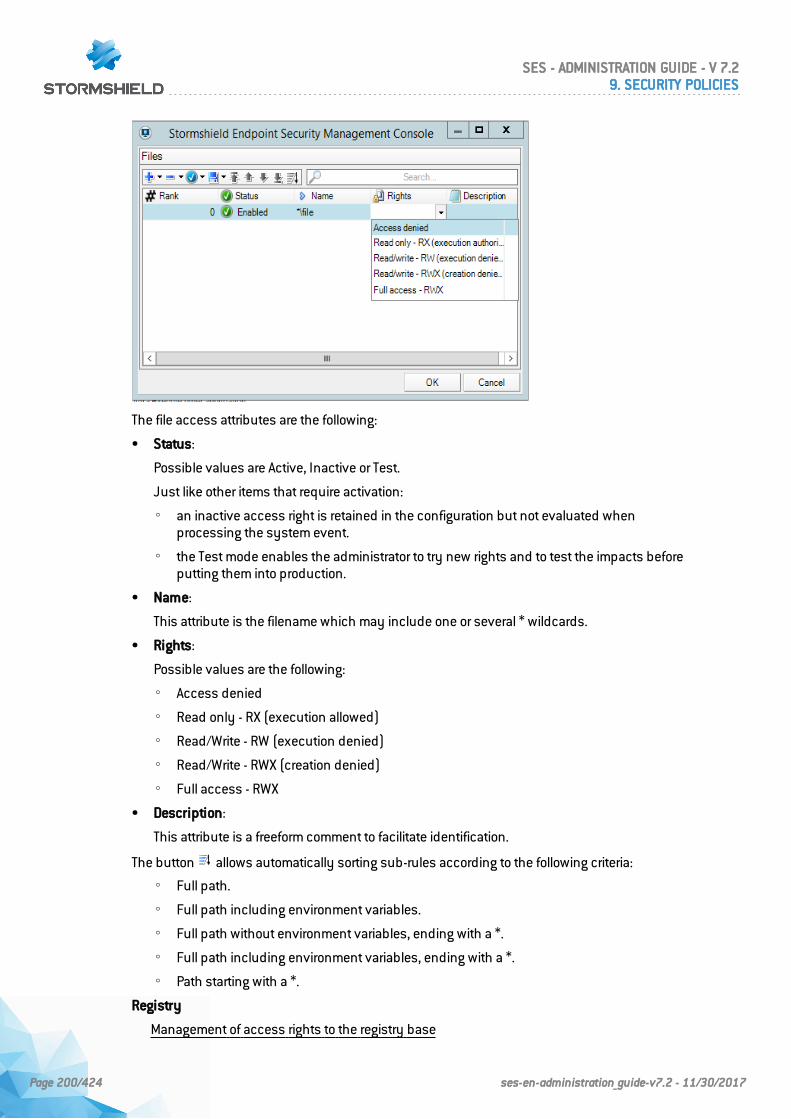
The file access attributes are the following:
• Status:
Possible values are Active, Inactive or Test.
Just like other items that require activation:
◦ an inactive access right is retained in the configuration but not evaluated whenprocessing the system event.
◦ the Test mode enables the administrator to try new rights and to test the impacts beforeputting them into production.
• Name:
This attribute is the filename which may include one or several * wildcards.
• Rights:
Possible values are the following:
◦ Access denied
◦ Read only - RX (execution allowed)
◦ Read/Write - RW (execution denied)
◦ Read/Write - RWX (creation denied)
◦ Full access - RWX
• Description:
This attribute is a freeform comment to facilitate identification.
The button allows automatically sorting sub-rules according to the following criteria:
◦ Full path.
◦ Full path including environment variables.
◦ Full path without environment variables, ending with a *.
◦ Full path including environment variables, ending with a *.
◦ Path starting with a *.
Registry
Management of access rights to the registry base
SES - ADMINISTRATION GUIDE - V 7.29. SECURITY POLICIES
Page 200/424 ses-en-administration_guide-v7.2 - 11/30/2017
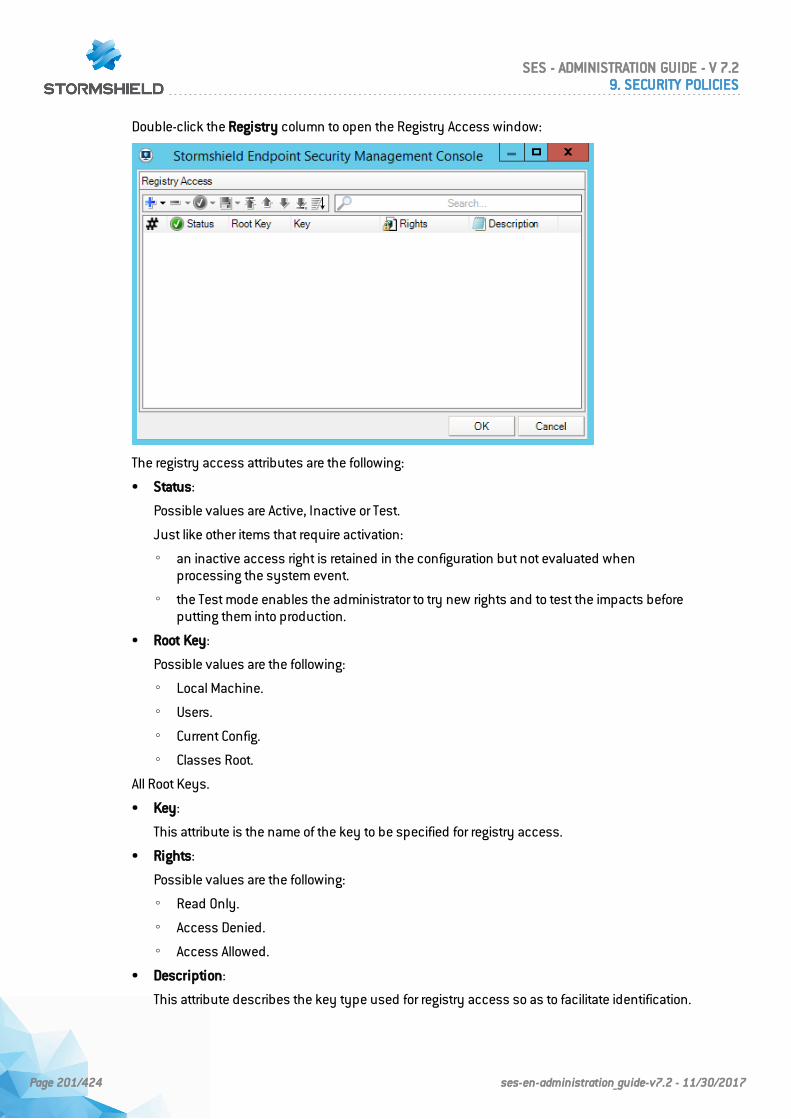
Double-click the Registry column to open the Registry Access window:
The registry access attributes are the following:
• Status:
Possible values are Active, Inactive or Test.
Just like other items that require activation:
◦ an inactive access right is retained in the configuration but not evaluated whenprocessing the system event.
◦ the Test mode enables the administrator to try new rights and to test the impacts beforeputting them into production.
• Root Key:
Possible values are the following:
◦ Local Machine.
◦ Users.
◦ Current Config.
◦ Classes Root.
All Root Keys.
• Key:
This attribute is the name of the key to be specified for registry access.
• Rights:
Possible values are the following:
◦ Read Only.
◦ Access Denied.
◦ Access Allowed.
• Description:
This attribute describes the key type used for registry access so as to facilitate identification.
SES - ADMINISTRATION GUIDE - V 7.29. SECURITY POLICIES
Page 201/424 ses-en-administration_guide-v7.2 - 11/30/2017
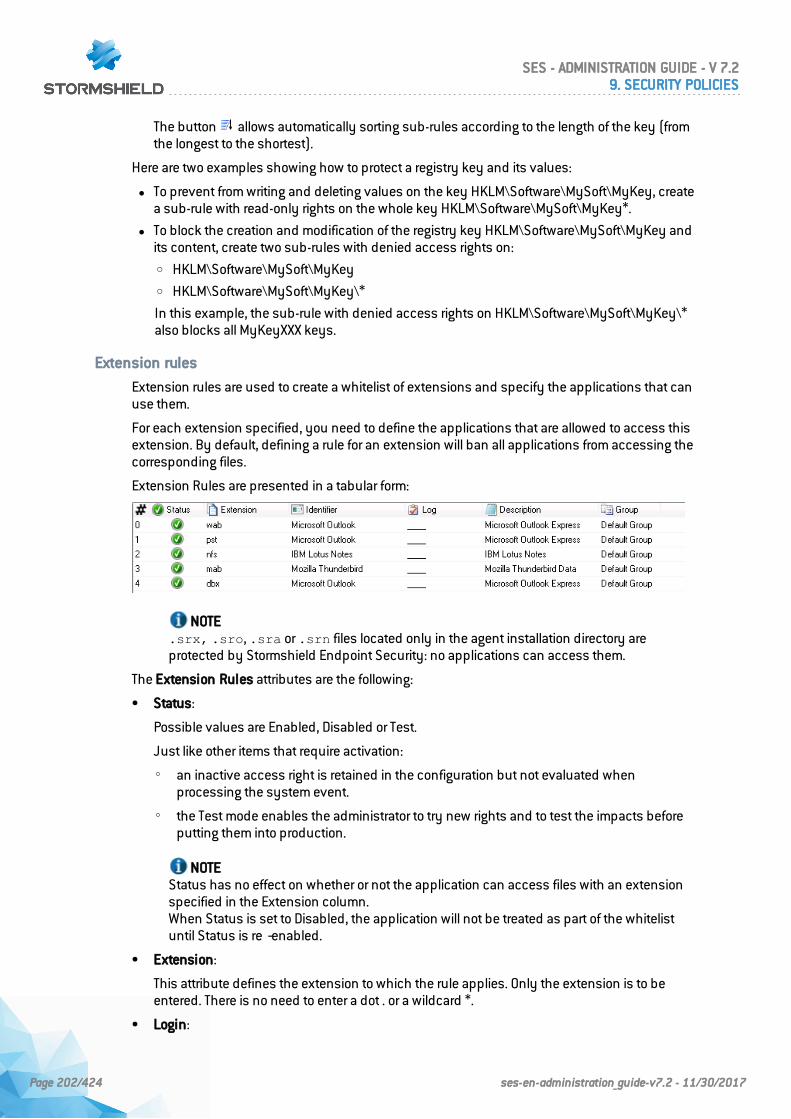
The button allows automatically sorting sub-rules according to the length of the key (fromthe longest to the shortest).
Here are two examples showing how to protect a registry key and its values:
l To prevent from writing and deleting values on the key HKLM\Software\MySoft\MyKey, createa sub-rule with read-only rights on the whole key HKLM\Software\MySoft\MyKey*.
l To block the creation and modification of the registry key HKLM\Software\MySoft\MyKey andits content, create two sub-rules with denied access rights on:o HKLM\Software\MySoft\MyKeyo HKLM\Software\MySoft\MyKey\*
In this example, the sub-rule with denied access rights on HKLM\Software\MySoft\MyKey\*also blocks all MyKeyXXX keys.
Extension rules
Extension rules are used to create a whitelist of extensions and specify the applications that canuse them.
For each extension specified, you need to define the applications that are allowed to access thisextension. By default, defining a rule for an extension will ban all applications from accessing thecorresponding files.
Extension Rules are presented in a tabular form:
NOTE.srx, .sro, .sra or .srn files located only in the agent installation directory areprotected by Stormshield Endpoint Security: no applications can access them.
The Extension Rules attributes are the following:
• Status:
Possible values are Enabled, Disabled or Test.
Just like other items that require activation:
◦ an inactive access right is retained in the configuration but not evaluated whenprocessing the system event.
◦ the Test mode enables the administrator to try new rights and to test the impacts beforeputting them into production.
NOTEStatus has no effect on whether or not the application can access files with an extensionspecified in the Extension column.When Status is set to Disabled, the application will not be treated as part of the whitelistuntil Status is re‐enabled.
• Extension:
This attribute defines the extension to which the rule applies. Only the extension is to beentered. There is no need to enter a dot . or a wildcard *.
• Login:
SES - ADMINISTRATION GUIDE - V 7.29. SECURITY POLICIES
Page 202/424 ses-en-administration_guide-v7.2 - 11/30/2017
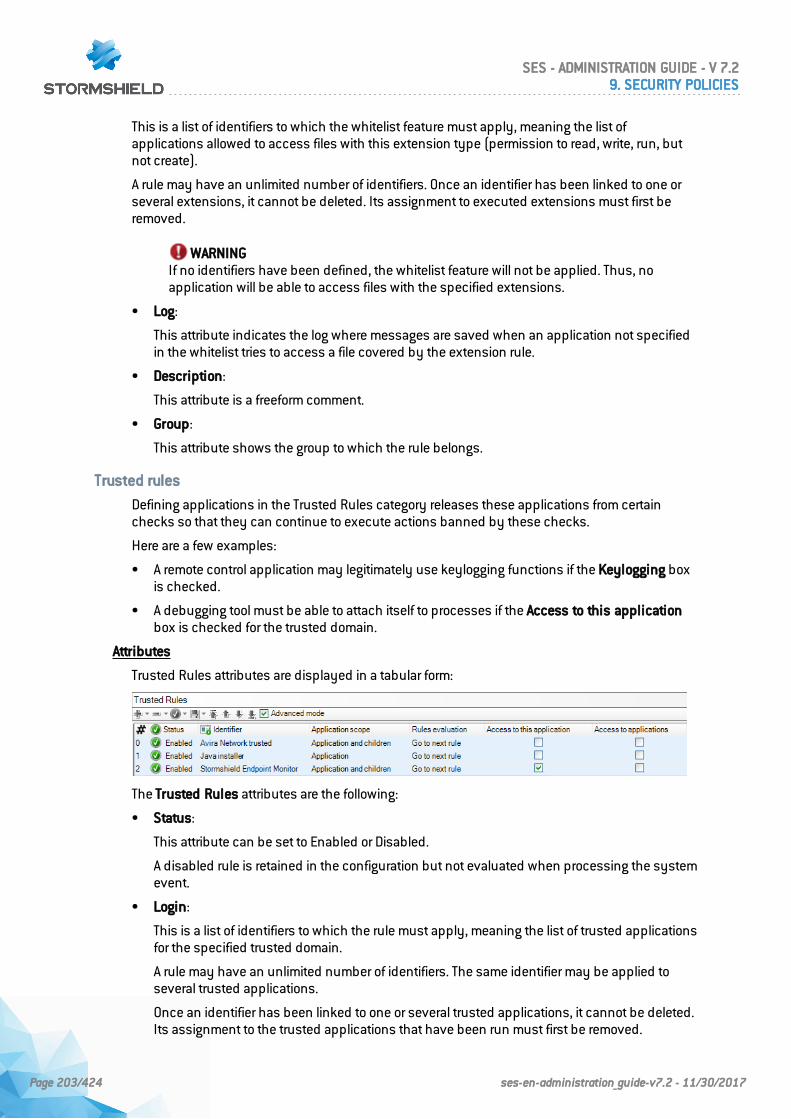
This is a list of identifiers to which the whitelist feature must apply, meaning the list ofapplications allowed to access files with this extension type (permission to read, write, run, butnot create).
A rule may have an unlimited number of identifiers. Once an identifier has been linked to one orseveral extensions, it cannot be deleted. Its assignment to executed extensions must first beremoved.
WARNINGIf no identifiers have been defined, the whitelist feature will not be applied. Thus, noapplication will be able to access files with the specified extensions.
• Log:
This attribute indicates the log where messages are saved when an application not specifiedin the whitelist tries to access a file covered by the extension rule.
• Description:
This attribute is a freeform comment.
• Group:
This attribute shows the group to which the rule belongs.
Trusted rules
Defining applications in the Trusted Rules category releases these applications from certainchecks so that they can continue to execute actions banned by these checks.
Here are a few examples:
• A remote control application may legitimately use keylogging functions if the Keylogging boxis checked.
• A debugging tool must be able to attach itself to processes if the Access to this applicationbox is checked for the trusted domain.
Attributes
Trusted Rules attributes are displayed in a tabular form:
The Trusted Rules attributes are the following:
• Status:
This attribute can be set to Enabled or Disabled.
A disabled rule is retained in the configuration but not evaluated when processing the systemevent.
• Login:
This is a list of identifiers to which the rule must apply, meaning the list of trusted applicationsfor the specified trusted domain.
A rule may have an unlimited number of identifiers. The same identifier may be applied toseveral trusted applications.
Once an identifier has been linked to one or several trusted applications, it cannot be deleted.Its assignment to the trusted applications that have been run must first be removed.
SES - ADMINISTRATION GUIDE - V 7.29. SECURITY POLICIES
Page 203/424 ses-en-administration_guide-v7.2 - 11/30/2017
• Application scope (advanced mode):
This refers to the scope of the trusted rule. A trusted rule applies by default to all applicationidentifiers assigned to the rule, but not to applications that were started via parentapplications. If an application starts another application, the trusted domains of the parentapplication will automatically apply to the latter when you select the Application andchildren option.
• Rules evaluation (advanced mode):
This parameter makes it possible to determine the mode for evaluating trust if the rule inquestion is applied. By default, the next rule that applies to the same application will beevaluated and applied accordingly. Conversely, if you select Skip next rules, as soon as therule applies, the following rules that apply to the same application will be ignored.Therefore, whenever the application's trusted domains are evaluated, the various rules thatapply to the application make it possible to accumulate trusted domains until you reach arule with specific instructions to skip the next rules, or until the last rule is reached.
• Trusted domains:
This attribute specifies the domains in which the application is trusted.
The checked box means that the application can be trusted in the specified domain. Allactions relating to this domain that are normally blocked or indicated by the automaticprotections or profile-based protection will, in this case, be considered legitimate.
The unchecked box means that the application is not trusted in the assigned domain.
• Description:
This attribute is a freeform comment.
• Group:
This attribute shows the group to which the rule belongs.
WARNINGTwo modes are available for this panel: the normal mode and the advanced mode. Innormal mode, the Application scope and Access to this application columns are hidden.
Trusted domains
The trusted domains used are the following:
• Access to this application:
If the box is checked, other applications are allowed to attach themselves to the application.
Applications access:
If the box is checked, the application is allowed to access and attach itself to one or moreapplications.
• Execution Control:
If the box is checked, the application is allowed to execute any application.
• Registry:
If the box is checked, the application is allowed to access the registry base.
• Network:
If the box is checked, the application is allowed to use sockets.
SES - ADMINISTRATION GUIDE - V 7.29. SECURITY POLICIES
Page 204/424 ses-en-administration_guide-v7.2 - 11/30/2017
WARNINGThe level of trust assigned to an application in order to use network sockets does notexempt it from the firewall's rules. However, it will allow the application to bypassapplication rules.
• Privileges:
If the box is checked, the application is allowed to do escalation of privileges.
• Files:
If the box is checked, the application is allowed to access protected files.
• Keylogging:
If the box is checked, the application is allowed to capture keyboard events.
• Overflow:
If the box is checked, the application is allowed to exceed memory.
NOTEData Execution Prevention (DEP) must be enabled to limit false positives.
• Reboot:
If the box is checked, the application is allowed to reboot the workstation.
• Exe on removable device:
If the box is checked and if the option Execution control on removable device in theapplication behavior control is enabled, the application can start from a removable deviceconnected to an agent without confirmation from the user.
• Attachment disabled (advanced mode):
If the box is checked, SES does not attach to the application. This only applies to 64-bit systems.When this box is checked, most SES protections are no longer enabled for the application. Usethis trust domain only as a last resort, if incompatibilities are confirmed between SES and theapplication.
The trusted domains correspond to the General Settings of the SystemBehavior tab.
Handling conflicts between application rules
Rule priority order
The order for evaluating rules depends on the rule order defined manually by the administrator,the rule category and its scope of action.
The check sequence for rule categories is the following:
1. Trusted Rules.
2. Application Rules.
3. Extension Rules.
WARNINGFor application rules, simply defining a rule for a particular application frees it from anyother rules applicable to a set of applications, as regards:
- Network environment.
- Files.
- Registries.
SES - ADMINISTRATION GUIDE - V 7.29. SECURITY POLICIES
Page 205/424 ses-en-administration_guide-v7.2 - 11/30/2017
Resolving conflicts
In application rules, several rules may apply to the same application. In this case, the order inwhich rules are checked follows the principles below:
1. Each type of sub-rule (files, registries and network) is independent. The rule engine willexamine rules according to the action performed by the user (opening a file, registry key,network access).
2. Sub-rules with an "authorize" privilege will have priority over all others in the definition ofprivileges on the resource in question, regardless of its rank.
3. Rules are examined by rank. Rules with a lower rank will have priority if several rules identifythe same application.
4. Rules that do not have certain types of sub-rules (files, registries and network) will be ignoredduring the resolution of privileges over such resources.
5. Rules with at least one sub-rule applying to the type of resource accessed will be consideredactive. As a result, higher ranking rules will not be examined. If the resource (file, registry key,network port) that the application is attempting to access has been indicated in a sub-rule,the specified privileges will be applied. Otherwise, the default privilege will be granted(allowed for files and registries, indicated in the panel for the network).
Examples
Here are four examples showing how application rule conflicts are handled.
Example 1
Let us consider the following situation:
• The first application rule associated with an identifier containing an entry corresponding to allapplications (*.exe) does not allow access to text files (*.txt).
• The second application rule associated with an identifier containing only Windows Notepad(*\notepad.exe) allows access to text files (*.txt).
In this case, the second rule takes precedence, as its access privilege is "allowed".
Example 2
Let us consider the following situation:
• The first application rule associated with an identifier containing an entry corresponding to allapplications (*.exe) does not allow access to text files (*.txt).
• The second application rule associated with an identifier containing only Windows Notepad(*\notepad.exe) denies access to CSV files (*.csv).
In this example, the application notepad.exe will not be able to access text files but will haveno restrictions on CSV files.
The first rule contains privileges to access files. It will therefore be selected and the other rules willbe ignored.
Example 3
Let us consider the following situation:
• The first application rule associated with an identifier containing an entry corresponding to allapplications (*.exe) does not specify any privilege to access files.
• The second application rule associated with an identifier containing only Windows Notepad(*\notepad.exe) denies access to CSV files (*.csv).
In this example, the application notepad.exe will not be able to access CSV files.
SES - ADMINISTRATION GUIDE - V 7.29. SECURITY POLICIES
Page 206/424 ses-en-administration_guide-v7.2 - 11/30/2017
The first rule does not contain any privileges to access files. It will therefore be ignored and theother rules will be examined. The second rule also identifies notepad.exe. Its access rules willtherefore be used.
Example 4
Let us consider the following situation:
• The first application rule associated with an identifier containing an entry corresponding to allapplications (*.exe) does not allow access to text files (*.txt).
• The second application rule associated with an identifier containing only Internet Explorer(*\iexplore.exe) explicitly allows Internet Explorer to access the network on certain ports.
The rule relating to Internet Explorer will be applied for network access. There is no conflict as thefield of application of the two rules is different:
• The first rule applies to files.
• The second rule applies to network access.
Writing conventions
Application entry format
The full application path can be specified in the Application column of each application rule. Oneor several * wildcards can also be used.
Example 1
Here is an example of an application identified by its full path:C:\program files\Internet Explorer\iexplore.exe
Example 2
This example shows how to identify an application regardless of the drive where it is located or itsaccess path:
*:\program files\Internet Explorer\iexplore.exe
*\iexplore.exe
Environment variables
There are three environment variables used to specify rules independently of differences innaming and organization proper to Windows system directories.
These variables are defined using pipe separators (|), at the beginning or end of the string:
|programfiles|
On a 32-bit operating system, this variable matches the directory:c:\program files
On a 64-bit operating system, this variable matches the directory:C:\progam files (x86)
|programfilesnative|
Regardless the architecture of the operating system, this variable matches the directory:C:\progam files
|systemdrive|
This is the root of the drive where the system is installed. It is usually:c:\
SES - ADMINISTRATION GUIDE - V 7.29. SECURITY POLICIES
Page 207/424 ses-en-administration_guide-v7.2 - 11/30/2017
|systemroot|
This is the primary directory for operating system files. For Windows XP, it is usually:c:\windows
9.6 Applying a security policy to an object of the directory
1. When you have finished editing the security policy, click Check In.
2. In the directory tree view, select the object containing the computers on which the policymust be applied.
3. Select the policy in the Security part in the Policies linked tab.
4. Click Apply changes to the environment. This action must be performed each time you editthe security policy.
NOTEWhen the agent receives the new security policy, an entry is added in the agent logs.
SES - ADMINISTRATION GUIDE - V 7.29. SECURITY POLICIES
Page 208/424 ses-en-administration_guide-v7.2 - 11/30/2017
10. Scripts
10.1 Overview
10.1.1 Scripts feature
The Scripts feature allows creating scripts that control the automatic and autonomousreconfiguration of Stormshield Endpoint Security agents.
Dynamic policy enforcement makes it possible to modify security policies and agent dynamicconfiguration in real time and enforce workstation conformity.The latter is highly important before allowing user workstation access the corporate network.
NOTEPolicies or configurations applied via script take the priority over those assigned in thepolicies linked tab of a group of agents. You are therefore advised to restore policies orconfigurations when their application is no longer needed.
10.1.2 Scripts
Scripts are configurable in a script policy. They are created and saved in the Script folder in thepolicies.
Scripts can include the following elements:
• Tests.
• Actions.
• Boolean logic operators.
• Results.
The Script icon is . .
The TRUE result icon is . .
The FALSE result icon is . .
Here is an example of script based on the verification of the execution of Windows Updateservice. If the service is not active, it will be relaunched:
SES - ADMINISTRATION GUIDE - V 7.210. SCRIPTS
Page 209/424 ses-en-administration_guide-v7.2 - 11/30/2017
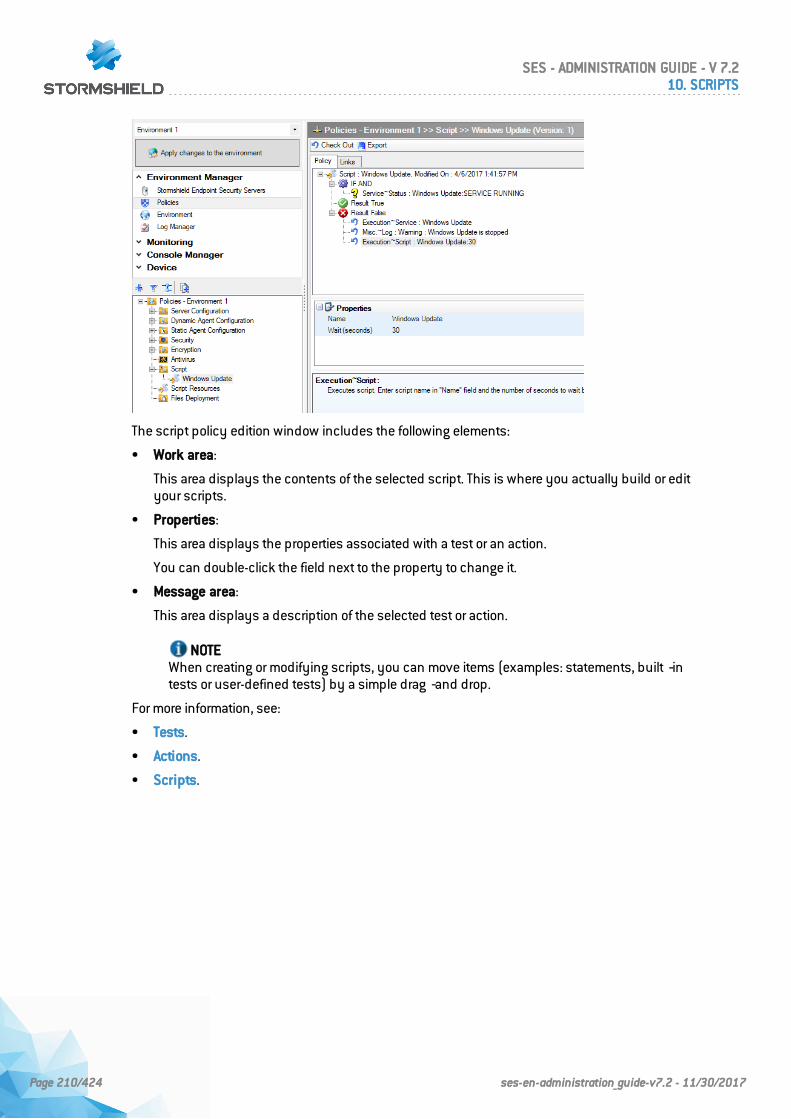
The script policy edition window includes the following elements:
• Work area:
This area displays the contents of the selected script. This is where you actually build or edityour scripts.
• Properties:
This area displays the properties associated with a test or an action.
You can double-click the field next to the property to change it.
• Message area:
This area displays a description of the selected test or action.
NOTEWhen creating or modifying scripts, you can move items (examples: statements, built‐intests or user-defined tests) by a simple drag‐and drop.
For more information, see:
• Tests.
• Actions.
• Scripts.
SES - ADMINISTRATION GUIDE - V 7.210. SCRIPTS
Page 210/424 ses-en-administration_guide-v7.2 - 11/30/2017
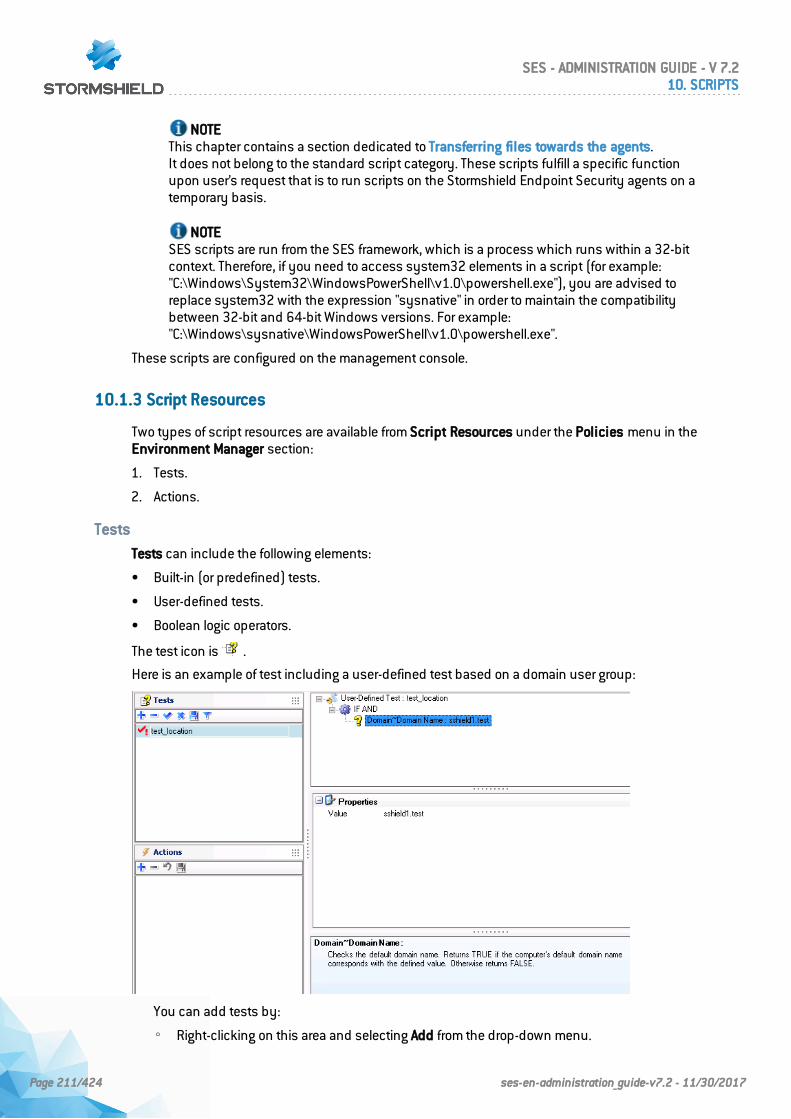
NOTEThis chapter contains a section dedicated to Transferring files towards the agents.It does not belong to the standard script category. These scripts fulfill a specific functionupon user’s request that is to run scripts on the Stormshield Endpoint Security agents on atemporary basis.
NOTESES scripts are run from the SES framework, which is a process which runs within a 32-bitcontext. Therefore, if you need to access system32 elements in a script (for example:"C:\Windows\System32\WindowsPowerShell\v1.0\powershell.exe"), you are advised toreplace system32 with the expression "sysnative" in order to maintain the compatibilitybetween 32-bit and 64-bit Windows versions. For example:"C:\Windows\sysnative\WindowsPowerShell\v1.0\powershell.exe".
These scripts are configured on the management console.
10.1.3 Script Resources
Two types of script resources are available from Script Resources under the Policies menu in theEnvironment Manager section:
1. Tests.
2. Actions.
Tests
Tests can include the following elements:
• Built-in (or predefined) tests.
• User-defined tests.
• Boolean logic operators.
The test icon is .
Here is an example of test including a user-defined test based on a domain user group:
You can add tests by:
◦ Right-clicking on this area and selecting Add from the drop-down menu.
SES - ADMINISTRATION GUIDE - V 7.210. SCRIPTS
Page 211/424 ses-en-administration_guide-v7.2 - 11/30/2017
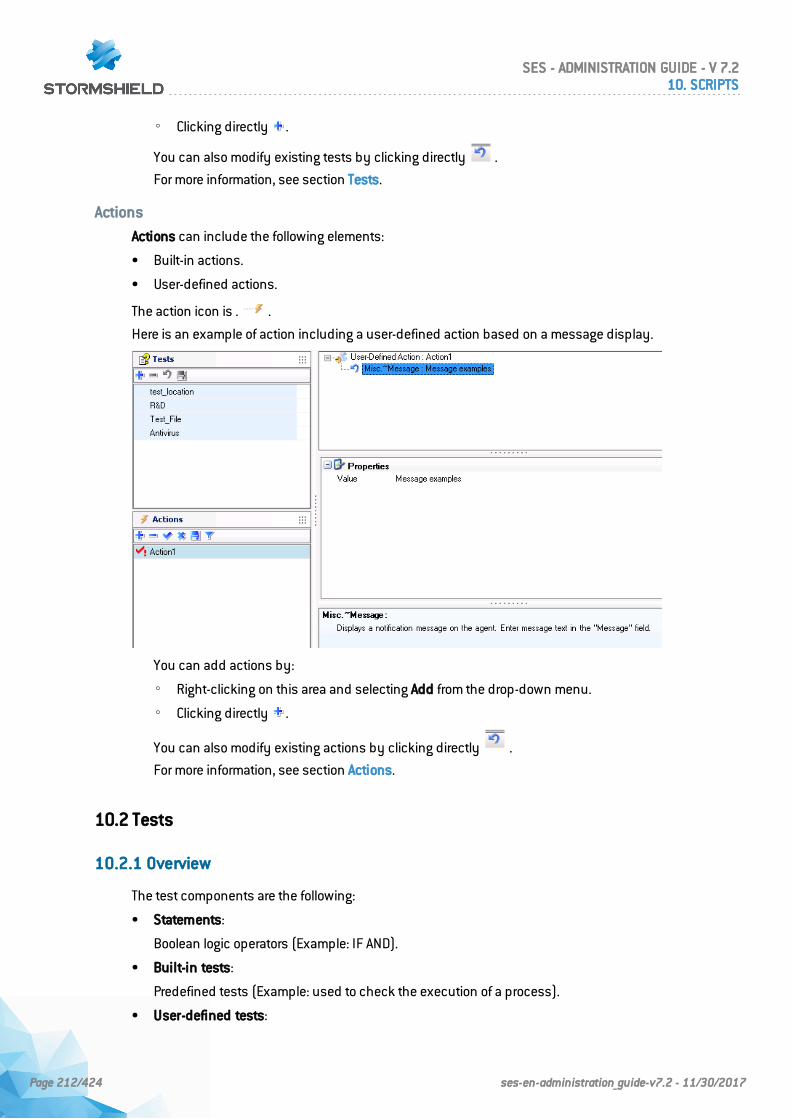
◦ Clicking directly .
You can also modify existing tests by clicking directly .
For more information, see section Tests.
Actions
Actions can include the following elements:
• Built-in actions.
• User-defined actions.
The action icon is . .
Here is an example of action including a user-defined action based on a message display.
You can add actions by:
◦ Right-clicking on this area and selecting Add from the drop-down menu.
◦ Clicking directly .
You can also modify existing actions by clicking directly .
For more information, see section Actions.
10.2 Tests
10.2.1 Overview
The test components are the following:
• Statements:
Boolean logic operators (Example: IF AND).
• Built-in tests:
Predefined tests (Example: used to check the execution of a process).
• User-defined tests:
SES - ADMINISTRATION GUIDE - V 7.210. SCRIPTS
Page 212/424 ses-en-administration_guide-v7.2 - 11/30/2017
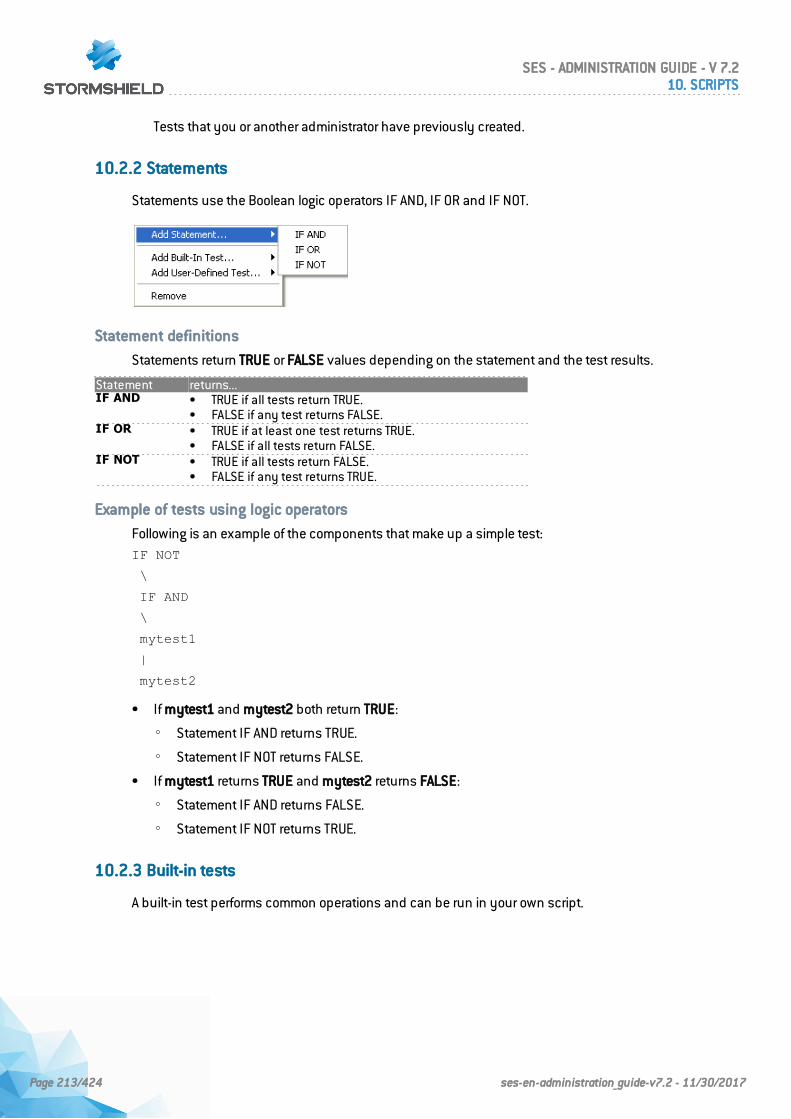
Tests that you or another administrator have previously created.
10.2.2 Statements
Statements use the Boolean logic operators IF AND, IF OR and IF NOT.
Statement definitions
Statements return TRUE or FALSE values depending on the statement and the test results.
Statement returns...IF AND • TRUE if all tests return TRUE.
• FALSE if any test returns FALSE.IF OR • TRUE if at least one test returns TRUE.
• FALSE if all tests return FALSE.IF NOT • TRUE if all tests return FALSE.
• FALSE if any test returns TRUE.
Example of tests using logic operators
Following is an example of the components that make up a simple test:IF NOT
\
IF AND
\
mytest1
|
mytest2
• If mytest1 and mytest2 both return TRUE:
◦ Statement IF AND returns TRUE.
◦ Statement IF NOT returns FALSE.
• If mytest1 returns TRUE and mytest2 returns FALSE:
◦ Statement IF AND returns FALSE.
◦ Statement IF NOT returns TRUE.
10.2.3 Built-in tests
A built-in test performs common operations and can be run in your own script.
SES - ADMINISTRATION GUIDE - V 7.210. SCRIPTS
Page 213/424 ses-en-administration_guide-v7.2 - 11/30/2017
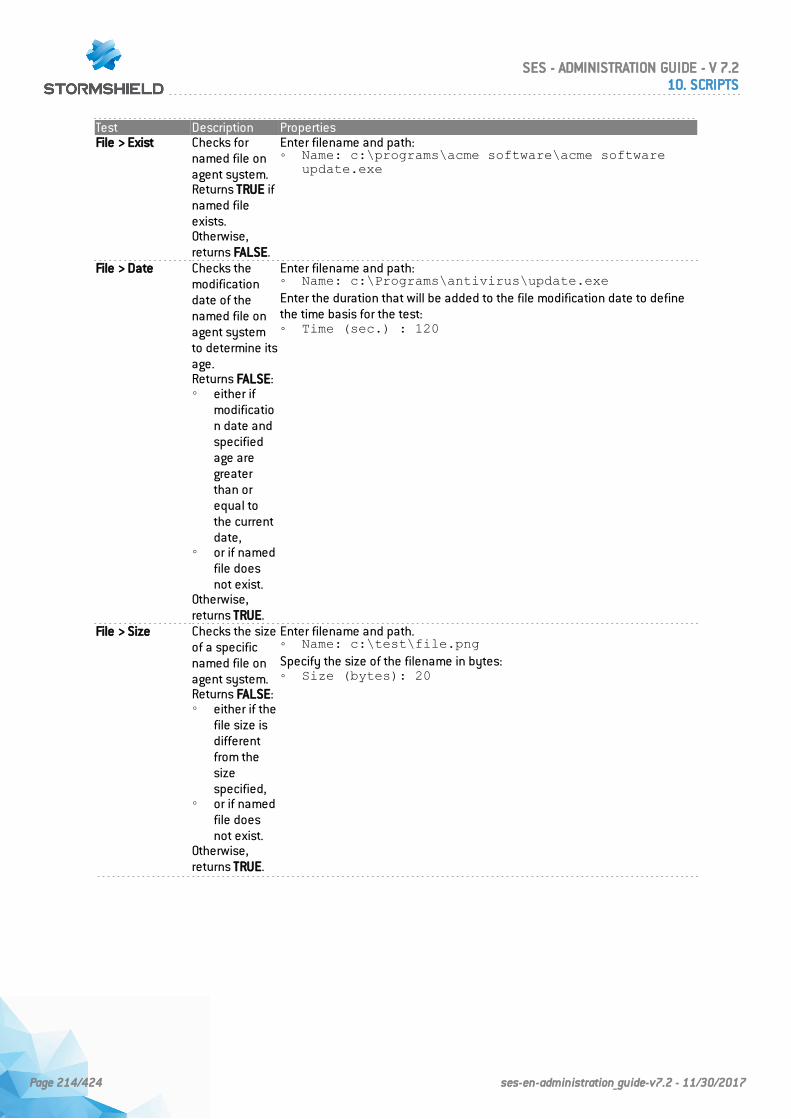
Test Description PropertiesFile > Exist Checks for
named file onagent system.Returns TRUE ifnamed fileexists.Otherwise,returns FALSE.
Enter filename and path:◦ Name: c:\programs\acme software\acme software
update.exe
File > Date Checks themodificationdate of thenamed file onagent systemto determine itsage.Returns FALSE:◦ either if
modification date andspecifiedage aregreaterthan orequal tothe currentdate,
◦ or if namedfile doesnot exist.
Otherwise,returns TRUE.
Enter filename and path:◦ Name: c:\Programs\antivirus\update.exeEnter the duration that will be added to the file modification date to definethe time basis for the test:◦ Time (sec.) : 120
File > Size Checks the sizeof a specificnamed file onagent system.Returns FALSE:◦ either if the
file size isdifferentfrom thesizespecified,
◦ or if namedfile doesnot exist.
Otherwise,returns TRUE.
Enter filename and path.◦ Name: c:\test\file.pngSpecify the size of the filename in bytes:◦ Size (bytes): 20
SES - ADMINISTRATION GUIDE - V 7.210. SCRIPTS
Page 214/424 ses-en-administration_guide-v7.2 - 11/30/2017
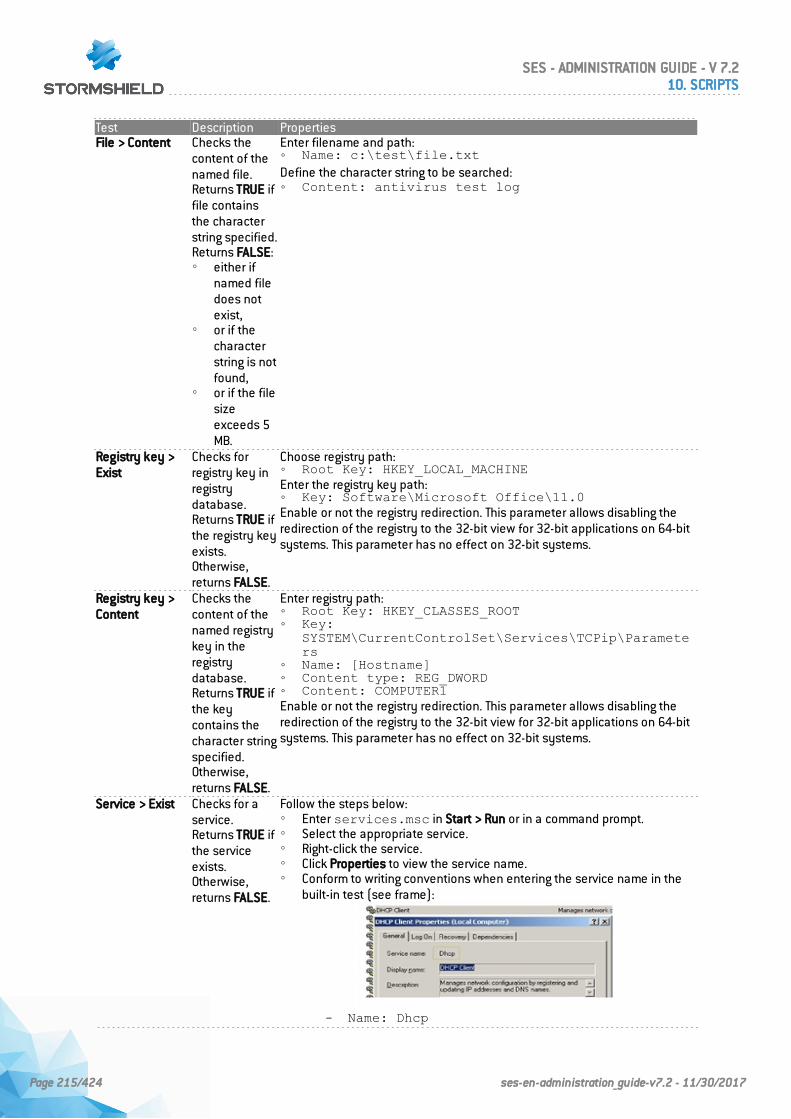
Test Description PropertiesFile > Content Checks the
content of thenamed file.Returns TRUE iffile containsthe characterstring specified.Returns FALSE:◦ either if
named filedoes notexist,
◦ or if thecharacterstring is notfound,
◦ or if the filesizeexceeds 5MB.
Enter filename and path:◦ Name: c:\test\file.txtDefine the character string to be searched:◦ Content: antivirus test log
Registry key >Exist
Checks forregistry key inregistrydatabase.Returns TRUE ifthe registry keyexists.Otherwise,returns FALSE.
Choose registry path:◦ Root Key: HKEY_LOCAL_MACHINEEnter the registry key path:◦ Key: Software\Microsoft Office\11.0Enable or not the registry redirection. This parameter allows disabling theredirection of the registry to the 32-bit view for 32-bit applications on 64-bitsystems. This parameter has no effect on 32-bit systems.
Registry key >Content
Checks thecontent of thenamed registrykey in theregistrydatabase.Returns TRUE ifthe keycontains thecharacter stringspecified.Otherwise,returns FALSE.
Enter registry path:◦ Root Key: HKEY_CLASSES_ROOT◦ Key:
SYSTEM\CurrentControlSet\Services\TCPip\Parameters
◦ Name: [Hostname]◦ Content type: REG_DWORD◦ Content: COMPUTER1Enable or not the registry redirection. This parameter allows disabling theredirection of the registry to the 32-bit view for 32-bit applications on 64-bitsystems. This parameter has no effect on 32-bit systems.
Service > Exist Checks for aservice.Returns TRUE ifthe serviceexists.Otherwise,returns FALSE.
Follow the steps below:◦ Enter services.msc in Start > Run or in a command prompt.◦ Select the appropriate service.◦ Right-click the service.◦ Click Properties to view the service name.◦ Conform to writing conventions when entering the service name in the
built-in test (see frame):
- Name: Dhcp
SES - ADMINISTRATION GUIDE - V 7.210. SCRIPTS
Page 215/424 ses-en-administration_guide-v7.2 - 11/30/2017
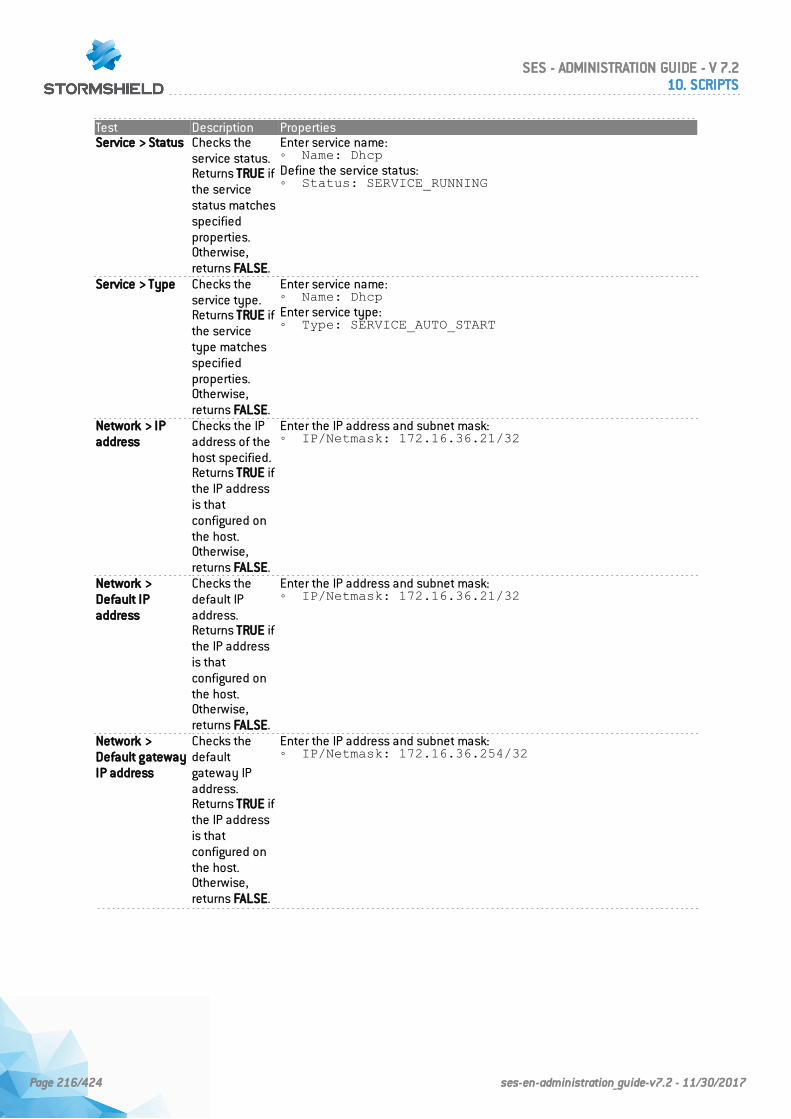
Test Description PropertiesService > Status Checks the
service status.Returns TRUE ifthe servicestatus matchesspecifiedproperties.Otherwise,returns FALSE.
Enter service name:◦ Name: DhcpDefine the service status:◦ Status: SERVICE_RUNNING
Service > Type Checks theservice type.Returns TRUE ifthe servicetype matchesspecifiedproperties.Otherwise,returns FALSE.
Enter service name:◦ Name: DhcpEnter service type:◦ Type: SERVICE_AUTO_START
Network > IPaddress
Checks the IPaddress of thehost specified.Returns TRUE ifthe IP addressis thatconfigured onthe host.Otherwise,returns FALSE.
Enter the IP address and subnet mask:◦ IP/Netmask: 172.16.36.21/32
Network >Default IPaddress
Checks thedefault IPaddress.Returns TRUE ifthe IP addressis thatconfigured onthe host.Otherwise,returns FALSE.
Enter the IP address and subnet mask:◦ IP/Netmask: 172.16.36.21/32
Network >Default gatewayIP address
Checks thedefaultgateway IPaddress.Returns TRUE ifthe IP addressis thatconfigured onthe host.Otherwise,returns FALSE.
Enter the IP address and subnet mask:◦ IP/Netmask: 172.16.36.254/32
SES - ADMINISTRATION GUIDE - V 7.210. SCRIPTS
Page 216/424 ses-en-administration_guide-v7.2 - 11/30/2017
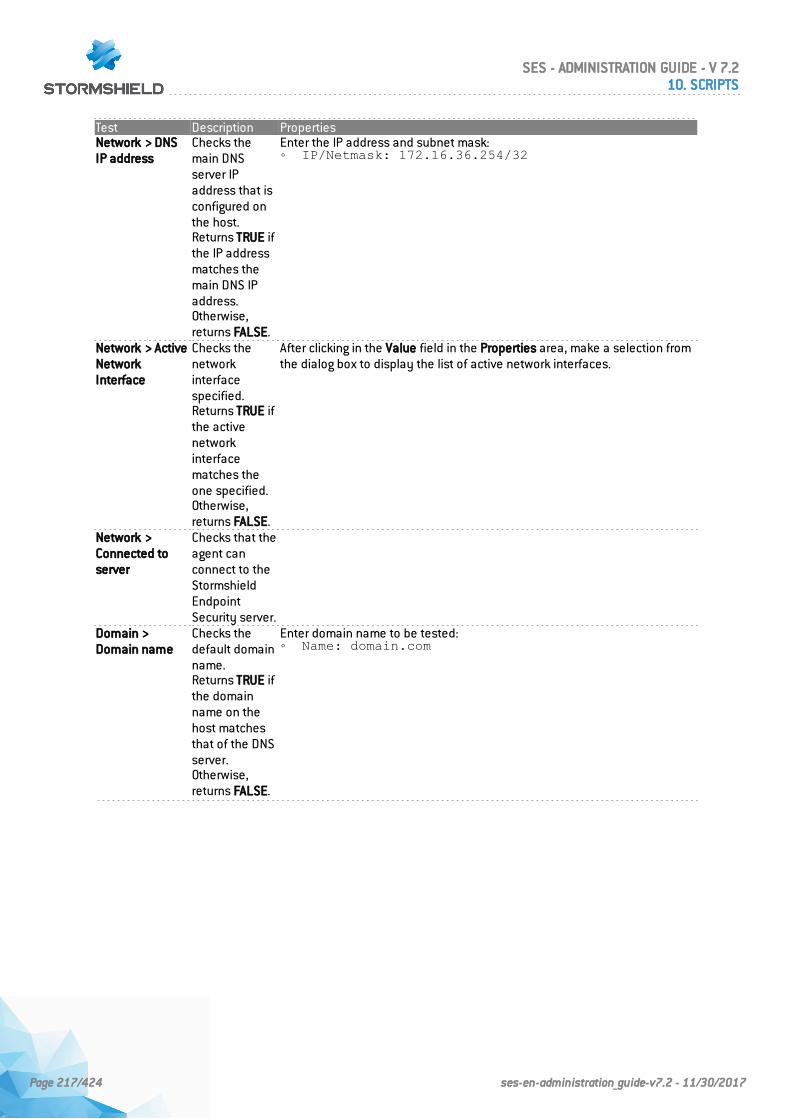
Test Description PropertiesNetwork > DNSIP address
Checks themain DNSserver IPaddress that isconfigured onthe host.Returns TRUE ifthe IP addressmatches themain DNS IPaddress.Otherwise,returns FALSE.
Enter the IP address and subnet mask:◦ IP/Netmask: 172.16.36.254/32
Network > ActiveNetworkInterface
Checks thenetworkinterfacespecified.Returns TRUE ifthe activenetworkinterfacematches theone specified.Otherwise,returns FALSE.
After clicking in the Value field in the Properties area, make a selection fromthe dialog box to display the list of active network interfaces.
Network >Connected toserver
Checks that theagent canconnect to theStormshieldEndpointSecurity server.
Domain >Domain name
Checks thedefault domainname.Returns TRUE ifthe domainname on thehost matchesthat of the DNSserver.Otherwise,returns FALSE.
Enter domain name to be tested:◦ Name: domain.com
SES - ADMINISTRATION GUIDE - V 7.210. SCRIPTS
Page 217/424 ses-en-administration_guide-v7.2 - 11/30/2017

Test Description PropertiesDomain > ActiveDirectory User
Checks theActive Directoryuser in thecurrentinteractivesession.Returns TRUE ifthe user loggedonto thecurrent sessioncorresponds tothe onespecified.Otherwise,returns FALSE.
Enter user Distinguished Name (DN):◦ Name: CN=john,OU=Users,DC=stormshield,DC=en
Remark: This built-in test only works in Connected mode.
Domain > ActiveDirectory Group
Checks that agiven userbelongs to theActive DirectoryGroup in thecurrentinteractivesession.Returns TRUE ifthe user loggedonto thecurrentinteractivesessionbelongs to thegroup specified.Otherwise,returns FALSE.
Enter the domain name in NETBIOS format:◦ Domain: STORMSHIELDEnter the Active Directory group name:◦ Name: users
Remark: This built-in test only works in Connected mode.
Antivirus > StatusChecks theantivirus status.Returns TRUE ifthe antivirus isenabled.Otherwise,returns FALSE.
Only if you have installed the AVP option.
Antivirus >Signatureversion
Checks the ageof the antivirussignaturedatabase.Returns TRUE ifthe age of theantivirussignaturedatabase is ≤ to the numberof daysspecified.Otherwise,returns FALSE.
Only if you have installed the AVP option.The antivirus signature database is considered obsolete when it is 3 daysold. You may increase this value.
SES - ADMINISTRATION GUIDE - V 7.210. SCRIPTS
Page 218/424 ses-en-administration_guide-v7.2 - 11/30/2017
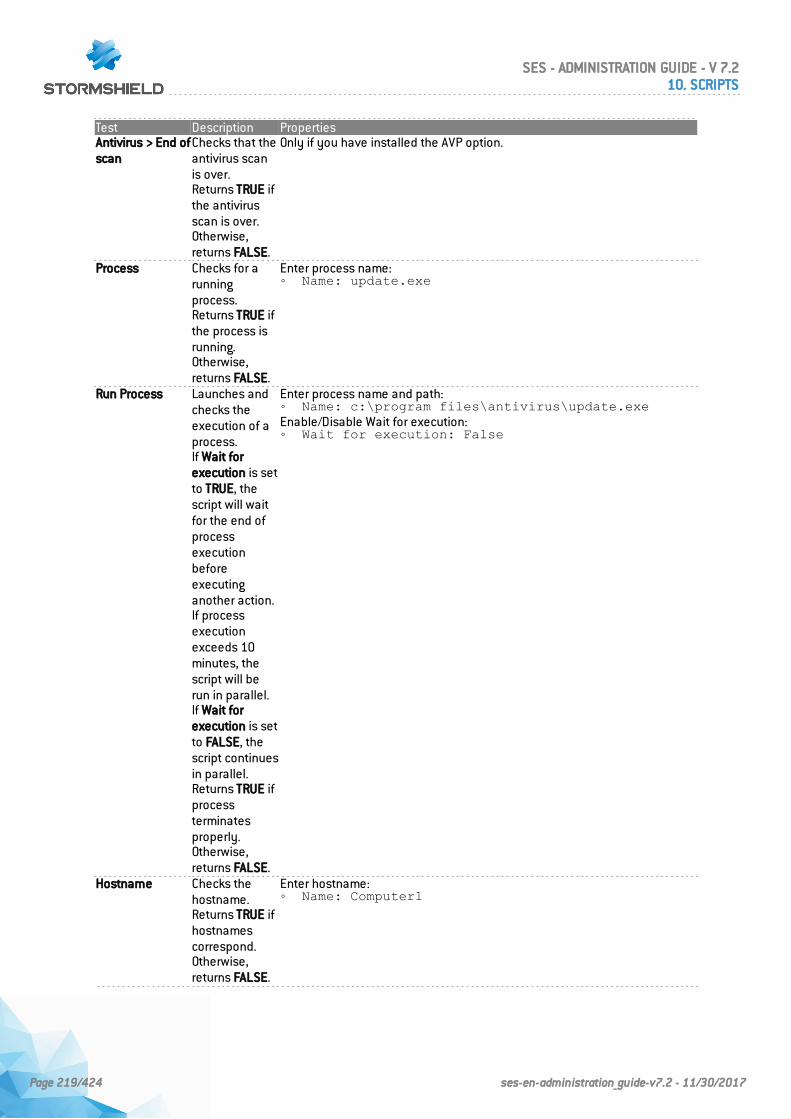
Test Description PropertiesAntivirus > End ofscan
Checks that theantivirus scanis over.Returns TRUE ifthe antivirusscan is over.Otherwise,returns FALSE.
Only if you have installed the AVP option.
Process Checks for arunningprocess.Returns TRUE ifthe process isrunning.Otherwise,returns FALSE.
Enter process name:◦ Name: update.exe
Run Process Launches andchecks theexecution of aprocess.If Wait forexecution is setto TRUE, thescript will waitfor the end ofprocessexecutionbeforeexecutinganother action.If processexecutionexceeds 10minutes, thescript will berun in parallel.If Wait forexecution is setto FALSE, thescript continuesin parallel.Returns TRUE ifprocessterminatesproperly.Otherwise,returns FALSE.
Enter process name and path:◦ Name: c:\program files\antivirus\update.exeEnable/Disable Wait for execution:◦ Wait for execution: False
Hostname Checks thehostname.Returns TRUE ifhostnamescorrespond.Otherwise,returns FALSE.
Enter hostname:◦ Name: Computer1
SES - ADMINISTRATION GUIDE - V 7.210. SCRIPTS
Page 219/424 ses-en-administration_guide-v7.2 - 11/30/2017
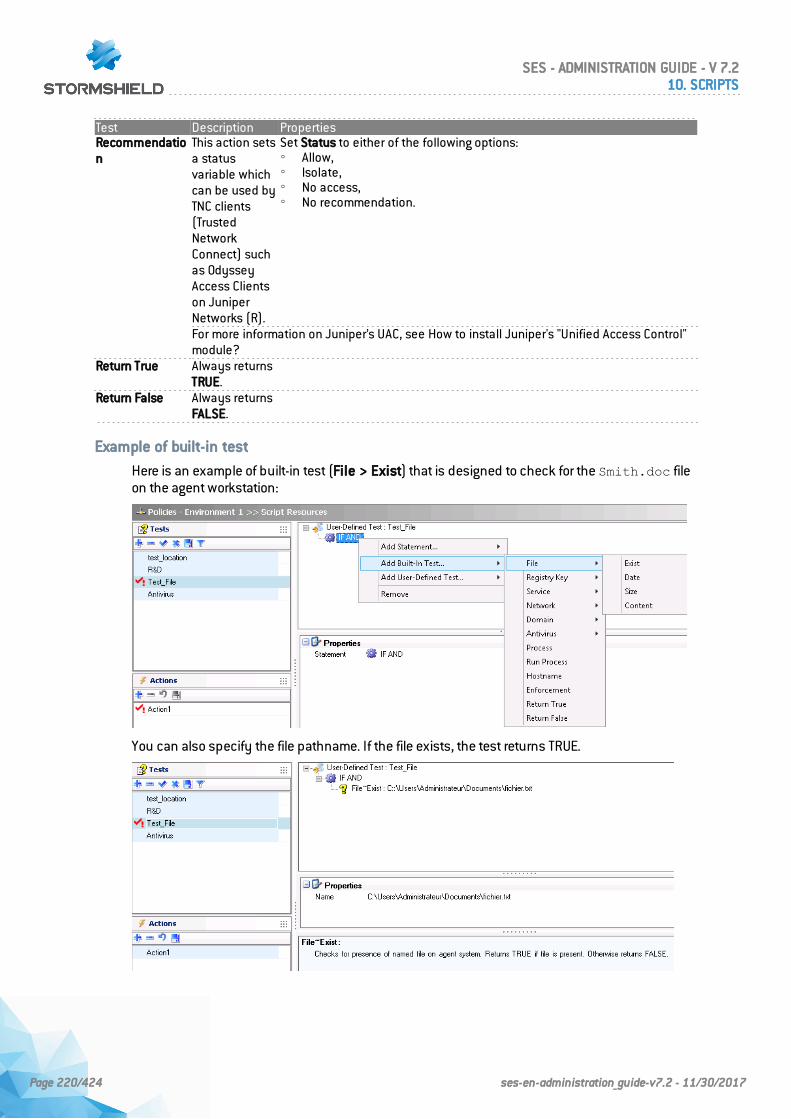
Test Description PropertiesRecommendation
This action setsa statusvariable whichcan be used byTNC clients(TrustedNetworkConnect) suchas OdysseyAccess Clientson JuniperNetworks (R).
Set Status to either of the following options:◦ Allow,◦ Isolate,◦ No access,◦ No recommendation.
For more information on Juniper’s UAC, see How to install Juniper's "Unified Access Control"module?
Return True Always returnsTRUE.
Return False Always returnsFALSE.
Example of built-in test
Here is an example of built-in test (File > Exist) that is designed to check for the Smith.doc fileon the agent workstation:
You can also specify the file pathname. If the file exists, the test returns TRUE.
SES - ADMINISTRATION GUIDE - V 7.210. SCRIPTS
Page 220/424 ses-en-administration_guide-v7.2 - 11/30/2017
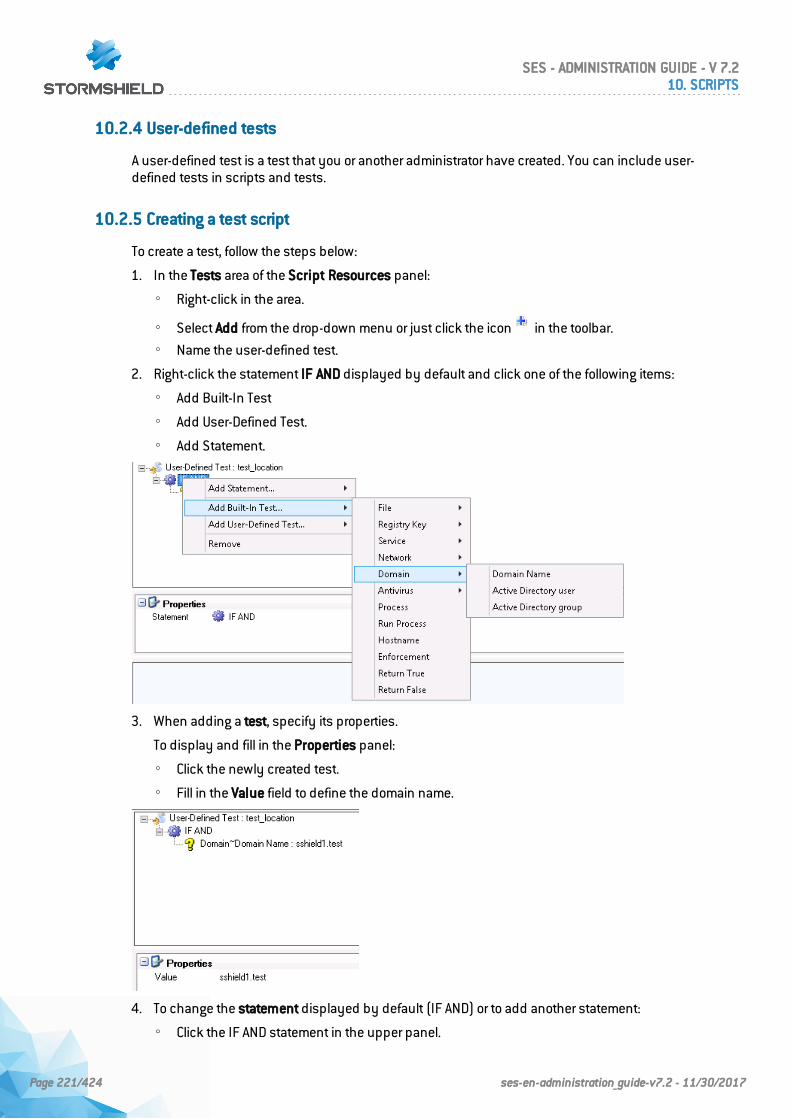
10.2.4 User-defined tests
A user-defined test is a test that you or another administrator have created. You can include user-defined tests in scripts and tests.
10.2.5 Creating a test script
To create a test, follow the steps below:
1. In the Tests area of the Script Resources panel:
◦ Right-click in the area.
◦ Select Add from the drop-down menu or just click the icon in the toolbar.
◦ Name the user-defined test.
2. Right-click the statement IF AND displayed by default and click one of the following items:
◦ Add Built-In Test
◦ Add User-Defined Test.
◦ Add Statement.
3. When adding a test, specify its properties.
To display and fill in the Properties panel:
◦ Click the newly created test.
◦ Fill in the Value field to define the domain name.
4. To change the statement displayed by default (IF AND) or to add another statement:
◦ Click the IF AND statement in the upper panel.
SES - ADMINISTRATION GUIDE - V 7.210. SCRIPTS
Page 221/424 ses-en-administration_guide-v7.2 - 11/30/2017
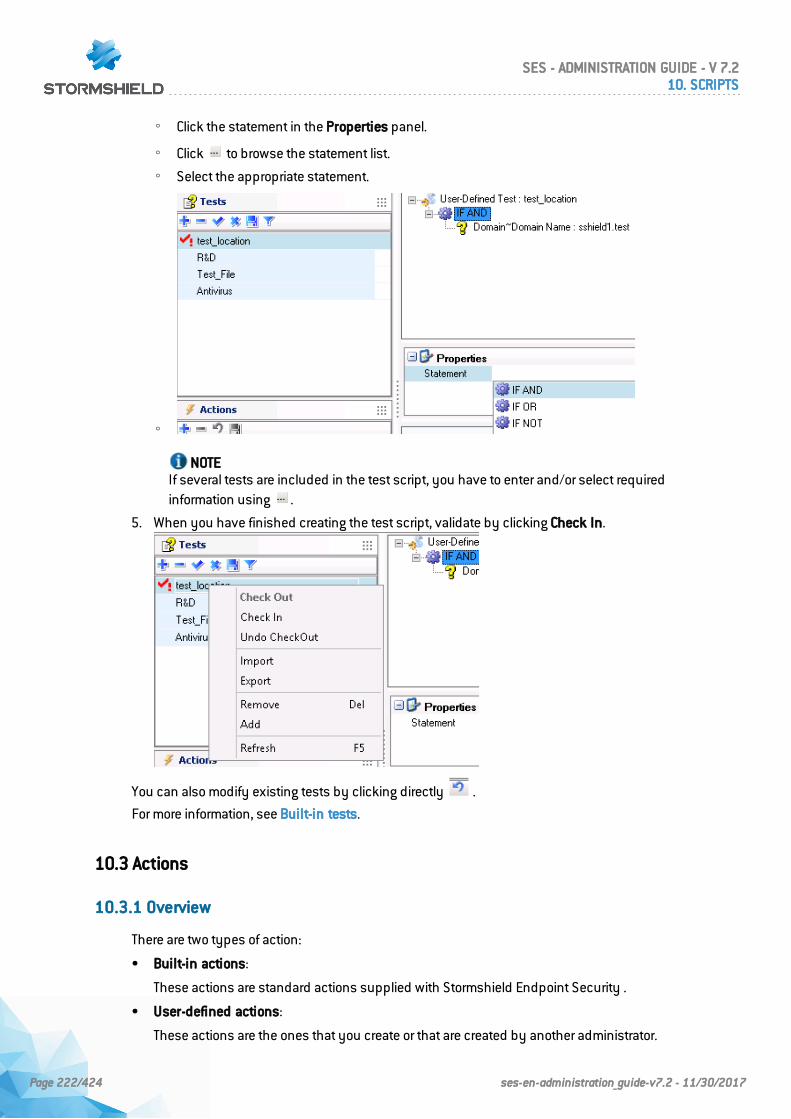
◦ Click the statement in the Properties panel.
◦ Click to browse the statement list.
◦ Select the appropriate statement.
◦
NOTEIf several tests are included in the test script, you have to enter and/or select requiredinformation using .
5. When you have finished creating the test script, validate by clicking Check In.
You can also modify existing tests by clicking directly .
For more information, see Built-in tests.
10.3 Actions
10.3.1 Overview
There are two types of action:
• Built-in actions:
These actions are standard actions supplied with Stormshield Endpoint Security .
• User-defined actions:
These actions are the ones that you create or that are created by another administrator.
SES - ADMINISTRATION GUIDE - V 7.210. SCRIPTS
Page 222/424 ses-en-administration_guide-v7.2 - 11/30/2017
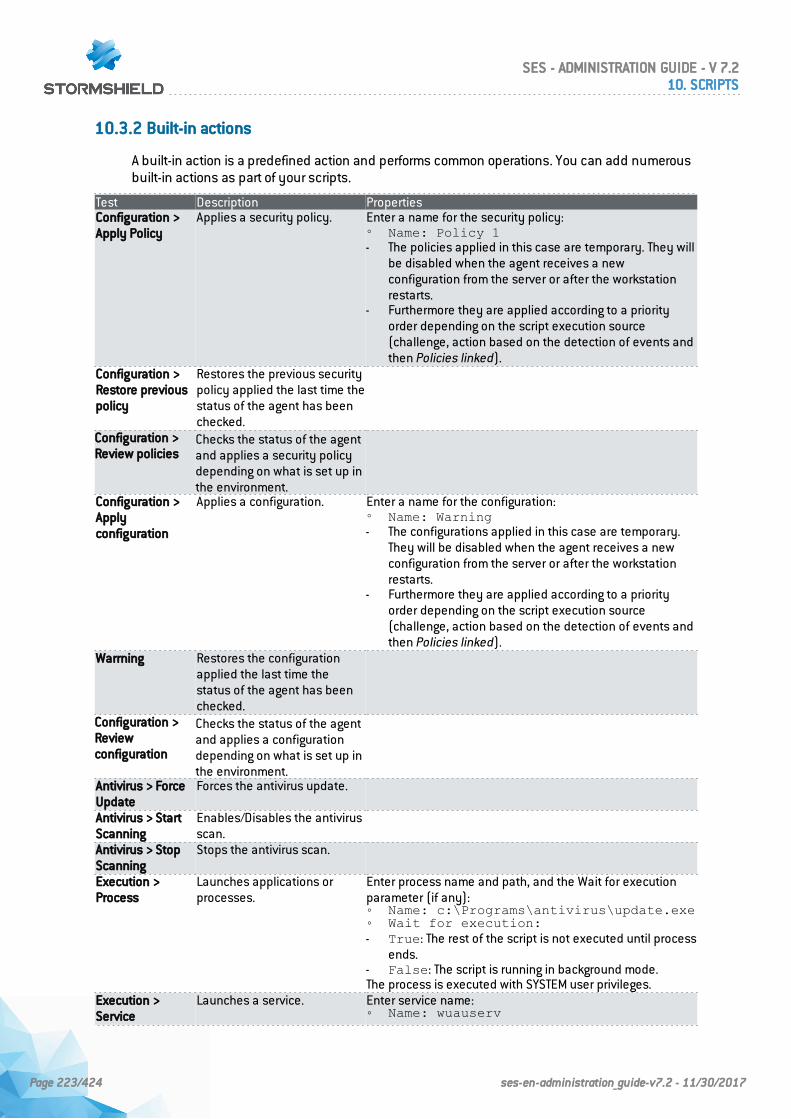
10.3.2 Built-in actions
A built-in action is a predefined action and performs common operations. You can add numerousbuilt-in actions as part of your scripts.
Test Description PropertiesConfiguration >Apply Policy
Applies a security policy. Enter a name for the security policy:◦ Name: Policy 1- The policies applied in this case are temporary. They will
be disabled when the agent receives a newconfiguration from the server or after the workstationrestarts.
- Furthermore they are applied according to a priorityorder depending on the script execution source(challenge, action based on the detection of events andthen Policies linked).
Configuration >Restore previouspolicy
Restores the previous securitypolicy applied the last time thestatus of the agent has beenchecked.
Configuration >Review policies
Checks the status of the agentand applies a security policydepending on what is set up inthe environment.
Configuration >Applyconfiguration
Applies a configuration. Enter a name for the configuration:◦ Name: Warning- The configurations applied in this case are temporary.
They will be disabled when the agent receives a newconfiguration from the server or after the workstationrestarts.
- Furthermore they are applied according to a priorityorder depending on the script execution source(challenge, action based on the detection of events andthen Policies linked).
Warrning Restores the configurationapplied the last time thestatus of the agent has beenchecked.
Configuration >Reviewconfiguration
Checks the status of the agentand applies a configurationdepending on what is set up inthe environment.
Antivirus > ForceUpdate
Forces the antivirus update.
Antivirus > StartScanning
Enables/Disables the antivirusscan.
Antivirus > StopScanning
Stops the antivirus scan.
Execution >Process
Launches applications orprocesses.
Enter process name and path, and the Wait for executionparameter (if any):◦ Name: c:\Programs\antivirus\update.exe◦ Wait for execution:- True: The rest of the script is not executed until process
ends.- False: The script is running in background mode.The process is executed with SYSTEM user privileges.
Execution >Service
Launches a service. Enter service name:◦ Name: wuauserv
SES - ADMINISTRATION GUIDE - V 7.210. SCRIPTS
Page 223/424 ses-en-administration_guide-v7.2 - 11/30/2017
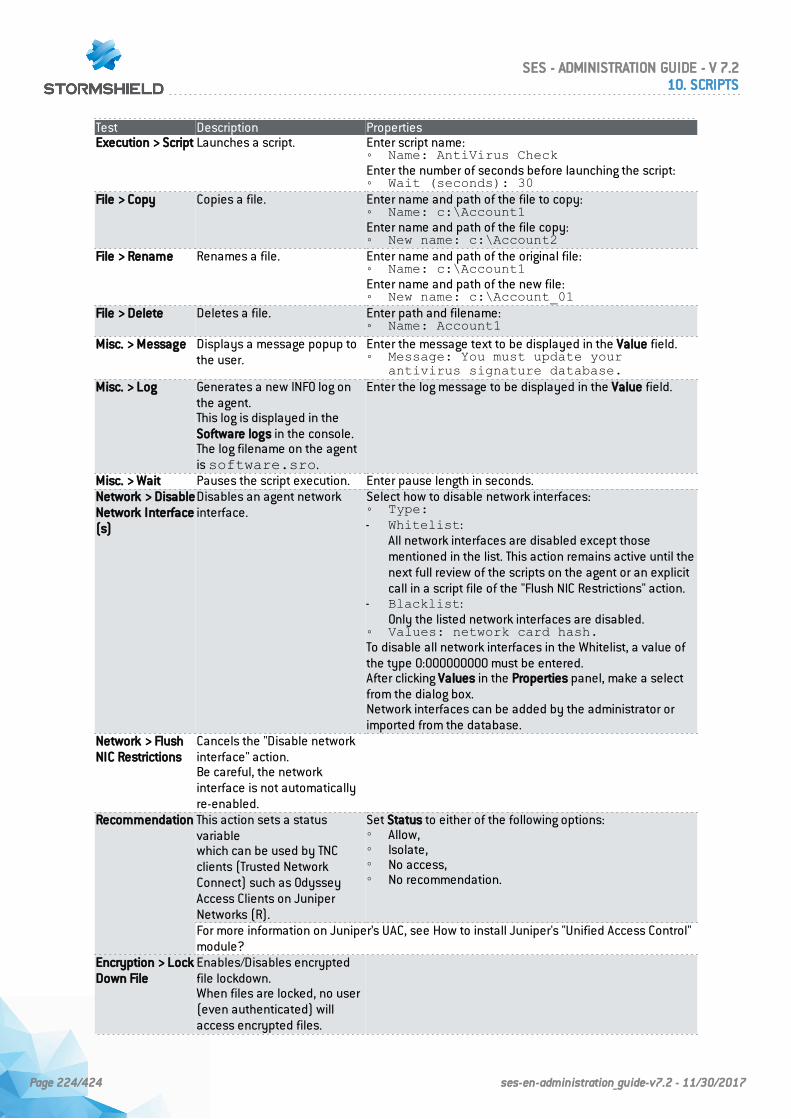
Test Description PropertiesExecution > Script Launches a script. Enter script name:
◦ Name: AntiVirus CheckEnter the number of seconds before launching the script:◦ Wait (seconds): 30
File > Copy Copies a file. Enter name and path of the file to copy:◦ Name: c:\Account1Enter name and path of the file copy:◦ New name: c:\Account2
File > Rename Renames a file. Enter name and path of the original file:◦ Name: c:\Account1Enter name and path of the new file:◦ New name: c:\Account_01
File > Delete Deletes a file. Enter path and filename:◦ Name: Account1
Misc. > Message Displays a message popup tothe user.
Enter the message text to be displayed in the Value field.◦ Message: You must update your
antivirus signature database.Misc. > Log Generates a new INFO log on
the agent.This log is displayed in theSoftware logs in the console.The log filename on the agentis software.sro.
Enter the log message to be displayed in the Value field.
Misc. > Wait Pauses the script execution. Enter pause length in seconds.Network > DisableNetwork Interface(s)
Disables an agent networkinterface.
Select how to disable network interfaces:◦ Type:- Whitelist:
All network interfaces are disabled except thosementioned in the list. This action remains active until thenext full review of the scripts on the agent or an explicitcall in a script file of the "Flush NIC Restrictions" action.
- Blacklist:Only the listed network interfaces are disabled.
◦ Values: network card hash.To disable all network interfaces in the Whitelist, a value ofthe type 0:000000000 must be entered.After clicking Values in the Properties panel, make a selectfrom the dialog box.Network interfaces can be added by the administrator orimported from the database.
Network > FlushNIC Restrictions
Cancels the "Disable networkinterface" action.Be careful, the networkinterface is not automaticallyre-enabled.
Recommendation This action sets a statusvariablewhich can be used by TNCclients (Trusted NetworkConnect) such as OdysseyAccess Clients on JuniperNetworks (R).
Set Status to either of the following options:◦ Allow,◦ Isolate,◦ No access,◦ No recommendation.
For more information on Juniper’s UAC, see How to install Juniper's "Unified Access Control"module?
Encryption > LockDown File
Enables/Disables encryptedfile lockdown.When files are locked, no user(even authenticated) willaccess encrypted files.
SES - ADMINISTRATION GUIDE - V 7.210. SCRIPTS
Page 224/424 ses-en-administration_guide-v7.2 - 11/30/2017
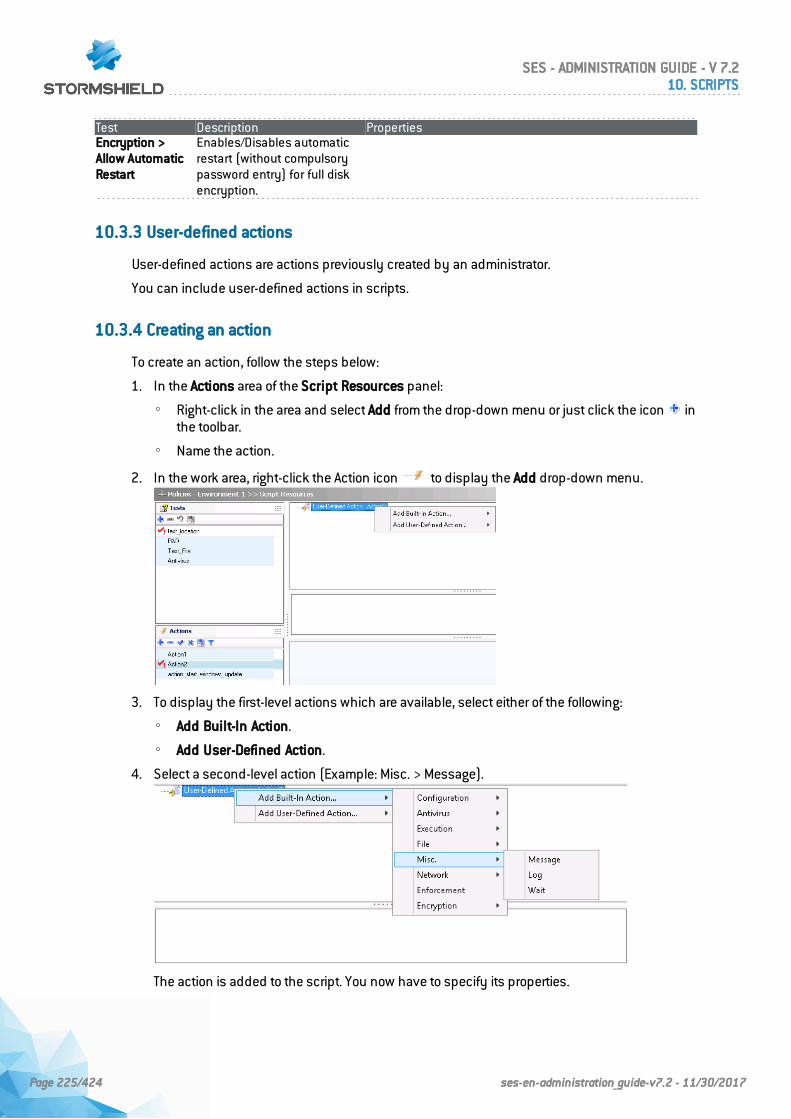
Test Description PropertiesEncryption >Allow AutomaticRestart
Enables/Disables automaticrestart (without compulsorypassword entry) for full diskencryption.
10.3.3 User-defined actions
User-defined actions are actions previously created by an administrator.
You can include user-defined actions in scripts.
10.3.4 Creating an action
To create an action, follow the steps below:
1. In the Actions area of the Script Resources panel:
◦ Right-click in the area and select Add from the drop-down menu or just click the icon inthe toolbar.
◦ Name the action.
2. In the work area, right-click the Action icon to display the Add drop-down menu.
3. To display the first-level actions which are available, select either of the following:
◦ Add Built-In Action.
◦ Add User-Defined Action.
4. Select a second-level action (Example: Misc. > Message).
The action is added to the script. You now have to specify its properties.
SES - ADMINISTRATION GUIDE - V 7.210. SCRIPTS
Page 225/424 ses-en-administration_guide-v7.2 - 11/30/2017
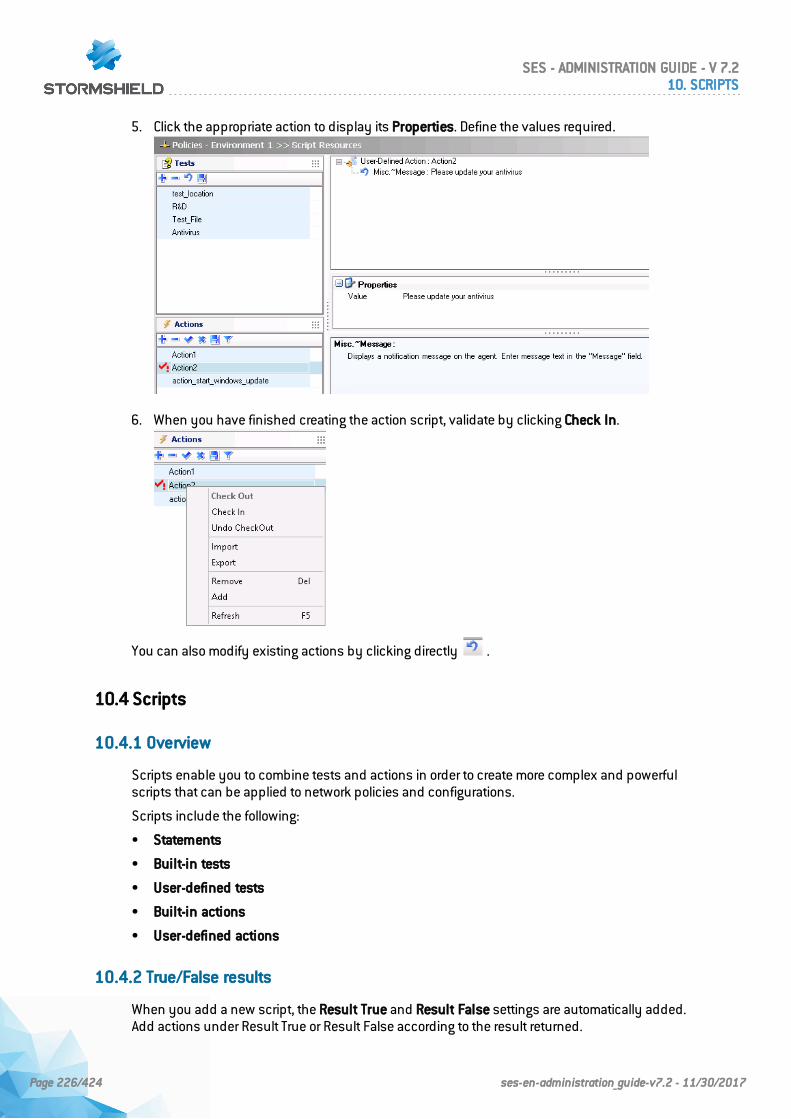
5. Click the appropriate action to display its Properties. Define the values required.
6. When you have finished creating the action script, validate by clicking Check In.
You can also modify existing actions by clicking directly .
10.4 Scripts
10.4.1 Overview
Scripts enable you to combine tests and actions in order to create more complex and powerfulscripts that can be applied to network policies and configurations.
Scripts include the following:
• Statements
• Built-in tests
• User-defined tests
• Built-in actions
• User-defined actions
10.4.2 True/False results
When you add a new script, the Result True and Result False settings are automatically added.Add actions under Result True or Result False according to the result returned.
SES - ADMINISTRATION GUIDE - V 7.210. SCRIPTS
Page 226/424 ses-en-administration_guide-v7.2 - 11/30/2017
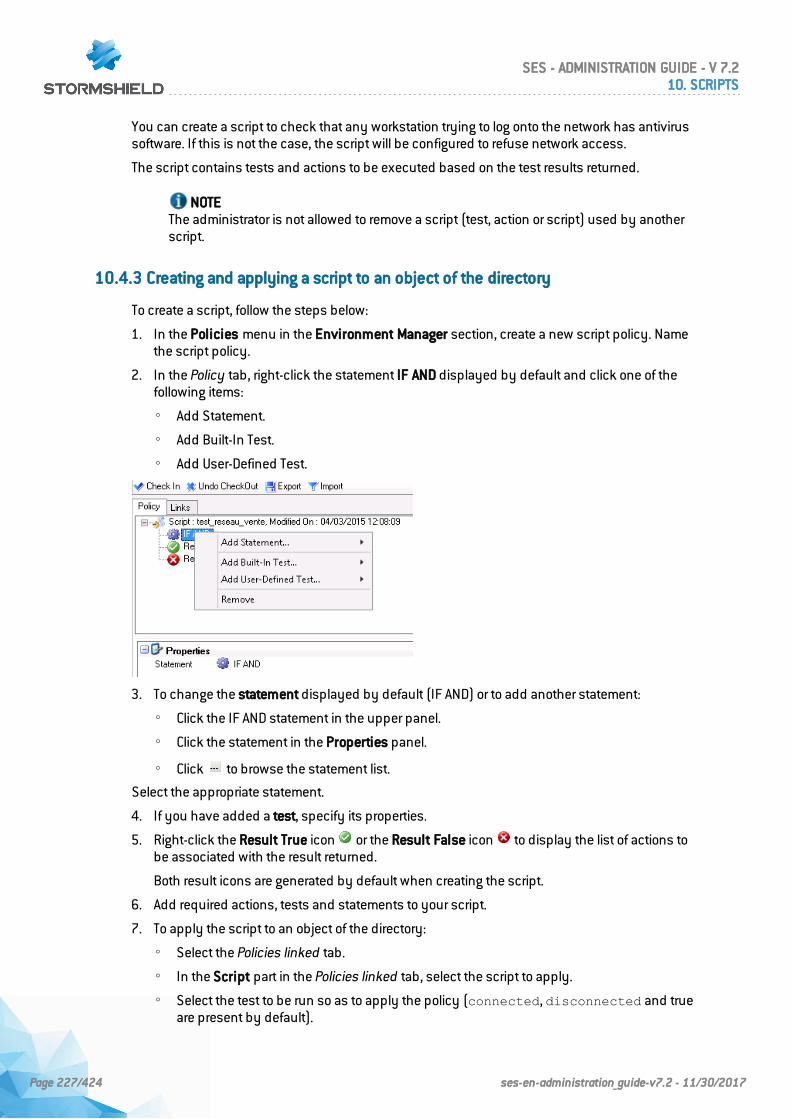
You can create a script to check that any workstation trying to log onto the network has antivirussoftware. If this is not the case, the script will be configured to refuse network access.
The script contains tests and actions to be executed based on the test results returned.
NOTEThe administrator is not allowed to remove a script (test, action or script) used by anotherscript.
10.4.3 Creating and applying a script to an object of the directory
To create a script, follow the steps below:
1. In the Policies menu in the Environment Manager section, create a new script policy. Namethe script policy.
2. In the Policy tab, right-click the statement IF AND displayed by default and click one of thefollowing items:
◦ Add Statement.
◦ Add Built-In Test.
◦ Add User-Defined Test.
3. To change the statement displayed by default (IF AND) or to add another statement:
◦ Click the IF AND statement in the upper panel.
◦ Click the statement in the Properties panel.
◦ Click to browse the statement list.
Select the appropriate statement.
4. If you have added a test, specify its properties.
5. Right-click the Result True icon or the Result False icon to display the list of actions tobe associated with the result returned.
Both result icons are generated by default when creating the script.
6. Add required actions, tests and statements to your script.
7. To apply the script to an object of the directory:
◦ Select the Policies linked tab.
◦ In the Script part in the Policies linked tab, select the script to apply.
◦ Select the test to be run so as to apply the policy (connected, disconnected and trueare present by default).
SES - ADMINISTRATION GUIDE - V 7.210. SCRIPTS
Page 227/424 ses-en-administration_guide-v7.2 - 11/30/2017
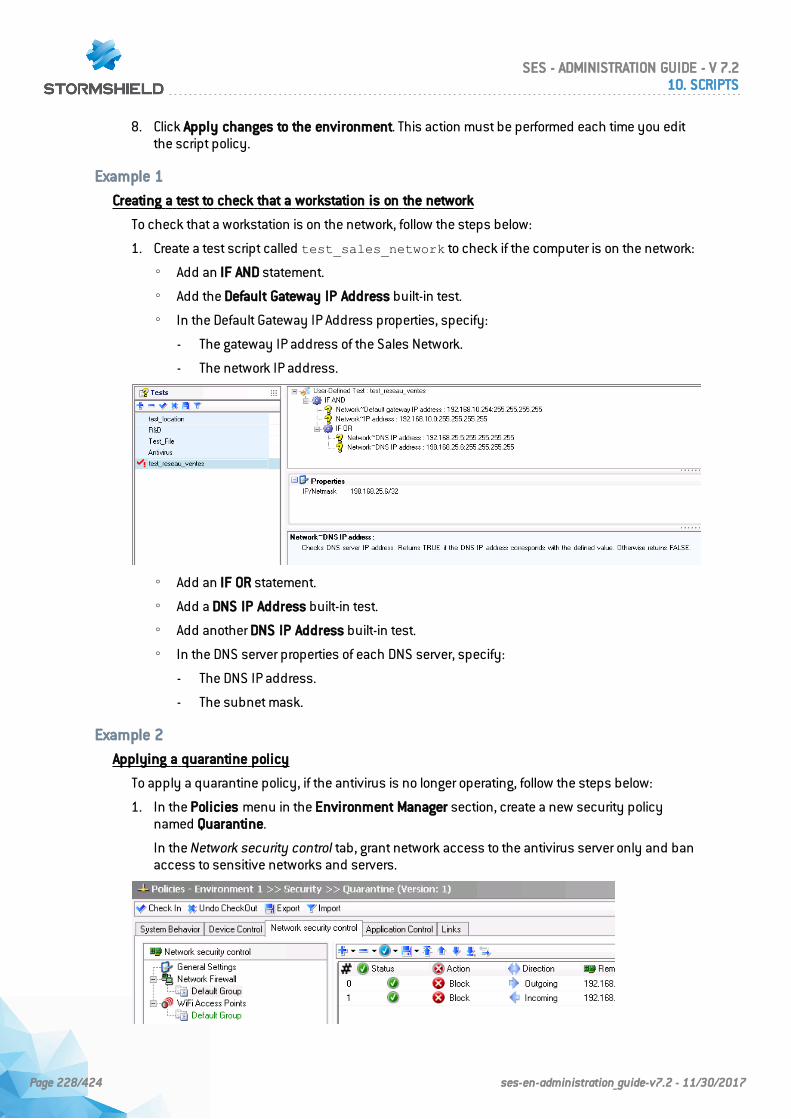
8. Click Apply changes to the environment. This action must be performed each time you editthe script policy.
Example 1
Creating a test to check that a workstation is on the network
To check that a workstation is on the network, follow the steps below:
1. Create a test script called test_sales_network to check if the computer is on the network:
◦ Add an IF AND statement.
◦ Add the Default Gateway IP Address built-in test.
◦ In the Default Gateway IP Address properties, specify:
- The gateway IP address of the Sales Network.
- The network IP address.
◦ Add an IF OR statement.
◦ Add a DNS IP Address built-in test.
◦ Add another DNS IP Address built-in test.
◦ In the DNS server properties of each DNS server, specify:
- The DNS IP address.
- The subnet mask.
Example 2
Applying a quarantine policy
To apply a quarantine policy, if the antivirus is no longer operating, follow the steps below:
1. In the Policies menu in the Environment Manager section, create a new security policynamed Quarantine.
In the Network security control tab, grant network access to the antivirus server only and banaccess to sensitive networks and servers.
SES - ADMINISTRATION GUIDE - V 7.210. SCRIPTS
Page 228/424 ses-en-administration_guide-v7.2 - 11/30/2017

NOTEYou can apply restrictions to any element in the same way as for a security policy(Example: forbid the execution of specific programs).
2. Create a test called test_antivirus to check that when a host connects to the companyserver:
◦ The antivirus is running.
◦ The signature file is not older than 2 days.
3. Under Environment Manager > Script Resources > Tests, follow the steps below:
◦ Add an IF AND statement.
◦ Inside the IF AND statement, add the two following tests:
- Antivirus > Status:
In order to check the status of your antivirus software (enabled/disabled).
- Antivirus > Signature version:
In the Properties panel, enter the duration after which the antivirus is consideredobsolete. In this example: 3 days is converted into seconds (259200 seconds in theupper part of the user-defined test).
4. Under Environment Manager > Script Resources > Actions, define a new action calledaction_restrict_access.
You will use this action to apply the Quarantine policy.
5. In the user-defined action action_restrict_access, follow the steps below:
◦ Add a Misc. > Message built-in action to inform the user.
◦ Add a Configuration >Apply Policy built-in action:
- Select the Quarantine policy that you have created in Step 1.
SES - ADMINISTRATION GUIDE - V 7.210. SCRIPTS
Page 229/424 ses-en-administration_guide-v7.2 - 11/30/2017
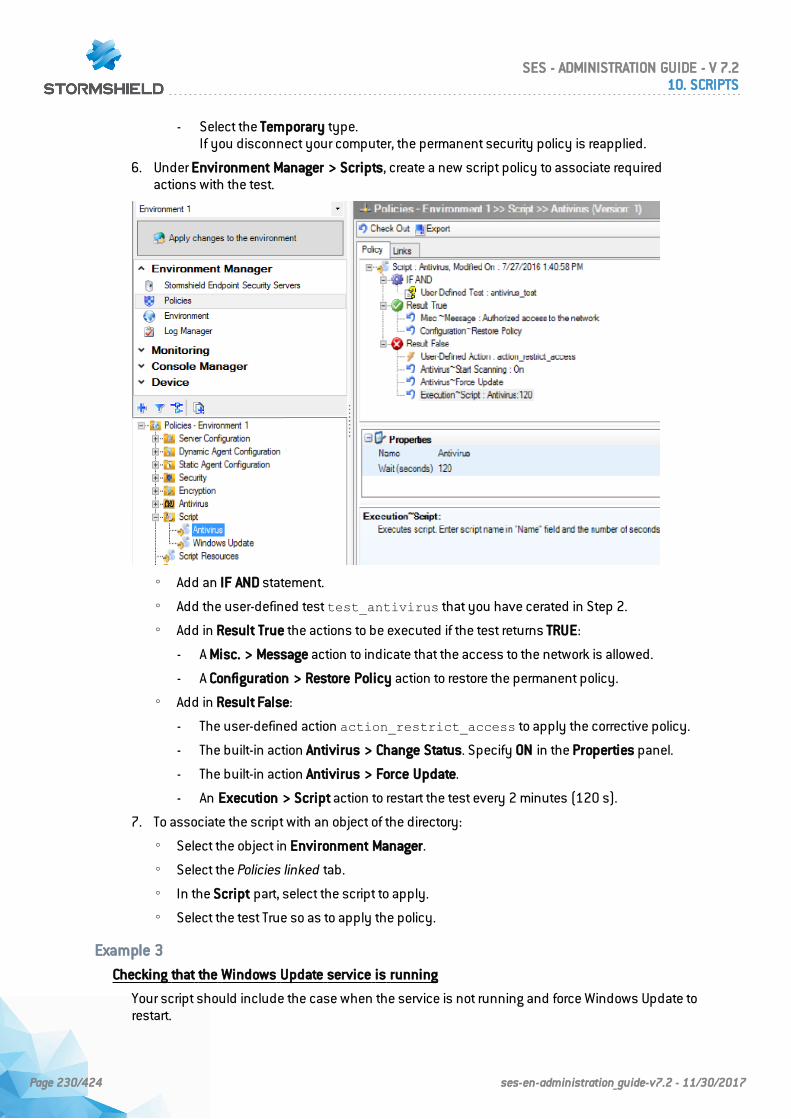
- Select the Temporary type.If you disconnect your computer, the permanent security policy is reapplied.
6. Under Environment Manager > Scripts, create a new script policy to associate requiredactions with the test.
◦ Add an IF AND statement.
◦ Add the user-defined test test_antivirus that you have cerated in Step 2.
◦ Add in Result True the actions to be executed if the test returns TRUE:
- A Misc. > Message action to indicate that the access to the network is allowed.
- A Configuration > Restore Policy action to restore the permanent policy.
◦ Add in Result False:
- The user-defined action action_restrict_access to apply the corrective policy.
- The built-in action Antivirus > Change Status. Specify ON in the Properties panel.
- The built-in action Antivirus > Force Update.
- An Execution > Script action to restart the test every 2 minutes (120 s).
7. To associate the script with an object of the directory:
◦ Select the object in Environment Manager.
◦ Select the Policies linked tab.
◦ In the Script part, select the script to apply.
◦ Select the test True so as to apply the policy.
Example 3
Checking that the Windows Update service is running
Your script should include the case when the service is not running and force Windows Update torestart.
SES - ADMINISTRATION GUIDE - V 7.210. SCRIPTS
Page 230/424 ses-en-administration_guide-v7.2 - 11/30/2017
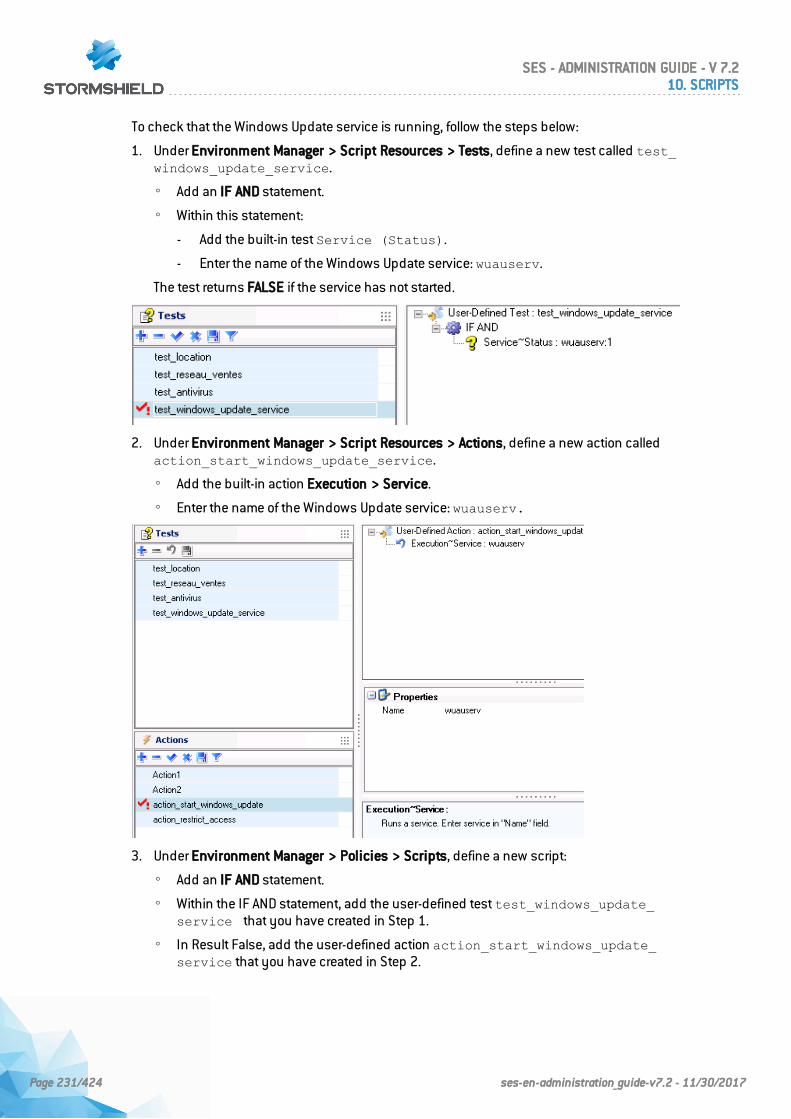
To check that the Windows Update service is running, follow the steps below:
1. Under Environment Manager > Script Resources > Tests, define a new test called test_windows_update_service.
◦ Add an IF AND statement.
◦ Within this statement:
- Add the built-in test Service (Status).
- Enter the name of the Windows Update service: wuauserv.
The test returns FALSE if the service has not started.
2. Under Environment Manager > Script Resources > Actions, define a new action calledaction_start_windows_update_service.
◦ Add the built-in action Execution > Service.
◦ Enter the name of the Windows Update service: wuauserv.
3. Under Environment Manager > Policies > Scripts, define a new script:
◦ Add an IF AND statement.
◦ Within the IF AND statement, add the user-defined test test_windows_update_service that you have created in Step 1.
◦ In Result False, add the user-defined action action_start_windows_update_service that you have created in Step 2.
SES - ADMINISTRATION GUIDE - V 7.210. SCRIPTS
Page 231/424 ses-en-administration_guide-v7.2 - 11/30/2017
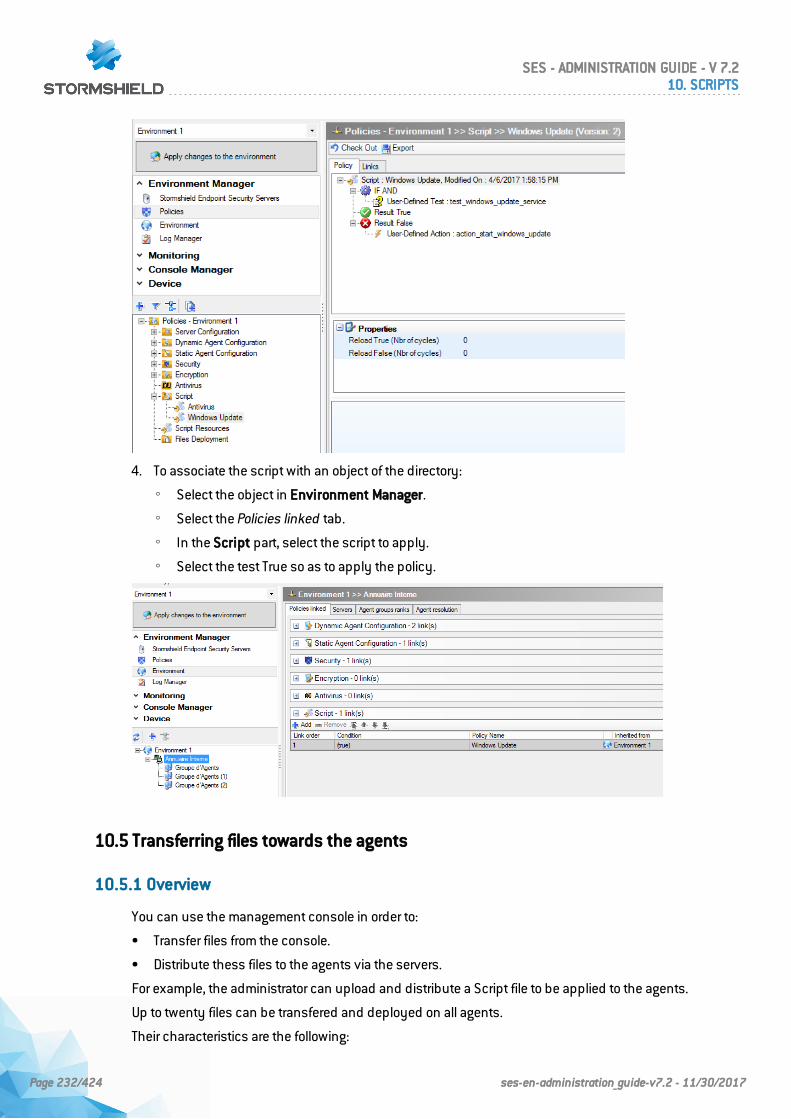
4. To associate the script with an object of the directory:
◦ Select the object in Environment Manager.
◦ Select the Policies linked tab.
◦ In the Script part, select the script to apply.
◦ Select the test True so as to apply the policy.
10.5 Transferring files towards the agents
10.5.1 Overview
You can use the management console in order to:
• Transfer files from the console.
• Distribute thess files to the agents via the servers.
For example, the administrator can upload and distribute a Script file to be applied to the agents.
Up to twenty files can be transfered and deployed on all agents.
Their characteristics are the following:
SES - ADMINISTRATION GUIDE - V 7.210. SCRIPTS
Page 232/424 ses-en-administration_guide-v7.2 - 11/30/2017
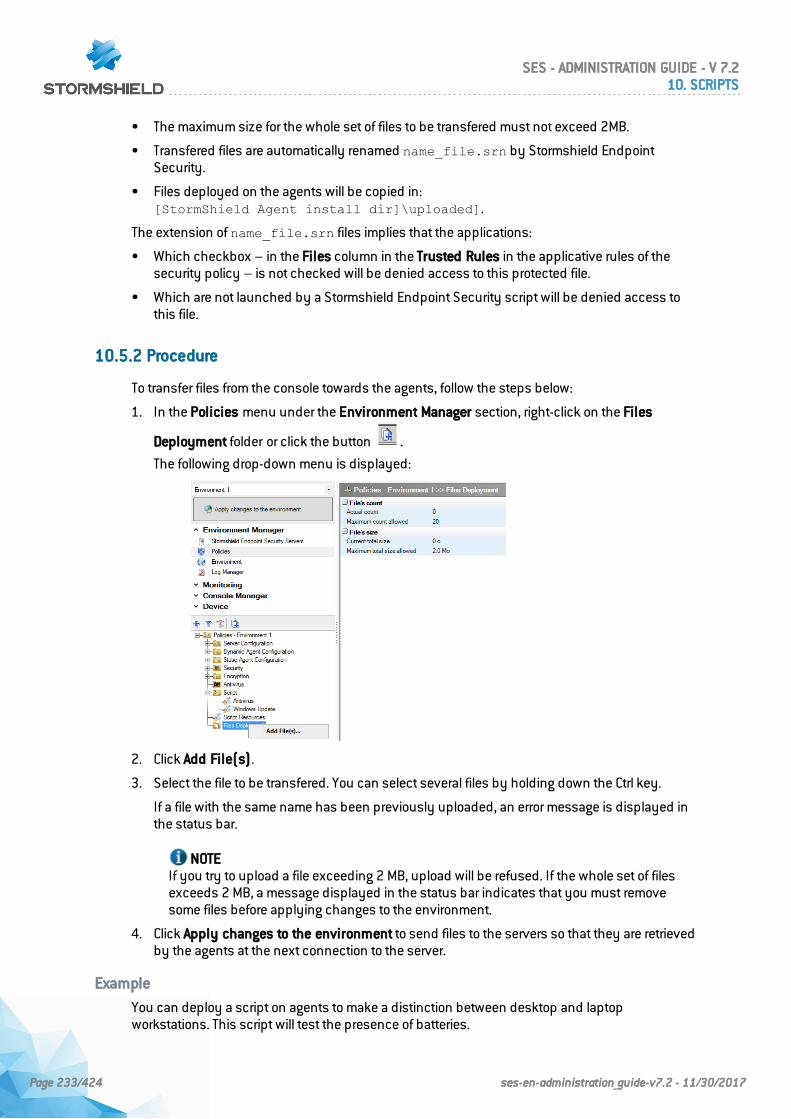
• The maximum size for the whole set of files to be transfered must not exceed 2MB.
• Transfered files are automatically renamed name_file.srn by Stormshield EndpointSecurity.
• Files deployed on the agents will be copied in:[StormShield Agent install dir]\uploaded].
The extension of name_file.srn files implies that the applications:
• Which checkbox – in the Files column in the Trusted Rules in the applicative rules of thesecurity policy – is not checked will be denied access to this protected file.
• Which are not launched by a Stormshield Endpoint Security script will be denied access tothis file.
10.5.2 Procedure
To transfer files from the console towards the agents, follow the steps below:
1. In the Policies menu under the Environment Manager section, right-click on the Files
Deployment folder or click the button .
The following drop-down menu is displayed:
2. Click Add File(s).
3. Select the file to be transfered. You can select several files by holding down the Ctrl key.
If a file with the same name has been previously uploaded, an error message is displayed inthe status bar.
NOTEIf you try to upload a file exceeding 2 MB, upload will be refused. If the whole set of filesexceeds 2 MB, a message displayed in the status bar indicates that you must removesome files before applying changes to the environment.
4. Click Apply changes to the environment to send files to the servers so that they are retrievedby the agents at the next connection to the server.
Example
You can deploy a script on agents to make a distinction between desktop and laptopworkstations. This script will test the presence of batteries.
SES - ADMINISTRATION GUIDE - V 7.210. SCRIPTS
Page 233/424 ses-en-administration_guide-v7.2 - 11/30/2017
NOTEThis test is not supplied with Stormshield Endpoint Security.
The script is written as follows:
• If a battery is detected, the script will return TRUE to the agent by sending value "1".This value is returned by the vbscript function "Wscript.quit(1)".
• Otherwise, the script will return FALSE to the agent by sending value "0".This value is returned by the vbscript function "Wscript.quit(0)".
To use this script in a test or another script, you will use the Run function and enter the followinginformation:
Cscript.exe /E:Vbscript "c:\program files\Stormshield\StormshieldEndpoint Security Agent\uploaded\file_name.srn"
/E:Vbscript is used to indicate the file format (name_file.srn) if its extension is not .VBS.
WARNINGThe administrator must not use the Wscript interpreter.
If the Vbs script allows the use of arguments, you will use the Run function and declarearguments as shown below:
Cscript.exe /E:Vbscript "c:\program files\Stormshield\StormshieldEndpoint Security Agent\uploaded\file_name.srn" Argument1
or Cscript.exe /E:Vbscript "c:\program files\Stormshield\StormshieldEndpoint Security Agent\uploaded\file_name.srn" Argument1 Argument2
SES - ADMINISTRATION GUIDE - V 7.210. SCRIPTS
Page 234/424 ses-en-administration_guide-v7.2 - 11/30/2017
11. Removable Device Administration
11.1 Overview
Stormshield Endpoint Security enables to enroll removable devices used on the organization’sworkstations in order to control them. It ensures the security of the workstation on which thedevice is connected and facilitates the management of devices.
An enrolled removable device is uniquely identified and configured by the device managementtool. It must be associated to a single user who is the owner.
An enrolled device is trusted as long as its content has not been modified out of the perimeter ofthe organization. It can be used on any workstation of the secured perimeter. If a modification ofthe content is detected, it is possible to configure an antivirus check on the device to be trustedagain.
A control agent installed on each workstation and server of the organization allows access only toenrolled removable devices complying with the controls defined in security policies.
Stormshield Endpoint Security supports all USB 2.0 device drivers. However it supports only 3.0USB devices using the following drivers:
l usbhub (Microsoft Generic)
l usbhub20
l vusb3hub (Via)
l nusb3hub (Nec Electronics, Renesas Electronics)
l iusb3hub (Intel)
l asmthub3 (AS Media)
l usbhub3 (Microsoft Generic Window 8)
l amdhub30 (AMD)
WARNINGAn enrolled device cannot be encrypted.
11.2 Preparation of the removable device enrollment
To enroll removable devices, you must satisfy the following prerequisites:
• a unique identifier, specific to the organization.
• an access to the organization LDAP directory.
The organization identifier is automatically generated when installing Stormshield EndpointSecurity. The value of the identifier can be manually modified, for example to reuse the identifierof a previous installation.
By default, the console uses the Active Directory set up for Stormshield Endpoint Security in thecase of an environment based on an Active Directory. If the environment is based on an internaldirectory, Stormshield Endpoint Security automatically detects the LDAP directory to which theworkstation belongs. This directory allows to identify the owners of the enrolled keys.
The removable device enrollment parameters are stored in the [db_environment] table of theStormshield Endpoint Security configuration SQL base.
This table can include the following properties:
SES - ADMINISTRATION GUIDE - V 7.211. REMOVABLE DEVICE ADMINISTRATION
Page 235/424 ses-en-administration_guide-v7.2 - 11/30/2017
Key Valueenrollment-organizationGuid The value of this property must be specific to the organization.
The identifier format is xxxxxxxx-xxxx-xxxx-xxxx-xxxxxxxx where x is ahexadecimal digit.It is initialized during the installation with a random value.This value can also be manually modified. In this case, follow the steps belowfor the identifier to be taken into account in your environment.1. After having modified the value of the identifier, close and open all running
instances of the management console.2. Click Apply changes to the environment to take the new parameter into
account.enrollment-LdapGuidAttribute This property contains the name of the LDAP attribute including users GUID.
The default value is objectguid.On other LDAP directories, it can be entryuuid.
enrollment-LdapBaseDN This property defines the branch of the directory from which users aresearched for.By default, it is the Active Directory root.
enrollment-LdapServer This property contains the address and the port of the LDAP server.The current Active Directory is used by default.
enrollment-LdapUser Login used to authenticate and search for users in the directory.This property can be empty when an anonymous or LDAP connection is used.
enrollment-LdapPwd This property contains the connection password to the directory.enrollment-LdapAuthType The possible values of this property are Anonymous for an anonymous
connection, Basic or Digest for a classic LDAP directory, andNegotiate for an Active Directory.
enrollment-LdapUserFilter This property contains the LDAP filter listing the directory users.The default filter corresponds to the active users of the Active Directory:(&(!(useraccountcontrol:1.2.840.113556.1.4.803:=2))(objectcategory=person))For a classic LDAP directory, the filter can be(objectclass=inetorgperson).
enrollment-LdapAutoCompleteFilter
LDAP filter used when automatically completing the name of a user.The default value is (cn={0}*).The attribute used as users RDN must be used. This filter can be replaced by(uid={0}*) for example.
enrollment-LdapAdministratorFilter
This property contains the LDAP filter enabling to find the LDAP account of theadministrator connected to the console from his/her Stormshield EndpointSecurity identifier.The default value is (&(userprincipalname={0}@*)(objectcategory=person)).We recommend naming Stormshield Endpoint Security users with the samename as their account in the directory.On some LDAP directories, the value can be (&(uid={0})(objectclass=inetorgperson)).
enrollment-LdapSearchUserFilter
This property contains the LDAP filter used by the console for the advancedsearch of names. It can be applied to all attributes containing a part of thename of the searched user.The default value is (l(cn=*{0}*)(displayname=*{0}*)(mail=*{0}*)).
enrollment-LdapSearchDepartmentFilter
This property is used as LDAP filter by the console for the advanced search ofnames. It can be applied to all attributes containing a part of the service or thesite of the searched user.The default value is (l(ou=*{0}*)(department=*{0}*)(l=*{0}*)).
To modify these properties, you must edit the [db_properties] table of the configuration SQL basethanks to an SQL Server client such as sqlcmd or SQL Management Studio.
SES - ADMINISTRATION GUIDE - V 7.211. REMOVABLE DEVICE ADMINISTRATION
Page 236/424 ses-en-administration_guide-v7.2 - 11/30/2017
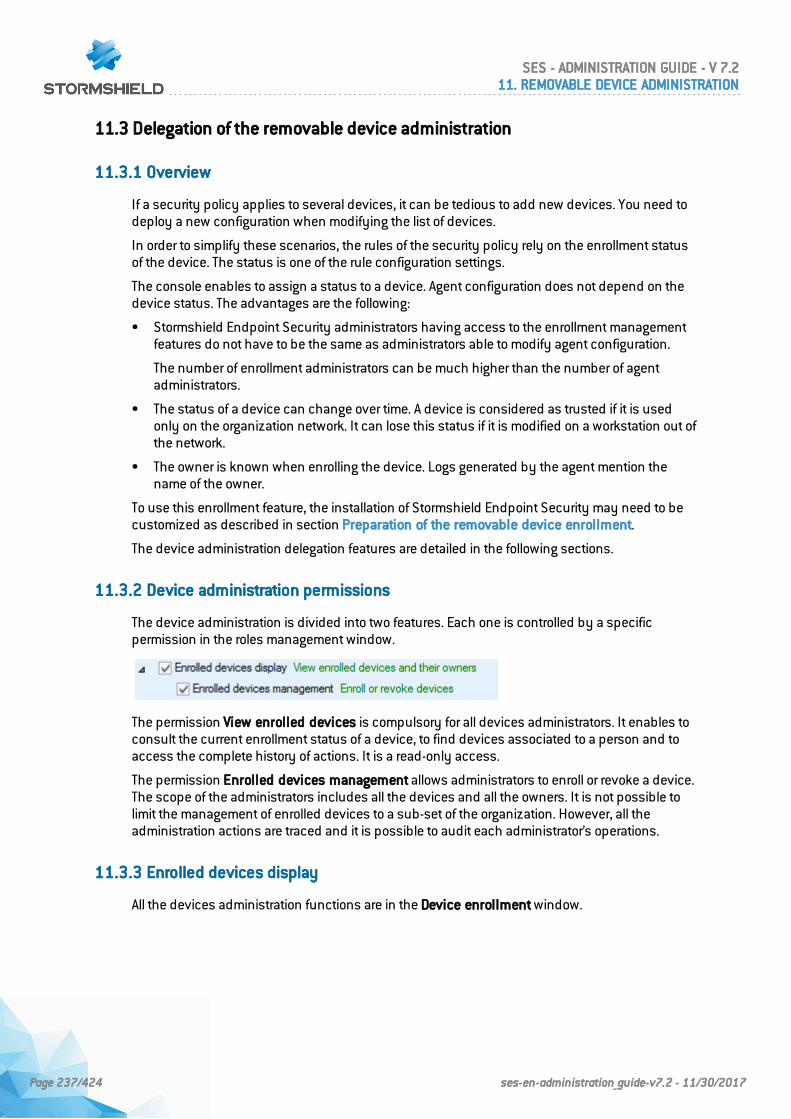
11.3 Delegation of the removable device administration
11.3.1 Overview
If a security policy applies to several devices, it can be tedious to add new devices. You need todeploy a new configuration when modifying the list of devices.
In order to simplify these scenarios, the rules of the security policy rely on the enrollment statusof the device. The status is one of the rule configuration settings.
The console enables to assign a status to a device. Agent configuration does not depend on thedevice status. The advantages are the following:
• Stormshield Endpoint Security administrators having access to the enrollment managementfeatures do not have to be the same as administrators able to modify agent configuration.
The number of enrollment administrators can be much higher than the number of agentadministrators.
• The status of a device can change over time. A device is considered as trusted if it is usedonly on the organization network. It can lose this status if it is modified on a workstation out ofthe network.
• The owner is known when enrolling the device. Logs generated by the agent mention thename of the owner.
To use this enrollment feature, the installation of Stormshield Endpoint Security may need to becustomized as described in section Preparation of the removable device enrollment.
The device administration delegation features are detailed in the following sections.
11.3.2 Device administration permissions
The device administration is divided into two features. Each one is controlled by a specificpermission in the roles management window.
The permission View enrolled devices is compulsory for all devices administrators. It enables toconsult the current enrollment status of a device, to find devices associated to a person and toaccess the complete history of actions. It is a read-only access.
The permission Enrolled devices management allows administrators to enroll or revoke a device.The scope of the administrators includes all the devices and all the owners. It is not possible tolimit the management of enrolled devices to a sub-set of the organization. However, all theadministration actions are traced and it is possible to audit each administrator’s operations.
11.3.3 Enrolled devices display
All the devices administration functions are in the Device enrollment window.
SES - ADMINISTRATION GUIDE - V 7.211. REMOVABLE DEVICE ADMINISTRATION
Page 237/424 ses-en-administration_guide-v7.2 - 11/30/2017
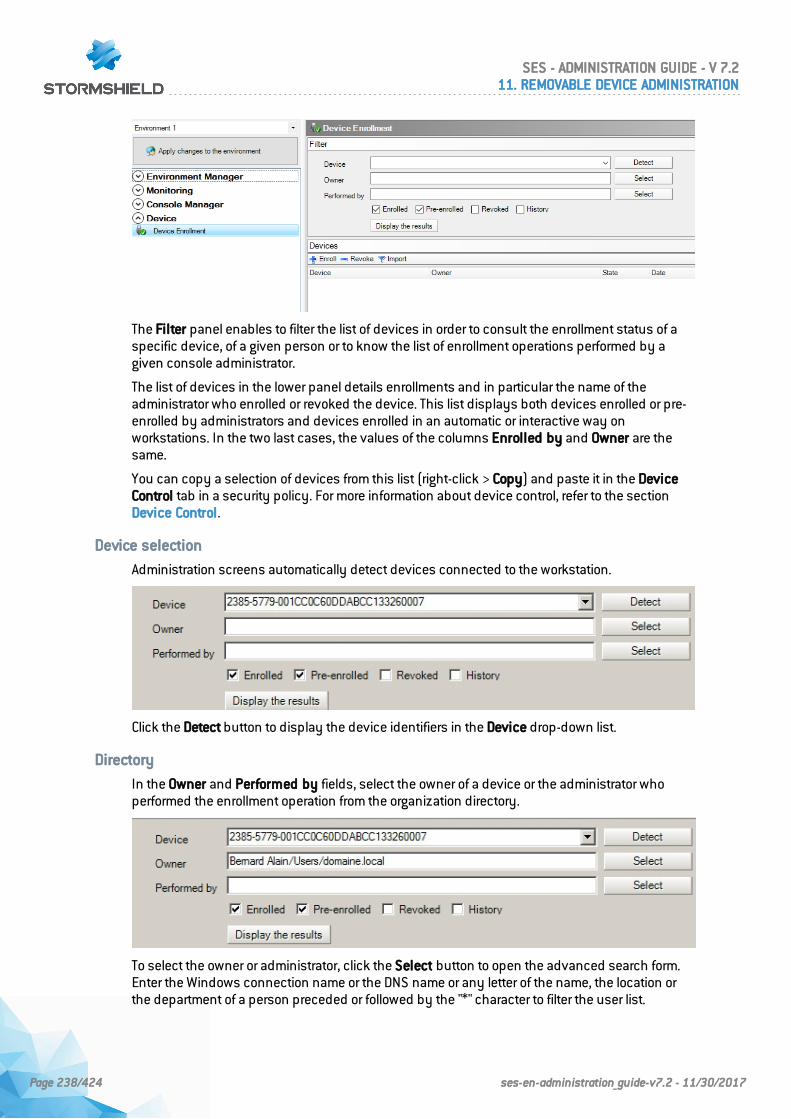
The Filter panel enables to filter the list of devices in order to consult the enrollment status of aspecific device, of a given person or to know the list of enrollment operations performed by agiven console administrator.
The list of devices in the lower panel details enrollments and in particular the name of theadministrator who enrolled or revoked the device. This list displays both devices enrolled or pre-enrolled by administrators and devices enrolled in an automatic or interactive way onworkstations. In the two last cases, the values of the columns Enrolled by and Owner are thesame.
You can copy a selection of devices from this list (right-click > Copy) and paste it in the DeviceControl tab in a security policy. For more information about device control, refer to the sectionDevice Control.
Device selection
Administration screens automatically detect devices connected to the workstation.
Click the Detect button to display the device identifiers in the Device drop-down list.
Directory
In the Owner and Performed by fields, select the owner of a device or the administrator whoperformed the enrollment operation from the organization directory.
To select the owner or administrator, click the Select button to open the advanced search form.Enter the Windows connection name or the DNS name or any letter of the name, the location orthe department of a person preceded or followed by the "*" character to filter the user list.
SES - ADMINISTRATION GUIDE - V 7.211. REMOVABLE DEVICE ADMINISTRATION
Page 238/424 ses-en-administration_guide-v7.2 - 11/30/2017
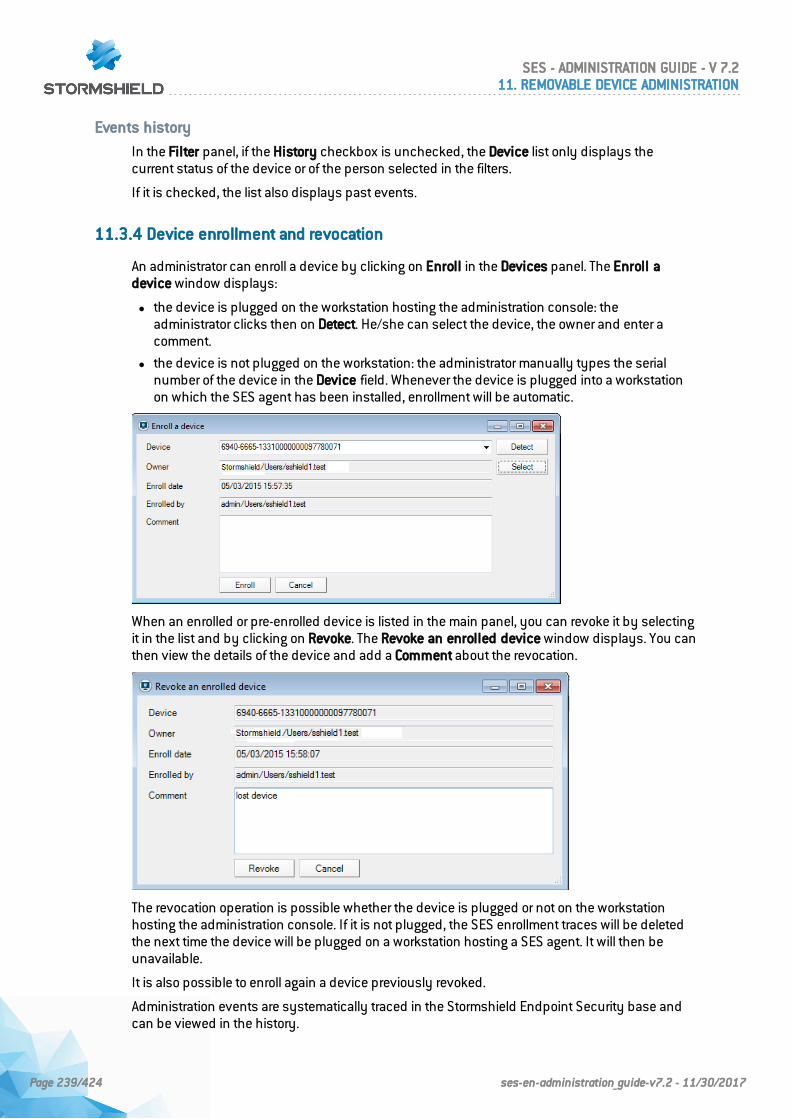
Events history
In the Filter panel, if the History checkbox is unchecked, the Device list only displays thecurrent status of the device or of the person selected in the filters.
If it is checked, the list also displays past events.
11.3.4 Device enrollment and revocation
An administrator can enroll a device by clicking on Enroll in the Devices panel. The Enroll adevice window displays:
l the device is plugged on the workstation hosting the administration console: theadministrator clicks then on Detect. He/she can select the device, the owner and enter acomment.
l the device is not plugged on the workstation: the administrator manually types the serialnumber of the device in the Device field. Whenever the device is plugged into a workstationon which the SES agent has been installed, enrollment will be automatic.
When an enrolled or pre-enrolled device is listed in the main panel, you can revoke it by selectingit in the list and by clicking on Revoke. The Revoke an enrolled device window displays. You canthen view the details of the device and add a Comment about the revocation.
The revocation operation is possible whether the device is plugged or not on the workstationhosting the administration console. If it is not plugged, the SES enrollment traces will be deletedthe next time the device will be plugged on a workstation hosting a SES agent. It will then beunavailable.
It is also possible to enroll again a device previously revoked.
Administration events are systematically traced in the Stormshield Endpoint Security base andcan be viewed in the history.
SES - ADMINISTRATION GUIDE - V 7.211. REMOVABLE DEVICE ADMINISTRATION
Page 239/424 ses-en-administration_guide-v7.2 - 11/30/2017
11.3.5 Pre-enrollment of removable devices
An administrator can also pre-enroll a batch of removable devices by importing a .csv file in theconsole. Enrollment will be thus pending for these devices and they will be automatically enrolledwhen they are plugged to a workstation with an SES agent for the first time.
A device is enrolled for the user specified by the administrator in the imported file. It is notenrolled for the user who plugged the device and who is connected to the Microsoft Windowssession.
Pre-enrolling devices takes the priority over the other types of enrollment. For example, even if theautomatic enrollment for a user connected to a workstation is allowed by the security policy, apre-enrolled device which is plugged to this workstation will be enrolled for the user specifiedduring pre-enrollment.
For more information about enrollment, refer to the section Device Control.
Preparing the file to import
The file must be in .csv format and encoded in UTF-8.
The columns must be arranged in the following order. The first line must directly contain the firstdevice to import instead of column headings:
Vendor ID Product ID Serial number Username Comment (optional)
Example:
2385;5734;60A44CB1AE3DB030385A6390;DOMAIN\User0;comment1
2385;5734;60A44CB1AE3DB030385A6391;DOMAIN\User1
2385;5734;60A44CB1AE3DB030385A6392;DOMAIN\User2
SES requires the Vendor ID, Product ID and Serial number columns to identify the device. In theUsername column, you specify the user for who the device will be enrolled when it will beplugged for the first time. The username can be in two formats:
l NetBIOS domain name\User account name: DOMAIN\User1
l User account name@Domain name: User1@DOMAIN
The column separator character must be the one you specified in the Console configuration >CSV separator menu.
Each line displays a device to enroll.
Importing the .csv file
To import a list of removable devices:
1. Open the menu Device Enrollment in the left panel.
2. In the Devices panel, click on Import.
3. Select the file to import, then click on Import.
4. When the import is done, click on Close. The list of devices in the Devices panel is updated.
SES - ADMINISTRATION GUIDE - V 7.211. REMOVABLE DEVICE ADMINISTRATION
Page 240/424 ses-en-administration_guide-v7.2 - 11/30/2017
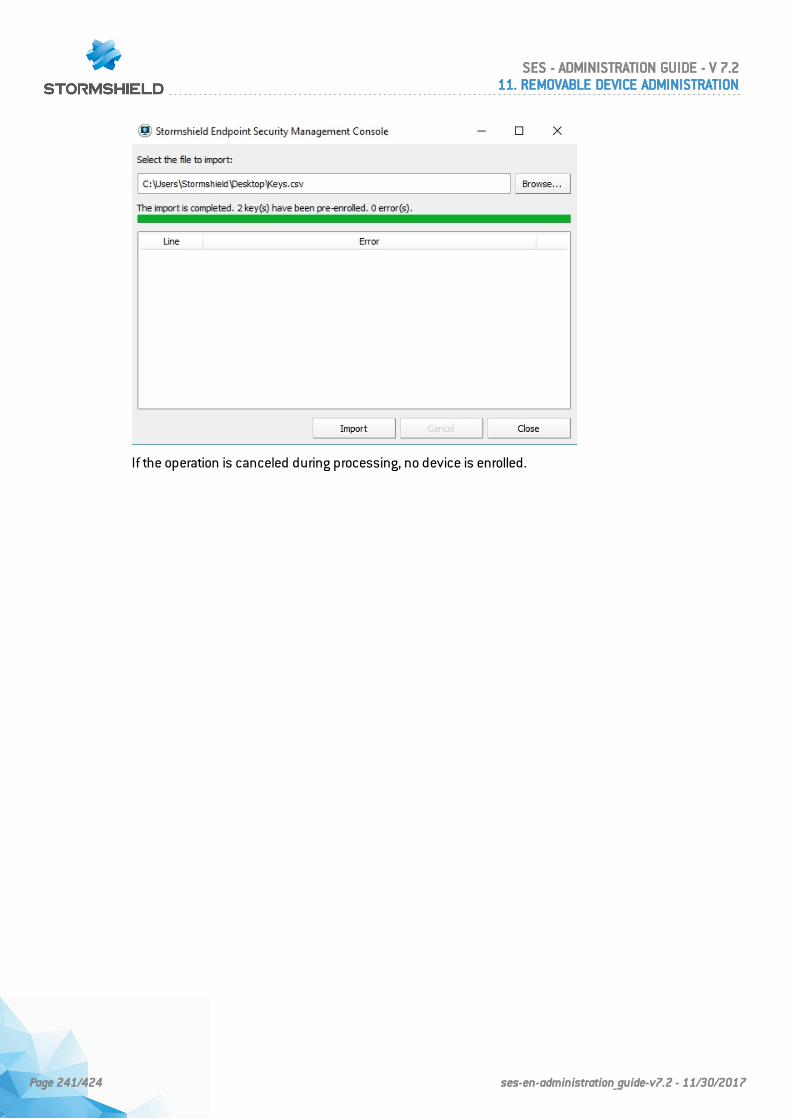
If the operation is canceled during processing, no device is enrolled.
SES - ADMINISTRATION GUIDE - V 7.211. REMOVABLE DEVICE ADMINISTRATION
Page 241/424 ses-en-administration_guide-v7.2 - 11/30/2017
12. Removable Device Encryption
12.1 Overview
12.1.1 Purpose
Removable Device Encryption provides an extra layer of protection by encrypting data stored onUSB or FireWire devices with a password-protected key.
WARNINGRemovable device encryption is not related to the Stormshield Endpoint Securityencryption feature.
WARNINGAn enrolled device cannot be encrypted.
12.1.2 Characteristics
Advanced Encryption Standard
The Stormshield Endpoint Security encryption feature (for USB and FireWire devices) is based onthe Advanced Encryption Standard (AES).This system which has been approved by the U.S. Government for use with both classified andnon-classified documents.
The size of device encryption keys is limited to 256 bits.
Password protection
By password-protecting the encrypted data stored on these devices, sensitive company data isfurther protected from theft.
Encryption password
The password used to open encrypted files is also encrypted. It is therefore as secure as theencryption applied on files.
Secure erasure
When encrypting a device already containing files, Stormshield Endpoint Security first generatesan encrypted copy of old data before performing a secure erasure. When creating new files on adevice encrypted by Stormshield Endpoint Security, this erasure operation is not required.
For this reason, the encryption of a device already containing files takes more time than the copyof the same amount of data on an already encrypted device. The number of passes required for asecure erasure depends on the device type: magnetic (external hard disk) or flash memory (USBkey) type.
12.1.3 Supported operating systems
USB and FireWire encryption is supported by:
• 32-bit Windows XP SP3.
• 32-bit Windows Vista SP2.
SES - ADMINISTRATION GUIDE - V 7.212. REMOVABLE DEVICE ENCRYPTION
Page 242/424 ses-en-administration_guide-v7.2 - 11/30/2017
• 32-bit and 64-bit Windows 7.
NOTERemovable device encryptionrelated menus are hidden on the agents that are installed onPCs running unsupported operating systems.
12.1.4 What can be encrypted
You can opt to automatically encrypt entire USB and FireWire devices.
For more information, see Creating an encryption policy to be applied to a group of devices.
WARNINGThe device encryption policy is applied to the entire device group.The password strength used by the device encryption policy is defined in the GeneralSettings panel.For more information, see Removable Device Encryption and Access to the devicewithout password.
12.1.5 Unencrypted partitions
For devices with partitions, such as external hard disks, you can omit a partition from theencryption policy after the first plug-in.
There is no password prompt for an unencrypted partition.
NOTEPartitions must be created before the device is encrypted.
12.1.6 Encryption key
The encryption key is stored in a file called sr_id. in the key root directory.There is one sr_id. file per partition. Each partition can be protected by a different password.
The Stormshield Endpoint Security server contains a copy of the data stored in the sr_id. file. Ifthis file is corrupted on the removable mass storage device, a copy of the data is automaticallydownloaded from the server in order to restore the file. This is invisible to the user.
If however, the server is not available, the user will receive a message indicating that:
• sr_id. is corrupted.
• Encrypted files are inaccessible.
The user can either request a new encryption key from the administrator or replace the sr_id.file with a backup copy (if the user has previously made one).
NOTEFor added assurance, the user should also make a backup of the encryption key using theExport function in the Stormshield Endpoint Security Agent monitor menu.For more information, see Exporting an encryption key.
12.1.7 Synchronization
The first time a device is plugged in after a device encryption policy is applied, it goes through asynchronization process encrypting the entire device.
SES - ADMINISTRATION GUIDE - V 7.212. REMOVABLE DEVICE ENCRYPTION
Page 243/424 ses-en-administration_guide-v7.2 - 11/30/2017
A progression bar is displayed throughout the process.
12.1.8 Symbology
A blue lock is displayed at "My Computer > Devices with Removable Storage" level to indicate thatthere is at least one encrypted file stored on the device.
12.2 Creating an encryption policy to be applied to a group of devices
12.2.1 Encryption settings
To set removable device encryption, fill in the following fields in the Device Control tab of thesecurity policy:
• General Settings.
• Removable Devices.
For more information, see the section Device Control.
General settings
The device encryption settings under Removable Devices > Device Control of the securitypolicy are the following:
• Group management:
This option makes it possible to enable or disable the management of device groups. Toenable device encryption, this option must be enabled.
• Mass storage recovery:
This option allows or denies the user to decrypt the removable device.
• Mandatory password strength
This option defines the password strength used for device encryption.
The value is set to Standard by default.
The administrator can define the minimum strength a password should have. As the userenters his password, Stormshield Endpoint Security performs a real-time evaluation of thestrength of the password. If the strength is lower than that defined by the administrator, thepassword is rejected.
The criteria for password strengths are:
l High: the password must consist of at least 16 characters, and at least three out of the fourfollowing types of characters: lowercase letters, uppercase letters, special characters andnumbers.
l Standard: the password must consist of at least 12 characters, and at least three out of thefour following types of characters: lowercase letters, uppercase letters, special characters andnumbers.
l Low: the password does not follow the criteria for High or Standard password strengths.
Removable devices
The device encryption settings under Removable Devices > Device Use Control > GroupSettings are the following:
SES - ADMINISTRATION GUIDE - V 7.212. REMOVABLE DEVICE ENCRYPTION
Page 244/424 ses-en-administration_guide-v7.2 - 11/30/2017
• File encryption
◦ Disabled:
No file encryption.
◦ Enabled:
This option encrypts the entire device or a device partition.
• Access right if encryption is cancelled:
This option enables:
◦ Read-only access,
◦ Read/Write access,
◦ Denial of access,
to unencrypted files if the user chooses not to encrypt the device when prompted to createan encryption password.
• Stand-alone decryption tool (SURT):
This option allows or denies use of the SURT encryption tool to enable file decryption onsystems not running Stormshield Endpoint Security.
WARNINGEncryption settings also apply to all devices in the device group.
NOTEIf Default access to the device group is set to Denied, the device will not be able to accessthe workstation on which the agent is installed.Access will remain denied whatever the encryption policy applied to devices.
For more information about applying an encryption policy to a device group, see Applying asecurity policy to an object of the directory .
12.3 Connecting a removable device
12.3.1 Password
The first time a user plugs in a device with an encryption policy, a window:
• Opens.
• Prompts you to enter the new password.
• Prompts you to confirm the password.
If a USB or FireWire device uses an encryption policy, a pop-up window prompts for the passwordeach time the device is plugged in.
The mandatory password strength is set by the administrator in General Settings > DeviceControl.
For more information, see Passwords.
12.3.2 Synchronization
The first time a device is plugged in after a device encryption policy is applied, it goes through asynchronization process encrypting the entire device.
SES - ADMINISTRATION GUIDE - V 7.212. REMOVABLE DEVICE ENCRYPTION
Page 245/424 ses-en-administration_guide-v7.2 - 11/30/2017
A progression bar is displayed throughout the process.
WARNINGDuring the synchronization process, the user should not leave the computer for a largeperiod of time.sIf the computer automatically locks or goes into standby mode after a period of time, thesynchronization process will stop. The user will then have to enter the device encryptionpassword to relaunch the process.Default access control is bypassed. This means that all files on the device will beencrypted even if Default access is set to Denied or Read only.
12.3.3 Access to the device without password
If, when prompted to enter the password, the user clicks Cancel, the device is locked to preventunencrypted data from being written to the device.
In this case, access rights depend on the Access right if encryption is cancelled in RemovableDevices > Device Control > Group Settings.
Access rights can assume the following values:
• Read (only).
• Read/Write.
• Denied.
NOTEIt should be noted that Default access and Exceptions by file extension settings alsoapply to the device group.Therefore, if default access to the device is set to Denied, the user cannot access thedevice.
If the user tries to access an encrypted file without setting the password, information containedin the file will be displayed as encrypted text.
NOTEThe Access right if encryption is cancelled option is valid only for this session. Next timethe user plugs in the device, the password prompt will be displayed again.
12.3.4 Access to encrypted data
As long as the correct password is entered, there is no difference to the user between readingencrypted and unencrypted data.
Data is encrypted whenever it is written to a device with encryption enabled. If a file is copied,created or modified on the device, its data is encrypted.
12.3.5 Behavior when deactivating removable device encryption
When disabling the group parameter File encryption under Device Control of the security policy,the encrypted device remains encrypted and files added on the device are encrypted.
The user must manually decrypt the device. The device will remain unencrypted according to thenew policy.
For more information about removable device decryption, see section Decrypting a removabledevice.
SES - ADMINISTRATION GUIDE - V 7.212. REMOVABLE DEVICE ENCRYPTION
Page 246/424 ses-en-administration_guide-v7.2 - 11/30/2017
12.3.6 Using encrypted devices on other computers
Sharing encrypted files
Encrypted files on a device can be shared on condition that:
• The device is plugged into another computer running a Stormshield Endpoint Security agent.
• The encryption policy on the computer includes Read or Read/Write access.
• The user knows the encrypted device password.
Systems not running Stormshield Endpoint Security
If an encrypted device is plugged into a computer that is not running a Stormshield EndpointSecurity agent:
• Encrypted files can be opened but their content will be displayed as encrypted text.If the device contains an unencrypted partition with files, these files can be used as normal.
• New files can be added onto the device. They will not be encrypted though.
• Files can be copied from the device but they will remain encrypted.
• If the SURT encryption tool is enabled in the device Group Settings of the security policy, theuser can encrypt and decrypt files simply by dragging and dropping files to the StormshieldEndpoint Security Express Encryption icon .
This standalone encryption tool can also be downloaded from MyStormshield website.
For more information, see section SURT.
Other systems running Stormshield Endpoint Security
If an encrypted device is plugged into a computer that is running a Stormshield EndpointSecurity agent:
• The encrypted device will be unaffected by the computer encryption policy.
• The user will need to enter the encrypted device password in order to access the files.
• The computer audit and access policies will be applied to the device.
12.3.7 Removing SD cards
When removing an SD card from the reader, Stormshield Endpoint Security is not notified.
If you remove an SD card from the reader, the system will not detect the action and the cardvolume label will still be displayed in Windows Explorer.
As a consequence, if you install a new SD card, Stormshield Endpoint Security will not promptyou to enter any password. Instead Stormshield Endpoint Security will use the password of theprevious SD card. The user will not be able to access existing files because the key used todecrypt them is not correct and new files will be encrypted with the wrong key.
Before removing an SD card, it is imperative to use the eject function in Windows (right-click thereader and click Eject).
12.4 Decrypting a removable device
12.4.1 Administrator side
To decrypt a removable device, perform the following operations:
SES - ADMINISTRATION GUIDE - V 7.212. REMOVABLE DEVICE ENCRYPTION
Page 247/424 ses-en-administration_guide-v7.2 - 11/30/2017

1. Connect the removable device to the computer where the management console is installed.
2. Click the Encryption menu.
3. Select Decrypt Removable Devices.
4. Enter the console certificate password.
5. Select a device from the list.
6. Click OK.
7. If the administrator's workstation has a Stormshield Endpoint Securityagent, the removabledevice must be disconnected so that it can be used again later.
12.4.2 Agent side
Any Stormshield Endpoint Security agent user can decrypt a device on condition that GeneralSettings > Device Control > Mass storage recovery is set to Allowed in the security policy.
NOTEDuring the decryption process, the user should not leave the computer for a large period oftime even if the device has a large disk space.If the computer automatically locks or goes into standby mode after a period of time, thesynchronization process will stop.The user will then have to enter the device encryption password to relaunch the process.
To decrypt a removable device, the user must follow the steps below:
1. Right-click the Stormshield Endpoint Security icon to display the menu below:
SES - ADMINISTRATION GUIDE - V 7.212. REMOVABLE DEVICE ENCRYPTION
Page 248/424 ses-en-administration_guide-v7.2 - 11/30/2017
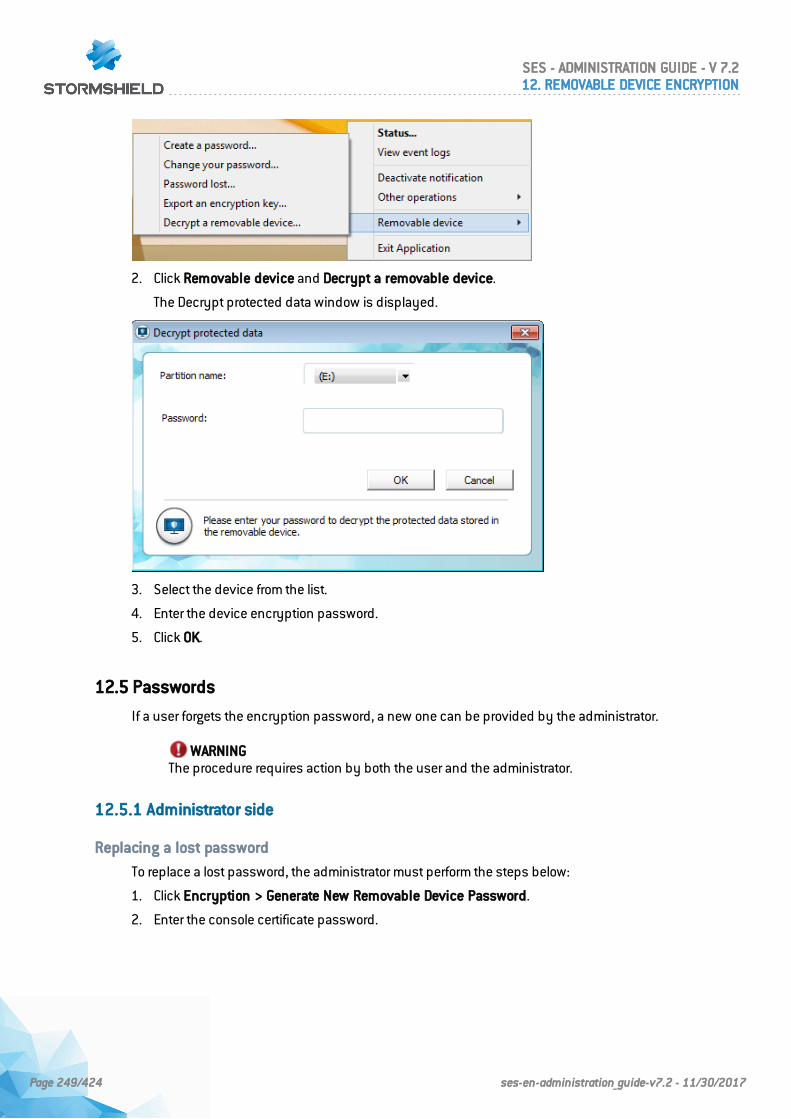
2. Click Removable device and Decrypt a removable device.
The Decrypt protected data window is displayed.
3. Select the device from the list.
4. Enter the device encryption password.
5. Click OK.
12.5 Passwords
If a user forgets the encryption password, a new one can be provided by the administrator.
WARNINGThe procedure requires action by both the user and the administrator.
12.5.1 Administrator side
Replacing a lost password
To replace a lost password, the administrator must perform the steps below:
1. Click Encryption > Generate New Removable Device Password.
2. Enter the console certificate password.
SES - ADMINISTRATION GUIDE - V 7.212. REMOVABLE DEVICE ENCRYPTION
Page 249/424 ses-en-administration_guide-v7.2 - 11/30/2017
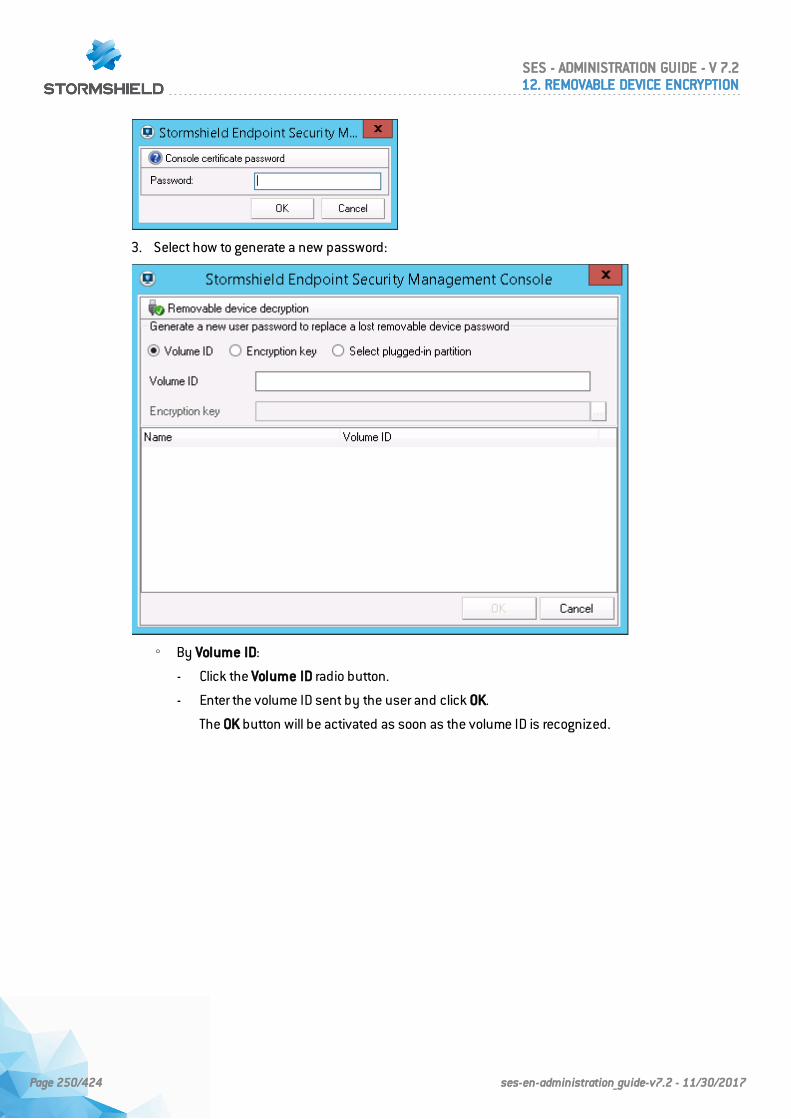
3. Select how to generate a new password:
◦ By Volume ID:
- Click the Volume ID radio button.
- Enter the volume ID sent by the user and click OK.
The OK button will be activated as soon as the volume ID is recognized.
SES - ADMINISTRATION GUIDE - V 7.212. REMOVABLE DEVICE ENCRYPTION
Page 250/424 ses-en-administration_guide-v7.2 - 11/30/2017
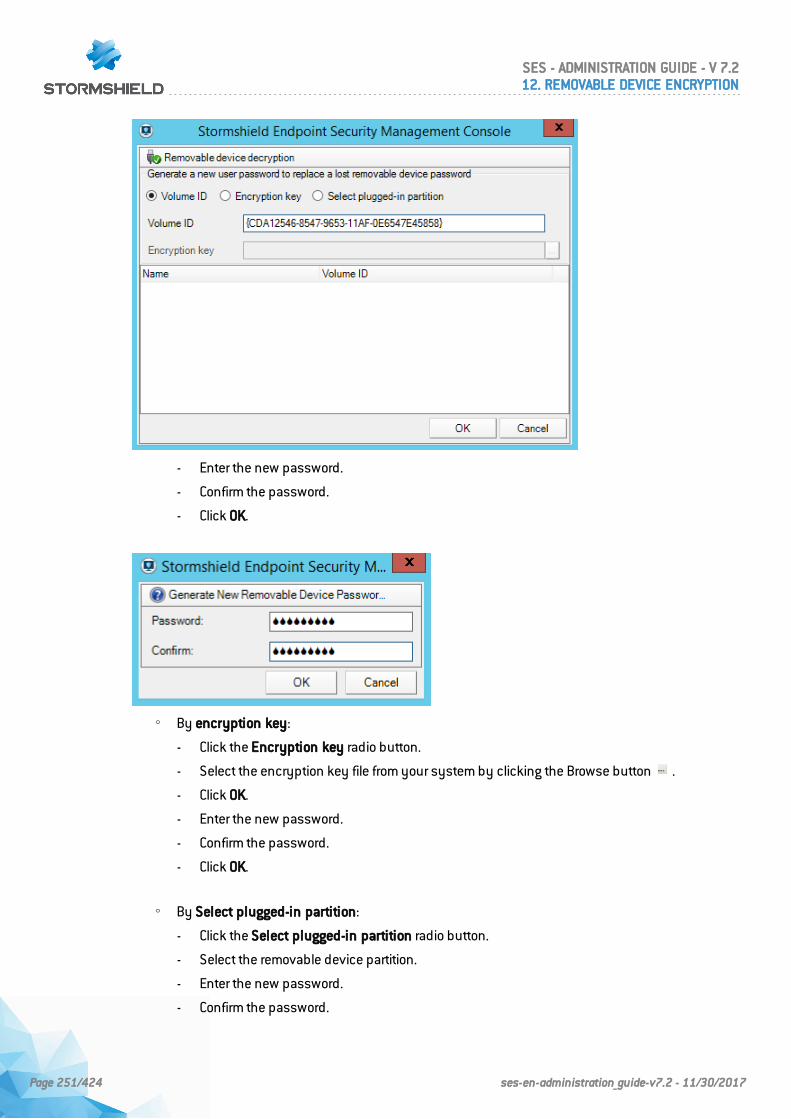
- Enter the new password.
- Confirm the password.
- Click OK.
◦ By encryption key:
- Click the Encryption key radio button.
- Select the encryption key file from your system by clicking the Browse button .
- Click OK.
- Enter the new password.
- Confirm the password.
- Click OK.
◦ By Select plugged-in partition:
- Click the Select plugged-in partition radio button.
- Select the removable device partition.
- Enter the new password.
- Confirm the password.
SES - ADMINISTRATION GUIDE - V 7.212. REMOVABLE DEVICE ENCRYPTION
Page 251/424 ses-en-administration_guide-v7.2 - 11/30/2017
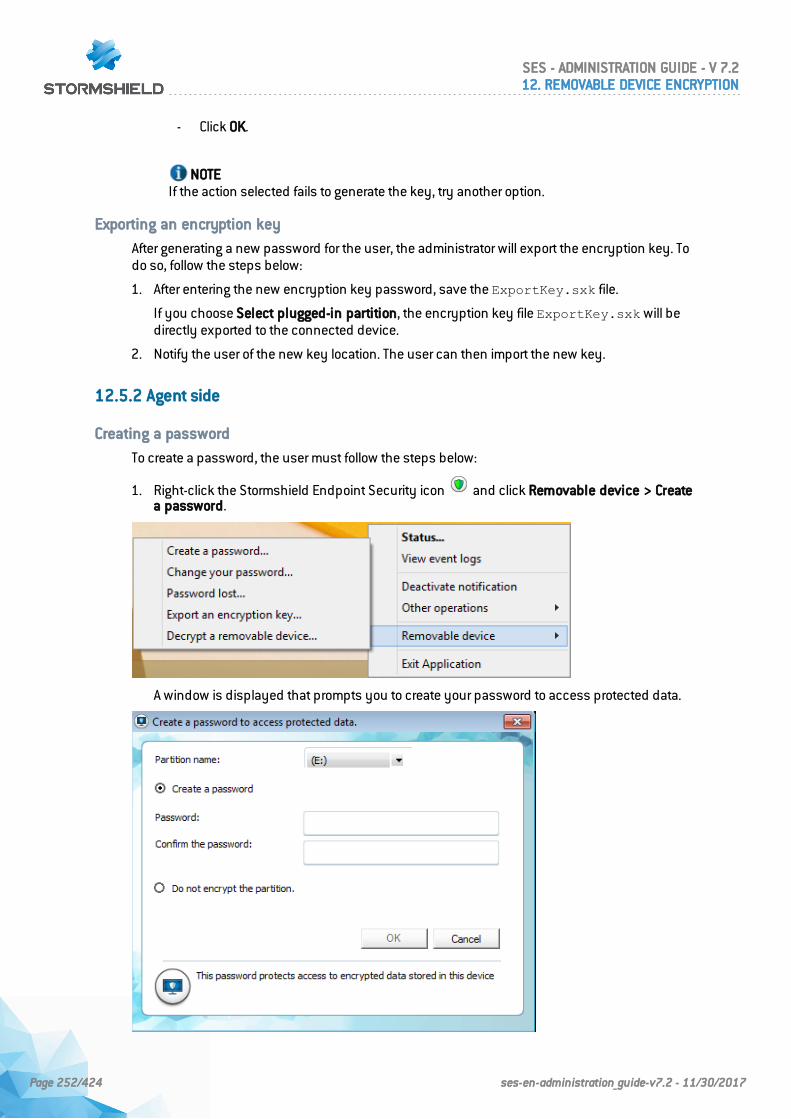
- Click OK.
NOTEIf the action selected fails to generate the key, try another option.
Exporting an encryption key
After generating a new password for the user, the administrator will export the encryption key. Todo so, follow the steps below:
1. After entering the new encryption key password, save the ExportKey.sxk file.
If you choose Select plugged-in partition, the encryption key file ExportKey.sxk will bedirectly exported to the connected device.
2. Notify the user of the new key location. The user can then import the new key.
12.5.2 Agent side
Creating a password
To create a password, the user must follow the steps below:
1. Right-click the Stormshield Endpoint Security icon and click Removable device > Createa password.
A window is displayed that prompts you to create your password to access protected data.
SES - ADMINISTRATION GUIDE - V 7.212. REMOVABLE DEVICE ENCRYPTION
Page 252/424 ses-en-administration_guide-v7.2 - 11/30/2017
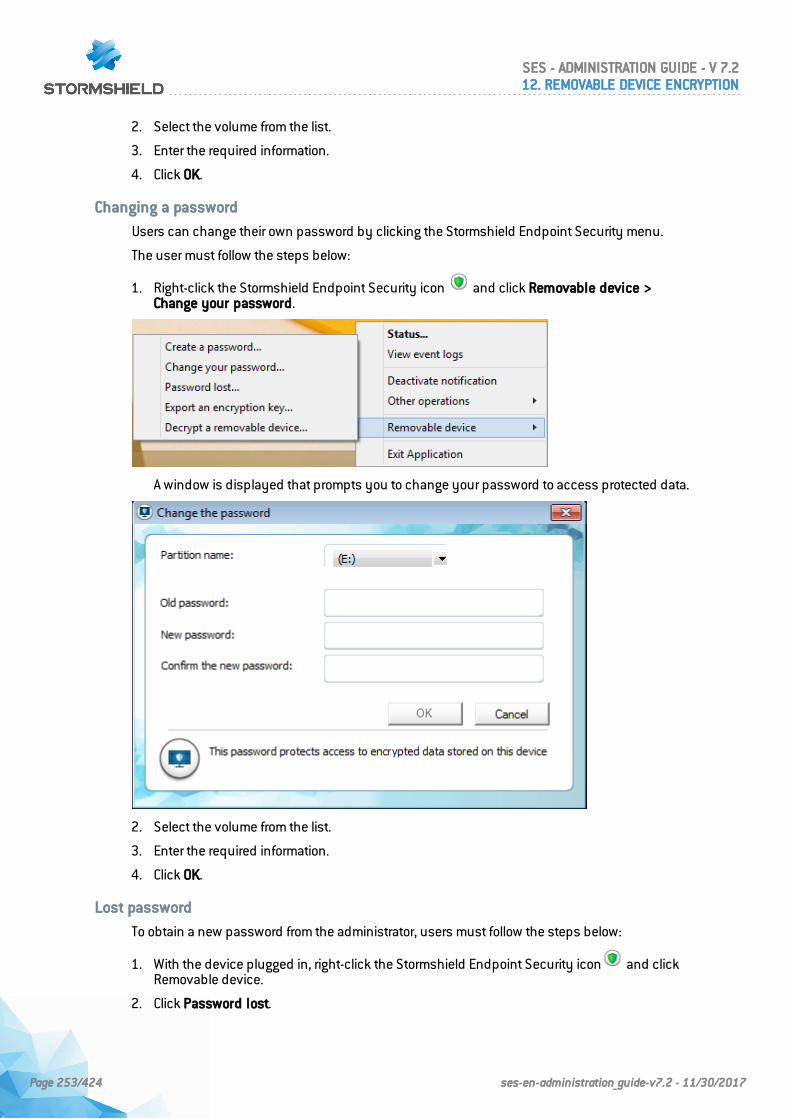
2. Select the volume from the list.
3. Enter the required information.
4. Click OK.
Changing a password
Users can change their own password by clicking the Stormshield Endpoint Security menu.
The user must follow the steps below:
1. Right-click the Stormshield Endpoint Security icon and click Removable device >Change your password.
A window is displayed that prompts you to change your password to access protected data.
2. Select the volume from the list.
3. Enter the required information.
4. Click OK.
Lost password
To obtain a new password from the administrator, users must follow the steps below:
1. With the device plugged in, right-click the Stormshield Endpoint Security icon and clickRemovable device.
2. Click Password lost.
SES - ADMINISTRATION GUIDE - V 7.212. REMOVABLE DEVICE ENCRYPTION
Page 253/424 ses-en-administration_guide-v7.2 - 11/30/2017
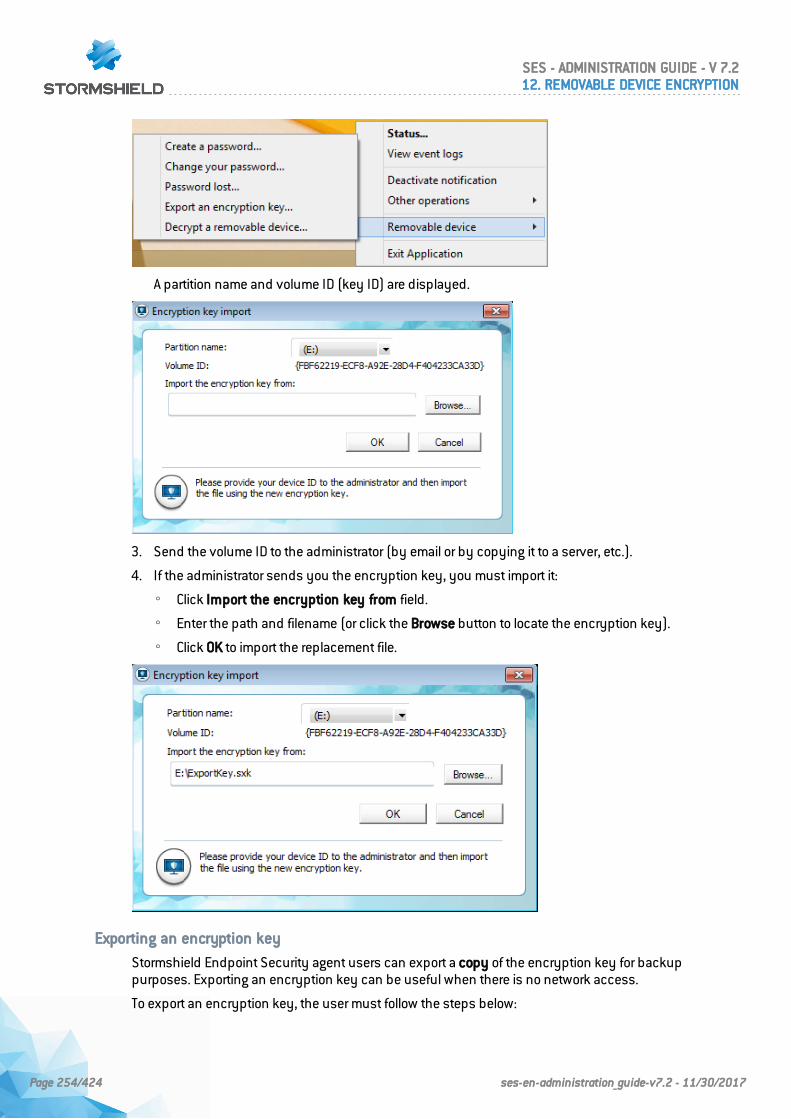
A partition name and volume ID (key ID) are displayed.
3. Send the volume ID to the administrator (by email or by copying it to a server, etc.).
4. If the administrator sends you the encryption key, you must import it:
◦ Click Import the encryption key from field.
◦ Enter the path and filename (or click the Browse button to locate the encryption key).
◦ Click OK to import the replacement file.
Exporting an encryption key
Stormshield Endpoint Security agent users can export a copy of the encryption key for backuppurposes. Exporting an encryption key can be useful when there is no network access.
To export an encryption key, the user must follow the steps below:
SES - ADMINISTRATION GUIDE - V 7.212. REMOVABLE DEVICE ENCRYPTION
Page 254/424 ses-en-administration_guide-v7.2 - 11/30/2017
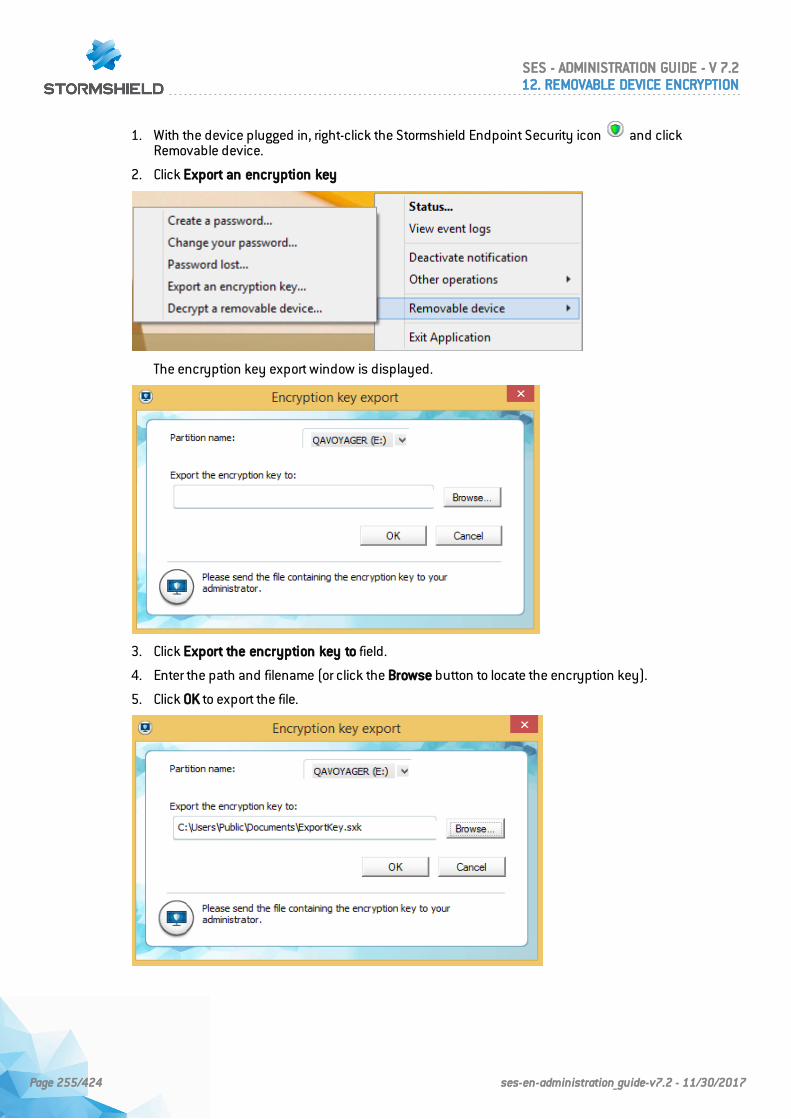
1. With the device plugged in, right-click the Stormshield Endpoint Security icon and clickRemovable device.
2. Click Export an encryption key
The encryption key export window is displayed.
3. Click Export the encryption key to field.
4. Enter the path and filename (or click the Browse button to locate the encryption key).
5. Click OK to export the file.
SES - ADMINISTRATION GUIDE - V 7.212. REMOVABLE DEVICE ENCRYPTION
Page 255/424 ses-en-administration_guide-v7.2 - 11/30/2017
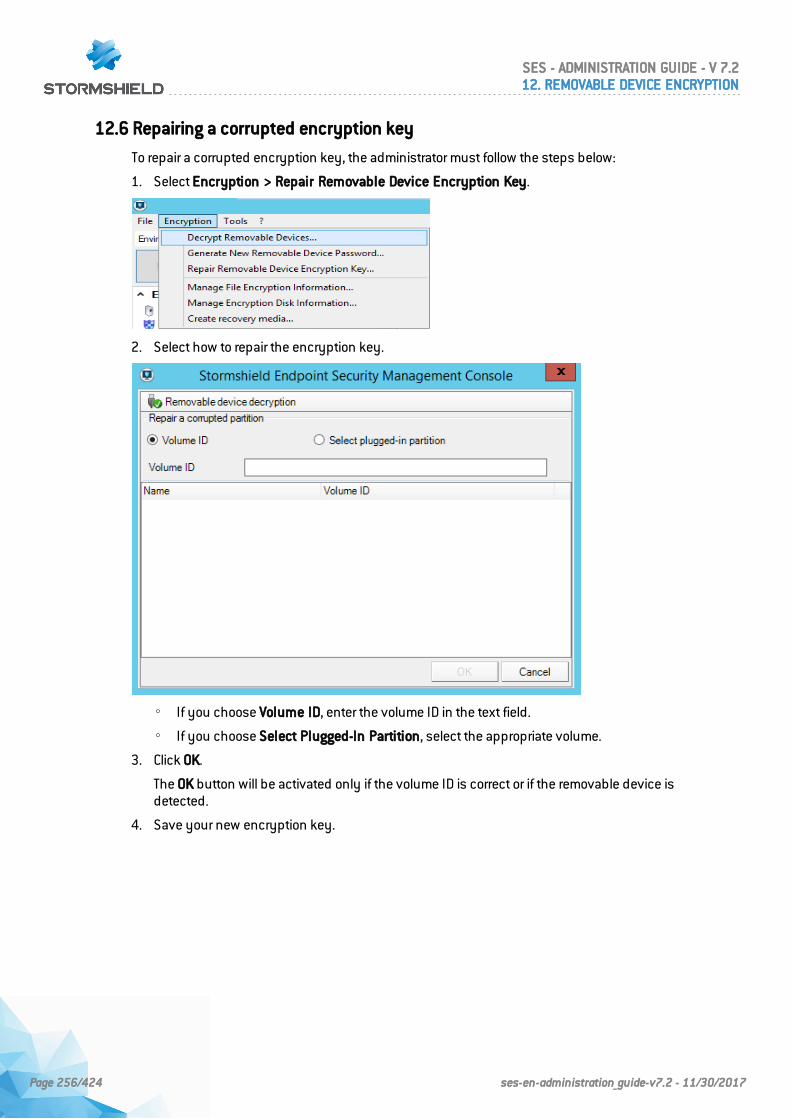
12.6 Repairing a corrupted encryption key
To repair a corrupted encryption key, the administrator must follow the steps below:
1. Select Encryption > Repair Removable Device Encryption Key.
2. Select how to repair the encryption key.
◦ If you choose Volume ID, enter the volume ID in the text field.
◦ If you choose Select Plugged-In Partition, select the appropriate volume.
3. Click OK.
The OK button will be activated only if the volume ID is correct or if the removable device isdetected.
4. Save your new encryption key.
SES - ADMINISTRATION GUIDE - V 7.212. REMOVABLE DEVICE ENCRYPTION
Page 256/424 ses-en-administration_guide-v7.2 - 11/30/2017
13. Encryption
13.1 Data encryption overview
13.1.1 Purpose
Data encryption provides an extra layer of data protection via encoding and password usage.
By password-protecting the encrypted data on your hard disks, sensitive data is protected incase of computer theft ( example: laptops stolen during business trips).
Data encryption consists in:
• a full disk encryption used to encrypt everything on a specific disk partition, includingcomputer configuration. New files saved on the computer are automatically encrypted.
• the encryption of file content located in folders defined by the administrator in the encryptionpolicy.
13.1.2 Characteristics
Advanced Encryption Standard
The Stormshield Endpoint Security Encryption feature is based on the Advanced EncryptionStandard (AES). This is a symmetric encryption system which offers the choice ofa 128, 192 or256-bit key length for encryption.
This system has been approved by the U.S. Government for use with both classified and non-classified documents.
Stormshield Endpoint Security ’s Data Encryption has obtained the Federal InformationProcessing Standard (FIPS) 140-2 certification.
NOTETwo CBC (Cipher Block Chaining) modes are available in Data Encryption.For more information, see Full Disk Encryption Parameters.
Invisibility
Once the administrator has configured the encryption policy, the computer launches thesynchronization process. The agent’s computer data is automatically encrypted by file or bydisk (depending on the encryption policy applied).
NOTEFile encryption does not exclude the use of full disk encryption. Both options can besimultaneously enabled.
After the deployment of the encryption policy, Stormshield Endpoint Security users will not noticethe encryption process in progress while working on their computer.
Nevertheless, some cases exist where a progress bar is visible during the encryption process(also called synchronization):
• Change of encryption policy.
• File transfer from unencrypted to encrypted paths.
• Recovery.
SES - ADMINISTRATION GUIDE - V 7.213. ENCRYPTION
Page 257/424 ses-en-administration_guide-v7.2 - 11/30/2017
To prevent the display of encryption indicators, the administrator can enable Stealth mode underthe file encryption parameters.
The lock indicating that encryption has been applied to a file will not be displayed onencrypted files.
NOTEIf the stealth mode is enabled, the administrator needs to set authentication mode toWindows.
13.1.3 Supported system, hardware and software
Unsupported hardware and software are the following:
• Software RAID and dynamic disks.
• Partition management and disk cloning tools.
• Hard drives with sector size other than 512 bytes.
• Extended partitions are not supported by Full Disk Encryption. Only disks containing masterpartitions can be encrypted.
• Multiboot (several operating systems on the same partition or on two separated partitions) isnot supported by disk encryption.
• Boot loaders other than Microsoft Windows boot loader are not supported by disk encryption.
To encrypt removable devices, you can use the Removable Device Encryption feature inStormshield Endpoint Security.
For more information, please refer to Removable Device Encryption.
WARNINGBefore using the data encryption feature, you must save all your data.
NOTEIf the encrypted hard disk includes one or several defective sectors, encryption will beinterrupted and all data already encrypted will be decrypted again.It is recommended to perform a deep scandisk and repair defective sectors beforeapplying Full Disk Encryption.
Just after applying a full disk encryption policy, downgraded performance can be observedwhen opening a session after startup.
This is absolutely normal due to the fact that encryption starts very early before the openingscreen is actually displayed.
WARNINGThe agent has to connect to the Stormshield Endpoint Security server in order to deploy fulldisk encryption.
Full disk encryption or decryption cannot be interrupted once started.
Once the disk is encrypted with full disk encryption, it is no longer possible to add, modify orremove anything on partitions. If you need to change something on partitions, first decrypt thedisk by disabling full disk encryption in the management console and then, enable again thepolicy after changes.
SES - ADMINISTRATION GUIDE - V 7.213. ENCRYPTION
Page 258/424 ses-en-administration_guide-v7.2 - 11/30/2017
13.1.4 Interoperability with versions previous to the certified 7.2.06 version
If you have a server in version 7.2.06 or higher, agents will have to be updated to the sameversions to be able to use encryption.
Versions 7.2.06 and higher provide an enhanced authentication protocol with a strengthenedidentification step on the agent. They also provide new processes for exchanging data betweenservers and agents which are more secure.
When you update agents to version 7.2.06 or higher, users will have to reset their password inorder to take advantage of the new authentication protocol.
If agents are not updated:
l users will not be able to modify their user password and recovery password and will thereforenot take advantage of the enhanced authentication protocol.
l the server will not be able to exchange data related to encryption with these agents.
13.2 Encryption types
13.2.1 File encryption
File encryption characteristics are the following:
• Only file content is encrypted.
• The file list is defined by the administrator.
• The system and programs remain unencrypted.
The advantages of file encryption are the following:
• Each file is usually encrypted with a separate encryption key.
• Individual management of encrypted files.
• The Administrator can modify which files to encrypt.
• When a workstation is in multi-user mode, each user has a unique password forauthentication.
The disadvantages of file encryption are the following:
• The administrator may forget to select important data that need to beencrypted.
• Users may save data in unencrypted folders.
• Less performance than full disk encryption.
13.2.2 Full disk encryption
Full Disk Encryption is used to encrypt everything on a specific disk partition.
IMPORTANTWhen using Full Disk Encryption, NEVER choose a system restore point that is older thanthe encryption policy’s application date.
In the event of a restoration, this operation would destroy the NEP driver (StormshieldEndpoint Security full disk encryption) and the encrypted disk would no longer bereadable.
SES - ADMINISTRATION GUIDE - V 7.213. ENCRYPTION
Page 259/424 ses-en-administration_guide-v7.2 - 11/30/2017
NOTEWhen defining or typing the encryption password, follow these guidelines:
- do not use the Caps Lock key (use Shift).
- do not use the numeric keypad (use the numbers at the top of the keypad).
The advantages of full disk encryption are the following:
• Everything is encrypted even computer configuration.
This is a major advantage when the administrator forgets to encrypt some files.
This becomes even more important when the administrator wants to encrypt sensitiveconfiguration files or data which are directly stored by software into program directories.
• Full disk encryption deployment is easier than File Encryption deployment.
The disadvantages of full disk encryption are the following:
• There is only one encryption password shared by all users of the computer.
• Full disk encryption deployment may take longer than file encryption deployment dependingon disk size.
• Only the hard disk on which the system has been installed is encrypted. If you want toencrypt documents present on another hard disk, you have to use both full disk encryptionand file encryption (under General Settings > Protection mode).
• Only file encryption will be applied to the second hard disk.
13.3 Creating an encryption policy
13.3.1 Graphical interface
Encryption policies are created and accessible from the Policies menu in the EnvironmentManager section.
SES - ADMINISTRATION GUIDE - V 7.213. ENCRYPTION
Page 260/424 ses-en-administration_guide-v7.2 - 11/30/2017
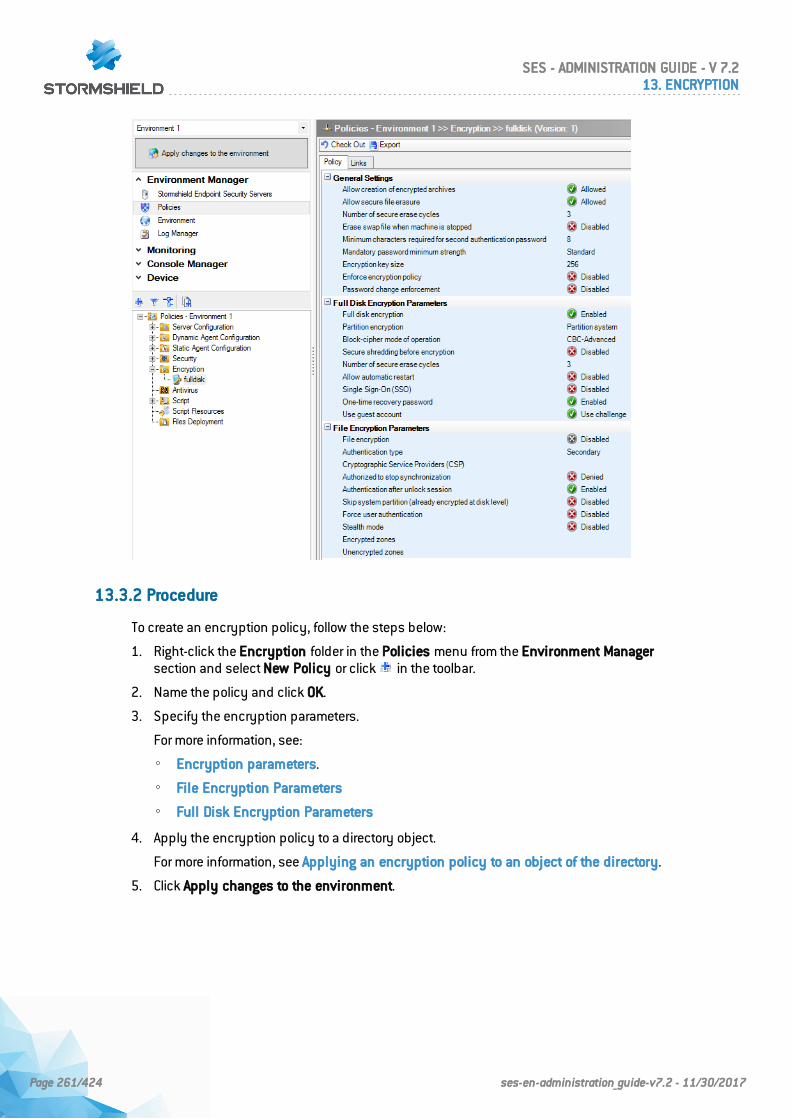
13.3.2 Procedure
To create an encryption policy, follow the steps below:
1. Right-click the Encryption folder in the Policies menu from the Environment Managersection and select New Policy or click in the toolbar.
2. Name the policy and click OK.
3. Specify the encryption parameters.
For more information, see:
◦ Encryption parameters.
◦ File Encryption Parameters
◦ Full Disk Encryption Parameters
4. Apply the encryption policy to a directory object.
For more information, see Applying an encryption policy to an object of the directory.
5. Click Apply changes to the environment.
SES - ADMINISTRATION GUIDE - V 7.213. ENCRYPTION
Page 261/424 ses-en-administration_guide-v7.2 - 11/30/2017

NOTEWhen you apply a new encryption policy to an agent group, the policy will not take effectuntil next reboot of the workstation.
NOTEAfter applying an encryption policy, the password of the Stormshield Endpoint Securityserver's certificate files (root.pem and rootcert.pem) must not be modified.
To disable encryption on a workstation:
1. Modify the encryption policy currently in force or create a new policy.
2. Disable Full disk encryption and/or File encryption settings.
3. Apply this new policy to the workstation concerned.
Instead of that, if you just remove an encryption policy from an object of the directory, agents willkeep applying the last encryption policy. This will avoid inadvertent decryption of a workstation.
13.4 File encryption features
13.4.1 Multi-user security
Stormshield Endpoint Security uses two types of encryption keys: a computer key and a userkey.
Each computer has only one computer key but multiple user keys. This enables users to sharecomputers and still maintain privacy and data confidentiality.
Computer encryption key
Folders and files which are encrypted with the computer encryption key can be opened by anyauthorized user.
User encryption key
After applying an encryption policy, folders and files which are encrypted with a user encryptionkey can only be opened by the first user who created or accessed the file/folder.
For more information, see:
• Computer encryption key .
• User encryption key.
13.4.2 Data erasure security
Providing secure file erasure implies overwriting deleted files to prevent data recovery (especiallyby unauthorized users). This is highly important when a laptop is stolen or left unattended.
You can select the number of overwrites to perform for data erasure.
SES - ADMINISTRATION GUIDE - V 7.213. ENCRYPTION
Page 262/424 ses-en-administration_guide-v7.2 - 11/30/2017
NOTEProfessionals can retrieve information from almost any magnetic data carrier, evendamaged ones.To delete a file permanently, the secure data erasure process performs several randomdata overwrites where the deleted file was stored.It is currently the only method which is valid to obliterate securely data on your disk. Itmakes it almost impossible to retrieve data via magnetic remanence.
13.4.3 File encryption options
To encrypt a file, you need to enter a path which can be a folder, a file or an extension with thehelp of the wildcard *.
Here are some examples of wildcard use:
• c :\*
• *\crypt\*
• c :\*.txt
• c :\file.txt
• |userprofile|\*
You can also exempt files and/or folders from encryption.
For more information, see File Encryption Parameters and File Encryption Parameters.
13.4.4 Password creation and user logon
Password creation
The first time the user logs onto the computer after the encryption policy isapplied, he isprompted to create an authentication password or a PIN codedepending on the type ofauthentication selected (Windows, Secondary or Smart-Card).
This authentication password becomes the encryption password to accessprotected data on theworkstation.
If a user is in the process of creating a new password and the Agent loses its connection to theserver before the password is confirmed, the following error message is displayed:
You are not connected to the server
WARNINGIf you apply a file encryption policy just after installing the Stormshield Endpoint Securityagent, a popup window prompts the user to create his password.qAn error message is displayed if the agent computer was not rebooted before creating theuser password.Reboot the computer in order to fix the problem and create the user password.
Create password prompt
The same password window is displayed to new users and users who already have passwords.
This is because a user may already have an existing encryption password on another computer.
Another situation may be that an encryption password already exists for the user and theStormshield Endpoint Security agent has been uninstalled and re-installed on his computer.
SES - ADMINISTRATION GUIDE - V 7.213. ENCRYPTION
Page 263/424 ses-en-administration_guide-v7.2 - 11/30/2017
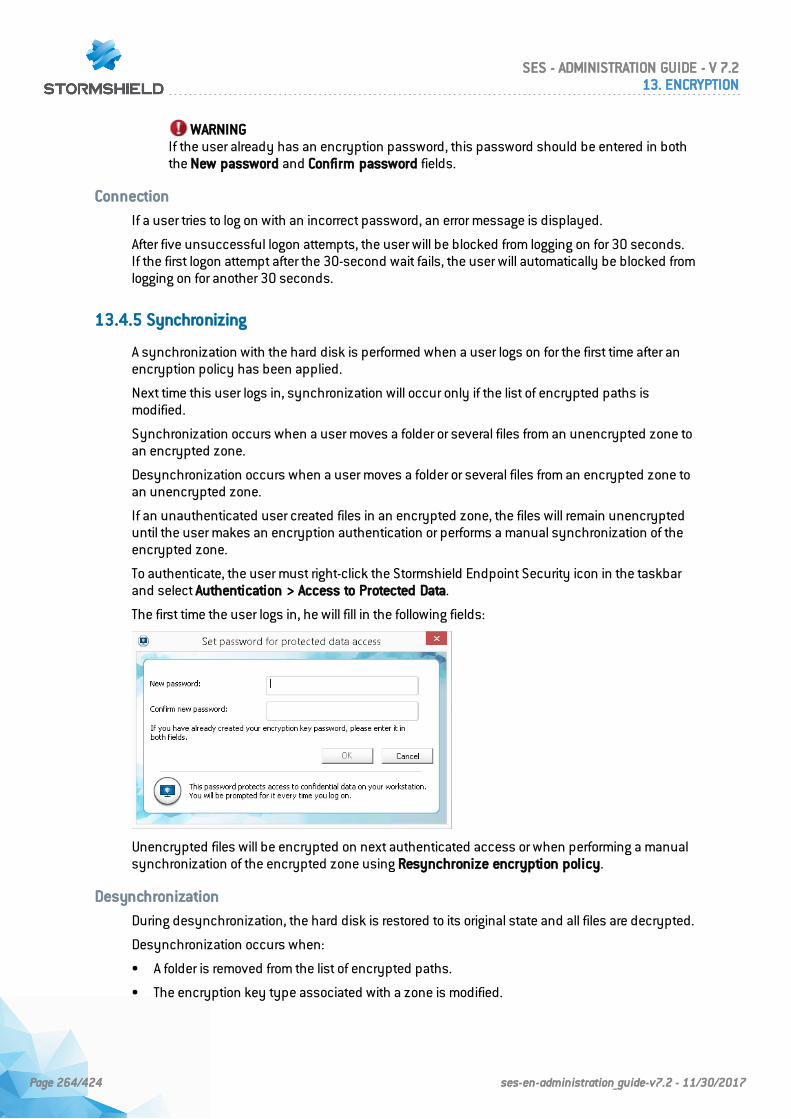
WARNINGIf the user already has an encryption password, this password should be entered in boththe New password and Confirm password fields.
Connection
If a user tries to log on with an incorrect password, an error message is displayed.
After five unsuccessful logon attempts, the user will be blocked from logging on for 30 seconds.If the first logon attempt after the 30-second wait fails, the user will automatically be blocked fromlogging on for another 30 seconds.
13.4.5 Synchronizing
A synchronization with the hard disk is performed when a user logs on for the first time after anencryption policy has been applied.
Next time this user logs in, synchronization will occur only if the list of encrypted paths ismodified.
Synchronization occurs when a user moves a folder or several files from an unencrypted zone toan encrypted zone.
Desynchronization occurs when a user moves a folder or several files from an encrypted zone toan unencrypted zone.
If an unauthenticated user created files in an encrypted zone, the files will remain unencrypteduntil the user makes an encryption authentication or performs a manual synchronization of theencrypted zone.
To authenticate, the user must right-click the Stormshield Endpoint Security icon in the taskbarand select Authentication > Access to Protected Data.
The first time the user logs in, he will fill in the following fields:
Unencrypted files will be encrypted on next authenticated access or when performing a manualsynchronization of the encrypted zone using Resynchronize encryption policy.
Desynchronization
During desynchronization, the hard disk is restored to its original state and all files are decrypted.
Desynchronization occurs when:
• A folder is removed from the list of encrypted paths.
• The encryption key type associated with a zone is modified.
SES - ADMINISTRATION GUIDE - V 7.213. ENCRYPTION
Page 264/424 ses-en-administration_guide-v7.2 - 11/30/2017
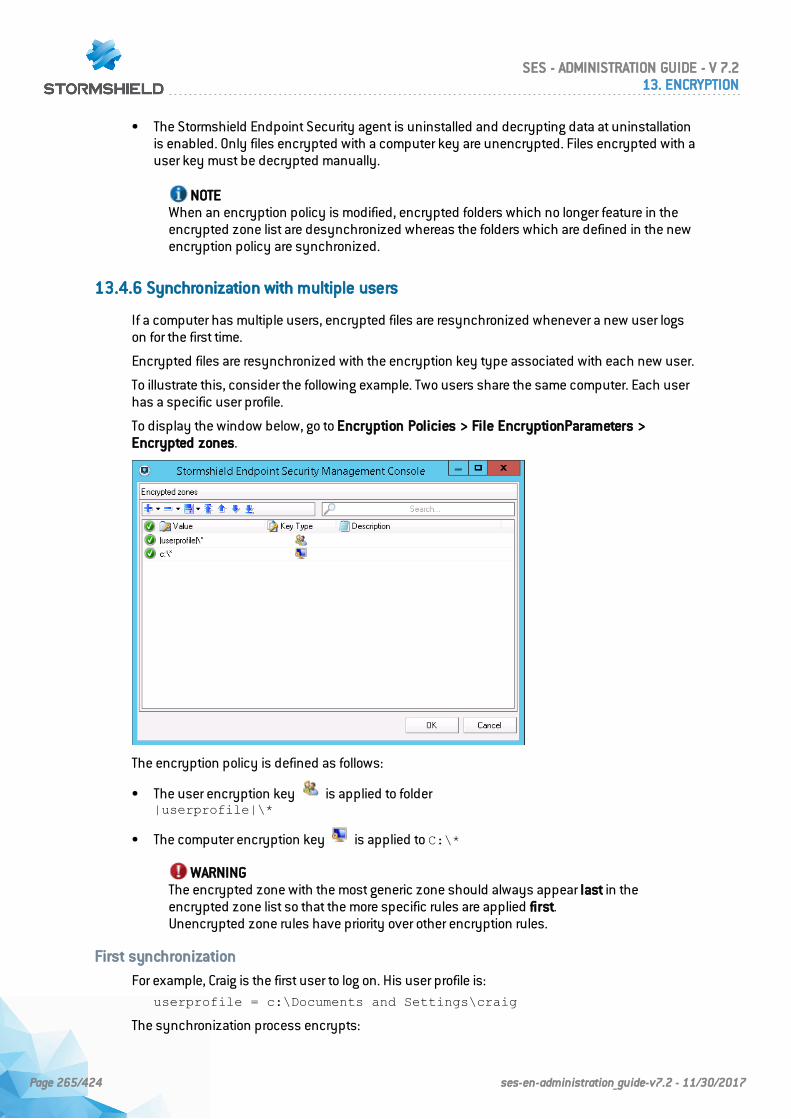
• The Stormshield Endpoint Security agent is uninstalled and decrypting data at uninstallationis enabled. Only files encrypted with a computer key are unencrypted. Files encrypted with auser key must be decrypted manually.
NOTEWhen an encryption policy is modified, encrypted folders which no longer feature in theencrypted zone list are desynchronized whereas the folders which are defined in the newencryption policy are synchronized.
13.4.6 Synchronization with multiple users
If a computer has multiple users, encrypted files are resynchronized whenever a new user logson for the first time.
Encrypted files are resynchronized with the encryption key type associated with each new user.
To illustrate this, consider the following example. Two users share the same computer. Each userhas a specific user profile.
To display the window below, go to Encryption Policies > File EncryptionParameters >Encrypted zones.
The encryption policy is defined as follows:
• The user encryption key is applied to folder|userprofile|\*
• The computer encryption key is applied to C:\*
WARNINGThe encrypted zone with the most generic zone should always appear last in theencrypted zone list so that the more specific rules are applied first.Unencrypted zone rules have priority over other encryption rules.
First synchronization
For example, Craig is the first user to log on. His user profile is:userprofile = c:\Documents and Settings\craig
The synchronization process encrypts:
SES - ADMINISTRATION GUIDE - V 7.213. ENCRYPTION
Page 265/424 ses-en-administration_guide-v7.2 - 11/30/2017
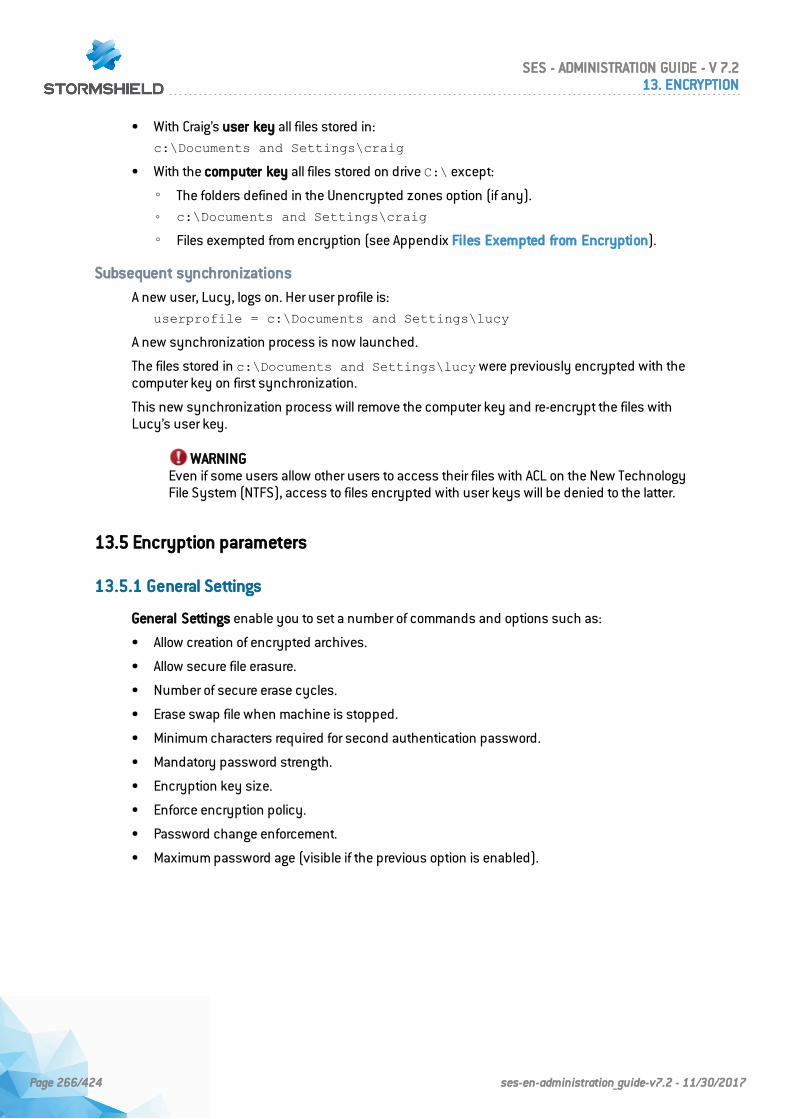
• With Craig’s user key all files stored in:c:\Documents and Settings\craig
• With the computer key all files stored on drive C:\ except:
◦ The folders defined in the Unencrypted zones option (if any).◦ c:\Documents and Settings\craig
◦ Files exempted from encryption (see Appendix Files Exempted from Encryption).
Subsequent synchronizations
A new user, Lucy, logs on. Her user profile is:userprofile = c:\Documents and Settings\lucy
A new synchronization process is now launched.
The files stored in c:\Documents and Settings\lucy were previously encrypted with thecomputer key on first synchronization.
This new synchronization process will remove the computer key and re-encrypt the files withLucy’s user key.
WARNINGEven if some users allow other users to access their files with ACL on the New TechnologyFile System (NTFS), access to files encrypted with user keys will be denied to the latter.
13.5 Encryption parameters
13.5.1 General Settings
General Settings enable you to set a number of commands and options such as:
• Allow creation of encrypted archives.
• Allow secure file erasure.
• Number of secure erase cycles.
• Erase swap file when machine is stopped.
• Minimum characters required for second authentication password.
• Mandatory password strength.
• Encryption key size.
• Enforce encryption policy.
• Password change enforcement.
• Maximum password age (visible if the previous option is enabled).
SES - ADMINISTRATION GUIDE - V 7.213. ENCRYPTION
Page 266/424 ses-en-administration_guide-v7.2 - 11/30/2017
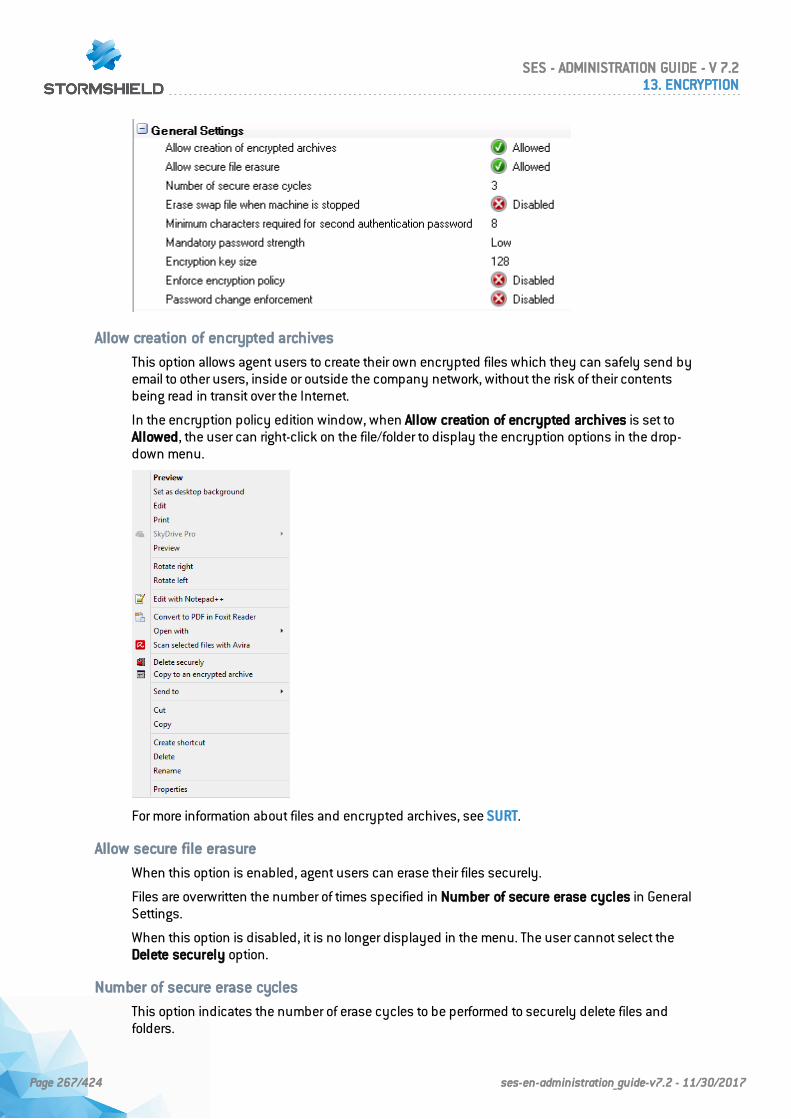
Allow creation of encrypted archives
This option allows agent users to create their own encrypted files which they can safely send byemail to other users, inside or outside the company network, without the risk of their contentsbeing read in transit over the Internet.
In the encryption policy edition window, when Allow creation of encrypted archives is set toAllowed, the user can right-click on the file/folder to display the encryption options in the drop-down menu.
For more information about files and encrypted archives, see SURT.
Allow secure file erasure
When this option is enabled, agent users can erase their files securely.
Files are overwritten the number of times specified in Number of secure erase cycles in GeneralSettings.
When this option is disabled, it is no longer displayed in the menu. The user cannot select theDelete securely option.
Number of secure erase cycles
This option indicates the number of erase cycles to be performed to securely delete files andfolders.
SES - ADMINISTRATION GUIDE - V 7.213. ENCRYPTION
Page 267/424 ses-en-administration_guide-v7.2 - 11/30/2017
The files marked deleted are overwritten the number of times specified in Number of secureerase cycles in General Settings.
By default, the value is 3.
NOTEYou may increase this value. However, it will increase the time it takes to erase files/folders,which can be problematic with bulky files/folders.
Erase swap file when machine is stopped
This option ensures that the swap file is completely erased whenever the computer is stopped.
Minimum characters required for second authentication password
This is the minimum number of characters required to the user to create the password forprotected data encryption and decryption.
By default, the value is 8.
NOTEThis option can be modified only when the authentication type is set to Secondary.
Mandatory password strength
The administrator can define the minimum strength a password should have. The strength ismeasured according to three levels: High, Standard and Low.
As the user enters his password, Stormshield Endpoint Security performs a real-time evaluation ofthe strength of the password. If the strength is lower than that defined by the administrator, thepassword is rejected.
The criteria for password strengths are:
l High: the password must consist of at least 16 characters, and at least three out of the fourfollowing types of characters: lowercase letters, uppercase letters, special characters andnumbers.
l Standard: the password must consist of at least 12 characters, and at least three out of thefour following types of characters: lowercase letters, uppercase letters, special characters andnumbers.
l Low: the password does not follow the criteria for High or Standard password strengths.
WARNINGWhen using full disk encryption, the number of password entry attempts on computerstartup is limited to 10. When exceeding 10 attempts, it is necessary to start the computeragain.
NOTEWhen specifying a password, the user is asked to restart the computer before starting diskencryption. Restarting the computer is required to validate the possibility to enter thepassword during startup. If the user cannot enter the password during startup, MicrosoftWindows starts after the tenth invalid attempt and the user is asked to specify a newpassword.
Encryption key size
The administrator can set the encryption key size to:
• 128 bits.
SES - ADMINISTRATION GUIDE - V 7.213. ENCRYPTION
Page 268/424 ses-en-administration_guide-v7.2 - 11/30/2017
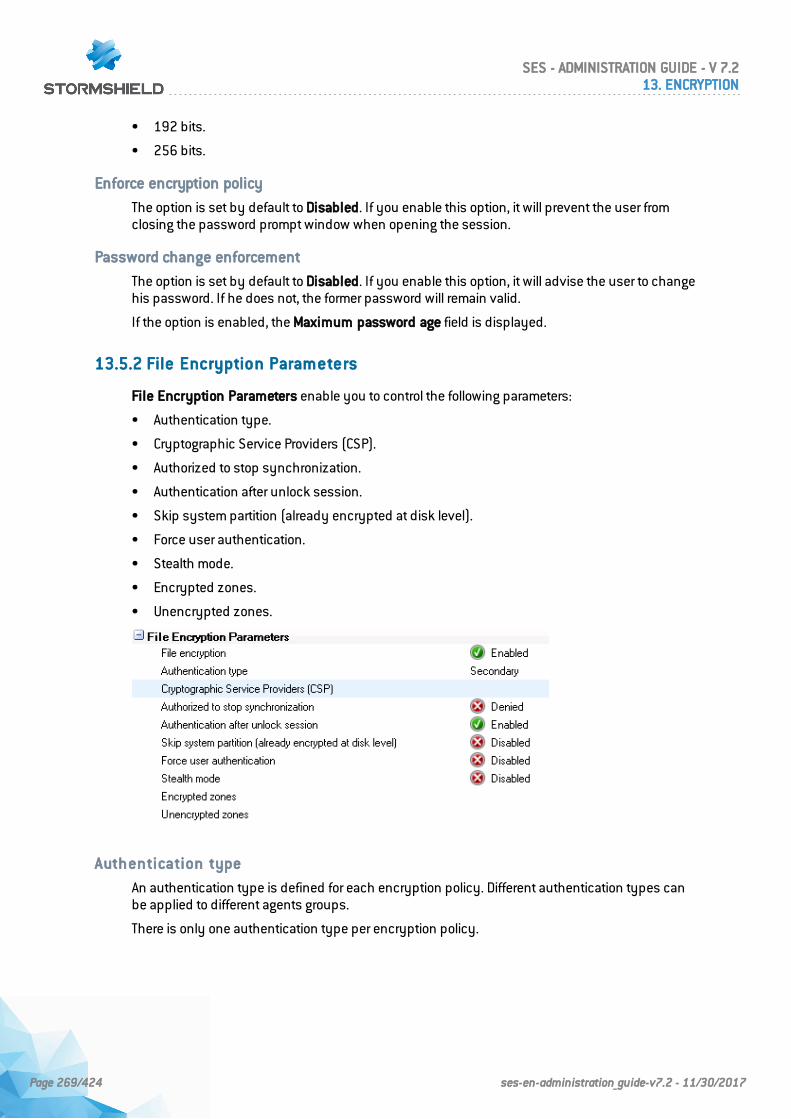
• 192 bits.
• 256 bits.
Enforce encryption policy
The option is set by default to Disabled. If you enable this option, it will prevent the user fromclosing the password prompt window when opening the session.
Password change enforcement
The option is set by default to Disabled. If you enable this option, it will advise the user to changehis password. If he does not, the former password will remain valid.
If the option is enabled, the Maximum password age field is displayed.
13.5.2 File Encryption Parameters
File Encryption Parameters enable you to control the following parameters:
• Authentication type.
• Cryptographic Service Providers (CSP).
• Authorized to stop synchronization.
• Authentication after unlock session.
• Skip system partition (already encrypted at disk level).
• Force user authentication.
• Stealth mode.
• Encrypted zones.
• Unencrypted zones.
Auth en tication type
An authentication type is defined for each encryption policy. Different authentication types canbe applied to different agents groups.
There is only one authentication type per encryption policy.
SES - ADMINISTRATION GUIDE - V 7.213. ENCRYPTION
Page 269/424 ses-en-administration_guide-v7.2 - 11/30/2017
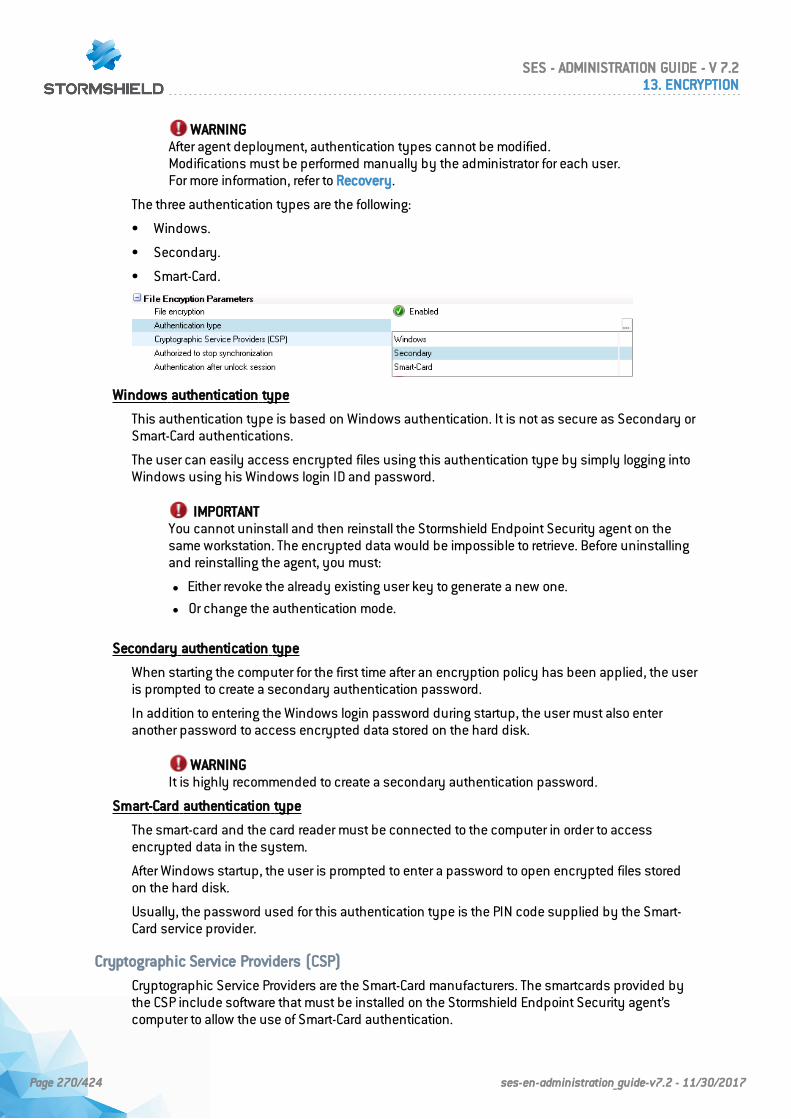
WARNINGAfter agent deployment, authentication types cannot be modified.Modifications must be performed manually by the administrator for each user.For more information, refer to Recovery.
The three authentication types are the following:
• Windows.
• Secondary.
• Smart-Card.
Windows authentication type
This authentication type is based on Windows authentication. It is not as secure as Secondary orSmart-Card authentications.
The user can easily access encrypted files using this authentication type by simply logging intoWindows using his Windows login ID and password.
IMPORTANTYou cannot uninstall and then reinstall the Stormshield Endpoint Security agent on thesame workstation. The encrypted data would be impossible to retrieve. Before uninstallingand reinstalling the agent, you must:
l Either revoke the already existing user key to generate a new one.
l Or change the authentication mode.
Secondary authentication type
When starting the computer for the first time after an encryption policy has been applied, the useris prompted to create a secondary authentication password.
In addition to entering the Windows login password during startup, the user must also enteranother password to access encrypted data stored on the hard disk.
WARNINGIt is highly recommended to create a secondary authentication password.
Smart-Card authentication type
The smart-card and the card reader must be connected to the computer in order to accessencrypted data in the system.
After Windows startup, the user is prompted to enter a password to open encrypted files storedon the hard disk.
Usually, the password used for this authentication type is the PIN code supplied by the Smart-Card service provider.
Cryptographic Service Providers (CSP)
Cryptographic Service Providers are the Smart-Card manufacturers. The smartcards provided bythe CSP include software that must be installed on the Stormshield Endpoint Security agent’scomputer to allow the use of Smart-Card authentication.
SES - ADMINISTRATION GUIDE - V 7.213. ENCRYPTION
Page 270/424 ses-en-administration_guide-v7.2 - 11/30/2017
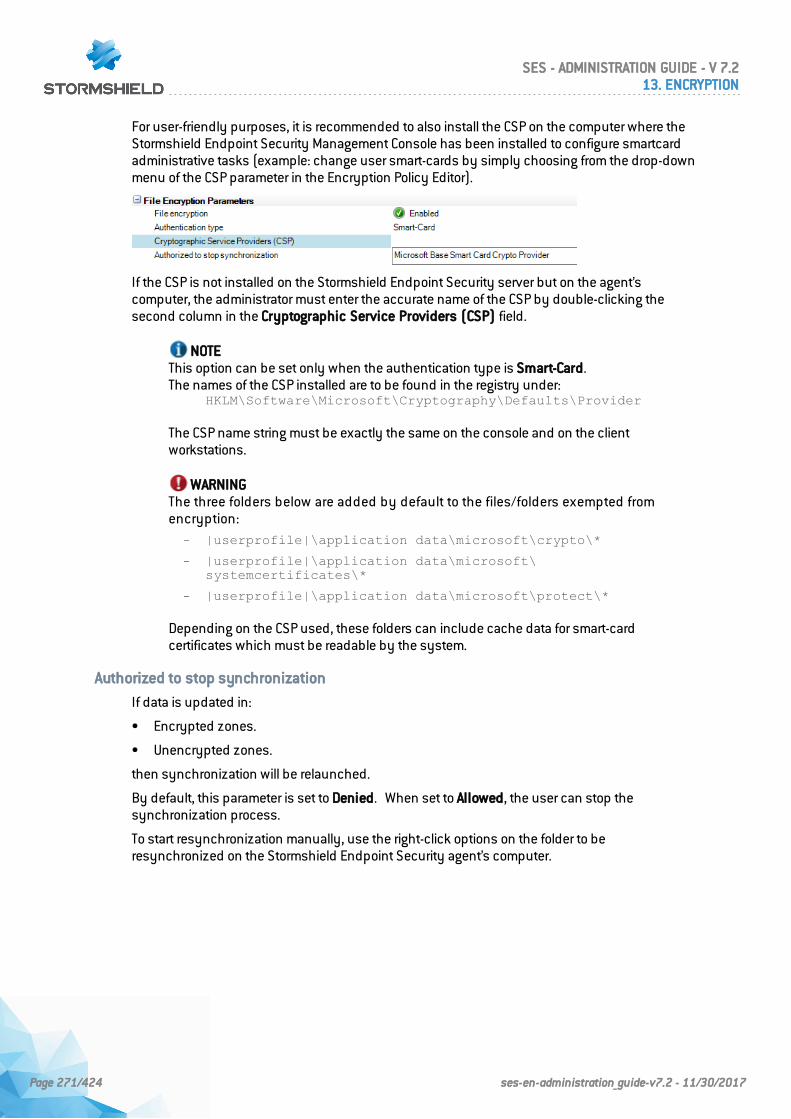
For user-friendly purposes, it is recommended to also install the CSP on the computer where theStormshield Endpoint Security Management Console has been installed to configure smartcardadministrative tasks (example: change user smart-cards by simply choosing from the drop-downmenu of the CSP parameter in the Encryption Policy Editor).
If the CSP is not installed on the Stormshield Endpoint Security server but on the agent’scomputer, the administrator must enter the accurate name of the CSP by double-clicking thesecond column in the Cryptographic Service Providers (CSP) field.
NOTEThis option can be set only when the authentication type is Smart-Card.The names of the CSP installed are to be found in the registry under:
HKLM\Software\Microsoft\Cryptography\Defaults\Provider
The CSP name string must be exactly the same on the console and on the clientworkstations.
WARNINGThe three folders below are added by default to the files/folders exempted fromencryption:- |userprofile|\application data\microsoft\crypto\*
- |userprofile|\application data\microsoft\systemcertificates\*
- |userprofile|\application data\microsoft\protect\*
Depending on the CSP used, these folders can include cache data for smart-cardcertificates which must be readable by the system.
Authorized to stop synchronization
If data is updated in:
• Encrypted zones.
• Unencrypted zones.
then synchronization will be relaunched.
By default, this parameter is set to Denied. When set to Allowed, the user can stop thesynchronization process.
To start resynchronization manually, use the right-click options on the folder to beresynchronized on the Stormshield Endpoint Security agent’s computer.
SES - ADMINISTRATION GUIDE - V 7.213. ENCRYPTION
Page 271/424 ses-en-administration_guide-v7.2 - 11/30/2017
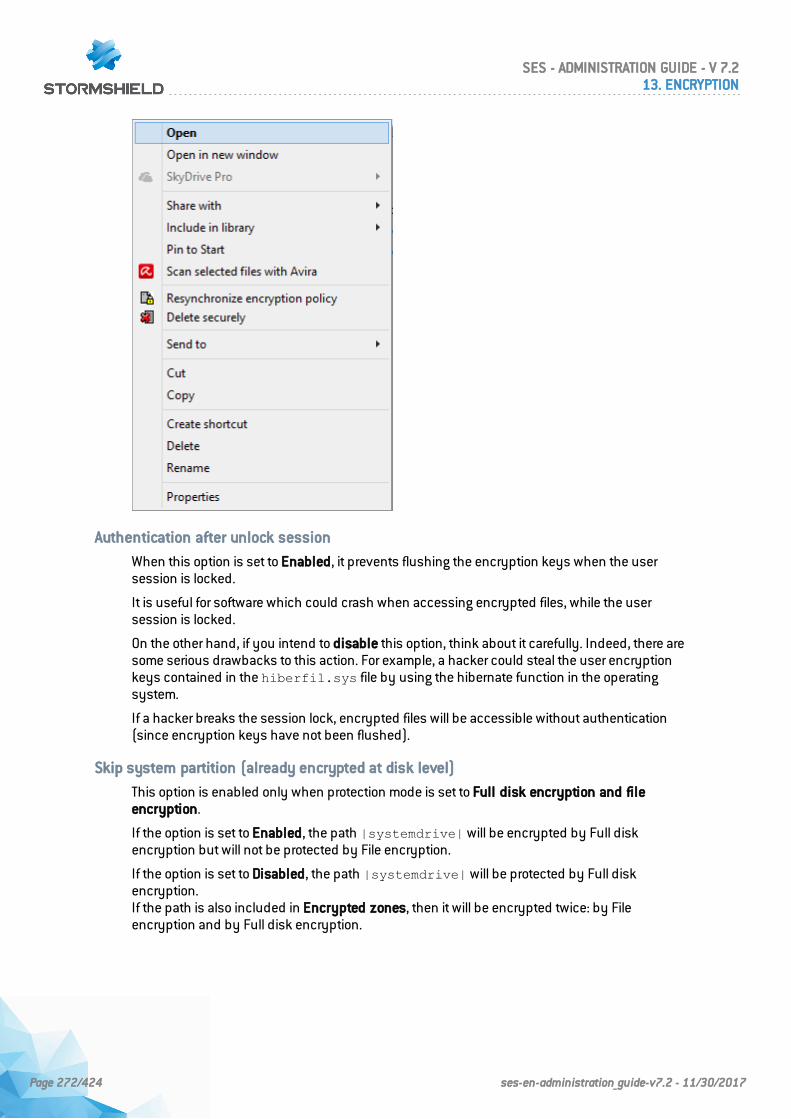
Authentication after unlock session
When this option is set to Enabled, it prevents flushing the encryption keys when the usersession is locked.
It is useful for software which could crash when accessing encrypted files, while the usersession is locked.
On the other hand, if you intend to disable this option, think about it carefully. Indeed, there aresome serious drawbacks to this action. For example, a hacker could steal the user encryptionkeys contained in the hiberfil.sys file by using the hibernate function in the operatingsystem.
If a hacker breaks the session lock, encrypted files will be accessible without authentication(since encryption keys have not been flushed).
Skip system partition (already encrypted at disk level)
This option is enabled only when protection mode is set to Full disk encryption and fileencryption.
If the option is set to Enabled, the path |systemdrive| will be encrypted by Full diskencryption but will not be protected by File encryption.
If the option is set to Disabled, the path |systemdrive| will be protected by Full diskencryption.If the path is also included in Encrypted zones, then it will be encrypted twice: by Fileencryption and by Full disk encryption.
SES - ADMINISTRATION GUIDE - V 7.213. ENCRYPTION
Page 272/424 ses-en-administration_guide-v7.2 - 11/30/2017
WARNINGUnencrypted zone rules have priority over other encryption rules.
Force user authentication
When this option is set to Enabled, the user is prompted to authenticate when opening a sessionso as to prevent him from creating unencrypted files.
Stealth mode
When this option is set to Enabled, file encryption is applied to the workstations but their userswill not notice the encryption process in progress.
The agent will not display the following elements on the user’s workstation:
• Right-click file encryption window.
• Encryption progress bar.
• Right-click menu (Copy to an encrypted archive).
• The lock icon on encrypted files.
WARNINGYou need to set the authentication mode to Windows.
Encrypted zones
This option is used to encrypt all the files in a specific folder.
You have to define the folders where users can store their files securely.
NOTEThe Administrator has to inform the users where they can store their files securely.The encrypted zone with the most generic path should always appear last in the list ofEncrypted zones so that the more specific rules are applied first.Unencrypted zone rules have priority over other encryption rules.
NOTEZones that are considered vital for the proper running of the operating system cannot beencrypted. As a result, folders such as C:\Windows\ and C:\Program Files\ will beexempted from file encryption. The corresponding environment variables (|systemroot|and |programfiles| respectively) cannot be used in the file encryption policy. If youconsider the data in these folders sensitive and require encryption, it may be preferable toencrypt the whole disk.
Environment variables
Environment variables make it easier to configure encrypted zones.
For example, you can enter |userprofile| to specify all individual user folders, rather thanenter each individual folder one at a time.
Supported environment variables are the following:• |username|
• |systemdrive|
• |userprofile|
• |mydocuments|
SES - ADMINISTRATION GUIDE - V 7.213. ENCRYPTION
Page 273/424 ses-en-administration_guide-v7.2 - 11/30/2017
WARNINGEnvironment variables, in particular|username| and |userprofile|, aredynamic. They change with each user session.Let us consider the following situation:
- user1 logs on.The zone to be encrypted which is defined by the policy is:c :\documents and settings\user1(the environment variable is replaced by its value).
- user2 logs on after user1 on the same computer.The zone to be encrypted as defined in the policy is now:c :\documents and settings\user2and synchronization is launched.If user2 is allowed to access c:\documents and settings\user1 (provided that filesystem permissions are granted and files are encrypted with a computer key),encryption will take place.
To prevent this, the administrator must define a user key for these types of folders.For more information, see Environment variables.
Encryption key types
There are two encryption key types:
• The computer encryption key.
• The user encryption key.
Computer encryption key
The computer encryption key is available to any user who has an encryption password forthat particular computer.
This means that encrypted data is protected from theft and access by unauthorized users.
Each computer has only one computer key. The computer key is changed every time theStormshield Endpoint Security Agent is installed so that each computer has a unique computerencryption key.
User encryption key
The user encryption key is unique to the user.
This means that if a file is encrypted by user "A", only user "A" can access the file.
When the user logs on for the first time with a password, Stormshield Endpoint Security creates aunique user key. The user key is a combination of the computer key and the user key with theuser password.
Here are three typical situations:
• Files encrypted by one key:
A file can be encrypted by only one key: a unique user key or the computer key.
• User access to computer key:
Each user is able to access the computer key with his own password. Actually, the userpassword is used both for computer and user encryption keys. This is invisible to the user.
• File access denied:
Access to encrypted files is denied when:
◦ The file has been encrypted with the user key of another user.
SES - ADMINISTRATION GUIDE - V 7.213. ENCRYPTION
Page 274/424 ses-en-administration_guide-v7.2 - 11/30/2017
◦ No password authentication has been entered.
◦ There are several user sessions on a computer under Windows Vista.
◦ The Stormshield Endpoint Security agent has been shut down.
◦ The administrator has disabled the encryption policy whereas files are still encrypted.
Unencrypted zones
You can use this option to prevent the encryption of unencryptable files.
Important applications that are initialized during computer start-up are not encrypted, namely:
• Windows Operating System files.
• System Volume Information.
• Stormshield Endpoint Security.
For more information on the list of applications exempted from encryption, see Files Exemptedfrom Encryption.
WARNINGThe following must also be exempted from encryption:
l Any system file loaded during Windows startupSince files can be decrypted only after the user logs on, all files used during the boot-up sequence by services, drivers or the operating system must not be encrypted. Thisincludes the desktop manager file currently selected.
l Roaming profilesAccess to encrypted files is denied until after encryption password authentication.Since Windows synchronization occurs before authentication, the roaming profilewould still be encrypted and Windows synchronization would fail.
13.5.3 Full Disk Encryption Parameters
Full Disk Encryption Parameters enable you to control the following parameters:
• Partition encryption.
• Block-cipher mode of operation.
• Secure shredding before encryption.
• Number of secure erase cycles (before first encryption).
• Allow automatic restart.
• Single Sign-On (SSO).
• One-time recovery password.
• Use guest account.
SES - ADMINISTRATION GUIDE - V 7.213. ENCRYPTION
Page 275/424 ses-en-administration_guide-v7.2 - 11/30/2017
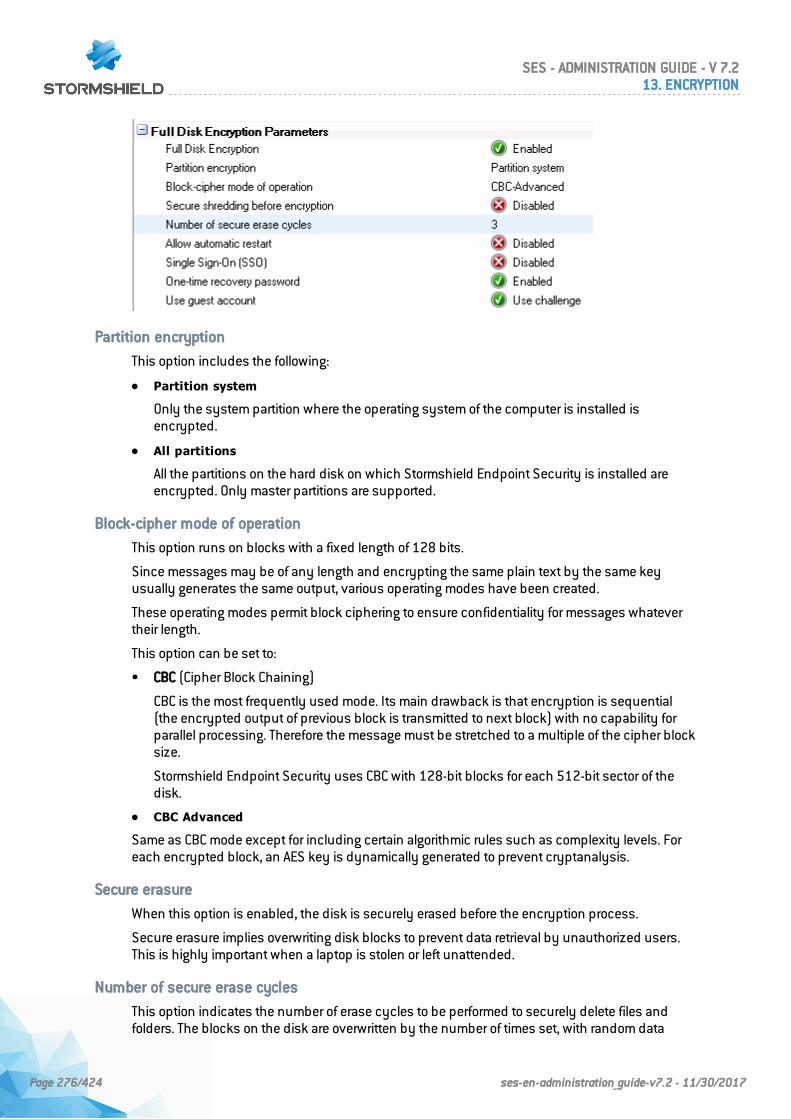
Partition encryption
This option includes the following:
• Partition system
Only the system partition where the operating system of the computer is installed isencrypted.
• All partitions
All the partitions on the hard disk on which Stormshield Endpoint Security is installed areencrypted. Only master partitions are supported.
Block-cipher mode of operation
This option runs on blocks with a fixed length of 128 bits.
Since messages may be of any length and encrypting the same plain text by the same keyusually generates the same output, various operating modes have been created.
These operating modes permit block ciphering to ensure confidentiality for messages whatevertheir length.
This option can be set to:
• CBC (Cipher Block Chaining)
CBC is the most frequently used mode. Its main drawback is that encryption is sequential(the encrypted output of previous block is transmitted to next block) with no capability forparallel processing. Therefore the message must be stretched to a multiple of the cipher blocksize.
Stormshield Endpoint Security uses CBC with 128-bit blocks for each 512-bit sector of thedisk.
• CBC Advanced
Same as CBC mode except for including certain algorithmic rules such as complexity levels. Foreach encrypted block, an AES key is dynamically generated to prevent cryptanalysis.
Secure erasure
When this option is enabled, the disk is securely erased before the encryption process.
Secure erasure implies overwriting disk blocks to prevent data retrieval by unauthorized users.This is highly important when a laptop is stolen or left unattended.
Number of secure erase cycles
This option indicates the number of erase cycles to be performed to securely delete files andfolders. The blocks on the disk are overwritten by the number of times set, with random data
SES - ADMINISTRATION GUIDE - V 7.213. ENCRYPTION
Page 276/424 ses-en-administration_guide-v7.2 - 11/30/2017
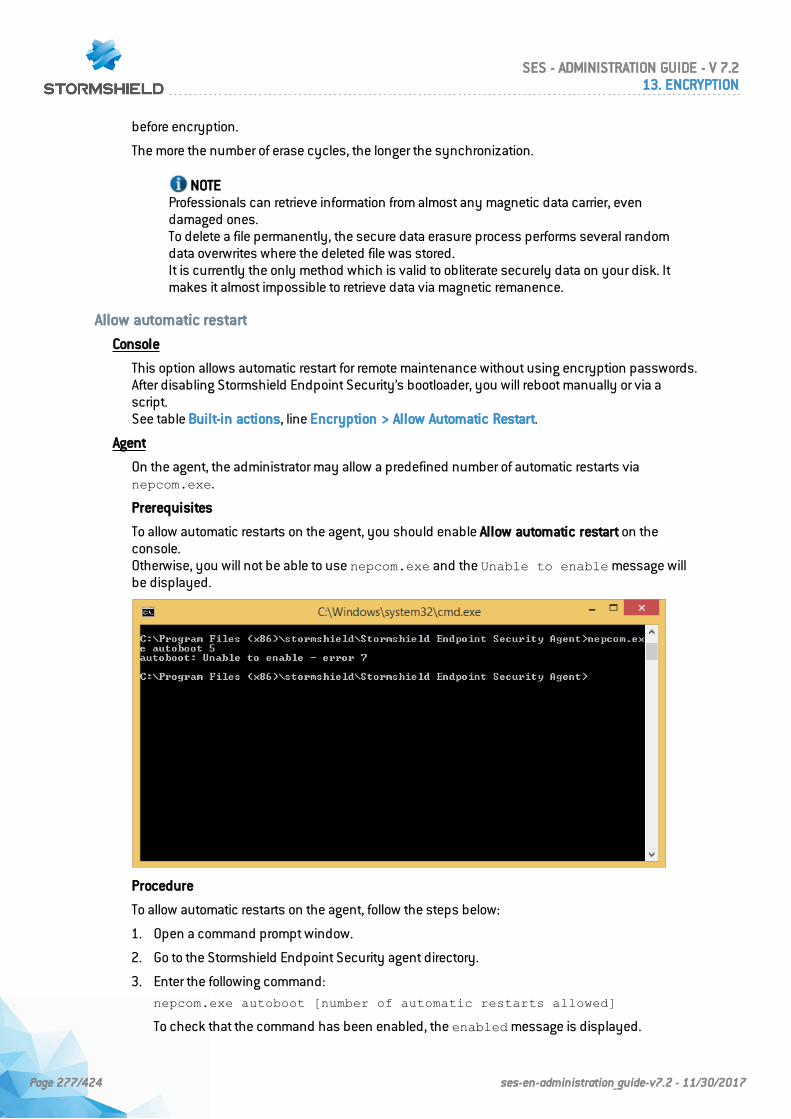
before encryption.
The more the number of erase cycles, the longer the synchronization.
NOTEProfessionals can retrieve information from almost any magnetic data carrier, evendamaged ones.To delete a file permanently, the secure data erasure process performs several randomdata overwrites where the deleted file was stored.It is currently the only method which is valid to obliterate securely data on your disk. Itmakes it almost impossible to retrieve data via magnetic remanence.
Allow automatic restart
Console
This option allows automatic restart for remote maintenance without using encryption passwords.After disabling Stormshield Endpoint Security’s bootloader, you will reboot manually or via ascript.See table Built-in actions, line Encryption > Allow Automatic Restart.
Agent
On the agent, the administrator may allow a predefined number of automatic restarts vianepcom.exe.
Prerequisites
To allow automatic restarts on the agent, you should enable Allow automatic restart on theconsole.Otherwise, you will not be able to use nepcom.exe and the Unable to enable message willbe displayed.
Procedure
To allow automatic restarts on the agent, follow the steps below:
1. Open a command prompt window.
2. Go to the Stormshield Endpoint Security agent directory.
3. Enter the following command:nepcom.exe autoboot [number of automatic restarts allowed]
To check that the command has been enabled, the enabled message is displayed.
SES - ADMINISTRATION GUIDE - V 7.213. ENCRYPTION
Page 277/424 ses-en-administration_guide-v7.2 - 11/30/2017

To disable automatic restarts on the agent, follow the steps below:
1. Open a command prompt window.
2. Go to the Stormshield Endpoint Security agent directory.
3. Enter the following command:nepcom.exe autoboot
To check that the command has been enabled, the disabled message is displayed.
Single Sign-On (SSO)
This option is used to combine two authentications (Encryption+Windows) for the main user.
When the user authenticates for the first time with his/her login and Windows password viaStormshield Endpoint Security authentication service, user authentication information will beencrypted with the encryption key and stored on the agent.
From now on, the user will no longer need to enter his/her login or Windows password as theagent has decrypted and sent this information to Stormshield Endpoint Security authenticationservice. The service will at present fill in automatically Windows account authentication details.
If the user changes his Windows password, he will follow the steps below:
• The user will proceed as usual under Windows in order to change his password.
• He/She will reboot his machine.
SES - ADMINISTRATION GUIDE - V 7.213. ENCRYPTION
Page 278/424 ses-en-administration_guide-v7.2 - 11/30/2017
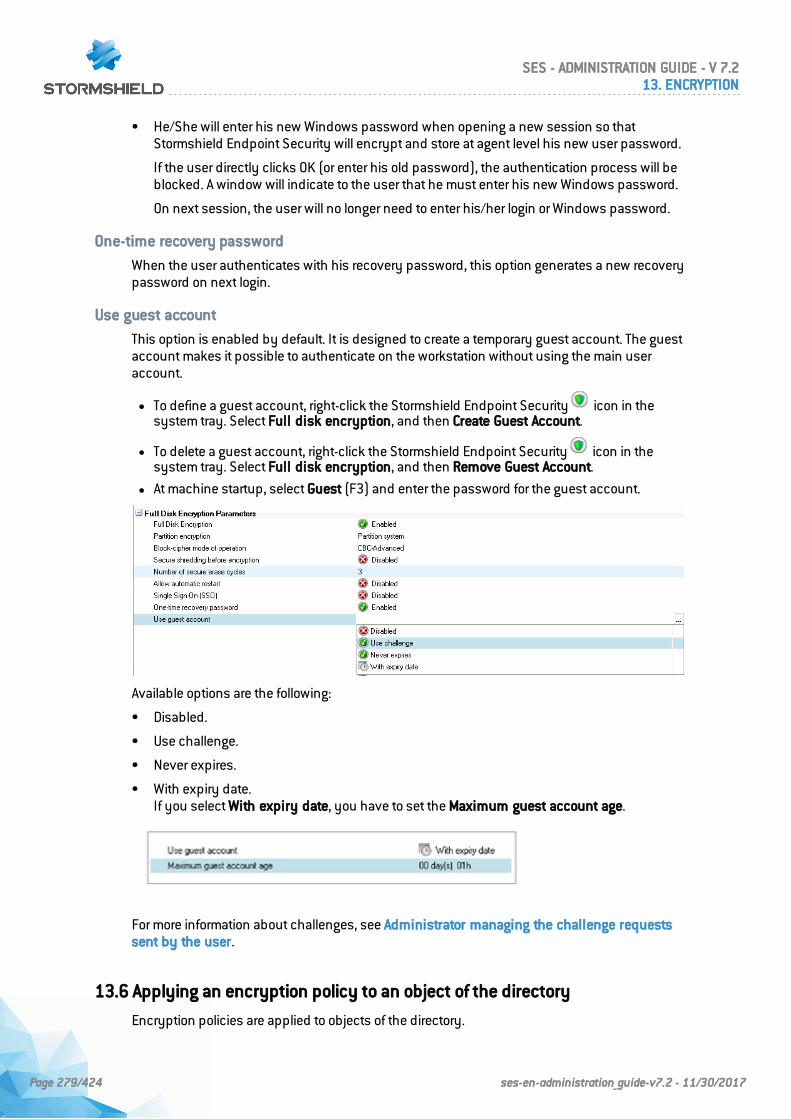
• He/She will enter his new Windows password when opening a new session so thatStormshield Endpoint Security will encrypt and store at agent level his new user password.
If the user directly clicks OK (or enter his old password), the authentication process will beblocked. A window will indicate to the user that he must enter his new Windows password.
On next session, the user will no longer need to enter his/her login or Windows password.
One-time recovery password
When the user authenticates with his recovery password, this option generates a new recoverypassword on next login.
Use guest account
This option is enabled by default. It is designed to create a temporary guest account. The guestaccount makes it possible to authenticate on the workstation without using the main useraccount.
l To define a guest account, right-click the Stormshield Endpoint Security icon in thesystem tray. Select Full disk encryption, and then Create Guest Account.
l To delete a guest account, right-click the Stormshield Endpoint Security icon in thesystem tray. Select Full disk encryption, and then Remove Guest Account.
l At machine startup, select Guest (F3) and enter the password for the guest account.
Available options are the following:
• Disabled.
• Use challenge.
• Never expires.
• With expiry date.If you select With expiry date, you have to set the Maximum guest account age.
For more information about challenges, see Administrator managing the challenge requestssent by the user.
13.6 Applying an encryption policy to an object of the directory
Encryption policies are applied to objects of the directory.
SES - ADMINISTRATION GUIDE - V 7.213. ENCRYPTION
Page 279/424 ses-en-administration_guide-v7.2 - 11/30/2017
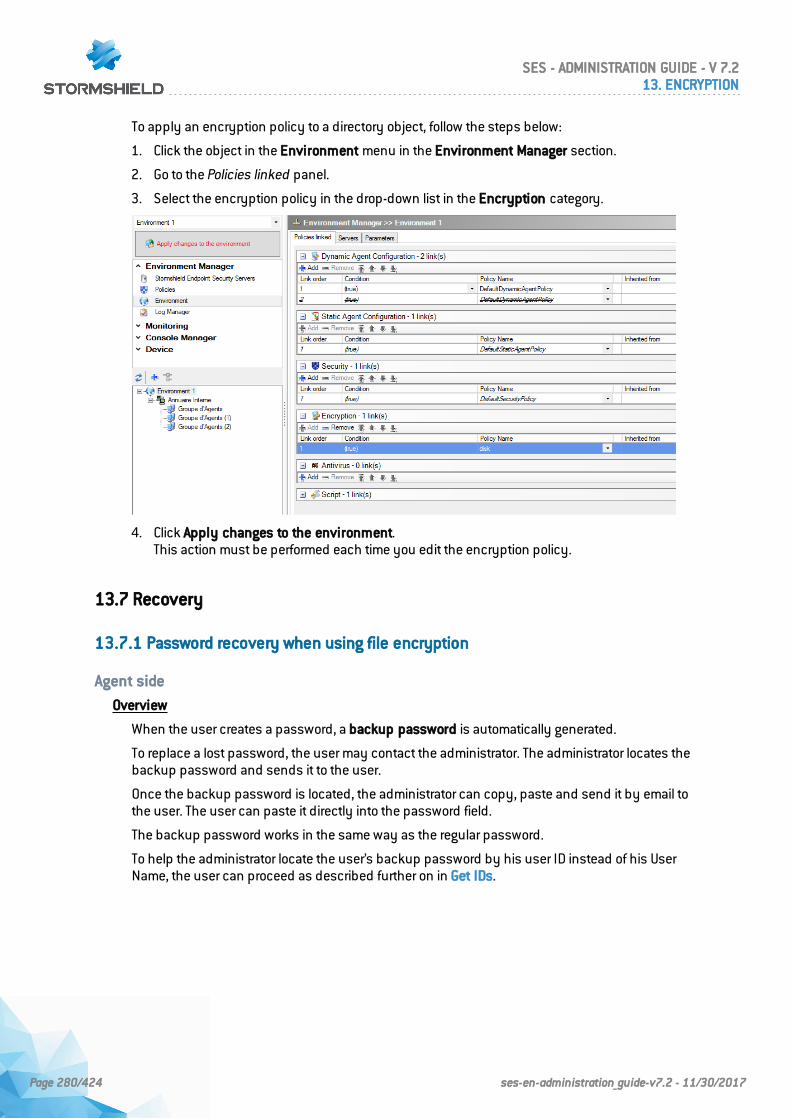
To apply an encryption policy to a directory object, follow the steps below:
1. Click the object in the Environment menu in the Environment Manager section.
2. Go to the Policies linked panel.
3. Select the encryption policy in the drop-down list in the Encryption category.
4. Click Apply changes to the environment.This action must be performed each time you edit the encryption policy.
13.7 Recovery
13.7.1 Password recovery when using file encryption
Agent side
Overview
When the user creates a password, a backup password is automatically generated.
To replace a lost password, the user may contact the administrator. The administrator locates thebackup password and sends it to the user.
Once the backup password is located, the administrator can copy, paste and send it by email tothe user. The user can paste it directly into the password field.
The backup password works in the same way as the regular password.
To help the administrator locate the user’s backup password by his user ID instead of his UserName, the user can proceed as described further on in Get IDs.
SES - ADMINISTRATION GUIDE - V 7.213. ENCRYPTION
Page 280/424 ses-en-administration_guide-v7.2 - 11/30/2017
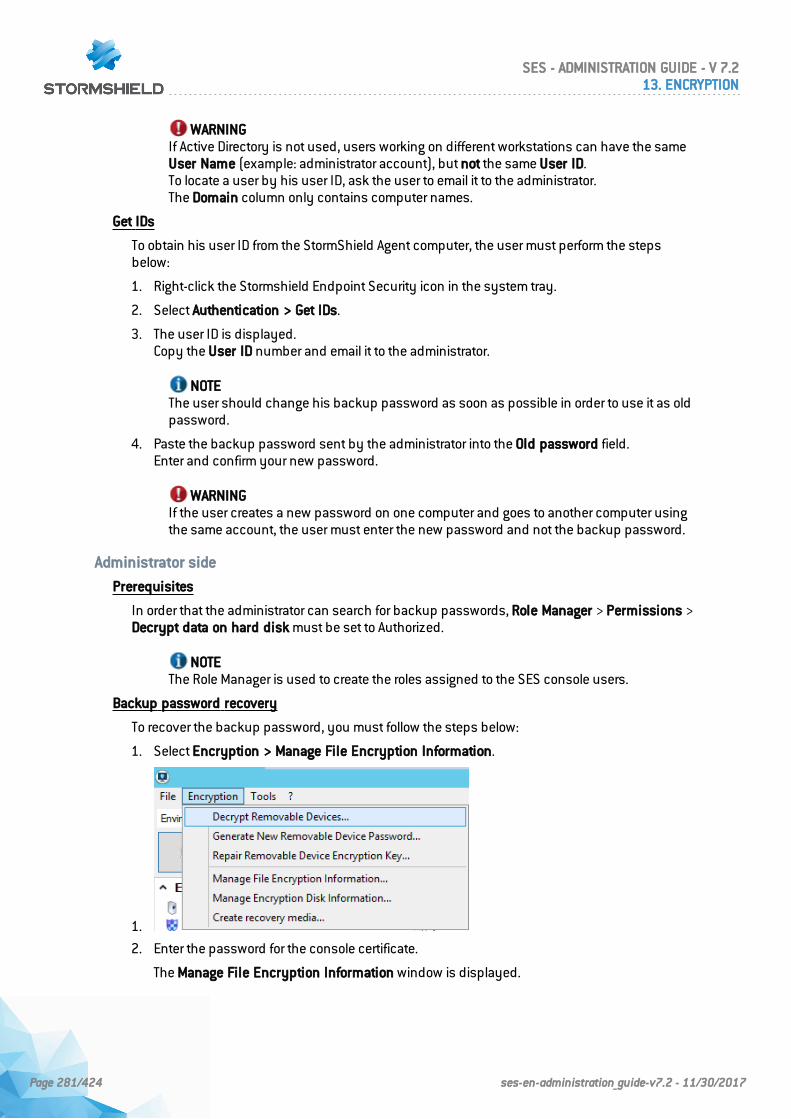
WARNINGIf Active Directory is not used, users working on different workstations can have the sameUser Name (example: administrator account), but not the same User ID.To locate a user by his user ID, ask the user to email it to the administrator.The Domain column only contains computer names.
Get IDs
To obtain his user ID from the StormShield Agent computer, the user must perform the stepsbelow:
1. Right-click the Stormshield Endpoint Security icon in the system tray.
2. Select Authentication > Get IDs.
3. The user ID is displayed.Copy the User ID number and email it to the administrator.
NOTEThe user should change his backup password as soon as possible in order to use it as oldpassword.
4. Paste the backup password sent by the administrator into the Old password field.Enter and confirm your new password.
WARNINGIf the user creates a new password on one computer and goes to another computer usingthe same account, the user must enter the new password and not the backup password.
Administrator side
Prerequisites
In order that the administrator can search for backup passwords, Role Manager > Permissions >Decrypt data on hard disk must be set to Authorized.
NOTEThe Role Manager is used to create the roles assigned to the SES console users.
Backup password recovery
To recover the backup password, you must follow the steps below:
1. Select Encryption > Manage File Encryption Information.
1.
2. Enter the password for the console certificate.
The Manage File Encryption Information window is displayed.
SES - ADMINISTRATION GUIDE - V 7.213. ENCRYPTION
Page 281/424 ses-en-administration_guide-v7.2 - 11/30/2017
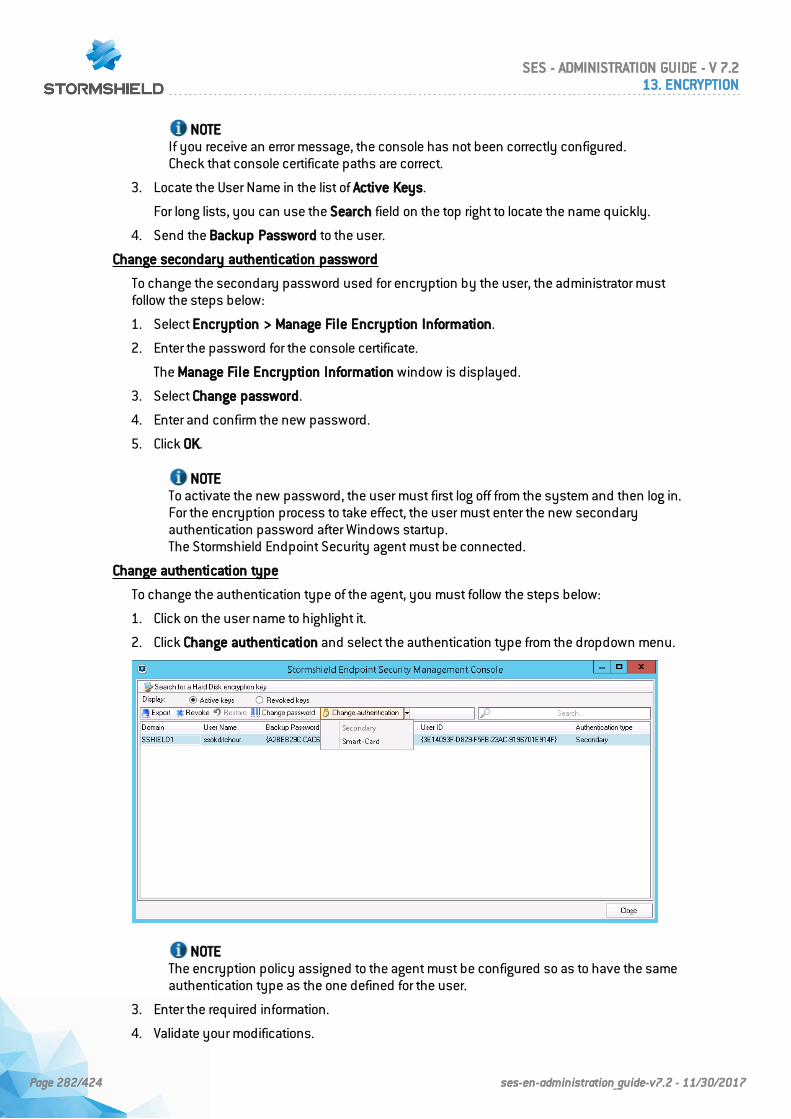
NOTEIf you receive an error message, the console has not been correctly configured.Check that console certificate paths are correct.
3. Locate the User Name in the list of Active Keys.
For long lists, you can use the Search field on the top right to locate the name quickly.
4. Send the Backup Password to the user.
Change secondary authentication password
To change the secondary password used for encryption by the user, the administrator mustfollow the steps below:
1. Select Encryption > Manage File Encryption Information.
2. Enter the password for the console certificate.
The Manage File Encryption Information window is displayed.
3. Select Change password.
4. Enter and confirm the new password.
5. Click OK.
NOTETo activate the new password, the user must first log off from the system and then log in.For the encryption process to take effect, the user must enter the new secondaryauthentication password after Windows startup.The Stormshield Endpoint Security agent must be connected.
Change authentication type
To change the authentication type of the agent, you must follow the steps below:
1. Click on the user name to highlight it.
2. Click Change authentication and select the authentication type from the dropdown menu.
NOTEThe encryption policy assigned to the agent must be configured so as to have the sameauthentication type as the one defined for the user.
3. Enter the required information.
4. Validate your modifications.
SES - ADMINISTRATION GUIDE - V 7.213. ENCRYPTION
Page 282/424 ses-en-administration_guide-v7.2 - 11/30/2017
5. Apply changes to the environment.
NOTEAfter the StormShield agent reconnects to the server and receives new information, theuser must log off and log on again to apply the new authentication type.
Change to Smart-Card authentication
To change the authentication type of the agent, you must follow the steps below:
1. Click on the user name to highlight it.
2. Click Change authentication and select Smart-Card type from the dropdown menu.
3. Define the following parameters:
◦ Select the CSP.
◦ Select the certificate.
◦ Enter the PIN code.
4. Click OK.
5. Apply changes to the environment.
NOTEAfter the StormShield agent reconnects to the server and receives new information, theuser must log off and log on again to apply the new authentication type.Upon login, Stormshield Endpoint Security prompts the user to insert the smart-card andenter the PIN code (provided by the CSP).
Revoking and restoring user keys
There are two types of user keys in Manage File Encryption Information:
• Active keys:
They are the keys belonging to active users who can authenticate themselves.
• Revoked keys:
They are the keys belonging to revoked users. The administrator can reactivate revoked keys.
NOTEA user with a revoked key will not be able to access encrypted files. Authentication will berejected.
To revoke or restore user keys, you must follow the steps below:
1. Search for a user using the Search field and click Revoke.
2. The user is removed from the list of Active keys. On the other hand, his name will appear onthe list of Revoked keys.To check this out, click the Revoked keys radio button.
3. Several actions are available from the toolbar:
◦ Export the user key as a [RecoveryKey].srk file.
◦ Delete the user key.
◦ Restore the user key (Revoked key > Active key).
◦ Change user password.
◦ Change user authentication.
SES - ADMINISTRATION GUIDE - V 7.213. ENCRYPTION
Page 283/424 ses-en-administration_guide-v7.2 - 11/30/2017

13.7.2 Recovering data from encrypted files (decryption)
You may need to decrypt some or all of the data on a hard disk.
Examples:
• When a user leaves the company.
• When data is to recovered from a damaged hard disk.
Recovery keyrin g
If you need to decrypt more than one hard disk, you can create a recovery key ring.The recovery keyring is a file that can be copied onto a USB key and which can be used tomanually decrypt each computer in turn.
To create a recovery keyring, see Decrypting data manually.
In Step 3 of the manual data decryption procedure, select the user names that you want toinclude in the recovery keyring.You can then rename the file (if necessary), and export it to a USB key.
NOTEThe recovery key ring includes all the keys of the computers used by selected users.
Decryptin g data m an ually
Administrator procedure
To decrypt data manually, follow the steps below:
1. Select Encryption > Manage File Encryption Information.
2. Enter the password for the console certificate.
The Manage File Encryption Information window is displayed.
NOTEIf you receive an error message, the console has not been correctly configured.
3. Locate the user name in the list.
For long lists, you can use the Search field to locate the name quickly.
You can select multiple user names to create a key ring.
For more information, see the section Recovery keyring.
NOTEIf Active Directory is not used, users working on different workstations can have the sameUser Name (example: administrator account), but not the same User ID.To locate a user by his user ID, ask the user to email it to you.For more information, see the section Recovery.
4. After selecting the User Names (or User IDs), click Export.
5. Enter the path and file name.
The file is saved as a [RecoveryKey].srk file which contains the keys used for file recovery.
SRK files can be exported from the console and used on the Stormshield Endpoint SecurityAgent.
For more information, see section Agent side or section Recovering data encrypted via thedata encryption feature of chapter SURT.
The file can be saved onto a USB key or another server.
SES - ADMINISTRATION GUIDE - V 7.213. ENCRYPTION
Page 284/424 ses-en-administration_guide-v7.2 - 11/30/2017
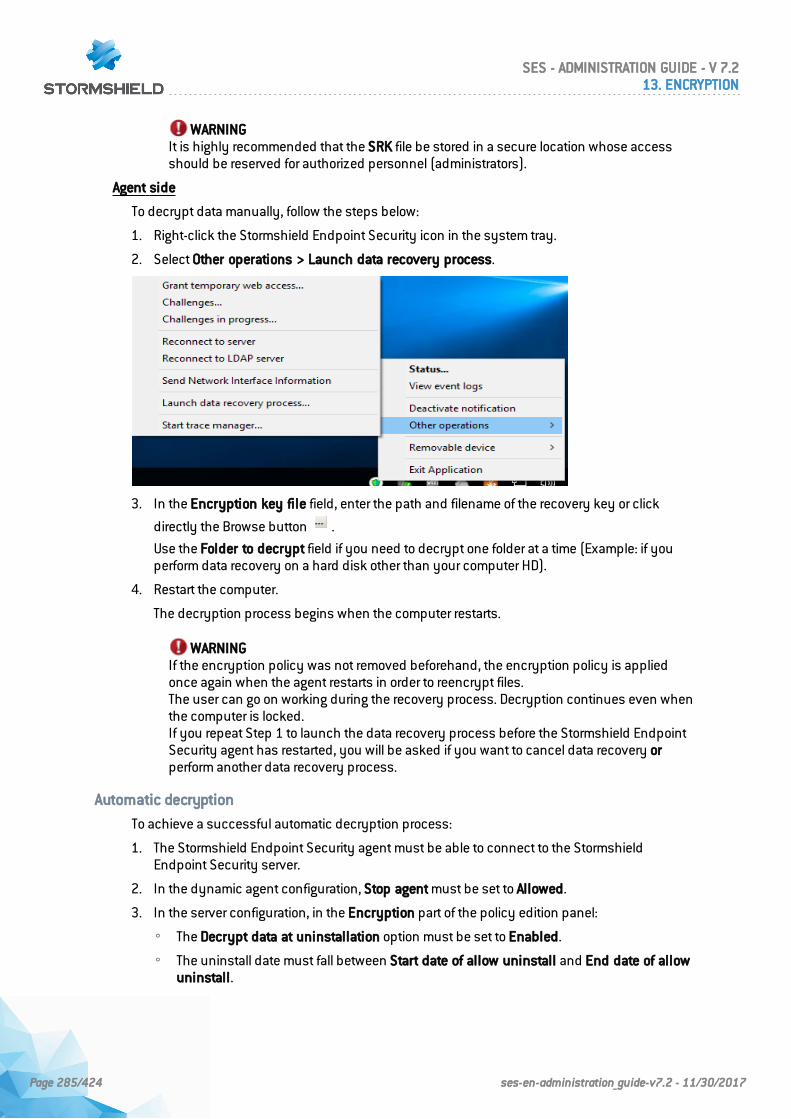
WARNINGIt is highly recommended that the SRK file be stored in a secure location whose accessshould be reserved for authorized personnel (administrators).
Agent side
To decrypt data manually, follow the steps below:
1. Right-click the Stormshield Endpoint Security icon in the system tray.
2. Select Other operations > Launch data recovery process.
3. In the Encryption key file field, enter the path and filename of the recovery key or click
directly the Browse button .
Use the Folder to decrypt field if you need to decrypt one folder at a time (Example: if youperform data recovery on a hard disk other than your computer HD).
4. Restart the computer.
The decryption process begins when the computer restarts.
WARNINGIf the encryption policy was not removed beforehand, the encryption policy is appliedonce again when the agent restarts in order to reencrypt files.The user can go on working during the recovery process. Decryption continues even whenthe computer is locked.If you repeat Step 1 to launch the data recovery process before the Stormshield EndpointSecurity agent has restarted, you will be asked if you want to cancel data recovery orperform another data recovery process.
Automatic decryption
To achieve a successful automatic decryption process:
1. The Stormshield Endpoint Security agent must be able to connect to the StormshieldEndpoint Security server.
2. In the dynamic agent configuration, Stop agent must be set to Allowed.
3. In the server configuration, in the Encryption part of the policy edition panel:
◦ The Decrypt data at uninstallation option must be set to Enabled.
◦ The uninstall date must fall between Start date of allow uninstall and End date of allowuninstall.
SES - ADMINISTRATION GUIDE - V 7.213. ENCRYPTION
Page 285/424 ses-en-administration_guide-v7.2 - 11/30/2017

WARNINGOnly files encrypted with the computer key are recovered during automatic decryption.For files encrypted with a user key, you must perform one of the following:
- Perform a manual recovery.
- Reinstall the agent.
- Transfer the files encrypted with a user key into a folder encrypted with a computerkey.
- Use SURT to decrypt files after uninstalling Stormshield Endpoint Security if the userdoes not wish to install the Stormshield Endpoint Security agent again.
If the Decrypt data at uninstallation parameter is enabled in the encryption policy, thedecryption process begins automatically when the user runs the Srend.exe file to uninstall theStormshield Endpoint Security agent.
During automatic decryption, it is not necessary to restart the computer if no user has logged inpreviously (example: when uninstalling with Active Directory GPO).
However, if the user is currently logged in or has logged in previously (with no reboot), then thecomputer must be restarted. The user will be prompted to restart the computer.
13.7.3 Password recovery when using full disk encryption
Recovery procedure
To access the recovery password when using full disk encryption, the user must follow the stepsbelow:
1. Go to Encryption > Manage Encryption Disk Information.
2. Enter the password for the console certificate.
3. The encrypted disks of the agent are detected automatically and listed in a tree structure.
To locate a disk or an encrypted system, use the Search by hostname field.
SES - ADMINISTRATION GUIDE - V 7.213. ENCRYPTION
Page 286/424 ses-en-administration_guide-v7.2 - 11/30/2017
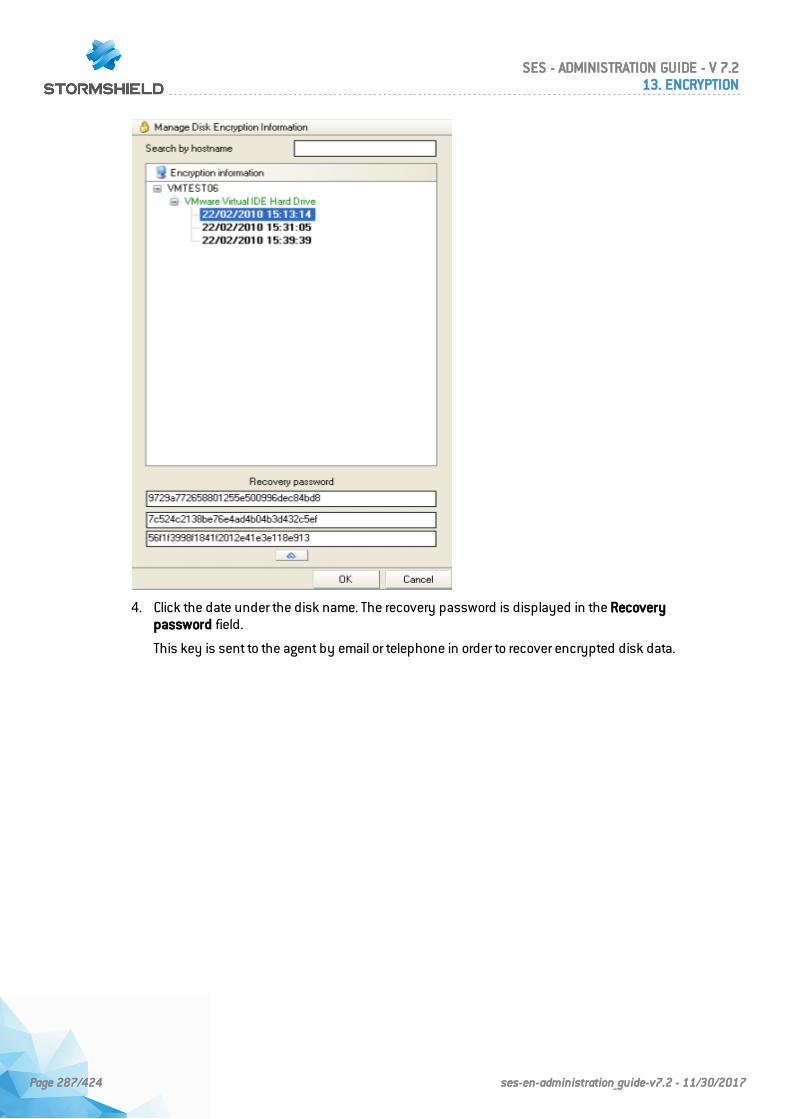
4. Click the date under the disk name. The recovery password is displayed in the Recoverypassword field.
This key is sent to the agent by email or telephone in order to recover encrypted disk data.
SES - ADMINISTRATION GUIDE - V 7.213. ENCRYPTION
Page 287/424 ses-en-administration_guide-v7.2 - 11/30/2017
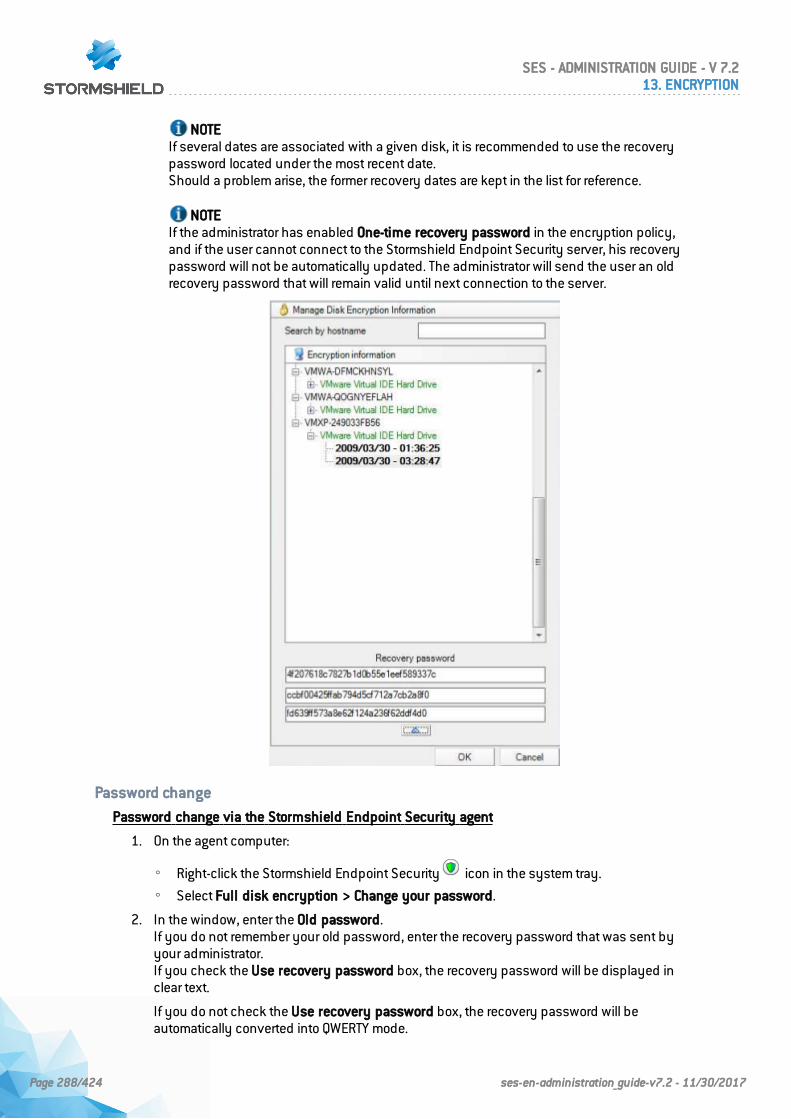
NOTEIf several dates are associated with a given disk, it is recommended to use the recoverypassword located under the most recent date.Should a problem arise, the former recovery dates are kept in the list for reference.
NOTEIf the administrator has enabled One-time recovery password in the encryption policy,and if the user cannot connect to the Stormshield Endpoint Security server, his recoverypassword will not be automatically updated. The administrator will send the user an oldrecovery password that will remain valid until next connection to the server.
Password change
Password change via the Stormshield Endpoint Security agent
1. On the agent computer:
◦ Right-click the Stormshield Endpoint Security icon in the system tray.
◦ Select Full disk encryption > Change your password.
2. In the window, enter the Old password.If you do not remember your old password, enter the recovery password that was sent byyour administrator.If you check the Use recovery password box, the recovery password will be displayed inclear text.
If you do not check the Use recovery password box, the recovery password will beautomatically converted into QWERTY mode.
SES - ADMINISTRATION GUIDE - V 7.213. ENCRYPTION
Page 288/424 ses-en-administration_guide-v7.2 - 11/30/2017
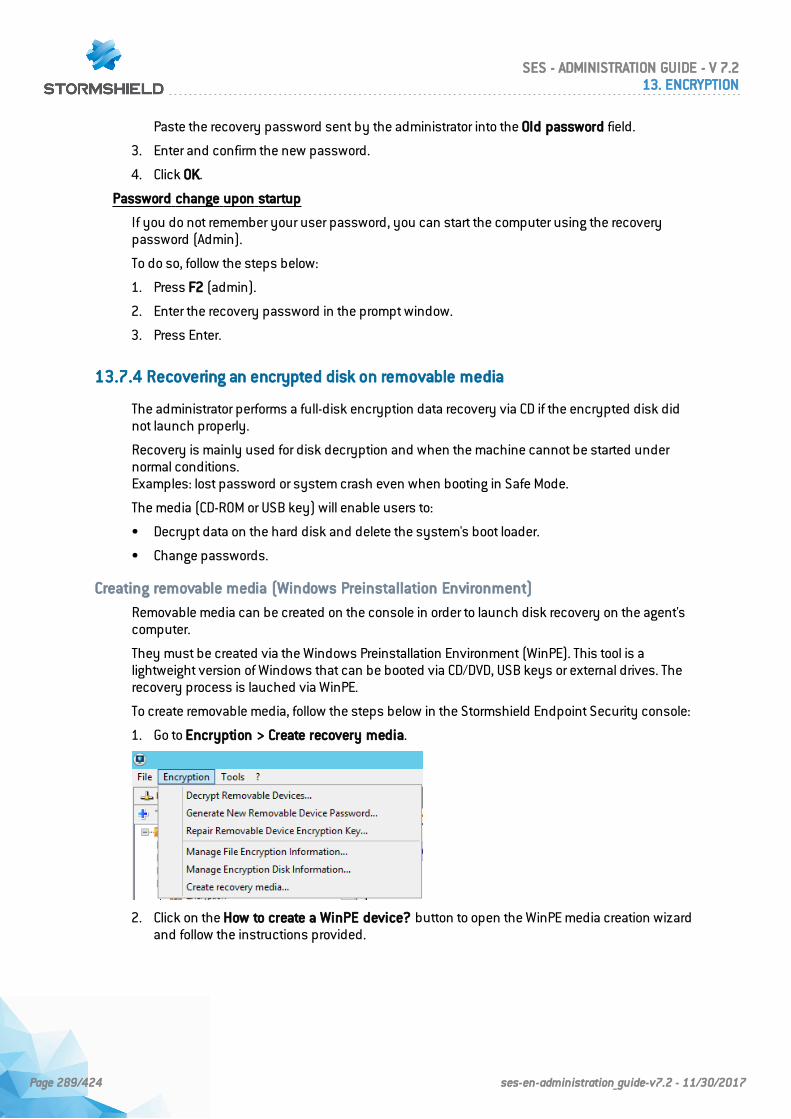
Paste the recovery password sent by the administrator into the Old password field.
3. Enter and confirm the new password.
4. Click OK.
Password change upon startup
If you do not remember your user password, you can start the computer using the recoverypassword (Admin).
To do so, follow the steps below:
1. Press F2 (admin).
2. Enter the recovery password in the prompt window.
3. Press Enter.
13.7.4 Recovering an encrypted disk on removable media
The administrator performs a full-disk encryption data recovery via CD if the encrypted disk didnot launch properly.
Recovery is mainly used for disk decryption and when the machine cannot be started undernormal conditions.Examples: lost password or system crash even when booting in Safe Mode.
The media (CD-ROM or USB key) will enable users to:
• Decrypt data on the hard disk and delete the system's boot loader.
• Change passwords.
Creating removable media (Windows Preinstallation Environment)
Removable media can be created on the console in order to launch disk recovery on the agent'scomputer.
They must be created via the Windows Preinstallation Environment (WinPE). This tool is alightweight version of Windows that can be booted via CD/DVD, USB keys or external drives. Therecovery process is lauched via WinPE.
To create removable media, follow the steps below in the Stormshield Endpoint Security console:
1. Go to Encryption > Create recovery media.
2. Click on the How to create a WinPE device? button to open the WinPE media creation wizardand follow the instructions provided.
SES - ADMINISTRATION GUIDE - V 7.213. ENCRYPTION
Page 289/424 ses-en-administration_guide-v7.2 - 11/30/2017
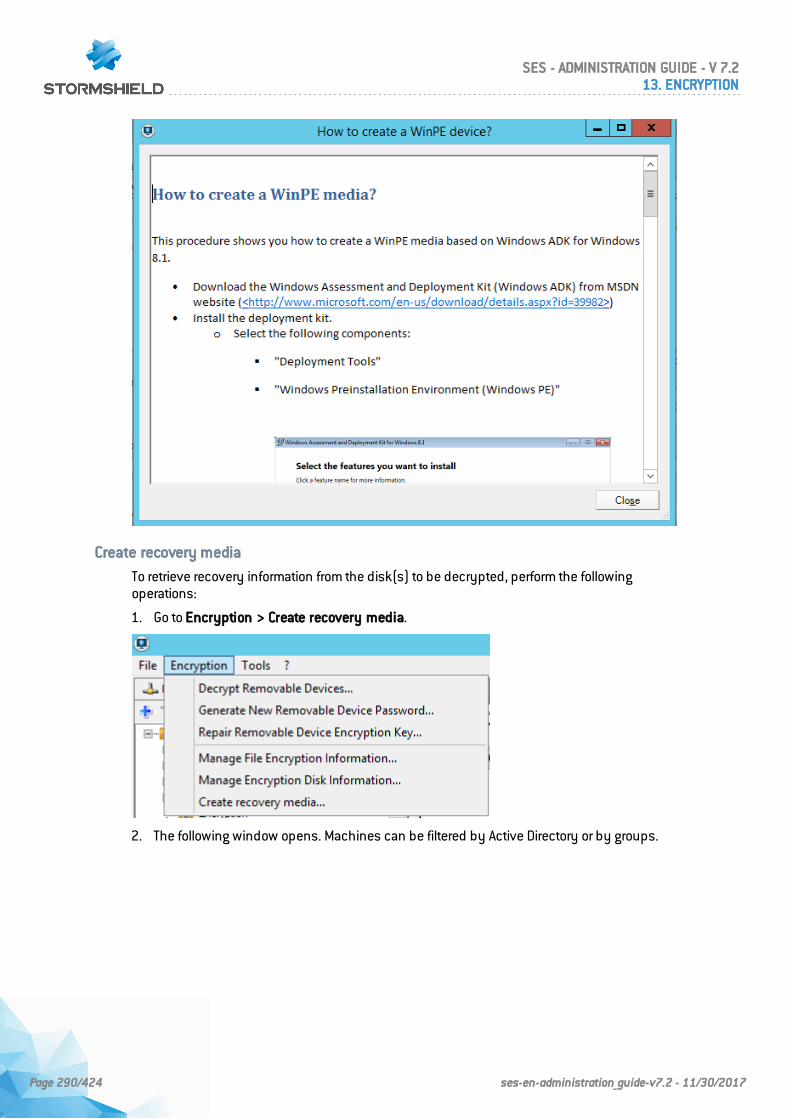
Create recovery media
To retrieve recovery information from the disk(s) to be decrypted, perform the followingoperations:
1. Go to Encryption > Create recovery media.
2. The following window opens. Machines can be filtered by Active Directory or by groups.
SES - ADMINISTRATION GUIDE - V 7.213. ENCRYPTION
Page 290/424 ses-en-administration_guide-v7.2 - 11/30/2017
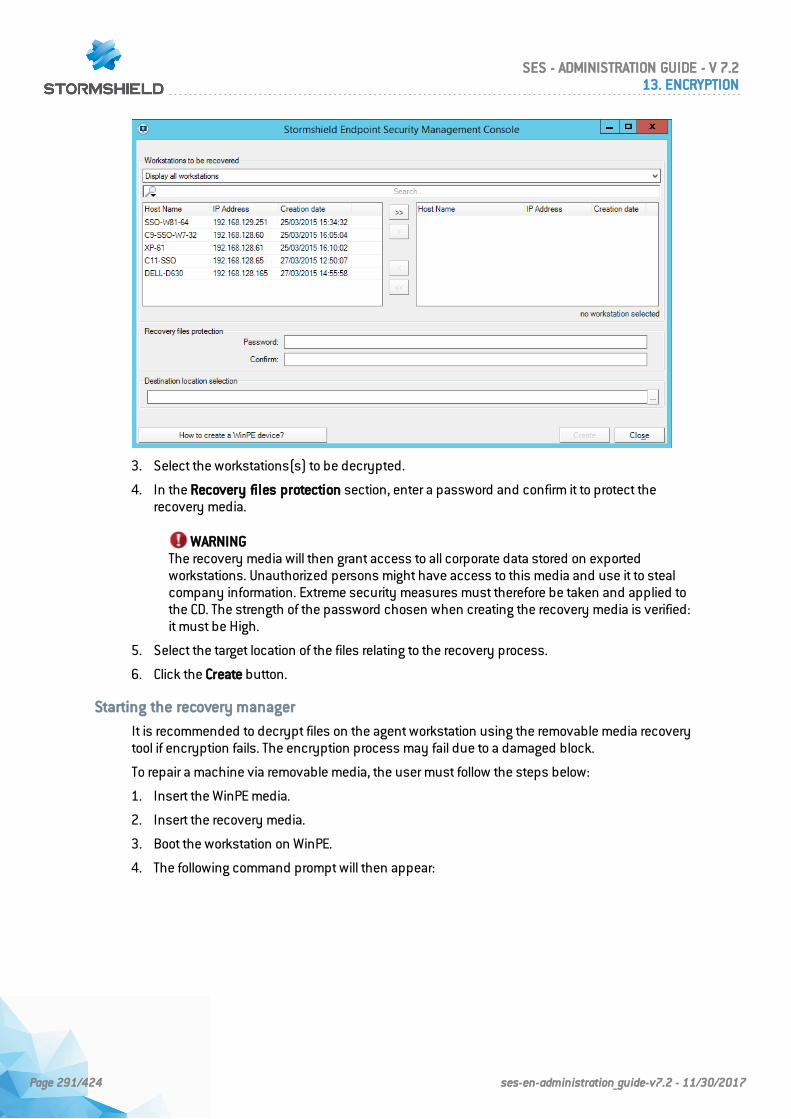
3. Select the workstations(s) to be decrypted.
4. In the Recovery files protection section, enter a password and confirm it to protect therecovery media.
WARNINGThe recovery media will then grant access to all corporate data stored on exportedworkstations. Unauthorized persons might have access to this media and use it to stealcompany information. Extreme security measures must therefore be taken and applied tothe CD. The strength of the password chosen when creating the recovery media is verified:it must be High.
5. Select the target location of the files relating to the recovery process.
6. Click the Create button.
Starting the recovery manager
It is recommended to decrypt files on the agent workstation using the removable media recoverytool if encryption fails. The encryption process may fail due to a damaged block.
To repair a machine via removable media, the user must follow the steps below:
1. Insert the WinPE media.
2. Insert the recovery media.
3. Boot the workstation on WinPE.
4. The following command prompt will then appear:
SES - ADMINISTRATION GUIDE - V 7.213. ENCRYPTION
Page 291/424 ses-en-administration_guide-v7.2 - 11/30/2017
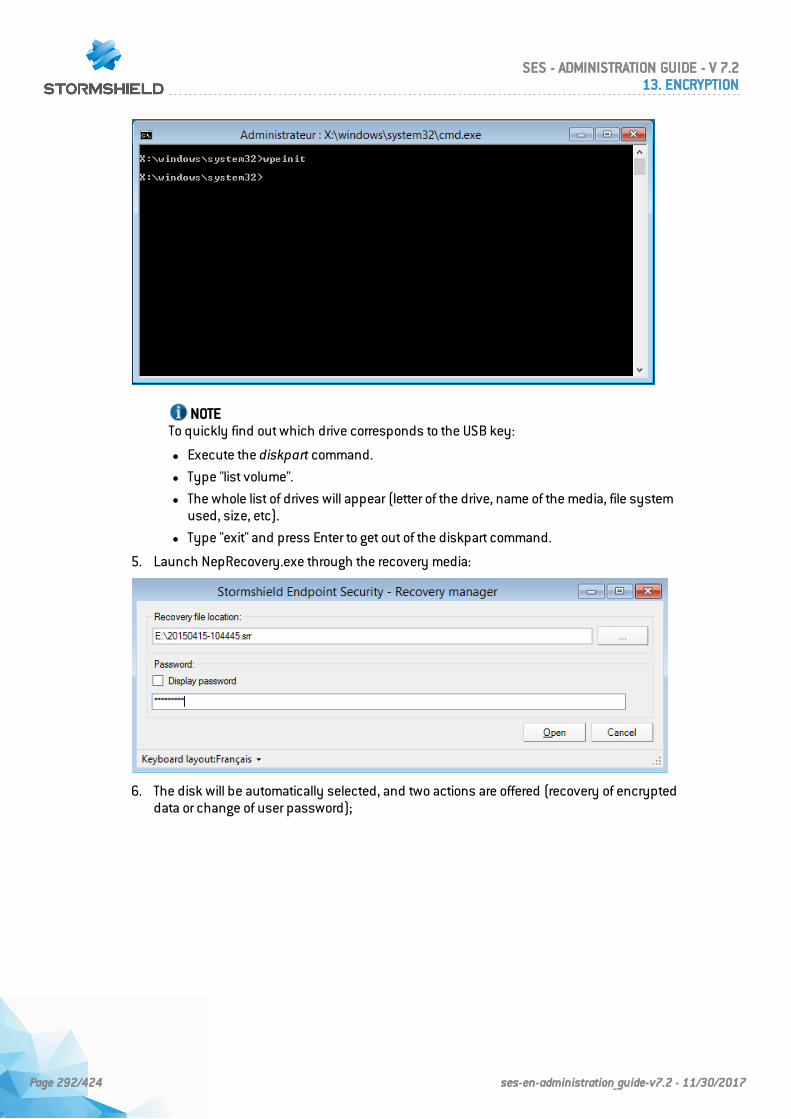
NOTETo quickly find out which drive corresponds to the USB key:
l Execute the diskpart command.
l Type "list volume".
l The whole list of drives will appear (letter of the drive, name of the media, file systemused, size, etc).
l Type "exit" and press Enter to get out of the diskpart command.
5. Launch NepRecovery.exe through the recovery media:
6. The disk will be automatically selected, and two actions are offered (recovery of encrypteddata or change of user password);
SES - ADMINISTRATION GUIDE - V 7.213. ENCRYPTION
Page 292/424 ses-en-administration_guide-v7.2 - 11/30/2017
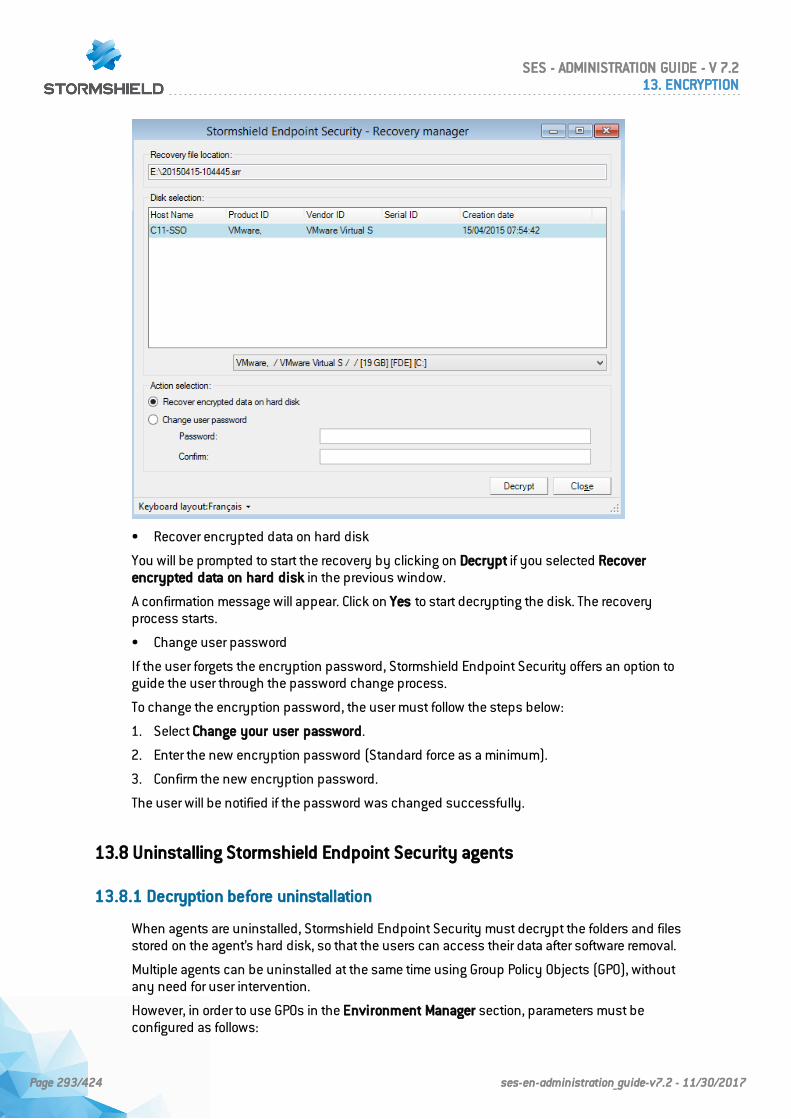
• Recover encrypted data on hard disk
You will be prompted to start the recovery by clicking on Decrypt if you selected Recoverencrypted data on hard disk in the previous window.
A confirmation message will appear. Click on Yes to start decrypting the disk. The recoveryprocess starts.
• Change user password
If the user forgets the encryption password, Stormshield Endpoint Security offers an option toguide the user through the password change process.
To change the encryption password, the user must follow the steps below:
1. Select Change your user password.
2. Enter the new encryption password (Standard force as a minimum).
3. Confirm the new encryption password.
The user will be notified if the password was changed successfully.
13.8 Uninstalling Stormshield Endpoint Security agents
13.8.1 Decryption before uninstallation
When agents are uninstalled, Stormshield Endpoint Security must decrypt the folders and filesstored on the agent’s hard disk, so that the users can access their data after software removal.
Multiple agents can be uninstalled at the same time using Group Policy Objects (GPO), withoutany need for user intervention.
However, in order to use GPOs in the Environment Manager section, parameters must beconfigured as follows:
SES - ADMINISTRATION GUIDE - V 7.213. ENCRYPTION
Page 293/424 ses-en-administration_guide-v7.2 - 11/30/2017
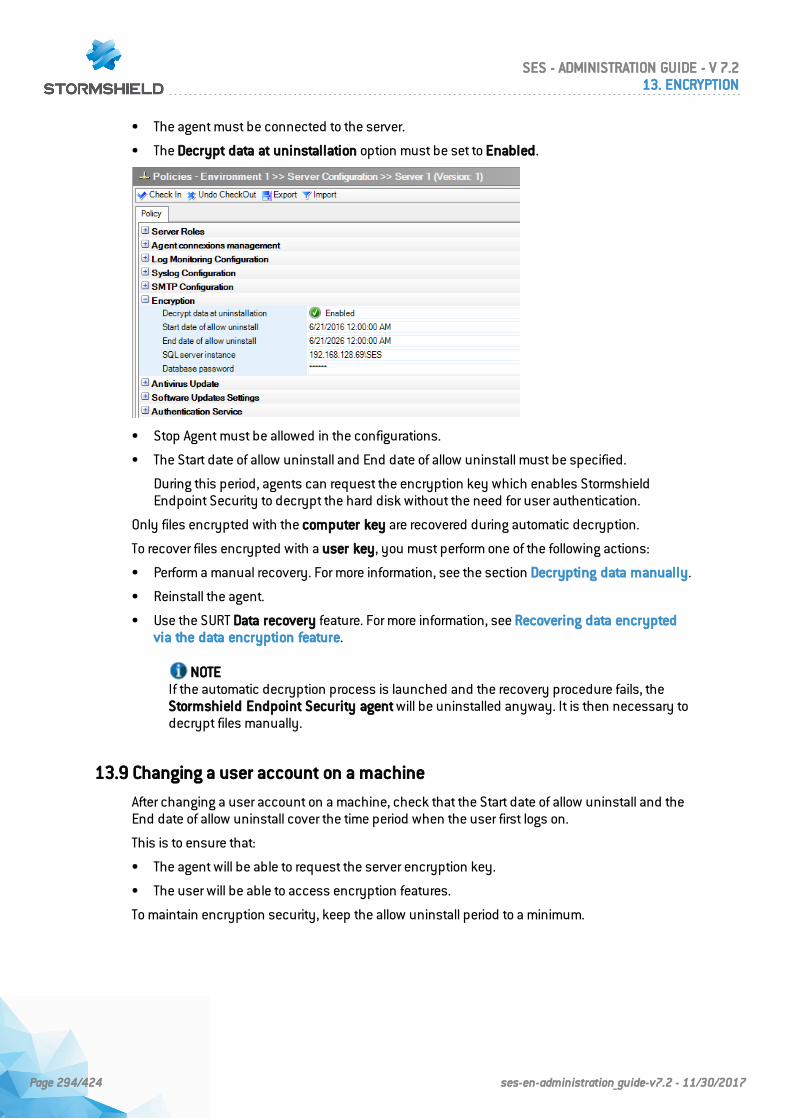
• The agent must be connected to the server.
• The Decrypt data at uninstallation option must be set to Enabled.
• Stop Agent must be allowed in the configurations.
• The Start date of allow uninstall and End date of allow uninstall must be specified.
During this period, agents can request the encryption key which enables StormshieldEndpoint Security to decrypt the hard disk without the need for user authentication.
Only files encrypted with the computer key are recovered during automatic decryption.
To recover files encrypted with a user key, you must perform one of the following actions:
• Perform a manual recovery. For more information, see the section Decrypting data manually.
• Reinstall the agent.
• Use the SURT Data recovery feature. For more information, see Recovering data encryptedvia the data encryption feature.
NOTEIf the automatic decryption process is launched and the recovery procedure fails, theStormshield Endpoint Security agent will be uninstalled anyway. It is then necessary todecrypt files manually.
13.9 Changing a user account on a machine
After changing a user account on a machine, check that the Start date of allow uninstall and theEnd date of allow uninstall cover the time period when the user first logs on.
This is to ensure that:
• The agent will be able to request the server encryption key.
• The user will be able to access encryption features.
To maintain encryption security, keep the allow uninstall period to a minimum.
SES - ADMINISTRATION GUIDE - V 7.213. ENCRYPTION
Page 294/424 ses-en-administration_guide-v7.2 - 11/30/2017
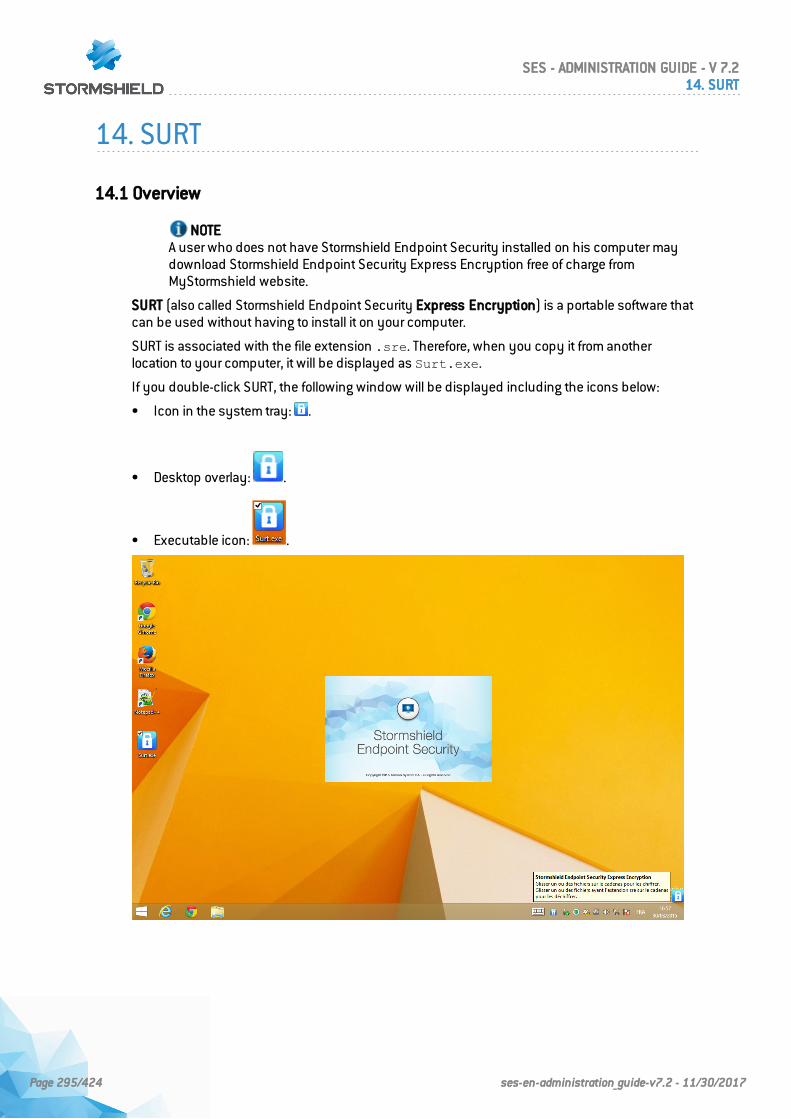
14. SURT
14.1 Overview
NOTEA user who does not have Stormshield Endpoint Security installed on his computer maydownload Stormshield Endpoint Security Express Encryption free of charge fromMyStormshield website.
SURT (also called Stormshield Endpoint Security Express Encryption) is a portable software thatcan be used without having to install it on your computer.
SURT is associated with the file extension .sre. Therefore, when you copy it from anotherlocation to your computer, it will be displayed as Surt.exe.
If you double-click SURT, the following window will be displayed including the icons below:
• Icon in the system tray: .
• Desktop overlay: .
• Executable icon: .
SES - ADMINISTRATION GUIDE - V 7.214. SURT
Page 295/424 ses-en-administration_guide-v7.2 - 11/30/2017
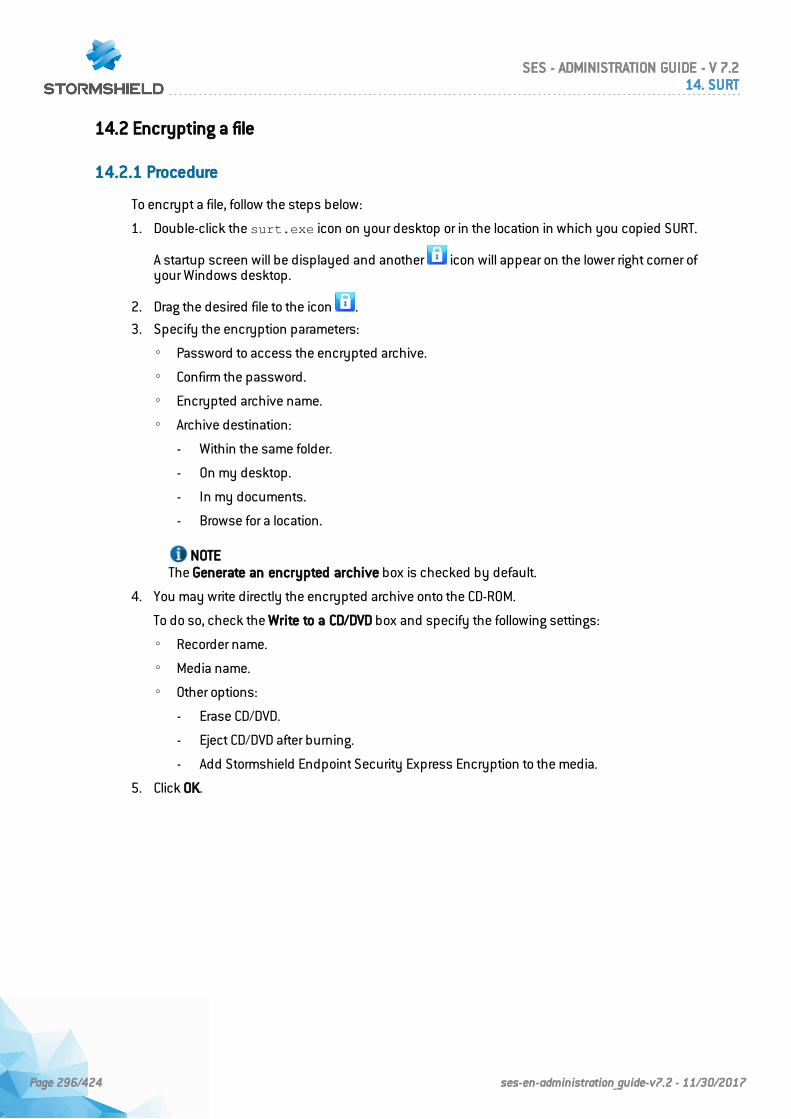
14.2 Encrypting a file
14.2.1 Procedure
To encrypt a file, follow the steps below:
1. Double-click the surt.exe icon on your desktop or in the location in which you copied SURT.
A startup screen will be displayed and another icon will appear on the lower right corner ofyour Windows desktop.
2. Drag the desired file to the icon .
3. Specify the encryption parameters:
◦ Password to access the encrypted archive.
◦ Confirm the password.
◦ Encrypted archive name.
◦ Archive destination:
- Within the same folder.
- On my desktop.
- In my documents.
- Browse for a location.
NOTEThe Generate an encrypted archive box is checked by default.
4. You may write directly the encrypted archive onto the CD-ROM.
To do so, check the Write to a CD/DVD box and specify the following settings:
◦ Recorder name.
◦ Media name.
◦ Other options:
- Erase CD/DVD.
- Eject CD/DVD after burning.
- Add Stormshield Endpoint Security Express Encryption to the media.
5. Click OK.
SES - ADMINISTRATION GUIDE - V 7.214. SURT
Page 296/424 ses-en-administration_guide-v7.2 - 11/30/2017

6. If you have checked the Write to a CD/DVD box, the burning process starts immediately.
7. When the burning process is completed, a new window is displayed.
Click OK.
14.3 Decrypting a file
14.3.1 Procedure
To decrypt a file, follow the steps below:
1. Drag and drop the file to be decrypted on the desktop overlay .
The following window is displayed:
2. Enter the password of the encrypted file.
3. Specify the decrypted file path.
4. Click OK.
SES - ADMINISTRATION GUIDE - V 7.214. SURT
Page 297/424 ses-en-administration_guide-v7.2 - 11/30/2017
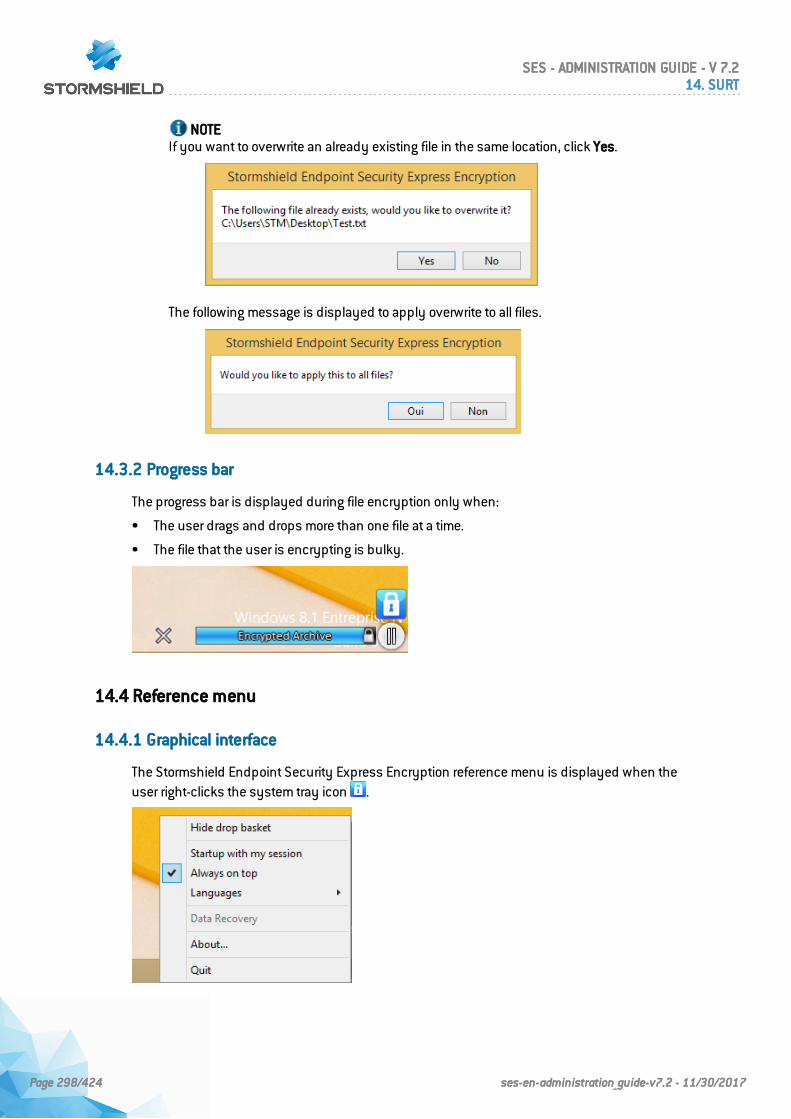
NOTEIf you want to overwrite an already existing file in the same location, click Yes.
The following message is displayed to apply overwrite to all files.
14.3.2 Progress bar
The progress bar is displayed during file encryption only when:
• The user drags and drops more than one file at a time.
• The file that the user is encrypting is bulky.
14.4 Reference menu
14.4.1 Graphical interface
The Stormshield Endpoint Security Express Encryption reference menu is displayed when theuser right-clicks the system tray icon .
SES - ADMINISTRATION GUIDE - V 7.214. SURT
Page 298/424 ses-en-administration_guide-v7.2 - 11/30/2017
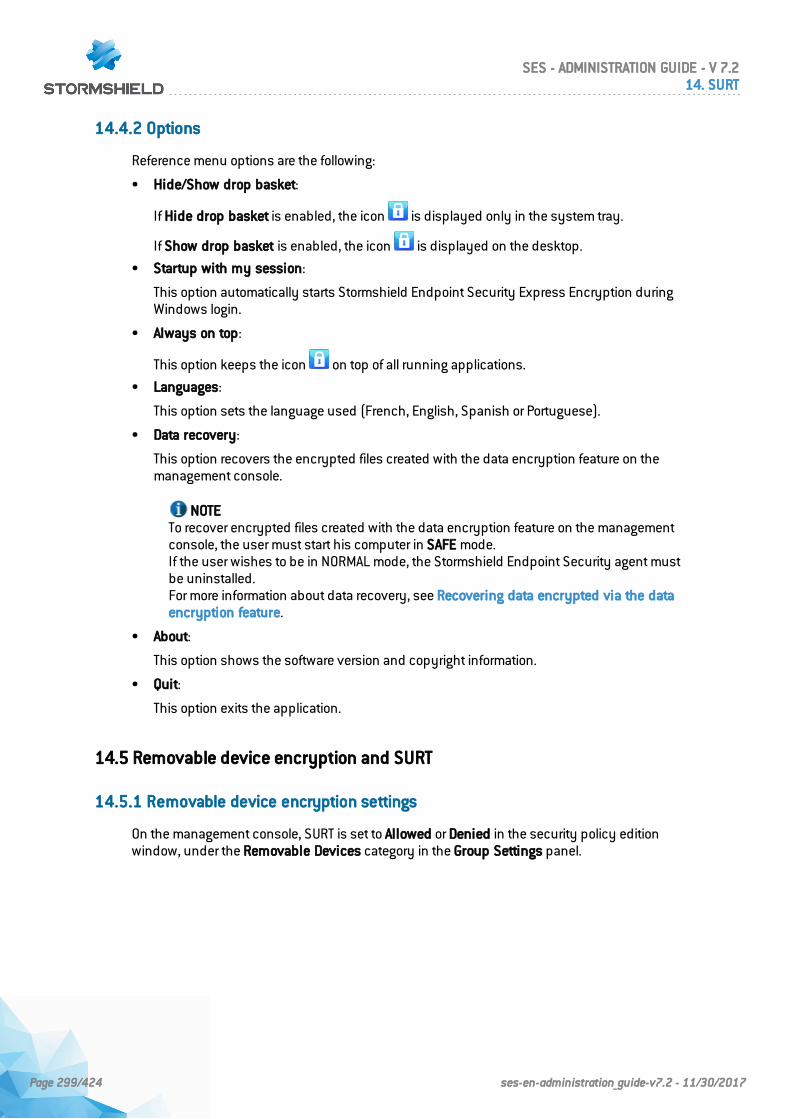
14.4.2 Options
Reference menu options are the following:
• Hide/Show drop basket:
If Hide drop basket is enabled, the icon is displayed only in the system tray.
If Show drop basket is enabled, the icon is displayed on the desktop.
• Startup with my session:
This option automatically starts Stormshield Endpoint Security Express Encryption duringWindows login.
• Always on top:
This option keeps the icon on top of all running applications.
• Languages:
This option sets the language used (French, English, Spanish or Portuguese).
• Data recovery:
This option recovers the encrypted files created with the data encryption feature on themanagement console.
NOTETo recover encrypted files created with the data encryption feature on the managementconsole, the user must start his computer in SAFE mode.If the user wishes to be in NORMAL mode, the Stormshield Endpoint Security agent mustbe uninstalled.For more information about data recovery, see Recovering data encrypted via the dataencryption feature.
• About:
This option shows the software version and copyright information.
• Quit:
This option exits the application.
14.5 Removable device encryption and SURT
14.5.1 Removable device encryption settings
On the management console, SURT is set to Allowed or Denied in the security policy editionwindow, under the Removable Devices category in the Group Settings panel.
SES - ADMINISTRATION GUIDE - V 7.214. SURT
Page 299/424 ses-en-administration_guide-v7.2 - 11/30/2017
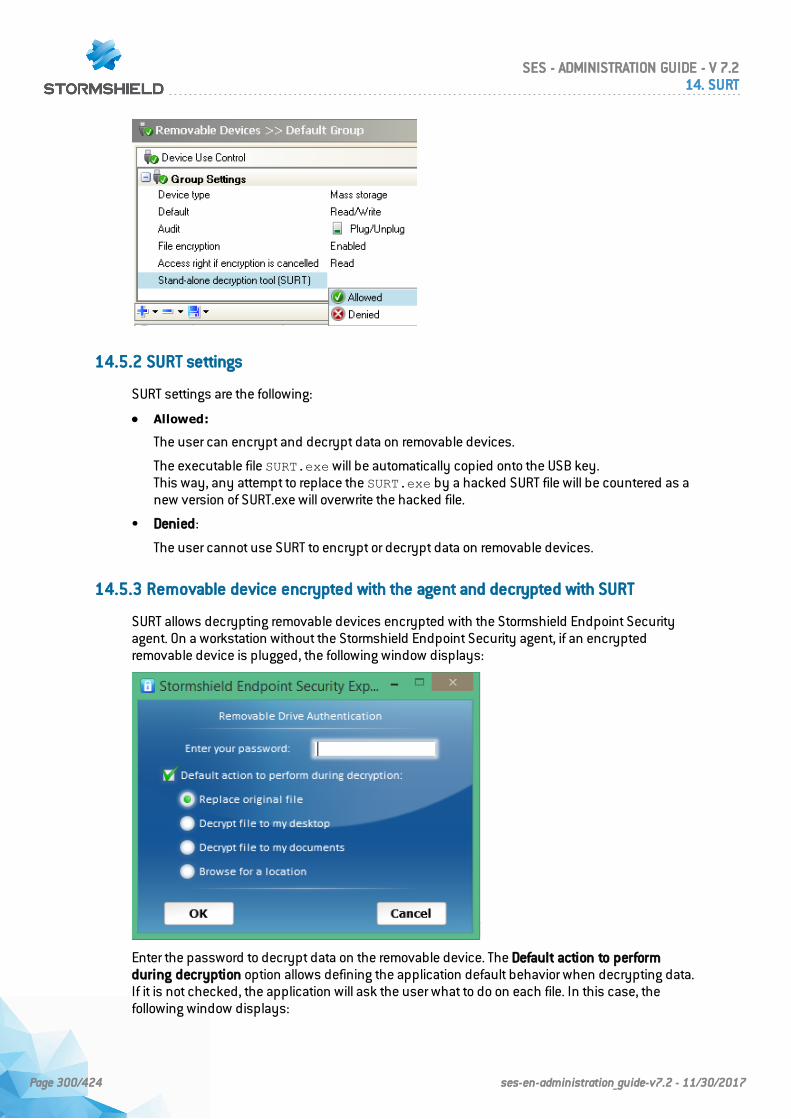
14.5.2 SURT settings
SURT settings are the following:
• Allowed:
The user can encrypt and decrypt data on removable devices.
The executable file SURT.exe will be automatically copied onto the USB key.This way, any attempt to replace the SURT.exe by a hacked SURT file will be countered as anew version of SURT.exe will overwrite the hacked file.
• Denied:
The user cannot use SURT to encrypt or decrypt data on removable devices.
14.5.3 Removable device encrypted with the agent and decrypted with SURT
SURT allows decrypting removable devices encrypted with the Stormshield Endpoint Securityagent. On a workstation without the Stormshield Endpoint Security agent, if an encryptedremovable device is plugged, the following window displays:
Enter the password to decrypt data on the removable device. The Default action to performduring decryption option allows defining the application default behavior when decrypting data.If it is not checked, the application will ask the user what to do on each file. In this case, thefollowing window displays:
SES - ADMINISTRATION GUIDE - V 7.214. SURT
Page 300/424 ses-en-administration_guide-v7.2 - 11/30/2017
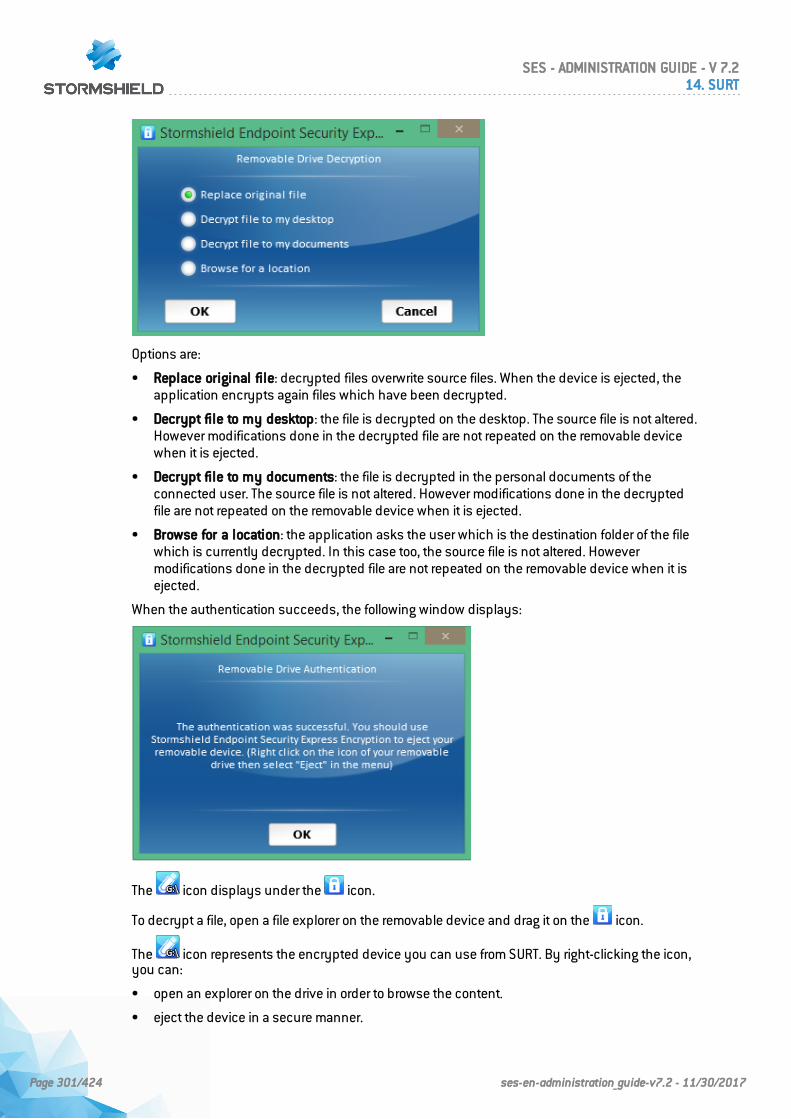
Options are:
• Replace original file: decrypted files overwrite source files. When the device is ejected, theapplication encrypts again files which have been decrypted.
• Decrypt file to my desktop: the file is decrypted on the desktop. The source file is not altered.However modifications done in the decrypted file are not repeated on the removable devicewhen it is ejected.
• Decrypt file to my documents: the file is decrypted in the personal documents of theconnected user. The source file is not altered. However modifications done in the decryptedfile are not repeated on the removable device when it is ejected.
• Browse for a location: the application asks the user which is the destination folder of the filewhich is currently decrypted. In this case too, the source file is not altered. Howevermodifications done in the decrypted file are not repeated on the removable device when it isejected.
When the authentication succeeds, the following window displays:
The icon displays under the icon.
To decrypt a file, open a file explorer on the removable device and drag it on the icon.
The icon represents the encrypted device you can use from SURT. By right-clicking the icon,you can:
• open an explorer on the drive in order to browse the content.
• eject the device in a secure manner.
SES - ADMINISTRATION GUIDE - V 7.214. SURT
Page 301/424 ses-en-administration_guide-v7.2 - 11/30/2017
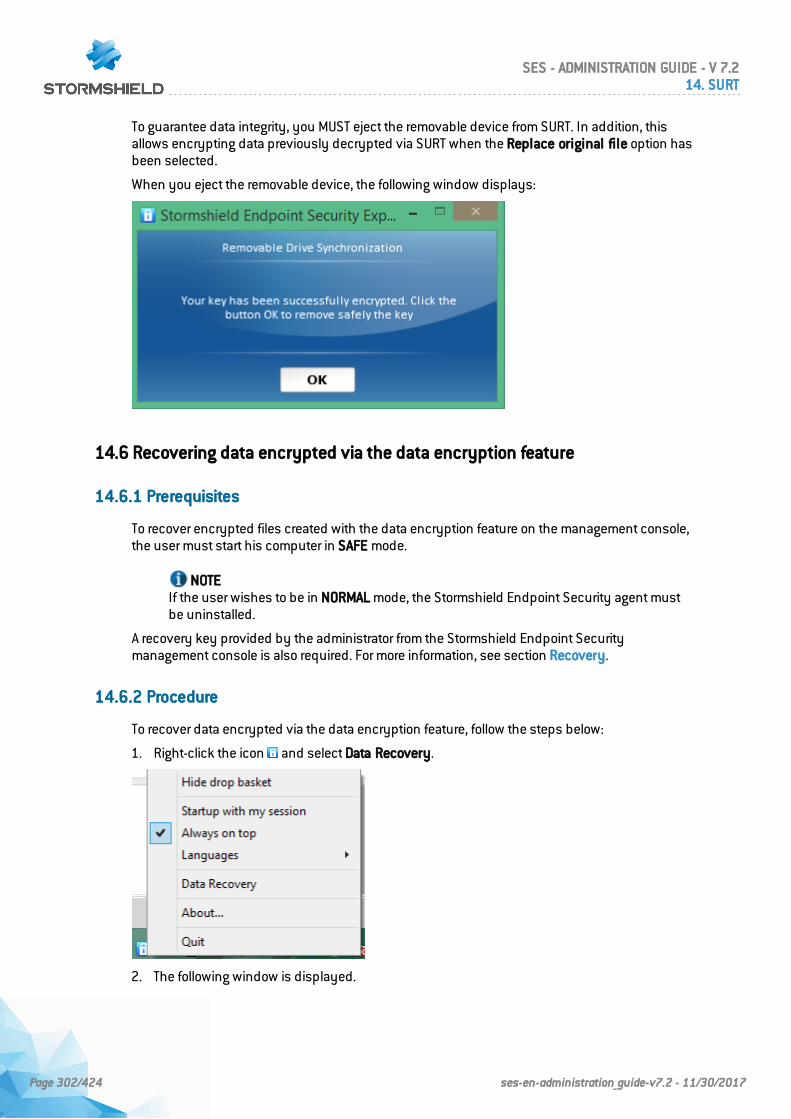
To guarantee data integrity, you MUST eject the removable device from SURT. In addition, thisallows encrypting data previously decrypted via SURT when the Replace original file option hasbeen selected.
When you eject the removable device, the following window displays:
14.6 Recovering data encrypted via the data encryption feature
14.6.1 Prerequisites
To recover encrypted files created with the data encryption feature on the management console,the user must start his computer in SAFE mode.
NOTEIf the user wishes to be in NORMAL mode, the Stormshield Endpoint Security agent mustbe uninstalled.
A recovery key provided by the administrator from the Stormshield Endpoint Securitymanagement console is also required. For more information, see section Recovery.
14.6.2 Procedure
To recover data encrypted via the data encryption feature, follow the steps below:
1. Right-click the icon and select Data Recovery.
2. The following window is displayed.
SES - ADMINISTRATION GUIDE - V 7.214. SURT
Page 302/424 ses-en-administration_guide-v7.2 - 11/30/2017
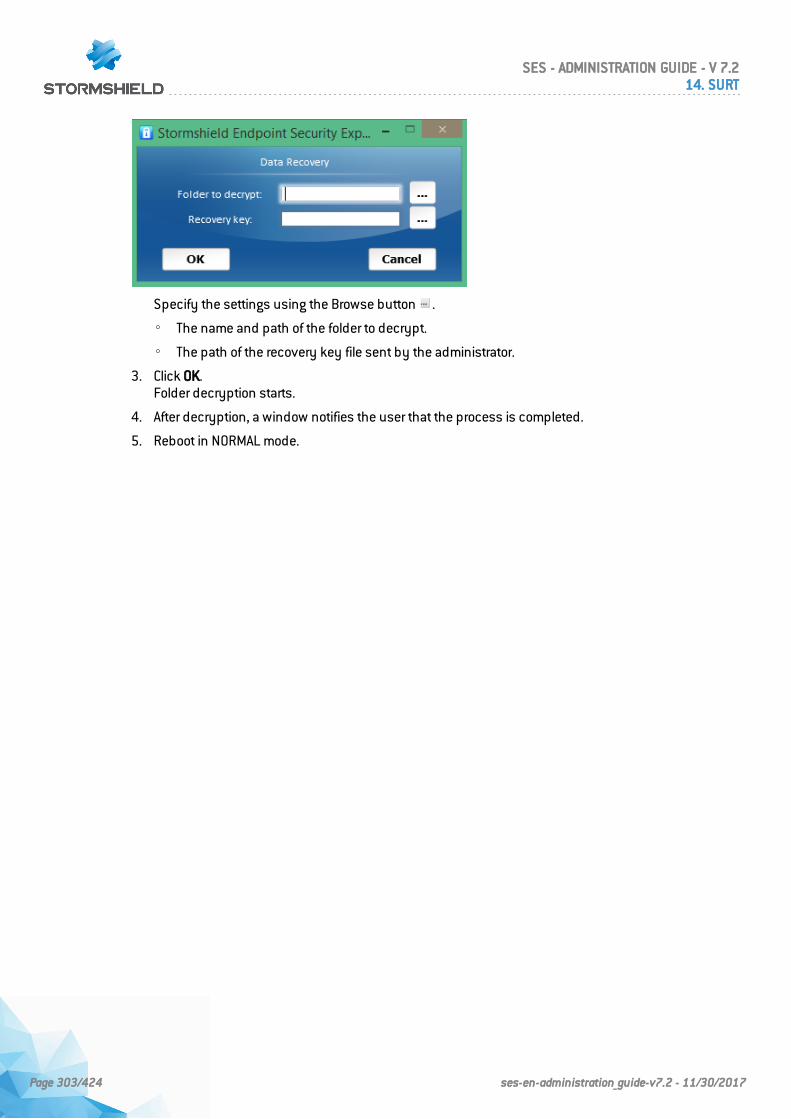
Specify the settings using the Browse button .
◦ The name and path of the folder to decrypt.
◦ The path of the recovery key file sent by the administrator.
3. Click OK.Folder decryption starts.
4. After decryption, a window notifies the user that the process is completed.
5. Reboot in NORMAL mode.
SES - ADMINISTRATION GUIDE - V 7.214. SURT
Page 303/424 ses-en-administration_guide-v7.2 - 11/30/2017
15. Antivirus
15.1 Overview
The Antivirus option is not embedded during the installation of Stormshield Endpoint Security onyour computer.
It has to be integrated both into the server and agent sides of Stormshield Endpoint Security .
Moreover, a valid Stormshield Endpoint Security license has to be applied to your environment onthe management console.
If this is not the case, please update your Stormshield Endpoint Security license before updatingthe antivirus license.
For more information, see:
• AVP option.
• Licenses.
15.2 Antivirus integration
You must integrate the antivirus option at two levels:
• Stormshield Endpoint Security server.
• Stormshield Endpoint Security agent.
15.2.1 Stormshield Endpoint Security Server
To integrate the antivirus module, follow the steps below:
1. Check that the Stormshield Endpoint Security license is up to date.
To do so, right-click your environment and select Update / License.
If you need to update the licenses, see Licenses.
2. After updating the Stormshield Endpoint Security and Avira licenses, you must activate theantivirus server function in the server configuration policy.
To do so, edit the server configuration policy and set the Antivirus server function toEnabled.
3. Configure the signature update in the server configuration policy.
SES - ADMINISTRATION GUIDE - V 7.215. ANTIVIRUS
Page 304/424 ses-en-administration_guide-v7.2 - 11/30/2017
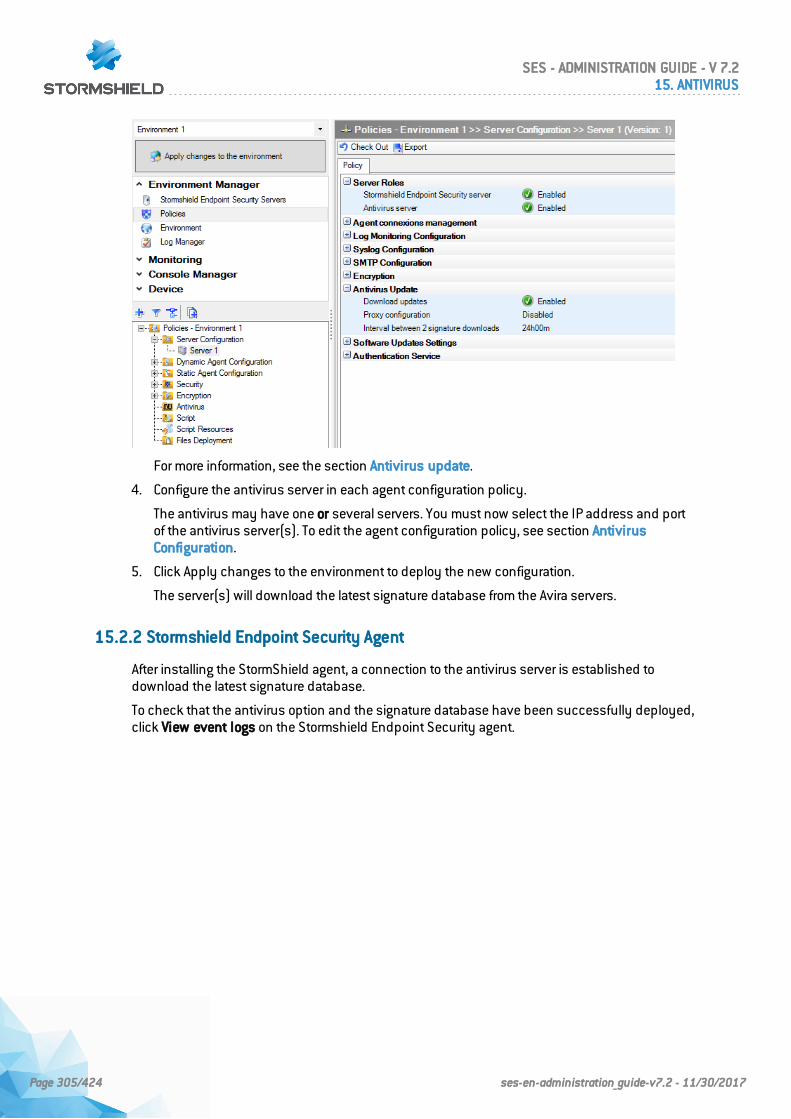
For more information, see the section Antivirus update.
4. Configure the antivirus server in each agent configuration policy.
The antivirus may have one or several servers. You must now select the IP address and portof the antivirus server(s). To edit the agent configuration policy, see section AntivirusConfiguration.
5. Click Apply changes to the environment to deploy the new configuration.
The server(s) will download the latest signature database from the Avira servers.
15.2.2 Stormshield Endpoint Security Agent
After installing the StormShield agent, a connection to the antivirus server is established todownload the latest signature database.
To check that the antivirus option and the signature database have been successfully deployed,click View event logs on the Stormshield Endpoint Security agent.
SES - ADMINISTRATION GUIDE - V 7.215. ANTIVIRUS
Page 305/424 ses-en-administration_guide-v7.2 - 11/30/2017
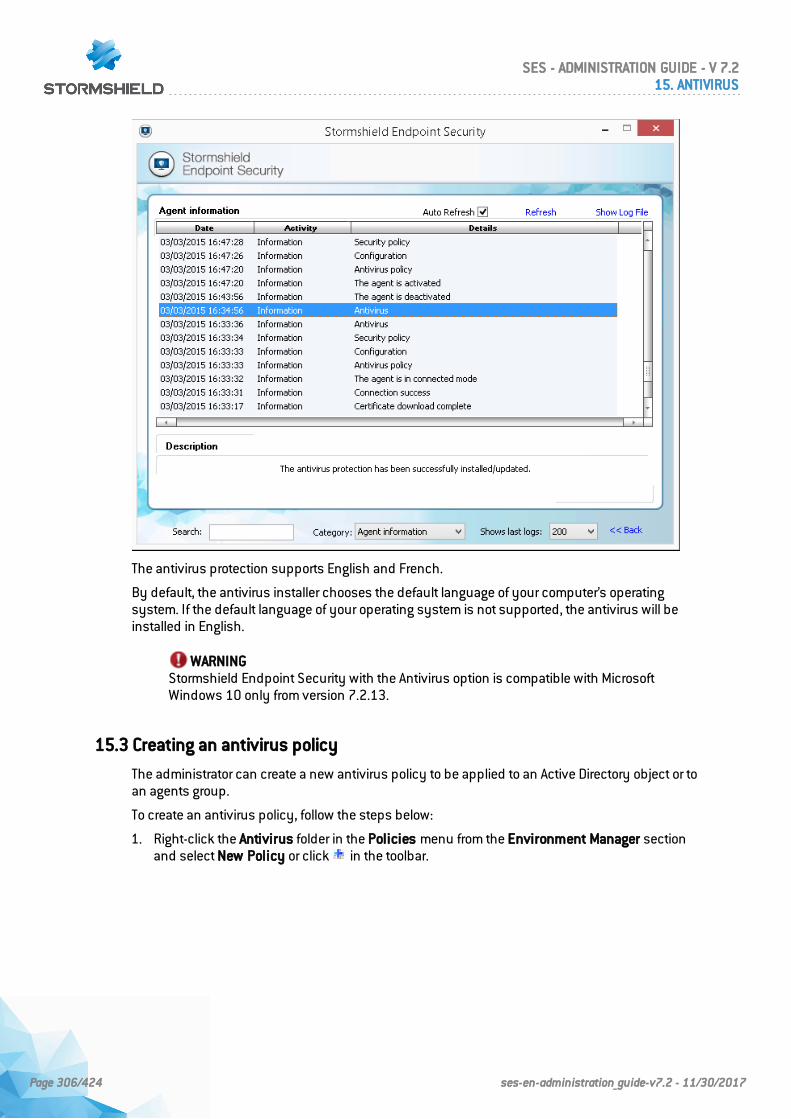
The antivirus protection supports English and French.
By default, the antivirus installer chooses the default language of your computer’s operatingsystem. If the default language of your operating system is not supported, the antivirus will beinstalled in English.
WARNINGStormshield Endpoint Security with the Antivirus option is compatible with MicrosoftWindows 10 only from version 7.2.13.
15.3 Creating an antivirus policy
The administrator can create a new antivirus policy to be applied to an Active Directory object or toan agents group.
To create an antivirus policy, follow the steps below:
1. Right-click the Antivirus folder in the Policies menu from the Environment Manager sectionand select New Policy or click in the toolbar.
SES - ADMINISTRATION GUIDE - V 7.215. ANTIVIRUS
Page 306/424 ses-en-administration_guide-v7.2 - 11/30/2017
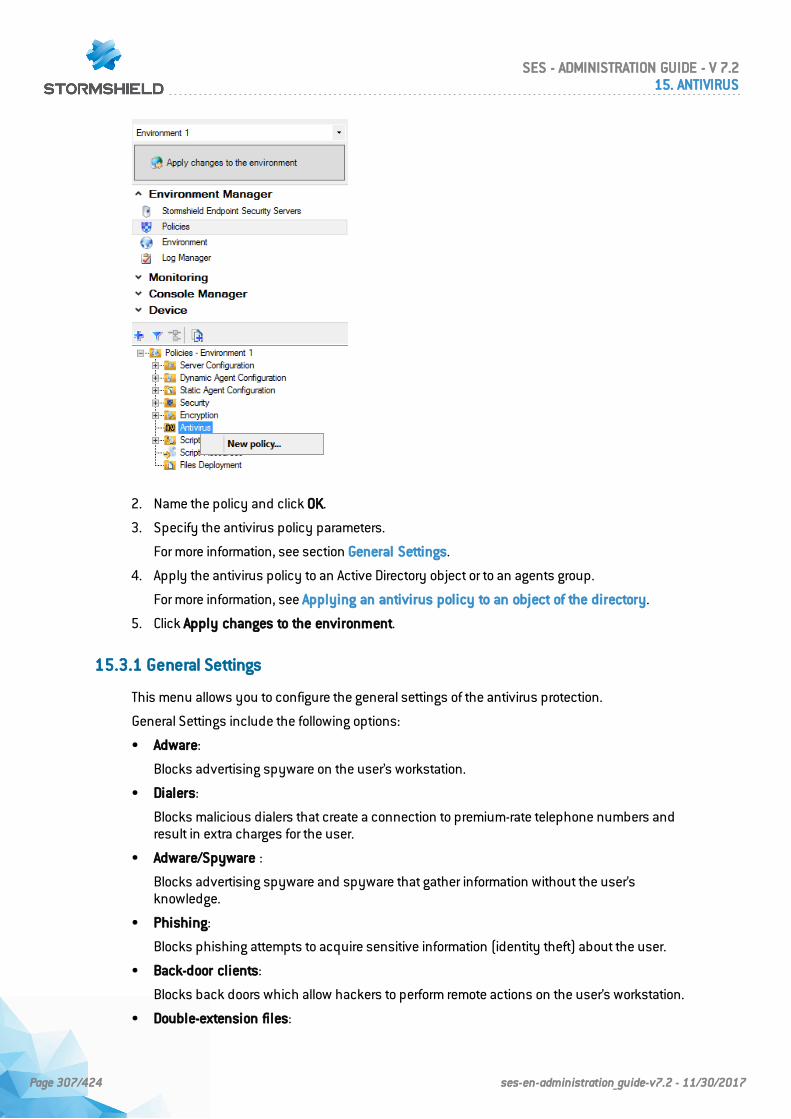
2. Name the policy and click OK.
3. Specify the antivirus policy parameters.
For more information, see section General Settings.
4. Apply the antivirus policy to an Active Directory object or to an agents group.
For more information, see Applying an antivirus policy to an object of the directory.
5. Click Apply changes to the environment.
15.3.1 General Settings
This menu allows you to configure the general settings of the antivirus protection.
General Settings include the following options:
• Adware:
Blocks advertising spyware on the user’s workstation.
• Dialers:
Blocks malicious dialers that create a connection to premium-rate telephone numbers andresult in extra charges for the user.
• Adware/Spyware :
Blocks advertising spyware and spyware that gather information without the user’sknowledge.
• Phishing:
Blocks phishing attempts to acquire sensitive information (identity theft) about the user.
• Back-door clients:
Blocks back doors which allow hackers to perform remote actions on the user’s workstation.
• Double-extension files:
SES - ADMINISTRATION GUIDE - V 7.215. ANTIVIRUS
Page 307/424 ses-en-administration_guide-v7.2 - 11/30/2017
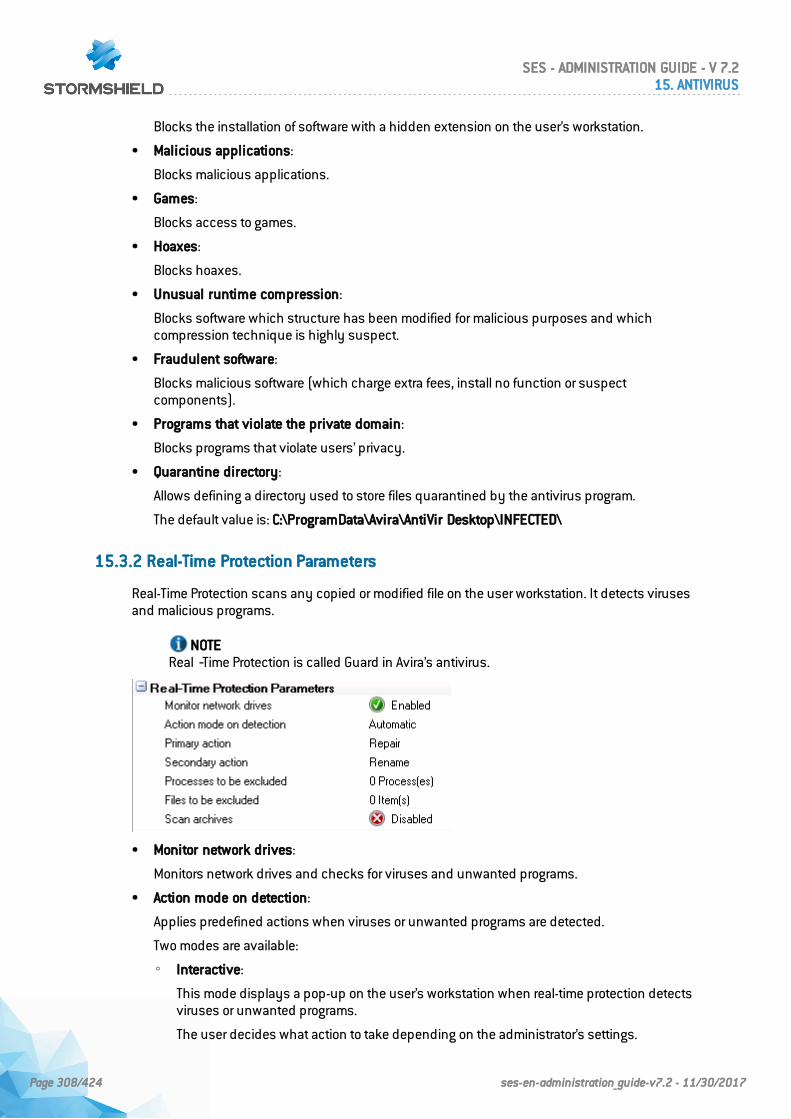
Blocks the installation of software with a hidden extension on the user’s workstation.
• Malicious applications:
Blocks malicious applications.
• Games:
Blocks access to games.
• Hoaxes:
Blocks hoaxes.
• Unusual runtime compression:
Blocks software which structure has been modified for malicious purposes and whichcompression technique is highly suspect.
• Fraudulent software:
Blocks malicious software (which charge extra fees, install no function or suspectcomponents).
• Programs that violate the private domain:
Blocks programs that violate users’ privacy.
• Quarantine directory:
Allows defining a directory used to store files quarantined by the antivirus program.
The default value is: C:\ProgramData\Avira\AntiVir Desktop\INFECTED\
15.3.2 Real-Time Protection Parameters
Real-Time Protection scans any copied or modified file on the user workstation. It detects virusesand malicious programs.
NOTEReal‐Time Protection is called Guard in Avira’s antivirus.
• Monitor network drives:
Monitors network drives and checks for viruses and unwanted programs.
• Action mode on detection:
Applies predefined actions when viruses or unwanted programs are detected.
Two modes are available:
◦ Interactive:
This mode displays a pop-up on the user’s workstation when real-time protection detectsviruses or unwanted programs.
The user decides what action to take depending on the administrator’s settings.
SES - ADMINISTRATION GUIDE - V 7.215. ANTIVIRUS
Page 308/424 ses-en-administration_guide-v7.2 - 11/30/2017
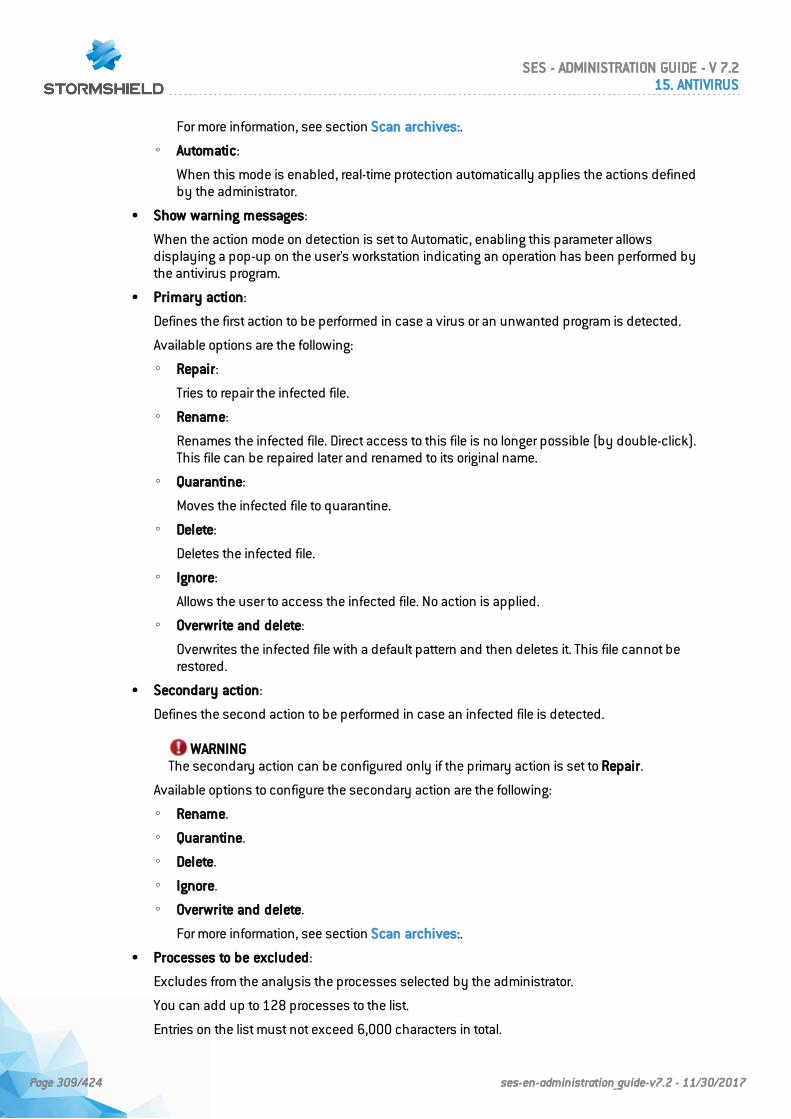
For more information, see section Scan archives:.
◦ Automatic:
When this mode is enabled, real-time protection automatically applies the actions definedby the administrator.
• Show warning messages:
When the action mode on detection is set to Automatic, enabling this parameter allowsdisplaying a pop-up on the user's workstation indicating an operation has been performed bythe antivirus program.
• Primary action:
Defines the first action to be performed in case a virus or an unwanted program is detected.
Available options are the following:
◦ Repair:
Tries to repair the infected file.
◦ Rename:
Renames the infected file. Direct access to this file is no longer possible (by double-click).This file can be repaired later and renamed to its original name.
◦ Quarantine:
Moves the infected file to quarantine.
◦ Delete:
Deletes the infected file.
◦ Ignore:
Allows the user to access the infected file. No action is applied.
◦ Overwrite and delete:
Overwrites the infected file with a default pattern and then deletes it. This file cannot berestored.
• Secondary action:
Defines the second action to be performed in case an infected file is detected.
WARNINGThe secondary action can be configured only if the primary action is set to Repair.
Available options to configure the secondary action are the following:
◦ Rename.
◦ Quarantine.
◦ Delete.
◦ Ignore.
◦ Overwrite and delete.
For more information, see section Scan archives:.
• Processes to be excluded:
Excludes from the analysis the processes selected by the administrator.
You can add up to 128 processes to the list.
Entries on the list must not exceed 6,000 characters in total.
SES - ADMINISTRATION GUIDE - V 7.215. ANTIVIRUS
Page 309/424 ses-en-administration_guide-v7.2 - 11/30/2017
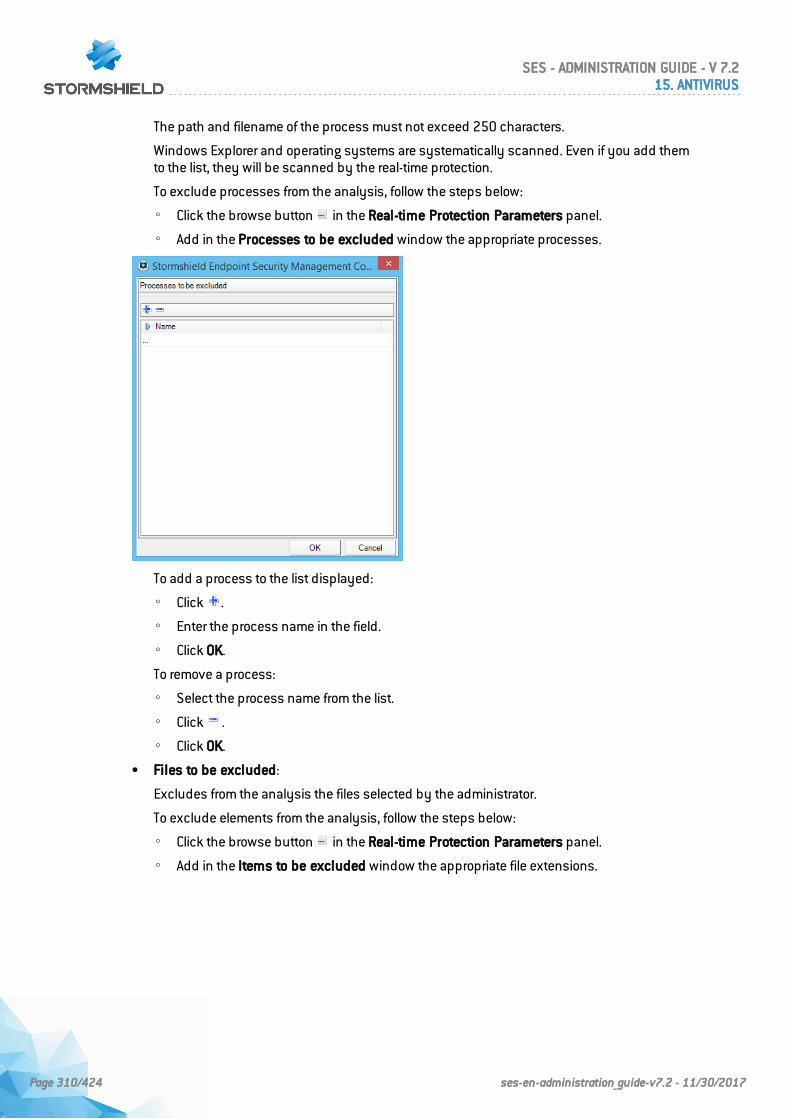
The path and filename of the process must not exceed 250 characters.
Windows Explorer and operating systems are systematically scanned. Even if you add themto the list, they will be scanned by the real-time protection.
To exclude processes from the analysis, follow the steps below:
◦ Click the browse button in the Real-time Protection Parameters panel.
◦ Add in the Processes to be excluded window the appropriate processes.
To add a process to the list displayed:
◦ Click .
◦ Enter the process name in the field.
◦ Click OK.
To remove a process:
◦ Select the process name from the list.
◦ Click .
◦ Click OK.
• Files to be excluded:
Excludes from the analysis the files selected by the administrator.
To exclude elements from the analysis, follow the steps below:
◦ Click the browse button in the Real-time Protection Parameters panel.
◦ Add in the Items to be excluded window the appropriate file extensions.
SES - ADMINISTRATION GUIDE - V 7.215. ANTIVIRUS
Page 310/424 ses-en-administration_guide-v7.2 - 11/30/2017
To add an item to the list displayed:
◦ Click .
◦ Enter the item name in the field.
◦ Click OK.
To remove an item from the list displayed:
◦ Click the item name (Example: .doc) in the field.
◦ Click .
◦ Click OK.
Entries on the list must not exceed 6,000 characters in total.
You can add up to 20 exceptions per network drive (starting with the drive letter followed bythe complete path).
Example:C:\Program Files\Application\Name.log
You can add up to 64 exceptions (without specifying the complete path).
Examples:*.log
Only use * and ? wildcards in filenames and extensions.
Use a backslash \ at the end of directory names, otherwise the directory will be regarded as afile.
The list is processed from top to bottom.
If you add a directory to the list, all its subdirectories will be automatically excluded from theanalysis.
The longer the list, the longer the analysis. To prevent slow processing, keep the list as shortas possible.
To add short DOS filenames (~) to the list, observe DOS naming rules (DOS 8.3) when addingfilenames to the list.
To add directories and files on connected network drives, specify the UNC path that you useto connect to the network drive.
SES - ADMINISTRATION GUIDE - V 7.215. ANTIVIRUS
Page 311/424 ses-en-administration_guide-v7.2 - 11/30/2017
Example:\\<Computer name>\<Enable>\-OR-\\<IP address>\<Enable>\
Do not use a backslash \ at the end of a filename which includes wildcards. Otherwise, theentry will not be valid and will not be regarded as an exception.
Example:C:\Program Files\Application\applic*.exe\
Regarding connected network drives, do not use the letter assigned to the drive. Directoriesand folders will be scanned anyway by the real-time protection.If the UNC path in the list differs from the UNC path used to connect to the network drive (IPaddress, computer name), directories and files will be scanned anyway by the real-timeprotection.To check UNC paths, refer to the logs sent to the server.
Regarding dynamic drives mounted as a directory on another drive, use the operating systemalias for the integrated drive:
Example:\Device\HarddiskDmVolumes\PhysicalDmVolumes\BlockVOlume1\
If you use, for instance, the mount point C:\DynDrive, the dynamic drive will be scannedanyway. To check the operating system alias, refer to the logs sent to the server.
The path used by the real-time protection when scanning for infected files is indicated in thelogs. Always use these paths in the list.
Examples:C:C:\C:\*.*C:\**.exe*.xl?*.*C:\Program Files\Application\application.exeC:\Program Files\Application\applic*.exeC:\Program Files\Application\applic*C:\Program Files\Application\applic?????.e*C:\Program Files\C:\Program Files\Application\*.mdb\\Computer name\Enable\\\1.0.0.0\Enable\application.exe
• Scan archives:
Scans compressed files on the user’s workstation. After scanning, the antivirusdecompresses compressed files and scans them again.
Extensions of scanned archives are the following:
◦ 7-ZIP
◦ 7-ZIP SFX
◦ ACE
◦ ACE SFX
◦ ARJ
◦ ARJ SFX
◦ AutoIt
◦ Base64
◦ BinHex
SES - ADMINISTRATION GUIDE - V 7.215. ANTIVIRUS
Page 312/424 ses-en-administration_guide-v7.2 - 11/30/2017
◦ BSD MailBox
◦ BZ2
◦ CAB
◦ CAB SFX
◦ CHM
◦ CPIO SVR4
◦ Eudora MailBox
◦ GZ
◦ ISO
◦ JAR
◦ LZH (+LHA)
◦ LZH (LHA) SFX
◦ MacBinary
◦ MIME
◦ MS Outlook Mailbox
◦ MSCOMPRESS
◦ Netscape/Mozilla MailBox
◦ NSIS
◦ Pegasus MailBox
◦ PGP
◦ RAR
◦ RAR SFX
◦ RPM
◦ SAPCar
◦ Squid Cache
◦ TAR
◦ TNEF
◦ UUEncoded
◦ ZIP
◦ ZIP SFX
◦ ZOO
15.3.3 Web Protection Parameters
Web Protection checks in real time for viruses and malicious software which may infect the user’sworkstation when downloading web pages.
SES - ADMINISTRATION GUIDE - V 7.215. ANTIVIRUS
Page 313/424 ses-en-administration_guide-v7.2 - 11/30/2017
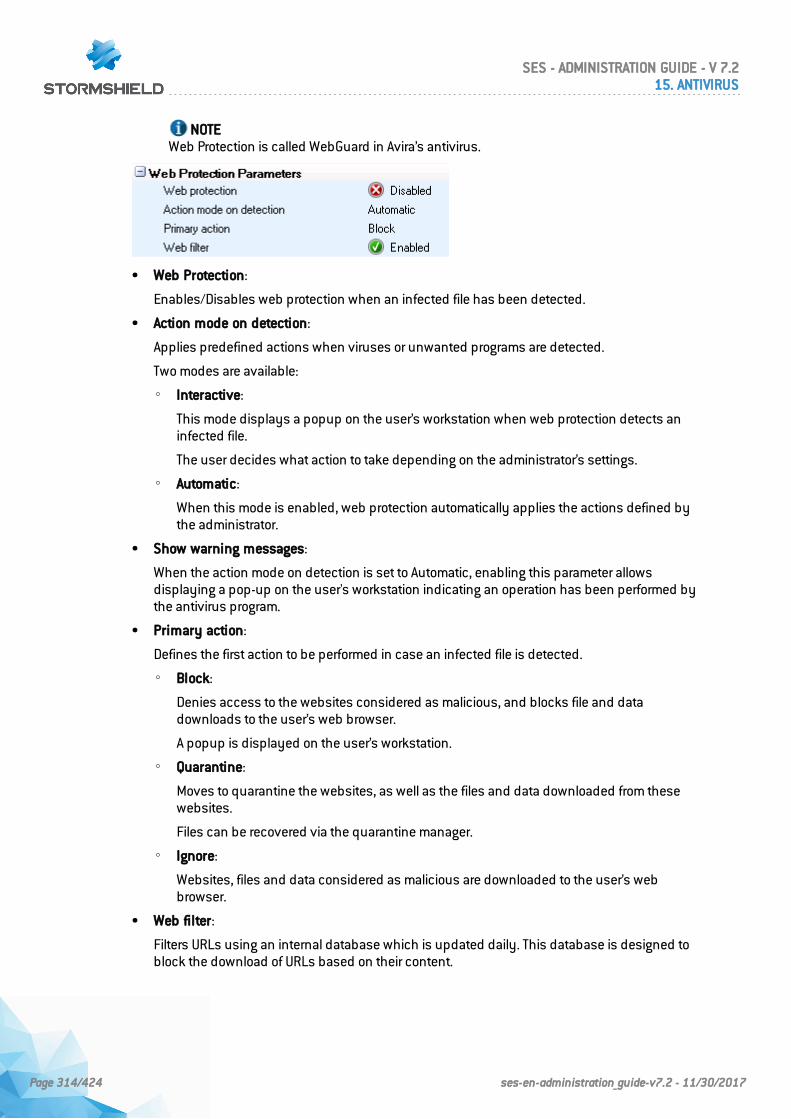
NOTEWeb Protection is called WebGuard in Avira’s antivirus.
• Web Protection:
Enables/Disables web protection when an infected file has been detected.
• Action mode on detection:
Applies predefined actions when viruses or unwanted programs are detected.
Two modes are available:
◦ Interactive:
This mode displays a popup on the user’s workstation when web protection detects aninfected file.
The user decides what action to take depending on the administrator’s settings.
◦ Automatic:
When this mode is enabled, web protection automatically applies the actions defined bythe administrator.
• Show warning messages:
When the action mode on detection is set to Automatic, enabling this parameter allowsdisplaying a pop-up on the user's workstation indicating an operation has been performed bythe antivirus program.
• Primary action:
Defines the first action to be performed in case an infected file is detected.
◦ Block:
Denies access to the websites considered as malicious, and blocks file and datadownloads to the user’s web browser.
A popup is displayed on the user’s workstation.
◦ Quarantine:
Moves to quarantine the websites, as well as the files and data downloaded from thesewebsites.
Files can be recovered via the quarantine manager.
◦ Ignore:
Websites, files and data considered as malicious are downloaded to the user’s webbrowser.
• Web filter:
Filters URLs using an internal database which is updated daily. This database is designed toblock the download of URLs based on their content.
SES - ADMINISTRATION GUIDE - V 7.215. ANTIVIRUS
Page 314/424 ses-en-administration_guide-v7.2 - 11/30/2017
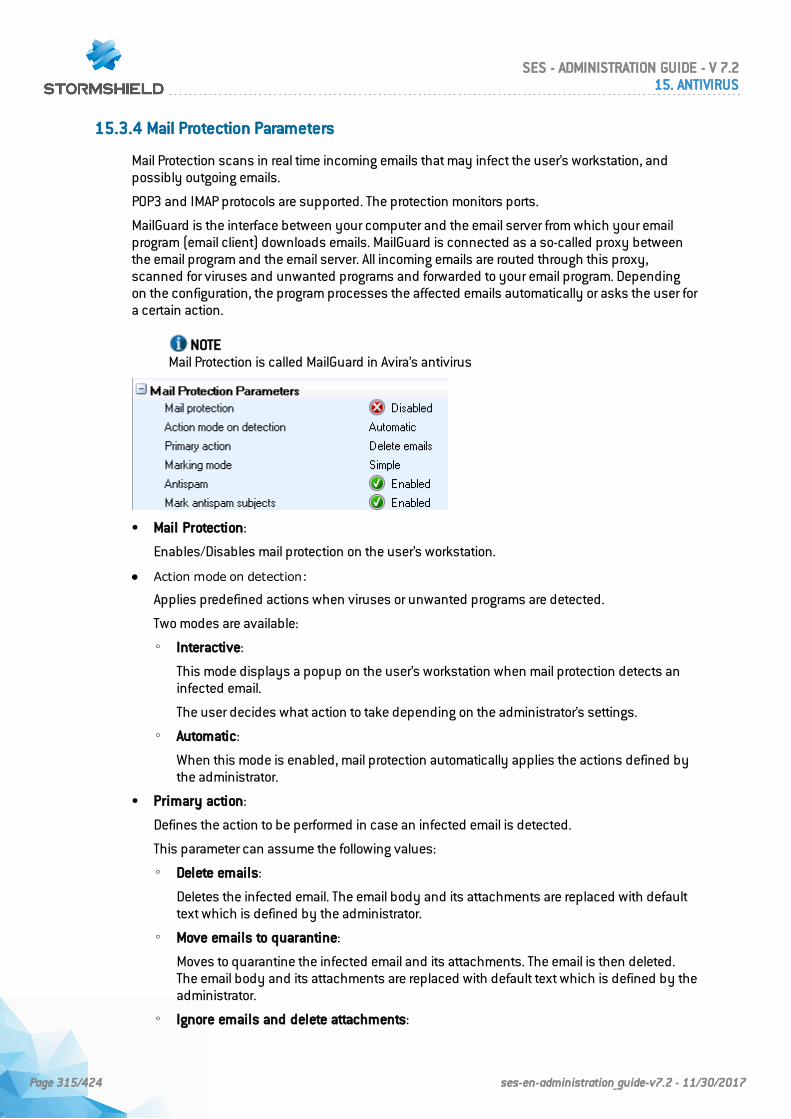
15.3.4 Mail Protection Parameters
Mail Protection scans in real time incoming emails that may infect the user’s workstation, andpossibly outgoing emails.
POP3 and IMAP protocols are supported. The protection monitors ports.
MailGuard is the interface between your computer and the email server from which your emailprogram (email client) downloads emails. MailGuard is connected as a so-called proxy betweenthe email program and the email server. All incoming emails are routed through this proxy,scanned for viruses and unwanted programs and forwarded to your email program. Dependingon the configuration, the program processes the affected emails automatically or asks the user fora certain action.
NOTEMail Protection is called MailGuard in Avira’s antivirus
• Mail Protection:
Enables/Disables mail protection on the user’s workstation.
• Action mode on detection:
Applies predefined actions when viruses or unwanted programs are detected.
Two modes are available:
◦ Interactive:
This mode displays a popup on the user’s workstation when mail protection detects aninfected email.
The user decides what action to take depending on the administrator’s settings.
◦ Automatic:
When this mode is enabled, mail protection automatically applies the actions defined bythe administrator.
• Primary action:
Defines the action to be performed in case an infected email is detected.
This parameter can assume the following values:
◦ Delete emails:
Deletes the infected email. The email body and its attachments are replaced with defaulttext which is defined by the administrator.
◦ Move emails to quarantine:
Moves to quarantine the infected email and its attachments. The email is then deleted.The email body and its attachments are replaced with default text which is defined by theadministrator.
◦ Ignore emails and delete attachments:
SES - ADMINISTRATION GUIDE - V 7.215. ANTIVIRUS
Page 315/424 ses-en-administration_guide-v7.2 - 11/30/2017
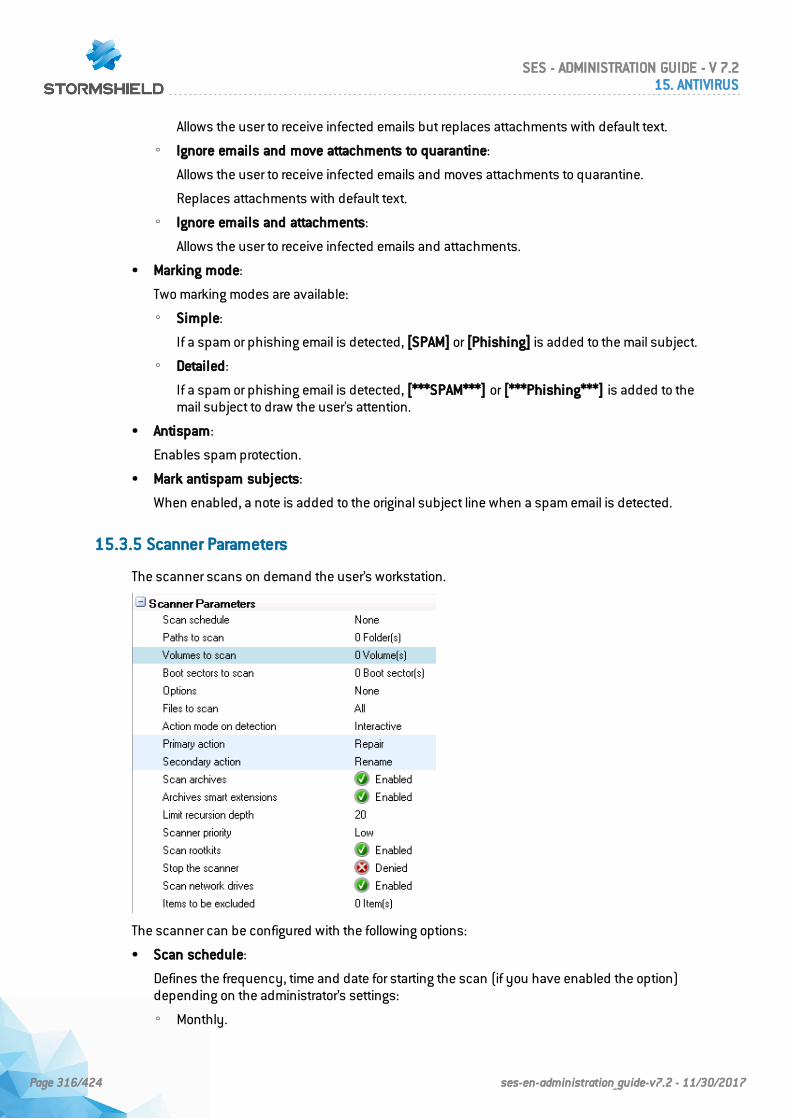
Allows the user to receive infected emails but replaces attachments with default text.
◦ Ignore emails and move attachments to quarantine:
Allows the user to receive infected emails and moves attachments to quarantine.
Replaces attachments with default text.
◦ Ignore emails and attachments:
Allows the user to receive infected emails and attachments.
• Marking mode:
Two marking modes are available:
◦ Simple:
If a spam or phishing email is detected, [SPAM] or [Phishing] is added to the mail subject.
◦ Detailed:
If a spam or phishing email is detected, [***SPAM***] or [***Phishing***] is added to themail subject to draw the user's attention.
• Antispam:
Enables spam protection.
• Mark antispam subjects:
When enabled, a note is added to the original subject line when a spam email is detected.
15.3.5 Scanner Parameters
The scanner scans on demand the user’s workstation.
The scanner can be configured with the following options:
• Scan schedule:
Defines the frequency, time and date for starting the scan (if you have enabled the option)depending on the administrator’s settings:
◦ Monthly.
SES - ADMINISTRATION GUIDE - V 7.215. ANTIVIRUS
Page 316/424 ses-en-administration_guide-v7.2 - 11/30/2017
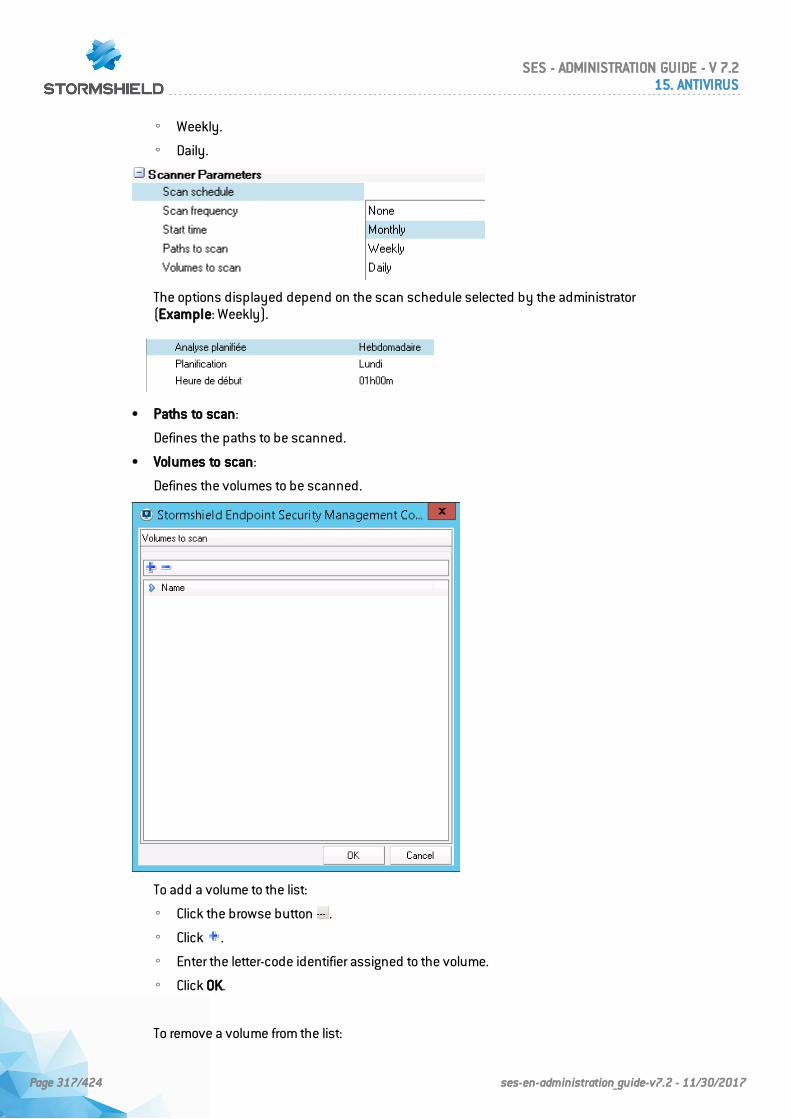
◦ Weekly.
◦ Daily.
The options displayed depend on the scan schedule selected by the administrator(Example: Weekly).
• Paths to scan:
Defines the paths to be scanned.
• Volumes to scan:
Defines the volumes to be scanned.
To add a volume to the list:
◦ Click the browse button .
◦ Click .
◦ Enter the letter-code identifier assigned to the volume.
◦ Click OK.
To remove a volume from the list:
SES - ADMINISTRATION GUIDE - V 7.215. ANTIVIRUS
Page 317/424 ses-en-administration_guide-v7.2 - 11/30/2017
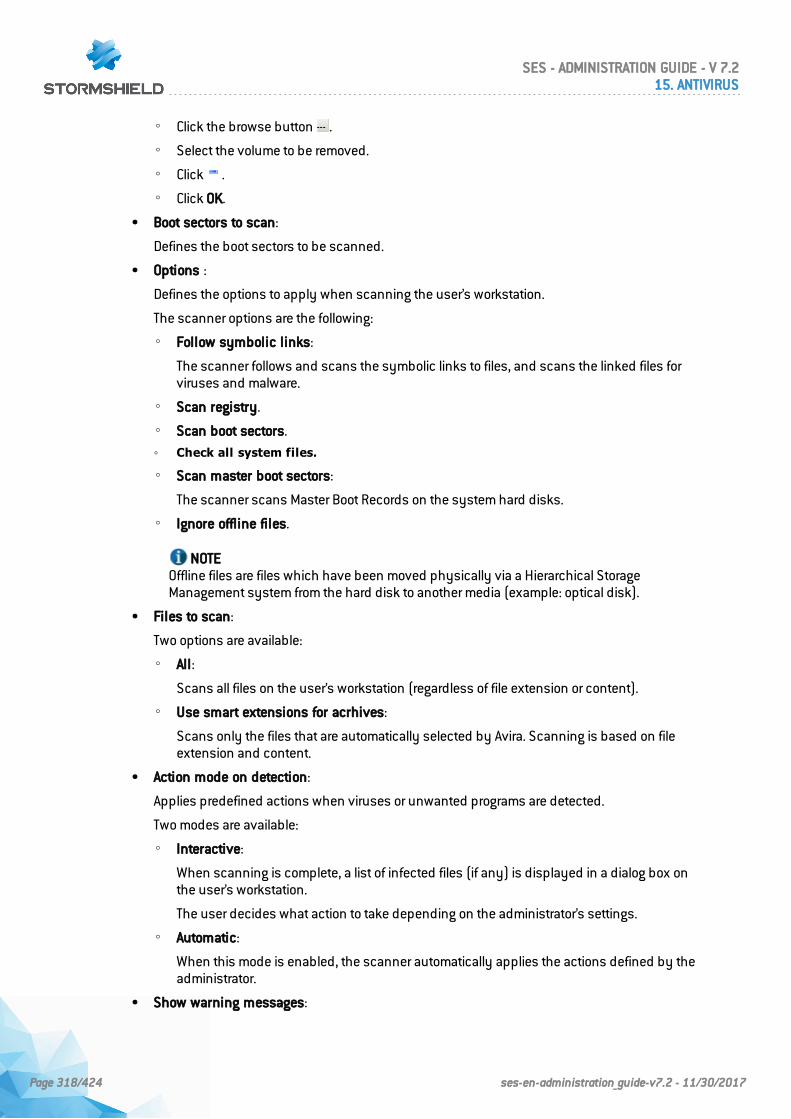
◦ Click the browse button .
◦ Select the volume to be removed.
◦ Click .
◦ Click OK.
• Boot sectors to scan:
Defines the boot sectors to be scanned.
• Options :
Defines the options to apply when scanning the user’s workstation.
The scanner options are the following:
◦ Follow symbolic links:
The scanner follows and scans the symbolic links to files, and scans the linked files forviruses and malware.
◦ Scan registry.
◦ Scan boot sectors.
◦ Check all system files.
◦ Scan master boot sectors:
The scanner scans Master Boot Records on the system hard disks.
◦ Ignore offline files.
NOTEOffline files are files which have been moved physically via a Hierarchical StorageManagement system from the hard disk to another media (example: optical disk).
• Files to scan:
Two options are available:
◦ All:
Scans all files on the user’s workstation (regardless of file extension or content).
◦ Use smart extensions for acrhives:
Scans only the files that are automatically selected by Avira. Scanning is based on fileextension and content.
• Action mode on detection:
Applies predefined actions when viruses or unwanted programs are detected.
Two modes are available:
◦ Interactive:
When scanning is complete, a list of infected files (if any) is displayed in a dialog box onthe user’s workstation.
The user decides what action to take depending on the administrator’s settings.
◦ Automatic:
When this mode is enabled, the scanner automatically applies the actions defined by theadministrator.
• Show warning messages:
SES - ADMINISTRATION GUIDE - V 7.215. ANTIVIRUS
Page 318/424 ses-en-administration_guide-v7.2 - 11/30/2017
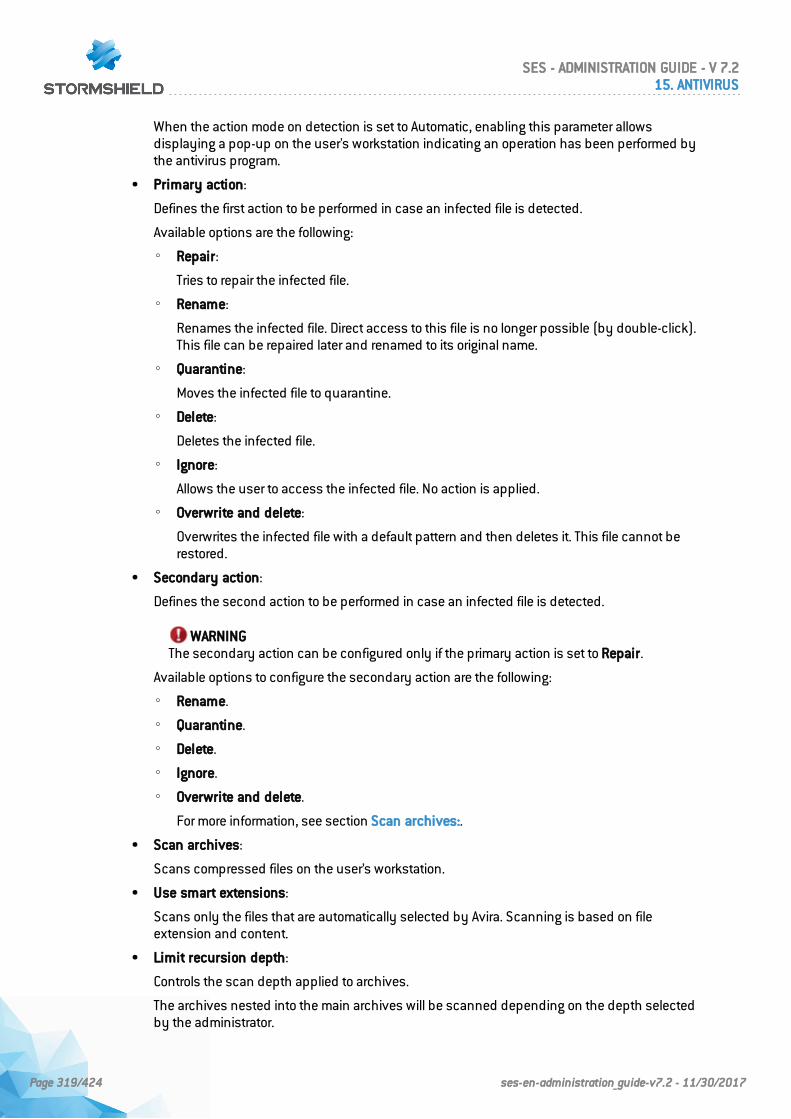
When the action mode on detection is set to Automatic, enabling this parameter allowsdisplaying a pop-up on the user's workstation indicating an operation has been performed bythe antivirus program.
• Primary action:
Defines the first action to be performed in case an infected file is detected.
Available options are the following:
◦ Repair:
Tries to repair the infected file.
◦ Rename:
Renames the infected file. Direct access to this file is no longer possible (by double-click).This file can be repaired later and renamed to its original name.
◦ Quarantine:
Moves the infected file to quarantine.
◦ Delete:
Deletes the infected file.
◦ Ignore:
Allows the user to access the infected file. No action is applied.
◦ Overwrite and delete:
Overwrites the infected file with a default pattern and then deletes it. This file cannot berestored.
• Secondary action:
Defines the second action to be performed in case an infected file is detected.
WARNINGThe secondary action can be configured only if the primary action is set to Repair.
Available options to configure the secondary action are the following:
◦ Rename.
◦ Quarantine.
◦ Delete.
◦ Ignore.
◦ Overwrite and delete.
For more information, see section Scan archives:.
• Scan archives:
Scans compressed files on the user’s workstation.
• Use smart extensions:
Scans only the files that are automatically selected by Avira. Scanning is based on fileextension and content.
• Limit recursion depth:
Controls the scan depth applied to archives.
The archives nested into the main archives will be scanned depending on the depth selectedby the administrator.
SES - ADMINISTRATION GUIDE - V 7.215. ANTIVIRUS
Page 319/424 ses-en-administration_guide-v7.2 - 11/30/2017

Authorized values range from 1 to 99. The default value is 1. The recommended value is 20.
• Scanner priority:
Defines the scanner priority levels.
This option is useful when several processes are running on the user’s workstation.
The administrator’s selection will impact scanning speed.
Available options are the following:
◦ Low:
Scanner resources are managed by the operating system. The scanner runs in thebackground if other processes are running on the user’s workstation. If no other processis running, the scanner will be allocated the full processor time.
This is the scanner priority level by default.
◦ Normal:
The Scanner runs in normal conditions. The operating system distributes evenly theprocessor time among all running processes.
◦ High:
The scanner runs at maximum speed.
Other running processes are considerably slowed down.
• Scan rootkits:
Scans Windows system directory to check for rootkits.
• Stop the scanner:
The user can stop at any time the scanning in progress on his workstation.
• Scan network drives:
Disabling this option may prove useful when network drives are protected by anotherantivirus or another version of the antivirus.
• Items to be excluded.
15.3.6 Password Parameters
The administrator can password-protect antivirus settings.
• Password:
The password can include a maximum of 20 alphanumeric characters. For security reasons,characters are replaced with asterisks.
• Password-protected areas:
The administrator defines the areas to be password-protected.
The user will have to enter this password to access protected areas.
The administrator can enable/disable the password protection applied to the following areas:
◦ Control Center
◦ Enable/Disable Real-Time Protection
◦ Enable/Disable Mail Protection
◦ Enable/Disable Avira Firewall
◦ Enable/Disable Web Protection
SES - ADMINISTRATION GUIDE - V 7.215. ANTIVIRUS
Page 320/424 ses-en-administration_guide-v7.2 - 11/30/2017
◦ Quarantine:
If the administrator checks the Quarantine box, all areas in the quarantine manager arechecked by default:
- Restore infected items
- Repair infected items
- Infected item properties
- Delete infected items
- Send emails to Avira
- Copy infected items
◦ Add/Modify jobs
◦ Download updates
◦ Download Rescue-CD from the internet
◦ Configure
◦ Manually switch configuration
◦ Install/Uninstall
15.4 Applying an antivirus policy to an object of the directory
Antivirus policies are applied to objects of the directory.
To apply an antivirus policy to an Active Directory object or to an agents group, follow the stepsbelow:
1. Click the object in the Environment menu in the Environment Manager section.
2. In the Antivirus part in the Policies linked tab, select the policy to apply.
SES - ADMINISTRATION GUIDE - V 7.215. ANTIVIRUS
Page 321/424 ses-en-administration_guide-v7.2 - 11/30/2017
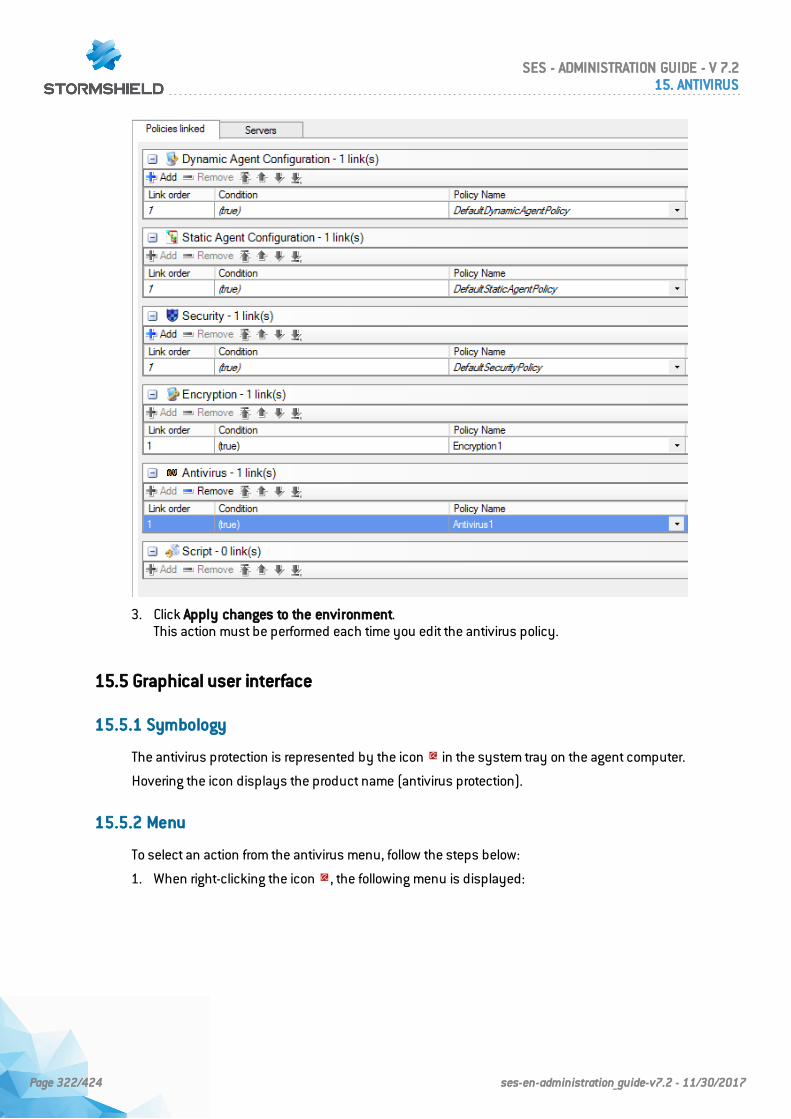
3. Click Apply changes to the environment.This action must be performed each time you edit the antivirus policy.
15.5 Graphical user interface
15.5.1 Symbology
The antivirus protection is represented by the icon in the system tray on the agent computer.
Hovering the icon displays the product name (antivirus protection).
15.5.2 Menu
To select an action from the antivirus menu, follow the steps below:
1. When right-clicking the icon , the following menu is displayed:
SES - ADMINISTRATION GUIDE - V 7.215. ANTIVIRUS
Page 322/424 ses-en-administration_guide-v7.2 - 11/30/2017
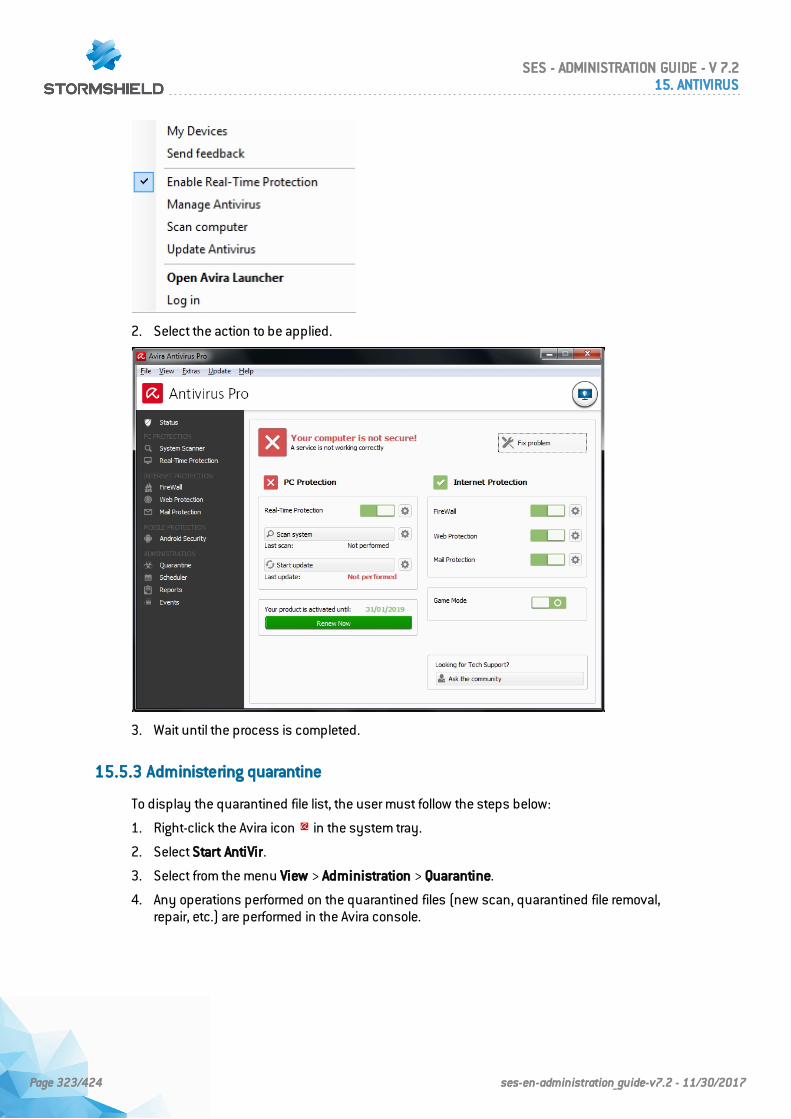
2. Select the action to be applied.
3. Wait until the process is completed.
15.5.3 Administering quarantine
To display the quarantined file list, the user must follow the steps below:
1. Right-click the Avira icon in the system tray.
2. Select Start AntiVir.
3. Select from the menu View > Administration > Quarantine.
4. Any operations performed on the quarantined files (new scan, quarantined file removal,repair, etc.) are performed in the Avira console.
SES - ADMINISTRATION GUIDE - V 7.215. ANTIVIRUS
Page 323/424 ses-en-administration_guide-v7.2 - 11/30/2017
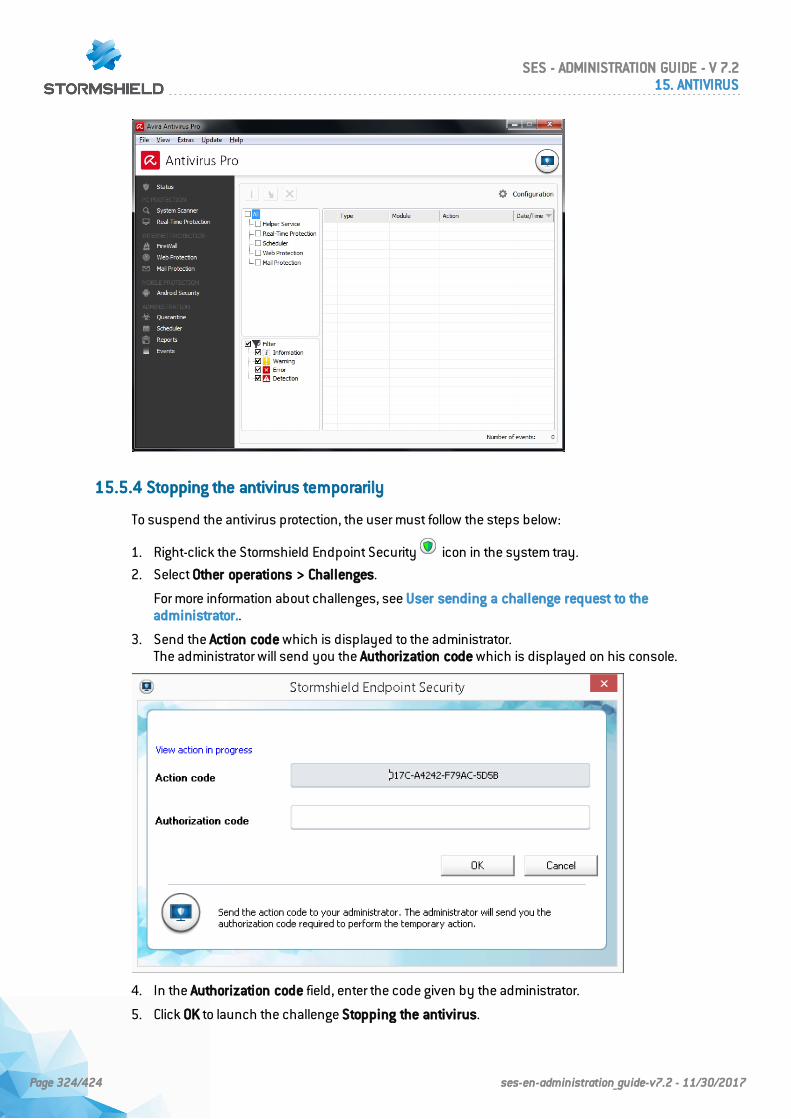
15.5.4 Stopping the antivirus temporarily
To suspend the antivirus protection, the user must follow the steps below:
1. Right-click the Stormshield Endpoint Security icon in the system tray.
2. Select Other operations > Challenges.
For more information about challenges, see User sending a challenge request to theadministrator..
3. Send the Action code which is displayed to the administrator.The administrator will send you the Authorization code which is displayed on his console.
4. In the Authorization code field, enter the code given by the administrator.
5. Click OK to launch the challenge Stopping the antivirus.
SES - ADMINISTRATION GUIDE - V 7.215. ANTIVIRUS
Page 324/424 ses-en-administration_guide-v7.2 - 11/30/2017
The antivirus icon becomes .
15.6 Migrating to Avira 2015 (from SES 7.2.13 onwards)
Version 2013 of Avira Professional Security is deployed on SES agents in versions lower thanversion 7.2.13.
Avira Antivirus Pro 2015 will be deployed on SES agents from version 7.2.13 onwards.
In order to upgrade the version of Avira on agents, you must first uninstall version 2013 beforeupgrading SES agents with the AVP option:
1. In the console, disable the antivirus policy on the relevant agents.
2. Restart the workstations on which the relevant agents have been installed.
3. Run the following command in order to uninstall Avira on workstations:"<agent_folder>\av\tmp\presetup.exe" /REMSILENTNOREBOOT /PASSWORD="<avira_password>" /unsetuplog="<log_file>"
l <agent_folder> contains the path to the SES agent installation folder.
l <avira_password> contains the administration password of the Avira console defined inthe antivirus policy. This parameter in the command is only mandatory if theInstall/Uninstall checkbox has been selected in the Password-protected areasparameter in the antivirus policy.
l <log_file> contains a path to a file in which Avira uninstall logs will be written.
4. Restart the workstations concerned.
5. Proceed with the upgrade of agents to version 7.2.13 or higher. For further information onupgrades, refer to the section Updating Stormshield Endpoint Security 7.2.
6. In the console, apply the antivirus policy again to agents. Doing so will start the installation ofAvira Antivirus Pro 2015. Workstations will then need to be restarted.
SES - ADMINISTRATION GUIDE - V 7.215. ANTIVIRUS
Page 325/424 ses-en-administration_guide-v7.2 - 11/30/2017
16. Activity Monitoring
16.1 Overview
Stormshield Endpoint Security is used to control, monitor and record activity on workstations viathe following features located in the Environment Manager, Monitoring and Console Managersections:
l Agent Monitoring.
l Dashboard.
l Logs.
l Log Manager.
l Console Monitoring.
NOTEIf you are using Stormshield Endpoint Security for the first time, it is unlikely that any eventcaptured by the Stormshield Endpoint Security agents has been recorded in the reportingdatabase.In this case, the functions covered in this chapter will of course be available but withoutany data.
16.2 Agent monitoring
16.2.1 Graphical interface
Display options
Agent Monitoring display options in the menu bar are the following:
• Real-Time:
Continuous display of monitoring information which is updated as the information isrefreshed.
By default, monitoring information is automatically updated according to the Agentmonitoring refresh time (sec.) set in Console Configuration in the Console section.
• Review:
Display of monitoring information without automatic update.
Click Refresh when you want to update information.
• Refresh:
Forces a refresh of monitoring information (displayed in real-time mode or review).
• Active Directory:
Used to determine which machines do not have the Stormshield Endpoint Security agentsoftware installed.
• or :
Used to display basic or detailed information on the agents. The number of columnsdisplayed depends on your selection.
SES - ADMINISTRATION GUIDE - V 7.216. ACTIVITY MONITORING
Page 326/424 ses-en-administration_guide-v7.2 - 11/30/2017
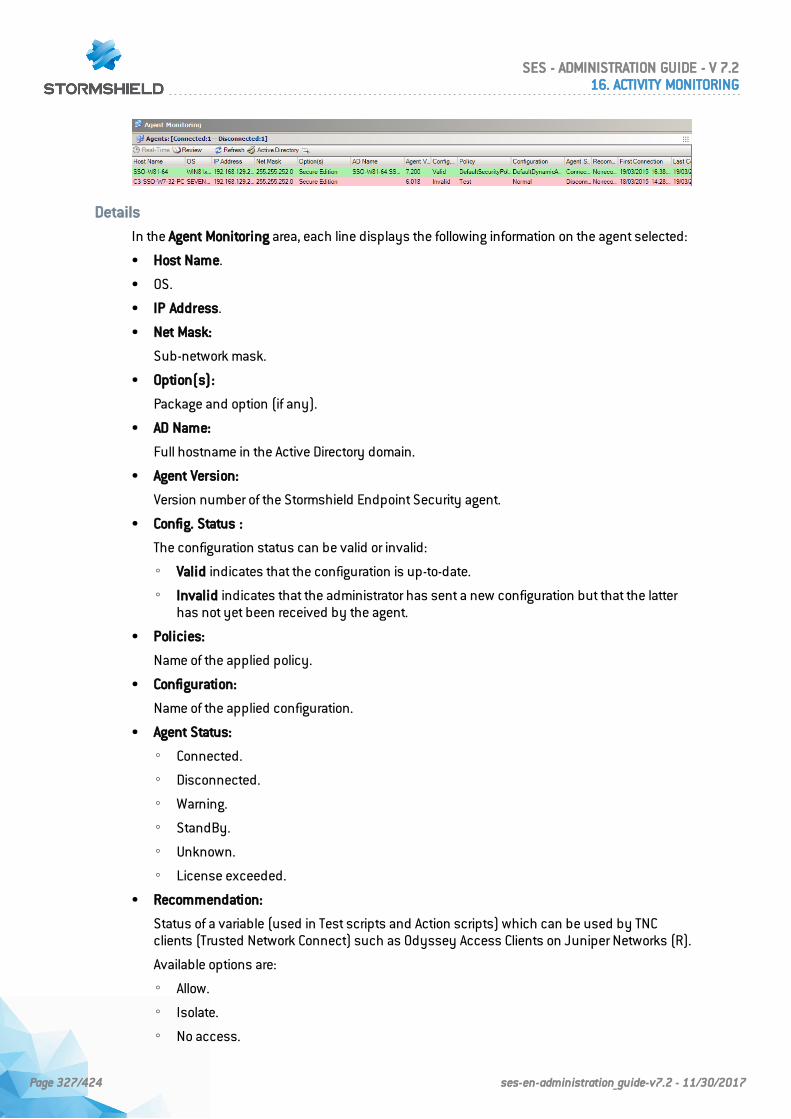
Details
In the Agent Monitoring area, each line displays the following information on the agent selected:
• Host Name.
• OS.
• IP Address.
• Net Mask:
Sub-network mask.
• Option(s):
Package and option (if any).
• AD Name:
Full hostname in the Active Directory domain.
• Agent Version:
Version number of the Stormshield Endpoint Security agent.
• Config. Status :
The configuration status can be valid or invalid:
◦ Valid indicates that the configuration is up-to-date.
◦ Invalid indicates that the administrator has sent a new configuration but that the latterhas not yet been received by the agent.
• Policies:
Name of the applied policy.
• Configuration:
Name of the applied configuration.
• Agent Status:
◦ Connected.
◦ Disconnected.
◦ Warning.
◦ StandBy.
◦ Unknown.
◦ License exceeded.
• Recommendation:
Status of a variable (used in Test scripts and Action scripts) which can be used by TNCclients (Trusted Network Connect) such as Odyssey Access Clients on Juniper Networks (R).
Available options are:
◦ Allow.
◦ Isolate.
◦ No access.
SES - ADMINISTRATION GUIDE - V 7.216. ACTIVITY MONITORING
Page 327/424 ses-en-administration_guide-v7.2 - 11/30/2017
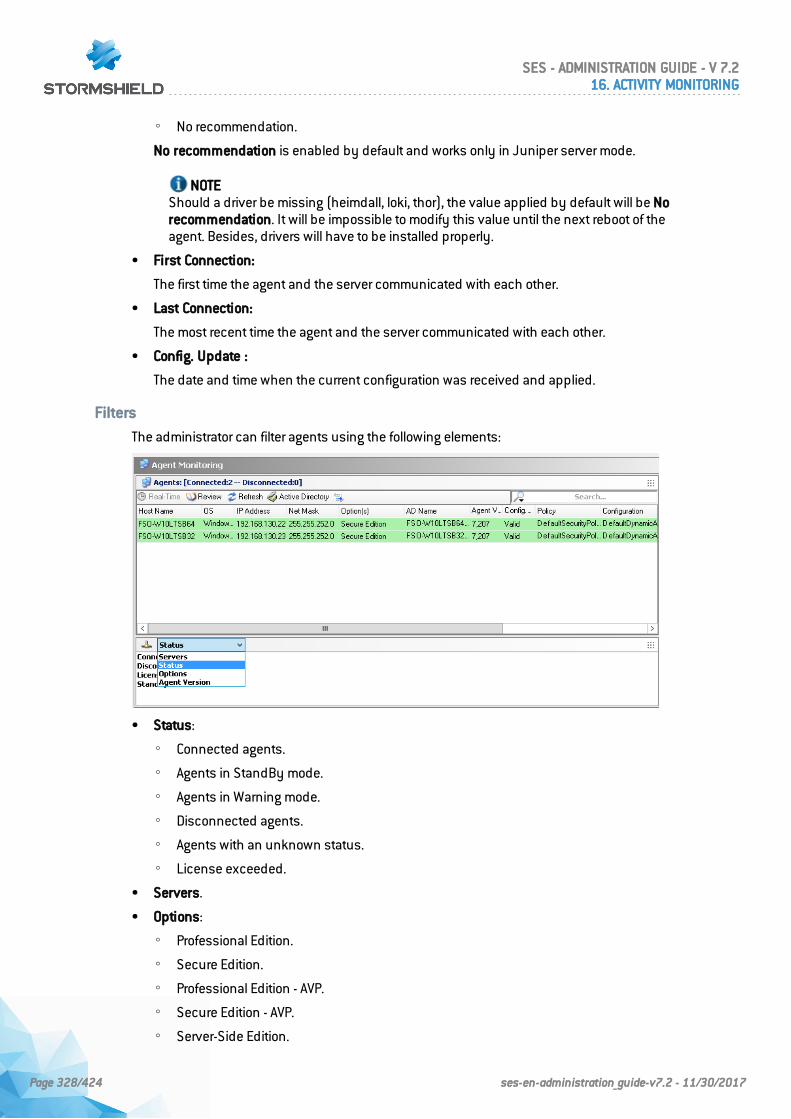
◦ No recommendation.
No recommendation is enabled by default and works only in Juniper server mode.
NOTEShould a driver be missing (heimdall, loki, thor), the value applied by default will be Norecommendation. It will be impossible to modify this value until the next reboot of theagent. Besides, drivers will have to be installed properly.
• First Connection:
The first time the agent and the server communicated with each other.
• Last Connection:
The most recent time the agent and the server communicated with each other.
• Config. Update :
The date and time when the current configuration was received and applied.
Filters
The administrator can filter agents using the following elements:
• Status:
◦ Connected agents.
◦ Agents in StandBy mode.
◦ Agents in Warning mode.
◦ Disconnected agents.
◦ Agents with an unknown status.
◦ License exceeded.
• Servers.
• Options:
◦ Professional Edition.
◦ Secure Edition.
◦ Professional Edition - AVP.
◦ Secure Edition - AVP.
◦ Server-Side Edition.
SES - ADMINISTRATION GUIDE - V 7.216. ACTIVITY MONITORING
Page 328/424 ses-en-administration_guide-v7.2 - 11/30/2017
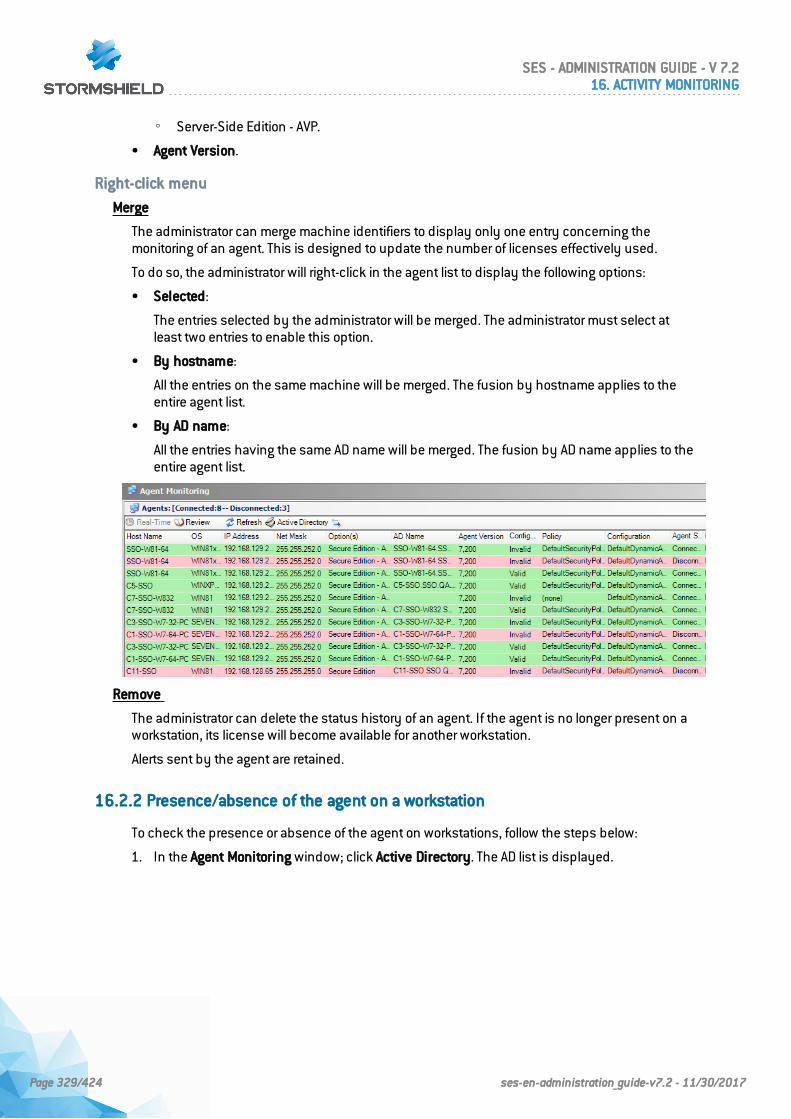
◦ Server-Side Edition - AVP.
• Agent Version.
Right-click menu
Merge
The administrator can merge machine identifiers to display only one entry concerning themonitoring of an agent. This is designed to update the number of licenses effectively used.
To do so, the administrator will right-click in the agent list to display the following options:
• Selected:
The entries selected by the administrator will be merged. The administrator must select atleast two entries to enable this option.
• By hostname:
All the entries on the same machine will be merged. The fusion by hostname applies to theentire agent list.
• By AD name:
All the entries having the same AD name will be merged. The fusion by AD name applies to theentire agent list.
Remove
The administrator can delete the status history of an agent. If the agent is no longer present on aworkstation, its license will become available for another workstation.
Alerts sent by the agent are retained.
16.2.2 Presence/absence of the agent on a workstation
To check the presence or absence of the agent on workstations, follow the steps below:
1. In the Agent Monitoring window; click Active Directory. The AD list is displayed.
SES - ADMINISTRATION GUIDE - V 7.216. ACTIVITY MONITORING
Page 329/424 ses-en-administration_guide-v7.2 - 11/30/2017

2. Click Connect.
3. Enter the following information:
◦ Login.
◦ Password.
◦ Domain.
◦ Type (of connection).
4. Click OK.
A list of machines is displayed showing their respective status:
◦ If the agent software has been installed, a ticked icon is displayed.
◦ If the agent software has not been installed, a cross icon is displayed.
5. You can use Export as to save the information to a file in either of the following formats:
◦ TXT (tabs used as separators).
◦ CSV (commas used as separators).
◦ XML.
SES - ADMINISTRATION GUIDE - V 7.216. ACTIVITY MONITORING
Page 330/424 ses-en-administration_guide-v7.2 - 11/30/2017
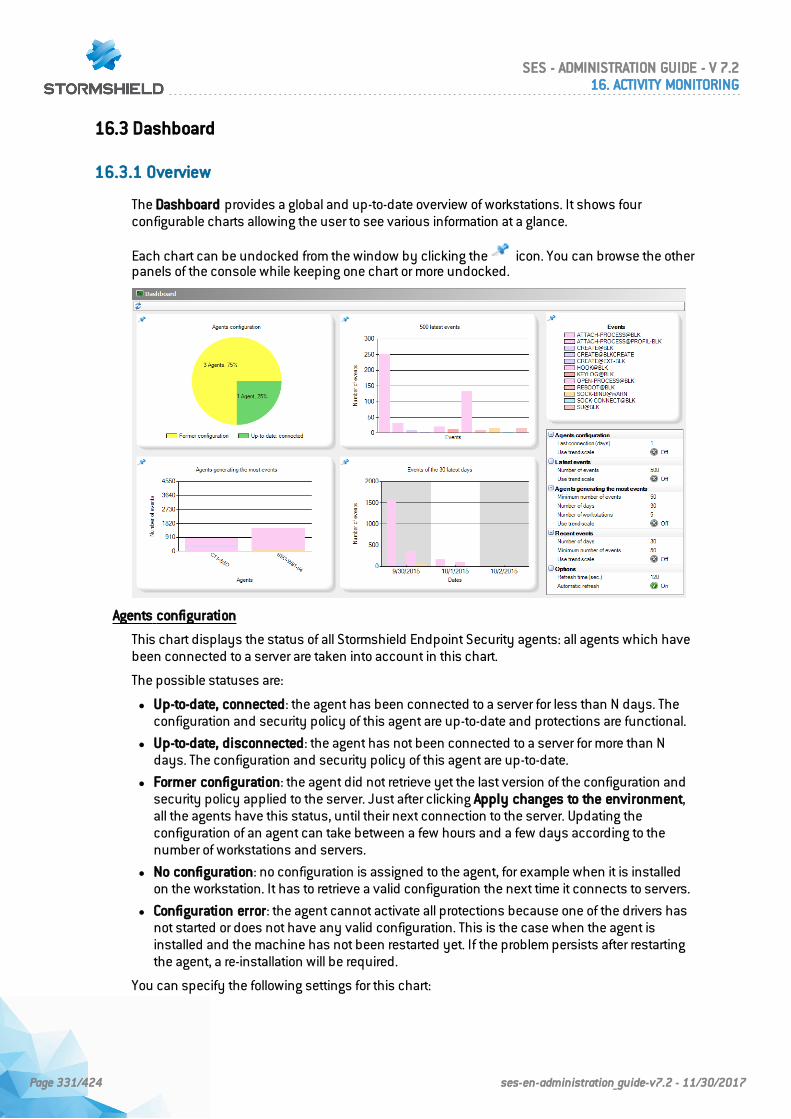
16.3 Dashboard
16.3.1 Overview
The Dashboard provides a global and up-to-date overview of workstations. It shows fourconfigurable charts allowing the user to see various information at a glance.
Each chart can be undocked from the window by clicking the icon. You can browse the otherpanels of the console while keeping one chart or more undocked.
Agents configuration
This chart displays the status of all Stormshield Endpoint Security agents: all agents which havebeen connected to a server are taken into account in this chart.
The possible statuses are:
l Up-to-date, connected: the agent has been connected to a server for less than N days. Theconfiguration and security policy of this agent are up-to-date and protections are functional.
l Up-to-date, disconnected: the agent has not been connected to a server for more than Ndays. The configuration and security policy of this agent are up-to-date.
l Former configuration: the agent did not retrieve yet the last version of the configuration andsecurity policy applied to the server. Just after clicking Apply changes to the environment,all the agents have this status, until their next connection to the server. Updating theconfiguration of an agent can take between a few hours and a few days according to thenumber of workstations and servers.
l No configuration: no configuration is assigned to the agent, for example when it is installedon the workstation. It has to retrieve a valid configuration the next time it connects to servers.
l Configuration error: the agent cannot activate all protections because one of the drivers hasnot started or does not have any valid configuration. This is the case when the agent isinstalled and the machine has not been restarted yet. If the problem persists after restartingthe agent, a re-installation will be required.
You can specify the following settings for this chart:
SES - ADMINISTRATION GUIDE - V 7.216. ACTIVITY MONITORING
Page 331/424 ses-en-administration_guide-v7.2 - 11/30/2017
l Last connection (days): define the number of days since the last connection agent-serverfor the agent to be considered as "disconnected" in the chart. In a local network clientenvironment, the recommended value to identify disconnected workstations is one or twodays.
l Use trend scale: angles are calculated according to the logarithm of the percentage of thetotal number of agents. This view keeps the order of values but allows pointing out smallvalues which can sometimes hardly be seen on a linear scale.
Latest events histogram
This chart displays the N last system events which occurred on agents. It provides an overviewof recent activity on agents.
You can specify the following settings for this chart:
l Number of events: define the total number of events to be displayed. Adjust the numberaccording to the number of workstations and the log generation policy defined in order to geta precise view of the activity.For less than 300 workstations, the value 50 is recommended.For more than 1000 workstations, select a value between 100 and 500.
l Use trend scale: the height of bars is calculated according to a logarithmic scale. This viewkeeps the order of values but allows pointing out small values which can sometimes hardlybe seen on a linear scale.
Agents generating the most events
This chart displays workstations which have generated the most events during the last days. Itenables identifying possible attacks if many protection logs have been recently generated onsome workstations.
Workstations are displayed in abscissa (X). Bars represent generated events. Events are dividedby type and displayed by order of importance.
You can specify the following settings for this chart:
l Minimum number of events: define the minimum number of events a workstation mustgenerate to be considered in this chart. This allows not displaying workstations with a toosmall amount of events to be considered as significant enough to be displayed.
l Number of days: define the number of days for which events have been generated. Thisallows restricting display to the recent activity of agents: an agent which has generated manyold events is considered as less important than an agent which has recently generatedevents. The value 7 is recommended.
l Number of machines: define the maximum number of machines to be displayed. This chartis meant to display only machines which have generated the most events recently. It is thususeless to display too many machines in this chart. The value 10 is recommended.
l Use trend scale: the height of bars is calculated according to a logarithmic scale. This viewkeeps the order of values but allows pointing out small values which can sometimes hardlybe seen on a linear scale.
Recent events
This chart displays events generated over the last few days by all workstations. Events aregrouped by day and displayed by order of importance.
You can specify the following settings for this chart:
l Number of days: define the rolling day period (from the current day) during which eventsmust be displayed.
SES - ADMINISTRATION GUIDE - V 7.216. ACTIVITY MONITORING
Page 332/424 ses-en-administration_guide-v7.2 - 11/30/2017
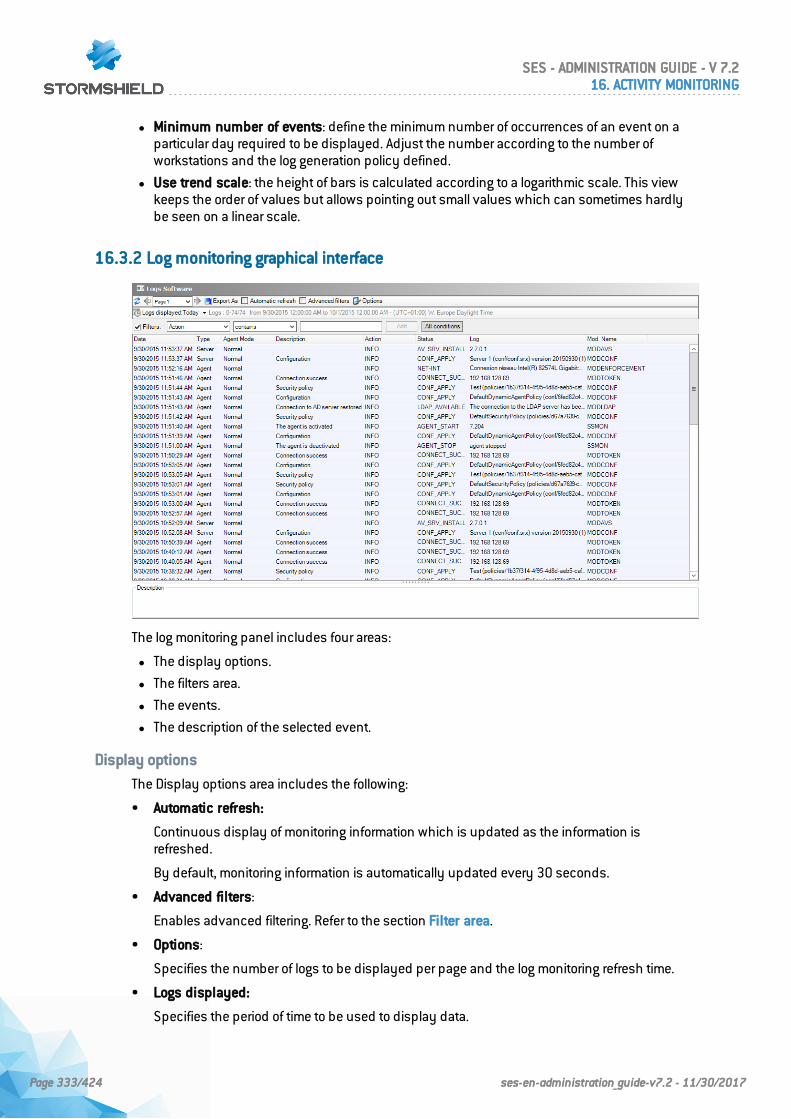
l Minimum number of events: define the minimum number of occurrences of an event on aparticular day required to be displayed. Adjust the number according to the number ofworkstations and the log generation policy defined.
l Use trend scale: the height of bars is calculated according to a logarithmic scale. This viewkeeps the order of values but allows pointing out small values which can sometimes hardlybe seen on a linear scale.
16.3.2 Log monitoring graphical interface
The log monitoring panel includes four areas:
l The display options.
l The filters area.
l The events.
l The description of the selected event.
Display options
The Display options area includes the following:
• Automatic refresh:
Continuous display of monitoring information which is updated as the information isrefreshed.
By default, monitoring information is automatically updated every 30 seconds.
• Advanced filters:
Enables advanced filtering. Refer to the section Filter area.
• Options:
Specifies the number of logs to be displayed per page and the log monitoring refresh time.
• Logs displayed:
Specifies the period of time to be used to display data.
SES - ADMINISTRATION GUIDE - V 7.216. ACTIVITY MONITORING
Page 333/424 ses-en-administration_guide-v7.2 - 11/30/2017
• Export As:
Saves log information to a file.
This feature enables the administrator to export the visible log (i.e. what is currently displayedon the management console).
The following file formats are supported by the Export As feature:
◦ TXT (tabs used as separators).
◦ CSV (commas used as separators).
◦ XML.
The information included in the exported file consists of the currently selected log (the logdisplayed) and identification information.
To export a log to a file, follow the steps below:
1. Select the logs that you want to export.
2. Click Export as.
3. From the drop-down list, select the file format that you want to use (example: txt).
4. Set the file path and enter the filename.
5. Click Save.
Filters area
The Filters area contains filter criteria for selective display.
Both simple and advanced filters are available.
Advanced filters allow embedding tests with various operators at different levels.
If the option Automatic refresh is enabled, filters apply as soon as the refresh request is sent.
Add a simple filter
1. In the drop-down menu, select the column on which to apply the filter.
2. Select the comparison type.
3. Enter the value to compare.
4. Click Add to apply the filter.
You can create as many simple filters as necessary.
Add an advanced filter
In the display options, select Advanced filters.
When creating or modifying filters, you can move items by a simple drag-and-drop.
Add an operator
1. Click Add operator or right-click the appropriate operator or test.
2. In the Filter criteria panel, select the condition of the operator. Three conditions are available:
l IF AND: returns 'TRUE' if all the sub nodes return 'TRUE'.
l IF OR: returns 'TRUE' if at least one sub node returns 'TRUE'.
l IF NOT: returns 'TRUE' if all the sub nodes return 'FALSE'.
Add a test
1. Click Add test or right-click the appropriate operator or test.
2. Configure the test in the Filter criteria panel.
SES - ADMINISTRATION GUIDE - V 7.216. ACTIVITY MONITORING
Page 334/424 ses-en-administration_guide-v7.2 - 11/30/2017
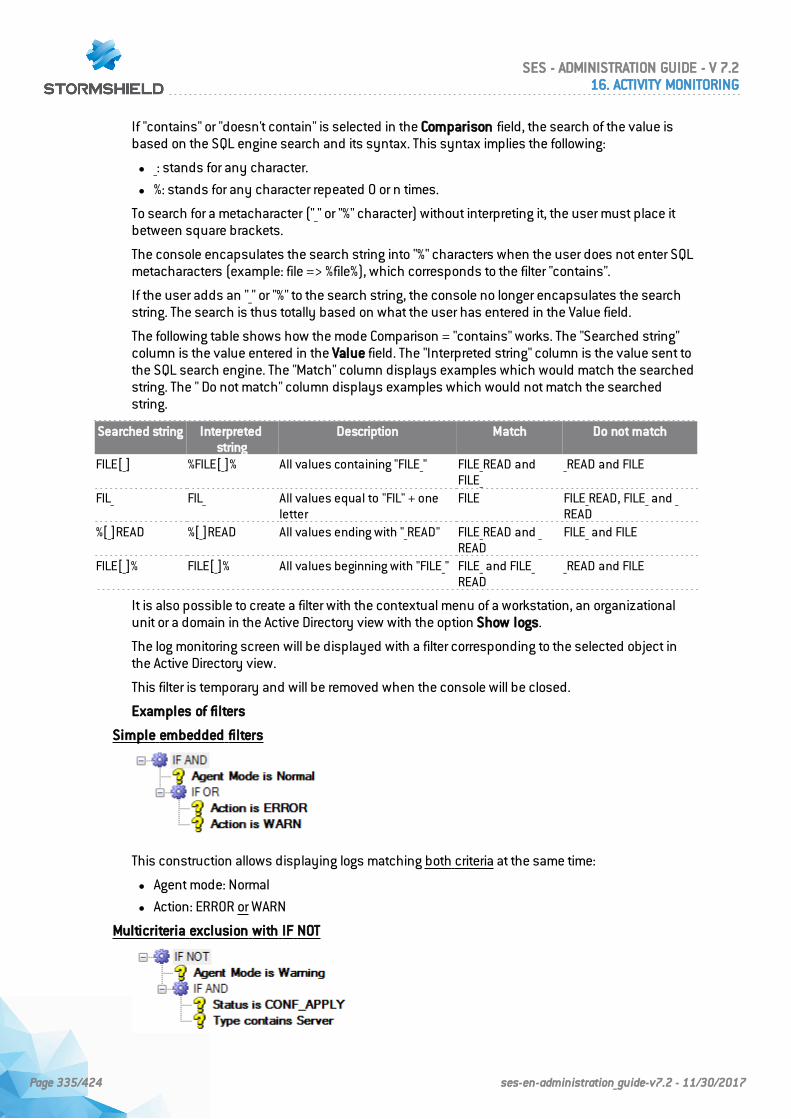
If "contains" or "doesn't contain" is selected in the Comparison field, the search of the value isbased on the SQL engine search and its syntax. This syntax implies the following:
l _: stands for any character.
l %: stands for any character repeated 0 or n times.
To search for a metacharacter ("_" or "%" character) without interpreting it, the user must place itbetween square brackets.
The console encapsulates the search string into "%" characters when the user does not enter SQLmetacharacters (example: file => %file%), which corresponds to the filter "contains".
If the user adds an "_" or "%" to the search string, the console no longer encapsulates the searchstring. The search is thus totally based on what the user has entered in the Value field.
The following table shows how the mode Comparison = "contains" works. The "Searched string"column is the value entered in the Value field. The "Interpreted string" column is the value sent tothe SQL search engine. The "Match" column displays examples which would match the searchedstring. The " Do not match" column displays examples which would not match the searchedstring.
Searched string Interpretedstring
Description Match Do not match
FILE[_] %FILE[_]% All values containing "FILE_" FILE_READ andFILE_
_READ and FILE
FIL_ FIL_ All values equal to "FIL" + oneletter
FILE FILE_READ, FILE_ and _READ
%[_]READ %[_]READ All values ending with "_READ" FILE_READ and _READ
FILE_ and FILE
FILE[_]% FILE[_]% All values beginning with "FILE_" FILE_ and FILE_READ
_READ and FILE
It is also possible to create a filter with the contextual menu of a workstation, an organizationalunit or a domain in the Active Directory view with the option Show logs.
The log monitoring screen will be displayed with a filter corresponding to the selected object inthe Active Directory view.
This filter is temporary and will be removed when the console will be closed.
Examples of filters
Simple embedded filters
This construction allows displaying logs matching both criteria at the same time:
l Agent mode: Normal
l Action: ERROR or WARN
Multicriteria exclusion with IF NOT
SES - ADMINISTRATION GUIDE - V 7.216. ACTIVITY MONITORING
Page 335/424 ses-en-administration_guide-v7.2 - 11/30/2017
The IF NOT operator allows hiding logs matching at least one of the specified criteria.
In this construction, logs matching at least one of the two following criteria are hidden afterfiltering:
l Agent mode: Warning
l Status: CONF_APPLY and Type: Server
Details of the filtering analysis:
Nodes Filtering actionNode 1: test "Agent Mode isWarning"
The test returns 'TRUE' if the value of the Agent mode column in the log isWarning.
Node 2: IF AND operatorincluding two tests
The test returns 'TRUE' if the values of the Status and Type columns in the logare CONF_APPLY and Server.
Result The final result of the IF NOT test returns 'FALSE' if the Node 1 or the Node 2 return 'TRUE'.All logs matching these criteria are thus hidden.
Events
The variables of the four types of logs available in the Monitoring section are detailed in thesection Information logs about agents.
In the logs table, right click the columns titles to select the columns to display.
Logs are displayed in the management console with filters applied. However, when you export alog to a file, the entire log is included (without any filter being applied).
16.4 Log monitoring
Log Monitoring records any suspicious activity on client workstations and servers and thecorresponding reaction of the Stormshield Endpoint Security agent.
This data is consolidated in a database where it can be consulted via the management console.
Stormshield Endpoint Security logs contain a record of all events triggered by the following:
• Software
• System
• Network
• Devices
Activities that trigger an event are defined in the security policies.
Software logs
A software log records the agent behavior whenever:
• The agent applies a configuration or a policy.
• The agent downloads a certificate or an update.
• There is a CPU overload on a server.
• The number of agents exceeds the maximum allowed by the license.
Etc.
For more information, see section Software Logs.
SES - ADMINISTRATION GUIDE - V 7.216. ACTIVITY MONITORING
Page 336/424 ses-en-administration_guide-v7.2 - 11/30/2017
System Logs
The system logs contain information on system protection.
For more information, see section System logs.
Network logs
The network logs contain information on:
• Network Firewall (Category).
• Intrusion Detection System (General Settings > Network security control).
For more information, see section Network logs.
Device Logs
The Device logs contain information on:
• Removable devices (Category).
• Device control (General settings).
• WiFi encryption and authentication (General settings).
For more information, see section Device Logs.
16.5 Log Manager
16.5.1 Overview
The Log Manager menu is used to customize Stormshield Endpoint Security agent logs. It isdesigned to configure event reporting for:
• Software Logs.
• System Logs.
• Network Logs.
• Device Logs.
The events used to generate reports are triggered by certain actions and statuses.
The actions and statuses which trigger a log are defined in the security policies.
Example 1:
The INFO action with status:
• AGENT_START:
Creates reports based on the agent version.
• SERVER_VERSION:
Creates reports based on the server version and server name.
• CONF_APPLY:
Creates reports based on the policy or configuration name.
Example 2:
The WARN action with status FLOOD_DETECTED is used to create flood reports (repeated logmessages until saturation).
SES - ADMINISTRATION GUIDE - V 7.216. ACTIVITY MONITORING
Page 337/424 ses-en-administration_guide-v7.2 - 11/30/2017
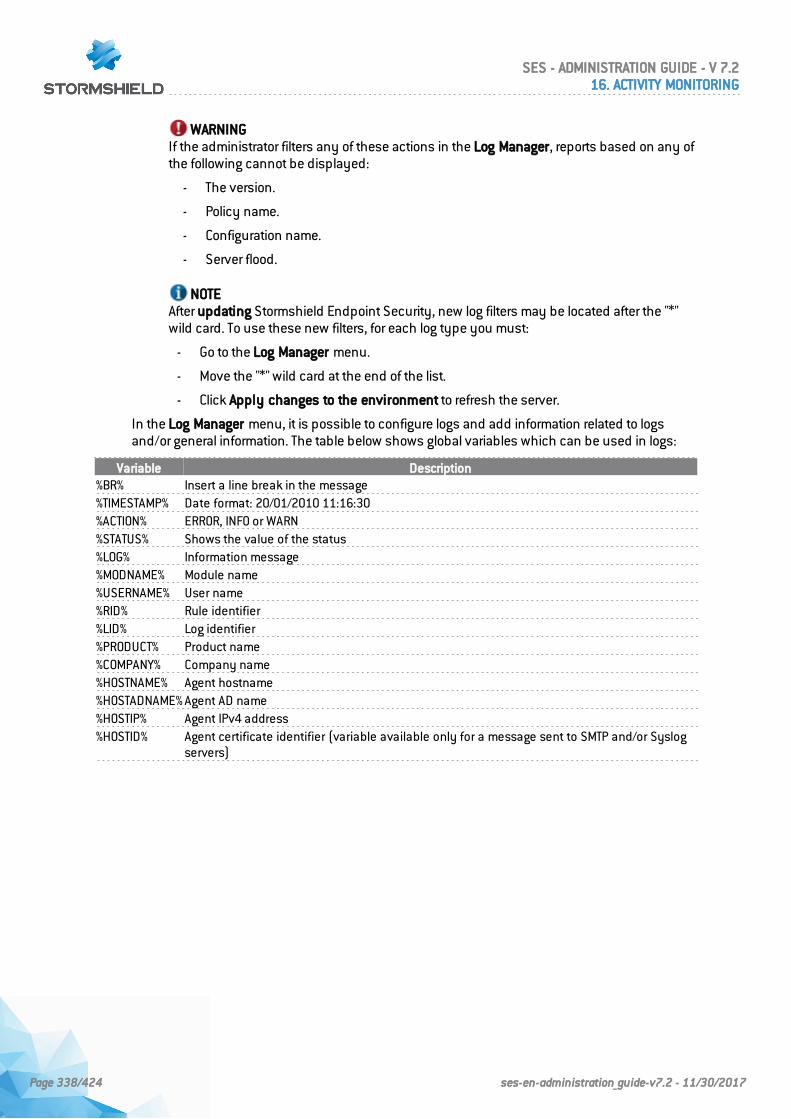
WARNINGIf the administrator filters any of these actions in the Log Manager, reports based on any ofthe following cannot be displayed:
- The version.
- Policy name.
- Configuration name.
- Server flood.
NOTEAfter updating Stormshield Endpoint Security, new log filters may be located after the "*"wild card. To use these new filters, for each log type you must:
- Go to the Log Manager menu.
- Move the "*" wild card at the end of the list.
- Click Apply changes to the environment to refresh the server.
In the Log Manager menu, it is possible to configure logs and add information related to logsand/or general information. The table below shows global variables which can be used in logs:
Variable Description%BR% Insert a line break in the message%TIMESTAMP% Date format: 20/01/2010 11:16:30%ACTION% ERROR, INFO or WARN%STATUS% Shows the value of the status%LOG% Information message%MODNAME% Module name%USERNAME% User name%RID% Rule identifier%LID% Log identifier%PRODUCT% Product name%COMPANY% Company name%HOSTNAME% Agent hostname%HOSTADNAME% Agent AD name%HOSTIP% Agent IPv4 address%HOSTID% Agent certificate identifier (variable available only for a message sent to SMTP and/or Syslog
servers)
SES - ADMINISTRATION GUIDE - V 7.216. ACTIVITY MONITORING
Page 338/424 ses-en-administration_guide-v7.2 - 11/30/2017
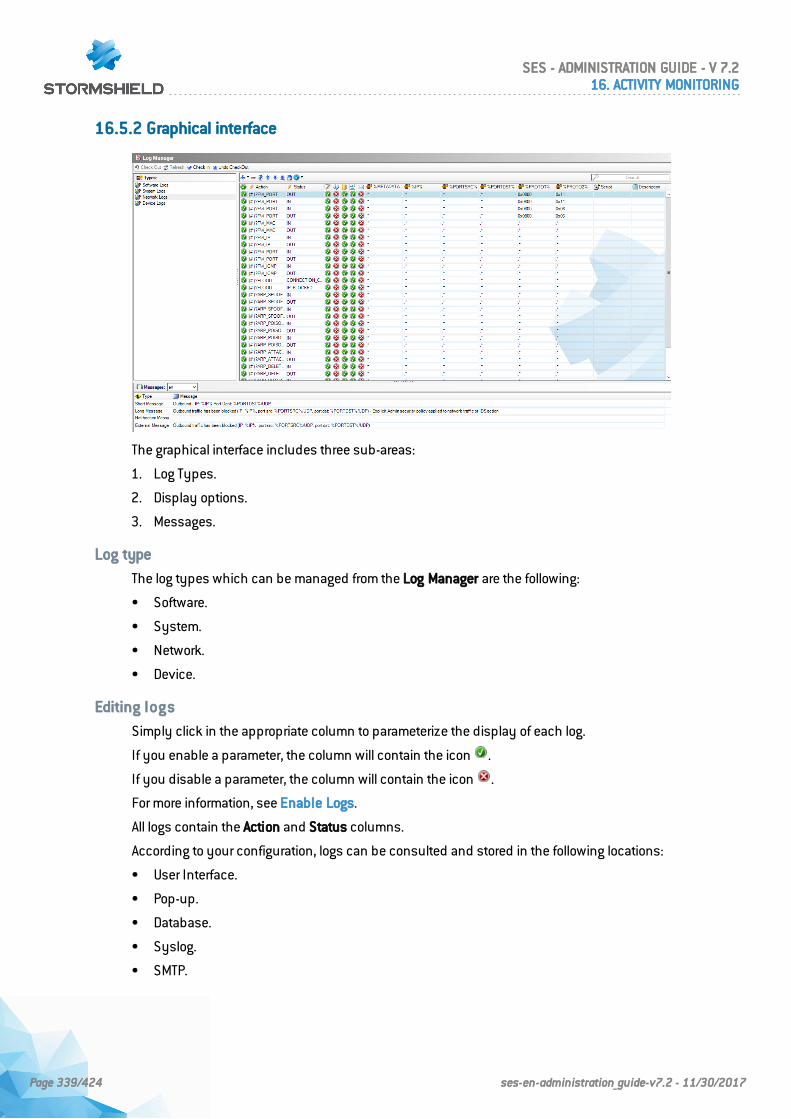
16.5.2 Graphical interface
The graphical interface includes three sub-areas:
1. Log Types.
2. Display options.
3. Messages.
Log type
The log types which can be managed from the Log Manager are the following:
• Software.
• System.
• Network.
• Device.
Editing logs
Simply click in the appropriate column to parameterize the display of each log.
If you enable a parameter, the column will contain the icon .
If you disable a parameter, the column will contain the icon .
For more information, see Enable Logs.
All logs contain the Action and Status columns.
According to your configuration, logs can be consulted and stored in the following locations:
• User Interface.
• Pop-up.
• Database.
• Syslog.
• SMTP.
SES - ADMINISTRATION GUIDE - V 7.216. ACTIVITY MONITORING
Page 339/424 ses-en-administration_guide-v7.2 - 11/30/2017
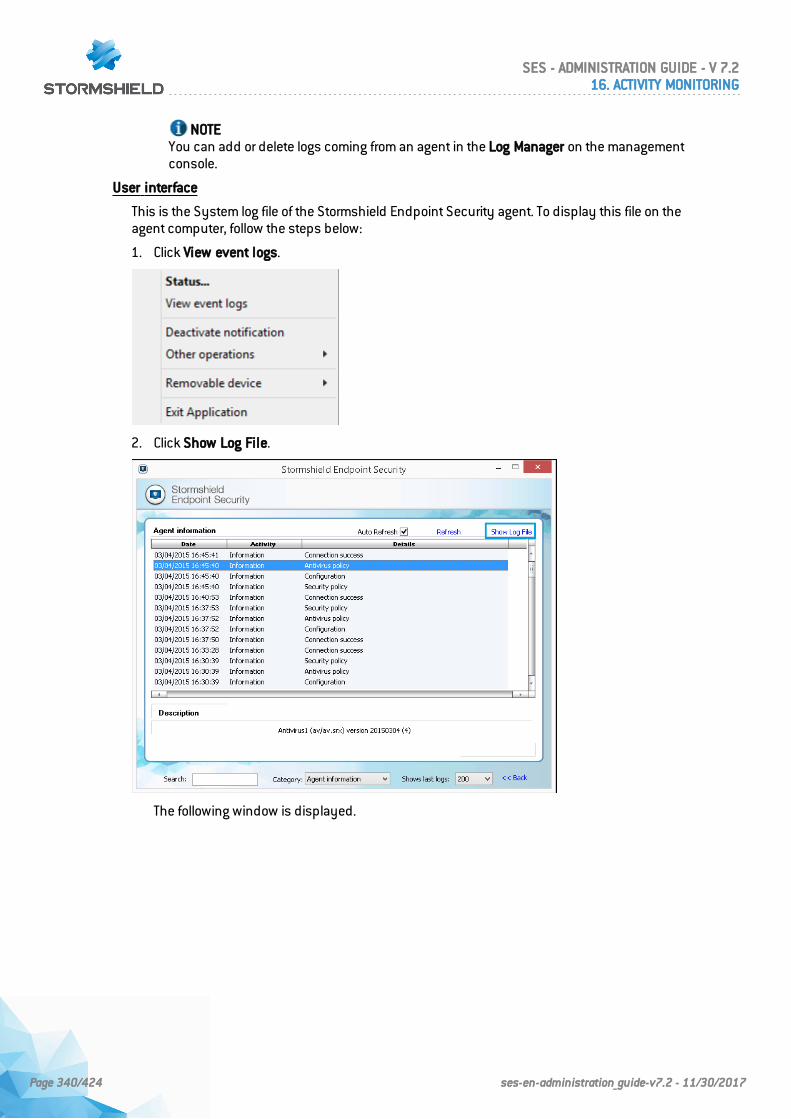
NOTEYou can add or delete logs coming from an agent in the Log Manager on the managementconsole.
User interface
This is the System log file of the Stormshield Endpoint Security agent. To display this file on theagent computer, follow the steps below:
1. Click View event logs.
2. Click Show Log File.
The following window is displayed.
SES - ADMINISTRATION GUIDE - V 7.216. ACTIVITY MONITORING
Page 340/424 ses-en-administration_guide-v7.2 - 11/30/2017
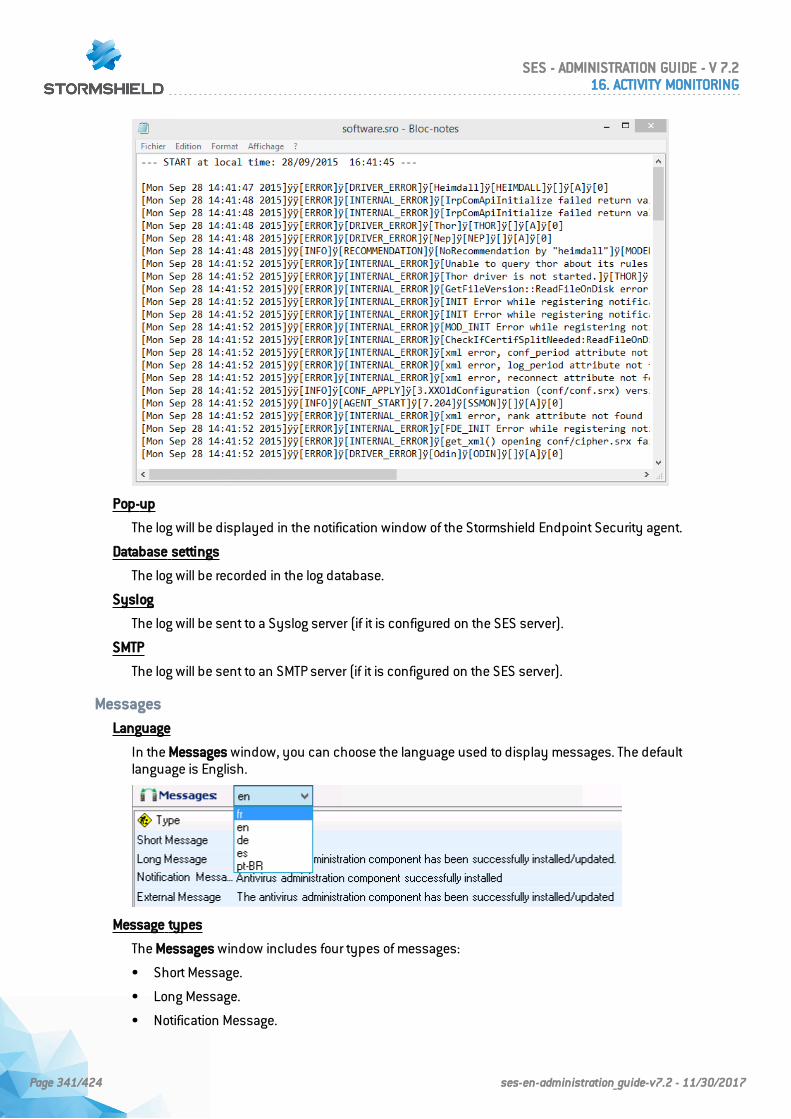
Pop-up
The log will be displayed in the notification window of the Stormshield Endpoint Security agent.
Database settings
The log will be recorded in the log database.
Syslog
The log will be sent to a Syslog server (if it is configured on the SES server).
SMTP
The log will be sent to an SMTP server (if it is configured on the SES server).
Messages
Language
In the Messages window, you can choose the language used to display messages. The defaultlanguage is English.
Message types
The Messages window includes four types of messages:
• Short Message.
• Long Message.
• Notification Message.
SES - ADMINISTRATION GUIDE - V 7.216. ACTIVITY MONITORING
Page 341/424 ses-en-administration_guide-v7.2 - 11/30/2017
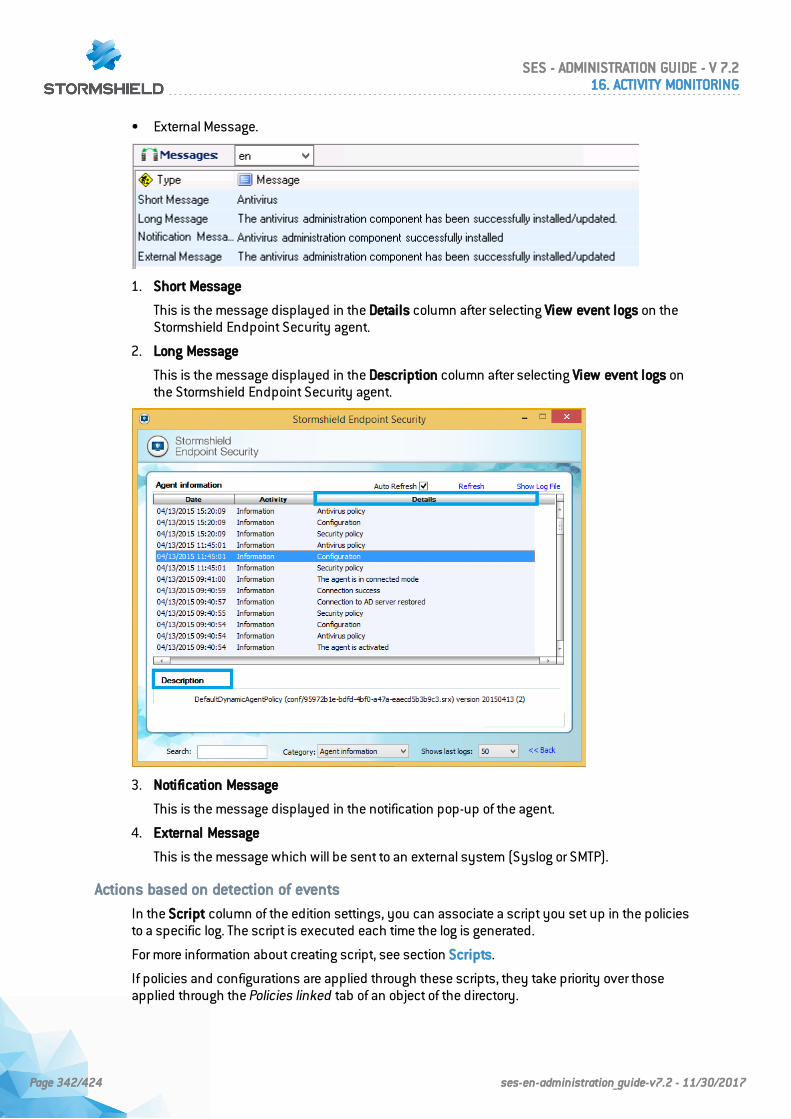
• External Message.
1. Short Message
This is the message displayed in the Details column after selecting View event logs on theStormshield Endpoint Security agent.
2. Long Message
This is the message displayed in the Description column after selecting View event logs onthe Stormshield Endpoint Security agent.
3. Notification Message
This is the message displayed in the notification pop-up of the agent.
4. External Message
This is the message which will be sent to an external system (Syslog or SMTP).
Actions based on detection of events
In the Script column of the edition settings, you can associate a script you set up in the policiesto a specific log. The script is executed each time the log is generated.
For more information about creating script, see section Scripts.
If policies and configurations are applied through these scripts, they take priority over thoseapplied through the Policies linked tab of an object of the directory.
SES - ADMINISTRATION GUIDE - V 7.216. ACTIVITY MONITORING
Page 342/424 ses-en-administration_guide-v7.2 - 11/30/2017
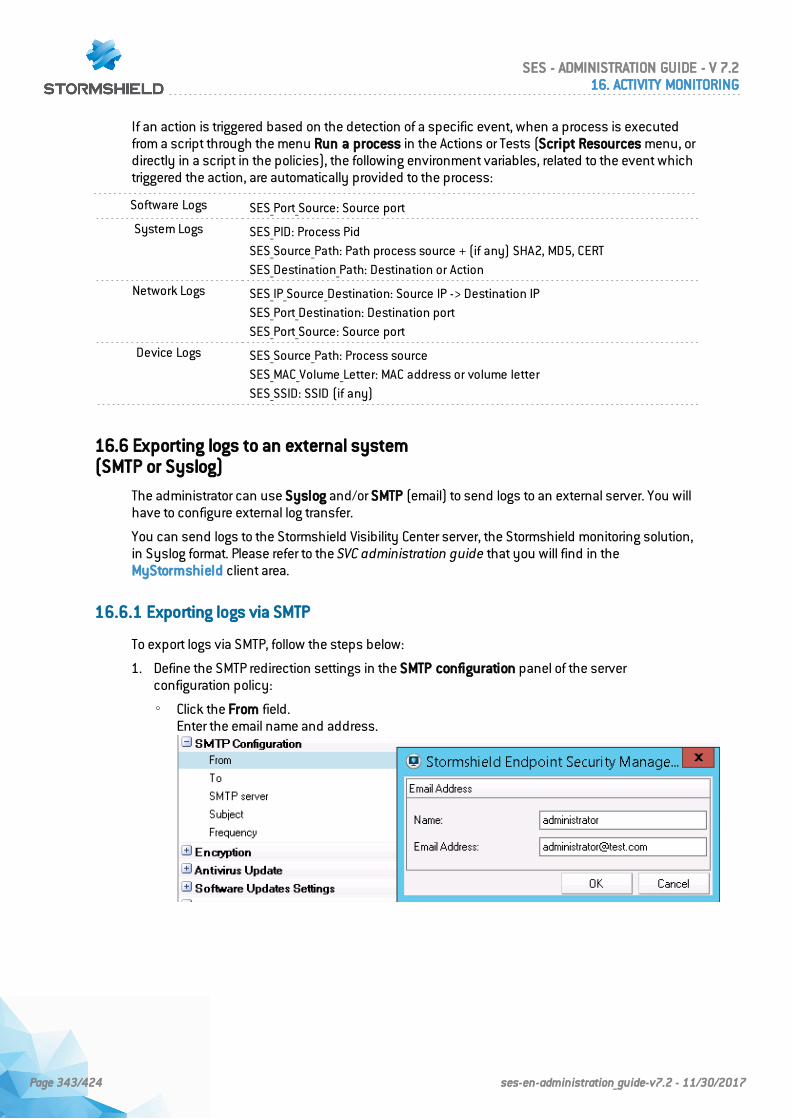
If an action is triggered based on the detection of a specific event, when a process is executedfrom a script through the menu Run a process in the Actions or Tests (Script Resources menu, ordirectly in a script in the policies), the following environment variables, related to the event whichtriggered the action, are automatically provided to the process:
Software Logs SES_Port_Source: Source port
System Logs SES_PID: Process PidSES_Source_Path: Path process source + (if any) SHA2, MD5, CERTSES_Destination_Path: Destination or Action
Network Logs SES_IP_Source_Destination: Source IP -> Destination IPSES_Port_Destination: Destination portSES_Port_Source: Source port
Device Logs SES_Source_Path: Process sourceSES_MAC_Volume_Letter: MAC address or volume letterSES_SSID: SSID (if any)
16.6 Exporting logs to an external system(SMTP or Syslog)
The administrator can use Syslog and/or SMTP (email) to send logs to an external server. You willhave to configure external log transfer.
You can send logs to the Stormshield Visibility Center server, the Stormshield monitoring solution,in Syslog format. Please refer to the SVC administration guide that you will find in theMyStormshield client area.
16.6.1 Exporting logs via SMTP
To export logs via SMTP, follow the steps below:
1. Define the SMTP redirection settings in the SMTP configuration panel of the serverconfiguration policy:
◦ Click the From field.Enter the email name and address.
SES - ADMINISTRATION GUIDE - V 7.216. ACTIVITY MONITORING
Page 343/424 ses-en-administration_guide-v7.2 - 11/30/2017
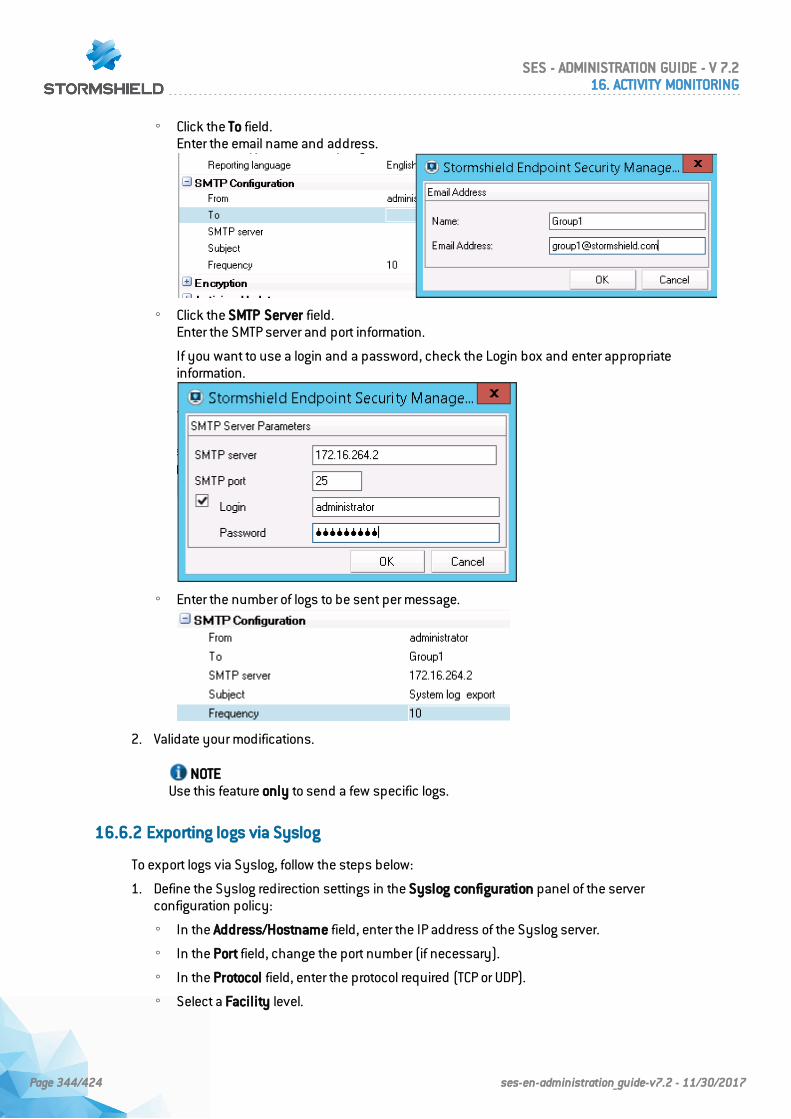
◦ Click the To field.Enter the email name and address.
◦ Click the SMTP Server field.Enter the SMTP server and port information.
If you want to use a login and a password, check the Login box and enter appropriateinformation.
◦ Enter the number of logs to be sent per message.
2. Validate your modifications.
NOTEUse this feature only to send a few specific logs.
16.6.2 Exporting logs via Syslog
To export logs via Syslog, follow the steps below:
1. Define the Syslog redirection settings in the Syslog configuration panel of the serverconfiguration policy:
◦ In the Address/Hostname field, enter the IP address of the Syslog server.
◦ In the Port field, change the port number (if necessary).
◦ In the Protocol field, enter the protocol required (TCP or UDP).
◦ Select a Facility level.
SES - ADMINISTRATION GUIDE - V 7.216. ACTIVITY MONITORING
Page 344/424 ses-en-administration_guide-v7.2 - 11/30/2017
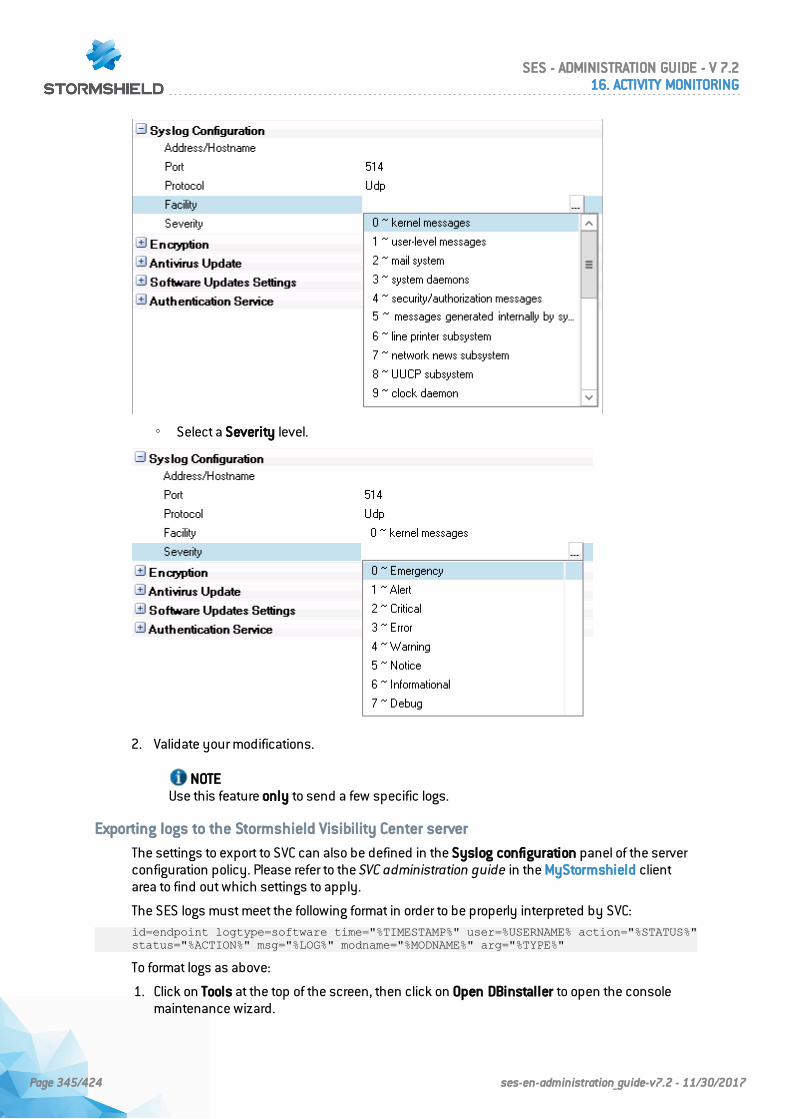
◦ Select a Severity level.
2. Validate your modifications.
NOTEUse this feature only to send a few specific logs.
Exporting logs to the Stormshield Visibility Center server
The settings to export to SVC can also be defined in the Syslog configuration panel of the serverconfiguration policy. Please refer to the SVC administration guide in the MyStormshield clientarea to find out which settings to apply.
The SES logs must meet the following format in order to be properly interpreted by SVC:id=endpoint logtype=software time="%TIMESTAMP%" user=%USERNAME% action="%STATUS%"status="%ACTION%" msg="%LOG%" modname="%MODNAME%" arg="%TYPE%"
To format logs as above:
1. Click on Tools at the top of the screen, then click on Open DBinstaller to open the consolemaintenance wizard.
SES - ADMINISTRATION GUIDE - V 7.216. ACTIVITY MONITORING
Page 345/424 ses-en-administration_guide-v7.2 - 11/30/2017
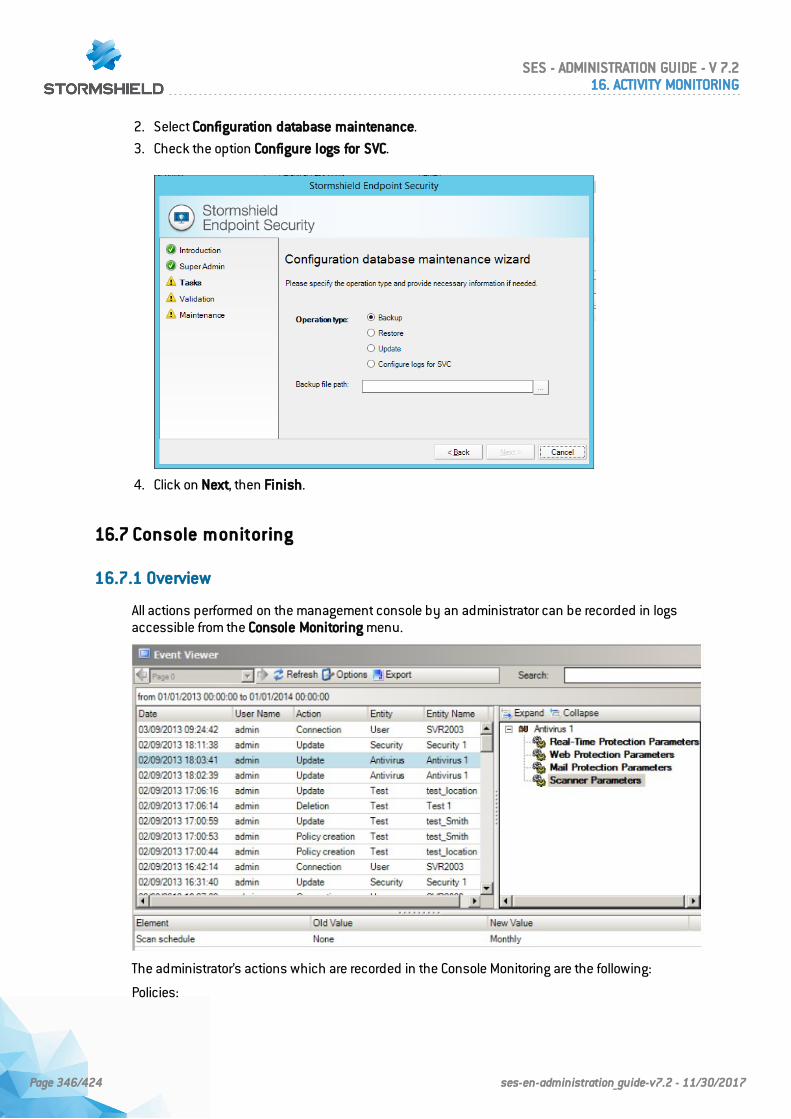
2. Select Configuration database maintenance.
3. Check the option Configure logs for SVC.
4. Click on Next, then Finish.
16.7 Console monitoring
16.7.1 Overview
All actions performed on the management console by an administrator can be recorded in logsaccessible from the Console Monitoring menu.
The administrator’s actions which are recorded in the Console Monitoring are the following:
Policies:
SES - ADMINISTRATION GUIDE - V 7.216. ACTIVITY MONITORING
Page 346/424 ses-en-administration_guide-v7.2 - 11/30/2017
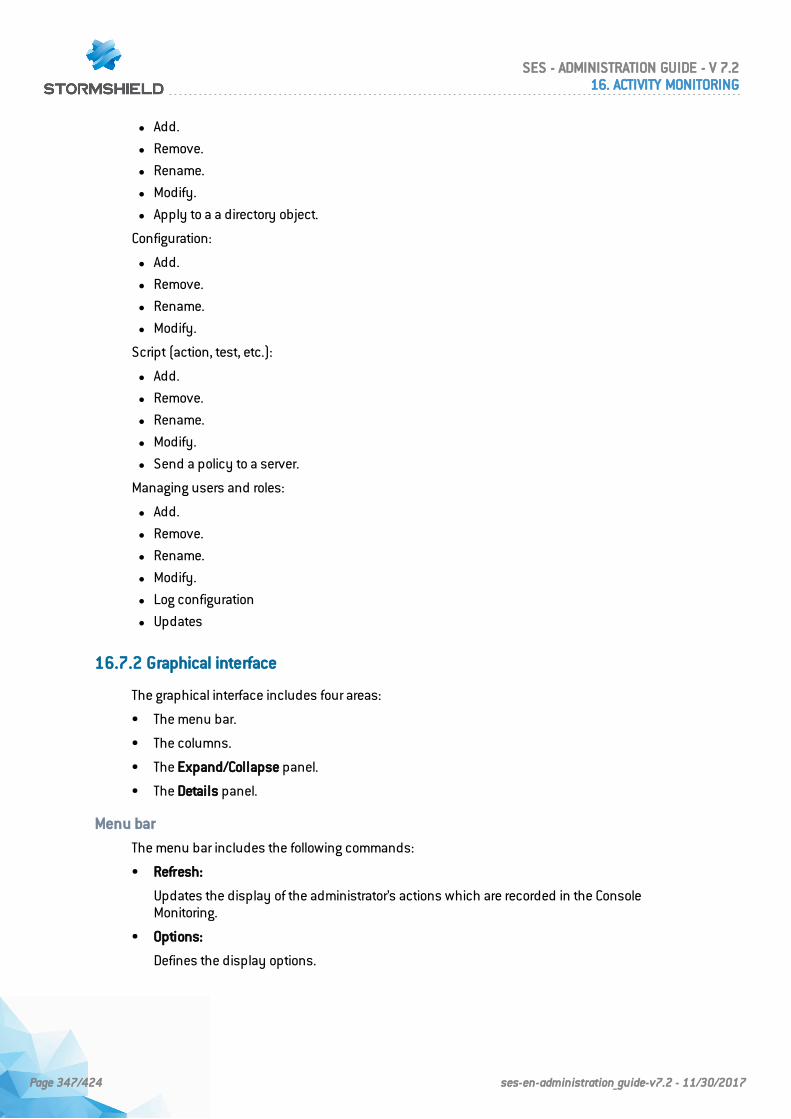
l Add.
l Remove.
l Rename.
l Modify.
l Apply to a a directory object.
Configuration:
l Add.
l Remove.
l Rename.
l Modify.
Script (action, test, etc.):
l Add.
l Remove.
l Rename.
l Modify.
l Send a policy to a server.
Managing users and roles:
l Add.
l Remove.
l Rename.
l Modify.
l Log configuration
l Updates
16.7.2 Graphical interface
The graphical interface includes four areas:
• The menu bar.
• The columns.
• The Expand/Collapse panel.
• The Details panel.
Menu bar
The menu bar includes the following commands:
• Refresh:
Updates the display of the administrator’s actions which are recorded in the ConsoleMonitoring.
• Options:
Defines the display options.
SES - ADMINISTRATION GUIDE - V 7.216. ACTIVITY MONITORING
Page 347/424 ses-en-administration_guide-v7.2 - 11/30/2017
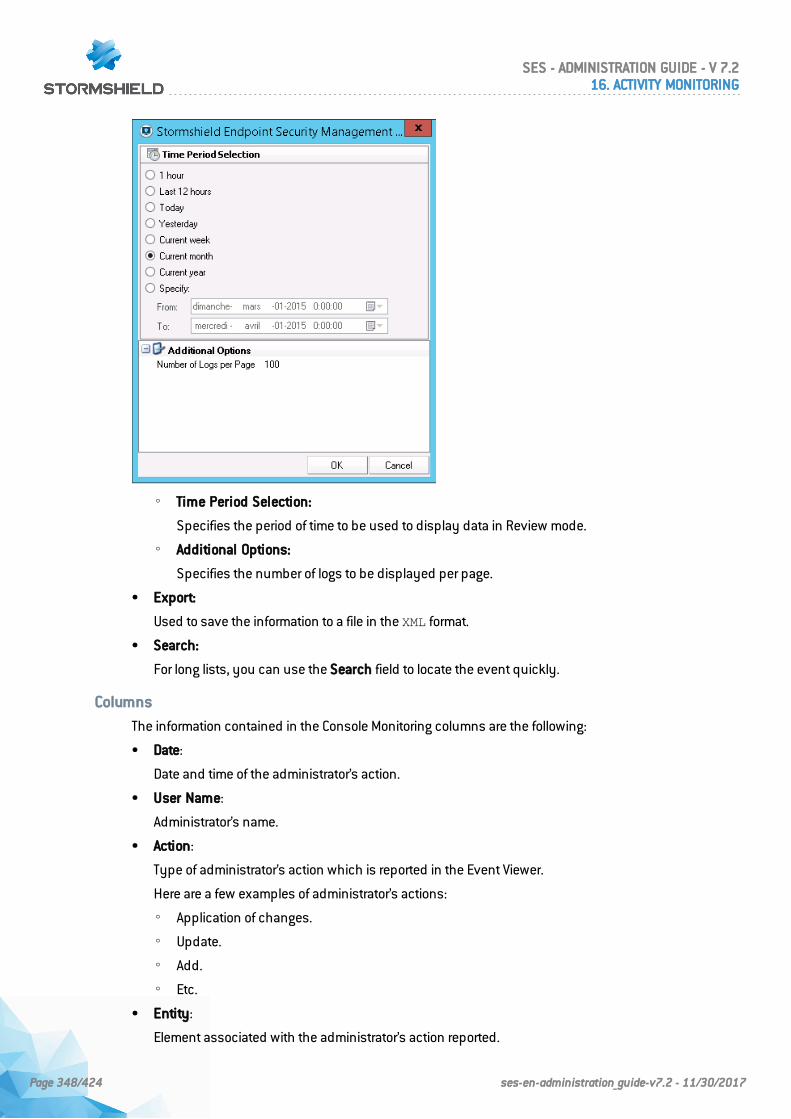
◦ Time Period Selection:
Specifies the period of time to be used to display data in Review mode.
◦ Additional Options:
Specifies the number of logs to be displayed per page.
• Export:
Used to save the information to a file in the XML format.
• Search:
For long lists, you can use the Search field to locate the event quickly.
Columns
The information contained in the Console Monitoring columns are the following:
• Date:
Date and time of the administrator’s action.
• User Name:
Administrator’s name.
• Action:
Type of administrator’s action which is reported in the Event Viewer.
Here are a few examples of administrator’s actions:
◦ Application of changes.
◦ Update.
◦ Add.
◦ Etc.
• Entity:
Element associated with the administrator’s action reported.
SES - ADMINISTRATION GUIDE - V 7.216. ACTIVITY MONITORING
Page 348/424 ses-en-administration_guide-v7.2 - 11/30/2017
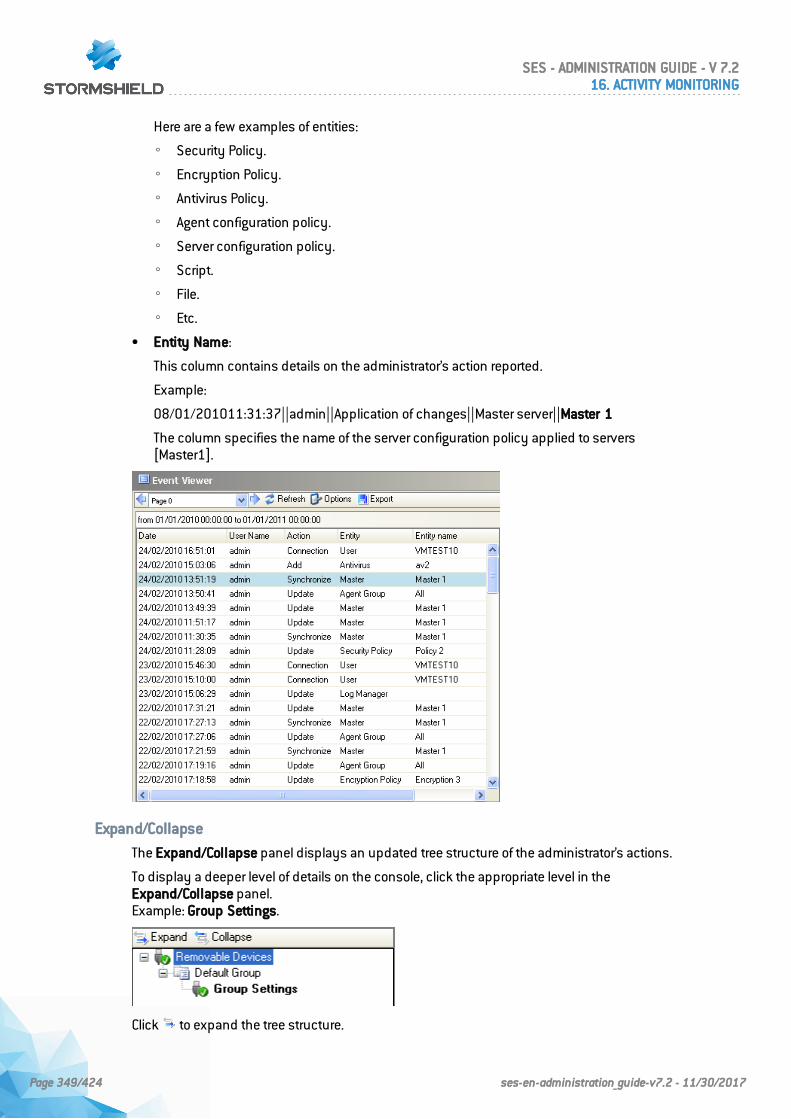
Here are a few examples of entities:
◦ Security Policy.
◦ Encryption Policy.
◦ Antivirus Policy.
◦ Agent configuration policy.
◦ Server configuration policy.
◦ Script.
◦ File.
◦ Etc.
• Entity Name:
This column contains details on the administrator’s action reported.
Example:
08/01/201011:31:37||admin||Application of changes||Master server||Master 1
The column specifies the name of the server configuration policy applied to servers[Master1].
Expand/Collapse
The Expand/Collapse panel displays an updated tree structure of the administrator’s actions.
To display a deeper level of details on the console, click the appropriate level in theExpand/Collapse panel.Example: Group Settings.
Click to expand the tree structure.
SES - ADMINISTRATION GUIDE - V 7.216. ACTIVITY MONITORING
Page 349/424 ses-en-administration_guide-v7.2 - 11/30/2017
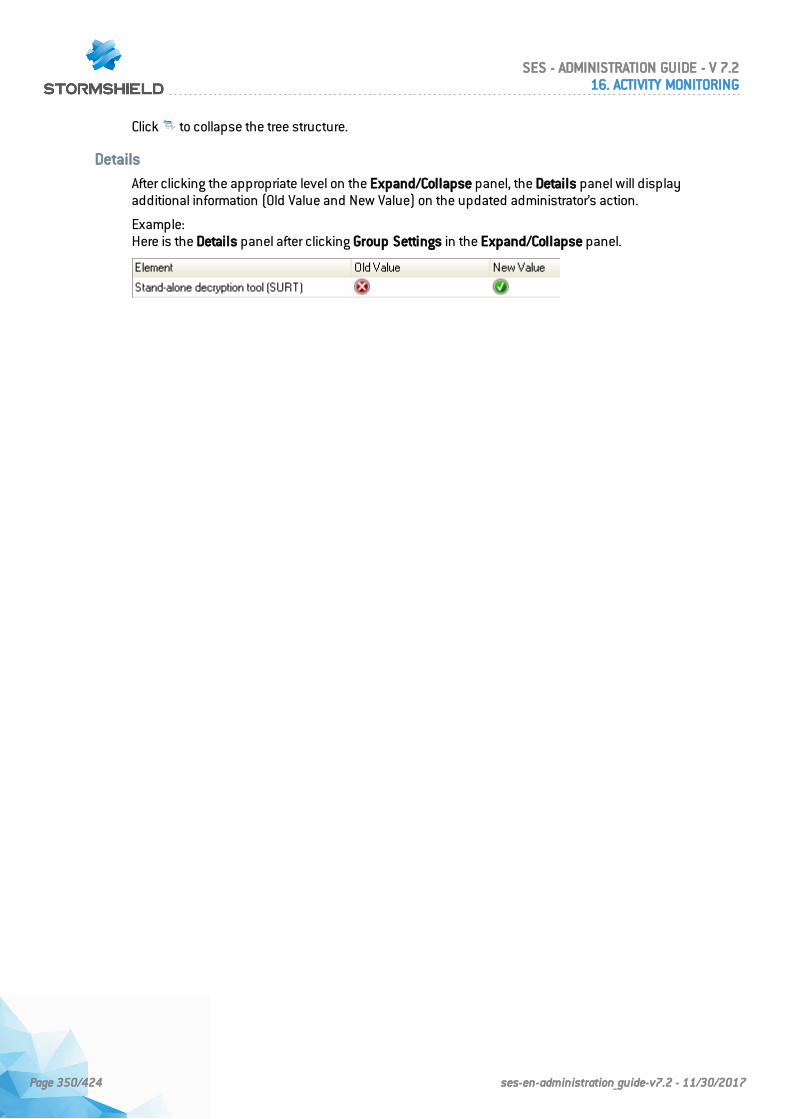
Click to collapse the tree structure.
Details
After clicking the appropriate level on the Expand/Collapse panel, the Details panel will displayadditional information (Old Value and New Value) on the updated administrator’s action.
Example:Here is the Details panel after clicking Group Settings in the Expand/Collapse panel.
SES - ADMINISTRATION GUIDE - V 7.216. ACTIVITY MONITORING
Page 350/424 ses-en-administration_guide-v7.2 - 11/30/2017

17. Agent Logs and Alerts
17.1 Introduction
Log data is collected by the Stormshield Endpoint Security agent on the client workstation andstored locally.
The path followed by the information used to generate reports is described below:
1. Logs are sent by the agents to the Stormshield Endpoint Security server.
2. The server sends these logs to the Stormshield Endpoint Security SQL database.
3. Logs are displayed on the management console.
In the event logs on the workstation (right-click on the icon in the View event logs menu), theagent will show logs from the current session by default, i.e., since the last Windows startup orsince the agent's last reconnection after a shutdown. Other display options may be selected inthe drop-down list at the bottom left of the window.
17.2 Information logs about agents
17.2.1 Software Logs
Location
Information on agent activity and status is stored in a log file which path is:[Program Files]\Stormshield\Stormshield Endpoint SecurityAgent\log\software.sro
The structure of this file is similar to the structure of a .csv file. Values are written between squarebrackets, separated by the character ‘ÿ’.
Each time the agent starts, the following line is inserted in the log file:--- START at local time: XX/YY/ZZZZ xx:yy:zz ---
XX/YY/ZZZZ and xx:yy:zz represent the start date and time.
Each time the agent stops, the following line is inserted:--- END at local time: XX/YY/ZZZZ xx:yy:zz ---
XX/YY/ZZZZ and xx:yy:zz represent the stop date and time.
This is an example of log:[Fri Jun 19 08:20:34 2015]ÿÿ[INFO]ÿ[AGENT_STOP]ÿ[agent stopped]ÿ[SSMON]ÿ[amartin]ÿ[A]ÿ[0]
In this example, the variables mean:
l TIMESTAMP : Fri Jun 19 8:20:34 AM 2015: time the message was generated.
l ACTION : INFO: message type.
l STATUS : AGENT_STOP: message status.
l LOG: agent stopped: English description of the log.
l MODNAME: SSMON: name of the module which sent the log.
l USERNAME: amartin: agent user name.
SES - ADMINISTRATION GUIDE - V 7.217. AGENT LOGS AND ALERTS
Page 351/424 ses-en-administration_guide-v7.2 - 11/30/2017
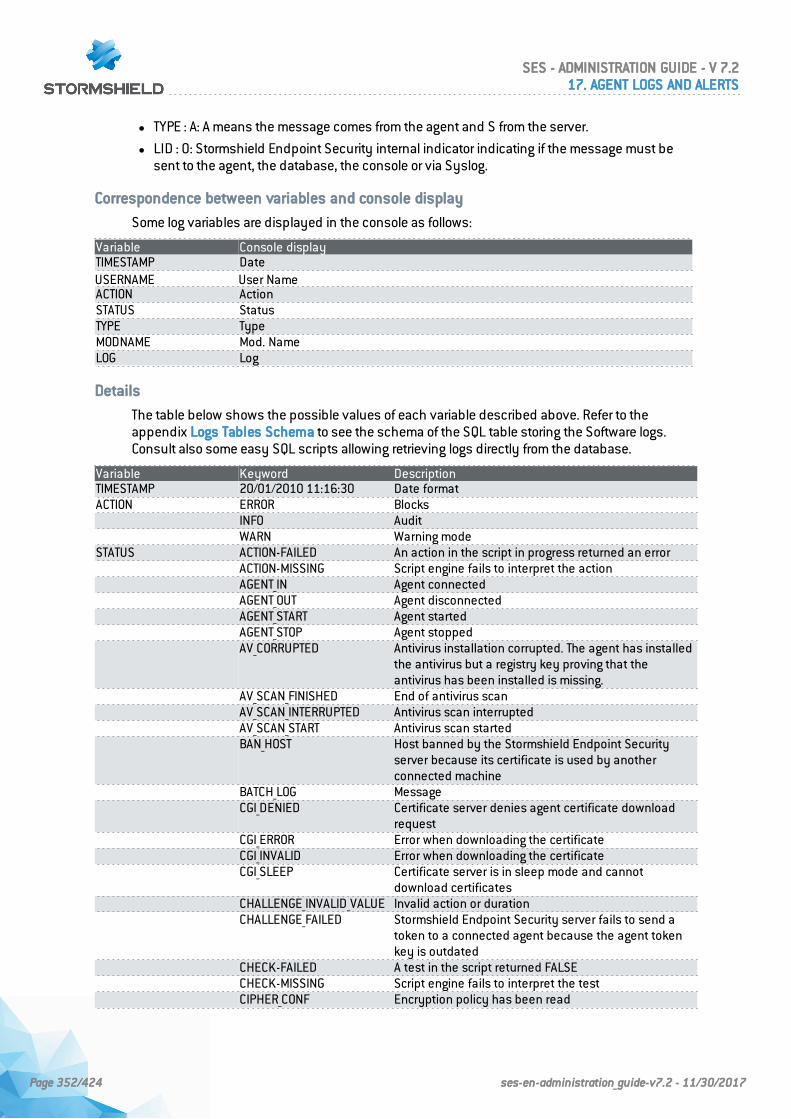
l TYPE : A: A means the message comes from the agent and S from the server.
l LID : 0: Stormshield Endpoint Security internal indicator indicating if the message must besent to the agent, the database, the console or via Syslog.
Correspondence between variables and console display
Some log variables are displayed in the console as follows:
Variable Console displayTIMESTAMP DateUSERNAME User NameACTION ActionSTATUS StatusTYPE TypeMODNAME Mod. NameLOG Log
Details
The table below shows the possible values of each variable described above. Refer to theappendix Logs Tables Schema to see the schema of the SQL table storing the Software logs.Consult also some easy SQL scripts allowing retrieving logs directly from the database.
Variable Keyword DescriptionTIMESTAMP 20/01/2010 11:16:30 Date formatACTION ERROR Blocks
INFO AuditWARN Warning mode
STATUS ACTION-FAILED An action in the script in progress returned an errorACTION-MISSING Script engine fails to interpret the actionAGENT_IN Agent connectedAGENT_OUT Agent disconnectedAGENT_START Agent startedAGENT_STOP Agent stoppedAV_CORRUPTED Antivirus installation corrupted. The agent has installed
the antivirus but a registry key proving that theantivirus has been installed is missing.
AV_SCAN_FINISHED End of antivirus scanAV_SCAN_INTERRUPTED Antivirus scan interruptedAV_SCAN_START Antivirus scan startedBAN_HOST Host banned by the Stormshield Endpoint Security
server because its certificate is used by anotherconnected machine
BATCH_LOG MessageCGI_DENIED Certificate server denies agent certificate download
requestCGI_ERROR Error when downloading the certificateCGI_INVALID Error when downloading the certificateCGI_SLEEP Certificate server is in sleep mode and cannot
download certificatesCHALLENGE_INVALID_VALUE Invalid action or durationCHALLENGE_FAILED Stormshield Endpoint Security server fails to send a
token to a connected agent because the agent tokenkey is outdated
CHECK-FAILED A test in the script returned FALSECHECK-MISSING Script engine fails to interpret the testCIPHER_CONF Encryption policy has been read
SES - ADMINISTRATION GUIDE - V 7.217. AGENT LOGS AND ALERTS
Page 352/424 ses-en-administration_guide-v7.2 - 11/30/2017
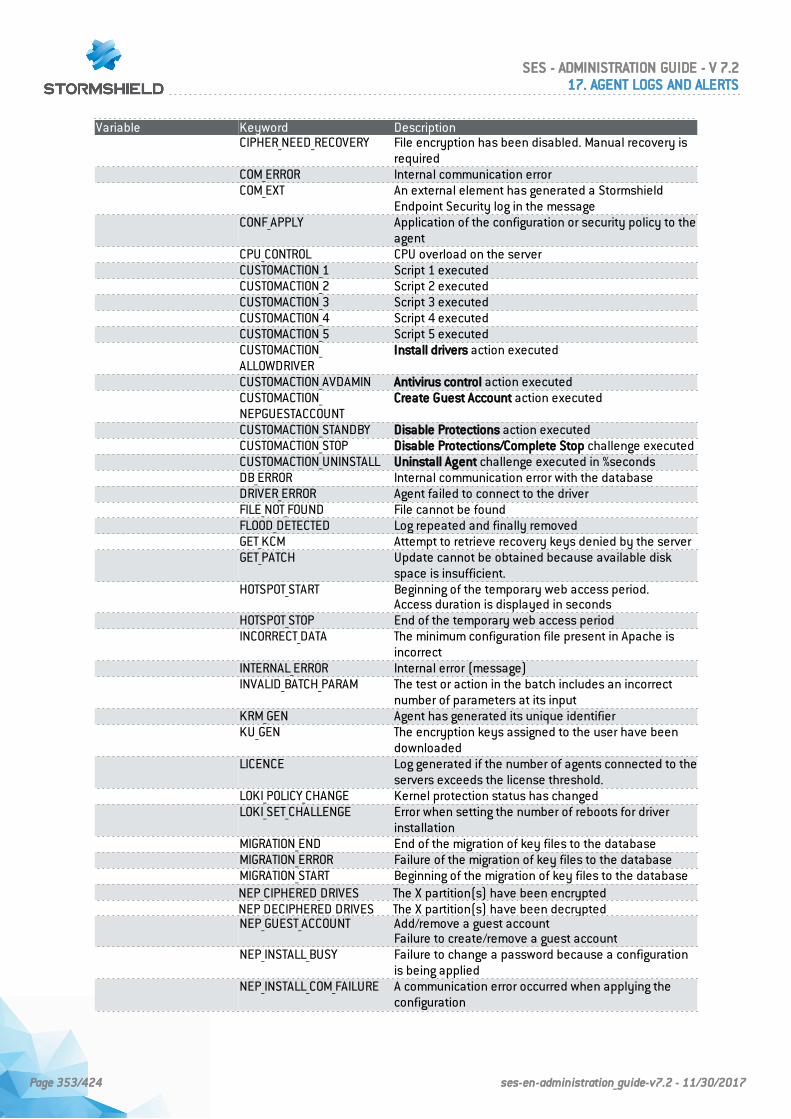
Variable Keyword DescriptionCIPHER_NEED_RECOVERY File encryption has been disabled. Manual recovery is
requiredCOM_ERROR Internal communication errorCOM_EXT An external element has generated a Stormshield
Endpoint Security log in the messageCONF_APPLY Application of the configuration or security policy to the
agentCPU_CONTROL CPU overload on the serverCUSTOMACTION_1 Script 1 executedCUSTOMACTION_2 Script 2 executedCUSTOMACTION_3 Script 3 executedCUSTOMACTION_4 Script 4 executedCUSTOMACTION_5 Script 5 executedCUSTOMACTION_ALLOWDRIVER
Install drivers action executed
CUSTOMACTION_AVDAMIN Antivirus control action executedCUSTOMACTION_NEPGUESTACCOUNT
Create Guest Account action executed
CUSTOMACTION_STANDBY Disable Protections action executedCUSTOMACTION_STOP Disable Protections/Complete Stop challenge executedCUSTOMACTION_UNINSTALL Uninstall Agent challenge executed in %secondsDB_ERROR Internal communication error with the databaseDRIVER_ERROR Agent failed to connect to the driverFILE_NOT_FOUND File cannot be foundFLOOD_DETECTED Log repeated and finally removedGET_KCM Attempt to retrieve recovery keys denied by the serverGET_PATCH Update cannot be obtained because available disk
space is insufficient.HOTSPOT_START Beginning of the temporary web access period.
Access duration is displayed in secondsHOTSPOT_STOP End of the temporary web access periodINCORRECT_DATA The minimum configuration file present in Apache is
incorrectINTERNAL_ERROR Internal error (message)INVALID_BATCH_PARAM The test or action in the batch includes an incorrect
number of parameters at its inputKRM_GEN Agent has generated its unique identifierKU_GEN The encryption keys assigned to the user have been
downloadedLICENCE Log generated if the number of agents connected to the
servers exceeds the license threshold.LOKI_POLICY_CHANGE Kernel protection status has changedLOKI_SET_CHALLENGE Error when setting the number of reboots for driver
installationMIGRATION_END End of the migration of key files to the databaseMIGRATION_ERROR Failure of the migration of key files to the databaseMIGRATION_START Beginning of the migration of key files to the databaseNEP_CIPHERED_DRIVES The X partition(s) have been encryptedNEP_DECIPHERED_DRIVES The X partition(s) have been decryptedNEP_GUEST_ACCOUNT Add/remove a guest account
Failure to create/remove a guest accountNEP_INSTALL_BUSY Failure to change a password because a configuration
is being appliedNEP_INSTALL_COM_FAILURE A communication error occurred when applying the
configuration
SES - ADMINISTRATION GUIDE - V 7.217. AGENT LOGS AND ALERTS
Page 353/424 ses-en-administration_guide-v7.2 - 11/30/2017

Variable Keyword DescriptionNEP_INSTALL_CONF_CANCELED
The application of the encryption configuration hasbeen cancelled
NEP_INSTALL_DISK_FAILURE A disk-related error occurred when applying theconfiguration
NEP_INSTALL_INVALID_CONF Failure when applying the configuration.The configuration is invalid
NEP_INSTALL_INVALID_DISK Failure when applying the configuration.The disk is invalid.
NEP_INSTALL_INVALID_SYSTEM
Failure when applying the configuration.The operating system is invalid
NEP_INSTALL_REBOOT Reboot the machine to complete the application of thefull disk encryption policy
NEP_INSTALL_REGISTRY_FAILURE
A registry-based error occurred when applying theconfiguration
NEP_INSTALL_SHM_FAILURE A shared memory error occurred when applying theconfiguration
NEP_INSTALL_SIMU_FAILURE A simulation error prevents the configuration from beingapplied
NEP_INSTALL_SUCCESS Successful application of the full disk encryptionconfiguration
NEP_INSTALL_SYNC_FAILURE An error occurred when synchronizing/desynchronizingthe disk
NEP_INSTALL_SYSTEM_FAILURE
A system error prevents the configuration from beingapplied
NEP_INSTALL_UNKNOWN An unknown error prevents the configuration from beingapplied
NEP_RECOVERED_DRIVES The data recovery media has successfully completeddisk decryption
NEP_POSTPONE_ENCRYPTION User postponed full disk encryptionNEP_BOOT_SUCCESS_AUTHENTAuthentication successful at computer startupNEP_RECOVERED_USER_PASSWORD
The data recovery media has successfully changeduser password
NEP_BOOT_FAILED_AUTHENT Authentication failed at computer startupNET_IN Network interfaces have been dumpedNEWCERT New certificate has been downloadedNO_CONF No configurationOBTAIN_FILE File cannot be obtained because available disk space
is insufficientODIN_ERROR_ACCES Agent fails to access a file for encryption/decryption
purposesOPTIM Network filtering rules hide lower rank rules (hidden
rules removed to speed up processing)An identical dynamic filtering rule already exists (theAdd operation is ignored to speed up processing)
PIPE_CALL_FROM_NAME Error occurred when the pipe called a functionPOLICY_CHANGE A new policy has been received. Reboot to apply the
policyPWD_CHG_NOT_APPLY Failure to change the password assigned to the
specified userRECOMMENDATION Whenever the UAC state changes (NAP or Juniper)RECOVER_PATH Recovery of a machine or directory using a file
including a key ringParam1: [Directory]/Param2: [File]
RECOVERY_COMPLETE Successful recoveryRECOVERY_DATA_CREATED Generation of recovery elementsRECOVERY_DATA_UPDATED Updating recovery elements
SES - ADMINISTRATION GUIDE - V 7.217. AGENT LOGS AND ALERTS
Page 354/424 ses-en-administration_guide-v7.2 - 11/30/2017
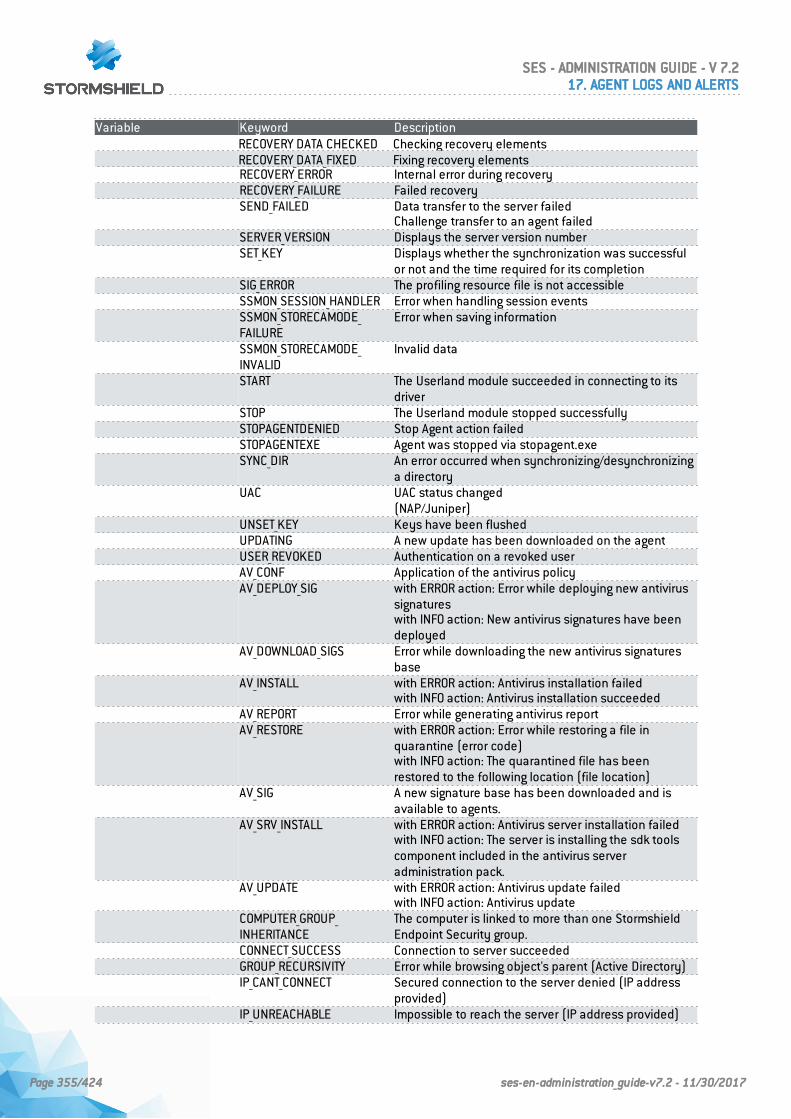
Variable Keyword DescriptionRECOVERY_DATA_CHECKED Checking recovery elementsRECOVERY_DATA_FIXED Fixing recovery elementsRECOVERY_ERROR Internal error during recoveryRECOVERY_FAILURE Failed recoverySEND_FAILED Data transfer to the server failed
Challenge transfer to an agent failedSERVER_VERSION Displays the server version numberSET_KEY Displays whether the synchronization was successful
or not and the time required for its completionSIG_ERROR The profiling resource file is not accessibleSSMON_SESSION_HANDLER Error when handling session eventsSSMON_STORECAMODE_FAILURE
Error when saving information
SSMON_STORECAMODE_INVALID
Invalid data
START The Userland module succeeded in connecting to itsdriver
STOP The Userland module stopped successfullySTOPAGENTDENIED Stop Agent action failedSTOPAGENTEXE Agent was stopped via stopagent.exeSYNC_DIR An error occurred when synchronizing/desynchronizing
a directoryUAC UAC status changed
(NAP/Juniper)UNSET_KEY Keys have been flushedUPDATING A new update has been downloaded on the agentUSER_REVOKED Authentication on a revoked userAV_CONF Application of the antivirus policyAV_DEPLOY_SIG with ERROR action: Error while deploying new antivirus
signatureswith INFO action: New antivirus signatures have beendeployed
AV_DOWNLOAD_SIGS Error while downloading the new antivirus signaturesbase
AV_INSTALL with ERROR action: Antivirus installation failedwith INFO action: Antivirus installation succeeded
AV_REPORT Error while generating antivirus reportAV_RESTORE with ERROR action: Error while restoring a file in
quarantine (error code)with INFO action: The quarantined file has beenrestored to the following location (file location)
AV_SIG A new signature base has been downloaded and isavailable to agents.
AV_SRV_INSTALL with ERROR action: Antivirus server installation failedwith INFO action: The server is installing the sdk toolscomponent included in the antivirus serveradministration pack.
AV_UPDATE with ERROR action: Antivirus update failedwith INFO action: Antivirus update
COMPUTER_GROUP_INHERITANCE
The computer is linked to more than one StormshieldEndpoint Security group.
CONNECT_SUCCESS Connection to server succeededGROUP_RECURSIVITY Error while browsing object's parent (Active Directory)IP_CANT_CONNECT Secured connection to the server denied (IP address
provided)IP_UNREACHABLE Impossible to reach the server (IP address provided)
SES - ADMINISTRATION GUIDE - V 7.217. AGENT LOGS AND ALERTS
Page 355/424 ses-en-administration_guide-v7.2 - 11/30/2017
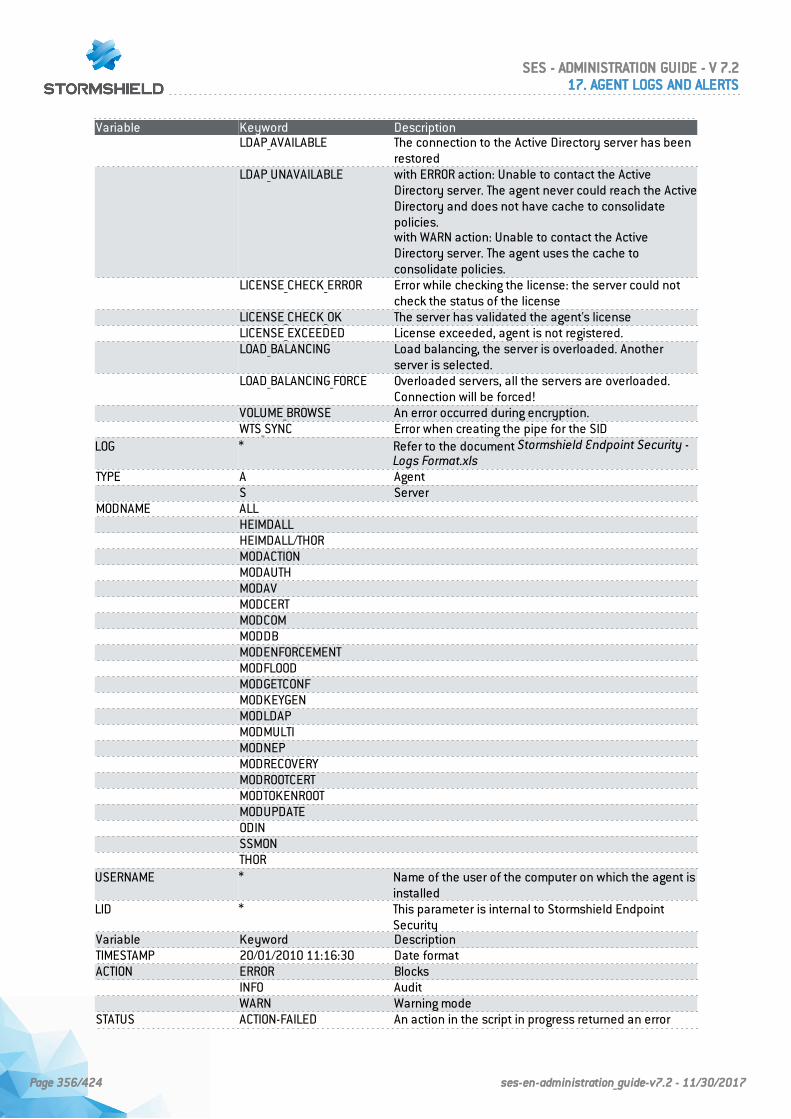
Variable Keyword DescriptionLDAP_AVAILABLE The connection to the Active Directory server has been
restoredLDAP_UNAVAILABLE with ERROR action: Unable to contact the Active
Directory server. The agent never could reach the ActiveDirectory and does not have cache to consolidatepolicies.with WARN action: Unable to contact the ActiveDirectory server. The agent uses the cache toconsolidate policies.
LICENSE_CHECK_ERROR Error while checking the license: the server could notcheck the status of the license
LICENSE_CHECK_OK The server has validated the agent's licenseLICENSE_EXCEEDED License exceeded, agent is not registered.LOAD_BALANCING Load balancing, the server is overloaded. Another
server is selected.LOAD_BALANCING_FORCE Overloaded servers, all the servers are overloaded.
Connection will be forced!VOLUME_BROWSE An error occurred during encryption.WTS_SYNC Error when creating the pipe for the SID
LOG * Refer to the document Stormshield Endpoint Security -Logs Format.xls
TYPE A AgentS Server
MODNAME ALLHEIMDALLHEIMDALL/THORMODACTIONMODAUTHMODAVMODCERTMODCOMMODDBMODENFORCEMENTMODFLOODMODGETCONFMODKEYGENMODLDAPMODMULTIMODNEPMODRECOVERYMODROOTCERTMODTOKENROOTMODUPDATEODINSSMONTHOR
USERNAME * Name of the user of the computer on which the agent isinstalled
LID * This parameter is internal to Stormshield EndpointSecurity
Variable Keyword DescriptionTIMESTAMP 20/01/2010 11:16:30 Date formatACTION ERROR Blocks
INFO AuditWARN Warning mode
STATUS ACTION-FAILED An action in the script in progress returned an error
SES - ADMINISTRATION GUIDE - V 7.217. AGENT LOGS AND ALERTS
Page 356/424 ses-en-administration_guide-v7.2 - 11/30/2017
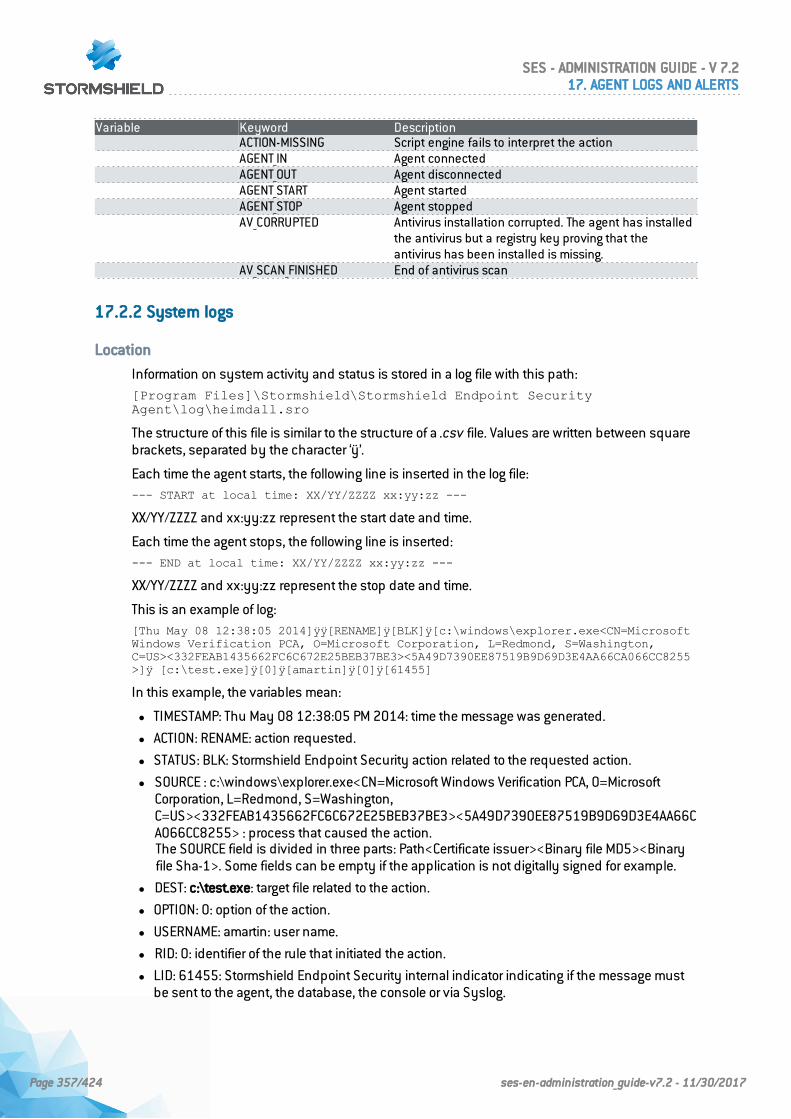
Variable Keyword DescriptionACTION-MISSING Script engine fails to interpret the actionAGENT_IN Agent connectedAGENT_OUT Agent disconnectedAGENT_START Agent startedAGENT_STOP Agent stoppedAV_CORRUPTED Antivirus installation corrupted. The agent has installed
the antivirus but a registry key proving that theantivirus has been installed is missing.
AV_SCAN_FINISHED End of antivirus scan
17.2.2 System logs
Location
Information on system activity and status is stored in a log file with this path:[Program Files]\Stormshield\Stormshield Endpoint SecurityAgent\log\heimdall.sro
The structure of this file is similar to the structure of a .csv file. Values are written between squarebrackets, separated by the character ‘ÿ’.
Each time the agent starts, the following line is inserted in the log file:--- START at local time: XX/YY/ZZZZ xx:yy:zz ---
XX/YY/ZZZZ and xx:yy:zz represent the start date and time.
Each time the agent stops, the following line is inserted:--- END at local time: XX/YY/ZZZZ xx:yy:zz ---
XX/YY/ZZZZ and xx:yy:zz represent the stop date and time.
This is an example of log:[Thu May 08 12:38:05 2014]ÿÿ[RENAME]ÿ[BLK]ÿ[c:\windows\explorer.exe<CN=MicrosoftWindows Verification PCA, O=Microsoft Corporation, L=Redmond, S=Washington,C=US><332FEAB1435662FC6C672E25BEB37BE3><5A49D7390EE87519B9D69D3E4AA66CA066CC8255>]ÿ [c:\test.exe]ÿ[0]ÿ[amartin]ÿ[0]ÿ[61455]
In this example, the variables mean:
l TIMESTAMP: Thu May 08 12:38:05 PM 2014: time the message was generated.
l ACTION: RENAME: action requested.
l STATUS: BLK: Stormshield Endpoint Security action related to the requested action.
l SOURCE : c:\windows\explorer.exe<CN=Microsoft Windows Verification PCA, O=MicrosoftCorporation, L=Redmond, S=Washington,C=US><332FEAB1435662FC6C672E25BEB37BE3><5A49D7390EE87519B9D69D3E4AA66CA066CC8255> : process that caused the action.The SOURCE field is divided in three parts: Path<Certificate issuer><Binary file MD5><Binaryfile Sha-1>. Some fields can be empty if the application is not digitally signed for example.
l DEST: c:\test.exe: target file related to the action.
l OPTION: 0: option of the action.
l USERNAME: amartin: user name.
l RID: 0: identifier of the rule that initiated the action.
l LID: 61455: Stormshield Endpoint Security internal indicator indicating if the message mustbe sent to the agent, the database, the console or via Syslog.
SES - ADMINISTRATION GUIDE - V 7.217. AGENT LOGS AND ALERTS
Page 357/424 ses-en-administration_guide-v7.2 - 11/30/2017
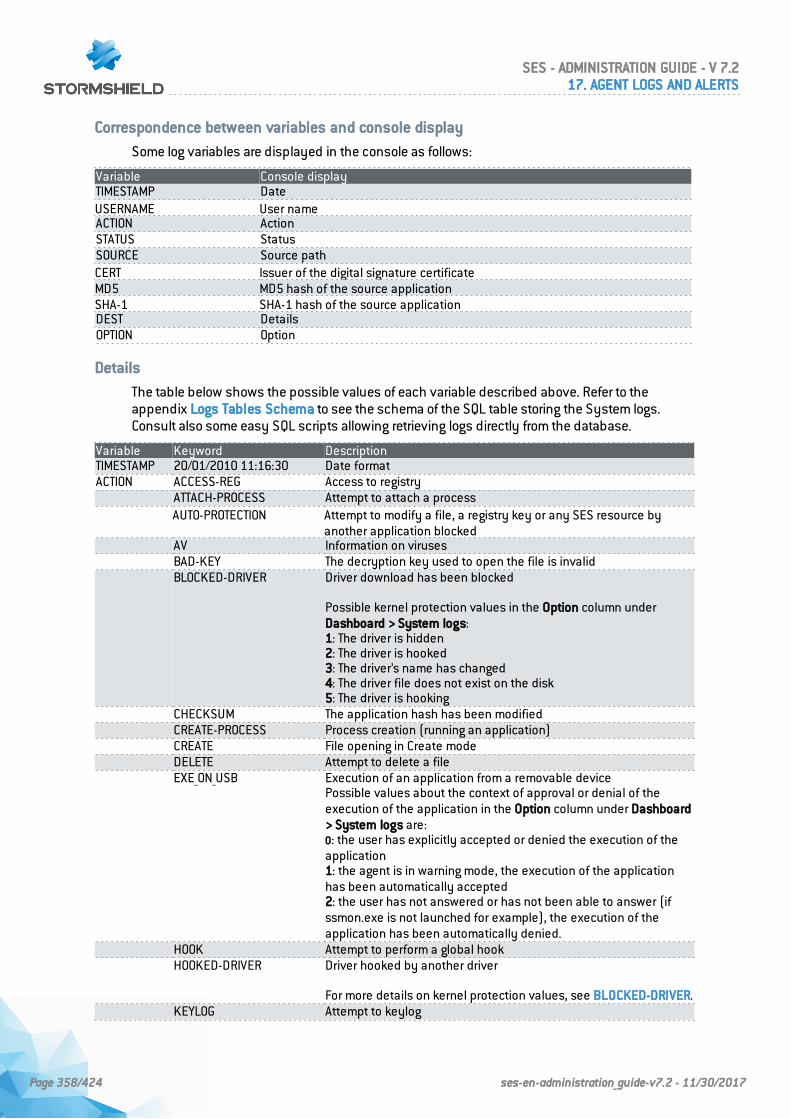
Correspondence between variables and console display
Some log variables are displayed in the console as follows:
Variable Console displayTIMESTAMP DateUSERNAME User nameACTION ActionSTATUS StatusSOURCE Source pathCERT Issuer of the digital signature certificateMD5 MD5 hash of the source applicationSHA-1 SHA-1 hash of the source applicationDEST DetailsOPTION Option
Details
The table below shows the possible values of each variable described above. Refer to theappendix Logs Tables Schema to see the schema of the SQL table storing the System logs.Consult also some easy SQL scripts allowing retrieving logs directly from the database.
Variable Keyword DescriptionTIMESTAMP 20/01/2010 11:16:30 Date formatACTION ACCESS-REG Access to registry
ATTACH-PROCESS Attempt to attach a processAUTO-PROTECTION Attempt to modify a file, a registry key or any SES resource by
another application blockedAV Information on virusesBAD-KEY The decryption key used to open the file is invalidBLOCKED-DRIVER Driver download has been blocked
Possible kernel protection values in the Option column underDashboard > System logs:1: The driver is hidden2: The driver is hooked3: The driver’s name has changed4: The driver file does not exist on the disk5: The driver is hooking
CHECKSUM The application hash has been modifiedCREATE-PROCESS Process creation (running an application)CREATE File opening in Create modeDELETE Attempt to delete a fileEXE_ON_USB Execution of an application from a removable device
Possible values about the context of approval or denial of theexecution of the application in the Option column under Dashboard> System logs are:0: the user has explicitly accepted or denied the execution of theapplication1: the agent is in warning mode, the execution of the applicationhas been automatically accepted2: the user has not answered or has not been able to answer (ifssmon.exe is not launched for example), the execution of theapplication has been automatically denied.
HOOK Attempt to perform a global hookHOOKED-DRIVER Driver hooked by another driver
For more details on kernel protection values, see BLOCKED-DRIVER.KEYLOG Attempt to keylog
SES - ADMINISTRATION GUIDE - V 7.217. AGENT LOGS AND ALERTS
Page 358/424 ses-en-administration_guide-v7.2 - 11/30/2017
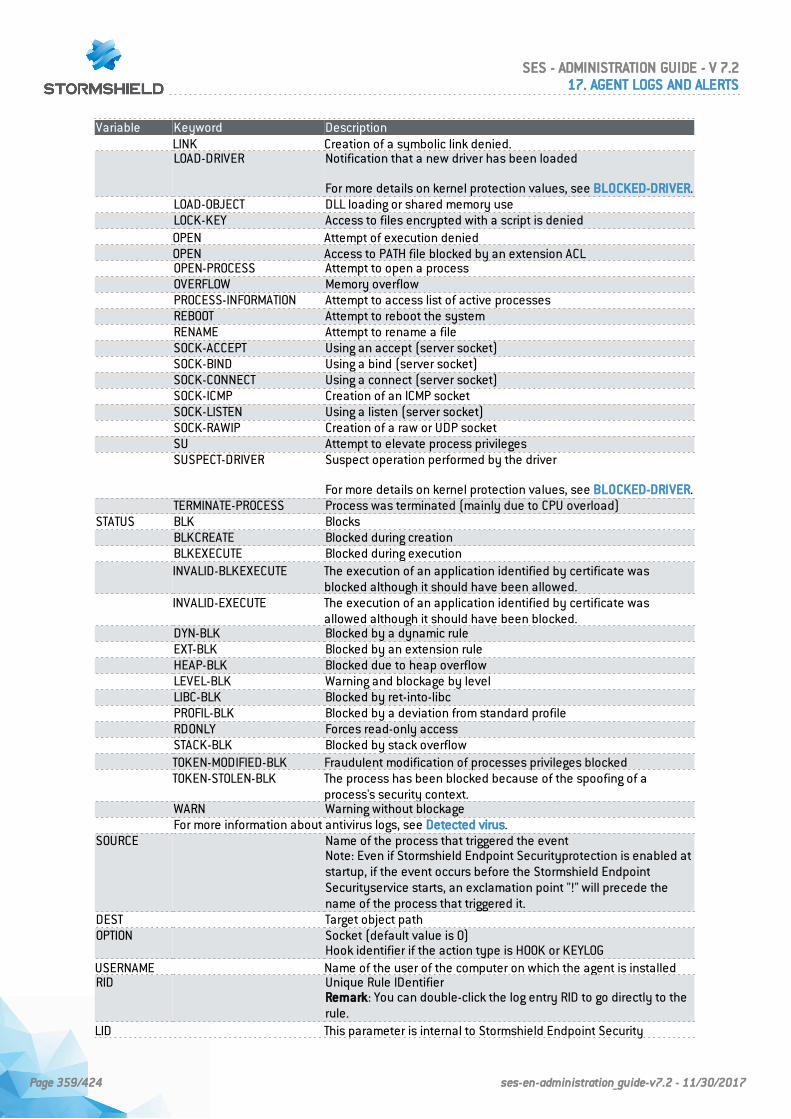
Variable Keyword DescriptionLINK Creation of a symbolic link denied.LOAD-DRIVER Notification that a new driver has been loaded
For more details on kernel protection values, see BLOCKED-DRIVER.LOAD-OBJECT DLL loading or shared memory useLOCK-KEY Access to files encrypted with a script is deniedOPEN Attempt of execution deniedOPEN Access to PATH file blocked by an extension ACLOPEN-PROCESS Attempt to open a processOVERFLOW Memory overflowPROCESS-INFORMATION Attempt to access list of active processesREBOOT Attempt to reboot the systemRENAME Attempt to rename a fileSOCK-ACCEPT Using an accept (server socket)SOCK-BIND Using a bind (server socket)SOCK-CONNECT Using a connect (server socket)SOCK-ICMP Creation of an ICMP socketSOCK-LISTEN Using a listen (server socket)SOCK-RAWIP Creation of a raw or UDP socketSU Attempt to elevate process privilegesSUSPECT-DRIVER Suspect operation performed by the driver
For more details on kernel protection values, see BLOCKED-DRIVER.TERMINATE-PROCESS Process was terminated (mainly due to CPU overload)
STATUS BLK BlocksBLKCREATE Blocked during creationBLKEXECUTE Blocked during executionINVALID-BLKEXECUTE The execution of an application identified by certificate was
blocked although it should have been allowed.INVALID-EXECUTE The execution of an application identified by certificate was
allowed although it should have been blocked.DYN-BLK Blocked by a dynamic ruleEXT-BLK Blocked by an extension ruleHEAP-BLK Blocked due to heap overflowLEVEL-BLK Warning and blockage by levelLIBC-BLK Blocked by ret-into-libcPROFIL-BLK Blocked by a deviation from standard profileRDONLY Forces read-only accessSTACK-BLK Blocked by stack overflowTOKEN-MODIFIED-BLK Fraudulent modification of processes privileges blockedTOKEN-STOLEN-BLK The process has been blocked because of the spoofing of a
process's security context.WARN Warning without blockageFor more information about antivirus logs, see Detected virus.
SOURCE Name of the process that triggered the eventNote: Even if Stormshield Endpoint Securityprotection is enabled atstartup, if the event occurs before the Stormshield EndpointSecurityservice starts, an exclamation point "!" will precede thename of the process that triggered it.
DEST Target object pathOPTION Socket (default value is 0)
Hook identifier if the action type is HOOK or KEYLOGUSERNAME Name of the user of the computer on which the agent is installedRID Unique Rule IDentifier
Remark: You can double-click the log entry RID to go directly to therule.
LID This parameter is internal to Stormshield Endpoint Security
SES - ADMINISTRATION GUIDE - V 7.217. AGENT LOGS AND ALERTS
Page 359/424 ses-en-administration_guide-v7.2 - 11/30/2017
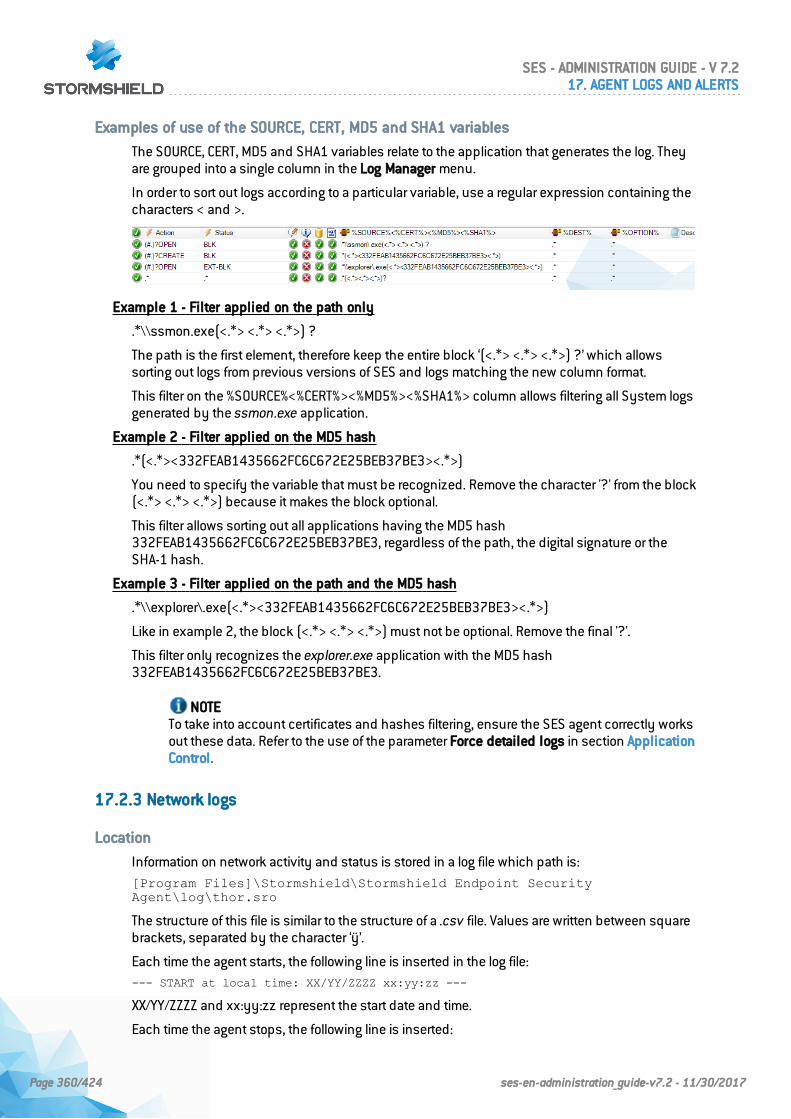
Examples of use of the SOURCE, CERT, MD5 and SHA1 variables
The SOURCE, CERT, MD5 and SHA1 variables relate to the application that generates the log. Theyare grouped into a single column in the Log Manager menu.
In order to sort out logs according to a particular variable, use a regular expression containing thecharacters < and >.
Example 1 - Filter applied on the path only
.*\\ssmon.exe(<.*> <.*> <.*>) ?
The path is the first element, therefore keep the entire block ‘(<.*> <.*> <.*>) ?’ which allowssorting out logs from previous versions of SES and logs matching the new column format.
This filter on the %SOURCE%<%CERT%><%MD5%><%SHA1%> column allows filtering all System logsgenerated by the ssmon.exe application.
Example 2 - Filter applied on the MD5 hash
.*(<.*><332FEAB1435662FC6C672E25BEB37BE3><.*>)
You need to specify the variable that must be recognized. Remove the character '?' from the block(<.*> <.*> <.*>) because it makes the block optional.
This filter allows sorting out all applications having the MD5 hash332FEAB1435662FC6C672E25BEB37BE3, regardless of the path, the digital signature or theSHA-1 hash.
Example 3 - Filter applied on the path and the MD5 hash
.*\\explorer\.exe(<.*><332FEAB1435662FC6C672E25BEB37BE3><.*>)
Like in example 2, the block (<.*> <.*> <.*>) must not be optional. Remove the final '?'.
This filter only recognizes the explorer.exe application with the MD5 hash332FEAB1435662FC6C672E25BEB37BE3.
NOTETo take into account certificates and hashes filtering, ensure the SES agent correctly worksout these data. Refer to the use of the parameter Force detailed logs in section ApplicationControl.
17.2.3 Network logs
Location
Information on network activity and status is stored in a log file which path is:[Program Files]\Stormshield\Stormshield Endpoint SecurityAgent\log\thor.sro
The structure of this file is similar to the structure of a .csv file. Values are written between squarebrackets, separated by the character ‘ÿ’.
Each time the agent starts, the following line is inserted in the log file:--- START at local time: XX/YY/ZZZZ xx:yy:zz ---
XX/YY/ZZZZ and xx:yy:zz represent the start date and time.
Each time the agent stops, the following line is inserted:
SES - ADMINISTRATION GUIDE - V 7.217. AGENT LOGS AND ALERTS
Page 360/424 ses-en-administration_guide-v7.2 - 11/30/2017
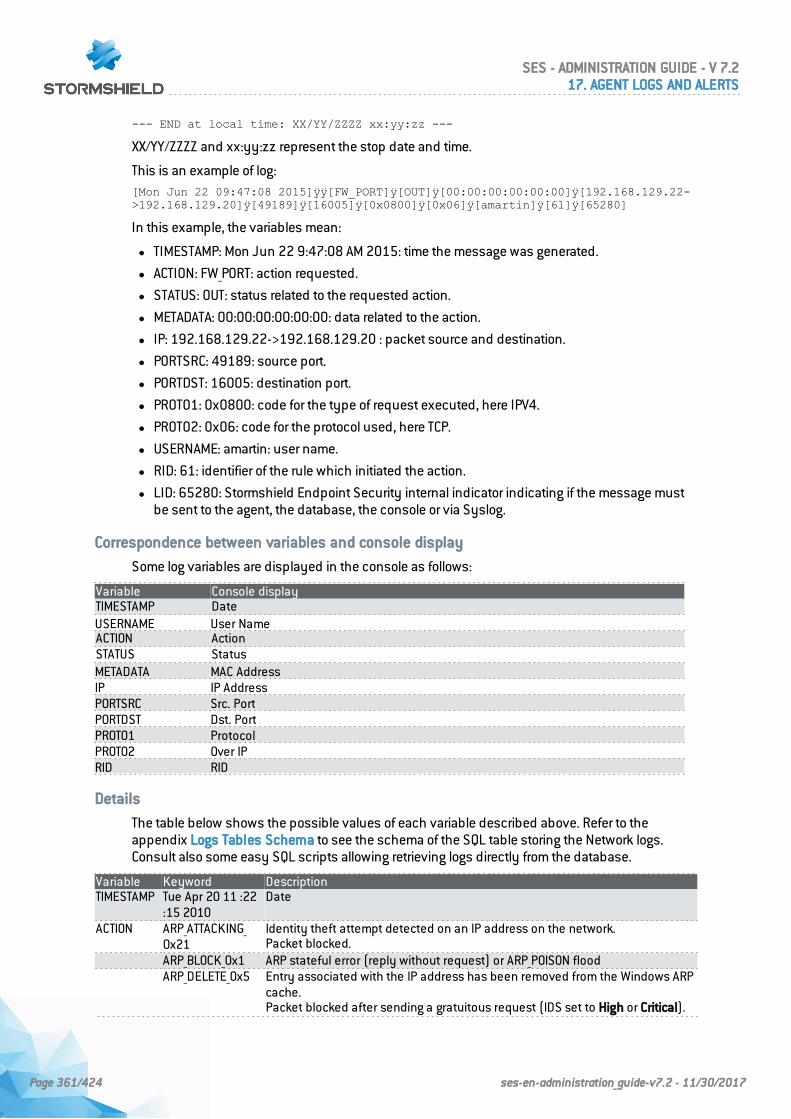
--- END at local time: XX/YY/ZZZZ xx:yy:zz ---
XX/YY/ZZZZ and xx:yy:zz represent the stop date and time.
This is an example of log:[Mon Jun 22 09:47:08 2015]ÿÿ[FW_PORT]ÿ[OUT]ÿ[00:00:00:00:00:00]ÿ[192.168.129.22->192.168.129.20]ÿ[49189]ÿ[16005]ÿ[0x0800]ÿ[0x06]ÿ[amartin]ÿ[61]ÿ[65280]
In this example, the variables mean:
l TIMESTAMP: Mon Jun 22 9:47:08 AM 2015: time the message was generated.
l ACTION: FW_PORT: action requested.
l STATUS: OUT: status related to the requested action.
l METADATA: 00:00:00:00:00:00: data related to the action.
l IP: 192.168.129.22->192.168.129.20 : packet source and destination.
l PORTSRC: 49189: source port.
l PORTDST: 16005: destination port.
l PROTO1: 0x0800: code for the type of request executed, here IPV4.
l PROTO2: 0x06: code for the protocol used, here TCP.
l USERNAME: amartin: user name.
l RID: 61: identifier of the rule which initiated the action.
l LID: 65280: Stormshield Endpoint Security internal indicator indicating if the message mustbe sent to the agent, the database, the console or via Syslog.
Correspondence between variables and console display
Some log variables are displayed in the console as follows:
Variable Console displayTIMESTAMP DateUSERNAME User NameACTION ActionSTATUS StatusMETADATA MAC AddressIP IP AddressPORTSRC Src. PortPORTDST Dst. PortPROTO1 ProtocolPROTO2 Over IPRID RID
Details
The table below shows the possible values of each variable described above. Refer to theappendix Logs Tables Schema to see the schema of the SQL table storing the Network logs.Consult also some easy SQL scripts allowing retrieving logs directly from the database.
Variable Keyword DescriptionTIMESTAMP Tue Apr 20 11 :22
:15 2010Date
ACTION ARP_ATTACKING_0x21
Identity theft attempt detected on an IP address on the network.Packet blocked.
ARP_BLOCK_0x1 ARP stateful error (reply without request) or ARP_POISON floodARP_DELETE_0x5 Entry associated with the IP address has been removed from the Windows ARP
cache.Packet blocked after sending a gratuitous request (IDS set to High or Critical).
SES - ADMINISTRATION GUIDE - V 7.217. AGENT LOGS AND ALERTS
Page 361/424 ses-en-administration_guide-v7.2 - 11/30/2017

Variable Keyword DescriptionARP_POISON_0x45 ARP cache poisoning attempt detected.
Packet blocked.Entry associated with the suspect IP address has been removed from theWindows ARP cache.
ARP_POISON_0x49 ARP cache poisoning attempt detected.Packet blocked.Windows ARP cache has been updated from the previous entry.
ARP_SPOOF_0x112 IP theft attempt detected.Packet accepted.Network protection (IDS set to Critical).
ARP_SPOOF_0x12 IP theft attempt detected.Packet accepted.
FLOOD Repeated log entryFW_ICMP Rule applied to an ICMP message.
METADATA, PROTO1, IP, PROTO2, PORTSRC and PORTDST variables are filled in.FW_IP Rule applied to an IP address (only METADATA, PROTO1, IP and PROTO2 variables
are filled in)FW_MAC Rule applied to MAC address (only METADATA and PROTO1 variables are filled
in).The MAC address (hardware address of the network card) indicated in the MACADDRESS column is the remote machine address since its local addressremains the same.
FW_PORT Rule applied to port filtering.METADATA, PROTO1, IP, PROTO2, PORTSRC and PORTDST variables are filled in.
PORTSCAN Port scan detectedSTATEFUL_STATUS PROTO1 variable indicates the stateful status code of the previously blocked
packetSTATUS CONNECTION_
CLOSEDOne or several connections have been closed because they are too slow
IN Filtering of incoming trafficIP_BLOCKED Suspect IP address causing flood blockedOUT Filtering of outgoing trafficSCAN_IN Incoming port scan detectedSCAN_OUT Outgoing port scan detected
IP SSID (WiFi) Name of the wireless networkIP fragment Partial IP addressIP Address Complete IP address
METADATA * In the case of a FLOOD, indicates the number of occurrences of the event.Otherwise, indicates the MAC addresses.
IP * Packet source and destinationPORTSRC * Source port numberPORTDST * Destination port numberPROTO1PROTO2
* Protocols being filtered.Refer to Protocols.
USERNAME * Name of the user of the computer on which the agent is installedRID * Unique Rule IDentifierLID * This parameter is internal to Stormshield Endpoint Security
17.2.4 Device Logs
The device log contains information on removable devices and WiFi activity.
Location
Information on removable device and WiFi activity is stored in a log file which path is:
SES - ADMINISTRATION GUIDE - V 7.217. AGENT LOGS AND ALERTS
Page 362/424 ses-en-administration_guide-v7.2 - 11/30/2017
[Program Files]\Stormshield\Stormshield Endpoint SecurityAgent\device.sro
The structure of this file is similar to the structure of a .csv file. Values are written between squarebrackets, separated by the character ‘ÿ’.
Each time the agent starts, the following line is inserted in the log file:--- START at local time: XX/YY/ZZZZ xx:yy:zz ---
XX/YY/ZZZZ and xx:yy:zz represent the start date and time.
Each time the agent stops, the following line is inserted:--- END at local time: XX/YY/ZZZZ xx:yy:zz ---
XX/YY/ZZZZ and xx:yy:zz represent the stop date and time.
This is an example of log:[Mon Jun 22 10:07:56 2015]ÿÿ[VOLUME_DENIED]ÿ[INFO]ÿ[]ÿ[]ÿ[]ÿ[0]ÿ[USB]ÿ[DISK]ÿ[35DF010EF40D19636380661A7983BB82]ÿ[5398]ÿ[34344]ÿ[00000000000000007BEF94A6]ÿ[Flash]ÿ[Drive AL_USB20]ÿ[UNENROLLED_CORRUPT_ENROLL]ÿ[]ÿ[amartin]ÿ[0]ÿ[61455]
In this example, the variables mean:
l TIMESTAMP: Mon Jun 22 10:07:56 2015: time the message was generated.
l ACTION: VOLUME_DENIED: action requested.
l STATUS: INFO: status related to the requested action.
l SOURCE: (empty): name of the network card (WiFi) or process (removable mass storagedevice).
l DEST1: (empty): name of the file (removable mass storage device) MAC Address (WiFi).
l DEST2: (empty): file name after renaming (removable mass storage device) or SSID (WiFi).
l SIZE: 0: device size.
l TYPE: USB: device type.
l CLASSID: DISK: device class identifier.
l MD5: 35DF010EF40D19636380661A7983BB82: MD5 checksum of a combination ofparameters allowing the unique identication of a device.
l VENDORID: 5398: vendor identifier.
l PRODUCTID: 34344: product identifier.
l SERIALID: 00000000000000007BEF94A6 : serial identifier.
l VENDORNAME: Flash: vendor name.
l PRODUCTNAME: Drive AL_USB20: product name.
l ENROLLMENTSTATE: UNENROLLED_CORRUPT_ENROLL: enrollment type.
l OWNERNAME: (empty): device owner name.
l USERNAME: amartin: user name.
l RID: 0: identifier of the rule which initiated the action.
l LID: 61455: Stormshield Endpoint Security internal indicator indicating if the message mustbe sent to the agent, the database, the console or via Syslog.
Correspondence between variables and console display
Some log variables are displayed in the console as follows:
Variable Console displayTIMESTAMP DateUSERNAME User Name
SES - ADMINISTRATION GUIDE - V 7.217. AGENT LOGS AND ALERTS
Page 363/424 ses-en-administration_guide-v7.2 - 11/30/2017
Variable Console displayACTION ActionSTATUS StatusSOURCE SourceDEST1 DestinationDEST2 Destination2SIZE SizeTYPE TypeCLASS ClassMD5 Checksum of a combination of parameters allowing the unique idetification of a
deviceVENDORID Vendor IDentifierPRODUCTID Product IDentifierSERIALID Serial number of the deviceVENDORNAME Vendor namePRODUCTNAME Product nameENROLLMENTSTATE Enrollment stateOWNERNAME Owner nameRID Unique identifier of the rule
Details
Device log table
The table below shows the possible values of each variable described above. Refer to theappendix Logs Tables Schema to see the schema of the SQL table storing the Device logs.Consult also some easy SQL scripts allowing logs to be retrieved directly from the database.
Variable Keyword DescriptionTIMESTAMP 20/01/2010
11:16:30Date format
ACTION AP_ACL Access point with ACL filtering rule (Status: WARN)AP_ADHOC Access point in adhoc mode (Status: WARN)AP_INSECURE Unsecured access point (Status: WARN)AP_WIFI WiFi access point set to on/off (Status: WARN)AUTO_ENROLL Removable device enrolled from the agentBAD_UNPLUG USB key incorrectly removedBLUETOOTH Bluetooth device blockedCD CD reading process blockedCDWRITER CD burning process blockedDEVICE_UNPLUG Device plugged outDEVICE_PLUG Device plugged inENROLLMENT Non enrolled device blockedFILE_CREATE File created (Status: INFO).FILE_DELETE File deleted on the removable device (Status: INFO)FILE_OPEN File open on removable device (Status: BLK)FILE_OVERWRITE File overwritten on the removable device (Status: INFO)FILE_READ Data read on the removable device (Status: INFO)FILE_RENAME File renamed on the removable device (Status: BLK or WARN)FILE_WOPEN File opened for overwrite operation on removable device (Status: BLK)FILE_WRITE Data written to a file on the removable device (Status: INFO)IRDA Device using infrared port blockedMODEM Modem blockedPARALLEL Device connected to the parallel port blockedPCMCIA PCMCIA device blockedSERIAL Device connected to the serial port blockedUSB_CLASSID Class ID of the removable device (in the Status field)VOLUME_DISMOUNT Disconnected removable device (Status: INFO)
SES - ADMINISTRATION GUIDE - V 7.217. AGENT LOGS AND ALERTS
Page 364/424 ses-en-administration_guide-v7.2 - 11/30/2017
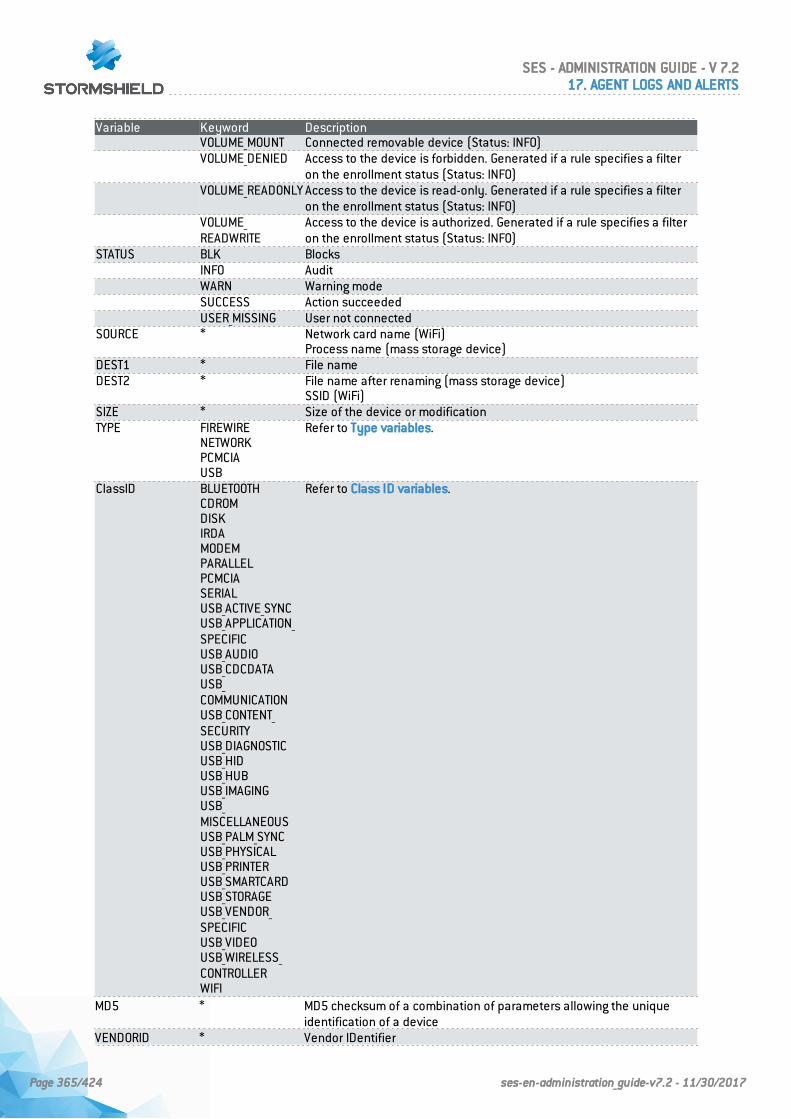
Variable Keyword DescriptionVOLUME_MOUNT Connected removable device (Status: INFO)VOLUME_DENIED Access to the device is forbidden. Generated if a rule specifies a filter
on the enrollment status (Status: INFO)VOLUME_READONLY Access to the device is read-only. Generated if a rule specifies a filter
on the enrollment status (Status: INFO)VOLUME_READWRITE
Access to the device is authorized. Generated if a rule specifies a filteron the enrollment status (Status: INFO)
STATUS BLK BlocksINFO AuditWARN Warning modeSUCCESS Action succeededUSER_MISSING User not connected
SOURCE * Network card name (WiFi)Process name (mass storage device)
DEST1 * File nameDEST2 * File name after renaming (mass storage device)
SSID (WiFi)SIZE * Size of the device or modificationTYPE FIREWIRE
NETWORKPCMCIAUSB
Refer to Type variables.
ClassID BLUETOOTHCDROMDISKIRDAMODEMPARALLELPCMCIASERIALUSB_ACTIVE_SYNCUSB_APPLICATION_SPECIFICUSB_AUDIOUSB_CDCDATAUSB_COMMUNICATIONUSB_CONTENT_SECURITYUSB_DIAGNOSTICUSB_HIDUSB_HUBUSB_IMAGINGUSB_MISCELLANEOUSUSB_PALM_SYNCUSB_PHYSICALUSB_PRINTERUSB_SMARTCARDUSB_STORAGEUSB_VENDOR_SPECIFICUSB_VIDEOUSB_WIRELESS_CONTROLLERWIFI
Refer to Class ID variables.
MD5 * MD5 checksum of a combination of parameters allowing the uniqueidentification of a device
VENDORID * Vendor IDentifier
SES - ADMINISTRATION GUIDE - V 7.217. AGENT LOGS AND ALERTS
Page 365/424 ses-en-administration_guide-v7.2 - 11/30/2017
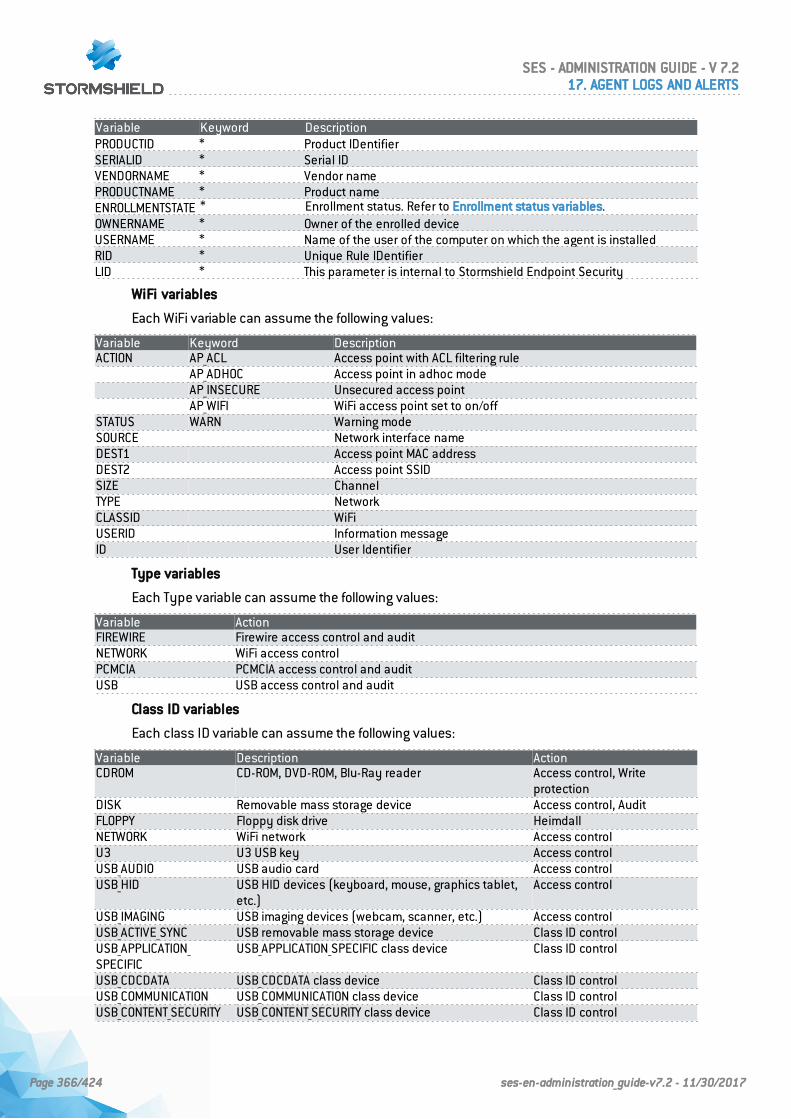
Variable Keyword DescriptionPRODUCTID * Product IDentifierSERIALID * Serial IDVENDORNAME * Vendor namePRODUCTNAME * Product nameENROLLMENTSTATE * Enrollment status. Refer to Enrollment status variables.OWNERNAME * Owner of the enrolled deviceUSERNAME * Name of the user of the computer on which the agent is installedRID * Unique Rule IDentifierLID * This parameter is internal to Stormshield Endpoint Security
WiFi variables
Each WiFi variable can assume the following values:
Variable Keyword DescriptionACTION AP_ACL Access point with ACL filtering rule
AP_ADHOC Access point in adhoc modeAP_INSECURE Unsecured access pointAP_WIFI WiFi access point set to on/off
STATUS WARN Warning modeSOURCE Network interface nameDEST1 Access point MAC addressDEST2 Access point SSIDSIZE ChannelTYPE NetworkCLASSID WiFiUSERID Information messageID User Identifier
Type variables
Each Type variable can assume the following values:
Variable ActionFIREWIRE Firewire access control and auditNETWORK WiFi access controlPCMCIA PCMCIA access control and auditUSB USB access control and audit
Class ID variables
Each class ID variable can assume the following values:
Variable Description ActionCDROM CD-ROM, DVD-ROM, Blu-Ray reader Access control, Write
protectionDISK Removable mass storage device Access control, AuditFLOPPY Floppy disk drive HeimdallNETWORK WiFi network Access controlU3 U3 USB key Access controlUSB_AUDIO USB audio card Access controlUSB_HID USB HID devices (keyboard, mouse, graphics tablet,
etc.)Access control
USB_IMAGING USB imaging devices (webcam, scanner, etc.) Access controlUSB_ACTIVE_SYNC USB removable mass storage device Class ID controlUSB_APPLICATION_SPECIFIC
USB_APPLICATION_SPECIFIC class device Class ID control
USB_CDCDATA USB_CDCDATA class device Class ID controlUSB_COMMUNICATION USB_COMMUNICATION class device Class ID controlUSB_CONTENT_SECURITY USB_CONTENT_SECURITY class device Class ID control
SES - ADMINISTRATION GUIDE - V 7.217. AGENT LOGS AND ALERTS
Page 366/424 ses-en-administration_guide-v7.2 - 11/30/2017
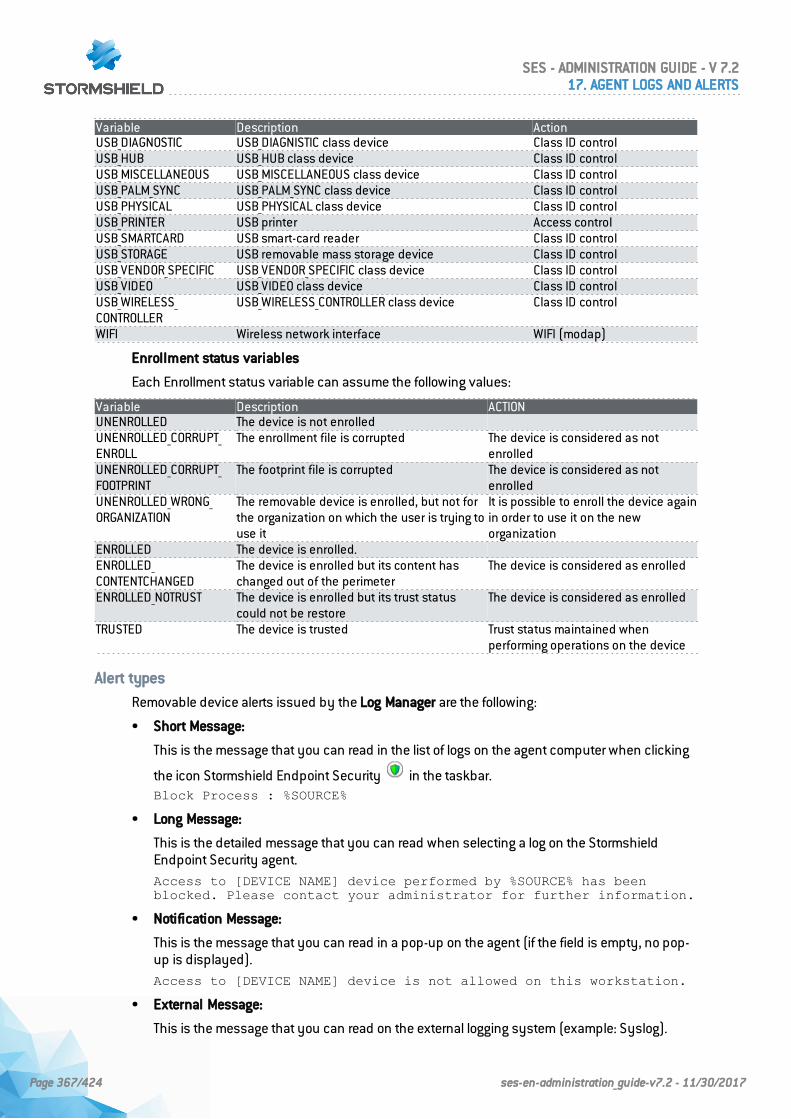
Variable Description ActionUSB_DIAGNOSTIC USB_DIAGNISTIC class device Class ID controlUSB_HUB USB_HUB class device Class ID controlUSB_MISCELLANEOUS USB_MISCELLANEOUS class device Class ID controlUSB_PALM_SYNC USB_PALM_SYNC class device Class ID controlUSB_PHYSICAL USB_PHYSICAL class device Class ID controlUSB_PRINTER USB printer Access controlUSB_SMARTCARD USB smart-card reader Class ID controlUSB_STORAGE USB removable mass storage device Class ID controlUSB_VENDOR_SPECIFIC USB_VENDOR_SPECIFIC class device Class ID controlUSB_VIDEO USB_VIDEO class device Class ID controlUSB_WIRELESS_CONTROLLER
USB_WIRELESS_CONTROLLER class device Class ID control
WIFI Wireless network interface WIFI (modap)
Enrollment status variables
Each Enrollment status variable can assume the following values:
Variable Description ACTIONUNENROLLED The device is not enrolledUNENROLLED_CORRUPT_ENROLL
The enrollment file is corrupted The device is considered as notenrolled
UNENROLLED_CORRUPT_FOOTPRINT
The footprint file is corrupted The device is considered as notenrolled
UNENROLLED_WRONG_ORGANIZATION
The removable device is enrolled, but not forthe organization on which the user is trying touse it
It is possible to enroll the device againin order to use it on the neworganization
ENROLLED The device is enrolled.ENROLLED_CONTENTCHANGED
The device is enrolled but its content haschanged out of the perimeter
The device is considered as enrolled
ENROLLED_NOTRUST The device is enrolled but its trust statuscould not be restore
The device is considered as enrolled
TRUSTED The device is trusted Trust status maintained whenperforming operations on the device
Alert types
Removable device alerts issued by the Log Manager are the following:
• Short Message:
This is the message that you can read in the list of logs on the agent computer when clicking
the icon Stormshield Endpoint Security in the taskbar.Block Process : %SOURCE%
• Long Message:
This is the detailed message that you can read when selecting a log on the StormshieldEndpoint Security agent.Access to [DEVICE NAME] device performed by %SOURCE% has beenblocked. Please contact your administrator for further information.
• Notification Message:
This is the message that you can read in a pop-up on the agent (if the field is empty, no pop-up is displayed).Access to [DEVICE NAME] device is not allowed on this workstation.
• External Message:
This is the message that you can read on the external logging system (example: Syslog).
SES - ADMINISTRATION GUIDE - V 7.217. AGENT LOGS AND ALERTS
Page 367/424 ses-en-administration_guide-v7.2 - 11/30/2017
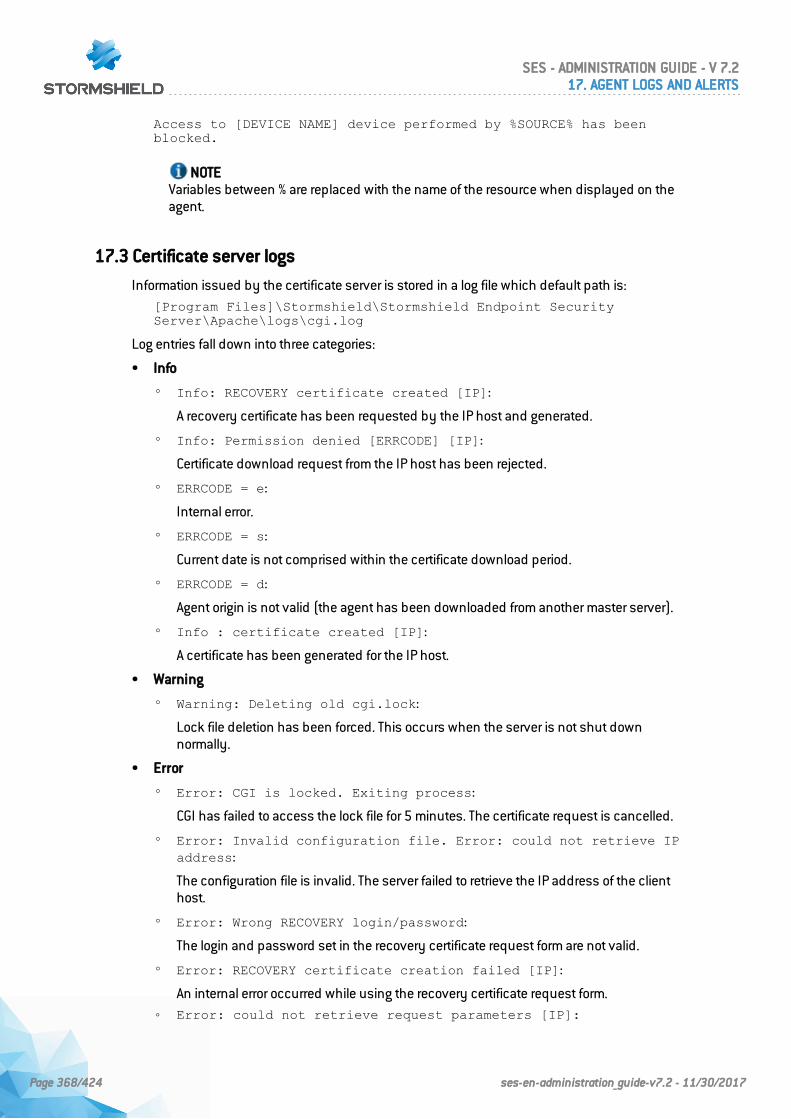
Access to [DEVICE NAME] device performed by %SOURCE% has beenblocked.
NOTEVariables between % are replaced with the name of the resource when displayed on theagent.
17.3 Certificate server logs
Information issued by the certificate server is stored in a log file which default path is:[Program Files]\Stormshield\Stormshield Endpoint SecurityServer\Apache\logs\cgi.log
Log entries fall down into three categories:
• Info
◦ Info: RECOVERY certificate created [IP]:
A recovery certificate has been requested by the IP host and generated.
◦ Info: Permission denied [ERRCODE] [IP]:
Certificate download request from the IP host has been rejected.
◦ ERRCODE = e:
Internal error.
◦ ERRCODE = s:
Current date is not comprised within the certificate download period.
◦ ERRCODE = d:
Agent origin is not valid (the agent has been downloaded from another master server).
◦ Info : certificate created [IP]:
A certificate has been generated for the IP host.
• Warning
◦ Warning: Deleting old cgi.lock:
Lock file deletion has been forced. This occurs when the server is not shut downnormally.
• Error
◦ Error: CGI is locked. Exiting process:
CGI has failed to access the lock file for 5 minutes. The certificate request is cancelled.
◦ Error: Invalid configuration file. Error: could not retrieve IPaddress:
The configuration file is invalid. The server failed to retrieve the IP address of the clienthost.
◦ Error: Wrong RECOVERY login/password:
The login and password set in the recovery certificate request form are not valid.
◦ Error: RECOVERY certificate creation failed [IP]:
An internal error occurred while using the recovery certificate request form.◦ Error: could not retrieve request parameters [IP]:
SES - ADMINISTRATION GUIDE - V 7.217. AGENT LOGS AND ALERTS
Page 368/424 ses-en-administration_guide-v7.2 - 11/30/2017
The server failed to retrieve request parameters.
◦ Error: certificate creation failed [IP]:
An internal error occurred.
17.4 Antivirus protection logs
17.4.1 Server installation and update
Server installation and update logs are stored in the software.sro file (server side).
These logs contain the following information:
• Error
◦ AV_SRV_INSTALL:
- Impossible to record the version of the Avira update manager which has beeninstalled in the registry base.
◦ AV_IUM:
- Avira generated an ERROR or WARNING log.
◦ LAST_FILE_CHANGED:
- An Avira log file different from the file used by Stormshield Endpoint Security hasbeen generated.
• Information
◦ AV_SRV_INSTALL:
- The installation of the Avira update manager started (version).
- The installation of the Avira update manager succeeded (version installed).
◦ AV_IUM:
- Avira generated an INFO log.
17.4.2 Agent installation and update
Agent installation and update logs are stored under System logs in the Monitoring section.
These logs contain the following information:
• Error
◦ AV_INSTALL:
- The agent fails to delete the existing file which will be replaced with the newlydownloaded file.
- Unable to download the file from the antivirus server.
- Unable to move the downloaded file to its destination directory.
- Unable to record the antivirus protection version installed in the registry base.
- Unable to find the download feature of the antivirus installation file.
- Unable to unzip the antivirus installation archive.
◦ AV_REPORT:
- Unable to allocate space to generate the source string.
SES - ADMINISTRATION GUIDE - V 7.217. AGENT LOGS AND ALERTS
Page 369/424 ses-en-administration_guide-v7.2 - 11/30/2017

- Unable to allocate space to generate the destination string.
- Unable to record the event date in the registry base.
◦ AV_CORRUPTED:
- Avira installation has been corrupted. The agent has installed Avira but a registry keyproving that Avira has been installed is missing.
◦ OBTAINFILE:
- File cannot be obtained because available disk space is insufficient.
• Information
◦ AV_INSTALL:
- The installation of the antivirus protection has been launched.
- Antivirus protection has been successfully installed/updated to the versionindicated.
- An installation of the antivirus protection has been run whereas the antivirus wasalready installed. Another user must have installed it manually or deleted the keyindicating that it had been previously installed from the registry base.
◦ AV_CONF:
- The antivirus policy has been read.
17.4.3 Detected virus
Detected virus logs are stored under System logs in the Monitoring section.
These logs contain the following information:
• Date
• Action
• Status:
◦ BLOCKED : The object has been blocked.
◦ CLEANED : The object has been disinfected/neutralized.
◦ ERASED : The object has been erased.
◦ FILE_UNKNOWN: Action unknown.
◦ IGNORED : The log has been generated but the antivirus has not modified the infectedobject.
◦ MSG_ATT_DELETED: The attachment has been deleted.
◦ MSG_ATT_MOVED_QUARANTINE: The attachment has been quarantined.
◦ MSG_ERASED: The mail has been destroyed.
◦ MSG_IGNORED: The mail was ignored.
◦ MSG_MOVED_QUARENTINE: The mail has been quarantined.
◦ MOVED_QUARENTINE: The object has been quarantined.
◦ OVERWRITTEN : The object has been overwritten.
◦ RENAMED : The object has been renamed.
◦ WEB_FILE_BLOCKED: The web file has been blocked.
◦ WEB_FILE_MOVED_QUARANTINE: The web file has been quarantined.
SES - ADMINISTRATION GUIDE - V 7.217. AGENT LOGS AND ALERTS
Page 370/424 ses-en-administration_guide-v7.2 - 11/30/2017
◦ WEB_IGNORED: The web file has been ignored.
• Source:
This is the path of the infected object.
• Destination
• Option:
The virus identifier is stored in the antivirus database.
• User Name:
Information on the infected user.
• RID:
Unique Rule IDentifier.
• Agent Mode:
◦ Normal.
◦ Warning.
◦ Standby.
All logs are recorded locally. When a virus is detected, associated logs are stored in the database.
17.5 Sending logs customized by the user
The SSUSRLOG command-line tool allows the user to send customized logs to the SESmanagement console from the agent.
The tool allows directly writing the new log in the command-line interface or sending a set of logsfrom a CSV file. It is located in the Stormshield Endpoint Security agent directory(ssusrlog.exe).
The settings of these customized logs are defined in the Log Manager in the SES managementconsole (sending logs to a server or an external tool, pop-up windows, etc.). It is also possible tocreate new log status and use them with the SSUSRLOG tool. For more information, see thesection Log Manager.
It is possible to create log messages for each language supported by Stormshield EndpointSecurity.
To send one or few logs directly with the command-line interface, the user must use the syntaxas follows:
• ssusrlog "log message" (default status: USER_LOG)
• ssusrlog LOG_STATUS "log message"
NOTEThe SSUSRLOG tool automatically converts status to capital letters.
The user can add the following options:
• -e: ERROR action
• -w: WARNING action
• -i: INFO action
These values display in the Action column of the Software logs, System logs, Network logs andDevice logs panels of the SES management console. The default value is INFO.
To send a set of logs, the user can enter a CSV file as a parameter of the command line as follows:
SES - ADMINISTRATION GUIDE - V 7.217. AGENT LOGS AND ALERTS
Page 371/424 ses-en-administration_guide-v7.2 - 11/30/2017
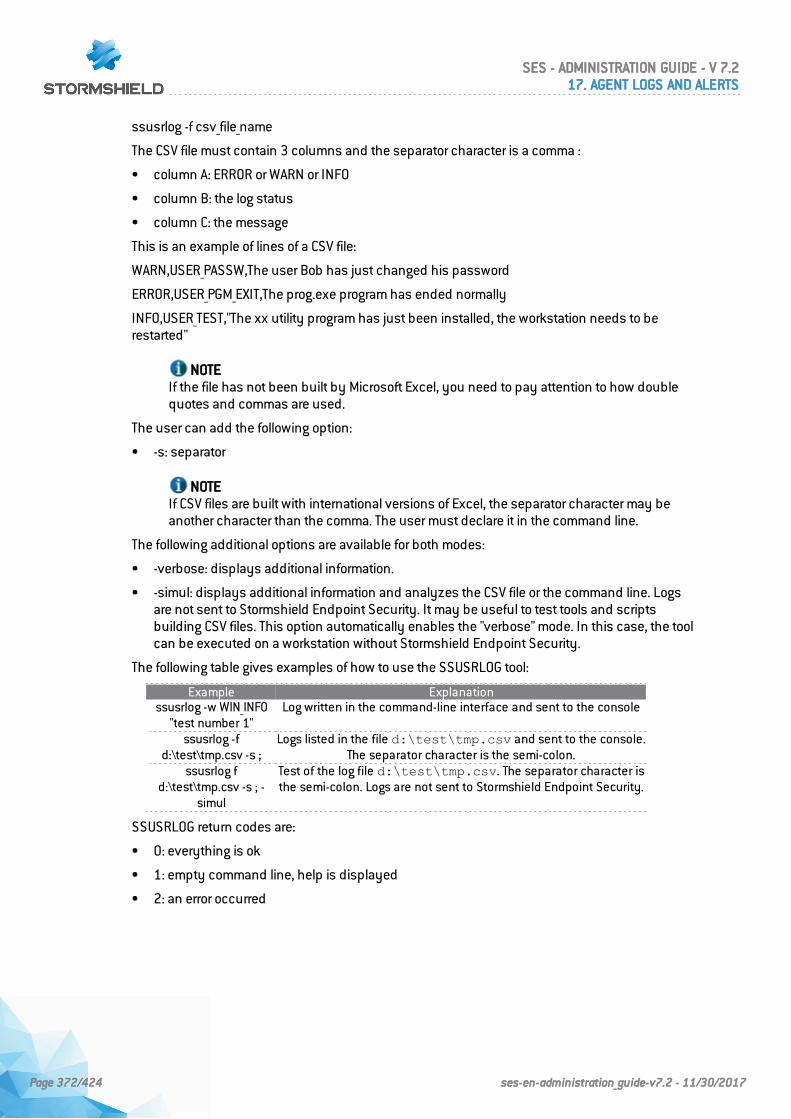
ssusrlog -f csv_file_name
The CSV file must contain 3 columns and the separator character is a comma :
• column A: ERROR or WARN or INFO
• column B: the log status
• column C: the message
This is an example of lines of a CSV file:
WARN,USER_PASSW,The user Bob has just changed his password
ERROR,USER_PGM_EXIT,The prog.exe program has ended normally
INFO,USER_TEST,"The xx utility program has just been installed, the workstation needs to berestarted"
NOTEIf the file has not been built by Microsoft Excel, you need to pay attention to how doublequotes and commas are used.
The user can add the following option:
• -s: separator
NOTEIf CSV files are built with international versions of Excel, the separator character may beanother character than the comma. The user must declare it in the command line.
The following additional options are available for both modes:
• -verbose: displays additional information.
• -simul: displays additional information and analyzes the CSV file or the command line. Logsare not sent to Stormshield Endpoint Security. It may be useful to test tools and scriptsbuilding CSV files. This option automatically enables the "verbose" mode. In this case, the toolcan be executed on a workstation without Stormshield Endpoint Security.
The following table gives examples of how to use the SSUSRLOG tool:
Example Explanationssusrlog -w WIN_INFO
"test number 1"Log written in the command-line interface and sent to the console
ssusrlog -fd:\test\tmp.csv -s ;
Logs listed in the file d:\test\tmp.csv and sent to the console.The separator character is the semi-colon.
ssusrlog fd:\test\tmp.csv -s ; -
simul
Test of the log file d:\test\tmp.csv. The separator character isthe semi-colon. Logs are not sent to Stormshield Endpoint Security.
SSUSRLOG return codes are:
• 0: everything is ok
• 1: empty command line, help is displayed
• 2: an error occurred
SES - ADMINISTRATION GUIDE - V 7.217. AGENT LOGS AND ALERTS
Page 372/424 ses-en-administration_guide-v7.2 - 11/30/2017
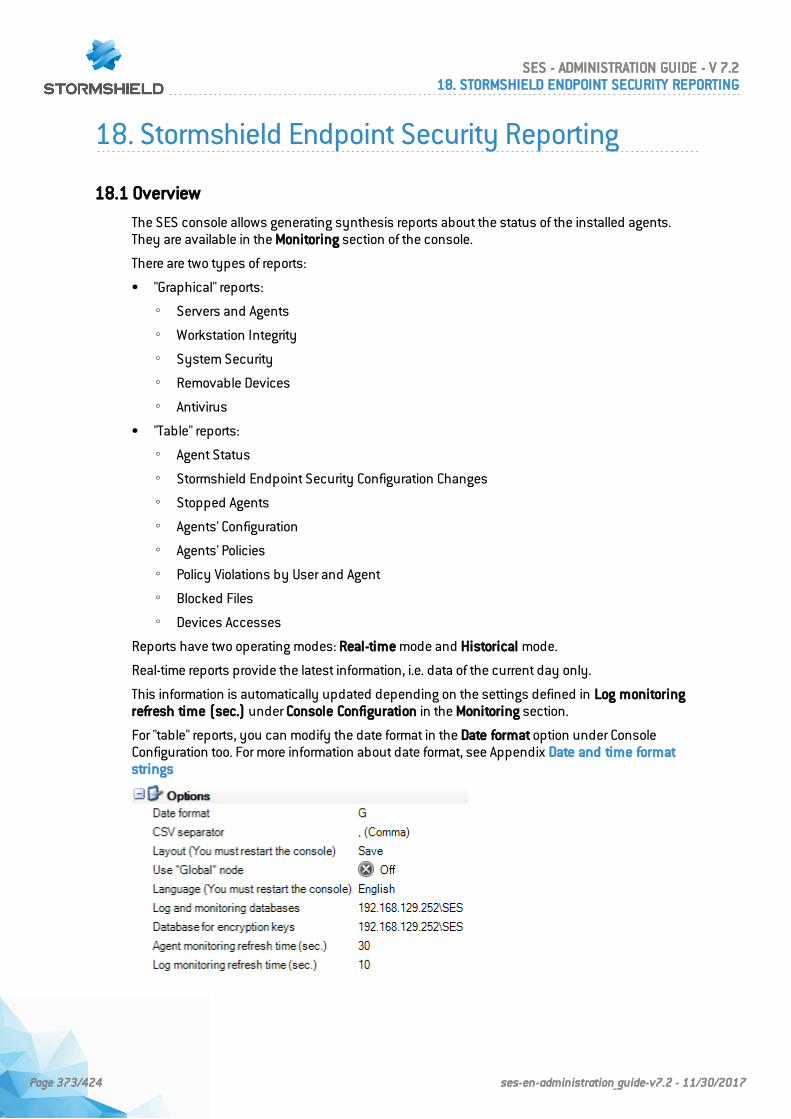
18. Stormshield Endpoint Security Reporting
18.1 Overview
The SES console allows generating synthesis reports about the status of the installed agents.They are available in the Monitoring section of the console.
There are two types of reports:
• "Graphical" reports:
◦ Servers and Agents
◦ Workstation Integrity
◦ System Security
◦ Removable Devices
◦ Antivirus
• "Table" reports:
◦ Agent Status
◦ Stormshield Endpoint Security Configuration Changes
◦ Stopped Agents
◦ Agents' Configuration
◦ Agents' Policies
◦ Policy Violations by User and Agent
◦ Blocked Files
◦ Devices Accesses
Reports have two operating modes: Real-time mode and Historical mode.
Real-time reports provide the latest information, i.e. data of the current day only.
This information is automatically updated depending on the settings defined in Log monitoringrefresh time (sec.) under Console Configuration in the Monitoring section.
For "table" reports, you can modify the date format in the Date format option under ConsoleConfiguration too. For more information about date format, see Appendix Date and time formatstrings
SES - ADMINISTRATION GUIDE - V 7.218. STORMSHIELD ENDPOINT SECURITY REPORTING
Page 373/424 ses-en-administration_guide-v7.2 - 11/30/2017
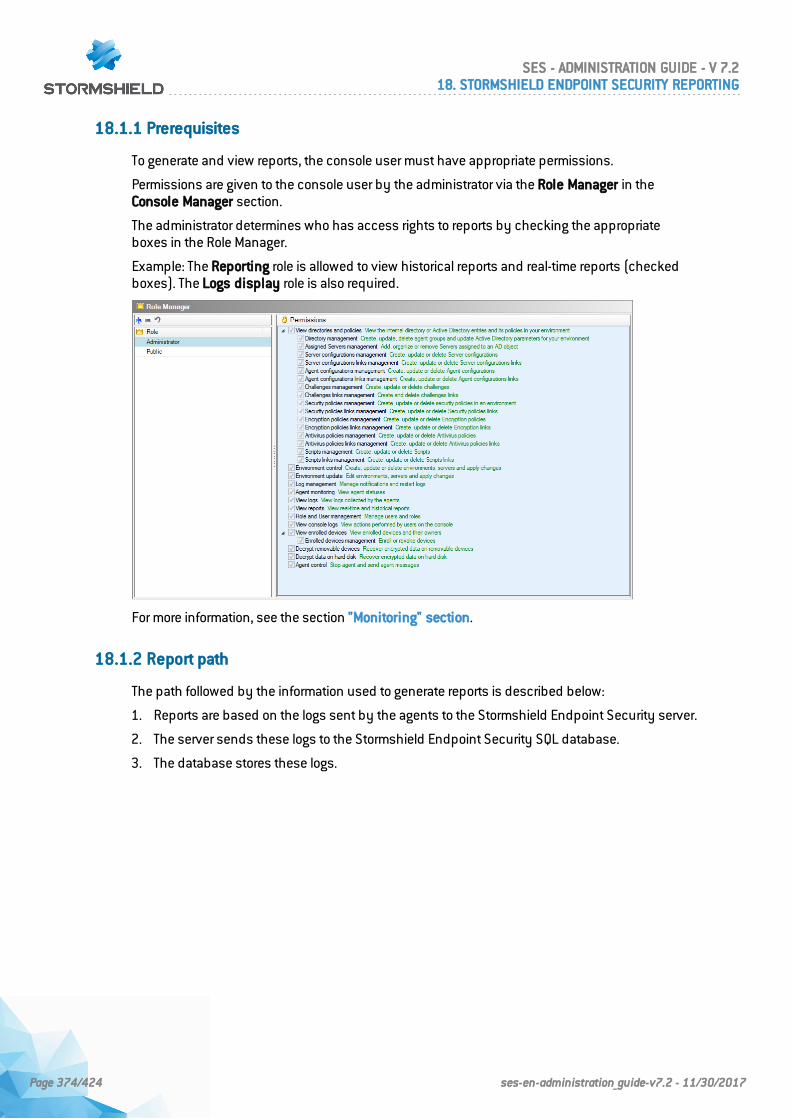
18.1.1 Prerequisites
To generate and view reports, the console user must have appropriate permissions.
Permissions are given to the console user by the administrator via the Role Manager in theConsole Manager section.
The administrator determines who has access rights to reports by checking the appropriateboxes in the Role Manager.
Example: The Reporting role is allowed to view historical reports and real-time reports (checkedboxes). The Logs display role is also required.
For more information, see the section "Monitoring" section.
18.1.2 Report path
The path followed by the information used to generate reports is described below:
1. Reports are based on the logs sent by the agents to the Stormshield Endpoint Security server.
2. The server sends these logs to the Stormshield Endpoint Security SQL database.
3. The database stores these logs.
SES - ADMINISTRATION GUIDE - V 7.218. STORMSHIELD ENDPOINT SECURITY REPORTING
Page 374/424 ses-en-administration_guide-v7.2 - 11/30/2017
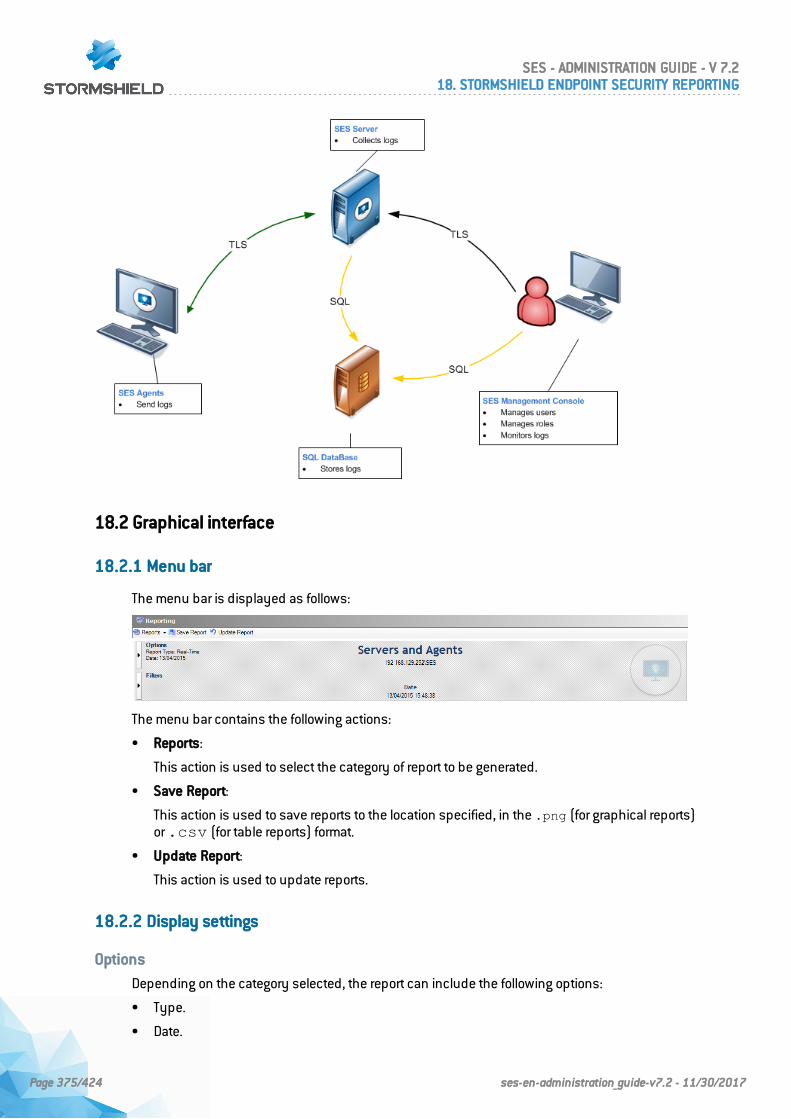
18.2 Graphical interface
18.2.1 Menu bar
The menu bar is displayed as follows:
The menu bar contains the following actions:
• Reports:
This action is used to select the category of report to be generated.
• Save Report:
This action is used to save reports to the location specified, in the .png (for graphical reports)or.csv (for table reports) format.
• Update Report:
This action is used to update reports.
18.2.2 Display settings
Options
Depending on the category selected, the report can include the following options:
• Type.
• Date.
SES - ADMINISTRATION GUIDE - V 7.218. STORMSHIELD ENDPOINT SECURITY REPORTING
Page 375/424 ses-en-administration_guide-v7.2 - 11/30/2017
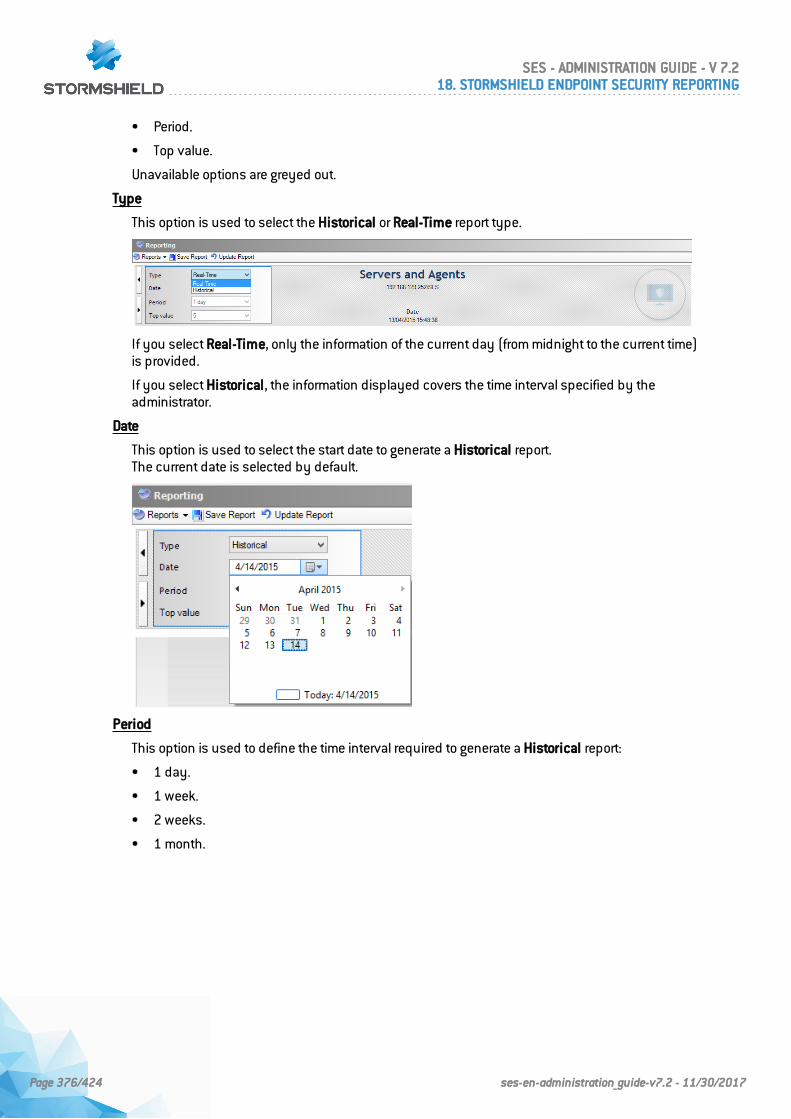
• Period.
• Top value.
Unavailable options are greyed out.
Type
This option is used to select the Historical or Real-Time report type.
If you select Real-Time, only the information of the current day (from midnight to the current time)is provided.
If you select Historical, the information displayed covers the time interval specified by theadministrator.
Date
This option is used to select the start date to generate a Historical report.The current date is selected by default.
Period
This option is used to define the time interval required to generate a Historical report:
• 1 day.
• 1 week.
• 2 weeks.
• 1 month.
SES - ADMINISTRATION GUIDE - V 7.218. STORMSHIELD ENDPOINT SECURITY REPORTING
Page 376/424 ses-en-administration_guide-v7.2 - 11/30/2017
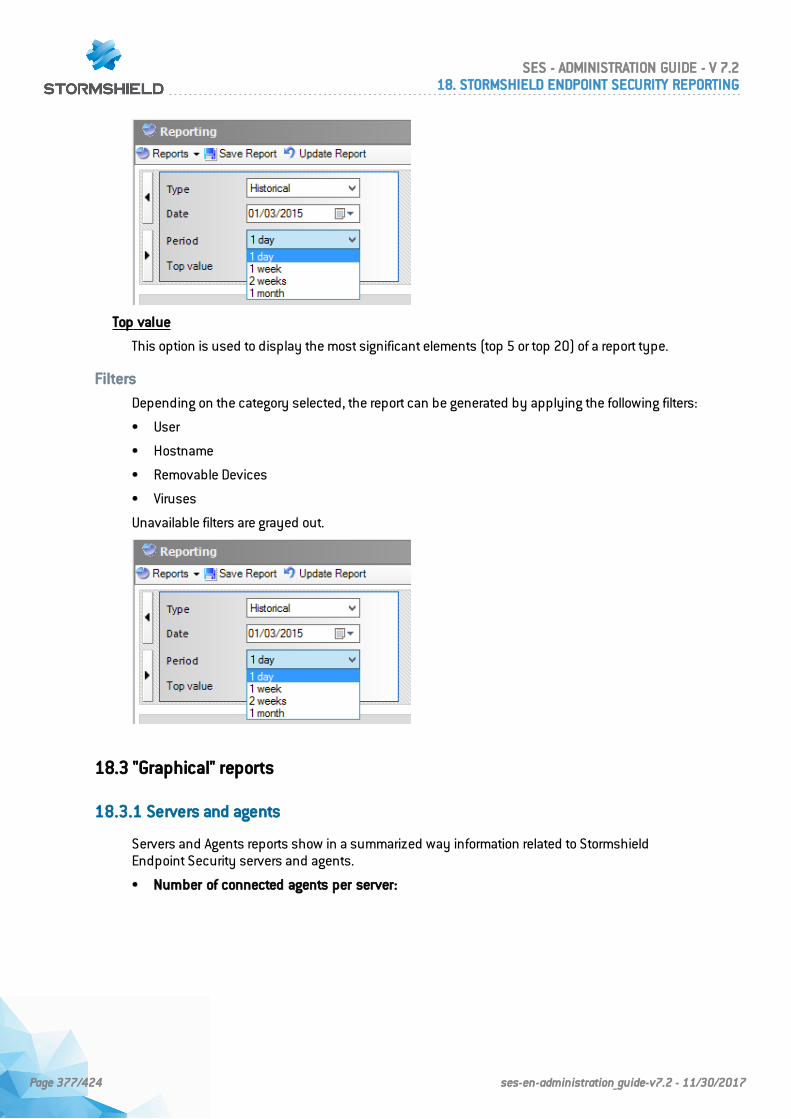
Top value
This option is used to display the most significant elements (top 5 or top 20) of a report type.
Filters
Depending on the category selected, the report can be generated by applying the following filters:
• User
• Hostname
• Removable Devices
• Viruses
Unavailable filters are grayed out.
18.3 "Graphical" reports
18.3.1 Servers and agents
Servers and Agents reports show in a summarized way information related to StormshieldEndpoint Security servers and agents.
• Number of connected agents per server:
SES - ADMINISTRATION GUIDE - V 7.218. STORMSHIELD ENDPOINT SECURITY REPORTING
Page 377/424 ses-en-administration_guide-v7.2 - 11/30/2017

• Agent compliance
This sub-report only displays in Real-Time mode. It shows the distribution of recommendationsamong agents. Possible recommendations are: authorize, isolate, no access or norecommendation. Recommendations are set up by script and allow communicating a status toTNC clients (Trusted Network Connect) such as Juniper.
• Number of agents per version:
• Number of agents per policy:
This is the security policy applied to the agents.
SES - ADMINISTRATION GUIDE - V 7.218. STORMSHIELD ENDPOINT SECURITY REPORTING
Page 378/424 ses-en-administration_guide-v7.2 - 11/30/2017
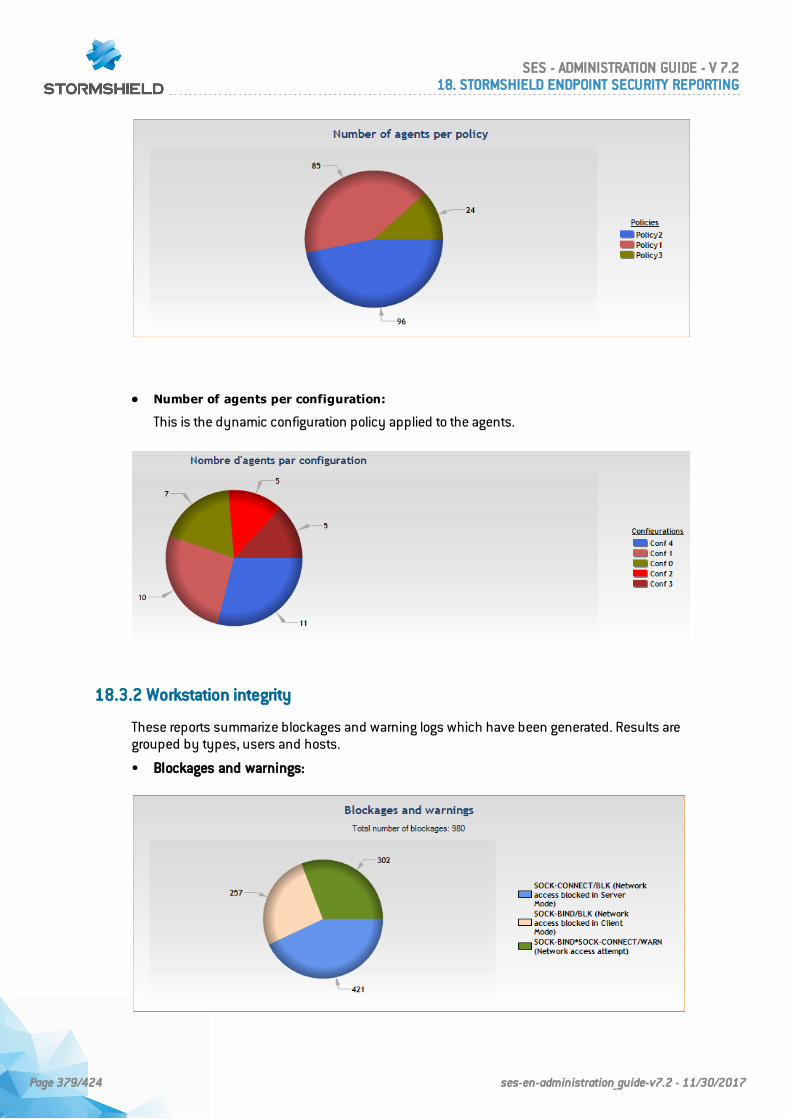
• Number of agents per configuration:
This is the dynamic configuration policy applied to the agents.
18.3.2 Workstation integrity
These reports summarize blockages and warning logs which have been generated. Results aregrouped by types, users and hosts.
• Blockages and warnings:
SES - ADMINISTRATION GUIDE - V 7.218. STORMSHIELD ENDPOINT SECURITY REPORTING
Page 379/424 ses-en-administration_guide-v7.2 - 11/30/2017
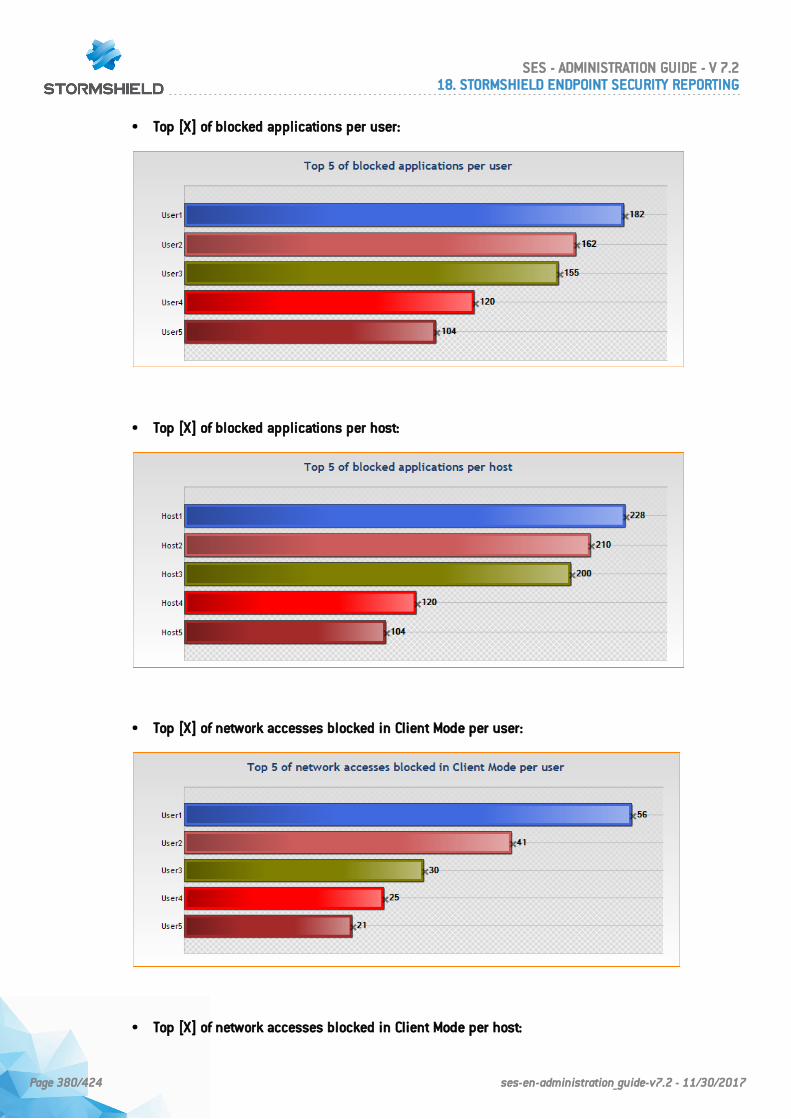
• Top [X] of blocked applications per user:
• Top [X] of blocked applications per host:
• Top [X] of network accesses blocked in Client Mode per user:
• Top [X] of network accesses blocked in Client Mode per host:
SES - ADMINISTRATION GUIDE - V 7.218. STORMSHIELD ENDPOINT SECURITY REPORTING
Page 380/424 ses-en-administration_guide-v7.2 - 11/30/2017
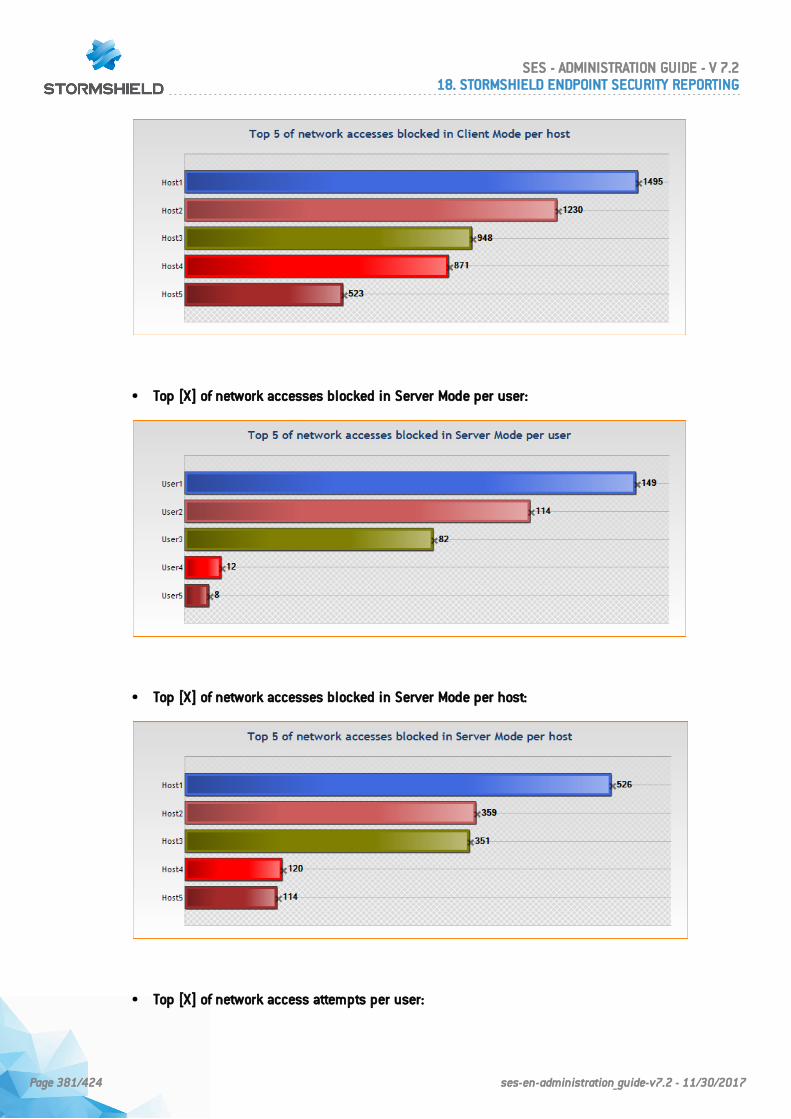
• Top [X] of network accesses blocked in Server Mode per user:
• Top [X] of network accesses blocked in Server Mode per host:
• Top [X] of network access attempts per user:
SES - ADMINISTRATION GUIDE - V 7.218. STORMSHIELD ENDPOINT SECURITY REPORTING
Page 381/424 ses-en-administration_guide-v7.2 - 11/30/2017
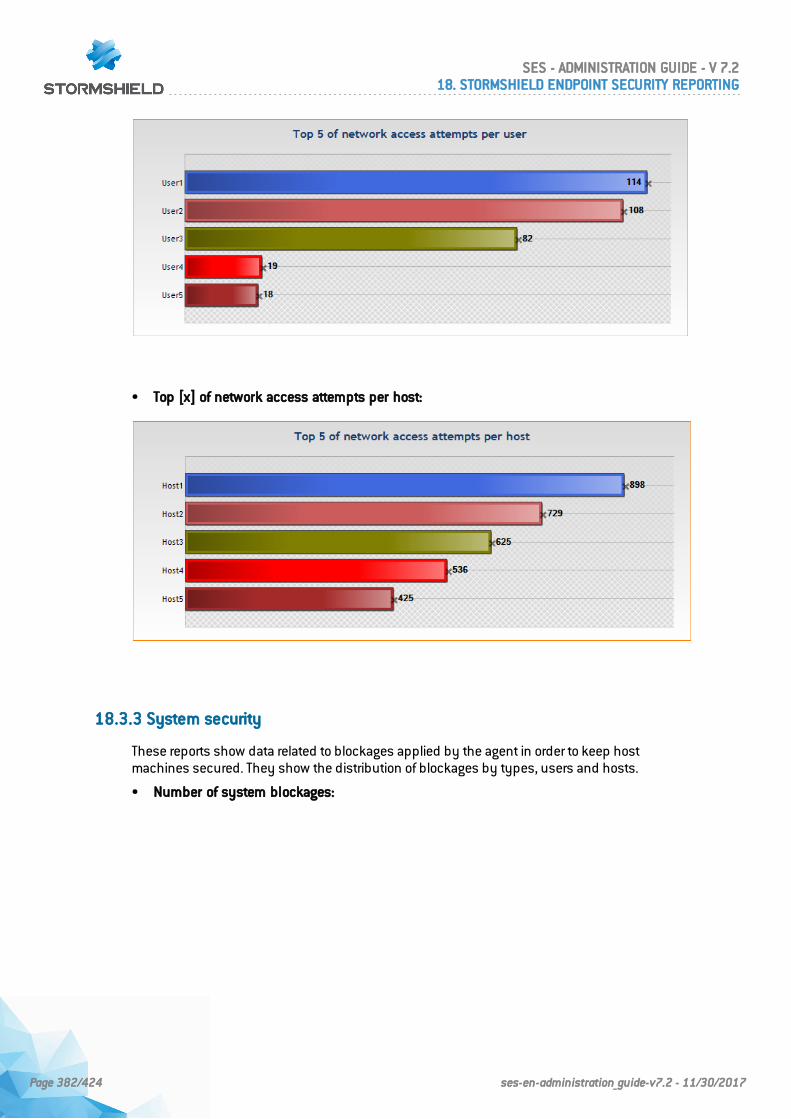
• Top [x] of network access attempts per host:
18.3.3 System security
These reports show data related to blockages applied by the agent in order to keep hostmachines secured. They show the distribution of blockages by types, users and hosts.
• Number of system blockages:
SES - ADMINISTRATION GUIDE - V 7.218. STORMSHIELD ENDPOINT SECURITY REPORTING
Page 382/424 ses-en-administration_guide-v7.2 - 11/30/2017
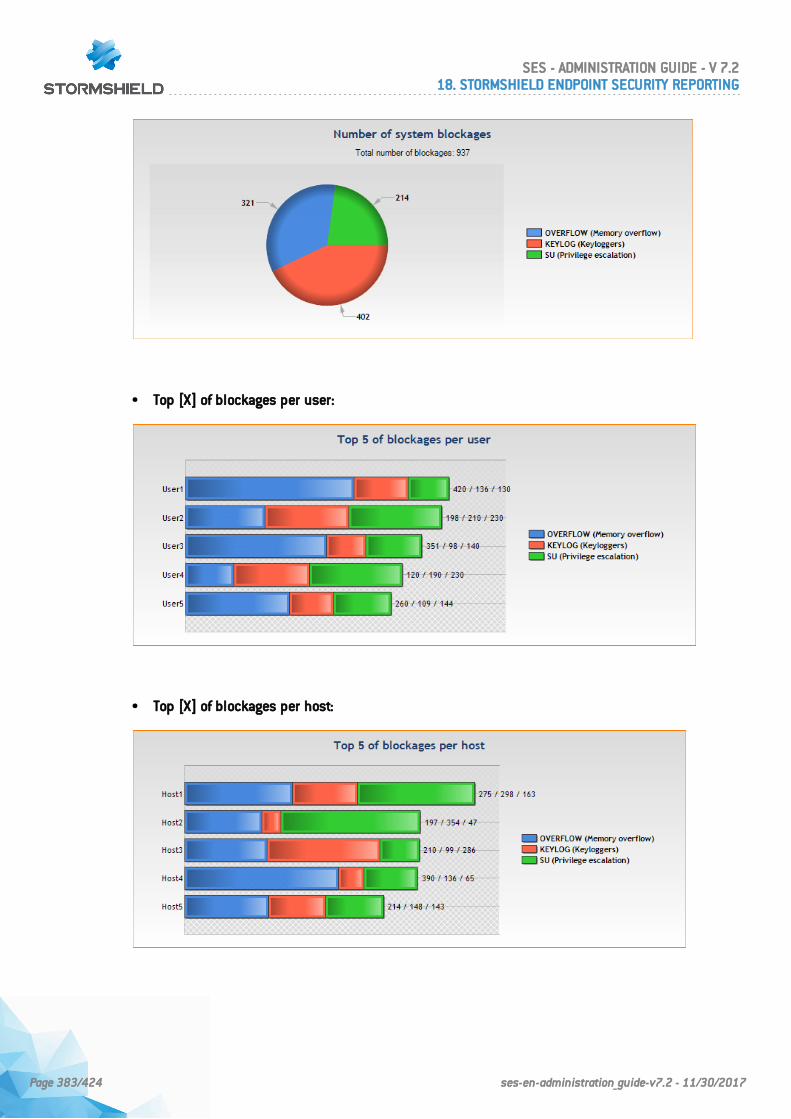
• Top [X] of blockages per user:
• Top [X] of blockages per host:
SES - ADMINISTRATION GUIDE - V 7.218. STORMSHIELD ENDPOINT SECURITY REPORTING
Page 383/424 ses-en-administration_guide-v7.2 - 11/30/2017

18.3.4 Devices
These reports show statistics about the use of removable devices on agents.
• Top [X] of blocked files per device:
• Top [X] of blocked files per user:
• Top [X] of blocked files per host:
SES - ADMINISTRATION GUIDE - V 7.218. STORMSHIELD ENDPOINT SECURITY REPORTING
Page 384/424 ses-en-administration_guide-v7.2 - 11/30/2017
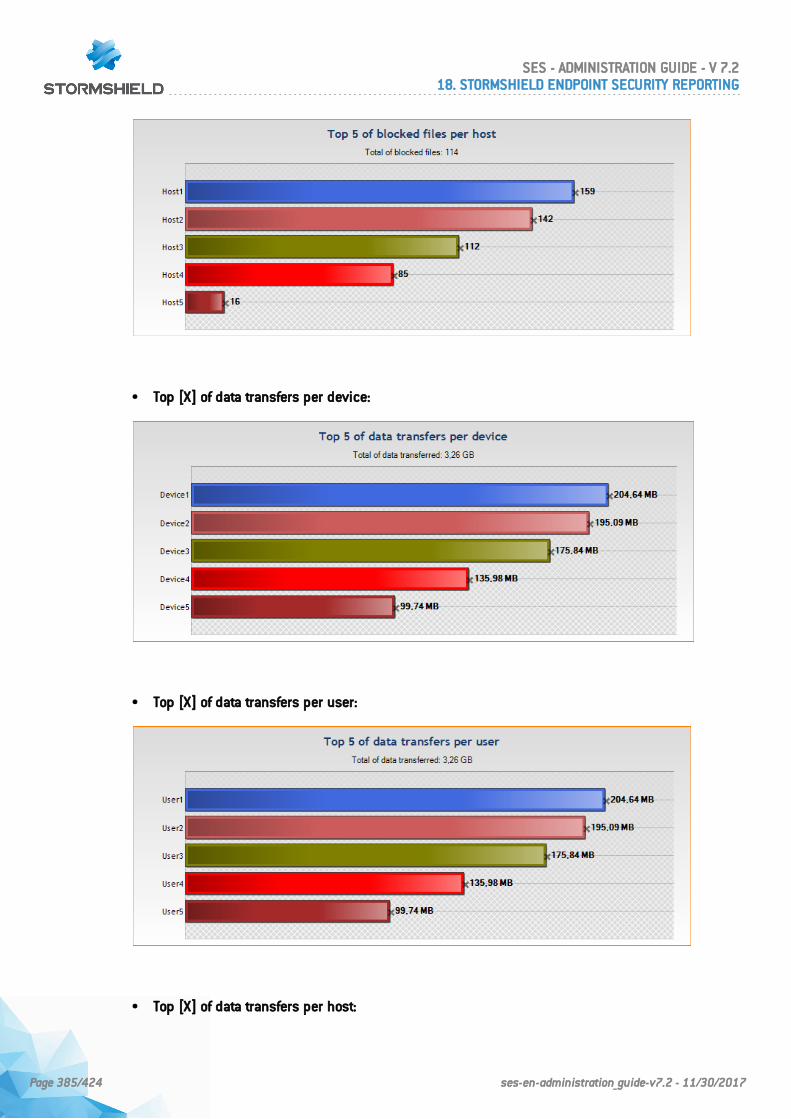
• Top [X] of data transfers per device:
• Top [X] of data transfers per user:
• Top [X] of data transfers per host:
SES - ADMINISTRATION GUIDE - V 7.218. STORMSHIELD ENDPOINT SECURITY REPORTING
Page 385/424 ses-en-administration_guide-v7.2 - 11/30/2017
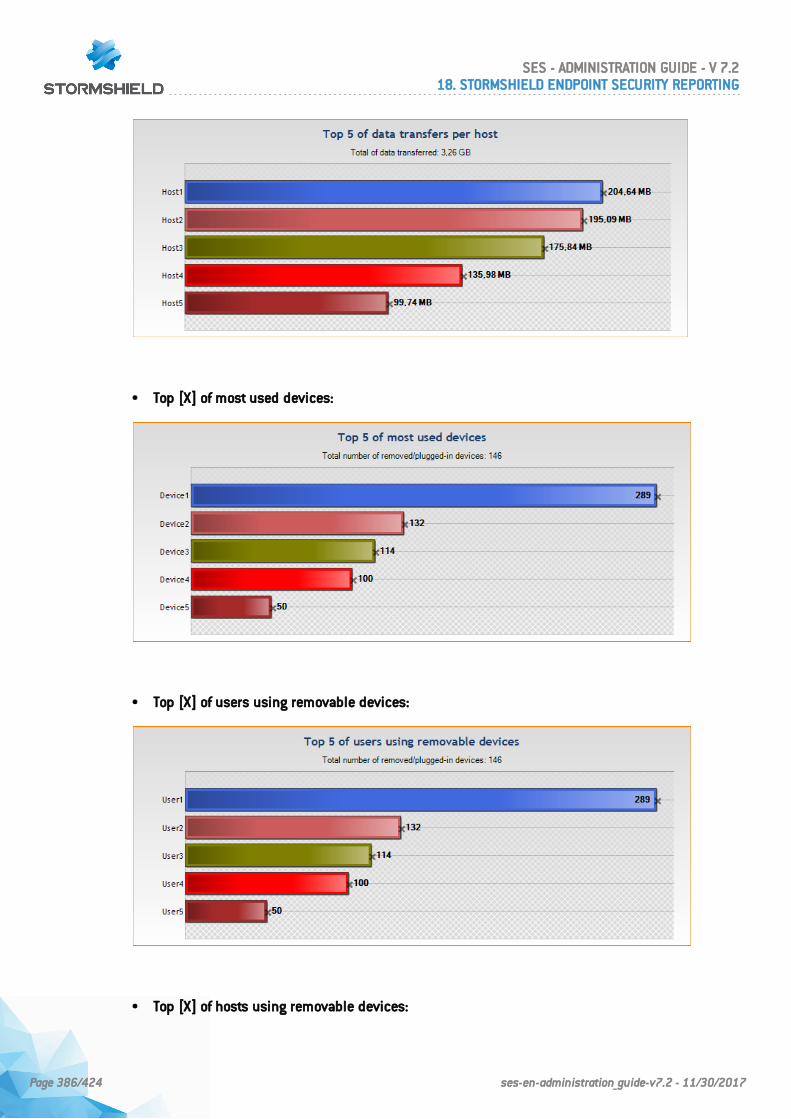
• Top [X] of most used devices:
• Top [X] of users using removable devices:
• Top [X] of hosts using removable devices:
SES - ADMINISTRATION GUIDE - V 7.218. STORMSHIELD ENDPOINT SECURITY REPORTING
Page 386/424 ses-en-administration_guide-v7.2 - 11/30/2017
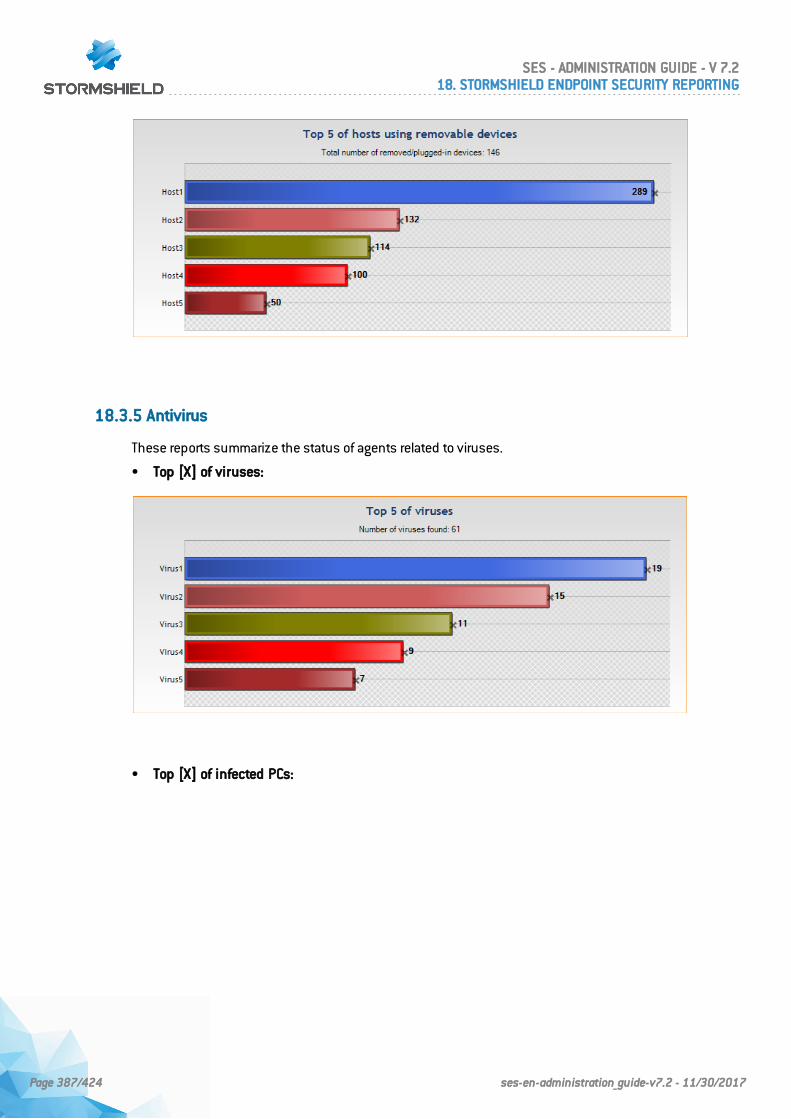
18.3.5 Antivirus
These reports summarize the status of agents related to viruses.
• Top [X] of viruses:
• Top [X] of infected PCs:
SES - ADMINISTRATION GUIDE - V 7.218. STORMSHIELD ENDPOINT SECURITY REPORTING
Page 387/424 ses-en-administration_guide-v7.2 - 11/30/2017
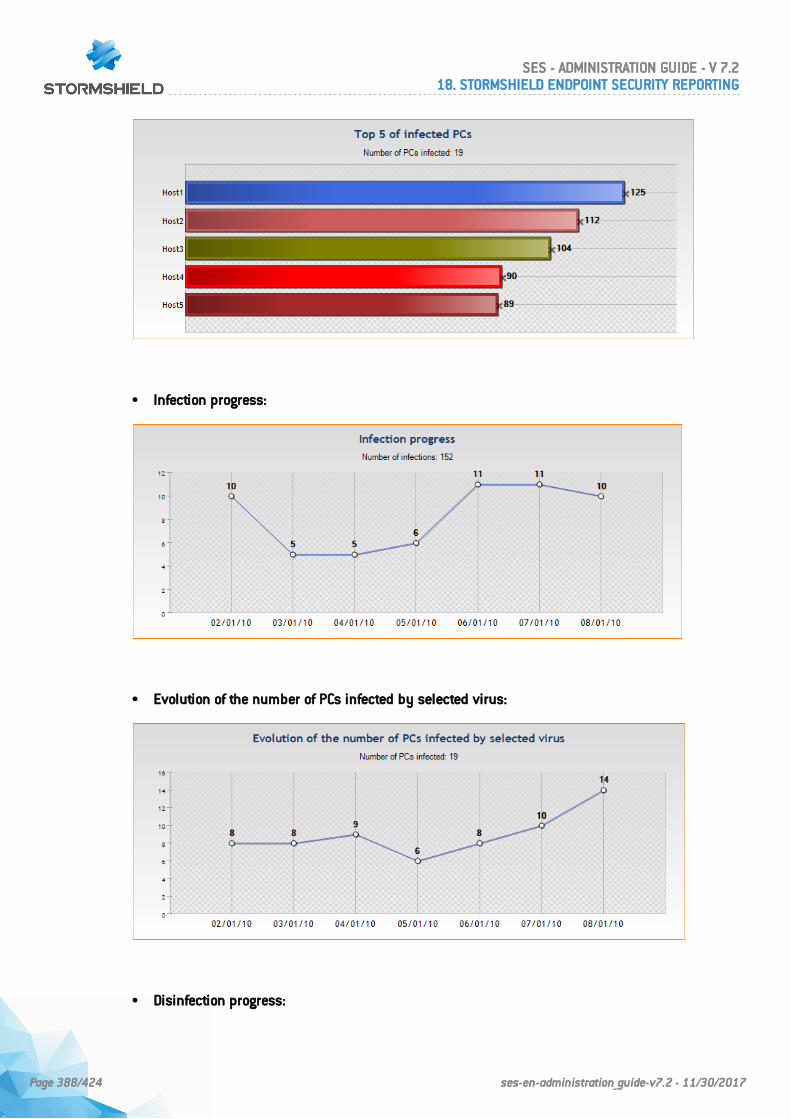
• Infection progress:
• Evolution of the number of PCs infected by selected virus:
• Disinfection progress:
SES - ADMINISTRATION GUIDE - V 7.218. STORMSHIELD ENDPOINT SECURITY REPORTING
Page 388/424 ses-en-administration_guide-v7.2 - 11/30/2017
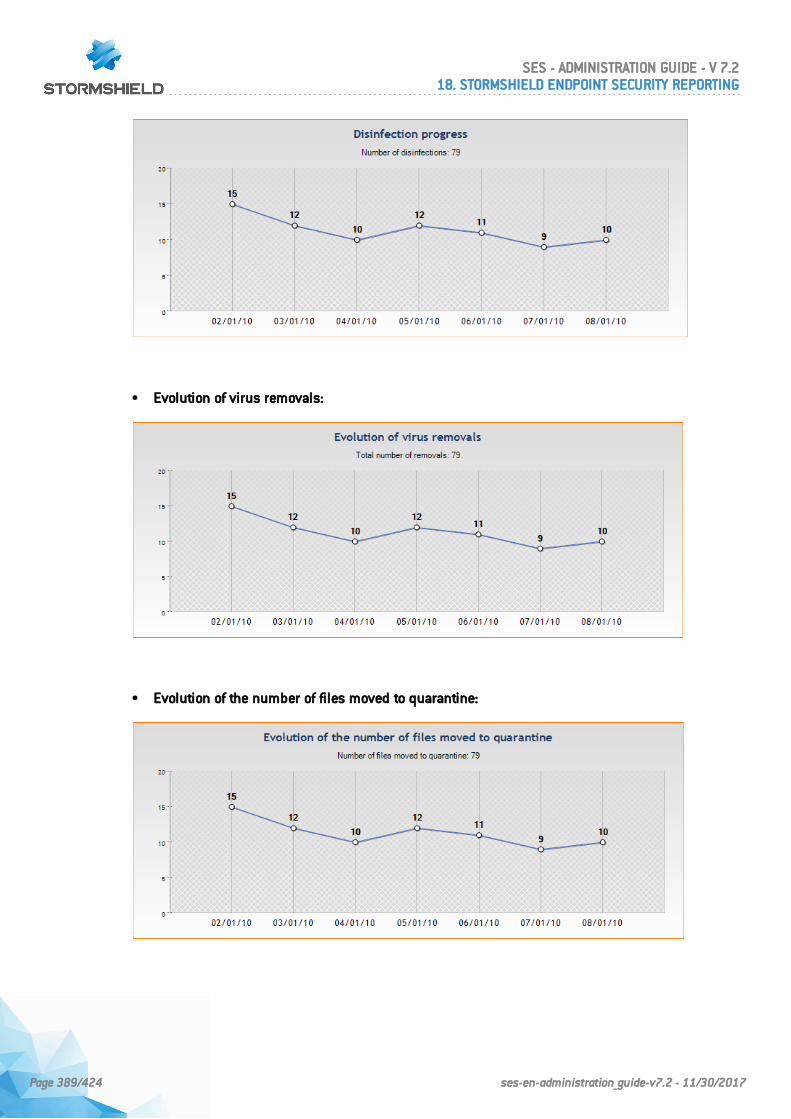
• Evolution of virus removals:
• Evolution of the number of files moved to quarantine:
SES - ADMINISTRATION GUIDE - V 7.218. STORMSHIELD ENDPOINT SECURITY REPORTING
Page 389/424 ses-en-administration_guide-v7.2 - 11/30/2017
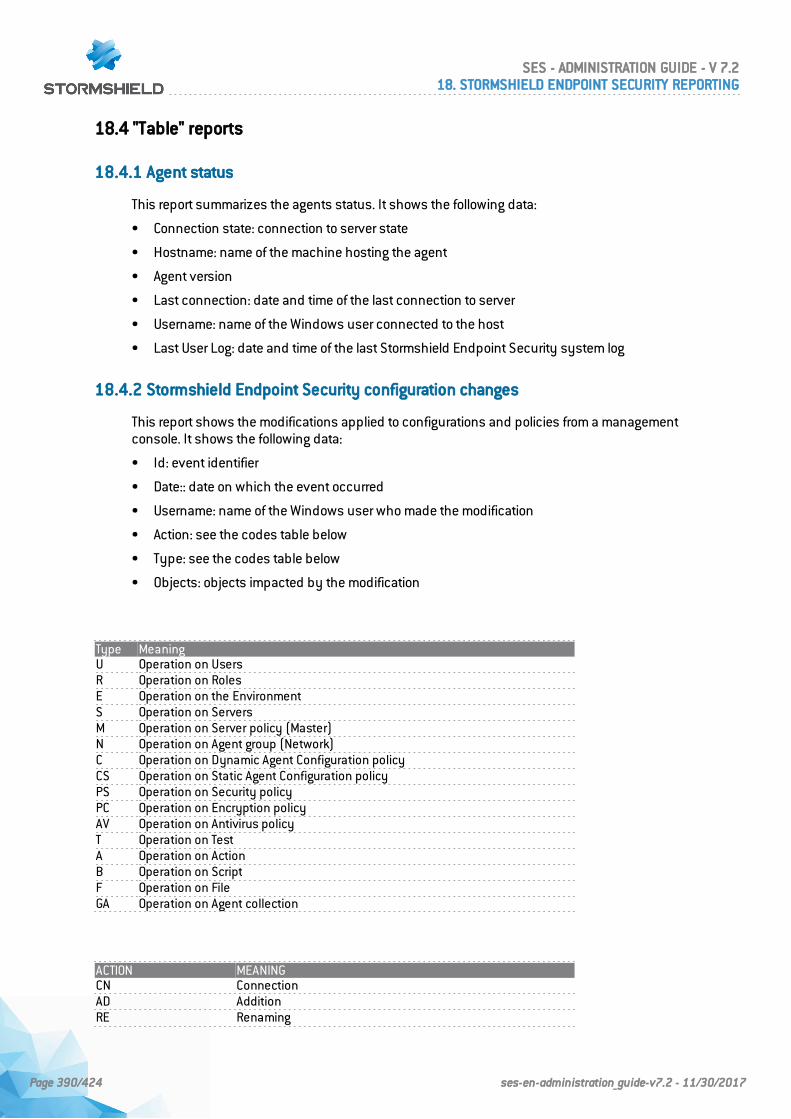
18.4 "Table" reports
18.4.1 Agent status
This report summarizes the agents status. It shows the following data:
• Connection state: connection to server state
• Hostname: name of the machine hosting the agent
• Agent version
• Last connection: date and time of the last connection to server
• Username: name of the Windows user connected to the host
• Last User Log: date and time of the last Stormshield Endpoint Security system log
18.4.2 Stormshield Endpoint Security configuration changes
This report shows the modifications applied to configurations and policies from a managementconsole. It shows the following data:
• Id: event identifier
• Date:: date on which the event occurred
• Username: name of the Windows user who made the modification
• Action: see the codes table below
• Type: see the codes table below
• Objects: objects impacted by the modification
Type MeaningU Operation on UsersR Operation on RolesE Operation on the EnvironmentS Operation on ServersM Operation on Server policy (Master)N Operation on Agent group (Network)C Operation on Dynamic Agent Configuration policyCS Operation on Static Agent Configuration policyPS Operation on Security policyPC Operation on Encryption policyAV Operation on Antivirus policyT Operation on TestA Operation on ActionB Operation on ScriptF Operation on FileGA Operation on Agent collection
ACTION MEANINGCN ConnectionAD AdditionRE Renaming
SES - ADMINISTRATION GUIDE - V 7.218. STORMSHIELD ENDPOINT SECURITY REPORTING
Page 390/424 ses-en-administration_guide-v7.2 - 11/30/2017
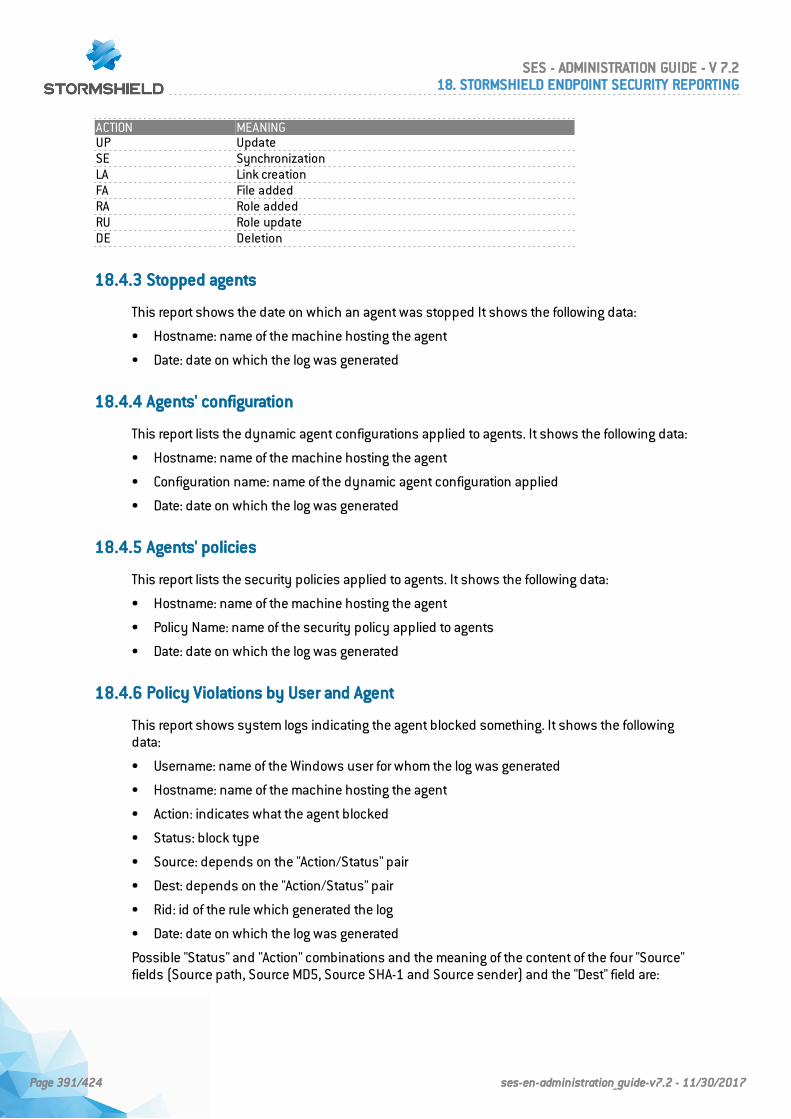
ACTION MEANINGUP UpdateSE SynchronizationLA Link creationFA File addedRA Role addedRU Role updateDE Deletion
18.4.3 Stopped agents
This report shows the date on which an agent was stopped It shows the following data:
• Hostname: name of the machine hosting the agent
• Date: date on which the log was generated
18.4.4 Agents' configuration
This report lists the dynamic agent configurations applied to agents. It shows the following data:
• Hostname: name of the machine hosting the agent
• Configuration name: name of the dynamic agent configuration applied
• Date: date on which the log was generated
18.4.5 Agents' policies
This report lists the security policies applied to agents. It shows the following data:
• Hostname: name of the machine hosting the agent
• Policy Name: name of the security policy applied to agents
• Date: date on which the log was generated
18.4.6 Policy Violations by User and Agent
This report shows system logs indicating the agent blocked something. It shows the followingdata:
• Username: name of the Windows user for whom the log was generated
• Hostname: name of the machine hosting the agent
• Action: indicates what the agent blocked
• Status: block type
• Source: depends on the "Action/Status" pair
• Dest: depends on the "Action/Status" pair
• Rid: id of the rule which generated the log
• Date: date on which the log was generated
Possible "Status" and "Action" combinations and the meaning of the content of the four "Source"fields (Source path, Source MD5, Source SHA-1 and Source sender) and the "Dest" field are:
SES - ADMINISTRATION GUIDE - V 7.218. STORMSHIELD ENDPOINT SECURITY REPORTING
Page 391/424 ses-en-administration_guide-v7.2 - 11/30/2017
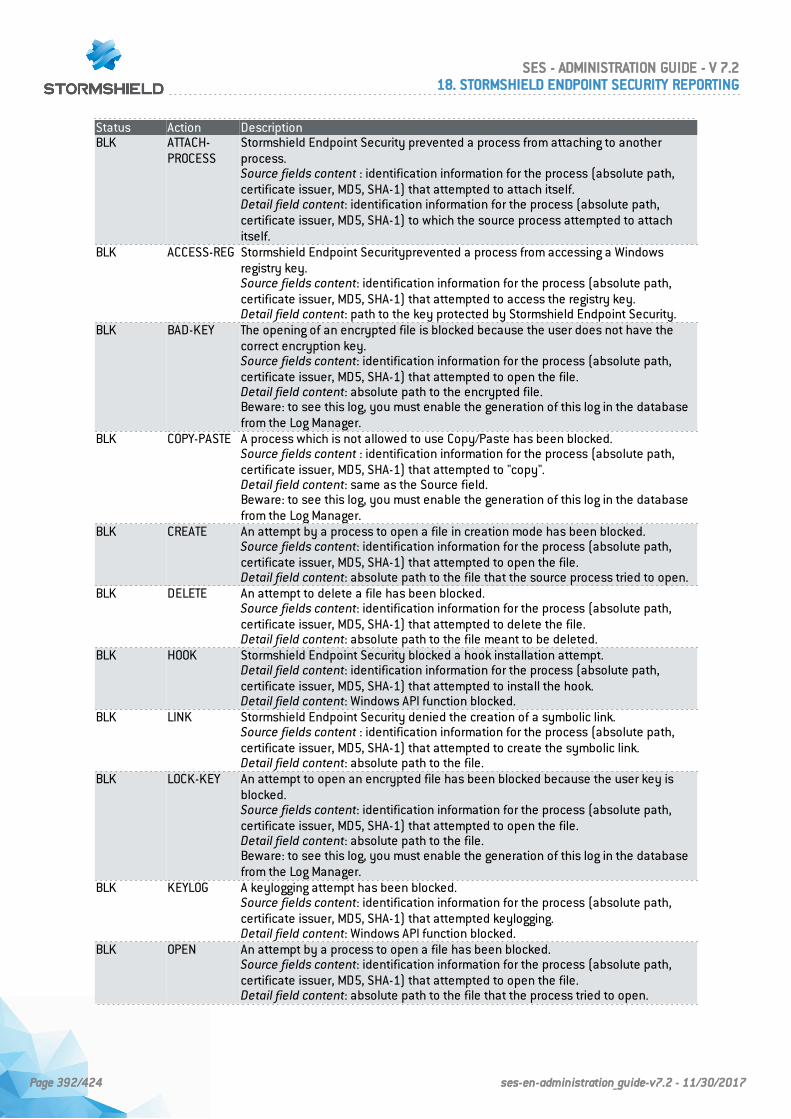
Status Action DescriptionBLK ATTACH-
PROCESSStormshield Endpoint Security prevented a process from attaching to anotherprocess.Source fields content : identification information for the process (absolute path,certificate issuer, MD5, SHA-1) that attempted to attach itself.Detail field content: identification information for the process (absolute path,certificate issuer, MD5, SHA-1) to which the source process attempted to attachitself.
BLK ACCESS-REG Stormshield Endpoint Securityprevented a process from accessing a Windowsregistry key.Source fields content: identification information for the process (absolute path,certificate issuer, MD5, SHA-1) that attempted to access the registry key.Detail field content: path to the key protected by Stormshield Endpoint Security.
BLK BAD-KEY The opening of an encrypted file is blocked because the user does not have thecorrect encryption key.Source fields content: identification information for the process (absolute path,certificate issuer, MD5, SHA-1) that attempted to open the file.Detail field content: absolute path to the encrypted file.Beware: to see this log, you must enable the generation of this log in the databasefrom the Log Manager.
BLK COPY-PASTE A process which is not allowed to use Copy/Paste has been blocked.Source fields content : identification information for the process (absolute path,certificate issuer, MD5, SHA-1) that attempted to "copy".Detail field content: same as the Source field.Beware: to see this log, you must enable the generation of this log in the databasefrom the Log Manager.
BLK CREATE An attempt by a process to open a file in creation mode has been blocked.Source fields content: identification information for the process (absolute path,certificate issuer, MD5, SHA-1) that attempted to open the file.Detail field content: absolute path to the file that the source process tried to open.
BLK DELETE An attempt to delete a file has been blocked.Source fields content: identification information for the process (absolute path,certificate issuer, MD5, SHA-1) that attempted to delete the file.Detail field content: absolute path to the file meant to be deleted.
BLK HOOK Stormshield Endpoint Security blocked a hook installation attempt.Detail field content: identification information for the process (absolute path,certificate issuer, MD5, SHA-1) that attempted to install the hook.Detail field content: Windows API function blocked.
BLK LINK Stormshield Endpoint Security denied the creation of a symbolic link.Source fields content : identification information for the process (absolute path,certificate issuer, MD5, SHA-1) that attempted to create the symbolic link.Detail field content: absolute path to the file.
BLK LOCK-KEY An attempt to open an encrypted file has been blocked because the user key isblocked.Source fields content: identification information for the process (absolute path,certificate issuer, MD5, SHA-1) that attempted to open the file.Detail field content: absolute path to the file.Beware: to see this log, you must enable the generation of this log in the databasefrom the Log Manager.
BLK KEYLOG A keylogging attempt has been blocked.Source fields content: identification information for the process (absolute path,certificate issuer, MD5, SHA-1) that attempted keylogging.Detail field content: Windows API function blocked.
BLK OPEN An attempt by a process to open a file has been blocked.Source fields content: identification information for the process (absolute path,certificate issuer, MD5, SHA-1) that attempted to open the file.Detail field content: absolute path to the file that the process tried to open.
SES - ADMINISTRATION GUIDE - V 7.218. STORMSHIELD ENDPOINT SECURITY REPORTING
Page 392/424 ses-en-administration_guide-v7.2 - 11/30/2017
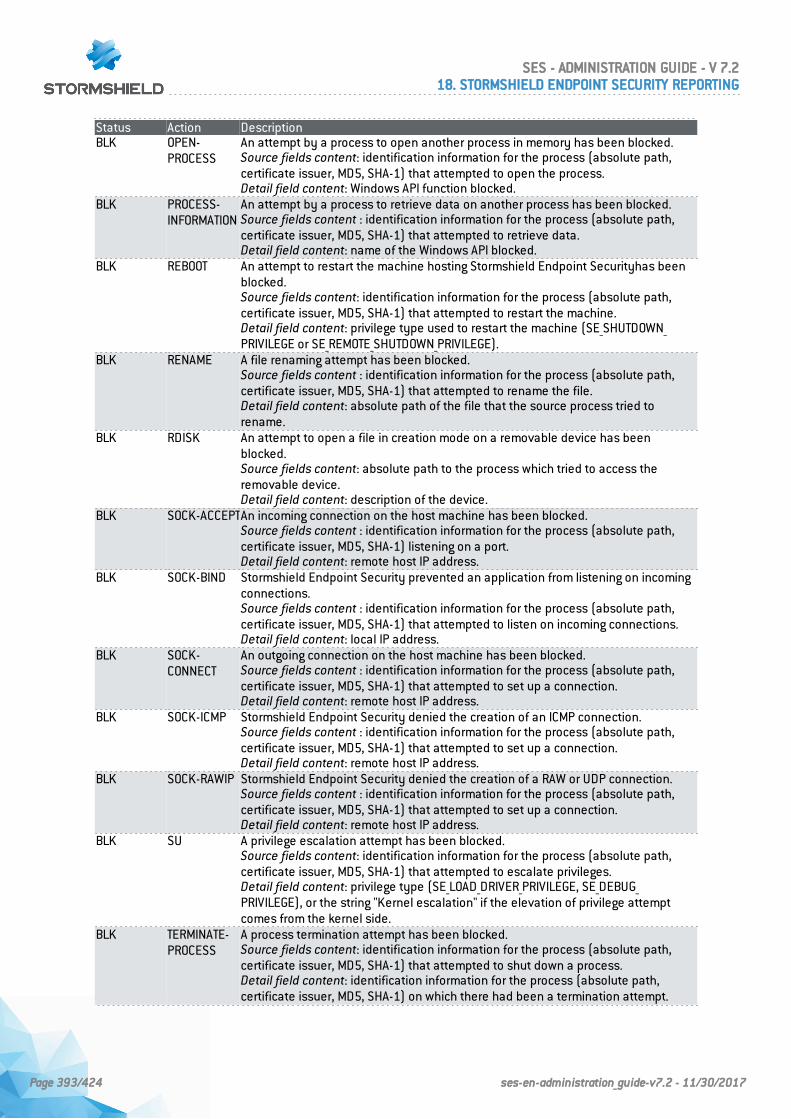
Status Action DescriptionBLK OPEN-
PROCESSAn attempt by a process to open another process in memory has been blocked.Source fields content: identification information for the process (absolute path,certificate issuer, MD5, SHA-1) that attempted to open the process.Detail field content: Windows API function blocked.
BLK PROCESS-INFORMATION
An attempt by a process to retrieve data on another process has been blocked.Source fields content : identification information for the process (absolute path,certificate issuer, MD5, SHA-1) that attempted to retrieve data.Detail field content: name of the Windows API blocked.
BLK REBOOT An attempt to restart the machine hosting Stormshield Endpoint Securityhas beenblocked.Source fields content: identification information for the process (absolute path,certificate issuer, MD5, SHA-1) that attempted to restart the machine.Detail field content: privilege type used to restart the machine (SE_SHUTDOWN_PRIVILEGE or SE_REMOTE_SHUTDOWN_PRIVILEGE).
BLK RENAME A file renaming attempt has been blocked.Source fields content : identification information for the process (absolute path,certificate issuer, MD5, SHA-1) that attempted to rename the file.Detail field content: absolute path of the file that the source process tried torename.
BLK RDISK An attempt to open a file in creation mode on a removable device has beenblocked.Source fields content: absolute path to the process which tried to access theremovable device.Detail field content: description of the device.
BLK SOCK-ACCEPTAn incoming connection on the host machine has been blocked.Source fields content : identification information for the process (absolute path,certificate issuer, MD5, SHA-1) listening on a port.Detail field content: remote host IP address.
BLK SOCK-BIND Stormshield Endpoint Security prevented an application from listening on incomingconnections.Source fields content : identification information for the process (absolute path,certificate issuer, MD5, SHA-1) that attempted to listen on incoming connections.Detail field content: local IP address.
BLK SOCK-CONNECT
An outgoing connection on the host machine has been blocked.Source fields content : identification information for the process (absolute path,certificate issuer, MD5, SHA-1) that attempted to set up a connection.Detail field content: remote host IP address.
BLK SOCK-ICMP Stormshield Endpoint Security denied the creation of an ICMP connection.Source fields content : identification information for the process (absolute path,certificate issuer, MD5, SHA-1) that attempted to set up a connection.Detail field content: remote host IP address.
BLK SOCK-RAWIP Stormshield Endpoint Security denied the creation of a RAW or UDP connection.Source fields content : identification information for the process (absolute path,certificate issuer, MD5, SHA-1) that attempted to set up a connection.Detail field content: remote host IP address.
BLK SU A privilege escalation attempt has been blocked.Source fields content: identification information for the process (absolute path,certificate issuer, MD5, SHA-1) that attempted to escalate privileges.Detail field content: privilege type (SE_LOAD_DRIVER_PRIVILEGE, SE_DEBUG_PRIVILEGE), or the string "Kernel escalation" if the elevation of privilege attemptcomes from the kernel side.
BLK TERMINATE-PROCESS
A process termination attempt has been blocked.Source fields content: identification information for the process (absolute path,certificate issuer, MD5, SHA-1) that attempted to shut down a process.Detail field content: identification information for the process (absolute path,certificate issuer, MD5, SHA-1) on which there had been a termination attempt.
SES - ADMINISTRATION GUIDE - V 7.218. STORMSHIELD ENDPOINT SECURITY REPORTING
Page 393/424 ses-en-administration_guide-v7.2 - 11/30/2017
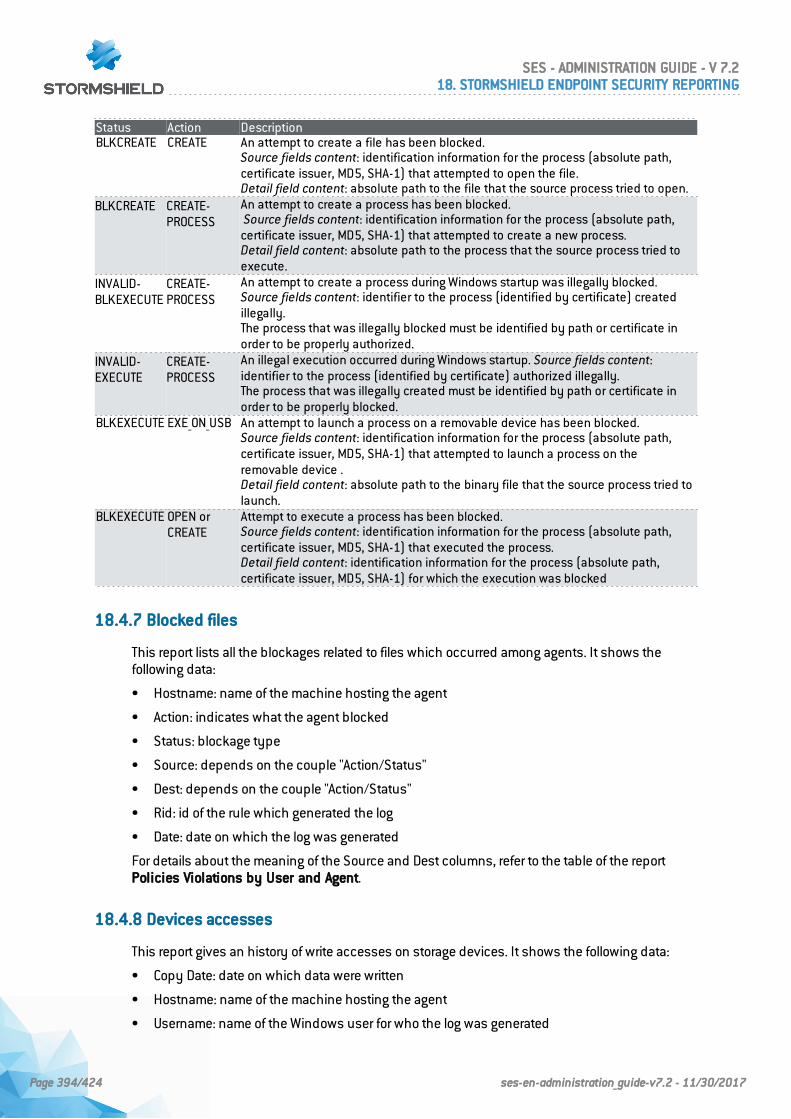
Status Action DescriptionBLKCREATE CREATE An attempt to create a file has been blocked.
Source fields content: identification information for the process (absolute path,certificate issuer, MD5, SHA-1) that attempted to open the file.Detail field content: absolute path to the file that the source process tried to open.
BLKCREATE CREATE-PROCESS
An attempt to create a process has been blocked.Source fields content: identification information for the process (absolute path,
certificate issuer, MD5, SHA-1) that attempted to create a new process.Detail field content: absolute path to the process that the source process tried toexecute.
INVALID-BLKEXECUTE
CREATE-PROCESS
An attempt to create a process during Windows startup was illegally blocked.Source fields content: identifier to the process (identified by certificate) createdillegally.The process that was illegally blocked must be identified by path or certificate inorder to be properly authorized.
INVALID-EXECUTE
CREATE-PROCESS
An illegal execution occurred during Windows startup. Source fields content:identifier to the process (identified by certificate) authorized illegally.The process that was illegally created must be identified by path or certificate inorder to be properly blocked.
BLKEXECUTE EXE_ON_USB An attempt to launch a process on a removable device has been blocked.Source fields content: identification information for the process (absolute path,certificate issuer, MD5, SHA-1) that attempted to launch a process on theremovable device .Detail field content: absolute path to the binary file that the source process tried tolaunch.
BLKEXECUTE OPEN orCREATE
Attempt to execute a process has been blocked.Source fields content: identification information for the process (absolute path,certificate issuer, MD5, SHA-1) that executed the process.Detail field content: identification information for the process (absolute path,certificate issuer, MD5, SHA-1) for which the execution was blocked
18.4.7 Blocked files
This report lists all the blockages related to files which occurred among agents. It shows thefollowing data:
• Hostname: name of the machine hosting the agent
• Action: indicates what the agent blocked
• Status: blockage type
• Source: depends on the couple "Action/Status"
• Dest: depends on the couple "Action/Status"
• Rid: id of the rule which generated the log
• Date: date on which the log was generated
For details about the meaning of the Source and Dest columns, refer to the table of the reportPolicies Violations by User and Agent.
18.4.8 Devices accesses
This report gives an history of write accesses on storage devices. It shows the following data:
• Copy Date: date on which data were written
• Hostname: name of the machine hosting the agent
• Username: name of the Windows user for who the log was generated
SES - ADMINISTRATION GUIDE - V 7.218. STORMSHIELD ENDPOINT SECURITY REPORTING
Page 394/424 ses-en-administration_guide-v7.2 - 11/30/2017
• Type: device type on which the operation occurred
• Manufacturer: device manufacturer
• Model: device model
• Serial Number: device serial number
• Copied File: name of the file on which the operation occurred
• Copied Size: size in bytes of copied data
SES - ADMINISTRATION GUIDE - V 7.218. STORMSHIELD ENDPOINT SECURITY REPORTING
Page 395/424 ses-en-administration_guide-v7.2 - 11/30/2017
19. TroubleshootingThis chapter explains how to solve technical problems that may arise while using StormshieldEndpoint Security.
19.1 Certificates
19.1.1 The console cannot communicate with the server
If the problem is related to the certificates used to encrypt communications between the serverand the console, a specific message is displayed in the Messages area in the Log Managermenu.
In this case, follow the steps below while respecting the order indicated:
1. Check that the certificates are located in an environment where they can be accessed byboth the console and the server.
If certificates are accessible, the problem is probably due to the certificate itself (example: thecertificate has expired).
The console will indicate the most likely reason for this in the Message column.
2. If there is no certificate problem, check the connectivity between the console and the server:
◦ Use ping from the console to test access to the server IP address.
◦ If the ping is successful, use telnet on the server address through port 16007 to test theopening of the port used for communication between the console and the server.
3. If connectivity is available, the Stormshield Endpoint Security server is effectively running onthe server host machine.
If connectivity is not available, restart the server.
4. If the problem is solved, send the configuration again.
The console will display a message verifying that the configuration was sent and that theserver received it.
19.1.2 The agent cannot download its certificate
After installation, the agent has to download an X509 certificate to communicate securely with theserver.
1. If the agent fails to download its certificate, a message is logged on the workstation.This message can be consulted by right-clicking the Stormshield Endpoint Security icondisplayed in the system tray and by selecting View event logs.
The most common reasons for such a failure are the following:
◦ The Checking server source option under Authentication Service is enabled on themanagement console and the agent has been downloaded from another StormshieldEndpoint Security server instance.
Two solutions can be considered:
- Reinstall an agent generated by the appropriate server.
- Disable the Checking server source option from the server configuration policy.
◦ The certificate deployment period has expired.
SES - ADMINISTRATION GUIDE - V 7.219. TROUBLESHOOTING
Page 396/424 ses-en-administration_guide-v7.2 - 11/30/2017
The period must be renewed. You can modify it on the management console underAuthentication Service of the server configuration policy.
2. If the configuration is correct and the agent still cannot download its certificate:
◦ Check the communication by sending a ping to the Stormshield Endpoint Security serverIP address from the workstation.
◦ Stop the Stormshield Endpoint Security server.
◦ Run telnet on port 443.
The connection should fail.
3. If the connection is established, this means that another Web server is present on the serverhost. Stop this server, and start the Stormshield Endpoint Security server again.
When the problem is solved, check that the agent actually downloads its certificate.
19.1.3 Unable to download certificates manually
If you cannot access the certificate downloading page, make sure that another Web server is notalready running the server host.
If manual download fails, one of the following error messages is displayed:
• Wrong login or password:
The login and/or password that have been entered do not match with those defined on themanagement console.
• The server is unable to respond to your request (server is locked):
The server is locked. Try again later.
• An internal error occurred. Please contact your administrator:
An internal error occurred. Server logs should be analyzed in order to diagnose the origin ofthe problem.
19.2 Configurations
19.2.1 Unable to apply the configuration
The simplest way to check that a security configuration has been properly applied to a clientworkstation is to attempt an operation explicitly banned by a rule defined on the managementconsole.
A good example is the rule that bans the use of Windows notepad (notepad.exe) to open a filewith a .txt extension.
1. If the blocking rule works, the application will not be allowed to access the file.
2. If the blocking rule is not applied, check the following:
◦ The configuration has been assigned to the target machine by the management console.
◦ The Stormshield Endpoint Security agent is running on the client workstation.
To do so, verify the Stormshield Endpoint Security Agent service status.
If the service is not found in the list of Windows services, there has probably been aproblem with agent installation.
Correct installation is shown in the following file:
SES - ADMINISTRATION GUIDE - V 7.219. TROUBLESHOOTING
Page 397/424 ses-en-administration_guide-v7.2 - 11/30/2017
[Program Files]\Stormshield\Stormshield Endpoint SecurityAgent\srservice.log
3. After verifying that the security configuration has been applied to the client workstation,check that the data collected by the agent:
◦ Has effectively been sent to the server.
◦ Has effectively been stored in the database.
◦ Is accessible to the console.
This data must be visible in the Log Manager menu on the management console.
4. If no data is displayed on the console, check database connection.
If the console cannot connect to the database, a message indicates this on opening theconsole.
5. When no connection to the database is available, you should check:
◦ The database server accessibility by sending a ping to the machine that hosts thedatabase.
◦ The database engine is started (via the services or system tray icon).
6. If the database engine is running and the host machine is accessible, check the connectiondata that is specific to the Stormshield Endpoint Security database.
To do so, verify the password in the Database password field and the IP address in the SQLserver instance field in the Environment Manager.
7. If the connection to the database is active, verify that event feedback is properly configuredon the console under Console Configuration.
When the connection to the database is active, you can generate a log to check that theconfiguration has been correctly applied to the client workstation:
◦ Trigger rule application on the client workstation once again.
◦ Check data feedback.
◦ Check the frequency of configuration updates which is also the frequency of eventfeedback.
WARNINGAvoid updating too frequently as this may cause network saturation.
19.3 Miscellaneous
19.3.1 Incorrect installation of the Stormshield Endpoint Security agent
You must use the Administrator account to install the Stormshield Endpoint Security agent.
If you use another account:
• The installation starts but not all of the files are copied.
• The service is not registered.
• Nothing works (including the uninstaller).
To fix the problem, you must manually remove all of the Stormshield Endpoint Security files andregistry keys.
SES - ADMINISTRATION GUIDE - V 7.219. TROUBLESHOOTING
Page 398/424 ses-en-administration_guide-v7.2 - 11/30/2017

WARNINGBefore installing the agent, make sure that the Windows XP embedded firewall has beendisabled.
19.3.2 Agent fails to be remotely deployed
When the srdeployment assistant fails to deploy the agent, the error message Hostunreachable is displayed on the console.
In this case, follow the steps below while respecting the order indicated:
1. Send a ping command to the host IP address.
2. Check that the host netbios C$ share is accessible.
3. Check that Use simple file sharing is disabled.
4. Check that port 445 can be accessed by sending a telnet command.
5. Check that there is no connection to the host which is already open.
6. Repeat the agent deployment procedure.
19.3.3 Hardware conflicts
Conflicts between drivers may sometimes cause a system crash called BSoD (Blue Screen ofDeath).To determine the cause of the conflict, it is recommended to enable a Windows service that keepsa trace of system activity at the time of the crash.
This service is accessible from the System Properties panel on your workstation:
1. Click the Advanced tab.
2. Click Settings in the Startup and Recovery group.
3. From the Write debugging information group, select Complete memory dump.
4. Keep the default directory %SystemRoot%\MEMORY.DMP.
%SystemRoot% usually corresponds to c:\windows\ in Windows XP.
19.3.4 Degraded performance
Stormshield Endpoint Security operation has no significant impact on client workstationperformance.
However, an application may repeatedly attempt to perform an operation that is blocked byStormshield Endpoint Security . This in turn may cause CPU overload.
If workstation performance drops, it is first of all necessary to check the affected process byopening the Windows Task Manager.
If the affected process is indeed blocked by Stormshield Endpoint Security , a trace of theblockage will be recorded in one of the agent log files. Checking the logs will show whether thecause of the problem was indeed triggered by a Stormshield Endpoint Security -imposedblockage.
19.3.5 StopAgent does not work and/or Stormshield Endpoint Security cannot beupdated
The issue may occur under Windows Server 2003 SP2 or R2 SP2.
SES - ADMINISTRATION GUIDE - V 7.219. TROUBLESHOOTING
Page 399/424 ses-en-administration_guide-v7.2 - 11/30/2017
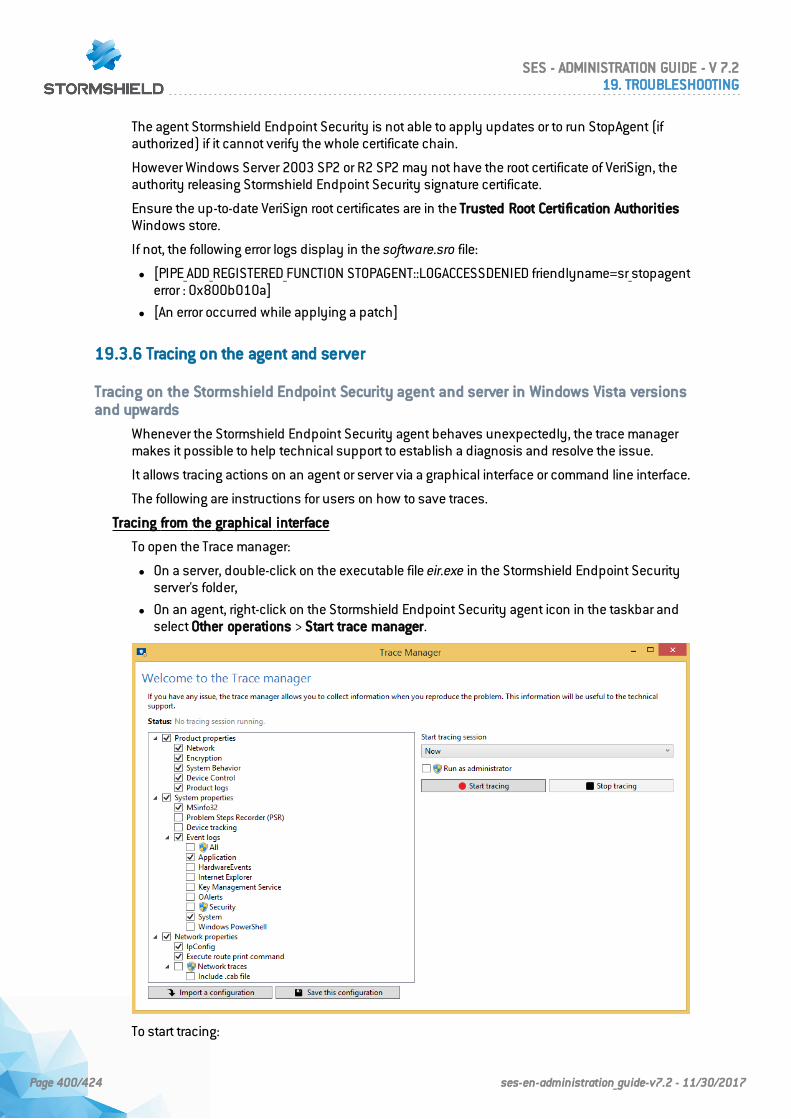
The agent Stormshield Endpoint Security is not able to apply updates or to run StopAgent (ifauthorized) if it cannot verify the whole certificate chain.
However Windows Server 2003 SP2 or R2 SP2 may not have the root certificate of VeriSign, theauthority releasing Stormshield Endpoint Security signature certificate.
Ensure the up-to-date VeriSign root certificates are in the Trusted Root Certification AuthoritiesWindows store.
If not, the following error logs display in the software.sro file:
l [PIPE_ADD_REGISTERED_FUNCTION STOPAGENT::LOGACCESSDENIED friendlyname=sr_stopagenterror : 0x800b010a]
l [An error occurred while applying a patch]
19.3.6 Tracing on the agent and server
Tracing on the Stormshield Endpoint Security agent and server in Windows Vista versionsand upwards
Whenever the Stormshield Endpoint Security agent behaves unexpectedly, the trace managermakes it possible to help technical support to establish a diagnosis and resolve the issue.
It allows tracing actions on an agent or server via a graphical interface or command line interface.
The following are instructions for users on how to save traces.
Tracing from the graphical interface
To open the Trace manager:
l On a server, double-click on the executable file eir.exe in the Stormshield Endpoint Securityserver's folder,
l On an agent, right-click on the Stormshield Endpoint Security agent icon in the taskbar andselect Other operations > Start trace manager.
To start tracing:
SES - ADMINISTRATION GUIDE - V 7.219. TROUBLESHOOTING
Page 400/424 ses-en-administration_guide-v7.2 - 11/30/2017
1. In the panel on the left, select the items for which you wish to collect traces.
2. Click on Start tracing.
3. Repeat the actions which caused the unexpected behavior of the agent or server.
4. Click on Stop tracing.
5. Write a comment if needed.
6. Wait for the end of the process.
7. When the archive is created, the save window opens. Save the archive. All the data recordedis in the archive.
8. Forward this archive to technical support.
Tracing from the command line interface
Traces can be collected via the command line interface without any interaction with the user.
To start tracing:
1. Open a command prompt in the agent's or server's installation folder.
2. Run the command EirCmd.exe start resultFilePath=ˮpath\example.zipˮ to starttracing and define the name and location of the trace archive.
3. Use the command EirCmd.exe stop to stop tracing.
4. Use the command EirCmd.exe status to find out the current status of the tracing operation.
NOTEThe trace manager cannot be used from the command line interface if simultaneously,items to be collected require administrator privileges, and if the tracing operation requiresthe workstation to be rebooted.
Saving and importing the configuration of the trace manager
l Once you have selected items from the left panel in the trace manager's graphical interface,and you have defined your preferences in the section on the right, you can save yourconfiguration by clicking on Save this configuration.It will be saved in .econf format.
l To use a configuration that was saved earlier:o Double-click on a .econf file to open the trace manager's graphical interface
-or-o Click on Import a configuration from the trace manager's graphical interface
-or-o Indicate the .econf file un the configFilePath parameter in the command line in order to
start tracing : EirCmd.exe start resultFilePath=ˮpath\example.zipˮ[configFilePath=”path\example.econf”].
Tracing on the Stormshield Endpoint Security agent in Windows XP
The tracing tool cannot be used at startup on Microsoft Windows XP clients.
To use the tool:
1. Right-click on the Stormshield Endpoint Security agent icon in the taskbar and select Otheroperations > Start trace manager.
2. Click the settings icon and select the traces you want to save. By default all traces arechecked and tracing will be done immediately only once.
3. Start tracing.
4. Repeat the actions which caused the unexpected behavior of the agent.
SES - ADMINISTRATION GUIDE - V 7.219. TROUBLESHOOTING
Page 401/424 ses-en-administration_guide-v7.2 - 11/30/2017
5. Stop tracing.
6. Write a comment if needed.
7. Wait for the process to end: various commands will be running to retrieve all the informationrequired about the machine as well as network configuration data. The technical supportteams needs them to analyze the problem.
8. When the archive is created, the save window opens. Save the archive. All the data recordedis in the archive.
9. Forward this archive to technical support.
NOTEOnly the technical support team can work on the trace file (extension .etl).
SES - ADMINISTRATION GUIDE - V 7.219. TROUBLESHOOTING
Page 402/424 ses-en-administration_guide-v7.2 - 11/30/2017
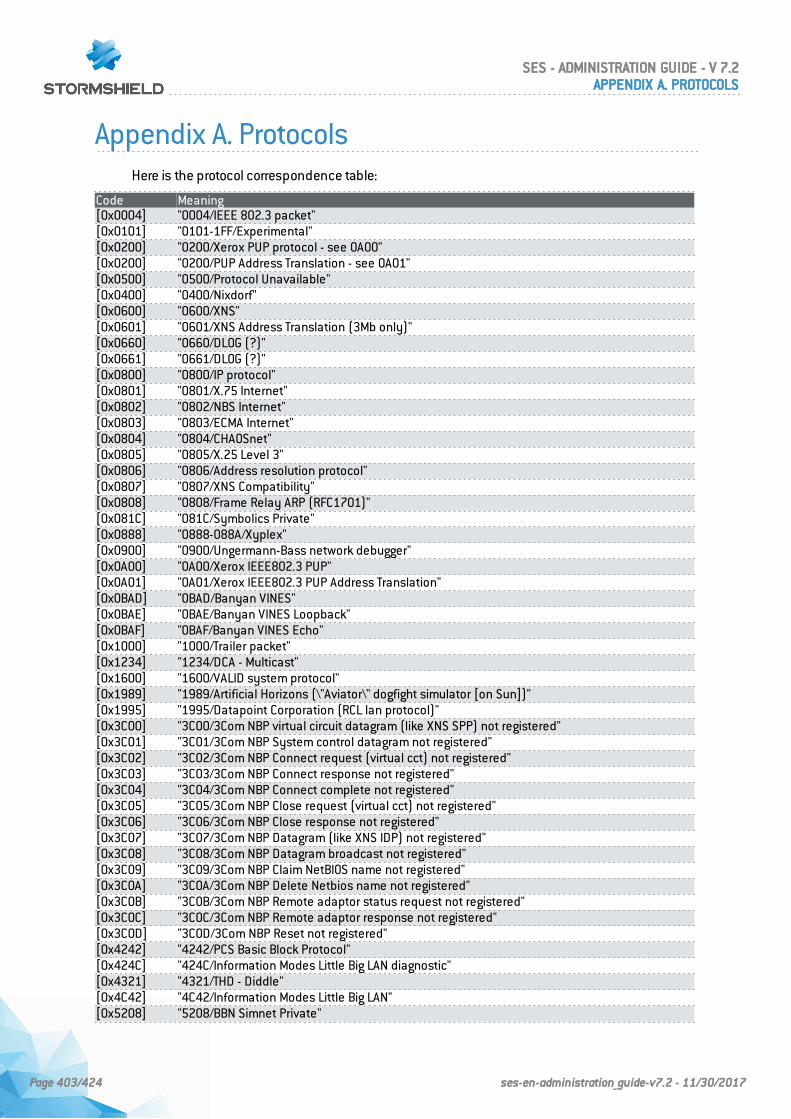
Appendix A. ProtocolsHere is the protocol correspondence table:
Code Meaning[0x0004] "0004/IEEE 802.3 packet"[0x0101] "0101-1FF/Experimental"[0x0200] "0200/Xerox PUP protocol - see 0A00"[0x0200] "0200/PUP Address Translation - see 0A01"[0x0500] "0500/Protocol Unavailable"[0x0400] "0400/Nixdorf"[0x0600] "0600/XNS"[0x0601] "0601/XNS Address Translation (3Mb only)"[0x0660] "0660/DLOG (?)"[0x0661] "0661/DLOG (?)"[0x0800] "0800/IP protocol"[0x0801] "0801/X.75 Internet"[0x0802] "0802/NBS Internet"[0x0803] "0803/ECMA Internet"[0x0804] "0804/CHAOSnet"[0x0805] "0805/X.25 Level 3"[0x0806] "0806/Address resolution protocol"[0x0807] "0807/XNS Compatibility"[0x0808] "0808/Frame Relay ARP (RFC1701)"[0x081C] "081C/Symbolics Private"[0x0888] "0888-088A/Xyplex"[0x0900] "0900/Ungermann-Bass network debugger"[0x0A00] "0A00/Xerox IEEE802.3 PUP"[0x0A01] "0A01/Xerox IEEE802.3 PUP Address Translation"[0x0BAD] "0BAD/Banyan VINES"[0x0BAE] "0BAE/Banyan VINES Loopback"[0x0BAF] "0BAF/Banyan VINES Echo"[0x1000] "1000/Trailer packet"[0x1234] "1234/DCA - Multicast"[0x1600] "1600/VALID system protocol"[0x1989] "1989/Artificial Horizons (\"Aviator\" dogfight simulator [on Sun])"[0x1995] "1995/Datapoint Corporation (RCL lan protocol)"[0x3C00] "3C00/3Com NBP virtual circuit datagram (like XNS SPP) not registered"[0x3C01] "3C01/3Com NBP System control datagram not registered"[0x3C02] "3C02/3Com NBP Connect request (virtual cct) not registered"[0x3C03] "3C03/3Com NBP Connect response not registered"[0x3C04] "3C04/3Com NBP Connect complete not registered"[0x3C05] "3C05/3Com NBP Close request (virtual cct) not registered"[0x3C06] "3C06/3Com NBP Close response not registered"[0x3C07] "3C07/3Com NBP Datagram (like XNS IDP) not registered"[0x3C08] "3C08/3Com NBP Datagram broadcast not registered"[0x3C09] "3C09/3Com NBP Claim NetBIOS name not registered"[0x3C0A] "3C0A/3Com NBP Delete Netbios name not registered"[0x3C0B] "3C0B/3Com NBP Remote adaptor status request not registered"[0x3C0C] "3C0C/3Com NBP Remote adaptor response not registered"[0x3C0D] "3C0D/3Com NBP Reset not registered"[0x4242] "4242/PCS Basic Block Protocol"[0x424C] "424C/Information Modes Little Big LAN diagnostic"[0x4321] "4321/THD - Diddle"[0x4C42] "4C42/Information Modes Little Big LAN"[0x5208] "5208/BBN Simnet Private"
SES - ADMINISTRATION GUIDE - V 7.2APPENDIX A. PROTOCOLS
Page 403/424 ses-en-administration_guide-v7.2 - 11/30/2017
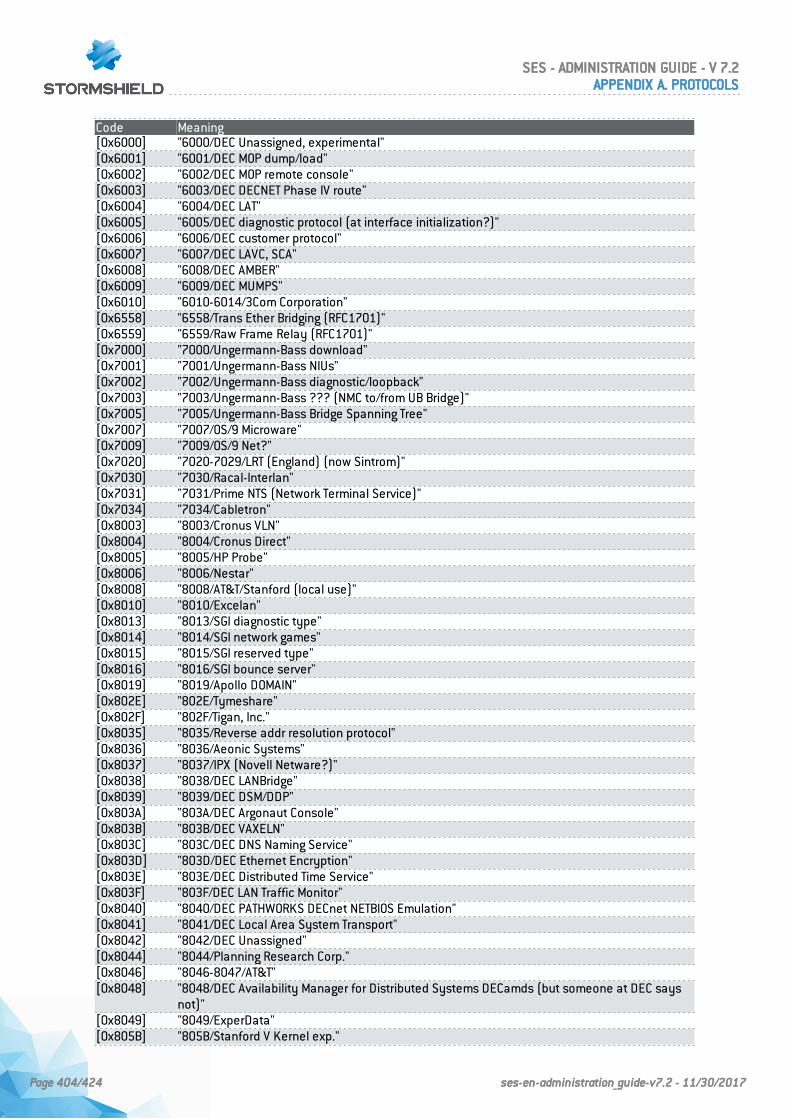
Code Meaning[0x6000] "6000/DEC Unassigned, experimental"[0x6001] "6001/DEC MOP dump/load"[0x6002] "6002/DEC MOP remote console"[0x6003] "6003/DEC DECNET Phase IV route"[0x6004] "6004/DEC LAT"[0x6005] "6005/DEC diagnostic protocol (at interface initialization?)"[0x6006] "6006/DEC customer protocol"[0x6007] "6007/DEC LAVC, SCA"[0x6008] "6008/DEC AMBER"[0x6009] "6009/DEC MUMPS"[0x6010] "6010-6014/3Com Corporation"[0x6558] "6558/Trans Ether Bridging (RFC1701)"[0x6559] "6559/Raw Frame Relay (RFC1701)"[0x7000] "7000/Ungermann-Bass download"[0x7001] "7001/Ungermann-Bass NIUs"[0x7002] "7002/Ungermann-Bass diagnostic/loopback"[0x7003] "7003/Ungermann-Bass ??? (NMC to/from UB Bridge)"[0x7005] "7005/Ungermann-Bass Bridge Spanning Tree"[0x7007] "7007/OS/9 Microware"[0x7009] "7009/OS/9 Net?"[0x7020] "7020-7029/LRT (England) (now Sintrom)"[0x7030] "7030/Racal-Interlan"[0x7031] "7031/Prime NTS (Network Terminal Service)"[0x7034] "7034/Cabletron"[0x8003] "8003/Cronus VLN"[0x8004] "8004/Cronus Direct"[0x8005] "8005/HP Probe"[0x8006] "8006/Nestar"[0x8008] "8008/AT&T/Stanford (local use)"[0x8010] "8010/Excelan"[0x8013] "8013/SGI diagnostic type"[0x8014] "8014/SGI network games"[0x8015] "8015/SGI reserved type"[0x8016] "8016/SGI bounce server"[0x8019] "8019/Apollo DOMAIN"[0x802E] "802E/Tymeshare"[0x802F] "802F/Tigan, Inc."[0x8035] "8035/Reverse addr resolution protocol"[0x8036] "8036/Aeonic Systems"[0x8037] "8037/IPX (Novell Netware?)"[0x8038] "8038/DEC LANBridge"[0x8039] "8039/DEC DSM/DDP"[0x803A] "803A/DEC Argonaut Console"[0x803B] "803B/DEC VAXELN"[0x803C] "803C/DEC DNS Naming Service"[0x803D] "803D/DEC Ethernet Encryption"[0x803E] "803E/DEC Distributed Time Service"[0x803F] "803F/DEC LAN Traffic Monitor"[0x8040] "8040/DEC PATHWORKS DECnet NETBIOS Emulation"[0x8041] "8041/DEC Local Area System Transport"[0x8042] "8042/DEC Unassigned"[0x8044] "8044/Planning Research Corp."[0x8046] "8046-8047/AT&T"[0x8048] "8048/DEC Availability Manager for Distributed Systems DECamds (but someone at DEC says
not)"[0x8049] "8049/ExperData"[0x805B] "805B/Stanford V Kernel exp."
SES - ADMINISTRATION GUIDE - V 7.2APPENDIX A. PROTOCOLS
Page 404/424 ses-en-administration_guide-v7.2 - 11/30/2017
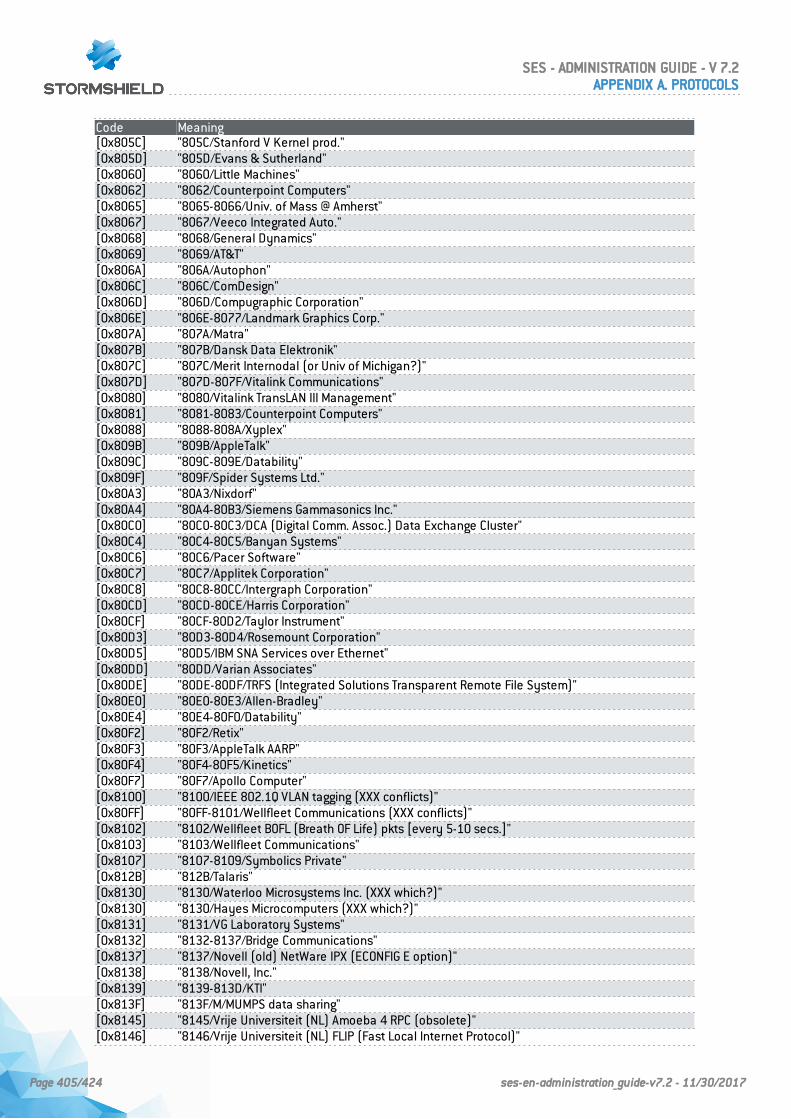
Code Meaning[0x805C] "805C/Stanford V Kernel prod."[0x805D] "805D/Evans & Sutherland"[0x8060] "8060/Little Machines"[0x8062] "8062/Counterpoint Computers"[0x8065] "8065-8066/Univ. of Mass @ Amherst"[0x8067] "8067/Veeco Integrated Auto."[0x8068] "8068/General Dynamics"[0x8069] "8069/AT&T"[0x806A] "806A/Autophon"[0x806C] "806C/ComDesign"[0x806D] "806D/Compugraphic Corporation"[0x806E] "806E-8077/Landmark Graphics Corp."[0x807A] "807A/Matra"[0x807B] "807B/Dansk Data Elektronik"[0x807C] "807C/Merit Internodal (or Univ of Michigan?)"[0x807D] "807D-807F/Vitalink Communications"[0x8080] "8080/Vitalink TransLAN III Management"[0x8081] "8081-8083/Counterpoint Computers"[0x8088] "8088-808A/Xyplex"[0x809B] "809B/AppleTalk"[0x809C] "809C-809E/Datability"[0x809F] "809F/Spider Systems Ltd."[0x80A3] "80A3/Nixdorf"[0x80A4] "80A4-80B3/Siemens Gammasonics Inc."[0x80C0] "80C0-80C3/DCA (Digital Comm. Assoc.) Data Exchange Cluster"[0x80C4] "80C4-80C5/Banyan Systems"[0x80C6] "80C6/Pacer Software"[0x80C7] "80C7/Applitek Corporation"[0x80C8] "80C8-80CC/Intergraph Corporation"[0x80CD] "80CD-80CE/Harris Corporation"[0x80CF] "80CF-80D2/Taylor Instrument"[0x80D3] "80D3-80D4/Rosemount Corporation"[0x80D5] "80D5/IBM SNA Services over Ethernet"[0x80DD] "80DD/Varian Associates"[0x80DE] "80DE-80DF/TRFS (Integrated Solutions Transparent Remote File System)"[0x80E0] "80E0-80E3/Allen-Bradley"[0x80E4] "80E4-80F0/Datability"[0x80F2] "80F2/Retix"[0x80F3] "80F3/AppleTalk AARP"[0x80F4] "80F4-80F5/Kinetics"[0x80F7] "80F7/Apollo Computer"[0x8100] "8100/IEEE 802.1Q VLAN tagging (XXX conflicts)"[0x80FF] "80FF-8101/Wellfleet Communications (XXX conflicts)"[0x8102] "8102/Wellfleet BOFL (Breath OF Life) pkts [every 5-10 secs.]"[0x8103] "8103/Wellfleet Communications"[0x8107] "8107-8109/Symbolics Private"[0x812B] "812B/Talaris"[0x8130] "8130/Waterloo Microsystems Inc. (XXX which?)"[0x8130] "8130/Hayes Microcomputers (XXX which?)"[0x8131] "8131/VG Laboratory Systems"[0x8132] "8132-8137/Bridge Communications"[0x8137] "8137/Novell (old) NetWare IPX (ECONFIG E option)"[0x8138] "8138/Novell, Inc."[0x8139] "8139-813D/KTI"[0x813F] "813F/M/MUMPS data sharing"[0x8145] "8145/Vrije Universiteit (NL) Amoeba 4 RPC (obsolete)"[0x8146] "8146/Vrije Universiteit (NL) FLIP (Fast Local Internet Protocol)"
SES - ADMINISTRATION GUIDE - V 7.2APPENDIX A. PROTOCOLS
Page 405/424 ses-en-administration_guide-v7.2 - 11/30/2017
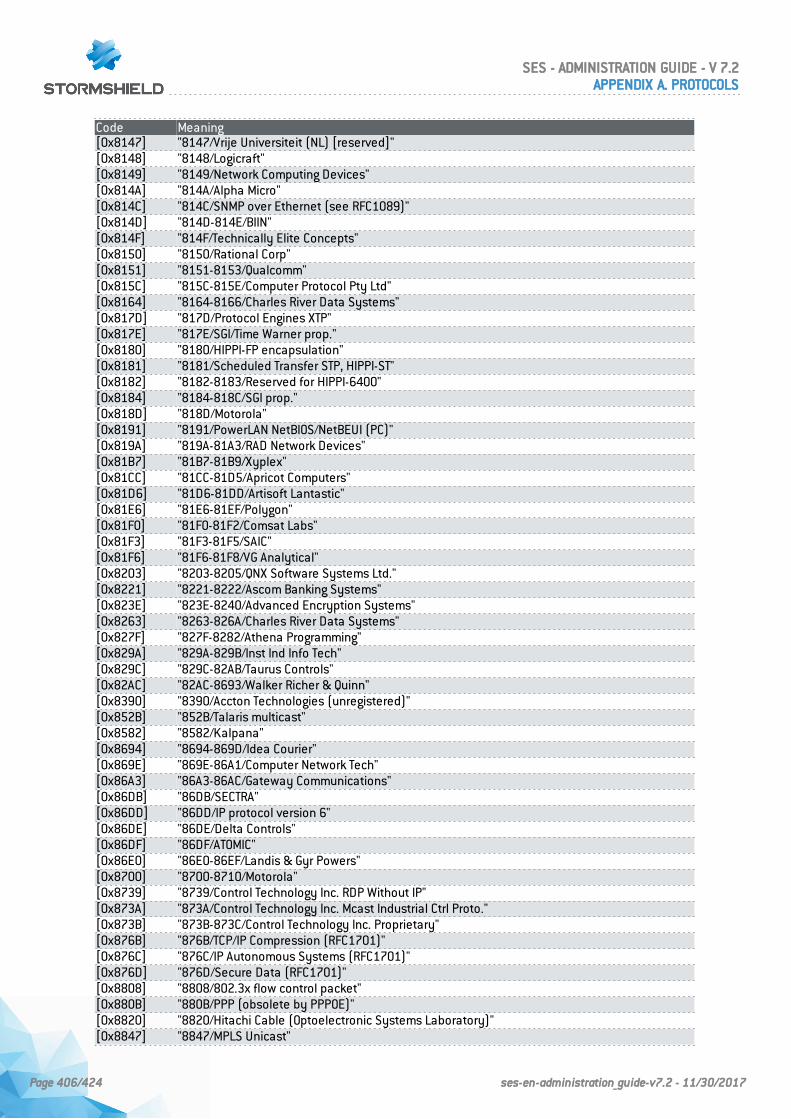
Code Meaning[0x8147] "8147/Vrije Universiteit (NL) [reserved]"[0x8148] "8148/Logicraft"[0x8149] "8149/Network Computing Devices"[0x814A] "814A/Alpha Micro"[0x814C] "814C/SNMP over Ethernet (see RFC1089)"[0x814D] "814D-814E/BIIN"[0x814F] "814F/Technically Elite Concepts"[0x8150] "8150/Rational Corp"[0x8151] "8151-8153/Qualcomm"[0x815C] "815C-815E/Computer Protocol Pty Ltd"[0x8164] "8164-8166/Charles River Data Systems"[0x817D] "817D/Protocol Engines XTP"[0x817E] "817E/SGI/Time Warner prop."[0x8180] "8180/HIPPI-FP encapsulation"[0x8181] "8181/Scheduled Transfer STP, HIPPI-ST"[0x8182] "8182-8183/Reserved for HIPPI-6400"[0x8184] "8184-818C/SGI prop."[0x818D] "818D/Motorola"[0x8191] "8191/PowerLAN NetBIOS/NetBEUI (PC)"[0x819A] "819A-81A3/RAD Network Devices"[0x81B7] "81B7-81B9/Xyplex"[0x81CC] "81CC-81D5/Apricot Computers"[0x81D6] "81D6-81DD/Artisoft Lantastic"[0x81E6] "81E6-81EF/Polygon"[0x81F0] "81F0-81F2/Comsat Labs"[0x81F3] "81F3-81F5/SAIC"[0x81F6] "81F6-81F8/VG Analytical"[0x8203] "8203-8205/QNX Software Systems Ltd."[0x8221] "8221-8222/Ascom Banking Systems"[0x823E] "823E-8240/Advanced Encryption Systems"[0x8263] "8263-826A/Charles River Data Systems"[0x827F] "827F-8282/Athena Programming"[0x829A] "829A-829B/Inst Ind Info Tech"[0x829C] "829C-82AB/Taurus Controls"[0x82AC] "82AC-8693/Walker Richer & Quinn"[0x8390] "8390/Accton Technologies (unregistered)"[0x852B] "852B/Talaris multicast"[0x8582] "8582/Kalpana"[0x8694] "8694-869D/Idea Courier"[0x869E] "869E-86A1/Computer Network Tech"[0x86A3] "86A3-86AC/Gateway Communications"[0x86DB] "86DB/SECTRA"[0x86DD] "86DD/IP protocol version 6"[0x86DE] "86DE/Delta Controls"[0x86DF] "86DF/ATOMIC"[0x86E0] "86E0-86EF/Landis & Gyr Powers"[0x8700] "8700-8710/Motorola"[0x8739] "8739/Control Technology Inc. RDP Without IP"[0x873A] "873A/Control Technology Inc. Mcast Industrial Ctrl Proto."[0x873B] "873B-873C/Control Technology Inc. Proprietary"[0x876B] "876B/TCP/IP Compression (RFC1701)"[0x876C] "876C/IP Autonomous Systems (RFC1701)"[0x876D] "876D/Secure Data (RFC1701)"[0x8808] "8808/802.3x flow control packet"[0x880B] "880B/PPP (obsolete by PPPOE)"[0x8820] "8820/Hitachi Cable (Optoelectronic Systems Laboratory)"[0x8847] "8847/MPLS Unicast"
SES - ADMINISTRATION GUIDE - V 7.2APPENDIX A. PROTOCOLS
Page 406/424 ses-en-administration_guide-v7.2 - 11/30/2017
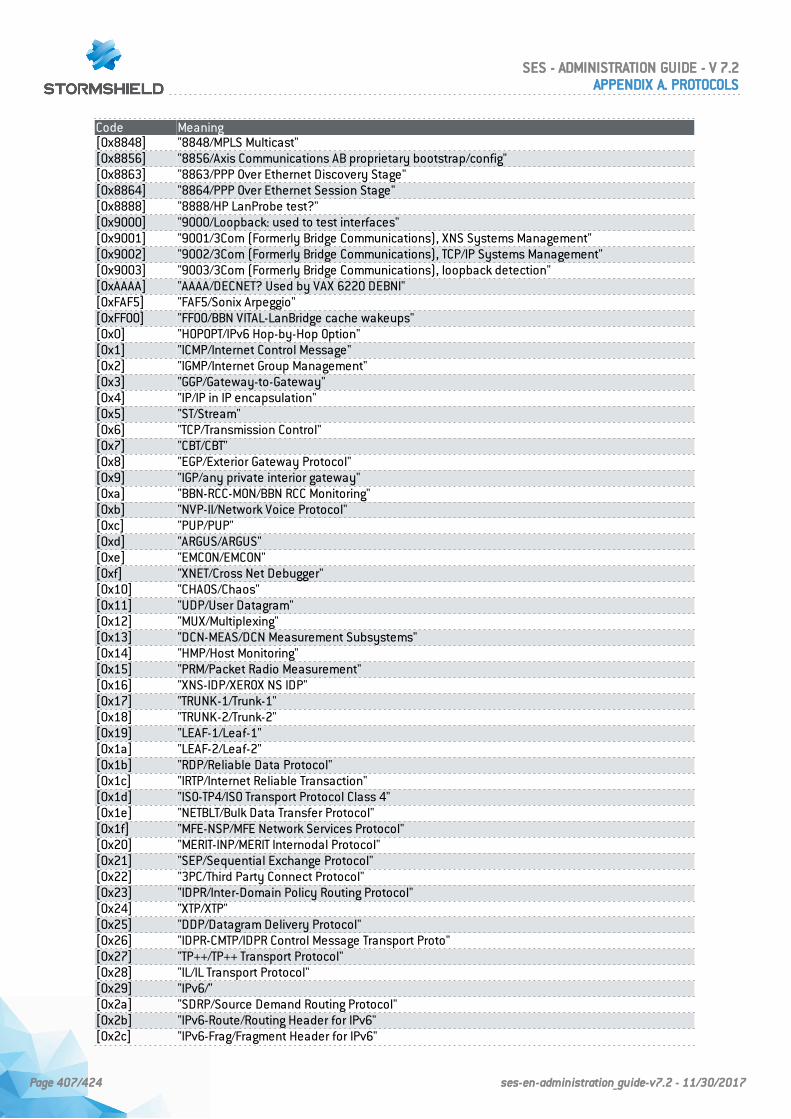
Code Meaning[0x8848] "8848/MPLS Multicast"[0x8856] "8856/Axis Communications AB proprietary bootstrap/config"[0x8863] "8863/PPP Over Ethernet Discovery Stage"[0x8864] "8864/PPP Over Ethernet Session Stage"[0x8888] "8888/HP LanProbe test?"[0x9000] "9000/Loopback: used to test interfaces"[0x9001] "9001/3Com (Formerly Bridge Communications), XNS Systems Management"[0x9002] "9002/3Com (Formerly Bridge Communications), TCP/IP Systems Management"[0x9003] "9003/3Com (Formerly Bridge Communications), loopback detection"[0xAAAA] "AAAA/DECNET? Used by VAX 6220 DEBNI"[0xFAF5] "FAF5/Sonix Arpeggio"[0xFF00] "FF00/BBN VITAL-LanBridge cache wakeups"[0x0] "HOPOPT/IPv6 Hop-by-Hop Option"[0x1] "ICMP/Internet Control Message"[0x2] "IGMP/Internet Group Management"[0x3] "GGP/Gateway-to-Gateway"[0x4] "IP/IP in IP encapsulation"[0x5] "ST/Stream"[0x6] "TCP/Transmission Control"[0x7] "CBT/CBT"[0x8] "EGP/Exterior Gateway Protocol"[0x9] "IGP/any private interior gateway"[0xa] "BBN-RCC-MON/BBN RCC Monitoring"[0xb] "NVP-II/Network Voice Protocol"[0xc] "PUP/PUP"[0xd] "ARGUS/ARGUS"[0xe] "EMCON/EMCON"[0xf] "XNET/Cross Net Debugger"[0x10] "CHAOS/Chaos"[0x11] "UDP/User Datagram"[0x12] "MUX/Multiplexing"[0x13] "DCN-MEAS/DCN Measurement Subsystems"[0x14] "HMP/Host Monitoring"[0x15] "PRM/Packet Radio Measurement"[0x16] "XNS-IDP/XEROX NS IDP"[0x17] "TRUNK-1/Trunk-1"[0x18] "TRUNK-2/Trunk-2"[0x19] "LEAF-1/Leaf-1"[0x1a] "LEAF-2/Leaf-2"[0x1b] "RDP/Reliable Data Protocol"[0x1c] "IRTP/Internet Reliable Transaction"[0x1d] "ISO-TP4/ISO Transport Protocol Class 4"[0x1e] "NETBLT/Bulk Data Transfer Protocol"[0x1f] "MFE-NSP/MFE Network Services Protocol"[0x20] "MERIT-INP/MERIT Internodal Protocol"[0x21] "SEP/Sequential Exchange Protocol"[0x22] "3PC/Third Party Connect Protocol"[0x23] "IDPR/Inter-Domain Policy Routing Protocol"[0x24] "XTP/XTP"[0x25] "DDP/Datagram Delivery Protocol"[0x26] "IDPR-CMTP/IDPR Control Message Transport Proto"[0x27] "TP++/TP++ Transport Protocol"[0x28] "IL/IL Transport Protocol"[0x29] "IPv6/"[0x2a] "SDRP/Source Demand Routing Protocol"[0x2b] "IPv6-Route/Routing Header for IPv6"[0x2c] "IPv6-Frag/Fragment Header for IPv6"
SES - ADMINISTRATION GUIDE - V 7.2APPENDIX A. PROTOCOLS
Page 407/424 ses-en-administration_guide-v7.2 - 11/30/2017

Code Meaning[0x2d] "IDRP/Inter-Domain Routing Protocol"[0x2e] "RSVP/Reservation Protocol"[0x2f] "GRE/General Routing Encapsulation"[0x30] "MHRP/Mobile Host Routing Protocol"[0x31] "BNA/"[0x32] "ESP/Encap Security Payload"[0x33] "AH/Authentication Header"[0x34] "I-NLSP/Integrated Net Layer Security TUBA"[0x35] "SWIPE/IP with Encryption"[0x36] "NARP/NBMA Address Resolution Protocol"[0x37] "MOBILE/IP Mobility"[0x38] "TLSP/Transport Layer Security Protocol using Kryptonet key management"[0x39] "SKIP/SKIP"[0x3a] "IPv6-ICMP/ICMP for IPv6"[0x3b] "IPv6-NoNxt/No Next Header for IPv6"[0x3c] "IPv6-Opts/Destination Options for IPv6"[0x3d] "any host internal protocol"[0x3e] "CFTP/CFTP"[0x3f] "any local network"[0x40] "SAT-EXPAK/SATNET and Backroom EXPAK"[0x41] "KRYPTOLAN/"[0x42] "RVD/MIT Remote Virtual Disk Protocol"[0x43] "IPPC/Internet Pluribus Packet Core"[0x44] "any distributed file system"[0x45] "SAT-MON/SATNET Monitoring"[0x46] "VISA/VISA Protocol"[0x47] "IPCV/Internet Packet Core Utility"[0x48] "CPNX/Computer Protocol Network Executive"[0x49] "CPHB/Computer Protocol Heart Beat"[0x4a] "WSN/Wang Span Network"[0x4b] "PVP/Packet Video Protocol"[0x4c] "BR-SAT-MON/Backroom SATNET Monitoring"[0x4d] "SUN-ND/SUN ND PROTOCOL-Temporary"[0x4e] "WB-MON/WIDEBAND Monitoring"[0x4f] "WB-EXPAK/WIDEBAND EXPAK"[0x50] "ISO-IP/ISO Internet Protocol"[0x51] "VMTP"[0x52] "SECURE-VMTP/SECURE-VMTP"[0x53] "VINES"[0x54] "TTP"[0x55] "NSFNET-IGP/NSFNET-IGP"[0x56] "DGP/Dissimilar Gateway Protocol"[0x57] "TCF"[0x58] "EIGRP"[0x59] "OSPFIGP"[0x5a] "Sprite-RPC/Sprite RPC Protocol"[0x5b] "LARP/Locus Address Resolution Protocol"[0x5c] "MTP/Multicast Transport Protocol"[0x5d] "AX.25/AX.25 Frames"[0x5e] "IPIP/IP-within-IP Encapsulation Protocol"[0x5f] "MICP/Mobile Internetworking Control Pro."[0x60] "SCC-SP/Semaphore Communications Sec. Pro."[0x61] "ETHERIP/Ethernet-within-IP Encapsulation"[0x62] "ENCAP/Encapsulation Header"[0x63] "any private encryption scheme"[0x64] "GMTP"[0x65] "IFMP/Ipsilon Flow Management Protocol"
SES - ADMINISTRATION GUIDE - V 7.2APPENDIX A. PROTOCOLS
Page 408/424 ses-en-administration_guide-v7.2 - 11/30/2017
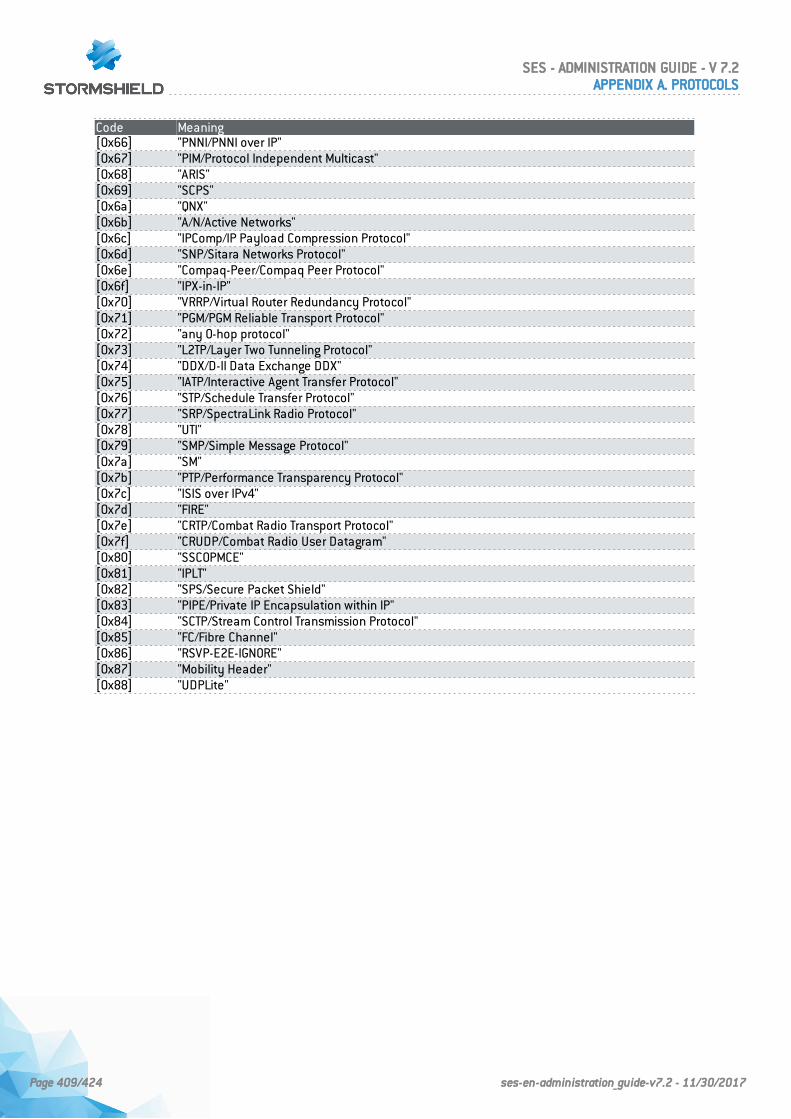
Code Meaning[0x66] "PNNI/PNNI over IP"[0x67] "PIM/Protocol Independent Multicast"[0x68] "ARIS"[0x69] "SCPS"[0x6a] "QNX"[0x6b] "A/N/Active Networks"[0x6c] "IPComp/IP Payload Compression Protocol"[0x6d] "SNP/Sitara Networks Protocol"[0x6e] "Compaq-Peer/Compaq Peer Protocol"[0x6f] "IPX-in-IP"[0x70] "VRRP/Virtual Router Redundancy Protocol"[0x71] "PGM/PGM Reliable Transport Protocol"[0x72] "any 0-hop protocol"[0x73] "L2TP/Layer Two Tunneling Protocol"[0x74] "DDX/D-II Data Exchange DDX"[0x75] "IATP/Interactive Agent Transfer Protocol"[0x76] "STP/Schedule Transfer Protocol"[0x77] "SRP/SpectraLink Radio Protocol"[0x78] "UTI"[0x79] "SMP/Simple Message Protocol"[0x7a] "SM"[0x7b] "PTP/Performance Transparency Protocol"[0x7c] "ISIS over IPv4"[0x7d] "FIRE"[0x7e] "CRTP/Combat Radio Transport Protocol"[0x7f] "CRUDP/Combat Radio User Datagram"[0x80] "SSCOPMCE"[0x81] "IPLT"[0x82] "SPS/Secure Packet Shield"[0x83] "PIPE/Private IP Encapsulation within IP"[0x84] "SCTP/Stream Control Transmission Protocol"[0x85] "FC/Fibre Channel"[0x86] "RSVP-E2E-IGNORE"[0x87] "Mobility Header"[0x88] "UDPLite"
SES - ADMINISTRATION GUIDE - V 7.2APPENDIX A. PROTOCOLS
Page 409/424 ses-en-administration_guide-v7.2 - 11/30/2017
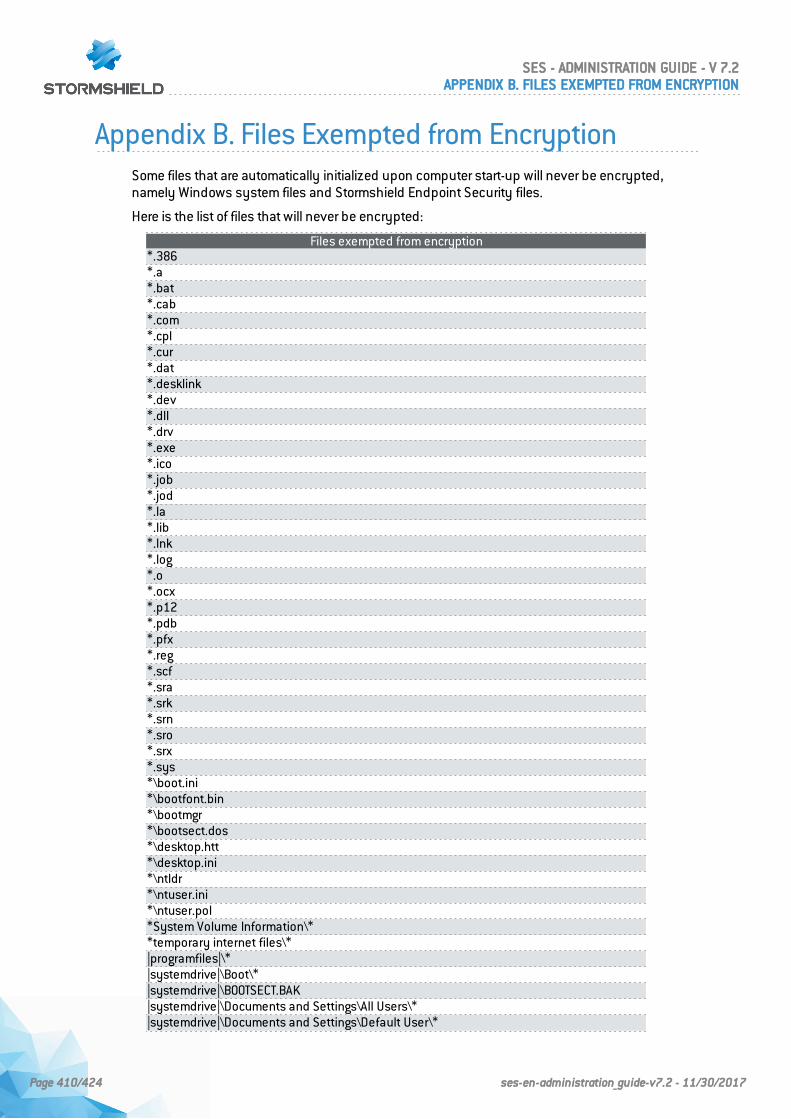
Appendix B. Files Exempted from EncryptionSome files that are automatically initialized upon computer start-up will never be encrypted,namely Windows system files and Stormshield Endpoint Security files.
Here is the list of files that will never be encrypted:
Files exempted from encryption*.386*.a*.bat*.cab*.com*.cpl*.cur*.dat*.desklink*.dev*.dll*.drv*.exe*.ico*.job*.jod*.la*.lib*.lnk*.log*.o*.ocx*.p12*.pdb*.pfx*.reg*.scf*.sra*.srk*.srn*.sro*.srx*.sys*\boot.ini*\bootfont.bin*\bootmgr*\bootsect.dos*\desktop.htt*\desktop.ini*\ntldr*\ntuser.ini*\ntuser.pol*System Volume Information\**temporary internet files\*|programfiles|\*|systemdrive|\Boot\*|systemdrive|\BOOTSECT.BAK|systemdrive|\Documents and Settings\All Users\*|systemdrive|\Documents and Settings\Default User\*
SES - ADMINISTRATION GUIDE - V 7.2APPENDIX B. FILES EXEMPTED FROM ENCRYPTION
Page 410/424 ses-en-administration_guide-v7.2 - 11/30/2017
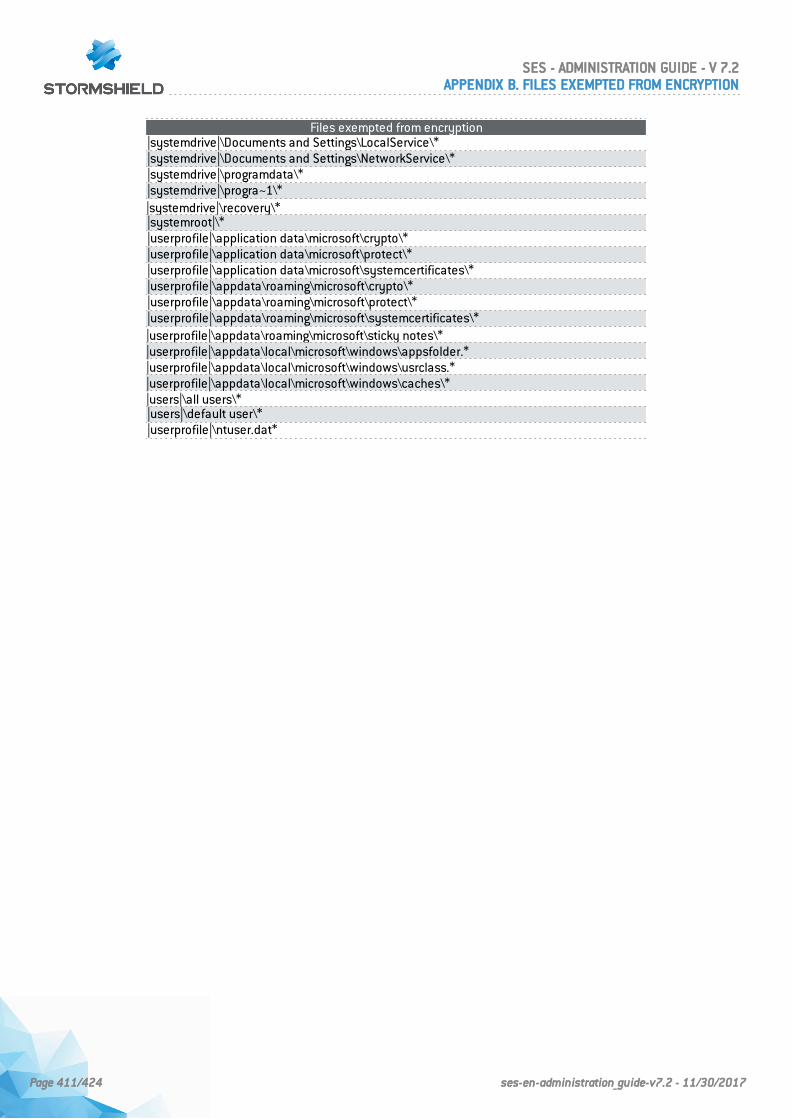
Files exempted from encryption|systemdrive|\Documents and Settings\LocalService\*|systemdrive|\Documents and Settings\NetworkService\*|systemdrive|\programdata\*|systemdrive|\progra~1\*|systemdrive|\recovery\*|systemroot|\*|userprofile|\application data\microsoft\crypto\*|userprofile|\application data\microsoft\protect\*|userprofile|\application data\microsoft\systemcertificates\*|userprofile|\appdata\roaming\microsoft\crypto\*|userprofile|\appdata\roaming\microsoft\protect\*|userprofile|\appdata\roaming\microsoft\systemcertificates\*|userprofile|\appdata\roaming\microsoft\sticky notes\*|userprofile|\appdata\local\microsoft\windows\appsfolder.*|userprofile|\appdata\local\microsoft\windows\usrclass.*|userprofile|\appdata\local\microsoft\windows\caches\*|users|\all users\*|users|\default user\*|userprofile|\ntuser.dat*
SES - ADMINISTRATION GUIDE - V 7.2APPENDIX B. FILES EXEMPTED FROM ENCRYPTION
Page 411/424 ses-en-administration_guide-v7.2 - 11/30/2017
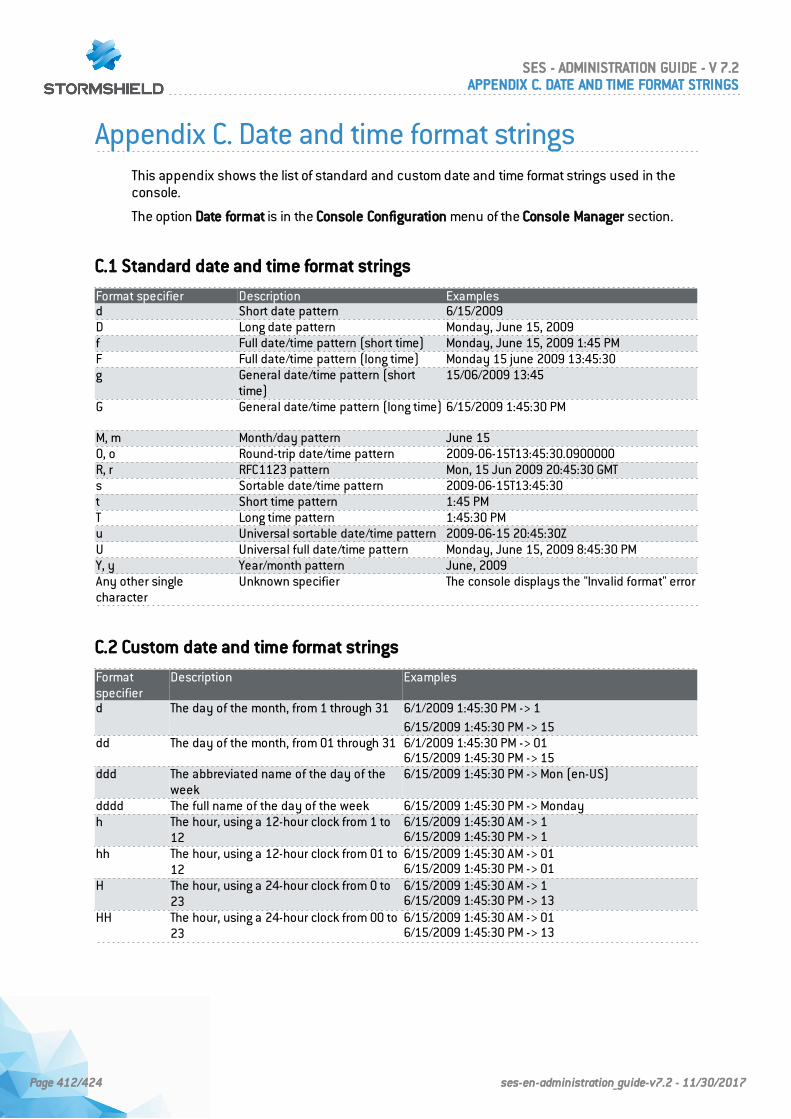
Appendix C. Date and time format stringsThis appendix shows the list of standard and custom date and time format strings used in theconsole.
The option Date format is in the Console Configuration menu of the Console Manager section.
C.1 Standard date and time format strings
Format specifier Description Examplesd Short date pattern 6/15/2009D Long date pattern Monday, June 15, 2009f Full date/time pattern (short time) Monday, June 15, 2009 1:45 PMF Full date/time pattern (long time) Monday 15 june 2009 13:45:30g General date/time pattern (short
time)15/06/2009 13:45
G General date/time pattern (long time) 6/15/2009 1:45:30 PM
M, m Month/day pattern June 15O, o Round-trip date/time pattern 2009-06-15T13:45:30.0900000R, r RFC1123 pattern Mon, 15 Jun 2009 20:45:30 GMTs Sortable date/time pattern 2009-06-15T13:45:30t Short time pattern 1:45 PMT Long time pattern 1:45:30 PMu Universal sortable date/time pattern 2009-06-15 20:45:30ZU Universal full date/time pattern Monday, June 15, 2009 8:45:30 PMY, y Year/month pattern June, 2009Any other singlecharacter
Unknown specifier The console displays the "Invalid format" error
C.2 Custom date and time format strings
Formatspecifier
Description Examples
d The day of the month, from 1 through 31 6/1/2009 1:45:30 PM -> 16/15/2009 1:45:30 PM -> 15
dd The day of the month, from 01 through 31 6/1/2009 1:45:30 PM -> 016/15/2009 1:45:30 PM -> 15
ddd The abbreviated name of the day of theweek
6/15/2009 1:45:30 PM -> Mon (en-US)
dddd The full name of the day of the week 6/15/2009 1:45:30 PM -> Mondayh The hour, using a 12-hour clock from 1 to
126/15/2009 1:45:30 AM -> 16/15/2009 1:45:30 PM -> 1
hh The hour, using a 12-hour clock from 01 to12
6/15/2009 1:45:30 AM -> 016/15/2009 1:45:30 PM -> 01
H The hour, using a 24-hour clock from 0 to23
6/15/2009 1:45:30 AM -> 16/15/2009 1:45:30 PM -> 13
HH The hour, using a 24-hour clock from 00 to23
6/15/2009 1:45:30 AM -> 016/15/2009 1:45:30 PM -> 13
SES - ADMINISTRATION GUIDE - V 7.2APPENDIX C. DATE AND TIME FORMAT STRINGS
Page 412/424 ses-en-administration_guide-v7.2 - 11/30/2017
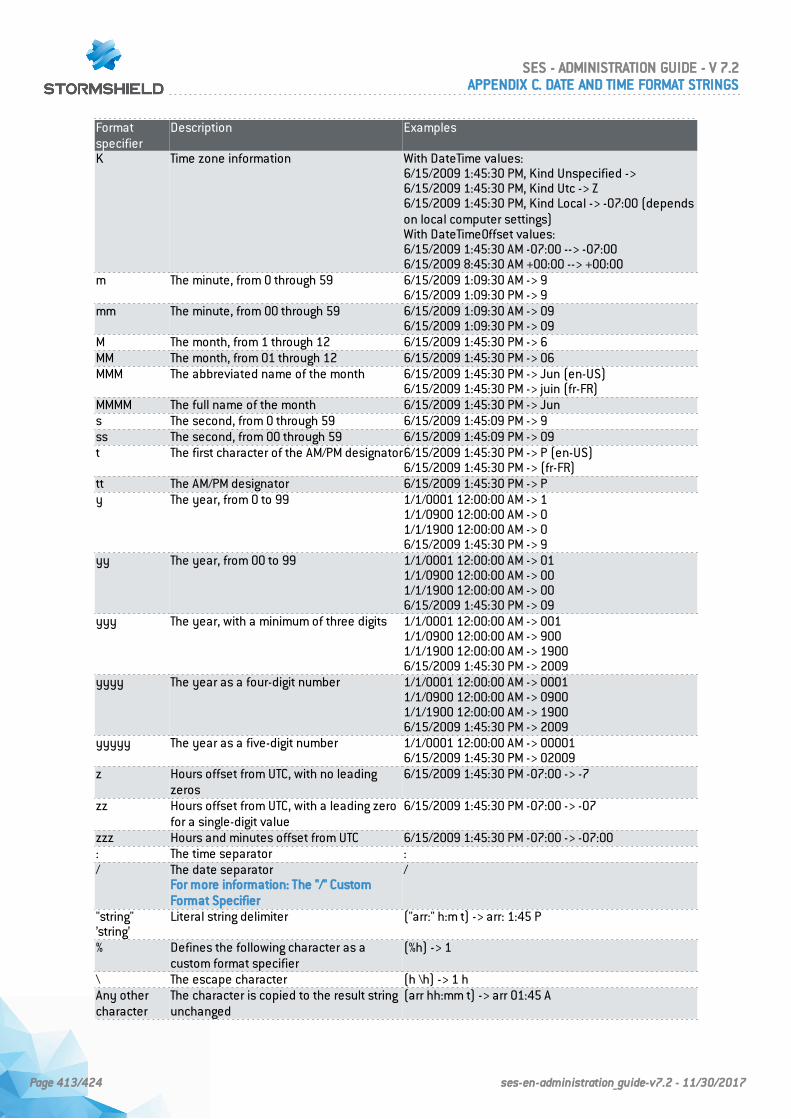
Formatspecifier
Description Examples
K Time zone information With DateTime values:6/15/2009 1:45:30 PM, Kind Unspecified ->6/15/2009 1:45:30 PM, Kind Utc -> Z6/15/2009 1:45:30 PM, Kind Local -> -07:00 (dependson local computer settings)With DateTimeOffset values:6/15/2009 1:45:30 AM -07:00 --> -07:006/15/2009 8:45:30 AM +00:00 --> +00:00
m The minute, from 0 through 59 6/15/2009 1:09:30 AM -> 96/15/2009 1:09:30 PM -> 9
mm The minute, from 00 through 59 6/15/2009 1:09:30 AM -> 096/15/2009 1:09:30 PM -> 09
M The month, from 1 through 12 6/15/2009 1:45:30 PM -> 6MM The month, from 01 through 12 6/15/2009 1:45:30 PM -> 06MMM The abbreviated name of the month 6/15/2009 1:45:30 PM -> Jun (en-US)
6/15/2009 1:45:30 PM -> juin (fr-FR)MMMM The full name of the month 6/15/2009 1:45:30 PM -> Juns The second, from 0 through 59 6/15/2009 1:45:09 PM -> 9ss The second, from 00 through 59 6/15/2009 1:45:09 PM -> 09t The first character of the AM/PM designator6/15/2009 1:45:30 PM -> P (en-US)
6/15/2009 1:45:30 PM -> (fr-FR)tt The AM/PM designator 6/15/2009 1:45:30 PM -> Py The year, from 0 to 99 1/1/0001 12:00:00 AM -> 1
1/1/0900 12:00:00 AM -> 01/1/1900 12:00:00 AM -> 06/15/2009 1:45:30 PM -> 9
yy The year, from 00 to 99 1/1/0001 12:00:00 AM -> 011/1/0900 12:00:00 AM -> 001/1/1900 12:00:00 AM -> 006/15/2009 1:45:30 PM -> 09
yyy The year, with a minimum of three digits 1/1/0001 12:00:00 AM -> 0011/1/0900 12:00:00 AM -> 9001/1/1900 12:00:00 AM -> 19006/15/2009 1:45:30 PM -> 2009
yyyy The year as a four-digit number 1/1/0001 12:00:00 AM -> 00011/1/0900 12:00:00 AM -> 09001/1/1900 12:00:00 AM -> 19006/15/2009 1:45:30 PM -> 2009
yyyyy The year as a five-digit number 1/1/0001 12:00:00 AM -> 000016/15/2009 1:45:30 PM -> 02009
z Hours offset from UTC, with no leadingzeros
6/15/2009 1:45:30 PM -07:00 -> -7
zz Hours offset from UTC, with a leading zerofor a single-digit value
6/15/2009 1:45:30 PM -07:00 -> -07
zzz Hours and minutes offset from UTC 6/15/2009 1:45:30 PM -07:00 -> -07:00: The time separator :/ The date separator
For more information: The "/" CustomFormat Specifier
/
"string"’string’
Literal string delimiter ("arr:" h:m t) -> arr: 1:45 P
% Defines the following character as acustom format specifier
(%h) -> 1
\ The escape character (h \h) -> 1 hAny othercharacter
The character is copied to the result stringunchanged
(arr hh:mm t) -> arr 01:45 A
SES - ADMINISTRATION GUIDE - V 7.2APPENDIX C. DATE AND TIME FORMAT STRINGS
Page 413/424 ses-en-administration_guide-v7.2 - 11/30/2017
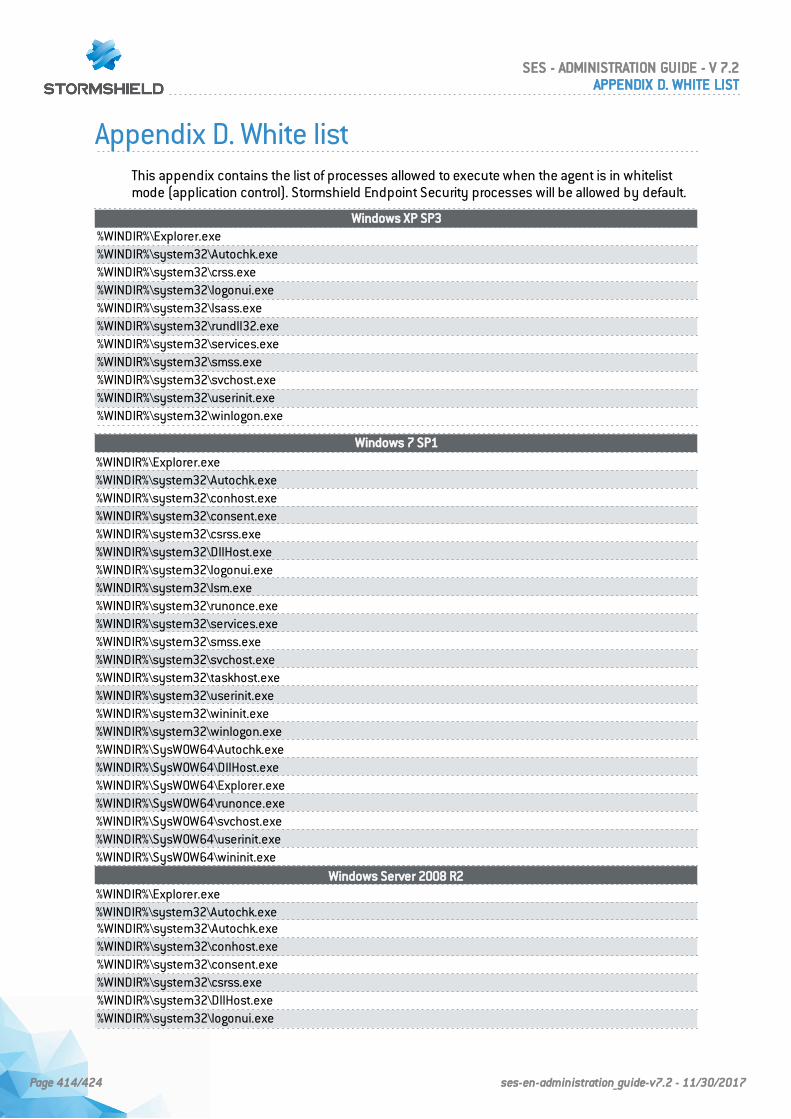
Appendix D. White listThis appendix contains the list of processes allowed to execute when the agent is in whitelistmode (application control). Stormshield Endpoint Security processes will be allowed by default.
Windows XP SP3%WINDIR%\Explorer.exe%WINDIR%\system32\Autochk.exe%WINDIR%\system32\crss.exe%WINDIR%\system32\logonui.exe%WINDIR%\system32\lsass.exe%WINDIR%\system32\rundll32.exe%WINDIR%\system32\services.exe%WINDIR%\system32\smss.exe%WINDIR%\system32\svchost.exe%WINDIR%\system32\userinit.exe%WINDIR%\system32\winlogon.exe
Windows 7 SP1
%WINDIR%\Explorer.exe%WINDIR%\system32\Autochk.exe%WINDIR%\system32\conhost.exe%WINDIR%\system32\consent.exe%WINDIR%\system32\csrss.exe%WINDIR%\system32\DllHost.exe%WINDIR%\system32\logonui.exe%WINDIR%\system32\lsm.exe%WINDIR%\system32\runonce.exe%WINDIR%\system32\services.exe%WINDIR%\system32\smss.exe%WINDIR%\system32\svchost.exe%WINDIR%\system32\taskhost.exe%WINDIR%\system32\userinit.exe%WINDIR%\system32\wininit.exe%WINDIR%\system32\winlogon.exe%WINDIR%\SysWOW64\Autochk.exe%WINDIR%\SysWOW64\DllHost.exe%WINDIR%\SysWOW64\Explorer.exe%WINDIR%\SysWOW64\runonce.exe%WINDIR%\SysWOW64\svchost.exe%WINDIR%\SysWOW64\userinit.exe%WINDIR%\SysWOW64\wininit.exe
Windows Server 2008 R2%WINDIR%\Explorer.exe%WINDIR%\system32\Autochk.exe%WINDIR%\system32\Autochk.exe%WINDIR%\system32\conhost.exe%WINDIR%\system32\consent.exe%WINDIR%\system32\csrss.exe%WINDIR%\system32\DllHost.exe%WINDIR%\system32\logonui.exe
SES - ADMINISTRATION GUIDE - V 7.2APPENDIX D. WHITE LIST
Page 414/424 ses-en-administration_guide-v7.2 - 11/30/2017
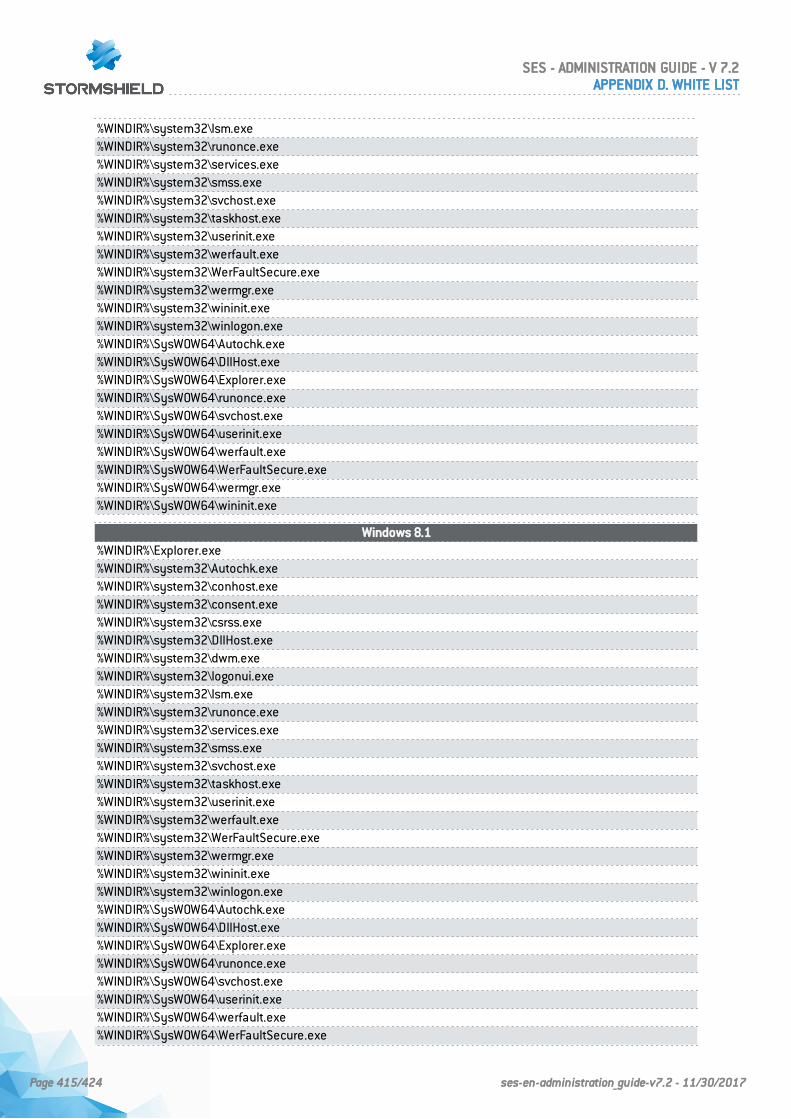
%WINDIR%\system32\lsm.exe%WINDIR%\system32\runonce.exe%WINDIR%\system32\services.exe%WINDIR%\system32\smss.exe%WINDIR%\system32\svchost.exe%WINDIR%\system32\taskhost.exe%WINDIR%\system32\userinit.exe%WINDIR%\system32\werfault.exe%WINDIR%\system32\WerFaultSecure.exe%WINDIR%\system32\wermgr.exe%WINDIR%\system32\wininit.exe%WINDIR%\system32\winlogon.exe%WINDIR%\SysWOW64\Autochk.exe%WINDIR%\SysWOW64\DllHost.exe%WINDIR%\SysWOW64\Explorer.exe%WINDIR%\SysWOW64\runonce.exe%WINDIR%\SysWOW64\svchost.exe%WINDIR%\SysWOW64\userinit.exe%WINDIR%\SysWOW64\werfault.exe%WINDIR%\SysWOW64\WerFaultSecure.exe%WINDIR%\SysWOW64\wermgr.exe%WINDIR%\SysWOW64\wininit.exe
Windows 8.1%WINDIR%\Explorer.exe%WINDIR%\system32\Autochk.exe%WINDIR%\system32\conhost.exe%WINDIR%\system32\consent.exe%WINDIR%\system32\csrss.exe%WINDIR%\system32\DllHost.exe%WINDIR%\system32\dwm.exe%WINDIR%\system32\logonui.exe%WINDIR%\system32\lsm.exe%WINDIR%\system32\runonce.exe%WINDIR%\system32\services.exe%WINDIR%\system32\smss.exe%WINDIR%\system32\svchost.exe%WINDIR%\system32\taskhost.exe%WINDIR%\system32\userinit.exe%WINDIR%\system32\werfault.exe%WINDIR%\system32\WerFaultSecure.exe%WINDIR%\system32\wermgr.exe%WINDIR%\system32\wininit.exe%WINDIR%\system32\winlogon.exe%WINDIR%\SysWOW64\Autochk.exe%WINDIR%\SysWOW64\DllHost.exe%WINDIR%\SysWOW64\Explorer.exe%WINDIR%\SysWOW64\runonce.exe%WINDIR%\SysWOW64\svchost.exe%WINDIR%\SysWOW64\userinit.exe%WINDIR%\SysWOW64\werfault.exe%WINDIR%\SysWOW64\WerFaultSecure.exe
SES - ADMINISTRATION GUIDE - V 7.2APPENDIX D. WHITE LIST
Page 415/424 ses-en-administration_guide-v7.2 - 11/30/2017
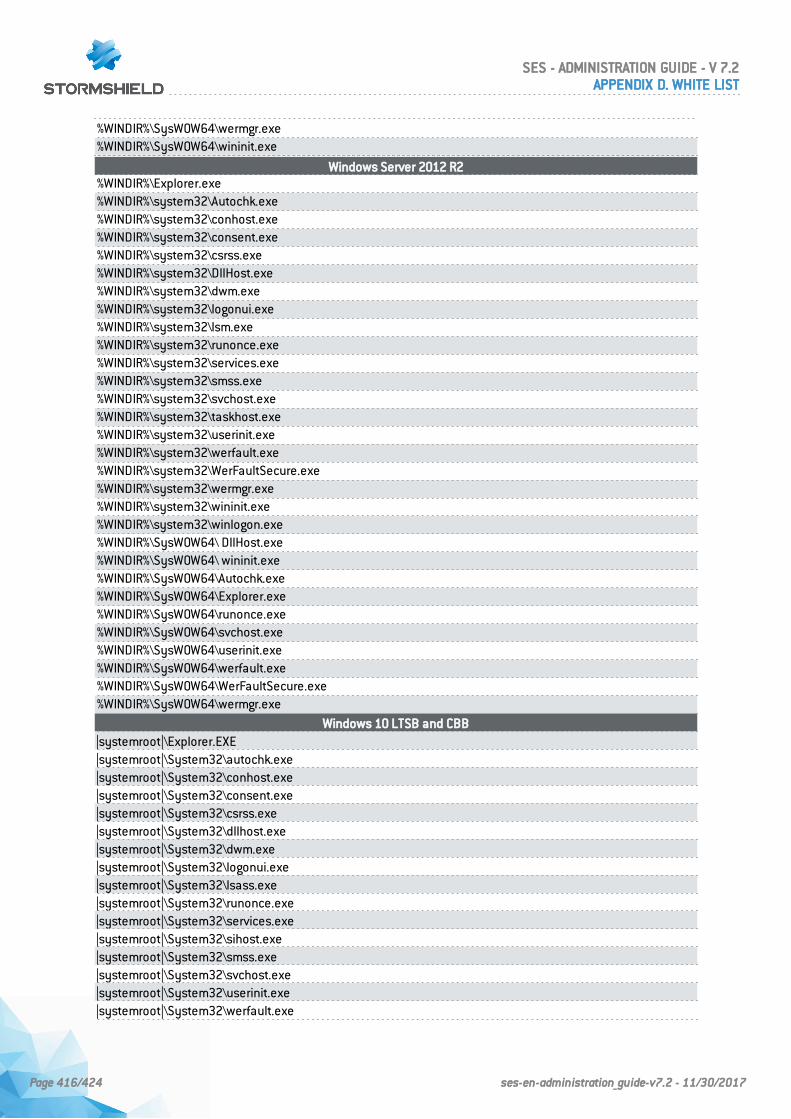
%WINDIR%\SysWOW64\wermgr.exe%WINDIR%\SysWOW64\wininit.exe
Windows Server 2012 R2%WINDIR%\Explorer.exe%WINDIR%\system32\Autochk.exe%WINDIR%\system32\conhost.exe%WINDIR%\system32\consent.exe%WINDIR%\system32\csrss.exe%WINDIR%\system32\DllHost.exe%WINDIR%\system32\dwm.exe%WINDIR%\system32\logonui.exe%WINDIR%\system32\lsm.exe%WINDIR%\system32\runonce.exe%WINDIR%\system32\services.exe%WINDIR%\system32\smss.exe%WINDIR%\system32\svchost.exe%WINDIR%\system32\taskhost.exe%WINDIR%\system32\userinit.exe%WINDIR%\system32\werfault.exe%WINDIR%\system32\WerFaultSecure.exe%WINDIR%\system32\wermgr.exe%WINDIR%\system32\wininit.exe%WINDIR%\system32\winlogon.exe%WINDIR%\SysWOW64\ DllHost.exe%WINDIR%\SysWOW64\ wininit.exe%WINDIR%\SysWOW64\Autochk.exe%WINDIR%\SysWOW64\Explorer.exe%WINDIR%\SysWOW64\runonce.exe%WINDIR%\SysWOW64\svchost.exe%WINDIR%\SysWOW64\userinit.exe%WINDIR%\SysWOW64\werfault.exe%WINDIR%\SysWOW64\WerFaultSecure.exe%WINDIR%\SysWOW64\wermgr.exe
Windows 10 LTSB and CBB|systemroot|\Explorer.EXE|systemroot|\System32\autochk.exe|systemroot|\System32\conhost.exe|systemroot|\System32\consent.exe|systemroot|\System32\csrss.exe|systemroot|\System32\dllhost.exe|systemroot|\System32\dwm.exe|systemroot|\System32\logonui.exe|systemroot|\System32\lsass.exe|systemroot|\System32\runonce.exe|systemroot|\System32\services.exe|systemroot|\System32\sihost.exe|systemroot|\System32\smss.exe|systemroot|\System32\svchost.exe|systemroot|\System32\userinit.exe|systemroot|\System32\werfault.exe
SES - ADMINISTRATION GUIDE - V 7.2APPENDIX D. WHITE LIST
Page 416/424 ses-en-administration_guide-v7.2 - 11/30/2017

|systemroot|\System32\werfaultsecure.exe|systemroot|\System32\wermgr.exe|systemroot|\System32\wininit.exe|systemroot|\System32\winlogon.exe|systemroot|\SysWOW64\autochk.exe|systemroot|\SysWOW64\dllhost.exe|systemroot|\SysWOW64\Explorer.EXE|systemroot|\SysWOW64\runonce.exe|systemroot|\SysWOW64\svchost.exe|systemroot|\SysWOW64\userinit.exe|systemroot|\SysWOW64\werfault.exe|systemroot|\SysWOW64\werfaultsecure.exe|systemroot|\SysWOW64\wermgr.exe
SES - ADMINISTRATION GUIDE - V 7.2APPENDIX D. WHITE LIST
Page 417/424 ses-en-administration_guide-v7.2 - 11/30/2017
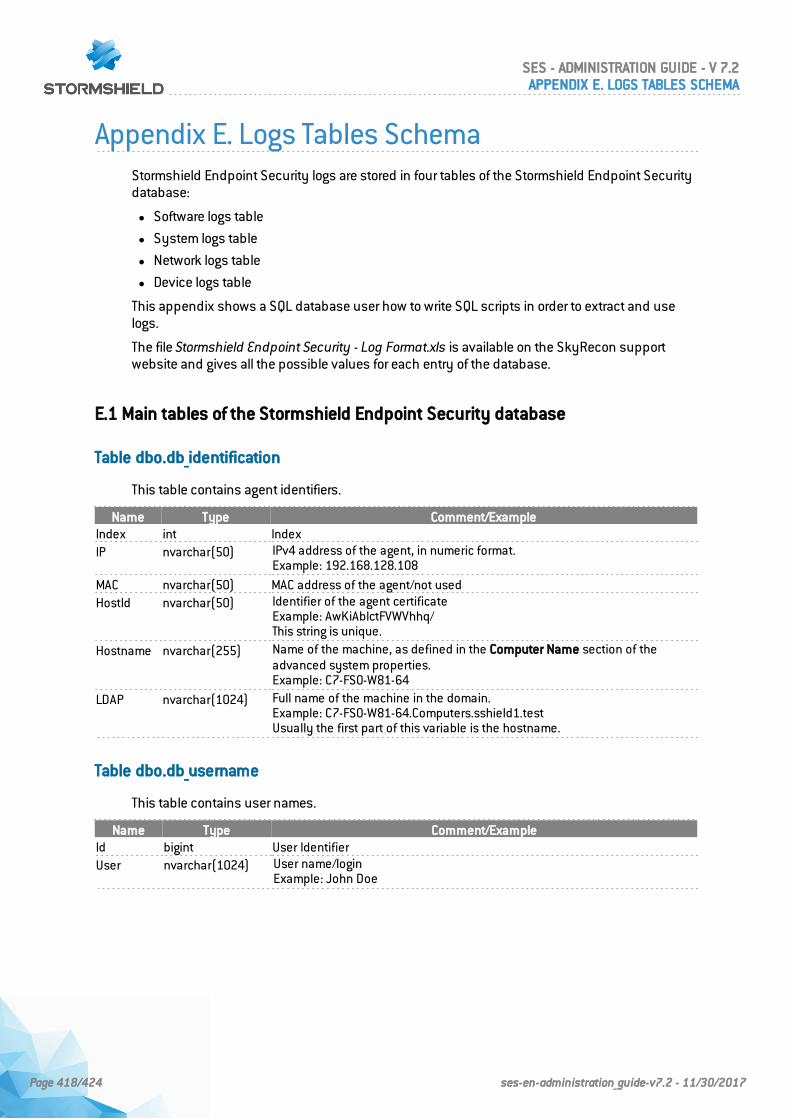
Appendix E. Logs Tables SchemaStormshield Endpoint Security logs are stored in four tables of the Stormshield Endpoint Securitydatabase:
l Software logs table
l System logs table
l Network logs table
l Device logs table
This appendix shows a SQL database user how to write SQL scripts in order to extract and uselogs.
The file Stormshield Endpoint Security - Log Format.xls is available on the SkyRecon supportwebsite and gives all the possible values for each entry of the database.
E.1 Main tables of the Stormshield Endpoint Security database
Table dbo.db_identification
This table contains agent identifiers.
Name Type Comment/ExampleIndex int IndexIP nvarchar(50) IPv4 address of the agent, in numeric format.
Example: 192.168.128.108
MAC nvarchar(50) MAC address of the agent/not usedHostId nvarchar(50) Identifier of the agent certificate
Example: AwKiAbIctFVWVhhq/This string is unique.
Hostname nvarchar(255) Name of the machine, as defined in the Computer Name section of theadvanced system properties.Example: C7-FSO-W81-64
LDAP nvarchar(1024) Full name of the machine in the domain.Example: C7-FSO-W81-64.Computers.sshield1.testUsually the first part of this variable is the hostname.
Table dbo.db_username
This table contains user names.
Name Type Comment/ExampleId bigint User IdentifierUser nvarchar(1024) User name/login
Example: John Doe
SES - ADMINISTRATION GUIDE - V 7.2APPENDIX E. LOGS TABLES SCHEMA
Page 418/424 ses-en-administration_guide-v7.2 - 11/30/2017

Table dbo.db_SystemLog
This table contains logs describing processes blocked by the agent, including viruses detectedby Avira. It is related to the System Logs in the Stormshield Endpoint Security console.
Name Type Comment/ExampleId bigint Log IdIndex int IndexLtimestamp bigint Time in seconds since 01/01/1970 ( time_t C/C++ )Action nvarchar(50) Action type
Action type performed by Stormshield Endpoint Security.Examples:AV: Antivirus blockedOVERFLOW: Overflow
Status nvarchar(50) Action statusSource nvarchar(1024) The meaning of these fields depends on the codes "action" and "status". See
logs table for more detailsDest nvarchar(1024)Option nvarchar(1024)Rid int Rule numberUserid nvarchar(1024) User identifier. Used to find the name in the db_username tableCnx_state tinyint Connection status
Table dbo.db_SoftwareLog
This table contains logs about the agent and the policies received. It also contains antivirusinstallation logs, configuration modification logs, etc.
Name Type Comment/ExampleId bigintIndex intLtimestamp bigint Time in seconds since 01/01/1970 ( time_t C/C++ )Action nvarchar(50) Severity of the event:
l INFO
l WARN
l ERROR
Status nvarchar(50) Nature of the eventLog nvarchar(1024) Message the user can read
Example: An error occurred when communicating with driver
Type nvarchar(50) Type of the eventModname nvarchar(50) Module which sent the logUserID bigint Used to find the user in the db_username tableCnx_state tinyint Connection status
SES - ADMINISTRATION GUIDE - V 7.2APPENDIX E. LOGS TABLES SCHEMA
Page 419/424 ses-en-administration_guide-v7.2 - 11/30/2017
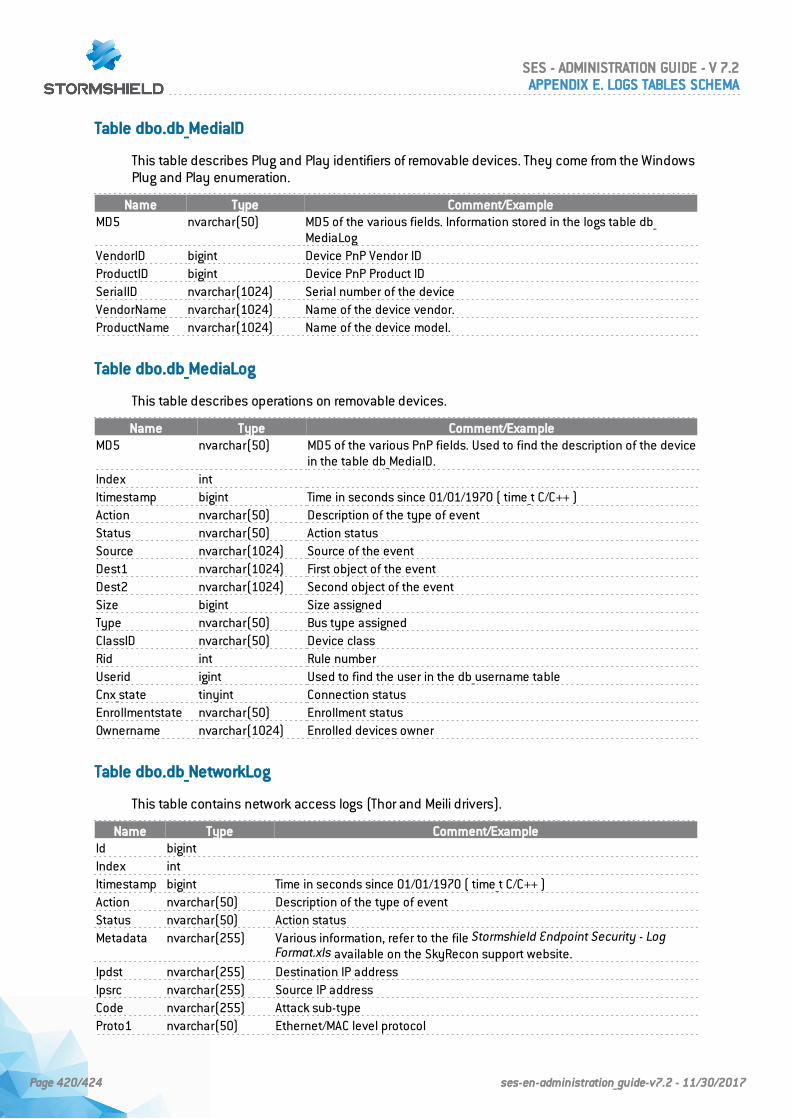
Table dbo.db_MediaID
This table describes Plug and Play identifiers of removable devices. They come from the WindowsPlug and Play enumeration.
Name Type Comment/ExampleMD5 nvarchar(50) MD5 of the various fields. Information stored in the logs table db_
MediaLogVendorID bigint Device PnP Vendor IDProductID bigint Device PnP Product IDSerialID nvarchar(1024) Serial number of the deviceVendorName nvarchar(1024) Name of the device vendor.ProductName nvarchar(1024) Name of the device model.
Table dbo.db_MediaLog
This table describes operations on removable devices.
Name Type Comment/ExampleMD5 nvarchar(50) MD5 of the various PnP fields. Used to find the description of the device
in the table db_MediaID.Index intltimestamp bigint Time in seconds since 01/01/1970 ( time_t C/C++ )Action nvarchar(50) Description of the type of eventStatus nvarchar(50) Action statusSource nvarchar(1024) Source of the eventDest1 nvarchar(1024) First object of the eventDest2 nvarchar(1024) Second object of the eventSize bigint Size assignedType nvarchar(50) Bus type assignedClassID nvarchar(50) Device classRid int Rule numberUserid igint Used to find the user in the db_username tableCnx_state tinyint Connection statusEnrollmentstate nvarchar(50) Enrollment statusOwnername nvarchar(1024) Enrolled devices owner
Table dbo.db_NetworkLog
This table contains network access logs (Thor and Meili drivers).
Name Type Comment/ExampleId bigintIndex intltimestamp bigint Time in seconds since 01/01/1970 ( time_t C/C++ )Action nvarchar(50) Description of the type of eventStatus nvarchar(50) Action statusMetadata nvarchar(255) Various information, refer to the file Stormshield Endpoint Security - Log
Format.xls available on the SkyRecon support website.Ipdst nvarchar(255) Destination IP addressIpsrc nvarchar(255) Source IP addressCode nvarchar(255) Attack sub-typeProto1 nvarchar(50) Ethernet/MAC level protocol
SES - ADMINISTRATION GUIDE - V 7.2APPENDIX E. LOGS TABLES SCHEMA
Page 420/424 ses-en-administration_guide-v7.2 - 11/30/2017
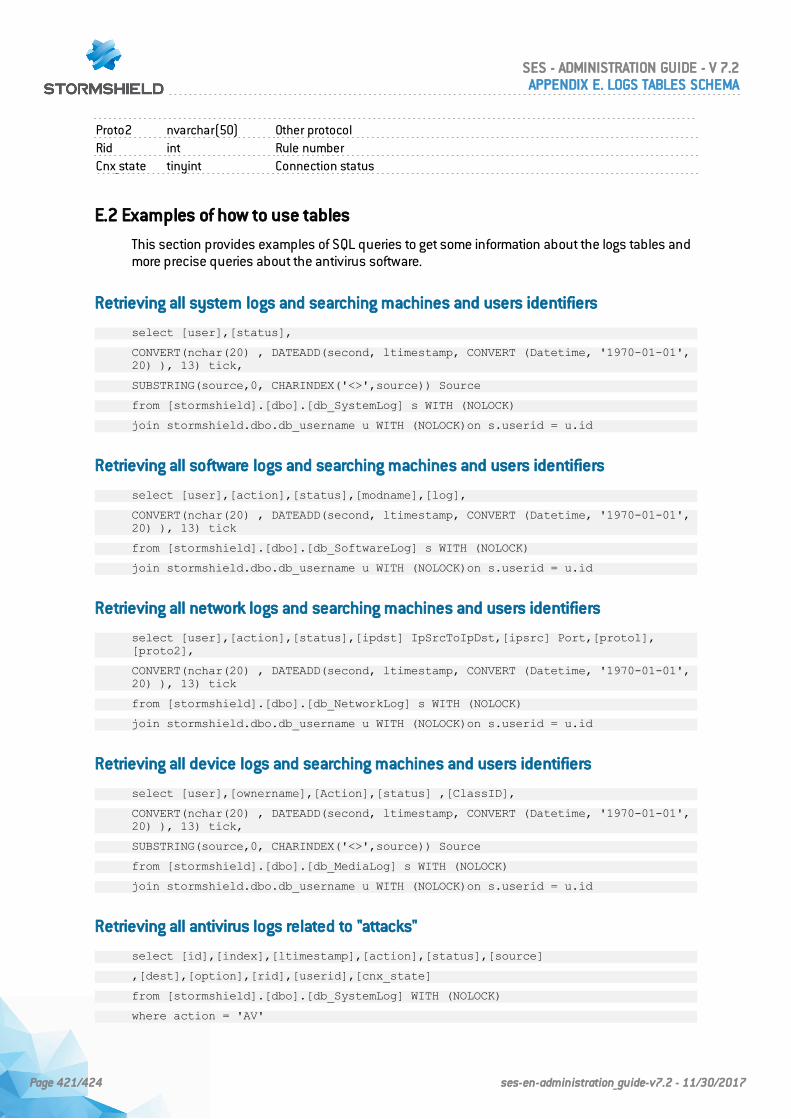
Proto2 nvarchar(50) Other protocolRid int Rule numberCnx_state tinyint Connection status
E.2 Examples of how to use tables
This section provides examples of SQL queries to get some information about the logs tables andmore precise queries about the antivirus software.
Retrieving all system logs and searching machines and users identifiers
select [user],[status],
CONVERT(nchar(20) , DATEADD(second, ltimestamp, CONVERT (Datetime, '1970-01-01',20) ), 13) tick,
SUBSTRING(source,0, CHARINDEX('<>',source)) Source
from [stormshield].[dbo].[db_SystemLog] s WITH (NOLOCK)
join stormshield.dbo.db_username u WITH (NOLOCK)on s.userid = u.id
Retrieving all software logs and searching machines and users identifiers
select [user],[action],[status],[modname],[log],
CONVERT(nchar(20) , DATEADD(second, ltimestamp, CONVERT (Datetime, '1970-01-01',20) ), 13) tick
from [stormshield].[dbo].[db_SoftwareLog] s WITH (NOLOCK)
join stormshield.dbo.db_username u WITH (NOLOCK)on s.userid = u.id
Retrieving all network logs and searching machines and users identifiers
select [user],[action],[status],[ipdst] IpSrcToIpDst,[ipsrc] Port,[proto1],[proto2],
CONVERT(nchar(20) , DATEADD(second, ltimestamp, CONVERT (Datetime, '1970-01-01',20) ), 13) tick
from [stormshield].[dbo].[db_NetworkLog] s WITH (NOLOCK)
join stormshield.dbo.db_username u WITH (NOLOCK)on s.userid = u.id
Retrieving all device logs and searching machines and users identifiers
select [user],[ownername],[Action],[status] ,[ClassID],
CONVERT(nchar(20) , DATEADD(second, ltimestamp, CONVERT (Datetime, '1970-01-01',20) ), 13) tick,
SUBSTRING(source,0, CHARINDEX('<>',source)) Source
from [stormshield].[dbo].[db_MediaLog] s WITH (NOLOCK)
join stormshield.dbo.db_username u WITH (NOLOCK)on s.userid = u.id
Retrieving all antivirus logs related to "attacks"
select [id],[index],[ltimestamp],[action],[status],[source]
,[dest],[option],[rid],[userid],[cnx_state]
from [stormshield].[dbo].[db_SystemLog] WITH (NOLOCK)
where action = 'AV'
SES - ADMINISTRATION GUIDE - V 7.2APPENDIX E. LOGS TABLES SCHEMA
Page 421/424 ses-en-administration_guide-v7.2 - 11/30/2017
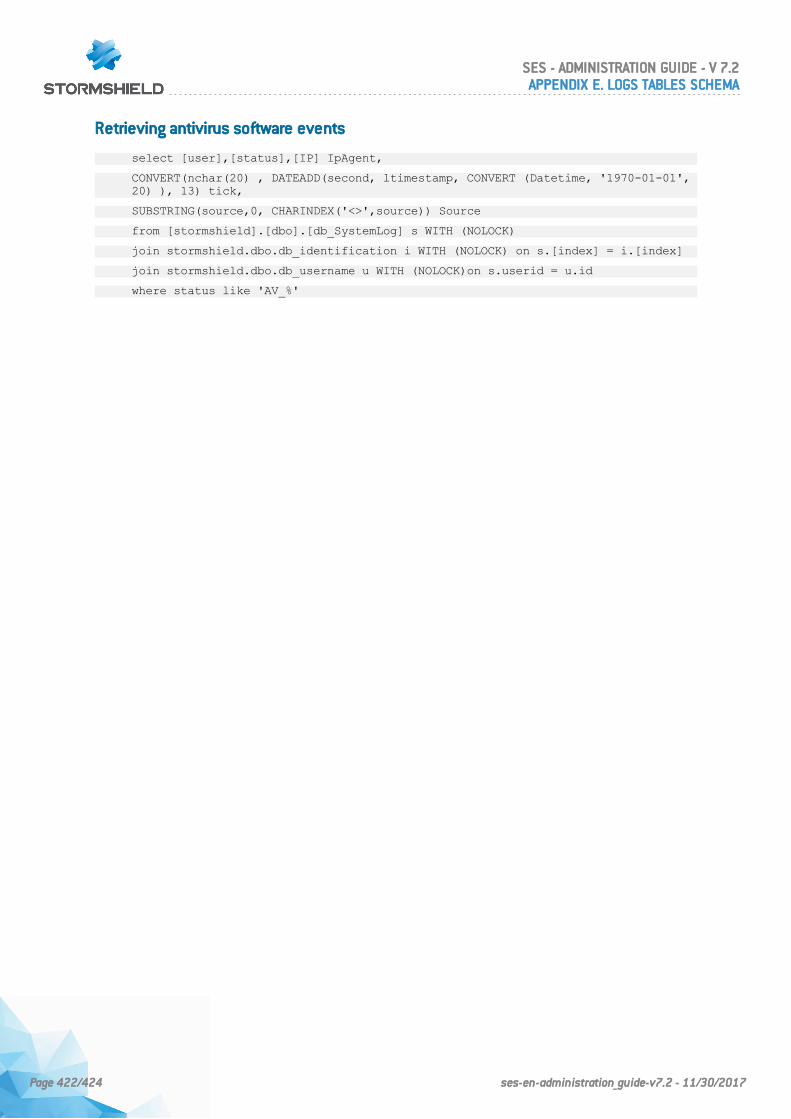
Retrieving antivirus software events
select [user],[status],[IP] IpAgent,
CONVERT(nchar(20) , DATEADD(second, ltimestamp, CONVERT (Datetime, '1970-01-01',20) ), 13) tick,
SUBSTRING(source,0, CHARINDEX('<>',source)) Source
from [stormshield].[dbo].[db_SystemLog] s WITH (NOLOCK)
join stormshield.dbo.db_identification i WITH (NOLOCK) on s.[index] = i.[index]
join stormshield.dbo.db_username u WITH (NOLOCK)on s.userid = u.id
where status like 'AV_%'
SES - ADMINISTRATION GUIDE - V 7.2APPENDIX E. LOGS TABLES SCHEMA
Page 422/424 ses-en-administration_guide-v7.2 - 11/30/2017
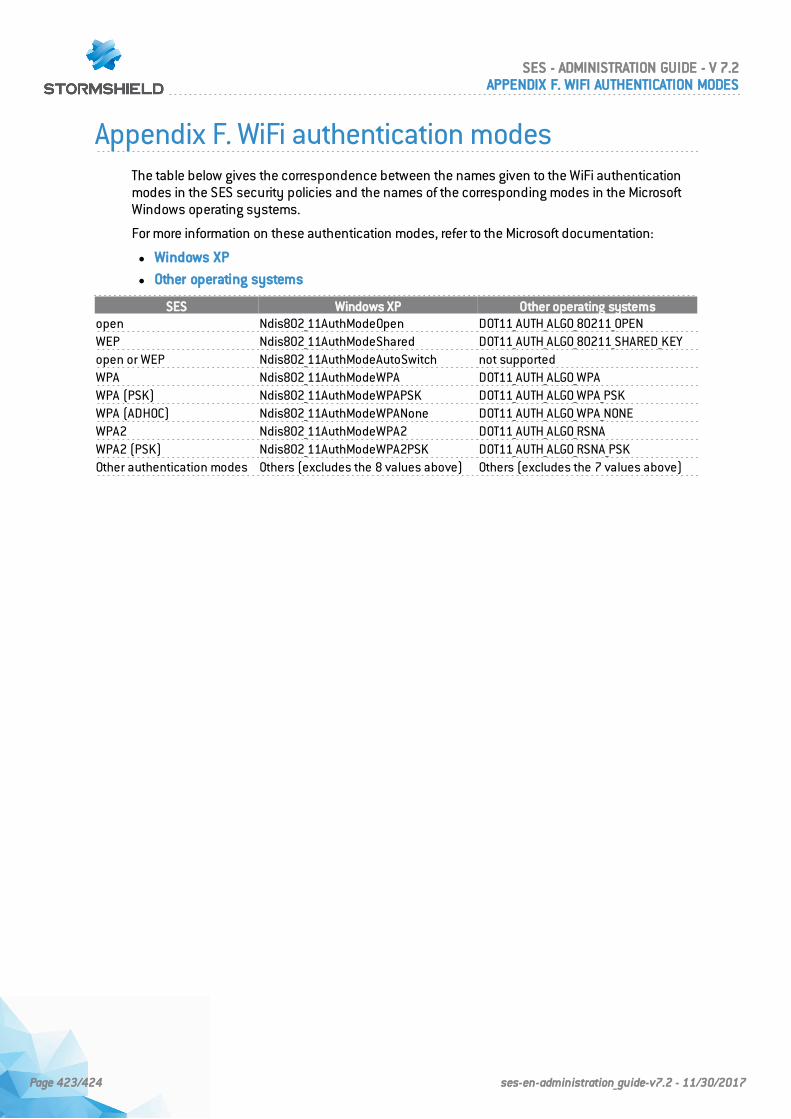
Appendix F. WiFi authentication modesThe table below gives the correspondence between the names given to the WiFi authenticationmodes in the SES security policies and the names of the corresponding modes in the MicrosoftWindows operating systems.
For more information on these authentication modes, refer to the Microsoft documentation:
l Windows XP
l Other operating systems
SES Windows XP Other operating systemsopen Ndis802_11AuthModeOpen DOT11_AUTH_ALGO_80211_OPENWEP Ndis802_11AuthModeShared DOT11_AUTH_ALGO_80211_SHARED_KEYopen or WEP Ndis802_11AuthModeAutoSwitch not supportedWPA Ndis802_11AuthModeWPA DOT11_AUTH_ALGO_WPAWPA (PSK) Ndis802_11AuthModeWPAPSK DOT11_AUTH_ALGO_WPA_PSKWPA (ADHOC) Ndis802_11AuthModeWPANone DOT11_AUTH_ALGO_WPA_NONEWPA2 Ndis802_11AuthModeWPA2 DOT11_AUTH_ALGO_RSNAWPA2 (PSK) Ndis802_11AuthModeWPA2PSK DOT11_AUTH_ALGO_RSNA_PSKOther authentication modes Others (excludes the 8 values above) Others (excludes the 7 values above)
SES - ADMINISTRATION GUIDE - V 7.2APPENDIX F. WIFI AUTHENTICATION MODES
Page 423/424 ses-en-administration_guide-v7.2 - 11/30/2017
Page 424/424 ses-en-administration_guide-v7.2 - 11/30/2017
SES - ADMINISTRATION GUIDE - V 7.2
All images in this document are for representational purposes only, actual products may differ.
Copyright SkyRecon Systems 2017. All rights reserved. All other company and product namescontained in this document are trademarks or registered trademarks of their respectivecompanies.


![anexo tecnología [7695 kb] - BOX](https://img.pdfslide.net/doc/110x75/631c33ea6c6907d368013292/anexo-tecnologia-7695-kb-box.jpg)


