Embed Size (px)
Citation preview
The Art of Talking without Talking Learn GSL (Gyani’s Sign Language) in 5 minutes
Gyani
De Ah-r-t of Tah-ke-n-g We-do-u-t Tah-ke-n-g

Introduction Scene 1 The teacher raps the table with her stick and shouts “Silence! No talking! If I catch anyone talking, I’ll send him out immediately.” The poor students try to stay quiet and feel miserable. Their young and fertile minds are full of ideas and thoughts which they want to share with their friends. But they need to talk in order to do that. The ban on talking by their teacher makes them feel suffocated and they try whispering. Soon the whispers become louder and the irritated teacher once again raps the table with her stick and shouts “No whispering either!” The frustrated students engage their remaining time in coining the choicest abuses for their ‘behated’ teacher. They wish they could talk without making a sound. Scene 2 Rohit had a severe throat infection which required an operation. After the operation he was ordered to be on complete voice rest for a month. In other words, he was not allowed to utter a sound for a month, so that his vocal chords could heal properly. He found it very difficult to communicate with his family, friends and colleagues in the office during that time. He wished he knew a simple sign language which could be learnt in 5 minutes and so could be easily taught to his friends and colleagues. It would have made life so much more easier for him. Scene 3 It was the final round of the inter-college DumbCharades Competition organized by the Physics department of D.G.Vaishnav College, Chennai. One team had a lead of almost a thousand points over the rest of the teams. No word seemed difficult for this team. They never took more than 10 seconds for the longest and toughest words. Everyone suspected that they used some sign language, but it was impossible to prove it. The rules of the game say that alphabets should not be signaled using actions. And they were clearly not doing that. The guy who was miming just seemed to be turning his head this way and that while driving an imaginary car by changing gears with his hands. The guy who was guessing the word, guessed it correctly and easily in the very first attempt every time. Needless to say they won the first
prize in every Dumbcharades competition they participated. The mimer in that team called himself Gyani and said he had invented a secret technique which he called GSL which he would not reveal. Scene 4 Mohan is deaf and dumb and has a horrid time trying to communicate with people who don’t know the language of the deaf and the dumb. But he understands that it’s not easy to learn the sign language of the deaf and the dumb and people who can talk and hear would never bother to learn it. But he wishes that there was a much easier sign language which anyone could learn in just 5 minutes. That way people would be more eager to learn it and he would be able to communicate with everyone easily. I was reading the book ‘Memory Makes Money’ by Harry Lorrayne when I got the brainwave for this sign language. I was in college at that time and we were planning to take part in Dumbcharades competitions. This technique helped my team make a clean sweep of all the prizes that year. Then recently I found that I have ‘Spasmodic Dysphonia’ (a problem with the vocal chords). It makes talking an ordeal for me. So I refined my Sign Language and taught it to my family, friends and colleagues in the office. No one took more than 5 minutes to learn it. So now we have a great time communicating with each other. It’s easy, it’s simple and it’s fun! You too can learn it and teach it to anyone in just 5 minutes. From my own experience I can tell you that it is a lot of fun and creates a lot of laughter and bonding among family and friends. Since this sign language is based on sounds, you can use it to speak in any language, or even a mixture of languages. And of course, the best part is that you can now talk even with your mouth full, by using just your left hand (in case you are holding a spoon in your right hand)!
The Basic Principle Every word we speak can be broken up into syllables. For example, the previous sentence in syllable form will be: Av-ri vard v speek can b bro-ken up in-to sy-la-bels. Elephant will be a-li-fant. Hippopotamus will be hi-po-po-ta-mus. Human will be he-u-mun. Yes will be e-a-s. “Please come here” will be p-lee-s co-m he-ar. “How are you?” will be hov r u? Each of these syllables is made up of a combination of a consonant and a vowel sound. ‘a’, ‘e’, ‘i’, ‘o’, ‘u’ are the vowel sounds of the English language. For my sign language I’ve added an extra vowel sound ‘ah’ ( the ‘h’ is silent. The ‘a’ here is pronounced as in ‘saw’.) The rest of the alphabets are the consonants of the English language. The English language has 26 alphabets and all existing sign languages have created a sign for each alphabet of their language. So each language has its own sign language and the deaf and dumb people have a hard time learning it. Learning to associate each of the 26 signs with its corresponding alphabet and then remembering it, is not an easy task. Yet, that is what the most popular sign language so far – the ASL (American Sign Language) wants us to do. This is where GSL (Gyani’s Sign Language) differs radically from the existing sign languages. The fact is that while talking, we don’t need the 26 alphabets. Just 11 will do. Well, actually it’s 17, but some of the similar consonants are grouped in pairs, so that you have only 11 major consonants to remember. And these can be easily remembered (thanks to Harry Lorrayne) by associating them with their respective numbers (from 0 to 10). So each of these 17 consonants has a sign, which is very easy to remember because it has a story (or, reason) behind it. The 6 vowel sounds (including the ‘ah’) are represented by the 6 possible directions – up, down, front, back, left and right. So now all we have to do to make a syllable is to make a sign with the hand (for the consonant) and take it to the respective directions (for the vowel sounds). For example, if you make the sign for ‘g’ with your hand in front of you, and then push the sign upwards (up direction is for ‘o’), it will mean g + o = go.
The 6 directions and the vowel sounds they represent To avoid confusion about the directions, please understand this part very clearly: Let’s call the person who does the signs - “Mimer” and the person who interprets the signs – “Interpreter”. They stand or sit facing each other. The ‘up-down’ directions are the same for both of them. But the ‘left-right’ and the ‘front-back’ directions are not the same for both of them. So let me first clarify these two sets of directions for the Mimer and the Interpreter. When you are the Mimer, your right-hand side represents the first vowel – ‘a’. When you become the interpreter and interpret the signals made by the Mimer in front of you, your left-hand side will represent the first vowel ‘a’. The Mimer will show ‘a’ with his right-hand side which appears on your left-hand side when you are the interpreter. To avoid confusion, remember it as follows: The vowels are in the order ‘aeiou’ and ‘ah’. ‘a’ comes first and is followed by ‘e’. When you are the Mimer, you are going to ‘write’(mime) with your right-hand and so you start with ‘a’ on your right-hand side and proceed to ‘e’ on your left-hand side. When you are the Interpreter, you are going to ‘read’ (interpret the signs) from left to right as in a book. So you start with ‘a’ on your left-hand side and proceed to ‘e’ on your right-hand side. Similarly for the ‘front-back’ directions, when you are the Mimer, the front direction (for ‘u’ sound) is in front of your body and going away from it (towards the interpreter). The back direction (for ‘i’ sound) is going backwards towards your chest (away from the interpreter). But when you are the Interpreter, the direction towards the mimer (and away from you) will represent the ‘i’ sound. The direction towards your chest (when the Mimer points towards you) will be the ‘u’ sound. That leaves us with the non-confusing ‘up-down’ pair of directions which are the same for both the Mimer and the Interpreter. ‘Up’ represents the ‘o’ sound. You can remember it easily by telling yourself that people often look up and exclaim “Oooh!” when they suddenly understand something after pondering over it for a long time. So ‘up’ means ‘o’ sound. The ‘down’ direction means ‘ah’ sound. You can remember this easily by telling yourself that you were delighted to see a gold coin on the ground and exclaimed “Aha!” So ‘down’ means ‘ah’ sound. So if you make a sign for one of the consonants and move it in one of these directions, it forms the corresponding syllables. The position right in front of your chest is the ‘neutral’ position. Here the consonant is in its ‘root’ form
without any vowel sound attached to it. So ‘k’ when showed in this neutral position is not ‘k’ as in ‘cane’, but is actually ‘k’ as in ‘pack’. As a Mimer, if you want to show ‘k’ as in ‘cane’, you must add the ‘a’ vowel sound after the ‘k’ consonant. So you must first make the ‘k’ sign in the ‘neutral’ position and then move it to your right-hand side. Then it will become ‘k’ as in ‘cane’. If you want to show ‘k’ as in ‘cone’, then you must move the ‘k’ sign upwards from the ‘neutral’ position. If the vowel sound precedes the consonant like in ‘act’, then you make the sign for ‘k’ in your right-hand side (which represents ‘a’) and then bring the ‘k’ sign to the ‘neutral’ position in front of your chest. That will mean ‘ak’ as in ‘act’. If you follow it up with the sign for ‘t’ in the ‘neutral’ position, you get ‘act’. Suppose there’s a word that has two different vowel sounds in the beginning, like ‘out’. This word can be split up as ah-u-t. So start the sign for ‘t’ from down (for ‘ah’) and then move it to the front (for ‘u’) and then bring it to the neutral position. This means you showed ‘out’. Suppose there’s a word that has no consonant in it, like ‘you’. ‘you’ is just ‘u’ in syllable form and it has no consonants. For such cases we need to rotate or move our heads in the respective directions:
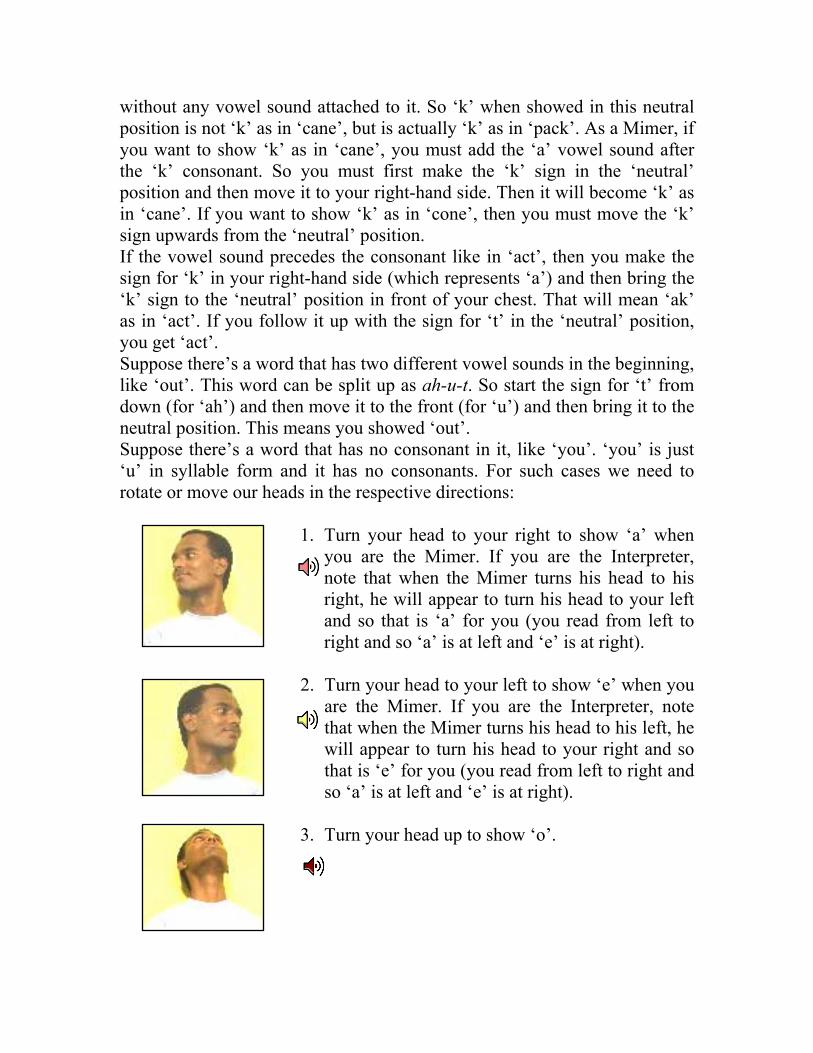
1. Turn your head to your right to show ‘a’ when you are the Mimer. If you are the Interpreter, note that when the Mimer turns his head to his right, he will appear to turn his head to your left and so that is ‘a’ for you (you read from left to right and so ‘a’ is at left and ‘e’ is at right).
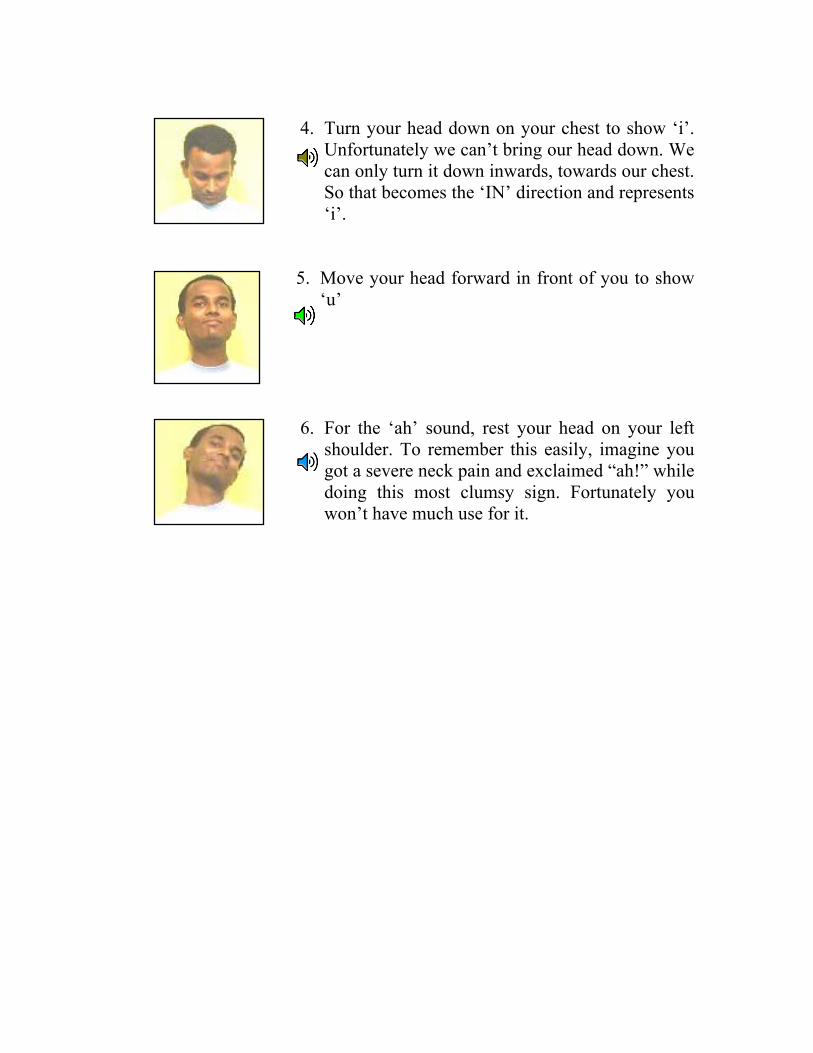
2. Turn your head to your left to show ‘e’ when you
are the Mimer. If you are the Interpreter, note that when the Mimer turns his head to his left, he will appear to turn his head to your right and so that is ‘e’ for you (you read from left to right and so ‘a’ is at left and ‘e’ is at right).
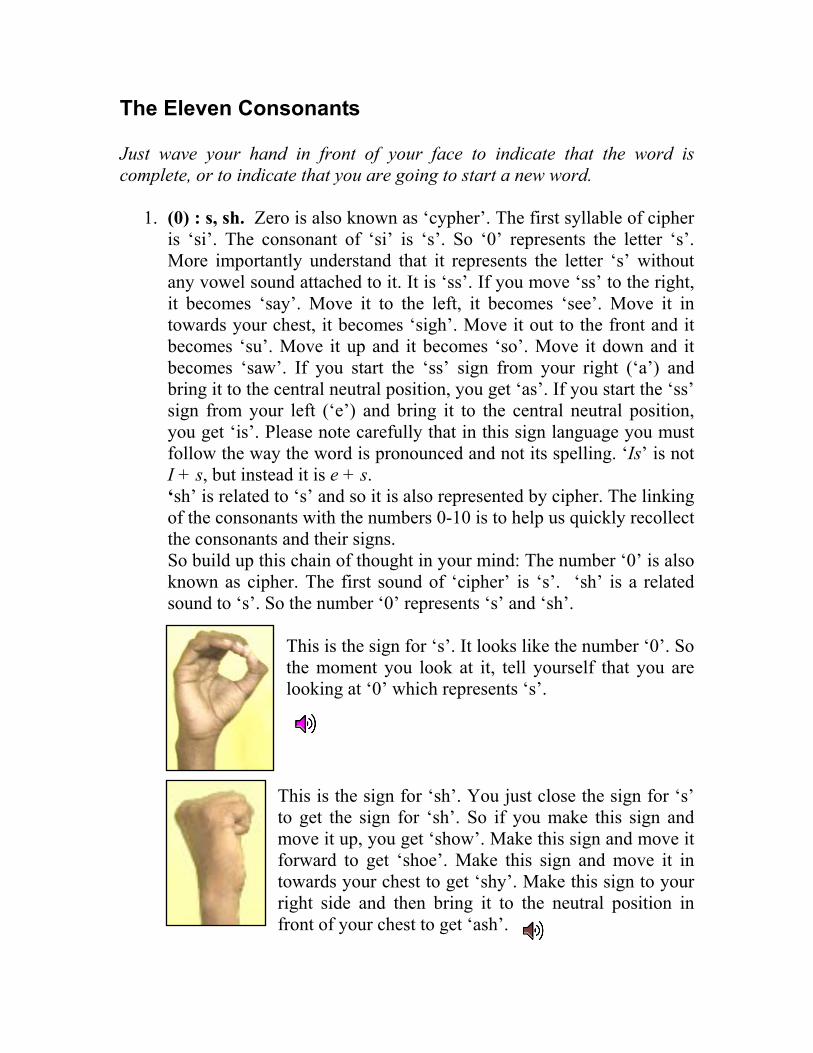
3. Turn your head up to show ‘o’.
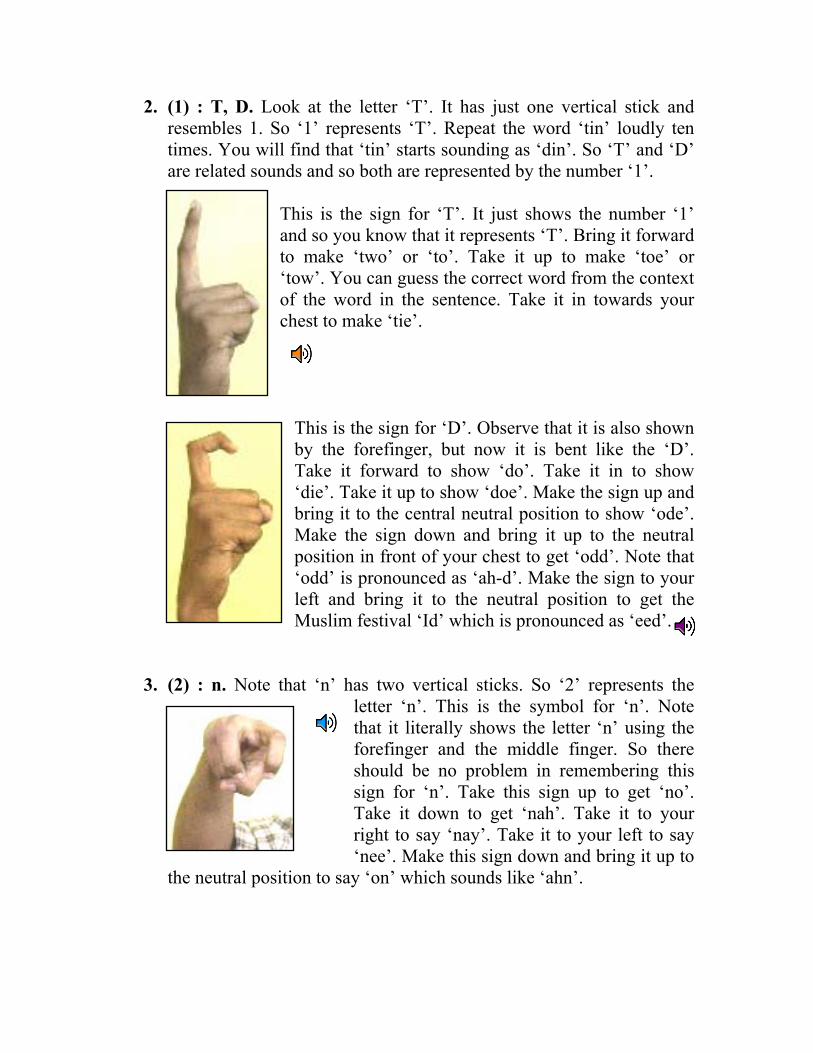
4. Turn your head down on your chest to show ‘i’.
Unfortunately we can’t bring our head down. We can only turn it down inwards, towards our chest. So that becomes the ‘IN’ direction and represents ‘i’.
5. Move your head forward in front of you to show ‘u’
6. For the ‘ah’ sound, rest your head on your left
shoulder. To remember this easily, imagine you got a severe neck pain and exclaimed “ah!” while doing this most clumsy sign. Fortunately you won’t have much use for it.
The Eleven Consonants Just wave your hand in front of your face to indicate that the word is complete, or to indicate that you are going to start a new word.
1. (0) : s, sh. Zero is also known as ‘cypher’. The first syllable of cipher is ‘si’. The consonant of ‘si’ is ‘s’. So ‘0’ represents the letter ‘s’. More importantly understand that it represents the letter ‘s’ without any vowel sound attached to it. It is ‘ss’. If you move ‘ss’ to the right, it becomes ‘say’. Move it to the left, it becomes ‘see’. Move it in towards your chest, it becomes ‘sigh’. Move it out to the front and it becomes ‘su’. Move it up and it becomes ‘so’. Move it down and it becomes ‘saw’. If you start the ‘ss’ sign from your right (‘a’) and bring it to the central neutral position, you get ‘as’. If you start the ‘ss’ sign from your left (‘e’) and bring it to the central neutral position, you get ‘is’. Please note carefully that in this sign language you must follow the way the word is pronounced and not its spelling. ‘Is’ is not I + s, but instead it is e + s. ‘sh’ is related to ‘s’ and so it is also represented by cipher. The linking of the consonants with the numbers 0-10 is to help us quickly recollect the consonants and their signs. So build up this chain of thought in your mind: The number ‘0’ is also known as cipher. The first sound of ‘cipher’ is ‘s’. ‘sh’ is a related sound to ‘s’. So the number ‘0’ represents ‘s’ and ‘sh’.
This is the sign for ‘s’. It looks like the number ‘0’. So the moment you look at it, tell yourself that you are looking at ‘0’ which represents ‘s’.
This is the sign for ‘sh’. You just close the sign for ‘s’ to get the sign for ‘sh’. So if you make this sign and move it up, you get ‘show’. Make this sign and move it forward to get ‘shoe’. Make this sign and move it in towards your chest to get ‘shy’. Make this sign to your right side and then bring it to the neutral position in front of your chest to get ‘ash’.
2. (1) : T, D. Look at the letter ‘T’. It has just one vertical stick and resembles 1. So ‘1’ represents ‘T’. Repeat the word ‘tin’ loudly ten times. You will find that ‘tin’ starts sounding as ‘din’. So ‘T’ and ‘D’ are related sounds and so both are represented by the number ‘1’.
This is the sign for ‘T’. It just shows the number ‘1’ and so you know that it represents ‘T’. Bring it forward to make ‘two’ or ‘to’. Take it up to make ‘toe’ or ‘tow’. You can guess the correct word from the context of the word in the sentence. Take it in towards your chest to make ‘tie’.
This is the sign for ‘D’. Observe that it is also shown by the forefinger, but now it is bent like the ‘D’. Take it forward to show ‘do’. Take it in to show ‘die’. Take it up to show ‘doe’. Make the sign up and bring it to the central neutral position to show ‘ode’. Make the sign down and bring it up to the neutral position in front of your chest to get ‘odd’. Note that ‘odd’ is pronounced as ‘ah-d’. Make the sign to your left and bring it to the neutral position to get the Muslim festival ‘Id’ which is pronounced as ‘eed’.
3. (2) : n. Note that ‘n’ has two vertical sticks. So ‘2’ represents the letter ‘n’. This is the symbol for ‘n’. Note that it literally shows the letter ‘n’ using the forefinger and the middle finger. So there should be no problem in remembering this sign for ‘n’. Take this sign up to get ‘no’. Take it down to get ‘nah’. Take it to your right to say ‘nay’. Take it to your left to say ‘nee’. Make this sign down and bring it up to
the neutral position to say ‘on’ which sounds like ‘ahn’.
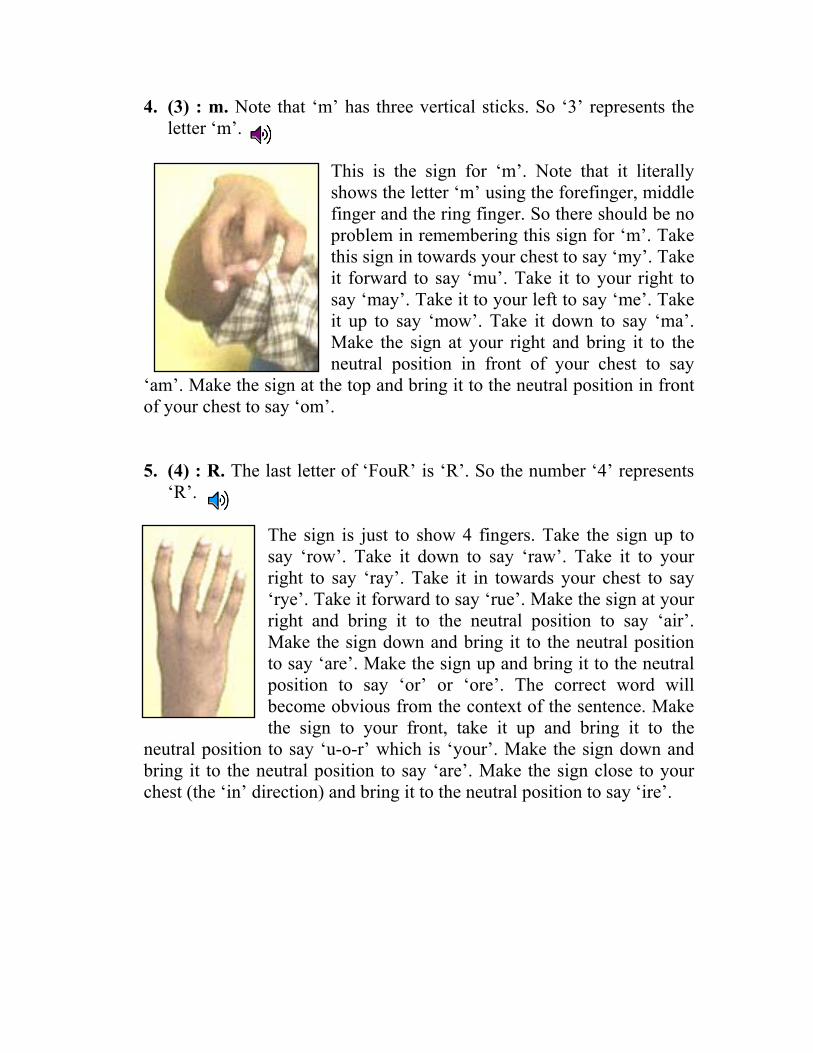
4. (3) : m. Note that ‘m’ has three vertical sticks. So ‘3’ represents the letter ‘m’.
This is the sign for ‘m’. Note that it literally shows the letter ‘m’ using the forefinger, middle finger and the ring finger. So there should be no problem in remembering this sign for ‘m’. Take this sign in towards your chest to say ‘my’. Take it forward to say ‘mu’. Take it to your right to say ‘may’. Take it to your left to say ‘me’. Take it up to say ‘mow’. Take it down to say ‘ma’. Make the sign at your right and bring it to the neutral position in front of your chest to say
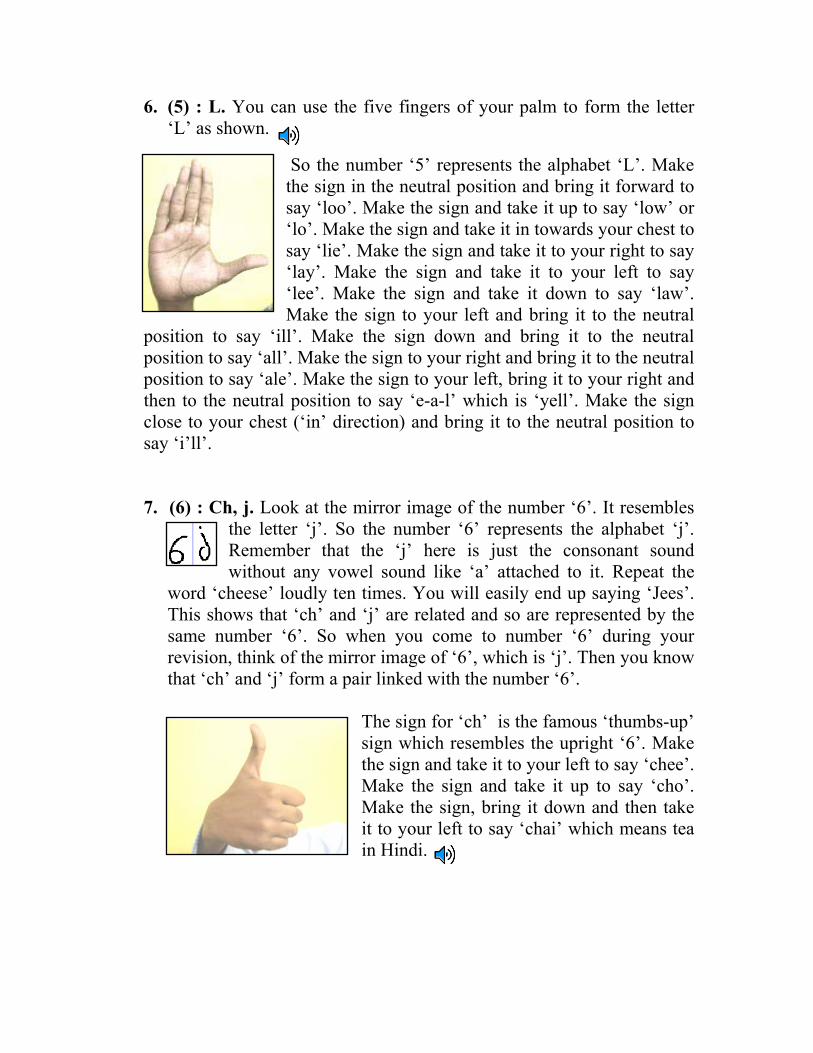
‘am’. Make the sign at the top and bring it to the neutral position in front of your chest to say ‘om’. 5. (4) : R. The last letter of ‘FouR’ is ‘R’. So the number ‘4’ represents
‘R’.
The sign is just to show 4 fingers. Take the sign up to say ‘row’. Take it down to say ‘raw’. Take it to your right to say ‘ray’. Take it in towards your chest to say ‘rye’. Take it forward to say ‘rue’. Make the sign at your right and bring it to the neutral position to say ‘air’. Make the sign down and bring it to the neutral position to say ‘are’. Make the sign up and bring it to the neutral position to say ‘or’ or ‘ore’. The correct word will become obvious from the context of the sentence. Make the sign to your front, take it up and bring it to the
neutral position to say ‘u-o-r’ which is ‘your’. Make the sign down and bring it to the neutral position to say ‘are’. Make the sign close to your chest (the ‘in’ direction) and bring it to the neutral position to say ‘ire’.
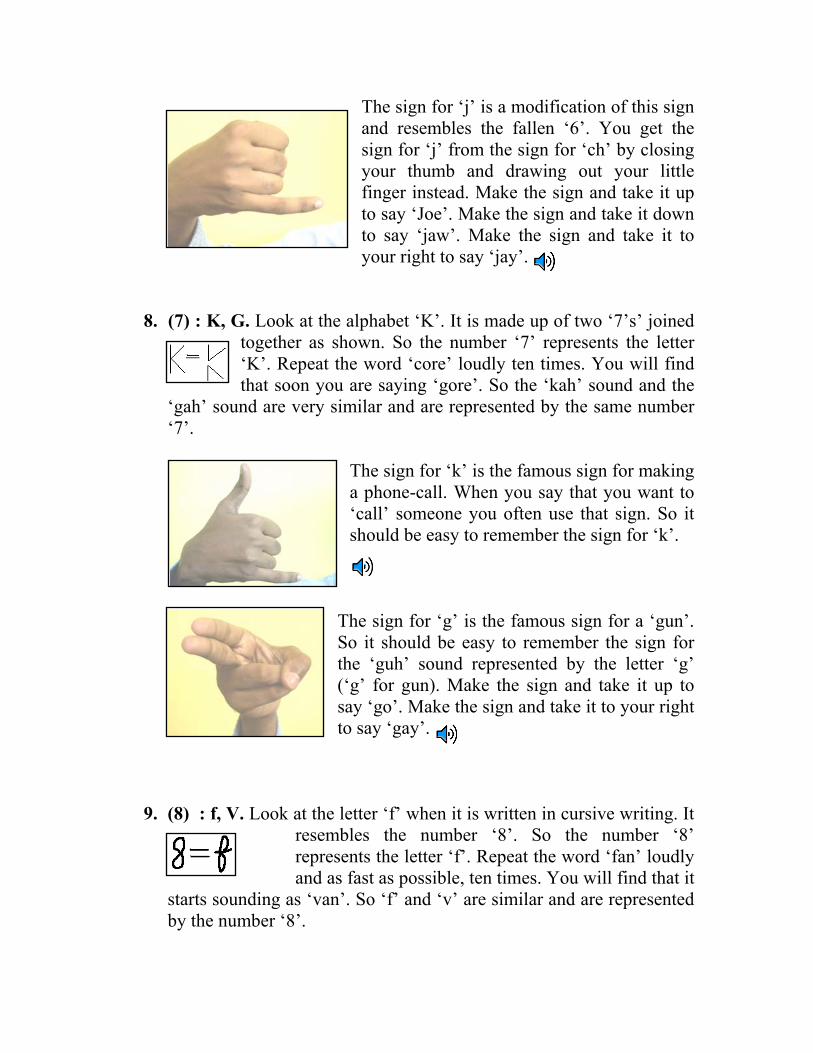
6. (5) : L. You can use the five fingers of your palm to form the letter ‘L’ as shown.
So the number ‘5’ represents the alphabet ‘L’. Make the sign in the neutral position and bring it forward to say ‘loo’. Make the sign and take it up to say ‘low’ or ‘lo’. Make the sign and take it in towards your chest to say ‘lie’. Make the sign and take it to your right to say ‘lay’. Make the sign and take it to your left to say ‘lee’. Make the sign and take it down to say ‘law’. Make the sign to your left and bring it to the neutral
position to say ‘ill’. Make the sign down and bring it to the neutral position to say ‘all’. Make the sign to your right and bring it to the neutral position to say ‘ale’. Make the sign to your left, bring it to your right and then to the neutral position to say ‘e-a-l’ which is ‘yell’. Make the sign close to your chest (‘in’ direction) and bring it to the neutral position to say ‘i’ll’. 7. (6) : Ch, j. Look at the mirror image of the number ‘6’. It resembles
the letter ‘j’. So the number ‘6’ represents the alphabet ‘j’. Remember that the ‘j’ here is just the consonant sound without any vowel sound like ‘a’ attached to it. Repeat the
word ‘cheese’ loudly ten times. You will easily end up saying ‘Jees’. This shows that ‘ch’ and ‘j’ are related and so are represented by the same number ‘6’. So when you come to number ‘6’ during your revision, think of the mirror image of ‘6’, which is ‘j’. Then you know that ‘ch’ and ‘j’ form a pair linked with the number ‘6’.
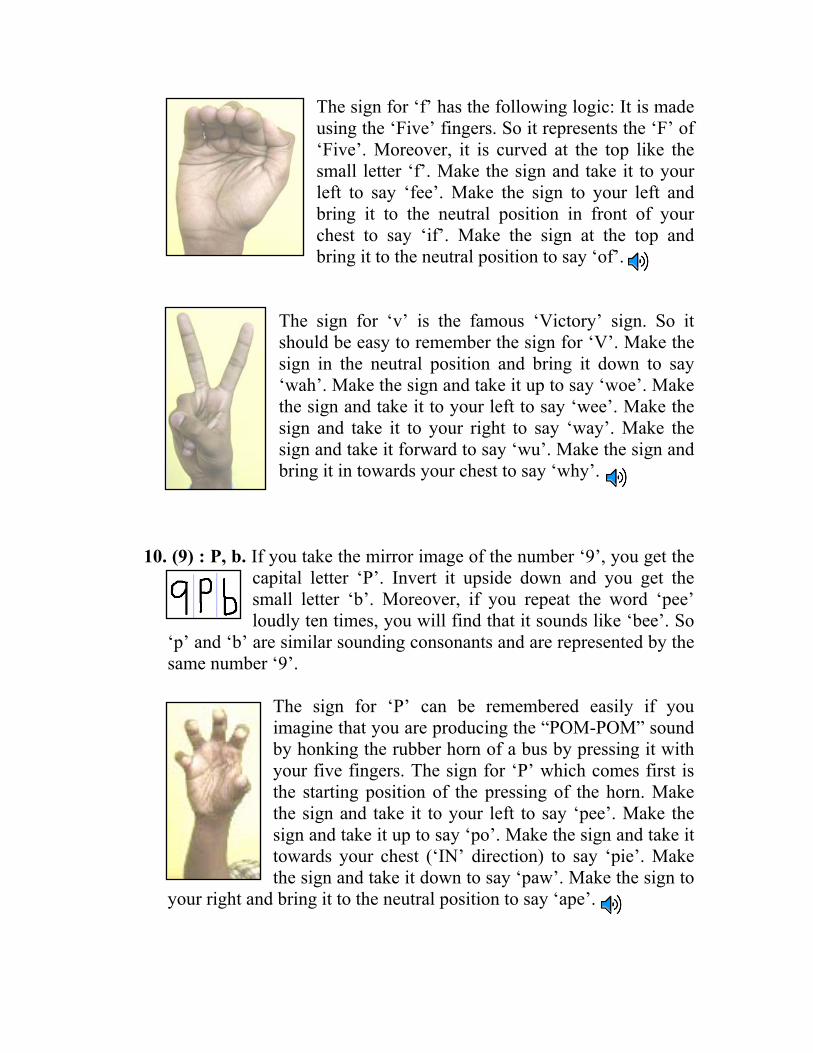
The sign for ‘ch’ is the famous ‘thumbs-up’ sign which resembles the upright ‘6’. Make the sign and take it to your left to say ‘chee’. Make the sign and take it up to say ‘cho’. Make the sign, bring it down and then take it to your left to say ‘chai’ which means tea in Hindi.
The sign for ‘j’ is a modification of this sign and resembles the fallen ‘6’. You get the sign for ‘j’ from the sign for ‘ch’ by closing your thumb and drawing out your little finger instead. Make the sign and take it up to say ‘Joe’. Make the sign and take it down to say ‘jaw’. Make the sign and take it to your right to say ‘jay’.
8. (7) : K, G. Look at the alphabet ‘K’. It is made up of two ‘7’s’ joined together as shown. So the number ‘7’ represents the letter ‘K’. Repeat the word ‘core’ loudly ten times. You will find that soon you are saying ‘gore’. So the ‘kah’ sound and the
‘gah’ sound are very similar and are represented by the same number ‘7’.
The sign for ‘k’ is the famous sign for making a phone-call. When you say that you want to ‘call’ someone you often use that sign. So it should be easy to remember the sign for ‘k’.
The sign for ‘g’ is the famous sign for a ‘gun’. So it should be easy to remember the sign for the ‘guh’ sound represented by the letter ‘g’ (‘g’ for gun). Make the sign and take it up to say ‘go’. Make the sign and take it to your right to say ‘gay’.
9. (8) : f, V. Look at the letter ‘f’ when it is written in cursive writing. It resembles the number ‘8’. So the number ‘8’ represents the letter ‘f’. Repeat the word ‘fan’ loudly and as fast as possible, ten times. You will find that it
starts sounding as ‘van’. So ‘f’ and ‘v’ are similar and are represented by the number ‘8’.
The sign for ‘f’ has the following logic: It is made using the ‘Five’ fingers. So it represents the ‘F’ of ‘Five’. Moreover, it is curved at the top like the small letter ‘f’. Make the sign and take it to your left to say ‘fee’. Make the sign to your left and bring it to the neutral position in front of your chest to say ‘if’. Make the sign at the top and bring it to the neutral position to say ‘of’.
The sign for ‘v’ is the famous ‘Victory’ sign. So it
should be easy to remember the sign for ‘V’. Make the sign in the neutral position and bring it down to say ‘wah’. Make the sign and take it up to say ‘woe’. Make the sign and take it to your left to say ‘wee’. Make the sign and take it to your right to say ‘way’. Make the sign and take it forward to say ‘wu’. Make the sign and bring it in towards your chest to say ‘why’.
10. (9) : P, b. If you take the mirror image of the number ‘9’, you get the
capital letter ‘P’. Invert it upside down and you get the small letter ‘b’. Moreover, if you repeat the word ‘pee’ loudly ten times, you will find that it sounds like ‘bee’. So
‘p’ and ‘b’ are similar sounding consonants and are represented by the same number ‘9’.
The sign for ‘P’ can be remembered easily if you imagine that you are producing the “POM-POM” sound by honking the rubber horn of a bus by pressing it with your five fingers. The sign for ‘P’ which comes first is the starting position of the pressing of the horn. Make the sign and take it to your left to say ‘pee’. Make the sign and take it up to say ‘po’. Make the sign and take it towards your chest (‘IN’ direction) to say ‘pie’. Make the sign and take it down to say ‘paw’. Make the sign to
your right and bring it to the neutral position to say ‘ape’.

The sign for ‘b’ is the final fully pressed position of the horn. So remember that ‘9’ represents ‘P’ and ‘b’ and their signs are related because they are related sounds. Make the sign and take it to your left to say ‘bee’. Make the sign and take it down to say ‘bah’. Make the sign and take it towards your chest to say ‘bi’ which represents ‘buy’ or ‘by’. The correct word will be obvious from the context of the word in the sentence.
Make the sign and take it down and then to your left to say ‘bah-e’ which represents ‘bye’.
11. (10) : H. The last and the 11th consonant is the letter ‘H’. Notice that it resembles the number 11. So it must be easy to remember that the last and the 11th consonant is ‘H’.
It’s sign resembles the two vertical sticks of ‘H’. So it must be easy to remember the sign of ‘H’. Make the sign and take it towards your chest to say ‘high’. Make the sign and take it down and then to your left to say ‘hah-e’ which represents ‘hi’. Make the sign and take it to your left to say ‘he’. Make the sign and take it to your right to say ‘hay’ or ‘hey’. The correct word will be obvious from the context. Make the sign and take it down to say ‘h-ah’ which represents ‘ha’. Do this action twice to say ‘haha’.
So that is all you need to know to master the Art of Talking without Talking using GSL!
Some sample words and sentences using GSL When you are the Interpreter, remember to add the consonant sounds and the vowel sounds in the exact order in which they are shown by the Mimer. It helps to say aloud as the Mimer makes the signs so that you can make sure that you are not making any mistake. Keep saying the entire word upto the point of completion. For example, as the Mimer signals the word ‘elephant’ keep saying the word aloud up to the part he has just completed. Like, first you say ‘a’, then ‘alee’, then ‘aleefa’, then ‘aleefan’, and finally the complete word ‘aleefant’, which you can easily guess to be ‘elephant’. If you follow this method while interpreting, many times you will guess the correct word even before the Mimer completes the word.
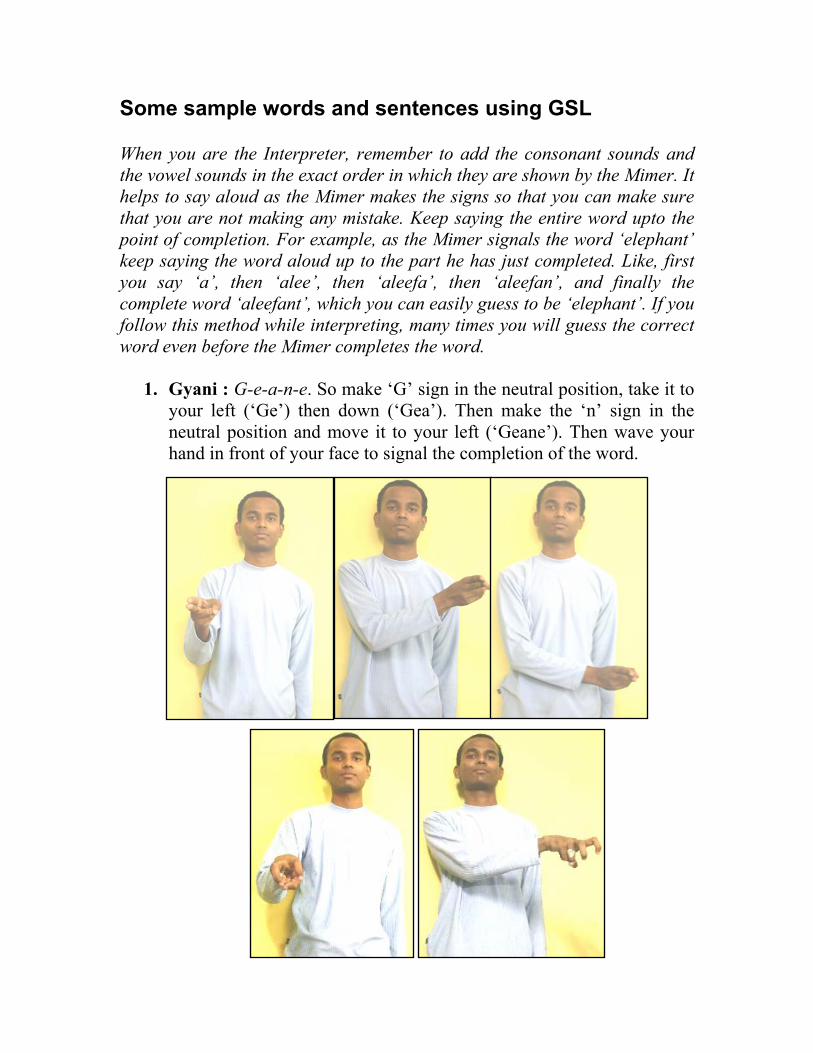
1. Gyani : G-e-a-n-e. So make ‘G’ sign in the neutral position, take it to
your left (‘Ge’) then down (‘Gea’). Then make the ‘n’ sign in the neutral position and move it to your left (‘Geane’). Then wave your hand in front of your face to signal the completion of the word.
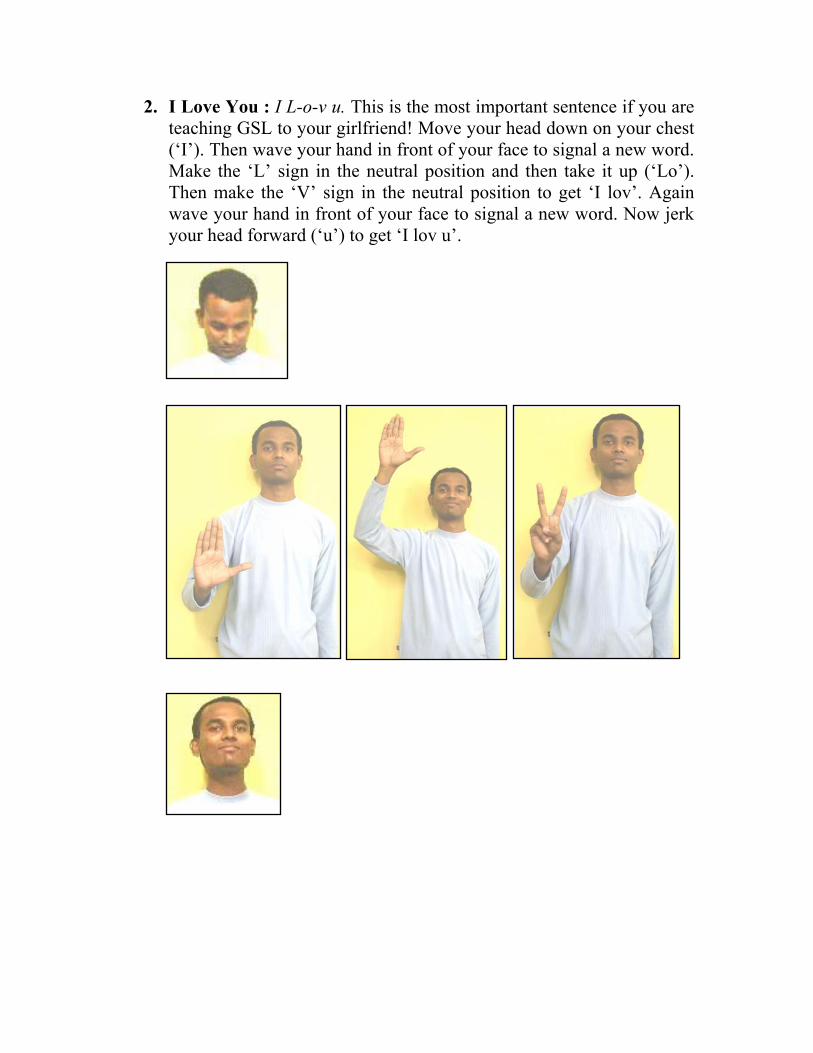
2. I Love You : I L-o-v u. This is the most important sentence if you are teaching GSL to your girlfriend! Move your head down on your chest (‘I’). Then wave your hand in front of your face to signal a new word. Make the ‘L’ sign in the neutral position and then take it up (‘Lo’). Then make the ‘V’ sign in the neutral position to get ‘I lov’. Again wave your hand in front of your face to signal a new word. Now jerk your head forward (‘u’) to get ‘I lov u’.
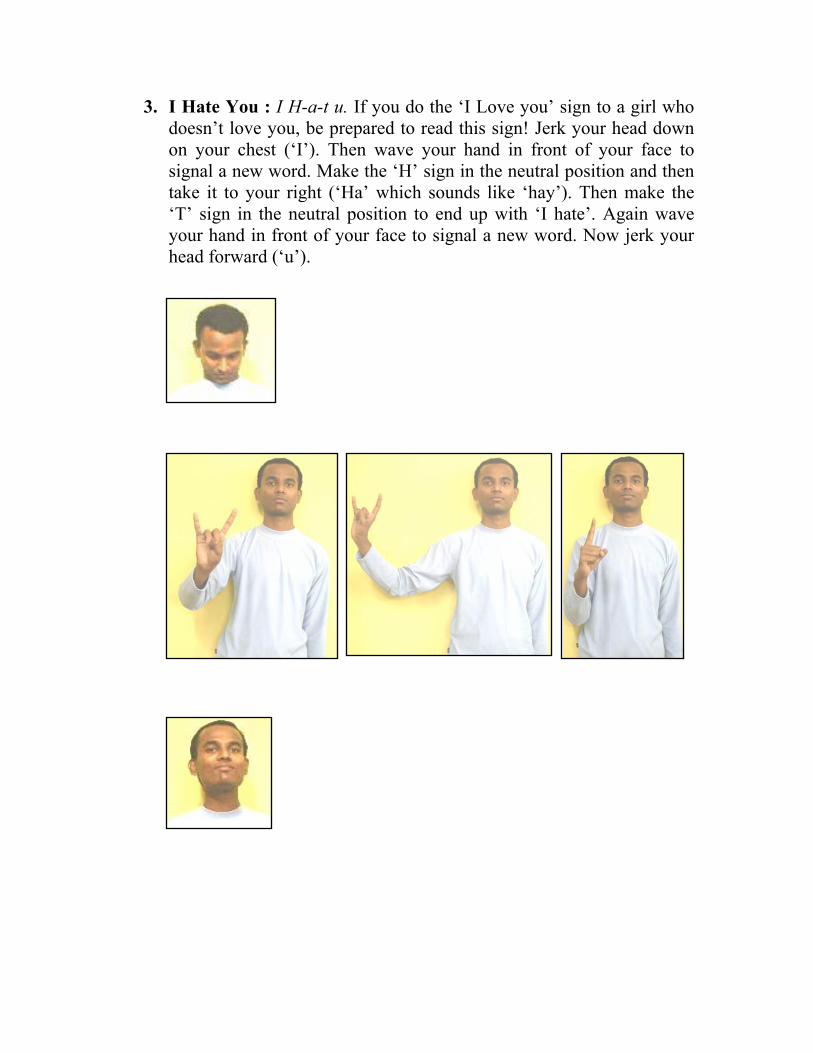
3. I Hate You : I H-a-t u. If you do the ‘I Love you’ sign to a girl who doesn’t love you, be prepared to read this sign! Jerk your head down on your chest (‘I’). Then wave your hand in front of your face to signal a new word. Make the ‘H’ sign in the neutral position and then take it to your right (‘Ha’ which sounds like ‘hay’). Then make the ‘T’ sign in the neutral position to end up with ‘I hate’. Again wave your hand in front of your face to signal a new word. Now jerk your head forward (‘u’).
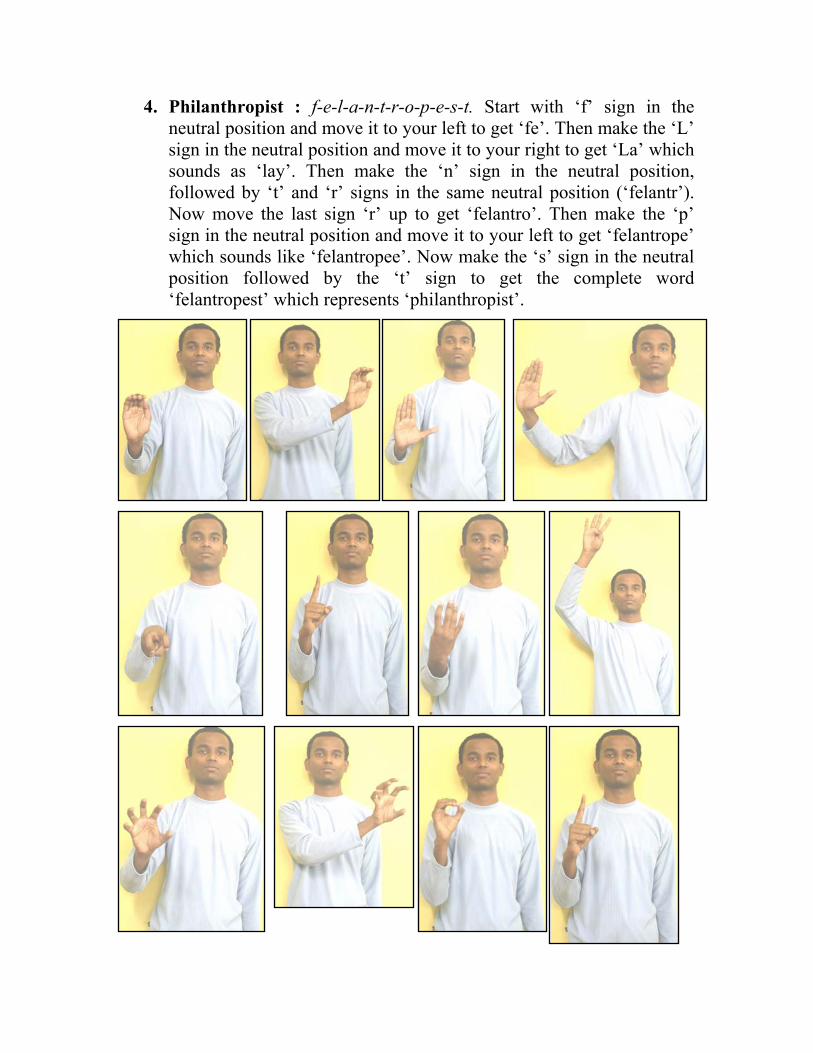
4. Philanthropist : f-e-l-a-n-t-r-o-p-e-s-t. Start with ‘f’ sign in the neutral position and move it to your left to get ‘fe’. Then make the ‘L’ sign in the neutral position and move it to your right to get ‘La’ which sounds as ‘lay’. Then make the ‘n’ sign in the neutral position, followed by ‘t’ and ‘r’ signs in the same neutral position (‘felantr’). Now move the last sign ‘r’ up to get ‘felantro’. Then make the ‘p’ sign in the neutral position and move it to your left to get ‘felantrope’ which sounds like ‘felantropee’. Now make the ‘s’ sign in the neutral position followed by the ‘t’ sign to get the complete word ‘felantropest’ which represents ‘philanthropist’.
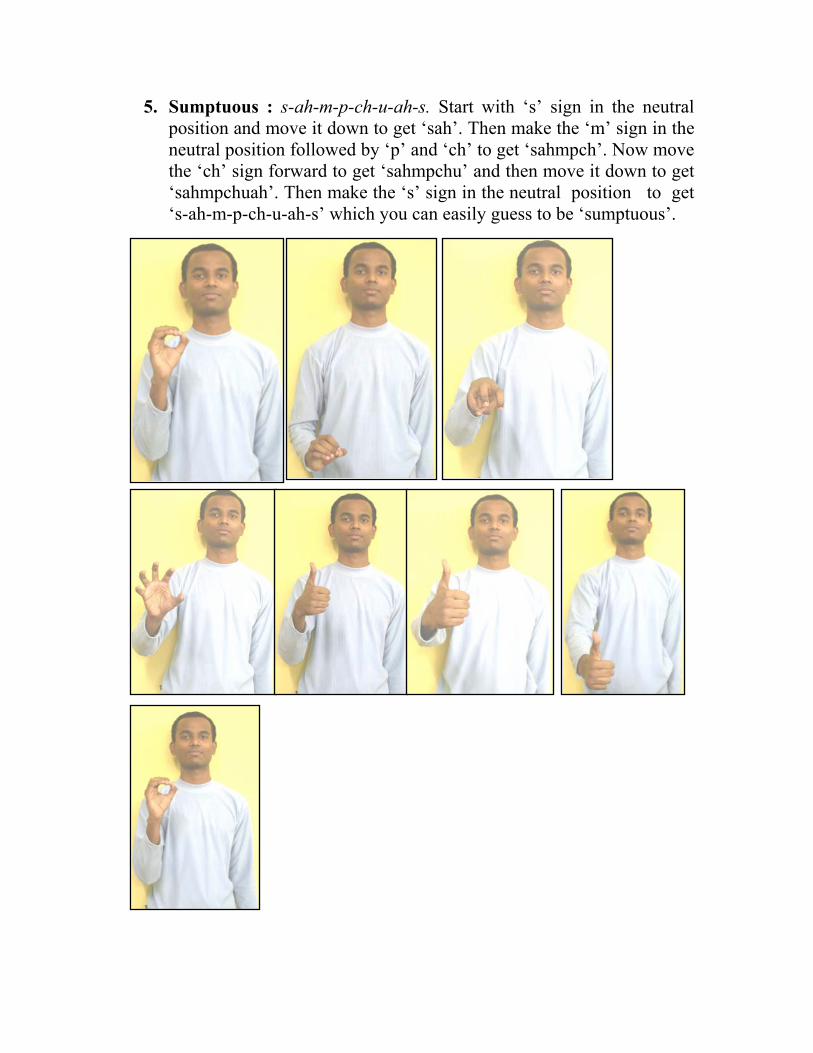
5. Sumptuous : s-ah-m-p-ch-u-ah-s. Start with ‘s’ sign in the neutral position and move it down to get ‘sah’. Then make the ‘m’ sign in the neutral position followed by ‘p’ and ‘ch’ to get ‘sahmpch’. Now move the ‘ch’ sign forward to get ‘sahmpchu’ and then move it down to get ‘sahmpchuah’. Then make the ‘s’ sign in the neutral position to get ‘s-ah-m-p-ch-u-ah-s’ which you can easily guess to be ‘sumptuous’.
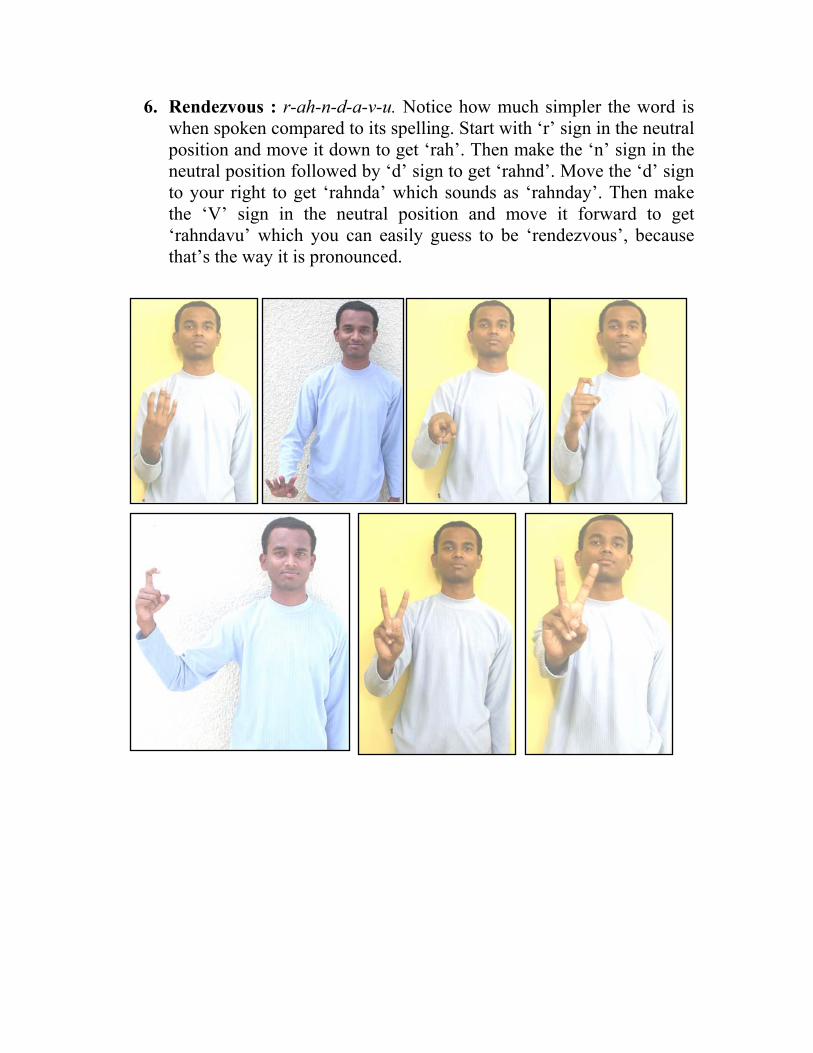
6. Rendezvous : r-ah-n-d-a-v-u. Notice how much simpler the word is when spoken compared to its spelling. Start with ‘r’ sign in the neutral position and move it down to get ‘rah’. Then make the ‘n’ sign in the neutral position followed by ‘d’ sign to get ‘rahnd’. Move the ‘d’ sign to your right to get ‘rahnda’ which sounds as ‘rahnday’. Then make the ‘V’ sign in the neutral position and move it forward to get ‘rahndavu’ which you can easily guess to be ‘rendezvous’, because that’s the way it is pronounced.
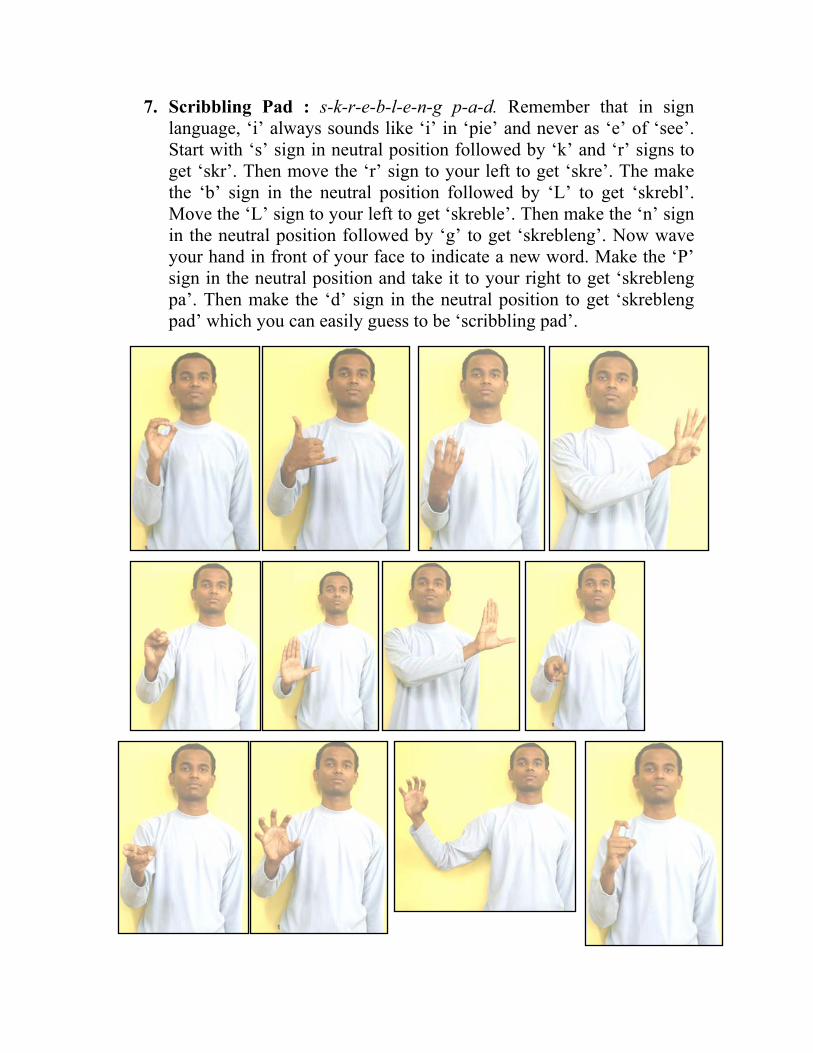
7. Scribbling Pad : s-k-r-e-b-l-e-n-g p-a-d. Remember that in sign language, ‘i’ always sounds like ‘i’ in ‘pie’ and never as ‘e’ of ‘see’. Start with ‘s’ sign in neutral position followed by ‘k’ and ‘r’ signs to get ‘skr’. Then move the ‘r’ sign to your left to get ‘skre’. The make the ‘b’ sign in the neutral position followed by ‘L’ to get ‘skrebl’. Move the ‘L’ sign to your left to get ‘skreble’. Then make the ‘n’ sign in the neutral position followed by ‘g’ to get ‘skrebleng’. Now wave your hand in front of your face to indicate a new word. Make the ‘P’ sign in the neutral position and take it to your right to get ‘skrebleng pa’. Then make the ‘d’ sign in the neutral position to get ‘skrebleng pad’ which you can easily guess to be ‘scribbling pad’.
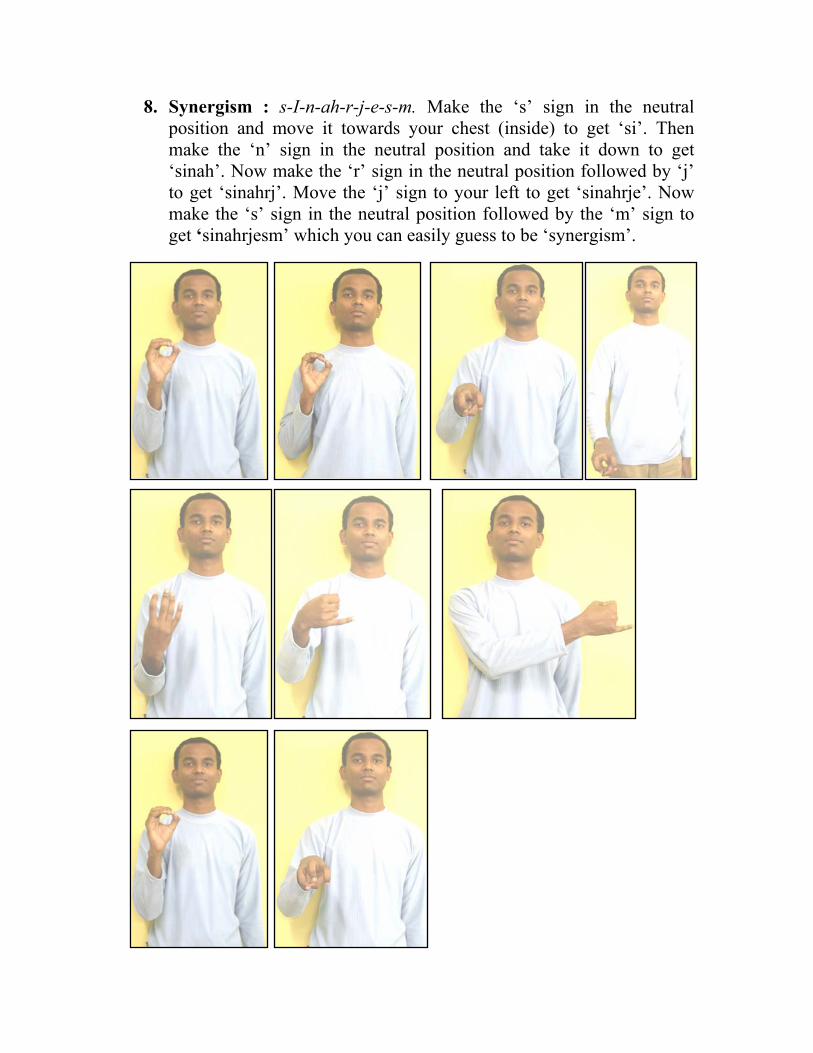
8. Synergism : s-I-n-ah-r-j-e-s-m. Make the ‘s’ sign in the neutral position and move it towards your chest (inside) to get ‘si’. Then make the ‘n’ sign in the neutral position and take it down to get ‘sinah’. Now make the ‘r’ sign in the neutral position followed by ‘j’ to get ‘sinahrj’. Move the ‘j’ sign to your left to get ‘sinahrje’. Now make the ‘s’ sign in the neutral position followed by the ‘m’ sign to get ‘sinahrjesm’ which you can easily guess to be ‘synergism’.

9. aquiduct : a-k-v-e-d-ah-k-t. Make the ‘k’ sign at your right side (which indicates that the vowel sound ‘a’ precedes the consonant ‘k’) and then bring it to the neutral position to get ‘ak’. Now make the ‘v’ sign in the neutral position and move it to your left to get ‘akve’. Then make the ‘d’ sign in the neutral position and move it down to get ‘akvedah’. Then make the ‘k’ sign in the neutral position followed by ‘t’ sign to get ‘akvedahkt’ which you can easily guess to be ‘aquiduct’.
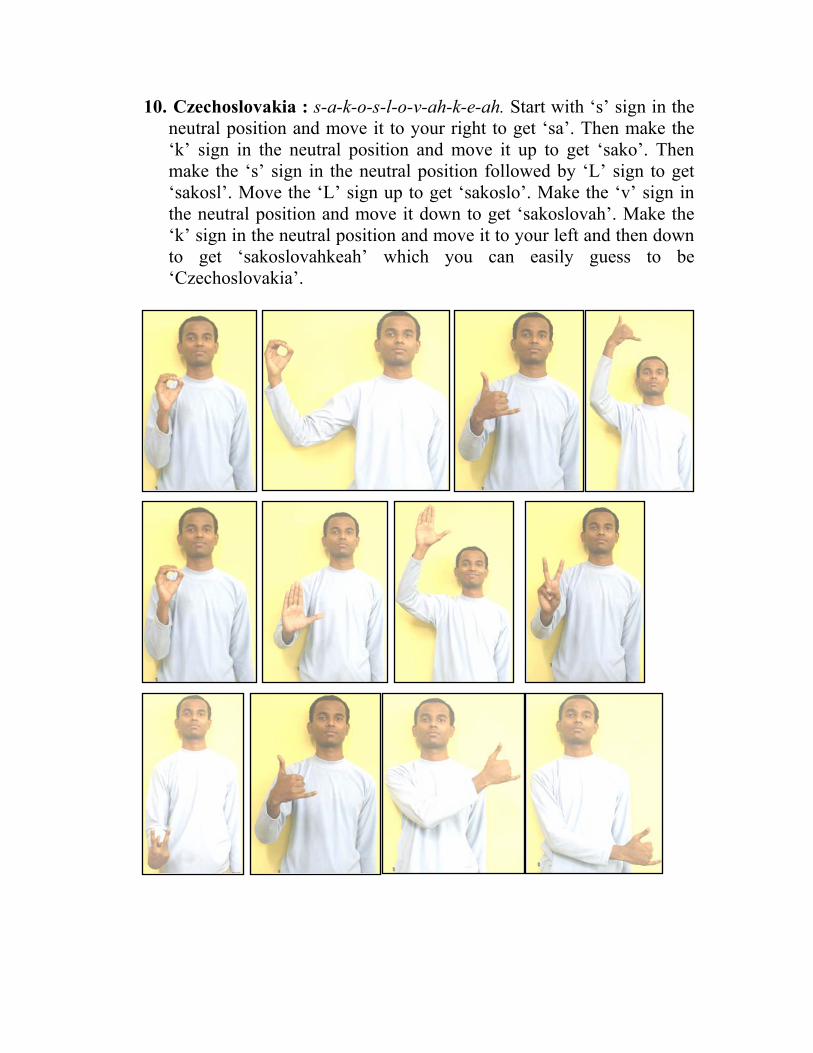
10. Czechoslovakia : s-a-k-o-s-l-o-v-ah-k-e-ah. Start with ‘s’ sign in the neutral position and move it to your right to get ‘sa’. Then make the ‘k’ sign in the neutral position and move it up to get ‘sako’. Then make the ‘s’ sign in the neutral position followed by ‘L’ sign to get ‘sakosl’. Move the ‘L’ sign up to get ‘sakoslo’. Make the ‘v’ sign in the neutral position and move it down to get ‘sakoslovah’. Make the ‘k’ sign in the neutral position and move it to your left and then down to get ‘sakoslovahkeah’ which you can easily guess to be ‘Czechoslovakia’.
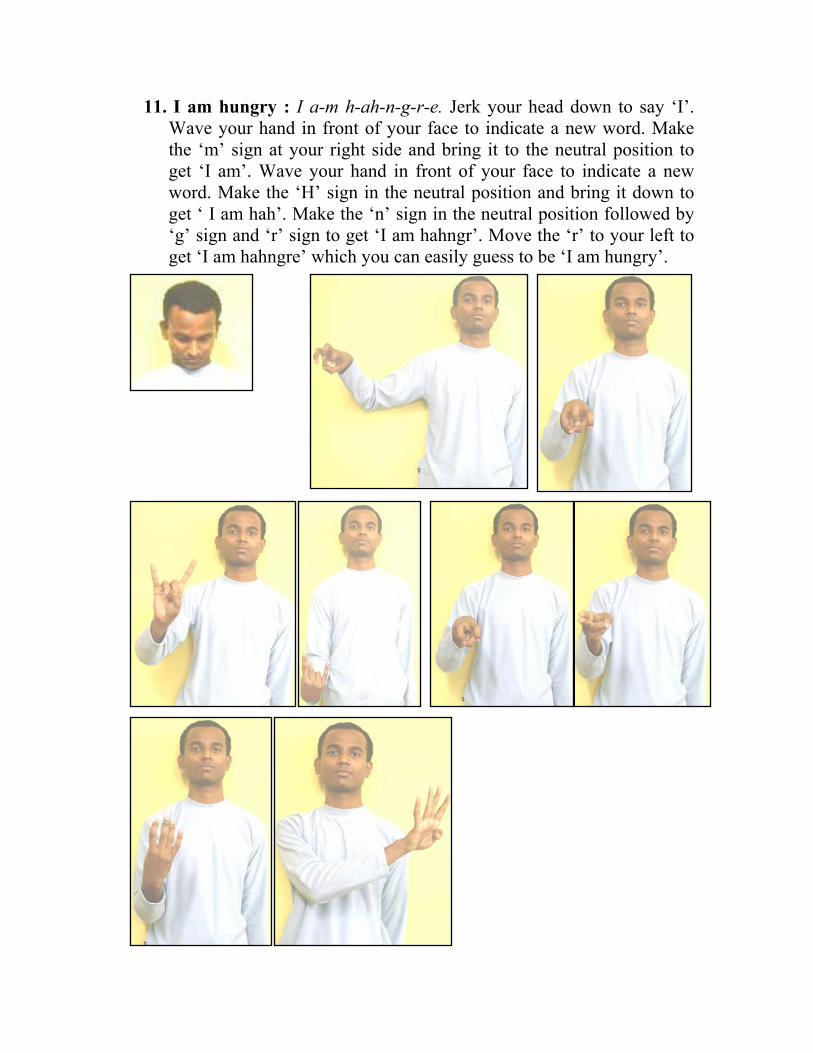
11. I am hungry : I a-m h-ah-n-g-r-e. Jerk your head down to say ‘I’. Wave your hand in front of your face to indicate a new word. Make the ‘m’ sign at your right side and bring it to the neutral position to get ‘I am’. Wave your hand in front of your face to indicate a new word. Make the ‘H’ sign in the neutral position and bring it down to get ‘ I am hah’. Make the ‘n’ sign in the neutral position followed by ‘g’ sign and ‘r’ sign to get ‘I am hahngr’. Move the ‘r’ to your left to get ‘I am hahngre’ which you can easily guess to be ‘I am hungry’.
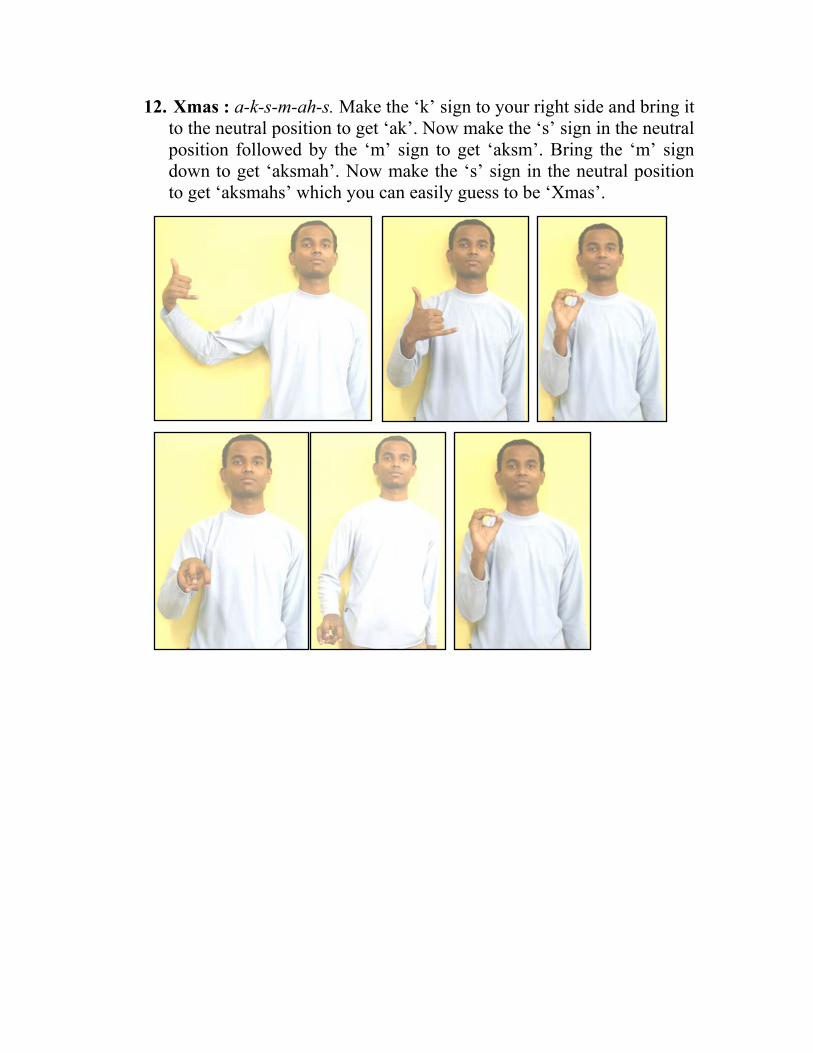
12. Xmas : a-k-s-m-ah-s. Make the ‘k’ sign to your right side and bring it to the neutral position to get ‘ak’. Now make the ‘s’ sign in the neutral position followed by the ‘m’ sign to get ‘aksm’. Bring the ‘m’ sign down to get ‘aksmah’. Now make the ‘s’ sign in the neutral position to get ‘aksmahs’ which you can easily guess to be ‘Xmas’.
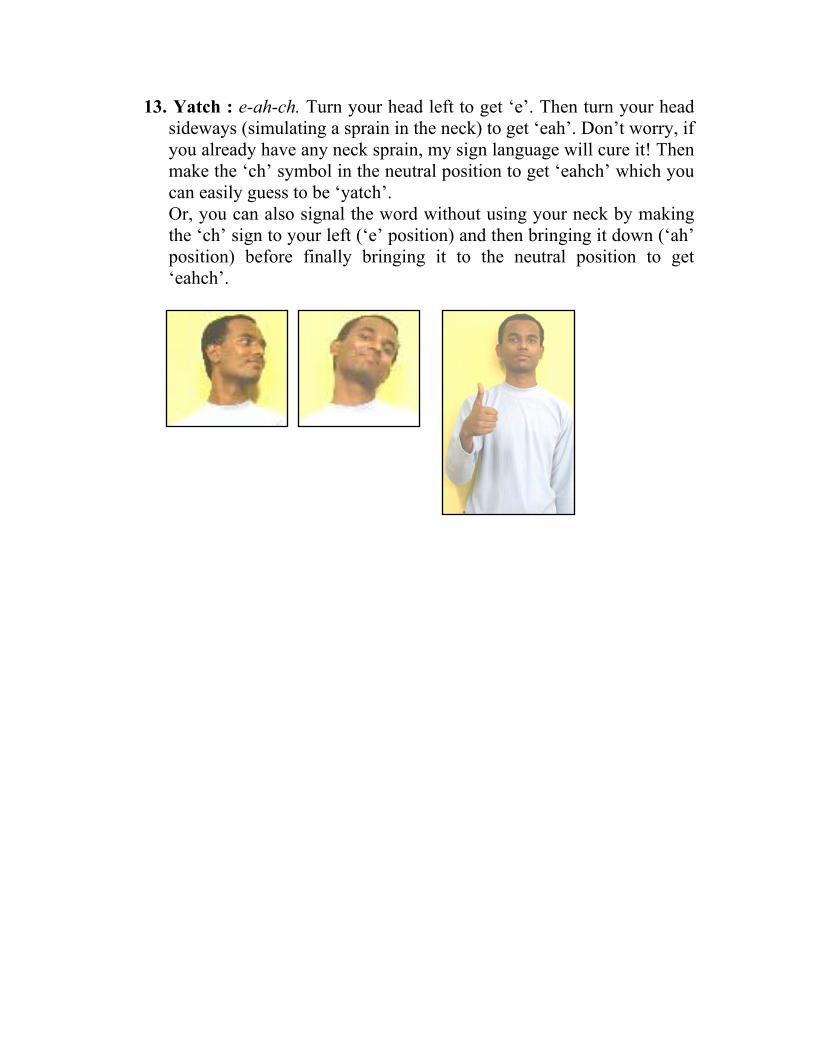
13. Yatch : e-ah-ch. Turn your head left to get ‘e’. Then turn your head sideways (simulating a sprain in the neck) to get ‘eah’. Don’t worry, if you already have any neck sprain, my sign language will cure it! Then make the ‘ch’ symbol in the neutral position to get ‘eahch’ which you can easily guess to be ‘yatch’. Or, you can also signal the word without using your neck by making the ‘ch’ sign to your left (‘e’ position) and then bringing it down (‘ah’ position) before finally bringing it to the neutral position to get ‘eahch’.
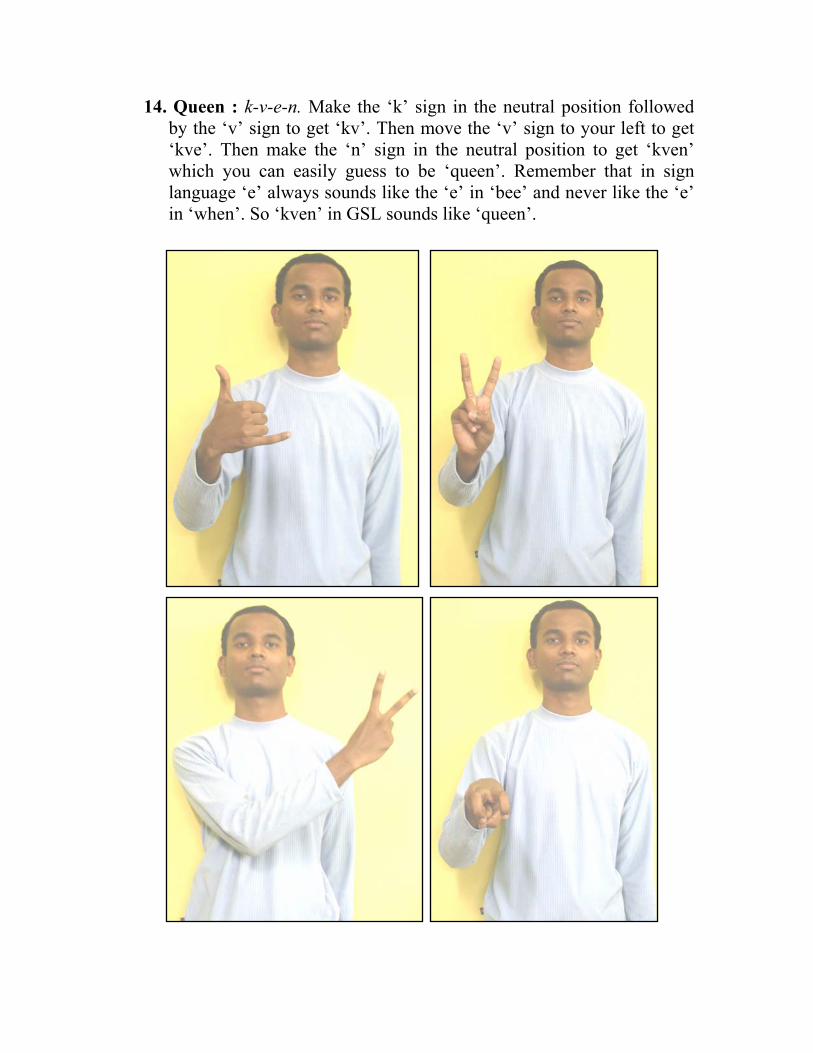
14. Queen : k-v-e-n. Make the ‘k’ sign in the neutral position followed by the ‘v’ sign to get ‘kv’. Then move the ‘v’ sign to your left to get ‘kve’. Then make the ‘n’ sign in the neutral position to get ‘kven’ which you can easily guess to be ‘queen’. Remember that in sign language ‘e’ always sounds like the ‘e’ in ‘bee’ and never like the ‘e’ in ‘when’. So ‘kven’ in GSL sounds like ‘queen’.
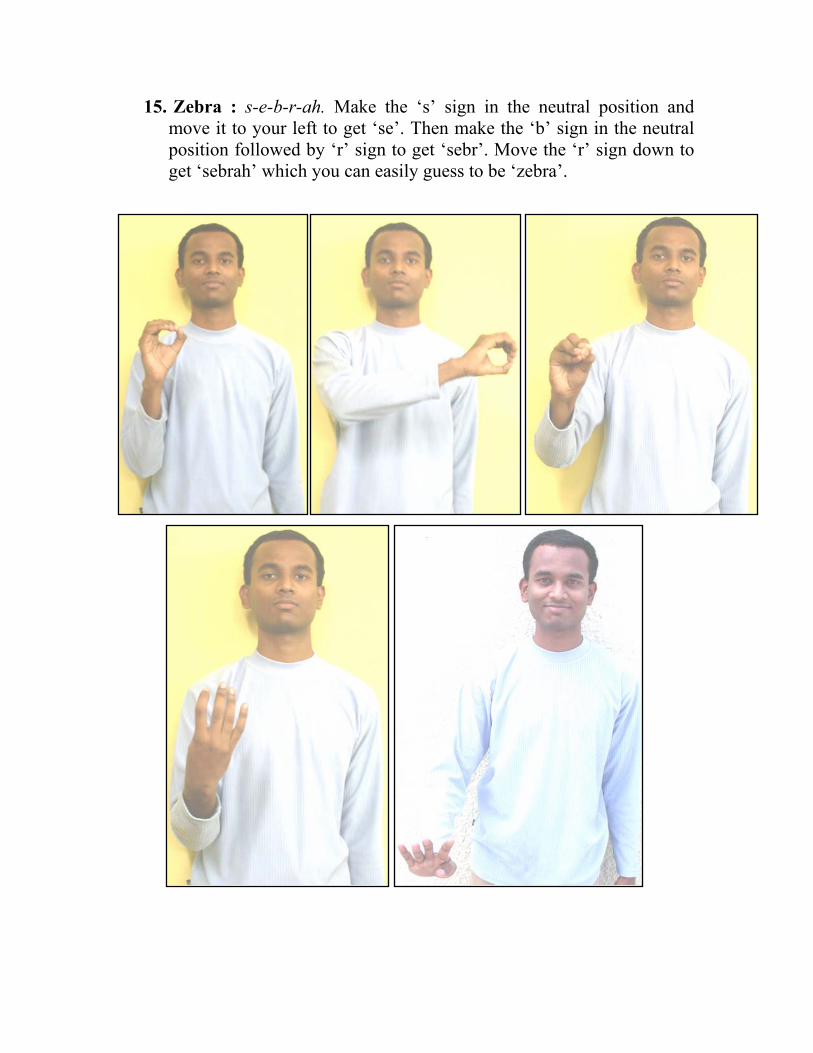
15. Zebra : s-e-b-r-ah. Make the ‘s’ sign in the neutral position and move it to your left to get ‘se’. Then make the ‘b’ sign in the neutral position followed by ‘r’ sign to get ‘sebr’. Move the ‘r’ sign down to get ‘sebrah’ which you can easily guess to be ‘zebra’.
Conclusion So that’s it folks! Have fun! I’m sure you’ll agree that once you’ve learned GSL by reading this book (or rather, booklet) you can teach it to anyone in just 5 minutes. So please do that and if everyone in the world knows GSL, life will become much more easier for the deaf and dumb people of this world. They won’t feel isolated from the non-deaf-and-dumb people anymore. More importantly, if you have a family, you can spend quality time with them by having fun through GSL. It’ll also keep your minds active and drive away the boredom from your life. And all the harassed mothers who want some silence and respite from the constant chatter of their teenage kids, can also teach GSL to their kids. This applies equally well to the more common case of harassed teachers and talkative students in school. Of course GSL will be invaluable to all space missions. It is the easiest and most efficient way to communicate in the vacuum of space and makes wireless sets redundant for short distance communication. Those who want to use GSL for Dumbcharades competitions, please substitute some dramatic action for each of the signs, so that it will seem that you are acting something. No one can even suspect that you are using sign language if you remove a gun from an imaginary holster ( sign for ‘g’). Even if they do, by the time they muster enough courage to question you, the competition will be over and you would’ve won the first prize! So good luck for your competitions! All those people who are recovering from throat problems (like me) and have been ordered complete voice rest, please pass this book (or rather, booklet) to all your friends and relatives and request (no, order) them to learn GSL. I’m sure it’ll solve all your communication problems. For all those who plan to cheat in exams by using GSL when the invigilator is looking the other way, my only word of caution is that you may get caught (even though the invigilator cannot produce any evidence unless they have a video camera in the examination hall to record your signals). You may be so busy doing the signals that you may stop watching the invigilator. Besides it’s not ethical to cheat in exams.

Of course all those working in very noisy environments (factories, etc) can now comfortably wear their ear-plugs and communicate using GSL. To recollect all the signs and the sounds of GSL, just start counting from 0 to 10 and recollect the corresponding sounds and actions. Lastly I would like to express my gratitude to my colleague Mr Vishnu Vardhan for patiently taking all those snaps which I used for illustrating this book (or rather, booklet).