Embed Size (px)
Citation preview
TIBCO® BPM EnterpriseClient User's GuideVersion 5.0
November 2020
Document Updated: April 2021
Copyright © 2015-2021. TIBCO Software Inc. All Rights Reserved.
Contents
TIBCO Documentation and Support Services . . . . . . . . . . . . . . . . . . . . . . . . . . . . . . . . . . . . . . . . . . . . . . . . . . . . . . . . . . . . 5
TIBCO® BPM Enterprise . . . . . . . . . . . . . . . . . . . . . . . . . . . . . . . . . . . . . . . . . . . . . . . . . . . . . . . . . . . . . . . . . . . . . . . . . . . . . . . . 6
Accessing TIBCO BPM Enterprise Work Manager . . . . . . . . . . . . . . . . . . . . . . . . . . . . . . . . . . . . . . . . . . . . . . . . . . . . . . . . 7
User Access . . . . . . . . . . . . . . . . . . . . . . . . . . . . . . . . . . . . . . . . . . . . . . . . . . . . . . . . . . . . . . . . . . . . . . . . . . . . . . . . . . . . . . . . . . .8
Business Services . . . . . . . . . . . . . . . . . . . . . . . . . . . . . . . . . . . . . . . . . . . . . . . . . . . . . . . . . . . . . . . . . . . . . . . . . . . . . . . . . . . . . 9
Business Services . . . . . . . . . . . . . . . . . . . . . . . . . . . . . . . . . . . . . . . . . . . . . . . . . . . . . . . . . . . . . . . . . . . . . . . . . . . . . . . . . . . . . . . . . . . . . . . . . . . . . . . . . 9
Categories . . . . . . . . . . . . . . . . . . . . . . . . . . . . . . . . . . . . . . . . . . . . . . . . . . . . . . . . . . . . . . . . . . . . . . . . . . . . . . . . . . . . . . . . . . . . . . . . . . . . . . . . . . . . . . . . . 9
Starting a Business Service . . . . . . . . . . . . . . . . . . . . . . . . . . . . . . . . . . . . . . . . . . . . . . . . . . . . . . . . . . . . . . . . . . . . . . . . . . . . . . . . . . . . . . . . . . . . . . . 10
Work Views . . . . . . . . . . . . . . . . . . . . . . . . . . . . . . . . . . . . . . . . . . . . . . . . . . . . . . . . . . . . . . . . . . . . . . . . . . . . . . . . . . . . . . . . . . .12
Work View Permissions . . . . . . . . . . . . . . . . . . . . . . . . . . . . . . . . . . . . . . . . . . . . . . . . . . . . . . . . . . . . . . . . . . . . . . . . . . . . . . . . . . . . . . . . . . . . . . . . . . . 12
Public Work Views . . . . . . . . . . . . . . . . . . . . . . . . . . . . . . . . . . . . . . . . . . . . . . . . . . . . . . . . . . . . . . . . . . . . . . . . . . . . . . . . . . . . . . . . . . . . . . . . . . . . . . . . 13
Creating a Work View for an Organizational Entity . . . . . . . . . . . . . . . . . . . . . . . . . . . . . . . . . . . . . . . . . . . . . . . . . . . . . . . . . . . . . . . . . . . . . . . . . 13
Accessing Work Views . . . . . . . . . . . . . . . . . . . . . . . . . . . . . . . . . . . . . . . . . . . . . . . . . . . . . . . . . . . . . . . . . . . . . . . . . . . . . . . . . . . . . . . . . . . . . . . . . . . . 14
Creating Work Views . . . . . . . . . . . . . . . . . . . . . . . . . . . . . . . . . . . . . . . . . . . . . . . . . . . . . . . . . . . . . . . . . . . . . . . . . . . . . . . . . . . . . . . . . . . . . . . . . . . . . .15
Enter Work View Details . . . . . . . . . . . . . . . . . . . . . . . . . . . . . . . . . . . . . . . . . . . . . . . . . . . . . . . . . . . . . . . . . . . . . . . . . . . . . . . . . . . . . . . . . . . . . . 16
Choose a Target . . . . . . . . . . . . . . . . . . . . . . . . . . . . . . . . . . . . . . . . . . . . . . . . . . . . . . . . . . . . . . . . . . . . . . . . . . . . . . . . . . . . . . . . . . . . . . . . . . . . . .16
Specify the Work Item Columns . . . . . . . . . . . . . . . . . . . . . . . . . . . . . . . . . . . . . . . . . . . . . . . . . . . . . . . . . . . . . . . . . . . . . . . . . . . . . . . . . . . . . . .17
Configure Work View Filter . . . . . . . . . . . . . . . . . . . . . . . . . . . . . . . . . . . . . . . . . . . . . . . . . . . . . . . . . . . . . . . . . . . . . . . . . . . . . . . . . . . . . . . . . . . 18
Configure Sorting Order for the Work View . . . . . . . . . . . . . . . . . . . . . . . . . . . . . . . . . . . . . . . . . . . . . . . . . . . . . . . . . . . . . . . . . . . . . . . . . . . . 19
Specify the Recipients . . . . . . . . . . . . . . . . . . . . . . . . . . . . . . . . . . . . . . . . . . . . . . . . . . . . . . . . . . . . . . . . . . . . . . . . . . . . . . . . . . . . . . . . . . . . . . . . 20
Specify the Authors . . . . . . . . . . . . . . . . . . . . . . . . . . . . . . . . . . . . . . . . . . . . . . . . . . . . . . . . . . . . . . . . . . . . . . . . . . . . . . . . . . . . . . . . . . . . . . . . . . .21
Editing Work Views . . . . . . . . . . . . . . . . . . . . . . . . . . . . . . . . . . . . . . . . . . . . . . . . . . . . . . . . . . . . . . . . . . . . . . . . . . . . . . . . . . . . . . . . . . . . . . . . . . . . . . . 22
Removing Work Views from Your Work View List . . . . . . . . . . . . . . . . . . . . . . . . . . . . . . . . . . . . . . . . . . . . . . . . . . . . . . . . . . . . . . . . . . . . . . . . . . 23
Work Items . . . . . . . . . . . . . . . . . . . . . . . . . . . . . . . . . . . . . . . . . . . . . . . . . . . . . . . . . . . . . . . . . . . . . . . . . . . . . . . . . . . . . . . . . . . . . . . . . . . . . . . . . . . . . . . 23
Work Item Columns . . . . . . . . . . . . . . . . . . . . . . . . . . . . . . . . . . . . . . . . . . . . . . . . . . . . . . . . . . . . . . . . . . . . . . . . . . . . . . . . . . . . . . . . . . . . . . . . . . 23
Work Item State . . . . . . . . . . . . . . . . . . . . . . . . . . . . . . . . . . . . . . . . . . . . . . . . . . . . . . . . . . . . . . . . . . . . . . . . . . . . . . . . . . . . . . . . . . . . . . . . . . . . . . 24
Changing Work Item Priority . . . . . . . . . . . . . . . . . . . . . . . . . . . . . . . . . . . . . . . . . . . . . . . . . . . . . . . . . . . . . . . . . . . . . . . . . . . . . . . . . . . . . . . . . . 25
Displaying Visible Hidden Work Items . . . . . . . . . . . . . . . . . . . . . . . . . . . . . . . . . . . . . . . . . . . . . . . . . . . . . . . . . . . . . . . . . . . . . . . . . . . . . . . . . 26
Filtering Work Items . . . . . . . . . . . . . . . . . . . . . . . . . . . . . . . . . . . . . . . . . . . . . . . . . . . . . . . . . . . . . . . . . . . . . . . . . . . . . . . . . . . . . . . . . . . . . . . . . . . . . . .26
Configure a Worklist Filter . . . . . . . . . . . . . . . . . . . . . . . . . . . . . . . . . . . . . . . . . . . . . . . . . . . . . . . . . . . . . . . . . . . . . . . . . . . . . . . . . . . . . . . . . . . . 26
Value Data Types . . . . . . . . . . . . . . . . . . . . . . . . . . . . . . . . . . . . . . . . . . . . . . . . . . . . . . . . . . . . . . . . . . . . . . . . . . . . . . . . . . . . . . . . . . . . . . . . 27
DateTime Data Types . . . . . . . . . . . . . . . . . . . . . . . . . . . . . . . . . . . . . . . . . . . . . . . . . . . . . . . . . . . . . . . . . . . . . . . . . . . . . . . . . . . . . . . . . . . . 28
Allocating Work Items Overview . . . . . . . . . . . . . . . . . . . . . . . . . . . . . . . . . . . . . . . . . . . . . . . . . . . . . . . . . . . . . . . . . . . . . . . . . . . . . . . . . . . . . . . . . . . 28
Allocating Work Items To Yourself . . . . . . . . . . . . . . . . . . . . . . . . . . . . . . . . . . . . . . . . . . . . . . . . . . . . . . . . . . . . . . . . . . . . . . . . . . . . . . . . . . . . . 28
Re-Offering Work Items . . . . . . . . . . . . . . . . . . . . . . . . . . . . . . . . . . . . . . . . . . . . . . . . . . . . . . . . . . . . . . . . . . . . . . . . . . . . . . . . . . . . . . . . . . . . . . .29
Reallocating Work Items to Another User . . . . . . . . . . . . . . . . . . . . . . . . . . . . . . . . . . . . . . . . . . . . . . . . . . . . . . . . . . . . . . . . . . . . . . . . . . . . . 30
2
TIBCO® BPM Enterprise Client User's Guide
Reallocate Work Item to Offer Set . . . . . . . . . . . . . . . . . . . . . . . . . . . . . . . . . . . . . . . . . . . . . . . . . . . . . . . . . . . . . . . . . . . . . . . . . . . . . . . . 31
Reallocating Work Items to the World . . . . . . . . . . . . . . . . . . . . . . . . . . . . . . . . . . . . . . . . . . . . . . . . . . . . . . . . . . . . . . . . . . . . . . . . . . . . .31
Processing Work Items Overview . . . . . . . . . . . . . . . . . . . . . . . . . . . . . . . . . . . . . . . . . . . . . . . . . . . . . . . . . . . . . . . . . . . . . . . . . . . . . . . . . . . . . . . . . .32
Opening Work Items . . . . . . . . . . . . . . . . . . . . . . . . . . . . . . . . . . . . . . . . . . . . . . . . . . . . . . . . . . . . . . . . . . . . . . . . . . . . . . . . . . . . . . . . . . . . . . . . . .32
Auto-Repeat . . . . . . . . . . . . . . . . . . . . . . . . . . . . . . . . . . . . . . . . . . . . . . . . . . . . . . . . . . . . . . . . . . . . . . . . . . . . . . . . . . . . . . . . . . . . . . . . . . . . . 32
Piling . . . . . . . . . . . . . . . . . . . . . . . . . . . . . . . . . . . . . . . . . . . . . . . . . . . . . . . . . . . . . . . . . . . . . . . . . . . . . . . . . . . . . . . . . . . . . . . . . . . . . . . . . . . . 33
Filling in a Work Item Form . . . . . . . . . . . . . . . . . . . . . . . . . . . . . . . . . . . . . . . . . . . . . . . . . . . . . . . . . . . . . . . . . . . . . . . . . . . . . . . . . . . . . . .33
Work Item Data Modified By Other Users or System Actions . . . . . . . . . . . . . . . . . . . . . . . . . . . . . . . . . . . . . . . . . . . . . . . . . .33
Saving Work Items . . . . . . . . . . . . . . . . . . . . . . . . . . . . . . . . . . . . . . . . . . . . . . . . . . . . . . . . . . . . . . . . . . . . . . . . . . . . . . . . . . . . . . . . . . . . . . . . . . . 34
Submitting Work Items . . . . . . . . . . . . . . . . . . . . . . . . . . . . . . . . . . . . . . . . . . . . . . . . . . . . . . . . . . . . . . . . . . . . . . . . . . . . . . . . . . . . . . . . . . . . . . . .34
Pending Work Items . . . . . . . . . . . . . . . . . . . . . . . . . . . . . . . . . . . . . . . . . . . . . . . . . . . . . . . . . . . . . . . . . . . . . . . . . . . . . . . . . . . . . . . . . . . . . . . . . . 34
Unpending Work Items . . . . . . . . . . . . . . . . . . . . . . . . . . . . . . . . . . . . . . . . . . . . . . . . . . . . . . . . . . . . . . . . . . . . . . . . . . . . . . . . . . . . . . . . . . .35
Skipping Work Items . . . . . . . . . . . . . . . . . . . . . . . . . . . . . . . . . . . . . . . . . . . . . . . . . . . . . . . . . . . . . . . . . . . . . . . . . . . . . . . . . . . . . . . . . . . . . . . . . .35
Canceling Changes . . . . . . . . . . . . . . . . . . . . . . . . . . . . . . . . . . . . . . . . . . . . . . . . . . . . . . . . . . . . . . . . . . . . . . . . . . . . . . . . . . . . . . . . . . . . . . . . . . 36
OpenWorkItem Application . . . . . . . . . . . . . . . . . . . . . . . . . . . . . . . . . . . . . . . . . . . . . . . . . . . . . . . . . . . . . . . . . . . . . . . . . . . . . . . . . . . . . . . . . . . . . . . . 37
StartBizApp . . . . . . . . . . . . . . . . . . . . . . . . . . . . . . . . . . . . . . . . . . . . . . . . . . . . . . . . . . . . . . . . . . . . . . . . . . . . . . . . . . . . . . . . . . . . . . . . . . . . . . . . . . . . . . .38
Case Manager . . . . . . . . . . . . . . . . . . . . . . . . . . . . . . . . . . . . . . . . . . . . . . . . . . . . . . . . . . . . . . . . . . . . . . . . . . . . . . . . . . . . . . . . 41
Accessing Case Manager . . . . . . . . . . . . . . . . . . . . . . . . . . . . . . . . . . . . . . . . . . . . . . . . . . . . . . . . . . . . . . . . . . . . . . . . . . . . . . . . . . . . . . . . . . . . . . . . . 41
Performing Case Actions . . . . . . . . . . . . . . . . . . . . . . . . . . . . . . . . . . . . . . . . . . . . . . . . . . . . . . . . . . . . . . . . . . . . . . . . . . . . . . . . . . . . . . . . . . . . . . . . . . 42
Using Search . . . . . . . . . . . . . . . . . . . . . . . . . . . . . . . . . . . . . . . . . . . . . . . . . . . . . . . . . . . . . . . . . . . . . . . . . . . . . . . . . . . . . . . . . . . . . . . . . . . . . . . . . . . . . 43
Managing Work Lists Associated With Cases . . . . . . . . . . . . . . . . . . . . . . . . . . . . . . . . . . . . . . . . . . . . . . . . . . . . . . . . . . . . . . . . . . . . . . . . . . . . . . 44
Managing Linked Cases . . . . . . . . . . . . . . . . . . . . . . . . . . . . . . . . . . . . . . . . . . . . . . . . . . . . . . . . . . . . . . . . . . . . . . . . . . . . . . . . . . . . . . . . . . . . . . . . . . .45
Managing Case Documents . . . . . . . . . . . . . . . . . . . . . . . . . . . . . . . . . . . . . . . . . . . . . . . . . . . . . . . . . . . . . . . . . . . . . . . . . . . . . . . . . . . . . . . . . . . . . . . 46
Auditing Case Data . . . . . . . . . . . . . . . . . . . . . . . . . . . . . . . . . . . . . . . . . . . . . . . . . . . . . . . . . . . . . . . . . . . . . . . . . . . . . . . . . . . . . . . . . . . . . . . . . . . . . . . 48
Auditing . . . . . . . . . . . . . . . . . . . . . . . . . . . . . . . . . . . . . . . . . . . . . . . . . . . . . . . . . . . . . . . . . . . . . . . . . . . . . . . . . . . . . . . . . . . . . 49
Filtering Audit Events . . . . . . . . . . . . . . . . . . . . . . . . . . . . . . . . . . . . . . . . . . . . . . . . . . . . . . . . . . . . . . . . . . . . . . . . . . . . . . . . . . . . . . . . . . . . . . . . . . . . . 50
Saving a Filter Criteria . . . . . . . . . . . . . . . . . . . . . . . . . . . . . . . . . . . . . . . . . . . . . . . . . . . . . . . . . . . . . . . . . . . . . . . . . . . . . . . . . . . . . . . . . . . . . . . . 50
Choosing a Saved Filter . . . . . . . . . . . . . . . . . . . . . . . . . . . . . . . . . . . . . . . . . . . . . . . . . . . . . . . . . . . . . . . . . . . . . . . . . . . . . . . . . . . . . . . . . . . . . . 50
Editing a Filter . . . . . . . . . . . . . . . . . . . . . . . . . . . . . . . . . . . . . . . . . . . . . . . . . . . . . . . . . . . . . . . . . . . . . . . . . . . . . . . . . . . . . . . . . . . . . . . . . . . . . . . .51
Deleting a Filter . . . . . . . . . . . . . . . . . . . . . . . . . . . . . . . . . . . . . . . . . . . . . . . . . . . . . . . . . . . . . . . . . . . . . . . . . . . . . . . . . . . . . . . . . . . . . . . . . . . . . . 51
View the Audit Event Details . . . . . . . . . . . . . . . . . . . . . . . . . . . . . . . . . . . . . . . . . . . . . . . . . . . . . . . . . . . . . . . . . . . . . . . . . . . . . . . . . . . . . . . . . . 51
Spotfire Visualizations . . . . . . . . . . . . . . . . . . . . . . . . . . . . . . . . . . . . . . . . . . . . . . . . . . . . . . . . . . . . . . . . . . . . . . . . . . . . . . . . 53
cdm_cases View . . . . . . . . . . . . . . . . . . . . . . . . . . . . . . . . . . . . . . . . . . . . . . . . . . . . . . . . . . . . . . . . . . . . . . . . . . . . . . . . . . . . . . . . . . . . . . . . . . . . . . . . . 53
Using cdm_cases View in TIBCO Spotfire . . . . . . . . . . . . . . . . . . . . . . . . . . . . . . . . . . . . . . . . . . . . . . . . . . . . . . . . . . . . . . . . . . . . . . . . . . . . . . . . . 54
Event Collector Overview . . . . . . . . . . . . . . . . . . . . . . . . . . . . . . . . . . . . . . . . . . . . . . . . . . . . . . . . . . . . . . . . . . . . . . . . . . . . . 55
Private Database Tables . . . . . . . . . . . . . . . . . . . . . . . . . . . . . . . . . . . . . . . . . . . . . . . . . . . . . . . . . . . . . . . . . . . . . . . . . . . . . . . . . . . . . . . . . . . . . . . . . . 55
Message Categories and Attribute Contents . . . . . . . . . . . . . . . . . . . . . . . . . . . . . . . . . . . . . . . . . . . . . . . . . . . . . . . . . . . . . . . . . . . . . . . . . . . . . . . 55
ec_event . . . . . . . . . . . . . . . . . . . . . . . . . . . . . . . . . . . . . . . . . . . . . . . . . . . . . . . . . . . . . . . . . . . . . . . . . . . . . . . . . . . . . . . . . . . . . . . . . . . . . . . . . . . . . . . . . .56
sc_processinstance_status . . . . . . . . . . . . . . . . . . . . . . . . . . . . . . . . . . . . . . . . . . . . . . . . . . . . . . . . . . . . . . . . . . . . . . . . . . . . . . . . . . . . . . . . . . . . . . . .61
3
TIBCO® BPM Enterprise Client User's Guide

sc_proc_template . . . . . . . . . . . . . . . . . . . . . . . . . . . . . . . . . . . . . . . . . . . . . . . . . . . . . . . . . . . . . . . . . . . . . . . . . . . . . . . . . . . . . . . . . . . . . . . . . . . . . . . . . 62
sc_workitem_activity . . . . . . . . . . . . . . . . . . . . . . . . . . . . . . . . . . . . . . . . . . . . . . . . . . . . . . . . . . . . . . . . . . . . . . . . . . . . . . . . . . . . . . . . . . . . . . . . . . . . . . 63
sc_workitem_status . . . . . . . . . . . . . . . . . . . . . . . . . . . . . . . . . . . . . . . . . . . . . . . . . . . . . . . . . . . . . . . . . . . . . . . . . . . . . . . . . . . . . . . . . . . . . . . . . . . . . . . 63
sc_processinstance_failedactivity . . . . . . . . . . . . . . . . . . . . . . . . . . . . . . . . . . . . . . . . . . . . . . . . . . . . . . . . . . . . . . . . . . . . . . . . . . . . . . . . . . . . . . . . . 65
sc_userresource . . . . . . . . . . . . . . . . . . . . . . . . . . . . . . . . . . . . . . . . . . . . . . . . . . . . . . . . . . . . . . . . . . . . . . . . . . . . . . . . . . . . . . . . . . . . . . . . . . . . . . . . . . 66
sc_app_status . . . . . . . . . . . . . . . . . . . . . . . . . . . . . . . . . . . . . . . . . . . . . . . . . . . . . . . . . . . . . . . . . . . . . . . . . . . . . . . . . . . . . . . . . . . . . . . . . . . . . . . . . . . . 66
Legal and Third-Party Notices . . . . . . . . . . . . . . . . . . . . . . . . . . . . . . . . . . . . . . . . . . . . . . . . . . . . . . . . . . . . . . . . . . . . . . . . . 68
4
TIBCO® BPM Enterprise Client User's Guide
TIBCO Documentation and Support Services
How to Access TIBCO Documentation
Documentation for TIBCO products is available on the TIBCO Product Documentation website, mainly in HTML and PDF formats.
The TIBCO Product Documentation website is updated frequently and is more current than any other documentation included with the product. To access the latest documentation, visit https://docs.tibco.com.
Product-Specific Documentation
Documentation for TIBCO® BPM Enterprise is available on the TIBCO BPM Enterprise Product Documentation page.
The following documents for this product can be found on the TIBCO Documentation site:
● TIBCO® BPM Enterprise Release Notes
● TIBCO® BPM Enterprise Installation
● TIBCO® BPM Enterprise Administration
● TIBCO® BPM Enterprise Getting Started
● TIBCO® BPM Enterprise Client User's Guide
● TIBCO® BPM Enterprise Developer's Guide
How to Contact TIBCO Support
You can contact TIBCO Support in the following ways:
● For an overview of TIBCO Support, visit http://www.tibco.com/services/support.
● For accessing the Support Knowledge Base and getting personalized content about products you areinterested in, visit the TIBCO Support portal at https://support.tibco.com.
● For creating a Support case, you must have a valid maintenance or support contract with TIBCO. Youalso need a user name and password to log in to https://support.tibco.com. If you do not have a username, you can request one by clicking Register on the website.
How to Join TIBCO Community
TIBCO Community is the official channel for TIBCO customers, partners, and employee subject matterexperts to share and access their collective experience. TIBCO Community offers access to Q&A forums,product wikis, and best practices. It also offers access to extensions, adapters, solution accelerators, andtools that extend and enable customers to gain full value from TIBCO products. In addition, users cansubmit and vote on feature requests from within the TIBCO Ideas Portal. For a free registration, go to https://community.tibco.com.
5
TIBCO® BPM Enterprise Client User's Guide
TIBCO® BPM Enterprise
You can connect to TIBCO® BPM Enterpriseand perform the functions you need to complete your dailytasks.
For example, you can:
● view the work items in your work list.
● create work views so that only the desired work items are displayed.
● open work items and complete and submit the forms that are displayed.
● start cases and business services.
● perform case actions.
● view audit trails.
6
TIBCO® BPM Enterprise Client User's Guide
Accessing TIBCO BPM Enterprise Work Manager
To access Work Manager, you must use the login URL.
Procedure
1. Type the following URL into your browser.protocol://host:port/apps/login/index.html
where:
● protocol is the communications protocol being used, either http or https. This was determined atinstallation.
● host is the DNS name or IP address of the server hosting the TIBCO BPM Enterprise runtime.
● port is the port being used. The default value is 80.
2. Log in with a valid TIBCO BPM Enterprise username and password.Note that:
● Out-of-the-box, TIBCO BPM Enterprise recognizes the user name “tibco-admin” with a password of“secret”.
● If there is no activity for 30 minutes, an Inactivity Warning message is displayed warning youthat you are about to be logged out.
7
TIBCO® BPM Enterprise Client User's Guide
User Access
By default, all functions, and buttons and menu selections that are available, are displayed, even thoughyou may not be able to use those functions because of your access privileges.
Access to functions is controlled by system actions. System actions are modeled in the organization modelthat is built in TIBCO Business Studio™ - BPM Edition. See TIBCO Business Studio - BPM Edition ApplicationDesigner's Guide for more information. Some functions are controlled by a single system action, some arecontrolled by multiple system actions, whereas some are not controlled by system actions at all.
You must be logged in as a user that has privileges with the correct system actions assigned to them. If youdo not have the correct privileges to use a particular function, an exception is displayed that includes anAuthorization Failed message.
8
TIBCO® BPM Enterprise Client User's Guide
Business Services
A business service is a set of actions that accomplishes some sort of business function. For example, abusiness service could be designed to handle an incoming insurance claim.
Business services are stateless, meaning that if it consists of a number of forms, and you enter data into someforms, then cancel the business service (by clicking on the Cancel button on a form) before completing thebusiness service, none of the data you entered on the previous forms is saved.
If a business performs a stateful action, that is, something that cannot be reversed (for example, writing to adatabase, starting a process instance, and so on.), typically it will be the last action performed by thebusiness service.
The example business service described above is just one simple example. Depending on how it isdesigned, a business service may consist of the following types of actions:
● Display forms - Multiple forms may be displayed in sequence. When a business service includesmultiple forms, the user that starts the business service will be the one to work through all of the forms— as soon as the user submits one form, the next one in the sequence is displayed. Note, however, that ifthere is an action of some sort in-between forms (database access, script execution, etc.), there may be adelay in displaying the next form. If this occurs, a shaded mask is shown over the previous form, and a"Waiting for response" message is displayed.
● Start process instances - One or more instances of processes may be started by a business service.resulting in one or more work items being sent to the appropriate users to process them.
If the business service starts process instances, and results in work items, you can see those in theprocess instance and work item lists, respectively.
This stateful type of action would typically be done as the last action in the business service.
● Calling REST Services - For information on how to call REST Services, see "Calling REST Services" inthe TIBCO® BPM Enterprise Administrator's Guide
● Scripts - Scripts can perform various functions, such as calculations, validation, etc.
● Logical branching - The flow of the business service may branch in various ways, depending on itsdesign.
Business ServicesBusiness services enables you to view information about the business services in your list.
You can categorize your business services, depending on your requirements. Categories are specified inTIBCO Business Studio - BPM Edition at design-time.
The business service list that is initially displayed is a snap shot of the business services available at thatpoint in time. You can refresh the list to get the most recent list of business services from TIBCO BPMEnterprise.
CategoriesYou can store your business services by category. As the number of business services grows, you canincrease the number of categories you have so you can organize your business services as effectively aspossible. You can specify a category for a business service in TIBCO Business Studio - BPM Edition atdesign-time. Business Services allows you to view your categories.
You can:
● Display all your categories.
● Display a list of your most recently viewed business services.
9
TIBCO® BPM Enterprise Client User's Guide
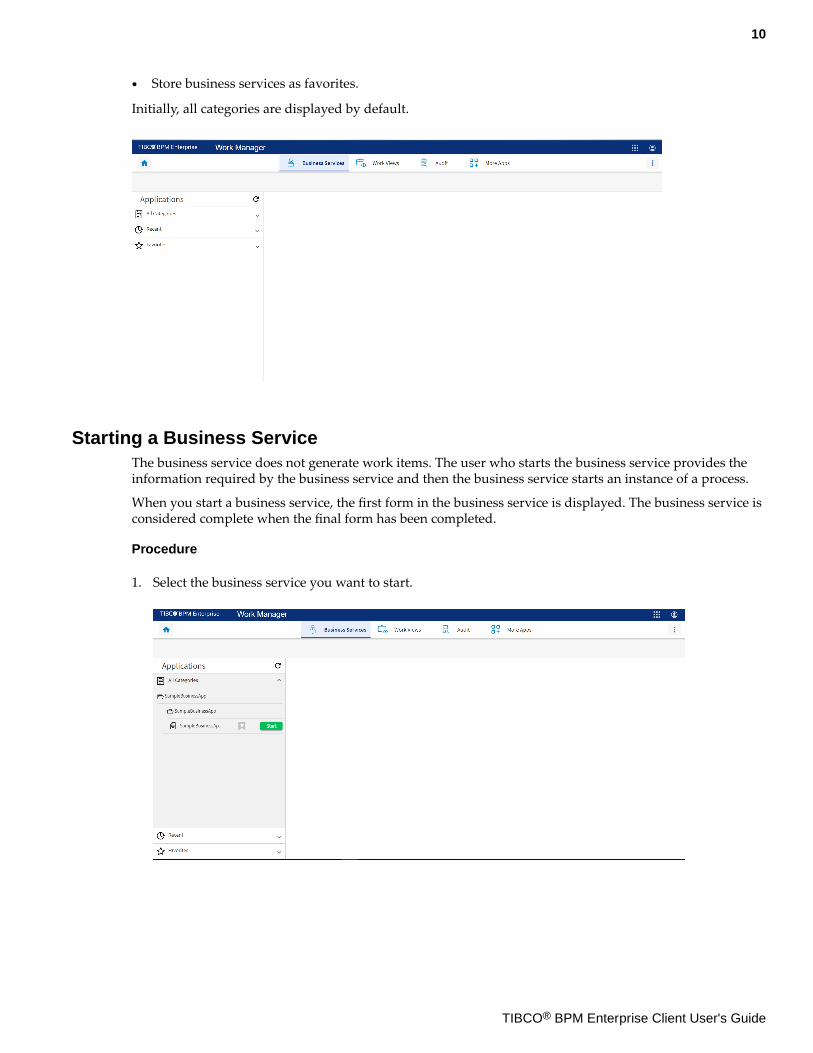
● Store business services as favorites.
Initially, all categories are displayed by default.
Starting a Business ServiceThe business service does not generate work items. The user who starts the business service provides theinformation required by the business service and then the business service starts an instance of a process.
When you start a business service, the first form in the business service is displayed. The business service isconsidered complete when the final form has been completed.
Procedure
1. Select the business service you want to start.
10
TIBCO® BPM Enterprise Client User's Guide
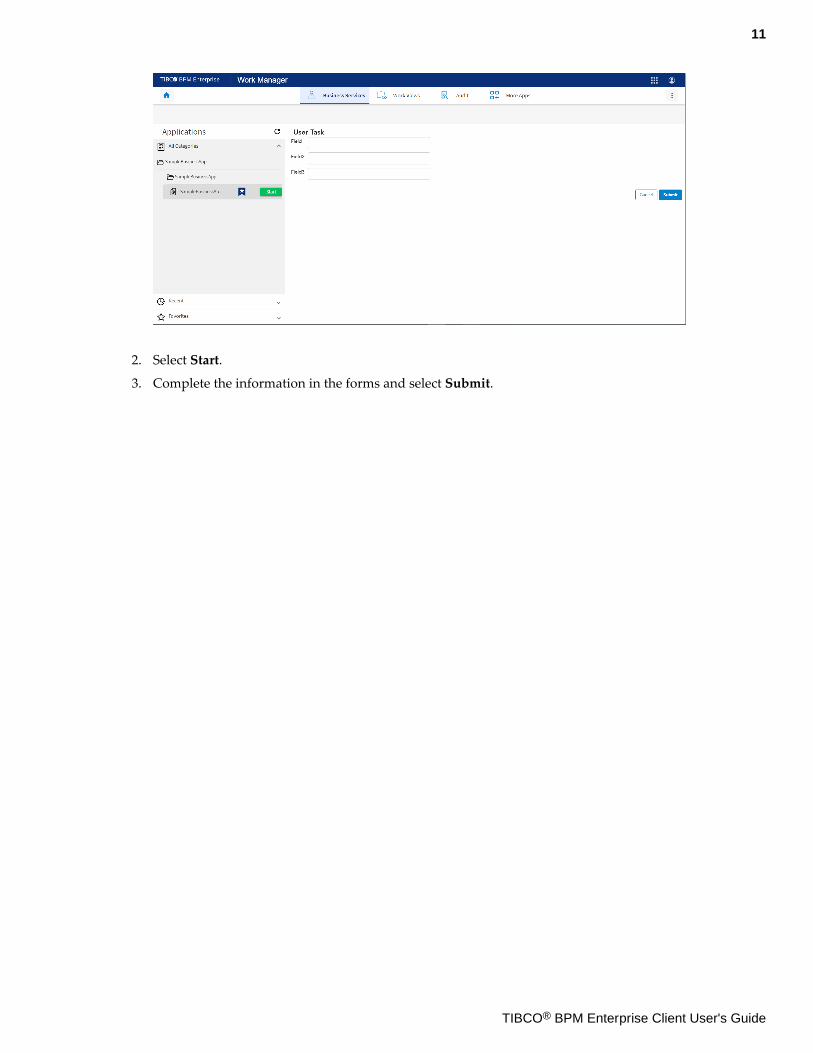
2. Select Start.
3. Complete the information in the forms and select Submit.
11
TIBCO® BPM Enterprise Client User's Guide
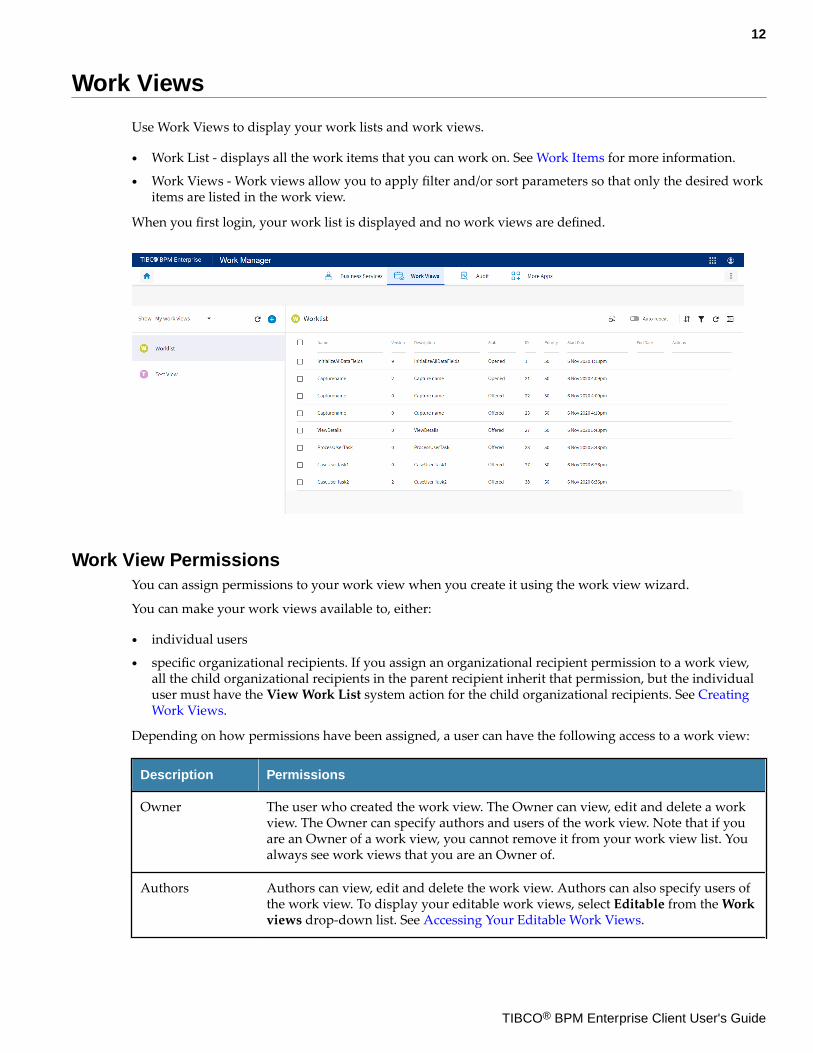
Work Views
Use Work Views to display your work lists and work views.
● Work List - displays all the work items that you can work on. See Work Items for more information.
● Work Views - Work views allow you to apply filter and/or sort parameters so that only the desired workitems are listed in the work view.
When you first login, your work list is displayed and no work views are defined.
Work View PermissionsYou can assign permissions to your work view when you create it using the work view wizard.
You can make your work views available to, either:
● individual users
● specific organizational recipients. If you assign an organizational recipient permission to a work view,all the child organizational recipients in the parent recipient inherit that permission, but the individualuser must have the View Work List system action for the child organizational recipients. See CreatingWork Views.
Depending on how permissions have been assigned, a user can have the following access to a work view:
Description Permissions
Owner The user who created the work view. The Owner can view, edit and delete a workview. The Owner can specify authors and users of the work view. Note that if youare an Owner of a work view, you cannot remove it from your work view list. Youalways see work views that you are an Owner of.
Authors Authors can view, edit and delete the work view. Authors can also specify users ofthe work view. To display your editable work views, select Editable from the Workviews drop-down list. See Accessing Your Editable Work Views.
12
TIBCO® BPM Enterprise Client User's Guide

Description Permissions
Users Users can only view the work view. A user cannot specify any access to the workview. If you have been specified as a User of a work view, the work view isautomatically displayed in your Work View list.
Public Work ViewsWork views can be either public or private. Private work views can only be viewed by you or others youspecify. Public work views can be viewed by every TIBCO BPM Enterprise user.
You must also have the View Work List system action to view a public work view. However, you cannotedit a work view unless you are the owner or an author of the work view. See Work View Permissions formore information about assigning permissions to work views.
You can specify whether or not a work view is public when you create it using the work view wizard. See Creating Work Views.
To view public work views, select Public from the Work View drop-down list.
Creating a Work View for an Organizational EntityYou can create different work views of your own work list. However, if you want to create a work view of awork list belonging to a resource in an organization model, you must have the View Work List systemaction for the work list you require.
Similarly, if you want to grant another user access to a work view of a work list belonging to an entity in anorganization model, that user must have the View Work List system action for the work list you want themto have access to. See Work View Permissions for more information about granting permissions to workviews.
13
TIBCO® BPM Enterprise Client User's Guide
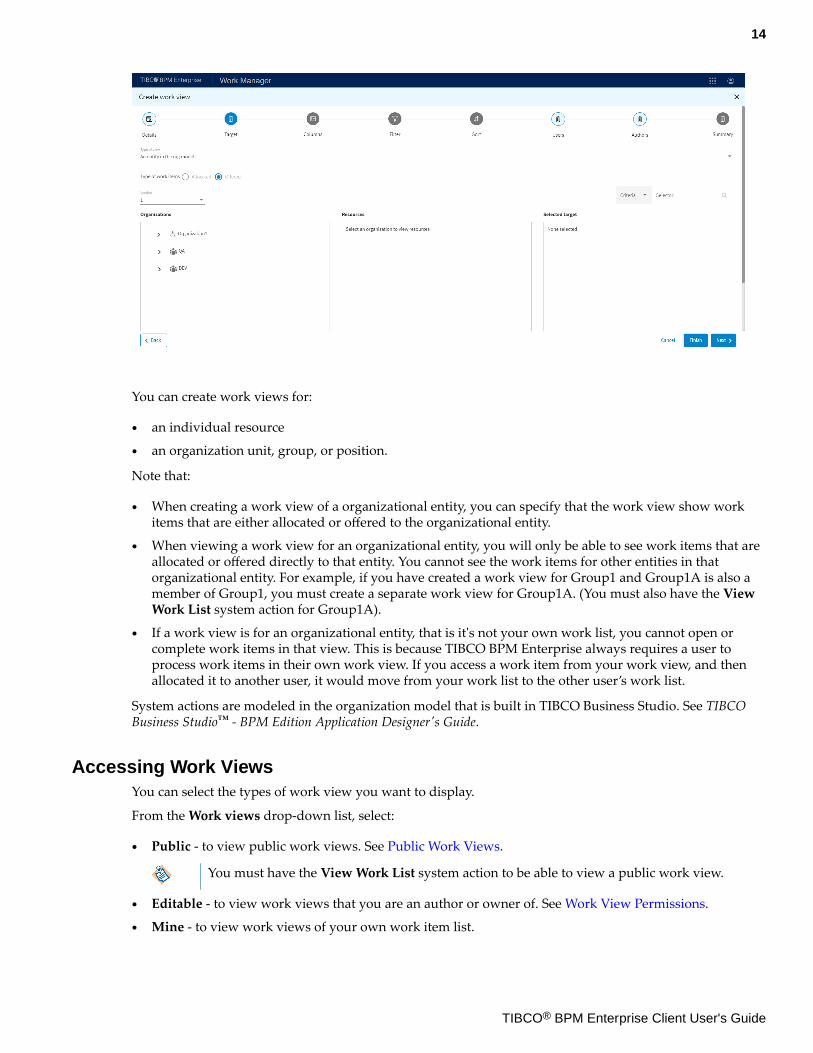
You can create work views for:
● an individual resource
● an organization unit, group, or position.
Note that:
● When creating a work view of a organizational entity, you can specify that the work view show workitems that are either allocated or offered to the organizational entity.
● When viewing a work view for an organizational entity, you will only be able to see work items that areallocated or offered directly to that entity. You cannot see the work items for other entities in thatorganizational entity. For example, if you have created a work view for Group1 and Group1A is also amember of Group1, you must create a separate work view for Group1A. (You must also have the ViewWork List system action for Group1A).
● If a work view is for an organizational entity, that is it's not your own work list, you cannot open orcomplete work items in that view. This is because TIBCO BPM Enterprise always requires a user toprocess work items in their own work view. If you access a work item from your work view, and thenallocated it to another user, it would move from your work list to the other user’s work list.
System actions are modeled in the organization model that is built in TIBCO Business Studio. See TIBCOBusiness Studio™ - BPM Edition Application Designer's Guide.
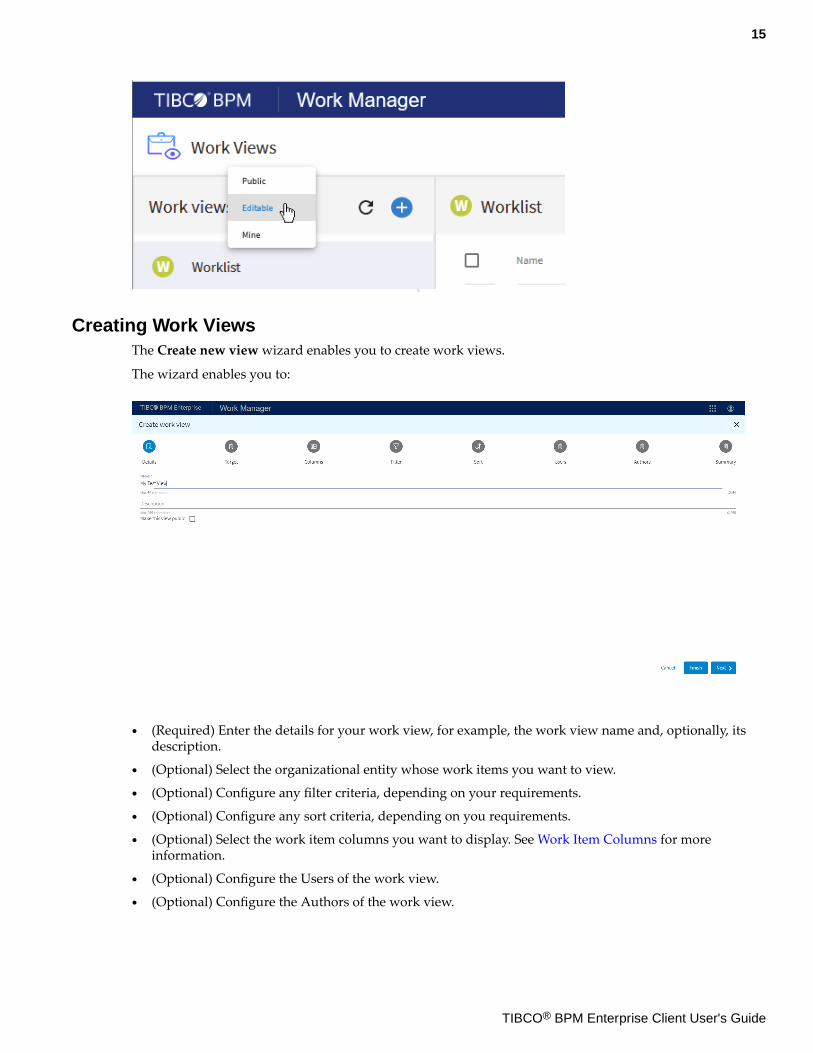
Accessing Work ViewsYou can select the types of work view you want to display.
From the Work views drop-down list, select:
● Public - to view public work views. See Public Work Views.
You must have the View Work List system action to be able to view a public work view.
● Editable - to view work views that you are an author or owner of. See Work View Permissions.
● Mine - to view work views of your own work item list.
14
TIBCO® BPM Enterprise Client User's Guide
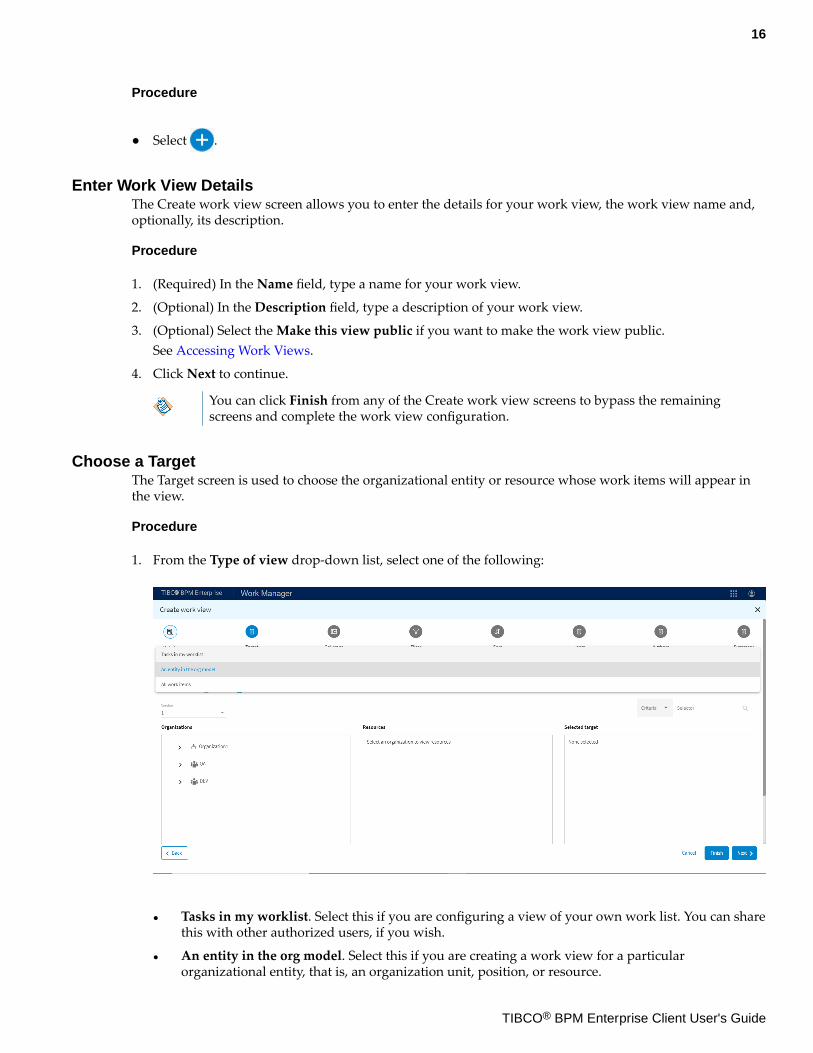
Creating Work ViewsThe Create new view wizard enables you to create work views.
The wizard enables you to:
● (Required) Enter the details for your work view, for example, the work view name and, optionally, itsdescription.
● (Optional) Select the organizational entity whose work items you want to view.
● (Optional) Configure any filter criteria, depending on your requirements.
● (Optional) Configure any sort criteria, depending on you requirements.
● (Optional) Select the work item columns you want to display. See Work Item Columns for moreinformation.
● (Optional) Configure the Users of the work view.
● (Optional) Configure the Authors of the work view.
15
TIBCO® BPM Enterprise Client User's Guide
Procedure
● Select .
Enter Work View DetailsThe Create work view screen allows you to enter the details for your work view, the work view name and,optionally, its description.
Procedure
1. (Required) In the Name field, type a name for your work view.
2. (Optional) In the Description field, type a description of your work view.
3. (Optional) Select the Make this view public if you want to make the work view public.See Accessing Work Views.
4. Click Next to continue.
You can click Finish from any of the Create work view screens to bypass the remainingscreens and complete the work view configuration.
Choose a TargetThe Target screen is used to choose the organizational entity or resource whose work items will appear inthe view.
Procedure
1. From the Type of view drop-down list, select one of the following:
● Tasks in my worklist. Select this if you are configuring a view of your own work list. You can sharethis with other authorized users, if you wish.
● An entity in the org model. Select this if you are creating a work view for a particularorganizational entity, that is, an organization unit, position, or resource.
16
TIBCO® BPM Enterprise Client User's Guide
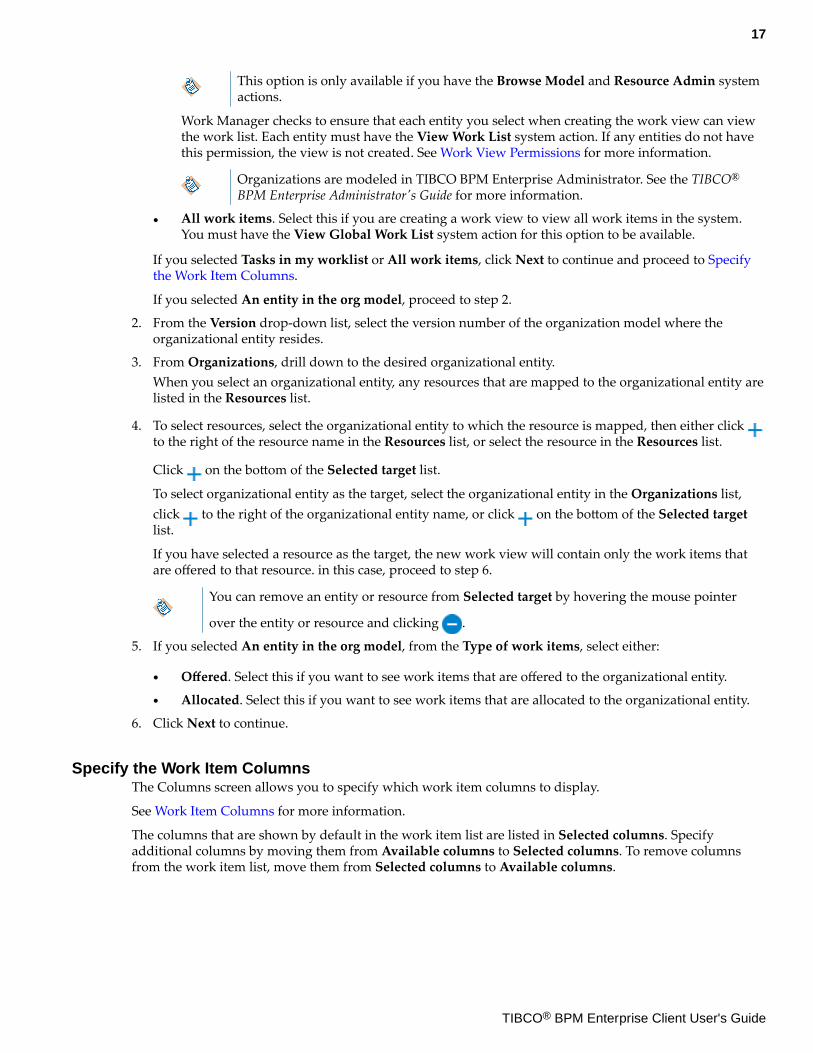
This option is only available if you have the Browse Model and Resource Admin systemactions.
Work Manager checks to ensure that each entity you select when creating the work view can viewthe work list. Each entity must have the View Work List system action. If any entities do not havethis permission, the view is not created. See Work View Permissions for more information.
Organizations are modeled in TIBCO BPM Enterprise Administrator. See the TIBCO®
BPM Enterprise Administrator's Guide for more information.
● All work items. Select this if you are creating a work view to view all work items in the system.You must have the View Global Work List system action for this option to be available.
If you selected Tasks in my worklist or All work items, click Next to continue and proceed to Specifythe Work Item Columns.
If you selected An entity in the org model, proceed to step 2.
2. From the Version drop-down list, select the version number of the organization model where theorganizational entity resides.
3. From Organizations, drill down to the desired organizational entity.When you select an organizational entity, any resources that are mapped to the organizational entity arelisted in the Resources list.
4. To select resources, select the organizational entity to which the resource is mapped, then either click to the right of the resource name in the Resources list, or select the resource in the Resources list.
Click on the bottom of the Selected target list.
To select organizational entity as the target, select the organizational entity in the Organizations list,click to the right of the organizational entity name, or click on the bottom of the Selected targetlist.
If you have selected a resource as the target, the new work view will contain only the work items thatare offered to that resource. in this case, proceed to step 6.
You can remove an entity or resource from Selected target by hovering the mouse pointer
over the entity or resource and clicking .
5. If you selected An entity in the org model, from the Type of work items, select either:
● Offered. Select this if you want to see work items that are offered to the organizational entity.
● Allocated. Select this if you want to see work items that are allocated to the organizational entity.
6. Click Next to continue.
Specify the Work Item ColumnsThe Columns screen allows you to specify which work item columns to display.
See Work Item Columns for more information.
The columns that are shown by default in the work item list are listed in Selected columns. Specifyadditional columns by moving them from Available columns to Selected columns. To remove columnsfrom the work item list, move them from Selected columns to Available columns.
17
TIBCO® BPM Enterprise Client User's Guide
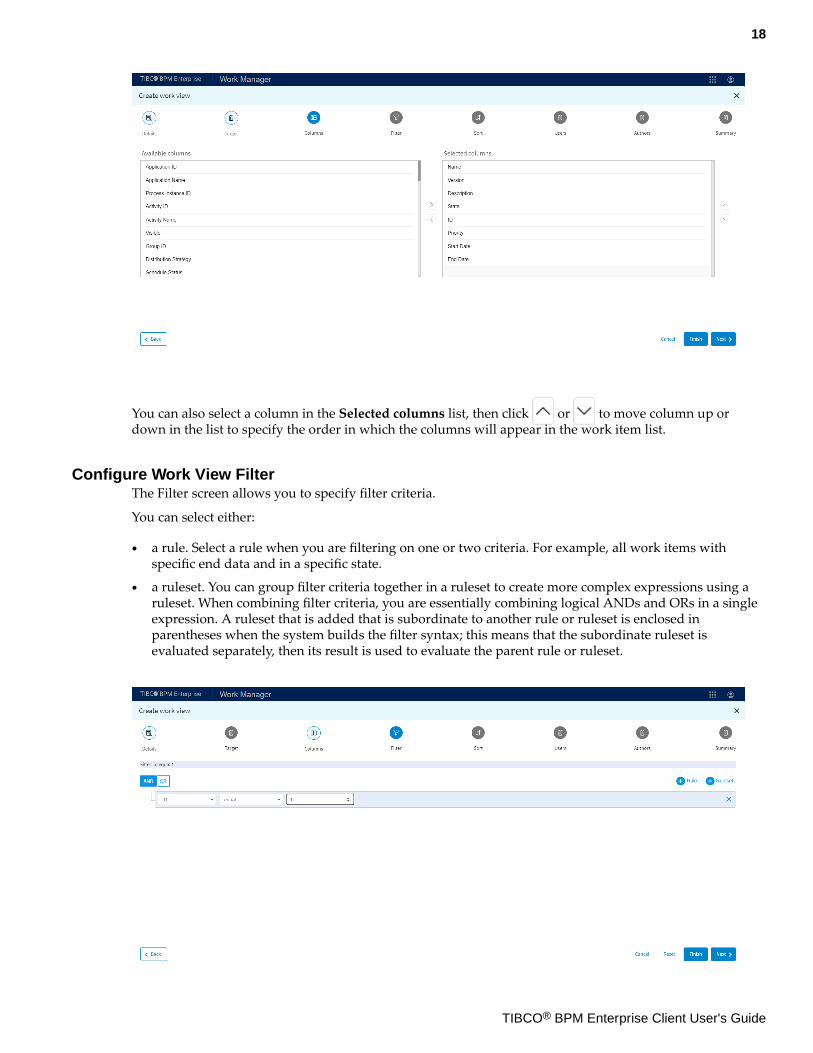
You can also select a column in the Selected columns list, then click or to move column up ordown in the list to specify the order in which the columns will appear in the work item list.
Configure Work View FilterThe Filter screen allows you to specify filter criteria.
You can select either:
● a rule. Select a rule when you are filtering on one or two criteria. For example, all work items withspecific end data and in a specific state.
● a ruleset. You can group filter criteria together in a ruleset to create more complex expressions using aruleset. When combining filter criteria, you are essentially combining logical ANDs and ORs in a singleexpression. A ruleset that is added that is subordinate to another rule or ruleset is enclosed inparentheses when the system builds the filter syntax; this means that the subordinate ruleset isevaluated separately, then its result is used to evaluate the parent rule or ruleset.
18
TIBCO® BPM Enterprise Client User's Guide
Procedure
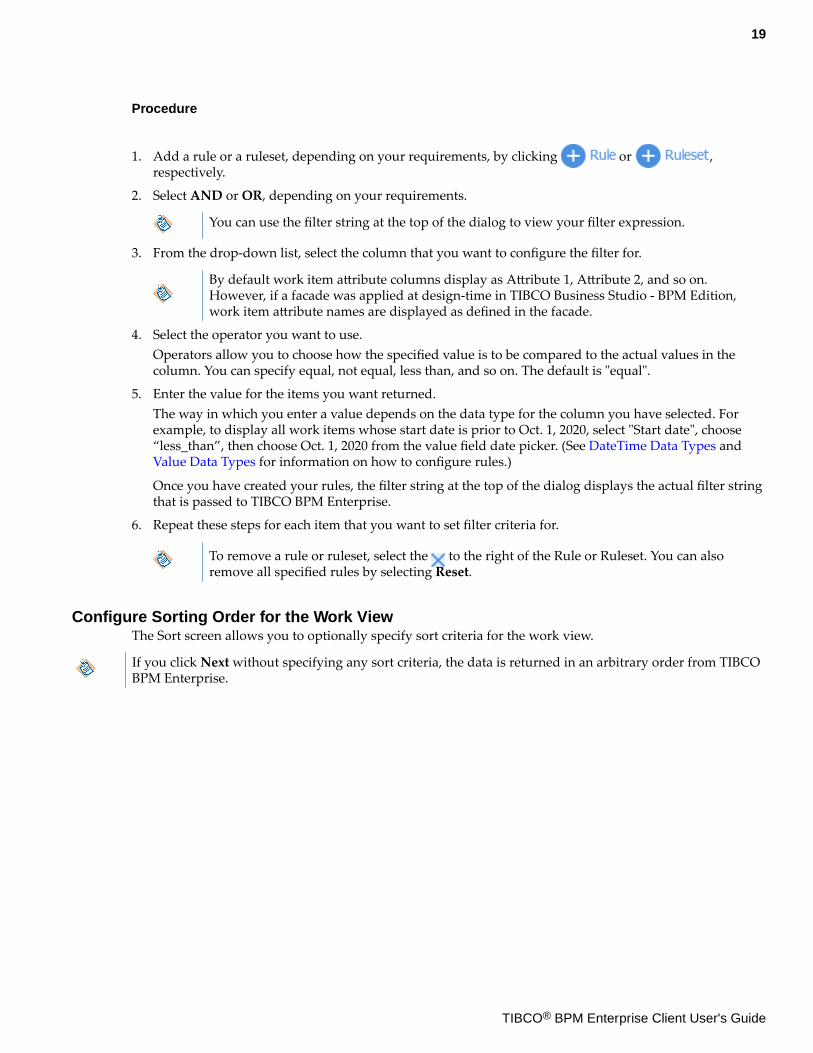
1. Add a rule or a ruleset, depending on your requirements, by clicking or ,respectively.
2. Select AND or OR, depending on your requirements.
You can use the filter string at the top of the dialog to view your filter expression.
3. From the drop-down list, select the column that you want to configure the filter for.
By default work item attribute columns display as Attribute 1, Attribute 2, and so on.However, if a facade was applied at design-time in TIBCO Business Studio - BPM Edition,work item attribute names are displayed as defined in the facade.
4. Select the operator you want to use.Operators allow you to choose how the specified value is to be compared to the actual values in thecolumn. You can specify equal, not equal, less than, and so on. The default is "equal".
5. Enter the value for the items you want returned.The way in which you enter a value depends on the data type for the column you have selected. Forexample, to display all work items whose start date is prior to Oct. 1, 2020, select "Start date", choose“less_than”, then choose Oct. 1, 2020 from the value field date picker. (See DateTime Data Types and Value Data Types for information on how to configure rules.)
Once you have created your rules, the filter string at the top of the dialog displays the actual filter stringthat is passed to TIBCO BPM Enterprise.
6. Repeat these steps for each item that you want to set filter criteria for.
To remove a rule or ruleset, select the to the right of the Rule or Ruleset. You can alsoremove all specified rules by selecting Reset.
Configure Sorting Order for the Work ViewThe Sort screen allows you to optionally specify sort criteria for the work view.
If you click Next without specifying any sort criteria, the data is returned in an arbitrary order from TIBCOBPM Enterprise.
19
TIBCO® BPM Enterprise Client User's Guide
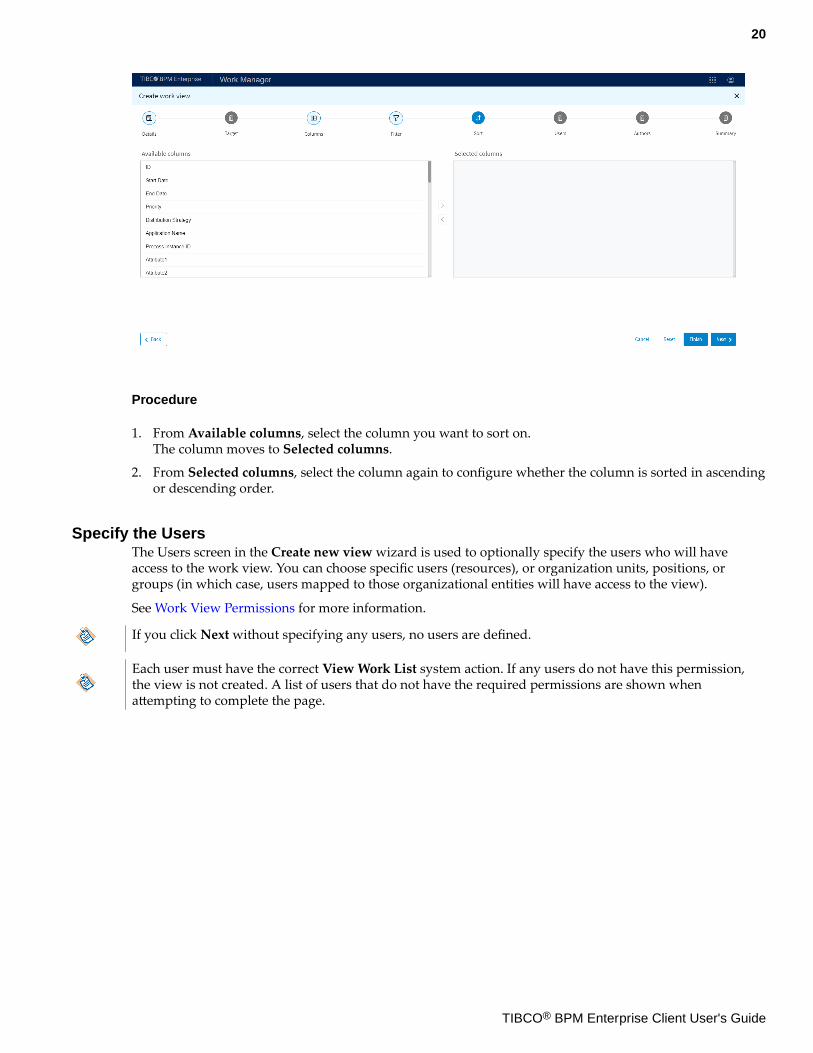
Procedure
1. From Available columns, select the column you want to sort on.The column moves to Selected columns.
2. From Selected columns, select the column again to configure whether the column is sorted in ascendingor descending order.
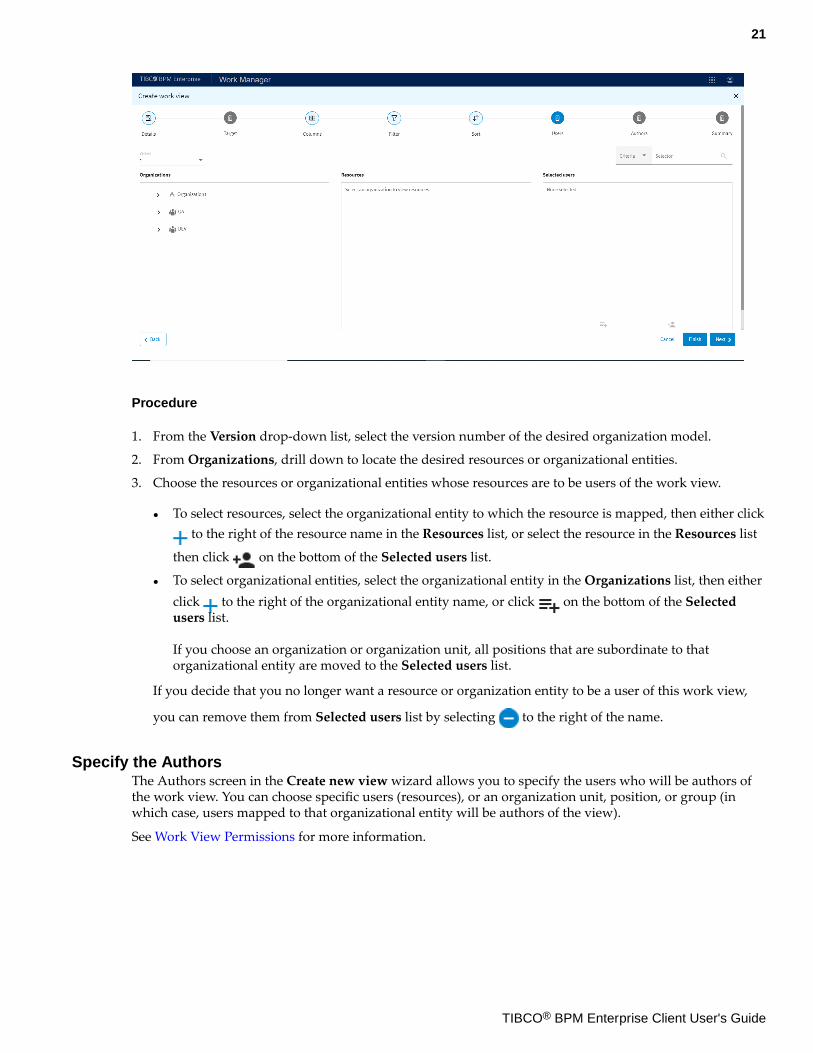
Specify the UsersThe Users screen in the Create new view wizard is used to optionally specify the users who will haveaccess to the work view. You can choose specific users (resources), or organization units, positions, orgroups (in which case, users mapped to those organizational entities will have access to the view).
See Work View Permissions for more information.
If you click Next without specifying any users, no users are defined.
Each user must have the correct View Work List system action. If any users do not have this permission,the view is not created. A list of users that do not have the required permissions are shown whenattempting to complete the page.
20
TIBCO® BPM Enterprise Client User's Guide
Procedure
1. From the Version drop-down list, select the version number of the desired organization model.
2. From Organizations, drill down to locate the desired resources or organizational entities.
3. Choose the resources or organizational entities whose resources are to be users of the work view.
● To select resources, select the organizational entity to which the resource is mapped, then either click to the right of the resource name in the Resources list, or select the resource in the Resources list
then click on the bottom of the Selected users list.
● To select organizational entities, select the organizational entity in the Organizations list, then eitherclick to the right of the organizational entity name, or click on the bottom of the Selectedusers list.
If you choose an organization or organization unit, all positions that are subordinate to thatorganizational entity are moved to the Selected users list.
If you decide that you no longer want a resource or organization entity to be a user of this work view,
you can remove them from Selected users list by selecting to the right of the name.
Specify the AuthorsThe Authors screen in the Create new view wizard allows you to specify the users who will be authors ofthe work view. You can choose specific users (resources), or an organization unit, position, or group (inwhich case, users mapped to that organizational entity will be authors of the view).
See Work View Permissions for more information.
21
TIBCO® BPM Enterprise Client User's Guide
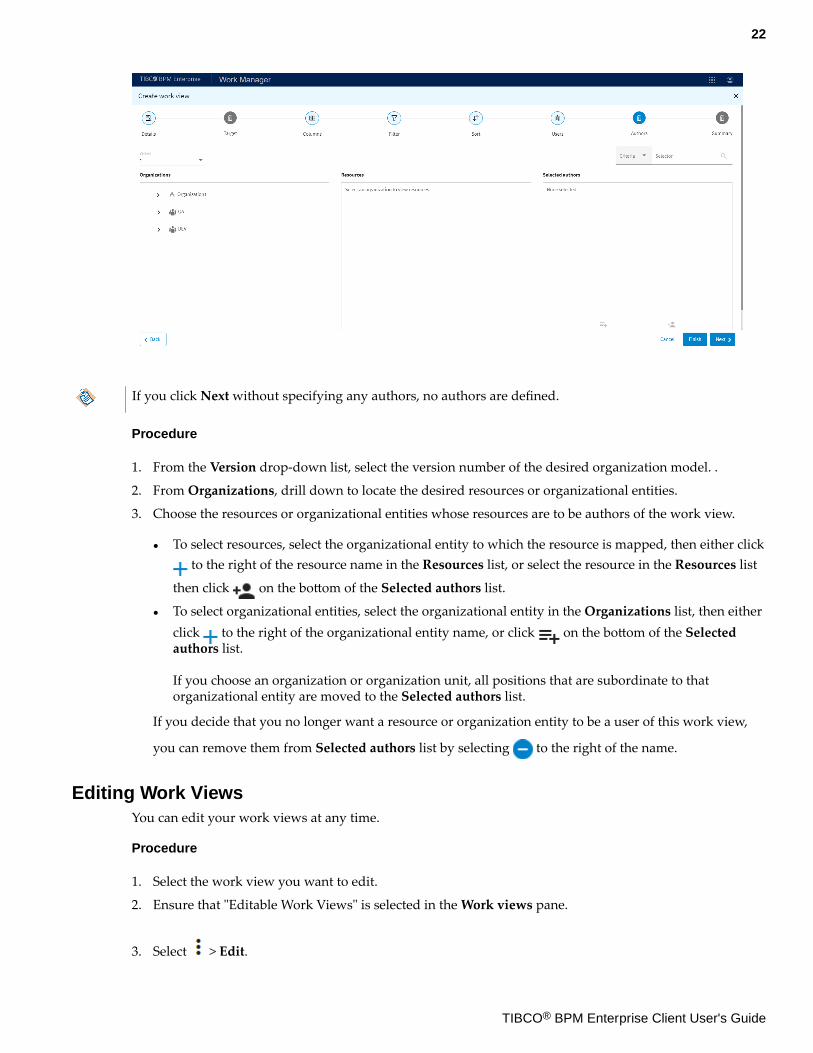
If you click Next without specifying any authors, no authors are defined.
Procedure
1. From the Version drop-down list, select the version number of the desired organization model. .
2. From Organizations, drill down to locate the desired resources or organizational entities.
3. Choose the resources or organizational entities whose resources are to be authors of the work view.
● To select resources, select the organizational entity to which the resource is mapped, then either click to the right of the resource name in the Resources list, or select the resource in the Resources list
then click on the bottom of the Selected authors list.
● To select organizational entities, select the organizational entity in the Organizations list, then eitherclick to the right of the organizational entity name, or click on the bottom of the Selectedauthors list.
If you choose an organization or organization unit, all positions that are subordinate to thatorganizational entity are moved to the Selected authors list.
If you decide that you no longer want a resource or organization entity to be a user of this work view,
you can remove them from Selected authors list by selecting to the right of the name.
Editing Work ViewsYou can edit your work views at any time.
Procedure
1. Select the work view you want to edit.
2. Ensure that "Editable Work Views" is selected in the Work views pane.
3. Select > Edit.
22
TIBCO® BPM Enterprise Client User's Guide
Removing Work Views from Your Work View ListYou can remove work views from your work view list.
Procedure
1. Select a work view.
2. Ensure that "Editable" is selected in the Work views pane.
3. Select > Delete.
Work ItemsA work item relates to a task in a case. Depending on your work item, you might need to open the workitem and enter data on a form, forward the work item to another user or group, save it so you can work onit later, or complete the work item so that you can move the case on to the next task.
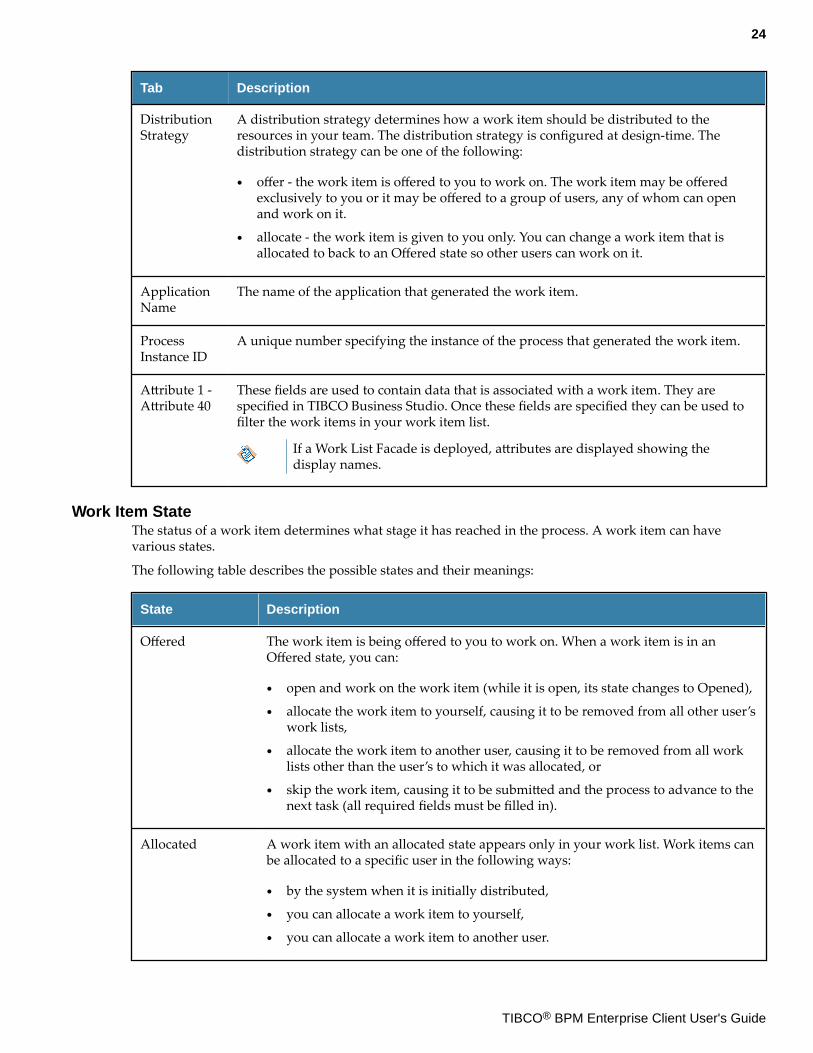
Work Item ColumnsYou can view information about your work items, like it's status, priority and target date.
You can select which columns are displayed by selecting .
Tab Description
ID A unique number identifying the work item.
Name The name of the user activity within the process template that generated the work item.
Version Identifies the version of the process template.
State The work item's current state. See Work Item State.
Start date The scheduled date and time specified for the work item. Example: 2008-08-30 15:00:00.If no scheduled date and time has been specified for the work item, the column is empty.
End date The end date and time specified for the work item. Example: 2008-08-30 15:00:00. If noend date and time has been specified for the work item, the column is empty.
Description The label of the user task associated with the work item. This is specified in TIBCOBusiness Studio - BPM Edition at design-time.
Priority Work item priority is configured in your case application at design-time. Setting thework item priority enables you to sort your work list by priority. Also, scripts andprocesses can perform case actions based on a work item's priority. For moreinformation, see Changing Work Item Priority.
23
TIBCO® BPM Enterprise Client User's Guide
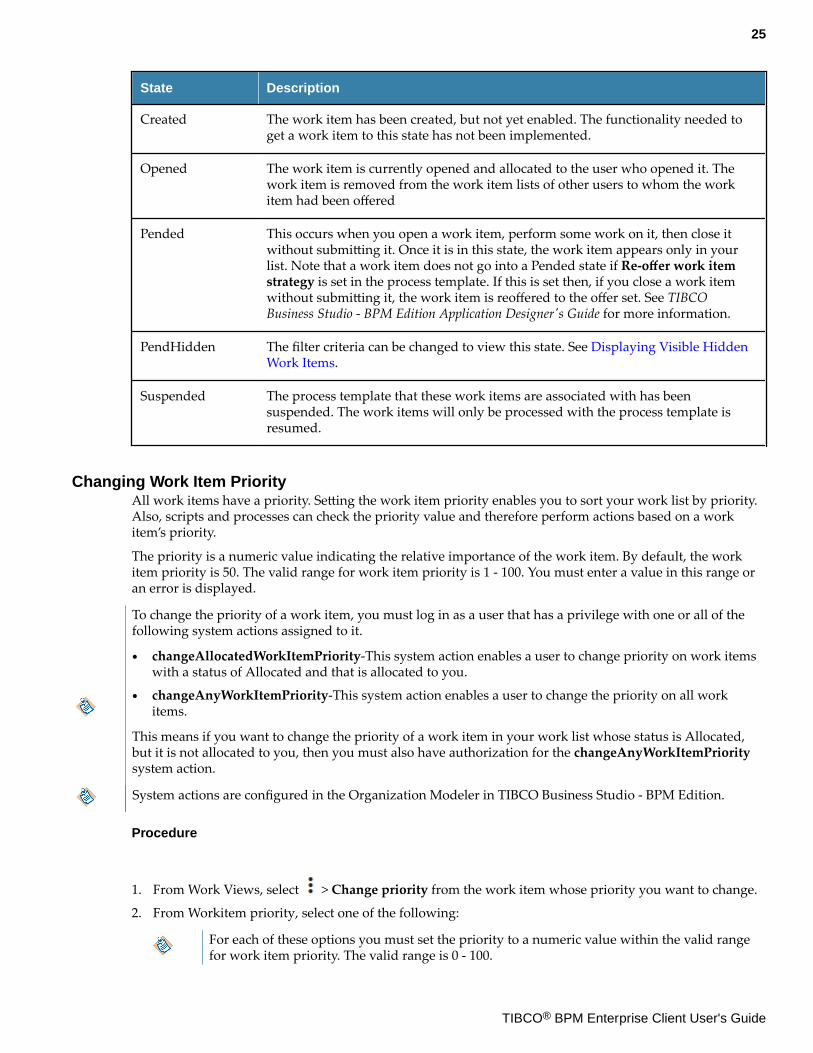
Tab Description
DistributionStrategy
A distribution strategy determines how a work item should be distributed to theresources in your team. The distribution strategy is configured at design-time. Thedistribution strategy can be one of the following:
● offer - the work item is offered to you to work on. The work item may be offeredexclusively to you or it may be offered to a group of users, any of whom can openand work on it.
● allocate - the work item is given to you only. You can change a work item that isallocated to back to an Offered state so other users can work on it.
ApplicationName
The name of the application that generated the work item.
ProcessInstance ID
A unique number specifying the instance of the process that generated the work item.
Attribute 1 -Attribute 40
These fields are used to contain data that is associated with a work item. They arespecified in TIBCO Business Studio. Once these fields are specified they can be used tofilter the work items in your work item list.
If a Work List Facade is deployed, attributes are displayed showing thedisplay names.
Work Item StateThe status of a work item determines what stage it has reached in the process. A work item can havevarious states.
The following table describes the possible states and their meanings:
State Description
Offered The work item is being offered to you to work on. When a work item is in anOffered state, you can:
● open and work on the work item (while it is open, its state changes to Opened),
● allocate the work item to yourself, causing it to be removed from all other user’swork lists,
● allocate the work item to another user, causing it to be removed from all worklists other than the user’s to which it was allocated, or
● skip the work item, causing it to be submitted and the process to advance to thenext task (all required fields must be filled in).
Allocated A work item with an allocated state appears only in your work list. Work items canbe allocated to a specific user in the following ways:
● by the system when it is initially distributed,
● you can allocate a work item to yourself,
● you can allocate a work item to another user.
24
TIBCO® BPM Enterprise Client User's Guide
State Description
Created The work item has been created, but not yet enabled. The functionality needed toget a work item to this state has not been implemented.
Opened The work item is currently opened and allocated to the user who opened it. Thework item is removed from the work item lists of other users to whom the workitem had been offered
Pended This occurs when you open a work item, perform some work on it, then close itwithout submitting it. Once it is in this state, the work item appears only in yourlist. Note that a work item does not go into a Pended state if Re-offer work itemstrategy is set in the process template. If this is set then, if you close a work itemwithout submitting it, the work item is reoffered to the offer set. See TIBCOBusiness Studio - BPM Edition Application Designer's Guide for more information.
PendHidden The filter criteria can be changed to view this state. See Displaying Visible HiddenWork Items.
Suspended The process template that these work items are associated with has beensuspended. The work items will only be processed with the process template isresumed.
Changing Work Item PriorityAll work items have a priority. Setting the work item priority enables you to sort your work list by priority.Also, scripts and processes can check the priority value and therefore perform actions based on a workitem’s priority.
The priority is a numeric value indicating the relative importance of the work item. By default, the workitem priority is 50. The valid range for work item priority is 1 - 100. You must enter a value in this range oran error is displayed.
To change the priority of a work item, you must log in as a user that has a privilege with one or all of thefollowing system actions assigned to it.
● changeAllocatedWorkItemPriority-This system action enables a user to change priority on work itemswith a status of Allocated and that is allocated to you.
● changeAnyWorkItemPriority-This system action enables a user to change the priority on all workitems.
This means if you want to change the priority of a work item in your work list whose status is Allocated,but it is not allocated to you, then you must also have authorization for the changeAnyWorkItemPrioritysystem action.
System actions are configured in the Organization Modeler in TIBCO Business Studio - BPM Edition.
Procedure
1. From Work Views, select > Change priority from the work item whose priority you want to change.
2. From Workitem priority, select one of the following:
For each of these options you must set the priority to a numeric value within the valid rangefor work item priority. The valid range is 0 - 100.
25
TIBCO® BPM Enterprise Client User's Guide

● You can:
— Select Absolute and enter a specific numeric value in the box.
— Select Offset. Enter a specific numeric value in the box and then use the arrows to offset a workitem priority by a specific numeric value. For example, an employee is away on holiday andyou want to offset the priority on all their work items by 20.
Displaying Visible Hidden Work ItemsYou can display hidden items by using the Worklist Filter dialog.There are two reasons why work items in your work item list may be hidden.
● They are work items that are associated with a process instance that has been suspended (see"Suspending a Process Instance" in the TIBCO® BPM Enterprise Administration Guide).
● They are work items that have been pended, that is, a timer has been set to make them hidden until aspecified date/time, or for a specified period of time (see Pending Work Items).
You can display hidden work items in your work item list by configuring a filter expression.
Procedure
1. Select to display the Worklist Filter dialog.
2. Add a rule.
3. In the first column, select Visible from the drop-down list.
4. Make sure the operator is equals.
5. In the second column, select False from the drop-down list.
6. Select Save.
The hidden work items are displayed.
To remove the filter, select to display the Worklist Filter dialog, and then select Reset.
Filtering Work ItemsYou can configure filter criteria for work items in your work list. This allows you to filter the list of workitems so that only some of the work items are shown. Filtering allows you to display only the work itemsyou are interested in. For example, you may only be interested in work items that arrived in the work itemlist after a specific date.
You can filter on all the available work item columns and their data types. See Work Item Columns for moreinformation.
You cannot use wild card characters when specifying filter criteria in Work views.
See Configure the Worklist Filter for more information.
Configure a Worklist FilterThe Worklist filter dialog allows you to specify filter criteria.
You can select which columns are displayed by selecting Column. See Work Item Columns. However, youcan further refine the list of work items that are displayed by configuring a work list filter.
You can select either:
26
TIBCO® BPM Enterprise Client User's Guide
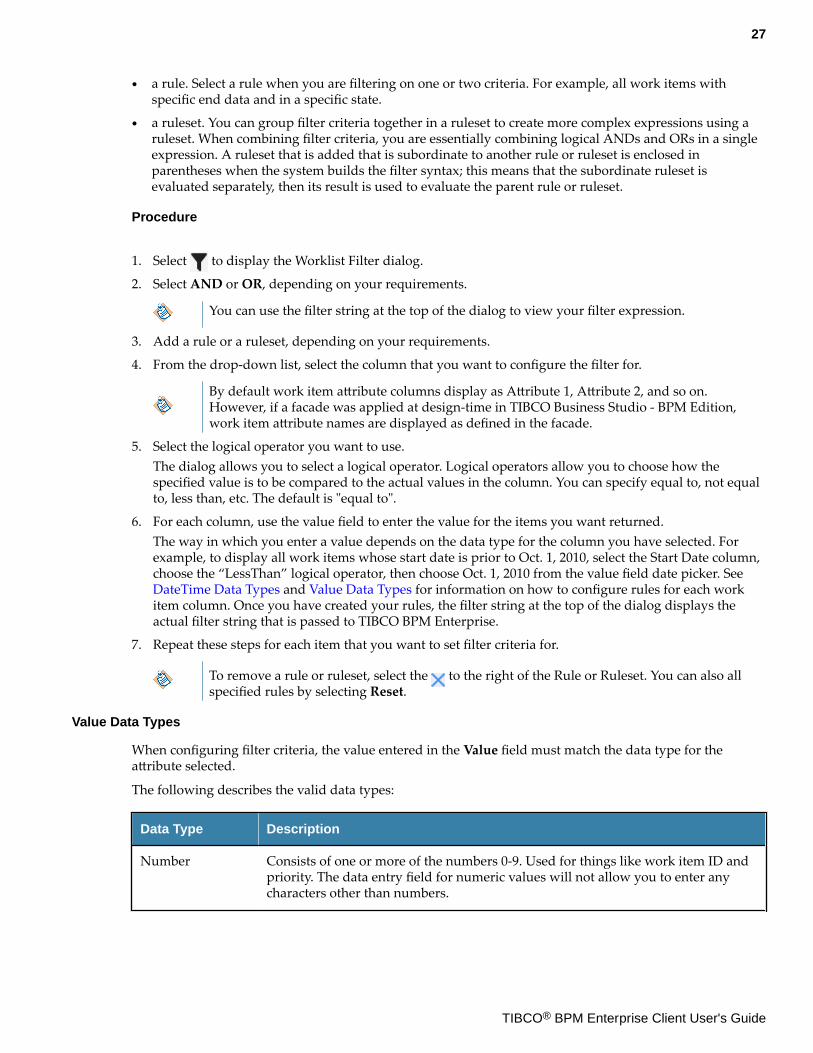
● a rule. Select a rule when you are filtering on one or two criteria. For example, all work items withspecific end data and in a specific state.
● a ruleset. You can group filter criteria together in a ruleset to create more complex expressions using aruleset. When combining filter criteria, you are essentially combining logical ANDs and ORs in a singleexpression. A ruleset that is added that is subordinate to another rule or ruleset is enclosed inparentheses when the system builds the filter syntax; this means that the subordinate ruleset isevaluated separately, then its result is used to evaluate the parent rule or ruleset.
Procedure
1. Select to display the Worklist Filter dialog.
2. Select AND or OR, depending on your requirements.
You can use the filter string at the top of the dialog to view your filter expression.
3. Add a rule or a ruleset, depending on your requirements.
4. From the drop-down list, select the column that you want to configure the filter for.
By default work item attribute columns display as Attribute 1, Attribute 2, and so on.However, if a facade was applied at design-time in TIBCO Business Studio - BPM Edition,work item attribute names are displayed as defined in the facade.
5. Select the logical operator you want to use.The dialog allows you to select a logical operator. Logical operators allow you to choose how thespecified value is to be compared to the actual values in the column. You can specify equal to, not equalto, less than, etc. The default is "equal to".
6. For each column, use the value field to enter the value for the items you want returned.The way in which you enter a value depends on the data type for the column you have selected. Forexample, to display all work items whose start date is prior to Oct. 1, 2010, select the Start Date column,choose the “LessThan” logical operator, then choose Oct. 1, 2010 from the value field date picker. See DateTime Data Types and Value Data Types for information on how to configure rules for each workitem column. Once you have created your rules, the filter string at the top of the dialog displays theactual filter string that is passed to TIBCO BPM Enterprise.
7. Repeat these steps for each item that you want to set filter criteria for.
To remove a rule or ruleset, select the to the right of the Rule or Ruleset. You can also allspecified rules by selecting Reset.
Value Data Types
When configuring filter criteria, the value entered in the Value field must match the data type for theattribute selected.
The following describes the valid data types:
Data Type Description
Number Consists of one or more of the numbers 0-9. Used for things like work item ID andpriority. The data entry field for numeric values will not allow you to enter anycharacters other than numbers.
27
TIBCO® BPM Enterprise Client User's Guide
Data Type Description
String Consists of any number of letters, numbers. Used for things like process instanceID and work item description.
Filtering on text is case sensitive.
Date Dates can be entered by using the “date picker” on the filter data-entry dialog.
Times, if specified, must be entered manually. If you enter a date, but not a time, itassumes “all times” for the specified date. All times use the 24-hour clock.
For more information about entering dates and times in the Filter data entry dialog,see DateTime Data Types.
Enumeration Select a valid entry from the drop-down list.
DateTime Data Types
When configuring filter criteria for dates attribute, ensure that you enter dates using the date picker tochoose the required date. The selected date will automatically appear in the date field.
Allocating Work Items OverviewA work item can be allocated to a specific user. This means that the work item is supposed to be worked onby that specific user - the work item only appears in your list with a state of Allocated.
A work item can be allocated to a specific user by TIBCO BPM Enterprise when the work item is created.When a process is defined in TIBCO Business Studio - BPM Edition, a distribution strategy is specified foreach user task (each work item results from a user task in a business process). The distribution strategyspecifies how to distribute, at runtime, a work item that is generated from the user task.
The distribution strategy will be one of the following:
● Offer - This means the work item is being offered to you to work on. Note that depending on how theuser task that resulted in the work item was defined, the work item may be offered exclusively to you, orit may be offered to a group of users, any of whom can open and work on it.
If a work item is offered to a group of users, and you open and work on it (for example, you enter orchange some data in the work item), the work item is removed from the work list of all other users.
● Allocate - This means the work item was given only to you to work on.
There are also functions available in Work Views that allow you to allocate a work item to yourself or toanother user.
You can also change a work item that is allocated to you back to an Offered state, so that other users canwork on it.
Allocating Work Items To YourselfYou can allocate one or more work items to yourself. It changes the work item’s state to Allocated so thatonly you can work on them. The work items are removed from the lists of all other users.
You can only do this if the work items are currently being offered to you; that is, their state is Offered.
Procedure
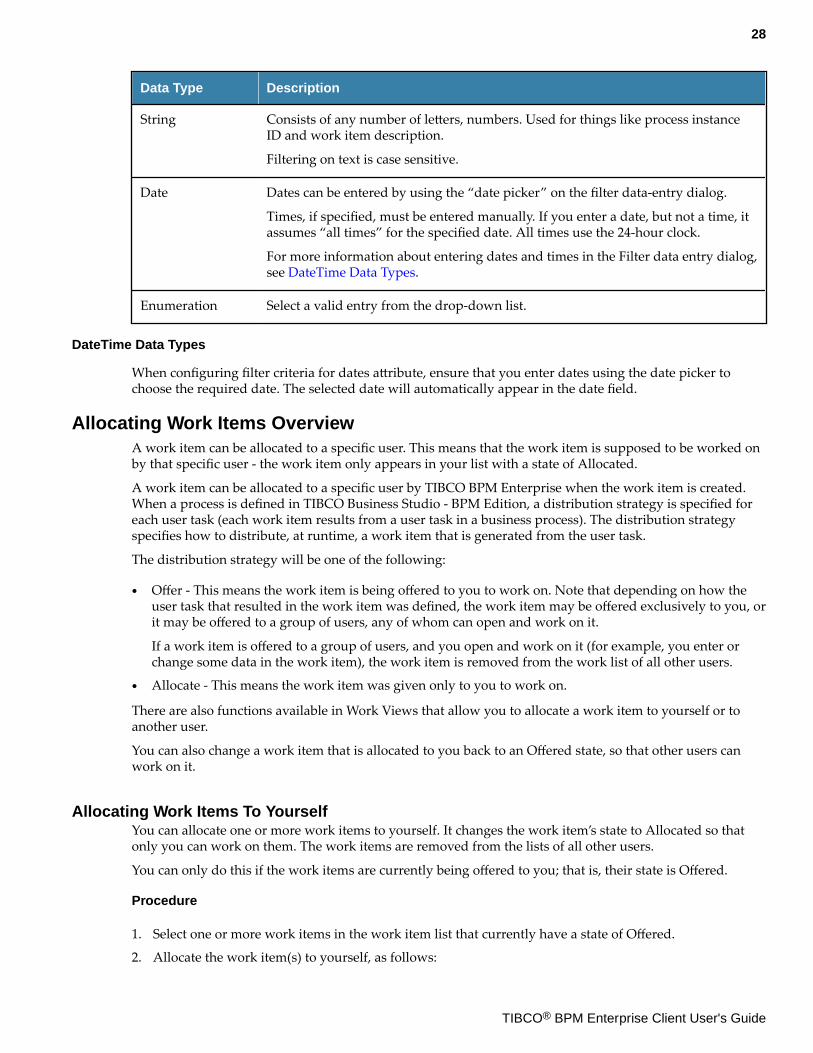
1. Select one or more work items in the work item list that currently have a state of Offered.
2. Allocate the work item(s) to yourself, as follows:
28
TIBCO® BPM Enterprise Client User's Guide
● If you have selected a single work item, you can either click in the work list header bar, or click
> Allocate to self.
● If you have selected multiple work items, click in the work list header bar.
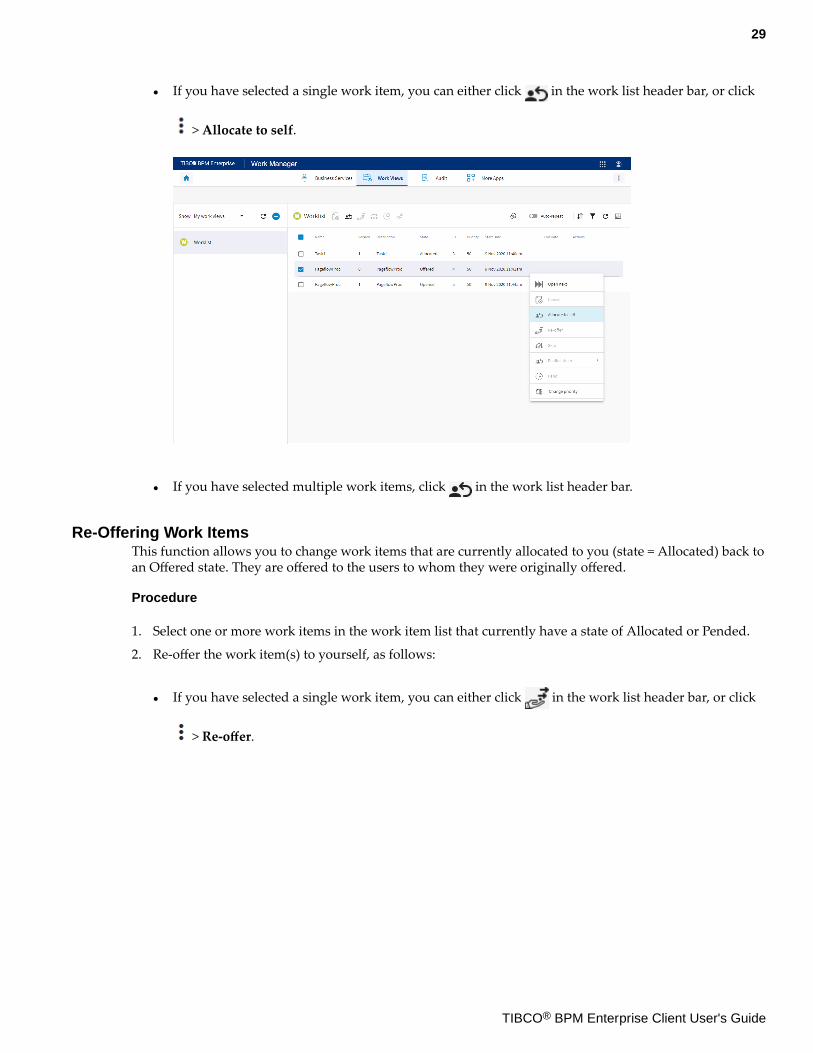
Re-Offering Work ItemsThis function allows you to change work items that are currently allocated to you (state = Allocated) back toan Offered state. They are offered to the users to whom they were originally offered.
Procedure
1. Select one or more work items in the work item list that currently have a state of Allocated or Pended.
2. Re-offer the work item(s) to yourself, as follows:
● If you have selected a single work item, you can either click in the work list header bar, or click
> Re-offer.
29
TIBCO® BPM Enterprise Client User's Guide
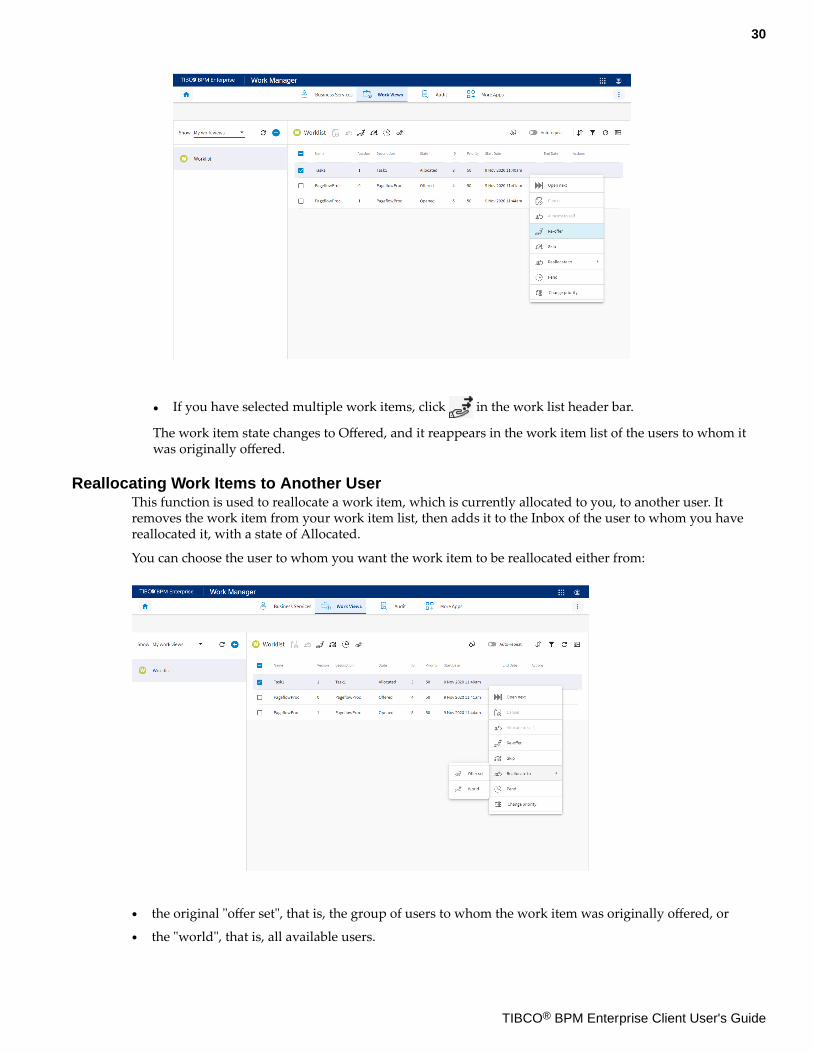
● If you have selected multiple work items, click in the work list header bar.
The work item state changes to Offered, and it reappears in the work item list of the users to whom itwas originally offered.
Reallocating Work Items to Another UserThis function is used to reallocate a work item, which is currently allocated to you, to another user. Itremoves the work item from your work item list, then adds it to the Inbox of the user to whom you havereallocated it, with a state of Allocated.
You can choose the user to whom you want the work item to be reallocated either from:
● the original "offer set", that is, the group of users to whom the work item was originally offered, or
● the "world", that is, all available users.
30
TIBCO® BPM Enterprise Client User's Guide
Reallocate Work Item to Offer Set
The Reallocate to Offer Set function is used to reallocate a work item to the original offer set, that is, thegroup of users to which the work item was originally offered.
The work item you want to reallocate must be in your work list with a state of Allocated or Pended. Afterreallocating, the work item is removed from your work list.
Procedure
1. Select a work item in your work list.
2. Select > Reallocate to > Offer Set.
3. Select the user you want to allocate the work item to.
4. Optionally select Revert data.
If you select this option it causes any data that had been entered/modified in the work item prior toallocating it to revert to its original value. (If any data in the work item had been entered/modified, thework item will have a state of Pended.)
5. Click Reallocate.
Result
The work items appear in the work list of the user that you selected, with a state of Allocated.
Reallocating Work Items to the World
The Reallocate to World function is used to reallocate a work item to any available user.
To use reallocate to world, you must be logged in as a user with a privilege that has both the ReallocateWorkItem To World and Resource Admin system actions assigned to it.
Procedure
1. Select a work item in the work item list that currently has a state of Allocated or Pended.
2. Select > Reallocate to > World. The Workitem Reallocate dialog is displayed, which is used to choosethe user to whom you would like to allocate the work item.
You may not be able to see all resources mapped to a particular position because there may beresources mapped to a position that were created in an LDAP container for which you don’thave visibility, (because of an organization relationship). In these cases, you will not see thatresource when viewing the position. (This applies only to positions, not to groups.)
For more information, see the "Container Organization Relationships" section in the TIBCO®
BPM Enterprise Administration Guide
3. From the Version drop-down list, select the version of the organization model that contains the resourceyou want to allocate the work item to.
4. From Organizations, drill down to an organizational entity in the left to which the resource has beenmapped.
5. Either click to the right of the resource name in the Resources list, or select the resource in the
Resources list then click on the bottom of the Selected list.
31
TIBCO® BPM Enterprise Client User's Guide
6. Optionally select Revert data.
If you select this option it causes any data that had been entered/modified in the work item prior toallocating it to revert to its original value. (If any data in the work item had been entered/modified, thework item will have a state of Pended.)
If you decide that you no longer want the work item to be allocated to this user, you can remove them
from the Selected list by selecting .7. Select Reallocate.
Result
The work item will appear in the work item list of the resource that you selected, with a state of Allocated.
Processing Work Items OverviewA work item represents a task in a business service. Typically, a work item has a form associated with it thatmust be opened and filled out (some forms only display information and do not have fields to fill out). Youcan save the work item in your work item list so that it can be opened again and completed at a later time.When the form is completed, the work item is submitted so that the business service can progress, possiblyresulting in another work item that represents the next task in the process.
Double-click a work item to open it.
For work items associated with page flows, no preview is displayed.
Opening Work ItemsYou can open work items in the following ways:
● From the work item list, double-click the work item you want to open. (Single-clicking shows the workitem in a preview pane.)
● Click the Open link in the Actions column.
● When you have finished working on a work item, select > Open Next. This causes the next availablework item to be opened in the work item list, where available means a work item that is not locked orsuspended.
You cannot open multiple work items.
Opening a work item causes Opened to be shown as the State. The work item is allocated to the user whoopened it and is removed from the work item lists of other users to whom the work item had been offered.
An error is thrown when user tries to open a user-defined form. User-defined forms cannot be displayed. Ifyou want to use user-defined forms, you must provide your own form identifier and render your ownforms.
Auto-Repeat
Work Views provides an auto-repeat feature that causes the next available work item to be automaticallyopened after you’ve submitted a work item, where “available” means a work item that is not locked orsuspended. This allows you to process work items in succession without manually opening each one.
To turn on the auto-repeat feature, drag the Auto-repeat slider to the right.
The auto-repeat feature works as a toggle — drag the Auto-repeat slider to the right and left turns it on and
off. When auto-repeat is turned on, the slider is highlighted .
32
TIBCO® BPM Enterprise Client User's Guide
The auto-repeat toggle is persisted. If you log out and log in again, you do not need to reset auto-repeat.
Piling
When a user task is defined in a process template, the designer specifies whether or not work itemsgenerated from that user task should be piled. If they are piled, when you submit a work item generated bythat user task, TIBCO BPM Enterprise searches through your work list to see if there are any other workitems from that user task. If it finds one, it automatically, opens it. If there are no more work items, you arereturned to Work Views.
This means that if your job entails processing a certain type of work item, TIBCO BPM Enterpriseautomatically opens work items of that type, without requiring you to continually select work items fromyour work item list — as if you are working on a pile of work items.
Filling in a Work Item Form
The form that appears when you open a work item is specific to your process template. You create yourown forms that relate to your specific business.
Your company will instruct you in properly filling out the forms that they have designed.
Press Tab to move from field to field on the form.
Some fields may include a drop-down menu from which you can select the valid options—they contain -Select - and an arrow head. Click on the field to display the options you can choose from.
A date picker may be available to enter dates in date fields. Click on the calendar icon next to the date field.A calendar is displayed from which you can choose a date; clicking on a date in the calendar causes it to beentered in the field.
Work Item Data Modified By Other Users or System Actions
It is possible that a work item’s data may be modified in some way, either by the system or anotherapplication. The change made by the system or another application can include changes to data in fields, orother aspects of the work item, such as a deadline date.
How the work item is modified depends on:
● how you have configured your process definition in TIBCO Business Studio - BPM Edition. Themodification of work item data is configured using the Overwrite data already modified in work itemcheck box. See TIBCO Business Studio - BPM Edition Application Designer's Guide for more information.
● whether the work item form is open or closed when the work item data is modified.
If the work item form is closed and you have made one or more changes to one or more fields on the form,then:
● If the Overwrite data already modified in work item check box is selected, when the work item ismodified, any data that has been updated by you (and the other fields rescheduled for update) areoverwritten with the new data.
● If the Overwrite data already modified in work item check box is not selected then, any changes youhave made to a form remain but the other fields are modified. For example, say you have a form thatcontains two fields (field1 and field2) and you update field1. If the work item is then rescheduled withchanges to both field1 and field2, then only field2 is modified. The changes that you have made to field1remain.
If a work item is modified while you have it open, when you click Submit or Close, a Data out of Syncmessage displays.
If the Overwrite data already modified in work item check box described above was not selected in TIBCOBusiness Studio - BPM Edition, you have the following options:
33
TIBCO® BPM Enterprise Client User's Guide
● Override. Click this if you want to finish updating the work item. In this case, the changes that you havemade to the form remain and the changes that have been made by TIBCO BPM Enterprise are lost.
● Reload. Click this if you want to reload the form with the new changes displayed. In this case, anychanges that you have made to the form are lost. You can then decide whether to re-enter the data orsubmit it as it is, depending on your requirements.
● Cancel. Click this if you want to cancel the changes you have made to the work item form. In this case,all the data you have entered is lost but the changes made by TIBCO BPM Enterprise are retained.
If the Overwrite data already modified in work item check box was selected in TIBCO Business Studio -BPM Edition, the Override option is not available.
Saving Work ItemsSaving a work item causes any information you have entered to be saved, then the work item is closed (andunlocked) and placed back in the work item list with a state of Pended. The work item is then available tobe opened and completed at a later time.
To save and close a work item, select Save from the form.
Submitting Work ItemsSubmitting a work item means that you have finished with it. If there are any fields designated as“required”, they must be filled in before you can submit the work item.
Submitting the work item causes any information you’ve entered to be saved, then the work item is closed(and unlocked) and removed from the work item list. The process instance advances to the next task in theprocess, possibly resulting in another work item appearing in someone’s work item list.
To submit a work item, select Submit.
Pending Work ItemsWork items can be pended, which causes them to be hidden in the work item list until a specified date/time,or period of time has expired. The work item becomes visible again when the date/time occurs, or period oftime expires. Work items can be pended only if they have a state of Allocated.
Procedure
1. Choose the work items to be pended in one of the following ways:
● Select one or more work items, then click in the header bar.
● Select a single work item, then select > Pend.
34
TIBCO® BPM Enterprise Client User's Guide
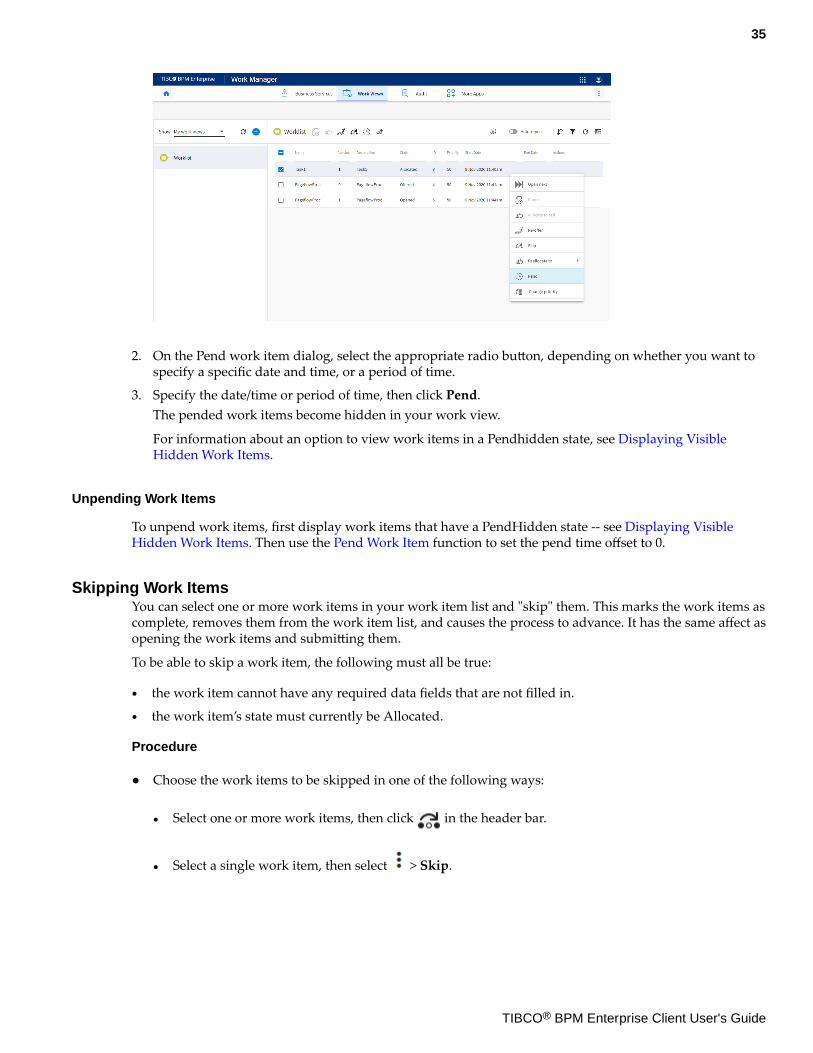
2. On the Pend work item dialog, select the appropriate radio button, depending on whether you want tospecify a specific date and time, or a period of time.
3. Specify the date/time or period of time, then click Pend.The pended work items become hidden in your work view.
For information about an option to view work items in a Pendhidden state, see Displaying VisibleHidden Work Items.
Unpending Work Items
To unpend work items, first display work items that have a PendHidden state -- see Displaying VisibleHidden Work Items. Then use the Pend Work Item function to set the pend time offset to 0.
Skipping Work ItemsYou can select one or more work items in your work item list and "skip" them. This marks the work items ascomplete, removes them from the work item list, and causes the process to advance. It has the same affect asopening the work items and submitting them.
To be able to skip a work item, the following must all be true:
● the work item cannot have any required data fields that are not filled in.
● the work item’s state must currently be Allocated.
Procedure
● Choose the work items to be skipped in one of the following ways:
● Select one or more work items, then click in the header bar.
● Select a single work item, then select > Skip.
35
TIBCO® BPM Enterprise Client User's Guide
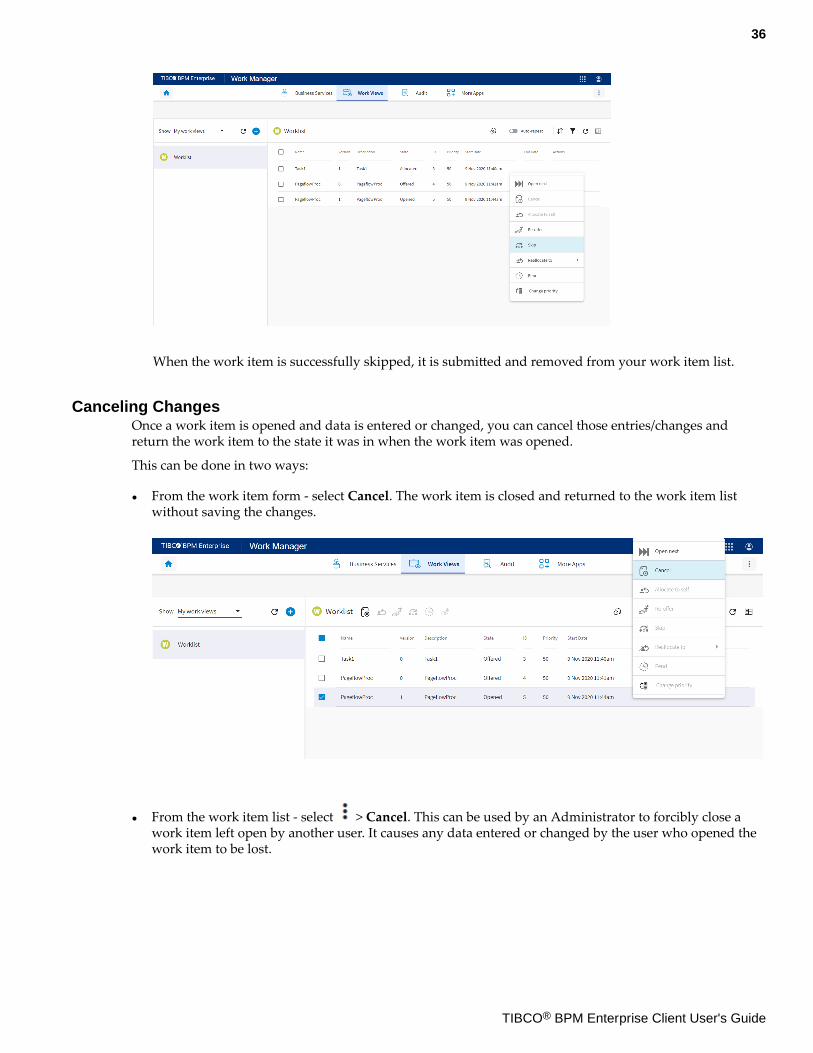
When the work item is successfully skipped, it is submitted and removed from your work item list.
Canceling ChangesOnce a work item is opened and data is entered or changed, you can cancel those entries/changes andreturn the work item to the state it was in when the work item was opened.
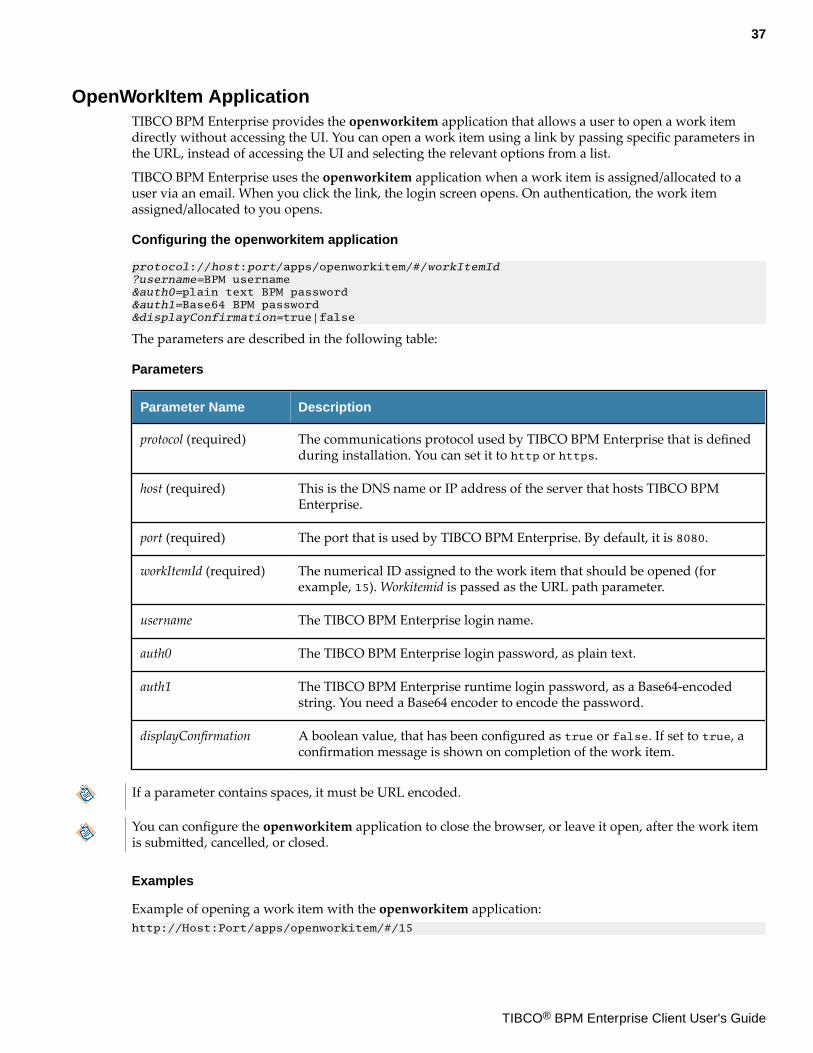
This can be done in two ways:
● From the work item form - select Cancel. The work item is closed and returned to the work item listwithout saving the changes.
● From the work item list - select > Cancel. This can be used by an Administrator to forcibly close awork item left open by another user. It causes any data entered or changed by the user who opened thework item to be lost.
36
TIBCO® BPM Enterprise Client User's Guide
OpenWorkItem ApplicationTIBCO BPM Enterprise provides the openworkitem application that allows a user to open a work itemdirectly without accessing the UI. You can open a work item using a link by passing specific parameters inthe URL, instead of accessing the UI and selecting the relevant options from a list.
TIBCO BPM Enterprise uses the openworkitem application when a work item is assigned/allocated to auser via an email. When you click the link, the login screen opens. On authentication, the work itemassigned/allocated to you opens.
Configuring the openworkitem application
protocol://host:port/apps/openworkitem/#/workItemId?username=BPM username&auth0=plain text BPM password&auth1=Base64 BPM password&displayConfirmation=true|false
The parameters are described in the following table:
Parameters
Parameter Name Description
protocol (required) The communications protocol used by TIBCO BPM Enterprise that is definedduring installation. You can set it to http or https.
host (required) This is the DNS name or IP address of the server that hosts TIBCO BPMEnterprise.
port (required) The port that is used by TIBCO BPM Enterprise. By default, it is 8080.
workItemId (required) The numerical ID assigned to the work item that should be opened (forexample, 15). Workitemid is passed as the URL path parameter.
username The TIBCO BPM Enterprise login name.
auth0 The TIBCO BPM Enterprise login password, as plain text.
auth1 The TIBCO BPM Enterprise runtime login password, as a Base64-encodedstring. You need a Base64 encoder to encode the password.
displayConfirmation A boolean value, that has been configured as true or false. If set to true, aconfirmation message is shown on completion of the work item.
If a parameter contains spaces, it must be URL encoded.
You can configure the openworkitem application to close the browser, or leave it open, after the work itemis submitted, cancelled, or closed.
Examples
Example of opening a work item with the openworkitem application:http://Host:Port/apps/openworkitem/#/15
37
TIBCO® BPM Enterprise Client User's Guide
Example of opening a work item with the openworkitem application with login credentials and displayconfirmation defined:http://Host:Port/apps/openworkitem/#/15?username=tibco-admin&auth0=secret&displayConfirmation=true
Events
The openworkitems application will generate load, cancel, close and submit events usingwindow.postMessage. The properties of event message are explained in the following table:
Event Event message Event description
Load
eventName: FORM_LOAD
data: workitem data
formUrl: URL for the form
This event is triggered when workitem form is loaded.
Cancel
eventName: FORM_CANCEL
data: workitem data
This event is triggered when formis cancelled by clicking on thecancel button on the form.
Close
eventName: FORM_CLOSE
data: workitem data
This event is triggered when formis closed by clicking on the closebutton on the form.
Submit
eventName: FORM_SUBMIT
completed: true|false. The value is set to true if the workitem is completed.
data: workitem data
This event is triggered when formis submitted by clicking on thesubmit button on the form.
StartBizAppThe StartBizApp is available as part of TIBCO BPM Enterprise. It enables you to start business services byproviding the appropriate URL. It can render TIBCO Forms and also supports the complete functionality ofstatic and dynamic sub-processes. It hides all the complexity of the multitude of calls to the server.
StartBizApp is accessed via a URL (for clarity, the URL is shown with each parameter on a separate line):
protocol://host:port/StartBiz/StartBiz.html?module=module name&process=process name&version=version number&payLoad=payload&username=BPM username&auth0=plain text BPM password&auth1=Base64 encoded BPM password
The URL parameters are explained in the following table:
38
TIBCO® BPM Enterprise Client User's Guide
Parameter Name Description
protocol (required) The communications protocol that is used byStartBizApp: either http or https. This wasdetermined at installation.
host (required) The DNS name or IP address of the server thathosts the BPM runtime.
port (required) The port that is used by StartBizApp. The defaultis 8080.
module (required) The module defines the module name of thebusiness service that needs to be started. Themodule can be found in the tooltip of Businessservices list in business service view of WorkManager application The value must be URI-encoded.
process (required) The name of the business service process.
version (required) The version number of the business service, in theformat of major.minor.micro .[qualifier]. If you do notspecify a qualifier, then the latest deployed versionof the application is used. You can also pass themajor version of the business service. So, if theversion of the business service is 1.0.0, you canpass the major version 1 to pick the latest with thein-range of that major version.
payload The JSON payload that is passed to the businessservice.
username The BPM runtime login name.
auth0 The BPM runtime login password, as plain text.
auth1 The BPM runtime login password, as a Base64-encoded string. You need a Base64 encoder toencode the password.
If a parameter contains spaces, it must be URL-encoded.
Examples
Example URL for starting a business service:http://<server>:<port>/apps/startBiz/#/?module=%2FStartBizTest%2FProcess%20Packages%2FStartBizTest.xpdl&process=StartBizTestProcessStartEvent&version=1.0.0.20201102172014627
Example URL that includes payload as a business service:http://<server>:<port>/apps/startBiz/#/?module=%2FWRM-11617%2FProcess%20Packages%2FWRM-11617.xpdl&process=WRM11617ProcessCatchMessageEvent&version=1.0.0.20201103112343808&payLoad={"body":{"inouts":[{"name":"numLoops","simple":["7"]}]}}
Events
39
TIBCO® BPM Enterprise Client User's Guide
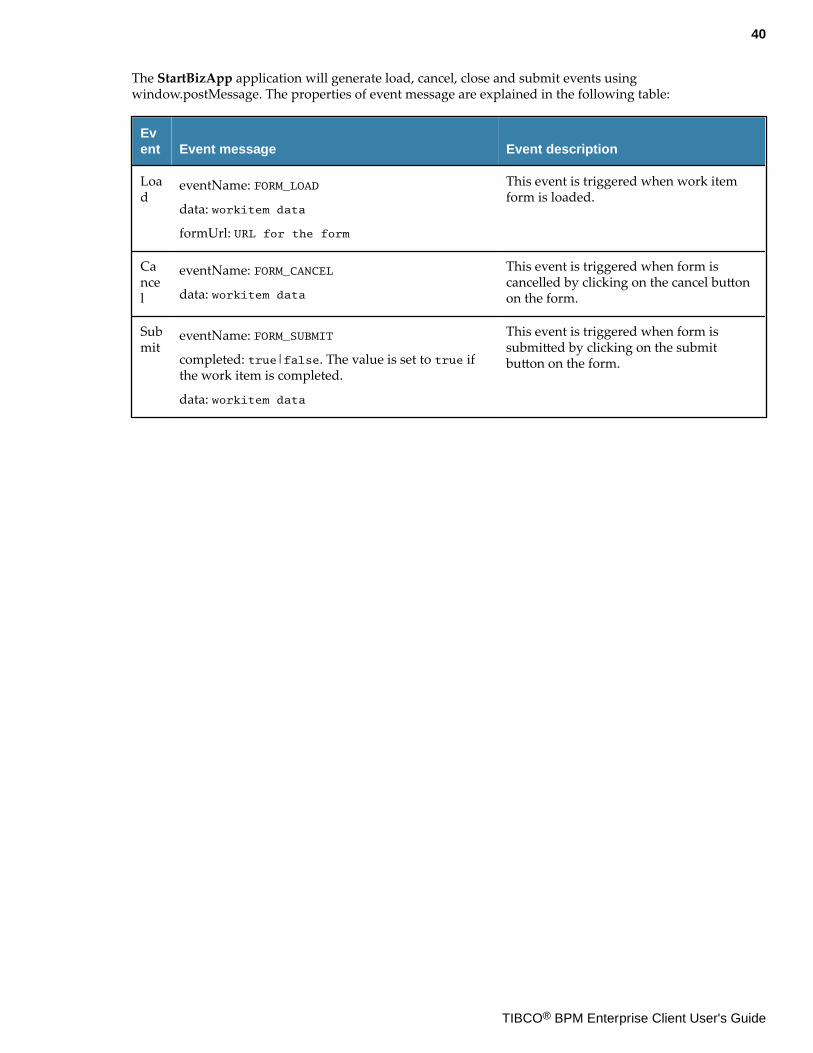
The StartBizApp application will generate load, cancel, close and submit events usingwindow.postMessage. The properties of event message are explained in the following table:
Event Event message Event description
Load
eventName: FORM_LOAD
data: workitem data
formUrl: URL for the form
This event is triggered when work itemform is loaded.
Cancel
eventName: FORM_CANCEL
data: workitem data
This event is triggered when form iscancelled by clicking on the cancel buttonon the form.
Submit
eventName: FORM_SUBMIT
completed: true|false. The value is set to true ifthe work item is completed.
data: workitem data
This event is triggered when form issubmitted by clicking on the submitbutton on the form.
40
TIBCO® BPM Enterprise Client User's Guide
Case Manager
You can use Case Manager to manage and manipulate your case data. Case data is business data that iscentrally managed by TIBCO BPM Enterprise and can therefore be accessed and updated by multipleTIBCO BPM Enterprise process applications.
Business data is structured data that contains information about real-world entities or business conceptsthat an organization needs to manipulate, for example: Customer, Order, Orderline, Claim or Policy.
Case data:
● has a case state (for example if it's an 'Order' case then the state might be one of 'Placed, Picker, Packed,Dispatched,Delivered)
● has data with case properties
● can have case-relevant documents associated with it
● can be referenced by a set of processes and/or work items that are responsible for making state changesto it.
● has its own audit history, independent of any processes or work items that operate on it.
Any TIBCO BPM Enterprise application can interact with a case data model to create, use data and haveassociated cases, which are also known as linked cases. An TIBCO BPM Enterprise application, in thiscontext, is a TIBCO BPM Enterprise process, defined in TIBCO Business Studio - BPM Edition and deployedto the TIBCO BPM Enterprise runtime.
Using Case Manager, you can manage and manipulate case data in the following ways:
● display and update case objects in forms or pageflows.
● view and manage any documents associated with the case data.
● use case data to find in-progress work items and/or process instances that are associated with aparticular case.
● locate a particular case and perform case state-specific actions on it.
● update case objects on an ad-hoc basis, independent of any enterprise process update - for example, acustomer reporting a change of address.
To access Case Manager, refer to the section, Accessing Case Manager below.
You must log in as a user who has privileges with the correct system actions assigned to the user account.
Accessing Case ManagerAccess the Case Manager as follows:
Procedure
1. Enter the following URL in your browser:protocol://host:port/apps/login
where:
● protocol is the communications protocol being used, either http or https. This was specified atinstallation.
● host is the DNS name or IP address of the server hosting the TIBCO BPM Enterprise runtime.
● port is the port being used. The default value is 80.
41
TIBCO® BPM Enterprise Client User's Guide
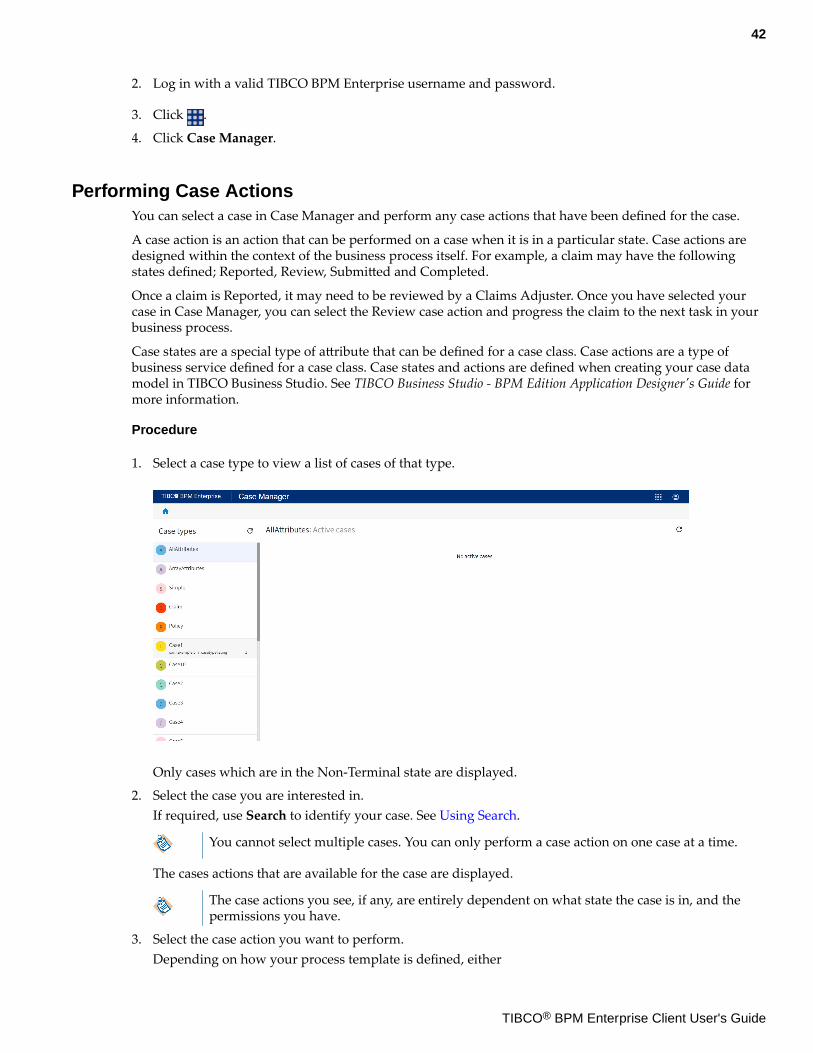
2. Log in with a valid TIBCO BPM Enterprise username and password.
3. Click .
4. Click Case Manager.
Performing Case ActionsYou can select a case in Case Manager and perform any case actions that have been defined for the case.
A case action is an action that can be performed on a case when it is in a particular state. Case actions aredesigned within the context of the business process itself. For example, a claim may have the followingstates defined; Reported, Review, Submitted and Completed.
Once a claim is Reported, it may need to be reviewed by a Claims Adjuster. Once you have selected yourcase in Case Manager, you can select the Review case action and progress the claim to the next task in yourbusiness process.
Case states are a special type of attribute that can be defined for a case class. Case actions are a type ofbusiness service defined for a case class. Case states and actions are defined when creating your case datamodel in TIBCO Business Studio. See TIBCO Business Studio - BPM Edition Application Designer's Guide formore information.
Procedure
1. Select a case type to view a list of cases of that type.
Only cases which are in the Non-Terminal state are displayed.
2. Select the case you are interested in.If required, use Search to identify your case. See Using Search.
You cannot select multiple cases. You can only perform a case action on one case at a time.
The cases actions that are available for the case are displayed.
The case actions you see, if any, are entirely dependent on what state the case is in, and thepermissions you have.
3. Select the case action you want to perform.Depending on how your process template is defined, either
42
TIBCO® BPM Enterprise Client User's Guide
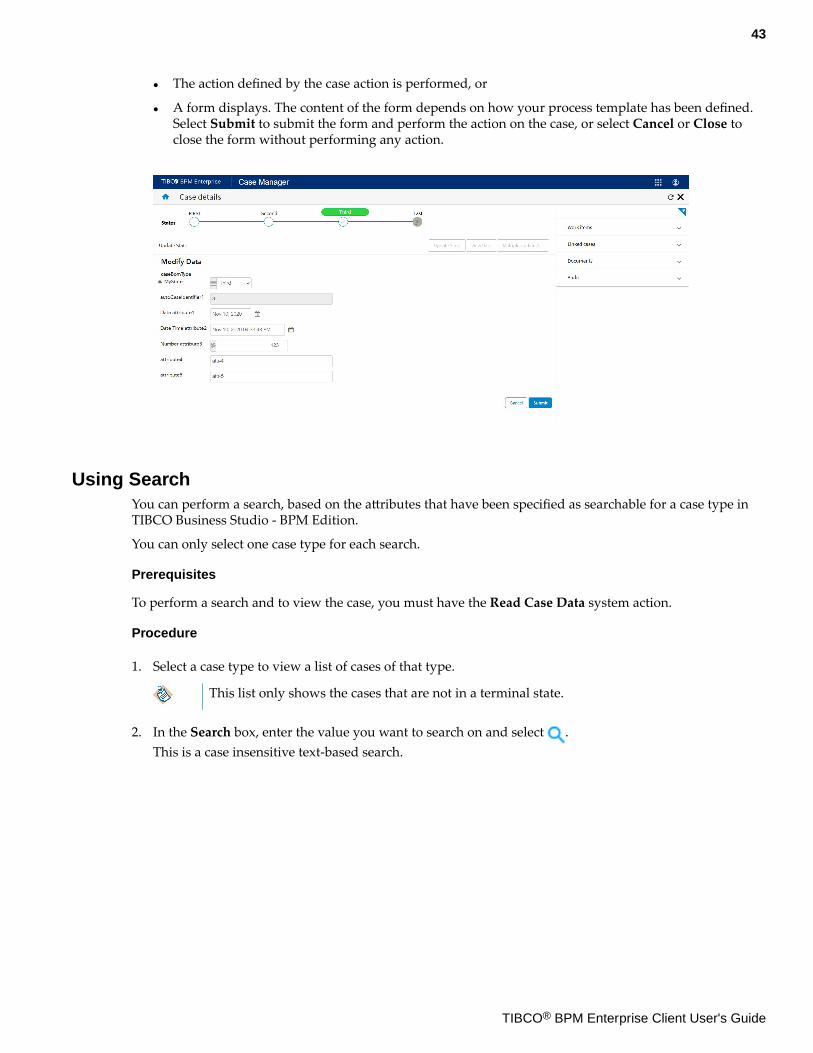
● The action defined by the case action is performed, or
● A form displays. The content of the form depends on how your process template has been defined.Select Submit to submit the form and perform the action on the case, or select Cancel or Close toclose the form without performing any action.
Using SearchYou can perform a search, based on the attributes that have been specified as searchable for a case type inTIBCO Business Studio - BPM Edition.
You can only select one case type for each search.
Prerequisites
To perform a search and to view the case, you must have the Read Case Data system action.
Procedure
1. Select a case type to view a list of cases of that type.
This list only shows the cases that are not in a terminal state.
2. In the Search box, enter the value you want to search on and select .This is a case insensitive text-based search.
43
TIBCO® BPM Enterprise Client User's Guide
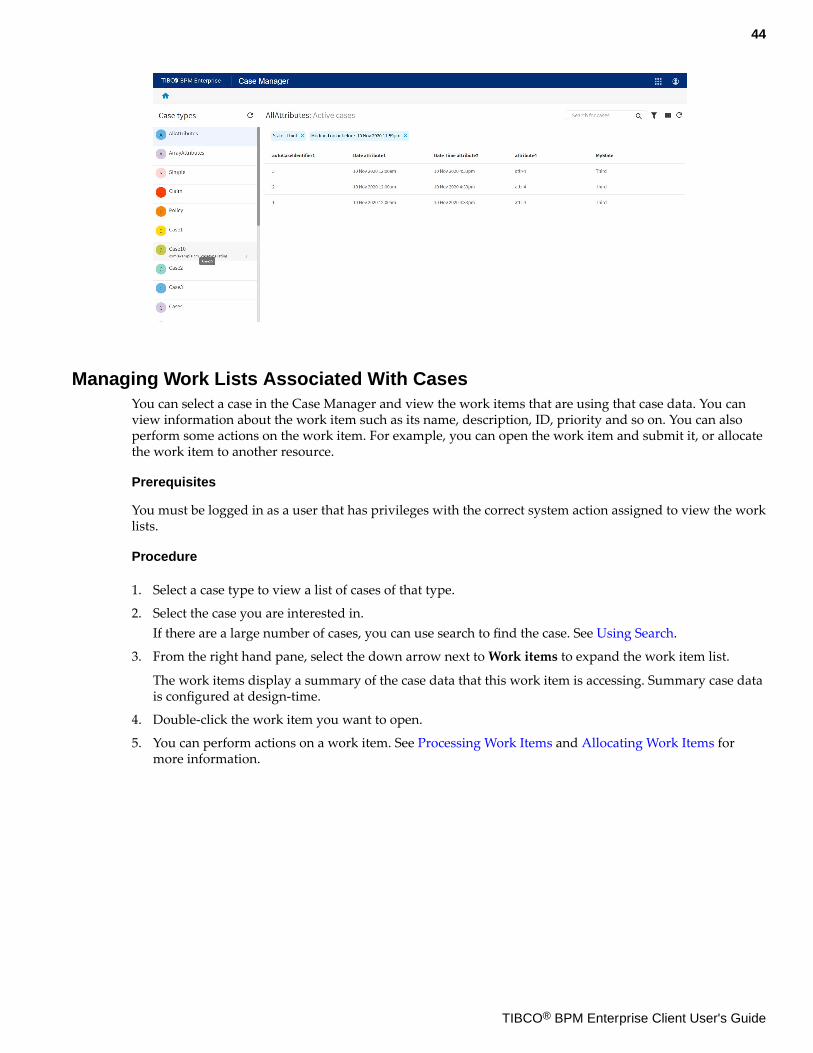
Managing Work Lists Associated With CasesYou can select a case in the Case Manager and view the work items that are using that case data. You canview information about the work item such as its name, description, ID, priority and so on. You can alsoperform some actions on the work item. For example, you can open the work item and submit it, or allocatethe work item to another resource.
Prerequisites
You must be logged in as a user that has privileges with the correct system action assigned to view the worklists.
Procedure
1. Select a case type to view a list of cases of that type.
2. Select the case you are interested in.If there are a large number of cases, you can use search to find the case. See Using Search.
3. From the right hand pane, select the down arrow next to Work items to expand the work item list.
The work items display a summary of the case data that this work item is accessing. Summary case datais configured at design-time.
4. Double-click the work item you want to open.
5. You can perform actions on a work item. See Processing Work Items and Allocating Work Items formore information.
44
TIBCO® BPM Enterprise Client User's Guide
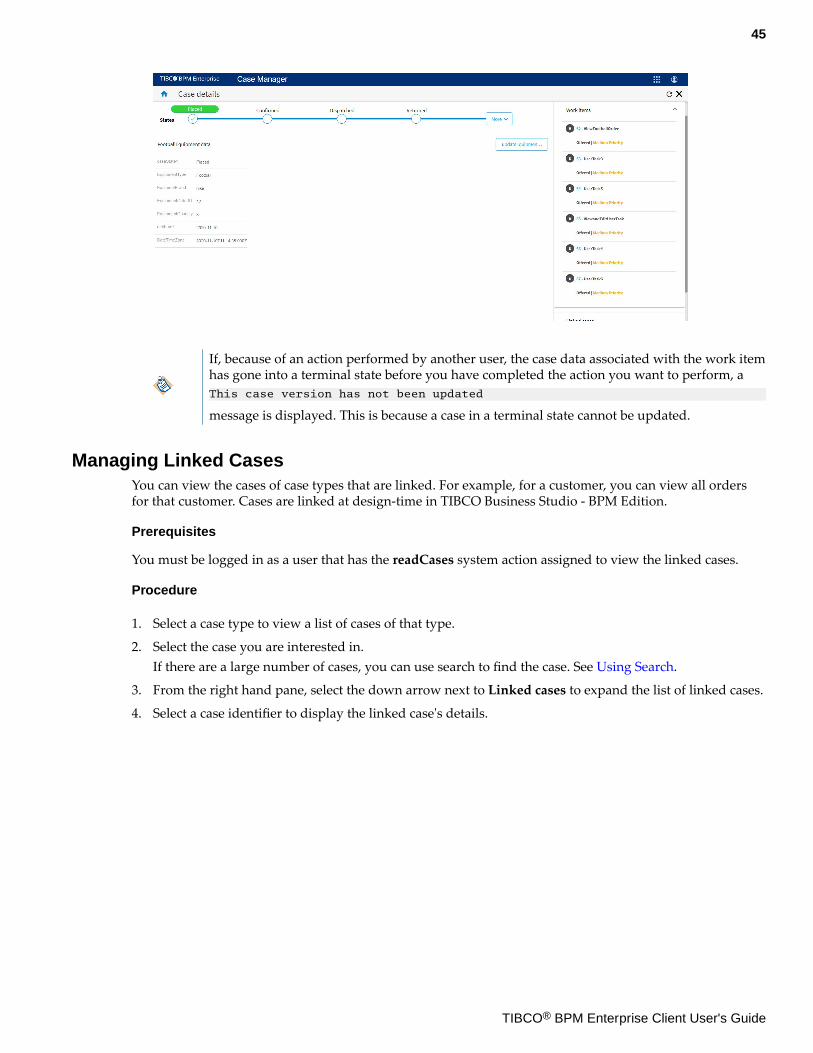
If, because of an action performed by another user, the case data associated with the work itemhas gone into a terminal state before you have completed the action you want to perform, aThis case version has not been updated
message is displayed. This is because a case in a terminal state cannot be updated.
Managing Linked CasesYou can view the cases of case types that are linked. For example, for a customer, you can view all ordersfor that customer. Cases are linked at design-time in TIBCO Business Studio - BPM Edition.
Prerequisites
You must be logged in as a user that has the readCases system action assigned to view the linked cases.
Procedure
1. Select a case type to view a list of cases of that type.
2. Select the case you are interested in.If there are a large number of cases, you can use search to find the case. See Using Search.
3. From the right hand pane, select the down arrow next to Linked cases to expand the list of linked cases.
4. Select a case identifier to display the linked case's details.
45
TIBCO® BPM Enterprise Client User's Guide
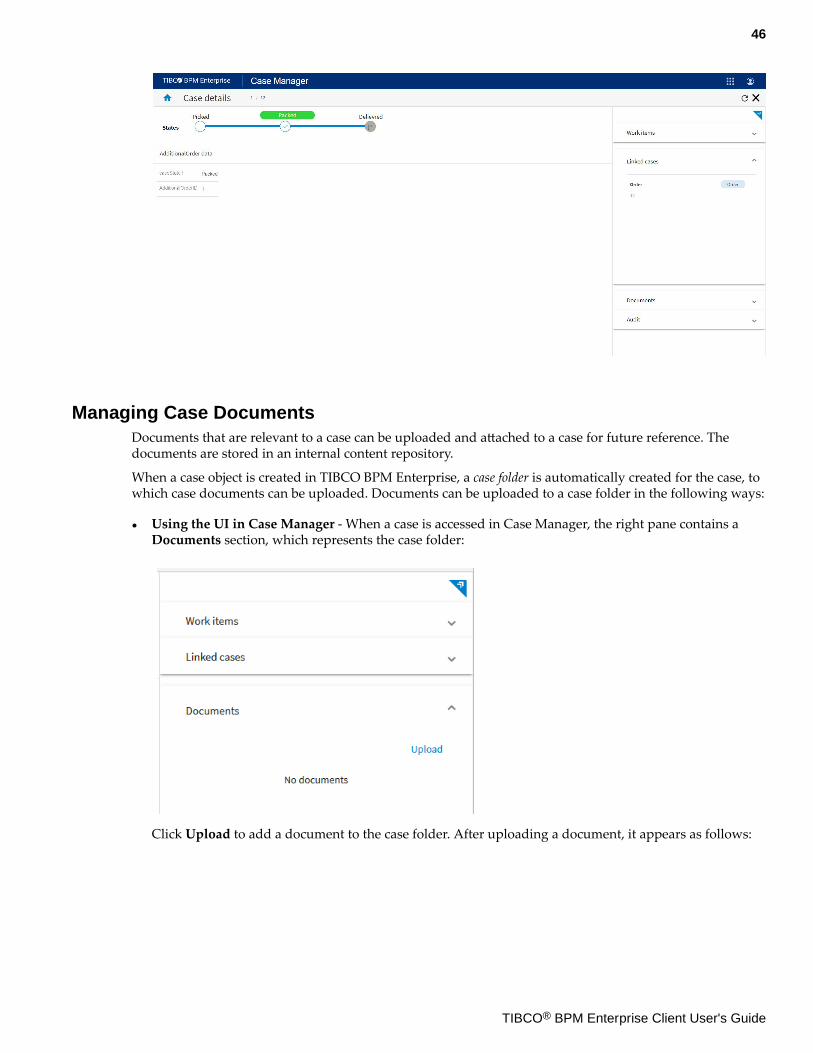
Managing Case DocumentsDocuments that are relevant to a case can be uploaded and attached to a case for future reference. Thedocuments are stored in an internal content repository.
When a case object is created in TIBCO BPM Enterprise, a case folder is automatically created for the case, towhich case documents can be uploaded. Documents can be uploaded to a case folder in the following ways:
● Using the UI in Case Manager - When a case is accessed in Case Manager, the right pane contains aDocuments section, which represents the case folder:
Click Upload to add a document to the case folder. After uploading a document, it appears as follows:
46
TIBCO® BPM Enterprise Client User's Guide
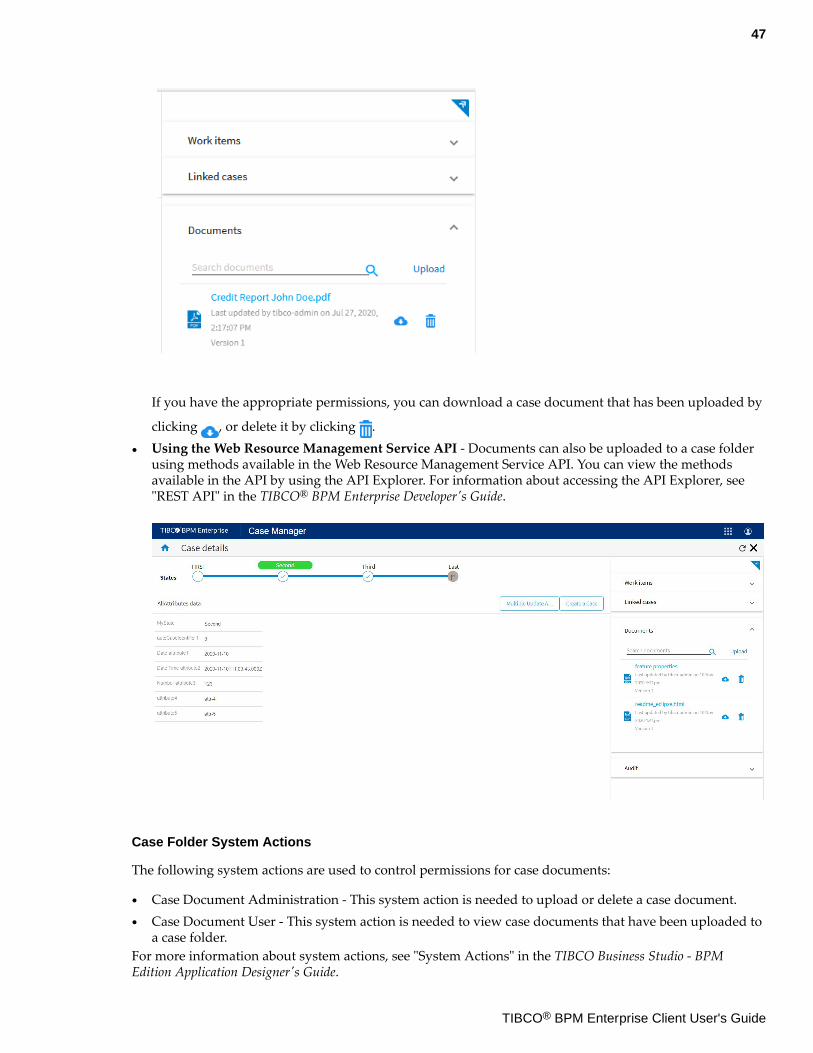
If you have the appropriate permissions, you can download a case document that has been uploaded by
clicking , or delete it by clicking .● Using the Web Resource Management Service API - Documents can also be uploaded to a case folder
using methods available in the Web Resource Management Service API. You can view the methodsavailable in the API by using the API Explorer. For information about accessing the API Explorer, see"REST API" in the TIBCO® BPM Enterprise Developer's Guide.
Case Folder System Actions
The following system actions are used to control permissions for case documents:
● Case Document Administration - This system action is needed to upload or delete a case document.● Case Document User - This system action is needed to view case documents that have been uploaded to
a case folder.For more information about system actions, see "System Actions" in the TIBCO Business Studio - BPMEdition Application Designer's Guide.
47
TIBCO® BPM Enterprise Client User's Guide
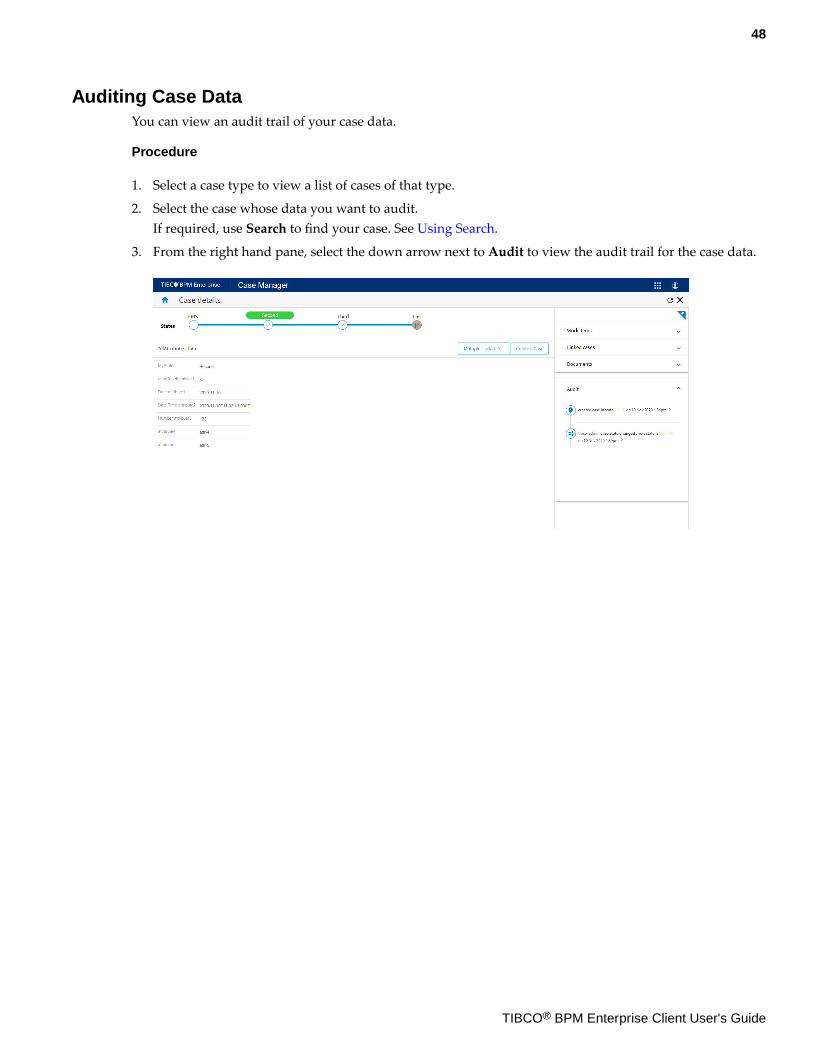
Auditing Case DataYou can view an audit trail of your case data.
Procedure
1. Select a case type to view a list of cases of that type.
2. Select the case whose data you want to audit.If required, use Search to find your case. See Using Search.
3. From the right hand pane, select the down arrow next to Audit to view the audit trail for the case data.
48
TIBCO® BPM Enterprise Client User's Guide
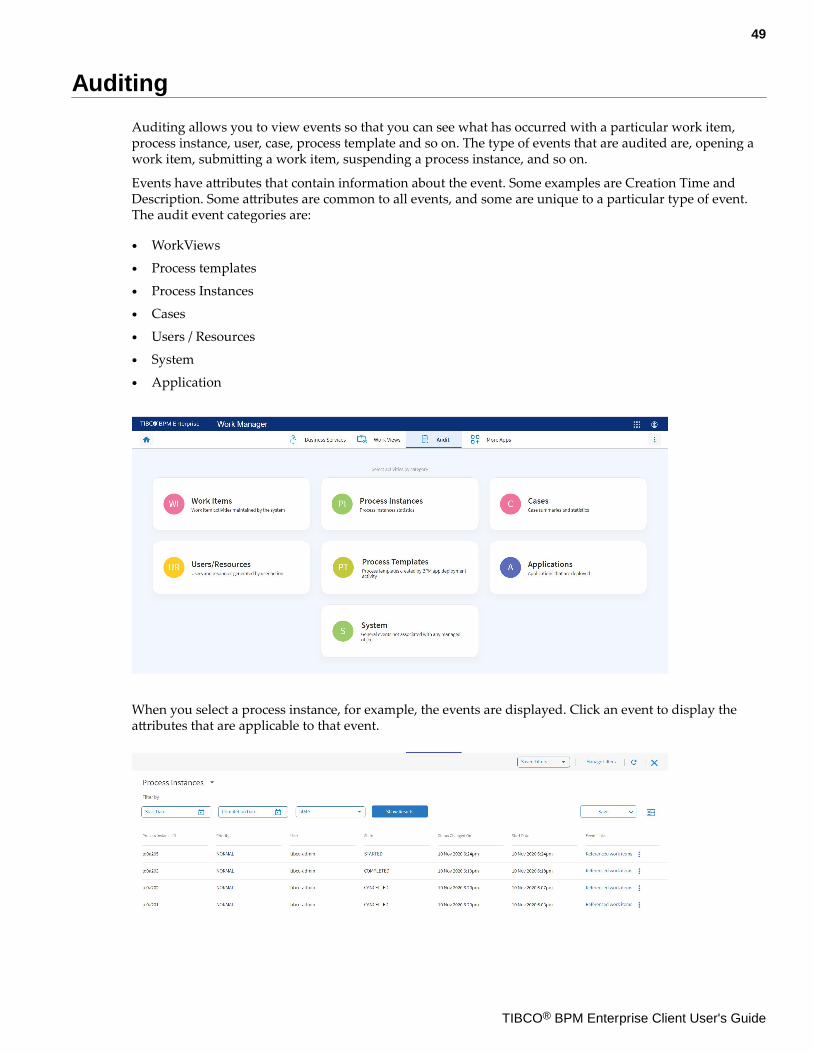
Auditing
Auditing allows you to view events so that you can see what has occurred with a particular work item,process instance, user, case, process template and so on. The type of events that are audited are, opening awork item, submitting a work item, suspending a process instance, and so on.
Events have attributes that contain information about the event. Some examples are Creation Time andDescription. Some attributes are common to all events, and some are unique to a particular type of event.The audit event categories are:
● WorkViews● Process templates● Process Instances● Cases● Users / Resources● System● Application
When you select a process instance, for example, the events are displayed. Click an event to display theattributes that are applicable to that event.
49
TIBCO® BPM Enterprise Client User's Guide
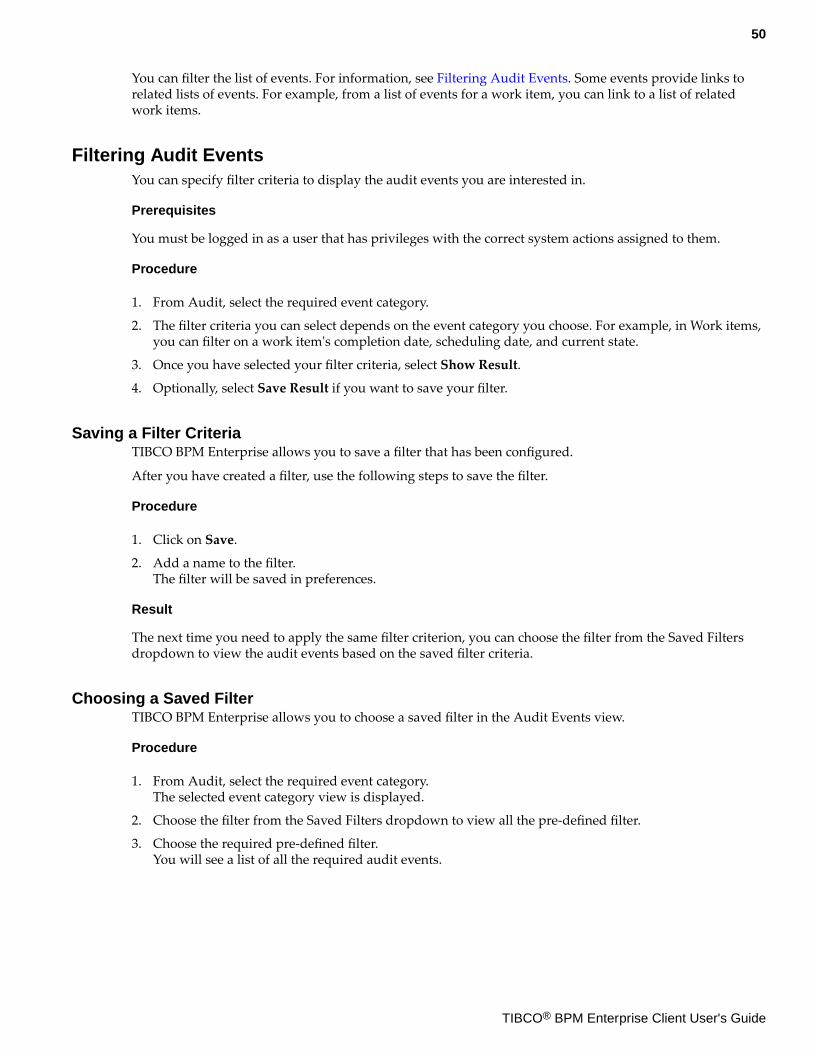
You can filter the list of events. For information, see Filtering Audit Events. Some events provide links torelated lists of events. For example, from a list of events for a work item, you can link to a list of relatedwork items.
Filtering Audit EventsYou can specify filter criteria to display the audit events you are interested in.
Prerequisites
You must be logged in as a user that has privileges with the correct system actions assigned to them.
Procedure
1. From Audit, select the required event category.
2. The filter criteria you can select depends on the event category you choose. For example, in Work items,you can filter on a work item's completion date, scheduling date, and current state.
3. Once you have selected your filter criteria, select Show Result.
4. Optionally, select Save Result if you want to save your filter.
Saving a Filter CriteriaTIBCO BPM Enterprise allows you to save a filter that has been configured.
After you have created a filter, use the following steps to save the filter.
Procedure
1. Click on Save.
2. Add a name to the filter.The filter will be saved in preferences.
Result
The next time you need to apply the same filter criterion, you can choose the filter from the Saved Filtersdropdown to view the audit events based on the saved filter criteria.
Choosing a Saved FilterTIBCO BPM Enterprise allows you to choose a saved filter in the Audit Events view.
Procedure
1. From Audit, select the required event category.The selected event category view is displayed.
2. Choose the filter from the Saved Filters dropdown to view all the pre-defined filter.
3. Choose the required pre-defined filter.You will see a list of all the required audit events.
50
TIBCO® BPM Enterprise Client User's Guide
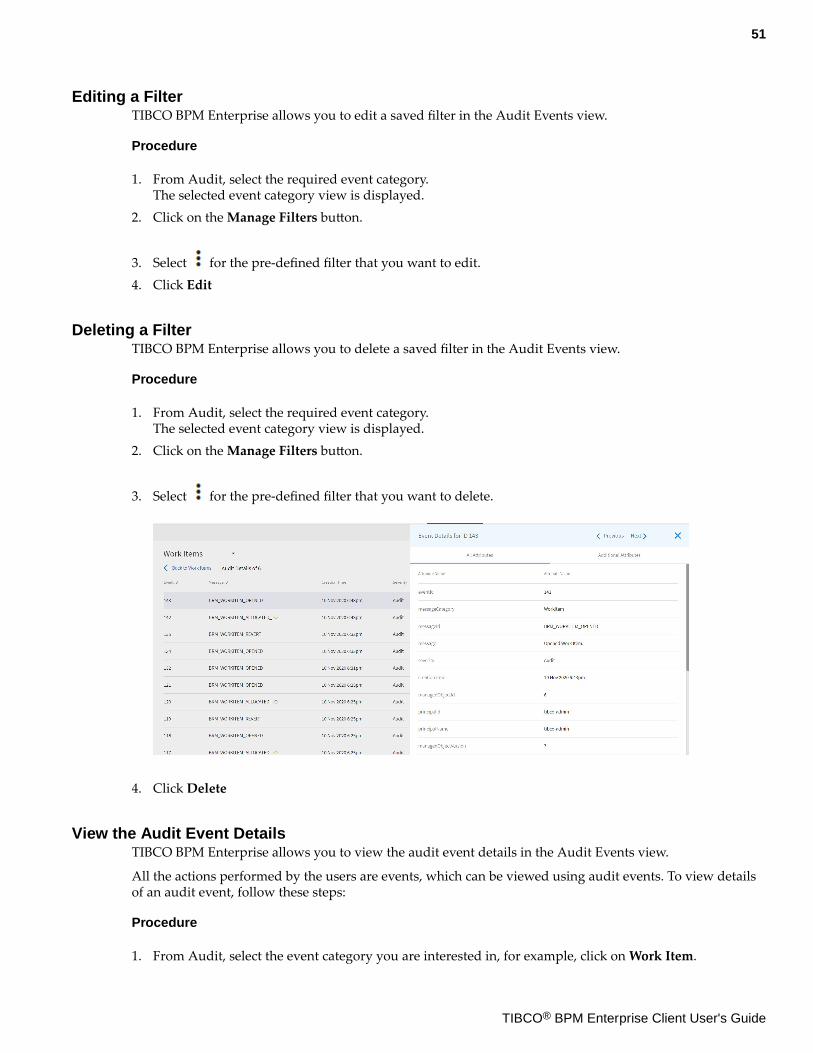
Editing a FilterTIBCO BPM Enterprise allows you to edit a saved filter in the Audit Events view.
Procedure
1. From Audit, select the required event category.The selected event category view is displayed.
2. Click on the Manage Filters button.
3. Select for the pre-defined filter that you want to edit.4. Click Edit
Deleting a FilterTIBCO BPM Enterprise allows you to delete a saved filter in the Audit Events view.
Procedure
1. From Audit, select the required event category.The selected event category view is displayed.
2. Click on the Manage Filters button.
3. Select for the pre-defined filter that you want to delete.
4. Click Delete
View the Audit Event DetailsTIBCO BPM Enterprise allows you to view the audit event details in the Audit Events view.
All the actions performed by the users are events, which can be viewed using audit events. To view detailsof an audit event, follow these steps:
Procedure
1. From Audit, select the event category you are interested in, for example, click on Work Item.
51
TIBCO® BPM Enterprise Client User's Guide
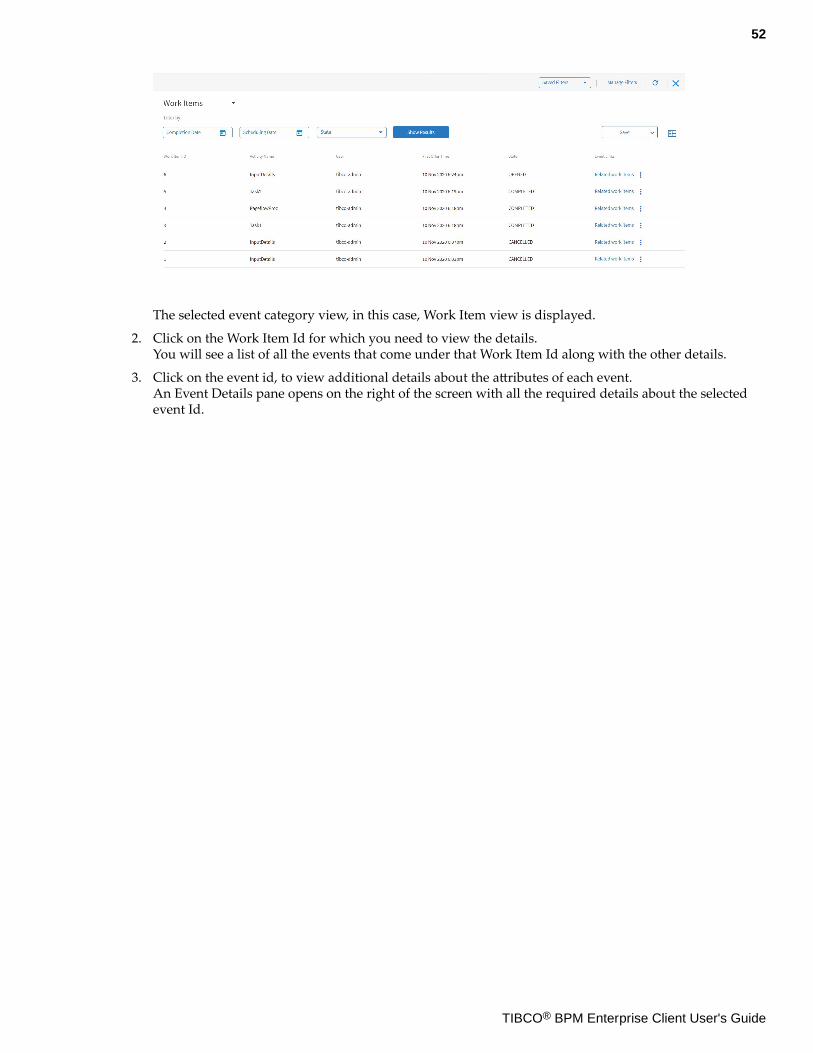
The selected event category view, in this case, Work Item view is displayed.
2. Click on the Work Item Id for which you need to view the details.You will see a list of all the events that come under that Work Item Id along with the other details.
3. Click on the event id, to view additional details about the attributes of each event.An Event Details pane opens on the right of the screen with all the required details about the selectedevent Id.
52
TIBCO® BPM Enterprise Client User's Guide
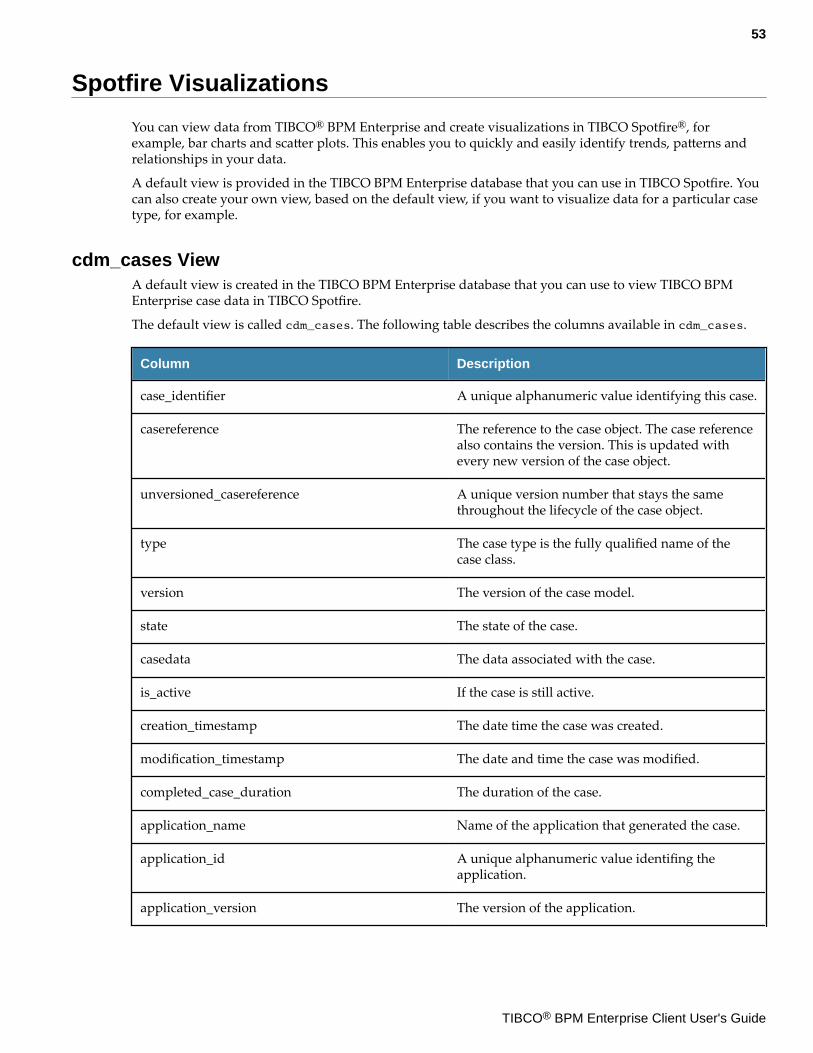
Spotfire Visualizations
You can view data from TIBCO® BPM Enterprise and create visualizations in TIBCO Spotfire®, forexample, bar charts and scatter plots. This enables you to quickly and easily identify trends, patterns andrelationships in your data.
A default view is provided in the TIBCO BPM Enterprise database that you can use in TIBCO Spotfire. Youcan also create your own view, based on the default view, if you want to visualize data for a particular casetype, for example.
cdm_cases ViewA default view is created in the TIBCO BPM Enterprise database that you can use to view TIBCO BPMEnterprise case data in TIBCO Spotfire.
The default view is called cdm_cases. The following table describes the columns available in cdm_cases.
Column Description
case_identifier A unique alphanumeric value identifying this case.
casereference The reference to the case object. The case referencealso contains the version. This is updated withevery new version of the case object.
unversioned_casereference A unique version number that stays the samethroughout the lifecycle of the case object.
type The case type is the fully qualified name of thecase class.
version The version of the case model.
state The state of the case.
casedata The data associated with the case.
is_active If the case is still active.
creation_timestamp The date time the case was created.
modification_timestamp The date and time the case was modified.
completed_case_duration The duration of the case.
application_name Name of the application that generated the case.
application_id A unique alphanumeric value identifing theapplication.
application_version The version of the application.
53
TIBCO® BPM Enterprise Client User's Guide
Using cdm_cases View in TIBCO SpotfireYou can use the cdm_cases view to create visualizations in TIBCO Spotfire.
You must have:
● installed TIBCO Spotfire Analyst
● installed TIBCO Spotfire Server
● created some user accounts on your TIBCO Spotfire Server.
From your TIBCO Spotfire client, create a data connection to the TIBCO BPM Enterprise database.
Obtain the database credentials from you system administrator for TIBCO BPM Enterprise database.
Once you have a data connection to the TIBCO BPM Enterprise database, you can begin visualizing the datain TIBCO Spotfire.
Refer to the documentation provided with TIBCO Spotfire for more information on how to do this.
54
TIBCO® BPM Enterprise Client User's Guide
Event Collector Overview
Event Collector is one of the components of TIBCO BPM Enterprise. It collects and correlates data onbusiness process events.
External services can access the data in the central event database either by using the query API supplied,or by directly querying the database tables and views.
In order to facilitate direct read access to the central event database, this guide describes the EventCollection database tables and views. As well as using this reference guide, you should study the databasetables and views themselves to see how the schema has been implemented by the manufacturers of thedifferent databases supported.
It is very important that any access to the Event Collector database tables and views must be read-only. Youmust not try to insert or modify any data in the tables or views. Any attempt to do so could haveunforeseen consequences on the behavior of TIBCO BPM Enterprise.
When modifying rules files (ec-probe and ec-event ) note the following:
● Rules must have globally unique names.
● Check that channels are defined as channel name='abcde' target='target' qualifier='abcde(the qualifier is optional).
For further information:
● On API access to the database, see TIBCO ActiveMatrix BPM Developer's Guide, in particular the chapter"Working with Events".
● On clearing event data from the database tables, see the chapter "Housekeeping Tasks" in TIBCOActiveMatrix BPM - BPM Administration.
● For archiving event data, see the chapter "Archiving Messages" in TIBCO ActiveMatrix BPM - BPMAdministration.
● On removing rows from the database tables after forcibly removing a process, see the description of theBPM database cleanup utility bpm-db-cleanup in TIBCO ActiveMatrix BPM Troubleshooting Guide.
This database schema may change from version to version of TIBCO BPM Enterprise.
Private Database TablesSome database tables in the Event Collector Schema are private. This means they are used internally by theEvent Collector and you should not try to access them.
The following database tables in the Event Collector Schema are private.
● ec_event_case_ref
● sc_processinstance_status_case_ref
● sc_workitem_status_case_ref
Message Categories and Attribute ContentsA number of attributes are available for each message category.
Standard Attributes
The attributes listed are in addition to the following standard attributes that are present for all messages:
55
TIBCO® BPM Enterprise Client User's Guide
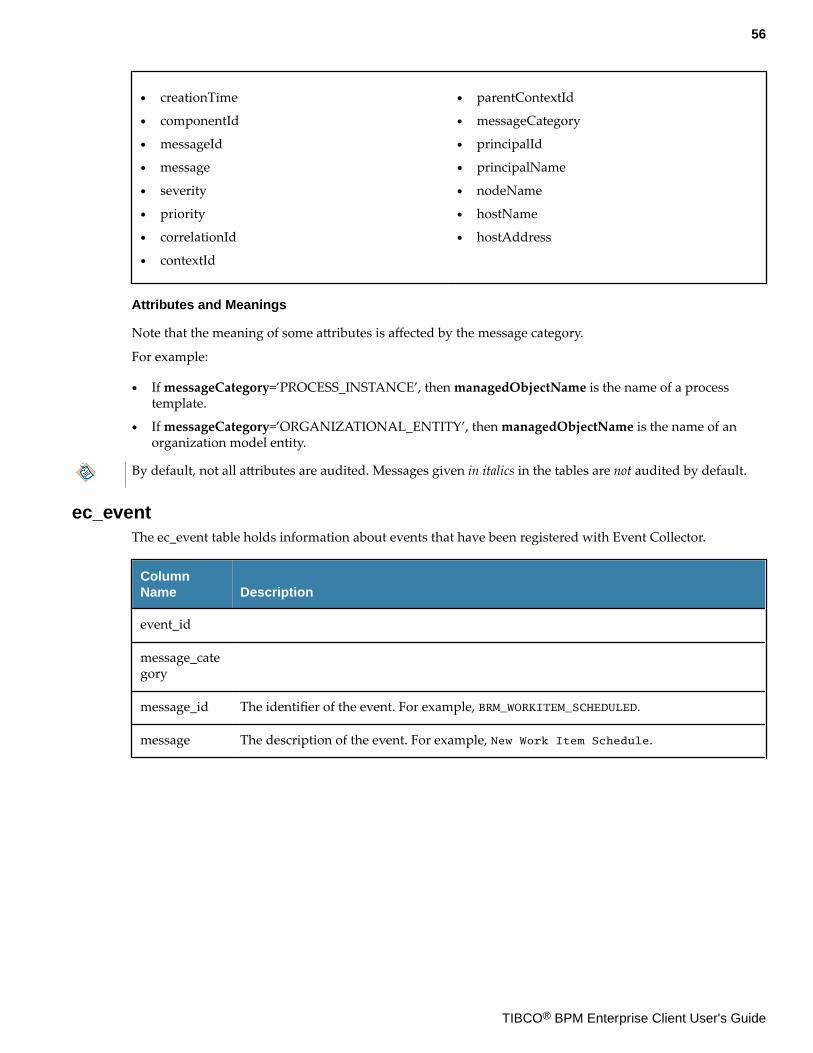
● creationTime
● componentId
● messageId
● message
● severity
● priority
● correlationId
● contextId
● parentContextId
● messageCategory
● principalId
● principalName
● nodeName
● hostName
● hostAddress
Attributes and Meanings
Note that the meaning of some attributes is affected by the message category.
For example:
● If messageCategory=’PROCESS_INSTANCE’, then managedObjectName is the name of a processtemplate.
● If messageCategory=’ORGANIZATIONAL_ENTITY’, then managedObjectName is the name of anorganization model entity.
By default, not all attributes are audited. Messages given in italics in the tables are not audited by default.
ec_eventThe ec_event table holds information about events that have been registered with Event Collector.
ColumnName Description
event_id
message_category
message_id The identifier of the event. For example, BRM_WORKITEM_SCHEDULED.
message The description of the event. For example, New Work Item Schedule.
56
TIBCO® BPM Enterprise Client User's Guide
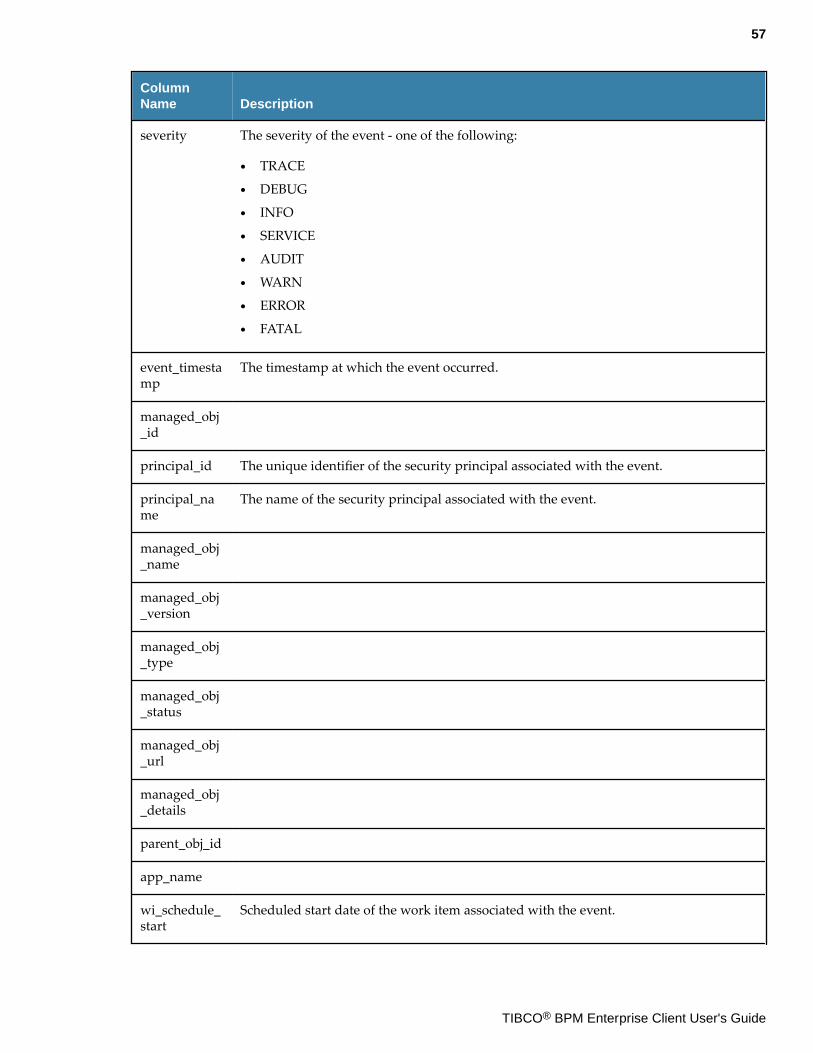
ColumnName Description
severity The severity of the event - one of the following:
● TRACE
● DEBUG
● INFO
● SERVICE
● AUDIT
● WARN
● ERROR
● FATAL
event_timestamp
The timestamp at which the event occurred.
managed_obj_id
principal_id The unique identifier of the security principal associated with the event.
principal_name
The name of the security principal associated with the event.
managed_obj_name
managed_obj_version
managed_obj_type
managed_obj_status
managed_obj_url
managed_obj_details
parent_obj_id
app_name
wi_schedule_start
Scheduled start date of the work item associated with the event.
57
TIBCO® BPM Enterprise Client User's Guide
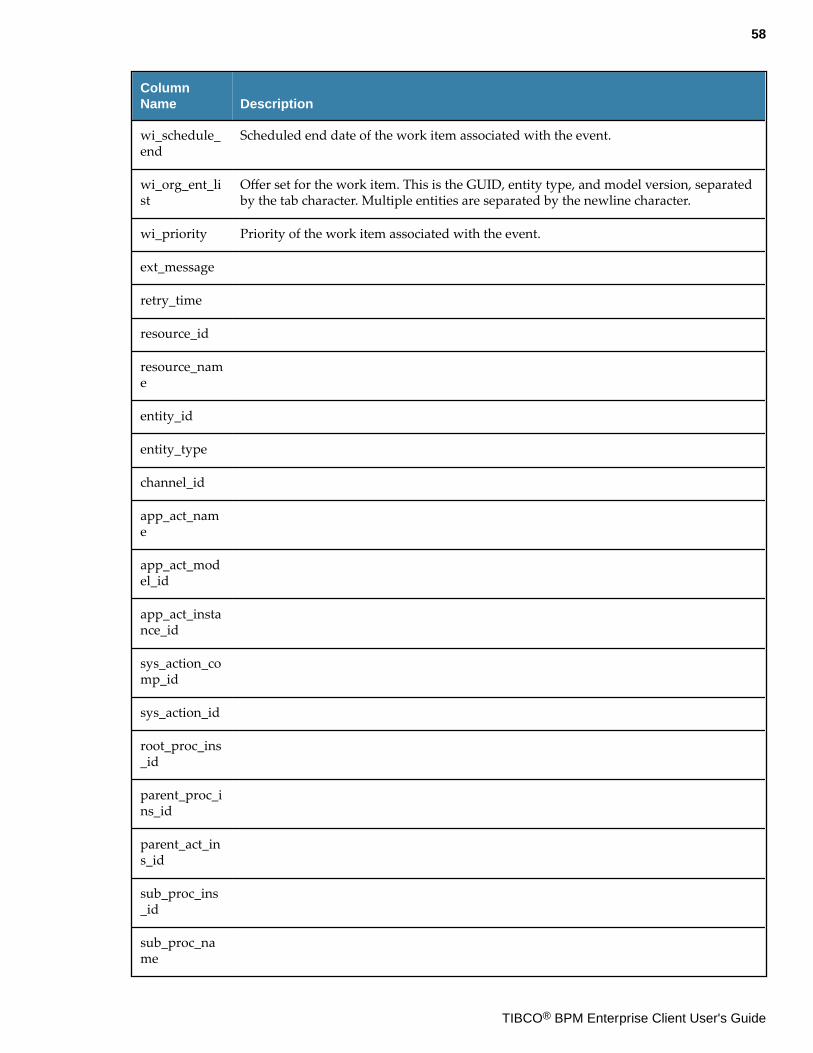
ColumnName Description
wi_schedule_end
Scheduled end date of the work item associated with the event.
wi_org_ent_list
Offer set for the work item. This is the GUID, entity type, and model version, separatedby the tab character. Multiple entities are separated by the newline character.
wi_priority Priority of the work item associated with the event.
ext_message
retry_time
resource_id
resource_name
entity_id
entity_type
channel_id
app_act_name
app_act_model_id
app_act_instance_id
sys_action_comp_id
sys_action_id
root_proc_ins_id
parent_proc_ins_id
parent_act_ins_id
sub_proc_ins_id
sub_proc_name
58
TIBCO® BPM Enterprise Client User's Guide
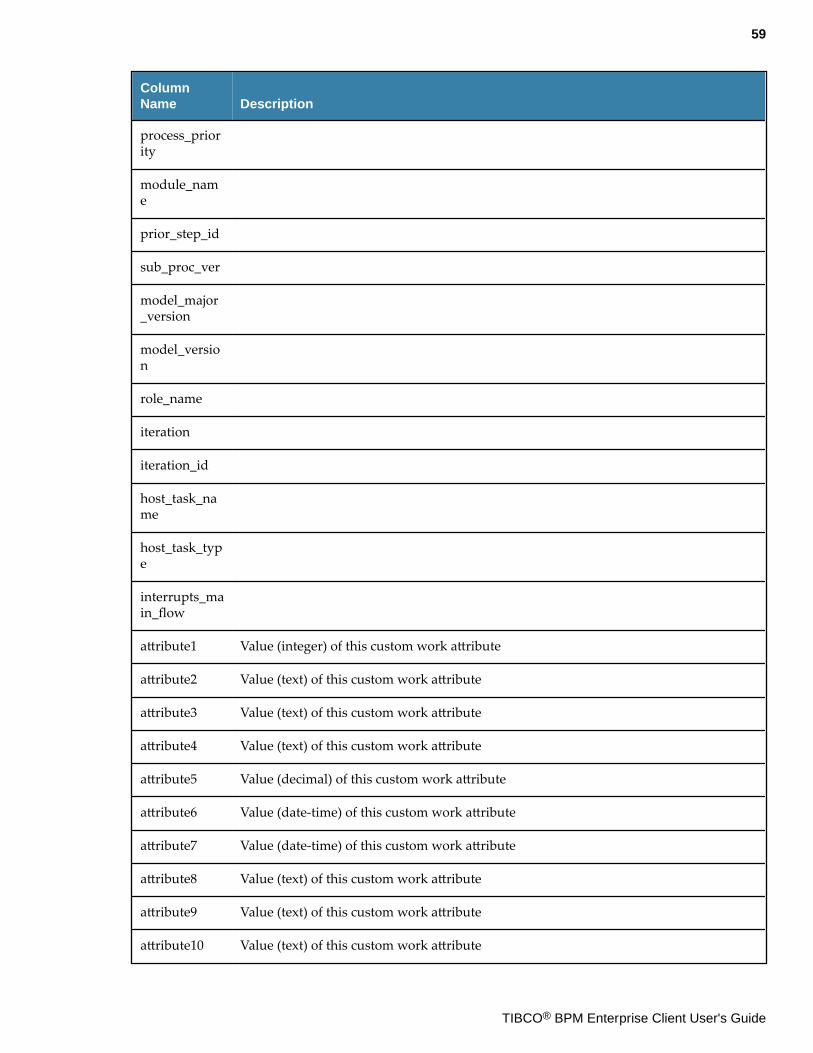
ColumnName Description
process_priority
module_name
prior_step_id
sub_proc_ver
model_major_version
model_version
role_name
iteration
iteration_id
host_task_name
host_task_type
interrupts_main_flow
attribute1 Value (integer) of this custom work attribute
attribute2 Value (text) of this custom work attribute
attribute3 Value (text) of this custom work attribute
attribute4 Value (text) of this custom work attribute
attribute5 Value (decimal) of this custom work attribute
attribute6 Value (date-time) of this custom work attribute
attribute7 Value (date-time) of this custom work attribute
attribute8 Value (text) of this custom work attribute
attribute9 Value (text) of this custom work attribute
attribute10 Value (text) of this custom work attribute
59
TIBCO® BPM Enterprise Client User's Guide
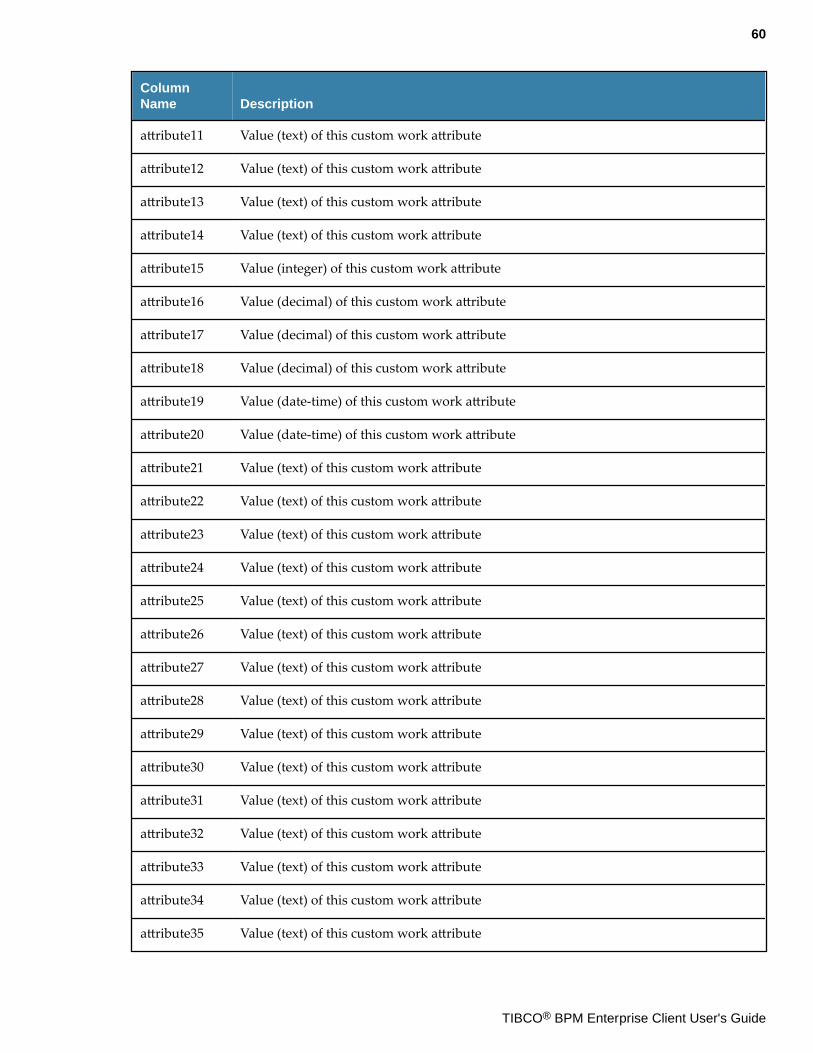
ColumnName Description
attribute11 Value (text) of this custom work attribute
attribute12 Value (text) of this custom work attribute
attribute13 Value (text) of this custom work attribute
attribute14 Value (text) of this custom work attribute
attribute15 Value (integer) of this custom work attribute
attribute16 Value (decimal) of this custom work attribute
attribute17 Value (decimal) of this custom work attribute
attribute18 Value (decimal) of this custom work attribute
attribute19 Value (date-time) of this custom work attribute
attribute20 Value (date-time) of this custom work attribute
attribute21 Value (text) of this custom work attribute
attribute22 Value (text) of this custom work attribute
attribute23 Value (text) of this custom work attribute
attribute24 Value (text) of this custom work attribute
attribute25 Value (text) of this custom work attribute
attribute26 Value (text) of this custom work attribute
attribute27 Value (text) of this custom work attribute
attribute28 Value (text) of this custom work attribute
attribute29 Value (text) of this custom work attribute
attribute30 Value (text) of this custom work attribute
attribute31 Value (text) of this custom work attribute
attribute32 Value (text) of this custom work attribute
attribute33 Value (text) of this custom work attribute
attribute34 Value (text) of this custom work attribute
attribute35 Value (text) of this custom work attribute
60
TIBCO® BPM Enterprise Client User's Guide
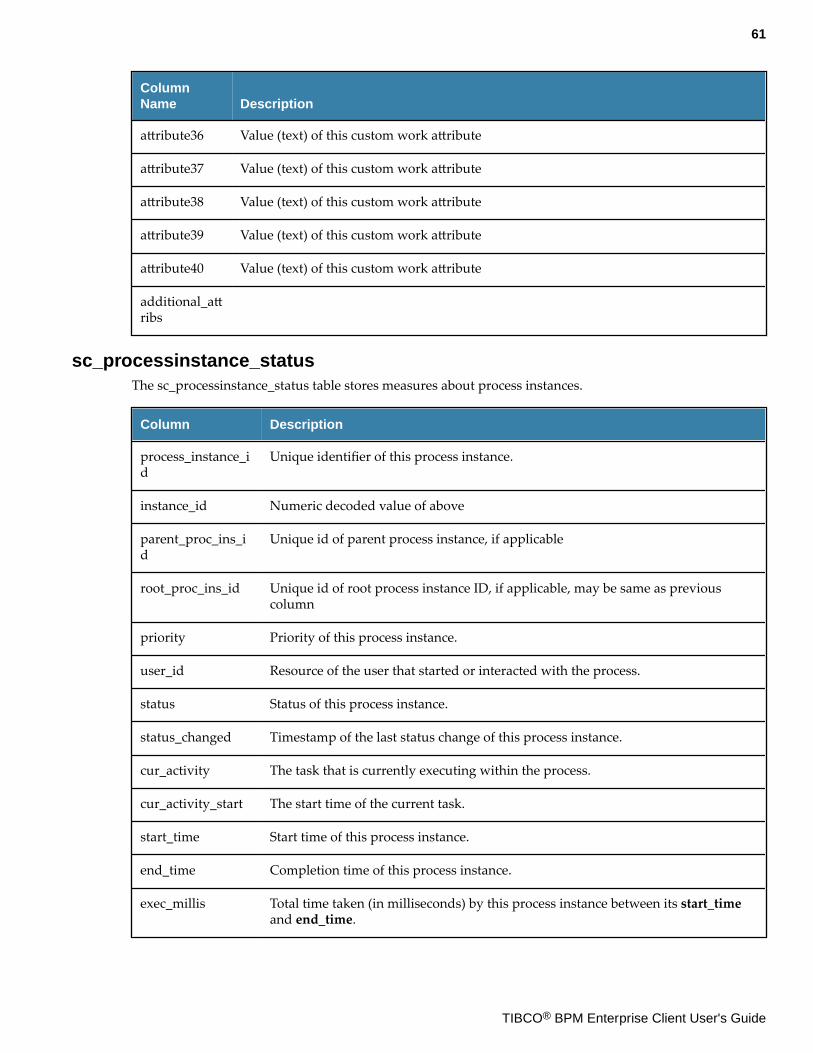
ColumnName Description
attribute36 Value (text) of this custom work attribute
attribute37 Value (text) of this custom work attribute
attribute38 Value (text) of this custom work attribute
attribute39 Value (text) of this custom work attribute
attribute40 Value (text) of this custom work attribute
additional_attribs
sc_processinstance_statusThe sc_processinstance_status table stores measures about process instances.
Column Description
process_instance_id
Unique identifier of this process instance.
instance_id Numeric decoded value of above
parent_proc_ins_id
Unique id of parent process instance, if applicable
root_proc_ins_id Unique id of root process instance ID, if applicable, may be same as previouscolumn
priority Priority of this process instance.
user_id Resource of the user that started or interacted with the process.
status Status of this process instance.
status_changed Timestamp of the last status change of this process instance.
cur_activity The task that is currently executing within the process.
cur_activity_start The start time of the current task.
start_time Start time of this process instance.
end_time Completion time of this process instance.
exec_millis Total time taken (in milliseconds) by this process instance between its start_timeand end_time.
61
TIBCO® BPM Enterprise Client User's Guide
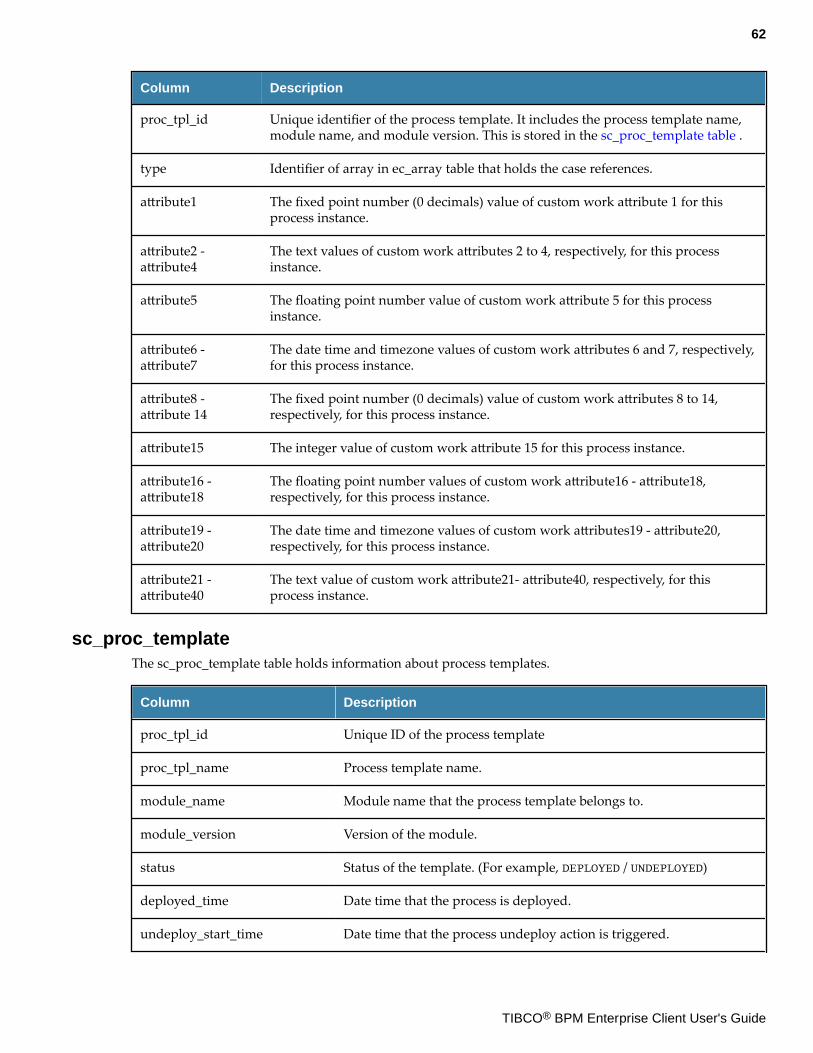
Column Description
proc_tpl_id Unique identifier of the process template. It includes the process template name,module name, and module version. This is stored in the sc_proc_template table .
type Identifier of array in ec_array table that holds the case references.
attribute1 The fixed point number (0 decimals) value of custom work attribute 1 for thisprocess instance.
attribute2 -attribute4
The text values of custom work attributes 2 to 4, respectively, for this processinstance.
attribute5 The floating point number value of custom work attribute 5 for this processinstance.
attribute6 -attribute7
The date time and timezone values of custom work attributes 6 and 7, respectively,for this process instance.
attribute8 -attribute 14
The fixed point number (0 decimals) value of custom work attributes 8 to 14,respectively, for this process instance.
attribute15 The integer value of custom work attribute 15 for this process instance.
attribute16 -attribute18
The floating point number values of custom work attribute16 - attribute18,respectively, for this process instance.
attribute19 -attribute20
The date time and timezone values of custom work attributes19 - attribute20,respectively, for this process instance.
attribute21 -attribute40
The text value of custom work attribute21- attribute40, respectively, for thisprocess instance.
sc_proc_templateThe sc_proc_template table holds information about process templates.
Column Description
proc_tpl_id Unique ID of the process template
proc_tpl_name Process template name.
module_name Module name that the process template belongs to.
module_version Version of the module.
status Status of the template. (For example, DEPLOYED / UNDEPLOYED)
deployed_time Date time that the process is deployed.
undeploy_start_time Date time that the process undeploy action is triggered.
62
TIBCO® BPM Enterprise Client User's Guide
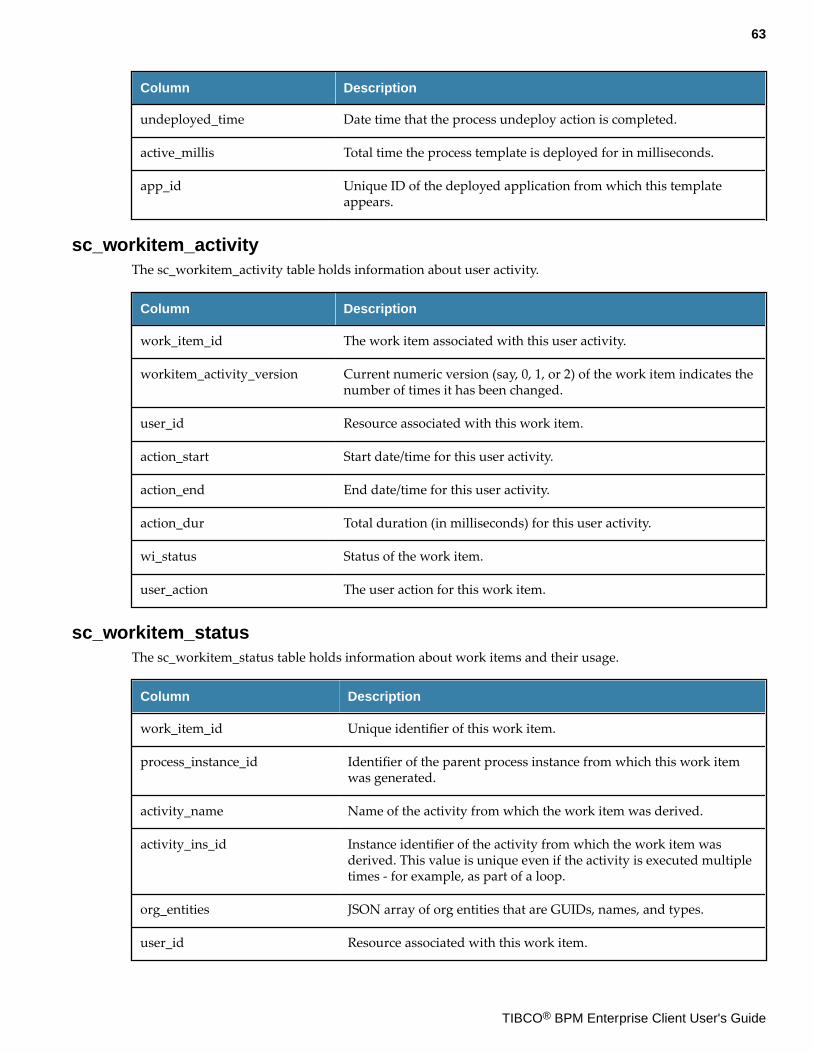
Column Description
undeployed_time Date time that the process undeploy action is completed.
active_millis Total time the process template is deployed for in milliseconds.
app_id Unique ID of the deployed application from which this templateappears.
sc_workitem_activityThe sc_workitem_activity table holds information about user activity.
Column Description
work_item_id The work item associated with this user activity.
workitem_activity_version Current numeric version (say, 0, 1, or 2) of the work item indicates thenumber of times it has been changed.
user_id Resource associated with this work item.
action_start Start date/time for this user activity.
action_end End date/time for this user activity.
action_dur Total duration (in milliseconds) for this user activity.
wi_status Status of the work item.
user_action The user action for this work item.
sc_workitem_statusThe sc_workitem_status table holds information about work items and their usage.
Column Description
work_item_id Unique identifier of this work item.
process_instance_id Identifier of the parent process instance from which this work itemwas generated.
activity_name Name of the activity from which the work item was derived.
activity_ins_id Instance identifier of the activity from which the work item wasderived. This value is unique even if the activity is executed multipletimes - for example, as part of a loop.
org_entities JSON array of org entities that are GUIDs, names, and types.
user_id Resource associated with this work item.
63
TIBCO® BPM Enterprise Client User's Guide
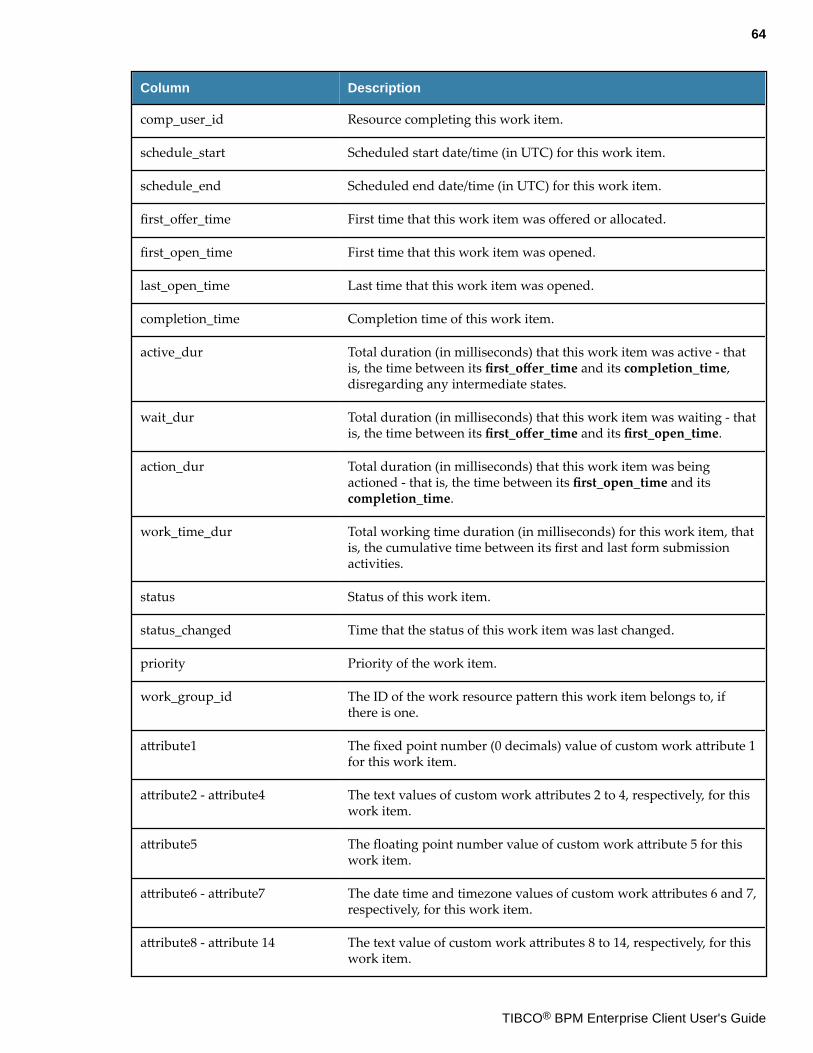
Column Description
comp_user_id Resource completing this work item.
schedule_start Scheduled start date/time (in UTC) for this work item.
schedule_end Scheduled end date/time (in UTC) for this work item.
first_offer_time First time that this work item was offered or allocated.
first_open_time First time that this work item was opened.
last_open_time Last time that this work item was opened.
completion_time Completion time of this work item.
active_dur Total duration (in milliseconds) that this work item was active - thatis, the time between its first_offer_time and its completion_time,disregarding any intermediate states.
wait_dur Total duration (in milliseconds) that this work item was waiting - thatis, the time between its first_offer_time and its first_open_time.
action_dur Total duration (in milliseconds) that this work item was beingactioned - that is, the time between its first_open_time and itscompletion_time.
work_time_dur Total working time duration (in milliseconds) for this work item, thatis, the cumulative time between its first and last form submissionactivities.
status Status of this work item.
status_changed Time that the status of this work item was last changed.
priority Priority of the work item.
work_group_id The ID of the work resource pattern this work item belongs to, ifthere is one.
attribute1 The fixed point number (0 decimals) value of custom work attribute 1for this work item.
attribute2 - attribute4 The text values of custom work attributes 2 to 4, respectively, for thiswork item.
attribute5 The floating point number value of custom work attribute 5 for thiswork item.
attribute6 - attribute7 The date time and timezone values of custom work attributes 6 and 7,respectively, for this work item.
attribute8 - attribute 14 The text value of custom work attributes 8 to 14, respectively, for thiswork item.
64
TIBCO® BPM Enterprise Client User's Guide
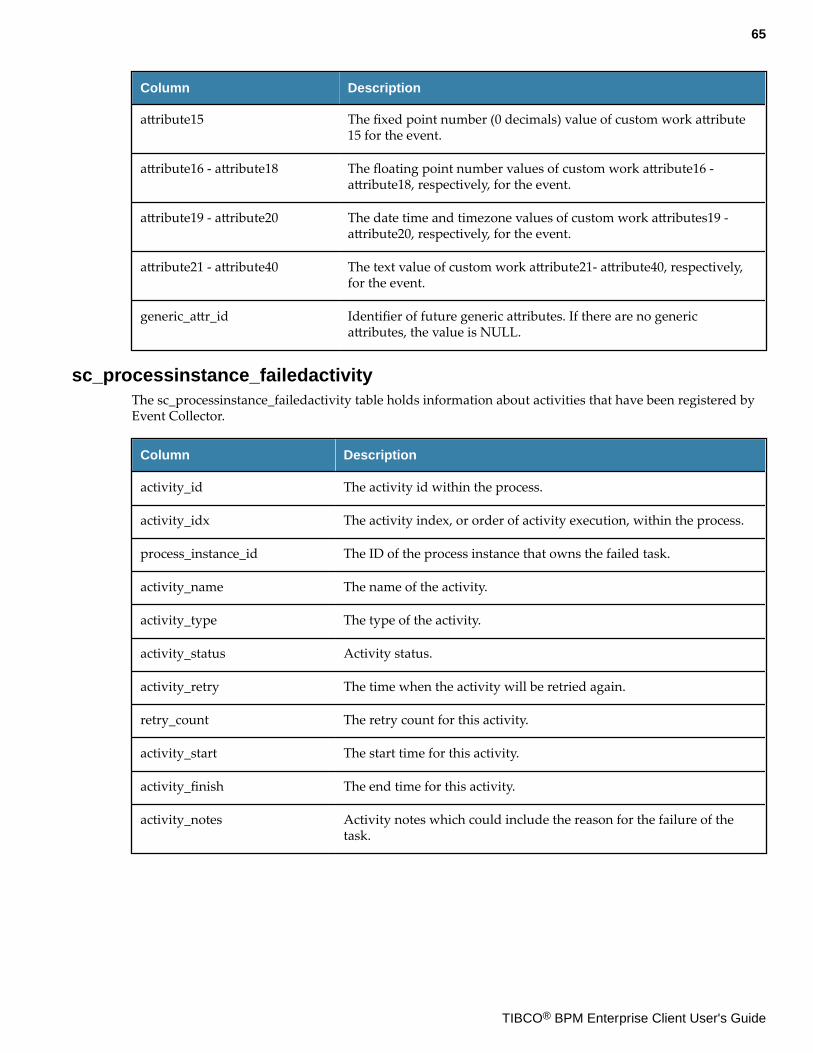
Column Description
attribute15 The fixed point number (0 decimals) value of custom work attribute15 for the event.
attribute16 - attribute18 The floating point number values of custom work attribute16 -attribute18, respectively, for the event.
attribute19 - attribute20 The date time and timezone values of custom work attributes19 -attribute20, respectively, for the event.
attribute21 - attribute40 The text value of custom work attribute21- attribute40, respectively,for the event.
generic_attr_id Identifier of future generic attributes. If there are no genericattributes, the value is NULL.
sc_processinstance_failedactivityThe sc_processinstance_failedactivity table holds information about activities that have been registered byEvent Collector.
Column Description
activity_id The activity id within the process.
activity_idx The activity index, or order of activity execution, within the process.
process_instance_id The ID of the process instance that owns the failed task.
activity_name The name of the activity.
activity_type The type of the activity.
activity_status Activity status.
activity_retry The time when the activity will be retried again.
retry_count The retry count for this activity.
activity_start The start time for this activity.
activity_finish The end time for this activity.
activity_notes Activity notes which could include the reason for the failure of thetask.
65
TIBCO® BPM Enterprise Client User's Guide
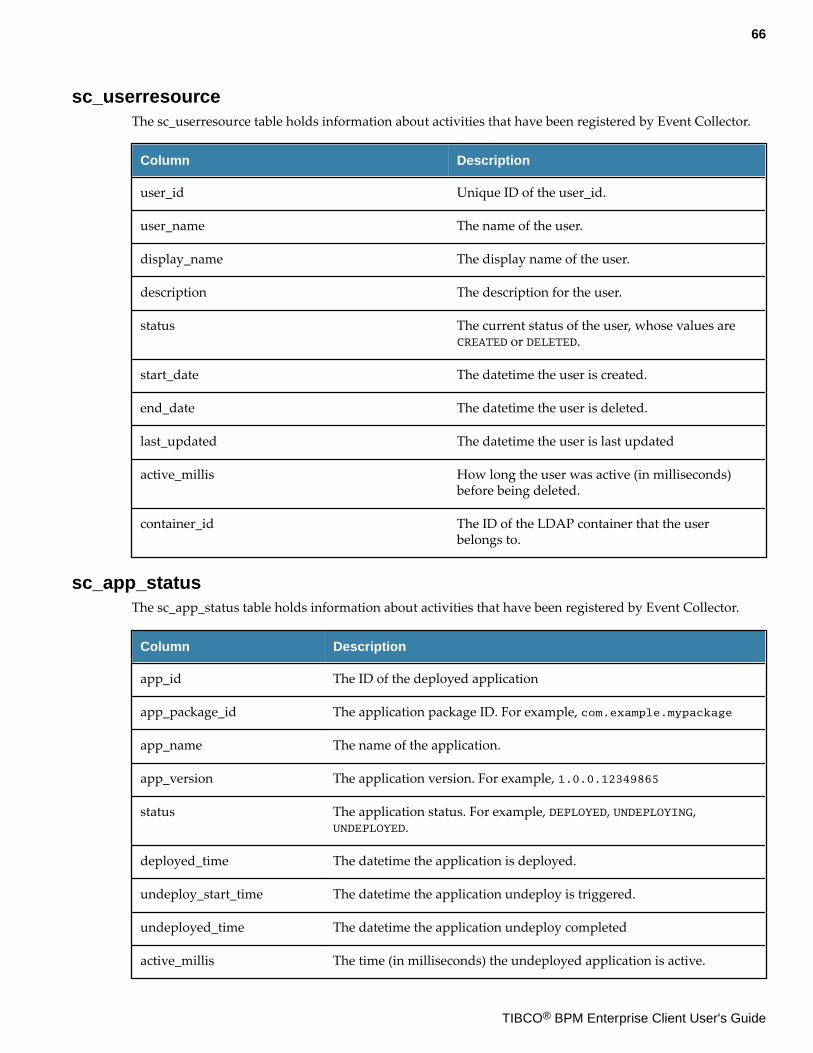
sc_userresourceThe sc_userresource table holds information about activities that have been registered by Event Collector.
Column Description
user_id Unique ID of the user_id.
user_name The name of the user.
display_name The display name of the user.
description The description for the user.
status The current status of the user, whose values areCREATED or DELETED.
start_date The datetime the user is created.
end_date The datetime the user is deleted.
last_updated The datetime the user is last updated
active_millis How long the user was active (in milliseconds)before being deleted.
container_id The ID of the LDAP container that the userbelongs to.
sc_app_statusThe sc_app_status table holds information about activities that have been registered by Event Collector.
Column Description
app_id The ID of the deployed application
app_package_id The application package ID. For example, com.example.mypackage
app_name The name of the application.
app_version The application version. For example, 1.0.0.12349865
status The application status. For example, DEPLOYED, UNDEPLOYING,UNDEPLOYED.
deployed_time The datetime the application is deployed.
undeploy_start_time The datetime the application undeploy is triggered.
undeployed_time The datetime the application undeploy completed
active_millis The time (in milliseconds) the undeployed application is active.
66
TIBCO® BPM Enterprise Client User's Guide
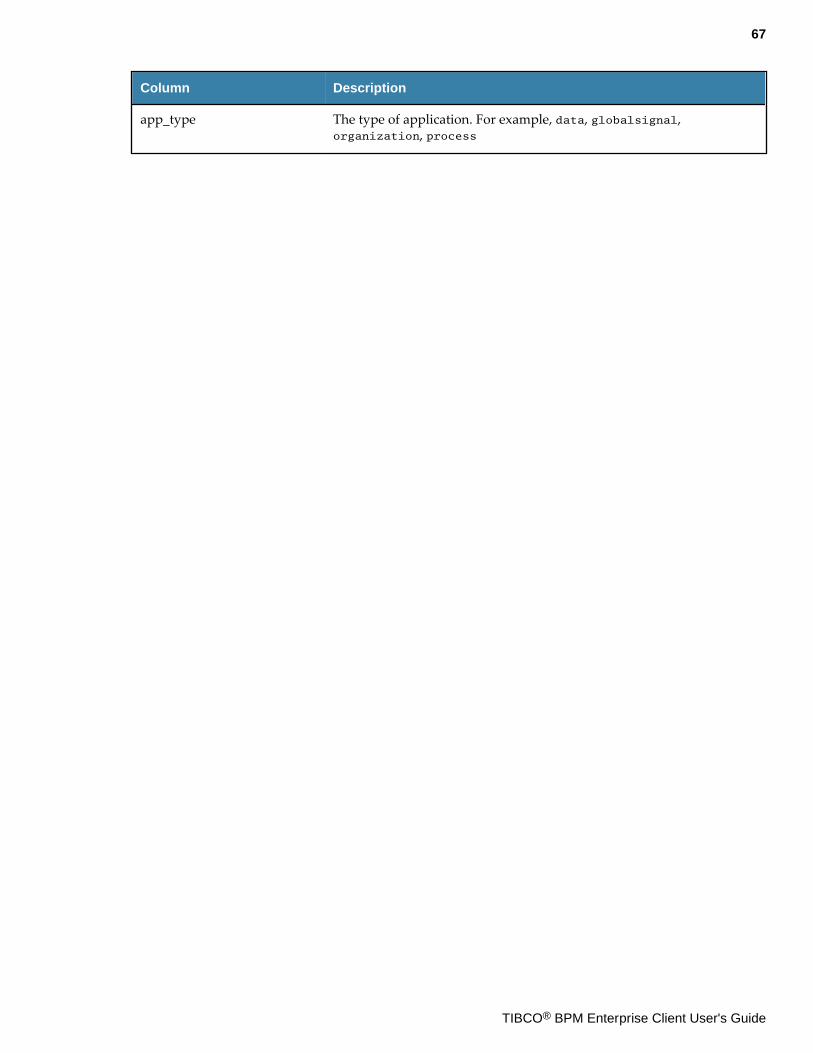
Column Description
app_type The type of application. For example, data, globalsignal,organization, process
67
TIBCO® BPM Enterprise Client User's Guide
Legal and Third-Party Notices
SOME TIBCO SOFTWARE EMBEDS OR BUNDLES OTHER TIBCO SOFTWARE. USE OF SUCH EMBEDDED OR BUNDLED TIBCO SOFTWARE IS SOLELY TO ENABLE THE FUNCTIONALITY (OR PROVIDE LIMITED ADD-ON FUNCTIONALITY OF THE LICENSED TIBCO SOFTWARE. THE EMBEDDED OR BUNDLED SOFTWARE IS NOT LICENSED TO BE USED OR ACCESSED BY ANY OTHER TIBCO SOFTWARE OR FOR ANY OTHER PURPOSE.
USE OF TIBCO SOFTWARE AND THIS DOCUMENT IS SUBJECT TO THE TERMS AND CONDITIONS OF A LICENSE AGREEMENT FOUND IN EITHER A SEPARATELY EXECUTED SOFTWARE LICENSE AGREEMENT, OR, IF THERE IS NO SUCH SEPARATE AGREEMENT, THE CLICKWRAP END USER LICENSE AGREEMENT WHICH IS DISPLAYED DURING DOWNLOAD OR INSTALLATION OF THE SOFTWARE (AND WHICH IS DUPLICATED IN THE LICENSE FILE OR IF THERE IS NO SUCH SOFTWARE LICENSE AGREEMENT OR CLICKWRAP END USER LICENSE AGREEMENT, THE LICENSE(S LOCATED IN THE “LICENSE” FILE(S OF THE SOFTWARE. USE OF THIS DOCUMENT IS SUBJECT TO THOSE TERMS AND CONDITIONS, AND YOUR USE HEREOF SHALL CONSTITUTE ACCEPTANCE OF AND AN AGREEMENT TO BE BOUND BY THE SAME.
This document is subject to U.S. and international copyright laws and treaties. No part of this document may be reproduced in any form without the written authorization of TIBCO Software Inc.
TIBCO, the TIBCO logo, the TIBCO O logo, TIBCO ActiveMatrix BPM, and TIBCO Business Studio - BPM Edition are either registered trademarks or trademarks of TIBCO Software Inc. in the United States and/or other countries.
Java and all Java based trademarks and logos are trademarks or registered trademarks of Oracle and/or its affiliates.
All other product and company names and marks mentioned in this document are the property of their respective owners and are mentioned for identification purposes only.
This software may be available on multiple operating systems. However, not all operating system platforms for a specific software version are released at the same time. Please see the readme.txt file for the availability of this software version on a specific operating system platform.
THIS DOCUMENT IS PROVIDED “AS IS” WITHOUT WARRANTY OF ANY KIND, EITHER EXPRESS OR IMPLIED, INCLUDING, BUT NOT LIMITED TO, THE IMPLIED WARRANTIES OF MERCHANTABILITY, FITNESS FOR A PARTICULAR PURPOSE, OR NON-INFRINGEMENT.
THIS DOCUMENT COULD INCLUDE TECHNICAL INACCURACIES OR TYPOGRAPHICAL ERRORS. CHANGES ARE PERIODICALLY ADDED TO THE INFORMATION HEREIN; THESE CHANGES WILL BE INCORPORATED IN NEW EDITIONS OF THIS DOCUMENT. TIBCO SOFTWARE INC. MAY MAKE IMPROVEMENTS AND/OR CHANGES IN THE PRODUCT(S AND/OR THE PROGRAM(S DESCRIBED IN THIS DOCUMENT AT ANY TIME.
THE CONTENTS OF THIS DOCUMENT MAY BE MODIFIED AND/OR QUALIFIED, DIRECTLY OR INDIRECTLY, BY OTHER DOCUMENTATION WHICH ACCOMPANIES THIS SOFTWARE, INCLUDING BUT NOT LIMITED TO ANY RELEASE NOTES AND "READ ME" FILES.
This and other products of TIBCO Software Inc. may be covered by registered patents. Please refer to TIBCO's Virtual Patent Marking document (https://www.tibco.com/patents) for details.
Copyright © 2015-2021. TIBCO Software Inc. All Rights Reserved.
68
TIBCO® BPM Enterprise Client User's Guide


