Embed Size (px)
Citation preview

TIBCO Business Studio TutorialsSoftware Release 3.0.0May 2014
Two-Second Advantage®

2
TIBCO Business Studio Tutorials
Contents
Create and Run Your First BPM Application . . . . . . . . . . . . . . . . . . . . . . . . . . . . . . . . . . . . . . . . . . . . . . . . . . . . . . . . .14
How To Design a Simple WelcomeUsers Business Service . . . . . . . . . . . . . . . . . . . . . . . . . . . . . . . . . . . . . . . . . . . . . . . . . . . . . . . . . . . .14
Creating a New Project . . . . . . . . . . . . . . . . . . . . . . . . . . . . . . . . . . . . . . . . . . . . . . . . . . . . . . . . . . . . . . . . . . . . . . . . . . . . . . . . . . . . . . . . . . 14
Adding a User Task to the Process . . . . . . . . . . . . . . . . . . . . . . . . . . . . . . . . . . . . . . . . . . . . . . . . . . . . . . . . . . . . . . . . . . . . . . . . . . . . . . . 17
Adding Data to the Process . . . . . . . . . . . . . . . . . . . . . . . . . . . . . . . . . . . . . . . . . . . . . . . . . . . . . . . . . . . . . . . . . . . . . . . . . . . . . . . . . . . . . . 20
Defining the Input Parameters . . . . . . . . . . . . . . . . . . . . . . . . . . . . . . . . . . . . . . . . . . . . . . . . . . . . . . . . . . . . . . . . . . . . . . . . . . . . . . . 20
Defining the Data Field . . . . . . . . . . . . . . . . . . . . . . . . . . . . . . . . . . . . . . . . . . . . . . . . . . . . . . . . . . . . . . . . . . . . . . . . . . . . . . . . . . . . . . 20
Refactoring the Start Event and Create a Business Service . . . . . . . . . . . . . . . . . . . . . . . . . . . . . . . . . . . . . . . . . . . . . . . . . . . . . . . 21
Changing the Start Event . . . . . . . . . . . . . . . . . . . . . . . . . . . . . . . . . . . . . . . . . . . . . . . . . . . . . . . . . . . . . . . . . . . . . . . . . . . . . . . . . . . . 22
Generating the Business Service . . . . . . . . . . . . . . . . . . . . . . . . . . . . . . . . . . . . . . . . . . . . . . . . . . . . . . . . . . . . . . . . . . . . . . . . . . . . 22
Defining an Organization Model for the Process . . . . . . . . . . . . . . . . . . . . . . . . . . . . . . . . . . . . . . . . . . . . . . . . . . . . . . . . . . . . . . . . . . 23
Adding the Tester Position as a Participant to the Process . . . . . . . . . . . . . . . . . . . . . . . . . . . . . . . . . . . . . . . . . . . . . . . . . . . . . . . . 24
Defining a Participant . . . . . . . . . . . . . . . . . . . . . . . . . . . . . . . . . . . . . . . . . . . . . . . . . . . . . . . . . . . . . . . . . . . . . . . . . . . . . . . . . . . . . . . .25
Assigning the Participant to the User Task . . . . . . . . . . . . . . . . . . . . . . . . . . . . . . . . . . . . . . . . . . . . . . . . . . . . . . . . . . . . . . . . . . . 26
Defining the Generate Message Script . . . . . . . . . . . . . . . . . . . . . . . . . . . . . . . . . . . . . . . . . . . . . . . . . . . . . . . . . . . . . . . . . . . . . . . . . . . 26
Verifying the Design Results . . . . . . . . . . . . . . . . . . . . . . . . . . . . . . . . . . . . . . . . . . . . . . . . . . . . . . . . . . . . . . . . . . . . . . . . . . . . . . . . . . . . . 26
How to Implement and Deploy the WelcomeUsers Application . . . . . . . . . . . . . . . . . . . . . . . . . . . . . . . . . . . . . . . . . . . . . . . . . . . . . . . . .27
Enabling Solution Design Capability . . . . . . . . . . . . . . . . . . . . . . . . . . . . . . . . . . . . . . . . . . . . . . . . . . . . . . . . . . . . . . . . . . . . . . . . . . . . . . 27
Implementing the Welcome Message Script . . . . . . . . . . . . . . . . . . . . . . . . . . . . . . . . . . . . . . . . . . . . . . . . . . . . . . . . . . . . . . . . . . . . . . 28
Creating a Deployment Server . . . . . . . . . . . . . . . . . . . . . . . . . . . . . . . . . . . . . . . . . . . . . . . . . . . . . . . . . . . . . . . . . . . . . . . . . . . . . . . . . . . 28
Connecting to the Deployment Server . . . . . . . . . . . . . . . . . . . . . . . . . . . . . . . . . . . . . . . . . . . . . . . . . . . . . . . . . . . . . . . . . . . . . . . . . . . . 31
Deploying the WelcomeUsers Project . . . . . . . . . . . . . . . . . . . . . . . . . . . . . . . . . . . . . . . . . . . . . . . . . . . . . . . . . . . . . . . . . . . . . . . . . . . . 31
Verifying the Implementation Results . . . . . . . . . . . . . . . . . . . . . . . . . . . . . . . . . . . . . . . . . . . . . . . . . . . . . . . . . . . . . . . . . . . . . . . . . . . . . 33
How to Map Users to the WelcomeUsers Organization Model . . . . . . . . . . . . . . . . . . . . . . . . . . . . . . . . . . . . . . . . . . . . . . . . . . . . . . . . . 34
Logging into Openspace and Starting the Organization Browser . . . . . . . . . . . . . . . . . . . . . . . . . . . . . . . . . . . . . . . . . . . . . . . . . . 34
Creating an LDAP Container . . . . . . . . . . . . . . . . . . . . . . . . . . . . . . . . . . . . . . . . . . . . . . . . . . . . . . . . . . . . . . . . . . . . . . . . . . . . . . . . . . . . . 35
Mapping a User to the Testers Position in the Organization Model . . . . . . . . . . . . . . . . . . . . . . . . . . . . . . . . . . . . . . . . . . . . . . . . 36
Logging Out of TIBCO Openspace . . . . . . . . . . . . . . . . . . . . . . . . . . . . . . . . . . . . . . . . . . . . . . . . . . . . . . . . . . . . . . . . . . . . . . . . . . . . . . . 38
Running the WelcomeUsers Application . . . . . . . . . . . . . . . . . . . . . . . . . . . . . . . . . . . . . . . . . . . . . . . . . . . . . . . . . . . . . . . . . . . . . . . . . . . . . . 39
Logging into Openspace . . . . . . . . . . . . . . . . . . . . . . . . . . . . . . . . . . . . . . . . . . . . . . . . . . . . . . . . . . . . . . . . . . . . . . . . . . . . . . . . . . . . . . . . . 39
Starting the Business Service . . . . . . . . . . . . . . . . . . . . . . . . . . . . . . . . . . . . . . . . . . . . . . . . . . . . . . . . . . . . . . . . . . . . . . . . . . . . . . . . . . . . 39
Logging Out of TIBCO Openspace . . . . . . . . . . . . . . . . . . . . . . . . . . . . . . . . . . . . . . . . . . . . . . . . . . . . . . . . . . . . . . . . . . . . . . . . . . . . . . . 40
Creating and Using Business Data . . . . . . . . . . . . . . . . . . . . . . . . . . . . . . . . . . . . . . . . . . . . . . . . . . . . . . . . . . . . . . . . . 42
How to Create Business Data . . . . . . . . . . . . . . . . . . . . . . . . . . . . . . . . . . . . . . . . . . . . . . . . . . . . . . . . . . . . . . . . . . . . . . . . . . . . . . . . . . . . . . . . .42
Creating a New Project . . . . . . . . . . . . . . . . . . . . . . . . . . . . . . . . . . . . . . . . . . . . . . . . . . . . . . . . . . . . . . . . . . . . . . . . . . . . . . . . . . . . . . . . . . 42
Creating a Package . . . . . . . . . . . . . . . . . . . . . . . . . . . . . . . . . . . . . . . . . . . . . . . . . . . . . . . . . . . . . . . . . . . . . . . . . . . . . . . . . . . . . . . . . . . . . . 44
Saving the Business Object Model . . . . . . . . . . . . . . . . . . . . . . . . . . . . . . . . . . . . . . . . . . . . . . . . . . . . . . . . . . . . . . . . . . . . . . . . . . . . . . . 45
Creating a Class and its Attributes . . . . . . . . . . . . . . . . . . . . . . . . . . . . . . . . . . . . . . . . . . . . . . . . . . . . . . . . . . . . . . . . . . . . . . . . . . . . . . . .45
3
TIBCO Business Studio Tutorials
Creating and Applying a Primitive Type . . . . . . . . . . . . . . . . . . . . . . . . . . . . . . . . . . . . . . . . . . . . . . . . . . . . . . . . . . . . . . . . . . . . . . . . . . .47
Creating a Generalization . . . . . . . . . . . . . . . . . . . . . . . . . . . . . . . . . . . . . . . . . . . . . . . . . . . . . . . . . . . . . . . . . . . . . . . . . . . . . . . . . . . . . . . . 48
Creating a Composition . . . . . . . . . . . . . . . . . . . . . . . . . . . . . . . . . . . . . . . . . . . . . . . . . . . . . . . . . . . . . . . . . . . . . . . . . . . . . . . . . . . . . . . . . . 49
Verifying the Results of "How to Create Business Data" . . . . . . . . . . . . . . . . . . . . . . . . . . . . . . . . . . . . . . . . . . . . . . . . . . . . . . . . . . .51
How to Use Business Data . . . . . . . . . . . . . . . . . . . . . . . . . . . . . . . . . . . . . . . . . . . . . . . . . . . . . . . . . . . . . . . . . . . . . . . . . . . . . . . . . . . . . . . . . . . 51
Opening the Business Object Model . . . . . . . . . . . . . . . . . . . . . . . . . . . . . . . . . . . . . . . . . . . . . . . . . . . . . . . . . . . . . . . . . . . . . . . . . . . . . .52
Defining a Business Process . . . . . . . . . . . . . . . . . . . . . . . . . . . . . . . . . . . . . . . . . . . . . . . . . . . . . . . . . . . . . . . . . . . . . . . . . . . . . . . . . . . . . 53
Saving the Process . . . . . . . . . . . . . . . . . . . . . . . . . . . . . . . . . . . . . . . . . . . . . . . . . . . . . . . . . . . . . . . . . . . . . . . . . . . . . . . . . . . . . . . . . . . . . . 54
Creating and Using a Conditional Script . . . . . . . . . . . . . . . . . . . . . . . . . . . . . . . . . . . . . . . . . . . . . . . . . . . . . . . . . . . . . . . . . . . . . . . . . . 55
Defining Data Fields that Reference Business Objects . . . . . . . . . . . . . . . . . . . . . . . . . . . . . . . . . . . . . . . . . . . . . . . . . . . . . . . . . . . . 56
Assigning the Data Fields to User Tasks . . . . . . . . . . . . . . . . . . . . . . . . . . . . . . . . . . . . . . . . . . . . . . . . . . . . . . . . . . . . . . . . . . . . . . . . . .58
Generating Forms for the User Tasks . . . . . . . . . . . . . . . . . . . . . . . . . . . . . . . . . . . . . . . . . . . . . . . . . . . . . . . . . . . . . . . . . . . . . . . . . . . . 59
Verifying the Results of "How to Use Business Data" . . . . . . . . . . . . . . . . . . . . . . . . . . . . . . . . . . . . . . . . . . . . . . . . . . . . . . . . . . . . . .63
Using the Organization Modeler . . . . . . . . . . . . . . . . . . . . . . . . . . . . . . . . . . . . . . . . . . . . . . . . . . . . . . . . . . . . . . . . . . . . 65
How to Use the Graphical Organization Modeler . . . . . . . . . . . . . . . . . . . . . . . . . . . . . . . . . . . . . . . . . . . . . . . . . . . . . . . . . . . . . . . . . . . . . . 65
Creating a New Project . . . . . . . . . . . . . . . . . . . . . . . . . . . . . . . . . . . . . . . . . . . . . . . . . . . . . . . . . . . . . . . . . . . . . . . . . . . . . . . . . . . . . . . . . . 65
Using the Organization Editor . . . . . . . . . . . . . . . . . . . . . . . . . . . . . . . . . . . . . . . . . . . . . . . . . . . . . . . . . . . . . . . . . . . . . . . . . . . . . . . . . . . . 67
Setting the Version . . . . . . . . . . . . . . . . . . . . . . . . . . . . . . . . . . . . . . . . . . . . . . . . . . . . . . . . . . . . . . . . . . . . . . . . . . . . . . . . . . . . . . . . . . . . . . .68
Saving the Organization Model . . . . . . . . . . . . . . . . . . . . . . . . . . . . . . . . . . . . . . . . . . . . . . . . . . . . . . . . . . . . . . . . . . . . . . . . . . . . . . . . . . . 69
Creating Organization Units . . . . . . . . . . . . . . . . . . . . . . . . . . . . . . . . . . . . . . . . . . . . . . . . . . . . . . . . . . . . . . . . . . . . . . . . . . . . . . . . . . . . . . 70
Creating Positions . . . . . . . . . . . . . . . . . . . . . . . . . . . . . . . . . . . . . . . . . . . . . . . . . . . . . . . . . . . . . . . . . . . . . . . . . . . . . . . . . . . . . . . . . . . . . . . 71
Copying and Pasting Organization Units . . . . . . . . . . . . . . . . . . . . . . . . . . . . . . . . . . . . . . . . . . . . . . . . . . . . . . . . . . . . . . . . . . . . . . . . . .72
Creating Hierarchical Relationships . . . . . . . . . . . . . . . . . . . . . . . . . . . . . . . . . . . . . . . . . . . . . . . . . . . . . . . . . . . . . . . . . . . . . . . . . . . . . . 73
Creating an Association . . . . . . . . . . . . . . . . . . . . . . . . . . . . . . . . . . . . . . . . . . . . . . . . . . . . . . . . . . . . . . . . . . . . . . . . . . . . . . . . . . . . . . . . . . 74
Verifying the Results . . . . . . . . . . . . . . . . . . . . . . . . . . . . . . . . . . . . . . . . . . . . . . . . . . . . . . . . . . . . . . . . . . . . . . . . . . . . . . . . . . . . . . . . . . . . . 75
How to Add Groups Capabilities and Privileges to an Organization Model . . . . . . . . . . . . . . . . . . . . . . . . . . . . . . . . . . . . . . . . . . . . . .76
Opening the Organization Model . . . . . . . . . . . . . . . . . . . . . . . . . . . . . . . . . . . . . . . . . . . . . . . . . . . . . . . . . . . . . . . . . . . . . . . . . . . . . . . . . 76
Creating a Group . . . . . . . . . . . . . . . . . . . . . . . . . . . . . . . . . . . . . . . . . . . . . . . . . . . . . . . . . . . . . . . . . . . . . . . . . . . . . . . . . . . . . . . . . . . . . . . . 77
Saving the Organization Model . . . . . . . . . . . . . . . . . . . . . . . . . . . . . . . . . . . . . . . . . . . . . . . . . . . . . . . . . . . . . . . . . . . . . . . . . . . . . . . . . . . 78
Creating Capabilities . . . . . . . . . . . . . . . . . . . . . . . . . . . . . . . . . . . . . . . . . . . . . . . . . . . . . . . . . . . . . . . . . . . . . . . . . . . . . . . . . . . . . . . . . . . . . 78
Assigning Capabilities . . . . . . . . . . . . . . . . . . . . . . . . . . . . . . . . . . . . . . . . . . . . . . . . . . . . . . . . . . . . . . . . . . . . . . . . . . . . . . . . . . . . . . . . . . . .79
Assigning Capabilities to Positions . . . . . . . . . . . . . . . . . . . . . . . . . . . . . . . . . . . . . . . . . . . . . . . . . . . . . . . . . . . . . . . . . . . . . . . . . . . 79
Assigning Capabilities to Groups . . . . . . . . . . . . . . . . . . . . . . . . . . . . . . . . . . . . . . . . . . . . . . . . . . . . . . . . . . . . . . . . . . . . . . . . . . . . .79
Creating Privileges . . . . . . . . . . . . . . . . . . . . . . . . . . . . . . . . . . . . . . . . . . . . . . . . . . . . . . . . . . . . . . . . . . . . . . . . . . . . . . . . . . . . . . . . . . . . . . .79
Assigning Privileges . . . . . . . . . . . . . . . . . . . . . . . . . . . . . . . . . . . . . . . . . . . . . . . . . . . . . . . . . . . . . . . . . . . . . . . . . . . . . . . . . . . . . . . . . . . . . 81
Assigning Privilege to Positions . . . . . . . . . . . . . . . . . . . . . . . . . . . . . . . . . . . . . . . . . . . . . . . . . . . . . . . . . . . . . . . . . . . . . . . . . . . . . . 81
Assigning Privileges to Organization Units . . . . . . . . . . . . . . . . . . . . . . . . . . . . . . . . . . . . . . . . . . . . . . . . . . . . . . . . . . . . . . . . . . . 82
Updating the Version . . . . . . . . . . . . . . . . . . . . . . . . . . . . . . . . . . . . . . . . . . . . . . . . . . . . . . . . . . . . . . . . . . . . . . . . . . . . . . . . . . . . . . . . . . . . .82
Deploying the Organization Model . . . . . . . . . . . . . . . . . . . . . . . . . . . . . . . . . . . . . . . . . . . . . . . . . . . . . . . . . . . . . . . . . . . . . . . . . . . . . . . .83
Assigning Work . . . . . . . . . . . . . . . . . . . . . . . . . . . . . . . . . . . . . . . . . . . . . . . . . . . . . . . . . . . . . . . . . . . . . . . . . . . . . . . . . . .85
4
TIBCO Business Studio Tutorials
How to Ensure that a Sequence of Tasks is Performed by the Same User . . . . . . . . . . . . . . . . . . . . . . . . . . . . . . . . . . . . . . . . . . . . . 85
Importing the Initial Resources . . . . . . . . . . . . . . . . . . . . . . . . . . . . . . . . . . . . . . . . . . . . . . . . . . . . . . . . . . . . . . . . . . . . . . . . . . . . . . . . . . . 85
Mapping a Participant to an Organization Model . . . . . . . . . . . . . . . . . . . . . . . . . . . . . . . . . . . . . . . . . . . . . . . . . . . . . . . . . . . . . . . . . . 86
Making Sure a Sequence of Tasks is Performed by the Same User . . . . . . . . . . . . . . . . . . . . . . . . . . . . . . . . . . . . . . . . . . . . . . . 88
Deploying and Running the Process . . . . . . . . . . . . . . . . . . . . . . . . . . . . . . . . . . . . . . . . . . . . . . . . . . . . . . . . . . . . . . . . . . . . . . . . . . . . . .91
Verifying the Results . . . . . . . . . . . . . . . . . . . . . . . . . . . . . . . . . . . . . . . . . . . . . . . . . . . . . . . . . . . . . . . . . . . . . . . . . . . . . . . . . . . . . . . . . . . . . 92
How to Ensure Specific Tasks in a Process are Performed by Different Users . . . . . . . . . . . . . . . . . . . . . . . . . . . . . . . . . . . . . . . . . .93
Importing the Initial Resources . . . . . . . . . . . . . . . . . . . . . . . . . . . . . . . . . . . . . . . . . . . . . . . . . . . . . . . . . . . . . . . . . . . . . . . . . . . . . . . . . . . 93
Making Sure that Specific Tasks are Performed by Different Users . . . . . . . . . . . . . . . . . . . . . . . . . . . . . . . . . . . . . . . . . . . . . . . . 93
Deploying and Running the Process . . . . . . . . . . . . . . . . . . . . . . . . . . . . . . . . . . . . . . . . . . . . . . . . . . . . . . . . . . . . . . . . . . . . . . . . . . . . . .95
Verifying the Results . . . . . . . . . . . . . . . . . . . . . . . . . . . . . . . . . . . . . . . . . . . . . . . . . . . . . . . . . . . . . . . . . . . . . . . . . . . . . . . . . . . . . . . . . . . . . 96
How to Dynamically Define Who Gets Work . . . . . . . . . . . . . . . . . . . . . . . . . . . . . . . . . . . . . . . . . . . . . . . . . . . . . . . . . . . . . . . . . . . . . . . . . . .96
Creating the Project . . . . . . . . . . . . . . . . . . . . . . . . . . . . . . . . . . . . . . . . . . . . . . . . . . . . . . . . . . . . . . . . . . . . . . . . . . . . . . . . . . . . . . . . . . . . . .97
Dynamically Defining Who Gets Work . . . . . . . . . . . . . . . . . . . . . . . . . . . . . . . . . . . . . . . . . . . . . . . . . . . . . . . . . . . . . . . . . . . . . . . . . . . 101
Deploying and Running the Project . . . . . . . . . . . . . . . . . . . . . . . . . . . . . . . . . . . . . . . . . . . . . . . . . . . . . . . . . . . . . . . . . . . . . . . . . . . . . .103
Verifying the Results . . . . . . . . . . . . . . . . . . . . . . . . . . . . . . . . . . . . . . . . . . . . . . . . . . . . . . . . . . . . . . . . . . . . . . . . . . . . . . . . . . . . . . . . . . . .105
How to Assign a Task to a User Based on their Job Function . . . . . . . . . . . . . . . . . . . . . . . . . . . . . . . . . . . . . . . . . . . . . . . . . . . . . . . . .105
Importing the Initial Resources . . . . . . . . . . . . . . . . . . . . . . . . . . . . . . . . . . . . . . . . . . . . . . . . . . . . . . . . . . . . . . . . . . . . . . . . . . . . . . . . . . 106
Assigning a Task to a User Based on their Job Function . . . . . . . . . . . . . . . . . . . . . . . . . . . . . . . . . . . . . . . . . . . . . . . . . . . . . . . . . 106
Deploying the Project . . . . . . . . . . . . . . . . . . . . . . . . . . . . . . . . . . . . . . . . . . . . . . . . . . . . . . . . . . . . . . . . . . . . . . . . . . . . . . . . . . . . . . . . . . . 108
Verifying the Results . . . . . . . . . . . . . . . . . . . . . . . . . . . . . . . . . . . . . . . . . . . . . . . . . . . . . . . . . . . . . . . . . . . . . . . . . . . . . . . . . . . . . . . . . . . .108
How to Deliver Work by Email . . . . . . . . . . . . . . . . . . . . . . . . . . . . . . . . . . . . . . . . . . . . . . . . . . . . . . . . . . . . . . . . . . . . . . . . . . . . . . . . . . . . . . . 109
Importing the Initial Resources . . . . . . . . . . . . . . . . . . . . . . . . . . . . . . . . . . . . . . . . . . . . . . . . . . . . . . . . . . . . . . . . . . . . . . . . . . . . . . . . . . 109
Creating the Project . . . . . . . . . . . . . . . . . . . . . . . . . . . . . . . . . . . . . . . . . . . . . . . . . . . . . . . . . . . . . . . . . . . . . . . . . . . . . . . . . . . . . . . . . . . . 110
Creating the Business Service . . . . . . . . . . . . . . . . . . . . . . . . . . . . . . . . . . . . . . . . . . . . . . . . . . . . . . . . . . . . . . . . . . . . . . . . . . . . . . . . . . 111
Editing the Email Attributes in the Presentation Channel . . . . . . . . . . . . . . . . . . . . . . . . . . . . . . . . . . . . . . . . . . . . . . . . . . . . . . . . . 112
Deploying the Project . . . . . . . . . . . . . . . . . . . . . . . . . . . . . . . . . . . . . . . . . . . . . . . . . . . . . . . . . . . . . . . . . . . . . . . . . . . . . . . . . . . . . . . . . . . 114
Editing and Using Organizational Entity Push Destinations . . . . . . . . . . . . . . . . . . . . . . . . . . . . . . . . . . . . . . . . . . . . . . . . . . . . . . .114
Verifying the Results . . . . . . . . . . . . . . . . . . . . . . . . . . . . . . . . . . . . . . . . . . . . . . . . . . . . . . . . . . . . . . . . . . . . . . . . . . . . . . . . . . . . . . . . . . . .116
How to Tailor Your Own Email Template . . . . . . . . . . . . . . . . . . . . . . . . . . . . . . . . . . . . . . . . . . . . . . . . . . . . . . . . . . . . . . . . . . . . . . . . . . . . .117
Importing the Initial Resources . . . . . . . . . . . . . . . . . . . . . . . . . . . . . . . . . . . . . . . . . . . . . . . . . . . . . . . . . . . . . . . . . . . . . . . . . . . . . . . . . . 117
Importing the Initial Projects . . . . . . . . . . . . . . . . . . . . . . . . . . . . . . . . . . . . . . . . . . . . . . . . . . . . . . . . . . . . . . . . . . . . . . . . . . . . . . . . 117
Updating the Project Version . . . . . . . . . . . . . . . . . . . . . . . . . . . . . . . . . . . . . . . . . . . . . . . . . . . . . . . . . . . . . . . . . . . . . . . . . . . . . . . 118
Importing the Template Files . . . . . . . . . . . . . . . . . . . . . . . . . . . . . . . . . . . . . . . . . . . . . . . . . . . . . . . . . . . . . . . . . . . . . . . . . . . . . . . 118
Creating an Alternative Template . . . . . . . . . . . . . . . . . . . . . . . . . . . . . . . . . . . . . . . . . . . . . . . . . . . . . . . . . . . . . . . . . . . . . . . . . . . . . . . 118
Including the Template Files in Your Project . . . . . . . . . . . . . . . . . . . . . . . . . . . . . . . . . . . . . . . . . . . . . . . . . . . . . . . . . . . . . . . . 118
Modifying the Template Files . . . . . . . . . . . . . . . . . . . . . . . . . . . . . . . . . . . . . . . . . . . . . . . . . . . . . . . . . . . . . . . . . . . . . . . . . . . . . . . 119
Adding a Graphic to the Template . . . . . . . . . . . . . . . . . . . . . . . . . . . . . . . . . . . . . . . . . . . . . . . . . . . . . . . . . . . . . . . . . . . . . . . . . . 119
Applying the Template . . . . . . . . . . . . . . . . . . . . . . . . . . . . . . . . . . . . . . . . . . . . . . . . . . . . . . . . . . . . . . . . . . . . . . . . . . . . . . . . . . . . . . . . . . 120
Deploying and Testing the Project . . . . . . . . . . . . . . . . . . . . . . . . . . . . . . . . . . . . . . . . . . . . . . . . . . . . . . . . . . . . . . . . . . . . . . . . . . . . . . .120
5
TIBCO Business Studio Tutorials
Deploying the Projects . . . . . . . . . . . . . . . . . . . . . . . . . . . . . . . . . . . . . . . . . . . . . . . . . . . . . . . . . . . . . . . . . . . . . . . . . . . . . . . . . . . . . 121
Testing the Project . . . . . . . . . . . . . . . . . . . . . . . . . . . . . . . . . . . . . . . . . . . . . . . . . . . . . . . . . . . . . . . . . . . . . . . . . . . . . . . . . . . . . . . . . 121
Verifying the Results . . . . . . . . . . . . . . . . . . . . . . . . . . . . . . . . . . . . . . . . . . . . . . . . . . . . . . . . . . . . . . . . . . . . . . . . . . . . . . . . . . . . . . . . . . . .121
Using Forms . . . . . . . . . . . . . . . . . . . . . . . . . . . . . . . . . . . . . . . . . . . . . . . . . . . . . . . . . . . . . . . . . . . . . . . . . . . . . . . . . . . . .123
How to Use Default Forms . . . . . . . . . . . . . . . . . . . . . . . . . . . . . . . . . . . . . . . . . . . . . . . . . . . . . . . . . . . . . . . . . . . . . . . . . . . . . . . . . . . . . . . . . . 123
Opening the Business Process . . . . . . . . . . . . . . . . . . . . . . . . . . . . . . . . . . . . . . . . . . . . . . . . . . . . . . . . . . . . . . . . . . . . . . . . . . . . . . . . . .123
Importing the FormsTutorialStart Project . . . . . . . . . . . . . . . . . . . . . . . . . . . . . . . . . . . . . . . . . . . . . . . . . . . . . . . . . . . . . . . . . . . . 123
Importing the EasyAsExtendedOMSolution Project . . . . . . . . . . . . . . . . . . . . . . . . . . . . . . . . . . . . . . . . . . . . . . . . . . . . . . . . . .124
Previewing the Default Form . . . . . . . . . . . . . . . . . . . . . . . . . . . . . . . . . . . . . . . . . . . . . . . . . . . . . . . . . . . . . . . . . . . . . . . . . . . . . . . . . . . . 124
Choosing Fields to Display in a Default Form . . . . . . . . . . . . . . . . . . . . . . . . . . . . . . . . . . . . . . . . . . . . . . . . . . . . . . . . . . . . . . . . . . . . 125
Specifying Structured Data for a Default Form . . . . . . . . . . . . . . . . . . . . . . . . . . . . . . . . . . . . . . . . . . . . . . . . . . . . . . . . . . . . . . . . . . . 126
Previewing the New Default Forms . . . . . . . . . . . . . . . . . . . . . . . . . . . . . . . . . . . . . . . . . . . . . . . . . . . . . . . . . . . . . . . . . . . . . . . . . . . . . .129
Adding Fields to a Default Form . . . . . . . . . . . . . . . . . . . . . . . . . . . . . . . . . . . . . . . . . . . . . . . . . . . . . . . . . . . . . . . . . . . . . . . . . . . . . . . . .130
Defining Restrictions for a Control on a Default Form . . . . . . . . . . . . . . . . . . . . . . . . . . . . . . . . . . . . . . . . . . . . . . . . . . . . . . . . . . . . 130
Verifying the Tutorial Solution . . . . . . . . . . . . . . . . . . . . . . . . . . . . . . . . . . . . . . . . . . . . . . . . . . . . . . . . . . . . . . . . . . . . . . . . . . . . . . . . . . . 131
How to Use Structured Data in a Form . . . . . . . . . . . . . . . . . . . . . . . . . . . . . . . . . . . . . . . . . . . . . . . . . . . . . . . . . . . . . . . . . . . . . . . . . . . . . . .132
Opening the Business Process . . . . . . . . . . . . . . . . . . . . . . . . . . . . . . . . . . . . . . . . . . . . . . . . . . . . . . . . . . . . . . . . . . . . . . . . . . . . . . . . . .132
Importing the FormsTutorialStart Project . . . . . . . . . . . . . . . . . . . . . . . . . . . . . . . . . . . . . . . . . . . . . . . . . . . . . . . . . . . . . . . . . . . . 132
Importing the EasyAsExtendedOMSolution Project . . . . . . . . . . . . . . . . . . . . . . . . . . . . . . . . . . . . . . . . . . . . . . . . . . . . . . . . . .133
Renaming the Project in the Project Explorer . . . . . . . . . . . . . . . . . . . . . . . . . . . . . . . . . . . . . . . . . . . . . . . . . . . . . . . . . . . . . . . . . . . . 133
Examining the Form and the Business Object Model . . . . . . . . . . . . . . . . . . . . . . . . . . . . . . . . . . . . . . . . . . . . . . . . . . . . . . . . . . . . 134
Marking Attributes as Required or Optional . . . . . . . . . . . . . . . . . . . . . . . . . . . . . . . . . . . . . . . . . . . . . . . . . . . . . . . . . . . . . . . . . . . . . . 136
Using Multiplicity to Configure Form Controls . . . . . . . . . . . . . . . . . . . . . . . . . . . . . . . . . . . . . . . . . . . . . . . . . . . . . . . . . . . . . . . . . . . . 137
Using an Enumeration to Specify Choice Values . . . . . . . . . . . . . . . . . . . . . . . . . . . . . . . . . . . . . . . . . . . . . . . . . . . . . . . . . . . . . . . . 139
Modifying the Appearance of Fields in a Default Form . . . . . . . . . . . . . . . . . . . . . . . . . . . . . . . . . . . . . . . . . . . . . . . . . . . . . . . . . . . 141
Changing the Order of Controls and Panes in the Default Form . . . . . . . . . . . . . . . . . . . . . . . . . . . . . . . . . . . . . . . . . . . . . 141
Changing the Labels for Controls in the Default Form . . . . . . . . . . . . . . . . . . . . . . . . . . . . . . . . . . . . . . . . . . . . . . . . . . . . . . . 143
Editing an Array of Objects Using a Grid Pane . . . . . . . . . . . . . . . . . . . . . . . . . . . . . . . . . . . . . . . . . . . . . . . . . . . . . . . . . . . . . . . . . . .144
Verifying the Tutorial Solution . . . . . . . . . . . . . . . . . . . . . . . . . . . . . . . . . . . . . . . . . . . . . . . . . . . . . . . . . . . . . . . . . . . . . . . . . . . . . . . . . . . 146
How to Customize the Appearance of a Form . . . . . . . . . . . . . . . . . . . . . . . . . . . . . . . . . . . . . . . . . . . . . . . . . . . . . . . . . . . . . . . . . . . . . . . . 146
Opening the Business Process . . . . . . . . . . . . . . . . . . . . . . . . . . . . . . . . . . . . . . . . . . . . . . . . . . . . . . . . . . . . . . . . . . . . . . . . . . . . . . . . . .146
Importing the FormsTutorialStart Project . . . . . . . . . . . . . . . . . . . . . . . . . . . . . . . . . . . . . . . . . . . . . . . . . . . . . . . . . . . . . . . . . . . . 146
Importing the EasyAsExtendedOMSolution Project . . . . . . . . . . . . . . . . . . . . . . . . . . . . . . . . . . . . . . . . . . . . . . . . . . . . . . . . . .147
Renaming the Project in the Project Explorer . . . . . . . . . . . . . . . . . . . . . . . . . . . . . . . . . . . . . . . . . . . . . . . . . . . . . . . . . . . . . . . . . . . . 147
Assigning a CSS Class to a Form . . . . . . . . . . . . . . . . . . . . . . . . . . . . . . . . . . . . . . . . . . . . . . . . . . . . . . . . . . . . . . . . . . . . . . . . . . . . . . . 148
Setting a CSS Class at the Form Level . . . . . . . . . . . . . . . . . . . . . . . . . . . . . . . . . . . . . . . . . . . . . . . . . . . . . . . . . . . . . . . . . . . . . . . . . . 149
Setting a CSS Class at the Pane Level . . . . . . . . . . . . . . . . . . . . . . . . . . . . . . . . . . . . . . . . . . . . . . . . . . . . . . . . . . . . . . . . . . . . . . . . . . 150
Setting a CSS Class at the Control Level . . . . . . . . . . . . . . . . . . . . . . . . . . . . . . . . . . . . . . . . . . . . . . . . . . . . . . . . . . . . . . . . . . . . . . . . 152
Changing the Style of a Control Based on an Input Value . . . . . . . . . . . . . . . . . . . . . . . . . . . . . . . . . . . . . . . . . . . . . . . . . . . . . . . . 153
Verifying the Tutorial Solution . . . . . . . . . . . . . . . . . . . . . . . . . . . . . . . . . . . . . . . . . . . . . . . . . . . . . . . . . . . . . . . . . . . . . . . . . . . . . . . . . . . 157
6
TIBCO Business Studio Tutorials
Using Dynamic Sub-Processes . . . . . . . . . . . . . . . . . . . . . . . . . . . . . . . . . . . . . . . . . . . . . . . . . . . . . . . . . . . . . . . . . . . 158
How to Use Dynamic Sub-Processes . . . . . . . . . . . . . . . . . . . . . . . . . . . . . . . . . . . . . . . . . . . . . . . . . . . . . . . . . . . . . . . . . . . . . . . . . . . . . . . . 158
Importing the Initial Resources . . . . . . . . . . . . . . . . . . . . . . . . . . . . . . . . . . . . . . . . . . . . . . . . . . . . . . . . . . . . . . . . . . . . . . . . . . . . . . . . . . 158
Examining the Starting Process . . . . . . . . . . . . . . . . . . . . . . . . . . . . . . . . . . . . . . . . . . . . . . . . . . . . . . . . . . . . . . . . . . . . . . . . . . . . . . . . . 159
Creating the Process Interface . . . . . . . . . . . . . . . . . . . . . . . . . . . . . . . . . . . . . . . . . . . . . . . . . . . . . . . . . . . . . . . . . . . . . . . . . . . . . . . . . . 160
Creating a Sub-Process . . . . . . . . . . . . . . . . . . . . . . . . . . . . . . . . . . . . . . . . . . . . . . . . . . . . . . . . . . . . . . . . . . . . . . . . . . . . . . . . . . . . . . . . 163
Creating a Second Sub-Process . . . . . . . . . . . . . . . . . . . . . . . . . . . . . . . . . . . . . . . . . . . . . . . . . . . . . . . . . . . . . . . . . . . . . . . . . . . . . . . . 167
Adding Parameters to the Process Tasks . . . . . . . . . . . . . . . . . . . . . . . . . . . . . . . . . . . . . . . . . . . . . . . . . . . . . . . . . . . . . . . . . . . . . . . 167
Tailoring the Forms . . . . . . . . . . . . . . . . . . . . . . . . . . . . . . . . . . . . . . . . . . . . . . . . . . . . . . . . . . . . . . . . . . . . . . . . . . . . . . . . . . . . . . . . . . . . . 168
Defining Which Sub-Process is Called . . . . . . . . . . . . . . . . . . . . . . . . . . . . . . . . . . . . . . . . . . . . . . . . . . . . . . . . . . . . . . . . . . . . . . . . . . 170
Setting up the Summary Task . . . . . . . . . . . . . . . . . . . . . . . . . . . . . . . . . . . . . . . . . . . . . . . . . . . . . . . . . . . . . . . . . . . . . . . . . . . . . . . . . . .172
Generating the Business Service . . . . . . . . . . . . . . . . . . . . . . . . . . . . . . . . . . . . . . . . . . . . . . . . . . . . . . . . . . . . . . . . . . . . . . . . . . . . . . . .173
Deploying and Running the Process . . . . . . . . . . . . . . . . . . . . . . . . . . . . . . . . . . . . . . . . . . . . . . . . . . . . . . . . . . . . . . . . . . . . . . . . . . . . 175
Deploying the Processes . . . . . . . . . . . . . . . . . . . . . . . . . . . . . . . . . . . . . . . . . . . . . . . . . . . . . . . . . . . . . . . . . . . . . . . . . . . . . . . . . . . 175
Mapping Users to the Organization Model . . . . . . . . . . . . . . . . . . . . . . . . . . . . . . . . . . . . . . . . . . . . . . . . . . . . . . . . . . . . . . . . . . 176
Running the Process . . . . . . . . . . . . . . . . . . . . . . . . . . . . . . . . . . . . . . . . . . . . . . . . . . . . . . . . . . . . . . . . . . . . . . . . . . . . . . . . . . . . . . . 176
Verifying the Results . . . . . . . . . . . . . . . . . . . . . . . . . . . . . . . . . . . . . . . . . . . . . . . . . . . . . . . . . . . . . . . . . . . . . . . . . . . . . . . . . . . . . . . . . . . .177
Accessing External Data and Services . . . . . . . . . . . . . . . . . . . . . . . . . . . . . . . . . . . . . . . . . . . . . . . . . . . . . . . . . . . . .178
How to Call a Database From a Process . . . . . . . . . . . . . . . . . . . . . . . . . . . . . . . . . . . . . . . . . . . . . . . . . . . . . . . . . . . . . . . . . . . . . . . . . . . . .178
Importing the GetUserLoginName Analysis Project . . . . . . . . . . . . . . . . . . . . . . . . . . . . . . . . . . . . . . . . . . . . . . . . . . . . . . . . . . . . . . 178
Importing the Business Process . . . . . . . . . . . . . . . . . . . . . . . . . . . . . . . . . . . . . . . . . . . . . . . . . . . . . . . . . . . . . . . . . . . . . . . . . . . . 178
Importing the Organization Model . . . . . . . . . . . . . . . . . . . . . . . . . . . . . . . . . . . . . . . . . . . . . . . . . . . . . . . . . . . . . . . . . . . . . . . . . . .179
Creating a Database Service Task . . . . . . . . . . . . . . . . . . . . . . . . . . . . . . . . . . . . . . . . . . . . . . . . . . . . . . . . . . . . . . . . . . . . . . . . . . . . . . 179
Setting up Data Inputs to and Outputs from the Database . . . . . . . . . . . . . . . . . . . . . . . . . . . . . . . . . . . . . . . . . . . . . . . . . . . . . . . .180
Creating a JDBC Resource Instance . . . . . . . . . . . . . . . . . . . . . . . . . . . . . . . . . . . . . . . . . . . . . . . . . . . . . . . . . . . . . . . . . . . . . . . . . . . . 182
Create a JDBC Resource Template . . . . . . . . . . . . . . . . . . . . . . . . . . . . . . . . . . . . . . . . . . . . . . . . . . . . . . . . . . . . . . . . . . . . . . . . 182
Create and Install a Resource Instance . . . . . . . . . . . . . . . . . . . . . . . . . . . . . . . . . . . . . . . . . . . . . . . . . . . . . . . . . . . . . . . . . . . . . 183
Creating a System Participant . . . . . . . . . . . . . . . . . . . . . . . . . . . . . . . . . . . . . . . . . . . . . . . . . . . . . . . . . . . . . . . . . . . . . . . . . . . . . . . . . . .183
Deploying the Application . . . . . . . . . . . . . . . . . . . . . . . . . . . . . . . . . . . . . . . . . . . . . . . . . . . . . . . . . . . . . . . . . . . . . . . . . . . . . . . . . . . . . . . 183
Deploying the EasyAsExtendedOMSolution Organization Model . . . . . . . . . . . . . . . . . . . . . . . . . . . . . . . . . . . . . . . . . . . . 184
Deploying the GetUserLoginName Application . . . . . . . . . . . . . . . . . . . . . . . . . . . . . . . . . . . . . . . . . . . . . . . . . . . . . . . . . . . . . . 184
Testing the Application . . . . . . . . . . . . . . . . . . . . . . . . . . . . . . . . . . . . . . . . . . . . . . . . . . . . . . . . . . . . . . . . . . . . . . . . . . . . . . . . . . . . . . . . . .185
How to Call an External Web Service From a Process . . . . . . . . . . . . . . . . . . . . . . . . . . . . . . . . . . . . . . . . . . . . . . . . . . . . . . . . . . . . . . . 186
Importing the FindAddress Analysis Project . . . . . . . . . . . . . . . . . . . . . . . . . . . . . . . . . . . . . . . . . . . . . . . . . . . . . . . . . . . . . . . . . . . . . 187
Importing the Business Process . . . . . . . . . . . . . . . . . . . . . . . . . . . . . . . . . . . . . . . . . . . . . . . . . . . . . . . . . . . . . . . . . . . . . . . . . . . . 187
Importing the Organization Model . . . . . . . . . . . . . . . . . . . . . . . . . . . . . . . . . . . . . . . . . . . . . . . . . . . . . . . . . . . . . . . . . . . . . . . . . . .188
Importing the UKAddressService WSDL Document . . . . . . . . . . . . . . . . . . . . . . . . . . . . . . . . . . . . . . . . . . . . . . . . . . . . . . . . . . . . . .189
Creating a Web Service Task . . . . . . . . . . . . . . . . . . . . . . . . . . . . . . . . . . . . . . . . . . . . . . . . . . . . . . . . . . . . . . . . . . . . . . . . . . . . . . . . . . . 189
Setting up Data Inputs to and Outputs from the Web Service . . . . . . . . . . . . . . . . . . . . . . . . . . . . . . . . . . . . . . . . . . . . . . . . . . . . 190
Setting Up a System Participant . . . . . . . . . . . . . . . . . . . . . . . . . . . . . . . . . . . . . . . . . . . . . . . . . . . . . . . . . . . . . . . . . . . . . . . . . . . . . . . . .191
7
TIBCO Business Studio Tutorials
Creating an HTTP Client Resource Instance . . . . . . . . . . . . . . . . . . . . . . . . . . . . . . . . . . . . . . . . . . . . . . . . . . . . . . . . . . . . . . . . . . . . 192
Create an HTTP Client Resource Template . . . . . . . . . . . . . . . . . . . . . . . . . . . . . . . . . . . . . . . . . . . . . . . . . . . . . . . . . . . . . . . . . 192
Create and Install an HTTP Client Resource Instance . . . . . . . . . . . . . . . . . . . . . . . . . . . . . . . . . . . . . . . . . . . . . . . . . . . . . . . 193
Deploying the Application . . . . . . . . . . . . . . . . . . . . . . . . . . . . . . . . . . . . . . . . . . . . . . . . . . . . . . . . . . . . . . . . . . . . . . . . . . . . . . . . . . . . . . . 193
Deploy the EasyAsExtendedOMSolution Organization Model . . . . . . . . . . . . . . . . . . . . . . . . . . . . . . . . . . . . . . . . . . . . . . . 193
Deploy the FindAddress Application . . . . . . . . . . . . . . . . . . . . . . . . . . . . . . . . . . . . . . . . . . . . . . . . . . . . . . . . . . . . . . . . . . . . . . . . 194
Testing the Application . . . . . . . . . . . . . . . . . . . . . . . . . . . . . . . . . . . . . . . . . . . . . . . . . . . . . . . . . . . . . . . . . . . . . . . . . . . . . . . . . . . . . . . . . .197
Importing a Tutorial Solution . . . . . . . . . . . . . . . . . . . . . . . . . . . . . . . . . . . . . . . . . . . . . . . . . . . . . . . . . . . . . . . . . . . . . . . . . . . . . . . . . . . . 197
How to Call a Secured External Web Service From a Process . . . . . . . . . . . . . . . . . . . . . . . . . . . . . . . . . . . . . . . . . . . . . . . . . . . . . . . .198
Obtaining and Distributing the Required Security Credentials . . . . . . . . . . . . . . . . . . . . . . . . . . . . . . . . . . . . . . . . . . . . . . . . . . . . 199
Generating a Keypair . . . . . . . . . . . . . . . . . . . . . . . . . . . . . . . . . . . . . . . . . . . . . . . . . . . . . . . . . . . . . . . . . . . . . . . . . . . . . . . . . . . . . . .199
Exporting the Certificate . . . . . . . . . . . . . . . . . . . . . . . . . . . . . . . . . . . . . . . . . . . . . . . . . . . . . . . . . . . . . . . . . . . . . . . . . . . . . . . . . . . . 200
Importing the Certificate into the Host System’s Truststore . . . . . . . . . . . . . . . . . . . . . . . . . . . . . . . . . . . . . . . . . . . . . . . . . . 200
Creating a Keystore Provider Resource Template . . . . . . . . . . . . . . . . . . . . . . . . . . . . . . . . . . . . . . . . . . . . . . . . . . . . . . . . . . . . . . . 200
Creating an Identity Provider Resource Template . . . . . . . . . . . . . . . . . . . . . . . . . . . . . . . . . . . . . . . . . . . . . . . . . . . . . . . . . . . . . . . .201
Creating the Identity Provider Resource Template . . . . . . . . . . . . . . . . . . . . . . . . . . . . . . . . . . . . . . . . . . . . . . . . . . . . . . . . . . 201
Creating the Resource Instances . . . . . . . . . . . . . . . . . . . . . . . . . . . . . . . . . . . . . . . . . . . . . . . . . . . . . . . . . . . . . . . . . . . . . . . . . . . 201
Configuring the System Participant in the Calling Process . . . . . . . . . . . . . . . . . . . . . . . . . . . . . . . . . . . . . . . . . . . . . . . . . . . . . . . 202
How to Call a BPM Runtime Service from a Process . . . . . . . . . . . . . . . . . . . . . . . . . . . . . . . . . . . . . . . . . . . . . . . . . . . . . . . . . . . . . . . . . 202
Importing the WSDL that Defines the Required BPM Service . . . . . . . . . . . . . . . . . . . . . . . . . . . . . . . . . . . . . . . . . . . . . . . . . . . . 204
Generating the WSDL for the EntityResolverService . . . . . . . . . . . . . . . . . . . . . . . . . . . . . . . . . . . . . . . . . . . . . . . . . . . . . . . . 204
Importing the EntityResolverService WSDL into the Project . . . . . . . . . . . . . . . . . . . . . . . . . . . . . . . . . . . . . . . . . . . . . . . . . 205
Configuring the Web Service Call . . . . . . . . . . . . . . . . . . . . . . . . . . . . . . . . . . . . . . . . . . . . . . . . . . . . . . . . . . . . . . . . . . . . . . . . . . . . . . . 209
Calling the lookupUser Operation . . . . . . . . . . . . . . . . . . . . . . . . . . . . . . . . . . . . . . . . . . . . . . . . . . . . . . . . . . . . . . . . . . . . . . . . . . .209
Identifying the Shared Resource to be Used to Call the Service . . . . . . . . . . . . . . . . . . . . . . . . . . . . . . . . . . . . . . . . . . . . . 210
Configuring how the Call will be Authenticated . . . . . . . . . . . . . . . . . . . . . . . . . . . . . . . . . . . . . . . . . . . . . . . . . . . . . . . . . . . . . . 210
Configuring Input Parameters . . . . . . . . . . . . . . . . . . . . . . . . . . . . . . . . . . . . . . . . . . . . . . . . . . . . . . . . . . . . . . . . . . . . . . . . . . . . . . . . . . . 211
Creating Required Data Fields . . . . . . . . . . . . . . . . . . . . . . . . . . . . . . . . . . . . . . . . . . . . . . . . . . . . . . . . . . . . . . . . . . . . . . . . . . . . . .211
Initializing Input Data . . . . . . . . . . . . . . . . . . . . . . . . . . . . . . . . . . . . . . . . . . . . . . . . . . . . . . . . . . . . . . . . . . . . . . . . . . . . . . . . . . . . . . . 211
Configuring Input Mappings . . . . . . . . . . . . . . . . . . . . . . . . . . . . . . . . . . . . . . . . . . . . . . . . . . . . . . . . . . . . . . . . . . . . . . . . . . . . . . . . 212
Processing Output Data . . . . . . . . . . . . . . . . . . . . . . . . . . . . . . . . . . . . . . . . . . . . . . . . . . . . . . . . . . . . . . . . . . . . . . . . . . . . . . . . . . . . . . . . 212
Creating Required Data Fields . . . . . . . . . . . . . . . . . . . . . . . . . . . . . . . . . . . . . . . . . . . . . . . . . . . . . . . . . . . . . . . . . . . . . . . . . . . . . .213
Configuring Output Mappings . . . . . . . . . . . . . . . . . . . . . . . . . . . . . . . . . . . . . . . . . . . . . . . . . . . . . . . . . . . . . . . . . . . . . . . . . . . . . . .214
Processing the Output Data . . . . . . . . . . . . . . . . . . . . . . . . . . . . . . . . . . . . . . . . . . . . . . . . . . . . . . . . . . . . . . . . . . . . . . . . . . . . . . . . 214
Configuring Shared Resources to Call the BPM Service . . . . . . . . . . . . . . . . . . . . . . . . . . . . . . . . . . . . . . . . . . . . . . . . . . . . . . . . . 215
Creating an HTTP Client Resource Template . . . . . . . . . . . . . . . . . . . . . . . . . . . . . . . . . . . . . . . . . . . . . . . . . . . . . . . . . . . . . . . 215
Configuring Shared Resources to Identify the Calling User . . . . . . . . . . . . . . . . . . . . . . . . . . . . . . . . . . . . . . . . . . . . . . . . . . . . . . .216
Creating a Keystore . . . . . . . . . . . . . . . . . . . . . . . . . . . . . . . . . . . . . . . . . . . . . . . . . . . . . . . . . . . . . . . . . . . . . . . . . . . . . . . . . . . . . . . . 216
Creating a Keystore Provider Resource Template . . . . . . . . . . . . . . . . . . . . . . . . . . . . . . . . . . . . . . . . . . . . . . . . . . . . . . . . . . .216
Creating an Identity Provider Resource Instance . . . . . . . . . . . . . . . . . . . . . . . . . . . . . . . . . . . . . . . . . . . . . . . . . . . . . . . . . . . . 217
8
TIBCO Business Studio Tutorials
Creating the Resource Instances . . . . . . . . . . . . . . . . . . . . . . . . . . . . . . . . . . . . . . . . . . . . . . . . . . . . . . . . . . . . . . . . . . . . . . . . . . . 217
Deploying and Testing the callLookupUser Application . . . . . . . . . . . . . . . . . . . . . . . . . . . . . . . . . . . . . . . . . . . . . . . . . . . . . . . . . . 217
How to Call a Virtualized Service from a Process . . . . . . . . . . . . . . . . . . . . . . . . . . . . . . . . . . . . . . . . . . . . . . . . . . . . . . . . . . . . . . . . . . . . 218
Importing the Organization Model . . . . . . . . . . . . . . . . . . . . . . . . . . . . . . . . . . . . . . . . . . . . . . . . . . . . . . . . . . . . . . . . . . . . . . . . . . . . . . . 219
Creating the Service Provider Project . . . . . . . . . . . . . . . . . . . . . . . . . . . . . . . . . . . . . . . . . . . . . . . . . . . . . . . . . . . . . . . . . . . . . . . . . . . 219
Creating the Business Objects in the Provider Project . . . . . . . . . . . . . . . . . . . . . . . . . . . . . . . . . . . . . . . . . . . . . . . . . . . . . . . . . . . 220
Defining the Business Process in the Provider Project . . . . . . . . . . . . . . . . . . . . . . . . . . . . . . . . . . . . . . . . . . . . . . . . . . . . . . . . . . . 220
Defining the Provider Project Parameters . . . . . . . . . . . . . . . . . . . . . . . . . . . . . . . . . . . . . . . . . . . . . . . . . . . . . . . . . . . . . . . . . . . . . . . 221
Defining the Task Script . . . . . . . . . . . . . . . . . . . . . . . . . . . . . . . . . . . . . . . . . . . . . . . . . . . . . . . . . . . . . . . . . . . . . . . . . . . . . . . . . . . . . . . . 221
Creating the Service Consumer Project . . . . . . . . . . . . . . . . . . . . . . . . . . . . . . . . . . . . . . . . . . . . . . . . . . . . . . . . . . . . . . . . . . . . . . . . . 222
Defining the Consumer Business Process . . . . . . . . . . . . . . . . . . . . . . . . . . . . . . . . . . . . . . . . . . . . . . . . . . . . . . . . . . . . . . . . . . . . . . . 222
Configuring the Business Process . . . . . . . . . . . . . . . . . . . . . . . . . . . . . . . . . . . . . . . . . . . . . . . . . . . . . . . . . . . . . . . . . . . . . . . . . . 222
Defining the Process Data . . . . . . . . . . . . . . . . . . . . . . . . . . . . . . . . . . . . . . . . . . . . . . . . . . . . . . . . . . . . . . . . . . . . . . . . . . . . . . . . . .224
Defining the Web Service Call . . . . . . . . . . . . . . . . . . . . . . . . . . . . . . . . . . . . . . . . . . . . . . . . . . . . . . . . . . . . . . . . . . . . . . . . . . . . . . 224
Generating the Business Service . . . . . . . . . . . . . . . . . . . . . . . . . . . . . . . . . . . . . . . . . . . . . . . . . . . . . . . . . . . . . . . . . . . . . . . . . . . 225
Final Steps . . . . . . . . . . . . . . . . . . . . . . . . . . . . . . . . . . . . . . . . . . . . . . . . . . . . . . . . . . . . . . . . . . . . . . . . . . . . . . . . . . . . . . . . . . . . . . . . .226
Checking the System Participant . . . . . . . . . . . . . . . . . . . . . . . . . . . . . . . . . . . . . . . . . . . . . . . . . . . . . . . . . . . . . . . . . . . . . . . . . . . . . . . . 226
Mapping the Parameters in the Consumer Process . . . . . . . . . . . . . . . . . . . . . . . . . . . . . . . . . . . . . . . . . . . . . . . . . . . . . . . . . . . . . . 227
Deploying the Projects . . . . . . . . . . . . . . . . . . . . . . . . . . . . . . . . . . . . . . . . . . . . . . . . . . . . . . . . . . . . . . . . . . . . . . . . . . . . . . . . . . . . . . . . . . 228
Deploying the Organization Model . . . . . . . . . . . . . . . . . . . . . . . . . . . . . . . . . . . . . . . . . . . . . . . . . . . . . . . . . . . . . . . . . . . . . . . . . . 228
Deploying the Service Provider Application . . . . . . . . . . . . . . . . . . . . . . . . . . . . . . . . . . . . . . . . . . . . . . . . . . . . . . . . . . . . . . . . . 228
Deploying the Service Consumer Application . . . . . . . . . . . . . . . . . . . . . . . . . . . . . . . . . . . . . . . . . . . . . . . . . . . . . . . . . . . . . . . 228
Testing the Application . . . . . . . . . . . . . . . . . . . . . . . . . . . . . . . . . . . . . . . . . . . . . . . . . . . . . . . . . . . . . . . . . . . . . . . . . . . . . . . . . . . . . . . . . .230
Installing the Tutorial Solution . . . . . . . . . . . . . . . . . . . . . . . . . . . . . . . . . . . . . . . . . . . . . . . . . . . . . . . . . . . . . . . . . . . . . . . . . . . . . . . . . . . 232
Using Credential Mapping to Associate a Specific Identity with a Process Instance . . . . . . . . . . . . . . . . . . . . . . . . . . . . . . . . . . . 232
Credential Mapping . . . . . . . . . . . . . . . . . . . . . . . . . . . . . . . . . . . . . . . . . . . . . . . . . . . . . . . . . . . . . . . . . . . . . . . . . . . . . . . . . . . . . . . . . . . . . 232
Process Design . . . . . . . . . . . . . . . . . . . . . . . . . . . . . . . . . . . . . . . . . . . . . . . . . . . . . . . . . . . . . . . . . . . . . . . . . . . . . . . . . . . . . . . . . . . . . . . . .234
Creating a Keystore Containing the Security Credentials to Run the Business Process . . . . . . . . . . . . . . . . . . . . . . . . . . . 235
Creating the Links to the Keystore . . . . . . . . . . . . . . . . . . . . . . . . . . . . . . . . . . . . . . . . . . . . . . . . . . . . . . . . . . . . . . . . . . . . . . . . . . . . . . 237
Creating and Install a Keystore Provider Resource Instance . . . . . . . . . . . . . . . . . . . . . . . . . . . . . . . . . . . . . . . . . . . . . . . . .237
Creating and Installing an Identity Provider Resource Instance . . . . . . . . . . . . . . . . . . . . . . . . . . . . . . . . . . . . . . . . . . . . . . 238
Creating and Installing an Identity Provider Application . . . . . . . . . . . . . . . . . . . . . . . . . . . . . . . . . . . . . . . . . . . . . . . . . . . . . . 238
Configuring the Credential Mapping Process to Assign the Security Policy . . . . . . . . . . . . . . . . . . . . . . . . . . . . . . . . . . . . . . . 239
How to Send an Email From a Process . . . . . . . . . . . . . . . . . . . . . . . . . . . . . . . . . . . . . . . . . . . . . . . . . . . . . . . . . . . . . . . . . . . . . . . . . . . . . . 239
Importing the AcknowledgeClaim Analysis Project . . . . . . . . . . . . . . . . . . . . . . . . . . . . . . . . . . . . . . . . . . . . . . . . . . . . . . . . . . . . . . . 240
Creating an Email Service Task . . . . . . . . . . . . . . . . . . . . . . . . . . . . . . . . . . . . . . . . . . . . . . . . . . . . . . . . . . . . . . . . . . . . . . . . . . . . . . . . . 241
Setting up Dynamic Data Inputs to the Email . . . . . . . . . . . . . . . . . . . . . . . . . . . . . . . . . . . . . . . . . . . . . . . . . . . . . . . . . . . . . . . . . . . . 241
Populating the Data Fields . . . . . . . . . . . . . . . . . . . . . . . . . . . . . . . . . . . . . . . . . . . . . . . . . . . . . . . . . . . . . . . . . . . . . . . . . . . . . . . . . . . . . . 242
Setting Up a System Participant . . . . . . . . . . . . . . . . . . . . . . . . . . . . . . . . . . . . . . . . . . . . . . . . . . . . . . . . . . . . . . . . . . . . . . . . . . . . . . . . .242
Creating an SMTP Resource Instance . . . . . . . . . . . . . . . . . . . . . . . . . . . . . . . . . . . . . . . . . . . . . . . . . . . . . . . . . . . . . . . . . . . . . . . . . . 243
9
TIBCO Business Studio Tutorials
Creating an SMTP Resource Template . . . . . . . . . . . . . . . . . . . . . . . . . . . . . . . . . . . . . . . . . . . . . . . . . . . . . . . . . . . . . . . . . . . . . 243
Creating and Install an SMTP Resource Instance . . . . . . . . . . . . . . . . . . . . . . . . . . . . . . . . . . . . . . . . . . . . . . . . . . . . . . . . . . . 244
Deploying the Application . . . . . . . . . . . . . . . . . . . . . . . . . . . . . . . . . . . . . . . . . . . . . . . . . . . . . . . . . . . . . . . . . . . . . . . . . . . . . . . . . . . . . . . 244
Testing the Application . . . . . . . . . . . . . . . . . . . . . . . . . . . . . . . . . . . . . . . . . . . . . . . . . . . . . . . . . . . . . . . . . . . . . . . . . . . . . . . . . . . . . . . . . .246
How to Call TIBCO BusinessEvents™ from a Process . . . . . . . . . . . . . . . . . . . . . . . . . . . . . . . . . . . . . . . . . . . . . . . . . . . . . . . . . . . . . . . .247
Creating the ActiveMatrix BPM Project . . . . . . . . . . . . . . . . . . . . . . . . . . . . . . . . . . . . . . . . . . . . . . . . . . . . . . . . . . . . . . . . . . . . . . . . . . 248
Creating the Business Object Model Objects . . . . . . . . . . . . . . . . . . . . . . . . . . . . . . . . . . . . . . . . . . . . . . . . . . . . . . . . . . . . . . . . . . . . 249
Defining the Business Process . . . . . . . . . . . . . . . . . . . . . . . . . . . . . . . . . . . . . . . . . . . . . . . . . . . . . . . . . . . . . . . . . . . . . . . . . . . . . . . . . . 249
Configuring the Business Process . . . . . . . . . . . . . . . . . . . . . . . . . . . . . . . . . . . . . . . . . . . . . . . . . . . . . . . . . . . . . . . . . . . . . . . . . . 249
Creating a Data Field . . . . . . . . . . . . . . . . . . . . . . . . . . . . . . . . . . . . . . . . . . . . . . . . . . . . . . . . . . . . . . . . . . . . . . . . . . . . . . . . . . . . . . .249
Configuring the Web Service Task . . . . . . . . . . . . . . . . . . . . . . . . . . . . . . . . . . . . . . . . . . . . . . . . . . . . . . . . . . . . . . . . . . . . . . . . . .250
Creating a Business Service . . . . . . . . . . . . . . . . . . . . . . . . . . . . . . . . . . . . . . . . . . . . . . . . . . . . . . . . . . . . . . . . . . . . . . . . . . . . . . . .251
Creating the HTTP Client Shared Resource . . . . . . . . . . . . . . . . . . . . . . . . . . . . . . . . . . . . . . . . . . . . . . . . . . . . . . . . . . . . . . . . .251
Creating the HTTP Client Resource Instance . . . . . . . . . . . . . . . . . . . . . . . . . . . . . . . . . . . . . . . . . . . . . . . . . . . . . . . . . . . . . . . 252
Deploying the Business Process Application . . . . . . . . . . . . . . . . . . . . . . . . . . . . . . . . . . . . . . . . . . . . . . . . . . . . . . . . . . . . . . . . . . . . 252
Creating the BusinessEvents Project . . . . . . . . . . . . . . . . . . . . . . . . . . . . . . . . . . . . . . . . . . . . . . . . . . . . . . . . . . . . . . . . . . . . . . . . . . . . 252
Creating a New BusinessEvents Project . . . . . . . . . . . . . . . . . . . . . . . . . . . . . . . . . . . . . . . . . . . . . . . . . . . . . . . . . . . . . . . . . . . . 252
Importing the TIBCO ActiveMatrix BPM WSDL . . . . . . . . . . . . . . . . . . . . . . . . . . . . . . . . . . . . . . . . . . . . . . . . . . . . . . . . . . . . . .253
Creating the Ontology . . . . . . . . . . . . . . . . . . . . . . . . . . . . . . . . . . . . . . . . . . . . . . . . . . . . . . . . . . . . . . . . . . . . . . . . . . . . . . . . . . . . . . . . . . 253
Creating a Concept . . . . . . . . . . . . . . . . . . . . . . . . . . . . . . . . . . . . . . . . . . . . . . . . . . . . . . . . . . . . . . . . . . . . . . . . . . . . . . . . . . . . . . . . 253
Configuring the Concept . . . . . . . . . . . . . . . . . . . . . . . . . . . . . . . . . . . . . . . . . . . . . . . . . . . . . . . . . . . . . . . . . . . . . . . . . . . . . . . . . . . .253
Setting Up the Rules and Rule Functions . . . . . . . . . . . . . . . . . . . . . . . . . . . . . . . . . . . . . . . . . . . . . . . . . . . . . . . . . . . . . . . . . . . . . . . .254
Creating a Virtual Rule Functions Folder . . . . . . . . . . . . . . . . . . . . . . . . . . . . . . . . . . . . . . . . . . . . . . . . . . . . . . . . . . . . . . . . . . . . 254
Creating a Virtual Rule Function . . . . . . . . . . . . . . . . . . . . . . . . . . . . . . . . . . . . . . . . . . . . . . . . . . . . . . . . . . . . . . . . . . . . . . . . . . . . 254
Configuring the Virtual Rule Function . . . . . . . . . . . . . . . . . . . . . . . . . . . . . . . . . . . . . . . . . . . . . . . . . . . . . . . . . . . . . . . . . . . . . . . 254
Configuring the Rule . . . . . . . . . . . . . . . . . . . . . . . . . . . . . . . . . . . . . . . . . . . . . . . . . . . . . . . . . . . . . . . . . . . . . . . . . . . . . . . . . . . . . . . 255
Configuring the Rule XSLT Request Mapping . . . . . . . . . . . . . . . . . . . . . . . . . . . . . . . . . . . . . . . . . . . . . . . . . . . . . . . . . . . . . . . 255
Configuring the Rule XSLT Response Mapping . . . . . . . . . . . . . . . . . . . . . . . . . . . . . . . . . . . . . . . . . . . . . . . . . . . . . . . . . . . . . 256
Defining the Decision Table . . . . . . . . . . . . . . . . . . . . . . . . . . . . . . . . . . . . . . . . . . . . . . . . . . . . . . . . . . . . . . . . . . . . . . . . . . . . . . . . . . . . . 257
Creating a Decision Table . . . . . . . . . . . . . . . . . . . . . . . . . . . . . . . . . . . . . . . . . . . . . . . . . . . . . . . . . . . . . . . . . . . . . . . . . . . . . . . . . . 257
Configuring the Decision Table . . . . . . . . . . . . . . . . . . . . . . . . . . . . . . . . . . . . . . . . . . . . . . . . . . . . . . . . . . . . . . . . . . . . . . . . . . . . . 257
Specifying the Decision Logic . . . . . . . . . . . . . . . . . . . . . . . . . . . . . . . . . . . . . . . . . . . . . . . . . . . . . . . . . . . . . . . . . . . . . . . . . . . . . . 258
Preparing the BusinessEvents Application for Deployment . . . . . . . . . . . . . . . . . . . . . . . . . . . . . . . . . . . . . . . . . . . . . . . . . . . . . . .259
Creating a Cluster Configuration . . . . . . . . . . . . . . . . . . . . . . . . . . . . . . . . . . . . . . . . . . . . . . . . . . . . . . . . . . . . . . . . . . . . . . . . . . . .259
Configuring the Cluster Configuration . . . . . . . . . . . . . . . . . . . . . . . . . . . . . . . . . . . . . . . . . . . . . . . . . . . . . . . . . . . . . . . . . . . . . . . 259
Deploying the BusinessEvents Application . . . . . . . . . . . . . . . . . . . . . . . . . . . . . . . . . . . . . . . . . . . . . . . . . . . . . . . . . . . . . . . . . . . . . . 259
Building the Enterprise Archive File . . . . . . . . . . . . . . . . . . . . . . . . . . . . . . . . . . . . . . . . . . . . . . . . . . . . . . . . . . . . . . . . . . . . . . . . . 259
Starting the BusinessEvents Engine . . . . . . . . . . . . . . . . . . . . . . . . . . . . . . . . . . . . . . . . . . . . . . . . . . . . . . . . . . . . . . . . . . . . . . . . . . . . .260
Testing the Applications . . . . . . . . . . . . . . . . . . . . . . . . . . . . . . . . . . . . . . . . . . . . . . . . . . . . . . . . . . . . . . . . . . . . . . . . . . . . . . . . . . . . . . . . 261
How to Call a TIBCO ActiveMatrix BusinessWorks Service from a BPM Process . . . . . . . . . . . . . . . . . . . . . . . . . . . . . . . . . . . . . .261
10
TIBCO Business Studio Tutorials
Setting up the Environment . . . . . . . . . . . . . . . . . . . . . . . . . . . . . . . . . . . . . . . . . . . . . . . . . . . . . . . . . . . . . . . . . . . . . . . . . . . . . . . . . . . . . 262
Importing the TIBCO SOA Project and ActiveMatrix BusinessWorks Project . . . . . . . . . . . . . . . . . . . . . . . . . . . . . . . . . . . . . .262
Importing the Simple Organization Model (Optional) . . . . . . . . . . . . . . . . . . . . . . . . . . . . . . . . . . . . . . . . . . . . . . . . . . . . . . . . . . . . . 262
Creating the BPM Developer Project . . . . . . . . . . . . . . . . . . . . . . . . . . . . . . . . . . . . . . . . . . . . . . . . . . . . . . . . . . . . . . . . . . . . . . . . . . . . 263
Importing the ActiveMatrix BusinessWorks Service Engine WSDL . . . . . . . . . . . . . . . . . . . . . . . . . . . . . . . . . . . . . . . . . . . . . . . 263
Defining the Business Process . . . . . . . . . . . . . . . . . . . . . . . . . . . . . . . . . . . . . . . . . . . . . . . . . . . . . . . . . . . . . . . . . . . . . . . . . . . . . . . . . . 264
Configuring the Business Process . . . . . . . . . . . . . . . . . . . . . . . . . . . . . . . . . . . . . . . . . . . . . . . . . . . . . . . . . . . . . . . . . . . . . . . . . . 264
Creating the Data Fields . . . . . . . . . . . . . . . . . . . . . . . . . . . . . . . . . . . . . . . . . . . . . . . . . . . . . . . . . . . . . . . . . . . . . . . . . . . . . . . . . . . .265
Configuring the Service Task . . . . . . . . . . . . . . . . . . . . . . . . . . . . . . . . . . . . . . . . . . . . . . . . . . . . . . . . . . . . . . . . . . . . . . . . . . . . . . . 265
Creating a Business Service . . . . . . . . . . . . . . . . . . . . . . . . . . . . . . . . . . . . . . . . . . . . . . . . . . . . . . . . . . . . . . . . . . . . . . . . . . . . . . . .265
Creating a DAA of the SimpleAddressClient Project . . . . . . . . . . . . . . . . . . . . . . . . . . . . . . . . . . . . . . . . . . . . . . . . . . . . . . . . . 265
Deploying the Applications . . . . . . . . . . . . . . . . . . . . . . . . . . . . . . . . . . . . . . . . . . . . . . . . . . . . . . . . . . . . . . . . . . . . . . . . . . . . . . . . . . . . . . 266
Deploying the TIBCO SOA Project . . . . . . . . . . . . . . . . . . . . . . . . . . . . . . . . . . . . . . . . . . . . . . . . . . . . . . . . . . . . . . . . . . . . . . . . . .266
Deploying the Organization Model . . . . . . . . . . . . . . . . . . . . . . . . . . . . . . . . . . . . . . . . . . . . . . . . . . . . . . . . . . . . . . . . . . . . . . . . . . 266
Deploying the ActiveMatrix BPM Project . . . . . . . . . . . . . . . . . . . . . . . . . . . . . . . . . . . . . . . . . . . . . . . . . . . . . . . . . . . . . . . . . . . . 267
Testing the Integration Between Applications . . . . . . . . . . . . . . . . . . . . . . . . . . . . . . . . . . . . . . . . . . . . . . . . . . . . . . . . . . . . . . . . . . . . 267
Using the Schema Construct xsd groups . . . . . . . . . . . . . . . . . . . . . . . . . . . . . . . . . . . . . . . . . . . . . . . . . . . . . . . . . . . . . . . . . . . . . . . . 268
Using Schema Construct xsd choice in a BPM Process . . . . . . . . . . . . . . . . . . . . . . . . . . . . . . . . . . . . . . . . . . . . . . . . . . . . . . . . . . . . . . 269
Creating the BPM Developer Project . . . . . . . . . . . . . . . . . . . . . . . . . . . . . . . . . . . . . . . . . . . . . . . . . . . . . . . . . . . . . . . . . . . . . . . . . . . . 269
Importing the ActiveMatrix BusinessWorks Service Engine WSDL . . . . . . . . . . . . . . . . . . . . . . . . . . . . . . . . . . . . . . . . . . . . . . . 270
Defining the Type Address in the BOM . . . . . . . . . . . . . . . . . . . . . . . . . . . . . . . . . . . . . . . . . . . . . . . . . . . . . . . . . . . . . . . . . . . . . . . . . . 271
Defining the Business Process . . . . . . . . . . . . . . . . . . . . . . . . . . . . . . . . . . . . . . . . . . . . . . . . . . . . . . . . . . . . . . . . . . . . . . . . . . . . . . . . . . 272
Configuring the Business Process . . . . . . . . . . . . . . . . . . . . . . . . . . . . . . . . . . . . . . . . . . . . . . . . . . . . . . . . . . . . . . . . . . . . . . . . . . 272
Creating the Data Fields . . . . . . . . . . . . . . . . . . . . . . . . . . . . . . . . . . . . . . . . . . . . . . . . . . . . . . . . . . . . . . . . . . . . . . . . . . . . . . . . . . . .272
Configuring the Service Task . . . . . . . . . . . . . . . . . . . . . . . . . . . . . . . . . . . . . . . . . . . . . . . . . . . . . . . . . . . . . . . . . . . . . . . . . . . . . . . 273
Configuring the Script Task . . . . . . . . . . . . . . . . . . . . . . . . . . . . . . . . . . . . . . . . . . . . . . . . . . . . . . . . . . . . . . . . . . . . . . . . . . . . . . . . .273
Creating a Business Service . . . . . . . . . . . . . . . . . . . . . . . . . . . . . . . . . . . . . . . . . . . . . . . . . . . . . . . . . . . . . . . . . . . . . . . . . . . . . . . .274
Deploying the Applications . . . . . . . . . . . . . . . . . . . . . . . . . . . . . . . . . . . . . . . . . . . . . . . . . . . . . . . . . . . . . . . . . . . . . . . . . . . . . . . . . . . . . . 274
Deploying the TIBCO SOA Project . . . . . . . . . . . . . . . . . . . . . . . . . . . . . . . . . . . . . . . . . . . . . . . . . . . . . . . . . . . . . . . . . . . . . . . . . .274
Deploying the Organization Model . . . . . . . . . . . . . . . . . . . . . . . . . . . . . . . . . . . . . . . . . . . . . . . . . . . . . . . . . . . . . . . . . . . . . . . . . . 275
Deploying the ActiveMatrix BPM Project . . . . . . . . . . . . . . . . . . . . . . . . . . . . . . . . . . . . . . . . . . . . . . . . . . . . . . . . . . . . . . . . . . . . 275
Running the Tutorial . . . . . . . . . . . . . . . . . . . . . . . . . . . . . . . . . . . . . . . . . . . . . . . . . . . . . . . . . . . . . . . . . . . . . . . . . . . . . . . . . . . . . . . . . . . . 275
Integrating Data Using POJO . . . . . . . . . . . . . . . . . . . . . . . . . . . . . . . . . . . . . . . . . . . . . . . . . . . . . . . . . . . . . . . . . . . . . 277
How to Integrate Data into a Process using Plain Old Java Objects (POJO) . . . . . . . . . . . . . . . . . . . . . . . . . . . . . . . . . . . . . . . . . . 277
Importing the Initial Resources . . . . . . . . . . . . . . . . . . . . . . . . . . . . . . . . . . . . . . . . . . . . . . . . . . . . . . . . . . . . . . . . . . . . . . . . . . . . . . . . . . 277
Creating a Java service task . . . . . . . . . . . . . . . . . . . . . . . . . . . . . . . . . . . . . . . . . . . . . . . . . . . . . . . . . . . . . . . . . . . . . . . . . . . . . . . . . . . . 278
Setting up Data Inputs and Outputs . . . . . . . . . . . . . . . . . . . . . . . . . . . . . . . . . . . . . . . . . . . . . . . . . . . . . . . . . . . . . . . . . . . . . . . . . . . . . 278
Deploying and Running the Process . . . . . . . . . . . . . . . . . . . . . . . . . . . . . . . . . . . . . . . . . . . . . . . . . . . . . . . . . . . . . . . . . . . . . . . . . . . . 279
Providing Services . . . . . . . . . . . . . . . . . . . . . . . . . . . . . . . . . . . . . . . . . . . . . . . . . . . . . . . . . . . . . . . . . . . . . . . . . . . . . . . 280
Exposing a Process as a Service . . . . . . . . . . . . . . . . . . . . . . . . . . . . . . . . . . . . . . . . . . . . . . . . . . . . . . . . . . . . . . . . . . . . . . . . . . . . . . . . . . . . 280
11
TIBCO Business Studio Tutorials

Creating a WelcomeUsersService Project . . . . . . . . . . . . . . . . . . . . . . . . . . . . . . . . . . . . . . . . . . . . . . . . . . . . . . . . . . . . . . . . . . . . . . . 280
Configuring the Start Event to Receive a Message From a Client . . . . . . . . . . . . . . . . . . . . . . . . . . . . . . . . . . . . . . . . . . . . . . . . 281
Configuring the End Event to Return a Message to the Client . . . . . . . . . . . . . . . . . . . . . . . . . . . . . . . . . . . . . . . . . . . . . . . . . . . . 282
Defining the Data Inputs to and Outputs from the Process . . . . . . . . . . . . . . . . . . . . . . . . . . . . . . . . . . . . . . . . . . . . . . . . . . . . . . . 283
Creating a Script to Generate the Welcome Greeting . . . . . . . . . . . . . . . . . . . . . . . . . . . . . . . . . . . . . . . . . . . . . . . . . . . . . . . . . . . . 285
Deploying the Application . . . . . . . . . . . . . . . . . . . . . . . . . . . . . . . . . . . . . . . . . . . . . . . . . . . . . . . . . . . . . . . . . . . . . . . . . . . . . . . . . . . . . . . 285
Generating the WSDL . . . . . . . . . . . . . . . . . . . . . . . . . . . . . . . . . . . . . . . . . . . . . . . . . . . . . . . . . . . . . . . . . . . . . . . . . . . . . . . . . . . . . . . . . . 286
Testing the Application . . . . . . . . . . . . . . . . . . . . . . . . . . . . . . . . . . . . . . . . . . . . . . . . . . . . . . . . . . . . . . . . . . . . . . . . . . . . . . . . . . . . . . . . . .287
Using Mediation to Transform and Route an Event to TIBCO BPM . . . . . . . . . . . . . . . . . . . . . . . . . . . . . . . . . . . . . . . . . . . . . . . . . . . 289
Creating a TIBCO SOA Project . . . . . . . . . . . . . . . . . . . . . . . . . . . . . . . . . . . . . . . . . . . . . . . . . . . . . . . . . . . . . . . . . . . . . . . . . . . . . . . . . 290
Importing the WSDL Files . . . . . . . . . . . . . . . . . . . . . . . . . . . . . . . . . . . . . . . . . . . . . . . . . . . . . . . . . . . . . . . . . . . . . . . . . . . . . . . . . . . . . . .290
Creating and Configuring the Mediation Flow Diagram . . . . . . . . . . . . . . . . . . . . . . . . . . . . . . . . . . . . . . . . . . . . . . . . . . . . . . . . . . .290
Adding a Route Mediation Task . . . . . . . . . . . . . . . . . . . . . . . . . . . . . . . . . . . . . . . . . . . . . . . . . . . . . . . . . . . . . . . . . . . . . . . . . . . . . . . . . 292
Adding Transform Mediation Tasks . . . . . . . . . . . . . . . . . . . . . . . . . . . . . . . . . . . . . . . . . . . . . . . . . . . . . . . . . . . . . . . . . . . . . . . . . . . . . 294
Adding Transform Tasks in the Input Path View . . . . . . . . . . . . . . . . . . . . . . . . . . . . . . . . . . . . . . . . . . . . . . . . . . . . . . . . . . . . . 294
Configuring the Throw Fault Task . . . . . . . . . . . . . . . . . . . . . . . . . . . . . . . . . . . . . . . . . . . . . . . . . . . . . . . . . . . . . . . . . . . . . . . . . . .295
Adding Transform tasks in the Output Path View . . . . . . . . . . . . . . . . . . . . . . . . . . . . . . . . . . . . . . . . . . . . . . . . . . . . . . . . . . . . 297
Configuring the Fault Path View . . . . . . . . . . . . . . . . . . . . . . . . . . . . . . . . . . . . . . . . . . . . . . . . . . . . . . . . . . . . . . . . . . . . . . . . . . . . 297
Creating the Shared Resources . . . . . . . . . . . . . . . . . . . . . . . . . . . . . . . . . . . . . . . . . . . . . . . . . . . . . . . . . . . . . . . . . . . . . . . . . . . . . . . . . 298
Creating Substitution Variables . . . . . . . . . . . . . . . . . . . . . . . . . . . . . . . . . . . . . . . . . . . . . . . . . . . . . . . . . . . . . . . . . . . . . . . . . . . . . 298
Creating the Shared Resources . . . . . . . . . . . . . . . . . . . . . . . . . . . . . . . . . . . . . . . . . . . . . . . . . . . . . . . . . . . . . . . . . . . . . . . . . . . . 299
Binding Properties of the Shared Resources to the Substitution Variables . . . . . . . . . . . . . . . . . . . . . . . . . . . . . . . . . . . 299
Configuring the Mediation Composite . . . . . . . . . . . . . . . . . . . . . . . . . . . . . . . . . . . . . . . . . . . . . . . . . . . . . . . . . . . . . . . . . . . . . . . . . . . 301
Creating the Service . . . . . . . . . . . . . . . . . . . . . . . . . . . . . . . . . . . . . . . . . . . . . . . . . . . . . . . . . . . . . . . . . . . . . . . . . . . . . . . . . . . . . . . . . . . . 301
Creating the References . . . . . . . . . . . . . . . . . . . . . . . . . . . . . . . . . . . . . . . . . . . . . . . . . . . . . . . . . . . . . . . . . . . . . . . . . . . . . . . . . . . . . . . . 302
Creating the Distributed Application Archive . . . . . . . . . . . . . . . . . . . . . . . . . . . . . . . . . . . . . . . . . . . . . . . . . . . . . . . . . . . . . . . . . . . . . 303
Importing a Tutorial Solution . . . . . . . . . . . . . . . . . . . . . . . . . . . . . . . . . . . . . . . . . . . . . . . . . . . . . . . . . . . . . . . . . . . . . . . . . . . . . . . . . . . . 304
Using Openspace . . . . . . . . . . . . . . . . . . . . . . . . . . . . . . . . . . . . . . . . . . . . . . . . . . . . . . . . . . . . . . . . . . . . . . . . . . . . . . . . 305
How to Get Started with Openspace . . . . . . . . . . . . . . . . . . . . . . . . . . . . . . . . . . . . . . . . . . . . . . . . . . . . . . . . . . . . . . . . . . . . . . . . . . . . . . . . . 305
Logging in to Openspace . . . . . . . . . . . . . . . . . . . . . . . . . . . . . . . . . . . . . . . . . . . . . . . . . . . . . . . . . . . . . . . . . . . . . . . . . . . . . . . . . . . . . . . 306
Adding a Gadget . . . . . . . . . . . . . . . . . . . . . . . . . . . . . . . . . . . . . . . . . . . . . . . . . . . . . . . . . . . . . . . . . . . . . . . . . . . . . . . . . . . . . . . . . . . . . . . 306
Starting a Business Service . . . . . . . . . . . . . . . . . . . . . . . . . . . . . . . . . . . . . . . . . . . . . . . . . . . . . . . . . . . . . . . . . . . . . . . . . . . . . . . . . . . . . 310
Using Pageflows and Business Services . . . . . . . . . . . . . . . . . . . . . . . . . . . . . . . . . . . . . . . . . . . . . . . . . . . . . . . . . . .313
How to Model and Run Pageflows . . . . . . . . . . . . . . . . . . . . . . . . . . . . . . . . . . . . . . . . . . . . . . . . . . . . . . . . . . . . . . . . . . . . . . . . . . . . . . . . . . . 313
Importing the Initial Resources . . . . . . . . . . . . . . . . . . . . . . . . . . . . . . . . . . . . . . . . . . . . . . . . . . . . . . . . . . . . . . . . . . . . . . . . . . . . . . . . . . 313
Mapping a Participant to an Organization Model . . . . . . . . . . . . . . . . . . . . . . . . . . . . . . . . . . . . . . . . . . . . . . . . . . . . . . . . . . . . . . . . . 314
Creating a New Pageflow Process . . . . . . . . . . . . . . . . . . . . . . . . . . . . . . . . . . . . . . . . . . . . . . . . . . . . . . . . . . . . . . . . . . . . . . . . . . . . . . 316
Adding a Sequence of Tasks to the Pageflow Process . . . . . . . . . . . . . . . . . . . . . . . . . . . . . . . . . . . . . . . . . . . . . . . . . . . . . . . . . . .320
Associating Existing Data with the Tasks . . . . . . . . . . . . . . . . . . . . . . . . . . . . . . . . . . . . . . . . . . . . . . . . . . . . . . . . . . . . . . . . . . . . . . . . 321
Adding Further Data to the Pageflow Process . . . . . . . . . . . . . . . . . . . . . . . . . . . . . . . . . . . . . . . . . . . . . . . . . . . . . . . . . . . . . . . . . . . 322
12
TIBCO Business Studio Tutorials
Creating Fields . . . . . . . . . . . . . . . . . . . . . . . . . . . . . . . . . . . . . . . . . . . . . . . . . . . . . . . . . . . . . . . . . . . . . . . . . . . . . . . . . . . . . . . . . . . . .322
Assigning Fields to Tasks . . . . . . . . . . . . . . . . . . . . . . . . . . . . . . . . . . . . . . . . . . . . . . . . . . . . . . . . . . . . . . . . . . . . . . . . . . . . . . . . . . 322
Deploying the Project . . . . . . . . . . . . . . . . . . . . . . . . . . . . . . . . . . . . . . . . . . . . . . . . . . . . . . . . . . . . . . . . . . . . . . . . . . . . . . . . . . . . . . . . . . . 323
Running the Project . . . . . . . . . . . . . . . . . . . . . . . . . . . . . . . . . . . . . . . . . . . . . . . . . . . . . . . . . . . . . . . . . . . . . . . . . . . . . . . . . . . . . . . . . . . . .323
Verifying the Results . . . . . . . . . . . . . . . . . . . . . . . . . . . . . . . . . . . . . . . . . . . . . . . . . . . . . . . . . . . . . . . . . . . . . . . . . . . . . . . . . . . . . . . . . . . .324
Debugging a Business Process . . . . . . . . . . . . . . . . . . . . . . . . . . . . . . . . . . . . . . . . . . . . . . . . . . . . . . . . . . . . . . . . . . . 325
How to Debug a Business Process . . . . . . . . . . . . . . . . . . . . . . . . . . . . . . . . . . . . . . . . . . . . . . . . . . . . . . . . . . . . . . . . . . . . . . . . . . . . . . . . . . 325
Understanding the Process . . . . . . . . . . . . . . . . . . . . . . . . . . . . . . . . . . . . . . . . . . . . . . . . . . . . . . . . . . . . . . . . . . . . . . . . . . . . . . . . . . . . . 326
Preparing TIBCO Business Studio for Debugging . . . . . . . . . . . . . . . . . . . . . . . . . . . . . . . . . . . . . . . . . . . . . . . . . . . . . . . . . . . . . . . .326
Preparing the Process for Debugging . . . . . . . . . . . . . . . . . . . . . . . . . . . . . . . . . . . . . . . . . . . . . . . . . . . . . . . . . . . . . . . . . . . . . . . . . . . 327
Adding Breakpoints . . . . . . . . . . . . . . . . . . . . . . . . . . . . . . . . . . . . . . . . . . . . . . . . . . . . . . . . . . . . . . . . . . . . . . . . . . . . . . . . . . . . . . . . . . . . . 327
Adding and Editing Emulation Files . . . . . . . . . . . . . . . . . . . . . . . . . . . . . . . . . . . . . . . . . . . . . . . . . . . . . . . . . . . . . . . . . . . . . . . . . . . . . 329
Configuring the Tester . . . . . . . . . . . . . . . . . . . . . . . . . . . . . . . . . . . . . . . . . . . . . . . . . . . . . . . . . . . . . . . . . . . . . . . . . . . . . . . . . . . . . . . . . . 332
Launching the Tester . . . . . . . . . . . . . . . . . . . . . . . . . . . . . . . . . . . . . . . . . . . . . . . . . . . . . . . . . . . . . . . . . . . . . . . . . . . . . . . . . . . . . . . . . . . 334
Running a Process . . . . . . . . . . . . . . . . . . . . . . . . . . . . . . . . . . . . . . . . . . . . . . . . . . . . . . . . . . . . . . . . . . . . . . . . . . . . . . . . . . . . . . . . . . . . . 335
Debugging the Process with Test Data . . . . . . . . . . . . . . . . . . . . . . . . . . . . . . . . . . . . . . . . . . . . . . . . . . . . . . . . . . . . . . . . . . . . . . . . . . 337
Performing Batch Testing . . . . . . . . . . . . . . . . . . . . . . . . . . . . . . . . . . . . . . . . . . . . . . . . . . . . . . . . . . . . . . . . . . . . . . . . . . . . . . . . . . . . . . . 341
13
TIBCO Business Studio Tutorials
Create and Run Your First BPM Application
How To Design a Simple WelcomeUsers Business ServiceThis tutorial shows you how to use TIBCO Business Studio to rapidly design a simple business service.
The business service:
● Displays a form to collect a user’s name and phone number. For example, the user may berequesting information on a product, or signing up to a service.
● Calls a process that runs a script to generate a message containing the name and phone number.● Displays a form requesting that the recipient of the work item call the user.
You should work through each section in turn to complete the tutorial.
Although it uses a very simple example, this tutorial demonstrates some of the fundamental points ofthe analysis phase for any business service:
● designing the process flow● creating and assigning the data required by the process● creating and assigning the participants who will be involved in the process● placing and describing tasks such as scripts (or services) that will be implemented later by the
solution designer.
After completing the tutorial, you should be familiar with the basic steps involved in creating a processdesign.
What to do next
After completing this tutorial, you can follow the How to Implement and Deploy the WelcomeUsersApplication tutorial, which describes how to elaborate your design to turn it into an executable model,and then to deploy it.
Creating a New ProjectA project is the basic container that you use to store all the artifacts needed by your business process.The project you create here contains a basic organizational model.
Procedure
1. Start Studio for Designers.
14
TIBCO Business Studio Tutorials
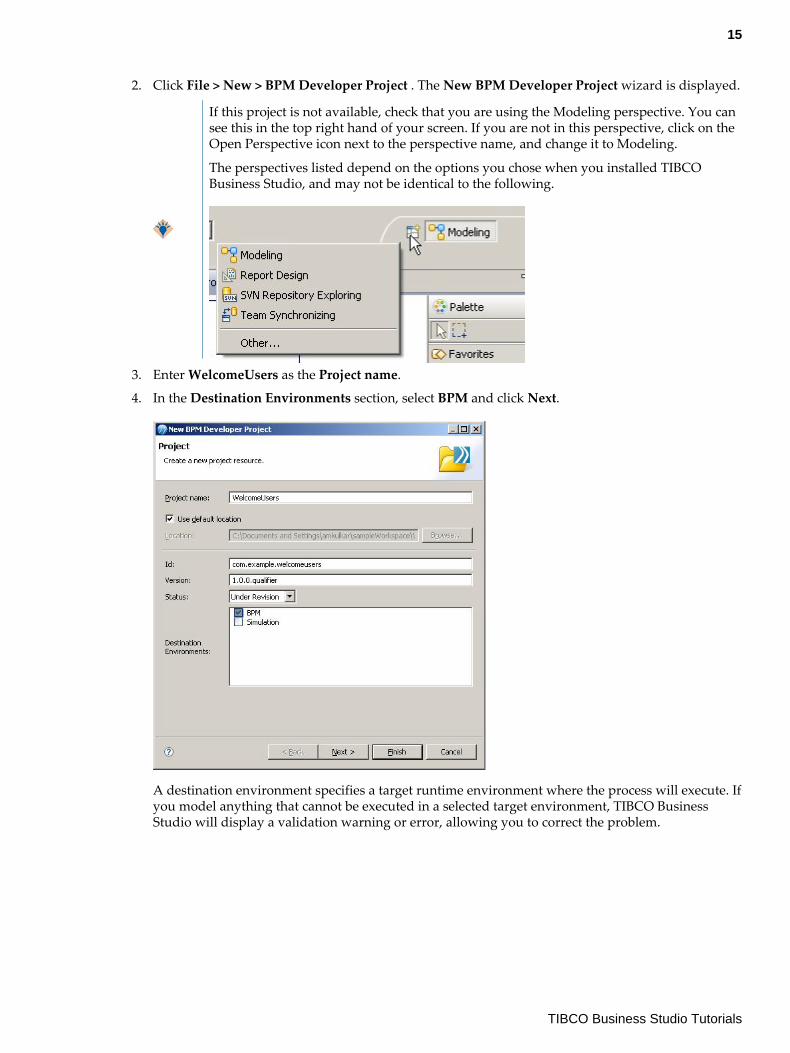
2. Click File > New > BPM Developer Project . The New BPM Developer Project wizard is displayed.
If this project is not available, check that you are using the Modeling perspective. You cansee this in the top right hand of your screen. If you are not in this perspective, click on theOpen Perspective icon next to the perspective name, and change it to Modeling.
The perspectives listed depend on the options you chose when you installed TIBCOBusiness Studio, and may not be identical to the following.
3. Enter WelcomeUsers as the Project name.
4. In the Destination Environments section, select BPM and click Next.
A destination environment specifies a target runtime environment where the process will execute. Ifyou model anything that cannot be executed in a selected target environment, TIBCO BusinessStudio will display a validation warning or error, allowing you to correct the problem.
15
TIBCO Business Studio Tutorials
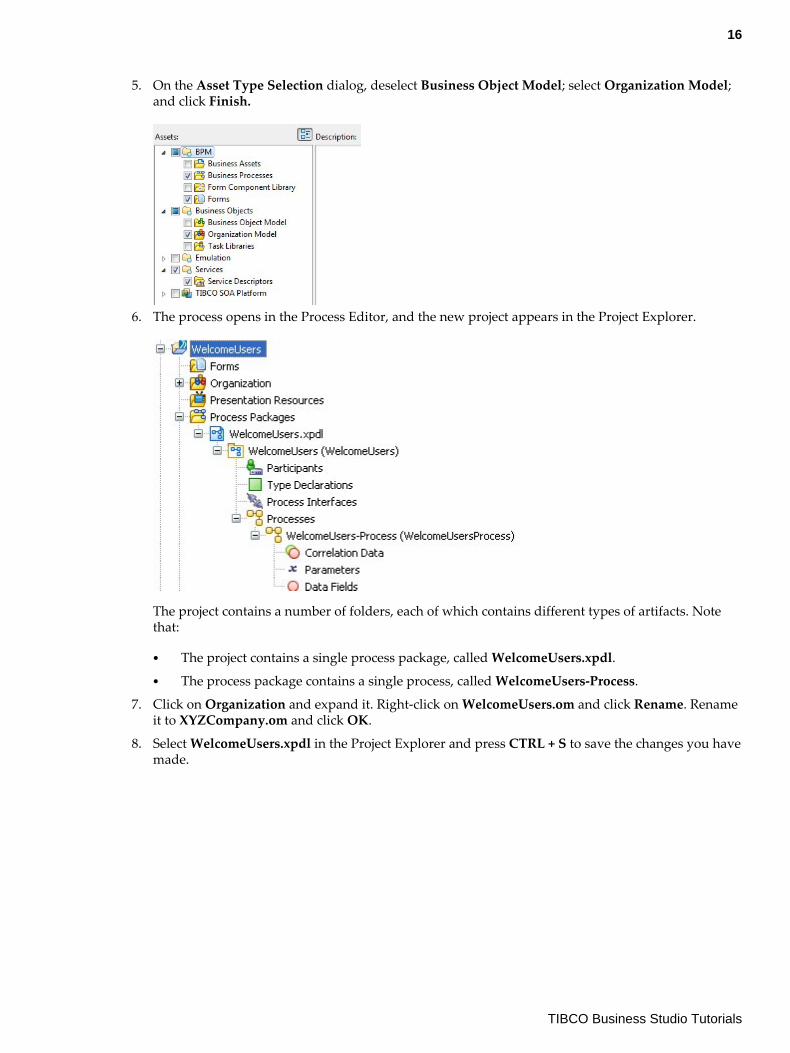
5. On the Asset Type Selection dialog, deselect Business Object Model; select Organization Model;and click Finish.
6. The process opens in the Process Editor, and the new project appears in the Project Explorer.
The project contains a number of folders, each of which contains different types of artifacts. Notethat:
● The project contains a single process package, called WelcomeUsers.xpdl.● The process package contains a single process, called WelcomeUsers-Process.
7. Click on Organization and expand it. Right-click on WelcomeUsers.om and click Rename. Renameit to XYZCompany.om and click OK.
8. Select WelcomeUsers.xpdl in the Project Explorer and press CTRL + S to save the changes you havemade.
16
TIBCO Business Studio Tutorials

Adding a User Task to the ProcessThe Process Editor is where you create your business process. It includes a Palette that contains thetools you use to create your process.
A default process is automatically displayed in the Process Editor when you create the project thatcontains it. The WelcomeUsers process contains:
● a Start Event, which marks the beginning of the process.● an End Event, which marks the end of the process.● a sequence flow, which shows the flow of activities through the process.
Now we need to outline the process by adding a user task to it.
17
TIBCO Business Studio Tutorials

Procedure
1. Click the Show Palette button (at the top right corner of the Process Editor).
The Palette contains a number of drawers, each of which contains a set of tools.
2. Click the Tasks drawer to open it.
Click the Script tool in the Palette in the Tasks drawer.
3. Position the mouse pointer over the sequence flow between the Start and End events, then click toadd the script task.
4. Change the task name to Generate Message and click away from the field to save the change.
5. Click the User Task tool in the Palette in the Tasks drawer.
18
TIBCO Business Studio Tutorials
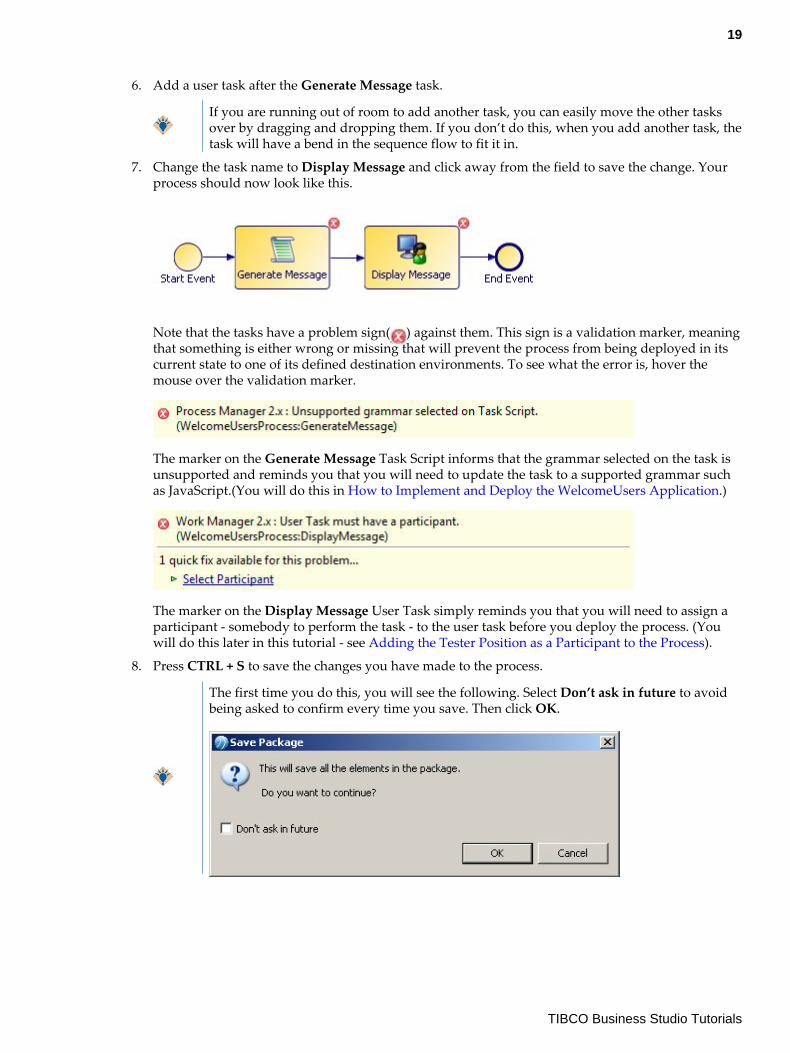
6. Add a user task after the Generate Message task.
If you are running out of room to add another task, you can easily move the other tasksover by dragging and dropping them. If you don’t do this, when you add another task, thetask will have a bend in the sequence flow to fit it in.
7. Change the task name to Display Message and click away from the field to save the change. Yourprocess should now look like this.
Note that the tasks have a problem sign( ) against them. This sign is a validation marker, meaningthat something is either wrong or missing that will prevent the process from being deployed in itscurrent state to one of its defined destination environments. To see what the error is, hover themouse over the validation marker.
The marker on the Generate Message Task Script informs that the grammar selected on the task isunsupported and reminds you that you will need to update the task to a supported grammar suchas JavaScript.(You will do this in How to Implement and Deploy the WelcomeUsers Application.)
The marker on the Display Message User Task simply reminds you that you will need to assign aparticipant - somebody to perform the task - to the user task before you deploy the process. (Youwill do this later in this tutorial - see Adding the Tester Position as a Participant to the Process).
8. Press CTRL + S to save the changes you have made to the process.
The first time you do this, you will see the following. Select Don’t ask in future to avoidbeing asked to confirm every time you save. Then click OK.
19
TIBCO Business Studio Tutorials
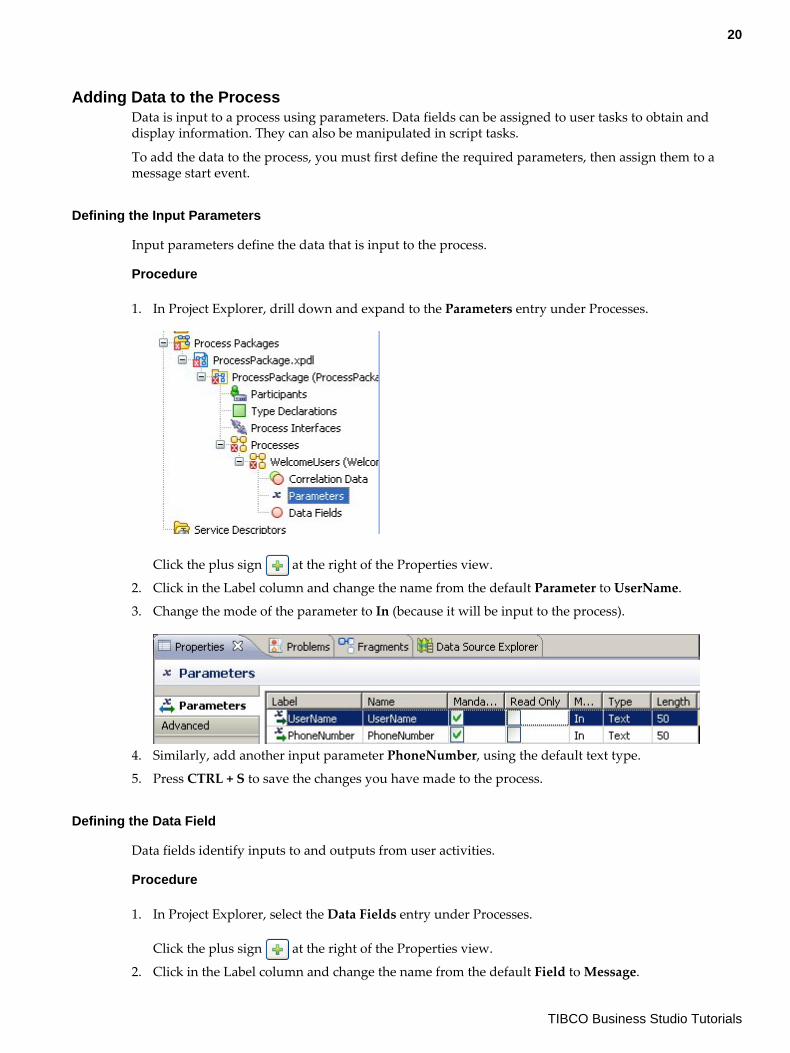
Adding Data to the ProcessData is input to a process using parameters. Data fields can be assigned to user tasks to obtain anddisplay information. They can also be manipulated in script tasks.
To add the data to the process, you must first define the required parameters, then assign them to amessage start event.
Defining the Input Parameters
Input parameters define the data that is input to the process.
Procedure
1. In Project Explorer, drill down and expand to the Parameters entry under Processes.
Click the plus sign at the right of the Properties view.
2. Click in the Label column and change the name from the default Parameter to UserName.
3. Change the mode of the parameter to In (because it will be input to the process).
4. Similarly, add another input parameter PhoneNumber, using the default text type.
5. Press CTRL + S to save the changes you have made to the process.
Defining the Data Field
Data fields identify inputs to and outputs from user activities.
Procedure
1. In Project Explorer, select the Data Fields entry under Processes.
Click the plus sign at the right of the Properties view.
2. Click in the Label column and change the name from the default Field to Message.
20
TIBCO Business Studio Tutorials
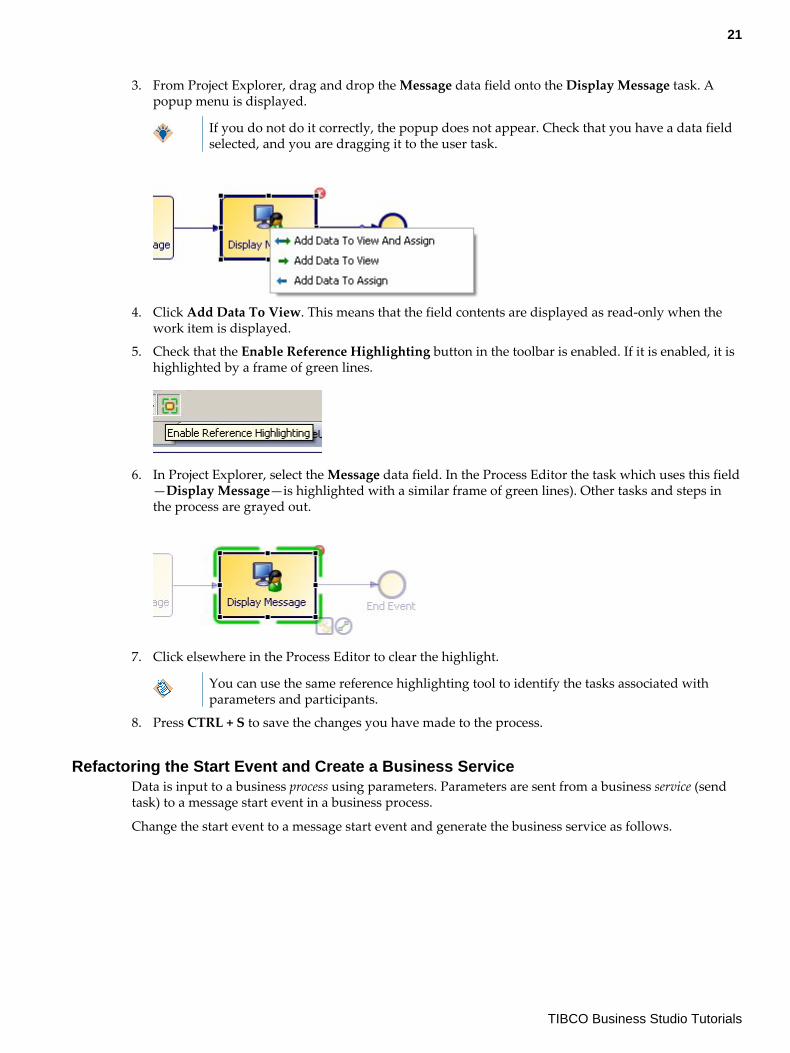
3. From Project Explorer, drag and drop the Message data field onto the Display Message task. Apopup menu is displayed.
If you do not do it correctly, the popup does not appear. Check that you have a data fieldselected, and you are dragging it to the user task.
4. Click Add Data To View. This means that the field contents are displayed as read-only when thework item is displayed.
5. Check that the Enable Reference Highlighting button in the toolbar is enabled. If it is enabled, it ishighlighted by a frame of green lines.
6. In Project Explorer, select the Message data field. In the Process Editor the task which uses this field—Display Message—is highlighted with a similar frame of green lines). Other tasks and steps inthe process are grayed out.
7. Click elsewhere in the Process Editor to clear the highlight.
You can use the same reference highlighting tool to identify the tasks associated withparameters and participants.
8. Press CTRL + S to save the changes you have made to the process.
Refactoring the Start Event and Create a Business ServiceData is input to a business process using parameters. Parameters are sent from a business service (sendtask) to a message start event in a business process.
Change the start event to a message start event and generate the business service as follows.
21
TIBCO Business Studio Tutorials
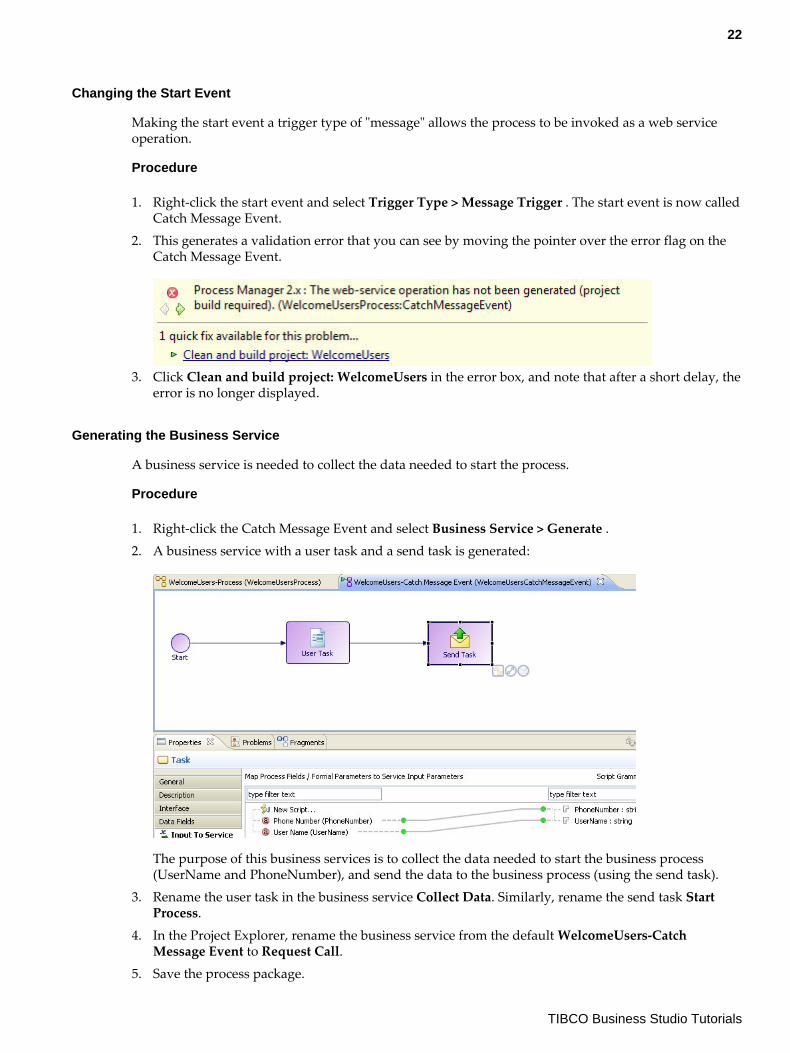
Changing the Start Event
Making the start event a trigger type of "message" allows the process to be invoked as a web serviceoperation.
Procedure
1. Right-click the start event and select Trigger Type > Message Trigger . The start event is now calledCatch Message Event.
2. This generates a validation error that you can see by moving the pointer over the error flag on theCatch Message Event.
3. Click Clean and build project: WelcomeUsers in the error box, and note that after a short delay, theerror is no longer displayed.
Generating the Business Service
A business service is needed to collect the data needed to start the process.
Procedure
1. Right-click the Catch Message Event and select Business Service > Generate .2. A business service with a user task and a send task is generated:
The purpose of this business services is to collect the data needed to start the business process(UserName and PhoneNumber), and send the data to the business process (using the send task).
3. Rename the user task in the business service Collect Data. Similarly, rename the send task StartProcess.
4. In the Project Explorer, rename the business service from the default WelcomeUsers-CatchMessage Event to Request Call.
5. Save the process package.
22
TIBCO Business Studio Tutorials
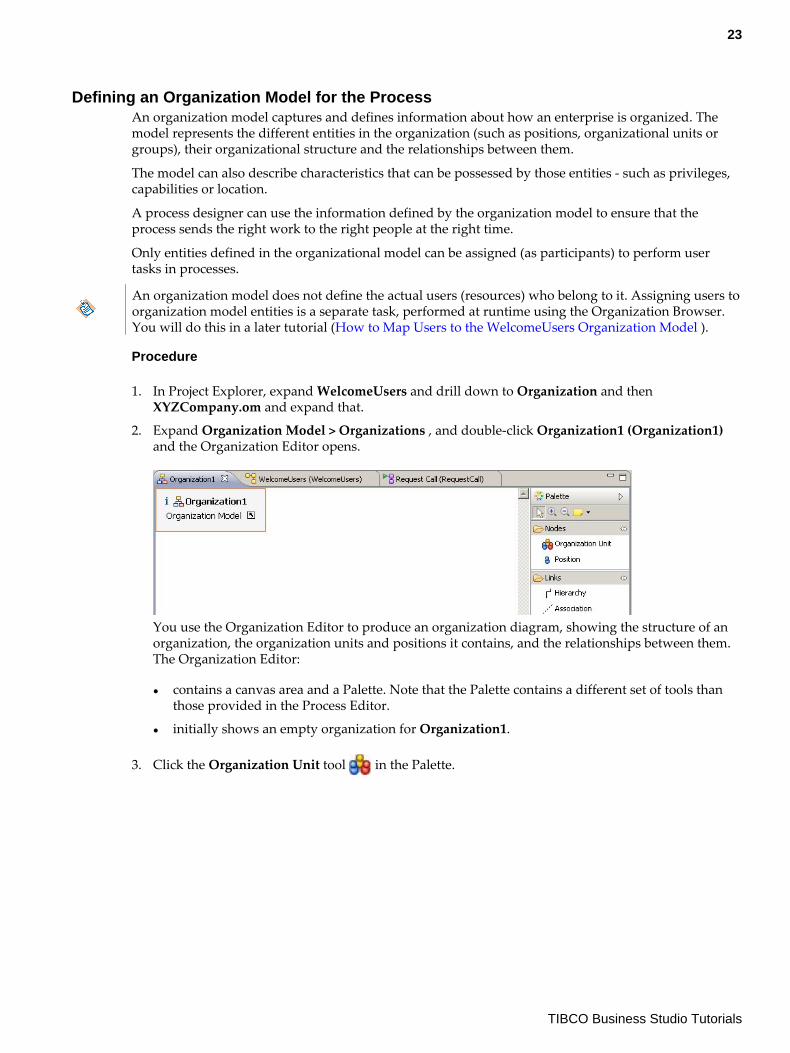
Defining an Organization Model for the ProcessAn organization model captures and defines information about how an enterprise is organized. Themodel represents the different entities in the organization (such as positions, organizational units orgroups), their organizational structure and the relationships between them.
The model can also describe characteristics that can be possessed by those entities - such as privileges,capabilities or location.
A process designer can use the information defined by the organization model to ensure that theprocess sends the right work to the right people at the right time.
Only entities defined in the organizational model can be assigned (as participants) to perform usertasks in processes.
An organization model does not define the actual users (resources) who belong to it. Assigning users toorganization model entities is a separate task, performed at runtime using the Organization Browser.You will do this in a later tutorial (How to Map Users to the WelcomeUsers Organization Model ).
Procedure
1. In Project Explorer, expand WelcomeUsers and drill down to Organization and thenXYZCompany.om and expand that.
2. Expand Organization Model > Organizations , and double-click Organization1 (Organization1)and the Organization Editor opens.
You use the Organization Editor to produce an organization diagram, showing the structure of anorganization, the organization units and positions it contains, and the relationships between them.The Organization Editor:
● contains a canvas area and a Palette. Note that the Palette contains a different set of tools thanthose provided in the Process Editor.
● initially shows an empty organization for Organization1.
3. Click the Organization Unit tool in the Palette.
23
TIBCO Business Studio Tutorials
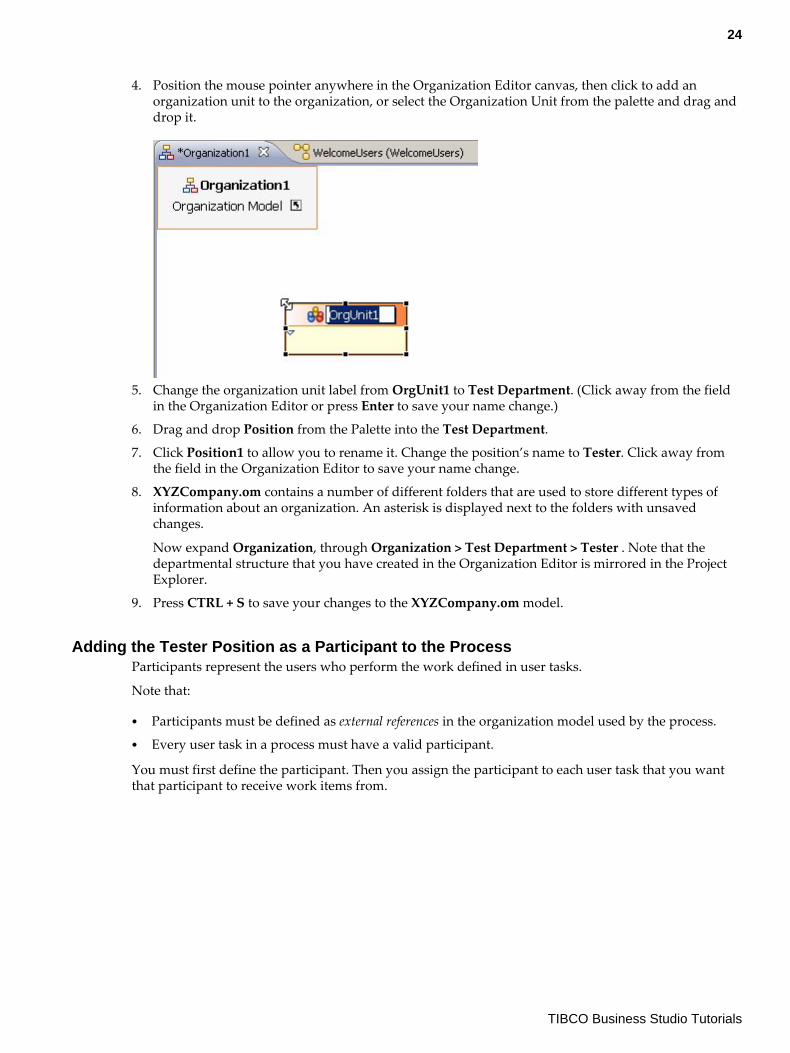
4. Position the mouse pointer anywhere in the Organization Editor canvas, then click to add anorganization unit to the organization, or select the Organization Unit from the palette and drag anddrop it.
5. Change the organization unit label from OrgUnit1 to Test Department. (Click away from the fieldin the Organization Editor or press Enter to save your name change.)
6. Drag and drop Position from the Palette into the Test Department.
7. Click Position1 to allow you to rename it. Change the position’s name to Tester. Click away fromthe field in the Organization Editor to save your name change.
8. XYZCompany.om contains a number of different folders that are used to store different types ofinformation about an organization. An asterisk is displayed next to the folders with unsavedchanges.
Now expand Organization, through Organization > Test Department > Tester . Note that thedepartmental structure that you have created in the Organization Editor is mirrored in the ProjectExplorer.
9. Press CTRL + S to save your changes to the XYZCompany.om model.
Adding the Tester Position as a Participant to the ProcessParticipants represent the users who perform the work defined in user tasks.
Note that:
● Participants must be defined as external references in the organization model used by the process.● Every user task in a process must have a valid participant.
You must first define the participant. Then you assign the participant to each user task that you wantthat participant to receive work items from.
24
TIBCO Business Studio Tutorials
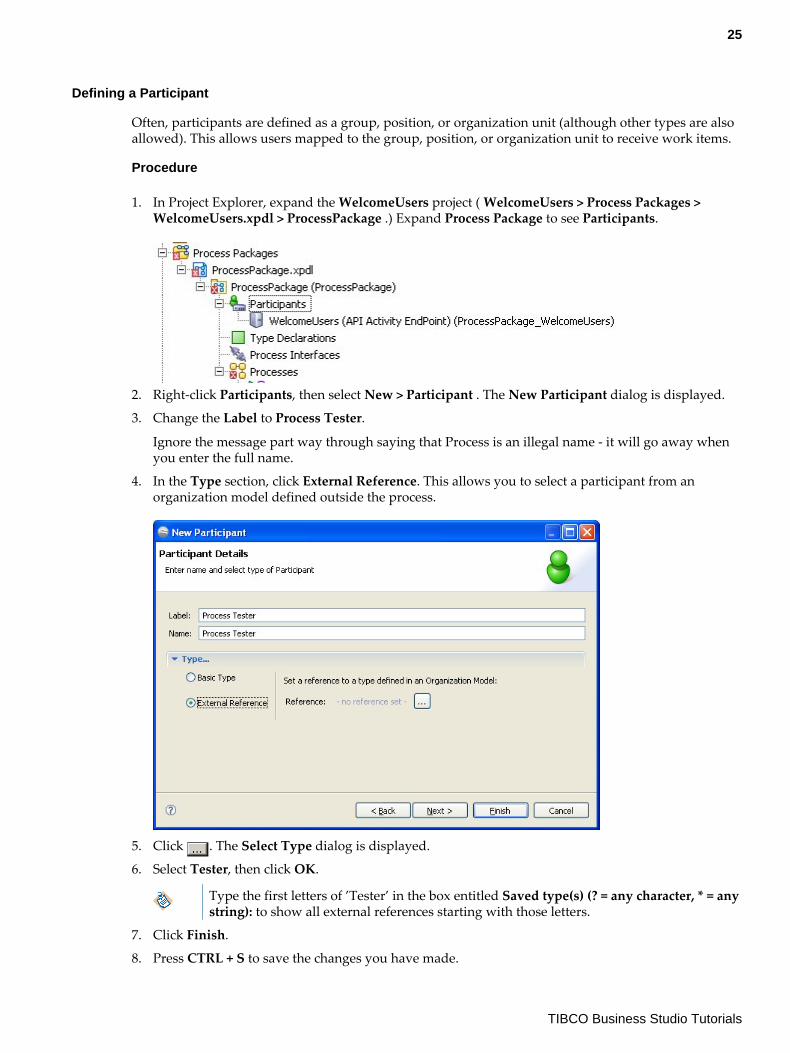
Defining a Participant
Often, participants are defined as a group, position, or organization unit (although other types are alsoallowed). This allows users mapped to the group, position, or organization unit to receive work items.
Procedure
1. In Project Explorer, expand the WelcomeUsers project ( WelcomeUsers > Process Packages >WelcomeUsers.xpdl > ProcessPackage .) Expand Process Package to see Participants.
2. Right-click Participants, then select New > Participant . The New Participant dialog is displayed.
3. Change the Label to Process Tester.
Ignore the message part way through saying that Process is an illegal name - it will go away whenyou enter the full name.
4. In the Type section, click External Reference. This allows you to select a participant from anorganization model defined outside the process.
5. Click . The Select Type dialog is displayed.
6. Select Tester, then click OK.
Type the first letters of ’Tester’ in the box entitled Saved type(s) (? = any character, * = anystring): to show all external references starting with those letters.
7. Click Finish.
8. Press CTRL + S to save the changes you have made.
25
TIBCO Business Studio Tutorials
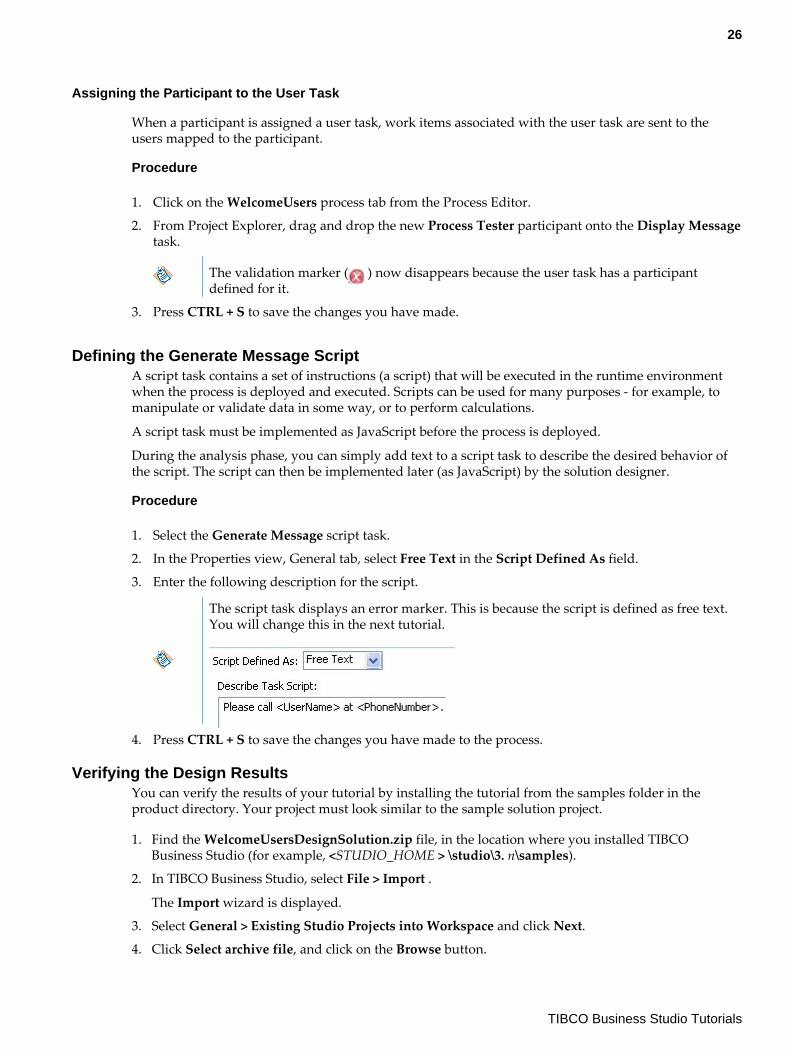
Assigning the Participant to the User Task
When a participant is assigned a user task, work items associated with the user task are sent to theusers mapped to the participant.
Procedure
1. Click on the WelcomeUsers process tab from the Process Editor.
2. From Project Explorer, drag and drop the new Process Tester participant onto the Display Messagetask.
The validation marker ( ) now disappears because the user task has a participantdefined for it.
3. Press CTRL + S to save the changes you have made.
Defining the Generate Message ScriptA script task contains a set of instructions (a script) that will be executed in the runtime environmentwhen the process is deployed and executed. Scripts can be used for many purposes - for example, tomanipulate or validate data in some way, or to perform calculations.
A script task must be implemented as JavaScript before the process is deployed.
During the analysis phase, you can simply add text to a script task to describe the desired behavior ofthe script. The script can then be implemented later (as JavaScript) by the solution designer.
Procedure
1. Select the Generate Message script task.
2. In the Properties view, General tab, select Free Text in the Script Defined As field.
3. Enter the following description for the script.
The script task displays an error marker. This is because the script is defined as free text.You will change this in the next tutorial.
4. Press CTRL + S to save the changes you have made to the process.
Verifying the Design ResultsYou can verify the results of your tutorial by installing the tutorial from the samples folder in theproduct directory. Your project must look similar to the sample solution project.
1. Find the WelcomeUsersDesignSolution.zip file, in the location where you installed TIBCOBusiness Studio (for example, <STUDIO_HOME > \studio\3. n\samples).
2. In TIBCO Business Studio, select File > Import .
The Import wizard is displayed.
3. Select General > Existing Studio Projects into Workspace and click Next.
4. Click Select archive file, and click on the Browse button.
26
TIBCO Business Studio Tutorials
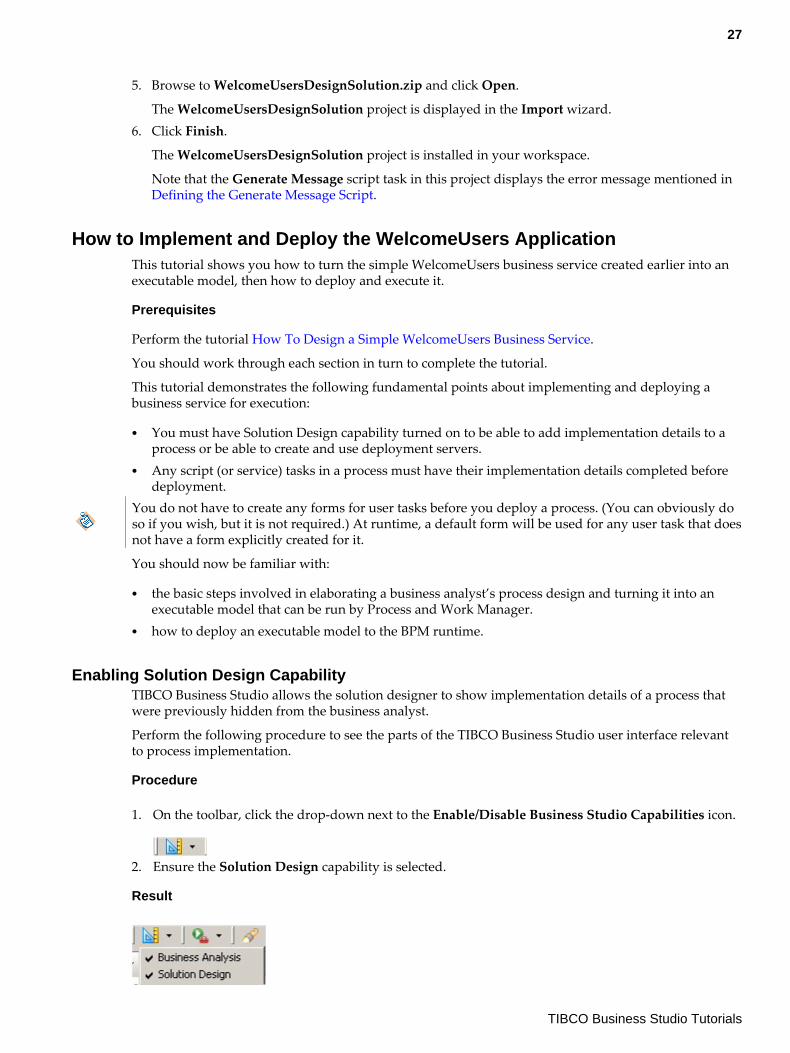
5. Browse to WelcomeUsersDesignSolution.zip and click Open.
The WelcomeUsersDesignSolution project is displayed in the Import wizard.6. Click Finish.
The WelcomeUsersDesignSolution project is installed in your workspace.
Note that the Generate Message script task in this project displays the error message mentioned in Defining the Generate Message Script.
How to Implement and Deploy the WelcomeUsers ApplicationThis tutorial shows you how to turn the simple WelcomeUsers business service created earlier into anexecutable model, then how to deploy and execute it.
Prerequisites
Perform the tutorial How To Design a Simple WelcomeUsers Business Service.
You should work through each section in turn to complete the tutorial.
This tutorial demonstrates the following fundamental points about implementing and deploying abusiness service for execution:
● You must have Solution Design capability turned on to be able to add implementation details to aprocess or be able to create and use deployment servers.
● Any script (or service) tasks in a process must have their implementation details completed beforedeployment.
You do not have to create any forms for user tasks before you deploy a process. (You can obviously doso if you wish, but it is not required.) At runtime, a default form will be used for any user task that doesnot have a form explicitly created for it.
You should now be familiar with:
● the basic steps involved in elaborating a business analyst’s process design and turning it into anexecutable model that can be run by Process and Work Manager.
● how to deploy an executable model to the BPM runtime.
Enabling Solution Design CapabilityTIBCO Business Studio allows the solution designer to show implementation details of a process thatwere previously hidden from the business analyst.
Perform the following procedure to see the parts of the TIBCO Business Studio user interface relevantto process implementation.
Procedure
1. On the toolbar, click the drop-down next to the Enable/Disable Business Studio Capabilities icon.
2. Ensure the Solution Design capability is selected.
Result
27
TIBCO Business Studio Tutorials
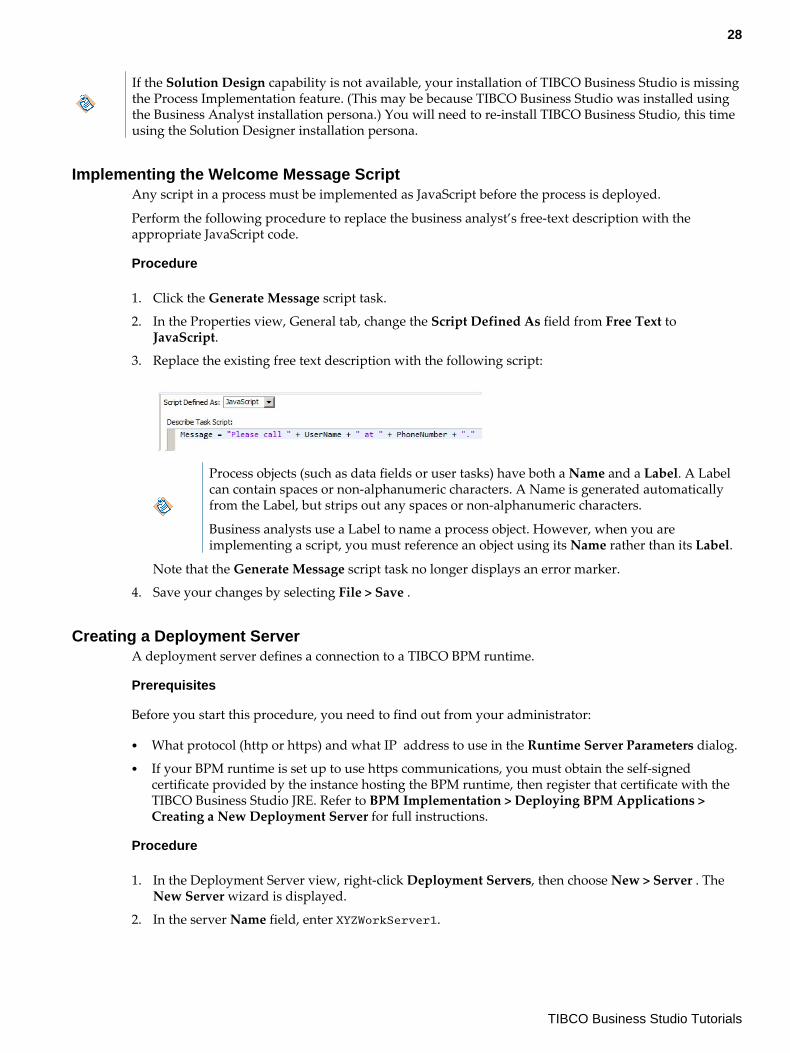
If the Solution Design capability is not available, your installation of TIBCO Business Studio is missingthe Process Implementation feature. (This may be because TIBCO Business Studio was installed usingthe Business Analyst installation persona.) You will need to re-install TIBCO Business Studio, this timeusing the Solution Designer installation persona.
Implementing the Welcome Message ScriptAny script in a process must be implemented as JavaScript before the process is deployed.
Perform the following procedure to replace the business analyst’s free-text description with theappropriate JavaScript code.
Procedure
1. Click the Generate Message script task.
2. In the Properties view, General tab, change the Script Defined As field from Free Text toJavaScript.
3. Replace the existing free text description with the following script:
Process objects (such as data fields or user tasks) have both a Name and a Label. A Labelcan contain spaces or non-alphanumeric characters. A Name is generated automaticallyfrom the Label, but strips out any spaces or non-alphanumeric characters.
Business analysts use a Label to name a process object. However, when you areimplementing a script, you must reference an object using its Name rather than its Label.
Note that the Generate Message script task no longer displays an error marker.
4. Save your changes by selecting File > Save .
Creating a Deployment ServerA deployment server defines a connection to a TIBCO BPM runtime.
Prerequisites
Before you start this procedure, you need to find out from your administrator:
● What protocol (http or https) and what IP address to use in the Runtime Server Parameters dialog.● If your BPM runtime is set up to use https communications, you must obtain the self-signed
certificate provided by the instance hosting the BPM runtime, then register that certificate with theTIBCO Business Studio JRE. Refer to BPM Implementation > Deploying BPM Applications >Creating a New Deployment Server for full instructions.
Procedure
1. In the Deployment Server view, right-click Deployment Servers, then choose New > Server . TheNew Server wizard is displayed.
2. In the server Name field, enter XYZWorkServer1.
28
TIBCO Business Studio Tutorials
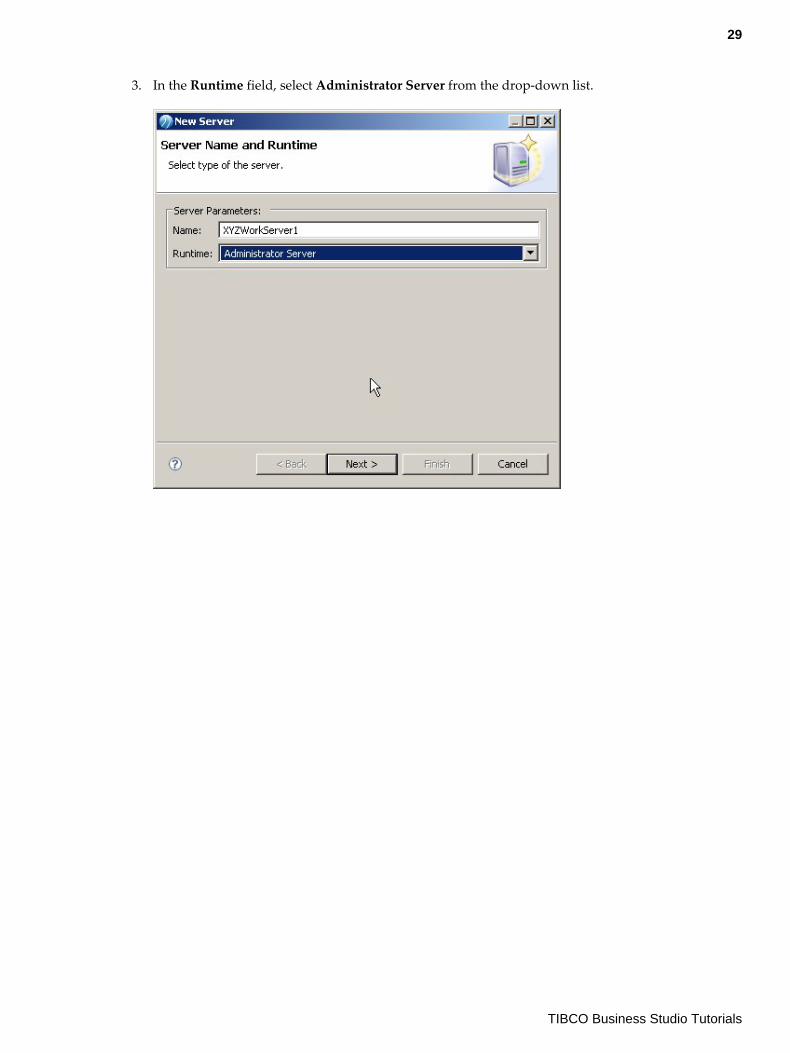
3. In the Runtime field, select Administrator Server from the drop-down list.
29
TIBCO Business Studio Tutorials
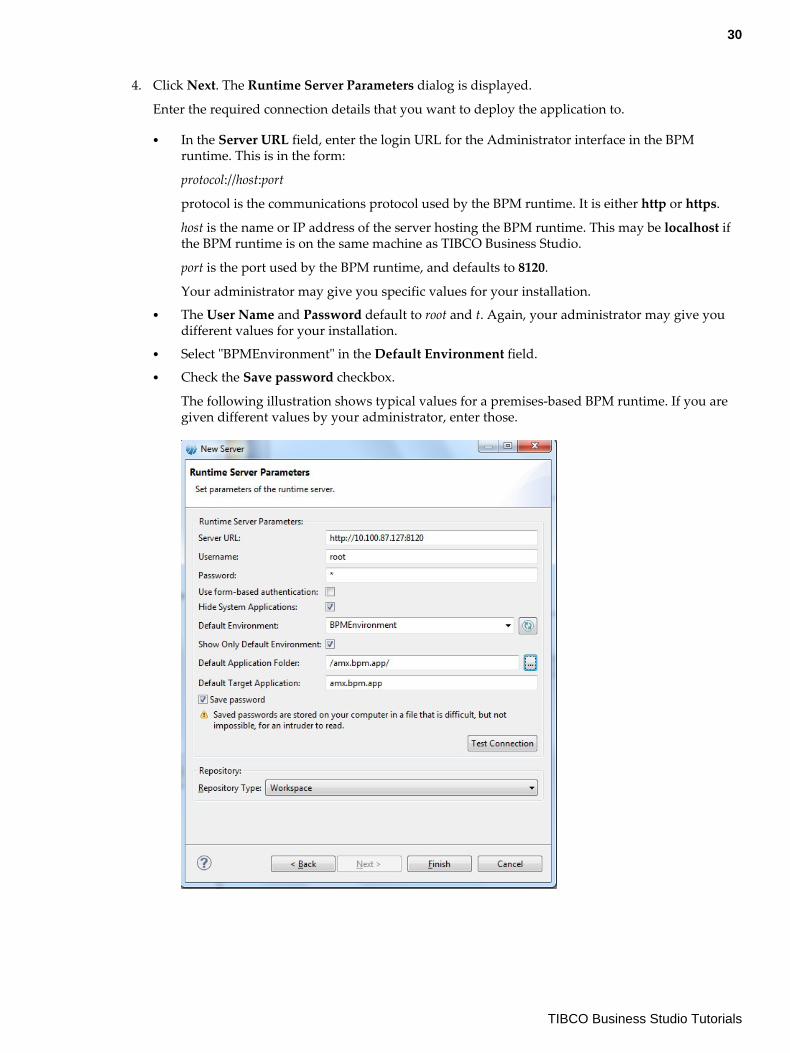
4. Click Next. The Runtime Server Parameters dialog is displayed.
Enter the required connection details that you want to deploy the application to.
● In the Server URL field, enter the login URL for the Administrator interface in the BPMruntime. This is in the form:
protocol://host:port
protocol is the communications protocol used by the BPM runtime. It is either http or https.
host is the name or IP address of the server hosting the BPM runtime. This may be localhost ifthe BPM runtime is on the same machine as TIBCO Business Studio.
port is the port used by the BPM runtime, and defaults to 8120.
Your administrator may give you specific values for your installation.● The User Name and Password default to root and t. Again, your administrator may give you
different values for your installation.● Select "BPMEnvironment" in the Default Environment field.● Check the Save password checkbox.
The following illustration shows typical values for a premises-based BPM runtime. If you aregiven different values by your administrator, enter those.
30
TIBCO Business Studio Tutorials
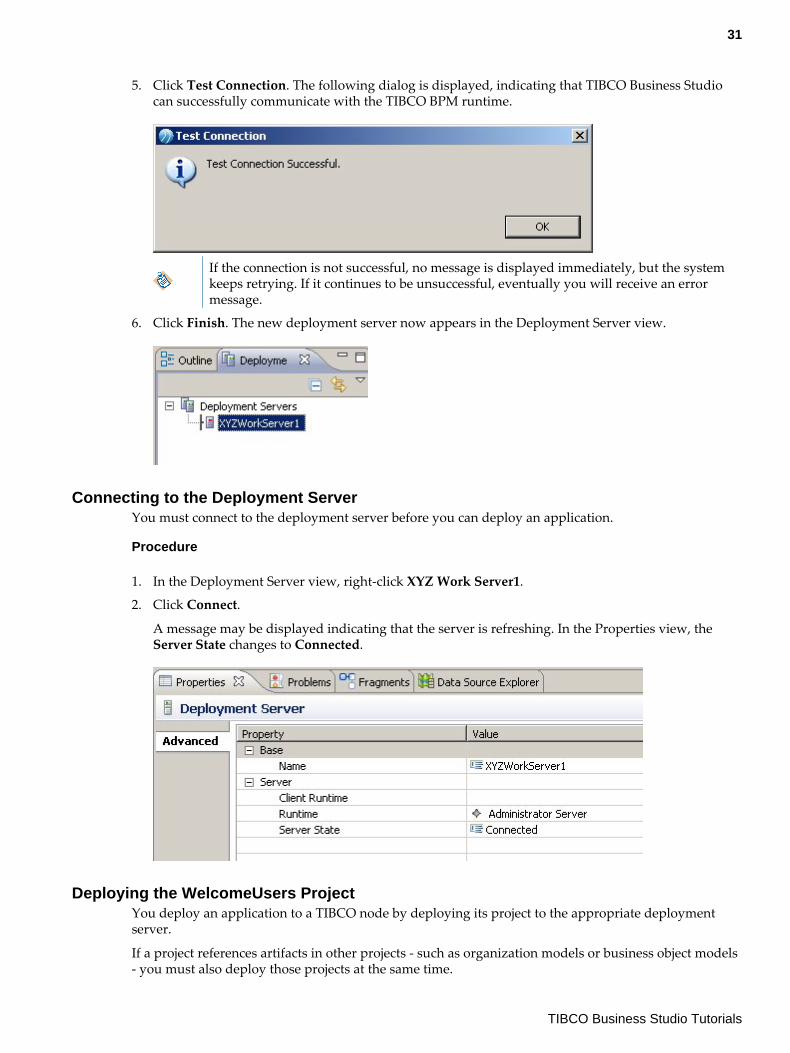
5. Click Test Connection. The following dialog is displayed, indicating that TIBCO Business Studiocan successfully communicate with the TIBCO BPM runtime.
If the connection is not successful, no message is displayed immediately, but the systemkeeps retrying. If it continues to be unsuccessful, eventually you will receive an errormessage.
6. Click Finish. The new deployment server now appears in the Deployment Server view.
Connecting to the Deployment ServerYou must connect to the deployment server before you can deploy an application.
Procedure
1. In the Deployment Server view, right-click XYZ Work Server1.
2. Click Connect.
A message may be displayed indicating that the server is refreshing. In the Properties view, theServer State changes to Connected.
Deploying the WelcomeUsers ProjectYou deploy an application to a TIBCO node by deploying its project to the appropriate deploymentserver.
If a project references artifacts in other projects - such as organization models or business object models- you must also deploy those projects at the same time.
31
TIBCO Business Studio Tutorials
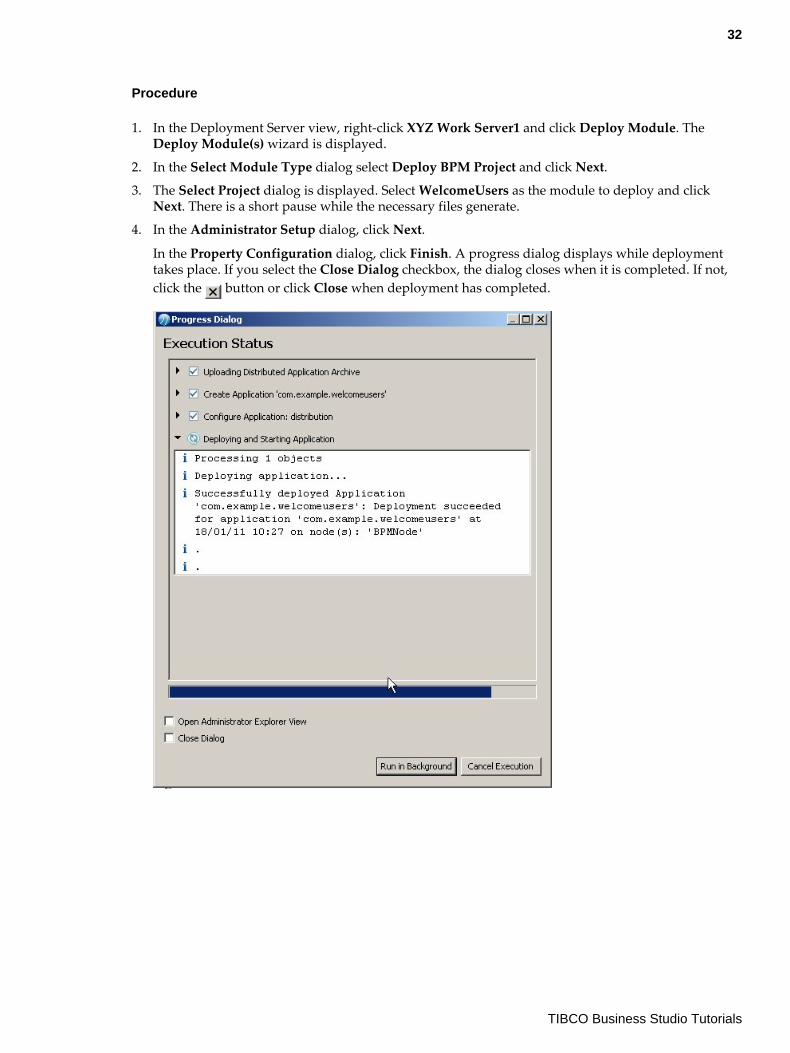
Procedure
1. In the Deployment Server view, right-click XYZ Work Server1 and click Deploy Module. TheDeploy Module(s) wizard is displayed.
2. In the Select Module Type dialog select Deploy BPM Project and click Next.
3. The Select Project dialog is displayed. Select WelcomeUsers as the module to deploy and clickNext. There is a short pause while the necessary files generate.
4. In the Administrator Setup dialog, click Next.
In the Property Configuration dialog, click Finish. A progress dialog displays while deploymenttakes place. If you select the Close Dialog checkbox, the dialog closes when it is completed. If not,click the button or click Close when deployment has completed.
32
TIBCO Business Studio Tutorials
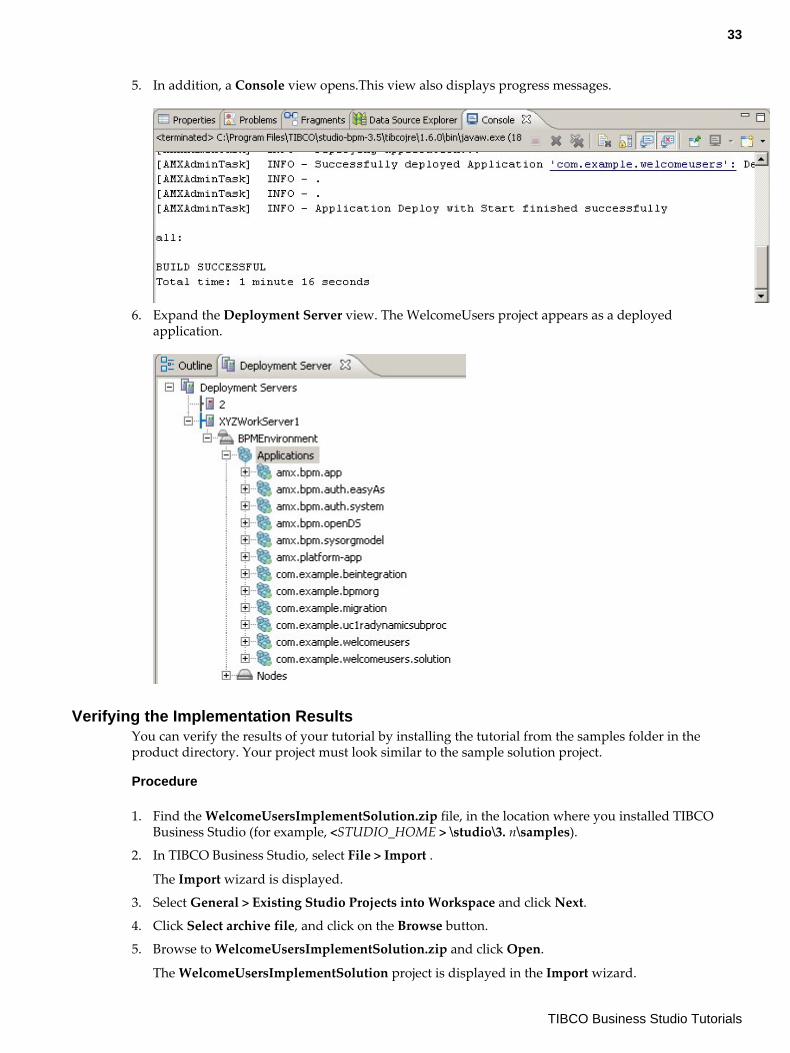
5. In addition, a Console view opens.This view also displays progress messages.
6. Expand the Deployment Server view. The WelcomeUsers project appears as a deployedapplication.
Verifying the Implementation ResultsYou can verify the results of your tutorial by installing the tutorial from the samples folder in theproduct directory. Your project must look similar to the sample solution project.
Procedure
1. Find the WelcomeUsersImplementSolution.zip file, in the location where you installed TIBCOBusiness Studio (for example, <STUDIO_HOME > \studio\3. n\samples).
2. In TIBCO Business Studio, select File > Import .
The Import wizard is displayed.
3. Select General > Existing Studio Projects into Workspace and click Next.
4. Click Select archive file, and click on the Browse button.
5. Browse to WelcomeUsersImplementSolution.zip and click Open.
The WelcomeUsersImplementSolution project is displayed in the Import wizard.
33
TIBCO Business Studio Tutorials
6. Click Finish.
The WelcomeUsersImplementSolution project is installed in your workspace.
How to Map Users to the WelcomeUsers Organization ModelThis tutorial shows you how to map a user to a position in the organization model. This enables the userto log into a BPM application and process work items generated by the WelcomeUsers application.
Prerequisites
Before you try to map resources, make sure that you have carried out the following tasks:
● The WelcomeUsers application must be deployed. See the How to Implement and Deploy theWelcomeUsers Application tutorial.
● The example EasyAs Insurance Company data must be available in an LDAP shared resource,because the BPM runtime retrieves details of resources, that is of users, from such a shared resource.
— If, at installation, you chose to install the internal LDAP directory server provided with the BPMruntime, then the resources needed for these tutorials are automatically made available.
— If, at installation, you chose to use an external LDAP server, you must import the data from thesupplied server.xml and easyAsInsurance.ldif files. Consult the documentation supplied byyour LDAP provider to find out how to do this.
You should work through each section in turn to complete the tutorial.
You must map users to either a group or position in the organization model to enable them to:
● log into a BPM application.● receive and process work items generated by BPM applications.
After completing this tutorial, you should be familiar with:
● how to log into Openspace and start the Organization Browser.● how to create an LDAP container.● how to map a user from an LDAP container to the organization model.
Logging into Openspace and Starting the Organization BrowserOpenspace is a web application that allows users to work with process and work managementapplications — for example, to process work items or start process instances.
The Organization Browser is a function available from Openspace that allows you to map resources(users) to groups and/or positions in an organization model so that those users can log into BPMapplications, as well as receive work items in their work lists.
Procedure
1. Contact your system administrator to find out how to start Openspace. You may need to enter aspecific URL in your browser, or click a link from a specific web page.
When you start Openspace, the Openspace login screen is displayed:
Openspace recognizes the user name “tibco-admin” with a password of “secret”. This isthe only user authorized to login until another user is mapped to the Organization Modelas described in this tutorial.
2. Enter “tibco-admin” in the User Name field, and ”secret” in the Password field, then click Login.
34
TIBCO Business Studio Tutorials
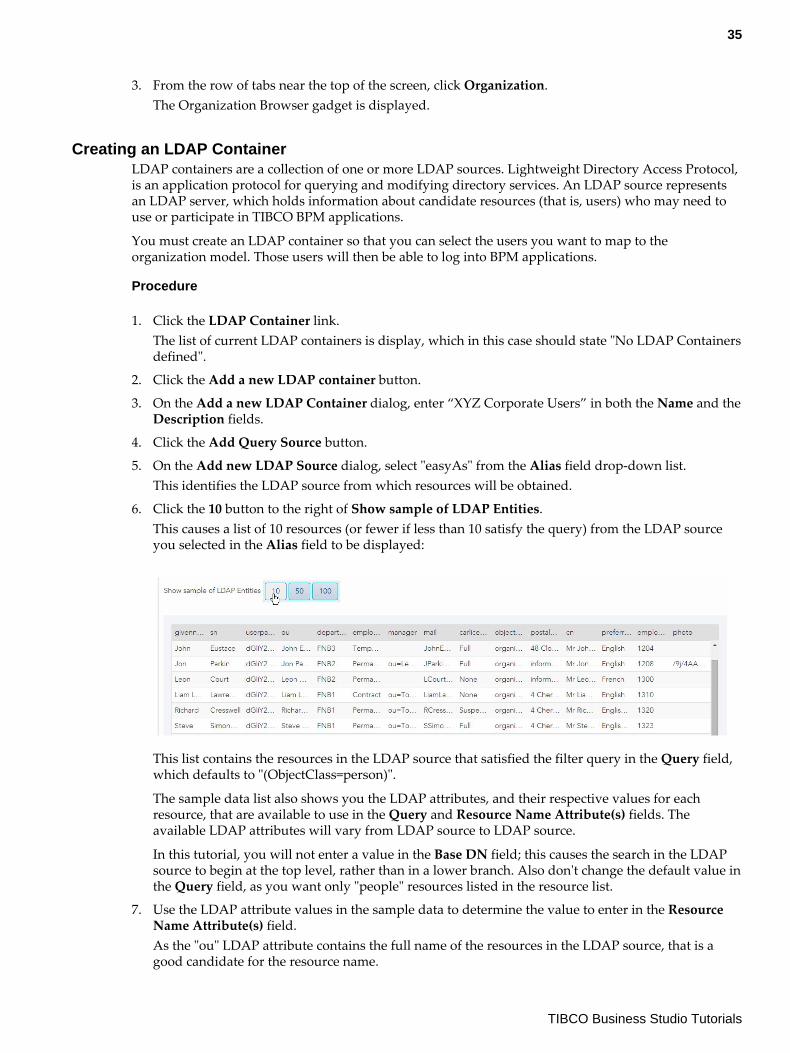
3. From the row of tabs near the top of the screen, click Organization.The Organization Browser gadget is displayed.
Creating an LDAP ContainerLDAP containers are a collection of one or more LDAP sources. Lightweight Directory Access Protocol,is an application protocol for querying and modifying directory services. An LDAP source representsan LDAP server, which holds information about candidate resources (that is, users) who may need touse or participate in TIBCO BPM applications.
You must create an LDAP container so that you can select the users you want to map to theorganization model. Those users will then be able to log into BPM applications.
Procedure
1. Click the LDAP Container link.The list of current LDAP containers is display, which in this case should state "No LDAP Containersdefined".
2. Click the Add a new LDAP container button.
3. On the Add a new LDAP Container dialog, enter “XYZ Corporate Users” in both the Name and theDescription fields.
4. Click the Add Query Source button.
5. On the Add new LDAP Source dialog, select "easyAs" from the Alias field drop-down list.This identifies the LDAP source from which resources will be obtained.
6. Click the 10 button to the right of Show sample of LDAP Entities.This causes a list of 10 resources (or fewer if less than 10 satisfy the query) from the LDAP sourceyou selected in the Alias field to be displayed:
This list contains the resources in the LDAP source that satisfied the filter query in the Query field,which defaults to "(ObjectClass=person)".
The sample data list also shows you the LDAP attributes, and their respective values for eachresource, that are available to use in the Query and Resource Name Attribute(s) fields. Theavailable LDAP attributes will vary from LDAP source to LDAP source.
In this tutorial, you will not enter a value in the Base DN field; this causes the search in the LDAPsource to begin at the top level, rather than in a lower branch. Also don't change the default value inthe Query field, as you want only "people" resources listed in the resource list.
7. Use the LDAP attribute values in the sample data to determine the value to enter in the ResourceName Attribute(s) field.As the "ou" LDAP attribute contains the full name of the resources in the LDAP source, that is agood candidate for the resource name.
35
TIBCO Business Studio Tutorials
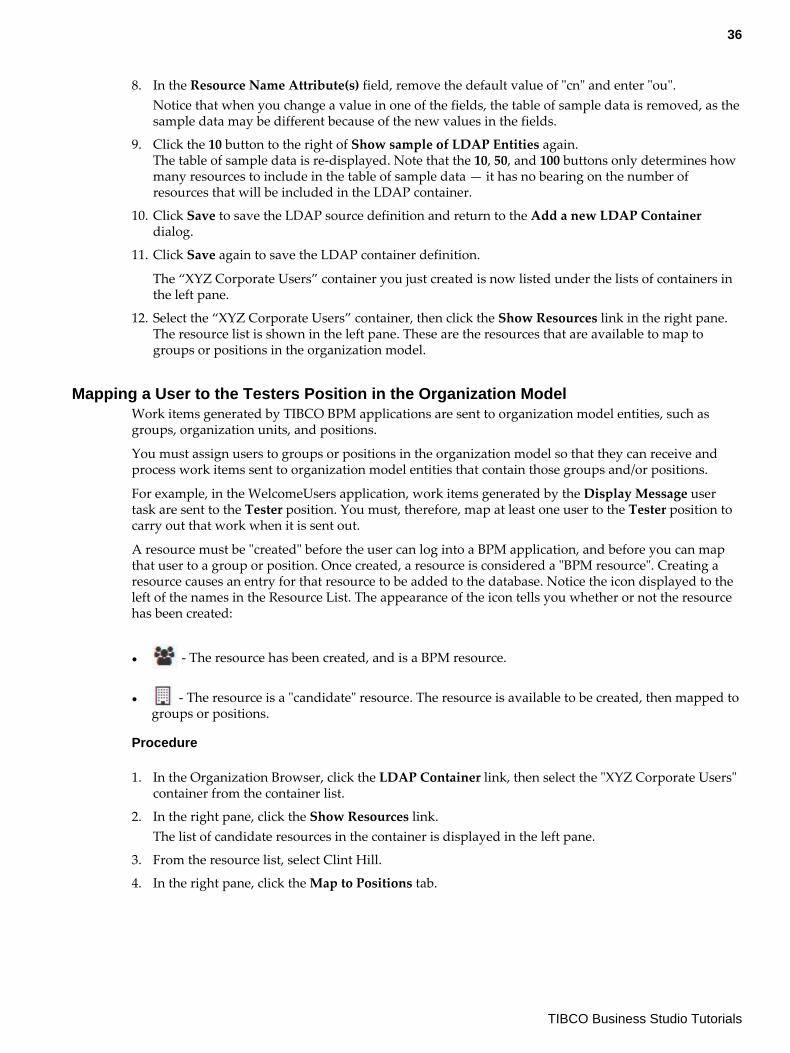
8. In the Resource Name Attribute(s) field, remove the default value of "cn" and enter "ou".Notice that when you change a value in one of the fields, the table of sample data is removed, as thesample data may be different because of the new values in the fields.
9. Click the 10 button to the right of Show sample of LDAP Entities again.The table of sample data is re-displayed. Note that the 10, 50, and 100 buttons only determines howmany resources to include in the table of sample data — it has no bearing on the number ofresources that will be included in the LDAP container.
10. Click Save to save the LDAP source definition and return to the Add a new LDAP Containerdialog.
11. Click Save again to save the LDAP container definition.
The “XYZ Corporate Users” container you just created is now listed under the lists of containers inthe left pane.
12. Select the “XYZ Corporate Users” container, then click the Show Resources link in the right pane.The resource list is shown in the left pane. These are the resources that are available to map togroups or positions in the organization model.
Mapping a User to the Testers Position in the Organization ModelWork items generated by TIBCO BPM applications are sent to organization model entities, such asgroups, organization units, and positions.
You must assign users to groups or positions in the organization model so that they can receive andprocess work items sent to organization model entities that contain those groups and/or positions.
For example, in the WelcomeUsers application, work items generated by the Display Message usertask are sent to the Tester position. You must, therefore, map at least one user to the Tester position tocarry out that work when it is sent out.
A resource must be "created" before the user can log into a BPM application, and before you can mapthat user to a group or position. Once created, a resource is considered a "BPM resource". Creating aresource causes an entry for that resource to be added to the database. Notice the icon displayed to theleft of the names in the Resource List. The appearance of the icon tells you whether or not the resourcehas been created:
● - The resource has been created, and is a BPM resource.
● - The resource is a "candidate" resource. The resource is available to be created, then mapped togroups or positions.
Procedure
1. In the Organization Browser, click the LDAP Container link, then select the "XYZ Corporate Users"container from the container list.
2. In the right pane, click the Show Resources link.The list of candidate resources in the container is displayed in the left pane.
3. From the resource list, select Clint Hill.
4. In the right pane, click the Map to Positions tab.
36
TIBCO Business Studio Tutorials

5. In the right pane, drill down in the organization structure until you can see the Tester position:
The zero shown in parentheses to the right of the Tester position indicates that there are currentlyno resources assigned to that position.
6. Click in the check box to the left of the Tester position.A red "1" appears to the left of the Tester position, indicating that there is currently one resourceselected that is not a member of that position.
7. Click the Grant link in the upper part of the right pane.The Create Selected Resources dialog is displayed. This dialog is for the purpose of actuallycreating the BPM resource. A resource must always for created before it can be mapped to a groupor position.
As part of the creation, you can change the resource's "Resource Name", which is the name that theresource must use to log into a BPM application.
37
TIBCO Business Studio Tutorials
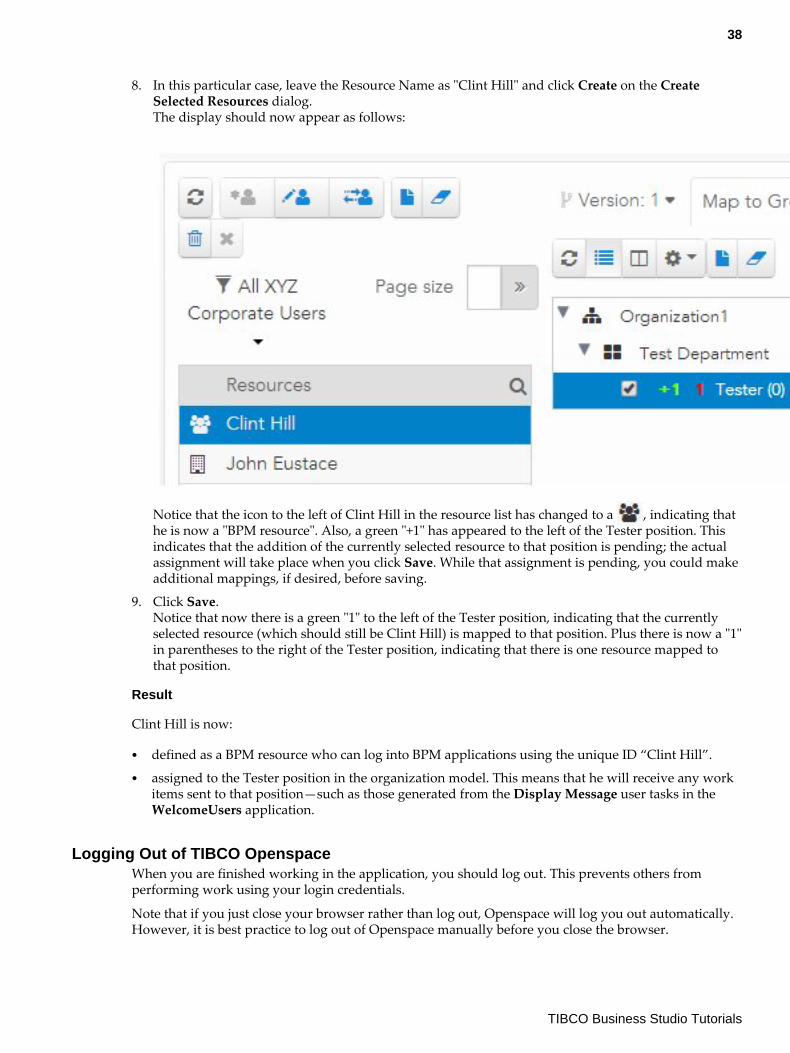
8. In this particular case, leave the Resource Name as "Clint Hill" and click Create on the CreateSelected Resources dialog.The display should now appear as follows:
Notice that the icon to the left of Clint Hill in the resource list has changed to a , indicating thathe is now a "BPM resource". Also, a green "+1" has appeared to the left of the Tester position. Thisindicates that the addition of the currently selected resource to that position is pending; the actualassignment will take place when you click Save. While that assignment is pending, you could makeadditional mappings, if desired, before saving.
9. Click Save.Notice that now there is a green "1" to the left of the Tester position, indicating that the currentlyselected resource (which should still be Clint Hill) is mapped to that position. Plus there is now a "1"in parentheses to the right of the Tester position, indicating that there is one resource mapped tothat position.
Result
Clint Hill is now:
● defined as a BPM resource who can log into BPM applications using the unique ID “Clint Hill”.● assigned to the Tester position in the organization model. This means that he will receive any work
items sent to that position—such as those generated from the Display Message user tasks in theWelcomeUsers application.
Logging Out of TIBCO OpenspaceWhen you are finished working in the application, you should log out. This prevents others fromperforming work using your login credentials.
Note that if you just close your browser rather than log out, Openspace will log you out automatically.However, it is best practice to log out of Openspace manually before you close the browser.
38
TIBCO Business Studio Tutorials
Procedure
● Click Logout to log out of Openspace.
You are logged out and the login screen is redisplayed.
Running the WelcomeUsers ApplicationThis tutorial shows you how to start the WelcomeUsers business service using TIBCO Openspace
You should work through each section in turn to complete the tutorial.
This tutorial demonstrates:
● how to log in to and log out of Openspace● how to start a business service.● how to open and process work items.
Logging into OpenspaceOpenspace is a browser-based application that allows you to work with process and work managementapplications—for example, to process work items or start business services.
Procedure
1. Contact your system administrator to find out how to start Openspace. You may need to enter aspecific URL in your browser, or click a link from a specific web page.
2. On the Openspace login screen, enter a User Name of "Clint Hill" with a Password of "tibco123",then click Login. The main Openspace user interface is displayed.
The password "tibco123" is a default defined in the LDAP.
Starting the Business ServiceOnce applications have been deployed, users (who have the appropriate permissions) can start themusing a business service. Starting a business service immediately displays a form, into which you enterthe information required by the underlying business process.
Procedure
1. From Openspace, click the Business Services link on the top menu bar.
39
TIBCO Business Studio Tutorials
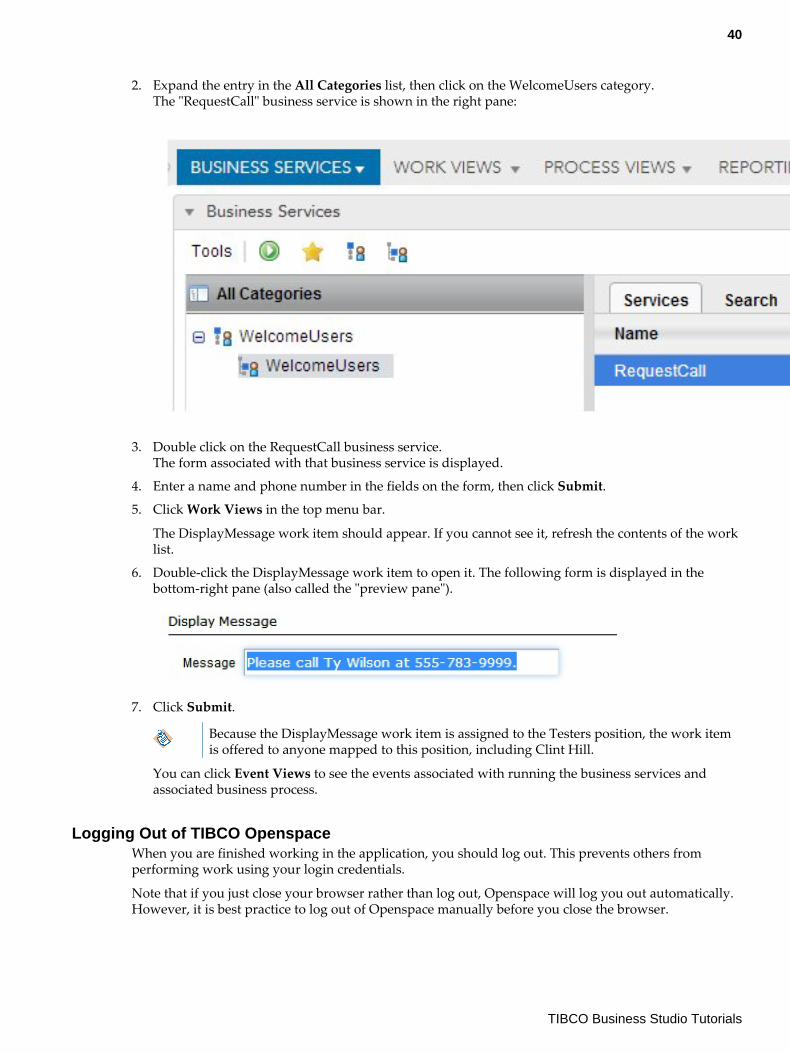
2. Expand the entry in the All Categories list, then click on the WelcomeUsers category.The "RequestCall" business service is shown in the right pane:
3. Double click on the RequestCall business service.The form associated with that business service is displayed.
4. Enter a name and phone number in the fields on the form, then click Submit.
5. Click Work Views in the top menu bar.
The DisplayMessage work item should appear. If you cannot see it, refresh the contents of the worklist.
6. Double-click the DisplayMessage work item to open it. The following form is displayed in thebottom-right pane (also called the "preview pane").
7. Click Submit.
Because the DisplayMessage work item is assigned to the Testers position, the work itemis offered to anyone mapped to this position, including Clint Hill.
You can click Event Views to see the events associated with running the business services andassociated business process.
Logging Out of TIBCO OpenspaceWhen you are finished working in the application, you should log out. This prevents others fromperforming work using your login credentials.
Note that if you just close your browser rather than log out, Openspace will log you out automatically.However, it is best practice to log out of Openspace manually before you close the browser.
40
TIBCO Business Studio Tutorials

Procedure
● Click Logout to log out of Openspace.
You are logged out and the login screen is redisplayed.
41
TIBCO Business Studio Tutorials
Creating and Using Business Data
How to Create Business DataThis tutorial shows you how to use TIBCO Business Studio to create a business object model andpopulate it with business data.
This is my final task topic.You should work through each section in turn to complete the tutorial.
Before you start this tutorial, you can become familiar with TIBCO Business Studio by completing theinitial WelcomeUsers tutorials.
Post Requisite
After completing this tutorial, you will be familiar with:
● Creating a business object model,● Creating business objects and the connections between them.
Creating a New ProjectA project is the basic container that you use to store all the artifacts needed by your business processes,including the business object model.
You can include the business object model in a project together with the organization model and/or thebusiness processes, or have them in separate projects.
The project that you will now create will be used in a subsequent tutorial (How to Use Business Data)for business processes. It does not contain an organization model.
Procedure
1. Start Studio for Designers.
Following this tutorial will be simpler and clearer if you close any other projects that youmay have open in your TIBCO Business Studio workspace, using the Project > CloseProject menu option.
2. Select File > New > BPM Developer Project .
3. In the New BPM Developer Project dialog, enter EasyAsBusinessData as the Project name field.
4. Check BPM in the Destination Environments field and click Next.
42
TIBCO Business Studio Tutorials
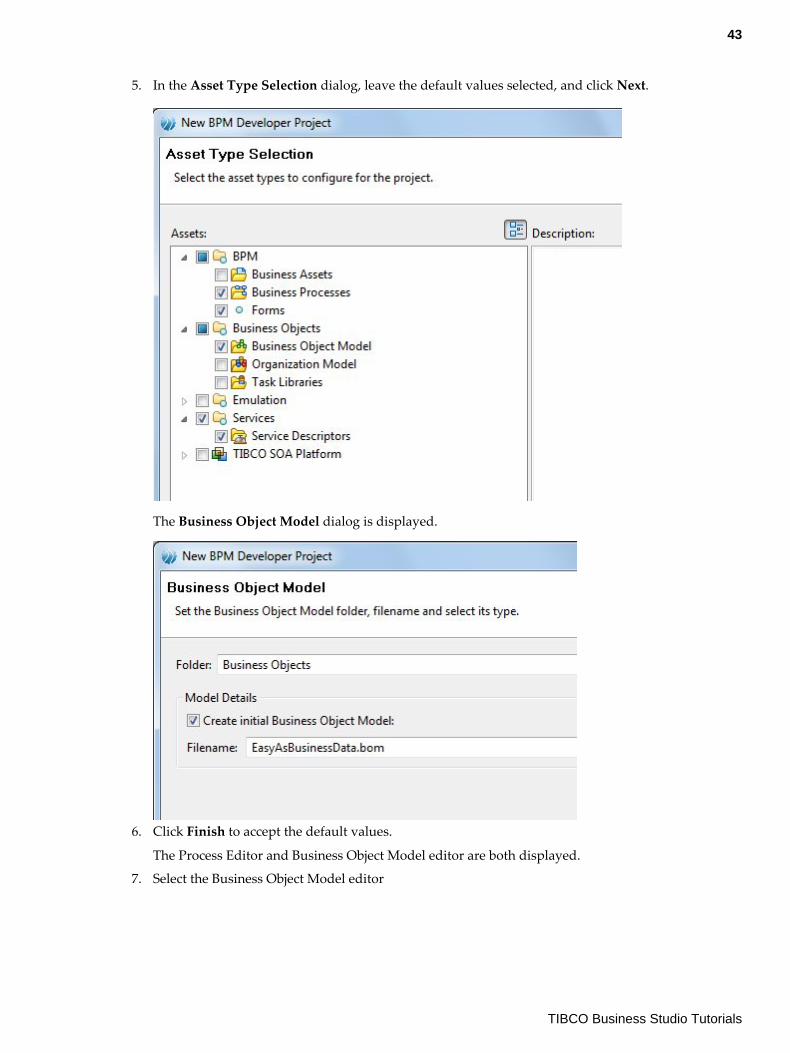
5. In the Asset Type Selection dialog, leave the default values selected, and click Next.
The Business Object Model dialog is displayed.
6. Click Finish to accept the default values.
The Process Editor and Business Object Model editor are both displayed.
7. Select the Business Object Model editor
43
TIBCO Business Studio Tutorials

Result
For more information, see "Defining a Business Object Model" in the "Tasks" chapter of TIBCO BusinessStudio Modeling User’s Guide.
Creating a PackagePackages are containers, which you can use to organize classes and other business objects.
Everything that you create in this tutorial will be included in the claim package. In this task you createone package, called claim.
Procedure
1. Select the Package tool in the palette.
2. Drag it on to the empty part of the business object model diagram and drop it.
This places a package in the diagram.
The Label field of the new package is automatically selected at this point.
44
TIBCO Business Studio Tutorials
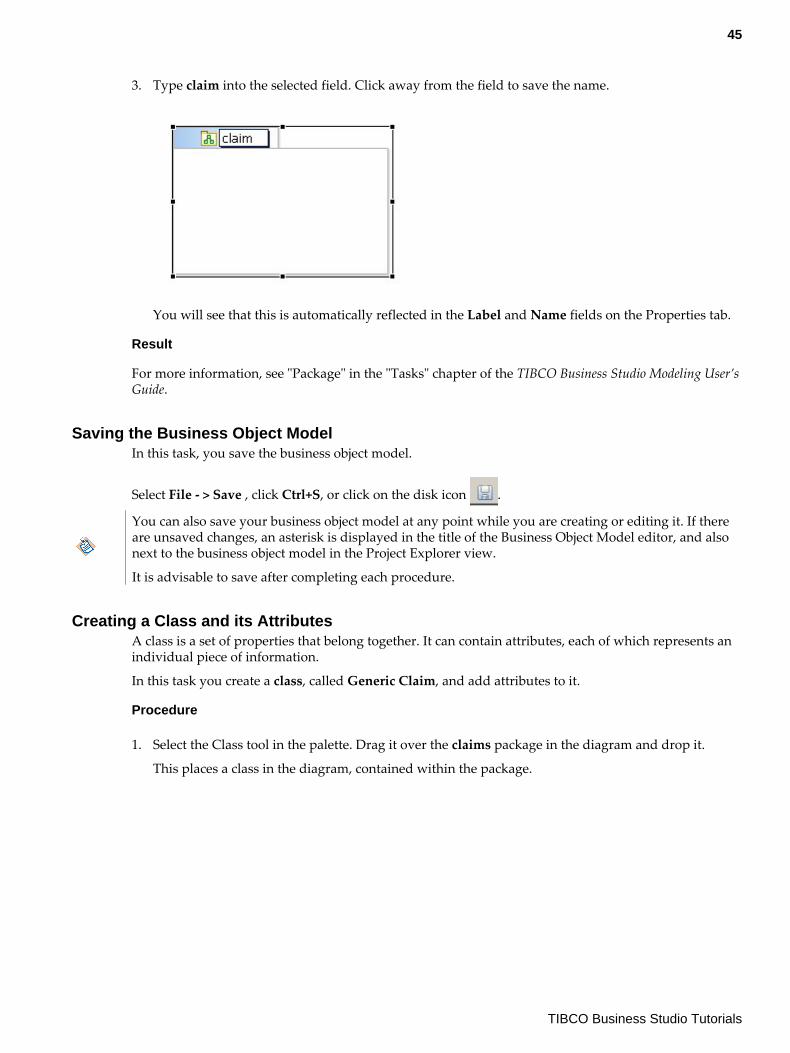
3. Type claim into the selected field. Click away from the field to save the name.
You will see that this is automatically reflected in the Label and Name fields on the Properties tab.
Result
For more information, see "Package" in the "Tasks" chapter of the TIBCO Business Studio Modeling User’sGuide.
Saving the Business Object ModelIn this task, you save the business object model.
Select File - > Save , click Ctrl+S, or click on the disk icon .
You can also save your business object model at any point while you are creating or editing it. If thereare unsaved changes, an asterisk is displayed in the title of the Business Object Model editor, and alsonext to the business object model in the Project Explorer view.
It is advisable to save after completing each procedure.
Creating a Class and its AttributesA class is a set of properties that belong together. It can contain attributes, each of which represents anindividual piece of information.
In this task you create a class, called Generic Claim, and add attributes to it.
Procedure
1. Select the Class tool in the palette. Drag it over the claims package in the diagram and drop it.
This places a class in the diagram, contained within the package.
45
TIBCO Business Studio Tutorials
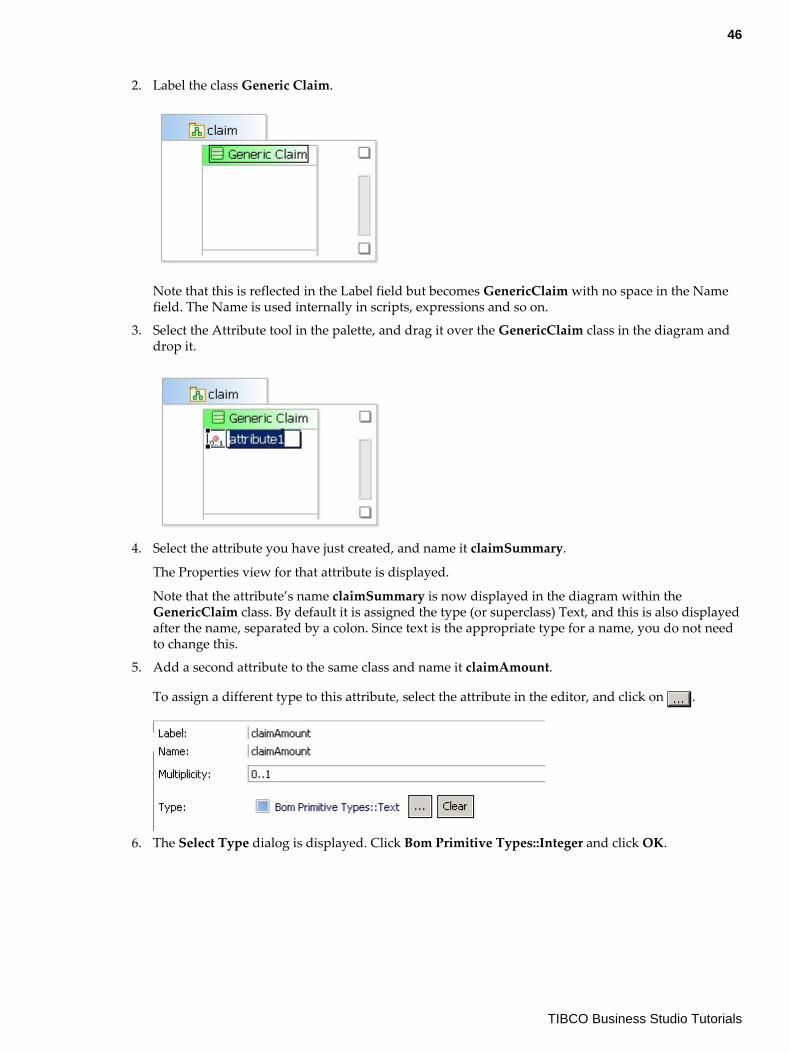
2. Label the class Generic Claim.
Note that this is reflected in the Label field but becomes GenericClaim with no space in the Namefield. The Name is used internally in scripts, expressions and so on.
3. Select the Attribute tool in the palette, and drag it over the GenericClaim class in the diagram anddrop it.
4. Select the attribute you have just created, and name it claimSummary.
The Properties view for that attribute is displayed.
Note that the attribute’s name claimSummary is now displayed in the diagram within theGenericClaim class. By default it is assigned the type (or superclass) Text, and this is also displayedafter the name, separated by a colon. Since text is the appropriate type for a name, you do not needto change this.
5. Add a second attribute to the same class and name it claimAmount.
To assign a different type to this attribute, select the attribute in the editor, and click on .
6. The Select Type dialog is displayed. Click Bom Primitive Types::Integer and click OK.
46
TIBCO Business Studio Tutorials
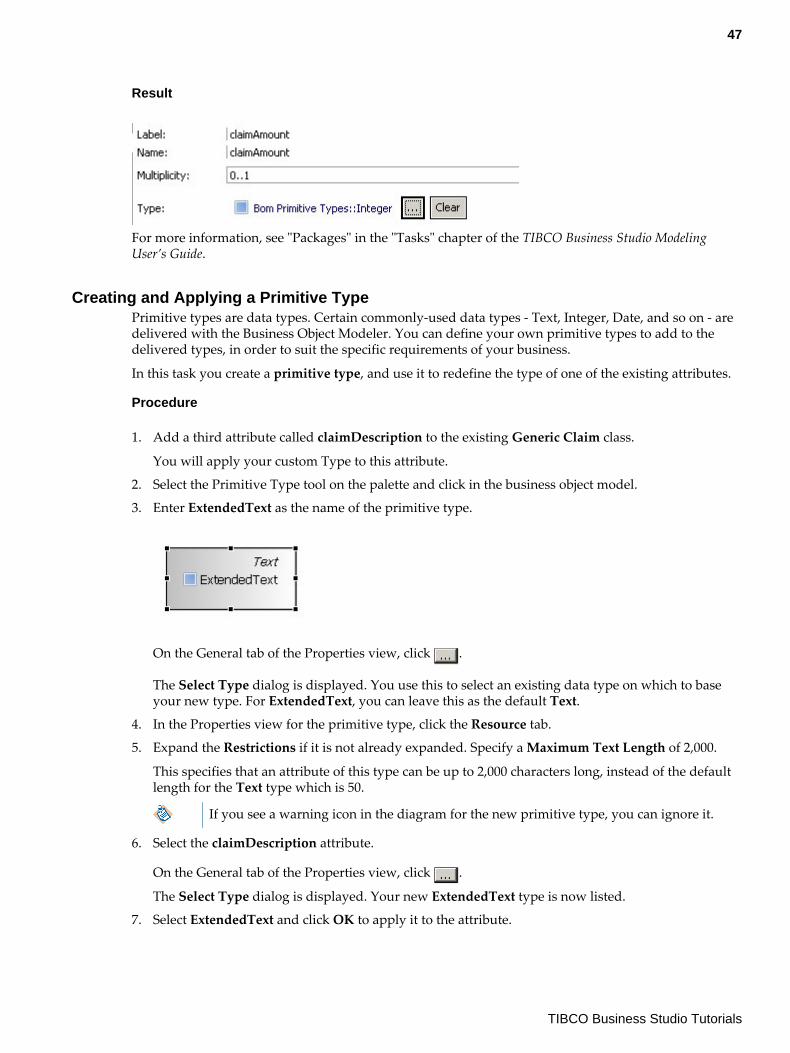
Result
For more information, see "Packages" in the "Tasks" chapter of the TIBCO Business Studio ModelingUser’s Guide.
Creating and Applying a Primitive TypePrimitive types are data types. Certain commonly-used data types - Text, Integer, Date, and so on - aredelivered with the Business Object Modeler. You can define your own primitive types to add to thedelivered types, in order to suit the specific requirements of your business.
In this task you create a primitive type, and use it to redefine the type of one of the existing attributes.
Procedure
1. Add a third attribute called claimDescription to the existing Generic Claim class.
You will apply your custom Type to this attribute.
2. Select the Primitive Type tool on the palette and click in the business object model.
3. Enter ExtendedText as the name of the primitive type.
On the General tab of the Properties view, click .
The Select Type dialog is displayed. You use this to select an existing data type on which to baseyour new type. For ExtendedText, you can leave this as the default Text.
4. In the Properties view for the primitive type, click the Resource tab.
5. Expand the Restrictions if it is not already expanded. Specify a Maximum Text Length of 2,000.
This specifies that an attribute of this type can be up to 2,000 characters long, instead of the defaultlength for the Text type which is 50.
If you see a warning icon in the diagram for the new primitive type, you can ignore it.
6. Select the claimDescription attribute.
On the General tab of the Properties view, click .
The Select Type dialog is displayed. Your new ExtendedText type is now listed.
7. Select ExtendedText and click OK to apply it to the attribute.
47
TIBCO Business Studio Tutorials
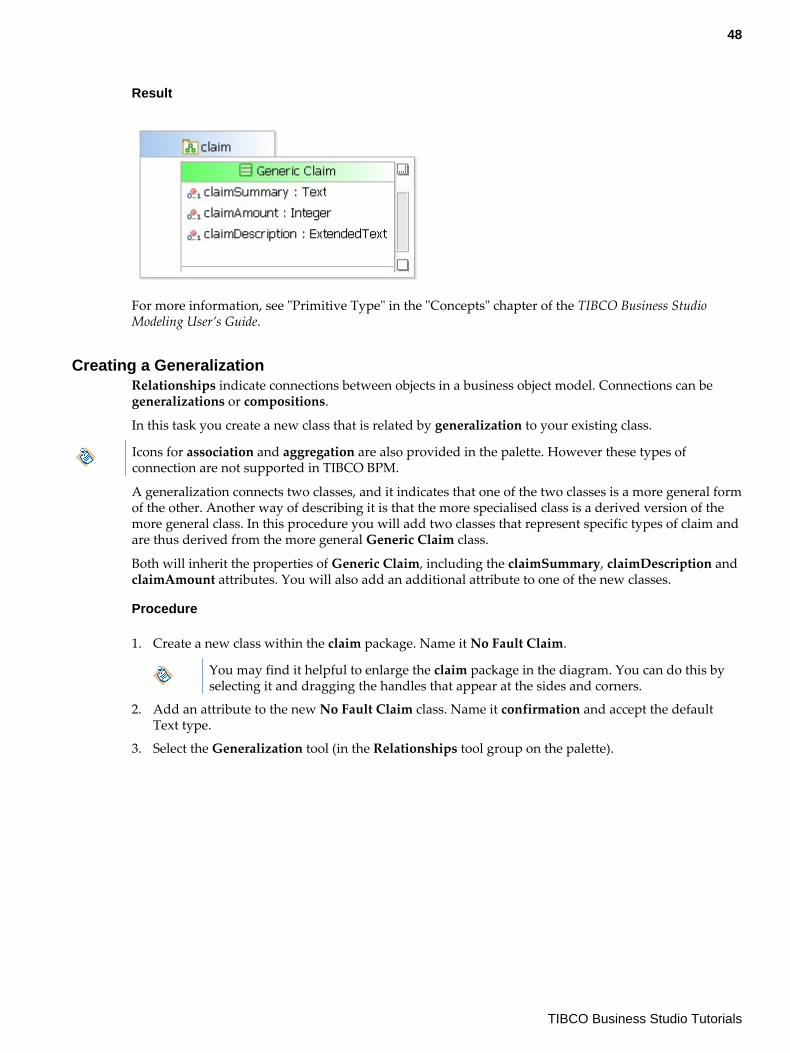
Result
For more information, see "Primitive Type" in the "Concepts" chapter of the TIBCO Business StudioModeling User’s Guide.
Creating a GeneralizationRelationships indicate connections between objects in a business object model. Connections can begeneralizations or compositions.
In this task you create a new class that is related by generalization to your existing class.
Icons for association and aggregation are also provided in the palette. However these types ofconnection are not supported in TIBCO BPM.
A generalization connects two classes, and it indicates that one of the two classes is a more general formof the other. Another way of describing it is that the more specialised class is a derived version of themore general class. In this procedure you will add two classes that represent specific types of claim andare thus derived from the more general Generic Claim class.
Both will inherit the properties of Generic Claim, including the claimSummary, claimDescription andclaimAmount attributes. You will also add an additional attribute to one of the new classes.
Procedure
1. Create a new class within the claim package. Name it No Fault Claim.
You may find it helpful to enlarge the claim package in the diagram. You can do this byselecting it and dragging the handles that appear at the sides and corners.
2. Add an attribute to the new No Fault Claim class. Name it confirmation and accept the defaultText type.
3. Select the Generalization tool (in the Relationships tool group on the palette).
48
TIBCO Business Studio Tutorials
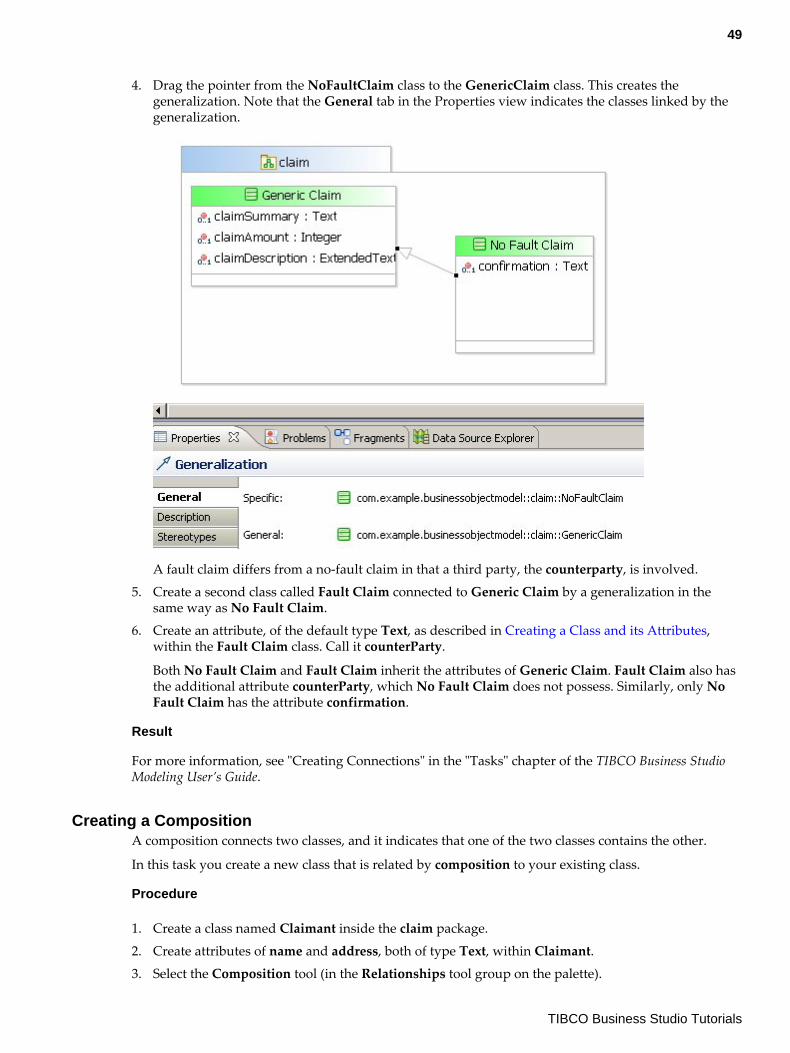
4. Drag the pointer from the NoFaultClaim class to the GenericClaim class. This creates thegeneralization. Note that the General tab in the Properties view indicates the classes linked by thegeneralization.
A fault claim differs from a no-fault claim in that a third party, the counterparty, is involved.
5. Create a second class called Fault Claim connected to Generic Claim by a generalization in thesame way as No Fault Claim.
6. Create an attribute, of the default type Text, as described in Creating a Class and its Attributes,within the Fault Claim class. Call it counterParty.
Both No Fault Claim and Fault Claim inherit the attributes of Generic Claim. Fault Claim also hasthe additional attribute counterParty, which No Fault Claim does not possess. Similarly, only NoFault Claim has the attribute confirmation.
Result
For more information, see "Creating Connections" in the "Tasks" chapter of the TIBCO Business StudioModeling User’s Guide.
Creating a CompositionA composition connects two classes, and it indicates that one of the two classes contains the other.
In this task you create a new class that is related by composition to your existing class.
Procedure
1. Create a class named Claimant inside the claim package.
2. Create attributes of name and address, both of type Text, within Claimant.
3. Select the Composition tool (in the Relationships tool group on the palette).
49
TIBCO Business Studio Tutorials
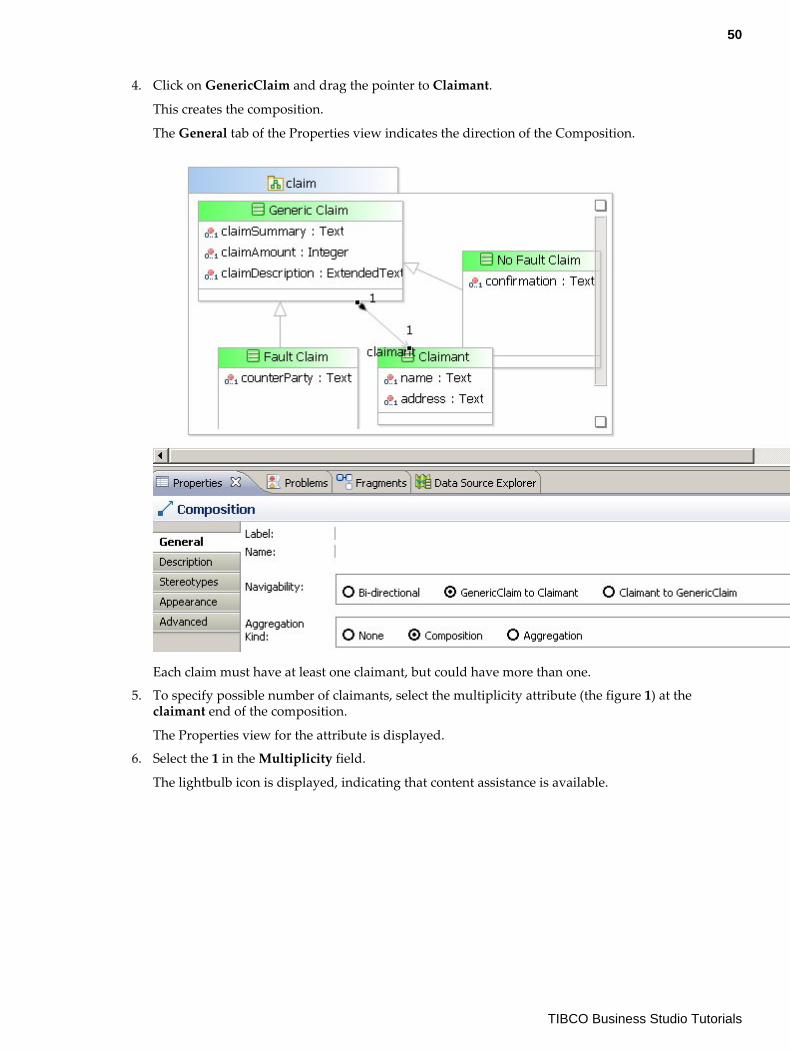
4. Click on GenericClaim and drag the pointer to Claimant.
This creates the composition.
The General tab of the Properties view indicates the direction of the Composition.
Each claim must have at least one claimant, but could have more than one.
5. To specify possible number of claimants, select the multiplicity attribute (the figure 1) at theclaimant end of the composition.
The Properties view for the attribute is displayed.
6. Select the 1 in the Multiplicity field.
The lightbulb icon is displayed, indicating that content assistance is available.
50
TIBCO Business Studio Tutorials
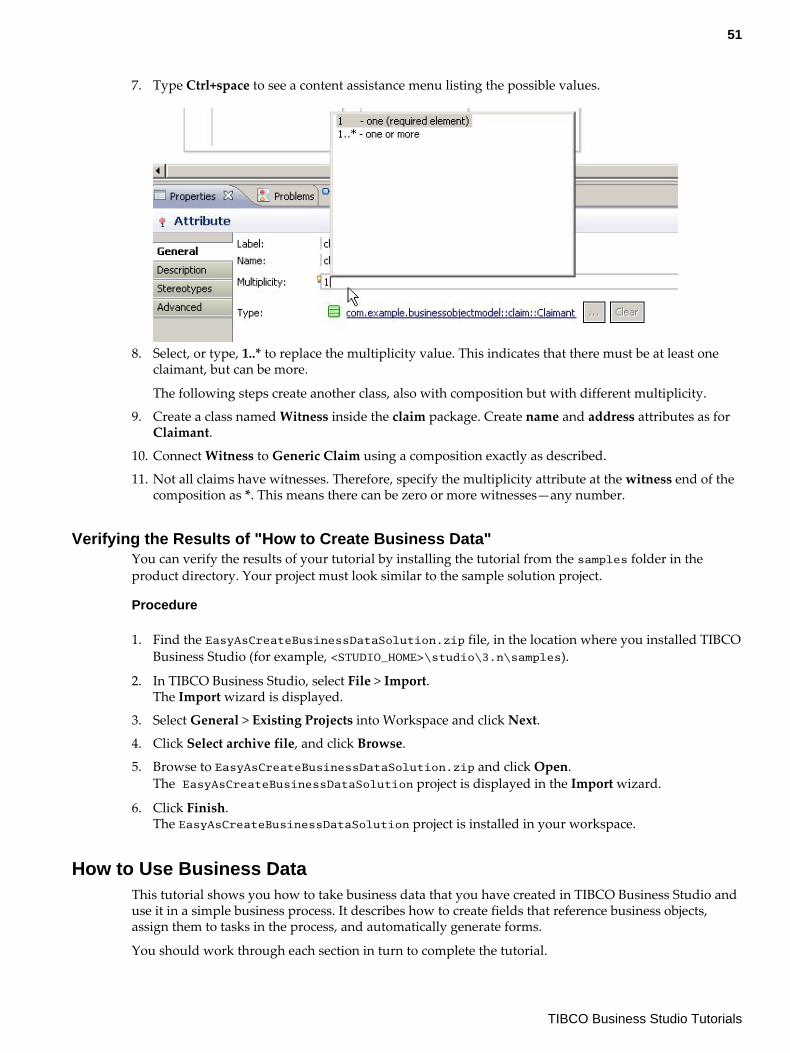
7. Type Ctrl+space to see a content assistance menu listing the possible values.
8. Select, or type, 1..* to replace the multiplicity value. This indicates that there must be at least oneclaimant, but can be more.
The following steps create another class, also with composition but with different multiplicity.
9. Create a class named Witness inside the claim package. Create name and address attributes as forClaimant.
10. Connect Witness to Generic Claim using a composition exactly as described.
11. Not all claims have witnesses. Therefore, specify the multiplicity attribute at the witness end of thecomposition as *. This means there can be zero or more witnesses—any number.
Verifying the Results of "How to Create Business Data"You can verify the results of your tutorial by installing the tutorial from the samples folder in theproduct directory. Your project must look similar to the sample solution project.
Procedure
1. Find the EasyAsCreateBusinessDataSolution.zip file, in the location where you installed TIBCOBusiness Studio (for example, <STUDIO_HOME>\studio\3.n\samples).
2. In TIBCO Business Studio, select File > Import.The Import wizard is displayed.
3. Select General > Existing Projects into Workspace and click Next.
4. Click Select archive file, and click Browse.
5. Browse to EasyAsCreateBusinessDataSolution.zip and click Open.The EasyAsCreateBusinessDataSolution project is displayed in the Import wizard.
6. Click Finish.The EasyAsCreateBusinessDataSolution project is installed in your workspace.
How to Use Business DataThis tutorial shows you how to take business data that you have created in TIBCO Business Studio anduse it in a simple business process. It describes how to create fields that reference business objects,assign them to tasks in the process, and automatically generate forms.
You should work through each section in turn to complete the tutorial.
51
TIBCO Business Studio Tutorials
Before you start this tutorial:
● You can become familiar with TIBCO Business Studio by completing the initial WelcomeUserstutorials.
● You should have completed the How to Create Business Data tutorial.
Post Requisite
After completing this tutorial, you can:
● Install the solution to this Tutorial and compare it with your version. See the instructions in Verifying the Results for how to do this.
● Optionally, you can assign participants to the user tasks. This is necessary if you want to deploy andrun the process.
1. Install an organization model. You can import the solution to the How to Add Groups, Capabilitiesand Privileges to an Organization Model tutorial, installing the EasyAsExtendedOMSolutionproject as described in that tutorial.
2. Assign a position in the organization model as the participant for each of the user tasks. TheCreate, Deploy, and Run Your First BPM Application tutorial describes how to do that.
3. If you wish, you can then deploy the project, as described in the How to Implement and Deploy theWelcome Users Application tutorial for deploying the WelcomeUsers project.
● Follow on with the other related tutorials.
Use the "For More Information" links in this chapter to explore particular topics in more details.
Opening the Business Object ModelA project is the basic container that you use to store all the artifacts needed by your business processes,including the business object model.
If you are continuing this tutorial directly from the previous one, the EasyAs Business Data project andthe business object model diagram editor will already be open. If so, skip this procedure and go on tothe next one.
Following this tutorial will be simpler and clearer if you close any other projects that you may haveopen in your TIBCO Business Studio workspace, using the Project > Close Project menu option. Thisincludes closing the solution to the Create Business Data tutorial, if you have imported that.
Procedure
1. Start Studio for Designers.
2. TIBCO Business Studio opens the projects that you had open when you quit your previous session,so the EasyAs Business Data project and the business object model it contains may openautomatically.
3. If it does not, in the Project Explorer expand EasyAs Business Data > Business Objects >EasyAsBusiness Data.bom .
4. Double-click on EasyAsBusiness Data.bom. The business object model diagram editor opens,showing that business object model.
Result
For more information, see:
● the How to Create Business Data tutorial● "Introduction" in the "Tutorial" chapter of the TIBCO Business Studio Modeling User’s Guide
52
TIBCO Business Studio Tutorials
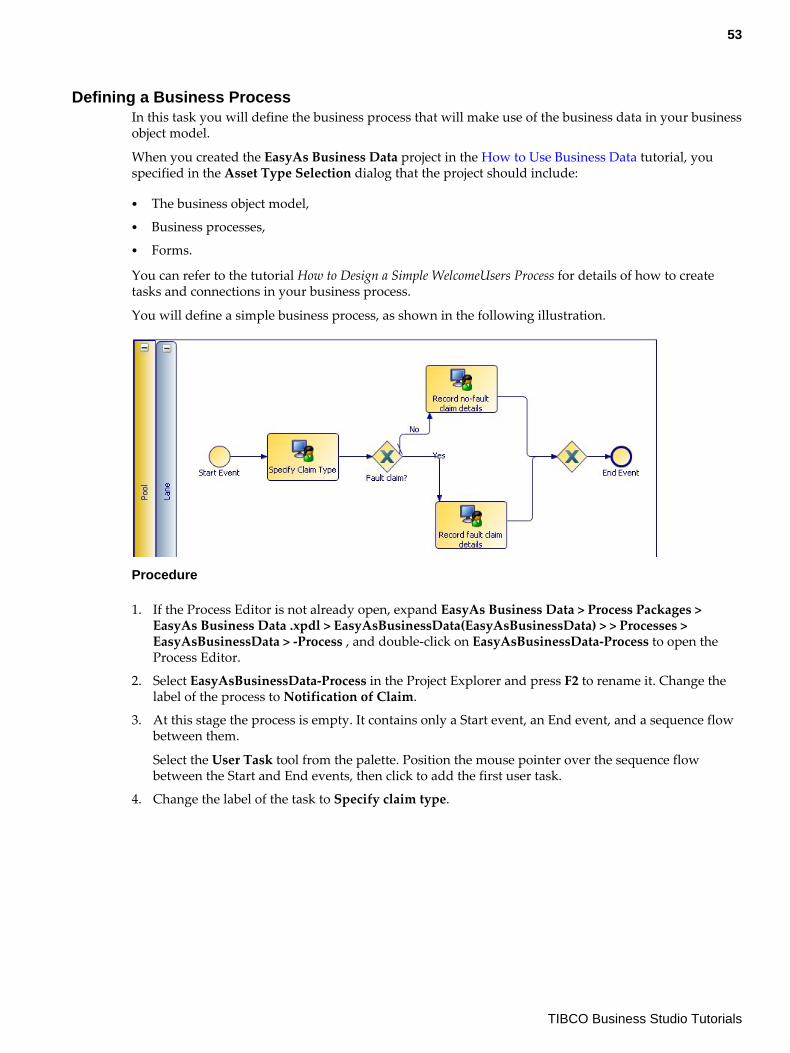
Defining a Business ProcessIn this task you will define the business process that will make use of the business data in your businessobject model.
When you created the EasyAs Business Data project in the How to Use Business Data tutorial, youspecified in the Asset Type Selection dialog that the project should include:
● The business object model,● Business processes,● Forms.
You can refer to the tutorial How to Design a Simple WelcomeUsers Process for details of how to createtasks and connections in your business process.
You will define a simple business process, as shown in the following illustration.
Procedure
1. If the Process Editor is not already open, expand EasyAs Business Data > Process Packages >EasyAs Business Data .xpdl > EasyAsBusinessData(EasyAsBusinessData) > > Processes >EasyAsBusinessData > -Process , and double-click on EasyAsBusinessData-Process to open theProcess Editor.
2. Select EasyAsBusinessData-Process in the Project Explorer and press F2 to rename it. Change thelabel of the process to Notification of Claim.
3. At this stage the process is empty. It contains only a Start event, an End event, and a sequence flowbetween them.
Select the User Task tool from the palette. Position the mouse pointer over the sequence flowbetween the Start and End events, then click to add the first user task.
4. Change the label of the task to Specify claim type.
53
TIBCO Business Studio Tutorials
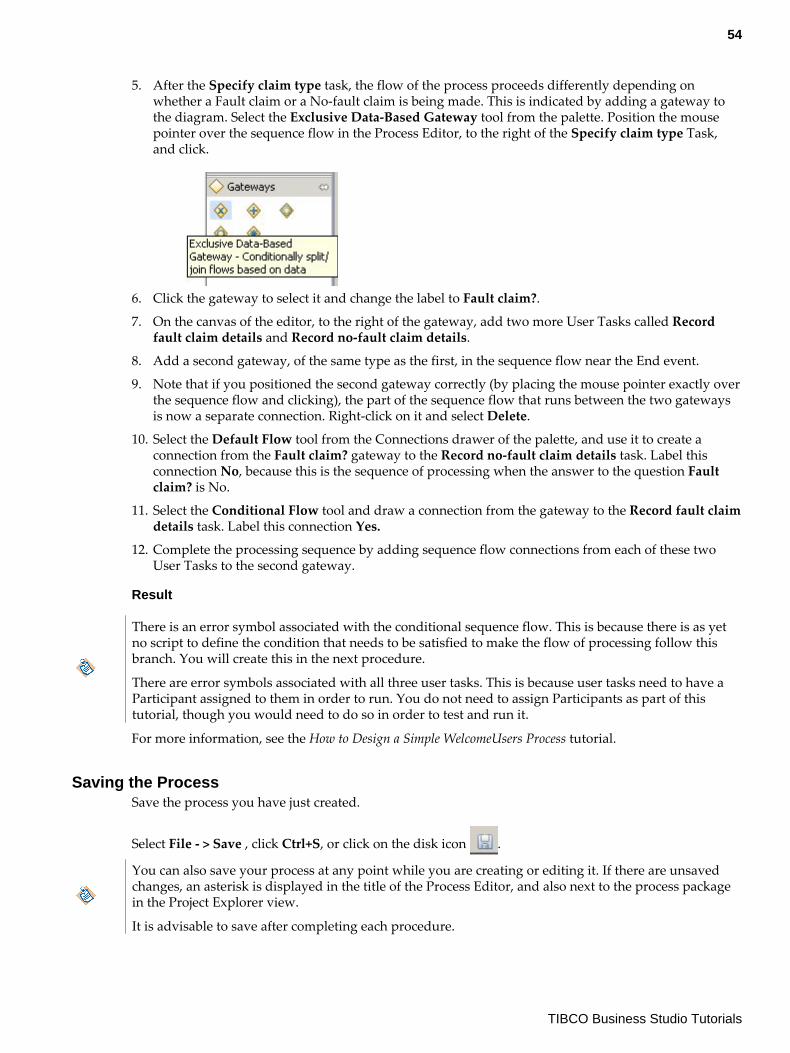
5. After the Specify claim type task, the flow of the process proceeds differently depending onwhether a Fault claim or a No-fault claim is being made. This is indicated by adding a gateway tothe diagram. Select the Exclusive Data-Based Gateway tool from the palette. Position the mousepointer over the sequence flow in the Process Editor, to the right of the Specify claim type Task,and click.
6. Click the gateway to select it and change the label to Fault claim?.
7. On the canvas of the editor, to the right of the gateway, add two more User Tasks called Recordfault claim details and Record no-fault claim details.
8. Add a second gateway, of the same type as the first, in the sequence flow near the End event.
9. Note that if you positioned the second gateway correctly (by placing the mouse pointer exactly overthe sequence flow and clicking), the part of the sequence flow that runs between the two gatewaysis now a separate connection. Right-click on it and select Delete.
10. Select the Default Flow tool from the Connections drawer of the palette, and use it to create aconnection from the Fault claim? gateway to the Record no-fault claim details task. Label thisconnection No, because this is the sequence of processing when the answer to the question Faultclaim? is No.
11. Select the Conditional Flow tool and draw a connection from the gateway to the Record fault claimdetails task. Label this connection Yes.
12. Complete the processing sequence by adding sequence flow connections from each of these twoUser Tasks to the second gateway.
Result
There is an error symbol associated with the conditional sequence flow. This is because there is as yetno script to define the condition that needs to be satisfied to make the flow of processing follow thisbranch. You will create this in the next procedure.
There are error symbols associated with all three user tasks. This is because user tasks need to have aParticipant assigned to them in order to run. You do not need to assign Participants as part of thistutorial, though you would need to do so in order to test and run it.
For more information, see the How to Design a Simple WelcomeUsers Process tutorial.
Saving the ProcessSave the process you have just created.
Select File - > Save , click Ctrl+S, or click on the disk icon .
You can also save your process at any point while you are creating or editing it. If there are unsavedchanges, an asterisk is displayed in the title of the Process Editor, and also next to the process packagein the Project Explorer view.
It is advisable to save after completing each procedure.
54
TIBCO Business Studio Tutorials
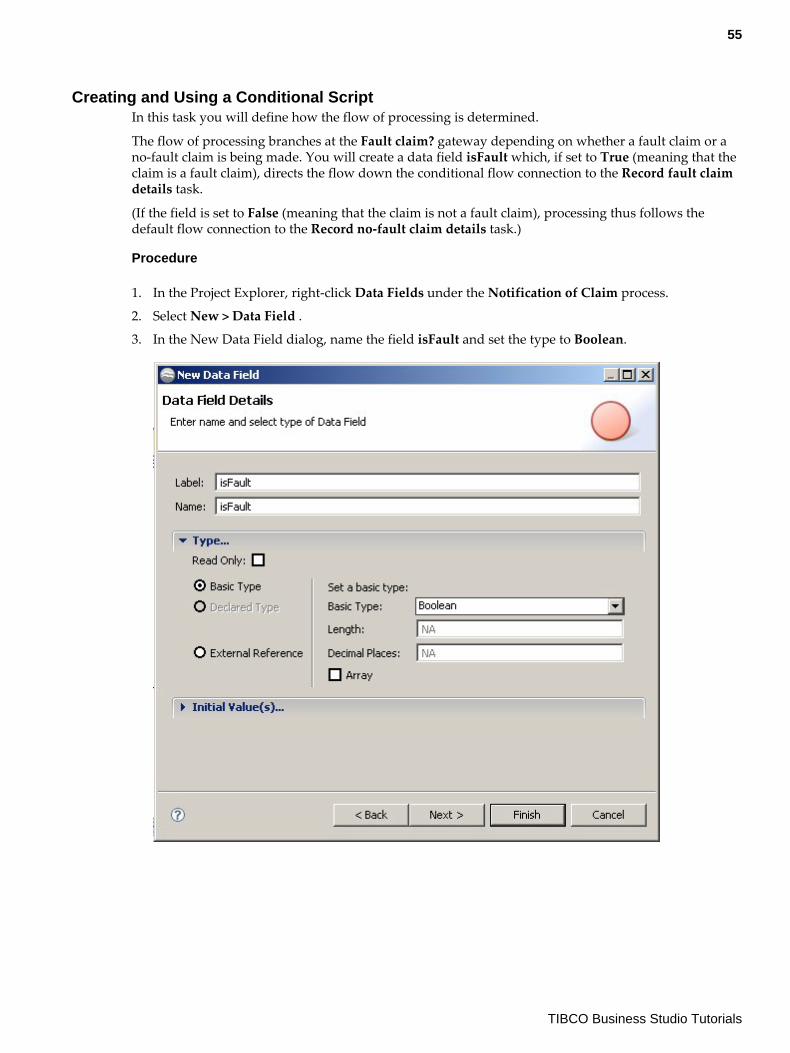
Creating and Using a Conditional ScriptIn this task you will define how the flow of processing is determined.
The flow of processing branches at the Fault claim? gateway depending on whether a fault claim or ano-fault claim is being made. You will create a data field isFault which, if set to True (meaning that theclaim is a fault claim), directs the flow down the conditional flow connection to the Record fault claimdetails task.
(If the field is set to False (meaning that the claim is not a fault claim), processing thus follows thedefault flow connection to the Record no-fault claim details task.)
Procedure
1. In the Project Explorer, right-click Data Fields under the Notification of Claim process.
2. Select New > Data Field .
3. In the New Data Field dialog, name the field isFault and set the type to Boolean.
55
TIBCO Business Studio Tutorials
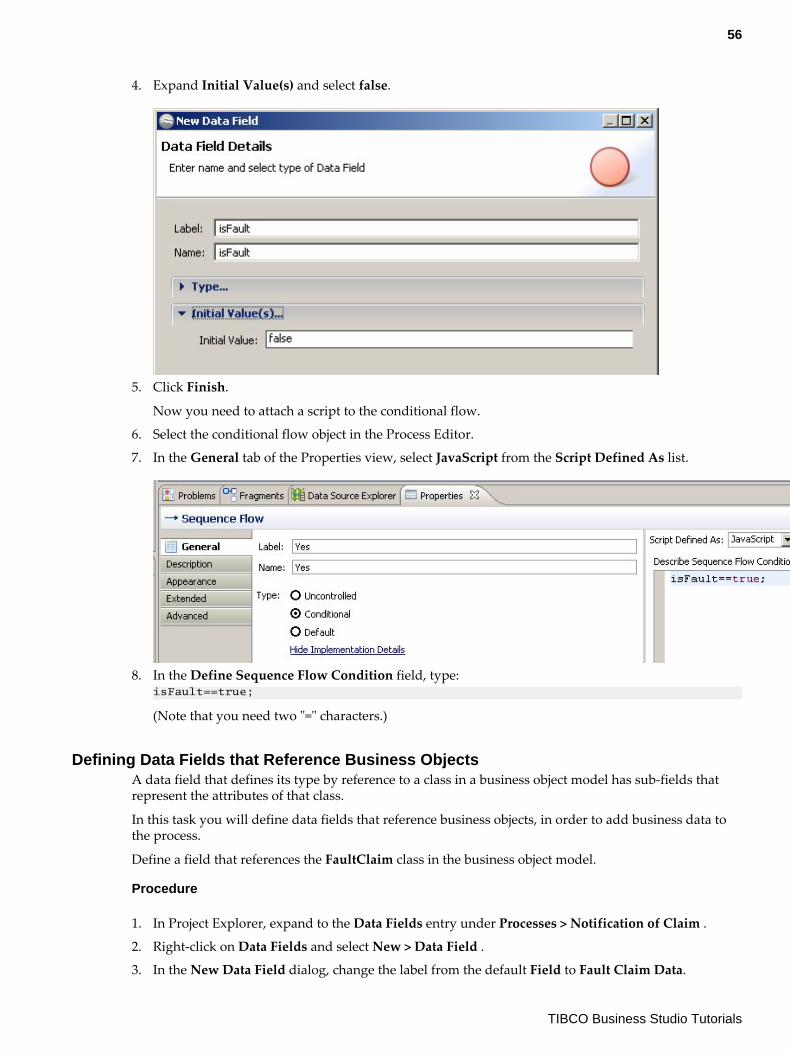
4. Expand Initial Value(s) and select false.
5. Click Finish.
Now you need to attach a script to the conditional flow.
6. Select the conditional flow object in the Process Editor.
7. In the General tab of the Properties view, select JavaScript from the Script Defined As list.
8. In the Define Sequence Flow Condition field, type:isFault==true;
(Note that you need two "=" characters.)
Defining Data Fields that Reference Business ObjectsA data field that defines its type by reference to a class in a business object model has sub-fields thatrepresent the attributes of that class.
In this task you will define data fields that reference business objects, in order to add business data tothe process.
Define a field that references the FaultClaim class in the business object model.
Procedure
1. In Project Explorer, expand to the Data Fields entry under Processes > Notification of Claim .
2. Right-click on Data Fields and select New > Data Field .
3. In the New Data Field dialog, change the label from the default Field to Fault Claim Data.
56
TIBCO Business Studio Tutorials
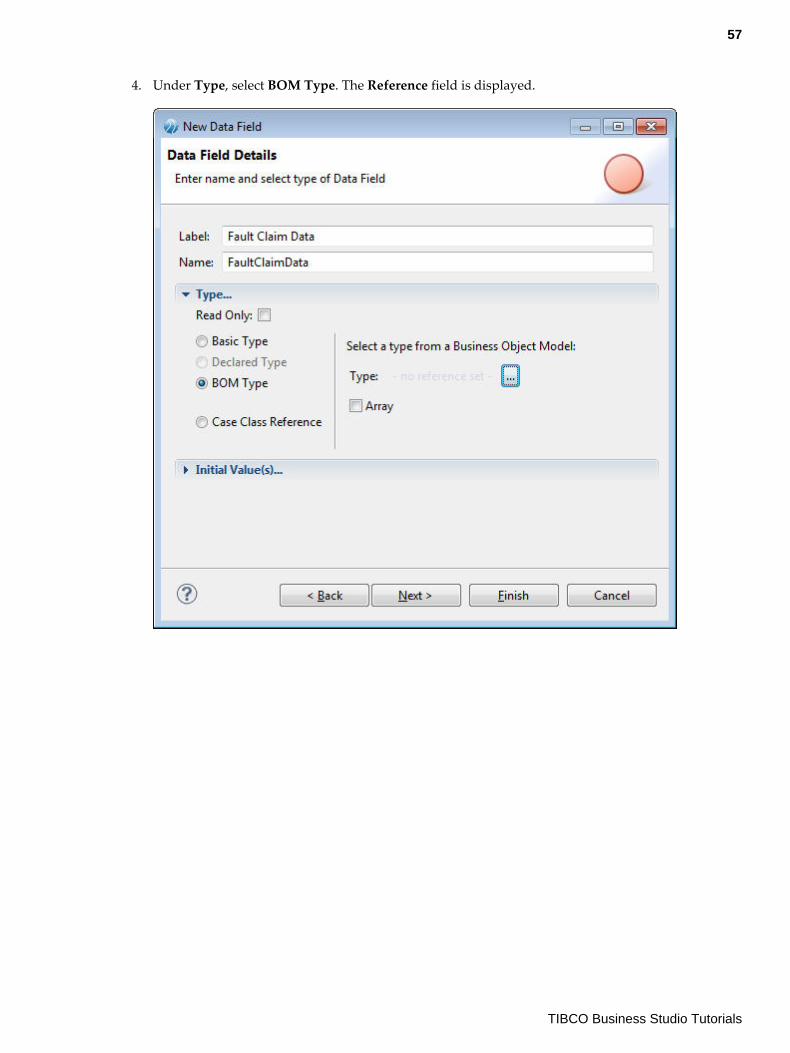
4. Under Type, select BOM Type. The Reference field is displayed.
57
TIBCO Business Studio Tutorials
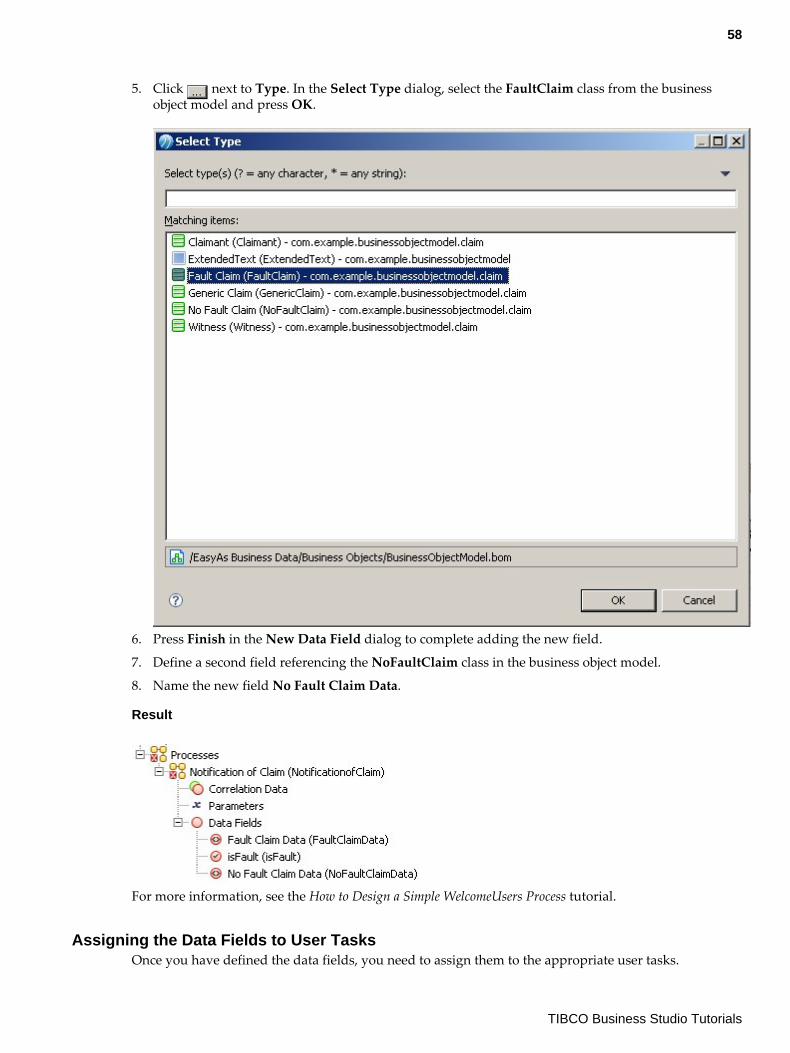
5. Click next to Type. In the Select Type dialog, select the FaultClaim class from the businessobject model and press OK.
6. Press Finish in the New Data Field dialog to complete adding the new field.
7. Define a second field referencing the NoFaultClaim class in the business object model.
8. Name the new field No Fault Claim Data.
Result
For more information, see the How to Design a Simple WelcomeUsers Process tutorial.
Assigning the Data Fields to User TasksOnce you have defined the data fields, you need to assign them to the appropriate user tasks.
58
TIBCO Business Studio Tutorials
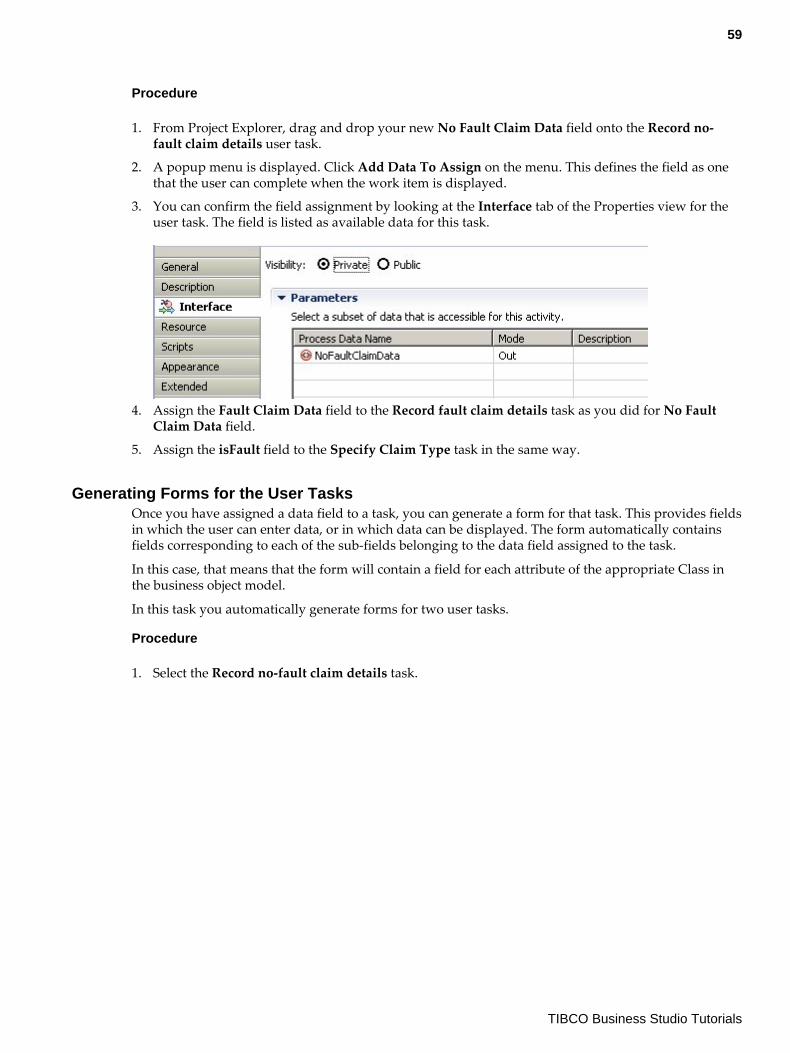
Procedure
1. From Project Explorer, drag and drop your new No Fault Claim Data field onto the Record no-fault claim details user task.
2. A popup menu is displayed. Click Add Data To Assign on the menu. This defines the field as onethat the user can complete when the work item is displayed.
3. You can confirm the field assignment by looking at the Interface tab of the Properties view for theuser task. The field is listed as available data for this task.
4. Assign the Fault Claim Data field to the Record fault claim details task as you did for No FaultClaim Data field.
5. Assign the isFault field to the Specify Claim Type task in the same way.
Generating Forms for the User TasksOnce you have assigned a data field to a task, you can generate a form for that task. This provides fieldsin which the user can enter data, or in which data can be displayed. The form automatically containsfields corresponding to each of the sub-fields belonging to the data field assigned to the task.
In this case, that means that the form will contain a field for each attribute of the appropriate Class inthe business object model.
In this task you automatically generate forms for two user tasks.
Procedure
1. Select the Record no-fault claim details task.
59
TIBCO Business Studio Tutorials
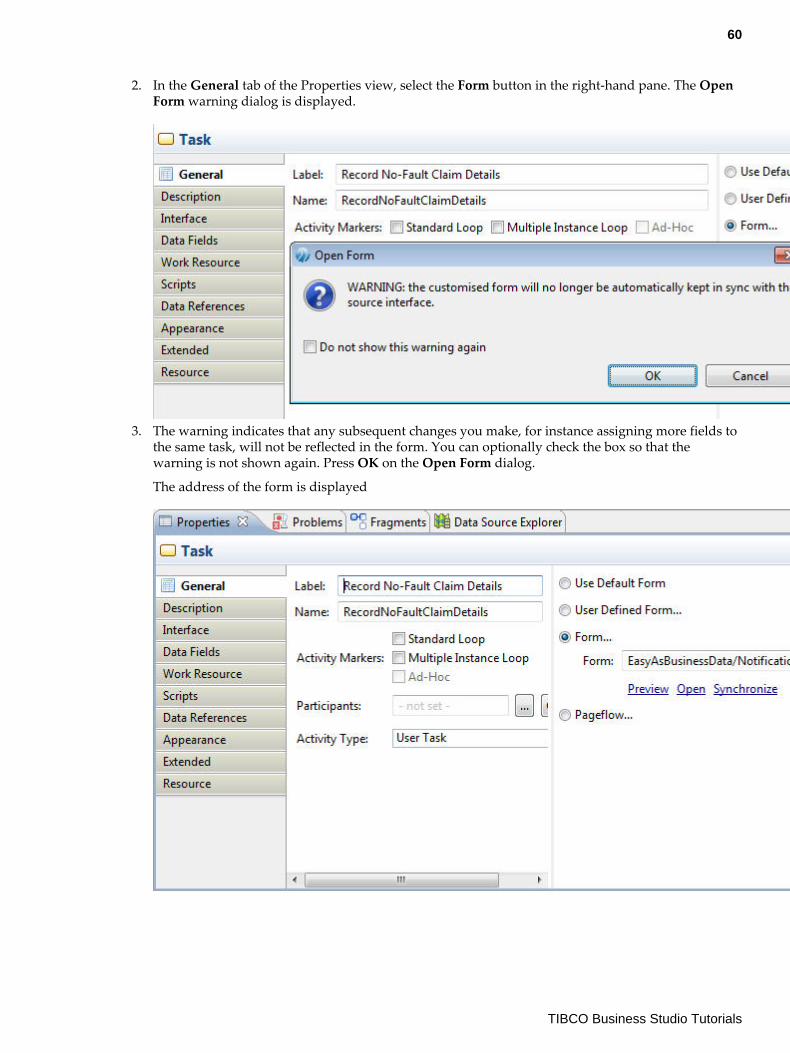
2. In the General tab of the Properties view, select the Form button in the right-hand pane. The OpenForm warning dialog is displayed.
3. The warning indicates that any subsequent changes you make, for instance assigning more fields tothe same task, will not be reflected in the form. You can optionally check the box so that thewarning is not shown again. Press OK on the Open Form dialog.
The address of the form is displayed
60
TIBCO Business Studio Tutorials
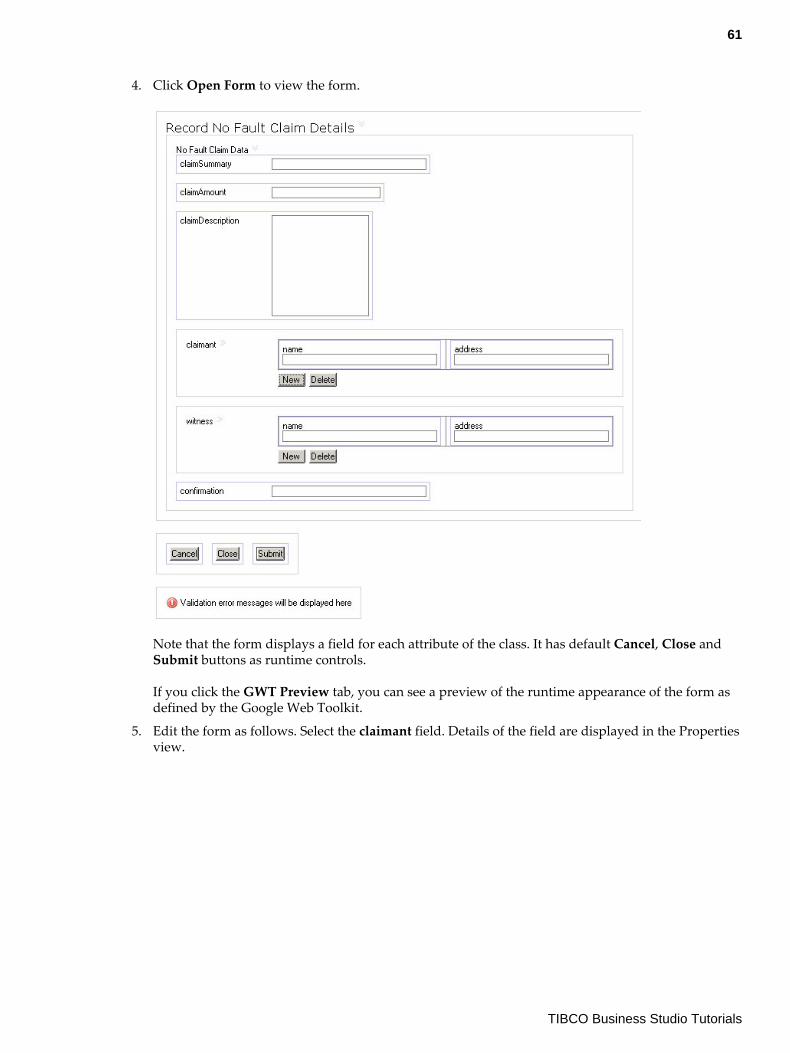
4. Click Open Form to view the form.
Note that the form displays a field for each attribute of the class. It has default Cancel, Close andSubmit buttons as runtime controls.
If you click the GWT Preview tab, you can see a preview of the runtime appearance of the form asdefined by the Google Web Toolkit.
5. Edit the form as follows. Select the claimant field. Details of the field are displayed in the Propertiesview.
61
TIBCO Business Studio Tutorials
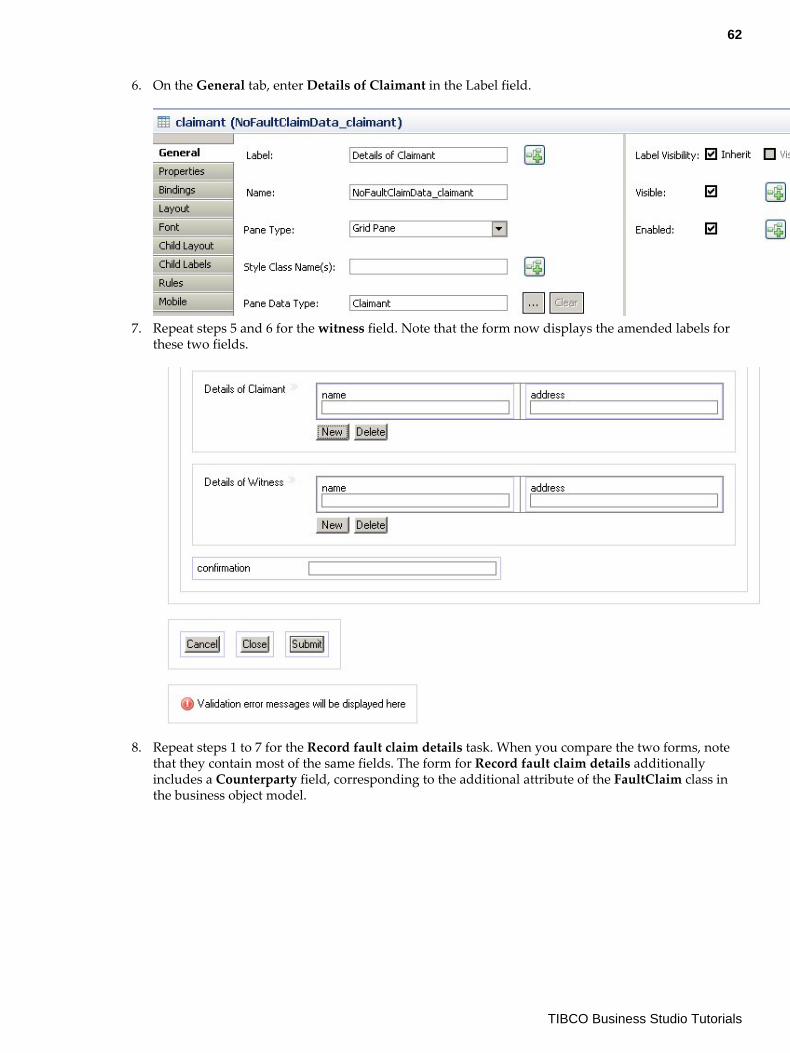
6. On the General tab, enter Details of Claimant in the Label field.
7. Repeat steps 5 and 6 for the witness field. Note that the form now displays the amended labels forthese two fields.
8. Repeat steps 1 to 7 for the Record fault claim details task. When you compare the two forms, notethat they contain most of the same fields. The form for Record fault claim details additionallyincludes a Counterparty field, corresponding to the additional attribute of the FaultClaim class inthe business object model.
62
TIBCO Business Studio Tutorials
9. Repeat steps 1 to 4 again to generate a form for the Specify Claim Type task. This contains only onefield, for the isFault data field.
For more information about forms, see the Forms documentation.
You have now completed this tutorial.
You should now be familiar with:
● Defining data fields that reference business objects.● Assigning those fields to tasks in a business process.● Generating the associated forms.
Verifying the Results
You can verify the results of your tutorial by installing the tutorial from the samples folder in the productdirectory. Your project must look similar to the sample solution project.
10. Find the easyasusebusinessdatasolution.zip file, in the location where you installed TIBCOBusiness Studio (for example, <STUDIO_HOME > \studio\3. n\samples).
11. In TIBCO Business Studio, select File > Import .
12. The Import wizard is displayed. Select General > Existing Projects into Workspace and click Next.
13. Click Select archive file, and click on the Browse button.
14. Browse to easyasusebusinessdatasolution.zip and click Open. The easyasusebusinessdatasolutionproject is displayed in the Import wizard.
15. Click Finish. The easyasusebusinessdatasolution project is installed in your workspace.
In this solution project, a Participant has been defined by reference to theEasyAsExtendedOMSolution organization model, as described in How to Use BusinessData. An error will be displayed unless you have the EasyAsExtendedOMSolutionproject open in your workspace.
Verifying the Results of "How to Use Business Data"You can verify the results of your tutorial by installing the tutorial from the samples folder in theproduct directory. Your project must look similar to the sample solution project.
Procedure
1. Find the easyasusebusinessdatasolution.zip file, in the location where you installed TIBCOBusiness Studio (for example, <STUDIO_HOME>\studio\3.n\samples).
2. In TIBCO Business Studio, select File > Import.The Import wizard is displayed.
3. Select General > Existing Projects into Workspace and click Next.
4. Click Select archive file, and click Browse.
5. Browse to easyasusebusinessdatasolution.zip and click Open.The easyasusebusinessdatasolution project is displayed in the Import wizard.
63
TIBCO Business Studio Tutorials

6. Click Finish.The easyasusebusinessdatasolution project is installed in your workspace.
In this solution project, a Participant has been defined by reference to theEasyAsExtendedOMSolution organization model, as described in How to Use BusinessData. An error will be displayed unless you have the EasyAsExtendedOMSolution projectopen in your workspace.
64
TIBCO Business Studio Tutorials
Using the Organization Modeler
How to Use the Graphical Organization ModelerThis tutorial shows you how to use TIBCO Business Studio to create and populate an OrganizationModel.
This tutorial demonstrates:
● Creating an Organization Model in a new project● The use of the Organization Editor, one of the two diagram editors provided in Organization
Modeler● Creating the basic Organization Model entities—Organizations, Organization Units and Positions—
and assigning properties to them● Creating relationships between the Organization Units
Before you start this tutorial, you can become familiar with TIBCO Business Studio by completing theinitial Create, Deploy and Run your First BPM Project tutorials.
After completing this tutorial, you will be familiar with:
● Using the graphical Organization Editor● Creating Organization Modeler entities using the tools in the palette, or by copying and pasting.
Creating a New ProjectA project is the basic container that you use to store all the artifacts needed by your business processes.This includes the organization model.
Procedure
1. Start Studio for Designers.
Following this tutorial will be simpler and clearer if you close any other projects that youmay have open in your TIBCO Business Studio workspace, using the Project > CloseProject menu option.
2. Select File > New > Analysis Project .
3. In the New Analysis Project dialog, enter EasyAsSimpleOrgModel as the Project name field.
4. Check BPM in the Destination Environments field and click Next.
65
TIBCO Business Studio Tutorials
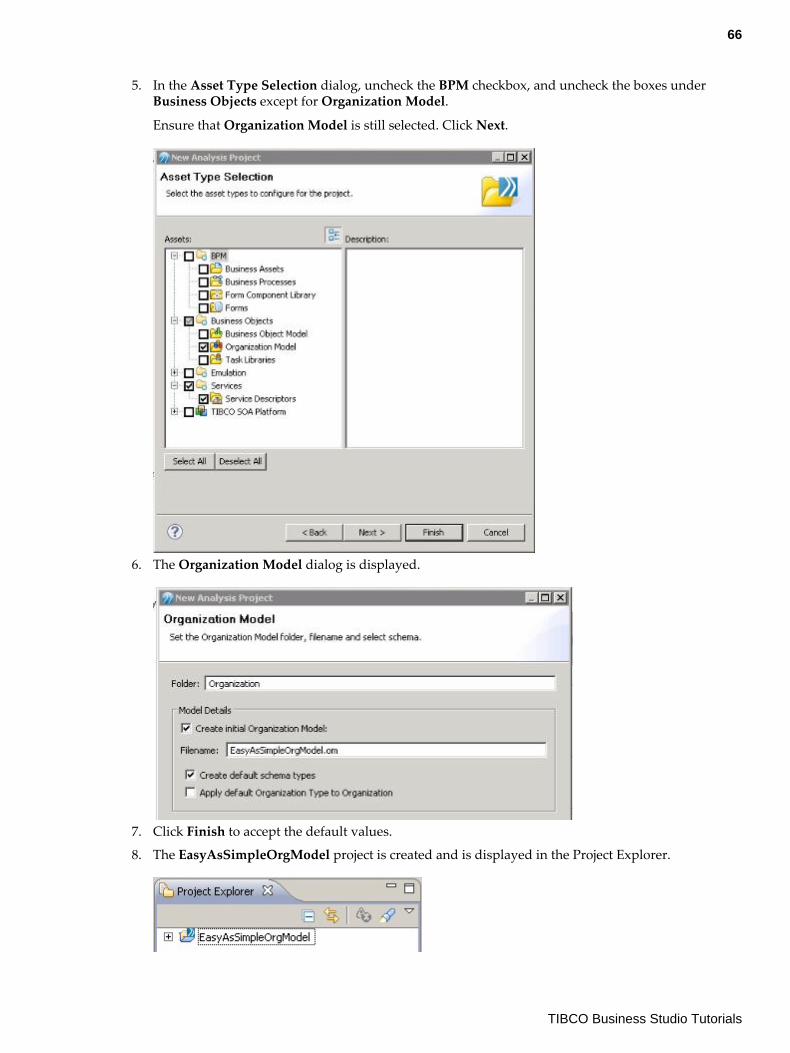
5. In the Asset Type Selection dialog, uncheck the BPM checkbox, and uncheck the boxes underBusiness Objects except for Organization Model.
Ensure that Organization Model is still selected. Click Next.
6. The Organization Model dialog is displayed.
7. Click Finish to accept the default values.
8. The EasyAsSimpleOrgModel project is created and is displayed in the Project Explorer.
66
TIBCO Business Studio Tutorials
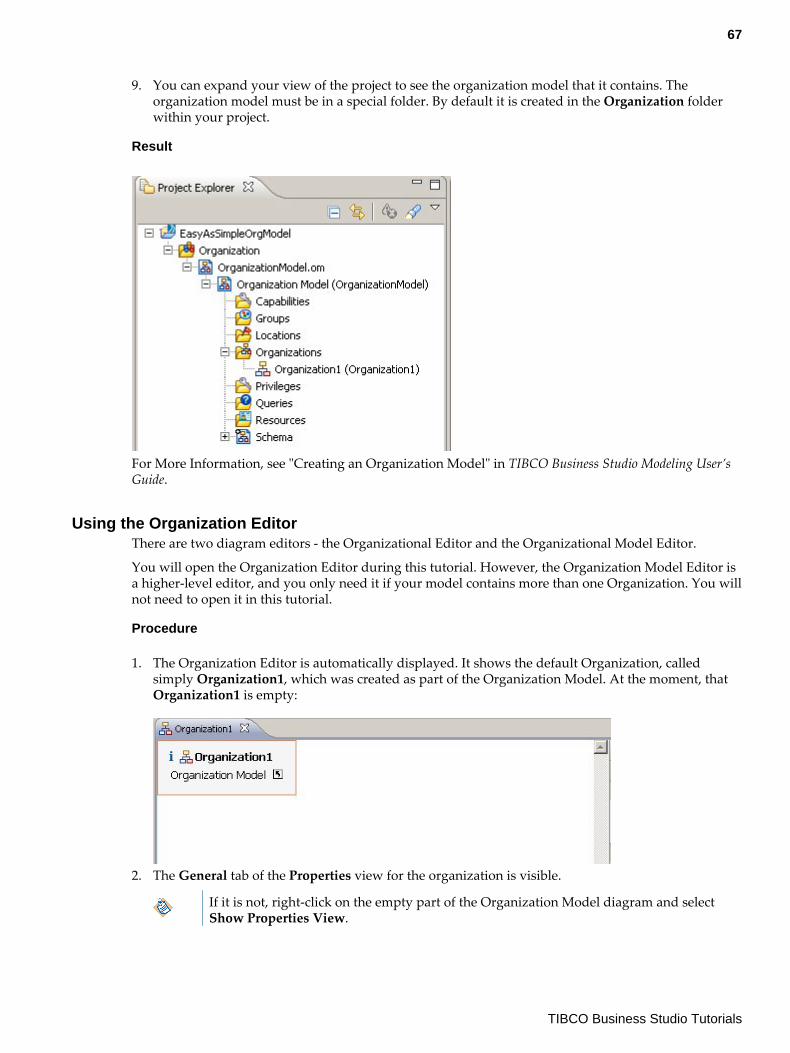
9. You can expand your view of the project to see the organization model that it contains. Theorganization model must be in a special folder. By default it is created in the Organization folderwithin your project.
Result
For More Information, see "Creating an Organization Model" in TIBCO Business Studio Modeling User’sGuide.
Using the Organization EditorThere are two diagram editors - the Organizational Editor and the Organizational Model Editor.
You will open the Organization Editor during this tutorial. However, the Organization Model Editor isa higher-level editor, and you only need it if your model contains more than one Organization. You willnot need to open it in this tutorial.
Procedure
1. The Organization Editor is automatically displayed. It shows the default Organization, calledsimply Organization1, which was created as part of the Organization Model. At the moment, thatOrganization1 is empty:
2. The General tab of the Properties view for the organization is visible.
If it is not, right-click on the empty part of the Organization Model diagram and selectShow Properties View.
67
TIBCO Business Studio Tutorials
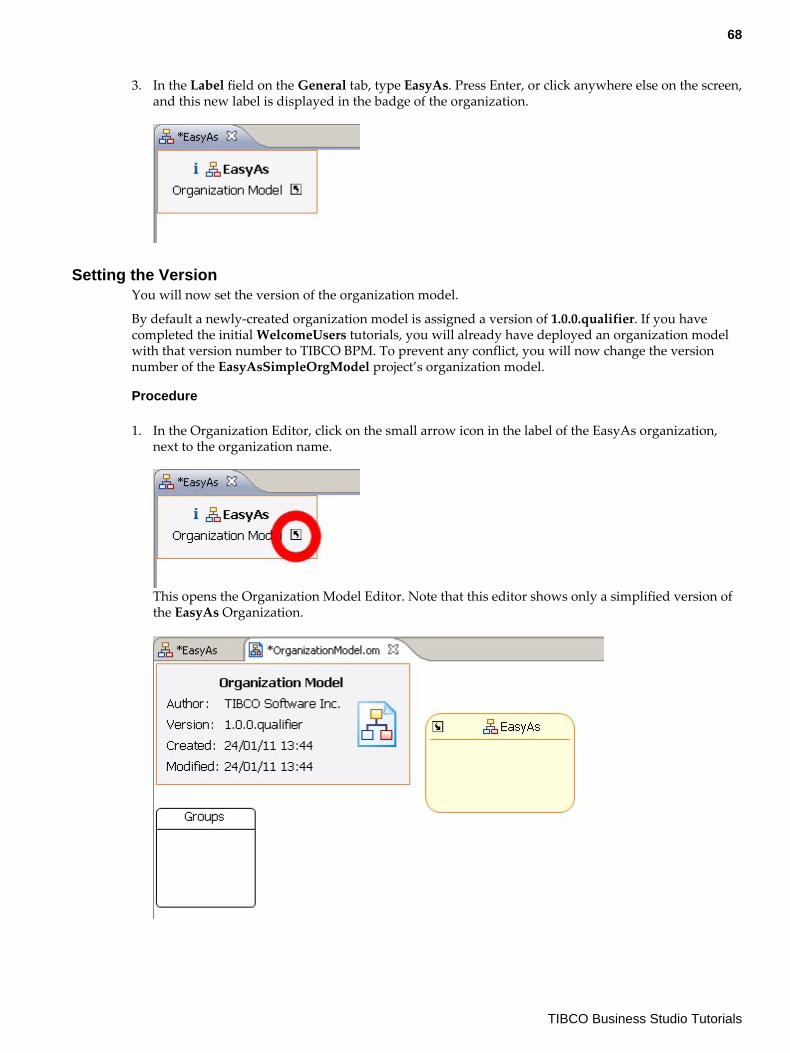
3. In the Label field on the General tab, type EasyAs. Press Enter, or click anywhere else on the screen,and this new label is displayed in the badge of the organization.
Setting the VersionYou will now set the version of the organization model.
By default a newly-created organization model is assigned a version of 1.0.0.qualifier. If you havecompleted the initial WelcomeUsers tutorials, you will already have deployed an organization modelwith that version number to TIBCO BPM. To prevent any conflict, you will now change the versionnumber of the EasyAsSimpleOrgModel project’s organization model.
Procedure
1. In the Organization Editor, click on the small arrow icon in the label of the EasyAs organization,next to the organization name.
This opens the Organization Model Editor. Note that this editor shows only a simplified version ofthe EasyAs Organization.
68
TIBCO Business Studio Tutorials
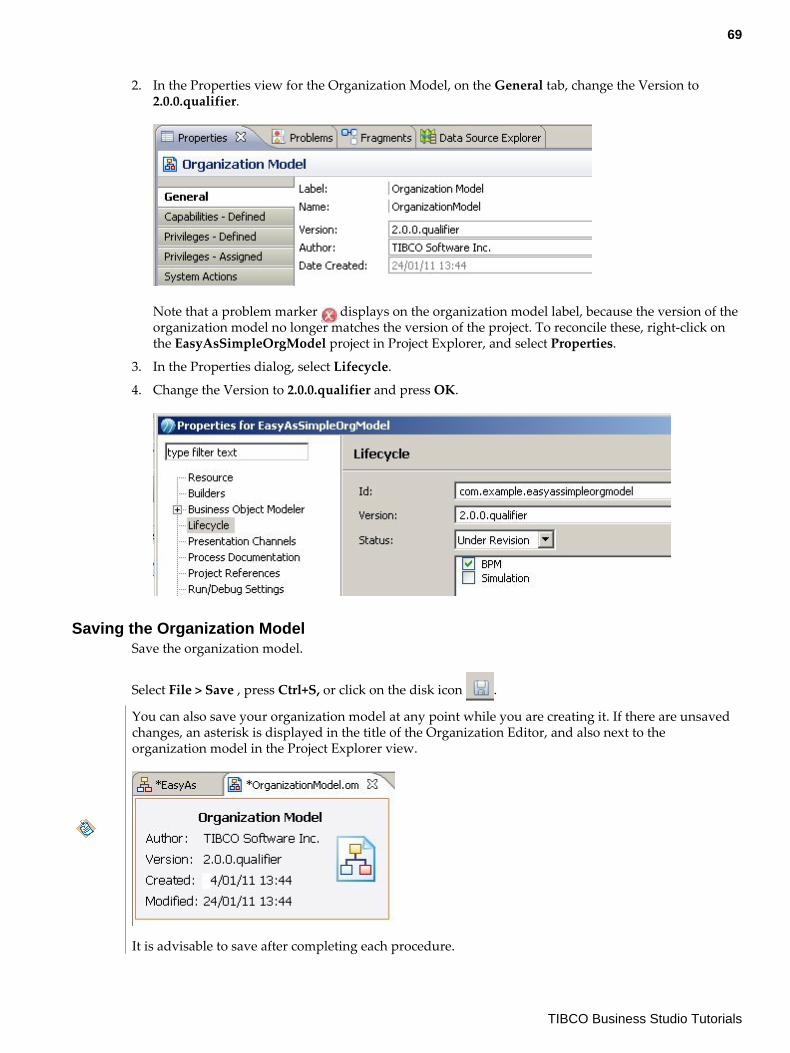
2. In the Properties view for the Organization Model, on the General tab, change the Version to2.0.0.qualifier.
Note that a problem marker displays on the organization model label, because the version of theorganization model no longer matches the version of the project. To reconcile these, right-click onthe EasyAsSimpleOrgModel project in Project Explorer, and select Properties.
3. In the Properties dialog, select Lifecycle.
4. Change the Version to 2.0.0.qualifier and press OK.
Saving the Organization ModelSave the organization model.
Select File > Save , press Ctrl+S, or click on the disk icon .
You can also save your organization model at any point while you are creating it. If there are unsavedchanges, an asterisk is displayed in the title of the Organization Editor, and also next to theorganization model in the Project Explorer view.
It is advisable to save after completing each procedure.
69
TIBCO Business Studio Tutorials
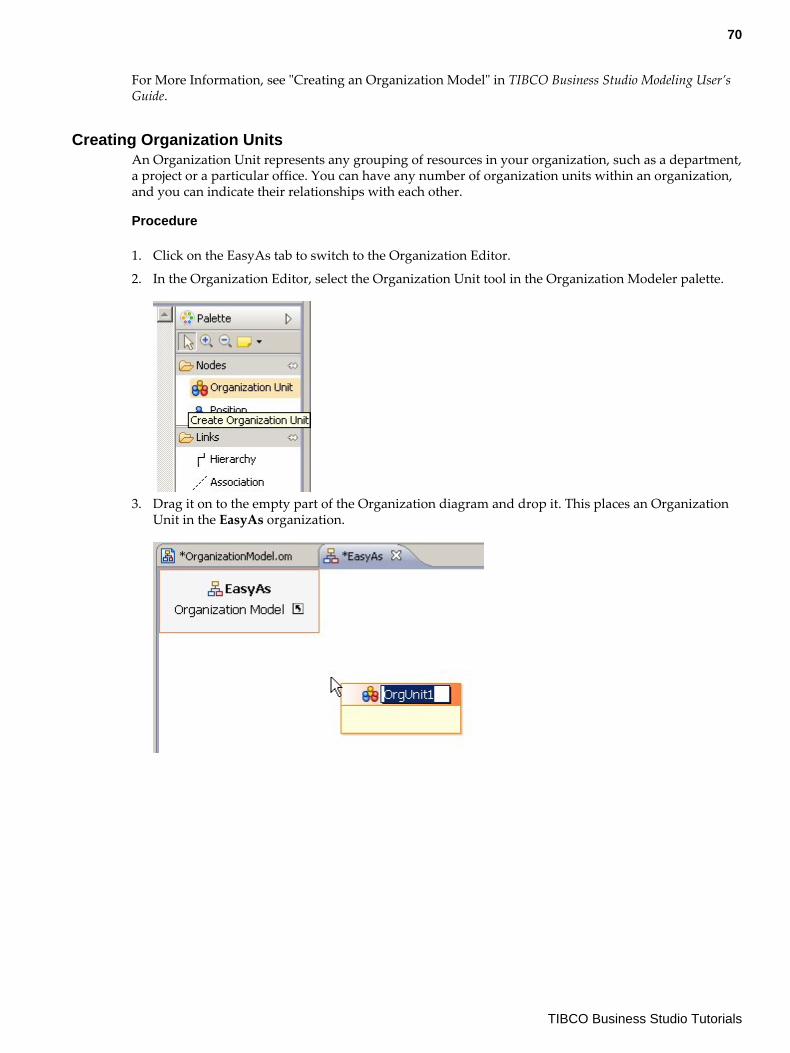
For More Information, see "Creating an Organization Model" in TIBCO Business Studio Modeling User’sGuide.
Creating Organization UnitsAn Organization Unit represents any grouping of resources in your organization, such as a department,a project or a particular office. You can have any number of organization units within an organization,and you can indicate their relationships with each other.
Procedure
1. Click on the EasyAs tab to switch to the Organization Editor.
2. In the Organization Editor, select the Organization Unit tool in the Organization Modeler palette.
3. Drag it on to the empty part of the Organization diagram and drop it. This places an OrganizationUnit in the EasyAs organization.
70
TIBCO Business Studio Tutorials
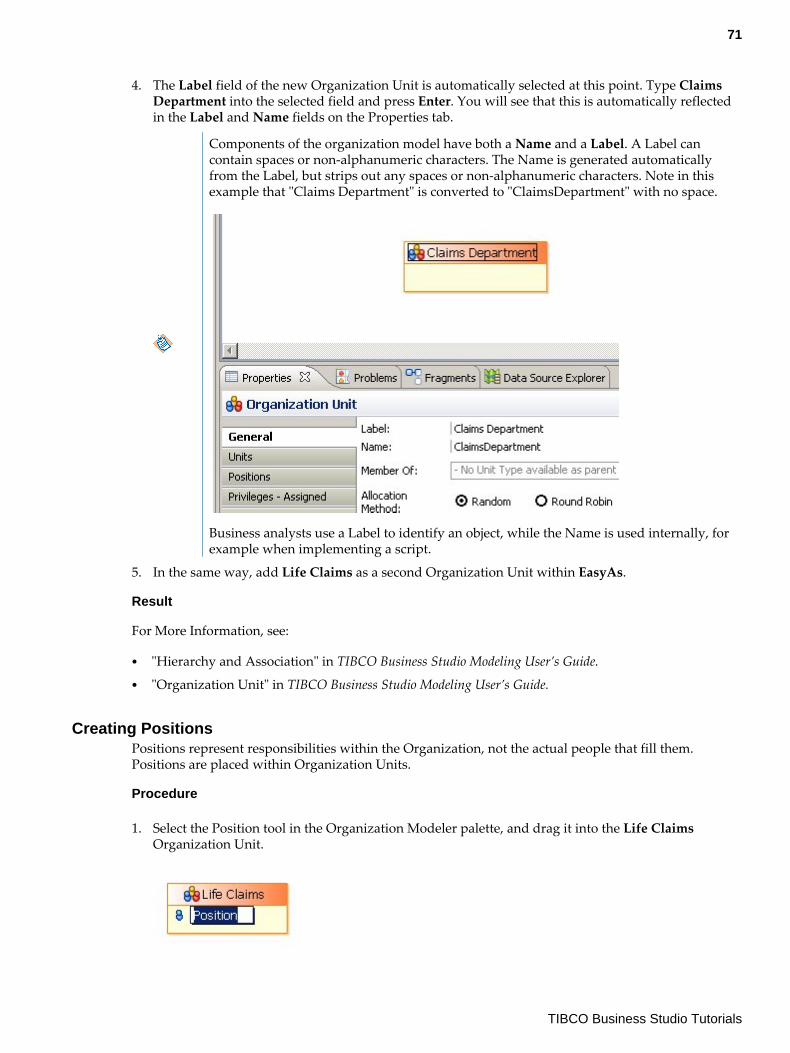
4. The Label field of the new Organization Unit is automatically selected at this point. Type ClaimsDepartment into the selected field and press Enter. You will see that this is automatically reflectedin the Label and Name fields on the Properties tab.
Components of the organization model have both a Name and a Label. A Label cancontain spaces or non-alphanumeric characters. The Name is generated automaticallyfrom the Label, but strips out any spaces or non-alphanumeric characters. Note in thisexample that "Claims Department" is converted to "ClaimsDepartment" with no space.
Business analysts use a Label to identify an object, while the Name is used internally, forexample when implementing a script.
5. In the same way, add Life Claims as a second Organization Unit within EasyAs.
Result
For More Information, see:
● "Hierarchy and Association" in TIBCO Business Studio Modeling User’s Guide.● "Organization Unit" in TIBCO Business Studio Modeling User’s Guide.
Creating PositionsPositions represent responsibilities within the Organization, not the actual people that fill them.Positions are placed within Organization Units.
Procedure
1. Select the Position tool in the Organization Modeler palette, and drag it into the Life ClaimsOrganization Unit.
71
TIBCO Business Studio Tutorials
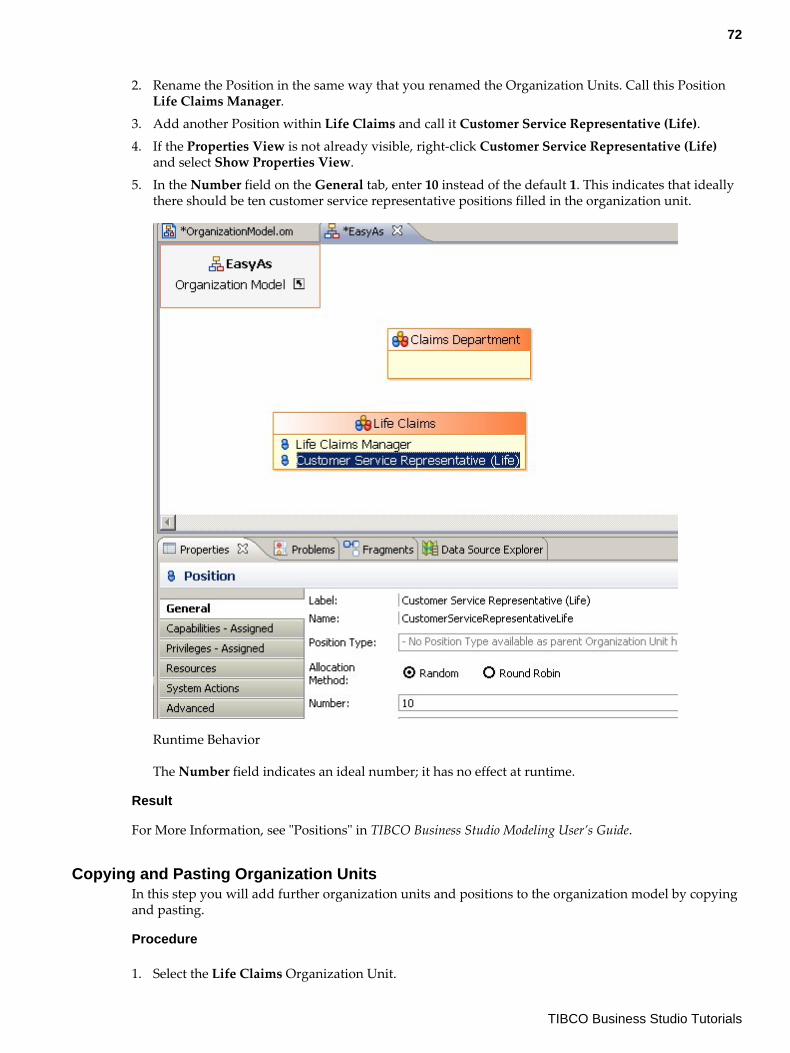
2. Rename the Position in the same way that you renamed the Organization Units. Call this PositionLife Claims Manager.
3. Add another Position within Life Claims and call it Customer Service Representative (Life).
4. If the Properties View is not already visible, right-click Customer Service Representative (Life)and select Show Properties View.
5. In the Number field on the General tab, enter 10 instead of the default 1. This indicates that ideallythere should be ten customer service representative positions filled in the organization unit.
Runtime Behavior
The Number field indicates an ideal number; it has no effect at runtime.
Result
For More Information, see "Positions" in TIBCO Business Studio Modeling User’s Guide.
Copying and Pasting Organization UnitsIn this step you will add further organization units and positions to the organization model by copyingand pasting.
Procedure
1. Select the Life Claims Organization Unit.
72
TIBCO Business Studio Tutorials
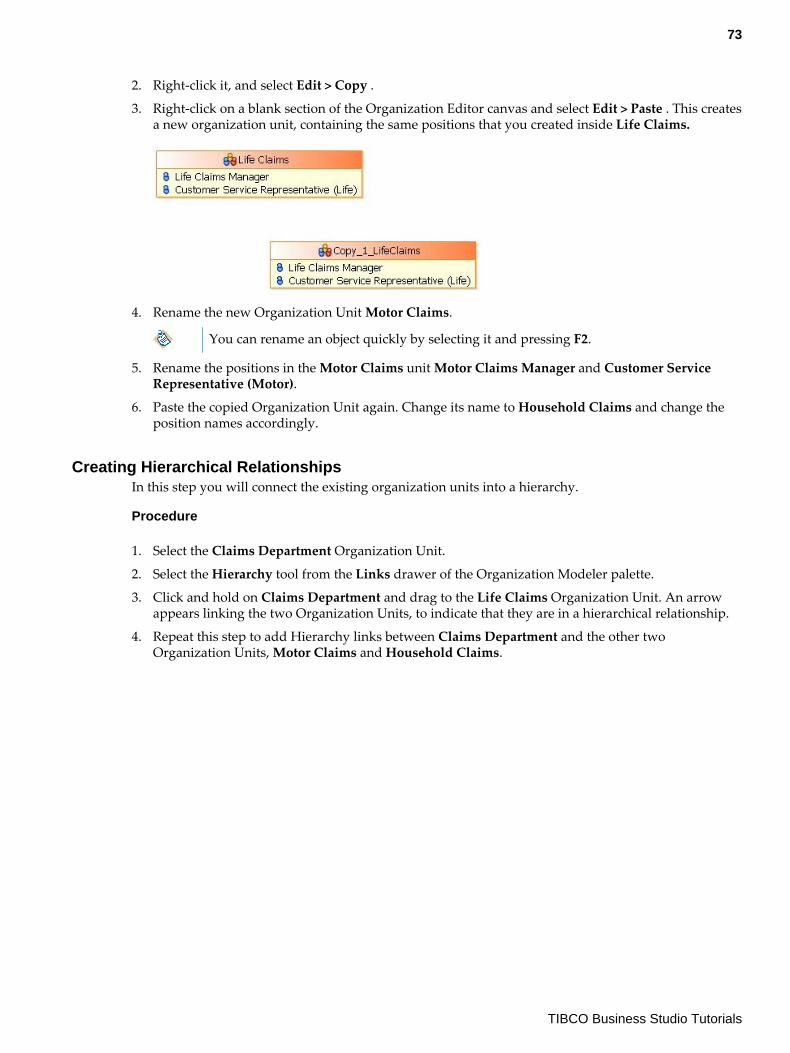
2. Right-click it, and select Edit > Copy .
3. Right-click on a blank section of the Organization Editor canvas and select Edit > Paste . This createsa new organization unit, containing the same positions that you created inside Life Claims.
4. Rename the new Organization Unit Motor Claims.
You can rename an object quickly by selecting it and pressing F2.
5. Rename the positions in the Motor Claims unit Motor Claims Manager and Customer ServiceRepresentative (Motor).
6. Paste the copied Organization Unit again. Change its name to Household Claims and change theposition names accordingly.
Creating Hierarchical RelationshipsIn this step you will connect the existing organization units into a hierarchy.
Procedure
1. Select the Claims Department Organization Unit.
2. Select the Hierarchy tool from the Links drawer of the Organization Modeler palette.
3. Click and hold on Claims Department and drag to the Life Claims Organization Unit. An arrowappears linking the two Organization Units, to indicate that they are in a hierarchical relationship.
4. Repeat this step to add Hierarchy links between Claims Department and the other twoOrganization Units, Motor Claims and Household Claims.
73
TIBCO Business Studio Tutorials
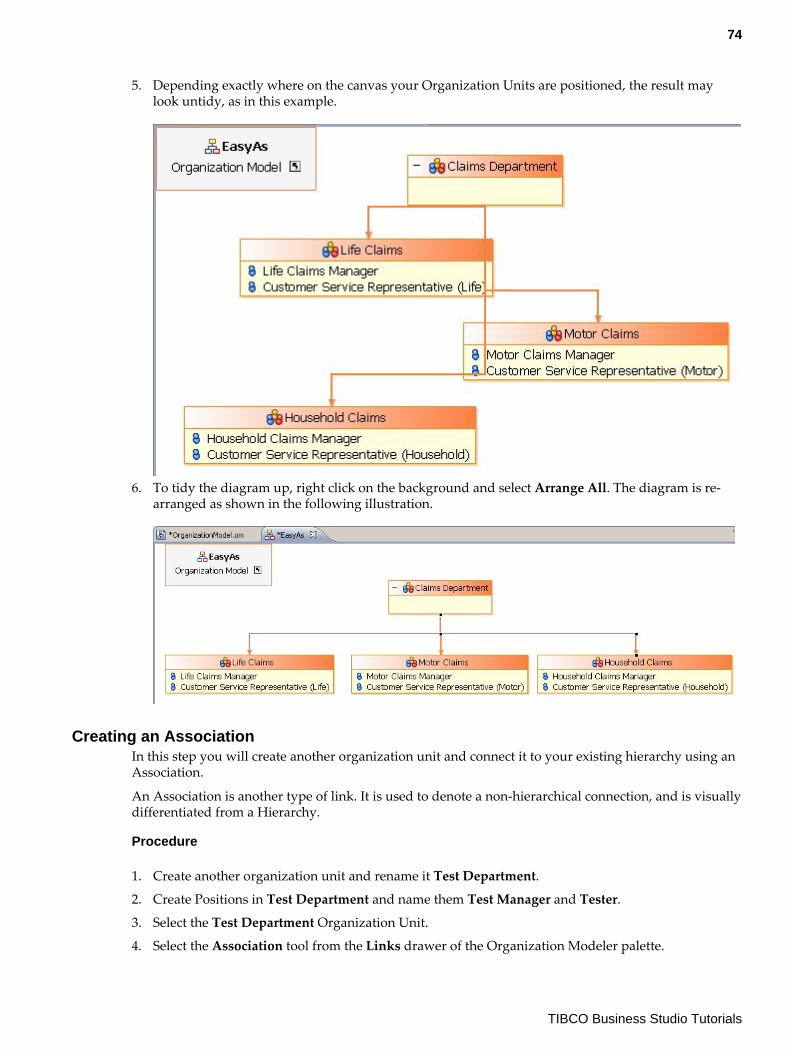
5. Depending exactly where on the canvas your Organization Units are positioned, the result maylook untidy, as in this example.
6. To tidy the diagram up, right click on the background and select Arrange All. The diagram is re-arranged as shown in the following illustration.
Creating an AssociationIn this step you will create another organization unit and connect it to your existing hierarchy using anAssociation.
An Association is another type of link. It is used to denote a non-hierarchical connection, and is visuallydifferentiated from a Hierarchy.
Procedure
1. Create another organization unit and rename it Test Department.
2. Create Positions in Test Department and name them Test Manager and Tester.
3. Select the Test Department Organization Unit.
4. Select the Association tool from the Links drawer of the Organization Modeler palette.
74
TIBCO Business Studio Tutorials

5. Click and hold on Test Department and drag to the Claims Department Organization Unit. Abroken line appears linking the two Organization Units, to indicate that they are associated in anon-hierarchical relationship.
6. Select File > Save , press Ctrl+S, or click on the disk icon to save the completed organizationmodel.
What to do next
After completing this tutorial, you can:
● install the solution to this Tutorial and compare it with your version. See the instructions in Verifying the Results for how to do this.
● follow the How to Add Groups Capabilities and Privileges to an Organization Model tutorial,which describes how to enhance an organization model with items that help allocate responsibilitiesand workflow.
● use the "For More Information" links in this chapter to explore particular topics in more details
Verifying the ResultsYou can verify the results of your tutorial by installing the tutorial from the samples folder in theproduct directory. Your project must look similar to the sample solution project.
Procedure
1. Find the EasyAsSimpleOMSolution > .zip file, in the location where you installed TIBCO BusinessStudio (for example, <STUDIO_HOME > \studio\3. n\samples).
2. In TIBCO Business Studio, select File > Import .
The Import wizard is displayed.
3. Select General > Existing Studio Projects into Workspace and click Next.
4. Click Select archive file, and click on the Browse button.
5. Browse to EasyAsSimpleOMSolution > .zip and click Open.
The EasyAsSimpleOMSolution project is displayed in the Import wizard.
6. Click Finish.
The EasyAsSimpleOMSolution project is installed in your workspace.
75
TIBCO Business Studio Tutorials
How to Add Groups Capabilities and Privileges to an Organization ModelThis tutorial shows you how to use some additional facilities of TIBCO Business Studio’s OrganizationModeler.
This tutorial demonstrates:
● Creating Groups● Creating Capabilities and Privileges● Assigning them to Positions and Groups
Before you start this tutorial, you can become familiar with TIBCO Business Studio by completing theinitial Create, Deploy and Run your First BPM Project tutorials.
In addition:
● You should have completed the How to Use the Graphical Organization Modeler tutorial.● You should have available an appropriate node to deploy the Organization Model to.
After completing this tutorial, you will be familiar with:
● how to create Groups, Capabilities, and Privileges● how to assign them to organization model entities
Opening the Organization ModelA project is the basic container that you use to store all the artifacts needed by your business processes,including the organization model.
If you are continuing this tutorial directly from the previous one, the EasyAsSimpleOrgModel projectand the Organization Editor will already be open. If so, skip this procedure and go on to the next one.
Following this tutorial will be simpler and clearer if you close any other projects that you may haveopen in your TIBCO Business Studio workspace, using the Project > Close Project menu option.
Procedure
1. Start Studio for Designers.
2. TIBCO Business Studio opens the projects that you had open when you quit your previous session,so the EasyAsSimpleOrgModel project and organization model may open automatically.
3. If it does not, in the Project Explorer expand EasyAs > Organization > EasyAs OrganizationModel> Organizations > EasyAs .
4. Double-click on the EasyAs Organization. The Organization Editor for that Organization opens.
Result
For More Information, see:
● How to Use the Graphical Organization Modeler tutorial● "About the Organization Model Diagram Editors" in TIBCO Business Studio Modeling User’s Guide
76
TIBCO Business Studio Tutorials
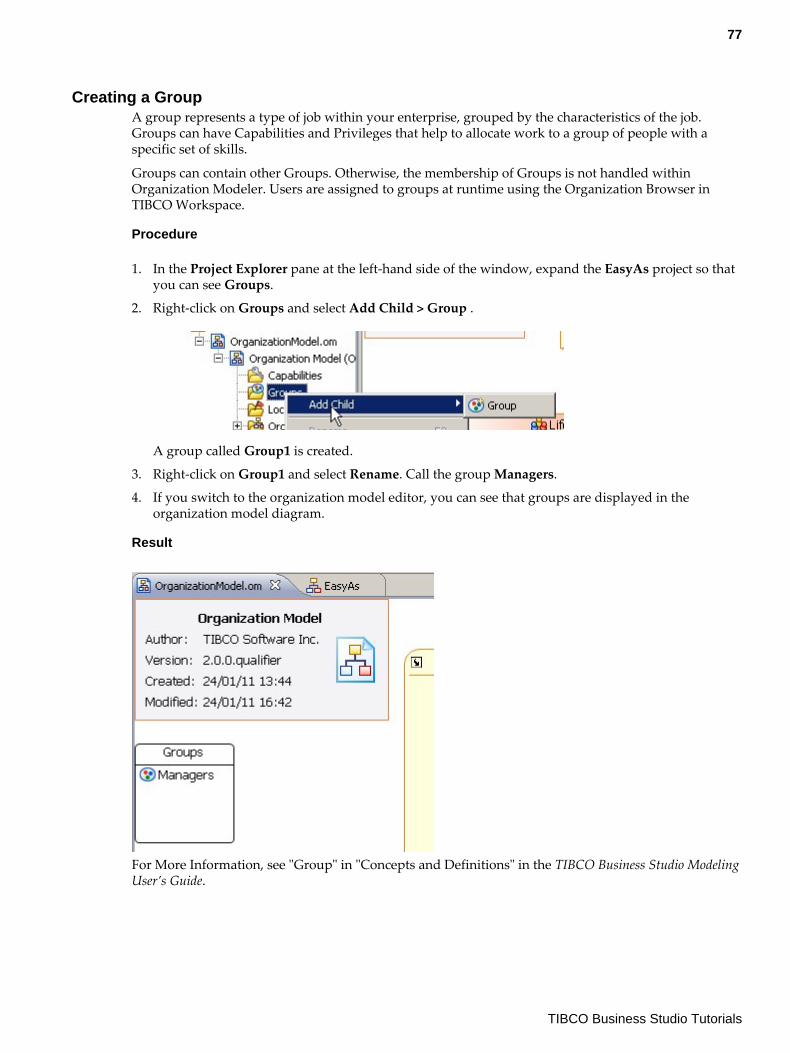
Creating a GroupA group represents a type of job within your enterprise, grouped by the characteristics of the job.Groups can have Capabilities and Privileges that help to allocate work to a group of people with aspecific set of skills.
Groups can contain other Groups. Otherwise, the membership of Groups is not handled withinOrganization Modeler. Users are assigned to groups at runtime using the Organization Browser inTIBCO Workspace.
Procedure
1. In the Project Explorer pane at the left-hand side of the window, expand the EasyAs project so thatyou can see Groups.
2. Right-click on Groups and select Add Child > Group .
A group called Group1 is created.
3. Right-click on Group1 and select Rename. Call the group Managers.
4. If you switch to the organization model editor, you can see that groups are displayed in theorganization model diagram.
Result
For More Information, see "Group" in "Concepts and Definitions" in the TIBCO Business Studio ModelingUser’s Guide.
77
TIBCO Business Studio Tutorials
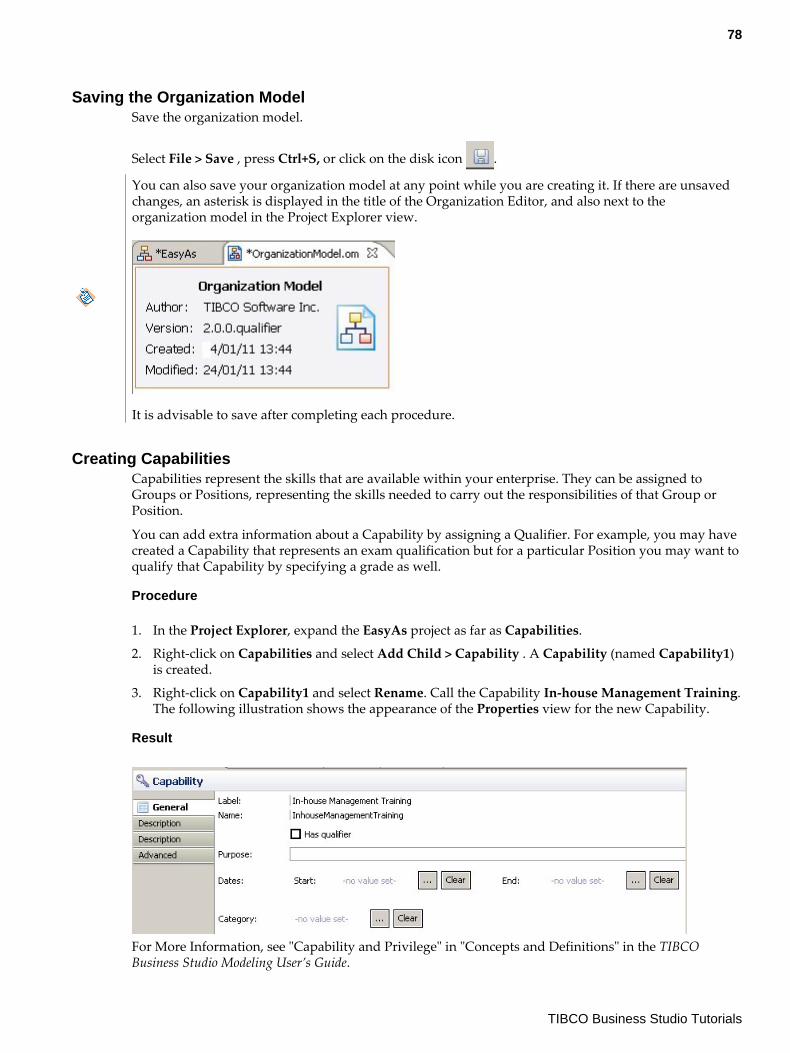
Saving the Organization ModelSave the organization model.
Select File > Save , press Ctrl+S, or click on the disk icon .
You can also save your organization model at any point while you are creating it. If there are unsavedchanges, an asterisk is displayed in the title of the Organization Editor, and also next to theorganization model in the Project Explorer view.
It is advisable to save after completing each procedure.
Creating CapabilitiesCapabilities represent the skills that are available within your enterprise. They can be assigned toGroups or Positions, representing the skills needed to carry out the responsibilities of that Group orPosition.
You can add extra information about a Capability by assigning a Qualifier. For example, you may havecreated a Capability that represents an exam qualification but for a particular Position you may want toqualify that Capability by specifying a grade as well.
Procedure
1. In the Project Explorer, expand the EasyAs project as far as Capabilities.
2. Right-click on Capabilities and select Add Child > Capability . A Capability (named Capability1)is created.
3. Right-click on Capability1 and select Rename. Call the Capability In-house Management Training.The following illustration shows the appearance of the Properties view for the new Capability.
Result
For More Information, see "Capability and Privilege" in "Concepts and Definitions" in the TIBCOBusiness Studio Modeling User’s Guide.
78
TIBCO Business Studio Tutorials
Assigning CapabilitiesOnce you have created a Capability, you can assign it to Positions and to Groups.
For More Information, see "Capability and Privilege" in "Concepts and Definitions" in the TIBCOBusiness Studio Modeling User’s Guide.
Assigning Capabilities to Positions
You can assign Capabilities to positions. TIBCO BPM will use these capabilities in defining thepositions at runtime.
Procedure
1. In the Organization Editor diagram, select the Manager position in the Motor Claims OrganizationUnit.
2. Click the Capabilities - Assigned tab in the Properties view.
3. Click to display the Select Type dialog.
4. From the Matching Items box, select In-house Management Training and click Add, then clickOK. The In-house Management Training capability is added to the Manager position.
This means that the In-house Management Training capability is a requirement for theManager position: any user occupying this position is expected to have received thistraining.
5. Similarly, select the Manager positions in the Life Claims, Household Claims and TestDepartment Organization Unit, and add the same Capability to them.
Assigning Capabilities to Groups
You can assign Capabilities to Groups. TIBCO BPM will use these capabilities in defining the Group atruntime.
Procedure
1. In the Project Explorer, select the Managers Group that you created earlier.
2. Click the Capabilities - Assigned tab in the Properties view.
3. Add the In-house Management Training capability following the same steps that you used toassign it to Positions.
Creating PrivilegesPrivileges represent the authority that an Organization Unit, Position or Group can have within anorganization, such as the authority to approve expenditure.You can add extra information about whena Privilege applies by assigning a Qualifier.
Procedure
1. In the Project Explorer pane at the left-hand side of the window, expand theEasyAsSimpleOrgModel project so that you can see Privileges.
2. Right-click on Privileges and select Add Child > Privilege . A Privilege named Privilege1 iscreated.
3. Right-click on Privilege1 and select Rename. Call the privilege Authorize Claims.
79
TIBCO Business Studio Tutorials
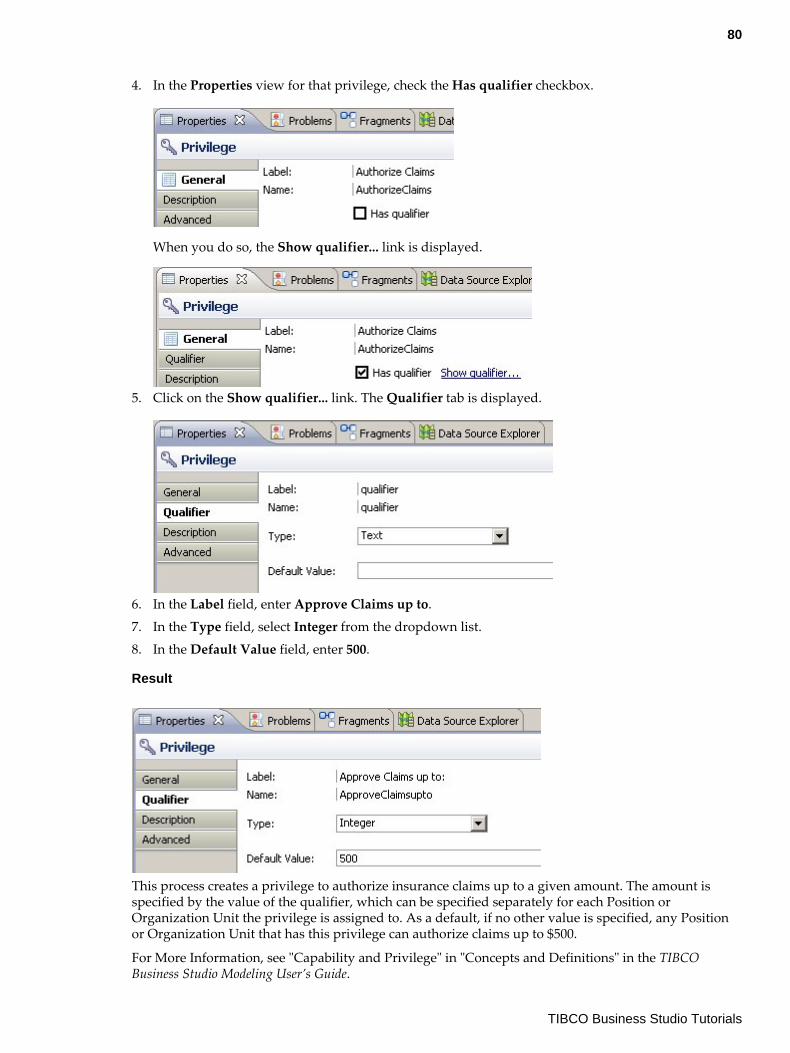
4. In the Properties view for that privilege, check the Has qualifier checkbox.
When you do so, the Show qualifier... link is displayed.
5. Click on the Show qualifier... link. The Qualifier tab is displayed.
6. In the Label field, enter Approve Claims up to.
7. In the Type field, select Integer from the dropdown list.
8. In the Default Value field, enter 500.
Result
This process creates a privilege to authorize insurance claims up to a given amount. The amount isspecified by the value of the qualifier, which can be specified separately for each Position orOrganization Unit the privilege is assigned to. As a default, if no other value is specified, any Positionor Organization Unit that has this privilege can authorize claims up to $500.
For More Information, see "Capability and Privilege" in "Concepts and Definitions" in the TIBCOBusiness Studio Modeling User’s Guide.
80
TIBCO Business Studio Tutorials
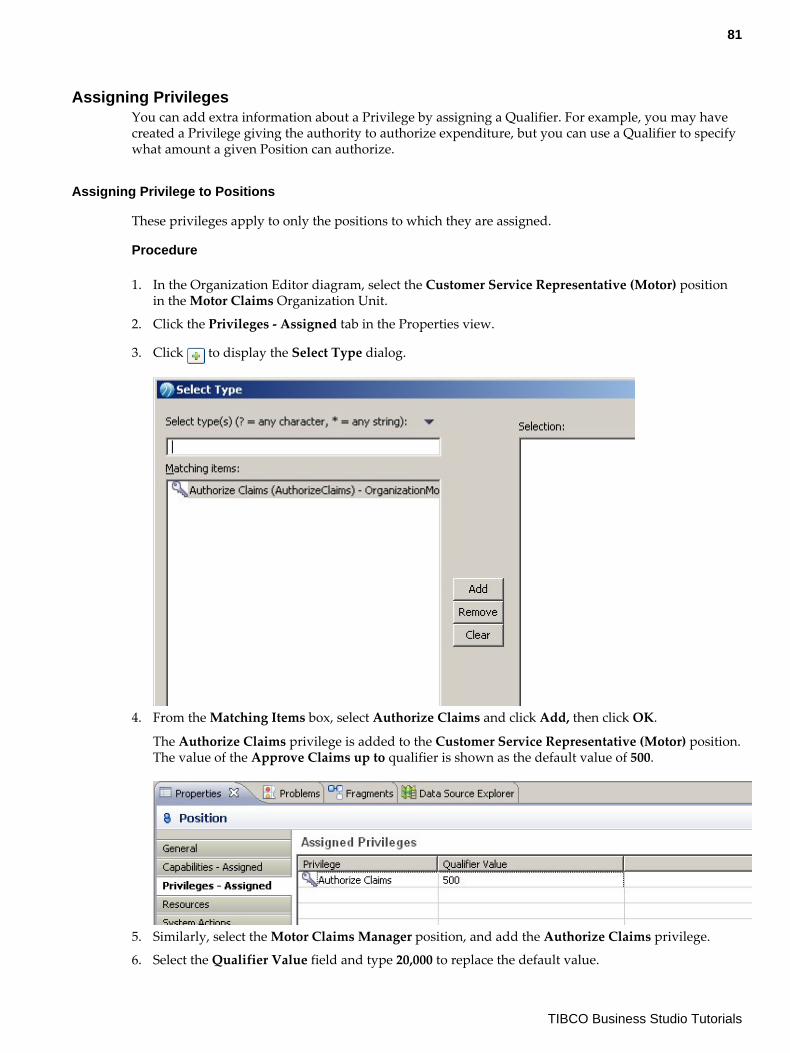
Assigning PrivilegesYou can add extra information about a Privilege by assigning a Qualifier. For example, you may havecreated a Privilege giving the authority to authorize expenditure, but you can use a Qualifier to specifywhat amount a given Position can authorize.
Assigning Privilege to Positions
These privileges apply to only the positions to which they are assigned.
Procedure
1. In the Organization Editor diagram, select the Customer Service Representative (Motor) positionin the Motor Claims Organization Unit.
2. Click the Privileges - Assigned tab in the Properties view.
3. Click to display the Select Type dialog.
4. From the Matching Items box, select Authorize Claims and click Add, then click OK.
The Authorize Claims privilege is added to the Customer Service Representative (Motor) position.The value of the Approve Claims up to qualifier is shown as the default value of 500.
5. Similarly, select the Motor Claims Manager position, and add the Authorize Claims privilege.
6. Select the Qualifier Value field and type 20,000 to replace the default value.
81
TIBCO Business Studio Tutorials

7. In the Household Claims Organization Unit, add the Authorize Claims privilege to both CustomerService Representative (Household) and Household Claims Manager. Change the value of thequalifier for the Manager to 1,000,000.
Assigning Privileges to Organization Units
These privileges will apply to all the Positions in that Organization Unit.
Note that the Privilege will not be displayed on the Privileges tabs of these Positions, only on that ofthe Organization Unit.
Procedure
1. In the Organization Editor diagram, select the Life Claims Organization Unit.
2. Click the Privileges - Assigned tab in the Properties view.
3. Click to display the Select Type dialog.
4. From the Matching Items box, select Authorize Claims and click Add, then click OK. TheAuthorize Claims privilege is added to the Life Claims Organization Unit.
5. Select the Qualifier Value field and type 5,000,000 to replace the default value.
Updating the VersionYou will now update the version of the organization model.
By default a newly-created organization model is assigned a version o f 1.0.0.qualifier. In the How toUse the Graphical Organization Modeler tutorial, you set the version of the organization model to2.0.0.qualifier.
You will now change the version number to 2.1.0.qualifier. Leaving the major version numberunchanged but changing the second digit will cause this version of the model, when deployed, toupdate the existing version 2.0.0.qualifier organization model.
Procedure
1. In the Organization Editor, click on the small arrow icon in the label of the EasyAs organization,next to the organization name.
2. This opens the Organization Model Editor. Note that this editor shows only a simplified version ofthe EasyAs Organization.
82
TIBCO Business Studio Tutorials
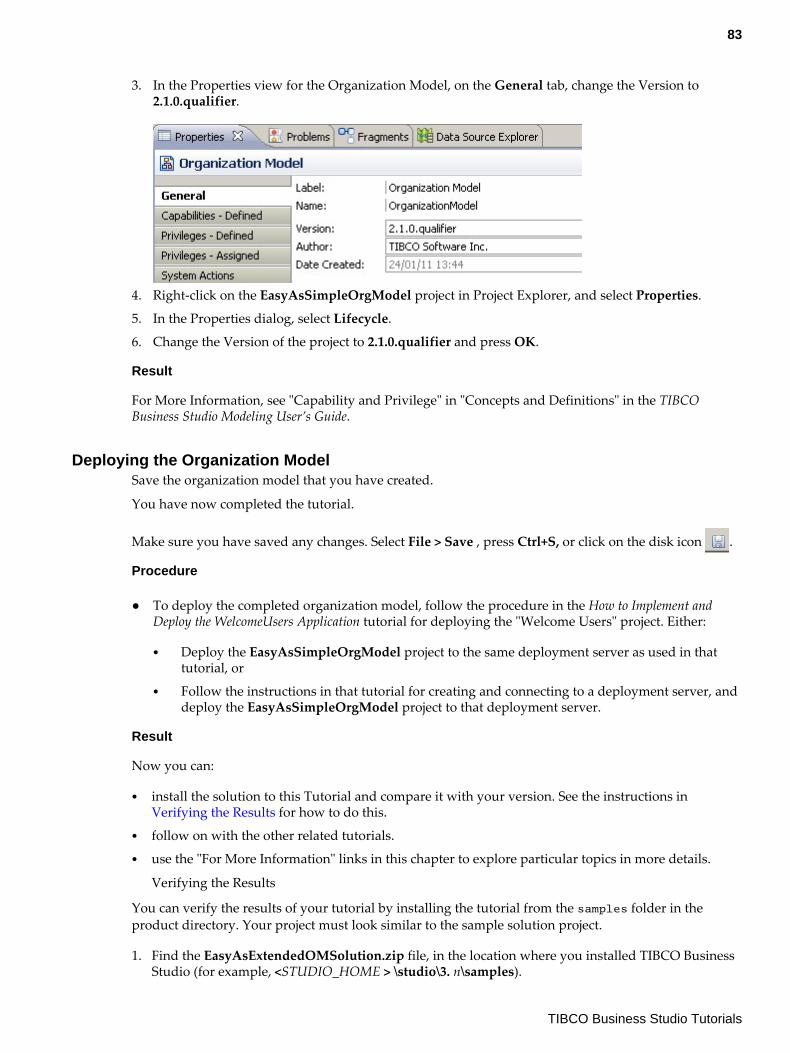
3. In the Properties view for the Organization Model, on the General tab, change the Version to2.1.0.qualifier.
4. Right-click on the EasyAsSimpleOrgModel project in Project Explorer, and select Properties.
5. In the Properties dialog, select Lifecycle.
6. Change the Version of the project to 2.1.0.qualifier and press OK.
Result
For More Information, see "Capability and Privilege" in "Concepts and Definitions" in the TIBCOBusiness Studio Modeling User’s Guide.
Deploying the Organization ModelSave the organization model that you have created.
You have now completed the tutorial.
Make sure you have saved any changes. Select File > Save , press Ctrl+S, or click on the disk icon .
Procedure
● To deploy the completed organization model, follow the procedure in the How to Implement andDeploy the WelcomeUsers Application tutorial for deploying the "Welcome Users" project. Either:
● Deploy the EasyAsSimpleOrgModel project to the same deployment server as used in thattutorial, or
● Follow the instructions in that tutorial for creating and connecting to a deployment server, anddeploy the EasyAsSimpleOrgModel project to that deployment server.
Result
Now you can:
● install the solution to this Tutorial and compare it with your version. See the instructions in Verifying the Results for how to do this.
● follow on with the other related tutorials.● use the "For More Information" links in this chapter to explore particular topics in more details.
Verifying the Results
You can verify the results of your tutorial by installing the tutorial from the samples folder in theproduct directory. Your project must look similar to the sample solution project.
1. Find the EasyAsExtendedOMSolution.zip file, in the location where you installed TIBCO BusinessStudio (for example, <STUDIO_HOME > \studio\3. n\samples).
83
TIBCO Business Studio Tutorials
2. In TIBCO Business Studio, select File > Import .
The Import wizard is displayed.
3. Select General > Existing Studio Projects into Workspace and click Next.
4. Click Select archive file, and click on the Browse button.
5. Browse to EasyAsExtendedOMSolution.zip and click Open.
The EasyAsExtendedOMSolution project is displayed in the Import wizard.
6. Click Finish.
The EasyAsExtendedOMSolution project is installed in your workspace.
Note that this solution project includes some extra elements - such as groups andcapabilities - which you did not create during this tutorial. These are for use in othertutorials which import the EasyAsExtendedOMSolution project as a starting point.
84
TIBCO Business Studio Tutorials
Assigning Work
How to Ensure that a Sequence of Tasks is Performed by the Same UserChained execution means that when a user submits one work item, they are immediately presentedwith the next work item in the chained sequence. The user must be included in the definition of theparticipants assigned to each of the user tasks identified for chained execution.
For example, if a user is a member of an organization that is assigned as the participant for Task1, andis also a member of a group assigned as a participant for Task2, that user is assigned both work items inturn, although the participants defined for the two tasks are different.
This tutorial shows you how to assign a sequence of tasks to the same user. This is known as chainedexecution.
Before you start this tutorial, you can become familiar with TIBCO Business Studio by completing thefollowing initial tutorials:
● How to Design a Simple WelcomeUsers Business Service● How to Implement and Deploy the WelcomeUsers Application
Importing the Initial ResourcesThis tutorial supplies a project as the starting-point, so that the initial work, not relating to chainedexecution, is already done for you. It also requires an organization model, which you may have createdand deployed in earlier tutorials.
If not, you can import and deploy it now.
Procedure
1. Start Studio for Designers.
Following this tutorial will be simpler and clearer if you close any other projects that youmay have open in your TIBCO Business Studio workspace, using the Project > CloseProject menu option.
2. To import the ChainingStart project into your workspace, find the ChainedStart.zip file in thelocation where you installed TIBCO Business Studio (for example, <STUDIO_HOME > \studio\3. n\samples)..
3. In TIBCO Business Studio, select File > Import .
4. The Import wizard is displayed. Select General > Existing Projects into Workspace and click Next.
5. Click Select archive file, and click on the Browse button.
6. Browse to the zip file and click Open. The project is displayed in the Import wizard.
7. Click Finish. The ChainingStart project is installed in your workspace.
85
TIBCO Business Studio Tutorials
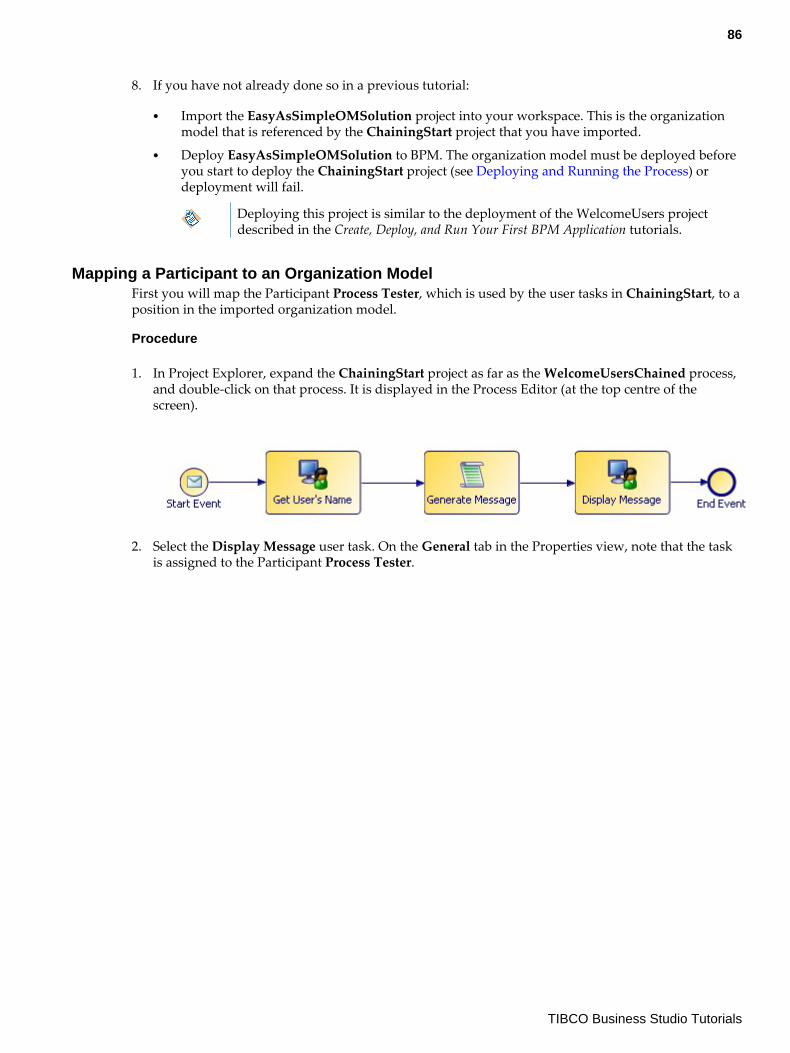
8. If you have not already done so in a previous tutorial:
● Import the EasyAsSimpleOMSolution project into your workspace. This is the organizationmodel that is referenced by the ChainingStart project that you have imported.
● Deploy EasyAsSimpleOMSolution to BPM. The organization model must be deployed beforeyou start to deploy the ChainingStart project (see Deploying and Running the Process) ordeployment will fail.
Deploying this project is similar to the deployment of the WelcomeUsers projectdescribed in the Create, Deploy, and Run Your First BPM Application tutorials.
Mapping a Participant to an Organization ModelFirst you will map the Participant Process Tester, which is used by the user tasks in ChainingStart, to aposition in the imported organization model.
Procedure
1. In Project Explorer, expand the ChainingStart project as far as the WelcomeUsersChained process,and double-click on that process. It is displayed in the Process Editor (at the top centre of thescreen).
2. Select the Display Message user task. On the General tab in the Properties view, note that the taskis assigned to the Participant Process Tester.
86
TIBCO Business Studio Tutorials
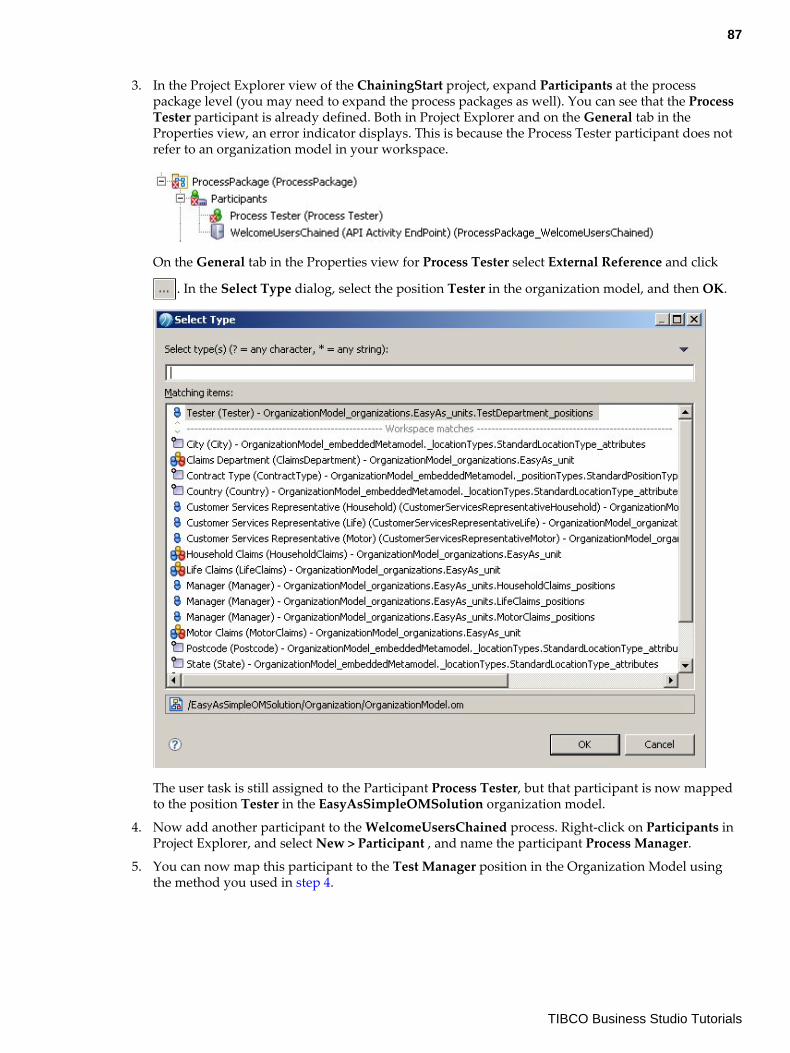
3. In the Project Explorer view of the ChainingStart project, expand Participants at the processpackage level (you may need to expand the process packages as well). You can see that the ProcessTester participant is already defined. Both in Project Explorer and on the General tab in theProperties view, an error indicator displays. This is because the Process Tester participant does notrefer to an organization model in your workspace.
On the General tab in the Properties view for Process Tester select External Reference and click
. In the Select Type dialog, select the position Tester in the organization model, and then OK.
The user task is still assigned to the Participant Process Tester, but that participant is now mappedto the position Tester in the EasyAsSimpleOMSolution organization model.
4. Now add another participant to the WelcomeUsersChained process. Right-click on Participants inProject Explorer, and select New > Participant , and name the participant Process Manager.
5. You can now map this participant to the Test Manager position in the Organization Model usingthe method you used in step 4.
87
TIBCO Business Studio Tutorials
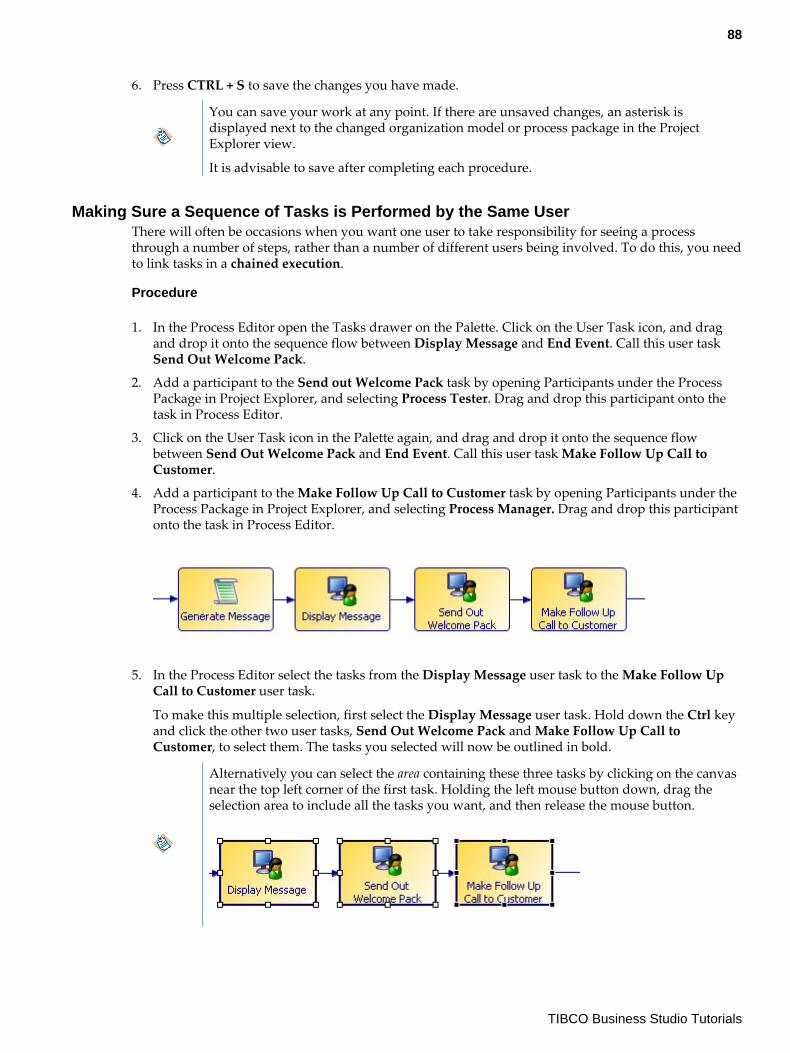
6. Press CTRL + S to save the changes you have made.
You can save your work at any point. If there are unsaved changes, an asterisk isdisplayed next to the changed organization model or process package in the ProjectExplorer view.
It is advisable to save after completing each procedure.
Making Sure a Sequence of Tasks is Performed by the Same UserThere will often be occasions when you want one user to take responsibility for seeing a processthrough a number of steps, rather than a number of different users being involved. To do this, you needto link tasks in a chained execution.
Procedure
1. In the Process Editor open the Tasks drawer on the Palette. Click on the User Task icon, and dragand drop it onto the sequence flow between Display Message and End Event. Call this user taskSend Out Welcome Pack.
2. Add a participant to the Send out Welcome Pack task by opening Participants under the ProcessPackage in Project Explorer, and selecting Process Tester. Drag and drop this participant onto thetask in Process Editor.
3. Click on the User Task icon in the Palette again, and drag and drop it onto the sequence flowbetween Send Out Welcome Pack and End Event. Call this user task Make Follow Up Call toCustomer.
4. Add a participant to the Make Follow Up Call to Customer task by opening Participants under theProcess Package in Project Explorer, and selecting Process Manager. Drag and drop this participantonto the task in Process Editor.
5. In the Process Editor select the tasks from the Display Message user task to the Make Follow UpCall to Customer user task.
To make this multiple selection, first select the Display Message user task. Hold down the Ctrl keyand click the other two user tasks, Send Out Welcome Pack and Make Follow Up Call toCustomer, to select them. The tasks you selected will now be outlined in bold.
Alternatively you can select the area containing these three tasks by clicking on the canvasnear the top left corner of the first task. Holding the left mouse button down, drag theselection area to include all the tasks you want, and then release the mouse button.
88
TIBCO Business Studio Tutorials
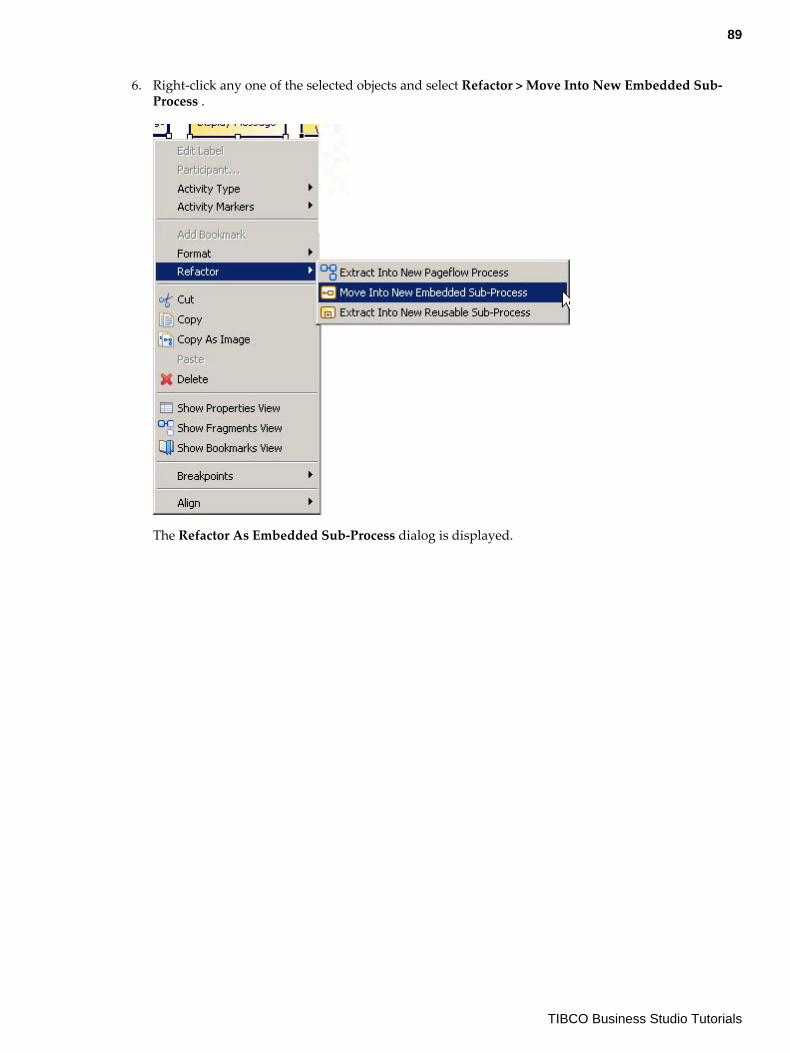
6. Right-click any one of the selected objects and select Refactor > Move Into New Embedded Sub-Process .
The Refactor As Embedded Sub-Process dialog is displayed.
89
TIBCO Business Studio Tutorials
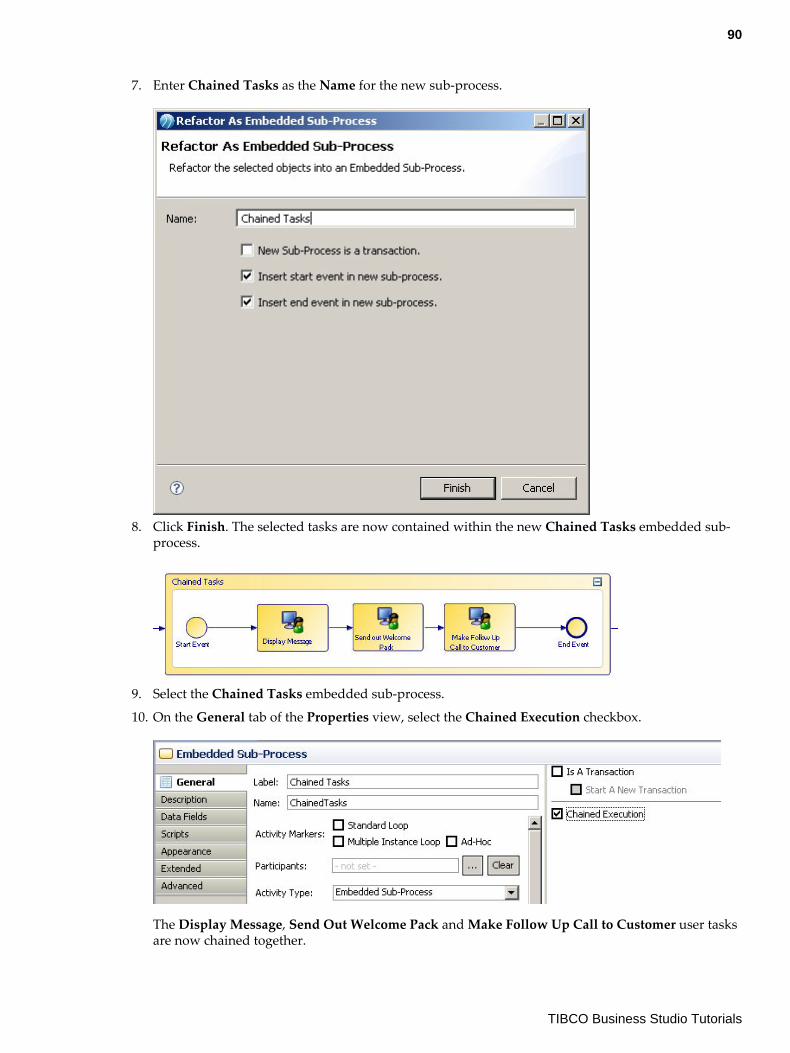
7. Enter Chained Tasks as the Name for the new sub-process.
8. Click Finish. The selected tasks are now contained within the new Chained Tasks embedded sub-process.
9. Select the Chained Tasks embedded sub-process.
10. On the General tab of the Properties view, select the Chained Execution checkbox.
The Display Message, Send Out Welcome Pack and Make Follow Up Call to Customer user tasksare now chained together.
90
TIBCO Business Studio Tutorials
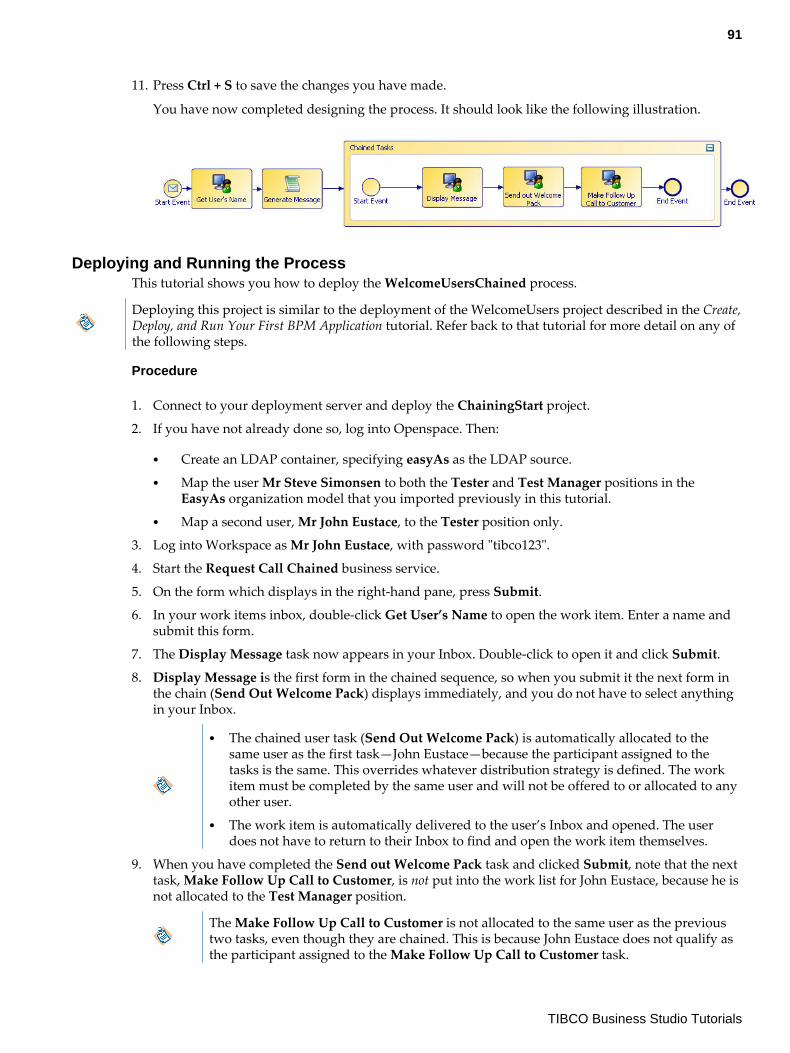
11. Press Ctrl + S to save the changes you have made.
You have now completed designing the process. It should look like the following illustration.
Deploying and Running the ProcessThis tutorial shows you how to deploy the WelcomeUsersChained process.
Deploying this project is similar to the deployment of the WelcomeUsers project described in the Create,Deploy, and Run Your First BPM Application tutorial. Refer back to that tutorial for more detail on any ofthe following steps.
Procedure
1. Connect to your deployment server and deploy the ChainingStart project.
2. If you have not already done so, log into Openspace. Then:
● Create an LDAP container, specifying easyAs as the LDAP source.● Map the user Mr Steve Simonsen to both the Tester and Test Manager positions in the
EasyAs organization model that you imported previously in this tutorial.● Map a second user, Mr John Eustace, to the Tester position only.
3. Log into Workspace as Mr John Eustace, with password "tibco123".
4. Start the Request Call Chained business service.
5. On the form which displays in the right-hand pane, press Submit.
6. In your work items inbox, double-click Get User’s Name to open the work item. Enter a name andsubmit this form.
7. The Display Message task now appears in your Inbox. Double-click to open it and click Submit.
8. Display Message is the first form in the chained sequence, so when you submit it the next form inthe chain (Send Out Welcome Pack) displays immediately, and you do not have to select anythingin your Inbox.
● The chained user task (Send Out Welcome Pack) is automatically allocated to thesame user as the first task—John Eustace—because the participant assigned to thetasks is the same. This overrides whatever distribution strategy is defined. The workitem must be completed by the same user and will not be offered to or allocated to anyother user.
● The work item is automatically delivered to the user’s Inbox and opened. The userdoes not have to return to their Inbox to find and open the work item themselves.
9. When you have completed the Send out Welcome Pack task and clicked Submit, note that the nexttask, Make Follow Up Call to Customer, is not put into the work list for John Eustace, because he isnot allocated to the Test Manager position.
The Make Follow Up Call to Customer is not allocated to the same user as the previoustwo tasks, even though they are chained. This is because John Eustace does not qualify asthe participant assigned to the Make Follow Up Call to Customer task.
91
TIBCO Business Studio Tutorials
10. Log out of Workspace as Mr John Eustace and log back in as Mr Steve Simonsen, the user youmapped to the Test Manager position. (The password is the same as for John Eustace.)
Note that there is already a work item in Mr Steve Simonsen’s Inbox, as a result of step 9. You cancomplete this later.
11. Start another instance of the Request Call Chained business service.
12. In your work item list, double click Get User’s Name to open the work item, fill in a name andsubmit the form.
13. The Display Message task for the same work item displays in your Inbox. Double-click to open itand submit this form.
14. The Send out Welcome Pack form is automatically opened, as it was for John Eustace. Because thisis a chained task following after Display Message, you do not need to select it from the Inbox; it ispresented to you automatically. Click Submit.
15. This time, Make Follow up Call to Customer is also displayed automatically as soon as you submitSend out Welcome Pack. When you press Submit for this final task, the process is complete.
Although the participant for Make Follow Up Call to Customer is defined differentlyfrom the participant assigned to the earlier tasks—defined as Process Manager not asProcess Tester—you are now logged in as a user who qualifies under both definitions.Therefore, all of the chained tasks are automatically allocated to the same user.
In your Inbox, you can also see the Make Follow Up Call to Customer task for the workitem that you started earlier as Mr John Eustace, but which John Eustace was not qualifiedto complete.
Click to log out of Workspace.
Verifying the ResultsYou can verify the results of your tutorial by installing the tutorial from the samples folder in theproduct directory. Your project must look similar to the sample solution project.
Procedure
1. Find the ChainedSolution.zip file, in the location where you installed TIBCO Business Studio (forexample, <STUDIO_HOME > \studio\3. n\samples).
2. In TIBCO Business Studio, select File > Import .
3. The Import wizard is displayed. Select General > Existing Studio Projects into Workspace , andclick Next.
4. Click Select archive file, and click the Browse button.
5. Browse to the zip file, and click Open.
The project is displayed in the Import wizard.
6. Click Finish.
The project is installed in your workspace.
92
TIBCO Business Studio Tutorials
How to Ensure Specific Tasks in a Process are Performed by DifferentUsers
This tutorial shows you how to ensure that specific tasks in a process are performed by different users.
Before you start this tutorial, you can become familiar with TIBCO Business Studio by completing thefollowing initial tutorials:
● How to Design a Simple WelcomeUsers Business Service● How to Implement and Deploy the WelcomeUsers Application
Importing the Initial ResourcesThis tutorial supplies a project as the starting-point, so that the initial work, not relating to separation ofduties, is already done for you. It also requires an organization model, which you may have createdand deployed in earlier tutorials.
If not, you can import and deploy it now.
Procedure
1. Start Studio for Designers.
Following this tutorial will be simpler and clearer if you close any other projects that youmay have open in your TIBCO Business Studio workspace, using the Project > CloseProject menu option.
2. To import the SODStart project into your workspace, find the SODStart.zip file in the locationwhere you installed TIBCO Business Studio (for example, <STUDIO_HOME > \studio\3. n\samples).
3. In TIBCO Business Studio, select File > Import .
4. The Import wizard is displayed. Select General > Existing Projects into Workspace and click Next.
5. Click Select archive file, and click on the Browse button.
6. Browse to the zip file and click Open. The project is displayed in the Import wizard.
7. Click Finish. The SODStart project is installed in your workspace.
8. If you have not already done so in a previous tutorial, import the EasyAsSimpleOMSolution fileinto your workspace This is the organization model that is referenced by the SODStart project thatyou have imported.
9. Deploy EasyAsSimpleOMSolution to BPM. The organization model must be deployed before youstart to deploy the SODStart project (see Deploying and Running the Process) or deployment willfail.
Deploying this project is similar to the deployment of the WelcomeUsers project describedin the Create, Deploy, and Run Your First BPM Application tutorials.
Making Sure that Specific Tasks are Performed by Different UsersSeparation of Duties allows you to specify that different users perform specific tasks in a process.
Procedure
1. In Project Explorer, expand the SODStart project.
2. Open the WelcomeUsersSOD process.
93
TIBCO Business Studio Tutorials
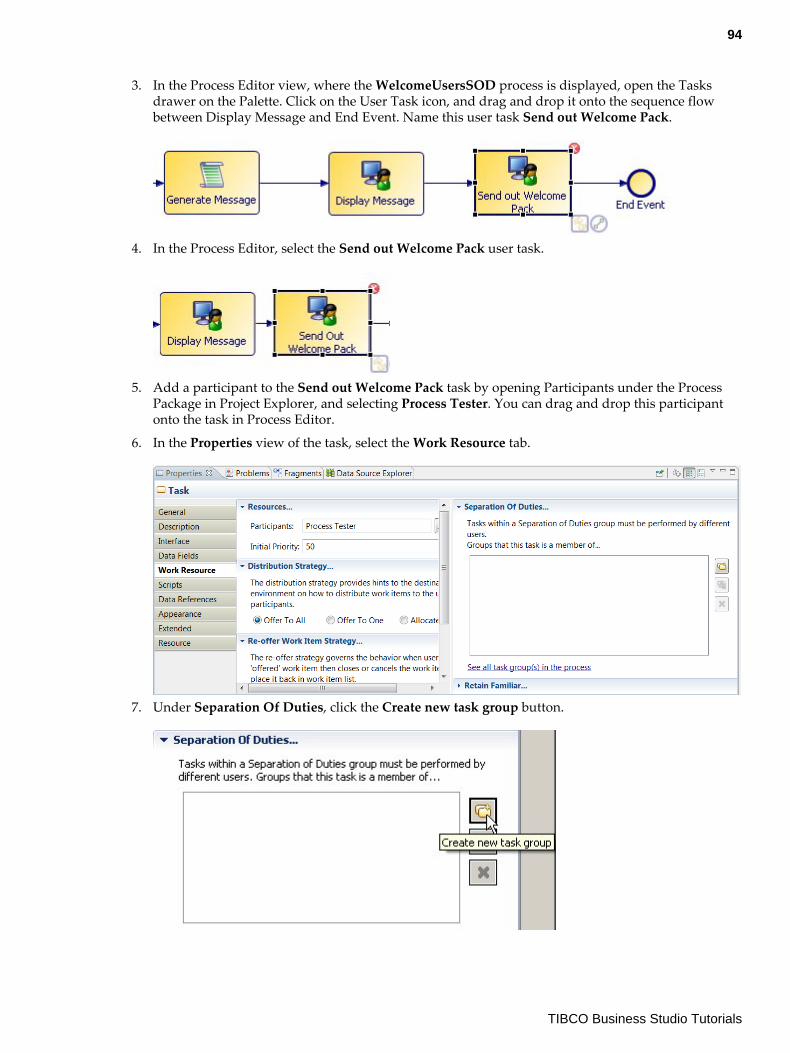
3. In the Process Editor view, where the WelcomeUsersSOD process is displayed, open the Tasksdrawer on the Palette. Click on the User Task icon, and drag and drop it onto the sequence flowbetween Display Message and End Event. Name this user task Send out Welcome Pack.
4. In the Process Editor, select the Send out Welcome Pack user task.
5. Add a participant to the Send out Welcome Pack task by opening Participants under the ProcessPackage in Project Explorer, and selecting Process Tester. You can drag and drop this participantonto the task in Process Editor.
6. In the Properties view of the task, select the Work Resource tab.
7. Under Separation Of Duties, click the Create new task group button.
94
TIBCO Business Studio Tutorials
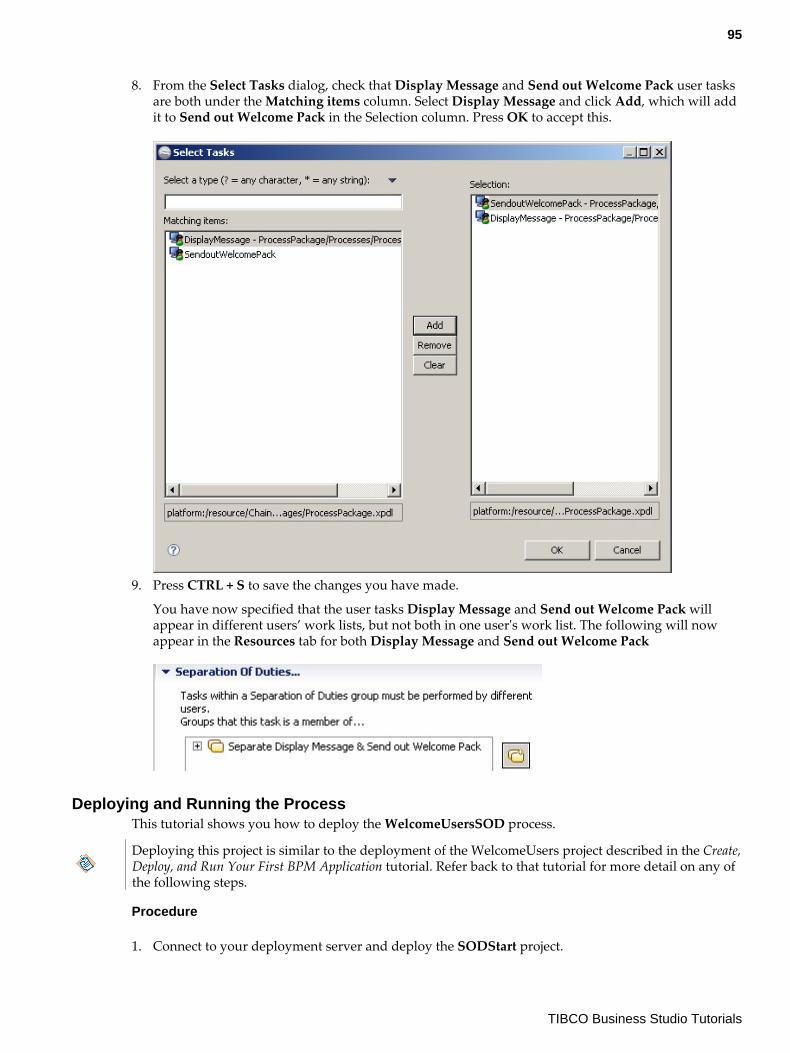
8. From the Select Tasks dialog, check that Display Message and Send out Welcome Pack user tasksare both under the Matching items column. Select Display Message and click Add, which will addit to Send out Welcome Pack in the Selection column. Press OK to accept this.
9. Press CTRL + S to save the changes you have made.
You have now specified that the user tasks Display Message and Send out Welcome Pack willappear in different users’ work lists, but not both in one user's work list. The following will nowappear in the Resources tab for both Display Message and Send out Welcome Pack
Deploying and Running the ProcessThis tutorial shows you how to deploy the WelcomeUsersSOD process.
Deploying this project is similar to the deployment of the WelcomeUsers project described in the Create,Deploy, and Run Your First BPM Application tutorial. Refer back to that tutorial for more detail on any ofthe following steps.
Procedure
1. Connect to your deployment server and deploy the SODStart project.
95
TIBCO Business Studio Tutorials
2. If you have not already done so, log into Openspace or Workspace, and create an LDAP container,specifying easyAs as the LDAP source..
3. Map two users to the Tester position in the Easy As organization model that you importedpreviously in this tutorial.
4. Log into Workspace as one of the users you mapped to the Tester position.
5. Start the WelcomeUsersSOD business service.
6. In your work item list, double click Get User’s Name to open the work item.
TheGet User’s Name task is also offered to the other user that you mapped to the Testerposition. You can confirm this by logging in as the other user and viewing the work list.
7. Enter a name and submit the Get User’s Name form.
8. The Display Message task is displayed. Click Submit.
9. Note that the next work item (Send out Welcome Pack) is not offered to you.
10. Log into TIBCO Workspace as the other user that you mapped. The Send out Welcome Pack workitem is in the work list.
11. Submit the Send out Welcome Pack form.
Verifying the ResultsYou can verify the results of your tutorial by installing the tutorial from the samples folder in theproduct directory. Your project must look similar to the sample solution project.
Procedure
1. Find the SODSolution.zip file in the location where you installed TIBCO Business Studio (forexample, <STUDIO_HOME > \studio\3. n\samples).
2. In TIBCO Business Studio, select File > Import .
3. The Import wizard is displayed. Select General > Existing Studio Projects into Workspace , andclick Next.
4. Click Select archive file, and click the Browse button.
5. Browse to the zip file, and click Open.
The project is displayed in the Import wizard.
6. Click Finish.
The project is installed in your workspace.
How to Dynamically Define Who Gets WorkThis tutorial shows you how to dynamically define who gets work. This means that you define criteriaabout how work should be assigned, which will be resolved to particular users at runtime.
Before you start this tutorial, you need to become familiar with TIBCO Business Studio by completingthe following initial tutorials:
● How to Design a Simple WelcomeUsers Business Service● How to Implement and Deploy the WelcomeUsers Application
After completing this tutorial, you will be familiar with the basic steps involved in creating aparticipant with properties that mean it will be resolved dynamically to a relevant user at runtimeaccording to criteria you define.
96
TIBCO Business Studio Tutorials
You may also wish to complete the following tutorials covering the use of the organization model:
● How to Use the Graphical Organization Modeler● How to Add Groups, Capabilities and Privileges to an Organization Model
Creating the ProjectYou start by creating a project that contains a simple business process.
It is good practice to use a separate organization model rather than to include the model within thesame project as your business processes. Your main project can reference the project containing theorganization model.
Procedure
1. Start Studio for Designers.
Following this tutorial will be simpler and clearer if you close any other projects that youmay have open in your TIBCO Business Studio workspace, using the Project > CloseProject menu option.
2. If it is not already in your workspace, import a project containing only an organization model calledEasyAsExtendedOMSolution.
To do this:
● Find the file, in the location where you installed TIBCO Business Studio (for example,<STUDIO_HOME > \studio\3. n\samples).
● In TIBCO Business Studio, select File > Import .● The Import wizard is displayed. Select General > Existing Projects into Workspace and click
Next.● Click Select archive file, and click on the Browse button.● Browse to and click Open. The EasyAsExtendedOMSolution project is displayed in the
Import wizard.● Click Finish. The EasyAsExtendedOMSolution project is installed in your workspace.
3. Expand this organization model. You will see that it contains a group called Customer ServicesRepresentatives, and a Capability called French Speaker.
4. Create a new Analysis project:a) Select File > New > Analysis Project .b) Name the project ManageCustomerEnquiries.c) Select BPM as the Destination Environment, and click Next.d) On the Asset Type Selection page, deselect Business Object Model and Organization Model.e) Click Finish.
97
TIBCO Business Studio Tutorials
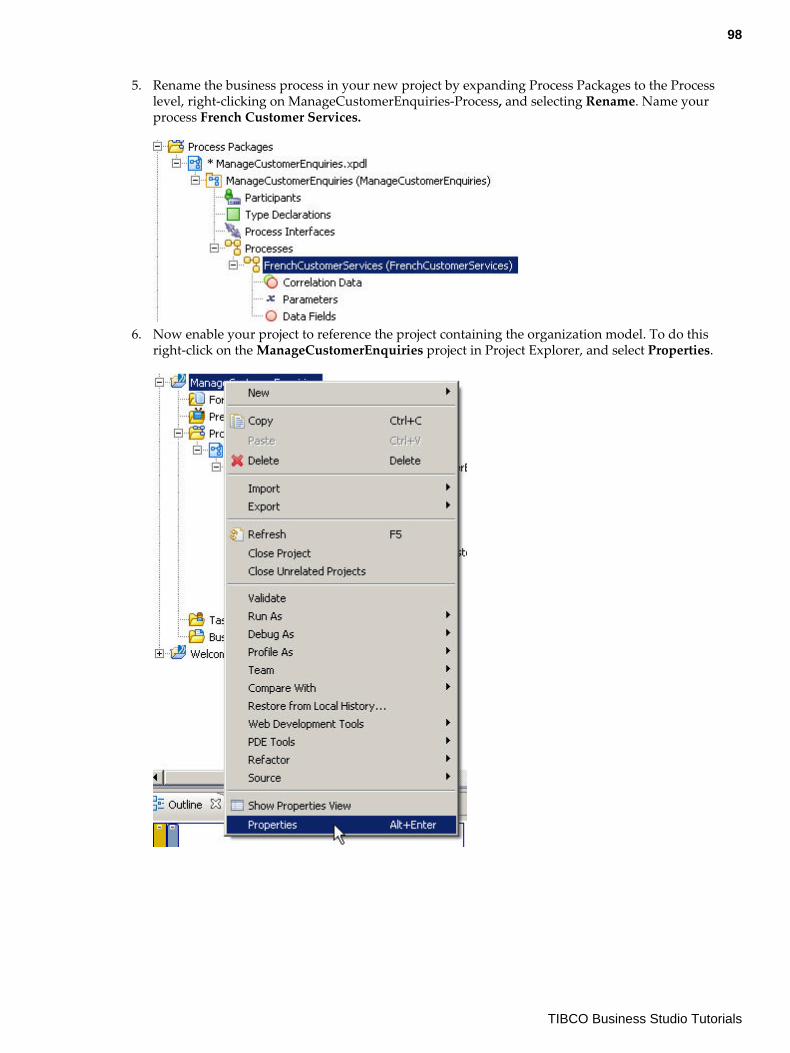
5. Rename the business process in your new project by expanding Process Packages to the Processlevel, right-clicking on ManageCustomerEnquiries-Process, and selecting Rename. Name yourprocess French Customer Services.
6. Now enable your project to reference the project containing the organization model. To do thisright-click on the ManageCustomerEnquiries project in Project Explorer, and select Properties.
98
TIBCO Business Studio Tutorials
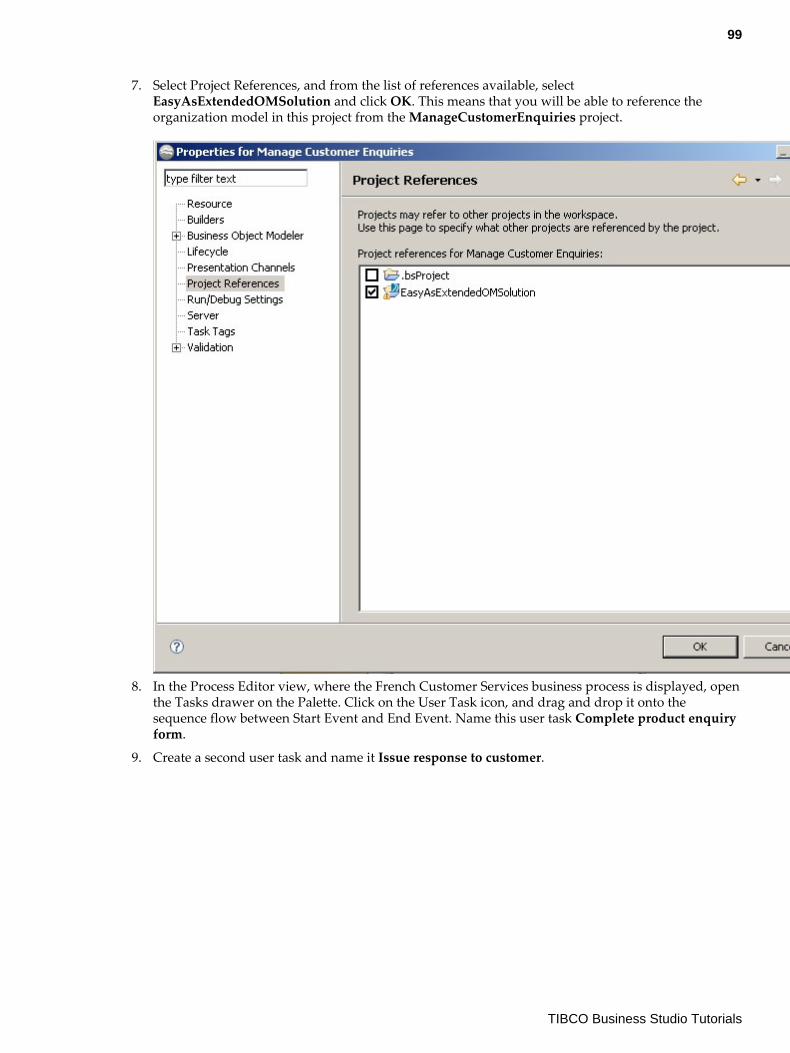
7. Select Project References, and from the list of references available, selectEasyAsExtendedOMSolution and click OK. This means that you will be able to reference theorganization model in this project from the ManageCustomerEnquiries project.
8. In the Process Editor view, where the French Customer Services business process is displayed, openthe Tasks drawer on the Palette. Click on the User Task icon, and drag and drop it onto thesequence flow between Start Event and End Event. Name this user task Complete product enquiryform.
9. Create a second user task and name it Issue response to customer.
99
TIBCO Business Studio Tutorials
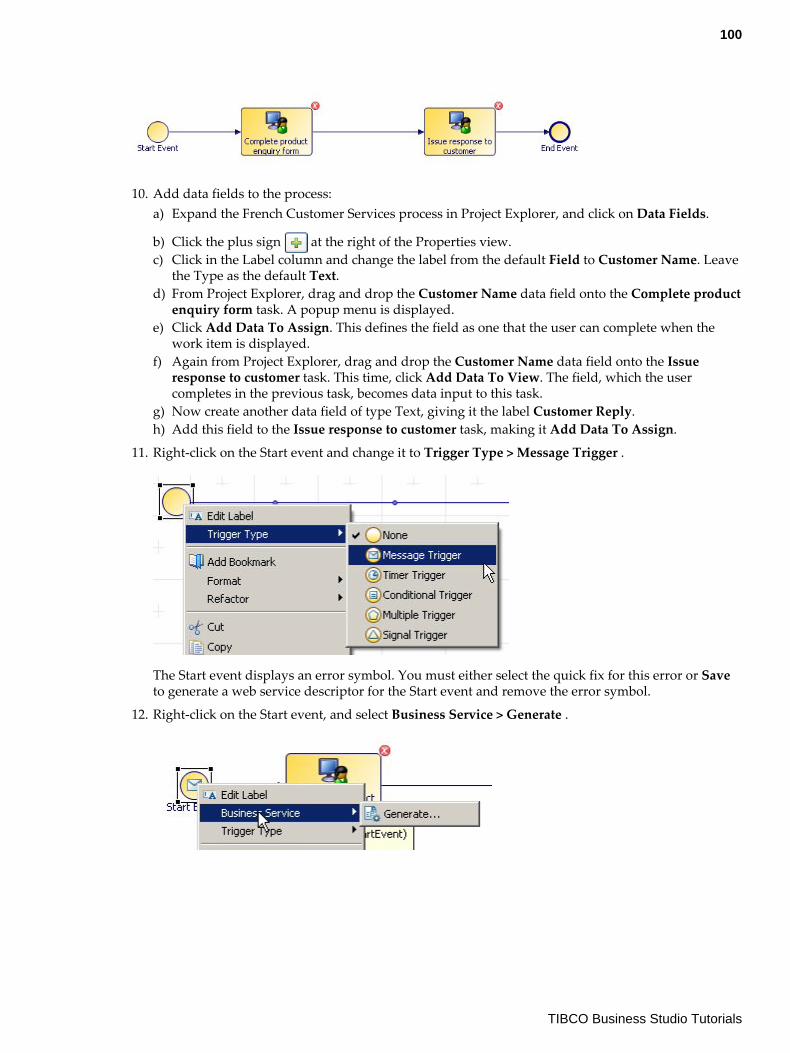
10. Add data fields to the process:a) Expand the French Customer Services process in Project Explorer, and click on Data Fields.
b) Click the plus sign at the right of the Properties view.c) Click in the Label column and change the label from the default Field to Customer Name. Leave
the Type as the default Text.d) From Project Explorer, drag and drop the Customer Name data field onto the Complete product
enquiry form task. A popup menu is displayed.e) Click Add Data To Assign. This defines the field as one that the user can complete when the
work item is displayed.f) Again from Project Explorer, drag and drop the Customer Name data field onto the Issue
response to customer task. This time, click Add Data To View. The field, which the usercompletes in the previous task, becomes data input to this task.
g) Now create another data field of type Text, giving it the label Customer Reply.h) Add this field to the Issue response to customer task, making it Add Data To Assign.
11. Right-click on the Start event and change it to Trigger Type > Message Trigger .
The Start event displays an error symbol. You must either select the quick fix for this error or Saveto generate a web service descriptor for the Start event and remove the error symbol.
12. Right-click on the Start event, and select Business Service > Generate .
100
TIBCO Business Studio Tutorials
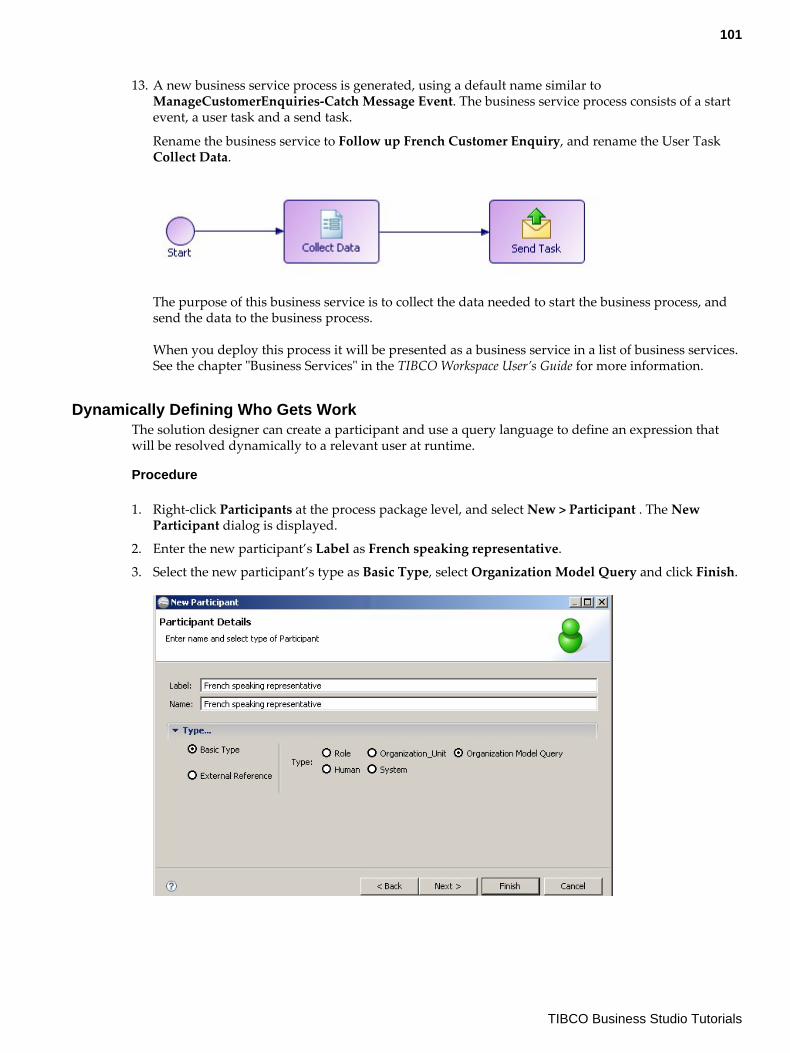
13. A new business service process is generated, using a default name similar toManageCustomerEnquiries-Catch Message Event. The business service process consists of a startevent, a user task and a send task.
Rename the business service to Follow up French Customer Enquiry, and rename the User TaskCollect Data.
The purpose of this business service is to collect the data needed to start the business process, andsend the data to the business process.
When you deploy this process it will be presented as a business service in a list of business services.See the chapter "Business Services" in the TIBCO Workspace User’s Guide for more information.
Dynamically Defining Who Gets WorkThe solution designer can create a participant and use a query language to define an expression thatwill be resolved dynamically to a relevant user at runtime.
Procedure
1. Right-click Participants at the process package level, and select New > Participant . The NewParticipant dialog is displayed.
2. Enter the new participant’s Label as French speaking representative.
3. Select the new participant’s type as Basic Type, select Organization Model Query and click Finish.
101
TIBCO Business Studio Tutorials
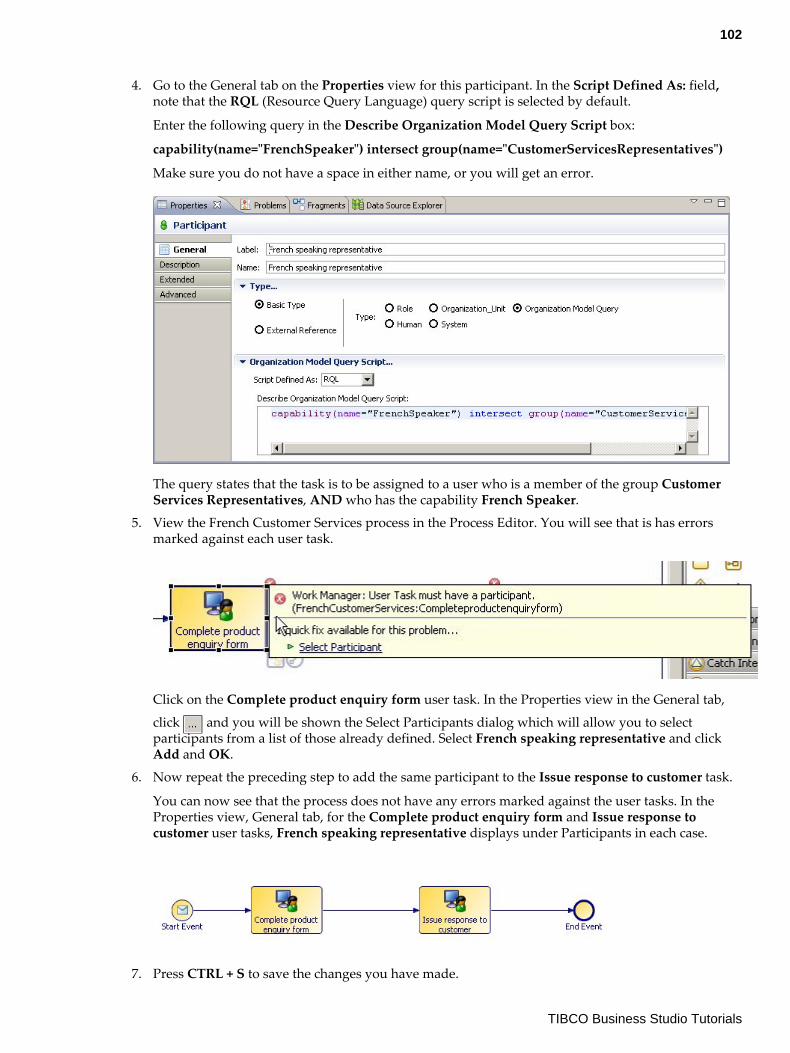
4. Go to the General tab on the Properties view for this participant. In the Script Defined As: field,note that the RQL (Resource Query Language) query script is selected by default.
Enter the following query in the Describe Organization Model Query Script box:
capability(name="FrenchSpeaker") intersect group(name="CustomerServicesRepresentatives")
Make sure you do not have a space in either name, or you will get an error.
The query states that the task is to be assigned to a user who is a member of the group CustomerServices Representatives, AND who has the capability French Speaker.
5. View the French Customer Services process in the Process Editor. You will see that is has errorsmarked against each user task.
Click on the Complete product enquiry form user task. In the Properties view in the General tab,
click and you will be shown the Select Participants dialog which will allow you to selectparticipants from a list of those already defined. Select French speaking representative and clickAdd and OK.
6. Now repeat the preceding step to add the same participant to the Issue response to customer task.
You can now see that the process does not have any errors marked against the user tasks. In theProperties view, General tab, for the Complete product enquiry form and Issue response tocustomer user tasks, French speaking representative displays under Participants in each case.
7. Press CTRL + S to save the changes you have made.
102
TIBCO Business Studio Tutorials
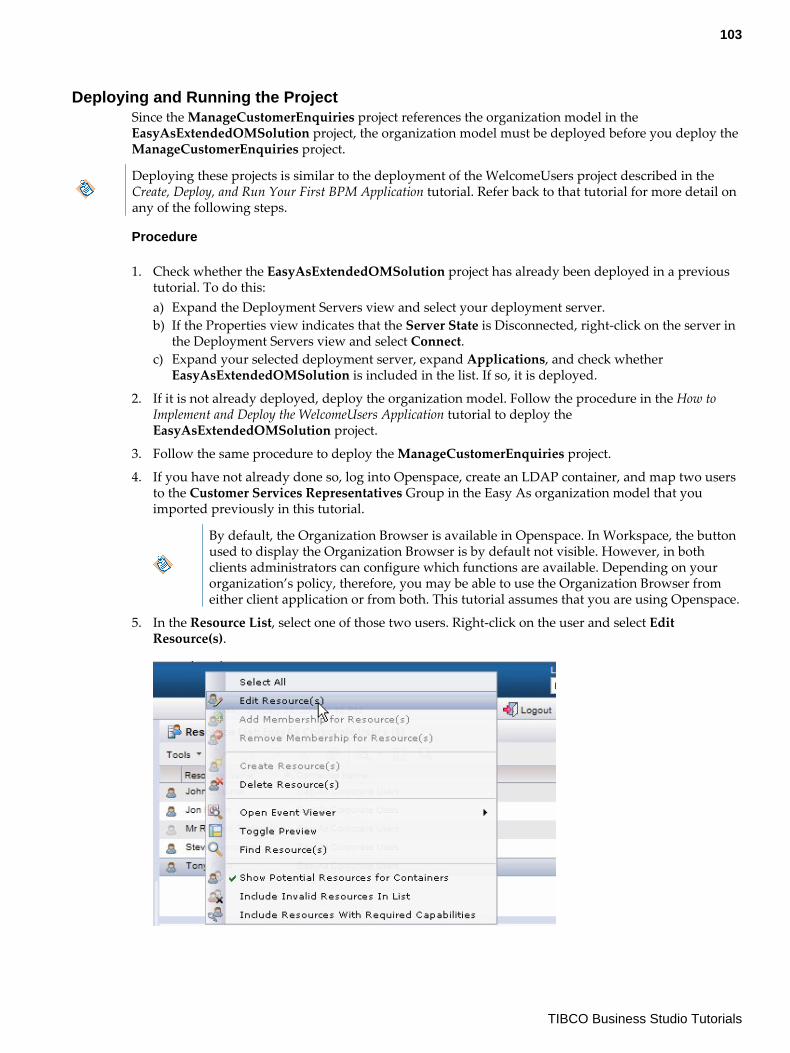
Deploying and Running the ProjectSince the ManageCustomerEnquiries project references the organization model in theEasyAsExtendedOMSolution project, the organization model must be deployed before you deploy theManageCustomerEnquiries project.
Deploying these projects is similar to the deployment of the WelcomeUsers project described in theCreate, Deploy, and Run Your First BPM Application tutorial. Refer back to that tutorial for more detail onany of the following steps.
Procedure
1. Check whether the EasyAsExtendedOMSolution project has already been deployed in a previoustutorial. To do this:a) Expand the Deployment Servers view and select your deployment server.b) If the Properties view indicates that the Server State is Disconnected, right-click on the server in
the Deployment Servers view and select Connect.c) Expand your selected deployment server, expand Applications, and check whether
EasyAsExtendedOMSolution is included in the list. If so, it is deployed.
2. If it is not already deployed, deploy the organization model. Follow the procedure in the How toImplement and Deploy the WelcomeUsers Application tutorial to deploy theEasyAsExtendedOMSolution project.
3. Follow the same procedure to deploy the ManageCustomerEnquiries project.
4. If you have not already done so, log into Openspace, create an LDAP container, and map two usersto the Customer Services Representatives Group in the Easy As organization model that youimported previously in this tutorial.
By default, the Organization Browser is available in Openspace. In Workspace, the buttonused to display the Organization Browser is by default not visible. However, in bothclients administrators can configure which functions are available. Depending on yourorganization’s policy, therefore, you may be able to use the Organization Browser fromeither client application or from both. This tutorial assumes that you are using Openspace.
5. In the Resource List, select one of those two users. Right-click on the user and select EditResource(s).
103
TIBCO Business Studio Tutorials

6. The Resource Editor displays. To assign the French Speaker capability:
● Select the user in the left-hand pane
● Scroll down the right-hand pane until you can see the capabilities, and select French Speaker.
● Click in the menu bar.
7. The same icon appears next to the user’s name, indicating that a capability has been granted.
Click OK to return to the Resource List. When the user is selected, the capability is now shown.
8. Log out of Openspace.
9. Log into Openspace again as the user you mapped to the Customer Services RepresentativesGroup and gave the French Speaker capability. Use the password "tibco123".
10. Start the Follow up > French Customer Enquiry business service. Click Submit.
11. In your work item list you should now see the work item Complete product enquiry form shownas OFFERED. Don’t do any more with this work item yet - you will come back to it later.
12. Log out as that user.
104
TIBCO Business Studio Tutorials
13. Now log in as the other user you mapped in step 4. You will not see a work item as you did not givethem the French Speaker capability.
14. Log out as that user.
15. Log in as the first user again, and double-click on the work item, complete the work item andsubmit it.
16. You will now be sent the next work item in the process, Issue response to customer. Double-clickon the work item, complete the work item and submit it.
Verifying the ResultsYou can verify the results of your tutorial by installing the tutorial from the samples folder in theproduct directory. Your project must look similar to the sample solution project.
Procedure
1. Find the ManageCustomerEnquiriesSol.zip file in the location where you installed TIBCO BusinessStudio (for example, <STUDIO_HOME > \studio\3. n\samples).
2. In TIBCO Business Studio, select File > Import .
The Import wizard is displayed.
3. Select General > Existing Studio Projects into Workspace and click Next.
4. Click Select archive file, and click the Browse button.
5. Browse to the zip file and click Open.
The project is displayed in the Import wizard.
6. Click Finish.
The project is installed in your workspace.
How to Assign a Task to a User Based on their Job FunctionTo assign a task to a user based on their job function, you can assign the task to a Group which hasbeen created in your organization model.
Groups consist of users who can come from a variety of Organization Units—so the Managers groupcould contain managers of your Testing Department, Human Resources Department and so on—withthe common job function that they are Managers.
The group is created in the organization model, and users are assigned to groups using theOrganization Browser in TIBCO Openspace.
This tutorial shows you how to assign a task to a user based on their job function.
Before you start this tutorial, you can become familiar with TIBCO Business Studio by completing thefollowing initial tutorials:
● How to Design a Simple WelcomeUsers Business Service● How to Implement and Deploy the WelcomeUsers Application
After completing the tutorial, you will be familiar with the basic steps involved in assigning a task to auser based on their job function.
105
TIBCO Business Studio Tutorials
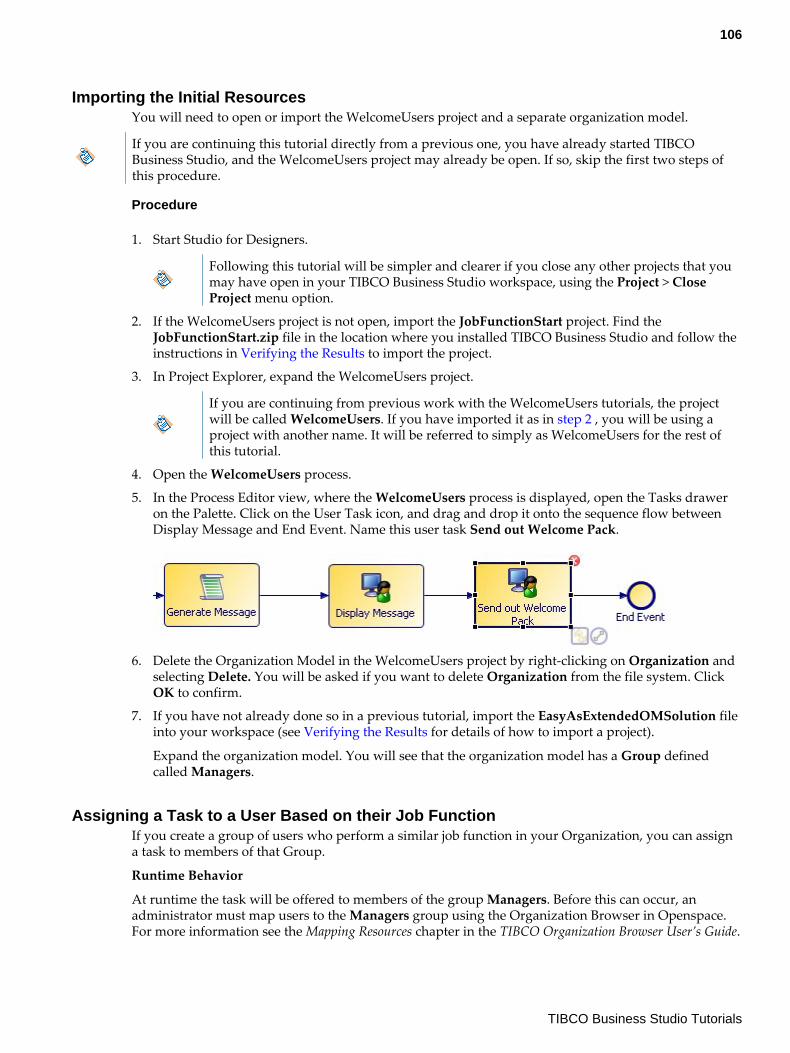
Importing the Initial ResourcesYou will need to open or import the WelcomeUsers project and a separate organization model.
If you are continuing this tutorial directly from a previous one, you have already started TIBCOBusiness Studio, and the WelcomeUsers project may already be open. If so, skip the first two steps ofthis procedure.
Procedure
1. Start Studio for Designers.
Following this tutorial will be simpler and clearer if you close any other projects that youmay have open in your TIBCO Business Studio workspace, using the Project > CloseProject menu option.
2. If the WelcomeUsers project is not open, import the JobFunctionStart project. Find theJobFunctionStart.zip file in the location where you installed TIBCO Business Studio and follow theinstructions in Verifying the Results to import the project.
3. In Project Explorer, expand the WelcomeUsers project.
If you are continuing from previous work with the WelcomeUsers tutorials, the projectwill be called WelcomeUsers. If you have imported it as in step 2 , you will be using aproject with another name. It will be referred to simply as WelcomeUsers for the rest ofthis tutorial.
4. Open the WelcomeUsers process.
5. In the Process Editor view, where the WelcomeUsers process is displayed, open the Tasks draweron the Palette. Click on the User Task icon, and drag and drop it onto the sequence flow betweenDisplay Message and End Event. Name this user task Send out Welcome Pack.
6. Delete the Organization Model in the WelcomeUsers project by right-clicking on Organization andselecting Delete. You will be asked if you want to delete Organization from the file system. ClickOK to confirm.
7. If you have not already done so in a previous tutorial, import the EasyAsExtendedOMSolution fileinto your workspace (see Verifying the Results for details of how to import a project).
Expand the organization model. You will see that the organization model has a Group definedcalled Managers.
Assigning a Task to a User Based on their Job FunctionIf you create a group of users who perform a similar job function in your Organization, you can assigna task to members of that Group.
Runtime Behavior
At runtime the task will be offered to members of the group Managers. Before this can occur, anadministrator must map users to the Managers group using the Organization Browser in Openspace.For more information see the Mapping Resources chapter in the TIBCO Organization Browser User’s Guide.
106
TIBCO Business Studio Tutorials

By default, the Organization Browser is available in Openspace. In Workspace, the button used todisplay the Organization Browser is by default not visible. However, in both clients administrators canconfigure which functions are available. Depending on your organization’s policy, therefore, you maybe able to use the Organization Browser from either client application or from both. This tutorialassumes that you are using Openspace.
Procedure
1. Select the WelcomeUsers process and click on the Display Message user task, and in the Generaltab for the Properties view, Process Tester is already selected as a Participant in the WelcomeUsersproject. Delete this reference to a participant by selecting the Clear button.
If you look at Process Tester in Project Explorer, you will see that it has an error indicator.This is because it references an entity in the organization model which you deleted in the Importing the Initial Resources procedure. Once Process Tester is no longer assigned toany task, you will delete it.
2. Drag and drop the group Managers from the Project Explorer view of theEasyAsExtendedOMSolution organization model onto the Display Message user task in theWelcomeUsers process. The following message displays:
3. Click Yes to allow this, which means that you can now assign elements of theEasyAsExtendedOMSolution organization model to the WelcomeUsers project.
4. You will now see Managers shown in the Participants tab for the Display Message user task.
5. Press CTRL + S to save the changes you have made.
6. Repeat steps 2 to 5 above to assign the same participant, the group Managers, to the Send outWelcome Pack user task.
107
TIBCO Business Studio Tutorials

7. In Project Explorer, right-click on the Process Tester participant and select Delete.
You have now assigned both user tasks in the process to users who are part of the group Managers.
Deploying the ProjectSince the WelcomeUsers project references the organization model in the EasyAsExtendedOMSolutionproject, the organization model must be deployed for the WelcomeUsers project to be able to run.
Save the project that you have created. You have now completed the tutorial.
Procedure
1. Check whether the EasyAsExtendedOMSolution project has already been deployed in a previoustutorial. To do this:a) Expand the Deployment Servers view and select your deployment server.b) If the Properties view indicates that the Server State is Disconnected, right-click on the server in
the Deployment Servers view and select Connect.c) Expand your selected deployment server, expand Applications, and check whether
EasyAsExtendedOMSolution is included in the list. If so, it is deployed.
2. If it is not already deployed, deploy the organization model. Follow the procedure in the How toImplement and Deploy the WelcomeUsers Application tutorial to deploy theEasyAsExtendedOMSolution project.
3. Follow the same procedure to deploy the WelcomeUsers project.
4. If you have not already done so, log into Openspace, create an LDAP container, and map a user tothe Managers group in the EasyAsExtendedOMSolution organization model that you importedpreviously in this tutorial.
5. Log into TIBCO Workspace as the user you mapped to the Managers group.
6. Now you can start the WelcomeUsers business service.
Verifying the ResultsYou can verify the results of your tutorial by installing the tutorial from the samples folder in theproduct directory. Your project must look similar to the sample solution project.
Procedure
1. Find the AssignByJobFunctionSolution.zip file in the location where you installed TIBCO BusinessStudio (for example, <STUDIO_HOME > \studio\3. n\samples)..
2. In TIBCO Business Studio, select File > Import .
3. The Import wizard is displayed. Select General > Existing Studio Projects into Workspace andclick Next.
4. Click Select archive file, and click the Browse button.
5. Browse to the zip file, and click Open.
The project is displayed in the Import wizard.
108
TIBCO Business Studio Tutorials
6. Click Finish.
The project is installed in your workspace.
How to Deliver Work by EmailThe body of the email message contains a link to either TIBCO Openspace or TIBCO Workspace(depending on which BPM client you are using) and to the location of the work item.
Clicking this link enables you to open the work item directly from the email message. If, when youinstalled your BPM runtime you specified localhost in your client properties, the link points tolocalhost rather than the actual address for TIBCO Openspace or TIBCO Workspace. As the work itemis not on the localhost, the link does not resolve. To change this, you must amend the followingproperties in the EmailChannelProperties.properties file:
● For TIBCO Openspace BaseOSFormAppUrl=http://localhost:8080/openspace/openform
● For TIBCO Workspace - BaseGIFormAppUrl=http://localhost:8080/workspace
The EmailChannelProperties.properties file is located under the folder BPM_CONFIG_FOLDER/tibco/data/bpm/configuration/. On Windows platforms, the default value for BPM_CONFIG_FOLDER is C:\ProgramData\amx-bpm\tibco\data.
This tutorial shows you how to deliver work by email by editing email attributes and pushing an emailnotification to a user for a work item.
This tutorial assumes that you have an smtp server installed locally. Please contact TIBCO if yourequire assistance with this procedure.
You should be familiar with the basics of designing, implementing and deploying process-basedapplications using TIBCO Business Studio. If you are not familiar with these things, you should runthrough the previous tutorials before attempting this one.
Before you start this tutorial, you can become familiar with TIBCO Business Studio by completing theinitial WelcomeUsers tutorials.
After completing the tutorial, you will be able to specify that email notifications of work will be pushedto users, and to enter email attributes that control how work will be displayed to a user at runtime.
Importing the Initial ResourcesImport a project containing a simple organization model to which your business process can refer.
Procedure
1. Start Studio for Designers.
Following this tutorial will be simpler and clearer if you close any other projects that youmay have open in your TIBCO Business Studio workspace, using the Project > CloseProject menu option.
109
TIBCO Business Studio Tutorials
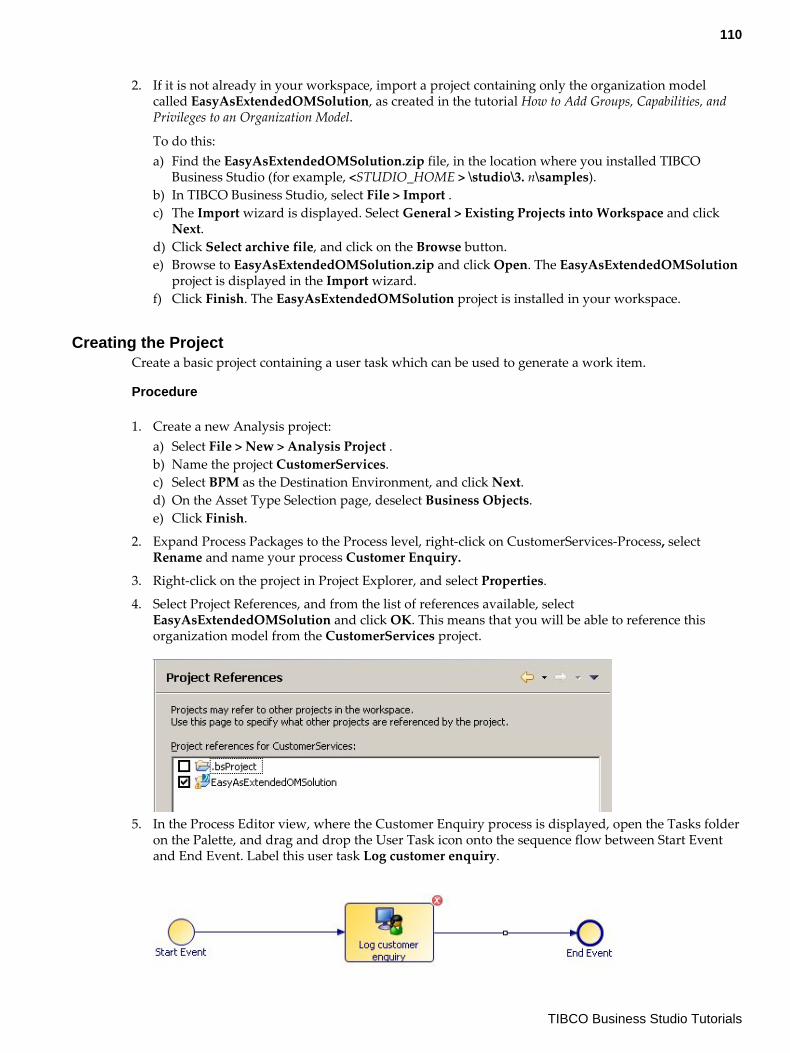
2. If it is not already in your workspace, import a project containing only the organization modelcalled EasyAsExtendedOMSolution, as created in the tutorial How to Add Groups, Capabilities, andPrivileges to an Organization Model.
To do this:a) Find the EasyAsExtendedOMSolution.zip file, in the location where you installed TIBCO
Business Studio (for example, <STUDIO_HOME > \studio\3. n\samples).b) In TIBCO Business Studio, select File > Import .c) The Import wizard is displayed. Select General > Existing Projects into Workspace and click
Next.d) Click Select archive file, and click on the Browse button.e) Browse to EasyAsExtendedOMSolution.zip and click Open. The EasyAsExtendedOMSolution
project is displayed in the Import wizard.f) Click Finish. The EasyAsExtendedOMSolution project is installed in your workspace.
Creating the ProjectCreate a basic project containing a user task which can be used to generate a work item.
Procedure
1. Create a new Analysis project:a) Select File > New > Analysis Project .b) Name the project CustomerServices.c) Select BPM as the Destination Environment, and click Next.d) On the Asset Type Selection page, deselect Business Objects.e) Click Finish.
2. Expand Process Packages to the Process level, right-click on CustomerServices-Process, selectRename and name your process Customer Enquiry.
3. Right-click on the project in Project Explorer, and select Properties.
4. Select Project References, and from the list of references available, selectEasyAsExtendedOMSolution and click OK. This means that you will be able to reference thisorganization model from the CustomerServices project.
5. In the Process Editor view, where the Customer Enquiry process is displayed, open the Tasks folderon the Palette, and drag and drop the User Task icon onto the sequence flow between Start Eventand End Event. Label this user task Log customer enquiry.
110
TIBCO Business Studio Tutorials
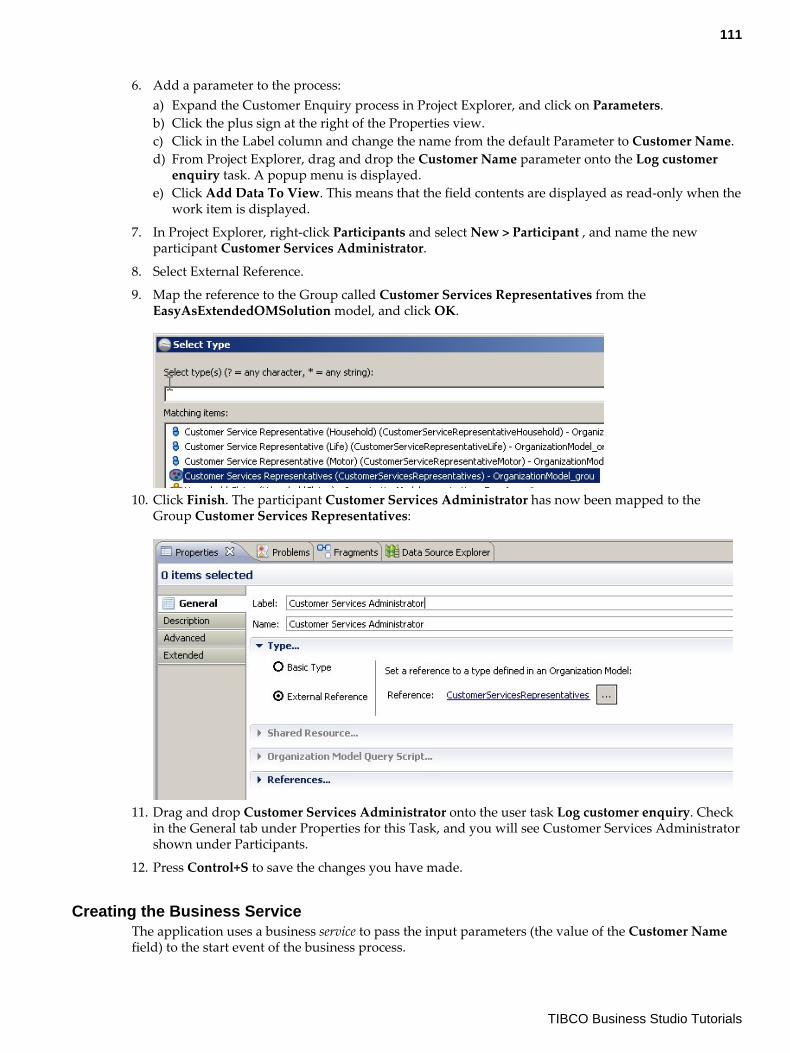
6. Add a parameter to the process:a) Expand the Customer Enquiry process in Project Explorer, and click on Parameters.b) Click the plus sign at the right of the Properties view.c) Click in the Label column and change the name from the default Parameter to Customer Name.d) From Project Explorer, drag and drop the Customer Name parameter onto the Log customer
enquiry task. A popup menu is displayed.e) Click Add Data To View. This means that the field contents are displayed as read-only when the
work item is displayed.
7. In Project Explorer, right-click Participants and select New > Participant , and name the newparticipant Customer Services Administrator.
8. Select External Reference.
9. Map the reference to the Group called Customer Services Representatives from theEasyAsExtendedOMSolution model, and click OK.
10. Click Finish. The participant Customer Services Administrator has now been mapped to theGroup Customer Services Representatives:
11. Drag and drop Customer Services Administrator onto the user task Log customer enquiry. Checkin the General tab under Properties for this Task, and you will see Customer Services Administratorshown under Participants.
12. Press Control+S to save the changes you have made.
Creating the Business ServiceThe application uses a business service to pass the input parameters (the value of the Customer Namefield) to the start event of the business process.
111
TIBCO Business Studio Tutorials
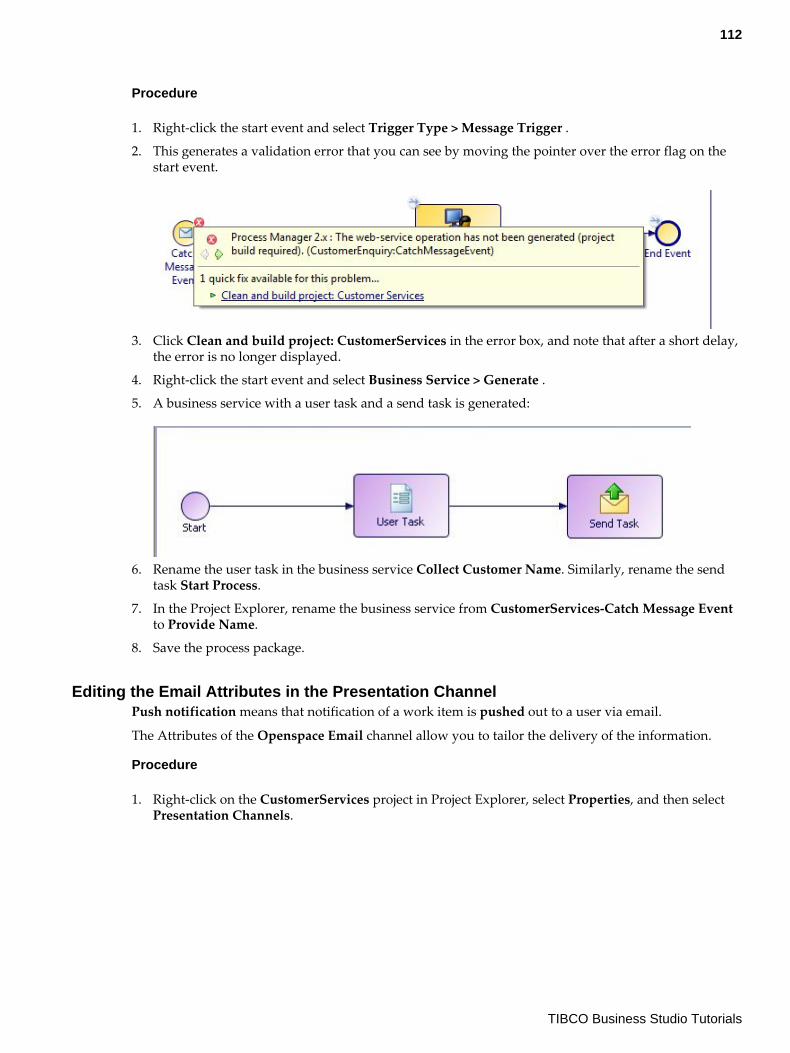
Procedure
1. Right-click the start event and select Trigger Type > Message Trigger .
2. This generates a validation error that you can see by moving the pointer over the error flag on thestart event.
3. Click Clean and build project: CustomerServices in the error box, and note that after a short delay,the error is no longer displayed.
4. Right-click the start event and select Business Service > Generate .
5. A business service with a user task and a send task is generated:
6. Rename the user task in the business service Collect Customer Name. Similarly, rename the sendtask Start Process.
7. In the Project Explorer, rename the business service from CustomerServices-Catch Message Eventto Provide Name.
8. Save the process package.
Editing the Email Attributes in the Presentation ChannelPush notification means that notification of a work item is pushed out to a user via email.
The Attributes of the Openspace Email channel allow you to tailor the delivery of the information.
Procedure
1. Right-click on the CustomerServices project in Project Explorer, select Properties, and then selectPresentation Channels.
112
TIBCO Business Studio Tutorials
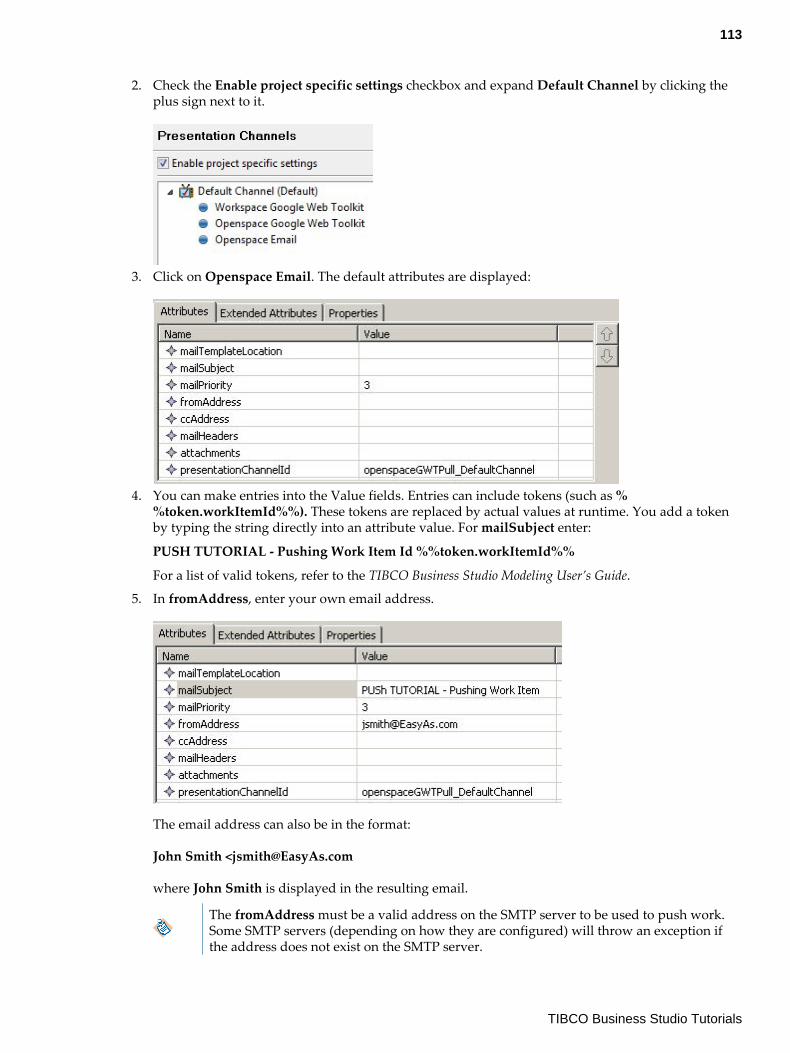
2. Check the Enable project specific settings checkbox and expand Default Channel by clicking theplus sign next to it.
3. Click on Openspace Email. The default attributes are displayed:
4. You can make entries into the Value fields. Entries can include tokens (such as %%token.workItemId%%). These tokens are replaced by actual values at runtime. You add a tokenby typing the string directly into an attribute value. For mailSubject enter:
PUSH TUTORIAL - Pushing Work Item Id %%token.workItemId%%
For a list of valid tokens, refer to the TIBCO Business Studio Modeling User’s Guide.
5. In fromAddress, enter your own email address.
The email address can also be in the format:
John Smith <[email protected]
where John Smith is displayed in the resulting email.
The fromAddress must be a valid address on the SMTP server to be used to push work.Some SMTP servers (depending on how they are configured) will throw an exception ifthe address does not exist on the SMTP server.
113
TIBCO Business Studio Tutorials
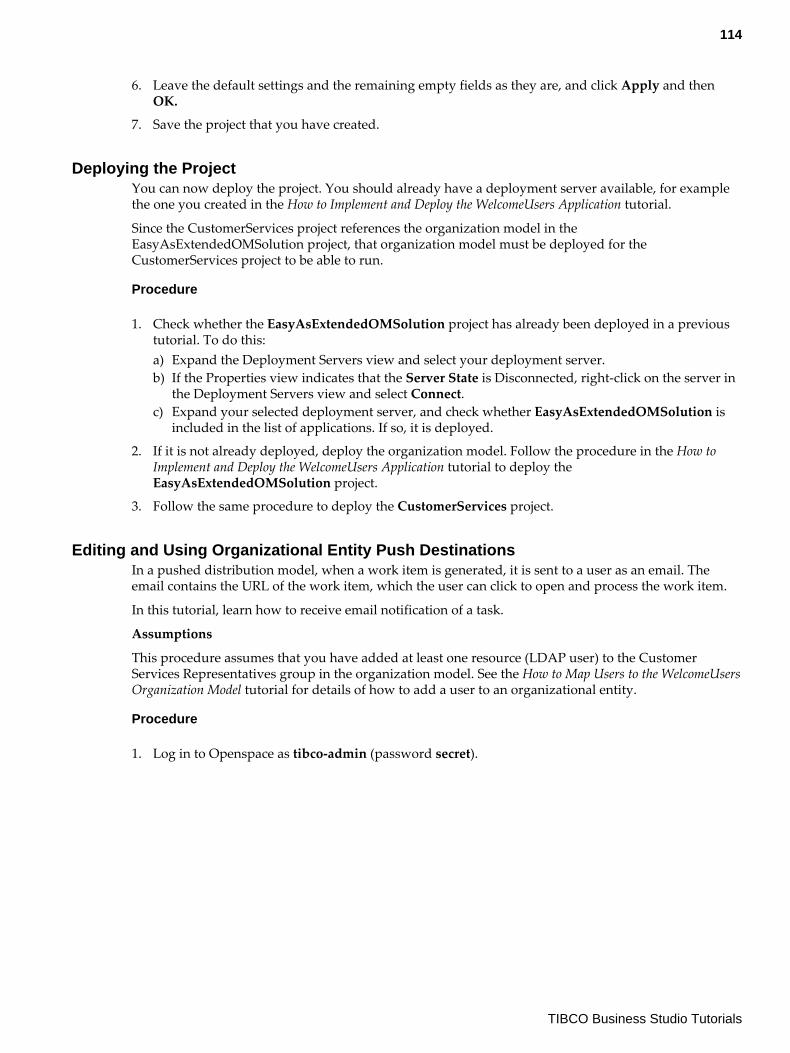
6. Leave the default settings and the remaining empty fields as they are, and click Apply and thenOK.
7. Save the project that you have created.
Deploying the ProjectYou can now deploy the project. You should already have a deployment server available, for examplethe one you created in the How to Implement and Deploy the WelcomeUsers Application tutorial.
Since the CustomerServices project references the organization model in theEasyAsExtendedOMSolution project, that organization model must be deployed for theCustomerServices project to be able to run.
Procedure
1. Check whether the EasyAsExtendedOMSolution project has already been deployed in a previoustutorial. To do this:a) Expand the Deployment Servers view and select your deployment server.b) If the Properties view indicates that the Server State is Disconnected, right-click on the server in
the Deployment Servers view and select Connect.c) Expand your selected deployment server, and check whether EasyAsExtendedOMSolution is
included in the list of applications. If so, it is deployed.
2. If it is not already deployed, deploy the organization model. Follow the procedure in the How toImplement and Deploy the WelcomeUsers Application tutorial to deploy theEasyAsExtendedOMSolution project.
3. Follow the same procedure to deploy the CustomerServices project.
Editing and Using Organizational Entity Push DestinationsIn a pushed distribution model, when a work item is generated, it is sent to a user as an email. Theemail contains the URL of the work item, which the user can click to open and process the work item.
In this tutorial, learn how to receive email notification of a task.
Assumptions
This procedure assumes that you have added at least one resource (LDAP user) to the CustomerServices Representatives group in the organization model. See the How to Map Users to the WelcomeUsersOrganization Model tutorial for details of how to add a user to an organizational entity.
Procedure
1. Log in to Openspace as tibco-admin (password secret).
114
TIBCO Business Studio Tutorials
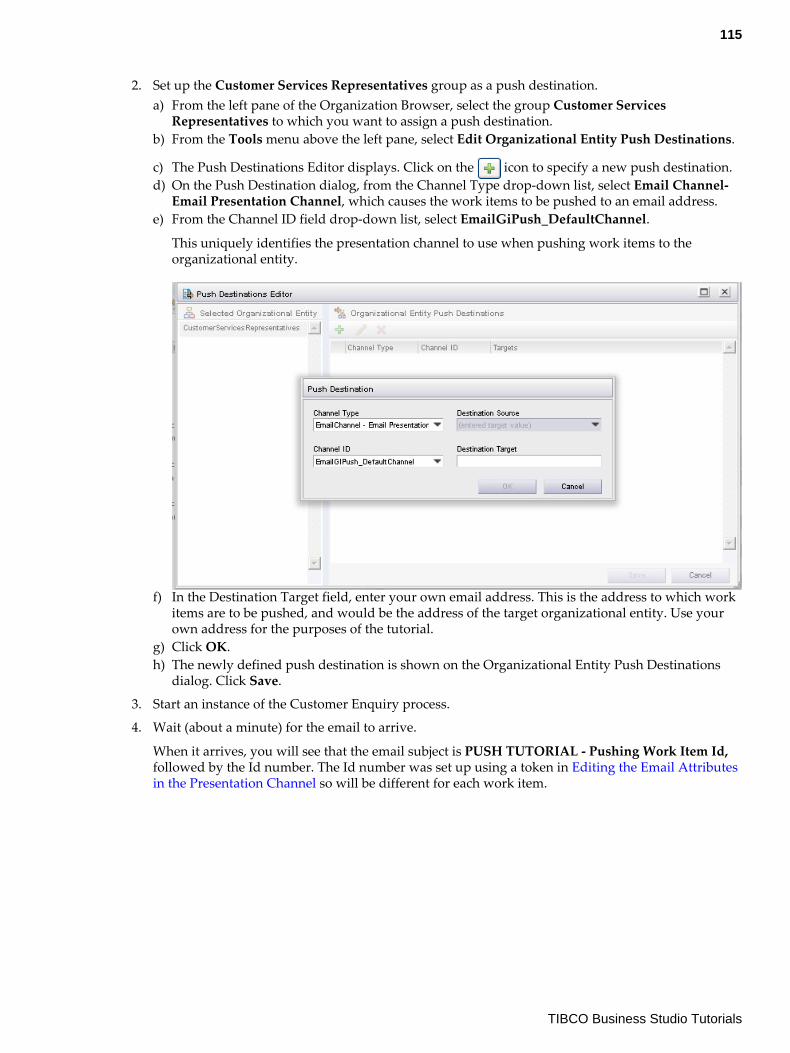
2. Set up the Customer Services Representatives group as a push destination.a) From the left pane of the Organization Browser, select the group Customer Services
Representatives to which you want to assign a push destination.b) From the Tools menu above the left pane, select Edit Organizational Entity Push Destinations.
c) The Push Destinations Editor displays. Click on the icon to specify a new push destination.d) On the Push Destination dialog, from the Channel Type drop-down list, select Email Channel-
Email Presentation Channel, which causes the work items to be pushed to an email address.e) From the Channel ID field drop-down list, select EmailGiPush_DefaultChannel.
This uniquely identifies the presentation channel to use when pushing work items to theorganizational entity.
f) In the Destination Target field, enter your own email address. This is the address to which workitems are to be pushed, and would be the address of the target organizational entity. Use yourown address for the purposes of the tutorial.
g) Click OK.h) The newly defined push destination is shown on the Organizational Entity Push Destinations
dialog. Click Save.
3. Start an instance of the Customer Enquiry process.
4. Wait (about a minute) for the email to arrive.
When it arrives, you will see that the email subject is PUSH TUTORIAL - Pushing Work Item Id,followed by the Id number. The Id number was set up using a token in Editing the Email Attributesin the Presentation Channel so will be different for each work item.
115
TIBCO Business Studio Tutorials

5. Open the email and click on the link provided.
6. The Openspace or Workspace login screen displays in your web browser. Log in as an LDAP userwho has been added to the Customer Services Representatives group.
7. Press Submit on the work item. The form, and Workspace, closes.
8. Open Openspace or Workspace, and you will see that the process has completed.
Verifying the ResultsYou can verify the results of your tutorial by installing the tutorial from the samples folder in theproduct directory. Your project must look similar to the sample solution project.
Procedure
1. Find the EmailSolution.zip file, in the location where you installed TIBCO Business Studio (forexample, <STUDIO_HOME > \studio\3. n\samples).
2. In TIBCO Business Studio, select File > Import .
3. The Import wizard is displayed. Select General > Existing Projects into Workspace , and clickNext.
4. Click Select archive file, and click the Browse button.
5. Browse to the zip file and click Open.
The project is displayed in the Import wizard.
6. Click Finish.
The CustomerServicesSolution project is installed in your workspace.
You will need to amend the value in the fromAddress field to be an email address validon your system before you can run the solution project.
116
TIBCO Business Studio Tutorials
How to Tailor Your Own Email TemplateThis tutorial shows you how to create a customized email template. You can include your company’sown text, styles, and images in a template which will be used in future emails sent out by a businessprocess.
You should be familiar with the basics of designing, implementing and deploying process-basedapplications using TIBCO Business Studio. If you are not familiar with these things, you should runthrough the previous tutorials before attempting this one.
Before you start this tutorial, you can become familiar with TIBCO Business Studio by completing theinitial WelcomeUsers tutorials. You should also complete the How to Deliver Work by Email tutorial.
After completing the tutorial, you will be able to create a tailored email template and specify that emailnotifications of work will use it.
Importing the Initial ResourcesResources needed in the tutorial must be imported.
In this tutorial you continue working with the project you created in How to Tailor Your Own EmailTemplate.
If you do not have this project open, you can download the solution to the How to Tailor Your OwnEmail Template tutorial and use that. As in that tutorial, you also need to have available theorganization model EasyAsExtendedOMSolution.
The files that you will use to create your tailored template are also provided.
Importing the Initial Projects
Following this tutorial will be simpler and clearer if you close any other projects that you may haveopen in your TIBCO Business Studio workspace, using the Project > Close Project menu option.
Procedure
1. Start Studio for Designers.
2. If it is not already in your workspace, import the CustomerServicesSolution project. To do this:
● Find the EmailSolution.zip file, in the location where you installed TIBCO Business Studio (forexample, <STUDIO_HOME > \studio\3. n\samples).
● In TIBCO Business Studio, select File > Import .● The Import wizard is displayed. Select General > Existing Projects into Workspace and click
Next.● Click Select archive file, and click on the Browse button.● Browse to EmailSolution.zip and click Open. The CustomerServicesSolution project is
displayed in the Import wizard.● Click Finish. The CustomerServicesSolution project is installed in your workspace.
3. In Project Explorer, expand the CustomerServicesSolution project.
If you are continuing from previous work with the How to Tailor Your Own EmailTemplate tutorial, the project will be called CustomerServices. If you have imported it,you will be using a project called CustomerServicesSolution. It will be referred to simplyas CustomerServices for the rest of this tutorial.
117
TIBCO Business Studio Tutorials
Updating the Project Version
Update the version number of the project so that you can deploy and run the amended applicationwithout previous versions of the project conflicting with it.
Procedure
1. In Project Explorer, right-click on the CustomerServices project and select Properties.
2. In the Properties dialog, select Lifecycle.
3. Amend the version number to 3.0.0.qualifier.
4. Click Apply and then OK.
5. In Project Explorer, select ProcessPackage(ProcessPackage).
6. In the Properties view, change the version to the same value, 3.0.0.qualifier.
Importing the Template Files
The needed template files are provided in the TIBCO Business Studio installation.
Procedure
1. Find the EmailTemplateFiles.zip file, in the location where you installed TIBCO Business Studio(for example, <STUDIO_HOME > \studio\3. n\samples).
2. Unzip the EmailTemplateFiles.zip file to a convenient temporary folder.
Creating an Alternative TemplateYou can now use the imported files to create your template.
The email template is an html file that references the following files:
● A stylesheet file (.css) that contains standard information such as banners, fonts, or backgroundcolors, that you want to be in every email you send.
● A properties file (cid.properties) that contains a list of references to any graphics that will beembedded in the emails.
Including the Template Files in Your Project
Template files must be included in the TIBCO Business Studio project.
Procedure
1. Copy the following files from the folder where you unzipped the EmailTemplateFiles.zip file:
● EasyAsTemplate.html● EasyAsStyleSheet.css● cid.properties● EasyAsLogo.png
118
TIBCO Business Studio Tutorials

2. In Project Explorer in TIBCO Business Studio, add these files into the Presentation Resources folderof the CustomerServices project. You can do this either by copying and pasting the files, or byright-clicking on the Presentation Resources folder and selecting Import > File System , browsingto the folder that contains the required files, selecting the files you want and pressing Finish.
A JavaScript Object Notation file, cid.properties.json, is automatically generated whenyou add the cid.properties file. It is updated whenever you save changes to the propertiesfile.
Modifying the Template Files
To tailor the appearance and content of the email to your needs, you can edit both the template file andthe stylesheet.
Procedure
1. In the Presentation Resources folder, double-click on EasyAsTemplate.html. It opens in an editorwindow.
2. After the line <p > Pushed Work Item Notification</p , add the following line:
<p>Congratulations! If you see this mail, your tutorial is going well.</p>
3. Save the file.
4. Double-click on EasyAsStyleSheet.css. It opens in an editor window
5. In the definition of style p2, replace the word red with blue.
6. Save the file.
Adding a Graphic to the Template
The template file that you have added to your project already includes one graphic, EasyAsLogo.png.You can see this listed in the Presentation Resources folder. To add another graphic to the templatefile, proceed as follows.
Procedure
1. Add the new image to the Presentation Resources folder by copying Logo2.png, from the folderwhere you extracted the zip file, to Presentation Resources, as you did in for the other files.
2. Double-click on the cid.properties file to open it in an editor.
3. After the definition of cidOne, add the following line:
cidTwo:Logo2.png
as in the following illustration.
4. Double-click EasyAsTemplate.html to open it in an editor.
119
TIBCO Business Studio Tutorials
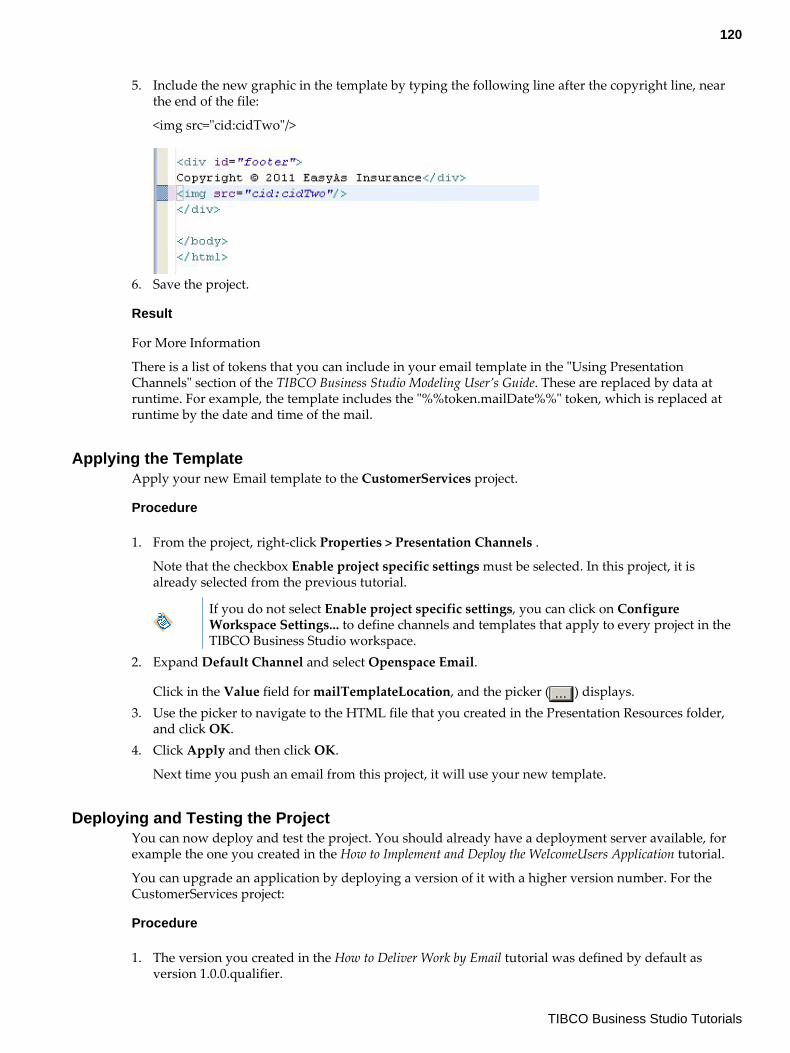
5. Include the new graphic in the template by typing the following line after the copyright line, nearthe end of the file:
<img src="cid:cidTwo"/>
6. Save the project.
Result
For More Information
There is a list of tokens that you can include in your email template in the "Using PresentationChannels" section of the TIBCO Business Studio Modeling User’s Guide. These are replaced by data atruntime. For example, the template includes the "%%token.mailDate%%" token, which is replaced atruntime by the date and time of the mail.
Applying the TemplateApply your new Email template to the CustomerServices project.
Procedure
1. From the project, right-click Properties > Presentation Channels .
Note that the checkbox Enable project specific settings must be selected. In this project, it isalready selected from the previous tutorial.
If you do not select Enable project specific settings, you can click on ConfigureWorkspace Settings... to define channels and templates that apply to every project in theTIBCO Business Studio workspace.
2. Expand Default Channel and select Openspace Email.
Click in the Value field for mailTemplateLocation, and the picker ( ) displays.3. Use the picker to navigate to the HTML file that you created in the Presentation Resources folder,
and click OK.4. Click Apply and then click OK.
Next time you push an email from this project, it will use your new template.
Deploying and Testing the ProjectYou can now deploy and test the project. You should already have a deployment server available, forexample the one you created in the How to Implement and Deploy the WelcomeUsers Application tutorial.
You can upgrade an application by deploying a version of it with a higher version number. For theCustomerServices project:
Procedure
1. The version you created in the How to Deliver Work by Email tutorial was defined by default asversion 1.0.0.qualifier.
120
TIBCO Business Studio Tutorials
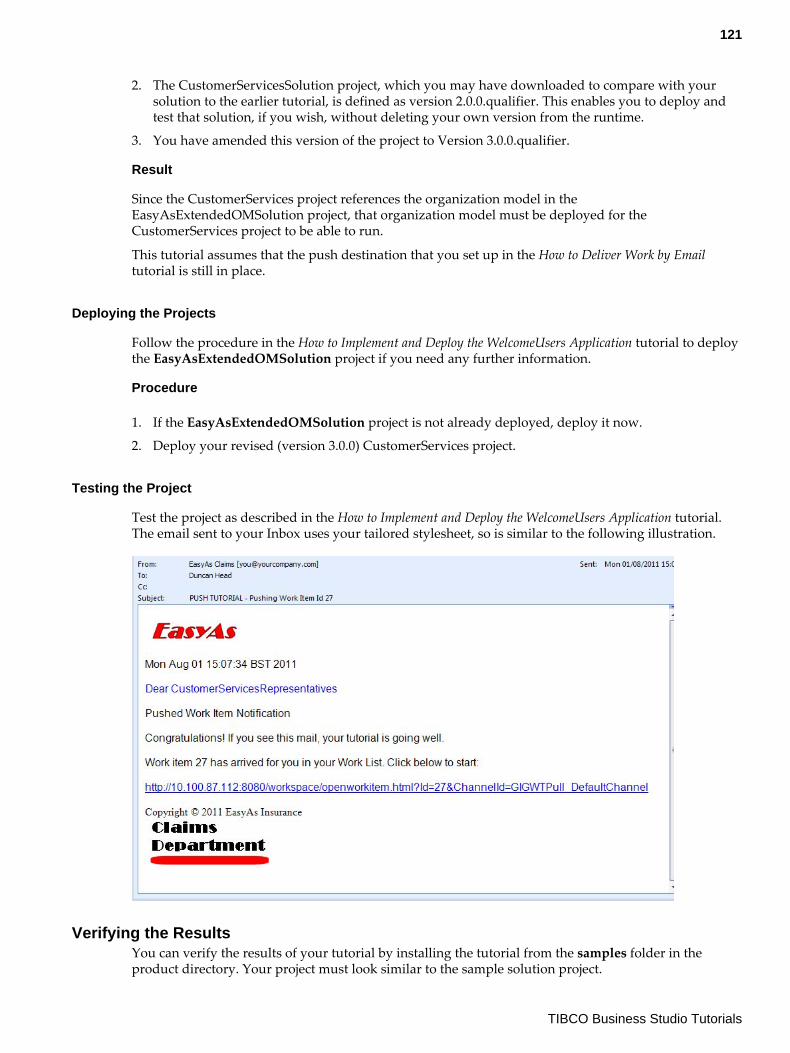
2. The CustomerServicesSolution project, which you may have downloaded to compare with yoursolution to the earlier tutorial, is defined as version 2.0.0.qualifier. This enables you to deploy andtest that solution, if you wish, without deleting your own version from the runtime.
3. You have amended this version of the project to Version 3.0.0.qualifier.
Result
Since the CustomerServices project references the organization model in theEasyAsExtendedOMSolution project, that organization model must be deployed for theCustomerServices project to be able to run.
This tutorial assumes that the push destination that you set up in the How to Deliver Work by Emailtutorial is still in place.
Deploying the Projects
Follow the procedure in the How to Implement and Deploy the WelcomeUsers Application tutorial to deploythe EasyAsExtendedOMSolution project if you need any further information.
Procedure
1. If the EasyAsExtendedOMSolution project is not already deployed, deploy it now.
2. Deploy your revised (version 3.0.0) CustomerServices project.
Testing the Project
Test the project as described in the How to Implement and Deploy the WelcomeUsers Application tutorial.The email sent to your Inbox uses your tailored stylesheet, so is similar to the following illustration.
Verifying the ResultsYou can verify the results of your tutorial by installing the tutorial from the samples folder in theproduct directory. Your project must look similar to the sample solution project.
121
TIBCO Business Studio Tutorials

Procedure
1. Find the EmailTailoredTemplateSolution.zip file, in the location where you installed TIBCOBusiness Studio (for example, <STUDIO_HOME > \studio\3. n\samples).
2. In TIBCO Business Studio, select File > Import .
The Import wizard is displayed.
3. Select General > Existing Projects into Workspace , and click Next.
4. Click Select archive file, and click the Browse button.
5. Browse to the zip file and click Open.
The project is displayed in the Import wizard.
6. Click Finish.
The CustomerServicesTailoredSolution project is installed in your workspace.
You will need to amend the value in the fromAddress field to be an email address validon your system before you can run the solution project.
122
TIBCO Business Studio Tutorials

Using Forms
How to Use Default FormsBusiness Studio automatically generates a default form for each user task in a business process, basedon the data that is defined in the user task.
Default forms are managed by Business Studio and automatically synchronized whenever there arechanges in the user task data interface. Users can also open the form for editing and customizingmanually.
Default Forms vs. Customized Forms
Customizing a Form allows you to introduce custom logic into the form, adjust the layout, look andfeel, and use different controls or panes from the default ones, or to tweak the default settings on thecontrols and panes used. But default forms offer an important advantage: they are automaticallysynchronized with the data in the user task. This means that changes to the user task parameters areimmediately reflected in the form, without manual synchronization.
After this tutorial you will be familiar with:
● Default forms and customized forms: advantages of each● How to preview a form (without opening it for editing)● How to choose the controls you want added to a default form by specifying primitive data for the
user task● How to add a control to a default form by adding attributes to a class in a business object model● Defining restrictions for a control through the business object model.You should work through each section in turn to complete the tutorial.
Opening the Business ProcessThis tutorial uses an already-prepared project, FormsTutorialStart, as a starting point.
The prepared project is much like the project you created if you previously performed the tutorials"How to Create Business Data" and "How to Use Business Data." It contains a single business process,called "Notification of claim." We will use the user tasks and corresponding forms in the "Notificationof claim" business process to explore some of the ways you can use default forms in TIBCO BusinessStudio.
Consider familiarizing yourself with the basics of creating and using business data by completing thetutorials "How to Create Business Data" and "How to Use Business Data" before beginning this tutorial.
Following this tutorial will be simpler and clearer if you close any other projects that you may haveopen in your TIBCO Business Studio workspace, using the Project > Close Project menu option.
Importing the FormsTutorialStart Project
Import the project FormsTutorialStart in your Business Studio workspace and use it as the startingpoint for the Opening the Business Process tutorial.
Procedure
1. Find the formstutorialstart.zip file, in the location where you installed TIBCO Business Studio (forexample, <STUDIO_HOME\studio\3.n\samples). Copy it to a local drive.
2. In TIBCO Business Studio, select File > Import .
123
TIBCO Business Studio Tutorials
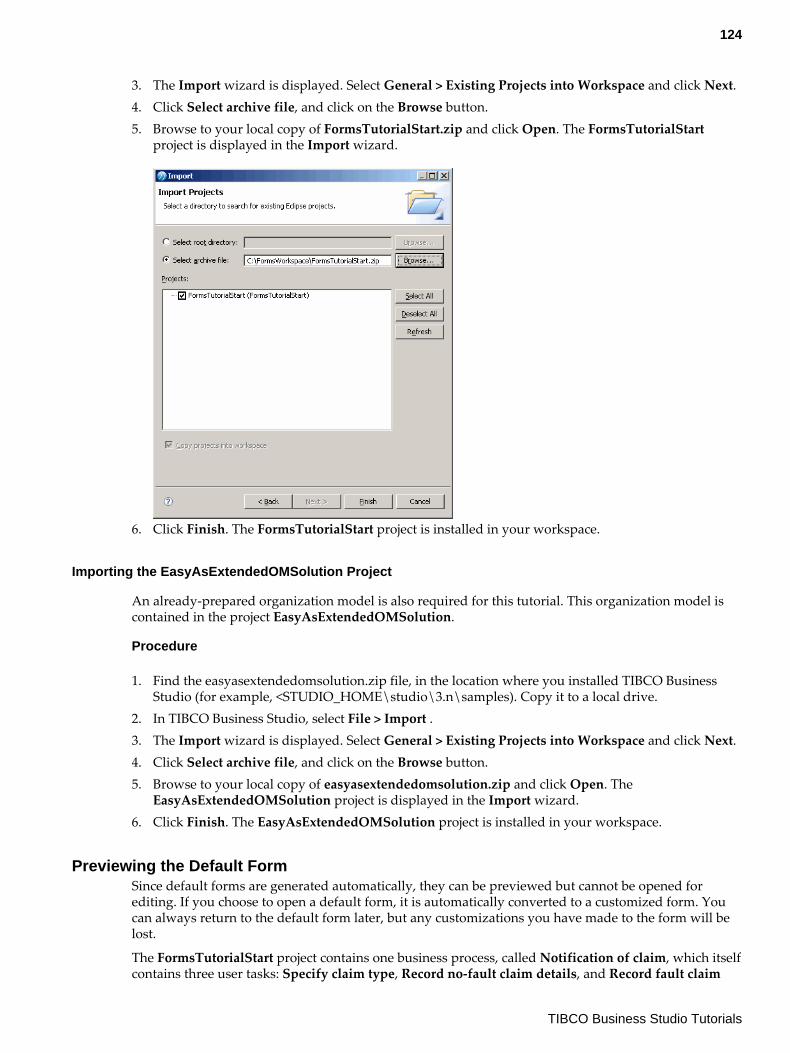
3. The Import wizard is displayed. Select General > Existing Projects into Workspace and click Next.4. Click Select archive file, and click on the Browse button.5. Browse to your local copy of FormsTutorialStart.zip and click Open. The FormsTutorialStart
project is displayed in the Import wizard.
6. Click Finish. The FormsTutorialStart project is installed in your workspace.
Importing the EasyAsExtendedOMSolution Project
An already-prepared organization model is also required for this tutorial. This organization model iscontained in the project EasyAsExtendedOMSolution.
Procedure
1. Find the easyasextendedomsolution.zip file, in the location where you installed TIBCO BusinessStudio (for example, <STUDIO_HOME\studio\3.n\samples). Copy it to a local drive.
2. In TIBCO Business Studio, select File > Import .3. The Import wizard is displayed. Select General > Existing Projects into Workspace and click Next.4. Click Select archive file, and click on the Browse button.5. Browse to your local copy of easyasextendedomsolution.zip and click Open. The
EasyAsExtendedOMSolution project is displayed in the Import wizard.6. Click Finish. The EasyAsExtendedOMSolution project is installed in your workspace.
Previewing the Default FormSince default forms are generated automatically, they can be previewed but cannot be opened forediting. If you choose to open a default form, it is automatically converted to a customized form. Youcan always return to the default form later, but any customizations you have made to the form will belost.
The FormsTutorialStart project contains one business process, called Notification of claim, which itselfcontains three user tasks: Specify claim type, Record no-fault claim details, and Record fault claim
124
TIBCO Business Studio Tutorials
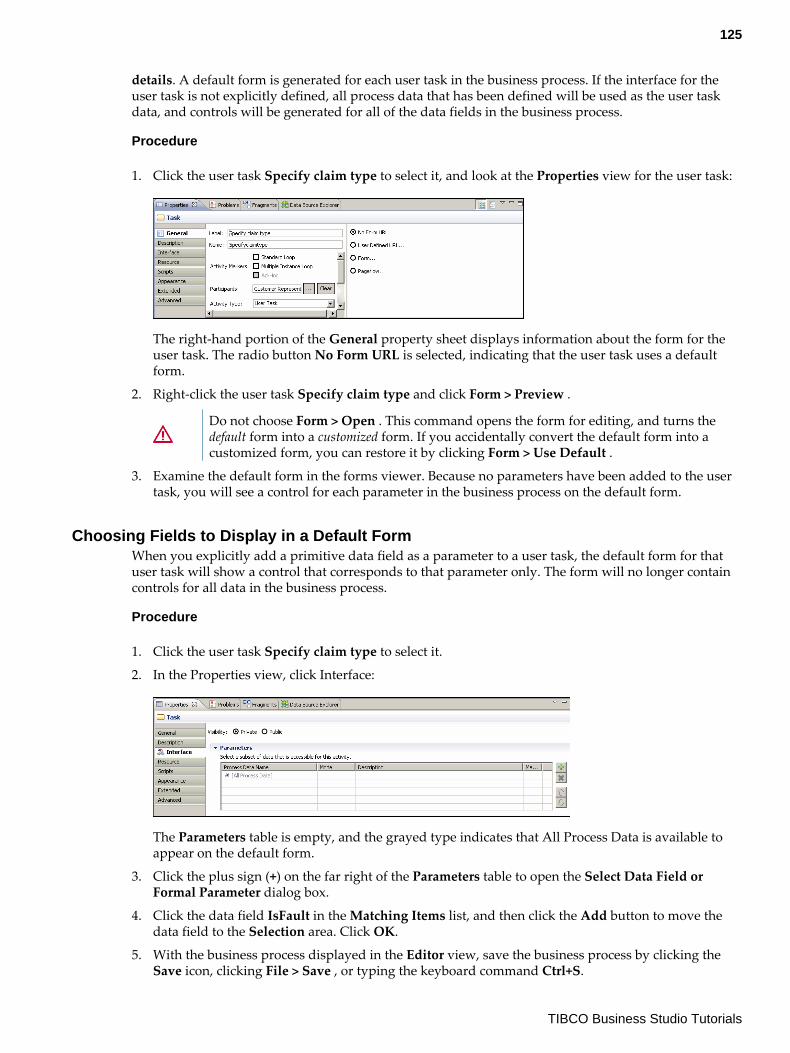
details. A default form is generated for each user task in the business process. If the interface for theuser task is not explicitly defined, all process data that has been defined will be used as the user taskdata, and controls will be generated for all of the data fields in the business process.
Procedure
1. Click the user task Specify claim type to select it, and look at the Properties view for the user task:
The right-hand portion of the General property sheet displays information about the form for theuser task. The radio button No Form URL is selected, indicating that the user task uses a defaultform.
2. Right-click the user task Specify claim type and click Form > Preview .
Do not choose Form > Open . This command opens the form for editing, and turns thedefault form into a customized form. If you accidentally convert the default form into acustomized form, you can restore it by clicking Form > Use Default .
3. Examine the default form in the forms viewer. Because no parameters have been added to the usertask, you will see a control for each parameter in the business process on the default form.
Choosing Fields to Display in a Default FormWhen you explicitly add a primitive data field as a parameter to a user task, the default form for thatuser task will show a control that corresponds to that parameter only. The form will no longer containcontrols for all data in the business process.
Procedure
1. Click the user task Specify claim type to select it.
2. In the Properties view, click Interface:
The Parameters table is empty, and the grayed type indicates that All Process Data is available toappear on the default form.
3. Click the plus sign (+) on the far right of the Parameters table to open the Select Data Field orFormal Parameter dialog box.
4. Click the data field IsFault in the Matching Items list, and then click the Add button to move thedata field to the Selection area. Click OK.
5. With the business process displayed in the Editor view, save the business process by clicking theSave icon, clicking File > Save , or typing the keyboard command Ctrl+S.
125
TIBCO Business Studio Tutorials
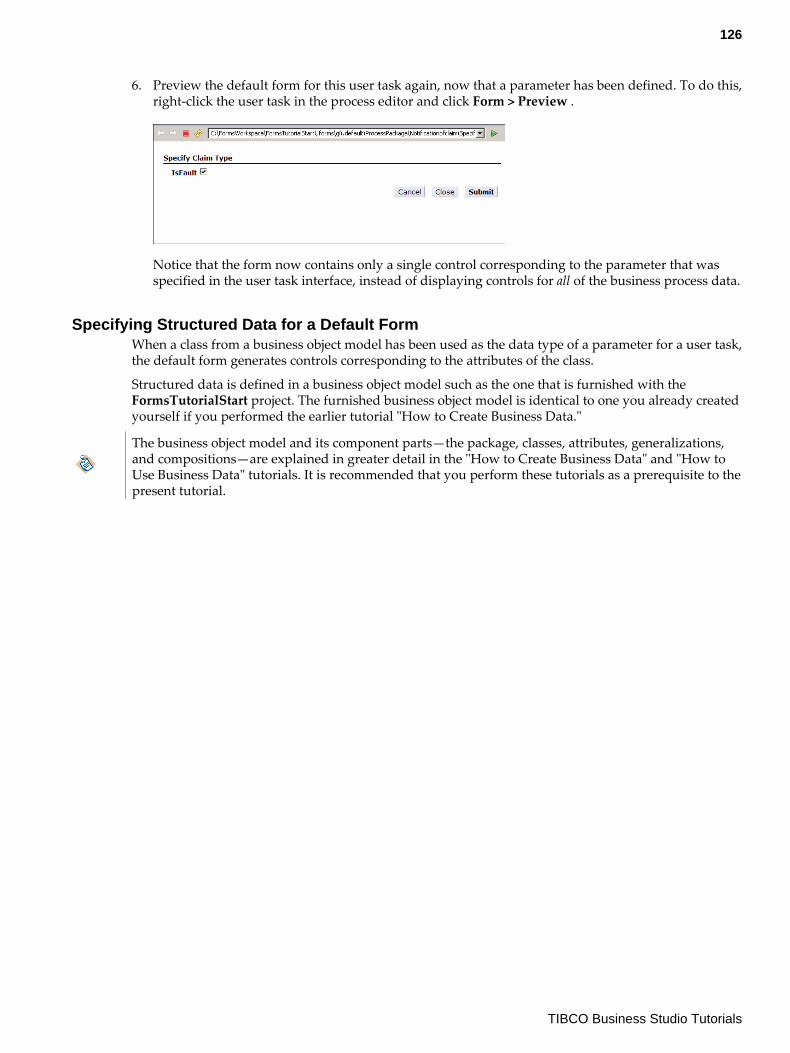
6. Preview the default form for this user task again, now that a parameter has been defined. To do this,right-click the user task in the process editor and click Form > Preview .
Notice that the form now contains only a single control corresponding to the parameter that wasspecified in the user task interface, instead of displaying controls for all of the business process data.
Specifying Structured Data for a Default FormWhen a class from a business object model has been used as the data type of a parameter for a user task,the default form generates controls corresponding to the attributes of the class.
Structured data is defined in a business object model such as the one that is furnished with theFormsTutorialStart project. The furnished business object model is identical to one you already createdyourself if you performed the earlier tutorial "How to Create Business Data."
The business object model and its component parts—the package, classes, attributes, generalizations,and compositions—are explained in greater detail in the "How to Create Business Data" and "How toUse Business Data" tutorials. It is recommended that you perform these tutorials as a prerequisite to thepresent tutorial.
126
TIBCO Business Studio Tutorials
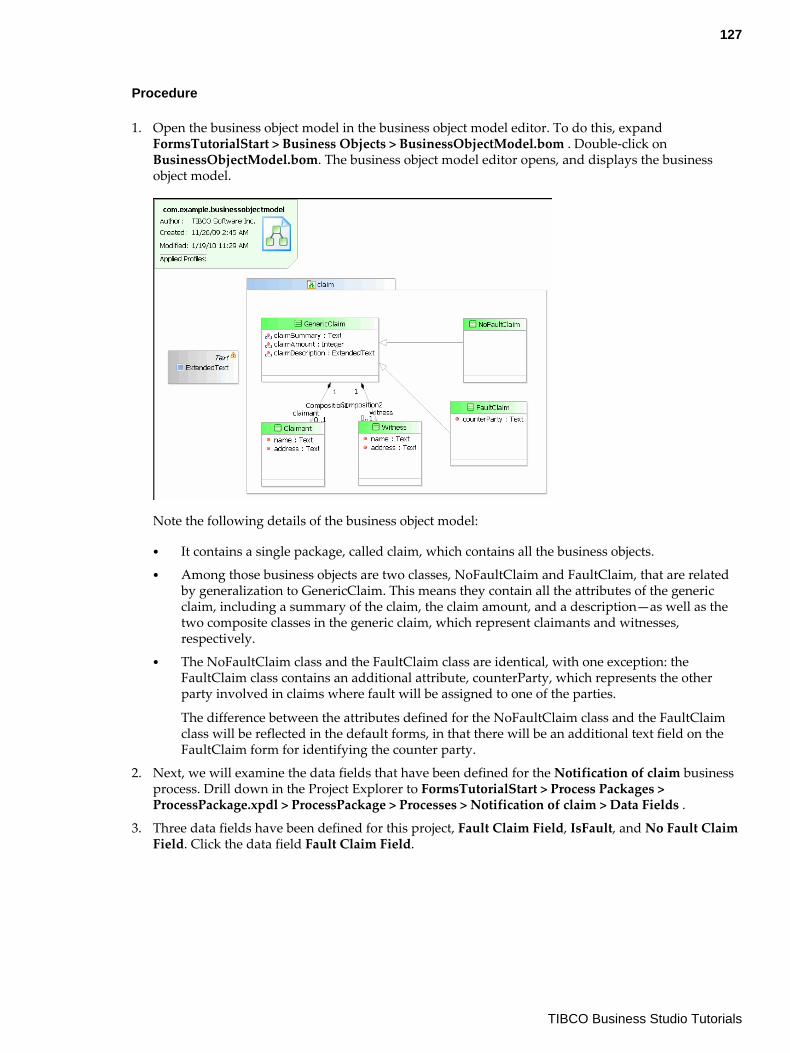
Procedure
1. Open the business object model in the business object model editor. To do this, expandFormsTutorialStart > Business Objects > BusinessObjectModel.bom . Double-click onBusinessObjectModel.bom. The business object model editor opens, and displays the businessobject model.
Note the following details of the business object model:
● It contains a single package, called claim, which contains all the business objects.● Among those business objects are two classes, NoFaultClaim and FaultClaim, that are related
by generalization to GenericClaim. This means they contain all the attributes of the genericclaim, including a summary of the claim, the claim amount, and a description—as well as thetwo composite classes in the generic claim, which represent claimants and witnesses,respectively.
● The NoFaultClaim class and the FaultClaim class are identical, with one exception: theFaultClaim class contains an additional attribute, counterParty, which represents the otherparty involved in claims where fault will be assigned to one of the parties.
The difference between the attributes defined for the NoFaultClaim class and the FaultClaimclass will be reflected in the default forms, in that there will be an additional text field on theFaultClaim form for identifying the counter party.
2. Next, we will examine the data fields that have been defined for the Notification of claim businessprocess. Drill down in the Project Explorer to FormsTutorialStart > Process Packages >ProcessPackage.xpdl > ProcessPackage > Processes > Notification of claim > Data Fields .
3. Three data fields have been defined for this project, Fault Claim Field, IsFault, and No Fault ClaimField. Click the data field Fault Claim Field.
127
TIBCO Business Studio Tutorials
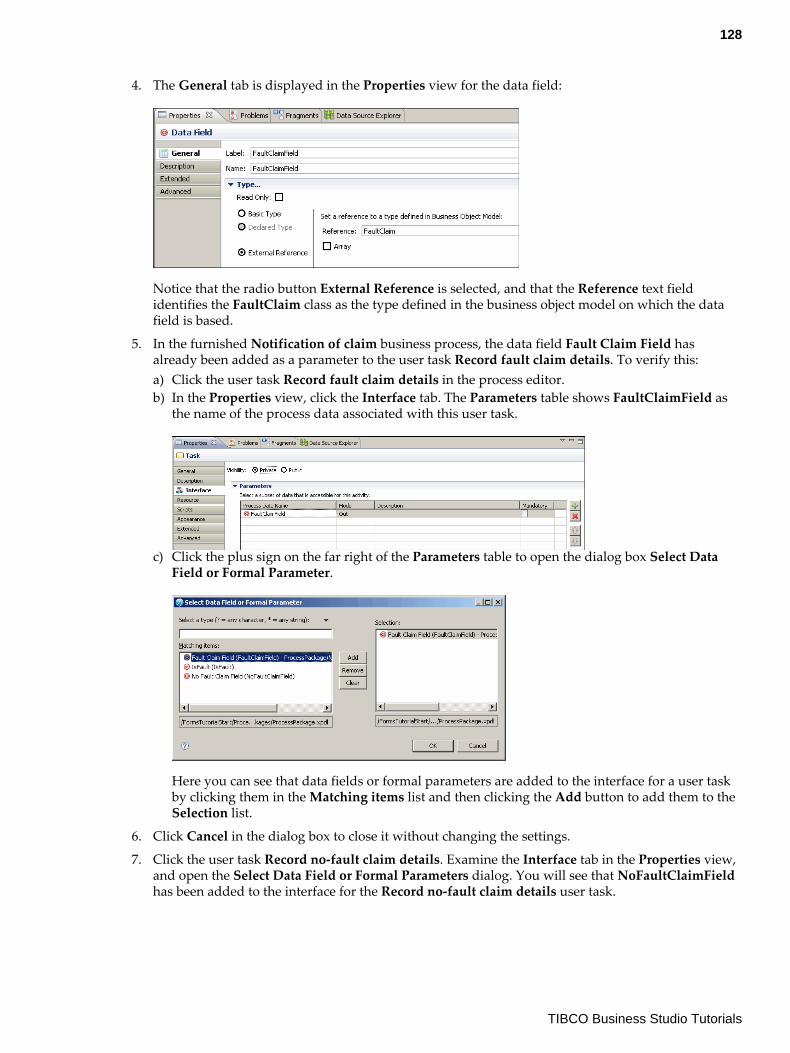
4. The General tab is displayed in the Properties view for the data field:
Notice that the radio button External Reference is selected, and that the Reference text fieldidentifies the FaultClaim class as the type defined in the business object model on which the datafield is based.
5. In the furnished Notification of claim business process, the data field Fault Claim Field hasalready been added as a parameter to the user task Record fault claim details. To verify this:a) Click the user task Record fault claim details in the process editor.b) In the Properties view, click the Interface tab. The Parameters table shows FaultClaimField as
the name of the process data associated with this user task.
c) Click the plus sign on the far right of the Parameters table to open the dialog box Select DataField or Formal Parameter.
Here you can see that data fields or formal parameters are added to the interface for a user taskby clicking them in the Matching items list and then clicking the Add button to add them to theSelection list.
6. Click Cancel in the dialog box to close it without changing the settings.
7. Click the user task Record no-fault claim details. Examine the Interface tab in the Properties view,and open the Select Data Field or Formal Parameters dialog. You will see that NoFaultClaimFieldhas been added to the interface for the Record no-fault claim details user task.
128
TIBCO Business Studio Tutorials
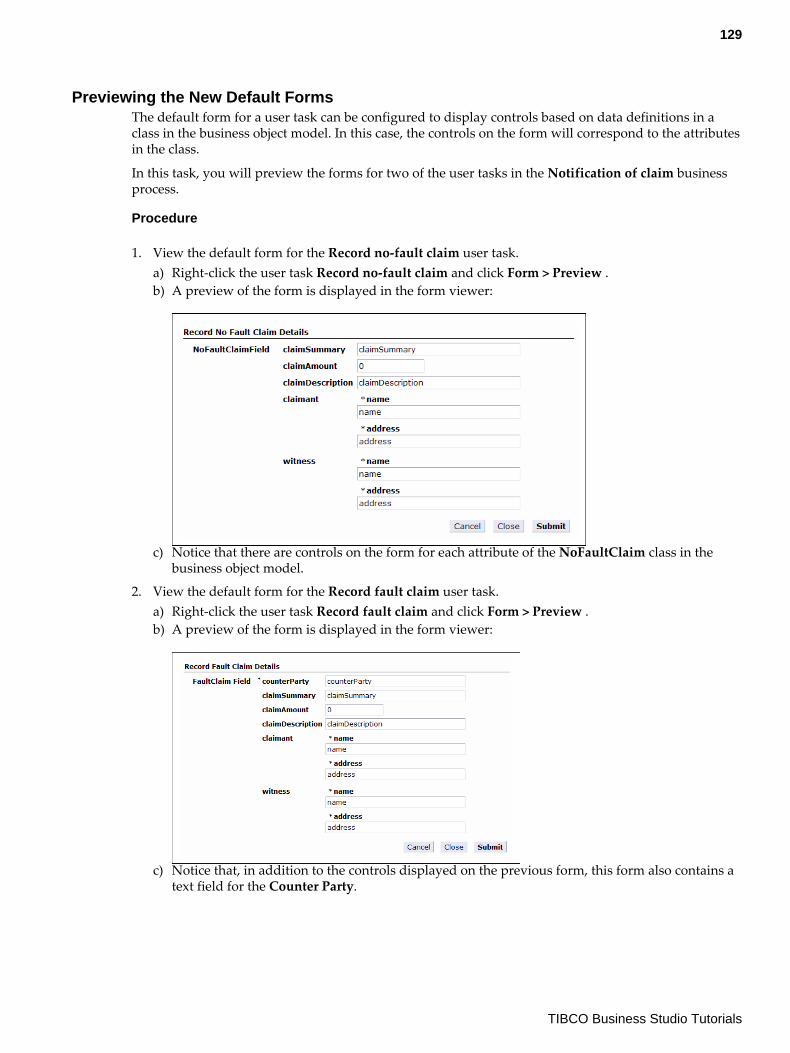
Previewing the New Default FormsThe default form for a user task can be configured to display controls based on data definitions in aclass in the business object model. In this case, the controls on the form will correspond to the attributesin the class.
In this task, you will preview the forms for two of the user tasks in the Notification of claim businessprocess.
Procedure
1. View the default form for the Record no-fault claim user task.a) Right-click the user task Record no-fault claim and click Form > Preview .b) A preview of the form is displayed in the form viewer:
c) Notice that there are controls on the form for each attribute of the NoFaultClaim class in thebusiness object model.
2. View the default form for the Record fault claim user task.a) Right-click the user task Record fault claim and click Form > Preview .b) A preview of the form is displayed in the form viewer:
c) Notice that, in addition to the controls displayed on the previous form, this form also contains atext field for the Counter Party.
129
TIBCO Business Studio Tutorials
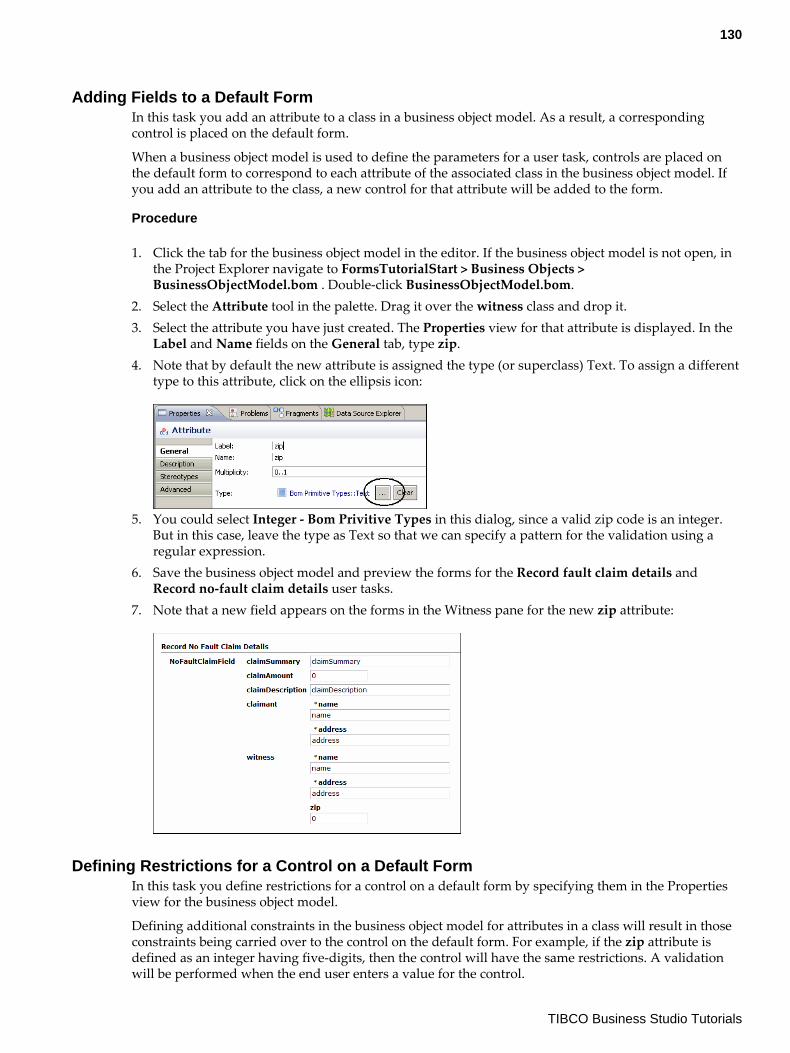
Adding Fields to a Default FormIn this task you add an attribute to a class in a business object model. As a result, a correspondingcontrol is placed on the default form.
When a business object model is used to define the parameters for a user task, controls are placed onthe default form to correspond to each attribute of the associated class in the business object model. Ifyou add an attribute to the class, a new control for that attribute will be added to the form.
Procedure
1. Click the tab for the business object model in the editor. If the business object model is not open, inthe Project Explorer navigate to FormsTutorialStart > Business Objects >BusinessObjectModel.bom . Double-click BusinessObjectModel.bom.
2. Select the Attribute tool in the palette. Drag it over the witness class and drop it.3. Select the attribute you have just created. The Properties view for that attribute is displayed. In the
Label and Name fields on the General tab, type zip.4. Note that by default the new attribute is assigned the type (or superclass) Text. To assign a different
type to this attribute, click on the ellipsis icon:
5. You could select Integer - Bom Privitive Types in this dialog, since a valid zip code is an integer.But in this case, leave the type as Text so that we can specify a pattern for the validation using aregular expression.
6. Save the business object model and preview the forms for the Record fault claim details andRecord no-fault claim details user tasks.
7. Note that a new field appears on the forms in the Witness pane for the new zip attribute:
Defining Restrictions for a Control on a Default FormIn this task you define restrictions for a control on a default form by specifying them in the Propertiesview for the business object model.
Defining additional constraints in the business object model for attributes in a class will result in thoseconstraints being carried over to the control on the default form. For example, if the zip attribute isdefined as an integer having five-digits, then the control will have the same restrictions. A validationwill be performed when the end user enters a value for the control.
130
TIBCO Business Studio Tutorials
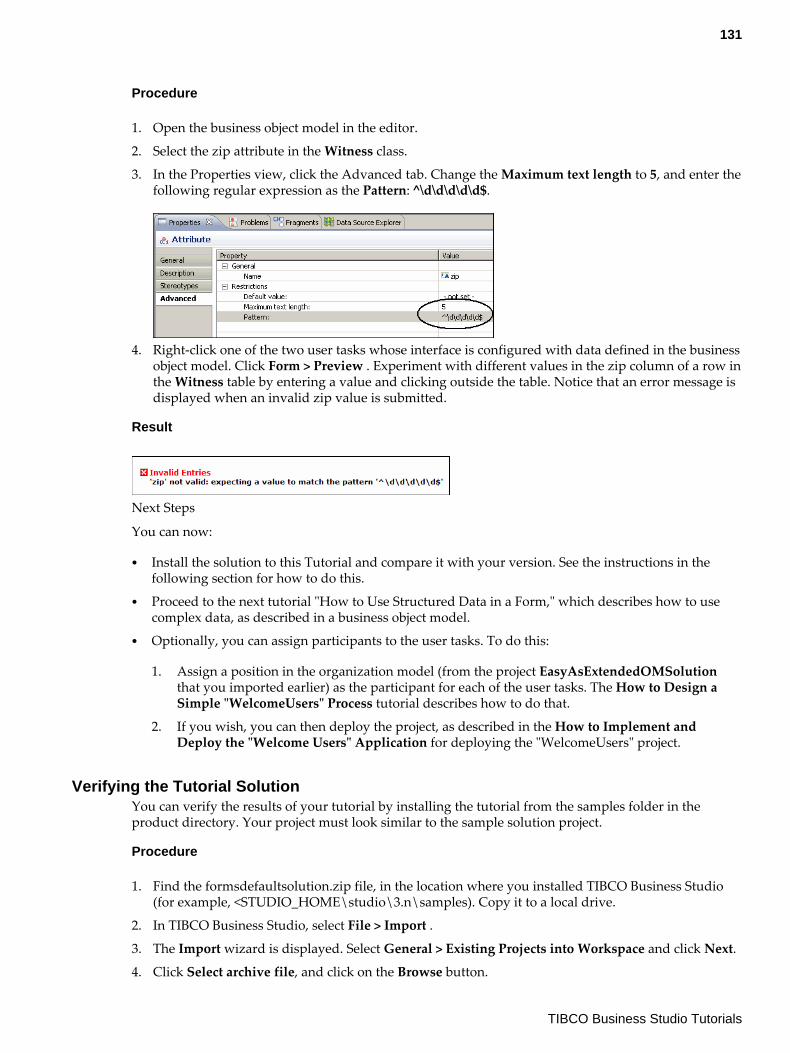
Procedure
1. Open the business object model in the editor.
2. Select the zip attribute in the Witness class.
3. In the Properties view, click the Advanced tab. Change the Maximum text length to 5, and enter thefollowing regular expression as the Pattern: ^\d\d\d\d\d$.
4. Right-click one of the two user tasks whose interface is configured with data defined in the businessobject model. Click Form > Preview . Experiment with different values in the zip column of a row inthe Witness table by entering a value and clicking outside the table. Notice that an error message isdisplayed when an invalid zip value is submitted.
Result
Next Steps
You can now:
● Install the solution to this Tutorial and compare it with your version. See the instructions in thefollowing section for how to do this.
● Proceed to the next tutorial "How to Use Structured Data in a Form," which describes how to usecomplex data, as described in a business object model.
● Optionally, you can assign participants to the user tasks. To do this:
1. Assign a position in the organization model (from the project EasyAsExtendedOMSolutionthat you imported earlier) as the participant for each of the user tasks. The How to Design aSimple "WelcomeUsers" Process tutorial describes how to do that.
2. If you wish, you can then deploy the project, as described in the How to Implement andDeploy the "Welcome Users" Application for deploying the "WelcomeUsers" project.
Verifying the Tutorial SolutionYou can verify the results of your tutorial by installing the tutorial from the samples folder in theproduct directory. Your project must look similar to the sample solution project.
Procedure
1. Find the formsdefaultsolution.zip file, in the location where you installed TIBCO Business Studio(for example, <STUDIO_HOME\studio\3.n\samples). Copy it to a local drive.
2. In TIBCO Business Studio, select File > Import .
3. The Import wizard is displayed. Select General > Existing Projects into Workspace and click Next.
4. Click Select archive file, and click on the Browse button.
131
TIBCO Business Studio Tutorials
5. Browse to your local copy of formsdefaultsolution.zip and click Open. The FormsDefaultSolutionproject is displayed in the Import wizard.
6. Click Finish. The FormsDefaultSolution project is installed in your workspace.
7. If you haven’t already installed the project EasyAsExtendedOMSolution, follow the proceduredescribed for importing formsdefaultsolution.zip to import the solution fileeasyasextendedomsolution.zip. This project includes an organization model, which is needed forthe functionality of FormsDefaultSolution to work as intended.
How to Use Structured Data in a FormThe How to Use Structured Data in a Form tutorial looks in more depth at the interaction between thebusiness object modeler and forms. You learn how to make use of class types and their attributes, andsee how changes to settings for the attributes in the business object model influence the way the formsare rendered.
You should work through each section in turn to complete the tutorial.
The procedures in this tutorial enable you to use the business object model to do the following:
● Examine an existing business process and understand the interactions between the form controlsand the attributes in the business object model.
● Make controls on the form required or optional.● Specify choice values for a control by using an enumeration.● Change the order in which controls appear on the form.● Modify the labels for the controls on a form.● Add validations for controls on the form by specifying constraints for the attributes in the business
object model.● Use a grid pane to edit an array of objects.● Use an action script to update an instance of an object.You need to perform a sequence of tasks to complete this tutorial.
Opening the Business ProcessIf you completed the previous tutorial, "How to Use Default Forms," the business process as you left itcan be used as a starting point for the present tutorial. Instead, if you wish, you can begin this tutorialby installing the furnished solution to the previous tutorial, FormsDefaultSolution.
Following this tutorial will be simpler and clearer if you close any other projects that you may haveopen in your TIBCO Business Studio workspace, using the Project > Close Project menu option.
Importing the FormsTutorialStart Project
In this task you will import the project FormsTutorialStart in your Business Studio workspace and useit as the starting point for the Opening the Business Process tutorial.
Procedure
1. Find the formstutorialstart.zip file, in the location where you installed TIBCO Business Studio (forexample, <STUDIO_HOME\studio\3.n\samples). Copy it to a local drive.
2. In TIBCO Business Studio, select File > Import .
3. The Import wizard is displayed. Select General > Existing Projects into Workspace and click Next.
4. Click Select archive file, and click on the Browse button.
132
TIBCO Business Studio Tutorials
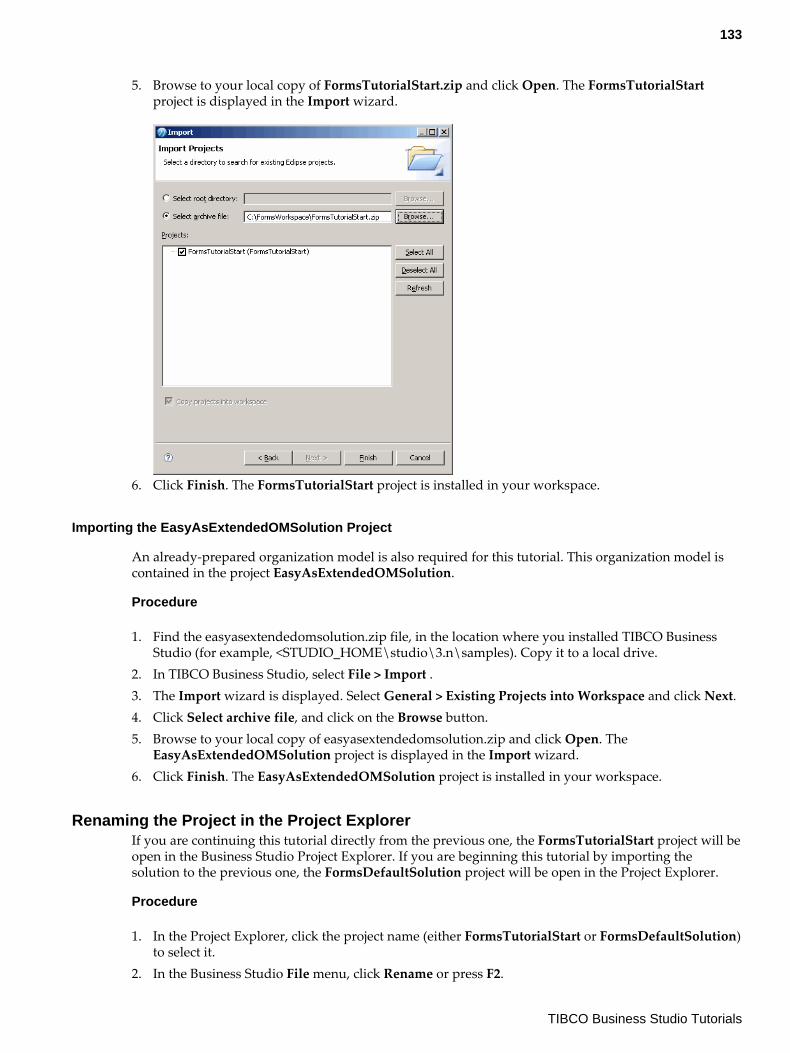
5. Browse to your local copy of FormsTutorialStart.zip and click Open. The FormsTutorialStartproject is displayed in the Import wizard.
6. Click Finish. The FormsTutorialStart project is installed in your workspace.
Importing the EasyAsExtendedOMSolution Project
An already-prepared organization model is also required for this tutorial. This organization model iscontained in the project EasyAsExtendedOMSolution.
Procedure
1. Find the easyasextendedomsolution.zip file, in the location where you installed TIBCO BusinessStudio (for example, <STUDIO_HOME\studio\3.n\samples). Copy it to a local drive.
2. In TIBCO Business Studio, select File > Import .3. The Import wizard is displayed. Select General > Existing Projects into Workspace and click Next.4. Click Select archive file, and click on the Browse button.5. Browse to your local copy of easyasextendedomsolution.zip and click Open. The
EasyAsExtendedOMSolution project is displayed in the Import wizard.6. Click Finish. The EasyAsExtendedOMSolution project is installed in your workspace.
Renaming the Project in the Project ExplorerIf you are continuing this tutorial directly from the previous one, the FormsTutorialStart project will beopen in the Business Studio Project Explorer. If you are beginning this tutorial by importing thesolution to the previous one, the FormsDefaultSolution project will be open in the Project Explorer.
Procedure
1. In the Project Explorer, click the project name (either FormsTutorialStart or FormsDefaultSolution)to select it.
2. In the Business Studio File menu, click Rename or press F2.
133
TIBCO Business Studio Tutorials
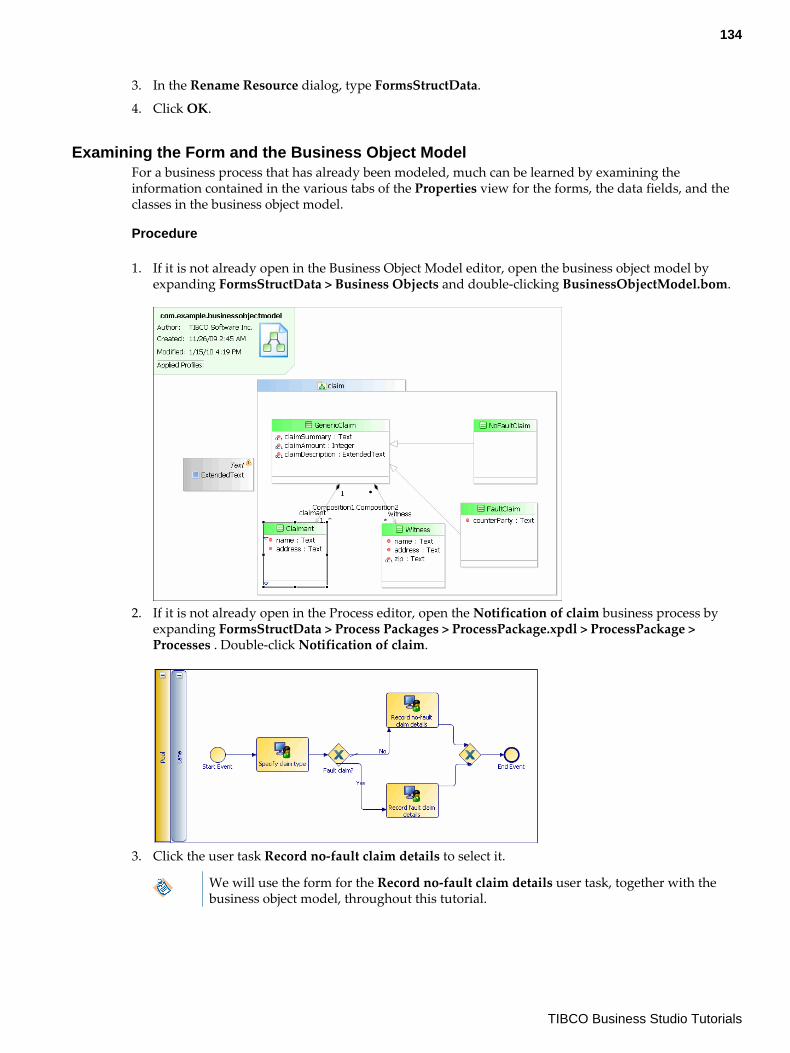
3. In the Rename Resource dialog, type FormsStructData.
4. Click OK.
Examining the Form and the Business Object ModelFor a business process that has already been modeled, much can be learned by examining theinformation contained in the various tabs of the Properties view for the forms, the data fields, and theclasses in the business object model.
Procedure
1. If it is not already open in the Business Object Model editor, open the business object model byexpanding FormsStructData > Business Objects and double-clicking BusinessObjectModel.bom.
2. If it is not already open in the Process editor, open the Notification of claim business process byexpanding FormsStructData > Process Packages > ProcessPackage.xpdl > ProcessPackage >Processes . Double-click Notification of claim.
3. Click the user task Record no-fault claim details to select it.
We will use the form for the Record no-fault claim details user task, together with thebusiness object model, throughout this tutorial.
134
TIBCO Business Studio Tutorials
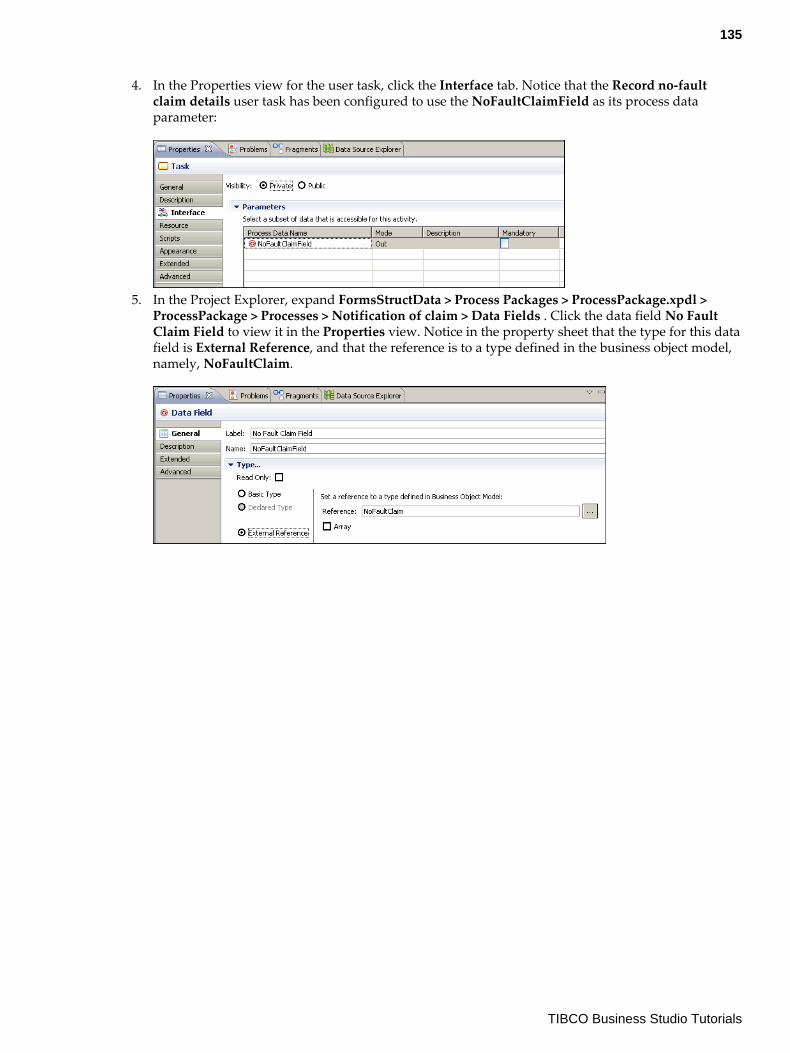
4. In the Properties view for the user task, click the Interface tab. Notice that the Record no-faultclaim details user task has been configured to use the NoFaultClaimField as its process dataparameter:
5. In the Project Explorer, expand FormsStructData > Process Packages > ProcessPackage.xpdl >ProcessPackage > Processes > Notification of claim > Data Fields . Click the data field No FaultClaim Field to view it in the Properties view. Notice in the property sheet that the type for this datafield is External Reference, and that the reference is to a type defined in the business object model,namely, NoFaultClaim.
135
TIBCO Business Studio Tutorials
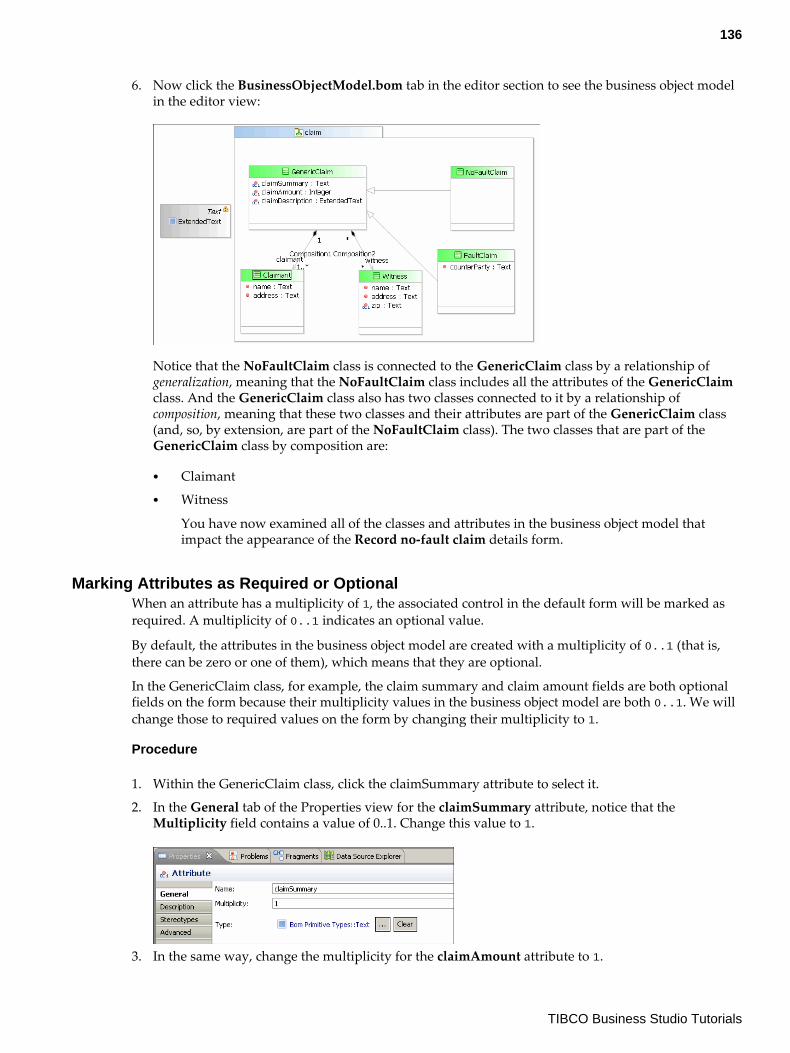
6. Now click the BusinessObjectModel.bom tab in the editor section to see the business object modelin the editor view:
Notice that the NoFaultClaim class is connected to the GenericClaim class by a relationship ofgeneralization, meaning that the NoFaultClaim class includes all the attributes of the GenericClaimclass. And the GenericClaim class also has two classes connected to it by a relationship ofcomposition, meaning that these two classes and their attributes are part of the GenericClaim class(and, so, by extension, are part of the NoFaultClaim class). The two classes that are part of theGenericClaim class by composition are:
● Claimant● Witness
You have now examined all of the classes and attributes in the business object model thatimpact the appearance of the Record no-fault claim details form.
Marking Attributes as Required or OptionalWhen an attribute has a multiplicity of 1, the associated control in the default form will be marked asrequired. A multiplicity of 0..1 indicates an optional value.
By default, the attributes in the business object model are created with a multiplicity of 0..1 (that is,there can be zero or one of them), which means that they are optional.
In the GenericClaim class, for example, the claim summary and claim amount fields are both optionalfields on the form because their multiplicity values in the business object model are both 0..1. We willchange those to required values on the form by changing their multiplicity to 1.
Procedure
1. Within the GenericClaim class, click the claimSummary attribute to select it.
2. In the General tab of the Properties view for the claimSummary attribute, notice that theMultiplicity field contains a value of 0..1. Change this value to 1.
3. In the same way, change the multiplicity for the claimAmount attribute to 1.
136
TIBCO Business Studio Tutorials
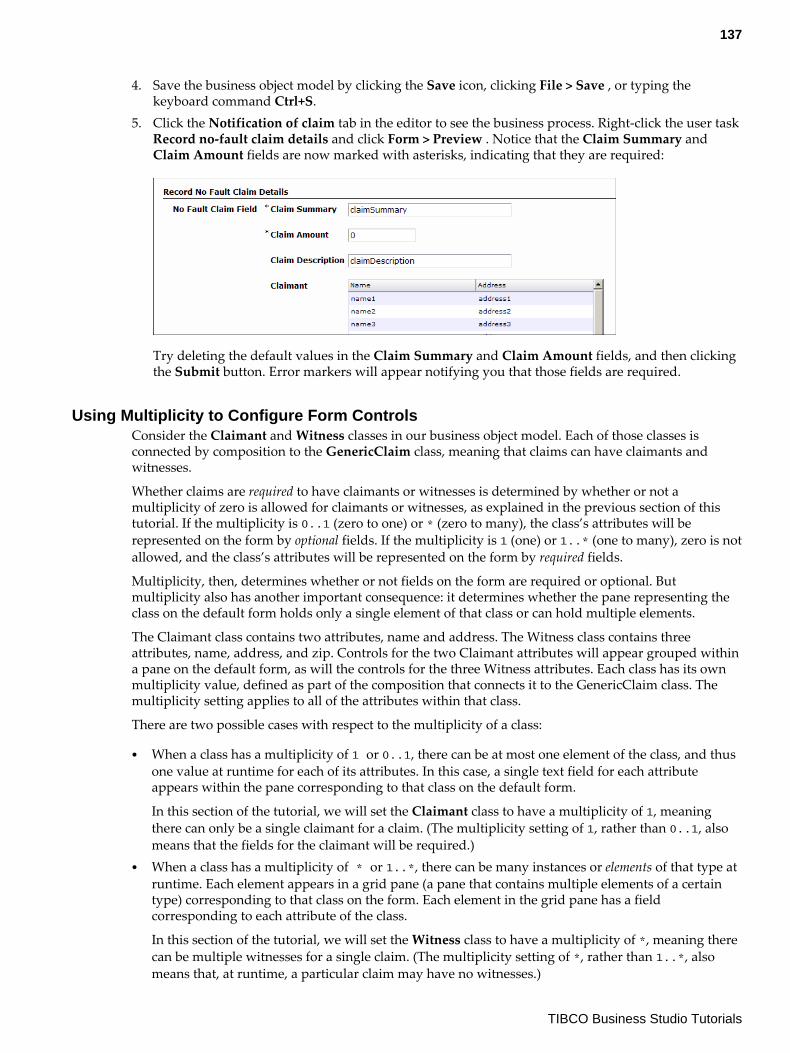
4. Save the business object model by clicking the Save icon, clicking File > Save , or typing thekeyboard command Ctrl+S.
5. Click the Notification of claim tab in the editor to see the business process. Right-click the user taskRecord no-fault claim details and click Form > Preview . Notice that the Claim Summary andClaim Amount fields are now marked with asterisks, indicating that they are required:
Try deleting the default values in the Claim Summary and Claim Amount fields, and then clickingthe Submit button. Error markers will appear notifying you that those fields are required.
Using Multiplicity to Configure Form ControlsConsider the Claimant and Witness classes in our business object model. Each of those classes isconnected by composition to the GenericClaim class, meaning that claims can have claimants andwitnesses.
Whether claims are required to have claimants or witnesses is determined by whether or not amultiplicity of zero is allowed for claimants or witnesses, as explained in the previous section of thistutorial. If the multiplicity is 0..1 (zero to one) or * (zero to many), the class’s attributes will berepresented on the form by optional fields. If the multiplicity is 1 (one) or 1..* (one to many), zero is notallowed, and the class’s attributes will be represented on the form by required fields.
Multiplicity, then, determines whether or not fields on the form are required or optional. Butmultiplicity also has another important consequence: it determines whether the pane representing theclass on the default form holds only a single element of that class or can hold multiple elements.
The Claimant class contains two attributes, name and address. The Witness class contains threeattributes, name, address, and zip. Controls for the two Claimant attributes will appear grouped withina pane on the default form, as will the controls for the three Witness attributes. Each class has its ownmultiplicity value, defined as part of the composition that connects it to the GenericClaim class. Themultiplicity setting applies to all of the attributes within that class.
There are two possible cases with respect to the multiplicity of a class:
● When a class has a multiplicity of 1 or 0..1, there can be at most one element of the class, and thusone value at runtime for each of its attributes. In this case, a single text field for each attributeappears within the pane corresponding to that class on the default form.
In this section of the tutorial, we will set the Claimant class to have a multiplicity of 1, meaningthere can only be a single claimant for a claim. (The multiplicity setting of 1, rather than 0..1, alsomeans that the fields for the claimant will be required.)
● When a class has a multiplicity of * or 1..*, there can be many instances or elements of that type atruntime. Each element appears in a grid pane (a pane that contains multiple elements of a certaintype) corresponding to that class on the form. Each element in the grid pane has a fieldcorresponding to each attribute of the class.
In this section of the tutorial, we will set the Witness class to have a multiplicity of *, meaning therecan be multiple witnesses for a single claim. (The multiplicity setting of *, rather than 1..*, alsomeans that, at runtime, a particular claim may have no witnesses.)
137
TIBCO Business Studio Tutorials
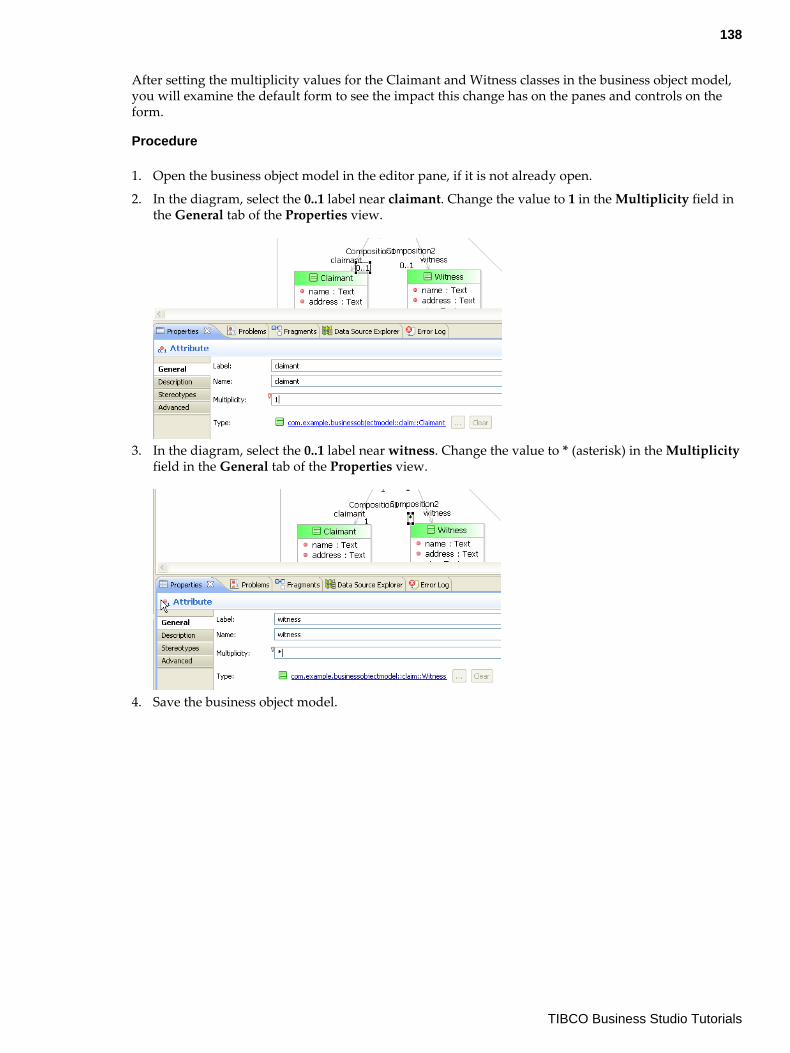
After setting the multiplicity values for the Claimant and Witness classes in the business object model,you will examine the default form to see the impact this change has on the panes and controls on theform.
Procedure
1. Open the business object model in the editor pane, if it is not already open.
2. In the diagram, select the 0..1 label near claimant. Change the value to 1 in the Multiplicity field inthe General tab of the Properties view.
3. In the diagram, select the 0..1 label near witness. Change the value to * (asterisk) in the Multiplicityfield in the General tab of the Properties view.
4. Save the business object model.
138
TIBCO Business Studio Tutorials
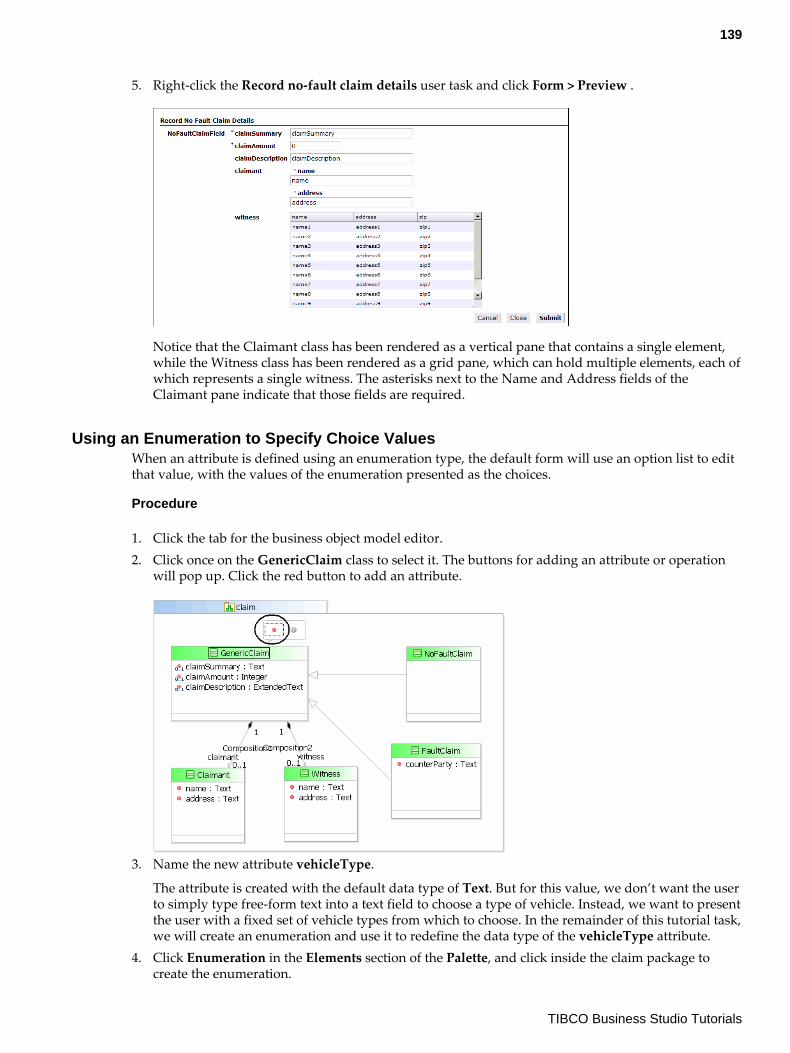
5. Right-click the Record no-fault claim details user task and click Form > Preview .
Notice that the Claimant class has been rendered as a vertical pane that contains a single element,while the Witness class has been rendered as a grid pane, which can hold multiple elements, each ofwhich represents a single witness. The asterisks next to the Name and Address fields of theClaimant pane indicate that those fields are required.
Using an Enumeration to Specify Choice ValuesWhen an attribute is defined using an enumeration type, the default form will use an option list to editthat value, with the values of the enumeration presented as the choices.
Procedure
1. Click the tab for the business object model editor.2. Click once on the GenericClaim class to select it. The buttons for adding an attribute or operation
will pop up. Click the red button to add an attribute.
3. Name the new attribute vehicleType.
The attribute is created with the default data type of Text. But for this value, we don’t want the userto simply type free-form text into a text field to choose a type of vehicle. Instead, we want to presentthe user with a fixed set of vehicle types from which to choose. In the remainder of this tutorial task,we will create an enumeration and use it to redefine the data type of the vehicleType attribute.
4. Click Enumeration in the Elements section of the Palette, and click inside the claim package tocreate the enumeration.
139
TIBCO Business Studio Tutorials
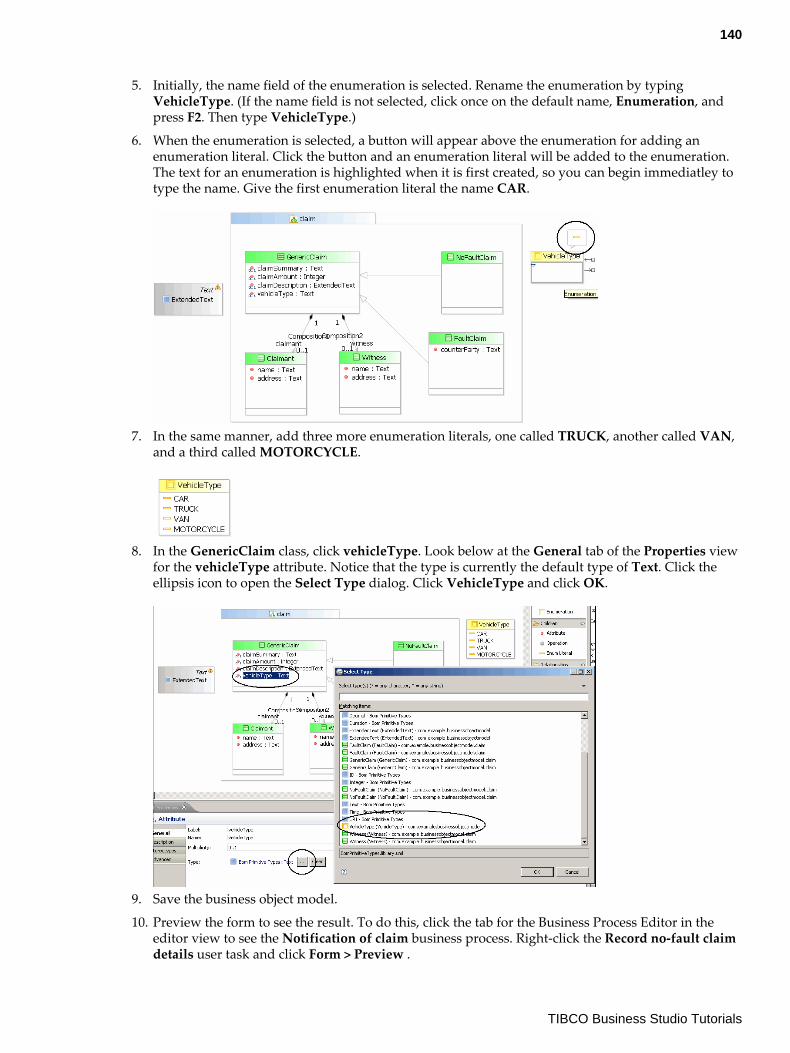
5. Initially, the name field of the enumeration is selected. Rename the enumeration by typingVehicleType. (If the name field is not selected, click once on the default name, Enumeration, andpress F2. Then type VehicleType.)
6. When the enumeration is selected, a button will appear above the enumeration for adding anenumeration literal. Click the button and an enumeration literal will be added to the enumeration.The text for an enumeration is highlighted when it is first created, so you can begin immediatley totype the name. Give the first enumeration literal the name CAR.
7. In the same manner, add three more enumeration literals, one called TRUCK, another called VAN,and a third called MOTORCYCLE.
8. In the GenericClaim class, click vehicleType. Look below at the General tab of the Properties viewfor the vehicleType attribute. Notice that the type is currently the default type of Text. Click theellipsis icon to open the Select Type dialog. Click VehicleType and click OK.
9. Save the business object model.
10. Preview the form to see the result. To do this, click the tab for the Business Process Editor in theeditor view to see the Notification of claim business process. Right-click the Record no-fault claimdetails user task and click Form > Preview .
140
TIBCO Business Studio Tutorials
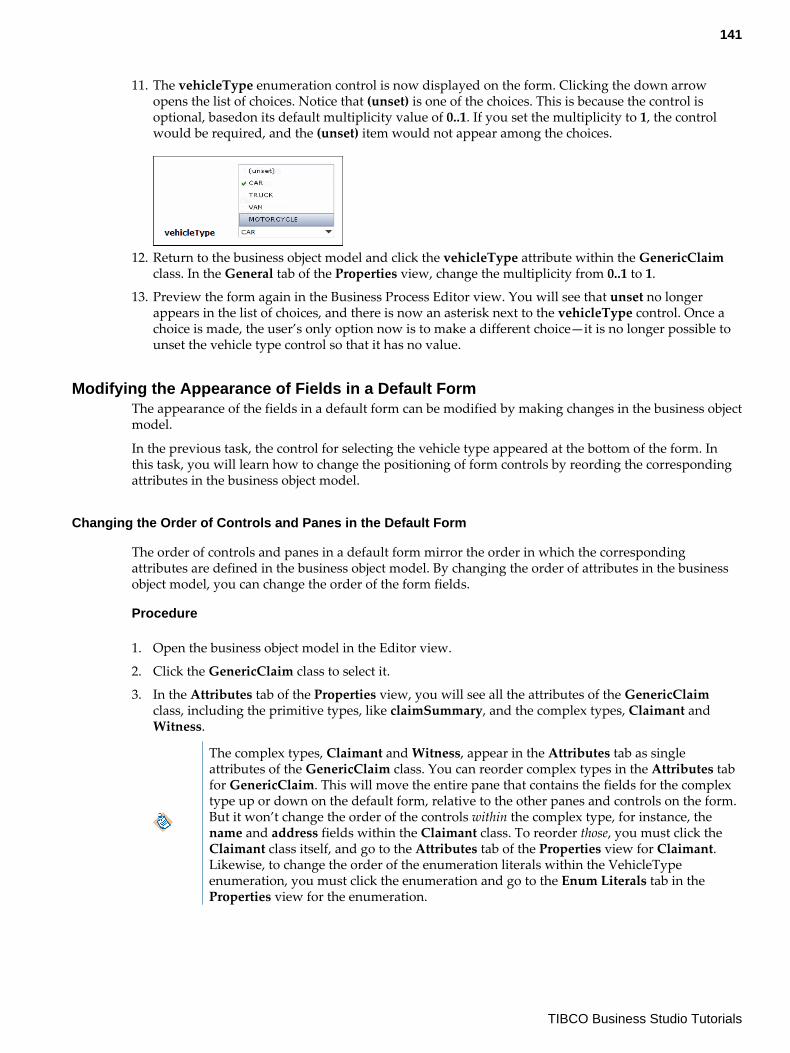
11. The vehicleType enumeration control is now displayed on the form. Clicking the down arrowopens the list of choices. Notice that (unset) is one of the choices. This is because the control isoptional, basedon its default multiplicity value of 0..1. If you set the multiplicity to 1, the controlwould be required, and the (unset) item would not appear among the choices.
12. Return to the business object model and click the vehicleType attribute within the GenericClaimclass. In the General tab of the Properties view, change the multiplicity from 0..1 to 1.
13. Preview the form again in the Business Process Editor view. You will see that unset no longerappears in the list of choices, and there is now an asterisk next to the vehicleType control. Once achoice is made, the user’s only option now is to make a different choice—it is no longer possible tounset the vehicle type control so that it has no value.
Modifying the Appearance of Fields in a Default FormThe appearance of the fields in a default form can be modified by making changes in the business objectmodel.
In the previous task, the control for selecting the vehicle type appeared at the bottom of the form. Inthis task, you will learn how to change the positioning of form controls by reording the correspondingattributes in the business object model.
Changing the Order of Controls and Panes in the Default Form
The order of controls and panes in a default form mirror the order in which the correspondingattributes are defined in the business object model. By changing the order of attributes in the businessobject model, you can change the order of the form fields.
Procedure
1. Open the business object model in the Editor view.
2. Click the GenericClaim class to select it.
3. In the Attributes tab of the Properties view, you will see all the attributes of the GenericClaimclass, including the primitive types, like claimSummary, and the complex types, Claimant andWitness.
The complex types, Claimant and Witness, appear in the Attributes tab as singleattributes of the GenericClaim class. You can reorder complex types in the Attributes tabfor GenericClaim. This will move the entire pane that contains the fields for the complextype up or down on the default form, relative to the other panes and controls on the form.But it won’t change the order of the controls within the complex type, for instance, thename and address fields within the Claimant class. To reorder those, you must click theClaimant class itself, and go to the Attributes tab of the Properties view for Claimant.Likewise, to change the order of the enumeration literals within the VehicleTypeenumeration, you must click the enumeration and go to the Enum Literals tab in theProperties view for the enumeration.
141
TIBCO Business Studio Tutorials
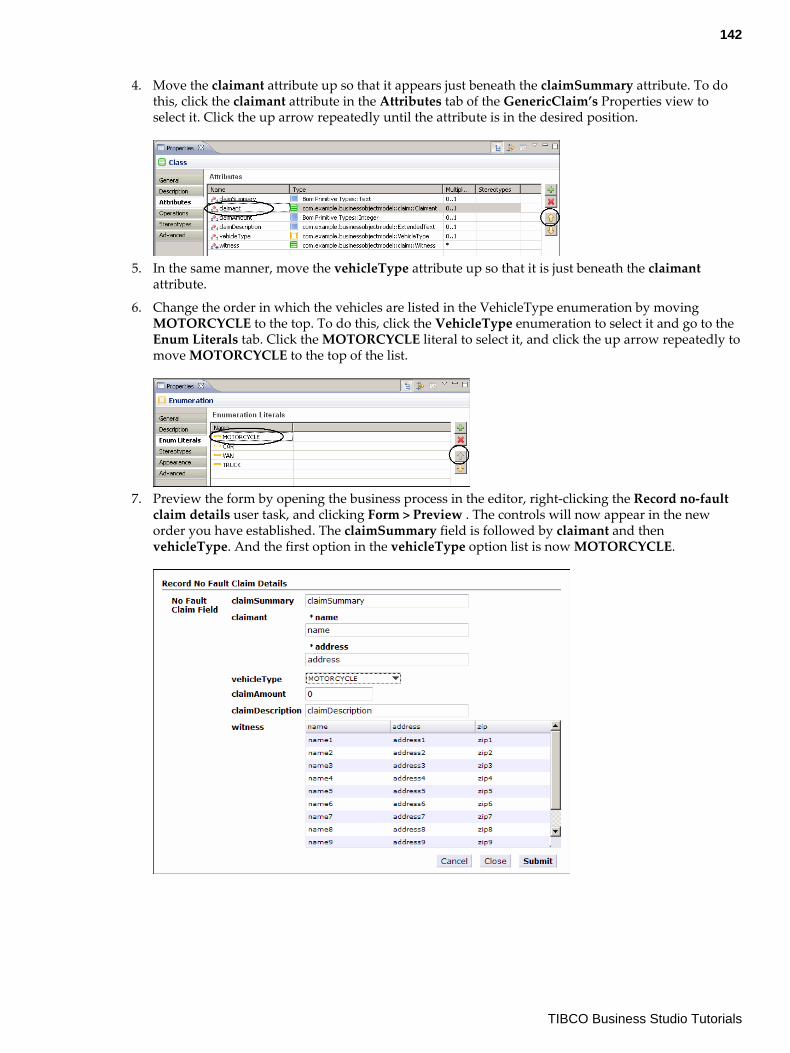
4. Move the claimant attribute up so that it appears just beneath the claimSummary attribute. To dothis, click the claimant attribute in the Attributes tab of the GenericClaim’s Properties view toselect it. Click the up arrow repeatedly until the attribute is in the desired position.
5. In the same manner, move the vehicleType attribute up so that it is just beneath the claimantattribute.
6. Change the order in which the vehicles are listed in the VehicleType enumeration by movingMOTORCYCLE to the top. To do this, click the VehicleType enumeration to select it and go to theEnum Literals tab. Click the MOTORCYCLE literal to select it, and click the up arrow repeatedly tomove MOTORCYCLE to the top of the list.
7. Preview the form by opening the business process in the editor, right-clicking the Record no-faultclaim details user task, and clicking Form > Preview . The controls will now appear in the neworder you have established. The claimSummary field is followed by claimant and thenvehicleType. And the first option in the vehicleType option list is now MOTORCYCLE.
142
TIBCO Business Studio Tutorials
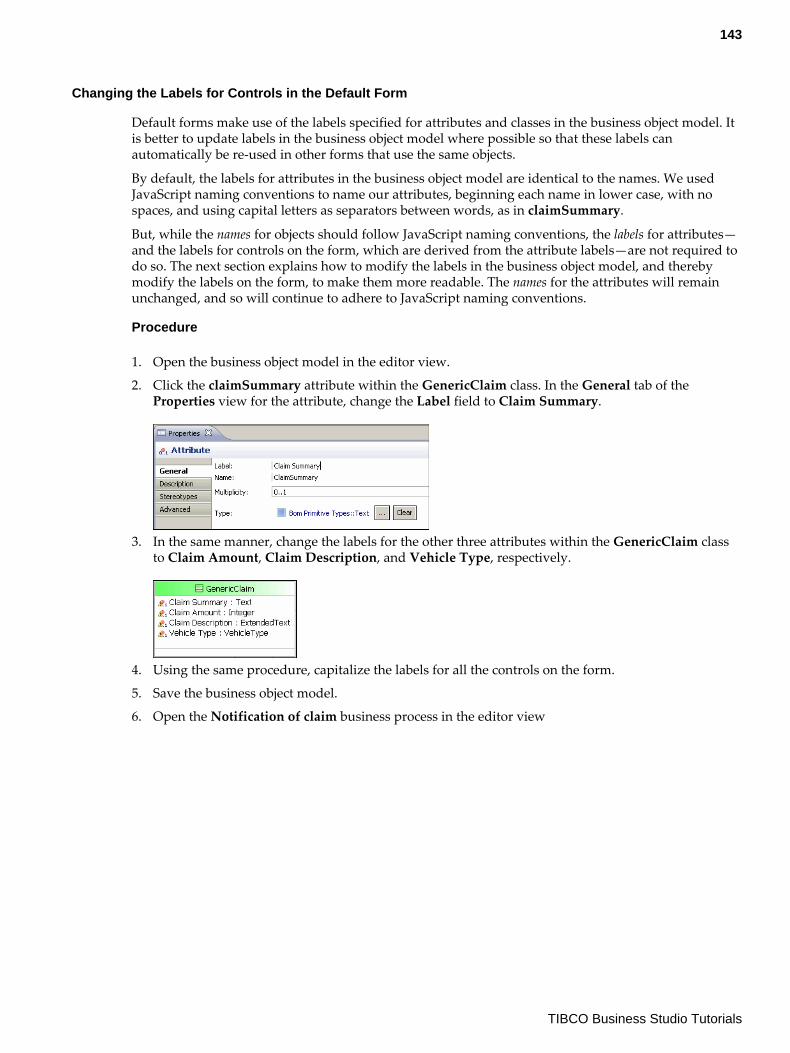
Changing the Labels for Controls in the Default Form
Default forms make use of the labels specified for attributes and classes in the business object model. Itis better to update labels in the business object model where possible so that these labels canautomatically be re-used in other forms that use the same objects.
By default, the labels for attributes in the business object model are identical to the names. We usedJavaScript naming conventions to name our attributes, beginning each name in lower case, with nospaces, and using capital letters as separators between words, as in claimSummary.
But, while the names for objects should follow JavaScript naming conventions, the labels for attributes—and the labels for controls on the form, which are derived from the attribute labels—are not required todo so. The next section explains how to modify the labels in the business object model, and therebymodify the labels on the form, to make them more readable. The names for the attributes will remainunchanged, and so will continue to adhere to JavaScript naming conventions.
Procedure
1. Open the business object model in the editor view.
2. Click the claimSummary attribute within the GenericClaim class. In the General tab of theProperties view for the attribute, change the Label field to Claim Summary.
3. In the same manner, change the labels for the other three attributes within the GenericClaim classto Claim Amount, Claim Description, and Vehicle Type, respectively.
4. Using the same procedure, capitalize the labels for all the controls on the form.
5. Save the business object model.
6. Open the Notification of claim business process in the editor view
143
TIBCO Business Studio Tutorials
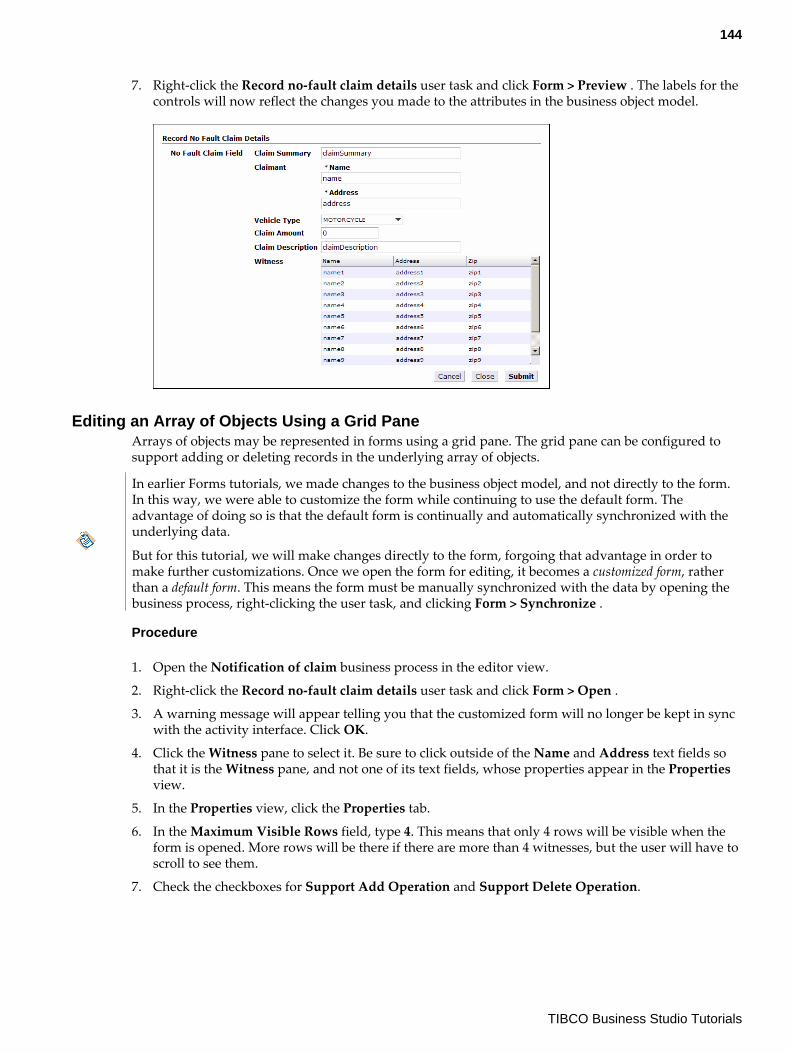
7. Right-click the Record no-fault claim details user task and click Form > Preview . The labels for thecontrols will now reflect the changes you made to the attributes in the business object model.
Editing an Array of Objects Using a Grid PaneArrays of objects may be represented in forms using a grid pane. The grid pane can be configured tosupport adding or deleting records in the underlying array of objects.
In earlier Forms tutorials, we made changes to the business object model, and not directly to the form.In this way, we were able to customize the form while continuing to use the default form. Theadvantage of doing so is that the default form is continually and automatically synchronized with theunderlying data.
But for this tutorial, we will make changes directly to the form, forgoing that advantage in order tomake further customizations. Once we open the form for editing, it becomes a customized form, ratherthan a default form. This means the form must be manually synchronized with the data by opening thebusiness process, right-clicking the user task, and clicking Form > Synchronize .
Procedure
1. Open the Notification of claim business process in the editor view.
2. Right-click the Record no-fault claim details user task and click Form > Open .
3. A warning message will appear telling you that the customized form will no longer be kept in syncwith the activity interface. Click OK.
4. Click the Witness pane to select it. Be sure to click outside of the Name and Address text fields sothat it is the Witness pane, and not one of its text fields, whose properties appear in the Propertiesview.
5. In the Properties view, click the Properties tab.
6. In the Maximum Visible Rows field, type 4. This means that only 4 rows will be visible when theform is opened. More rows will be there if there are more than 4 witnesses, but the user will have toscroll to see them.
7. Check the checkboxes for Support Add Operation and Support Delete Operation.
144
TIBCO Business Studio Tutorials
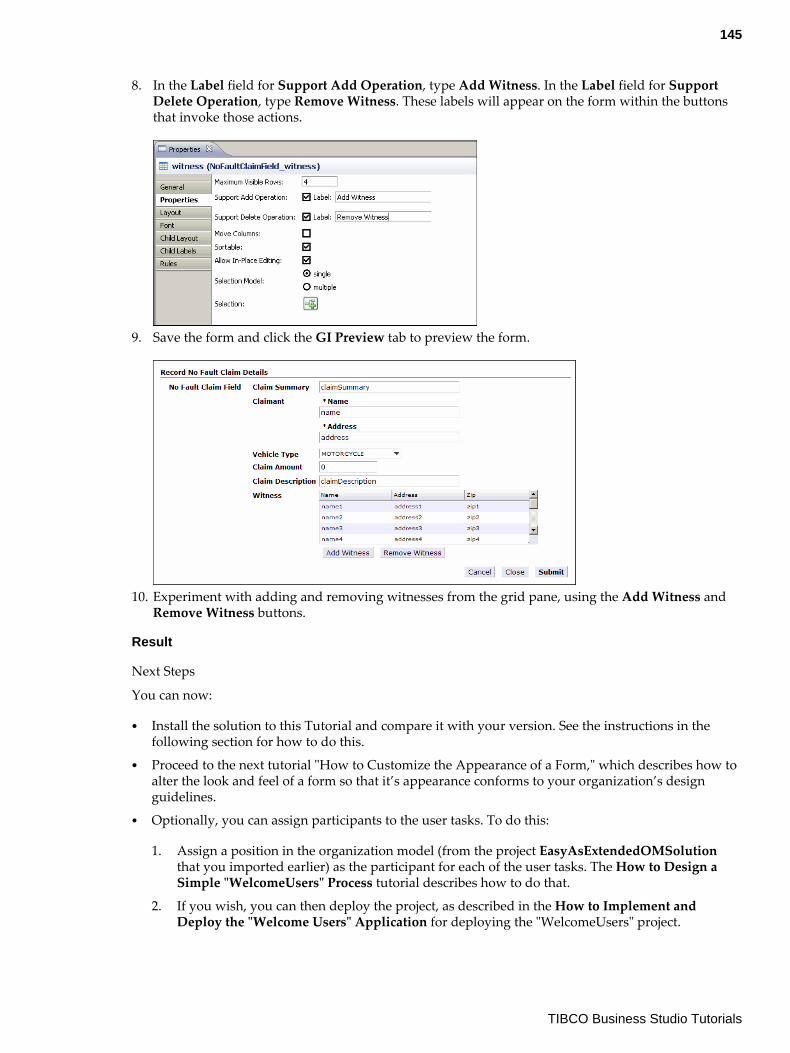
8. In the Label field for Support Add Operation, type Add Witness. In the Label field for SupportDelete Operation, type Remove Witness. These labels will appear on the form within the buttonsthat invoke those actions.
9. Save the form and click the GI Preview tab to preview the form.
10. Experiment with adding and removing witnesses from the grid pane, using the Add Witness andRemove Witness buttons.
Result
Next Steps
You can now:
● Install the solution to this Tutorial and compare it with your version. See the instructions in thefollowing section for how to do this.
● Proceed to the next tutorial "How to Customize the Appearance of a Form," which describes how toalter the look and feel of a form so that it’s appearance conforms to your organization’s designguidelines.
● Optionally, you can assign participants to the user tasks. To do this:
1. Assign a position in the organization model (from the project EasyAsExtendedOMSolutionthat you imported earlier) as the participant for each of the user tasks. The How to Design aSimple "WelcomeUsers" Process tutorial describes how to do that.
2. If you wish, you can then deploy the project, as described in the How to Implement andDeploy the "Welcome Users" Application for deploying the "WelcomeUsers" project.
145
TIBCO Business Studio Tutorials

Verifying the Tutorial SolutionYou can verify the results of your tutorial by installing the tutorial from the samples folder in theproduct directory. Your project must look similar to the sample solution project.
Procedure
1. Find the formsstructdatasolution.zip, in the location where you installed TIBCO Business Studio(for example, <STUDIO_HOME\studio\3.n\samples). Copy it to a local drive.
2. In TIBCO Business Studio, select File > Import .
3. The Import wizard is displayed. Select General > Existing Projects into Workspace and click Next.
4. Click Select archive file, and click on the Browse button.
5. Browse to your local copy of formsstructdatasolution.zip and click Open. TheFormsStructDataSolution project is displayed in the Import wizard.
6. Click Finish. The FormsStructDataSolution project is installed in your workspace.
How to Customize the Appearance of a FormIn the How to Customize the Appearance of a Form tutorial, you will learn techniques for customizingthe appearance of a form using a CSS class.
You should work through each section in turn to complete the tutorial.
The following points are illustrated by the tasks in this tutorial:
● To customize the appearance of a form, you can assign a CSS class (cascading style sheets) to theform.
● Within the CSS file, you will define a set of rules that determine the styles to be applied tocomponents within the form.
Opening the Business ProcessIf you completed the previous tutorial, "How to Use Structured Data in a Form," the business process asyou left it can be used as a starting point for the present tutorial. Instead, if you wish, you can begin thistutorial by installing the furnished solution to the previous tutorial, FormsStructDataSolution.
Following this tutorial will be simpler and clearer if you close any other projects that you may haveopen in your TIBCO Business Studio workspace, using the Project > Close Project menu option.
Importing the FormsTutorialStart Project
In this task you will import the project FormsTutorialStart in your Business Studio workspace and useit as the starting point for the Opening the Business Process tutorial.
Procedure
1. Find the formstutorialstart.zip file, in the location where you installed TIBCO Business Studio (forexample, <STUDIO_HOME\studio\3.n\samples). Copy it to a local drive.
2. In TIBCO Business Studio, select File > Import .
3. The Import wizard is displayed. Select General > Existing Projects into Workspace and click Next.
4. Click Select archive file, and click on the Browse button.
146
TIBCO Business Studio Tutorials
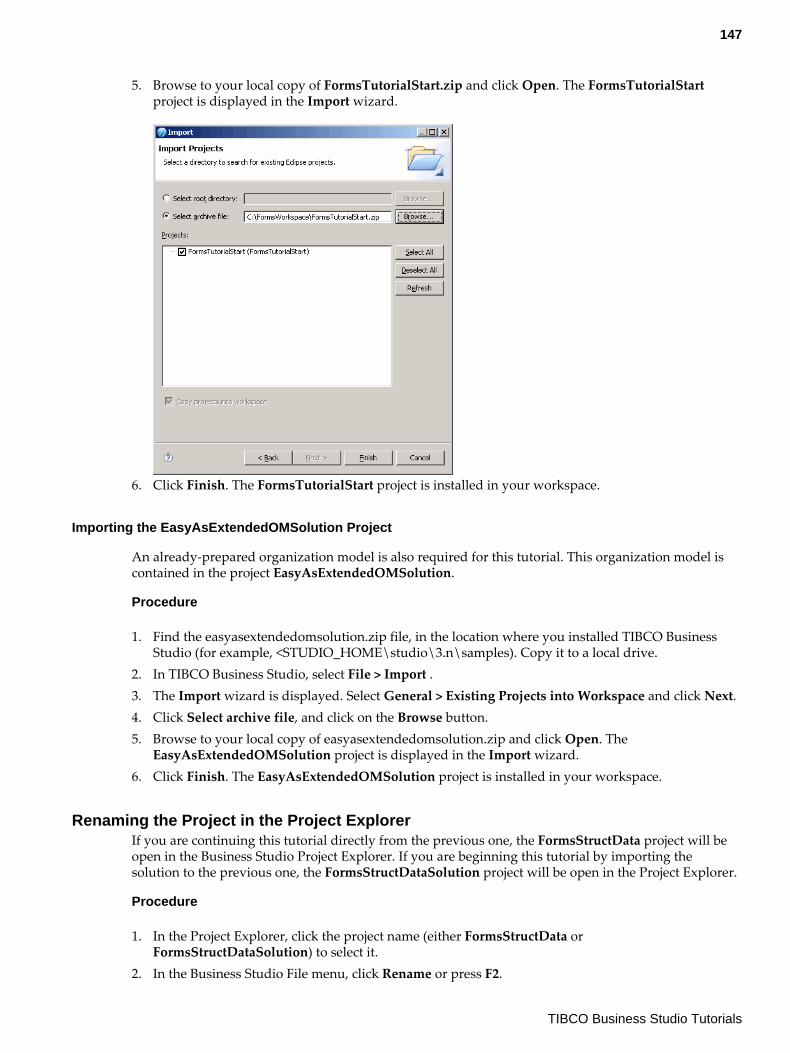
5. Browse to your local copy of FormsTutorialStart.zip and click Open. The FormsTutorialStartproject is displayed in the Import wizard.
6. Click Finish. The FormsTutorialStart project is installed in your workspace.
Importing the EasyAsExtendedOMSolution Project
An already-prepared organization model is also required for this tutorial. This organization model iscontained in the project EasyAsExtendedOMSolution.
Procedure
1. Find the easyasextendedomsolution.zip file, in the location where you installed TIBCO BusinessStudio (for example, <STUDIO_HOME\studio\3.n\samples). Copy it to a local drive.
2. In TIBCO Business Studio, select File > Import .3. The Import wizard is displayed. Select General > Existing Projects into Workspace and click Next.4. Click Select archive file, and click on the Browse button.5. Browse to your local copy of easyasextendedomsolution.zip and click Open. The
EasyAsExtendedOMSolution project is displayed in the Import wizard.6. Click Finish. The EasyAsExtendedOMSolution project is installed in your workspace.
Renaming the Project in the Project ExplorerIf you are continuing this tutorial directly from the previous one, the FormsStructData project will beopen in the Business Studio Project Explorer. If you are beginning this tutorial by importing thesolution to the previous one, the FormsStructDataSolution project will be open in the Project Explorer.
Procedure
1. In the Project Explorer, click the project name (either FormsStructData orFormsStructDataSolution) to select it.
2. In the Business Studio File menu, click Rename or press F2.
147
TIBCO Business Studio Tutorials
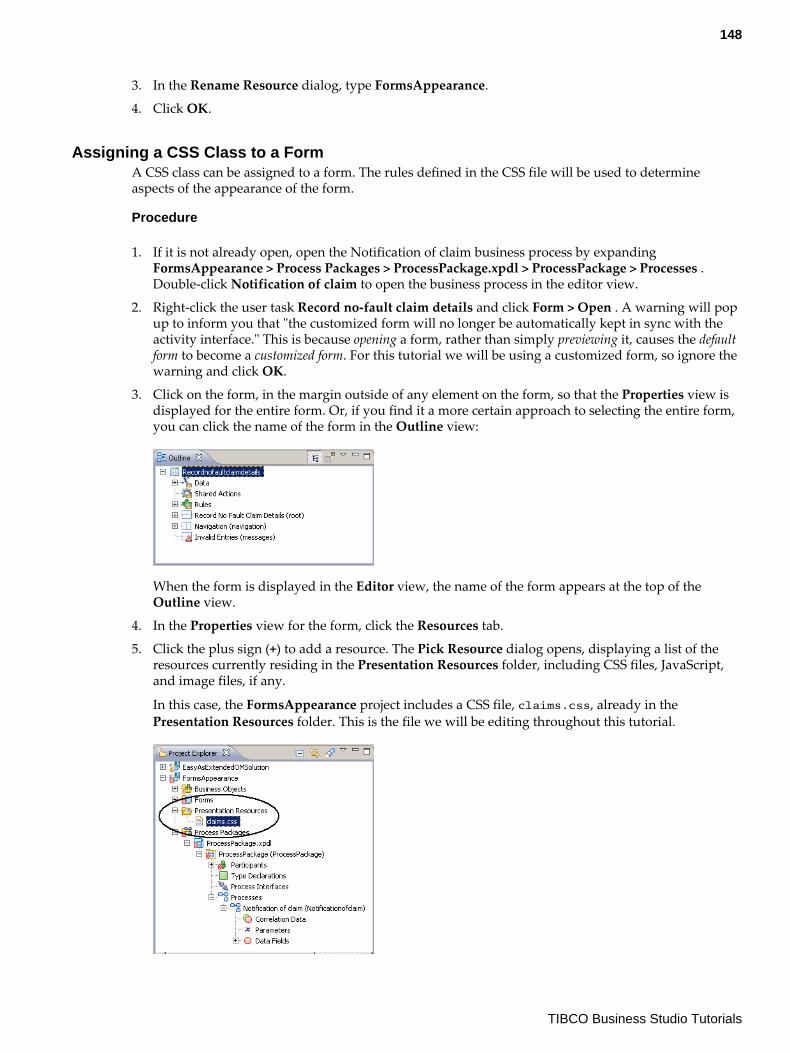
3. In the Rename Resource dialog, type FormsAppearance.
4. Click OK.
Assigning a CSS Class to a FormA CSS class can be assigned to a form. The rules defined in the CSS file will be used to determineaspects of the appearance of the form.
Procedure
1. If it is not already open, open the Notification of claim business process by expandingFormsAppearance > Process Packages > ProcessPackage.xpdl > ProcessPackage > Processes .Double-click Notification of claim to open the business process in the editor view.
2. Right-click the user task Record no-fault claim details and click Form > Open . A warning will popup to inform you that "the customized form will no longer be automatically kept in sync with theactivity interface." This is because opening a form, rather than simply previewing it, causes the defaultform to become a customized form. For this tutorial we will be using a customized form, so ignore thewarning and click OK.
3. Click on the form, in the margin outside of any element on the form, so that the Properties view isdisplayed for the entire form. Or, if you find it a more certain approach to selecting the entire form,you can click the name of the form in the Outline view:
When the form is displayed in the Editor view, the name of the form appears at the top of theOutline view.
4. In the Properties view for the form, click the Resources tab.
5. Click the plus sign (+) to add a resource. The Pick Resource dialog opens, displaying a list of theresources currently residing in the Presentation Resources folder, including CSS files, JavaScript,and image files, if any.
In this case, the FormsAppearance project includes a CSS file, claims.css, already in thePresentation Resources folder. This is the file we will be editing throughout this tutorial.
148
TIBCO Business Studio Tutorials
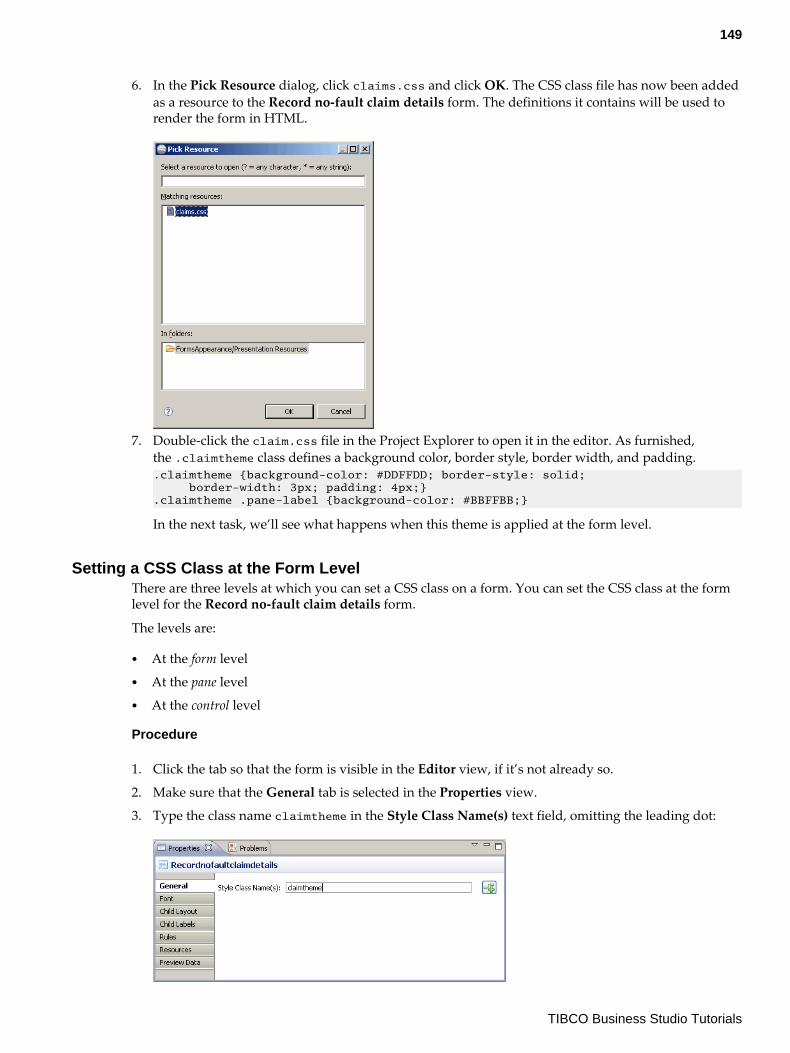
6. In the Pick Resource dialog, click claims.css and click OK. The CSS class file has now been addedas a resource to the Record no-fault claim details form. The definitions it contains will be used torender the form in HTML.
7. Double-click the claim.css file in the Project Explorer to open it in the editor. As furnished,the .claimtheme class defines a background color, border style, border width, and padding..claimtheme {background-color: #DDFFDD; border-style: solid; border-width: 3px; padding: 4px;}.claimtheme .pane-label {background-color: #BBFFBB;}
In the next task, we’ll see what happens when this theme is applied at the form level.
Setting a CSS Class at the Form LevelThere are three levels at which you can set a CSS class on a form. You can set the CSS class at the formlevel for the Record no-fault claim details form.
The levels are:
● At the form level● At the pane level● At the control level
Procedure
1. Click the tab so that the form is visible in the Editor view, if it’s not already so.
2. Make sure that the General tab is selected in the Properties view.
3. Type the class name claimtheme in the Style Class Name(s) text field, omitting the leading dot:
149
TIBCO Business Studio Tutorials
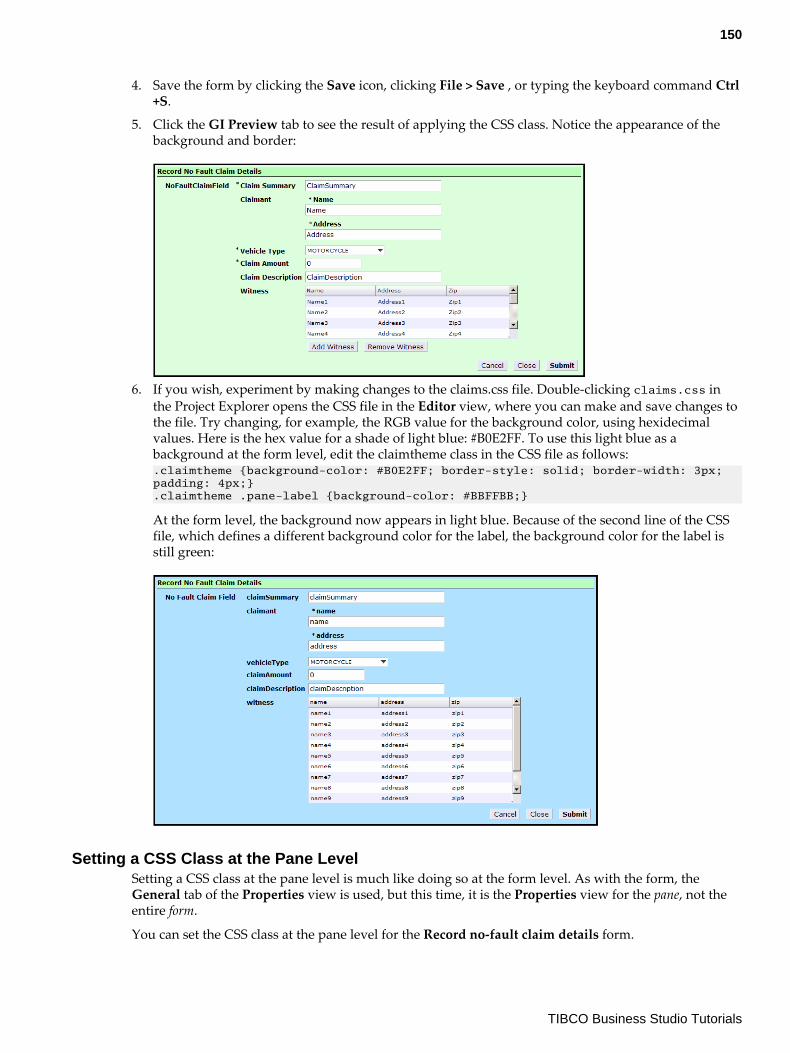
4. Save the form by clicking the Save icon, clicking File > Save , or typing the keyboard command Ctrl+S.
5. Click the GI Preview tab to see the result of applying the CSS class. Notice the appearance of thebackground and border:
6. If you wish, experiment by making changes to the claims.css file. Double-clicking claims.css inthe Project Explorer opens the CSS file in the Editor view, where you can make and save changes tothe file. Try changing, for example, the RGB value for the background color, using hexidecimalvalues. Here is the hex value for a shade of light blue: #B0E2FF. To use this light blue as abackground at the form level, edit the claimtheme class in the CSS file as follows:.claimtheme {background-color: #B0E2FF; border-style: solid; border-width: 3px; padding: 4px;}.claimtheme .pane-label {background-color: #BBFFBB;}
At the form level, the background now appears in light blue. Because of the second line of the CSSfile, which defines a different background color for the label, the background color for the label isstill green:
Setting a CSS Class at the Pane LevelSetting a CSS class at the pane level is much like doing so at the form level. As with the form, theGeneral tab of the Properties view is used, but this time, it is the Properties view for the pane, not theentire form.
You can set the CSS class at the pane level for the Record no-fault claim details form.
150
TIBCO Business Studio Tutorials
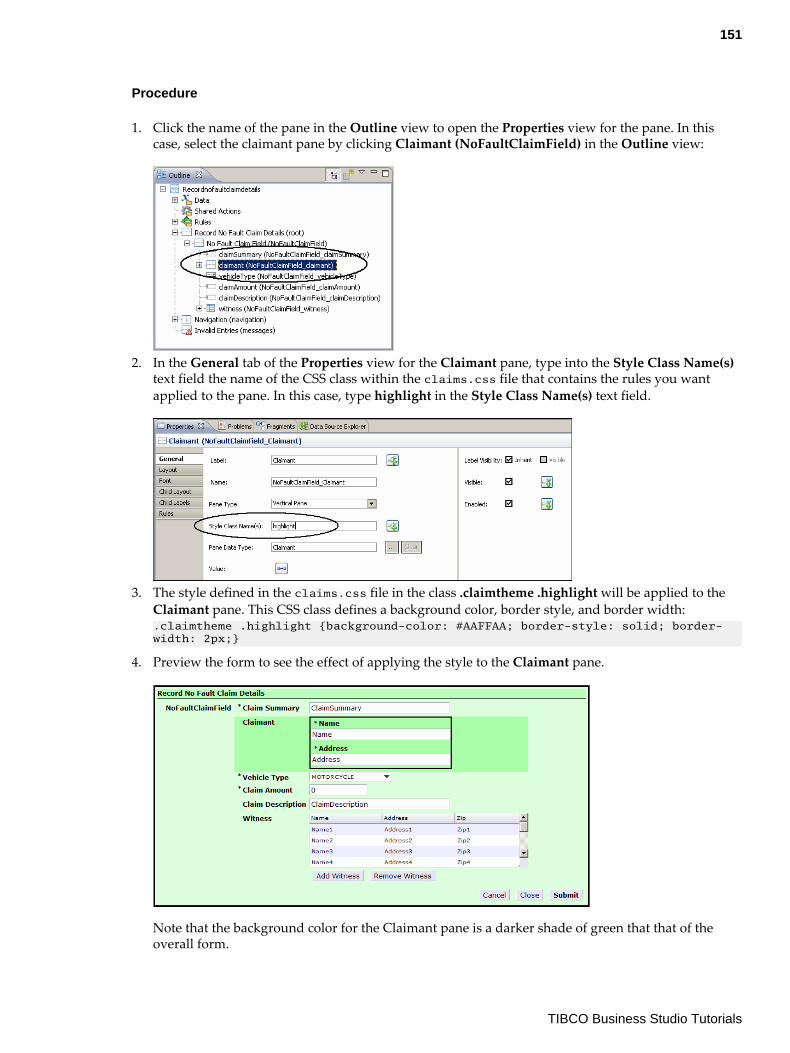
Procedure
1. Click the name of the pane in the Outline view to open the Properties view for the pane. In thiscase, select the claimant pane by clicking Claimant (NoFaultClaimField) in the Outline view:
2. In the General tab of the Properties view for the Claimant pane, type into the Style Class Name(s)text field the name of the CSS class within the claims.css file that contains the rules you wantapplied to the pane. In this case, type highlight in the Style Class Name(s) text field.
3. The style defined in the claims.css file in the class .claimtheme .highlight will be applied to theClaimant pane. This CSS class defines a background color, border style, and border width:.claimtheme .highlight {background-color: #AAFFAA; border-style: solid; border-width: 2px;}
4. Preview the form to see the effect of applying the style to the Claimant pane.
Note that the background color for the Claimant pane is a darker shade of green that that of theoverall form.
151
TIBCO Business Studio Tutorials
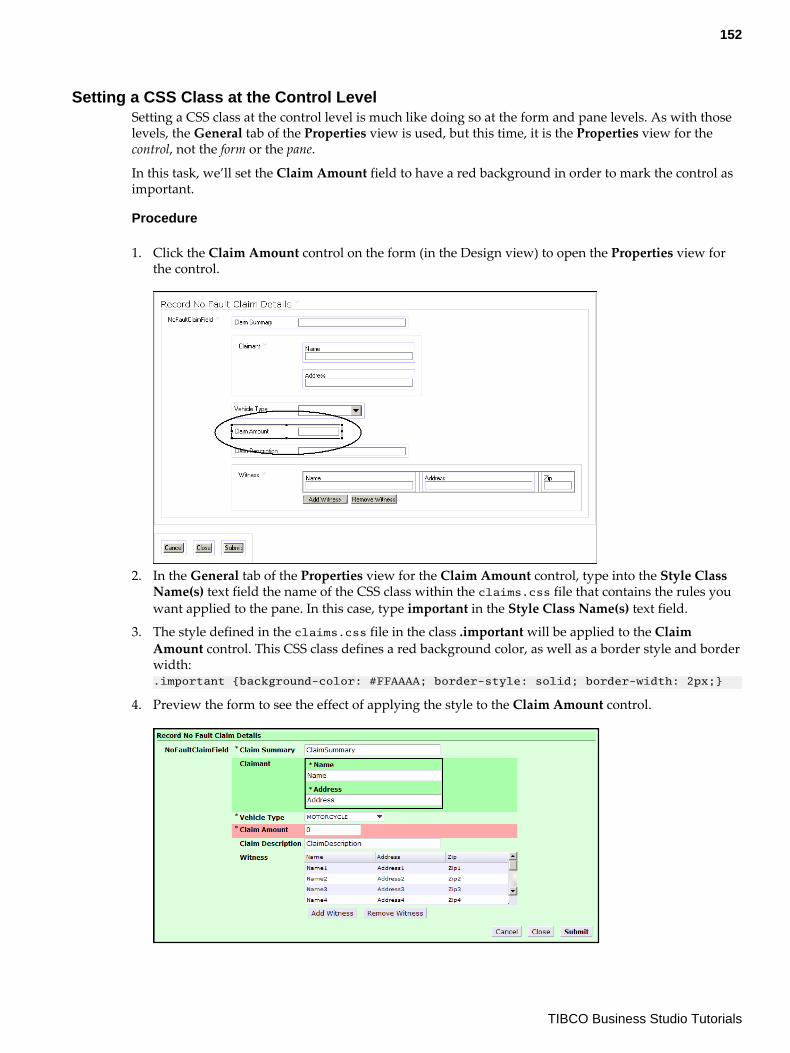
Setting a CSS Class at the Control LevelSetting a CSS class at the control level is much like doing so at the form and pane levels. As with thoselevels, the General tab of the Properties view is used, but this time, it is the Properties view for thecontrol, not the form or the pane.
In this task, we’ll set the Claim Amount field to have a red background in order to mark the control asimportant.
Procedure
1. Click the Claim Amount control on the form (in the Design view) to open the Properties view forthe control.
2. In the General tab of the Properties view for the Claim Amount control, type into the Style ClassName(s) text field the name of the CSS class within the claims.css file that contains the rules youwant applied to the pane. In this case, type important in the Style Class Name(s) text field.
3. The style defined in the claims.css file in the class .important will be applied to the ClaimAmount control. This CSS class defines a red background color, as well as a border style and borderwidth:.important {background-color: #FFAAAA; border-style: solid; border-width: 2px;}
4. Preview the form to see the effect of applying the style to the Claim Amount control.
152
TIBCO Business Studio Tutorials
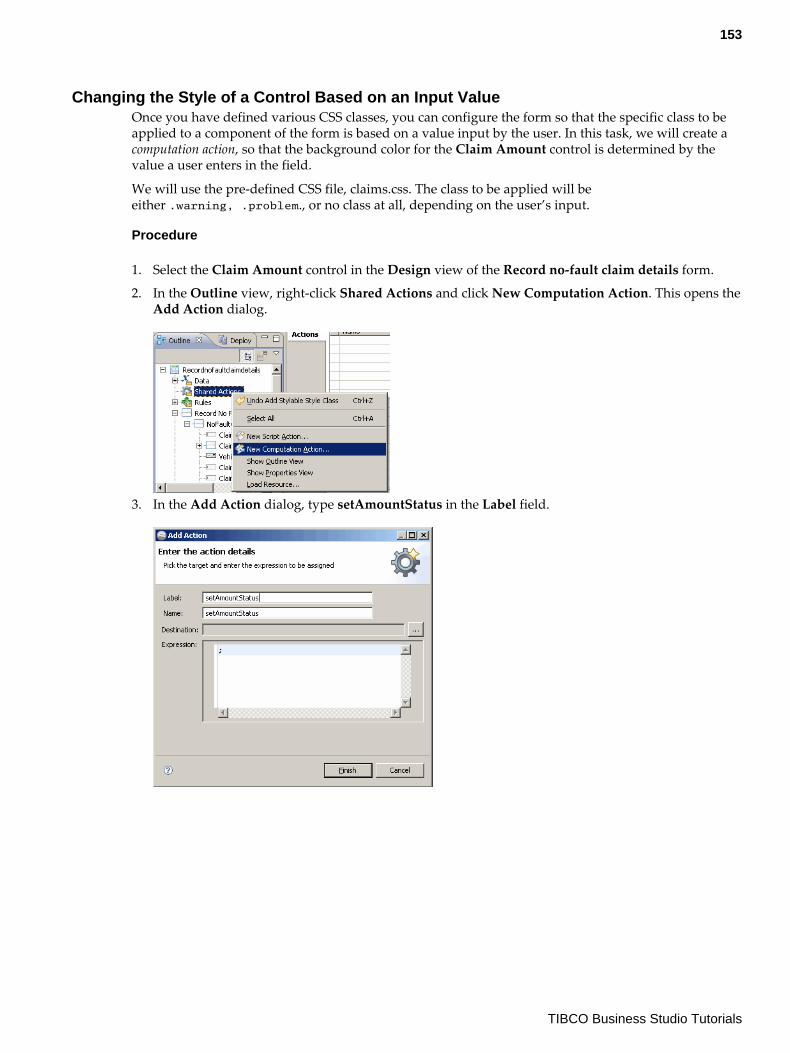
Changing the Style of a Control Based on an Input ValueOnce you have defined various CSS classes, you can configure the form so that the specific class to beapplied to a component of the form is based on a value input by the user. In this task, we will create acomputation action, so that the background color for the Claim Amount control is determined by thevalue a user enters in the field.
We will use the pre-defined CSS file, claims.css. The class to be applied will beeither .warning, .problem., or no class at all, depending on the user’s input.
Procedure
1. Select the Claim Amount control in the Design view of the Record no-fault claim details form.
2. In the Outline view, right-click Shared Actions and click New Computation Action. This opens theAdd Action dialog.
3. In the Add Action dialog, type setAmountStatus in the Label field.
153
TIBCO Business Studio Tutorials
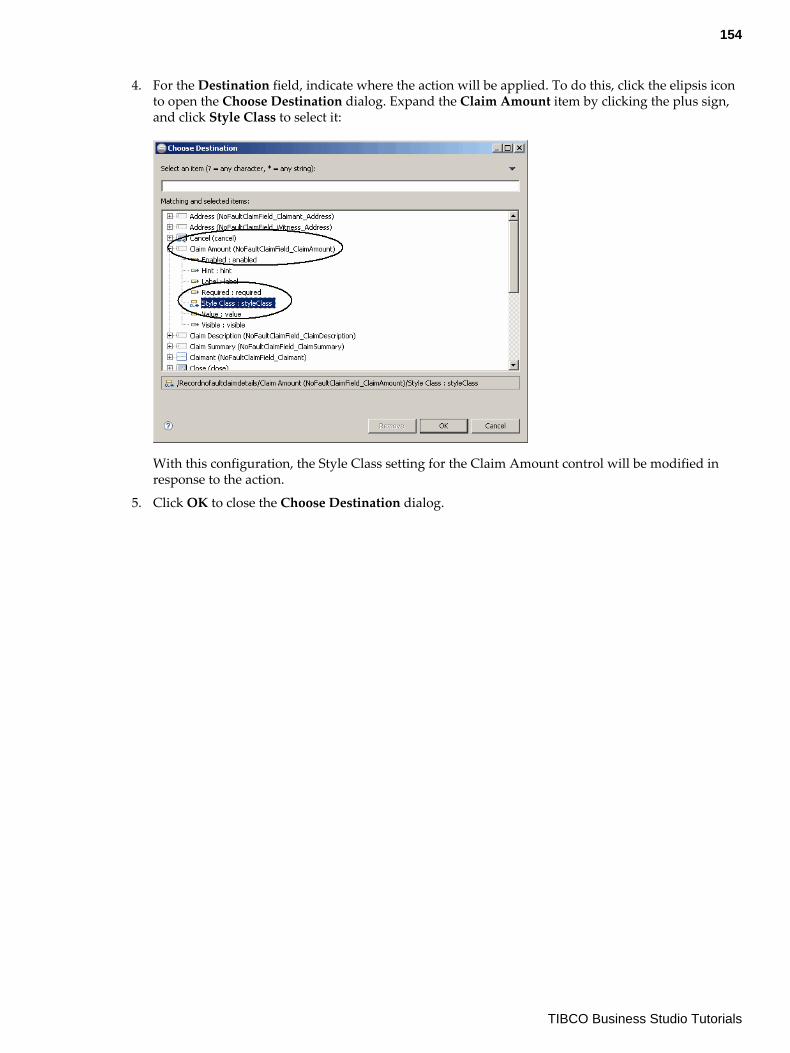
4. For the Destination field, indicate where the action will be applied. To do this, click the elipsis iconto open the Choose Destination dialog. Expand the Claim Amount item by clicking the plus sign,and click Style Class to select it:
With this configuration, the Style Class setting for the Claim Amount control will be modified inresponse to the action.
5. Click OK to close the Choose Destination dialog.
154
TIBCO Business Studio Tutorials
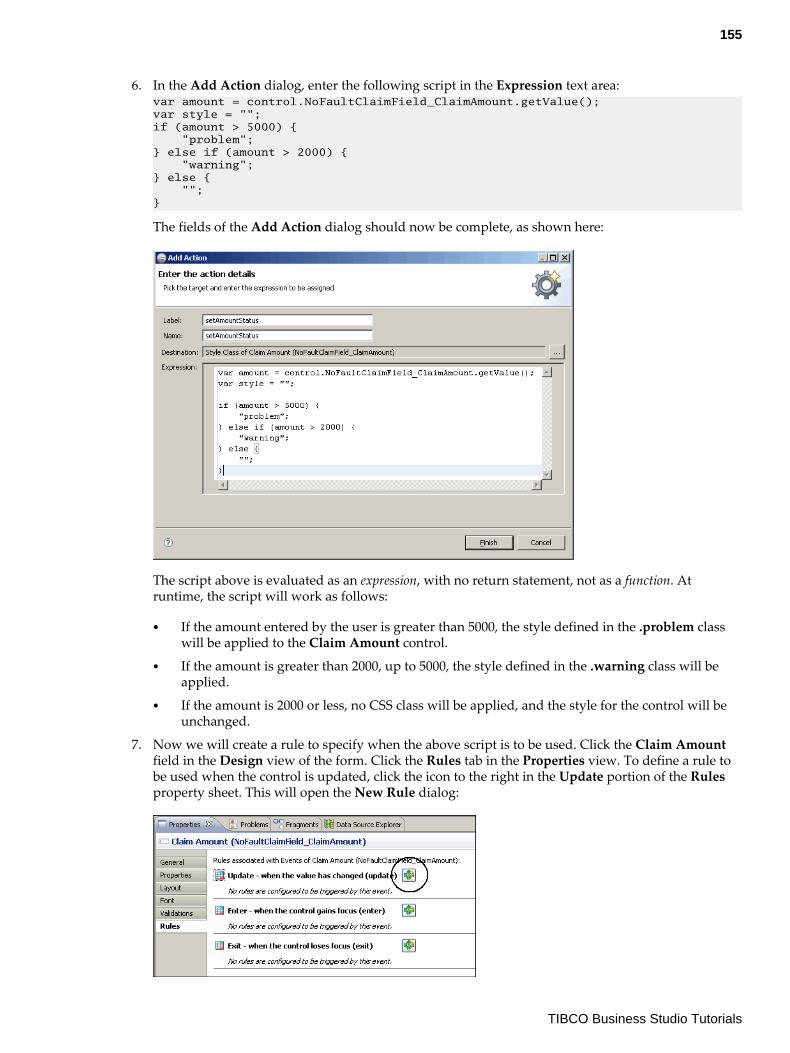
6. In the Add Action dialog, enter the following script in the Expression text area:var amount = control.NoFaultClaimField_ClaimAmount.getValue();var style = "";if (amount > 5000) { "problem";} else if (amount > 2000) { "warning";} else { "";}
The fields of the Add Action dialog should now be complete, as shown here:
The script above is evaluated as an expression, with no return statement, not as a function. Atruntime, the script will work as follows:
● If the amount entered by the user is greater than 5000, the style defined in the .problem classwill be applied to the Claim Amount control.
● If the amount is greater than 2000, up to 5000, the style defined in the .warning class will beapplied.
● If the amount is 2000 or less, no CSS class will be applied, and the style for the control will beunchanged.
7. Now we will create a rule to specify when the above script is to be used. Click the Claim Amountfield in the Design view of the form. Click the Rules tab in the Properties view. To define a rule tobe used when the control is updated, click the icon to the right in the Update portion of the Rulesproperty sheet. This will open the New Rule dialog:
155
TIBCO Business Studio Tutorials
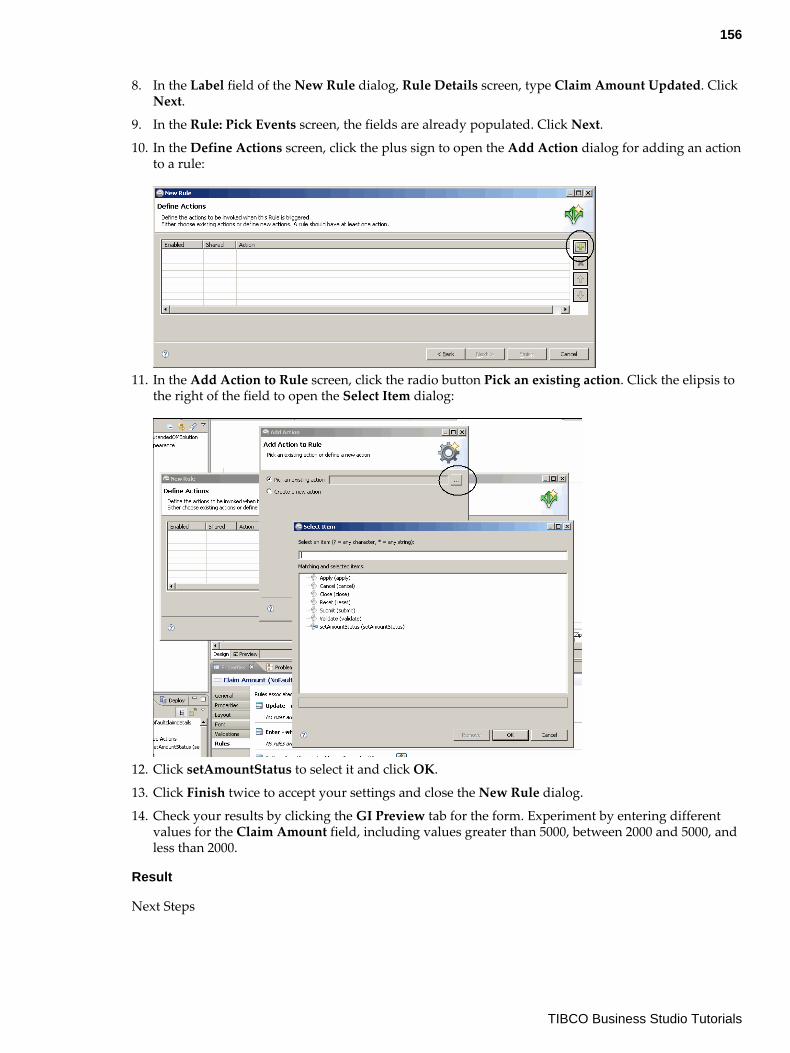
8. In the Label field of the New Rule dialog, Rule Details screen, type Claim Amount Updated. ClickNext.
9. In the Rule: Pick Events screen, the fields are already populated. Click Next.
10. In the Define Actions screen, click the plus sign to open the Add Action dialog for adding an actionto a rule:
11. In the Add Action to Rule screen, click the radio button Pick an existing action. Click the elipsis tothe right of the field to open the Select Item dialog:
12. Click setAmountStatus to select it and click OK.
13. Click Finish twice to accept your settings and close the New Rule dialog.
14. Check your results by clicking the GI Preview tab for the form. Experiment by entering differentvalues for the Claim Amount field, including values greater than 5000, between 2000 and 5000, andless than 2000.
Result
Next Steps
156
TIBCO Business Studio Tutorials
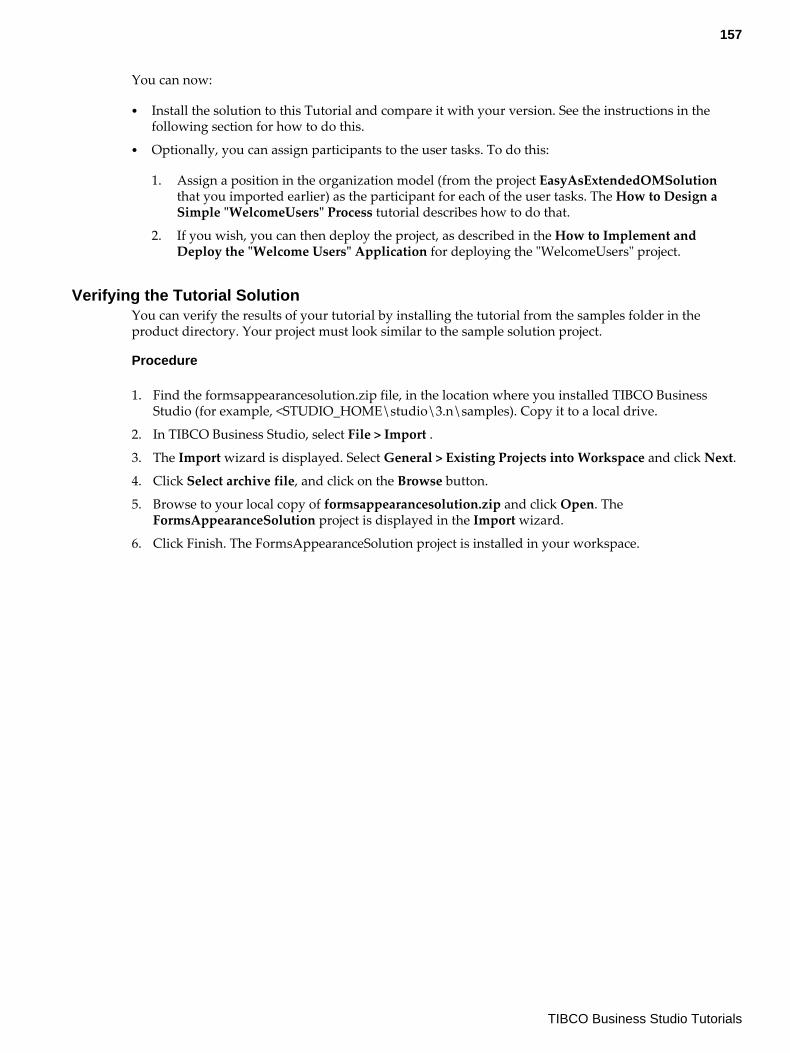
You can now:
● Install the solution to this Tutorial and compare it with your version. See the instructions in thefollowing section for how to do this.
● Optionally, you can assign participants to the user tasks. To do this:
1. Assign a position in the organization model (from the project EasyAsExtendedOMSolutionthat you imported earlier) as the participant for each of the user tasks. The How to Design aSimple "WelcomeUsers" Process tutorial describes how to do that.
2. If you wish, you can then deploy the project, as described in the How to Implement andDeploy the "Welcome Users" Application for deploying the "WelcomeUsers" project.
Verifying the Tutorial SolutionYou can verify the results of your tutorial by installing the tutorial from the samples folder in theproduct directory. Your project must look similar to the sample solution project.
Procedure
1. Find the formsappearancesolution.zip file, in the location where you installed TIBCO BusinessStudio (for example, <STUDIO_HOME\studio\3.n\samples). Copy it to a local drive.
2. In TIBCO Business Studio, select File > Import .
3. The Import wizard is displayed. Select General > Existing Projects into Workspace and click Next.
4. Click Select archive file, and click on the Browse button.
5. Browse to your local copy of formsappearancesolution.zip and click Open. TheFormsAppearanceSolution project is displayed in the Import wizard.
6. Click Finish. The FormsAppearanceSolution project is installed in your workspace.
157
TIBCO Business Studio Tutorials
Using Dynamic Sub-Processes
How to Use Dynamic Sub-ProcessesThis tutorial shows you how to use dynamic sub-processes within a business process.
There can be occasions when a business process needs to call on one from a number of routines, but it isnot known at design time which particular one of them will be called on any given occasion. This canbe handled by creating a number of sub-processes. The exact sub-process to be run is chosendynamically at runtime, depending on the process data that apply at that time. In TIBCO BusinessStudio, this is accomplished by using a common process interface for the set of sub-processes.
After you complete this tutorial, you should be able to use process interfaces to call sub-processeswithin a business process.
In this process:
● A nurse enters basic information about the patient, such as their name and address.● On a second form the nurse enters the symptom that the patient reports, and selects whether to send
the for a blood test, an X-ray, or both.● As a result of this decision, a work item is sent to the required departments (for example, the X-ray
department) and someone in that department books an appointment. An email is sent to the patientwith the appointment details.
● Finally, a form displays to a supervisor a summary of the patient’s admission information alongwith any new booking information that has been entered.
Before You Begin
Before you start this tutorial, you can become familiar with TIBCO Business Studio by completing theinitial Welcome Users tutorials.
Importing the Initial ResourcesThis tutorial supplies a project and an organization model as the starting-point, so that the initial workis already done for you.
Procedure
1. Start Studio for Designers.
Following this tutorial will be simpler and clearer if you close any other projects that youmay have open in your TIBCO Business Studio workspace, using the Project > CloseProject menu option.
2. To import the DynamicSubProcTutorial project into your workspace, find theDynamicSubProcTuteStart.zip file in the location where you installed TIBCO Business Studio (forexample, <STUDIO_HOME > \studio\3. n\samples)..
3. In TIBCO Business Studio, select File > Import .
The Import wizard is displayed.
4. Select General > Existing Projects into Workspace and click Next.
5. Click Select archive file, and click on the Browse button.
6. Browse to the zip file and click Open.
The project is displayed in the Import wizard.
158
TIBCO Business Studio Tutorials
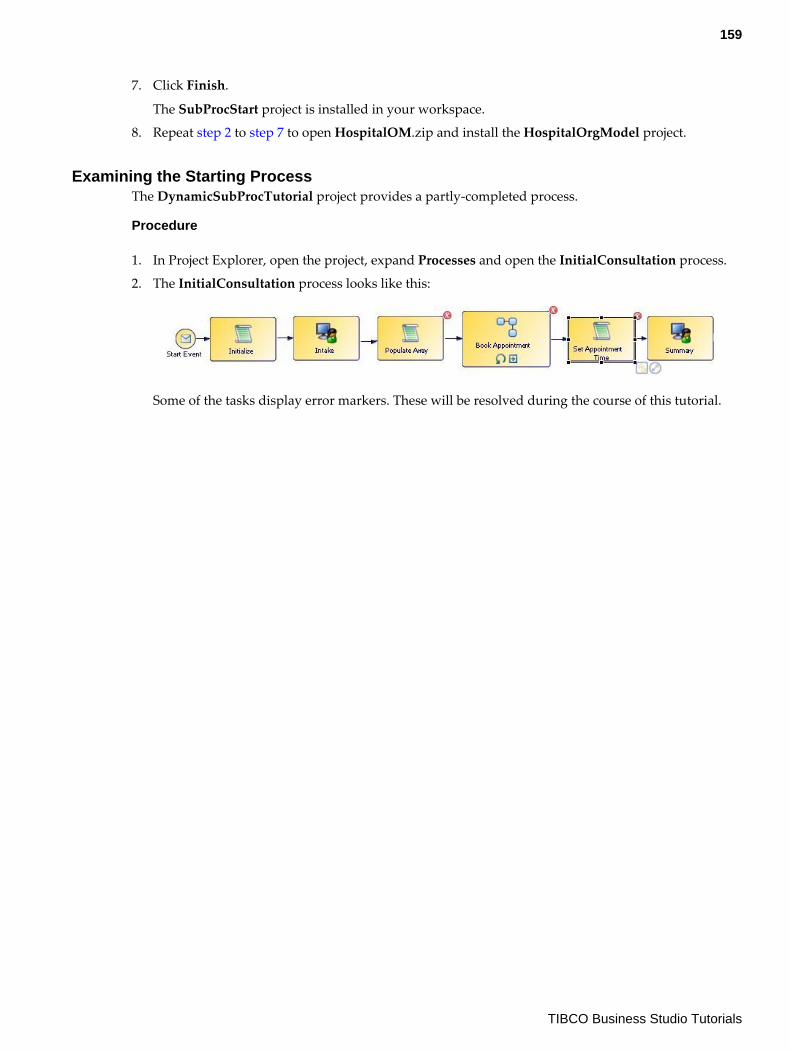
7. Click Finish.
The SubProcStart project is installed in your workspace.
8. Repeat step 2 to step 7 to open HospitalOM.zip and install the HospitalOrgModel project.
Examining the Starting ProcessThe DynamicSubProcTutorial project provides a partly-completed process.
Procedure
1. In Project Explorer, open the project, expand Processes and open the InitialConsultation process.
2. The InitialConsultation process looks like this:
Some of the tasks display error markers. These will be resolved during the course of this tutorial.
159
TIBCO Business Studio Tutorials
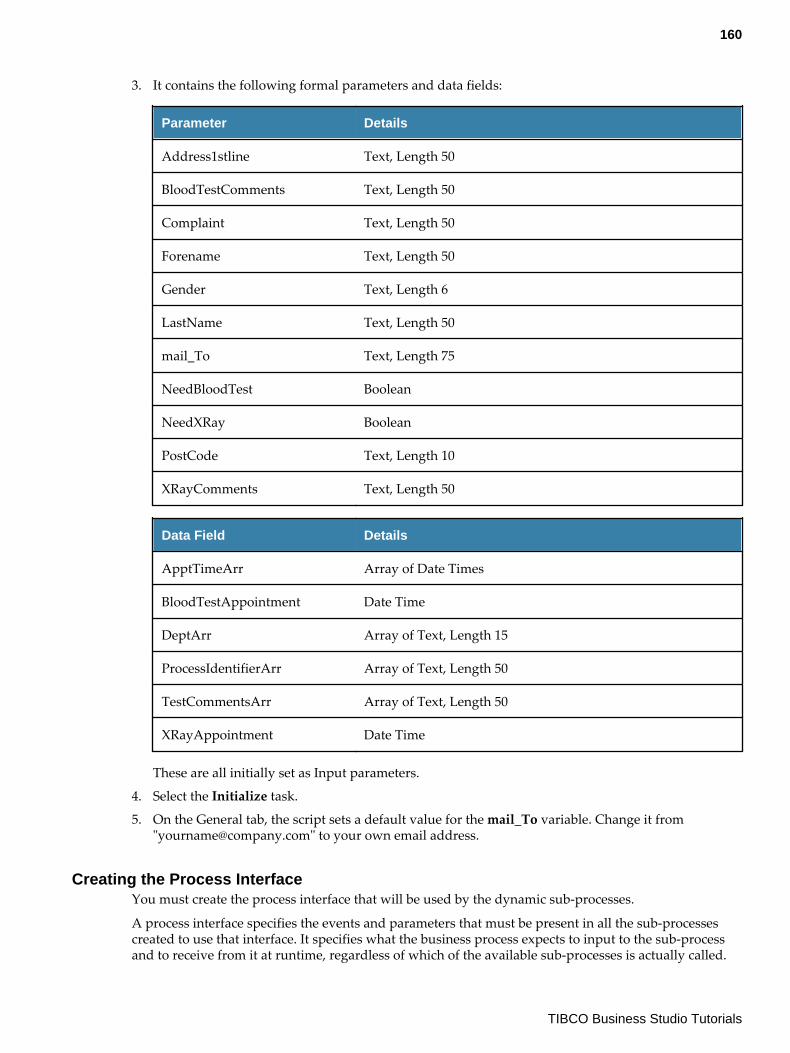
3. It contains the following formal parameters and data fields:
Parameter Details
Address1stline Text, Length 50
BloodTestComments Text, Length 50
Complaint Text, Length 50
Forename Text, Length 50
Gender Text, Length 6
LastName Text, Length 50
mail_To Text, Length 75
NeedBloodTest Boolean
NeedXRay Boolean
PostCode Text, Length 10
XRayComments Text, Length 50
Data Field Details
ApptTimeArr Array of Date Times
BloodTestAppointment Date Time
DeptArr Array of Text, Length 15
ProcessIdentifierArr Array of Text, Length 50
TestCommentsArr Array of Text, Length 50
XRayAppointment Date Time
These are all initially set as Input parameters.
4. Select the Initialize task.
5. On the General tab, the script sets a default value for the mail_To variable. Change it from"[email protected]" to your own email address.
Creating the Process InterfaceYou must create the process interface that will be used by the dynamic sub-processes.
A process interface specifies the events and parameters that must be present in all the sub-processescreated to use that interface. It specifies what the business process expects to input to the sub-processand to receive from it at runtime, regardless of which of the available sub-processes is actually called.
160
TIBCO Business Studio Tutorials
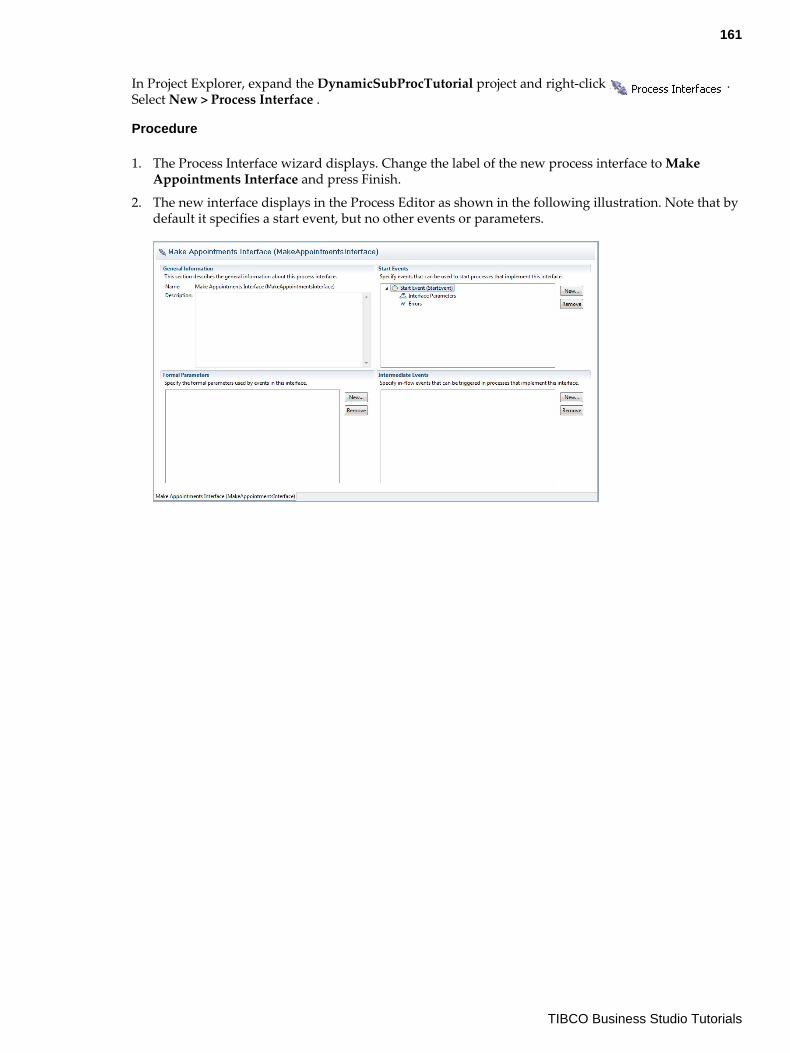
In Project Explorer, expand the DynamicSubProcTutorial project and right-click .Select New > Process Interface .
Procedure
1. The Process Interface wizard displays. Change the label of the new process interface to MakeAppointments Interface and press Finish.
2. The new interface displays in the Process Editor as shown in the following illustration. Note that bydefault it specifies a start event, but no other events or parameters.
161
TIBCO Business Studio Tutorials
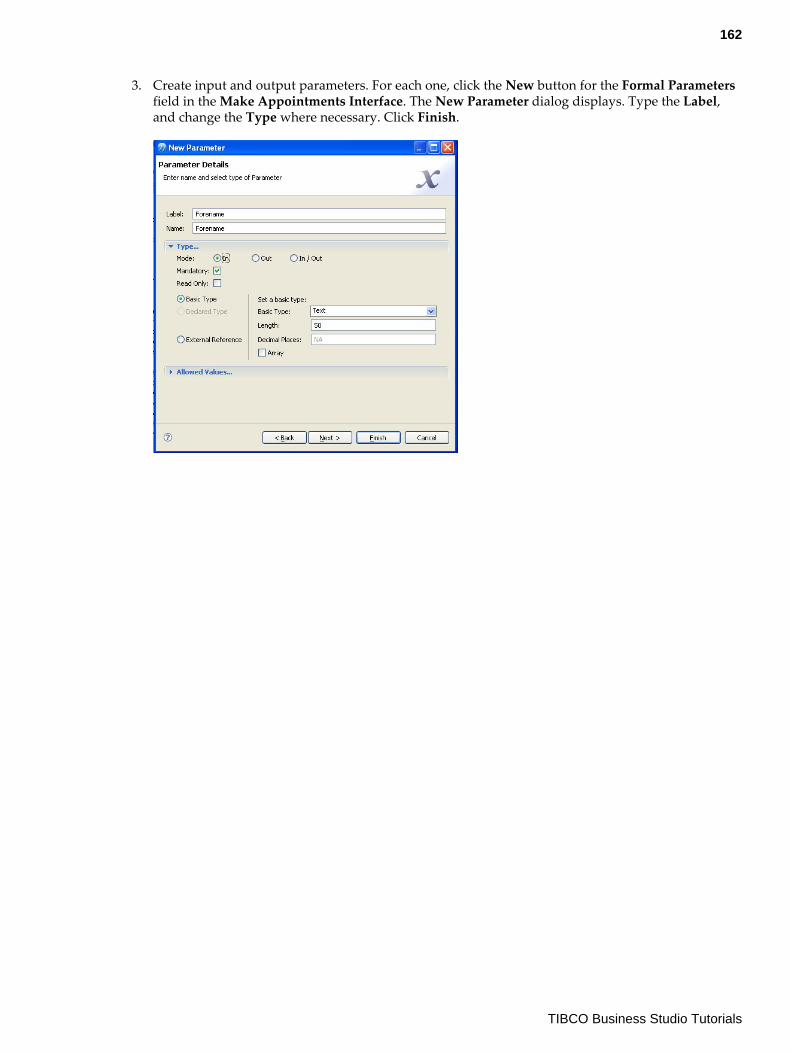
3. Create input and output parameters. For each one, click the New button for the Formal Parametersfield in the Make Appointments Interface. The New Parameter dialog displays. Type the Label,and change the Type where necessary. Click Finish.
162
TIBCO Business Studio Tutorials
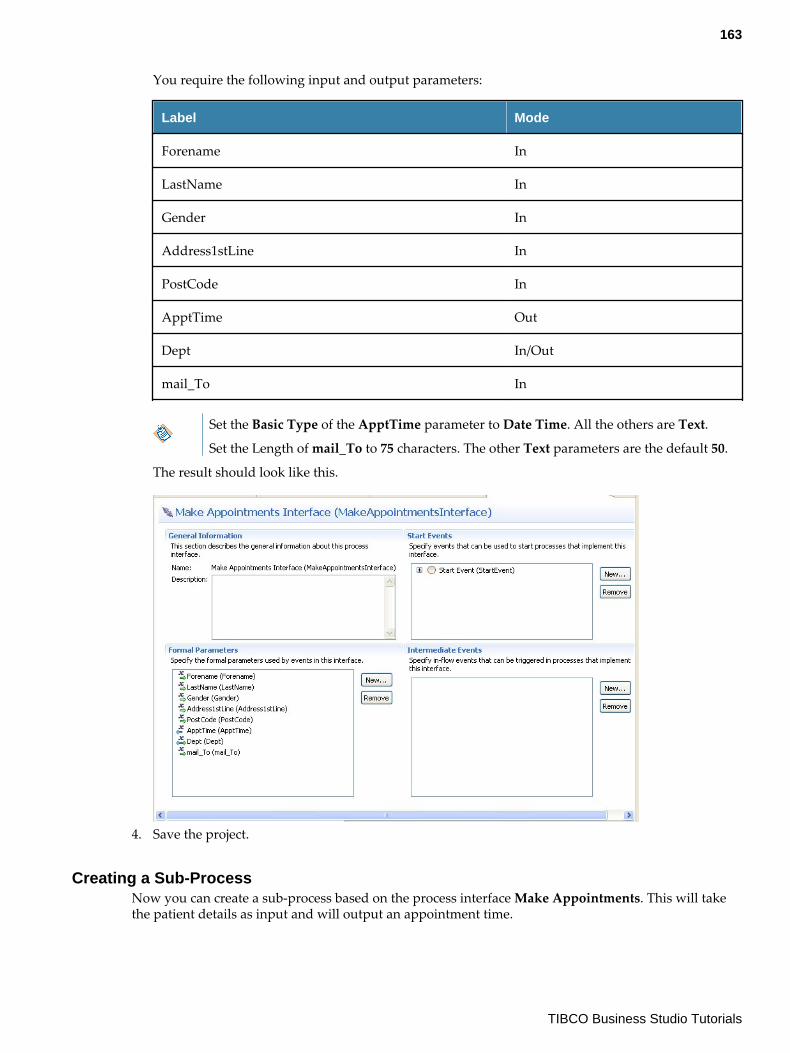
You require the following input and output parameters:
Label Mode
Forename In
LastName In
Gender In
Address1stLine In
PostCode In
ApptTime Out
Dept In/Out
mail_To In
Set the Basic Type of the ApptTime parameter to Date Time. All the others are Text.
Set the Length of mail_To to 75 characters. The other Text parameters are the default 50.
The result should look like this.
4. Save the project.
Creating a Sub-ProcessNow you can create a sub-process based on the process interface Make Appointments. This will takethe patient details as input and will output an appointment time.
163
TIBCO Business Studio Tutorials
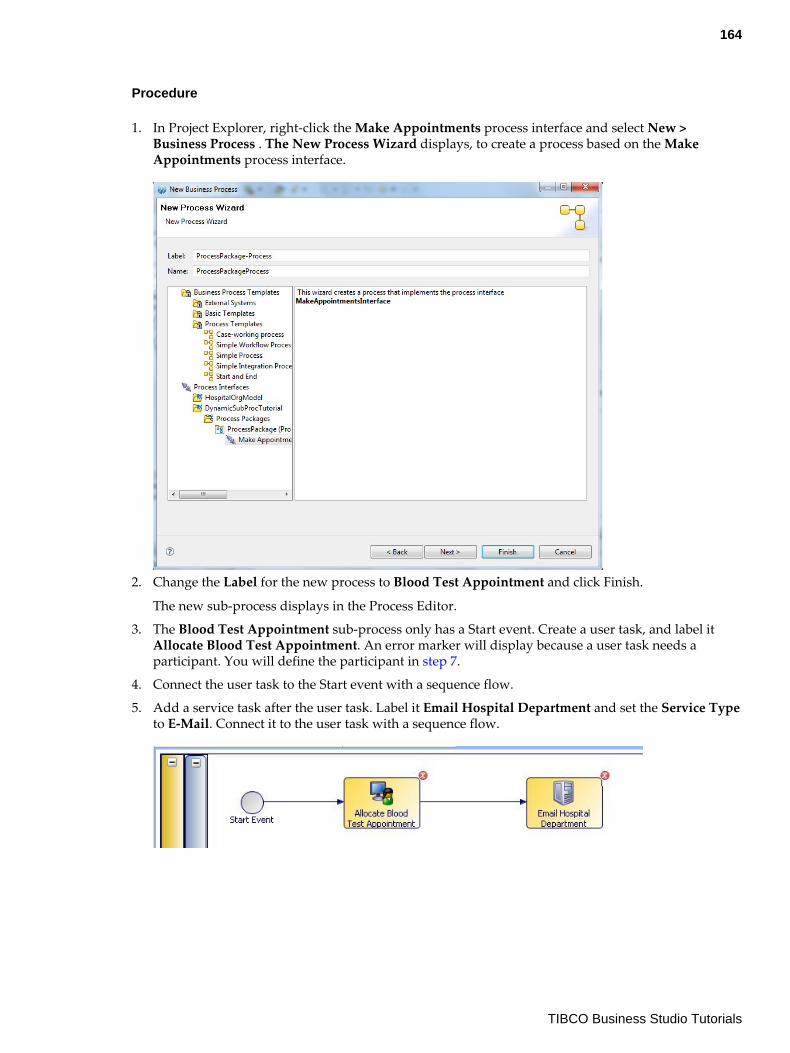
Procedure
1. In Project Explorer, right-click the Make Appointments process interface and select New >Business Process . The New Process Wizard displays, to create a process based on the MakeAppointments process interface.
2. Change the Label for the new process to Blood Test Appointment and click Finish.
The new sub-process displays in the Process Editor.
3. The Blood Test Appointment sub-process only has a Start event. Create a user task, and label itAllocate Blood Test Appointment. An error marker will display because a user task needs aparticipant. You will define the participant in step 7.
4. Connect the user task to the Start event with a sequence flow.
5. Add a service task after the user task. Label it Email Hospital Department and set the Service Typeto E-Mail. Connect it to the user task with a sequence flow.
164
TIBCO Business Studio Tutorials
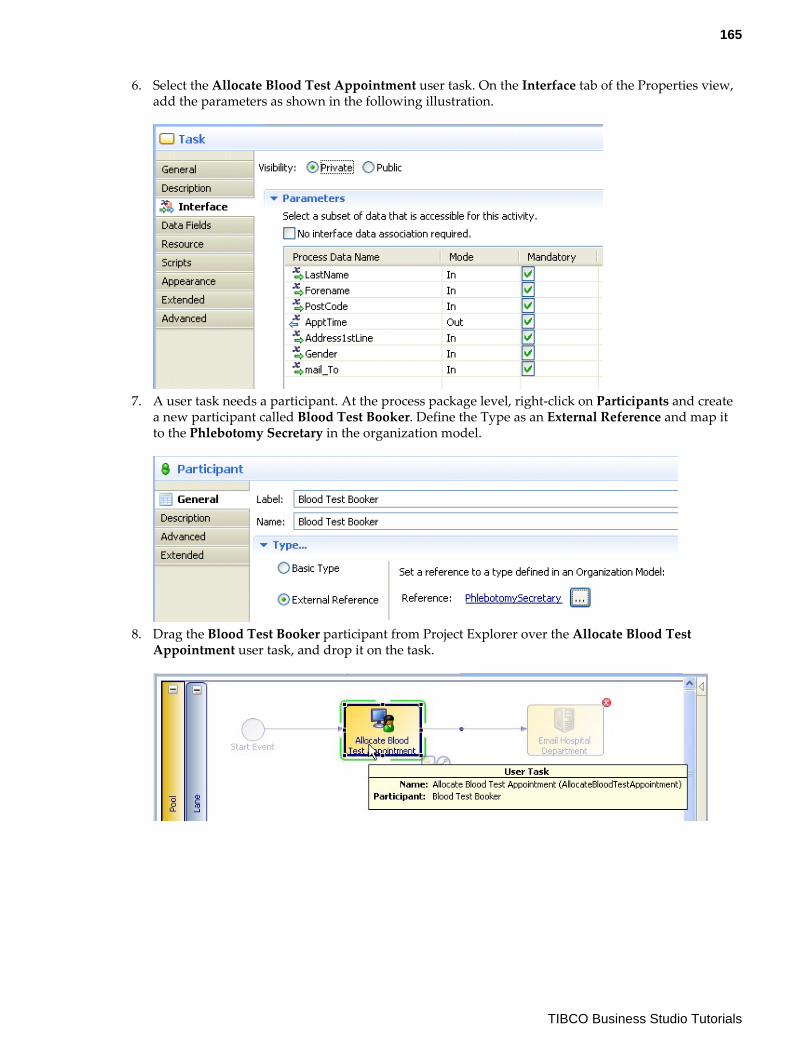
6. Select the Allocate Blood Test Appointment user task. On the Interface tab of the Properties view,add the parameters as shown in the following illustration.
7. A user task needs a participant. At the process package level, right-click on Participants and createa new participant called Blood Test Booker. Define the Type as an External Reference and map itto the Phlebotomy Secretary in the organization model.
8. Drag the Blood Test Booker participant from Project Explorer over the Allocate Blood TestAppointment user task, and drop it on the task.
165
TIBCO Business Studio Tutorials
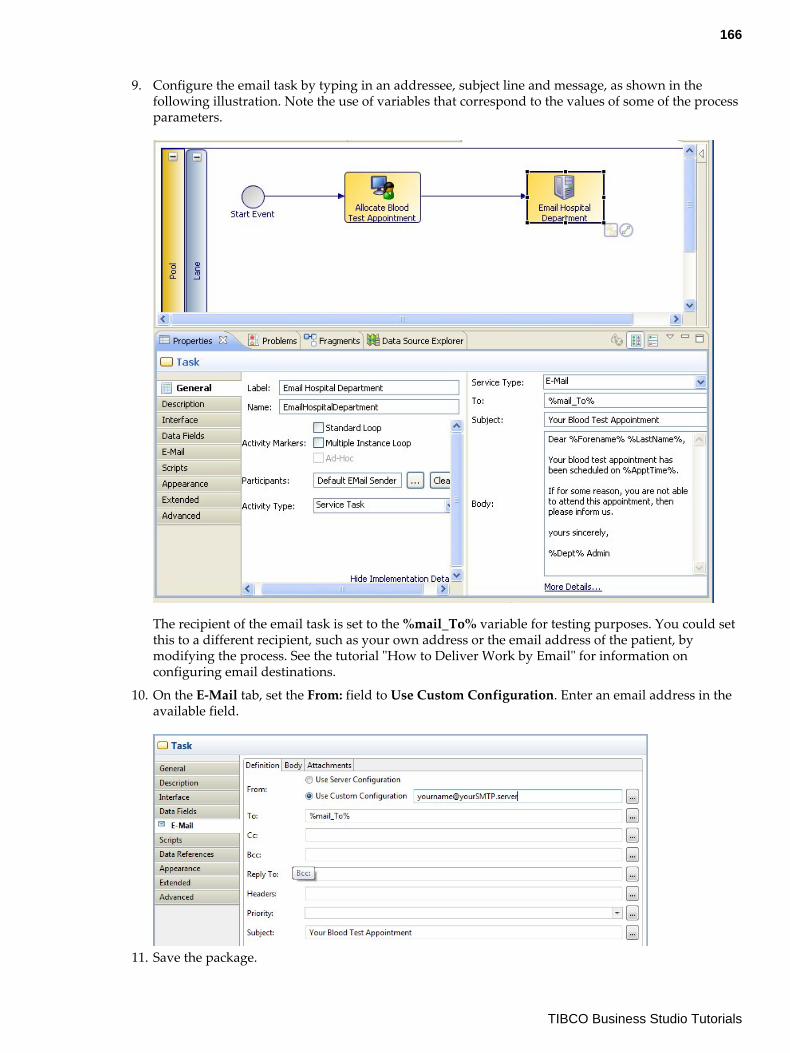
9. Configure the email task by typing in an addressee, subject line and message, as shown in thefollowing illustration. Note the use of variables that correspond to the values of some of the processparameters.
The recipient of the email task is set to the %mail_To% variable for testing purposes. You could setthis to a different recipient, such as your own address or the email address of the patient, bymodifying the process. See the tutorial "How to Deliver Work by Email" for information onconfiguring email destinations.
10. On the E-Mail tab, set the From: field to Use Custom Configuration. Enter an email address in theavailable field.
11. Save the package.
166
TIBCO Business Studio Tutorials
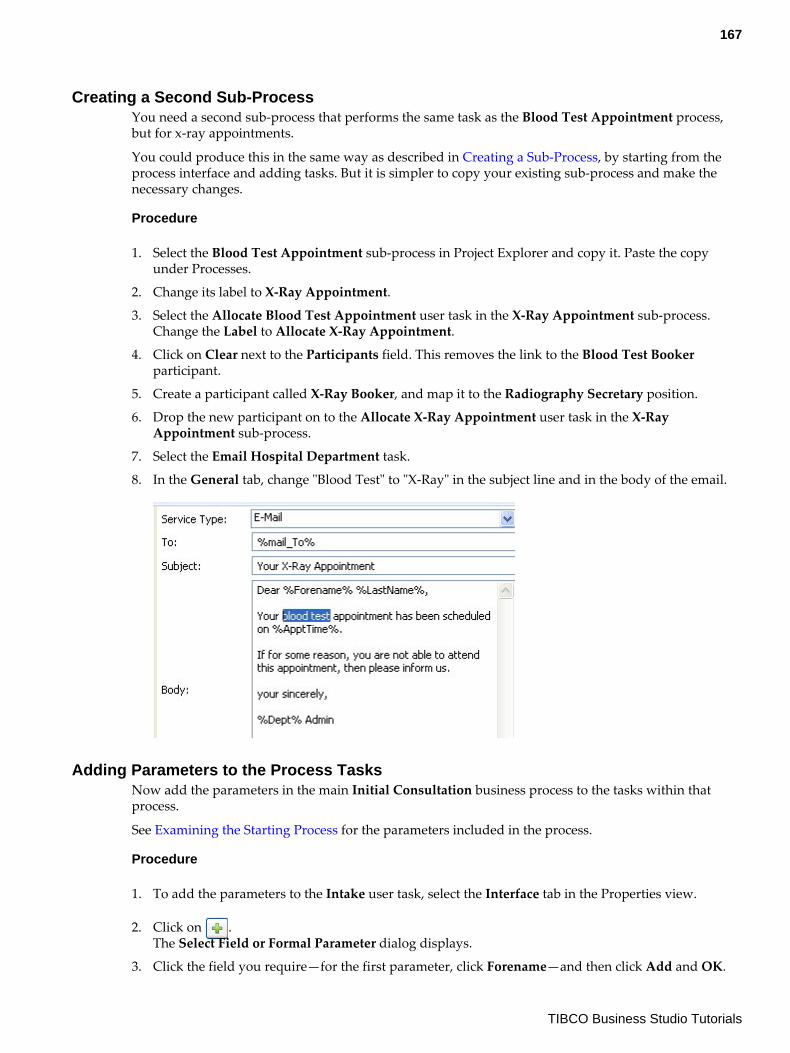
Creating a Second Sub-ProcessYou need a second sub-process that performs the same task as the Blood Test Appointment process,but for x-ray appointments.
You could produce this in the same way as described in Creating a Sub-Process, by starting from theprocess interface and adding tasks. But it is simpler to copy your existing sub-process and make thenecessary changes.
Procedure
1. Select the Blood Test Appointment sub-process in Project Explorer and copy it. Paste the copyunder Processes.
2. Change its label to X-Ray Appointment.
3. Select the Allocate Blood Test Appointment user task in the X-Ray Appointment sub-process.Change the Label to Allocate X-Ray Appointment.
4. Click on Clear next to the Participants field. This removes the link to the Blood Test Bookerparticipant.
5. Create a participant called X-Ray Booker, and map it to the Radiography Secretary position.
6. Drop the new participant on to the Allocate X-Ray Appointment user task in the X-RayAppointment sub-process.
7. Select the Email Hospital Department task.
8. In the General tab, change "Blood Test" to "X-Ray" in the subject line and in the body of the email.
Adding Parameters to the Process TasksNow add the parameters in the main Initial Consultation business process to the tasks within thatprocess.
See Examining the Starting Process for the parameters included in the process.
Procedure
1. To add the parameters to the Intake user task, select the Interface tab in the Properties view.
2. Click on .The Select Field or Formal Parameter dialog displays.
3. Click the field you require—for the first parameter, click Forename—and then click Add and OK.
167
TIBCO Business Studio Tutorials
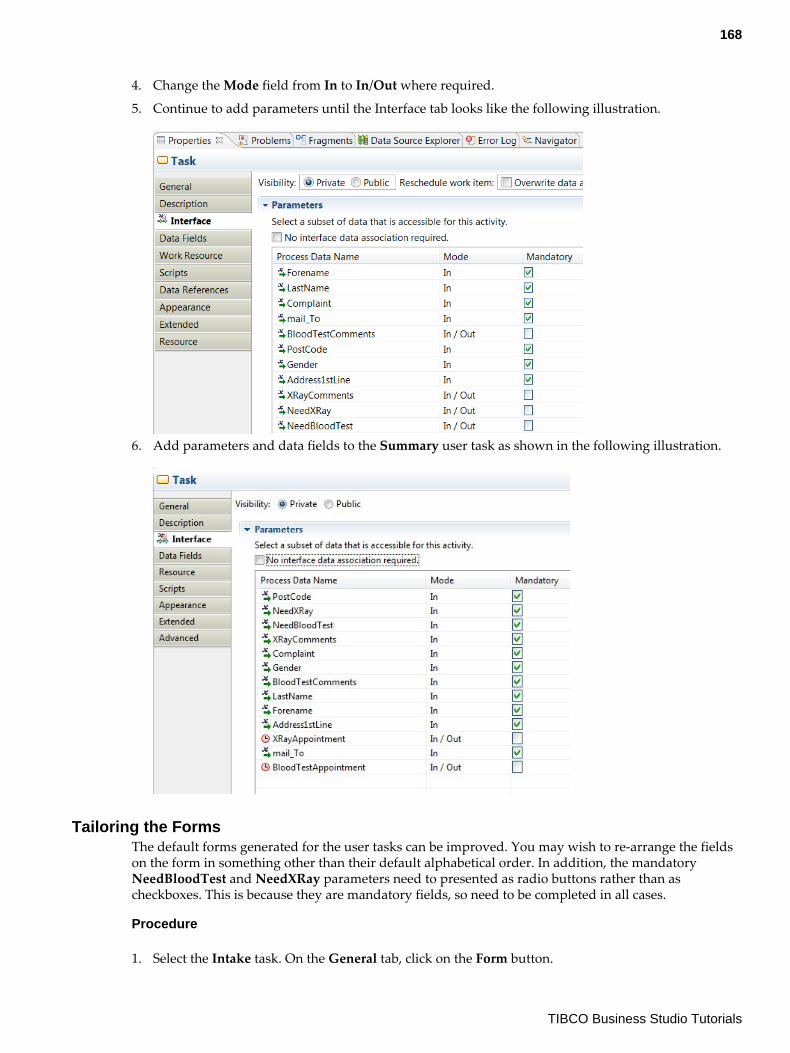
4. Change the Mode field from In to In/Out where required.
5. Continue to add parameters until the Interface tab looks like the following illustration.
6. Add parameters and data fields to the Summary user task as shown in the following illustration.
Tailoring the FormsThe default forms generated for the user tasks can be improved. You may wish to re-arrange the fieldson the form in something other than their default alphabetical order. In addition, the mandatoryNeedBloodTest and NeedXRay parameters need to presented as radio buttons rather than ascheckboxes. This is because they are mandatory fields, so need to be completed in all cases.
Procedure
1. Select the Intake task. On the General tab, click on the Form button.
168
TIBCO Business Studio Tutorials
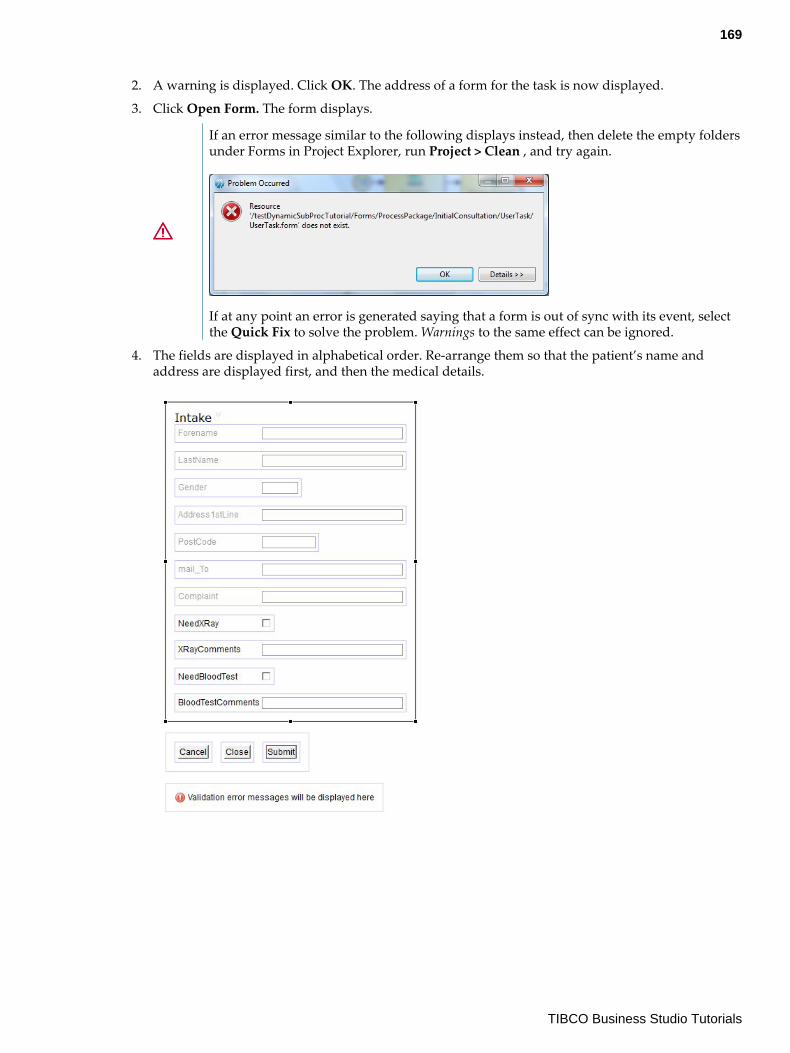
2. A warning is displayed. Click OK. The address of a form for the task is now displayed.
3. Click Open Form. The form displays.
If an error message similar to the following displays instead, then delete the empty foldersunder Forms in Project Explorer, run Project > Clean , and try again.
If at any point an error is generated saying that a form is out of sync with its event, selectthe Quick Fix to solve the problem. Warnings to the same effect can be ignored.
4. The fields are displayed in alphabetical order. Re-arrange them so that the patient’s name andaddress are displayed first, and then the medical details.
169
TIBCO Business Studio Tutorials
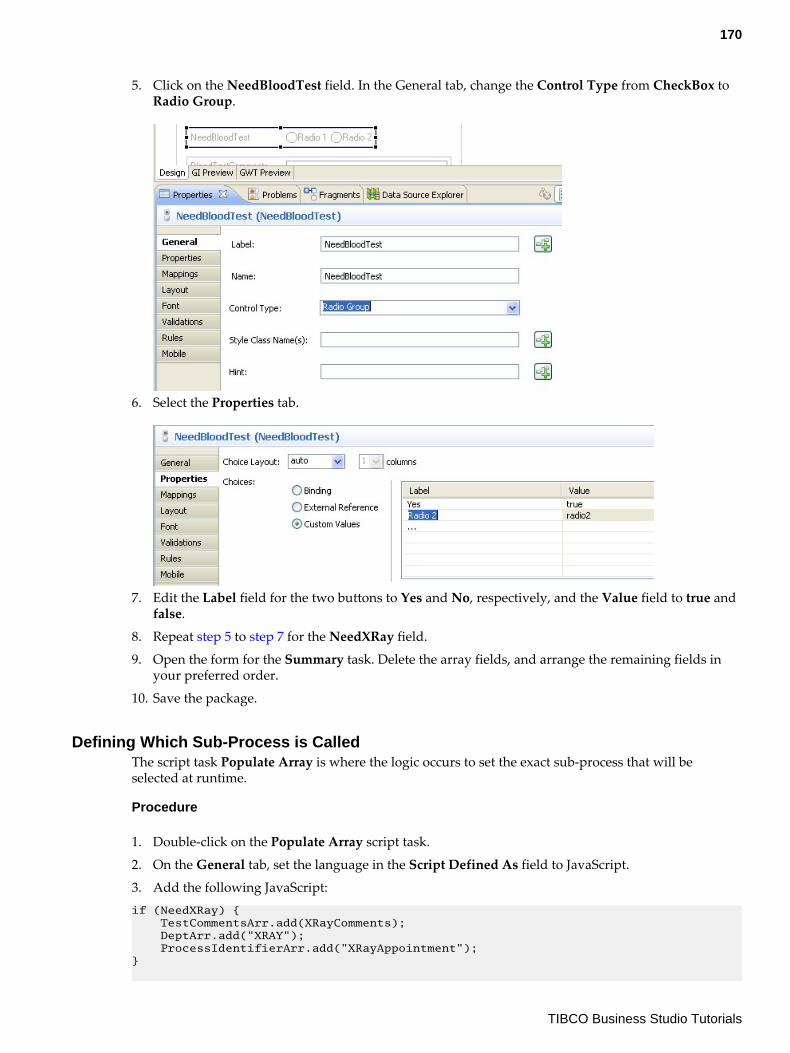
5. Click on the NeedBloodTest field. In the General tab, change the Control Type from CheckBox toRadio Group.
6. Select the Properties tab.
7. Edit the Label field for the two buttons to Yes and No, respectively, and the Value field to true andfalse.
8. Repeat step 5 to step 7 for the NeedXRay field.
9. Open the form for the Summary task. Delete the array fields, and arrange the remaining fields inyour preferred order.
10. Save the package.
Defining Which Sub-Process is CalledThe script task Populate Array is where the logic occurs to set the exact sub-process that will beselected at runtime.
Procedure
1. Double-click on the Populate Array script task.
2. On the General tab, set the language in the Script Defined As field to JavaScript.
3. Add the following JavaScript:if (NeedXRay) { TestCommentsArr.add(XRayComments); DeptArr.add("XRAY"); ProcessIdentifierArr.add("XRayAppointment");}
170
TIBCO Business Studio Tutorials
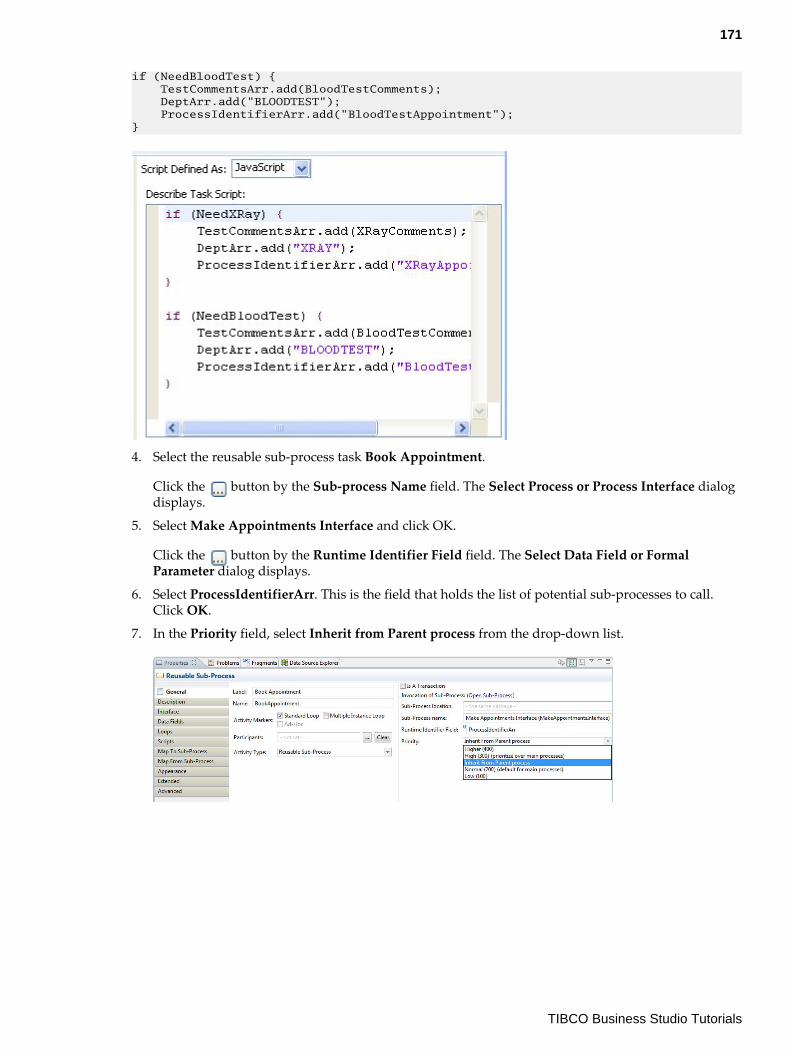
if (NeedBloodTest) { TestCommentsArr.add(BloodTestComments); DeptArr.add("BLOODTEST"); ProcessIdentifierArr.add("BloodTestAppointment");}
4. Select the reusable sub-process task Book Appointment.
Click the button by the Sub-process Name field. The Select Process or Process Interface dialogdisplays.
5. Select Make Appointments Interface and click OK.
Click the button by the Runtime Identifier Field field. The Select Data Field or FormalParameter dialog displays.
6. Select ProcessIdentifierArr. This is the field that holds the list of potential sub-processes to call.Click OK.
7. In the Priority field, select Inherit from Parent process from the drop-down list.
171
TIBCO Business Studio Tutorials
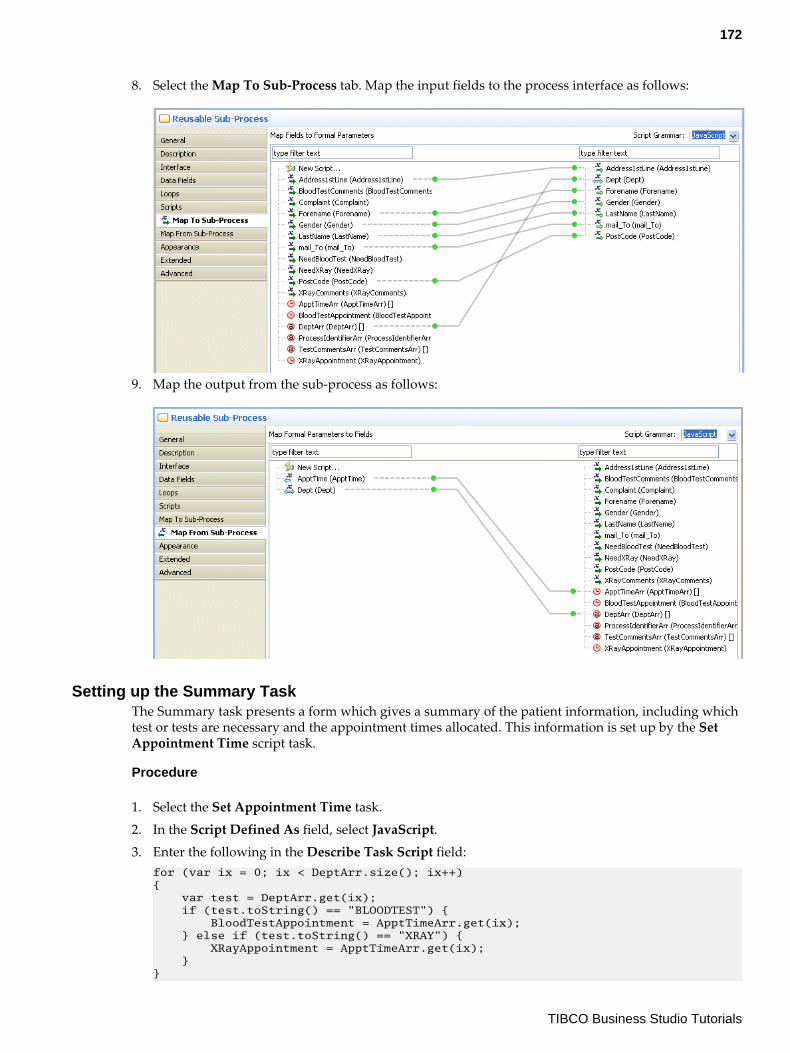
8. Select the Map To Sub-Process tab. Map the input fields to the process interface as follows:
9. Map the output from the sub-process as follows:
Setting up the Summary TaskThe Summary task presents a form which gives a summary of the patient information, including whichtest or tests are necessary and the appointment times allocated. This information is set up by the SetAppointment Time script task.
Procedure
1. Select the Set Appointment Time task.
2. In the Script Defined As field, select JavaScript.
3. Enter the following in the Describe Task Script field:for (var ix = 0; ix < DeptArr.size(); ix++){ var test = DeptArr.get(ix); if (test.toString() == "BLOODTEST") { BloodTestAppointment = ApptTimeArr.get(ix); } else if (test.toString() == "XRAY") { XRayAppointment = ApptTimeArr.get(ix); }}
172
TIBCO Business Studio Tutorials
4. Save the project.
Generating the Business ServiceYou must produce a business service to use in running the project.
Procedure
1. Right-click on the Start Event of the Initial Consultation process, and select Business Service >Generate . The business service displays. It contains:
● A start event● A user task that will be used to collect the starting information● A send task to communicate with the business process
2. Change the Label of the business service to Patient Admissions.
3. Change the Business Category to DynamicSubProcTutorial/PatientAdmissions.
4. Select the user task and change its Label to Take Patient Details.
5. Click on the Interface tab of Take Patient Details , and click on the + icon on the right side of thepanel. From the pop-up select the data fields that need to be added.
6. Click on Add, and data fields get added to the Interface tab.
173
TIBCO Business Studio Tutorials
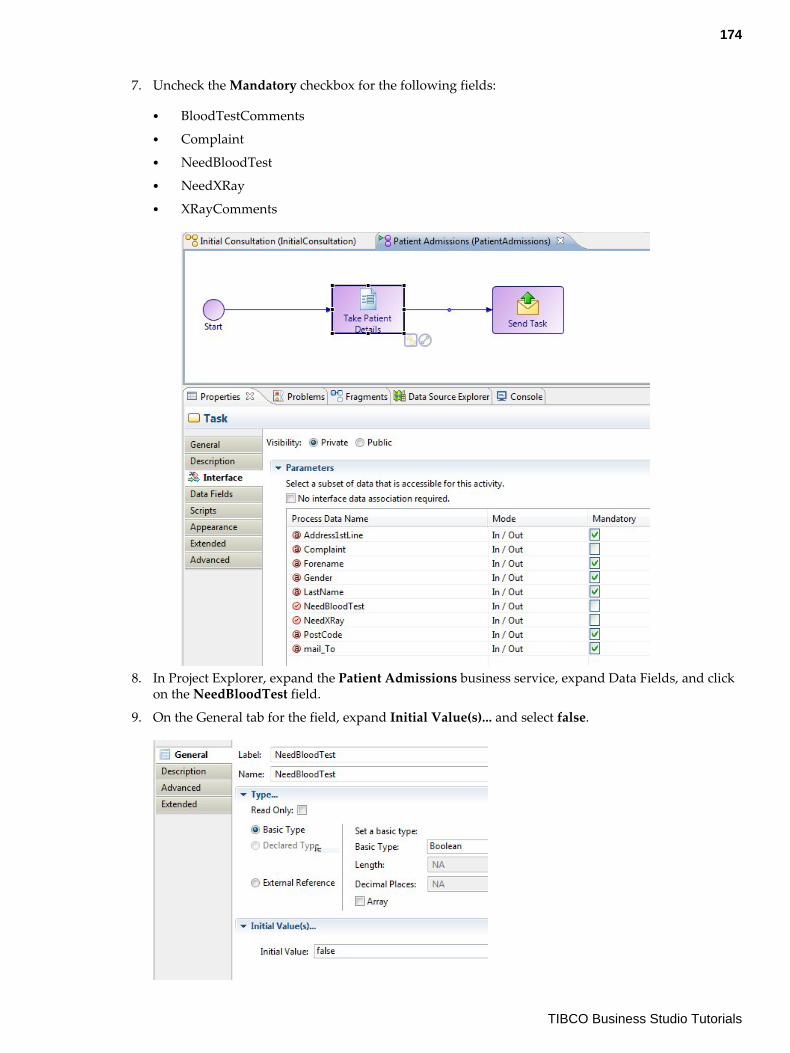
7. Uncheck the Mandatory checkbox for the following fields:
● BloodTestComments● Complaint● NeedBloodTest● NeedXRay● XRayComments
8. In Project Explorer, expand the Patient Admissions business service, expand Data Fields, and clickon the NeedBloodTest field.
9. On the General tab for the field, expand Initial Value(s)... and select false.
174
TIBCO Business Studio Tutorials
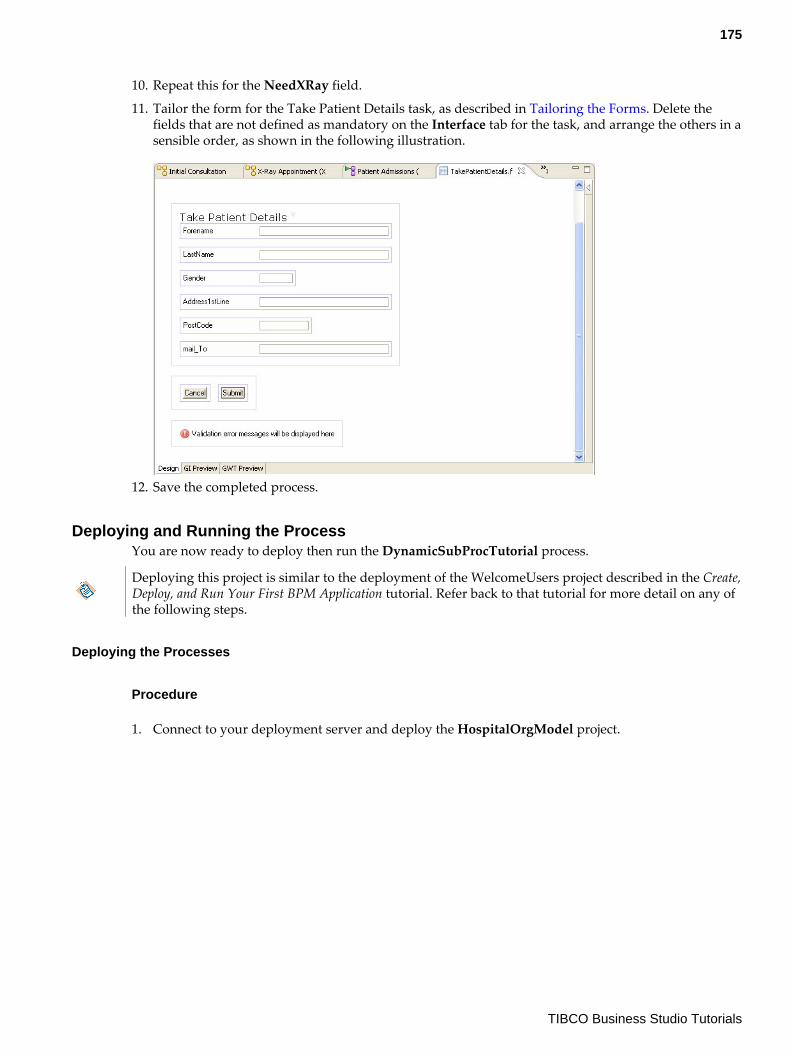
10. Repeat this for the NeedXRay field.
11. Tailor the form for the Take Patient Details task, as described in Tailoring the Forms. Delete thefields that are not defined as mandatory on the Interface tab for the task, and arrange the others in asensible order, as shown in the following illustration.
12. Save the completed process.
Deploying and Running the ProcessYou are now ready to deploy then run the DynamicSubProcTutorial process.
Deploying this project is similar to the deployment of the WelcomeUsers project described in the Create,Deploy, and Run Your First BPM Application tutorial. Refer back to that tutorial for more detail on any ofthe following steps.
Deploying the Processes
Procedure
1. Connect to your deployment server and deploy the HospitalOrgModel project.
175
TIBCO Business Studio Tutorials
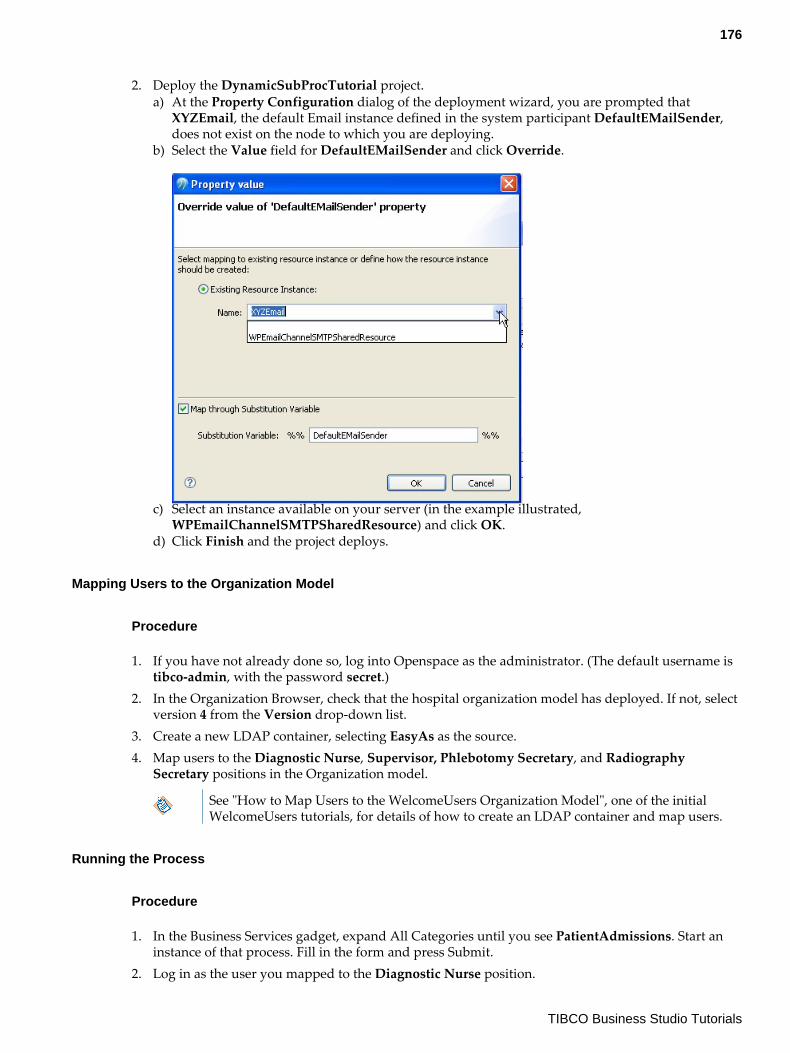
2. Deploy the DynamicSubProcTutorial project.a) At the Property Configuration dialog of the deployment wizard, you are prompted that
XYZEmail, the default Email instance defined in the system participant DefaultEMailSender,does not exist on the node to which you are deploying.
b) Select the Value field for DefaultEMailSender and click Override.
c) Select an instance available on your server (in the example illustrated,WPEmailChannelSMTPSharedResource) and click OK.
d) Click Finish and the project deploys.
Mapping Users to the Organization Model
Procedure
1. If you have not already done so, log into Openspace as the administrator. (The default username istibco-admin, with the password secret.)
2. In the Organization Browser, check that the hospital organization model has deployed. If not, selectversion 4 from the Version drop-down list.
3. Create a new LDAP container, selecting EasyAs as the source.4. Map users to the Diagnostic Nurse, Supervisor, Phlebotomy Secretary, and Radiography
Secretary positions in the Organization model.
See "How to Map Users to the WelcomeUsers Organization Model", one of the initialWelcomeUsers tutorials, for details of how to create an LDAP container and map users.
Running the Process
Procedure
1. In the Business Services gadget, expand All Categories until you see PatientAdmissions. Start aninstance of that process. Fill in the form and press Submit.
2. Log in as the user you mapped to the Diagnostic Nurse position.
176
TIBCO Business Studio Tutorials
3. There is an Intake task in your ToDo list. Select this task and complete the form. Click:
● The Yes button in the NeedXRay field● The No button in the NeedBloodTest field
4. Log in as the user you mapped to the Radiography Secretary.
5. There is an Allocate X-Ray Appointment task in your ToDo list. Select this task.
6. Select a date and time for the appointment from the gadget in the ApptTime field, and pressSubmit.
7. Log in as the user you mapped to the Supervisor position.
8. There is a Summary task in your ToDo list. Select this task and review the form. Click Submit.
9. Run some more instances of the process, specifying Yes to NeedBloodTest or to both fields.
Verifying the ResultsYou can verify the results of your tutorial by installing the tutorial from the samples folder in theproduct directory. Your project must look similar to the sample solution project.
Procedure
1. Find the DynamicSubProcTutorialSolution.zip file, in the location where you installed TIBCOBusiness Studio (for example, <STUDIO_HOME > \studio\3. n\samples).
2. In TIBCO Business Studio, select File > Import .
The Import wizard is displayed.
3. Select General > Existing Projects into Workspace and click Next.
4. Click Select archive file, and click on the Browse button.
5. Browse to the zip file and click Open.
The project is displayed in the Import wizard.
6. Click Finish.
The project is installed in your workspace.
177
TIBCO Business Studio Tutorials
Accessing External Data and Services
How to Call a Database From a ProcessYou can implement a call to a database from a business process application, and then deploy and testthat application.
Prerequisites
You should be familiar with the basics of designing, implementing and deploying process-basedapplications using TIBCO Business Studio. If you are not familiar with these things, you should runthrough the following tutorials before attempting this one:
● How to Design a Simple WelcomeUsers Business Service● How to Implement and Deploy the WelcomeUsers Application
You should work through each section in turn to complete the tutorial.
You can use a service task to establish a JDBC connection to an external database and execute adatabase operation - either a stored procedure, or a SQL query (a SELECT, INSERT, UPDATE orDELETE statement).
For simplicity, this tutorial runs a very simple query against the BPM runtime database.
Importing the GetUserLoginName Analysis ProjectTo avoid having to build the process from scratch and to focus just on the steps involved incommunicating with a database, this tutorial provides a "work in progress" project as a starting point.
This project represents the process at the handover point from business analyst to solution designer:
● The overall process, underlying business object model and organization model have all beendefined.
● The data to be passed to and from the database has been defined.● The database service call needs to be implemented.
Importing the Business Process
Import the GetUserLoginName project to your TIBCO Business Studio workspace.
Procedure
1. Start Studio for Designers.
Following this tutorial will be simpler and clearer if you close any other projects that youmay have open in your TIBCO Business Studio workspace, using the Project > CloseProject menu option.
2. To import the GetUserLoginName project into your workspace, find the getuserloginname.zip filein the location where you installed TIBCO Business Studio (for example, STUDIO_HOME\studio\3.n\samples).
3. In TIBCO Business Studio, choose File > Import . The Import wizard is displayed.
4. On the Select page, expand General, select Existing Studio Projects into Workspace and clickNext. The Import Projects page is displayed.
5. Click Select archive file, and click on the Browse button.
178
TIBCO Business Studio Tutorials
6. Browse to the zip file and click Open. The project is displayed in the Import wizard.
7. Click Finish. TIBCO Business Studio imports the GetUserLoginName project to your workspace.The project contains the processes:
Result
Process Description
GetUserName(business service /pageflow process)
This is a business service which, when started by a user:
● Displays a form to get a fragment of a user’s name.● Invokes the GetLoginName business process, passing the user’s name
as input parameters.
GetLoginName(business process)
This is a business process which, when invoked by the GetUserNamebusiness service:
● Looks up the supplied name fragment in the BPM runtime database.● Offers a user task to a member of the Customer Services
Representatives (Motor) position. The work item displays the user’s fulllogin name.
Note: Although this tutorial project uses a business service to collectthe data used as input to the web service, this is simply a convenienceto make it easy to run and test the application.
Importing the Organization Model
If you have not already done so in a previous tutorial, import the EasyAsExtendedOMSolution projectinto your workspace.
This is the organization model that is referenced by the GetLoginName project that you have imported:the participant User in the GetLoginName project is mapped to the position Customer ServiceRepresentative (Motor) in the organization model.
Creating a Database Service TaskTo call a database from a process, you use a Service task of type Database.
Procedure
1. Open the GetLoginName process.
2. Select the Get login name task.
179
TIBCO Business Studio Tutorials
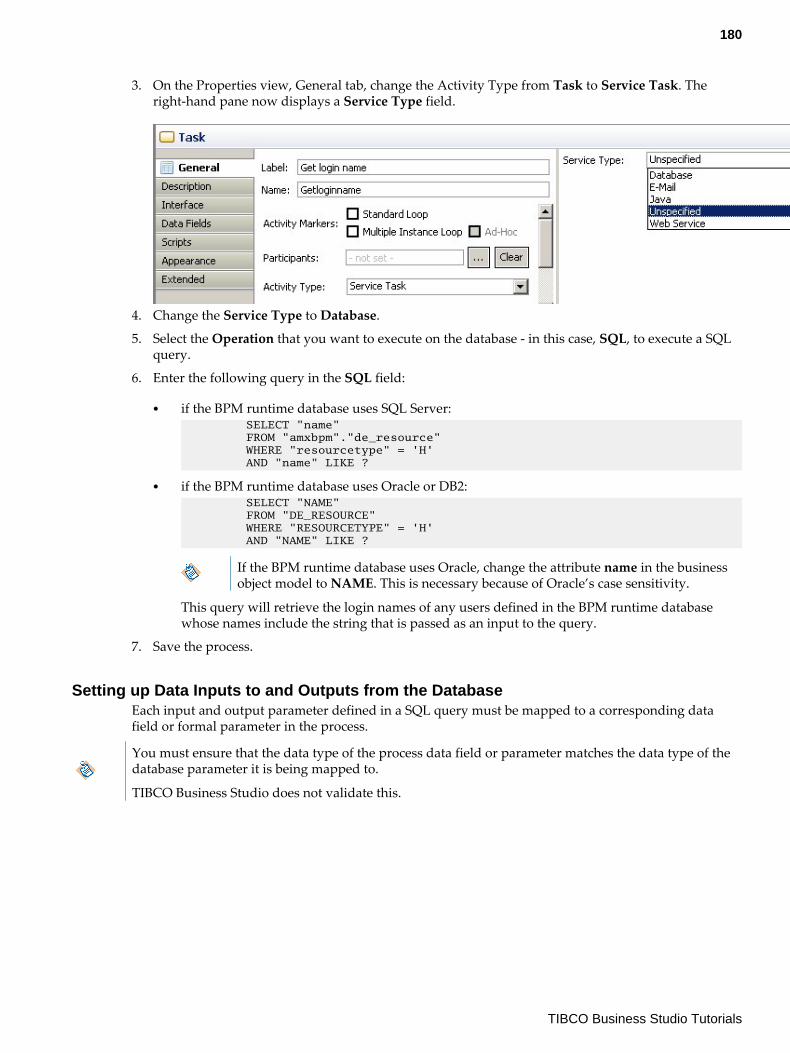
3. On the Properties view, General tab, change the Activity Type from Task to Service Task. Theright-hand pane now displays a Service Type field.
4. Change the Service Type to Database.
5. Select the Operation that you want to execute on the database - in this case, SQL, to execute a SQLquery.
6. Enter the following query in the SQL field:
● if the BPM runtime database uses SQL Server: SELECT "name" FROM "amxbpm"."de_resource" WHERE "resourcetype" = 'H' AND "name" LIKE ?
● if the BPM runtime database uses Oracle or DB2: SELECT "NAME" FROM "DE_RESOURCE" WHERE "RESOURCETYPE" = 'H' AND "NAME" LIKE ?
If the BPM runtime database uses Oracle, change the attribute name in the businessobject model to NAME. This is necessary because of Oracle’s case sensitivity.
This query will retrieve the login names of any users defined in the BPM runtime databasewhose names include the string that is passed as an input to the query.
7. Save the process.
Setting up Data Inputs to and Outputs from the DatabaseEach input and output parameter defined in a SQL query must be mapped to a corresponding datafield or formal parameter in the process.
You must ensure that the data type of the process data field or parameter matches the data type of thedatabase parameter it is being mapped to.
TIBCO Business Studio does not validate this.
180
TIBCO Business Studio Tutorials
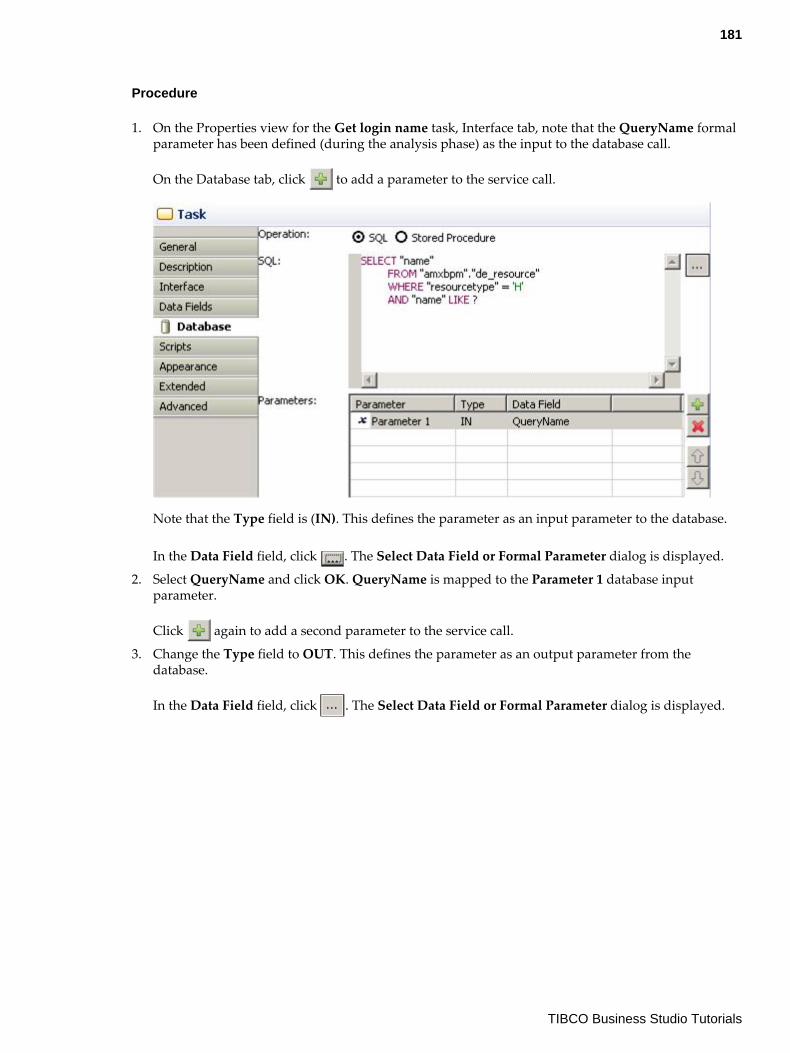
Procedure
1. On the Properties view for the Get login name task, Interface tab, note that the QueryName formalparameter has been defined (during the analysis phase) as the input to the database call.
On the Database tab, click to add a parameter to the service call.
Note that the Type field is (IN). This defines the parameter as an input parameter to the database.
In the Data Field field, click . The Select Data Field or Formal Parameter dialog is displayed.
2. Select QueryName and click OK. QueryName is mapped to the Parameter 1 database inputparameter.
Click again to add a second parameter to the service call.
3. Change the Type field to OUT. This defines the parameter as an output parameter from thedatabase.
In the Data Field field, click . The Select Data Field or Formal Parameter dialog is displayed.
181
TIBCO Business Studio Tutorials
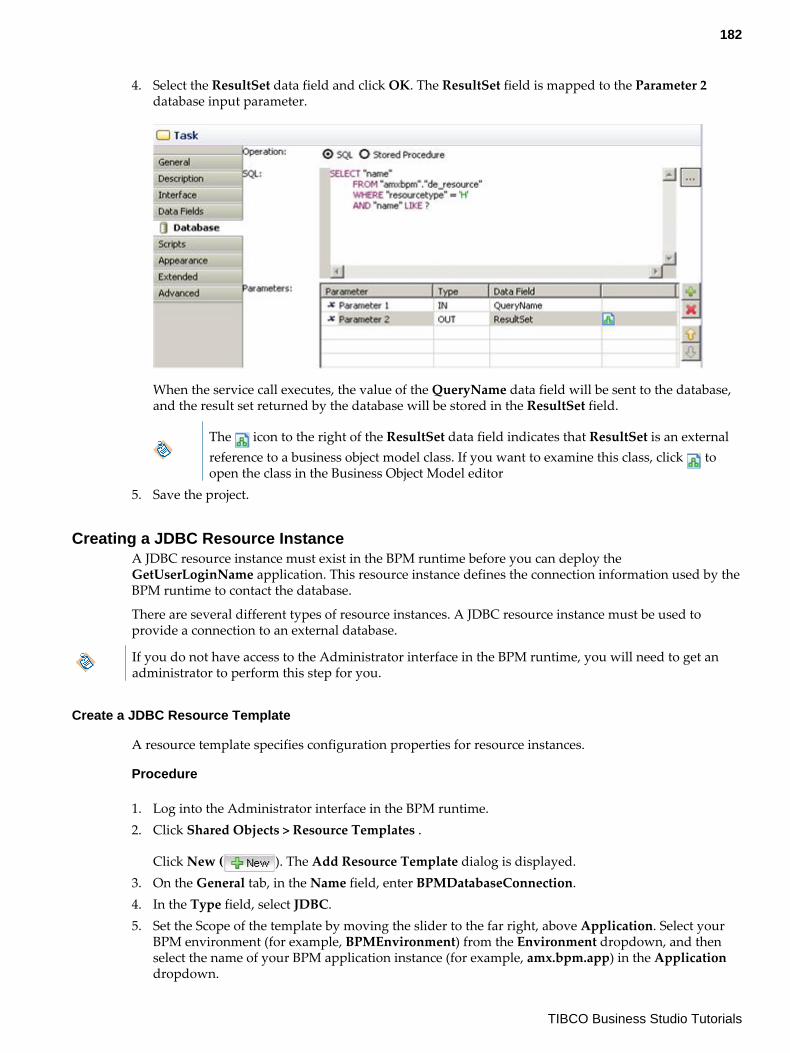
4. Select the ResultSet data field and click OK. The ResultSet field is mapped to the Parameter 2database input parameter.
When the service call executes, the value of the QueryName data field will be sent to the database,and the result set returned by the database will be stored in the ResultSet field.
The icon to the right of the ResultSet data field indicates that ResultSet is an externalreference to a business object model class. If you want to examine this class, click toopen the class in the Business Object Model editor
5. Save the project.
Creating a JDBC Resource InstanceA JDBC resource instance must exist in the BPM runtime before you can deploy theGetUserLoginName application. This resource instance defines the connection information used by theBPM runtime to contact the database.
There are several different types of resource instances. A JDBC resource instance must be used toprovide a connection to an external database.
If you do not have access to the Administrator interface in the BPM runtime, you will need to get anadministrator to perform this step for you.
Create a JDBC Resource Template
A resource template specifies configuration properties for resource instances.
Procedure
1. Log into the Administrator interface in the BPM runtime.2. Click Shared Objects > Resource Templates .
Click New ( ). The Add Resource Template dialog is displayed.3. On the General tab, in the Name field, enter BPMDatabaseConnection.4. In the Type field, select JDBC.5. Set the Scope of the template by moving the slider to the far right, above Application. Select your
BPM environment (for example, BPMEnvironment) from the Environment dropdown, and thenselect the name of your BPM application instance (for example, amx.bpm.app) in the Applicationdropdown.
182
TIBCO Business Studio Tutorials
6. In the Connection Type field, select Direct. (You must use a Direct connection, not an XAconnection.)
7. In the Database Driver, Database URL and Login Credentials sections, enter the informationneeded to connect to the BPM database. Contact your database administrator if you do not alreadyknow this information.
8. Click Save. BPMDatabaseConnection is added to the list of resource templates.
Create and Install a Resource Instance
A resource instance represents a resource shared between applications. It is then available toapplications running on that node—in this case, to the GetUserLoginName application.
Click New Resource Instances ( ). The New Resource Instances dialog isdisplayed, showing values based on the BPMDatabaseConnection template.
Procedure
1. In the Instance Name field, change the displayed value to BPMDatabaseConnection.
In the Available Nodes area, select BPMNode, then click to move it to the Selected Nodes area- that is, the node to which you want to add the resource instance.
2. Click Save and Install. BPMDatabaseConnection is installed on the node BPMNode.
For more information about the specific information needed to configure a JDBC resource instance,see the Administrator interface documentation for your BPM runtime environment.
Creating a System ParticipantA system participant must be defined and assigned to the database service task. The system participantmust be configured to identify the BPM runtime JDBC resource instance that defines the connection tothe database.
Procedure
1. In Project Explorer, expand the GetLoginName process and create a new participant in the process-level Participants folder. Name the participant DBConnection and make sure its type is System.
2. On the Properties view for the Participant, on the General tab, expand the Shared Resource entry.Select the Jdbc radio button.
3. In the Instance Name field, enter BPMDatabaseConnection, which is the name of the BPM runtimeJDBC resource instance that defines the connection to the database.
Leave the Jdbc Profile Name field blank. (See the TIBCO Business Studio BPM Implementation guidefor information on the use of this field.)
4. Assign the DBConnection participant to the Get login name database service task.5. Save the project.
Deploying the ApplicationAs part of the deployment process, you map the system participant used by the database service task tothe appropriate JDBC resource instance.
Prerequisites
You must have created the XYZ Work Server1 Deployment Server, as described in the How toImplement and Deploy the WelcomeUsers Application tutorial.
183
TIBCO Business Studio Tutorials
If you have already deployed the EasyAsExtendedOMSolution organization model as part of anothertutorial, you can skip Deploying the EasyAsExtendedOMSolution Organization Modeland go straightto Deploying the GetUserLoginName Application.
The EasyAsExtendedOMSolution organization model is used by the user tasks in the GetLoginNameprocess that collect and display the data used in the database service call. It is not required toimplement the database service task itself.
Deploying the EasyAsExtendedOMSolution Organization Model
Procedure
1. In the Deployment Servers view, right-click XYZ Work Server1 and click Deploy Module. TheDeploy Module(s) wizard is displayed.
2. Select Deploy BPM Project then click Next. The Select Project dialog is displayed.
3. Select EasyAsExtendedOMSolution as the project to deploy.
4. Click Next. There is a short pause while the necessary files generate and then the AdministratorSetup dialog is displayed.
5. Click Finish. The Progress Dialog is displayed while deployment takes place, and should indicatethat deployment has finished with no errors. Progress messages are also displayed in the Consoleview.
6. Click OK.
7. In the Deployment Server view, expand XYZServer1 > BPMEnvironment > Applications . Aneasyasextendedomsolution entry is displayed, indicating that the application has been deployed tothe BPM runtime.
Deploying the GetUserLoginName Application
Procedure
1. In the Deployment Servers view, right-click XYZ Work Server1 and click Deploy Module. TheDeploy Module(s) wizard is displayed.
2. Select Deploy BPM Project then click Next. The Select Project dialog is displayed.
3. Select GetUserLoginName as the project to deploy.
4. Click Next. There is a short pause while the necessary files generate and then the AdministratorSetup dialog is displayed.
184
TIBCO Business Studio Tutorials
5. Click Next. The Property Configuration dialog is displayed. The list identifies the systemparticipants used in the process:
● DBConnection1 is used by the Get login name database service task. Note that the value isDBConnection1, rather than the name of the system participant, which is DBConnection.
● HttpInboundConnectionConfig is used by the Start Event to expose the process as avirtualized service to the GetUserName business service.
DBConnection1 is the name of a runtime substitution variable which TIBCO BusinessStudio creates automatically from the DBConnection system participant name.
Using a substitution variable to identify the system participant makes it easy tochange the resource instance used by the application at runtime, without having toredeploy the application.
See the Administrator interface documentation for your BPM runtime environmentfor more information about substitution variables.
6. Click Finish. The Progress Dialog is displayed while deployment takes place, and should indicatethat deployment has finished with no errors. Progress messages are also displayed in the Consoleview.
7. In the Deployment Servers view, expand XYZServer1 > BPMEnvironment > Applications . Acom.example.getuserloginname entry is displayed, indicating that the application has beendeployed to the BPM runtime.
8. In the Deployment Servers view, right-click XYZ Work Server1 and select Open > Administrator >in web browser . The login screen for the Administrator interface in the BPM runtime is displayed.
9. Log in using an appropriate username and password.
10. Click Applications. The list of available applications is displayed.
11. Check that com.example.getuserloginname has deployed successfully. Its Runtime State should beRunning. Its Action Status should be Deploy with Start Successful.
12. Log out from Administrator.
Testing the ApplicationYou can test the application by running an instance of it in Workspace.
For more information, refer:
● How to Map Users to the WelcomeUsers Organization Model● How to Run the WelcomeUsers Application
Procedure
1. In the Deployment Servers view, right-click XYZ Work Server1 and select Open > TIBCOOpenspace . The Openspace login screen is displayed.
2. Log in as user tibco-admin.
3. Open the Organization Browser.
4. If Organization Model - Version: 2 is not already displayed, select 2 from the Version dropdownmenu. This displays the organization model version that contains theEasyAsExtendedOMSolution, and which is referenced by the GetUserLoginName application.
5. Map a user to the CustomerServiceRepresentativeMotor position.
6. Click Business Services.
7. Select and start the GetUserName business service.
185
TIBCO Business Studio Tutorials
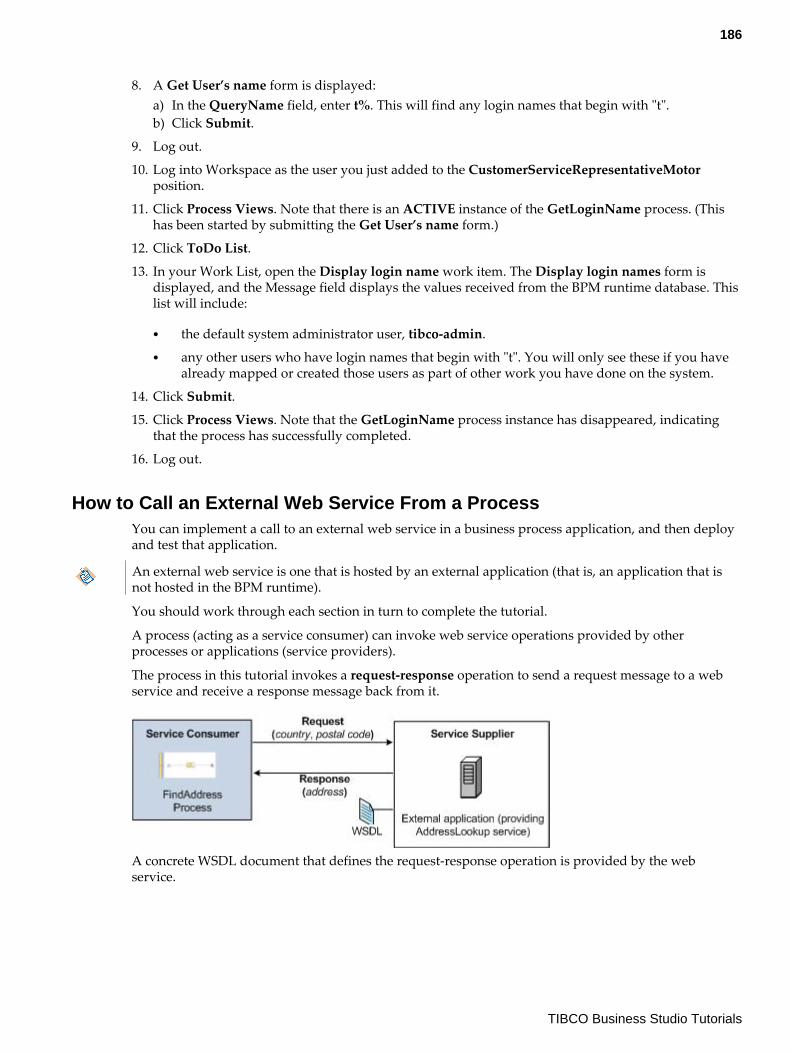
8. A Get User’s name form is displayed:a) In the QueryName field, enter t%. This will find any login names that begin with "t".b) Click Submit.
9. Log out.
10. Log into Workspace as the user you just added to the CustomerServiceRepresentativeMotorposition.
11. Click Process Views. Note that there is an ACTIVE instance of the GetLoginName process. (Thishas been started by submitting the Get User’s name form.)
12. Click ToDo List.
13. In your Work List, open the Display login name work item. The Display login names form isdisplayed, and the Message field displays the values received from the BPM runtime database. Thislist will include:
● the default system administrator user, tibco-admin.● any other users who have login names that begin with "t". You will only see these if you have
already mapped or created those users as part of other work you have done on the system.
14. Click Submit.
15. Click Process Views. Note that the GetLoginName process instance has disappeared, indicatingthat the process has successfully completed.
16. Log out.
How to Call an External Web Service From a ProcessYou can implement a call to an external web service in a business process application, and then deployand test that application.
An external web service is one that is hosted by an external application (that is, an application that isnot hosted in the BPM runtime).
You should work through each section in turn to complete the tutorial.
A process (acting as a service consumer) can invoke web service operations provided by otherprocesses or applications (service providers).
The process in this tutorial invokes a request-response operation to send a request message to a webservice and receive a response message back from it.
A concrete WSDL document that defines the request-response operation is provided by the webservice.
186
TIBCO Business Studio Tutorials
From this tutorial you will learn:
● to use a service task to call an external web service from a business process, using a concrete WSDLprovided by the web service. See "Calling a Web Service" in the TIBCO ActiveMatrix BPMImplementation Guide.
● to import a WSDL into a project and associate it with a web service task. See "Using Web Services"in the TIBCO ActiveMatrix BPM Implementation Guide.
● to create and install an HTTP Client resource instance from a resource template, using theAdministrator interface in the BPM runtime.See "Exposing a Web Service" in the TIBCOActiveMatrix BPM Implementation Guide.
● to map the system participant used by a web service task to a BPM runtime HTTP Client resourceinstance. See "Calling a Web Service" in the TIBCO ActiveMatrix BPM Implementation Guide.
Prerequisites
You should be familiar with the basic concepts and principles involved in calling web services.
You should be familiar with the basics of designing, implementing and deploying process-basedapplications using TIBCO Business Studio. If you are not familiar with these things, you should runthrough the following tutorials before attempting this one:
● How to Design a Simple WelcomeUsers Business Service● How to Implement and Deploy the WelcomeUsers Application
This tutorial implements a call to an Apache Axis2 web service called UKAddressService. Before youbegin, you must deploy this web service to a J2EE server (such as Apache Tomcat) that is runningversion 1.4.1 of the Axis2 engine. To do this:
Procedure
1. Find the UKAddressService.zip file in the location where you installed TIBCO Business Studio.
2. Copy the zip file to a temporary directory and unzip it. It contains a single Axis2 web servicearchive, UKAddressService.aar.
3. Deploy the UKAddressService.aar file to a J2EE server that is running the Axis2 engine, version1.4.1.
See http://ws.apache.org/axis2/index.html for more information about Axis2.
4. Make sure that the UKAddressService web service has been properly deployed and is running.
Importing the FindAddress Analysis ProjectTo avoid having to build the process from scratch and focus just on the steps involved in calling a webservice, the tutorial provides a "work in progress" project as a starting point.
The project represents the process at the handover point from business analyst to solution designer:
● The overall process and organization model have all been defined.● The data to be passed to and from the web service has been defined.● The web service call needs to be implemented.
Importing the Business Process
187
TIBCO Business Studio Tutorials
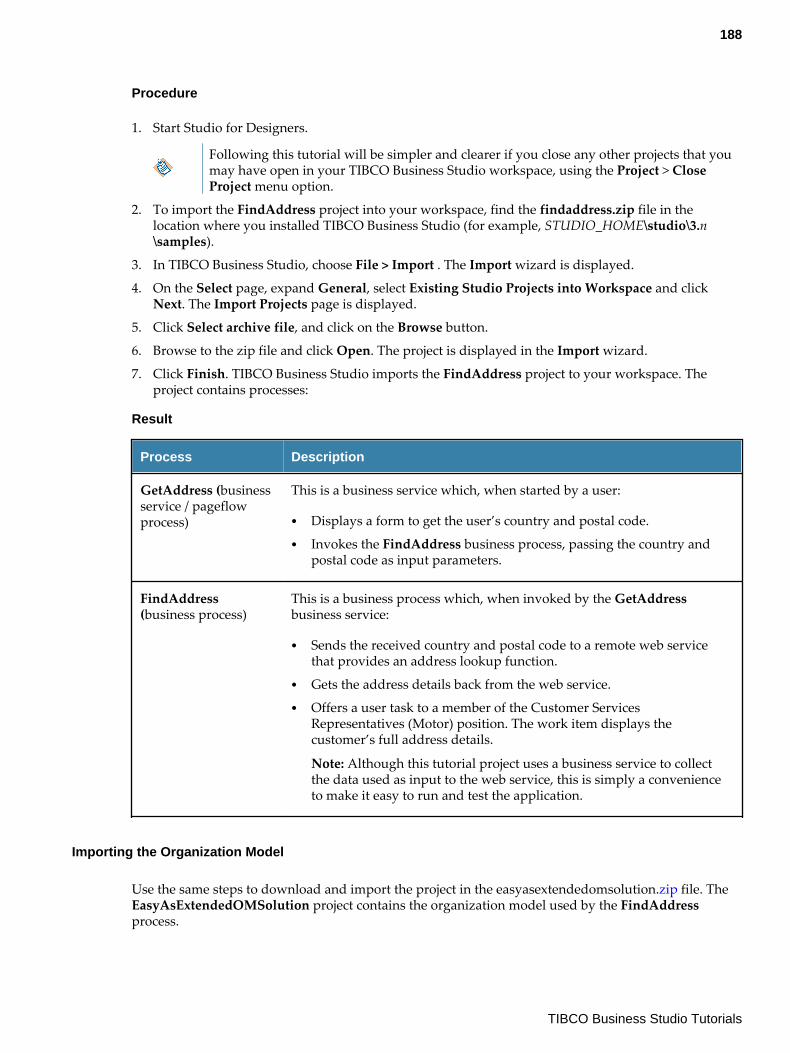
Procedure
1. Start Studio for Designers.
Following this tutorial will be simpler and clearer if you close any other projects that youmay have open in your TIBCO Business Studio workspace, using the Project > CloseProject menu option.
2. To import the FindAddress project into your workspace, find the findaddress.zip file in thelocation where you installed TIBCO Business Studio (for example, STUDIO_HOME\studio\3.n\samples).
3. In TIBCO Business Studio, choose File > Import . The Import wizard is displayed.
4. On the Select page, expand General, select Existing Studio Projects into Workspace and clickNext. The Import Projects page is displayed.
5. Click Select archive file, and click on the Browse button.
6. Browse to the zip file and click Open. The project is displayed in the Import wizard.
7. Click Finish. TIBCO Business Studio imports the FindAddress project to your workspace. Theproject contains processes:
Result
Process Description
GetAddress (businessservice / pageflowprocess)
This is a business service which, when started by a user:
● Displays a form to get the user’s country and postal code.● Invokes the FindAddress business process, passing the country and
postal code as input parameters.
FindAddress(business process)
This is a business process which, when invoked by the GetAddressbusiness service:
● Sends the received country and postal code to a remote web servicethat provides an address lookup function.
● Gets the address details back from the web service.● Offers a user task to a member of the Customer Services
Representatives (Motor) position. The work item displays thecustomer’s full address details.
Note: Although this tutorial project uses a business service to collectthe data used as input to the web service, this is simply a convenienceto make it easy to run and test the application.
Importing the Organization Model
Use the same steps to download and import the project in the easyasextendedomsolution.zip file. TheEasyAsExtendedOMSolution project contains the organization model used by the FindAddressprocess.
188
TIBCO Business Studio Tutorials
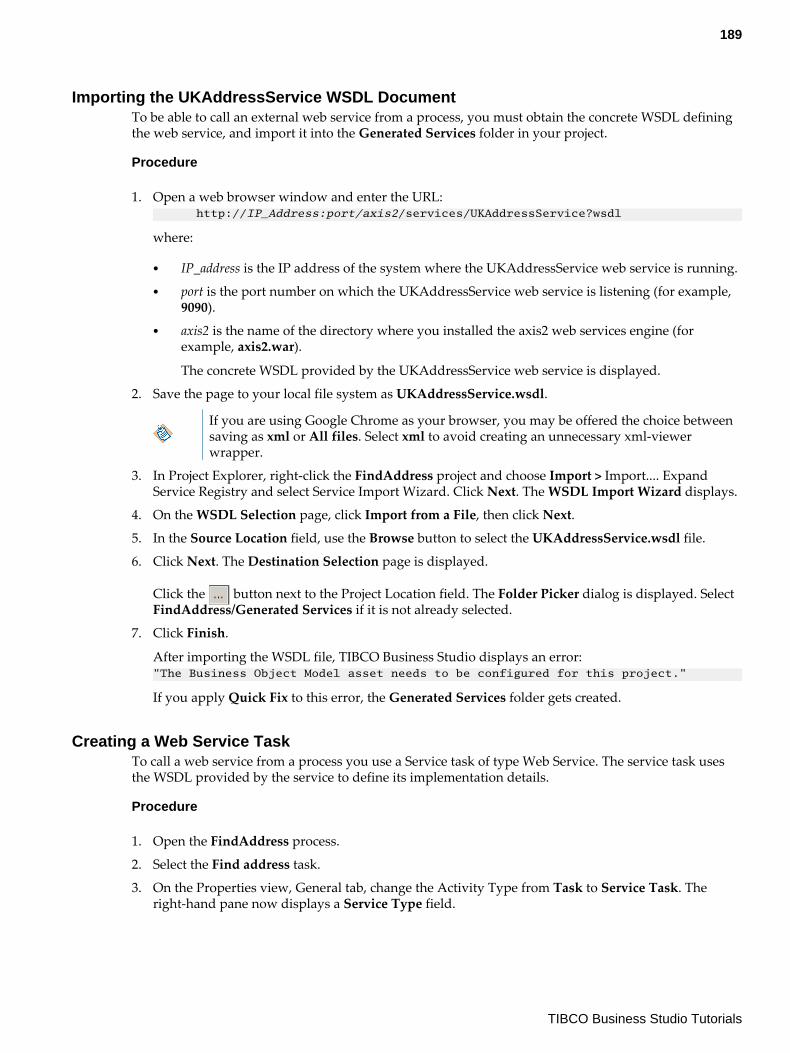
Importing the UKAddressService WSDL DocumentTo be able to call an external web service from a process, you must obtain the concrete WSDL definingthe web service, and import it into the Generated Services folder in your project.
Procedure
1. Open a web browser window and enter the URL: http://IP_Address:port/axis2/services/UKAddressService?wsdl
where:
● IP_address is the IP address of the system where the UKAddressService web service is running.● port is the port number on which the UKAddressService web service is listening (for example,
9090).● axis2 is the name of the directory where you installed the axis2 web services engine (for
example, axis2.war).
The concrete WSDL provided by the UKAddressService web service is displayed.
2. Save the page to your local file system as UKAddressService.wsdl.
If you are using Google Chrome as your browser, you may be offered the choice betweensaving as xml or All files. Select xml to avoid creating an unnecessary xml-viewerwrapper.
3. In Project Explorer, right-click the FindAddress project and choose Import > Import.... ExpandService Registry and select Service Import Wizard. Click Next. The WSDL Import Wizard displays.
4. On the WSDL Selection page, click Import from a File, then click Next.
5. In the Source Location field, use the Browse button to select the UKAddressService.wsdl file.
6. Click Next. The Destination Selection page is displayed.
Click the button next to the Project Location field. The Folder Picker dialog is displayed. SelectFindAddress/Generated Services if it is not already selected.
7. Click Finish.
After importing the WSDL file, TIBCO Business Studio displays an error:"The Business Object Model asset needs to be configured for this project."
If you apply Quick Fix to this error, the Generated Services folder gets created.
Creating a Web Service TaskTo call a web service from a process you use a Service task of type Web Service. The service task usesthe WSDL provided by the service to define its implementation details.
Procedure
1. Open the FindAddress process.
2. Select the Find address task.
3. On the Properties view, General tab, change the Activity Type from Task to Service Task. Theright-hand pane now displays a Service Type field.
189
TIBCO Business Studio Tutorials
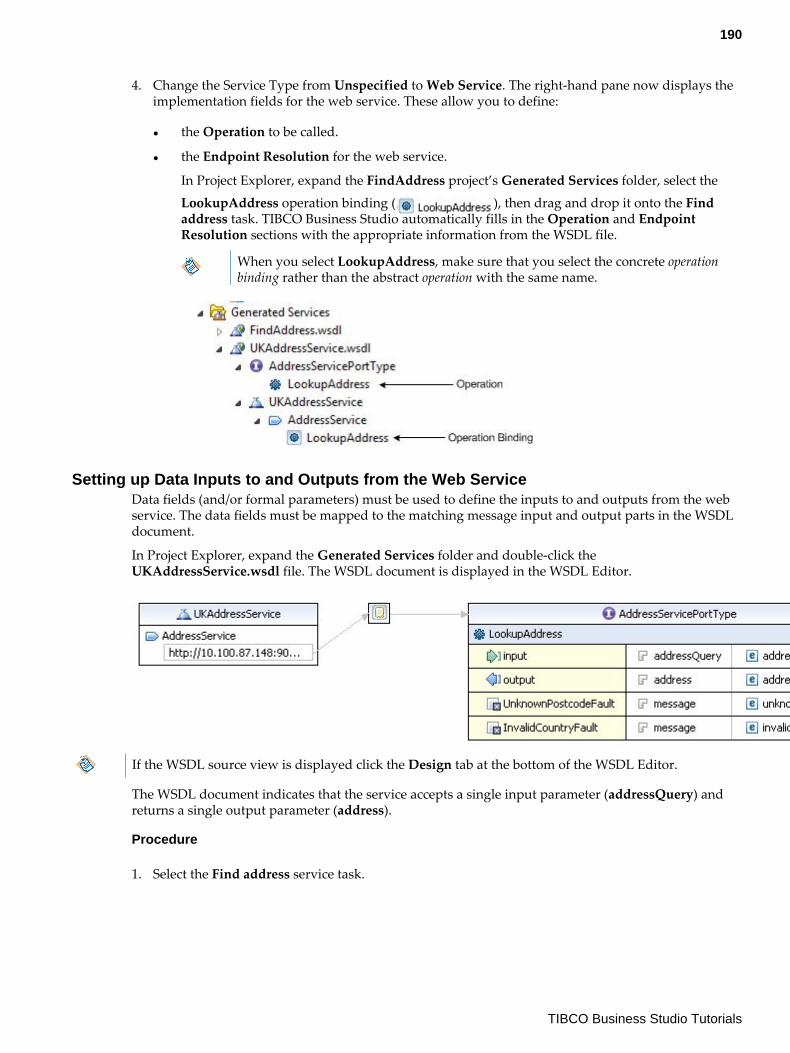
4. Change the Service Type from Unspecified to Web Service. The right-hand pane now displays theimplementation fields for the web service. These allow you to define:
● the Operation to be called.
● the Endpoint Resolution for the web service.
In Project Explorer, expand the FindAddress project’s Generated Services folder, select the
LookupAddress operation binding ( ), then drag and drop it onto the Findaddress task. TIBCO Business Studio automatically fills in the Operation and EndpointResolution sections with the appropriate information from the WSDL file.
When you select LookupAddress, make sure that you select the concrete operationbinding rather than the abstract operation with the same name.
Setting up Data Inputs to and Outputs from the Web ServiceData fields (and/or formal parameters) must be used to define the inputs to and outputs from the webservice. The data fields must be mapped to the matching message input and output parts in the WSDLdocument.
In Project Explorer, expand the Generated Services folder and double-click theUKAddressService.wsdl file. The WSDL document is displayed in the WSDL Editor.
If the WSDL source view is displayed click the Design tab at the bottom of the WSDL Editor.
The WSDL document indicates that the service accepts a single input parameter (addressQuery) andreturns a single output parameter (address).
Procedure
1. Select the Find address service task.
190
TIBCO Business Studio Tutorials
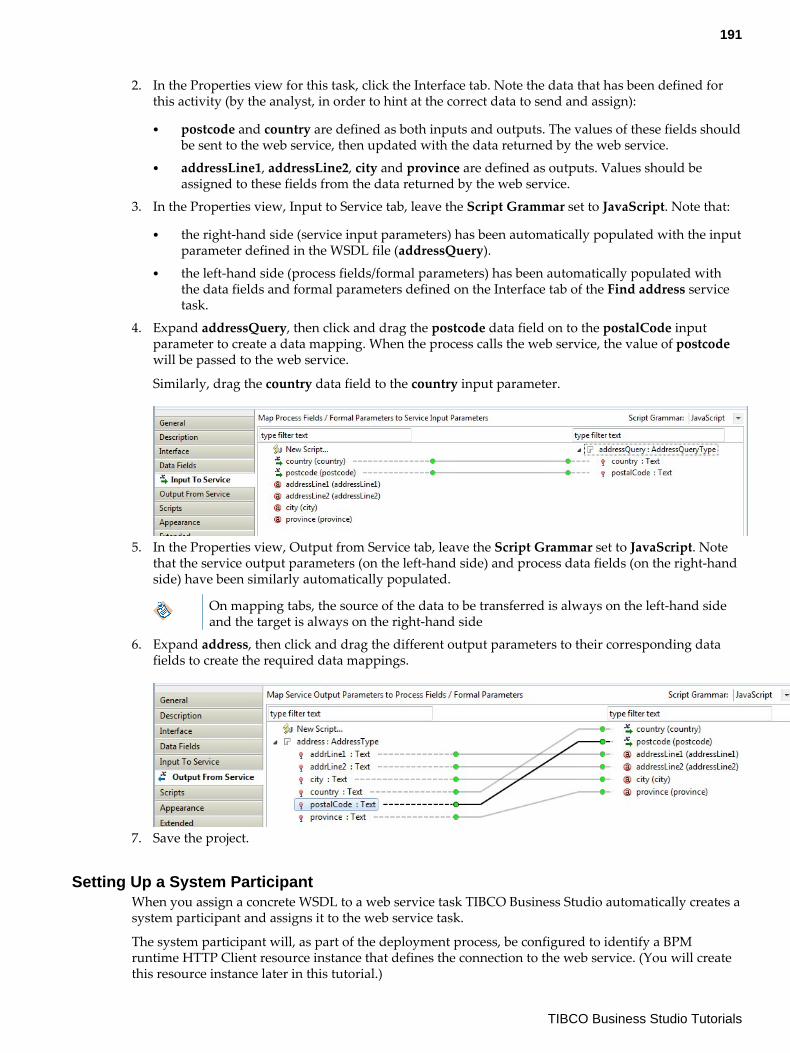
2. In the Properties view for this task, click the Interface tab. Note the data that has been defined forthis activity (by the analyst, in order to hint at the correct data to send and assign):
● postcode and country are defined as both inputs and outputs. The values of these fields shouldbe sent to the web service, then updated with the data returned by the web service.
● addressLine1, addressLine2, city and province are defined as outputs. Values should beassigned to these fields from the data returned by the web service.
3. In the Properties view, Input to Service tab, leave the Script Grammar set to JavaScript. Note that:
● the right-hand side (service input parameters) has been automatically populated with the inputparameter defined in the WSDL file (addressQuery).
● the left-hand side (process fields/formal parameters) has been automatically populated withthe data fields and formal parameters defined on the Interface tab of the Find address servicetask.
4. Expand addressQuery, then click and drag the postcode data field on to the postalCode inputparameter to create a data mapping. When the process calls the web service, the value of postcodewill be passed to the web service.
Similarly, drag the country data field to the country input parameter.
5. In the Properties view, Output from Service tab, leave the Script Grammar set to JavaScript. Notethat the service output parameters (on the left-hand side) and process data fields (on the right-handside) have been similarly automatically populated.
On mapping tabs, the source of the data to be transferred is always on the left-hand sideand the target is always on the right-hand side
6. Expand address, then click and drag the different output parameters to their corresponding datafields to create the required data mappings.
7. Save the project.
Setting Up a System ParticipantWhen you assign a concrete WSDL to a web service task TIBCO Business Studio automatically creates asystem participant and assigns it to the web service task.
The system participant will, as part of the deployment process, be configured to identify a BPMruntime HTTP Client resource instance that defines the connection to the web service. (You will createthis resource instance later in this tutorial.)
191
TIBCO Business Studio Tutorials
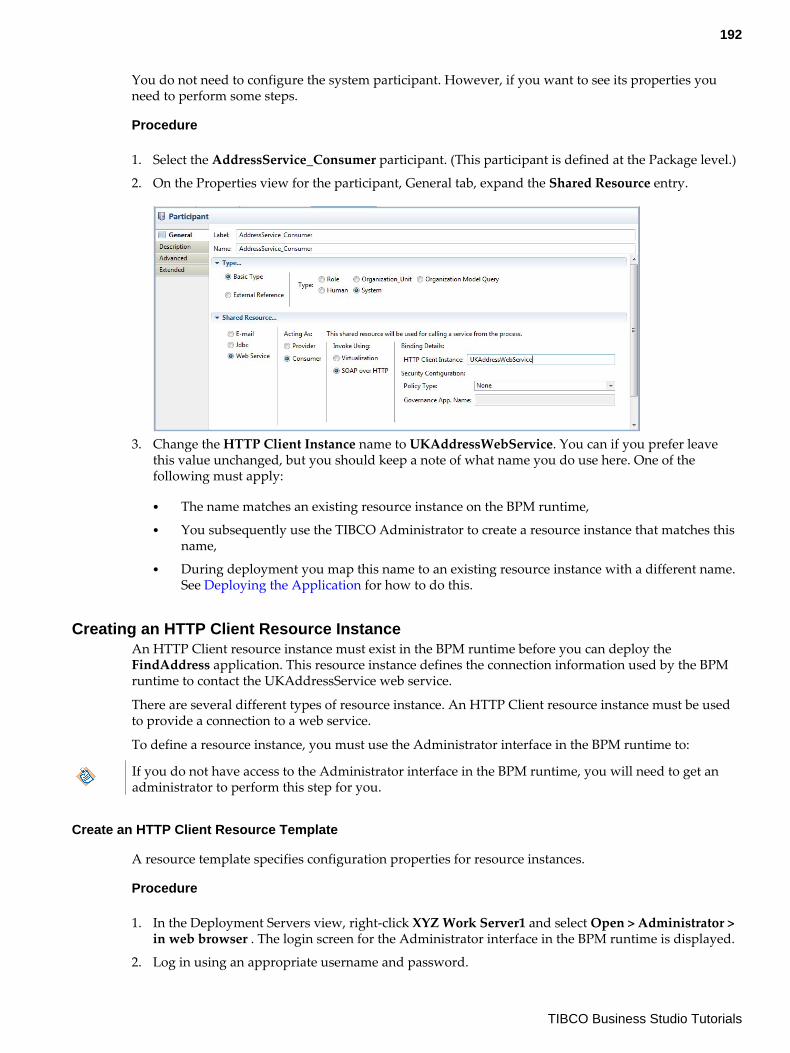
You do not need to configure the system participant. However, if you want to see its properties youneed to perform some steps.
Procedure
1. Select the AddressService_Consumer participant. (This participant is defined at the Package level.)
2. On the Properties view for the participant, General tab, expand the Shared Resource entry.
3. Change the HTTP Client Instance name to UKAddressWebService. You can if you prefer leavethis value unchanged, but you should keep a note of what name you do use here. One of thefollowing must apply:
● The name matches an existing resource instance on the BPM runtime,● You subsequently use the TIBCO Administrator to create a resource instance that matches this
name,● During deployment you map this name to an existing resource instance with a different name.
See Deploying the Application for how to do this.
Creating an HTTP Client Resource InstanceAn HTTP Client resource instance must exist in the BPM runtime before you can deploy theFindAddress application. This resource instance defines the connection information used by the BPMruntime to contact the UKAddressService web service.
There are several different types of resource instance. An HTTP Client resource instance must be usedto provide a connection to a web service.
To define a resource instance, you must use the Administrator interface in the BPM runtime to:
If you do not have access to the Administrator interface in the BPM runtime, you will need to get anadministrator to perform this step for you.
Create an HTTP Client Resource Template
A resource template specifies configuration properties for resource instances.
Procedure
1. In the Deployment Servers view, right-click XYZ Work Server1 and select Open > Administrator >in web browser . The login screen for the Administrator interface in the BPM runtime is displayed.
2. Log in using an appropriate username and password.
192
TIBCO Business Studio Tutorials
3. Click Shared Objects > Resource Templates .
Click New ( ). The Add Resource Template dialog is displayed.
4. In the Type field, select HTTP Client.
5. In the Name field, enter UKAddressServiceTemplate.
If this does not match the Binding Details on the Properties view for the Participant. you willneed to override the discrepancy at deployment time.
6. Set the Scope of the template by moving the slider to the far right, above Application. Select yourBPM environment (for example, BPMEnvironment) from the Environment dropdown, and thenselect the name of your BPM application instance (for example, amx.bpm.app) in the Applicationdropdown.
7. In the Machine Name field, enter the IP address of the system where the UKAddressService webservice is running.
8. In the Port field, change the default value (80) to the port number on which the web service islistening.
9. Click Save. UKAddressServiceTemplate is added to the list of resource templates.
Create and Install an HTTP Client Resource Instance
A resource instance represents a resource shared between applications. It is then available toapplications running on that node—in this case, to the FindAddress application.
This step assumes that you have created the XYZ Work Server1 Deployment Server, as described in theHow to Implement and Deploy the WelcomeUsers Application tutorial.
Click New Resource Instances ( ). The New Resource Instances dialog isdisplayed, with the Resource Template set to UKAddressServiceTemplate and the Type to Httpclient.
Procedure
1. In the Instance Name field, change the displayed value to UKAddressWebService.
2. In the Host column, click SystemHost.
In the Available Nodes area, select BPMNode, then click to move it to the Selected Nodes area- that is, the node to which you want to add the resource instance.
3. Click Save and Install. UKAddressWebService is installed on the node BPMNode.
Deploying the ApplicationAs part of the deployment process, you map the system participant used by the web service task to theHTTP Client resource instance you created earlier.
If you have already deployed the EasyAsExtendedOMSolution organization model as part of anothertutorial, you can skip and go straight to .
The EasyAsExtendedOMSolution organization model is used by the user task in the FindAddressprocess. It is not required to implement the web service task itself.
Deploy the EasyAsExtendedOMSolution Organization Model
193
TIBCO Business Studio Tutorials
Procedure
1. In the Deployment Servers view, right-click XYZ Work Server1 and click Connect, then clickDeploy Module.The Deploy Module(s) wizard is displayed.
2. Select Deploy BPM Project then click Next. The Select Project dialog is displayed.
3. Select EasyAsExtendedOMSolution as the module to deploy.
4. Click Next. There is a short pause while the necessary files generate and then the AdministratorSetup dialog is displayed.
5. Click Finish. The Progress Dialog is displayed while deployment takes place, and should indicatethat deployment has finished with no errors. Progress messages are also displayed in the Consoleview.
6. Click OK.
7. In the Deployment Servers view, expand XYZServer1 > BPMEnvironment > Applications . Acom.example.easyasextendedomsolution entry is displayed, indicating that the application hasbeen deployed to the BPM runtime.
Deploy the FindAddress Application
Procedure
1. In the Deployment Servers view, right-click XYZ Work Server1 and click Deploy Module. TheDeploy Module(s) wizard is displayed.
2. Select Deploy BPM Project then click Next. The Select Project dialog is displayed.
3. Select FindAddress as the module to deploy.
4. Click Next. The Administrator Setup dialog is displayed.
194
TIBCO Business Studio Tutorials
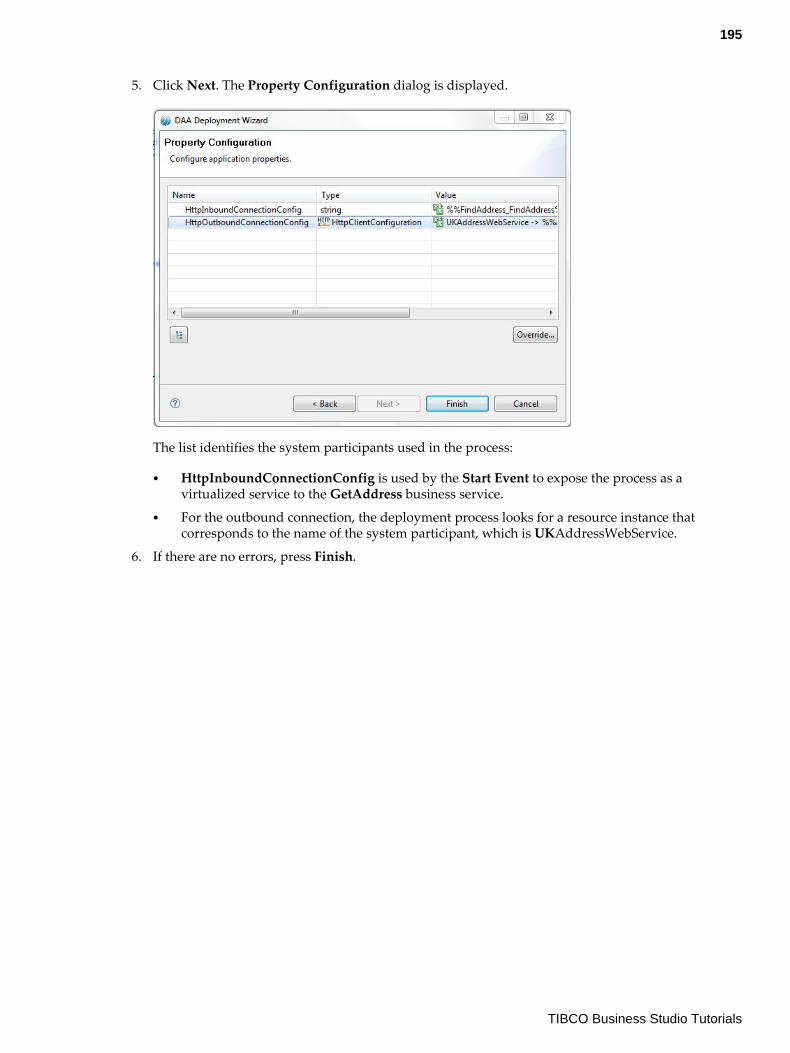
5. Click Next. The Property Configuration dialog is displayed.
The list identifies the system participants used in the process:
● HttpInboundConnectionConfig is used by the Start Event to expose the process as avirtualized service to the GetAddress business service.
● For the outbound connection, the deployment process looks for a resource instance thatcorresponds to the name of the system participant, which is UKAddressWebService.
6. If there are no errors, press Finish.
195
TIBCO Business Studio Tutorials
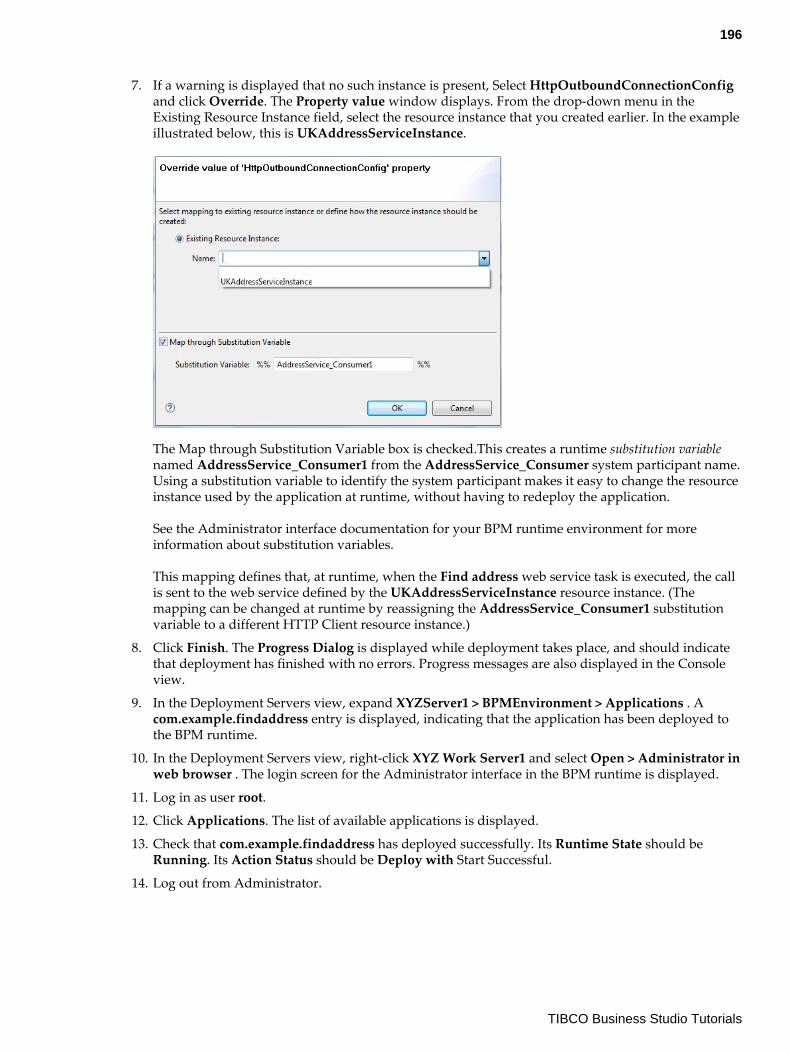
7. If a warning is displayed that no such instance is present, Select HttpOutboundConnectionConfigand click Override. The Property value window displays. From the drop-down menu in theExisting Resource Instance field, select the resource instance that you created earlier. In the exampleillustrated below, this is UKAddressServiceInstance.
The Map through Substitution Variable box is checked.This creates a runtime substitution variablenamed AddressService_Consumer1 from the AddressService_Consumer system participant name.Using a substitution variable to identify the system participant makes it easy to change the resourceinstance used by the application at runtime, without having to redeploy the application.
See the Administrator interface documentation for your BPM runtime environment for moreinformation about substitution variables.
This mapping defines that, at runtime, when the Find address web service task is executed, the callis sent to the web service defined by the UKAddressServiceInstance resource instance. (Themapping can be changed at runtime by reassigning the AddressService_Consumer1 substitutionvariable to a different HTTP Client resource instance.)
8. Click Finish. The Progress Dialog is displayed while deployment takes place, and should indicatethat deployment has finished with no errors. Progress messages are also displayed in the Consoleview.
9. In the Deployment Servers view, expand XYZServer1 > BPMEnvironment > Applications . Acom.example.findaddress entry is displayed, indicating that the application has been deployed tothe BPM runtime.
10. In the Deployment Servers view, right-click XYZ Work Server1 and select Open > Administrator inweb browser . The login screen for the Administrator interface in the BPM runtime is displayed.
11. Log in as user root.
12. Click Applications. The list of available applications is displayed.
13. Check that com.example.findaddress has deployed successfully. Its Runtime State should beRunning. Its Action Status should be Deploy with Start Successful.
14. Log out from Administrator.
196
TIBCO Business Studio Tutorials
Testing the ApplicationYou can now test the application by running an instance of it in Workspace.
If you need more information about the steps in the given procedure, see the following tutorials:
● How to Map Users to the WelcomeUsers Organization Model● How to Run the WelcomeUsers Application
Procedure
1. In the Deployment Servers view, right-click XYZ Work Server1 and select Open > TIBCOOpenspace . The Openspace login screen is displayed.
2. Log in as user tibco-admin.
3. Click Organization. The Organization Browser displays.
4. If it is not already displayed, select Display Version: 2 from the Version dropdown menu. Thisdisplays the organization model version that contains the EasyAsExtendedOMSolution, and whichis referenced by the FindAddress application.
5. Map a user to the CustomerServiceRepresentativeMotor position.
6. Click Business Services.
7. Select and start the GetAddress business service.
8. A Get User Details form is displayed:a) In the country field, enter UK.b) In the postcode field, enter SN2 8BLc) Click Submit.
9. Click Process Views. Note that there is an ACTIVE instance of the FindAddress process. (This hasbeen started by submitting the Get user details form.)
10. Log out.
11. Log in again as the user you just added to the CustomerServiceRepresentativeMotor position.
12. Click Work Views (if it is not already selected).
13. In your Inbox, open the Display Address work item.
The Display message form is displayed, showing the full address details received from theUKAddressService web service - 4 Apple Walk, Kembrey Park, Swindon, Wiltshire, SN2 8BL, UK.
14. Click Submit.
15. Click Process Views. Note that the FindAddress process instance has disappeared, indicating thatthe process has successfully completed.
Process instances are removed from the Process Views when they complete, or when theyfail or are cancelled. You can use Event Views to find out more about what happened to aprocess instance. See the Workspace Help for more information.
16. Log out.
Importing a Tutorial SolutionYou can import the solution to the tutorial.
197
TIBCO Business Studio Tutorials
Prerequisites
Procedure
1. Find the FindAddressSolution.zip file in the location where you installed TIBCO Business Studio(for example, STUDIO_HOME\studio\3.n\samples).
2. In TIBCO Business Studio, select File > Import .
3. The Import wizard is displayed. Select General > Existing Projects into Workspace and click Next.
4. Click Select archive file, and click on the Browse button.
5. Browse to your local copy of the zip file and click Open. The project is displayed in the Importwizard.
6. Click Finish. The project is installed in your workspace.
How to Call a Secured External Web Service From a ProcessIn order to perform to enable a business process application to call a secured external web service, youneed to perform some steps.
This tutorial will make you familiar with:
● configuring the BPM runtime to call a particular secured external web service, by digitally signingan outgoing SOAP message using (in this example) an X.509 certificate.
● configuring a business process application to call that secured external web service, by assigning theappropriate security policy to the system participant that identifies the web service endpoint.
There are no initial resources or solutions for this tutorial. The tutorial assumes that you already knowhow to create a business process application to implement a call to an external web service, and thenhow to deploy and test that application.
You should work through each section in turn to complete the tutorial.
● The BPM runtime can be configured to provide message-level security when a business processapplication invokes a secured external web service.
● The BPM runtime implements the following message-level security mechanisms (defined by theWS-Security specification):
— Authentication - A security token is inserted into the outgoing SOAP message. The serviceprovider examines the token to validate the identity of the entity that is trying to invoke theweb service.
— Integrity - The outgoing SOAP message is signed with an XML digital signature. The serviceprovider validates the signature to ensure that the message has not been changed in transit.
● Specific security requirements are encapsulated in policy templates that are applied to businessprocess applications. Currently supported policies are:
— Security Assertion Markup Language (SAML) "Sender Vouches" token, which provides SingleSign-On (SSO).
— X.509 certificate— UsernameToken
● At design-time, the solution designer specifies the information that will be used by the callingprocess—the policy template to be used and the specific runtime information required.
● At runtime, an identity provider resource instance intercepts the outgoing message and enforces therequired policy with the appropriate runtime information.
198
TIBCO Business Studio Tutorials
Prerequisites
● that you know how to implement a call to an external web service in a business process application,and then how to deploy and test that application. If you are not already familiar with these topics,run through the How to Call an External Web Service From a Process tutorial before attempting thisone.
● that you are familiar with web service security concepts and techniques.● the use of an X.509 certificate.
For More Information
If you wish to call an external web service that is secured using a SAML "Sender Vouches" token or aUsernameToken, you will need to follow similar steps to those described in this tutorial. Refer to theAdministrator interface documentation for your BPM runtime environment for more information.
Obtaining and Distributing the Required Security CredentialsThe credentials needed to contact the secured service must be made available to both the BPM runtimenode (acting as the service consumer) and the system hosting the web service (the service provider):
● The private key must be available on the BPM runtime node, so that the identity providerapplication can use it to generate the necessary security information in the (outgoing) SOAPmessage.
● The associated public key/certificate must be available on the external system hosting the webservice, so that the service can use it to validate the security information received in the (incoming)SOAP message.
Depending on the scenario, these credentials may be generated and distributed by either party. For thisexample, we assume that the service provider has:
● generated the credentials required to access the service (as a private key/certificate entry in itskeystore).
● stored the corresponding public key/certificate in its own trusted store.● given a copy of the keystore file containing the private key to the BPM runtime administrator, who
has copied it to the BPM runtime node.
You do not need to do anything further. As background information, the following sections provideexamples of the commands required to create and distribute the necessary credentials to both parties,using the Java keytool utility.
For detailed information about these commands and options refer to the documentation for the Javakeytool utility.
Generating a Keypair
The example command can be used to generate a key pair (a public key and associated private key) forthe X.500 Distinguished name CN=Clint Hill, OU=Claims, O=EasyAs Insurance, L=Swindon,C=UK.
The command also wraps the public key into an X.509 v1 self-signed certificate, which is stored as asingle-element certificate chain. This certificate chain and the private key are stored in a new keystoreentry identified by the alias bskey with password EAkey1, in the keystore c:\apps\bs.jks.
C:\Users\Administrator>keytool -genkeypair -dname "cn=Clint Hill, ou=Claims,
o=EasyAs Insurance, l=Swindon, c=UK" -alias bskey -keypass EAkey1 -keystore c:\apps
\bs.jks -storepass EAStore2 -validity 360 -keyalg "RSA"
The following command can be used to list the contents of the bskey entry.
199
TIBCO Business Studio Tutorials
C:\Users\Administrator>keytool -list -keystore c:\apps\bs.jks -alias bskey -v Enter
keystore password: Alias name: bskey Creation date: 01-Sep-2010 Entry type:
PrivateKeyEntry Certificate chain length: 1 Certificate[1]: Owner: CN=Clint Hill,
OU=Claims, O=EasyAs Insurance, L=Swindon, C=UK Issuer: CN=Clint Hill, OU=Claims,
O=EasyAs Insurance, L=Swindon, C=UK Serial number: 4c7e6e6b Valid from: Wed Sep 01
16:16:59 BST 2010 until: Sat Aug 27 16:16:59 BST 2011 Certificate fingerprints: MD5:
FF:0B:67:D6:59:1A:87:38:BB:84:19:4A:C9:9E:C2:C3 SHA1: E3:92:E1:4F:8A:EA:6D:A7:90:2D:
36:FC:40:90:48:EF:71:2B:BC:33 Signature algorithm name: SHA1withRSA Version: 3
Exporting the Certificate
The command can be used to export the self-signed certificate for the bskey alias from the keystore to afile called bskey.cert.
C:\Users\Administrator>keytool -export -file bskey.cert -keystore c:\apps\bs.jks -
alias bskey -v Enter keystore password: Certificate stored in file <bskey.cert>
Importing the Certificate into the Host System’s Truststore
The bskey.cert file can now be imported into the web service provider’s truststore as a trustedcertificate.
The command could be used to accomplish this (on the system that hosts the web service).
C:\Users\Administrator>keytool -import -file bskey.cert -keystore c:\apps
\bstrust.jks -alias bskey -v Enter keystore password: Re-enter new password: Owner:
CN=Clint Hill, OU=Claims, O=EasyAs Insurance, L=Swindon, C=UK Issuer: CN=Clint Hill,
OU=Claims, O=EasyAs Insurance, L=Swindon, C=UK Serial number: 4c7e6e6b Valid from:
Wed Sep 01 16:16:59 BST 2010 until: Sat Aug 27 16:16:59 BST 2011 Certificate
fingerprints: MD5: FF:0B:67:D6:59:1A:87:38:BB:84:19:4A:C9:9E:C2:C3 SHA1:
E3:92:E1:4F:8A:EA:6D:A7:90:2D:36:FC:40:90:48:EF:71:2B:BC:33 Signature algorithm
name: SHA1withRSA Version: 3 Trust this certificate? [no]: yes Certificate was added
to keystore [Storing c:\apps\bstrust.jks]
Creating a Keystore Provider Resource TemplateA keystore provider resource instance provides a reference to the keystore that contains the keypairrequired to invoke the secured web service. You will create a keystore provider resource template, andthen a corresponding resource instance will be created automatically when you redeploy the BPMapplication.
Procedure
1. Log into the Administrator interface in the BPM runtime.
2. Click Shared Objects > Resource Templates .
Click New ( ). The Add Resource Template dialog is displayed.
3. In the Type field, select Keystore Provider.
4. In the Name field, enter a suitable name for this resource template - for example, bsKeystoreRT.
5. Set the Scope of the template by moving the slider to the far right, above Application. Select yourBPM environment (for example, BPMEnvironment) from the Environment dropdown, and thenselect the name of your BPM application instance (for example, amx.bpm.app) in the Applicationdropdown.
200
TIBCO Business Studio Tutorials
6. Edit the following properties:
● Keystore Served From: Identify the keystore that contains the credentials needed to access theexternal web service. You can either upload the keystore to be served from the Administratorinterface in the BPM runtime; or you can enter the external location of the keystore, either as aURL or as a pathname to a file.
If you specify a pathname, it must be to a file that exists locally, on the same server asthe runtime environment.
● Password: Enter the password needed to access the keystore.● Type: Select JKS (for Java Keystore).● Provider: Clear this field and leave it blank.
7. Click Save. The new resource template is added to the list of resource templates.
Creating an Identity Provider Resource TemplateAn identity provider resource instance provides a reference to the specific keypair (via its alias)required to invoke the secured web service. You will create an identity provider resource template, andthen a corresponding resource instance will be created automatically when you redeploy the BPMapplication.
Creating the Identity Provider Resource Template
This procedure describes how to create an identity provider resource template
Procedure
1. Create a new resource template, of type Identity Provider, with a suitable name - for example,bsSubjectRT.
2. Set the Scope of the template to your BPM application instance (for example, amx.bpm.app) .
3. Edit the following properties:
● Keystore Provider to Supply Identity: Enter (or use the picker tool to select) the name of theKeystore Provider resource template that you created earlier - for example, bsKeystoreRT.
● Enable Access to Credential Store Containing Identity: Select this option.● Key Alias to Access Identity: Enter the name of the alias specified when generating the
required keypair (using the -alias option) in the keystore - for example bskey.
● Key Alias Password: Enter the password specified when generating this alias (using the -keypass option).
Creating the Resource Instances
Resource instances based on the new resource templates are created automatically when you redeploythe application for which the template is scoped.
Procedure
1. Select Applications and select your instance of the BPM application (by default, amx.bpm.app).
2. Select Deploy > Deploy with Start .
3. Select the Resource Templates tab and click on Resource Instances. Instances of your new KeystoreProvider and Identity Provider resource templates have been created.
201
TIBCO Business Studio Tutorials
Configuring the System Participant in the Calling ProcessTo invoke the secured external web service from the calling process, you must assign the securitypolicy that will be applied to the outgoing message sent by the task or event to the system participantthat identifies the web service endpoint.
There are no initial resources or solutions for this tutorial. The tutorial assumes that you already knowhow to create a business process application to implement a call to an external web service, and thenhow to deploy and test that application.
Procedure
1. In TIBCO Business Studio, open the process that will be used to call the secured external webservice.
2. In Project Explorer, select the system participant that identifies the web service endpoint. This istypically the participant with the same name as the web service being called.
3. On the General tab of the Properties view for this participant, expand Shared Resource. If it is notalready selected, in the Invoke Using column select SOAP over HTTP.
4. In the Policy Type field, select X509 Token from the drop-down menu.
To call an external web service that is secured using:● a SAML "Sender Vouches" token, you would select SAML Token instead.● a UsernameToken, you would select Username Token instead.
5. In the Governance App. Name field, enter the name of the BPM runtime identity provider resourceinstance that you created earlier, bsKeystoreRT. This application will be used to apply the requiredpolicy to the outgoing SOAP request.
The value of this field is not an actual resource instance, but an application that referencesthe required resource instance. The purpose of the application is to inject the resourceinstance into policies that require it.
How to Call a BPM Runtime Service from a ProcessThis tutorial shows you how to call a service provided by the BPM runtime from a BPM process.
The tutorial demonstrates:
● how to identify and obtain the WSDL for the BPM service that you want to call.● how to call a particular operation provided by a BPM service.● how to identify and prepare the data to be sent to the BPM service.● how to process data returned by the BPM service.● how to ensure that the call satisfies the authentication and authorization requirements needed to
access a BPM service.
Prerequisites
You should be familiar with the topics:
● calling secured web services over SOAP/HTTP● the services and operations provided by the BPM API● creating shared resources using the Administrator interface in the BPM runtime.
202
TIBCO Business Studio Tutorials
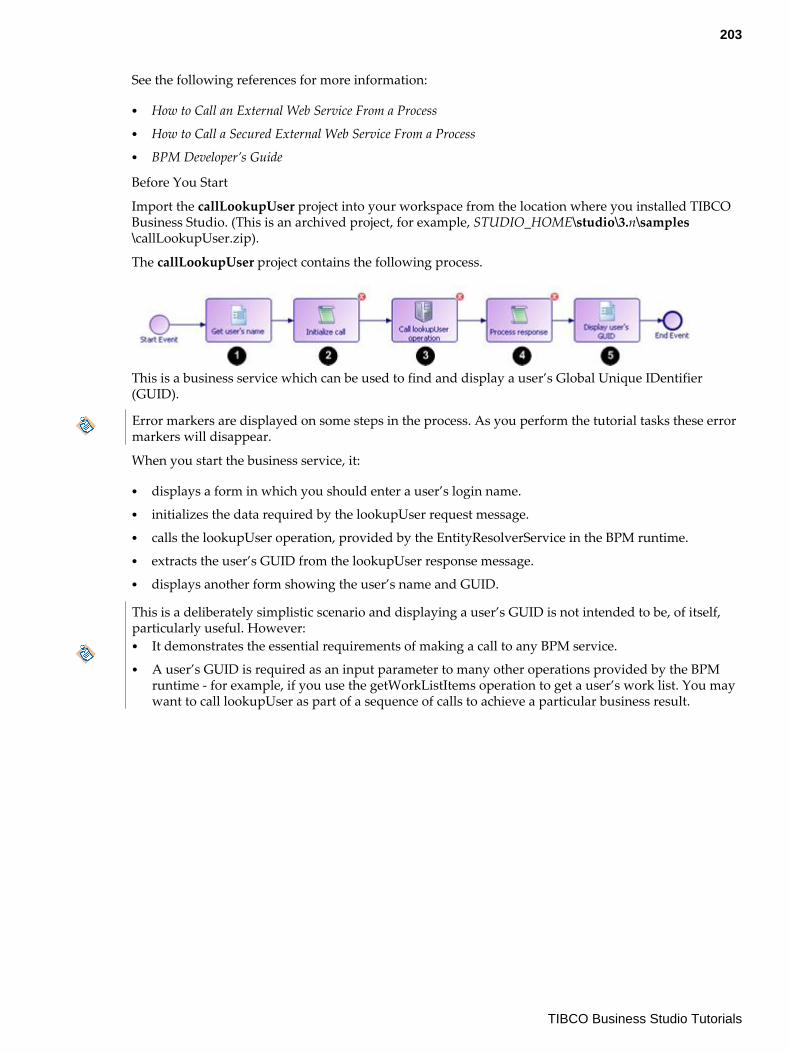
See the following references for more information:
● How to Call an External Web Service From a Process● How to Call a Secured External Web Service From a Process● BPM Developer’s Guide
Before You Start
Import the callLookupUser project into your workspace from the location where you installed TIBCOBusiness Studio. (This is an archived project, for example, STUDIO_HOME\studio\3.n\samples\callLookupUser.zip).
The callLookupUser project contains the following process.
This is a business service which can be used to find and display a user’s Global Unique IDentifier(GUID).
Error markers are displayed on some steps in the process. As you perform the tutorial tasks these errormarkers will disappear.
When you start the business service, it:
● displays a form in which you should enter a user’s login name.● initializes the data required by the lookupUser request message.● calls the lookupUser operation, provided by the EntityResolverService in the BPM runtime.● extracts the user’s GUID from the lookupUser response message.● displays another form showing the user’s name and GUID.
This is a deliberately simplistic scenario and displaying a user’s GUID is not intended to be, of itself,particularly useful. However:● It demonstrates the essential requirements of making a call to any BPM service.● A user’s GUID is required as an input parameter to many other operations provided by the BPM
runtime - for example, if you use the getWorkListItems operation to get a user’s work list. You maywant to call lookupUser as part of a sequence of calls to achieve a particular business result.
203
TIBCO Business Studio Tutorials
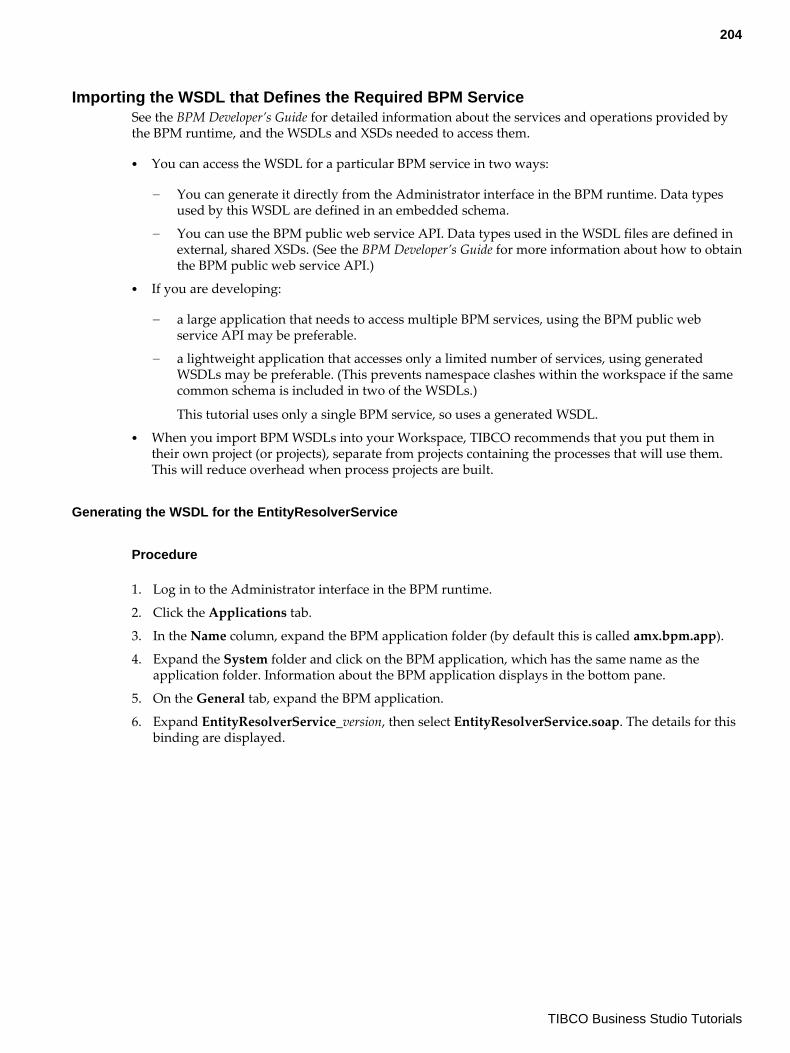
Importing the WSDL that Defines the Required BPM ServiceSee the BPM Developer’s Guide for detailed information about the services and operations provided bythe BPM runtime, and the WSDLs and XSDs needed to access them.
● You can access the WSDL for a particular BPM service in two ways:
— You can generate it directly from the Administrator interface in the BPM runtime. Data typesused by this WSDL are defined in an embedded schema.
— You can use the BPM public web service API. Data types used in the WSDL files are defined inexternal, shared XSDs. (See the BPM Developer’s Guide for more information about how to obtainthe BPM public web service API.)
● If you are developing:
— a large application that needs to access multiple BPM services, using the BPM public webservice API may be preferable.
— a lightweight application that accesses only a limited number of services, using generatedWSDLs may be preferable. (This prevents namespace clashes within the workspace if the samecommon schema is included in two of the WSDLs.)
This tutorial uses only a single BPM service, so uses a generated WSDL.● When you import BPM WSDLs into your Workspace, TIBCO recommends that you put them in
their own project (or projects), separate from projects containing the processes that will use them.This will reduce overhead when process projects are built.
Generating the WSDL for the EntityResolverService
Procedure
1. Log in to the Administrator interface in the BPM runtime.
2. Click the Applications tab.
3. In the Name column, expand the BPM application folder (by default this is called amx.bpm.app).
4. Expand the System folder and click on the BPM application, which has the same name as theapplication folder. Information about the BPM application displays in the bottom pane.
5. On the General tab, expand the BPM application.
6. Expand EntityResolverService_version, then select EntityResolverService.soap. The details for thisbinding are displayed.
204
TIBCO Business Studio Tutorials
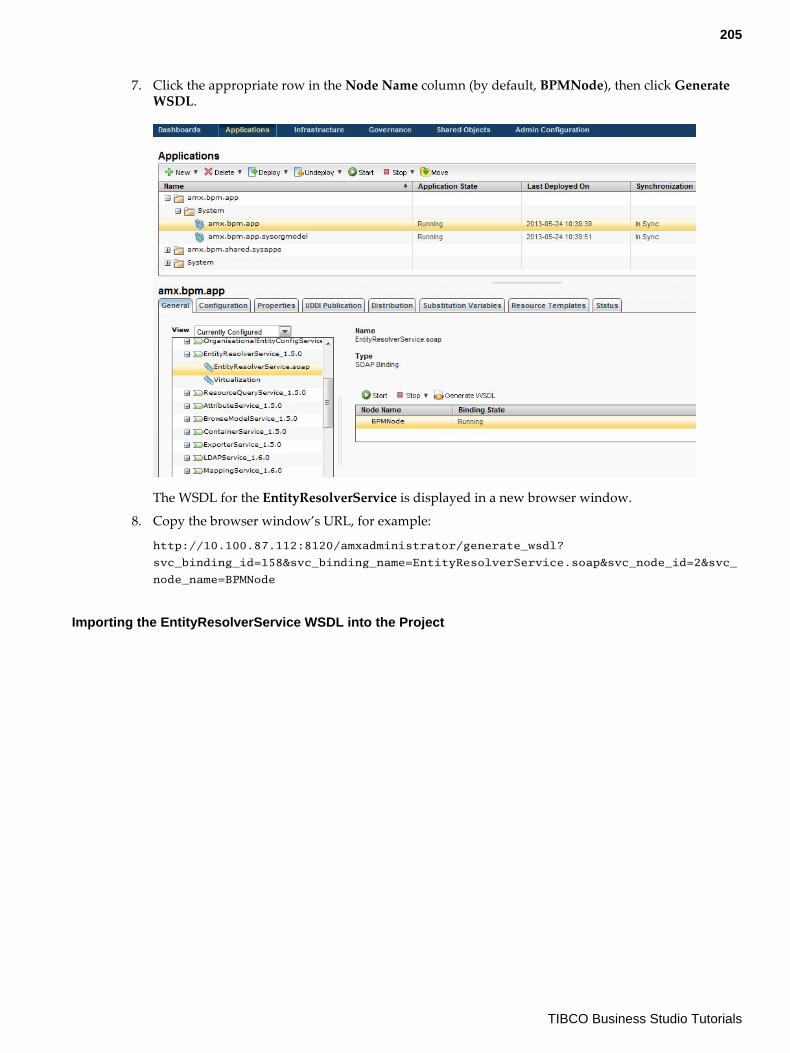
7. Click the appropriate row in the Node Name column (by default, BPMNode), then click GenerateWSDL.
The WSDL for the EntityResolverService is displayed in a new browser window.
8. Copy the browser window’s URL, for example:
http://10.100.87.112:8120/amxadministrator/generate_wsdl?
svc_binding_id=158&svc_binding_name=EntityResolverService.soap&svc_node_id=2&svc_
node_name=BPMNode
Importing the EntityResolverService WSDL into the Project
205
TIBCO Business Studio Tutorials
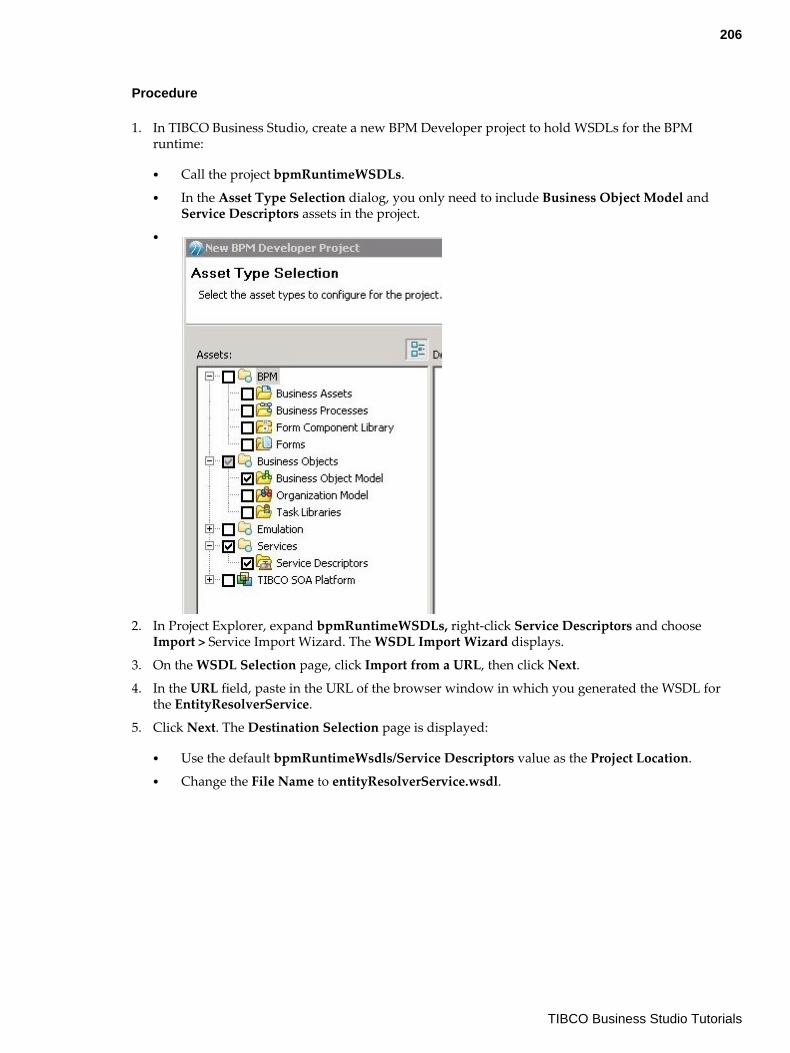
Procedure
1. In TIBCO Business Studio, create a new BPM Developer project to hold WSDLs for the BPMruntime:
● Call the project bpmRuntimeWSDLs.● In the Asset Type Selection dialog, you only need to include Business Object Model and
Service Descriptors assets in the project.●
2. In Project Explorer, expand bpmRuntimeWSDLs, right-click Service Descriptors and chooseImport > Service Import Wizard. The WSDL Import Wizard displays.
3. On the WSDL Selection page, click Import from a URL, then click Next.
4. In the URL field, paste in the URL of the browser window in which you generated the WSDL forthe EntityResolverService.
5. Click Next. The Destination Selection page is displayed:
● Use the default bpmRuntimeWsdls/Service Descriptors value as the Project Location.● Change the File Name to entityResolverService.wsdl.
206
TIBCO Business Studio Tutorials
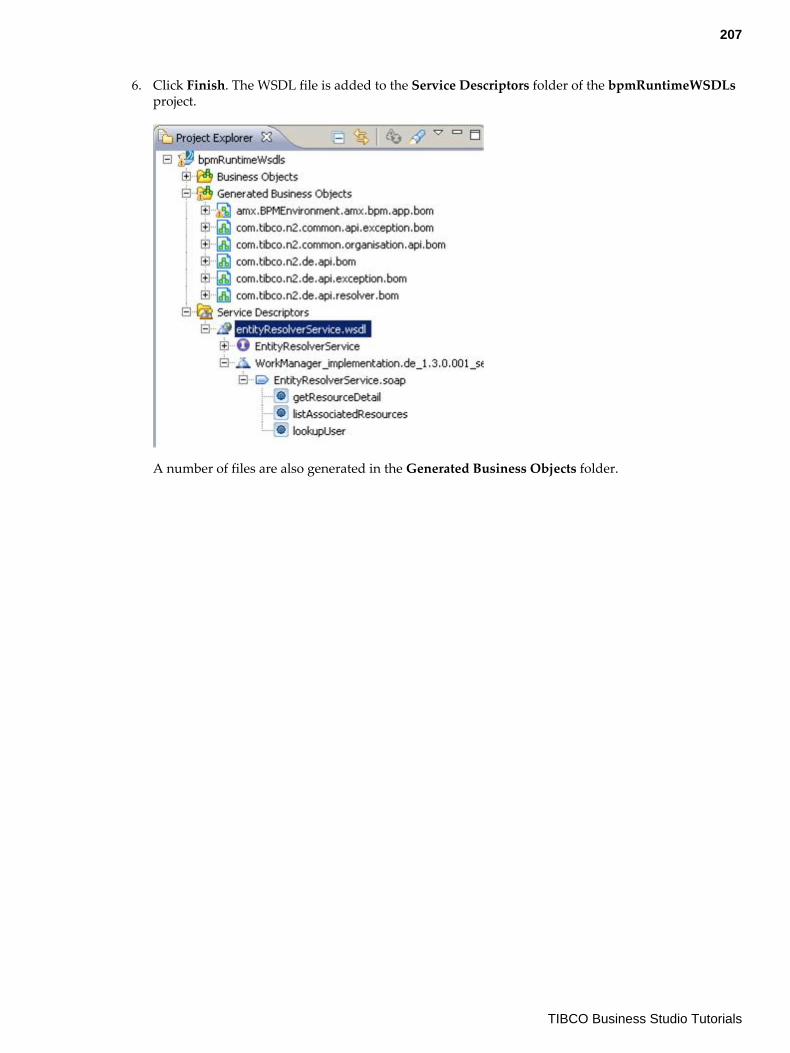
6. Click Finish. The WSDL file is added to the Service Descriptors folder of the bpmRuntimeWSDLsproject.
A number of files are also generated in the Generated Business Objects folder.
207
TIBCO Business Studio Tutorials
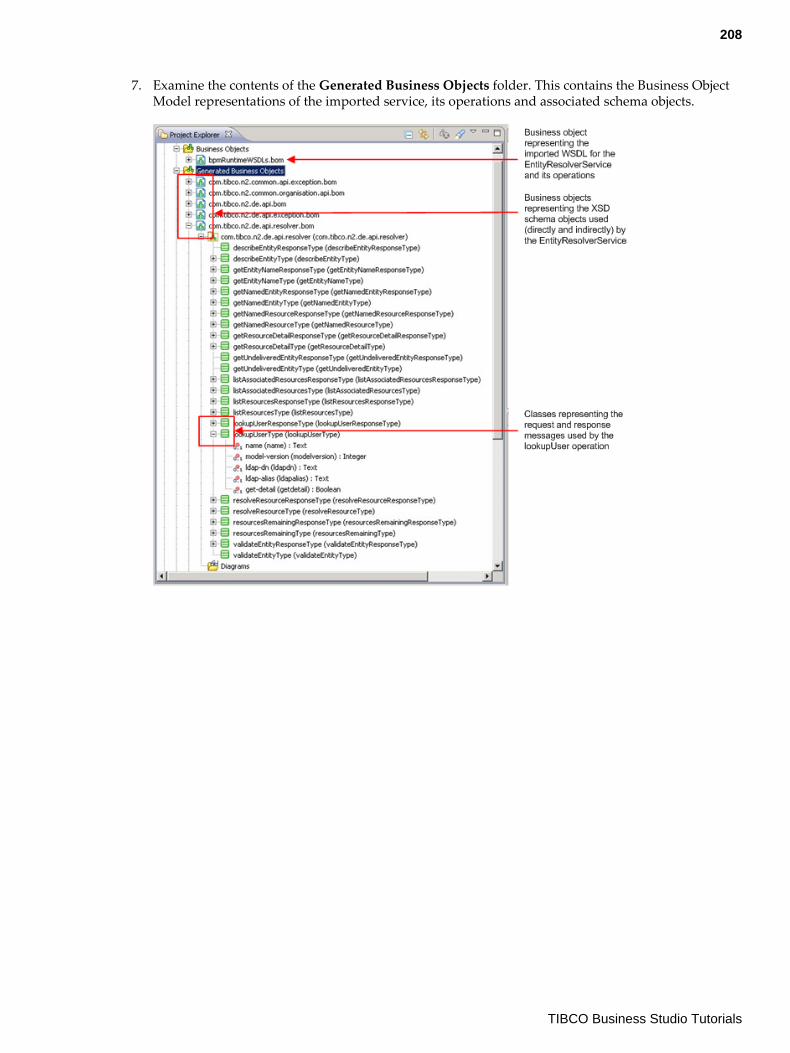
7. Examine the contents of the Generated Business Objects folder. This contains the Business ObjectModel representations of the imported service, its operations and associated schema objects.
208
TIBCO Business Studio Tutorials
Configuring the Web Service CallYou must use a web service task to call a BPM service.
You must use a SOAP/HTTP binding to call a BPM service. Currently, you cannot use other bindingsfor the following reasons:
● SOAP/JMS: BPM services are not exposed on SOAP/JMS bindings.● Virtualization: A security policy must be applied to the outgoing call to authenticate the calling
user. You cannot apply such a policy on a virtualized binding.
● You must identify the calling user. The calling user is identified by an Identity Provider applicationreferenced by the system participant that is used by the call - see Configuring how the Call will beAuthenticated. The BPM runtime will only accept the call to the service if it can authenticate thecalling user as a valid BPM user.
The calling user is NOT the user who is running the process from which the call is beingmade. Although different users may run the same process, the call to the BPM service willalways be made using the same fixed identity of the user specified by the IdentityProvider application.
This tutorial uses Clint Hill as the calling user. This is a user provided by the sample EasyAsorganization model, used in earlier tutorials.
● The calling user can be authenticated using either an X509 Token, Username Token or SAML Token- which one you use will depend on the security configuration used by the BPM runtime.
● The calling user must also be authorized to execute any system actions that are required by theparticular operation being called. This authorization is determined by the privileges held by thecalling user.
See the BPM Developer’s Guide for more information:
— The description of each operation lists any system actions required to execute that operation.— The "System Actions Reference" appendix describes how required privileges can be assigned to
system actions by configuring the organization model.
For example, lookupUser requires the resolveResource system action. By default,resolveResource can be can be performed by any user (for example, Clint Hill) without themhaving to hold specific privileges.
Calling the lookupUser Operation
209
TIBCO Business Studio Tutorials
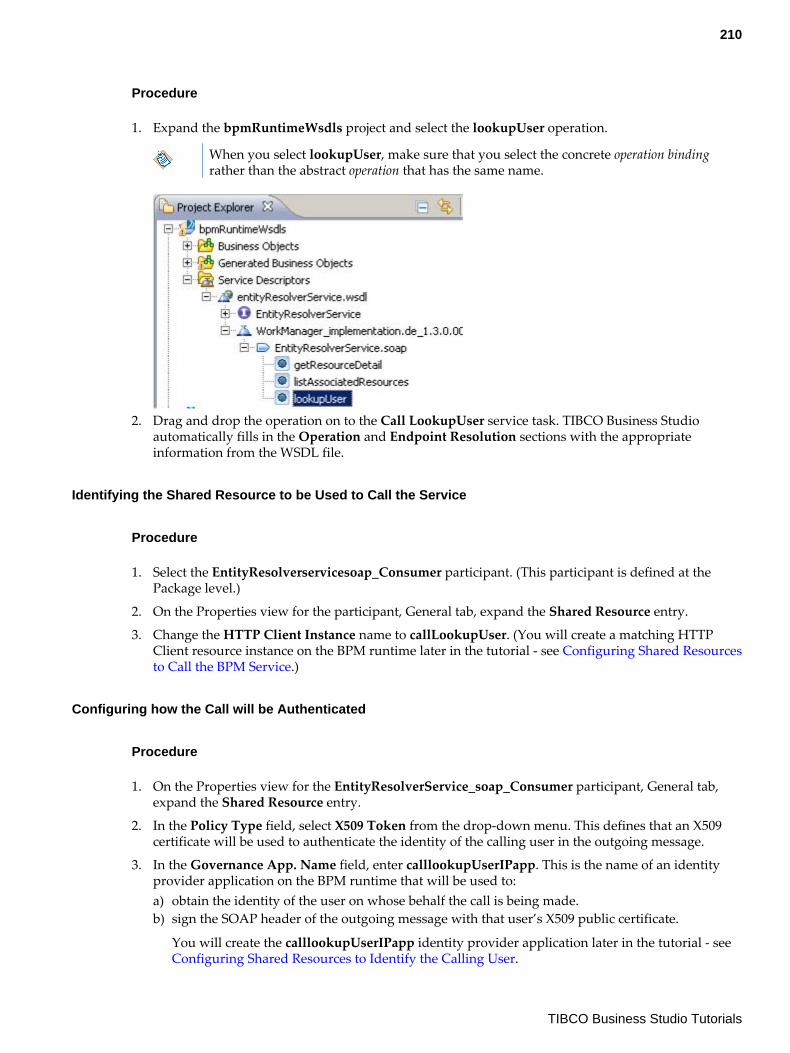
Procedure
1. Expand the bpmRuntimeWsdls project and select the lookupUser operation.
When you select lookupUser, make sure that you select the concrete operation bindingrather than the abstract operation that has the same name.
2. Drag and drop the operation on to the Call LookupUser service task. TIBCO Business Studioautomatically fills in the Operation and Endpoint Resolution sections with the appropriateinformation from the WSDL file.
Identifying the Shared Resource to be Used to Call the Service
Procedure
1. Select the EntityResolverservicesoap_Consumer participant. (This participant is defined at thePackage level.)
2. On the Properties view for the participant, General tab, expand the Shared Resource entry.
3. Change the HTTP Client Instance name to callLookupUser. (You will create a matching HTTPClient resource instance on the BPM runtime later in the tutorial - see Configuring Shared Resourcesto Call the BPM Service.)
Configuring how the Call will be Authenticated
Procedure
1. On the Properties view for the EntityResolverService_soap_Consumer participant, General tab,expand the Shared Resource entry.
2. In the Policy Type field, select X509 Token from the drop-down menu. This defines that an X509certificate will be used to authenticate the identity of the calling user in the outgoing message.
3. In the Governance App. Name field, enter calllookupUserIPapp. This is the name of an identityprovider application on the BPM runtime that will be used to:a) obtain the identity of the user on whose behalf the call is being made.b) sign the SOAP header of the outgoing message with that user’s X509 public certificate.
You will create the calllookupUserIPapp identity provider application later in the tutorial - see Configuring Shared Resources to Identify the Calling User.
210
TIBCO Business Studio Tutorials
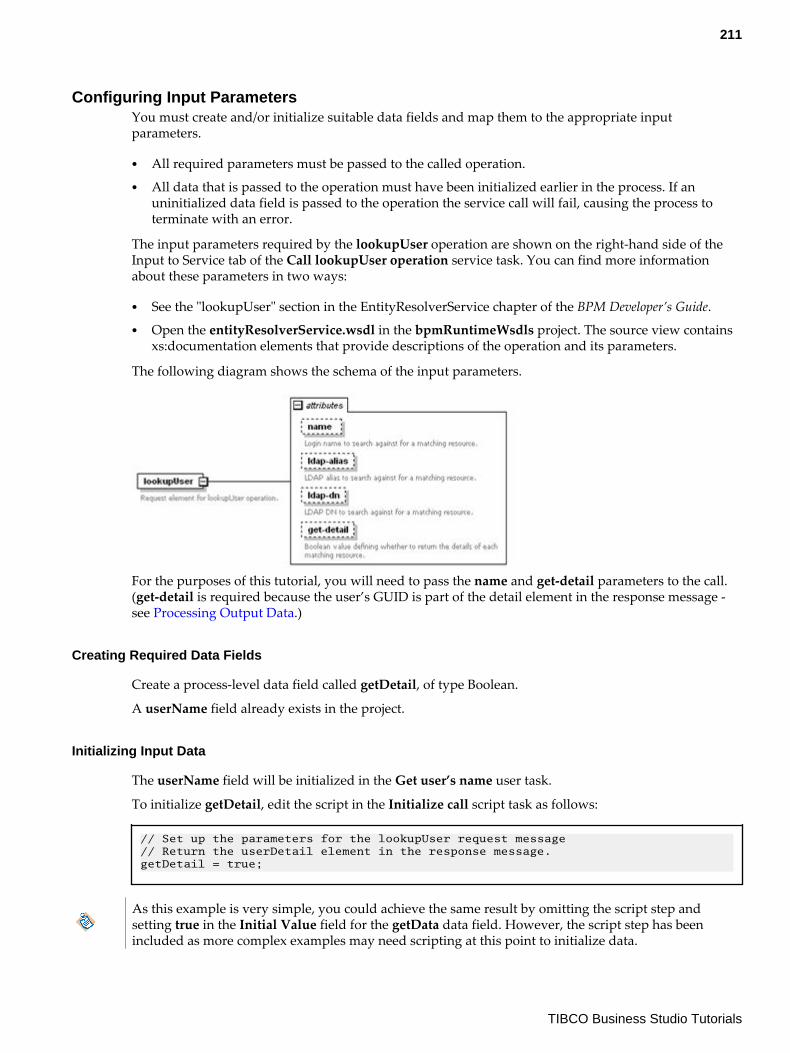
Configuring Input ParametersYou must create and/or initialize suitable data fields and map them to the appropriate inputparameters.
● All required parameters must be passed to the called operation.● All data that is passed to the operation must have been initialized earlier in the process. If an
uninitialized data field is passed to the operation the service call will fail, causing the process toterminate with an error.
The input parameters required by the lookupUser operation are shown on the right-hand side of theInput to Service tab of the Call lookupUser operation service task. You can find more informationabout these parameters in two ways:
● See the "lookupUser" section in the EntityResolverService chapter of the BPM Developer’s Guide.● Open the entityResolverService.wsdl in the bpmRuntimeWsdls project. The source view contains
xs:documentation elements that provide descriptions of the operation and its parameters.
The following diagram shows the schema of the input parameters.
For the purposes of this tutorial, you will need to pass the name and get-detail parameters to the call.(get-detail is required because the user’s GUID is part of the detail element in the response message -see Processing Output Data.)
Creating Required Data Fields
Create a process-level data field called getDetail, of type Boolean.
A userName field already exists in the project.
Initializing Input Data
The userName field will be initialized in the Get user’s name user task.
To initialize getDetail, edit the script in the Initialize call script task as follows:
// Set up the parameters for the lookupUser request message// Return the userDetail element in the response message.getDetail = true;
As this example is very simple, you could achieve the same result by omitting the script step andsetting true in the Initial Value field for the getData data field. However, the script step has beenincluded as more complex examples may need scripting at this point to initialize data.
211
TIBCO Business Studio Tutorials
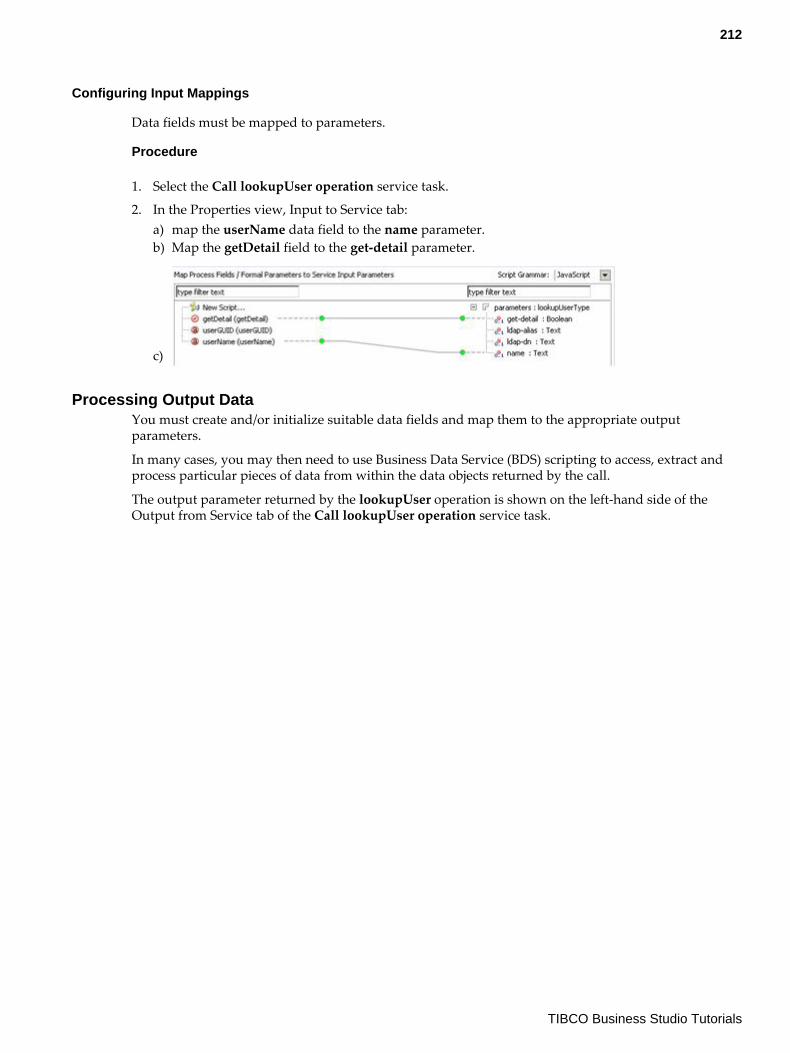
Configuring Input Mappings
Data fields must be mapped to parameters.
Procedure
1. Select the Call lookupUser operation service task.
2. In the Properties view, Input to Service tab:a) map the userName data field to the name parameter.b) Map the getDetail field to the get-detail parameter.
c)
Processing Output DataYou must create and/or initialize suitable data fields and map them to the appropriate outputparameters.
In many cases, you may then need to use Business Data Service (BDS) scripting to access, extract andprocess particular pieces of data from within the data objects returned by the call.
The output parameter returned by the lookupUser operation is shown on the left-hand side of theOutput from Service tab of the Call lookupUser operation service task.
212
TIBCO Business Studio Tutorials
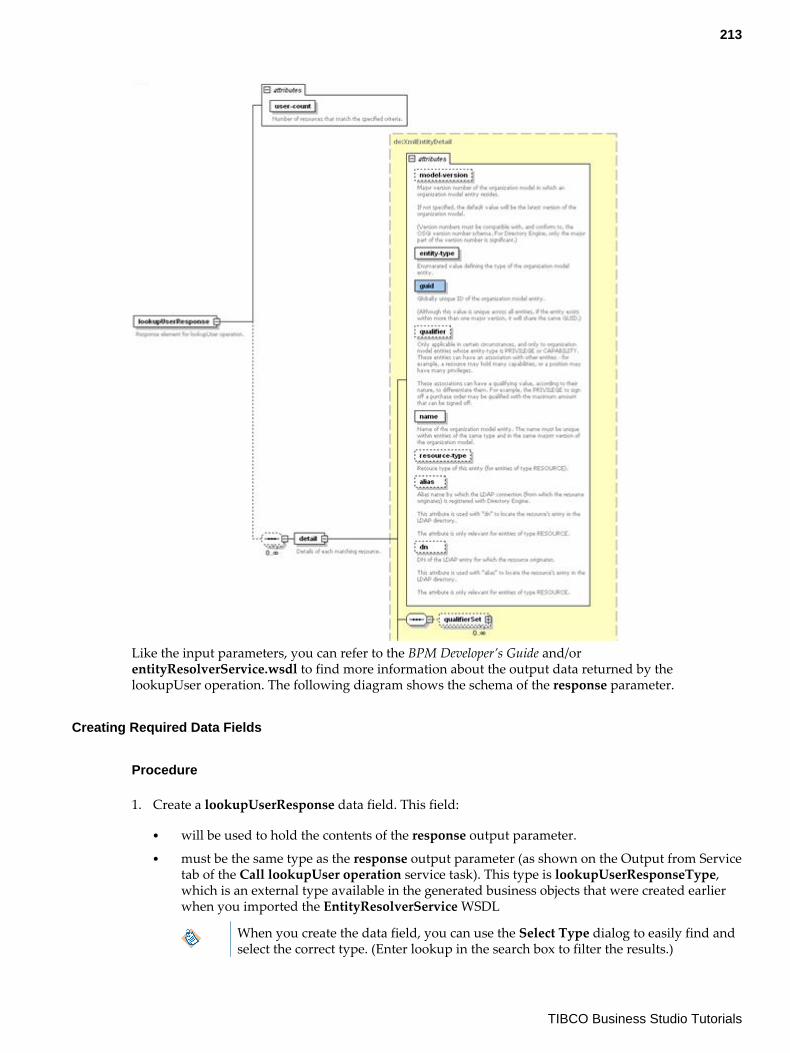
Like the input parameters, you can refer to the BPM Developer’s Guide and/orentityResolverService.wsdl to find more information about the output data returned by thelookupUser operation. The following diagram shows the schema of the response parameter.
Creating Required Data Fields
Procedure
1. Create a lookupUserResponse data field. This field:
● will be used to hold the contents of the response output parameter.● must be the same type as the response output parameter (as shown on the Output from Service
tab of the Call lookupUser operation service task). This type is lookupUserResponseType,which is an external type available in the generated business objects that were created earlierwhen you imported the EntityResolverService WSDL
When you create the data field, you can use the Select Type dialog to easily find andselect the correct type. (Enter lookup in the search box to filter the results.)
213
TIBCO Business Studio Tutorials
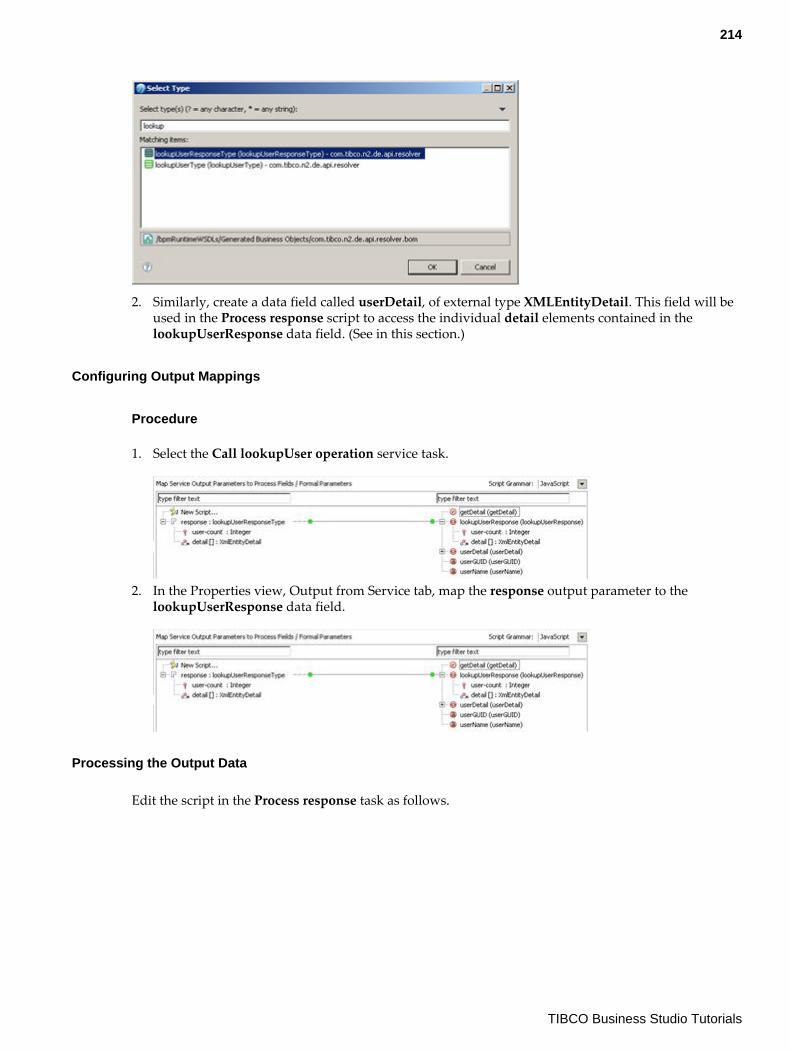
2. Similarly, create a data field called userDetail, of external type XMLEntityDetail. This field will beused in the Process response script to access the individual detail elements contained in thelookupUserResponse data field. (See in this section.)
Configuring Output Mappings
Procedure
1. Select the Call lookupUser operation service task.
2. In the Properties view, Output from Service tab, map the response output parameter to thelookupUserResponse data field.
Processing the Output Data
Edit the script in the Process response task as follows.
214
TIBCO Business Studio Tutorials
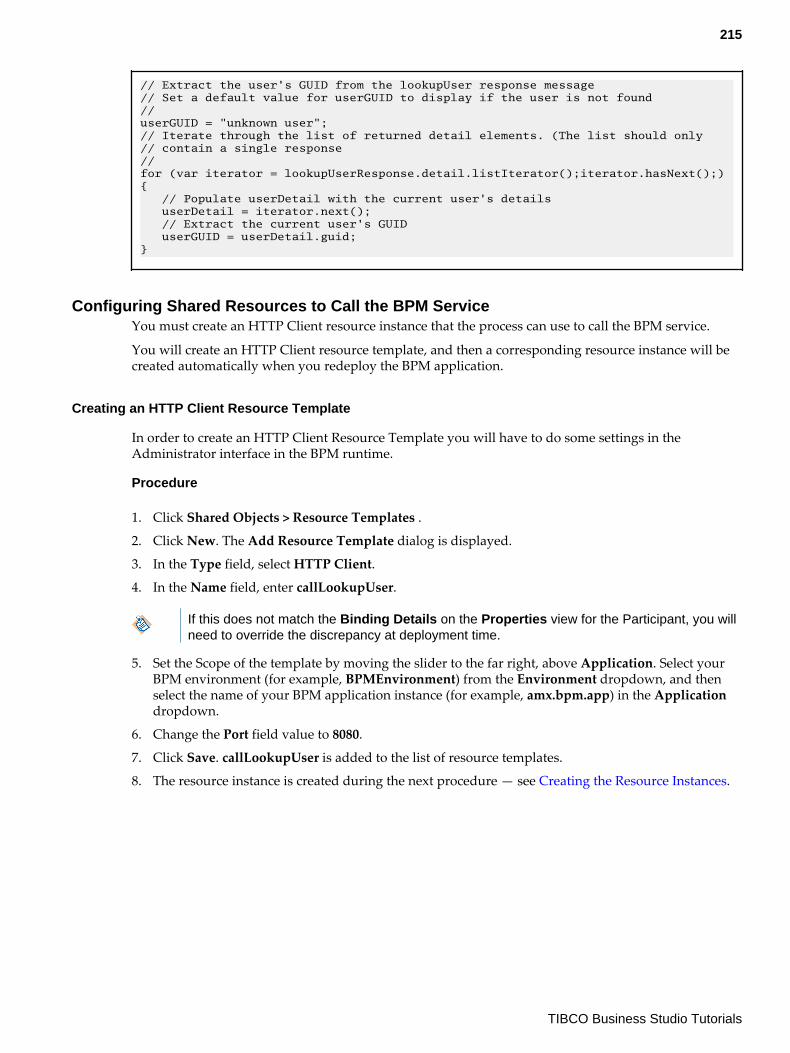
// Extract the user's GUID from the lookupUser response message// Set a default value for userGUID to display if the user is not found//userGUID = "unknown user";// Iterate through the list of returned detail elements. (The list should only// contain a single response//for (var iterator = lookupUserResponse.detail.listIterator();iterator.hasNext();){ // Populate userDetail with the current user's details userDetail = iterator.next(); // Extract the current user's GUID userGUID = userDetail.guid;}
Configuring Shared Resources to Call the BPM ServiceYou must create an HTTP Client resource instance that the process can use to call the BPM service.
You will create an HTTP Client resource template, and then a corresponding resource instance will becreated automatically when you redeploy the BPM application.
Creating an HTTP Client Resource Template
In order to create an HTTP Client Resource Template you will have to do some settings in theAdministrator interface in the BPM runtime.
Procedure
1. Click Shared Objects > Resource Templates .
2. Click New. The Add Resource Template dialog is displayed.
3. In the Type field, select HTTP Client.
4. In the Name field, enter callLookupUser.
If this does not match the Binding Details on the Properties view for the Participant, you willneed to override the discrepancy at deployment time.
5. Set the Scope of the template by moving the slider to the far right, above Application. Select yourBPM environment (for example, BPMEnvironment) from the Environment dropdown, and thenselect the name of your BPM application instance (for example, amx.bpm.app) in the Applicationdropdown.
6. Change the Port field value to 8080.
7. Click Save. callLookupUser is added to the list of resource templates.
8. The resource instance is created during the next procedure — see Creating the Resource Instances.
215
TIBCO Business Studio Tutorials
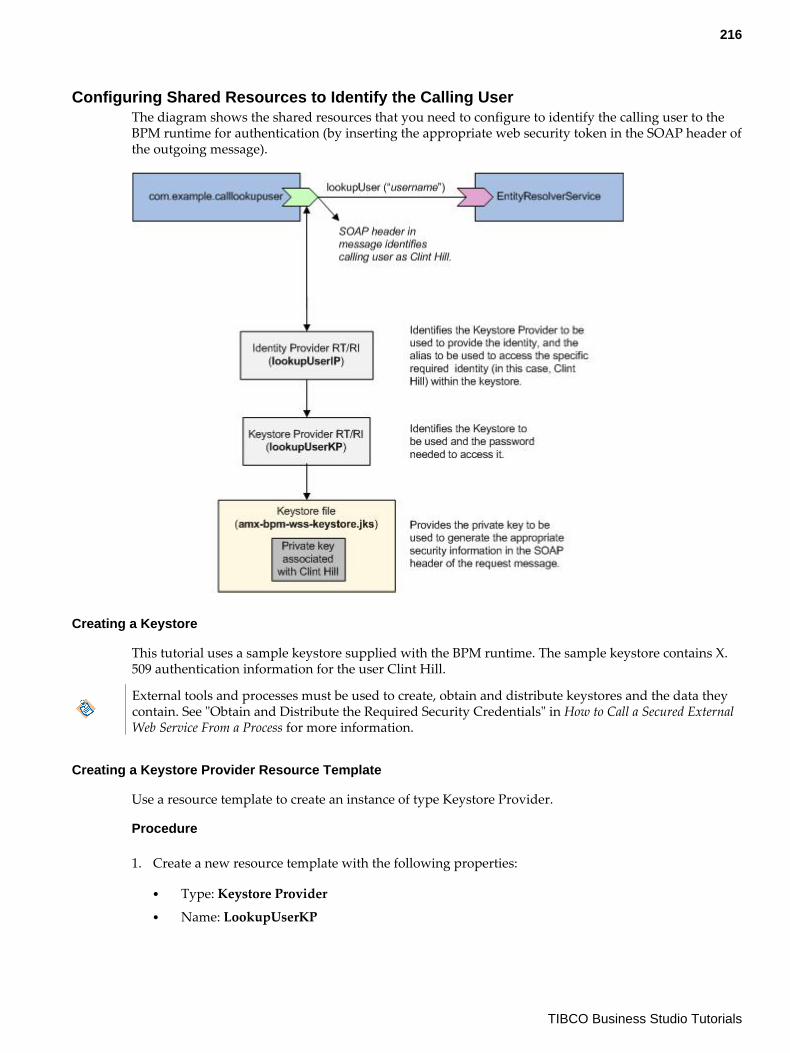
Configuring Shared Resources to Identify the Calling UserThe diagram shows the shared resources that you need to configure to identify the calling user to theBPM runtime for authentication (by inserting the appropriate web security token in the SOAP header ofthe outgoing message).
Creating a Keystore
This tutorial uses a sample keystore supplied with the BPM runtime. The sample keystore contains X.509 authentication information for the user Clint Hill.
External tools and processes must be used to create, obtain and distribute keystores and the data theycontain. See "Obtain and Distribute the Required Security Credentials" in How to Call a Secured ExternalWeb Service From a Process for more information.
Creating a Keystore Provider Resource Template
Use a resource template to create an instance of type Keystore Provider.
Procedure
1. Create a new resource template with the following properties:
● Type: Keystore Provider● Name: LookupUserKP
216
TIBCO Business Studio Tutorials
2. Set the Scope of the template by moving the slider to the far right, above Application. Select yourBPM environment (for example, BPMEnvironment) from the Environment dropdown, and thenselect the name of your BPM application instance (for example, amx.bpm.app) in the Applicationdropdown.
3. Edit the following properties:
● Location of keystore: Use the location of the sample keystore, which is CONFIG_HOME\bpm\amx.bpm.app\keystores\amx-bpm-wss-keystore.jks (where CONFIG_HOME is, for example, C:\ProgramData\amx-bpm\tibco\data). This keystore contains X.509 authentication details forthe user Clint Hill, who is defined in the EasyAs LDAP directory.
● Password: Enter the password needed to access the keystore. (By default this is password.)● Type: Select JKS (for Java Keystore).● Provider: Clear this field and leave it blank.
4. Click Save. The new resource template is added to the list of resource templates.
Creating an Identity Provider Resource Instance
Use a resource template to create an instance of type Identity Provider.
Procedure
1. Create a new resource template with the following properties:
● Type: Identity Provider● Name: calllookupUserIPapp
2. Edit the following properties:
● Keystore Provider to Supply Identity: Use lookupUserKP.● Enable Access to Credential Store Containing Identity: Select this option.● Key Alias to Access Identity: Enter chill. This is the alias needed to access the private key for
Clint Hill in the keystore.● Key Alias Password: Enter password. This is the password for this alias.
Creating the Resource Instances
Resource instances based on the new resource templates are created automatically when you redeploythe application for which the template is scoped:
Procedure
1. Select Applications and select your instance of the BPM application (by default, amx.bpm.app).
2. Select Deploy > Deploy with Start .
3. Select the Resource Templates tab and click on Resource Instances. Instances of your new HTTPClient resource template, keystore provider resource template, and identity provide resourcetemplate have been created.
Deploying and Testing the callLookupUser ApplicationYou should be able to deploy and successfully run the callLookupUser application.
217
TIBCO Business Studio Tutorials
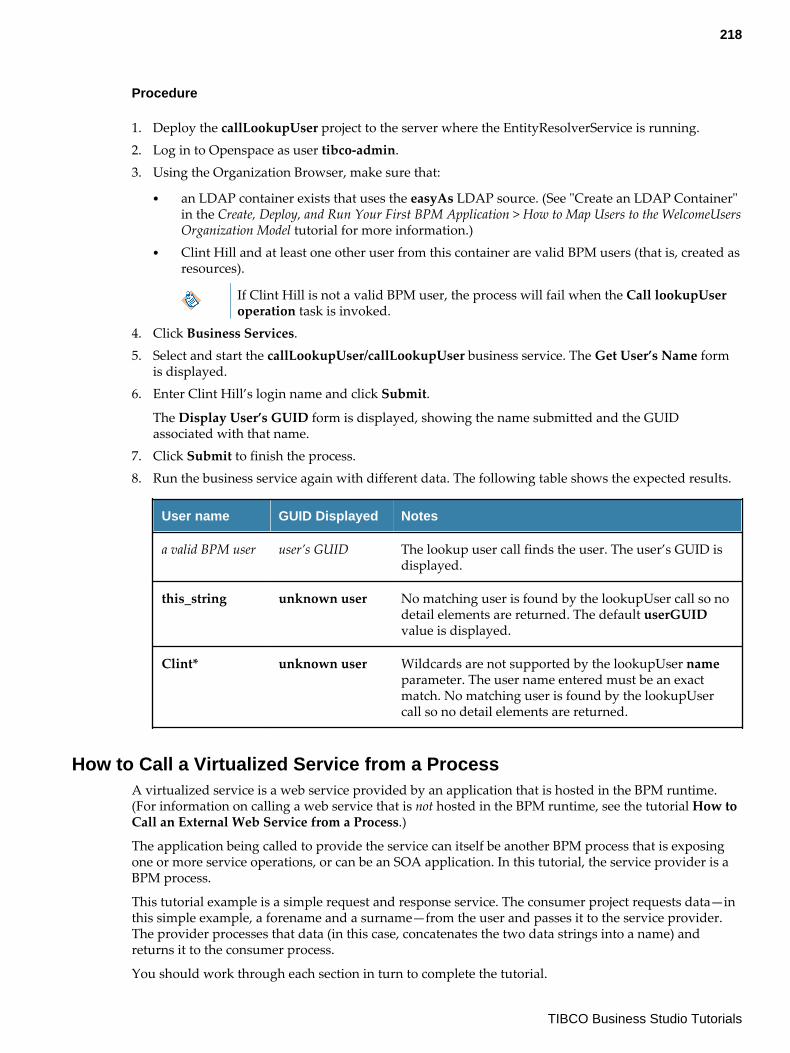
Procedure
1. Deploy the callLookupUser project to the server where the EntityResolverService is running.2. Log in to Openspace as user tibco-admin.3. Using the Organization Browser, make sure that:
● an LDAP container exists that uses the easyAs LDAP source. (See "Create an LDAP Container"in the Create, Deploy, and Run Your First BPM Application > How to Map Users to the WelcomeUsersOrganization Model tutorial for more information.)
● Clint Hill and at least one other user from this container are valid BPM users (that is, created asresources).
If Clint Hill is not a valid BPM user, the process will fail when the Call lookupUseroperation task is invoked.
4. Click Business Services.5. Select and start the callLookupUser/callLookupUser business service. The Get User’s Name form
is displayed.6. Enter Clint Hill’s login name and click Submit.
The Display User’s GUID form is displayed, showing the name submitted and the GUIDassociated with that name.
7. Click Submit to finish the process.8. Run the business service again with different data. The following table shows the expected results.
User name GUID Displayed Notes
a valid BPM user user’s GUID The lookup user call finds the user. The user’s GUID isdisplayed.
this_string unknown user No matching user is found by the lookupUser call so nodetail elements are returned. The default userGUIDvalue is displayed.
Clint* unknown user Wildcards are not supported by the lookupUser nameparameter. The user name entered must be an exactmatch. No matching user is found by the lookupUsercall so no detail elements are returned.
How to Call a Virtualized Service from a ProcessA virtualized service is a web service provided by an application that is hosted in the BPM runtime.(For information on calling a web service that is not hosted in the BPM runtime, see the tutorial How toCall an External Web Service from a Process.)
The application being called to provide the service can itself be another BPM process that is exposingone or more service operations, or can be an SOA application. In this tutorial, the service provider is aBPM process.
This tutorial example is a simple request and response service. The consumer project requests data—inthis simple example, a forename and a surname—from the user and passes it to the service provider.The provider processes that data (in this case, concatenates the two data strings into a name) andreturns it to the consumer process.
You should work through each section in turn to complete the tutorial.
218
TIBCO Business Studio Tutorials
A business process (acting as a service consumer) can invoke services provided by other BPM processesor SOA applications (service providers).
An abstract WSDL document that defines the service is provided by the service provider.
Prerequisites
You should be familiar with the basics of designing, implementing and deploying process-basedapplications using TIBCO Business Studio. If you are not familiar with these things, you should runthrough the following tutorials before attempting this one:
● Create, Deploy and Run Your First BPM Application● How to Create Business Data● How to Call an External Web Service from a Process
Importing the Organization ModelA participant in the service consumer project in this tutorial references an organization model. Theorganization model must be available in your TIBCO Business Studio workspace, and later must bedeployed to your BPM runtime.
If you have not already done so, import the EasyAsExtendedOM project into your workspace. To dothis:
Procedure
1. Start Studio for Designers.
Following this tutorial will be simpler and clearer if you close any other projects that youmay have open in your TIBCO Business Studio workspace, using the Project > CloseProject menu option.
2. To import the EasyAsExtendedOM project into your workspace, find theEasyAsExtendedOMSolution.zip file in the location where you installed TIBCO Business Studio(for example, <STUDIO_HOME > \studio\3. n\samples).
3. In TIBCO Business Studio, choose File > Import . The Import wizard is displayed.
4. On the Select page, expand General, select Existing Studio Projects into Workspace and clickNext. The Import Projects page is displayed.
5. In the Select archive file field, Browse to EasyAsExtendedOMSolution.zip and select it. TheEasyAsExtendedOMSolution project appears in the list of Projects.
6. Select the project (if it is not already selected).
7. Select Copy projects into workspace (if it is not already selected).
8. Click Finish. TIBCO Business Studio imports the EasyAsExtendedOMSolution project to yourworkspace. The organization model is now ready for use.
Creating the Service Provider ProjectFirst create the project that will provide the virtual service. This can be a BPM or an SOA project. Thistutorial uses a BPM project.
Procedure
1. Select File > New > BPM Developer Project .
2. Call the project ServiceProvider.
3. Select BPM as the Destination Environment, and click Next.
219
TIBCO Business Studio Tutorials
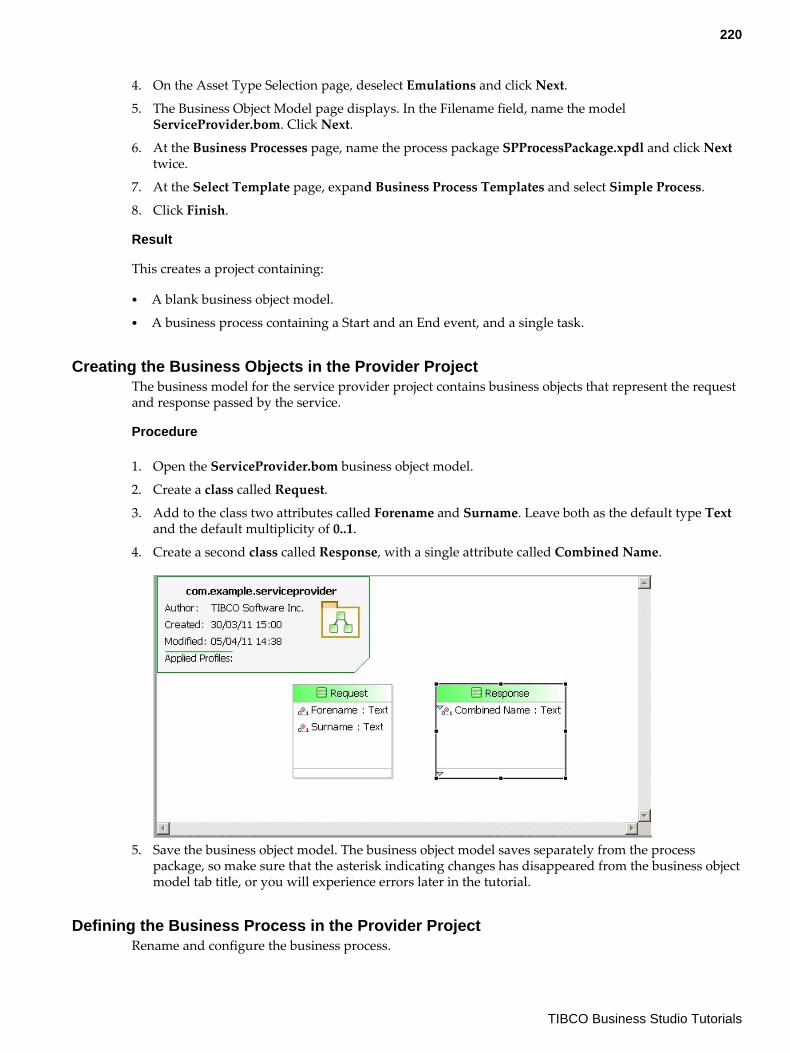
4. On the Asset Type Selection page, deselect Emulations and click Next.
5. The Business Object Model page displays. In the Filename field, name the modelServiceProvider.bom. Click Next.
6. At the Business Processes page, name the process package SPProcessPackage.xpdl and click Nexttwice.
7. At the Select Template page, expand Business Process Templates and select Simple Process.
8. Click Finish.
Result
This creates a project containing:
● A blank business object model.● A business process containing a Start and an End event, and a single task.
Creating the Business Objects in the Provider ProjectThe business model for the service provider project contains business objects that represent the requestand response passed by the service.
Procedure
1. Open the ServiceProvider.bom business object model.
2. Create a class called Request.
3. Add to the class two attributes called Forename and Surname. Leave both as the default type Textand the default multiplicity of 0..1.
4. Create a second class called Response, with a single attribute called Combined Name.
5. Save the business object model. The business object model saves separately from the processpackage, so make sure that the asterisk indicating changes has disappeared from the business objectmodel tab title, or you will experience errors later in the tutorial.
Defining the Business Process in the Provider ProjectRename and configure the business process.
220
TIBCO Business Studio Tutorials
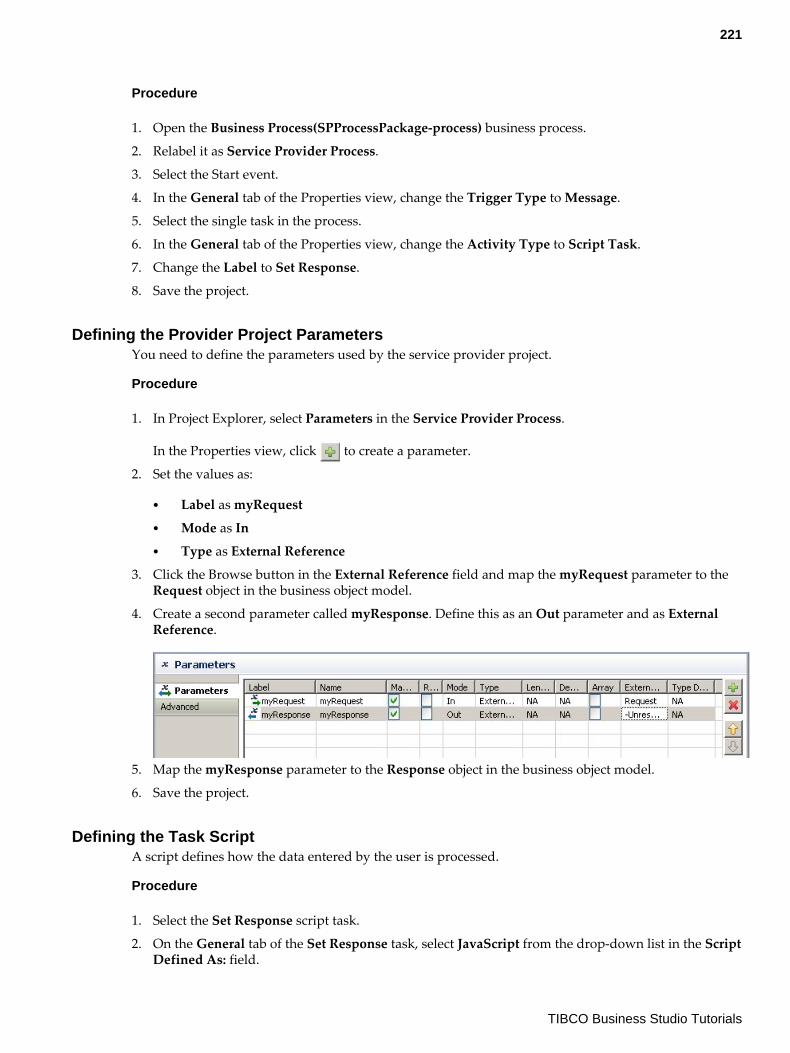
Procedure
1. Open the Business Process(SPProcessPackage-process) business process.
2. Relabel it as Service Provider Process.
3. Select the Start event.
4. In the General tab of the Properties view, change the Trigger Type to Message.
5. Select the single task in the process.
6. In the General tab of the Properties view, change the Activity Type to Script Task.
7. Change the Label to Set Response.
8. Save the project.
Defining the Provider Project ParametersYou need to define the parameters used by the service provider project.
Procedure
1. In Project Explorer, select Parameters in the Service Provider Process.
In the Properties view, click to create a parameter.
2. Set the values as:
● Label as myRequest● Mode as In● Type as External Reference
3. Click the Browse button in the External Reference field and map the myRequest parameter to theRequest object in the business object model.
4. Create a second parameter called myResponse. Define this as an Out parameter and as ExternalReference.
5. Map the myResponse parameter to the Response object in the business object model.
6. Save the project.
Defining the Task ScriptA script defines how the data entered by the user is processed.
Procedure
1. Select the Set Response script task.
2. On the General tab of the Set Response task, select JavaScript from the drop-down list in the ScriptDefined As: field.
221
TIBCO Business Studio Tutorials
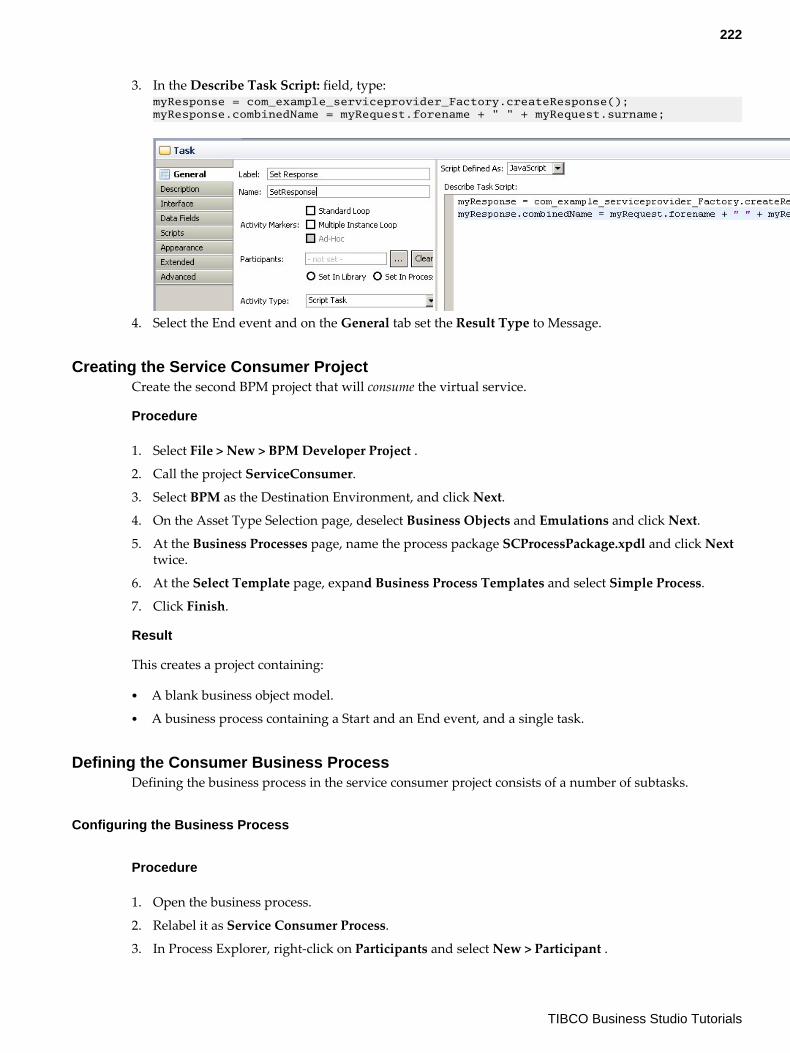
3. In the Describe Task Script: field, type:myResponse = com_example_serviceprovider_Factory.createResponse();myResponse.combinedName = myRequest.forename + " " + myRequest.surname;
4. Select the End event and on the General tab set the Result Type to Message.
Creating the Service Consumer ProjectCreate the second BPM project that will consume the virtual service.
Procedure
1. Select File > New > BPM Developer Project .
2. Call the project ServiceConsumer.
3. Select BPM as the Destination Environment, and click Next.
4. On the Asset Type Selection page, deselect Business Objects and Emulations and click Next.
5. At the Business Processes page, name the process package SCProcessPackage.xpdl and click Nexttwice.
6. At the Select Template page, expand Business Process Templates and select Simple Process.
7. Click Finish.
Result
This creates a project containing:
● A blank business object model.● A business process containing a Start and an End event, and a single task.
Defining the Consumer Business ProcessDefining the business process in the service consumer project consists of a number of subtasks.
Configuring the Business Process
Procedure
1. Open the business process.
2. Relabel it as Service Consumer Process.
3. In Process Explorer, right-click on Participants and select New > Participant .
222
TIBCO Business Studio Tutorials
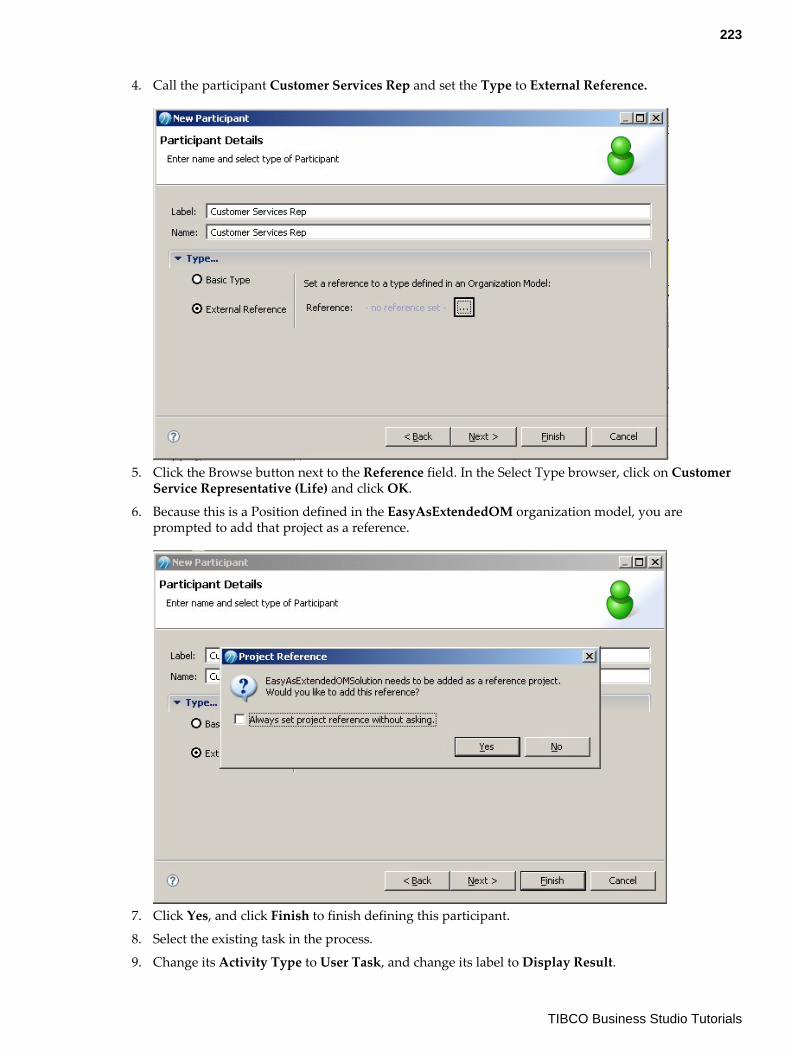
4. Call the participant Customer Services Rep and set the Type to External Reference.
5. Click the Browse button next to the Reference field. In the Select Type browser, click on CustomerService Representative (Life) and click OK.
6. Because this is a Position defined in the EasyAsExtendedOM organization model, you areprompted to add that project as a reference.
7. Click Yes, and click Finish to finish defining this participant.
8. Select the existing task in the process.
9. Change its Activity Type to User Task, and change its label to Display Result.
223
TIBCO Business Studio Tutorials
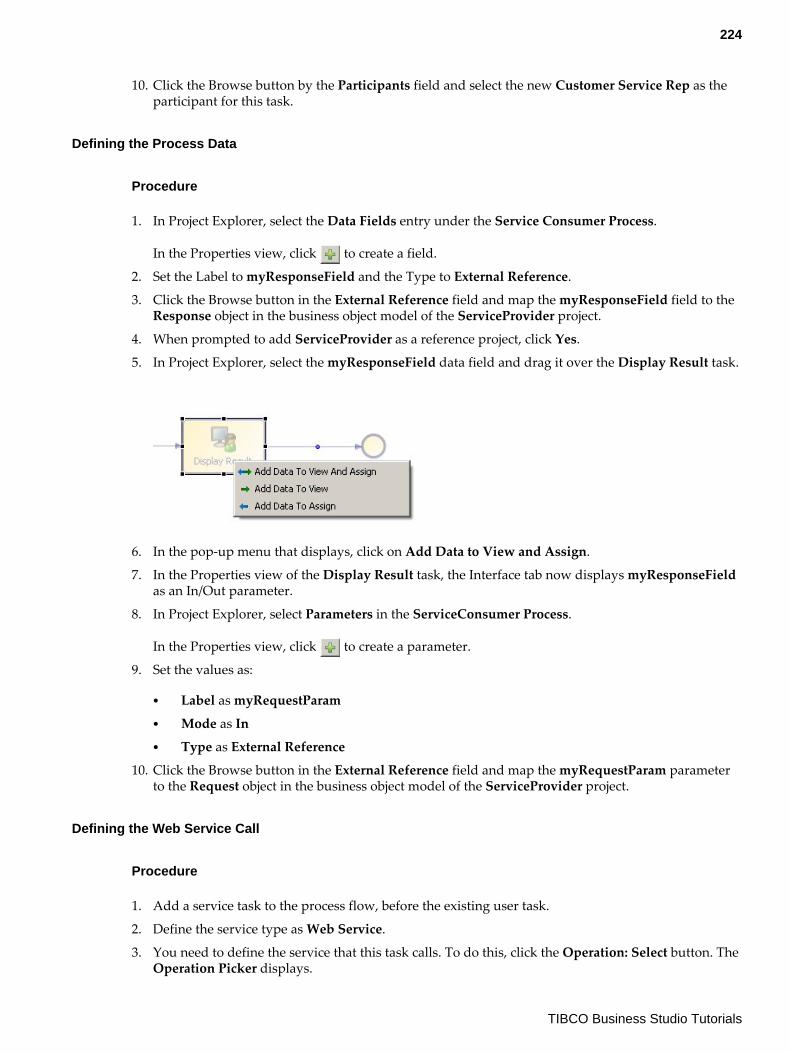
10. Click the Browse button by the Participants field and select the new Customer Service Rep as theparticipant for this task.
Defining the Process Data
Procedure
1. In Project Explorer, select the Data Fields entry under the Service Consumer Process.
In the Properties view, click to create a field.
2. Set the Label to myResponseField and the Type to External Reference.
3. Click the Browse button in the External Reference field and map the myResponseField field to theResponse object in the business object model of the ServiceProvider project.
4. When prompted to add ServiceProvider as a reference project, click Yes.
5. In Project Explorer, select the myResponseField data field and drag it over the Display Result task.
6. In the pop-up menu that displays, click on Add Data to View and Assign.
7. In the Properties view of the Display Result task, the Interface tab now displays myResponseFieldas an In/Out parameter.
8. In Project Explorer, select Parameters in the ServiceConsumer Process.
In the Properties view, click to create a parameter.
9. Set the values as:
● Label as myRequestParam● Mode as In● Type as External Reference
10. Click the Browse button in the External Reference field and map the myRequestParam parameterto the Request object in the business object model of the ServiceProvider project.
Defining the Web Service Call
Procedure
1. Add a service task to the process flow, before the existing user task.
2. Define the service type as Web Service.
3. You need to define the service that this task calls. To do this, click the Operation: Select button. TheOperation Picker displays.
224
TIBCO Business Studio Tutorials
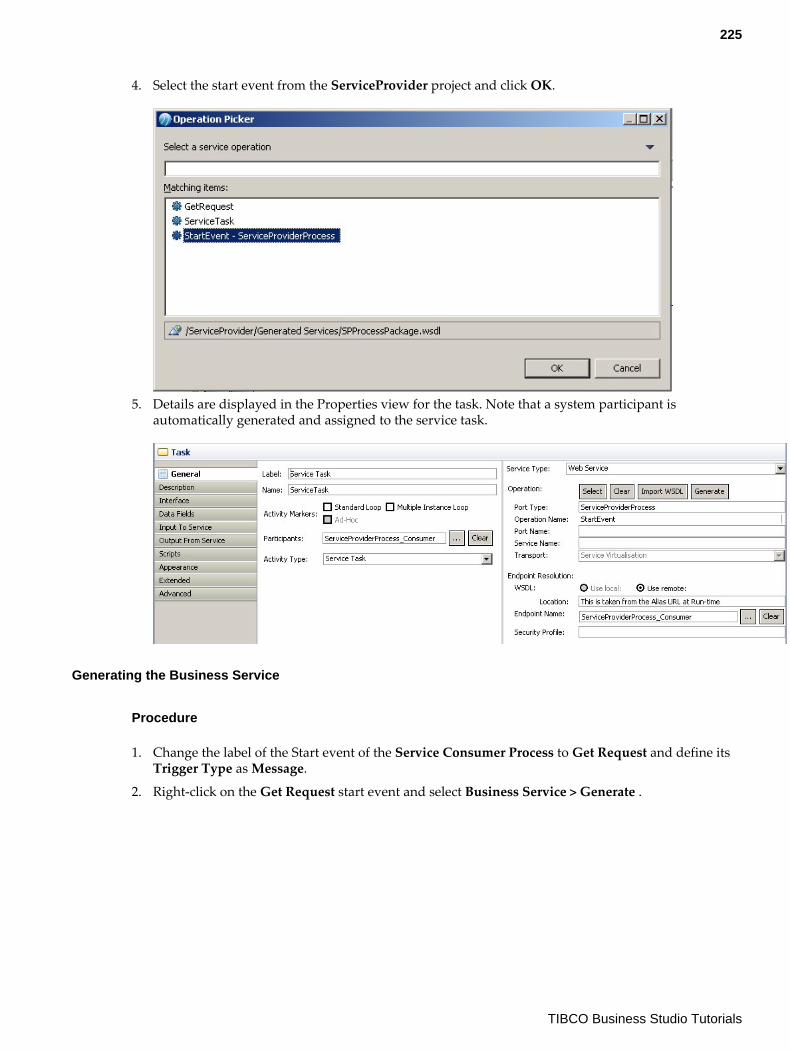
4. Select the start event from the ServiceProvider project and click OK.
5. Details are displayed in the Properties view for the task. Note that a system participant isautomatically generated and assigned to the service task.
Generating the Business Service
Procedure
1. Change the label of the Start event of the Service Consumer Process to Get Request and define itsTrigger Type as Message.
2. Right-click on the Get Request start event and select Business Service > Generate .
225
TIBCO Business Studio Tutorials

3. The generated business service displays. It contains a start event, a user task, and a Send task whichopens the Service Consumer Process business process.
4. Change the name of the automatically generated data field from myRequestParam tomyRequestField.
5. Change the automatic mapping on the Input to Service tab of the Send Task so that themyRequestField field maps to the myRequestParam parameter.
Final Steps
Procedure
1. Clean the project using the Project > Clean menu option to remove any error markers.
2. Save the project.
Checking the System ParticipantWhen you assign an abstract WSDL to a service task TIBCO Business Studio automatically creates asystem participant and assigns it to the service task.
You do not need to configure the system participant. However, if you want to see its properties:
Procedure
1. Select the ServiceProviderProcess_Consumer participant. (This participant is defined at thePackage level in the ServiceConsumer project.)
226
TIBCO Business Studio Tutorials
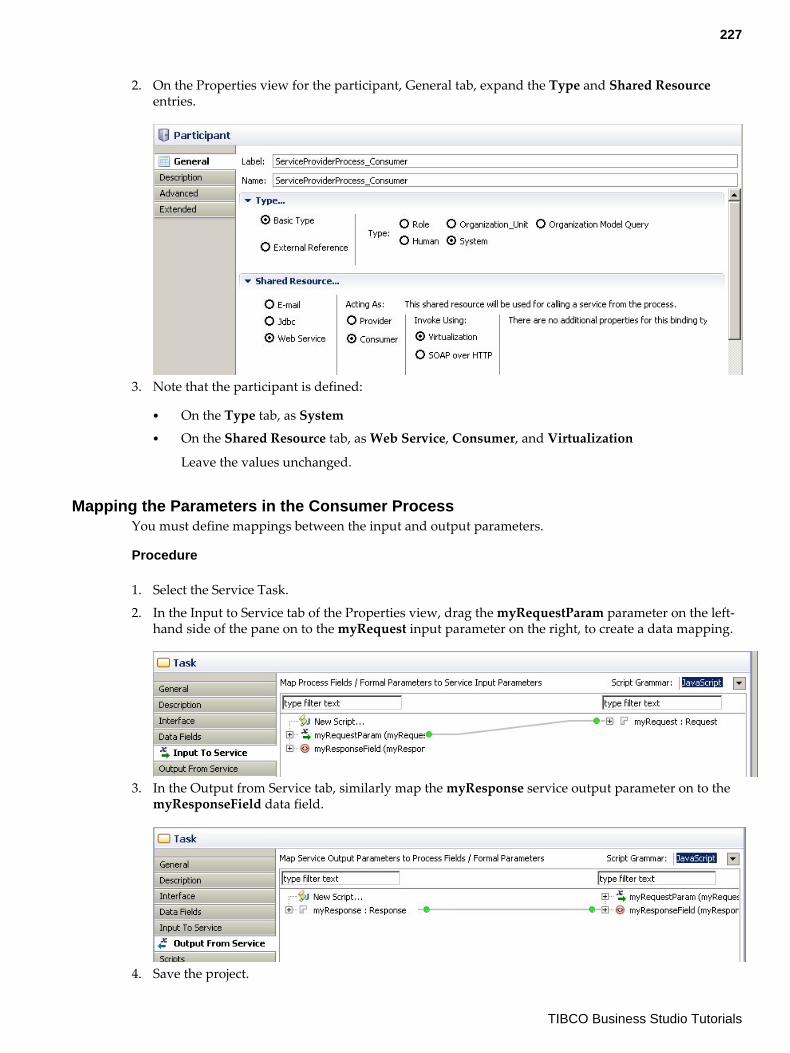
2. On the Properties view for the participant, General tab, expand the Type and Shared Resourceentries.
3. Note that the participant is defined:
● On the Type tab, as System● On the Shared Resource tab, as Web Service, Consumer, and Virtualization
Leave the values unchanged.
Mapping the Parameters in the Consumer ProcessYou must define mappings between the input and output parameters.
Procedure
1. Select the Service Task.
2. In the Input to Service tab of the Properties view, drag the myRequestParam parameter on the left-hand side of the pane on to the myRequest input parameter on the right, to create a data mapping.
3. In the Output from Service tab, similarly map the myResponse service output parameter on to themyResponseField data field.
4. Save the project.
227
TIBCO Business Studio Tutorials
Deploying the ProjectsYou must deploy the provider project before the consumer project.
This procedure assumes that you have already worked through the How to Implement and Deploy theWelcomeUsers Application tutorial. As part of that tutorial, you created a deployment server called XYZWork Server1, and that is the name used for the deployment server in this procedure. If you are using adifferent server name, substitute that name in the following instructions.
Deploying the Organization Model
Procedure
● You may already have deployed the EasyAs extended organization model as part of anothertutorial. If you have not already done so, deploy the EasyAsExtendedOM project to your BPMruntime now.
See the How to Implement and Deploy the WelcomeUsers Application tutorial for details of how todeploy BPM projects.
Deploying the Service Provider Application
Procedure
● Deploy the ServiceProvider project to your BPM runtime, as described in the How to Implement andDeploy the WelcomeUsers Application tutorial.
Deploying the Service Consumer Application
Procedure
1. In the Deployment Servers view, right-click XYZ Work Server1 and click Deploy Module. TheDeploy Module(s) wizard is displayed.
2. Select Deploy BPM Project then click Next. The Select Project dialog is displayed.
3. Select ServiceConsumer as the module to deploy.
228
TIBCO Business Studio Tutorials
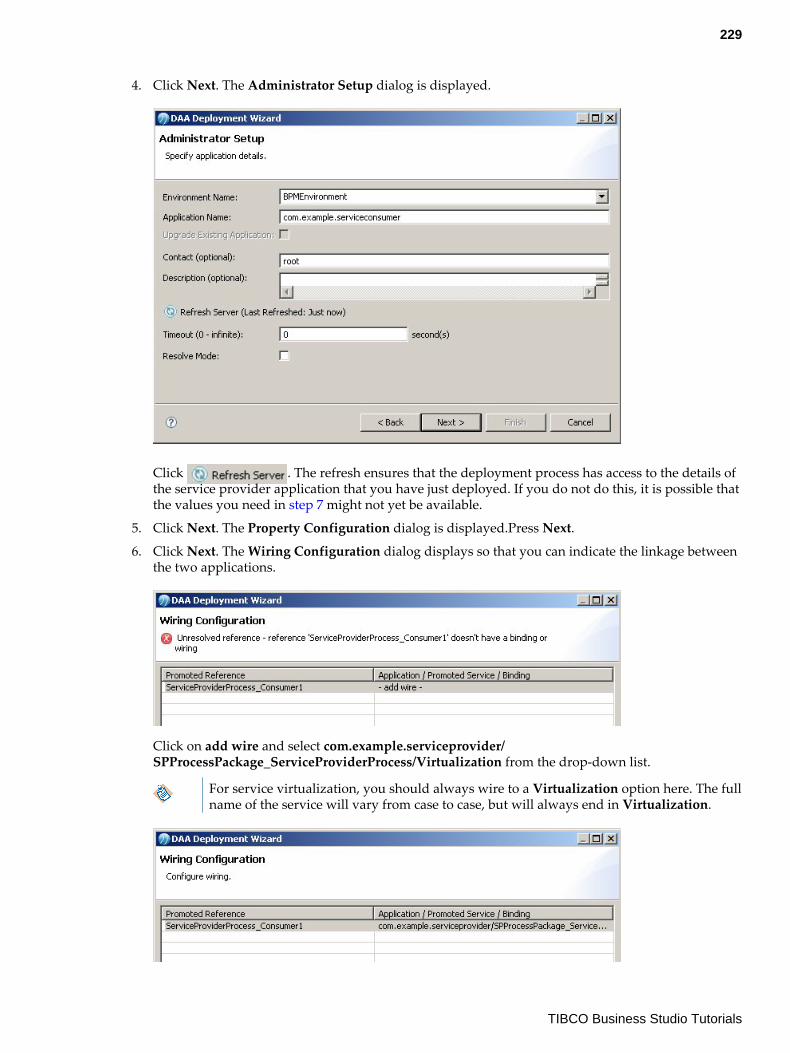
4. Click Next. The Administrator Setup dialog is displayed.
Click . The refresh ensures that the deployment process has access to the details ofthe service provider application that you have just deployed. If you do not do this, it is possible thatthe values you need in step 7 might not yet be available.
5. Click Next. The Property Configuration dialog is displayed.Press Next.
6. Click Next. The Wiring Configuration dialog displays so that you can indicate the linkage betweenthe two applications.
Click on add wire and select com.example.serviceprovider/SPProcessPackage_ServiceProviderProcess/Virtualization from the drop-down list.
For service virtualization, you should always wire to a Virtualization option here. The fullname of the service will vary from case to case, but will always end in Virtualization.
229
TIBCO Business Studio Tutorials
7. Click away from the field and click Finish. The Progress Dialog is displayed while deploymenttakes place, and should indicate that deployment has finished with no errors. Progress messages arealso displayed in the Console view.
8. In the Deployment Servers view, expand XYZServer1 > BPMEnvironment > Applications . Acom.example.serviceconsumer entry is displayed, indicating that the application has beendeployed to the BPM runtime.
9. In the Deployment Servers view, right-click XYZ Work Server1 and select Open > OpenAdministrator in web browser . The login screen for the Administrator interface in the BPMruntime is displayed.
10. Log in as root.
11. Click Applications. The list of available applications is displayed.
12. Check that com.example.serviceconsumer has deployed successfully. Its Runtime State should beRunning. Its Action Status should be Deploy with Start Successful.
13. Log out from Administrator.
Testing the ApplicationYou can now test the application by running an instance of it in Workspace or Openspace. TheServiceConsumer application will call the service from the ServiceProvider.
If you need more information about the steps in the following procedure, see the following tutorials:● How to Map Users to the WelcomeUsers Organization Model● How to Run the WelcomeUsers Application
Test that the ServiceConsumer application works as intended.
Procedure
1. Log in to Openspace and map a user to the Customer Services (Life) position.
By default, the Organization Browser is available in Openspace. In Workspace, the buttonused to display the Organization Browser is by default not visible. However, in bothclients administrators can configure which functions are available. Depending on yourorganization’s policy, therefore, you may be able to use the Organization Browser fromeither client application or from both. This tutorial assumes that you are using Openspace.
2. Log in to Workspace as that user.
3. Click the Business Services pane.
4. Expand All Business Services > ServiceConsumer as far as ProcessPackageGetRequest.
230
TIBCO Business Studio Tutorials
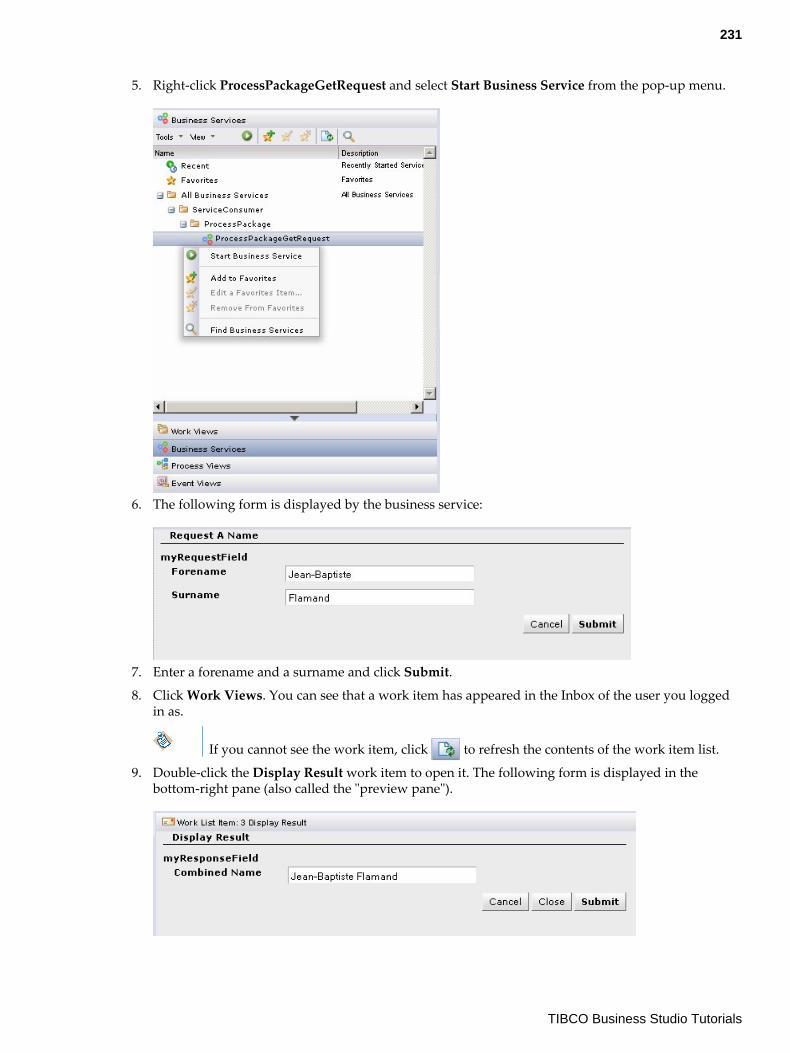
5. Right-click ProcessPackageGetRequest and select Start Business Service from the pop-up menu.
6. The following form is displayed by the business service:
7. Enter a forename and a surname and click Submit.
8. Click Work Views. You can see that a work item has appeared in the Inbox of the user you loggedin as.
If you cannot see the work item, click to refresh the contents of the work item list.
9. Double-click the Display Result work item to open it. The following form is displayed in thebottom-right pane (also called the "preview pane").
231
TIBCO Business Studio Tutorials
10. Click Submit.
You can click Event Views to see the events associated with running the business services andassociated business process.
11. Log out of Workspace.
Installing the Tutorial SolutionThe solution to the tutorial is provided in the TIBCO Business Studio installation. You can import it intoTIBCO Business Studio.
Procedure
1. Find the VirtualizationSolution.zip file in the location where you installed TIBCO Business Studio,(for example, <STUDIO_HOME > \studio\3. n\samples).
2. In TIBCO Business Studio, select File > Import .
3. The Import wizard is displayed. Select General > Existing Projects into Workspace and click Next.
4. Click Select archive file, and click on the Browse button.
5. Browse to the zip file and click Open. The provider and consumer projects are displayed in theImport wizard.
6. Click Finish. The projects are installed in your workspace.
Using Credential Mapping to Associate a Specific Identity with a ProcessInstance
This tutorial provides an example of what you need to do to enable a business process application toensure that a process instance always runs using fixed credentials.
You should work through each section in turn to complete the tutorial.
Credential MappingBy default, when a process instance is started it takes on the identity of the user who started theprocess. Whenever an activity in the process instance is executed, the BPM runtime authenticates thestarting user’s credentials against the appropriate LDAP directory. The activity can only be executed ifthat authentication request succeeds.
This authentication model may not be appropriate for some business processes. For example:
● If a process takes a significant length of time to complete (perhaps months or even years) the userwho started the process may have left the company before the process instance has finished. Whenthe next activity in the process instance executes, authentication will fail as the user’s credentialshave been removed from the company’s LDAP directories. The process instance will therefore beunable to progress.
● If a process contains an activity that calls a secured web service, some users may have the necessaryauthorization rights to start an instance of the process, but not to access the secured web service.The process instance will therefore be unable to progress beyond the call to the secured web service.
232
TIBCO Business Studio Tutorials
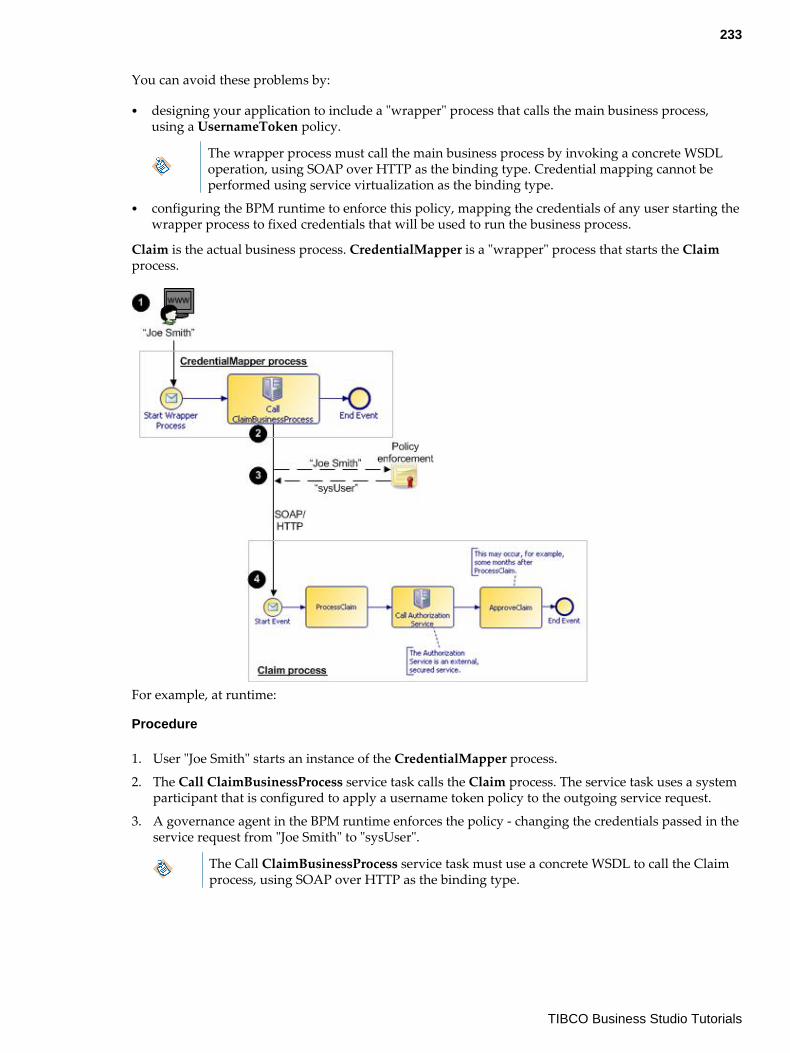
You can avoid these problems by:
● designing your application to include a "wrapper" process that calls the main business process,using a UsernameToken policy.
The wrapper process must call the main business process by invoking a concrete WSDLoperation, using SOAP over HTTP as the binding type. Credential mapping cannot beperformed using service virtualization as the binding type.
● configuring the BPM runtime to enforce this policy, mapping the credentials of any user starting thewrapper process to fixed credentials that will be used to run the business process.
Claim is the actual business process. CredentialMapper is a "wrapper" process that starts the Claimprocess.
For example, at runtime:
Procedure
1. User "Joe Smith" starts an instance of the CredentialMapper process.
2. The Call ClaimBusinessProcess service task calls the Claim process. The service task uses a systemparticipant that is configured to apply a username token policy to the outgoing service request.
3. A governance agent in the BPM runtime enforces the policy - changing the credentials passed in theservice request from "Joe Smith" to "sysUser".
The Call ClaimBusinessProcess service task must use a concrete WSDL to call the Claimprocess, using SOAP over HTTP as the binding type.
233
TIBCO Business Studio Tutorials
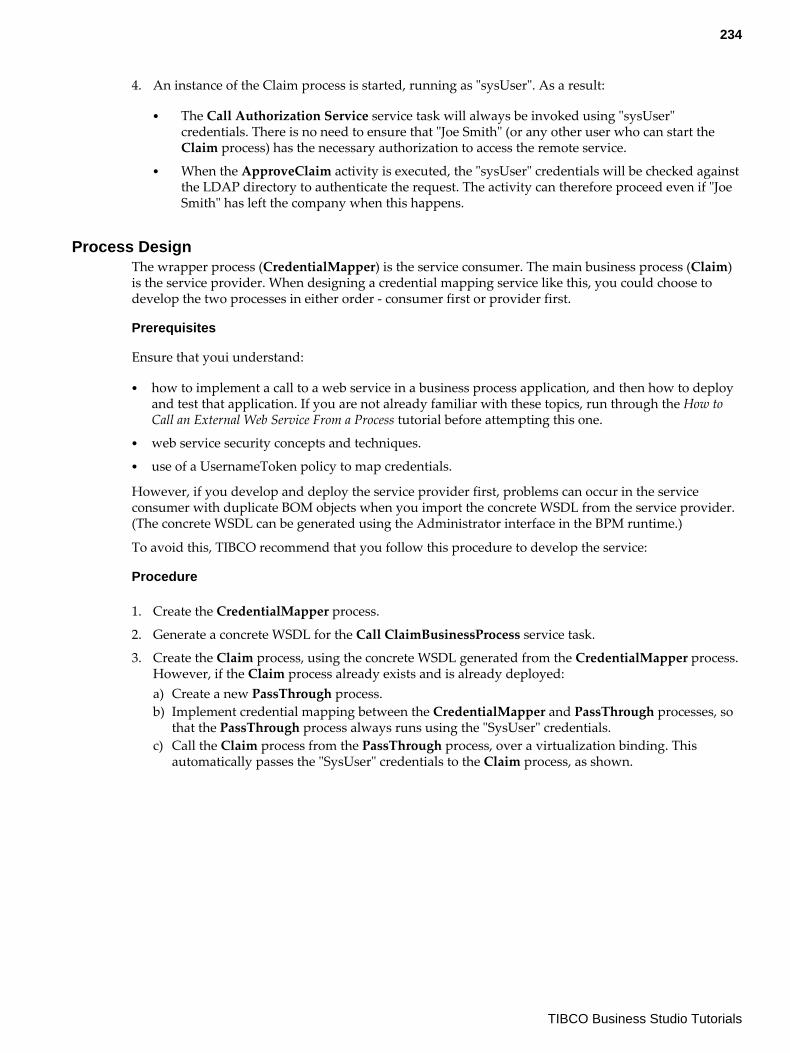
4. An instance of the Claim process is started, running as "sysUser". As a result:
● The Call Authorization Service service task will always be invoked using "sysUser"credentials. There is no need to ensure that "Joe Smith" (or any other user who can start theClaim process) has the necessary authorization to access the remote service.
● When the ApproveClaim activity is executed, the "sysUser" credentials will be checked againstthe LDAP directory to authenticate the request. The activity can therefore proceed even if "JoeSmith" has left the company when this happens.
Process DesignThe wrapper process (CredentialMapper) is the service consumer. The main business process (Claim)is the service provider. When designing a credential mapping service like this, you could choose todevelop the two processes in either order - consumer first or provider first.
Prerequisites
Ensure that youi understand:
● how to implement a call to a web service in a business process application, and then how to deployand test that application. If you are not already familiar with these topics, run through the How toCall an External Web Service From a Process tutorial before attempting this one.
● web service security concepts and techniques.● use of a UsernameToken policy to map credentials.
However, if you develop and deploy the service provider first, problems can occur in the serviceconsumer with duplicate BOM objects when you import the concrete WSDL from the service provider.(The concrete WSDL can be generated using the Administrator interface in the BPM runtime.)
To avoid this, TIBCO recommend that you follow this procedure to develop the service:
Procedure
1. Create the CredentialMapper process.
2. Generate a concrete WSDL for the Call ClaimBusinessProcess service task.
3. Create the Claim process, using the concrete WSDL generated from the CredentialMapper process.However, if the Claim process already exists and is already deployed:a) Create a new PassThrough process.b) Implement credential mapping between the CredentialMapper and PassThrough processes, so
that the PassThrough process always runs using the "SysUser" credentials.c) Call the Claim process from the PassThrough process, over a virtualization binding. This
automatically passes the "SysUser" credentials to the Claim process, as shown.
234
TIBCO Business Studio Tutorials
Result
Creating a Keystore Containing the Security Credentials to Run the Business ProcessThe credentials that will be used to run the business process must be defined in a keystore that isavailable to the BPM runtime.
If you do not have access to the BPM runtime you will need to get an administrator to perform this stepfor you.
Procedure
1. Log into the BPM runtime.
2. Using a text editor, open the file: BPM_CONFIG_FOLDER\tibco\data\admin\enterpriseName\samples\ keystore_data.xml
where:
● BPM_CONFIG_FOLDER is the path of the TIBCO configuration folder created when the BPMruntime was installed.
● enterpriseName is the enterprise name specified for the Administrator Server when the BPMruntime was installed. (The default value is AMX BPM.)
For example: C:\ProgramData\amx-bpm\tibco\data\admin\AMX BPM\samples\ keystore_data.xml
3. Delete the existing CredentialEntry elements.
235
TIBCO Business Studio Tutorials
4. Add a new CredentialEntry element that defines:
● the username (username) and password (secret) of the credentials that will be used to run thebusiness process.
● the alias (alias) and associated password (protectionParam) that will be used to access thesecredentials.
For example:<AMXKeyStore xsi:type="amxdata:AMXKeyStore"> <CredentialEntry alias="myKeystore" protectionParam="myKeyStoreAliasPassword" username="sysUser" secret="sysUserPassword" /</AMXKeyStore>
5. Save the file.
6. Open the BPM_CONFIG_FOLDER\tibco\data\admin\enterpriseName\samples\keystore_build.xml file and edit the following entries:
● adminKeyStorelocation - the name of the file that will contain the keystore.
● adminKeyStorePassword - the password that will be required to access the keystore file.
For example:<project name="keystore_build" default="all"> <!-- This property lets you safely define all paths relative to the absolute location of this Ant file. --> <dirname property="admin.samples.directory" file="${ant.file.keystore_build}"/> <!-- This import defines the custom AMXKeyStoreTask. --> <import file="${admin.samples.directory}/admin-scripts-base.xml"/> <!-- Predefine ${dataFile} to apply the targets in this script with different parameters. --> <property name="dataFile" value="${admin.samples.directory}/keystore_data.xml"/> <!-- Add credential and delete credentials from admin default keystore --> <target name="all" depends="addCredential,deleteCredential"/> <target name="addCredential"> <AMXKeyStoreTask dataFile="${dataFile}" adminKeyStorelocation = "my_keystore.jceks" adminKeyStorePassword = "AKSpassWd" action="add"/> </target> <target name="deleteCredential"> <AMXKeyStoreTask dataFile="${dataFile}" adminKeyStorelocation = "my_keystore.jceks" adminKeyStorePassword = "AKSpassWd" action="delete"/> </target></project>
7. Save the file.
236
TIBCO Business Studio Tutorials
8. Run the command to generate the keystore file. ant -f keystore_build.xml addCredential
If Apache Ant™ is not already installed on the BPM runtime system, download it from http://ant.apache.org, install as directed in the Ant documentation, and add the antexecutable to your path.
The file containing the keystore (defined by adminKeyStorelocation) is created in the same folder.For example:
C:\ProgramData\amx-bpm\tibco\data\admin\AMX BPM\samples>ant -f keystore_build.xm
l addCredential Buildfile: C:\ProgramData\amx-bpm\tibco\data\admin\AMX BPM
\samples\keystore_buil d.xml addCredential: [AMXKeyStoreTask] INFO - Keystore
file C:\ProgramData\amx-bpm\tibco\data\admin\ AMX BPM\samples\my_keystore.jceks
does not exist; creating a new keystore file [AMXKeyStoreTask] Adding entry for
alias 'myDatabase'... [AMXKeyStoreTask] Saving to keystore file C:\ProgramData
\amx-bpm\tibco\data\admi n\AMX BPM\samples\my_keystore.jceks BUILD SUCCESSFUL
Total time: 9 seconds C:\ProgramData\amx-bpm\tibco\data\admin\AMX BPM\samples>
Result
See Also
See the following topics in the BPM runtime documentation:
● Administration: Resource Templates > Security Resource Templates > Keystore Provider > Creating aKeystore Containing a Username and Password
● Administration: Administrator Interfaces > Command-Line Interface
Creating the Links to the KeystoreA keystore provider resource instance provides a reference to the keystore created.
An identity provider resource instance provides a reference to the specific credentials defined in thekeystore.
An identity provider application (or governance agent):
● provides a reference to the identity provider resource instance that will be used to map thecredentials.
● enforces the required credential mapping when the wrapper process invokes the business process.
At design-time, in TIBCO Business Studio, the name of the identity provider applicationcan be referenced from a BPM application using the Governance App. Field, which isdefined for the system participant used to define the web service endpoint.
See "Configuring Security on an Outgoing Service Call" in the TIBCO Business Studio BPMImplementation guide for more information.
If you do not have access to the Administrator interface in the BPM runtime, you will need to get anadministrator to perform this step for you.
Creating and Install a Keystore Provider Resource Instance
Procedure
1. Log into the Administrator interface in the BPM runtime.
237
TIBCO Business Studio Tutorials
2. Create a Keystore Provider resource template with the following properties:
● Location of keystore: Identify the keystore that you created earlier.● Password: Enter the password needed to access the keystore, as defined by the
adminKeyStorePassword parameter in the keystore_build.xml file.
● Scope: Scope the template to your BPM application instance (for example, amx.bpm.app).● Type: Select JCEKS.● Provider: Clear this field and leave it blank.
3. Using the Keystore Provider resource template that you have just created, create and install a newKeystore Provider resource instance on the BPMNode.
Creating and Installing an Identity Provider Resource Instance
Procedure
1. Create an Identity Provider resource template with the following properties:
● Keystore Provider to Supply Identity: Enter (or use the picker tool to select) the name of theKeystore Provider resource instance that you created earlier.
● Enable Access to Credential Store Containing Identity: Select this option.● Key Alias to Access Identity: Enter the alias name that you specified in the
keystore_data.xml file.
● Key Alias Password: Enter the protectionParam password that you specified in thekeystore_data.xml file.
2. Using the Identity Provider resource template that you have just created, create and install a newIdentity Provider resource instance on the BPMNode.
Creating and Installing an Identity Provider Application
Procedure
1. Create a new identity provider application with the following characteristics:
● Environment Name. Select BPMEnvironment.● Application Template Name: Select TIBCO ActiveMatrix Governance Agent Identity
Provider.● Node Name: Select BPMNode● Folder Name: accept the default.● subjectIspConnectorFactory property: Enter the name of the Identity Provider resource
instance you created earlier
2. Deploy and start the identity provider application.
238
TIBCO Business Studio Tutorials
Result
See the following topics in the BPM runtime documentation:
● Administration: Resource Templates > Security Resource Templates > Keystore Provider > Creating aKeystore Containing a Username and Password
● Concepts: Platform > Governance● Development Tutorials: Policy tutorials > Preparing an Application that Injects Resource Instances
into Policies
Configuring the Credential Mapping Process to Assign the Security PolicyIn the wrapper process, you must assign the appropriate security policy to the system participant thatidentifies the web service endpoint used to call the main business process.
Procedure
1. In TIBCO Business Studio, open the wrapper process that will be used to call the main businessprocess.
2. In Project Explorer, select the system participant used by the web service task that calls the mainbusiness process.
3. On the General tab of the Properties view, expand Shared Resource.
4. Make sure that SOAP over HTTP is selected for the Invoke using field.
5. In the Policy Type field, select Username Token from the drop-down menu.
6. In the Governance App. Name property, enter the name of the BPM runtime identity providerapplication that you created earlier. This application will be used to apply the required policy to theoutgoing message used to call the main business process.
How to Send an Email From a ProcessThis tutorial shows you how to configure a service task to send an email from a business processapplication, and then how to deploy and test that application.
You should work through each section in turn to complete the tutorial.
Data fields can be used to dynamically set parts of the email at runtime (for example, the recipient, orpart of the body text of the email).
A connection to an SMTP mail server must be configured, using a BPM runtime SMTP resourceinstance. At runtime, when the service task is executed, the BPM runtime constructs the email from thedata provided in the send task and sends the email to the SMTP mail server, which in turn sends it tothe specified recipients.
Prerequisites
You should be familiar with the basics of designing, implementing and deploying process-basedapplications using TIBCO Business Studio. If you are not familiar with these things, you should runthrough the following tutorials before attempting this one:
● How to Design a Simple WelcomeUsers Business Service● How to Implement and Deploy the WelcomeUsers Application
Before You Begin
You will need to know the SMTP address and port number used by your SMTP mail server to be ableto test and run this tutorial.
239
TIBCO Business Studio Tutorials

Importing the AcknowledgeClaim Analysis ProjectTo avoid having to build the process from scratch and focus just on the steps involved in sending anemail from a process, this tutorial provides a "work in progress" project as a starting point.
This project represents the process at the handover point from business analyst to solution designer:
● The overall process has been defined.● The data to be passed in the email has been defined.● The email service call needs to be implemented.
Procedure
1. Start Studio for Designers.
Following this tutorial will be simpler and clearer if you close any other projects that youmay have open in your TIBCO Business Studio workspace, using the Project > CloseProject menu option.
2. To import the AcknowledgeClaim project into your workspace, find the acknowledgeclaim.zip filein the location where you installed TIBCO Business Studio.
3. In TIBCO Business Studio, choose File > Import . The Import wizard is displayed.
4. On the Select page, expand General, select Existing Studio Projects into Workspace and clickNext. The Import Projects page is displayed.
5. Click Select archive file, and click on the Browse button.
6. Browse to the zip file and click Open. The project is displayed in the Import wizard.
7. Click Finish. TIBCO Business Studio imports the AcknowledgeClaim project to your workspace.The project contains the processes:
Result
Process Description
MakeClaim (businessservice / pageflowprocess)
This is a business service which, when started by a user:
1. Displays a form to get user’s email address.
2. Invokes the AcknowledgeClaim business process, passing the user’semail address as the input parameter.
Note: Although this tutorial project uses a business service to collect thedata used as input to the web service, this is simply a convenience to makeit easy to run and test the application.
AcknowledgeClaim(business process)
This is a business process which, when invoked by the MakeClaimbusiness service:
1. Runs a script which identifies "ReplyTo" and "From" email addresses.
2. Sends an email to the user.
Note that when you import the project, one error marker displays on thescript task in this business process. You will remove this later in thetutorial.
240
TIBCO Business Studio Tutorials

Creating an Email Service TaskTo send an email from a process you use a Service task of type Email.
Procedure
1. Open the AcknowledgeClaim process.
2. Select the Acknowledge claim task.
3. On the Properties view, General tab, change the Activity Type from Task to Service Task. Theright-hand pane now displays a Service Type field.
4. Change the Service Type to E-Mail.
5. Enter a suitable Subject and Body for the email message. For example:
You will populate the To field in the later
6. Click More Details. The E-Mail tab is displayed.
Setting up Dynamic Data Inputs to the EmailData fields defined in the process can be used to dynamically set parts of the email at runtime - forexample, the recipient, part of the body text of the email, or the contents of attachments.
In the To field, click the Browse button ( ) at the right-hand side of the field. The Select Data Field orFormal Parameter dialog is displayed.
Procedure
1. Select claimant, then click OK. The To field now contains the token %claimant%, indicating that atruntime the field will be populated with the current value of the claimant formal parameter.
241
TIBCO Business Studio Tutorials
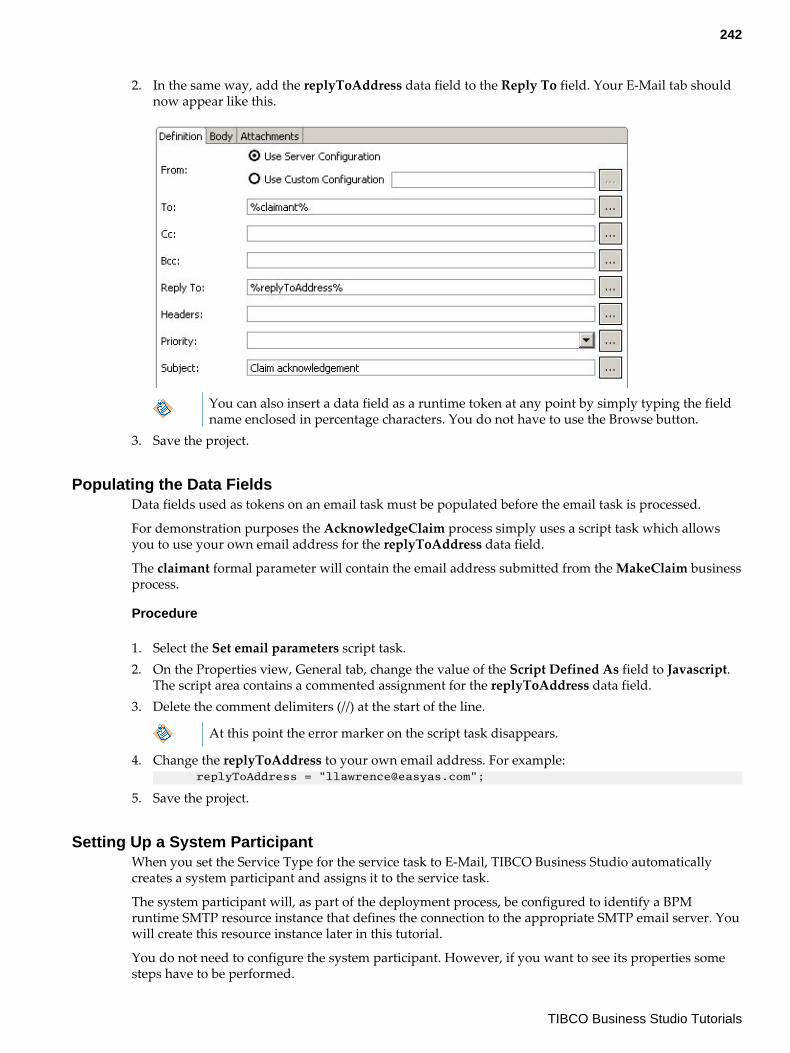
2. In the same way, add the replyToAddress data field to the Reply To field. Your E-Mail tab shouldnow appear like this.
You can also insert a data field as a runtime token at any point by simply typing the fieldname enclosed in percentage characters. You do not have to use the Browse button.
3. Save the project.
Populating the Data FieldsData fields used as tokens on an email task must be populated before the email task is processed.
For demonstration purposes the AcknowledgeClaim process simply uses a script task which allowsyou to use your own email address for the replyToAddress data field.
The claimant formal parameter will contain the email address submitted from the MakeClaim businessprocess.
Procedure
1. Select the Set email parameters script task.2. On the Properties view, General tab, change the value of the Script Defined As field to Javascript.
The script area contains a commented assignment for the replyToAddress data field.3. Delete the comment delimiters (//) at the start of the line.
At this point the error marker on the script task disappears.
4. Change the replyToAddress to your own email address. For example: replyToAddress = "[email protected]";
5. Save the project.
Setting Up a System ParticipantWhen you set the Service Type for the service task to E-Mail, TIBCO Business Studio automaticallycreates a system participant and assigns it to the service task.
The system participant will, as part of the deployment process, be configured to identify a BPMruntime SMTP resource instance that defines the connection to the appropriate SMTP email server. Youwill create this resource instance later in this tutorial.
You do not need to configure the system participant. However, if you want to see its properties somesteps have to be performed.
242
TIBCO Business Studio Tutorials

Procedure
1. Select the Default EMail Sender participant. (This participant is defined at the Package level.)
2. On the Properties view, General tab, expand the Shared Resource entry.
3. Leave the values unchanged.
Creating an SMTP Resource InstanceAn SMTP resource instance must exist in the BPM runtime before you can deploy theAcknowledgeClaim application. This resource instance defines the connection information used by theBPM runtime to contact the SMTP mail server.
There are several different types of resource instance. An SMTP resource instance must be used toprovide a connection to an SMTP mail server.
To define a resource instance, you must use the Administrator interface in the BPM runtime to:
Procedure
1. create a resource template. A resource template specifies configuration properties for resourceinstances.
2. create a resource instance based on the resource template, and install it on a host. A resourceinstance represents a resource shared between applications. It is then available to applicationsrunning on that node—in this case, to the AcknowledgeClaim application.
Result
This step assumes that you have created the XYZ Work Server1 Deployment Server, as described in theHow to Implement and Deploy the WelcomeUsers Application tutorial.
If you do not have access to the Administrator interface in the BPM runtime, you will need to get anadministrator to perform this step for you.
Creating an SMTP Resource Template
Procedure
1. In the Deployment Servers view, right-click XYZ Work Server1 and select Open > Administrator .The login screen for the Administrator interface in the BPM runtime is displayed.
243
TIBCO Business Studio Tutorials
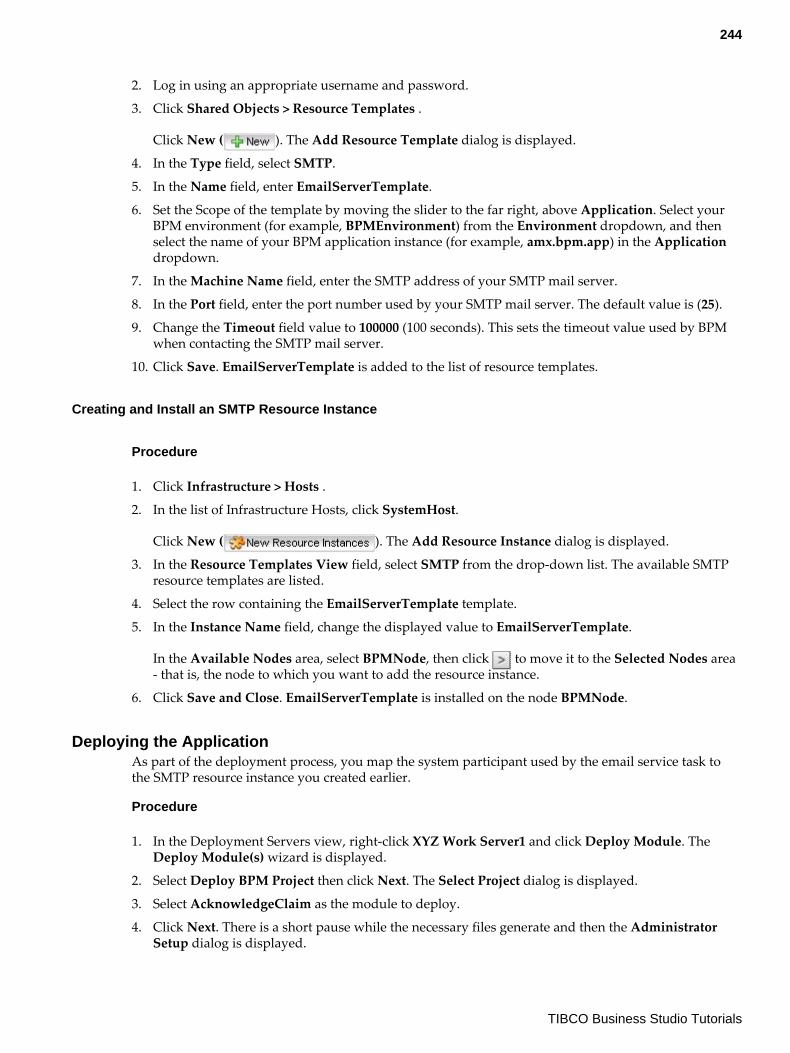
2. Log in using an appropriate username and password.
3. Click Shared Objects > Resource Templates .
Click New ( ). The Add Resource Template dialog is displayed.
4. In the Type field, select SMTP.
5. In the Name field, enter EmailServerTemplate.
6. Set the Scope of the template by moving the slider to the far right, above Application. Select yourBPM environment (for example, BPMEnvironment) from the Environment dropdown, and thenselect the name of your BPM application instance (for example, amx.bpm.app) in the Applicationdropdown.
7. In the Machine Name field, enter the SMTP address of your SMTP mail server.
8. In the Port field, enter the port number used by your SMTP mail server. The default value is (25).
9. Change the Timeout field value to 100000 (100 seconds). This sets the timeout value used by BPMwhen contacting the SMTP mail server.
10. Click Save. EmailServerTemplate is added to the list of resource templates.
Creating and Install an SMTP Resource Instance
Procedure
1. Click Infrastructure > Hosts .
2. In the list of Infrastructure Hosts, click SystemHost.
Click New ( ). The Add Resource Instance dialog is displayed.
3. In the Resource Templates View field, select SMTP from the drop-down list. The available SMTPresource templates are listed.
4. Select the row containing the EmailServerTemplate template.
5. In the Instance Name field, change the displayed value to EmailServerTemplate.
In the Available Nodes area, select BPMNode, then click to move it to the Selected Nodes area- that is, the node to which you want to add the resource instance.
6. Click Save and Close. EmailServerTemplate is installed on the node BPMNode.
Deploying the ApplicationAs part of the deployment process, you map the system participant used by the email service task tothe SMTP resource instance you created earlier.
Procedure
1. In the Deployment Servers view, right-click XYZ Work Server1 and click Deploy Module. TheDeploy Module(s) wizard is displayed.
2. Select Deploy BPM Project then click Next. The Select Project dialog is displayed.
3. Select AcknowledgeClaim as the module to deploy.
4. Click Next. There is a short pause while the necessary files generate and then the AdministratorSetup dialog is displayed.
244
TIBCO Business Studio Tutorials
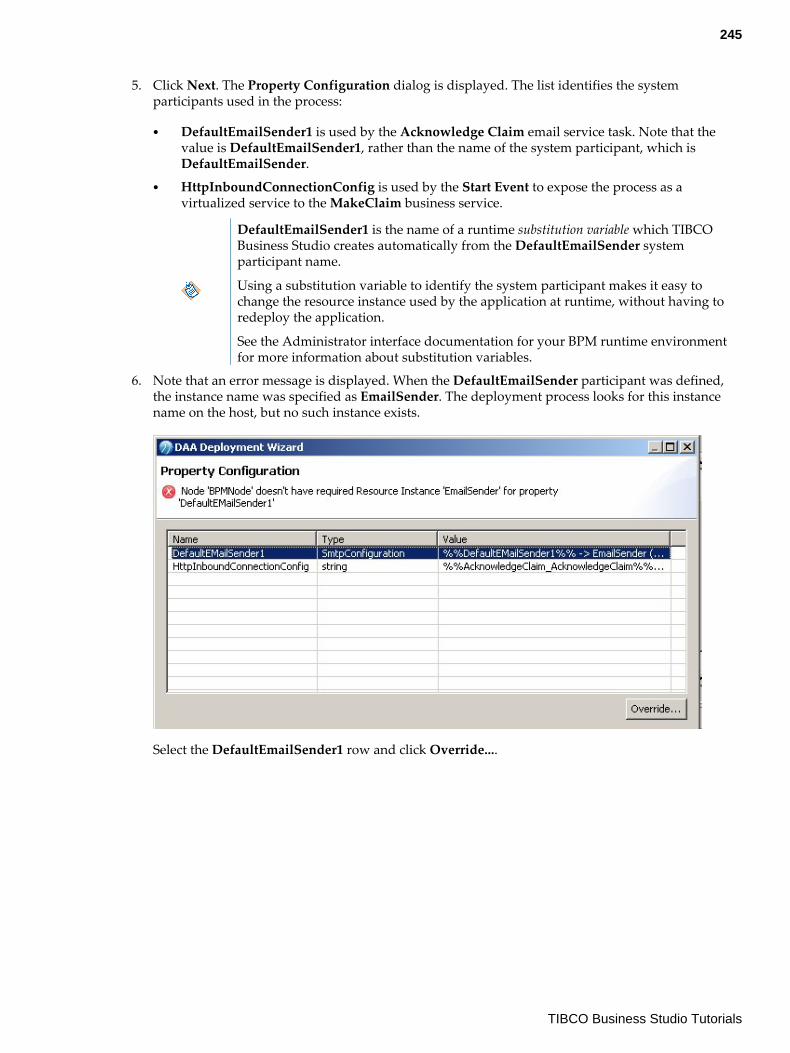
5. Click Next. The Property Configuration dialog is displayed. The list identifies the systemparticipants used in the process:
● DefaultEmailSender1 is used by the Acknowledge Claim email service task. Note that thevalue is DefaultEmailSender1, rather than the name of the system participant, which isDefaultEmailSender.
● HttpInboundConnectionConfig is used by the Start Event to expose the process as avirtualized service to the MakeClaim business service.
DefaultEmailSender1 is the name of a runtime substitution variable which TIBCOBusiness Studio creates automatically from the DefaultEmailSender systemparticipant name.
Using a substitution variable to identify the system participant makes it easy tochange the resource instance used by the application at runtime, without having toredeploy the application.
See the Administrator interface documentation for your BPM runtime environmentfor more information about substitution variables.
6. Note that an error message is displayed. When the DefaultEmailSender participant was defined,the instance name was specified as EmailSender. The deployment process looks for this instancename on the host, but no such instance exists.
Select the DefaultEmailSender1 row and click Override....
245
TIBCO Business Studio Tutorials
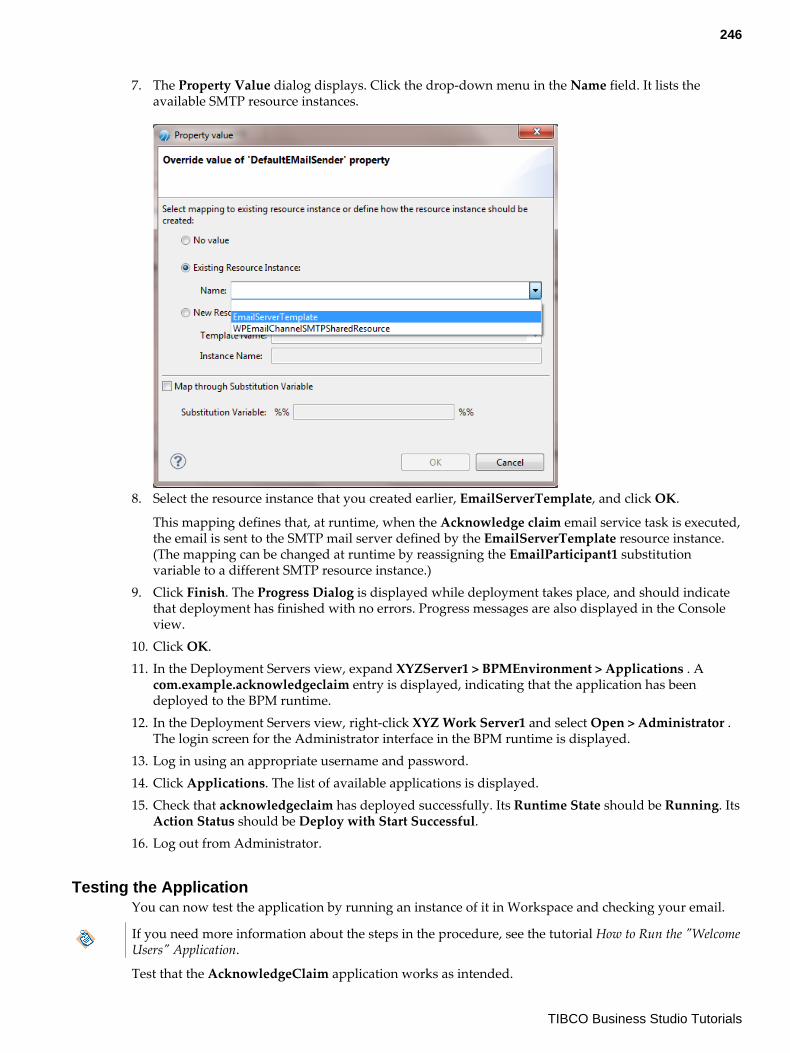
7. The Property Value dialog displays. Click the drop-down menu in the Name field. It lists theavailable SMTP resource instances.
8. Select the resource instance that you created earlier, EmailServerTemplate, and click OK.
This mapping defines that, at runtime, when the Acknowledge claim email service task is executed,the email is sent to the SMTP mail server defined by the EmailServerTemplate resource instance.(The mapping can be changed at runtime by reassigning the EmailParticipant1 substitutionvariable to a different SMTP resource instance.)
9. Click Finish. The Progress Dialog is displayed while deployment takes place, and should indicatethat deployment has finished with no errors. Progress messages are also displayed in the Consoleview.
10. Click OK.11. In the Deployment Servers view, expand XYZServer1 > BPMEnvironment > Applications . A
com.example.acknowledgeclaim entry is displayed, indicating that the application has beendeployed to the BPM runtime.
12. In the Deployment Servers view, right-click XYZ Work Server1 and select Open > Administrator .The login screen for the Administrator interface in the BPM runtime is displayed.
13. Log in using an appropriate username and password.14. Click Applications. The list of available applications is displayed.15. Check that acknowledgeclaim has deployed successfully. Its Runtime State should be Running. Its
Action Status should be Deploy with Start Successful.16. Log out from Administrator.
Testing the ApplicationYou can now test the application by running an instance of it in Workspace and checking your email.
If you need more information about the steps in the procedure, see the tutorial How to Run the "WelcomeUsers" Application.
Test that the AcknowledgeClaim application works as intended.
246
TIBCO Business Studio Tutorials

Procedure
1. In the Deployment Servers view, right-click XYZ Work Server1 and select Open > TIBCO . TheWorkspace login screen is displayed.
2. Log in as user tibco-admin (or as any other user that you have already added to the system).
3. Click Business Services.
4. Expand All Business Services > uncategorized , then select and start the MakeClaim businessservice.
5. A Get email address form is displayed:a) In the claimant field, enter your own email address.b) Click Submit.
6. Log out.
7. Check the inbox in your email program. You should receive an email with the Subject and Bodyyou specified in the Acknowledge claim service task.
If you do not see the email in your inbox, check your junk email folder. The spam filtersettings on your mail program may direct the email there instead of to your inbox.
8. Create a reply to the email. The To address of your reply should contain the address you specifiedin the replyToAddress data field.
How to Call TIBCO BusinessEvents™ from a ProcessThe applications described demonstrate a simple interface between TIBCO ActiveMatrix BPM andTIBCO BusinessEvents.
TIBCO BusinessEvents applications can be exposed as web services that can be called by externalapplications. The business process in this tutorial calls TIBCO BusinessEvents via a web serviceinvocation.
You can create a BusinessEvents application, implement a call to the BusinessEvents application via aweb service in a business process application, and then deploy and test that application.
The tutorial is comprised of three sections:
● Creating an TIBCO ActiveMatrix BPM application using structured data.● Creating a TIBCO BusinessEvents application.● Testing the integration between the two applications.
You should work through all the steps in each section in turn to complete the tutorial.
The BusinessEvents application is based on a decision table. The table implements a simple rule thatexamines activity on a bank account for fraud.
The deposit or withdrawal of more than $500 triggers an alert on the transaction.
The business process application sends the name of the account holder and the amount of thetransaction to BusinessEvents for analysis, then receives a status message regarding the transaction inreturn.
247
TIBCO Business Studio Tutorials

Prerequisites
● You are not expected to have any specific knowledge of TIBCO BusinessEvents in this tutorial.However, you should understand the general concepts and purpose of a rules engine.
● You are familiar with business process design for TIBCO ActiveMatrix BPM using TIBCO BusinessStudio. Note that:
— Structured data types will be referenced from the business process.— The input and output parameters used by the web service activity will be defined using
JavaScript mapping.
Before You Begin
● Install the following software (from the TIBCO Software Inc. Product Download Site) as per thedocumentation referenced within each product:
— TIBCO ActiveMatrix BPM 1.1.0— TIBCO Business Studio - BPM Edition 3.5.0— TIBCO BusinessEvents Standard Edition 4.0.1— TIBCO BusinessEvents Decision Manager 4.0.1 (This should be installed into the same
TIBCO_HOME as the TIBCO BusinessEvents Standard Edition.)
● Configure TIBCO BusinessEvents Studio and TIBCO Business Studio BPM Edition to have theirown unique workspace.
● From TIBCO Business Studio BPM Edition, create and connect to an ActiveMatrix BPM serverinstance.
Creating the ActiveMatrix BPM ProjectThe BPM project consists of a user task to collect the data - name and transaction amount - followed bya call to BusinessEvents via web services. Finally, the status of the transaction determined byBusinessEvents is displayed in a user task.
The use of structured data enables JavaScript mapping to be used in the web service activity.
You must create and deploy a suitable organization model prior to creating and deploying theActiveMatrix BPM project.
Each aspect of the application will be defined in turn as part of a BPM Developer Project within TIBCOBusiness Studio.
Procedure
1. In TIBCO Business Studio BPM Edition, right-click the Project Explorer and select New > BPMDeveloper Project to create a new BPM Developer Project called AdvBEIntegration.
2. Specify the BPM destination environment and click Next.
3. Accept the default values on the screens until the Business Processes screen. Enter the name of theProcess Package as AdvBEIntegration.
4. Accept the default values on the remaining screens and click Finish to create the project.
248
TIBCO Business Studio Tutorials
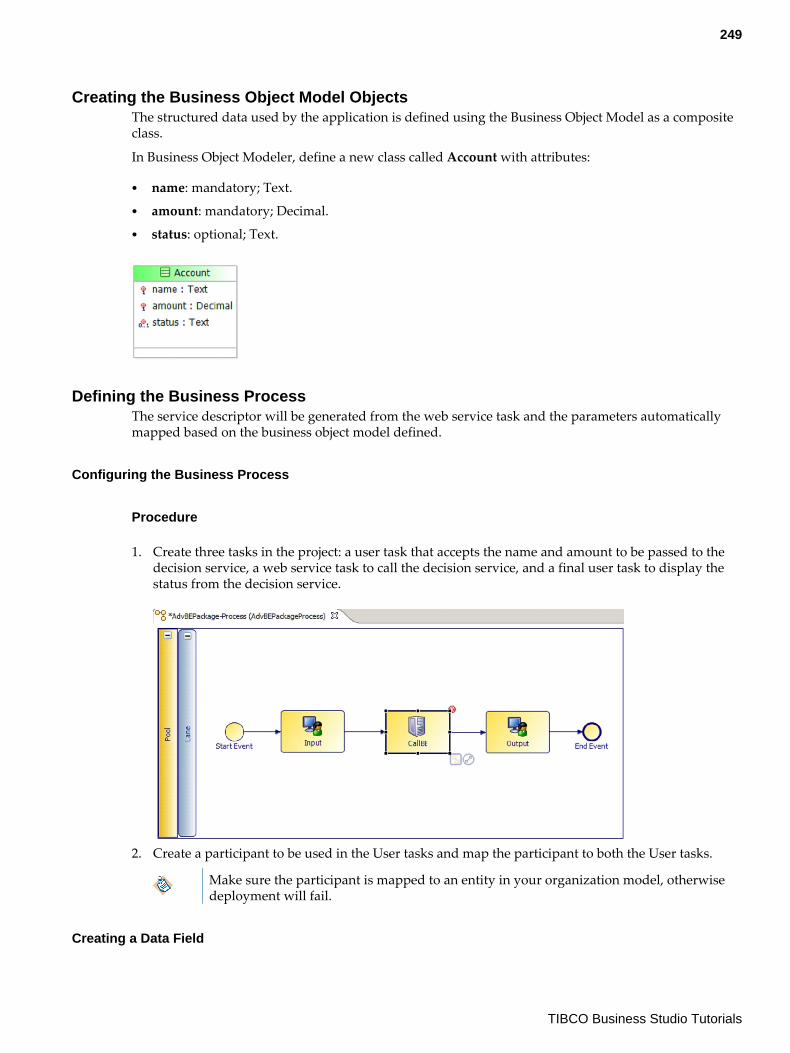
Creating the Business Object Model ObjectsThe structured data used by the application is defined using the Business Object Model as a compositeclass.
In Business Object Modeler, define a new class called Account with attributes:
● name: mandatory; Text.● amount: mandatory; Decimal.● status: optional; Text.
Defining the Business ProcessThe service descriptor will be generated from the web service task and the parameters automaticallymapped based on the business object model defined.
Configuring the Business Process
Procedure
1. Create three tasks in the project: a user task that accepts the name and amount to be passed to thedecision service, a web service task to call the decision service, and a final user task to display thestatus from the decision service.
2. Create a participant to be used in the User tasks and map the participant to both the User tasks.
Make sure the participant is mapped to an entity in your organization model, otherwisedeployment will fail.
Creating a Data Field
249
TIBCO Business Studio Tutorials
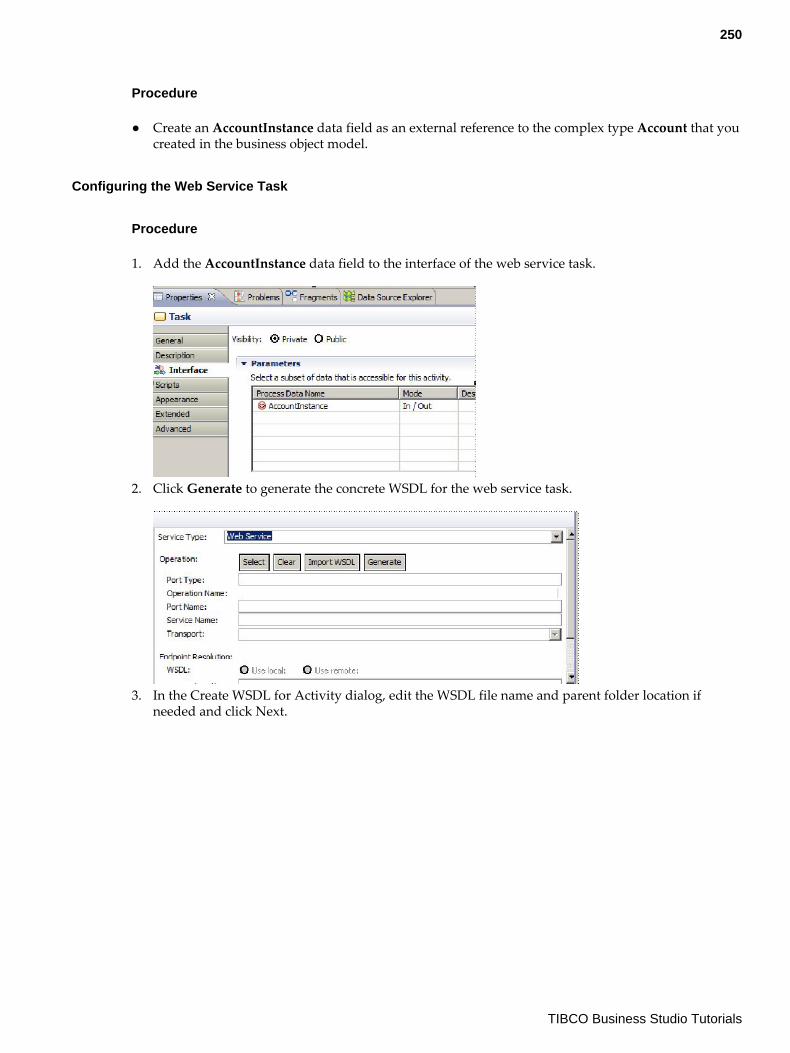
Procedure
● Create an AccountInstance data field as an external reference to the complex type Account that youcreated in the business object model.
Configuring the Web Service Task
Procedure
1. Add the AccountInstance data field to the interface of the web service task.
2. Click Generate to generate the concrete WSDL for the web service task.
3. In the Create WSDL for Activity dialog, edit the WSDL file name and parent folder location ifneeded and click Next.
250
TIBCO Business Studio Tutorials
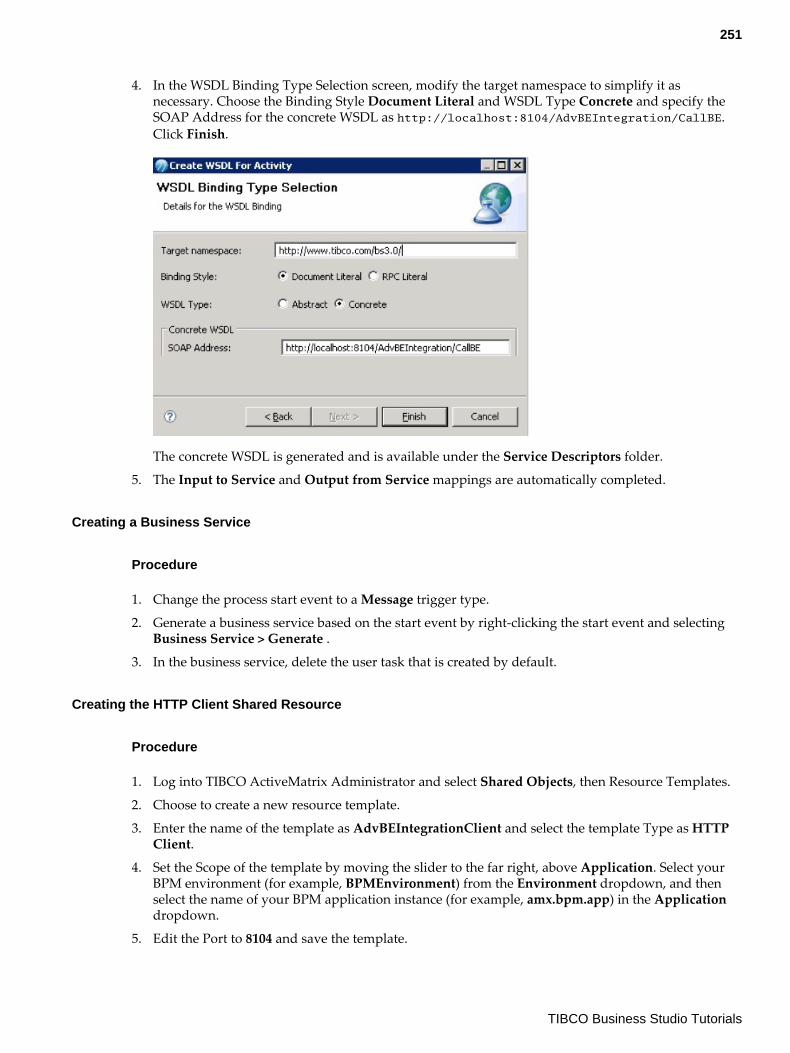
4. In the WSDL Binding Type Selection screen, modify the target namespace to simplify it asnecessary. Choose the Binding Style Document Literal and WSDL Type Concrete and specify theSOAP Address for the concrete WSDL as http://localhost:8104/AdvBEIntegration/CallBE.Click Finish.
The concrete WSDL is generated and is available under the Service Descriptors folder.
5. The Input to Service and Output from Service mappings are automatically completed.
Creating a Business Service
Procedure
1. Change the process start event to a Message trigger type.
2. Generate a business service based on the start event by right-clicking the start event and selectingBusiness Service > Generate .
3. In the business service, delete the user task that is created by default.
Creating the HTTP Client Shared Resource
Procedure
1. Log into TIBCO ActiveMatrix Administrator and select Shared Objects, then Resource Templates.
2. Choose to create a new resource template.
3. Enter the name of the template as AdvBEIntegrationClient and select the template Type as HTTPClient.
4. Set the Scope of the template by moving the slider to the far right, above Application. Select yourBPM environment (for example, BPMEnvironment) from the Environment dropdown, and thenselect the name of your BPM application instance (for example, amx.bpm.app) in the Applicationdropdown.
5. Edit the Port to 8104 and save the template.
251
TIBCO Business Studio Tutorials
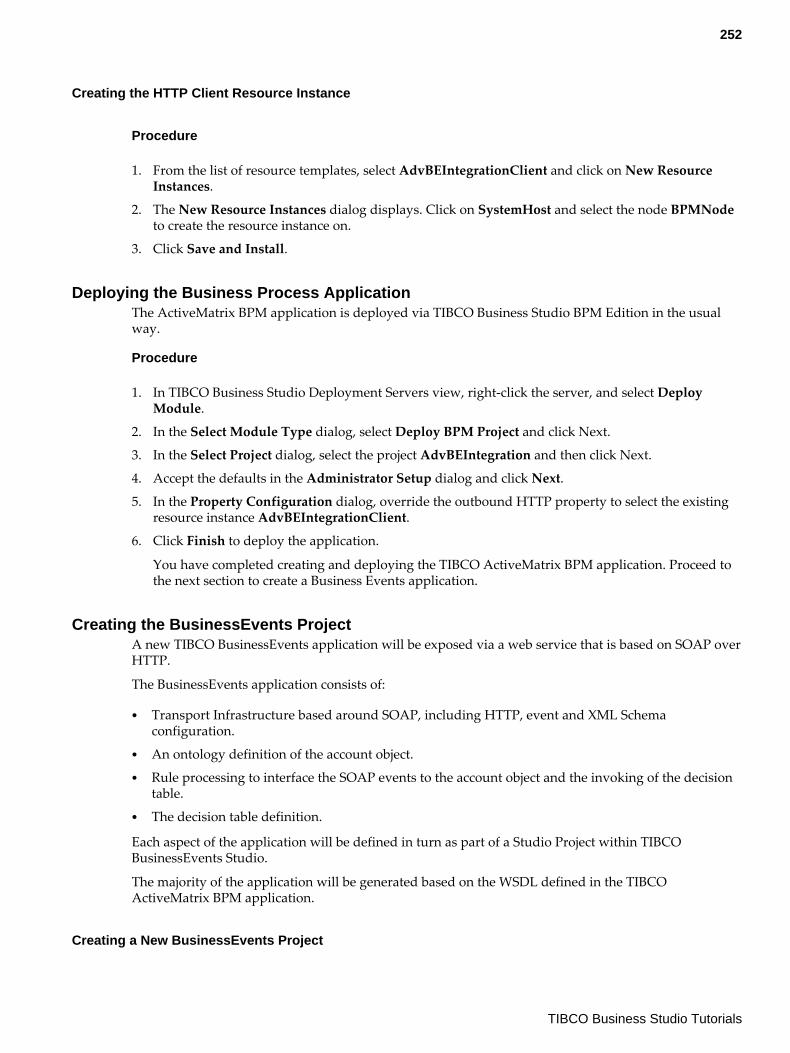
Creating the HTTP Client Resource Instance
Procedure
1. From the list of resource templates, select AdvBEIntegrationClient and click on New ResourceInstances.
2. The New Resource Instances dialog displays. Click on SystemHost and select the node BPMNodeto create the resource instance on.
3. Click Save and Install.
Deploying the Business Process ApplicationThe ActiveMatrix BPM application is deployed via TIBCO Business Studio BPM Edition in the usualway.
Procedure
1. In TIBCO Business Studio Deployment Servers view, right-click the server, and select DeployModule.
2. In the Select Module Type dialog, select Deploy BPM Project and click Next.
3. In the Select Project dialog, select the project AdvBEIntegration and then click Next.
4. Accept the defaults in the Administrator Setup dialog and click Next.
5. In the Property Configuration dialog, override the outbound HTTP property to select the existingresource instance AdvBEIntegrationClient.
6. Click Finish to deploy the application.
You have completed creating and deploying the TIBCO ActiveMatrix BPM application. Proceed tothe next section to create a Business Events application.
Creating the BusinessEvents ProjectA new TIBCO BusinessEvents application will be exposed via a web service that is based on SOAP overHTTP.
The BusinessEvents application consists of:
● Transport Infrastructure based around SOAP, including HTTP, event and XML Schemaconfiguration.
● An ontology definition of the account object.● Rule processing to interface the SOAP events to the account object and the invoking of the decision
table.● The decision table definition.
Each aspect of the application will be defined in turn as part of a Studio Project within TIBCOBusinessEvents Studio.
The majority of the application will be generated based on the WSDL defined in the TIBCOActiveMatrix BPM application.
Creating a New BusinessEvents Project
252
TIBCO Business Studio Tutorials

Procedure
1. Launch TIBCO BusinessEvents Studio (displayed as just Studio in the Windows start menu).
2. Click File > New > Other and select the wizard TIBCO BusinessEvents, then Studio Project tocreate a new Studio Project called BPMIntegration.
Importing the TIBCO ActiveMatrix BPM WSDL
Procedure
1. Create a new folder by right-clicking the project and then select New > Folder .
2. Name the folder as WSDL.
3. Copy the concrete WSDL generated in the TIBCO ActiveMatrix BPM project to a local directory onyour machine.
4. From TIBCO BusinessEvents Studio, right-click and select Import > > WSDL .
5. Browse and select the WSDL copied in step 3.
Creating the OntologyA BusinessEvents Concept is the equivalent of a Business Object Model (or structured data) object inTIBCO ActiveMatrix BPM.
A single Account concept will be defined that represents the name, transaction amount and the statusof a transaction, which will be subsequently determined by the decision table logic.
The name is not explicitly represented in the concept as all concepts have a built in identity parameter,@extId, which will be referenced as the account holder’s name in our example.
Creating a Concept
Procedure
1. Right-click the Concepts folder in the project and select New > Concept .
2. Specify a Concept name of Account to be created in the Concepts parent folder.
Configuring the Concept
253
TIBCO Business Studio Tutorials
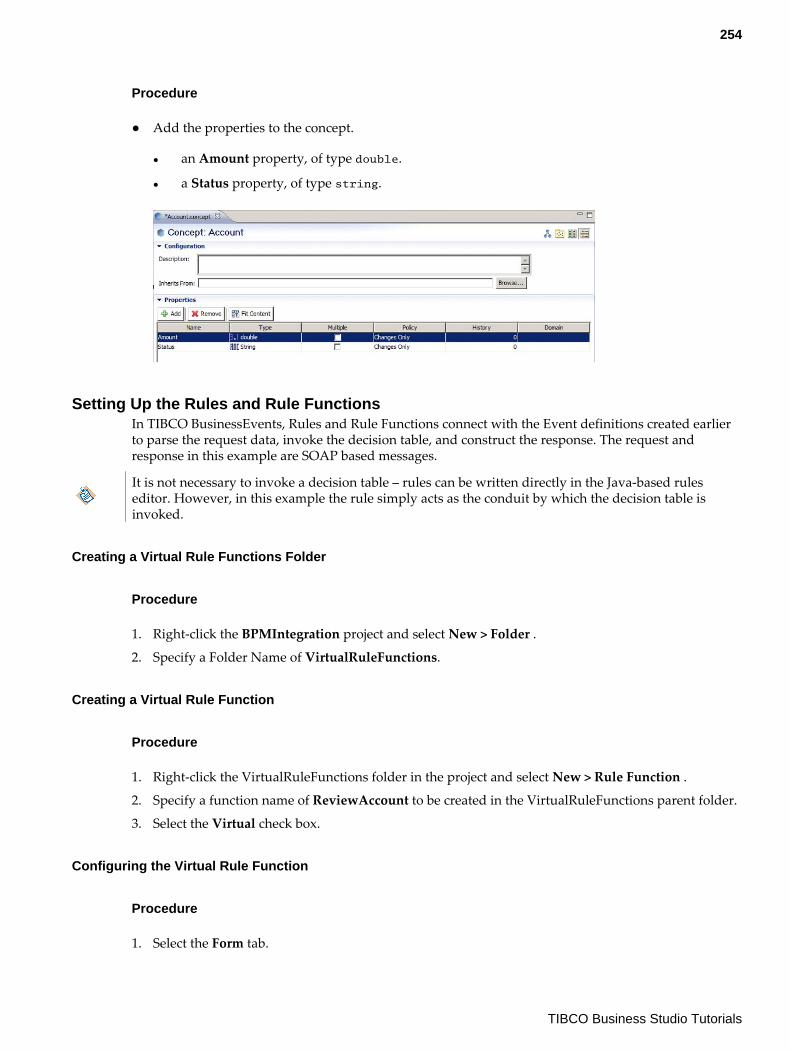
Procedure
● Add the properties to the concept.
● an Amount property, of type double.
● a Status property, of type string.
Setting Up the Rules and Rule FunctionsIn TIBCO BusinessEvents, Rules and Rule Functions connect with the Event definitions created earlierto parse the request data, invoke the decision table, and construct the response. The request andresponse in this example are SOAP based messages.
It is not necessary to invoke a decision table – rules can be written directly in the Java-based ruleseditor. However, in this example the rule simply acts as the conduit by which the decision table isinvoked.
Creating a Virtual Rule Functions Folder
Procedure
1. Right-click the BPMIntegration project and select New > Folder .
2. Specify a Folder Name of VirtualRuleFunctions.
Creating a Virtual Rule Function
Procedure
1. Right-click the VirtualRuleFunctions folder in the project and select New > Rule Function .
2. Specify a function name of ReviewAccount to be created in the VirtualRuleFunctions parent folder.
3. Select the Virtual check box.
Configuring the Virtual Rule Function
Procedure
1. Select the Form tab.
254
TIBCO Business Studio Tutorials
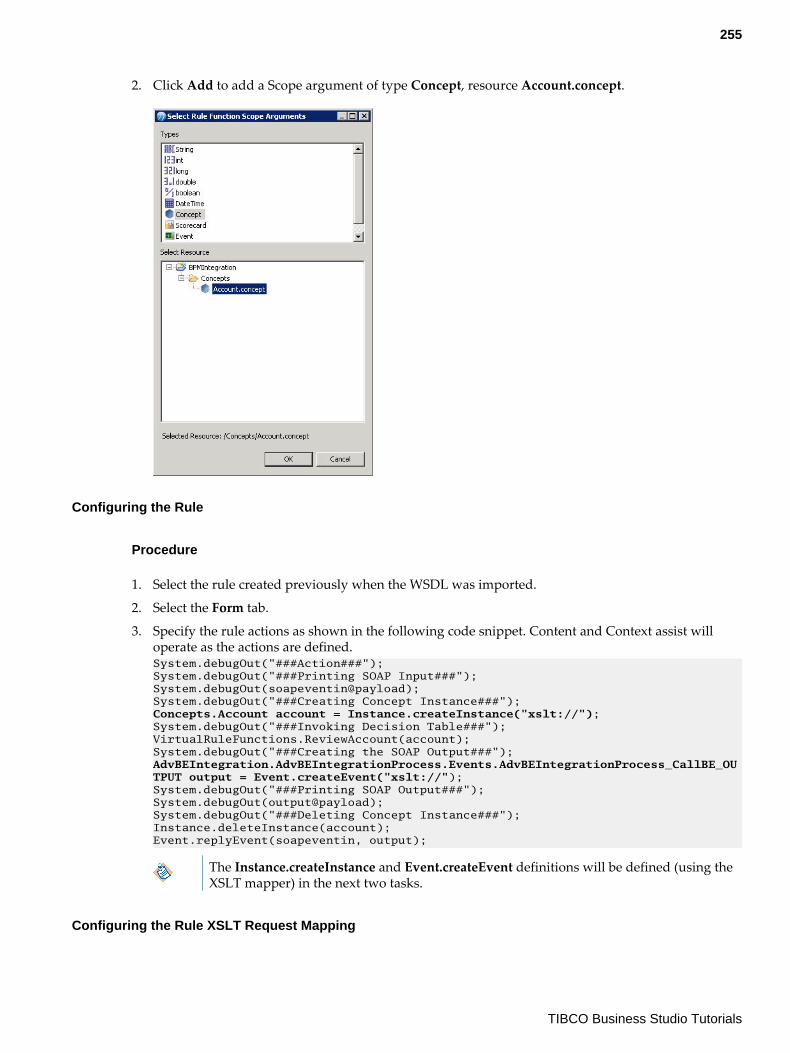
2. Click Add to add a Scope argument of type Concept, resource Account.concept.
Configuring the Rule
Procedure
1. Select the rule created previously when the WSDL was imported.
2. Select the Form tab.
3. Specify the rule actions as shown in the following code snippet. Content and Context assist willoperate as the actions are defined.System.debugOut("###Action###");System.debugOut("###Printing SOAP Input###");System.debugOut(soapeventin@payload);System.debugOut("###Creating Concept Instance###");Concepts.Account account = Instance.createInstance("xslt://");System.debugOut("###Invoking Decision Table###");VirtualRuleFunctions.ReviewAccount(account);System.debugOut("###Creating the SOAP Output###");AdvBEIntegration.AdvBEIntegrationProcess.Events.AdvBEIntegrationProcess_CallBE_OUTPUT output = Event.createEvent("xslt://");System.debugOut("###Printing SOAP Output###");System.debugOut(output@payload);System.debugOut("###Deleting Concept Instance###");Instance.deleteInstance(account);Event.replyEvent(soapeventin, output);
The Instance.createInstance and Event.createEvent definitions will be defined (using theXSLT mapper) in the next two tasks.
Configuring the Rule XSLT Request Mapping
255
TIBCO Business Studio Tutorials
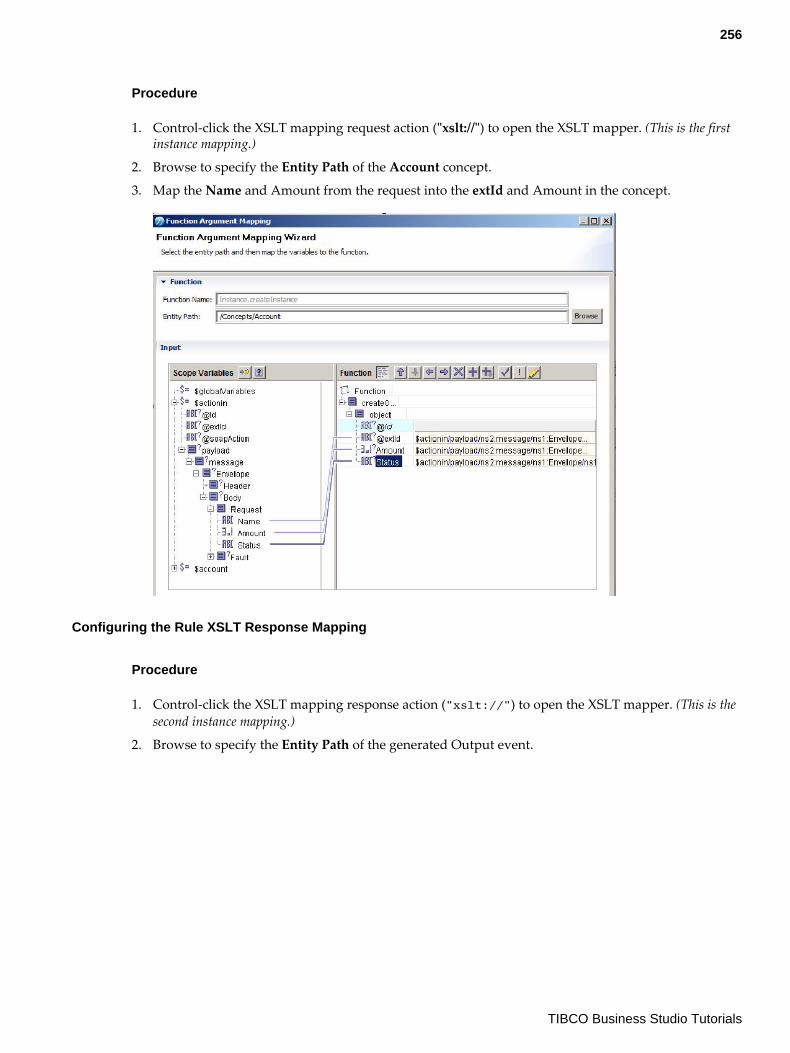
Procedure
1. Control-click the XSLT mapping request action ("xslt://") to open the XSLT mapper. (This is the firstinstance mapping.)
2. Browse to specify the Entity Path of the Account concept.
3. Map the Name and Amount from the request into the extId and Amount in the concept.
Configuring the Rule XSLT Response Mapping
Procedure
1. Control-click the XSLT mapping response action ("xslt://") to open the XSLT mapper. (This is thesecond instance mapping.)
2. Browse to specify the Entity Path of the generated Output event.
256
TIBCO Business Studio Tutorials
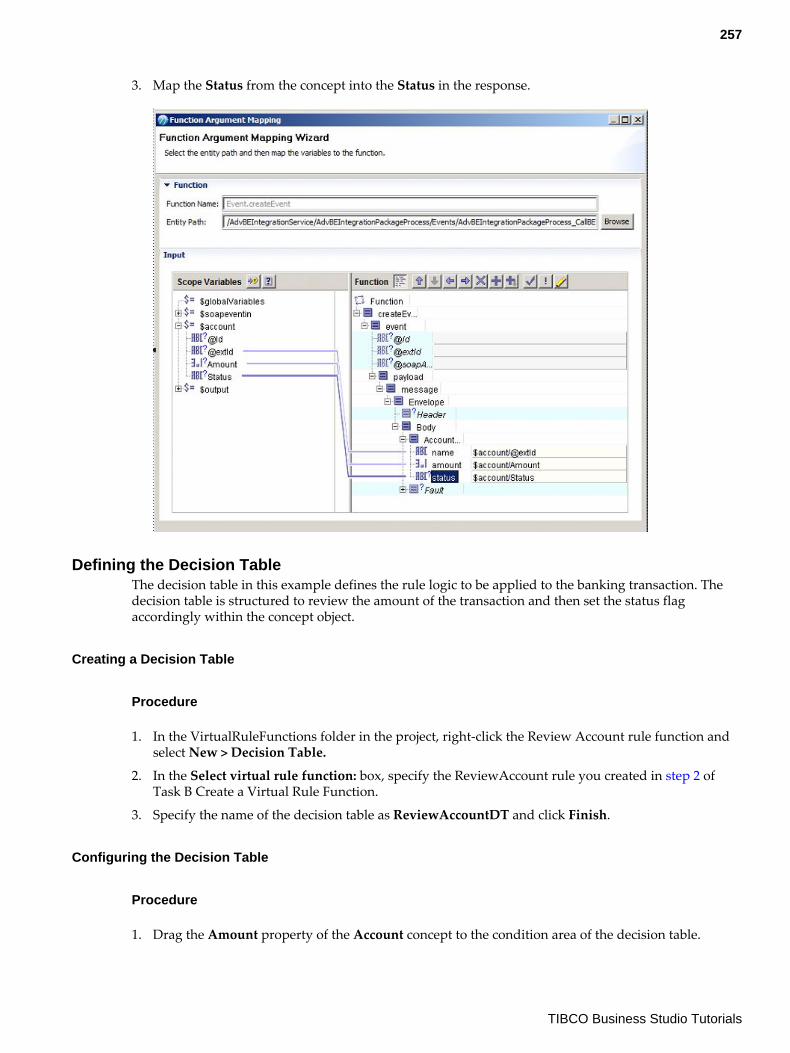
3. Map the Status from the concept into the Status in the response.
Defining the Decision TableThe decision table in this example defines the rule logic to be applied to the banking transaction. Thedecision table is structured to review the amount of the transaction and then set the status flagaccordingly within the concept object.
Creating a Decision Table
Procedure
1. In the VirtualRuleFunctions folder in the project, right-click the Review Account rule function andselect New > Decision Table.
2. In the Select virtual rule function: box, specify the ReviewAccount rule you created in step 2 ofTask B Create a Virtual Rule Function.
3. Specify the name of the decision table as ReviewAccountDT and click Finish.
Configuring the Decision Table
Procedure
1. Drag the Amount property of the Account concept to the condition area of the decision table.
257
TIBCO Business Studio Tutorials
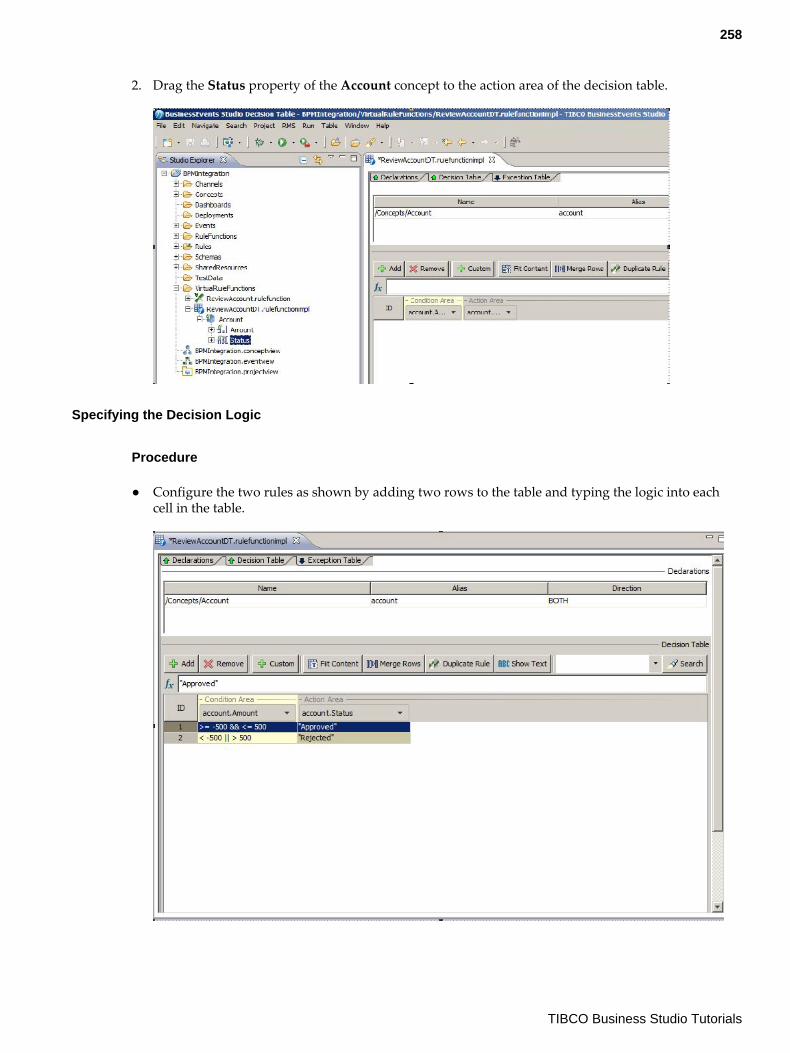
2. Drag the Status property of the Account concept to the action area of the decision table.
Specifying the Decision Logic
Procedure
● Configure the two rules as shown by adding two rows to the table and typing the logic into eachcell in the table.
258
TIBCO Business Studio Tutorials
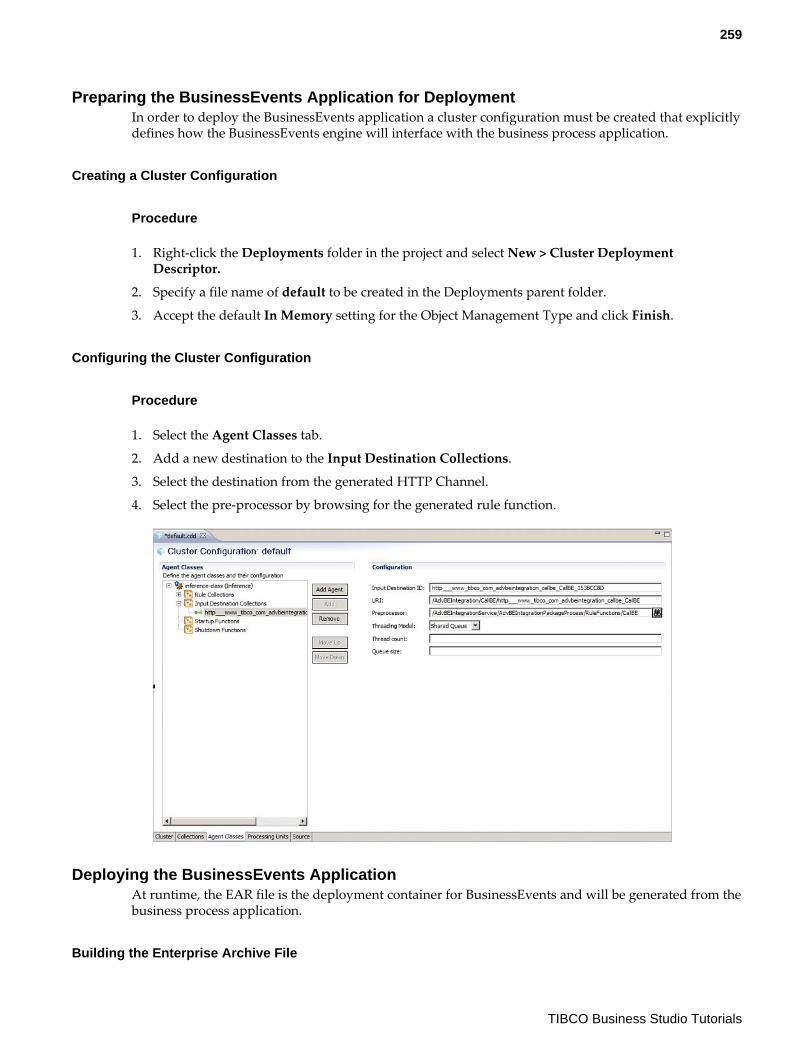
Preparing the BusinessEvents Application for DeploymentIn order to deploy the BusinessEvents application a cluster configuration must be created that explicitlydefines how the BusinessEvents engine will interface with the business process application.
Creating a Cluster Configuration
Procedure
1. Right-click the Deployments folder in the project and select New > Cluster DeploymentDescriptor.
2. Specify a file name of default to be created in the Deployments parent folder.
3. Accept the default In Memory setting for the Object Management Type and click Finish.
Configuring the Cluster Configuration
Procedure
1. Select the Agent Classes tab.
2. Add a new destination to the Input Destination Collections.
3. Select the destination from the generated HTTP Channel.
4. Select the pre-processor by browsing for the generated rule function.
Deploying the BusinessEvents ApplicationAt runtime, the EAR file is the deployment container for BusinessEvents and will be generated from thebusiness process application.
Building the Enterprise Archive File
259
TIBCO Business Studio Tutorials
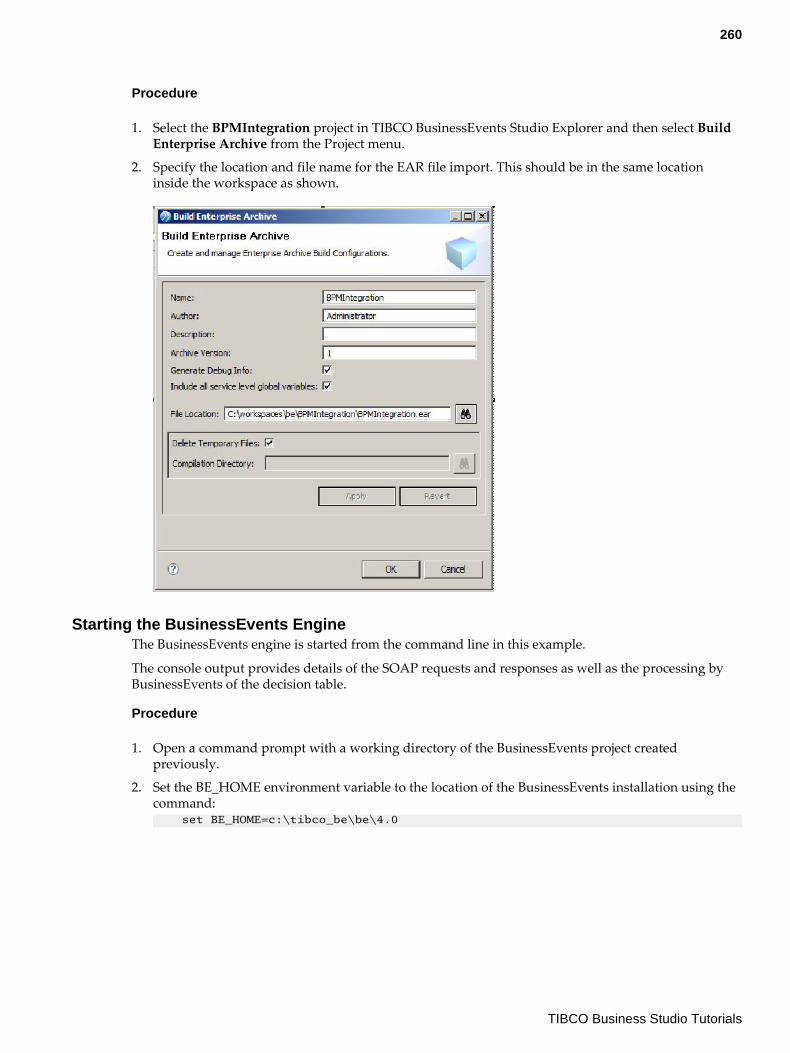
Procedure
1. Select the BPMIntegration project in TIBCO BusinessEvents Studio Explorer and then select BuildEnterprise Archive from the Project menu.
2. Specify the location and file name for the EAR file import. This should be in the same locationinside the workspace as shown.
Starting the BusinessEvents EngineThe BusinessEvents engine is started from the command line in this example.
The console output provides details of the SOAP requests and responses as well as the processing byBusinessEvents of the decision table.
Procedure
1. Open a command prompt with a working directory of the BusinessEvents project createdpreviously.
2. Set the BE_HOME environment variable to the location of the BusinessEvents installation using thecommand: set BE_HOME=c:\tibco_be\be\4.0
260
TIBCO Business Studio Tutorials
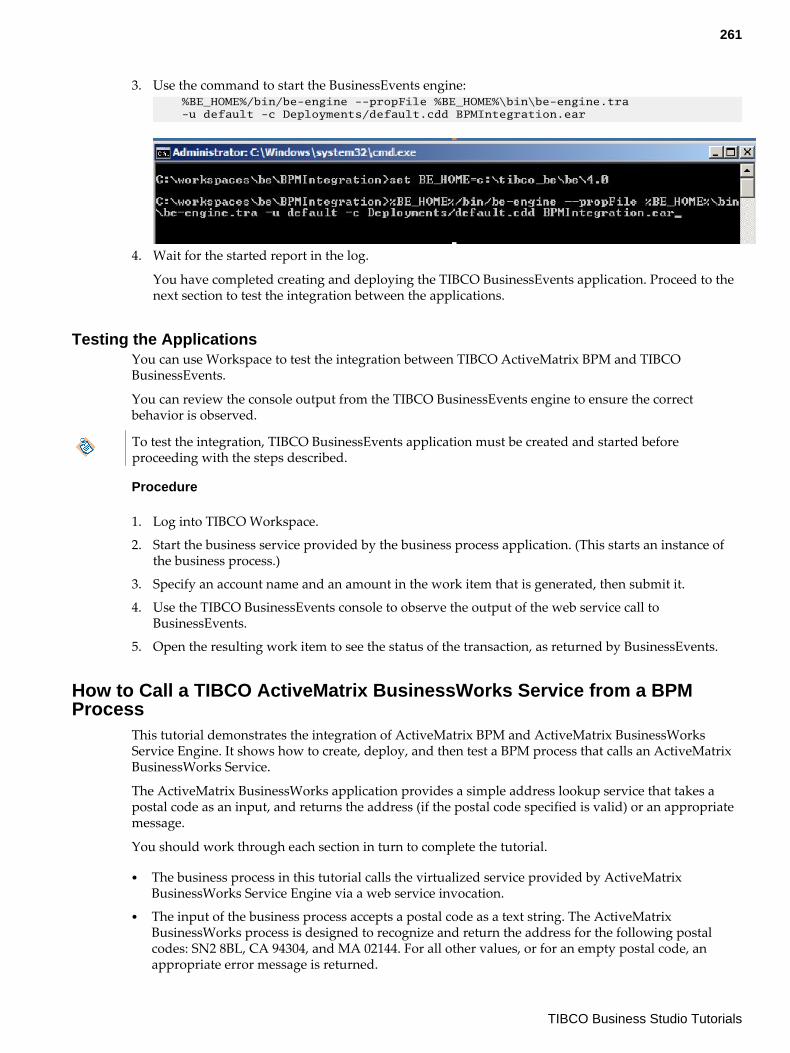
3. Use the command to start the BusinessEvents engine: %BE_HOME%/bin/be-engine --propFile %BE_HOME%\bin\be-engine.tra -u default -c Deployments/default.cdd BPMIntegration.ear
4. Wait for the started report in the log.
You have completed creating and deploying the TIBCO BusinessEvents application. Proceed to thenext section to test the integration between the applications.
Testing the ApplicationsYou can use Workspace to test the integration between TIBCO ActiveMatrix BPM and TIBCOBusinessEvents.
You can review the console output from the TIBCO BusinessEvents engine to ensure the correctbehavior is observed.
To test the integration, TIBCO BusinessEvents application must be created and started beforeproceeding with the steps described.
Procedure
1. Log into TIBCO Workspace.
2. Start the business service provided by the business process application. (This starts an instance ofthe business process.)
3. Specify an account name and an amount in the work item that is generated, then submit it.
4. Use the TIBCO BusinessEvents console to observe the output of the web service call toBusinessEvents.
5. Open the resulting work item to see the status of the transaction, as returned by BusinessEvents.
How to Call a TIBCO ActiveMatrix BusinessWorks Service from a BPMProcess
This tutorial demonstrates the integration of ActiveMatrix BPM and ActiveMatrix BusinessWorksService Engine. It shows how to create, deploy, and then test a BPM process that calls an ActiveMatrixBusinessWorks Service.
The ActiveMatrix BusinessWorks application provides a simple address lookup service that takes apostal code as an input, and returns the address (if the postal code specified is valid) or an appropriatemessage.
You should work through each section in turn to complete the tutorial.
● The business process in this tutorial calls the virtualized service provided by ActiveMatrixBusinessWorks Service Engine via a web service invocation.
● The input of the business process accepts a postal code as a text string. The ActiveMatrixBusinessWorks process is designed to recognize and return the address for the following postalcodes: SN2 8BL, CA 94304, and MA 02144. For all other values, or for an empty postal code, anappropriate error message is returned.
261
TIBCO Business Studio Tutorials
● The address lookup service uses structured data (xsd:sequence) to return the address of the postalcode.
In this tutorial, the TIBCO Business Studio variant that is installed with ActiveMatrixBusinessWorks Service Engine is referred to as Studio for Designers, and the one installedwith ActiveMatrix BPM is referred to as TIBCO Business Studio.
● You are familiar with the concepts and working of TIBCO ActiveMatrix BusinessWorks and TIBCOActiveMatrix BusinessWorks Service Engine.
● You are familiar with WSDLs and schema constructs.
Setting up the EnvironmentSoftware must be installed and configured to set up the environment.
Procedure
1. Install the following software (in the given sequence) from the TIBCO Software Inc. ProductDownload site using the documentation referenced within each product:
● TIBCO Rendezvous 8.3.1● TIBCO Runtime Agent 5.7.1● TIBCO ActiveMatrix BusinessWorks 5.9.2● TIBCO ActiveMatrix BusinessWorks Service Engine 5.9.2● TIBCO ActiveMatrix BPM 1.1.0● TIBCO Enterprise Message Service 6.0.1
See the installation guides for the products for additional information aboutinstallation options and permitted combinations.
2. Configure the TIBCO Business Studio variants installed with ActiveMatrix BusinessWorks ServiceEngine and ActiveMatrix BPM to have their own unique workspaces.
3. In the TIBCO Business Studio Deployment Servers view, create and connect to an ActiveMatrixBPM server instance.
Similarly, in the Studio for Designers Deployment Servers view, create and connect to theActiveMatrix BPM server instance.
Importing the TIBCO SOA Project and ActiveMatrix BusinessWorks ProjectThe projects - TIBCO SOA Project containing the BusinessWorks component, and the associatedActiveMatrix BusinessWorks project - required to test the integration are supplied.
Find the projects SimpleAddressLookup.zip and SimpleAddressLookup-BW.zip from the locationwhere you installed TIBCO Business Studio and import them into your Studio for Designersworkspace.
Importing the Simple Organization Model (Optional)A simple organization model that can be used in the tutorial is supplied. However, you can choose touse your own organization model to develop and run the tutorial.
If you wish to use the organization model that is supplied, find SimpleOrg.zip from the location whereyou installed TIBCO Business Studio and import the project into your TIBCO Business Studioworkspace.
262
TIBCO Business Studio Tutorials

Creating the BPM Developer ProjectThe BPM project consists of a user task to collect the data - postal code - followed by a call toActiveMatrix BusinessWorks Service Engine via web services. The output returned by the web serviceis displayed in a user task.
The use of structured data enables JavaScript mapping to be used in the web service activity.
You must create and deploy a simple organization model prior to creating and deploying theActiveMatrix BPM project. See Importing the Simple Organization Model (Optional) for additionalinformation.
Procedure
1. In TIBCO Business Studio Project Explorer view, right-click and select New > BPM DeveloperProject to create a new BPM Developer Project called SimpleAddressClient.
2. Specify the BPM destination environment and click Next.
3. Accept the default values on the screens until the Business Processes screen. Enter the name of theProcess Package as SimpleAddressLookupClient.
4. Accept the default values on the remaining screens and click Finish to create the project.
Importing the ActiveMatrix BusinessWorks Service Engine WSDLWhen you import the WSDL file into the BPM Developer’s project, the associated Business ObjectModel is generated under the Generated Business Objects folder.
Procedure
1. In the Project Explorer, right-click the Service Descriptors folder and select Import, and then selectService Import Wizard.
2. Choose the option to Import from a File and click Next.
3. Browse to the location of the Studio for Designers workspace and select the fileSimpleAddressLookup.wsdl from the imported SimpleAddressLookup-BW project, and clickOpen.
4. Verify the project location and click Finish.
263
TIBCO Business Studio Tutorials
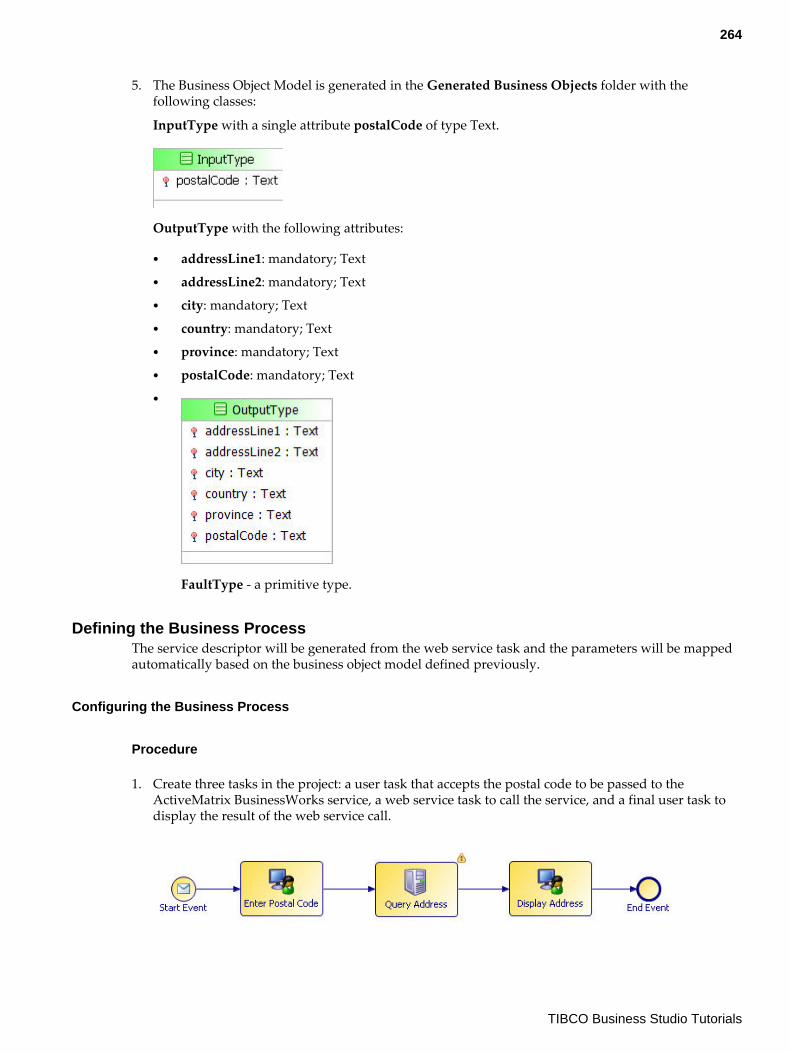
5. The Business Object Model is generated in the Generated Business Objects folder with thefollowing classes:
InputType with a single attribute postalCode of type Text.
OutputType with the following attributes:
● addressLine1: mandatory; Text● addressLine2: mandatory; Text● city: mandatory; Text● country: mandatory; Text● province: mandatory; Text● postalCode: mandatory; Text●
FaultType - a primitive type.
Defining the Business ProcessThe service descriptor will be generated from the web service task and the parameters will be mappedautomatically based on the business object model defined previously.
Configuring the Business Process
Procedure
1. Create three tasks in the project: a user task that accepts the postal code to be passed to theActiveMatrix BusinessWorks service, a web service task to call the service, and a final user task todisplay the result of the web service call.
264
TIBCO Business Studio Tutorials
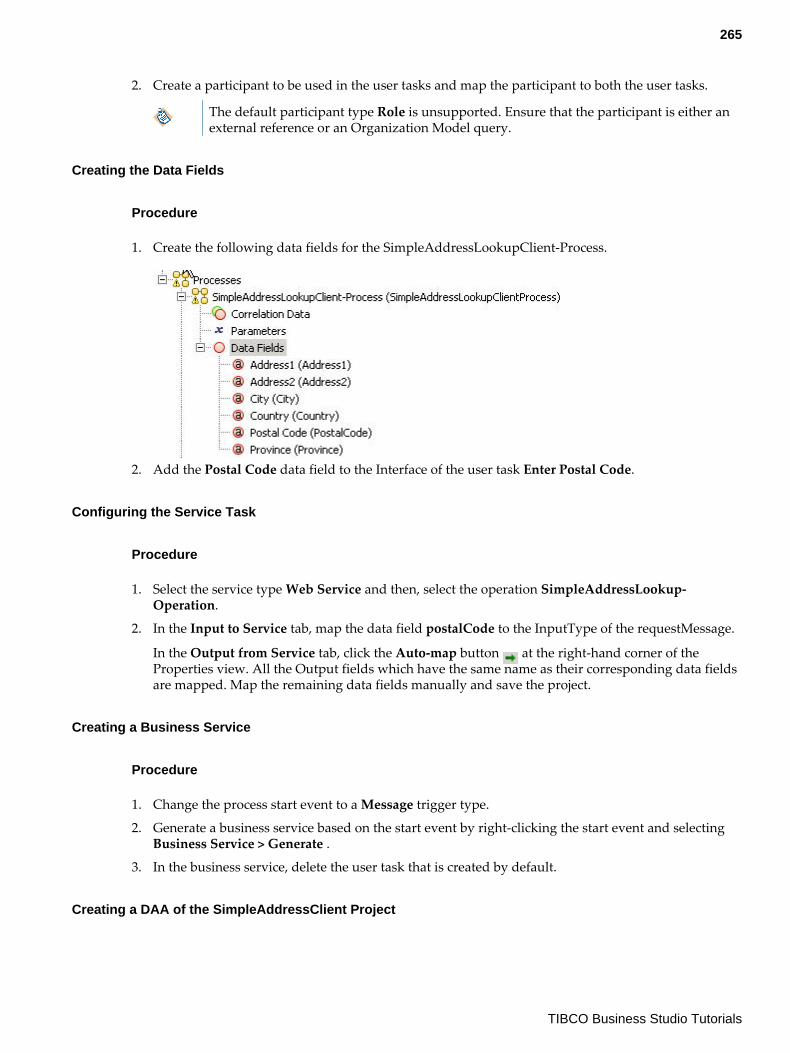
2. Create a participant to be used in the user tasks and map the participant to both the user tasks.
The default participant type Role is unsupported. Ensure that the participant is either anexternal reference or an Organization Model query.
Creating the Data Fields
Procedure
1. Create the following data fields for the SimpleAddressLookupClient-Process.
2. Add the Postal Code data field to the Interface of the user task Enter Postal Code.
Configuring the Service Task
Procedure
1. Select the service type Web Service and then, select the operation SimpleAddressLookup-Operation.
2. In the Input to Service tab, map the data field postalCode to the InputType of the requestMessage.
In the Output from Service tab, click the Auto-map button at the right-hand corner of theProperties view. All the Output fields which have the same name as their corresponding data fieldsare mapped. Map the remaining data fields manually and save the project.
Creating a Business Service
Procedure
1. Change the process start event to a Message trigger type.
2. Generate a business service based on the start event by right-clicking the start event and selectingBusiness Service > Generate .
3. In the business service, delete the user task that is created by default.
Creating a DAA of the SimpleAddressClient Project
265
TIBCO Business Studio Tutorials
Procedure
1. In the Project Explorer, right-click SimpleAddressClient and select Export > DistributedApplication Archive (DAA) Export .
2. Select the SimpleAddressClient folder and click Finish.
The DAA com.example.simpleaddressclient.daa is created under the Exports folder.
Deploying the ApplicationsBefore deploying the ActiveMatrix BPM project, ensure that the simple organization model that isreferenced by the project is deployed.
A simple organization model SimpleOrg.zip is available at the location where you installed TIBCOBusiness Studio BPM Edition.
The tutorial describes deploying the applications using the DAA module type. However, you canchoose to deploy the BPM Developer Project directly to the server.
Deploying the TIBCO SOA Project
Procedure
1. In Studio for Designers Deployment Servers view, right-click the server and select Deploy Module.The DAA Deployment Wizard is started.
2. Select the module type Deploy DAA... and click Next.
3. In the Application Setup dialog, click Workspace..., browse and select theSimpleAddressLookup.daa from the Studio from Designers workspace. Click Open.
4. Accept the defaults in the Administrator Setup dialog and click Next.
In the Distribution dialog, select the default target application for ActiveMatrix BusinessWorksService Engine. (In a typical environment, this default target application is amx.bwse.app.)
Alternately, you can select the Single Node distribution policy and choose the BWSENode from thedrop-down list.
5. Click Finish to deploy the application.
Result
The Progress Dialog displays the execution status. Click Close after the deployment completes.
Deploying the Organization Model
Procedure
1. In TIBCO Business Studio Deployment Servers view, right-click and select Deploy Module. TheDAA Deployment Wizard is started.
2. In the Application Setup dialog, click Workspace..., browse and select the com.tibco.simpleorg.daafrom the workspace. Click OK, and then click Next.
3. Accept the defaults in the Administrator Setup dialog and click Finish.
266
TIBCO Business Studio Tutorials
Result
The Progress Dialog displays the execution status. Click Close after the deployment completes.
Deploying the ActiveMatrix BPM Project
Procedure
1. In TIBCO Business Studio Deployment Servers view, right-click the server and select DeployModule.
2. Select the module type Deploy DAA... and click Next.
3. In the Application Setup dialog, click Workspace..., browse and select thecom.example.simpleaddressclient.daa from the workspace. Click Next.
4. Accept the defaults in the Administrator Setup dialog and click Next.
5. In the Property Configuration dialog, override the value of the HttpInboundConnectionConfigproperty by clicking Override... and selecting the Existing Resource Instance httpConnector. ClickOK and then click Next.
6. In the Wiring Configuration dialog, wire the promoted reference to the virtualized serviceSimpleAddressLookup/SimpleAddressLookupPortType/Virtualization and click away from thefield.
Sometimes the virtualized service may not be visible. In this case, you must refresh thedeployment server view and repeat the steps to deploy the ActiveMatrix BPM project.
7. Click Finish to deploy the application.
Testing the Integration Between ApplicationsYou can use TIBCO Workspace to test the integration.
Procedure
1. Log in to TIBCO Openspace.
2. Create an LDAP Container and map the participants to LDAP resources.
See section How to Map Users to the WelcomeUsers Organization Model in the Create,Deploy, and Run Your First BPM Application tutorial for details on how to create anLDAP container and map participants to LDAP resources.
3. Log in to TIBCO Workspace.
4. In the Business Services tab, select and start the business serviceSimpleAddressLookupClientStartEvent.
5. In the Work Views tab, open the work item from the Work Items Inbox. Enter the postal code SN28BL and click Submit.
The input data is passed to the SimpleAddressLookupService provided by ActiveMatrixBusinessWorks Service Engine, which processes the data and returns the result.
6. Refresh Workspace and open the work item to view the address.
267
TIBCO Business Studio Tutorials
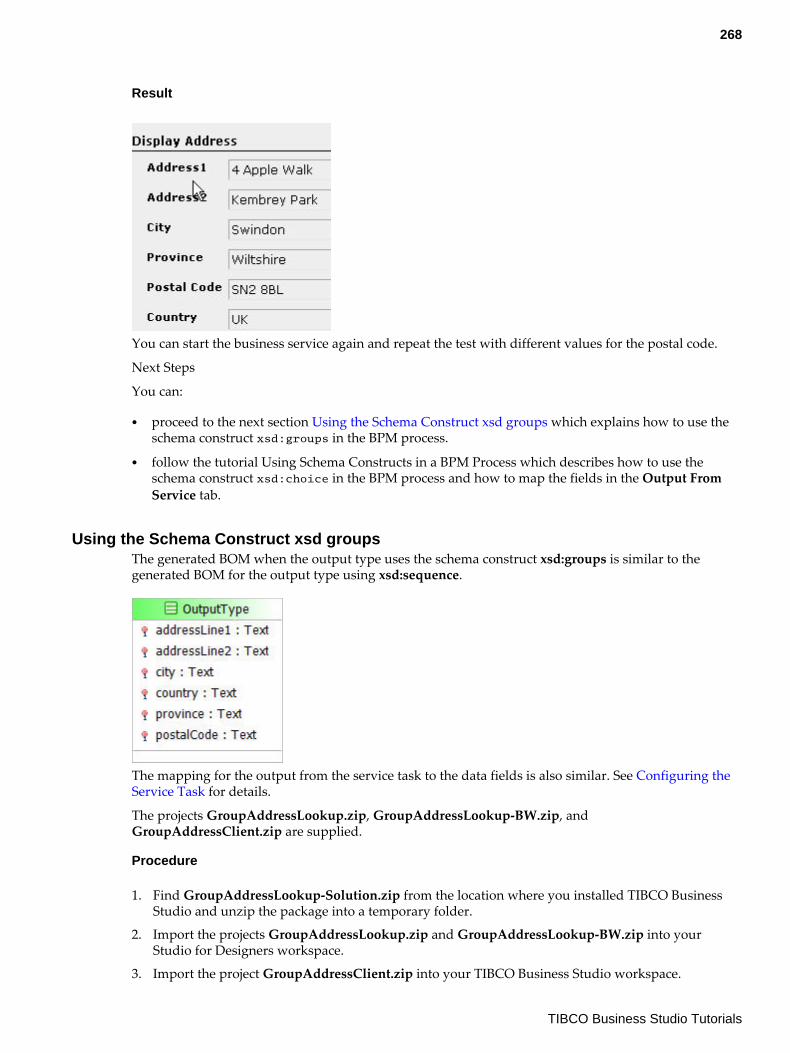
Result
You can start the business service again and repeat the test with different values for the postal code.
Next Steps
You can:
● proceed to the next section Using the Schema Construct xsd groups which explains how to use theschema construct xsd:groups in the BPM process.
● follow the tutorial Using Schema Constructs in a BPM Process which describes how to use theschema construct xsd:choice in the BPM process and how to map the fields in the Output FromService tab.
Using the Schema Construct xsd groupsThe generated BOM when the output type uses the schema construct xsd:groups is similar to thegenerated BOM for the output type using xsd:sequence.
The mapping for the output from the service task to the data fields is also similar. See Configuring theService Task for details.
The projects GroupAddressLookup.zip, GroupAddressLookup-BW.zip, andGroupAddressClient.zip are supplied.
Procedure
1. Find GroupAddressLookup-Solution.zip from the location where you installed TIBCO BusinessStudio and unzip the package into a temporary folder.
2. Import the projects GroupAddressLookup.zip and GroupAddressLookup-BW.zip into yourStudio for Designers workspace.
3. Import the project GroupAddressClient.zip into your TIBCO Business Studio workspace.
268
TIBCO Business Studio Tutorials
Result
After importing the projects into the workspaces, run the applications as explained in Testing theIntegration Between Applications.
Using Schema Construct xsd choice in a BPM ProcessThe use of the schema construct xsd:choice in a BPM process can be demonstrated.
The tutorial is an extension of How to Call a TIBCO ActiveMatrix BusinessWorks Service from a BPMProcess and demonstrates the mapping of the web service output containing structured data.
The ActiveMatrix BusinessWorks service used in this tutorial provides an address lookup service thattakes a postal code as an input, and returns the address (if the postal code specified is valid) or anappropriate message.
You should work through each section in turn to complete the tutorial.
● The business process in this tutorial calls the virtualized ActiveMatrix BusinessWorks service via aweb service invocation.
● The input of the business process accepts a postal code as a text string. The ActiveMatrixBusinessWorks process is designed to recognize and return the address for the following postalcodes: SN2 8BL, CA 94304, and MA 02144. For all other values, or for an empty postal code, anappropriate error message is returned.
● The address lookup service uses structured data (xsd:choice) to return the address of the postalcode.
In this tutorial, the TIBCO Business Studio variant that is installed with ActiveMatrixBusinessWorks Service Engine is referred to as Studio for Designers, and the one installedwith ActiveMatrix BPM is referred to as TIBCO Business Studio.
Prerequisites
● You are familiar with the concepts and working of TIBCO ActiveMatrix BusinessWorks and TIBCOActiveMatrix BusinessWorks Service Engine.
● You are familiar with WSDLs and schema constructs.● You have completed the tutorial How to Call a TIBCO ActiveMatrix BusinessWorks Service from a BPM
Process. If not, you must complete the following tasks described in that tutorial:
— Setting up the Environment required to run the tutorials.— Importing the Simple Organization Model (Optional).
Before You Begin
Import the TIBCO SOA Project and ActiveMatrix BusinessWorks Project
The projects - TIBCO SOA Project containing the BusinessWorks component, and the associatedActiveMatrix BusinessWorks project - required to test the integration are supplied.
Find the projects ChoiceAddressLookup.zip and ChoiceAddressLookup-BW.zip from the locationwhere you installed TIBCO Business Studio and import them into your Studio for Designersworkspace.
Creating the BPM Developer ProjectYou must first create a new BPM Developer project.
269
TIBCO Business Studio Tutorials
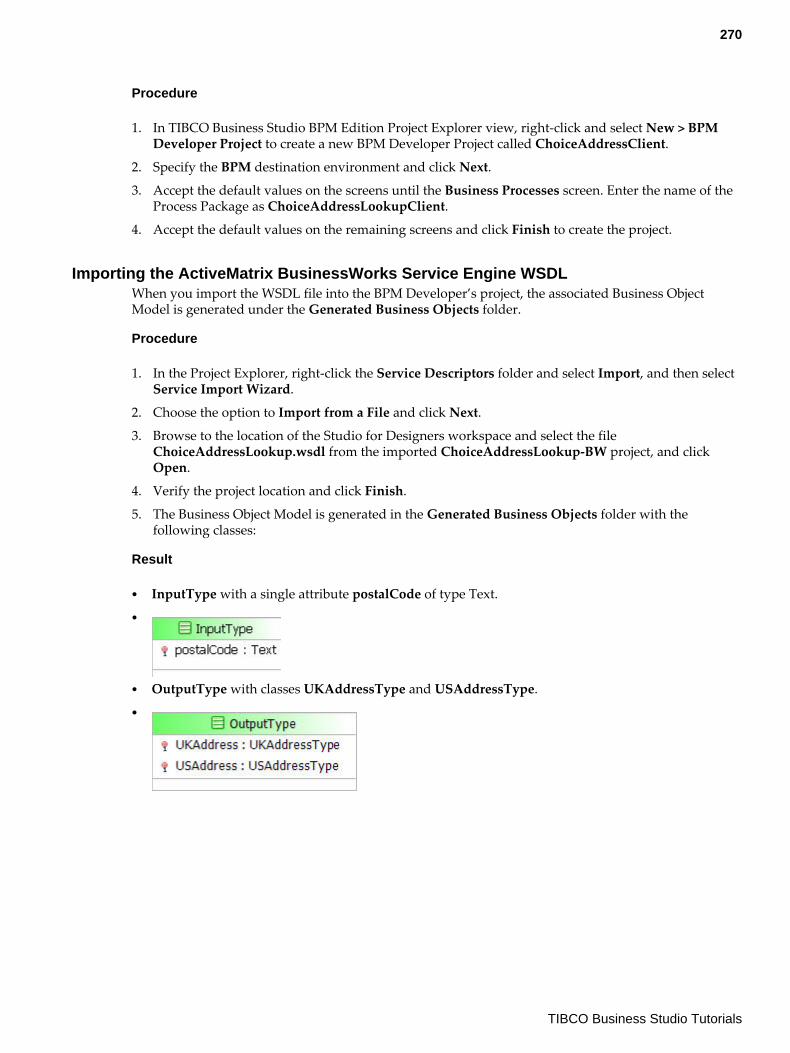
Procedure
1. In TIBCO Business Studio BPM Edition Project Explorer view, right-click and select New > BPMDeveloper Project to create a new BPM Developer Project called ChoiceAddressClient.
2. Specify the BPM destination environment and click Next.
3. Accept the default values on the screens until the Business Processes screen. Enter the name of theProcess Package as ChoiceAddressLookupClient.
4. Accept the default values on the remaining screens and click Finish to create the project.
Importing the ActiveMatrix BusinessWorks Service Engine WSDLWhen you import the WSDL file into the BPM Developer’s project, the associated Business ObjectModel is generated under the Generated Business Objects folder.
Procedure
1. In the Project Explorer, right-click the Service Descriptors folder and select Import, and then selectService Import Wizard.
2. Choose the option to Import from a File and click Next.
3. Browse to the location of the Studio for Designers workspace and select the fileChoiceAddressLookup.wsdl from the imported ChoiceAddressLookup-BW project, and clickOpen.
4. Verify the project location and click Finish.
5. The Business Object Model is generated in the Generated Business Objects folder with thefollowing classes:
Result
● InputType with a single attribute postalCode of type Text.●
● OutputType with classes UKAddressType and USAddressType.●
270
TIBCO Business Studio Tutorials
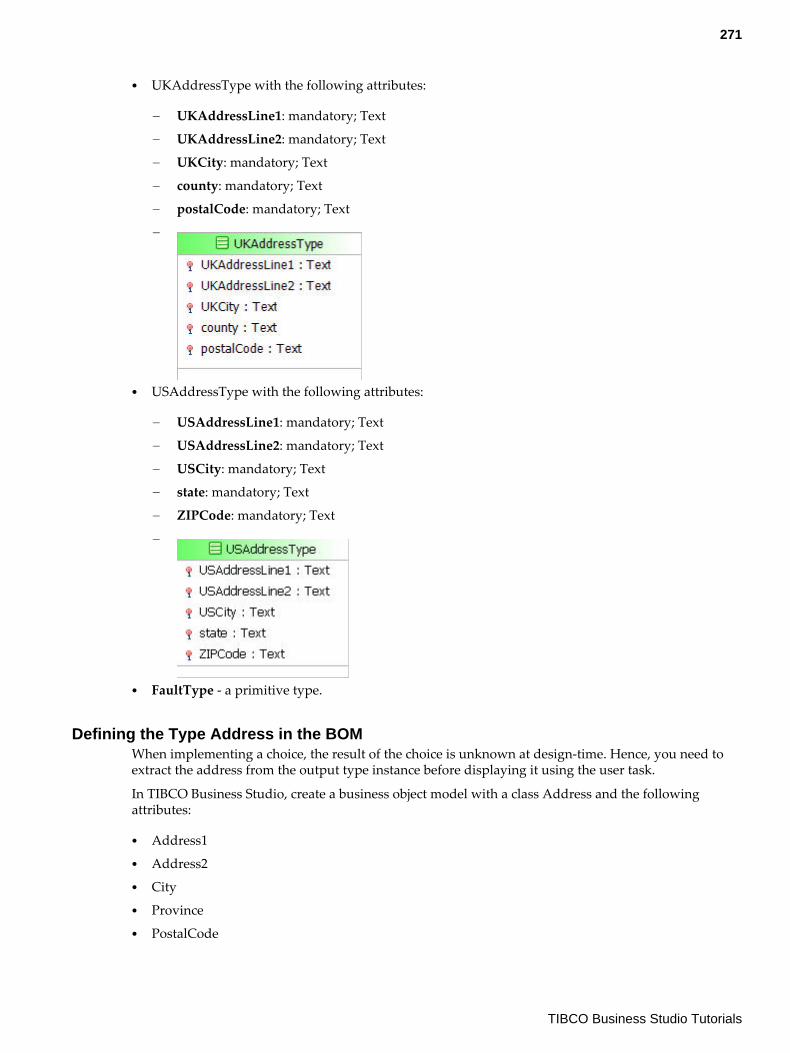
● UKAddressType with the following attributes:
— UKAddressLine1: mandatory; Text— UKAddressLine2: mandatory; Text— UKCity: mandatory; Text— county: mandatory; Text— postalCode: mandatory; Text—
● USAddressType with the following attributes:
— USAddressLine1: mandatory; Text— USAddressLine2: mandatory; Text— USCity: mandatory; Text— state: mandatory; Text— ZIPCode: mandatory; Text—
● FaultType - a primitive type.
Defining the Type Address in the BOMWhen implementing a choice, the result of the choice is unknown at design-time. Hence, you need toextract the address from the output type instance before displaying it using the user task.
In TIBCO Business Studio, create a business object model with a class Address and the followingattributes:
● Address1● Address2● City● Province● PostalCode
271
TIBCO Business Studio Tutorials
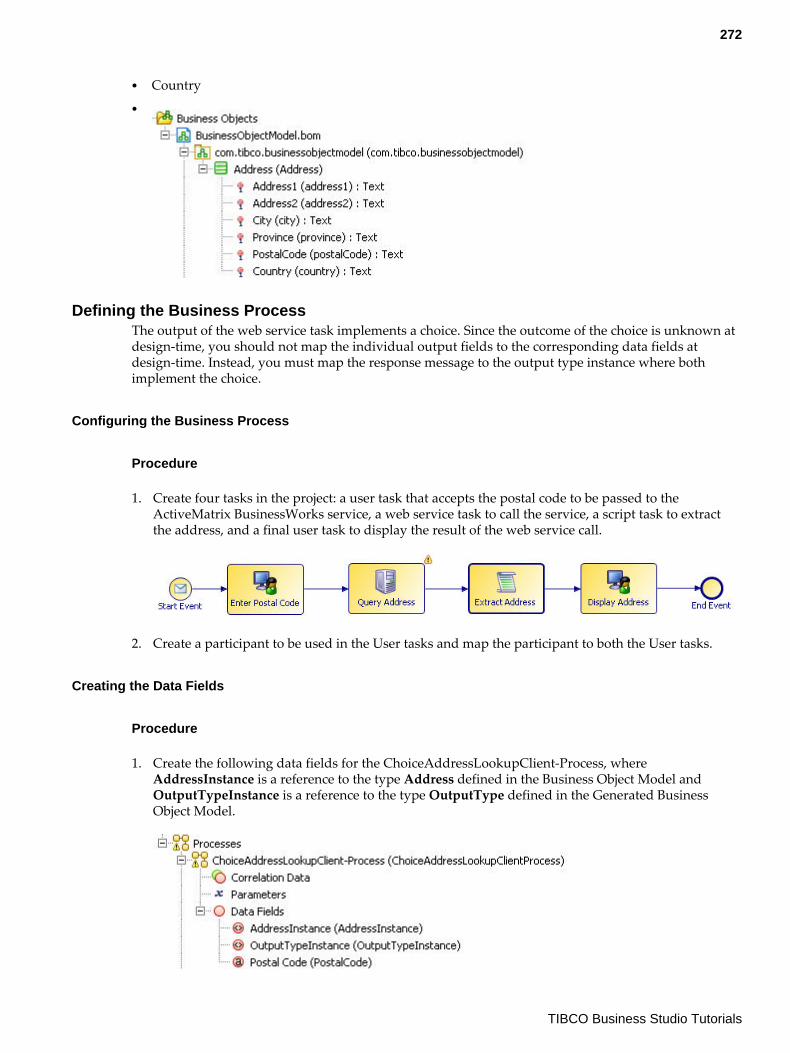
● Country●
Defining the Business ProcessThe output of the web service task implements a choice. Since the outcome of the choice is unknown atdesign-time, you should not map the individual output fields to the corresponding data fields atdesign-time. Instead, you must map the response message to the output type instance where bothimplement the choice.
Configuring the Business Process
Procedure
1. Create four tasks in the project: a user task that accepts the postal code to be passed to theActiveMatrix BusinessWorks service, a web service task to call the service, a script task to extractthe address, and a final user task to display the result of the web service call.
2. Create a participant to be used in the User tasks and map the participant to both the User tasks.
Creating the Data Fields
Procedure
1. Create the following data fields for the ChoiceAddressLookupClient-Process, whereAddressInstance is a reference to the type Address defined in the Business Object Model andOutputTypeInstance is a reference to the type OutputType defined in the Generated BusinessObject Model.
272
TIBCO Business Studio Tutorials

2. Add the data field Postal Code to the Interface of the user task Enter Postal Code.
3. Add the data fields AddressInstance and OutputTypeInstance to the Interface of the service taskQuery Address and of the script task Extract Address.
4. Add the data field AddressInstance to the Interface of the user task Display Address.
Configuring the Service Task
Procedure
1. Select the service type Web Service and then, select the operation ChoiceAddressLookup-Operation.
2. In the Input to Service tab, map the data field postalCode to the InputType of the requestMessage.
3. In the Output from Service tab, map the OutputType of the response message to theOutputTypeInstance.
You must not map the individual data fields as the outcome of the schema constructchoice is unknown at design-time. Also, if the mapped data is not returned at runtime, themapping at design-time will throw an exception.
Configuring the Script Task
Procedure
1. In the Properties tab for the Script task, define the script task as JavaScript.
273
TIBCO Business Studio Tutorials

2. In the Describe Task Script field, enter the following code to extract the address:AddressInstance = com_tibco_businessobjectmodel_Factory.createAddress();if (OutputTypeInstance.UKAddress != null){ AddressInstance.address1 = OutputTypeInstance.UKAddress.UKAddressLine1; AddressInstance.address2 = OutputTypeInstance.UKAddress.UKAddressLine2; AddressInstance.city = OutputTypeInstance.UKAddress.UKCity; AddressInstance.province = OutputTypeInstance.UKAddress.county; AddressInstance.country = "UK"; AddressInstance.postalCode = OutputTypeInstance.UKAddress.postalCode;}else{ AddressInstance.address1 = OutputTypeInstance.USAddress.USAddressLine1; AddressInstance.address2 = OutputTypeInstance.USAddress.USAddressLine2; AddressInstance.city = OutputTypeInstance.USAddress.USCity; AddressInstance.province = OutputTypeInstance.USAddress.state; AddressInstance.country = "USA"; AddressInstance.postalCode = OutputTypeInstance.USAddress.ZIPCode;}
Creating a Business Service
Procedure
1. Change the process start event to a Message trigger type.
2. Generate a business service based on the start event by right-clicking the start event and selectingBusiness Service > Generate .
3. In the business service, delete the user task that is created by default
Deploying the ApplicationsBefore deploying the ActiveMatrix BPM project, ensure that the simple organization model that isreferenced by the project is deployed.
A simple organization model SimpleOrg.zip is available at the location where you installed TIBCOBusiness Studio BPM Edition.
The tutorial describes deploying the BPM Developer Project directly to the server. However, you canchoose to deploy the applications using the DAA module type.
Deploying the TIBCO SOA Project
Procedure
1. In Studio for Designers Deployment Servers view, right-click the server and select Deploy Module.The DAA Deployment Wizard is started.
2. In the Application Setup dialog, click Workspace..., browse and select theChoiceAddressLookup.daa from the Studio from Designers workspace. Click Open.
3. Accept the defaults in the Administrator Setup dialog and click Next.
In the Distribution dialog, select the default target application for ActiveMatrix BusinessWorksService Engine. (In a typical environment, this default target application is amx.bwse.app.)
4. Click Finish to deploy the application.
274
TIBCO Business Studio Tutorials
Result
The Progress Dialog displays the execution status. Click Close after the deployment completes.
Deploying the Organization Model
Note that this needs to be done only if the organization model had not been deployed previously.
Procedure
1. In TIBCO Business Studio Deployment Servers view, right-click and select Deploy Module.... TheDAA Deployment Wizard is started.
2. Select the module type Deploy BPM Project and click Next.
3. In the Select Project dialog, select Simple Org and click Next.
4. Verify the environment name and application name in the Administrator Setup dialog and clickFinish.
Result
The Progress Dialog displays the execution status. Click Close after the deployment completes.
Deploying the ActiveMatrix BPM Project
Procedure
1. In TIBCO Business Studio Deployment Servers view, right-click the server and select DeployModule....The DAA Deployment Wizard is started.
2. Select the module type Deploy BPM Project and click Next.
3. In the Select Project dialog, select ChoiceAddressClient and click Next.
4. Verify the environment name and application name in the Administrator Setup dialog and clickFinish.
5. In the Property Configuration dialog, override the value of the HttpInboundConnectionConfigproperty by clicking Override... and selecting the Existing Resource Instance httpConnector. ClickOK and then click Next.
6. In the Wiring Configuration dialog, wire the promoted reference to the virtualized serviceChoiceAddressLookup/ChoiceAddressLookupPortType/Virtualization.
7. Click Finish to deploy the application.
Running the TutorialYou can use TIBCO Workspace to test the integration.
Procedure
1. Log in to TIBCO Workspace.
2. In the Business Services tab, select and start the business serviceChoiceAddressLookupClientStartEvent.
275
TIBCO Business Studio Tutorials
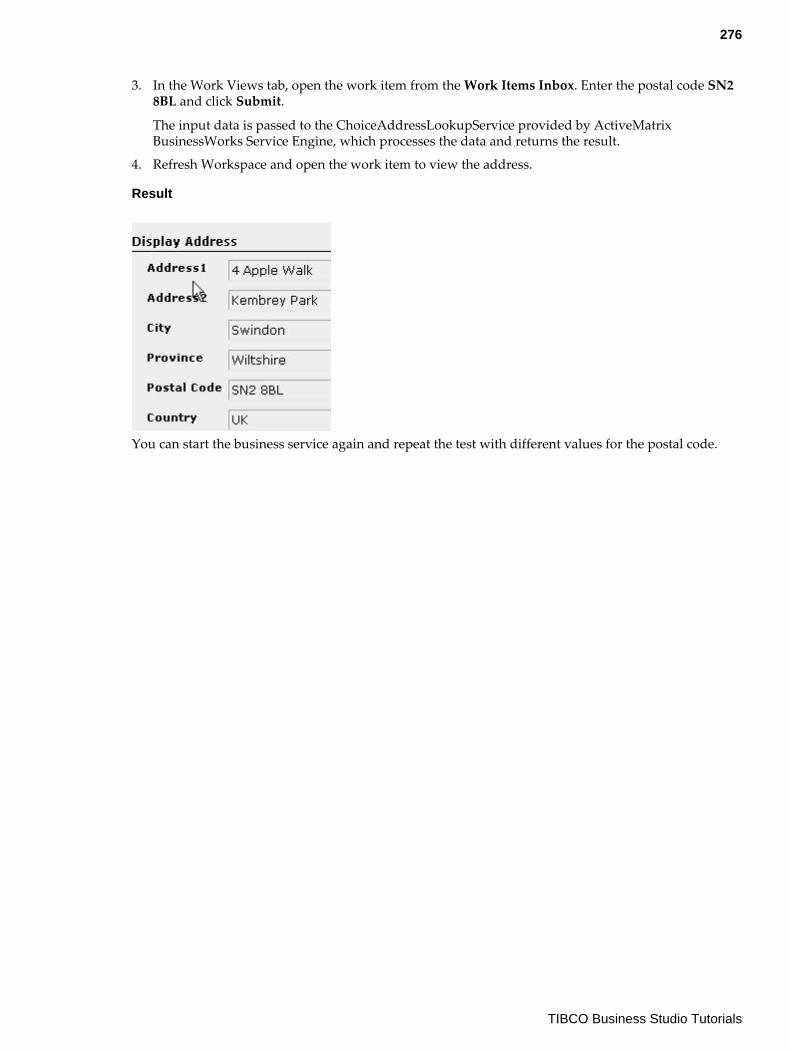
3. In the Work Views tab, open the work item from the Work Items Inbox. Enter the postal code SN28BL and click Submit.
The input data is passed to the ChoiceAddressLookupService provided by ActiveMatrixBusinessWorks Service Engine, which processes the data and returns the result.
4. Refresh Workspace and open the work item to view the address.
Result
You can start the business service again and repeat the test with different values for the postal code.
276
TIBCO Business Studio Tutorials
Integrating Data Using POJO
How to Integrate Data into a Process using Plain Old Java Objects (POJO)This tutorial explains two dependencies of the POJO along with invoking business logic in existingPOJOs from within a business process.
From this tutorial, you will learn:
● The POJO with two kinds of dependencies: dependency on a local library, and a dependency on anexternal library that is already deployed in the BPM node
● Adding a Java service step to a Process● Adding the input/output mappings to/from the Java step● Deploying and running an instance of this process
Importing the Initial ResourcesAs a starting point, use TIBCO Business Studio projects and a simple POJO supplied with this project.
The POJOTutorialInput archive contains:
● A simple POJO that will perform an address lookup based on postal code(com.example.addresslookup.pojo2).
● The POJO has a dependency on an external library already deployed in the BPM node (log4j) andanother that is included in the archive provided, and which you will import(com.example.addresslookup.lib).
● A BPM project with a business process that will invoke the POJO to find the full address of a TIBCOoffice from its postal code (AddressLookupInput).
● A BPM project with an Organization Model that defines a Group used by the Process(UC2OrgModel).
Procedure
1. From TIBCO Business Studio, start Studio for Designers.
Following this tutorial will be simpler and clearer if you close any other projects that youmay have open in your TIBCO Business Studio workspace, using the Project > CloseProject menu option.
2. To import the projects into your workspace, find the POJOTutorialInput.zip file in the locationwhere you installed TIBCO Business Studio (for example, <STUDIO_HOME>\studio\3.n\samples).
3. In TIBCO Business Studio, choose File > Import . The Import wizard is displayed.
4. On the Select page, expand General, select Existing Studio Projects into Workspace and clickNext. The Import Projects page is displayed.
5. Click Select archive file, and click on the Browse button.
6. Browse to the archive zip file and click Open. The projects are displayed in the Import wizard.
277
TIBCO Business Studio Tutorials
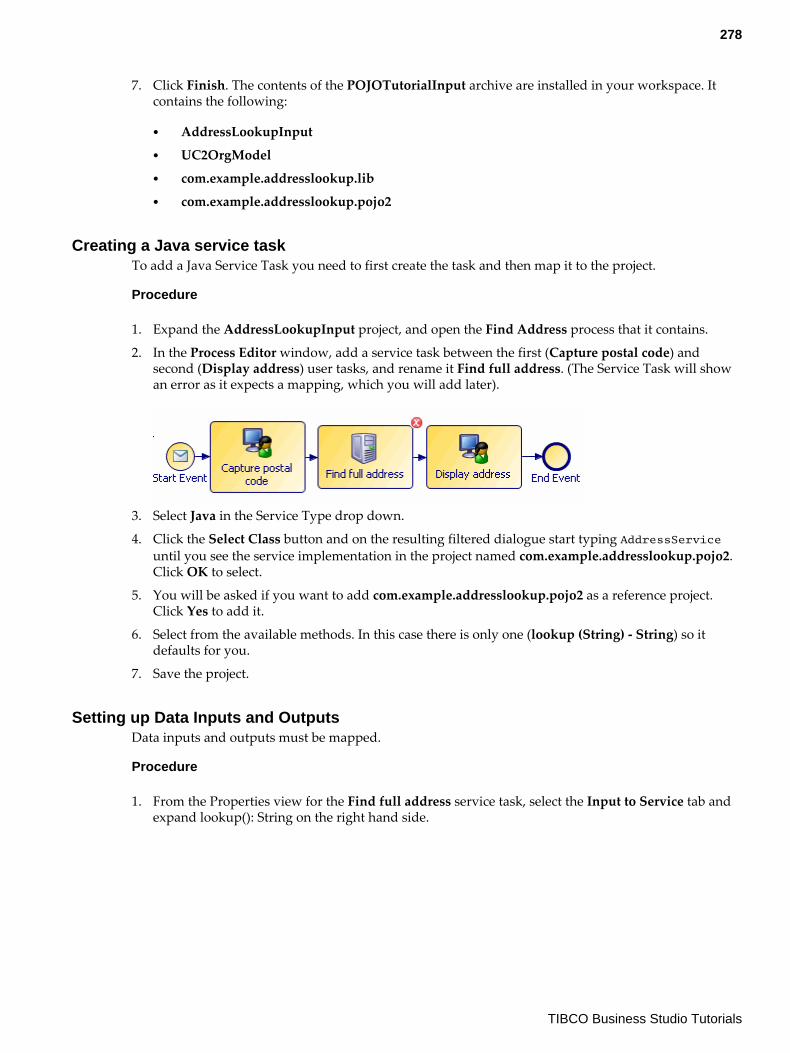
7. Click Finish. The contents of the POJOTutorialInput archive are installed in your workspace. Itcontains the following:
● AddressLookupInput● UC2OrgModel● com.example.addresslookup.lib● com.example.addresslookup.pojo2
Creating a Java service taskTo add a Java Service Task you need to first create the task and then map it to the project.
Procedure
1. Expand the AddressLookupInput project, and open the Find Address process that it contains.
2. In the Process Editor window, add a service task between the first (Capture postal code) andsecond (Display address) user tasks, and rename it Find full address. (The Service Task will showan error as it expects a mapping, which you will add later).
3. Select Java in the Service Type drop down.
4. Click the Select Class button and on the resulting filtered dialogue start typing AddressServiceuntil you see the service implementation in the project named com.example.addresslookup.pojo2.Click OK to select.
5. You will be asked if you want to add com.example.addresslookup.pojo2 as a reference project.Click Yes to add it.
6. Select from the available methods. In this case there is only one (lookup (String) - String) so itdefaults for you.
7. Save the project.
Setting up Data Inputs and OutputsData inputs and outputs must be mapped.
Procedure
1. From the Properties view for the Find full address service task, select the Input to Service tab andexpand lookup(): String on the right hand side.
278
TIBCO Business Studio Tutorials

2. To make the mapping, select postalCode on the left hand side, and drag and drop to postalCode onthe right. You will see a mapping. The red error marker on the Find full address service task, andon the lookup(): String on the right hand side of the mapping will now disappear, as well as theerror in the Problems view.
3. Select the Output from Service tab and expand lookup(): String. Map RETURNVALUE to address.
Result
Deploying and Running the ProcessYou must deploy the AddressLookupInput and UC2OrgModel projects before they can be run.
Deploying these projects is similar to the deployment of the WelcomeUsers project described in theCreate, Deploy, and Run Your First BPM Application tutorial. See deployment of the WelcomeUsersproject for more details.
Procedure
1. Connect to your deployment server.
2. Deploy the UC2OrgModel project (which contains the Organization Model you use).
3. Deploy the AddressLookupInput project (containing the process).
4. If you have not already done so, log into TIBCO Openspace. Then:a) Open the Organization Browser.b) Add a user to the Group (called Group) which is part of the organization model you deployed.c) Start a business process.d) Log in as the user you created in the Group in the organization model.e) Wait for the work item to arrive, open it, then enter the postal code (you can enter SN2 8BL
which is the postal code for a TIBCO office).f) Wait for the next work item to appear and check it has the address.
279
TIBCO Business Studio Tutorials
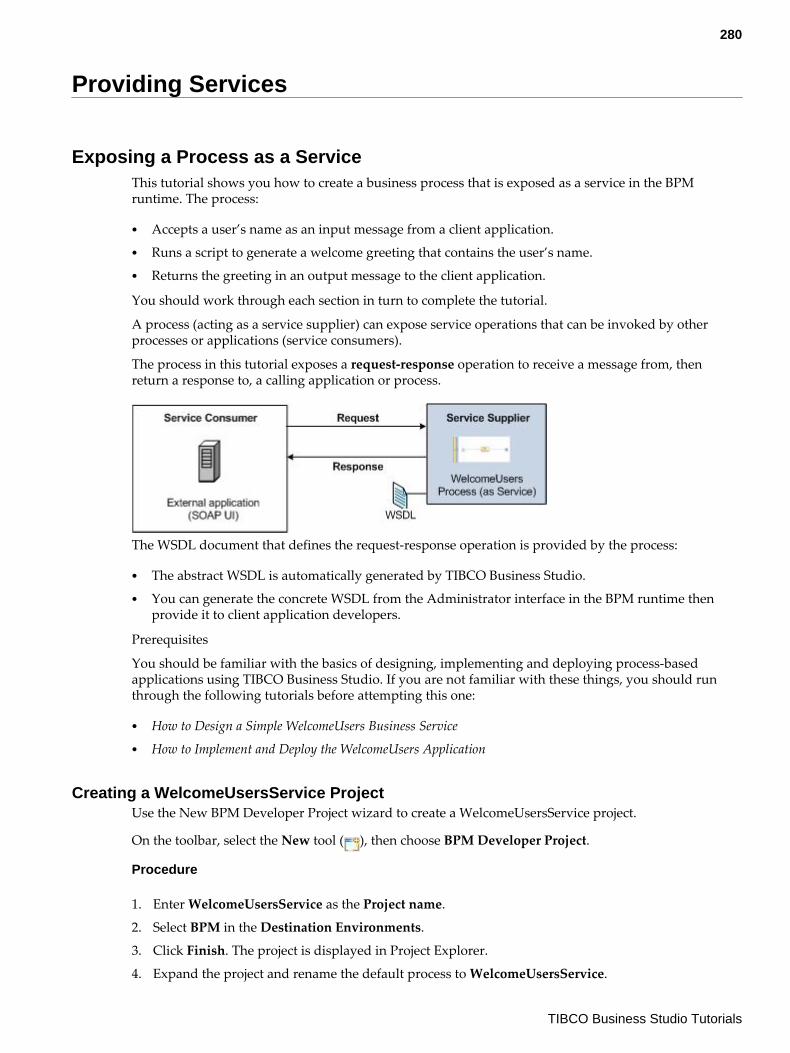
Providing Services
Exposing a Process as a ServiceThis tutorial shows you how to create a business process that is exposed as a service in the BPMruntime. The process:
● Accepts a user’s name as an input message from a client application.● Runs a script to generate a welcome greeting that contains the user’s name.● Returns the greeting in an output message to the client application.
You should work through each section in turn to complete the tutorial.
A process (acting as a service supplier) can expose service operations that can be invoked by otherprocesses or applications (service consumers).
The process in this tutorial exposes a request-response operation to receive a message from, thenreturn a response to, a calling application or process.
The WSDL document that defines the request-response operation is provided by the process:
● The abstract WSDL is automatically generated by TIBCO Business Studio.● You can generate the concrete WSDL from the Administrator interface in the BPM runtime then
provide it to client application developers.
Prerequisites
You should be familiar with the basics of designing, implementing and deploying process-basedapplications using TIBCO Business Studio. If you are not familiar with these things, you should runthrough the following tutorials before attempting this one:
● How to Design a Simple WelcomeUsers Business Service● How to Implement and Deploy the WelcomeUsers Application
Creating a WelcomeUsersService ProjectUse the New BPM Developer Project wizard to create a WelcomeUsersService project.
On the toolbar, select the New tool ( ), then choose BPM Developer Project.
Procedure
1. Enter WelcomeUsersService as the Project name.
2. Select BPM in the Destination Environments.
3. Click Finish. The project is displayed in Project Explorer.
4. Expand the project and rename the default process to WelcomeUsersService.
280
TIBCO Business Studio Tutorials
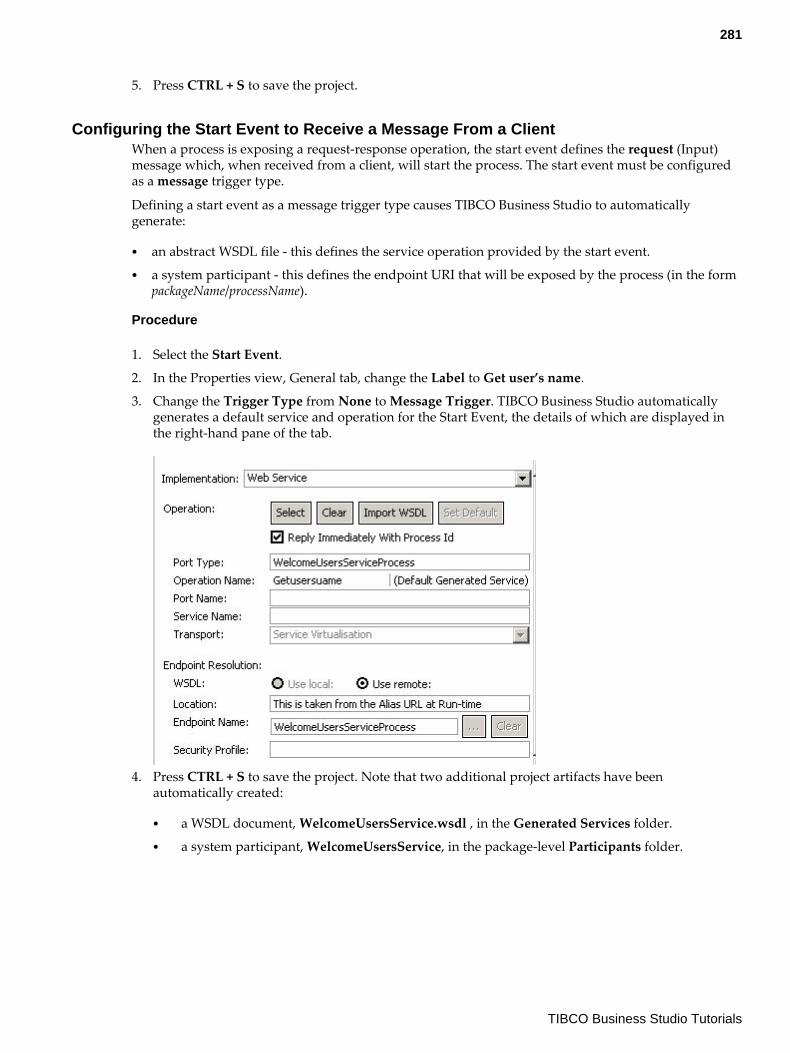
5. Press CTRL + S to save the project.
Configuring the Start Event to Receive a Message From a ClientWhen a process is exposing a request-response operation, the start event defines the request (Input)message which, when received from a client, will start the process. The start event must be configuredas a message trigger type.
Defining a start event as a message trigger type causes TIBCO Business Studio to automaticallygenerate:
● an abstract WSDL file - this defines the service operation provided by the start event.● a system participant - this defines the endpoint URI that will be exposed by the process (in the form
packageName/processName).
Procedure
1. Select the Start Event.
2. In the Properties view, General tab, change the Label to Get user’s name.
3. Change the Trigger Type from None to Message Trigger. TIBCO Business Studio automaticallygenerates a default service and operation for the Start Event, the details of which are displayed inthe right-hand pane of the tab.
4. Press CTRL + S to save the project. Note that two additional project artifacts have beenautomatically created:
● a WSDL document, WelcomeUsersService.wsdl , in the Generated Services folder.● a system participant, WelcomeUsersService, in the package-level Participants folder.
281
TIBCO Business Studio Tutorials
Configuring the End Event to Return a Message to the ClientWhen a process is exposing a request-response operation, the end event defines the response (Output)message which will be returned to the client when the process ends.
The end event must be configured both:
● as a message trigger type, and● as the reply to the earlier request, by pairing it with the upstream start event.
Defining an end event as a message trigger type causes TIBCO Business Studio to automatically updatethe abstract WSDL file to add a response message to the service operation provided by the start event.
Procedure
1. Select the End Event.
2. In the Properties view, General tab, change the Label to Send greeting.
282
TIBCO Business Studio Tutorials
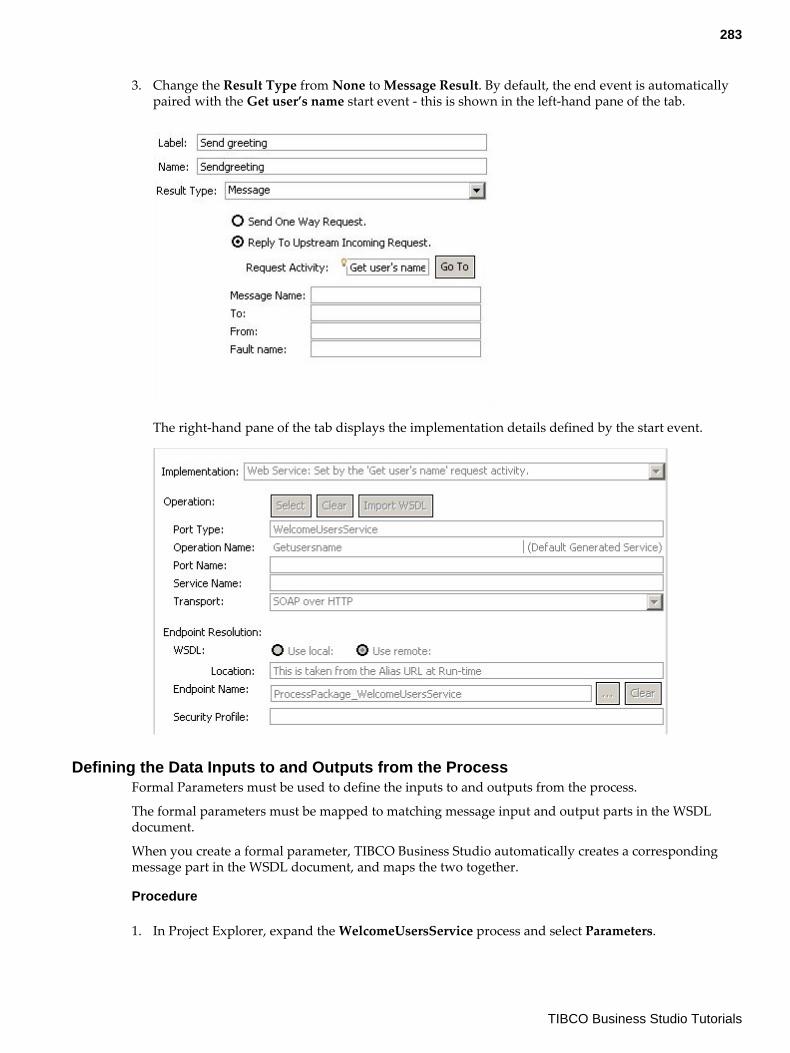
3. Change the Result Type from None to Message Result. By default, the end event is automaticallypaired with the Get user’s name start event - this is shown in the left-hand pane of the tab.
The right-hand pane of the tab displays the implementation details defined by the start event.
Defining the Data Inputs to and Outputs from the ProcessFormal Parameters must be used to define the inputs to and outputs from the process.
The formal parameters must be mapped to matching message input and output parts in the WSDLdocument.
When you create a formal parameter, TIBCO Business Studio automatically creates a correspondingmessage part in the WSDL document, and maps the two together.
Procedure
1. In Project Explorer, expand the WelcomeUsersService process and select Parameters.
283
TIBCO Business Studio Tutorials
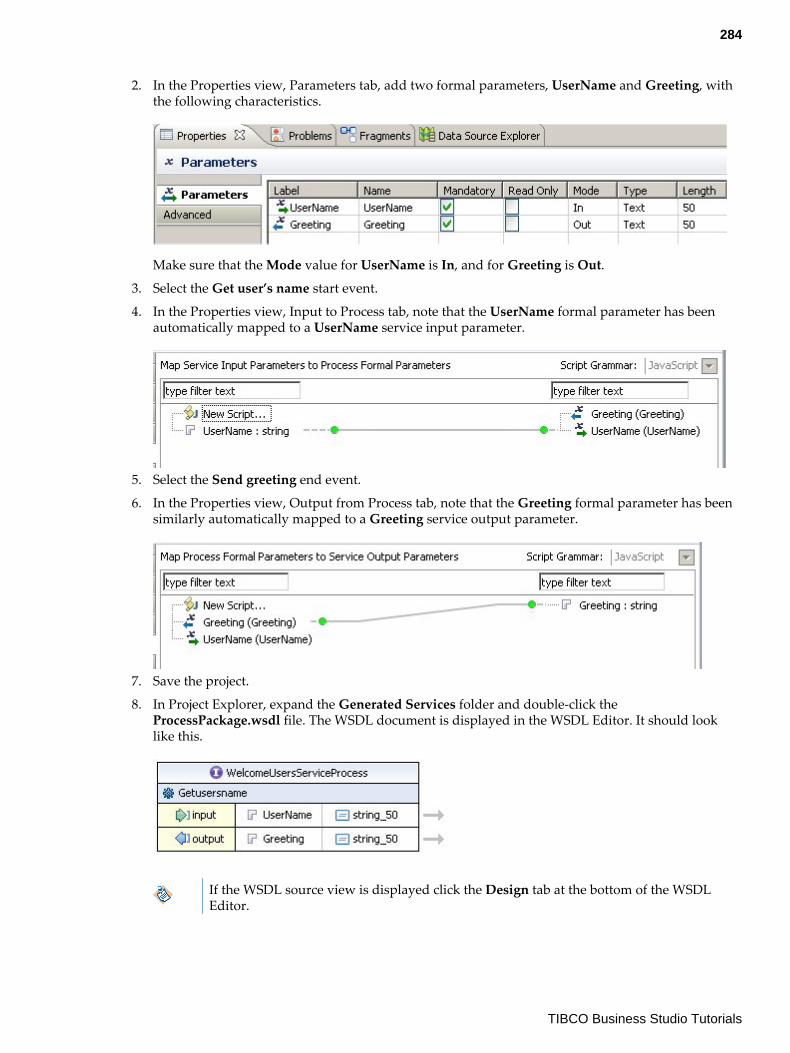
2. In the Properties view, Parameters tab, add two formal parameters, UserName and Greeting, withthe following characteristics.
Make sure that the Mode value for UserName is In, and for Greeting is Out.
3. Select the Get user’s name start event.
4. In the Properties view, Input to Process tab, note that the UserName formal parameter has beenautomatically mapped to a UserName service input parameter.
5. Select the Send greeting end event.
6. In the Properties view, Output from Process tab, note that the Greeting formal parameter has beensimilarly automatically mapped to a Greeting service output parameter.
7. Save the project.
8. In Project Explorer, expand the Generated Services folder and double-click theProcessPackage.wsdl file. The WSDL document is displayed in the WSDL Editor. It should looklike this.
If the WSDL source view is displayed click the Design tab at the bottom of the WSDLEditor.
284
TIBCO Business Studio Tutorials
Result
The WSDL document indicates that the process provides a single PortType, WelcomeUsersService,which provides a single Getusersname operation. The operation has:
● an input message that provides a UserName string, and● an output message that returns a Greeting string.
Creating a Script to Generate the Welcome GreetingThe WelcomeUsersService process does not do anything complex between its start and end events. Itsimply runs a script that:
● takes the UserName string provided by the start event.● generates the Greeting string that will be returned by the end event.
Procedure
1. Click the Script tool in the Palette in the Tasks drawer.
2. Position the mouse pointer over the sequence flow between the Get user’s Name start event and theSend greeting end event, then click to add the script task.
3. Change the script task label to Generate greeting.
4. In the Properties view, General tab, change the Script Defined As field to JavaScript.
5. Enter the following script: Greeting = "Hello " + UserName + ".";
6. Save the project.
Deploying the ApplicationThis step assumes that you have created the XYZ Work Server1 Deployment Server, as described in theHow to Implement and Deploy the WelcomeUsers Application tutorial; and that the server is connected.
Procedure
1. In the Deployment Servers view, right-click XYZ Work Server1 and click Deploy Module. TheDeploy Module(s) wizard is displayed.
2. Select Deploy BPM Project and click Next. The Select Project dialog is displayed.
3. Select WelcomeUsersService as the module to deploy, then click Next. There is a short pause whilethe necessary files generate.
4. In the Administrator Setup dialog, click Next.
5. The Property Configuration dialog is displayed. HttpInboundConnectionConfig is a string withthe value ProcessPackage_WelcomeUsersService. It identifies the HTTP Connector resourceinstance that the BPM runtime will use to make the service available to client applications.
6. Click Finish. The Progress Dialog is displayed while deployment takes place, and should indicatethat deployment has finished with no errors. Progress messages are also displayed in the Consoleview.
7. In the Deployment Servers view, expand XYZServer1 <BPM_app> (where <BPM_app> is your BPMapplication, by default amx.bpm.app). A com.example.welcomeusersservice entry is displayed,indicating that the application has been deployed to the BPM runtime.
285
TIBCO Business Studio Tutorials
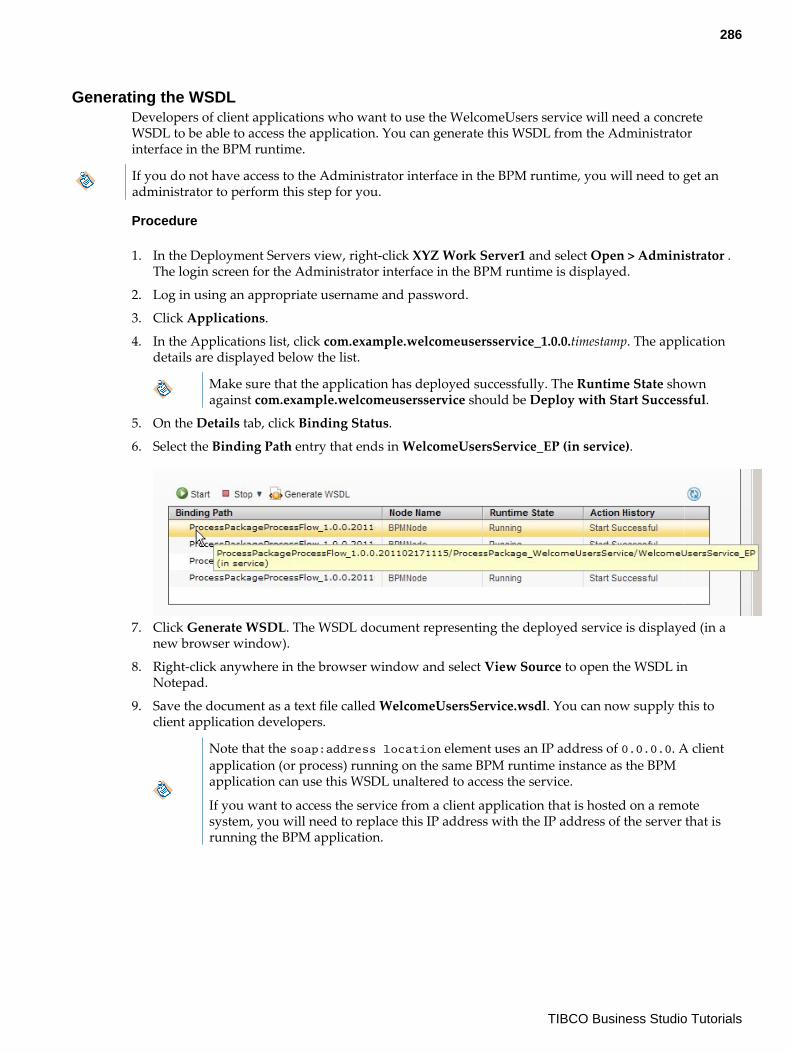
Generating the WSDLDevelopers of client applications who want to use the WelcomeUsers service will need a concreteWSDL to be able to access the application. You can generate this WSDL from the Administratorinterface in the BPM runtime.
If you do not have access to the Administrator interface in the BPM runtime, you will need to get anadministrator to perform this step for you.
Procedure
1. In the Deployment Servers view, right-click XYZ Work Server1 and select Open > Administrator .The login screen for the Administrator interface in the BPM runtime is displayed.
2. Log in using an appropriate username and password.
3. Click Applications.
4. In the Applications list, click com.example.welcomeusersservice_1.0.0.timestamp. The applicationdetails are displayed below the list.
Make sure that the application has deployed successfully. The Runtime State shownagainst com.example.welcomeusersservice should be Deploy with Start Successful.
5. On the Details tab, click Binding Status.
6. Select the Binding Path entry that ends in WelcomeUsersService_EP (in service).
7. Click Generate WSDL. The WSDL document representing the deployed service is displayed (in anew browser window).
8. Right-click anywhere in the browser window and select View Source to open the WSDL inNotepad.
9. Save the document as a text file called WelcomeUsersService.wsdl. You can now supply this toclient application developers.
Note that the soap:address location element uses an IP address of 0.0.0.0. A clientapplication (or process) running on the same BPM runtime instance as the BPMapplication can use this WSDL unaltered to access the service.
If you want to access the service from a client application that is hosted on a remotesystem, you will need to replace this IP address with the IP address of the server that isrunning the BPM application.
286
TIBCO Business Studio Tutorials
Testing the ApplicationThe WelcomeUsers service can now be invoked (using the WelcomeUsersService.wsdl file) fromanother process or SOA application running in the BPM runtime, or from an external application.
All access to the BPM runtime must be by an authenticated user. Any unauthenticated request will berejected.
An external application must therefore pass the security credentials - encoded username and password- of an authenticated BPM runtime user in every message it sends to the BPM runtime.
The encoded username and password (compliant with the Web Services Security UsernameTokenProfile) must be included in a standard SOAP or HTTPS security header via HTTPS communications.
For demonstration purposes, this tutorial uses the open source tool soapUI to generate and run asimple external application that can call the WelcomeUsers service. You can, if you prefer, use anyother tool that allows you to generate and send a SOAP request from a WSDL file.
Procedure
1. If you do not already have soapUI on your system, download it from http://www.soapui.org.
2. Edit the soap:address location element in the WelcomeUsersService.wsdl file as follows:a) Save the file.
3. Start soapUI.
4. Create a new WSDL project that uses WelcomeUsersService.wsdl.
5. Select the Create Requests checkbox to create sample requests for all operations.
6. Right-click on the project name and select Show Project View.
7. In the Project View dialog, select the Security Configurations tab.
287
TIBCO Business Studio Tutorials
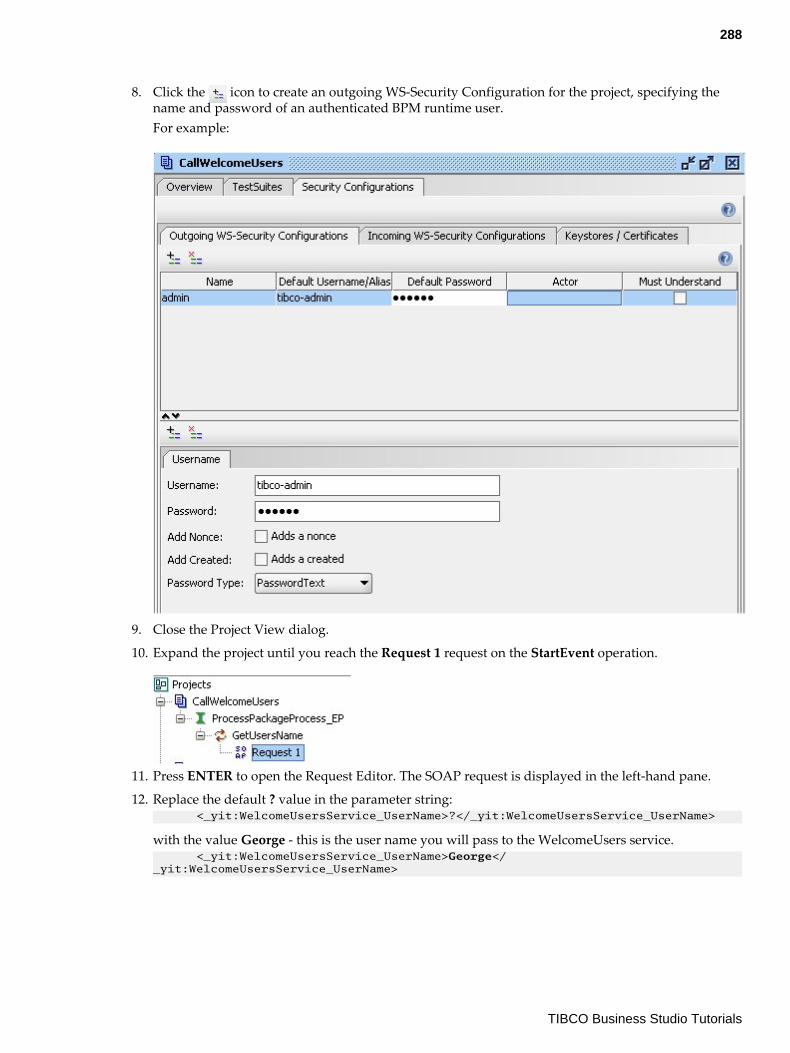
8. Click the icon to create an outgoing WS-Security Configuration for the project, specifying thename and password of an authenticated BPM runtime user.For example:
9. Close the Project View dialog.
10. Expand the project until you reach the Request 1 request on the StartEvent operation.
11. Press ENTER to open the Request Editor. The SOAP request is displayed in the left-hand pane.
12. Replace the default ? value in the parameter string: <_yit:WelcomeUsersService_UserName>?</_yit:WelcomeUsersService_UserName>
with the value George - this is the user name you will pass to the WelcomeUsers service. <_yit:WelcomeUsersService_UserName>George</_yit:WelcomeUsersService_UserName>
288
TIBCO Business Studio Tutorials
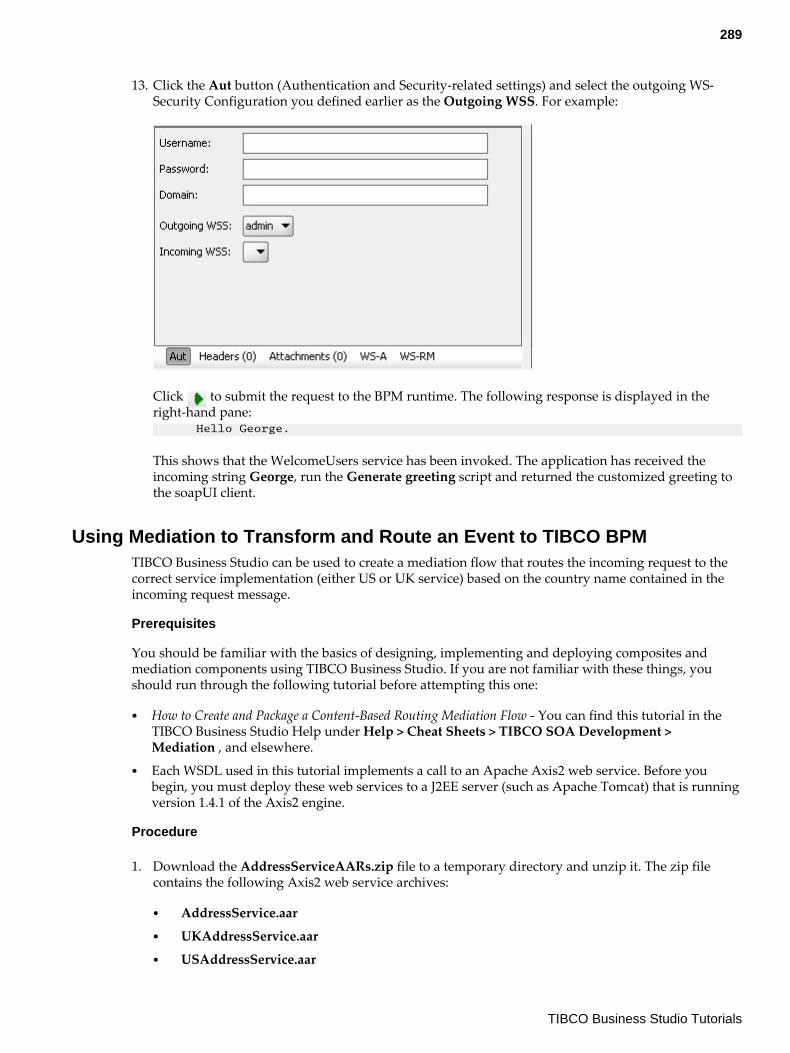
13. Click the Aut button (Authentication and Security-related settings) and select the outgoing WS-Security Configuration you defined earlier as the Outgoing WSS. For example:
Click to submit the request to the BPM runtime. The following response is displayed in theright-hand pane: Hello George.
This shows that the WelcomeUsers service has been invoked. The application has received theincoming string George, run the Generate greeting script and returned the customized greeting tothe soapUI client.
Using Mediation to Transform and Route an Event to TIBCO BPMTIBCO Business Studio can be used to create a mediation flow that routes the incoming request to thecorrect service implementation (either US or UK service) based on the country name contained in theincoming request message.
Prerequisites
You should be familiar with the basics of designing, implementing and deploying composites andmediation components using TIBCO Business Studio. If you are not familiar with these things, youshould run through the following tutorial before attempting this one:
● How to Create and Package a Content-Based Routing Mediation Flow - You can find this tutorial in theTIBCO Business Studio Help under Help > Cheat Sheets > TIBCO SOA Development >Mediation , and elsewhere.
● Each WSDL used in this tutorial implements a call to an Apache Axis2 web service. Before youbegin, you must deploy these web services to a J2EE server (such as Apache Tomcat) that is runningversion 1.4.1 of the Axis2 engine.
Procedure
1. Download the AddressServiceAARs.zip file to a temporary directory and unzip it. The zip filecontains the following Axis2 web service archives:
● AddressService.aar● UKAddressService.aar● USAddressService.aar
289
TIBCO Business Studio Tutorials
2. Deploy the three aar files to a J2EE server that is running the Axis2 engine, version 1.4.1.
See http://ws.apache.org/axis2/index.html for more information about Axis2.
3. Make sure that these web services have been properly deployed and are running.
Result
If you wish to deploy and test a project that invokes the services implemented in this project, you willneed to have completed the How to Call a Web Service From a Process tutorial.
Creating a TIBCO SOA ProjectUse the SOA Resource wizard to create a new SOA project.
Procedure
1. Open Studio for Designers.
2. Select File > New > TIBCO SOA Resources .
The TIBCO SOA Resource Wizard displays.
3. Select TIBCO SOA Project and click Next .
4. Type mediation.myaddressservice.soa in the Project name field and click Next.
5. Accept default values for all checkboxes in the Asset Type Selection dialog and click Next.
6. Select Empty SOA Project in the Composite Project dialog and click Next.
7. Type AddressServiceMediation in the Composite File name dialog and click Next.
8. Click Finish.
Importing the WSDL FilesThe wsdl files that you need for this project are provided with TIBCO Business Studio.
Procedure
1. Find the AddressServiceWSDLs.zip file in the location where you installed TIBCO Business Studio(for example, <STUDIO_HOME > \studio\3. n\samples).
2. Unzip it to a suitable location.
3. In the Project Explorer view, right-click the mediation.myaddressservice.soa > Service Descriptorsfolder and select Import > Import > File System .
4. Click the Browse... button to the right of the From Location field.
5. Navigate to the directory containing the WSDL files.
6. Select the following files for import:
● AddressService.wsdl● USAddressService.wsdl● UKAddressService.wsdl
7. Click Finish to import the WSDL files into your project.
Creating and Configuring the Mediation Flow DiagramIn this procedure you create the diagram that defines the mediation flow.
290
TIBCO Business Studio Tutorials
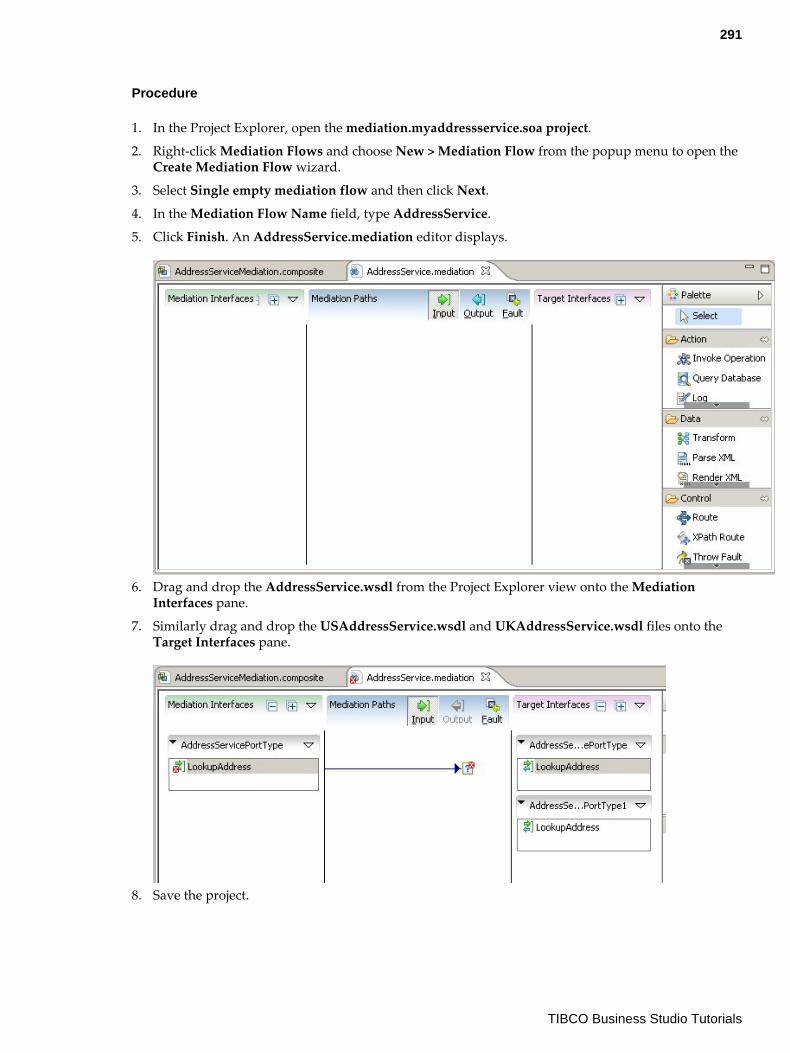
Procedure
1. In the Project Explorer, open the mediation.myaddressservice.soa project.
2. Right-click Mediation Flows and choose New > Mediation Flow from the popup menu to open theCreate Mediation Flow wizard.
3. Select Single empty mediation flow and then click Next.
4. In the Mediation Flow Name field, type AddressService.
5. Click Finish. An AddressService.mediation editor displays.
6. Drag and drop the AddressService.wsdl from the Project Explorer view onto the MediationInterfaces pane.
7. Similarly drag and drop the USAddressService.wsdl and UKAddressService.wsdl files onto theTarget Interfaces pane.
8. Save the project.
291
TIBCO Business Studio Tutorials
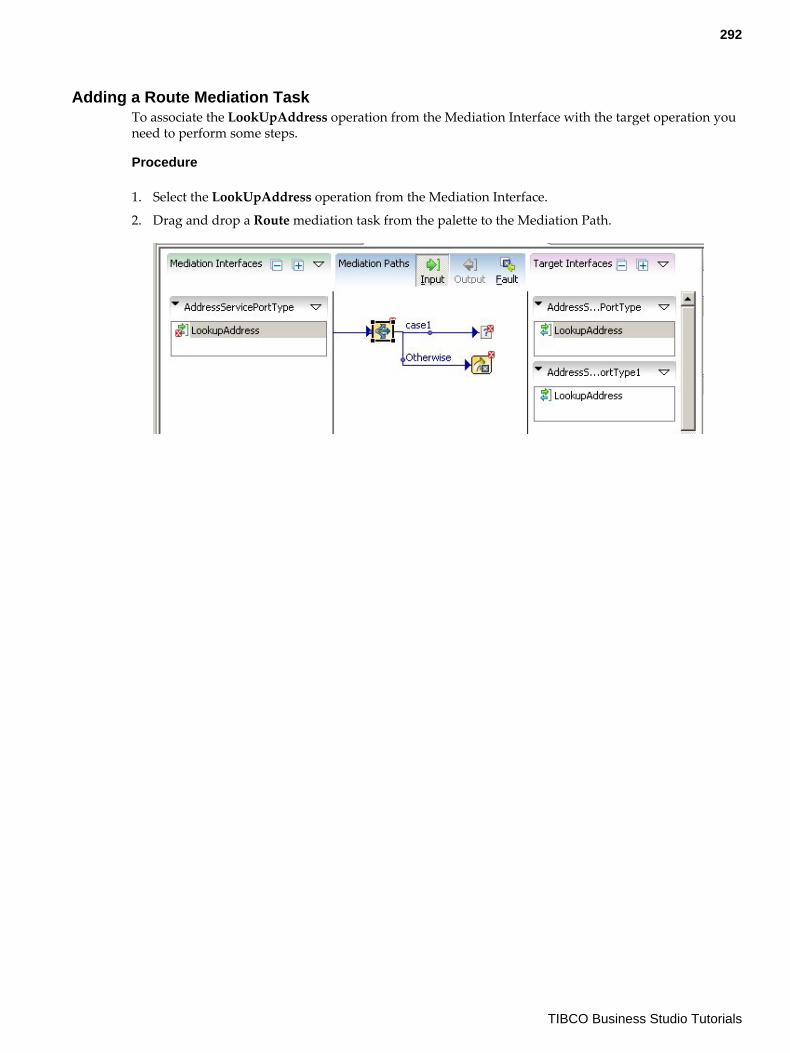
Adding a Route Mediation TaskTo associate the LookUpAddress operation from the Mediation Interface with the target operation youneed to perform some steps.
Procedure
1. Select the LookUpAddress operation from the Mediation Interface.
2. Drag and drop a Route mediation task from the palette to the Mediation Path.
292
TIBCO Business Studio Tutorials
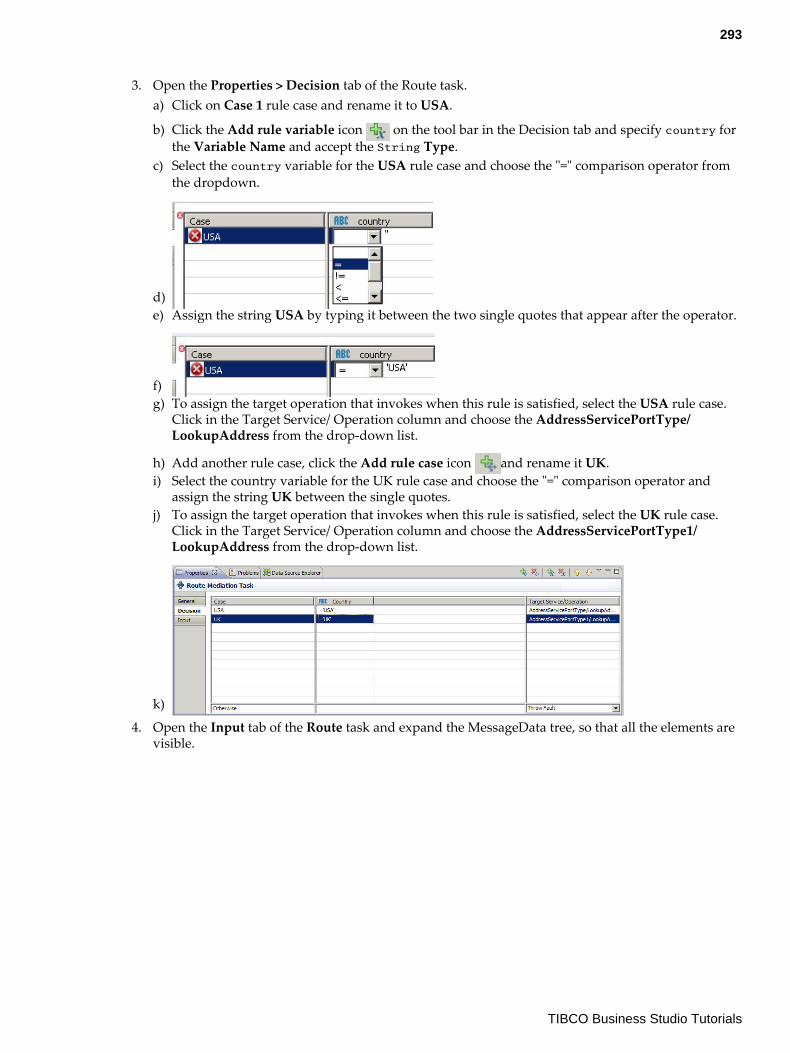
3. Open the Properties > Decision tab of the Route task.a) Click on Case 1 rule case and rename it to USA.
b) Click the Add rule variable icon on the tool bar in the Decision tab and specify country forthe Variable Name and accept the String Type.
c) Select the country variable for the USA rule case and choose the "=" comparison operator fromthe dropdown.
d)e) Assign the string USA by typing it between the two single quotes that appear after the operator.
f)g) To assign the target operation that invokes when this rule is satisfied, select the USA rule case.
Click in the Target Service/ Operation column and choose the AddressServicePortType/LookupAddress from the drop-down list.
h) Add another rule case, click the Add rule case icon and rename it UK.i) Select the country variable for the UK rule case and choose the "=" comparison operator and
assign the string UK between the single quotes.j) To assign the target operation that invokes when this rule is satisfied, select the UK rule case.
Click in the Target Service/ Operation column and choose the AddressServicePortType1/LookupAddress from the drop-down list.
k)
4. Open the Input tab of the Route task and expand the MessageData tree, so that all the elements arevisible.
293
TIBCO Business Studio Tutorials
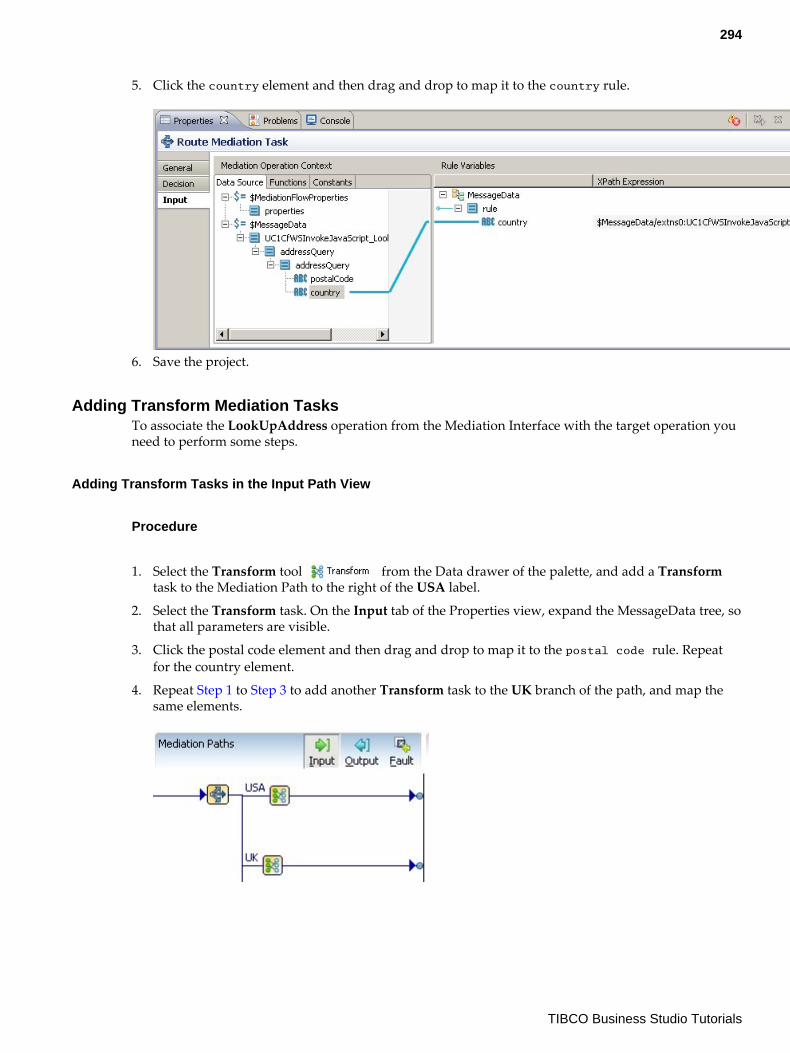
5. Click the country element and then drag and drop to map it to the country rule.
6. Save the project.
Adding Transform Mediation TasksTo associate the LookUpAddress operation from the Mediation Interface with the target operation youneed to perform some steps.
Adding Transform Tasks in the Input Path View
Procedure
1. Select the Transform tool from the Data drawer of the palette, and add a Transformtask to the Mediation Path to the right of the USA label.
2. Select the Transform task. On the Input tab of the Properties view, expand the MessageData tree, sothat all parameters are visible.
3. Click the postal code element and then drag and drop to map it to the postal code rule. Repeatfor the country element.
4. Repeat Step 1 to Step 3 to add another Transform task to the UK branch of the path, and map thesame elements.
294
TIBCO Business Studio Tutorials
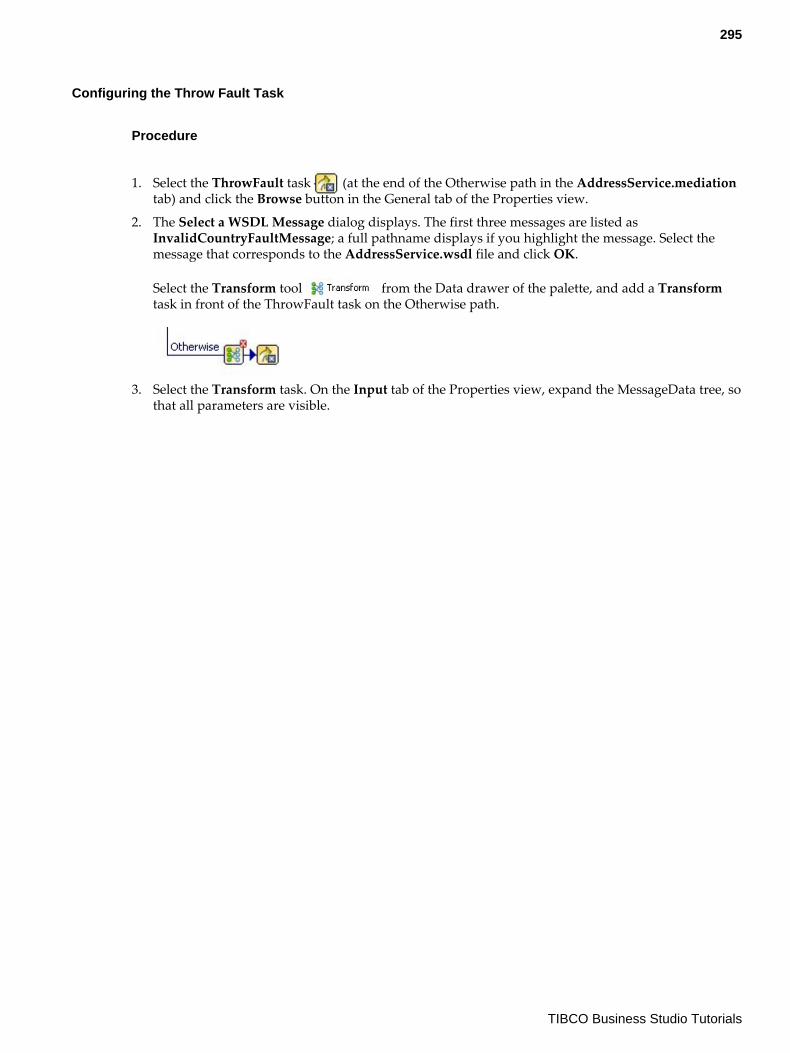
Configuring the Throw Fault Task
Procedure
1. Select the ThrowFault task (at the end of the Otherwise path in the AddressService.mediationtab) and click the Browse button in the General tab of the Properties view.
2. The Select a WSDL Message dialog displays. The first three messages are listed asInvalidCountryFaultMessage; a full pathname displays if you highlight the message. Select themessage that corresponds to the AddressService.wsdl file and click OK.
Select the Transform tool from the Data drawer of the palette, and add a Transformtask in front of the ThrowFault task on the Otherwise path.
3. Select the Transform task. On the Input tab of the Properties view, expand the MessageData tree, sothat all parameters are visible.
295
TIBCO Business Studio Tutorials
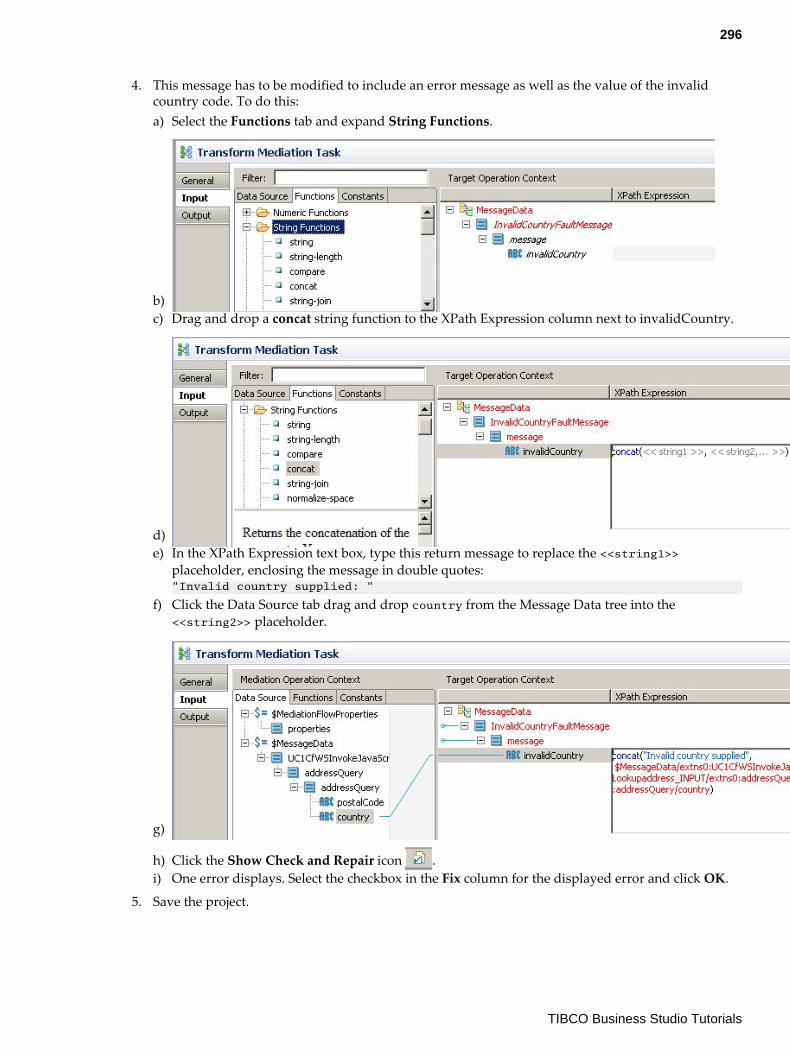
4. This message has to be modified to include an error message as well as the value of the invalidcountry code. To do this:a) Select the Functions tab and expand String Functions.
b)c) Drag and drop a concat string function to the XPath Expression column next to invalidCountry.
d)e) In the XPath Expression text box, type this return message to replace the <<string1>>
placeholder, enclosing the message in double quotes:"Invalid country supplied: "
f) Click the Data Source tab drag and drop country from the Message Data tree into the<<string2>> placeholder.
g)
h) Click the Show Check and Repair icon .i) One error displays. Select the checkbox in the Fix column for the displayed error and click OK.
5. Save the project.
296
TIBCO Business Studio Tutorials
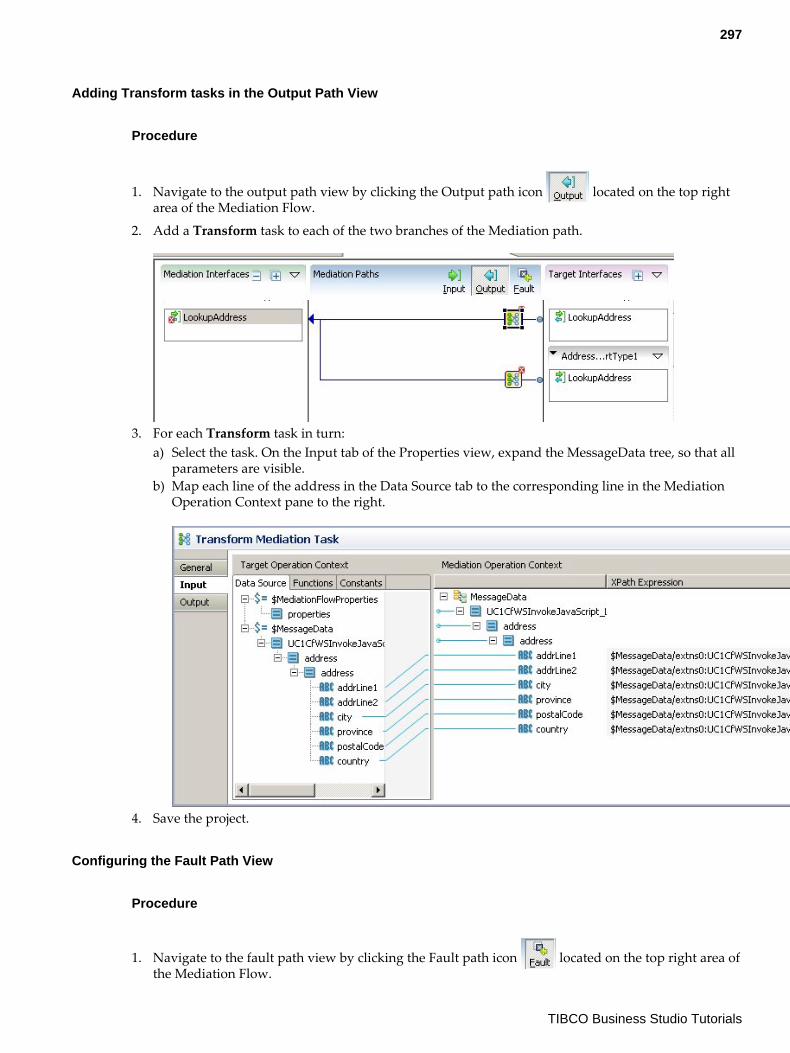
Adding Transform tasks in the Output Path View
Procedure
1. Navigate to the output path view by clicking the Output path icon located on the top rightarea of the Mediation Flow.
2. Add a Transform task to each of the two branches of the Mediation path.
3. For each Transform task in turn:a) Select the task. On the Input tab of the Properties view, expand the MessageData tree, so that all
parameters are visible.b) Map each line of the address in the Data Source tab to the corresponding line in the Mediation
Operation Context pane to the right.
4. Save the project.
Configuring the Fault Path View
Procedure
1. Navigate to the fault path view by clicking the Fault path icon located on the top right area ofthe Mediation Flow.
297
TIBCO Business Studio Tutorials
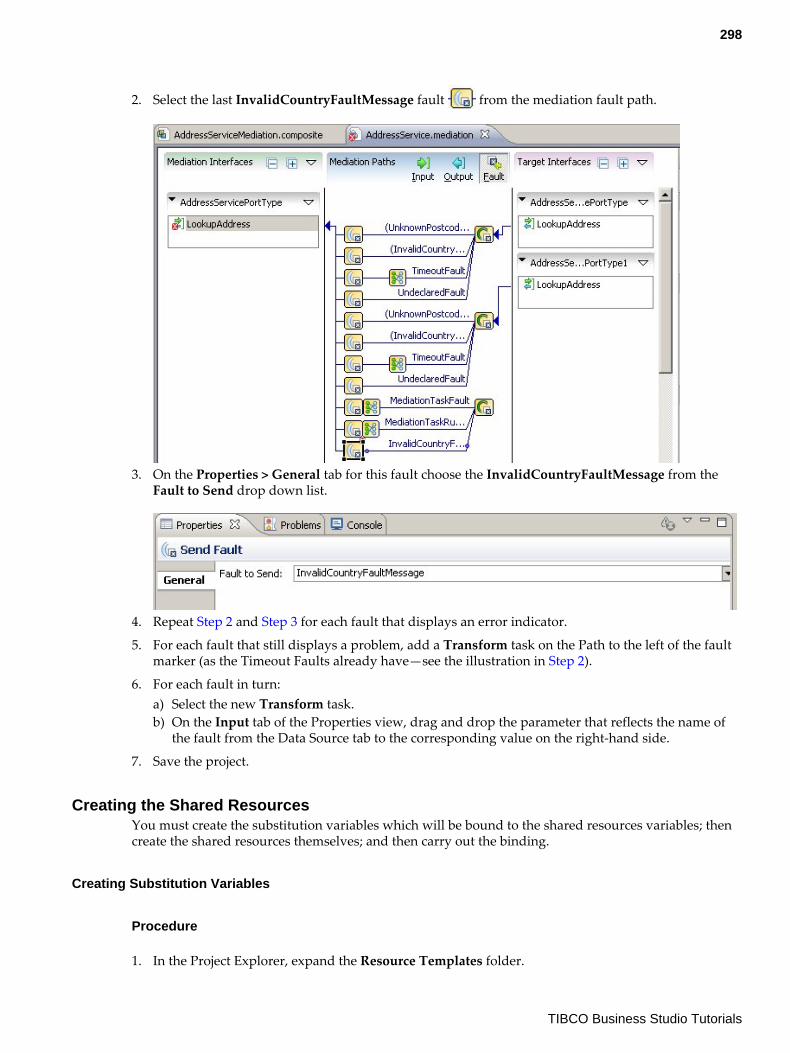
2. Select the last InvalidCountryFaultMessage fault from the mediation fault path.
3. On the Properties > General tab for this fault choose the InvalidCountryFaultMessage from theFault to Send drop down list.
4. Repeat Step 2 and Step 3 for each fault that displays an error indicator.
5. For each fault that still displays a problem, add a Transform task on the Path to the left of the faultmarker (as the Timeout Faults already have—see the illustration in Step 2).
6. For each fault in turn:a) Select the new Transform task.b) On the Input tab of the Properties view, drag and drop the parameter that reflects the name of
the fault from the Data Source tab to the corresponding value on the right-hand side.
7. Save the project.
Creating the Shared ResourcesYou must create the substitution variables which will be bound to the shared resources variables; thencreate the shared resources themselves; and then carry out the binding.
Creating Substitution Variables
Procedure
1. In the Project Explorer, expand the Resource Templates folder.
298
TIBCO Business Studio Tutorials
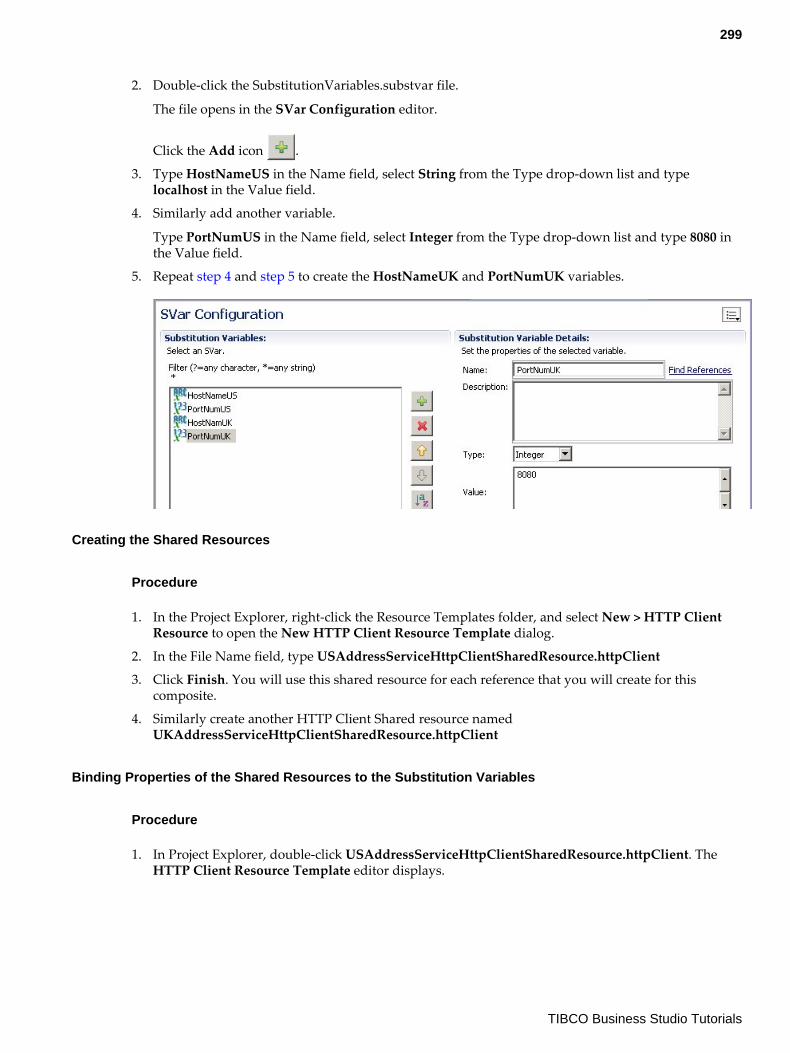
2. Double-click the SubstitutionVariables.substvar file.
The file opens in the SVar Configuration editor.
Click the Add icon .
3. Type HostNameUS in the Name field, select String from the Type drop-down list and typelocalhost in the Value field.
4. Similarly add another variable.
Type PortNumUS in the Name field, select Integer from the Type drop-down list and type 8080 inthe Value field.
5. Repeat step 4 and step 5 to create the HostNameUK and PortNumUK variables.
Creating the Shared Resources
Procedure
1. In the Project Explorer, right-click the Resource Templates folder, and select New > HTTP ClientResource to open the New HTTP Client Resource Template dialog.
2. In the File Name field, type USAddressServiceHttpClientSharedResource.httpClient
3. Click Finish. You will use this shared resource for each reference that you will create for thiscomposite.
4. Similarly create another HTTP Client Shared resource namedUKAddressServiceHttpClientSharedResource.httpClient
Binding Properties of the Shared Resources to the Substitution Variables
Procedure
1. In Project Explorer, double-click USAddressServiceHttpClientSharedResource.httpClient. TheHTTP Client Resource Template editor displays.
299
TIBCO Business Studio Tutorials
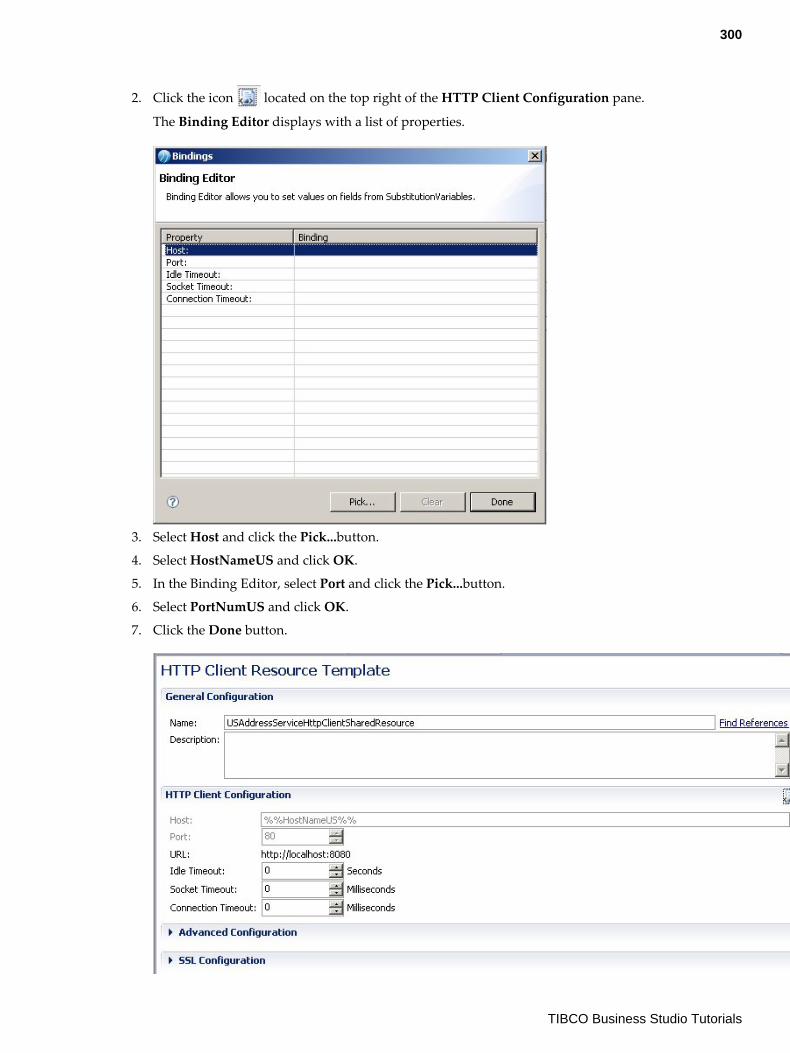
2. Click the icon located on the top right of the HTTP Client Configuration pane.
The Binding Editor displays with a list of properties.
3. Select Host and click the Pick...button.
4. Select HostNameUS and click OK.
5. In the Binding Editor, select Port and click the Pick...button.
6. Select PortNumUS and click OK.
7. Click the Done button.
300
TIBCO Business Studio Tutorials
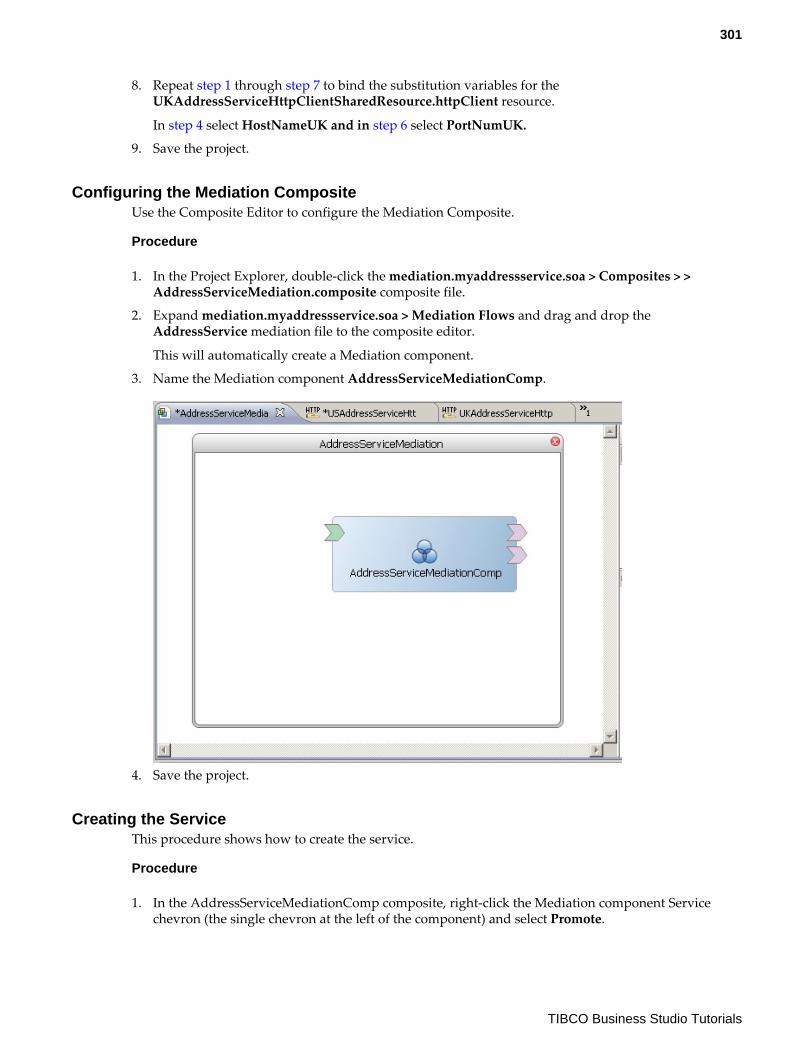
8. Repeat step 1 through step 7 to bind the substitution variables for theUKAddressServiceHttpClientSharedResource.httpClient resource.
In step 4 select HostNameUK and in step 6 select PortNumUK.
9. Save the project.
Configuring the Mediation CompositeUse the Composite Editor to configure the Mediation Composite.
Procedure
1. In the Project Explorer, double-click the mediation.myaddressservice.soa > Composites > >AddressServiceMediation.composite composite file.
2. Expand mediation.myaddressservice.soa > Mediation Flows and drag and drop theAddressService mediation file to the composite editor.
This will automatically create a Mediation component.
3. Name the Mediation component AddressServiceMediationComp.
4. Save the project.
Creating the ServiceThis procedure shows how to create the service.
Procedure
1. In the AddressServiceMediationComp composite, right-click the Mediation component Servicechevron (the single chevron at the left of the component) and select Promote.
301
TIBCO Business Studio Tutorials
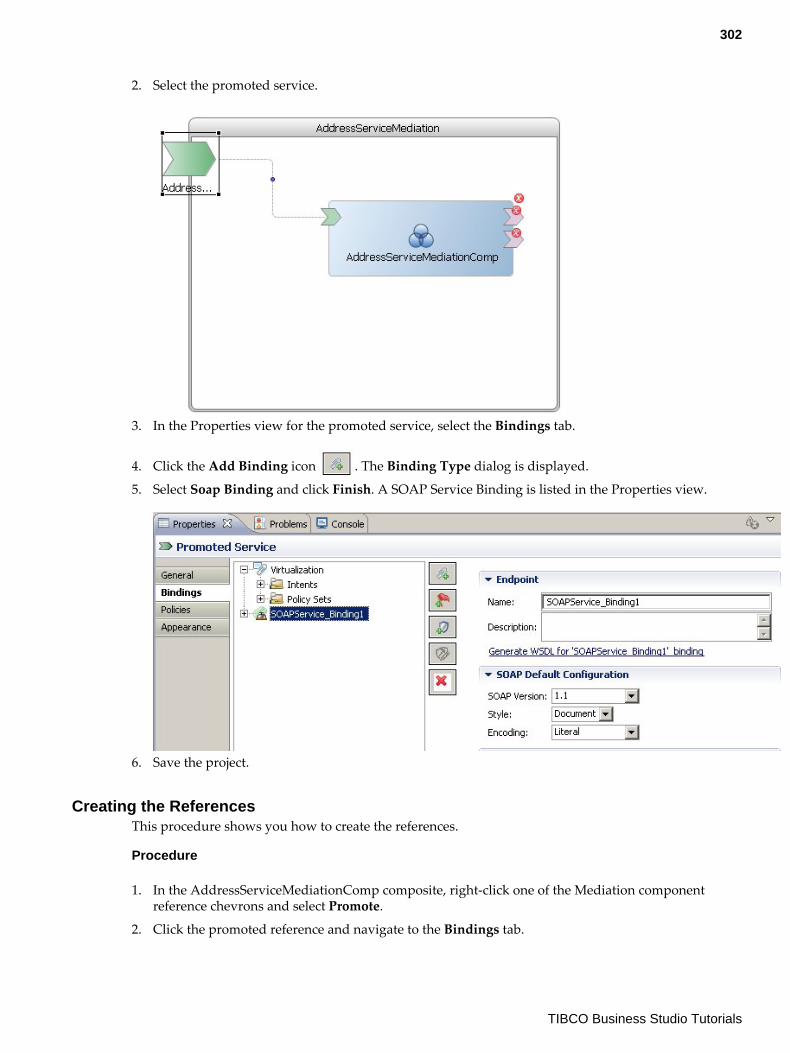
2. Select the promoted service.
3. In the Properties view for the promoted service, select the Bindings tab.
4. Click the Add Binding icon . The Binding Type dialog is displayed.
5. Select Soap Binding and click Finish. A SOAP Service Binding is listed in the Properties view.
6. Save the project.
Creating the ReferencesThis procedure shows you how to create the references.
Procedure
1. In the AddressServiceMediationComp composite, right-click one of the Mediation componentreference chevrons and select Promote.
2. Click the promoted reference and navigate to the Bindings tab.
302
TIBCO Business Studio Tutorials
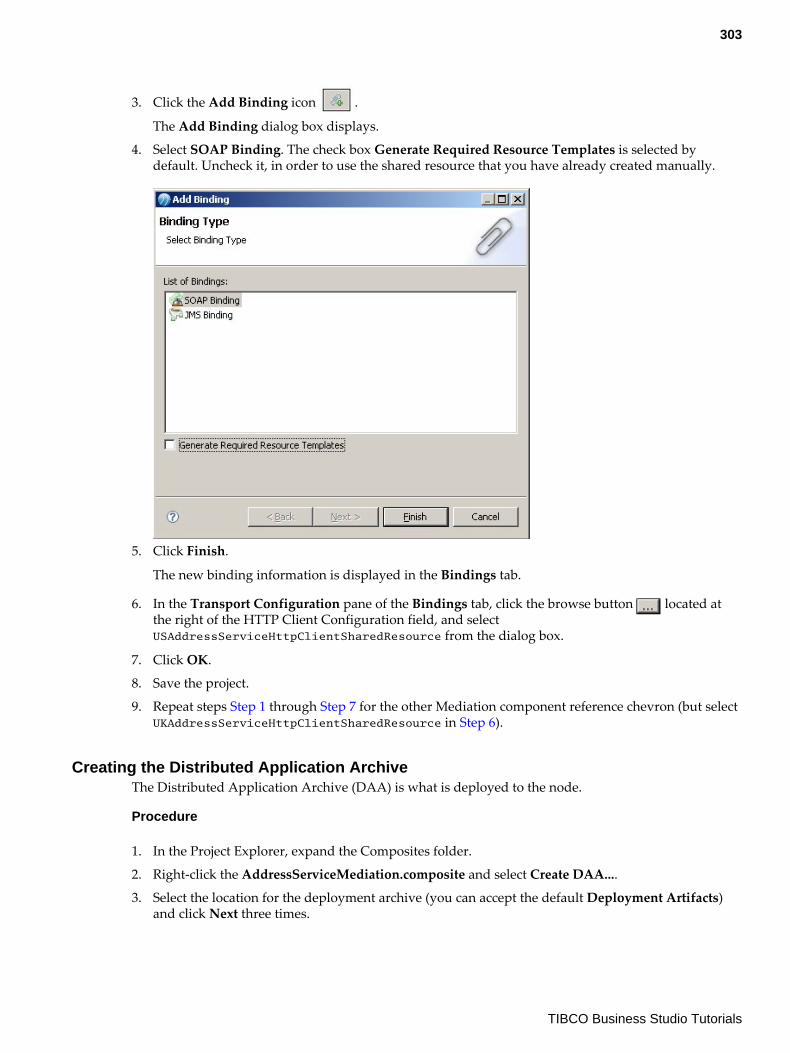
3. Click the Add Binding icon .
The Add Binding dialog box displays.
4. Select SOAP Binding. The check box Generate Required Resource Templates is selected bydefault. Uncheck it, in order to use the shared resource that you have already created manually.
5. Click Finish.
The new binding information is displayed in the Bindings tab.
6. In the Transport Configuration pane of the Bindings tab, click the browse button located atthe right of the HTTP Client Configuration field, and selectUSAddressServiceHttpClientSharedResource from the dialog box.
7. Click OK.
8. Save the project.
9. Repeat steps Step 1 through Step 7 for the other Mediation component reference chevron (but selectUKAddressServiceHttpClientSharedResource in Step 6).
Creating the Distributed Application ArchiveThe Distributed Application Archive (DAA) is what is deployed to the node.
Procedure
1. In the Project Explorer, expand the Composites folder.
2. Right-click the AddressServiceMediation.composite and select Create DAA....
3. Select the location for the deployment archive (you can accept the default Deployment Artifacts)and click Next three times.
303
TIBCO Business Studio Tutorials
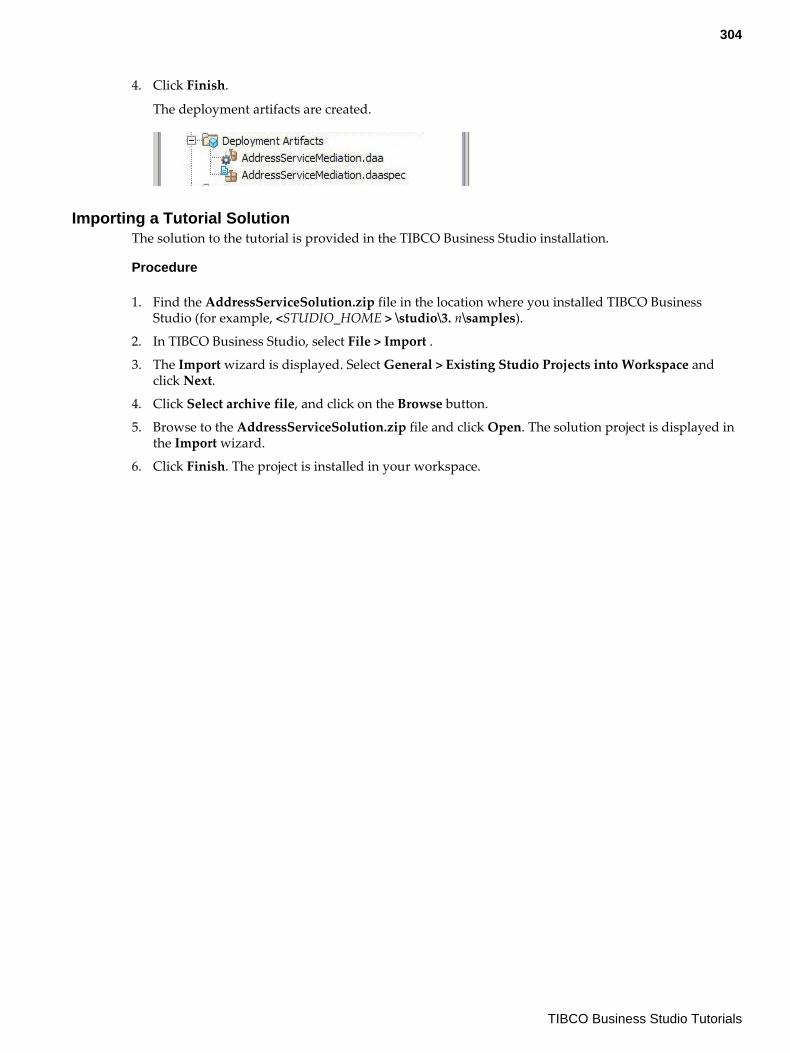
4. Click Finish.
The deployment artifacts are created.
Importing a Tutorial SolutionThe solution to the tutorial is provided in the TIBCO Business Studio installation.
Procedure
1. Find the AddressServiceSolution.zip file in the location where you installed TIBCO BusinessStudio (for example, <STUDIO_HOME > \studio\3. n\samples).
2. In TIBCO Business Studio, select File > Import .
3. The Import wizard is displayed. Select General > Existing Studio Projects into Workspace andclick Next.
4. Click Select archive file, and click on the Browse button.
5. Browse to the AddressServiceSolution.zip file and click Open. The solution project is displayed inthe Import wizard.
6. Click Finish. The project is installed in your workspace.
304
TIBCO Business Studio Tutorials
Using Openspace
How to Get Started with OpenspaceThis tutorial describes how to customize the layout of Openspace, and how to use the BusinessServices and Work Views gadgets in Openspace.
Openspace is a web application that enables you to host gadgets and widgets. Using Openspace, youcan add web content from different sources as gadgets and customize how they are displayed.Openspace provides a unified view of all your gadgets and acts as a gateway to your frequently usedservices.
Openspace provides an interface that connects to TIBCO BPM runtime. Using Openspace, you canaccess the functions you need to carry out your daily tasks, such as mapping users to organizationalentities and running business services. A business service is a set of actions that accomplishes some sortof business function. For example, a business service could be designed to handle an incominginsurance claim. A business service can display forms, start processes, access databases, run scripts orcall web services.
On completion of this tutorial you will be familiar with:
● logging into Openspace● adding gadgets in Openspace● using layouts in Openspace● using the Business Services gadget to start business services.
Before You Begin
This tutorial uses the WelcomeUsers application, which is a sample application used to illustrate BPMfunctionality. For more information about the WelcomeUsers application see the Create, Deploy, andRun Your First BPM Application tutorials.
Before you start this tutorial, make sure that:
● The WelcomeUsers application is deployed to BPM. See the How to Implement and Deploy theWelcomeUsers Application tutorial.
● The user “Clint Hill” is mapped to the Testers position in the WelcomeUsers organization model.See the How to Map Users to the WelcomeUsers Organization Model tutorial.
For more information about TIBCO Openspace, see the TIBCO Openspace User Guide.
305
TIBCO Business Studio Tutorials
Logging in to OpenspaceYou will be logging in as user Clint Hill, who was mapped to the Testers position in an earlier tutorial .
Procedure
1. In your browser, type in the Openspace login URL:protocol://host:port/openspace
where:
● protocol is the communications protocol being used by Openspace, either http or https. Thiswas determined at installation.
● host is the DNS name or IP address of the server hosting the BPM runtime.
● port is the port being used by Openspace. The default value is 8080.
When you start Openspace, the Openspace login screen is displayed.
2. In the User Name field, type Clint Hill.
3. In the Password field, type tibco123.
4. Select Remember User Name if you do not want to type in your user name every time you login toOpenspace.
5. Click Login.
Adding a GadgetOpenspace uses personas to determine what layouts, themes and gadgets are displayed when you login.
An Openspace administrator can create different personas that display different combinations oflayouts, themes and gadgets according to the requirements of their users. This is useful because itmeans that users do not have to define these themselves when they first log in.
As supplied, Openspace provides two personas:
● Standard. The Standard persona is initially blank. You can use the Standard persona to configurewhich layouts, themes and gadgets are displayed when users log in, depending on yourrequirements.
● Default. If no Standard persona has been defined, the first time you log in to Openspace, theDefault persona is used. The Default persona displays a selection of tabs and gadgets that users aremost likely to find useful.
306
TIBCO Business Studio Tutorials

Procedure
1. On logging in as Clint Hill the opening tab of the Default persona is displayed,.
The Default persona has the following tabs:
● Business Services● Work Views● Process Views● Reporting● Event Views● Organization● Calendar
2. Make sure that the Business Services tab is selected.
307
TIBCO Business Studio Tutorials
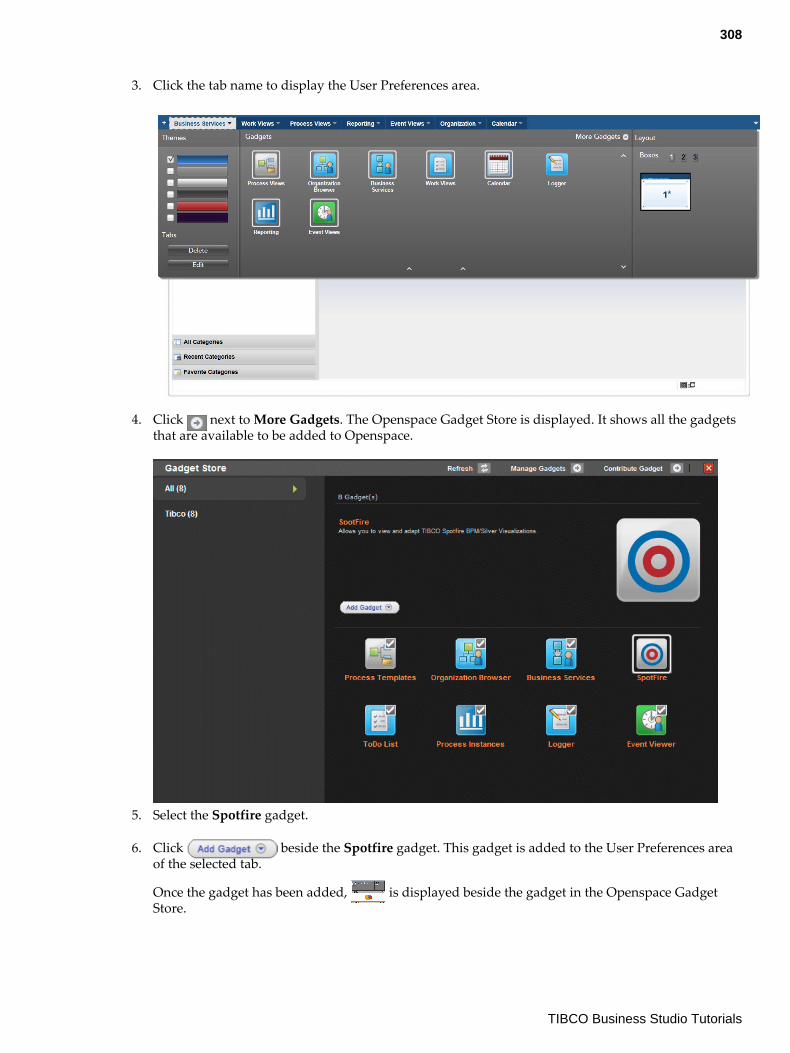
3. Click the tab name to display the User Preferences area.
4. Click next to More Gadgets. The Openspace Gadget Store is displayed. It shows all the gadgetsthat are available to be added to Openspace.
5. Select the Spotfire gadget.
6. Click beside the Spotfire gadget. This gadget is added to the User Preferences areaof the selected tab.
Once the gadget has been added, is displayed beside the gadget in the Openspace GadgetStore.
308
TIBCO Business Studio Tutorials
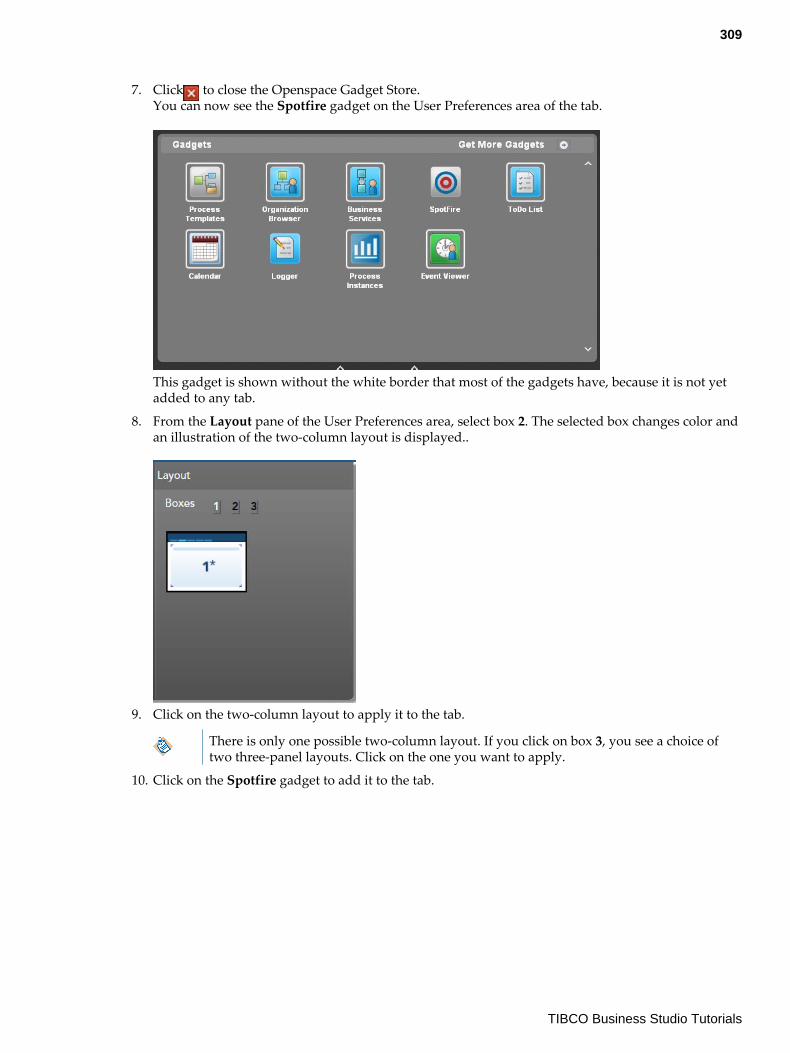
7. Click to close the Openspace Gadget Store.You can now see the Spotfire gadget on the User Preferences area of the tab.
This gadget is shown without the white border that most of the gadgets have, because it is not yetadded to any tab.
8. From the Layout pane of the User Preferences area, select box 2. The selected box changes color andan illustration of the two-column layout is displayed..
9. Click on the two-column layout to apply it to the tab.
There is only one possible two-column layout. If you click on box 3, you see a choice oftwo three-panel layouts. Click on the one you want to apply.
10. Click on the Spotfire gadget to add it to the tab.
309
TIBCO Business Studio Tutorials
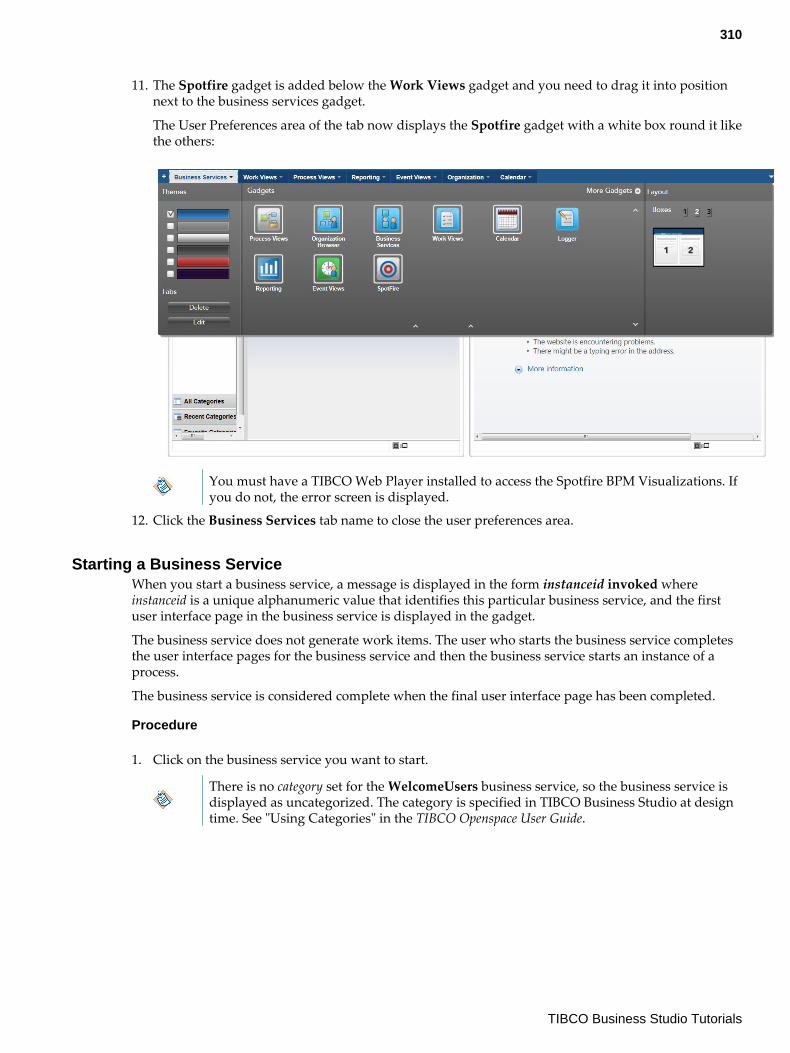
11. The Spotfire gadget is added below the Work Views gadget and you need to drag it into positionnext to the business services gadget.
The User Preferences area of the tab now displays the Spotfire gadget with a white box round it likethe others:
You must have a TIBCO Web Player installed to access the Spotfire BPM Visualizations. Ifyou do not, the error screen is displayed.
12. Click the Business Services tab name to close the user preferences area.
Starting a Business ServiceWhen you start a business service, a message is displayed in the form instanceid invoked whereinstanceid is a unique alphanumeric value that identifies this particular business service, and the firstuser interface page in the business service is displayed in the gadget.
The business service does not generate work items. The user who starts the business service completesthe user interface pages for the business service and then the business service starts an instance of aprocess.
The business service is considered complete when the final user interface page has been completed.
Procedure
1. Click on the business service you want to start.
There is no category set for the WelcomeUsers business service, so the business service isdisplayed as uncategorized. The category is specified in TIBCO Business Studio at designtime. See "Using Categories" in the TIBCO Openspace User Guide.
310
TIBCO Business Studio Tutorials
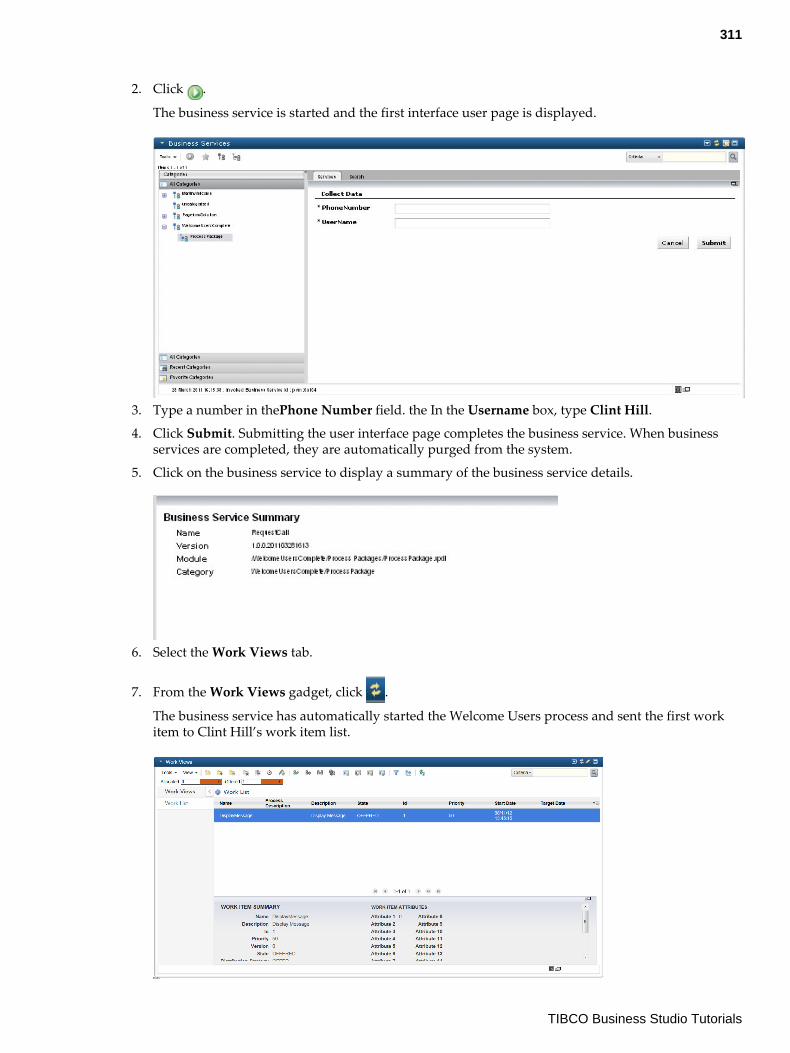
2. Click .
The business service is started and the first interface user page is displayed.
3. Type a number in thePhone Number field. the In the Username box, type Clint Hill.
4. Click Submit. Submitting the user interface page completes the business service. When businessservices are completed, they are automatically purged from the system.
5. Click on the business service to display a summary of the business service details.
6. Select the Work Views tab.
7. From the Work Views gadget, click .
The business service has automatically started the Welcome Users process and sent the first workitem to Clint Hill’s work item list.
311
TIBCO Business Studio Tutorials
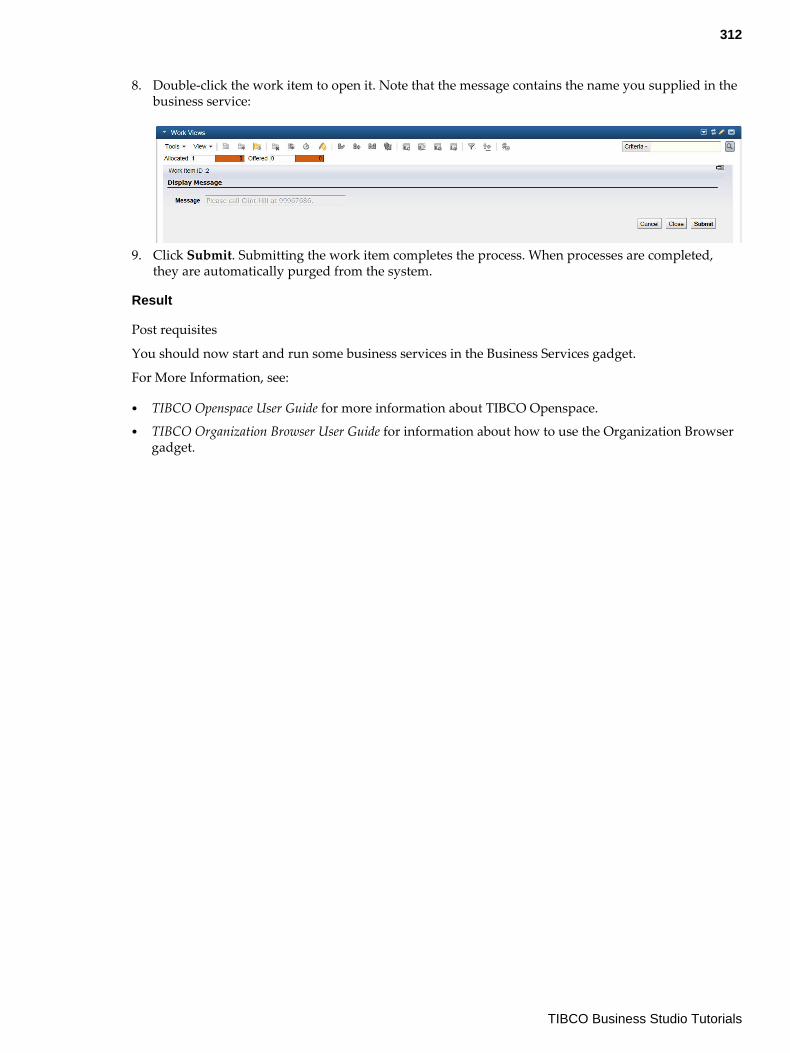
8. Double-click the work item to open it. Note that the message contains the name you supplied in thebusiness service:
9. Click Submit. Submitting the work item completes the process. When processes are completed,they are automatically purged from the system.
Result
Post requisites
You should now start and run some business services in the Business Services gadget.
For More Information, see:
● TIBCO Openspace User Guide for more information about TIBCO Openspace.● TIBCO Organization Browser User Guide for information about how to use the Organization Browser
gadget.
312
TIBCO Business Studio Tutorials
Using Pageflows and Business Services
How to Model and Run PageflowsA pageflow process is a short-lived process designed to display user interface pages to the user insequence. It can also include other activities - such as web service or database calls - which can be usedto drive the interaction with the user.
This tutorial shows you how to create a pageflow process.
A pageflow process is a specialized version of a normal business process that can be used to provide ananimated user interface - a sequence of forms rather than just a single form - for a single work item tothe same user.
Before you start this tutorial, you can become familiar with TIBCO Business Studio by completing thefollowing initial tutorials:
● How to Design a Simple WelcomeUsers Business Service● How to Implement and Deploy the WelcomeUsers Application
You can find these tutorials under Start here > Create, Deploy and Run Your First BPM Application .
You may also wish to complete the following tutorials covering the use of the organization model:
● How to Use the Graphical Organization Modeler● How to Add Groups, Capabilities and Privileges to an Organization Model
After completing this tutorial, you will be familiar with using the pageflow process.
Importing the Initial ResourcesIt is good practice to use a separate organization model rather than to include the model within thesame project as your business processes.
In this procedure you will import an existing project to use as the basis for this tutorial. TheWelcomeUsers project includes a business process and a business service (called RequestCall). A businessservice is a type of pageflow, which is used to collect information and can be used as a mechanism tostart off a business process.
You will also import an organization model in another project.
If you are continuing this tutorial directly from a previous one, you have already started TIBCOBusiness Studio, and the WelcomeUsers project may already be open. If so, skip the first two steps ofthis procedure.
Procedure
1. Start Studio for Designers.
Following this tutorial will be simpler and clearer if you close any other projects that youmay have open in your TIBCO Business Studio workspace, using the Project > CloseProject menu option.
2. If the WelcomeUsers project is not open, import the solution from the tutorial How to Implementand Deploy the WelcomeUsers Application. Find the WelcomeUsersImplementSolution.zip filein the location where you installed TIBCO Business Studio (for example, <STUDIO_HOME >\studio\3. n\samples).
3. In TIBCO Business Studio, select File > Import .
313
TIBCO Business Studio Tutorials

4. The Import wizard is displayed. Select General > Existing Studio Projects into Workspace andclick Next.
5. Click Select archive file, and click on the Browse button.
6. Browse to WelcomeUsersImplementSolution.zip and click Open. TheWelcomeUsersImplementSolution project is displayed in the Import wizard.
7. Click Finish. The WelcomeUsersImplementSolution project is installed in your workspace
8. In Project Explorer, expand the WelcomeUsers project.
If you are continuing from previous work with the WelcomeUsers tutorials, the projectwill be called WelcomeUsers. If you have imported it, you will be using a project calledWelcomeUsersSolution. It will be referred to simply as WelcomeUsers for the rest of thistutorial.
9. Delete the Organization Model in the WelcomeUsers project by right-clicking on Organization andselecting Delete. You will be asked if you want to delete Organization from the file system. ClickOK to confirm.
10. Select Project > Clean... . In the Clean dialog, select the WelcomeUsers project, and press OK.
This ensures that the output file for the deleted organization model, which is normally hidden, isalso deleted.
11. Import the EasyAsExtendedOMSolution project, following the instructions above, and expand theorganization model.
Mapping a Participant to an Organization ModelFirst you will map the Participant Process Tester, which is used by the user task in WelcomeUsers, to aposition in the imported organization model.
Procedure
1. In Project Explorer, expand the WelcomeUsers project as far as the WelcomeUsers process, anddouble-click on that process. It is displayed in the Process Editor (at the top centre of the screen).
2. Select the Display Message user task. On the General tab in the Properties view, note that the taskis assigned to the Participant Process Tester.
3. In the Project Explorer view of the WelcomeUsers project, expand Participants at the processpackage level (you may need to expand the process packages as well). Note that the Process Testerparticipant is already defined. Note that, both in Project Explorer and on the General tab in theProperties view, you will see an error indicator. This is because the Process Tester participantreferred to the organization model which you deleted in Importing the Initial Resources.
314
TIBCO Business Studio Tutorials

4. On the General tab in the Properties view for ProcessTester, expand Type if it is not alreadyexpanded.External Reference is already selected.
5. Click .
6. In the Select Type dialog, select Tester in the organization model, and then OK.
7. You will be shown the following message:
8. Click Yes to reference EasyAsExtendedOMSolution from the WelcomeUsers project.
Now the user task is still assigned to the Participant Process Tester, but that participant is nowmapped to the position Tester in the EasyAsExtendedOMSolution organization model.
315
TIBCO Business Studio Tutorials
9. Press CTRL + S to save the changes you have made.
You can save your work at any point. If there are unsaved changes, an asterisk isdisplayed next to the changed organization model or process package in the ProjectExplorer view.
It is advisable to save after completing each procedure.
Creating a New Pageflow ProcessA pageflow process can be used to display a sequence of forms to a user, to do a particular task, likedisplaying details about a user’s name or contact details.
In this task you create a new pageflow process to gather further details about the user, using the NewPageflow Process wizard. This displays a series of forms which the process can use to record somemore details about the user whose name was specified in the Request Call business service andincorporated in the Generate Message task of the WelcomeUsers process.
316
TIBCO Business Studio Tutorials
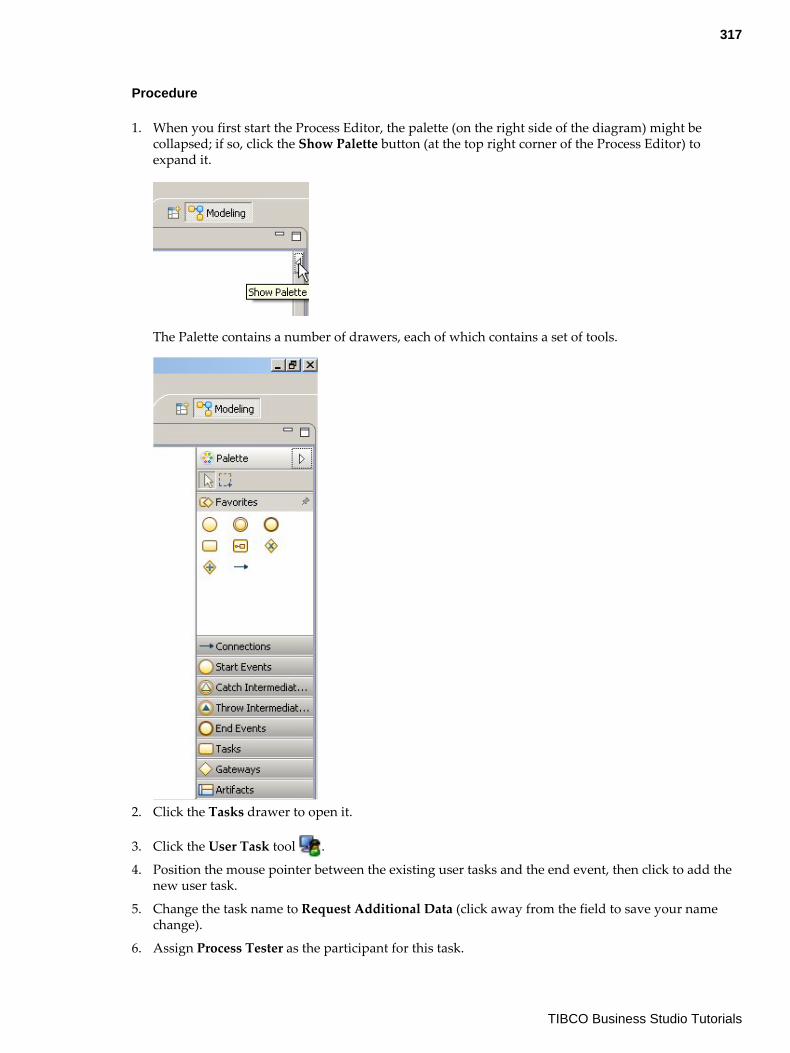
Procedure
1. When you first start the Process Editor, the palette (on the right side of the diagram) might becollapsed; if so, click the Show Palette button (at the top right corner of the Process Editor) toexpand it.
The Palette contains a number of drawers, each of which contains a set of tools.
2. Click the Tasks drawer to open it.
3. Click the User Task tool .
4. Position the mouse pointer between the existing user tasks and the end event, then click to add thenew user task.
5. Change the task name to Request Additional Data (click away from the field to save your namechange).
6. Assign Process Tester as the participant for this task.
317
TIBCO Business Studio Tutorials
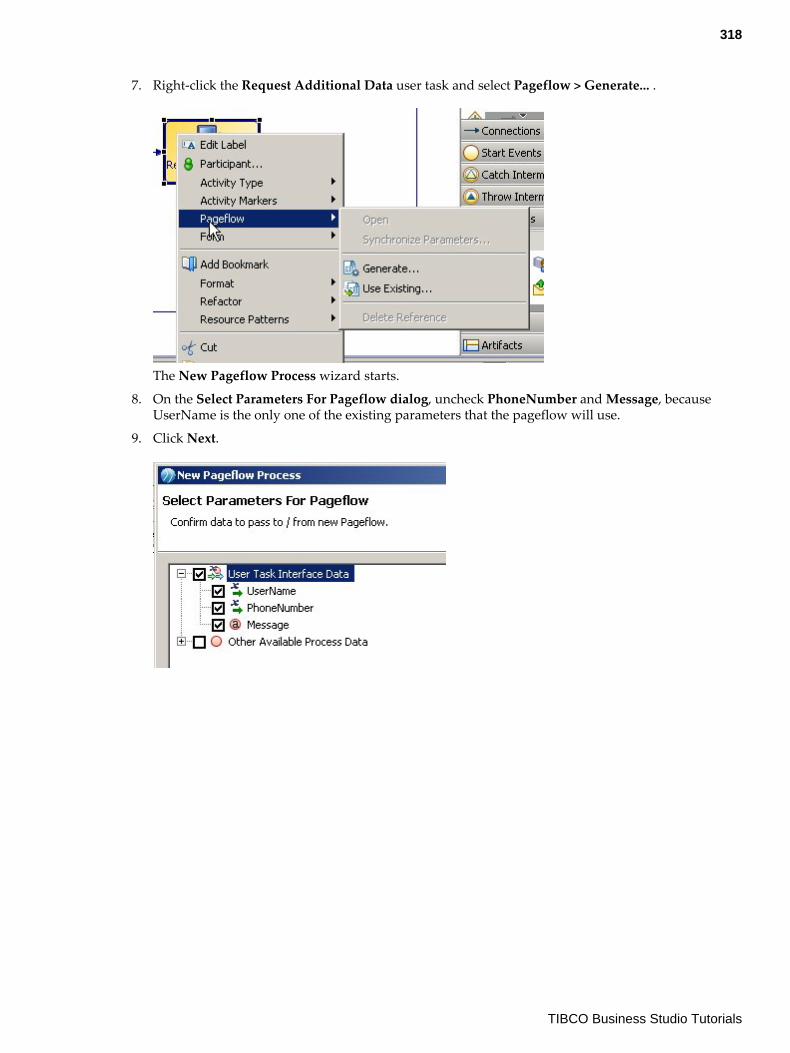
7. Right-click the Request Additional Data user task and select Pageflow > Generate... .
The New Pageflow Process wizard starts.
8. On the Select Parameters For Pageflow dialog, uncheck PhoneNumber and Message, becauseUserName is the only one of the existing parameters that the pageflow will use.
9. Click Next.
318
TIBCO Business Studio Tutorials

10. On the New Process Wizard dialog, label the pageflow process Request Additional Data Pageflow.Accept the Start and End template option, and click Finish.
The process that you created is displayed in the Process Editor. A pageflow process has a differentdefault color scheme from a business process.
Pageflows do not contain pools or lanes.
A pageflow process is stored under the Processes branch of the Project Explorer alongside businessprocesses. Note that a parameter UserName has been created in the new pageflow process. Thiscorresponds to the parameter of the same name in the WelcomeUsers process, and is createdbecause you indicated in the New Pageflow Process wizard (by leaving UserName checked) thatthe pageflow process would use this data.
If you look at the Properties view for the Request Additional Data task in the WelcomeUsersprocess, the pageflow is indicated in the right-hand pane of the General tab.
319
TIBCO Business Studio Tutorials
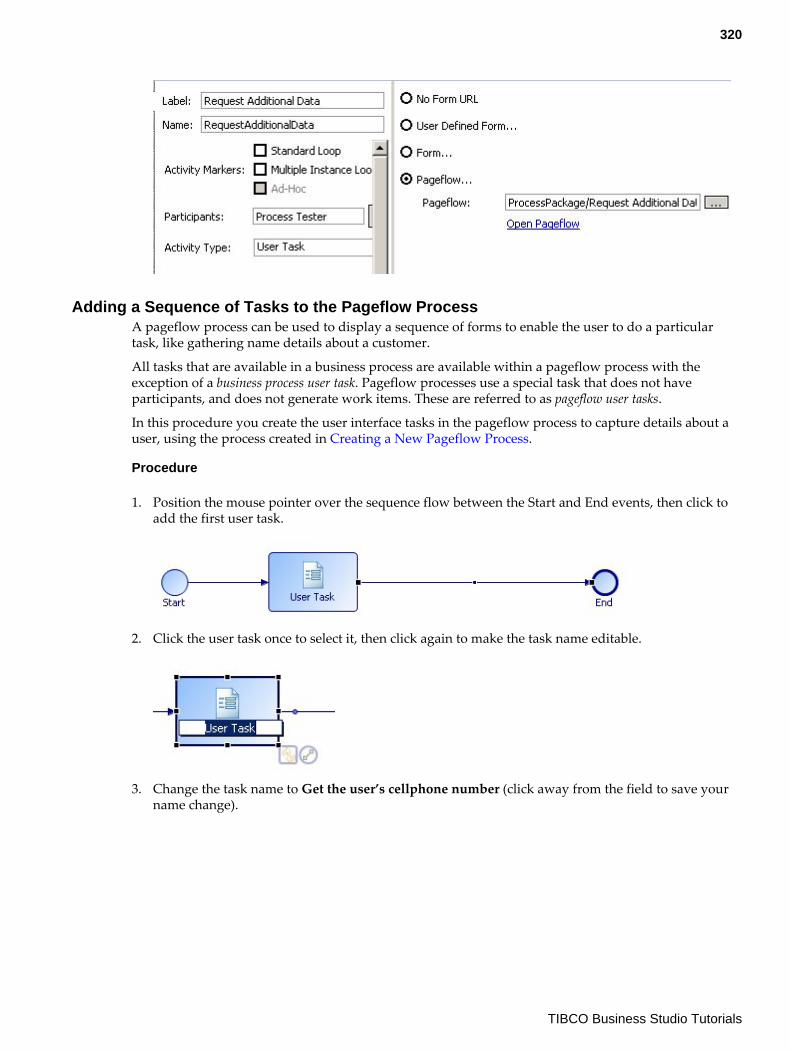
Adding a Sequence of Tasks to the Pageflow ProcessA pageflow process can be used to display a sequence of forms to enable the user to do a particulartask, like gathering name details about a customer.
All tasks that are available in a business process are available within a pageflow process with theexception of a business process user task. Pageflow processes use a special task that does not haveparticipants, and does not generate work items. These are referred to as pageflow user tasks.
In this procedure you create the user interface tasks in the pageflow process to capture details about auser, using the process created in Creating a New Pageflow Process.
Procedure
1. Position the mouse pointer over the sequence flow between the Start and End events, then click toadd the first user task.
2. Click the user task once to select it, then click again to make the task name editable.
3. Change the task name to Get the user’s cellphone number (click away from the field to save yourname change).
320
TIBCO Business Studio Tutorials

4. Add two more user tasks after the first one, and name them Get the user’s email address and Askthe user for a security question (click away from the field to save your name change).
Your pageflow process now looks like the following illustration.
Associating Existing Data with the TasksFields that are defined in one process cannot be directly used by another process. Data can be passedfrom one process to another using parameters. You can associate a parameter with a user task in thesame way that you have already associated data fields with the user tasks in the business process.
The tasks in this pageflow process will display the user name that was entered during the initialbusiness service, and each task is used to collect a different piece of information about that user.
In this procedure you associate an existing (UserName) parameter with the pageflow user tasks thatyou created in the previous procedure.
Procedure
1. Expand the Request Additional Data Pageflow process in Project Explorer until you can see theParameters.
2. Select Parameters > UserName in Project Explorer. Drag and drop UserName data field onto eachof the three tasks in this process, in turn.
Note in the following illustration the green outline that displays around the tasks to whichthe UserName field has already been assigned. This is because the Enable ReferenceHighlighting button in the toolbar is enabled. When you select a parameter, field orparticpant—in this case, the UserName parameter—the tasks to which it is assigned arehighlighted. See "Adding Data to the Process" in the How to Design a Simple WelcomeUsersBusiness Service tutorial for more details.
3. Each time, a popup menu is displayed. Click Add Data To View.
321
TIBCO Business Studio Tutorials
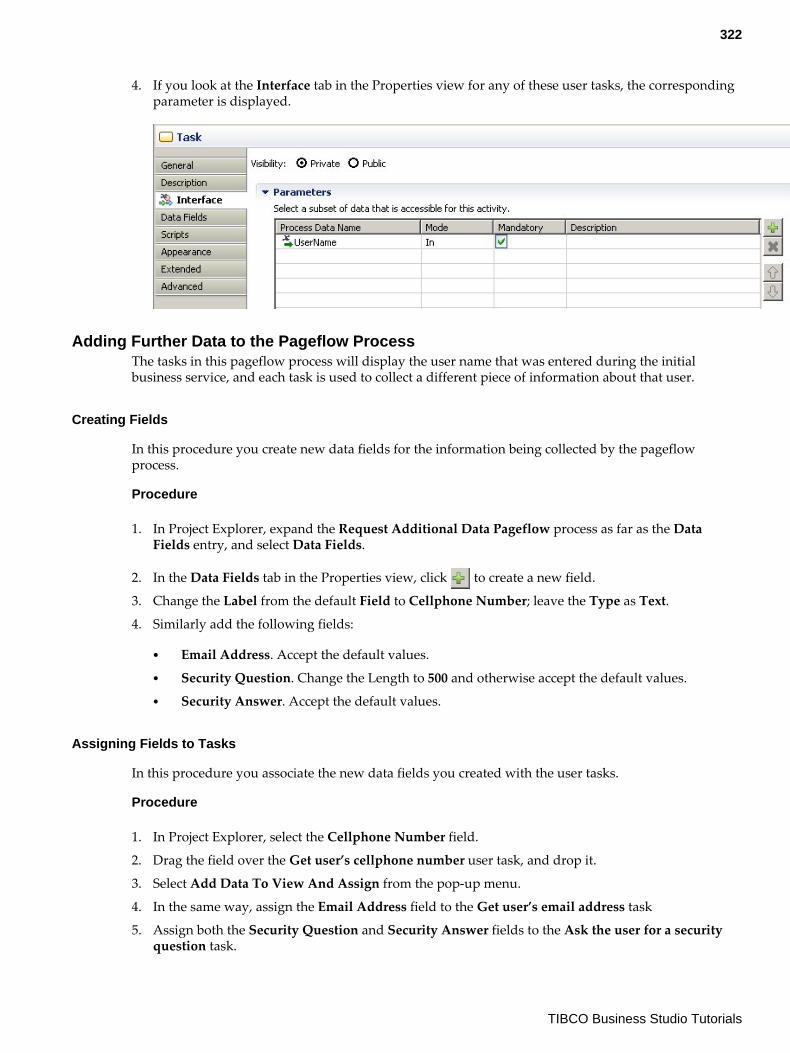
4. If you look at the Interface tab in the Properties view for any of these user tasks, the correspondingparameter is displayed.
Adding Further Data to the Pageflow ProcessThe tasks in this pageflow process will display the user name that was entered during the initialbusiness service, and each task is used to collect a different piece of information about that user.
Creating Fields
In this procedure you create new data fields for the information being collected by the pageflowprocess.
Procedure
1. In Project Explorer, expand the Request Additional Data Pageflow process as far as the DataFields entry, and select Data Fields.
2. In the Data Fields tab in the Properties view, click to create a new field.
3. Change the Label from the default Field to Cellphone Number; leave the Type as Text.
4. Similarly add the following fields:
● Email Address. Accept the default values.● Security Question. Change the Length to 500 and otherwise accept the default values.● Security Answer. Accept the default values.
Assigning Fields to Tasks
In this procedure you associate the new data fields you created with the user tasks.
Procedure
1. In Project Explorer, select the Cellphone Number field.
2. Drag the field over the Get user’s cellphone number user task, and drop it.
3. Select Add Data To View And Assign from the pop-up menu.
4. In the same way, assign the Email Address field to the Get user’s email address task
5. Assign both the Security Question and Security Answer fields to the Ask the user for a securityquestion task.
322
TIBCO Business Studio Tutorials
6. Press CTRL + S to save the changes made to the process.
Runtime Behavior
The user will be presented with the first task in the pageflow process, Get user’s cellphonenumber, at runtime. As soon as they enter a value and press Submit, the same user will bepresented with the Get user’s email address task and Ask the user for a security question task inturn.
Deploying the ProjectSince the WelcomeUsers project references the organization model in the EasyAsExtendedOMSolutionproject, the organization model must be deployed for the WelcomeUsers project to be able to run.
Save the project that you have created. You have now completed the tutorial.
Procedure
1. Check whether the EasyAsExtendedOMSolution project has already been deployed in a previoustutorial. To do this:a) Expand the Deployment Servers view and select your deployment server.b) If the Properties view indicates that the Server State is Disconnected, right-click on the server in
the Deployment Servers view and select Connect.c) Expand your selected deployment server, expand amx.bpm.app, and check whether
EasyAsExtendedOMSolution is included in the list. If so, it is deployed.
2. If it is not already deployed, deploy the organization model. Follow the procedure in the How toImplement and Deploy the WelcomeUsers Application tutorial to deploy theEasyAsExtendedOMSolution project.
3. Follow the same procedure to deploy the WelcomeUsers project.
Running the ProjectOnce you have deployed the project, you can test it by running an instance.
This assumes that users must have already been mapped to the organization model used by theapplication (see the How to Model and Run Pageflows tutorial).
If you need more information about the steps in the following procedure, see the tutorial How to Runthe WelcomeUsers Application, which you can find under Start Here > Create, Deploy and Run YourFirst BPM Application .
Procedure
1. Log into TIBCO Workspace by either of the following methods:
● In the Deployment Servers view, right-clicking XYZ Work Server1 and selecting Open >Workspace ;
● Entering a browser URL or following a web page as directed by your system administrator.
The TIBCO Workspace login screen is displayed.
2. Enter a User Name of "Clint Hill" with a Password of "tibco123", then click OK. The mainWorkspace user interface is displayed.
3. Click Business Services, and under WelcomeUsersSolution > ProcessPackage , double-clickRequest Call to start an instance of the Request Call business service.
The Collect Data form is displayed.
4. Enter a name and telephone number and click Submit.
323
TIBCO Business Studio Tutorials

5. Click Work Views.
You can see that a Display Message work item has appeared in Clint Hill’s Work Items Inbox.(Refresh the contents of the Inbox if you cannot see the new work item.) Double-click to open it.
6. Press Submit.
The form for the Get the user’s cellphone number task, the first task in the Request AdditionalData Pageflow process, is displayed.
7. Enter a number and click Submit.
8. Repeat step 5 and step 7 for the Get the user’s email address task, and again for the Ask the userfor a security question task.
Verifying the ResultsYou can verify the results of your tutorial by installing the tutorial from the samples folder in theproduct directory. Your project must look similar to the sample solution project.
Procedure
1. Find the PageFlowSolution.zip file in the location where you installed TIBCO Business Studio (forexample, <STUDIO_HOME > \studio\3. n\samples).
2. In TIBCO Business Studio, select File > Import .
The Import wizard is displayed.
3. Select General > Existing Studio Projects into Workspace , and click Next.
4. Click Select archive file, and click the Browse button.
5. Browse to PageflowSolution.zip and click Open.
The Pageflow Solution project is displayed in the Import wizard.
6. Click Finish.
The PageflowSolution project is installed in your workspace.
324
TIBCO Business Studio Tutorials
Debugging a Business Process
How to Debug a Business ProcessThis tutorial demonstrates how to debug a business process that has been designed in TIBCO BusinessStudio and deployed to a server.
This tutorial describes the steps for debugging a simple business process. You can also debug apageflow process. This follows a very similar procedure to that described here, but you need to enterdifferent values at some points - see for example Configuring the Tester, step 3.
For an independent pageflow or business service, if it contains a user task, it cannot be stepped throughusing the TIBCO Business Studio debugging tools alone. It requires a web service call (via pageflow/business service APIs) to move over these tasks.
You should use the Process launcher and Emulation launcher in a single node setup. The ProcessLauncher and Emulation launcher are not supported in the multi-node HA environment. These toolsare targeted for the process debugging purposes and not meant for the production environment. Theyrely on monitoring the process creation notifications from the debugger and will not work when theprocess instances can be created on anyone of the multiple nodes.
Although it uses a very simple process, this tutorial demonstrates some of the fundamental points ofthe analysis phase for any business process:
● Import the project.● Deploy the process to BPM.● Add breakpoints to check the process flow. To prepare a process for debugging, you need to set
breakpoints in a process so the tester suspends execution and allows you to debug. Otherwise, theprogram runs to completion without letting you do any debugging.
● Add testpoints to check the data flow. To check the flow of data in a process, you need to addtestpoints and/or assertions in the process and pass values through these variables.
● Configure and launch the tester, which applies the breakpoints defined to the already deployedprocess.
After you complete this tutorial, you should be familiar with:
● how to add breakpoints to an activity● how to add testpoints and test data to an activity● how to configure and launch a process in the debug perspective● how to launch a tester● how to execute the process in the tester and check the output (with and without emulation data).
Before you Begin
Before you start this tutorial, you should have completed:
● TIBCO Business Studio Tutorials > Create, Deploy, and Run Your First BPM Application > How toDesign a Simple WelcomeUsers Business Process
● TIBCO Business Studio Tutorials > Create, Deploy, and Run Your First BPM Application > How toImplement and Deploy the WelcomeUsers Application
325
TIBCO Business Studio Tutorials
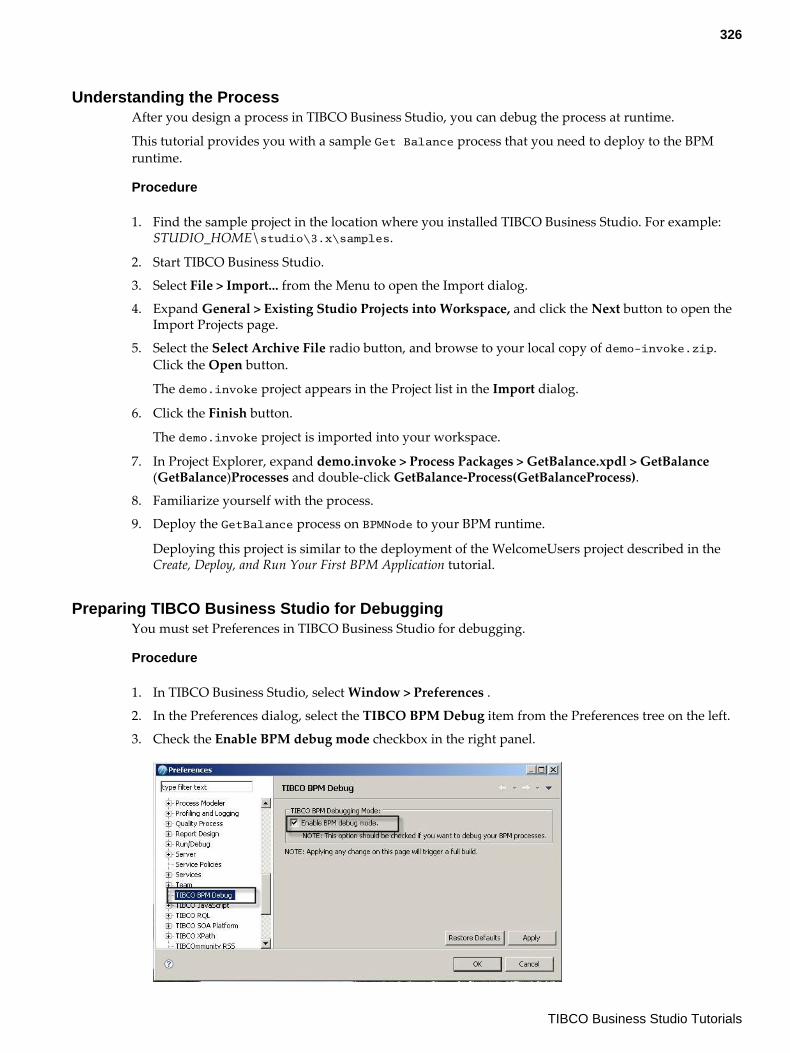
Understanding the ProcessAfter you design a process in TIBCO Business Studio, you can debug the process at runtime.
This tutorial provides you with a sample Get Balance process that you need to deploy to the BPMruntime.
Procedure
1. Find the sample project in the location where you installed TIBCO Business Studio. For example:STUDIO_HOME\studio\3.x\samples.
2. Start TIBCO Business Studio.
3. Select File > Import... from the Menu to open the Import dialog.
4. Expand General > Existing Studio Projects into Workspace, and click the Next button to open theImport Projects page.
5. Select the Select Archive File radio button, and browse to your local copy of demo-invoke.zip.Click the Open button.
The demo.invoke project appears in the Project list in the Import dialog.
6. Click the Finish button.
The demo.invoke project is imported into your workspace.
7. In Project Explorer, expand demo.invoke > Process Packages > GetBalance.xpdl > GetBalance(GetBalance)Processes and double-click GetBalance-Process(GetBalanceProcess).
8. Familiarize yourself with the process.
9. Deploy the GetBalance process on BPMNode to your BPM runtime.
Deploying this project is similar to the deployment of the WelcomeUsers project described in theCreate, Deploy, and Run Your First BPM Application tutorial.
Preparing TIBCO Business Studio for DebuggingYou must set Preferences in TIBCO Business Studio for debugging.
Procedure
1. In TIBCO Business Studio, select Window > Preferences .
2. In the Preferences dialog, select the TIBCO BPM Debug item from the Preferences tree on the left.
3. Check the Enable BPM debug mode checkbox in the right panel.
326
TIBCO Business Studio Tutorials
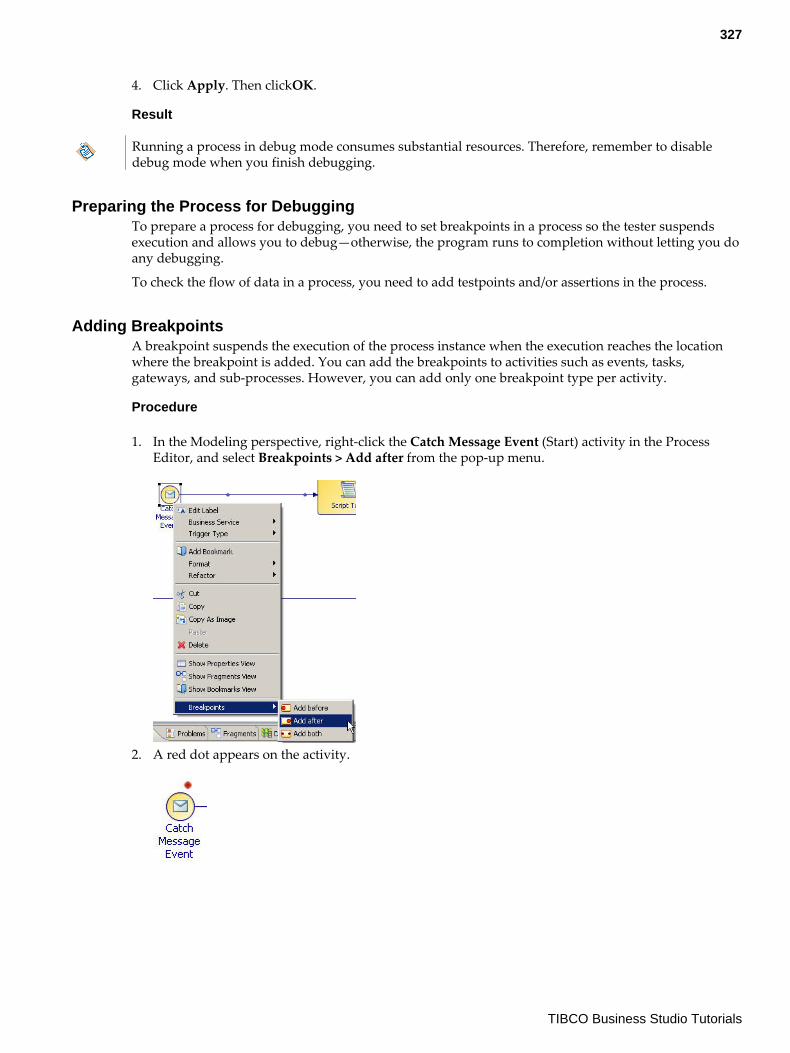
4. Click Apply. Then clickOK.
Result
Running a process in debug mode consumes substantial resources. Therefore, remember to disabledebug mode when you finish debugging.
Preparing the Process for DebuggingTo prepare a process for debugging, you need to set breakpoints in a process so the tester suspendsexecution and allows you to debug—otherwise, the program runs to completion without letting you doany debugging.
To check the flow of data in a process, you need to add testpoints and/or assertions in the process.
Adding BreakpointsA breakpoint suspends the execution of the process instance when the execution reaches the locationwhere the breakpoint is added. You can add the breakpoints to activities such as events, tasks,gateways, and sub-processes. However, you can add only one breakpoint type per activity.
Procedure
1. In the Modeling perspective, right-click the Catch Message Event (Start) activity in the ProcessEditor, and select Breakpoints > Add after from the pop-up menu.
2. A red dot appears on the activity.
327
TIBCO Business Studio Tutorials
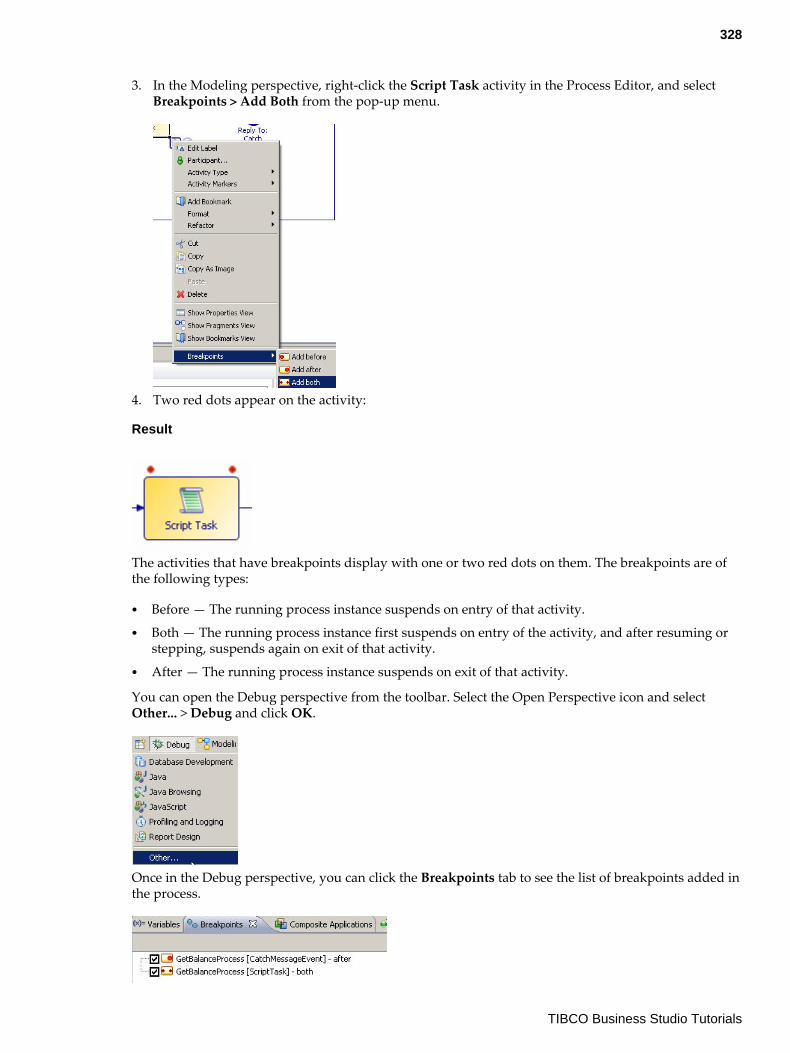
3. In the Modeling perspective, right-click the Script Task activity in the Process Editor, and selectBreakpoints > Add Both from the pop-up menu.
4. Two red dots appear on the activity:
Result
The activities that have breakpoints display with one or two red dots on them. The breakpoints are ofthe following types:
● Before — The running process instance suspends on entry of that activity.● Both — The running process instance first suspends on entry of the activity, and after resuming or
stepping, suspends again on exit of that activity.● After — The running process instance suspends on exit of that activity.
You can open the Debug perspective from the toolbar. Select the Open Perspective icon and selectOther... > Debug and click OK.
Once in the Debug perspective, you can click the Breakpoints tab to see the list of breakpoints added inthe process.
328
TIBCO Business Studio Tutorials
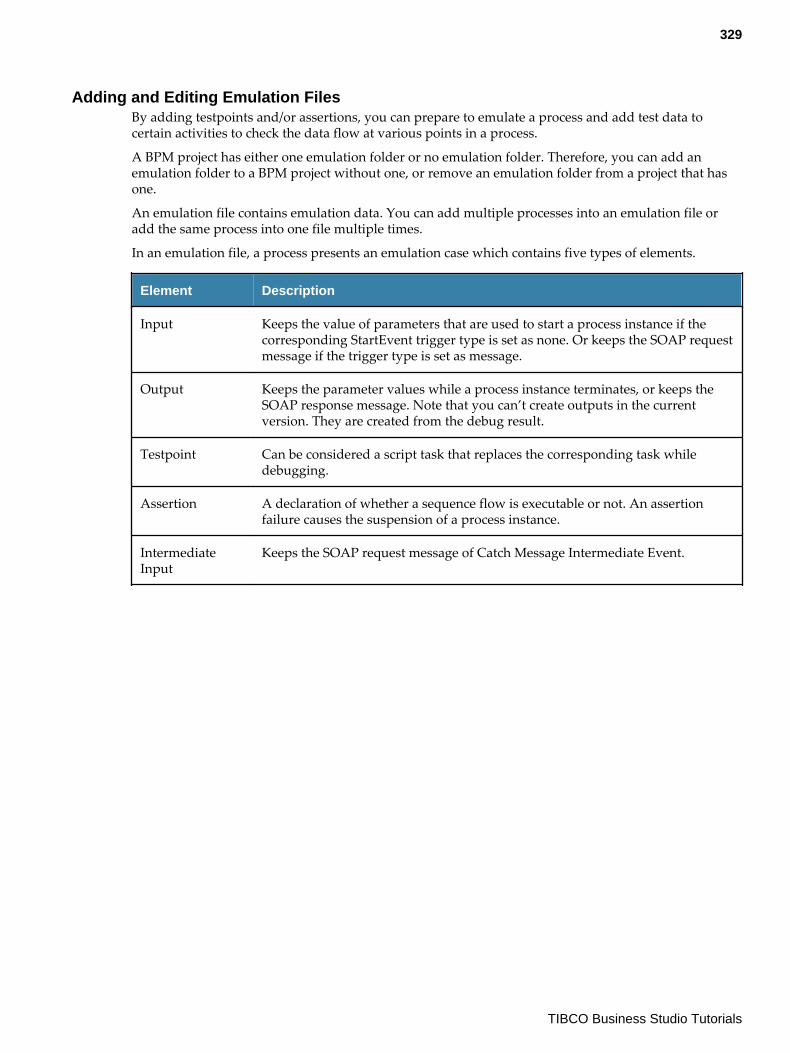
Adding and Editing Emulation FilesBy adding testpoints and/or assertions, you can prepare to emulate a process and add test data tocertain activities to check the data flow at various points in a process.
A BPM project has either one emulation folder or no emulation folder. Therefore, you can add anemulation folder to a BPM project without one, or remove an emulation folder from a project that hasone.
An emulation file contains emulation data. You can add multiple processes into an emulation file oradd the same process into one file multiple times.
In an emulation file, a process presents an emulation case which contains five types of elements.
Element Description
Input Keeps the value of parameters that are used to start a process instance if thecorresponding StartEvent trigger type is set as none. Or keeps the SOAP requestmessage if the trigger type is set as message.
Output Keeps the parameter values while a process instance terminates, or keeps theSOAP response message. Note that you can’t create outputs in the currentversion. They are created from the debug result.
Testpoint Can be considered a script task that replaces the corresponding task whiledebugging.
Assertion A declaration of whether a sequence flow is executable or not. An assertionfailure causes the suspension of a process instance.
IntermediateInput
Keeps the SOAP request message of Catch Message Intermediate Event.
329
TIBCO Business Studio Tutorials
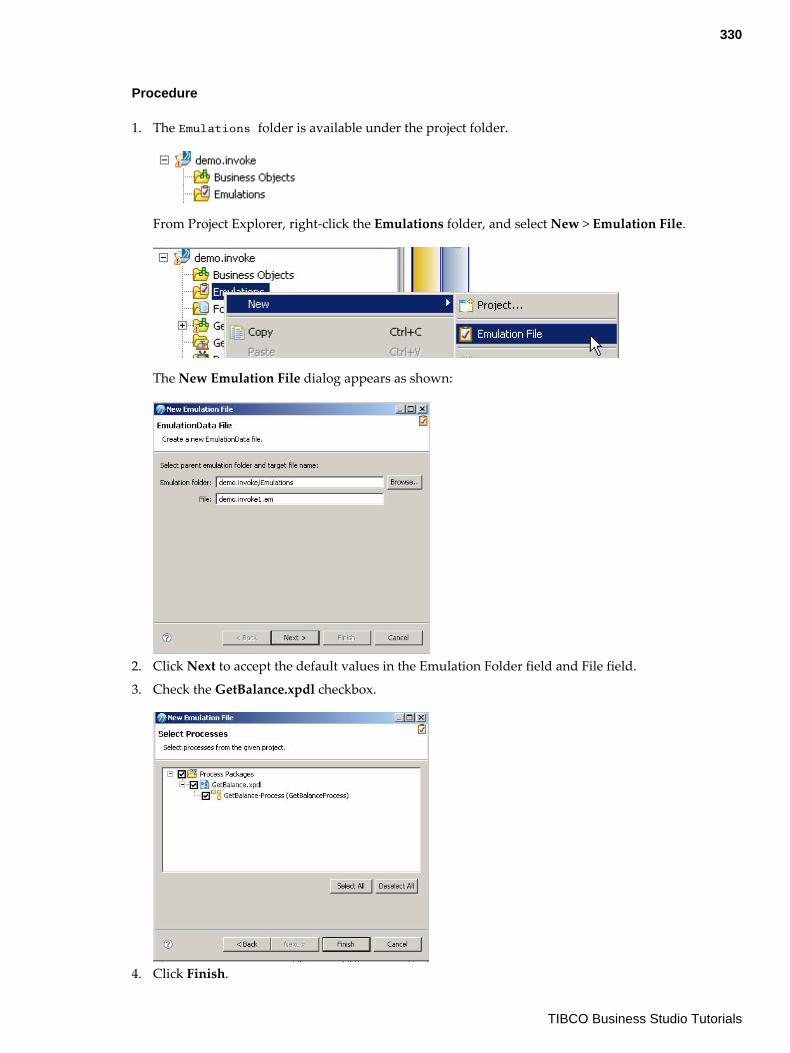
Procedure
1. The Emulations folder is available under the project folder.
From Project Explorer, right-click the Emulations folder, and select New > Emulation File.
The New Emulation File dialog appears as shown:
2. Click Next to accept the default values in the Emulation Folder field and File field.
3. Check the GetBalance.xpdl checkbox.
4. Click Finish.
330
TIBCO Business Studio Tutorials
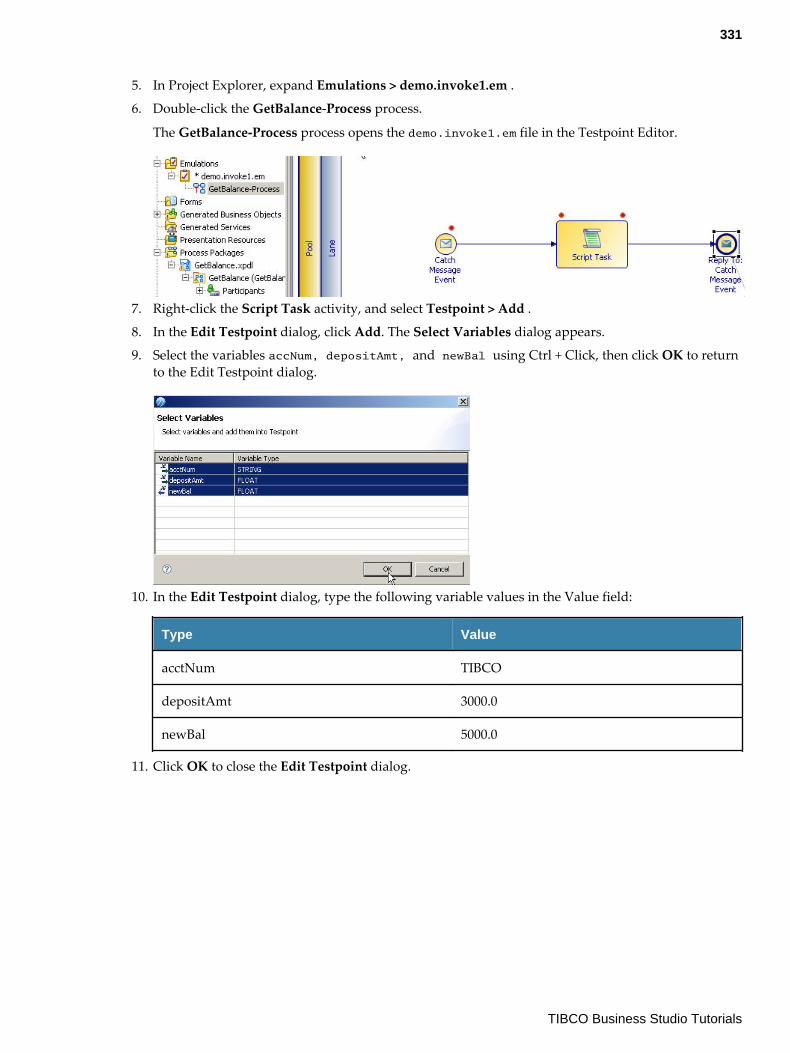
5. In Project Explorer, expand Emulations > demo.invoke1.em .
6. Double-click the GetBalance-Process process.
The GetBalance-Process process opens the demo.invoke1.em file in the Testpoint Editor.
7. Right-click the Script Task activity, and select Testpoint > Add .
8. In the Edit Testpoint dialog, click Add. The Select Variables dialog appears.
9. Select the variables accNum, depositAmt, and newBal using Ctrl + Click, then click OK to returnto the Edit Testpoint dialog.
10. In the Edit Testpoint dialog, type the following variable values in the Value field:
Type Value
acctNum TIBCO
depositAmt 3000.0
newBal 5000.0
11. Click OK to close the Edit Testpoint dialog.
331
TIBCO Business Studio Tutorials
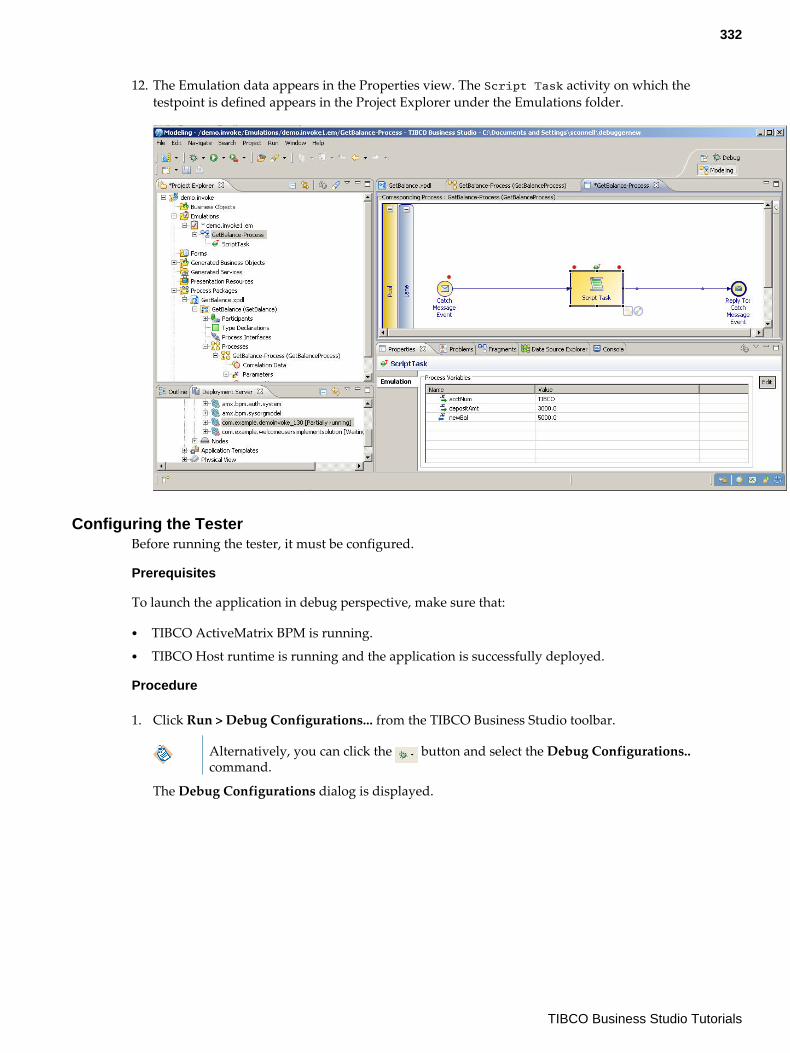
12. The Emulation data appears in the Properties view. The Script Task activity on which thetestpoint is defined appears in the Project Explorer under the Emulations folder.
Configuring the TesterBefore running the tester, it must be configured.
Prerequisites
To launch the application in debug perspective, make sure that:
● TIBCO ActiveMatrix BPM is running.● TIBCO Host runtime is running and the application is successfully deployed.
Procedure
1. Click Run > Debug Configurations... from the TIBCO Business Studio toolbar.
Alternatively, you can click the button and select the Debug Configurations..command.
The Debug Configurations dialog is displayed.
332
TIBCO Business Studio Tutorials
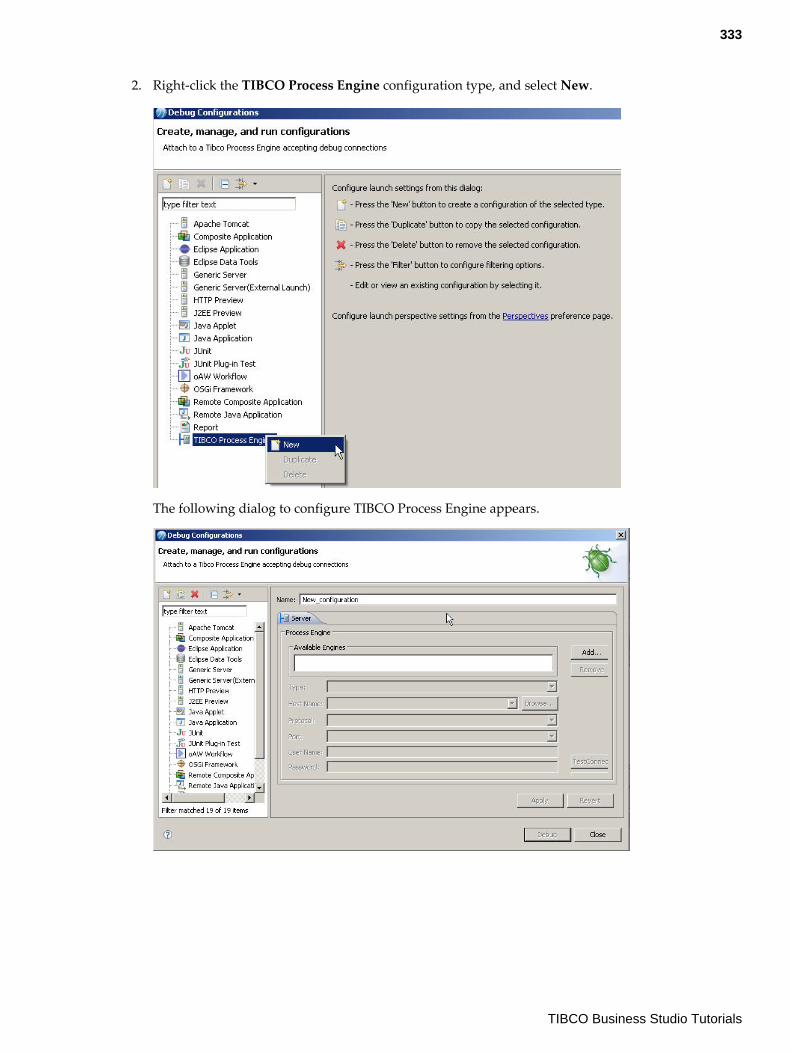
2. Right-click the TIBCO Process Engine configuration type, and select New.
The following dialog to configure TIBCO Process Engine appears.
333
TIBCO Business Studio Tutorials
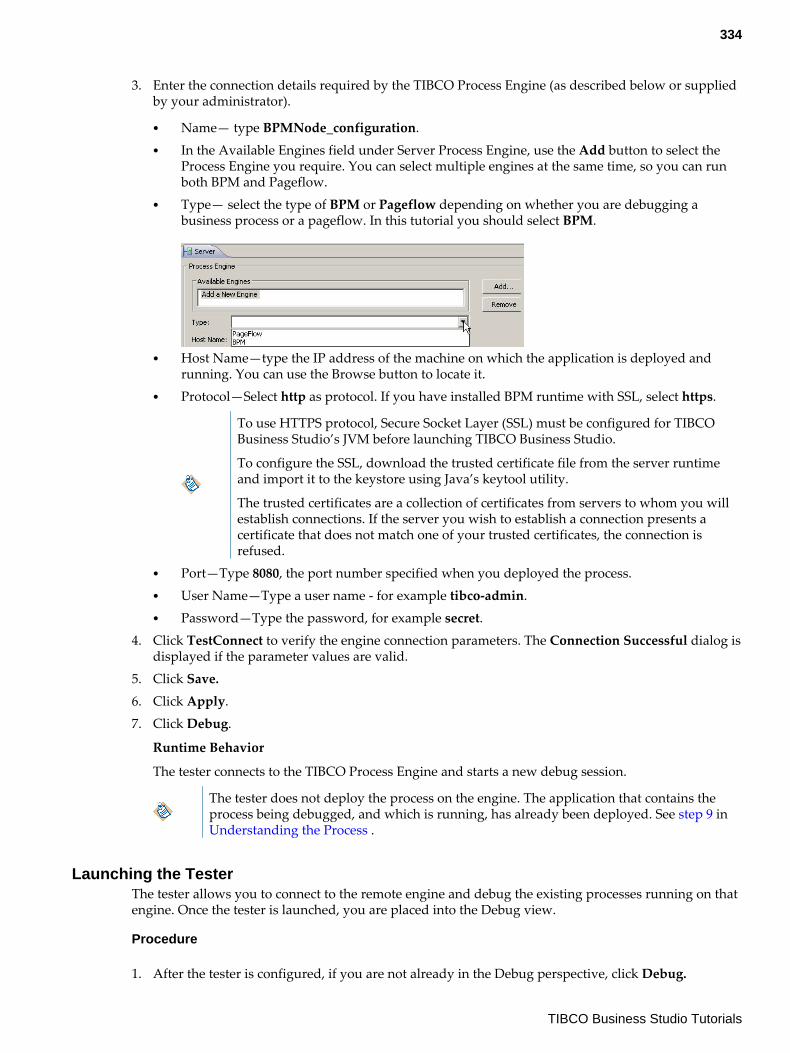
3. Enter the connection details required by the TIBCO Process Engine (as described below or suppliedby your administrator).
● Name— type BPMNode_configuration.● In the Available Engines field under Server Process Engine, use the Add button to select the
Process Engine you require. You can select multiple engines at the same time, so you can runboth BPM and Pageflow.
● Type— select the type of BPM or Pageflow depending on whether you are debugging abusiness process or a pageflow. In this tutorial you should select BPM.
● Host Name—type the IP address of the machine on which the application is deployed andrunning. You can use the Browse button to locate it.
● Protocol—Select http as protocol. If you have installed BPM runtime with SSL, select https.
To use HTTPS protocol, Secure Socket Layer (SSL) must be configured for TIBCOBusiness Studio’s JVM before launching TIBCO Business Studio.
To configure the SSL, download the trusted certificate file from the server runtimeand import it to the keystore using Java’s keytool utility.
The trusted certificates are a collection of certificates from servers to whom you willestablish connections. If the server you wish to establish a connection presents acertificate that does not match one of your trusted certificates, the connection isrefused.
● Port—Type 8080, the port number specified when you deployed the process.● User Name—Type a user name - for example tibco-admin.● Password—Type the password, for example secret.
4. Click TestConnect to verify the engine connection parameters. The Connection Successful dialog isdisplayed if the parameter values are valid.
5. Click Save.6. Click Apply.
7. Click Debug.
Runtime Behavior
The tester connects to the TIBCO Process Engine and starts a new debug session.
The tester does not deploy the process on the engine. The application that contains theprocess being debugged, and which is running, has already been deployed. See step 9 in Understanding the Process .
Launching the TesterThe tester allows you to connect to the remote engine and debug the existing processes running on thatengine. Once the tester is launched, you are placed into the Debug view.
Procedure
1. After the tester is configured, if you are not already in the Debug perspective, click Debug.
334
TIBCO Business Studio Tutorials
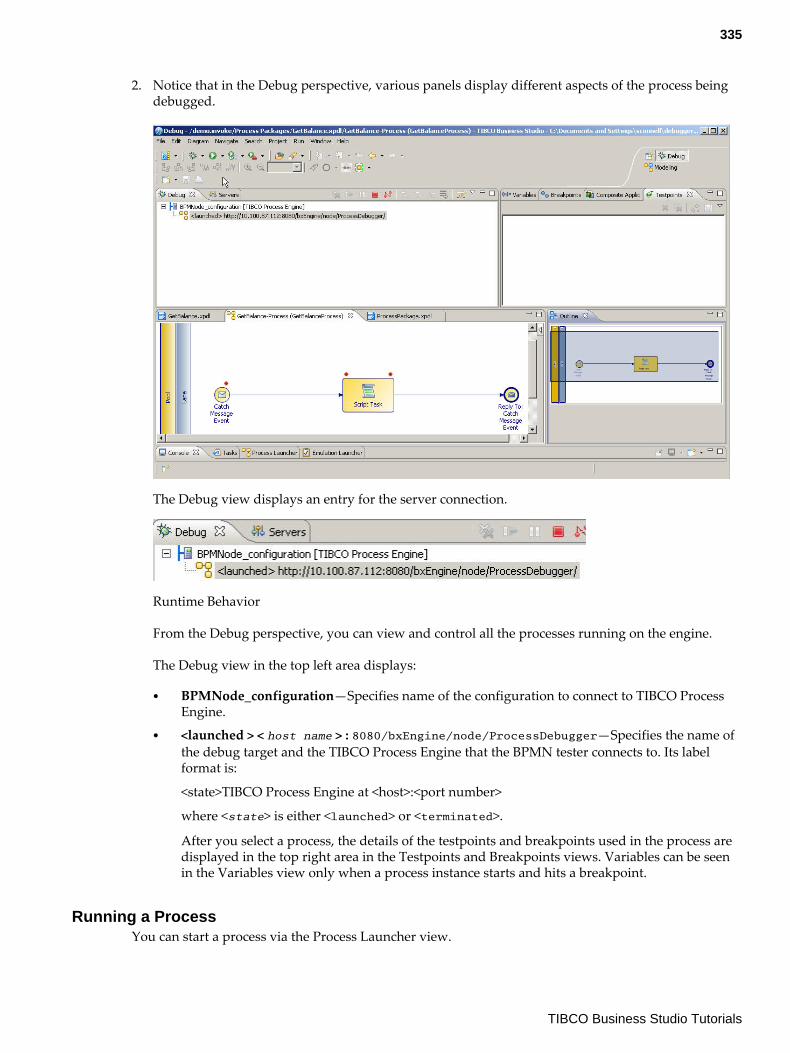
2. Notice that in the Debug perspective, various panels display different aspects of the process beingdebugged.
The Debug view displays an entry for the server connection.
Runtime Behavior
From the Debug perspective, you can view and control all the processes running on the engine.
The Debug view in the top left area displays:
● BPMNode_configuration—Specifies name of the configuration to connect to TIBCO ProcessEngine.
● <launched > < host name > : 8080/bxEngine/node/ProcessDebugger—Specifies the name ofthe debug target and the TIBCO Process Engine that the BPMN tester connects to. Its labelformat is:
<state>TIBCO Process Engine at <host>:<port number>
where <state> is either <launched> or <terminated>.
After you select a process, the details of the testpoints and breakpoints used in the process aredisplayed in the top right area in the Testpoints and Breakpoints views. Variables can be seenin the Variables view only when a process instance starts and hits a breakpoint.
Running a ProcessYou can start a process via the Process Launcher view.
335
TIBCO Business Studio Tutorials
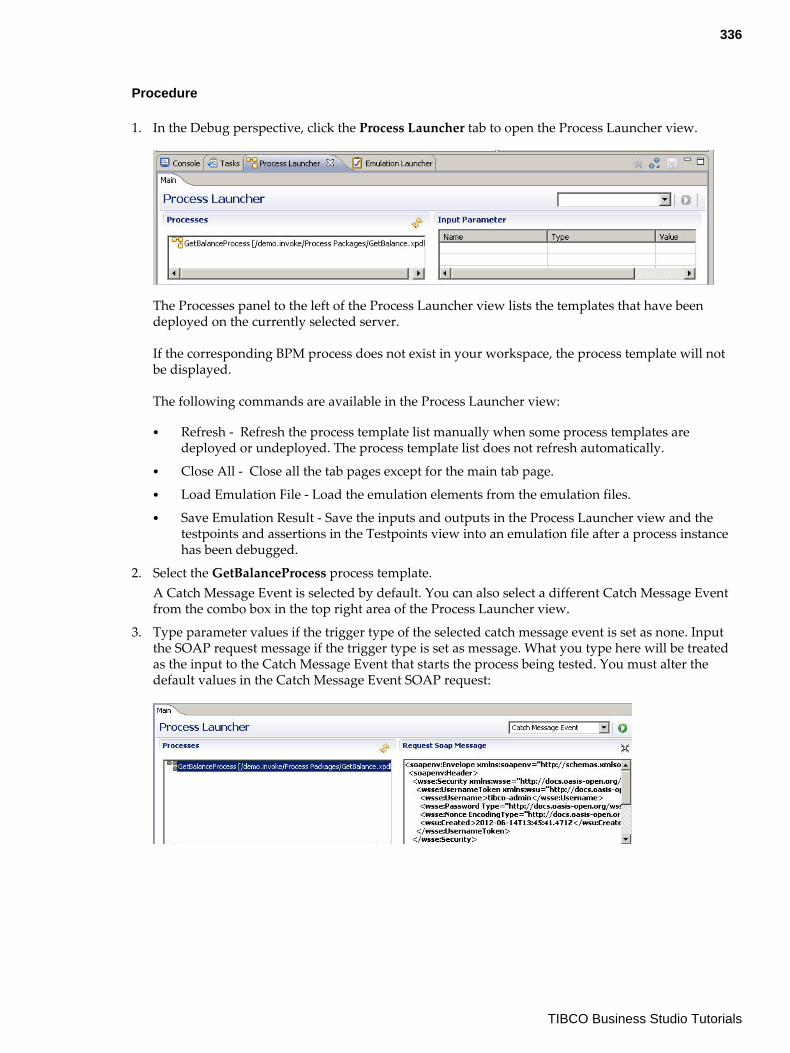
Procedure
1. In the Debug perspective, click the Process Launcher tab to open the Process Launcher view.
The Processes panel to the left of the Process Launcher view lists the templates that have beendeployed on the currently selected server.
If the corresponding BPM process does not exist in your workspace, the process template will notbe displayed.
The following commands are available in the Process Launcher view:
● Refresh - Refresh the process template list manually when some process templates aredeployed or undeployed. The process template list does not refresh automatically.
● Close All - Close all the tab pages except for the main tab page.● Load Emulation File - Load the emulation elements from the emulation files.● Save Emulation Result - Save the inputs and outputs in the Process Launcher view and the
testpoints and assertions in the Testpoints view into an emulation file after a process instancehas been debugged.
2. Select the GetBalanceProcess process template.A Catch Message Event is selected by default. You can also select a different Catch Message Eventfrom the combo box in the top right area of the Process Launcher view.
3. Type parameter values if the trigger type of the selected catch message event is set as none. Inputthe SOAP request message if the trigger type is set as message. What you type here will be treatedas the input to the Catch Message Event that starts the process being tested. You must alter thedefault values in the Catch Message Event SOAP request:
336
TIBCO Business Studio Tutorials

4. Click the button. A tag page is created in the Process Launcher view. The SOAP request messageand response message are displayed if the connection protocol is HTTP or HTTPS, and if the CatchMessage Event trigger type is set as message after the process instance is completed.
5. Click the button to view the input parameters in the left panel, and the output parameters in theright panel.The hypertext label displays the status of the process instance. For example, Completed.
6. Click the hypertext label, and a dialog opens displaying the details of the activities.
Debugging the Process with Test DataTo interact in Debug view, you can use the following toolbar. Which icons in the toolbar are enabled atany time depends on the states of the debug models and the debug event notifications from the engine.
The process may be in one of the following states when debugging:
● "Suspended" means the process is halted by a breakpoint. In this state, you can browse/modify thevariables in the Variables view
● "Active" means the process is running, and the variables will not be listed in the Variables view.● "Completed" means the process runs successfully.● "Cancelled" means that you terminate the process instance before it finishes.
When debugging the process, you should press "Step Over" or "Step Into" if you want to change thestate to "suspended" . If you press "Resume" while debugging a process, the state of the process doesnot change to "suspended" so you cannot see the variables in the debug window.
337
TIBCO Business Studio Tutorials
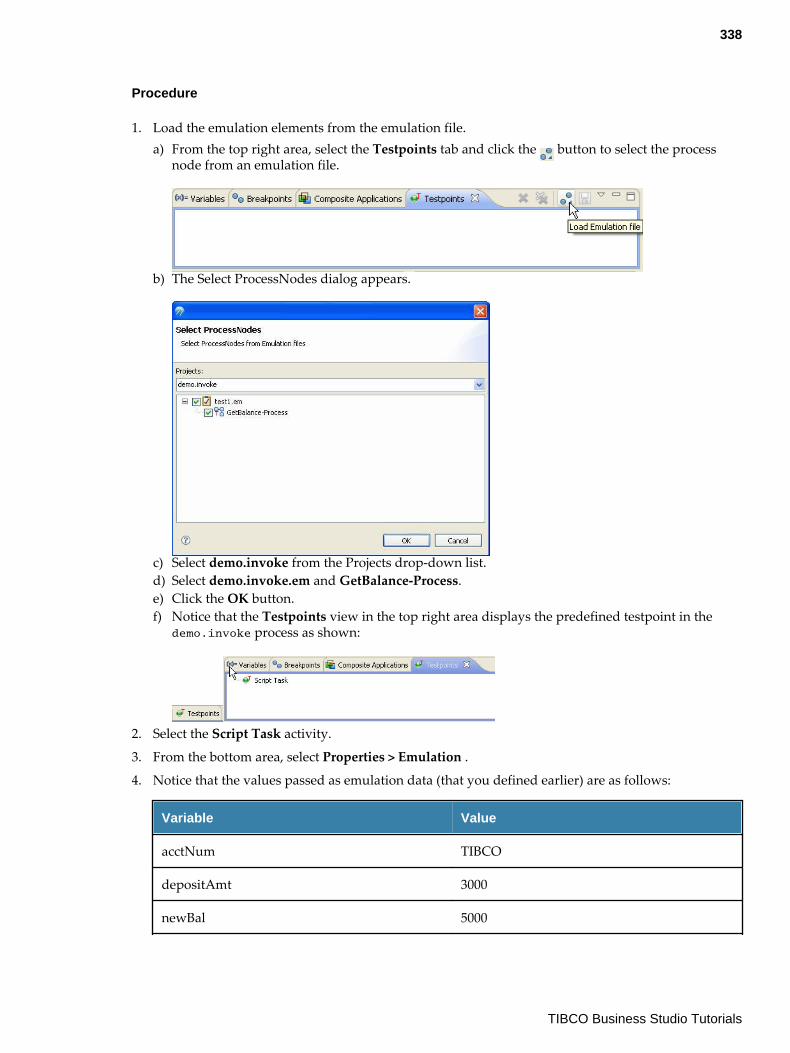
Procedure
1. Load the emulation elements from the emulation file.a) From the top right area, select the Testpoints tab and click the button to select the process
node from an emulation file.
b) The Select ProcessNodes dialog appears.
c) Select demo.invoke from the Projects drop-down list.d) Select demo.invoke.em and GetBalance-Process.e) Click the OK button.f) Notice that the Testpoints view in the top right area displays the predefined testpoint in the
demo.invoke process as shown:
2. Select the Script Task activity.
3. From the bottom area, select Properties > Emulation .
4. Notice that the values passed as emulation data (that you defined earlier) are as follows:
Variable Value
acctNum TIBCO
depositAmt 3000
newBal 5000
338
TIBCO Business Studio Tutorials
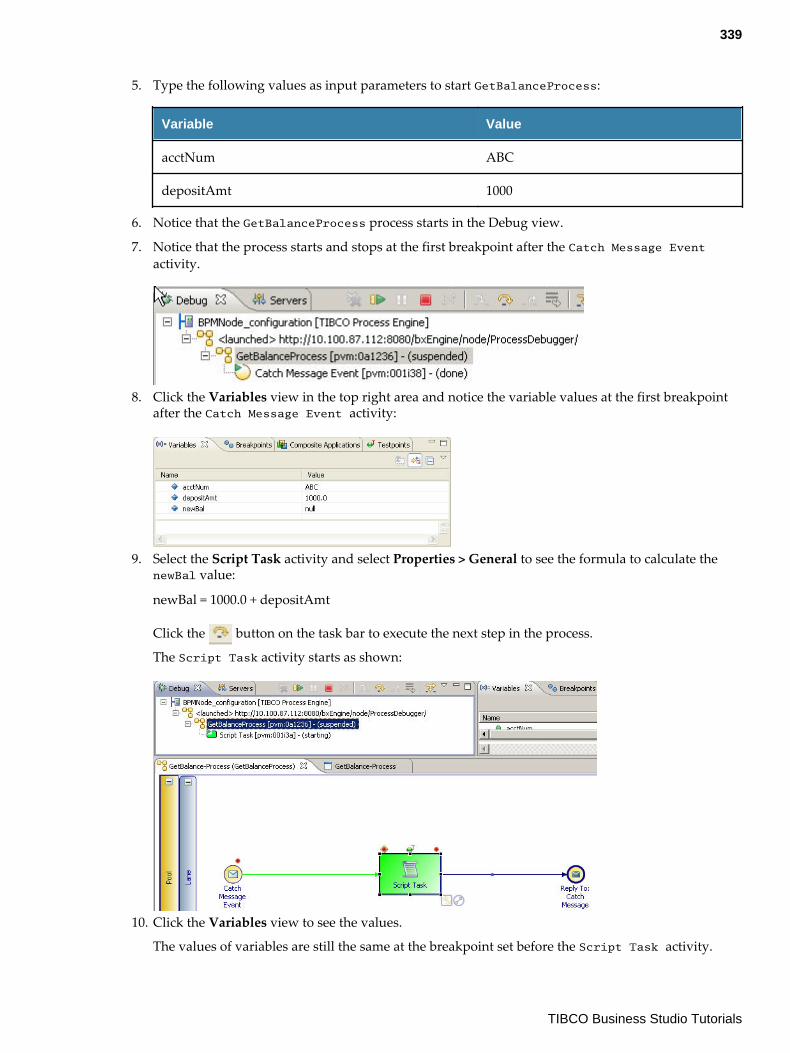
5. Type the following values as input parameters to start GetBalanceProcess:
Variable Value
acctNum ABC
depositAmt 1000
6. Notice that the GetBalanceProcess process starts in the Debug view.
7. Notice that the process starts and stops at the first breakpoint after the Catch Message Eventactivity.
8. Click the Variables view in the top right area and notice the variable values at the first breakpointafter the Catch Message Event activity:
9. Select the Script Task activity and select Properties > General to see the formula to calculate thenewBal value:
newBal = 1000.0 + depositAmt
Click the button on the task bar to execute the next step in the process.
The Script Task activity starts as shown:
10. Click the Variables view to see the values.
The values of variables are still the same at the breakpoint set before the Script Task activity.
339
TIBCO Business Studio Tutorials
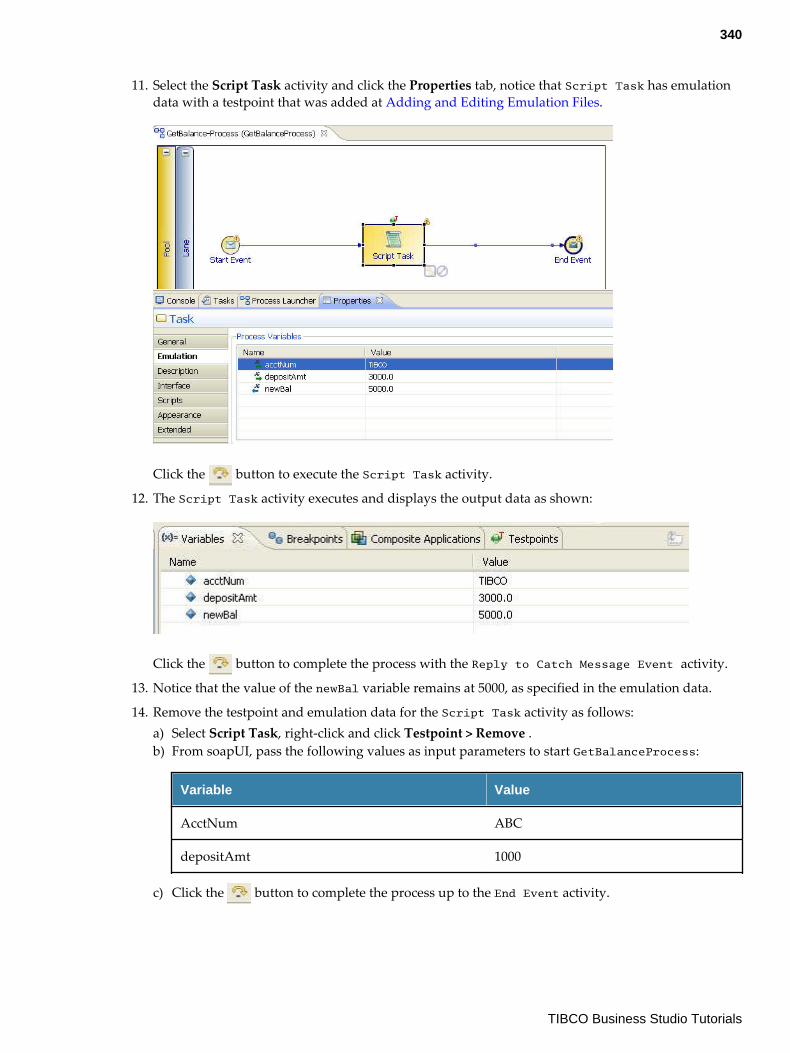
11. Select the Script Task activity and click the Properties tab, notice that Script Task has emulationdata with a testpoint that was added at Adding and Editing Emulation Files.
Click the button to execute the Script Task activity.
12. The Script Task activity executes and displays the output data as shown:
Click the button to complete the process with the Reply to Catch Message Event activity.
13. Notice that the value of the newBal variable remains at 5000, as specified in the emulation data.
14. Remove the testpoint and emulation data for the Script Task activity as follows:a) Select Script Task, right-click and click Testpoint > Remove .b) From soapUI, pass the following values as input parameters to start GetBalanceProcess:
Variable Value
AcctNum ABC
depositAmt 1000
c) Click the button to complete the process up to the End Event activity.
340
TIBCO Business Studio Tutorials
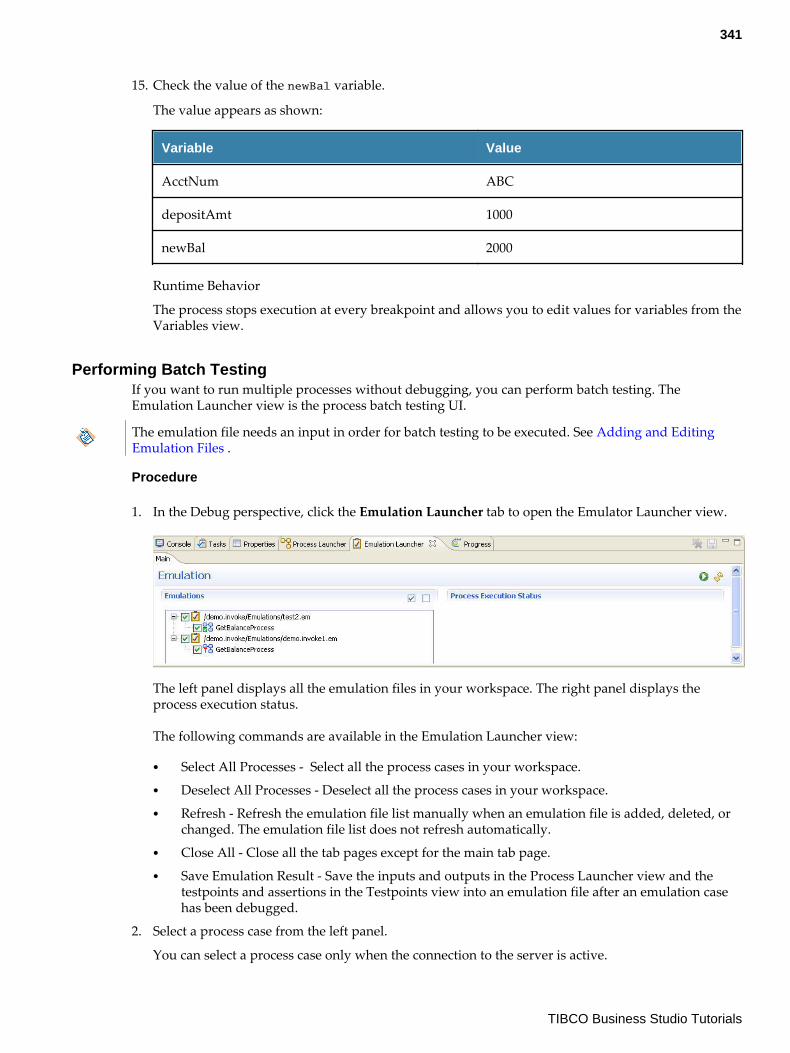
15. Check the value of the newBal variable.
The value appears as shown:
Variable Value
AcctNum ABC
depositAmt 1000
newBal 2000
Runtime Behavior
The process stops execution at every breakpoint and allows you to edit values for variables from theVariables view.
Performing Batch TestingIf you want to run multiple processes without debugging, you can perform batch testing. TheEmulation Launcher view is the process batch testing UI.
The emulation file needs an input in order for batch testing to be executed. See Adding and EditingEmulation Files .
Procedure
1. In the Debug perspective, click the Emulation Launcher tab to open the Emulator Launcher view.
The left panel displays all the emulation files in your workspace. The right panel displays theprocess execution status.
The following commands are available in the Emulation Launcher view:
● Select All Processes - Select all the process cases in your workspace.● Deselect All Processes - Deselect all the process cases in your workspace.● Refresh - Refresh the emulation file list manually when an emulation file is added, deleted, or
changed. The emulation file list does not refresh automatically.● Close All - Close all the tab pages except for the main tab page.● Save Emulation Result - Save the inputs and outputs in the Process Launcher view and the
testpoints and assertions in the Testpoints view into an emulation file after an emulation casehas been debugged.
2. Select a process case from the left panel.
You can select a process case only when the connection to the server is active.
341
TIBCO Business Studio Tutorials
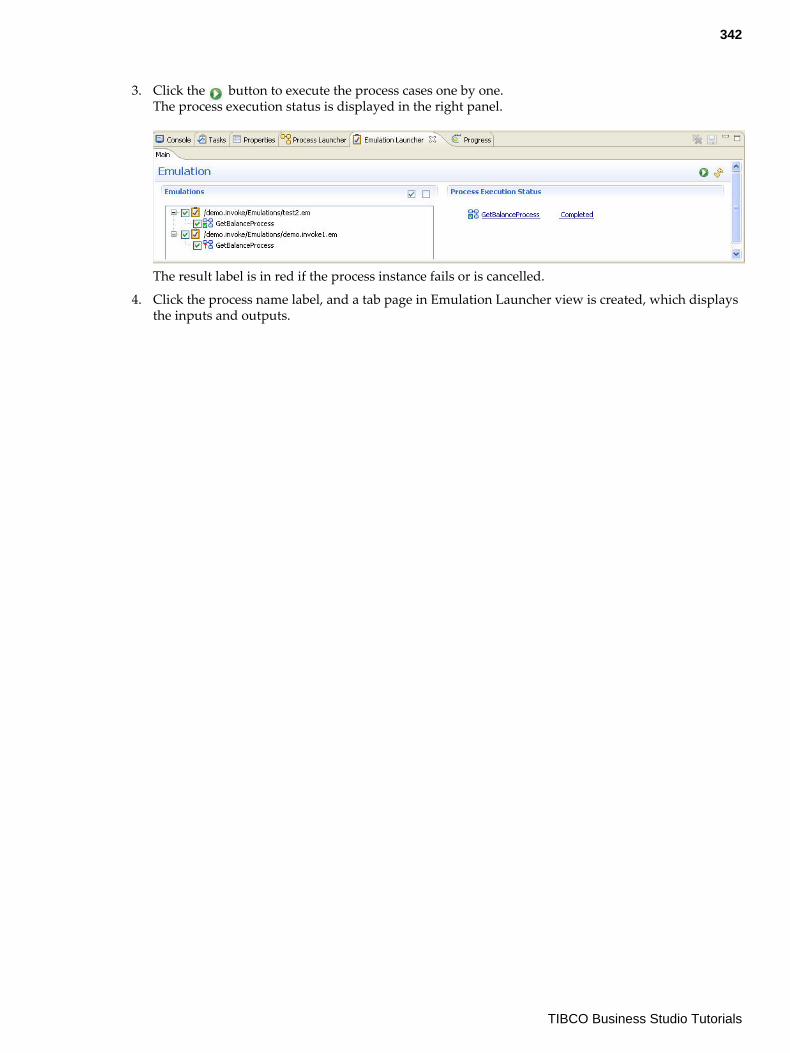
3. Click the button to execute the process cases one by one.The process execution status is displayed in the right panel.
The result label is in red if the process instance fails or is cancelled.
4. Click the process name label, and a tab page in Emulation Launcher view is created, which displaysthe inputs and outputs.
342
TIBCO Business Studio Tutorials


