Embed Size (px)
Citation preview
TIBCO BusinessConnect™ Services Plug-in
Installation and Configuration
Software Release 6.3October 2019

Important Information
SOME TIBCO SOFTWARE EMBEDS OR BUNDLES OTHER TIBCO SOFTWARE. USE OF SUCH EMBEDDED OR BUNDLED TIBCO SOFTWARE IS SOLELY TO ENABLE THE FUNCTIONALITY (OR PROVIDE LIMITED ADD-ON FUNCTIONALITY) OF THE LICENSED TIBCO SOFTWARE. THE EMBEDDED OR BUNDLED SOFTWARE IS NOT LICENSED TO BE USED OR ACCESSED BY ANY OTHER TIBCO SOFTWARE OR FOR ANY OTHER PURPOSE.
USE OF TIBCO SOFTWARE AND THIS DOCUMENT IS SUBJECT TO THE TERMS AND CONDITIONS OF A LICENSE AGREEMENT FOUND IN EITHER A SEPARATELY EXECUTED SOFTWARE LICENSE AGREEMENT, OR, IF THERE IS NO SUCH SEPARATE AGREEMENT, THE CLICKWRAP END USER LICENSE AGREEMENT WHICH IS DISPLAYED DURING DOWNLOAD OR INSTALLATION OF THE SOFTWARE (AND WHICH IS DUPLICATED IN THE LICENSE FILE) OR IF THERE IS NO SUCH SOFTWARE LICENSE AGREEMENT OR CLICKWRAP END USER LICENSE AGREEMENT, THE LICENSE(S) LOCATED IN THE “LICENSE” FILE(S) OF THE SOFTWARE. USE OF THIS DOCUMENT IS SUBJECT TO THOSE TERMS AND CONDITIONS, AND YOUR USE HEREOF SHALL CONSTITUTE ACCEPTANCE OF AND AN AGREEMENT TO BE BOUND BY THE SAME.
ANY SOFTWARE ITEM IDENTIFIED AS THIRD PARTY LIBRARY IS AVAILABLE UNDER SEPARATE SOFTWARE LICENSE TERMS AND IS NOT PART OF A TIBCO PRODUCT. AS SUCH, THESE SOFTWARE ITEMS ARE NOT COVERED BY THE TERMS OF YOUR AGREEMENT WITH TIBCO, INCLUDING ANY TERMS CONCERNING SUPPORT, MAINTENANCE, WARRANTIES, AND INDEMNITIES. DOWNLOAD AND USE OF THESE ITEMS IS SOLELY AT YOUR OWN DISCRETION AND SUBJECT TO THE LICENSE TERMS APPLICABLE TO THEM. BY PROCEEDING TO DOWNLOAD, INSTALL OR USE ANY OF THESE ITEMS, YOU
ACKNOWLEDGE THE FOREGOING DISTINCTIONS BETWEEN THESE ITEMS AND TIBCO PRODUCTS.
This document is subject to U.S. and international copyright laws and treaties. No part of this document may be reproduced in any form without the written authorization of TIBCO Software Inc.
TIBCO, the TIBCO logo, the TIBCO O logo, TIB, Information Bus, TIBCO Administrator, TIBCO ActiveMatrix BusinessWorks, TIBCO Business Studio, TIBCO Designer, TIBCO Enterprise Message Service, TIBCO Runtime Agent, and TIBCO Rendezvous are either registered trademarks or trademarks of TIBCO Software Inc. in the United States and/or other countries.
Java and all Java based trademarks and logos are trademarks or registered trademarks of Oracle Corporation and/or its affiliates.
All other product and company names and marks mentioned in this document are the property of their respective owners and are mentioned for identification purposes only.
This software may be available on multiple operating systems. However, not all operating system platforms for a specific software version are released at the same time. See the readme file for the availability of this software version on a specific operating system platform.
THIS DOCUMENT IS PROVIDED “AS IS” WITHOUT WARRANTY OF ANY KIND, EITHER EXPRESS OR IMPLIED, INCLUDING, BUT NOT LIMITED TO, THE IMPLIED WARRANTIES OF MERCHANTABILITY, FITNESS FOR A PARTICULAR PURPOSE, OR NON-INFRINGEMENT.
THIS DOCUMENT COULD INCLUDE TECHNICAL INACCURACIES OR TYPOGRAPHICAL ERRORS. CHANGES ARE PERIODICALLY ADDED TO THE INFORMATION HEREIN; THESE CHANGES WILL BE INCORPORATED IN NEW EDITIONS OF THIS DOCUMENT. TIBCO SOFTWARE INC. MAY MAKE IMPROVEMENTS AND/OR CHANGES IN THE PRODUCT(S) AND/OR THE PROGRAM(S) DESCRIBED IN THIS DOCUMENT AT ANY TIME.
THE CONTENTS OF THIS DOCUMENT MAY BE MODIFIED AND/OR QUALIFIED, DIRECTLY OR INDIRECTLY, BY OTHER DOCUMENTATION WHICH ACCOMPANIES THIS SOFTWARE, INCLUDING BUT NOT LIMITED TO ANY RELEASE NOTES AND "READ ME" FILES.
This and other products of TIBCO Software Inc. may be covered by registered patents. Please refer to TIBCO's Virtual Patent Marking document (https://www.tibco.com/patents) for details.
Copyright © 1994-2019. TIBCO Software Inc. All Rights Reserved.
| iii
Contents
Preface . . . . . . . . . . . . . . . . . . . . . . . . . . . . . . . . . . . . . . . . . . . . . . . . . . . . . . . . . . . . . . . . . . . . . . . . .v
Related Documentation . . . . . . . . . . . . . . . . . . . . . . . . . . . . . . . . . . . . . . . . . . . . . . . . . . . . . . . . . . . . . . . . . . . . . viTIBCO BusinessConnect™ Services Plug-in Documentation . . . . . . . . . . . . . . . . . . . . . . . . . . . . . . . . . . . . viOther TIBCO Product Documentation . . . . . . . . . . . . . . . . . . . . . . . . . . . . . . . . . . . . . . . . . . . . . . . . . . . . . . vi
Typographical Conventions . . . . . . . . . . . . . . . . . . . . . . . . . . . . . . . . . . . . . . . . . . . . . . . . . . . . . . . . . . . . . . . . . .viii
TIBCO Product Documentation and Support Services . . . . . . . . . . . . . . . . . . . . . . . . . . . . . . . . . . . . . . . . . . . . . . xHow to Access TIBCO Documentation. . . . . . . . . . . . . . . . . . . . . . . . . . . . . . . . . . . . . . . . . . . . . . . . . . . . . . . xHow to Contact TIBCO Support . . . . . . . . . . . . . . . . . . . . . . . . . . . . . . . . . . . . . . . . . . . . . . . . . . . . . . . . . . . . xHow to Join TIBCO Community . . . . . . . . . . . . . . . . . . . . . . . . . . . . . . . . . . . . . . . . . . . . . . . . . . . . . . . . . . . . x
Chapter 1 Introduction . . . . . . . . . . . . . . . . . . . . . . . . . . . . . . . . . . . . . . . . . . . . . . . . . . . . . . . . . . .1
Installation Overview . . . . . . . . . . . . . . . . . . . . . . . . . . . . . . . . . . . . . . . . . . . . . . . . . . . . . . . . . . . . . . . . . . . . . . . . 2Installation Modes. . . . . . . . . . . . . . . . . . . . . . . . . . . . . . . . . . . . . . . . . . . . . . . . . . . . . . . . . . . . . . . . . . . . . . . 2Installation Profiles . . . . . . . . . . . . . . . . . . . . . . . . . . . . . . . . . . . . . . . . . . . . . . . . . . . . . . . . . . . . . . . . . . . . . . 2Installation Components . . . . . . . . . . . . . . . . . . . . . . . . . . . . . . . . . . . . . . . . . . . . . . . . . . . . . . . . . . . . . . . . . . 2Installer Account . . . . . . . . . . . . . . . . . . . . . . . . . . . . . . . . . . . . . . . . . . . . . . . . . . . . . . . . . . . . . . . . . . . . . . . . 3Installer Log File . . . . . . . . . . . . . . . . . . . . . . . . . . . . . . . . . . . . . . . . . . . . . . . . . . . . . . . . . . . . . . . . . . . . . . . . 3
Installation Requirements . . . . . . . . . . . . . . . . . . . . . . . . . . . . . . . . . . . . . . . . . . . . . . . . . . . . . . . . . . . . . . . . . . . . 4Disk Space Requirements . . . . . . . . . . . . . . . . . . . . . . . . . . . . . . . . . . . . . . . . . . . . . . . . . . . . . . . . . . . . . . . . 4System Memory Requirements . . . . . . . . . . . . . . . . . . . . . . . . . . . . . . . . . . . . . . . . . . . . . . . . . . . . . . . . . . . . 4Supported Platforms . . . . . . . . . . . . . . . . . . . . . . . . . . . . . . . . . . . . . . . . . . . . . . . . . . . . . . . . . . . . . . . . . . . . . 4Software Requirements . . . . . . . . . . . . . . . . . . . . . . . . . . . . . . . . . . . . . . . . . . . . . . . . . . . . . . . . . . . . . . . . . . 4
Chapter 2 Installation and Uninstallation. . . . . . . . . . . . . . . . . . . . . . . . . . . . . . . . . . . . . . . . . . . . .5
Installation . . . . . . . . . . . . . . . . . . . . . . . . . . . . . . . . . . . . . . . . . . . . . . . . . . . . . . . . . . . . . . . . . . . . . . . . . . . . . . . . 6GUI Mode . . . . . . . . . . . . . . . . . . . . . . . . . . . . . . . . . . . . . . . . . . . . . . . . . . . . . . . . . . . . . . . . . . . . . . . . . . . . . 6Console Mode . . . . . . . . . . . . . . . . . . . . . . . . . . . . . . . . . . . . . . . . . . . . . . . . . . . . . . . . . . . . . . . . . . . . . . . . . 7Silent Mode. . . . . . . . . . . . . . . . . . . . . . . . . . . . . . . . . . . . . . . . . . . . . . . . . . . . . . . . . . . . . . . . . . . . . . . . . . . . 8
Uninstallation . . . . . . . . . . . . . . . . . . . . . . . . . . . . . . . . . . . . . . . . . . . . . . . . . . . . . . . . . . . . . . . . . . . . . . . . . . . . . . 9GUI Mode . . . . . . . . . . . . . . . . . . . . . . . . . . . . . . . . . . . . . . . . . . . . . . . . . . . . . . . . . . . . . . . . . . . . . . . . . . . . . 9Console Mode . . . . . . . . . . . . . . . . . . . . . . . . . . . . . . . . . . . . . . . . . . . . . . . . . . . . . . . . . . . . . . . . . . . . . . . . 10
Chapter 3 Protocol Activation . . . . . . . . . . . . . . . . . . . . . . . . . . . . . . . . . . . . . . . . . . . . . . . . . . . . 11
Overview . . . . . . . . . . . . . . . . . . . . . . . . . . . . . . . . . . . . . . . . . . . . . . . . . . . . . . . . . . . . . . . . . . . . . . . . . . . . . . . . 12
Protocol Activation . . . . . . . . . . . . . . . . . . . . . . . . . . . . . . . . . . . . . . . . . . . . . . . . . . . . . . . . . . . . . . . . . . . . . . . . . 13
TIBCO BusinessConnect Services Plug-in Installation and Configuration

iv | Contents
Protocol Deployment. . . . . . . . . . . . . . . . . . . . . . . . . . . . . . . . . . . . . . . . . . . . . . . . . . . . . . . . . . . . . . . . . . . . . . . 14
Index . . . . . . . . . . . . . . . . . . . . . . . . . . . . . . . . . . . . . . . . . . . . . . . . . . . . . . . . . . . . . . . . . . . . . . . . . 15
TIBCO BusinessConnect Services Plug-in Installation and Configuration
| v
Preface
TIBCO BusinessConnect™ Services Plug-in is an easy-to-use data transfer protocol, which provides a secure data exchange over the Internet.
Topics
• Related Documentation, page vi
• Typographical Conventions, page viii
• TIBCO Product Documentation and Support Services, page x
This software may be available on multiple operating systems. However, not all operating system platforms for a specific software version are released at the same time. Please see the readme file for the availability of this software version on a specific operating system platform.
TIBCO BusinessConnect Services Plug-in User’s Guide

vi | Related Documentation
Related Documentation
This section lists documentation resources you may find useful.
TIBCO BusinessConnect™ Services Plug-in Documentation
The following documents form the TIBCO BusinessConnect Services Plug-in documentation set:
• TIBCO BusinessConnect™ Services Plug-in Installation and Configuration: Read this guide to install and configure TIBCO BusinessConnect Services Plug-in.
• TIBCO BusinessConnect™ Services Plug-in User’s Guide: Read this guide to learn how to manage TIBCO BusinessConnect Services Plug-in.
• TIBCO BusinessConnect™ Services Plug-in Release Notes: Read the release notes for a list of new and changed features. This document also contains lists of known issues and closed issues for this release.
Other TIBCO Product Documentation
You may find it useful to read the documentation for the following TIBCO products, which may be used or integrated with BusinessConnect:
• TIBCO Administrator™ software: The software allows you to manage users, machines and applications defined in a TIBCO Administration Domain. The TIBCO Administrator graphical user interface enables users to deploy, monitor, and start and stop TIBCO applications.
• TIBCO ActiveMatrix BusinessWorks™ software: This software is a scalable, extensible, and easy to use integration platform that allows you to develop integration projects. TIBCO BusinessWorks includes a graphical user interface (GUI) for defining business processes and an engine that executes the process.
• TIBCO Business Studio™ software: This graphical user interface is used for designing and creating integration project configurations and building an Enterprise Archive (EAR) for the project. The EAR can then be used by TIBCO Enterprise Administrator for deploying and running the application.
• TIBCO Designer™ software: This graphical user interface is used for designing and creating integration project configurations and building an Enterprise Archive (EAR) for the project. The EAR can then be used by TIBCO Administrator for deploying and running the application.
TIBCO BusinessConnect Services Plug-in User’s Guide
Preface | vii
• TIBCO Enterprise Message Service ™ software: This software provides a message service that enables integration of applications within an enterprise based on the Java Message Service (JMS) specifications.
• TIBCO Hawk® software: This software is a tool for monitoring and managing distributed applications and operating systems. The software is designed specifically for monitoring distributed systems, so there is no centralized console or frequent polling across the network.
• TIBCO Runtime Agent™ software: This software suite is a prerequisite for other TIBCO software products. In addition to TIBCO Runtime Agent components, the software suite includes the third-party libraries used by other TIBCO products such as TIBCO Designer, Java Runtime Environment (JRE), TIBCO Hawk®, and TIBCO Rendezvous®.
• TIBCO Rendezvous® software: This software enables programs running on many different kinds of computers on a network to communicate seamlessly. It includes two main components: the Rendezvous programming language interface (API) in several languages, and the Rendezvous daemon.
TIBCO BusinessConnect Services Plug-in User’s Guide
viii | Typographical Conventions
Typographical Conventions
The following typographical conventions are used in this manual.
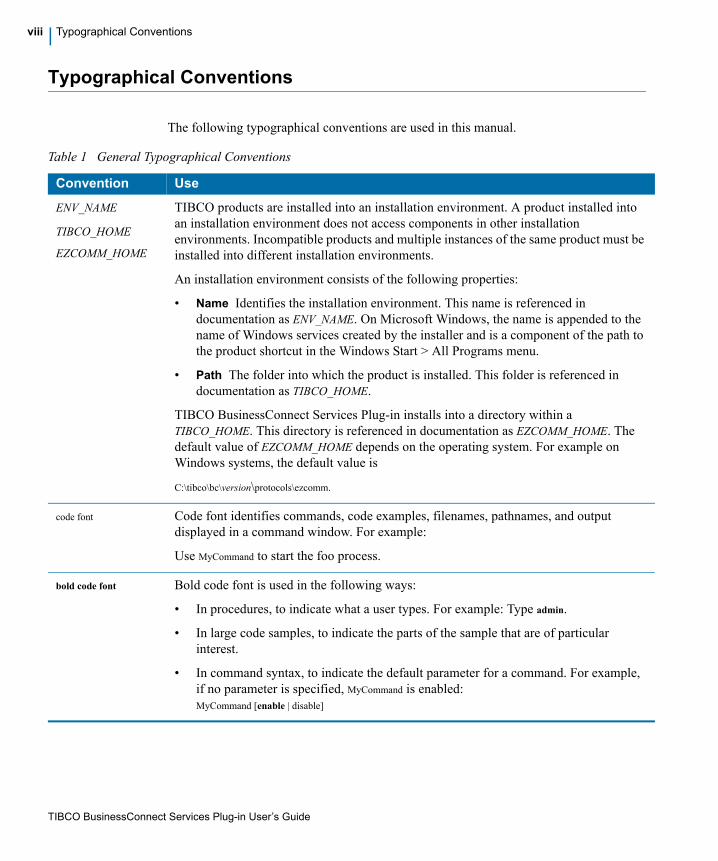
Table 1 General Typographical Conventions
Convention Use
ENV_NAME
TIBCO_HOME
EZCOMM_HOME
TIBCO products are installed into an installation environment. A product installed into an installation environment does not access components in other installation environments. Incompatible products and multiple instances of the same product must be installed into different installation environments.
An installation environment consists of the following properties:
• Name Identifies the installation environment. This name is referenced in documentation as ENV_NAME. On Microsoft Windows, the name is appended to the name of Windows services created by the installer and is a component of the path to the product shortcut in the Windows Start > All Programs menu.
• Path The folder into which the product is installed. This folder is referenced in documentation as TIBCO_HOME.
TIBCO BusinessConnect Services Plug-in installs into a directory within a TIBCO_HOME. This directory is referenced in documentation as EZCOMM_HOME. The default value of EZCOMM_HOME depends on the operating system. For example on Windows systems, the default value is
C:\tibco\bc\version\protocols\ezcomm.
code font Code font identifies commands, code examples, filenames, pathnames, and output displayed in a command window. For example:
Use MyCommand to start the foo process.
bold code font Bold code font is used in the following ways:
• In procedures, to indicate what a user types. For example: Type admin.
• In large code samples, to indicate the parts of the sample that are of particular interest.
• In command syntax, to indicate the default parameter for a command. For example, if no parameter is specified, MyCommand is enabled: MyCommand [enable | disable]
TIBCO BusinessConnect Services Plug-in User’s Guide
Preface | ix
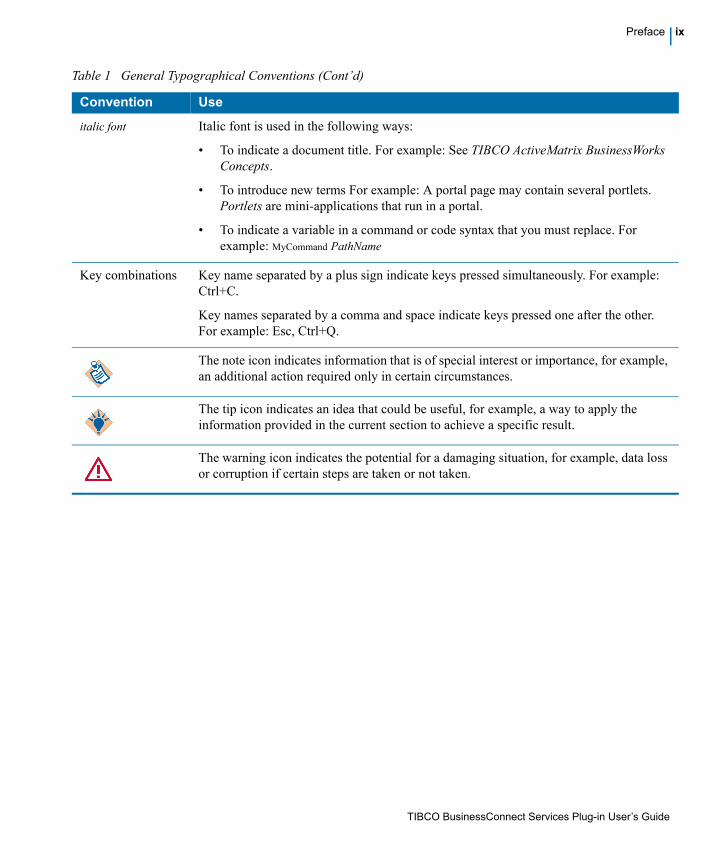
italic font Italic font is used in the following ways:
• To indicate a document title. For example: See TIBCO ActiveMatrix BusinessWorks Concepts.
• To introduce new terms For example: A portal page may contain several portlets. Portlets are mini-applications that run in a portal.
• To indicate a variable in a command or code syntax that you must replace. For example: MyCommand PathName
Key combinations Key name separated by a plus sign indicate keys pressed simultaneously. For example: Ctrl+C.
Key names separated by a comma and space indicate keys pressed one after the other. For example: Esc, Ctrl+Q.
The note icon indicates information that is of special interest or importance, for example, an additional action required only in certain circumstances.
The tip icon indicates an idea that could be useful, for example, a way to apply the information provided in the current section to achieve a specific result.
The warning icon indicates the potential for a damaging situation, for example, data loss or corruption if certain steps are taken or not taken.
Table 1 General Typographical Conventions (Cont’d)
Convention Use
TIBCO BusinessConnect Services Plug-in User’s Guide
x | TIBCO Product Documentation and Support Services
TIBCO Product Documentation and Support Services
For information about this product, you can read the documentation, contact TIBCO Support, or join TIBCO Community.
How to Access TIBCO Documentation
Documentation for TIBCO products is available on the TIBCO Product Documentation website mainly in the HTML and PDF formats.
The TIBCO Product Documentation website is updated frequently and is more current than any other documentation included with the product. To access the latest documentation, visit https://docs.tibco.com.
Documentation for TIBCO BusinessConnect Services Plug-in is available on the https://docs.tibco.com/products/tibco-businessconnect-services-plug-in Product Documentation page.
How to Contact TIBCO Support
You can contact TIBCO Support in the following ways:
• For an overview of TIBCO Support, and information about getting started with TIBCO Support, visit http://www.tibco.com/services/support
• For accessing the Support Knowledge Base and getting personalized content about products you are interested in, visit the TIBCO Support portal at https://support.tibco.com.
• For creating a Support case, you must have a valid maintenance or support contract with TIBCO. You also need a user name and password to log in to https://support.tibco.com. If you do not have a user name, you can request one by clicking Register on the website.
How to Join TIBCO Community
TIBCO Community is the official channel for TIBCO customers, partners, and employee subject matter experts to share and access their collective experience. TIBCO Community offers access to Q&A forums, product wikis, and best practices. It also offers access to extensions, adapters, solution accelerators, and tools that extend and enable customers to gain full value from TIBCO products. In addition, users can submit and vote on feature requests from within the TIBCO Ideas Portal. For a free registration, go to https://community.tibco.com.
TIBCO BusinessConnect Services Plug-in User’s Guide
| 1
Chapter 1 Introduction
This chapter explains installation modes, requirements, and other options you should be aware of before starting the installation.
Topics
• Installation Overview, page 2
• Installation Requirements, page 4
TIBCO BusinessConnect Services Plug-in Installation and Configuration
2 | Chapter 1 Introduction
Installation Overview
This section gives an overview of the installer.
Installation Modes
Three installation modes are available: GUI, console, and silent.
GUI Mode
In the GUI mode, the installer presents panels that allow you to make choices about product selection, product location, and so on. To invoke the installer in GUI mode, double-click the executable.
Console Mode
Console mode allows you to run the installer from the command prompt or terminal window. This is useful if your machine does not have a GUI environment.
Silent Mode
Silent mode installs the product using either default or custom settings that are saved in a response file. Silent mode installs the product without prompting you for information.
Installation Profiles
Two installation profiles are available: BusinessConnect Services Plug-in or Customize Installation.
• BusinessConnect Services Plug-in The BusinessConnect Services Plug-in installation profile installs all the software for a specific profile.
• Customize Installation The Customize Installation profile allows you to select components.
Installation Components
The following installation components are available for the plug-in:
• EZComm Documentation Includes the TIBCO BusinessConnect Services Plug-in documentation. The documentation is installed in the EZCOMM_HOME\doc directory.
• EZComm Runtime Includes the runtime tools for TIBCO BusinessConnect Services Plug-in.
TIBCO BusinessConnect Services Plug-in Installation and Configuration
Installation Overview | 3
Installer Account
Before you can run the installer on your Windows or Linux system, you must log in as a user with appropriate permissions. The privileges differ for the different platforms.
Microsoft Windows
You must have administrator privileges for the machine on which this product is installed. If you do not have administrator privileges, the installer exits. You must then log out of the system and log in as a user with the required privileges, or request your system administrator to assign the privileges to your account.
If you intend to install the product on a network drive, ensure that the account used for installation has permission to access the network drive.
UNIX
Any user can install this product.
• Regular user (non-root)
• Super-user (root)
While installing this product on UNIX platforms, ensure that the same installer account is used to install all TIBCO products.
A graphic environment such as CDE or X Windows is required to run the installer in the GUI mode.
Installer Log File
The installer log file, tibco_universal_installer.username_install.log, is written to the .TIBCO/install_timestamp folder of the user’s home directory.
To change the location of the installer log file, specify the option -V logFile="myLogFile" when you run the installer.
The installer log file captures the following information:
• Installation environment details, such as, user that invoked the installer, host name, Java home in the environment, operating system details, and so on.
• List of assemblies installed.
Information related to the Ant scripts that are executed by the installer.
TIBCO BusinessConnect Services Plug-in Installation and Configuration
4 | Chapter 1 Introduction
Installation Requirements
This section describes the disk space requirements, system memory requirements, software requirements, and supported platforms for this product.
Disk Space Requirements
See the readme file for the disk space requirements.
System Memory Requirements
See the readme file for the system memory requirements.
Supported Platforms
See the readme file for the supported platforms and versions and required patches.
Software Requirements
TIBCO Software
Before you install TIBCO BusinessConnect Services Plug-in, you must first install TIBCO BusinessConnect with all other products that are prerequisites for its installation.
See TIBCO BusinessConnect Installation and Configuration for details.
Third-party Software
You need a database to run TIBCO BusinessConnect.
For the updated list of supported databases and version numbers, see the TIB_bcezcomm_version_number_readme.txt file for the specific release.
TIBCO BusinessConnect Services Plug-in Installation and Configuration
| 5
Chapter 2 Installation and Uninstallation
This chapter explains how to install and uninstall TIBCO BusinessConnect Services Plug-in in different modes.
Topics
• Installation, page 6
• Uninstallation, page 9
TIBCO BusinessConnect Services Plug-in Installation and Configuration
6 | Chapter 2 Installation and Uninstallation
Installation
The following sections describe the installation process in the available installation modes:
• GUI Mode, page 6
• Console Mode, page 7
• Silent Mode, page 8
GUI Mode
To install this product in the GUI mode:
1. Open the physical media or download the package.
2. Extract the contents of the package to a temporary directory.
3. Navigate to the temporary directory.
4. Run TIBCOUniversalInstaller. You can do so in one of the following ways:
— Double-click the installer icon.
— On the command prompt, provide the absolute path of the installer file without specifying any options. The installer defaults to the GUI mode.
5. Click Next on the Welcome page.
6. Read through the license text when the License Agreement page appears, click I accept the terms of the license agreement. Click Next.
7. To install TIBCO BusinessConnect Services Plug-in into an existing installation environment where TIBCO Rendezvous and TIBCO Runtime Agent are installed, click Use an existing TIBCO_HOME, next select the environment from the drop-down list, and then click Next on the TIBCO Installation Home page.
An installation environment isolates product installations. A product installed into an installation environment does not access components in other installation environments.
The following shows the two options displayed on the TIBCO Installation Home page:
— Create a new TIBCO_HOME Install the product into a new installation environment.
— Use an existing TIBCO_HOME Install the product into an existing installation environment.
TIBCO BusinessConnect Services Plug-in Installation and Configuration
Installation | 7
8. Select an installation profile from the list on the left to install corresponding components on the right. See Installation Profiles, page 2 and Installation Components, page 2 for details about installation profiles and components.
To customize the profile, select the Customize Installation check box and use the feature tree on the right.
Click Next.
9. Verify the list of products selected for install in the Pre-Install Summary page, and then click Install to start the installation process.
10. Review the information listed in the Post Install Summary page, and then click Finish to complete the installation process and exit the universal installer.
Console Mode
To install this product in the console mode:
1. Open the physical media or download the package.
2. Extract the contents of the package to a temporary directory.
3. Using a console window, navigate to the temporary directory.
4. Run TIBCOUniversalInstaller-platform_acronym -console.
For example:
— Windows:TIBCOUniversalInstaller-x86-64.exe -console
— AIX:TIBCOUniversalInstaller-aix.bin -console
— Linux: TIBCOUniversalInstaller-lnx-x86-64.bin -console
— Solaris Sparc: TIBCOUniversalInstaller-sol-sparc.bin -console
— Solaris x86 64:TIBCOUniversalInstaller-sol-x86.bin -console
5. Complete the installation by responding to the console window prompts.
TIBCO BusinessConnect Services Plug-in Installation and Configuration
8 | Chapter 2 Installation and Uninstallation
Silent Mode
In the silent mode, the universal installer does not prompt for any inputs during installation. Instead, the inputs are read from a response file that can be provided as a command-line parameter. If no value is specified, the installer uses the default TIBCOUniversalInstaller-bcezcomm.silent file.
The TIBCOUniversalInstaller.silent file is packaged in the directory that contains the universal installer. Edit the file with information for your environment before launching the silent installation. The file includes comments that describe the installation properties you can set. While you can use the TIBCOUniversalInstaller-bcezcomm.silent file, it’s good practice to copy the file to a different name and use that file for the silent install.
If errors occur during installation, they will be listed in the installation log file located in the User_Home/.TIBCO directory.
1. Open the physical media or download the package.
2. Extract the contents of the package to a temporary directory.
3. Using a console window, navigate to the temporary directory.
4. Make a copy of the TIBCOUniversalInstaller-bcezcomm.silent file and rename the file.
5. Using a text editor, open the copied file and update the install location ENV_NAME, and features to install.
— Update the install location. TIBCO BusinessConnect Services Plug-in must be installed in the same directory where the TIBCO products are installed. The default location is:
<entry key="installationRoot">C:\tibco</entry>
— Update ENV_NAME. TIBCO BusinessConnect Services Plug-in must use the same ENV_NAME that TIBCO products use.
— Update features to install. Set the features that you want to install to true.
6. Run the following commands:
WindowsTIBCOUniversalInstaller.cmd -silent -V responseFile="myfilename.silent"
UNIXTIBCOUniversalInstaller_platform_acronym.bin -silent -V responseFile="myfilename.silent"
TIBCO BusinessConnect Services Plug-in Installation and Configuration
Uninstallation | 9
Uninstallation
This section describes how to uninstall this product in the following available modes:
• GUI Mode, page 9
• Console Mode, page 10
GUI Mode
To uninstall this plug-in:
1. Shut down all running TIBCO BusinessConnect applications.
2. Navigate to the universal installer using one of the following methods:
— Go to the TIBCO_HOME\tools\universal_installer directory and run TIBCOUniversalInstaller to start the uninstall process.
— From the Start menu, click All Programs > TIBCO > Uninstall to start the uninstall process.
3. On the TIBCOInstallationManager page, perform the following steps:
a. Click Uninstall Products from a TIBCO Home Location.
b. Select the TIBCO_HOME location from the TIBCO HOME Location list.
c. Click Next.
4. Click Next on the Welcome page.
5. On the Uninstallation Type page, select one of the following uninstallation options:
— Custom Uninstall You can select the products to be removed.
— Typical Uninstall The universal uninstaller removes all the products in the TIBCO_HOME.
Click Next.
6. If you clicked Custom Uninstall (select the products to be removed), select the check boxes for products to uninstall, and then click Next.
7. Review the Pre-Uninstall Summary and click Uninstall to start the uninstallation process.
8. Review the Post Uninstall Summary and click Finish to exit the uninstall process.
TIBCO BusinessConnect Services Plug-in Installation and Configuration
10 | Chapter 2 Installation and Uninstallation
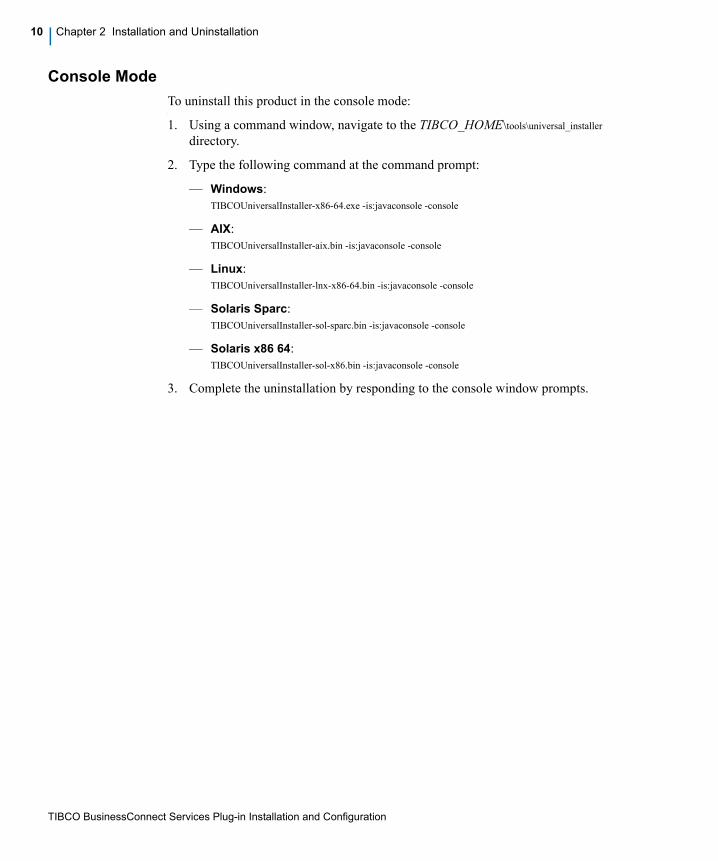
Console Mode
To uninstall this product in the console mode::
1. Using a command window, navigate to the TIBCO_HOME\tools\universal_installer directory.
2. Type the following command at the command prompt:
— Windows:TIBCOUniversalInstaller-x86-64.exe -is:javaconsole -console
— AIX:TIBCOUniversalInstaller-aix.bin -is:javaconsole -console
— Linux: TIBCOUniversalInstaller-lnx-x86-64.bin -is:javaconsole -console
— Solaris Sparc: TIBCOUniversalInstaller-sol-sparc.bin -is:javaconsole -console
— Solaris x86 64:TIBCOUniversalInstaller-sol-x86.bin -is:javaconsole -console
3. Complete the uninstallation by responding to the console window prompts.
TIBCO BusinessConnect Services Plug-in Installation and Configuration
| 11
Chapter 3 Protocol Activation
This chapter explains how to activate and deploy TIBCO BusinessConnect Services Plug-in.
Topics
• Overview, page 12
• Protocol Activation, page 13
TIBCO BusinessConnect Services Plug-in Installation and Configuration
12 | Chapter 3 Protocol Activation
Overview
When installation is complete, TIBCO BusinessConnect Services Plug-in appears in the table that displays when you click Resource Management > Installed Software on the left panel of TIBCO Administrator.
This chapter summarizes post-installation activities to activate and deploy TIBCO BusinessConnect Services Plug-in.
Before activating TIBCO BusinessConnect Services Plug-in, you must complete all pre-deployment and deployment tasks described in TIBCO BusinessConnect Interior Server Administration Guide, including creating the TIBCO BusinessConnect installation on the Interior Server.
Make sure that the directories for shared and temporary files have been configured using a valid path.
TIBCO BusinessConnect Services Plug-in Installation and Configuration

Protocol Activation | 13
Protocol Activation
After TIBCO BusinessConnect Services Plug-in on the host site is installed, it is activated like all other TIBCO BusinessConnect protocols:
1. Using TIBCO Administrator, select BusinessConnect and click Manage.
2. Click the Protocol Plug-In Activation tab in the Manage Installation window.
3. Select the check box next to the EZComm (BusinessConnect EZComm Protocol) and click Activate.
After any other protocol activation, you are automatically logged out of the system.
When you log in again, TIBCO BusinessConnect Services Plug-in has the status Activated.
Verify Activated Protocols
To check that the protocol has been activated:
1. Click the BusinessConnect link in the left panel.
2. Click System Settings > Activated Protocol Plug-ins and Properties.
3. Verify that EZComm is listed in the Plug-in column with the correct version number.
TIBCO BusinessConnect Services Plug-in Installation and Configuration
14 | Chapter 3 Protocol Activation
Protocol Deployment
Before TIBCO BusinessConnect Services Plug-in can be used in B2B transactions, it must be deployed.
To deploy TIBCO BusinessConnect Services Plug-in that has just been installed, you must deploy TIBCO BusinessConnect (even it has been previously deployed).
Before deploying TIBCO BusinessConnect, you must first create a deployment configuration. See TIBCO BusinessConnect Interior Server Administration Guide for information on how to create a deployment configuration.
If TIBCO BusinessConnect is already deployed, undeploy it and deploy again.
To deploy TIBCO BusinessConnect, do the following:
1. In TIBCO Administrator, click Application Management > BusinessConnect > Configuration on the left panel.
2. Click Deploy on the right panel.
3. Click OK.
Deployability is now Synchronized and Deployment Status is Success, indicating that the instance is now deployed.
TIBCO BusinessConnect Services Plug-in Installation and Configuration
TIBCO BusinessConnect Services Plug-in Installation and Configuration
| 15
Index
C
Custom Uninstall 9customer support x
I
installationconsole mode 7GUI mode 6silent mode 8
installation components 2installation modes
console mode 2GUI mode 2silent mode 2
installation requirementsdisk space requirements 4software 4supported platforms 4system memory requirements 4
installation typesBusinessConnect Services Plug-in 2custom 2
installer account 3Installer Log File 3installer log file 3
P
pre-installation tasks 6protocol activation 13protocol deployment 14
S
support, contacting x
T
technical support xTIBCO support
TIBCOmmunity xTIBCO_HOME viiiTypical Uninstall 9
U
uninstallation 9
V
verify activated protocols 13


