Embed Size (px)
Citation preview
Unlock AD DS
using {C# .NET}
Edward Willemsen
December, 2012

Book license All rights reserved. No part of this book may be reproduced, stored in a retrieval system or transmitted in any form or by any means, electronic,
mechanical, photocopying, recording, scanning or otherwise, without prior written permission of the publisher.
When this book is delivered to the purchaser in a digital format (as a PDF file), the purchaser is allowed to make only ONE printed copy and possess
TWO digital copies at any given time. The PDF version of this book may not be placed on a network server or cloud service accessible by more than one
person at any given time.
By following the requirements outlined above for the digital distribution of
this book, the purchaser will in effect have one copy of the book which can be viewed by a single reader as though the book was delivered in a printed
format.
Copyright © 2012 Edward Willemsen
Published by Books4Brains, December 2012
P.O. Box 345 3830 AJ Leusden
The Netherlands
ISBN 9789072389220
Disclaimer The author and publisher of this book have made every effort to make this
book as complete and accurate as possible. The author and publisher make no representations or warranties of any kind as to the accuracy or the
contents of this book and accept no liability whatsoever with respect to any loss or damages that may arise from the information contained in this book
or the use of any programs described in this book.
The author and publisher do not guarantee that the information in this
book will continue to work with future versions of Microsoft Directory Services.
Trademarks
Microsoft Windows, Microsoft Active Directory Services, Microsoft Active
Directory Domain Services are all trademarks of Microsoft Corporation.

Unlock AD DS using {C# .NET} I
Introduction There is much to-do about Identity and Access Management. A lot of companies are struggling with Identity and Access Management issues in
order to reach their compliancy goals. In Microsoft-oriented environments, Active Directory is the most important technical enabler of Identity and
Access Management. Controlling Active Directory means controlling the
permissions and privileges of all who dwell within the directory.
Driven by cost-cutting, there is also a high need for self-service and delegation of control so that end-users can perform basic tasks themselves.
Information Security is also an important topic for many organizations. The implementation of Role Based Access Control and the necessary reports
about how access is provided are getting more and more important.
This book focuses on the heart of all these demands, Microsoft Active
Directory Domain Services.
About this book This book is written for professionals who need to access Microsoft Active Directory Domain Services (AD DS) using the Microsoft .NT Framework and
C#-programming language.
The information provided in this book is based on real-world scenarios that will help you to interface with AD DS and its content. All information is
based on personal research and findings during the creation of the
following functionalities: Self-Service portals
AD DS clean-up tools AD DS reporting tools
Delegation of Control applications
Role Based Access Control applications Active Directory Domain Services migration utilities
Identity and Access Management applications with AD DS (de)provisioning
This book will provide code snippets, screen captures, tips and drawings to
explain the different AD DS objects and their related tasks.
Over time, this book has been updated with new directory features that
have become available with each new operating system release.
II Unlock AD DS using {C# .NET}
Furthermore, any required enhancement in C# programming language is
also explained.
This book will not contain explanations of all overloads of methods, nor will it contain code snippets in other programming languages. These
explanations can be found in the Microsoft Developer Network (MSDN) reference or other books on related subjects.
My assumptions about the reader This book is meant for professionals who need to interface with Microsoft
Active Directory Domain Services.
You need basic knowledge of Microsoft Active Directory Domain Services
and a basic understanding of C# and, preferably, the Microsoft Visual Studio development tools.
The information provided covers Microsoft Windows 2000 Server, Microsoft Windows Server 2003, Microsoft Windows Server 2008, Microsoft Windows
Server 2008 R2 and Microsoft Windows Server 2012 Active Directory Domain Services. Any basic knowledge of one of these operating systems
will help the reader understand the topics described.
Knowledge of particular practices like AG(U)DLP can assist you in creating
your own AD DS applications, but that knowledge is not necessary.
IT professionals with the following certifications will have no problem understanding the contents of this book: Microsoft Certified Application
Developer or Microsoft Certified Professional Developer and Microsoft
Certified Systems Administrator or Microsoft Certified Solutions Associate.

Unlock AD DS using {C# .NET} III
About the author I started my IT career as a support engineer working with Novell Netware networks in 1994. Microsoft’s network product was Microsoft Windows NT
3.51, and its installed base was rather small. Over several years, my knowledge of infrastructure grew enormously, as I specialized in migrating
Novell Netware to Microsoft Windows NT 4.0.
At that time, developing utilities was nothing more than a hobby for me,
and I shared my products via bulletin boards. One day, I received a letter from Iceland, and it seemed that one of my applications, called Multi Media
Machine (MMM), had been published in a computer magazine. In those
days, Turbo Pascal was hot, and I had used object-oriented Turbo Pascal with Turbo Vision to create the program. Not long after that, I contributed
to a bulletin board and started creating tiny DOS-based advertisements using Assembler. At first, I used TASM (Turbo Assembler), and later I
started using MASM (Microsoft Assembler). When object-oriented
programming (OOP) and rapid application development (RAD) increased in popularity, I switched to C++.
I started developing migration tools with the development skills I had
taught myself, but I never expected them to have any commercial potential. A few years later, I specialized in Microsoft Windows Server
migrations, upgrades and consolidations. In 2000, I decided to combine my
infrastructural knowledge with my programming skills for commercial purposes. From that moment on, programming utilities was not a hobby
anymore.
Professional
Hobby
Knowledge Infrastructure
Development time
Figure 1: The development of my knowledge through time
In 2006, I finally switched to the Microsoft .NET Framework, thereby
dropping Pascal and C++. I was familiar with C++, so I decided to learn and use C# programming language. Since then, I have created applications
used by the Dutch government, (international) banks, insurance
IV Unlock AD DS using {C# .NET}
companies, brokerage companies and many other organizations. All these
applications are related by Microsoft infrastructure components or Microsoft Active Directory Domain Services.
I have numerous certificates in Microsoft products from 1996 until now. I
have reached the early achiever status three times. My current certifications include the following:
Unlock AD DS using {C# .NET} V
VI Unlock AD DS using {C# .NET}
Besides my interest in Microsoft technology, I am also interested and
certified in other technologies and areas, including the following:
All that remains for me to say is have fun using this book!
With kind regards,
~Edward
Unlock AD DS using {C# .NET} VII
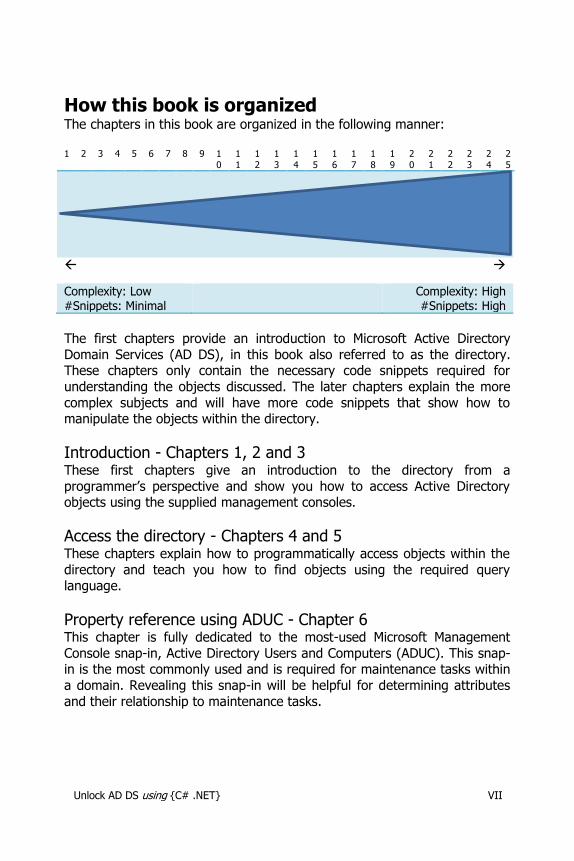
How this book is organized The chapters in this book are organized in the following manner: 1 2 3 4 5 6 7 8 9 1
0 11
12
13
14
15
16
17
18
19
20
21
22
23
24
25
Complexity: Low #Snippets: Minimal
Complexity: High #Snippets: High
The first chapters provide an introduction to Microsoft Active Directory
Domain Services (AD DS), in this book also referred to as the directory. These chapters only contain the necessary code snippets required for
understanding the objects discussed. The later chapters explain the more
complex subjects and will have more code snippets that show how to manipulate the objects within the directory.
Introduction - Chapters 1, 2 and 3 These first chapters give an introduction to the directory from a
programmer’s perspective and show you how to access Active Directory objects using the supplied management consoles.
Access the directory - Chapters 4 and 5
These chapters explain how to programmatically access objects within the
directory and teach you how to find objects using the required query language.
Property reference using ADUC - Chapter 6
This chapter is fully dedicated to the most-used Microsoft Management
Console snap-in, Active Directory Users and Computers (ADUC). This snap-in is the most commonly used and is required for maintenance tasks within
a domain. Revealing this snap-in will be helpful for determining attributes
and their relationship to maintenance tasks.
VIII Unlock AD DS using {C# .NET}
Schema, GUID and SID - Chapters 7, 8 and 9
These chapters explain the position of objects within the directory, together with their relation to security principals.
Property and Objects CRUD1 - Chapters 9 - 24
These chapters explain how to manipulate both default and custom
properties and objects available within the directory.
MMC - Chapter 24
This chapter explains how to create a Microsoft Management Console (MMC) so that custom directory applications can be deployed in a standard
manner.
Legacy - Chapter 25
This chapter briefly explains how to access a Microsoft Windows NT 4.0 legacy environment.
Snippets
Most of the snippets are based on Microsoft .NET Framework version 2.0. If
another version is required, the paragraph explaining the snippet will explicitly say so.
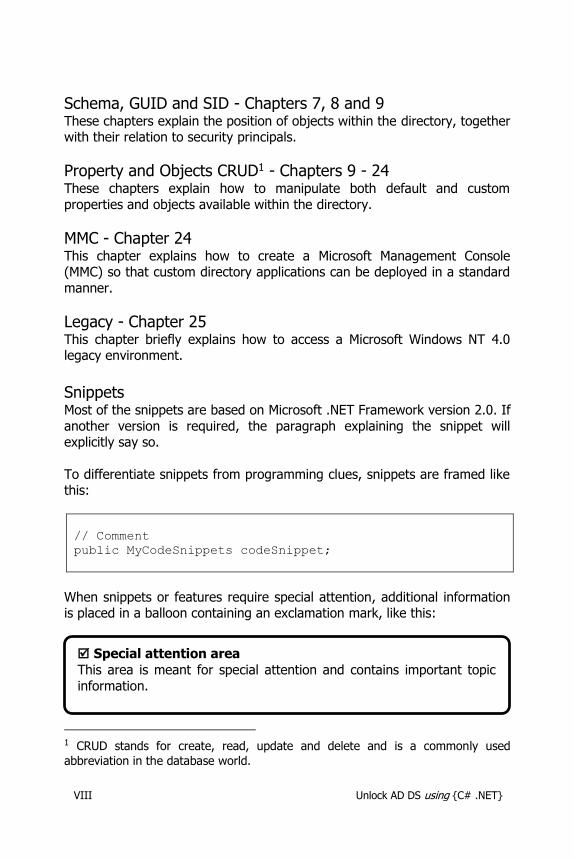
To differentiate snippets from programming clues, snippets are framed like this:
// Comment
public MyCodeSnippets codeSnippet;
When snippets or features require special attention, additional information is placed in a balloon containing an exclamation mark, like this:
1 CRUD stands for create, read, update and delete and is a commonly used
abbreviation in the database world.
Special attention area
This area is meant for special attention and contains important topic
information.

Unlock AD DS using {C# .NET} IX
Within the chapters, important keywords are in bold.
General Comments
General comments can be found on the right-hand side of the item to which they apply. The comment is placed within a note, as shown here:
In most cases, the dialog shown and the general information note will be
followed by a table describing the available properties.
Sample applications
This book is loaded with code snippets. I understand that a working sample application—in the form of a prototype—appeals more to the imagination.
That is why I have added several prototypes on my website that refer to one or more chapters in this book. These prototypes, together with the
source code, can be found at www.utools.nl/Prototypes.aspx.
Subject – General information about the left-hand item.
X Unlock AD DS using {C# .NET}
Essential people
I would like to thank the following people: Iris and Vincent (my kids) and Willeke (my wife) for their support.
Maurits van Boetzelaer for reading and correcting the text. Klaasjan Ooms for his fresh ideas, subjects and technical validation.
Stay in touch
If you have any comments on the content of this book, visit my website at
www.utools.nl, or drop me an e-mail at [email protected].
Unlock AD DS using {C# .NET} XI
Table of Contents 1. About Active Directory ........................................................................ 1
1.1. Core ............................................................................................ 2 1.2. Security principals ........................................................................ 3 1.3. Partitions ..................................................................................... 3 1.4. ADSI ........................................................................................... 4 1.5. LDAP ........................................................................................... 4 1.6. AD DS limitations ......................................................................... 5
2. IDE ................................................................................................... 7 3. ADSI Edit ......................................................................................... 13
3.1. Windows Server 2003 ................................................................ 13 3.2. Windows Server 2008 (R2) ......................................................... 14 3.3. Windows Server 2012 ................................................................ 15
4. DirectoryEntry .................................................................................. 17 4.1. Distinguished name .................................................................... 20 4.2. rootDSE .................................................................................... 21
4.2.1. Naming context ................................................................... 24 4.2.2. Server names ...................................................................... 27 4.2.3. Functional levels .................................................................. 28
4.3. Finding items ............................................................................. 29 4.3.1. Narrow down result set size ................................................. 32
4.4. Search filter ............................................................................... 32 4.4.1. Search scope ....................................................................... 34 4.4.2. Force attribute index ............................................................ 35 4.4.3. Index attribute for a containerized search ............................. 37
4.5. Attribute Types .......................................................................... 39 4.5.1. Regular properties ............................................................... 39 4.5.2. Constructed/Computed attributes ......................................... 39 4.5.3. Linked attributes .................................................................. 39
4.6. Clearing a property value ........................................................... 40 4.6.1. Constraint exception ............................................................ 40 4.6.2. Clear using InvokeSet .......................................................... 41
4.7. Case sensitivity .......................................................................... 41 4.8. Children .................................................................................... 42 4.9. Accessing un-trusted domain/forest ............................................ 42 4.10. Communication ........................................................................ 44
4.10.1. Global Catalog ................................................................... 46 4.10.2. Secure LDAP ...................................................................... 47
4.11. Principal .................................................................................. 48 5. Query Strings ................................................................................... 51
5.1. Custom search ........................................................................... 51
XII Unlock AD DS using {C# .NET}
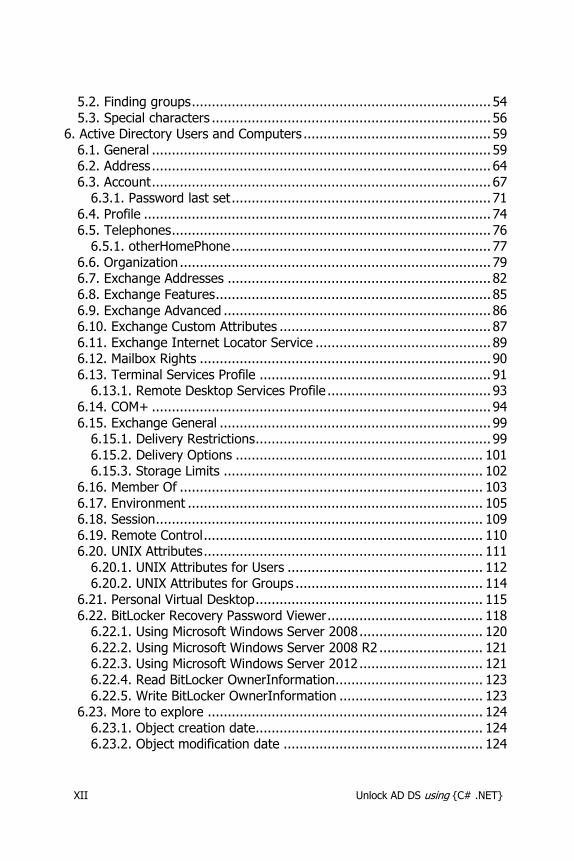
5.2. Finding groups ........................................................................... 54 5.3. Special characters ...................................................................... 56
6. Active Directory Users and Computers ............................................... 59 6.1. General ..................................................................................... 59 6.2. Address ..................................................................................... 64 6.3. Account ..................................................................................... 67
6.3.1. Password last set ................................................................. 71 6.4. Profile ....................................................................................... 74 6.5. Telephones ................................................................................ 76
6.5.1. otherHomePhone ................................................................. 77 6.6. Organization .............................................................................. 79 6.7. Exchange Addresses .................................................................. 82 6.8. Exchange Features ..................................................................... 85 6.9. Exchange Advanced ................................................................... 86 6.10. Exchange Custom Attributes ..................................................... 87 6.11. Exchange Internet Locator Service ............................................ 89 6.12. Mailbox Rights ......................................................................... 90 6.13. Terminal Services Profile .......................................................... 91
6.13.1. Remote Desktop Services Profile ......................................... 93 6.14. COM+ ..................................................................................... 94 6.15. Exchange General .................................................................... 99
6.15.1. Delivery Restrictions ........................................................... 99 6.15.2. Delivery Options .............................................................. 101 6.15.3. Storage Limits ................................................................. 102
6.16. Member Of ............................................................................ 103 6.17. Environment .......................................................................... 105 6.18. Session .................................................................................. 109 6.19. Remote Control ...................................................................... 110 6.20. UNIX Attributes ...................................................................... 111
6.20.1. UNIX Attributes for Users ................................................. 112 6.20.2. UNIX Attributes for Groups ............................................... 114
6.21. Personal Virtual Desktop ......................................................... 115 6.22. BitLocker Recovery Password Viewer ....................................... 118
6.22.1. Using Microsoft Windows Server 2008 ............................... 120 6.22.2. Using Microsoft Windows Server 2008 R2 .......................... 121 6.22.3. Using Microsoft Windows Server 2012 ............................... 121 6.22.4. Read BitLocker OwnerInformation..................................... 123 6.22.5. Write BitLocker OwnerInformation .................................... 123
6.23. More to explore ..................................................................... 124 6.23.1. Object creation date......................................................... 124 6.23.2. Object modification date .................................................. 124
Unlock AD DS using {C# .NET} XIII
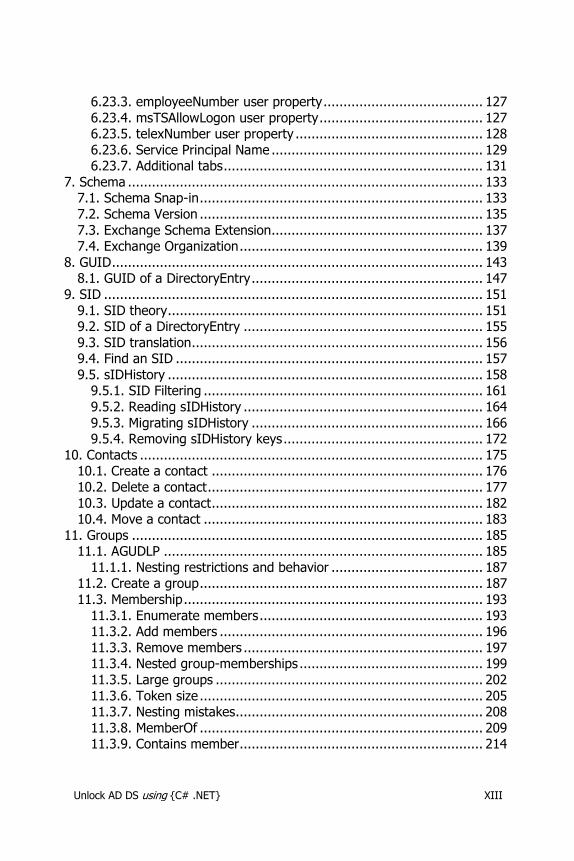
6.23.3. employeeNumber user property ........................................ 127 6.23.4. msTSAllowLogon user property ......................................... 127 6.23.5. telexNumber user property ............................................... 128 6.23.6. Service Principal Name ..................................................... 129 6.23.7. Additional tabs ................................................................. 131
7. Schema ......................................................................................... 133 7.1. Schema Snap-in ....................................................................... 133 7.2. Schema Version ....................................................................... 135 7.3. Exchange Schema Extension..................................................... 137 7.4. Exchange Organization ............................................................. 139
8. GUID ............................................................................................. 143 8.1. GUID of a DirectoryEntry .......................................................... 147
9. SID ............................................................................................... 151 9.1. SID theory ............................................................................... 151 9.2. SID of a DirectoryEntry ............................................................ 155 9.3. SID translation ......................................................................... 156 9.4. Find an SID ............................................................................. 157 9.5. sIDHistory ............................................................................... 158
9.5.1. SID Filtering ...................................................................... 161 9.5.2. Reading sIDHistory ............................................................ 164 9.5.3. Migrating sIDHistory .......................................................... 166 9.5.4. Removing sIDHistory keys .................................................. 172
10. Contacts ...................................................................................... 175 10.1. Create a contact .................................................................... 176 10.2. Delete a contact ..................................................................... 177 10.3. Update a contact .................................................................... 182 10.4. Move a contact ...................................................................... 183
11. Groups ........................................................................................ 185 11.1. AGUDLP ................................................................................ 185
11.1.1. Nesting restrictions and behavior ...................................... 187 11.2. Create a group ....................................................................... 187 11.3. Membership ........................................................................... 193
11.3.1. Enumerate members ........................................................ 193 11.3.2. Add members .................................................................. 196 11.3.3. Remove members ............................................................ 197 11.3.4. Nested group-memberships .............................................. 199 11.3.5. Large groups ................................................................... 202 11.3.6. Token size ....................................................................... 205 11.3.7. Nesting mistakes.............................................................. 208 11.3.8. MemberOf ....................................................................... 209 11.3.9. Contains member ............................................................. 214
XIV Unlock AD DS using {C# .NET}
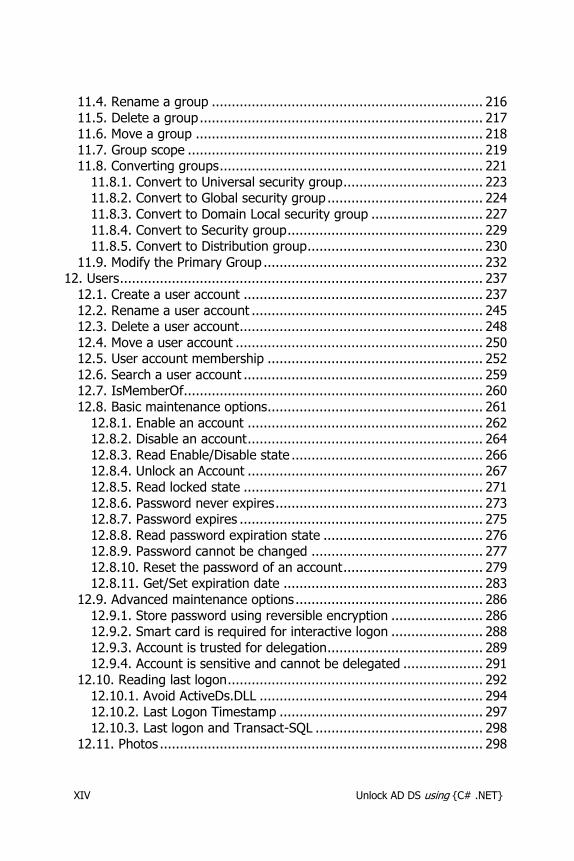
11.4. Rename a group .................................................................... 216 11.5. Delete a group ....................................................................... 217 11.6. Move a group ........................................................................ 218 11.7. Group scope .......................................................................... 219 11.8. Converting groups .................................................................. 221
11.8.1. Convert to Universal security group ................................... 223 11.8.2. Convert to Global security group ....................................... 224 11.8.3. Convert to Domain Local security group ............................ 227 11.8.4. Convert to Security group ................................................. 229 11.8.5. Convert to Distribution group ............................................ 230
11.9. Modify the Primary Group ....................................................... 232 12. Users ........................................................................................... 237
12.1. Create a user account ............................................................ 237 12.2. Rename a user account .......................................................... 245 12.3. Delete a user account ............................................................. 248 12.4. Move a user account .............................................................. 250 12.5. User account membership ...................................................... 252 12.6. Search a user account ............................................................ 259 12.7. IsMemberOf........................................................................... 260 12.8. Basic maintenance options...................................................... 261
12.8.1. Enable an account ........................................................... 262 12.8.2. Disable an account ........................................................... 264 12.8.3. Read Enable/Disable state ................................................ 266 12.8.4. Unlock an Account ........................................................... 267 12.8.5. Read locked state ............................................................ 271 12.8.6. Password never expires .................................................... 273 12.8.7. Password expires ............................................................. 275 12.8.8. Read password expiration state ........................................ 276 12.8.9. Password cannot be changed ........................................... 277 12.8.10. Reset the password of an account ................................... 279 12.8.11. Get/Set expiration date .................................................. 283
12.9. Advanced maintenance options ............................................... 286 12.9.1. Store password using reversible encryption ....................... 286 12.9.2. Smart card is required for interactive logon ....................... 288 12.9.3. Account is trusted for delegation ....................................... 289 12.9.4. Account is sensitive and cannot be delegated .................... 291
12.10. Reading last logon ................................................................ 292 12.10.1. Avoid ActiveDs.DLL ........................................................ 294 12.10.2. Last Logon Timestamp ................................................... 297 12.10.3. Last logon and Transact-SQL .......................................... 298
12.11. Photos ................................................................................. 298
Unlock AD DS using {C# .NET} XV
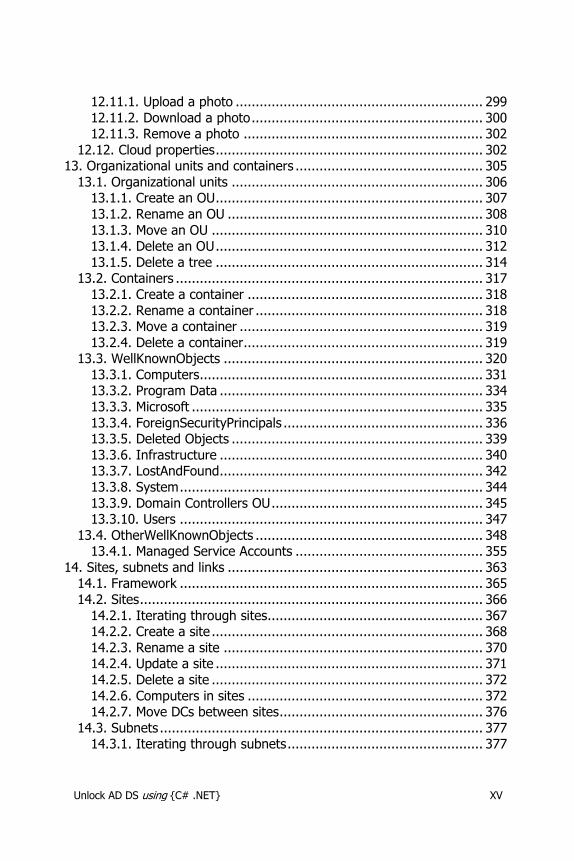
12.11.1. Upload a photo .............................................................. 299 12.11.2. Download a photo .......................................................... 300 12.11.3. Remove a photo ............................................................ 302
12.12. Cloud properties ................................................................... 302 13. Organizational units and containers ............................................... 305
13.1. Organizational units ............................................................... 306 13.1.1. Create an OU ................................................................... 307 13.1.2. Rename an OU ................................................................ 308 13.1.3. Move an OU .................................................................... 310 13.1.4. Delete an OU ................................................................... 312 13.1.5. Delete a tree ................................................................... 314
13.2. Containers ............................................................................. 317 13.2.1. Create a container ........................................................... 318 13.2.2. Rename a container ......................................................... 318 13.2.3. Move a container ............................................................. 319 13.2.4. Delete a container............................................................ 319
13.3. WellKnownObjects ................................................................. 320 13.3.1. Computers....................................................................... 331 13.3.2. Program Data .................................................................. 334 13.3.3. Microsoft ......................................................................... 335 13.3.4. ForeignSecurityPrincipals .................................................. 336 13.3.5. Deleted Objects ............................................................... 339 13.3.6. Infrastructure .................................................................. 340 13.3.7. LostAndFound.................................................................. 342 13.3.8. System ............................................................................ 344 13.3.9. Domain Controllers OU ..................................................... 345 13.3.10. Users ............................................................................ 347
13.4. OtherWellKnownObjects ......................................................... 348 13.4.1. Managed Service Accounts ............................................... 355
14. Sites, subnets and links ................................................................ 363 14.1. Framework ............................................................................ 365 14.2. Sites ...................................................................................... 366
14.2.1. Iterating through sites...................................................... 367 14.2.2. Create a site .................................................................... 368 14.2.3. Rename a site ................................................................. 370 14.2.4. Update a site ................................................................... 371 14.2.5. Delete a site .................................................................... 372 14.2.6. Computers in sites ........................................................... 372 14.2.7. Move DCs between sites ................................................... 376
14.3. Subnets ................................................................................. 377 14.3.1. Iterating through subnets ................................................. 377
XVI Unlock AD DS using {C# .NET}
14.3.2. Create a subnet ............................................................... 379 14.3.3. Modify a subnet ............................................................... 381 14.3.4. Update a subnet .............................................................. 382 14.3.5. Delete a subnet ............................................................... 382 14.3.6. Assign a site .................................................................... 383
14.4. Transport-Links ...................................................................... 384 14.4.1. Iterating through inter-site transport links ......................... 384 14.4.2. Create a transport-link ..................................................... 386 14.4.3. Update a transport-link .................................................... 388 14.4.4. Delete a transport-link ...................................................... 390
15. Hardware..................................................................................... 393 15.1. Computer(s) .......................................................................... 393
15.1.1. Find a computer .............................................................. 396 15.1.2. Disable a computer .......................................................... 397 15.1.3. Enable a computer ........................................................... 398 15.1.4. Reset a computer ............................................................ 398 15.1.5. Create a computer ........................................................... 401
15.2. Managed Computers .............................................................. 404 15.2.1. Read the MAC-address ..................................................... 406 15.2.2. Read the netbootGUID ..................................................... 408 15.2.3. Write the netbootGUID ..................................................... 409 15.2.4. Clear the netbootGUID ..................................................... 411 15.2.5. GUID and Binary Octet ..................................................... 412
15.3. Printer(s) ............................................................................... 413 15.3.1. Find a print-queue ........................................................... 418 15.3.2. Move a print-queue .......................................................... 419 15.3.3. Delete a print-queue ........................................................ 420
16. Terminal Services/Remote Desktop Services .................................. 423 16.1. Terminal Services/Remote Desktop Environment ...................... 426
16.1.1. Starting program ............................................................. 426 16.1.2. Connect client drives at logon ........................................... 432 16.1.3. Connect client printers at logon ........................................ 434 16.1.4. Default to main client printer ............................................ 435 16.1.5. Reading the settings ........................................................ 437
16.2. Terminal Services/Remote Desktop Sessions ............................ 438 16.2.1. End a disconnected session .............................................. 438 16.2.2. Active session limit ........................................................... 440 16.2.3. Idle session limit .............................................................. 441 16.2.4. When a session limit is reached or a connection is broken .. 443 16.2.5. Allow reconnection ........................................................... 444
16.3. Remote Deskstop Services ...................................................... 445

Unlock AD DS using {C# .NET} XVII
16.3.1. Access Remote Desktop Session Host................................ 446 16.3.2. Remote Control................................................................ 447
17. Infrastructure............................................................................... 451 17.1. Forest ................................................................................... 451
17.1.1. Forest Functional levels .................................................... 452 17.1.2. Raise Forest Functional level ............................................. 456
17.2. Domain ................................................................................. 458 17.2.1. Domain Functional Levels ................................................. 459 17.2.2. Raise Domain Functional level .......................................... 464 17.2.3. friendlyDomainName ........................................................ 466
17.3. FSMO(s) ................................................................................ 467 17.4. Domain Controller(s) .............................................................. 472
17.4.1. Operating system ............................................................. 472 17.5. Global Catalog(s) ................................................................... 473
17.5.1. Add GC role ..................................................................... 475 17.5.2. Remove GC role ............................................................... 476
17.6. RODC .................................................................................... 477 17.7. Trusts.................................................................................... 479 17.8. Time Server ........................................................................... 485
17.8.1. Time slack ....................................................................... 488 17.9. KDC ...................................................................................... 489 17.10. Replication ........................................................................... 491
18. Group Policy Object ...................................................................... 493 18.1. Reading GPOs ........................................................................ 494 18.2. Unlinked GPOs ....................................................................... 496 18.3. Orphaned GPOs ..................................................................... 497 18.4. GPO version incompatibility .................................................... 500 18.5. Default Domain Policy ............................................................ 502
19. Password Settings Object ............................................................. 509 19.1. Read a PSO ........................................................................... 513 19.2. Create a PSO ......................................................................... 516 19.3. Update a PSO ........................................................................ 518
19.3.1. Validating properties ........................................................ 519 19.4. Delete a PSO ......................................................................... 519 19.5. Apply a PSO ........................................................................... 521
20. Recover Deleted Objects ............................................................... 523 20.1. Before the AD Recycle Bin ...................................................... 523
20.1.1. Read Deleted Objects ....................................................... 525 20.1.2. Recover Deleted Objects .................................................. 527 20.1.3. TombstoneLifetime .......................................................... 529
20.2. AD Recycle Bin ....................................................................... 530
XVIII Unlock AD DS using {C# .NET}
20.2.1. Raise Forest Level ............................................................ 531 20.2.2. Enable the AD Recycle Bin ................................................ 531 20.2.3. Recovering Objects .......................................................... 532 20.2.4. Detecting the AD Recycle Bin ............................................ 532
21. Directory Rights ........................................................................... 535 21.1. DACL ..................................................................................... 535
21.1.1. Read a DACL ................................................................... 536 21.1.2. Write a DACL ................................................................... 543
21.2. Protect object ........................................................................ 546 21.2.1. Read protect object.......................................................... 547 21.2.2. Check protect object ........................................................ 548 21.2.3. Uncheck protect object ..................................................... 549
21.3. Managed By ........................................................................... 550 21.3.1. Setting the manager ........................................................ 551 21.3.2. Clearing the manager ....................................................... 553
21.4. Ownership ............................................................................. 554 21.4.1. Read Ownership .............................................................. 555 21.4.2. Set Ownership ................................................................. 556
21.5. Quota .................................................................................... 559 21.5.1. Default quota .................................................................. 560 21.5.2. Tombstone quota ............................................................. 562 21.5.3. Personalized quotas ......................................................... 564 21.5.4. Domain level quotas......................................................... 567 21.5.5. Top quota usage .............................................................. 569
22. Exchange Interface Providers ........................................................ 575 22.1. Microsoft Exchange 2003 ........................................................ 575
22.1.1. CDOEXM ......................................................................... 575 22.1.2. Create Mailbox ................................................................. 576
22.2. Microsoft Exchange 2007 ........................................................ 578 22.3. Microsoft Exchange 2010 ........................................................ 578 22.4. Microsoft Exchange Legacy ..................................................... 579
22.4.1. CDO ................................................................................ 579 22.4.2. MAPI ............................................................................... 580 22.4.3. Legacy Exchange APIs ..................................................... 580
22.5. Sending e-Mail ....................................................................... 581 23. Distribution Lists .......................................................................... 587
23.1. Creation steps ........................................................................ 587 23.2. Creating a Distribution List ...................................................... 589
23.2.1. Create a group ................................................................ 589 23.2.2. Access, mail-enable and configure new group .................... 590 23.2.3. Setting a manager ........................................................... 592
Unlock AD DS using {C# .NET} XIX
23.2.4. Adding members .............................................................. 594 23.2.5. Removing members ......................................................... 594
24. MMC ............................................................................................ 595 24.1. MMC interface ........................................................................ 595 24.2. Create an MMC ...................................................................... 597
24.2.1. Project and view .............................................................. 597 24.2.2. Add library....................................................................... 598 24.2.3. Add installer .................................................................... 600 24.2.4. Detail pane ...................................................................... 606 24.2.5. Actions ............................................................................ 609
24.3. Custom root node .................................................................. 615 24.4. Installing and removing an MMC snap-in ................................. 617
24.4.1. 32-bits operating systems ................................................. 617 24.4.2. 64-bits operating system .................................................. 618
24.5. Troubleshooting MMC in Visual Studio ..................................... 620 25. Legacy Windows NT 4.0 ............................................................... 623
25.1. Managed/Unmanaged ............................................................ 623 25.2. NETAPI32 .............................................................................. 624
25.2.1. Obtain PDC ...................................................................... 625 25.2.2. Free buffers ..................................................................... 626 25.2.3. Read all users .................................................................. 627 25.2.4. Read user memberships ................................................... 631 25.2.5. Read all groups ................................................................ 633 25.2.6. Read group members ....................................................... 636 25.2.7. Read servers ................................................................... 639
Appendix – I ...................................................................................... 643

Chapter 1. About Active Directory 1
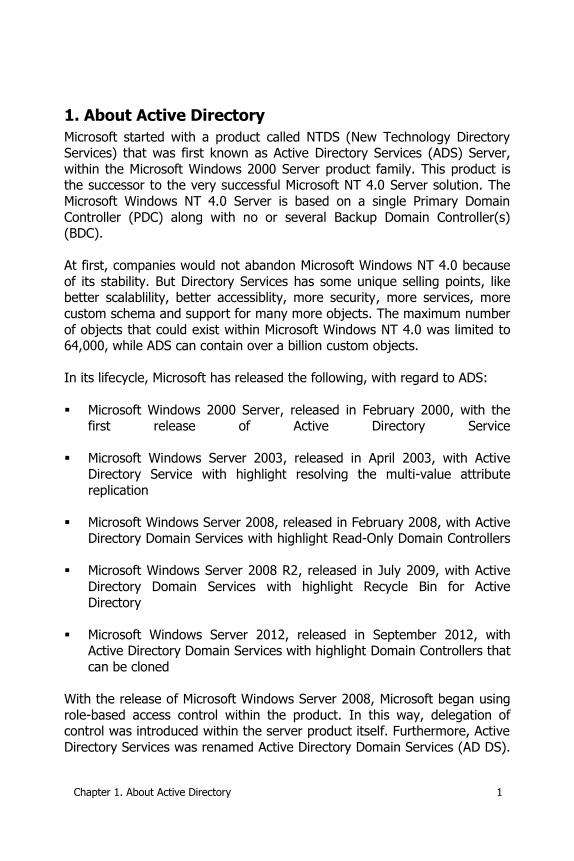
1. About Active Directory
Microsoft started with a product called NTDS (New Technology Directory Services) that was first known as Active Directory Services (ADS) Server,
within the Microsoft Windows 2000 Server product family. This product is the successor to the very successful Microsoft NT 4.0 Server solution. The
Microsoft Windows NT 4.0 Server is based on a single Primary Domain
Controller (PDC) along with no or several Backup Domain Controller(s) (BDC).
At first, companies would not abandon Microsoft Windows NT 4.0 because
of its stability. But Directory Services has some unique selling points, like better scalablility, better accessiblity, more security, more services, more
custom schema and support for many more objects. The maximum number
of objects that could exist within Microsoft Windows NT 4.0 was limited to 64,000, while ADS can contain over a billion custom objects.
In its lifecycle, Microsoft has released the following, with regard to ADS:
Microsoft Windows 2000 Server, released in February 2000, with the first release of Active Directory Service
Microsoft Windows Server 2003, released in April 2003, with Active
Directory Service with highlight resolving the multi-value attribute
replication
Microsoft Windows Server 2008, released in February 2008, with Active Directory Domain Services with highlight Read-Only Domain Controllers
Microsoft Windows Server 2008 R2, released in July 2009, with Active
Directory Domain Services with highlight Recycle Bin for Active
Directory
Microsoft Windows Server 2012, released in September 2012, with Active Directory Domain Services with highlight Domain Controllers that
can be cloned
With the release of Microsoft Windows Server 2008, Microsoft began using
role-based access control within the product. In this way, delegation of control was introduced within the server product itself. Furthermore, Active
Directory Services was renamed Active Directory Domain Services (AD DS).

2 Chapter 1. About Active Directory
I will use the AD DS abbreviation and the word directory in this book to
cover Microsoft Windows 2000 and later versions.
1.1. Core
At its core, AD DS is nothing more than a file called NTDS.DIT. This file is,
in fact, an indexed and sequential access method (ISAM) database that is based on Microsoft’s own Extensible Storage Engine (ESE) solution. The
storage engine is responsible for indexing data and for transferring entries
into and out of the database. This database, called the directory, is a set of objects with similar attributes organized in a logical and hierarchical
manner.
The database file is stored in the %SystemRoot%\NTDS folder. Within the
laboratory environment, the absolute path to the file is:
C:\Windows\NTDS\ntds.dit
The NTDS.DIT file size depends on the number of objects created within
the directory, but ESE has the capability to grow (as a single file) to 16 terabytes.
AD DS uses a multi-master model, but because not all changes within the
domain are replicated, the size of the file can differ within the domain. Only
changes are replicated, not the database itself.
The file should not be accessed directly, but the content of the file can be accessed through the use of the commonly used Lightweight Directory
Access Protocol (LDAP) access layer.
At first, AD DS was part of the operating system and could only be
restarted by rebooting the server. Today, AD DS is implemented as a real service and can be restarted just like any other service. The following
command will stop directory services on a Windows Server:
net stop ntds
And this command will start directory services:
net start ntds
Chapter 1. About Active Directory 3
Thanks to its flexibility, scalability, maintainability and ease of accessibility,
Microsoft Active Directory Domain Services is currently the most commonly used directory service worldwide.
1.2. Security principals
The directory contains several types of objects, and custom objects can be added as well. Several Microsoft products can add additional objects or
extend the built-in objects within the schema. Products from other vendors
that are integrated with the directory might require their own objects or extensions, like Cisco Unity and Citrix Password Manager.
A special type of object is the security principal. A security principal
provides access to securable resources like files, applications, databases
and e-mail. Within Microsoft AD DS, a security principal fits in the following definition:
Any entity that can be authenticated by the directory.
In practice, a security principal can be a user account, a computer account, a security group or a thread or process that runs in the security context of
either a user account or a computer account.
When a security principal is created within the directory, the object is automatically assigned a Security Identifier (SID).
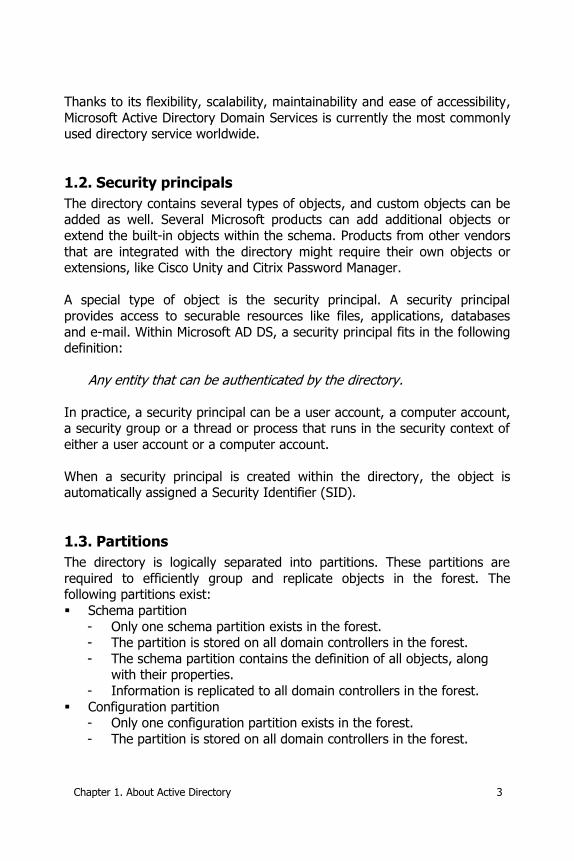
1.3. Partitions
The directory is logically separated into partitions. These partitions are
required to efficiently group and replicate objects in the forest. The following partitions exist:
Schema partition
- Only one schema partition exists in the forest. - The partition is stored on all domain controllers in the forest.
- The schema partition contains the definition of all objects, along with their properties.
- Information is replicated to all domain controllers in the forest.
Configuration partition - Only one configuration partition exists in the forest.
- The partition is stored on all domain controllers in the forest.
4 Chapter 1. About Active Directory
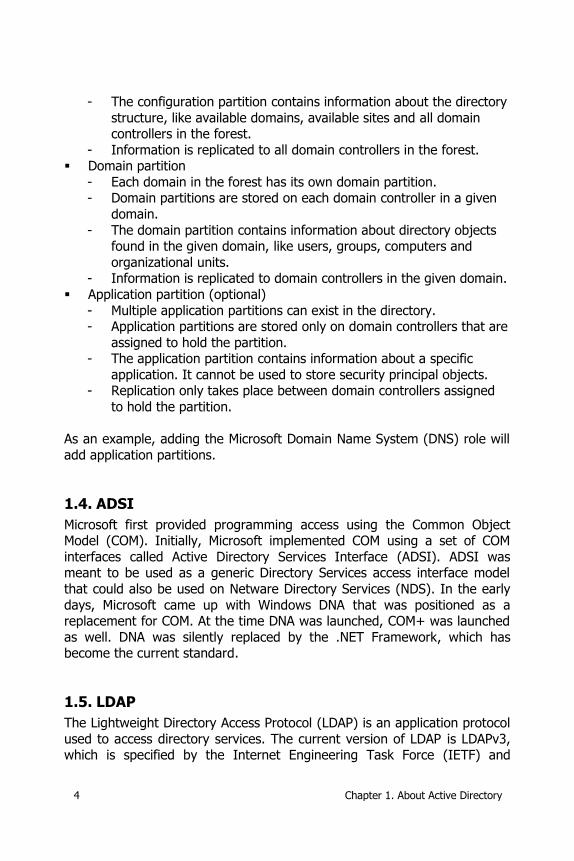
- The configuration partition contains information about the directory
structure, like available domains, available sites and all domain controllers in the forest.
- Information is replicated to all domain controllers in the forest. Domain partition
- Each domain in the forest has its own domain partition. - Domain partitions are stored on each domain controller in a given
domain.
- The domain partition contains information about directory objects found in the given domain, like users, groups, computers and
organizational units. - Information is replicated to domain controllers in the given domain.
Application partition (optional)
- Multiple application partitions can exist in the directory. - Application partitions are stored only on domain controllers that are
assigned to hold the partition. - The application partition contains information about a specific
application. It cannot be used to store security principal objects. - Replication only takes place between domain controllers assigned
to hold the partition.
As an example, adding the Microsoft Domain Name System (DNS) role will
add application partitions.
1.4. ADSI
Microsoft first provided programming access using the Common Object Model (COM). Initially, Microsoft implemented COM using a set of COM
interfaces called Active Directory Services Interface (ADSI). ADSI was meant to be used as a generic Directory Services access interface model
that could also be used on Netware Directory Services (NDS). In the early
days, Microsoft came up with Windows DNA that was positioned as a replacement for COM. At the time DNA was launched, COM+ was launched
as well. DNA was silently replaced by the .NET Framework, which has become the current standard.
1.5. LDAP
The Lightweight Directory Access Protocol (LDAP) is an application protocol
used to access directory services. The current version of LDAP is LDAPv3, which is specified by the Internet Engineering Task Force (IETF) and
Chapter 1. About Active Directory 5
detailed within Request for Comments (RFC) 4510. Microsoft has
implemented and is still adding more native LDAP support through the .NET Framework.
The default port number used to access the database is TCP/IP port 389.
Secure LDAP traffic uses port 636 and is actually LDAP using Secure Socket Layer (SSL) encryption.
LDAP is a lightweight alternative to the X.500 directory services access protocol. The X.500 protocol is called Directory Access Protocol (DAP). The
International Organization for Standards (ISO) was a partner in developing the standards found under the ISO/IEC 9594 identification.
Several AD DS tasks can be fulfilled by both LDAP and ADSI, but some attributes or tasks can only be accessed or achieved by one of the two. For
example, changing terminal services-related attributes can only be done through ADSI.
1.6. AD DS limitations
The number of objects that can be placed within AD DS is enormous. Each
domain controller can create fewer than 2.15 billion objects. Furthermore, there is a limit of approximately 1 billion security identifiers over the life of
a domain. Some limits to the characteristics of these objects are less extreme.
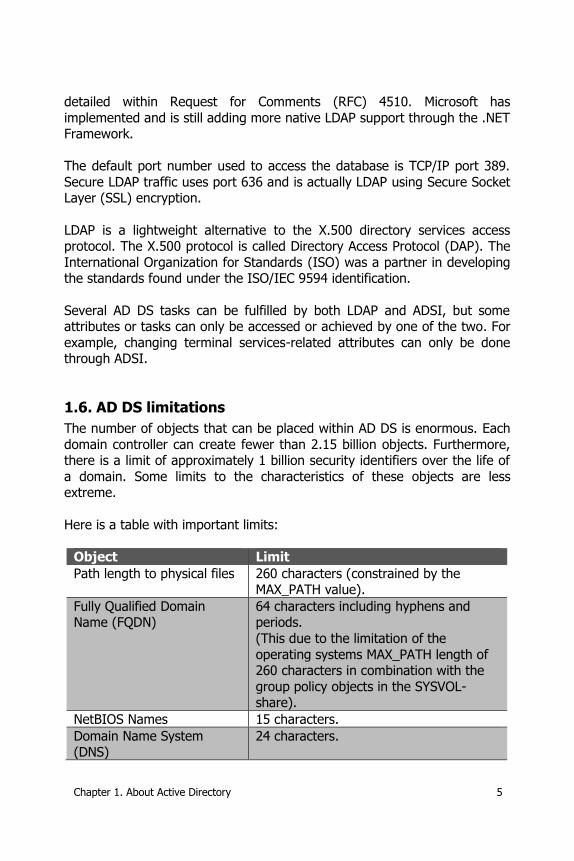
Here is a table with important limits:
Object Limit
Path length to physical files 260 characters (constrained by the MAX_PATH value).
Fully Qualified Domain Name (FQDN)
64 characters including hyphens and periods.
(This due to the limitation of the
operating systems MAX_PATH length of 260 characters in combination with the
group policy objects in the SYSVOL-share).
NetBIOS Names 15 characters.
Domain Name System (DNS)
24 characters.
6 Chapter 1. About Active Directory
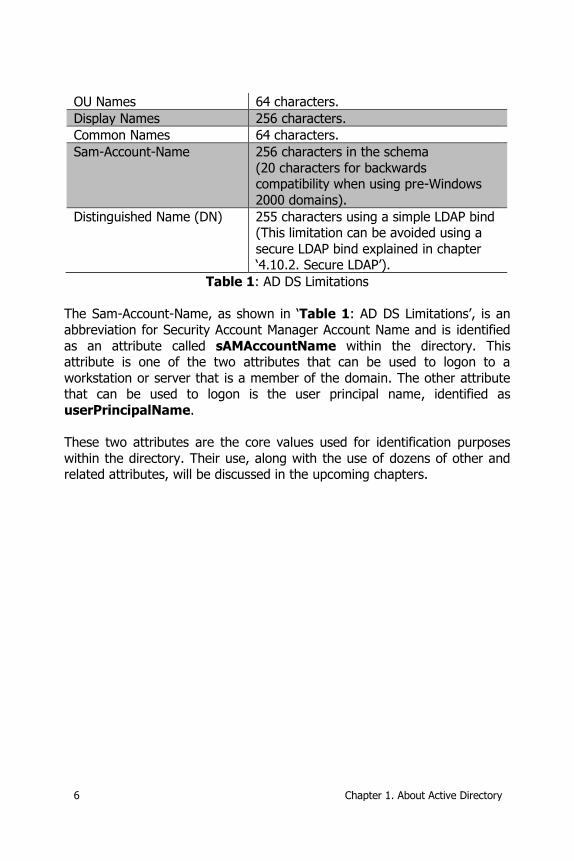
OU Names 64 characters.
Display Names 256 characters.
Common Names 64 characters.
Sam-Account-Name 256 characters in the schema
(20 characters for backwards compatibility when using pre-Windows
2000 domains).
Distinguished Name (DN) 255 characters using a simple LDAP bind (This limitation can be avoided using a
secure LDAP bind explained in chapter ‘4.10.2. Secure LDAP’).
Table 1: AD DS Limitations
The Sam-Account-Name, as shown in ‘Table 1: AD DS Limitations’, is an
abbreviation for Security Account Manager Account Name and is identified
as an attribute called sAMAccountName within the directory. This attribute is one of the two attributes that can be used to logon to a
workstation or server that is a member of the domain. The other attribute that can be used to logon is the user principal name, identified as
userPrincipalName.
These two attributes are the core values used for identification purposes
within the directory. Their use, along with the use of dozens of other and related attributes, will be discussed in the upcoming chapters.
Chapter 2. IDE 7
2. IDE
IDE is an acronym for the Integrated Development Environment, called Visual Developer Studio. In this book, Visual Developer Studio is shortened
to Visual Studio. This paragraph will not discuss the IDE in depth, but will provide the necessary steps to follow in order to interface with AD DS.
One or more references must be added within the Visual Studio project in order for it to communicate with Microsoft Active Directory Domain
Services. Most of the tasks can be fulfilled using the Lightweight Directory Access Protocol provider, which can be referenced by using the following
dynamic link library (DLL), available within the .NET Framework:
System.DirectoryServices.dll
First, start a new project within Visual Studio by selecting File New
Project. Next, select project type Visual C# Windows, and select the
Windows Forms Application-template.
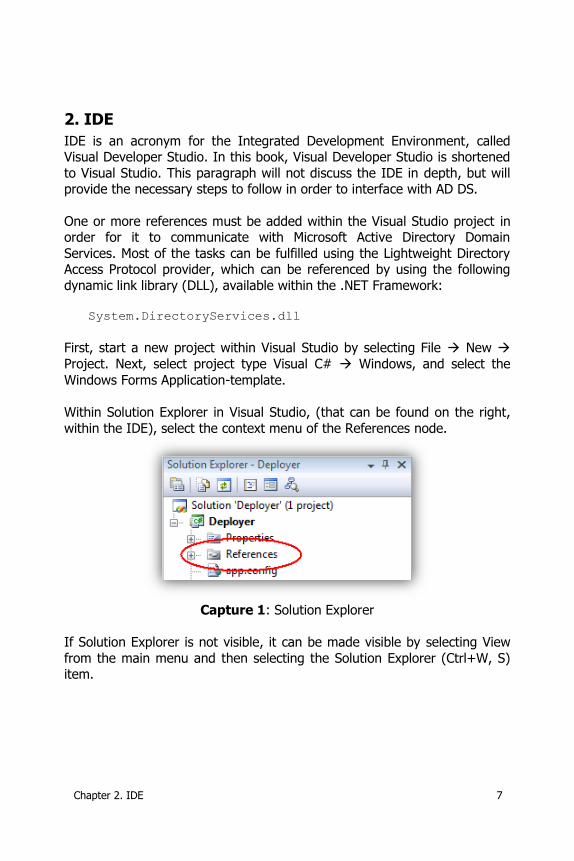
Within Solution Explorer in Visual Studio, (that can be found on the right,
within the IDE), select the context menu of the References node.
Capture 1: Solution Explorer
If Solution Explorer is not visible, it can be made visible by selecting View
from the main menu and then selecting the Solution Explorer (Ctrl+W, S) item.

8 Chapter 2. IDE
Capture 2: View the Solution Explorer
Next, select the ‘Add Reference…’ item from within the context menu of the Solution Explorer area.
Capture 3: Adding a reference
If this is the first time you have opened this dialog within this session, it may take several seconds to load.
Solution
A solution is a placeholder for one or more (most of the time related) projects.

Chapter 2. IDE 9
Capture 4: Add .NET Reference dialog
When the ‘Add Reference’-dialog appears, select .NET-tab (if it is not already selected) and browse to the Component Name, called
System.DirectoryServices, and click OK. The new reference will be added under the References-node in the Solution Explorer.
It is possible to use types, methods and properties by typing their complete namespace:
System.DirectoryServices.DirectoryEntry myEntry;
Shorten the process by adding the DirectoryServices-namespace, which should be placed in the upper area of the source file:
using System.DirectoryServices;
After adding the namespace, the types, methods and properties can simply be referenced without the namespace prefix.
DirectoryEntry myEntry;
The reference to the namespace can also be shortened by adding a synonym, as shown here:
using Ldap = System.DirectoryServices;
Now, you can simply reference the types, methods and properties like this: Ldap.DirectoryEntry item;
Simplifying the reference can be done on any depth within the namespace:
using Word = Microsoft.Office.Interop.Word;
10 Chapter 2. IDE
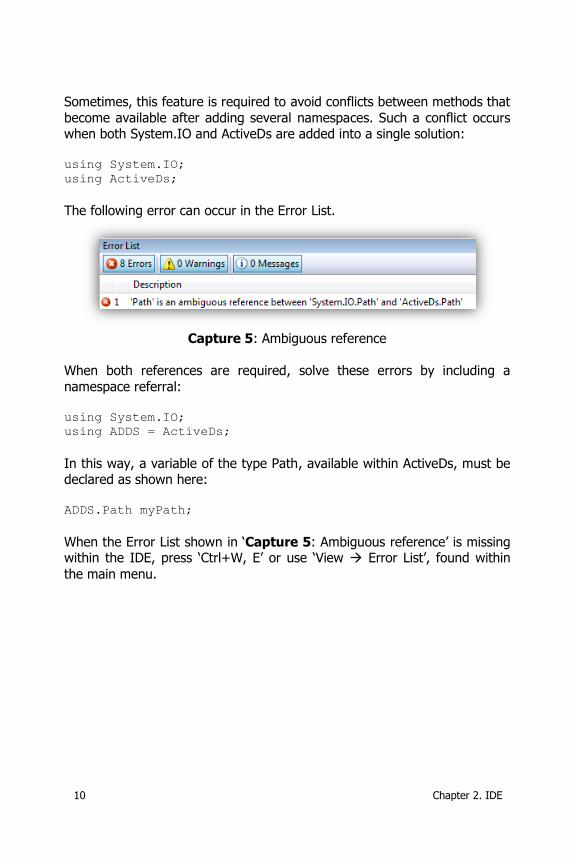
Sometimes, this feature is required to avoid conflicts between methods that
become available after adding several namespaces. Such a conflict occurs when both System.IO and ActiveDs are added into a single solution:
using System.IO;
using ActiveDs;
The following error can occur in the Error List.
Capture 5: Ambiguous reference
When both references are required, solve these errors by including a
namespace referral: using System.IO;
using ADDS = ActiveDs;
In this way, a variable of the type Path, available within ActiveDs, must be declared as shown here:
ADDS.Path myPath;
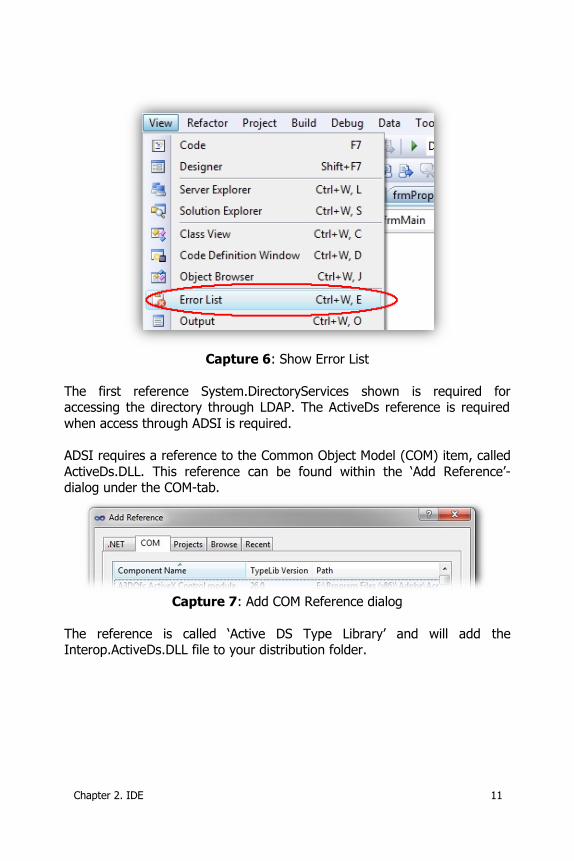
When the Error List shown in ‘Capture 5: Ambiguous reference’ is missing within the IDE, press ‘Ctrl+W, E’ or use ‘View Error List’, found within
the main menu.
Chapter 2. IDE 11
Capture 6: Show Error List
The first reference System.DirectoryServices shown is required for accessing the directory through LDAP. The ActiveDs reference is required
when access through ADSI is required.
ADSI requires a reference to the Common Object Model (COM) item, called
ActiveDs.DLL. This reference can be found within the ‘Add Reference’-dialog under the COM-tab.
Capture 7: Add COM Reference dialog
The reference is called ‘Active DS Type Library’ and will add the Interop.ActiveDs.DLL file to your distribution folder.

Chapter 3. ADSI Edit 13
3. ADSI Edit
Using the ADSI Edit Microsoft Management Console (MMC), Adsiedit.MSC, almost all directory object attributes can be viewed, modified or deleted.
This is a very important tool for both AD DS management and AD DS developers. Its power goes far beyond the requirements of most support or
maintenance employees. In the wrong hands, the management console
allows a user with too much permission to ruin the workings of the directory.
For directory professionals and developers, however, this management
console is a necessity. When Microsoft Windows 2008 became available, the ‘Attribute Editor’-tab was added. It can be displayed using the
advanced features found in the view area in several management consoles.
This tab shows properties and their value when available. In most cases, this feature limits the necessity of using the ADSI Edit management
console.
3.1. Windows Server 2003
The ADSI Edit console is not installed by default and can be downloaded from the Microsoft download site. If you have the original installation media
on hand, the ADSI Edit console can be found within the \SUPPORT\TOOLS folder.
ADSI Edit is a console that consists of the files Adsiedit.MSC (the management console) and Adsiedit.dll (the dynamic link library). The
dynamic link library has to be registered before the management console can be used.
Put both files in a useful folder on the computer first. Next, register the dynamic link library by pressing ‘Windows’-key + R or by pressing ‘Start
Run’.
14 Chapter 3. ADSI Edit
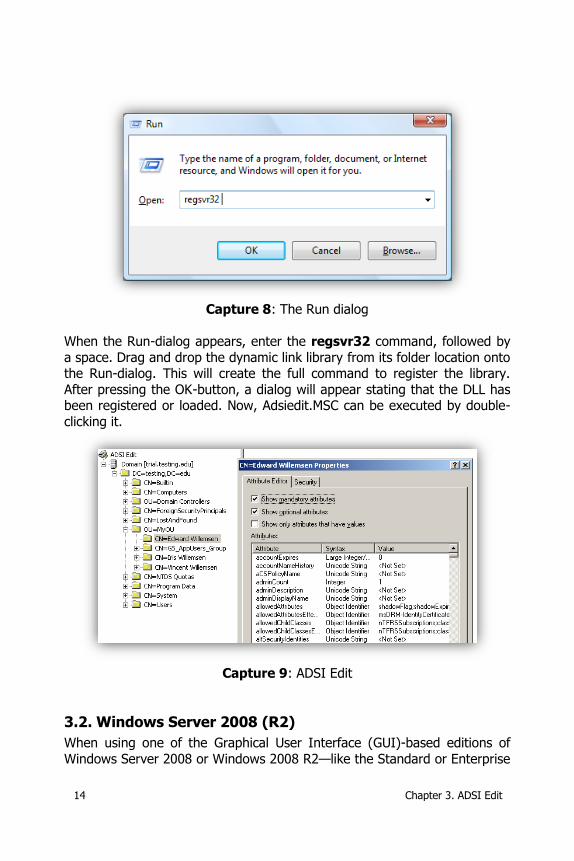
Capture 8: The Run dialog
When the Run-dialog appears, enter the regsvr32 command, followed by
a space. Drag and drop the dynamic link library from its folder location onto the Run-dialog. This will create the full command to register the library.
After pressing the OK-button, a dialog will appear stating that the DLL has been registered or loaded. Now, Adsiedit.MSC can be executed by double-
clicking it.
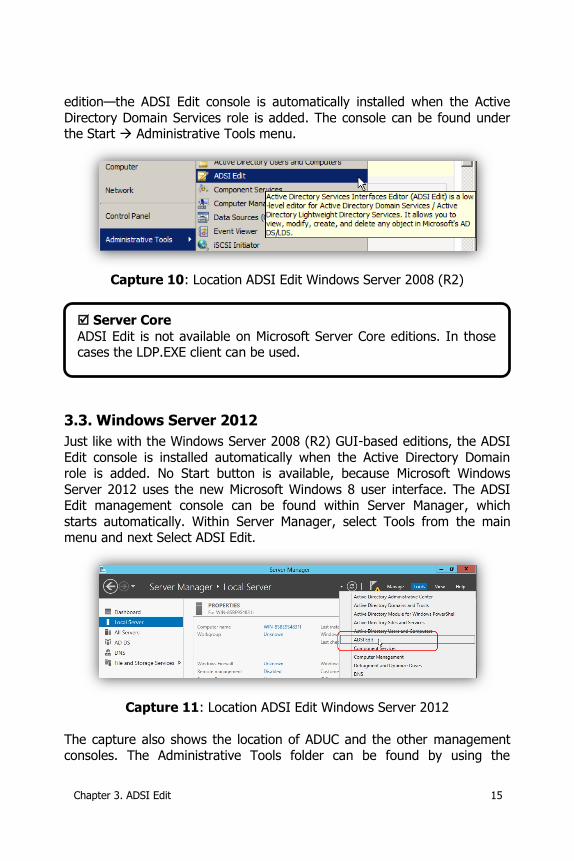
Capture 9: ADSI Edit
3.2. Windows Server 2008 (R2)
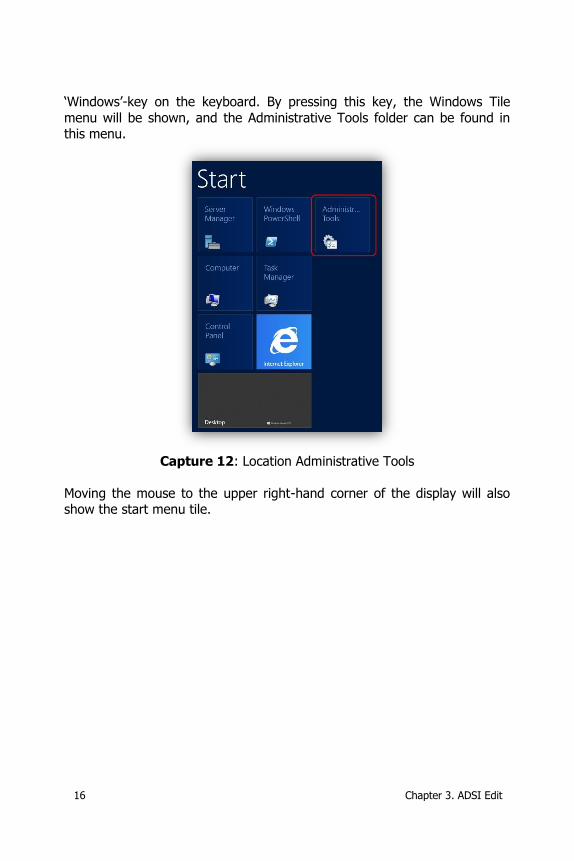
When using one of the Graphical User Interface (GUI)-based editions of
Windows Server 2008 or Windows 2008 R2—like the Standard or Enterprise
Chapter 3. ADSI Edit 15
edition—the ADSI Edit console is automatically installed when the Active
Directory Domain Services role is added. The console can be found under the Start Administrative Tools menu.
Capture 10: Location ADSI Edit Windows Server 2008 (R2)
3.3. Windows Server 2012
Just like with the Windows Server 2008 (R2) GUI-based editions, the ADSI
Edit console is installed automatically when the Active Directory Domain role is added. No Start button is available, because Microsoft Windows
Server 2012 uses the new Microsoft Windows 8 user interface. The ADSI Edit management console can be found within Server Manager, which
starts automatically. Within Server Manager, select Tools from the main menu and next Select ADSI Edit.
Capture 11: Location ADSI Edit Windows Server 2012
The capture also shows the location of ADUC and the other management consoles. The Administrative Tools folder can be found by using the
Server Core
ADSI Edit is not available on Microsoft Server Core editions. In those cases the LDP.EXE client can be used.
16 Chapter 3. ADSI Edit
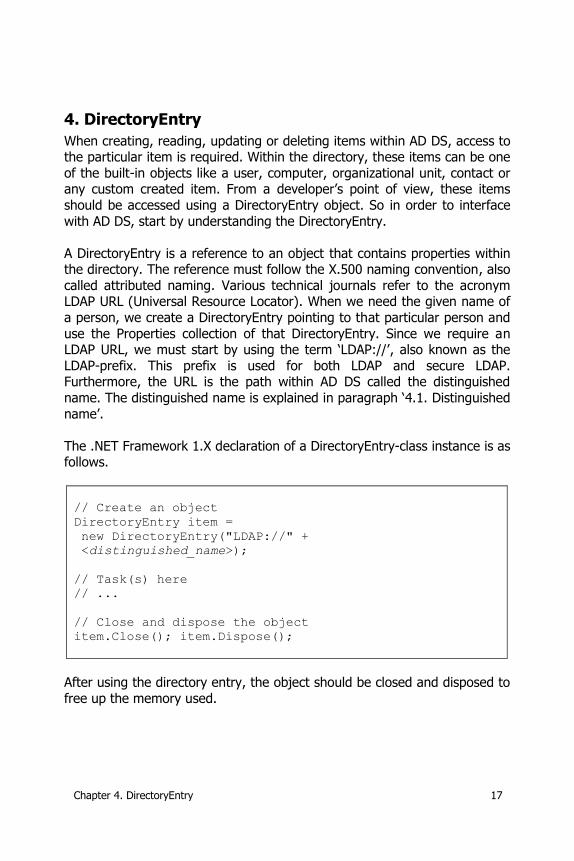
‘Windows’-key on the keyboard. By pressing this key, the Windows Tile
menu will be shown, and the Administrative Tools folder can be found in this menu.
Capture 12: Location Administrative Tools
Moving the mouse to the upper right-hand corner of the display will also show the start menu tile.
Chapter 4. DirectoryEntry 17
4. DirectoryEntry
When creating, reading, updating or deleting items within AD DS, access to the particular item is required. Within the directory, these items can be one
of the built-in objects like a user, computer, organizational unit, contact or any custom created item. From a developer’s point of view, these items
should be accessed using a DirectoryEntry object. So in order to interface
with AD DS, start by understanding the DirectoryEntry.
A DirectoryEntry is a reference to an object that contains properties within the directory. The reference must follow the X.500 naming convention, also
called attributed naming. Various technical journals refer to the acronym LDAP URL (Universal Resource Locator). When we need the given name of
a person, we create a DirectoryEntry pointing to that particular person and
use the Properties collection of that DirectoryEntry. Since we require an LDAP URL, we must start by using the term ‘LDAP://’, also known as the
LDAP-prefix. This prefix is used for both LDAP and secure LDAP. Furthermore, the URL is the path within AD DS called the distinguished
name. The distinguished name is explained in paragraph ‘4.1. Distinguished
name’.
The .NET Framework 1.X declaration of a DirectoryEntry-class instance is as follows.
// Create an object
DirectoryEntry item =
new DirectoryEntry("LDAP://" +
<distinguished_name>);
// Task(s) here
// ...
// Close and dispose the object
item.Close(); item.Dispose();
After using the directory entry, the object should be closed and disposed to
free up the memory used.
18 Chapter 4. DirectoryEntry
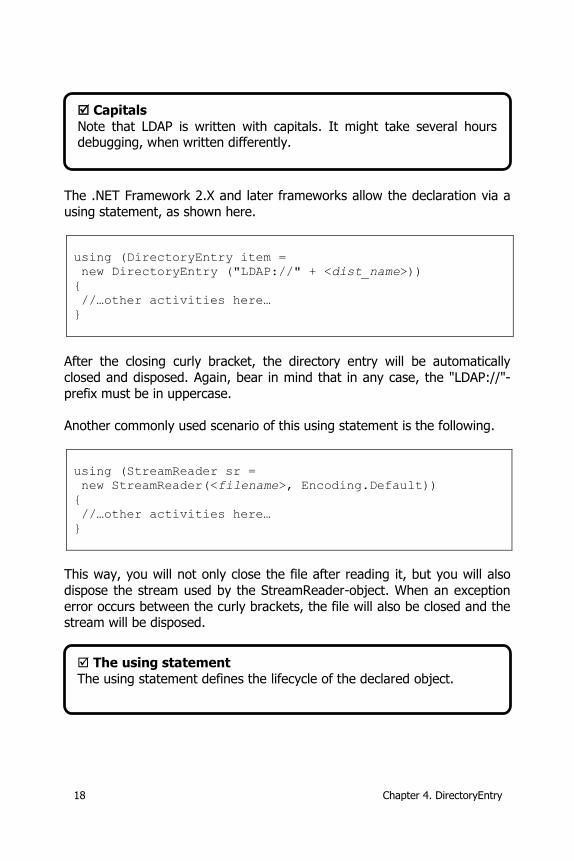
The .NET Framework 2.X and later frameworks allow the declaration via a
using statement, as shown here.
using (DirectoryEntry item =
new DirectoryEntry ("LDAP://" + <dist_name>))
{
//…other activities here…
}
After the closing curly bracket, the directory entry will be automatically
closed and disposed. Again, bear in mind that in any case, the "LDAP://"-
prefix must be in uppercase.
Another commonly used scenario of this using statement is the following.
using (StreamReader sr =
new StreamReader(<filename>, Encoding.Default))
{
//…other activities here…
}
This way, you will not only close the file after reading it, but you will also
dispose the stream used by the StreamReader-object. When an exception
error occurs between the curly brackets, the file will also be closed and the stream will be disposed.
Capitals
Note that LDAP is written with capitals. It might take several hours debugging, when written differently.
The using statement
The using statement defines the lifecycle of the declared object.
Chapter 4. DirectoryEntry 19
Starting with .NET Framework 3.0, which also introduced version 3.0 of the
C# language, it is possible to shorten declarations using the ‘var’-declaration. The previous declarations can be written like this.
using (var item = new DirectoryEntry ("LDAP://" +
<dist_name>))
{
//…other activities here…
}
and
using (var sr = new StreamReader(<filename>,
Encoding.Default))
{
//…other activities here…
}
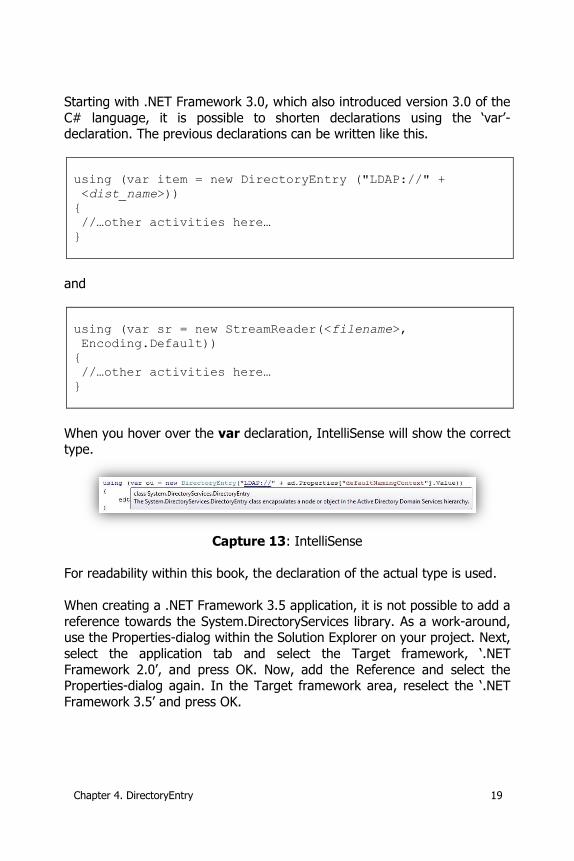
When you hover over the var declaration, IntelliSense will show the correct type.
Capture 13: IntelliSense
For readability within this book, the declaration of the actual type is used.
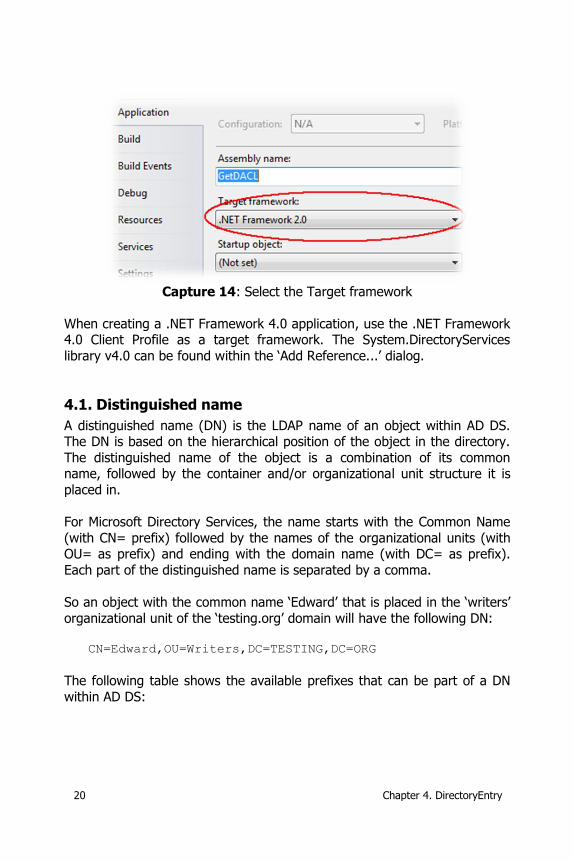
When creating a .NET Framework 3.5 application, it is not possible to add a
reference towards the System.DirectoryServices library. As a work-around, use the Properties-dialog within the Solution Explorer on your project. Next,
select the application tab and select the Target framework, ‘.NET
Framework 2.0’, and press OK. Now, add the Reference and select the Properties-dialog again. In the Target framework area, reselect the ‘.NET
Framework 3.5’ and press OK.
20 Chapter 4. DirectoryEntry
Capture 14: Select the Target framework
When creating a .NET Framework 4.0 application, use the .NET Framework 4.0 Client Profile as a target framework. The System.DirectoryServices
library v4.0 can be found within the ‘Add Reference...’ dialog.
4.1. Distinguished name
A distinguished name (DN) is the LDAP name of an object within AD DS. The DN is based on the hierarchical position of the object in the directory.
The distinguished name of the object is a combination of its common name, followed by the container and/or organizational unit structure it is
placed in.
For Microsoft Directory Services, the name starts with the Common Name
(with CN= prefix) followed by the names of the organizational units (with OU= as prefix) and ending with the domain name (with DC= as prefix).
Each part of the distinguished name is separated by a comma.
So an object with the common name ‘Edward’ that is placed in the ‘writers’
organizational unit of the ‘testing.org’ domain will have the following DN:
CN=Edward,OU=Writers,DC=TESTING,DC=ORG
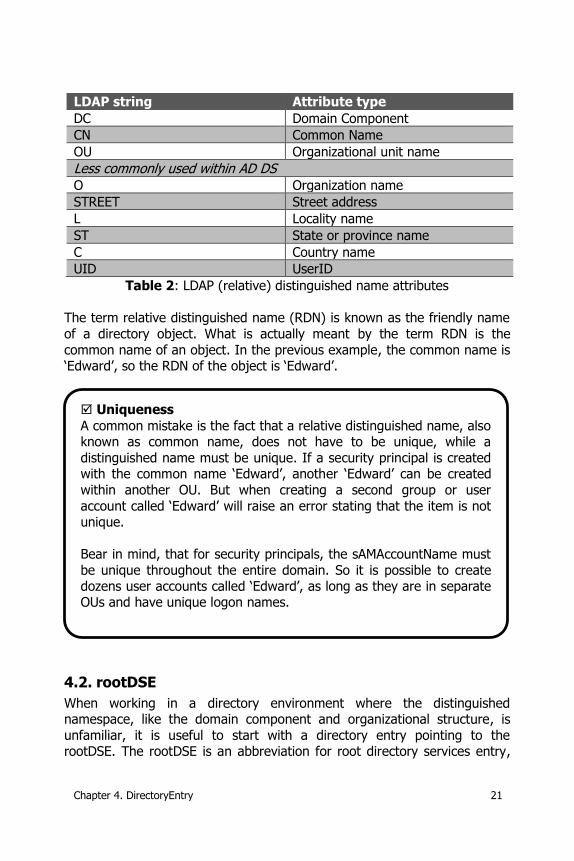
The following table shows the available prefixes that can be part of a DN
within AD DS:
Chapter 4. DirectoryEntry 21
LDAP string Attribute type
DC Domain Component
CN Common Name
OU Organizational unit name
Less commonly used within AD DS O Organization name
STREET Street address
L Locality name
ST State or province name
C Country name
UID UserID
Table 2: LDAP (relative) distinguished name attributes
The term relative distinguished name (RDN) is known as the friendly name
of a directory object. What is actually meant by the term RDN is the
common name of an object. In the previous example, the common name is ‘Edward’, so the RDN of the object is ‘Edward’.
4.2. rootDSE
When working in a directory environment where the distinguished namespace, like the domain component and organizational structure, is
unfamiliar, it is useful to start with a directory entry pointing to the rootDSE. The rootDSE is an abbreviation for root directory services entry,
Uniqueness
A common mistake is the fact that a relative distinguished name, also known as common name, does not have to be unique, while a
distinguished name must be unique. If a security principal is created with the common name ‘Edward’, another ‘Edward’ can be created
within another OU. But when creating a second group or user
account called ‘Edward’ will raise an error stating that the item is not unique.
Bear in mind, that for security principals, the sAMAccountName must
be unique throughout the entire domain. So it is possible to create dozens user accounts called ‘Edward’, as long as they are in separate OUs and have unique logon names.
22 Chapter 4. DirectoryEntry
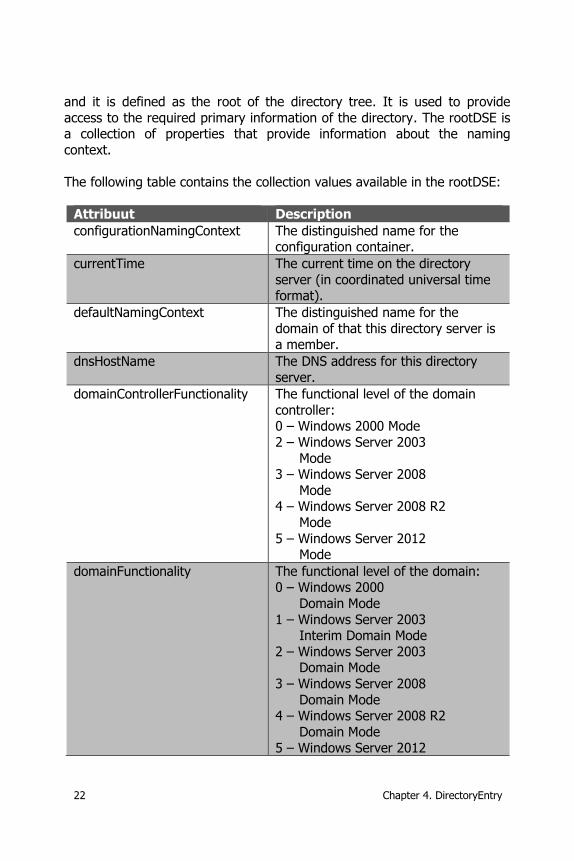
and it is defined as the root of the directory tree. It is used to provide
access to the required primary information of the directory. The rootDSE is a collection of properties that provide information about the naming
context.
The following table contains the collection values available in the rootDSE:
Attribuut Description
configurationNamingContext The distinguished name for the configuration container.
currentTime The current time on the directory
server (in coordinated universal time format).
defaultNamingContext The distinguished name for the
domain of that this directory server is a member.
dnsHostName The DNS address for this directory
server.
domainControllerFunctionality The functional level of the domain
controller: 0 – Windows 2000 Mode
2 – Windows Server 2003
Mode 3 – Windows Server 2008
Mode 4 – Windows Server 2008 R2
Mode
5 – Windows Server 2012 Mode
domainFunctionality The functional level of the domain: 0 – Windows 2000
Domain Mode
1 – Windows Server 2003 Interim Domain Mode
2 – Windows Server 2003 Domain Mode
3 – Windows Server 2008
Domain Mode 4 – Windows Server 2008 R2
Domain Mode 5 – Windows Server 2012
Chapter 4. DirectoryEntry 23
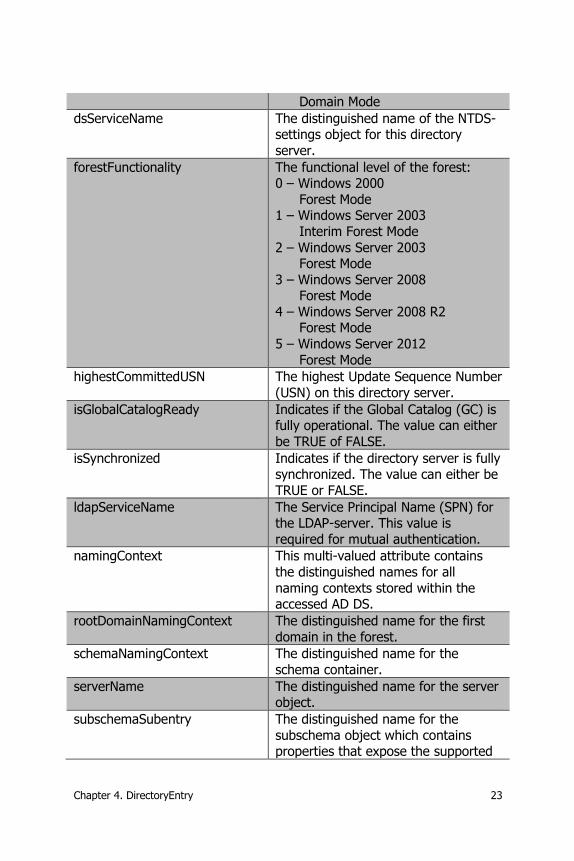
Domain Mode
dsServiceName The distinguished name of the NTDS-settings object for this directory
server.
forestFunctionality The functional level of the forest: 0 – Windows 2000
Forest Mode 1 – Windows Server 2003
Interim Forest Mode
2 – Windows Server 2003 Forest Mode
3 – Windows Server 2008 Forest Mode
4 – Windows Server 2008 R2 Forest Mode
5 – Windows Server 2012
Forest Mode
highestCommittedUSN The highest Update Sequence Number
(USN) on this directory server.
isGlobalCatalogReady Indicates if the Global Catalog (GC) is fully operational. The value can either
be TRUE of FALSE.
isSynchronized Indicates if the directory server is fully synchronized. The value can either be
TRUE or FALSE.
ldapServiceName The Service Principal Name (SPN) for the LDAP-server. This value is
required for mutual authentication.
namingContext This multi-valued attribute contains
the distinguished names for all
naming contexts stored within the accessed AD DS.
rootDomainNamingContext The distinguished name for the first
domain in the forest.
schemaNamingContext The distinguished name for the
schema container.
serverName The distinguished name for the server object.
subschemaSubentry The distinguished name for the
subschema object which contains properties that expose the supported
24 Chapter 4. DirectoryEntry
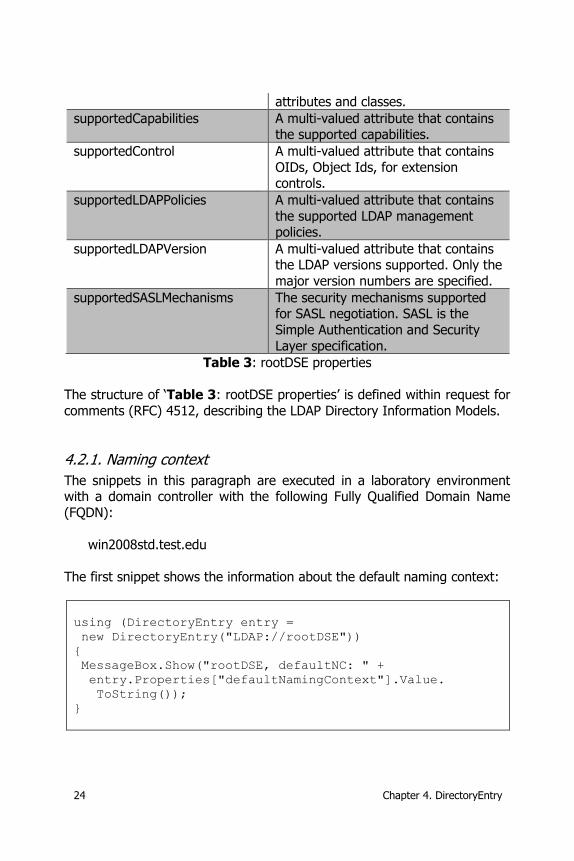
attributes and classes.
supportedCapabilities A multi-valued attribute that contains the supported capabilities.
supportedControl A multi-valued attribute that contains
OIDs, Object Ids, for extension controls.
supportedLDAPPolicies A multi-valued attribute that contains
the supported LDAP management policies.
supportedLDAPVersion A multi-valued attribute that contains the LDAP versions supported. Only the
major version numbers are specified.
supportedSASLMechanisms The security mechanisms supported for SASL negotiation. SASL is the
Simple Authentication and Security
Layer specification.
Table 3: rootDSE properties
The structure of ‘Table 3: rootDSE properties’ is defined within request for
comments (RFC) 4512, describing the LDAP Directory Information Models.
4.2.1. Naming context
The snippets in this paragraph are executed in a laboratory environment with a domain controller with the following Fully Qualified Domain Name
(FQDN):
win2008std.test.edu
The first snippet shows the information about the default naming context:
using (DirectoryEntry entry =
new DirectoryEntry("LDAP://rootDSE"))
{
MessageBox.Show("rootDSE, defaultNC: " +
entry.Properties["defaultNamingContext"].Value.
ToString());
}
Chapter 4. DirectoryEntry 25
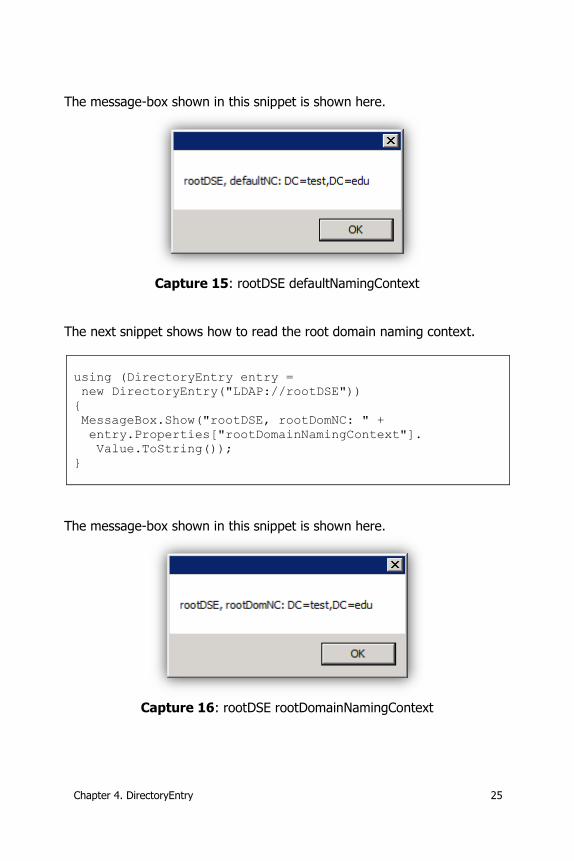
The message-box shown in this snippet is shown here.
Capture 15: rootDSE defaultNamingContext
The next snippet shows how to read the root domain naming context.
using (DirectoryEntry entry =
new DirectoryEntry("LDAP://rootDSE"))
{
MessageBox.Show("rootDSE, rootDomNC: " +
entry.Properties["rootDomainNamingContext"].
Value.ToString());
}
The message-box shown in this snippet is shown here.
Capture 16: rootDSE rootDomainNamingContext
26 Chapter 4. DirectoryEntry
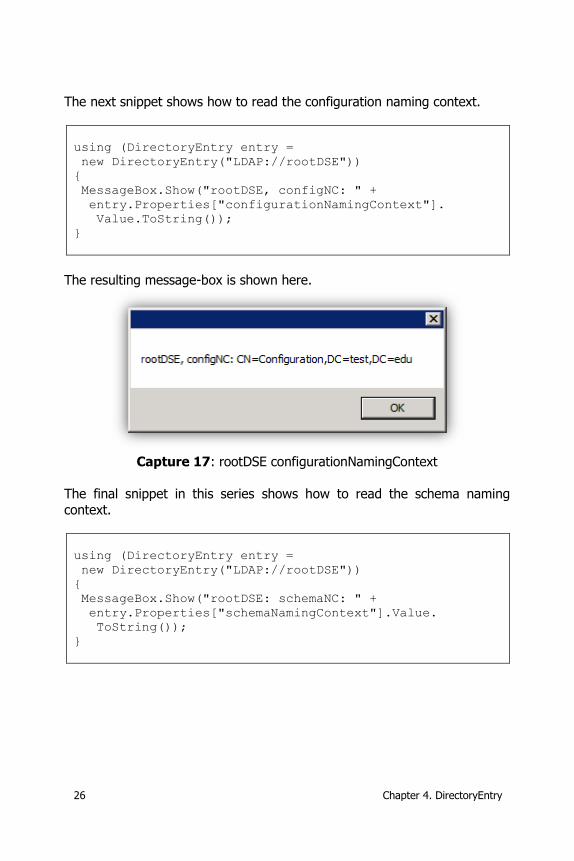
The next snippet shows how to read the configuration naming context.
using (DirectoryEntry entry =
new DirectoryEntry("LDAP://rootDSE"))
{
MessageBox.Show("rootDSE, configNC: " +
entry.Properties["configurationNamingContext"].
Value.ToString());
}
The resulting message-box is shown here.
Capture 17: rootDSE configurationNamingContext
The final snippet in this series shows how to read the schema naming
context.
using (DirectoryEntry entry =
new DirectoryEntry("LDAP://rootDSE"))
{
MessageBox.Show("rootDSE: schemaNC: " +
entry.Properties["schemaNamingContext"].Value.
ToString());
}
Chapter 4. DirectoryEntry 27
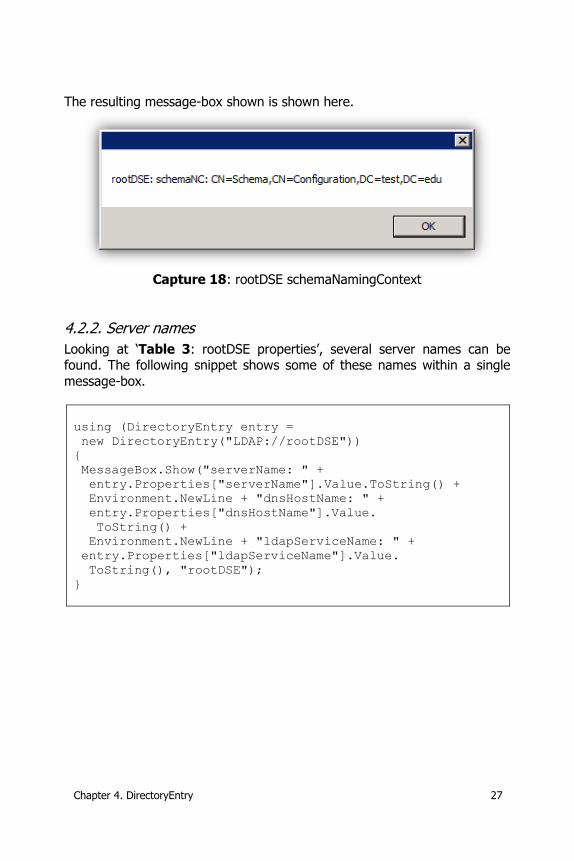
The resulting message-box shown is shown here.
Capture 18: rootDSE schemaNamingContext
4.2.2. Server names
Looking at ‘Table 3: rootDSE properties’, several server names can be found. The following snippet shows some of these names within a single
message-box.
using (DirectoryEntry entry =
new DirectoryEntry("LDAP://rootDSE"))
{
MessageBox.Show("serverName: " +
entry.Properties["serverName"].Value.ToString() +
Environment.NewLine + "dnsHostName: " +
entry.Properties["dnsHostName"].Value.
ToString() +
Environment.NewLine + "ldapServiceName: " +
entry.Properties["ldapServiceName"].Value.
ToString(), "rootDSE");
}
28 Chapter 4. DirectoryEntry
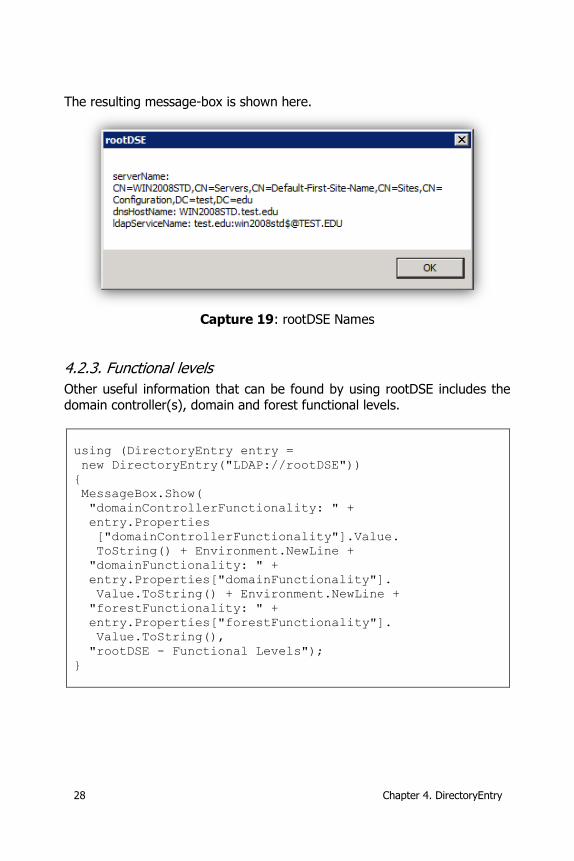
The resulting message-box is shown here.
Capture 19: rootDSE Names
4.2.3. Functional levels
Other useful information that can be found by using rootDSE includes the domain controller(s), domain and forest functional levels.
using (DirectoryEntry entry =
new DirectoryEntry("LDAP://rootDSE"))
{
MessageBox.Show(
"domainControllerFunctionality: " +
entry.Properties
["domainControllerFunctionality"].Value.
ToString() + Environment.NewLine +
"domainFunctionality: " +
entry.Properties["domainFunctionality"].
Value.ToString() + Environment.NewLine +
"forestFunctionality: " +
entry.Properties["forestFunctionality"].
Value.ToString(),
"rootDSE - Functional Levels");
}
Chapter 4. DirectoryEntry 29
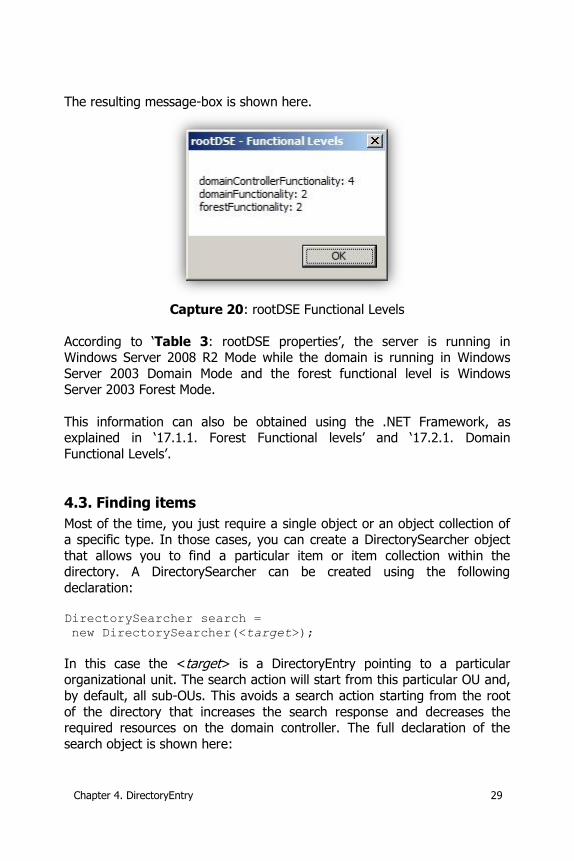
The resulting message-box is shown here.
Capture 20: rootDSE Functional Levels
According to ‘Table 3: rootDSE properties’, the server is running in Windows Server 2008 R2 Mode while the domain is running in Windows
Server 2003 Domain Mode and the forest functional level is Windows Server 2003 Forest Mode.
This information can also be obtained using the .NET Framework, as explained in ‘17.1.1. Forest Functional levels’ and ‘17.2.1. Domain
Functional Levels’.
4.3. Finding items
Most of the time, you just require a single object or an object collection of a specific type. In those cases, you can create a DirectorySearcher object
that allows you to find a particular item or item collection within the directory. A DirectorySearcher can be created using the following
declaration:
DirectorySearcher search =
new DirectorySearcher(<target>);
In this case the <target> is a DirectoryEntry pointing to a particular organizational unit. The search action will start from this particular OU and,
by default, all sub-OUs. This avoids a search action starting from the root
of the directory that increases the search response and decreases the required resources on the domain controller. The full declaration of the
search object is shown here:
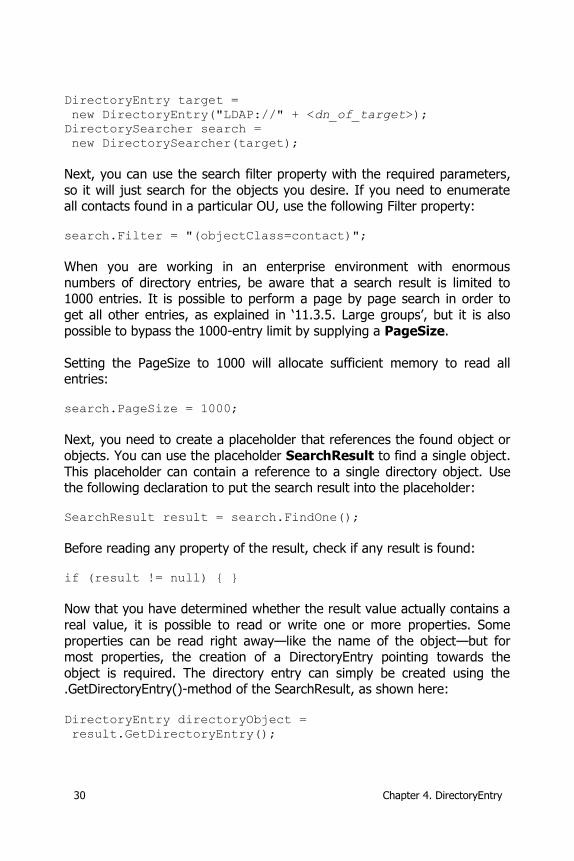
30 Chapter 4. DirectoryEntry
DirectoryEntry target =
new DirectoryEntry("LDAP://" + <dn_of_target>);
DirectorySearcher search =
new DirectorySearcher(target);
Next, you can use the search filter property with the required parameters,
so it will just search for the objects you desire. If you need to enumerate all contacts found in a particular OU, use the following Filter property:
search.Filter = "(objectClass=contact)";
When you are working in an enterprise environment with enormous
numbers of directory entries, be aware that a search result is limited to 1000 entries. It is possible to perform a page by page search in order to
get all other entries, as explained in ‘11.3.5. Large groups’, but it is also
possible to bypass the 1000-entry limit by supplying a PageSize.
Setting the PageSize to 1000 will allocate sufficient memory to read all entries:
search.PageSize = 1000;
Next, you need to create a placeholder that references the found object or
objects. You can use the placeholder SearchResult to find a single object.
This placeholder can contain a reference to a single directory object. Use the following declaration to put the search result into the placeholder:
SearchResult result = search.FindOne();
Before reading any property of the result, check if any result is found:
if (result != null) { }
Now that you have determined whether the result value actually contains a
real value, it is possible to read or write one or more properties. Some
properties can be read right away—like the name of the object—but for most properties, the creation of a DirectoryEntry pointing towards the
object is required. The directory entry can simply be created using the .GetDirectoryEntry()-method of the SearchResult, as shown here:
DirectoryEntry directoryObject =
result.GetDirectoryEntry();
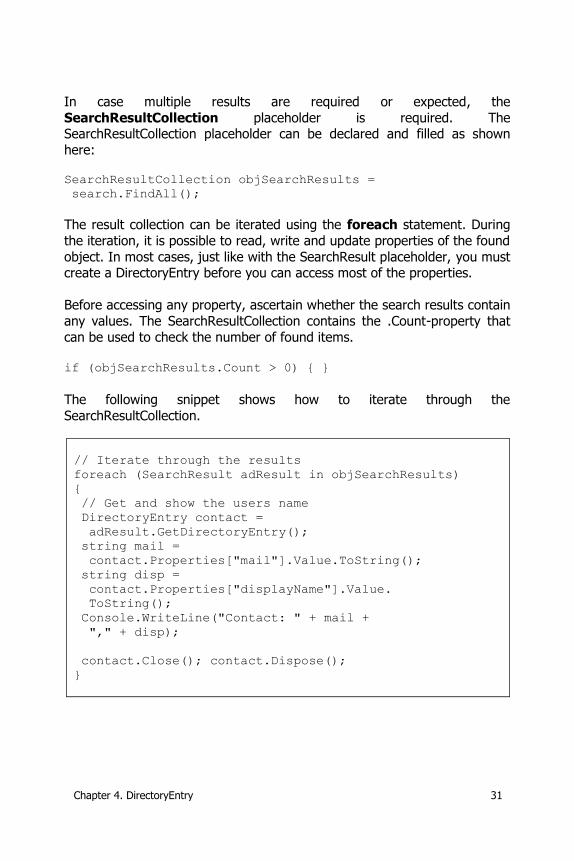
Chapter 4. DirectoryEntry 31
In case multiple results are required or expected, the
SearchResultCollection placeholder is required. The SearchResultCollection placeholder can be declared and filled as shown
here:
SearchResultCollection objSearchResults =
search.FindAll();
The result collection can be iterated using the foreach statement. During
the iteration, it is possible to read, write and update properties of the found
object. In most cases, just like with the SearchResult placeholder, you must create a DirectoryEntry before you can access most of the properties.
Before accessing any property, ascertain whether the search results contain
any values. The SearchResultCollection contains the .Count-property that
can be used to check the number of found items. if (objSearchResults.Count > 0) { }
The following snippet shows how to iterate through the
SearchResultCollection.
// Iterate through the results
foreach (SearchResult adResult in objSearchResults)
{
// Get and show the users name
DirectoryEntry contact =
adResult.GetDirectoryEntry();
string mail =
contact.Properties["mail"].Value.ToString();
string disp =
contact.Properties["displayName"].Value.
ToString();
Console.WriteLine("Contact: " + mail +
"," + disp);
contact.Close(); contact.Dispose();
}
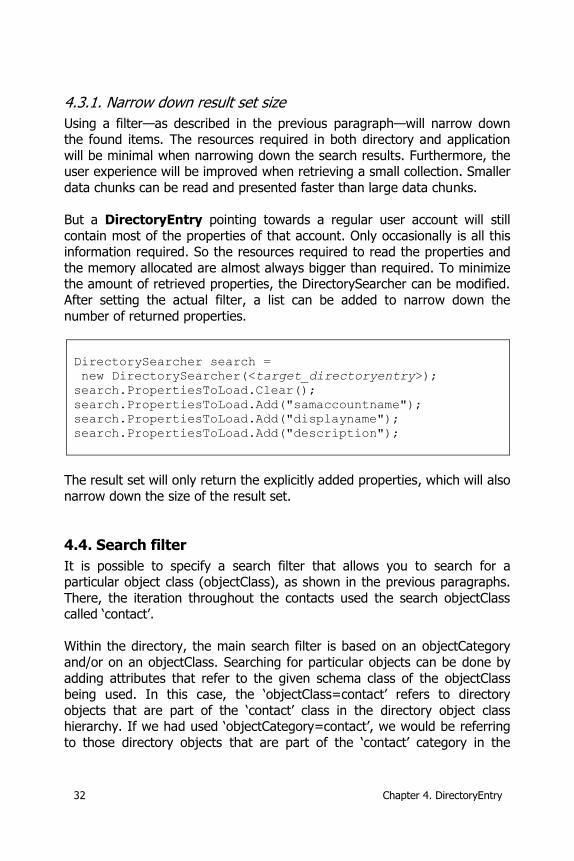
32 Chapter 4. DirectoryEntry
4.3.1. Narrow down result set size
Using a filter—as described in the previous paragraph—will narrow down the found items. The resources required in both directory and application
will be minimal when narrowing down the search results. Furthermore, the user experience will be improved when retrieving a small collection. Smaller
data chunks can be read and presented faster than large data chunks.
But a DirectoryEntry pointing towards a regular user account will still
contain most of the properties of that account. Only occasionally is all this information required. So the resources required to read the properties and
the memory allocated are almost always bigger than required. To minimize the amount of retrieved properties, the DirectorySearcher can be modified.
After setting the actual filter, a list can be added to narrow down the
number of returned properties.
DirectorySearcher search =
new DirectorySearcher(<target_directoryentry>);
search.PropertiesToLoad.Clear();
search.PropertiesToLoad.Add("samaccountname");
search.PropertiesToLoad.Add("displayname");
search.PropertiesToLoad.Add("description");
The result set will only return the explicitly added properties, which will also
narrow down the size of the result set.
4.4. Search filter
It is possible to specify a search filter that allows you to search for a particular object class (objectClass), as shown in the previous paragraphs.
There, the iteration throughout the contacts used the search objectClass called ‘contact’.
Within the directory, the main search filter is based on an objectCategory
and/or on an objectClass. Searching for particular objects can be done by
adding attributes that refer to the given schema class of the objectClass being used. In this case, the ‘objectClass=contact’ refers to directory
objects that are part of the ‘contact’ class in the directory object class hierarchy. If we had used ‘objectCategory=contact’, we would be referring
to those directory objects that are part of the ‘contact’ category in the
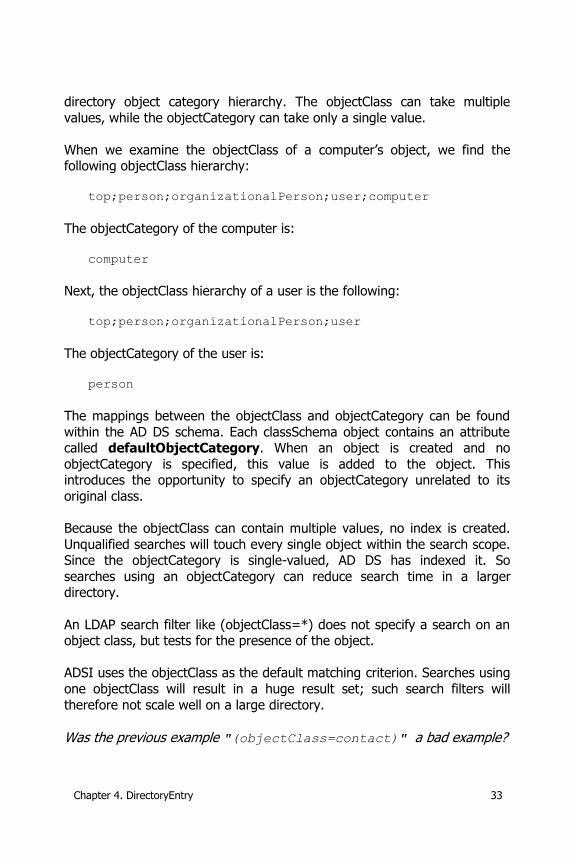
Chapter 4. DirectoryEntry 33
directory object category hierarchy. The objectClass can take multiple
values, while the objectCategory can take only a single value.
When we examine the objectClass of a computer’s object, we find the following objectClass hierarchy:
top;person;organizationalPerson;user;computer
The objectCategory of the computer is:
computer
Next, the objectClass hierarchy of a user is the following:
top;person;organizationalPerson;user
The objectCategory of the user is:
person
The mappings between the objectClass and objectCategory can be found
within the AD DS schema. Each classSchema object contains an attribute called defaultObjectCategory. When an object is created and no
objectCategory is specified, this value is added to the object. This introduces the opportunity to specify an objectCategory unrelated to its
original class.
Because the objectClass can contain multiple values, no index is created.
Unqualified searches will touch every single object within the search scope. Since the objectCategory is single-valued, AD DS has indexed it. So
searches using an objectCategory can reduce search time in a larger directory.
An LDAP search filter like (objectClass=*) does not specify a search on an object class, but tests for the presence of the object.
ADSI uses the objectClass as the default matching criterion. Searches using
one objectClass will result in a huge result set; such search filters will
therefore not scale well on a large directory.
Was the previous example "(objectClass=contact)" a bad example?
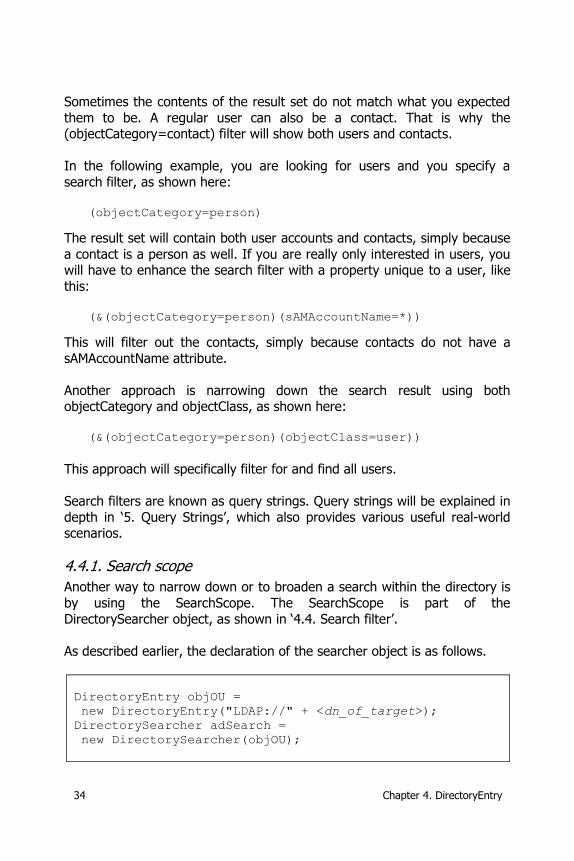
34 Chapter 4. DirectoryEntry
Sometimes the contents of the result set do not match what you expected
them to be. A regular user can also be a contact. That is why the (objectCategory=contact) filter will show both users and contacts.
In the following example, you are looking for users and you specify a
search filter, as shown here:
(objectCategory=person)
The result set will contain both user accounts and contacts, simply because
a contact is a person as well. If you are really only interested in users, you will have to enhance the search filter with a property unique to a user, like
this:
(&(objectCategory=person)(sAMAccountName=*))
This will filter out the contacts, simply because contacts do not have a
sAMAccountName attribute.
Another approach is narrowing down the search result using both objectCategory and objectClass, as shown here:
(&(objectCategory=person)(objectClass=user))
This approach will specifically filter for and find all users.
Search filters are known as query strings. Query strings will be explained in
depth in ‘5. Query Strings’, which also provides various useful real-world scenarios.
4.4.1. Search scope
Another way to narrow down or to broaden a search within the directory is
by using the SearchScope. The SearchScope is part of the
DirectorySearcher object, as shown in ‘4.4. Search filter’.
As described earlier, the declaration of the searcher object is as follows.
DirectoryEntry objOU =
new DirectoryEntry("LDAP://" + <dn_of_target>);
DirectorySearcher adSearch =
new DirectorySearcher(objOU);
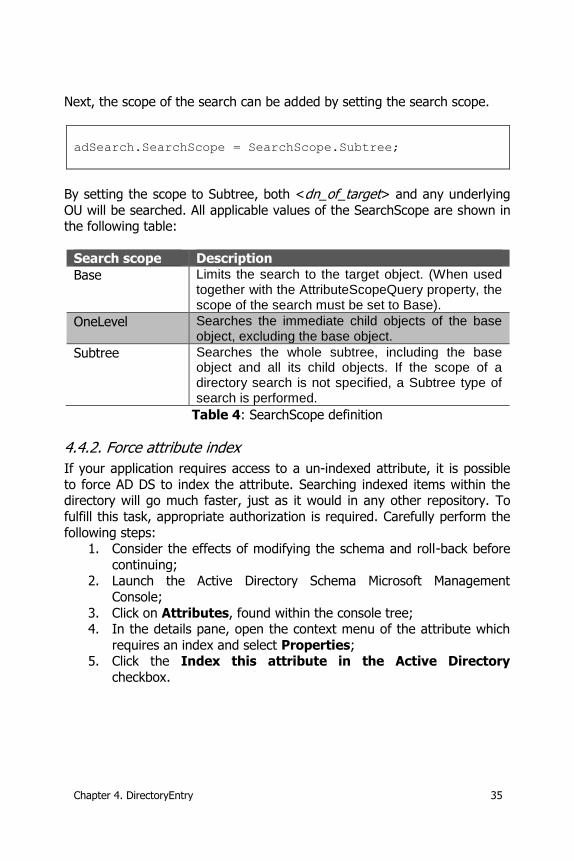
Chapter 4. DirectoryEntry 35
Next, the scope of the search can be added by setting the search scope.
adSearch.SearchScope = SearchScope.Subtree;
By setting the scope to Subtree, both <dn_of_target> and any underlying
OU will be searched. All applicable values of the SearchScope are shown in the following table:
Search scope Description
Base Limits the search to the target object. (When used together with the AttributeScopeQuery property, the scope of the search must be set to Base).
OneLevel Searches the immediate child objects of the base object, excluding the base object.
Subtree Searches the whole subtree, including the base object and all its child objects. If the scope of a directory search is not specified, a Subtree type of search is performed.
Table 4: SearchScope definition
4.4.2. Force attribute index
If your application requires access to a un-indexed attribute, it is possible
to force AD DS to index the attribute. Searching indexed items within the directory will go much faster, just as it would in any other repository. To
fulfill this task, appropriate authorization is required. Carefully perform the
following steps: 1. Consider the effects of modifying the schema and roll-back before
continuing; 2. Launch the Active Directory Schema Microsoft Management
Console;
3. Click on Attributes, found within the console tree; 4. In the details pane, open the context menu of the attribute which
requires an index and select Properties; 5. Click the Index this attribute in the Active Directory
checkbox.
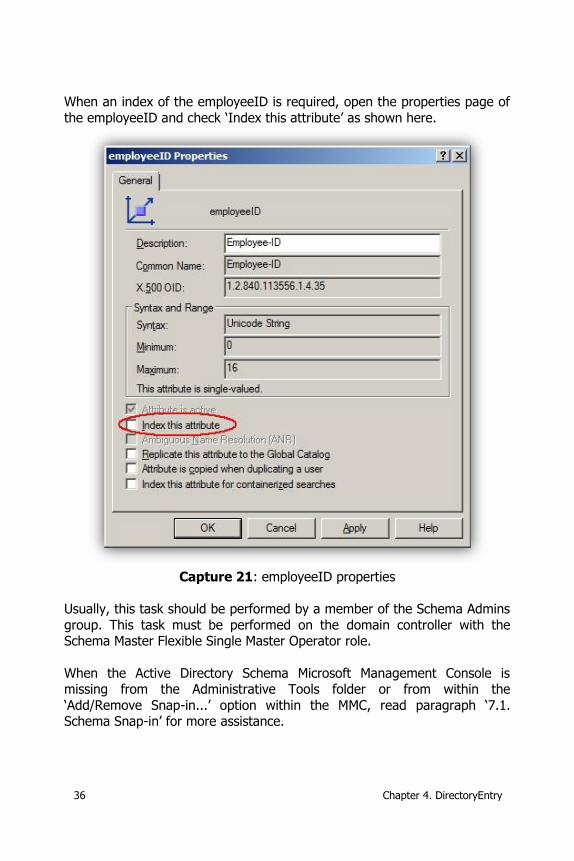
36 Chapter 4. DirectoryEntry
When an index of the employeeID is required, open the properties page of
the employeeID and check ‘Index this attribute’ as shown here.
Capture 21: employeeID properties
Usually, this task should be performed by a member of the Schema Admins
group. This task must be performed on the domain controller with the Schema Master Flexible Single Master Operator role.
When the Active Directory Schema Microsoft Management Console is missing from the Administrative Tools folder or from within the
‘Add/Remove Snap-in...’ option within the MMC, read paragraph ‘7.1. Schema Snap-in’ for more assistance.
Chapter 4. DirectoryEntry 37
4.4.3. Index attribute for a containerized search
A containerized search is a search that takes place while querying an OU. If an attribute needs to be found during a containerized search, its index flag
must be adjusted. To fulfill this task, the appropriate authorization is required and the following steps should be followed carefully:
1. Consider the effects of modifying the schema and roll-back before continuing;
2. Launch the Active Directory Schema Microsoft Management
Console; 3. Click on Attributes, found within the console tree;
4. In the details pane, open the context menu of the attribute which requires an index and select Properties;
5. Click the Index this attribute in the Active Directory
checkbox. 6. Click the Index this attribute for containerized searches in
the Active Directory checkbox.
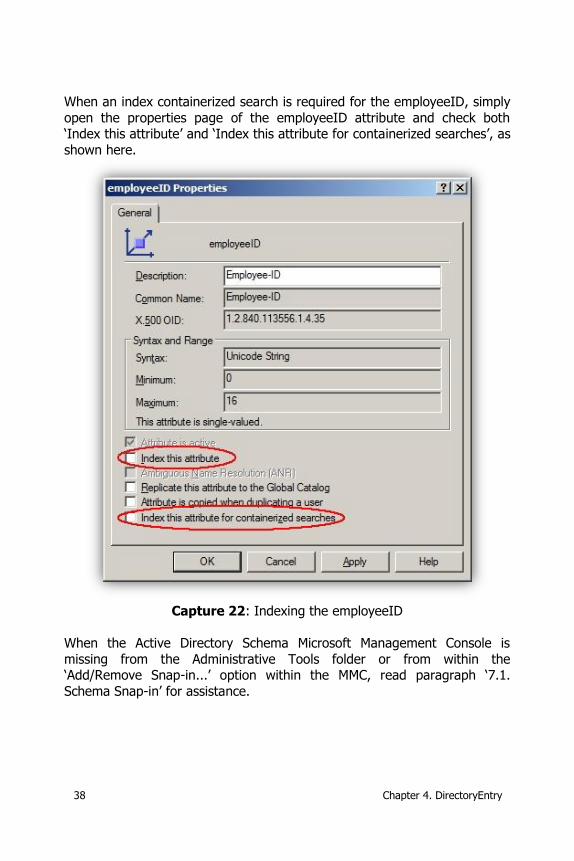
38 Chapter 4. DirectoryEntry
When an index containerized search is required for the employeeID, simply
open the properties page of the employeeID attribute and check both ‘Index this attribute’ and ‘Index this attribute for containerized searches’, as
shown here.
Capture 22: Indexing the employeeID
When the Active Directory Schema Microsoft Management Console is
missing from the Administrative Tools folder or from within the ‘Add/Remove Snap-in...’ option within the MMC, read paragraph ‘7.1.
Schema Snap-in’ for assistance.
Chapter 4. DirectoryEntry 39
4.5. Attribute Types
An object within the directory contains attributes, also called properties. In
this book, most of the time the term property is used, because this is a term used in C# programming language. A set of properties together
create the definition of an object. Most properties can be simply read, cleared or set, but there are a few other types of properties, as described
in this paragraph.
4.5.1. Regular properties
These are the common properties of an object, like the first name of a user
or the description of a group.
4.5.2. Constructed/Computed attributes
Within the directory, the terms constructed and computed are used interchangeably. Although constructed/computed attributes can be read
like a regular property, they do not really exist within the directory. When the property is queried, the directory calculates their value on demand.
Other constructed properties, like the primaryGroup cannot be used in a
search query at all.
Examples of constructed/computed attributes are the primaryGroupToken and the modifyTimeStamp.
4.5.3. Linked attributes
When Microsoft Windows Server 2008 was released, the term linked
attributes was introduced. Linked attributes are pairs of attributes in which the system calculates the value of one property, called the back-link, based
on the values set on the other property, called the forward-link.
Within the schema, the forward/back-link pair is identified by the linkID
values of the two attributeSchema definitions.
Indexes
Adding indexes on attributes may delay Active Directory replication until the indexing process is completed.
40 Chapter 4. DirectoryEntry
An example of a linked attribute is the group’s members and memberOf-
property. The member-property can be manipulated as if it were a regular property, so members can be added, removed or all members can be
cleared at once. The memberOf-property can be read but cannot be manipulated. In fact, from a development point of view, the memberOf-
property behaves like a read-only property. In this example, the members-property is the forward-link and the memberOf-property is the back-link-
property.
4.6. Clearing a property value
If, for example, a string valued property needs to be cleared, it is not sufficient simply to assign an empty string to the property’s value:
// Wrong!
DirectoryEntry.Properties["Value"].Value = "";
In this case, the actual property value will remain untouched. The solution is to reset the value by moving the ‘null’ value into the property:
// Works most of the time!
DirectoryEntry.Properties["Value"].Value = null;
If a complete property value must be cleared, it is also possible to call the
.Clear()-method: // Works on the whole property
DirectoryEntry.Properties["Value"].Clear();
Be very careful calling this method, since even multivalued properties will
be totally cleared.
There are scenarios in which setting the property to ‘null’ will result in an exception error. The next paragraph describes how to counter those
scenarios.
4.6.1. Constraint exception
As mentioned, in some scenarios it is possible that a constraint exception will arise when a property value is set to ‘null’. This might happen on
custom objects that, in some cases, behave differently. When a constraint exception occurs, use the following PropertyValueCollection instead.
Chapter 4. DirectoryEntry 41
The objects property can be assigned to the PropertyValueCollection and
can be cleared from there.
PropertyValueCollection propValue =
obj.Properties["Value"];
propValue.Clear();
Calling the .Clear()-method of the PropertyValueCollection will remove the
value from the specified property. After the property value is cleared, commit the changes to the DirectoryEntry. In this case, the
.CommitChanges()-method of the ‘obj’ DirectoryEntry must be called.
4.6.2. Clear using InvokeSet
When using the .InvokeSet()-method to change a value within the directory, be aware that the behavior of the property is changed in newer
versions of Windows Server. When using Microsoft Windows Server 2003 AD DS, a property can be cleared by using a ‘null’ value.
DirectoryEntry.
InvokeSet("TerminalServicesProfilePath", null);
When using Microsoft Windows Server 2008 (R2) AD DS, the value must be
cleared using an empty string:
DirectoryEntry.
InvokeSet("TerminalServicesProfilePath", "");
Setting a ‘null’ into a Microsoft Windows Server 2008 AD DS property’s
value will result in an exception error.
4.7. Case sensitivity
C# language is case sensitive, but the DirectoryEntry property values are not. Reading the display name property of a contact in any of the following
ways will return the same value: dispname =
contact.Properties["displayName"].Value.
ToString();
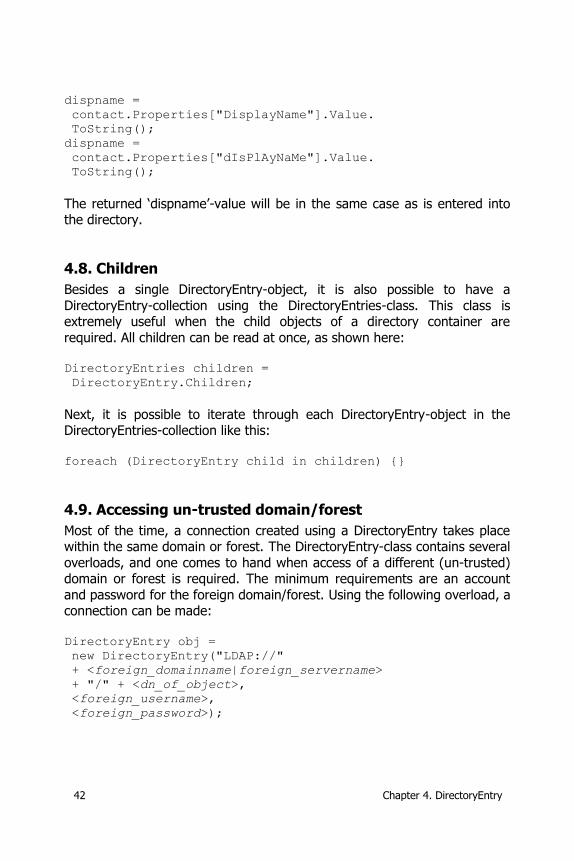
42 Chapter 4. DirectoryEntry
dispname =
contact.Properties["DisplayName"].Value.
ToString();
dispname =
contact.Properties["dIsPlAyNaMe"].Value.
ToString();
The returned ‘dispname’-value will be in the same case as is entered into the directory.
4.8. Children
Besides a single DirectoryEntry-object, it is also possible to have a
DirectoryEntry-collection using the DirectoryEntries-class. This class is extremely useful when the child objects of a directory container are
required. All children can be read at once, as shown here: DirectoryEntries children =
DirectoryEntry.Children;
Next, it is possible to iterate through each DirectoryEntry-object in the DirectoryEntries-collection like this:
foreach (DirectoryEntry child in children) {}
4.9. Accessing un-trusted domain/forest
Most of the time, a connection created using a DirectoryEntry takes place within the same domain or forest. The DirectoryEntry-class contains several
overloads, and one comes to hand when access of a different (un-trusted) domain or forest is required. The minimum requirements are an account
and password for the foreign domain/forest. Using the following overload, a connection can be made:
DirectoryEntry obj =
new DirectoryEntry("LDAP://"
+ <foreign_domainname|foreign_servername>
+ "/" + <dn_of_object>,
<foreign_username>,
<foreign_password>);
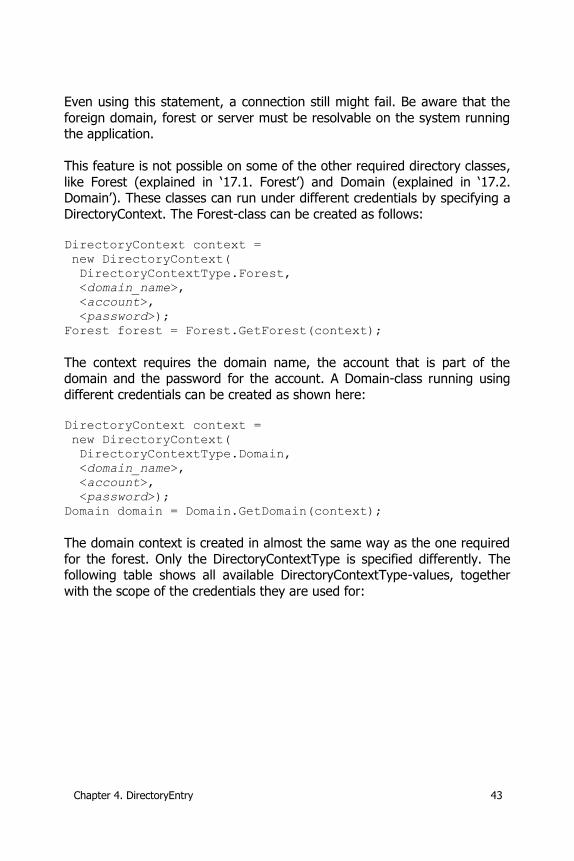
Chapter 4. DirectoryEntry 43
Even using this statement, a connection still might fail. Be aware that the
foreign domain, forest or server must be resolvable on the system running the application.
This feature is not possible on some of the other required directory classes,
like Forest (explained in ‘17.1. Forest’) and Domain (explained in ‘17.2. Domain’). These classes can run under different credentials by specifying a
DirectoryContext. The Forest-class can be created as follows:
DirectoryContext context =
new DirectoryContext(
DirectoryContextType.Forest,
<domain_name>,
<account>,
<password>);
Forest forest = Forest.GetForest(context);
The context requires the domain name, the account that is part of the domain and the password for the account. A Domain-class running using
different credentials can be created as shown here: DirectoryContext context =
new DirectoryContext(
DirectoryContextType.Domain,
<domain_name>,
<account>,
<password>);
Domain domain = Domain.GetDomain(context);
The domain context is created in almost the same way as the one required
for the forest. Only the DirectoryContextType is specified differently. The following table shows all available DirectoryContextType-values, together
with the scope of the credentials they are used for:
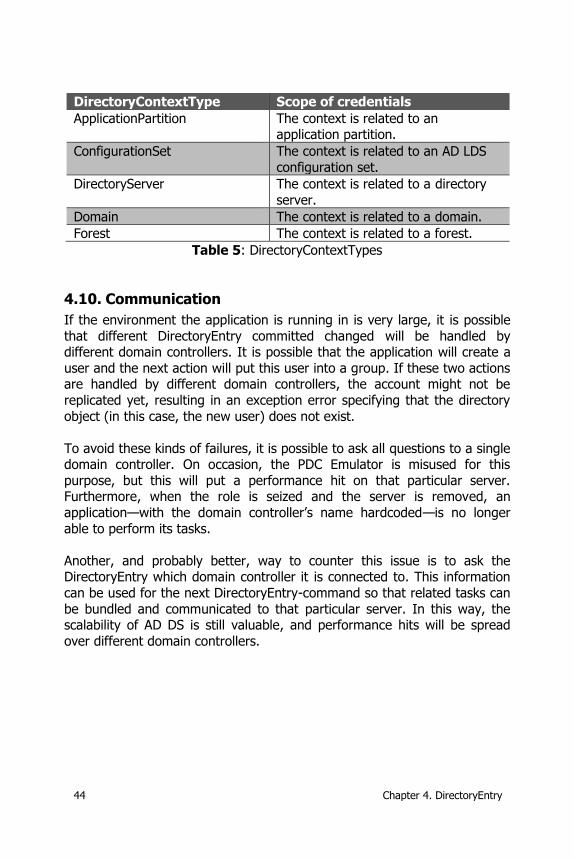
44 Chapter 4. DirectoryEntry
DirectoryContextType Scope of credentials
ApplicationPartition The context is related to an application partition.
ConfigurationSet The context is related to an AD LDS
configuration set.
DirectoryServer The context is related to a directory
server.
Domain The context is related to a domain.
Forest The context is related to a forest.
Table 5: DirectoryContextTypes
4.10. Communication
If the environment the application is running in is very large, it is possible
that different DirectoryEntry committed changed will be handled by different domain controllers. It is possible that the application will create a
user and the next action will put this user into a group. If these two actions are handled by different domain controllers, the account might not be
replicated yet, resulting in an exception error specifying that the directory
object (in this case, the new user) does not exist.
To avoid these kinds of failures, it is possible to ask all questions to a single domain controller. On occasion, the PDC Emulator is misused for this
purpose, but this will put a performance hit on that particular server. Furthermore, when the role is seized and the server is removed, an
application—with the domain controller’s name hardcoded—is no longer
able to perform its tasks.
Another, and probably better, way to counter this issue is to ask the DirectoryEntry which domain controller it is connected to. This information
can be used for the next DirectoryEntry-command so that related tasks can
be bundled and communicated to that particular server. In this way, the scalability of AD DS is still valuable, and performance hits will be spread
over different domain controllers.
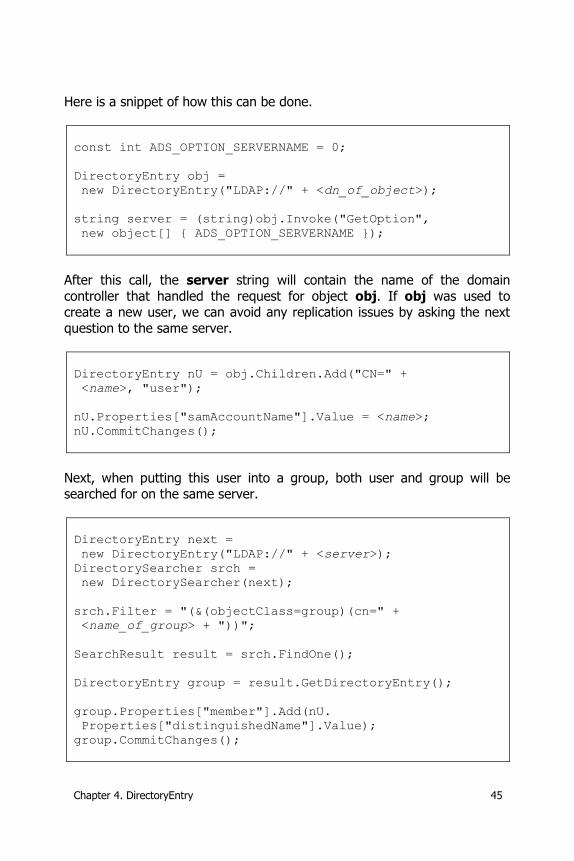
Chapter 4. DirectoryEntry 45
Here is a snippet of how this can be done.
const int ADS_OPTION_SERVERNAME = 0;
DirectoryEntry obj =
new DirectoryEntry("LDAP://" + <dn_of_object>);
string server = (string)obj.Invoke("GetOption",
new object[] { ADS_OPTION_SERVERNAME });
After this call, the server string will contain the name of the domain
controller that handled the request for object obj. If obj was used to create a new user, we can avoid any replication issues by asking the next
question to the same server.
DirectoryEntry nU = obj.Children.Add("CN=" +
<name>, "user");
nU.Properties["samAccountName"].Value = <name>;
nU.CommitChanges();
Next, when putting this user into a group, both user and group will be searched for on the same server.
DirectoryEntry next =
new DirectoryEntry("LDAP://" + <server>);
DirectorySearcher srch =
new DirectorySearcher(next);
srch.Filter = "(&(objectClass=group)(cn=" +
<name_of_group> + "))";
SearchResult result = srch.FindOne();
DirectoryEntry group = result.GetDirectoryEntry();
group.Properties["member"].Add(nU.
Properties["distinguishedName"].Value);
group.CommitChanges();

46 Chapter 4. DirectoryEntry
Although the search filter used in the snippet is looking for a group based
on its common name, the common name does not have to be unique within the domain. In order to be sure to put the user in the correct group,
use the distinguished name or sAMAccountName where possible.
Do not forget to close and dispose the used objects (or use the using command instead).
4.10.1. Global Catalog
The Global Catalog (GC) is an additional role on a domain controller. Because of this role, a Global Catalog server contains not only a complete
replica of all the objects available for its own domain—the domain to which the GC is joined—it also contains a partial replica of all objects of other
domains within the forest.
Forest-wide inquiries can sometimes be fulfilled by simply asking the GC.
Until now, we have used the LDAP URL "LDAP://"–prefix connection string that supplied a connection to a domain controller. When using the following
LDAP URL, actually GC URL, "GC://"-prefix, it is possible to request
communication with a Global Catalog server within the domain.
The following snippet asks a Global Catalog server for all user objects within a particular OU.
DirectoryEntry entry =
new DirectoryEntry("GC://" + <dn_of_ou>);
DirectorySearcher search =
new DirectorySearcher(entry);
search.Filter = "(objectClass=user)";
foreach (SearchResult result in search.FindAll())
{
ListViewItem item =
new ListViewItem(result.GetDirectoryEntry().
Name);
lvResult.Items.Add(item);
}
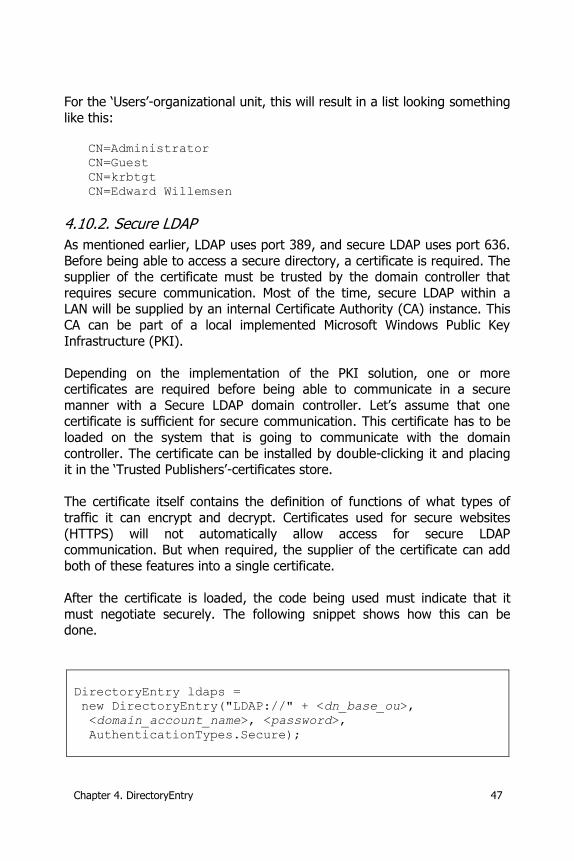
Chapter 4. DirectoryEntry 47
For the ‘Users’-organizational unit, this will result in a list looking something
like this:
CN=Administrator
CN=Guest
CN=krbtgt
CN=Edward Willemsen
4.10.2. Secure LDAP
As mentioned earlier, LDAP uses port 389, and secure LDAP uses port 636.
Before being able to access a secure directory, a certificate is required. The supplier of the certificate must be trusted by the domain controller that
requires secure communication. Most of the time, secure LDAP within a LAN will be supplied by an internal Certificate Authority (CA) instance. This
CA can be part of a local implemented Microsoft Windows Public Key
Infrastructure (PKI).
Depending on the implementation of the PKI solution, one or more certificates are required before being able to communicate in a secure
manner with a Secure LDAP domain controller. Let’s assume that one certificate is sufficient for secure communication. This certificate has to be
loaded on the system that is going to communicate with the domain
controller. The certificate can be installed by double-clicking it and placing it in the ‘Trusted Publishers’-certificates store.
The certificate itself contains the definition of functions of what types of
traffic it can encrypt and decrypt. Certificates used for secure websites
(HTTPS) will not automatically allow access for secure LDAP communication. But when required, the supplier of the certificate can add
both of these features into a single certificate.
After the certificate is loaded, the code being used must indicate that it
must negotiate securely. The following snippet shows how this can be done.
DirectoryEntry ldaps =
new DirectoryEntry("LDAP://" + <dn_base_ou>,
<domain_account_name>, <password>,
AuthenticationTypes.Secure);
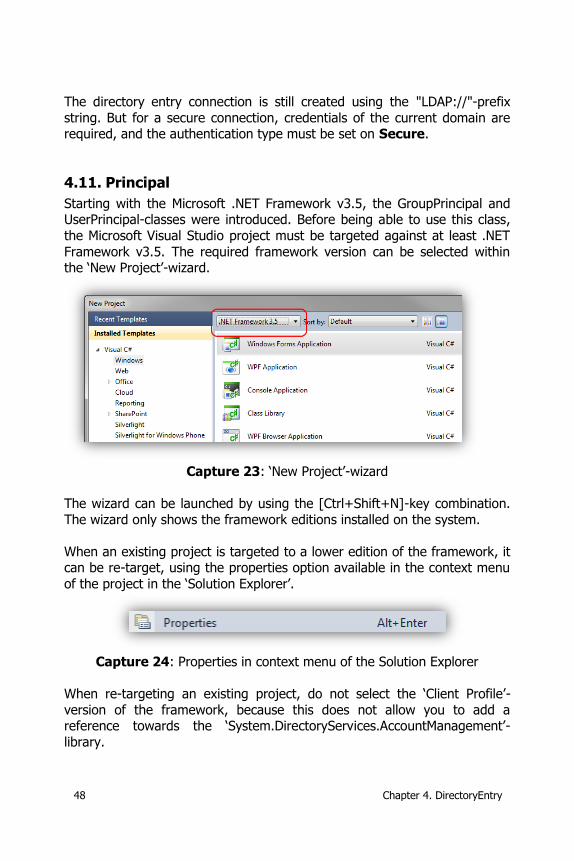
48 Chapter 4. DirectoryEntry
The directory entry connection is still created using the "LDAP://"-prefix
string. But for a secure connection, credentials of the current domain are required, and the authentication type must be set on Secure.
4.11. Principal
Starting with the Microsoft .NET Framework v3.5, the GroupPrincipal and UserPrincipal-classes were introduced. Before being able to use this class,
the Microsoft Visual Studio project must be targeted against at least .NET
Framework v3.5. The required framework version can be selected within the ‘New Project’-wizard.
Capture 23: ‘New Project’-wizard
The wizard can be launched by using the [Ctrl+Shift+N]-key combination.
The wizard only shows the framework editions installed on the system.
When an existing project is targeted to a lower edition of the framework, it can be re-target, using the properties option available in the context menu
of the project in the ‘Solution Explorer’.
Capture 24: Properties in context menu of the Solution Explorer
When re-targeting an existing project, do not select the ‘Client Profile’-
version of the framework, because this does not allow you to add a reference towards the ‘System.DirectoryServices.AccountManagement’-
library.
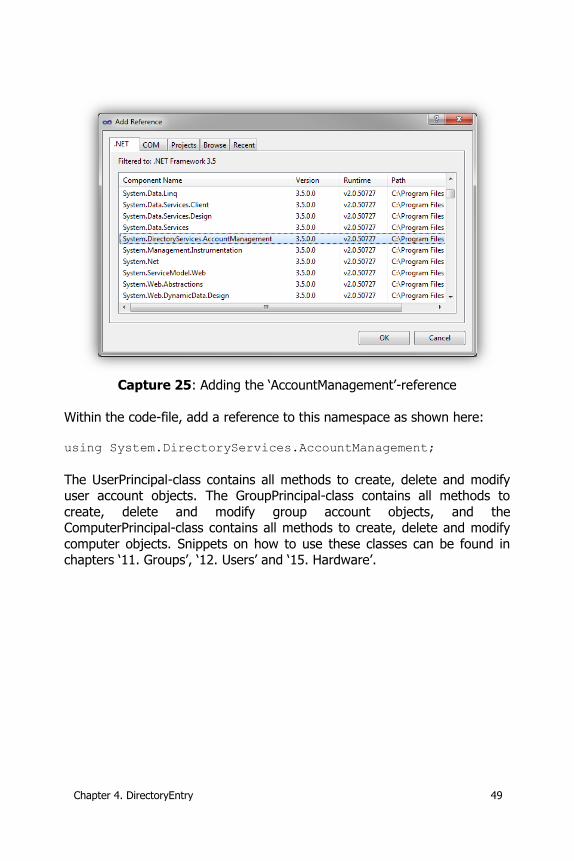
Chapter 4. DirectoryEntry 49
Capture 25: Adding the ‘AccountManagement’-reference
Within the code-file, add a reference to this namespace as shown here:
using System.DirectoryServices.AccountManagement;
The UserPrincipal-class contains all methods to create, delete and modify user account objects. The GroupPrincipal-class contains all methods to
create, delete and modify group account objects, and the ComputerPrincipal-class contains all methods to create, delete and modify
computer objects. Snippets on how to use these classes can be found in chapters ‘11. Groups’, ‘12. Users’ and ‘15. Hardware’.

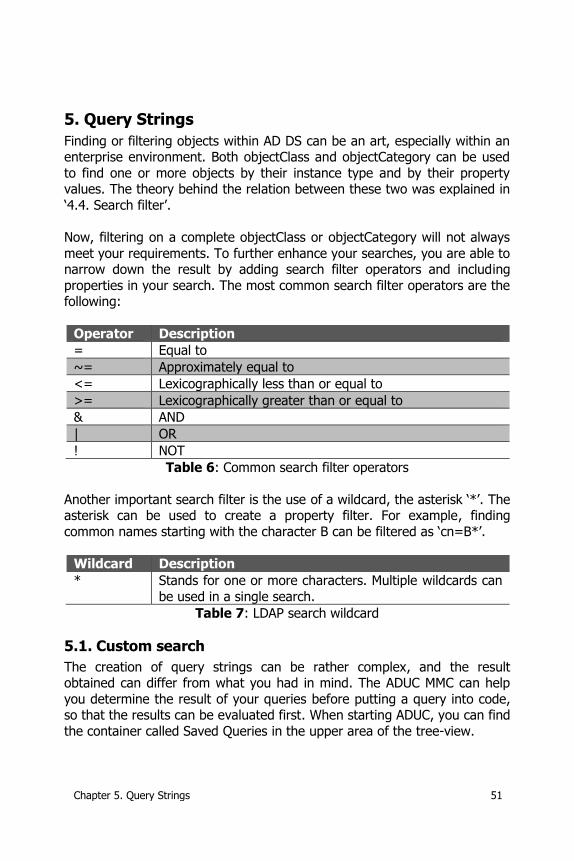
Chapter 5. Query Strings 51
5. Query Strings
Finding or filtering objects within AD DS can be an art, especially within an enterprise environment. Both objectClass and objectCategory can be used
to find one or more objects by their instance type and by their property values. The theory behind the relation between these two was explained in
‘4.4. Search filter’.
Now, filtering on a complete objectClass or objectCategory will not always
meet your requirements. To further enhance your searches, you are able to narrow down the result by adding search filter operators and including
properties in your search. The most common search filter operators are the following:
Operator Description
= Equal to
~= Approximately equal to
<= Lexicographically less than or equal to
>= Lexicographically greater than or equal to
& AND
| OR
! NOT
Table 6: Common search filter operators
Another important search filter is the use of a wildcard, the asterisk ‘*’. The asterisk can be used to create a property filter. For example, finding
common names starting with the character B can be filtered as ‘cn=B*’.
Wildcard Description
* Stands for one or more characters. Multiple wildcards can
be used in a single search.
Table 7: LDAP search wildcard
5.1. Custom search
The creation of query strings can be rather complex, and the result obtained can differ from what you had in mind. The ADUC MMC can help
you determine the result of your queries before putting a query into code, so that the results can be evaluated first. When starting ADUC, you can find
the container called Saved Queries in the upper area of the tree-view.

52 Chapter 5. Query Strings
Capture 26: Saved Queries container
Within the details pane, in our capture on the right, use the context menu and select New Query.
Capture 27: New Query
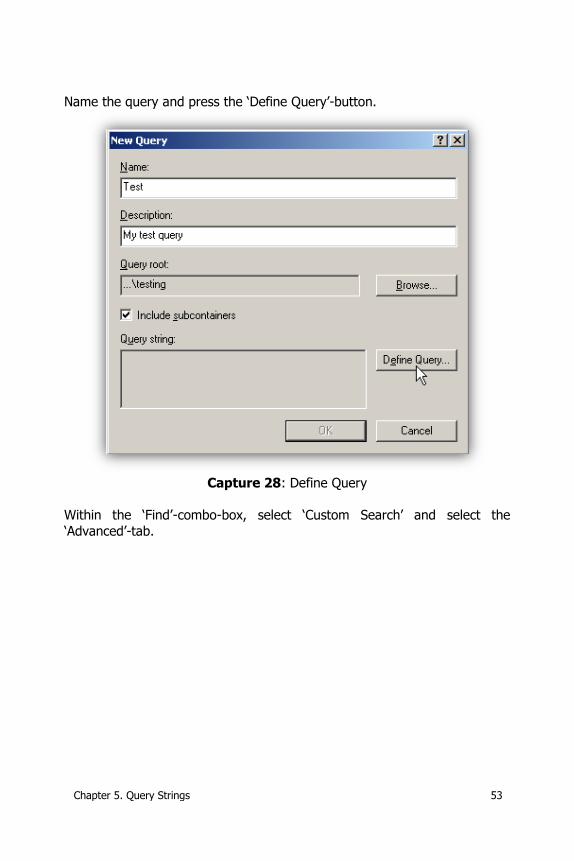
Chapter 5. Query Strings 53
Name the query and press the ‘Define Query’-button.
Capture 28: Define Query
Within the ‘Find’-combo-box, select ‘Custom Search’ and select the
‘Advanced’-tab.
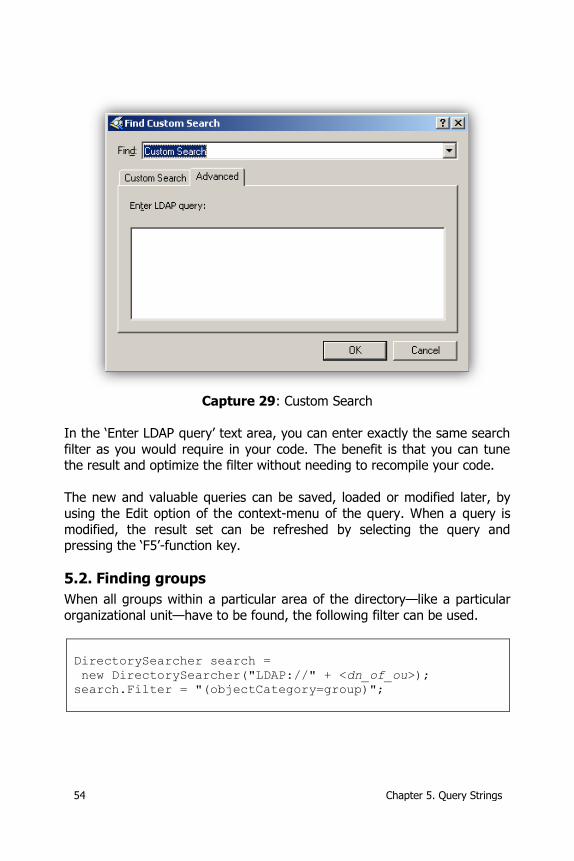
54 Chapter 5. Query Strings
Capture 29: Custom Search
In the ‘Enter LDAP query’ text area, you can enter exactly the same search
filter as you would require in your code. The benefit is that you can tune the result and optimize the filter without needing to recompile your code.
The new and valuable queries can be saved, loaded or modified later, by
using the Edit option of the context-menu of the query. When a query is
modified, the result set can be refreshed by selecting the query and pressing the ‘F5’-function key.
5.2. Finding groups
When all groups within a particular area of the directory—like a particular
organizational unit—have to be found, the following filter can be used.
DirectorySearcher search =
new DirectorySearcher("LDAP://" + <dn_of_ou>);
search.Filter = "(objectCategory=group)";
Chapter 5. Query Strings 55
But when groups of a particular type or scope need to be found—like
Domain Local groups—this filter will not fit. Along with objectCategory, a groupType can also be added within the search query. The groupType
specifies the type and scope of the group and can be determined by using a bitwise filter, also known as an LDAP Matching Rule. The syntax of an
LDAP Matching Rule is the following:
attributename:ruleOID:=value
The attributename is the LDAP display-name of the attribute, and the
ruleOID is the object ID (OID) for the matching rule control. The value is the decimal value required for the comparison. The value of the ruleOID
can be one of the following:
1.2.840.113556.1.4.803 - This is the LDAP_MATCHING_RULE_BIT_AND rule.
The matching rule is true if all bits from the property match the value. This rule works like a bitwise AND.
1.2.840.113556.1.4.804 - This is the
LDAP_MATCHING_RULE_BIT_OR rule. The matching rule is true if any bits from the property match the
value. This rule works like a bitwise OR.
The LDAP Matching Rule for a group with a Domain Local scope is the following:
(&(objectCategory=group)
(groupType:1.2.840.113556.1.4.804:=4"))
Extending this search—like looking for Domain Local groups that start with the character ‘a’—can be done as shown here:
(&(objectCategory=group)
(groupType:1.2.840.113556.1.4.804:=4)(cn=a*))
56 Chapter 5. Query Strings
The following table shows the groupType of the available AD DS groups:
Value Description
1 (0x00000001) Specifies a group that is created by the system.
2 (0x00000002) Specifies a group with global scope.
4 (0x00000004) Specifies a group with domain local scope.
8 (0x00000008) Specifies a group with universal scope.
16 (0x00000010) Specifies an APP_BASIC group for Windows Server Authorization Manager.
32 (0x00000020) Specifies an APP_QUERY group for Windows Server
Authorization Manager.
2147483648 (0x80000000)
Specifies a security group. If this flag is not set, then the group is a distribution group.
Table 8: Group types
LDAP Matching Rules also apply to the user account control flag; for example, a userAccountControl with the UF_ACCOUNTDISABLED bit set can
be found using the following filter:
(UserAccountControl:1.2.840.113556.1.4.803:=2)
The flag can be used to compose the following query, which will result in all
user accounts being disabled in the directory:
(&(objectCategory=user)
(UserAccountControl:1.2.840.113556.1.4.803:=2))
5.3. Special characters
As shown in the previous paragraphs, characters like ‘*’, ‘"’, ‘(’ and ‘)’ are
used to create a query string. But what if you are searching for display-names containing a quote or asterisk? In those cases, the character should
be written as a sequence. Here is a small translation table:
Character Sequence
" \22
* \2a
( \28
) \29
\ \5c
/ \2f
Null \00
Table 9: Sequence translation characters
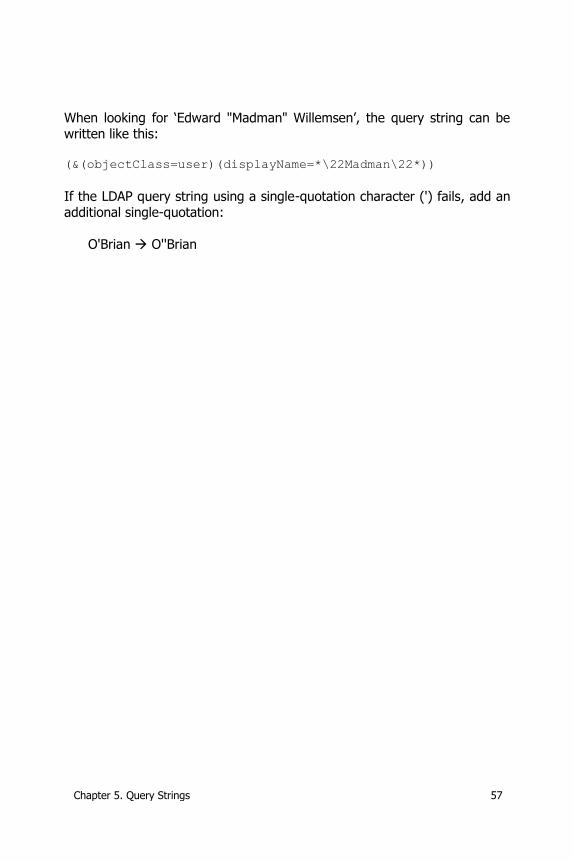
Chapter 5. Query Strings 57
When looking for ‘Edward "Madman" Willemsen’, the query string can be written like this:
(&(objectClass=user)(displayName=*\22Madman\22*))
If the LDAP query string using a single-quotation character (') fails, add an additional single-quotation:
O'Brian O''Brian

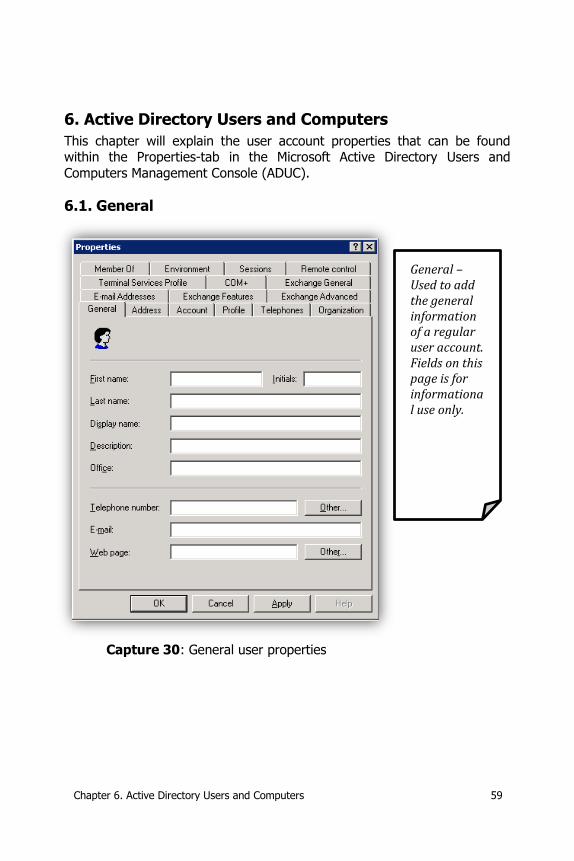
Chapter 6. Active Directory Users and Computers 59
6. Active Directory Users and Computers
This chapter will explain the user account properties that can be found within the Properties-tab in the Microsoft Active Directory Users and
Computers Management Console (ADUC).
6.1. General
Capture 30: General user properties
General – Used to add the general information of a regular user account. Fields on this page is for informational use only.
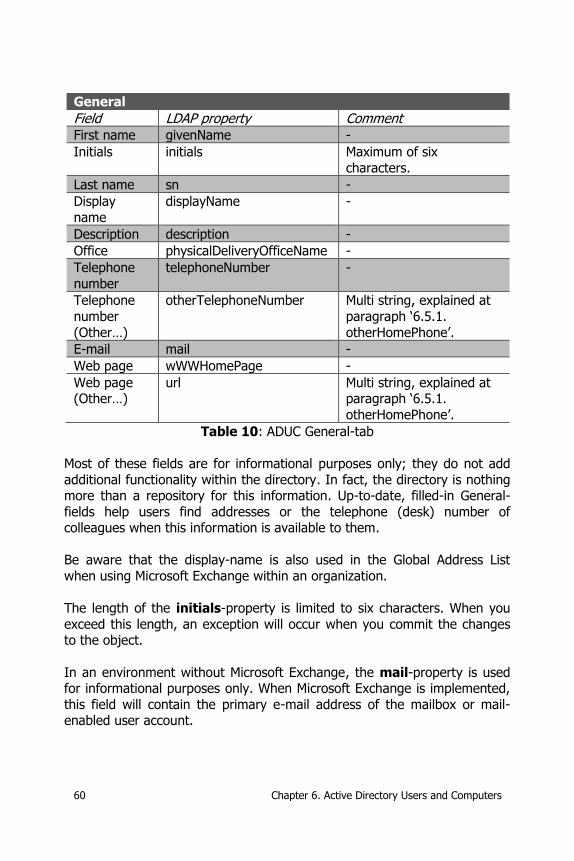
60 Chapter 6. Active Directory Users and Computers
General
Field LDAP property Comment First name givenName -
Initials initials Maximum of six
characters.
Last name sn -
Display
name
displayName -
Description description -
Office physicalDeliveryOfficeName -
Telephone
number
telephoneNumber -
Telephone
number
(Other…)
otherTelephoneNumber Multi string, explained at
paragraph ‘6.5.1.
otherHomePhone’.
E-mail mail -
Web page wWWHomePage -
Web page (Other…)
url Multi string, explained at paragraph ‘6.5.1.
otherHomePhone’.
Table 10: ADUC General-tab
Most of these fields are for informational purposes only; they do not add
additional functionality within the directory. In fact, the directory is nothing more than a repository for this information. Up-to-date, filled-in General-
fields help users find addresses or the telephone (desk) number of colleagues when this information is available to them.
Be aware that the display-name is also used in the Global Address List
when using Microsoft Exchange within an organization.
The length of the initials-property is limited to six characters. When you
exceed this length, an exception will occur when you commit the changes to the object.
In an environment without Microsoft Exchange, the mail-property is used for informational purposes only. When Microsoft Exchange is implemented,
this field will contain the primary e-mail address of the mailbox or mail-enabled user account.
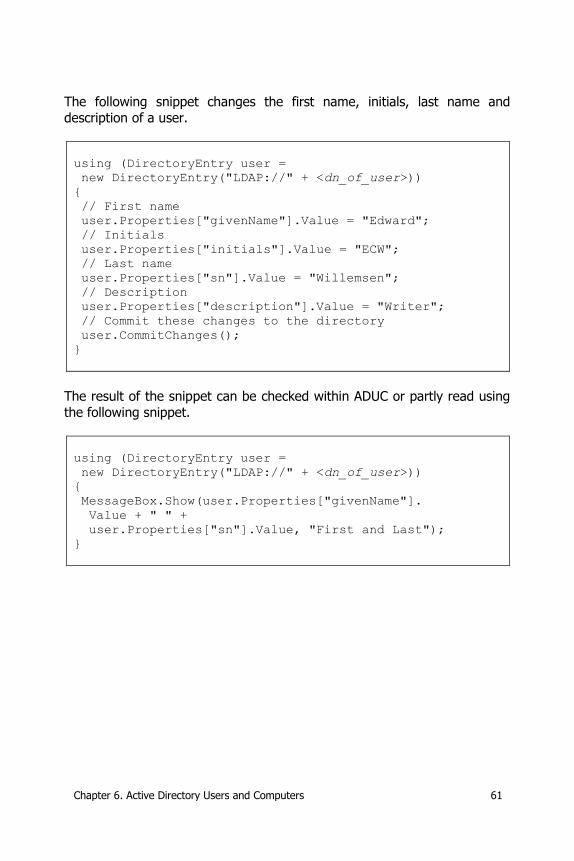
Chapter 6. Active Directory Users and Computers 61
The following snippet changes the first name, initials, last name and
description of a user.
using (DirectoryEntry user =
new DirectoryEntry("LDAP://" + <dn_of_user>))
{
// First name
user.Properties["givenName"].Value = "Edward";
// Initials
user.Properties["initials"].Value = "ECW";
// Last name
user.Properties["sn"].Value = "Willemsen";
// Description
user.Properties["description"].Value = "Writer";
// Commit these changes to the directory
user.CommitChanges();
}
The result of the snippet can be checked within ADUC or partly read using
the following snippet.
using (DirectoryEntry user =
new DirectoryEntry("LDAP://" + <dn_of_user>))
{
MessageBox.Show(user.Properties["givenName"].
Value + " " +
user.Properties["sn"].Value, "First and Last");
}
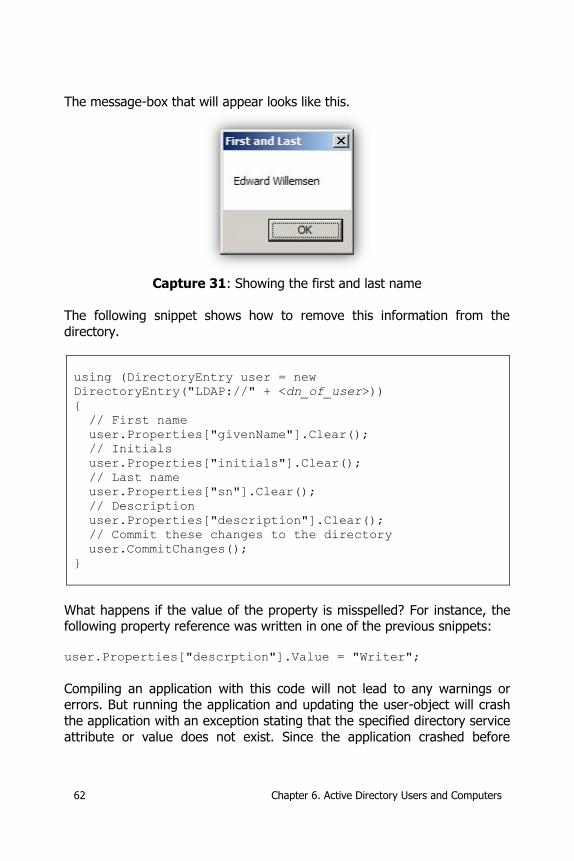
62 Chapter 6. Active Directory Users and Computers
The message-box that will appear looks like this.
Capture 31: Showing the first and last name
The following snippet shows how to remove this information from the
directory.
using (DirectoryEntry user = new
DirectoryEntry("LDAP://" + <dn_of_user>))
{
// First name
user.Properties["givenName"].Clear();
// Initials
user.Properties["initials"].Clear();
// Last name
user.Properties["sn"].Clear();
// Description
user.Properties["description"].Clear();
// Commit these changes to the directory
user.CommitChanges();
}
What happens if the value of the property is misspelled? For instance, the following property reference was written in one of the previous snippets:
user.Properties["descrption"].Value = "Writer";
Compiling an application with this code will not lead to any warnings or errors. But running the application and updating the user-object will crash
the application with an exception stating that the specified directory service
attribute or value does not exist. Since the application crashed before
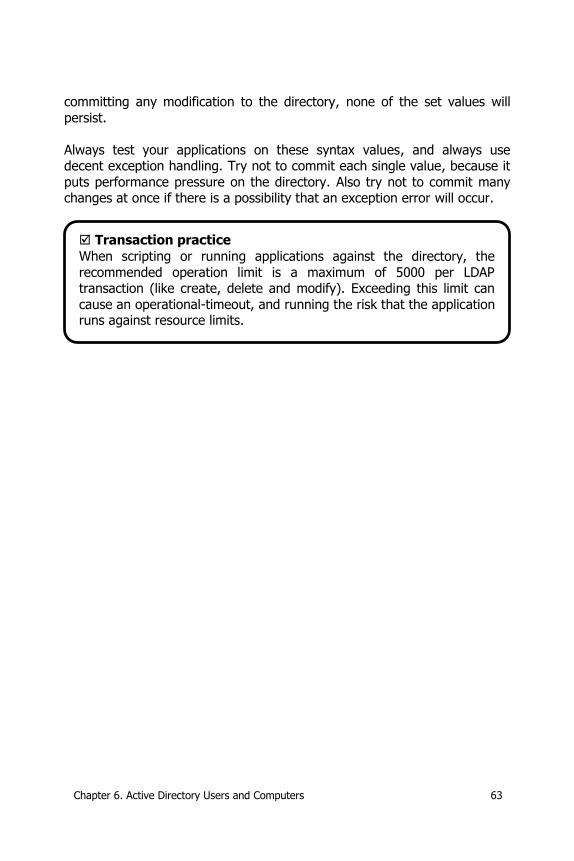
Chapter 6. Active Directory Users and Computers 63
committing any modification to the directory, none of the set values will
persist.
Always test your applications on these syntax values, and always use decent exception handling. Try not to commit each single value, because it
puts performance pressure on the directory. Also try not to commit many changes at once if there is a possibility that an exception error will occur.
Transaction practice
When scripting or running applications against the directory, the
recommended operation limit is a maximum of 5000 per LDAP transaction (like create, delete and modify). Exceeding this limit can
cause an operational-timeout, and running the risk that the application runs against resource limits.
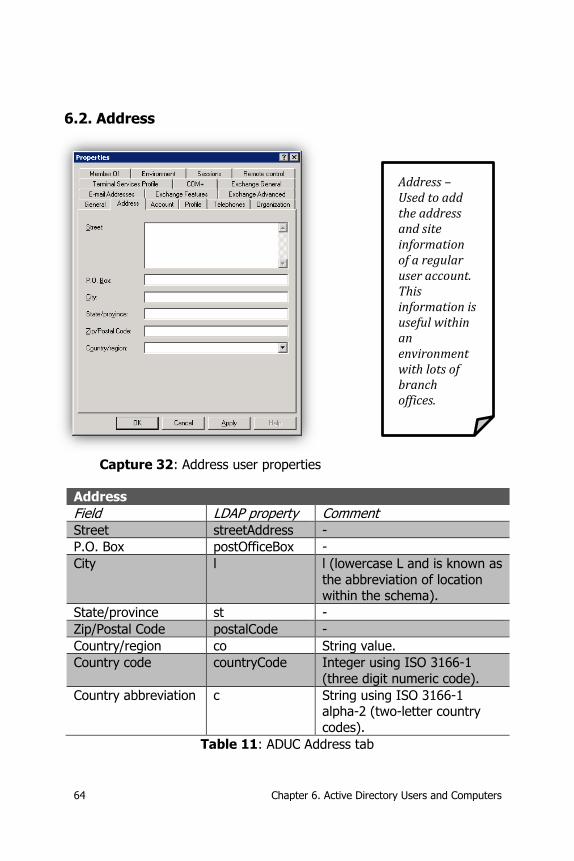
64 Chapter 6. Active Directory Users and Computers
6.2. Address
Capture 32: Address user properties
Address
Field LDAP property Comment Street streetAddress -
P.O. Box postOfficeBox -
City l l (lowercase L and is known as
the abbreviation of location within the schema).
State/province st -
Zip/Postal Code postalCode -
Country/region co String value.
Country code countryCode Integer using ISO 3166-1
(three digit numeric code).
Country abbreviation c String using ISO 3166-1 alpha-2 (two-letter country
codes).
Table 11: ADUC Address tab
Address – Used to add the address and site information of a regular user account. This information is useful within an environment with lots of branch offices.
Chapter 6. Active Directory Users and Computers 65
As stated in the side note, this information is useful in environments with
lots of branch offices. The information can contain shipping information for a particular user’s location.
When selecting a country/region using the combo-box in the MMC, three
items are set within the address properties area. The first property is the countryCode that is a three-digit integer value, as defined within the ISO
3166-1 numeric standard. To name a few items in this standard, the United States has a code of 840, the United Kingdom 826, France 250, Germany
276 and the Netherlands has a code of 528. Next, the country-abbreviation,
based on the ISO 3166-1 alpha-2 specification, is placed within the c-property. In accordance with the previously mentioned countries, these are
US, UK, FR, DE and NL. The last item set is the country/region string within the co-property. Again, looking at the previously mentioned countries, this
property can be United States, Unites Kingdom, France, Germany or The Netherlands.
Programmatically changing one of these address values will not
automatically update the others. It is possible to have an address consisting
of the capital Amsterdam in France, with country code 276, using US as the country-abbreviation. When your application allows a user or process to
change these values, use the ISO 3166-1 specification to maintain country-integrity within your own application. The following snippet will modify the
address properties of a user who lives in New Zealand.
using (DirectoryEntry user =
new DirectoryEntry("LDAP://" + <dn_of_user>))
{
// Street
user.Properties["streetAddress"].Value =
"Main street 1";
// City
user.Properties["l"].Value = "Wellington";
// Country
user.Properties["co"].Value = "New Zealand";
// Country abbreviation
user.Properties["c"].Value = "NZ";
// Country code
user.Properties["countryCode"].Value = 554;
// Commit these changes to the directory
user.CommitChanges();
}
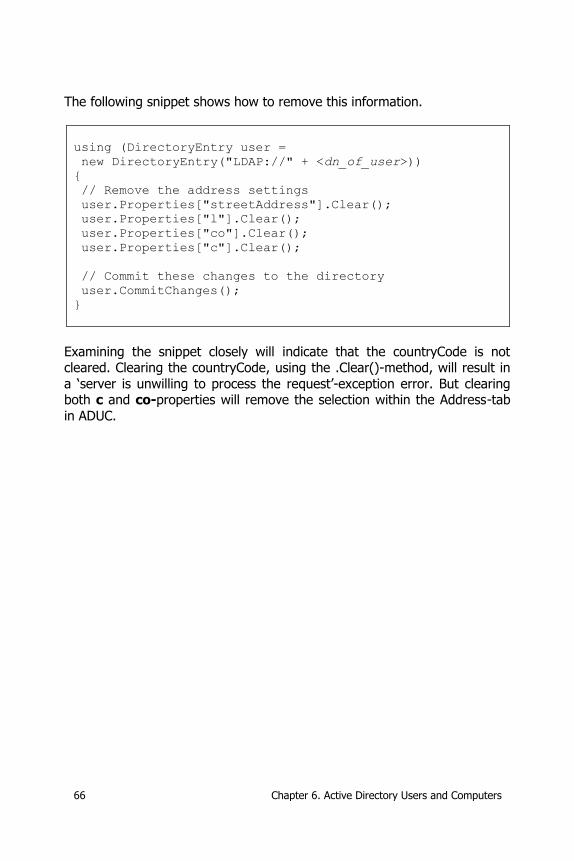
66 Chapter 6. Active Directory Users and Computers
The following snippet shows how to remove this information.
using (DirectoryEntry user =
new DirectoryEntry("LDAP://" + <dn_of_user>))
{
// Remove the address settings
user.Properties["streetAddress"].Clear();
user.Properties["l"].Clear();
user.Properties["co"].Clear();
user.Properties["c"].Clear();
// Commit these changes to the directory
user.CommitChanges();
}
Examining the snippet closely will indicate that the countryCode is not cleared. Clearing the countryCode, using the .Clear()-method, will result in
a ‘server is unwilling to process the request’-exception error. But clearing both c and co-properties will remove the selection within the Address-tab
in ADUC.
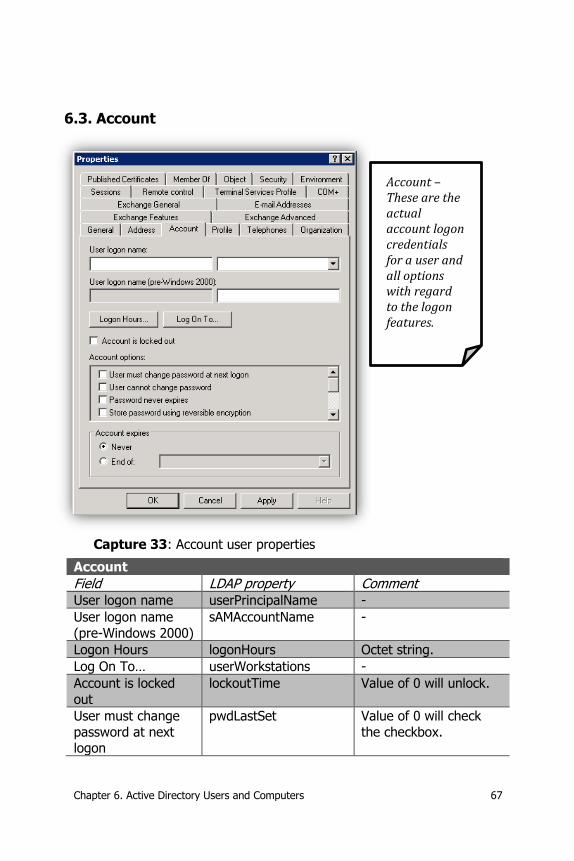
Chapter 6. Active Directory Users and Computers 67
6.3. Account
Capture 33: Account user properties
Account
Field LDAP property Comment User logon name userPrincipalName -
User logon name
(pre-Windows 2000)
sAMAccountName -
Logon Hours logonHours Octet string.
Log On To… userWorkstations -
Account is locked
out
lockoutTime Value of 0 will unlock.
User must change
password at next logon
pwdLastSet Value of 0 will check
the checkbox.
Account – These are the actual account logon credentials for a user and all options with regard to the logon features.
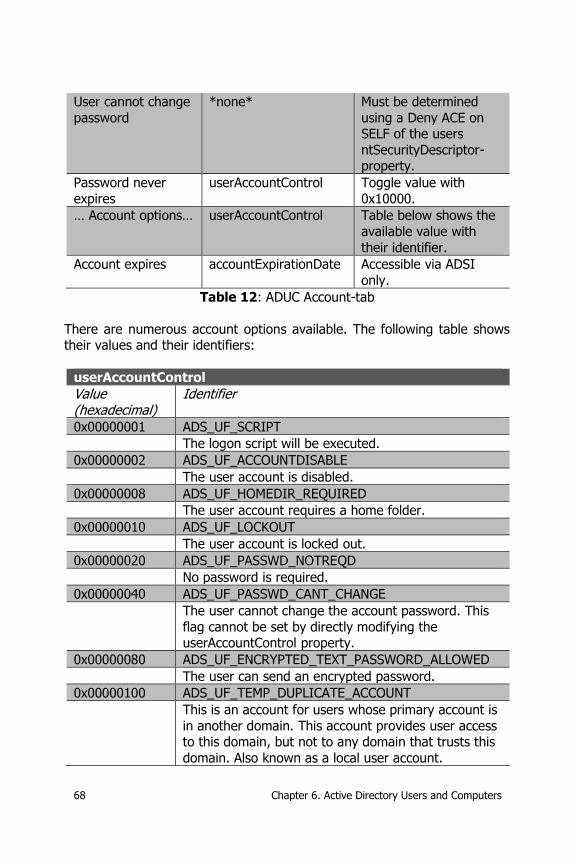
68 Chapter 6. Active Directory Users and Computers
User cannot change
password
*none* Must be determined
using a Deny ACE on SELF of the users
ntSecurityDescriptor-property.
Password never
expires
userAccountControl Toggle value with
0x10000.
… Account options… userAccountControl Table below shows the
available value with
their identifier.
Account expires accountExpirationDate Accessible via ADSI
only.
Table 12: ADUC Account-tab
There are numerous account options available. The following table shows their values and their identifiers:
userAccountControl
Value (hexadecimal)
Identifier
0x00000001 ADS_UF_SCRIPT
The logon script will be executed.
0x00000002 ADS_UF_ACCOUNTDISABLE
The user account is disabled.
0x00000008 ADS_UF_HOMEDIR_REQUIRED
The user account requires a home folder.
0x00000010 ADS_UF_LOCKOUT
The user account is locked out.
0x00000020 ADS_UF_PASSWD_NOTREQD
No password is required.
0x00000040 ADS_UF_PASSWD_CANT_CHANGE
The user cannot change the account password. This
flag cannot be set by directly modifying the userAccountControl property.
0x00000080 ADS_UF_ENCRYPTED_TEXT_PASSWORD_ALLOWED
The user can send an encrypted password.
0x00000100 ADS_UF_TEMP_DUPLICATE_ACCOUNT
This is an account for users whose primary account is
in another domain. This account provides user access to this domain, but not to any domain that trusts this
domain. Also known as a local user account.
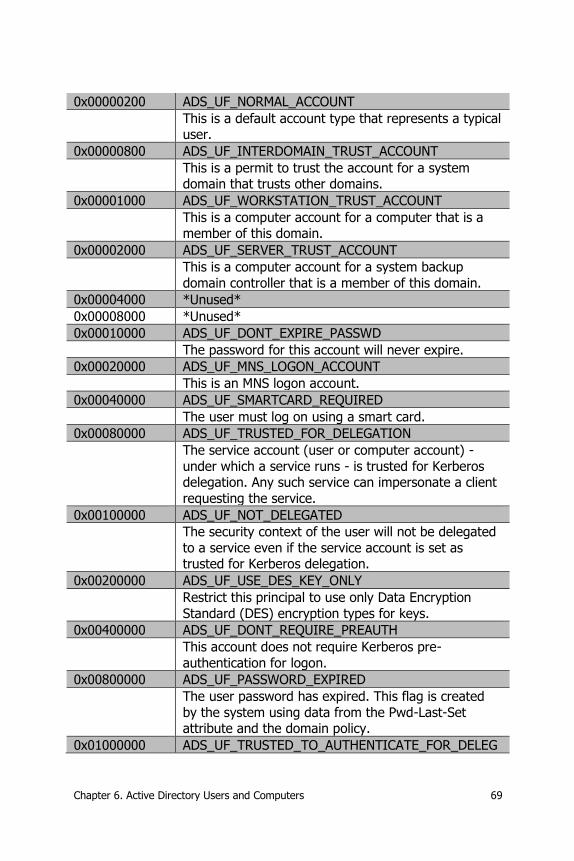
Chapter 6. Active Directory Users and Computers 69
0x00000200 ADS_UF_NORMAL_ACCOUNT
This is a default account type that represents a typical user.
0x00000800 ADS_UF_INTERDOMAIN_TRUST_ACCOUNT
This is a permit to trust the account for a system domain that trusts other domains.
0x00001000 ADS_UF_WORKSTATION_TRUST_ACCOUNT
This is a computer account for a computer that is a member of this domain.
0x00002000 ADS_UF_SERVER_TRUST_ACCOUNT
This is a computer account for a system backup
domain controller that is a member of this domain.
0x00004000 *Unused*
0x00008000 *Unused*
0x00010000 ADS_UF_DONT_EXPIRE_PASSWD
The password for this account will never expire.
0x00020000 ADS_UF_MNS_LOGON_ACCOUNT
This is an MNS logon account.
0x00040000 ADS_UF_SMARTCARD_REQUIRED
The user must log on using a smart card.
0x00080000 ADS_UF_TRUSTED_FOR_DELEGATION
The service account (user or computer account) -
under which a service runs - is trusted for Kerberos delegation. Any such service can impersonate a client
requesting the service.
0x00100000 ADS_UF_NOT_DELEGATED
The security context of the user will not be delegated
to a service even if the service account is set as trusted for Kerberos delegation.
0x00200000 ADS_UF_USE_DES_KEY_ONLY
Restrict this principal to use only Data Encryption
Standard (DES) encryption types for keys.
0x00400000 ADS_UF_DONT_REQUIRE_PREAUTH
This account does not require Kerberos pre-
authentication for logon.
0x00800000 ADS_UF_PASSWORD_EXPIRED
The user password has expired. This flag is created
by the system using data from the Pwd-Last-Set attribute and the domain policy.
0x01000000 ADS_UF_TRUSTED_TO_AUTHENTICATE_FOR_DELEG
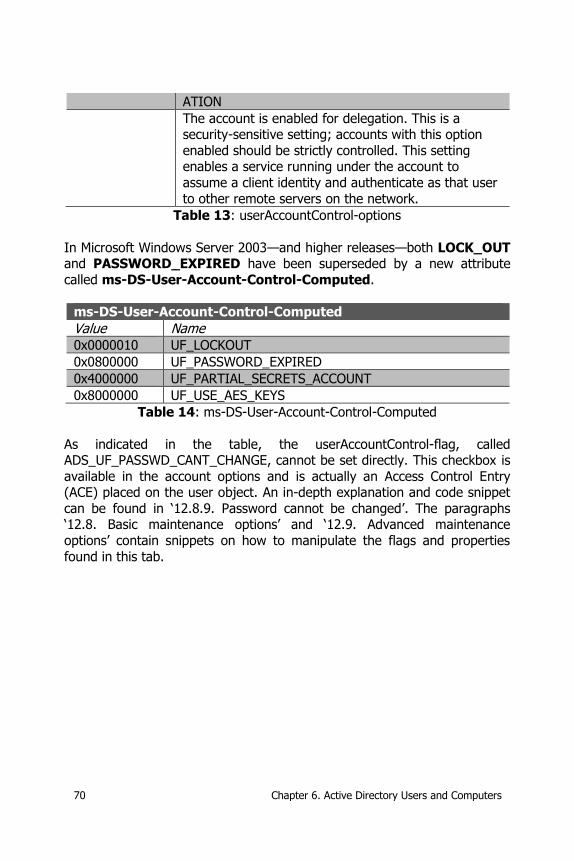
70 Chapter 6. Active Directory Users and Computers
ATION
The account is enabled for delegation. This is a security-sensitive setting; accounts with this option
enabled should be strictly controlled. This setting enables a service running under the account to
assume a client identity and authenticate as that user
to other remote servers on the network.
Table 13: userAccountControl-options
In Microsoft Windows Server 2003—and higher releases—both LOCK_OUT and PASSWORD_EXPIRED have been superseded by a new attribute
called ms-DS-User-Account-Control-Computed.
ms-DS-User-Account-Control-Computed
Value Name 0x0000010 UF_LOCKOUT
0x0800000 UF_PASSWORD_EXPIRED
0x4000000 UF_PARTIAL_SECRETS_ACCOUNT
0x8000000 UF_USE_AES_KEYS
Table 14: ms-DS-User-Account-Control-Computed
As indicated in the table, the userAccountControl-flag, called ADS_UF_PASSWD_CANT_CHANGE, cannot be set directly. This checkbox is
available in the account options and is actually an Access Control Entry (ACE) placed on the user object. An in-depth explanation and code snippet
can be found in ‘12.8.9. Password cannot be changed’. The paragraphs ‘12.8. Basic maintenance options’ and ‘12.9. Advanced maintenance
options’ contain snippets on how to manipulate the flags and properties
found in this tab.
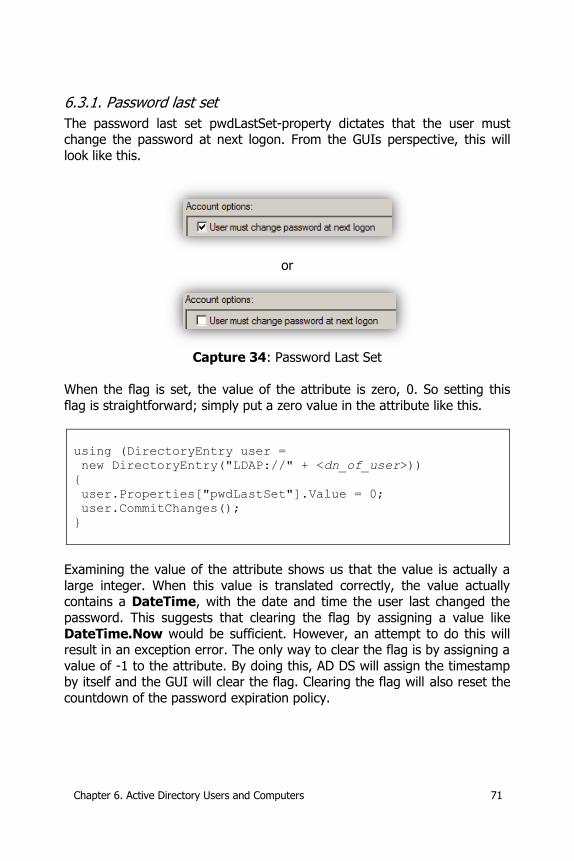
Chapter 6. Active Directory Users and Computers 71
6.3.1. Password last set
The password last set pwdLastSet-property dictates that the user must change the password at next logon. From the GUIs perspective, this will
look like this.
or
Capture 34: Password Last Set
When the flag is set, the value of the attribute is zero, 0. So setting this
flag is straightforward; simply put a zero value in the attribute like this.
using (DirectoryEntry user =
new DirectoryEntry("LDAP://" + <dn_of_user>))
{
user.Properties["pwdLastSet"].Value = 0;
user.CommitChanges();
}
Examining the value of the attribute shows us that the value is actually a
large integer. When this value is translated correctly, the value actually contains a DateTime, with the date and time the user last changed the
password. This suggests that clearing the flag by assigning a value like
DateTime.Now would be sufficient. However, an attempt to do this will result in an exception error. The only way to clear the flag is by assigning a
value of -1 to the attribute. By doing this, AD DS will assign the timestamp by itself and the GUI will clear the flag. Clearing the flag will also reset the
countdown of the password expiration policy.
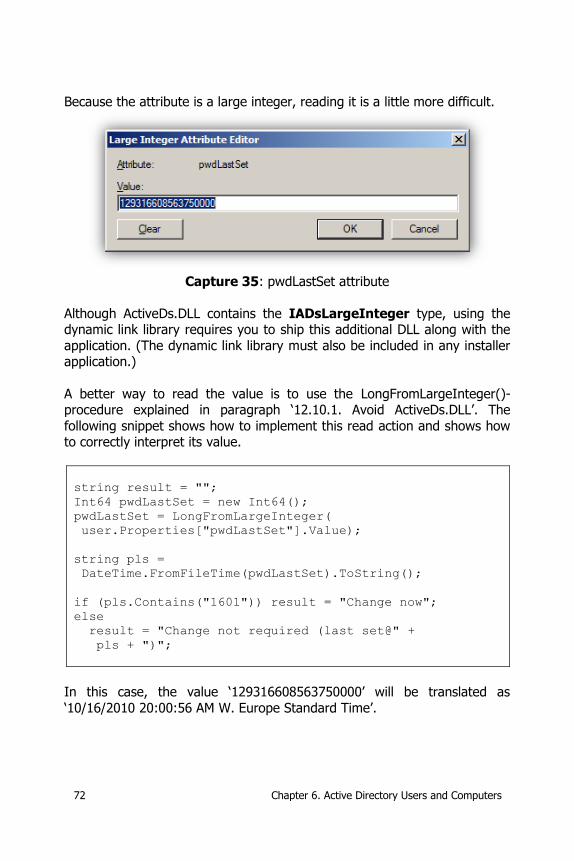
72 Chapter 6. Active Directory Users and Computers
Because the attribute is a large integer, reading it is a little more difficult.
Capture 35: pwdLastSet attribute
Although ActiveDs.DLL contains the IADsLargeInteger type, using the dynamic link library requires you to ship this additional DLL along with the
application. (The dynamic link library must also be included in any installer application.)
A better way to read the value is to use the LongFromLargeInteger()-procedure explained in paragraph ‘12.10.1. Avoid ActiveDs.DLL’. The
following snippet shows how to implement this read action and shows how to correctly interpret its value.
string result = "";
Int64 pwdLastSet = new Int64();
pwdLastSet = LongFromLargeInteger(
user.Properties["pwdLastSet"].Value);
string pls =
DateTime.FromFileTime(pwdLastSet).ToString();
if (pls.Contains("1601")) result = "Change now";
else
result = "Change not required (last set@" +
pls + ")";
In this case, the value ‘129316608563750000’ will be translated as
‘10/16/2010 20:00:56 AM W. Europe Standard Time’.
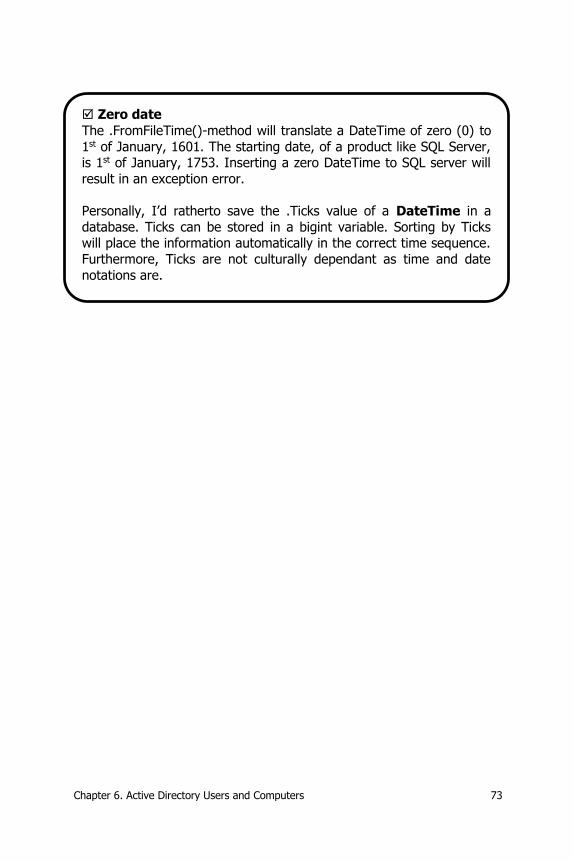
Chapter 6. Active Directory Users and Computers 73
Zero date
The .FromFileTime()-method will translate a DateTime of zero (0) to
1st of January, 1601. The starting date, of a product like SQL Server, is 1st of January, 1753. Inserting a zero DateTime to SQL server will
result in an exception error.
Personally, I’d ratherto save the .Ticks value of a DateTime in a
database. Ticks can be stored in a bigint variable. Sorting by Ticks will place the information automatically in the correct time sequence.
Furthermore, Ticks are not culturally dependant as time and date
notations are.
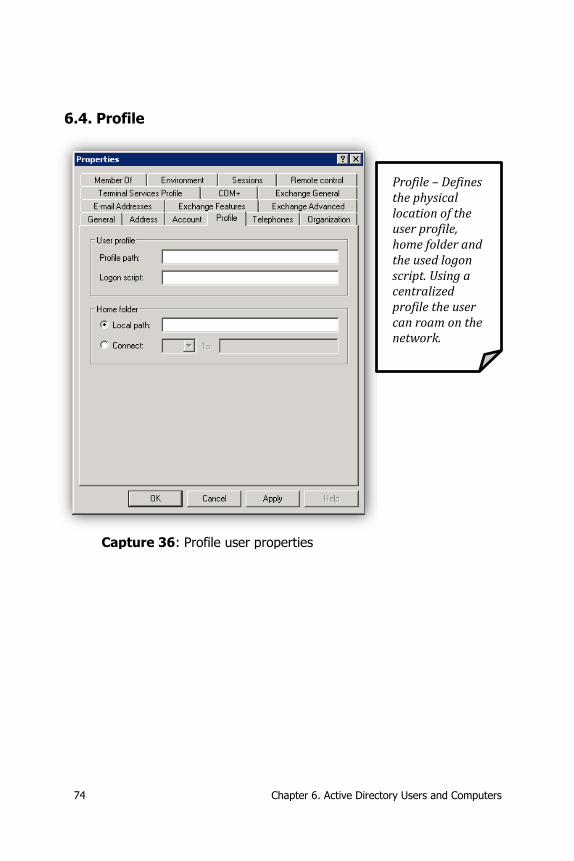
74 Chapter 6. Active Directory Users and Computers
6.4. Profile
Capture 36: Profile user properties
Profile – Defines the physical location of the user profile, home folder and the used logon script. Using a centralized profile the user can roam on the network.
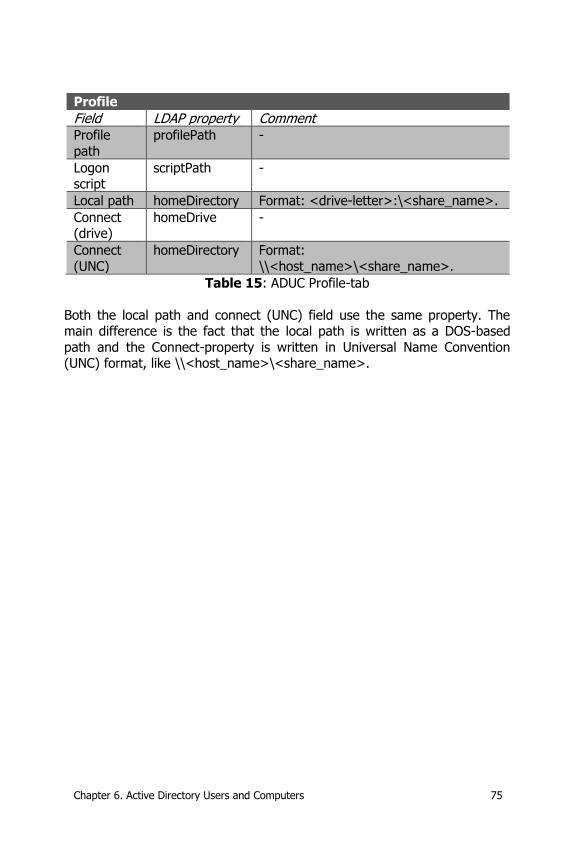
Chapter 6. Active Directory Users and Computers 75
Profile
Field LDAP property Comment Profile
path
profilePath -
Logon script
scriptPath -
Local path homeDirectory Format: <drive-letter>:\<share_name>.
Connect (drive)
homeDrive -
Connect
(UNC)
homeDirectory Format:
\\<host_name>\<share_name>.
Table 15: ADUC Profile-tab
Both the local path and connect (UNC) field use the same property. The main difference is the fact that the local path is written as a DOS-based
path and the Connect-property is written in Universal Name Convention (UNC) format, like \\<host_name>\<share_name>.
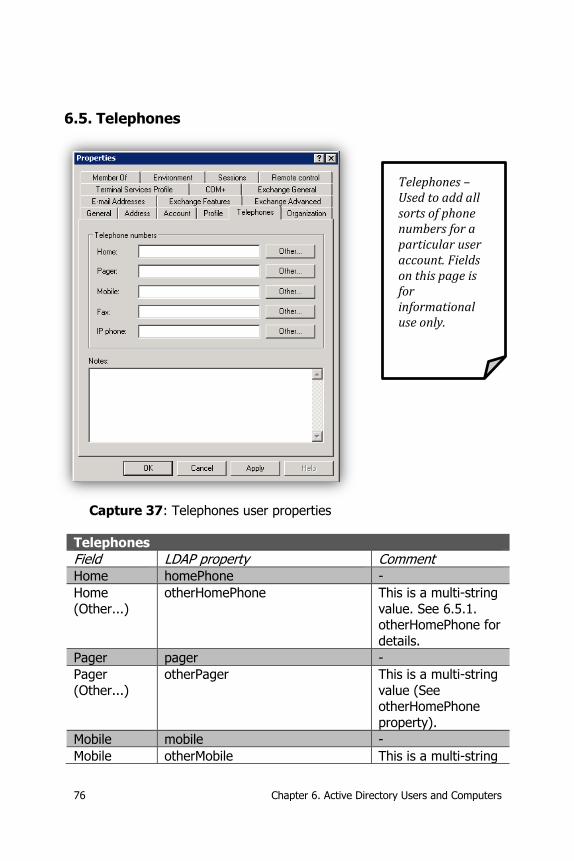
76 Chapter 6. Active Directory Users and Computers
6.5. Telephones
Capture 37: Telephones user properties
Telephones
Field LDAP property Comment Home homePhone -
Home
(Other...)
otherHomePhone This is a multi-string
value. See 6.5.1. otherHomePhone for
details.
Pager pager -
Pager
(Other...)
otherPager This is a multi-string
value (See otherHomePhone
property).
Mobile mobile -
Mobile otherMobile This is a multi-string
Telephones – Used to add all sorts of phone numbers for a particular user account. Fields on this page is for informational use only.
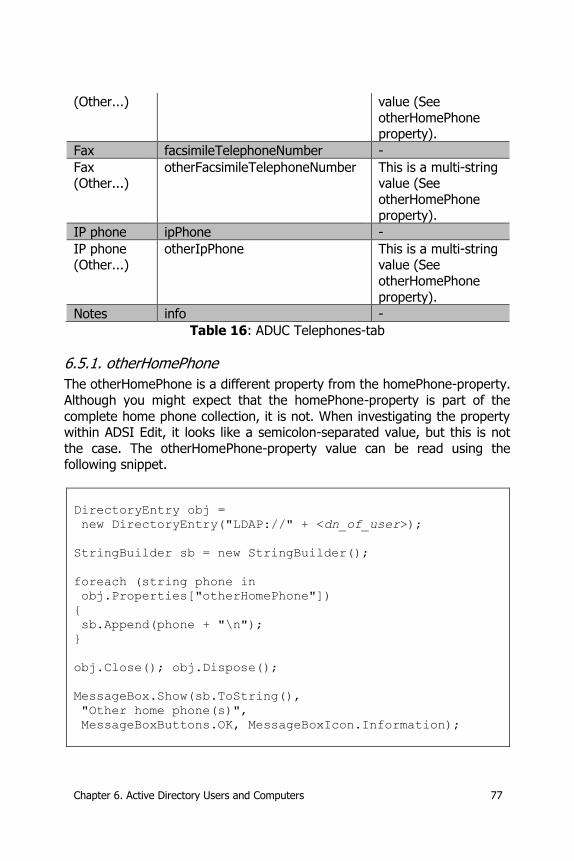
Chapter 6. Active Directory Users and Computers 77
(Other...) value (See
otherHomePhone property).
Fax facsimileTelephoneNumber -
Fax (Other...)
otherFacsimileTelephoneNumber This is a multi-string value (See
otherHomePhone property).
IP phone ipPhone -
IP phone (Other...)
otherIpPhone This is a multi-string value (See
otherHomePhone
property).
Notes info -
Table 16: ADUC Telephones-tab
6.5.1. otherHomePhone
The otherHomePhone is a different property from the homePhone-property.
Although you might expect that the homePhone-property is part of the
complete home phone collection, it is not. When investigating the property within ADSI Edit, it looks like a semicolon-separated value, but this is not
the case. The otherHomePhone-property value can be read using the following snippet.
DirectoryEntry obj =
new DirectoryEntry("LDAP://" + <dn_of_user>);
StringBuilder sb = new StringBuilder();
foreach (string phone in
obj.Properties["otherHomePhone"])
{
sb.Append(phone + "\n");
}
obj.Close(); obj.Dispose();
MessageBox.Show(sb.ToString(),
"Other home phone(s)",
MessageBoxButtons.OK, MessageBoxIcon.Information);
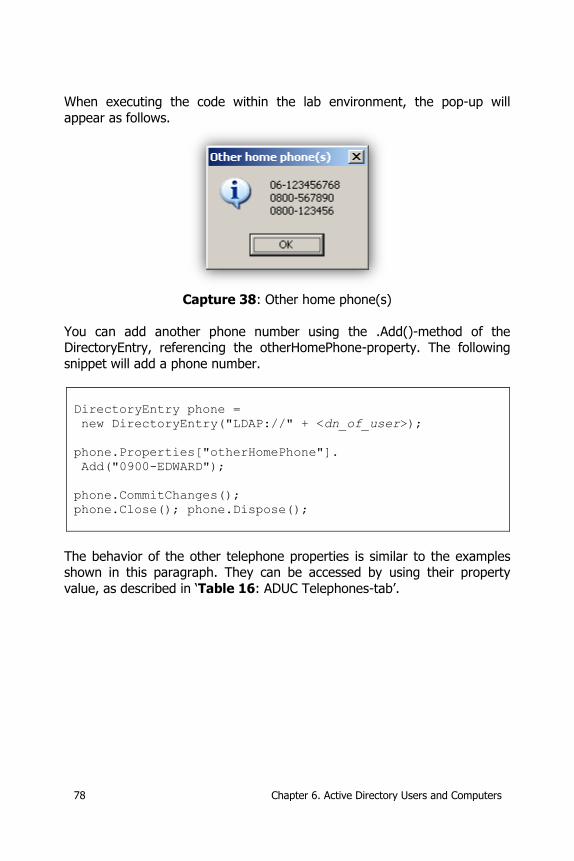
78 Chapter 6. Active Directory Users and Computers
When executing the code within the lab environment, the pop-up will
appear as follows.
Capture 38: Other home phone(s)
You can add another phone number using the .Add()-method of the DirectoryEntry, referencing the otherHomePhone-property. The following
snippet will add a phone number.
DirectoryEntry phone =
new DirectoryEntry("LDAP://" + <dn_of_user>);
phone.Properties["otherHomePhone"].
Add("0900-EDWARD");
phone.CommitChanges();
phone.Close(); phone.Dispose();
The behavior of the other telephone properties is similar to the examples shown in this paragraph. They can be accessed by using their property
value, as described in ‘Table 16: ADUC Telephones-tab’.
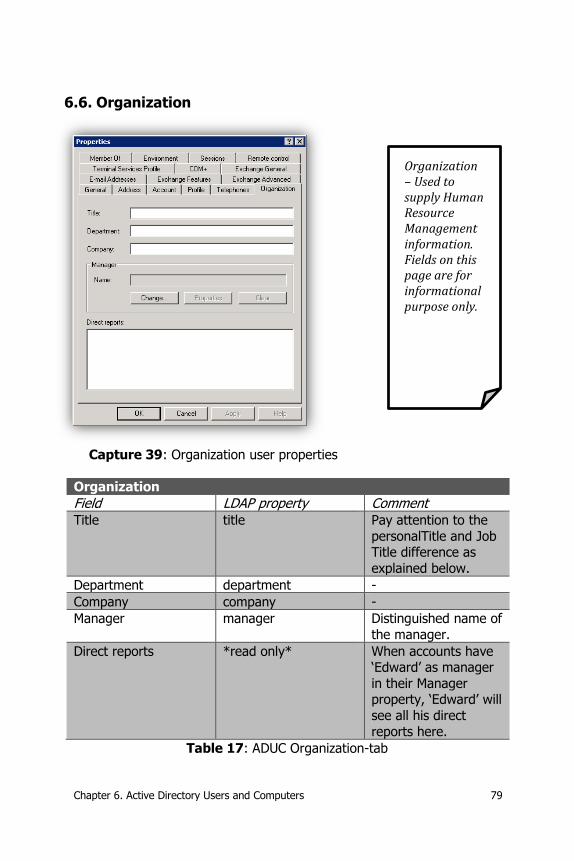
Chapter 6. Active Directory Users and Computers 79
6.6. Organization
Capture 39: Organization user properties
Organization
Field LDAP property Comment Title title Pay attention to the
personalTitle and Job Title difference as
explained below.
Department department -
Company company -
Manager manager Distinguished name of
the manager.
Direct reports *read only* When accounts have ‘Edward’ as manager
in their Manager property, ‘Edward’ will
see all his direct
reports here.
Table 17: ADUC Organization-tab
Organization – Used to supply Human Resource Management information. Fields on this page are for informational purpose only.
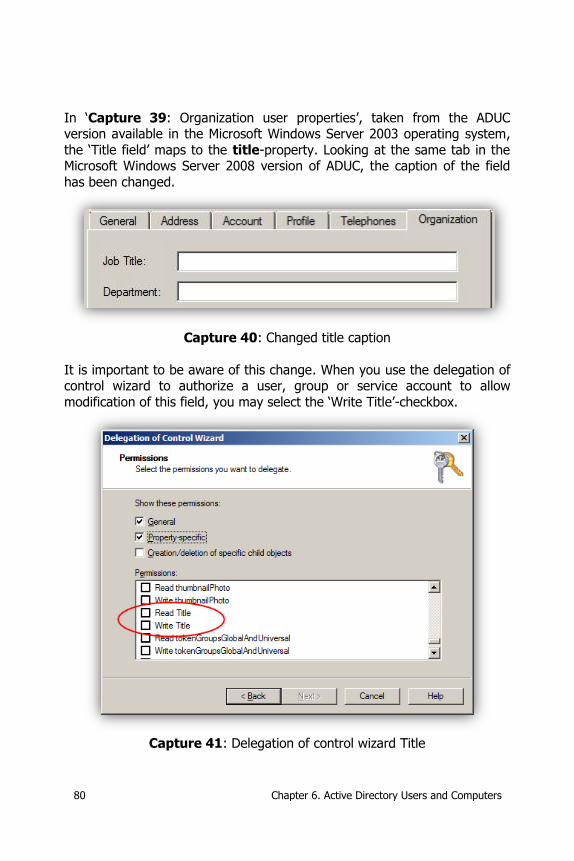
80 Chapter 6. Active Directory Users and Computers
In ‘Capture 39: Organization user properties’, taken from the ADUC version available in the Microsoft Windows Server 2003 operating system,
the ‘Title field’ maps to the title-property. Looking at the same tab in the Microsoft Windows Server 2008 version of ADUC, the caption of the field
has been changed.
Capture 40: Changed title caption
It is important to be aware of this change. When you use the delegation of control wizard to authorize a user, group or service account to allow
modification of this field, you may select the ‘Write Title’-checkbox.
Capture 41: Delegation of control wizard Title
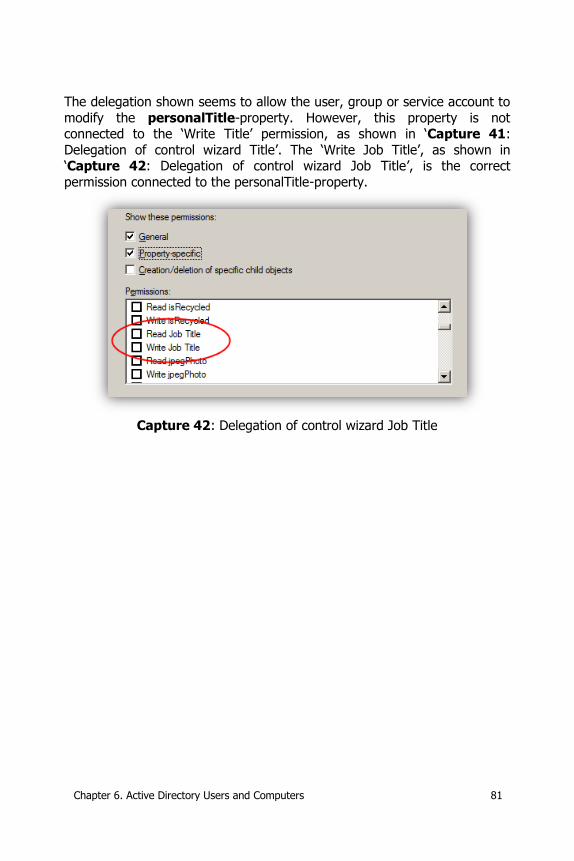
Chapter 6. Active Directory Users and Computers 81
The delegation shown seems to allow the user, group or service account to
modify the personalTitle-property. However, this property is not connected to the ‘Write Title’ permission, as shown in ‘Capture 41:
Delegation of control wizard Title’. The ‘Write Job Title’, as shown in ‘Capture 42: Delegation of control wizard Job Title’, is the correct
permission connected to the personalTitle-property.
Capture 42: Delegation of control wizard Job Title
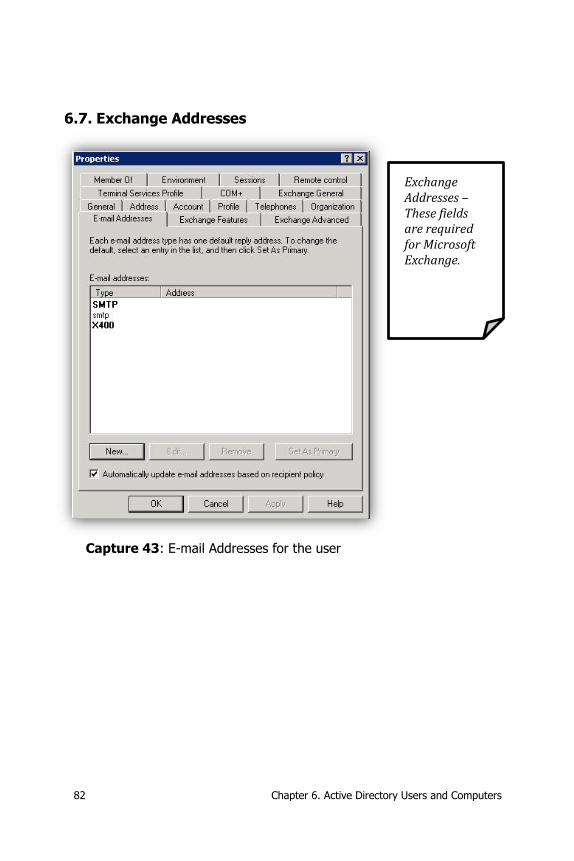
82 Chapter 6. Active Directory Users and Computers
6.7. Exchange Addresses
Capture 43: E-mail Addresses for the user
Exchange Addresses – These fields are required for Microsoft Exchange.
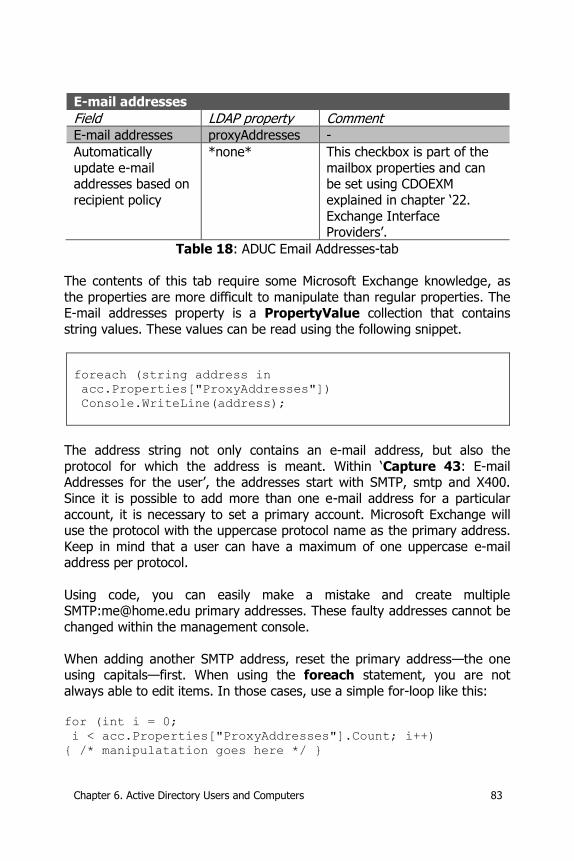
Chapter 6. Active Directory Users and Computers 83
E-mail addresses
Field LDAP property Comment E-mail addresses proxyAddresses -
Automatically
update e-mail addresses based on
recipient policy
*none* This checkbox is part of the
mailbox properties and can be set using CDOEXM
explained in chapter ‘22.
Exchange Interface Providers’.
Table 18: ADUC Email Addresses-tab
The contents of this tab require some Microsoft Exchange knowledge, as
the properties are more difficult to manipulate than regular properties. The E-mail addresses property is a PropertyValue collection that contains
string values. These values can be read using the following snippet.
foreach (string address in
acc.Properties["ProxyAddresses"])
Console.WriteLine(address);
The address string not only contains an e-mail address, but also the
protocol for which the address is meant. Within ‘Capture 43: E-mail Addresses for the user’, the addresses start with SMTP, smtp and X400.
Since it is possible to add more than one e-mail address for a particular
account, it is necessary to set a primary account. Microsoft Exchange will use the protocol with the uppercase protocol name as the primary address.
Keep in mind that a user can have a maximum of one uppercase e-mail address per protocol.
Using code, you can easily make a mistake and create multiple SMTP:[email protected] primary addresses. These faulty addresses cannot be
changed within the management console.
When adding another SMTP address, reset the primary address—the one using capitals—first. When using the foreach statement, you are not
always able to edit items. In those cases, use a simple for-loop like this:
for (int i = 0;
i < acc.Properties["ProxyAddresses"].Count; i++)
{ /* manipulatation goes here */ }
84 Chapter 6. Active Directory Users and Computers
Next, you can change the default value using a code like this:
acc.Properties["ProxyAddresses"][i].ToString().
Replace("smtp:","SMTP:");
Or remove an item like this: acc.Properties["ProxyAddresses"].RemoveAt(i);
After manipulation, commit the changes back to the directory:
acc.CommitChanges();
Other types of e-mail addresses that can be available in the address list or that can be added are:
MS Microsoft Mail SMTP Simple Mail Transfer Protocol
X400 X500
NOTES Lotus Notes
GWISE Novell GroupWise
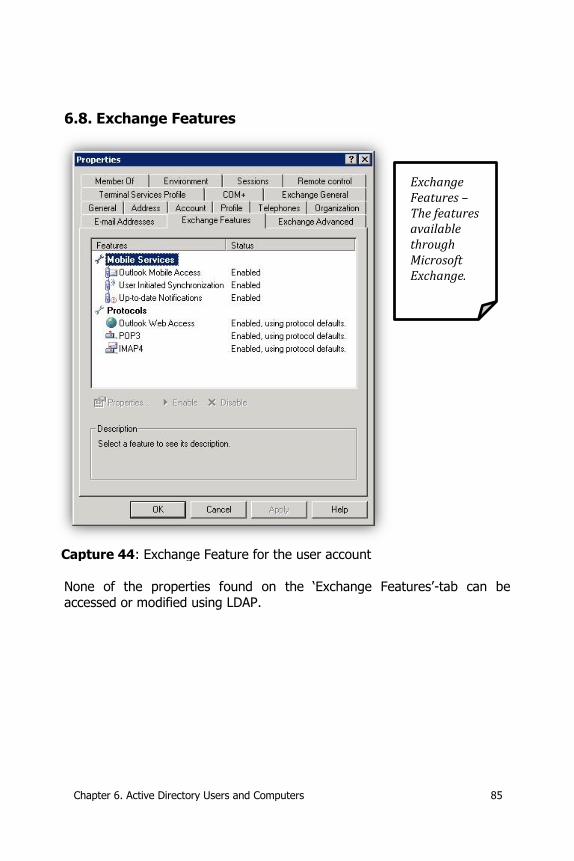
Chapter 6. Active Directory Users and Computers 85
6.8. Exchange Features
Capture 44: Exchange Feature for the user account
None of the properties found on the ‘Exchange Features’-tab can be accessed or modified using LDAP.
Exchange Features – The features available through Microsoft Exchange.
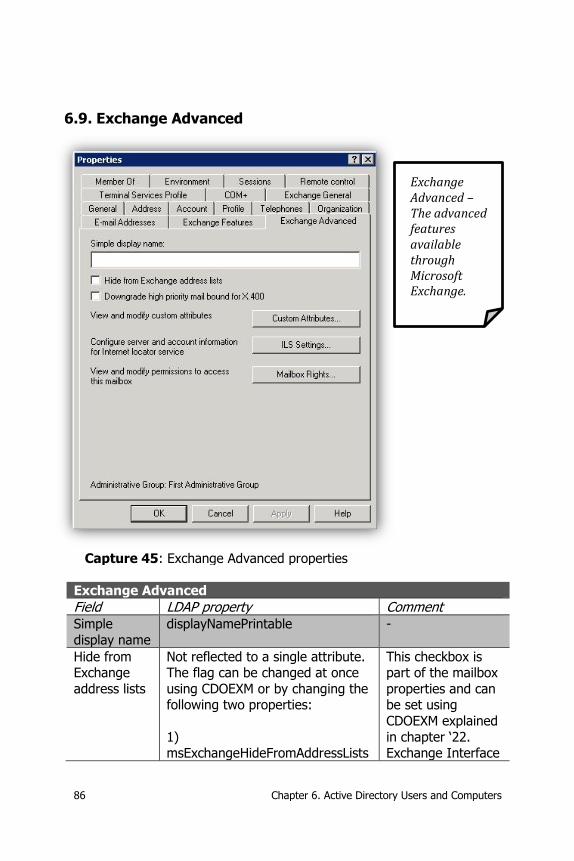
86 Chapter 6. Active Directory Users and Computers
6.9. Exchange Advanced
Capture 45: Exchange Advanced properties
Exchange Advanced
Field LDAP property Comment Simple
display name
displayNamePrintable -
Hide from Exchange
address lists
Not reflected to a single attribute. The flag can be changed at once
using CDOEXM or by changing the following two properties:
1) msExchangeHideFromAddressLists
This checkbox is part of the mailbox
properties and can be set using
CDOEXM explained
in chapter ‘22. Exchange Interface
Exchange Advanced – The advanced features available through Microsoft Exchange.
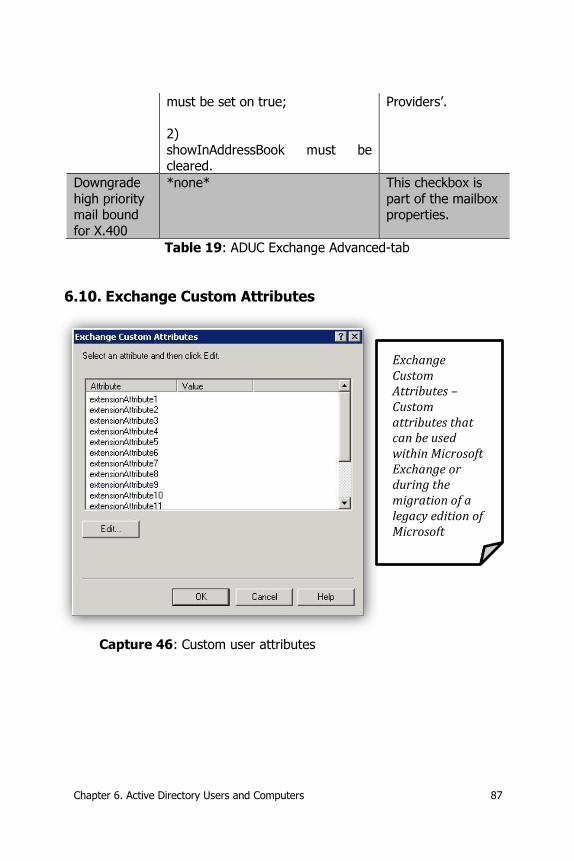
Chapter 6. Active Directory Users and Computers 87
must be set on true;
2)
showInAddressBook must be cleared.
Providers’.
Downgrade
high priority mail bound
for X.400
*none* This checkbox is
part of the mailbox properties.
Table 19: ADUC Exchange Advanced-tab
6.10. Exchange Custom Attributes
Capture 46: Custom user attributes
Exchange Custom Attributes – Custom attributes that can be used within Microsoft Exchange or during the migration of a legacy edition of Microsoft Exchange.
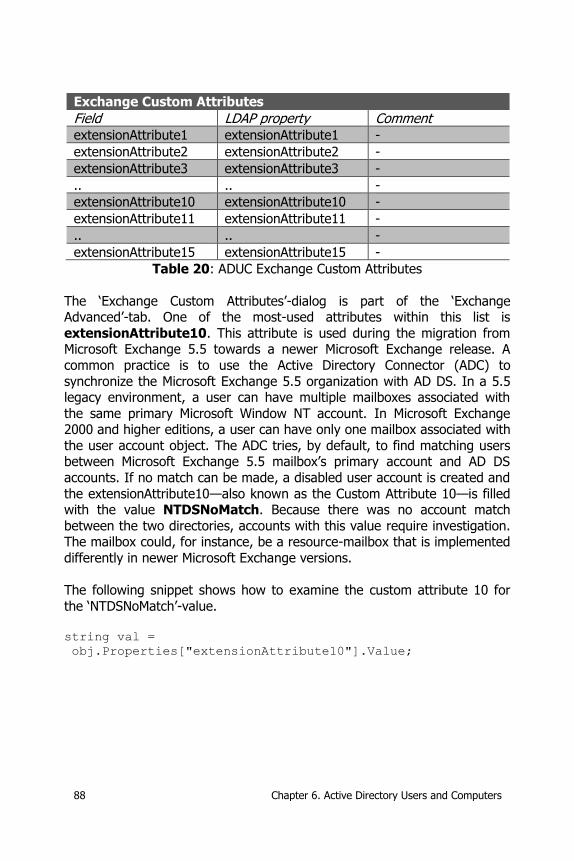
88 Chapter 6. Active Directory Users and Computers
Exchange Custom Attributes
Field LDAP property Comment extensionAttribute1 extensionAttribute1 -
extensionAttribute2 extensionAttribute2 -
extensionAttribute3 extensionAttribute3 -
.. .. -
extensionAttribute10 extensionAttribute10 -
extensionAttribute11 extensionAttribute11 -
.. .. -
extensionAttribute15 extensionAttribute15 -
Table 20: ADUC Exchange Custom Attributes
The ‘Exchange Custom Attributes’-dialog is part of the ‘Exchange Advanced’-tab. One of the most-used attributes within this list is
extensionAttribute10. This attribute is used during the migration from Microsoft Exchange 5.5 towards a newer Microsoft Exchange release. A
common practice is to use the Active Directory Connector (ADC) to
synchronize the Microsoft Exchange 5.5 organization with AD DS. In a 5.5 legacy environment, a user can have multiple mailboxes associated with
the same primary Microsoft Window NT account. In Microsoft Exchange 2000 and higher editions, a user can have only one mailbox associated with
the user account object. The ADC tries, by default, to find matching users between Microsoft Exchange 5.5 mailbox’s primary account and AD DS
accounts. If no match can be made, a disabled user account is created and
the extensionAttribute10—also known as the Custom Attribute 10—is filled with the value NTDSNoMatch. Because there was no account match
between the two directories, accounts with this value require investigation. The mailbox could, for instance, be a resource-mailbox that is implemented
differently in newer Microsoft Exchange versions.
The following snippet shows how to examine the custom attribute 10 for
the ‘NTDSNoMatch’-value. string val =
obj.Properties["extensionAttribute10"].Value;
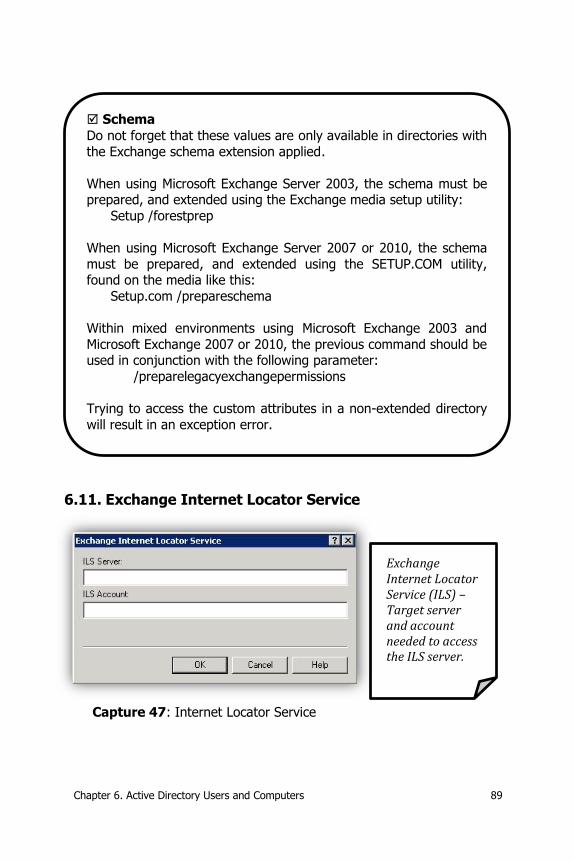
Chapter 6. Active Directory Users and Computers 89
6.11. Exchange Internet Locator Service
Capture 47: Internet Locator Service
Exchange Internet Locator Service (ILS) – Target server and account needed to access the ILS server.
Schema
Do not forget that these values are only available in directories with
the Exchange schema extension applied.
When using Microsoft Exchange Server 2003, the schema must be prepared, and extended using the Exchange media setup utility:
Setup /forestprep
When using Microsoft Exchange Server 2007 or 2010, the schema
must be prepared, and extended using the SETUP.COM utility, found on the media like this:
Setup.com /prepareschema
Within mixed environments using Microsoft Exchange 2003 and
Microsoft Exchange 2007 or 2010, the previous command should be used in conjunction with the following parameter:
/preparelegacyexchangepermissions
Trying to access the custom attributes in a non-extended directory
will result in an exception error.

90 Chapter 6. Active Directory Users and Computers
Exchange Internet Locator Service
Field LDAP property Comment ILS Server autoReplyMessage Left part of the
value
ILS Account autoReplyMessage Right part of the value
Table 21: ADUC Exchange Internet Locator Service
An Internet Locator Server is a server that acts like a directory service for
Microsoft NetMeeting clients. The Microsoft NetMeeting client is included in many older versions of Microsoft Windows, up to Microsoft Windows XP. It
uses the H.323 protocol for audio and video conferencing. The
‘autoReplyMessage’-property is written in the following format: <ILS Server>/<ILSAccount> within the user’s properties class.
6.12. Mailbox Rights
Capture 48: Mailbox permissions
Mailbox rights – The permissions of the mailbox.
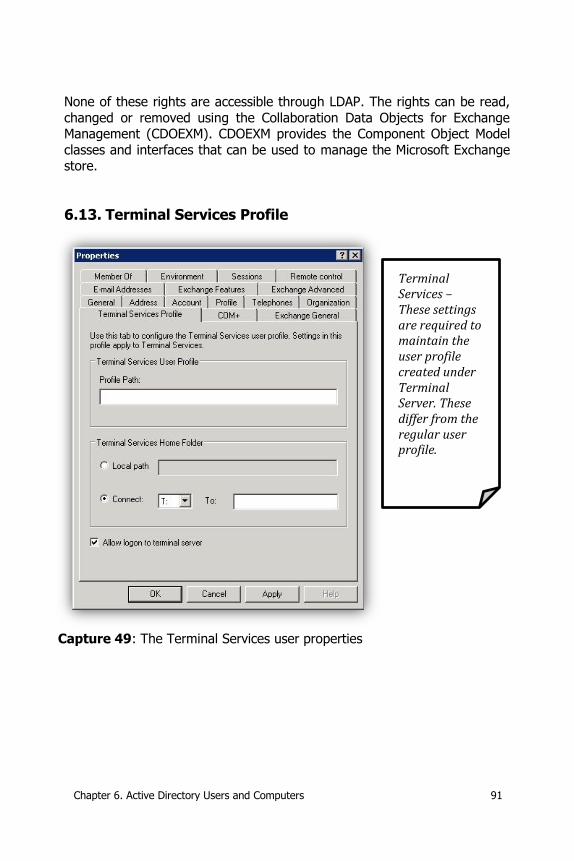
Chapter 6. Active Directory Users and Computers 91
None of these rights are accessible through LDAP. The rights can be read,
changed or removed using the Collaboration Data Objects for Exchange Management (CDOEXM). CDOEXM provides the Component Object Model
classes and interfaces that can be used to manage the Microsoft Exchange store.
6.13. Terminal Services Profile
Capture 49: The Terminal Services user properties
Terminal Services – These settings are required to maintain the user profile created under Terminal Server. These differ from the regular user profile.
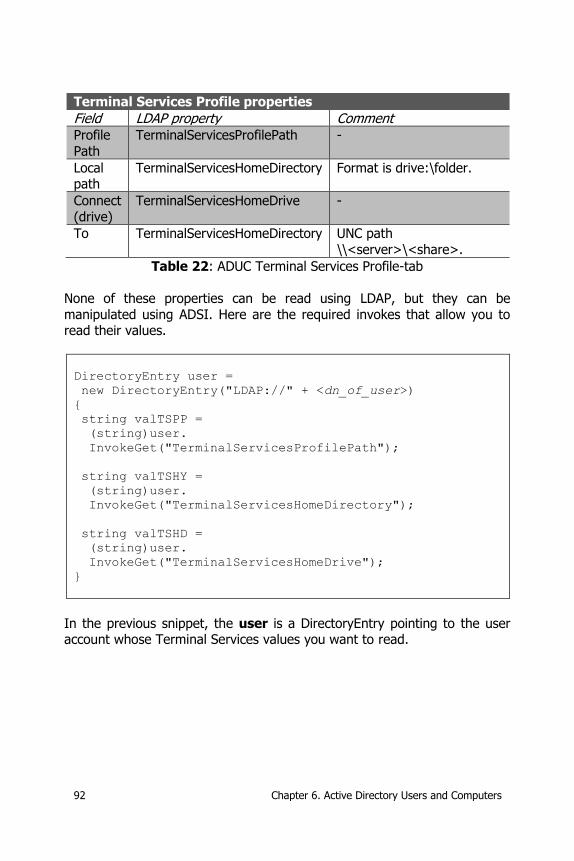
92 Chapter 6. Active Directory Users and Computers
Terminal Services Profile properties
Field LDAP property Comment Profile
Path
TerminalServicesProfilePath -
Local path
TerminalServicesHomeDirectory Format is drive:\folder.
Connect
(drive)
TerminalServicesHomeDrive -
To TerminalServicesHomeDirectory UNC path
\\<server>\<share>.
Table 22: ADUC Terminal Services Profile-tab
None of these properties can be read using LDAP, but they can be
manipulated using ADSI. Here are the required invokes that allow you to read their values.
DirectoryEntry user =
new DirectoryEntry("LDAP://" + <dn_of_user>)
{
string valTSPP =
(string)user.
InvokeGet("TerminalServicesProfilePath");
string valTSHY =
(string)user.
InvokeGet("TerminalServicesHomeDirectory");
string valTSHD =
(string)user.
InvokeGet("TerminalServicesHomeDrive");
}
In the previous snippet, the user is a DirectoryEntry pointing to the user account whose Terminal Services values you want to read.
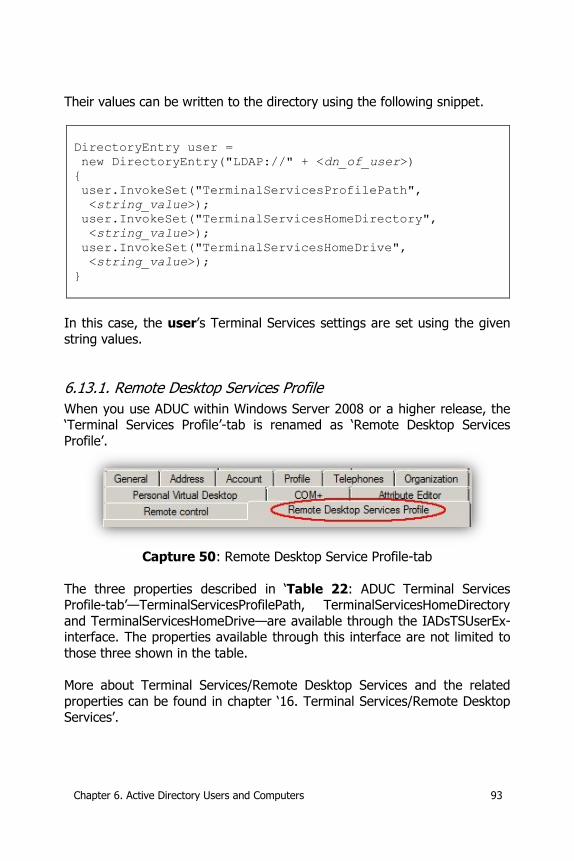
Chapter 6. Active Directory Users and Computers 93
Their values can be written to the directory using the following snippet.
DirectoryEntry user =
new DirectoryEntry("LDAP://" + <dn_of_user>)
{
user.InvokeSet("TerminalServicesProfilePath",
<string_value>);
user.InvokeSet("TerminalServicesHomeDirectory",
<string_value>);
user.InvokeSet("TerminalServicesHomeDrive",
<string_value>);
}
In this case, the user’s Terminal Services settings are set using the given
string values.
6.13.1. Remote Desktop Services Profile
When you use ADUC within Windows Server 2008 or a higher release, the ‘Terminal Services Profile’-tab is renamed as ‘Remote Desktop Services
Profile’.
Capture 50: Remote Desktop Service Profile-tab
The three properties described in ‘Table 22: ADUC Terminal Services Profile-tab’—TerminalServicesProfilePath, TerminalServicesHomeDirectory
and TerminalServicesHomeDrive—are available through the IADsTSUserEx-interface. The properties available through this interface are not limited to
those three shown in the table.
More about Terminal Services/Remote Desktop Services and the related
properties can be found in chapter ‘16. Terminal Services/Remote Desktop Services’.
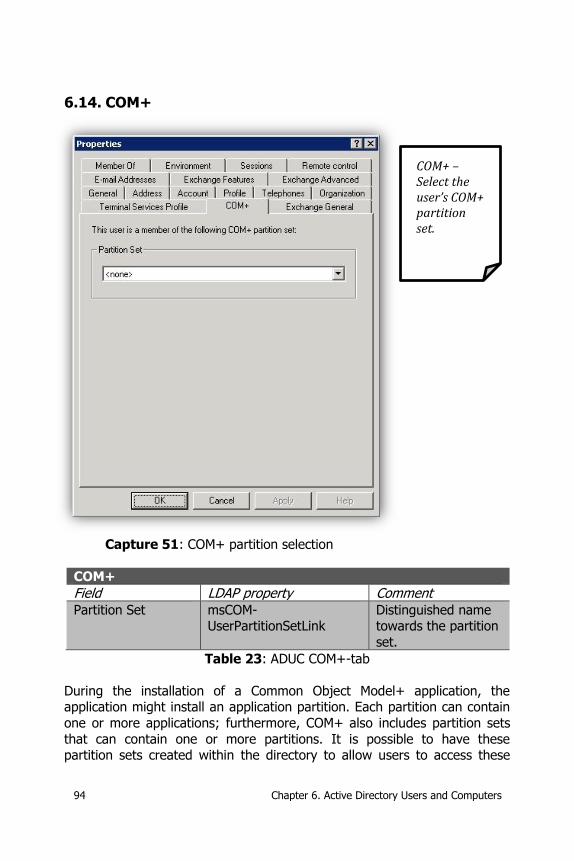
94 Chapter 6. Active Directory Users and Computers
6.14. COM+
Capture 51: COM+ partition selection
COM+
Field LDAP property Comment Partition Set msCOM-
UserPartitionSetLink Distinguished name towards the partition
set.
Table 23: ADUC COM+-tab
During the installation of a Common Object Model+ application, the application might install an application partition. Each partition can contain
one or more applications; furthermore, COM+ also includes partition sets
that can contain one or more partitions. It is possible to have these partition sets created within the directory to allow users to access these
COM+ – Select the user’s COM+ partition set.

Chapter 6. Active Directory Users and Computers 95
applications throughout the domain. A user can be assigned to a particular
partition set. Partition sets can be created through ADUC by selecting the ‘View’
‘Advanced Features’-option.
Capture 52: ‘Advanced Features’-tree view
Selecting the ‘Advanced Features’-option will reload the tree-view so it will
contain much more items than before. Under the ‘System’-node, both the
ComPartitions and ComPartitionSets can be found.

96 Chapter 6. Active Directory Users and Computers
The context menu of the ComPartitions allows you to create a partition,
while the context menu of the ComPartitionSets allows you to create a partition set.
Capture 53: Partitions
One or more created partitions can be added within a partition set by double-clicking the newly created partition set.
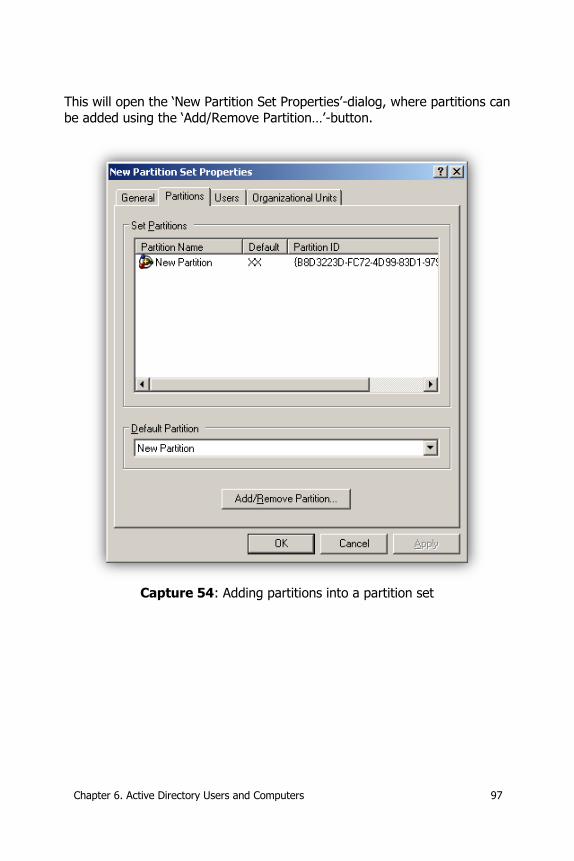
Chapter 6. Active Directory Users and Computers 97
This will open the ‘New Partition Set Properties’-dialog, where partitions can
be added using the ‘Add/Remove Partition…’-button.
Capture 54: Adding partitions into a partition set
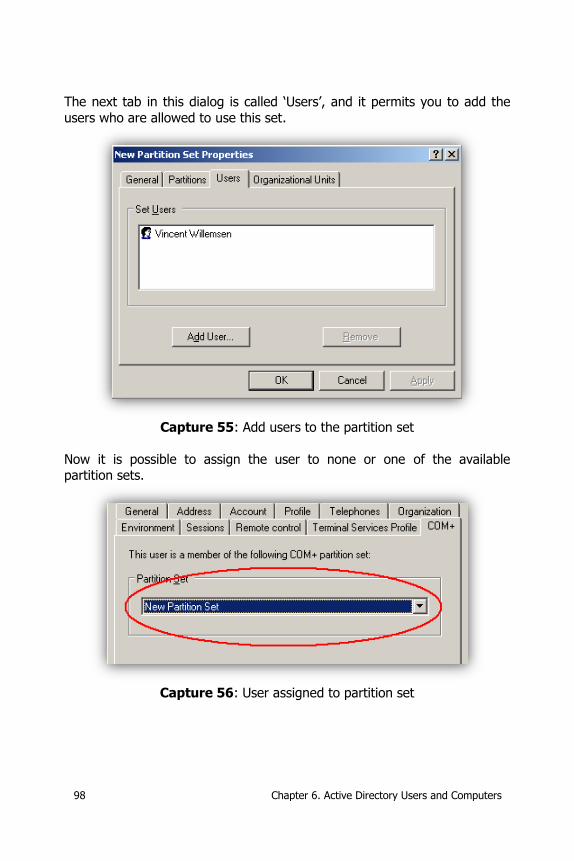
98 Chapter 6. Active Directory Users and Computers
The next tab in this dialog is called ‘Users’, and it permits you to add the
users who are allowed to use this set.
Capture 55: Add users to the partition set
Now it is possible to assign the user to none or one of the available partition sets.
Capture 56: User assigned to partition set
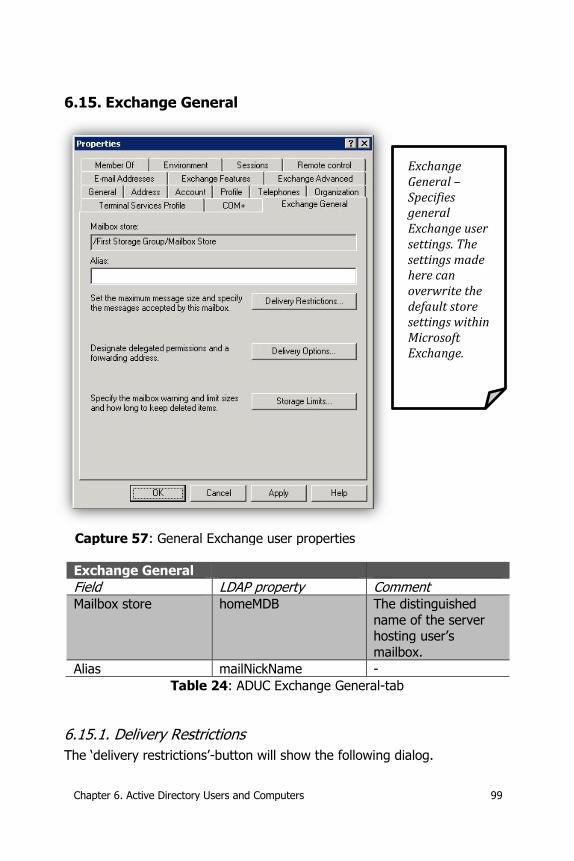
Chapter 6. Active Directory Users and Computers 99
6.15. Exchange General
Capture 57: General Exchange user properties
Exchange General
Field LDAP property Comment Mailbox store homeMDB The distinguished
name of the server hosting user’s
mailbox.
Alias mailNickName -
Table 24: ADUC Exchange General-tab
6.15.1. Delivery Restrictions
The ‘delivery restrictions’-button will show the following dialog.
Exchange General – Specifies general Exchange user settings. The settings made here can overwrite the default store settings within Microsoft Exchange.
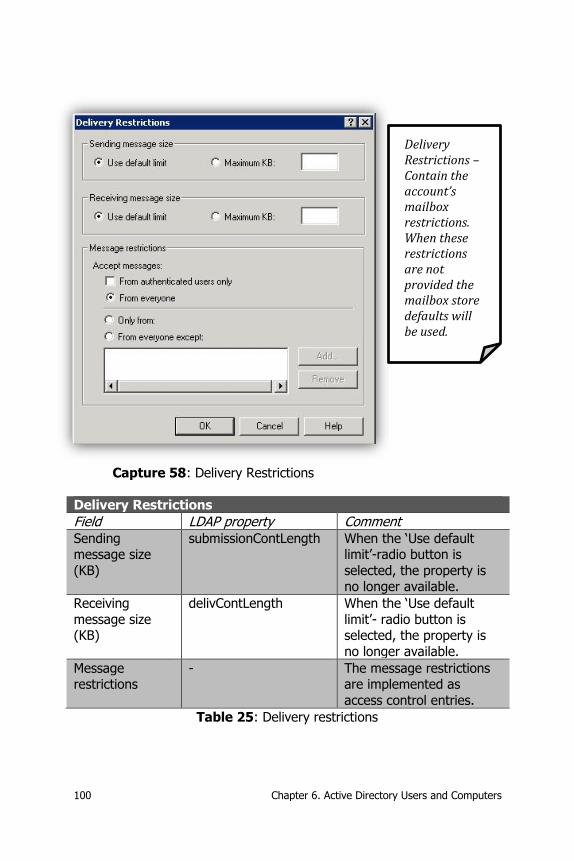
100 Chapter 6. Active Directory Users and Computers
Capture 58: Delivery Restrictions
Delivery Restrictions
Field LDAP property Comment Sending message size
(KB)
submissionContLength When the ‘Use default limit’-radio button is
selected, the property is no longer available.
Receiving
message size (KB)
delivContLength When the ‘Use default
limit’- radio button is selected, the property is
no longer available.
Message restrictions
- The message restrictions are implemented as
access control entries.
Table 25: Delivery restrictions
Delivery Restrictions – Contain the account’s mailbox restrictions. When these restrictions are not provided the mailbox store defaults will be used.
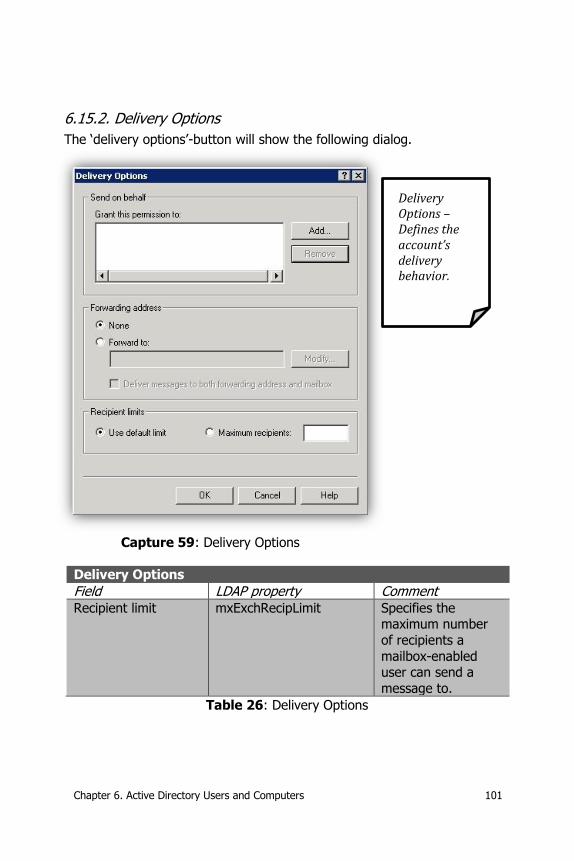
Chapter 6. Active Directory Users and Computers 101
6.15.2. Delivery Options
The ‘delivery options’-button will show the following dialog.
Capture 59: Delivery Options
Delivery Options
Field LDAP property Comment Recipient limit mxExchRecipLimit Specifies the
maximum number
of recipients a
mailbox-enabled user can send a
message to.
Table 26: Delivery Options
Delivery Options – Defines the account’s delivery behavior.
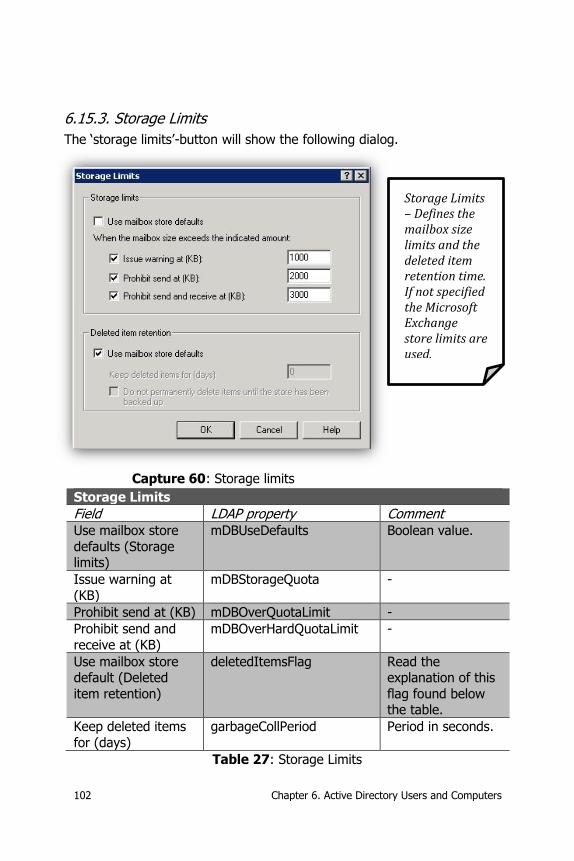
102 Chapter 6. Active Directory Users and Computers
6.15.3. Storage Limits
The ‘storage limits’-button will show the following dialog.
Capture 60: Storage limits
Storage Limits
Field LDAP property Comment Use mailbox store
defaults (Storage limits)
mDBUseDefaults Boolean value.
Issue warning at
(KB)
mDBStorageQuota -
Prohibit send at (KB) mDBOverQuotaLimit -
Prohibit send and
receive at (KB)
mDBOverHardQuotaLimit -
Use mailbox store default (Deleted
item retention)
deletedItemsFlag Read the explanation of this
flag found below the table.
Keep deleted items
for (days)
garbageCollPeriod Period in seconds.
Table 27: Storage Limits
Storage Limits – Defines the mailbox size limits and the deleted item retention time. If not specified the Microsoft Exchange store limits are used.
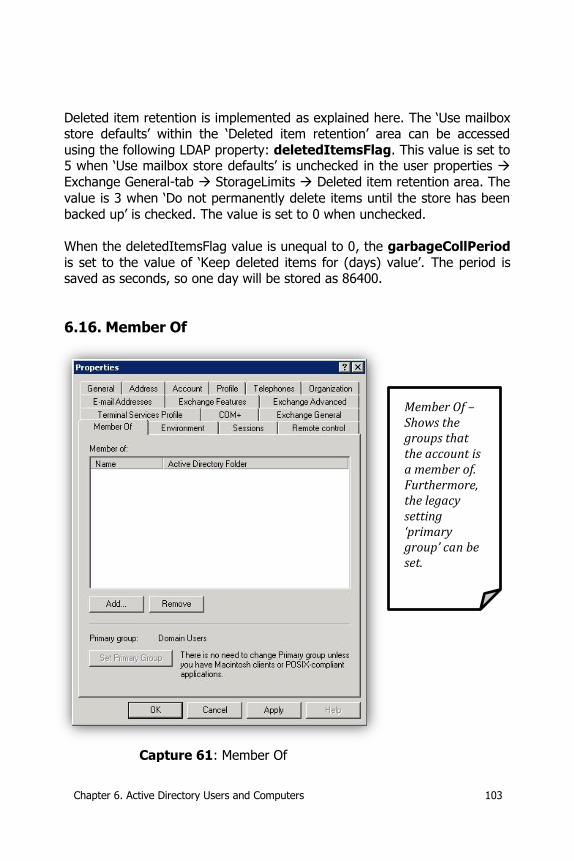
Chapter 6. Active Directory Users and Computers 103
Deleted item retention is implemented as explained here. The ‘Use mailbox store defaults’ within the ‘Deleted item retention’ area can be accessed
using the following LDAP property: deletedItemsFlag. This value is set to 5 when ‘Use mailbox store defaults’ is unchecked in the user properties
Exchange General-tab StorageLimits Deleted item retention area. The
value is 3 when ‘Do not permanently delete items until the store has been
backed up’ is checked. The value is set to 0 when unchecked.
When the deletedItemsFlag value is unequal to 0, the garbageCollPeriod
is set to the value of ‘Keep deleted items for (days) value’. The period is saved as seconds, so one day will be stored as 86400.
6.16. Member Of
Capture 61: Member Of
Member Of – Shows the groups that the account is a member of. Furthermore, the legacy setting ‘primary group’ can be set.
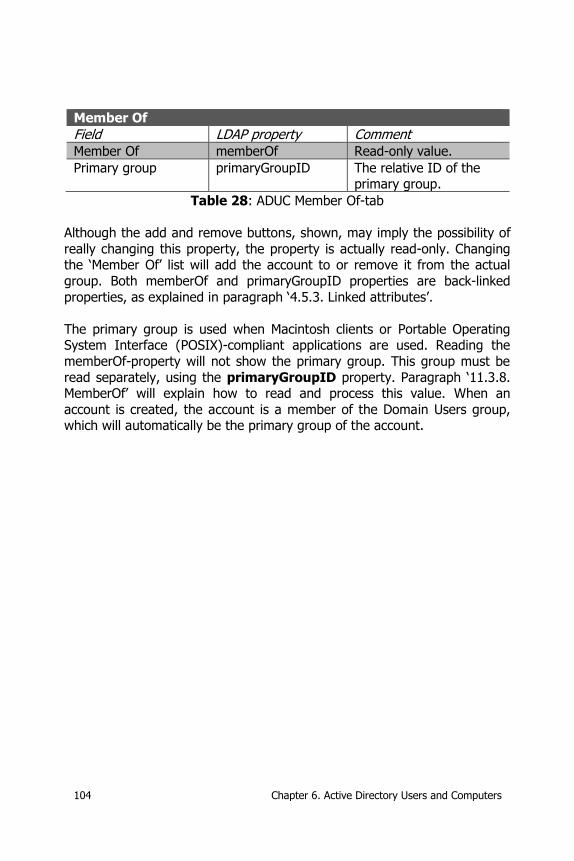
104 Chapter 6. Active Directory Users and Computers
Member Of
Field LDAP property Comment Member Of memberOf Read-only value.
Primary group primaryGroupID The relative ID of the primary group.
Table 28: ADUC Member Of-tab
Although the add and remove buttons, shown, may imply the possibility of
really changing this property, the property is actually read-only. Changing the ‘Member Of’ list will add the account to or remove it from the actual
group. Both memberOf and primaryGroupID properties are back-linked
properties, as explained in paragraph ‘4.5.3. Linked attributes’.
The primary group is used when Macintosh clients or Portable Operating System Interface (POSIX)-compliant applications are used. Reading the
memberOf-property will not show the primary group. This group must be
read separately, using the primaryGroupID property. Paragraph ‘11.3.8. MemberOf’ will explain how to read and process this value. When an
account is created, the account is a member of the Domain Users group, which will automatically be the primary group of the account.
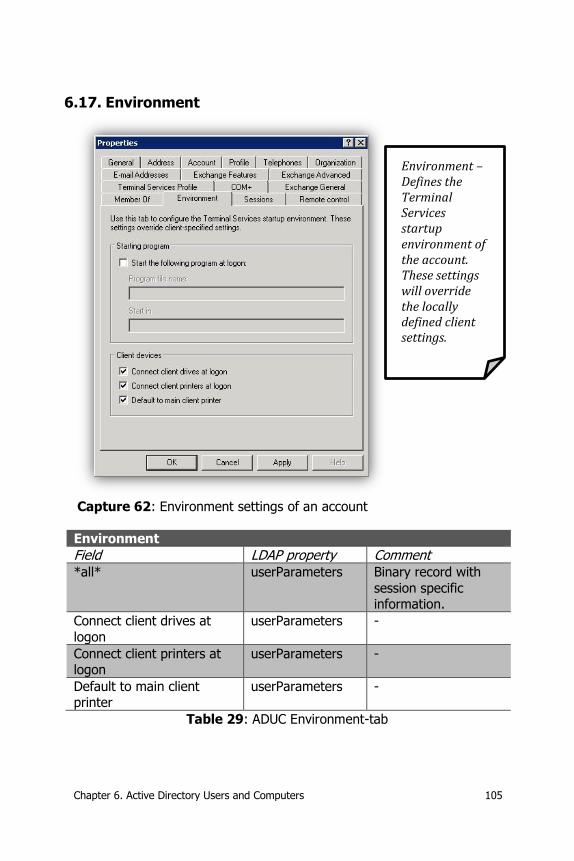
Chapter 6. Active Directory Users and Computers 105
6.17. Environment
Capture 62: Environment settings of an account
Environment
Field LDAP property Comment *all* userParameters Binary record with
session specific information.
Connect client drives at
logon
userParameters -
Connect client printers at logon
userParameters -
Default to main client printer
userParameters -
Table 29: ADUC Environment-tab
Environment – Defines the Terminal Services startup environment of the account. These settings will override the locally defined client settings.
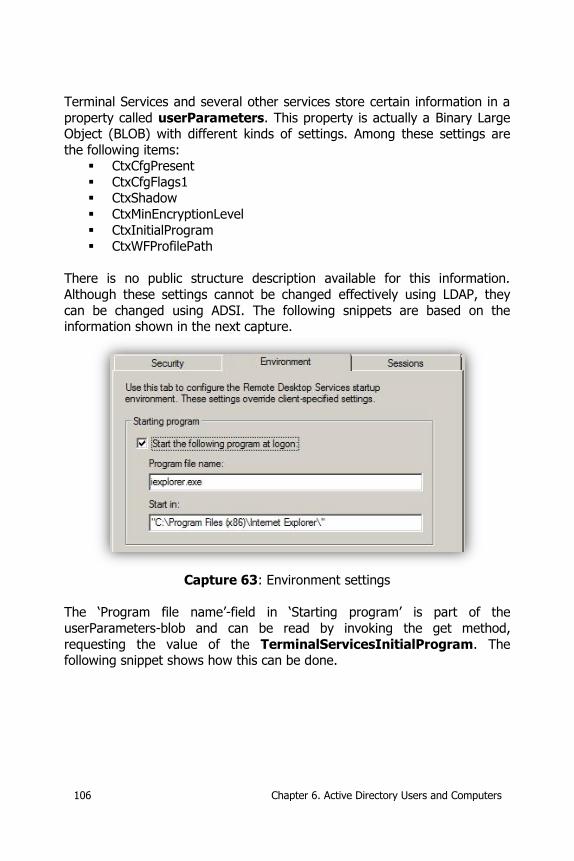
106 Chapter 6. Active Directory Users and Computers
Terminal Services and several other services store certain information in a
property called userParameters. This property is actually a Binary Large Object (BLOB) with different kinds of settings. Among these settings are
the following items: CtxCfgPresent
CtxCfgFlags1 CtxShadow
CtxMinEncryptionLevel
CtxInitialProgram CtxWFProfilePath
There is no public structure description available for this information.
Although these settings cannot be changed effectively using LDAP, they
can be changed using ADSI. The following snippets are based on the information shown in the next capture.
Capture 63: Environment settings
The ‘Program file name’-field in ‘Starting program’ is part of the
userParameters-blob and can be read by invoking the get method,
requesting the value of the TerminalServicesInitialProgram. The following snippet shows how this can be done.

Chapter 6. Active Directory Users and Computers 107
using (DirectoryEntry user =
new DirectoryEntry("LDAP://" + <dn_of_user>))
{
// Read the TerminalServicesInitialProgram
// part of userParameters
string val = (string)user.
InvokeGet("TerminalServicesInitialProgram");
MessageBox.Show(
"TerminalServicesInitialProgram: " + val,
"Information",
MessageBoxButtons.OK,
MessageBoxIcon.Information);
}
The message-box related to the specified information and snippet is shown here.
Capture 64: TerminalServicesInitialProgram information
The ‘Start in’-field is also part of the userParameters-property and can also be read by invoking the get method. In this case, the
TerminalServicesWorkDirectory argument should be used. The following snippet shows how this value can be read.
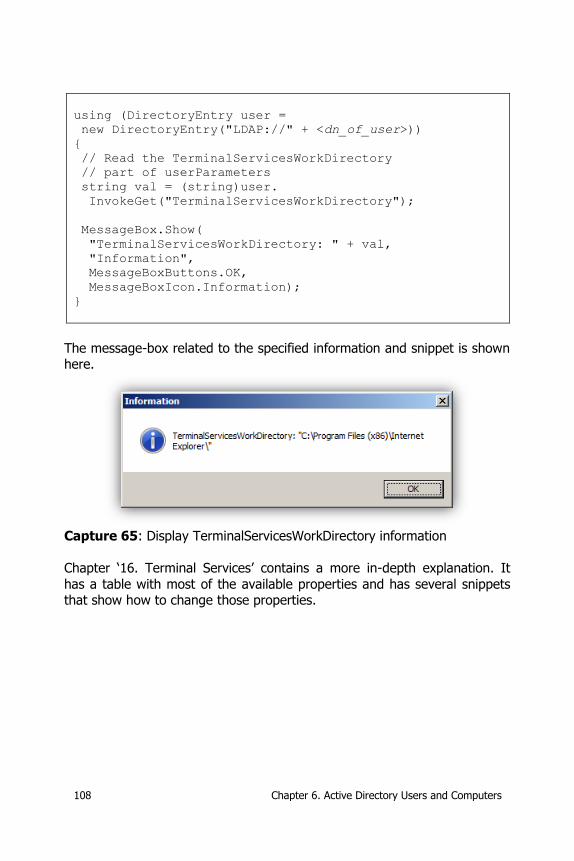
108 Chapter 6. Active Directory Users and Computers
using (DirectoryEntry user =
new DirectoryEntry("LDAP://" + <dn_of_user>))
{
// Read the TerminalServicesWorkDirectory
// part of userParameters
string val = (string)user.
InvokeGet("TerminalServicesWorkDirectory");
MessageBox.Show(
"TerminalServicesWorkDirectory: " + val,
"Information",
MessageBoxButtons.OK,
MessageBoxIcon.Information);
}
The message-box related to the specified information and snippet is shown here.
Capture 65: Display TerminalServicesWorkDirectory information
Chapter ‘16. Terminal Services’ contains a more in-depth explanation. It
has a table with most of the available properties and has several snippets that show how to change those properties.
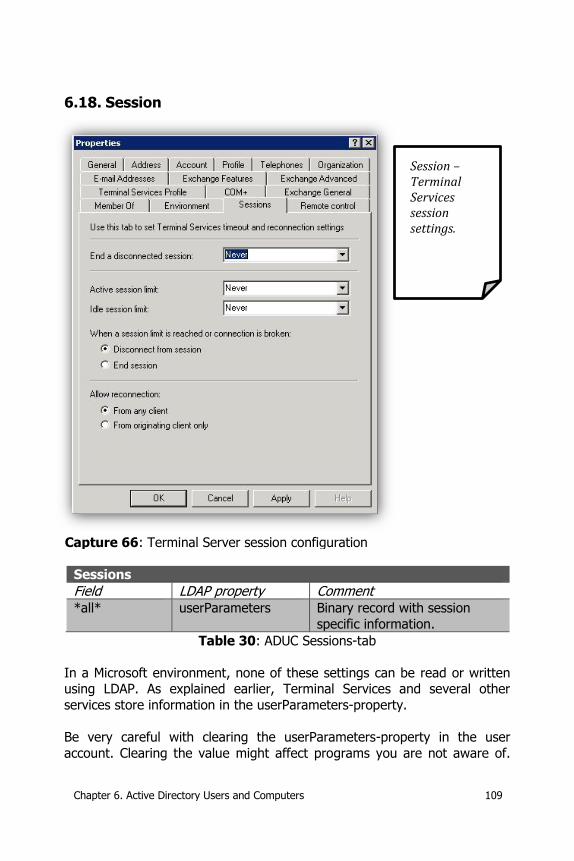
Chapter 6. Active Directory Users and Computers 109
6.18. Session
Capture 66: Terminal Server session configuration
Sessions
Field LDAP property Comment *all* userParameters Binary record with session
specific information.
Table 30: ADUC Sessions-tab
In a Microsoft environment, none of these settings can be read or written using LDAP. As explained earlier, Terminal Services and several other
services store information in the userParameters-property.
Be very careful with clearing the userParameters-property in the user
account. Clearing the value might affect programs you are not aware of.
Session – Terminal Services session settings.
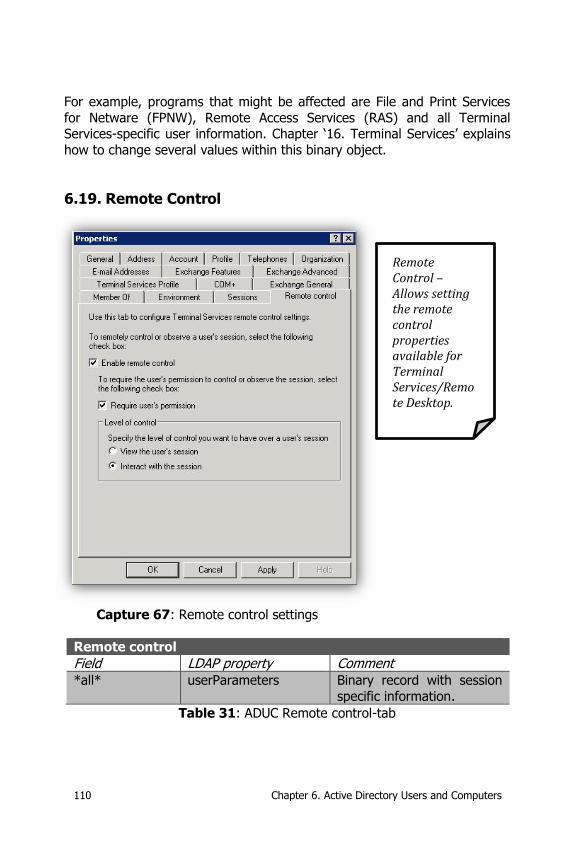
110 Chapter 6. Active Directory Users and Computers
For example, programs that might be affected are File and Print Services
for Netware (FPNW), Remote Access Services (RAS) and all Terminal Services-specific user information. Chapter ‘16. Terminal Services’ explains
how to change several values within this binary object.
6.19. Remote Control
Capture 67: Remote control settings
Remote control
Field LDAP property Comment *all* userParameters Binary record with session
specific information.
Table 31: ADUC Remote control-tab
Remote Control – Allows setting the remote control properties available for Terminal Services/Remote Desktop.
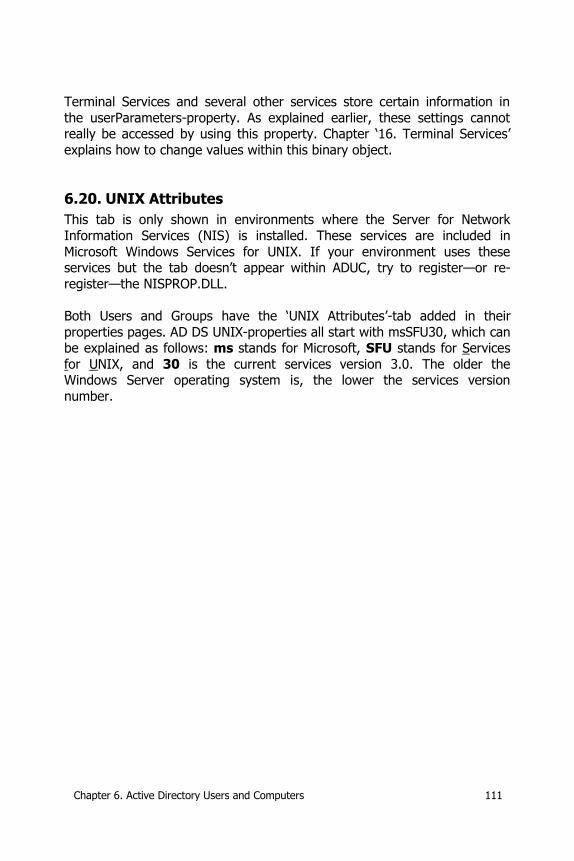
Chapter 6. Active Directory Users and Computers 111
Terminal Services and several other services store certain information in
the userParameters-property. As explained earlier, these settings cannot really be accessed by using this property. Chapter ‘16. Terminal Services’
explains how to change values within this binary object.
6.20. UNIX Attributes
This tab is only shown in environments where the Server for Network
Information Services (NIS) is installed. These services are included in
Microsoft Windows Services for UNIX. If your environment uses these services but the tab doesn’t appear within ADUC, try to register—or re-
register—the NISPROP.DLL.
Both Users and Groups have the ‘UNIX Attributes’-tab added in their
properties pages. AD DS UNIX-properties all start with msSFU30, which can be explained as follows: ms stands for Microsoft, SFU stands for Services
for UNIX, and 30 is the current services version 3.0. The older the Windows Server operating system is, the lower the services version
number.
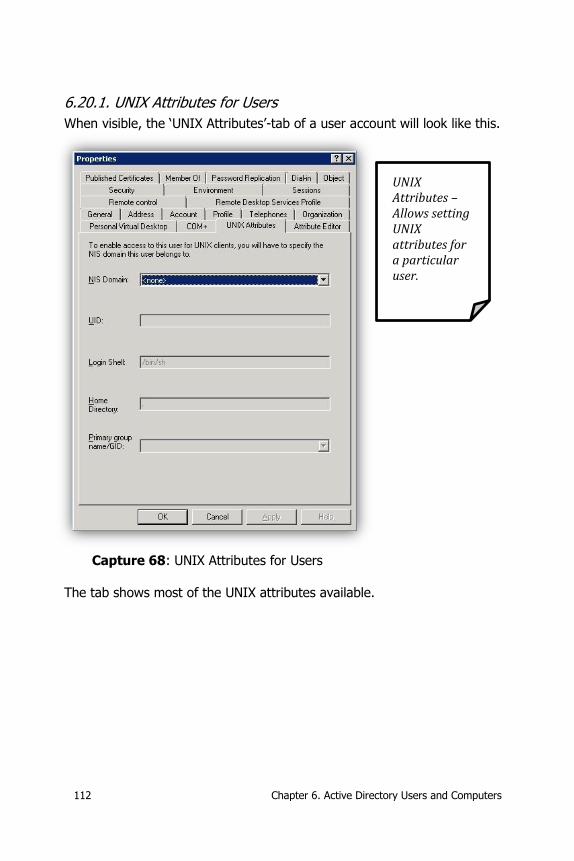
112 Chapter 6. Active Directory Users and Computers
6.20.1. UNIX Attributes for Users
When visible, the ‘UNIX Attributes’-tab of a user account will look like this.
Capture 68: UNIX Attributes for Users
The tab shows most of the UNIX attributes available.
UNIX Attributes – Allows setting UNIX attributes for a particular user.

Chapter 6. Active Directory Users and Computers 113
The following table contains all available UNIX attributes:
UNIX Attributes for Users
Field LDAP property Comment NIS Domain msSFU30NisDomain The NIS domain the
user belongs to.
UID msSFU30UidNumber The number belonging
to the selected user account.
Login Shell msSFU30LoginShell The shell used to allow the user to login;
/bin/sh or another shell
like /bin/bash.
Home Directory msSFU30HomeDirectory The path UNIX home
directory of the
selected user; /home/Edward.
Primary group GID
msSFU30GidNumber The global identifier of the user’s primary
group.
Primary group name
msSFU30PosixMemberOf The name of the user’s primary group.
- msSFU30Name Contains the name of a
map, generally the sAMAccountName.
- msSFU30Password The UNIX password
belonging to the selected user account.
Table 32: UNIX Attributes for Users
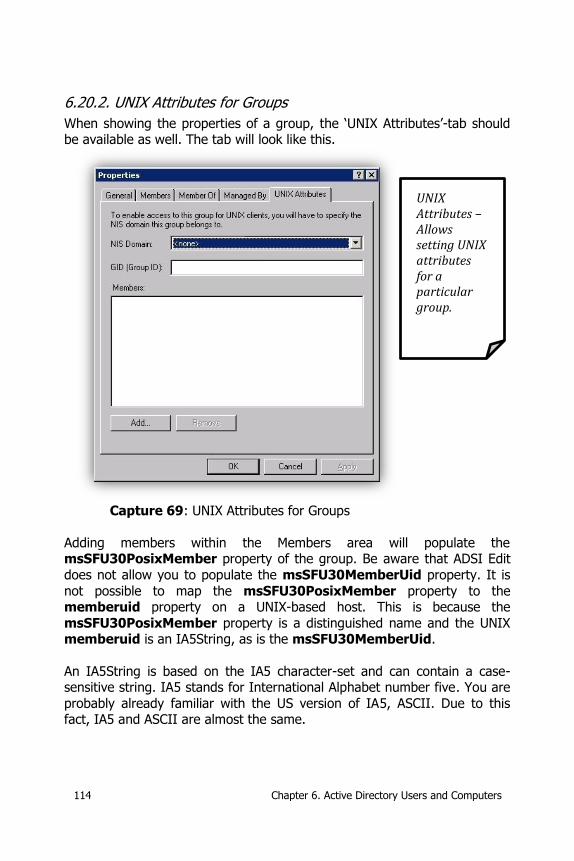
114 Chapter 6. Active Directory Users and Computers
6.20.2. UNIX Attributes for Groups
When showing the properties of a group, the ‘UNIX Attributes’-tab should be available as well. The tab will look like this.
Capture 69: UNIX Attributes for Groups
Adding members within the Members area will populate the msSFU30PosixMember property of the group. Be aware that ADSI Edit
does not allow you to populate the msSFU30MemberUid property. It is
not possible to map the msSFU30PosixMember property to the memberuid property on a UNIX-based host. This is because the
msSFU30PosixMember property is a distinguished name and the UNIX memberuid is an IA5String, as is the msSFU30MemberUid.
An IA5String is based on the IA5 character-set and can contain a case-sensitive string. IA5 stands for International Alphabet number five. You are
probably already familiar with the US version of IA5, ASCII. Due to this fact, IA5 and ASCII are almost the same.
UNIX Attributes – Allows setting UNIX attributes for a particular group.
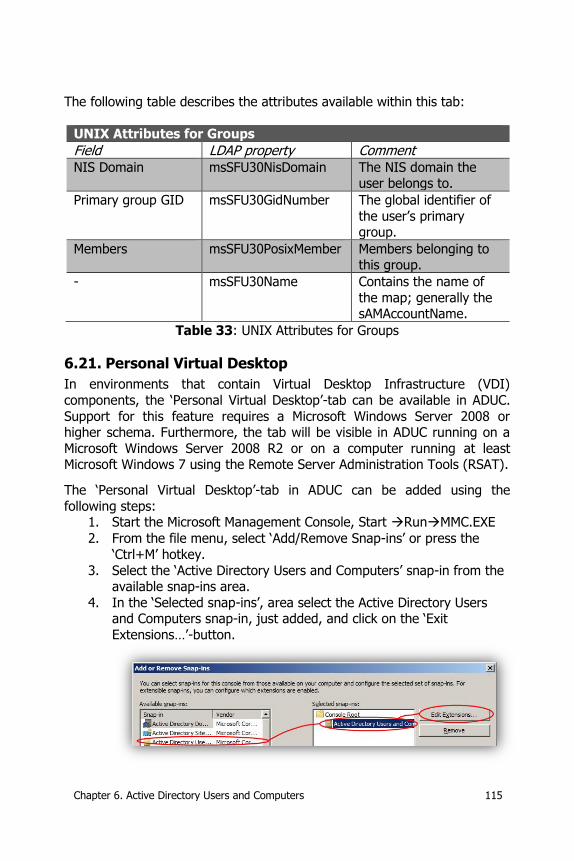
Chapter 6. Active Directory Users and Computers 115
The following table describes the attributes available within this tab:
UNIX Attributes for Groups
Field LDAP property Comment NIS Domain msSFU30NisDomain The NIS domain the
user belongs to.
Primary group GID msSFU30GidNumber The global identifier of
the user’s primary group.
Members msSFU30PosixMember Members belonging to this group.
- msSFU30Name Contains the name of
the map; generally the sAMAccountName.
Table 33: UNIX Attributes for Groups
6.21. Personal Virtual Desktop
In environments that contain Virtual Desktop Infrastructure (VDI)
components, the ‘Personal Virtual Desktop’-tab can be available in ADUC.
Support for this feature requires a Microsoft Windows Server 2008 or higher schema. Furthermore, the tab will be visible in ADUC running on a
Microsoft Windows Server 2008 R2 or on a computer running at least Microsoft Windows 7 using the Remote Server Administration Tools (RSAT).
The ‘Personal Virtual Desktop’-tab in ADUC can be added using the
following steps: 1. Start the Microsoft Management Console, Start RunMMC.EXE
2. From the file menu, select ‘Add/Remove Snap-ins’ or press the
‘Ctrl+M’ hotkey.
3. Select the ‘Active Directory Users and Computers’ snap-in from the available snap-ins area.
4. In the ‘Selected snap-ins’, area select the Active Directory Users and Computers snap-in, just added, and click on the ‘Exit
Extensions…’-button.
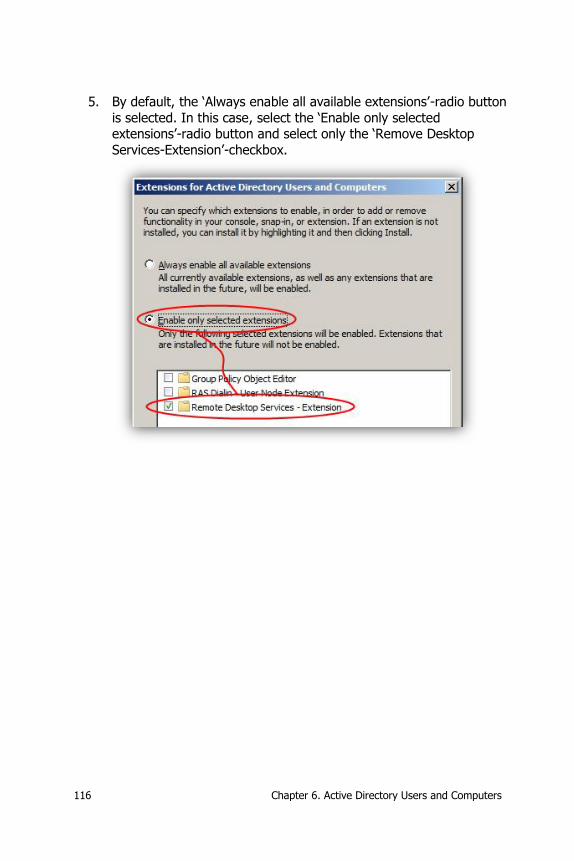
116 Chapter 6. Active Directory Users and Computers
5. By default, the ‘Always enable all available extensions’-radio button
is selected. In this case, select the ‘Enable only selected extensions’-radio button and select only the ‘Remove Desktop
Services-Extension’-checkbox.
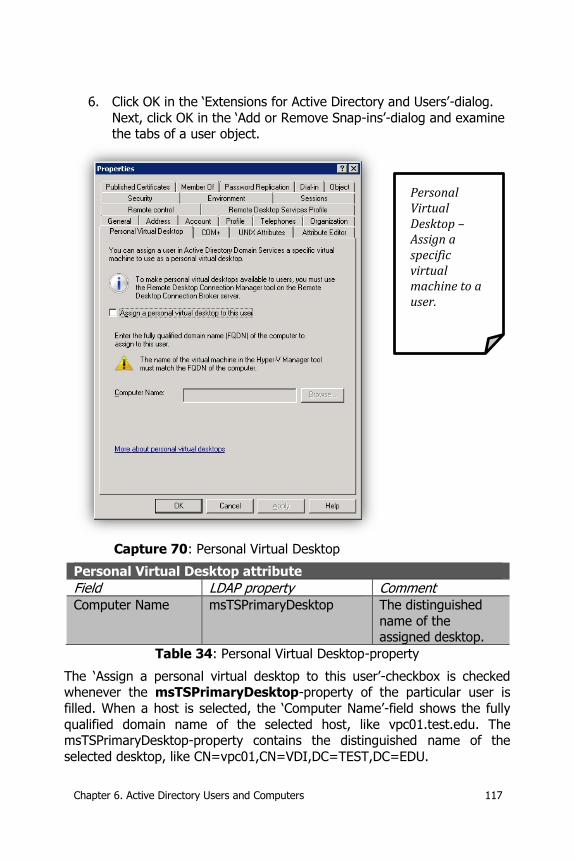
Chapter 6. Active Directory Users and Computers 117
6. Click OK in the ‘Extensions for Active Directory and Users’-dialog.
Next, click OK in the ‘Add or Remove Snap-ins’-dialog and examine the tabs of a user object.
Capture 70: Personal Virtual Desktop
Personal Virtual Desktop attribute
Field LDAP property Comment Computer Name msTSPrimaryDesktop The distinguished
name of the assigned desktop.
Table 34: Personal Virtual Desktop-property
The ‘Assign a personal virtual desktop to this user’-checkbox is checked whenever the msTSPrimaryDesktop-property of the particular user is
filled. When a host is selected, the ‘Computer Name’-field shows the fully
qualified domain name of the selected host, like vpc01.test.edu. The msTSPrimaryDesktop-property contains the distinguished name of the
selected desktop, like CN=vpc01,CN=VDI,DC=TEST,DC=EDU.
Personal Virtual Desktop – Assign a specific virtual machine to a user.
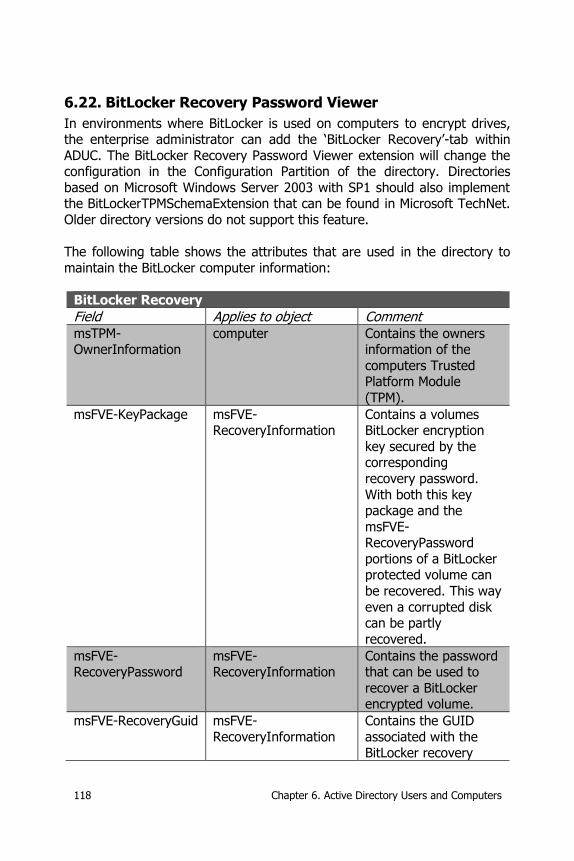
118 Chapter 6. Active Directory Users and Computers
6.22. BitLocker Recovery Password Viewer
In environments where BitLocker is used on computers to encrypt drives, the enterprise administrator can add the ‘BitLocker Recovery’-tab within
ADUC. The BitLocker Recovery Password Viewer extension will change the configuration in the Configuration Partition of the directory. Directories
based on Microsoft Windows Server 2003 with SP1 should also implement the BitLockerTPMSchemaExtension that can be found in Microsoft TechNet.
Older directory versions do not support this feature.
The following table shows the attributes that are used in the directory to
maintain the BitLocker computer information:
BitLocker Recovery
Field Applies to object Comment msTPM-OwnerInformation
computer Contains the owners information of the
computers Trusted Platform Module
(TPM).
msFVE-KeyPackage msFVE-RecoveryInformation
Contains a volumes BitLocker encryption
key secured by the corresponding
recovery password.
With both this key package and the
msFVE-RecoveryPassword
portions of a BitLocker protected volume can
be recovered. This way
even a corrupted disk can be partly
recovered.
msFVE-RecoveryPassword
msFVE-RecoveryInformation
Contains the password that can be used to
recover a BitLocker encrypted volume.
msFVE-RecoveryGuid msFVE-
RecoveryInformation
Contains the GUID
associated with the BitLocker recovery
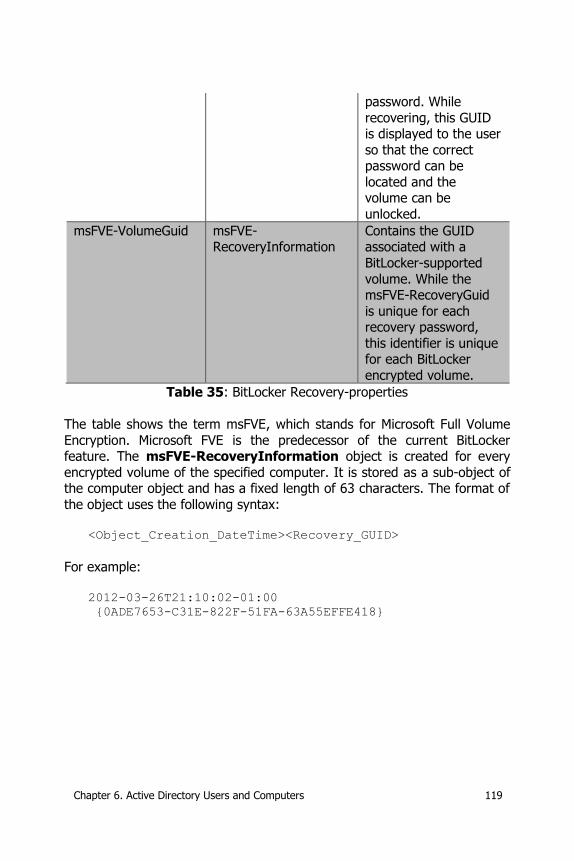
Chapter 6. Active Directory Users and Computers 119
password. While
recovering, this GUID is displayed to the user
so that the correct password can be
located and the volume can be
unlocked.
msFVE-VolumeGuid msFVE-RecoveryInformation
Contains the GUID associated with a
BitLocker-supported
volume. While the msFVE-RecoveryGuid
is unique for each recovery password,
this identifier is unique for each BitLocker
encrypted volume.
Table 35: BitLocker Recovery-properties
The table shows the term msFVE, which stands for Microsoft Full Volume
Encryption. Microsoft FVE is the predecessor of the current BitLocker feature. The msFVE-RecoveryInformation object is created for every
encrypted volume of the specified computer. It is stored as a sub-object of the computer object and has a fixed length of 63 characters. The format of
the object uses the following syntax:
<Object_Creation_DateTime><Recovery_GUID>
For example:
2012-03-26T21:10:02-01:00
{0ADE7653-C31E-822F-51FA-63A55EFFE418}
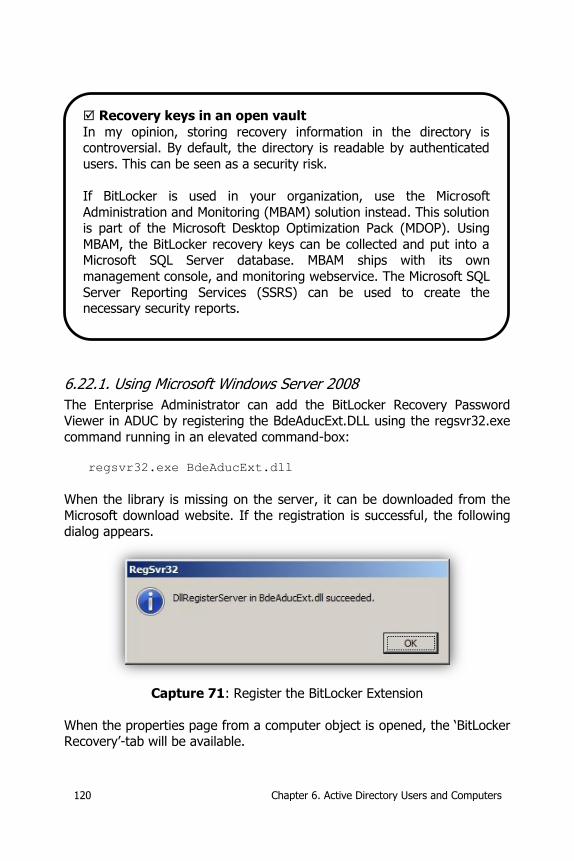
120 Chapter 6. Active Directory Users and Computers
6.22.1. Using Microsoft Windows Server 2008
The Enterprise Administrator can add the BitLocker Recovery Password Viewer in ADUC by registering the BdeAducExt.DLL using the regsvr32.exe
command running in an elevated command-box:
regsvr32.exe BdeAducExt.dll
When the library is missing on the server, it can be downloaded from the
Microsoft download website. If the registration is successful, the following dialog appears.
Capture 71: Register the BitLocker Extension
When the properties page from a computer object is opened, the ‘BitLocker Recovery’-tab will be available.
Recovery keys in an open vault
In my opinion, storing recovery information in the directory is controversial. By default, the directory is readable by authenticated
users. This can be seen as a security risk.
If BitLocker is used in your organization, use the Microsoft
Administration and Monitoring (MBAM) solution instead. This solution is part of the Microsoft Desktop Optimization Pack (MDOP). Using
MBAM, the BitLocker recovery keys can be collected and put into a Microsoft SQL Server database. MBAM ships with its own
management console, and monitoring webservice. The Microsoft SQL
Server Reporting Services (SSRS) can be used to create the necessary security reports.
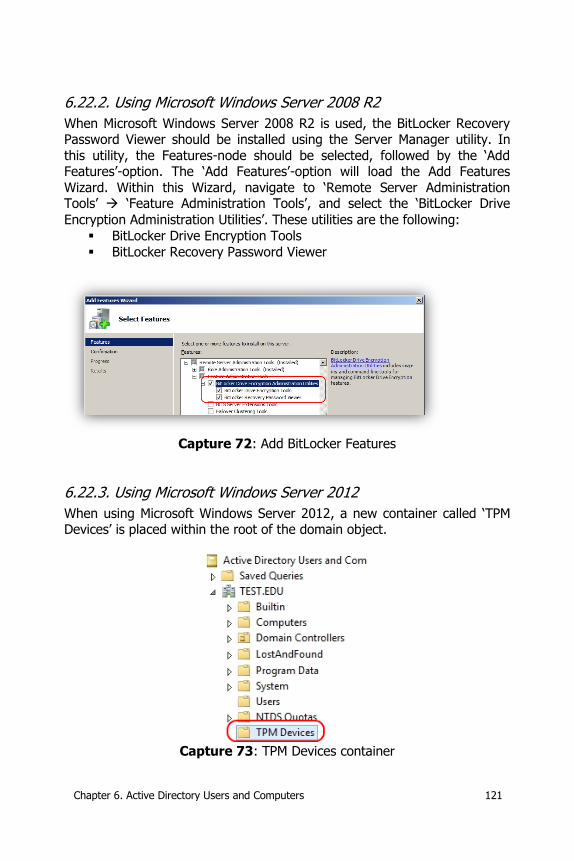
Chapter 6. Active Directory Users and Computers 121
6.22.2. Using Microsoft Windows Server 2008 R2
When Microsoft Windows Server 2008 R2 is used, the BitLocker Recovery Password Viewer should be installed using the Server Manager utility. In
this utility, the Features-node should be selected, followed by the ‘Add Features’-option. The ‘Add Features’-option will load the Add Features
Wizard. Within this Wizard, navigate to ‘Remote Server Administration Tools’ ‘Feature Administration Tools’, and select the ‘BitLocker Drive
Encryption Administration Utilities’. These utilities are the following:
BitLocker Drive Encryption Tools
BitLocker Recovery Password Viewer
Capture 72: Add BitLocker Features
6.22.3. Using Microsoft Windows Server 2012
When using Microsoft Windows Server 2012, a new container called ‘TPM Devices’ is placed within the root of the domain object.
Capture 73: TPM Devices container
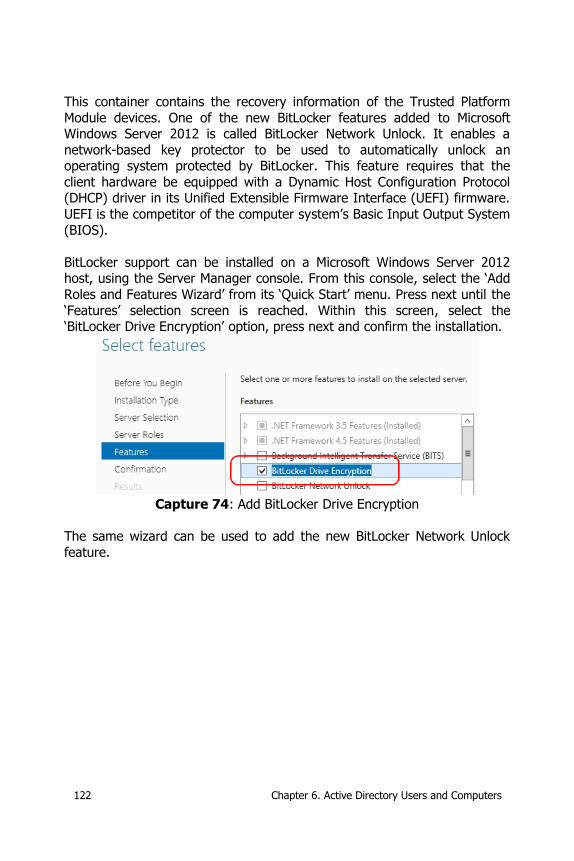
122 Chapter 6. Active Directory Users and Computers
This container contains the recovery information of the Trusted Platform
Module devices. One of the new BitLocker features added to Microsoft Windows Server 2012 is called BitLocker Network Unlock. It enables a
network-based key protector to be used to automatically unlock an operating system protected by BitLocker. This feature requires that the
client hardware be equipped with a Dynamic Host Configuration Protocol (DHCP) driver in its Unified Extensible Firmware Interface (UEFI) firmware.
UEFI is the competitor of the computer system’s Basic Input Output System
(BIOS).
BitLocker support can be installed on a Microsoft Windows Server 2012 host, using the Server Manager console. From this console, select the ‘Add
Roles and Features Wizard’ from its ‘Quick Start’ menu. Press next until the
‘Features’ selection screen is reached. Within this screen, select the ‘BitLocker Drive Encryption’ option, press next and confirm the installation.
Capture 74: Add BitLocker Drive Encryption
The same wizard can be used to add the new BitLocker Network Unlock
feature.
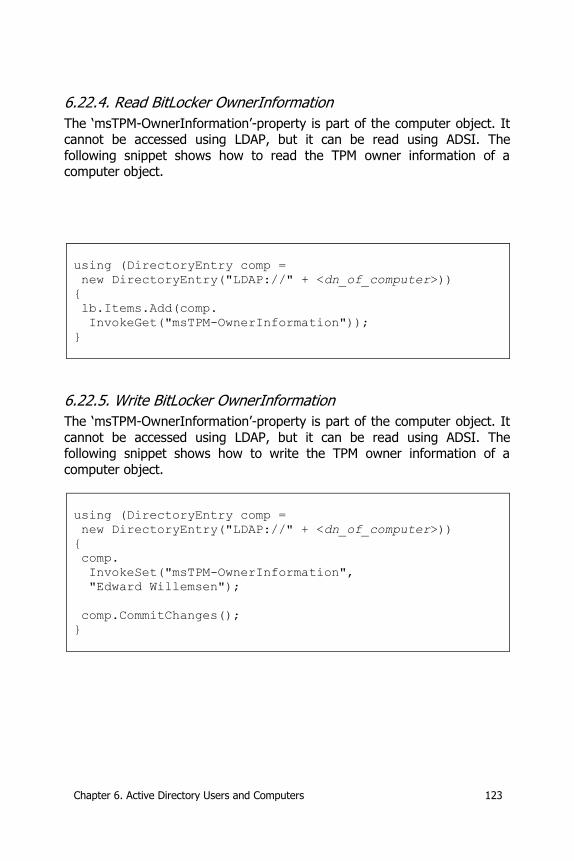
Chapter 6. Active Directory Users and Computers 123
6.22.4. Read BitLocker OwnerInformation
The ‘msTPM-OwnerInformation’-property is part of the computer object. It cannot be accessed using LDAP, but it can be read using ADSI. The
following snippet shows how to read the TPM owner information of a computer object.
using (DirectoryEntry comp =
new DirectoryEntry("LDAP://" + <dn_of_computer>))
{
lb.Items.Add(comp.
InvokeGet("msTPM-OwnerInformation"));
}
6.22.5. Write BitLocker OwnerInformation
The ‘msTPM-OwnerInformation’-property is part of the computer object. It
cannot be accessed using LDAP, but it can be read using ADSI. The following snippet shows how to write the TPM owner information of a
computer object.
using (DirectoryEntry comp =
new DirectoryEntry("LDAP://" + <dn_of_computer>))
{
comp.
InvokeSet("msTPM-OwnerInformation",
"Edward Willemsen");
comp.CommitChanges();
}
124 Chapter 6. Active Directory Users and Computers
6.23. More to explore
Besides the regular information provided by ADUC and by any installed features, as shown in paragraphs ‘6.20. UNIX Attributes’, ‘6.21. Personal
Virtual Desktop’ and ‘6.22. BitLocker Recovery Password Viewer’, there is still more to explore. This paragraph shows some object attributes
(properties) that are not part of the regular tabs of the management console. These attributes can be viewed or modified using ADSI Edit or the
MMC attribute tab within Microsoft Windows 2008 and higher operating
systems.
6.23.1. Object creation date
If your application has automatically created dozens of groups and you have made a clerical error, you can put some effort into editing those
groups, or you can simply remove the groups and recreate them without
the error in writing. Each object contains the whenCreated property, which contains the date and time of the creation of the object. When you
examine this value using Adsiedit.MSC, the value is formatted in the local date and time. But when you write a query and simply enter a date and
time, the search will result in an error. The date and time format used in a
query requires the following syntax:
YYMMDDHHMMSSZ
The YY stands for the two-digit year notation, where the year 2011 is
written as 11. The MM stands for month, DD for day, HH for hour, MM for minutes and SS for seconds. The whole entry must end with an uppercase
‘Z’. In the query, you can use zeros in the time elements that you are not interested in.
In this case, we have created groups with a typo in the name, like ‘gruop’ on the 22nd of February in 2011. We can filter them from the directory
using the following query:
(&(objectCategory=group)(cn=*gruop*)
(whenCreated>=110222000000Z))
6.23.2. Object modification date
One of the tasks of the maintenance crew is to remove obsolete directory
objects. If we examine computer objects, new computers will be added and
joined to the domain on a regular basis. With personal computers and
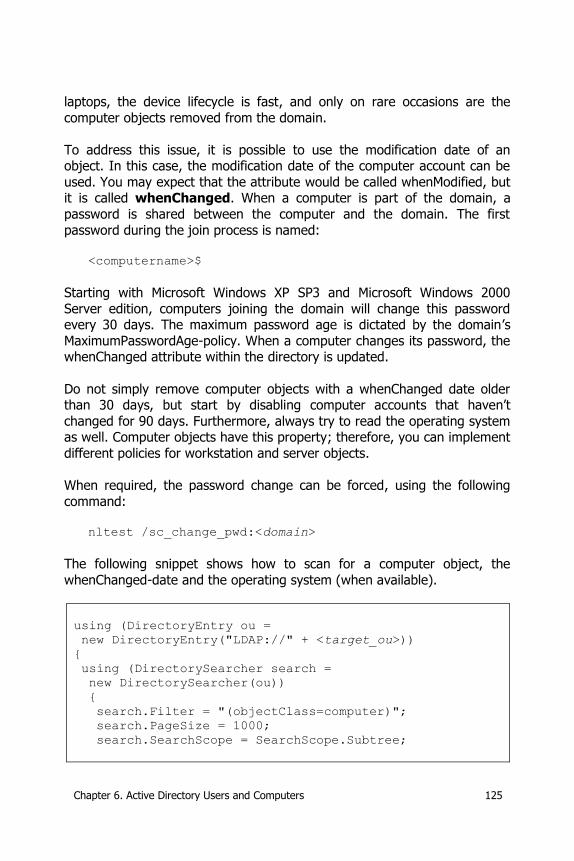
Chapter 6. Active Directory Users and Computers 125
laptops, the device lifecycle is fast, and only on rare occasions are the
computer objects removed from the domain.
To address this issue, it is possible to use the modification date of an object. In this case, the modification date of the computer account can be
used. You may expect that the attribute would be called whenModified, but it is called whenChanged. When a computer is part of the domain, a
password is shared between the computer and the domain. The first
password during the join process is named:
<computername>$
Starting with Microsoft Windows XP SP3 and Microsoft Windows 2000
Server edition, computers joining the domain will change this password every 30 days. The maximum password age is dictated by the domain’s
MaximumPasswordAge-policy. When a computer changes its password, the whenChanged attribute within the directory is updated.
Do not simply remove computer objects with a whenChanged date older than 30 days, but start by disabling computer accounts that haven’t
changed for 90 days. Furthermore, always try to read the operating system as well. Computer objects have this property; therefore, you can implement
different policies for workstation and server objects.
When required, the password change can be forced, using the following
command:
nltest /sc_change_pwd:<domain>
The following snippet shows how to scan for a computer object, the
whenChanged-date and the operating system (when available).
using (DirectoryEntry ou =
new DirectoryEntry("LDAP://" + <target_ou>))
{
using (DirectorySearcher search =
new DirectorySearcher(ou))
{
search.Filter = "(objectClass=computer)";
search.PageSize = 1000;
search.SearchScope = SearchScope.Subtree;
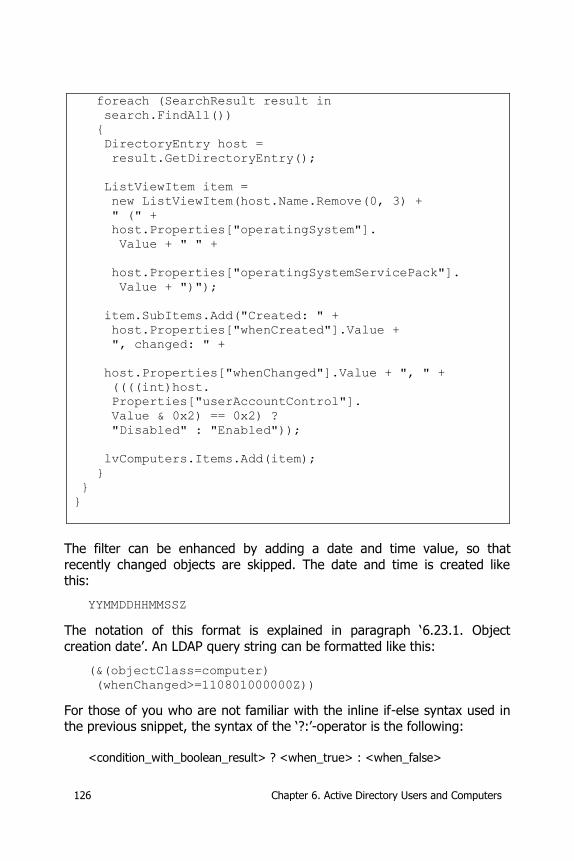
126 Chapter 6. Active Directory Users and Computers
foreach (SearchResult result in
search.FindAll())
{
DirectoryEntry host =
result.GetDirectoryEntry();
ListViewItem item =
new ListViewItem(host.Name.Remove(0, 3) +
" (" +
host.Properties["operatingSystem"].
Value + " " +
host.Properties["operatingSystemServicePack"].
Value + ")");
item.SubItems.Add("Created: " +
host.Properties["whenCreated"].Value +
", changed: " +
host.Properties["whenChanged"].Value + ", " +
((((int)host.
Properties["userAccountControl"].
Value & 0x2) == 0x2) ?
"Disabled" : "Enabled"));
lvComputers.Items.Add(item);
}
}
}
The filter can be enhanced by adding a date and time value, so that
recently changed objects are skipped. The date and time is created like this:
YYMMDDHHMMSSZ
The notation of this format is explained in paragraph ‘6.23.1. Object
creation date’. An LDAP query string can be formatted like this:
(&(objectClass=computer)
(whenChanged>=110801000000Z))
For those of you who are not familiar with the inline if-else syntax used in the previous snippet, the syntax of the ‘?:’-operator is the following:
<condition_with_boolean_result> ? <when_true> : <when_false>
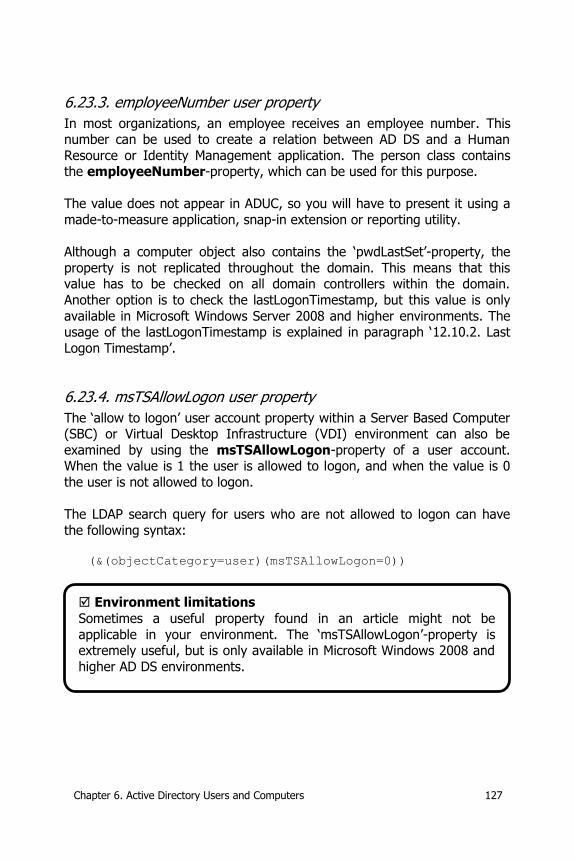
Chapter 6. Active Directory Users and Computers 127
6.23.3. employeeNumber user property
In most organizations, an employee receives an employee number. This number can be used to create a relation between AD DS and a Human
Resource or Identity Management application. The person class contains the employeeNumber-property, which can be used for this purpose.
The value does not appear in ADUC, so you will have to present it using a
made-to-measure application, snap-in extension or reporting utility.
Although a computer object also contains the ‘pwdLastSet’-property, the
property is not replicated throughout the domain. This means that this value has to be checked on all domain controllers within the domain.
Another option is to check the lastLogonTimestamp, but this value is only
available in Microsoft Windows Server 2008 and higher environments. The usage of the lastLogonTimestamp is explained in paragraph ‘12.10.2. Last
Logon Timestamp’.
6.23.4. msTSAllowLogon user property
The ‘allow to logon’ user account property within a Server Based Computer (SBC) or Virtual Desktop Infrastructure (VDI) environment can also be
examined by using the msTSAllowLogon-property of a user account. When the value is 1 the user is allowed to logon, and when the value is 0
the user is not allowed to logon.
The LDAP search query for users who are not allowed to logon can have
the following syntax:
(&(objectCategory=user)(msTSAllowLogon=0))
Environment limitations
Sometimes a useful property found in an article might not be
applicable in your environment. The ‘msTSAllowLogon’-property is extremely useful, but is only available in Microsoft Windows 2008 and
higher AD DS environments.
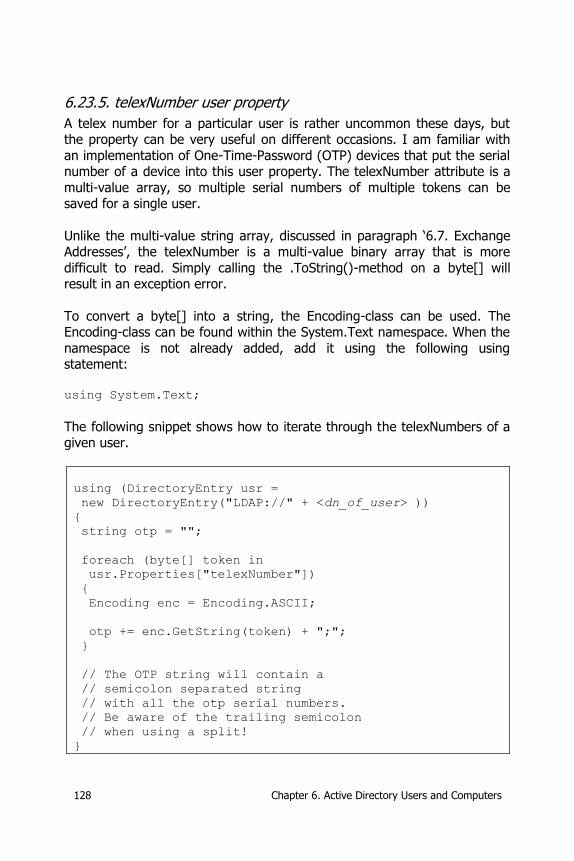
128 Chapter 6. Active Directory Users and Computers
6.23.5. telexNumber user property
A telex number for a particular user is rather uncommon these days, but the property can be very useful on different occasions. I am familiar with
an implementation of One-Time-Password (OTP) devices that put the serial number of a device into this user property. The telexNumber attribute is a
multi-value array, so multiple serial numbers of multiple tokens can be saved for a single user.
Unlike the multi-value string array, discussed in paragraph ‘6.7. Exchange Addresses’, the telexNumber is a multi-value binary array that is more
difficult to read. Simply calling the .ToString()-method on a byte[] will result in an exception error.
To convert a byte[] into a string, the Encoding-class can be used. The Encoding-class can be found within the System.Text namespace. When the
namespace is not already added, add it using the following using statement:
using System.Text;
The following snippet shows how to iterate through the telexNumbers of a given user.
using (DirectoryEntry usr =
new DirectoryEntry("LDAP://" + <dn_of_user> ))
{
string otp = "";
foreach (byte[] token in
usr.Properties["telexNumber"])
{
Encoding enc = Encoding.ASCII;
otp += enc.GetString(token) + ";";
}
// The OTP string will contain a
// semicolon separated string
// with all the otp serial numbers.
// Be aware of the trailing semicolon
// when using a split!
}
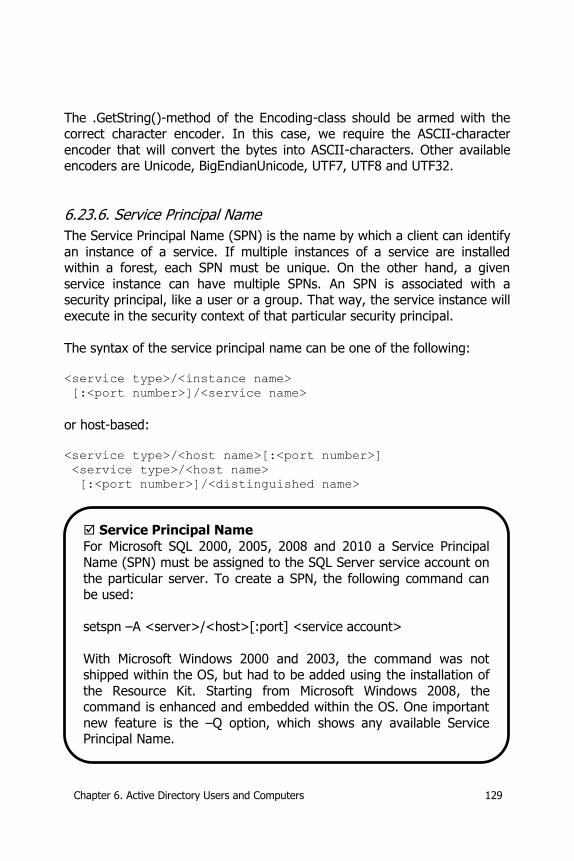
Chapter 6. Active Directory Users and Computers 129
The .GetString()-method of the Encoding-class should be armed with the correct character encoder. In this case, we require the ASCII-character
encoder that will convert the bytes into ASCII-characters. Other available encoders are Unicode, BigEndianUnicode, UTF7, UTF8 and UTF32.
6.23.6. Service Principal Name
The Service Principal Name (SPN) is the name by which a client can identify
an instance of a service. If multiple instances of a service are installed within a forest, each SPN must be unique. On the other hand, a given
service instance can have multiple SPNs. An SPN is associated with a security principal, like a user or a group. That way, the service instance will
execute in the security context of that particular security principal.
The syntax of the service principal name can be one of the following:
<service type>/<instance name>
[:<port number>]/<service name>
or host-based:
<service type>/<host name>[:<port number>]
<service type>/<host name>
[:<port number>]/<distinguished name>
Service Principal Name
For Microsoft SQL 2000, 2005, 2008 and 2010 a Service Principal
Name (SPN) must be assigned to the SQL Server service account on
the particular server. To create a SPN, the following command can be used:
setspn –A <server>/<host>[:port] <service account>
With Microsoft Windows 2000 and 2003, the command was not shipped within the OS, but had to be added using the installation of
the Resource Kit. Starting from Microsoft Windows 2008, the command is enhanced and embedded within the OS. One important
new feature is the –Q option, which shows any available Service Principal Name.

130 Chapter 6. Active Directory Users and Computers
Item Description
Service type This can be any supported service type like ‘http’ for a web-endpoint, ‘www’ for World Wide Web or ‘ldap’
for Lightweight Directory Access Protocol.
Instance name The name of the instance of the service. This can be either the name or the IP address of the host running
the service.
Port number This item is optional and contains the port number used by the service on the host. This should be used
when the port number is different from the default port number used for the service type.
Service name The name of the service like; the DNS name of the
host or the distinguished name of the service connection point.
Distinguished
name
The distinguished name of the instance of the used
service type.
Hostname The DNS name of the host running the instance of
the used distinguished name.
Table 36: SPN description
Now, let’s examine the following examples. If the Microsoft Active Directory Federation Services (AD FS) feature is installed on a server that is running
using a service account called AdfsSvc, the service account requires an
SPN. With the above syntax in mind, the required SPN needs a service type and a service name. In a basic configuration of AD FS, the service type is
http and the service name is the name of the default website, like server.test.edu. Both of these items will lead to the following SPN:
http/server.test.edu
Microsoft provides a utility to list, set and remove SPNs; it is called setspn. Using the previous example, the following command will assign the SPN
with the service account:
setspn -A http/server.test.edu AdfsSvc
Another example is the registration of a Microsoft SQL Server host that can
be done like this:
setspn –A MSSQLSvc/server.test.edu:sqlexpress SqlSvc
This feature requires Microsoft SQL Server 2008 or higher.
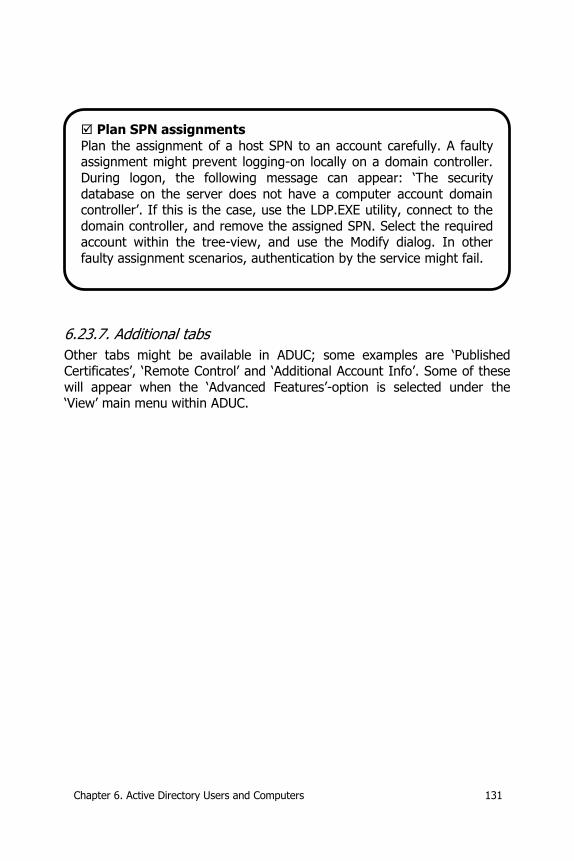
Chapter 6. Active Directory Users and Computers 131
6.23.7. Additional tabs
Other tabs might be available in ADUC; some examples are ‘Published Certificates’, ‘Remote Control’ and ‘Additional Account Info’. Some of these
will appear when the ‘Advanced Features’-option is selected under the ‘View’ main menu within ADUC.
Plan SPN assignments
Plan the assignment of a host SPN to an account carefully. A faulty assignment might prevent logging-on locally on a domain controller.
During logon, the following message can appear: ‘The security
database on the server does not have a computer account domain controller’. If this is the case, use the LDP.EXE utility, connect to the
domain controller, and remove the assigned SPN. Select the required account within the tree-view, and use the Modify dialog. In other
faulty assignment scenarios, authentication by the service might fail.

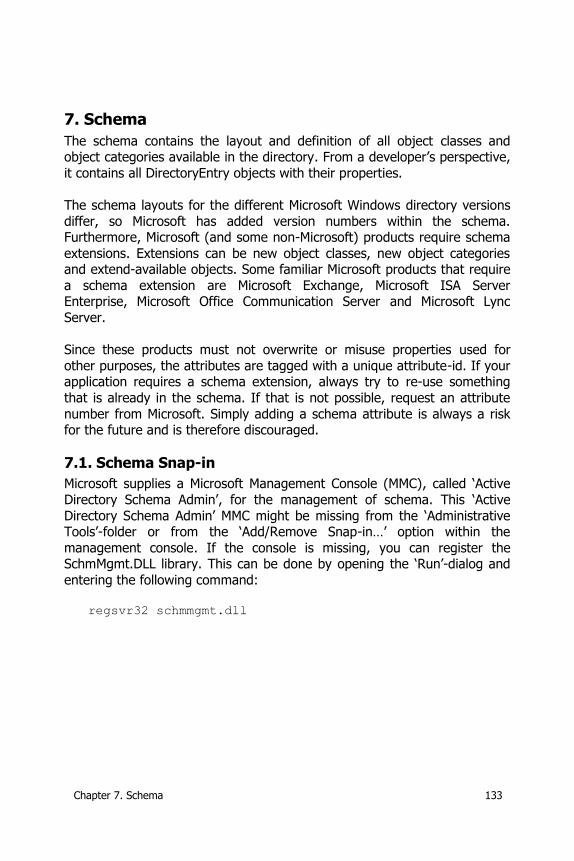
Chapter 7. Schema 133
7. Schema
The schema contains the layout and definition of all object classes and object categories available in the directory. From a developer’s perspective,
it contains all DirectoryEntry objects with their properties.
The schema layouts for the different Microsoft Windows directory versions
differ, so Microsoft has added version numbers within the schema. Furthermore, Microsoft (and some non-Microsoft) products require schema
extensions. Extensions can be new object classes, new object categories and extend-available objects. Some familiar Microsoft products that require
a schema extension are Microsoft Exchange, Microsoft ISA Server Enterprise, Microsoft Office Communication Server and Microsoft Lync
Server.
Since these products must not overwrite or misuse properties used for
other purposes, the attributes are tagged with a unique attribute-id. If your application requires a schema extension, always try to re-use something
that is already in the schema. If that is not possible, request an attribute
number from Microsoft. Simply adding a schema attribute is always a risk for the future and is therefore discouraged.
7.1. Schema Snap-in
Microsoft supplies a Microsoft Management Console (MMC), called ‘Active
Directory Schema Admin’, for the management of schema. This ‘Active
Directory Schema Admin’ MMC might be missing from the ‘Administrative Tools’-folder or from the ‘Add/Remove Snap-in…’ option within the
management console. If the console is missing, you can register the SchmMgmt.DLL library. This can be done by opening the ‘Run’-dialog and
entering the following command:
regsvr32 schmmgmt.dll
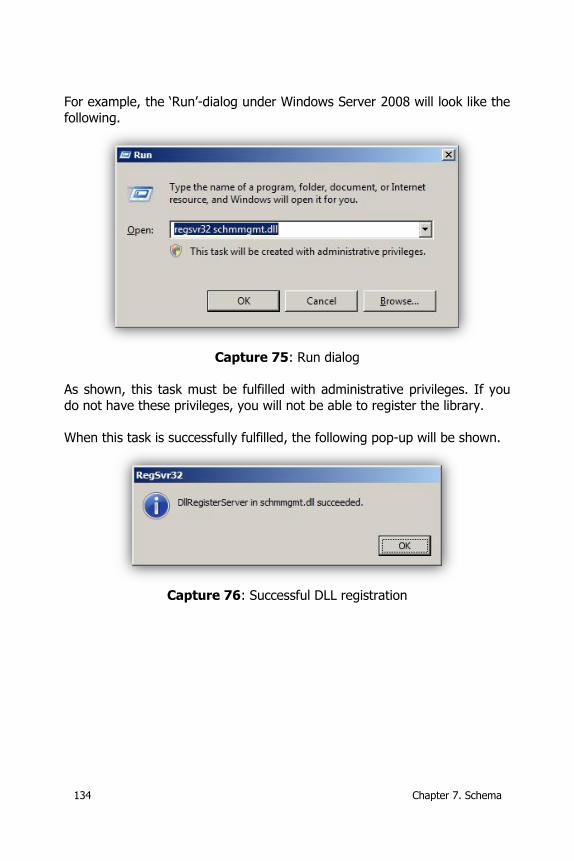
134 Chapter 7. Schema
For example, the ‘Run’-dialog under Windows Server 2008 will look like the
following.
Capture 75: Run dialog
As shown, this task must be fulfilled with administrative privileges. If you
do not have these privileges, you will not be able to register the library.
When this task is successfully fulfilled, the following pop-up will be shown.
Capture 76: Successful DLL registration
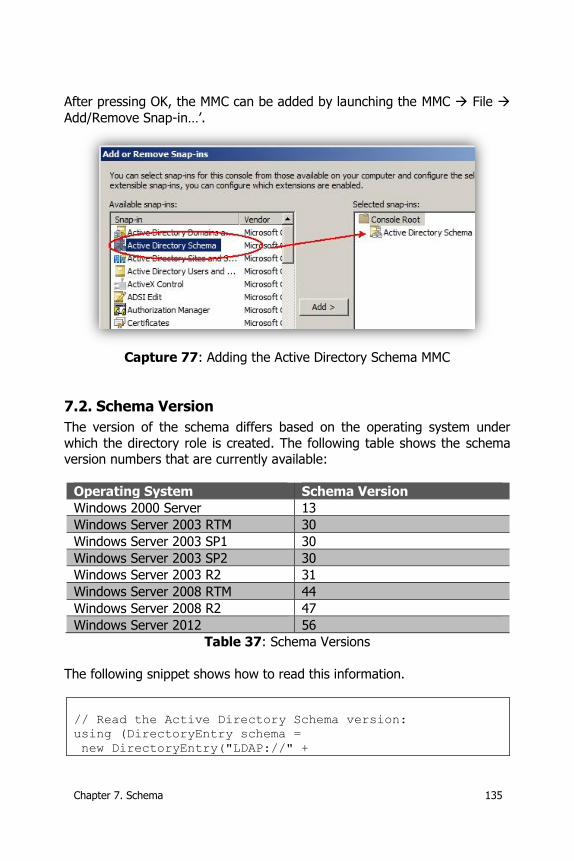
Chapter 7. Schema 135
After pressing OK, the MMC can be added by launching the MMC File
Add/Remove Snap-in…’.
Capture 77: Adding the Active Directory Schema MMC
7.2. Schema Version
The version of the schema differs based on the operating system under
which the directory role is created. The following table shows the schema version numbers that are currently available:
Operating System Schema Version
Windows 2000 Server 13
Windows Server 2003 RTM 30
Windows Server 2003 SP1 30
Windows Server 2003 SP2 30
Windows Server 2003 R2 31
Windows Server 2008 RTM 44
Windows Server 2008 R2 47
Windows Server 2012 56
Table 37: Schema Versions
The following snippet shows how to read this information.
// Read the Active Directory Schema version:
using (DirectoryEntry schema =
new DirectoryEntry("LDAP://" +
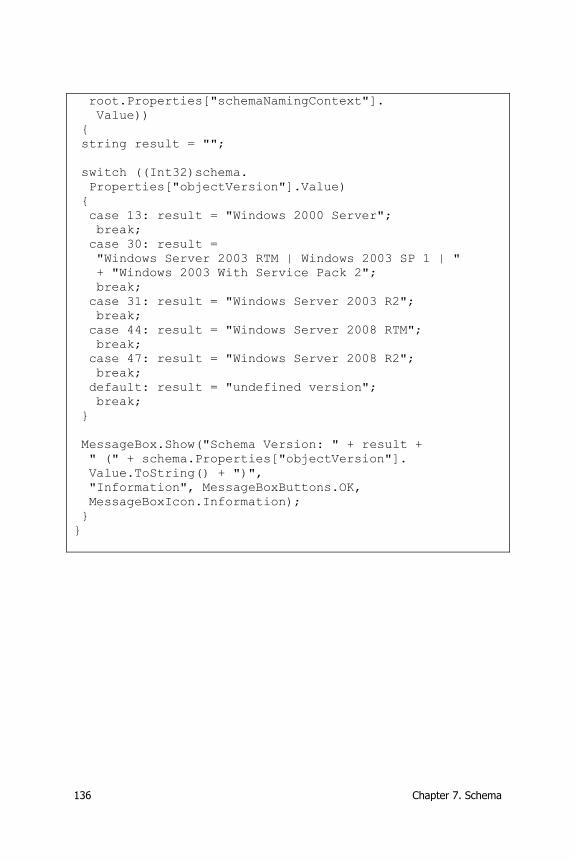
136 Chapter 7. Schema
root.Properties["schemaNamingContext"].
Value))
{
string result = "";
switch ((Int32)schema.
Properties["objectVersion"].Value)
{
case 13: result = "Windows 2000 Server";
break;
case 30: result =
"Windows Server 2003 RTM | Windows 2003 SP 1 | "
+ "Windows 2003 With Service Pack 2";
break;
case 31: result = "Windows Server 2003 R2";
break;
case 44: result = "Windows Server 2008 RTM";
break;
case 47: result = "Windows Server 2008 R2";
break;
default: result = "undefined version";
break;
}
MessageBox.Show("Schema Version: " + result +
" (" + schema.Properties["objectVersion"].
Value.ToString() + ")",
"Information", MessageBoxButtons.OK,
MessageBoxIcon.Information);
}
}
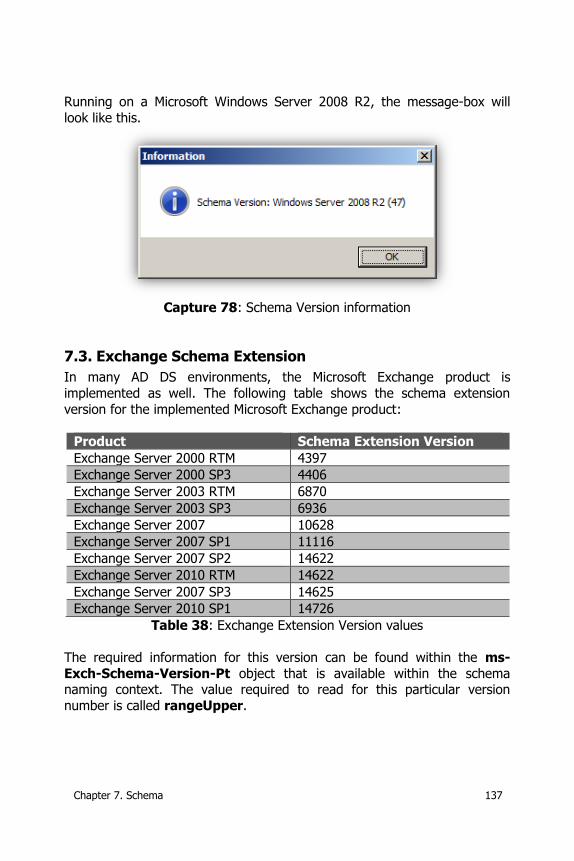
Chapter 7. Schema 137
Running on a Microsoft Windows Server 2008 R2, the message-box will
look like this.
Capture 78: Schema Version information
7.3. Exchange Schema Extension
In many AD DS environments, the Microsoft Exchange product is
implemented as well. The following table shows the schema extension
version for the implemented Microsoft Exchange product:
Product Schema Extension Version
Exchange Server 2000 RTM 4397
Exchange Server 2000 SP3 4406
Exchange Server 2003 RTM 6870
Exchange Server 2003 SP3 6936
Exchange Server 2007 10628
Exchange Server 2007 SP1 11116
Exchange Server 2007 SP2 14622
Exchange Server 2010 RTM 14622
Exchange Server 2007 SP3 14625
Exchange Server 2010 SP1 14726
Table 38: Exchange Extension Version values
The required information for this version can be found within the ms-
Exch-Schema-Version-Pt object that is available within the schema naming context. The value required to read for this particular version
number is called rangeUpper.
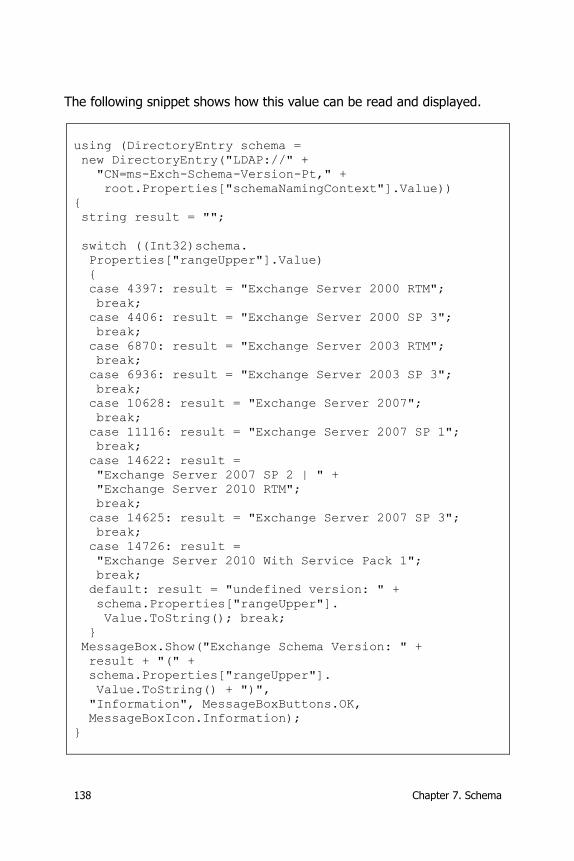
138 Chapter 7. Schema
The following snippet shows how this value can be read and displayed.
using (DirectoryEntry schema =
new DirectoryEntry("LDAP://" +
"CN=ms-Exch-Schema-Version-Pt," +
root.Properties["schemaNamingContext"].Value))
{
string result = "";
switch ((Int32)schema.
Properties["rangeUpper"].Value)
{
case 4397: result = "Exchange Server 2000 RTM";
break;
case 4406: result = "Exchange Server 2000 SP 3";
break;
case 6870: result = "Exchange Server 2003 RTM";
break;
case 6936: result = "Exchange Server 2003 SP 3";
break;
case 10628: result = "Exchange Server 2007";
break;
case 11116: result = "Exchange Server 2007 SP 1";
break;
case 14622: result =
"Exchange Server 2007 SP 2 | " +
"Exchange Server 2010 RTM";
break;
case 14625: result = "Exchange Server 2007 SP 3";
break;
case 14726: result =
"Exchange Server 2010 With Service Pack 1";
break;
default: result = "undefined version: " +
schema.Properties["rangeUpper"].
Value.ToString(); break;
}
MessageBox.Show("Exchange Schema Version: " +
result + "(" +
schema.Properties["rangeUpper"].
Value.ToString() + ")",
"Information", MessageBoxButtons.OK,
MessageBoxIcon.Information);
}
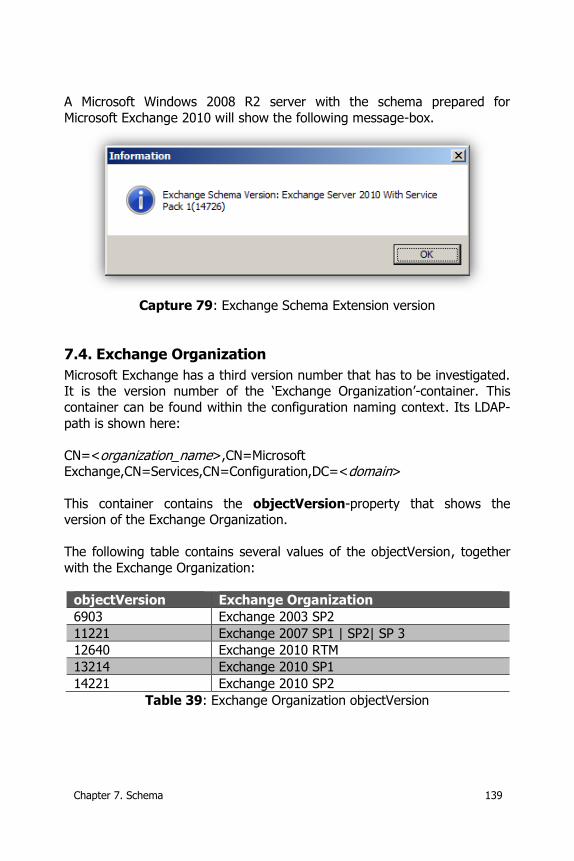
Chapter 7. Schema 139
A Microsoft Windows 2008 R2 server with the schema prepared for
Microsoft Exchange 2010 will show the following message-box.
Capture 79: Exchange Schema Extension version
7.4. Exchange Organization
Microsoft Exchange has a third version number that has to be investigated. It is the version number of the ‘Exchange Organization’-container. This
container can be found within the configuration naming context. Its LDAP-
path is shown here:
CN=<organization_name>,CN=Microsoft Exchange,CN=Services,CN=Configuration,DC=<domain>
This container contains the objectVersion-property that shows the version of the Exchange Organization.
The following table contains several values of the objectVersion, together
with the Exchange Organization:
objectVersion Exchange Organization
6903 Exchange 2003 SP2
11221 Exchange 2007 SP1 | SP2| SP 3
12640 Exchange 2010 RTM
13214 Exchange 2010 SP1
14221 Exchange 2010 SP2
Table 39: Exchange Organization objectVersion
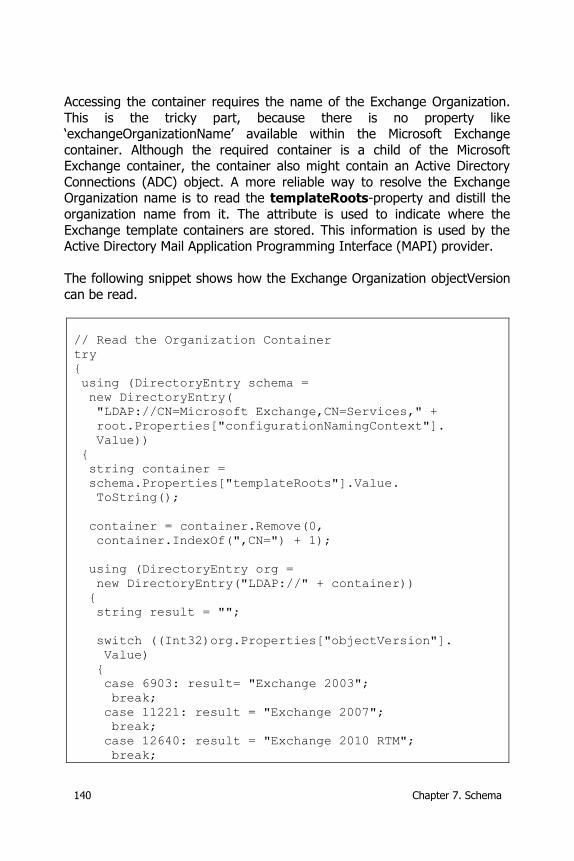
140 Chapter 7. Schema
Accessing the container requires the name of the Exchange Organization.
This is the tricky part, because there is no property like ‘exchangeOrganizationName’ available within the Microsoft Exchange
container. Although the required container is a child of the Microsoft Exchange container, the container also might contain an Active Directory
Connections (ADC) object. A more reliable way to resolve the Exchange Organization name is to read the templateRoots-property and distill the
organization name from it. The attribute is used to indicate where the
Exchange template containers are stored. This information is used by the Active Directory Mail Application Programming Interface (MAPI) provider.
The following snippet shows how the Exchange Organization objectVersion
can be read.
// Read the Organization Container
try
{
using (DirectoryEntry schema =
new DirectoryEntry(
"LDAP://CN=Microsoft Exchange,CN=Services," +
root.Properties["configurationNamingContext"].
Value))
{
string container =
schema.Properties["templateRoots"].Value.
ToString();
container = container.Remove(0,
container.IndexOf(",CN=") + 1);
using (DirectoryEntry org =
new DirectoryEntry("LDAP://" + container))
{
string result = "";
switch ((Int32)org.Properties["objectVersion"].
Value)
{
case 6903: result= "Exchange 2003";
break;
case 11221: result = "Exchange 2007";
break;
case 12640: result = "Exchange 2010 RTM";
break;
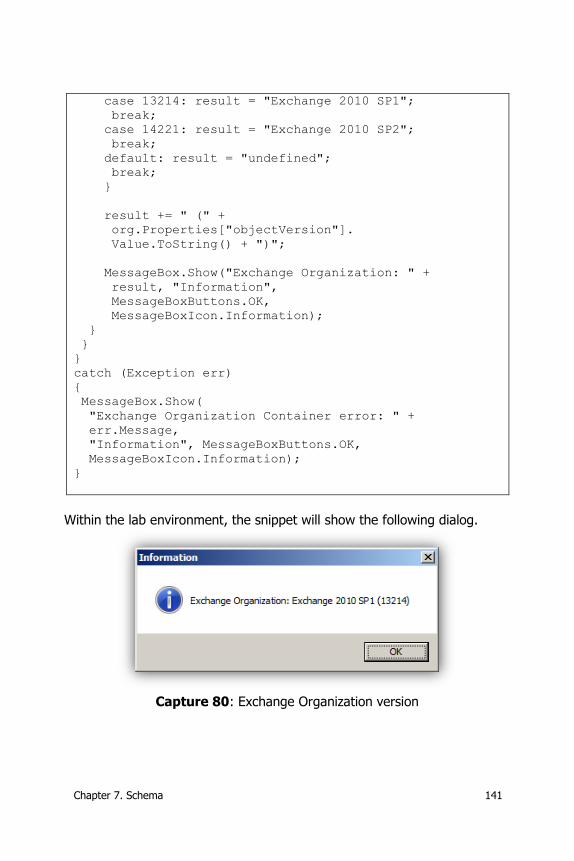
Chapter 7. Schema 141
case 13214: result = "Exchange 2010 SP1";
break;
case 14221: result = "Exchange 2010 SP2";
break;
default: result = "undefined";
break;
}
result += " (" +
org.Properties["objectVersion"].
Value.ToString() + ")";
MessageBox.Show("Exchange Organization: " +
result, "Information",
MessageBoxButtons.OK,
MessageBoxIcon.Information);
}
}
}
catch (Exception err)
{
MessageBox.Show(
"Exchange Organization Container error: " +
err.Message,
"Information", MessageBoxButtons.OK,
MessageBoxIcon.Information);
}
Within the lab environment, the snippet will show the following dialog.
Capture 80: Exchange Organization version
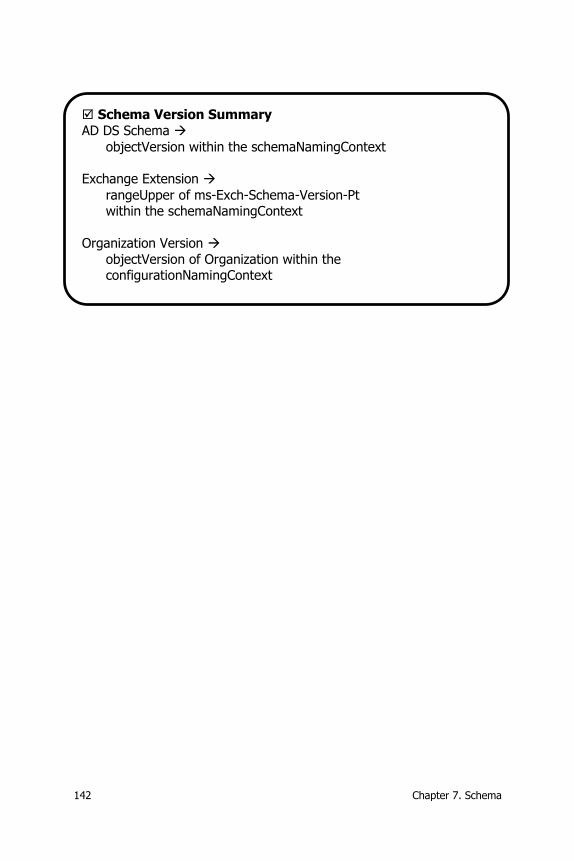
142 Chapter 7. Schema
Schema Version Summary
AD DS Schema
objectVersion within the schemaNamingContext
Exchange Extension
rangeUpper of ms-Exch-Schema-Version-Pt within the schemaNamingContext
Organization Version
objectVersion of Organization within the configurationNamingContext
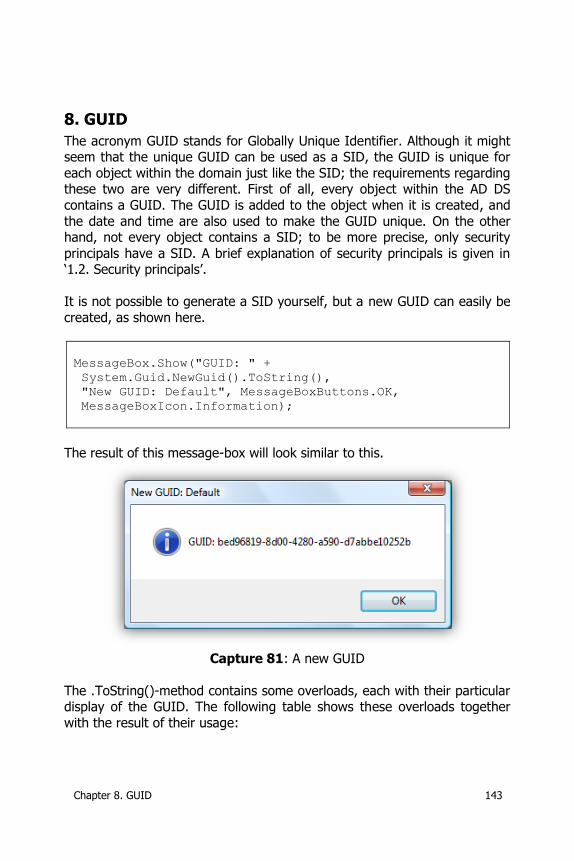
Chapter 8. GUID 143
8. GUID
The acronym GUID stands for Globally Unique Identifier. Although it might seem that the unique GUID can be used as a SID, the GUID is unique for
each object within the domain just like the SID; the requirements regarding these two are very different. First of all, every object within the AD DS
contains a GUID. The GUID is added to the object when it is created, and
the date and time are also used to make the GUID unique. On the other hand, not every object contains a SID; to be more precise, only security
principals have a SID. A brief explanation of security principals is given in ‘1.2. Security principals’.
It is not possible to generate a SID yourself, but a new GUID can easily be
created, as shown here.
MessageBox.Show("GUID: " +
System.Guid.NewGuid().ToString(),
"New GUID: Default", MessageBoxButtons.OK,
MessageBoxIcon.Information);
The result of this message-box will look similar to this.
Capture 81: A new GUID
The .ToString()-method contains some overloads, each with their particular display of the GUID. The following table shows these overloads together
with the result of their usage:
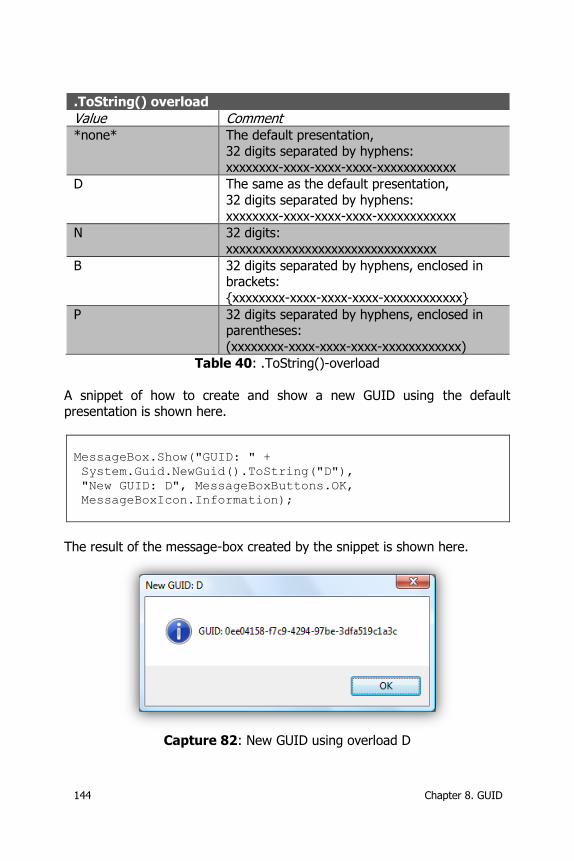
144 Chapter 8. GUID
.ToString() overload
Value Comment *none* The default presentation,
32 digits separated by hyphens:
xxxxxxxx-xxxx-xxxx-xxxx-xxxxxxxxxxxx
D The same as the default presentation,
32 digits separated by hyphens:
xxxxxxxx-xxxx-xxxx-xxxx-xxxxxxxxxxxx
N 32 digits:
xxxxxxxxxxxxxxxxxxxxxxxxxxxxxxxx
B 32 digits separated by hyphens, enclosed in brackets:
{xxxxxxxx-xxxx-xxxx-xxxx-xxxxxxxxxxxx}
P 32 digits separated by hyphens, enclosed in parentheses:
(xxxxxxxx-xxxx-xxxx-xxxx-xxxxxxxxxxxx)
Table 40: .ToString()-overload
A snippet of how to create and show a new GUID using the default presentation is shown here.
MessageBox.Show("GUID: " +
System.Guid.NewGuid().ToString("D"),
"New GUID: D", MessageBoxButtons.OK,
MessageBoxIcon.Information);
The result of the message-box created by the snippet is shown here.
Capture 82: New GUID using overload D
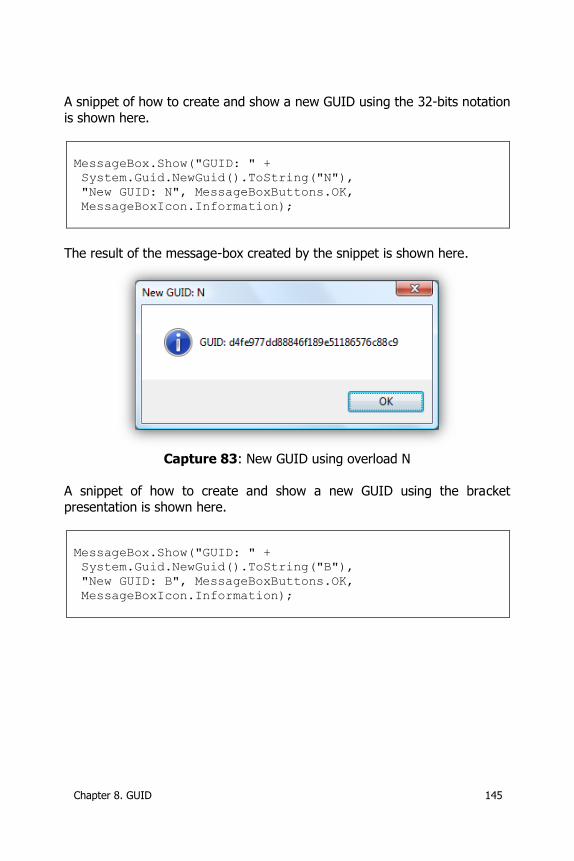
Chapter 8. GUID 145
A snippet of how to create and show a new GUID using the 32-bits notation
is shown here.
MessageBox.Show("GUID: " +
System.Guid.NewGuid().ToString("N"),
"New GUID: N", MessageBoxButtons.OK,
MessageBoxIcon.Information);
The result of the message-box created by the snippet is shown here.
Capture 83: New GUID using overload N
A snippet of how to create and show a new GUID using the bracket
presentation is shown here.
MessageBox.Show("GUID: " +
System.Guid.NewGuid().ToString("B"),
"New GUID: B", MessageBoxButtons.OK,
MessageBoxIcon.Information);
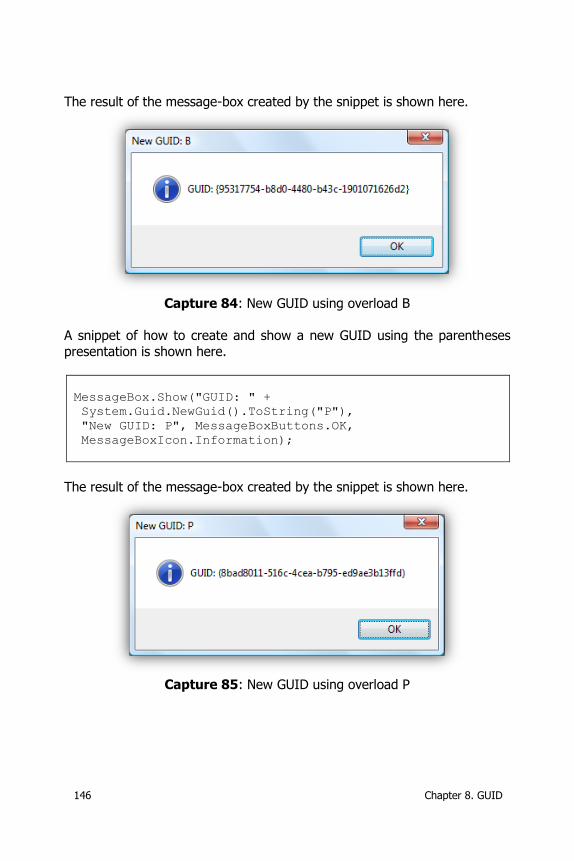
146 Chapter 8. GUID
The result of the message-box created by the snippet is shown here.
Capture 84: New GUID using overload B
A snippet of how to create and show a new GUID using the parentheses
presentation is shown here.
MessageBox.Show("GUID: " +
System.Guid.NewGuid().ToString("P"),
"New GUID: P", MessageBoxButtons.OK,
MessageBoxIcon.Information);
The result of the message-box created by the snippet is shown here.
Capture 85: New GUID using overload P
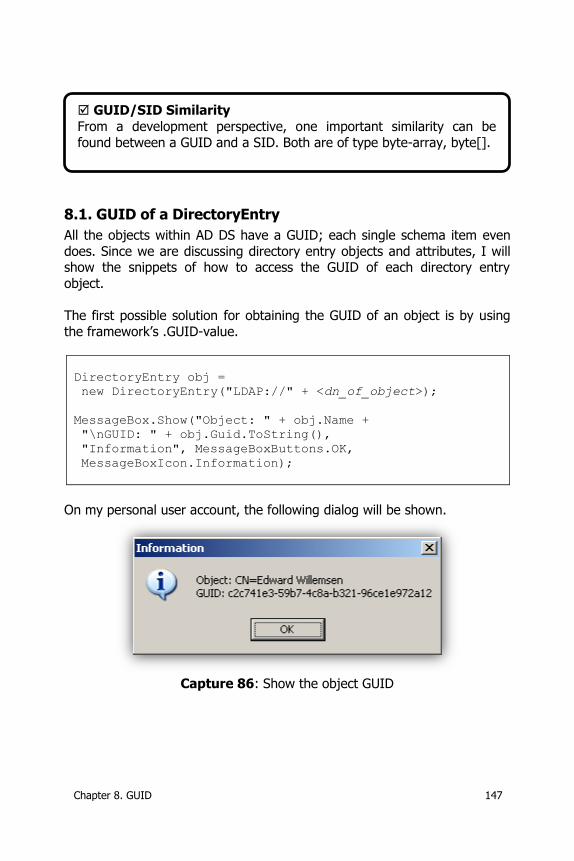
Chapter 8. GUID 147
8.1. GUID of a DirectoryEntry
All the objects within AD DS have a GUID; each single schema item even
does. Since we are discussing directory entry objects and attributes, I will show the snippets of how to access the GUID of each directory entry
object.
The first possible solution for obtaining the GUID of an object is by using
the framework’s .GUID-value.
DirectoryEntry obj =
new DirectoryEntry("LDAP://" + <dn_of_object>);
MessageBox.Show("Object: " + obj.Name +
"\nGUID: " + obj.Guid.ToString(),
"Information", MessageBoxButtons.OK,
MessageBoxIcon.Information);
On my personal user account, the following dialog will be shown.
Capture 86: Show the object GUID
GUID/SID Similarity
From a development perspective, one important similarity can be
found between a GUID and a SID. Both are of type byte-array, byte[].
148 Chapter 8. GUID
Within the snippet, the ‘\n’ value is used to create a newline1. Some other
snippets in this book use the Environment.NewLine value instead; the visual result is the same.
The second solution shows how to access the GUID as a property value of
a directory entry object.
DirectoryEntry obj =
new DirectoryEntry("LDAP://" + <dn_of_object>);
Guid guid =
new Guid((byte[])obj.Properties["objectGUID"].
Value);
MessageBox.Show("Object: " + obj.Name +
"\nGUID: " + guid.ToString(),
"Information", MessageBoxButtons.OK,
MessageBoxIcon.Information);
The snippet shows that the step to create a new GUID object using the object’s ‘objectGUID’ attribute is required in order to cast the byte[] and
read it as a string. Although the .ToString()-method is available when using the objects class, when it is used in a snippet, as shown here, it will lead to
an unexpected result.
MessageBox.Show("Object: " + obj.Name +
"\nGUID: " +
obj.Properties["objectGUID"].Value.ToString(),
"Information",
MessageBoxButtons.OK,
MessageBoxIcon.Information);
1 This is a common syntax, used in development languages like c/c++.
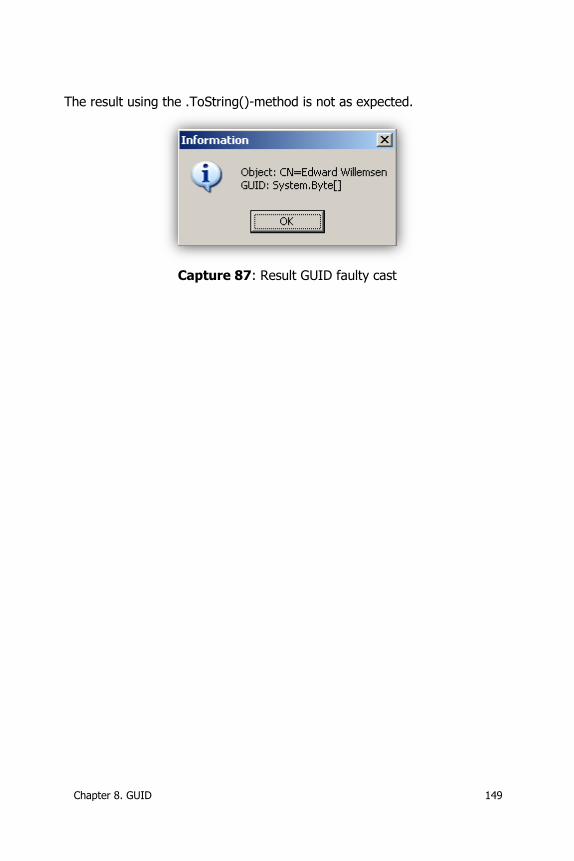
Chapter 8. GUID 149
The result using the .ToString()-method is not as expected.
Capture 87: Result GUID faulty cast

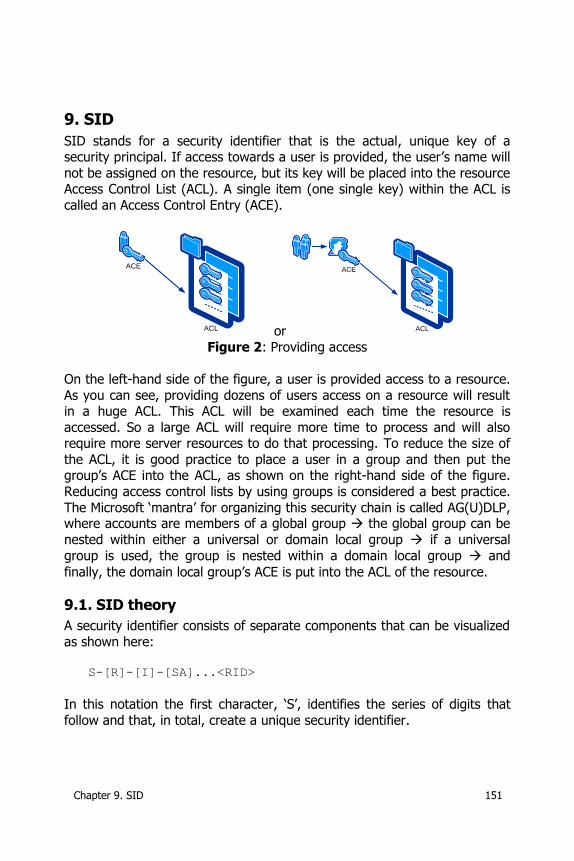
Chapter 9. SID 151
9. SID
SID stands for a security identifier that is the actual, unique key of a security principal. If access towards a user is provided, the user’s name will
not be assigned on the resource, but its key will be placed into the resource Access Control List (ACL). A single item (one single key) within the ACL is
called an Access Control Entry (ACE).
ACL
ACE
or ACL
ACE
Figure 2: Providing access
On the left-hand side of the figure, a user is provided access to a resource.
As you can see, providing dozens of users access on a resource will result in a huge ACL. This ACL will be examined each time the resource is
accessed. So a large ACL will require more time to process and will also require more server resources to do that processing. To reduce the size of
the ACL, it is good practice to place a user in a group and then put the group’s ACE into the ACL, as shown on the right-hand side of the figure.
Reducing access control lists by using groups is considered a best practice.
The Microsoft ‘mantra’ for organizing this security chain is called AG(U)DLP, where accounts are members of a global group the global group can be
nested within either a universal or domain local group if a universal
group is used, the group is nested within a domain local group and
finally, the domain local group’s ACE is put into the ACL of the resource.
9.1. SID theory
A security identifier consists of separate components that can be visualized
as shown here:
S-[R]-[I]-[SA]...<RID>
In this notation the first character, ‘S’, identifies the series of digits that
follow and that, in total, create a unique security identifier.
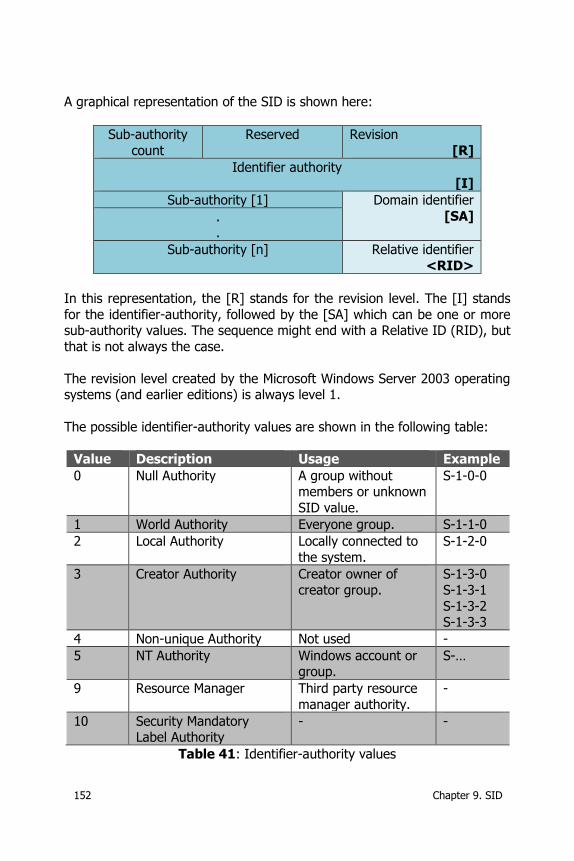
152 Chapter 9. SID
A graphical representation of the SID is shown here:
Sub-authority
count
Reserved Revision
[R]
Identifier authority [I]
Sub-authority [1] Domain identifier
[SA] . .
Sub-authority [n] Relative identifier
<RID>
In this representation, the [R] stands for the revision level. The [I] stands
for the identifier-authority, followed by the [SA] which can be one or more sub-authority values. The sequence might end with a Relative ID (RID), but
that is not always the case.
The revision level created by the Microsoft Windows Server 2003 operating systems (and earlier editions) is always level 1.
The possible identifier-authority values are shown in the following table:
Value Description Usage Example
0 Null Authority A group without members or unknown
SID value.
S-1-0-0
1 World Authority Everyone group. S-1-1-0
2 Local Authority Locally connected to
the system.
S-1-2-0
3 Creator Authority Creator owner of creator group.
S-1-3-0 S-1-3-1
S-1-3-2 S-1-3-3
4 Non-unique Authority Not used -
5 NT Authority Windows account or group.
S-…
9 Resource Manager Third party resource
manager authority.
-
10 Security Mandatory Label Authority
- -
Table 41: Identifier-authority values
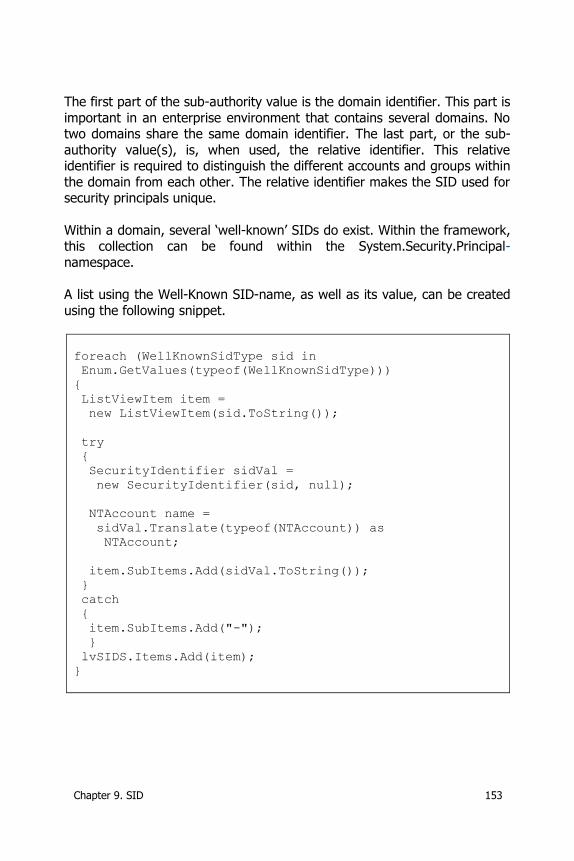
Chapter 9. SID 153
The first part of the sub-authority value is the domain identifier. This part is
important in an enterprise environment that contains several domains. No two domains share the same domain identifier. The last part, or the sub-
authority value(s), is, when used, the relative identifier. This relative identifier is required to distinguish the different accounts and groups within
the domain from each other. The relative identifier makes the SID used for security principals unique.
Within a domain, several ‘well-known’ SIDs do exist. Within the framework, this collection can be found within the System.Security.Principal-
namespace.
A list using the Well-Known SID-name, as well as its value, can be created
using the following snippet.
foreach (WellKnownSidType sid in
Enum.GetValues(typeof(WellKnownSidType)))
{
ListViewItem item =
new ListViewItem(sid.ToString());
try
{
SecurityIdentifier sidVal =
new SecurityIdentifier(sid, null);
NTAccount name =
sidVal.Translate(typeof(NTAccount)) as
NTAccount;
item.SubItems.Add(sidVal.ToString());
}
catch
{
item.SubItems.Add("-");
}
lvSIDS.Items.Add(item);
}
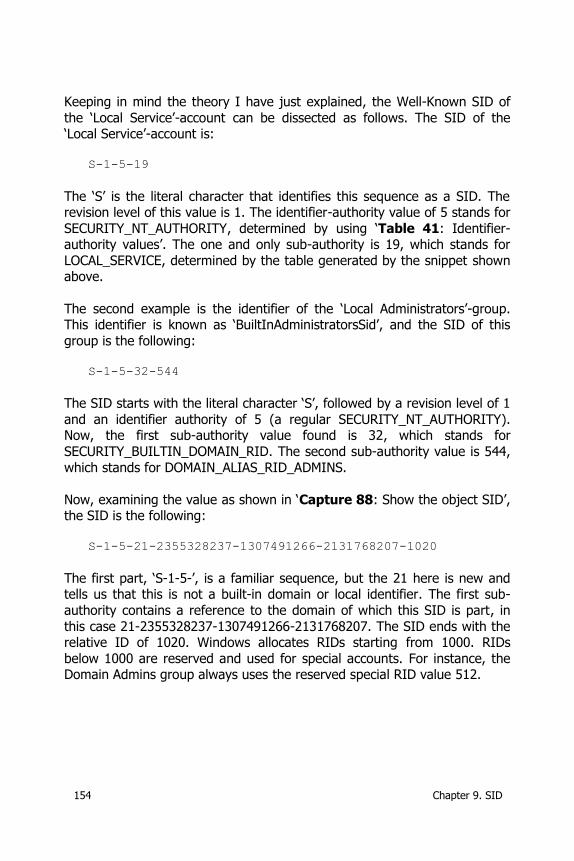
154 Chapter 9. SID
Keeping in mind the theory I have just explained, the Well-Known SID of
the ‘Local Service’-account can be dissected as follows. The SID of the ‘Local Service’-account is:
S-1-5-19
The ‘S’ is the literal character that identifies this sequence as a SID. The revision level of this value is 1. The identifier-authority value of 5 stands for
SECURITY_NT_AUTHORITY, determined by using ‘Table 41: Identifier-authority values’. The one and only sub-authority is 19, which stands for
LOCAL_SERVICE, determined by the table generated by the snippet shown above.
The second example is the identifier of the ‘Local Administrators’-group. This identifier is known as ‘BuiltInAdministratorsSid’, and the SID of this
group is the following:
S-1-5-32-544
The SID starts with the literal character ‘S’, followed by a revision level of 1
and an identifier authority of 5 (a regular SECURITY_NT_AUTHORITY). Now, the first sub-authority value found is 32, which stands for
SECURITY_BUILTIN_DOMAIN_RID. The second sub-authority value is 544,
which stands for DOMAIN_ALIAS_RID_ADMINS.
Now, examining the value as shown in ‘Capture 88: Show the object SID’, the SID is the following:
S-1-5-21-2355328237-1307491266-2131768207-1020
The first part, ‘S-1-5-’, is a familiar sequence, but the 21 here is new and tells us that this is not a built-in domain or local identifier. The first sub-
authority contains a reference to the domain of which this SID is part, in
this case 21-2355328237-1307491266-2131768207. The SID ends with the relative ID of 1020. Windows allocates RIDs starting from 1000. RIDs
below 1000 are reserved and used for special accounts. For instance, the Domain Admins group always uses the reserved special RID value 512.

Chapter 9. SID 155
9.2. SID of a DirectoryEntry
As mentioned earlier, not all objects have a SID, but all of the security principals have one. Before .NET Framework v2.0, a lot of tinkering was
required to access and display the SID. Starting with .NET Framework v2.0 and higher, a reliable solution was implemented to obtain and present the
SID as a string.
DirectoryEntry obj =
new DirectoryEntry("LDAP://"+ <dn_of_object>);
try
{
SecurityIdentifier sid =
new SecurityIdentifier((byte[])obj.
Properties["objectSid"].Value, 0);
MessageBox.Show("Object: " + obj.Name +
"\nSID: " + sid.Value,
"Information", MessageBoxButtons.OK,
MessageBoxIcon.Information);
}
catch
{
MessageBox.Show("Object does not contain a SID.",
"Information",
MessageBoxButtons.OK,
MessageBoxIcon.Information);
}
obj.Close(); obj.Dispose();
The snippet will produce the following dialog.
Capture 88: Show the object SID
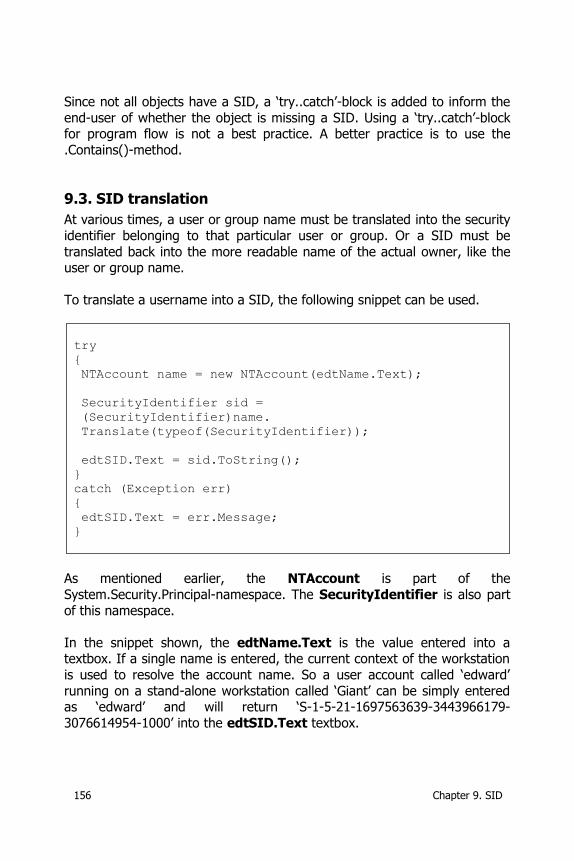
156 Chapter 9. SID
Since not all objects have a SID, a ‘try..catch’-block is added to inform the
end-user of whether the object is missing a SID. Using a ‘try..catch’-block for program flow is not a best practice. A better practice is to use the
.Contains()-method.
9.3. SID translation
At various times, a user or group name must be translated into the security
identifier belonging to that particular user or group. Or a SID must be
translated back into the more readable name of the actual owner, like the user or group name.
To translate a username into a SID, the following snippet can be used.
try
{
NTAccount name = new NTAccount(edtName.Text);
SecurityIdentifier sid =
(SecurityIdentifier)name.
Translate(typeof(SecurityIdentifier));
edtSID.Text = sid.ToString();
}
catch (Exception err)
{
edtSID.Text = err.Message;
}
As mentioned earlier, the NTAccount is part of the
System.Security.Principal-namespace. The SecurityIdentifier is also part
of this namespace.
In the snippet shown, the edtName.Text is the value entered into a textbox. If a single name is entered, the current context of the workstation
is used to resolve the account name. So a user account called ‘edward’
running on a stand-alone workstation called ‘Giant’ can be simply entered as ‘edward’ and will return ‘S-1-5-21-1697563639-3443966179-
3076614954-1000’ into the edtSID.Text textbox.
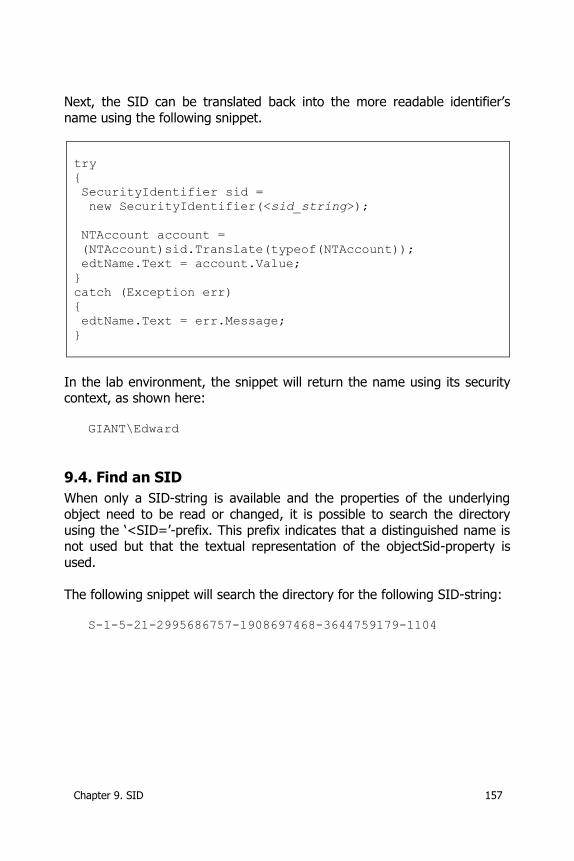
Chapter 9. SID 157
Next, the SID can be translated back into the more readable identifier’s
name using the following snippet.
try
{
SecurityIdentifier sid =
new SecurityIdentifier(<sid_string>);
NTAccount account =
(NTAccount)sid.Translate(typeof(NTAccount));
edtName.Text = account.Value;
}
catch (Exception err)
{
edtName.Text = err.Message;
}
In the lab environment, the snippet will return the name using its security context, as shown here:
GIANT\Edward
9.4. Find an SID
When only a SID-string is available and the properties of the underlying
object need to be read or changed, it is possible to search the directory
using the ‘<SID=’-prefix. This prefix indicates that a distinguished name is not used but that the textual representation of the objectSid-property is
used.
The following snippet will search the directory for the following SID-string:
S-1-5-21-2995686757-1908697468-3644759179-1104

158 Chapter 9. SID
The following snippet shows how this can be done.
string sidstr = "S-1-5-21-2995686757-1908697468-
3644759179-1104";
using (DirectoryEntry obj =
new DirectoryEntry("LDAP://<SID=" + sidstr + ">"))
{
MessageBox.Show(obj.
Properties["distinguishedName"].Value.ToString(),
sidstr, MessageBoxButtons.OK);
}
Within the lab environment, the following message-box will be shown.
Capture 89: Find and translate a SID
9.5. sIDHistory
After Windows NT 4.0, Microsoft introduced an on Directory Access Protocol
(DAP)-based Directory Service. In those days, many companies were satisfied with their domain structure, and a migration towards AD DS was
seen as a complex venture. When Microsoft released their migration application, Microsoft Active Directory Migration Tool (ADMT), IT-specialists
were required to familiarize themselves with a property called sIDHistory.
This property can be used during migrations from one domain to another. It allows you to keep the original SID of the security principal object in a
separate property. When accessing resources, both SID and sIDHistory values are examined. So by using the original SID in the sIDHistory of the
new security principal, the user is allowed to access resources that were
provided within the original domain. When accessing a resource, both SID
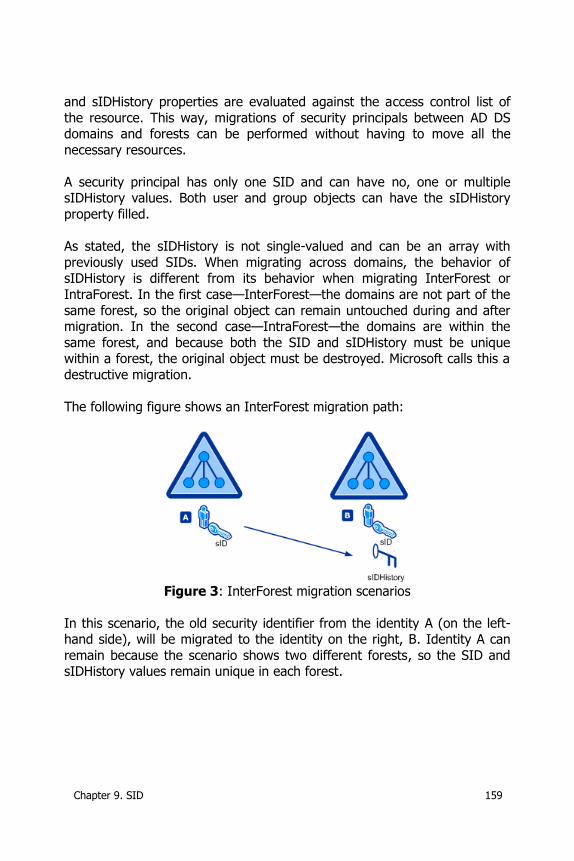
Chapter 9. SID 159
and sIDHistory properties are evaluated against the access control list of
the resource. This way, migrations of security principals between AD DS domains and forests can be performed without having to move all the
necessary resources.
A security principal has only one SID and can have no, one or multiple sIDHistory values. Both user and group objects can have the sIDHistory
property filled.
As stated, the sIDHistory is not single-valued and can be an array with
previously used SIDs. When migrating across domains, the behavior of sIDHistory is different from its behavior when migrating InterForest or
IntraForest. In the first case—InterForest—the domains are not part of the
same forest, so the original object can remain untouched during and after migration. In the second case—IntraForest—the domains are within the
same forest, and because both the SID and sIDHistory must be unique within a forest, the original object must be destroyed. Microsoft calls this a
destructive migration.
The following figure shows an InterForest migration path:
Figure 3: InterForest migration scenarios
In this scenario, the old security identifier from the identity A (on the left-hand side), will be migrated to the identity on the right, B. Identity A can
remain because the scenario shows two different forests, so the SID and sIDHistory values remain unique in each forest.
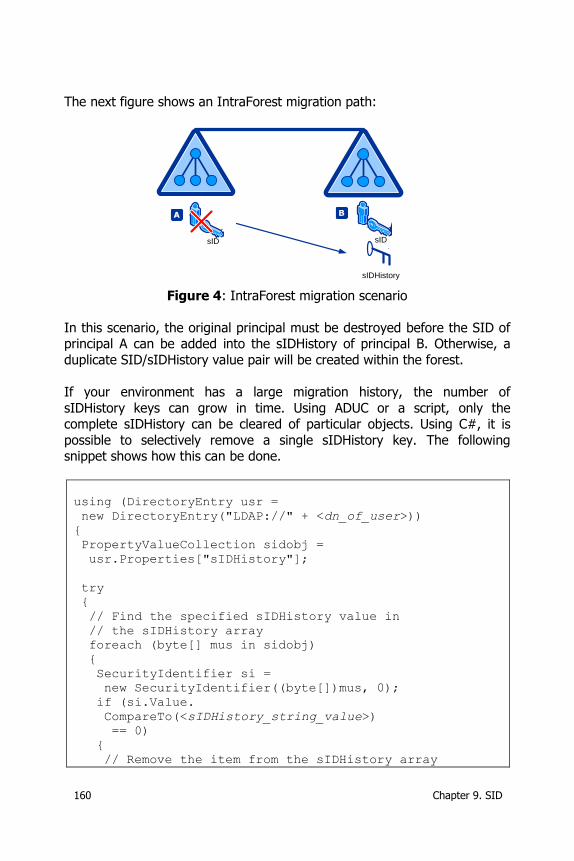
160 Chapter 9. SID
The next figure shows an IntraForest migration path:
sID sID
sIDHistory
Figure 4: IntraForest migration scenario
In this scenario, the original principal must be destroyed before the SID of principal A can be added into the sIDHistory of principal B. Otherwise, a
duplicate SID/sIDHistory value pair will be created within the forest.
If your environment has a large migration history, the number of
sIDHistory keys can grow in time. Using ADUC or a script, only the complete sIDHistory can be cleared of particular objects. Using C#, it is
possible to selectively remove a single sIDHistory key. The following snippet shows how this can be done.
using (DirectoryEntry usr =
new DirectoryEntry("LDAP://" + <dn_of_user>))
{
PropertyValueCollection sidobj =
usr.Properties["sIDHistory"];
try
{
// Find the specified sIDHistory value in
// the sIDHistory array
foreach (byte[] mus in sidobj)
{
SecurityIdentifier si =
new SecurityIdentifier((byte[])mus, 0);
if (si.Value.
CompareTo(<sIDHistory_string_value>)
== 0)
{
// Remove the item from the sIDHistory array
Chapter 9. SID 161
sidobj.Remove(mus);
break;
}
}
}
catch (Exception err)
{
MessageBox.Show("Error: " + err.Message,
"Error", MessageBoxButtons.OK,
MessageBoxIcon.Error);
}
try
{
// Commit the removal of the sIDHistory entry
usr.CommitChanges();
}
catch (Exception err)
{
MessageBox.Show("Error: " + err.Message,
"Error", MessageBoxButtons.OK,
MessageBoxIcon.Error);
}
}
The snippet uses a text-based comparison of the SID that needs to be removed from the sIDHistory list. The removal itself is based on the byte
array of the SID value.
9.5.1. SID Filtering
When preparing for a domain migration, be aware that a forest or domain trust can be configured to use SID Filtering. SID Filtering will not allow the
use of the sIDHistory property.
Changing SID Filtering can be done using the NETDOM.EXE command-line
utility. With the version that ships with Microsoft Windows 2000 Server and Microsoft Windows Server 2003, SID Filtering can be changed as explained
here.
To disable the SID Filter quarantining for the trusting domain, open a
Command Prompt and type the following command and then press the <enter> key:

162 Chapter 9. SID
netdom trust <TrustingDomainName>
/domain:<TrustedDomainName>
/quarantine:No
/userD:<domainAdministratorAccount>
/passwordD:<domainAdministratorPassword>
TrustingDomainName
The Domain Name System (DNS) name (or Network Basic Input Output
System (NetBIOS) name) of the trusting domain in the trust that is being created.
TrustedDomainName
The DNS name (or NetBIOS name) of the domain that will be trusted in the trust that is being created.
domainAdministratorAccount
The user account name with the appropriate administrator credentials to
modify the trust.
domainAdministratorPassword
The password of the used account in the domainAdministratorAccount-argument.
To enable SID Filtering, do the opposite with the quarantine value: netdom trust <TrustingDomainName>
/domain:<TrustedDomainName>
/quarantine:Yes
/userD:<domainAdministratorAccount>
/passwordD:<domainAdministratorPassword>
The syntax of the NETDOM.EXE command-line utility that ships with
Microsoft Windows Server 2008 and later versions is changed. This edition does not contain the quarantine-option; it contains the more descriptive
EnableSIDHistory-option. This is because—by default—SID History support is disabled on the trust.
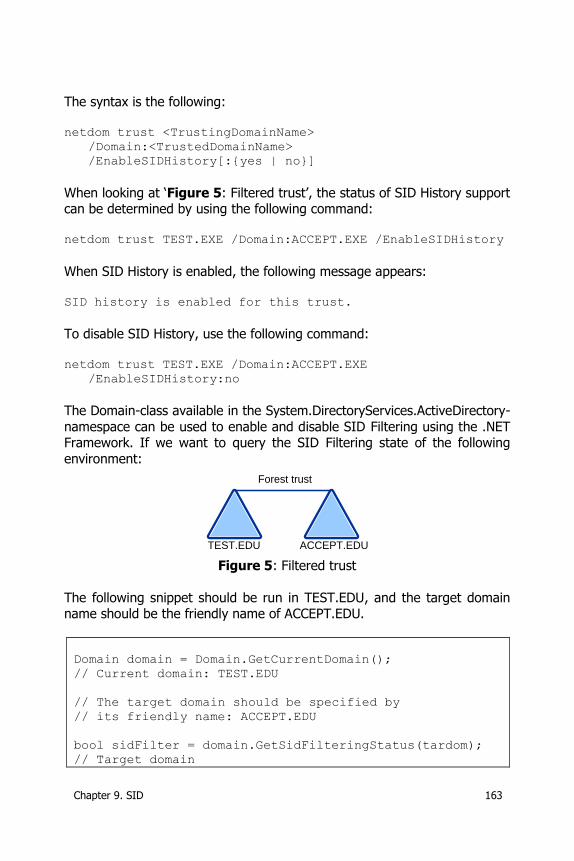
Chapter 9. SID 163
The syntax is the following:
netdom trust <TrustingDomainName>
/Domain:<TrustedDomainName>
/EnableSIDHistory[:{yes | no}]
When looking at ‘Figure 5: Filtered trust’, the status of SID History support can be determined by using the following command:
netdom trust TEST.EXE /Domain:ACCEPT.EXE /EnableSIDHistory
When SID History is enabled, the following message appears: SID history is enabled for this trust.
To disable SID History, use the following command:
netdom trust TEST.EXE /Domain:ACCEPT.EXE
/EnableSIDHistory:no
The Domain-class available in the System.DirectoryServices.ActiveDirectory-
namespace can be used to enable and disable SID Filtering using the .NET Framework. If we want to query the SID Filtering state of the following
environment:
Forest trust
TEST.EDU ACCEPT.EDU
Figure 5: Filtered trust
The following snippet should be run in TEST.EDU, and the target domain name should be the friendly name of ACCEPT.EDU.
Domain domain = Domain.GetCurrentDomain();
// Current domain: TEST.EDU
// The target domain should be specified by
// its friendly name: ACCEPT.EDU
bool sidFilter = domain.GetSidFilteringStatus(tardom);
// Target domain
164 Chapter 9. SID
info.Items.Add("sidFilter between " +
<current_domain> + " and " +
<target_domain> + " is turned " +
(sidFilter ? "on" : "off"));
The result of this query is the following:
sidFilter between TEST.EDU and ACCEPT.EDU is turned on
If no trust relationship exists between the two domains, a ‘domain trust relationship does not exist between "TEST.EDU" and "ACCEPT.EDU"’
exception error will appear. To enable or disable SID Filtering, the
.SetSidFilteringStatus()-method can be used, as shown in the following snippet.
Domain domain = Domain.GetCurrentDomain();
// Current domain
// The target domain should be specified by
// its friendly name
domain.SetSidFilteringStatus(
<target_domain>, true);
The second parameter of the .SetSidFilteringStatus()-method is a Boolean
value, where a value of false will disable SID Filtering and a value of true
enables SID Filtering. The snippet does not contain any error handling; consider it a best practice to always use ‘try..catch’-blocks when modifying
the directory.
9.5.2. Reading sIDHistory
Although it is quite easy to read a single property value using .Properties[<property>].Value, what if the property has more than one
value? As shown in the previous figure, the sIDHistory property is one such
multi-valued property. If you want to iterate through these values, you will have to use a PropertyCollectionValue. A PropertyCollectionValue is an
array that can be iterated through the use of the foreach statement.
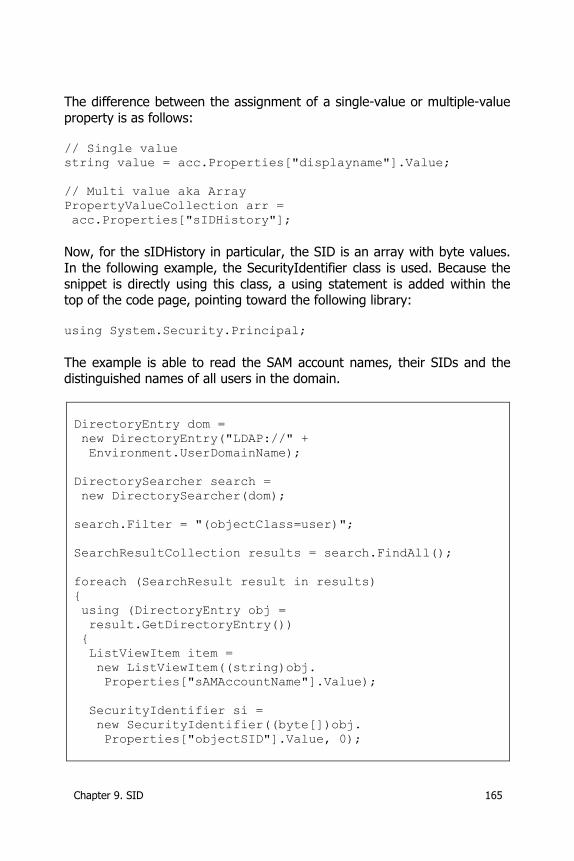
Chapter 9. SID 165
The difference between the assignment of a single-value or multiple-value
property is as follows: // Single value
string value = acc.Properties["displayname"].Value;
// Multi value aka Array
PropertyValueCollection arr =
acc.Properties["sIDHistory"];
Now, for the sIDHistory in particular, the SID is an array with byte values.
In the following example, the SecurityIdentifier class is used. Because the
snippet is directly using this class, a using statement is added within the top of the code page, pointing toward the following library:
using System.Security.Principal;
The example is able to read the SAM account names, their SIDs and the distinguished names of all users in the domain.
DirectoryEntry dom =
new DirectoryEntry("LDAP://" +
Environment.UserDomainName);
DirectorySearcher search =
new DirectorySearcher(dom);
search.Filter = "(objectClass=user)";
SearchResultCollection results = search.FindAll();
foreach (SearchResult result in results)
{
using (DirectoryEntry obj =
result.GetDirectoryEntry())
{
ListViewItem item =
new ListViewItem((string)obj.
Properties["sAMAccountName"].Value);
SecurityIdentifier si =
new SecurityIdentifier((byte[])obj.
Properties["objectSID"].Value, 0);
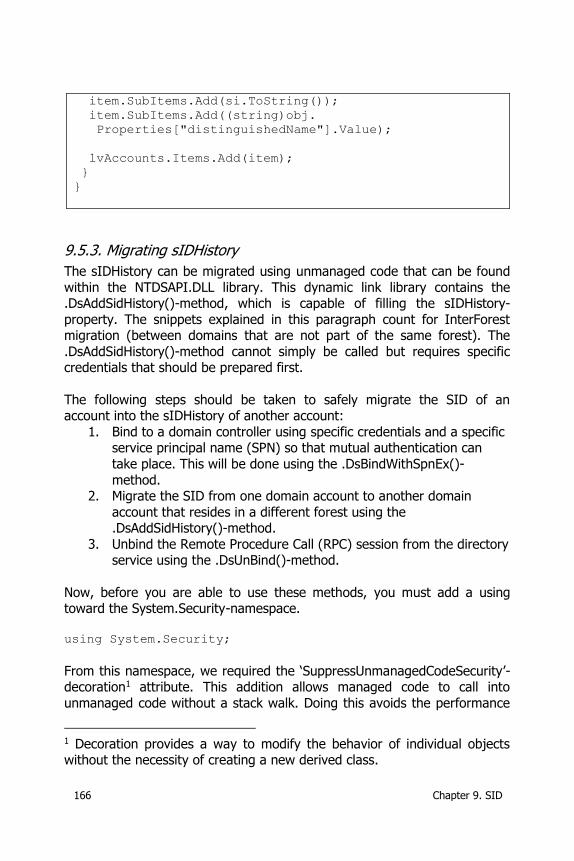
166 Chapter 9. SID
item.SubItems.Add(si.ToString());
item.SubItems.Add((string)obj.
Properties["distinguishedName"].Value);
lvAccounts.Items.Add(item);
}
}
9.5.3. Migrating sIDHistory
The sIDHistory can be migrated using unmanaged code that can be found
within the NTDSAPI.DLL library. This dynamic link library contains the .DsAddSidHistory()-method, which is capable of filling the sIDHistory-
property. The snippets explained in this paragraph count for InterForest migration (between domains that are not part of the same forest). The
.DsAddSidHistory()-method cannot simply be called but requires specific credentials that should be prepared first.
The following steps should be taken to safely migrate the SID of an account into the sIDHistory of another account:
1. Bind to a domain controller using specific credentials and a specific service principal name (SPN) so that mutual authentication can
take place. This will be done using the .DsBindWithSpnEx()-
method. 2. Migrate the SID from one domain account to another domain
account that resides in a different forest using the .DsAddSidHistory()-method.
3. Unbind the Remote Procedure Call (RPC) session from the directory service using the .DsUnBind()-method.
Now, before you are able to use these methods, you must add a using toward the System.Security-namespace.
using System.Security;
From this namespace, we required the ‘SuppressUnmanagedCodeSecurity’-decoration1 attribute. This addition allows managed code to call into
unmanaged code without a stack walk. Doing this avoids the performance
1 Decoration provides a way to modify the behavior of individual objects without the necessity of creating a new derived class.
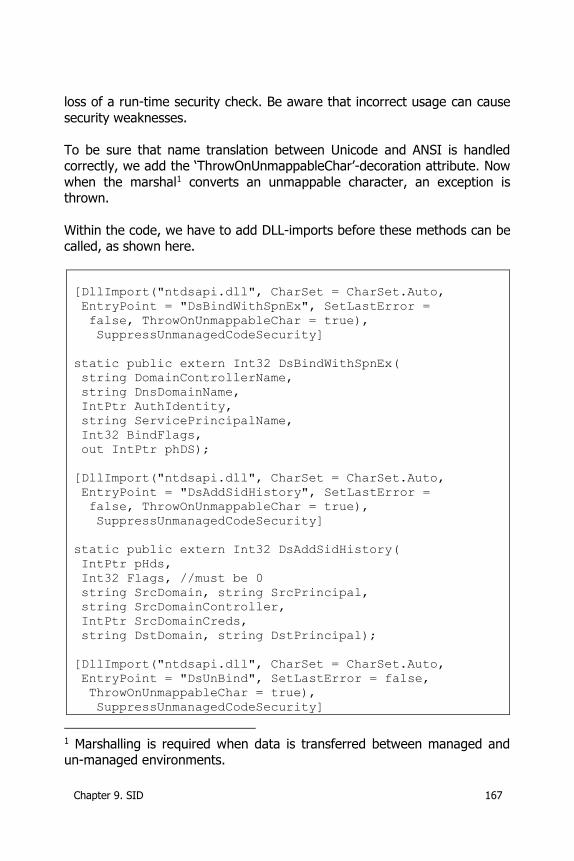
Chapter 9. SID 167
loss of a run-time security check. Be aware that incorrect usage can cause
security weaknesses.
To be sure that name translation between Unicode and ANSI is handled correctly, we add the ‘ThrowOnUnmappableChar’-decoration attribute. Now
when the marshal1 converts an unmappable character, an exception is thrown.
Within the code, we have to add DLL-imports before these methods can be called, as shown here.
[DllImport("ntdsapi.dll", CharSet = CharSet.Auto,
EntryPoint = "DsBindWithSpnEx", SetLastError =
false, ThrowOnUnmappableChar = true),
SuppressUnmanagedCodeSecurity]
static public extern Int32 DsBindWithSpnEx(
string DomainControllerName,
string DnsDomainName,
IntPtr AuthIdentity,
string ServicePrincipalName,
Int32 BindFlags,
out IntPtr phDS);
[DllImport("ntdsapi.dll", CharSet = CharSet.Auto,
EntryPoint = "DsAddSidHistory", SetLastError =
false, ThrowOnUnmappableChar = true),
SuppressUnmanagedCodeSecurity]
static public extern Int32 DsAddSidHistory(
IntPtr pHds,
Int32 Flags, //must be 0
string SrcDomain, string SrcPrincipal,
string SrcDomainController,
IntPtr SrcDomainCreds,
string DstDomain, string DstPrincipal);
[DllImport("ntdsapi.dll", CharSet = CharSet.Auto,
EntryPoint = "DsUnBind", SetLastError = false,
ThrowOnUnmappableChar = true),
SuppressUnmanagedCodeSecurity]
1 Marshalling is required when data is transferred between managed and un-managed environments.
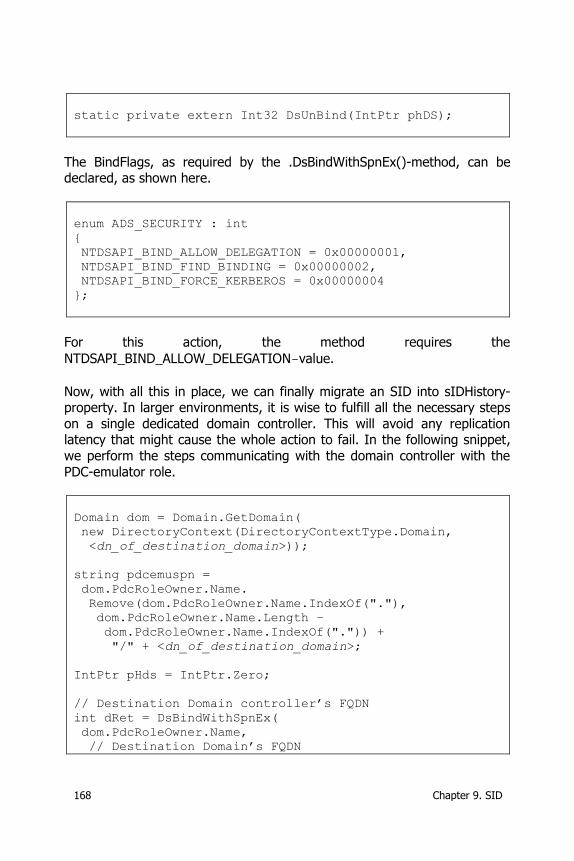
168 Chapter 9. SID
static private extern Int32 DsUnBind(IntPtr phDS);
The BindFlags, as required by the .DsBindWithSpnEx()-method, can be declared, as shown here.
enum ADS_SECURITY : int
{
NTDSAPI_BIND_ALLOW_DELEGATION = 0x00000001,
NTDSAPI_BIND_FIND_BINDING = 0x00000002,
NTDSAPI_BIND_FORCE_KERBEROS = 0x00000004
};
For this action, the method requires the
NTDSAPI_BIND_ALLOW_DELEGATION-value.
Now, with all this in place, we can finally migrate an SID into sIDHistory-property. In larger environments, it is wise to fulfill all the necessary steps
on a single dedicated domain controller. This will avoid any replication latency that might cause the whole action to fail. In the following snippet,
we perform the steps communicating with the domain controller with the
PDC-emulator role.
Domain dom = Domain.GetDomain(
new DirectoryContext(DirectoryContextType.Domain,
<dn_of_destination_domain>));
string pdcemuspn =
dom.PdcRoleOwner.Name.
Remove(dom.PdcRoleOwner.Name.IndexOf("."),
dom.PdcRoleOwner.Name.Length –
dom.PdcRoleOwner.Name.IndexOf(".")) +
"/" + <dn_of_destination_domain>;
IntPtr pHds = IntPtr.Zero;
// Destination Domain controller’s FQDN
int dRet = DsBindWithSpnEx(
dom.PdcRoleOwner.Name,
// Destination Domain’s FQDN
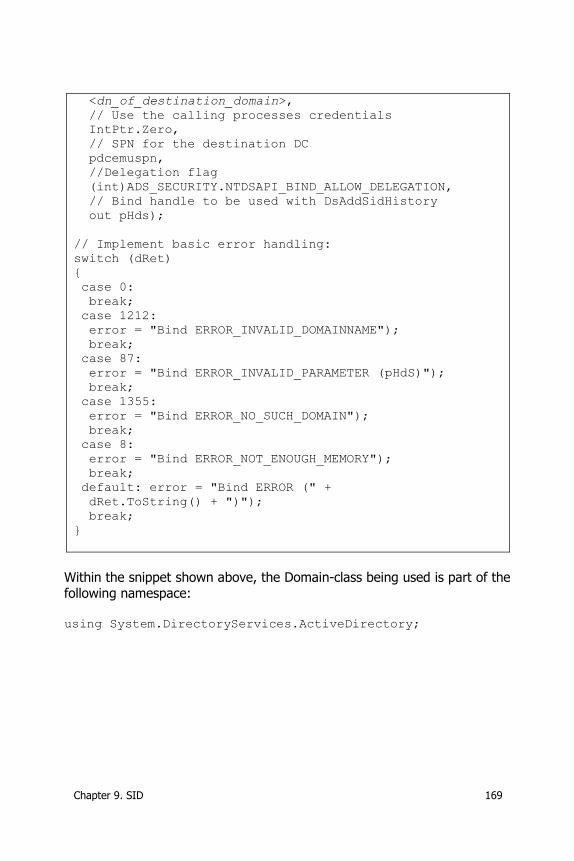
Chapter 9. SID 169
<dn_of_destination_domain>,
// Use the calling processes credentials
IntPtr.Zero,
// SPN for the destination DC
pdcemuspn,
//Delegation flag
(int)ADS_SECURITY.NTDSAPI_BIND_ALLOW_DELEGATION,
// Bind handle to be used with DsAddSidHistory
out pHds);
// Implement basic error handling:
switch (dRet)
{
case 0:
break;
case 1212:
error = "Bind ERROR_INVALID_DOMAINNAME");
break;
case 87:
error = "Bind ERROR_INVALID_PARAMETER (pHdS)");
break;
case 1355:
error = "Bind ERROR_NO_SUCH_DOMAIN");
break;
case 8:
error = "Bind ERROR_NOT_ENOUGH_MEMORY");
break;
default: error = "Bind ERROR (" +
dRet.ToString() + ")");
break;
}
Within the snippet shown above, the Domain-class being used is part of the following namespace:
using System.DirectoryServices.ActiveDirectory;
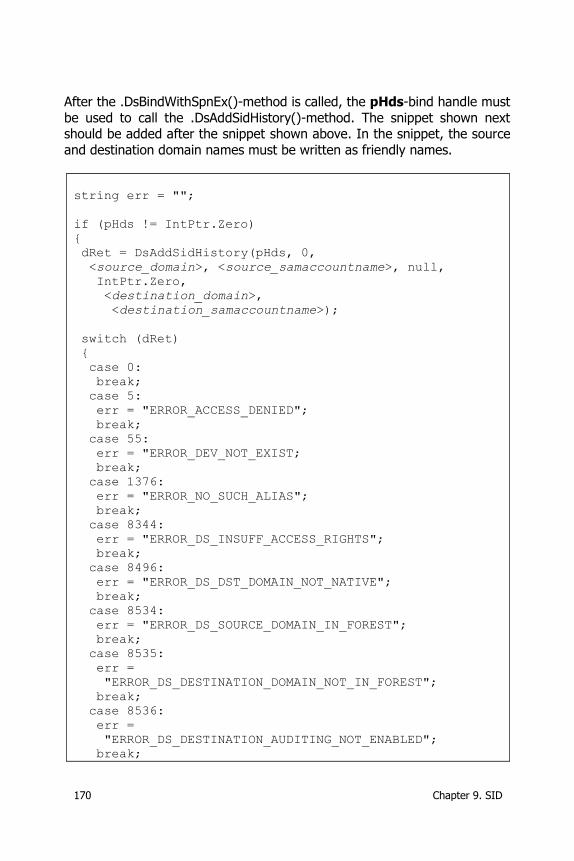
170 Chapter 9. SID
After the .DsBindWithSpnEx()-method is called, the pHds-bind handle must
be used to call the .DsAddSidHistory()-method. The snippet shown next should be added after the snippet shown above. In the snippet, the source
and destination domain names must be written as friendly names.
string err = "";
if (pHds != IntPtr.Zero)
{
dRet = DsAddSidHistory(pHds, 0,
<source_domain>, <source_samaccountname>, null,
IntPtr.Zero,
<destination_domain>,
<destination_samaccountname>);
switch (dRet)
{
case 0:
break;
case 5:
err = "ERROR_ACCESS_DENIED";
break;
case 55:
err = "ERROR_DEV_NOT_EXIST;
break;
case 1376:
err = "ERROR_NO_SUCH_ALIAS";
break;
case 8344:
err = "ERROR_DS_INSUFF_ACCESS_RIGHTS";
break;
case 8496:
err = "ERROR_DS_DST_DOMAIN_NOT_NATIVE";
break;
case 8534:
err = "ERROR_DS_SOURCE_DOMAIN_IN_FOREST";
break;
case 8535:
err =
"ERROR_DS_DESTINATION_DOMAIN_NOT_IN_FOREST";
break;
case 8536:
err =
"ERROR_DS_DESTINATION_AUDITING_NOT_ENABLED";
break;
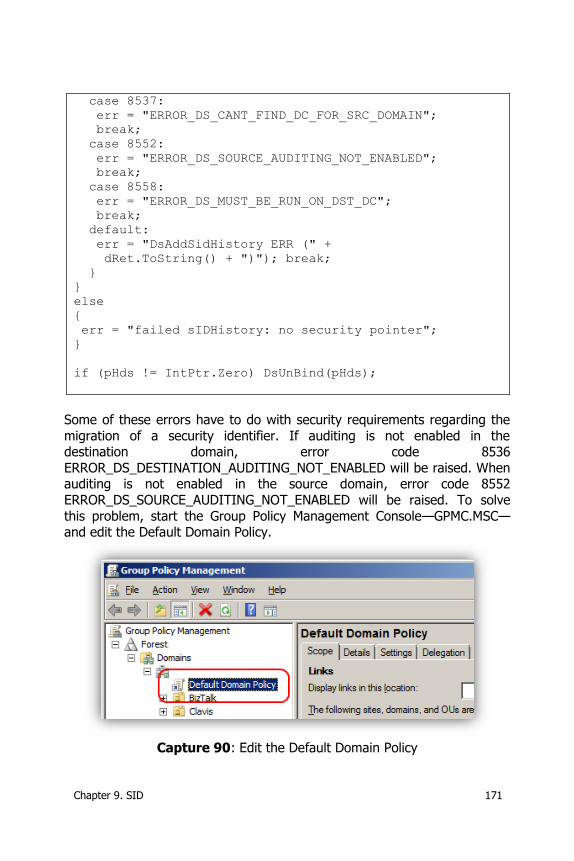
Chapter 9. SID 171
case 8537:
err = "ERROR_DS_CANT_FIND_DC_FOR_SRC_DOMAIN";
break;
case 8552:
err = "ERROR_DS_SOURCE_AUDITING_NOT_ENABLED";
break;
case 8558:
err = "ERROR_DS_MUST_BE_RUN_ON_DST_DC";
break;
default:
err = "DsAddSidHistory ERR (" +
dRet.ToString() + ")"); break;
}
}
else
{
err = "failed sIDHistory: no security pointer";
}
if (pHds != IntPtr.Zero) DsUnBind(pHds);
Some of these errors have to do with security requirements regarding the
migration of a security identifier. If auditing is not enabled in the destination domain, error code 8536
ERROR_DS_DESTINATION_AUDITING_NOT_ENABLED will be raised. When auditing is not enabled in the source domain, error code 8552
ERROR_DS_SOURCE_AUDITING_NOT_ENABLED will be raised. To solve
this problem, start the Group Policy Management Console—GPMC.MSC—and edit the Default Domain Policy.
Capture 90: Edit the Default Domain Policy
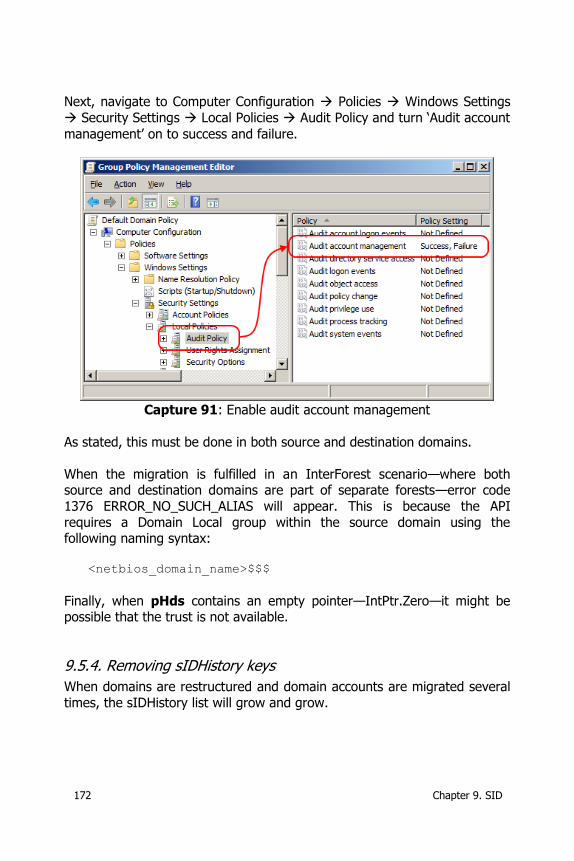
172 Chapter 9. SID
Next, navigate to Computer Configuration Policies Windows Settings
Security Settings Local Policies Audit Policy and turn ‘Audit account
management’ on to success and failure.
Capture 91: Enable audit account management
As stated, this must be done in both source and destination domains.
When the migration is fulfilled in an InterForest scenario—where both source and destination domains are part of separate forests—error code
1376 ERROR_NO_SUCH_ALIAS will appear. This is because the API
requires a Domain Local group within the source domain using the following naming syntax:
<netbios_domain_name>$$$
Finally, when pHds contains an empty pointer—IntPtr.Zero—it might be possible that the trust is not available.
9.5.4. Removing sIDHistory keys
When domains are restructured and domain accounts are migrated several
times, the sIDHistory list will grow and grow.
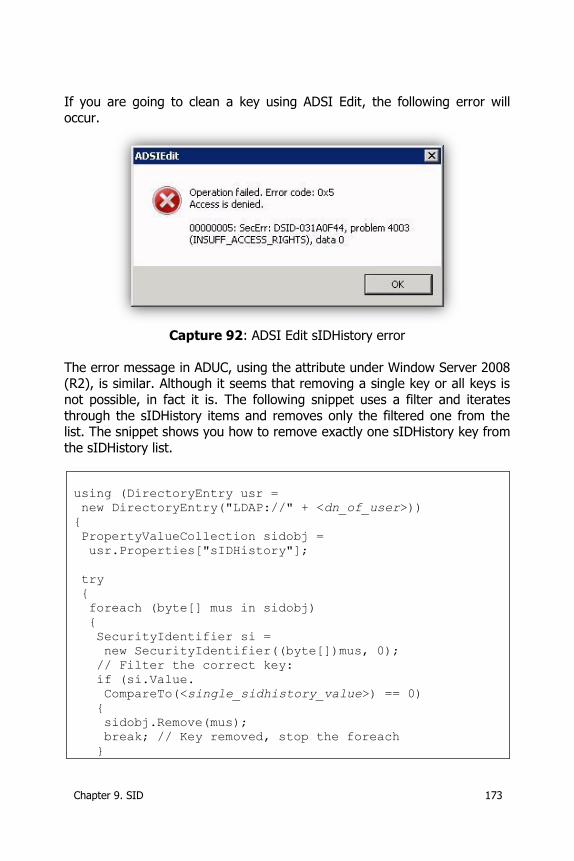
Chapter 9. SID 173
If you are going to clean a key using ADSI Edit, the following error will
occur.
Capture 92: ADSI Edit sIDHistory error
The error message in ADUC, using the attribute under Window Server 2008 (R2), is similar. Although it seems that removing a single key or all keys is
not possible, in fact it is. The following snippet uses a filter and iterates
through the sIDHistory items and removes only the filtered one from the list. The snippet shows you how to remove exactly one sIDHistory key from
the sIDHistory list.
using (DirectoryEntry usr =
new DirectoryEntry("LDAP://" + <dn_of_user>))
{
PropertyValueCollection sidobj =
usr.Properties["sIDHistory"];
try
{
foreach (byte[] mus in sidobj)
{
SecurityIdentifier si =
new SecurityIdentifier((byte[])mus, 0);
// Filter the correct key:
if (si.Value.
CompareTo(<single_sidhistory_value>) == 0)
{
sidobj.Remove(mus);
break; // Key removed, stop the foreach
}
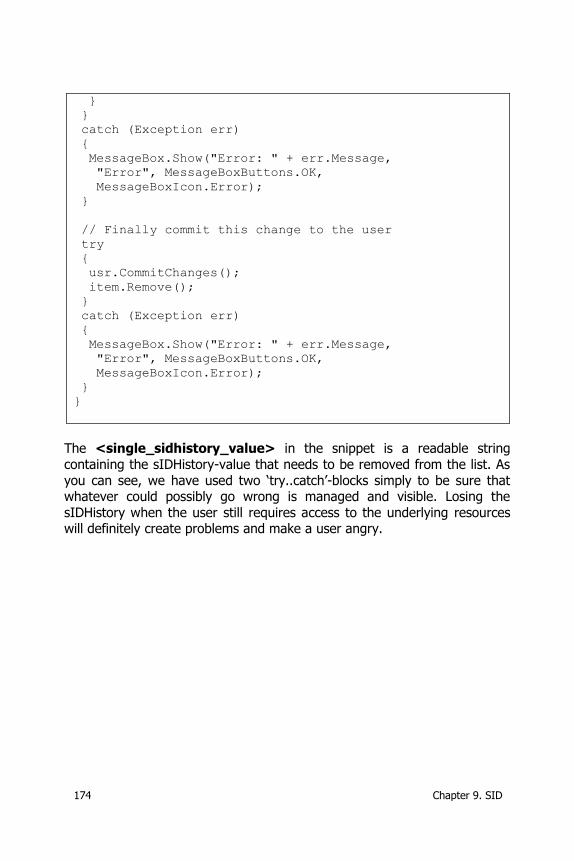
174 Chapter 9. SID
}
}
catch (Exception err)
{
MessageBox.Show("Error: " + err.Message,
"Error", MessageBoxButtons.OK,
MessageBoxIcon.Error);
}
// Finally commit this change to the user
try
{
usr.CommitChanges();
item.Remove();
}
catch (Exception err)
{
MessageBox.Show("Error: " + err.Message,
"Error", MessageBoxButtons.OK,
MessageBoxIcon.Error);
}
}
The <single_sidhistory_value> in the snippet is a readable string
containing the sIDHistory-value that needs to be removed from the list. As
you can see, we have used two ‘try..catch’-blocks simply to be sure that whatever could possibly go wrong is managed and visible. Losing the
sIDHistory when the user still requires access to the underlying resources will definitely create problems and make a user angry.
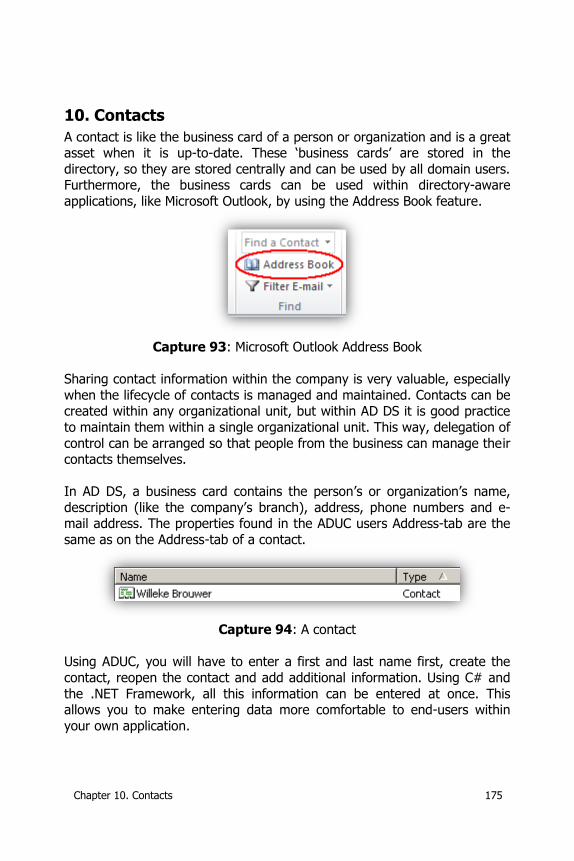
Chapter 10. Contacts 175
10. Contacts
A contact is like the business card of a person or organization and is a great asset when it is up-to-date. These ‘business cards’ are stored in the
directory, so they are stored centrally and can be used by all domain users. Furthermore, the business cards can be used within directory-aware
applications, like Microsoft Outlook, by using the Address Book feature.
Capture 93: Microsoft Outlook Address Book
Sharing contact information within the company is very valuable, especially
when the lifecycle of contacts is managed and maintained. Contacts can be created within any organizational unit, but within AD DS it is good practice
to maintain them within a single organizational unit. This way, delegation of
control can be arranged so that people from the business can manage their contacts themselves.
In AD DS, a business card contains the person’s or organization’s name,
description (like the company’s branch), address, phone numbers and e-mail address. The properties found in the ADUC users Address-tab are the
same as on the Address-tab of a contact.
Capture 94: A contact
Using ADUC, you will have to enter a first and last name first, create the
contact, reopen the contact and add additional information. Using C# and
the .NET Framework, all this information can be entered at once. This allows you to make entering data more comfortable to end-users within
your own application.
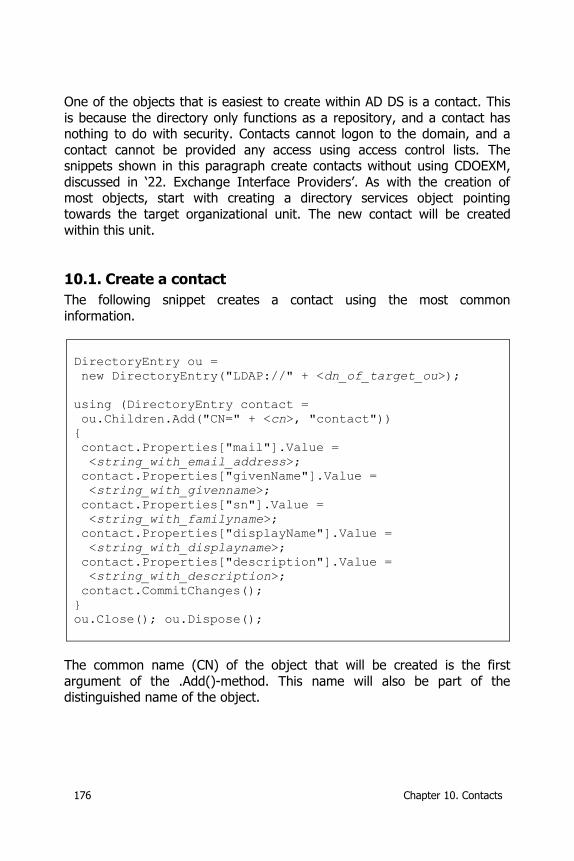
176 Chapter 10. Contacts
One of the objects that is easiest to create within AD DS is a contact. This
is because the directory only functions as a repository, and a contact has nothing to do with security. Contacts cannot logon to the domain, and a
contact cannot be provided any access using access control lists. The snippets shown in this paragraph create contacts without using CDOEXM,
discussed in ‘22. Exchange Interface Providers’. As with the creation of most objects, start with creating a directory services object pointing
towards the target organizational unit. The new contact will be created
within this unit.
10.1. Create a contact
The following snippet creates a contact using the most common
information.
DirectoryEntry ou =
new DirectoryEntry("LDAP://" + <dn_of_target_ou>);
using (DirectoryEntry contact =
ou.Children.Add("CN=" + <cn>, "contact"))
{
contact.Properties["mail"].Value =
<string_with_email_address>;
contact.Properties["givenName"].Value =
<string_with_givenname>;
contact.Properties["sn"].Value =
<string_with_familyname>;
contact.Properties["displayName"].Value =
<string_with_displayname>;
contact.Properties["description"].Value =
<string_with_description>;
contact.CommitChanges();
}
ou.Close(); ou.Dispose();
The common name (CN) of the object that will be created is the first
argument of the .Add()-method. This name will also be part of the distinguished name of the object.
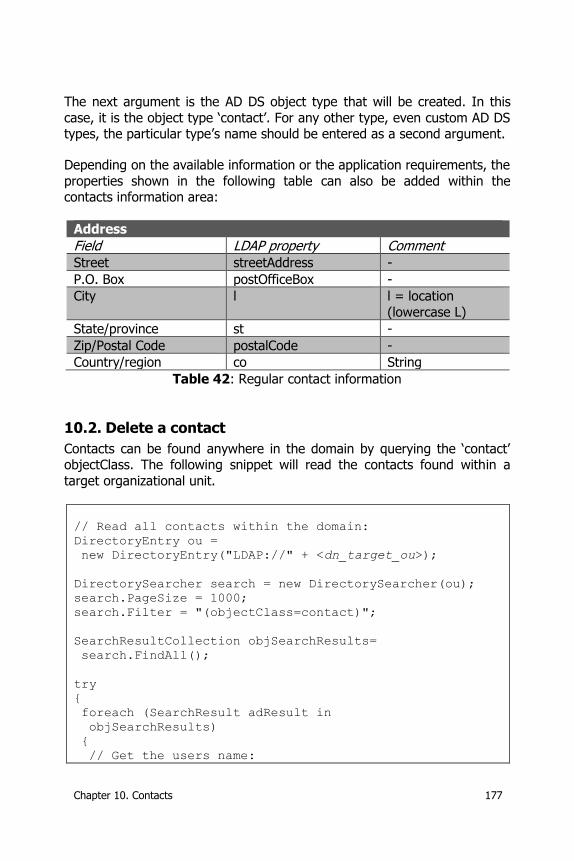
Chapter 10. Contacts 177
The next argument is the AD DS object type that will be created. In this
case, it is the object type ‘contact’. For any other type, even custom AD DS types, the particular type’s name should be entered as a second argument.
Depending on the available information or the application requirements, the
properties shown in the following table can also be added within the contacts information area:
Address
Field LDAP property Comment Street streetAddress -
P.O. Box postOfficeBox -
City l l = location
(lowercase L)
State/province st -
Zip/Postal Code postalCode -
Country/region co String
Table 42: Regular contact information
10.2. Delete a contact
Contacts can be found anywhere in the domain by querying the ‘contact’ objectClass. The following snippet will read the contacts found within a
target organizational unit.
// Read all contacts within the domain:
DirectoryEntry ou =
new DirectoryEntry("LDAP://" + <dn_target_ou>);
DirectorySearcher search = new DirectorySearcher(ou);
search.PageSize = 1000;
search.Filter = "(objectClass=contact)";
SearchResultCollection objSearchResults=
search.FindAll();
try
{
foreach (SearchResult adResult in
objSearchResults)
{
// Get the users name:
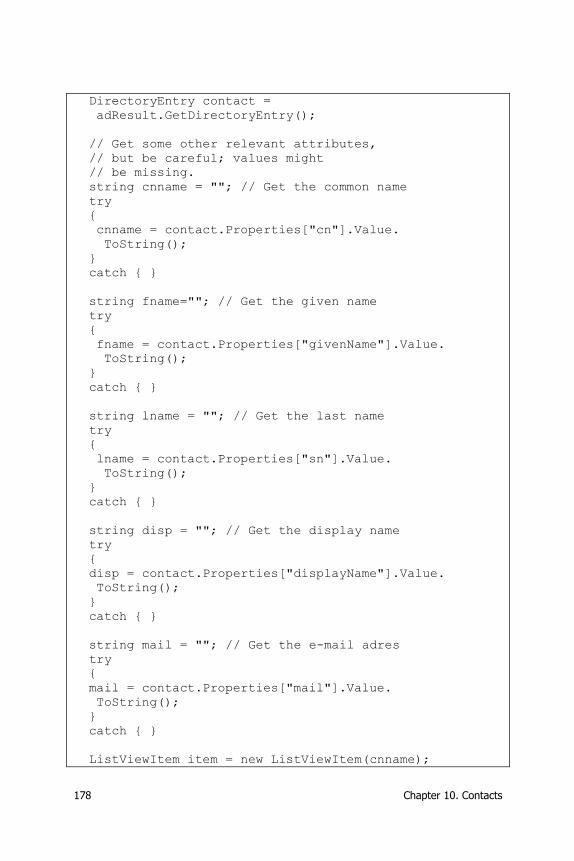
178 Chapter 10. Contacts
DirectoryEntry contact =
adResult.GetDirectoryEntry();
// Get some other relevant attributes,
// but be careful; values might
// be missing.
string cnname = ""; // Get the common name
try
{
cnname = contact.Properties["cn"].Value.
ToString();
}
catch { }
string fname=""; // Get the given name
try
{
fname = contact.Properties["givenName"].Value.
ToString();
}
catch { }
string lname = ""; // Get the last name
try
{
lname = contact.Properties["sn"].Value.
ToString();
}
catch { }
string disp = ""; // Get the display name
try
{
disp = contact.Properties["displayName"].Value.
ToString();
}
catch { }
string mail = ""; // Get the e-mail adres
try
{
mail = contact.Properties["mail"].Value.
ToString();
}
catch { }
ListViewItem item = new ListViewItem(cnname);
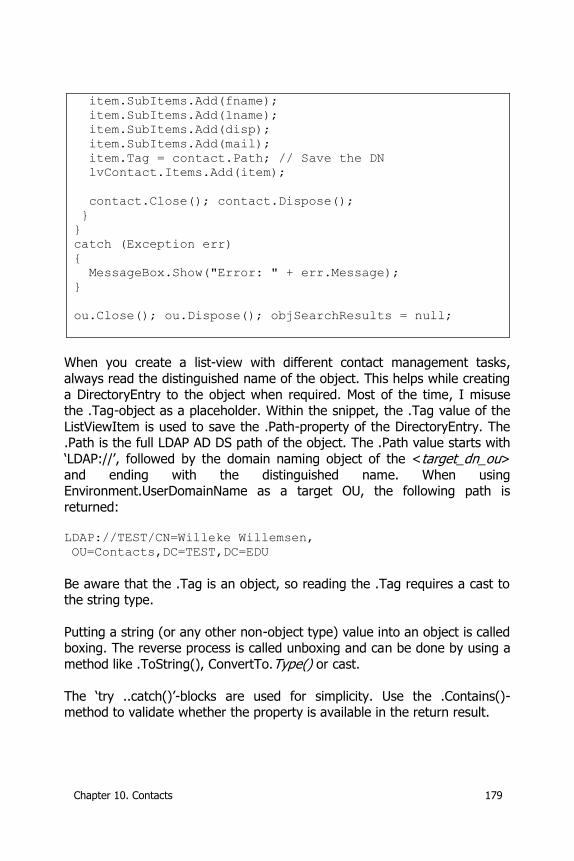
Chapter 10. Contacts 179
item.SubItems.Add(fname);
item.SubItems.Add(lname);
item.SubItems.Add(disp);
item.SubItems.Add(mail);
item.Tag = contact.Path; // Save the DN
lvContact.Items.Add(item);
contact.Close(); contact.Dispose();
}
}
catch (Exception err)
{
MessageBox.Show("Error: " + err.Message);
}
ou.Close(); ou.Dispose(); objSearchResults = null;
When you create a list-view with different contact management tasks,
always read the distinguished name of the object. This helps while creating
a DirectoryEntry to the object when required. Most of the time, I misuse the .Tag-object as a placeholder. Within the snippet, the .Tag value of the
ListViewItem is used to save the .Path-property of the DirectoryEntry. The .Path is the full LDAP AD DS path of the object. The .Path value starts with
‘LDAP://’, followed by the domain naming object of the <target_dn_ou>
and ending with the distinguished name. When using Environment.UserDomainName as a target OU, the following path is
returned: LDAP://TEST/CN=Willeke Willemsen,
OU=Contacts,DC=TEST,DC=EDU
Be aware that the .Tag is an object, so reading the .Tag requires a cast to the string type.
Putting a string (or any other non-object type) value into an object is called boxing. The reverse process is called unboxing and can be done by using a
method like .ToString(), ConvertTo.Type() or cast.
The ‘try ..catch()’-blocks are used for simplicity. Use the .Contains()-method to validate whether the property is available in the return result.
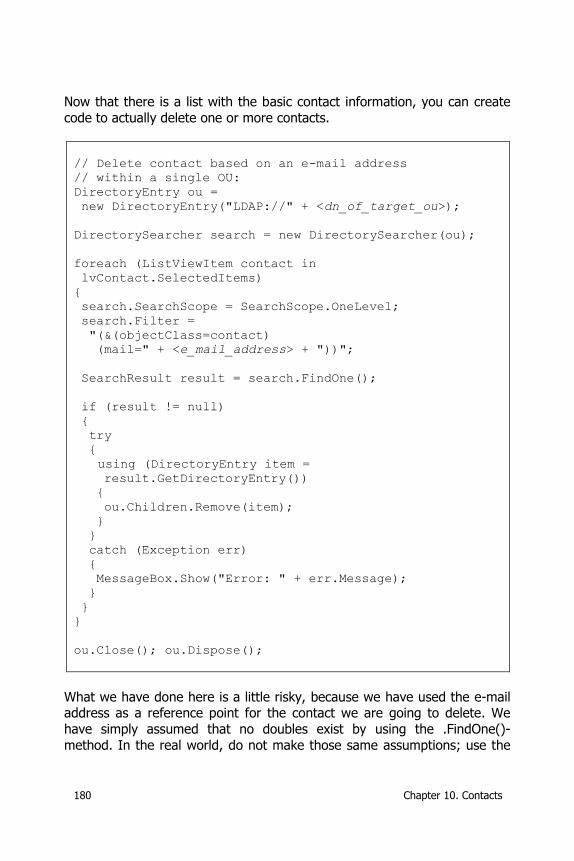
180 Chapter 10. Contacts
Now that there is a list with the basic contact information, you can create
code to actually delete one or more contacts.
// Delete contact based on an e-mail address
// within a single OU:
DirectoryEntry ou =
new DirectoryEntry("LDAP://" + <dn_of_target_ou>);
DirectorySearcher search = new DirectorySearcher(ou);
foreach (ListViewItem contact in
lvContact.SelectedItems)
{
search.SearchScope = SearchScope.OneLevel;
search.Filter =
"(&(objectClass=contact)
(mail=" + <e_mail_address> + "))";
SearchResult result = search.FindOne();
if (result != null)
{
try
{
using (DirectoryEntry item =
result.GetDirectoryEntry())
{
ou.Children.Remove(item);
}
}
catch (Exception err)
{
MessageBox.Show("Error: " + err.Message);
}
}
}
ou.Close(); ou.Dispose();
What we have done here is a little risky, because we have used the e-mail address as a reference point for the contact we are going to delete. We
have simply assumed that no doubles exist by using the .FindOne()-
method. In the real world, do not make those same assumptions; use the
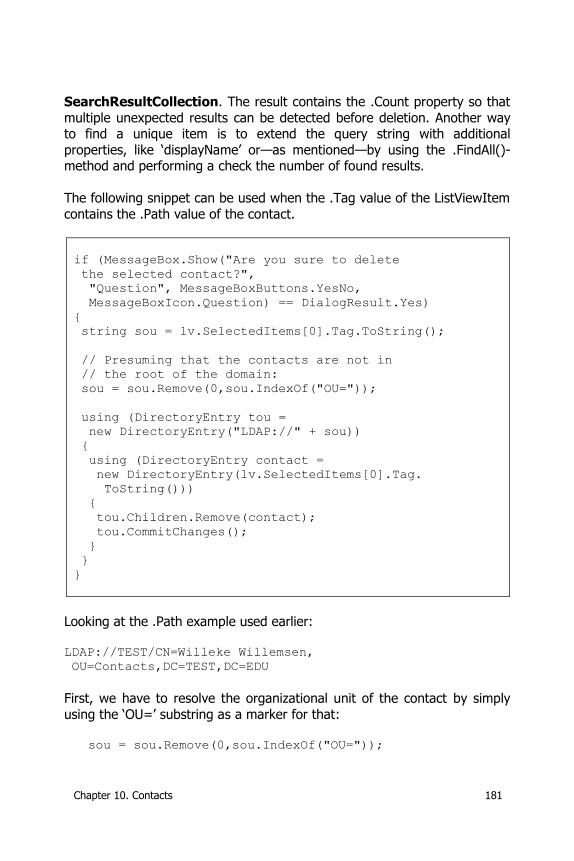
Chapter 10. Contacts 181
SearchResultCollection. The result contains the .Count property so that
multiple unexpected results can be detected before deletion. Another way to find a unique item is to extend the query string with additional
properties, like ‘displayName’ or—as mentioned—by using the .FindAll()-method and performing a check the number of found results.
The following snippet can be used when the .Tag value of the ListViewItem
contains the .Path value of the contact.
if (MessageBox.Show("Are you sure to delete
the selected contact?",
"Question", MessageBoxButtons.YesNo,
MessageBoxIcon.Question) == DialogResult.Yes)
{
string sou = lv.SelectedItems[0].Tag.ToString();
// Presuming that the contacts are not in
// the root of the domain:
sou = sou.Remove(0,sou.IndexOf("OU="));
using (DirectoryEntry tou =
new DirectoryEntry("LDAP://" + sou))
{
using (DirectoryEntry contact =
new DirectoryEntry(lv.SelectedItems[0].Tag.
ToString()))
{
tou.Children.Remove(contact);
tou.CommitChanges();
}
}
}
Looking at the .Path example used earlier:
LDAP://TEST/CN=Willeke Willemsen,
OU=Contacts,DC=TEST,DC=EDU
First, we have to resolve the organizational unit of the contact by simply
using the ‘OU=’ substring as a marker for that:
sou = sou.Remove(0,sou.IndexOf("OU="));
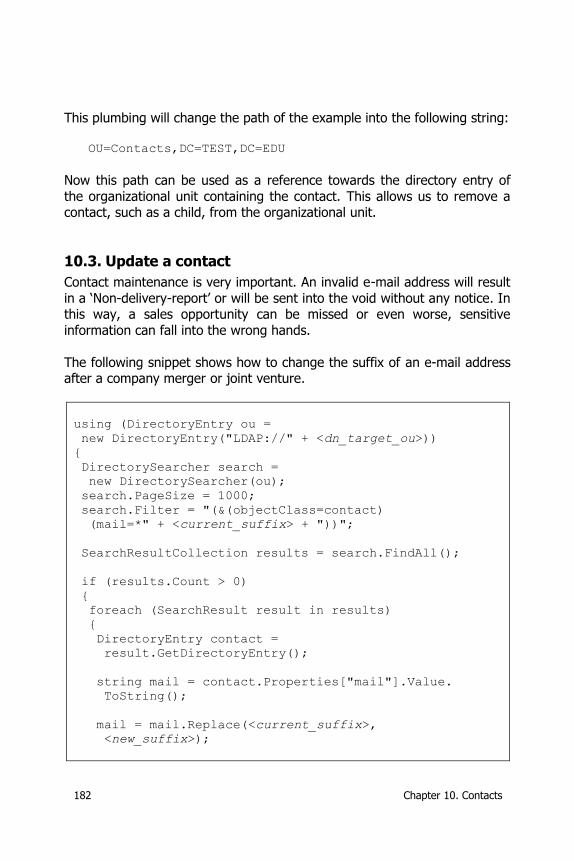
182 Chapter 10. Contacts
This plumbing will change the path of the example into the following string:
OU=Contacts,DC=TEST,DC=EDU
Now this path can be used as a reference towards the directory entry of
the organizational unit containing the contact. This allows us to remove a contact, such as a child, from the organizational unit.
10.3. Update a contact
Contact maintenance is very important. An invalid e-mail address will result
in a ‘Non-delivery-report’ or will be sent into the void without any notice. In this way, a sales opportunity can be missed or even worse, sensitive
information can fall into the wrong hands.
The following snippet shows how to change the suffix of an e-mail address after a company merger or joint venture.
using (DirectoryEntry ou =
new DirectoryEntry("LDAP://" + <dn_target_ou>))
{
DirectorySearcher search =
new DirectorySearcher(ou);
search.PageSize = 1000;
search.Filter = "(&(objectClass=contact)
(mail=*" + <current_suffix> + "))";
SearchResultCollection results = search.FindAll();
if (results.Count > 0)
{
foreach (SearchResult result in results)
{
DirectoryEntry contact =
result.GetDirectoryEntry();
string mail = contact.Properties["mail"].Value.
ToString();
mail = mail.Replace(<current_suffix>,
<new_suffix>);
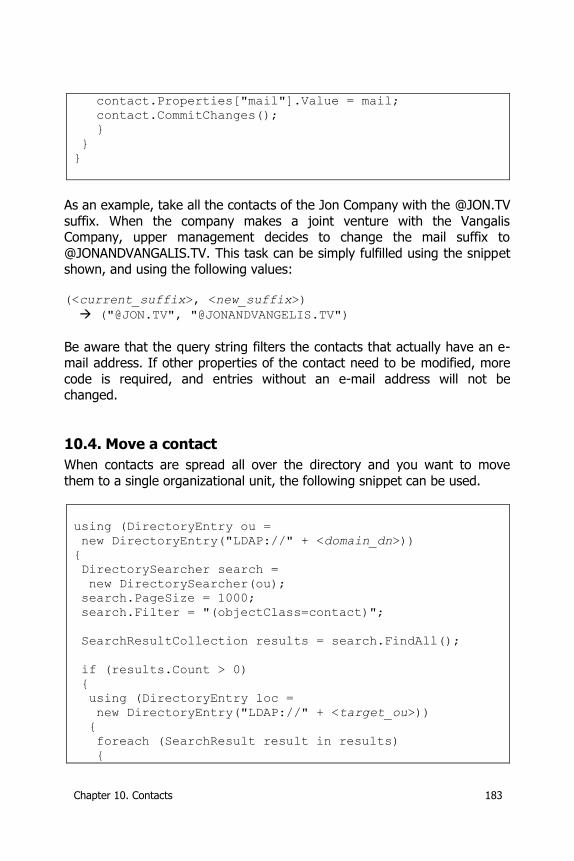
Chapter 10. Contacts 183
contact.Properties["mail"].Value = mail;
contact.CommitChanges();
}
}
}
As an example, take all the contacts of the Jon Company with the @JON.TV
suffix. When the company makes a joint venture with the Vangalis Company, upper management decides to change the mail suffix to
@JONANDVANGALIS.TV. This task can be simply fulfilled using the snippet shown, and using the following values:
(<current_suffix>, <new_suffix>)
("@JON.TV", "@JONANDVANGELIS.TV")
Be aware that the query string filters the contacts that actually have an e-mail address. If other properties of the contact need to be modified, more
code is required, and entries without an e-mail address will not be changed.
10.4. Move a contact
When contacts are spread all over the directory and you want to move
them to a single organizational unit, the following snippet can be used.
using (DirectoryEntry ou =
new DirectoryEntry("LDAP://" + <domain_dn>))
{
DirectorySearcher search =
new DirectorySearcher(ou);
search.PageSize = 1000;
search.Filter = "(objectClass=contact)";
SearchResultCollection results = search.FindAll();
if (results.Count > 0)
{
using (DirectoryEntry loc =
new DirectoryEntry("LDAP://" + <target_ou>))
{
foreach (SearchResult result in results)
{
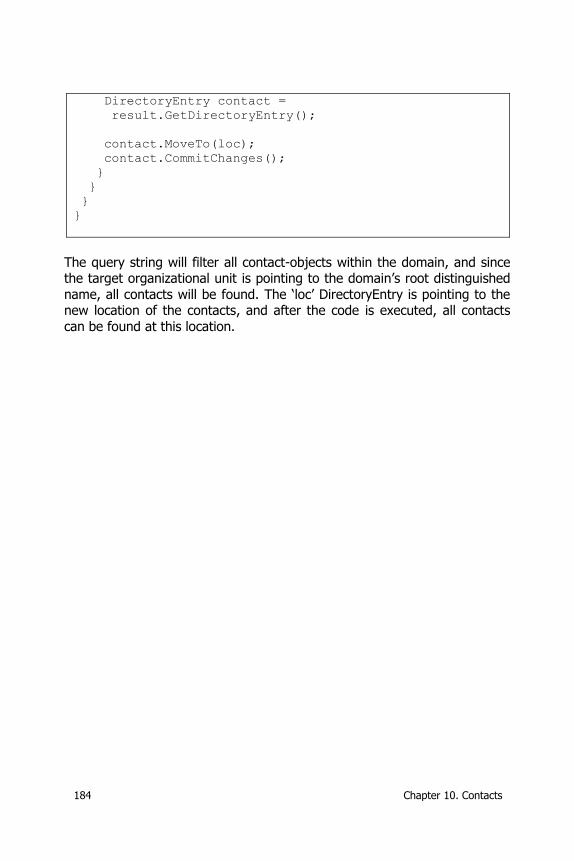
184 Chapter 10. Contacts
DirectoryEntry contact =
result.GetDirectoryEntry();
contact.MoveTo(loc);
contact.CommitChanges();
}
}
}
}
The query string will filter all contact-objects within the domain, and since the target organizational unit is pointing to the domain’s root distinguished
name, all contacts will be found. The ‘loc’ DirectoryEntry is pointing to the new location of the contacts, and after the code is executed, all contacts
can be found at this location.
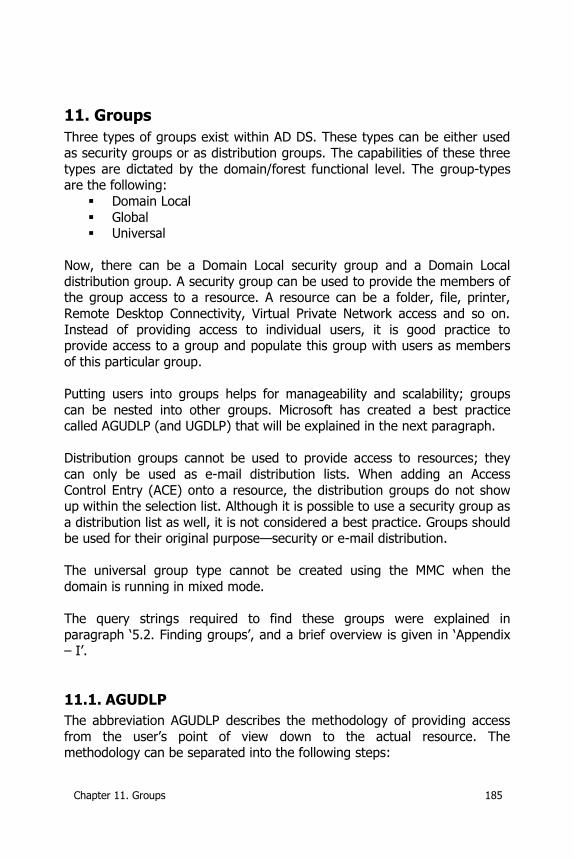
Chapter 11. Groups 185
11. Groups
Three types of groups exist within AD DS. These types can be either used as security groups or as distribution groups. The capabilities of these three
types are dictated by the domain/forest functional level. The group-types are the following:
Domain Local
Global Universal
Now, there can be a Domain Local security group and a Domain Local
distribution group. A security group can be used to provide the members of the group access to a resource. A resource can be a folder, file, printer,
Remote Desktop Connectivity, Virtual Private Network access and so on.
Instead of providing access to individual users, it is good practice to provide access to a group and populate this group with users as members
of this particular group.
Putting users into groups helps for manageability and scalability; groups
can be nested into other groups. Microsoft has created a best practice called AGUDLP (and UGDLP) that will be explained in the next paragraph.
Distribution groups cannot be used to provide access to resources; they
can only be used as e-mail distribution lists. When adding an Access
Control Entry (ACE) onto a resource, the distribution groups do not show up within the selection list. Although it is possible to use a security group as
a distribution list as well, it is not considered a best practice. Groups should be used for their original purpose—security or e-mail distribution.
The universal group type cannot be created using the MMC when the
domain is running in mixed mode.
The query strings required to find these groups were explained in
paragraph ‘5.2. Finding groups’, and a brief overview is given in ‘Appendix – I’.
11.1. AGUDLP
The abbreviation AGUDLP describes the methodology of providing access
from the user’s point of view down to the actual resource. The methodology can be separated into the following steps:
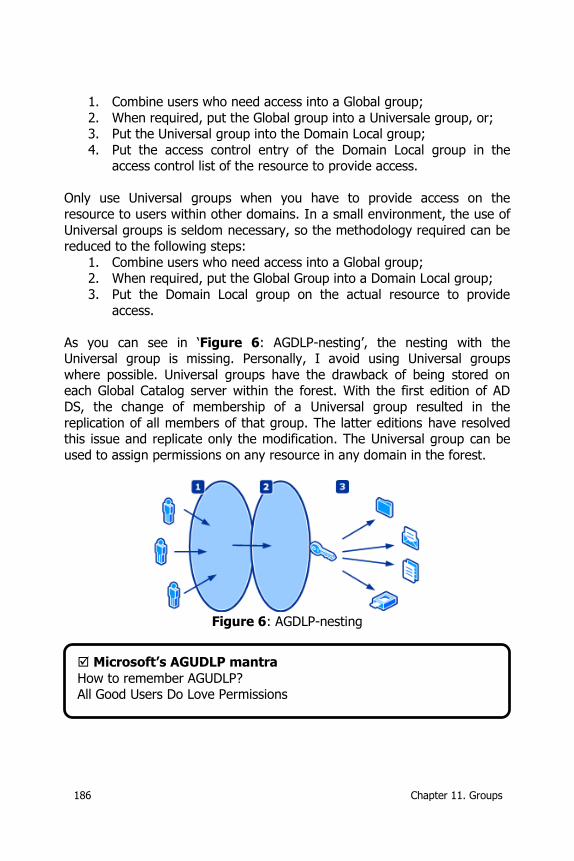
186 Chapter 11. Groups
1. Combine users who need access into a Global group;
2. When required, put the Global group into a Universale group, or; 3. Put the Universal group into the Domain Local group;
4. Put the access control entry of the Domain Local group in the access control list of the resource to provide access.
Only use Universal groups when you have to provide access on the
resource to users within other domains. In a small environment, the use of
Universal groups is seldom necessary, so the methodology required can be reduced to the following steps:
1. Combine users who need access into a Global group; 2. When required, put the Global Group into a Domain Local group;
3. Put the Domain Local group on the actual resource to provide
access.
As you can see in ‘Figure 6: AGDLP-nesting’, the nesting with the Universal group is missing. Personally, I avoid using Universal groups
where possible. Universal groups have the drawback of being stored on each Global Catalog server within the forest. With the first edition of AD
DS, the change of membership of a Universal group resulted in the
replication of all members of that group. The latter editions have resolved this issue and replicate only the modification. The Universal group can be
used to assign permissions on any resource in any domain in the forest.
Figure 6: AGDLP-nesting
Microsoft’s AGUDLP mantra
How to remember AGUDLP? All Good Users Do Love Permissions

Chapter 11. Groups 187
11.1.1. Nesting restrictions and behavior
The capability of group nesting is different for domains running in mixed or native mode. Here is a brief summary of these restrictions and the group’s
behavior:
Mode Group type Comment
Mixed Universal Security Cannot be created using the MMC. The creation of these groups starts at the
Windows-2000 native-mode domain level.
Mixed Global Security Can contain accounts from the same
domain. Cannot contain universal groups. Cannot contain accounts from
another domain. Cannot contain any
other global group.
Mixed Domain Local
Security
Can contain global groups and accounts
from any domain or forest. Cannot contain any other domain local group.
Mixed Distribution According the rules for security groups
in native mode.
Native Universal Security Can contain other universal groups, global groups and accounts from any
domain within the forest. Cannot contain any domain local group.
Native Global Security Can contain other global groups and
accounts from the same domain. Cannot contain universal groups. Cannot
contain any global group or accounts from another domain.
Native Domain Local
Security
Can contain universal groups, global
groups and accounts from any domain within the forest. Can only contain
domain local groups from the same domain.
Table 43: Nesting restrictions and behavior
11.2. Create a group
The creation of a group is not complex; the most important thing to know
is where to create it.
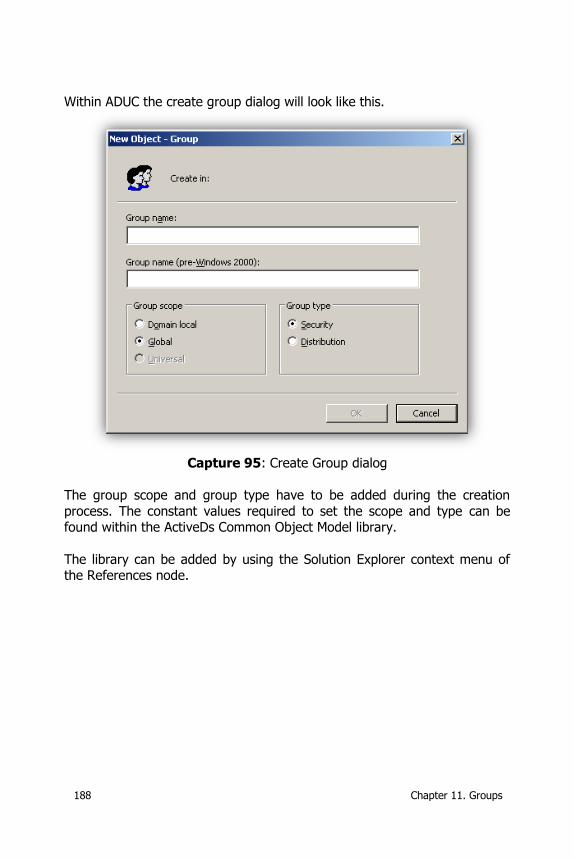
188 Chapter 11. Groups
Within ADUC the create group dialog will look like this.
Capture 95: Create Group dialog
The group scope and group type have to be added during the creation
process. The constant values required to set the scope and type can be found within the ActiveDs Common Object Model library.
The library can be added by using the Solution Explorer context menu of the References node.
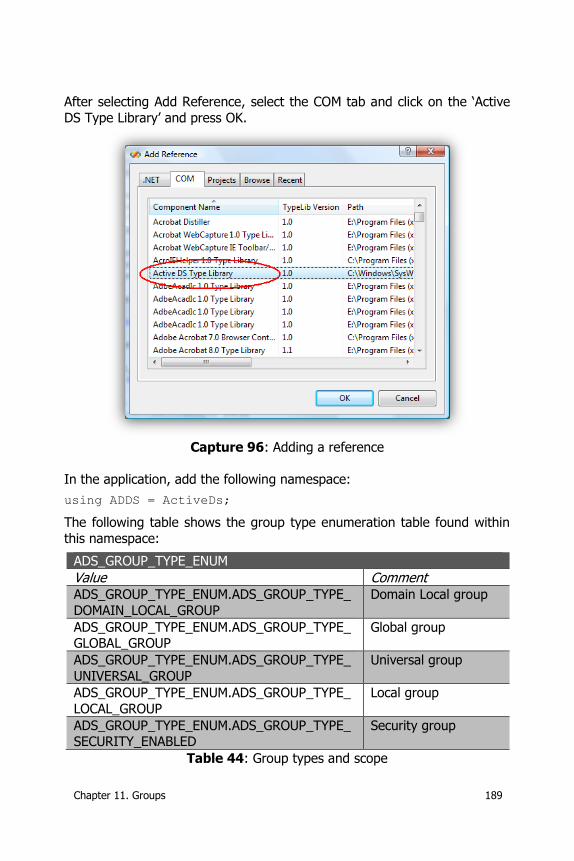
Chapter 11. Groups 189
After selecting Add Reference, select the COM tab and click on the ‘Active
DS Type Library’ and press OK.
Capture 96: Adding a reference
In the application, add the following namespace:
using ADDS = ActiveDs;
The following table shows the group type enumeration table found within
this namespace:
ADS_GROUP_TYPE_ENUM
Value Comment ADS_GROUP_TYPE_ENUM.ADS_GROUP_TYPE_
DOMAIN_LOCAL_GROUP
Domain Local group
ADS_GROUP_TYPE_ENUM.ADS_GROUP_TYPE_GLOBAL_GROUP
Global group
ADS_GROUP_TYPE_ENUM.ADS_GROUP_TYPE_
UNIVERSAL_GROUP
Universal group
ADS_GROUP_TYPE_ENUM.ADS_GROUP_TYPE_
LOCAL_GROUP
Local group
ADS_GROUP_TYPE_ENUM.ADS_GROUP_TYPE_SECURITY_ENABLED
Security group
Table 44: Group types and scope
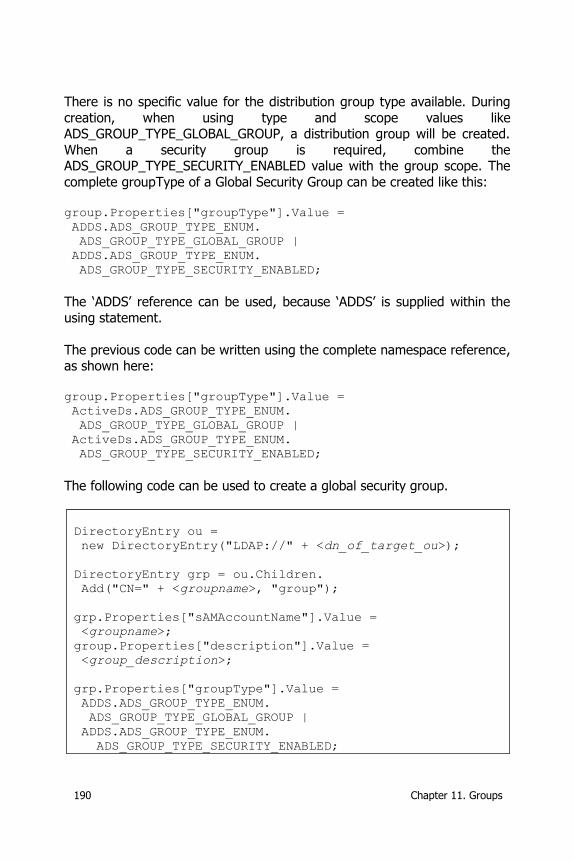
190 Chapter 11. Groups
There is no specific value for the distribution group type available. During
creation, when using type and scope values like ADS_GROUP_TYPE_GLOBAL_GROUP, a distribution group will be created.
When a security group is required, combine the ADS_GROUP_TYPE_SECURITY_ENABLED value with the group scope. The
complete groupType of a Global Security Group can be created like this: group.Properties["groupType"].Value =
ADDS.ADS_GROUP_TYPE_ENUM.
ADS_GROUP_TYPE_GLOBAL_GROUP |
ADDS.ADS_GROUP_TYPE_ENUM.
ADS_GROUP_TYPE_SECURITY_ENABLED;
The ‘ADDS’ reference can be used, because ‘ADDS’ is supplied within the
using statement.
The previous code can be written using the complete namespace reference, as shown here:
group.Properties["groupType"].Value =
ActiveDs.ADS_GROUP_TYPE_ENUM.
ADS_GROUP_TYPE_GLOBAL_GROUP |
ActiveDs.ADS_GROUP_TYPE_ENUM.
ADS_GROUP_TYPE_SECURITY_ENABLED;
The following code can be used to create a global security group.
DirectoryEntry ou =
new DirectoryEntry("LDAP://" + <dn_of_target_ou>);
DirectoryEntry grp = ou.Children.
Add("CN=" + <groupname>, "group");
grp.Properties["sAMAccountName"].Value =
<groupname>;
group.Properties["description"].Value =
<group_description>;
grp.Properties["groupType"].Value =
ADDS.ADS_GROUP_TYPE_ENUM.
ADS_GROUP_TYPE_GLOBAL_GROUP |
ADDS.ADS_GROUP_TYPE_ENUM.
ADS_GROUP_TYPE_SECURITY_ENABLED;
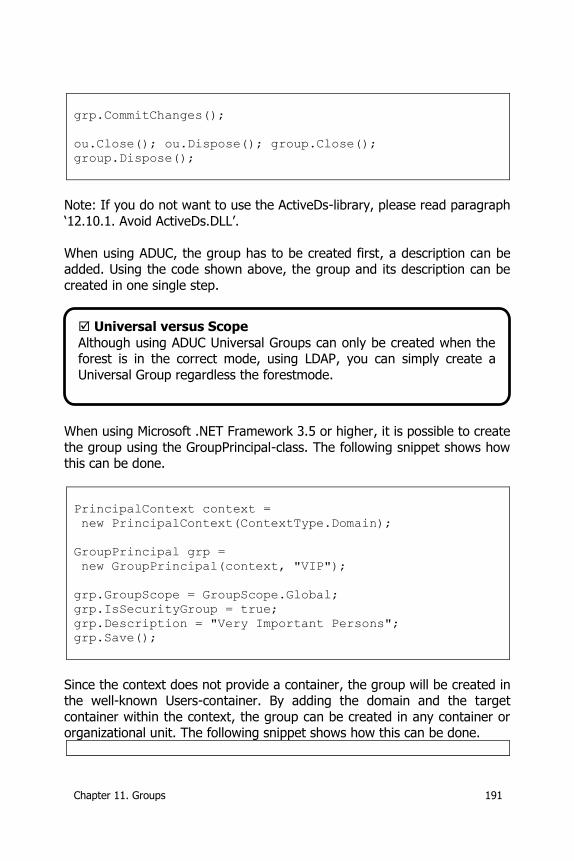
Chapter 11. Groups 191
grp.CommitChanges();
ou.Close(); ou.Dispose(); group.Close();
group.Dispose();
Note: If you do not want to use the ActiveDs-library, please read paragraph
‘12.10.1. Avoid ActiveDs.DLL’.
When using ADUC, the group has to be created first, a description can be added. Using the code shown above, the group and its description can be
created in one single step.
When using Microsoft .NET Framework 3.5 or higher, it is possible to create
the group using the GroupPrincipal-class. The following snippet shows how this can be done.
PrincipalContext context =
new PrincipalContext(ContextType.Domain);
GroupPrincipal grp =
new GroupPrincipal(context, "VIP");
grp.GroupScope = GroupScope.Global;
grp.IsSecurityGroup = true;
grp.Description = "Very Important Persons";
grp.Save();
Since the context does not provide a container, the group will be created in the well-known Users-container. By adding the domain and the target
container within the context, the group can be created in any container or organizational unit. The following snippet shows how this can be done.
Universal versus Scope
Although using ADUC Universal Groups can only be created when the forest is in the correct mode, using LDAP, you can simply create a
Universal Group regardless the forestmode.
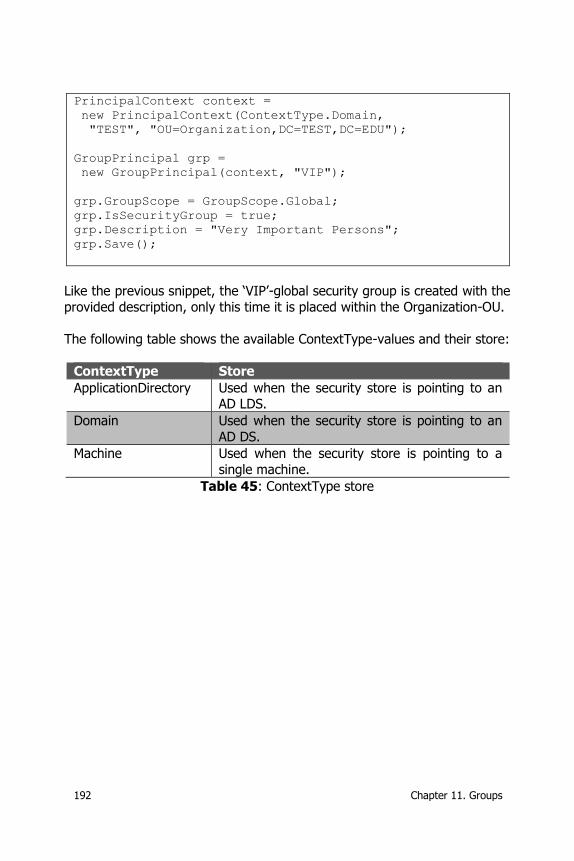
192 Chapter 11. Groups
PrincipalContext context =
new PrincipalContext(ContextType.Domain,
"TEST", "OU=Organization,DC=TEST,DC=EDU");
GroupPrincipal grp =
new GroupPrincipal(context, "VIP");
grp.GroupScope = GroupScope.Global;
grp.IsSecurityGroup = true;
grp.Description = "Very Important Persons";
grp.Save();
Like the previous snippet, the ‘VIP’-global security group is created with the
provided description, only this time it is placed within the Organization-OU.
The following table shows the available ContextType-values and their store:
ContextType Store
ApplicationDirectory Used when the security store is pointing to an AD LDS.
Domain Used when the security store is pointing to an
AD DS.
Machine Used when the security store is pointing to a
single machine.
Table 45: ContextType store
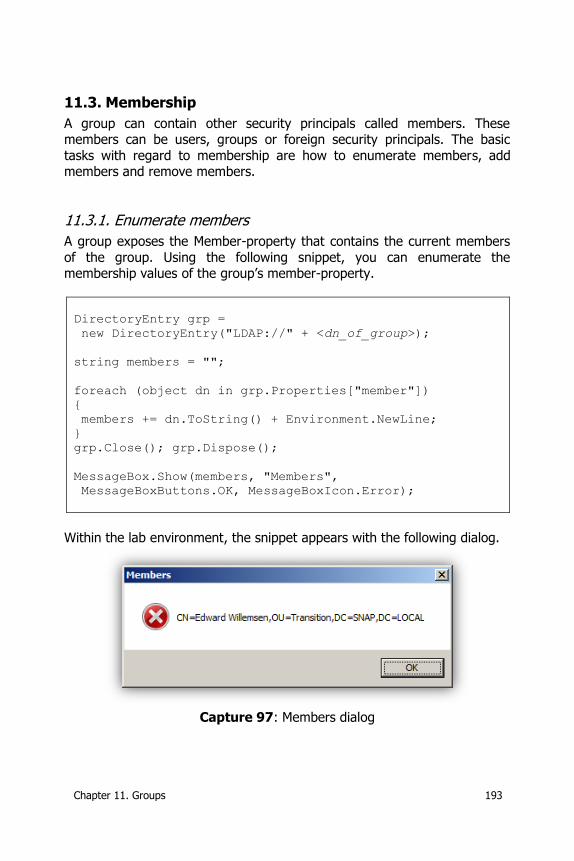
Chapter 11. Groups 193
11.3. Membership
A group can contain other security principals called members. These members can be users, groups or foreign security principals. The basic
tasks with regard to membership are how to enumerate members, add members and remove members.
11.3.1. Enumerate members
A group exposes the Member-property that contains the current members
of the group. Using the following snippet, you can enumerate the membership values of the group’s member-property.
DirectoryEntry grp =
new DirectoryEntry("LDAP://" + <dn_of_group>);
string members = "";
foreach (object dn in grp.Properties["member"])
{
members += dn.ToString() + Environment.NewLine;
}
grp.Close(); grp.Dispose();
MessageBox.Show(members, "Members",
MessageBoxButtons.OK, MessageBoxIcon.Error);
Within the lab environment, the snippet appears with the following dialog.
Capture 97: Members dialog
194 Chapter 11. Groups
If you do not have the distinguished name of the group but only have the
group name, use a simple directory searcher, as shown here.
DirectoryEntry group =
new DirectoryEntry("LDAP://" +
Environment.UserDomainName);
DirectorySearcher search =
new DirectorySearcher(group);
search.Filter = "(&(objectCategory=group)
(cn=" + <group_name> + "))";
SearchResult result = search.FindOne();
Domain Users
If you are going to try this snippet on the ‘Domain Users’-group,
the result will be probably empty. When you try another group, the list will be filled with the actual users. When you check the ‘Domain
Users’-group using ADUC, the members will be there. Next, when
you check the members using ADSI Edit, the value will be empty as well! The previous snippet used on the ‘Domain Users’-group
will show the following pop-up.
The ‘Domain Users’-group is a computed group, as explained in
‘4.5. Attribute Types’. The memberships of this group are not visible when accessing the Member-property using a
DirectoryEntry-object.
Being member of this group is by design. Membership is stored in
the primary group ID, explained in paragraph ‘11.3.8. MemberOf’.
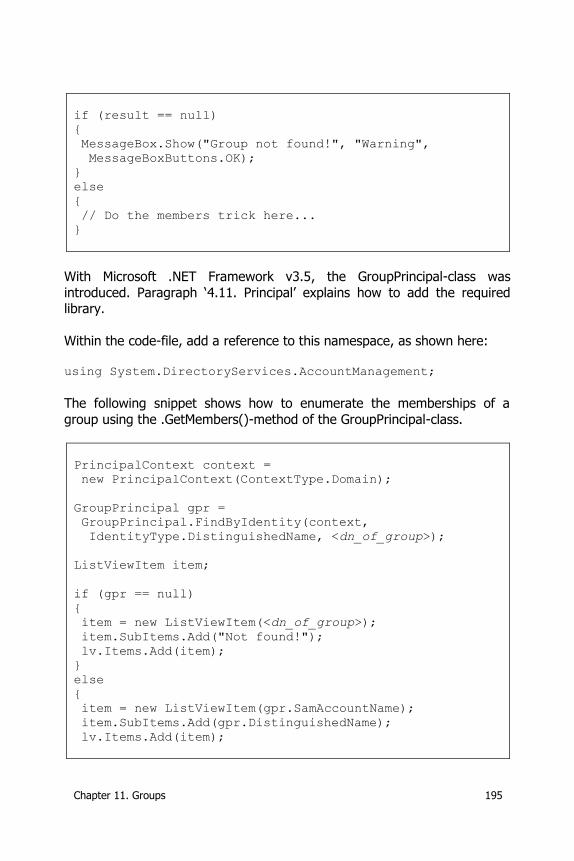
Chapter 11. Groups 195
if (result == null)
{
MessageBox.Show("Group not found!", "Warning",
MessageBoxButtons.OK);
}
else
{
// Do the members trick here...
}
With Microsoft .NET Framework v3.5, the GroupPrincipal-class was
introduced. Paragraph ‘4.11. Principal’ explains how to add the required library.
Within the code-file, add a reference to this namespace, as shown here: using System.DirectoryServices.AccountManagement;
The following snippet shows how to enumerate the memberships of a
group using the .GetMembers()-method of the GroupPrincipal-class.
PrincipalContext context =
new PrincipalContext(ContextType.Domain);
GroupPrincipal gpr =
GroupPrincipal.FindByIdentity(context,
IdentityType.DistinguishedName, <dn_of_group>);
ListViewItem item;
if (gpr == null)
{
item = new ListViewItem(<dn_of_group>);
item.SubItems.Add("Not found!");
lv.Items.Add(item);
}
else
{
item = new ListViewItem(gpr.SamAccountName);
item.SubItems.Add(gpr.DistinguishedName);
lv.Items.Add(item);
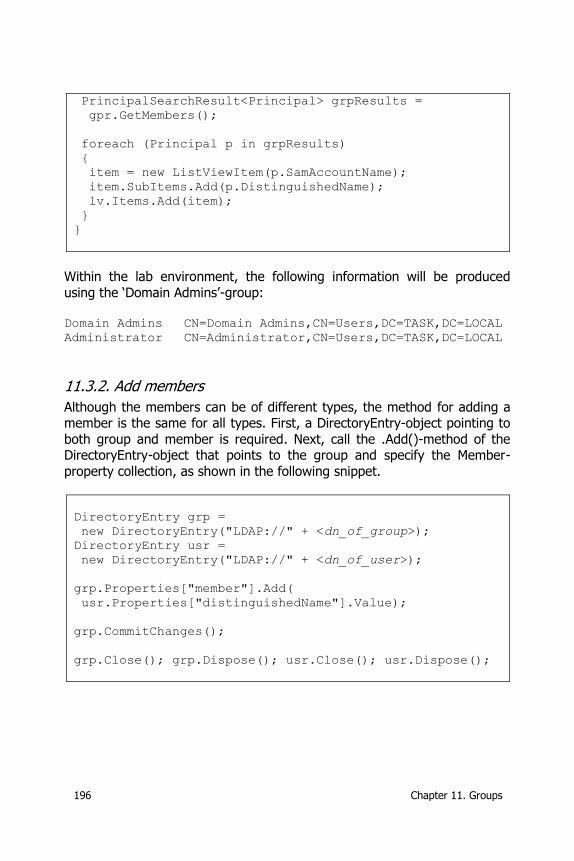
196 Chapter 11. Groups
PrincipalSearchResult<Principal> grpResults =
gpr.GetMembers();
foreach (Principal p in grpResults)
{
item = new ListViewItem(p.SamAccountName);
item.SubItems.Add(p.DistinguishedName);
lv.Items.Add(item);
}
}
Within the lab environment, the following information will be produced
using the ‘Domain Admins’-group: Domain Admins CN=Domain Admins,CN=Users,DC=TASK,DC=LOCAL
Administrator CN=Administrator,CN=Users,DC=TASK,DC=LOCAL
11.3.2. Add members
Although the members can be of different types, the method for adding a member is the same for all types. First, a DirectoryEntry-object pointing to
both group and member is required. Next, call the .Add()-method of the DirectoryEntry-object that points to the group and specify the Member-
property collection, as shown in the following snippet.
DirectoryEntry grp =
new DirectoryEntry("LDAP://" + <dn_of_group>);
DirectoryEntry usr =
new DirectoryEntry("LDAP://" + <dn_of_user>);
grp.Properties["member"].Add(
usr.Properties["distinguishedName"].Value);
grp.CommitChanges();
grp.Close(); grp.Dispose(); usr.Close(); usr.Dispose();
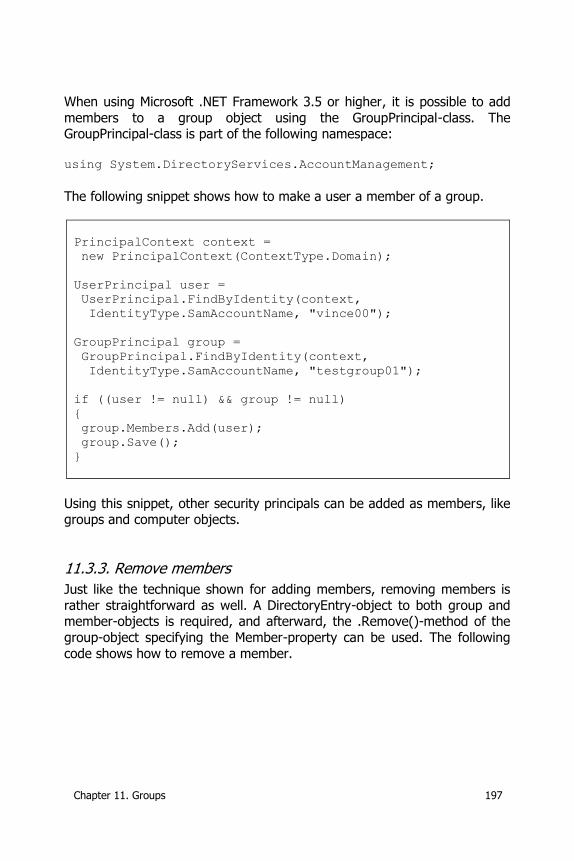
Chapter 11. Groups 197
When using Microsoft .NET Framework 3.5 or higher, it is possible to add
members to a group object using the GroupPrincipal-class. The GroupPrincipal-class is part of the following namespace:
using System.DirectoryServices.AccountManagement;
The following snippet shows how to make a user a member of a group.
PrincipalContext context =
new PrincipalContext(ContextType.Domain);
UserPrincipal user =
UserPrincipal.FindByIdentity(context,
IdentityType.SamAccountName, "vince00");
GroupPrincipal group =
GroupPrincipal.FindByIdentity(context,
IdentityType.SamAccountName, "testgroup01");
if ((user != null) && group != null)
{
group.Members.Add(user);
group.Save();
}
Using this snippet, other security principals can be added as members, like groups and computer objects.
11.3.3. Remove members
Just like the technique shown for adding members, removing members is
rather straightforward as well. A DirectoryEntry-object to both group and member-objects is required, and afterward, the .Remove()-method of the
group-object specifying the Member-property can be used. The following
code shows how to remove a member.
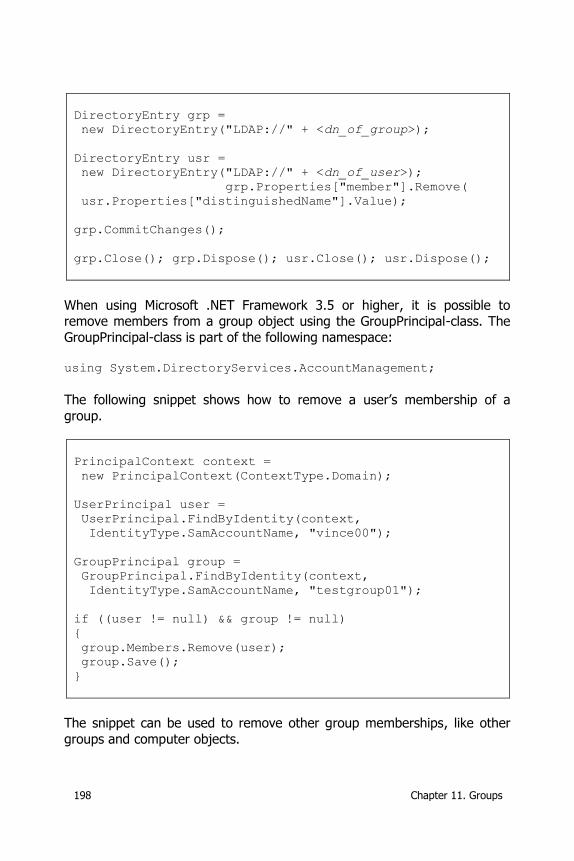
198 Chapter 11. Groups
DirectoryEntry grp =
new DirectoryEntry("LDAP://" + <dn_of_group>);
DirectoryEntry usr =
new DirectoryEntry("LDAP://" + <dn_of_user>);
grp.Properties["member"].Remove(
usr.Properties["distinguishedName"].Value);
grp.CommitChanges();
grp.Close(); grp.Dispose(); usr.Close(); usr.Dispose();
When using Microsoft .NET Framework 3.5 or higher, it is possible to remove members from a group object using the GroupPrincipal-class. The
GroupPrincipal-class is part of the following namespace: using System.DirectoryServices.AccountManagement;
The following snippet shows how to remove a user’s membership of a
group.
PrincipalContext context =
new PrincipalContext(ContextType.Domain);
UserPrincipal user =
UserPrincipal.FindByIdentity(context,
IdentityType.SamAccountName, "vince00");
GroupPrincipal group =
GroupPrincipal.FindByIdentity(context,
IdentityType.SamAccountName, "testgroup01");
if ((user != null) && group != null)
{
group.Members.Remove(user);
group.Save();
}
The snippet can be used to remove other group memberships, like other
groups and computer objects.
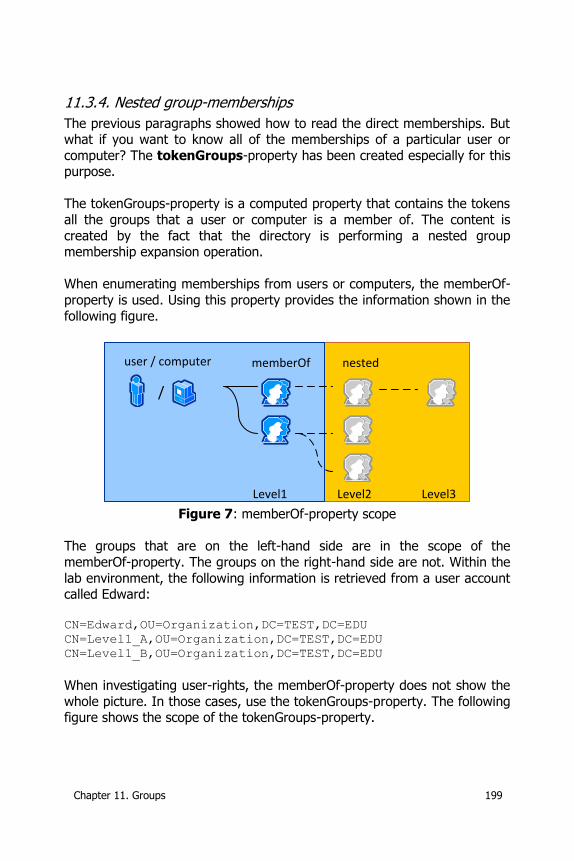
Chapter 11. Groups 199
11.3.4. Nested group-memberships
The previous paragraphs showed how to read the direct memberships. But what if you want to know all of the memberships of a particular user or
computer? The tokenGroups-property has been created especially for this purpose.
The tokenGroups-property is a computed property that contains the tokens
all the groups that a user or computer is a member of. The content is
created by the fact that the directory is performing a nested group membership expansion operation.
When enumerating memberships from users or computers, the memberOf-
property is used. Using this property provides the information shown in the
following figure.
user / computer memberOf nested
/
Level1 Level2 Level3
Figure 7: memberOf-property scope
The groups that are on the left-hand side are in the scope of the
memberOf-property. The groups on the right-hand side are not. Within the
lab environment, the following information is retrieved from a user account called Edward:
CN=Edward,OU=Organization,DC=TEST,DC=EDU
CN=Level1_A,OU=Organization,DC=TEST,DC=EDU
CN=Level1_B,OU=Organization,DC=TEST,DC=EDU
When investigating user-rights, the memberOf-property does not show the
whole picture. In those cases, use the tokenGroups-property. The following figure shows the scope of the tokenGroups-property.
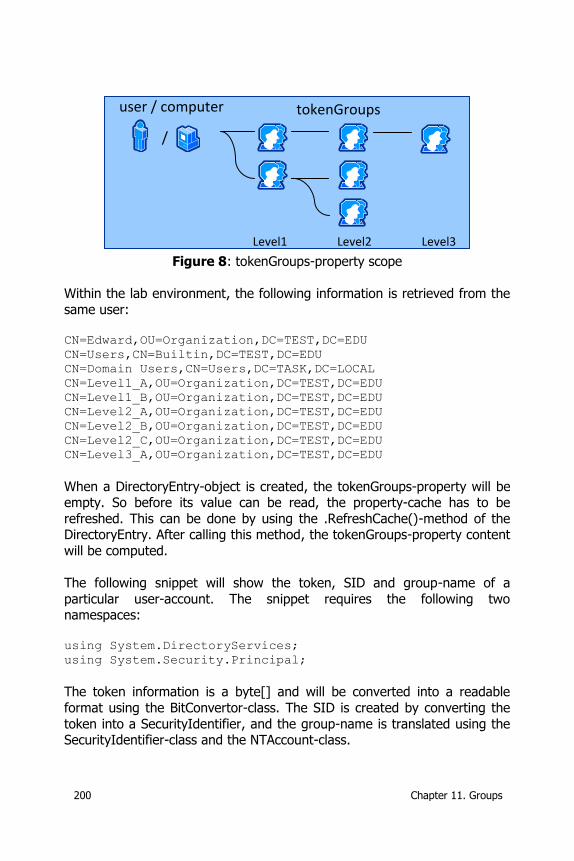
200 Chapter 11. Groups
tokenGroupsuser / computer
/
Level1 Level2 Level3
Figure 8: tokenGroups-property scope
Within the lab environment, the following information is retrieved from the
same user: CN=Edward,OU=Organization,DC=TEST,DC=EDU
CN=Users,CN=Builtin,DC=TEST,DC=EDU
CN=Domain Users,CN=Users,DC=TASK,DC=LOCAL
CN=Level1_A,OU=Organization,DC=TEST,DC=EDU
CN=Level1_B,OU=Organization,DC=TEST,DC=EDU
CN=Level2_A,OU=Organization,DC=TEST,DC=EDU
CN=Level2_B,OU=Organization,DC=TEST,DC=EDU
CN=Level2_C,OU=Organization,DC=TEST,DC=EDU
CN=Level3_A,OU=Organization,DC=TEST,DC=EDU
When a DirectoryEntry-object is created, the tokenGroups-property will be empty. So before its value can be read, the property-cache has to be
refreshed. This can be done by using the .RefreshCache()-method of the DirectoryEntry. After calling this method, the tokenGroups-property content
will be computed.
The following snippet will show the token, SID and group-name of a
particular user-account. The snippet requires the following two namespaces:
using System.DirectoryServices;
using System.Security.Principal;
The token information is a byte[] and will be converted into a readable
format using the BitConvertor-class. The SID is created by converting the
token into a SecurityIdentifier, and the group-name is translated using the SecurityIdentifier-class and the NTAccount-class.
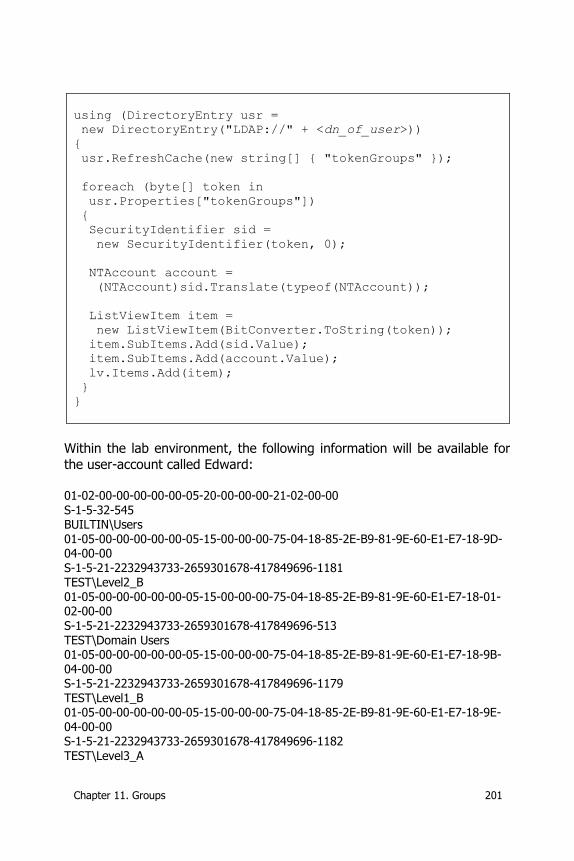
Chapter 11. Groups 201
using (DirectoryEntry usr =
new DirectoryEntry("LDAP://" + <dn_of_user>))
{
usr.RefreshCache(new string[] { "tokenGroups" });
foreach (byte[] token in
usr.Properties["tokenGroups"])
{
SecurityIdentifier sid =
new SecurityIdentifier(token, 0);
NTAccount account =
(NTAccount)sid.Translate(typeof(NTAccount));
ListViewItem item =
new ListViewItem(BitConverter.ToString(token));
item.SubItems.Add(sid.Value);
item.SubItems.Add(account.Value);
lv.Items.Add(item);
}
}
Within the lab environment, the following information will be available for
the user-account called Edward:
01-02-00-00-00-00-00-05-20-00-00-00-21-02-00-00 S-1-5-32-545 BUILTIN\Users 01-05-00-00-00-00-00-05-15-00-00-00-75-04-18-85-2E-B9-81-9E-60-E1-E7-18-9D-04-00-00 S-1-5-21-2232943733-2659301678-417849696-1181 TEST\Level2_B 01-05-00-00-00-00-00-05-15-00-00-00-75-04-18-85-2E-B9-81-9E-60-E1-E7-18-01-02-00-00 S-1-5-21-2232943733-2659301678-417849696-513 TEST\Domain Users 01-05-00-00-00-00-00-05-15-00-00-00-75-04-18-85-2E-B9-81-9E-60-E1-E7-18-9B-04-00-00 S-1-5-21-2232943733-2659301678-417849696-1179 TEST\Level1_B 01-05-00-00-00-00-00-05-15-00-00-00-75-04-18-85-2E-B9-81-9E-60-E1-E7-18-9E-04-00-00 S-1-5-21-2232943733-2659301678-417849696-1182
TEST\Level3_A
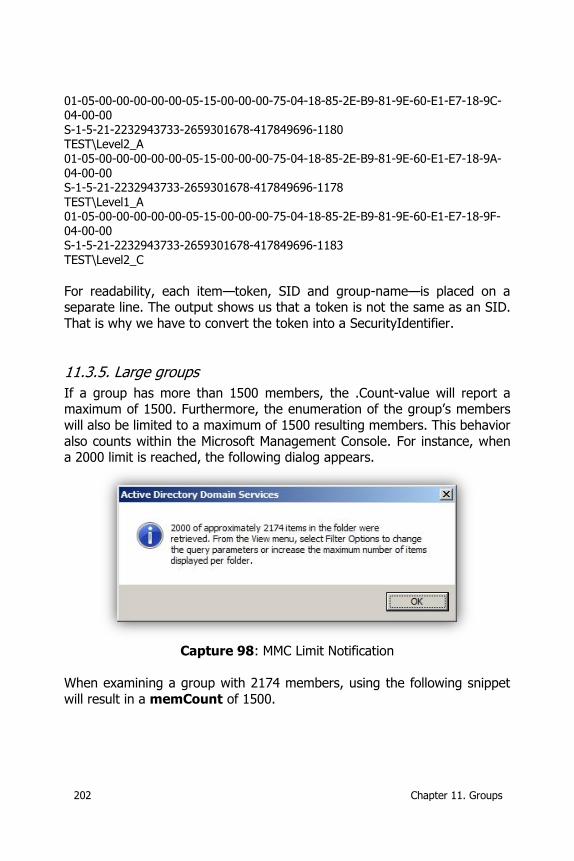
202 Chapter 11. Groups
01-05-00-00-00-00-00-05-15-00-00-00-75-04-18-85-2E-B9-81-9E-60-E1-E7-18-9C-04-00-00 S-1-5-21-2232943733-2659301678-417849696-1180 TEST\Level2_A 01-05-00-00-00-00-00-05-15-00-00-00-75-04-18-85-2E-B9-81-9E-60-E1-E7-18-9A-04-00-00 S-1-5-21-2232943733-2659301678-417849696-1178 TEST\Level1_A 01-05-00-00-00-00-00-05-15-00-00-00-75-04-18-85-2E-B9-81-9E-60-E1-E7-18-9F-04-00-00 S-1-5-21-2232943733-2659301678-417849696-1183 TEST\Level2_C
For readability, each item—token, SID and group-name—is placed on a separate line. The output shows us that a token is not the same as an SID.
That is why we have to convert the token into a SecurityIdentifier.
11.3.5. Large groups
If a group has more than 1500 members, the .Count-value will report a maximum of 1500. Furthermore, the enumeration of the group’s members
will also be limited to a maximum of 1500 resulting members. This behavior
also counts within the Microsoft Management Console. For instance, when a 2000 limit is reached, the following dialog appears.
Capture 98: MMC Limit Notification
When examining a group with 2174 members, using the following snippet
will result in a memCount of 1500.
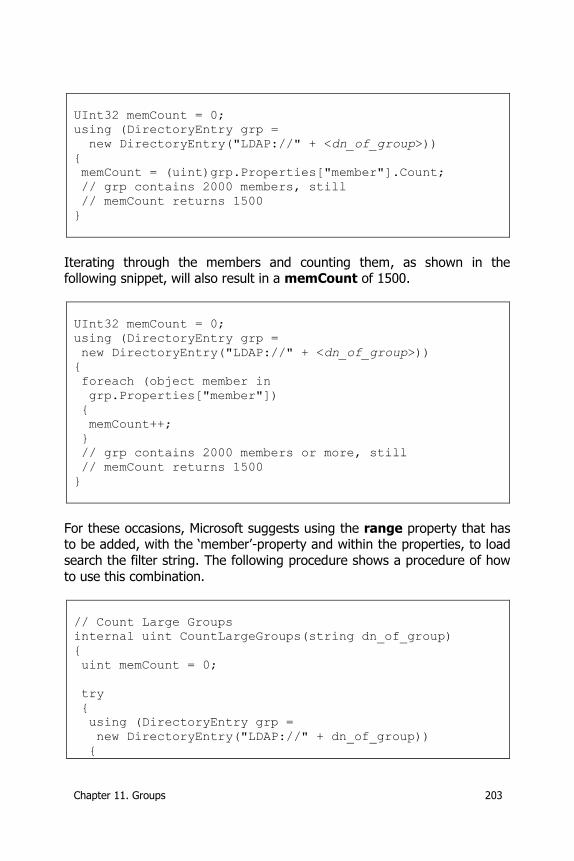
Chapter 11. Groups 203
UInt32 memCount = 0;
using (DirectoryEntry grp =
new DirectoryEntry("LDAP://" + <dn_of_group>))
{
memCount = (uint)grp.Properties["member"].Count;
// grp contains 2000 members, still
// memCount returns 1500
}
Iterating through the members and counting them, as shown in the following snippet, will also result in a memCount of 1500.
UInt32 memCount = 0;
using (DirectoryEntry grp =
new DirectoryEntry("LDAP://" + <dn_of_group>))
{
foreach (object member in
grp.Properties["member"])
{
memCount++;
}
// grp contains 2000 members or more, still
// memCount returns 1500
}
For these occasions, Microsoft suggests using the range property that has to be added, with the ‘member’-property and within the properties, to load
search the filter string. The following procedure shows a procedure of how
to use this combination.
// Count Large Groups
internal uint CountLargeGroups(string dn_of_group)
{
uint memCount = 0;
try
{
using (DirectoryEntry grp =
new DirectoryEntry("LDAP://" + dn_of_group))
{
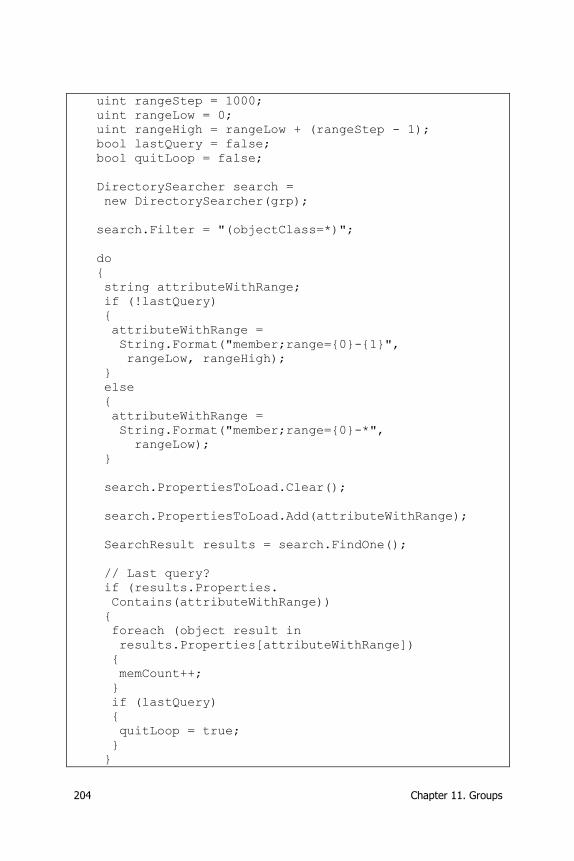
204 Chapter 11. Groups
uint rangeStep = 1000;
uint rangeLow = 0;
uint rangeHigh = rangeLow + (rangeStep - 1);
bool lastQuery = false;
bool quitLoop = false;
DirectorySearcher search =
new DirectorySearcher(grp);
search.Filter = "(objectClass=*)";
do
{
string attributeWithRange;
if (!lastQuery)
{
attributeWithRange =
String.Format("member;range={0}-{1}",
rangeLow, rangeHigh);
}
else
{
attributeWithRange =
String.Format("member;range={0}-*",
rangeLow);
}
search.PropertiesToLoad.Clear();
search.PropertiesToLoad.Add(attributeWithRange);
SearchResult results = search.FindOne();
// Last query?
if (results.Properties.
Contains(attributeWithRange))
{
foreach (object result in
results.Properties[attributeWithRange])
{
memCount++;
}
if (lastQuery)
{
quitLoop = true;
}
}
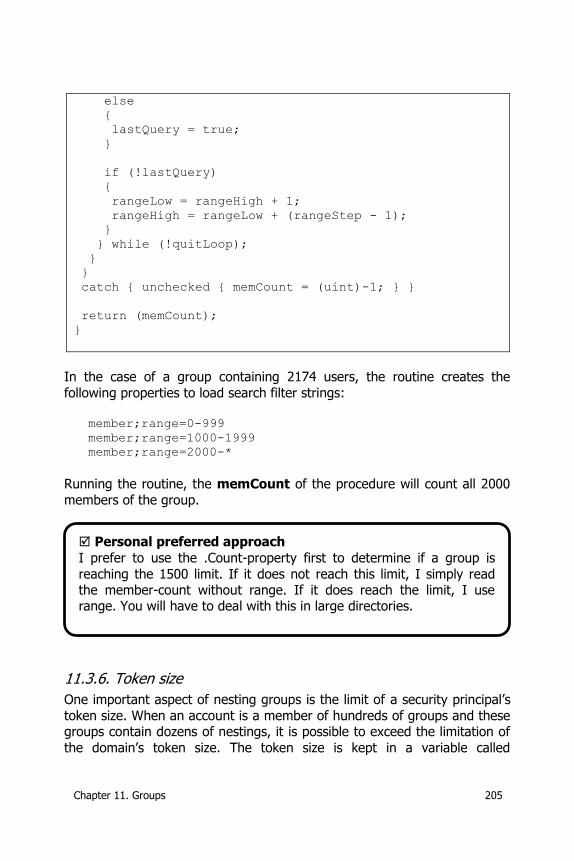
Chapter 11. Groups 205
else
{
lastQuery = true;
}
if (!lastQuery)
{
rangeLow = rangeHigh + 1;
rangeHigh = rangeLow + (rangeStep - 1);
}
} while (!quitLoop);
}
}
catch { unchecked { memCount = (uint)-1; } }
return (memCount);
}
In the case of a group containing 2174 users, the routine creates the
following properties to load search filter strings:
member;range=0-999
member;range=1000-1999
member;range=2000-*
Running the routine, the memCount of the procedure will count all 2000
members of the group.
11.3.6. Token size
One important aspect of nesting groups is the limit of a security principal’s
token size. When an account is a member of hundreds of groups and these groups contain dozens of nestings, it is possible to exceed the limitation of
the domain’s token size. The token size is kept in a variable called
Personal preferred approach
I prefer to use the .Count-property first to determine if a group is
reaching the 1500 limit. If it does not reach this limit, I simply read the member-count without range. If it does reach the limit, I use range. You will have to deal with this in large directories.
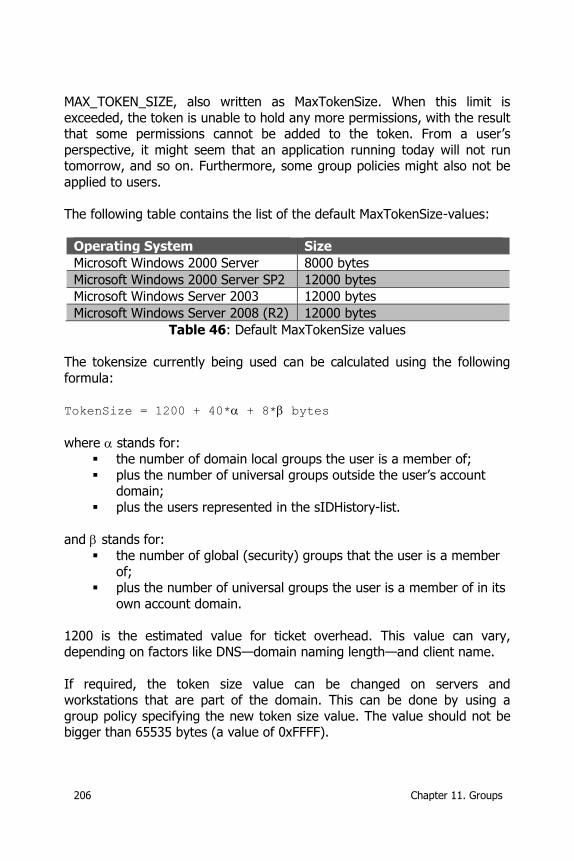
206 Chapter 11. Groups
MAX_TOKEN_SIZE, also written as MaxTokenSize. When this limit is
exceeded, the token is unable to hold any more permissions, with the result that some permissions cannot be added to the token. From a user’s
perspective, it might seem that an application running today will not run tomorrow, and so on. Furthermore, some group policies might also not be
applied to users.
The following table contains the list of the default MaxTokenSize-values:
Operating System Size
Microsoft Windows 2000 Server 8000 bytes
Microsoft Windows 2000 Server SP2 12000 bytes
Microsoft Windows Server 2003 12000 bytes
Microsoft Windows Server 2008 (R2) 12000 bytes
Table 46: Default MaxTokenSize values
The tokensize currently being used can be calculated using the following
formula: TokenSize = 1200 + 40* + 8* bytes
where stands for:
the number of domain local groups the user is a member of;
plus the number of universal groups outside the user’s account domain;
plus the users represented in the sIDHistory-list.
and stands for:
the number of global (security) groups that the user is a member
of; plus the number of universal groups the user is a member of in its
own account domain.
1200 is the estimated value for ticket overhead. This value can vary, depending on factors like DNS—domain naming length—and client name.
If required, the token size value can be changed on servers and workstations that are part of the domain. This can be done by using a
group policy specifying the new token size value. The value should not be bigger than 65535 bytes (a value of 0xFFFF).
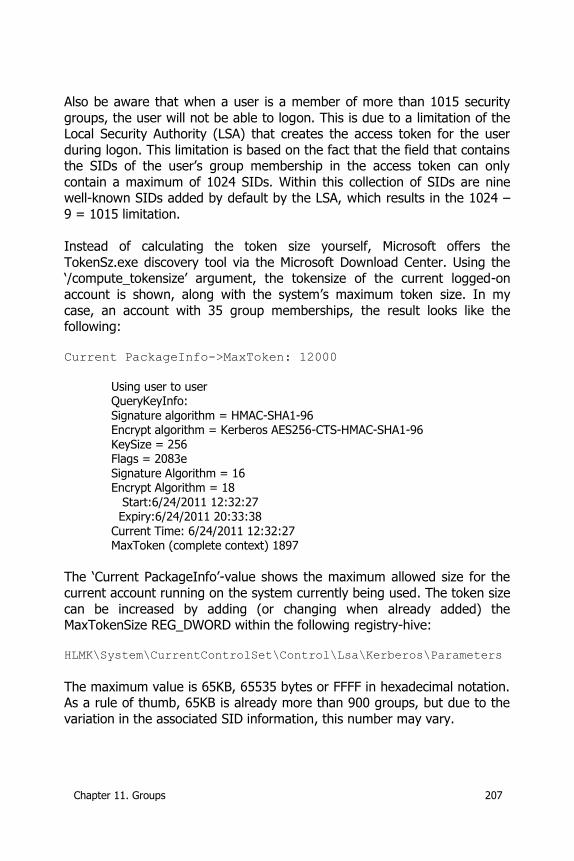
Chapter 11. Groups 207
Also be aware that when a user is a member of more than 1015 security
groups, the user will not be able to logon. This is due to a limitation of the Local Security Authority (LSA) that creates the access token for the user
during logon. This limitation is based on the fact that the field that contains the SIDs of the user’s group membership in the access token can only
contain a maximum of 1024 SIDs. Within this collection of SIDs are nine well-known SIDs added by default by the LSA, which results in the 1024 –
9 = 1015 limitation.
Instead of calculating the token size yourself, Microsoft offers the
TokenSz.exe discovery tool via the Microsoft Download Center. Using the ‘/compute_tokensize’ argument, the tokensize of the current logged-on
account is shown, along with the system’s maximum token size. In my
case, an account with 35 group memberships, the result looks like the following:
Current PackageInfo->MaxToken: 12000
Using user to user QueryKeyInfo:
Signature algorithm = HMAC-SHA1-96 Encrypt algorithm = Kerberos AES256-CTS-HMAC-SHA1-96 KeySize = 256 Flags = 2083e Signature Algorithm = 16 Encrypt Algorithm = 18 Start:6/24/2011 12:32:27 Expiry:6/24/2011 20:33:38 Current Time: 6/24/2011 12:32:27 MaxToken (complete context) 1897
The ‘Current PackageInfo’-value shows the maximum allowed size for the
current account running on the system currently being used. The token size
can be increased by adding (or changing when already added) the MaxTokenSize REG_DWORD within the following registry-hive:
HLMK\System\CurrentControlSet\Control\Lsa\Kerberos\Parameters
The maximum value is 65KB, 65535 bytes or FFFF in hexadecimal notation. As a rule of thumb, 65KB is already more than 900 groups, but due to the
variation in the associated SID information, this number may vary.
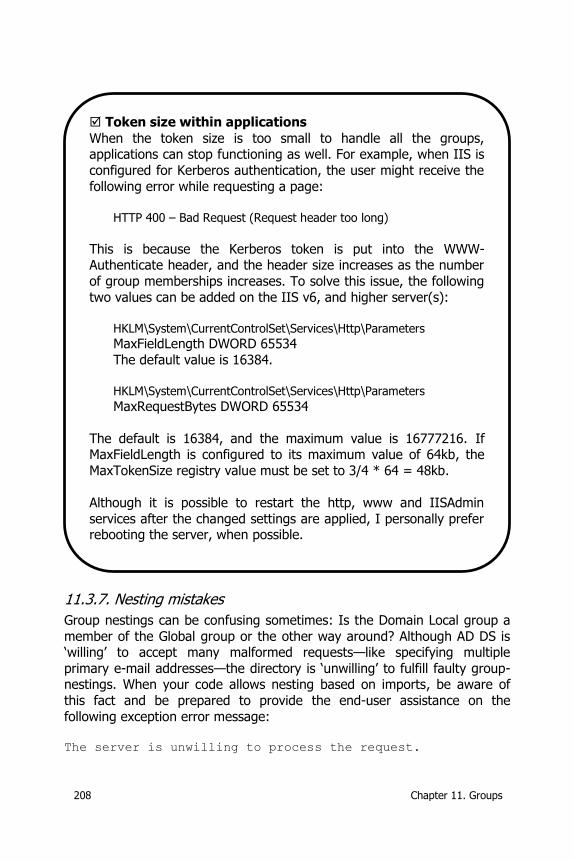
208 Chapter 11. Groups
11.3.7. Nesting mistakes
Group nestings can be confusing sometimes: Is the Domain Local group a
member of the Global group or the other way around? Although AD DS is ‘willing’ to accept many malformed requests—like specifying multiple
primary e-mail addresses—the directory is ‘unwilling’ to fulfill faulty group-nestings. When your code allows nesting based on imports, be aware of
this fact and be prepared to provide the end-user assistance on the
following exception error message: The server is unwilling to process the request.
Token size within applications
When the token size is too small to handle all the groups, applications can stop functioning as well. For example, when IIS is
configured for Kerberos authentication, the user might receive the
following error while requesting a page:
HTTP 400 – Bad Request (Request header too long)
This is because the Kerberos token is put into the WWW-Authenticate header, and the header size increases as the number
of group memberships increases. To solve this issue, the following
two values can be added on the IIS v6, and higher server(s):
HKLM\System\CurrentControlSet\Services\Http\Parameters
MaxFieldLength DWORD 65534
The default value is 16384.
HKLM\System\CurrentControlSet\Services\Http\Parameters MaxRequestBytes DWORD 65534
The default is 16384, and the maximum value is 16777216. If MaxFieldLength is configured to its maximum value of 64kb, the
MaxTokenSize registry value must be set to 3/4 * 64 = 48kb.
Although it is possible to restart the http, www and IISAdmin
services after the changed settings are applied, I personally prefer rebooting the server, when possible.
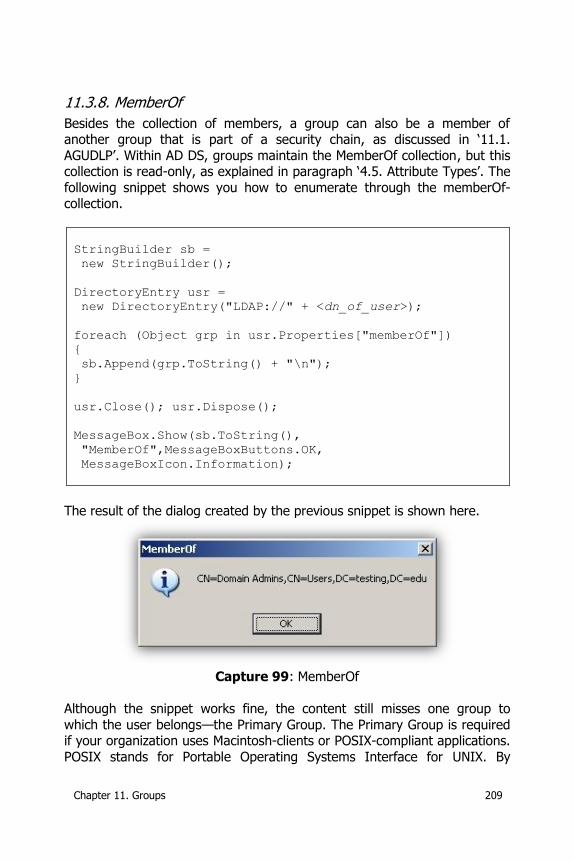
Chapter 11. Groups 209
11.3.8. MemberOf
Besides the collection of members, a group can also be a member of another group that is part of a security chain, as discussed in ‘11.1.
AGUDLP’. Within AD DS, groups maintain the MemberOf collection, but this collection is read-only, as explained in paragraph ‘4.5. Attribute Types’. The
following snippet shows you how to enumerate through the memberOf-collection.
StringBuilder sb =
new StringBuilder();
DirectoryEntry usr =
new DirectoryEntry("LDAP://" + <dn_of_user>);
foreach (Object grp in usr.Properties["memberOf"])
{
sb.Append(grp.ToString() + "\n");
}
usr.Close(); usr.Dispose();
MessageBox.Show(sb.ToString(),
"MemberOf",MessageBoxButtons.OK,
MessageBoxIcon.Information);
The result of the dialog created by the previous snippet is shown here.
Capture 99: MemberOf
Although the snippet works fine, the content still misses one group to
which the user belongs—the Primary Group. The Primary Group is required if your organization uses Macintosh-clients or POSIX-compliant applications.
POSIX stands for Portable Operating Systems Interface for UNIX. By

210 Chapter 11. Groups
default, each user account object created will automatically be a member of
the ‘Domain Users’-group. This group will automatically be the Primary Group of that new user account object. Modifying the Primary Group will be
discussed in paragraph ‘11.9. Modify the Primary Group’, but reading and interpreting this group will be discussed here.
By default, the Primary Group’s identifier will be 513, which happens to be the WellKnownSID of the group called ‘Domain Users’. Rewriting the
previous snippet will result in the following code.
StringBuilder sb = new StringBuilder();
DirectoryEntry usr =
Object versus object
In the snippet we have used Object. We could also have used object instead. What is the difference between these two? A
technical approach: object obj_ca = new object();
MessageBox.Show("object " +
obj_ca.GetType().ToString());
Object obj_cb = new Object();
MessageBox.Show("Object " +
obj_cb.GetType().ToString());
As you can see, there is technical no difference between the two.
If you have a C or C++ background, you will probably prefer object, and when you have a Visual Basic background, you
probably prefer Object.
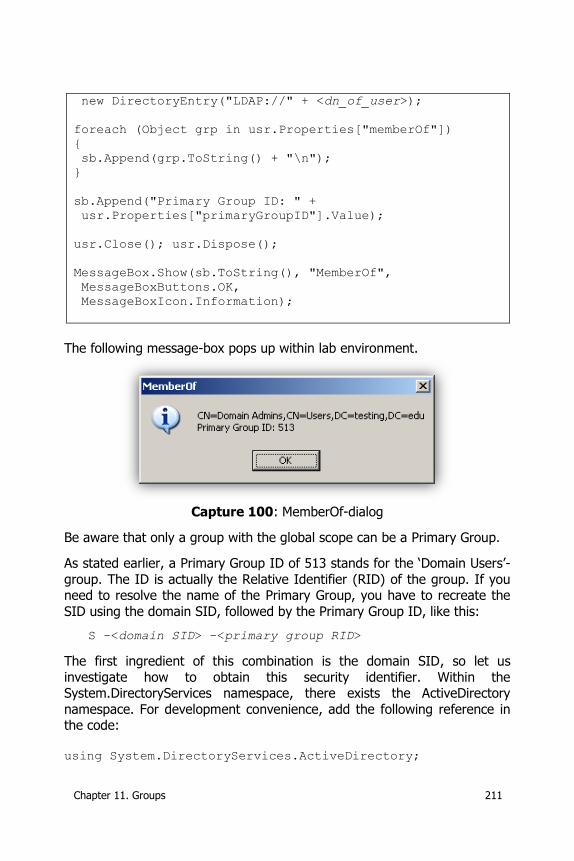
Chapter 11. Groups 211
new DirectoryEntry("LDAP://" + <dn_of_user>);
foreach (Object grp in usr.Properties["memberOf"])
{
sb.Append(grp.ToString() + "\n");
}
sb.Append("Primary Group ID: " +
usr.Properties["primaryGroupID"].Value);
usr.Close(); usr.Dispose();
MessageBox.Show(sb.ToString(), "MemberOf",
MessageBoxButtons.OK,
MessageBoxIcon.Information);
The following message-box pops up within lab environment.
Capture 100: MemberOf-dialog
Be aware that only a group with the global scope can be a Primary Group.
As stated earlier, a Primary Group ID of 513 stands for the ‘Domain Users’-
group. The ID is actually the Relative Identifier (RID) of the group. If you need to resolve the name of the Primary Group, you have to recreate the
SID using the domain SID, followed by the Primary Group ID, like this:
S -<domain SID> -<primary group RID>
The first ingredient of this combination is the domain SID, so let us
investigate how to obtain this security identifier. Within the System.DirectoryServices namespace, there exists the ActiveDirectory
namespace. For development convenience, add the following reference in the code:
using System.DirectoryServices.ActiveDirectory;

212 Chapter 11. Groups
This way, AD DS-objects can easily be accessed. Within this namespace,
the Domain-class that can provide a DirectoryEntry-object exists. By using this DirectoryEntry-object, the ‘objectSID’-property can be read. This object
is similar to all SIDs: a byte array, byte[]. The byte array can be translated into a security identifier, which can be translated into a readable SID, called
an SID-string. Reading this explanation can be a little confusing, but reading these steps using the following code snippet makes it self-
explanatory.
Domain curDom = Domain.GetCurrentDomain();
DirectoryEntry domEnt = curDom.GetDirectoryEntry();
byte[] domainSidBytes =
(byte[])domEnt.Properties["objectSid"].Value;
SecurityIdentifier si =
new SecurityIdentifier(domainSidBytes, 0);
MessageBox.Show(si.Value.ToString(),
"Domain SID", MessageBoxButtons.OK,
MessageBoxIcon.Information);
domEnt.Close(); domEnt.Dispose();
Within the lab, the following pop-up appears.
Capture 101: Domain SID
Now, looking back at the value of our Primary Group ID, it would be very
elegant to show the common name of the group instead of the RID. The only thing that has to be done is to glue the byte[] of the domain and the
Int32-value of the primary group ID together and translate it back into a
readable format. The following code translates both the domain SID and
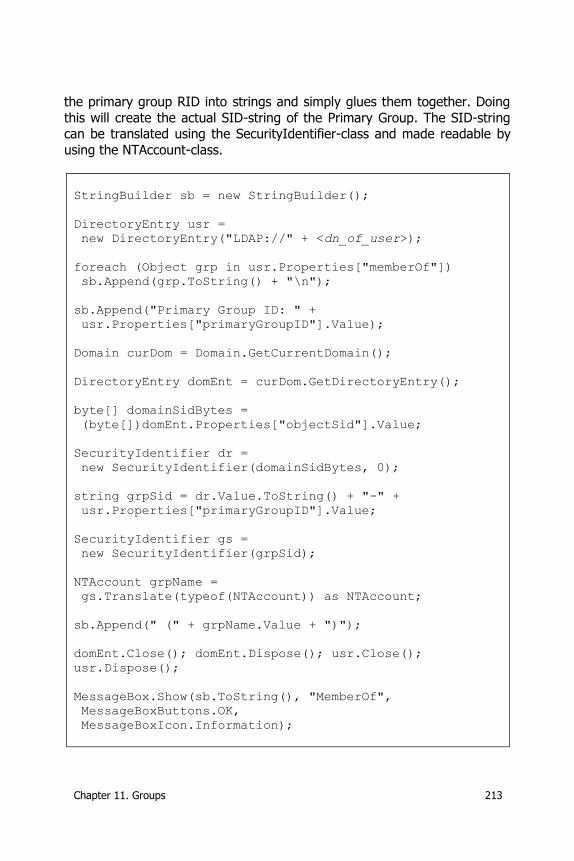
Chapter 11. Groups 213
the primary group RID into strings and simply glues them together. Doing
this will create the actual SID-string of the Primary Group. The SID-string can be translated using the SecurityIdentifier-class and made readable by
using the NTAccount-class.
StringBuilder sb = new StringBuilder();
DirectoryEntry usr =
new DirectoryEntry("LDAP://" + <dn_of_user>);
foreach (Object grp in usr.Properties["memberOf"])
sb.Append(grp.ToString() + "\n");
sb.Append("Primary Group ID: " +
usr.Properties["primaryGroupID"].Value);
Domain curDom = Domain.GetCurrentDomain();
DirectoryEntry domEnt = curDom.GetDirectoryEntry();
byte[] domainSidBytes =
(byte[])domEnt.Properties["objectSid"].Value;
SecurityIdentifier dr =
new SecurityIdentifier(domainSidBytes, 0);
string grpSid = dr.Value.ToString() + "-" +
usr.Properties["primaryGroupID"].Value;
SecurityIdentifier gs =
new SecurityIdentifier(grpSid);
NTAccount grpName =
gs.Translate(typeof(NTAccount)) as NTAccount;
sb.Append(" (" + grpName.Value + ")");
domEnt.Close(); domEnt.Dispose(); usr.Close();
usr.Dispose();
MessageBox.Show(sb.ToString(), "MemberOf",
MessageBoxButtons.OK,
MessageBoxIcon.Information);
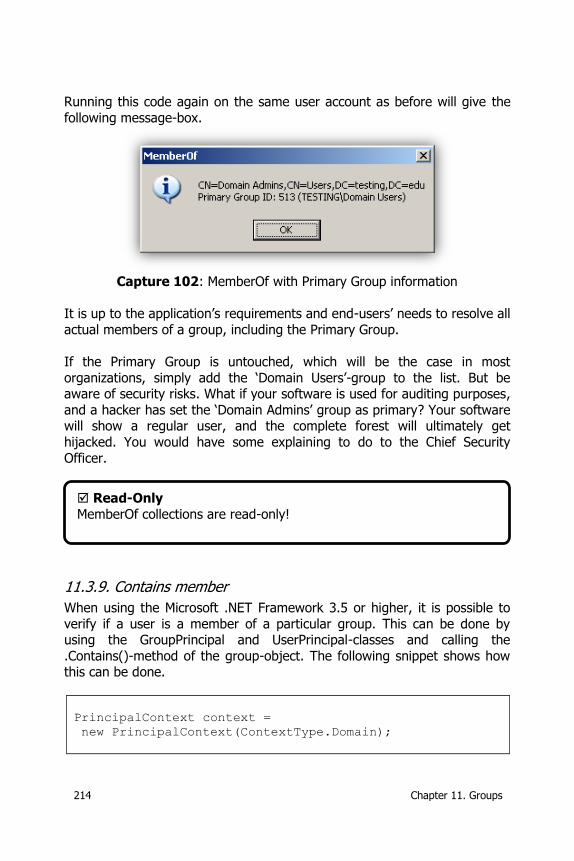
214 Chapter 11. Groups
Running this code again on the same user account as before will give the
following message-box.
Capture 102: MemberOf with Primary Group information
It is up to the application’s requirements and end-users’ needs to resolve all
actual members of a group, including the Primary Group.
If the Primary Group is untouched, which will be the case in most
organizations, simply add the ‘Domain Users’-group to the list. But be aware of security risks. What if your software is used for auditing purposes,
and a hacker has set the ‘Domain Admins’ group as primary? Your software will show a regular user, and the complete forest will ultimately get
hijacked. You would have some explaining to do to the Chief Security
Officer.
11.3.9. Contains member
When using the Microsoft .NET Framework 3.5 or higher, it is possible to
verify if a user is a member of a particular group. This can be done by using the GroupPrincipal and UserPrincipal-classes and calling the
.Contains()-method of the group-object. The following snippet shows how this can be done.
PrincipalContext context =
new PrincipalContext(ContextType.Domain);
Read-Only
MemberOf collections are read-only!
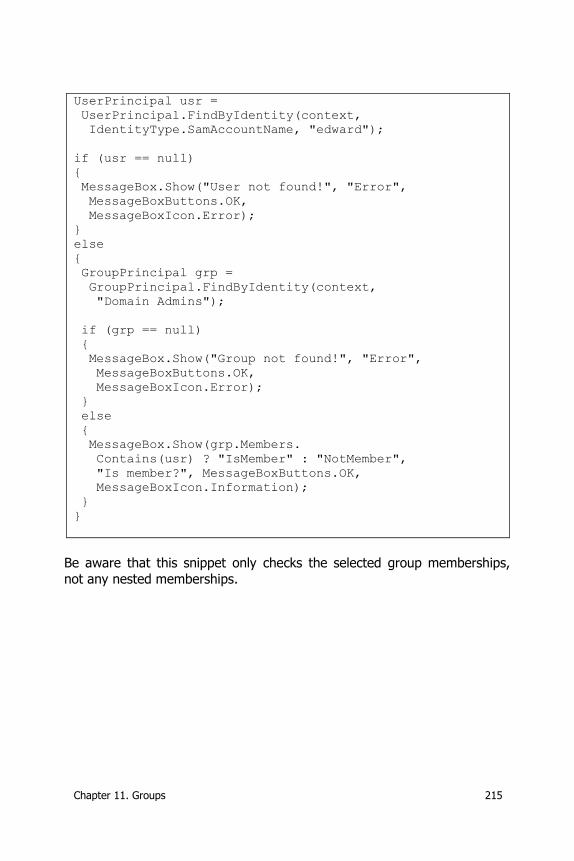
Chapter 11. Groups 215
UserPrincipal usr =
UserPrincipal.FindByIdentity(context,
IdentityType.SamAccountName, "edward");
if (usr == null)
{
MessageBox.Show("User not found!", "Error",
MessageBoxButtons.OK,
MessageBoxIcon.Error);
}
else
{
GroupPrincipal grp =
GroupPrincipal.FindByIdentity(context,
"Domain Admins");
if (grp == null)
{
MessageBox.Show("Group not found!", "Error",
MessageBoxButtons.OK,
MessageBoxIcon.Error);
}
else
{
MessageBox.Show(grp.Members.
Contains(usr) ? "IsMember" : "NotMember",
"Is member?", MessageBoxButtons.OK,
MessageBoxIcon.Information);
}
}
Be aware that this snippet only checks the selected group memberships,
not any nested memberships.
216 Chapter 11. Groups
Within the lab environment, the following message-box appears.
Capture 103: Contains-message-box
11.4. Rename a group
As with most actions, a group can be renamed using a DirectoryEntry-
object pointing to the group. But when you rename a group, which attribute are you renaming? Calling the .Rename()-method of a group will
change the group’s common name (CN) (and the distinguished name (DN),
since the common name is part of it). Although this seems sufficient, in most cases you will want to keep the common name and the
sAMAccountName of the object identical. This is because the common name is displayed within the Microsoft Management Console and most
administrators expect it to be the sAMAccountName as well. So when
renaming a group, consider renaming its sAMAccountName accordingly, as shown in the following snippet.
using (DirectoryEntry grp =
new DirectoryEntry("LDAP://" + <dn_of_group>))
{
grp.Rename("CN=" + <new_name>);
grp.CommitChanges();
grp.Properties["sAMAccountName"].Value =
<new_name>;
grp.CommitChanges();
}
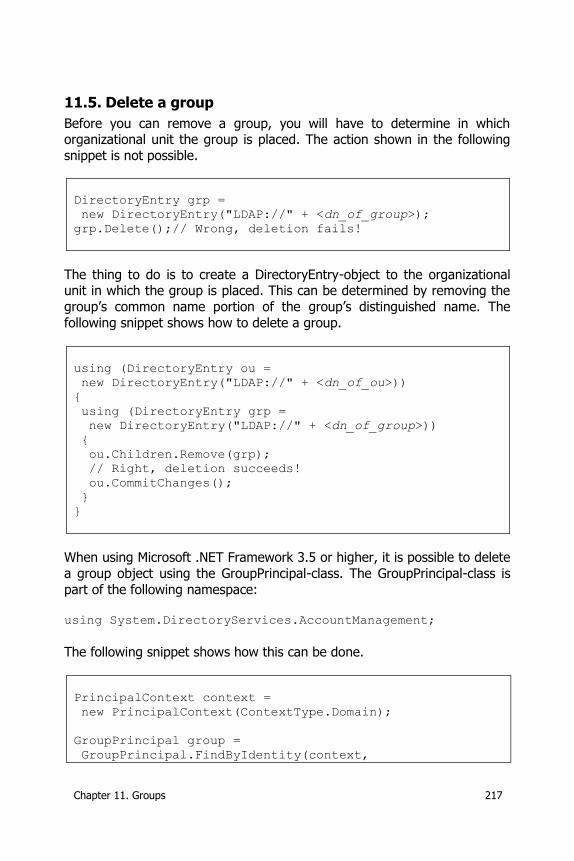
Chapter 11. Groups 217
11.5. Delete a group
Before you can remove a group, you will have to determine in which organizational unit the group is placed. The action shown in the following
snippet is not possible.
DirectoryEntry grp =
new DirectoryEntry("LDAP://" + <dn_of_group>);
grp.Delete();// Wrong, deletion fails!
The thing to do is to create a DirectoryEntry-object to the organizational unit in which the group is placed. This can be determined by removing the
group’s common name portion of the group’s distinguished name. The
following snippet shows how to delete a group.
using (DirectoryEntry ou =
new DirectoryEntry("LDAP://" + <dn_of_ou>))
{
using (DirectoryEntry grp =
new DirectoryEntry("LDAP://" + <dn_of_group>))
{
ou.Children.Remove(grp);
// Right, deletion succeeds!
ou.CommitChanges();
}
}
When using Microsoft .NET Framework 3.5 or higher, it is possible to delete
a group object using the GroupPrincipal-class. The GroupPrincipal-class is
part of the following namespace: using System.DirectoryServices.AccountManagement;
The following snippet shows how this can be done.
PrincipalContext context =
new PrincipalContext(ContextType.Domain);
GroupPrincipal group =
GroupPrincipal.FindByIdentity(context,
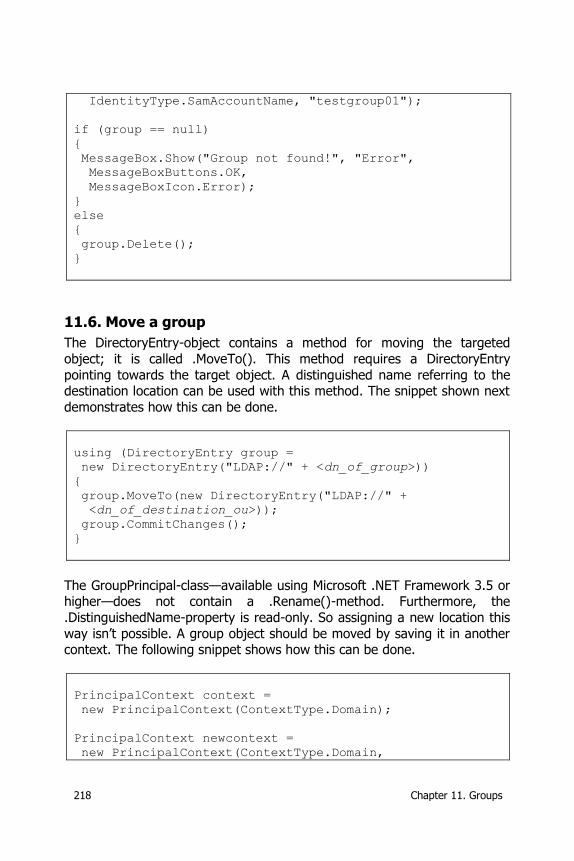
218 Chapter 11. Groups
IdentityType.SamAccountName, "testgroup01");
if (group == null)
{
MessageBox.Show("Group not found!", "Error",
MessageBoxButtons.OK,
MessageBoxIcon.Error);
}
else
{
group.Delete();
}
11.6. Move a group
The DirectoryEntry-object contains a method for moving the targeted
object; it is called .MoveTo(). This method requires a DirectoryEntry
pointing towards the target object. A distinguished name referring to the destination location can be used with this method. The snippet shown next
demonstrates how this can be done.
using (DirectoryEntry group =
new DirectoryEntry("LDAP://" + <dn_of_group>))
{
group.MoveTo(new DirectoryEntry("LDAP://" +
<dn_of_destination_ou>));
group.CommitChanges();
}
The GroupPrincipal-class—available using Microsoft .NET Framework 3.5 or higher—does not contain a .Rename()-method. Furthermore, the
.DistinguishedName-property is read-only. So assigning a new location this
way isn’t possible. A group object should be moved by saving it in another context. The following snippet shows how this can be done.
PrincipalContext context =
new PrincipalContext(ContextType.Domain);
PrincipalContext newcontext =
new PrincipalContext(ContextType.Domain,
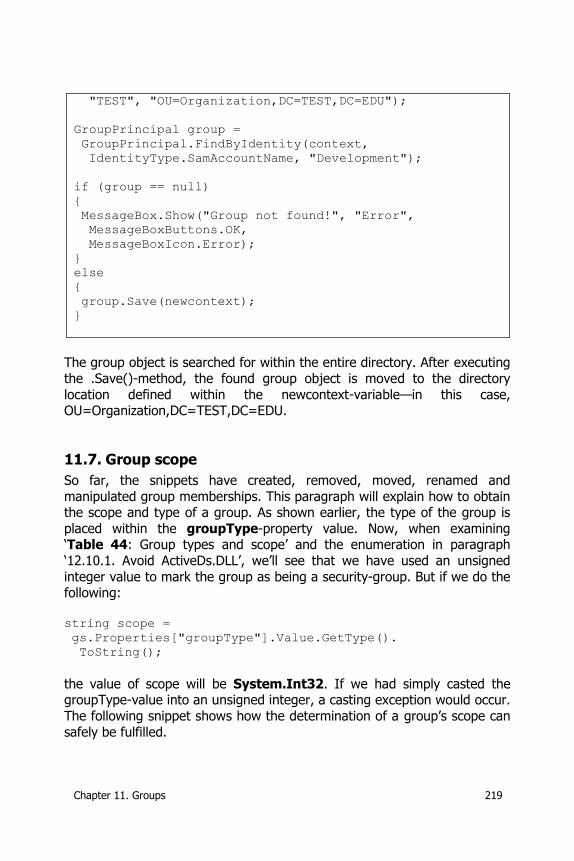
Chapter 11. Groups 219
"TEST", "OU=Organization,DC=TEST,DC=EDU");
GroupPrincipal group =
GroupPrincipal.FindByIdentity(context,
IdentityType.SamAccountName, "Development");
if (group == null)
{
MessageBox.Show("Group not found!", "Error",
MessageBoxButtons.OK,
MessageBoxIcon.Error);
}
else
{
group.Save(newcontext);
}
The group object is searched for within the entire directory. After executing
the .Save()-method, the found group object is moved to the directory
location defined within the newcontext-variable—in this case, OU=Organization,DC=TEST,DC=EDU.
11.7. Group scope
So far, the snippets have created, removed, moved, renamed and
manipulated group memberships. This paragraph will explain how to obtain the scope and type of a group. As shown earlier, the type of the group is
placed within the groupType-property value. Now, when examining ‘Table 44: Group types and scope’ and the enumeration in paragraph
‘12.10.1. Avoid ActiveDs.DLL’, we’ll see that we have used an unsigned
integer value to mark the group as being a security-group. But if we do the following:
string scope =
gs.Properties["groupType"].Value.GetType().
ToString();
the value of scope will be System.Int32. If we had simply casted the groupType-value into an unsigned integer, a casting exception would occur.
The following snippet shows how the determination of a group’s scope can
safely be fulfilled.
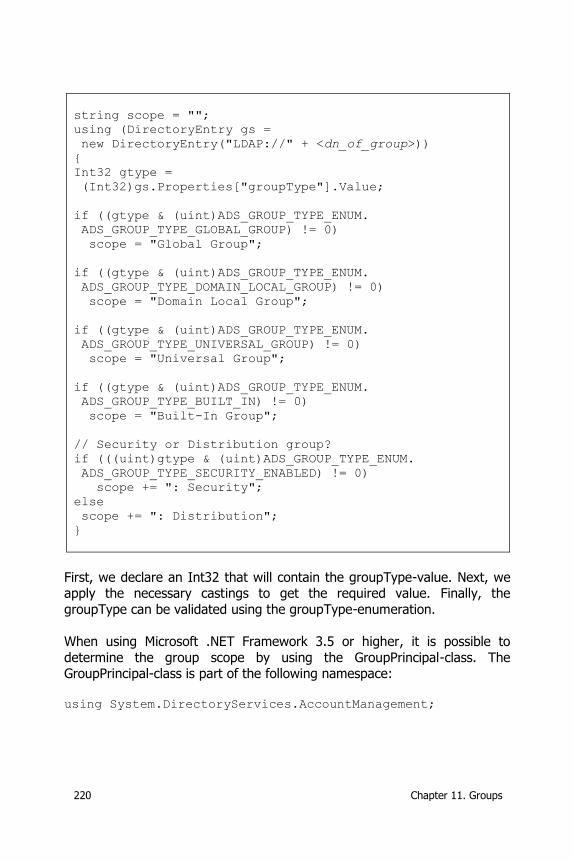
220 Chapter 11. Groups
string scope = "";
using (DirectoryEntry gs =
new DirectoryEntry("LDAP://" + <dn_of_group>))
{
Int32 gtype =
(Int32)gs.Properties["groupType"].Value;
if ((gtype & (uint)ADS_GROUP_TYPE_ENUM.
ADS_GROUP_TYPE_GLOBAL_GROUP) != 0)
scope = "Global Group";
if ((gtype & (uint)ADS_GROUP_TYPE_ENUM.
ADS_GROUP_TYPE_DOMAIN_LOCAL_GROUP) != 0)
scope = "Domain Local Group";
if ((gtype & (uint)ADS_GROUP_TYPE_ENUM.
ADS_GROUP_TYPE_UNIVERSAL_GROUP) != 0)
scope = "Universal Group";
if ((gtype & (uint)ADS_GROUP_TYPE_ENUM.
ADS_GROUP_TYPE_BUILT_IN) != 0)
scope = "Built-In Group";
// Security or Distribution group?
if (((uint)gtype & (uint)ADS_GROUP_TYPE_ENUM.
ADS_GROUP_TYPE_SECURITY_ENABLED) != 0)
scope += ": Security";
else
scope += ": Distribution";
}
First, we declare an Int32 that will contain the groupType-value. Next, we apply the necessary castings to get the required value. Finally, the
groupType can be validated using the groupType-enumeration.
When using Microsoft .NET Framework 3.5 or higher, it is possible to
determine the group scope by using the GroupPrincipal-class. The GroupPrincipal-class is part of the following namespace:
using System.DirectoryServices.AccountManagement;
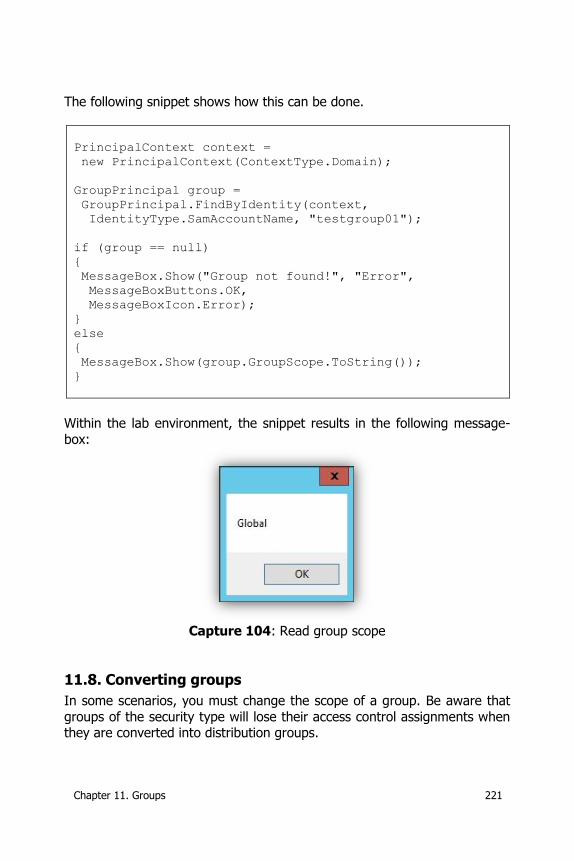
Chapter 11. Groups 221
The following snippet shows how this can be done.
PrincipalContext context =
new PrincipalContext(ContextType.Domain);
GroupPrincipal group =
GroupPrincipal.FindByIdentity(context,
IdentityType.SamAccountName, "testgroup01");
if (group == null)
{
MessageBox.Show("Group not found!", "Error",
MessageBoxButtons.OK,
MessageBoxIcon.Error);
}
else
{
MessageBox.Show(group.GroupScope.ToString());
}
Within the lab environment, the snippet results in the following message-
box:
Capture 104: Read group scope
11.8. Converting groups
In some scenarios, you must change the scope of a group. Be aware that
groups of the security type will lose their access control assignments when they are converted into distribution groups.
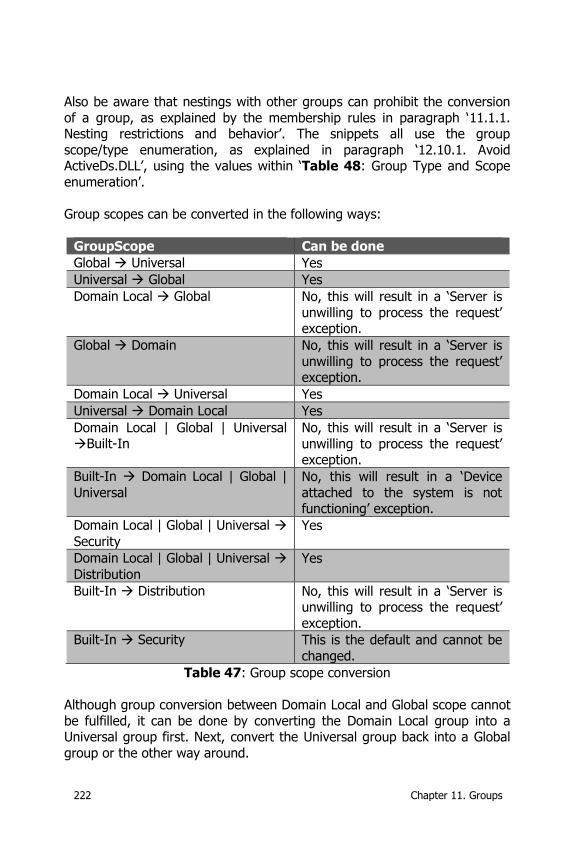
222 Chapter 11. Groups
Also be aware that nestings with other groups can prohibit the conversion
of a group, as explained by the membership rules in paragraph ‘11.1.1. Nesting restrictions and behavior’. The snippets all use the group
scope/type enumeration, as explained in paragraph ‘12.10.1. Avoid ActiveDs.DLL’, using the values within ‘Table 48: Group Type and Scope
enumeration’.
Group scopes can be converted in the following ways:
GroupScope Can be done
Global Universal Yes
Universal Global Yes
Domain Local Global No, this will result in a ‘Server is
unwilling to process the request’ exception.
Global Domain No, this will result in a ‘Server is
unwilling to process the request’ exception.
Domain Local Universal Yes
Universal Domain Local Yes
Domain Local | Global | Universal Built-In
No, this will result in a ‘Server is
unwilling to process the request’ exception.
Built-In Domain Local | Global |
Universal
No, this will result in a ‘Device
attached to the system is not functioning’ exception.
Domain Local | Global | Universal
Security
Yes
Domain Local | Global | Universal
Distribution
Yes
Built-In Distribution No, this will result in a ‘Server is unwilling to process the request’
exception.
Built-In Security This is the default and cannot be
changed.
Table 47: Group scope conversion
Although group conversion between Domain Local and Global scope cannot
be fulfilled, it can be done by converting the Domain Local group into a Universal group first. Next, convert the Universal group back into a Global
group or the other way around.
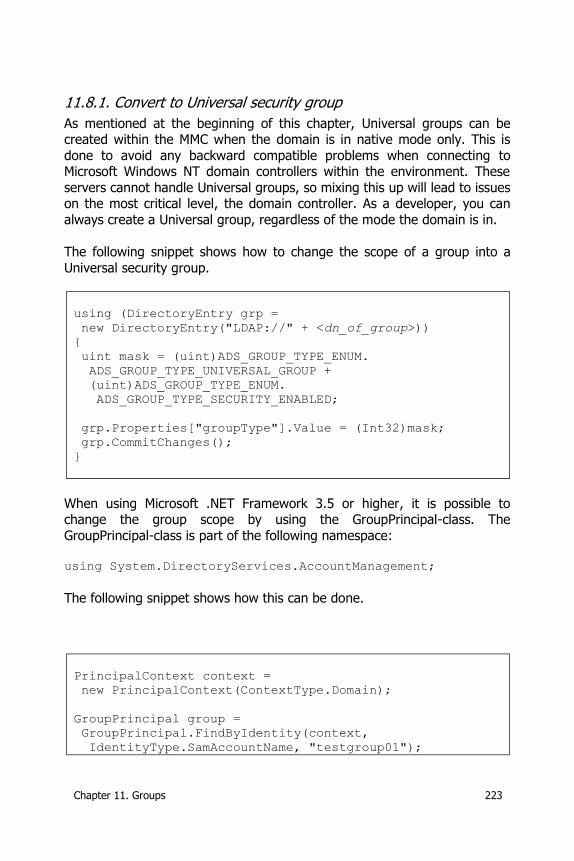
Chapter 11. Groups 223
11.8.1. Convert to Universal security group
As mentioned at the beginning of this chapter, Universal groups can be created within the MMC when the domain is in native mode only. This is
done to avoid any backward compatible problems when connecting to Microsoft Windows NT domain controllers within the environment. These
servers cannot handle Universal groups, so mixing this up will lead to issues on the most critical level, the domain controller. As a developer, you can
always create a Universal group, regardless of the mode the domain is in.
The following snippet shows how to change the scope of a group into a
Universal security group.
using (DirectoryEntry grp =
new DirectoryEntry("LDAP://" + <dn_of_group>))
{
uint mask = (uint)ADS_GROUP_TYPE_ENUM.
ADS_GROUP_TYPE_UNIVERSAL_GROUP +
(uint)ADS_GROUP_TYPE_ENUM.
ADS_GROUP_TYPE_SECURITY_ENABLED;
grp.Properties["groupType"].Value = (Int32)mask;
grp.CommitChanges();
}
When using Microsoft .NET Framework 3.5 or higher, it is possible to change the group scope by using the GroupPrincipal-class. The
GroupPrincipal-class is part of the following namespace:
using System.DirectoryServices.AccountManagement;
The following snippet shows how this can be done.
PrincipalContext context =
new PrincipalContext(ContextType.Domain);
GroupPrincipal group =
GroupPrincipal.FindByIdentity(context,
IdentityType.SamAccountName, "testgroup01");
224 Chapter 11. Groups
if (group == null)
{
MessageBox.Show("Group not found!", "Error",
MessageBoxButtons.OK,
MessageBoxIcon.Error);
}
else
{
group.GroupScope = GroupScope.Universal;
group.Save();
}
11.8.2. Convert to Global security group
The conversion from a Universal group into a Global group can be done in
a single step. But the conversion from a Domain Local security group into a
Global Security group cannot be done in a single step. If you try this conversion in one step, the following error will occur.
Capture 105: Unwilling to process request
Before you can convert the scope of the group, you will have to change it into a Universal security group first and convert it into a Global security
group next.
The following snippet shows how this can be done.
using (DirectoryEntry grp =
new DirectoryEntry("LDAP://" + <dn_of_group>))
{
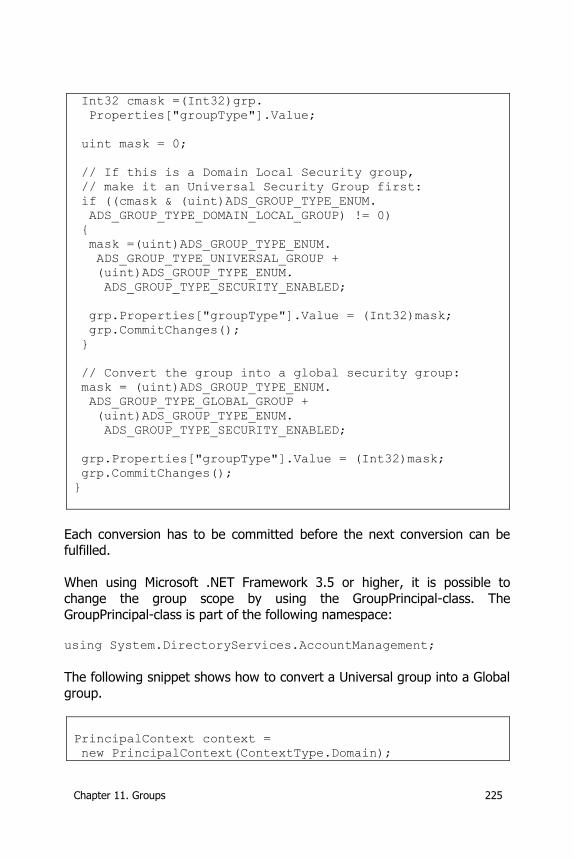
Chapter 11. Groups 225
Int32 cmask =(Int32)grp.
Properties["groupType"].Value;
uint mask = 0;
// If this is a Domain Local Security group,
// make it an Universal Security Group first:
if ((cmask & (uint)ADS_GROUP_TYPE_ENUM.
ADS_GROUP_TYPE_DOMAIN_LOCAL_GROUP) != 0)
{
mask =(uint)ADS_GROUP_TYPE_ENUM.
ADS_GROUP_TYPE_UNIVERSAL_GROUP +
(uint)ADS_GROUP_TYPE_ENUM.
ADS_GROUP_TYPE_SECURITY_ENABLED;
grp.Properties["groupType"].Value = (Int32)mask;
grp.CommitChanges();
}
// Convert the group into a global security group:
mask = (uint)ADS_GROUP_TYPE_ENUM.
ADS_GROUP_TYPE_GLOBAL_GROUP +
(uint)ADS_GROUP_TYPE_ENUM.
ADS_GROUP_TYPE_SECURITY_ENABLED;
grp.Properties["groupType"].Value = (Int32)mask;
grp.CommitChanges();
}
Each conversion has to be committed before the next conversion can be fulfilled.
When using Microsoft .NET Framework 3.5 or higher, it is possible to
change the group scope by using the GroupPrincipal-class. The
GroupPrincipal-class is part of the following namespace: using System.DirectoryServices.AccountManagement;
The following snippet shows how to convert a Universal group into a Global
group.
PrincipalContext context =
new PrincipalContext(ContextType.Domain);
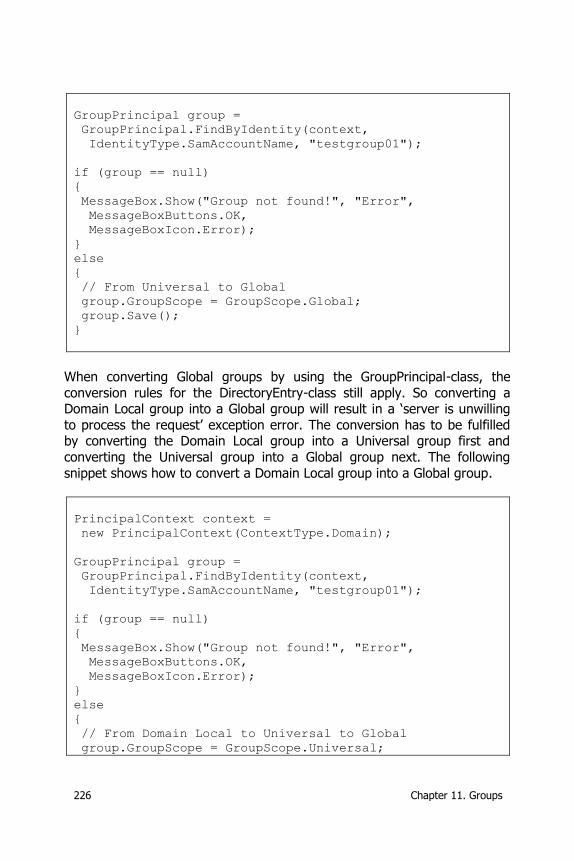
226 Chapter 11. Groups
GroupPrincipal group =
GroupPrincipal.FindByIdentity(context,
IdentityType.SamAccountName, "testgroup01");
if (group == null)
{
MessageBox.Show("Group not found!", "Error",
MessageBoxButtons.OK,
MessageBoxIcon.Error);
}
else
{
// From Universal to Global
group.GroupScope = GroupScope.Global;
group.Save();
}
When converting Global groups by using the GroupPrincipal-class, the
conversion rules for the DirectoryEntry-class still apply. So converting a Domain Local group into a Global group will result in a ‘server is unwilling
to process the request’ exception error. The conversion has to be fulfilled by converting the Domain Local group into a Universal group first and
converting the Universal group into a Global group next. The following
snippet shows how to convert a Domain Local group into a Global group.
PrincipalContext context =
new PrincipalContext(ContextType.Domain);
GroupPrincipal group =
GroupPrincipal.FindByIdentity(context,
IdentityType.SamAccountName, "testgroup01");
if (group == null)
{
MessageBox.Show("Group not found!", "Error",
MessageBoxButtons.OK,
MessageBoxIcon.Error);
}
else
{
// From Domain Local to Universal to Global
group.GroupScope = GroupScope.Universal;
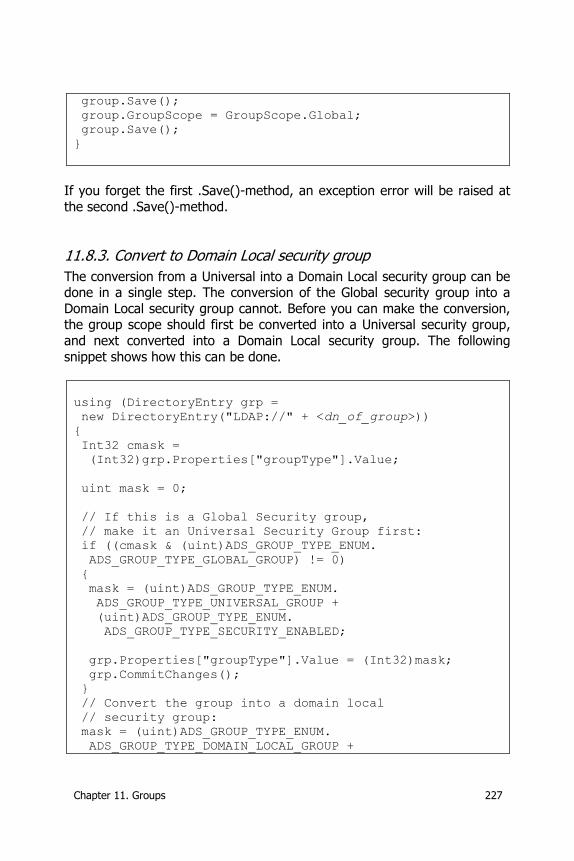
Chapter 11. Groups 227
group.Save();
group.GroupScope = GroupScope.Global;
group.Save();
}
If you forget the first .Save()-method, an exception error will be raised at
the second .Save()-method.
11.8.3. Convert to Domain Local security group
The conversion from a Universal into a Domain Local security group can be done in a single step. The conversion of the Global security group into a
Domain Local security group cannot. Before you can make the conversion, the group scope should first be converted into a Universal security group,
and next converted into a Domain Local security group. The following
snippet shows how this can be done.
using (DirectoryEntry grp =
new DirectoryEntry("LDAP://" + <dn_of_group>))
{
Int32 cmask =
(Int32)grp.Properties["groupType"].Value;
uint mask = 0;
// If this is a Global Security group,
// make it an Universal Security Group first:
if ((cmask & (uint)ADS_GROUP_TYPE_ENUM.
ADS_GROUP_TYPE_GLOBAL_GROUP) != 0)
{
mask = (uint)ADS_GROUP_TYPE_ENUM.
ADS_GROUP_TYPE_UNIVERSAL_GROUP +
(uint)ADS_GROUP_TYPE_ENUM.
ADS_GROUP_TYPE_SECURITY_ENABLED;
grp.Properties["groupType"].Value = (Int32)mask;
grp.CommitChanges();
}
// Convert the group into a domain local
// security group:
mask = (uint)ADS_GROUP_TYPE_ENUM.
ADS_GROUP_TYPE_DOMAIN_LOCAL_GROUP +
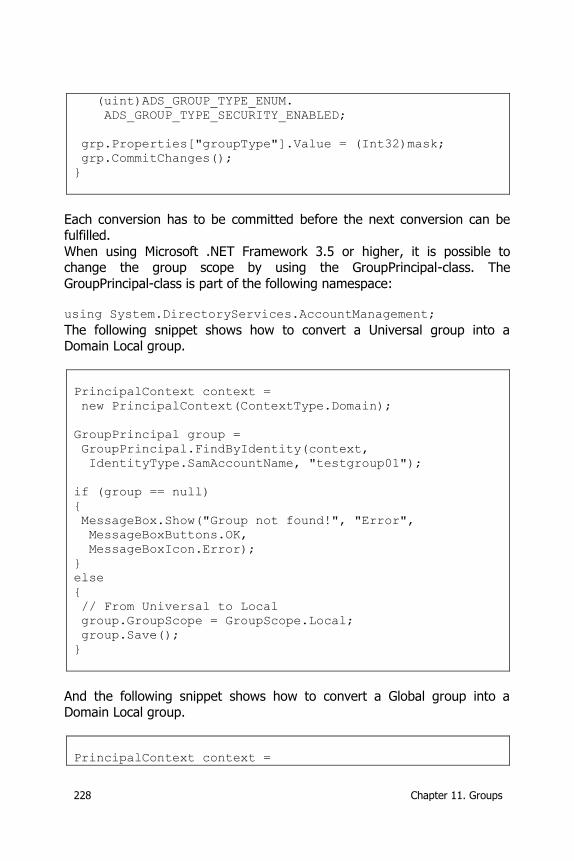
228 Chapter 11. Groups
(uint)ADS_GROUP_TYPE_ENUM.
ADS_GROUP_TYPE_SECURITY_ENABLED;
grp.Properties["groupType"].Value = (Int32)mask;
grp.CommitChanges();
}
Each conversion has to be committed before the next conversion can be fulfilled.
When using Microsoft .NET Framework 3.5 or higher, it is possible to change the group scope by using the GroupPrincipal-class. The
GroupPrincipal-class is part of the following namespace:
using System.DirectoryServices.AccountManagement;
The following snippet shows how to convert a Universal group into a Domain Local group.
PrincipalContext context =
new PrincipalContext(ContextType.Domain);
GroupPrincipal group =
GroupPrincipal.FindByIdentity(context,
IdentityType.SamAccountName, "testgroup01");
if (group == null)
{
MessageBox.Show("Group not found!", "Error",
MessageBoxButtons.OK,
MessageBoxIcon.Error);
}
else
{
// From Universal to Local
group.GroupScope = GroupScope.Local;
group.Save();
}
And the following snippet shows how to convert a Global group into a Domain Local group.
PrincipalContext context =
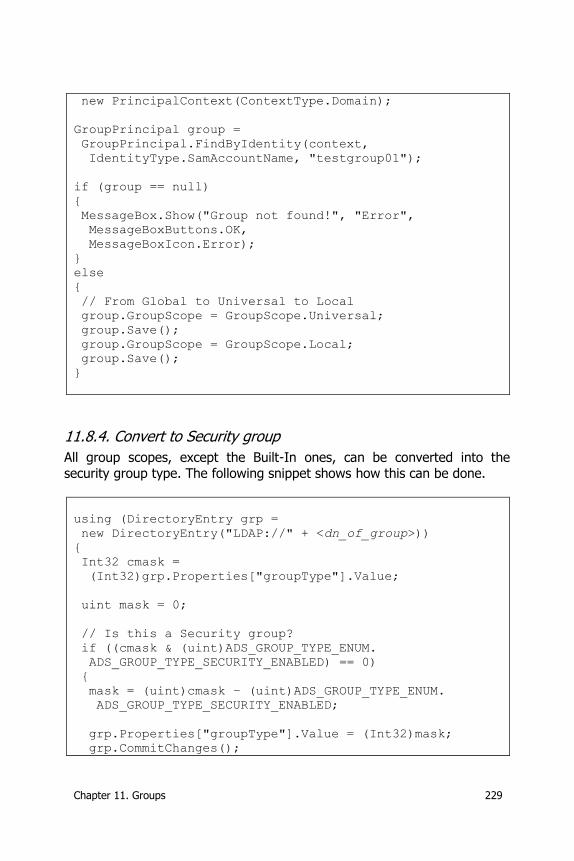
Chapter 11. Groups 229
new PrincipalContext(ContextType.Domain);
GroupPrincipal group =
GroupPrincipal.FindByIdentity(context,
IdentityType.SamAccountName, "testgroup01");
if (group == null)
{
MessageBox.Show("Group not found!", "Error",
MessageBoxButtons.OK,
MessageBoxIcon.Error);
}
else
{
// From Global to Universal to Local
group.GroupScope = GroupScope.Universal;
group.Save();
group.GroupScope = GroupScope.Local;
group.Save();
}
11.8.4. Convert to Security group
All group scopes, except the Built-In ones, can be converted into the security group type. The following snippet shows how this can be done.
using (DirectoryEntry grp =
new DirectoryEntry("LDAP://" + <dn_of_group>))
{
Int32 cmask =
(Int32)grp.Properties["groupType"].Value;
uint mask = 0;
// Is this a Security group?
if ((cmask & (uint)ADS_GROUP_TYPE_ENUM.
ADS_GROUP_TYPE_SECURITY_ENABLED) == 0)
{
mask = (uint)cmask – (uint)ADS_GROUP_TYPE_ENUM.
ADS_GROUP_TYPE_SECURITY_ENABLED;
grp.Properties["groupType"].Value = (Int32)mask;
grp.CommitChanges();
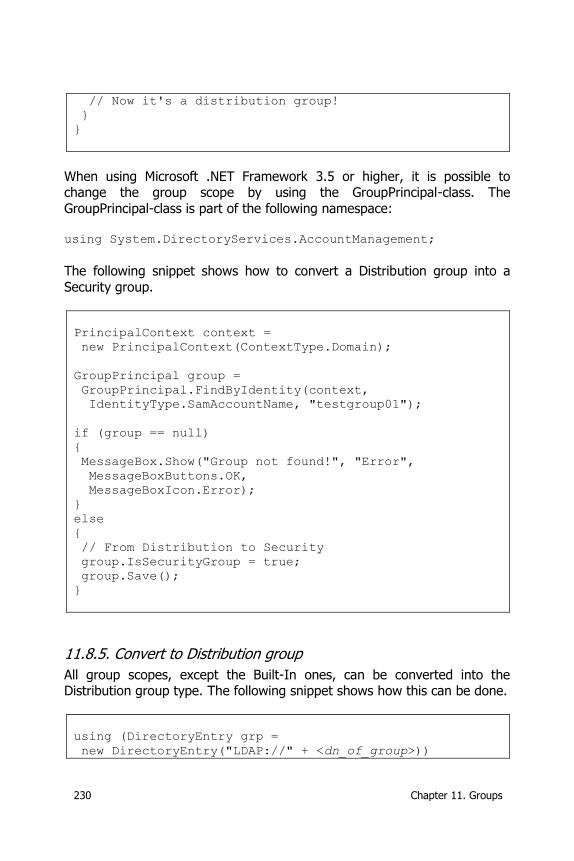
230 Chapter 11. Groups
// Now it's a distribution group!
}
}
When using Microsoft .NET Framework 3.5 or higher, it is possible to change the group scope by using the GroupPrincipal-class. The
GroupPrincipal-class is part of the following namespace: using System.DirectoryServices.AccountManagement;
The following snippet shows how to convert a Distribution group into a
Security group.
PrincipalContext context =
new PrincipalContext(ContextType.Domain);
GroupPrincipal group =
GroupPrincipal.FindByIdentity(context,
IdentityType.SamAccountName, "testgroup01");
if (group == null)
{
MessageBox.Show("Group not found!", "Error",
MessageBoxButtons.OK,
MessageBoxIcon.Error);
}
else
{
// From Distribution to Security
group.IsSecurityGroup = true;
group.Save();
}
11.8.5. Convert to Distribution group
All group scopes, except the Built-In ones, can be converted into the Distribution group type. The following snippet shows how this can be done.
using (DirectoryEntry grp =
new DirectoryEntry("LDAP://" + <dn_of_group>))
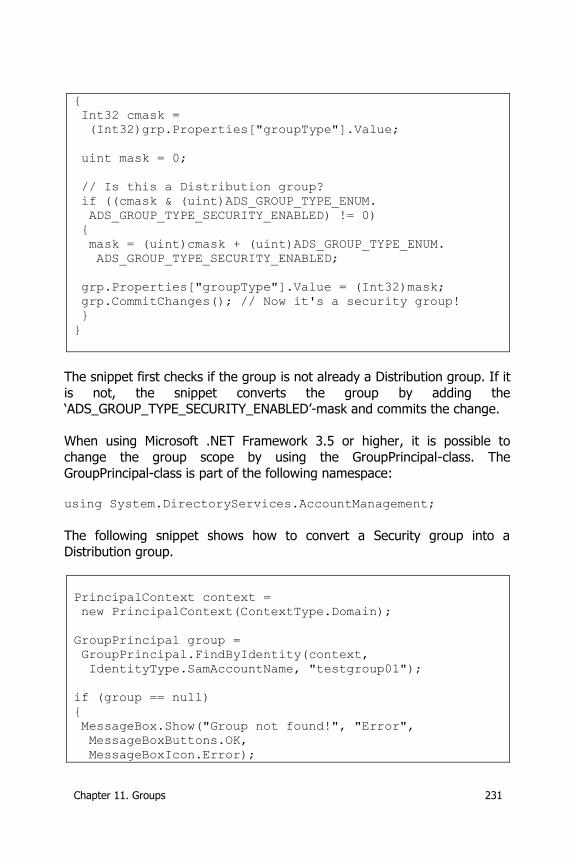
Chapter 11. Groups 231
{
Int32 cmask =
(Int32)grp.Properties["groupType"].Value;
uint mask = 0;
// Is this a Distribution group?
if ((cmask & (uint)ADS_GROUP_TYPE_ENUM.
ADS_GROUP_TYPE_SECURITY_ENABLED) != 0)
{
mask = (uint)cmask + (uint)ADS_GROUP_TYPE_ENUM.
ADS_GROUP_TYPE_SECURITY_ENABLED;
grp.Properties["groupType"].Value = (Int32)mask;
grp.CommitChanges(); // Now it's a security group!
}
}
The snippet first checks if the group is not already a Distribution group. If it
is not, the snippet converts the group by adding the ‘ADS_GROUP_TYPE_SECURITY_ENABLED’-mask and commits the change.
When using Microsoft .NET Framework 3.5 or higher, it is possible to
change the group scope by using the GroupPrincipal-class. The
GroupPrincipal-class is part of the following namespace: using System.DirectoryServices.AccountManagement;
The following snippet shows how to convert a Security group into a
Distribution group.
PrincipalContext context =
new PrincipalContext(ContextType.Domain);
GroupPrincipal group =
GroupPrincipal.FindByIdentity(context,
IdentityType.SamAccountName, "testgroup01");
if (group == null)
{
MessageBox.Show("Group not found!", "Error",
MessageBoxButtons.OK,
MessageBoxIcon.Error);
232 Chapter 11. Groups
}
else
{
// From Security to Distribution
group.IsSecurityGroup = false;
group.Save();
}
11.9. Modify the Primary Group
We have already covered this subject in ‘11.3.8. MemberOf’, where reading
and various translations were explained. In this paragraph, we are going to examine the Primary Group more in-depth.
On some occasions—like during a migration, for instance—you might want
to modify the Primary Group of dozens of accounts. In the previous paragraph, we have shown a snippet that can be used to read a user’s
Primary Group and the primary group token. Examining the value of the
Primary Group token with the object SID in mind, you can see that the Primary Group token is the utmost right value of the object SID.
Capture 106: Group SID and Primary Group ID
This Primary Group token is a constructed property of the queried object.
This means that the property is not stored within the directory but constructed on the client by the ADSI-provider. The various property types
were discussed in paragraph ‘4.5. Attribute Types’.
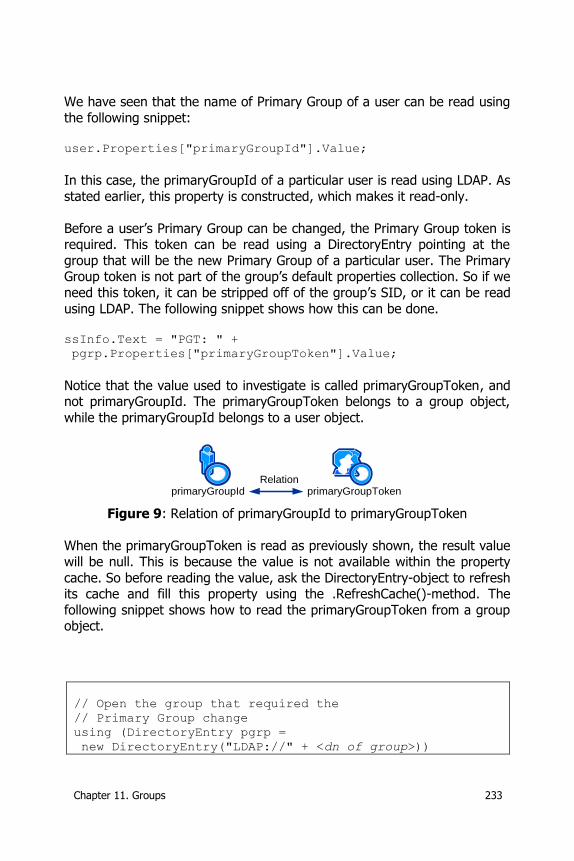
Chapter 11. Groups 233
We have seen that the name of Primary Group of a user can be read using
the following snippet: user.Properties["primaryGroupId"].Value;
In this case, the primaryGroupId of a particular user is read using LDAP. As
stated earlier, this property is constructed, which makes it read-only.
Before a user’s Primary Group can be changed, the Primary Group token is required. This token can be read using a DirectoryEntry pointing at the
group that will be the new Primary Group of a particular user. The Primary Group token is not part of the group’s default properties collection. So if we
need this token, it can be stripped off of the group’s SID, or it can be read
using LDAP. The following snippet shows how this can be done. ssInfo.Text = "PGT: " +
pgrp.Properties["primaryGroupToken"].Value;
Notice that the value used to investigate is called primaryGroupToken, and not primaryGroupId. The primaryGroupToken belongs to a group object,
while the primaryGroupId belongs to a user object.
primaryGroupId primaryGroupTokenRelation
Figure 9: Relation of primaryGroupId to primaryGroupToken
When the primaryGroupToken is read as previously shown, the result value
will be null. This is because the value is not available within the property
cache. So before reading the value, ask the DirectoryEntry-object to refresh its cache and fill this property using the .RefreshCache()-method. The
following snippet shows how to read the primaryGroupToken from a group object.
// Open the group that required the
// Primary Group change
using (DirectoryEntry pgrp =
new DirectoryEntry("LDAP://" + <dn_of_group>))
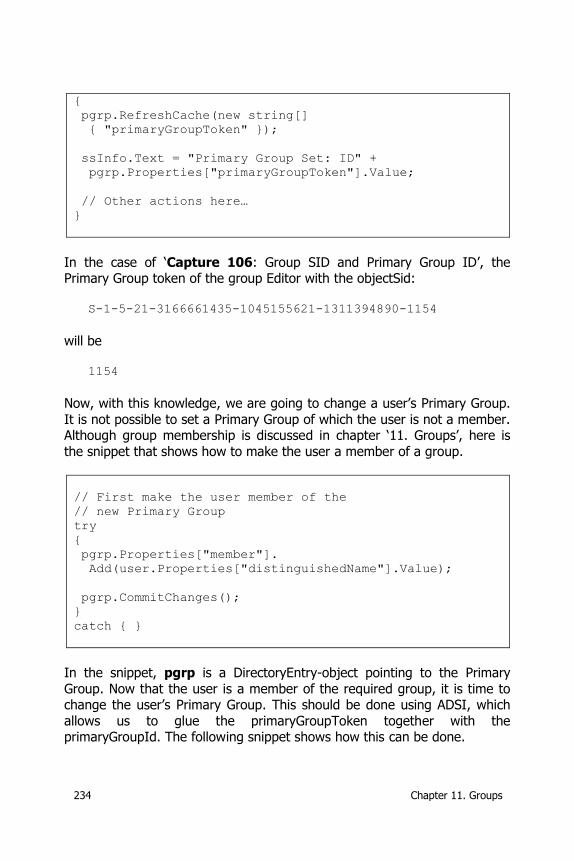
234 Chapter 11. Groups
{
pgrp.RefreshCache(new string[]
{ "primaryGroupToken" });
ssInfo.Text = "Primary Group Set: ID" +
pgrp.Properties["primaryGroupToken"].Value;
// Other actions here…
}
In the case of ‘Capture 106: Group SID and Primary Group ID’, the Primary Group token of the group Editor with the objectSid:
S-1-5-21-3166661435-1045155621-1311394890-1154
will be
1154
Now, with this knowledge, we are going to change a user’s Primary Group.
It is not possible to set a Primary Group of which the user is not a member. Although group membership is discussed in chapter ‘11. Groups’, here is
the snippet that shows how to make the user a member of a group.
// First make the user member of the
// new Primary Group
try
{
pgrp.Properties["member"].
Add(user.Properties["distinguishedName"].Value);
pgrp.CommitChanges();
}
catch { }
In the snippet, pgrp is a DirectoryEntry-object pointing to the Primary
Group. Now that the user is a member of the required group, it is time to change the user’s Primary Group. This should be done using ADSI, which
allows us to glue the primaryGroupToken together with the primaryGroupId. The following snippet shows how this can be done.
Chapter 11. Groups 235
// Set the primary group
user.InvokeSet("primaryGroupId",
new object[]
{ pgrp.Properties["primaryGroupToken"].Value });
user.CommitChanges();
Primary Group Membership
Bear in mind that an account has to be a member of the Primary Group that is going to be assigned.

Chapter 12. Users 237
12. Users
Users are the most complex security principals available within AD DS. The creation and manipulation of user objects require more skill than they do
for contacts and groups. This because simply creating a user account will not meet the requirements within most organizations. Whether or not a
roaming profile is required, a login script is needed, a terminal server
profile is required or security demands that newly created accounts be disabled—these are all questions that have to be answered and that require
user-object configuration.
When we speak about users, we actually mean the user’s account. In this paragraph, we mostly use the word account to mean the user’s AD DS-
logon account.
Furthermore, several basic user account maintenance tasks exist; the most
common tasks are listed here: Enable an account;
Disable an account;
Unlock an account; Set a password that expires;
Set a password that never expires; Set a password that cannot be changed;
Reset the password of an account;
Set expiration date.
When creating an identity and access (de)provisioning application, these tasks will probably be part of application requirements. Furthermore,
password manipulation will also be part of self-service applications that become more and more popular in organizations.
Let’s start by examining the creation, renaming and deletion process regarding an account. Afterwards, I will discuss the basic maintenance
tasks in depth.
12.1. Create a user account
A user account is one of the more complex objects to create within AD DS, although there are just two mandatory attributes—the common name and
the sAMAccountName.
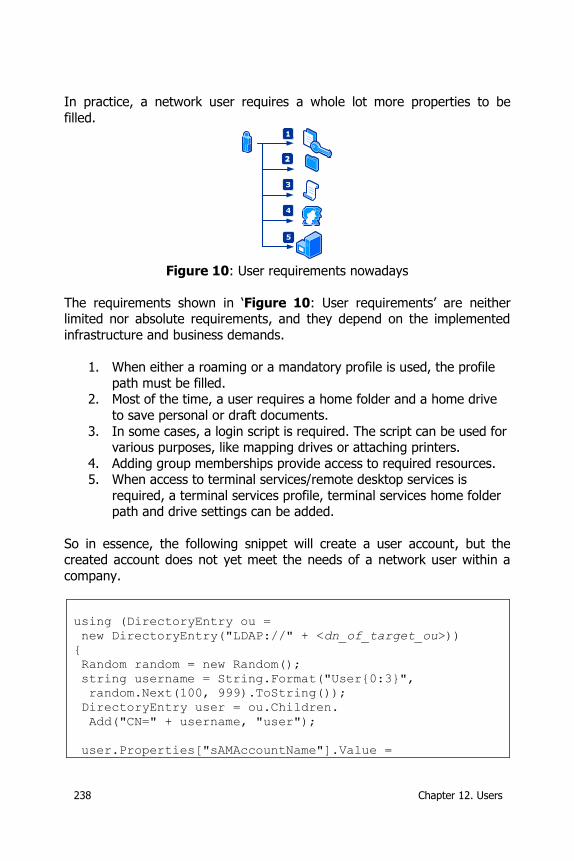
238 Chapter 12. Users
In practice, a network user requires a whole lot more properties to be
filled.
Figure 10: User requirements nowadays
The requirements shown in ‘Figure 10: User requirements’ are neither limited nor absolute requirements, and they depend on the implemented
infrastructure and business demands.
1. When either a roaming or a mandatory profile is used, the profile
path must be filled. 2. Most of the time, a user requires a home folder and a home drive
to save personal or draft documents.
3. In some cases, a login script is required. The script can be used for various purposes, like mapping drives or attaching printers.
4. Adding group memberships provide access to required resources. 5. When access to terminal services/remote desktop services is
required, a terminal services profile, terminal services home folder path and drive settings can be added.
So in essence, the following snippet will create a user account, but the created account does not yet meet the needs of a network user within a
company.
using (DirectoryEntry ou =
new DirectoryEntry("LDAP://" + <dn_of_target_ou>))
{
Random random = new Random();
string username = String.Format("User{0:3}",
random.Next(100, 999).ToString());
DirectoryEntry user = ou.Children.
Add("CN=" + username, "user");
user.Properties["sAMAccountName"].Value =
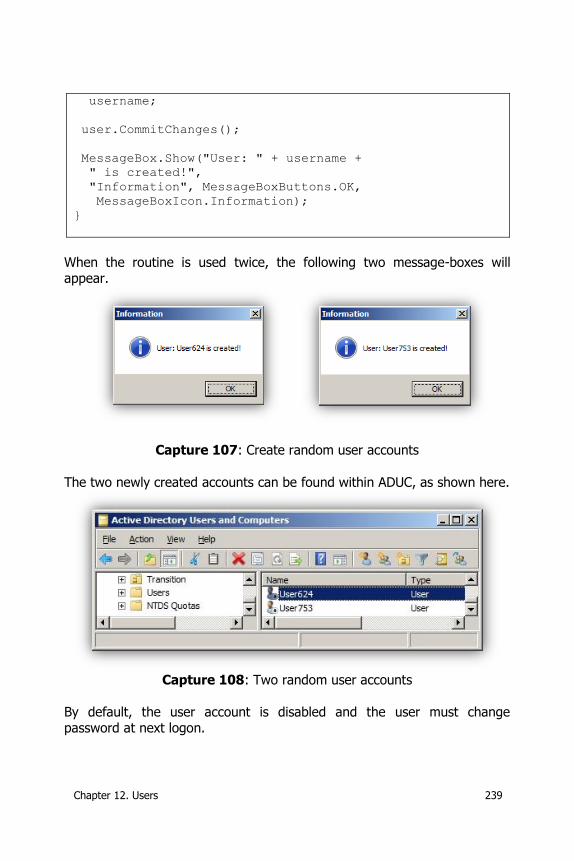
Chapter 12. Users 239
username;
user.CommitChanges();
MessageBox.Show("User: " + username +
" is created!",
"Information", MessageBoxButtons.OK,
MessageBoxIcon.Information);
}
When the routine is used twice, the following two message-boxes will appear.
Capture 107: Create random user accounts
The two newly created accounts can be found within ADUC, as shown here.
Capture 108: Two random user accounts
By default, the user account is disabled and the user must change password at next logon.
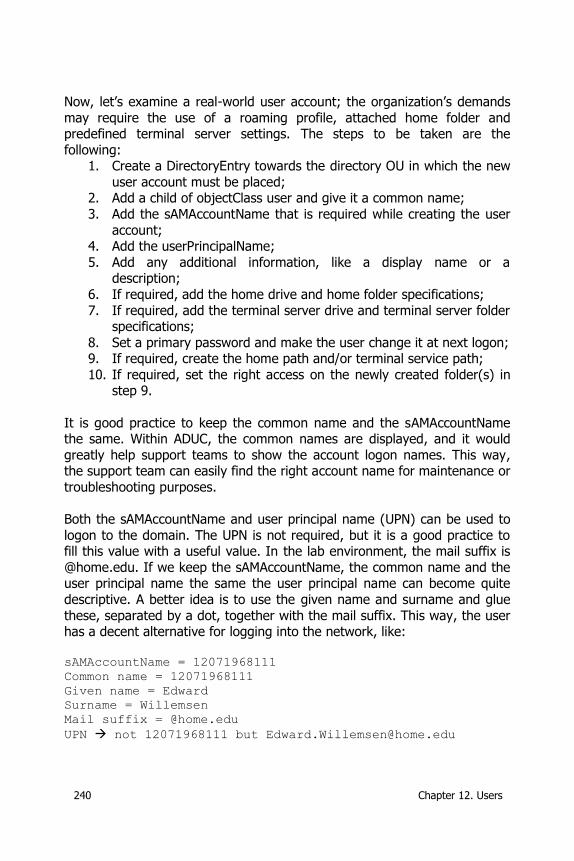
240 Chapter 12. Users
Now, let’s examine a real-world user account; the organization’s demands
may require the use of a roaming profile, attached home folder and predefined terminal server settings. The steps to be taken are the
following: 1. Create a DirectoryEntry towards the directory OU in which the new
user account must be placed; 2. Add a child of objectClass user and give it a common name;
3. Add the sAMAccountName that is required while creating the user
account; 4. Add the userPrincipalName;
5. Add any additional information, like a display name or a description;
6. If required, add the home drive and home folder specifications;
7. If required, add the terminal server drive and terminal server folder specifications;
8. Set a primary password and make the user change it at next logon; 9. If required, create the home path and/or terminal service path;
10. If required, set the right access on the newly created folder(s) in step 9.
It is good practice to keep the common name and the sAMAccountName the same. Within ADUC, the common names are displayed, and it would
greatly help support teams to show the account logon names. This way, the support team can easily find the right account name for maintenance or
troubleshooting purposes.
Both the sAMAccountName and user principal name (UPN) can be used to
logon to the domain. The UPN is not required, but it is a good practice to fill this value with a useful value. In the lab environment, the mail suffix is
@home.edu. If we keep the sAMAccountName, the common name and the user principal name the same the user principal name can become quite
descriptive. A better idea is to use the given name and surname and glue
these, separated by a dot, together with the mail suffix. This way, the user has a decent alternative for logging into the network, like:
sAMAccountName = 12071968111
Common name = 12071968111
Given name = Edward
Surname = Willemsen
Mail suffix = @home.edu
UPN not 12071968111 but [email protected]
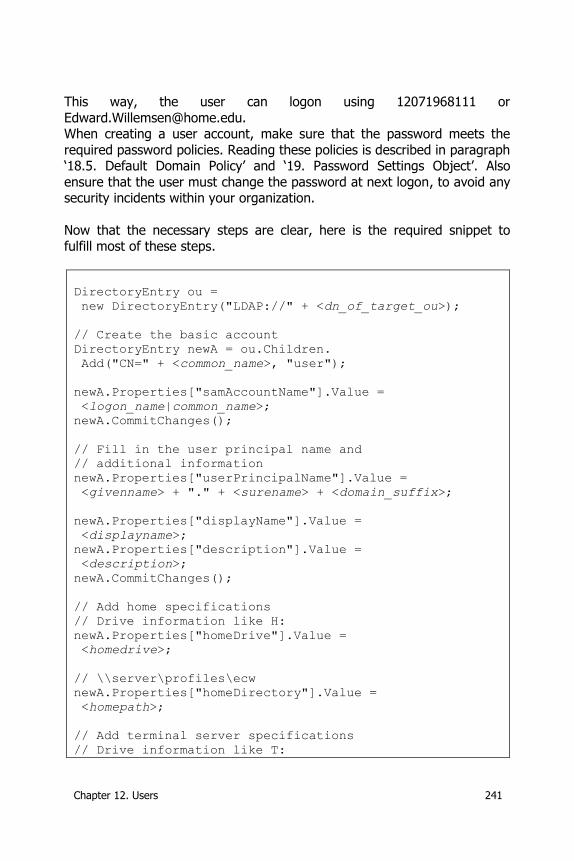
Chapter 12. Users 241
This way, the user can logon using 12071968111 or
[email protected]. When creating a user account, make sure that the password meets the
required password policies. Reading these policies is described in paragraph ‘18.5. Default Domain Policy’ and ‘19. Password Settings Object’. Also
ensure that the user must change the password at next logon, to avoid any security incidents within your organization.
Now that the necessary steps are clear, here is the required snippet to fulfill most of these steps.
DirectoryEntry ou =
new DirectoryEntry("LDAP://" + <dn_of_target_ou>);
// Create the basic account
DirectoryEntry newA = ou.Children.
Add("CN=" + <common_name>, "user");
newA.Properties["samAccountName"].Value =
<logon_name|common_name>;
newA.CommitChanges();
// Fill in the user principal name and
// additional information
newA.Properties["userPrincipalName"].Value =
<givenname> + "." + <surename> + <domain_suffix>;
newA.Properties["displayName"].Value =
<displayname>;
newA.Properties["description"].Value =
<description>;
newA.CommitChanges();
// Add home specifications
// Drive information like H:
newA.Properties["homeDrive"].Value =
<homedrive>;
// \\server\profiles\ecw
newA.Properties["homeDirectory"].Value =
<homepath>;
// Add terminal server specifications
// Drive information like T:
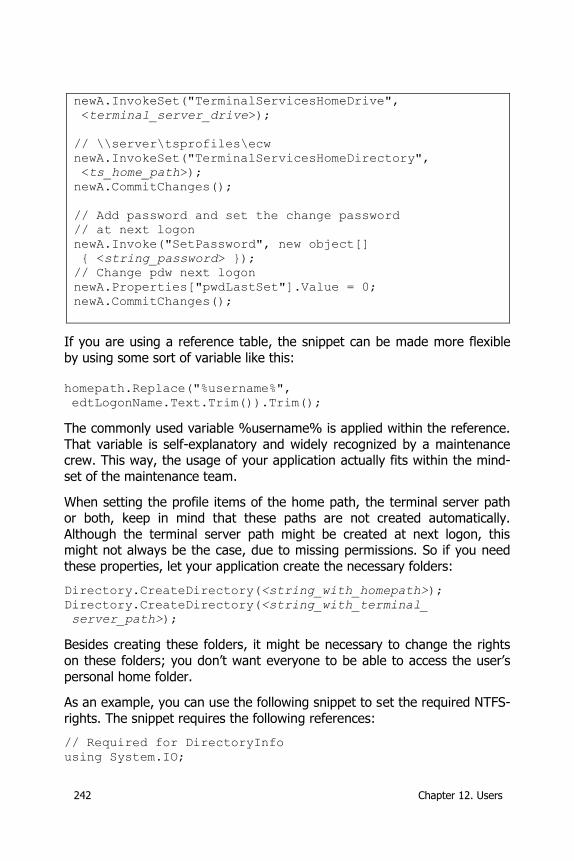
242 Chapter 12. Users
newA.InvokeSet("TerminalServicesHomeDrive",
<terminal_server_drive>);
// \\server\tsprofiles\ecw
newA.InvokeSet("TerminalServicesHomeDirectory",
<ts_home_path>);
newA.CommitChanges();
// Add password and set the change password
// at next logon
newA.Invoke("SetPassword", new object[]
{ <string_password> });
// Change pdw next logon
newA.Properties["pwdLastSet"].Value = 0;
newA.CommitChanges();
If you are using a reference table, the snippet can be made more flexible
by using some sort of variable like this:
homepath.Replace("%username%",
edtLogonName.Text.Trim()).Trim();
The commonly used variable %username% is applied within the reference.
That variable is self-explanatory and widely recognized by a maintenance crew. This way, the usage of your application actually fits within the mind-
set of the maintenance team.
When setting the profile items of the home path, the terminal server path or both, keep in mind that these paths are not created automatically.
Although the terminal server path might be created at next logon, this might not always be the case, due to missing permissions. So if you need
these properties, let your application create the necessary folders:
Directory.CreateDirectory(<string_with_homepath>);
Directory.CreateDirectory(<string_with_terminal_
server_path>);
Besides creating these folders, it might be necessary to change the rights
on these folders; you don’t want everyone to be able to access the user’s
personal home folder.
As an example, you can use the following snippet to set the required NTFS-
rights. The snippet requires the following references:
// Required for DirectoryInfo
using System.IO;
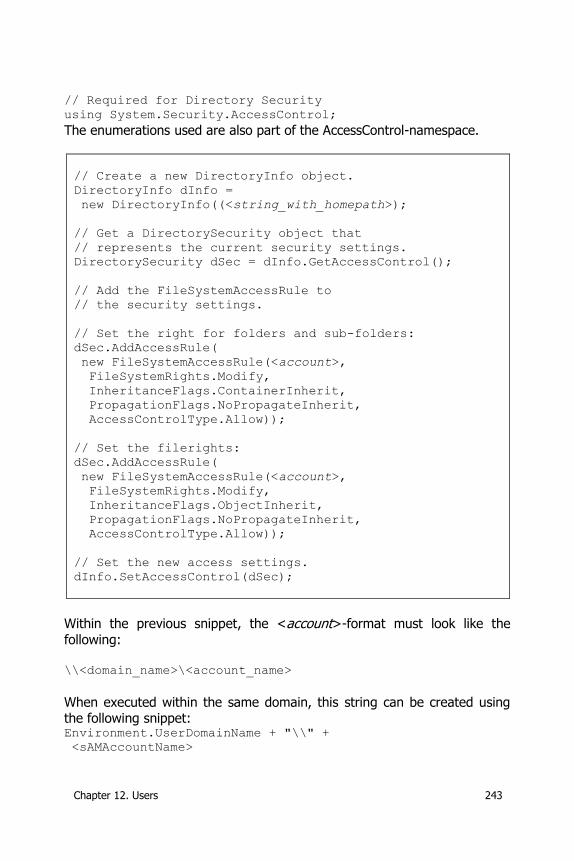
Chapter 12. Users 243
// Required for Directory Security
using System.Security.AccessControl;
The enumerations used are also part of the AccessControl-namespace.
// Create a new DirectoryInfo object.
DirectoryInfo dInfo =
new DirectoryInfo((<string_with_homepath>);
// Get a DirectorySecurity object that
// represents the current security settings.
DirectorySecurity dSec = dInfo.GetAccessControl();
// Add the FileSystemAccessRule to
// the security settings.
// Set the right for folders and sub-folders:
dSec.AddAccessRule(
new FileSystemAccessRule(<account>,
FileSystemRights.Modify,
InheritanceFlags.ContainerInherit,
PropagationFlags.NoPropagateInherit,
AccessControlType.Allow));
// Set the filerights:
dSec.AddAccessRule(
new FileSystemAccessRule(<account>,
FileSystemRights.Modify,
InheritanceFlags.ObjectInherit,
PropagationFlags.NoPropagateInherit,
AccessControlType.Allow));
// Set the new access settings.
dInfo.SetAccessControl(dSec);
Within the previous snippet, the <account>-format must look like the
following:
\\<domain_name>\<account_name>
When executed within the same domain, this string can be created using the following snippet: Environment.UserDomainName + "\\" +
<sAMAccountName>
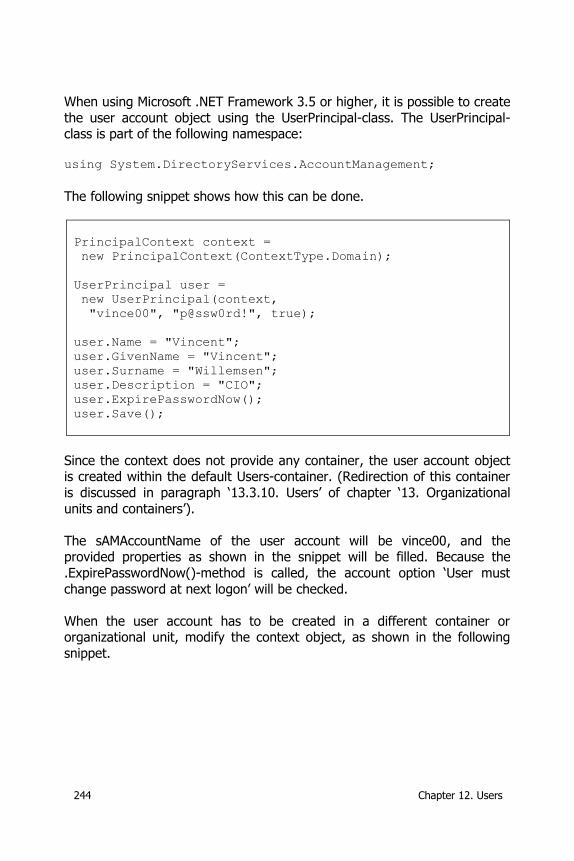
244 Chapter 12. Users
When using Microsoft .NET Framework 3.5 or higher, it is possible to create
the user account object using the UserPrincipal-class. The UserPrincipal-class is part of the following namespace:
using System.DirectoryServices.AccountManagement;
The following snippet shows how this can be done.
PrincipalContext context =
new PrincipalContext(ContextType.Domain);
UserPrincipal user =
new UserPrincipal(context,
"vince00", "p@ssw0rd!", true);
user.Name = "Vincent";
user.GivenName = "Vincent";
user.Surname = "Willemsen";
user.Description = "CIO";
user.ExpirePasswordNow();
user.Save();
Since the context does not provide any container, the user account object is created within the default Users-container. (Redirection of this container
is discussed in paragraph ‘13.3.10. Users’ of chapter ‘13. Organizational
units and containers’).
The sAMAccountName of the user account will be vince00, and the provided properties as shown in the snippet will be filled. Because the
.ExpirePasswordNow()-method is called, the account option ‘User must
change password at next logon’ will be checked.
When the user account has to be created in a different container or organizational unit, modify the context object, as shown in the following
snippet.
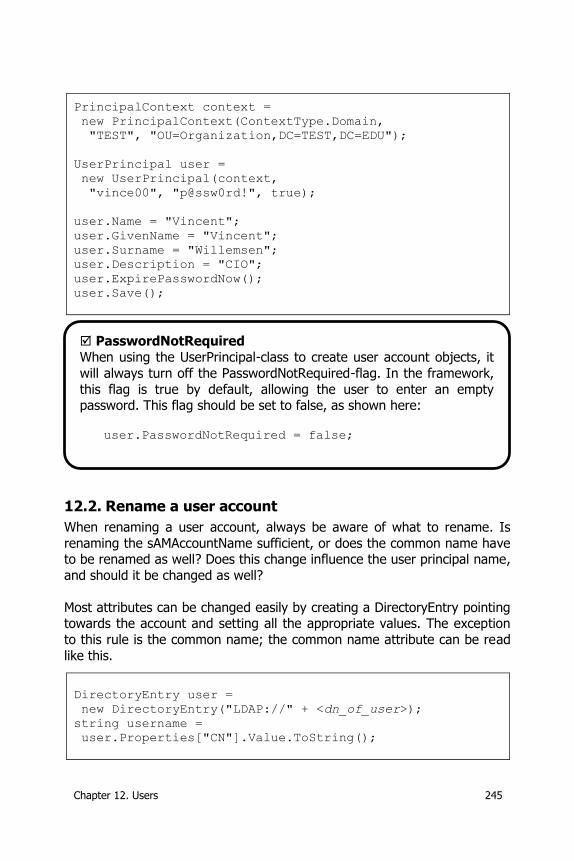
Chapter 12. Users 245
PrincipalContext context =
new PrincipalContext(ContextType.Domain,
"TEST", "OU=Organization,DC=TEST,DC=EDU");
UserPrincipal user =
new UserPrincipal(context,
"vince00", "p@ssw0rd!", true);
user.Name = "Vincent";
user.GivenName = "Vincent";
user.Surname = "Willemsen";
user.Description = "CIO";
user.ExpirePasswordNow();
user.Save();
12.2. Rename a user account
When renaming a user account, always be aware of what to rename. Is
renaming the sAMAccountName sufficient, or does the common name have to be renamed as well? Does this change influence the user principal name,
and should it be changed as well?
Most attributes can be changed easily by creating a DirectoryEntry pointing towards the account and setting all the appropriate values. The exception
to this rule is the common name; the common name attribute can be read
like this.
DirectoryEntry user =
new DirectoryEntry("LDAP://" + <dn_of_user>);
string username =
user.Properties["CN"].Value.ToString();
PasswordNotRequired
When using the UserPrincipal-class to create user account objects, it
will always turn off the PasswordNotRequired-flag. In the framework,
this flag is true by default, allowing the user to enter an empty password. This flag should be set to false, as shown here:
user.PasswordNotRequired = false;
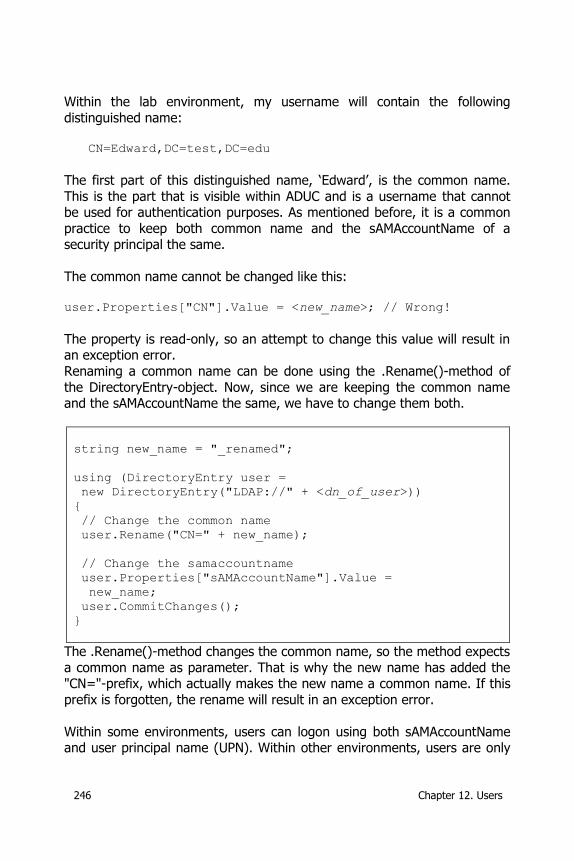
246 Chapter 12. Users
Within the lab environment, my username will contain the following
distinguished name:
CN=Edward,DC=test,DC=edu
The first part of this distinguished name, ‘Edward’, is the common name.
This is the part that is visible within ADUC and is a username that cannot be used for authentication purposes. As mentioned before, it is a common
practice to keep both common name and the sAMAccountName of a security principal the same.
The common name cannot be changed like this:
user.Properties["CN"].Value = <new_name>; // Wrong!
The property is read-only, so an attempt to change this value will result in an exception error.
Renaming a common name can be done using the .Rename()-method of
the DirectoryEntry-object. Now, since we are keeping the common name and the sAMAccountName the same, we have to change them both.
string new_name = "_renamed";
using (DirectoryEntry user =
new DirectoryEntry("LDAP://" + <dn_of_user>))
{
// Change the common name
user.Rename("CN=" + new_name);
// Change the samaccountname
user.Properties["sAMAccountName"].Value =
new_name;
user.CommitChanges();
}
The .Rename()-method changes the common name, so the method expects
a common name as parameter. That is why the new name has added the "CN="-prefix, which actually makes the new name a common name. If this
prefix is forgotten, the rename will result in an exception error.
Within some environments, users can logon using both sAMAccountName and user principal name (UPN). Within other environments, users are only
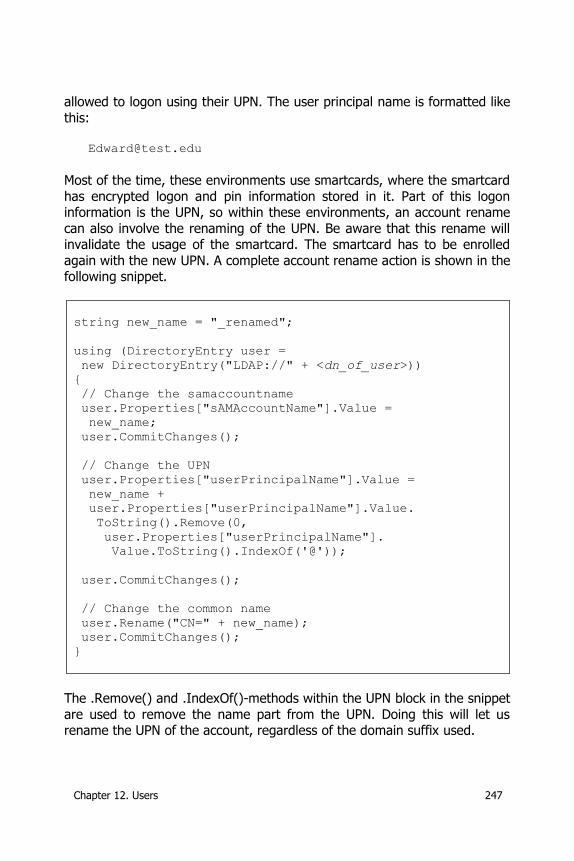
Chapter 12. Users 247
allowed to logon using their UPN. The user principal name is formatted like
this:
Most of the time, these environments use smartcards, where the smartcard
has encrypted logon and pin information stored in it. Part of this logon information is the UPN, so within these environments, an account rename
can also involve the renaming of the UPN. Be aware that this rename will invalidate the usage of the smartcard. The smartcard has to be enrolled
again with the new UPN. A complete account rename action is shown in the following snippet.
string new_name = "_renamed";
using (DirectoryEntry user =
new DirectoryEntry("LDAP://" + <dn_of_user>))
{
// Change the samaccountname
user.Properties["sAMAccountName"].Value =
new_name;
user.CommitChanges();
// Change the UPN
user.Properties["userPrincipalName"].Value =
new_name +
user.Properties["userPrincipalName"].Value.
ToString().Remove(0,
user.Properties["userPrincipalName"].
Value.ToString().IndexOf('@'));
user.CommitChanges();
// Change the common name
user.Rename("CN=" + new_name);
user.CommitChanges();
}
The .Remove() and .IndexOf()-methods within the UPN block in the snippet
are used to remove the name part from the UPN. Doing this will let us rename the UPN of the account, regardless of the domain suffix used.
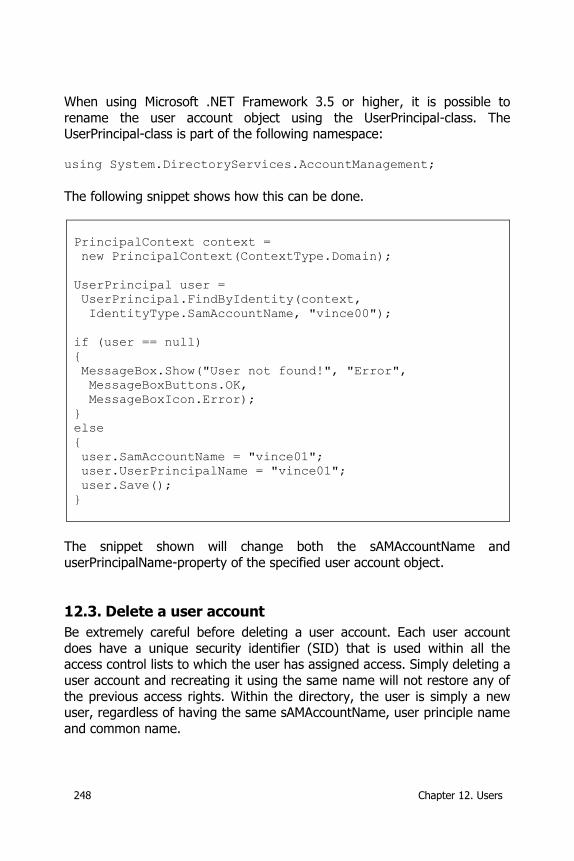
248 Chapter 12. Users
When using Microsoft .NET Framework 3.5 or higher, it is possible to
rename the user account object using the UserPrincipal-class. The UserPrincipal-class is part of the following namespace:
using System.DirectoryServices.AccountManagement;
The following snippet shows how this can be done.
PrincipalContext context =
new PrincipalContext(ContextType.Domain);
UserPrincipal user =
UserPrincipal.FindByIdentity(context,
IdentityType.SamAccountName, "vince00");
if (user == null)
{
MessageBox.Show("User not found!", "Error",
MessageBoxButtons.OK,
MessageBoxIcon.Error);
}
else
{
user.SamAccountName = "vince01";
user.UserPrincipalName = "vince01";
user.Save();
}
The snippet shown will change both the sAMAccountName and
userPrincipalName-property of the specified user account object.
12.3. Delete a user account
Be extremely careful before deleting a user account. Each user account
does have a unique security identifier (SID) that is used within all the access control lists to which the user has assigned access. Simply deleting a
user account and recreating it using the same name will not restore any of
the previous access rights. Within the directory, the user is simply a new user, regardless of having the same sAMAccountName, user principle name
and common name.
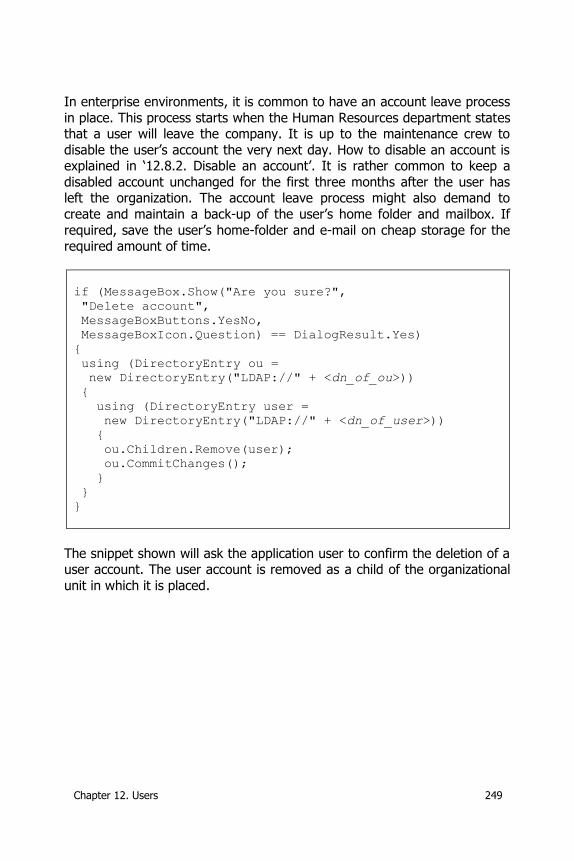
Chapter 12. Users 249
In enterprise environments, it is common to have an account leave process
in place. This process starts when the Human Resources department states that a user will leave the company. It is up to the maintenance crew to
disable the user’s account the very next day. How to disable an account is explained in ‘12.8.2. Disable an account’. It is rather common to keep a
disabled account unchanged for the first three months after the user has left the organization. The account leave process might also demand to
create and maintain a back-up of the user’s home folder and mailbox. If
required, save the user’s home-folder and e-mail on cheap storage for the required amount of time.
if (MessageBox.Show("Are you sure?",
"Delete account",
MessageBoxButtons.YesNo,
MessageBoxIcon.Question) == DialogResult.Yes)
{
using (DirectoryEntry ou =
new DirectoryEntry("LDAP://" + <dn_of_ou>))
{
using (DirectoryEntry user =
new DirectoryEntry("LDAP://" + <dn_of_user>))
{
ou.Children.Remove(user);
ou.CommitChanges();
}
}
}
The snippet shown will ask the application user to confirm the deletion of a user account. The user account is removed as a child of the organizational
unit in which it is placed.
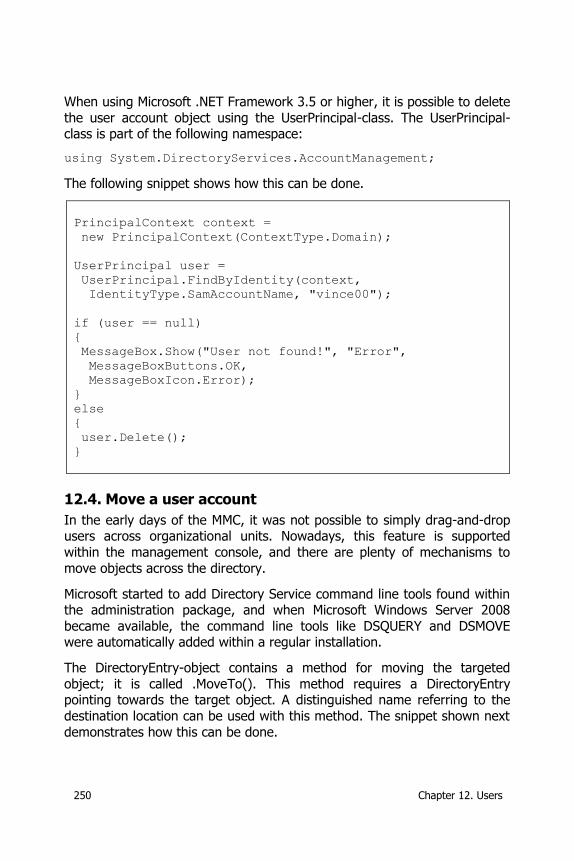
250 Chapter 12. Users
When using Microsoft .NET Framework 3.5 or higher, it is possible to delete
the user account object using the UserPrincipal-class. The UserPrincipal-class is part of the following namespace:
using System.DirectoryServices.AccountManagement;
The following snippet shows how this can be done.
PrincipalContext context =
new PrincipalContext(ContextType.Domain);
UserPrincipal user =
UserPrincipal.FindByIdentity(context,
IdentityType.SamAccountName, "vince00");
if (user == null)
{
MessageBox.Show("User not found!", "Error",
MessageBoxButtons.OK,
MessageBoxIcon.Error);
}
else
{
user.Delete();
}
12.4. Move a user account
In the early days of the MMC, it was not possible to simply drag-and-drop users across organizational units. Nowadays, this feature is supported
within the management console, and there are plenty of mechanisms to
move objects across the directory.
Microsoft started to add Directory Service command line tools found within the administration package, and when Microsoft Windows Server 2008
became available, the command line tools like DSQUERY and DSMOVE were automatically added within a regular installation.
The DirectoryEntry-object contains a method for moving the targeted
object; it is called .MoveTo(). This method requires a DirectoryEntry pointing towards the target object. A distinguished name referring to the
destination location can be used with this method. The snippet shown next
demonstrates how this can be done.
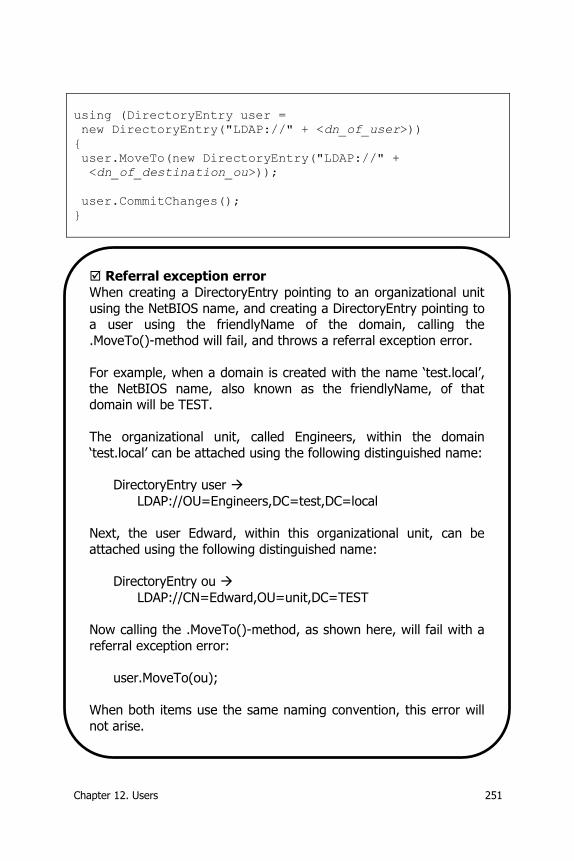
Chapter 12. Users 251
using (DirectoryEntry user =
new DirectoryEntry("LDAP://" + <dn_of_user>))
{
user.MoveTo(new DirectoryEntry("LDAP://" +
<dn_of_destination_ou>));
user.CommitChanges();
}
Referral exception error
When creating a DirectoryEntry pointing to an organizational unit
using the NetBIOS name, and creating a DirectoryEntry pointing to a user using the friendlyName of the domain, calling the
.MoveTo()-method will fail, and throws a referral exception error.
For example, when a domain is created with the name ‘test.local’,
the NetBIOS name, also known as the friendlyName, of that domain will be TEST.
The organizational unit, called Engineers, within the domain
‘test.local’ can be attached using the following distinguished name:
DirectoryEntry user
LDAP://OU=Engineers,DC=test,DC=local
Next, the user Edward, within this organizational unit, can be
attached using the following distinguished name:
DirectoryEntry ou
LDAP://CN=Edward,OU=unit,DC=TEST
Now calling the .MoveTo()-method, as shown here, will fail with a
referral exception error:
user.MoveTo(ou);
When both items use the same naming convention, this error will
not arise.

252 Chapter 12. Users
The UserPrincipal-class—available in Microsoft .NET Framework 3.5 or
higher—does not contain a .Rename()-method. Furthermore, the .DistinguishedName-propery is read-only. So assigning a new location this
way isn’t possible. A user account object should be moved by saving it in another context. The following snippet shows how this can be done.
PrincipalContext context =
new PrincipalContext(ContextType.Domain);
PrincipalContext newcontext =
new PrincipalContext(ContextType.Domain,
"TEST", "CN=Users,DC=TEST,DC=EDU");
UserPrincipal user =
UserPrincipal.FindByIdentity(context,
IdentityType.SamAccountName, "vince00");
if (user == null)
{
MessageBox.Show("User not found!", "Error",
MessageBoxButtons.OK,
MessageBoxIcon.Error);
}
else
{
user.Save(newcontext);
}
The user account object is searched for within the entire directory. After
executing the .Save()-method, the found user account object is moved to the directory location defined within the newcontext-variable—in this case,
CN=Users,DC=TEST,DC=EDU.
12.5. User account membership
Membership from a group’s perspective is discussed in ‘
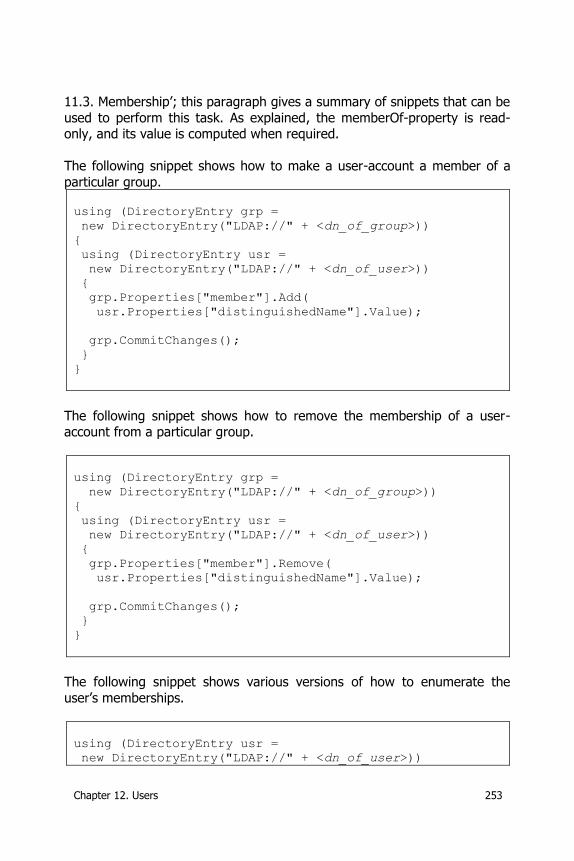
Chapter 12. Users 253
11.3. Membership’; this paragraph gives a summary of snippets that can be
used to perform this task. As explained, the memberOf-property is read-only, and its value is computed when required.
The following snippet shows how to make a user-account a member of a
particular group.
using (DirectoryEntry grp =
new DirectoryEntry("LDAP://" + <dn_of_group>))
{
using (DirectoryEntry usr =
new DirectoryEntry("LDAP://" + <dn_of_user>))
{
grp.Properties["member"].Add(
usr.Properties["distinguishedName"].Value);
grp.CommitChanges();
}
}
The following snippet shows how to remove the membership of a user-account from a particular group.
using (DirectoryEntry grp =
new DirectoryEntry("LDAP://" + <dn_of_group>))
{
using (DirectoryEntry usr =
new DirectoryEntry("LDAP://" + <dn_of_user>))
{
grp.Properties["member"].Remove(
usr.Properties["distinguishedName"].Value);
grp.CommitChanges();
}
}
The following snippet shows various versions of how to enumerate the
user’s memberships.
using (DirectoryEntry usr =
new DirectoryEntry("LDAP://" + <dn_of_user>))
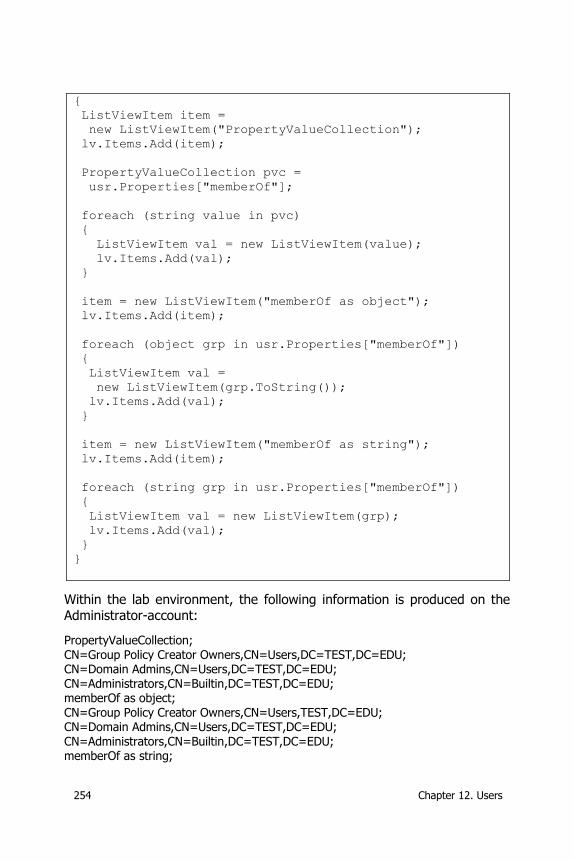
254 Chapter 12. Users
{
ListViewItem item =
new ListViewItem("PropertyValueCollection");
lv.Items.Add(item);
PropertyValueCollection pvc =
usr.Properties["memberOf"];
foreach (string value in pvc)
{
ListViewItem val = new ListViewItem(value);
lv.Items.Add(val);
}
item = new ListViewItem("memberOf as object");
lv.Items.Add(item);
foreach (object grp in usr.Properties["memberOf"])
{
ListViewItem val =
new ListViewItem(grp.ToString());
lv.Items.Add(val);
}
item = new ListViewItem("memberOf as string");
lv.Items.Add(item);
foreach (string grp in usr.Properties["memberOf"])
{
ListViewItem val = new ListViewItem(grp);
lv.Items.Add(val);
}
}
Within the lab environment, the following information is produced on the Administrator-account:
PropertyValueCollection; CN=Group Policy Creator Owners,CN=Users,DC=TEST,DC=EDU; CN=Domain Admins,CN=Users,DC=TEST,DC=EDU; CN=Administrators,CN=Builtin,DC=TEST,DC=EDU; memberOf as object; CN=Group Policy Creator Owners,CN=Users,TEST,DC=EDU; CN=Domain Admins,CN=Users,DC=TEST,DC=EDU; CN=Administrators,CN=Builtin,DC=TEST,DC=EDU; memberOf as string;
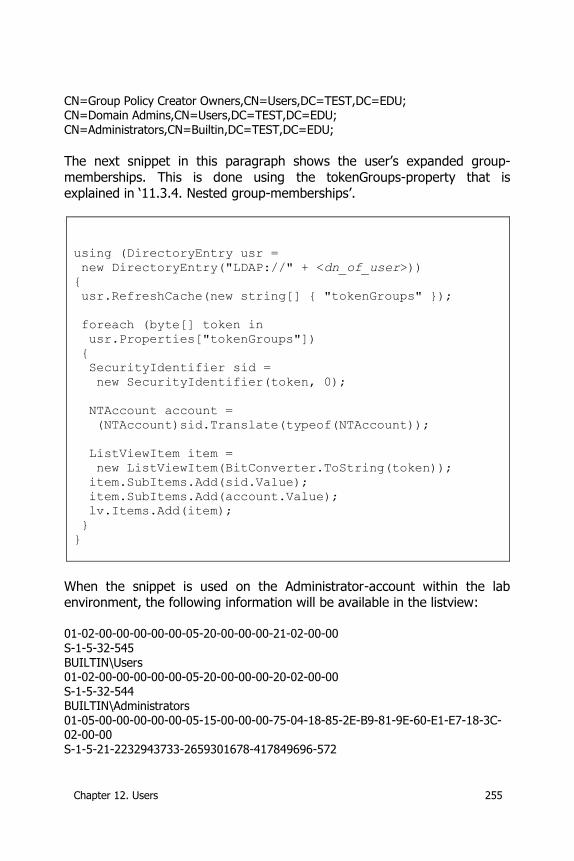
Chapter 12. Users 255
CN=Group Policy Creator Owners,CN=Users,DC=TEST,DC=EDU; CN=Domain Admins,CN=Users,DC=TEST,DC=EDU; CN=Administrators,CN=Builtin,DC=TEST,DC=EDU;
The next snippet in this paragraph shows the user’s expanded group-
memberships. This is done using the tokenGroups-property that is explained in ‘11.3.4. Nested group-memberships’.
using (DirectoryEntry usr =
new DirectoryEntry("LDAP://" + <dn_of_user>))
{
usr.RefreshCache(new string[] { "tokenGroups" });
foreach (byte[] token in
usr.Properties["tokenGroups"])
{
SecurityIdentifier sid =
new SecurityIdentifier(token, 0);
NTAccount account =
(NTAccount)sid.Translate(typeof(NTAccount));
ListViewItem item =
new ListViewItem(BitConverter.ToString(token));
item.SubItems.Add(sid.Value);
item.SubItems.Add(account.Value);
lv.Items.Add(item);
}
}
When the snippet is used on the Administrator-account within the lab environment, the following information will be available in the listview:
01-02-00-00-00-00-00-05-20-00-00-00-21-02-00-00 S-1-5-32-545 BUILTIN\Users 01-02-00-00-00-00-00-05-20-00-00-00-20-02-00-00 S-1-5-32-544 BUILTIN\Administrators 01-05-00-00-00-00-00-05-15-00-00-00-75-04-18-85-2E-B9-81-9E-60-E1-E7-18-3C-02-00-00
S-1-5-21-2232943733-2659301678-417849696-572
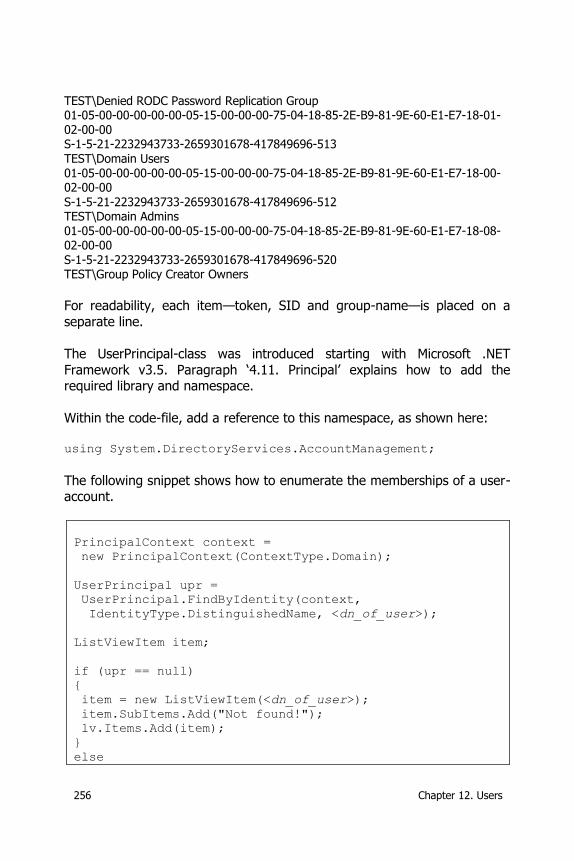
256 Chapter 12. Users
TEST\Denied RODC Password Replication Group 01-05-00-00-00-00-00-05-15-00-00-00-75-04-18-85-2E-B9-81-9E-60-E1-E7-18-01-02-00-00 S-1-5-21-2232943733-2659301678-417849696-513 TEST\Domain Users 01-05-00-00-00-00-00-05-15-00-00-00-75-04-18-85-2E-B9-81-9E-60-E1-E7-18-00-02-00-00 S-1-5-21-2232943733-2659301678-417849696-512 TEST\Domain Admins 01-05-00-00-00-00-00-05-15-00-00-00-75-04-18-85-2E-B9-81-9E-60-E1-E7-18-08-02-00-00 S-1-5-21-2232943733-2659301678-417849696-520 TEST\Group Policy Creator Owners
For readability, each item—token, SID and group-name—is placed on a
separate line.
The UserPrincipal-class was introduced starting with Microsoft .NET
Framework v3.5. Paragraph ‘4.11. Principal’ explains how to add the required library and namespace.
Within the code-file, add a reference to this namespace, as shown here:
using System.DirectoryServices.AccountManagement;
The following snippet shows how to enumerate the memberships of a user-account.
PrincipalContext context =
new PrincipalContext(ContextType.Domain);
UserPrincipal upr =
UserPrincipal.FindByIdentity(context,
IdentityType.DistinguishedName, <dn_of_user>);
ListViewItem item;
if (upr == null)
{
item = new ListViewItem(<dn_of_user>);
item.SubItems.Add("Not found!");
lv.Items.Add(item);
}
else
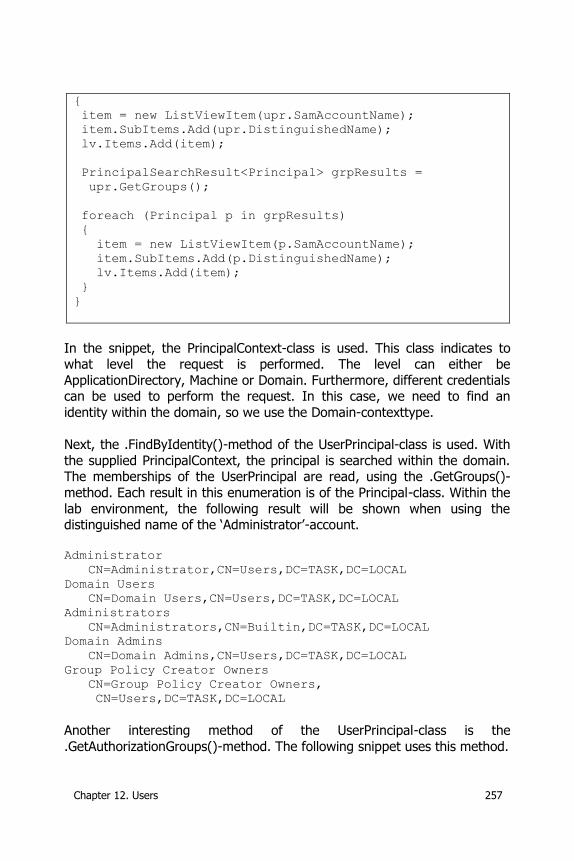
Chapter 12. Users 257
{
item = new ListViewItem(upr.SamAccountName);
item.SubItems.Add(upr.DistinguishedName);
lv.Items.Add(item);
PrincipalSearchResult<Principal> grpResults =
upr.GetGroups();
foreach (Principal p in grpResults)
{
item = new ListViewItem(p.SamAccountName);
item.SubItems.Add(p.DistinguishedName);
lv.Items.Add(item);
}
}
In the snippet, the PrincipalContext-class is used. This class indicates to what level the request is performed. The level can either be
ApplicationDirectory, Machine or Domain. Furthermore, different credentials can be used to perform the request. In this case, we need to find an
identity within the domain, so we use the Domain-contexttype.
Next, the .FindByIdentity()-method of the UserPrincipal-class is used. With
the supplied PrincipalContext, the principal is searched within the domain. The memberships of the UserPrincipal are read, using the .GetGroups()-
method. Each result in this enumeration is of the Principal-class. Within the
lab environment, the following result will be shown when using the distinguished name of the ‘Administrator’-account.
Administrator
CN=Administrator,CN=Users,DC=TASK,DC=LOCAL
Domain Users
CN=Domain Users,CN=Users,DC=TASK,DC=LOCAL
Administrators
CN=Administrators,CN=Builtin,DC=TASK,DC=LOCAL
Domain Admins
CN=Domain Admins,CN=Users,DC=TASK,DC=LOCAL
Group Policy Creator Owners
CN=Group Policy Creator Owners,
CN=Users,DC=TASK,DC=LOCAL
Another interesting method of the UserPrincipal-class is the
.GetAuthorizationGroups()-method. The following snippet uses this method.

258 Chapter 12. Users
PrincipalContext context =
new PrincipalContext(ContextType.Domain);
UserPrincipal upr =
UserPrincipal.FindByIdentity(context,
IdentityType.DistinguishedName, <dn_of_user>);
ListViewItem item;
if (upr == null)
{
item = new ListViewItem(<dn_of_user>);
item.SubItems.Add("Not found!");
lv.Items.Add(item);
}
else
{
item = new ListViewItem(upr.SamAccountName);
item.SubItems.Add(upr.DistinguishedName);
lv.Items.Add(item);
PrincipalSearchResult<Principal> grpResults =
upr.GetAuthorizationGroups();
foreach (Principal p in grpResults)
{
item = new ListViewItem(p.SamAccountName);
item.SubItems.Add(p.DistinguishedName);
lv.Items.Add(item);
}
}
When the distinguished name of the ‘Administrator’-account is used within
the lab environment, the following information will be available in the listview:
Administrator;CN=Administrator,CN=Users,DC=TASK,DC=LOCAL
Domain Users;CN=Domain Users,CN=Users,DC=TASK,DC=LOCAL
Everyone;
Administrators;CN=Administrators,CN=Builtin,DC=TASK,DC=LOCAL
Users;CN=Users,CN=Builtin,DC=TASK,DC=LOCAL
Pre-Windows 2000 Compatible Access;CN=Pre-Windows 2000 Compatible
Access,CN=Builtin,DC=TASK,DC=LOCAL
Authenticated Users;
This Organization;
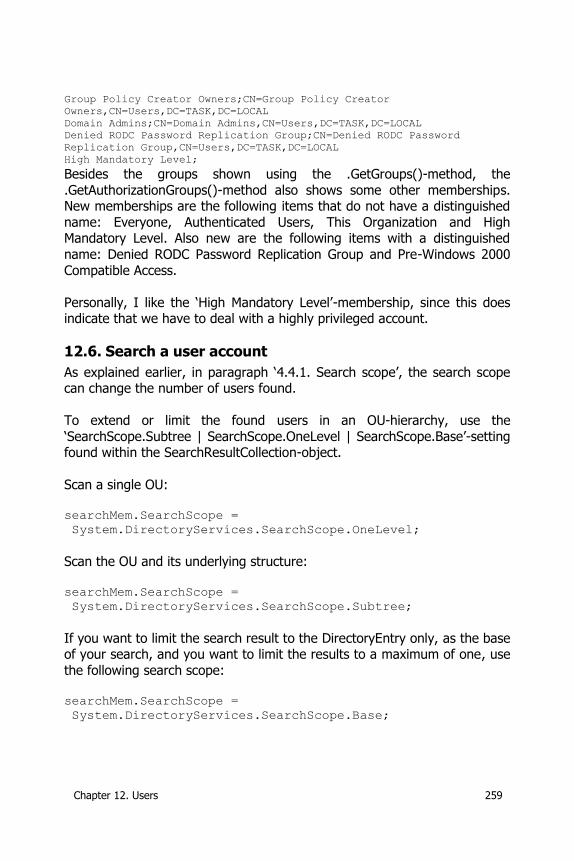
Chapter 12. Users 259
Group Policy Creator Owners;CN=Group Policy Creator
Owners,CN=Users,DC=TASK,DC=LOCAL
Domain Admins;CN=Domain Admins,CN=Users,DC=TASK,DC=LOCAL
Denied RODC Password Replication Group;CN=Denied RODC Password
Replication Group,CN=Users,DC=TASK,DC=LOCAL
High Mandatory Level;
Besides the groups shown using the .GetGroups()-method, the
.GetAuthorizationGroups()-method also shows some other memberships. New memberships are the following items that do not have a distinguished
name: Everyone, Authenticated Users, This Organization and High Mandatory Level. Also new are the following items with a distinguished
name: Denied RODC Password Replication Group and Pre-Windows 2000
Compatible Access.
Personally, I like the ‘High Mandatory Level’-membership, since this does indicate that we have to deal with a highly privileged account.
12.6. Search a user account
As explained earlier, in paragraph ‘4.4.1. Search scope’, the search scope can change the number of users found.
To extend or limit the found users in an OU-hierarchy, use the
‘SearchScope.Subtree | SearchScope.OneLevel | SearchScope.Base’-setting found within the SearchResultCollection-object.
Scan a single OU: searchMem.SearchScope =
System.DirectoryServices.SearchScope.OneLevel;
Scan the OU and its underlying structure: searchMem.SearchScope =
System.DirectoryServices.SearchScope.Subtree;
If you want to limit the search result to the DirectoryEntry only, as the base of your search, and you want to limit the results to a maximum of one, use
the following search scope:
searchMem.SearchScope =
System.DirectoryServices.SearchScope.Base;
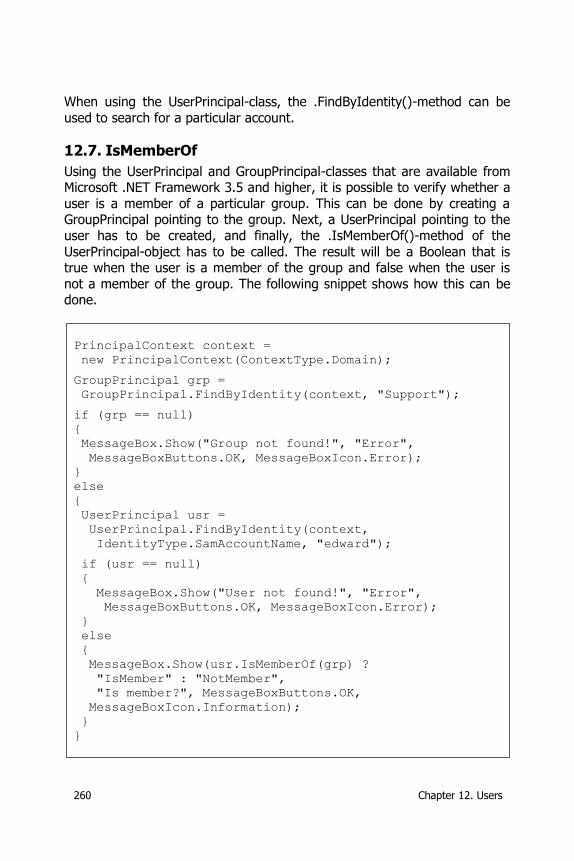
260 Chapter 12. Users
When using the UserPrincipal-class, the .FindByIdentity()-method can be
used to search for a particular account.
12.7. IsMemberOf
Using the UserPrincipal and GroupPrincipal-classes that are available from Microsoft .NET Framework 3.5 and higher, it is possible to verify whether a
user is a member of a particular group. This can be done by creating a GroupPrincipal pointing to the group. Next, a UserPrincipal pointing to the
user has to be created, and finally, the .IsMemberOf()-method of the
UserPrincipal-object has to be called. The result will be a Boolean that is true when the user is a member of the group and false when the user is
not a member of the group. The following snippet shows how this can be done.
PrincipalContext context =
new PrincipalContext(ContextType.Domain);
GroupPrincipal grp =
GroupPrincipal.FindByIdentity(context, "Support");
if (grp == null)
{
MessageBox.Show("Group not found!", "Error",
MessageBoxButtons.OK, MessageBoxIcon.Error);
}
else
{
UserPrincipal usr =
UserPrincipal.FindByIdentity(context,
IdentityType.SamAccountName, "edward");
if (usr == null)
{
MessageBox.Show("User not found!", "Error",
MessageBoxButtons.OK, MessageBoxIcon.Error);
}
else
{
MessageBox.Show(usr.IsMemberOf(grp) ?
"IsMember" : "NotMember",
"Is member?", MessageBoxButtons.OK,
MessageBoxIcon.Information);
}
}
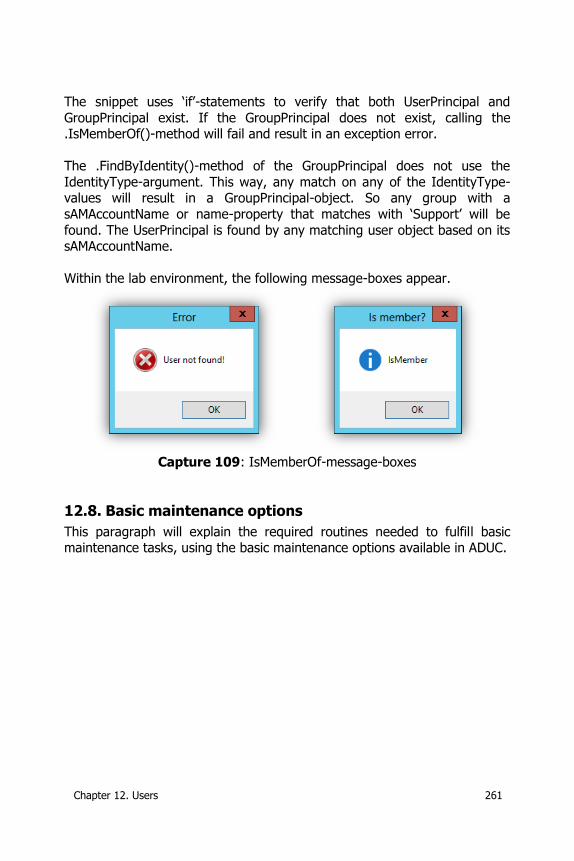
Chapter 12. Users 261
The snippet uses ‘if’-statements to verify that both UserPrincipal and
GroupPrincipal exist. If the GroupPrincipal does not exist, calling the .IsMemberOf()-method will fail and result in an exception error.
The .FindByIdentity()-method of the GroupPrincipal does not use the
IdentityType-argument. This way, any match on any of the IdentityType-values will result in a GroupPrincipal-object. So any group with a
sAMAccountName or name-property that matches with ‘Support’ will be
found. The UserPrincipal is found by any matching user object based on its sAMAccountName.
Within the lab environment, the following message-boxes appear.
Capture 109: IsMemberOf-message-boxes
12.8. Basic maintenance options
This paragraph will explain the required routines needed to fulfill basic maintenance tasks, using the basic maintenance options available in ADUC.
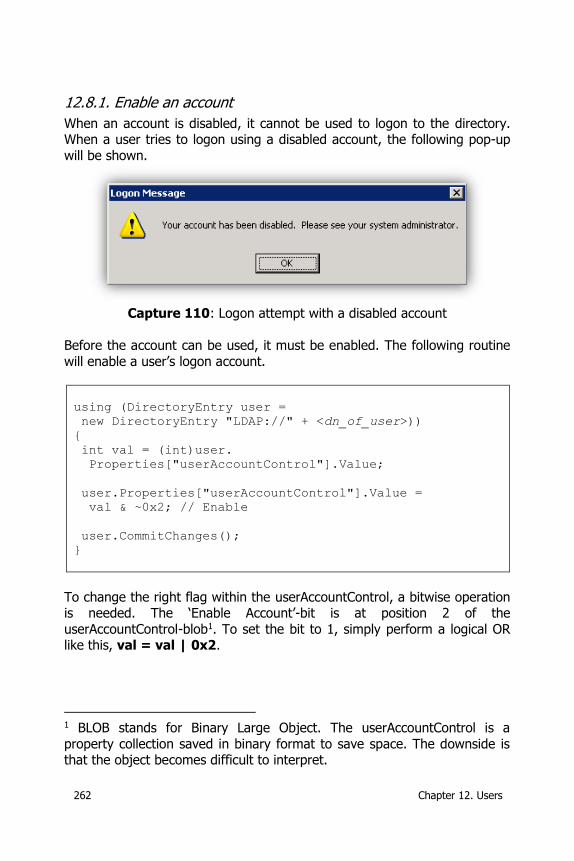
262 Chapter 12. Users
12.8.1. Enable an account
When an account is disabled, it cannot be used to logon to the directory. When a user tries to logon using a disabled account, the following pop-up
will be shown.
Capture 110: Logon attempt with a disabled account
Before the account can be used, it must be enabled. The following routine
will enable a user’s logon account.
using (DirectoryEntry user =
new DirectoryEntry "LDAP://" + <dn_of_user>))
{
int val = (int)user.
Properties["userAccountControl"].Value;
user.Properties["userAccountControl"].Value =
val & ~0x2; // Enable
user.CommitChanges();
}
To change the right flag within the userAccountControl, a bitwise operation is needed. The ‘Enable Account’-bit is at position 2 of the
userAccountControl-blob1. To set the bit to 1, simply perform a logical OR like this, val = val | 0x2.
1 BLOB stands for Binary Large Object. The userAccountControl is a
property collection saved in binary format to save space. The downside is that the object becomes difficult to interpret.
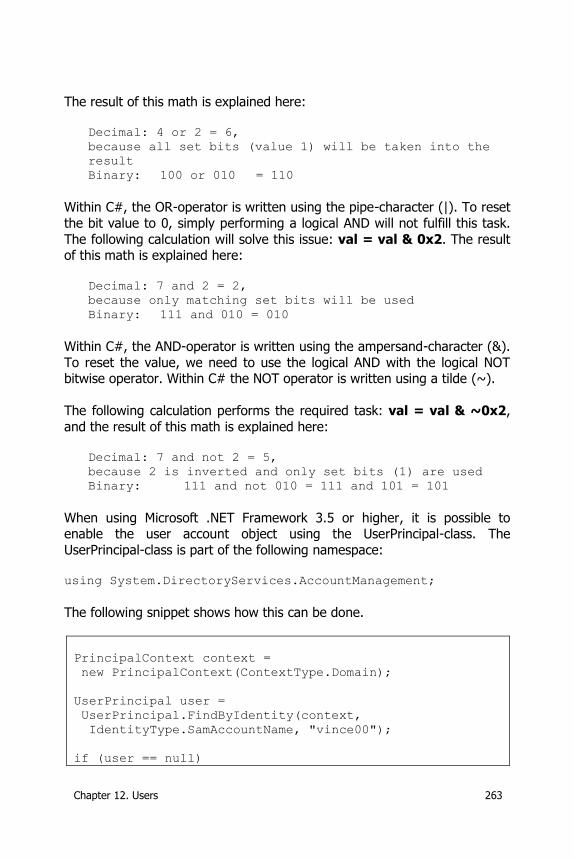
Chapter 12. Users 263
The result of this math is explained here:
Decimal: 4 or 2 = 6,
because all set bits (value 1) will be taken into the
result
Binary: 100 or 010 = 110
Within C#, the OR-operator is written using the pipe-character (|). To reset
the bit value to 0, simply performing a logical AND will not fulfill this task.
The following calculation will solve this issue: val = val & 0x2. The result of this math is explained here:
Decimal: 7 and 2 = 2,
because only matching set bits will be used
Binary: 111 and 010 = 010
Within C#, the AND-operator is written using the ampersand-character (&).
To reset the value, we need to use the logical AND with the logical NOT bitwise operator. Within C# the NOT operator is written using a tilde (~).
The following calculation performs the required task: val = val & ~0x2,
and the result of this math is explained here:
Decimal: 7 and not 2 = 5,
because 2 is inverted and only set bits (1) are used
Binary: 111 and not 010 = 111 and 101 = 101
When using Microsoft .NET Framework 3.5 or higher, it is possible to enable the user account object using the UserPrincipal-class. The
UserPrincipal-class is part of the following namespace: using System.DirectoryServices.AccountManagement;
The following snippet shows how this can be done.
PrincipalContext context =
new PrincipalContext(ContextType.Domain);
UserPrincipal user =
UserPrincipal.FindByIdentity(context,
IdentityType.SamAccountName, "vince00");
if (user == null)
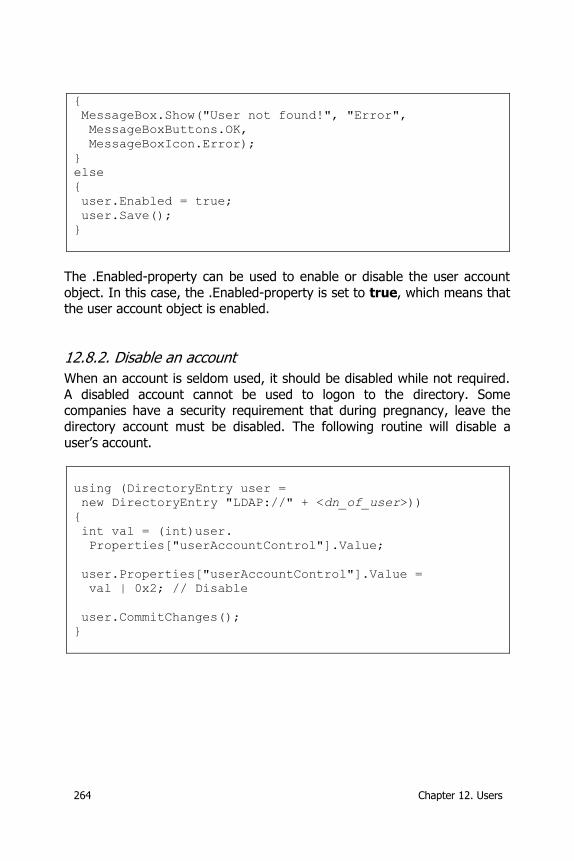
264 Chapter 12. Users
{
MessageBox.Show("User not found!", "Error",
MessageBoxButtons.OK,
MessageBoxIcon.Error);
}
else
{
user.Enabled = true;
user.Save();
}
The .Enabled-property can be used to enable or disable the user account
object. In this case, the .Enabled-property is set to true, which means that the user account object is enabled.
12.8.2. Disable an account
When an account is seldom used, it should be disabled while not required.
A disabled account cannot be used to logon to the directory. Some companies have a security requirement that during pregnancy, leave the
directory account must be disabled. The following routine will disable a
user’s account.
using (DirectoryEntry user =
new DirectoryEntry "LDAP://" + <dn_of_user>))
{
int val = (int)user.
Properties["userAccountControl"].Value;
user.Properties["userAccountControl"].Value =
val | 0x2; // Disable
user.CommitChanges();
}
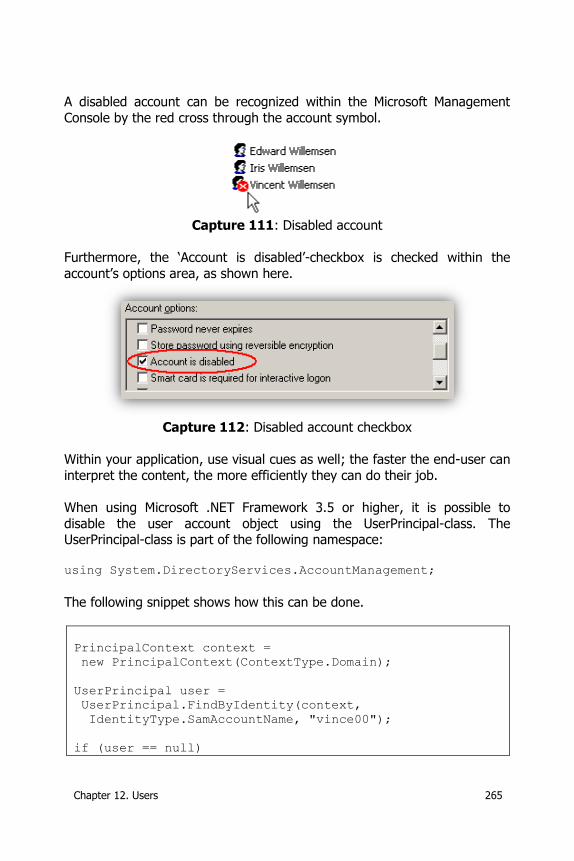
Chapter 12. Users 265
A disabled account can be recognized within the Microsoft Management
Console by the red cross through the account symbol.
Capture 111: Disabled account
Furthermore, the ‘Account is disabled’-checkbox is checked within the
account’s options area, as shown here.
Capture 112: Disabled account checkbox
Within your application, use visual cues as well; the faster the end-user can
interpret the content, the more efficiently they can do their job.
When using Microsoft .NET Framework 3.5 or higher, it is possible to
disable the user account object using the UserPrincipal-class. The UserPrincipal-class is part of the following namespace:
using System.DirectoryServices.AccountManagement;
The following snippet shows how this can be done.
PrincipalContext context =
new PrincipalContext(ContextType.Domain);
UserPrincipal user =
UserPrincipal.FindByIdentity(context,
IdentityType.SamAccountName, "vince00");
if (user == null)
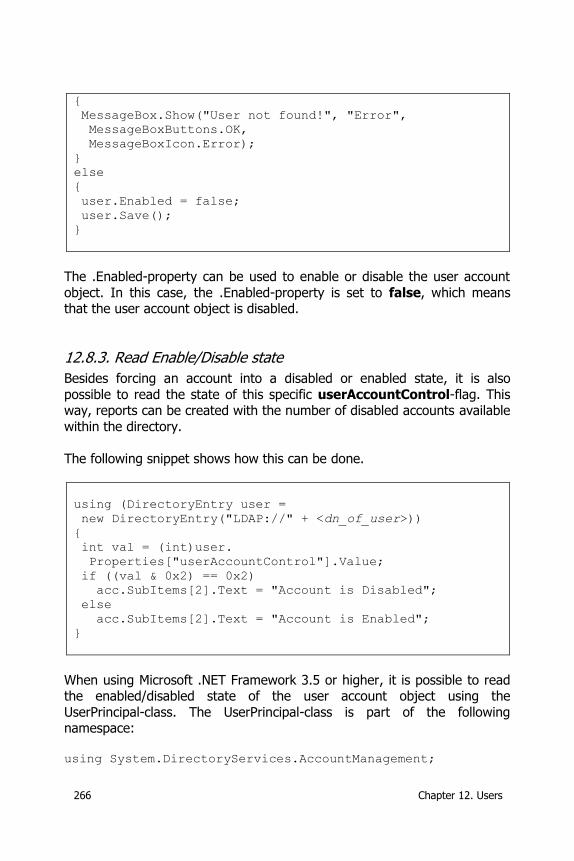
266 Chapter 12. Users
{
MessageBox.Show("User not found!", "Error",
MessageBoxButtons.OK,
MessageBoxIcon.Error);
}
else
{
user.Enabled = false;
user.Save();
}
The .Enabled-property can be used to enable or disable the user account
object. In this case, the .Enabled-property is set to false, which means that the user account object is disabled.
12.8.3. Read Enable/Disable state
Besides forcing an account into a disabled or enabled state, it is also
possible to read the state of this specific userAccountControl-flag. This way, reports can be created with the number of disabled accounts available
within the directory.
The following snippet shows how this can be done.
using (DirectoryEntry user =
new DirectoryEntry("LDAP://" + <dn_of_user>))
{
int val = (int)user.
Properties["userAccountControl"].Value;
if ((val & 0x2) == 0x2)
acc.SubItems[2].Text = "Account is Disabled";
else
acc.SubItems[2].Text = "Account is Enabled";
}
When using Microsoft .NET Framework 3.5 or higher, it is possible to read the enabled/disabled state of the user account object using the
UserPrincipal-class. The UserPrincipal-class is part of the following namespace:
using System.DirectoryServices.AccountManagement;
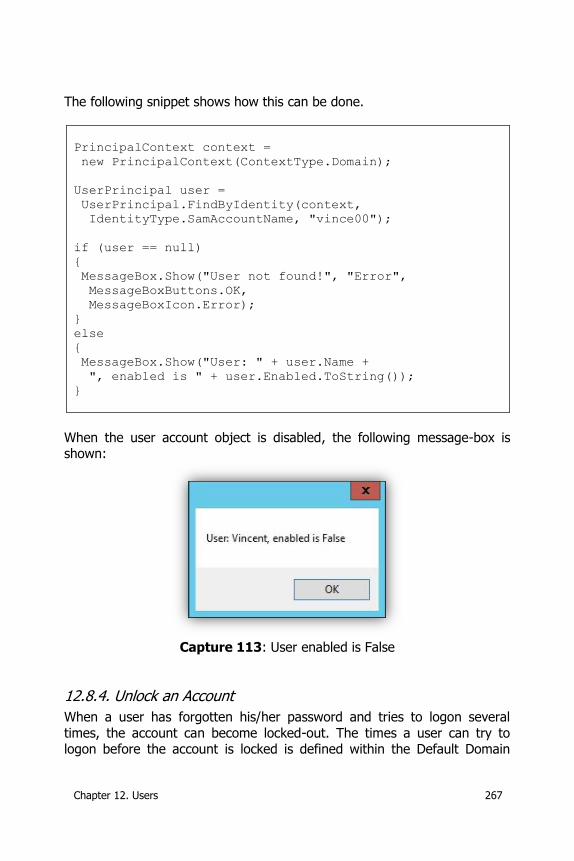
Chapter 12. Users 267
The following snippet shows how this can be done.
PrincipalContext context =
new PrincipalContext(ContextType.Domain);
UserPrincipal user =
UserPrincipal.FindByIdentity(context,
IdentityType.SamAccountName, "vince00");
if (user == null)
{
MessageBox.Show("User not found!", "Error",
MessageBoxButtons.OK,
MessageBoxIcon.Error);
}
else
{
MessageBox.Show("User: " + user.Name +
", enabled is " + user.Enabled.ToString());
}
When the user account object is disabled, the following message-box is shown:
Capture 113: User enabled is False
12.8.4. Unlock an Account
When a user has forgotten his/her password and tries to logon several
times, the account can become locked-out. The times a user can try to logon before the account is locked is defined within the Default Domain
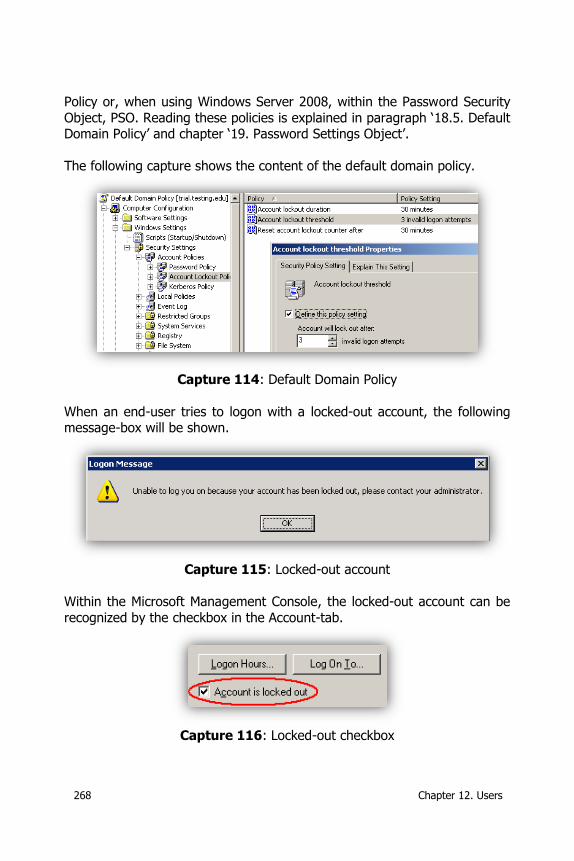
268 Chapter 12. Users
Policy or, when using Windows Server 2008, within the Password Security
Object, PSO. Reading these policies is explained in paragraph ‘18.5. Default Domain Policy’ and chapter ‘19. Password Settings Object’.
The following capture shows the content of the default domain policy.
Capture 114: Default Domain Policy
When an end-user tries to logon with a locked-out account, the following message-box will be shown.
Capture 115: Locked-out account
Within the Microsoft Management Console, the locked-out account can be
recognized by the checkbox in the Account-tab.
Capture 116: Locked-out checkbox
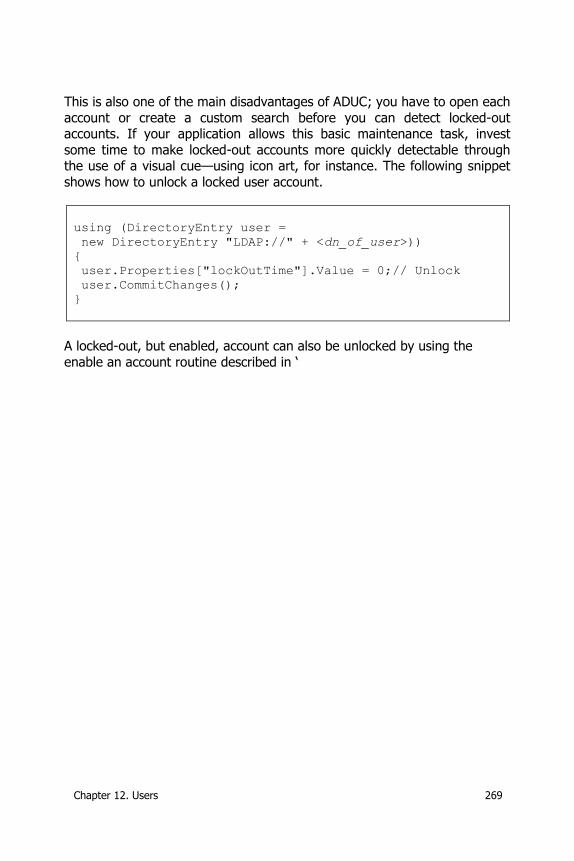
Chapter 12. Users 269
This is also one of the main disadvantages of ADUC; you have to open each
account or create a custom search before you can detect locked-out accounts. If your application allows this basic maintenance task, invest
some time to make locked-out accounts more quickly detectable through the use of a visual cue—using icon art, for instance. The following snippet
shows how to unlock a locked user account.
using (DirectoryEntry user =
new DirectoryEntry "LDAP://" + <dn_of_user>))
{
user.Properties["lockOutTime"].Value = 0;// Unlock
user.CommitChanges();
}
A locked-out, but enabled, account can also be unlocked by using the
enable an account routine described in ‘
270 Chapter 12. Users
12.8.1. Enable an account’. Typically, this behavior cannot be replayed
using ADUC, since no ‘Enable Account’-option is available in the context-menu of the management console. The account is enabled, which will make
the ‘Enable Account’-option invisible and the ‘Disable Account’-option visible.
So keep in mind that changing the userAccountControl can influence the
value of the lockoutTime. Failed logon attempts are registered within the
account property called badPwdCount. This counter will be reset after the ‘Reset account lockout counter after’ time, defined within the Default
Domain policy or in a Windows Server 2008 PSO, is expired.
As you can see, it is possible to unlock an account programmatically.
However, it is not possible to lock an account programmatically, but the locked status can be read.
When using Microsoft .NET Framework 3.5 or higher, it is possible to unlock
the user account object using the UserPrincipal-class. The UserPrincipal-class is part of the following namespace:
using System.DirectoryServices.AccountManagement;

Chapter 12. Users 271
The following snippet shows how this can be done.
PrincipalContext context =
new PrincipalContext(ContextType.Domain);
UserPrincipal user =
UserPrincipal.FindByIdentity(context,
IdentityType.SamAccountName, "vince00");
if (user == null)
{
MessageBox.Show("User not found!", "Error",
MessageBoxButtons.OK,
MessageBoxIcon.Error);
}
else
{
user.UnlockAccount();
user.Save();
}
The .UnlockAccount()-method of the UserPrincipal-class is used to unlock the user account object.
12.8.5. Read locked state
When proactive maintenance is required, reading and visualizing the
number of locked accounts might help the maintenance crew. The following snippet shows how to read the locked status of a user.
string locked = "?";
using (DirectoryEntry user =
new DirectoryEntry("LDAP://" + <dn_of_user>))
{
try
{
Int64 lockoutTime = new Int64();
lockoutTime = LongFromLargeInteger(
user.Properties["lockoutTime"].Value);
string pls = DateTime.FromFileTime(lockoutTime).
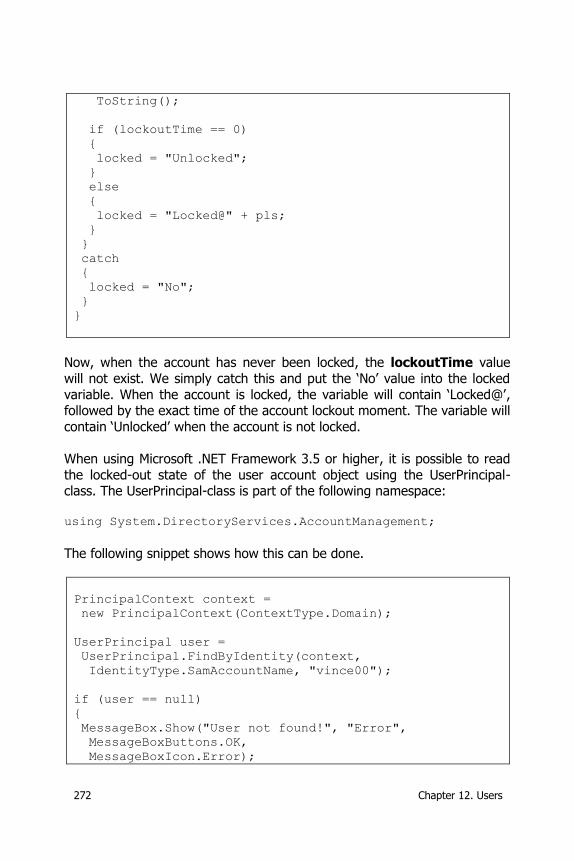
272 Chapter 12. Users
ToString();
if (lockoutTime == 0)
{
locked = "Unlocked";
}
else
{
locked = "Locked@" + pls;
}
}
catch
{
locked = "No";
}
}
Now, when the account has never been locked, the lockoutTime value
will not exist. We simply catch this and put the ‘No’ value into the locked
variable. When the account is locked, the variable will contain ‘Locked@’, followed by the exact time of the account lockout moment. The variable will
contain ‘Unlocked’ when the account is not locked.
When using Microsoft .NET Framework 3.5 or higher, it is possible to read
the locked-out state of the user account object using the UserPrincipal-class. The UserPrincipal-class is part of the following namespace:
using System.DirectoryServices.AccountManagement;
The following snippet shows how this can be done.
PrincipalContext context =
new PrincipalContext(ContextType.Domain);
UserPrincipal user =
UserPrincipal.FindByIdentity(context,
IdentityType.SamAccountName, "vince00");
if (user == null)
{
MessageBox.Show("User not found!", "Error",
MessageBoxButtons.OK,
MessageBoxIcon.Error);
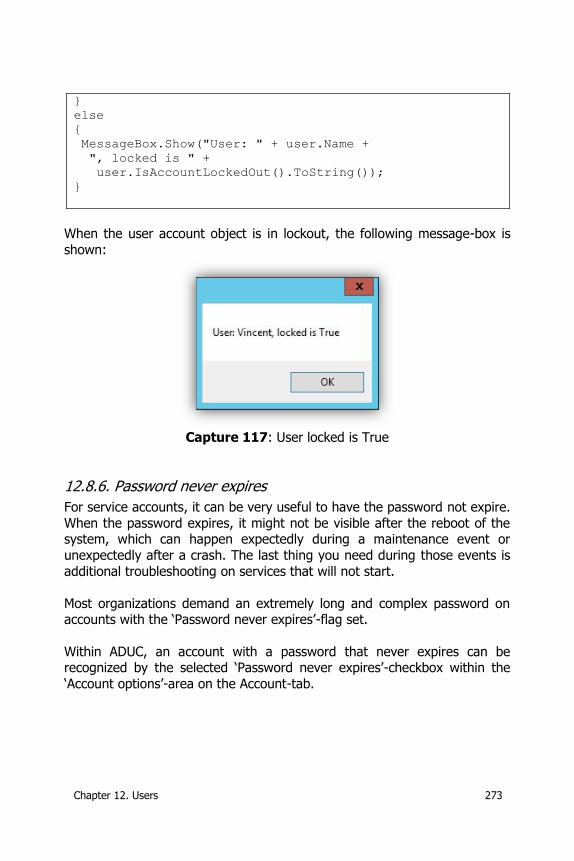
Chapter 12. Users 273
}
else
{
MessageBox.Show("User: " + user.Name +
", locked is " +
user.IsAccountLockedOut().ToString());
}
When the user account object is in lockout, the following message-box is
shown:
Capture 117: User locked is True
12.8.6. Password never expires
For service accounts, it can be very useful to have the password not expire.
When the password expires, it might not be visible after the reboot of the system, which can happen expectedly during a maintenance event or
unexpectedly after a crash. The last thing you need during those events is
additional troubleshooting on services that will not start.
Most organizations demand an extremely long and complex password on accounts with the ‘Password never expires’-flag set.
Within ADUC, an account with a password that never expires can be recognized by the selected ‘Password never expires’-checkbox within the
‘Account options’-area on the Account-tab.
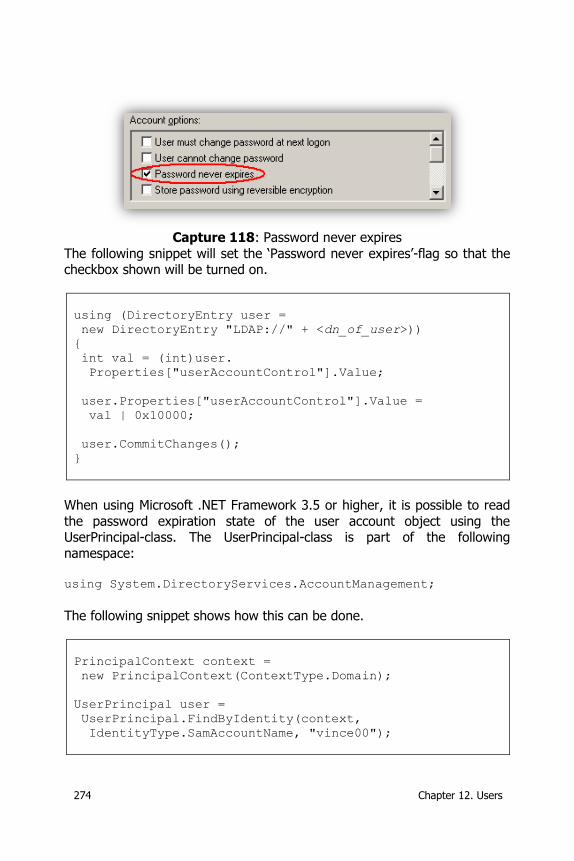
274 Chapter 12. Users
Capture 118: Password never expires
The following snippet will set the ‘Password never expires’-flag so that the checkbox shown will be turned on.
using (DirectoryEntry user =
new DirectoryEntry "LDAP://" + <dn_of_user>))
{
int val = (int)user.
Properties["userAccountControl"].Value;
user.Properties["userAccountControl"].Value =
val | 0x10000;
user.CommitChanges();
}
When using Microsoft .NET Framework 3.5 or higher, it is possible to read
the password expiration state of the user account object using the UserPrincipal-class. The UserPrincipal-class is part of the following
namespace: using System.DirectoryServices.AccountManagement;
The following snippet shows how this can be done.
PrincipalContext context =
new PrincipalContext(ContextType.Domain);
UserPrincipal user =
UserPrincipal.FindByIdentity(context,
IdentityType.SamAccountName, "vince00");
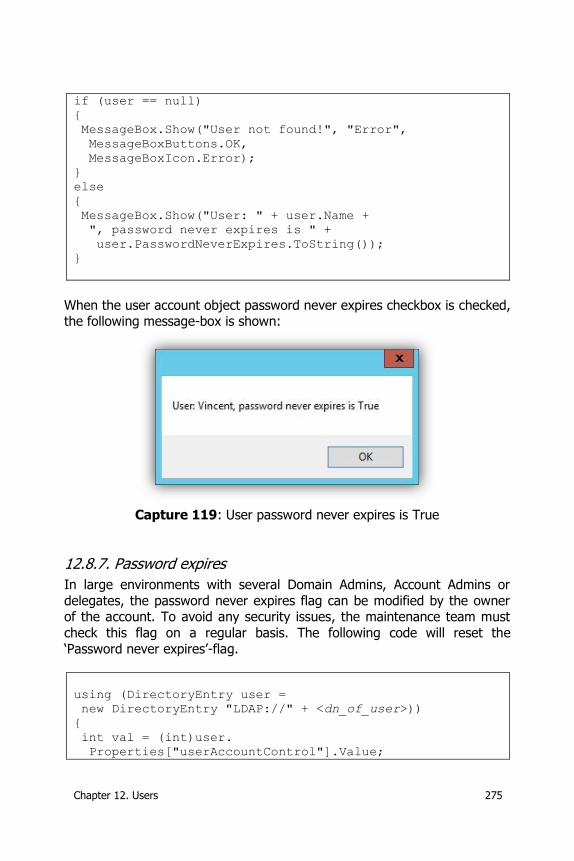
Chapter 12. Users 275
if (user == null)
{
MessageBox.Show("User not found!", "Error",
MessageBoxButtons.OK,
MessageBoxIcon.Error);
}
else
{
MessageBox.Show("User: " + user.Name +
", password never expires is " +
user.PasswordNeverExpires.ToString());
}
When the user account object password never expires checkbox is checked, the following message-box is shown:
Capture 119: User password never expires is True
12.8.7. Password expires
In large environments with several Domain Admins, Account Admins or
delegates, the password never expires flag can be modified by the owner of the account. To avoid any security issues, the maintenance team must
check this flag on a regular basis. The following code will reset the
‘Password never expires’-flag.
using (DirectoryEntry user =
new DirectoryEntry "LDAP://" + <dn_of_user>))
{
int val = (int)user.
Properties["userAccountControl"].Value;
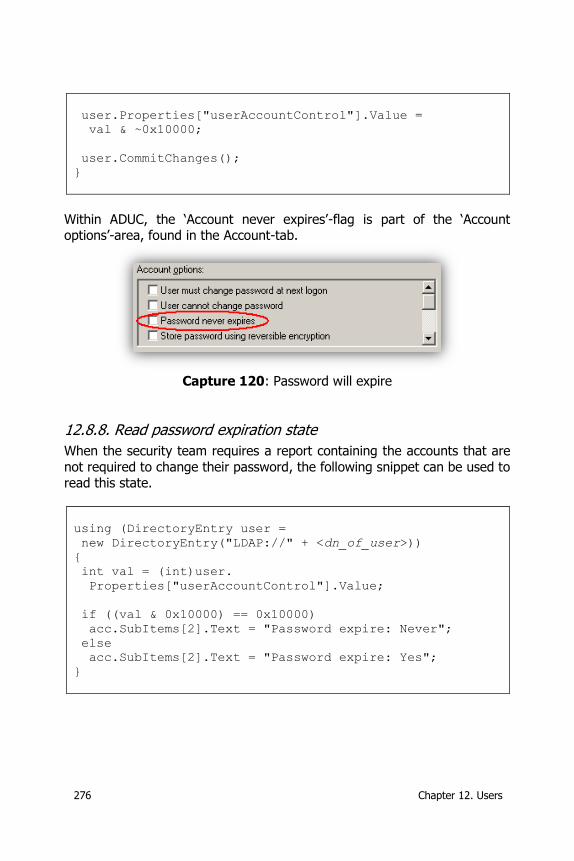
276 Chapter 12. Users
user.Properties["userAccountControl"].Value =
val & ~0x10000;
user.CommitChanges();
}
Within ADUC, the ‘Account never expires’-flag is part of the ‘Account options’-area, found in the Account-tab.
Capture 120: Password will expire
12.8.8. Read password expiration state
When the security team requires a report containing the accounts that are
not required to change their password, the following snippet can be used to read this state.
using (DirectoryEntry user =
new DirectoryEntry("LDAP://" + <dn_of_user>))
{
int val = (int)user.
Properties["userAccountControl"].Value;
if ((val & 0x10000) == 0x10000)
acc.SubItems[2].Text = "Password expire: Never";
else
acc.SubItems[2].Text = "Password expire: Yes";
}
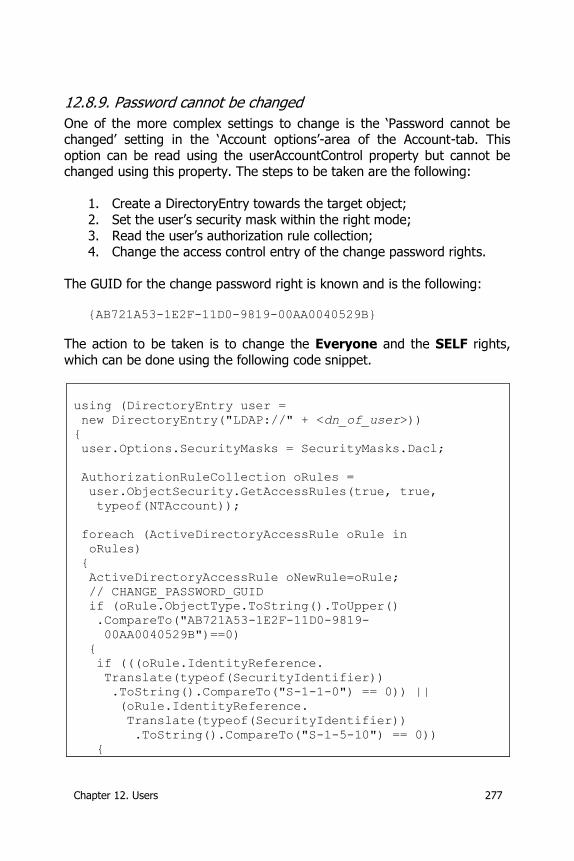
Chapter 12. Users 277
12.8.9. Password cannot be changed
One of the more complex settings to change is the ‘Password cannot be changed’ setting in the ‘Account options’-area of the Account-tab. This
option can be read using the userAccountControl property but cannot be changed using this property. The steps to be taken are the following:
1. Create a DirectoryEntry towards the target object;
2. Set the user’s security mask within the right mode;
3. Read the user’s authorization rule collection; 4. Change the access control entry of the change password rights.
The GUID for the change password right is known and is the following:
{AB721A53-1E2F-11D0-9819-00AA0040529B}
The action to be taken is to change the Everyone and the SELF rights,
which can be done using the following code snippet.
using (DirectoryEntry user =
new DirectoryEntry("LDAP://" + <dn_of_user>))
{
user.Options.SecurityMasks = SecurityMasks.Dacl;
AuthorizationRuleCollection oRules =
user.ObjectSecurity.GetAccessRules(true, true,
typeof(NTAccount));
foreach (ActiveDirectoryAccessRule oRule in
oRules)
{
ActiveDirectoryAccessRule oNewRule=oRule;
// CHANGE_PASSWORD_GUID
if (oRule.ObjectType.ToString().ToUpper()
.CompareTo("AB721A53-1E2F-11D0-9819-
00AA0040529B")==0)
{
if (((oRule.IdentityReference.
Translate(typeof(SecurityIdentifier))
.ToString().CompareTo("S-1-1-0") == 0)) ||
(oRule.IdentityReference.
Translate(typeof(SecurityIdentifier))
.ToString().CompareTo("S-1-5-10") == 0))
{
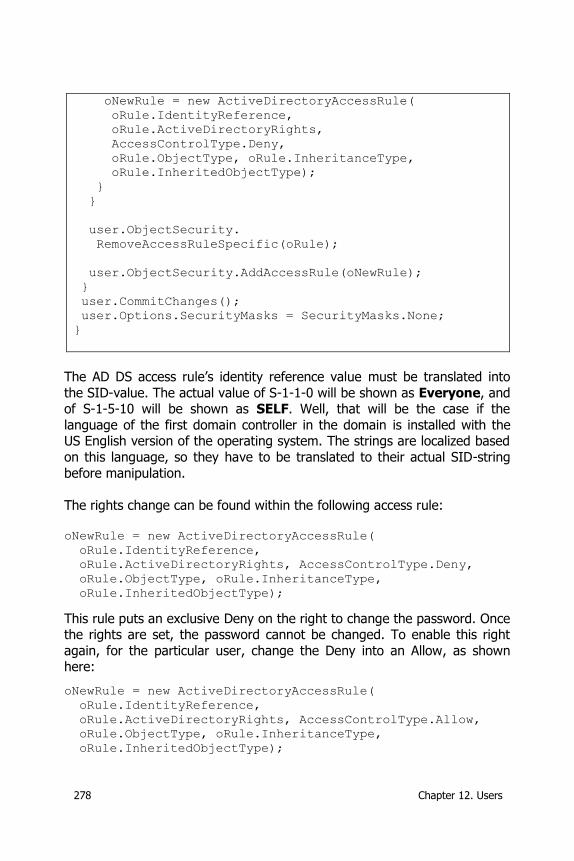
278 Chapter 12. Users
oNewRule = new ActiveDirectoryAccessRule(
oRule.IdentityReference,
oRule.ActiveDirectoryRights,
AccessControlType.Deny,
oRule.ObjectType, oRule.InheritanceType,
oRule.InheritedObjectType);
}
}
user.ObjectSecurity.
RemoveAccessRuleSpecific(oRule);
user.ObjectSecurity.AddAccessRule(oNewRule);
}
user.CommitChanges();
user.Options.SecurityMasks = SecurityMasks.None;
}
The AD DS access rule’s identity reference value must be translated into
the SID-value. The actual value of S-1-1-0 will be shown as Everyone, and of S-1-5-10 will be shown as SELF. Well, that will be the case if the
language of the first domain controller in the domain is installed with the US English version of the operating system. The strings are localized based
on this language, so they have to be translated to their actual SID-string
before manipulation.
The rights change can be found within the following access rule: oNewRule = new ActiveDirectoryAccessRule(
oRule.IdentityReference,
oRule.ActiveDirectoryRights, AccessControlType.Deny,
oRule.ObjectType, oRule.InheritanceType,
oRule.InheritedObjectType);
This rule puts an exclusive Deny on the right to change the password. Once the rights are set, the password cannot be changed. To enable this right
again, for the particular user, change the Deny into an Allow, as shown here:
oNewRule = new ActiveDirectoryAccessRule(
oRule.IdentityReference,
oRule.ActiveDirectoryRights, AccessControlType.Allow,
oRule.ObjectType, oRule.InheritanceType,
oRule.InheritedObjectType);
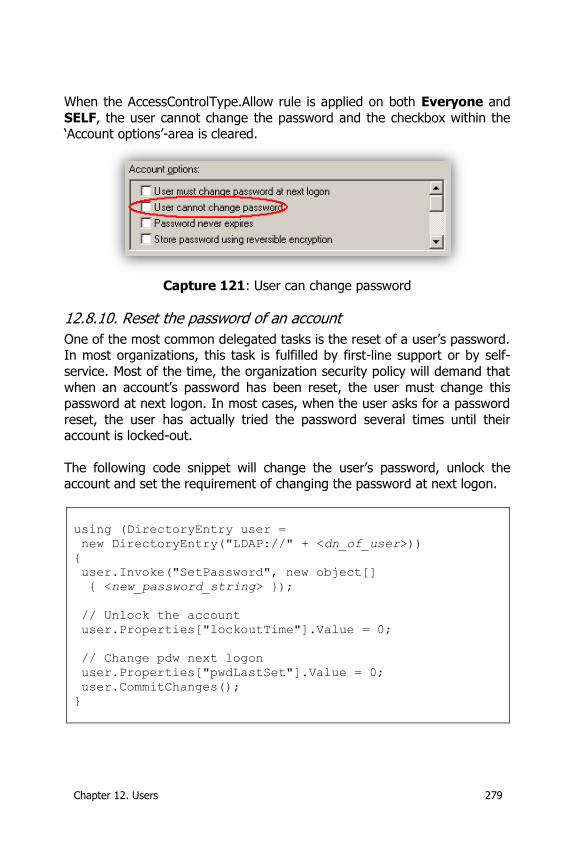
Chapter 12. Users 279
When the AccessControlType.Allow rule is applied on both Everyone and
SELF, the user cannot change the password and the checkbox within the ‘Account options’-area is cleared.
Capture 121: User can change password
12.8.10. Reset the password of an account
One of the most common delegated tasks is the reset of a user’s password. In most organizations, this task is fulfilled by first-line support or by self-
service. Most of the time, the organization security policy will demand that
when an account’s password has been reset, the user must change this password at next logon. In most cases, when the user asks for a password
reset, the user has actually tried the password several times until their account is locked-out.
The following code snippet will change the user’s password, unlock the account and set the requirement of changing the password at next logon.
using (DirectoryEntry user =
new DirectoryEntry("LDAP://" + <dn_of_user>))
{
user.Invoke("SetPassword", new object[]
{ <new_password_string> });
// Unlock the account
user.Properties["lockoutTime"].Value = 0;
// Change pdw next logon
user.Properties["pwdLastSet"].Value = 0;
user.CommitChanges();
}
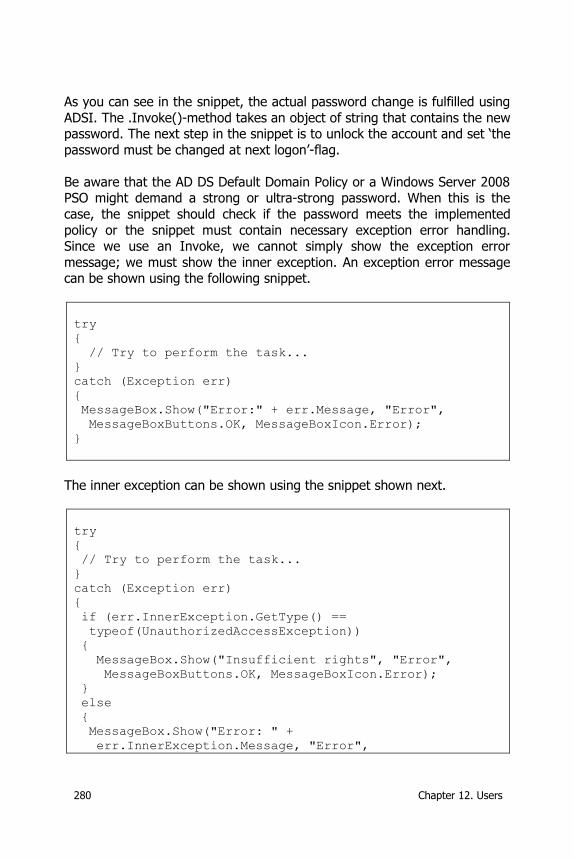
280 Chapter 12. Users
As you can see in the snippet, the actual password change is fulfilled using
ADSI. The .Invoke()-method takes an object of string that contains the new password. The next step in the snippet is to unlock the account and set ‘the
password must be changed at next logon’-flag.
Be aware that the AD DS Default Domain Policy or a Windows Server 2008 PSO might demand a strong or ultra-strong password. When this is the
case, the snippet should check if the password meets the implemented
policy or the snippet must contain necessary exception error handling. Since we use an Invoke, we cannot simply show the exception error
message; we must show the inner exception. An exception error message can be shown using the following snippet.
try
{
// Try to perform the task...
}
catch (Exception err)
{
MessageBox.Show("Error:" + err.Message, "Error",
MessageBoxButtons.OK, MessageBoxIcon.Error);
}
The inner exception can be shown using the snippet shown next.
try
{
// Try to perform the task...
}
catch (Exception err)
{
if (err.InnerException.GetType() ==
typeof(UnauthorizedAccessException))
{
MessageBox.Show("Insufficient rights", "Error",
MessageBoxButtons.OK, MessageBoxIcon.Error);
}
else
{
MessageBox.Show("Error: " +
err.InnerException.Message, "Error",
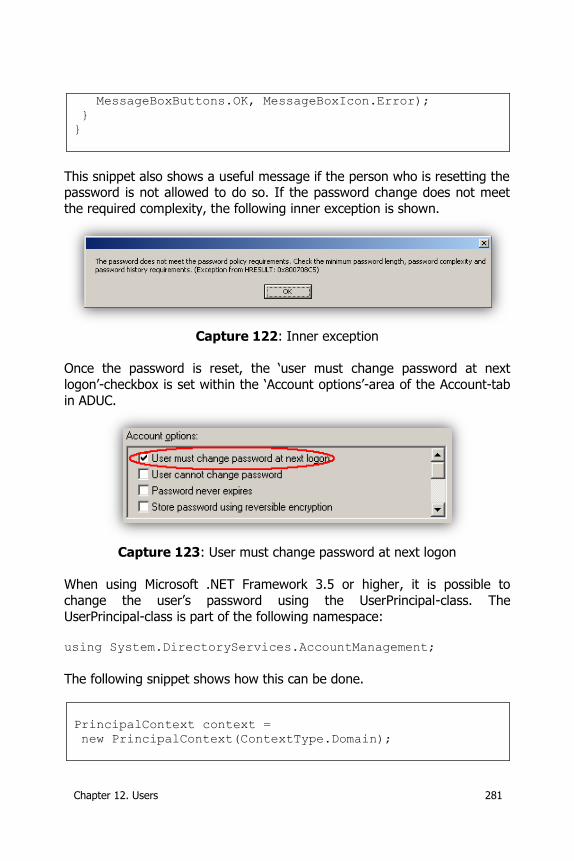
Chapter 12. Users 281
MessageBoxButtons.OK, MessageBoxIcon.Error);
}
}
This snippet also shows a useful message if the person who is resetting the password is not allowed to do so. If the password change does not meet
the required complexity, the following inner exception is shown.
Capture 122: Inner exception
Once the password is reset, the ‘user must change password at next
logon’-checkbox is set within the ‘Account options’-area of the Account-tab
in ADUC.
Capture 123: User must change password at next logon
When using Microsoft .NET Framework 3.5 or higher, it is possible to
change the user’s password using the UserPrincipal-class. The
UserPrincipal-class is part of the following namespace: using System.DirectoryServices.AccountManagement;
The following snippet shows how this can be done.
PrincipalContext context =
new PrincipalContext(ContextType.Domain);
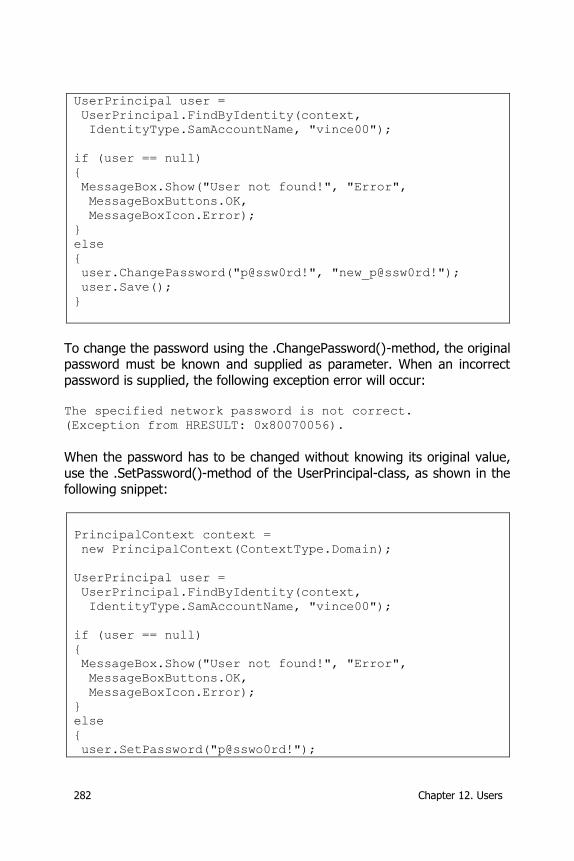
282 Chapter 12. Users
UserPrincipal user =
UserPrincipal.FindByIdentity(context,
IdentityType.SamAccountName, "vince00");
if (user == null)
{
MessageBox.Show("User not found!", "Error",
MessageBoxButtons.OK,
MessageBoxIcon.Error);
}
else
{
user.ChangePassword("p@ssw0rd!", "new_p@ssw0rd!");
user.Save();
}
To change the password using the .ChangePassword()-method, the original password must be known and supplied as parameter. When an incorrect
password is supplied, the following exception error will occur: The specified network password is not correct.
(Exception from HRESULT: 0x80070056).
When the password has to be changed without knowing its original value,
use the .SetPassword()-method of the UserPrincipal-class, as shown in the following snippet:
PrincipalContext context =
new PrincipalContext(ContextType.Domain);
UserPrincipal user =
UserPrincipal.FindByIdentity(context,
IdentityType.SamAccountName, "vince00");
if (user == null)
{
MessageBox.Show("User not found!", "Error",
MessageBoxButtons.OK,
MessageBoxIcon.Error);
}
else
{
user.SetPassword("p@sswo0rd!");
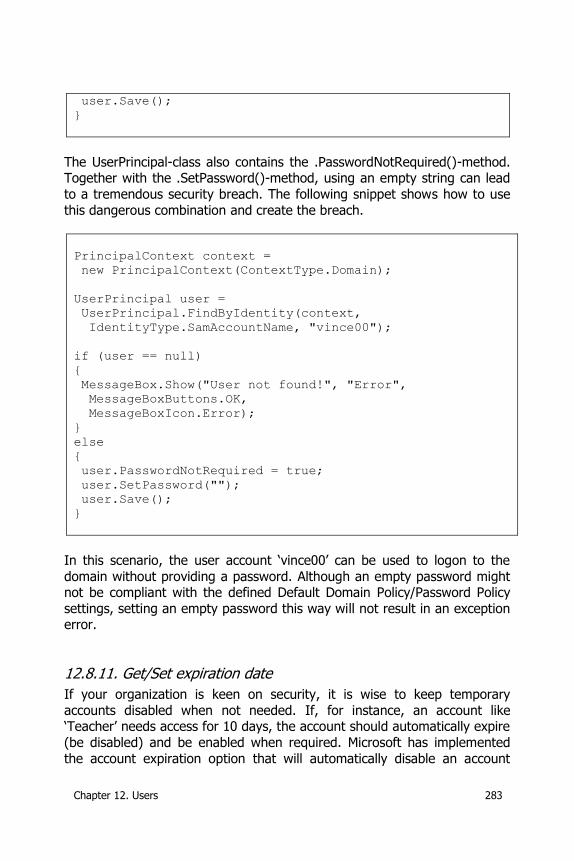
Chapter 12. Users 283
user.Save();
}
The UserPrincipal-class also contains the .PasswordNotRequired()-method. Together with the .SetPassword()-method, using an empty string can lead
to a tremendous security breach. The following snippet shows how to use
this dangerous combination and create the breach.
PrincipalContext context =
new PrincipalContext(ContextType.Domain);
UserPrincipal user =
UserPrincipal.FindByIdentity(context,
IdentityType.SamAccountName, "vince00");
if (user == null)
{
MessageBox.Show("User not found!", "Error",
MessageBoxButtons.OK,
MessageBoxIcon.Error);
}
else
{
user.PasswordNotRequired = true;
user.SetPassword("");
user.Save();
}
In this scenario, the user account ‘vince00’ can be used to logon to the
domain without providing a password. Although an empty password might not be compliant with the defined Default Domain Policy/Password Policy
settings, setting an empty password this way will not result in an exception error.
12.8.11. Get/Set expiration date
If your organization is keen on security, it is wise to keep temporary
accounts disabled when not needed. If, for instance, an account like ‘Teacher’ needs access for 10 days, the account should automatically expire
(be disabled) and be enabled when required. Microsoft has implemented
the account expiration option that will automatically disable an account
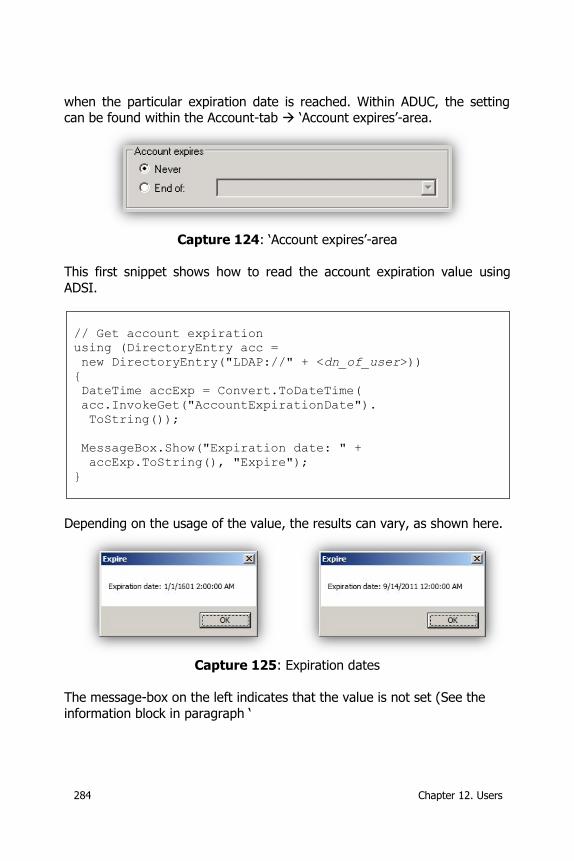
284 Chapter 12. Users
when the particular expiration date is reached. Within ADUC, the setting can be found within the Account-tab ‘Account expires’-area.
Capture 124: ‘Account expires’-area
This first snippet shows how to read the account expiration value using
ADSI.
// Get account expiration
using (DirectoryEntry acc =
new DirectoryEntry("LDAP://" + <dn_of_user>))
{
DateTime accExp = Convert.ToDateTime(
acc.InvokeGet("AccountExpirationDate").
ToString());
MessageBox.Show("Expiration date: " +
accExp.ToString(), "Expire");
}
Depending on the usage of the value, the results can vary, as shown here.
Capture 125: Expiration dates
The message-box on the left indicates that the value is not set (See the
information block in paragraph ‘
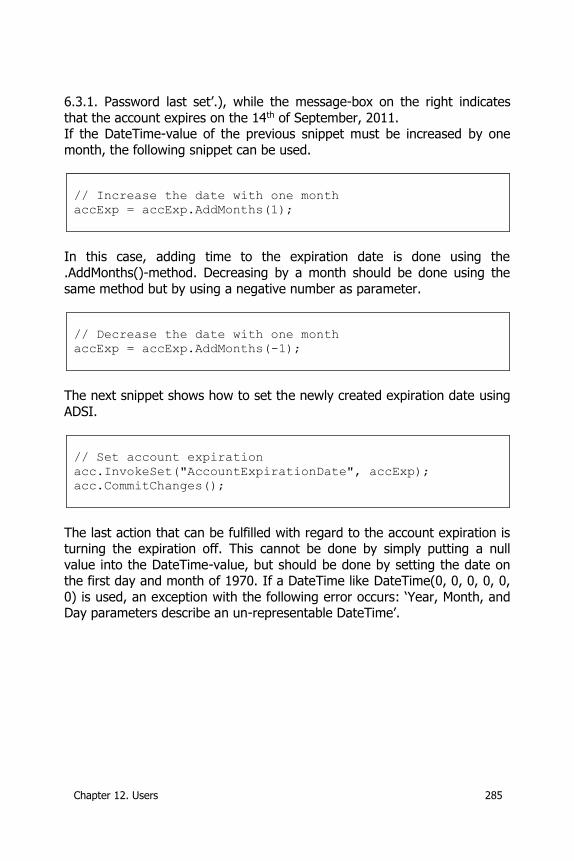
Chapter 12. Users 285
6.3.1. Password last set’.), while the message-box on the right indicates
that the account expires on the 14th of September, 2011. If the DateTime-value of the previous snippet must be increased by one
month, the following snippet can be used.
// Increase the date with one month
accExp = accExp.AddMonths(1);
In this case, adding time to the expiration date is done using the
.AddMonths()-method. Decreasing by a month should be done using the
same method but by using a negative number as parameter.
// Decrease the date with one month
accExp = accExp.AddMonths(-1);
The next snippet shows how to set the newly created expiration date using
ADSI.
// Set account expiration
acc.InvokeSet("AccountExpirationDate", accExp);
acc.CommitChanges();
The last action that can be fulfilled with regard to the account expiration is turning the expiration off. This cannot be done by simply putting a null
value into the DateTime-value, but should be done by setting the date on the first day and month of 1970. If a DateTime like DateTime(0, 0, 0, 0, 0,
0) is used, an exception with the following error occurs: ‘Year, Month, and Day parameters describe an un-representable DateTime’.

286 Chapter 12. Users
The following snippet shows how the account expiration can be removed
from an account.
// Remove account expiration
using (DirectoryEntry acc =
new DirectoryEntry("LDAP://" + <dn_of_user>))
{
acc.InvokeSet("AccountExpirationDate",
new object[]
{ new DateTime(1970, 1, 1, 0, 0, 0) });
acc.CommitChanges();
}
The DateTime of 1970 is not explicitly required; the system default can be used as well, as shown here:
new DateTime(1601, 1, 1, 0, 0, 0, 0)
12.9. Advanced maintenance options
Depending on the Microsoft Windows Server edition, installed Service Pack
and features, the ‘Account options’-area can contain several other options.
On some of the captures shown earlier, the ‘Store password using reversible encryption’ is available. Changing these values is not part of the
described regular maintenance tasks and is meant to be used sporadically and used with care.
Since some of these values might be very interesting to gather from an enterprise level, this paragraph will explain how to read and set some of
them.
12.9.1. Store password using reversible encryption
The ‘Store password using reversible encryption’-checkbox is required on
accounts where the password is not saved using one-way encryption, but using two-way encryption. This way, the password is not saved as hash,
but can be resolved back into its original value.
Some applications require a readable password for their authentication tasks. An example is a legacy Microsoft Windows 2000 Remote Access
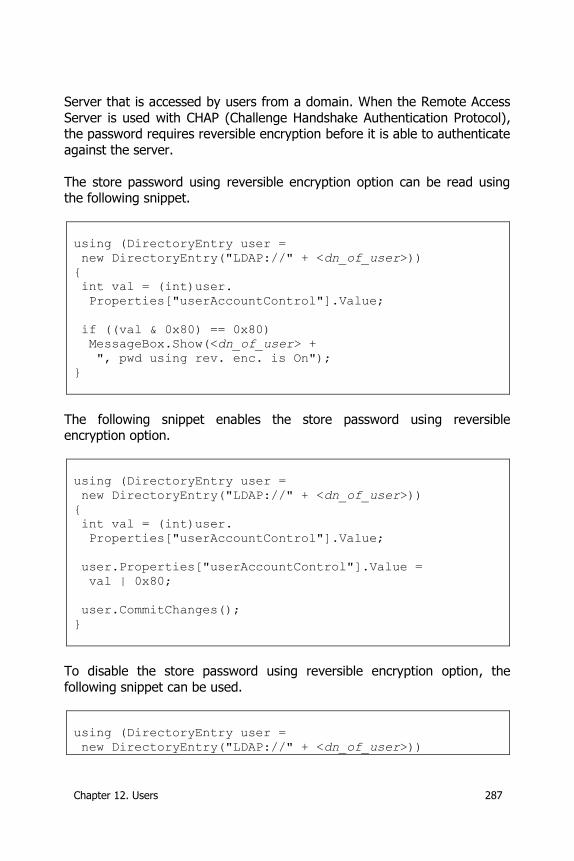
Chapter 12. Users 287
Server that is accessed by users from a domain. When the Remote Access
Server is used with CHAP (Challenge Handshake Authentication Protocol), the password requires reversible encryption before it is able to authenticate
against the server.
The store password using reversible encryption option can be read using the following snippet.
using (DirectoryEntry user =
new DirectoryEntry("LDAP://" + <dn_of_user>))
{
int val = (int)user.
Properties["userAccountControl"].Value;
if ((val & 0x80) == 0x80)
MessageBox.Show(<dn_of_user> +
", pwd using rev. enc. is On");
}
The following snippet enables the store password using reversible encryption option.
using (DirectoryEntry user =
new DirectoryEntry("LDAP://" + <dn_of_user>))
{
int val = (int)user.
Properties["userAccountControl"].Value;
user.Properties["userAccountControl"].Value =
val | 0x80;
user.CommitChanges();
}
To disable the store password using reversible encryption option, the
following snippet can be used.
using (DirectoryEntry user =
new DirectoryEntry("LDAP://" + <dn_of_user>))
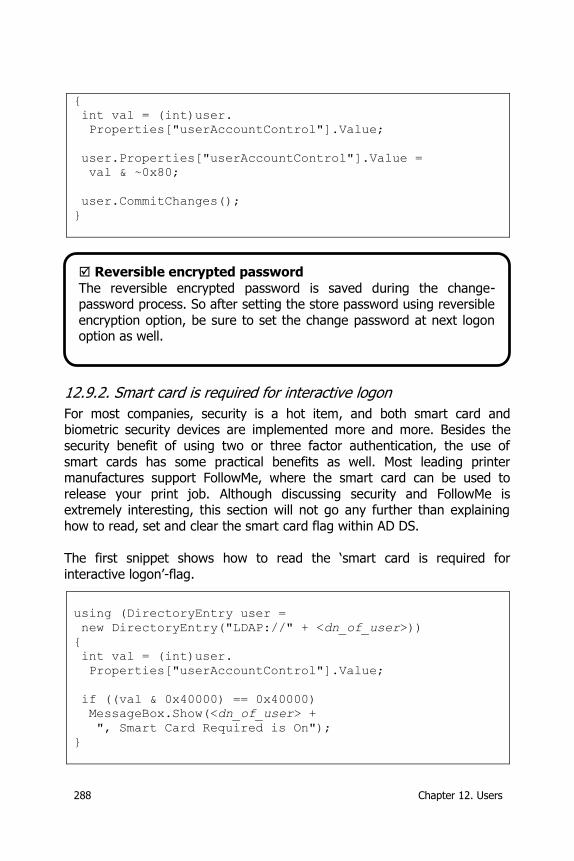
288 Chapter 12. Users
{
int val = (int)user.
Properties["userAccountControl"].Value;
user.Properties["userAccountControl"].Value =
val & ~0x80;
user.CommitChanges();
}
12.9.2. Smart card is required for interactive logon
For most companies, security is a hot item, and both smart card and biometric security devices are implemented more and more. Besides the
security benefit of using two or three factor authentication, the use of
smart cards has some practical benefits as well. Most leading printer manufactures support FollowMe, where the smart card can be used to
release your print job. Although discussing security and FollowMe is extremely interesting, this section will not go any further than explaining
how to read, set and clear the smart card flag within AD DS.
The first snippet shows how to read the ‘smart card is required for
interactive logon’-flag.
using (DirectoryEntry user =
new DirectoryEntry("LDAP://" + <dn_of_user>))
{
int val = (int)user.
Properties["userAccountControl"].Value;
if ((val & 0x40000) == 0x40000)
MessageBox.Show(<dn_of_user> +
", Smart Card Required is On");
}
Reversible encrypted password
The reversible encrypted password is saved during the change-password process. So after setting the store password using reversible
encryption option, be sure to set the change password at next logon option as well.
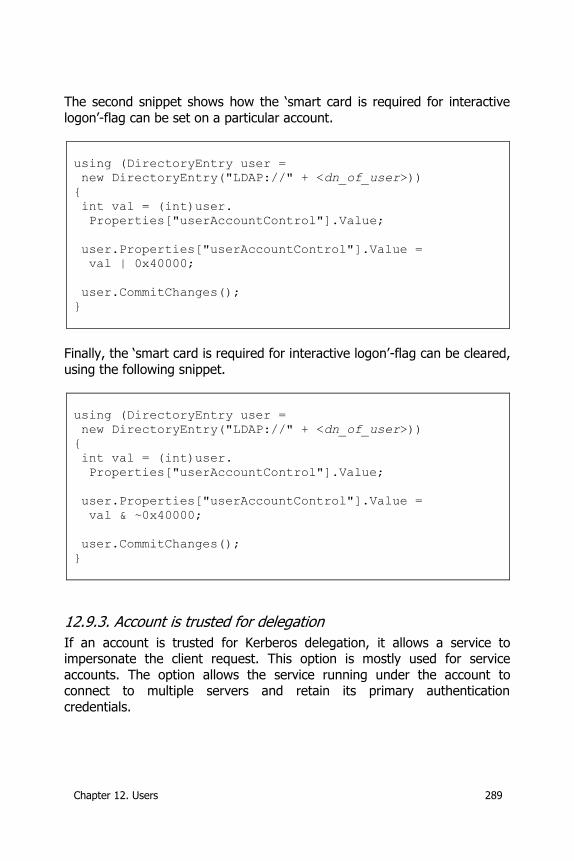
Chapter 12. Users 289
The second snippet shows how the ‘smart card is required for interactive
logon’-flag can be set on a particular account.
using (DirectoryEntry user =
new DirectoryEntry("LDAP://" + <dn_of_user>))
{
int val = (int)user.
Properties["userAccountControl"].Value;
user.Properties["userAccountControl"].Value =
val | 0x40000;
user.CommitChanges();
}
Finally, the ‘smart card is required for interactive logon’-flag can be cleared,
using the following snippet.
using (DirectoryEntry user =
new DirectoryEntry("LDAP://" + <dn_of_user>))
{
int val = (int)user.
Properties["userAccountControl"].Value;
user.Properties["userAccountControl"].Value =
val & ~0x40000;
user.CommitChanges();
}
12.9.3. Account is trusted for delegation
If an account is trusted for Kerberos delegation, it allows a service to impersonate the client request. This option is mostly used for service
accounts. The option allows the service running under the account to connect to multiple servers and retain its primary authentication
credentials.
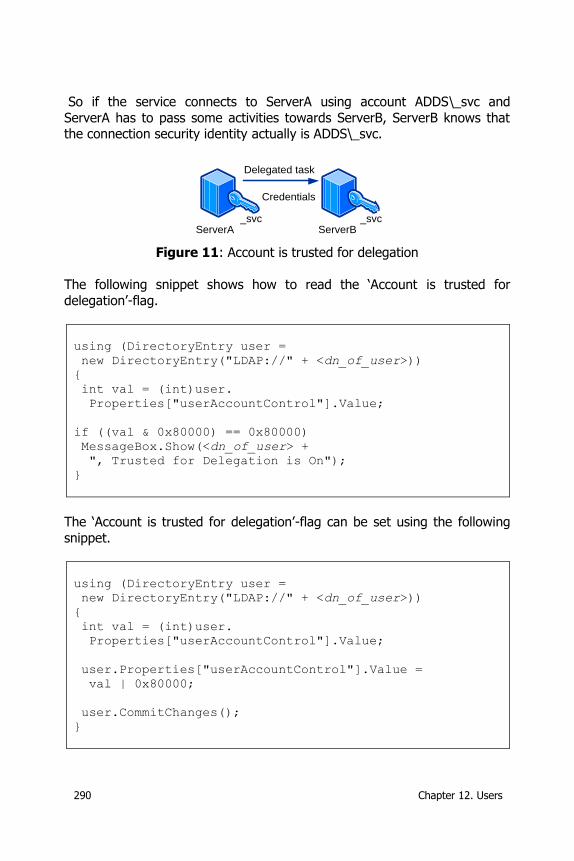
290 Chapter 12. Users
So if the service connects to ServerA using account ADDS\_svc and
ServerA has to pass some activities towards ServerB, ServerB knows that the connection security identity actually is ADDS\_svc.
Delegated task
Credentials
_svc _svcServerA ServerB
Figure 11: Account is trusted for delegation
The following snippet shows how to read the ‘Account is trusted for
delegation’-flag.
using (DirectoryEntry user =
new DirectoryEntry("LDAP://" + <dn_of_user>))
{
int val = (int)user.
Properties["userAccountControl"].Value;
if ((val & 0x80000) == 0x80000)
MessageBox.Show(<dn_of_user> +
", Trusted for Delegation is On");
}
The ‘Account is trusted for delegation’-flag can be set using the following
snippet.
using (DirectoryEntry user =
new DirectoryEntry("LDAP://" + <dn_of_user>))
{
int val = (int)user.
Properties["userAccountControl"].Value;
user.Properties["userAccountControl"].Value =
val | 0x80000;
user.CommitChanges();
}
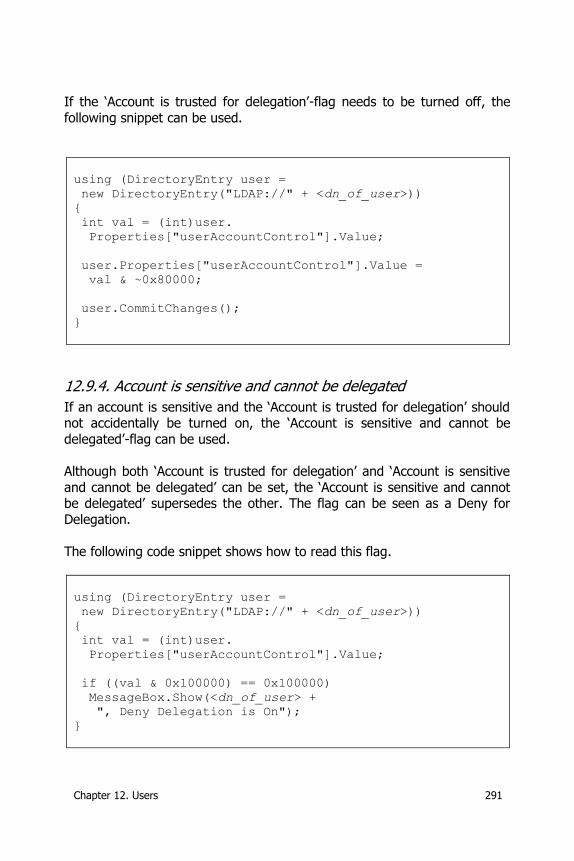
Chapter 12. Users 291
If the ‘Account is trusted for delegation’-flag needs to be turned off, the
following snippet can be used.
using (DirectoryEntry user =
new DirectoryEntry("LDAP://" + <dn_of_user>))
{
int val = (int)user.
Properties["userAccountControl"].Value;
user.Properties["userAccountControl"].Value =
val & ~0x80000;
user.CommitChanges();
}
12.9.4. Account is sensitive and cannot be delegated
If an account is sensitive and the ‘Account is trusted for delegation’ should not accidentally be turned on, the ‘Account is sensitive and cannot be
delegated’-flag can be used.
Although both ‘Account is trusted for delegation’ and ‘Account is sensitive
and cannot be delegated’ can be set, the ‘Account is sensitive and cannot be delegated’ supersedes the other. The flag can be seen as a Deny for
Delegation.
The following code snippet shows how to read this flag.
using (DirectoryEntry user =
new DirectoryEntry("LDAP://" + <dn_of_user>))
{
int val = (int)user.
Properties["userAccountControl"].Value;
if ((val & 0x100000) == 0x100000)
MessageBox.Show(<dn_of_user> +
", Deny Delegation is On");
}
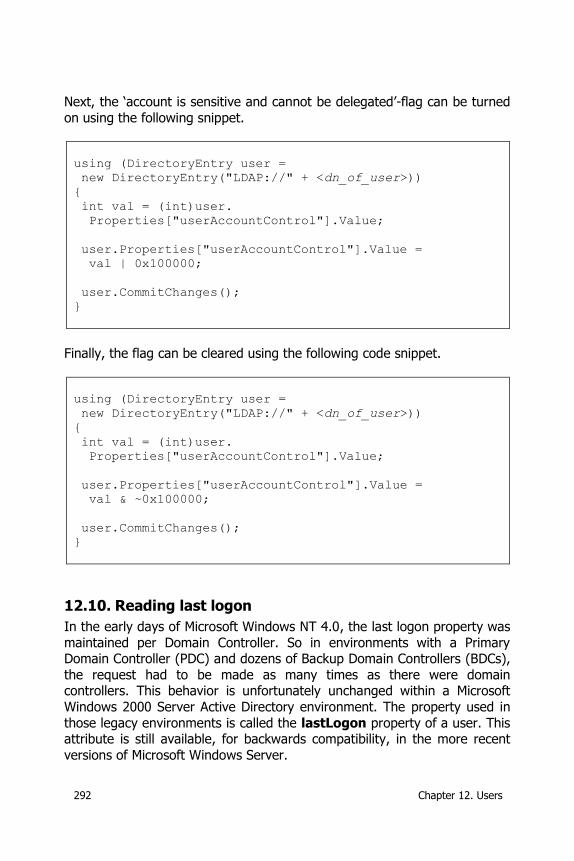
292 Chapter 12. Users
Next, the ‘account is sensitive and cannot be delegated’-flag can be turned
on using the following snippet.
using (DirectoryEntry user =
new DirectoryEntry("LDAP://" + <dn_of_user>))
{
int val = (int)user.
Properties["userAccountControl"].Value;
user.Properties["userAccountControl"].Value =
val | 0x100000;
user.CommitChanges();
}
Finally, the flag can be cleared using the following code snippet.
using (DirectoryEntry user =
new DirectoryEntry("LDAP://" + <dn_of_user>))
{
int val = (int)user.
Properties["userAccountControl"].Value;
user.Properties["userAccountControl"].Value =
val & ~0x100000;
user.CommitChanges();
}
12.10. Reading last logon
In the early days of Microsoft Windows NT 4.0, the last logon property was
maintained per Domain Controller. So in environments with a Primary Domain Controller (PDC) and dozens of Backup Domain Controllers (BDCs),
the request had to be made as many times as there were domain controllers. This behavior is unfortunately unchanged within a Microsoft
Windows 2000 Server Active Directory environment. The property used in
those legacy environments is called the lastLogon property of a user. This attribute is still available, for backwards compatibility, in the more recent
versions of Microsoft Windows Server.
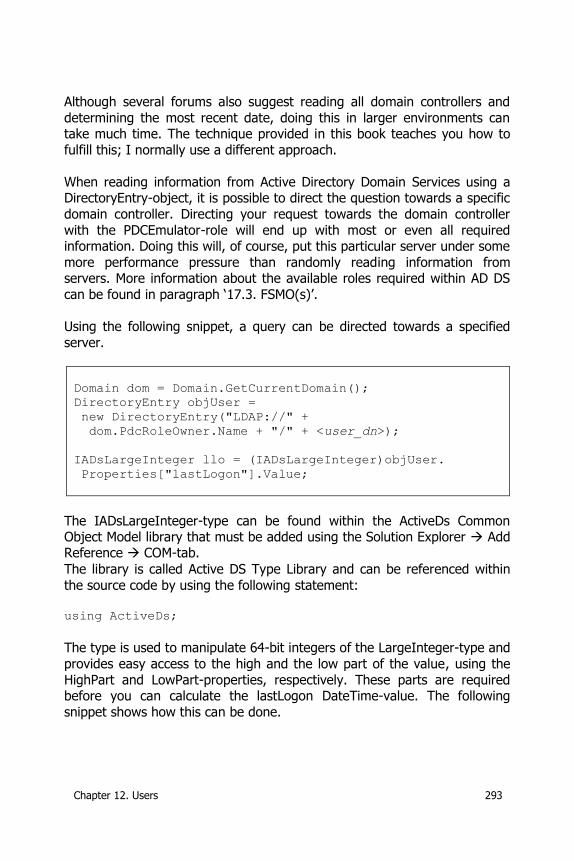
Chapter 12. Users 293
Although several forums also suggest reading all domain controllers and
determining the most recent date, doing this in larger environments can take much time. The technique provided in this book teaches you how to
fulfill this; I normally use a different approach.
When reading information from Active Directory Domain Services using a DirectoryEntry-object, it is possible to direct the question towards a specific
domain controller. Directing your request towards the domain controller
with the PDCEmulator-role will end up with most or even all required information. Doing this will, of course, put this particular server under some
more performance pressure than randomly reading information from servers. More information about the available roles required within AD DS
can be found in paragraph ‘17.3. FSMO(s)’.
Using the following snippet, a query can be directed towards a specified
server.
Domain dom = Domain.GetCurrentDomain();
DirectoryEntry objUser =
new DirectoryEntry("LDAP://" +
dom.PdcRoleOwner.Name + "/" + <user_dn>);
IADsLargeInteger llo = (IADsLargeInteger)objUser.
Properties["lastLogon"].Value;
The IADsLargeInteger-type can be found within the ActiveDs Common Object Model library that must be added using the Solution Explorer Add Reference COM-tab.
The library is called Active DS Type Library and can be referenced within
the source code by using the following statement:
using ActiveDs;
The type is used to manipulate 64-bit integers of the LargeInteger-type and
provides easy access to the high and the low part of the value, using the
HighPart and LowPart-properties, respectively. These parts are required before you can calculate the lastLogon DateTime-value. The following
snippet shows how this can be done.
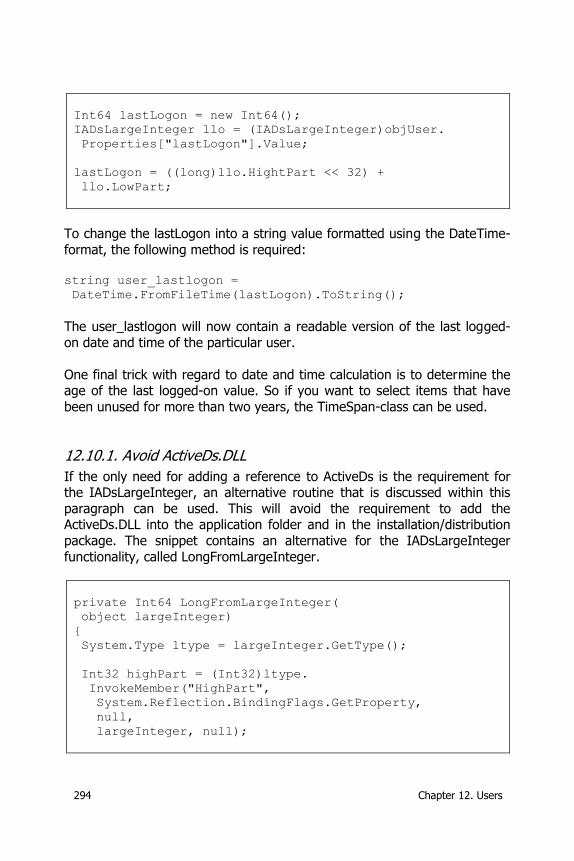
294 Chapter 12. Users
Int64 lastLogon = new Int64();
IADsLargeInteger llo = (IADsLargeInteger)objUser.
Properties["lastLogon"].Value;
lastLogon = ((long)llo.HightPart << 32) +
llo.LowPart;
To change the lastLogon into a string value formatted using the DateTime-
format, the following method is required: string user_lastlogon =
DateTime.FromFileTime(lastLogon).ToString();
The user_lastlogon will now contain a readable version of the last logged-
on date and time of the particular user.
One final trick with regard to date and time calculation is to determine the age of the last logged-on value. So if you want to select items that have
been unused for more than two years, the TimeSpan-class can be used.
12.10.1. Avoid ActiveDs.DLL
If the only need for adding a reference to ActiveDs is the requirement for the IADsLargeInteger, an alternative routine that is discussed within this
paragraph can be used. This will avoid the requirement to add the ActiveDs.DLL into the application folder and in the installation/distribution
package. The snippet contains an alternative for the IADsLargeInteger
functionality, called LongFromLargeInteger.
private Int64 LongFromLargeInteger(
object largeInteger)
{
System.Type ltype = largeInteger.GetType();
Int32 highPart = (Int32)ltype.
InvokeMember("HighPart",
System.Reflection.BindingFlags.GetProperty,
null,
largeInteger, null);

Chapter 12. Users 295
Int32 lowPart = (Int32)ltype.
InvokeMember("LowPart",
System.Reflection.BindingFlags.GetProperty,
null,
largeInteger, null);
return ((Int64)highPart << 32) | (UInt32)lowPart;
}
This routine can be used in the following manner.
Int64 lastLogon = new Int64();
lastLogon = LongFromLargeInteger(
objUser.Properties["lastLogon"].Value);
string user_lastlogon =
DateTime.FromFileTime(lastLogon).ToString();
Another important usage of ActiveDs is the availability of the group
definition, as shown in ‘Table 44: Group types and scope’. These definitions can be included into the program using an enumeration, using
the ‘enum’-statement. An enumeration can be used as shown here.
enum numbers
{
one = 1,
two = 2,
three = 3,
four = 5 // Just an example
};
The enumeration is used as shown within the following snippet.
MessageBox.Show(numbers.one.ToString() + " " +
Convert.ToInt32(numbers.four).ToString(), "Enum");
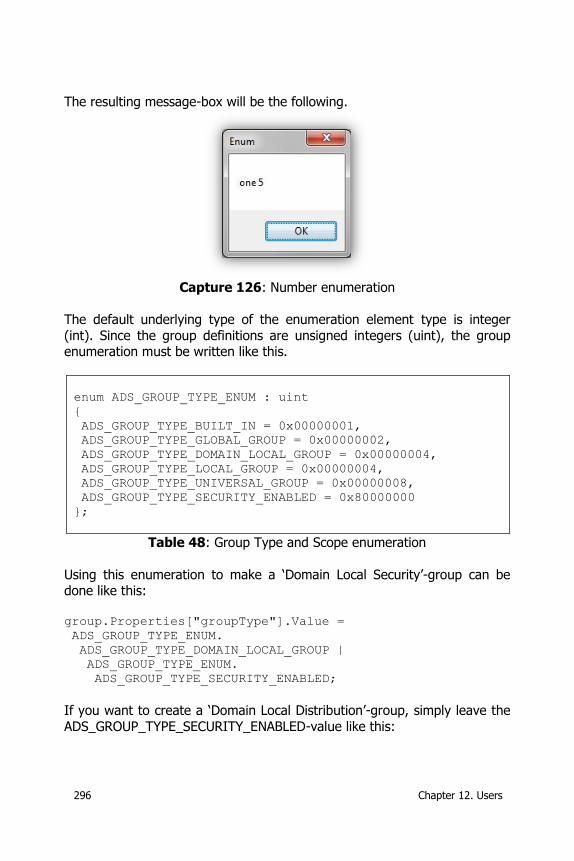
296 Chapter 12. Users
The resulting message-box will be the following.
Capture 126: Number enumeration
The default underlying type of the enumeration element type is integer
(int). Since the group definitions are unsigned integers (uint), the group enumeration must be written like this.
enum ADS_GROUP_TYPE_ENUM : uint
{
ADS_GROUP_TYPE_BUILT_IN = 0x00000001,
ADS_GROUP_TYPE_GLOBAL_GROUP = 0x00000002,
ADS_GROUP_TYPE_DOMAIN_LOCAL_GROUP = 0x00000004,
ADS_GROUP_TYPE_LOCAL_GROUP = 0x00000004,
ADS_GROUP_TYPE_UNIVERSAL_GROUP = 0x00000008,
ADS_GROUP_TYPE_SECURITY_ENABLED = 0x80000000
};
Table 48: Group Type and Scope enumeration
Using this enumeration to make a ‘Domain Local Security’-group can be done like this:
group.Properties["groupType"].Value =
ADS_GROUP_TYPE_ENUM.
ADS_GROUP_TYPE_DOMAIN_LOCAL_GROUP |
ADS_GROUP_TYPE_ENUM.
ADS_GROUP_TYPE_SECURITY_ENABLED;
If you want to create a ‘Domain Local Distribution’-group, simply leave the
ADS_GROUP_TYPE_SECURITY_ENABLED-value like this:

Chapter 12. Users 297
group.Properties["groupType"].Value =
ADS_GROUP_TYPE_ENUM.
ADS_GROUP_TYPE_DOMAIN_LOCAL_GROUP’;
When comparing the enumeration from ‘Table 48: Group Type and Scope enumeration’ with ‘Table 44: Group types and scope’, you can see that the
BUILT_IN value is missing within the ActiveDs-library. This is probably because groups flagged as Built-In can only be read and cannot be created
or converted towards another group scope.
12.10.2. Last Logon Timestamp
Starting with Microsoft Windows Server 2003, the ‘lastLogonTimestamp’-property has been added. This value is replicated throughout the domain,
so a single domain controller can be queried for all users. Keep in mind that there is some latency when using this value. When a user logs on to the
domain and the ‘lastLogonTimestamp’-value is older than the current time
minus the ‘msDS-LogonTimeSyncInterval’-value, the timestamp is updated. The initial update value of the lastLogonTimeStamp is, after raising the
domain functional level, calculated as 14 days minus a random percentage of five days.
Although the value is replicated, it is not intended to be used as real-time logon information. The following snippet shows how the
lastLogonTimeStamp can be read from a single user account object.
Int64 lastLogon = new Int64();
lastLogonTimeStamp = LongFromLargeInteger(
objUser.Properties["lastLogonTimeStamp"].Value);
string user_lastlogontimestamp =
DateTime.FromFileTime(lastLogonTimeStamp).ToString();
The LongFromLargeInteger()-procedure is explained in ‘12.10.1. Avoid ActiveDs.DLL’.
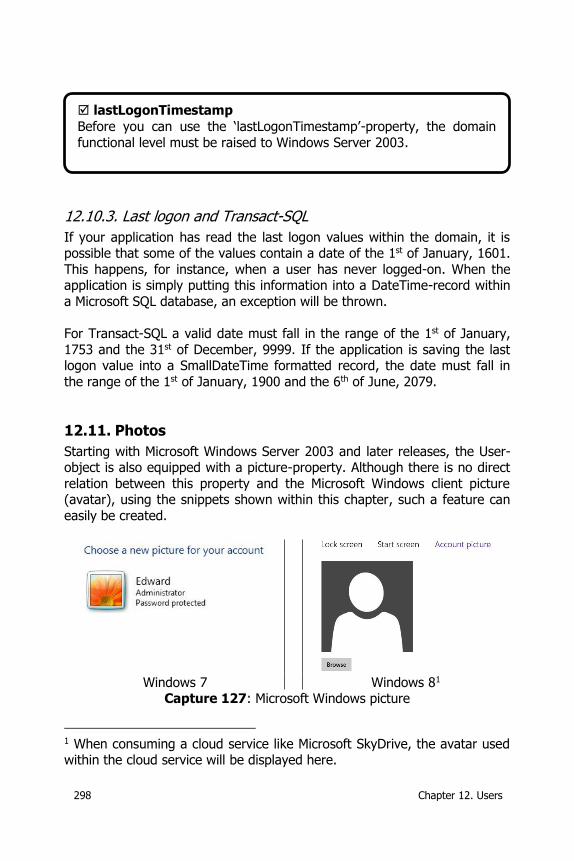
298 Chapter 12. Users
12.10.3. Last logon and Transact-SQL
If your application has read the last logon values within the domain, it is possible that some of the values contain a date of the 1st of January, 1601.
This happens, for instance, when a user has never logged-on. When the application is simply putting this information into a DateTime-record within
a Microsoft SQL database, an exception will be thrown.
For Transact-SQL a valid date must fall in the range of the 1st of January,
1753 and the 31st of December, 9999. If the application is saving the last logon value into a SmallDateTime formatted record, the date must fall in
the range of the 1st of January, 1900 and the 6th of June, 2079.
12.11. Photos
Starting with Microsoft Windows Server 2003 and later releases, the User-object is also equipped with a picture-property. Although there is no direct
relation between this property and the Microsoft Windows client picture (avatar), using the snippets shown within this chapter, such a feature can
easily be created.
Windows 7 Windows 81
Capture 127: Microsoft Windows picture
1 When consuming a cloud service like Microsoft SkyDrive, the avatar used within the cloud service will be displayed here.
lastLogonTimestamp
Before you can use the ‘lastLogonTimestamp’-property, the domain
functional level must be raised to Windows Server 2003.
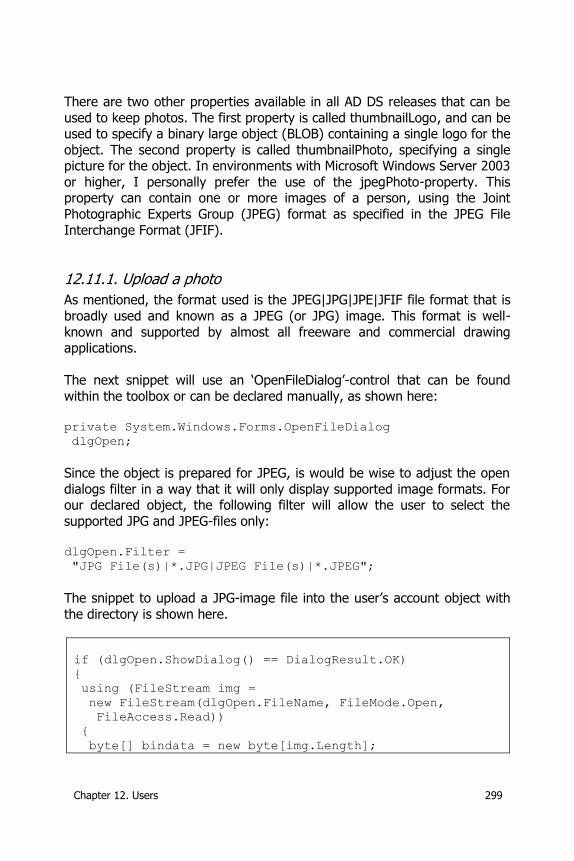
Chapter 12. Users 299
There are two other properties available in all AD DS releases that can be
used to keep photos. The first property is called thumbnailLogo, and can be used to specify a binary large object (BLOB) containing a single logo for the
object. The second property is called thumbnailPhoto, specifying a single picture for the object. In environments with Microsoft Windows Server 2003
or higher, I personally prefer the use of the jpegPhoto-property. This property can contain one or more images of a person, using the Joint
Photographic Experts Group (JPEG) format as specified in the JPEG File
Interchange Format (JFIF).
12.11.1. Upload a photo
As mentioned, the format used is the JPEG|JPG|JPE|JFIF file format that is
broadly used and known as a JPEG (or JPG) image. This format is well-
known and supported by almost all freeware and commercial drawing applications.
The next snippet will use an ‘OpenFileDialog’-control that can be found
within the toolbox or can be declared manually, as shown here:
private System.Windows.Forms.OpenFileDialog
dlgOpen;
Since the object is prepared for JPEG, is would be wise to adjust the open
dialogs filter in a way that it will only display supported image formats. For our declared object, the following filter will allow the user to select the
supported JPG and JPEG-files only: dlgOpen.Filter =
"JPG File(s)|*.JPG|JPEG File(s)|*.JPEG";
The snippet to upload a JPG-image file into the user’s account object with
the directory is shown here.
if (dlgOpen.ShowDialog() == DialogResult.OK)
{
using (FileStream img =
new FileStream(dlgOpen.FileName, FileMode.Open,
FileAccess.Read))
{
byte[] bindata = new byte[img.Length];
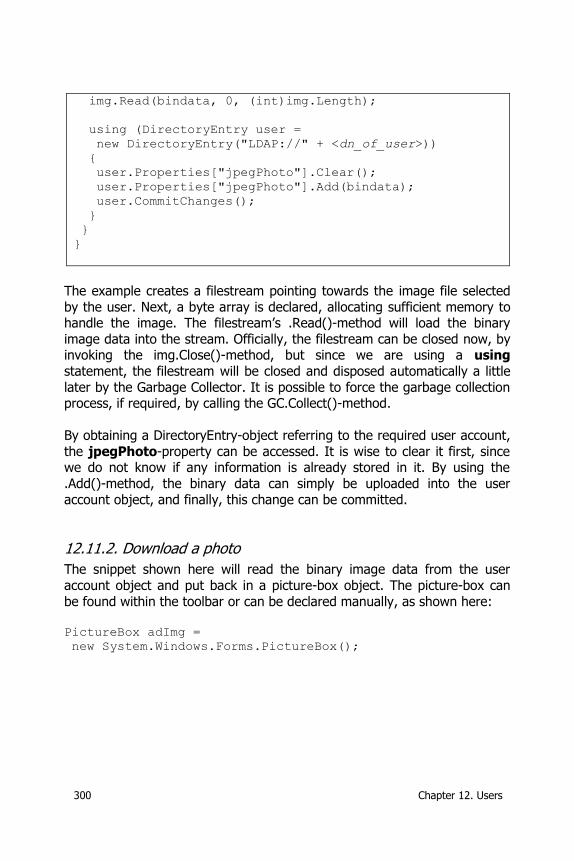
300 Chapter 12. Users
img.Read(bindata, 0, (int)img.Length);
using (DirectoryEntry user =
new DirectoryEntry("LDAP://" + <dn_of_user>))
{
user.Properties["jpegPhoto"].Clear();
user.Properties["jpegPhoto"].Add(bindata);
user.CommitChanges();
}
}
}
The example creates a filestream pointing towards the image file selected
by the user. Next, a byte array is declared, allocating sufficient memory to handle the image. The filestream’s .Read()-method will load the binary
image data into the stream. Officially, the filestream can be closed now, by invoking the img.Close()-method, but since we are using a using
statement, the filestream will be closed and disposed automatically a little
later by the Garbage Collector. It is possible to force the garbage collection process, if required, by calling the GC.Collect()-method.
By obtaining a DirectoryEntry-object referring to the required user account,
the jpegPhoto-property can be accessed. It is wise to clear it first, since we do not know if any information is already stored in it. By using the
.Add()-method, the binary data can simply be uploaded into the user
account object, and finally, this change can be committed.
12.11.2. Download a photo
The snippet shown here will read the binary image data from the user
account object and put back in a picture-box object. The picture-box can
be found within the toolbar or can be declared manually, as shown here: PictureBox adImg =
new System.Windows.Forms.PictureBox();
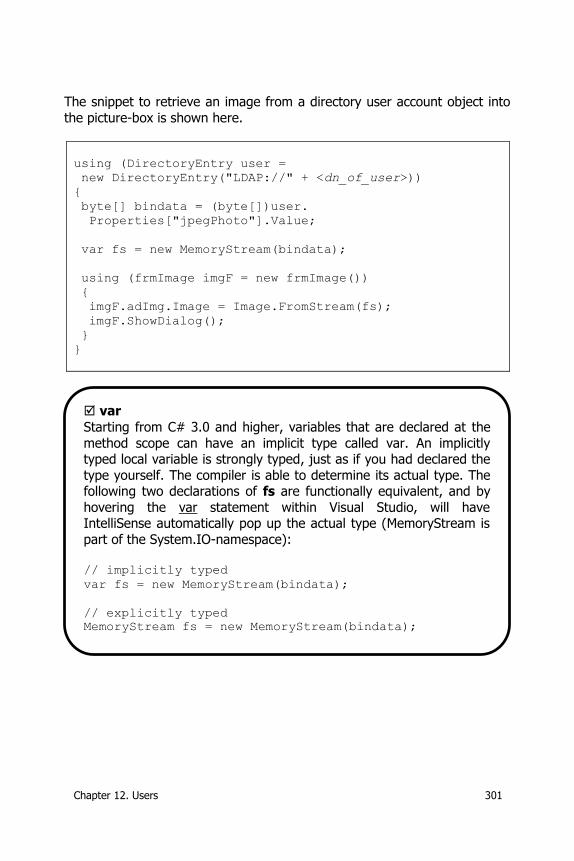
Chapter 12. Users 301
The snippet to retrieve an image from a directory user account object into
the picture-box is shown here.
using (DirectoryEntry user =
new DirectoryEntry("LDAP://" + <dn_of_user>))
{
byte[] bindata = (byte[])user.
Properties["jpegPhoto"].Value;
var fs = new MemoryStream(bindata);
using (frmImage imgF = new frmImage())
{
imgF.adImg.Image = Image.FromStream(fs);
imgF.ShowDialog();
}
}
var
Starting from C# 3.0 and higher, variables that are declared at the
method scope can have an implicit type called var. An implicitly typed local variable is strongly typed, just as if you had declared the
type yourself. The compiler is able to determine its actual type. The following two declarations of fs are functionally equivalent, and by
hovering the var statement within Visual Studio, will have IntelliSense automatically pop up the actual type (MemoryStream is
part of the System.IO-namespace):
// implicitly typed
var fs = new MemoryStream(bindata);
// explicitly typed
MemoryStream fs = new MemoryStream(bindata);
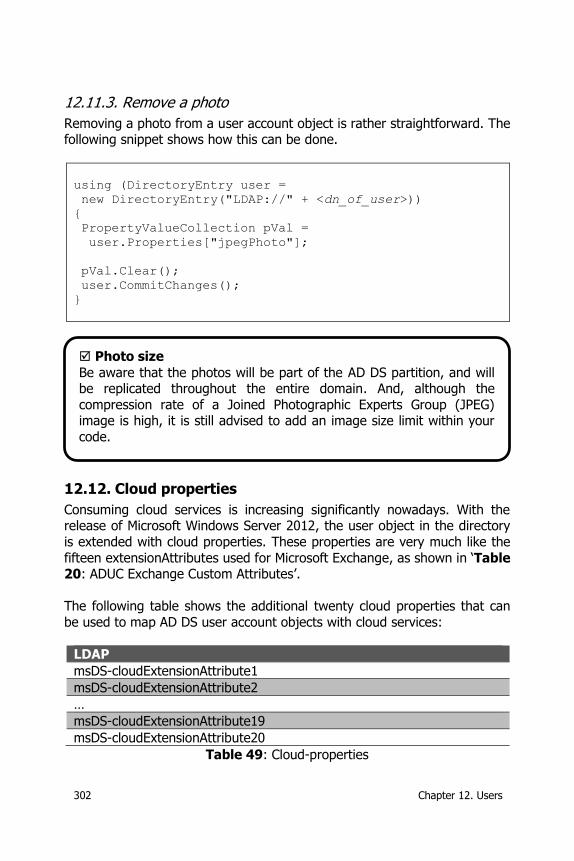
302 Chapter 12. Users
12.11.3. Remove a photo
Removing a photo from a user account object is rather straightforward. The following snippet shows how this can be done.
using (DirectoryEntry user =
new DirectoryEntry("LDAP://" + <dn_of_user>))
{
PropertyValueCollection pVal =
user.Properties["jpegPhoto"];
pVal.Clear();
user.CommitChanges();
}
12.12. Cloud properties
Consuming cloud services is increasing significantly nowadays. With the release of Microsoft Windows Server 2012, the user object in the directory
is extended with cloud properties. These properties are very much like the
fifteen extensionAttributes used for Microsoft Exchange, as shown in ‘Table 20: ADUC Exchange Custom Attributes’.
The following table shows the additional twenty cloud properties that can
be used to map AD DS user account objects with cloud services:
LDAP
msDS-cloudExtensionAttribute1
msDS-cloudExtensionAttribute2
…
msDS-cloudExtensionAttribute19
msDS-cloudExtensionAttribute20
Table 49: Cloud-properties
Photo size
Be aware that the photos will be part of the AD DS partition, and will be replicated throughout the entire domain. And, although the
compression rate of a Joined Photographic Experts Group (JPEG) image is high, it is still advised to add an image size limit within your
code.
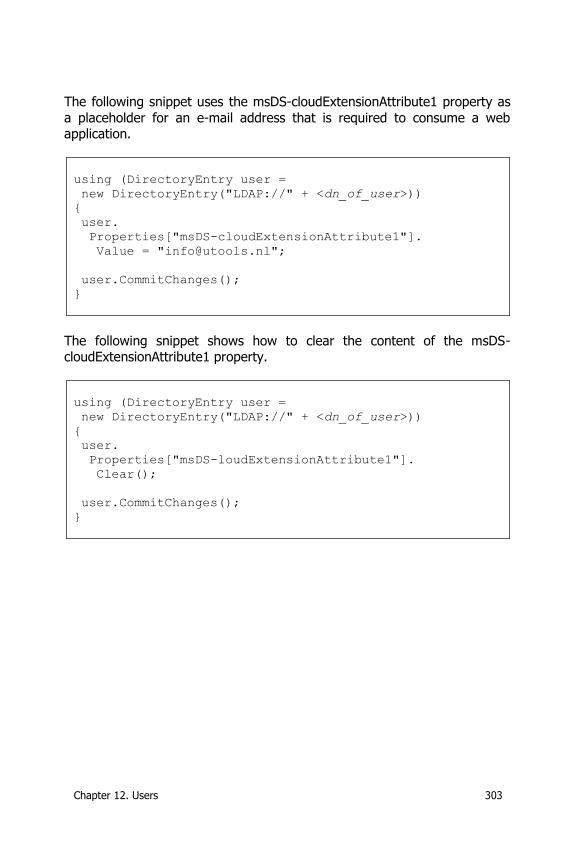
Chapter 12. Users 303
The following snippet uses the msDS-cloudExtensionAttribute1 property as
a placeholder for an e-mail address that is required to consume a web application.
using (DirectoryEntry user =
new DirectoryEntry("LDAP://" + <dn_of_user>))
{
user.
Properties["msDS-cloudExtensionAttribute1"].
Value = "[email protected]";
user.CommitChanges();
}
The following snippet shows how to clear the content of the msDS-cloudExtensionAttribute1 property.
using (DirectoryEntry user =
new DirectoryEntry("LDAP://" + <dn_of_user>))
{
user.
Properties["msDS-loudExtensionAttribute1"].
Clear();
user.CommitChanges();
}

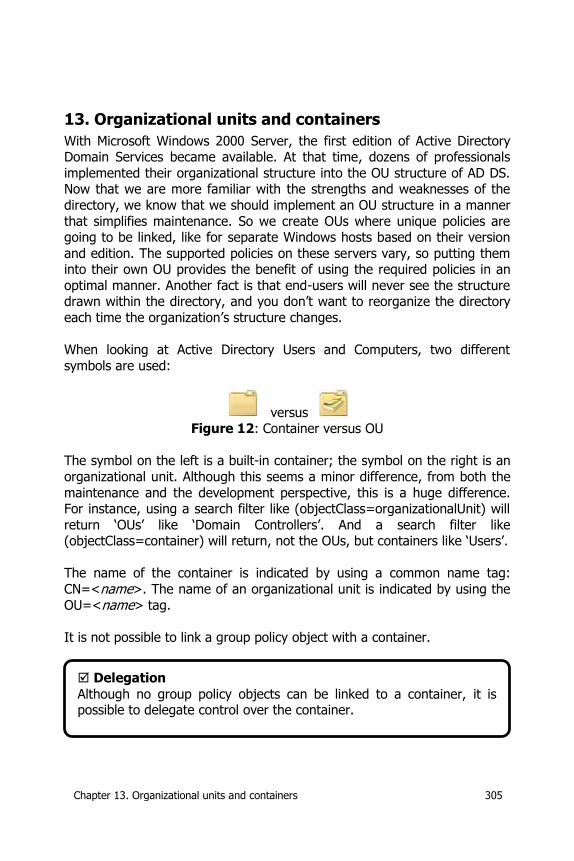
Chapter 13. Organizational units and containers 305
13. Organizational units and containers
With Microsoft Windows 2000 Server, the first edition of Active Directory Domain Services became available. At that time, dozens of professionals
implemented their organizational structure into the OU structure of AD DS. Now that we are more familiar with the strengths and weaknesses of the
directory, we know that we should implement an OU structure in a manner
that simplifies maintenance. So we create OUs where unique policies are going to be linked, like for separate Windows hosts based on their version
and edition. The supported policies on these servers vary, so putting them into their own OU provides the benefit of using the required policies in an
optimal manner. Another fact is that end-users will never see the structure drawn within the directory, and you don’t want to reorganize the directory
each time the organization’s structure changes.
When looking at Active Directory Users and Computers, two different
symbols are used:
versus Figure 12: Container versus OU
The symbol on the left is a built-in container; the symbol on the right is an
organizational unit. Although this seems a minor difference, from both the
maintenance and the development perspective, this is a huge difference. For instance, using a search filter like (objectClass=organizationalUnit) will
return ‘OUs’ like ‘Domain Controllers’. And a search filter like (objectClass=container) will return, not the OUs, but containers like ‘Users’.
The name of the container is indicated by using a common name tag:
CN=<name>. The name of an organizational unit is indicated by using the
OU=<name> tag.
It is not possible to link a group policy object with a container.
Delegation
Although no group policy objects can be linked to a container, it is possible to delegate control over the container.
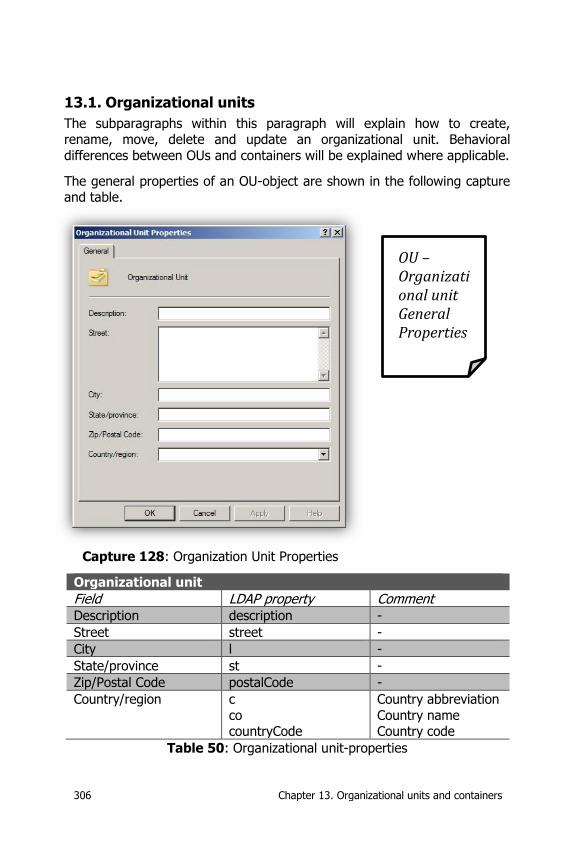
306 Chapter 13. Organizational units and containers
13.1. Organizational units
The subparagraphs within this paragraph will explain how to create, rename, move, delete and update an organizational unit. Behavioral
differences between OUs and containers will be explained where applicable.
The general properties of an OU-object are shown in the following capture and table.
Capture 128: Organization Unit Properties
Organizational unit
Field LDAP property Comment Description description -
Street street -
City l -
State/province st -
Zip/Postal Code postalCode -
Country/region c
co countryCode
Country abbreviation
Country name Country code
Table 50: Organizational unit-properties
OU – Organizational unit General Properties.
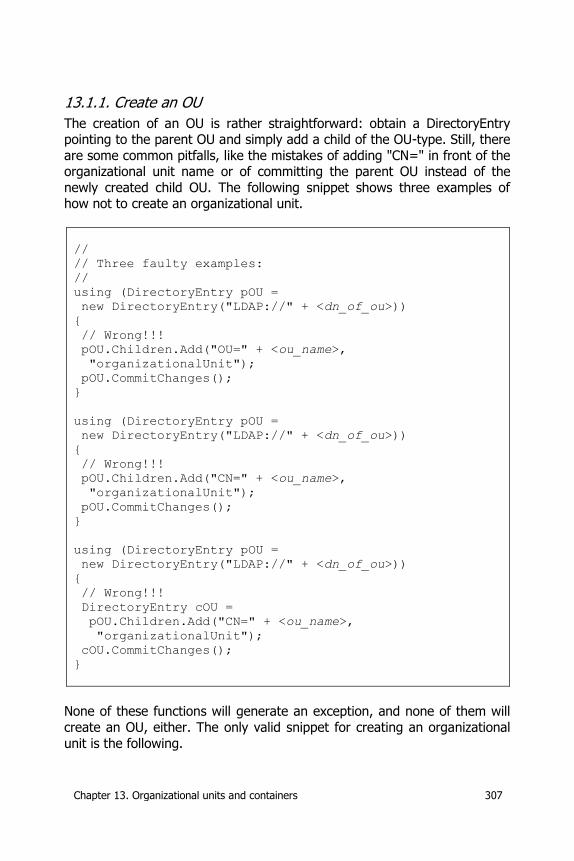
Chapter 13. Organizational units and containers 307
13.1.1. Create an OU
The creation of an OU is rather straightforward: obtain a DirectoryEntry pointing to the parent OU and simply add a child of the OU-type. Still, there
are some common pitfalls, like the mistakes of adding "CN=" in front of the organizational unit name or of committing the parent OU instead of the
newly created child OU. The following snippet shows three examples of how not to create an organizational unit.
//
// Three faulty examples:
//
using (DirectoryEntry pOU =
new DirectoryEntry("LDAP://" + <dn_of_ou>))
{
// Wrong!!!
pOU.Children.Add("OU=" + <ou_name>,
"organizationalUnit");
pOU.CommitChanges();
}
using (DirectoryEntry pOU =
new DirectoryEntry("LDAP://" + <dn_of_ou>))
{
// Wrong!!!
pOU.Children.Add("CN=" + <ou_name>,
"organizationalUnit");
pOU.CommitChanges();
}
using (DirectoryEntry pOU =
new DirectoryEntry("LDAP://" + <dn_of_ou>))
{
// Wrong!!!
DirectoryEntry cOU =
pOU.Children.Add("CN=" + <ou_name>,
"organizationalUnit");
cOU.CommitChanges();
}
None of these functions will generate an exception, and none of them will
create an OU, either. The only valid snippet for creating an organizational
unit is the following.
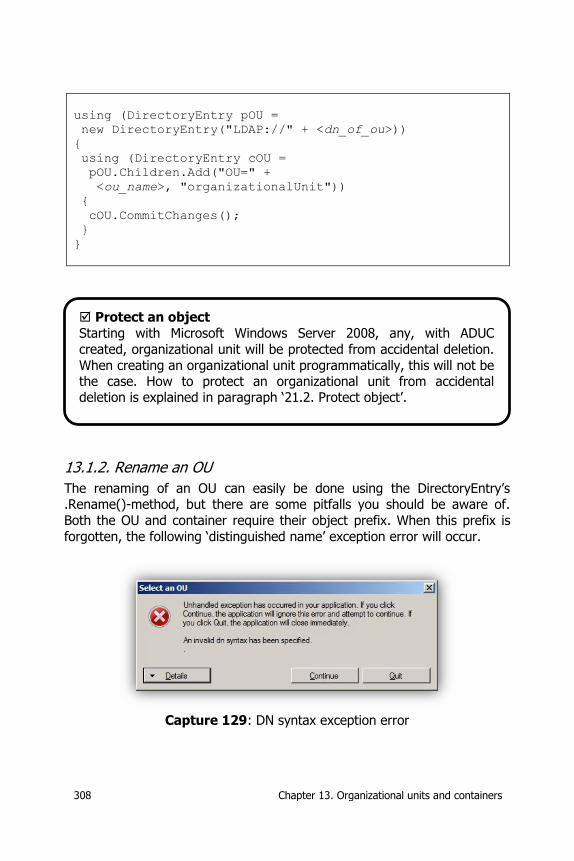
308 Chapter 13. Organizational units and containers
using (DirectoryEntry pOU =
new DirectoryEntry("LDAP://" + <dn_of_ou>))
{
using (DirectoryEntry cOU =
pOU.Children.Add("OU=" +
<ou_name>, "organizationalUnit"))
{
cOU.CommitChanges();
}
}
13.1.2. Rename an OU
The renaming of an OU can easily be done using the DirectoryEntry’s .Rename()-method, but there are some pitfalls you should be aware of.
Both the OU and container require their object prefix. When this prefix is
forgotten, the following ‘distinguished name’ exception error will occur.
Capture 129: DN syntax exception error
Protect an object
Starting with Microsoft Windows Server 2008, any, with ADUC
created, organizational unit will be protected from accidental deletion.
When creating an organizational unit programmatically, this will not be the case. How to protect an organizational unit from accidental deletion is explained in paragraph ‘21.2. Protect object’.
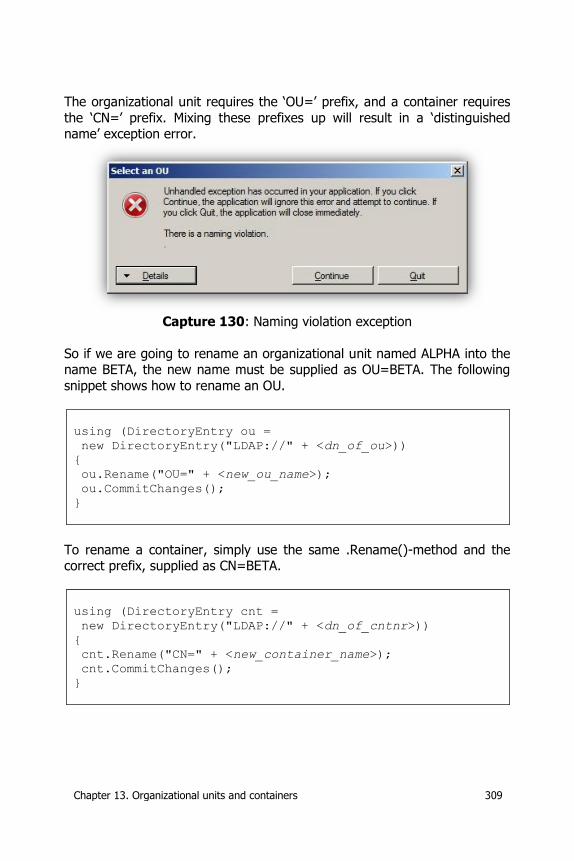
Chapter 13. Organizational units and containers 309
The organizational unit requires the ‘OU=’ prefix, and a container requires
the ‘CN=’ prefix. Mixing these prefixes up will result in a ‘distinguished name’ exception error.
Capture 130: Naming violation exception
So if we are going to rename an organizational unit named ALPHA into the name BETA, the new name must be supplied as OU=BETA. The following
snippet shows how to rename an OU.
using (DirectoryEntry ou =
new DirectoryEntry("LDAP://" + <dn_of_ou>))
{
ou.Rename("OU=" + <new_ou_name>);
ou.CommitChanges();
}
To rename a container, simply use the same .Rename()-method and the correct prefix, supplied as CN=BETA.
using (DirectoryEntry cnt =
new DirectoryEntry("LDAP://" + <dn_of_cntnr>))
{
cnt.Rename("CN=" + <new_container_name>);
cnt.CommitChanges();
}
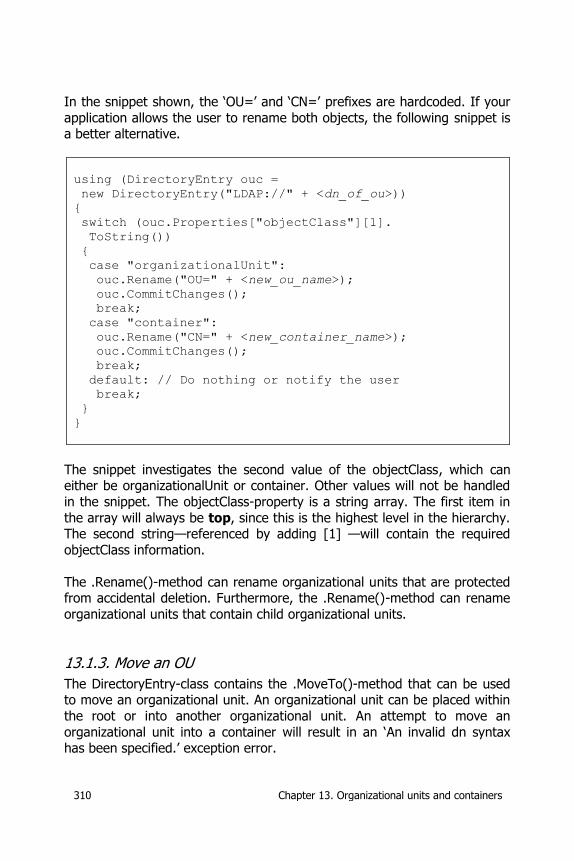
310 Chapter 13. Organizational units and containers
In the snippet shown, the ‘OU=’ and ‘CN=’ prefixes are hardcoded. If your
application allows the user to rename both objects, the following snippet is a better alternative.
using (DirectoryEntry ouc =
new DirectoryEntry("LDAP://" + <dn_of_ou>))
{
switch (ouc.Properties["objectClass"][1].
ToString())
{
case "organizationalUnit":
ouc.Rename("OU=" + <new_ou_name>);
ouc.CommitChanges();
break;
case "container":
ouc.Rename("CN=" + <new_container_name>);
ouc.CommitChanges();
break;
default: // Do nothing or notify the user
break;
}
}
The snippet investigates the second value of the objectClass, which can either be organizationalUnit or container. Other values will not be handled
in the snippet. The objectClass-property is a string array. The first item in
the array will always be top, since this is the highest level in the hierarchy. The second string—referenced by adding [1] —will contain the required
objectClass information.
The .Rename()-method can rename organizational units that are protected from accidental deletion. Furthermore, the .Rename()-method can rename
organizational units that contain child organizational units.
13.1.3. Move an OU
The DirectoryEntry-class contains the .MoveTo()-method that can be used to move an organizational unit. An organizational unit can be placed within
the root or into another organizational unit. An attempt to move an
organizational unit into a container will result in an ‘An invalid dn syntax has been specified.’ exception error.
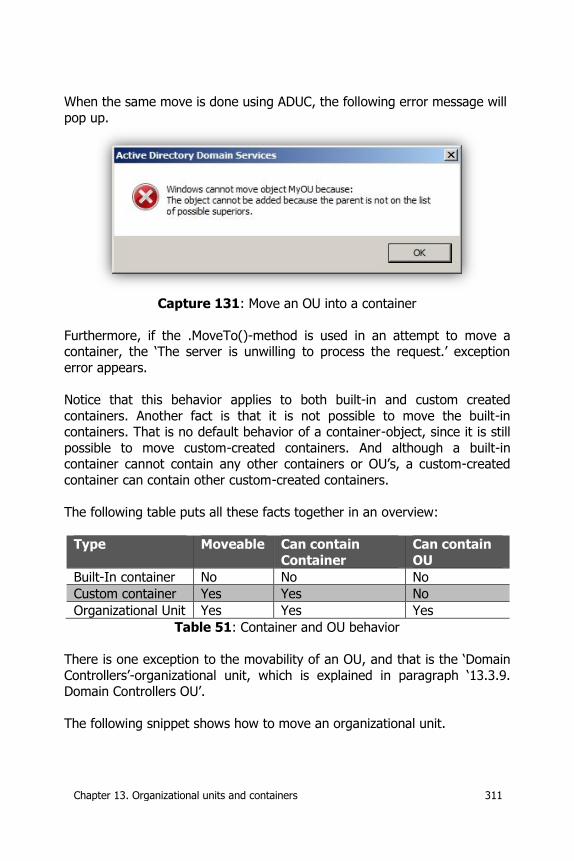
Chapter 13. Organizational units and containers 311
When the same move is done using ADUC, the following error message will
pop up.
Capture 131: Move an OU into a container
Furthermore, if the .MoveTo()-method is used in an attempt to move a container, the ‘The server is unwilling to process the request.’ exception
error appears.
Notice that this behavior applies to both built-in and custom created
containers. Another fact is that it is not possible to move the built-in containers. That is no default behavior of a container-object, since it is still
possible to move custom-created containers. And although a built-in container cannot contain any other containers or OU’s, a custom-created
container can contain other custom-created containers.
The following table puts all these facts together in an overview:
Type Moveable Can contain
Container
Can contain
OU
Built-In container No No No
Custom container Yes Yes No
Organizational Unit Yes Yes Yes
Table 51: Container and OU behavior
There is one exception to the movability of an OU, and that is the ‘Domain
Controllers’-organizational unit, which is explained in paragraph ‘13.3.9. Domain Controllers OU’.
The following snippet shows how to move an organizational unit.
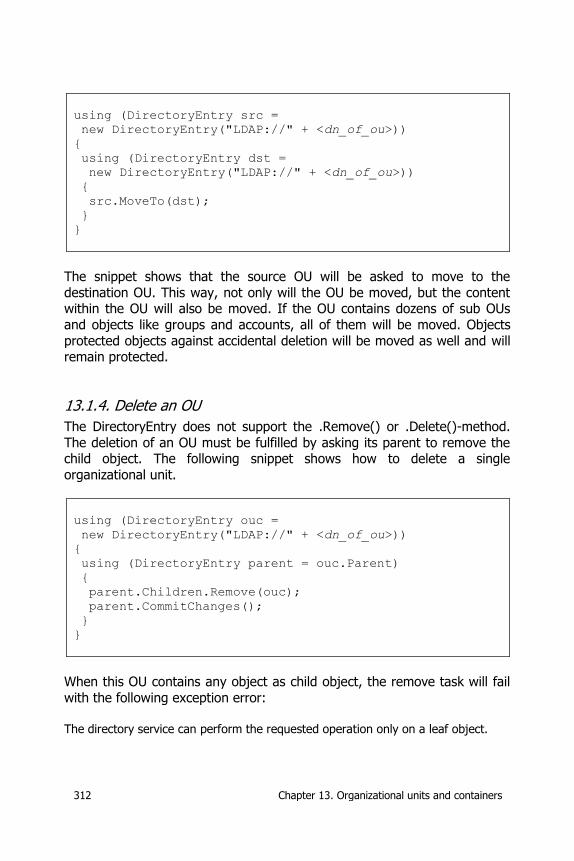
312 Chapter 13. Organizational units and containers
using (DirectoryEntry src =
new DirectoryEntry("LDAP://" + <dn_of_ou>))
{
using (DirectoryEntry dst =
new DirectoryEntry("LDAP://" + <dn_of_ou>))
{
src.MoveTo(dst);
}
}
The snippet shows that the source OU will be asked to move to the
destination OU. This way, not only will the OU be moved, but the content within the OU will also be moved. If the OU contains dozens of sub OUs
and objects like groups and accounts, all of them will be moved. Objects
protected objects against accidental deletion will be moved as well and will remain protected.
13.1.4. Delete an OU
The DirectoryEntry does not support the .Remove() or .Delete()-method.
The deletion of an OU must be fulfilled by asking its parent to remove the child object. The following snippet shows how to delete a single
organizational unit.
using (DirectoryEntry ouc =
new DirectoryEntry("LDAP://" + <dn_of_ou>))
{
using (DirectoryEntry parent = ouc.Parent)
{
parent.Children.Remove(ouc);
parent.CommitChanges();
}
}
When this OU contains any object as child object, the remove task will fail
with the following exception error:
The directory service can perform the requested operation only on a leaf object.
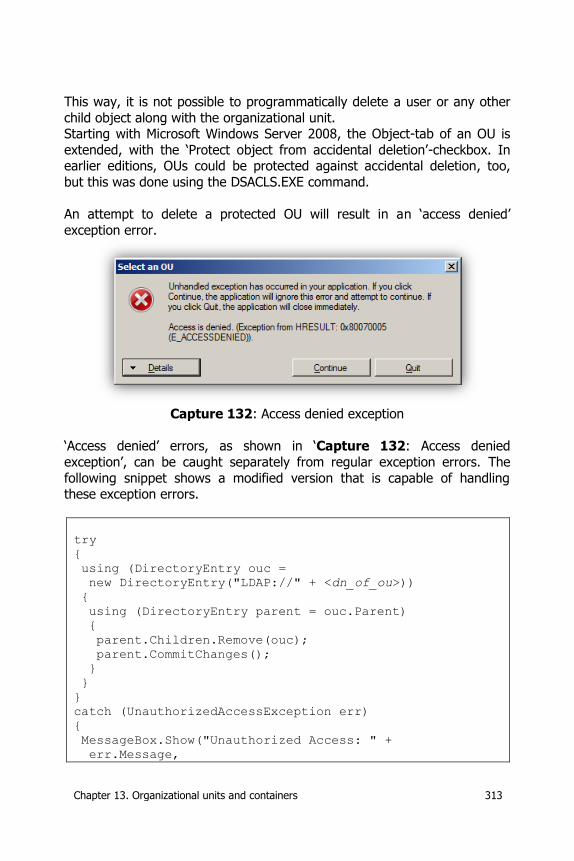
Chapter 13. Organizational units and containers 313
This way, it is not possible to programmatically delete a user or any other
child object along with the organizational unit. Starting with Microsoft Windows Server 2008, the Object-tab of an OU is
extended, with the ‘Protect object from accidental deletion’-checkbox. In earlier editions, OUs could be protected against accidental deletion, too,
but this was done using the DSACLS.EXE command.
An attempt to delete a protected OU will result in an ‘access denied’
exception error.
Capture 132: Access denied exception
‘Access denied’ errors, as shown in ‘Capture 132: Access denied
exception’, can be caught separately from regular exception errors. The
following snippet shows a modified version that is capable of handling these exception errors.
try
{
using (DirectoryEntry ouc =
new DirectoryEntry("LDAP://" + <dn_of_ou>))
{
using (DirectoryEntry parent = ouc.Parent)
{
parent.Children.Remove(ouc);
parent.CommitChanges();
}
}
}
catch (UnauthorizedAccessException err)
{
MessageBox.Show("Unauthorized Access: " +
err.Message,
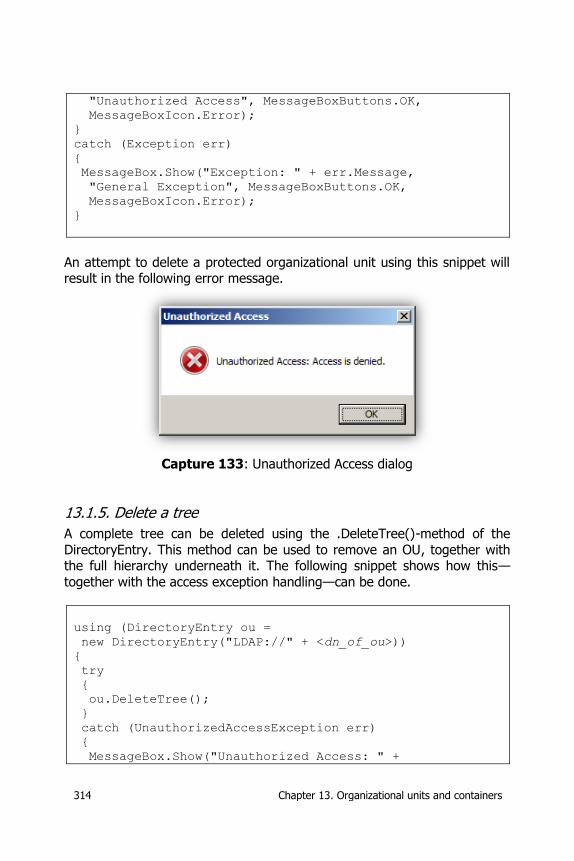
314 Chapter 13. Organizational units and containers
"Unauthorized Access", MessageBoxButtons.OK,
MessageBoxIcon.Error);
}
catch (Exception err)
{
MessageBox.Show("Exception: " + err.Message,
"General Exception", MessageBoxButtons.OK,
MessageBoxIcon.Error);
}
An attempt to delete a protected organizational unit using this snippet will result in the following error message.
Capture 133: Unauthorized Access dialog
13.1.5. Delete a tree
A complete tree can be deleted using the .DeleteTree()-method of the
DirectoryEntry. This method can be used to remove an OU, together with the full hierarchy underneath it. The following snippet shows how this—
together with the access exception handling—can be done.
using (DirectoryEntry ou =
new DirectoryEntry("LDAP://" + <dn_of_ou>))
{
try
{
ou.DeleteTree();
}
catch (UnauthorizedAccessException err)
{
MessageBox.Show("Unauthorized Access: " +
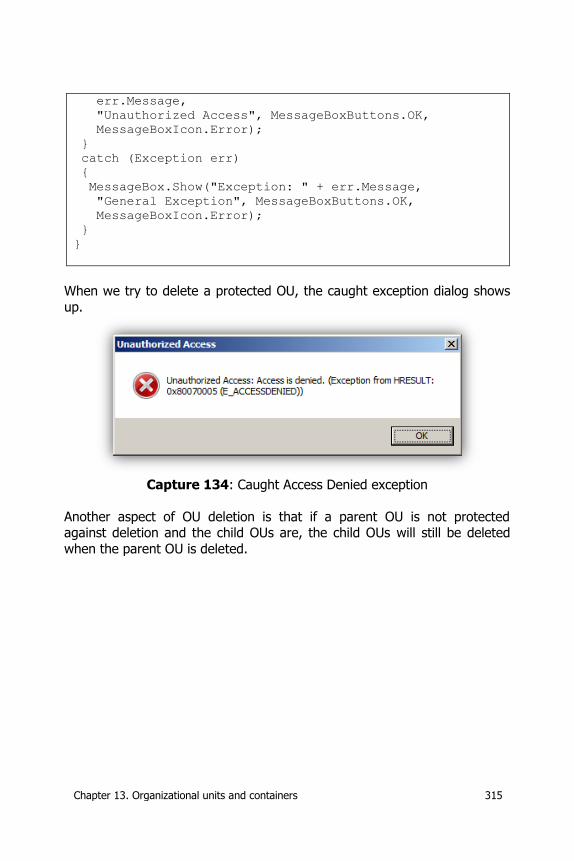
Chapter 13. Organizational units and containers 315
err.Message,
"Unauthorized Access", MessageBoxButtons.OK,
MessageBoxIcon.Error);
}
catch (Exception err)
{
MessageBox.Show("Exception: " + err.Message,
"General Exception", MessageBoxButtons.OK,
MessageBoxIcon.Error);
}
}
When we try to delete a protected OU, the caught exception dialog shows
up.
Capture 134: Caught Access Denied exception
Another aspect of OU deletion is that if a parent OU is not protected against deletion and the child OUs are, the child OUs will still be deleted
when the parent OU is deleted.
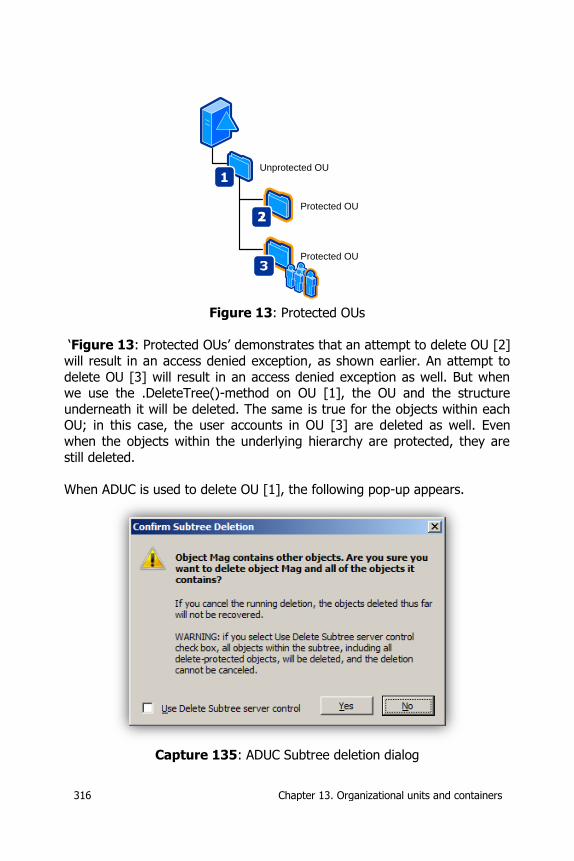
316 Chapter 13. Organizational units and containers
Protected OU
Protected OU
Unprotected OU
Figure 13: Protected OUs
‘Figure 13: Protected OUs’ demonstrates that an attempt to delete OU [2]
will result in an access denied exception, as shown earlier. An attempt to
delete OU [3] will result in an access denied exception as well. But when we use the .DeleteTree()-method on OU [1], the OU and the structure
underneath it will be deleted. The same is true for the objects within each OU; in this case, the user accounts in OU [3] are deleted as well. Even
when the objects within the underlying hierarchy are protected, they are
still deleted.
When ADUC is used to delete OU [1], the following pop-up appears.
Capture 135: ADUC Subtree deletion dialog
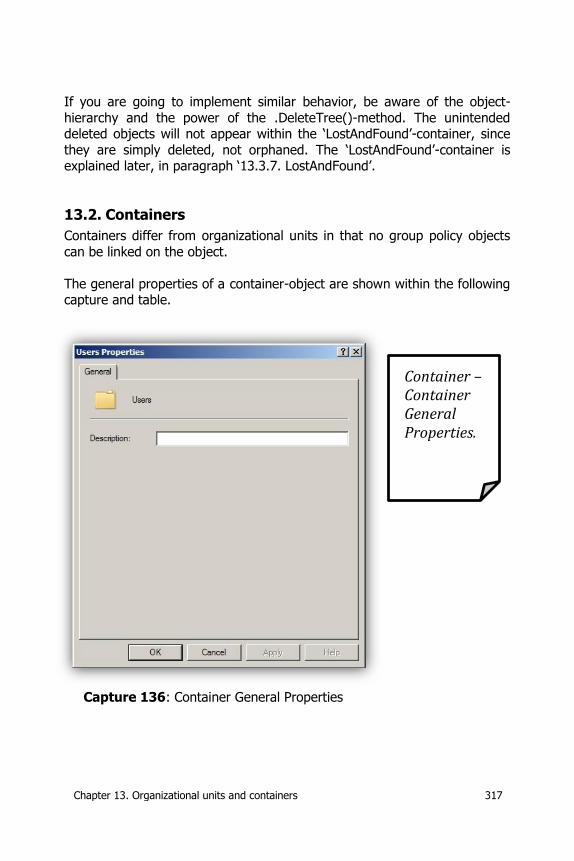
Chapter 13. Organizational units and containers 317
If you are going to implement similar behavior, be aware of the object-
hierarchy and the power of the .DeleteTree()-method. The unintended deleted objects will not appear within the ‘LostAndFound’-container, since
they are simply deleted, not orphaned. The ‘LostAndFound’-container is explained later, in paragraph ‘13.3.7. LostAndFound’.
13.2. Containers
Containers differ from organizational units in that no group policy objects
can be linked on the object.
The general properties of a container-object are shown within the following capture and table.
Capture 136: Container General Properties
Container – Container General Properties.
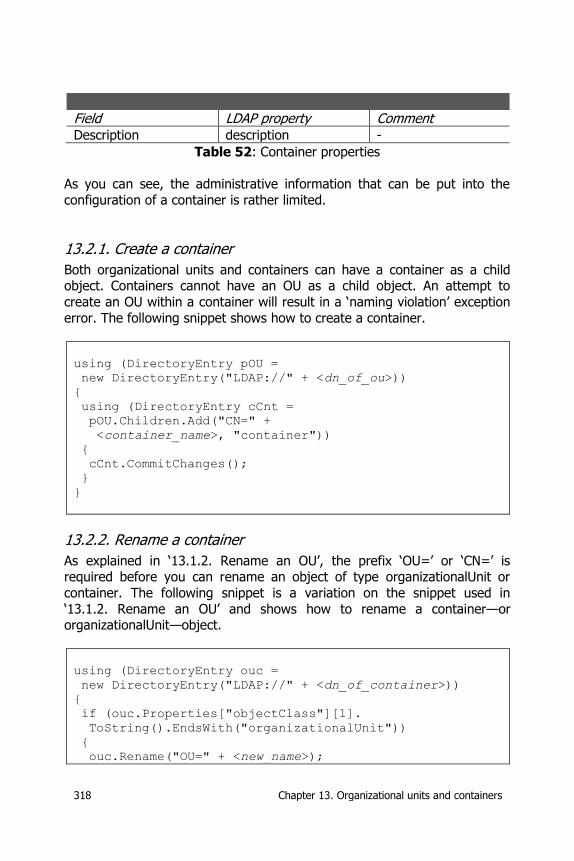
318 Chapter 13. Organizational units and containers
Field LDAP property Comment Description description -
Table 52: Container properties
As you can see, the administrative information that can be put into the
configuration of a container is rather limited.
13.2.1. Create a container
Both organizational units and containers can have a container as a child object. Containers cannot have an OU as a child object. An attempt to
create an OU within a container will result in a ‘naming violation’ exception
error. The following snippet shows how to create a container.
using (DirectoryEntry pOU =
new DirectoryEntry("LDAP://" + <dn_of_ou>))
{
using (DirectoryEntry cCnt =
pOU.Children.Add("CN=" +
<container_name>, "container"))
{
cCnt.CommitChanges();
}
}
13.2.2. Rename a container
As explained in ‘13.1.2. Rename an OU’, the prefix ‘OU=’ or ‘CN=’ is required before you can rename an object of type organizationalUnit or
container. The following snippet is a variation on the snippet used in
‘13.1.2. Rename an OU’ and shows how to rename a container—or organizationalUnit—object.
using (DirectoryEntry ouc =
new DirectoryEntry("LDAP://" + <dn_of_container>))
{
if (ouc.Properties["objectClass"][1].
ToString().EndsWith("organizationalUnit"))
{
ouc.Rename("OU=" + <new_name>);
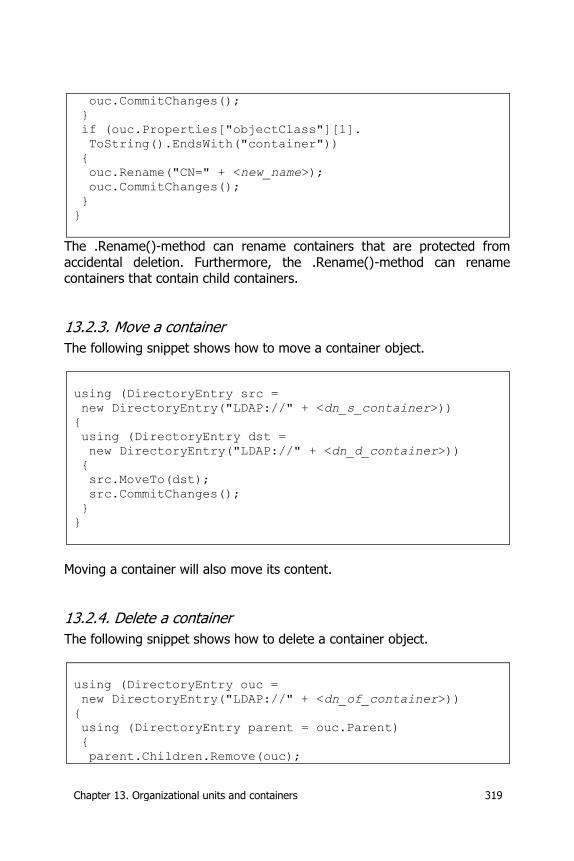
Chapter 13. Organizational units and containers 319
ouc.CommitChanges();
}
if (ouc.Properties["objectClass"][1].
ToString().EndsWith("container"))
{
ouc.Rename("CN=" + <new_name>);
ouc.CommitChanges();
}
}
The .Rename()-method can rename containers that are protected from
accidental deletion. Furthermore, the .Rename()-method can rename containers that contain child containers.
13.2.3. Move a container
The following snippet shows how to move a container object.
using (DirectoryEntry src =
new DirectoryEntry("LDAP://" + <dn_s_container>))
{
using (DirectoryEntry dst =
new DirectoryEntry("LDAP://" + <dn_d_container>))
{
src.MoveTo(dst);
src.CommitChanges();
}
}
Moving a container will also move its content.
13.2.4. Delete a container
The following snippet shows how to delete a container object.
using (DirectoryEntry ouc =
new DirectoryEntry("LDAP://" + <dn_of_container>))
{
using (DirectoryEntry parent = ouc.Parent)
{
parent.Children.Remove(ouc);
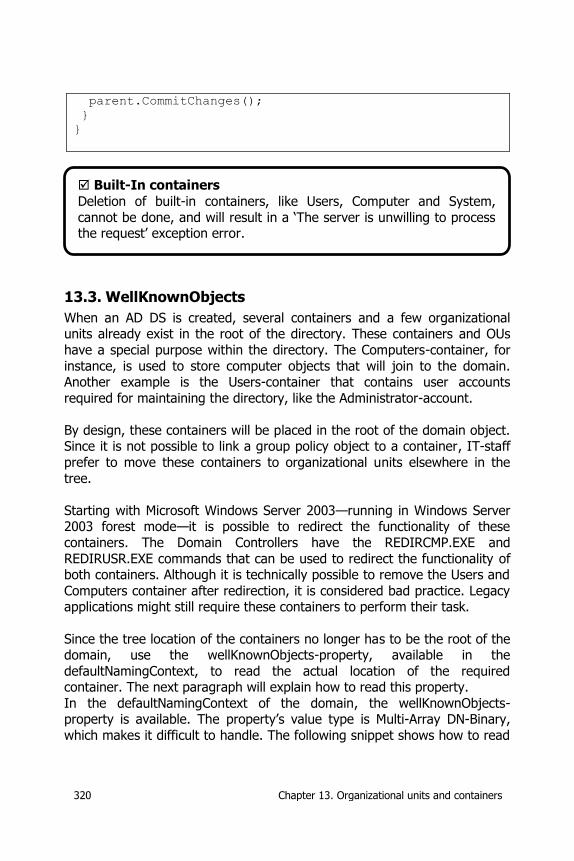
320 Chapter 13. Organizational units and containers
parent.CommitChanges();
}
}
13.3. WellKnownObjects
When an AD DS is created, several containers and a few organizational units already exist in the root of the directory. These containers and OUs
have a special purpose within the directory. The Computers-container, for
instance, is used to store computer objects that will join to the domain. Another example is the Users-container that contains user accounts
required for maintaining the directory, like the Administrator-account.
By design, these containers will be placed in the root of the domain object. Since it is not possible to link a group policy object to a container, IT-staff
prefer to move these containers to organizational units elsewhere in the
tree.
Starting with Microsoft Windows Server 2003—running in Windows Server 2003 forest mode—it is possible to redirect the functionality of these
containers. The Domain Controllers have the REDIRCMP.EXE and
REDIRUSR.EXE commands that can be used to redirect the functionality of both containers. Although it is technically possible to remove the Users and
Computers container after redirection, it is considered bad practice. Legacy applications might still require these containers to perform their task.
Since the tree location of the containers no longer has to be the root of the domain, use the wellKnownObjects-property, available in the
defaultNamingContext, to read the actual location of the required container. The next paragraph will explain how to read this property.
In the defaultNamingContext of the domain, the wellKnownObjects-property is available. The property’s value type is Multi-Array DN-Binary,
which makes it difficult to handle. The following snippet shows how to read
Built-In containers
Deletion of built-in containers, like Users, Computer and System,
cannot be done, and will result in a ‘The server is unwilling to process the request’ exception error.
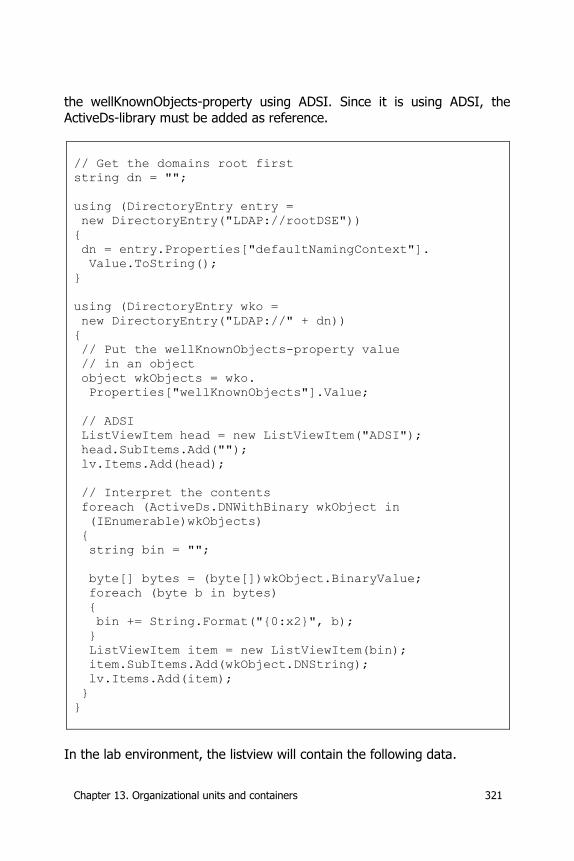
Chapter 13. Organizational units and containers 321
the wellKnownObjects-property using ADSI. Since it is using ADSI, the
ActiveDs-library must be added as reference.
// Get the domains root first
string dn = "";
using (DirectoryEntry entry =
new DirectoryEntry("LDAP://rootDSE"))
{
dn = entry.Properties["defaultNamingContext"].
Value.ToString();
}
using (DirectoryEntry wko =
new DirectoryEntry("LDAP://" + dn))
{
// Put the wellKnownObjects-property value
// in an object
object wkObjects = wko.
Properties["wellKnownObjects"].Value;
// ADSI
ListViewItem head = new ListViewItem("ADSI");
head.SubItems.Add("");
lv.Items.Add(head);
// Interpret the contents
foreach (ActiveDs.DNWithBinary wkObject in
(IEnumerable)wkObjects)
{
string bin = "";
byte[] bytes = (byte[])wkObject.BinaryValue;
foreach (byte b in bytes)
{
bin += String.Format("{0:x2}", b);
}
ListViewItem item = new ListViewItem(bin);
item.SubItems.Add(wkObject.DNString);
lv.Items.Add(item);
}
}
In the lab environment, the listview will contain the following data.
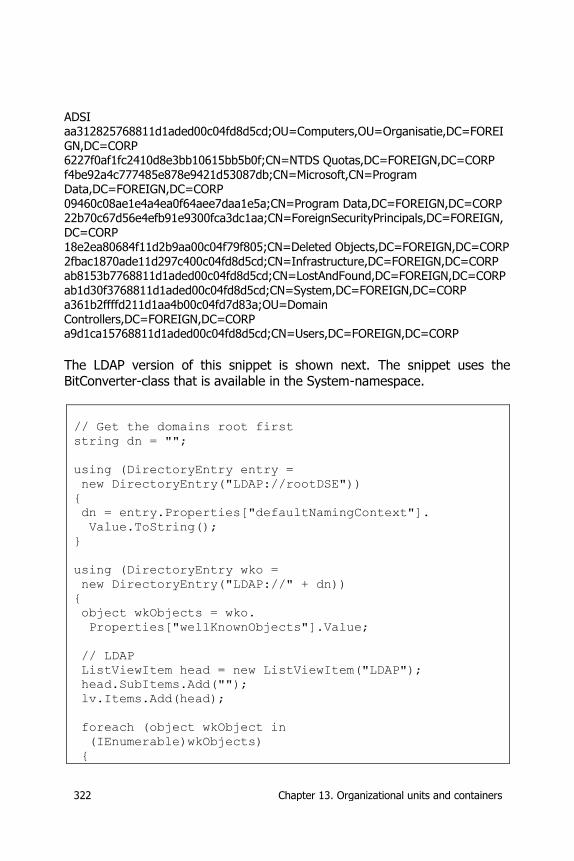
322 Chapter 13. Organizational units and containers
ADSI aa312825768811d1aded00c04fd8d5cd;OU=Computers,OU=Organisatie,DC=FOREIGN,DC=CORP 6227f0af1fc2410d8e3bb10615bb5b0f;CN=NTDS Quotas,DC=FOREIGN,DC=CORP f4be92a4c777485e878e9421d53087db;CN=Microsoft,CN=Program Data,DC=FOREIGN,DC=CORP 09460c08ae1e4a4ea0f64aee7daa1e5a;CN=Program Data,DC=FOREIGN,DC=CORP 22b70c67d56e4efb91e9300fca3dc1aa;CN=ForeignSecurityPrincipals,DC=FOREIGN,DC=CORP 18e2ea80684f11d2b9aa00c04f79f805;CN=Deleted Objects,DC=FOREIGN,DC=CORP 2fbac1870ade11d297c400c04fd8d5cd;CN=Infrastructure,DC=FOREIGN,DC=CORP ab8153b7768811d1aded00c04fd8d5cd;CN=LostAndFound,DC=FOREIGN,DC=CORP ab1d30f3768811d1aded00c04fd8d5cd;CN=System,DC=FOREIGN,DC=CORP a361b2ffffd211d1aa4b00c04fd7d83a;OU=Domain Controllers,DC=FOREIGN,DC=CORP a9d1ca15768811d1aded00c04fd8d5cd;CN=Users,DC=FOREIGN,DC=CORP
The LDAP version of this snippet is shown next. The snippet uses the BitConverter-class that is available in the System-namespace.
// Get the domains root first
string dn = "";
using (DirectoryEntry entry =
new DirectoryEntry("LDAP://rootDSE"))
{
dn = entry.Properties["defaultNamingContext"].
Value.ToString();
}
using (DirectoryEntry wko =
new DirectoryEntry("LDAP://" + dn))
{
object wkObjects = wko.
Properties["wellKnownObjects"].Value;
// LDAP
ListViewItem head = new ListViewItem("LDAP");
head.SubItems.Add("");
lv.Items.Add(head);
foreach (object wkObject in
(IEnumerable)wkObjects)
{
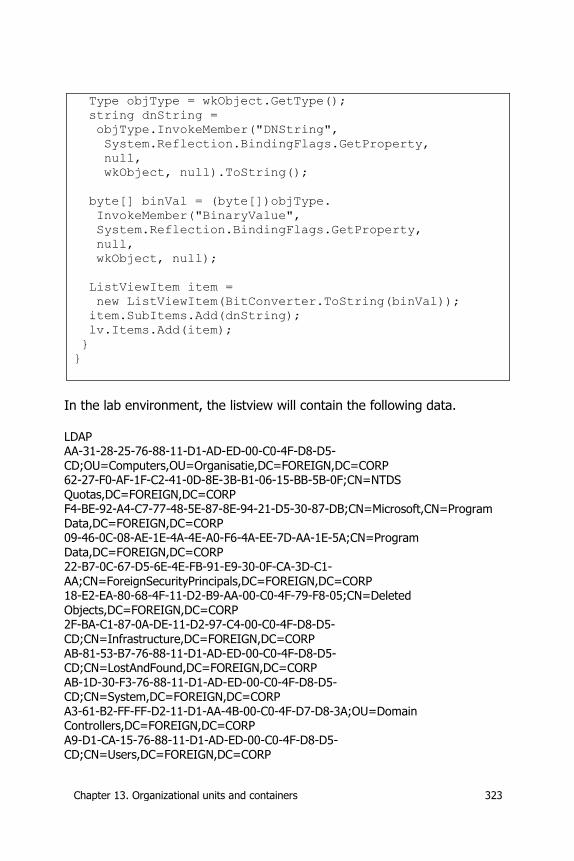
Chapter 13. Organizational units and containers 323
Type objType = wkObject.GetType();
string dnString =
objType.InvokeMember("DNString",
System.Reflection.BindingFlags.GetProperty,
null,
wkObject, null).ToString();
byte[] binVal = (byte[])objType.
InvokeMember("BinaryValue",
System.Reflection.BindingFlags.GetProperty,
null,
wkObject, null);
ListViewItem item =
new ListViewItem(BitConverter.ToString(binVal));
item.SubItems.Add(dnString);
lv.Items.Add(item);
}
}
In the lab environment, the listview will contain the following data.
LDAP AA-31-28-25-76-88-11-D1-AD-ED-00-C0-4F-D8-D5-CD;OU=Computers,OU=Organisatie,DC=FOREIGN,DC=CORP 62-27-F0-AF-1F-C2-41-0D-8E-3B-B1-06-15-BB-5B-0F;CN=NTDS Quotas,DC=FOREIGN,DC=CORP F4-BE-92-A4-C7-77-48-5E-87-8E-94-21-D5-30-87-DB;CN=Microsoft,CN=Program Data,DC=FOREIGN,DC=CORP 09-46-0C-08-AE-1E-4A-4E-A0-F6-4A-EE-7D-AA-1E-5A;CN=Program Data,DC=FOREIGN,DC=CORP 22-B7-0C-67-D5-6E-4E-FB-91-E9-30-0F-CA-3D-C1-
AA;CN=ForeignSecurityPrincipals,DC=FOREIGN,DC=CORP 18-E2-EA-80-68-4F-11-D2-B9-AA-00-C0-4F-79-F8-05;CN=Deleted Objects,DC=FOREIGN,DC=CORP 2F-BA-C1-87-0A-DE-11-D2-97-C4-00-C0-4F-D8-D5-CD;CN=Infrastructure,DC=FOREIGN,DC=CORP AB-81-53-B7-76-88-11-D1-AD-ED-00-C0-4F-D8-D5-CD;CN=LostAndFound,DC=FOREIGN,DC=CORP AB-1D-30-F3-76-88-11-D1-AD-ED-00-C0-4F-D8-D5-CD;CN=System,DC=FOREIGN,DC=CORP A3-61-B2-FF-FF-D2-11-D1-AA-4B-00-C0-4F-D7-D8-3A;OU=Domain Controllers,DC=FOREIGN,DC=CORP A9-D1-CA-15-76-88-11-D1-AD-ED-00-C0-4F-D8-D5-CD;CN=Users,DC=FOREIGN,DC=CORP
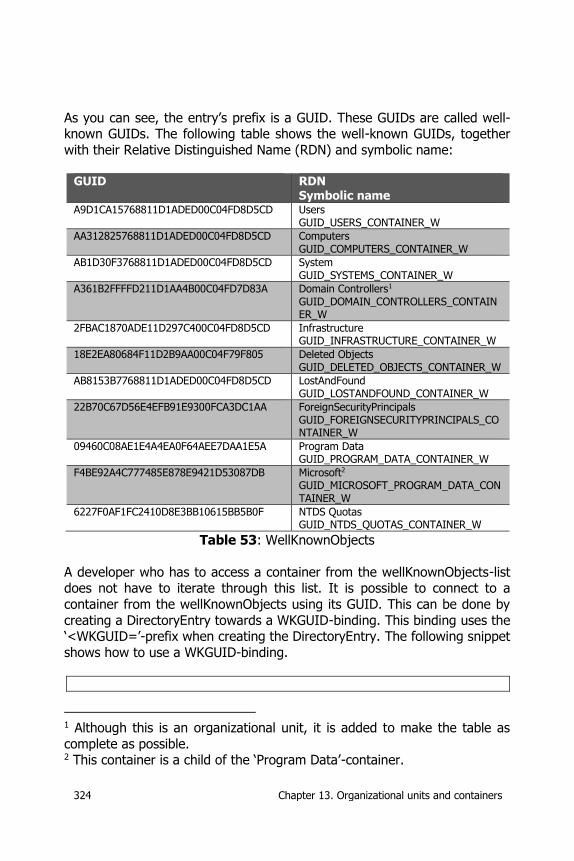
324 Chapter 13. Organizational units and containers
As you can see, the entry’s prefix is a GUID. These GUIDs are called well-known GUIDs. The following table shows the well-known GUIDs, together
with their Relative Distinguished Name (RDN) and symbolic name:
GUID RDN Symbolic name
A9D1CA15768811D1ADED00C04FD8D5CD Users GUID_USERS_CONTAINER_W
AA312825768811D1ADED00C04FD8D5CD Computers GUID_COMPUTERS_CONTAINER_W
AB1D30F3768811D1ADED00C04FD8D5CD System GUID_SYSTEMS_CONTAINER_W
A361B2FFFFD211D1AA4B00C04FD7D83A Domain Controllers1 GUID_DOMAIN_CONTROLLERS_CONTAINER_W
2FBAC1870ADE11D297C400C04FD8D5CD Infrastructure GUID_INFRASTRUCTURE_CONTAINER_W
18E2EA80684F11D2B9AA00C04F79F805 Deleted Objects GUID_DELETED_OBJECTS_CONTAINER_W
AB8153B7768811D1ADED00C04FD8D5CD LostAndFound GUID_LOSTANDFOUND_CONTAINER_W
22B70C67D56E4EFB91E9300FCA3DC1AA ForeignSecurityPrincipals GUID_FOREIGNSECURITYPRINCIPALS_CONTAINER_W
09460C08AE1E4A4EA0F64AEE7DAA1E5A Program Data GUID_PROGRAM_DATA_CONTAINER_W
F4BE92A4C777485E878E9421D53087DB Microsoft2 GUID_MICROSOFT_PROGRAM_DATA_CONTAINER_W
6227F0AF1FC2410D8E3BB10615BB5B0F NTDS Quotas GUID_NTDS_QUOTAS_CONTAINER_W
Table 53: WellKnownObjects
A developer who has to access a container from the wellKnownObjects-list does not have to iterate through this list. It is possible to connect to a
container from the wellKnownObjects using its GUID. This can be done by
creating a DirectoryEntry towards a WKGUID-binding. This binding uses the ‘<WKGUID=’-prefix when creating the DirectoryEntry. The following snippet
shows how to use a WKGUID-binding.
1 Although this is an organizational unit, it is added to make the table as
complete as possible. 2 This container is a child of the ‘Program Data’-container.
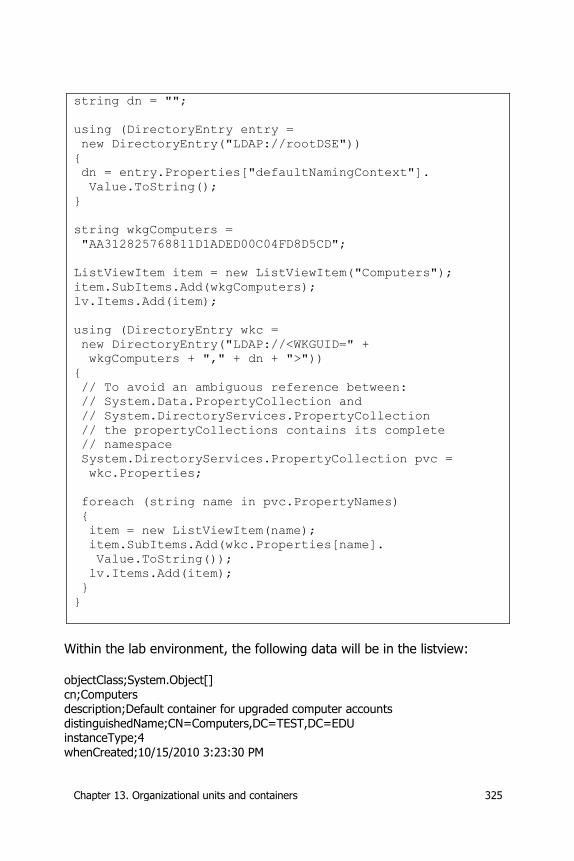
Chapter 13. Organizational units and containers 325
string dn = "";
using (DirectoryEntry entry =
new DirectoryEntry("LDAP://rootDSE"))
{
dn = entry.Properties["defaultNamingContext"].
Value.ToString();
}
string wkgComputers =
"AA312825768811D1ADED00C04FD8D5CD";
ListViewItem item = new ListViewItem("Computers");
item.SubItems.Add(wkgComputers);
lv.Items.Add(item);
using (DirectoryEntry wkc =
new DirectoryEntry("LDAP://<WKGUID=" +
wkgComputers + "," + dn + ">"))
{
// To avoid an ambiguous reference between:
// System.Data.PropertyCollection and
// System.DirectoryServices.PropertyCollection
// the propertyCollections contains its complete
// namespace
System.DirectoryServices.PropertyCollection pvc =
wkc.Properties;
foreach (string name in pvc.PropertyNames)
{
item = new ListViewItem(name);
item.SubItems.Add(wkc.Properties[name].
Value.ToString());
lv.Items.Add(item);
}
}
Within the lab environment, the following data will be in the listview:
objectClass;System.Object[] cn;Computers description;Default container for upgraded computer accounts distinguishedName;CN=Computers,DC=TEST,DC=EDU instanceType;4
whenCreated;10/15/2010 3:23:30 PM
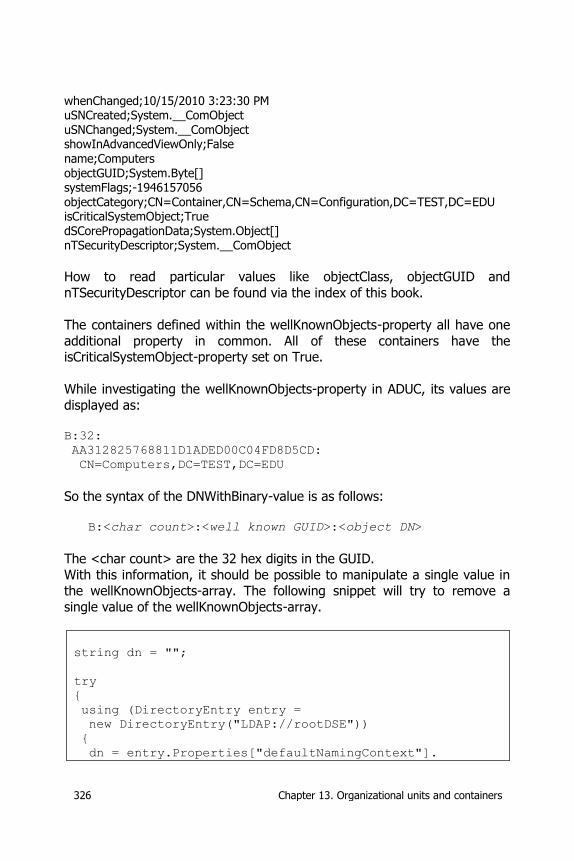
326 Chapter 13. Organizational units and containers
whenChanged;10/15/2010 3:23:30 PM uSNCreated;System.__ComObject uSNChanged;System.__ComObject showInAdvancedViewOnly;False name;Computers objectGUID;System.Byte[] systemFlags;-1946157056 objectCategory;CN=Container,CN=Schema,CN=Configuration,DC=TEST,DC=EDU isCriticalSystemObject;True dSCorePropagationData;System.Object[] nTSecurityDescriptor;System.__ComObject
How to read particular values like objectClass, objectGUID and
nTSecurityDescriptor can be found via the index of this book.
The containers defined within the wellKnownObjects-property all have one
additional property in common. All of these containers have the isCriticalSystemObject-property set on True.
While investigating the wellKnownObjects-property in ADUC, its values are
displayed as:
B:32:
AA312825768811D1ADED00C04FD8D5CD:
CN=Computers,DC=TEST,DC=EDU
So the syntax of the DNWithBinary-value is as follows:
B:<char count>:<well known GUID>:<object DN>
The <char count> are the 32 hex digits in the GUID.
With this information, it should be possible to manipulate a single value in the wellKnownObjects-array. The following snippet will try to remove a
single value of the wellKnownObjects-array.
string dn = "";
try
{
using (DirectoryEntry entry =
new DirectoryEntry("LDAP://rootDSE"))
{
dn = entry.Properties["defaultNamingContext"].
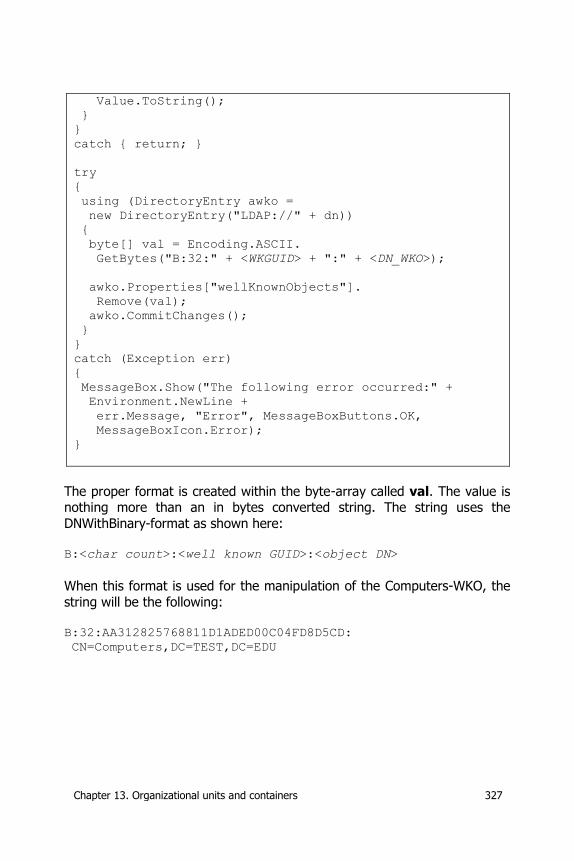
Chapter 13. Organizational units and containers 327
Value.ToString();
}
}
catch { return; }
try
{
using (DirectoryEntry awko =
new DirectoryEntry("LDAP://" + dn))
{
byte[] val = Encoding.ASCII.
GetBytes("B:32:" + <WKGUID> + ":" + <DN_WKO>);
awko.Properties["wellKnownObjects"].
Remove(val);
awko.CommitChanges();
}
}
catch (Exception err)
{
MessageBox.Show("The following error occurred:" +
Environment.NewLine +
err.Message, "Error", MessageBoxButtons.OK,
MessageBoxIcon.Error);
}
The proper format is created within the byte-array called val. The value is nothing more than an in bytes converted string. The string uses the
DNWithBinary-format as shown here: B:<char count>:<well known GUID>:<object DN>
When this format is used for the manipulation of the Computers-WKO, the
string will be the following: B:32:AA312825768811D1ADED00C04FD8D5CD:
CN=Computers,DC=TEST,DC=EDU
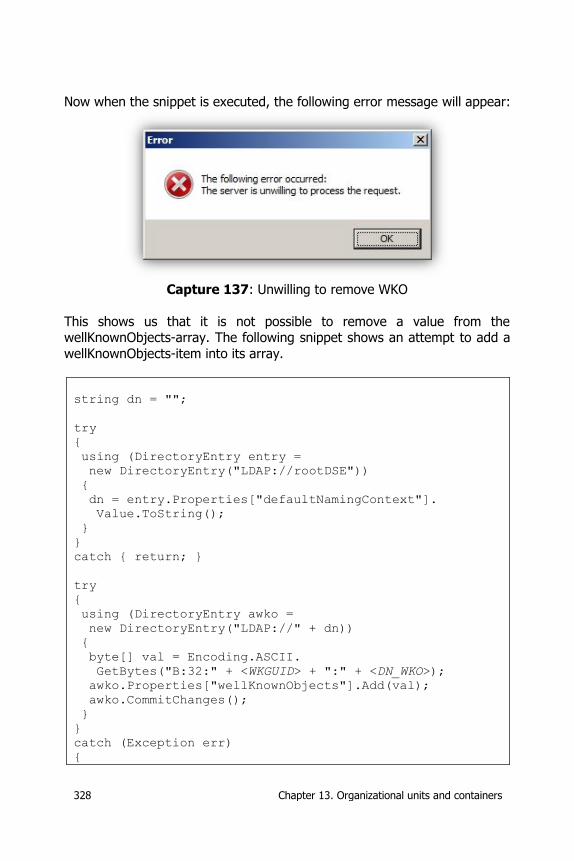
328 Chapter 13. Organizational units and containers
Now when the snippet is executed, the following error message will appear:
Capture 137: Unwilling to remove WKO
This shows us that it is not possible to remove a value from the wellKnownObjects-array. The following snippet shows an attempt to add a
wellKnownObjects-item into its array.
string dn = "";
try
{
using (DirectoryEntry entry =
new DirectoryEntry("LDAP://rootDSE"))
{
dn = entry.Properties["defaultNamingContext"].
Value.ToString();
}
}
catch { return; }
try
{
using (DirectoryEntry awko =
new DirectoryEntry("LDAP://" + dn))
{
byte[] val = Encoding.ASCII.
GetBytes("B:32:" + <WKGUID> + ":" + <DN_WKO>);
awko.Properties["wellKnownObjects"].Add(val);
awko.CommitChanges();
}
}
catch (Exception err)
{
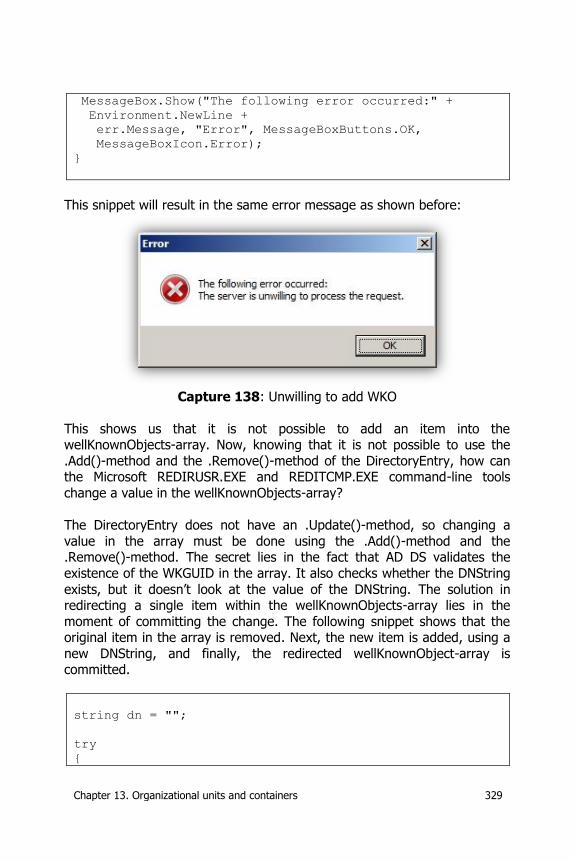
Chapter 13. Organizational units and containers 329
MessageBox.Show("The following error occurred:" +
Environment.NewLine +
err.Message, "Error", MessageBoxButtons.OK,
MessageBoxIcon.Error);
}
This snippet will result in the same error message as shown before:
Capture 138: Unwilling to add WKO
This shows us that it is not possible to add an item into the wellKnownObjects-array. Now, knowing that it is not possible to use the
.Add()-method and the .Remove()-method of the DirectoryEntry, how can the Microsoft REDIRUSR.EXE and REDITCMP.EXE command-line tools
change a value in the wellKnownObjects-array?
The DirectoryEntry does not have an .Update()-method, so changing a
value in the array must be done using the .Add()-method and the .Remove()-method. The secret lies in the fact that AD DS validates the
existence of the WKGUID in the array. It also checks whether the DNString
exists, but it doesn’t look at the value of the DNString. The solution in redirecting a single item within the wellKnownObjects-array lies in the
moment of committing the change. The following snippet shows that the original item in the array is removed. Next, the new item is added, using a
new DNString, and finally, the redirected wellKnownObject-array is committed.
string dn = "";
try
{
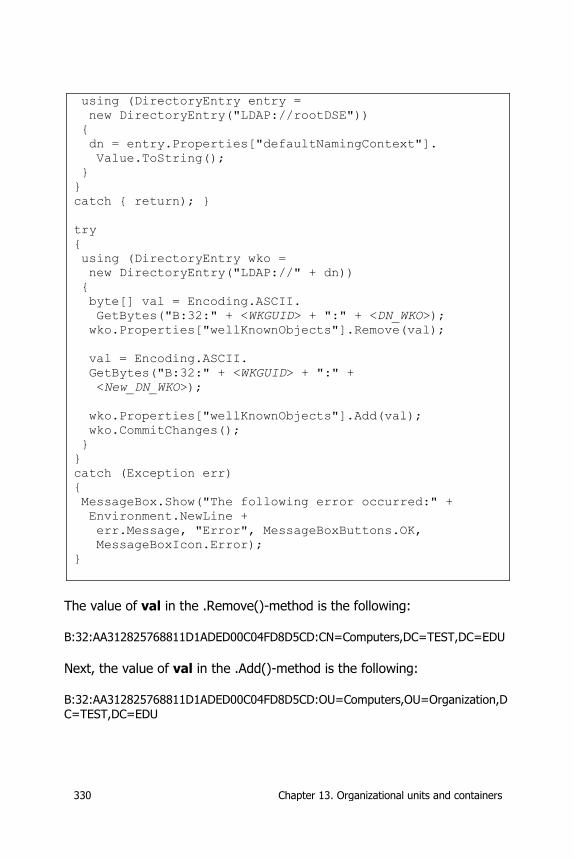
330 Chapter 13. Organizational units and containers
using (DirectoryEntry entry =
new DirectoryEntry("LDAP://rootDSE"))
{
dn = entry.Properties["defaultNamingContext"].
Value.ToString();
}
}
catch { return); }
try
{
using (DirectoryEntry wko =
new DirectoryEntry("LDAP://" + dn))
{
byte[] val = Encoding.ASCII.
GetBytes("B:32:" + <WKGUID> + ":" + <DN_WKO>);
wko.Properties["wellKnownObjects"].Remove(val);
val = Encoding.ASCII.
GetBytes("B:32:" + <WKGUID> + ":" +
<New_DN_WKO>);
wko.Properties["wellKnownObjects"].Add(val);
wko.CommitChanges();
}
}
catch (Exception err)
{
MessageBox.Show("The following error occurred:" +
Environment.NewLine +
err.Message, "Error", MessageBoxButtons.OK,
MessageBoxIcon.Error);
}
The value of val in the .Remove()-method is the following:
B:32:AA312825768811D1ADED00C04FD8D5CD:CN=Computers,DC=TEST,DC=EDU Next, the value of val in the .Add()-method is the following:
B:32:AA312825768811D1ADED00C04FD8D5CD:OU=Computers,OU=Organization,DC=TEST,DC=EDU

Chapter 13. Organizational units and containers 331
After the commit, the Computers-container is redirected to the new
location.
When the distinguished name of the new wellKnownObjects-item is pointing to a non-existent organizational unit or container object, a
‘constraint violation’ error is thrown:
Capture 139: Constraint violation on wellKnownObjects
13.3.1.Computers
The Computers-container is the container where computers newly joined to
the domain can be found. It is possible to manually create a computer
account into a different container or organizational unit in advance. When the physical computer joins the domain, it uses this prepared account in
the container or organizational unit being used.
Many organizations will assign group policy objects to newly joined computers—like a red background indicating that the necessary patches
and delegation need to be applied. In larger environments, pre-creating the
computer object will put a great deal of pressure on the maintenance team. In those cases, it is better to redirect the Computers-container to an
organizational unit so that group policies can be applied to the newly joined systems.
Change wellKnownObjects-array
Although it is not possible to remove or add items into the wellKnownObjects-array, it is possible to change their DNString value.
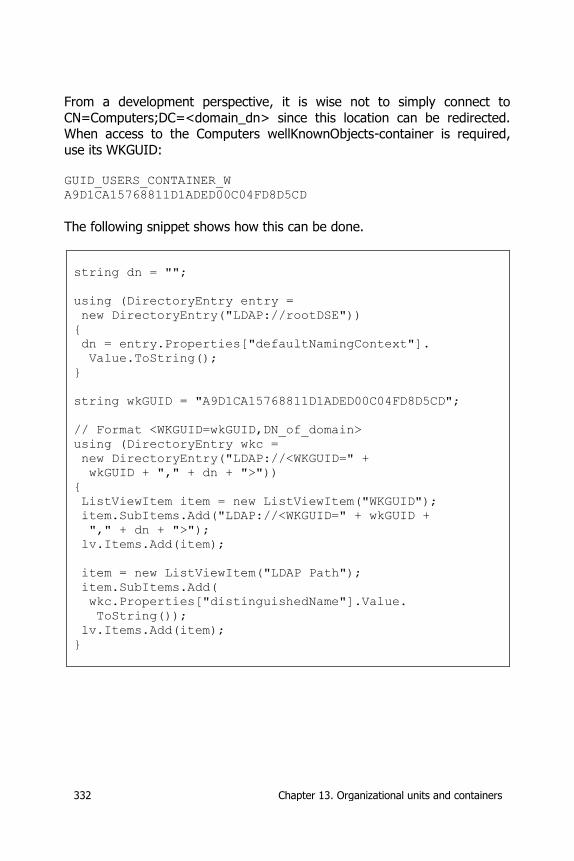
332 Chapter 13. Organizational units and containers
From a development perspective, it is wise not to simply connect to
CN=Computers;DC=<domain_dn> since this location can be redirected. When access to the Computers wellKnownObjects-container is required,
use its WKGUID: GUID_USERS_CONTAINER_W
A9D1CA15768811D1ADED00C04FD8D5CD
The following snippet shows how this can be done.
string dn = "";
using (DirectoryEntry entry =
new DirectoryEntry("LDAP://rootDSE"))
{
dn = entry.Properties["defaultNamingContext"].
Value.ToString();
}
string wkGUID = "A9D1CA15768811D1ADED00C04FD8D5CD";
// Format <WKGUID=wkGUID,DN_of_domain>
using (DirectoryEntry wkc =
new DirectoryEntry("LDAP://<WKGUID=" +
wkGUID + "," + dn + ">"))
{
ListViewItem item = new ListViewItem("WKGUID");
item.SubItems.Add("LDAP://<WKGUID=" + wkGUID +
"," + dn + ">");
lv.Items.Add(item);
item = new ListViewItem("LDAP Path");
item.SubItems.Add(
wkc.Properties["distinguishedName"].Value.
ToString());
lv.Items.Add(item);
}
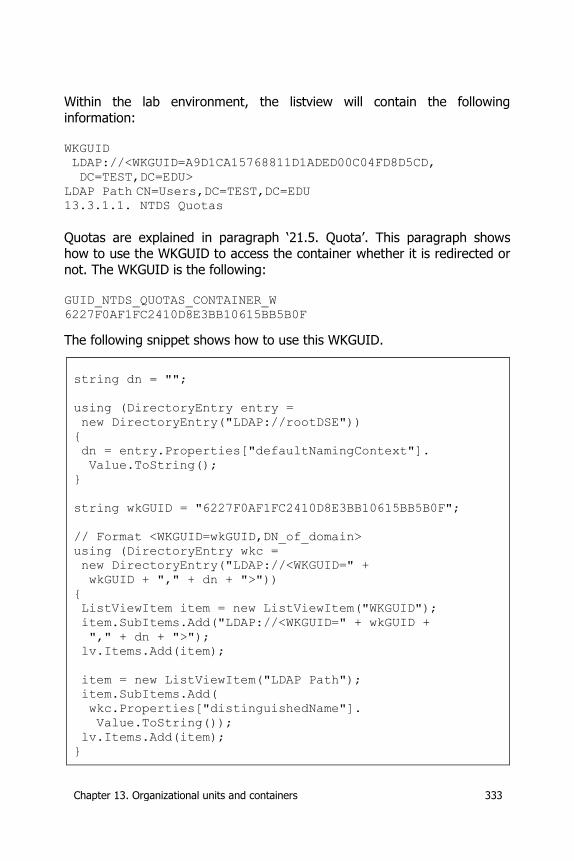
Chapter 13. Organizational units and containers 333
Within the lab environment, the listview will contain the following
information: WKGUID
LDAP://<WKGUID=A9D1CA15768811D1ADED00C04FD8D5CD,
DC=TEST,DC=EDU>
LDAP Path CN=Users,DC=TEST,DC=EDU
13.3.1.1. NTDS Quotas
Quotas are explained in paragraph ‘21.5. Quota’. This paragraph shows how to use the WKGUID to access the container whether it is redirected or
not. The WKGUID is the following: GUID_NTDS_QUOTAS_CONTAINER_W
6227F0AF1FC2410D8E3BB10615BB5B0F
The following snippet shows how to use this WKGUID.
string dn = "";
using (DirectoryEntry entry =
new DirectoryEntry("LDAP://rootDSE"))
{
dn = entry.Properties["defaultNamingContext"].
Value.ToString();
}
string wkGUID = "6227F0AF1FC2410D8E3BB10615BB5B0F";
// Format <WKGUID=wkGUID,DN_of_domain>
using (DirectoryEntry wkc =
new DirectoryEntry("LDAP://<WKGUID=" +
wkGUID + "," + dn + ">"))
{
ListViewItem item = new ListViewItem("WKGUID");
item.SubItems.Add("LDAP://<WKGUID=" + wkGUID +
"," + dn + ">");
lv.Items.Add(item);
item = new ListViewItem("LDAP Path");
item.SubItems.Add(
wkc.Properties["distinguishedName"].
Value.ToString());
lv.Items.Add(item);
}
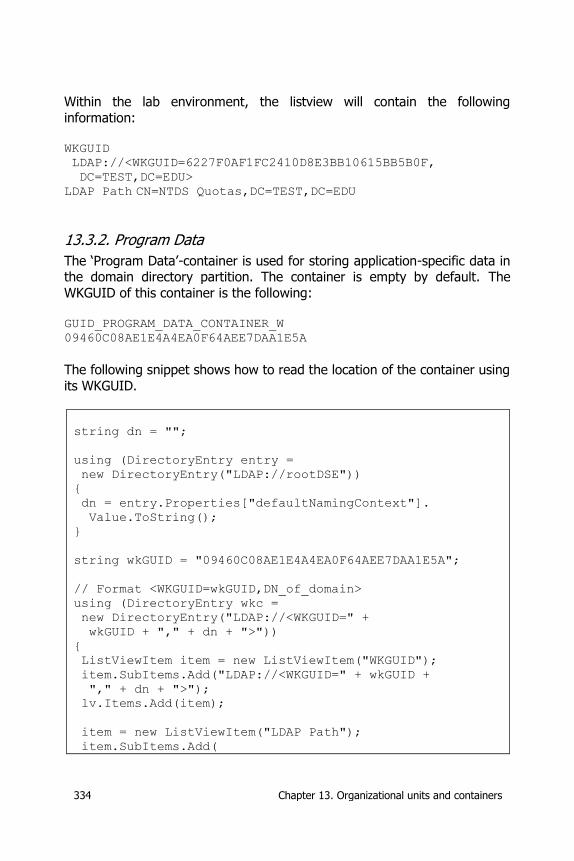
334 Chapter 13. Organizational units and containers
Within the lab environment, the listview will contain the following
information: WKGUID
LDAP://<WKGUID=6227F0AF1FC2410D8E3BB10615BB5B0F,
DC=TEST,DC=EDU>
LDAP Path CN=NTDS Quotas,DC=TEST,DC=EDU
13.3.2. Program Data
The ‘Program Data’-container is used for storing application-specific data in the domain directory partition. The container is empty by default. The
WKGUID of this container is the following: GUID_PROGRAM_DATA_CONTAINER_W
09460C08AE1E4A4EA0F64AEE7DAA1E5A
The following snippet shows how to read the location of the container using
its WKGUID.
string dn = "";
using (DirectoryEntry entry =
new DirectoryEntry("LDAP://rootDSE"))
{
dn = entry.Properties["defaultNamingContext"].
Value.ToString();
}
string wkGUID = "09460C08AE1E4A4EA0F64AEE7DAA1E5A";
// Format <WKGUID=wkGUID,DN_of_domain>
using (DirectoryEntry wkc =
new DirectoryEntry("LDAP://<WKGUID=" +
wkGUID + "," + dn + ">"))
{
ListViewItem item = new ListViewItem("WKGUID");
item.SubItems.Add("LDAP://<WKGUID=" + wkGUID +
"," + dn + ">");
lv.Items.Add(item);
item = new ListViewItem("LDAP Path");
item.SubItems.Add(
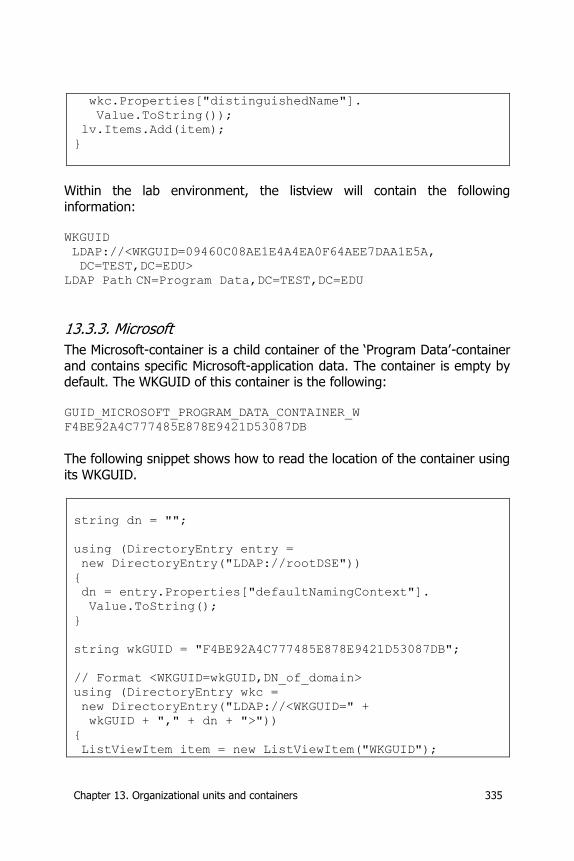
Chapter 13. Organizational units and containers 335
wkc.Properties["distinguishedName"].
Value.ToString());
lv.Items.Add(item);
}
Within the lab environment, the listview will contain the following
information: WKGUID
LDAP://<WKGUID=09460C08AE1E4A4EA0F64AEE7DAA1E5A,
DC=TEST,DC=EDU>
LDAP Path CN=Program Data,DC=TEST,DC=EDU
13.3.3. Microsoft
The Microsoft-container is a child container of the ‘Program Data’-container
and contains specific Microsoft-application data. The container is empty by default. The WKGUID of this container is the following:
GUID_MICROSOFT_PROGRAM_DATA_CONTAINER_W
F4BE92A4C777485E878E9421D53087DB
The following snippet shows how to read the location of the container using
its WKGUID.
string dn = "";
using (DirectoryEntry entry =
new DirectoryEntry("LDAP://rootDSE"))
{
dn = entry.Properties["defaultNamingContext"].
Value.ToString();
}
string wkGUID = "F4BE92A4C777485E878E9421D53087DB";
// Format <WKGUID=wkGUID,DN_of_domain>
using (DirectoryEntry wkc =
new DirectoryEntry("LDAP://<WKGUID=" +
wkGUID + "," + dn + ">"))
{
ListViewItem item = new ListViewItem("WKGUID");
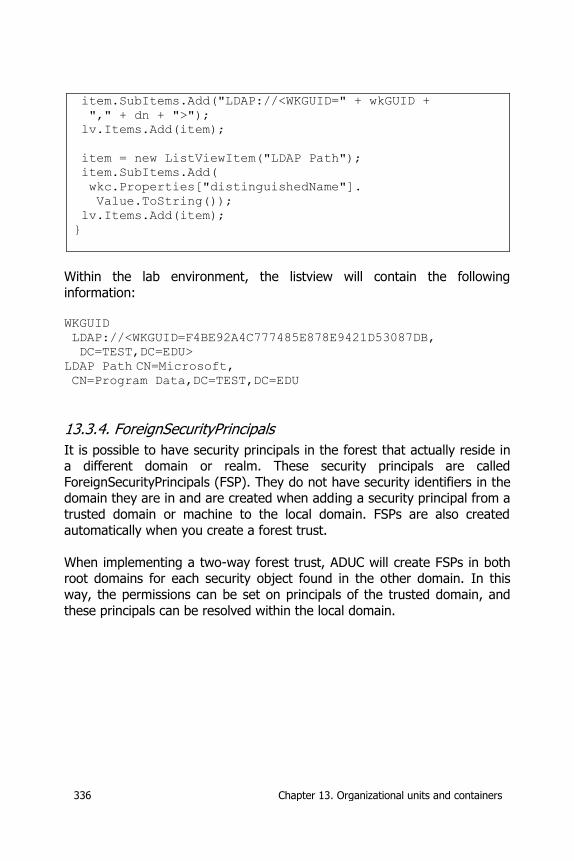
336 Chapter 13. Organizational units and containers
item.SubItems.Add("LDAP://<WKGUID=" + wkGUID +
"," + dn + ">");
lv.Items.Add(item);
item = new ListViewItem("LDAP Path");
item.SubItems.Add(
wkc.Properties["distinguishedName"].
Value.ToString());
lv.Items.Add(item);
}
Within the lab environment, the listview will contain the following
information: WKGUID
LDAP://<WKGUID=F4BE92A4C777485E878E9421D53087DB,
DC=TEST,DC=EDU>
LDAP Path CN=Microsoft,
CN=Program Data,DC=TEST,DC=EDU
13.3.4. ForeignSecurityPrincipals
It is possible to have security principals in the forest that actually reside in a different domain or realm. These security principals are called
ForeignSecurityPrincipals (FSP). They do not have security identifiers in the domain they are in and are created when adding a security principal from a
trusted domain or machine to the local domain. FSPs are also created
automatically when you create a forest trust.
When implementing a two-way forest trust, ADUC will create FSPs in both root domains for each security object found in the other domain. In this
way, the permissions can be set on principals of the trusted domain, and
these principals can be resolved within the local domain.
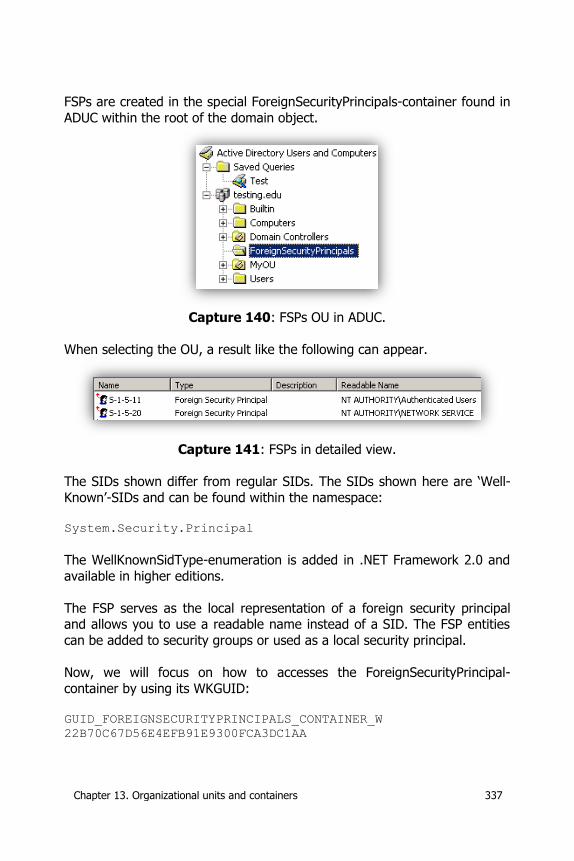
Chapter 13. Organizational units and containers 337
FSPs are created in the special ForeignSecurityPrincipals-container found in
ADUC within the root of the domain object.
Capture 140: FSPs OU in ADUC.
When selecting the OU, a result like the following can appear.
Capture 141: FSPs in detailed view.
The SIDs shown differ from regular SIDs. The SIDs shown here are ‘Well-
Known’-SIDs and can be found within the namespace: System.Security.Principal
The WellKnownSidType-enumeration is added in .NET Framework 2.0 and
available in higher editions.
The FSP serves as the local representation of a foreign security principal and allows you to use a readable name instead of a SID. The FSP entities
can be added to security groups or used as a local security principal.
Now, we will focus on how to accesses the ForeignSecurityPrincipal-
container by using its WKGUID: GUID_FOREIGNSECURITYPRINCIPALS_CONTAINER_W
22B70C67D56E4EFB91E9300FCA3DC1AA
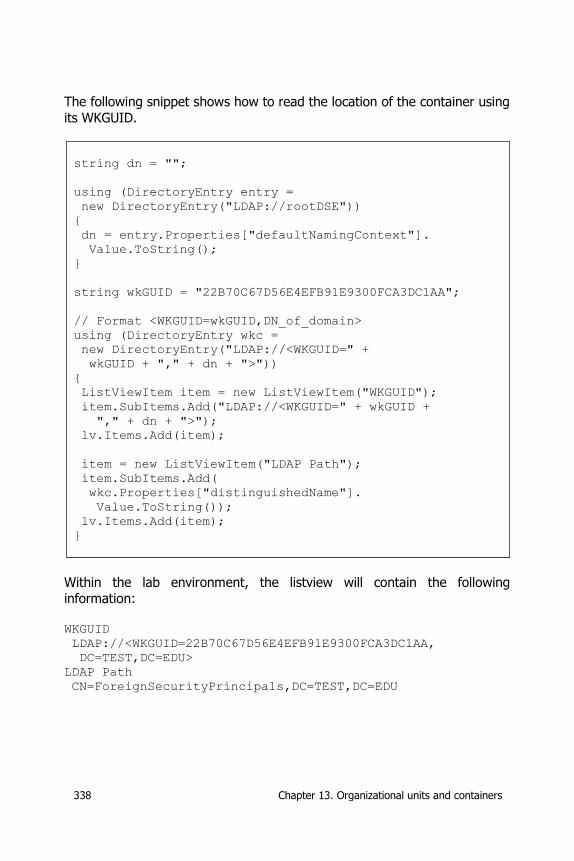
338 Chapter 13. Organizational units and containers
The following snippet shows how to read the location of the container using
its WKGUID.
string dn = "";
using (DirectoryEntry entry =
new DirectoryEntry("LDAP://rootDSE"))
{
dn = entry.Properties["defaultNamingContext"].
Value.ToString();
}
string wkGUID = "22B70C67D56E4EFB91E9300FCA3DC1AA";
// Format <WKGUID=wkGUID,DN_of_domain>
using (DirectoryEntry wkc =
new DirectoryEntry("LDAP://<WKGUID=" +
wkGUID + "," + dn + ">"))
{
ListViewItem item = new ListViewItem("WKGUID");
item.SubItems.Add("LDAP://<WKGUID=" + wkGUID +
"," + dn + ">");
lv.Items.Add(item);
item = new ListViewItem("LDAP Path");
item.SubItems.Add(
wkc.Properties["distinguishedName"].
Value.ToString());
lv.Items.Add(item);
}
Within the lab environment, the listview will contain the following
information:
WKGUID
LDAP://<WKGUID=22B70C67D56E4EFB91E9300FCA3DC1AA,
DC=TEST,DC=EDU>
LDAP Path
CN=ForeignSecurityPrincipals,DC=TEST,DC=EDU
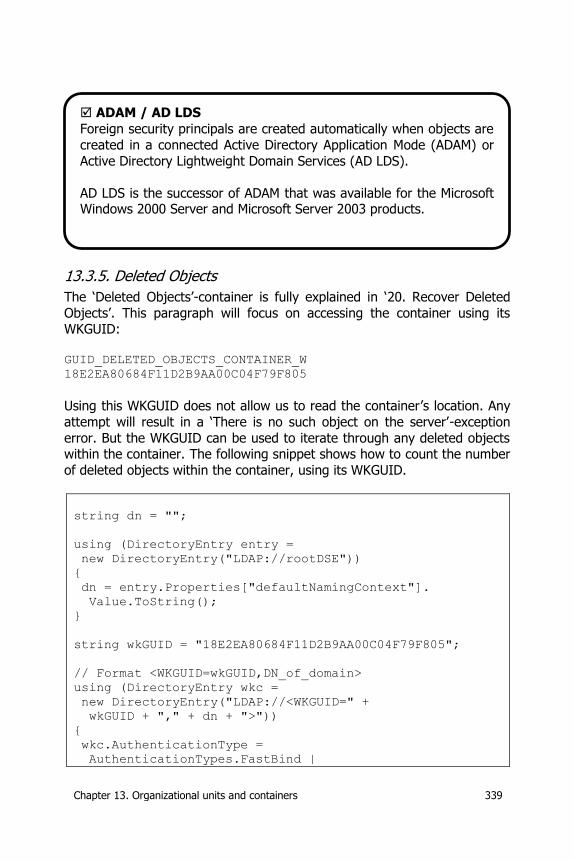
Chapter 13. Organizational units and containers 339
13.3.5. Deleted Objects
The ‘Deleted Objects’-container is fully explained in ‘20. Recover Deleted
Objects’. This paragraph will focus on accessing the container using its WKGUID:
GUID_DELETED_OBJECTS_CONTAINER_W
18E2EA80684F11D2B9AA00C04F79F805
Using this WKGUID does not allow us to read the container’s location. Any
attempt will result in a ‘There is no such object on the server’-exception
error. But the WKGUID can be used to iterate through any deleted objects within the container. The following snippet shows how to count the number
of deleted objects within the container, using its WKGUID.
string dn = "";
using (DirectoryEntry entry =
new DirectoryEntry("LDAP://rootDSE"))
{
dn = entry.Properties["defaultNamingContext"].
Value.ToString();
}
string wkGUID = "18E2EA80684F11D2B9AA00C04F79F805";
// Format <WKGUID=wkGUID,DN_of_domain>
using (DirectoryEntry wkc =
new DirectoryEntry("LDAP://<WKGUID=" +
wkGUID + "," + dn + ">"))
{
wkc.AuthenticationType =
AuthenticationTypes.FastBind |
ADAM / AD LDS
Foreign security principals are created automatically when objects are
created in a connected Active Directory Application Mode (ADAM) or
Active Directory Lightweight Domain Services (AD LDS).
AD LDS is the successor of ADAM that was available for the Microsoft Windows 2000 Server and Microsoft Server 2003 products.
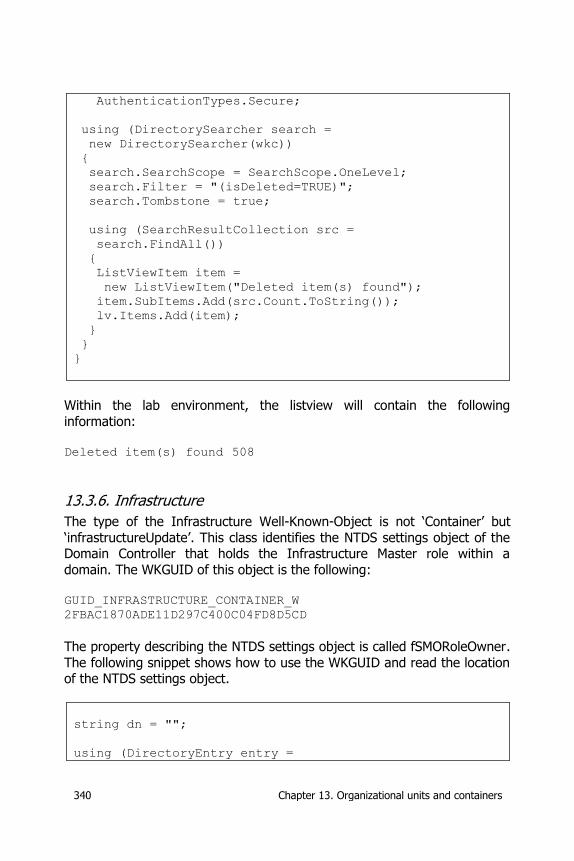
340 Chapter 13. Organizational units and containers
AuthenticationTypes.Secure;
using (DirectorySearcher search =
new DirectorySearcher(wkc))
{
search.SearchScope = SearchScope.OneLevel;
search.Filter = "(isDeleted=TRUE)";
search.Tombstone = true;
using (SearchResultCollection src =
search.FindAll())
{
ListViewItem item =
new ListViewItem("Deleted item(s) found");
item.SubItems.Add(src.Count.ToString());
lv.Items.Add(item);
}
}
}
Within the lab environment, the listview will contain the following
information:
Deleted item(s) found 508
13.3.6. Infrastructure
The type of the Infrastructure Well-Known-Object is not ‘Container’ but
‘infrastructureUpdate’. This class identifies the NTDS settings object of the Domain Controller that holds the Infrastructure Master role within a
domain. The WKGUID of this object is the following: GUID_INFRASTRUCTURE_CONTAINER_W
2FBAC1870ADE11D297C400C04FD8D5CD
The property describing the NTDS settings object is called fSMORoleOwner.
The following snippet shows how to use the WKGUID and read the location of the NTDS settings object.
string dn = "";
using (DirectoryEntry entry =
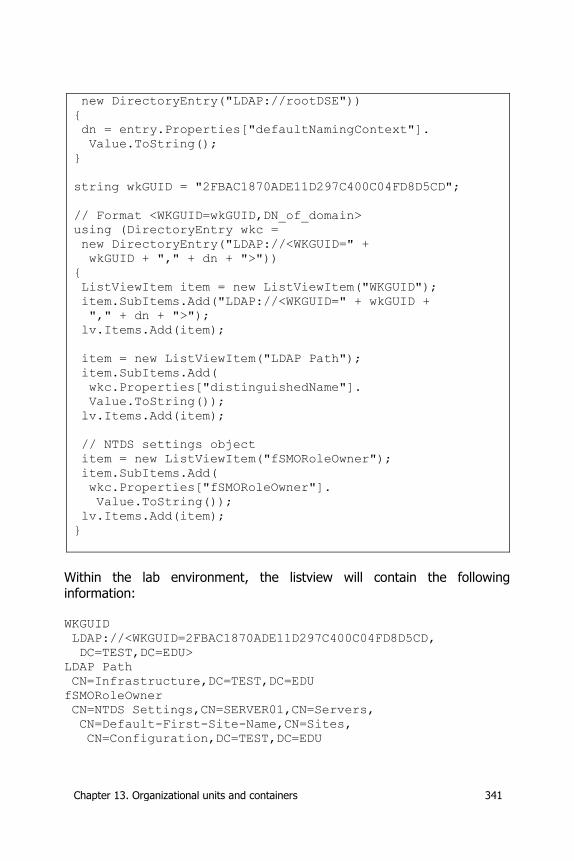
Chapter 13. Organizational units and containers 341
new DirectoryEntry("LDAP://rootDSE"))
{
dn = entry.Properties["defaultNamingContext"].
Value.ToString();
}
string wkGUID = "2FBAC1870ADE11D297C400C04FD8D5CD";
// Format <WKGUID=wkGUID,DN_of_domain>
using (DirectoryEntry wkc =
new DirectoryEntry("LDAP://<WKGUID=" +
wkGUID + "," + dn + ">"))
{
ListViewItem item = new ListViewItem("WKGUID");
item.SubItems.Add("LDAP://<WKGUID=" + wkGUID +
"," + dn + ">");
lv.Items.Add(item);
item = new ListViewItem("LDAP Path");
item.SubItems.Add(
wkc.Properties["distinguishedName"].
Value.ToString());
lv.Items.Add(item);
// NTDS settings object
item = new ListViewItem("fSMORoleOwner");
item.SubItems.Add(
wkc.Properties["fSMORoleOwner"].
Value.ToString());
lv.Items.Add(item);
}
Within the lab environment, the listview will contain the following information:
WKGUID
LDAP://<WKGUID=2FBAC1870ADE11D297C400C04FD8D5CD,
DC=TEST,DC=EDU>
LDAP Path
CN=Infrastructure,DC=TEST,DC=EDU
fSMORoleOwner
CN=NTDS Settings,CN=SERVER01,CN=Servers,
CN=Default-First-Site-Name,CN=Sites,
CN=Configuration,DC=TEST,DC=EDU
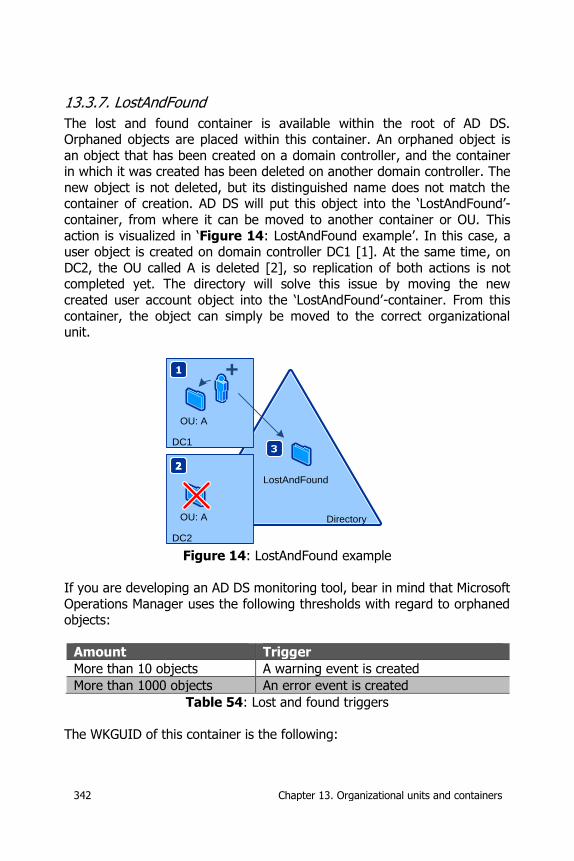
342 Chapter 13. Organizational units and containers
13.3.7. LostAndFound
The lost and found container is available within the root of AD DS. Orphaned objects are placed within this container. An orphaned object is
an object that has been created on a domain controller, and the container in which it was created has been deleted on another domain controller. The
new object is not deleted, but its distinguished name does not match the container of creation. AD DS will put this object into the ‘LostAndFound’-
container, from where it can be moved to another container or OU. This
action is visualized in ‘Figure 14: LostAndFound example’. In this case, a user object is created on domain controller DC1 [1]. At the same time, on
DC2, the OU called A is deleted [2], so replication of both actions is not completed yet. The directory will solve this issue by moving the new
created user account object into the ‘LostAndFound’-container. From this
container, the object can simply be moved to the correct organizational unit.
OU: A
+
DC1
OU: A
DC2
LostAndFound
Directory
Figure 14: LostAndFound example
If you are developing an AD DS monitoring tool, bear in mind that Microsoft
Operations Manager uses the following thresholds with regard to orphaned objects:
Amount Trigger
More than 10 objects A warning event is created
More than 1000 objects An error event is created
Table 54: Lost and found triggers
The WKGUID of this container is the following:
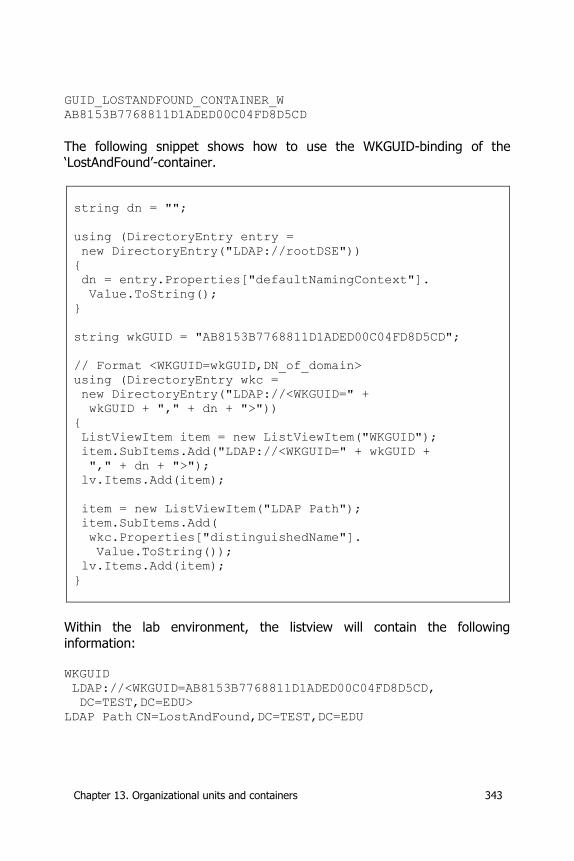
Chapter 13. Organizational units and containers 343
GUID_LOSTANDFOUND_CONTAINER_W
AB8153B7768811D1ADED00C04FD8D5CD
The following snippet shows how to use the WKGUID-binding of the ‘LostAndFound’-container.
string dn = "";
using (DirectoryEntry entry =
new DirectoryEntry("LDAP://rootDSE"))
{
dn = entry.Properties["defaultNamingContext"].
Value.ToString();
}
string wkGUID = "AB8153B7768811D1ADED00C04FD8D5CD";
// Format <WKGUID=wkGUID,DN_of_domain>
using (DirectoryEntry wkc =
new DirectoryEntry("LDAP://<WKGUID=" +
wkGUID + "," + dn + ">"))
{
ListViewItem item = new ListViewItem("WKGUID");
item.SubItems.Add("LDAP://<WKGUID=" + wkGUID +
"," + dn + ">");
lv.Items.Add(item);
item = new ListViewItem("LDAP Path");
item.SubItems.Add(
wkc.Properties["distinguishedName"].
Value.ToString());
lv.Items.Add(item);
}
Within the lab environment, the listview will contain the following
information: WKGUID
LDAP://<WKGUID=AB8153B7768811D1ADED00C04FD8D5CD,
DC=TEST,DC=EDU>
LDAP Path CN=LostAndFound,DC=TEST,DC=EDU
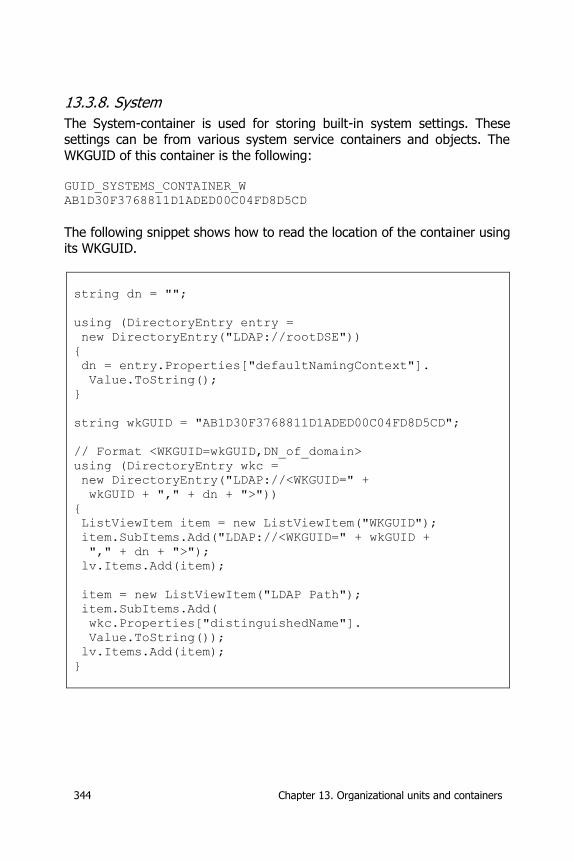
344 Chapter 13. Organizational units and containers
13.3.8. System
The System-container is used for storing built-in system settings. These settings can be from various system service containers and objects. The
WKGUID of this container is the following: GUID_SYSTEMS_CONTAINER_W
AB1D30F3768811D1ADED00C04FD8D5CD
The following snippet shows how to read the location of the container using its WKGUID.
string dn = "";
using (DirectoryEntry entry =
new DirectoryEntry("LDAP://rootDSE"))
{
dn = entry.Properties["defaultNamingContext"].
Value.ToString();
}
string wkGUID = "AB1D30F3768811D1ADED00C04FD8D5CD";
// Format <WKGUID=wkGUID,DN_of_domain>
using (DirectoryEntry wkc =
new DirectoryEntry("LDAP://<WKGUID=" +
wkGUID + "," + dn + ">"))
{
ListViewItem item = new ListViewItem("WKGUID");
item.SubItems.Add("LDAP://<WKGUID=" + wkGUID +
"," + dn + ">");
lv.Items.Add(item);
item = new ListViewItem("LDAP Path");
item.SubItems.Add(
wkc.Properties["distinguishedName"].
Value.ToString());
lv.Items.Add(item);
}
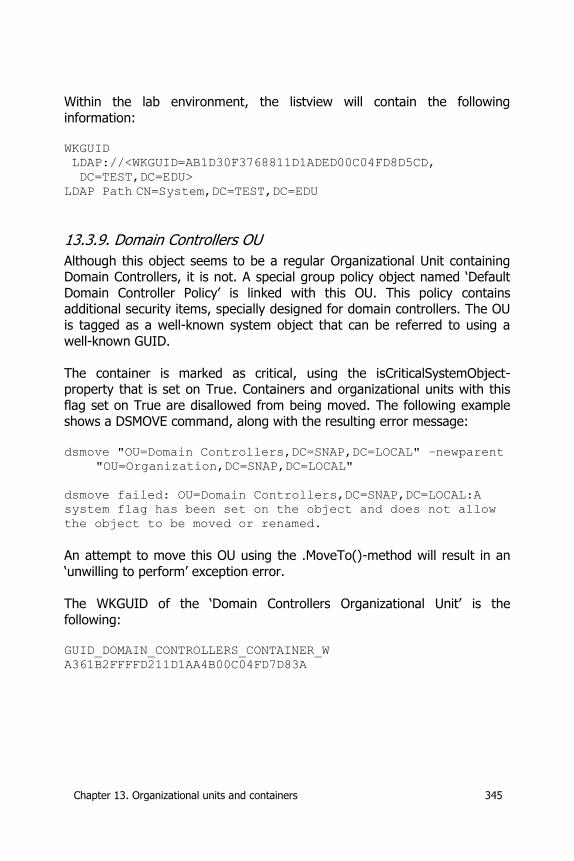
Chapter 13. Organizational units and containers 345
Within the lab environment, the listview will contain the following
information: WKGUID
LDAP://<WKGUID=AB1D30F3768811D1ADED00C04FD8D5CD,
DC=TEST,DC=EDU>
LDAP Path CN=System,DC=TEST,DC=EDU
13.3.9. Domain Controllers OU
Although this object seems to be a regular Organizational Unit containing Domain Controllers, it is not. A special group policy object named ‘Default
Domain Controller Policy’ is linked with this OU. This policy contains additional security items, specially designed for domain controllers. The OU
is tagged as a well-known system object that can be referred to using a
well-known GUID.
The container is marked as critical, using the isCriticalSystemObject-property that is set on True. Containers and organizational units with this
flag set on True are disallowed from being moved. The following example shows a DSMOVE command, along with the resulting error message:
dsmove "OU=Domain Controllers,DC=SNAP,DC=LOCAL" –newparent
"OU=Organization,DC=SNAP,DC=LOCAL"
dsmove failed: OU=Domain Controllers,DC=SNAP,DC=LOCAL:A
system flag has been set on the object and does not allow
the object to be moved or renamed.
An attempt to move this OU using the .MoveTo()-method will result in an
‘unwilling to perform’ exception error.
The WKGUID of the ‘Domain Controllers Organizational Unit’ is the
following: GUID_DOMAIN_CONTROLLERS_CONTAINER_W
A361B2FFFFD211D1AA4B00C04FD7D83A
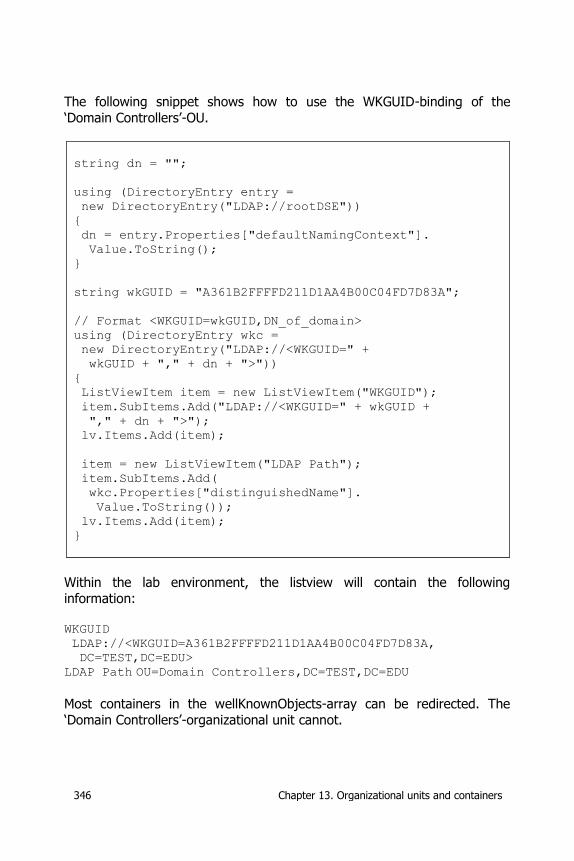
346 Chapter 13. Organizational units and containers
The following snippet shows how to use the WKGUID-binding of the
‘Domain Controllers’-OU.
string dn = "";
using (DirectoryEntry entry =
new DirectoryEntry("LDAP://rootDSE"))
{
dn = entry.Properties["defaultNamingContext"].
Value.ToString();
}
string wkGUID = "A361B2FFFFD211D1AA4B00C04FD7D83A";
// Format <WKGUID=wkGUID,DN_of_domain>
using (DirectoryEntry wkc =
new DirectoryEntry("LDAP://<WKGUID=" +
wkGUID + "," + dn + ">"))
{
ListViewItem item = new ListViewItem("WKGUID");
item.SubItems.Add("LDAP://<WKGUID=" + wkGUID +
"," + dn + ">");
lv.Items.Add(item);
item = new ListViewItem("LDAP Path");
item.SubItems.Add(
wkc.Properties["distinguishedName"].
Value.ToString());
lv.Items.Add(item);
}
Within the lab environment, the listview will contain the following
information:
WKGUID
LDAP://<WKGUID=A361B2FFFFD211D1AA4B00C04FD7D83A,
DC=TEST,DC=EDU>
LDAP Path OU=Domain Controllers,DC=TEST,DC=EDU
Most containers in the wellKnownObjects-array can be redirected. The
‘Domain Controllers’-organizational unit cannot.
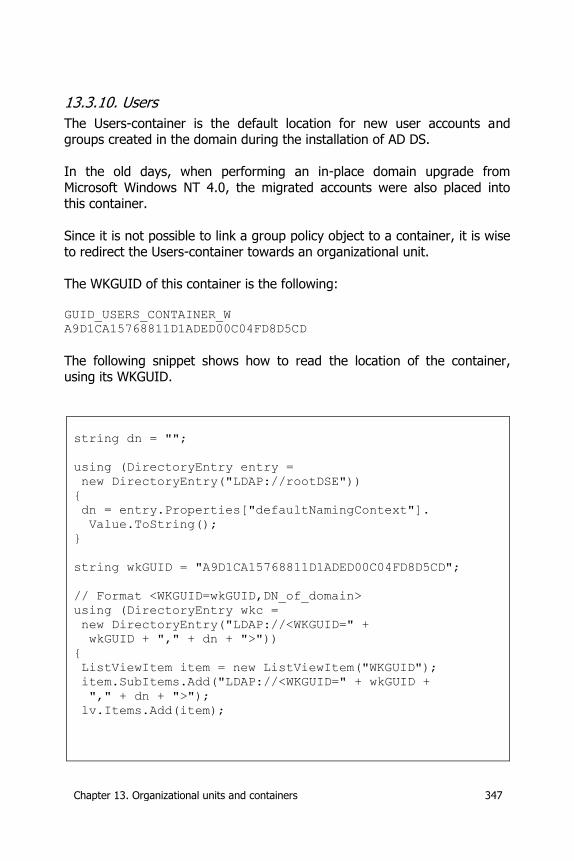
Chapter 13. Organizational units and containers 347
13.3.10. Users
The Users-container is the default location for new user accounts and groups created in the domain during the installation of AD DS.
In the old days, when performing an in-place domain upgrade from
Microsoft Windows NT 4.0, the migrated accounts were also placed into this container.
Since it is not possible to link a group policy object to a container, it is wise to redirect the Users-container towards an organizational unit.
The WKGUID of this container is the following:
GUID_USERS_CONTAINER_W
A9D1CA15768811D1ADED00C04FD8D5CD
The following snippet shows how to read the location of the container, using its WKGUID.
string dn = "";
using (DirectoryEntry entry =
new DirectoryEntry("LDAP://rootDSE"))
{
dn = entry.Properties["defaultNamingContext"].
Value.ToString();
}
string wkGUID = "A9D1CA15768811D1ADED00C04FD8D5CD";
// Format <WKGUID=wkGUID,DN_of_domain>
using (DirectoryEntry wkc =
new DirectoryEntry("LDAP://<WKGUID=" +
wkGUID + "," + dn + ">"))
{
ListViewItem item = new ListViewItem("WKGUID");
item.SubItems.Add("LDAP://<WKGUID=" + wkGUID +
"," + dn + ">");
lv.Items.Add(item);
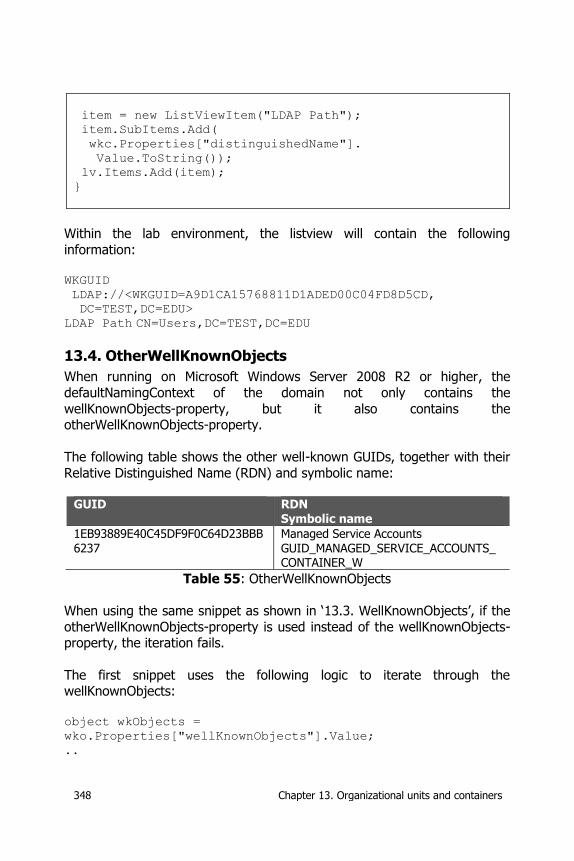
348 Chapter 13. Organizational units and containers
item = new ListViewItem("LDAP Path");
item.SubItems.Add(
wkc.Properties["distinguishedName"].
Value.ToString());
lv.Items.Add(item);
}
Within the lab environment, the listview will contain the following
information: WKGUID
LDAP://<WKGUID=A9D1CA15768811D1ADED00C04FD8D5CD,
DC=TEST,DC=EDU>
LDAP Path CN=Users,DC=TEST,DC=EDU
13.4. OtherWellKnownObjects
When running on Microsoft Windows Server 2008 R2 or higher, the
defaultNamingContext of the domain not only contains the
wellKnownObjects-property, but it also contains the otherWellKnownObjects-property.
The following table shows the other well-known GUIDs, together with their
Relative Distinguished Name (RDN) and symbolic name:
GUID RDN
Symbolic name
1EB93889E40C45DF9F0C64D23BBB6237
Managed Service Accounts GUID_MANAGED_SERVICE_ACCOUNTS_CONTAINER_W
Table 55: OtherWellKnownObjects
When using the same snippet as shown in ‘13.3. WellKnownObjects’, if the
otherWellKnownObjects-property is used instead of the wellKnownObjects-property, the iteration fails.
The first snippet uses the following logic to iterate through the wellKnownObjects:
object wkObjects =
wko.Properties["wellKnownObjects"].Value;
..
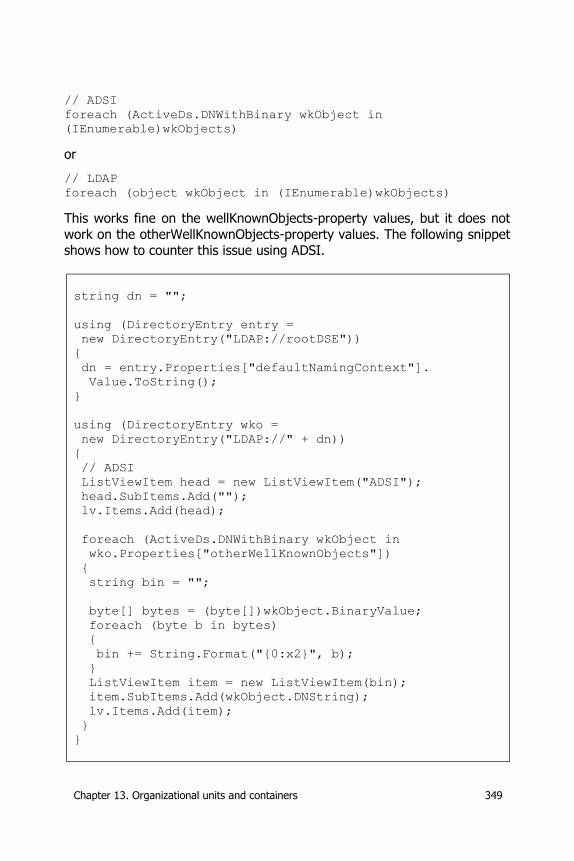
Chapter 13. Organizational units and containers 349
// ADSI
foreach (ActiveDs.DNWithBinary wkObject in
(IEnumerable)wkObjects)
or
// LDAP
foreach (object wkObject in (IEnumerable)wkObjects)
This works fine on the wellKnownObjects-property values, but it does not
work on the otherWellKnownObjects-property values. The following snippet shows how to counter this issue using ADSI.
string dn = "";
using (DirectoryEntry entry =
new DirectoryEntry("LDAP://rootDSE"))
{
dn = entry.Properties["defaultNamingContext"].
Value.ToString();
}
using (DirectoryEntry wko =
new DirectoryEntry("LDAP://" + dn))
{
// ADSI
ListViewItem head = new ListViewItem("ADSI");
head.SubItems.Add("");
lv.Items.Add(head);
foreach (ActiveDs.DNWithBinary wkObject in
wko.Properties["otherWellKnownObjects"])
{
string bin = "";
byte[] bytes = (byte[])wkObject.BinaryValue;
foreach (byte b in bytes)
{
bin += String.Format("{0:x2}", b);
}
ListViewItem item = new ListViewItem(bin);
item.SubItems.Add(wkObject.DNString);
lv.Items.Add(item);
}
}
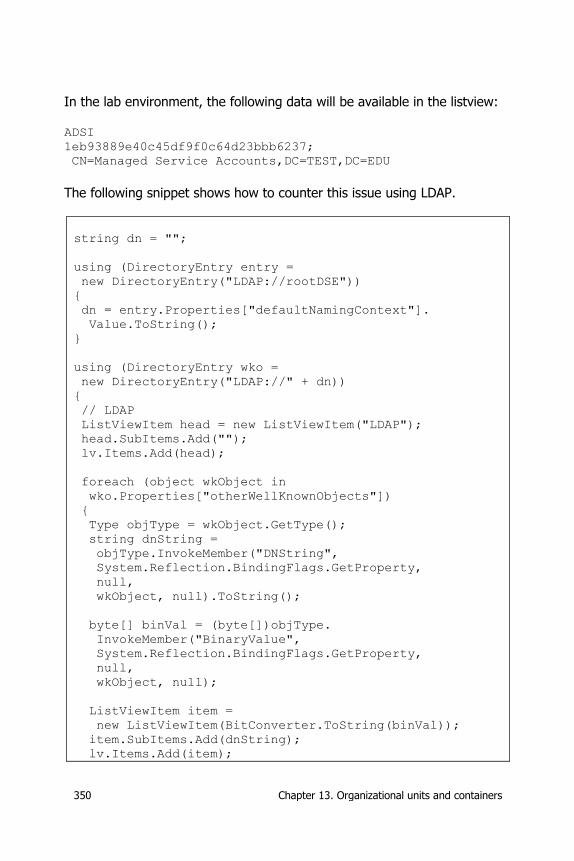
350 Chapter 13. Organizational units and containers
In the lab environment, the following data will be available in the listview:
ADSI
1eb93889e40c45df9f0c64d23bbb6237;
CN=Managed Service Accounts,DC=TEST,DC=EDU
The following snippet shows how to counter this issue using LDAP.
string dn = "";
using (DirectoryEntry entry =
new DirectoryEntry("LDAP://rootDSE"))
{
dn = entry.Properties["defaultNamingContext"].
Value.ToString();
}
using (DirectoryEntry wko =
new DirectoryEntry("LDAP://" + dn))
{
// LDAP
ListViewItem head = new ListViewItem("LDAP");
head.SubItems.Add("");
lv.Items.Add(head);
foreach (object wkObject in
wko.Properties["otherWellKnownObjects"])
{
Type objType = wkObject.GetType();
string dnString =
objType.InvokeMember("DNString",
System.Reflection.BindingFlags.GetProperty,
null,
wkObject, null).ToString();
byte[] binVal = (byte[])objType.
InvokeMember("BinaryValue",
System.Reflection.BindingFlags.GetProperty,
null,
wkObject, null);
ListViewItem item =
new ListViewItem(BitConverter.ToString(binVal));
item.SubItems.Add(dnString);
lv.Items.Add(item);
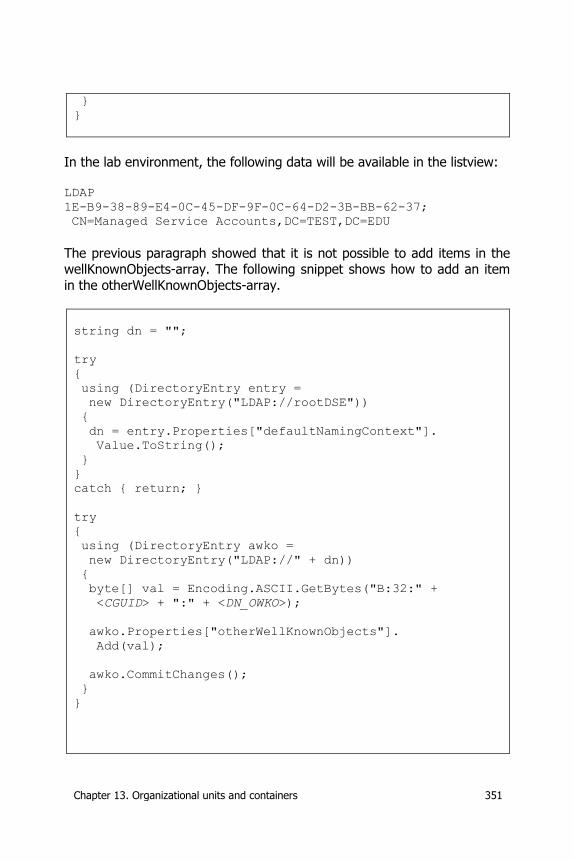
Chapter 13. Organizational units and containers 351
}
}
In the lab environment, the following data will be available in the listview: LDAP
1E-B9-38-89-E4-0C-45-DF-9F-0C-64-D2-3B-BB-62-37;
CN=Managed Service Accounts,DC=TEST,DC=EDU
The previous paragraph showed that it is not possible to add items in the wellKnownObjects-array. The following snippet shows how to add an item
in the otherWellKnownObjects-array.
string dn = "";
try
{
using (DirectoryEntry entry =
new DirectoryEntry("LDAP://rootDSE"))
{
dn = entry.Properties["defaultNamingContext"].
Value.ToString();
}
}
catch { return; }
try
{
using (DirectoryEntry awko =
new DirectoryEntry("LDAP://" + dn))
{
byte[] val = Encoding.ASCII.GetBytes("B:32:" +
<CGUID> + ":" + <DN_OWKO>);
awko.Properties["otherWellKnownObjects"].
Add(val);
awko.CommitChanges();
}
}
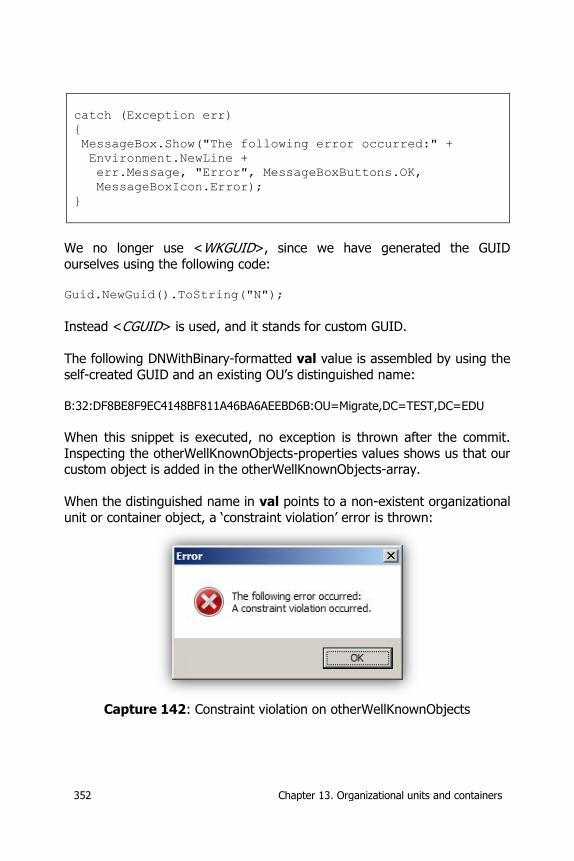
352 Chapter 13. Organizational units and containers
catch (Exception err)
{
MessageBox.Show("The following error occurred:" +
Environment.NewLine +
err.Message, "Error", MessageBoxButtons.OK,
MessageBoxIcon.Error);
}
We no longer use <WKGUID>, since we have generated the GUID
ourselves using the following code: Guid.NewGuid().ToString("N");
Instead <CGUID> is used, and it stands for custom GUID.
The following DNWithBinary-formatted val value is assembled by using the
self-created GUID and an existing OU’s distinguished name: B:32:DF8BE8F9EC4148BF811A46BA6AEEBD6B:OU=Migrate,DC=TEST,DC=EDU
When this snippet is executed, no exception is thrown after the commit.
Inspecting the otherWellKnownObjects-properties values shows us that our custom object is added in the otherWellKnownObjects-array.
When the distinguished name in val points to a non-existent organizational
unit or container object, a ‘constraint violation’ error is thrown:
Capture 142: Constraint violation on otherWellKnownObjects

Chapter 13. Organizational units and containers 353
When the newly created otherWellKnownObjects-item is no longer
required, it can be removed using the following snippet.
string dn = "";
try
{
using (DirectoryEntry entry =
new DirectoryEntry("LDAP://rootDSE"))
{
dn = entry.Properties["defaultNamingContext"].
Value.ToString();
}
}
catch { return; }
try
{
using (DirectoryEntry awko =
new DirectoryEntry("LDAP://" + dn))
{
byte[] val = Encoding.ASCII.GetBytes("B:32:" +
<CGUID> + ":" + <DN_OWKO>);
awko.Properties["otherWellKnownObjects"].
Remove(val);
awko.CommitChanges();
}
}
catch (Exception err)
{
MessageBox.Show("The following error occurred:" +
Environment.NewLine +
err.Message, "Error", MessageBoxButtons.OK,
MessageBoxIcon.Error);
}
After running the snippet, the newly created otherWellKnownObjects-item
will be removed from the otherWellKnownObjects-array.
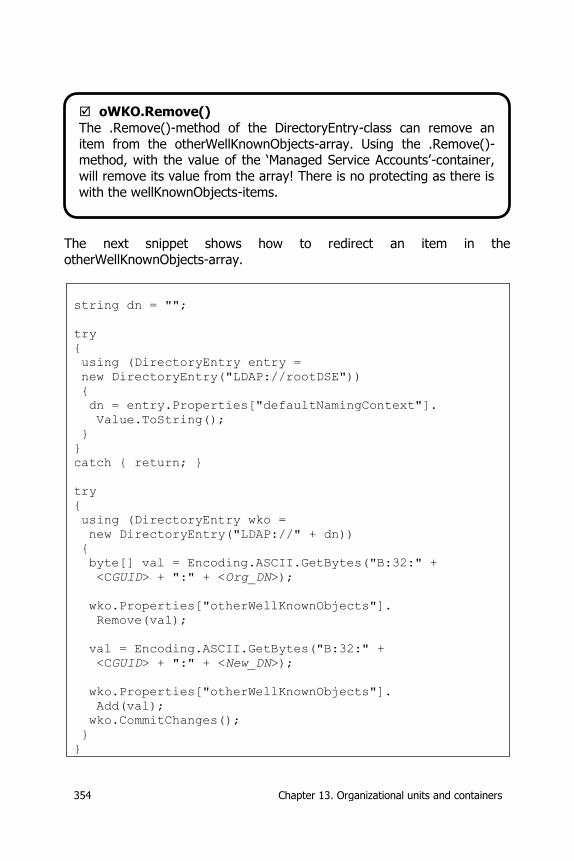
354 Chapter 13. Organizational units and containers
The next snippet shows how to redirect an item in the
otherWellKnownObjects-array.
string dn = "";
try
{
using (DirectoryEntry entry =
new DirectoryEntry("LDAP://rootDSE"))
{
dn = entry.Properties["defaultNamingContext"].
Value.ToString();
}
}
catch { return; }
try
{
using (DirectoryEntry wko =
new DirectoryEntry("LDAP://" + dn))
{
byte[] val = Encoding.ASCII.GetBytes("B:32:" +
<CGUID> + ":" + <Org_DN>);
wko.Properties["otherWellKnownObjects"].
Remove(val);
val = Encoding.ASCII.GetBytes("B:32:" +
<CGUID> + ":" + <New_DN>);
wko.Properties["otherWellKnownObjects"].
Add(val);
wko.CommitChanges();
}
}
oWKO.Remove()
The .Remove()-method of the DirectoryEntry-class can remove an
item from the otherWellKnownObjects-array. Using the .Remove()-method, with the value of the ‘Managed Service Accounts’-container,
will remove its value from the array! There is no protecting as there is
with the wellKnownObjects-items.
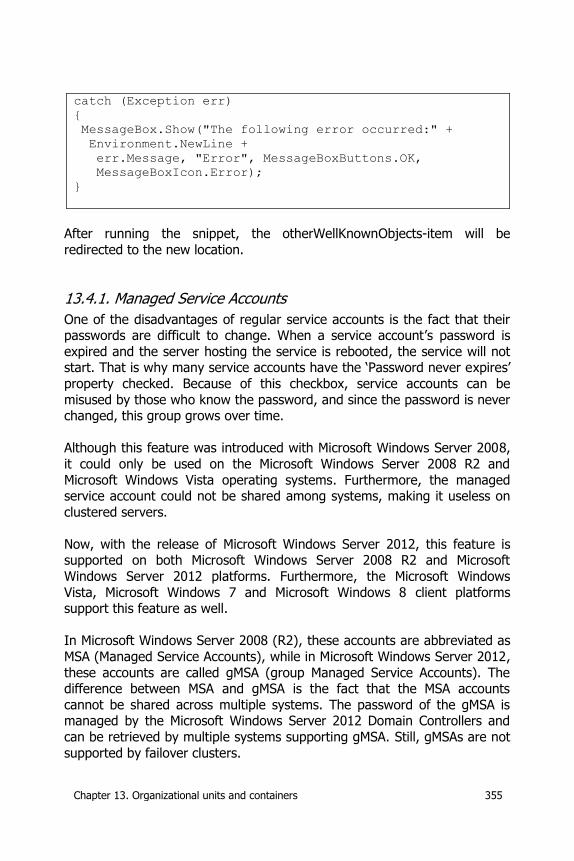
Chapter 13. Organizational units and containers 355
catch (Exception err)
{
MessageBox.Show("The following error occurred:" +
Environment.NewLine +
err.Message, "Error", MessageBoxButtons.OK,
MessageBoxIcon.Error);
}
After running the snippet, the otherWellKnownObjects-item will be
redirected to the new location.
13.4.1. Managed Service Accounts
One of the disadvantages of regular service accounts is the fact that their passwords are difficult to change. When a service account’s password is
expired and the server hosting the service is rebooted, the service will not start. That is why many service accounts have the ‘Password never expires’
property checked. Because of this checkbox, service accounts can be
misused by those who know the password, and since the password is never changed, this group grows over time.
Although this feature was introduced with Microsoft Windows Server 2008,
it could only be used on the Microsoft Windows Server 2008 R2 and
Microsoft Windows Vista operating systems. Furthermore, the managed service account could not be shared among systems, making it useless on
clustered servers.
Now, with the release of Microsoft Windows Server 2012, this feature is supported on both Microsoft Windows Server 2008 R2 and Microsoft
Windows Server 2012 platforms. Furthermore, the Microsoft Windows
Vista, Microsoft Windows 7 and Microsoft Windows 8 client platforms support this feature as well.
In Microsoft Windows Server 2008 (R2), these accounts are abbreviated as
MSA (Managed Service Accounts), while in Microsoft Windows Server 2012,
these accounts are called gMSA (group Managed Service Accounts). The difference between MSA and gMSA is the fact that the MSA accounts
cannot be shared across multiple systems. The password of the gMSA is managed by the Microsoft Windows Server 2012 Domain Controllers and
can be retrieved by multiple systems supporting gMSA. Still, gMSAs are not
supported by failover clusters.
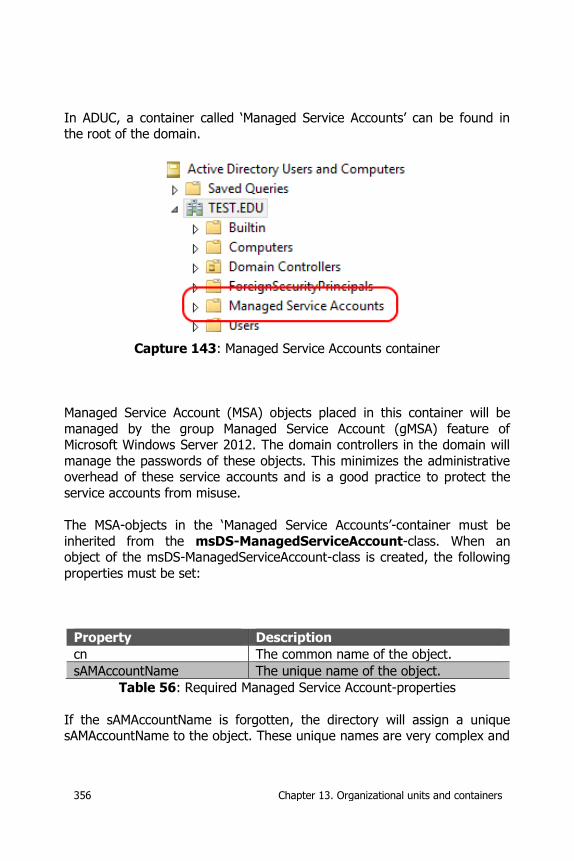
356 Chapter 13. Organizational units and containers
In ADUC, a container called ‘Managed Service Accounts’ can be found in the root of the domain.
Capture 143: Managed Service Accounts container
Managed Service Account (MSA) objects placed in this container will be
managed by the group Managed Service Account (gMSA) feature of Microsoft Windows Server 2012. The domain controllers in the domain will
manage the passwords of these objects. This minimizes the administrative overhead of these service accounts and is a good practice to protect the
service accounts from misuse.
The MSA-objects in the ‘Managed Service Accounts’-container must be
inherited from the msDS-ManagedServiceAccount-class. When an object of the msDS-ManagedServiceAccount-class is created, the following
properties must be set:
Property Description
cn The common name of the object.
sAMAccountName The unique name of the object.
Table 56: Required Managed Service Account-properties
If the sAMAccountName is forgotten, the directory will assign a unique sAMAccountName to the object. These unique names are very complex and
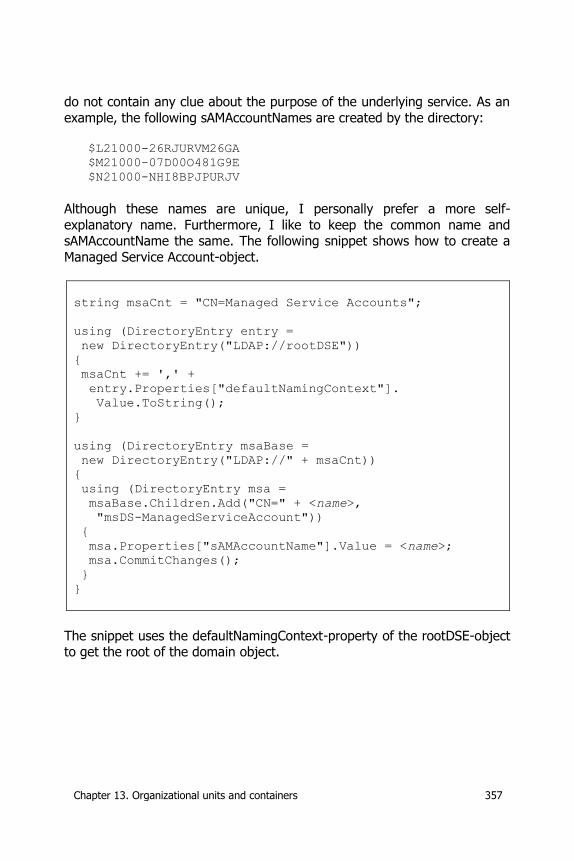
Chapter 13. Organizational units and containers 357
do not contain any clue about the purpose of the underlying service. As an
example, the following sAMAccountNames are created by the directory:
$L21000-26RJURVM26GA
$M21000-07D00O481G9E
$N21000-NHI8BPJPURJV
Although these names are unique, I personally prefer a more self-
explanatory name. Furthermore, I like to keep the common name and sAMAccountName the same. The following snippet shows how to create a
Managed Service Account-object.
string msaCnt = "CN=Managed Service Accounts";
using (DirectoryEntry entry =
new DirectoryEntry("LDAP://rootDSE"))
{
msaCnt += ',' +
entry.Properties["defaultNamingContext"].
Value.ToString();
}
using (DirectoryEntry msaBase =
new DirectoryEntry("LDAP://" + msaCnt))
{
using (DirectoryEntry msa =
msaBase.Children.Add("CN=" + <name>,
"msDS-ManagedServiceAccount"))
{
msa.Properties["sAMAccountName"].Value = <name>;
msa.CommitChanges();
}
}
The snippet uses the defaultNamingContext-property of the rootDSE-object to get the root of the domain object.
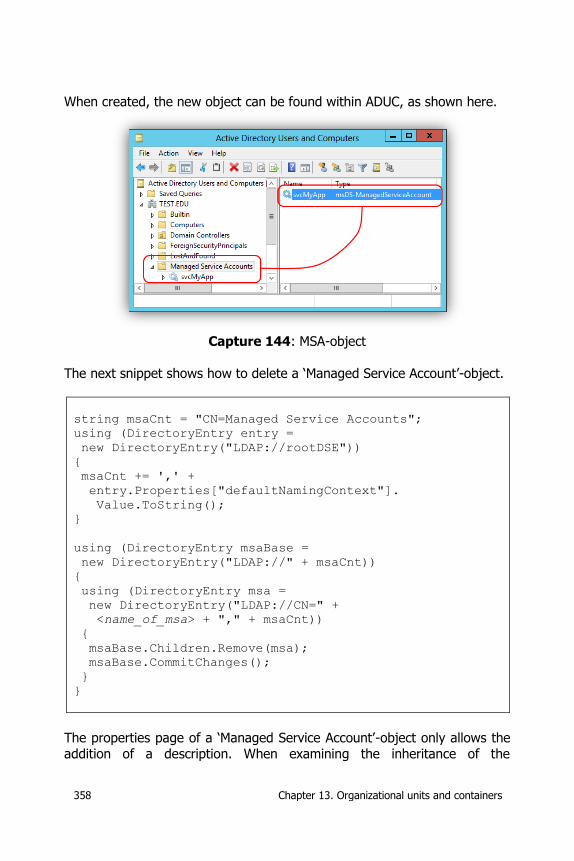
358 Chapter 13. Organizational units and containers
When created, the new object can be found within ADUC, as shown here.
Capture 144: MSA-object
The next snippet shows how to delete a ‘Managed Service Account’-object.
string msaCnt = "CN=Managed Service Accounts";
using (DirectoryEntry entry =
new DirectoryEntry("LDAP://rootDSE"))
{
msaCnt += ',' +
entry.Properties["defaultNamingContext"].
Value.ToString();
}
using (DirectoryEntry msaBase =
new DirectoryEntry("LDAP://" + msaCnt))
{
using (DirectoryEntry msa =
new DirectoryEntry("LDAP://CN=" +
<name_of_msa> + "," + msaCnt))
{
msaBase.Children.Remove(msa);
msaBase.CommitChanges();
}
}
The properties page of a ‘Managed Service Account’-object only allows the addition of a description. When examining the inheritance of the
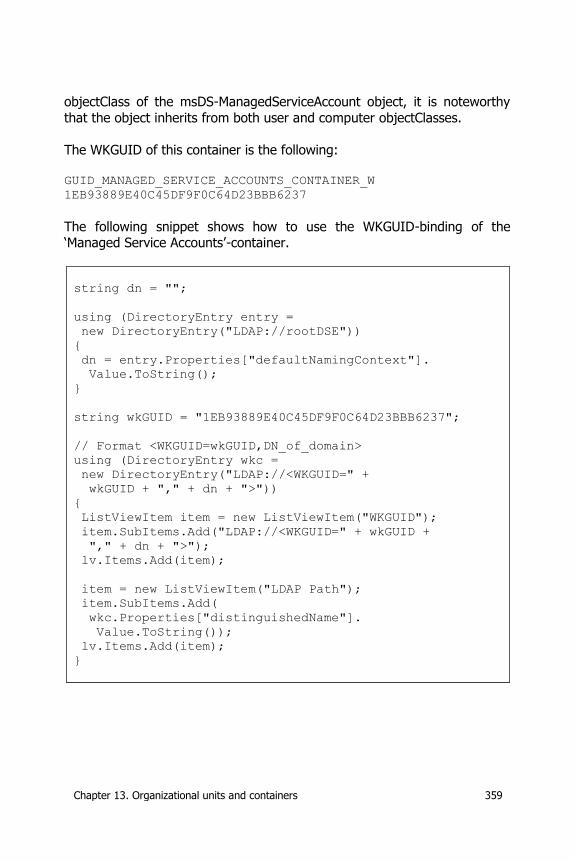
Chapter 13. Organizational units and containers 359
objectClass of the msDS-ManagedServiceAccount object, it is noteworthy
that the object inherits from both user and computer objectClasses.
The WKGUID of this container is the following: GUID_MANAGED_SERVICE_ACCOUNTS_CONTAINER_W
1EB93889E40C45DF9F0C64D23BBB6237
The following snippet shows how to use the WKGUID-binding of the ‘Managed Service Accounts’-container.
string dn = "";
using (DirectoryEntry entry =
new DirectoryEntry("LDAP://rootDSE"))
{
dn = entry.Properties["defaultNamingContext"].
Value.ToString();
}
string wkGUID = "1EB93889E40C45DF9F0C64D23BBB6237";
// Format <WKGUID=wkGUID,DN_of_domain>
using (DirectoryEntry wkc =
new DirectoryEntry("LDAP://<WKGUID=" +
wkGUID + "," + dn + ">"))
{
ListViewItem item = new ListViewItem("WKGUID");
item.SubItems.Add("LDAP://<WKGUID=" + wkGUID +
"," + dn + ">");
lv.Items.Add(item);
item = new ListViewItem("LDAP Path");
item.SubItems.Add(
wkc.Properties["distinguishedName"].
Value.ToString());
lv.Items.Add(item);
}
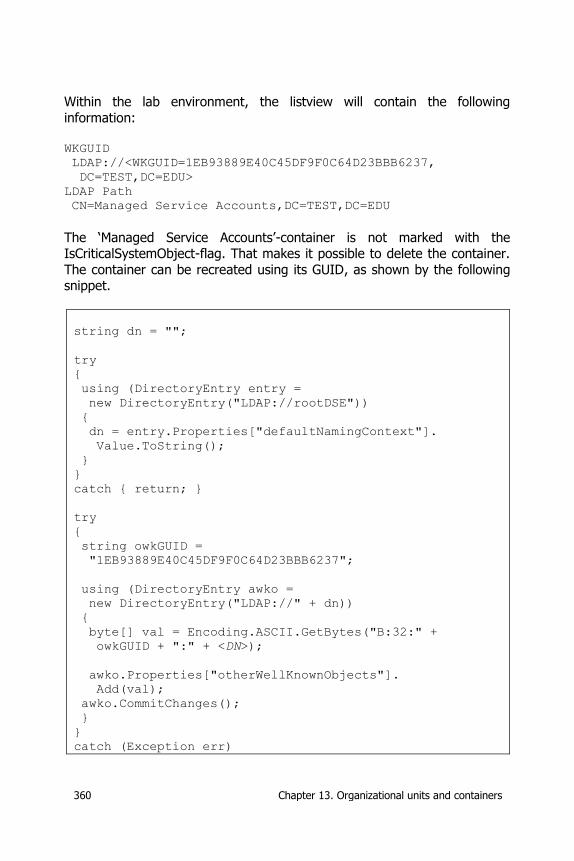
360 Chapter 13. Organizational units and containers
Within the lab environment, the listview will contain the following
information: WKGUID
LDAP://<WKGUID=1EB93889E40C45DF9F0C64D23BBB6237,
DC=TEST,DC=EDU>
LDAP Path
CN=Managed Service Accounts,DC=TEST,DC=EDU
The ‘Managed Service Accounts’-container is not marked with the IsCriticalSystemObject-flag. That makes it possible to delete the container.
The container can be recreated using its GUID, as shown by the following snippet.
string dn = "";
try
{
using (DirectoryEntry entry =
new DirectoryEntry("LDAP://rootDSE"))
{
dn = entry.Properties["defaultNamingContext"].
Value.ToString();
}
}
catch { return; }
try
{
string owkGUID =
"1EB93889E40C45DF9F0C64D23BBB6237";
using (DirectoryEntry awko =
new DirectoryEntry("LDAP://" + dn))
{
byte[] val = Encoding.ASCII.GetBytes("B:32:" +
owkGUID + ":" + <DN>);
awko.Properties["otherWellKnownObjects"].
Add(val);
awko.CommitChanges();
}
}
catch (Exception err)
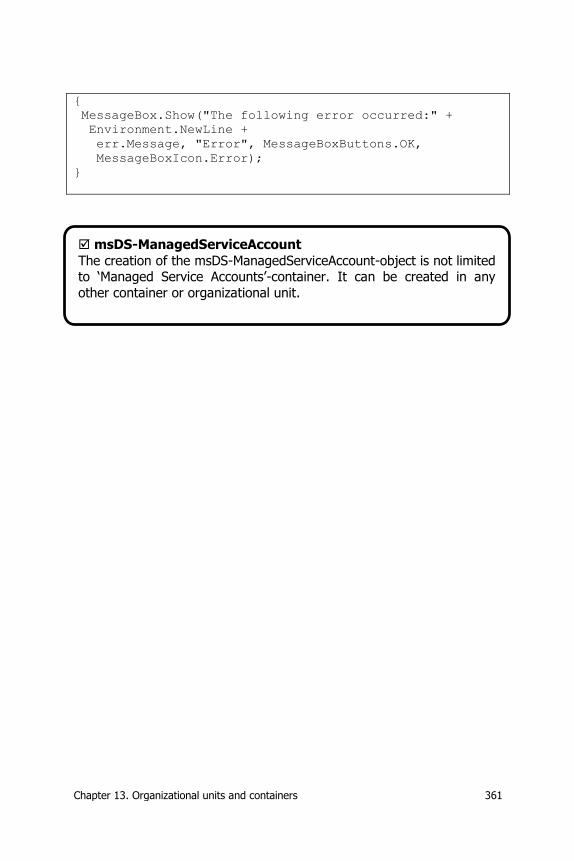
Chapter 13. Organizational units and containers 361
{
MessageBox.Show("The following error occurred:" +
Environment.NewLine +
err.Message, "Error", MessageBoxButtons.OK,
MessageBoxIcon.Error);
}
msDS-ManagedServiceAccount
The creation of the msDS-ManagedServiceAccount-object is not limited to ‘Managed Service Accounts’-container. It can be created in any
other container or organizational unit.

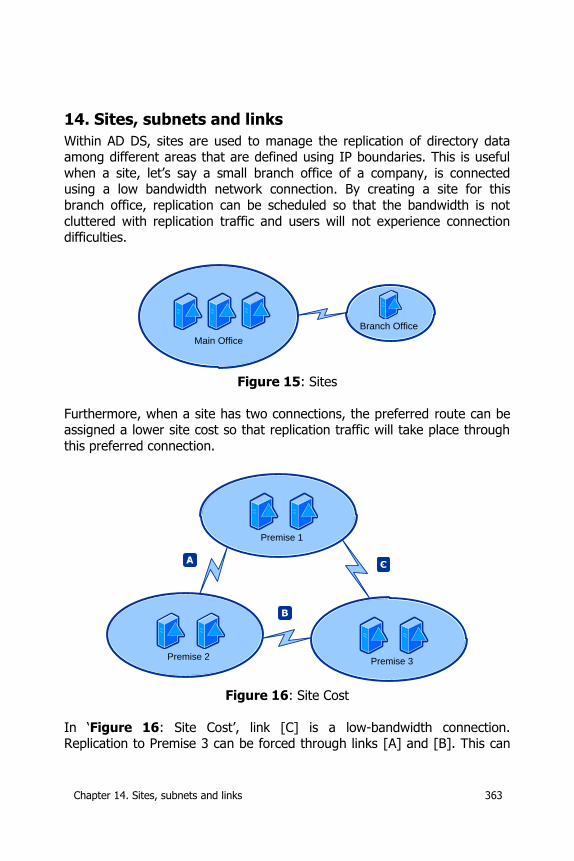
Chapter 14. Sites, subnets and links 363
14. Sites, subnets and links
Within AD DS, sites are used to manage the replication of directory data among different areas that are defined using IP boundaries. This is useful
when a site, let’s say a small branch office of a company, is connected using a low bandwidth network connection. By creating a site for this
branch office, replication can be scheduled so that the bandwidth is not
cluttered with replication traffic and users will not experience connection difficulties.
Main Office
Branch Office
Figure 15: Sites
Furthermore, when a site has two connections, the preferred route can be assigned a lower site cost so that replication traffic will take place through
this preferred connection.
Premise 1
Premise 2Premise 3
Figure 16: Site Cost
In ‘Figure 16: Site Cost’, link [C] is a low-bandwidth connection. Replication to Premise 3 can be forced through links [A] and [B]. This can
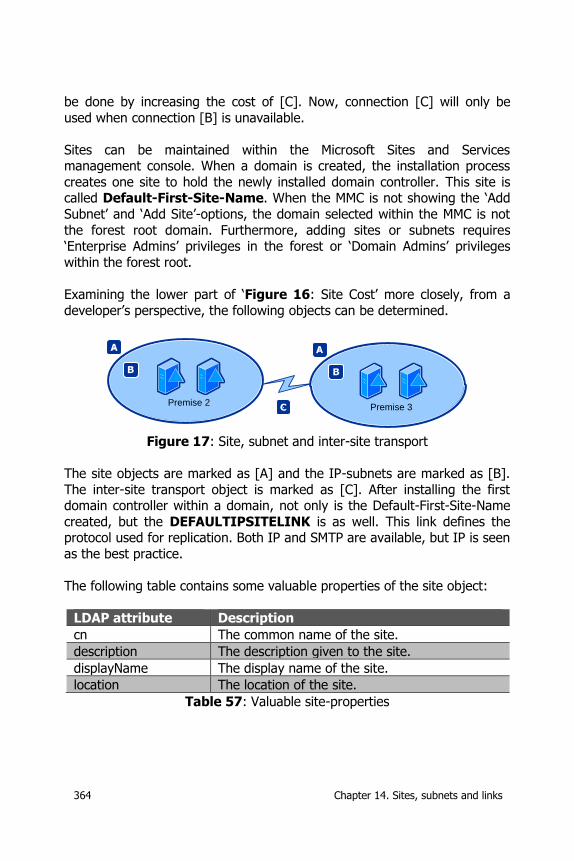
364 Chapter 14. Sites, subnets and links
be done by increasing the cost of [C]. Now, connection [C] will only be
used when connection [B] is unavailable.
Sites can be maintained within the Microsoft Sites and Services management console. When a domain is created, the installation process
creates one site to hold the newly installed domain controller. This site is called Default-First-Site-Name. When the MMC is not showing the ‘Add
Subnet’ and ‘Add Site’-options, the domain selected within the MMC is not
the forest root domain. Furthermore, adding sites or subnets requires ‘Enterprise Admins’ privileges in the forest or ‘Domain Admins’ privileges
within the forest root.
Examining the lower part of ‘Figure 16: Site Cost’ more closely, from a
developer’s perspective, the following objects can be determined.
Premise 2Premise 3
Figure 17: Site, subnet and inter-site transport
The site objects are marked as [A] and the IP-subnets are marked as [B].
The inter-site transport object is marked as [C]. After installing the first domain controller within a domain, not only is the Default-First-Site-Name
created, but the DEFAULTIPSITELINK is as well. This link defines the protocol used for replication. Both IP and SMTP are available, but IP is seen
as the best practice.
The following table contains some valuable properties of the site object:
LDAP attribute Description
cn The common name of the site.
description The description given to the site.
displayName The display name of the site.
location The location of the site.
Table 57: Valuable site-properties
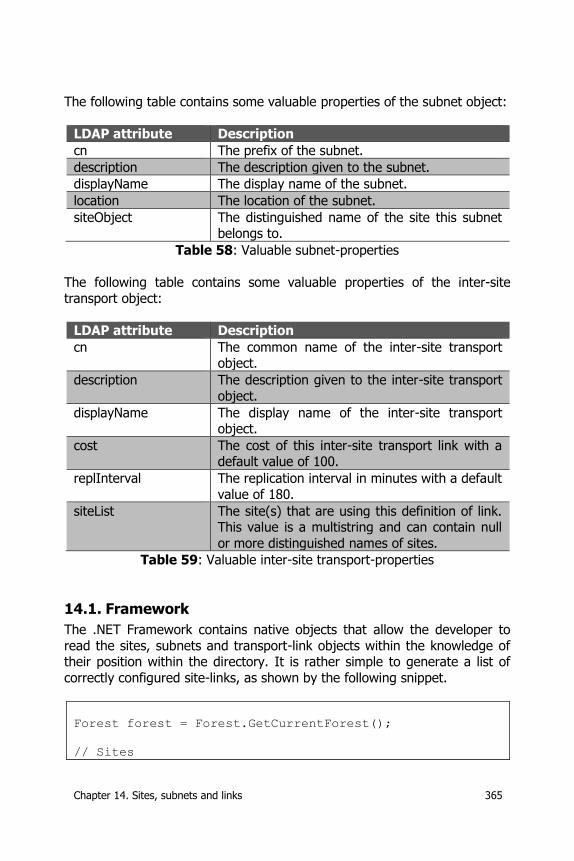
Chapter 14. Sites, subnets and links 365
The following table contains some valuable properties of the subnet object:
LDAP attribute Description
cn The prefix of the subnet.
description The description given to the subnet.
displayName The display name of the subnet.
location The location of the subnet.
siteObject The distinguished name of the site this subnet belongs to.
Table 58: Valuable subnet-properties
The following table contains some valuable properties of the inter-site
transport object:
LDAP attribute Description
cn The common name of the inter-site transport object.
description The description given to the inter-site transport
object.
displayName The display name of the inter-site transport object.
cost The cost of this inter-site transport link with a default value of 100.
replInterval The replication interval in minutes with a default
value of 180.
siteList The site(s) that are using this definition of link. This value is a multistring and can contain null
or more distinguished names of sites.
Table 59: Valuable inter-site transport-properties
14.1. Framework
The .NET Framework contains native objects that allow the developer to
read the sites, subnets and transport-link objects within the knowledge of their position within the directory. It is rather simple to generate a list of
correctly configured site-links, as shown by the following snippet.
Forest forest = Forest.GetCurrentForest();
// Sites
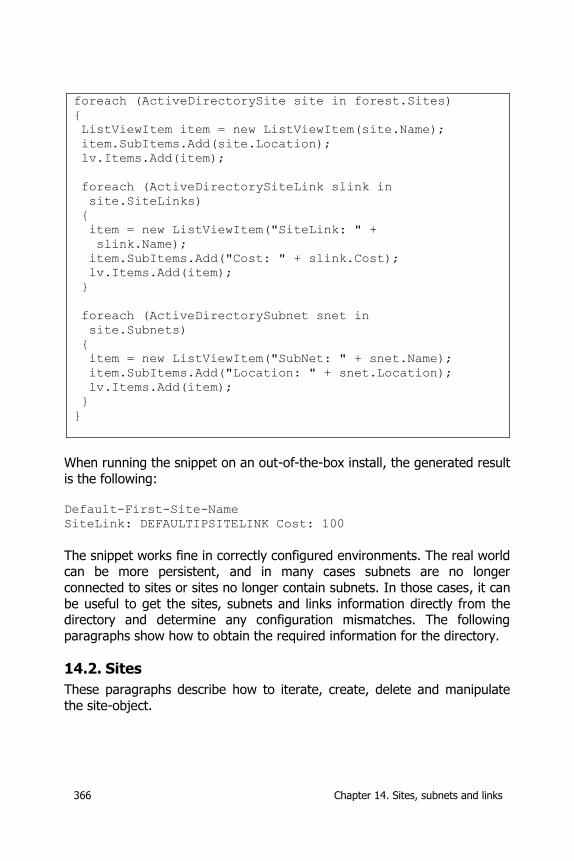
366 Chapter 14. Sites, subnets and links
foreach (ActiveDirectorySite site in forest.Sites)
{
ListViewItem item = new ListViewItem(site.Name);
item.SubItems.Add(site.Location);
lv.Items.Add(item);
foreach (ActiveDirectorySiteLink slink in
site.SiteLinks)
{
item = new ListViewItem("SiteLink: " +
slink.Name);
item.SubItems.Add("Cost: " + slink.Cost);
lv.Items.Add(item);
}
foreach (ActiveDirectorySubnet snet in
site.Subnets)
{
item = new ListViewItem("SubNet: " + snet.Name);
item.SubItems.Add("Location: " + snet.Location);
lv.Items.Add(item);
}
}
When running the snippet on an out-of-the-box install, the generated result
is the following: Default-First-Site-Name
SiteLink: DEFAULTIPSITELINK Cost: 100
The snippet works fine in correctly configured environments. The real world can be more persistent, and in many cases subnets are no longer
connected to sites or sites no longer contain subnets. In those cases, it can
be useful to get the sites, subnets and links information directly from the directory and determine any configuration mismatches. The following
paragraphs show how to obtain the required information for the directory.
14.2. Sites
These paragraphs describe how to iterate, create, delete and manipulate
the site-object.
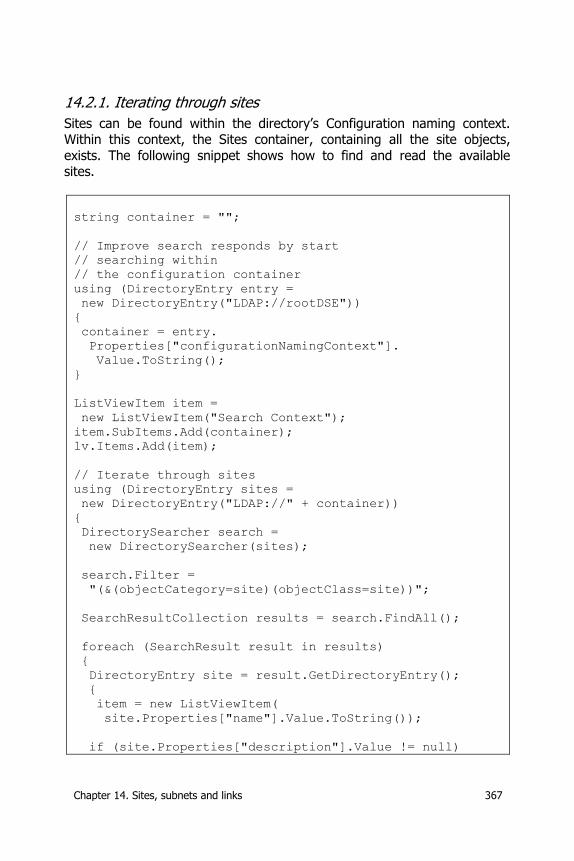
Chapter 14. Sites, subnets and links 367
14.2.1. Iterating through sites
Sites can be found within the directory’s Configuration naming context. Within this context, the Sites container, containing all the site objects,
exists. The following snippet shows how to find and read the available sites.
string container = "";
// Improve search responds by start
// searching within
// the configuration container
using (DirectoryEntry entry =
new DirectoryEntry("LDAP://rootDSE"))
{
container = entry.
Properties["configurationNamingContext"].
Value.ToString();
}
ListViewItem item =
new ListViewItem("Search Context");
item.SubItems.Add(container);
lv.Items.Add(item);
// Iterate through sites
using (DirectoryEntry sites =
new DirectoryEntry("LDAP://" + container))
{
DirectorySearcher search =
new DirectorySearcher(sites);
search.Filter =
"(&(objectCategory=site)(objectClass=site))";
SearchResultCollection results = search.FindAll();
foreach (SearchResult result in results)
{
DirectoryEntry site = result.GetDirectoryEntry();
{
item = new ListViewItem(
site.Properties["name"].Value.ToString());
if (site.Properties["description"].Value != null)
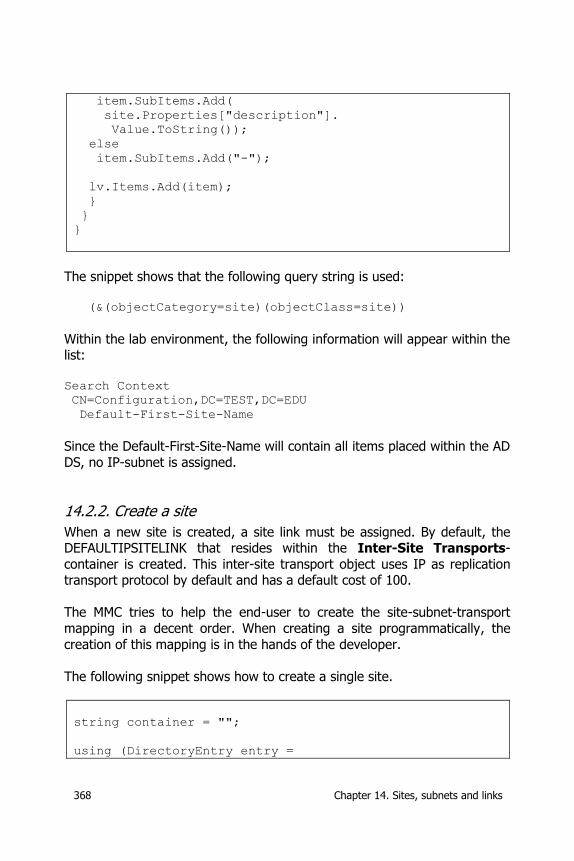
368 Chapter 14. Sites, subnets and links
item.SubItems.Add(
site.Properties["description"].
Value.ToString());
else
item.SubItems.Add("-");
lv.Items.Add(item);
}
}
}
The snippet shows that the following query string is used:
(&(objectCategory=site)(objectClass=site))
Within the lab environment, the following information will appear within the list:
Search Context
CN=Configuration,DC=TEST,DC=EDU
Default-First-Site-Name
Since the Default-First-Site-Name will contain all items placed within the AD
DS, no IP-subnet is assigned.
14.2.2. Create a site
When a new site is created, a site link must be assigned. By default, the DEFAULTIPSITELINK that resides within the Inter-Site Transports-
container is created. This inter-site transport object uses IP as replication transport protocol by default and has a default cost of 100.
The MMC tries to help the end-user to create the site-subnet-transport
mapping in a decent order. When creating a site programmatically, the
creation of this mapping is in the hands of the developer.
The following snippet shows how to create a single site.
string container = "";
using (DirectoryEntry entry =
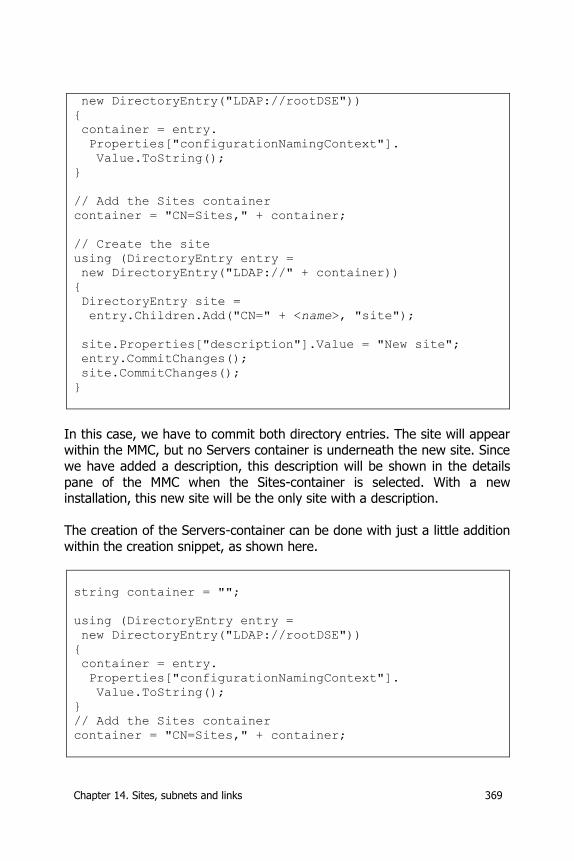
Chapter 14. Sites, subnets and links 369
new DirectoryEntry("LDAP://rootDSE"))
{
container = entry.
Properties["configurationNamingContext"].
Value.ToString();
}
// Add the Sites container
container = "CN=Sites," + container;
// Create the site
using (DirectoryEntry entry =
new DirectoryEntry("LDAP://" + container))
{
DirectoryEntry site =
entry.Children.Add("CN=" + <name>, "site");
site.Properties["description"].Value = "New site";
entry.CommitChanges();
site.CommitChanges();
}
In this case, we have to commit both directory entries. The site will appear within the MMC, but no Servers container is underneath the new site. Since
we have added a description, this description will be shown in the details
pane of the MMC when the Sites-container is selected. With a new installation, this new site will be the only site with a description.
The creation of the Servers-container can be done with just a little addition
within the creation snippet, as shown here.
string container = "";
using (DirectoryEntry entry =
new DirectoryEntry("LDAP://rootDSE"))
{
container = entry.
Properties["configurationNamingContext"].
Value.ToString();
}
// Add the Sites container
container = "CN=Sites," + container;

370 Chapter 14. Sites, subnets and links
// Create the site
using (DirectoryEntry entry =
new DirectoryEntry("LDAP://" + container))
{
DirectoryEntry site =
entry.Children.Add("CN=" + <name_of_site>,
"site");
site.Properties["description"].Value =
"New site with Servers container";
entry.CommitChanges();
site.CommitChanges();
// Create the Servers container
DirectoryEntry servers =
site.Children.Add("CN=Servers",
"serversContainer");
site.CommitChanges();
servers.CommitChanges();
}
The Servers-container is based on the serversContainer objectClass and is
always named Servers. An attempt to rename this container within the
MMC will show an ‘operation failed’ error stating that the attribute cannot be modified because it is owned by the system. Creating the container
using a different name can be done programmatically: DirectoryEntry servers =
site.Children.Add("CN=Servers2",
"serversContainer");
Although possible, I would personally not recommend doing this.
14.2.3. Rename a site
The site object contains both a common name and a name property. If a
site has to be renamed, it must be fulfilled using its common name. The
name property is considered to be read-only but changes when the common name changes.
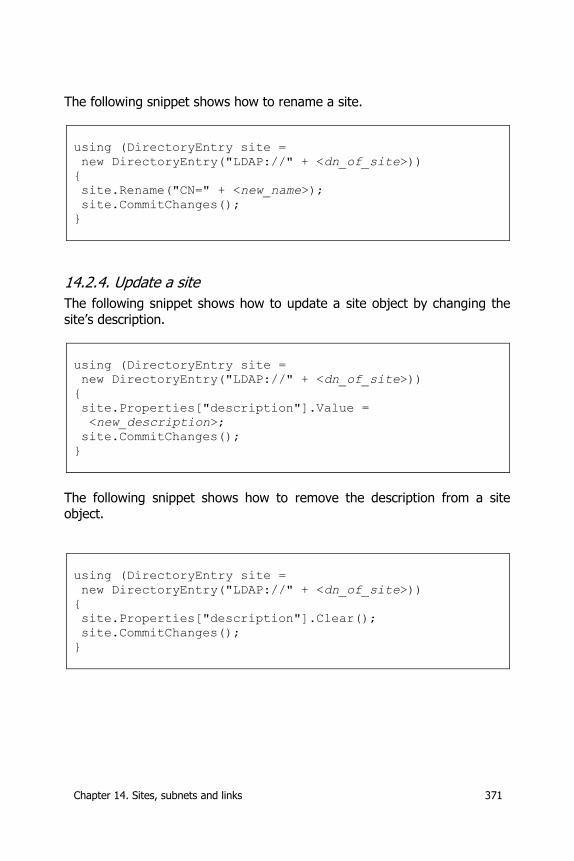
Chapter 14. Sites, subnets and links 371
The following snippet shows how to rename a site.
using (DirectoryEntry site =
new DirectoryEntry("LDAP://" + <dn_of_site>))
{
site.Rename("CN=" + <new_name>);
site.CommitChanges();
}
14.2.4. Update a site
The following snippet shows how to update a site object by changing the
site’s description.
using (DirectoryEntry site =
new DirectoryEntry("LDAP://" + <dn_of_site>))
{
site.Properties["description"].Value =
<new_description>;
site.CommitChanges();
}
The following snippet shows how to remove the description from a site object.
using (DirectoryEntry site =
new DirectoryEntry("LDAP://" + <dn_of_site>))
{
site.Properties["description"].Clear();
site.CommitChanges();
}
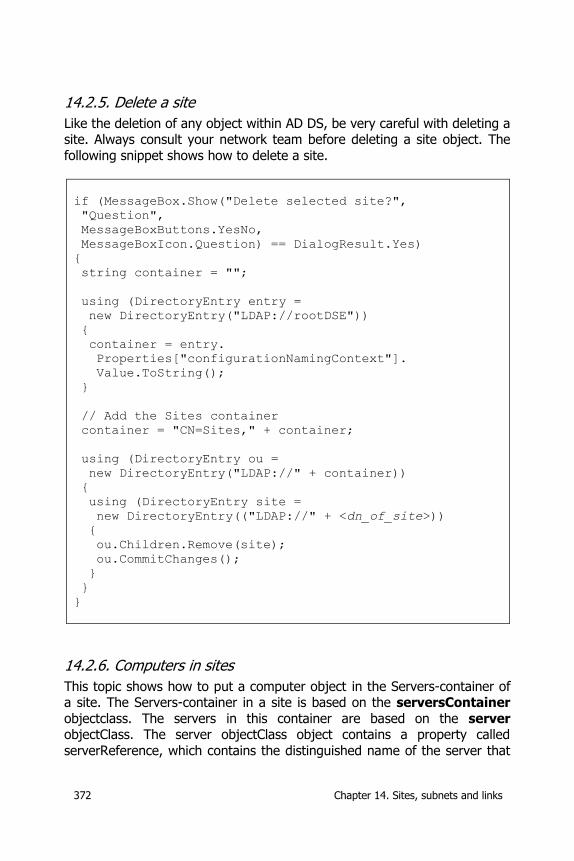
372 Chapter 14. Sites, subnets and links
14.2.5. Delete a site
Like the deletion of any object within AD DS, be very careful with deleting a site. Always consult your network team before deleting a site object. The
following snippet shows how to delete a site.
if (MessageBox.Show("Delete selected site?",
"Question",
MessageBoxButtons.YesNo,
MessageBoxIcon.Question) == DialogResult.Yes)
{
string container = "";
using (DirectoryEntry entry =
new DirectoryEntry("LDAP://rootDSE"))
{
container = entry.
Properties["configurationNamingContext"].
Value.ToString();
}
// Add the Sites container
container = "CN=Sites," + container;
using (DirectoryEntry ou =
new DirectoryEntry("LDAP://" + container))
{
using (DirectoryEntry site =
new DirectoryEntry(("LDAP://" + <dn_of_site>))
{
ou.Children.Remove(site);
ou.CommitChanges();
}
}
}
14.2.6. Computers in sites
This topic shows how to put a computer object in the Servers-container of a site. The Servers-container in a site is based on the serversContainer
objectclass. The servers in this container are based on the server objectClass. The server objectClass object contains a property called
serverReference, which contains the distinguished name of the server that
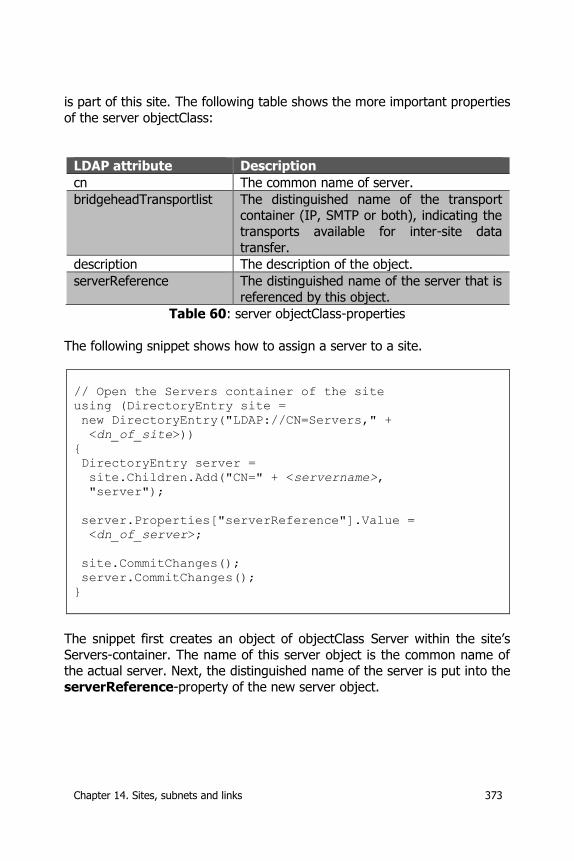
Chapter 14. Sites, subnets and links 373
is part of this site. The following table shows the more important properties
of the server objectClass:
LDAP attribute Description
cn The common name of server.
bridgeheadTransportlist The distinguished name of the transport container (IP, SMTP or both), indicating the
transports available for inter-site data
transfer.
description The description of the object.
serverReference The distinguished name of the server that is
referenced by this object.
Table 60: server objectClass-properties
The following snippet shows how to assign a server to a site.
// Open the Servers container of the site
using (DirectoryEntry site =
new DirectoryEntry("LDAP://CN=Servers," +
<dn_of_site>))
{
DirectoryEntry server =
site.Children.Add("CN=" + <servername>,
"server");
server.Properties["serverReference"].Value =
<dn_of_server>;
site.CommitChanges();
server.CommitChanges();
}
The snippet first creates an object of objectClass Server within the site’s
Servers-container. The name of this server object is the common name of the actual server. Next, the distinguished name of the server is put into the
serverReference-property of the new server object.
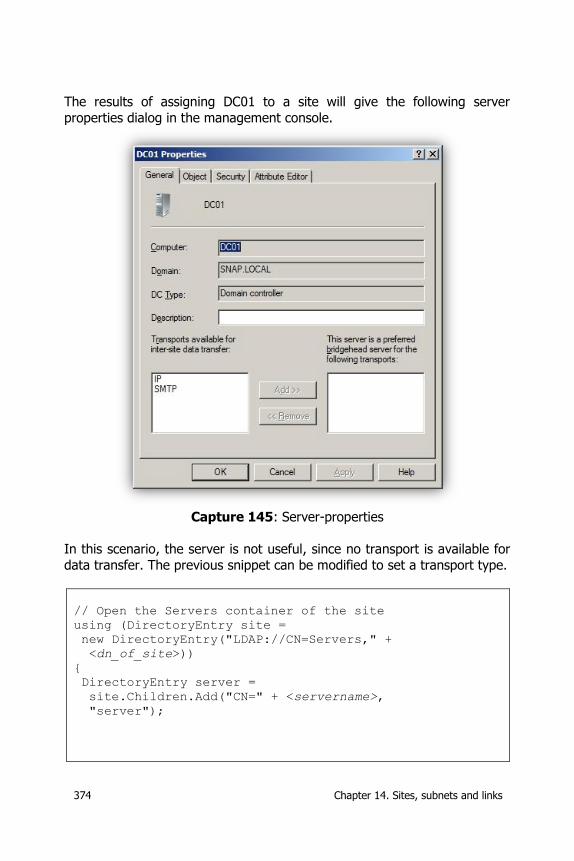
374 Chapter 14. Sites, subnets and links
The results of assigning DC01 to a site will give the following server
properties dialog in the management console.
Capture 145: Server-properties
In this scenario, the server is not useful, since no transport is available for
data transfer. The previous snippet can be modified to set a transport type.
// Open the Servers container of the site
using (DirectoryEntry site =
new DirectoryEntry("LDAP://CN=Servers," +
<dn_of_site>))
{
DirectoryEntry server =
site.Children.Add("CN=" + <servername>,
"server");
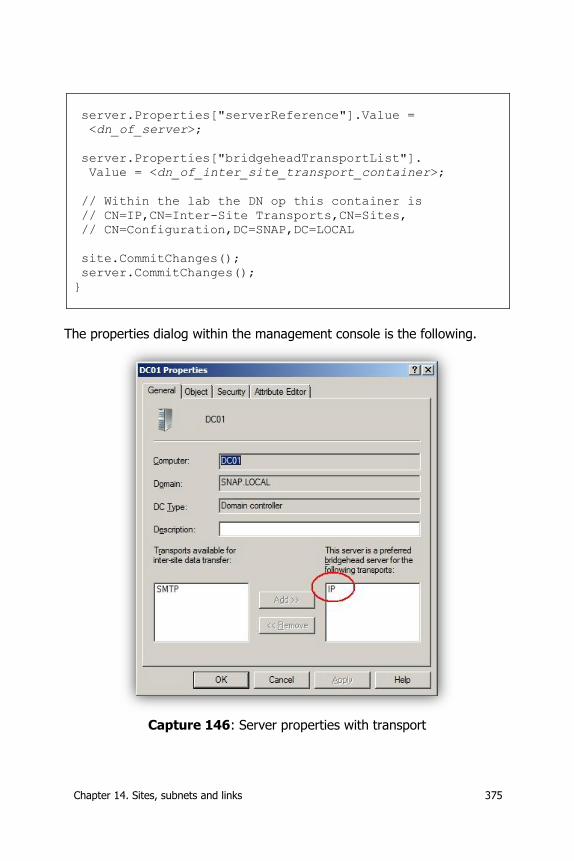
Chapter 14. Sites, subnets and links 375
server.Properties["serverReference"].Value =
<dn_of_server>;
server.Properties["bridgeheadTransportList"].
Value = <dn_of_inter_site_transport_container>;
// Within the lab the DN op this container is
// CN=IP,CN=Inter-Site Transports,CN=Sites,
// CN=Configuration,DC=SNAP,DC=LOCAL
site.CommitChanges();
server.CommitChanges();
}
The properties dialog within the management console is the following.
Capture 146: Server properties with transport
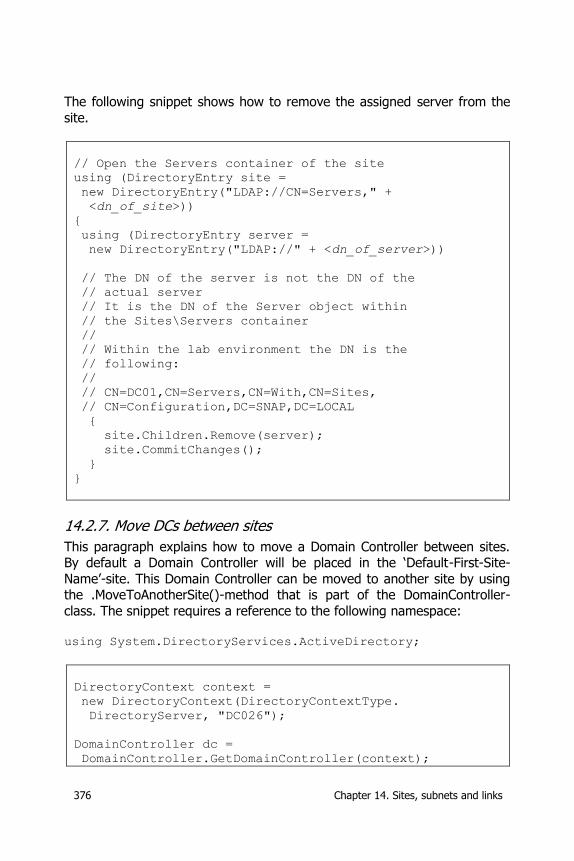
376 Chapter 14. Sites, subnets and links
The following snippet shows how to remove the assigned server from the
site.
// Open the Servers container of the site
using (DirectoryEntry site =
new DirectoryEntry("LDAP://CN=Servers," +
<dn_of_site>))
{
using (DirectoryEntry server =
new DirectoryEntry("LDAP://" + <dn_of_server>))
// The DN of the server is not the DN of the
// actual server
// It is the DN of the Server object within
// the Sites\Servers container
//
// Within the lab environment the DN is the
// following:
//
// CN=DC01,CN=Servers,CN=With,CN=Sites,
// CN=Configuration,DC=SNAP,DC=LOCAL
{
site.Children.Remove(server);
site.CommitChanges();
}
}
14.2.7. Move DCs between sites
This paragraph explains how to move a Domain Controller between sites. By default a Domain Controller will be placed in the ‘Default-First-Site-
Name’-site. This Domain Controller can be moved to another site by using the .MoveToAnotherSite()-method that is part of the DomainController-
class. The snippet requires a reference to the following namespace:
using System.DirectoryServices.ActiveDirectory;
DirectoryContext context =
new DirectoryContext(DirectoryContextType.
DirectoryServer, "DC026");
DomainController dc =
DomainController.GetDomainController(context);
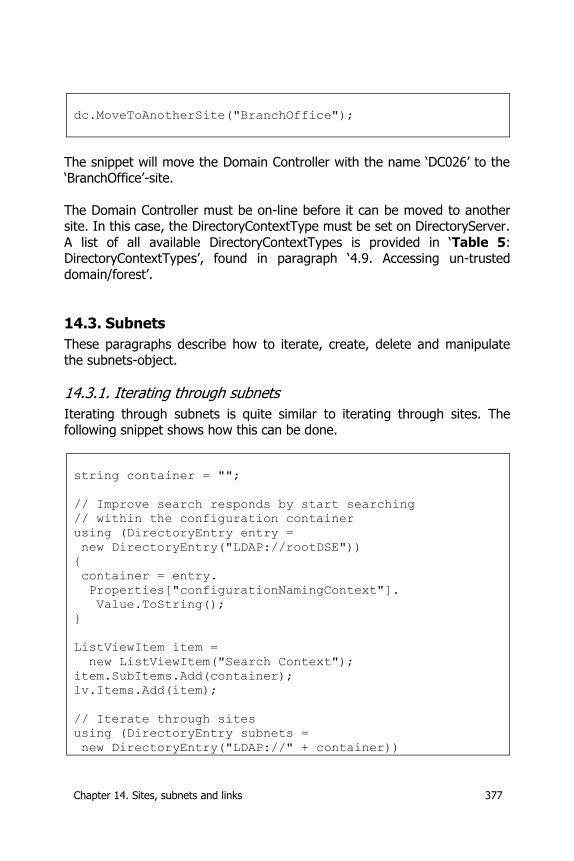
Chapter 14. Sites, subnets and links 377
dc.MoveToAnotherSite("BranchOffice");
The snippet will move the Domain Controller with the name ‘DC026’ to the ‘BranchOffice’-site.
The Domain Controller must be on-line before it can be moved to another site. In this case, the DirectoryContextType must be set on DirectoryServer.
A list of all available DirectoryContextTypes is provided in ‘Table 5: DirectoryContextTypes’, found in paragraph ‘4.9. Accessing un-trusted
domain/forest’.
14.3. Subnets
These paragraphs describe how to iterate, create, delete and manipulate the subnets-object.
14.3.1. Iterating through subnets
Iterating through subnets is quite similar to iterating through sites. The following snippet shows how this can be done.
string container = "";
// Improve search responds by start searching
// within the configuration container
using (DirectoryEntry entry =
new DirectoryEntry("LDAP://rootDSE"))
{
container = entry.
Properties["configurationNamingContext"].
Value.ToString();
}
ListViewItem item =
new ListViewItem("Search Context");
item.SubItems.Add(container);
lv.Items.Add(item);
// Iterate through sites
using (DirectoryEntry subnets =
new DirectoryEntry("LDAP://" + container))
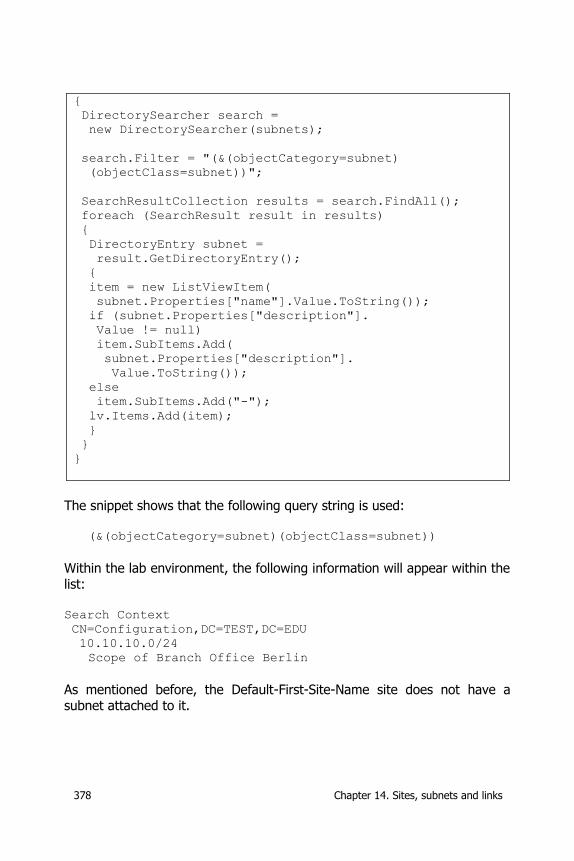
378 Chapter 14. Sites, subnets and links
{
DirectorySearcher search =
new DirectorySearcher(subnets);
search.Filter = "(&(objectCategory=subnet)
(objectClass=subnet))";
SearchResultCollection results = search.FindAll();
foreach (SearchResult result in results)
{
DirectoryEntry subnet =
result.GetDirectoryEntry();
{
item = new ListViewItem(
subnet.Properties["name"].Value.ToString());
if (subnet.Properties["description"].
Value != null)
item.SubItems.Add(
subnet.Properties["description"].
Value.ToString());
else
item.SubItems.Add("-");
lv.Items.Add(item);
}
}
}
The snippet shows that the following query string is used:
(&(objectCategory=subnet)(objectClass=subnet))
Within the lab environment, the following information will appear within the list:
Search Context
CN=Configuration,DC=TEST,DC=EDU
10.10.10.0/24
Scope of Branch Office Berlin
As mentioned before, the Default-First-Site-Name site does not have a subnet attached to it.
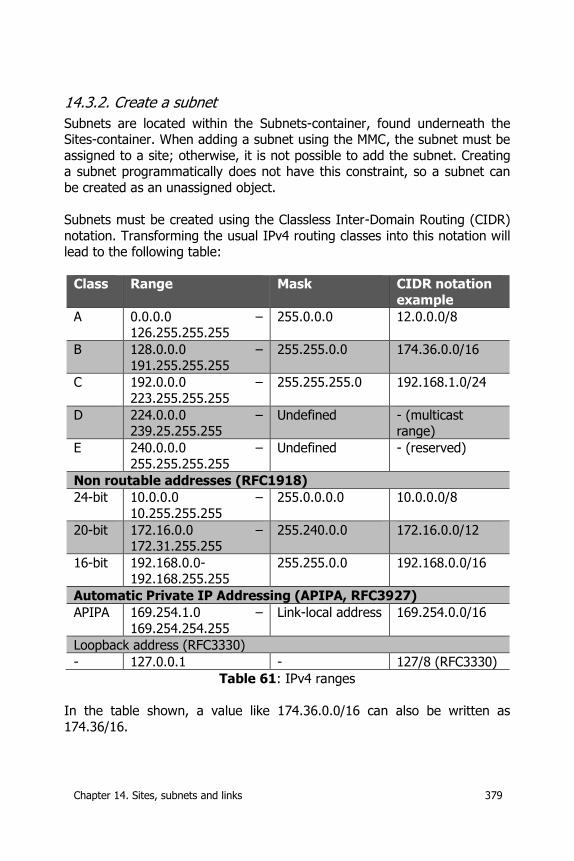
Chapter 14. Sites, subnets and links 379
14.3.2. Create a subnet
Subnets are located within the Subnets-container, found underneath the Sites-container. When adding a subnet using the MMC, the subnet must be
assigned to a site; otherwise, it is not possible to add the subnet. Creating a subnet programmatically does not have this constraint, so a subnet can
be created as an unassigned object.
Subnets must be created using the Classless Inter-Domain Routing (CIDR)
notation. Transforming the usual IPv4 routing classes into this notation will lead to the following table:
Class Range Mask CIDR notation
example
A 0.0.0.0 – 126.255.255.255
255.0.0.0 12.0.0.0/8
B 128.0.0.0 –
191.255.255.255
255.255.0.0 174.36.0.0/16
C 192.0.0.0 –
223.255.255.255
255.255.255.0 192.168.1.0/24
D 224.0.0.0 – 239.25.255.255
Undefined - (multicast range)
E 240.0.0.0 –
255.255.255.255
Undefined - (reserved)
Non routable addresses (RFC1918)
24-bit 10.0.0.0 –
10.255.255.255
255.0.0.0.0 10.0.0.0/8
20-bit 172.16.0.0 – 172.31.255.255
255.240.0.0 172.16.0.0/12
16-bit 192.168.0.0-192.168.255.255
255.255.0.0 192.168.0.0/16
Automatic Private IP Addressing (APIPA, RFC3927)
APIPA 169.254.1.0 –
169.254.254.255
Link-local address 169.254.0.0/16
Loopback address (RFC3330)
- 127.0.0.1 - 127/8 (RFC3330)
Table 61: IPv4 ranges
In the table shown, a value like 174.36.0.0/16 can also be written as
174.36/16.
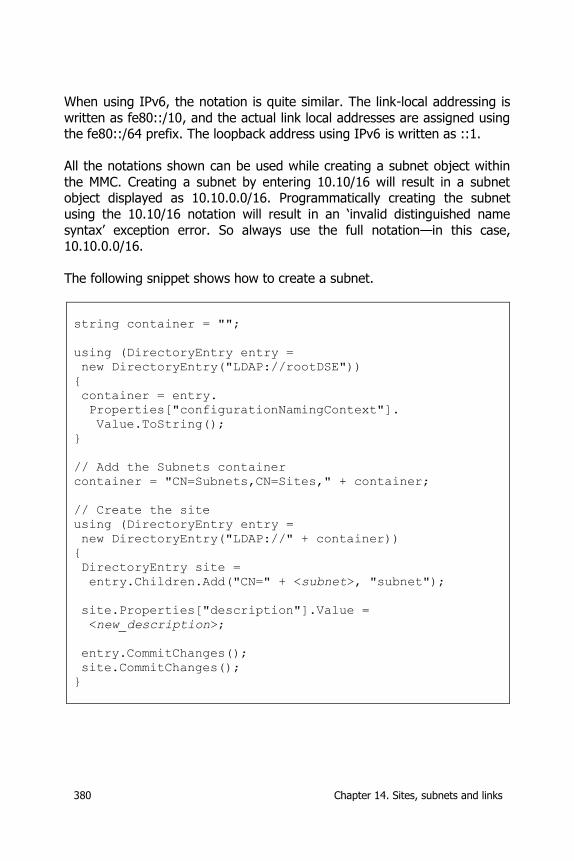
380 Chapter 14. Sites, subnets and links
When using IPv6, the notation is quite similar. The link-local addressing is
written as fe80::/10, and the actual link local addresses are assigned using the fe80::/64 prefix. The loopback address using IPv6 is written as ::1.
All the notations shown can be used while creating a subnet object within
the MMC. Creating a subnet by entering 10.10/16 will result in a subnet object displayed as 10.10.0.0/16. Programmatically creating the subnet
using the 10.10/16 notation will result in an ‘invalid distinguished name
syntax’ exception error. So always use the full notation—in this case, 10.10.0.0/16.
The following snippet shows how to create a subnet.
string container = "";
using (DirectoryEntry entry =
new DirectoryEntry("LDAP://rootDSE"))
{
container = entry.
Properties["configurationNamingContext"].
Value.ToString();
}
// Add the Subnets container
container = "CN=Subnets,CN=Sites," + container;
// Create the site
using (DirectoryEntry entry =
new DirectoryEntry("LDAP://" + container))
{
DirectoryEntry site =
entry.Children.Add("CN=" + <subnet>, "subnet");
site.Properties["description"].Value =
<new_description>;
entry.CommitChanges();
site.CommitChanges();
}
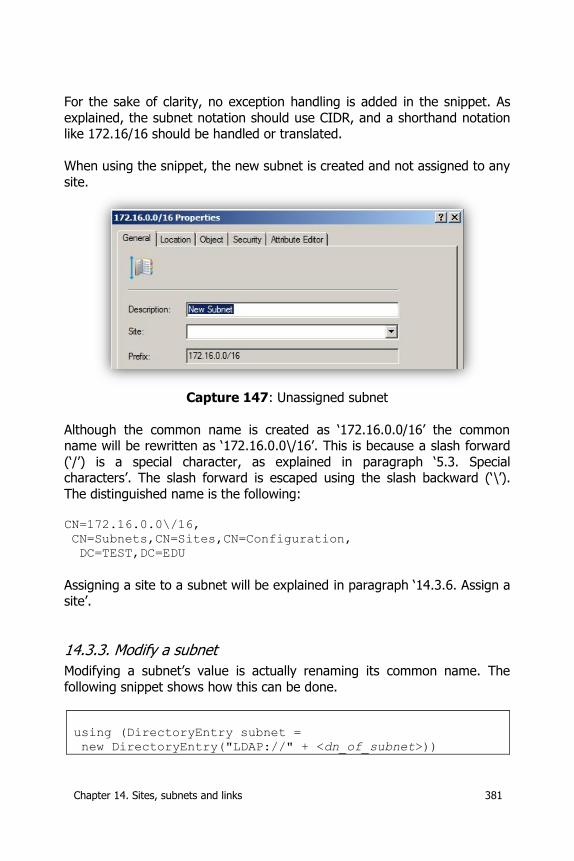
Chapter 14. Sites, subnets and links 381
For the sake of clarity, no exception handling is added in the snippet. As
explained, the subnet notation should use CIDR, and a shorthand notation like 172.16/16 should be handled or translated.
When using the snippet, the new subnet is created and not assigned to any
site.
Capture 147: Unassigned subnet
Although the common name is created as ‘172.16.0.0/16’ the common name will be rewritten as ‘172.16.0.0\/16’. This is because a slash forward
(‘/’) is a special character, as explained in paragraph ‘5.3. Special characters’. The slash forward is escaped using the slash backward (‘\’).
The distinguished name is the following:
CN=172.16.0.0\/16,
CN=Subnets,CN=Sites,CN=Configuration,
DC=TEST,DC=EDU
Assigning a site to a subnet will be explained in paragraph ‘14.3.6. Assign a site’.
14.3.3. Modify a subnet
Modifying a subnet’s value is actually renaming its common name. The
following snippet shows how this can be done.
using (DirectoryEntry subnet =
new DirectoryEntry("LDAP://" + <dn_of_subnet>))
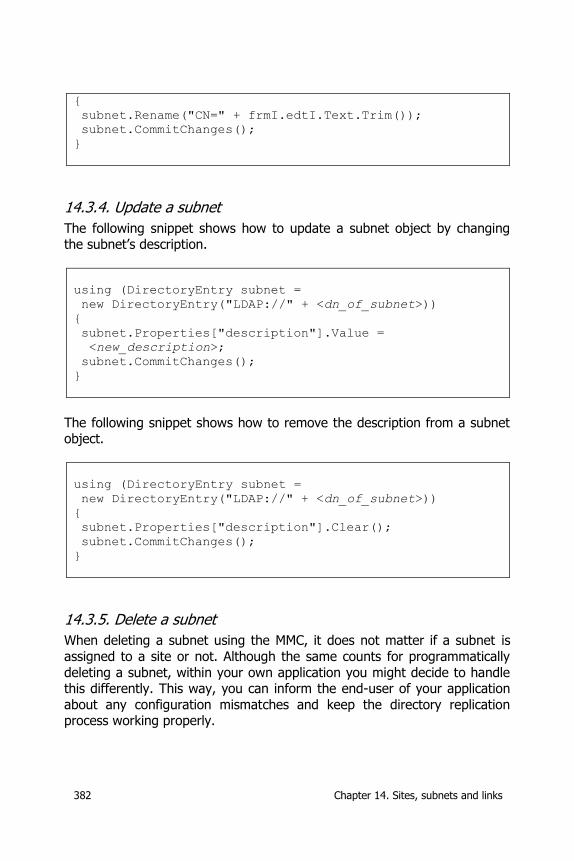
382 Chapter 14. Sites, subnets and links
{
subnet.Rename("CN=" + frmI.edtI.Text.Trim());
subnet.CommitChanges();
}
14.3.4. Update a subnet
The following snippet shows how to update a subnet object by changing the subnet’s description.
using (DirectoryEntry subnet =
new DirectoryEntry("LDAP://" + <dn_of_subnet>))
{
subnet.Properties["description"].Value =
<new_description>;
subnet.CommitChanges();
}
The following snippet shows how to remove the description from a subnet object.
using (DirectoryEntry subnet =
new DirectoryEntry("LDAP://" + <dn_of_subnet>))
{
subnet.Properties["description"].Clear();
subnet.CommitChanges();
}
14.3.5. Delete a subnet
When deleting a subnet using the MMC, it does not matter if a subnet is
assigned to a site or not. Although the same counts for programmatically
deleting a subnet, within your own application you might decide to handle this differently. This way, you can inform the end-user of your application
about any configuration mismatches and keep the directory replication process working properly.
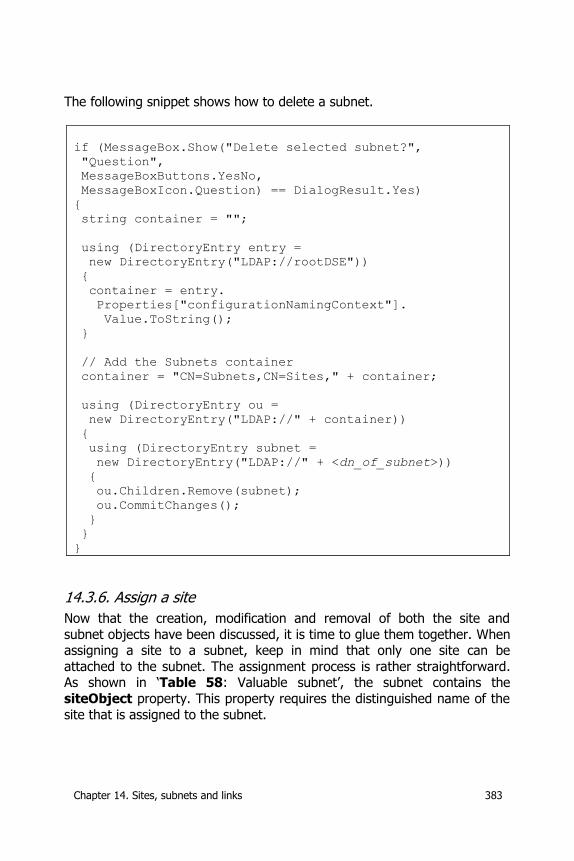
Chapter 14. Sites, subnets and links 383
The following snippet shows how to delete a subnet.
if (MessageBox.Show("Delete selected subnet?",
"Question",
MessageBoxButtons.YesNo,
MessageBoxIcon.Question) == DialogResult.Yes)
{
string container = "";
using (DirectoryEntry entry =
new DirectoryEntry("LDAP://rootDSE"))
{
container = entry.
Properties["configurationNamingContext"].
Value.ToString();
}
// Add the Subnets container
container = "CN=Subnets,CN=Sites," + container;
using (DirectoryEntry ou =
new DirectoryEntry("LDAP://" + container))
{
using (DirectoryEntry subnet =
new DirectoryEntry("LDAP://" + <dn_of_subnet>))
{
ou.Children.Remove(subnet);
ou.CommitChanges();
}
}
}
14.3.6. Assign a site
Now that the creation, modification and removal of both the site and
subnet objects have been discussed, it is time to glue them together. When assigning a site to a subnet, keep in mind that only one site can be
attached to the subnet. The assignment process is rather straightforward. As shown in ‘Table 58: Valuable subnet’, the subnet contains the
siteObject property. This property requires the distinguished name of the
site that is assigned to the subnet.
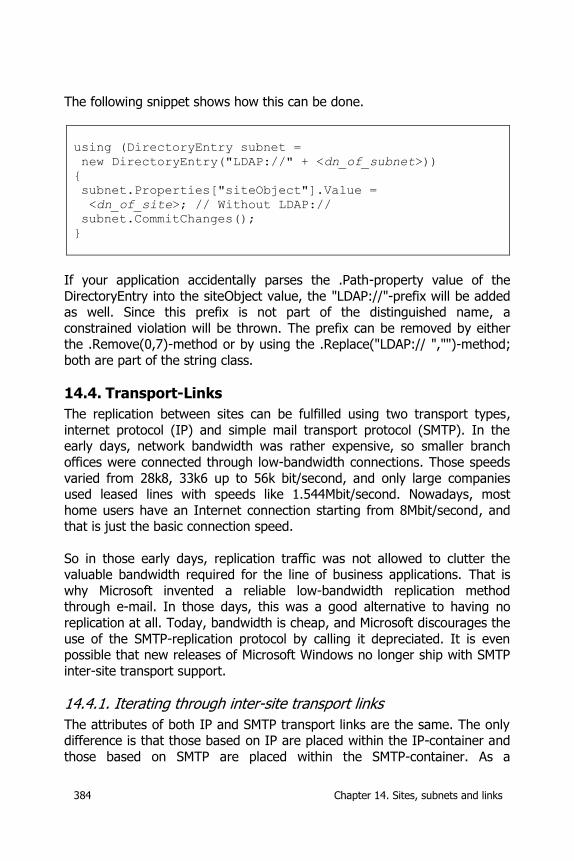
384 Chapter 14. Sites, subnets and links
The following snippet shows how this can be done.
using (DirectoryEntry subnet =
new DirectoryEntry("LDAP://" + <dn_of_subnet>))
{
subnet.Properties["siteObject"].Value =
<dn_of_site>; // Without LDAP://
subnet.CommitChanges();
}
If your application accidentally parses the .Path-property value of the
DirectoryEntry into the siteObject value, the "LDAP://"-prefix will be added as well. Since this prefix is not part of the distinguished name, a
constrained violation will be thrown. The prefix can be removed by either the .Remove(0,7)-method or by using the .Replace("LDAP:// ","")-method;
both are part of the string class.
14.4. Transport-Links
The replication between sites can be fulfilled using two transport types,
internet protocol (IP) and simple mail transport protocol (SMTP). In the early days, network bandwidth was rather expensive, so smaller branch
offices were connected through low-bandwidth connections. Those speeds
varied from 28k8, 33k6 up to 56k bit/second, and only large companies used leased lines with speeds like 1.544Mbit/second. Nowadays, most
home users have an Internet connection starting from 8Mbit/second, and that is just the basic connection speed.
So in those early days, replication traffic was not allowed to clutter the valuable bandwidth required for the line of business applications. That is
why Microsoft invented a reliable low-bandwidth replication method through e-mail. In those days, this was a good alternative to having no
replication at all. Today, bandwidth is cheap, and Microsoft discourages the
use of the SMTP-replication protocol by calling it depreciated. It is even possible that new releases of Microsoft Windows no longer ship with SMTP
inter-site transport support.
14.4.1. Iterating through inter-site transport links
The attributes of both IP and SMTP transport links are the same. The only difference is that those based on IP are placed within the IP-container and
those based on SMTP are placed within the SMTP-container. As a
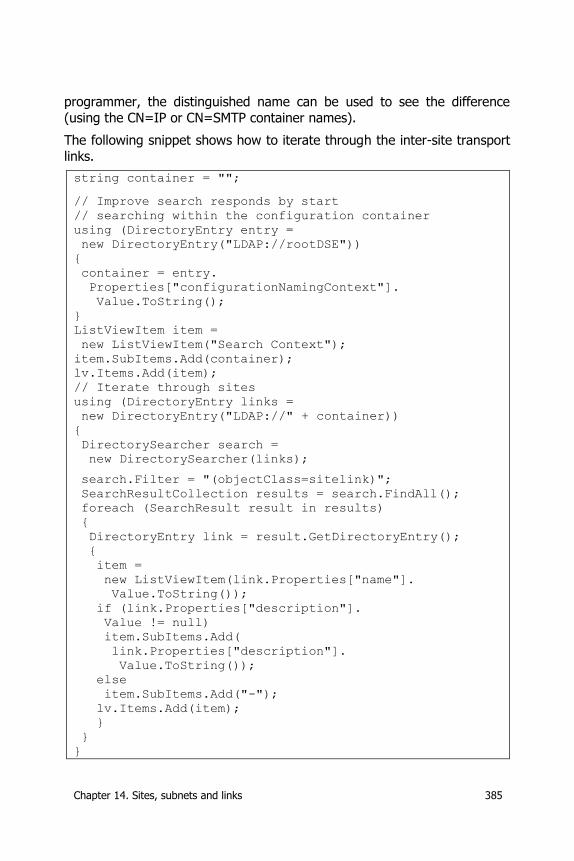
Chapter 14. Sites, subnets and links 385
programmer, the distinguished name can be used to see the difference
(using the CN=IP or CN=SMTP container names).
The following snippet shows how to iterate through the inter-site transport
links.
string container = "";
// Improve search responds by start
// searching within the configuration container
using (DirectoryEntry entry =
new DirectoryEntry("LDAP://rootDSE"))
{
container = entry.
Properties["configurationNamingContext"].
Value.ToString();
}
ListViewItem item =
new ListViewItem("Search Context");
item.SubItems.Add(container);
lv.Items.Add(item);
// Iterate through sites
using (DirectoryEntry links =
new DirectoryEntry("LDAP://" + container))
{
DirectorySearcher search =
new DirectorySearcher(links);
search.Filter = "(objectClass=sitelink)";
SearchResultCollection results = search.FindAll();
foreach (SearchResult result in results)
{
DirectoryEntry link = result.GetDirectoryEntry();
{
item =
new ListViewItem(link.Properties["name"].
Value.ToString());
if (link.Properties["description"].
Value != null)
item.SubItems.Add(
link.Properties["description"].
Value.ToString());
else
item.SubItems.Add("-");
lv.Items.Add(item);
}
}
}
386 Chapter 14. Sites, subnets and links
The snippet shows that the following query string is used:
(objectClass=sitelink)
Within the lab environment, the following information will appear within the
list:
Search Context
CN=Configuration,DC=TEST,DC=EDU
DEFAULTIPSITELINK -
14.4.2. Create a transport-link
As mentioned in the previous paragraph, two types of inter-site transport
links exist. The most commonly used is IP, but the SMTP transport-link is
still supported under Microsoft Windows 2008 R2. You might expect that the transport protocol used by the link is part of the object. This is not the
case; the used transport protocol is defined by the container that the link is in.
Since the link defines the replication process between sites, the inter-site
transport link object must at least contain two site objects. When a site is
created using the MMC, the link will have a default cost of 100 and a default replication interval of 180 minutes.
When creating a link, the type of transport must be known. An attempt to
create a link in the Inter-Site Transports container itself will result in a
‘naming violation’ exception error. Although both cost and replication interval are needed, they are not mandated by the directory. On the other
hand, an attempt to create a link without the site link property being filled will result in one or more constraints associated with the ‘class of object’
exception error.
The following snippet shows how to create an IP-based transport-link with
the default cost and replication interval.
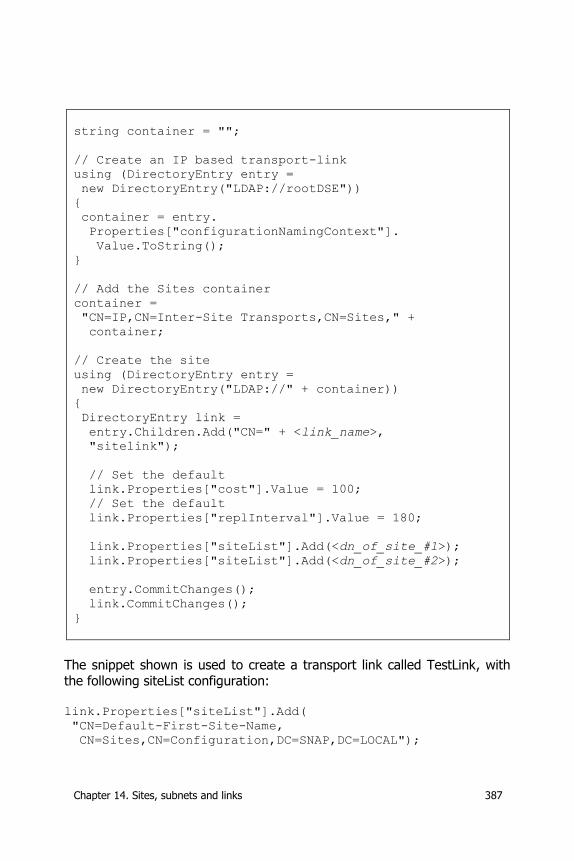
Chapter 14. Sites, subnets and links 387
string container = "";
// Create an IP based transport-link
using (DirectoryEntry entry =
new DirectoryEntry("LDAP://rootDSE"))
{
container = entry.
Properties["configurationNamingContext"].
Value.ToString();
}
// Add the Sites container
container =
"CN=IP,CN=Inter-Site Transports,CN=Sites," +
container;
// Create the site
using (DirectoryEntry entry =
new DirectoryEntry("LDAP://" + container))
{
DirectoryEntry link =
entry.Children.Add("CN=" + <link_name>,
"sitelink");
// Set the default
link.Properties["cost"].Value = 100;
// Set the default
link.Properties["replInterval"].Value = 180;
link.Properties["siteList"].Add(<dn_of_site_#1>);
link.Properties["siteList"].Add(<dn_of_site_#2>);
entry.CommitChanges();
link.CommitChanges();
}
The snippet shown is used to create a transport link called TestLink, with the following siteList configuration:
link.Properties["siteList"].Add(
"CN=Default-First-Site-Name,
CN=Sites,CN=Configuration,DC=SNAP,DC=LOCAL");
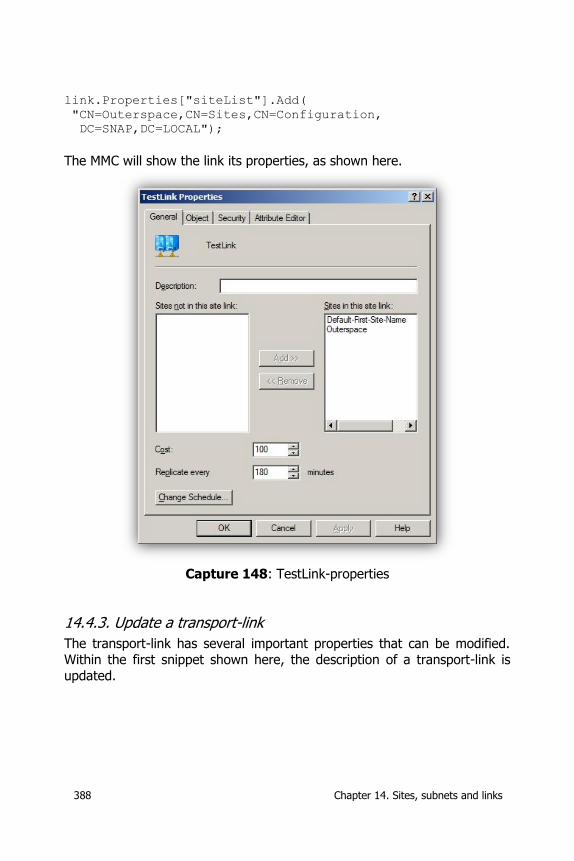
388 Chapter 14. Sites, subnets and links
link.Properties["siteList"].Add(
"CN=Outerspace,CN=Sites,CN=Configuration,
DC=SNAP,DC=LOCAL");
The MMC will show the link its properties, as shown here.
Capture 148: TestLink-properties
14.4.3. Update a transport-link
The transport-link has several important properties that can be modified.
Within the first snippet shown here, the description of a transport-link is
updated.
Chapter 14. Sites, subnets and links 389
using (DirectoryEntry link =
new DirectoryEntry("LDAP://" + <dn_of_link>))
{
link.Properties["description"].Value =
<new_description>;
link.CommitChanges();
}
The following snippet shows how to remove the description of the
transport-link.
using (DirectoryEntry link =
new DirectoryEntry("LDAP://" + <dn_of_link>))
{
link.Properties["description"].Clear();
link.CommitChanges();
}
Using the same technique, the cost can be changed, as shown in the
following snippet.
using (DirectoryEntry link =
new DirectoryEntry("LDAP://" + <dn_of_link>))
{
link.Properties["cost"].Value = <new_cost_value>;
link.CommitChanges();
}
Changing the site links is no problem as long as there are at least two sites within the list. The next snippet adds another site link.
using (DirectoryEntry link =
new DirectoryEntry("LDAP://" + <dn_of_link>))
{
link.Properties["siteList"].Add(<dn_of_site>);
link.CommitChanges();
}
390 Chapter 14. Sites, subnets and links
The following example removes a site link from the transport-link.
using (DirectoryEntry link =
new DirectoryEntry("LDAP://" + <dn_of_link>))
{
link.Properties["siteList"].Remove(<dn_of_site>);
link.CommitChanges();
}
14.4.4. Delete a transport-link
Since there are IP and SMTP containers, the correct container must be
assigned to the DirectoryEntry. Target container can be detected by examining the distinguished name of the transport-link object. If this link
contains the ‘CN=IP,’-container prefix string, then the IP protocol container
must be selected. The following snippet shows how to delete a transport-link object from the correct protocol container.
string container = "";
using (DirectoryEntry entry =
new DirectoryEntry("LDAP://rootDSE"))
{
container = entry.
Properties["configurationNamingContext"].
Value.ToString();
}
// Add the transport-link container
.MoveTo() protocol container
As explained earlier, the difference in transport is the container in
which the transport-link is created. This can be either IP or SMTP, and the used protocol is part of the distinguished name.
When moving a transport-link from the IP to the SMTP container, using the DirectoryEntry’s .MoveTo()-method will fail. The move will
cause a server is unwilling to process the request exception.
Chapter 14. Sites, subnets and links 391
if (<dn_of_link>.Contains("CN=IP,"))
container =
"CN=IP,CN=Inter-Site Transports,CN=Sites," +
container;
else
container =
"CN=SMTP,CN=Inter-Site Transports,CN=Sites," +
container;
using (DirectoryEntry ou =
new DirectoryEntry("LDAP://" + container))
{
using (DirectoryEntry link =
new DirectoryEntry("LDAP://" + <dn_of_link>))
{
ou.Children.Remove(link);
ou.CommitChanges();
}
}
Since only two protocol types are available, the snippet can use an ‘if..else’-
statement.


Chapter 15. Hardware 393
15. Hardware
This paragraph will discuss two types of hardware; the first type are items that can be found within the directory mainly due to authorization
purposes, and the second type are items that mainly use the directory so that they can be found.
15.1. Computer(s)
Computer objects available within AD DS can be of any type—like laptops,
servers and workstations. To separate these items, you can place them within separate OUs, use a naming convention or use one of the object’s
attributes.
To create a list of all computer objects within the domain, use the following
snippet.
DirectoryEntry root =
new DirectoryEntry("LDAP://rootDSE");
DirectorySearcher search = new DirectorySearcher();
search.Filter = "(objectClass=computer)";
search.PageSize = 1000;
search.SearchScope =
System.DirectoryServices.SearchScope.Subtree;
foreach (SearchResult result in search.FindAll())
{
DirectoryEntry host = result.GetDirectoryEntry();
ListViewItem item = new ListViewItem(host.Name);
lvResult.Items.Add(item);
}
root.Close(); root.Dispose();
The result is something like:
CN=SVR33183282
CN=WKS18867340
CN=WKS66213148
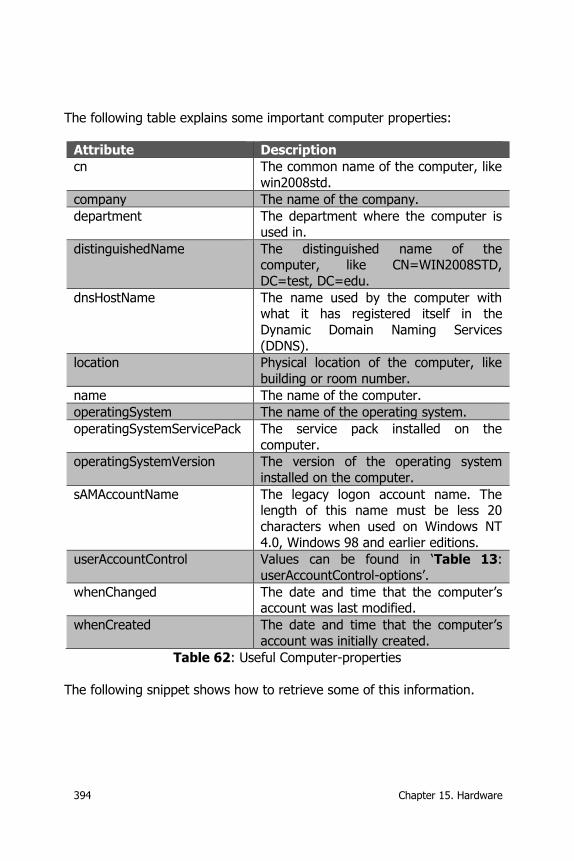
394 Chapter 15. Hardware
The following table explains some important computer properties:
Attribute Description
cn The common name of the computer, like
win2008std.
company The name of the company.
department The department where the computer is used in.
distinguishedName The distinguished name of the computer, like CN=WIN2008STD,
DC=test, DC=edu.
dnsHostName The name used by the computer with what it has registered itself in the
Dynamic Domain Naming Services
(DDNS).
location Physical location of the computer, like
building or room number.
name The name of the computer.
operatingSystem The name of the operating system.
operatingSystemServicePack The service pack installed on the
computer.
operatingSystemVersion The version of the operating system
installed on the computer.
sAMAccountName The legacy logon account name. The length of this name must be less 20
characters when used on Windows NT
4.0, Windows 98 and earlier editions.
userAccountControl Values can be found in ‘Table 13:
userAccountControl-options’.
whenChanged The date and time that the computer’s account was last modified.
whenCreated The date and time that the computer’s
account was initially created.
Table 62: Useful Computer-properties
The following snippet shows how to retrieve some of this information.
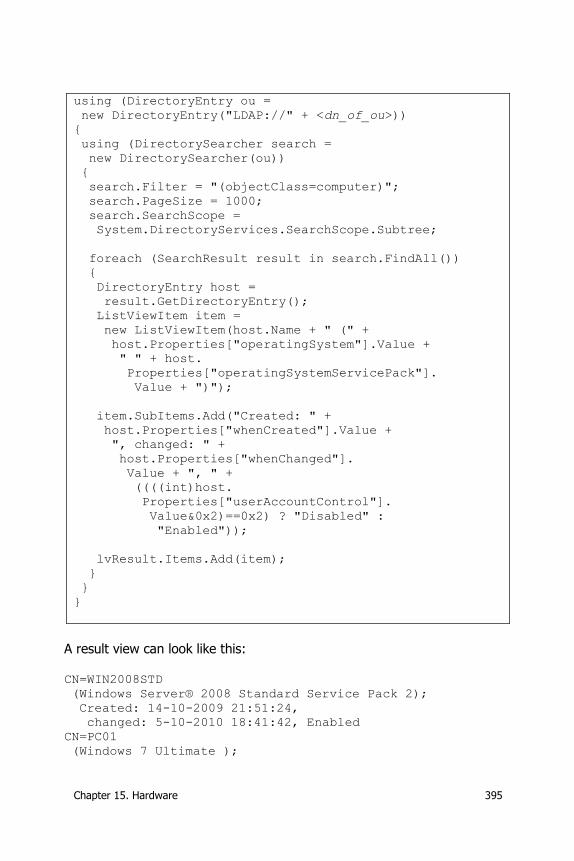
Chapter 15. Hardware 395
using (DirectoryEntry ou =
new DirectoryEntry("LDAP://" + <dn_of_ou>))
{
using (DirectorySearcher search =
new DirectorySearcher(ou))
{
search.Filter = "(objectClass=computer)";
search.PageSize = 1000;
search.SearchScope =
System.DirectoryServices.SearchScope.Subtree;
foreach (SearchResult result in search.FindAll())
{
DirectoryEntry host =
result.GetDirectoryEntry();
ListViewItem item =
new ListViewItem(host.Name + " (" +
host.Properties["operatingSystem"].Value +
" " + host.
Properties["operatingSystemServicePack"].
Value + ")");
item.SubItems.Add("Created: " +
host.Properties["whenCreated"].Value +
", changed: " +
host.Properties["whenChanged"].
Value + ", " +
((((int)host.
Properties["userAccountControl"].
Value&0x2)==0x2) ? "Disabled" :
"Enabled"));
lvResult.Items.Add(item);
}
}
}
A result view can look like this:
CN=WIN2008STD
(Windows Server® 2008 Standard Service Pack 2);
Created: 14-10-2009 21:51:24,
changed: 5-10-2010 18:41:42, Enabled
CN=PC01
(Windows 7 Ultimate );
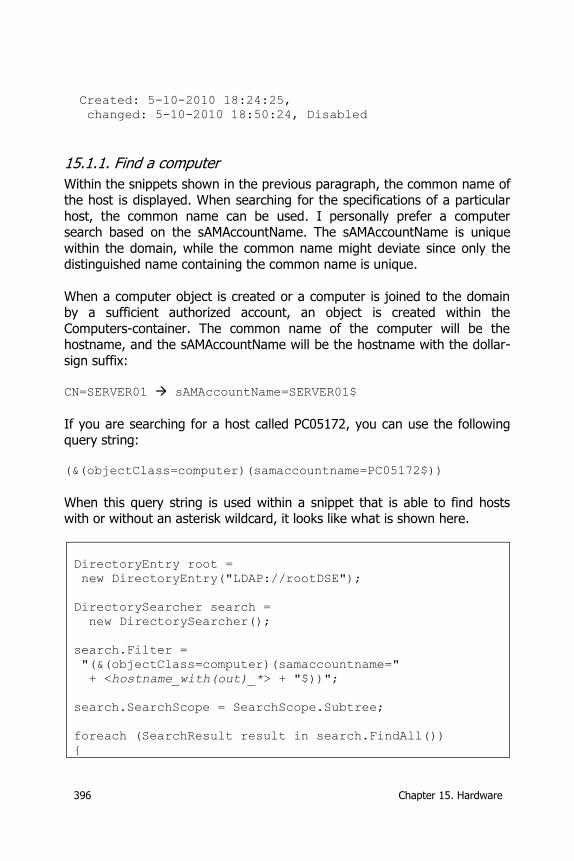
396 Chapter 15. Hardware
Created: 5-10-2010 18:24:25,
changed: 5-10-2010 18:50:24, Disabled
15.1.1. Find a computer
Within the snippets shown in the previous paragraph, the common name of the host is displayed. When searching for the specifications of a particular
host, the common name can be used. I personally prefer a computer search based on the sAMAccountName. The sAMAccountName is unique
within the domain, while the common name might deviate since only the distinguished name containing the common name is unique.
When a computer object is created or a computer is joined to the domain by a sufficient authorized account, an object is created within the
Computers-container. The common name of the computer will be the hostname, and the sAMAccountName will be the hostname with the dollar-
sign suffix:
CN=SERVER01 sAMAccountName=SERVER01$
If you are searching for a host called PC05172, you can use the following query string:
(&(objectClass=computer)(samaccountname=PC05172$))
When this query string is used within a snippet that is able to find hosts with or without an asterisk wildcard, it looks like what is shown here.
DirectoryEntry root =
new DirectoryEntry("LDAP://rootDSE");
DirectorySearcher search =
new DirectorySearcher();
search.Filter =
"(&(objectClass=computer)(samaccountname="
+ <hostname_with(out)_*> + "$))";
search.SearchScope = SearchScope.Subtree;
foreach (SearchResult result in search.FindAll())
{
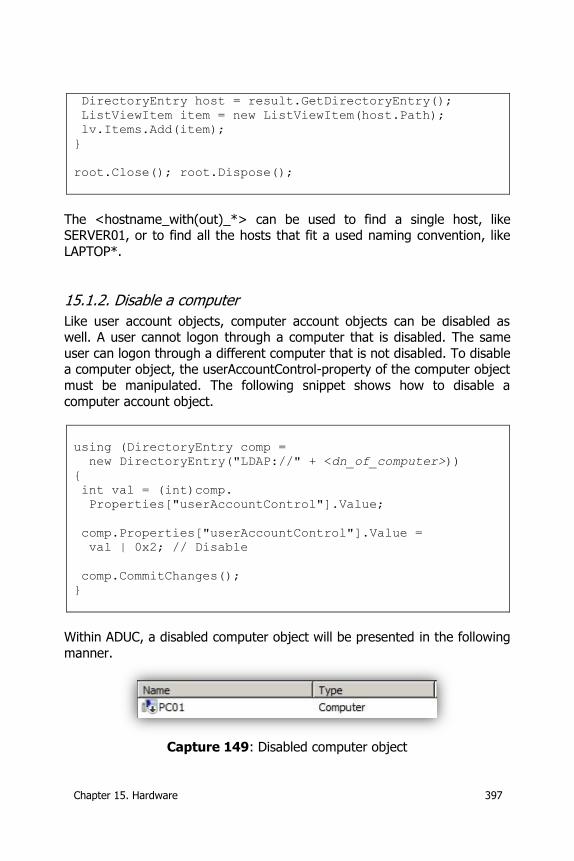
Chapter 15. Hardware 397
DirectoryEntry host = result.GetDirectoryEntry();
ListViewItem item = new ListViewItem(host.Path);
lv.Items.Add(item);
}
root.Close(); root.Dispose();
The <hostname_with(out)_*> can be used to find a single host, like SERVER01, or to find all the hosts that fit a used naming convention, like
LAPTOP*.
15.1.2. Disable a computer
Like user account objects, computer account objects can be disabled as well. A user cannot logon through a computer that is disabled. The same
user can logon through a different computer that is not disabled. To disable a computer object, the userAccountControl-property of the computer object
must be manipulated. The following snippet shows how to disable a
computer account object.
using (DirectoryEntry comp =
new DirectoryEntry("LDAP://" + <dn_of_computer>))
{
int val = (int)comp.
Properties["userAccountControl"].Value;
comp.Properties["userAccountControl"].Value =
val | 0x2; // Disable
comp.CommitChanges();
}
Within ADUC, a disabled computer object will be presented in the following
manner.
Capture 149: Disabled computer object
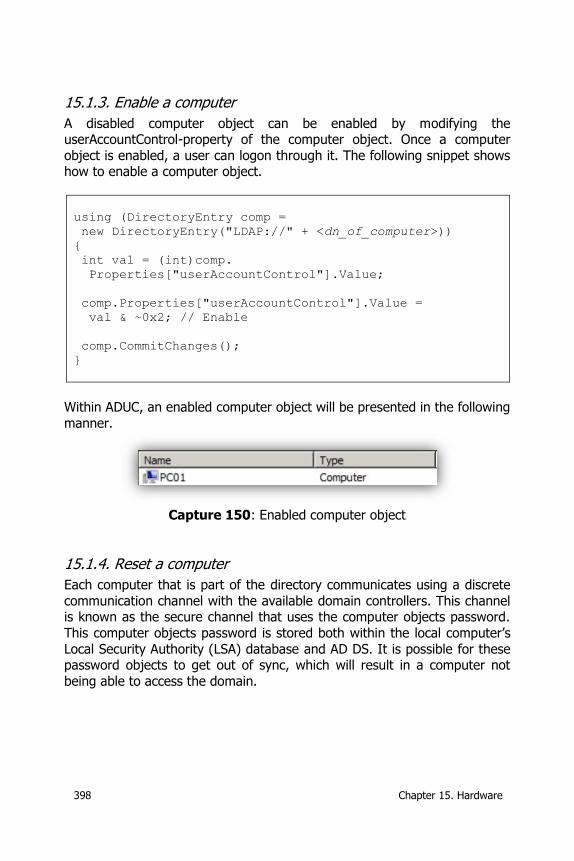
398 Chapter 15. Hardware
15.1.3. Enable a computer
A disabled computer object can be enabled by modifying the userAccountControl-property of the computer object. Once a computer
object is enabled, a user can logon through it. The following snippet shows how to enable a computer object.
using (DirectoryEntry comp =
new DirectoryEntry("LDAP://" + <dn_of_computer>))
{
int val = (int)comp.
Properties["userAccountControl"].Value;
comp.Properties["userAccountControl"].Value =
val & ~0x2; // Enable
comp.CommitChanges();
}
Within ADUC, an enabled computer object will be presented in the following
manner.
Capture 150: Enabled computer object
15.1.4. Reset a computer
Each computer that is part of the directory communicates using a discrete
communication channel with the available domain controllers. This channel is known as the secure channel that uses the computer objects password.
This computer objects password is stored both within the local computer’s
Local Security Authority (LSA) database and AD DS. It is possible for these password objects to get out of sync, which will result in a computer not
being able to access the domain.
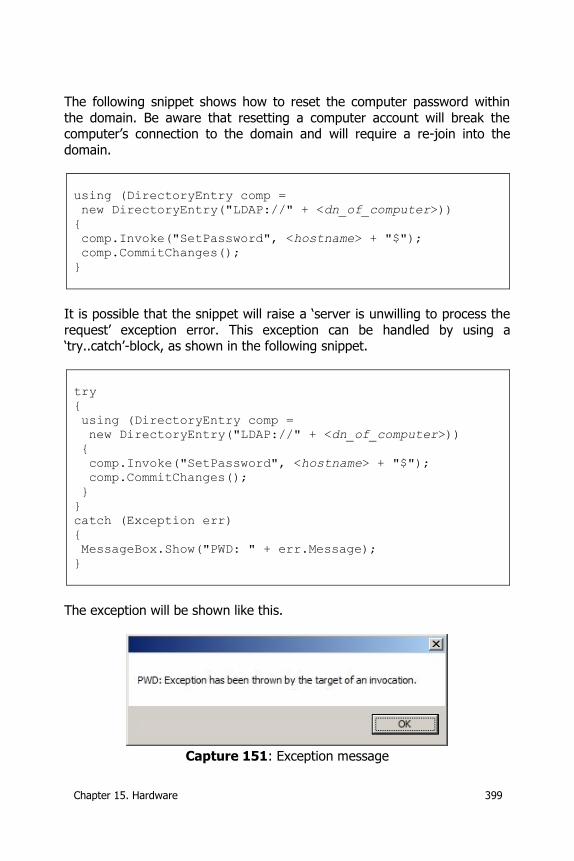
Chapter 15. Hardware 399
The following snippet shows how to reset the computer password within
the domain. Be aware that resetting a computer account will break the computer’s connection to the domain and will require a re-join into the
domain.
using (DirectoryEntry comp =
new DirectoryEntry("LDAP://" + <dn_of_computer>))
{
comp.Invoke("SetPassword", <hostname> + "$");
comp.CommitChanges();
}
It is possible that the snippet will raise a ‘server is unwilling to process the
request’ exception error. This exception can be handled by using a ‘try..catch’-block, as shown in the following snippet.
try
{
using (DirectoryEntry comp =
new DirectoryEntry("LDAP://" + <dn_of_computer>))
{
comp.Invoke("SetPassword", <hostname> + "$");
comp.CommitChanges();
}
}
catch (Exception err)
{
MessageBox.Show("PWD: " + err.Message);
}
The exception will be shown like this.
Capture 151: Exception message
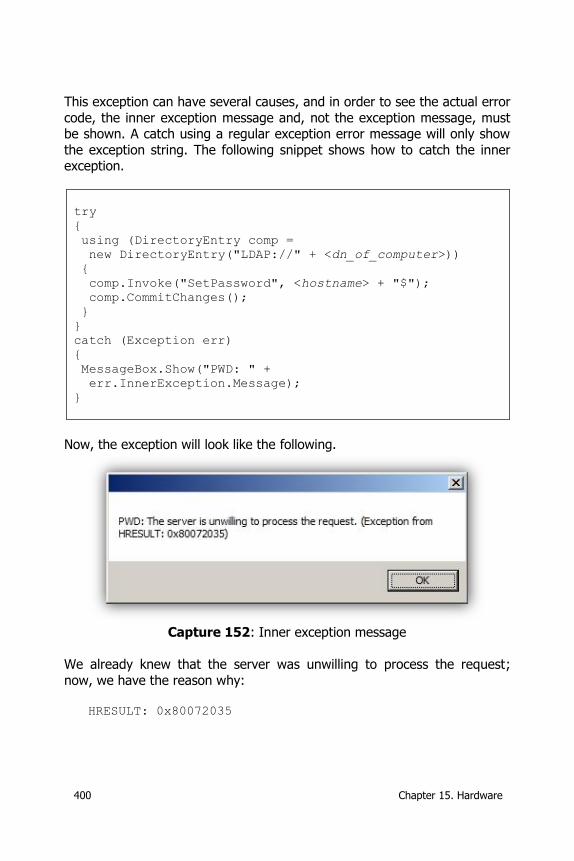
400 Chapter 15. Hardware
This exception can have several causes, and in order to see the actual error
code, the inner exception message and, not the exception message, must be shown. A catch using a regular exception error message will only show
the exception string. The following snippet shows how to catch the inner exception.
try
{
using (DirectoryEntry comp =
new DirectoryEntry("LDAP://" + <dn_of_computer>))
{
comp.Invoke("SetPassword", <hostname> + "$");
comp.CommitChanges();
}
}
catch (Exception err)
{
MessageBox.Show("PWD: " +
err.InnerException.Message);
}
Now, the exception will look like the following.
Capture 152: Inner exception message
We already knew that the server was unwilling to process the request;
now, we have the reason why:
HRESULT: 0x80072035
Chapter 15. Hardware 401
In this case, this error is a result of the fact that we are trying to change
the password of an object without complying with the domain password policy. Examining password policies is explained in paragraph ‘18.5. Default
Domain Policy’ and chapter ‘19. Password Settings Object’.
15.1.5. Create a computer
There are occasions when in-advance creation of computer objects is required. This might be the case when loads of computers are going to be
migrated from one domain to another. When the computers are created
within the default Computers-container, no regular policies can be applied. By pre-creating the object within a regular organizational unit, policies
assigned to this organizational unit will be applied to its child objects—in this case, the computer objects.
A computer object is created based on the computer objectClass. Before the computer object can be useful, several computer properties need to be
filled. First, the computer must be assigned a password. As described in ‘15.1.4. Reset a computer’, the computer object must have an initial
password formatted, like ‘hostname+$’. Next, when using a utility like
NETDOM.EXE to remotely re-join a computer from one domain to another, the sAMAccountName of the original computer must match the
sAMAccountName of the newly created computer. If no sAMAccountName is supplied during creation, the directory will assign a sAMAccountName
formatted, using random characters, as shown here:
$151000-IROEOUUTCHRO
This sAMAccountName is visible within ADUC under the General-tab in the
‘Computer name (pre-Windows 2000)’ field of the computer object’s properties.
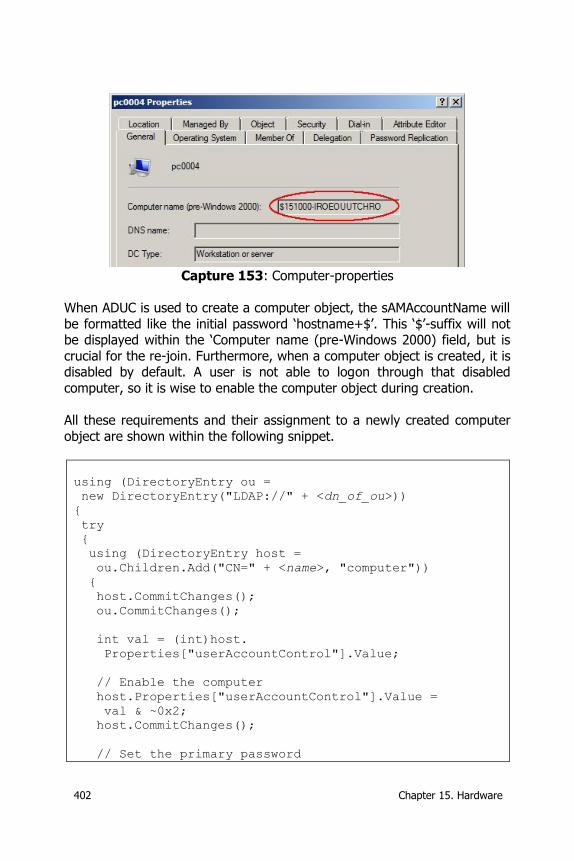
402 Chapter 15. Hardware
Capture 153: Computer-properties
When ADUC is used to create a computer object, the sAMAccountName will
be formatted like the initial password ‘hostname+$’. This ‘$’-suffix will not be displayed within the ‘Computer name (pre-Windows 2000) field, but is
crucial for the re-join. Furthermore, when a computer object is created, it is disabled by default. A user is not able to logon through that disabled
computer, so it is wise to enable the computer object during creation.
All these requirements and their assignment to a newly created computer
object are shown within the following snippet.
using (DirectoryEntry ou =
new DirectoryEntry("LDAP://" + <dn_of_ou>))
{
try
{
using (DirectoryEntry host =
ou.Children.Add("CN=" + <name>, "computer"))
{
host.CommitChanges();
ou.CommitChanges();
int val = (int)host.
Properties["userAccountControl"].Value;
// Enable the computer
host.Properties["userAccountControl"].Value =
val & ~0x2;
host.CommitChanges();
// Set the primary password
Chapter 15. Hardware 403
host.Invoke("SetPassword", <name> + "$");
host.CommitChanges();
// Set the pre-Windows 2000 computer name
host.Properties["sAMAccountName"].Value =
<name> + "$";
host.CommitChanges();
}
}
catch (Exception err)
{
MessageBox.Show("Error while creating host: " +
<name> + Environment.NewLine + err.Message,
"Error",
MessageBoxButtons.OK, MessageBoxIcon.Error);
}
}
Creating computer account objects without supplying a sAMAccountName
allows you to create multiple computers with the same common name, on the condition that the distinguished name is unique.
Be sure to comply with the domain password policy when setting the
computer objects password. To determine the invocation error, use the
‘try..catch’-block as described in ‘15.1.4. Reset a computer’.
When using the Microsoft .NET Framework 3.5 or higher, it is possible to create a computer account using the ComputerPrincipal-class. The following
snippet shows how this can be done.
PrincipalContext context =
new PrincipalContext(ContextType.Domain,
"TEST", "CN=Computers,DC=TEST,DC=EDU");
try
{
ComputerPrincipal cmp =
new ComputerPrincipal(context,
"pc01", "pc01$", true);
cmp.Save();
MessageBox.Show("Computer account created!",

404 Chapter 15. Hardware
"Information",
MessageBoxButtons.OK,
MessageBoxIcon.Information);
}
catch (Exception err)
{
MessageBox.Show(err.Message, "Error",
MessageBoxButtons.OK,
MessageBoxIcon.Error);
}
Within the lab, the following message-boxes appear when running the
snippet twice.
Capture 154: ComputerPrincipal creates computer object
15.2. Managed Computers
When Microsoft Operations Manager (MOM) or System Center Configuration Manager (SCCM) is installed within the environment, ADUC
allows you to configure computer account objects as ‘Managed Computers’.
Managed computers can be remotely installed using Remote Installation Services (RIS) or using Windows Deployment Services (WDS).
Using one of these deployment technologies allows you to remotely
(re)install hosts based on a predefined image (deployment package
installed using a script). The host must contain a Pre-boot Execution Environment (PXE)-enabled network adapter. The network adapter is
capable of searching for an implemented PXE Service Point. This service point provides the Operating System Deployment (OSD) configuration so
that the network adapter can download the required image and the unattended installation can begin.
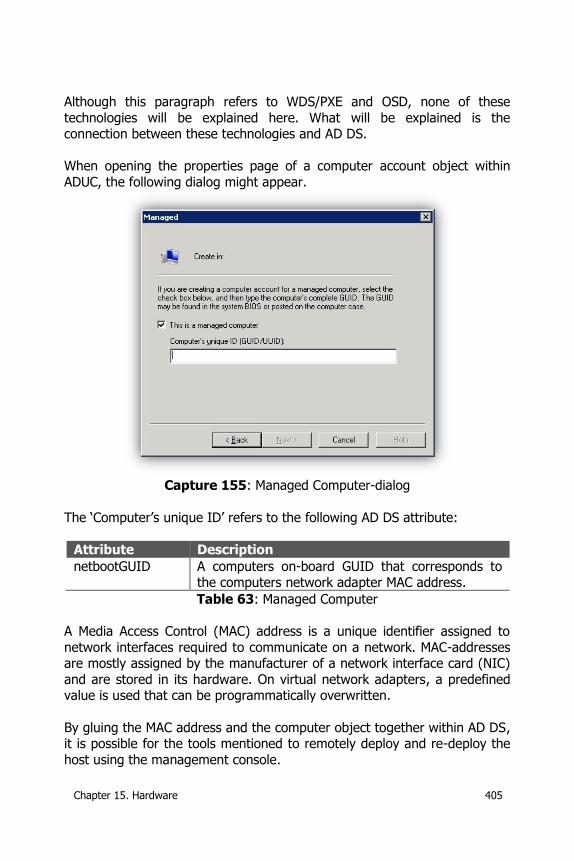
Chapter 15. Hardware 405
Although this paragraph refers to WDS/PXE and OSD, none of these
technologies will be explained here. What will be explained is the connection between these technologies and AD DS.
When opening the properties page of a computer account object within
ADUC, the following dialog might appear.
Capture 155: Managed Computer-dialog
The ‘Computer’s unique ID’ refers to the following AD DS attribute:
Attribute Description
netbootGUID A computers on-board GUID that corresponds to the computers network adapter MAC address.
Table 63: Managed Computer
A Media Access Control (MAC) address is a unique identifier assigned to
network interfaces required to communicate on a network. MAC-addresses are mostly assigned by the manufacturer of a network interface card (NIC)
and are stored in its hardware. On virtual network adapters, a predefined value is used that can be programmatically overwritten.
By gluing the MAC address and the computer object together within AD DS, it is possible for the tools mentioned to remotely deploy and re-deploy the
host using the management console.
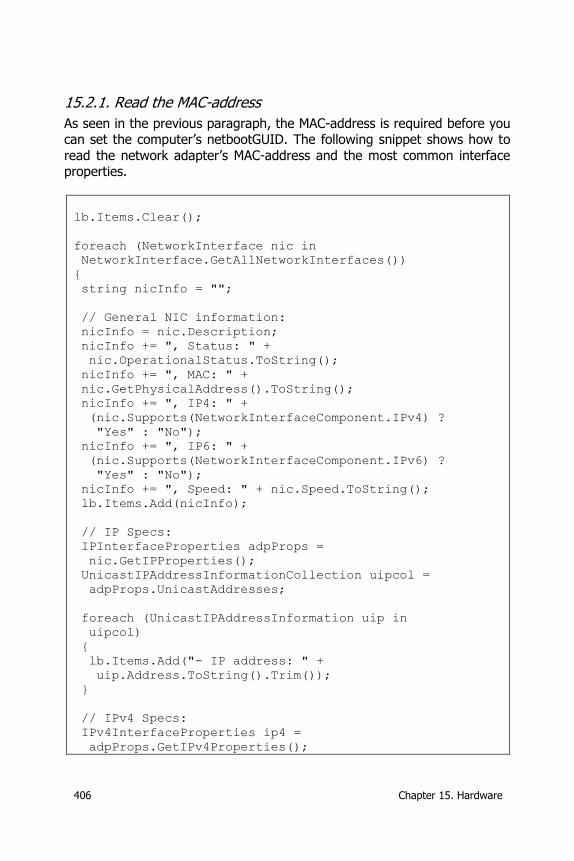
406 Chapter 15. Hardware
15.2.1. Read the MAC-address
As seen in the previous paragraph, the MAC-address is required before you can set the computer’s netbootGUID. The following snippet shows how to
read the network adapter’s MAC-address and the most common interface properties.
lb.Items.Clear();
foreach (NetworkInterface nic in
NetworkInterface.GetAllNetworkInterfaces())
{
string nicInfo = "";
// General NIC information:
nicInfo = nic.Description;
nicInfo += ", Status: " +
nic.OperationalStatus.ToString();
nicInfo += ", MAC: " +
nic.GetPhysicalAddress().ToString();
nicInfo += ", IP4: " +
(nic.Supports(NetworkInterfaceComponent.IPv4) ?
"Yes" : "No");
nicInfo += ", IP6: " +
(nic.Supports(NetworkInterfaceComponent.IPv6) ?
"Yes" : "No");
nicInfo += ", Speed: " + nic.Speed.ToString();
lb.Items.Add(nicInfo);
// IP Specs:
IPInterfaceProperties adpProps =
nic.GetIPProperties();
UnicastIPAddressInformationCollection uipcol =
adpProps.UnicastAddresses;
foreach (UnicastIPAddressInformation uip in
uipcol)
{
lb.Items.Add("- IP address: " +
uip.Address.ToString().Trim());
}
// IPv4 Specs:
IPv4InterfaceProperties ip4 =
adpProps.GetIPv4Properties();
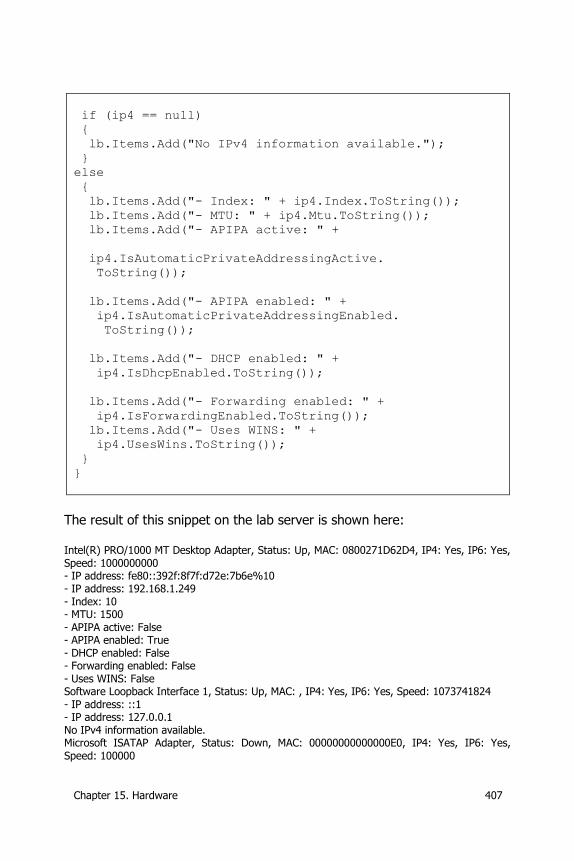
Chapter 15. Hardware 407
if (ip4 == null)
{
lb.Items.Add("No IPv4 information available.");
}
else
{
lb.Items.Add("- Index: " + ip4.Index.ToString());
lb.Items.Add("- MTU: " + ip4.Mtu.ToString());
lb.Items.Add("- APIPA active: " +
ip4.IsAutomaticPrivateAddressingActive.
ToString());
lb.Items.Add("- APIPA enabled: " +
ip4.IsAutomaticPrivateAddressingEnabled.
ToString());
lb.Items.Add("- DHCP enabled: " +
ip4.IsDhcpEnabled.ToString());
lb.Items.Add("- Forwarding enabled: " +
ip4.IsForwardingEnabled.ToString());
lb.Items.Add("- Uses WINS: " +
ip4.UsesWins.ToString());
}
}
The result of this snippet on the lab server is shown here: Intel(R) PRO/1000 MT Desktop Adapter, Status: Up, MAC: 0800271D62D4, IP4: Yes, IP6: Yes, Speed: 1000000000 - IP address: fe80::392f:8f7f:d72e:7b6e%10 - IP address: 192.168.1.249 - Index: 10 - MTU: 1500 - APIPA active: False - APIPA enabled: True - DHCP enabled: False - Forwarding enabled: False - Uses WINS: False Software Loopback Interface 1, Status: Up, MAC: , IP4: Yes, IP6: Yes, Speed: 1073741824 - IP address: ::1 - IP address: 127.0.0.1 No IPv4 information available. Microsoft ISATAP Adapter, Status: Down, MAC: 00000000000000E0, IP4: Yes, IP6: Yes, Speed: 100000
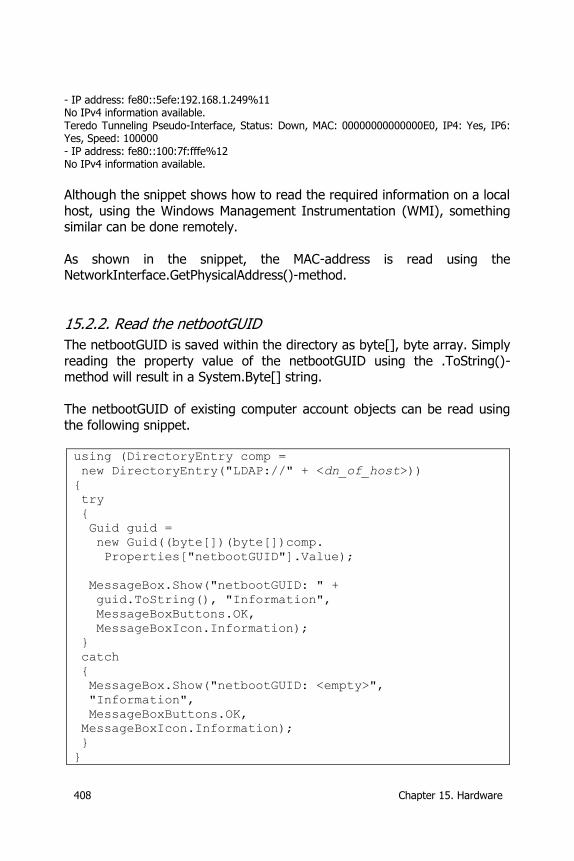
408 Chapter 15. Hardware
- IP address: fe80::5efe:192.168.1.249%11 No IPv4 information available. Teredo Tunneling Pseudo-Interface, Status: Down, MAC: 00000000000000E0, IP4: Yes, IP6: Yes, Speed: 100000 - IP address: fe80::100:7f:fffe%12 No IPv4 information available. Although the snippet shows how to read the required information on a local
host, using the Windows Management Instrumentation (WMI), something similar can be done remotely.
As shown in the snippet, the MAC-address is read using the NetworkInterface.GetPhysicalAddress()-method.
15.2.2. Read the netbootGUID
The netbootGUID is saved within the directory as byte[], byte array. Simply
reading the property value of the netbootGUID using the .ToString()-method will result in a System.Byte[] string.
The netbootGUID of existing computer account objects can be read using
the following snippet.
using (DirectoryEntry comp =
new DirectoryEntry("LDAP://" + <dn_of_host>))
{
try
{
Guid guid =
new Guid((byte[])(byte[])comp.
Properties["netbootGUID"].Value);
MessageBox.Show("netbootGUID: " +
guid.ToString(), "Information",
MessageBoxButtons.OK,
MessageBoxIcon.Information);
}
catch
{
MessageBox.Show("netbootGUID: <empty>",
"Information",
MessageBoxButtons.OK,
MessageBoxIcon.Information);
}
}
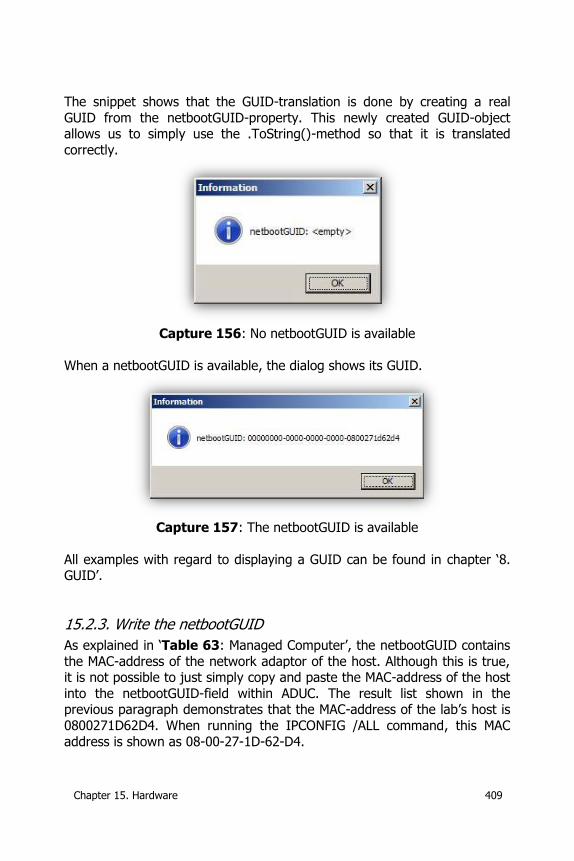
Chapter 15. Hardware 409
The snippet shows that the GUID-translation is done by creating a real
GUID from the netbootGUID-property. This newly created GUID-object allows us to simply use the .ToString()-method so that it is translated
correctly.
Capture 156: No netbootGUID is available
When a netbootGUID is available, the dialog shows its GUID.
Capture 157: The netbootGUID is available
All examples with regard to displaying a GUID can be found in chapter ‘8. GUID’.
15.2.3. Write the netbootGUID
As explained in ‘Table 63: Managed Computer’, the netbootGUID contains
the MAC-address of the network adaptor of the host. Although this is true, it is not possible to just simply copy and paste the MAC-address of the host
into the netbootGUID-field within ADUC. The result list shown in the previous paragraph demonstrates that the MAC-address of the lab’s host is
0800271D62D4. When running the IPCONFIG /ALL command, this MAC
address is shown as 08-00-27-1D-62-D4.
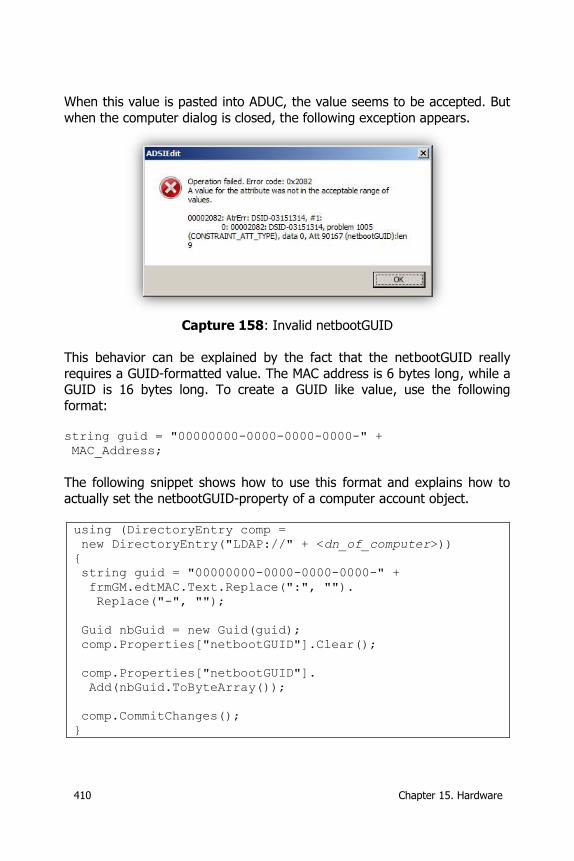
410 Chapter 15. Hardware
When this value is pasted into ADUC, the value seems to be accepted. But
when the computer dialog is closed, the following exception appears.
Capture 158: Invalid netbootGUID
This behavior can be explained by the fact that the netbootGUID really
requires a GUID-formatted value. The MAC address is 6 bytes long, while a GUID is 16 bytes long. To create a GUID like value, use the following
format:
string guid = "00000000-0000-0000-0000-" +
MAC_Address;
The following snippet shows how to use this format and explains how to
actually set the netbootGUID-property of a computer account object. using (DirectoryEntry comp =
new DirectoryEntry("LDAP://" + <dn_of_computer>))
{
string guid = "00000000-0000-0000-0000-" +
frmGM.edtMAC.Text.Replace(":", "").
Replace("-", "");
Guid nbGuid = new Guid(guid);
comp.Properties["netbootGUID"].Clear();
comp.Properties["netbootGUID"].
Add(nbGuid.ToByteArray());
comp.CommitChanges();
}
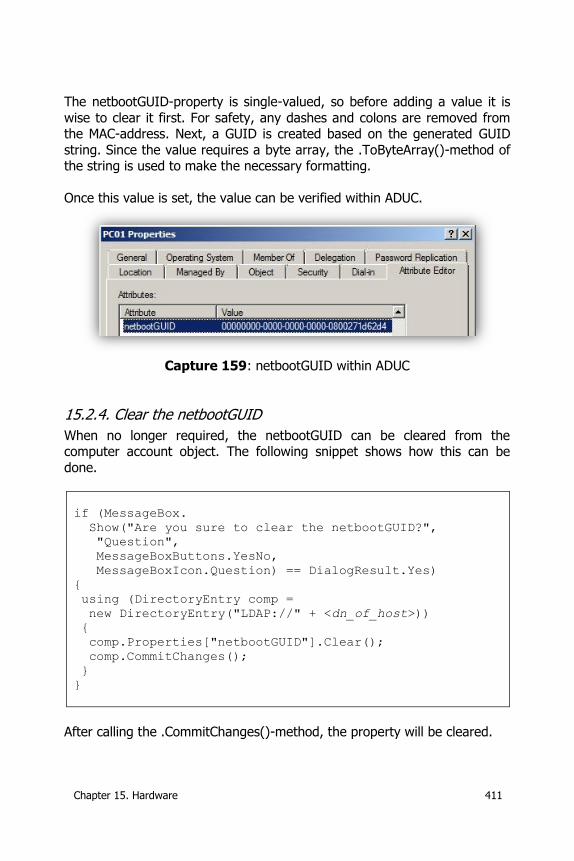
Chapter 15. Hardware 411
The netbootGUID-property is single-valued, so before adding a value it is
wise to clear it first. For safety, any dashes and colons are removed from the MAC-address. Next, a GUID is created based on the generated GUID
string. Since the value requires a byte array, the .ToByteArray()-method of the string is used to make the necessary formatting.
Once this value is set, the value can be verified within ADUC.
Capture 159: netbootGUID within ADUC
15.2.4. Clear the netbootGUID
When no longer required, the netbootGUID can be cleared from the computer account object. The following snippet shows how this can be
done.
if (MessageBox.
Show("Are you sure to clear the netbootGUID?",
"Question",
MessageBoxButtons.YesNo,
MessageBoxIcon.Question) == DialogResult.Yes)
{
using (DirectoryEntry comp =
new DirectoryEntry("LDAP://" + <dn_of_host>))
{
comp.Properties["netbootGUID"].Clear();
comp.CommitChanges();
}
}
After calling the .CommitChanges()-method, the property will be cleared.

412 Chapter 15. Hardware
15.2.5. GUID and Binary Octet
Reading the netbootGUID formatted like this ‘00000000-0000-0000-0000-0800271D62D4’ was easy. Even ‘Capture 159: netbootGUID within ADUC’
showed what we expected. Now, when we used the following netbootGUID: ‘AABBCCDD-AABB-CCDD-EEFF-0800271D62D4’, the
properties page of ADUC shows the content as expected.
Capture 160: Correct netbootGUID notation
But when opening this property, the dialog shows a somewhat twisted result.
Capture 161: Octet notation of the netbootGUID
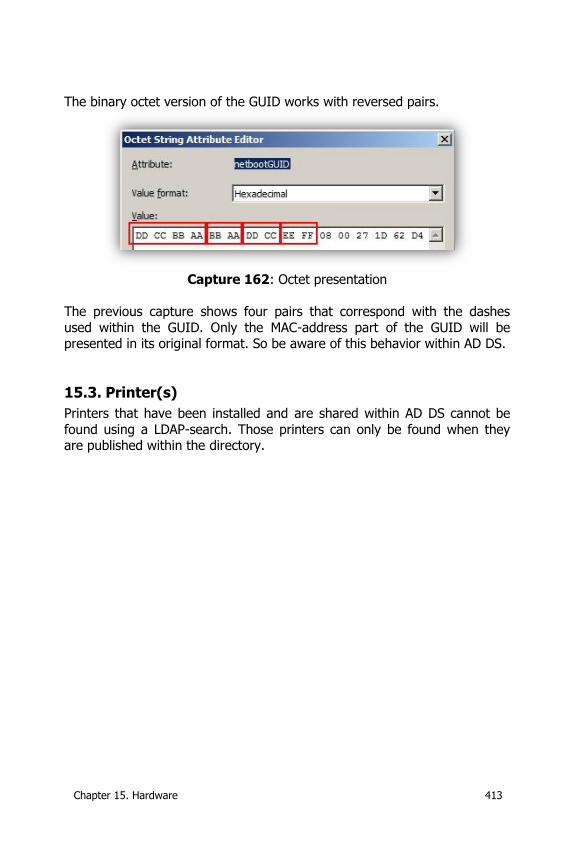
Chapter 15. Hardware 413
The binary octet version of the GUID works with reversed pairs.
Capture 162: Octet presentation
The previous capture shows four pairs that correspond with the dashes
used within the GUID. Only the MAC-address part of the GUID will be presented in its original format. So be aware of this behavior within AD DS.
15.3. Printer(s)
Printers that have been installed and are shared within AD DS cannot be
found using a LDAP-search. Those printers can only be found when they are published within the directory.
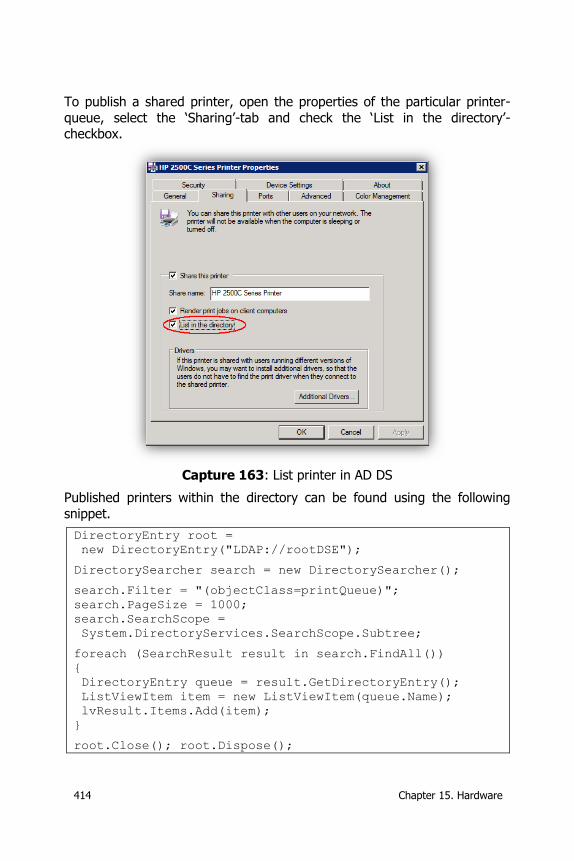
414 Chapter 15. Hardware
To publish a shared printer, open the properties of the particular printer-
queue, select the ‘Sharing’-tab and check the ‘List in the directory’-checkbox.
Capture 163: List printer in AD DS
Published printers within the directory can be found using the following
snippet.
DirectoryEntry root =
new DirectoryEntry("LDAP://rootDSE");
DirectorySearcher search = new DirectorySearcher();
search.Filter = "(objectClass=printQueue)";
search.PageSize = 1000;
search.SearchScope =
System.DirectoryServices.SearchScope.Subtree;
foreach (SearchResult result in search.FindAll())
{
DirectoryEntry queue = result.GetDirectoryEntry();
ListViewItem item = new ListViewItem(queue.Name);
lvResult.Items.Add(item);
}
root.Close(); root.Dispose();
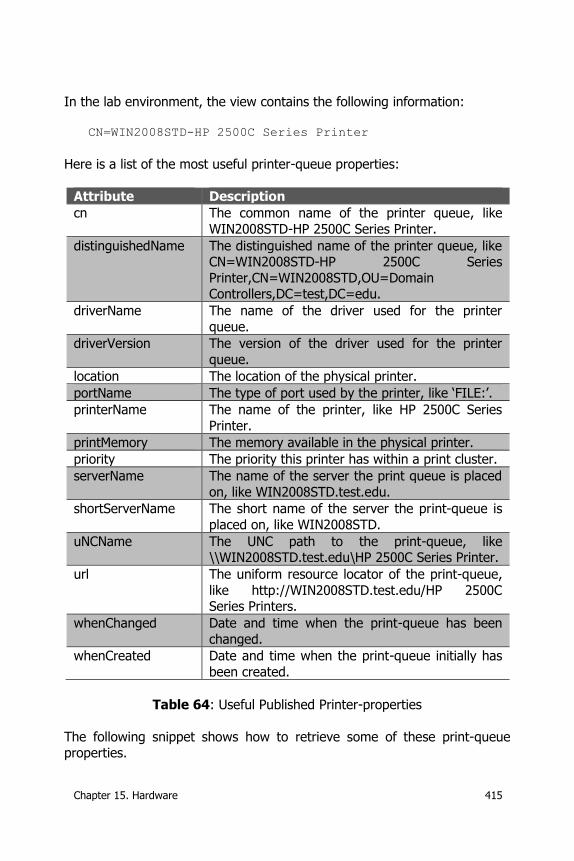
Chapter 15. Hardware 415
In the lab environment, the view contains the following information:
CN=WIN2008STD-HP 2500C Series Printer
Here is a list of the most useful printer-queue properties:
Attribute Description
cn The common name of the printer queue, like
WIN2008STD-HP 2500C Series Printer.
distinguishedName The distinguished name of the printer queue, like CN=WIN2008STD-HP 2500C Series
Printer,CN=WIN2008STD,OU=Domain Controllers,DC=test,DC=edu.
driverName The name of the driver used for the printer
queue.
driverVersion The version of the driver used for the printer
queue.
location The location of the physical printer.
portName The type of port used by the printer, like ‘FILE:’.
printerName The name of the printer, like HP 2500C Series
Printer.
printMemory The memory available in the physical printer.
priority The priority this printer has within a print cluster.
serverName The name of the server the print queue is placed
on, like WIN2008STD.test.edu.
shortServerName The short name of the server the print-queue is
placed on, like WIN2008STD.
uNCName The UNC path to the print-queue, like \\WIN2008STD.test.edu\HP 2500C Series Printer.
url The uniform resource locator of the print-queue,
like http://WIN2008STD.test.edu/HP 2500C Series Printers.
whenChanged Date and time when the print-queue has been
changed.
whenCreated Date and time when the print-queue initially has
been created.
Table 64: Useful Published Printer-properties
The following snippet shows how to retrieve some of these print-queue properties.
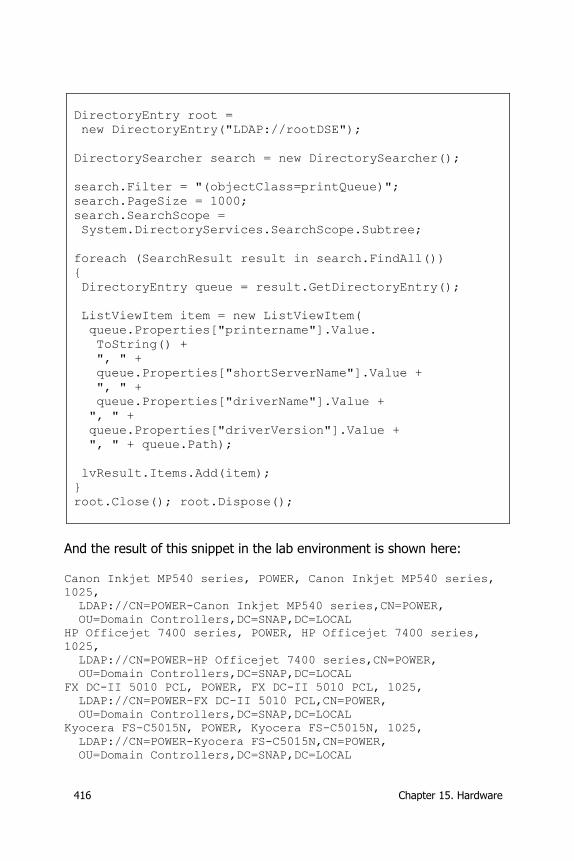
416 Chapter 15. Hardware
DirectoryEntry root =
new DirectoryEntry("LDAP://rootDSE");
DirectorySearcher search = new DirectorySearcher();
search.Filter = "(objectClass=printQueue)";
search.PageSize = 1000;
search.SearchScope =
System.DirectoryServices.SearchScope.Subtree;
foreach (SearchResult result in search.FindAll())
{
DirectoryEntry queue = result.GetDirectoryEntry();
ListViewItem item = new ListViewItem(
queue.Properties["printername"].Value.
ToString() +
", " +
queue.Properties["shortServerName"].Value +
", " +
queue.Properties["driverName"].Value +
", " +
queue.Properties["driverVersion"].Value +
", " + queue.Path);
lvResult.Items.Add(item);
}
root.Close(); root.Dispose();
And the result of this snippet in the lab environment is shown here:
Canon Inkjet MP540 series, POWER, Canon Inkjet MP540 series,
1025,
LDAP://CN=POWER-Canon Inkjet MP540 series,CN=POWER,
OU=Domain Controllers,DC=SNAP,DC=LOCAL
HP Officejet 7400 series, POWER, HP Officejet 7400 series,
1025,
LDAP://CN=POWER-HP Officejet 7400 series,CN=POWER,
OU=Domain Controllers,DC=SNAP,DC=LOCAL
FX DC-II 5010 PCL, POWER, FX DC-II 5010 PCL, 1025,
LDAP://CN=POWER-FX DC-II 5010 PCL,CN=POWER,
OU=Domain Controllers,DC=SNAP,DC=LOCAL
Kyocera FS-C5015N, POWER, Kyocera FS-C5015N, 1025,
LDAP://CN=POWER-Kyocera FS-C5015N,CN=POWER,
OU=Domain Controllers,DC=SNAP,DC=LOCAL
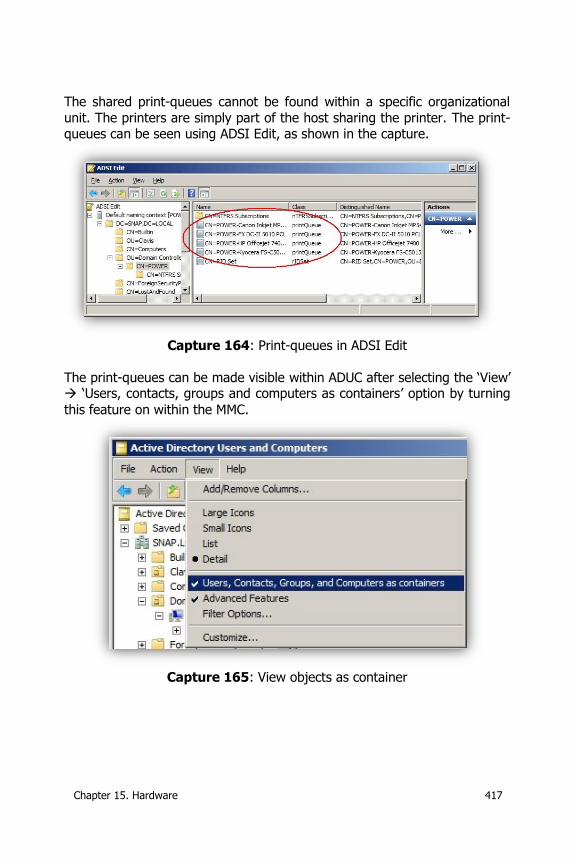
Chapter 15. Hardware 417
The shared print-queues cannot be found within a specific organizational
unit. The printers are simply part of the host sharing the printer. The print-queues can be seen using ADSI Edit, as shown in the capture.
Capture 164: Print-queues in ADSI Edit
The print-queues can be made visible within ADUC after selecting the ‘View’ ‘Users, contacts, groups and computers as containers’ option by turning
this feature on within the MMC.
Capture 165: View objects as container
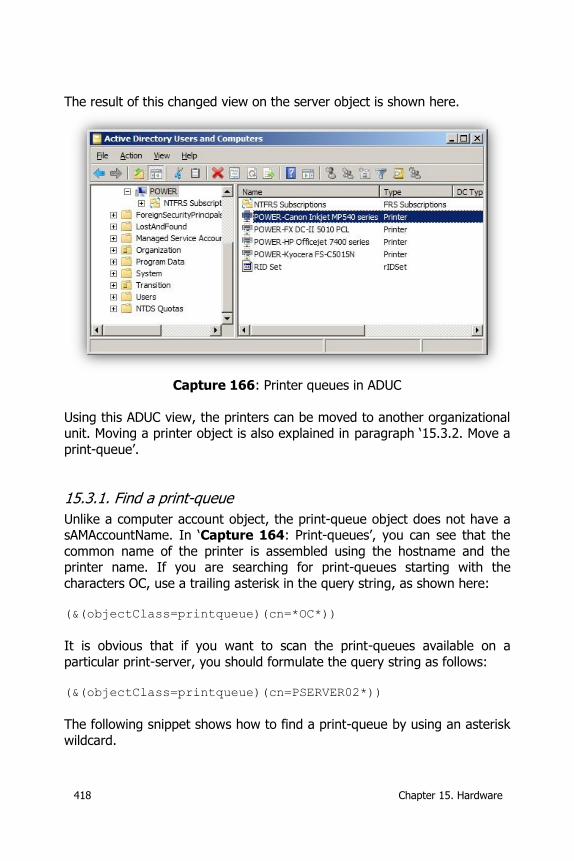
418 Chapter 15. Hardware
The result of this changed view on the server object is shown here.
Capture 166: Printer queues in ADUC
Using this ADUC view, the printers can be moved to another organizational unit. Moving a printer object is also explained in paragraph ‘15.3.2. Move a
print-queue’.
15.3.1. Find a print-queue
Unlike a computer account object, the print-queue object does not have a sAMAccountName. In ‘Capture 164: Print-queues’, you can see that the
common name of the printer is assembled using the hostname and the printer name. If you are searching for print-queues starting with the
characters OC, use a trailing asterisk in the query string, as shown here:
(&(objectClass=printqueue)(cn=*OC*))
It is obvious that if you want to scan the print-queues available on a
particular print-server, you should formulate the query string as follows:
(&(objectClass=printqueue)(cn=PSERVER02*))
The following snippet shows how to find a print-queue by using an asterisk
wildcard.
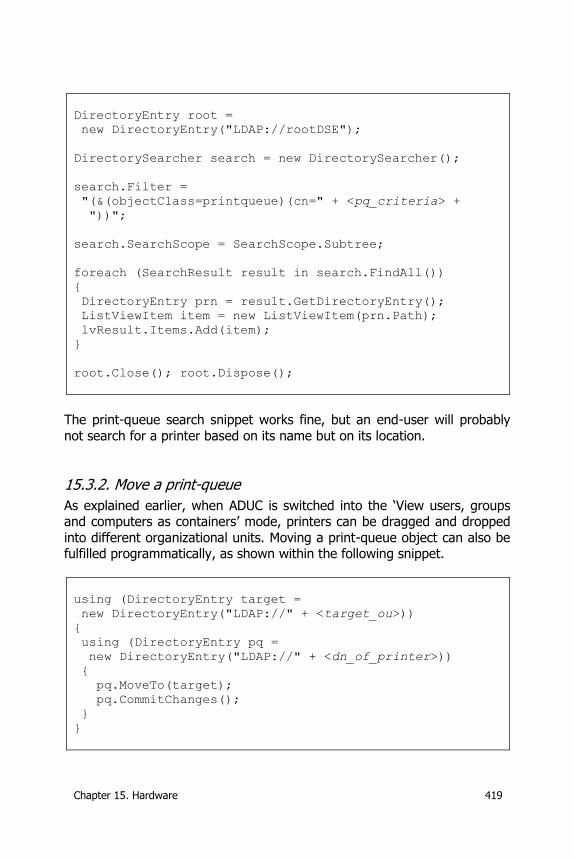
Chapter 15. Hardware 419
DirectoryEntry root =
new DirectoryEntry("LDAP://rootDSE");
DirectorySearcher search = new DirectorySearcher();
search.Filter =
"(&(objectClass=printqueue)(cn=" + <pq_criteria> +
"))";
search.SearchScope = SearchScope.Subtree;
foreach (SearchResult result in search.FindAll())
{
DirectoryEntry prn = result.GetDirectoryEntry();
ListViewItem item = new ListViewItem(prn.Path);
lvResult.Items.Add(item);
}
root.Close(); root.Dispose();
The print-queue search snippet works fine, but an end-user will probably
not search for a printer based on its name but on its location.
15.3.2. Move a print-queue
As explained earlier, when ADUC is switched into the ‘View users, groups and computers as containers’ mode, printers can be dragged and dropped
into different organizational units. Moving a print-queue object can also be fulfilled programmatically, as shown within the following snippet.
using (DirectoryEntry target =
new DirectoryEntry("LDAP://" + <target_ou>))
{
using (DirectoryEntry pq =
new DirectoryEntry("LDAP://" + <dn_of_printer>))
{
pq.MoveTo(target);
pq.CommitChanges();
}
}
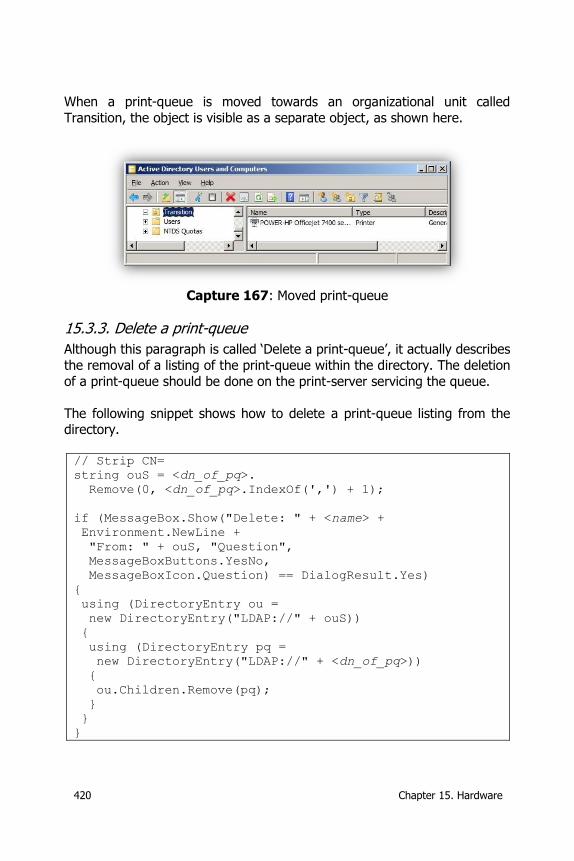
420 Chapter 15. Hardware
When a print-queue is moved towards an organizational unit called
Transition, the object is visible as a separate object, as shown here.
Capture 167: Moved print-queue
15.3.3. Delete a print-queue
Although this paragraph is called ‘Delete a print-queue’, it actually describes
the removal of a listing of the print-queue within the directory. The deletion
of a print-queue should be done on the print-server servicing the queue.
The following snippet shows how to delete a print-queue listing from the directory.
// Strip CN=
string ouS = <dn_of_pq>.
Remove(0, <dn_of_pq>.IndexOf(',') + 1);
if (MessageBox.Show("Delete: " + <name> +
Environment.NewLine +
"From: " + ouS, "Question",
MessageBoxButtons.YesNo,
MessageBoxIcon.Question) == DialogResult.Yes)
{
using (DirectoryEntry ou =
new DirectoryEntry("LDAP://" + ouS))
{
using (DirectoryEntry pq =
new DirectoryEntry("LDAP://" + <dn_of_pq>))
{
ou.Children.Remove(pq);
}
}
}
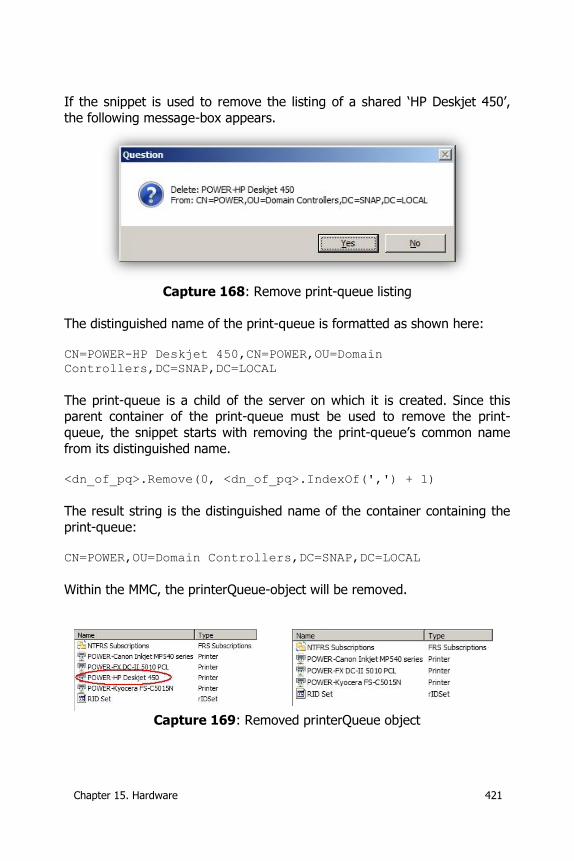
Chapter 15. Hardware 421
If the snippet is used to remove the listing of a shared ‘HP Deskjet 450’,
the following message-box appears.
Capture 168: Remove print-queue listing
The distinguished name of the print-queue is formatted as shown here: CN=POWER-HP Deskjet 450,CN=POWER,OU=Domain
Controllers,DC=SNAP,DC=LOCAL
The print-queue is a child of the server on which it is created. Since this parent container of the print-queue must be used to remove the print-
queue, the snippet starts with removing the print-queue’s common name
from its distinguished name. <dn_of_pq>.Remove(0, <dn_of_pq>.IndexOf(',') + 1)
The result string is the distinguished name of the container containing the
print-queue: CN=POWER,OU=Domain Controllers,DC=SNAP,DC=LOCAL
Within the MMC, the printerQueue-object will be removed.
Capture 169: Removed printerQueue object
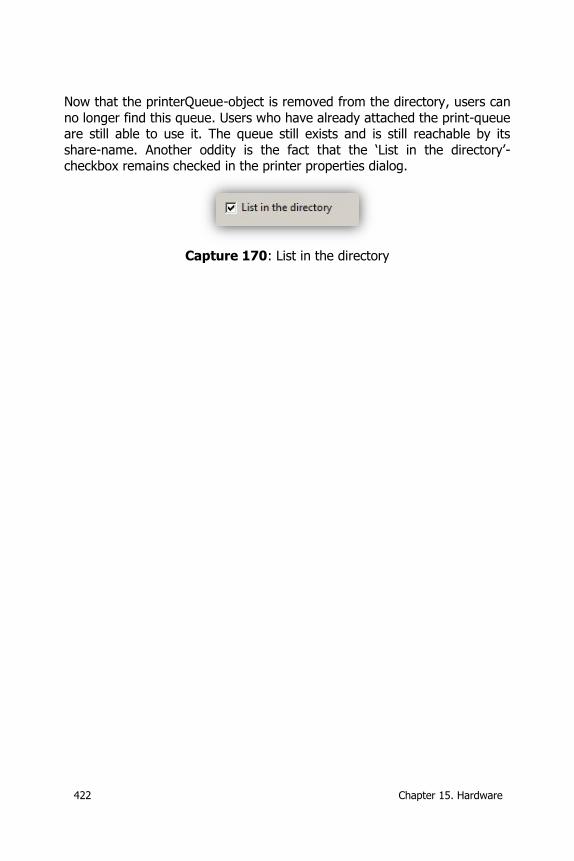
422 Chapter 15. Hardware
Now that the printerQueue-object is removed from the directory, users can
no longer find this queue. Users who have already attached the print-queue are still able to use it. The queue still exists and is still reachable by its
share-name. Another oddity is the fact that the ‘List in the directory’-checkbox remains checked in the printer properties dialog.
Capture 170: List in the directory
Chapter 16. Terminal Services/Remote Desktop Services 423
16. Terminal Services/Remote Desktop Services
As discussed in paragraphs ‘6.13. Terminal Services Profile’ and ‘6.17. Environment’, the Terminal Services settings (and other services settings)
can be found within the userParameters-property blob. This property blob contains information about services like these:
Migrated Novell NetWare user configuration information: o NWPassword
o OldNWPassword o MaxConnections
o NWPasswordSet o GraceLoginAllowed
o GraceLoginRemaining
o NWLogonFrom NWHomeDir Windows Terminal Services user configuration information:
o CtxCfgPresent o CtxCfgFlags1
o CtxCallback
o CtxShadow o CtxMaxConnectionTime
o CtxMaxDisconnectionTime o CtxMaxIdleTime
o CtxKeyboardLayout
o CtxMinEncryptionLevel o CtxWorkDirectory
o CtxNWLogonServer o CtxWFHomeDir
o CtxWFHomeDirDrive o CtxWFProfilePath
o CtxInitialProgram
o CtxCallbackNumber Dial-up user configuration information
Custom properties that third-party programs
Since the format of the property is poorly described, it is unwise to change
this value directly. Nevertheless, it is still possible to manipulate certain parts of this property. Manipulation of these parts can be done through the
IADsTSUserEx-interface. The properties of this interface are shown in the next table:
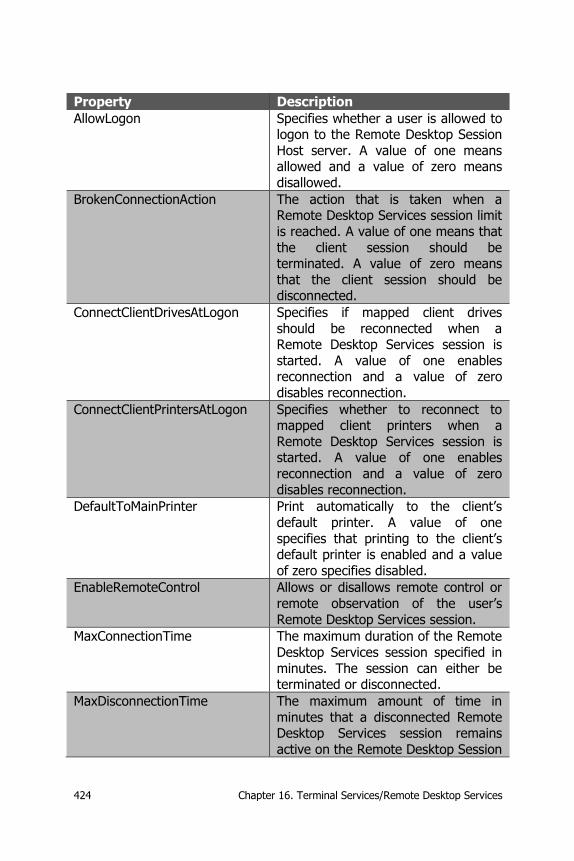
424 Chapter 16. Terminal Services/Remote Desktop Services
Property Description
AllowLogon Specifies whether a user is allowed to logon to the Remote Desktop Session
Host server. A value of one means allowed and a value of zero means
disallowed.
BrokenConnectionAction The action that is taken when a Remote Desktop Services session limit
is reached. A value of one means that
the client session should be terminated. A value of zero means
that the client session should be disconnected.
ConnectClientDrivesAtLogon Specifies if mapped client drives
should be reconnected when a Remote Desktop Services session is
started. A value of one enables reconnection and a value of zero
disables reconnection.
ConnectClientPrintersAtLogon Specifies whether to reconnect to mapped client printers when a
Remote Desktop Services session is started. A value of one enables
reconnection and a value of zero
disables reconnection.
DefaultToMainPrinter Print automatically to the client’s
default printer. A value of one
specifies that printing to the client’s default printer is enabled and a value
of zero specifies disabled.
EnableRemoteControl Allows or disallows remote control or
remote observation of the user’s
Remote Desktop Services session.
MaxConnectionTime The maximum duration of the Remote
Desktop Services session specified in
minutes. The session can either be terminated or disconnected.
MaxDisconnectionTime The maximum amount of time in
minutes that a disconnected Remote Desktop Services session remains
active on the Remote Desktop Session
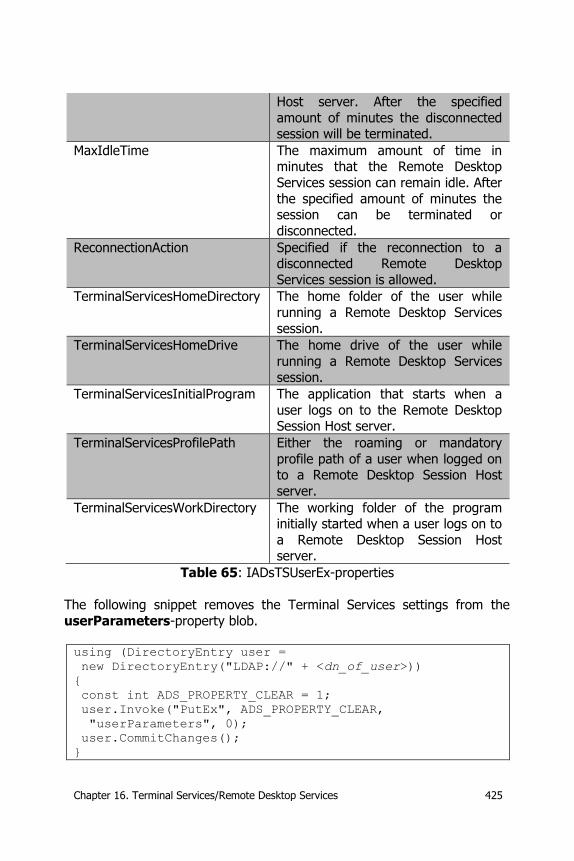
Chapter 16. Terminal Services/Remote Desktop Services 425
Host server. After the specified
amount of minutes the disconnected session will be terminated.
MaxIdleTime The maximum amount of time in minutes that the Remote Desktop
Services session can remain idle. After
the specified amount of minutes the session can be terminated or
disconnected.
ReconnectionAction Specified if the reconnection to a disconnected Remote Desktop
Services session is allowed.
TerminalServicesHomeDirectory The home folder of the user while
running a Remote Desktop Services
session.
TerminalServicesHomeDrive The home drive of the user while
running a Remote Desktop Services
session.
TerminalServicesInitialProgram The application that starts when a
user logs on to the Remote Desktop Session Host server.
TerminalServicesProfilePath Either the roaming or mandatory
profile path of a user when logged on to a Remote Desktop Session Host
server.
TerminalServicesWorkDirectory The working folder of the program initially started when a user logs on to
a Remote Desktop Session Host server.
Table 65: IADsTSUserEx-properties
The following snippet removes the Terminal Services settings from the
userParameters-property blob.
using (DirectoryEntry user =
new DirectoryEntry("LDAP://" + <dn_of_user>))
{
const int ADS_PROPERTY_CLEAR = 1;
user.Invoke("PutEx", ADS_PROPERTY_CLEAR,
"userParameters", 0);
user.CommitChanges();
}
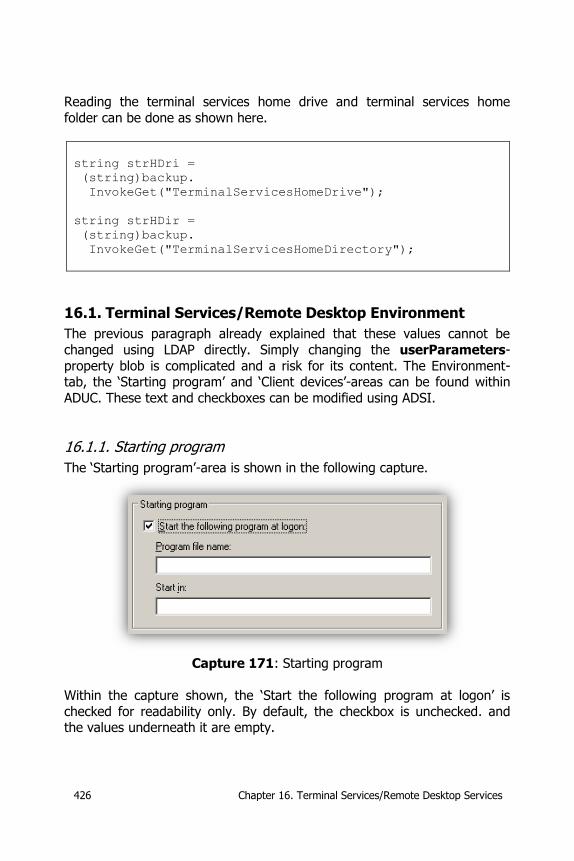
426 Chapter 16. Terminal Services/Remote Desktop Services
Reading the terminal services home drive and terminal services home
folder can be done as shown here.
string strHDri =
(string)backup.
InvokeGet("TerminalServicesHomeDrive");
string strHDir =
(string)backup.
InvokeGet("TerminalServicesHomeDirectory");
16.1. Terminal Services/Remote Desktop Environment
The previous paragraph already explained that these values cannot be
changed using LDAP directly. Simply changing the userParameters-
property blob is complicated and a risk for its content. The Environment-tab, the ‘Starting program’ and ‘Client devices’-areas can be found within
ADUC. These text and checkboxes can be modified using ADSI.
16.1.1. Starting program
The ‘Starting program’-area is shown in the following capture.
Capture 171: Starting program
Within the capture shown, the ‘Start the following program at logon’ is
checked for readability only. By default, the checkbox is unchecked. and the values underneath it are empty.
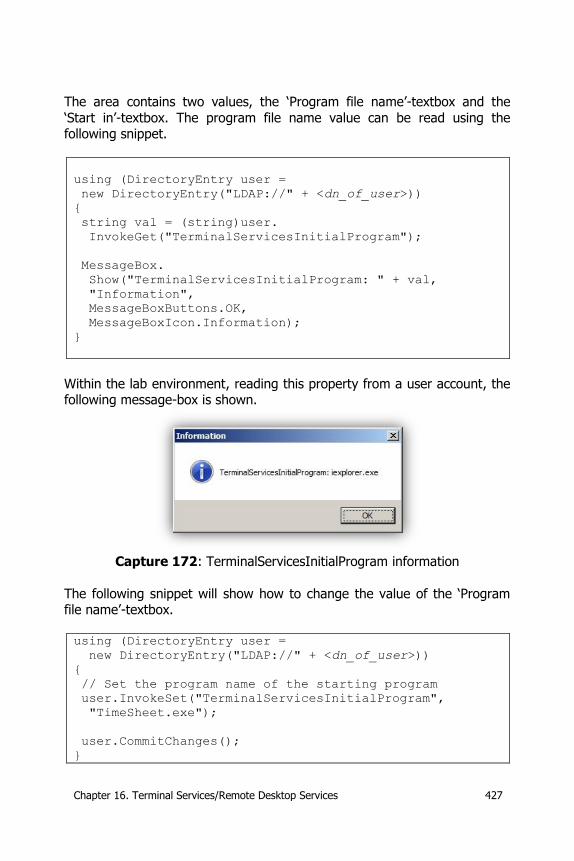
Chapter 16. Terminal Services/Remote Desktop Services 427
The area contains two values, the ‘Program file name’-textbox and the
‘Start in’-textbox. The program file name value can be read using the following snippet.
using (DirectoryEntry user =
new DirectoryEntry("LDAP://" + <dn_of_user>))
{
string val = (string)user.
InvokeGet("TerminalServicesInitialProgram");
MessageBox.
Show("TerminalServicesInitialProgram: " + val,
"Information",
MessageBoxButtons.OK,
MessageBoxIcon.Information);
}
Within the lab environment, reading this property from a user account, the following message-box is shown.
Capture 172: TerminalServicesInitialProgram information
The following snippet will show how to change the value of the ‘Program file name’-textbox.
using (DirectoryEntry user =
new DirectoryEntry("LDAP://" + <dn_of_user>))
{
// Set the program name of the starting program
user.InvokeSet("TerminalServicesInitialProgram",
"TimeSheet.exe");
user.CommitChanges();
}
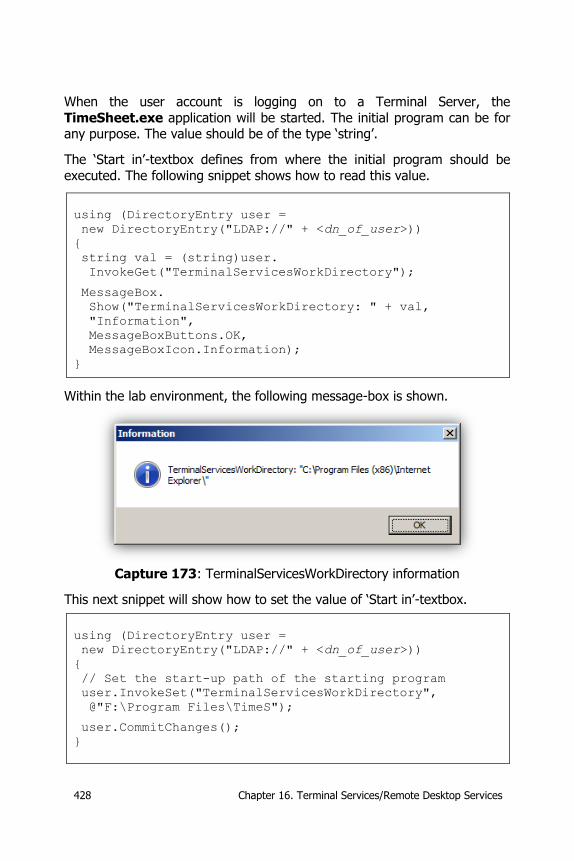
428 Chapter 16. Terminal Services/Remote Desktop Services
When the user account is logging on to a Terminal Server, the
TimeSheet.exe application will be started. The initial program can be for any purpose. The value should be of the type ‘string’.
The ‘Start in’-textbox defines from where the initial program should be
executed. The following snippet shows how to read this value.
using (DirectoryEntry user =
new DirectoryEntry("LDAP://" + <dn_of_user>))
{
string val = (string)user.
InvokeGet("TerminalServicesWorkDirectory");
MessageBox.
Show("TerminalServicesWorkDirectory: " + val,
"Information",
MessageBoxButtons.OK,
MessageBoxIcon.Information);
}
Within the lab environment, the following message-box is shown.
Capture 173: TerminalServicesWorkDirectory information
This next snippet will show how to set the value of ‘Start in’-textbox.
using (DirectoryEntry user =
new DirectoryEntry("LDAP://" + <dn_of_user>))
{
// Set the start-up path of the starting program
user.InvokeSet("TerminalServicesWorkDirectory",
@"F:\Program Files\TimeS");
user.CommitChanges();
}
Chapter 16. Terminal Services/Remote Desktop Services 429
The previous snippets showed how to activate the ‘Starting program’-area.
Putting a value into the ‘Program file name’-field, actually filling the TerminalServicesInitialProgram-property of the userParameters blob,
automatically checks the ‘Start the following program at logon’-checkbox. The snippets also showed how to change the current value into another
starting program and another launch folder.
Now it is time to uncheck the ‘Start the following program at logon’-
checkbox. This task is easier said than done; none of the following commands will clear or remove the initial program entry.
// None of these work!
user.Invoke("Put",
"TerminalServicesInitialProgram", "");
user.Invoke("Put",
"TerminalServicesInitialProgram", null);
user.Invoke("Put", new object[]
{ "TerminalServicesInitialProgram", null });
user.InvokeSet("TerminalServicesInitialProgram",
"");
user.InvokeSet("TerminalServicesInitialProgram",
null);
user.Invoke("Delete",
"TerminalServicesInitialProgram");
user.Invoke("PutEx",
ADS_PROPOP.ADS_PROPERTY_DELETE,
"TerminalServicesInitialProgram", "");
So it is possible to add a value and change it as long as the value is longer than an empty string. But how is the MMC able to clear these values? The
MMC uses the TSUSEREX.DLL dynamic link library to perform these tasks. If your application requires managing these user properties, the application
must use this library as well. Since this library is not a COM-library, it can’t
be referenced directly within Visual Studio. The library must be converted using the Microsoft .NET Framework Type Library to Assembly Converter
(TlbImp.exe). This converter is part of the Microsoft Windows Software
430 Chapter 16. Terminal Services/Remote Desktop Services
Development Kit (SDK). The converter is (still) not able to target to a
specific .NET Framework version. The TlbImp.exe utility from SDK version 7.0 will automatically target to .NET v3.5.30729 framework and the 7.1
SDK will automatically target to .NET v4.0.30319 framework. If targeting to older framework versions is required, an older SDK is required.
If the TSUSEREX.DLL-library is missing on the client system, install the
Remote Server Administration Tools (RSAT) first, and enable the Terminal
Services feature so that the client is able to remotely manage Terminal Services servers. Another method is copying the dynamic link library from a
server onto the client. When the TSUSEREX.DLL-library is available on the client open the Visual Studio Command Prompt and enter the following
command:
tlbimp tsuserex.dll
Within the lab environment, the following message appears:
Microsoft (R) .NET Framework Type Library to Assembly
Converter 4.0.30319.1
Copyright (C) Microsoft Corporation. All rights reserved.
TlbImp : warning TI3002 : Importing a type library into a
platform agnostic assembly.
This can cause errors if the type library is not truly
platform agnostic.
TlbImp : Type library imported to TSUSEREXLib.dll
The TSUSEREX.DLL-library is converted into a file called TSUSEREXLib.dll.
This new library can be referenced within Visual Studio. Within the Solution Explorer, right click the References-node and select ‘Add Reference’. Select
the Browse-tab and navigate to the previously created TSUSEREXLib.dll library file. The terminal service library does not work with DirectoryEntry
objects but requires an object of the type IADsTSUserEx. An attempt to cast the DirectoryEntry object into a TSUSEREXLib.IADsTSUserEx object will
result in an ‘unable to cast object’ exception error. This cast can only be
fulfilled using the user’s native object. The native object of a user object can be reached by the DirectoryEntry.NativeObject-property.
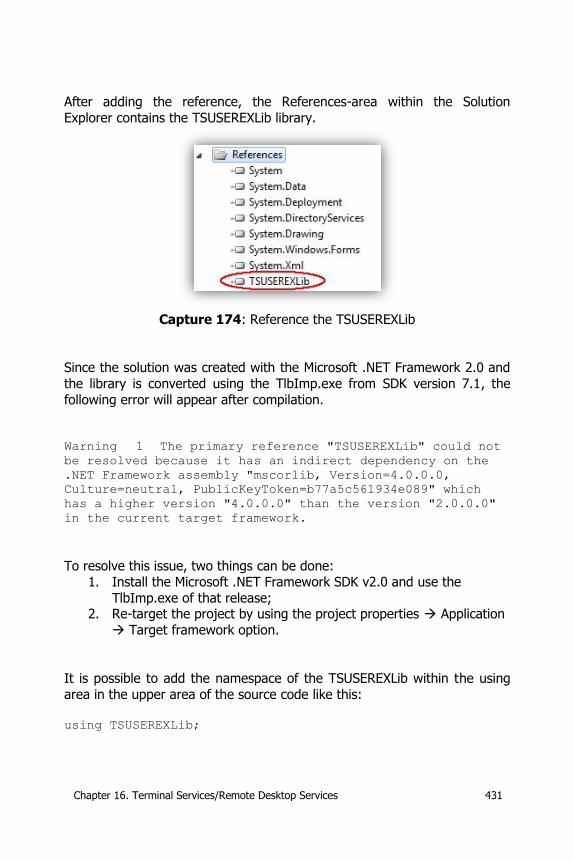
Chapter 16. Terminal Services/Remote Desktop Services 431
After adding the reference, the References-area within the Solution
Explorer contains the TSUSEREXLib library.
Capture 174: Reference the TSUSEREXLib
Since the solution was created with the Microsoft .NET Framework 2.0 and
the library is converted using the TlbImp.exe from SDK version 7.1, the
following error will appear after compilation.
Warning 1 The primary reference "TSUSEREXLib" could not
be resolved because it has an indirect dependency on the
.NET Framework assembly "mscorlib, Version=4.0.0.0,
Culture=neutral, PublicKeyToken=b77a5c561934e089" which
has a higher version "4.0.0.0" than the version "2.0.0.0"
in the current target framework.
To resolve this issue, two things can be done: 1. Install the Microsoft .NET Framework SDK v2.0 and use the
TlbImp.exe of that release; 2. Re-target the project by using the project properties Application
Target framework option.
It is possible to add the namespace of the TSUSEREXLib within the using
area in the upper area of the source code like this:
using TSUSEREXLib;
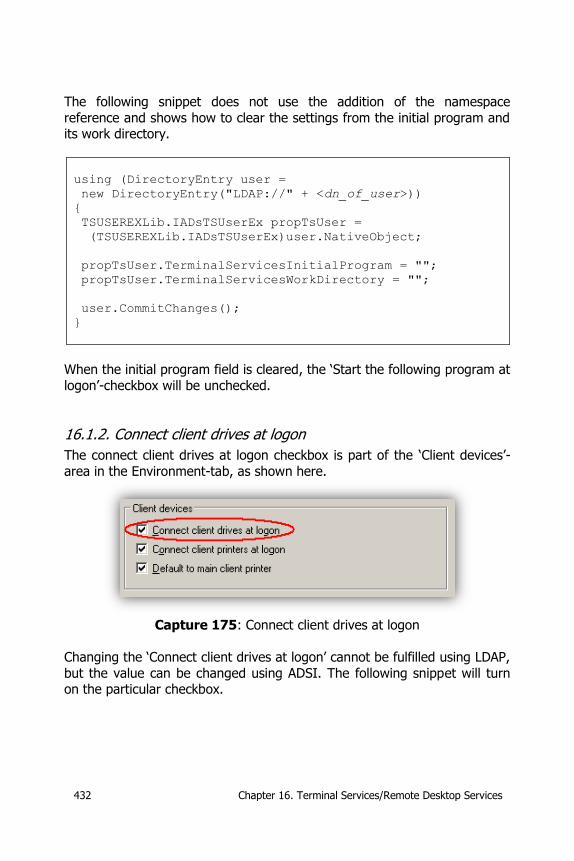
432 Chapter 16. Terminal Services/Remote Desktop Services
The following snippet does not use the addition of the namespace
reference and shows how to clear the settings from the initial program and its work directory.
using (DirectoryEntry user =
new DirectoryEntry("LDAP://" + <dn_of_user>))
{
TSUSEREXLib.IADsTSUserEx propTsUser =
(TSUSEREXLib.IADsTSUserEx)user.NativeObject;
propTsUser.TerminalServicesInitialProgram = "";
propTsUser.TerminalServicesWorkDirectory = "";
user.CommitChanges();
}
When the initial program field is cleared, the ‘Start the following program at
logon’-checkbox will be unchecked.
16.1.2. Connect client drives at logon
The connect client drives at logon checkbox is part of the ‘Client devices’-
area in the Environment-tab, as shown here.
Capture 175: Connect client drives at logon
Changing the ‘Connect client drives at logon’ cannot be fulfilled using LDAP,
but the value can be changed using ADSI. The following snippet will turn on the particular checkbox.
Chapter 16. Terminal Services/Remote Desktop Services 433
using (DirectoryEntry user =
new DirectoryEntry("LDAP://" + <dn_of_user>))
{
// Turn on
user.InvokeSet("ConnectClientDrivesAtLogon", 1);
user.CommitChanges();
}
And the way to turn off the ConnectClientDrivesAtLogon-property is shown
here.
using (DirectoryEntry user =
new DirectoryEntry("LDAP://" + <dn_of_user>))
{
// Turn off
user.InvokeSet("ConnectClientDrivesAtLogon", 0);
user.CommitChanges();
}
Finally, if you only want to read the value for report purposes, the following snippet can be used.
string result = "";
using (DirectoryEntry user =
new DirectoryEntry("LDAP://" + <dn_of_user>))
{
int val = (int)user.
InvokeGet("ConnectClientDrivesAtLogon");
if (val == 1) result = "On";
else result = "Off";
}
Use the code within a ‘try..catch’-block, when the property is never used,
its value will be null. The result string will contain the value of the ConnectClientDrivesAtLogon status.
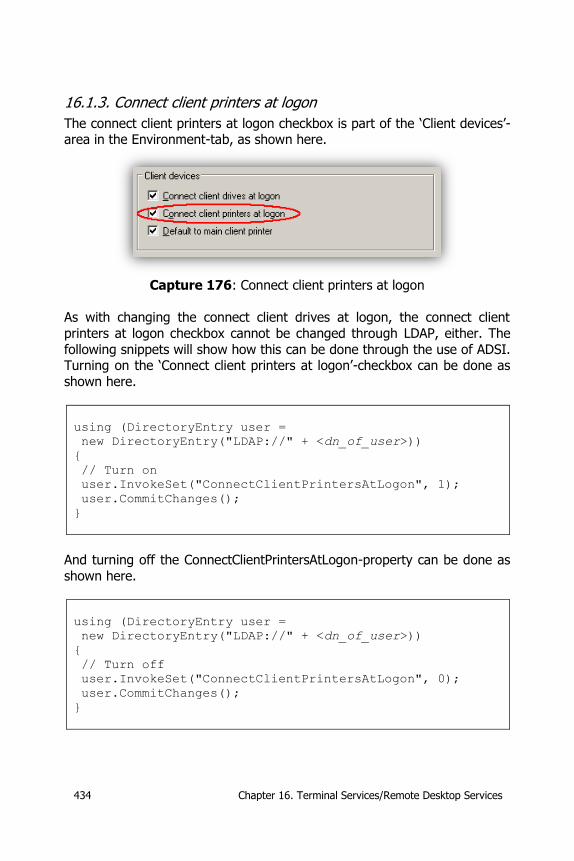
434 Chapter 16. Terminal Services/Remote Desktop Services
16.1.3. Connect client printers at logon
The connect client printers at logon checkbox is part of the ‘Client devices’-area in the Environment-tab, as shown here.
Capture 176: Connect client printers at logon
As with changing the connect client drives at logon, the connect client
printers at logon checkbox cannot be changed through LDAP, either. The
following snippets will show how this can be done through the use of ADSI. Turning on the ‘Connect client printers at logon’-checkbox can be done as
shown here.
using (DirectoryEntry user =
new DirectoryEntry("LDAP://" + <dn_of_user>))
{
// Turn on
user.InvokeSet("ConnectClientPrintersAtLogon", 1);
user.CommitChanges();
}
And turning off the ConnectClientPrintersAtLogon-property can be done as
shown here.
using (DirectoryEntry user =
new DirectoryEntry("LDAP://" + <dn_of_user>))
{
// Turn off
user.InvokeSet("ConnectClientPrintersAtLogon", 0);
user.CommitChanges();
}
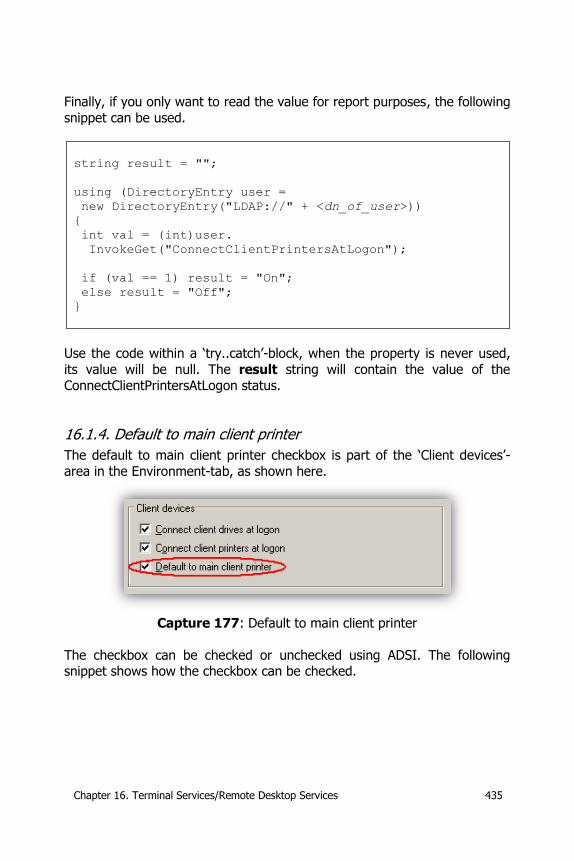
Chapter 16. Terminal Services/Remote Desktop Services 435
Finally, if you only want to read the value for report purposes, the following
snippet can be used.
string result = "";
using (DirectoryEntry user =
new DirectoryEntry("LDAP://" + <dn_of_user>))
{
int val = (int)user.
InvokeGet("ConnectClientPrintersAtLogon");
if (val == 1) result = "On";
else result = "Off";
}
Use the code within a ‘try..catch’-block, when the property is never used,
its value will be null. The result string will contain the value of the
ConnectClientPrintersAtLogon status.
16.1.4. Default to main client printer
The default to main client printer checkbox is part of the ‘Client devices’-
area in the Environment-tab, as shown here.
Capture 177: Default to main client printer
The checkbox can be checked or unchecked using ADSI. The following snippet shows how the checkbox can be checked.
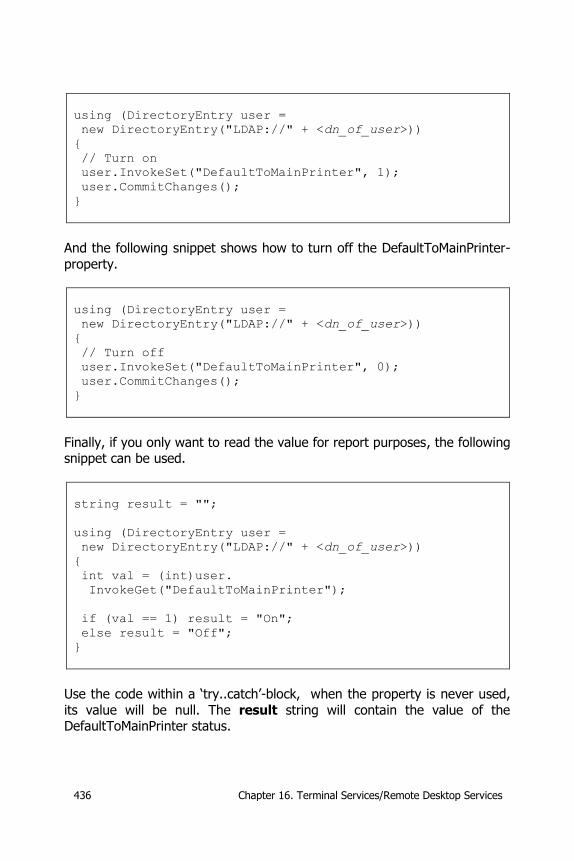
436 Chapter 16. Terminal Services/Remote Desktop Services
using (DirectoryEntry user =
new DirectoryEntry("LDAP://" + <dn_of_user>))
{
// Turn on
user.InvokeSet("DefaultToMainPrinter", 1);
user.CommitChanges();
}
And the following snippet shows how to turn off the DefaultToMainPrinter-
property.
using (DirectoryEntry user =
new DirectoryEntry("LDAP://" + <dn_of_user>))
{
// Turn off
user.InvokeSet("DefaultToMainPrinter", 0);
user.CommitChanges();
}
Finally, if you only want to read the value for report purposes, the following snippet can be used.
string result = "";
using (DirectoryEntry user =
new DirectoryEntry("LDAP://" + <dn_of_user>))
{
int val = (int)user.
InvokeGet("DefaultToMainPrinter");
if (val == 1) result = "On";
else result = "Off";
}
Use the code within a ‘try..catch’-block, when the property is never used,
its value will be null. The result string will contain the value of the DefaultToMainPrinter status.
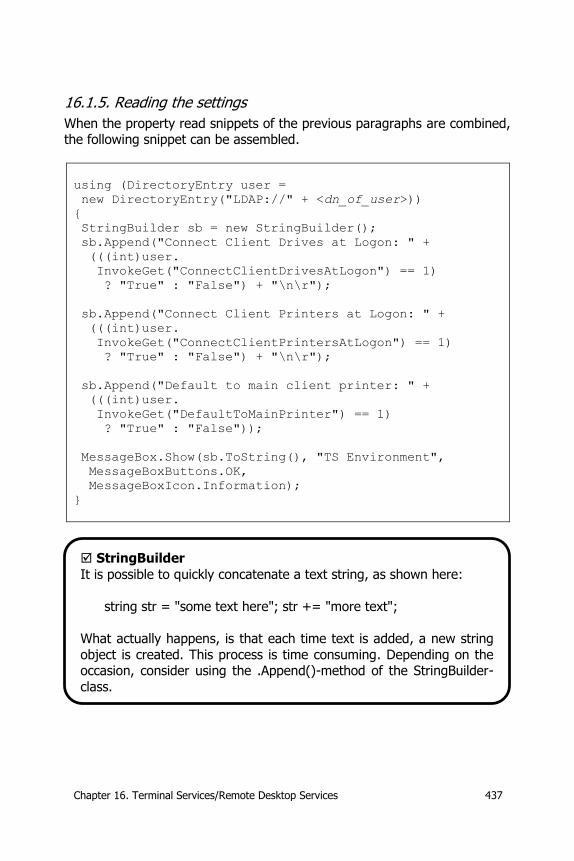
Chapter 16. Terminal Services/Remote Desktop Services 437
16.1.5. Reading the settings
When the property read snippets of the previous paragraphs are combined, the following snippet can be assembled.
using (DirectoryEntry user =
new DirectoryEntry("LDAP://" + <dn_of_user>))
{
StringBuilder sb = new StringBuilder();
sb.Append("Connect Client Drives at Logon: " +
(((int)user.
InvokeGet("ConnectClientDrivesAtLogon") == 1)
? "True" : "False") + "\n\r");
sb.Append("Connect Client Printers at Logon: " +
(((int)user.
InvokeGet("ConnectClientPrintersAtLogon") == 1)
? "True" : "False") + "\n\r");
sb.Append("Default to main client printer: " +
(((int)user.
InvokeGet("DefaultToMainPrinter") == 1)
? "True" : "False"));
MessageBox.Show(sb.ToString(), "TS Environment",
MessageBoxButtons.OK,
MessageBoxIcon.Information);
}
StringBuilder
It is possible to quickly concatenate a text string, as shown here:
string str = "some text here"; str += "more text";
What actually happens, is that each time text is added, a new string
object is created. This process is time consuming. Depending on the occasion, consider using the .Append()-method of the StringBuilder-
class.
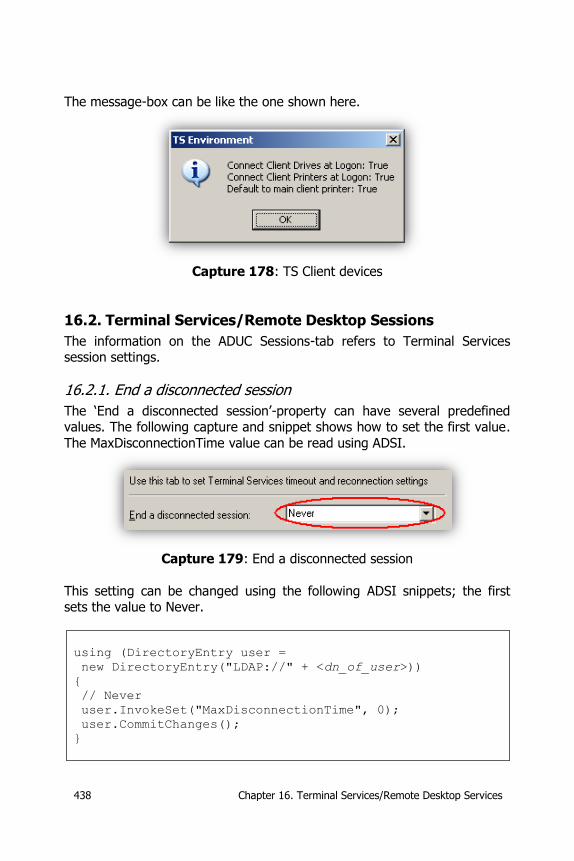
438 Chapter 16. Terminal Services/Remote Desktop Services
The message-box can be like the one shown here.
Capture 178: TS Client devices
16.2. Terminal Services/Remote Desktop Sessions
The information on the ADUC Sessions-tab refers to Terminal Services session settings.
16.2.1. End a disconnected session
The ‘End a disconnected session’-property can have several predefined values. The following capture and snippet shows how to set the first value.
The MaxDisconnectionTime value can be read using ADSI.
Capture 179: End a disconnected session
This setting can be changed using the following ADSI snippets; the first sets the value to Never.
using (DirectoryEntry user =
new DirectoryEntry("LDAP://" + <dn_of_user>))
{
// Never
user.InvokeSet("MaxDisconnectionTime", 0);
user.CommitChanges();
}
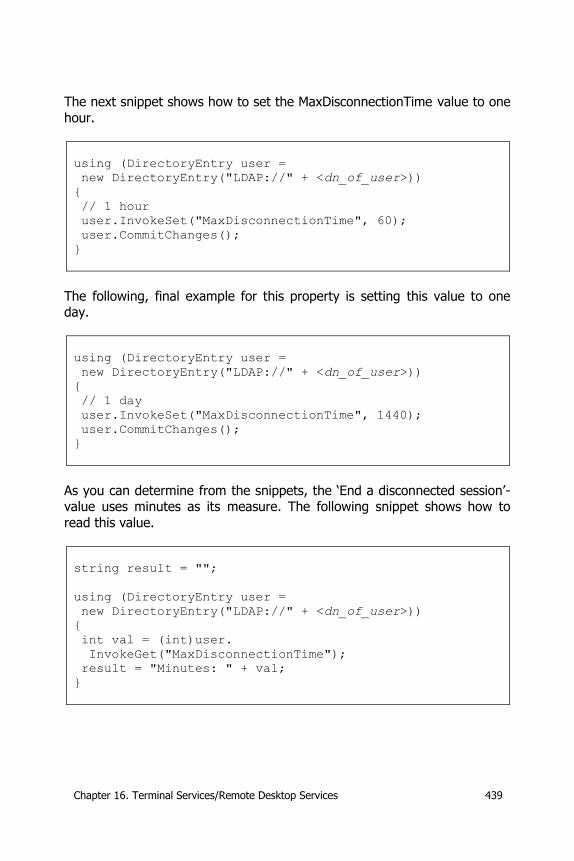
Chapter 16. Terminal Services/Remote Desktop Services 439
The next snippet shows how to set the MaxDisconnectionTime value to one
hour.
using (DirectoryEntry user =
new DirectoryEntry("LDAP://" + <dn_of_user>))
{
// 1 hour
user.InvokeSet("MaxDisconnectionTime", 60);
user.CommitChanges();
}
The following, final example for this property is setting this value to one day.
using (DirectoryEntry user =
new DirectoryEntry("LDAP://" + <dn_of_user>))
{
// 1 day
user.InvokeSet("MaxDisconnectionTime", 1440);
user.CommitChanges();
}
As you can determine from the snippets, the ‘End a disconnected session’-value uses minutes as its measure. The following snippet shows how to
read this value.
string result = "";
using (DirectoryEntry user =
new DirectoryEntry("LDAP://" + <dn_of_user>))
{
int val = (int)user.
InvokeGet("MaxDisconnectionTime");
result = "Minutes: " + val;
}
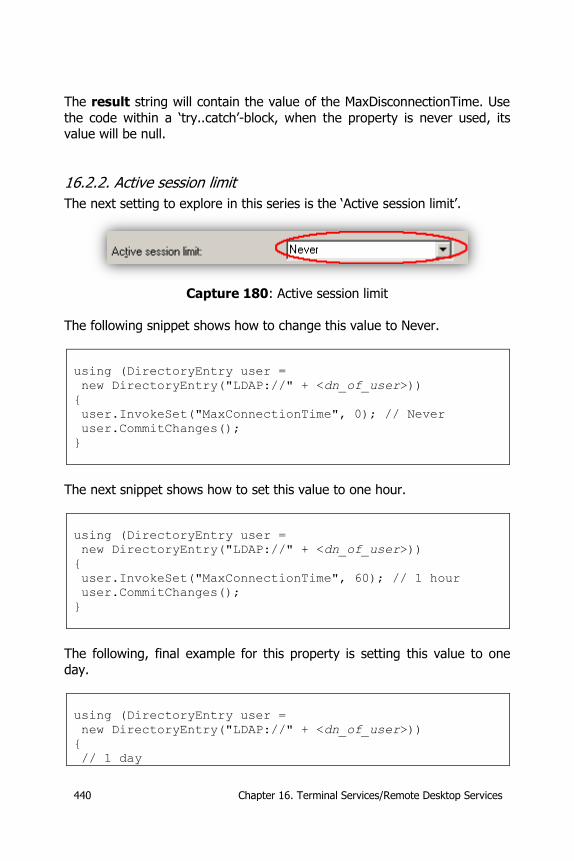
440 Chapter 16. Terminal Services/Remote Desktop Services
The result string will contain the value of the MaxDisconnectionTime. Use
the code within a ‘try..catch’-block, when the property is never used, its value will be null.
16.2.2. Active session limit
The next setting to explore in this series is the ‘Active session limit’.
Capture 180: Active session limit
The following snippet shows how to change this value to Never.
using (DirectoryEntry user =
new DirectoryEntry("LDAP://" + <dn_of_user>))
{
user.InvokeSet("MaxConnectionTime", 0); // Never
user.CommitChanges();
}
The next snippet shows how to set this value to one hour.
using (DirectoryEntry user =
new DirectoryEntry("LDAP://" + <dn_of_user>))
{
user.InvokeSet("MaxConnectionTime", 60); // 1 hour
user.CommitChanges();
}
The following, final example for this property is setting this value to one
day.
using (DirectoryEntry user =
new DirectoryEntry("LDAP://" + <dn_of_user>))
{
// 1 day
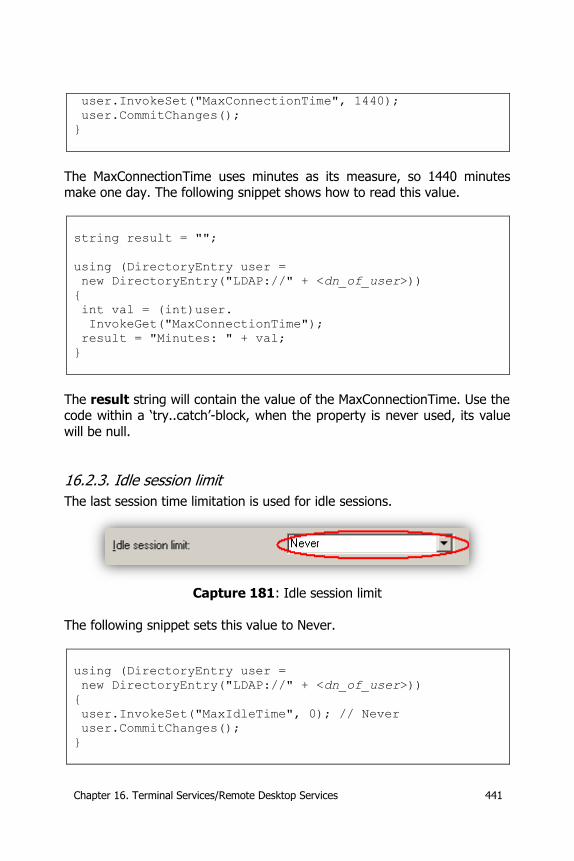
Chapter 16. Terminal Services/Remote Desktop Services 441
user.InvokeSet("MaxConnectionTime", 1440);
user.CommitChanges();
}
The MaxConnectionTime uses minutes as its measure, so 1440 minutes make one day. The following snippet shows how to read this value.
string result = "";
using (DirectoryEntry user =
new DirectoryEntry("LDAP://" + <dn_of_user>))
{
int val = (int)user.
InvokeGet("MaxConnectionTime");
result = "Minutes: " + val;
}
The result string will contain the value of the MaxConnectionTime. Use the code within a ‘try..catch’-block, when the property is never used, its value
will be null.
16.2.3. Idle session limit
The last session time limitation is used for idle sessions.
Capture 181: Idle session limit
The following snippet sets this value to Never.
using (DirectoryEntry user =
new DirectoryEntry("LDAP://" + <dn_of_user>))
{
user.InvokeSet("MaxIdleTime", 0); // Never
user.CommitChanges();
}
442 Chapter 16. Terminal Services/Remote Desktop Services
The following snippet sets this value to one hour.
using (DirectoryEntry user =
new DirectoryEntry("LDAP://" + <dn_of_user>))
{
user.InvokeSet("MaxIdleTime", 60); // 1 hour
user.CommitChanges();
}
And finally, the following setting will change the value to one day.
using (DirectoryEntry user =
new DirectoryEntry("LDAP://" + <dn_of_user>))
{
user.InvokeSet("MaxIdleTime", 1440); // 1 day
user.CommitChanges();
}
The MaxIdleTime uses minutes as its measure. The following snippet shows
how to read this value.
string result = "";
using (DirectoryEntry user =
new DirectoryEntry("LDAP://" + <dn_of_user>))
{
int val = (int)user.InvokeGet("MaxIdleTime");
result = "Minutes: " + val;
}
The result string will contain the value of the maximal idle time. Use the
code within a ‘try..catch’-block, when the property is never used, its value
will be null.
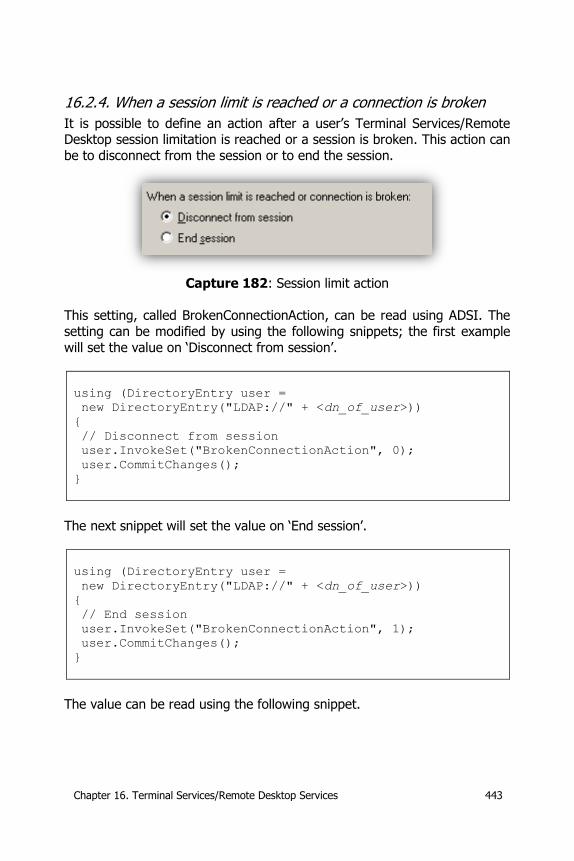
Chapter 16. Terminal Services/Remote Desktop Services 443
16.2.4. When a session limit is reached or a connection is broken
It is possible to define an action after a user’s Terminal Services/Remote Desktop session limitation is reached or a session is broken. This action can
be to disconnect from the session or to end the session.
Capture 182: Session limit action
This setting, called BrokenConnectionAction, can be read using ADSI. The
setting can be modified by using the following snippets; the first example
will set the value on ‘Disconnect from session’.
using (DirectoryEntry user =
new DirectoryEntry("LDAP://" + <dn_of_user>))
{
// Disconnect from session
user.InvokeSet("BrokenConnectionAction", 0);
user.CommitChanges();
}
The next snippet will set the value on ‘End session’.
using (DirectoryEntry user =
new DirectoryEntry("LDAP://" + <dn_of_user>))
{
// End session
user.InvokeSet("BrokenConnectionAction", 1);
user.CommitChanges();
}
The value can be read using the following snippet.
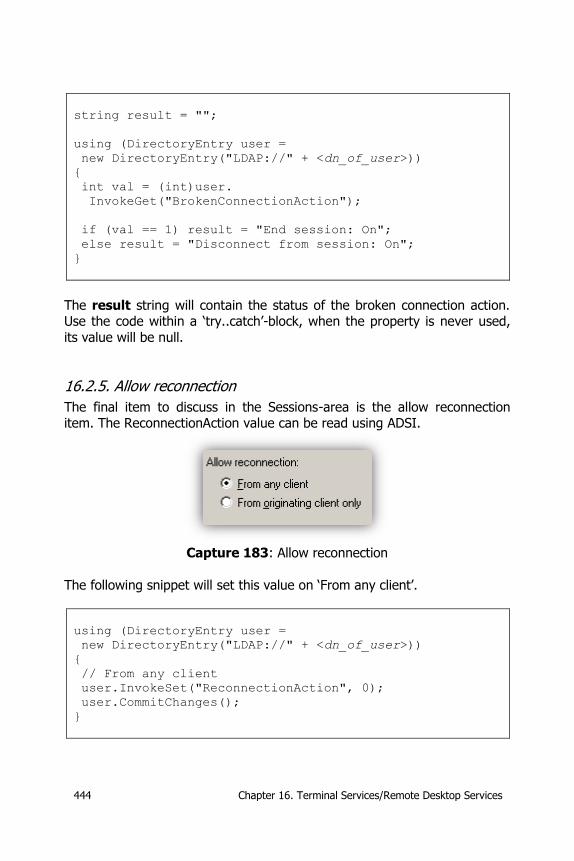
444 Chapter 16. Terminal Services/Remote Desktop Services
string result = "";
using (DirectoryEntry user =
new DirectoryEntry("LDAP://" + <dn_of_user>))
{
int val = (int)user.
InvokeGet("BrokenConnectionAction");
if (val == 1) result = "End session: On";
else result = "Disconnect from session: On";
}
The result string will contain the status of the broken connection action. Use the code within a ‘try..catch’-block, when the property is never used,
its value will be null.
16.2.5. Allow reconnection
The final item to discuss in the Sessions-area is the allow reconnection item. The ReconnectionAction value can be read using ADSI.
Capture 183: Allow reconnection
The following snippet will set this value on ‘From any client’.
using (DirectoryEntry user =
new DirectoryEntry("LDAP://" + <dn_of_user>))
{
// From any client
user.InvokeSet("ReconnectionAction", 0);
user.CommitChanges();
}
Chapter 16. Terminal Services/Remote Desktop Services 445
The next snippet will set this value on ‘From originating client only’.
using (DirectoryEntry user =
new DirectoryEntry("LDAP://" + <dn_of_user>))
{
// From originating client only
user.InvokeSet("ReconnectionAction", 1);
user.CommitChanges();
}
The following snippet shows how to read this property.
string result = "";
using (DirectoryEntry user =
new DirectoryEntry("LDAP://" + <dn_of_user>))
{
int val = (int)user.
InvokeGet("ReconnectionAction");
if (val == 1) result =
"From originating client only: On";
else result = "From any client: On";
}
The result string will contain the status of the reconnection action. Use the code within a ‘try..catch’-block, when the property is never used, its value
will be null.
16.3. Remote Deskstop Services
Paragraph ‘6.13.1. Remote Desktop Services Profile’ has already mentioned that the IADsTSUserEx-interface is used for the management of Terminal
Services/Remote Desktop Services properties. This paragraph provides more properties and shows their usage.
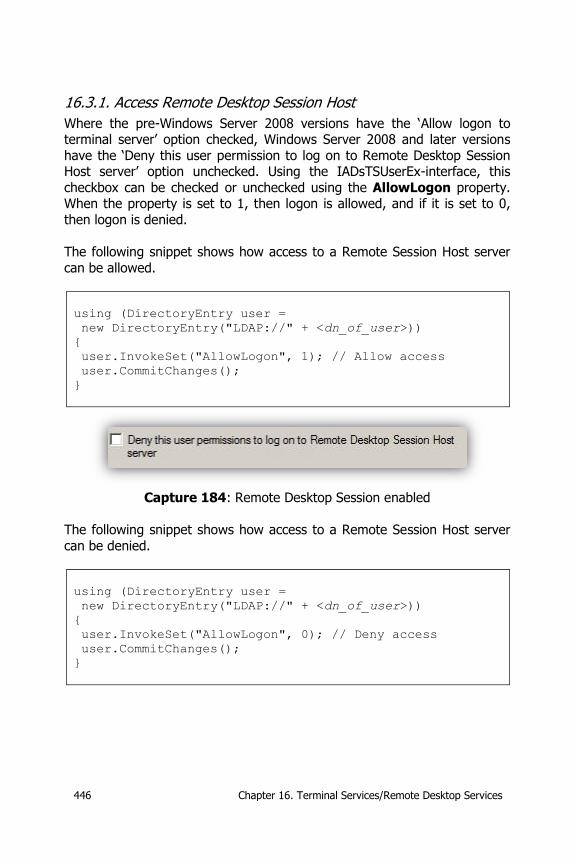
446 Chapter 16. Terminal Services/Remote Desktop Services
16.3.1. Access Remote Desktop Session Host
Where the pre-Windows Server 2008 versions have the ‘Allow logon to terminal server’ option checked, Windows Server 2008 and later versions
have the ‘Deny this user permission to log on to Remote Desktop Session Host server’ option unchecked. Using the IADsTSUserEx-interface, this
checkbox can be checked or unchecked using the AllowLogon property. When the property is set to 1, then logon is allowed, and if it is set to 0,
then logon is denied.
The following snippet shows how access to a Remote Session Host server
can be allowed.
using (DirectoryEntry user =
new DirectoryEntry("LDAP://" + <dn_of_user>))
{
user.InvokeSet("AllowLogon", 1); // Allow access
user.CommitChanges();
}
Capture 184: Remote Desktop Session enabled
The following snippet shows how access to a Remote Session Host server
can be denied.
using (DirectoryEntry user =
new DirectoryEntry("LDAP://" + <dn_of_user>))
{
user.InvokeSet("AllowLogon", 0); // Deny access
user.CommitChanges();
}
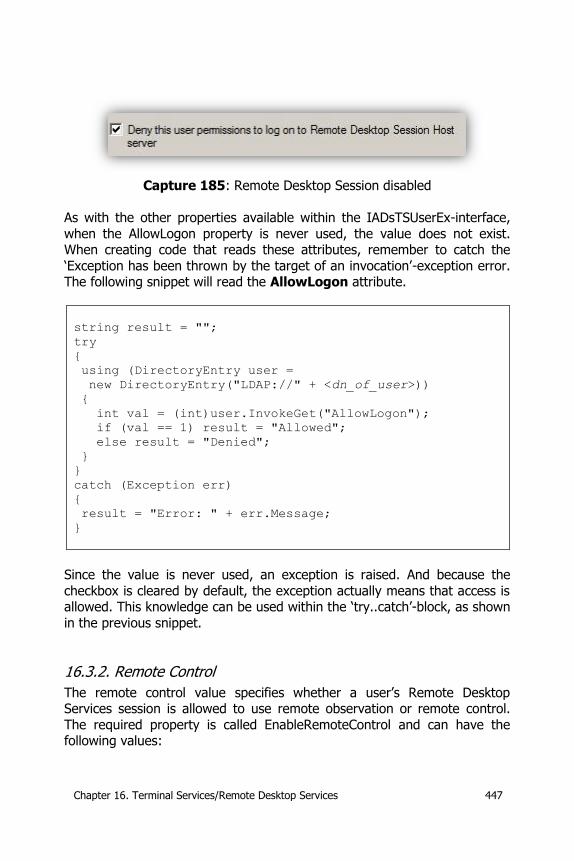
Chapter 16. Terminal Services/Remote Desktop Services 447
Capture 185: Remote Desktop Session disabled
As with the other properties available within the IADsTSUserEx-interface,
when the AllowLogon property is never used, the value does not exist. When creating code that reads these attributes, remember to catch the
‘Exception has been thrown by the target of an invocation’-exception error. The following snippet will read the AllowLogon attribute.
string result = "";
try
{
using (DirectoryEntry user =
new DirectoryEntry("LDAP://" + <dn_of_user>))
{
int val = (int)user.InvokeGet("AllowLogon");
if (val == 1) result = "Allowed";
else result = "Denied";
}
}
catch (Exception err)
{
result = "Error: " + err.Message;
}
Since the value is never used, an exception is raised. And because the
checkbox is cleared by default, the exception actually means that access is allowed. This knowledge can be used within the ‘try..catch’-block, as shown
in the previous snippet.
16.3.2. Remote Control
The remote control value specifies whether a user’s Remote Desktop Services session is allowed to use remote observation or remote control.
The required property is called EnableRemoteControl and can have the following values:
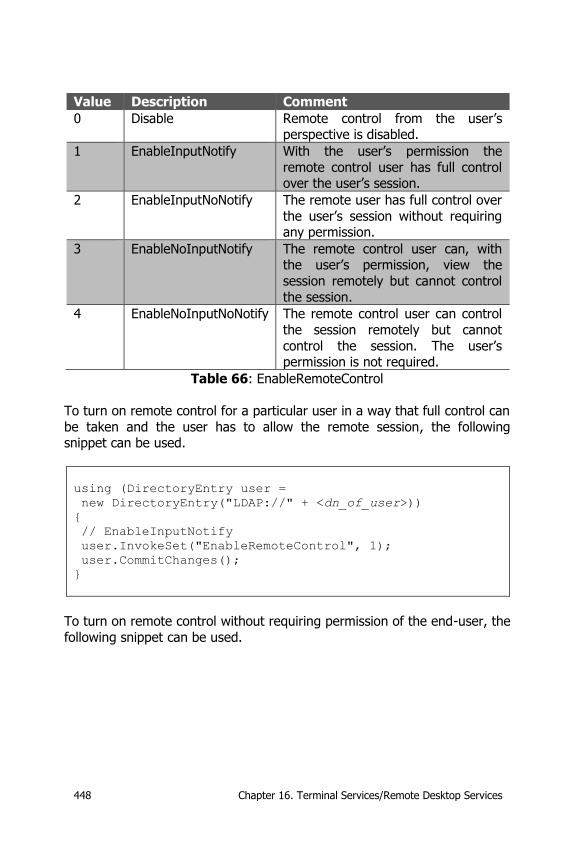
448 Chapter 16. Terminal Services/Remote Desktop Services
Value Description Comment
0 Disable Remote control from the user’s perspective is disabled.
1 EnableInputNotify With the user’s permission the
remote control user has full control over the user’s session.
2 EnableInputNoNotify The remote user has full control over
the user’s session without requiring any permission.
3 EnableNoInputNotify The remote control user can, with the user’s permission, view the
session remotely but cannot control
the session.
4 EnableNoInputNoNotify The remote control user can control
the session remotely but cannot
control the session. The user’s permission is not required.
Table 66: EnableRemoteControl
To turn on remote control for a particular user in a way that full control can
be taken and the user has to allow the remote session, the following snippet can be used.
using (DirectoryEntry user =
new DirectoryEntry("LDAP://" + <dn_of_user>))
{
// EnableInputNotify
user.InvokeSet("EnableRemoteControl", 1);
user.CommitChanges();
}
To turn on remote control without requiring permission of the end-user, the
following snippet can be used.

Chapter 16. Terminal Services/Remote Desktop Services 449
using (DirectoryEntry user =
new DirectoryEntry("LDAP://" + <dn_of_user>))
{
// EnableInputNoNotify
user.InvokeSet("EnableRemoteControl", 2);
user.CommitChanges();
}
And to disable remote control for a user, the following snippet can be used.
using (DirectoryEntry user =
new DirectoryEntry("LDAP://" + <dn_of_user>))
{
// Disable
user.InvokeSet("EnableRemoteControl", 0);
user.CommitChanges();
}

Chapter 17. Infrastructure 451
17. Infrastructure
This paragraph describes the infrastructure of AD DS from a developer’s perspective. This description will start at the forest level, move downwards
to the domain level, FSMO-roles, Domain Controllers, Global Catalog and still lower to the infrastructural services, like a reliable time source.
Some features can be accessed using multiple solutions. Where applicable, more than one snippet will be provided to explain how to obtain the
required information.
17.1. Forest
When retrieving information about the AD DS forest, the
System.DirectoryServices.dll reference must be added. It is also a good practice to add the following namespace:
using System.DirectoryServices.ActiveDirectory;
The first forest-related snippet shows how to obtain the name of the forest.
Forest forest = Forest.GetCurrentForest();
ListViewItem item =
new ListViewItem("Forest name: " + forest.Name);
lvResult.Items.Add(item);
Within the lab environment, the view contains the following line:
Forest name: test.edu
Domains per forest
When using Microsoft Windows 2000 Server, a maximum of 800
domains in a single forest is possible. On Microsoft Windows Server 2003 and higher operating systems, running in at least forest
functional level Windows Server 2003, a maximum of 1200 domains in
a single forest is possible.
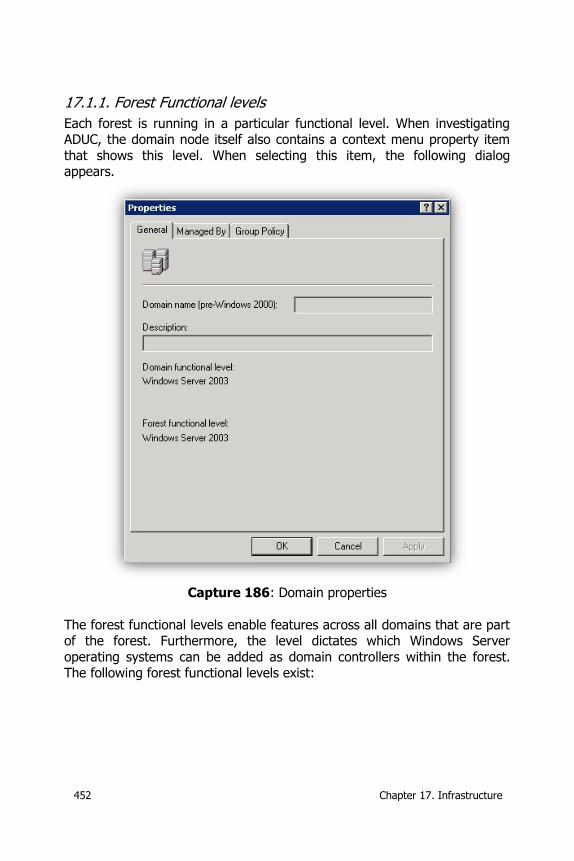
452 Chapter 17. Infrastructure
17.1.1. Forest Functional levels
Each forest is running in a particular functional level. When investigating ADUC, the domain node itself also contains a context menu property item
that shows this level. When selecting this item, the following dialog appears.
Capture 186: Domain properties
The forest functional levels enable features across all domains that are part of the forest. Furthermore, the level dictates which Windows Server
operating systems can be added as domain controllers within the forest. The following forest functional levels exist:
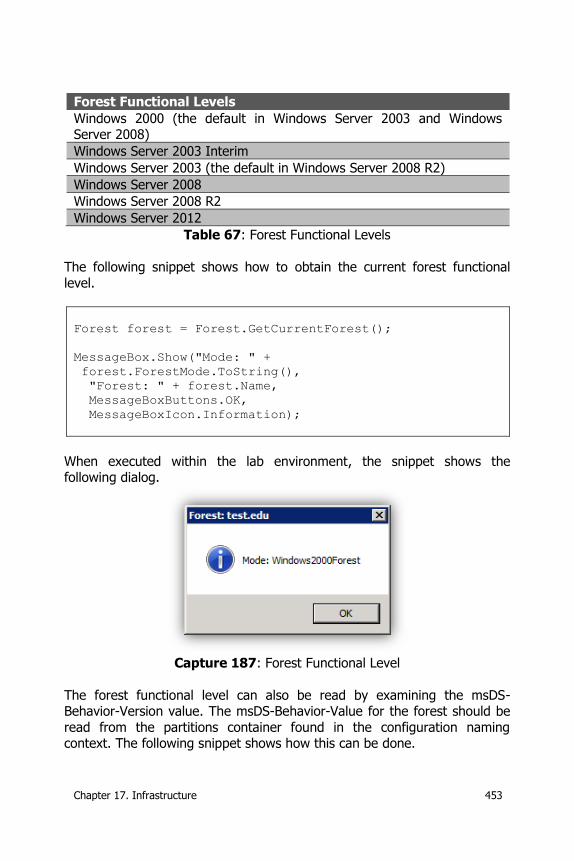
Chapter 17. Infrastructure 453
Forest Functional Levels
Windows 2000 (the default in Windows Server 2003 and Windows Server 2008)
Windows Server 2003 Interim
Windows Server 2003 (the default in Windows Server 2008 R2)
Windows Server 2008
Windows Server 2008 R2
Windows Server 2012
Table 67: Forest Functional Levels
The following snippet shows how to obtain the current forest functional
level.
Forest forest = Forest.GetCurrentForest();
MessageBox.Show("Mode: " +
forest.ForestMode.ToString(),
"Forest: " + forest.Name,
MessageBoxButtons.OK,
MessageBoxIcon.Information);
When executed within the lab environment, the snippet shows the following dialog.
Capture 187: Forest Functional Level
The forest functional level can also be read by examining the msDS-Behavior-Version value. The msDS-Behavior-Value for the forest should be
read from the partitions container found in the configuration naming context. The following snippet shows how this can be done.
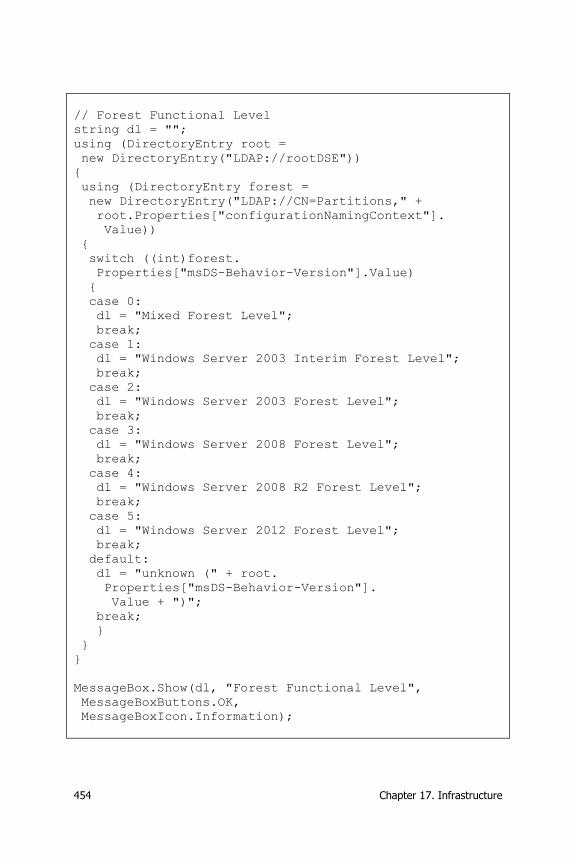
454 Chapter 17. Infrastructure
// Forest Functional Level
string dl = "";
using (DirectoryEntry root =
new DirectoryEntry("LDAP://rootDSE"))
{
using (DirectoryEntry forest =
new DirectoryEntry("LDAP://CN=Partitions," +
root.Properties["configurationNamingContext"].
Value))
{
switch ((int)forest.
Properties["msDS-Behavior-Version"].Value)
{
case 0:
dl = "Mixed Forest Level";
break;
case 1:
dl = "Windows Server 2003 Interim Forest Level";
break;
case 2:
dl = "Windows Server 2003 Forest Level";
break;
case 3:
dl = "Windows Server 2008 Forest Level";
break;
case 4:
dl = "Windows Server 2008 R2 Forest Level";
break;
case 5:
dl = "Windows Server 2012 Forest Level";
break;
default:
dl = "unknown (" + root.
Properties["msDS-Behavior-Version"].
Value + ")";
break;
}
}
}
MessageBox.Show(dl, "Forest Functional Level",
MessageBoxButtons.OK,
MessageBoxIcon.Information);
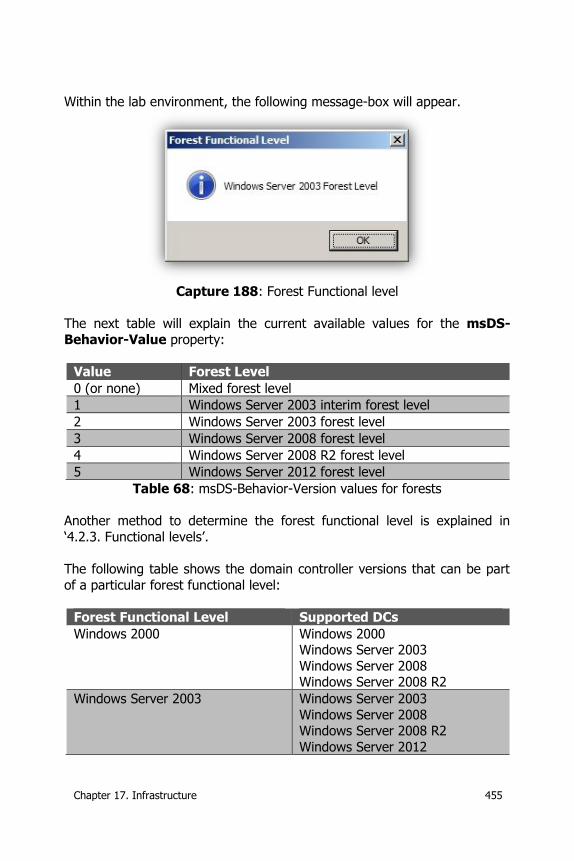
Chapter 17. Infrastructure 455
Within the lab environment, the following message-box will appear.
Capture 188: Forest Functional level
The next table will explain the current available values for the msDS-
Behavior-Value property:
Value Forest Level
0 (or none) Mixed forest level
1 Windows Server 2003 interim forest level
2 Windows Server 2003 forest level
3 Windows Server 2008 forest level
4 Windows Server 2008 R2 forest level
5 Windows Server 2012 forest level
Table 68: msDS-Behavior-Version values for forests
Another method to determine the forest functional level is explained in
‘4.2.3. Functional levels’.
The following table shows the domain controller versions that can be part
of a particular forest functional level:
Forest Functional Level Supported DCs
Windows 2000 Windows 2000 Windows Server 2003
Windows Server 2008 Windows Server 2008 R2
Windows Server 2003 Windows Server 2003
Windows Server 2008 Windows Server 2008 R2
Windows Server 2012
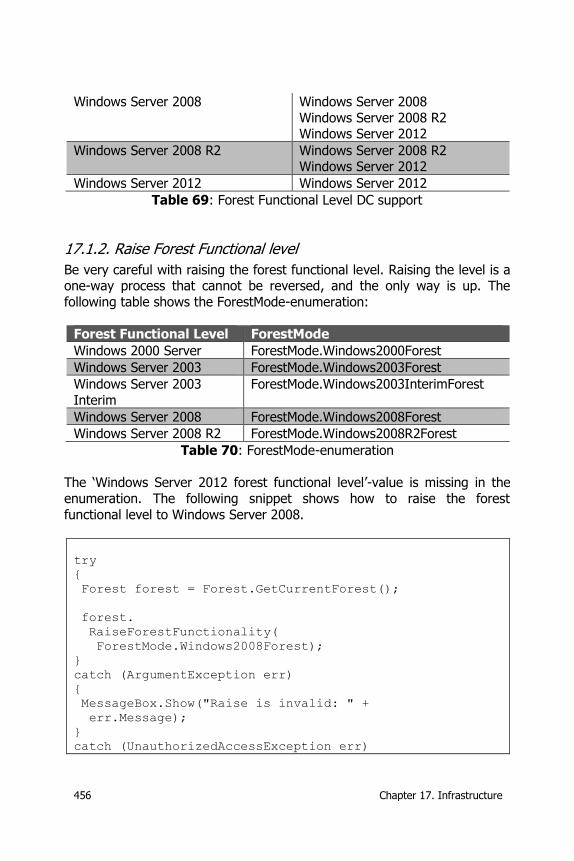
456 Chapter 17. Infrastructure
Windows Server 2008 Windows Server 2008
Windows Server 2008 R2 Windows Server 2012
Windows Server 2008 R2 Windows Server 2008 R2 Windows Server 2012
Windows Server 2012 Windows Server 2012
Table 69: Forest Functional Level DC support
17.1.2. Raise Forest Functional level
Be very careful with raising the forest functional level. Raising the level is a one-way process that cannot be reversed, and the only way is up. The
following table shows the ForestMode-enumeration:
Forest Functional Level ForestMode
Windows 2000 Server ForestMode.Windows2000Forest
Windows Server 2003 ForestMode.Windows2003Forest
Windows Server 2003
Interim
ForestMode.Windows2003InterimForest
Windows Server 2008 ForestMode.Windows2008Forest
Windows Server 2008 R2 ForestMode.Windows2008R2Forest
Table 70: ForestMode-enumeration
The ‘Windows Server 2012 forest functional level’-value is missing in the
enumeration. The following snippet shows how to raise the forest
functional level to Windows Server 2008.
try
{
Forest forest = Forest.GetCurrentForest();
forest.
RaiseForestFunctionality(
ForestMode.Windows2008Forest);
}
catch (ArgumentException err)
{
MessageBox.Show("Raise is invalid: " +
err.Message);
}
catch (UnauthorizedAccessException err)
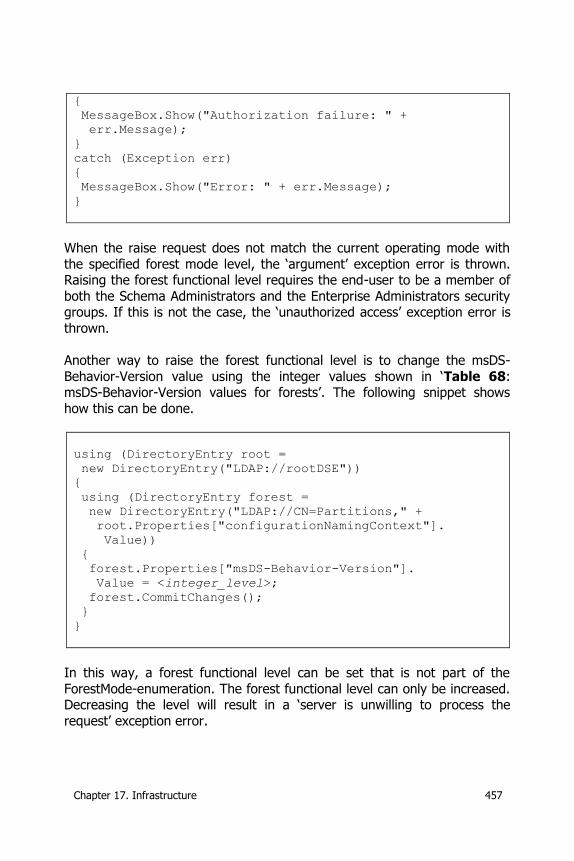
Chapter 17. Infrastructure 457
{
MessageBox.Show("Authorization failure: " +
err.Message);
}
catch (Exception err)
{
MessageBox.Show("Error: " + err.Message);
}
When the raise request does not match the current operating mode with
the specified forest mode level, the ‘argument’ exception error is thrown. Raising the forest functional level requires the end-user to be a member of
both the Schema Administrators and the Enterprise Administrators security groups. If this is not the case, the ‘unauthorized access’ exception error is
thrown.
Another way to raise the forest functional level is to change the msDS-
Behavior-Version value using the integer values shown in ‘Table 68: msDS-Behavior-Version values for forests’. The following snippet shows
how this can be done.
using (DirectoryEntry root =
new DirectoryEntry("LDAP://rootDSE"))
{
using (DirectoryEntry forest =
new DirectoryEntry("LDAP://CN=Partitions," +
root.Properties["configurationNamingContext"].
Value))
{
forest.Properties["msDS-Behavior-Version"].
Value = <integer_level>;
forest.CommitChanges();
}
}
In this way, a forest functional level can be set that is not part of the
ForestMode-enumeration. The forest functional level can only be increased. Decreasing the level will result in a ‘server is unwilling to process the
request’ exception error.
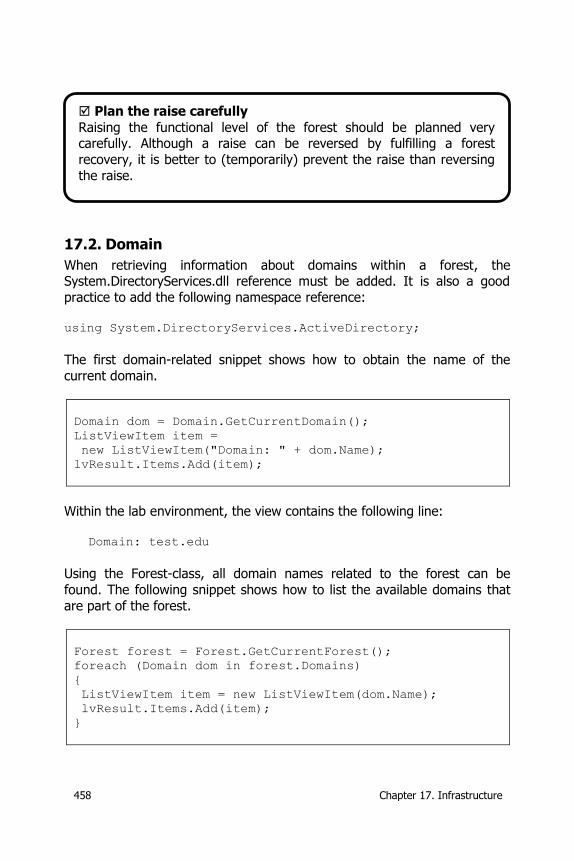
458 Chapter 17. Infrastructure
17.2. Domain
When retrieving information about domains within a forest, the System.DirectoryServices.dll reference must be added. It is also a good
practice to add the following namespace reference: using System.DirectoryServices.ActiveDirectory;
The first domain-related snippet shows how to obtain the name of the
current domain.
Domain dom = Domain.GetCurrentDomain();
ListViewItem item =
new ListViewItem("Domain: " + dom.Name);
lvResult.Items.Add(item);
Within the lab environment, the view contains the following line:
Domain: test.edu
Using the Forest-class, all domain names related to the forest can be
found. The following snippet shows how to list the available domains that
are part of the forest.
Forest forest = Forest.GetCurrentForest();
foreach (Domain dom in forest.Domains)
{
ListViewItem item = new ListViewItem(dom.Name);
lvResult.Items.Add(item);
}
Plan the raise carefully
Raising the functional level of the forest should be planned very carefully. Although a raise can be reversed by fulfilling a forest
recovery, it is better to (temporarily) prevent the raise than reversing
the raise.
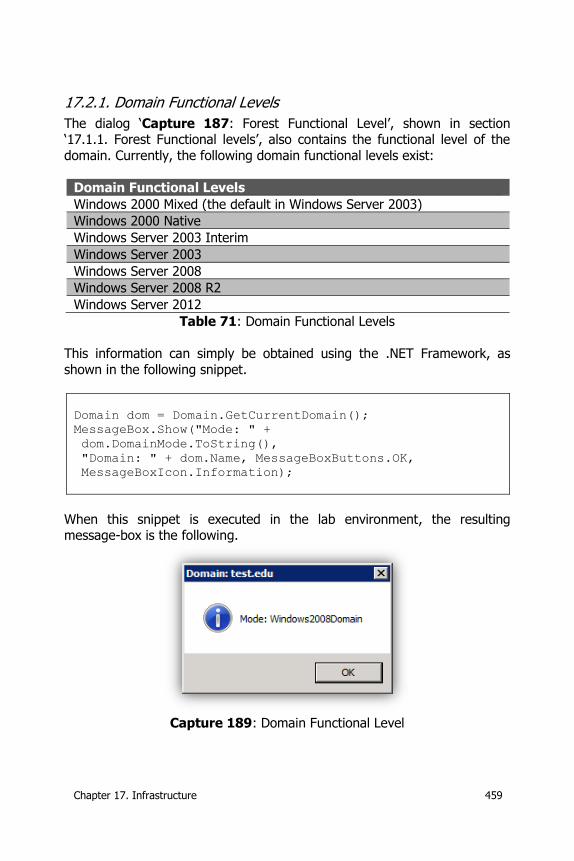
Chapter 17. Infrastructure 459
17.2.1. Domain Functional Levels
The dialog ‘Capture 187: Forest Functional Level’, shown in section ‘17.1.1. Forest Functional levels’, also contains the functional level of the
domain. Currently, the following domain functional levels exist:
Domain Functional Levels
Windows 2000 Mixed (the default in Windows Server 2003)
Windows 2000 Native
Windows Server 2003 Interim
Windows Server 2003
Windows Server 2008
Windows Server 2008 R2
Windows Server 2012
Table 71: Domain Functional Levels
This information can simply be obtained using the .NET Framework, as
shown in the following snippet.
Domain dom = Domain.GetCurrentDomain();
MessageBox.Show("Mode: " +
dom.DomainMode.ToString(),
"Domain: " + dom.Name, MessageBoxButtons.OK,
MessageBoxIcon.Information);
When this snippet is executed in the lab environment, the resulting message-box is the following.
Capture 189: Domain Functional Level
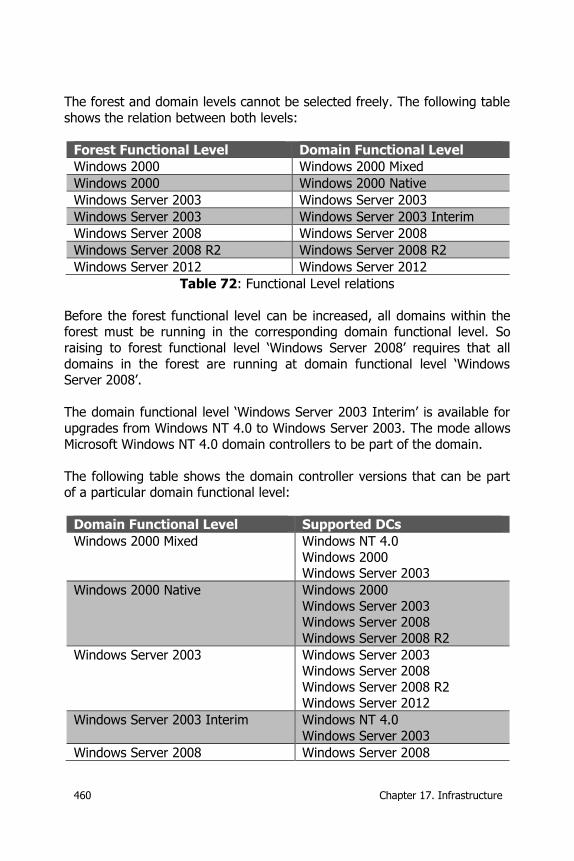
460 Chapter 17. Infrastructure
The forest and domain levels cannot be selected freely. The following table
shows the relation between both levels:
Forest Functional Level Domain Functional Level
Windows 2000 Windows 2000 Mixed
Windows 2000 Windows 2000 Native
Windows Server 2003 Windows Server 2003
Windows Server 2003 Windows Server 2003 Interim
Windows Server 2008 Windows Server 2008
Windows Server 2008 R2 Windows Server 2008 R2
Windows Server 2012 Windows Server 2012
Table 72: Functional Level relations
Before the forest functional level can be increased, all domains within the forest must be running in the corresponding domain functional level. So
raising to forest functional level ‘Windows Server 2008’ requires that all
domains in the forest are running at domain functional level ‘Windows Server 2008’.
The domain functional level ‘Windows Server 2003 Interim’ is available for
upgrades from Windows NT 4.0 to Windows Server 2003. The mode allows
Microsoft Windows NT 4.0 domain controllers to be part of the domain.
The following table shows the domain controller versions that can be part of a particular domain functional level:
Domain Functional Level Supported DCs
Windows 2000 Mixed Windows NT 4.0
Windows 2000 Windows Server 2003
Windows 2000 Native Windows 2000
Windows Server 2003 Windows Server 2008
Windows Server 2008 R2
Windows Server 2003 Windows Server 2003 Windows Server 2008
Windows Server 2008 R2 Windows Server 2012
Windows Server 2003 Interim Windows NT 4.0
Windows Server 2003
Windows Server 2008 Windows Server 2008
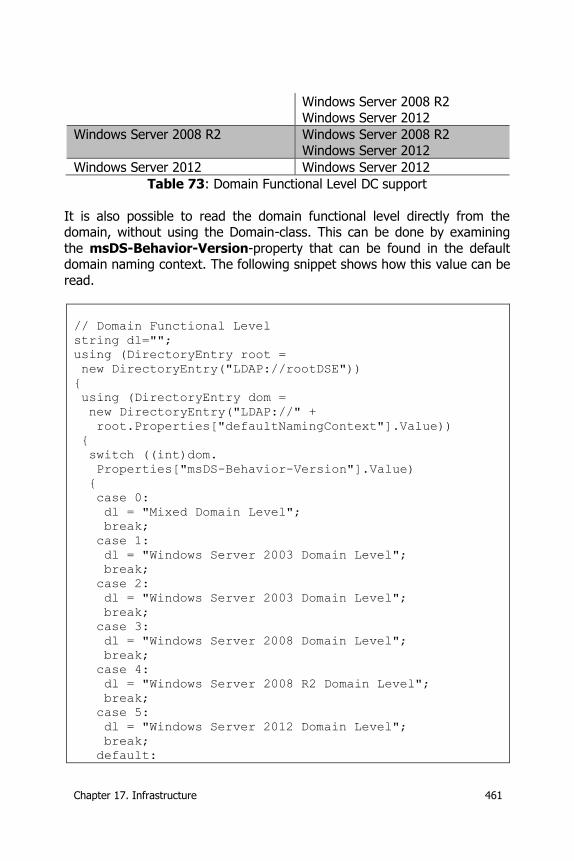
Chapter 17. Infrastructure 461
Windows Server 2008 R2
Windows Server 2012
Windows Server 2008 R2 Windows Server 2008 R2
Windows Server 2012
Windows Server 2012 Windows Server 2012
Table 73: Domain Functional Level DC support
It is also possible to read the domain functional level directly from the domain, without using the Domain-class. This can be done by examining
the msDS-Behavior-Version-property that can be found in the default domain naming context. The following snippet shows how this value can be
read.
// Domain Functional Level
string dl="";
using (DirectoryEntry root =
new DirectoryEntry("LDAP://rootDSE"))
{
using (DirectoryEntry dom =
new DirectoryEntry("LDAP://" +
root.Properties["defaultNamingContext"].Value))
{
switch ((int)dom.
Properties["msDS-Behavior-Version"].Value)
{
case 0:
dl = "Mixed Domain Level";
break;
case 1:
dl = "Windows Server 2003 Domain Level";
break;
case 2:
dl = "Windows Server 2003 Domain Level";
break;
case 3:
dl = "Windows Server 2008 Domain Level";
break;
case 4:
dl = "Windows Server 2008 R2 Domain Level";
break;
case 5:
dl = "Windows Server 2012 Domain Level";
break;
default:
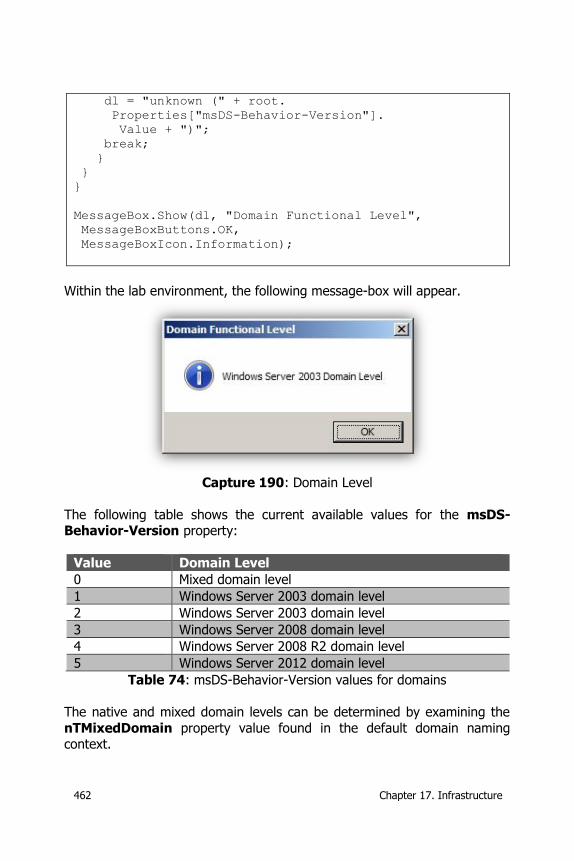
462 Chapter 17. Infrastructure
dl = "unknown (" + root.
Properties["msDS-Behavior-Version"].
Value + ")";
break;
}
}
}
MessageBox.Show(dl, "Domain Functional Level",
MessageBoxButtons.OK,
MessageBoxIcon.Information);
Within the lab environment, the following message-box will appear.
Capture 190: Domain Level
The following table shows the current available values for the msDS-Behavior-Version property:
Value Domain Level
0 Mixed domain level
1 Windows Server 2003 domain level
2 Windows Server 2003 domain level
3 Windows Server 2008 domain level
4 Windows Server 2008 R2 domain level
5 Windows Server 2012 domain level
Table 74: msDS-Behavior-Version values for domains
The native and mixed domain levels can be determined by examining the
nTMixedDomain property value found in the default domain naming context.
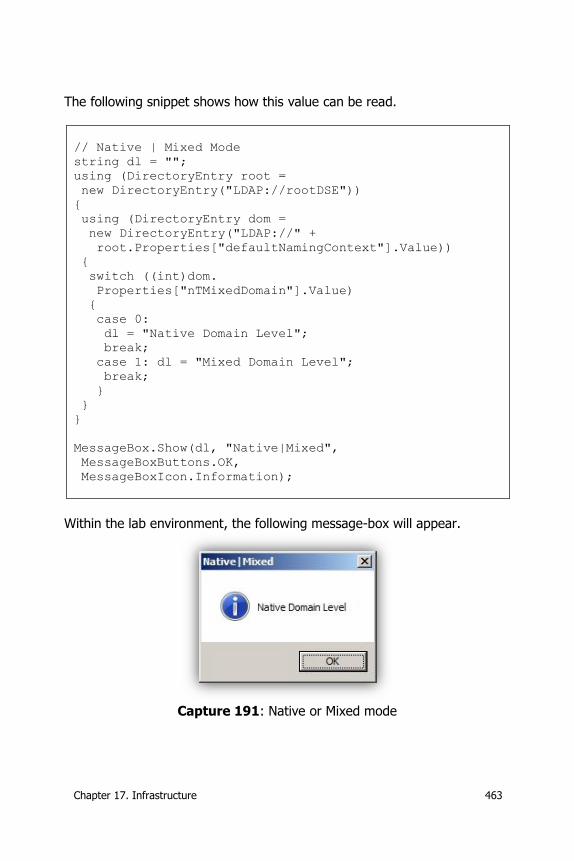
Chapter 17. Infrastructure 463
The following snippet shows how this value can be read.
// Native | Mixed Mode
string dl = "";
using (DirectoryEntry root =
new DirectoryEntry("LDAP://rootDSE"))
{
using (DirectoryEntry dom =
new DirectoryEntry("LDAP://" +
root.Properties["defaultNamingContext"].Value))
{
switch ((int)dom.
Properties["nTMixedDomain"].Value)
{
case 0:
dl = "Native Domain Level";
break;
case 1: dl = "Mixed Domain Level";
break;
}
}
}
MessageBox.Show(dl, "Native|Mixed",
MessageBoxButtons.OK,
MessageBoxIcon.Information);
Within the lab environment, the following message-box will appear.
Capture 191: Native or Mixed mode
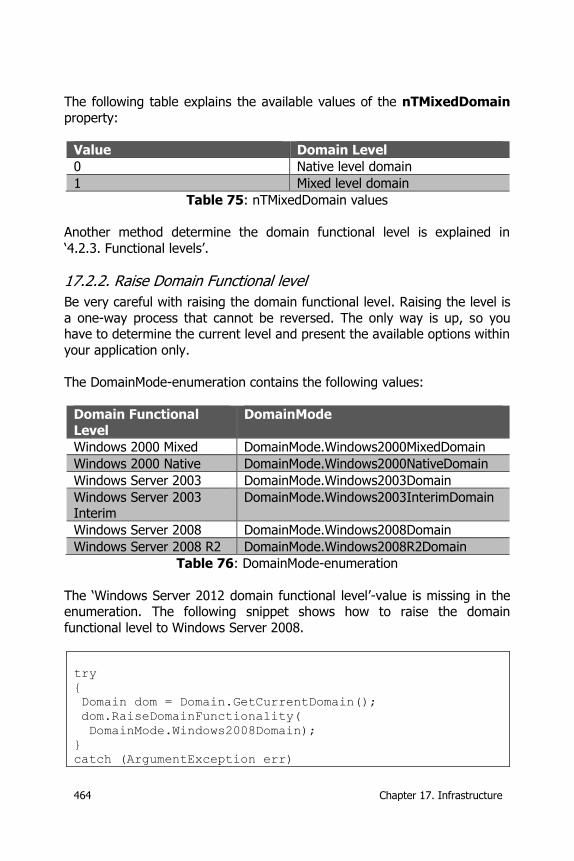
464 Chapter 17. Infrastructure
The following table explains the available values of the nTMixedDomain
property:
Value Domain Level
0 Native level domain
1 Mixed level domain
Table 75: nTMixedDomain values
Another method determine the domain functional level is explained in
‘4.2.3. Functional levels’.
17.2.2. Raise Domain Functional level
Be very careful with raising the domain functional level. Raising the level is
a one-way process that cannot be reversed. The only way is up, so you have to determine the current level and present the available options within
your application only.
The DomainMode-enumeration contains the following values:
Domain Functional
Level
DomainMode
Windows 2000 Mixed DomainMode.Windows2000MixedDomain
Windows 2000 Native DomainMode.Windows2000NativeDomain
Windows Server 2003 DomainMode.Windows2003Domain
Windows Server 2003 Interim
DomainMode.Windows2003InterimDomain
Windows Server 2008 DomainMode.Windows2008Domain
Windows Server 2008 R2 DomainMode.Windows2008R2Domain
Table 76: DomainMode-enumeration
The ‘Windows Server 2012 domain functional level’-value is missing in the enumeration. The following snippet shows how to raise the domain
functional level to Windows Server 2008.
try
{
Domain dom = Domain.GetCurrentDomain();
dom.RaiseDomainFunctionality(
DomainMode.Windows2008Domain);
}
catch (ArgumentException err)
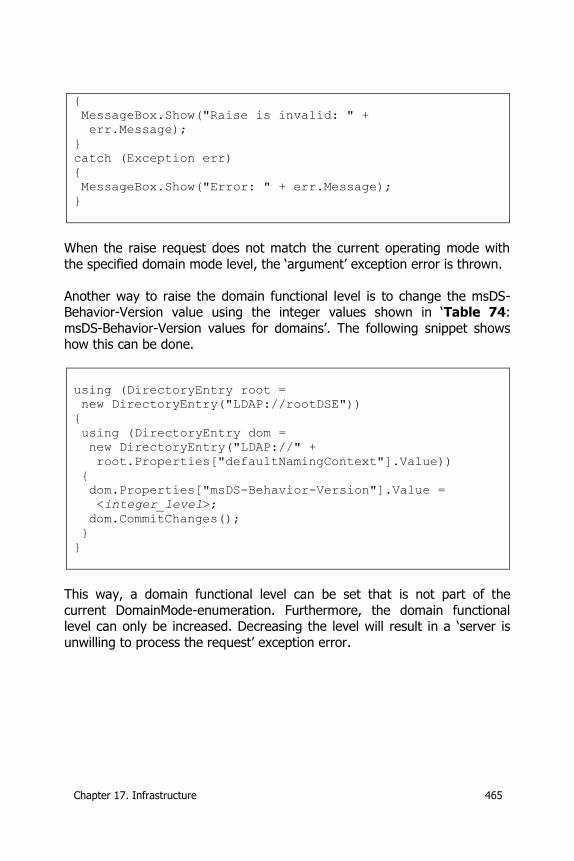
Chapter 17. Infrastructure 465
{
MessageBox.Show("Raise is invalid: " +
err.Message);
}
catch (Exception err)
{
MessageBox.Show("Error: " + err.Message);
}
When the raise request does not match the current operating mode with
the specified domain mode level, the ‘argument’ exception error is thrown.
Another way to raise the domain functional level is to change the msDS-Behavior-Version value using the integer values shown in ‘Table 74:
msDS-Behavior-Version values for domains’. The following snippet shows how this can be done.
using (DirectoryEntry root =
new DirectoryEntry("LDAP://rootDSE"))
{
using (DirectoryEntry dom =
new DirectoryEntry("LDAP://" +
root.Properties["defaultNamingContext"].Value))
{
dom.Properties["msDS-Behavior-Version"].Value =
<integer_level>;
dom.CommitChanges();
}
}
This way, a domain functional level can be set that is not part of the
current DomainMode-enumeration. Furthermore, the domain functional level can only be increased. Decreasing the level will result in a ‘server is
unwilling to process the request’ exception error.
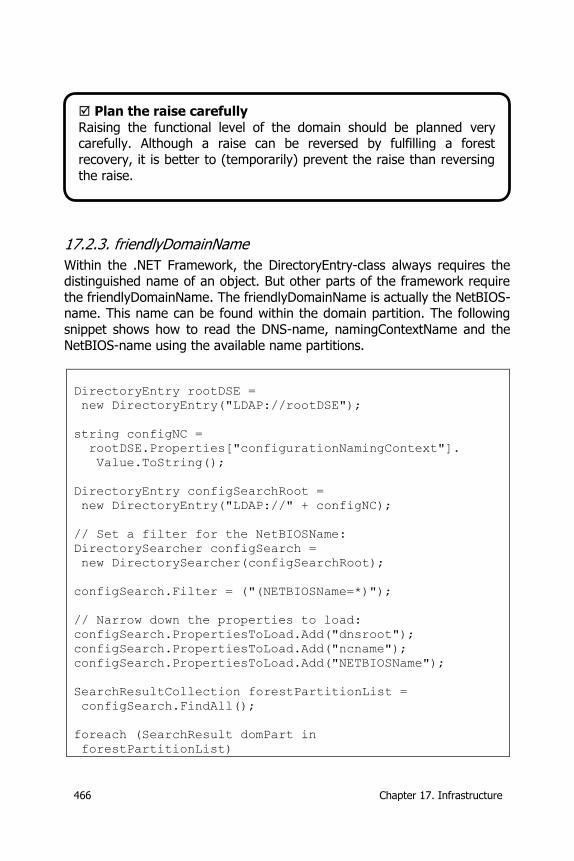
466 Chapter 17. Infrastructure
17.2.3. friendlyDomainName
Within the .NET Framework, the DirectoryEntry-class always requires the distinguished name of an object. But other parts of the framework require
the friendlyDomainName. The friendlyDomainName is actually the NetBIOS-name. This name can be found within the domain partition. The following
snippet shows how to read the DNS-name, namingContextName and the
NetBIOS-name using the available name partitions.
DirectoryEntry rootDSE =
new DirectoryEntry("LDAP://rootDSE");
string configNC =
rootDSE.Properties["configurationNamingContext"].
Value.ToString();
DirectoryEntry configSearchRoot =
new DirectoryEntry("LDAP://" + configNC);
// Set a filter for the NetBIOSName:
DirectorySearcher configSearch =
new DirectorySearcher(configSearchRoot);
configSearch.Filter = ("(NETBIOSName=*)");
// Narrow down the properties to load:
configSearch.PropertiesToLoad.Add("dnsroot");
configSearch.PropertiesToLoad.Add("ncname");
configSearch.PropertiesToLoad.Add("NETBIOSName");
SearchResultCollection forestPartitionList =
configSearch.FindAll();
foreach (SearchResult domPart in
forestPartitionList)
Plan the raise carefully
Raising the functional level of the domain should be planned very carefully. Although a raise can be reversed by fulfilling a forest
recovery, it is better to (temporarily) prevent the raise than reversing
the raise.
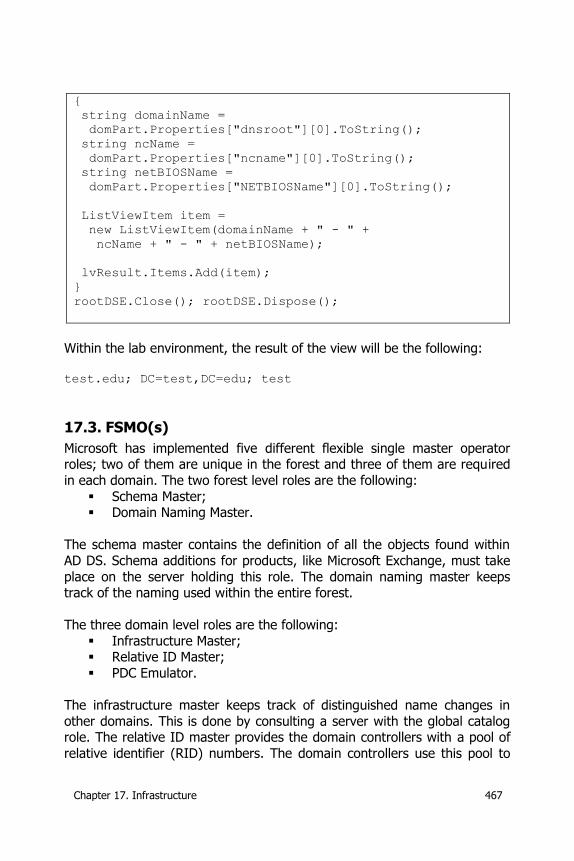
Chapter 17. Infrastructure 467
{
string domainName =
domPart.Properties["dnsroot"][0].ToString();
string ncName =
domPart.Properties["ncname"][0].ToString();
string netBIOSName =
domPart.Properties["NETBIOSName"][0].ToString();
ListViewItem item =
new ListViewItem(domainName + " - " +
ncName + " - " + netBIOSName);
lvResult.Items.Add(item);
}
rootDSE.Close(); rootDSE.Dispose();
Within the lab environment, the result of the view will be the following: test.edu; DC=test,DC=edu; test
17.3. FSMO(s)
Microsoft has implemented five different flexible single master operator roles; two of them are unique in the forest and three of them are required
in each domain. The two forest level roles are the following:
Schema Master; Domain Naming Master.
The schema master contains the definition of all the objects found within
AD DS. Schema additions for products, like Microsoft Exchange, must take
place on the server holding this role. The domain naming master keeps track of the naming used within the entire forest.
The three domain level roles are the following:
Infrastructure Master; Relative ID Master;
PDC Emulator.
The infrastructure master keeps track of distinguished name changes in
other domains. This is done by consulting a server with the global catalog role. The relative ID master provides the domain controllers with a pool of
relative identifier (RID) numbers. The domain controllers use this pool to
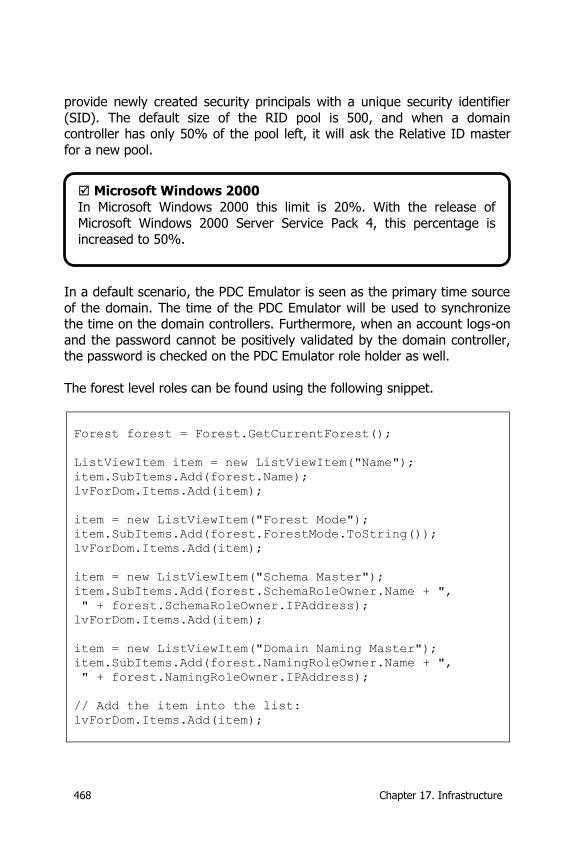
468 Chapter 17. Infrastructure
provide newly created security principals with a unique security identifier
(SID). The default size of the RID pool is 500, and when a domain controller has only 50% of the pool left, it will ask the Relative ID master
for a new pool.
In a default scenario, the PDC Emulator is seen as the primary time source
of the domain. The time of the PDC Emulator will be used to synchronize the time on the domain controllers. Furthermore, when an account logs-on
and the password cannot be positively validated by the domain controller, the password is checked on the PDC Emulator role holder as well.
The forest level roles can be found using the following snippet.
Forest forest = Forest.GetCurrentForest();
ListViewItem item = new ListViewItem("Name");
item.SubItems.Add(forest.Name);
lvForDom.Items.Add(item);
item = new ListViewItem("Forest Mode");
item.SubItems.Add(forest.ForestMode.ToString());
lvForDom.Items.Add(item);
item = new ListViewItem("Schema Master");
item.SubItems.Add(forest.SchemaRoleOwner.Name + ",
" + forest.SchemaRoleOwner.IPAddress);
lvForDom.Items.Add(item);
item = new ListViewItem("Domain Naming Master");
item.SubItems.Add(forest.NamingRoleOwner.Name + ",
" + forest.NamingRoleOwner.IPAddress);
// Add the item into the list:
lvForDom.Items.Add(item);
Microsoft Windows 2000
In Microsoft Windows 2000 this limit is 20%. With the release of
Microsoft Windows 2000 Server Service Pack 4, this percentage is
increased to 50%.
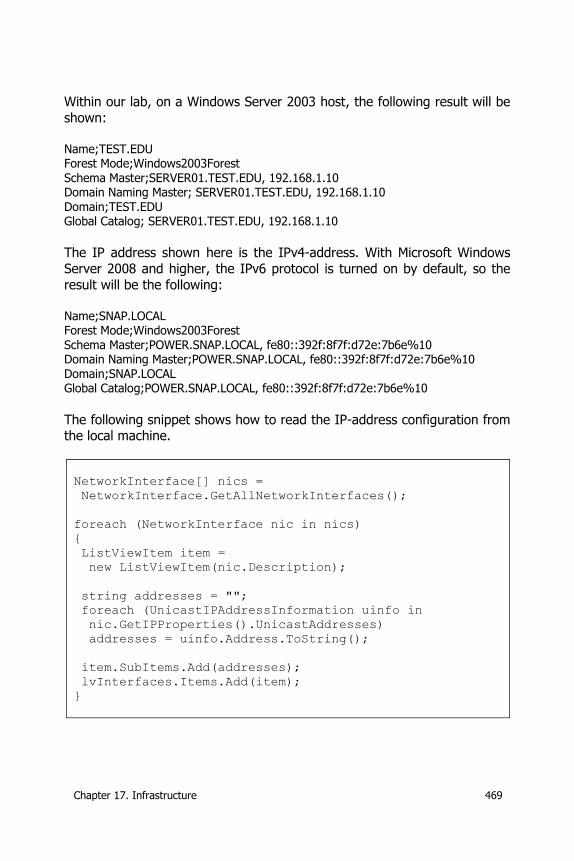
Chapter 17. Infrastructure 469
Within our lab, on a Windows Server 2003 host, the following result will be
shown: Name;TEST.EDU Forest Mode;Windows2003Forest Schema Master;SERVER01.TEST.EDU, 192.168.1.10 Domain Naming Master; SERVER01.TEST.EDU, 192.168.1.10 Domain;TEST.EDU Global Catalog; SERVER01.TEST.EDU, 192.168.1.10 The IP address shown here is the IPv4-address. With Microsoft Windows
Server 2008 and higher, the IPv6 protocol is turned on by default, so the
result will be the following: Name;SNAP.LOCAL Forest Mode;Windows2003Forest Schema Master;POWER.SNAP.LOCAL, fe80::392f:8f7f:d72e:7b6e%10 Domain Naming Master;POWER.SNAP.LOCAL, fe80::392f:8f7f:d72e:7b6e%10 Domain;SNAP.LOCAL Global Catalog;POWER.SNAP.LOCAL, fe80::392f:8f7f:d72e:7b6e%10
The following snippet shows how to read the IP-address configuration from the local machine.
NetworkInterface[] nics =
NetworkInterface.GetAllNetworkInterfaces();
foreach (NetworkInterface nic in nics)
{
ListViewItem item =
new ListViewItem(nic.Description);
string addresses = "";
foreach (UnicastIPAddressInformation uinfo in
nic.GetIPProperties().UnicastAddresses)
addresses = uinfo.Address.ToString();
item.SubItems.Add(addresses);
lvInterfaces.Items.Add(item);
}
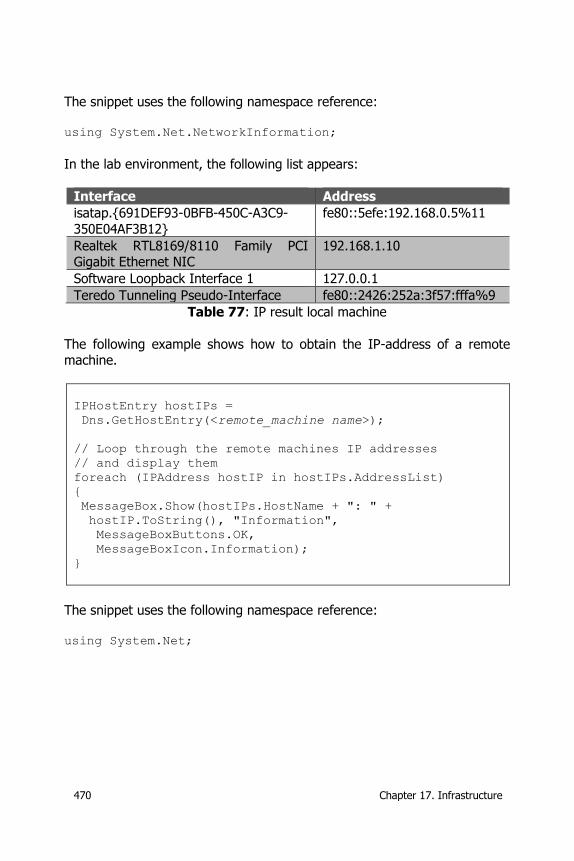
470 Chapter 17. Infrastructure
The snippet uses the following namespace reference:
using System.Net.NetworkInformation;
In the lab environment, the following list appears:
Interface Address
isatap.{691DEF93-0BFB-450C-A3C9-
350E04AF3B12}
fe80::5efe:192.168.0.5%11
Realtek RTL8169/8110 Family PCI Gigabit Ethernet NIC
192.168.1.10
Software Loopback Interface 1 127.0.0.1
Teredo Tunneling Pseudo-Interface fe80::2426:252a:3f57:fffa%9
Table 77: IP result local machine
The following example shows how to obtain the IP-address of a remote machine.
IPHostEntry hostIPs =
Dns.GetHostEntry(<remote_machine name>);
// Loop through the remote machines IP addresses
// and display them
foreach (IPAddress hostIP in hostIPs.AddressList)
{
MessageBox.Show(hostIPs.HostName + ": " +
hostIP.ToString(), "Information",
MessageBoxButtons.OK,
MessageBoxIcon.Information);
}
The snippet uses the following namespace reference: using System.Net;
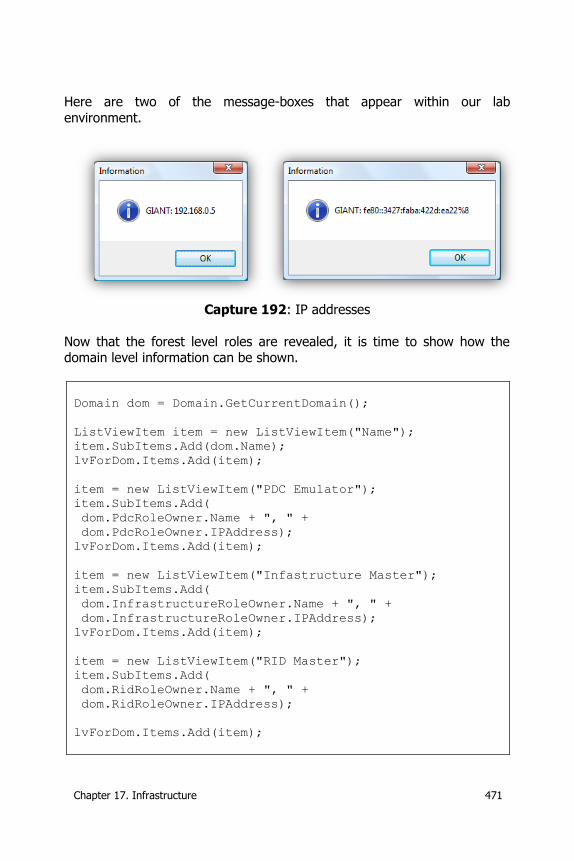
Chapter 17. Infrastructure 471
Here are two of the message-boxes that appear within our lab
environment.
Capture 192: IP addresses
Now that the forest level roles are revealed, it is time to show how the domain level information can be shown.
Domain dom = Domain.GetCurrentDomain();
ListViewItem item = new ListViewItem("Name");
item.SubItems.Add(dom.Name);
lvForDom.Items.Add(item);
item = new ListViewItem("PDC Emulator");
item.SubItems.Add(
dom.PdcRoleOwner.Name + ", " +
dom.PdcRoleOwner.IPAddress);
lvForDom.Items.Add(item);
item = new ListViewItem("Infastructure Master");
item.SubItems.Add(
dom.InfrastructureRoleOwner.Name + ", " +
dom.InfrastructureRoleOwner.IPAddress);
lvForDom.Items.Add(item);
item = new ListViewItem("RID Master");
item.SubItems.Add(
dom.RidRoleOwner.Name + ", " +
dom.RidRoleOwner.IPAddress);
lvForDom.Items.Add(item);

472 Chapter 17. Infrastructure
The snippet requires the following namespace reference:
using System.DirectoryServices.ActiveDirectory;
Within our lab, the snippet generates the following information:
Name;SNAP.LOCAL Domain Mode;Windows2003Domain DC;POWER.SNAP.LOCAL, fe80::392f:8f7f:d72e:7b6e%10 PDC Emulator;POWER.SNAP.LOCAL, fe80::392f:8f7f:d72e:7b6e%10
Infastructure Master;POWER.SNAP.LOCAL, fe80::392f:8f7f:d72e:7b6e%10 RID Master;POWER.SNAP.LOCAL, fe80::392f:8f7f:d72e:7b6e%10
17.4. Domain Controller(s)
Besides domain controllers with an FSMO-role installed, the organization
can have regular domain controllers as well. Most of the time, these domain controllers are placed for redundancy or in sites that are connected
with lower network bandwidth. The following snippet uses the DomainController-class and shows how to obtain a list of all domain
controllers in a particular domain.
Domain dom = Domain.GetCurrentDomain();
foreach (DomainController dc in
dom.DomainControllers)
{
ListViewItem item = new ListViewItem("DC");
item.SubItems.Add(dc.Name + ", " + dc.IPAddress);
lvForDom.Items.Add(item);
}
The snippet requires the following namespace reference:
using System.DirectoryServices.ActiveDirectory;
17.4.1. Operating system
Investigating the operating system of each Domain Controller is required prior to raising the domain functional level, as explained in paragraph
‘17.2.1. Domain Functional Levels’.
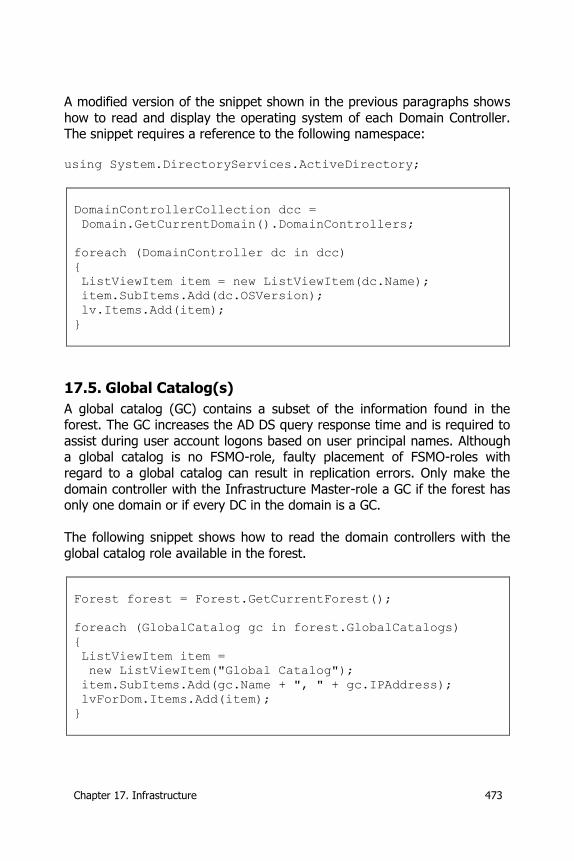
Chapter 17. Infrastructure 473
A modified version of the snippet shown in the previous paragraphs shows
how to read and display the operating system of each Domain Controller. The snippet requires a reference to the following namespace:
using System.DirectoryServices.ActiveDirectory;
DomainControllerCollection dcc =
Domain.GetCurrentDomain().DomainControllers;
foreach (DomainController dc in dcc)
{
ListViewItem item = new ListViewItem(dc.Name);
item.SubItems.Add(dc.OSVersion);
lv.Items.Add(item);
}
17.5. Global Catalog(s)
A global catalog (GC) contains a subset of the information found in the forest. The GC increases the AD DS query response time and is required to
assist during user account logons based on user principal names. Although a global catalog is no FSMO-role, faulty placement of FSMO-roles with
regard to a global catalog can result in replication errors. Only make the
domain controller with the Infrastructure Master-role a GC if the forest has only one domain or if every DC in the domain is a GC.
The following snippet shows how to read the domain controllers with the
global catalog role available in the forest.
Forest forest = Forest.GetCurrentForest();
foreach (GlobalCatalog gc in forest.GlobalCatalogs)
{
ListViewItem item =
new ListViewItem("Global Catalog");
item.SubItems.Add(gc.Name + ", " + gc.IPAddress);
lvForDom.Items.Add(item);
}
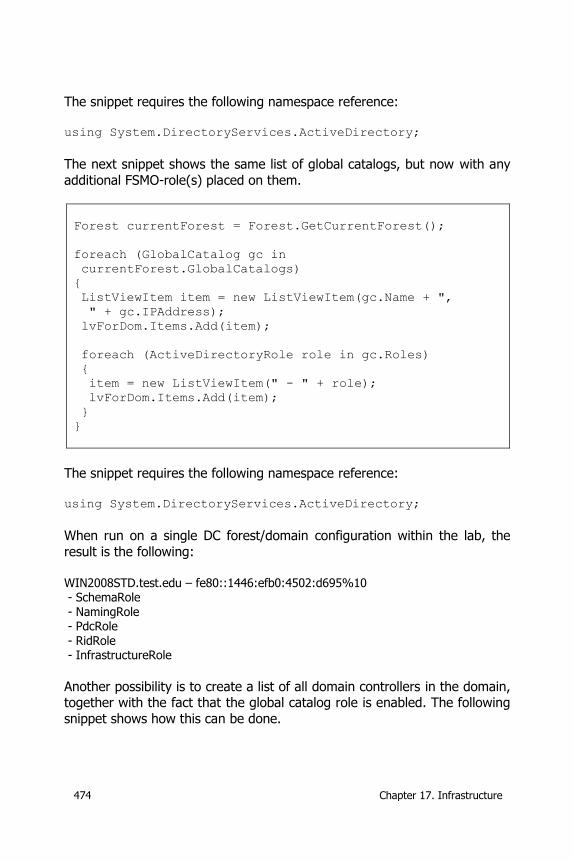
474 Chapter 17. Infrastructure
The snippet requires the following namespace reference:
using System.DirectoryServices.ActiveDirectory;
The next snippet shows the same list of global catalogs, but now with any
additional FSMO-role(s) placed on them.
Forest currentForest = Forest.GetCurrentForest();
foreach (GlobalCatalog gc in
currentForest.GlobalCatalogs)
{
ListViewItem item = new ListViewItem(gc.Name + ",
" + gc.IPAddress);
lvForDom.Items.Add(item);
foreach (ActiveDirectoryRole role in gc.Roles)
{
item = new ListViewItem(" - " + role);
lvForDom.Items.Add(item);
}
}
The snippet requires the following namespace reference: using System.DirectoryServices.ActiveDirectory;
When run on a single DC forest/domain configuration within the lab, the
result is the following: WIN2008STD.test.edu – fe80::1446:efb0:4502:d695%10 - SchemaRole - NamingRole - PdcRole - RidRole - InfrastructureRole
Another possibility is to create a list of all domain controllers in the domain, together with the fact that the global catalog role is enabled. The following
snippet shows how this can be done.
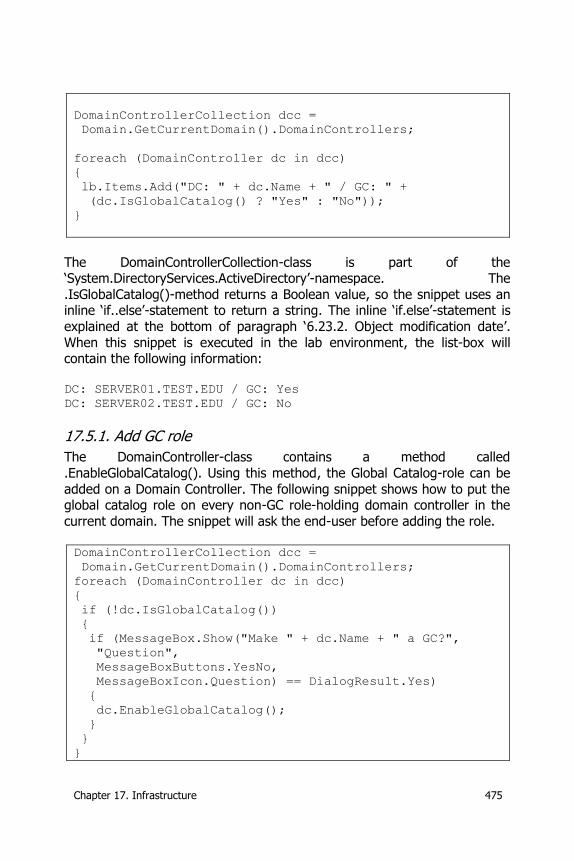
Chapter 17. Infrastructure 475
DomainControllerCollection dcc =
Domain.GetCurrentDomain().DomainControllers;
foreach (DomainController dc in dcc)
{
lb.Items.Add("DC: " + dc.Name + " / GC: " +
(dc.IsGlobalCatalog() ? "Yes" : "No"));
}
The DomainControllerCollection-class is part of the ‘System.DirectoryServices.ActiveDirectory’-namespace. The
.IsGlobalCatalog()-method returns a Boolean value, so the snippet uses an inline ‘if..else’-statement to return a string. The inline ‘if.else’-statement is
explained at the bottom of paragraph ‘6.23.2. Object modification date’.
When this snippet is executed in the lab environment, the list-box will contain the following information:
DC: SERVER01.TEST.EDU / GC: Yes
DC: SERVER02.TEST.EDU / GC: No
17.5.1. Add GC role
The DomainController-class contains a method called
.EnableGlobalCatalog(). Using this method, the Global Catalog-role can be
added on a Domain Controller. The following snippet shows how to put the global catalog role on every non-GC role-holding domain controller in the
current domain. The snippet will ask the end-user before adding the role. DomainControllerCollection dcc =
Domain.GetCurrentDomain().DomainControllers;
foreach (DomainController dc in dcc)
{
if (!dc.IsGlobalCatalog())
{
if (MessageBox.Show("Make " + dc.Name + " a GC?",
"Question",
MessageBoxButtons.YesNo,
MessageBoxIcon.Question) == DialogResult.Yes)
{
dc.EnableGlobalCatalog();
}
}
}
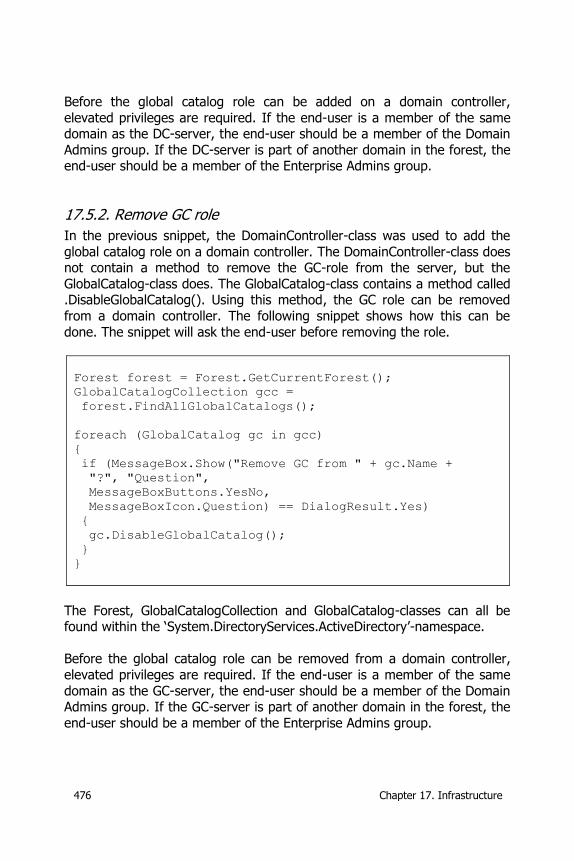
476 Chapter 17. Infrastructure
Before the global catalog role can be added on a domain controller,
elevated privileges are required. If the end-user is a member of the same domain as the DC-server, the end-user should be a member of the Domain
Admins group. If the DC-server is part of another domain in the forest, the end-user should be a member of the Enterprise Admins group.
17.5.2. Remove GC role
In the previous snippet, the DomainController-class was used to add the
global catalog role on a domain controller. The DomainController-class does not contain a method to remove the GC-role from the server, but the
GlobalCatalog-class does. The GlobalCatalog-class contains a method called .DisableGlobalCatalog(). Using this method, the GC role can be removed
from a domain controller. The following snippet shows how this can be
done. The snippet will ask the end-user before removing the role.
Forest forest = Forest.GetCurrentForest();
GlobalCatalogCollection gcc =
forest.FindAllGlobalCatalogs();
foreach (GlobalCatalog gc in gcc)
{
if (MessageBox.Show("Remove GC from " + gc.Name +
"?", "Question",
MessageBoxButtons.YesNo,
MessageBoxIcon.Question) == DialogResult.Yes)
{
gc.DisableGlobalCatalog();
}
}
The Forest, GlobalCatalogCollection and GlobalCatalog-classes can all be found within the ‘System.DirectoryServices.ActiveDirectory’-namespace.
Before the global catalog role can be removed from a domain controller,
elevated privileges are required. If the end-user is a member of the same
domain as the GC-server, the end-user should be a member of the Domain Admins group. If the GC-server is part of another domain in the forest, the
end-user should be a member of the Enterprise Admins group.
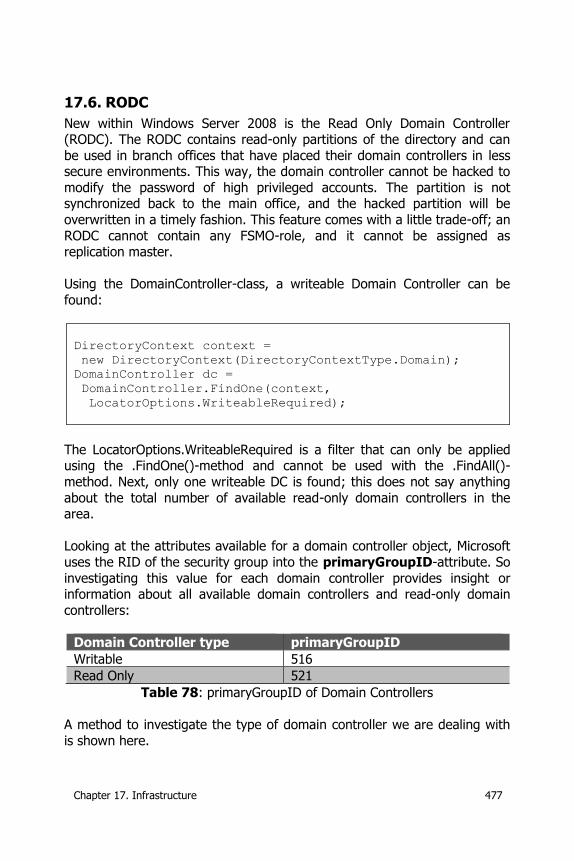
Chapter 17. Infrastructure 477
17.6. RODC
New within Windows Server 2008 is the Read Only Domain Controller (RODC). The RODC contains read-only partitions of the directory and can
be used in branch offices that have placed their domain controllers in less secure environments. This way, the domain controller cannot be hacked to
modify the password of high privileged accounts. The partition is not synchronized back to the main office, and the hacked partition will be
overwritten in a timely fashion. This feature comes with a little trade-off; an
RODC cannot contain any FSMO-role, and it cannot be assigned as replication master.
Using the DomainController-class, a writeable Domain Controller can be
found:
DirectoryContext context =
new DirectoryContext(DirectoryContextType.Domain);
DomainController dc =
DomainController.FindOne(context,
LocatorOptions.WriteableRequired);
The LocatorOptions.WriteableRequired is a filter that can only be applied using the .FindOne()-method and cannot be used with the .FindAll()-
method. Next, only one writeable DC is found; this does not say anything
about the total number of available read-only domain controllers in the area.
Looking at the attributes available for a domain controller object, Microsoft
uses the RID of the security group into the primaryGroupID-attribute. So
investigating this value for each domain controller provides insight or information about all available domain controllers and read-only domain
controllers:
Domain Controller type primaryGroupID
Writable 516
Read Only 521
Table 78: primaryGroupID of Domain Controllers
A method to investigate the type of domain controller we are dealing with
is shown here.
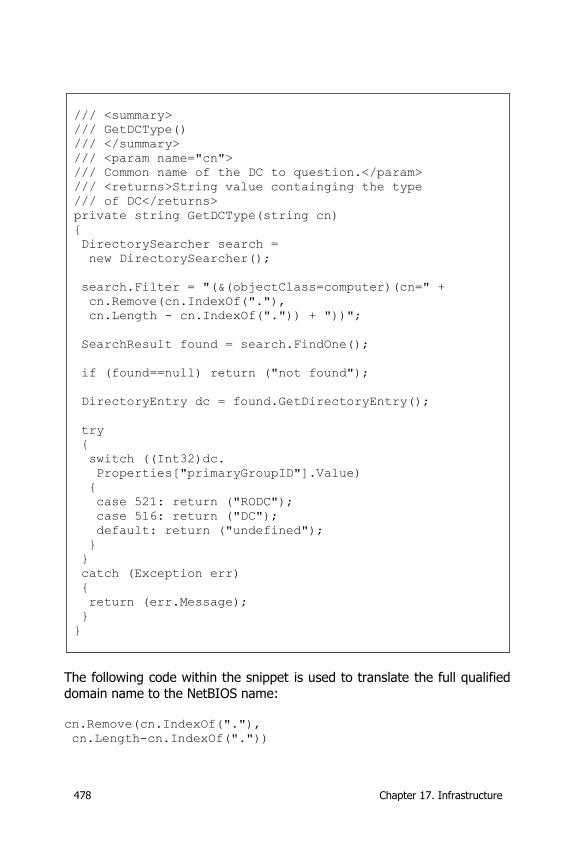
478 Chapter 17. Infrastructure
/// <summary>
/// GetDCType()
/// </summary>
/// <param name="cn">
/// Common name of the DC to question.</param>
/// <returns>String value containging the type
/// of DC</returns>
private string GetDCType(string cn)
{
DirectorySearcher search =
new DirectorySearcher();
search.Filter = "(&(objectClass=computer)(cn=" +
cn.Remove(cn.IndexOf("."),
cn.Length - cn.IndexOf(".")) + "))";
SearchResult found = search.FindOne();
if (found==null) return ("not found");
DirectoryEntry dc = found.GetDirectoryEntry();
try
{
switch ((Int32)dc.
Properties["primaryGroupID"].Value)
{
case 521: return ("RODC");
case 516: return ("DC");
default: return ("undefined");
}
}
catch (Exception err)
{
return (err.Message);
}
}
The following code within the snippet is used to translate the full qualified
domain name to the NetBIOS name:
cn.Remove(cn.IndexOf("."),
cn.Length-cn.IndexOf("."))
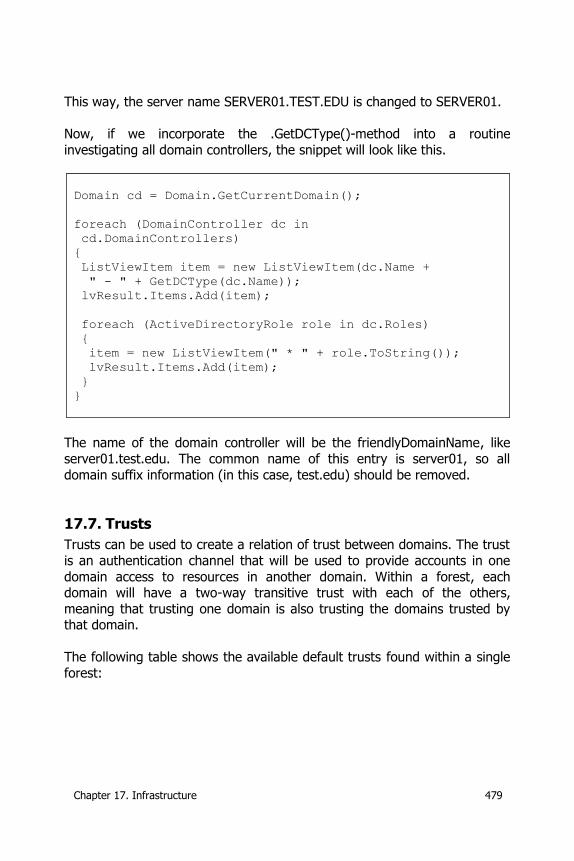
Chapter 17. Infrastructure 479
This way, the server name SERVER01.TEST.EDU is changed to SERVER01.
Now, if we incorporate the .GetDCType()-method into a routine
investigating all domain controllers, the snippet will look like this.
Domain cd = Domain.GetCurrentDomain();
foreach (DomainController dc in
cd.DomainControllers)
{
ListViewItem item = new ListViewItem(dc.Name +
" - " + GetDCType(dc.Name));
lvResult.Items.Add(item);
foreach (ActiveDirectoryRole role in dc.Roles)
{
item = new ListViewItem(" * " + role.ToString());
lvResult.Items.Add(item);
}
}
The name of the domain controller will be the friendlyDomainName, like
server01.test.edu. The common name of this entry is server01, so all
domain suffix information (in this case, test.edu) should be removed.
17.7. Trusts
Trusts can be used to create a relation of trust between domains. The trust
is an authentication channel that will be used to provide accounts in one
domain access to resources in another domain. Within a forest, each domain will have a two-way transitive trust with each of the others,
meaning that trusting one domain is also trusting the domains trusted by that domain.
The following table shows the available default trusts found within a single
forest:

480 Chapter 17. Infrastructure
Type Transitivity Direction Comment
Tree-root Transitive Two-way Automatically created when a new domain tree is created in
an existing forest.
Parent-child
Transitive Two-way Automatically created when a new child is added to an
existing domain tree. Authentication requests made
from a subordinate domain
flow upward through their parent to the trusting
domain.
Table 79: Default trusts
The following table shows trusts that can be created manually:
Type Transitivity Direction Comment
External Non-transitive One-way or two-way
External trusts are used to provide access on resource
that are located within a Windows NT 4.0 or located
in a domain within a separate forest.
Realm Transitive or
non-transitive
One-way or
two-way
Realm trusts can be used to
create a trust between a Microsoft Windows domain
and a non-Windows domain.
Forest Transitive One-way or two-way
Forest trusts are used to share resources between
forests. If the trust is created as two-way trust,
authentication requests
made in either forest reach the other forest.
Shortcut Transitive One-way or
two-way
Shortcut trusts can be used
to improve the logon times between two domains within
a forest. This is useful when two domains are separated
by two domain trees.
Table 80: Creatable trusts
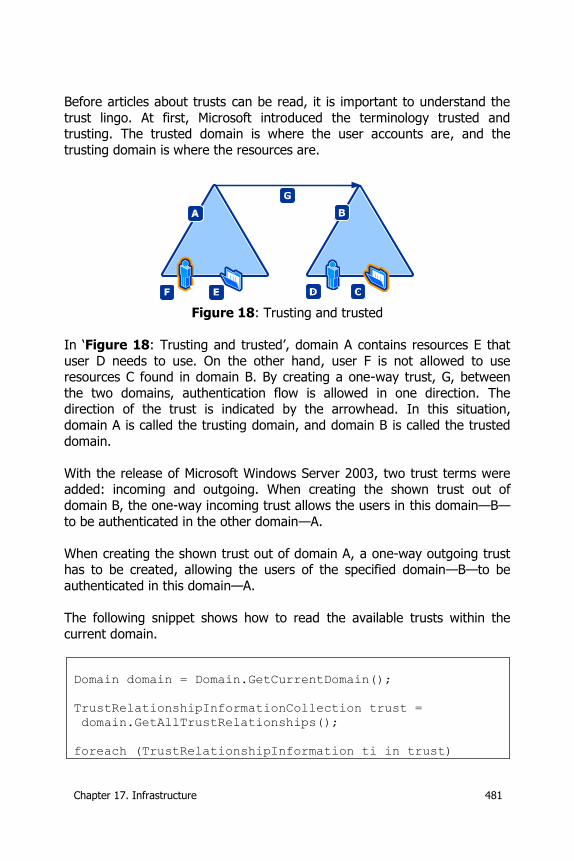
Chapter 17. Infrastructure 481
Before articles about trusts can be read, it is important to understand the
trust lingo. At first, Microsoft introduced the terminology trusted and trusting. The trusted domain is where the user accounts are, and the
trusting domain is where the resources are.
Figure 18: Trusting and trusted
In ‘Figure 18: Trusting and trusted’, domain A contains resources E that
user D needs to use. On the other hand, user F is not allowed to use resources C found in domain B. By creating a one-way trust, G, between
the two domains, authentication flow is allowed in one direction. The direction of the trust is indicated by the arrowhead. In this situation,
domain A is called the trusting domain, and domain B is called the trusted
domain.
With the release of Microsoft Windows Server 2003, two trust terms were added: incoming and outgoing. When creating the shown trust out of
domain B, the one-way incoming trust allows the users in this domain—B—
to be authenticated in the other domain—A.
When creating the shown trust out of domain A, a one-way outgoing trust has to be created, allowing the users of the specified domain—B—to be
authenticated in this domain—A.
The following snippet shows how to read the available trusts within the
current domain.
Domain domain = Domain.GetCurrentDomain();
TrustRelationshipInformationCollection trust =
domain.GetAllTrustRelationships();
foreach (TrustRelationshipInformation ti in trust)
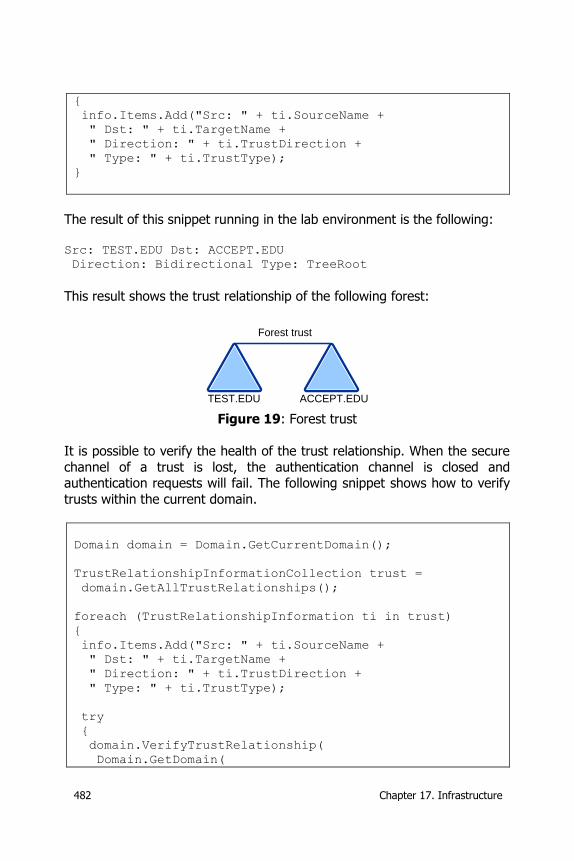
482 Chapter 17. Infrastructure
{
info.Items.Add("Src: " + ti.SourceName +
" Dst: " + ti.TargetName +
" Direction: " + ti.TrustDirection +
" Type: " + ti.TrustType);
}
The result of this snippet running in the lab environment is the following: Src: TEST.EDU Dst: ACCEPT.EDU
Direction: Bidirectional Type: TreeRoot
This result shows the trust relationship of the following forest:
Forest trust
TEST.EDU ACCEPT.EDU
Figure 19: Forest trust
It is possible to verify the health of the trust relationship. When the secure
channel of a trust is lost, the authentication channel is closed and authentication requests will fail. The following snippet shows how to verify
trusts within the current domain.
Domain domain = Domain.GetCurrentDomain();
TrustRelationshipInformationCollection trust =
domain.GetAllTrustRelationships();
foreach (TrustRelationshipInformation ti in trust)
{
info.Items.Add("Src: " + ti.SourceName +
" Dst: " + ti.TargetName +
" Direction: " + ti.TrustDirection +
" Type: " + ti.TrustType);
try
{
domain.VerifyTrustRelationship(
Domain.GetDomain(
Chapter 17. Infrastructure 483
new DirectoryContext(
DirectoryContextType.Domain,
ti.TargetName)), ti.TrustDirection);
info.Items.Add("Verify: true");
}
catch (ActiveDirectoryServerDownException err)
{
info.Items.Add("Verify failed (ServerDown): " +
err.Message);
}
catch (UnauthorizedAccessException err)
{
info.Items.Add(
"Verify failed (InsufficientRights): " +
err.Message);
}
catch (Exception err)
{
info.Items.Add("Verify (Undefined): " +
err.Message);
}
}
When this snippet is run in the lab environment, the following message will
be in the list-box: Src: TEST.EDU Dst: ACCEPT.EDU
Direction: Bidirectional Type: TreeRoot
Verify: true
The exceptions used in the snippet shown are two of the most common exceptions and one general exception (Exception) catching all other
possible failures. The first exception, ActiveDirectoryServerDownException, will be caught when the domain controller asked is down. The second
exception, UnauthorizedAccessException, will be caught when the end-user does not have sufficient permission to query trust relationships.
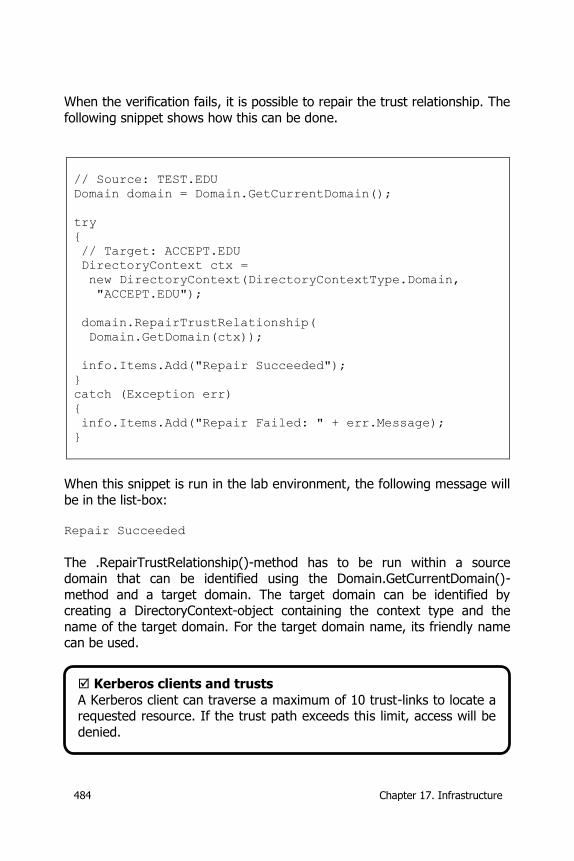
484 Chapter 17. Infrastructure
When the verification fails, it is possible to repair the trust relationship. The
following snippet shows how this can be done.
// Source: TEST.EDU
Domain domain = Domain.GetCurrentDomain();
try
{
// Target: ACCEPT.EDU
DirectoryContext ctx =
new DirectoryContext(DirectoryContextType.Domain,
"ACCEPT.EDU");
domain.RepairTrustRelationship(
Domain.GetDomain(ctx));
info.Items.Add("Repair Succeeded");
}
catch (Exception err)
{
info.Items.Add("Repair Failed: " + err.Message);
}
When this snippet is run in the lab environment, the following message will
be in the list-box:
Repair Succeeded
The .RepairTrustRelationship()-method has to be run within a source domain that can be identified using the Domain.GetCurrentDomain()-
method and a target domain. The target domain can be identified by creating a DirectoryContext-object containing the context type and the
name of the target domain. For the target domain name, its friendly name can be used.
Kerberos clients and trusts
A Kerberos client can traverse a maximum of 10 trust-links to locate a requested resource. If the trust path exceeds this limit, access will be
denied.
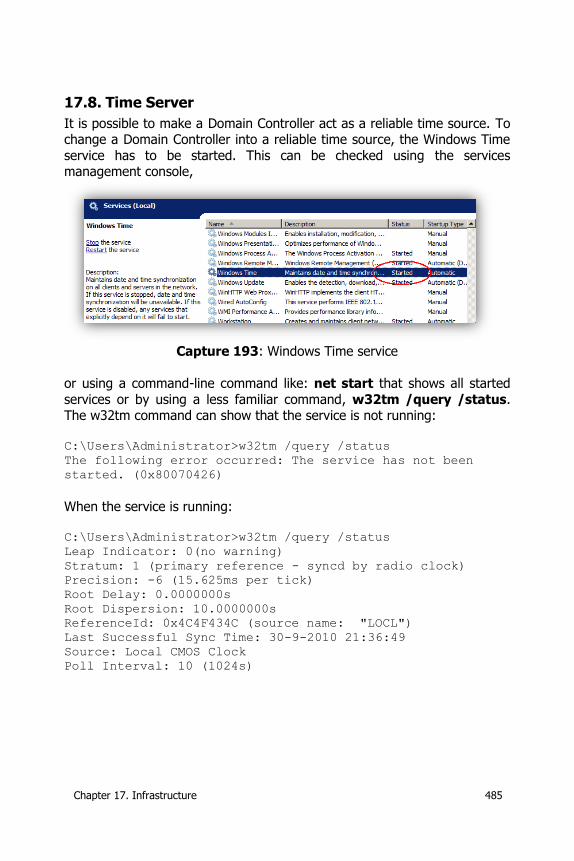
Chapter 17. Infrastructure 485
17.8. Time Server
It is possible to make a Domain Controller act as a reliable time source. To change a Domain Controller into a reliable time source, the Windows Time
service has to be started. This can be checked using the services management console,
Capture 193: Windows Time service
or using a command-line command like: net start that shows all started
services or by using a less familiar command, w32tm /query /status. The w32tm command can show that the service is not running:
C:\Users\Administrator>w32tm /query /status
The following error occurred: The service has not been
started. (0x80070426)
When the service is running:
C:\Users\Administrator>w32tm /query /status
Leap Indicator: 0(no warning)
Stratum: 1 (primary reference - syncd by radio clock)
Precision: -6 (15.625ms per tick)
Root Delay: 0.0000000s
Root Dispersion: 10.0000000s
ReferenceId: 0x4C4F434C (source name: "LOCL")
Last Successful Sync Time: 30-9-2010 21:36:49
Source: Local CMOS Clock
Poll Interval: 10 (1024s)
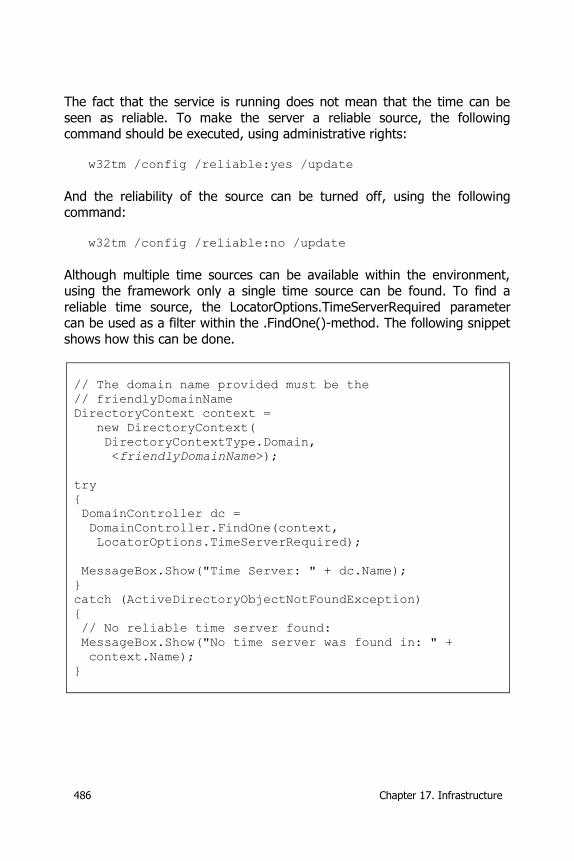
486 Chapter 17. Infrastructure
The fact that the service is running does not mean that the time can be
seen as reliable. To make the server a reliable source, the following command should be executed, using administrative rights:
w32tm /config /reliable:yes /update
And the reliability of the source can be turned off, using the following command:
w32tm /config /reliable:no /update
Although multiple time sources can be available within the environment, using the framework only a single time source can be found. To find a
reliable time source, the LocatorOptions.TimeServerRequired parameter can be used as a filter within the .FindOne()-method. The following snippet
shows how this can be done.
// The domain name provided must be the
// friendlyDomainName
DirectoryContext context =
new DirectoryContext(
DirectoryContextType.Domain,
<friendlyDomainName>);
try
{
DomainController dc =
DomainController.FindOne(context,
LocatorOptions.TimeServerRequired);
MessageBox.Show("Time Server: " + dc.Name);
}
catch (ActiveDirectoryObjectNotFoundException)
{
// No reliable time server found:
MessageBox.Show("No time server was found in: " +
context.Name);
}
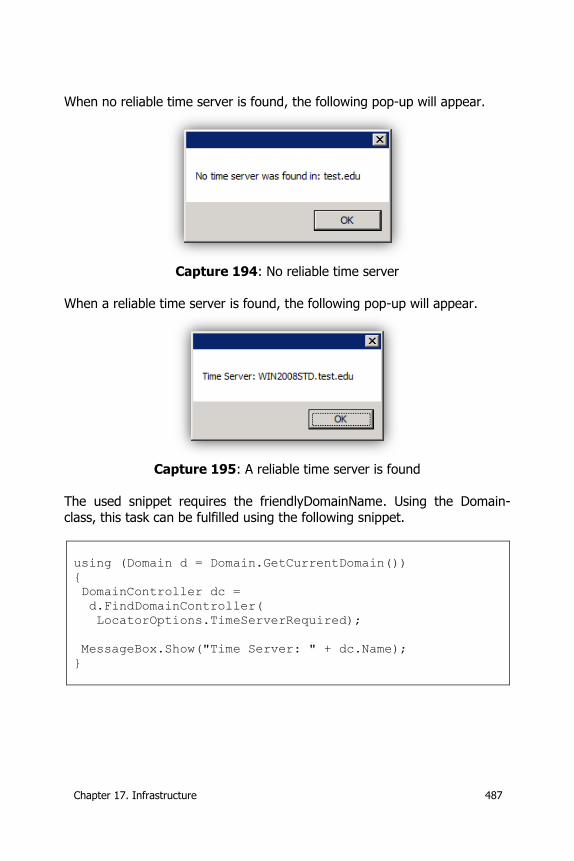
Chapter 17. Infrastructure 487
When no reliable time server is found, the following pop-up will appear.
Capture 194: No reliable time server
When a reliable time server is found, the following pop-up will appear.
Capture 195: A reliable time server is found
The used snippet requires the friendlyDomainName. Using the Domain-
class, this task can be fulfilled using the following snippet.
using (Domain d = Domain.GetCurrentDomain())
{
DomainController dc =
d.FindDomainController(
LocatorOptions.TimeServerRequired);
MessageBox.Show("Time Server: " + dc.Name);
}
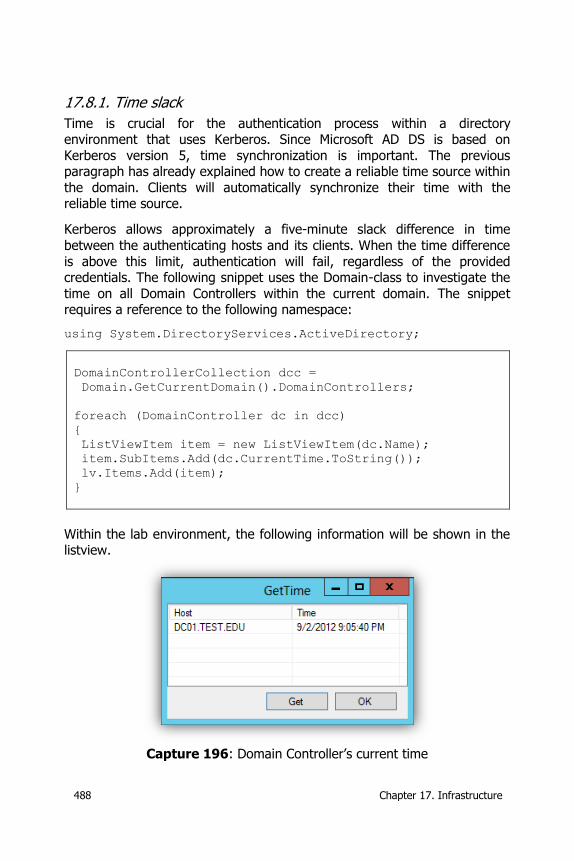
488 Chapter 17. Infrastructure
17.8.1. Time slack
Time is crucial for the authentication process within a directory environment that uses Kerberos. Since Microsoft AD DS is based on
Kerberos version 5, time synchronization is important. The previous paragraph has already explained how to create a reliable time source within
the domain. Clients will automatically synchronize their time with the reliable time source.
Kerberos allows approximately a five-minute slack difference in time
between the authenticating hosts and its clients. When the time difference
is above this limit, authentication will fail, regardless of the provided credentials. The following snippet uses the Domain-class to investigate the
time on all Domain Controllers within the current domain. The snippet requires a reference to the following namespace:
using System.DirectoryServices.ActiveDirectory;
DomainControllerCollection dcc =
Domain.GetCurrentDomain().DomainControllers;
foreach (DomainController dc in dcc)
{
ListViewItem item = new ListViewItem(dc.Name);
item.SubItems.Add(dc.CurrentTime.ToString());
lv.Items.Add(item);
}
Within the lab environment, the following information will be shown in the listview.
Capture 196: Domain Controller’s current time
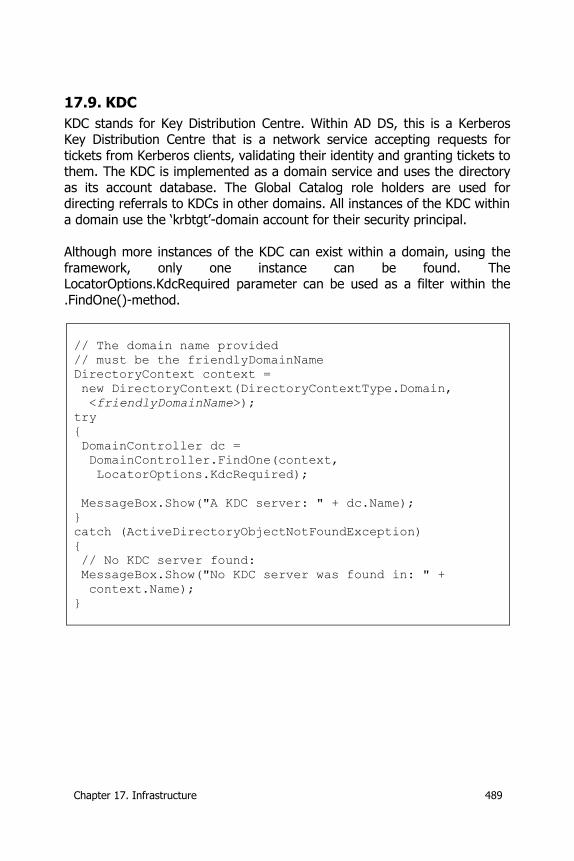
Chapter 17. Infrastructure 489
17.9. KDC
KDC stands for Key Distribution Centre. Within AD DS, this is a Kerberos Key Distribution Centre that is a network service accepting requests for
tickets from Kerberos clients, validating their identity and granting tickets to them. The KDC is implemented as a domain service and uses the directory
as its account database. The Global Catalog role holders are used for directing referrals to KDCs in other domains. All instances of the KDC within
a domain use the ‘krbtgt’-domain account for their security principal.
Although more instances of the KDC can exist within a domain, using the
framework, only one instance can be found. The LocatorOptions.KdcRequired parameter can be used as a filter within the
.FindOne()-method.
// The domain name provided
// must be the friendlyDomainName
DirectoryContext context =
new DirectoryContext(DirectoryContextType.Domain,
<friendlyDomainName>);
try
{
DomainController dc =
DomainController.FindOne(context,
LocatorOptions.KdcRequired);
MessageBox.Show("A KDC server: " + dc.Name);
}
catch (ActiveDirectoryObjectNotFoundException)
{
// No KDC server found:
MessageBox.Show("No KDC server was found in: " +
context.Name);
}
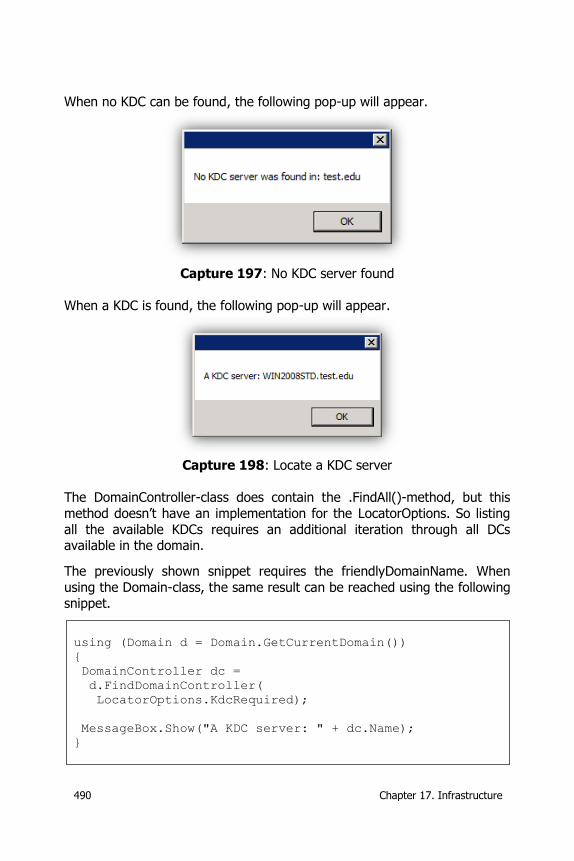
490 Chapter 17. Infrastructure
When no KDC can be found, the following pop-up will appear.
Capture 197: No KDC server found
When a KDC is found, the following pop-up will appear.
Capture 198: Locate a KDC server
The DomainController-class does contain the .FindAll()-method, but this
method doesn’t have an implementation for the LocatorOptions. So listing
all the available KDCs requires an additional iteration through all DCs available in the domain.
The previously shown snippet requires the friendlyDomainName. When
using the Domain-class, the same result can be reached using the following snippet.
using (Domain d = Domain.GetCurrentDomain())
{
DomainController dc =
d.FindDomainController(
LocatorOptions.KdcRequired);
MessageBox.Show("A KDC server: " + dc.Name);
}
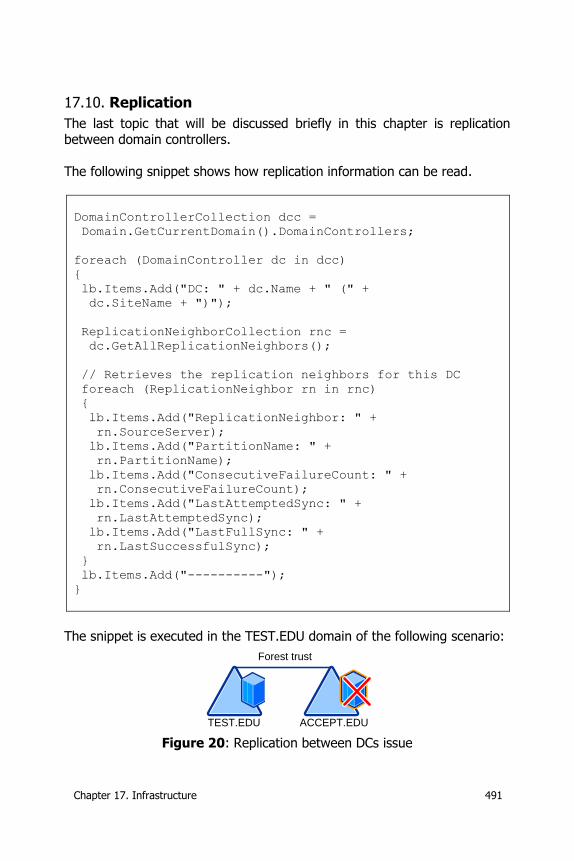
Chapter 17. Infrastructure 491
17.10. Replication
The last topic that will be discussed briefly in this chapter is replication between domain controllers.
The following snippet shows how replication information can be read.
DomainControllerCollection dcc =
Domain.GetCurrentDomain().DomainControllers;
foreach (DomainController dc in dcc)
{
lb.Items.Add("DC: " + dc.Name + " (" +
dc.SiteName + ")");
ReplicationNeighborCollection rnc =
dc.GetAllReplicationNeighbors();
// Retrieves the replication neighbors for this DC
foreach (ReplicationNeighbor rn in rnc)
{
lb.Items.Add("ReplicationNeighbor: " +
rn.SourceServer);
lb.Items.Add("PartitionName: " +
rn.PartitionName);
lb.Items.Add("ConsecutiveFailureCount: " +
rn.ConsecutiveFailureCount);
lb.Items.Add("LastAttemptedSync: " +
rn.LastAttemptedSync);
lb.Items.Add("LastFullSync: " +
rn.LastSuccessfulSync);
}
lb.Items.Add("----------");
}
The snippet is executed in the TEST.EDU domain of the following scenario:
Forest trust
TEST.EDU ACCEPT.EDU
Figure 20: Replication between DCs issue
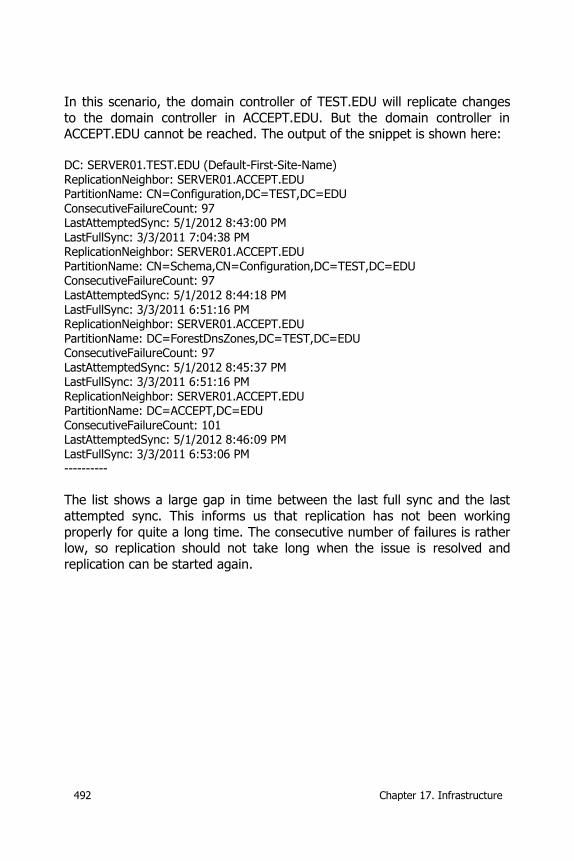
492 Chapter 17. Infrastructure
In this scenario, the domain controller of TEST.EDU will replicate changes
to the domain controller in ACCEPT.EDU. But the domain controller in ACCEPT.EDU cannot be reached. The output of the snippet is shown here:
DC: SERVER01.TEST.EDU (Default-First-Site-Name) ReplicationNeighbor: SERVER01.ACCEPT.EDU PartitionName: CN=Configuration,DC=TEST,DC=EDU ConsecutiveFailureCount: 97 LastAttemptedSync: 5/1/2012 8:43:00 PM LastFullSync: 3/3/2011 7:04:38 PM ReplicationNeighbor: SERVER01.ACCEPT.EDU PartitionName: CN=Schema,CN=Configuration,DC=TEST,DC=EDU ConsecutiveFailureCount: 97 LastAttemptedSync: 5/1/2012 8:44:18 PM LastFullSync: 3/3/2011 6:51:16 PM ReplicationNeighbor: SERVER01.ACCEPT.EDU PartitionName: DC=ForestDnsZones,DC=TEST,DC=EDU ConsecutiveFailureCount: 97 LastAttemptedSync: 5/1/2012 8:45:37 PM LastFullSync: 3/3/2011 6:51:16 PM ReplicationNeighbor: SERVER01.ACCEPT.EDU PartitionName: DC=ACCEPT,DC=EDU ConsecutiveFailureCount: 101 LastAttemptedSync: 5/1/2012 8:46:09 PM LastFullSync: 3/3/2011 6:53:06 PM ---------- The list shows a large gap in time between the last full sync and the last
attempted sync. This informs us that replication has not been working
properly for quite a long time. The consecutive number of failures is rather low, so replication should not take long when the issue is resolved and
replication can be started again.
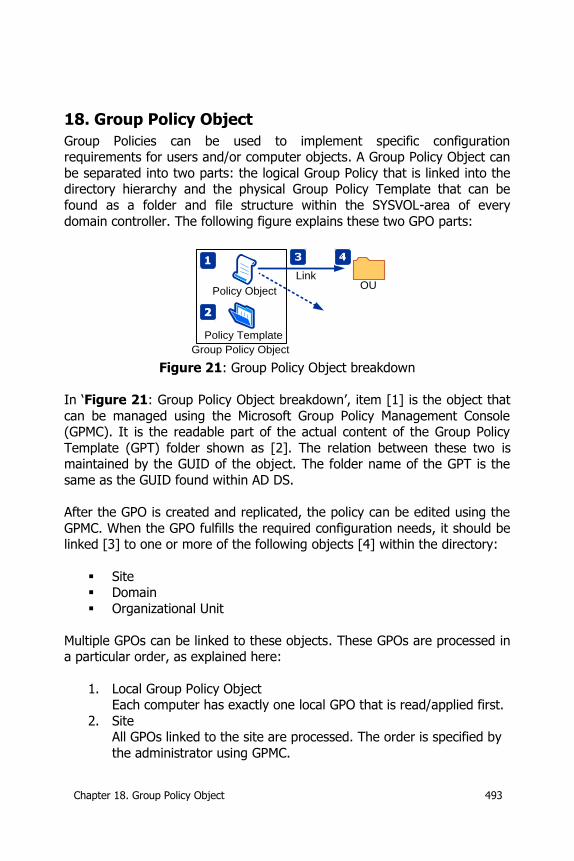
Chapter 18. Group Policy Object 493
18. Group Policy Object
Group Policies can be used to implement specific configuration requirements for users and/or computer objects. A Group Policy Object can
be separated into two parts: the logical Group Policy that is linked into the directory hierarchy and the physical Group Policy Template that can be
found as a folder and file structure within the SYSVOL-area of every
domain controller. The following figure explains these two GPO parts:
OUPolicy Object
Policy Template
Link
Group Policy Object Figure 21: Group Policy Object breakdown
In ‘Figure 21: Group Policy Object breakdown’, item [1] is the object that
can be managed using the Microsoft Group Policy Management Console (GPMC). It is the readable part of the actual content of the Group Policy
Template (GPT) folder shown as [2]. The relation between these two is maintained by the GUID of the object. The folder name of the GPT is the
same as the GUID found within AD DS.
After the GPO is created and replicated, the policy can be edited using the
GPMC. When the GPO fulfills the required configuration needs, it should be linked [3] to one or more of the following objects [4] within the directory:
Site Domain
Organizational Unit
Multiple GPOs can be linked to these objects. These GPOs are processed in a particular order, as explained here:
1. Local Group Policy Object Each computer has exactly one local GPO that is read/applied first.
2. Site All GPOs linked to the site are processed. The order is specified by
the administrator using GPMC.
494 Chapter 18. Group Policy Object
3. Domain
All GPOs linked to the domain are processed. The order is specified by the administrator using the GPMC.
4. Organizational Units Last, all GPOs linked to OUs are processed according to their
position within the AD DS hierarchy. The highest linked OU within the hierarchy will be processed first. Next, child OU GPOs will be
applied until the OU containing the user or computer account
object is reached.
Exceptions to this order can be made by using the ‘No Override’, ‘Disable’ and the ‘Block Policy inheritance’-options available on each site, domain or
OU. Furthermore, two loopback options are available on computer account
objects: replace and merge. These can be used to protect the local computer account policy from being overwritten.
18.1. Reading GPOs
Although reading GPOs can be done using the .NET Framework, it cannot be done using an out-of-the-box installation of the framework. A reference
toward the ‘Microsoft.GroupPolicy.Management’-library is required to be able to read GPOs. This library is part of the Remote Server Administration
Tools (RSAT) and can be found in the following folder: %SystemRoot%\assembly\GAC_MSIL\
Microsoft.GroupPolicy.Management\
2.0.0.0__31bf3856ad364e35\
Microsoft.GroupPolicy.Management.dll
If the library is missing from this folder, install RSAT and activate the
GPMC-features on the system. Using Visual Studio 2008 (and older), it can
be quite cumbersome to add the reference.
GPO limit
There is a maximum limitation of 999 GPOs that can be applied to a user or computer account object. Thus a single user or computer
account object will not be able to process more than 999 GPOs. Therefore the maximum number of GPOs that will be processed, by a
user/computer combination, is 1998. This limitation is added for performance reasons.
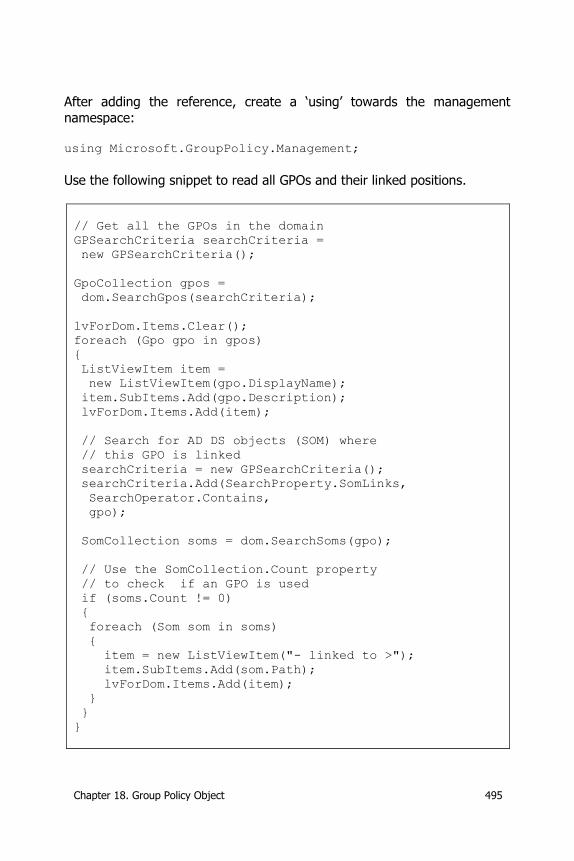
Chapter 18. Group Policy Object 495
After adding the reference, create a ‘using’ towards the management
namespace: using Microsoft.GroupPolicy.Management;
Use the following snippet to read all GPOs and their linked positions.
// Get all the GPOs in the domain
GPSearchCriteria searchCriteria =
new GPSearchCriteria();
GpoCollection gpos =
dom.SearchGpos(searchCriteria);
lvForDom.Items.Clear();
foreach (Gpo gpo in gpos)
{
ListViewItem item =
new ListViewItem(gpo.DisplayName);
item.SubItems.Add(gpo.Description);
lvForDom.Items.Add(item);
// Search for AD DS objects (SOM) where
// this GPO is linked
searchCriteria = new GPSearchCriteria();
searchCriteria.Add(SearchProperty.SomLinks,
SearchOperator.Contains,
gpo);
SomCollection soms = dom.SearchSoms(gpo);
// Use the SomCollection.Count property
// to check if an GPO is used
if (soms.Count != 0)
{
foreach (Som som in soms)
{
item = new ListViewItem("- linked to >");
item.SubItems.Add(som.Path);
lvForDom.Items.Add(item);
}
}
}
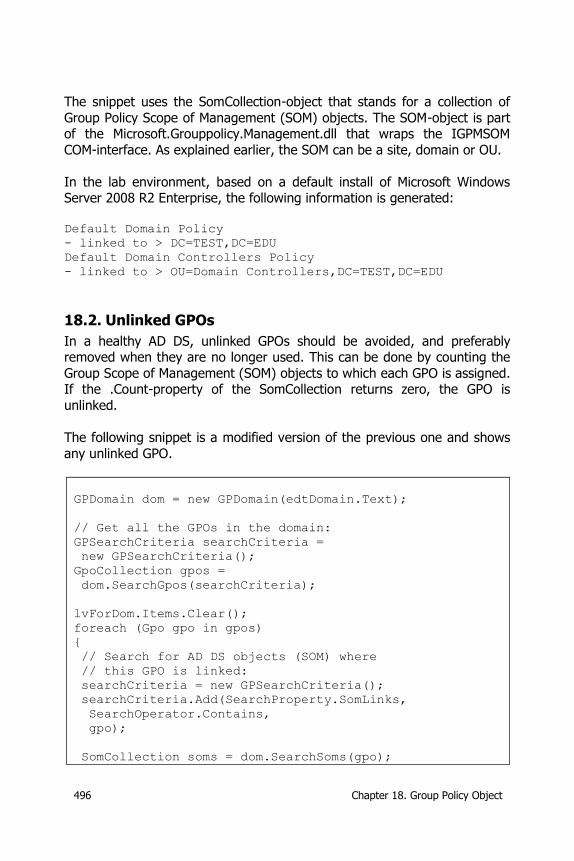
496 Chapter 18. Group Policy Object
The snippet uses the SomCollection-object that stands for a collection of
Group Policy Scope of Management (SOM) objects. The SOM-object is part of the Microsoft.Grouppolicy.Management.dll that wraps the IGPMSOM
COM-interface. As explained earlier, the SOM can be a site, domain or OU.
In the lab environment, based on a default install of Microsoft Windows Server 2008 R2 Enterprise, the following information is generated:
Default Domain Policy
- linked to > DC=TEST,DC=EDU
Default Domain Controllers Policy
- linked to > OU=Domain Controllers,DC=TEST,DC=EDU
18.2. Unlinked GPOs
In a healthy AD DS, unlinked GPOs should be avoided, and preferably removed when they are no longer used. This can be done by counting the
Group Scope of Management (SOM) objects to which each GPO is assigned. If the .Count-property of the SomCollection returns zero, the GPO is
unlinked.
The following snippet is a modified version of the previous one and shows
any unlinked GPO.
GPDomain dom = new GPDomain(edtDomain.Text);
// Get all the GPOs in the domain:
GPSearchCriteria searchCriteria =
new GPSearchCriteria();
GpoCollection gpos =
dom.SearchGpos(searchCriteria);
lvForDom.Items.Clear();
foreach (Gpo gpo in gpos)
{
// Search for AD DS objects (SOM) where
// this GPO is linked:
searchCriteria = new GPSearchCriteria();
searchCriteria.Add(SearchProperty.SomLinks,
SearchOperator.Contains,
gpo);
SomCollection soms = dom.SearchSoms(gpo);
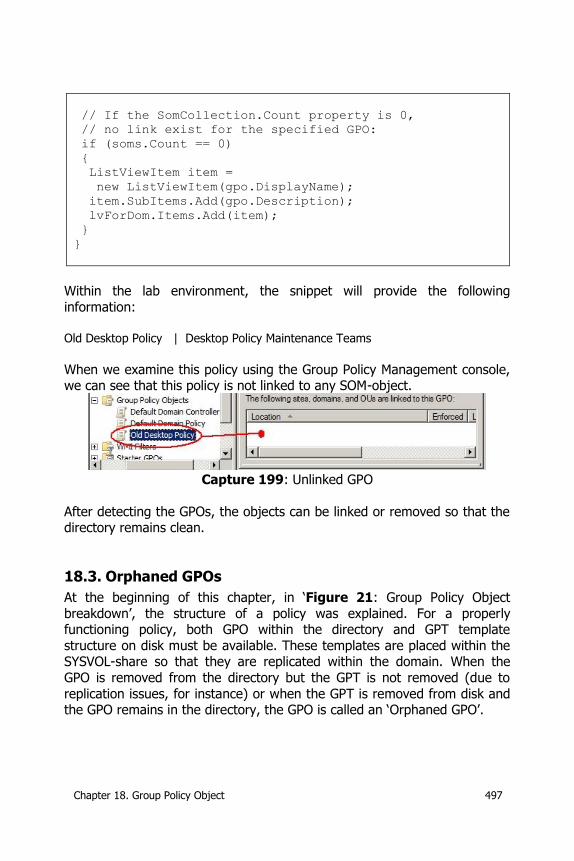
Chapter 18. Group Policy Object 497
// If the SomCollection.Count property is 0,
// no link exist for the specified GPO:
if (soms.Count == 0)
{
ListViewItem item =
new ListViewItem(gpo.DisplayName);
item.SubItems.Add(gpo.Description);
lvForDom.Items.Add(item);
}
}
Within the lab environment, the snippet will provide the following
information: Old Desktop Policy | Desktop Policy Maintenance Teams
When we examine this policy using the Group Policy Management console, we can see that this policy is not linked to any SOM-object.
Capture 199: Unlinked GPO
After detecting the GPOs, the objects can be linked or removed so that the directory remains clean.
18.3. Orphaned GPOs
At the beginning of this chapter, in ‘Figure 21: Group Policy Object
breakdown’, the structure of a policy was explained. For a properly functioning policy, both GPO within the directory and GPT template
structure on disk must be available. These templates are placed within the SYSVOL-share so that they are replicated within the domain. When the
GPO is removed from the directory but the GPT is not removed (due to
replication issues, for instance) or when the GPT is removed from disk and the GPO remains in the directory, the GPO is called an ‘Orphaned GPO’.
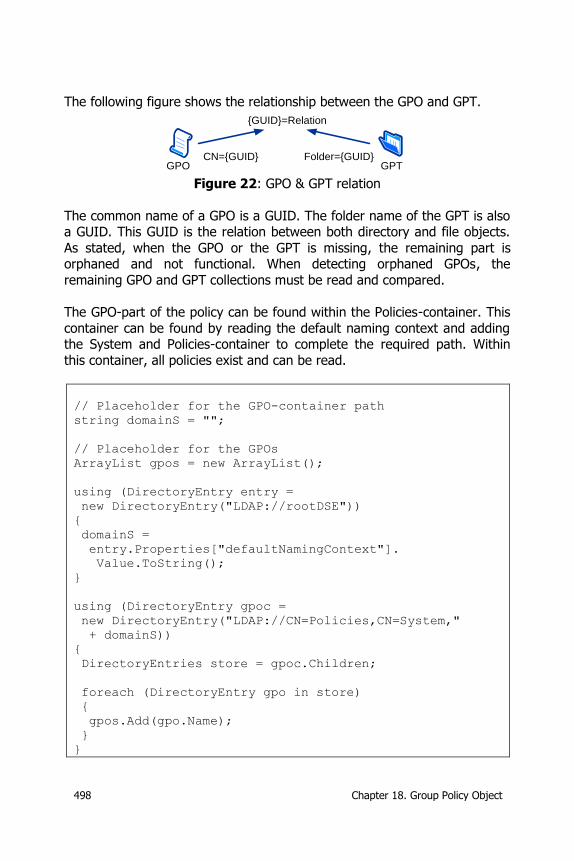
498 Chapter 18. Group Policy Object
The following figure shows the relationship between the GPO and GPT.
GPO GPT
{GUID}=Relation
CN={GUID} Folder={GUID}
Figure 22: GPO & GPT relation
The common name of a GPO is a GUID. The folder name of the GPT is also a GUID. This GUID is the relation between both directory and file objects.
As stated, when the GPO or the GPT is missing, the remaining part is orphaned and not functional. When detecting orphaned GPOs, the
remaining GPO and GPT collections must be read and compared.
The GPO-part of the policy can be found within the Policies-container. This
container can be found by reading the default naming context and adding the System and Policies-container to complete the required path. Within
this container, all policies exist and can be read.
// Placeholder for the GPO-container path
string domainS = "";
// Placeholder for the GPOs
ArrayList gpos = new ArrayList();
using (DirectoryEntry entry =
new DirectoryEntry("LDAP://rootDSE"))
{
domainS =
entry.Properties["defaultNamingContext"].
Value.ToString();
}
using (DirectoryEntry gpoc =
new DirectoryEntry("LDAP://CN=Policies,CN=System,"
+ domainS))
{
DirectoryEntries store = gpoc.Children;
foreach (DirectoryEntry gpo in store)
{
gpos.Add(gpo.Name);
}
}
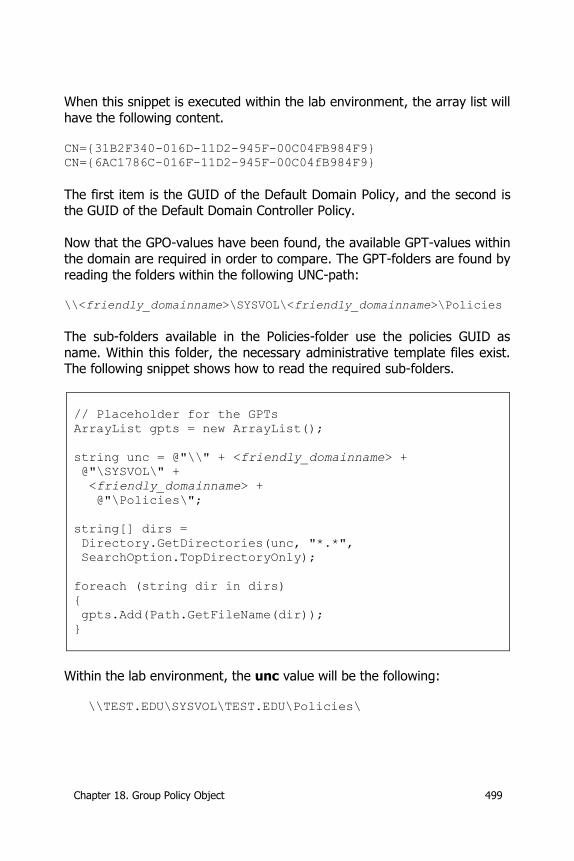
Chapter 18. Group Policy Object 499
When this snippet is executed within the lab environment, the array list will
have the following content. CN={31B2F340-016D-11D2-945F-00C04FB984F9}
CN={6AC1786C-016F-11D2-945F-00C04fB984F9}
The first item is the GUID of the Default Domain Policy, and the second is the GUID of the Default Domain Controller Policy.
Now that the GPO-values have been found, the available GPT-values within
the domain are required in order to compare. The GPT-folders are found by
reading the folders within the following UNC-path: \\<friendly_domainname>\SYSVOL\<friendly_domainname>\Policies
The sub-folders available in the Policies-folder use the policies GUID as
name. Within this folder, the necessary administrative template files exist. The following snippet shows how to read the required sub-folders.
// Placeholder for the GPTs
ArrayList gpts = new ArrayList();
string unc = @"\\" + <friendly_domainname> +
@"\SYSVOL\" +
<friendly_domainname> +
@"\Policies\";
string[] dirs =
Directory.GetDirectories(unc, "*.*",
SearchOption.TopDirectoryOnly);
foreach (string dir in dirs)
{
gpts.Add(Path.GetFileName(dir));
}
Within the lab environment, the unc value will be the following:
\\TEST.EDU\SYSVOL\TEST.EDU\Policies\
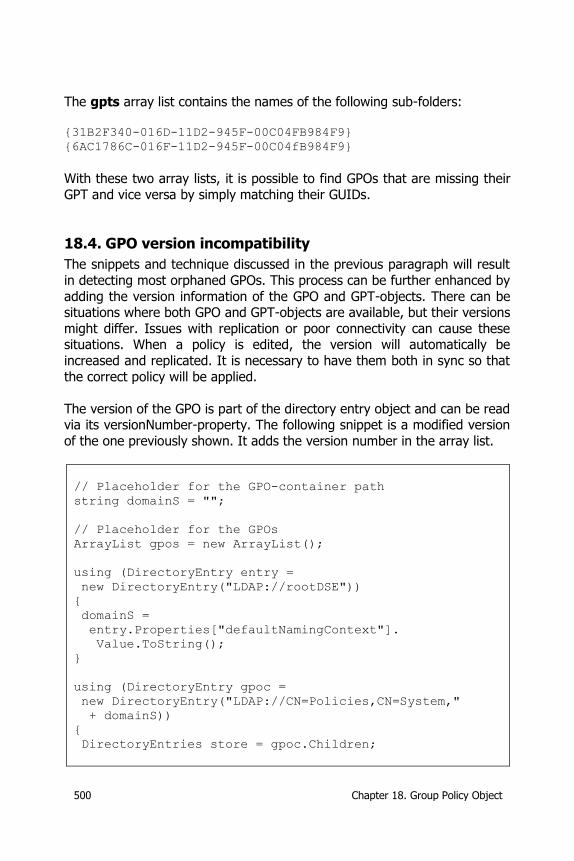
500 Chapter 18. Group Policy Object
The gpts array list contains the names of the following sub-folders:
{31B2F340-016D-11D2-945F-00C04FB984F9}
{6AC1786C-016F-11D2-945F-00C04fB984F9}
With these two array lists, it is possible to find GPOs that are missing their
GPT and vice versa by simply matching their GUIDs.
18.4. GPO version incompatibility
The snippets and technique discussed in the previous paragraph will result
in detecting most orphaned GPOs. This process can be further enhanced by
adding the version information of the GPO and GPT-objects. There can be situations where both GPO and GPT-objects are available, but their versions
might differ. Issues with replication or poor connectivity can cause these situations. When a policy is edited, the version will automatically be
increased and replicated. It is necessary to have them both in sync so that
the correct policy will be applied.
The version of the GPO is part of the directory entry object and can be read via its versionNumber-property. The following snippet is a modified version
of the one previously shown. It adds the version number in the array list.
// Placeholder for the GPO-container path
string domainS = "";
// Placeholder for the GPOs
ArrayList gpos = new ArrayList();
using (DirectoryEntry entry =
new DirectoryEntry("LDAP://rootDSE"))
{
domainS =
entry.Properties["defaultNamingContext"].
Value.ToString();
}
using (DirectoryEntry gpoc =
new DirectoryEntry("LDAP://CN=Policies,CN=System,"
+ domainS))
{
DirectoryEntries store = gpoc.Children;
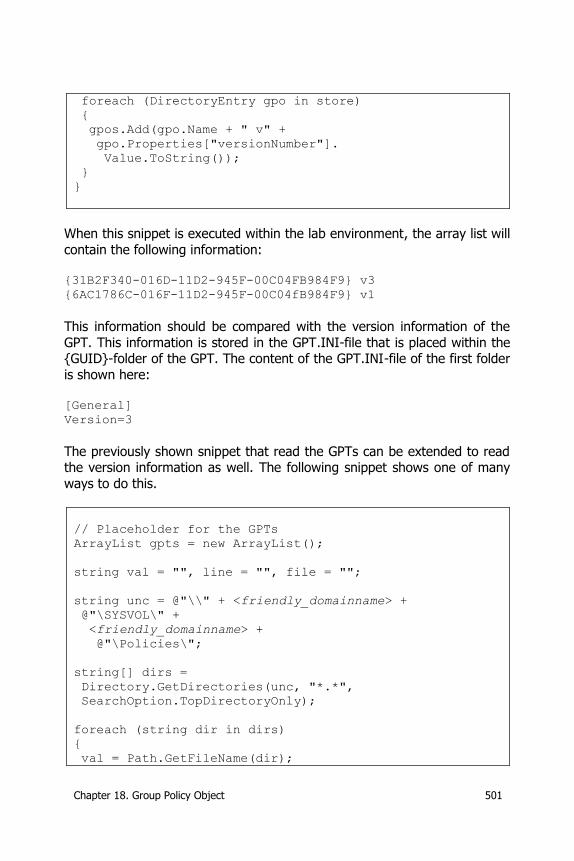
Chapter 18. Group Policy Object 501
foreach (DirectoryEntry gpo in store)
{
gpos.Add(gpo.Name + " v" +
gpo.Properties["versionNumber"].
Value.ToString());
}
}
When this snippet is executed within the lab environment, the array list will
contain the following information: {31B2F340-016D-11D2-945F-00C04FB984F9} v3
{6AC1786C-016F-11D2-945F-00C04fB984F9} v1
This information should be compared with the version information of the
GPT. This information is stored in the GPT.INI-file that is placed within the {GUID}-folder of the GPT. The content of the GPT.INI-file of the first folder
is shown here: [General]
Version=3
The previously shown snippet that read the GPTs can be extended to read the version information as well. The following snippet shows one of many
ways to do this.
// Placeholder for the GPTs
ArrayList gpts = new ArrayList();
string val = "", line = "", file = "";
string unc = @"\\" + <friendly_domainname> +
@"\SYSVOL\" +
<friendly_domainname> +
@"\Policies\";
string[] dirs =
Directory.GetDirectories(unc, "*.*",
SearchOption.TopDirectoryOnly);
foreach (string dir in dirs)
{
val = Path.GetFileName(dir);
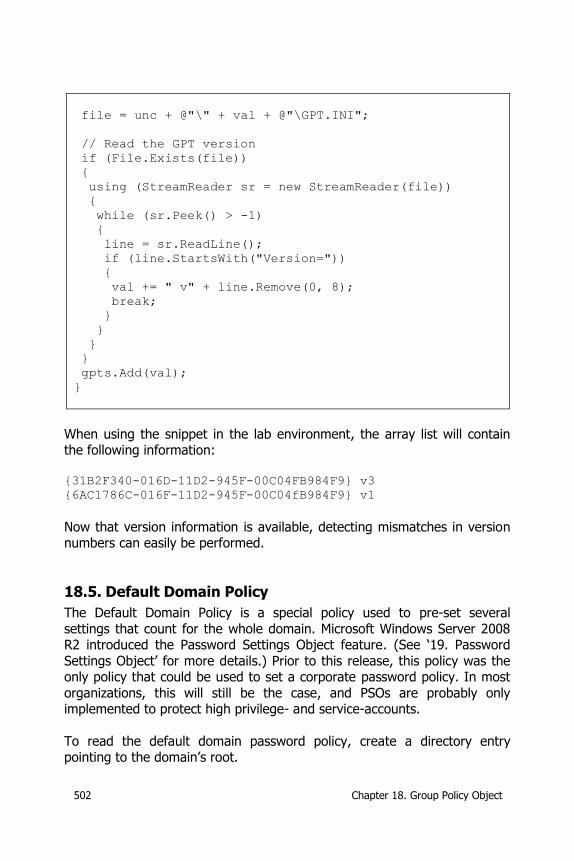
502 Chapter 18. Group Policy Object
file = unc + @"\" + val + @"\GPT.INI";
// Read the GPT version
if (File.Exists(file))
{
using (StreamReader sr = new StreamReader(file))
{
while (sr.Peek() > -1)
{
line = sr.ReadLine();
if (line.StartsWith("Version="))
{
val += " v" + line.Remove(0, 8);
break;
}
}
}
}
gpts.Add(val);
}
When using the snippet in the lab environment, the array list will contain the following information:
{31B2F340-016D-11D2-945F-00C04FB984F9} v3
{6AC1786C-016F-11D2-945F-00C04fB984F9} v1
Now that version information is available, detecting mismatches in version numbers can easily be performed.
18.5. Default Domain Policy
The Default Domain Policy is a special policy used to pre-set several
settings that count for the whole domain. Microsoft Windows Server 2008 R2 introduced the Password Settings Object feature. (See ‘19. Password
Settings Object’ for more details.) Prior to this release, this policy was the only policy that could be used to set a corporate password policy. In most
organizations, this will still be the case, and PSOs are probably only implemented to protect high privilege- and service-accounts.
To read the default domain password policy, create a directory entry pointing to the domain’s root.
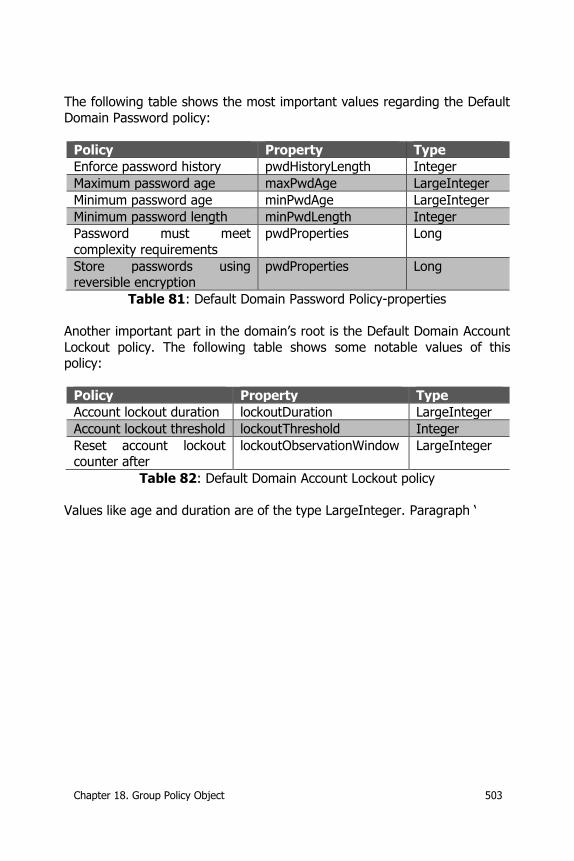
Chapter 18. Group Policy Object 503
The following table shows the most important values regarding the Default
Domain Password policy:
Policy Property Type
Enforce password history pwdHistoryLength Integer
Maximum password age maxPwdAge LargeInteger
Minimum password age minPwdAge LargeInteger
Minimum password length minPwdLength Integer
Password must meet
complexity requirements
pwdProperties Long
Store passwords using reversible encryption
pwdProperties Long
Table 81: Default Domain Password Policy-properties
Another important part in the domain’s root is the Default Domain Account
Lockout policy. The following table shows some notable values of this policy:
Policy Property Type
Account lockout duration lockoutDuration LargeInteger
Account lockout threshold lockoutThreshold Integer
Reset account lockout counter after
lockoutObservationWindow LargeInteger
Table 82: Default Domain Account Lockout policy
Values like age and duration are of the type LargeInteger. Paragraph ‘
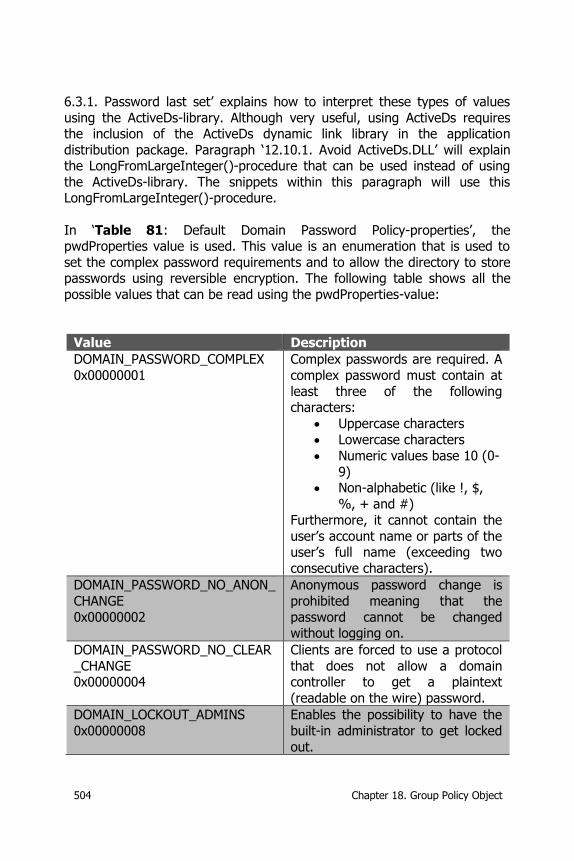
504 Chapter 18. Group Policy Object
6.3.1. Password last set’ explains how to interpret these types of values
using the ActiveDs-library. Although very useful, using ActiveDs requires the inclusion of the ActiveDs dynamic link library in the application
distribution package. Paragraph ‘12.10.1. Avoid ActiveDs.DLL’ will explain the LongFromLargeInteger()-procedure that can be used instead of using
the ActiveDs-library. The snippets within this paragraph will use this LongFromLargeInteger()-procedure.
In ‘Table 81: Default Domain Password Policy-properties’, the pwdProperties value is used. This value is an enumeration that is used to
set the complex password requirements and to allow the directory to store passwords using reversible encryption. The following table shows all the
possible values that can be read using the pwdProperties-value:
Value Description
DOMAIN_PASSWORD_COMPLEX
0x00000001
Complex passwords are required. A
complex password must contain at
least three of the following characters:
Uppercase characters
Lowercase characters
Numeric values base 10 (0-
9) Non-alphabetic (like !, $,
%, + and #)
Furthermore, it cannot contain the
user’s account name or parts of the user’s full name (exceeding two
consecutive characters).
DOMAIN_PASSWORD_NO_ANON_
CHANGE
0x00000002
Anonymous password change is
prohibited meaning that the
password cannot be changed without logging on.
DOMAIN_PASSWORD_NO_CLEAR
_CHANGE 0x00000004
Clients are forced to use a protocol
that does not allow a domain controller to get a plaintext
(readable on the wire) password.
DOMAIN_LOCKOUT_ADMINS
0x00000008
Enables the possibility to have the
built-in administrator to get locked
out.
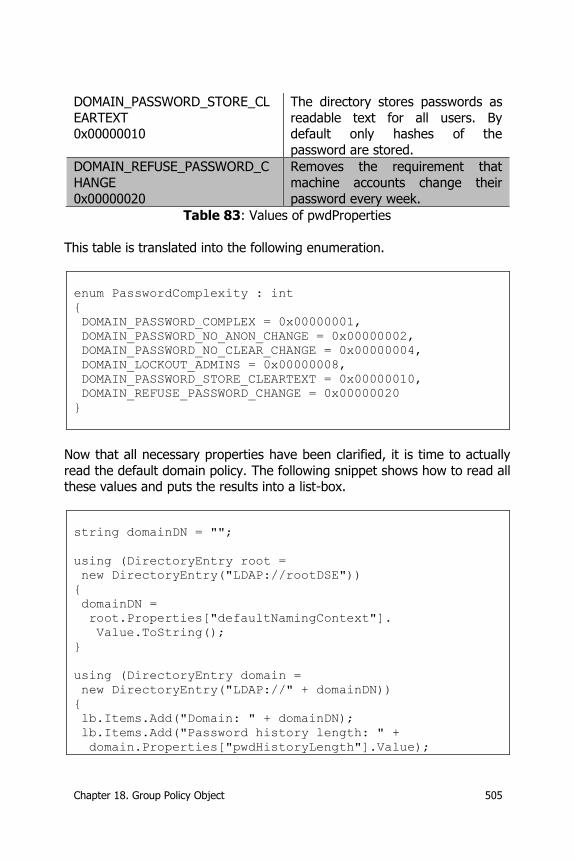
Chapter 18. Group Policy Object 505
DOMAIN_PASSWORD_STORE_CL
EARTEXT 0x00000010
The directory stores passwords as
readable text for all users. By default only hashes of the
password are stored.
DOMAIN_REFUSE_PASSWORD_C
HANGE
0x00000020
Removes the requirement that
machine accounts change their
password every week.
Table 83: Values of pwdProperties
This table is translated into the following enumeration.
enum PasswordComplexity : int
{
DOMAIN_PASSWORD_COMPLEX = 0x00000001,
DOMAIN_PASSWORD_NO_ANON_CHANGE = 0x00000002,
DOMAIN_PASSWORD_NO_CLEAR_CHANGE = 0x00000004,
DOMAIN_LOCKOUT_ADMINS = 0x00000008,
DOMAIN_PASSWORD_STORE_CLEARTEXT = 0x00000010,
DOMAIN_REFUSE_PASSWORD_CHANGE = 0x00000020
}
Now that all necessary properties have been clarified, it is time to actually
read the default domain policy. The following snippet shows how to read all these values and puts the results into a list-box.
string domainDN = "";
using (DirectoryEntry root =
new DirectoryEntry("LDAP://rootDSE"))
{
domainDN =
root.Properties["defaultNamingContext"].
Value.ToString();
}
using (DirectoryEntry domain =
new DirectoryEntry("LDAP://" + domainDN))
{
lb.Items.Add("Domain: " + domainDN);
lb.Items.Add("Password history length: " +
domain.Properties["pwdHistoryLength"].Value);
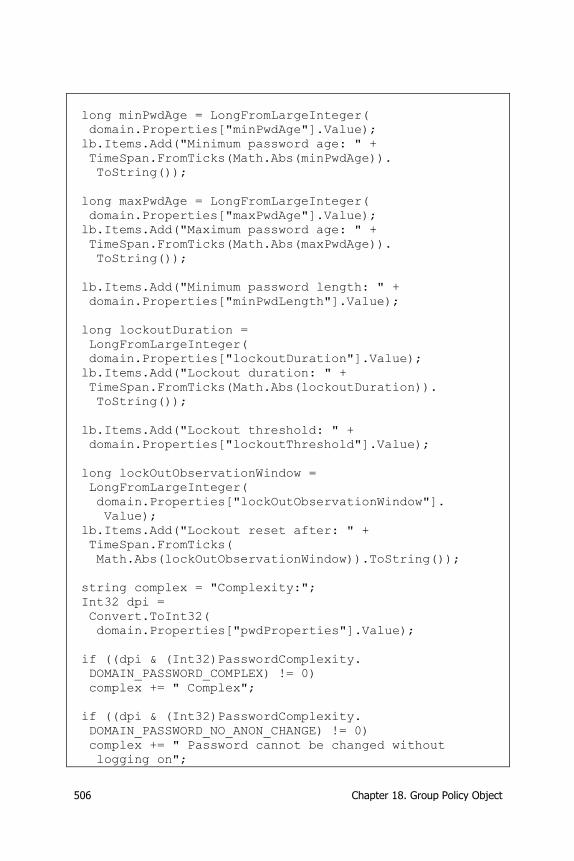
506 Chapter 18. Group Policy Object
long minPwdAge = LongFromLargeInteger(
domain.Properties["minPwdAge"].Value);
lb.Items.Add("Minimum password age: " +
TimeSpan.FromTicks(Math.Abs(minPwdAge)).
ToString());
long maxPwdAge = LongFromLargeInteger(
domain.Properties["maxPwdAge"].Value);
lb.Items.Add("Maximum password age: " +
TimeSpan.FromTicks(Math.Abs(maxPwdAge)).
ToString());
lb.Items.Add("Minimum password length: " +
domain.Properties["minPwdLength"].Value);
long lockoutDuration =
LongFromLargeInteger(
domain.Properties["lockoutDuration"].Value);
lb.Items.Add("Lockout duration: " +
TimeSpan.FromTicks(Math.Abs(lockoutDuration)).
ToString());
lb.Items.Add("Lockout threshold: " +
domain.Properties["lockoutThreshold"].Value);
long lockOutObservationWindow =
LongFromLargeInteger(
domain.Properties["lockOutObservationWindow"].
Value);
lb.Items.Add("Lockout reset after: " +
TimeSpan.FromTicks(
Math.Abs(lockOutObservationWindow)).ToString());
string complex = "Complexity:";
Int32 dpi =
Convert.ToInt32(
domain.Properties["pwdProperties"].Value);
if ((dpi & (Int32)PasswordComplexity.
DOMAIN_PASSWORD_COMPLEX) != 0)
complex += " Complex";
if ((dpi & (Int32)PasswordComplexity.
DOMAIN_PASSWORD_NO_ANON_CHANGE) != 0)
complex += " Password cannot be changed without
logging on";
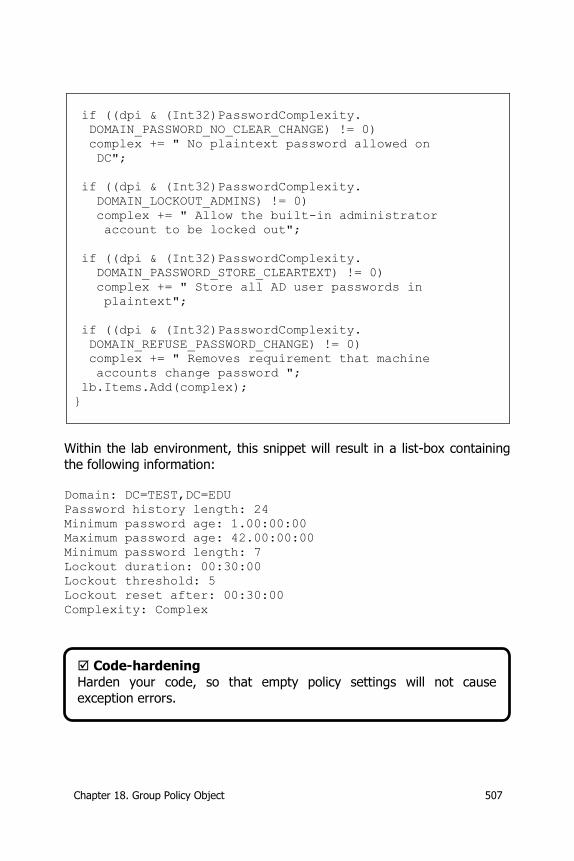
Chapter 18. Group Policy Object 507
if ((dpi & (Int32)PasswordComplexity.
DOMAIN_PASSWORD_NO_CLEAR_CHANGE) != 0)
complex += " No plaintext password allowed on
DC";
if ((dpi & (Int32)PasswordComplexity.
DOMAIN_LOCKOUT_ADMINS) != 0)
complex += " Allow the built-in administrator
account to be locked out";
if ((dpi & (Int32)PasswordComplexity.
DOMAIN_PASSWORD_STORE_CLEARTEXT) != 0)
complex += " Store all AD user passwords in
plaintext";
if ((dpi & (Int32)PasswordComplexity.
DOMAIN_REFUSE_PASSWORD_CHANGE) != 0)
complex += " Removes requirement that machine
accounts change password ";
lb.Items.Add(complex);
}
Within the lab environment, this snippet will result in a list-box containing
the following information:
Domain: DC=TEST,DC=EDU
Password history length: 24
Minimum password age: 1.00:00:00
Maximum password age: 42.00:00:00
Minimum password length: 7
Lockout duration: 00:30:00
Lockout threshold: 5
Lockout reset after: 00:30:00
Complexity: Complex
Code-hardening
Harden your code, so that empty policy settings will not cause
exception errors.


Chapter 19. Password Settings Object 509
19. Password Settings Object
The Password Settings Object (PSO) is also known as ‘AD DS Fine-Grained Password and Account Lockout Policy’. Within Microsoft Windows 2000
Server and Microsoft Windows Server 2003, the Default Domain Policy dictated the password and lockout policy. The policy is active for the whole
domain, so any requirement for multiple password and/or account policies
will lead to additional domains within the forest.
Microsoft Windows Server 2008 introduces the PSO. The Default Domain Policy remains, but a new policy can be attached to a group that contains
users which require a different policy. The Default Domain Policy may require a minimum password length of eight, while the members of the
group ‘Service Account’ have a PSO which states that the minimum
password length must be 24. Needless to say, no additional domains are necessary.
The PSO is placed within the directory’s Password Settings Container (PSC).
This container can be found using the following snippet.
using (DirectoryEntry ad =
new DirectoryEntry("LDAP://RootDSE"))
{
strContext =
"CN=Password Settings Container,CN=System," +
ad.Properties["defaultNamingContext"].Value.
ToString();
}
In the lab environment, the value of strContext contains the following
value: CN=Password Settings Container,CN=System,DC=test,DC=edu
Domain Functional Level Requirement
Before you can use Password Setting Objects, the domain must be in Windows Server 2008 domain functional level.
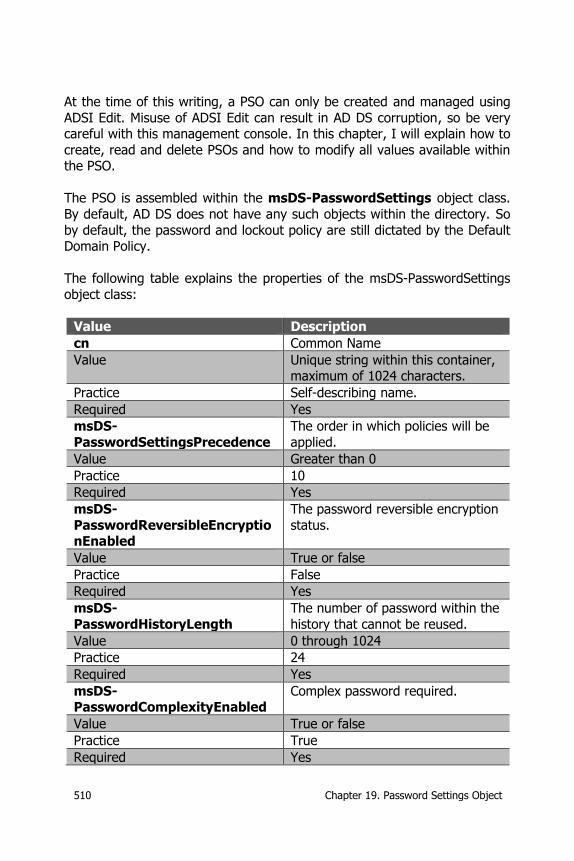
510 Chapter 19. Password Settings Object
At the time of this writing, a PSO can only be created and managed using
ADSI Edit. Misuse of ADSI Edit can result in AD DS corruption, so be very careful with this management console. In this chapter, I will explain how to
create, read and delete PSOs and how to modify all values available within the PSO.
The PSO is assembled within the msDS-PasswordSettings object class.
By default, AD DS does not have any such objects within the directory. So
by default, the password and lockout policy are still dictated by the Default Domain Policy.
The following table explains the properties of the msDS-PasswordSettings
object class:
Value Description
cn Common Name
Value Unique string within this container, maximum of 1024 characters.
Practice Self-describing name.
Required Yes
msDS-
PasswordSettingsPrecedence
The order in which policies will be
applied.
Value Greater than 0
Practice 10
Required Yes
msDS-
PasswordReversibleEncryptionEnabled
The password reversible encryption
status.
Value True or false
Practice False
Required Yes
msDS-
PasswordHistoryLength
The number of password within the
history that cannot be reused.
Value 0 through 1024
Practice 24
Required Yes
msDS-PasswordComplexityEnabled
Complex password required.
Value True or false
Practice True
Required Yes

Chapter 19. Password Settings Object 511
msDS-
PasswordHistoryLength
The number of previous passwords
that cannot be reused.
Value Integer value from 0 through 1024.
Practice 25
Required Yes
msDS-MinimumPasswordLength
The minimum password length required.
Value 0 through 255.
Practice 8
Required Yes
msDS-MinimumPasswordAge The age of a changed password.
The user cannot change the password before it is expired.
Value dd.hh:mm:ss ¹) through msDS-
MaximumPasswordAge. The value entered can also be the following
string value: (none), including the brackets.
Practice 01.00:00:00 (1day).
Required Yes
msDS-MaximumPasswordAge The maximum password age. When the age is expired the user must
change the password.
Value To set the time to never, set the value to:
-9223372036854775808
The value can be msDS-MaximumPasswordAge through the
never value.
The value cannot be zero.
Practice 42.00:00:00 (42 days)
Required Yes
msDS-LockoutThreshold The threshold before being locked-out.
Value Integer value from 0 through to 65535.
Practice 10
Required Yes
msDS- The observation window for the
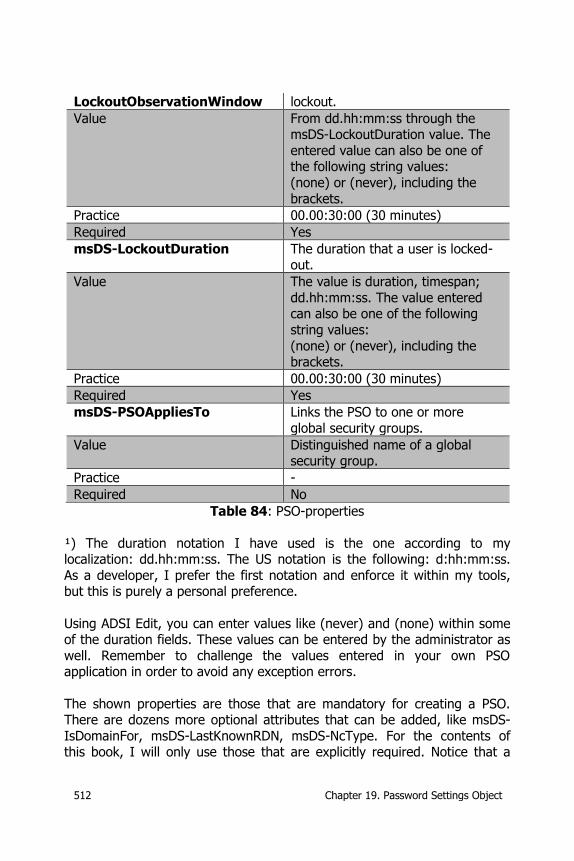
512 Chapter 19. Password Settings Object
LockoutObservationWindow lockout.
Value From dd.hh:mm:ss through the msDS-LockoutDuration value. The
entered value can also be one of the following string values:
(none) or (never), including the
brackets.
Practice 00.00:30:00 (30 minutes)
Required Yes
msDS-LockoutDuration The duration that a user is locked-out.
Value The value is duration, timespan;
dd.hh:mm:ss. The value entered can also be one of the following
string values:
(none) or (never), including the brackets.
Practice 00.00:30:00 (30 minutes)
Required Yes
msDS-PSOAppliesTo Links the PSO to one or more
global security groups.
Value Distinguished name of a global security group.
Practice -
Required No
Table 84: PSO-properties
¹) The duration notation I have used is the one according to my localization: dd.hh:mm:ss. The US notation is the following: d:hh:mm:ss.
As a developer, I prefer the first notation and enforce it within my tools, but this is purely a personal preference.
Using ADSI Edit, you can enter values like (never) and (none) within some of the duration fields. These values can be entered by the administrator as
well. Remember to challenge the values entered in your own PSO application in order to avoid any exception errors.
The shown properties are those that are mandatory for creating a PSO. There are dozens more optional attributes that can be added, like msDS-
IsDomainFor, msDS-LastKnownRDN, msDS-NcType. For the contents of this book, I will only use those that are explicitly required. Notice that a
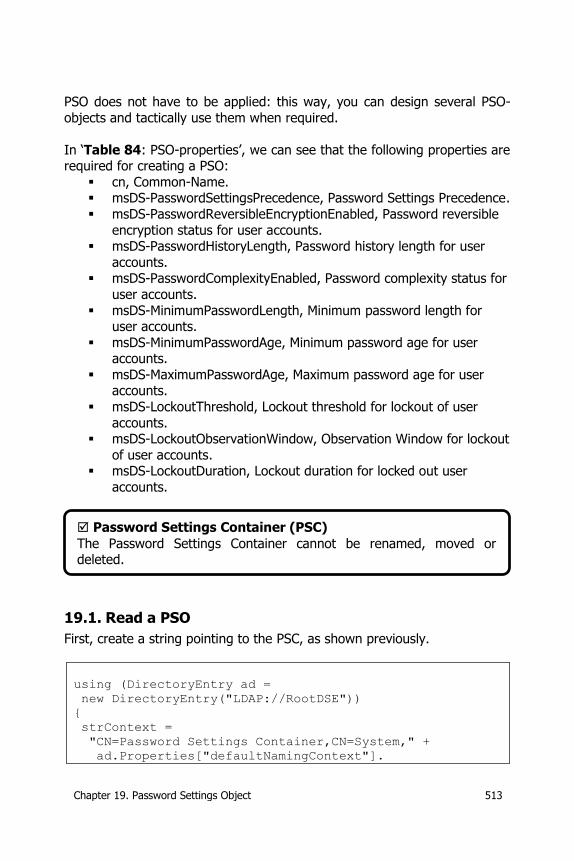
Chapter 19. Password Settings Object 513
PSO does not have to be applied: this way, you can design several PSO-
objects and tactically use them when required.
In ‘Table 84: PSO-properties’, we can see that the following properties are required for creating a PSO:
cn, Common-Name. msDS-PasswordSettingsPrecedence, Password Settings Precedence.
msDS-PasswordReversibleEncryptionEnabled, Password reversible
encryption status for user accounts. msDS-PasswordHistoryLength, Password history length for user
accounts. msDS-PasswordComplexityEnabled, Password complexity status for
user accounts.
msDS-MinimumPasswordLength, Minimum password length for user accounts.
msDS-MinimumPasswordAge, Minimum password age for user accounts.
msDS-MaximumPasswordAge, Maximum password age for user accounts.
msDS-LockoutThreshold, Lockout threshold for lockout of user
accounts. msDS-LockoutObservationWindow, Observation Window for lockout
of user accounts. msDS-LockoutDuration, Lockout duration for locked out user
accounts.
19.1. Read a PSO
First, create a string pointing to the PSC, as shown previously.
using (DirectoryEntry ad =
new DirectoryEntry("LDAP://RootDSE"))
{
strContext =
"CN=Password Settings Container,CN=System," +
ad.Properties["defaultNamingContext"].
Password Settings Container (PSC)
The Password Settings Container cannot be renamed, moved or deleted.
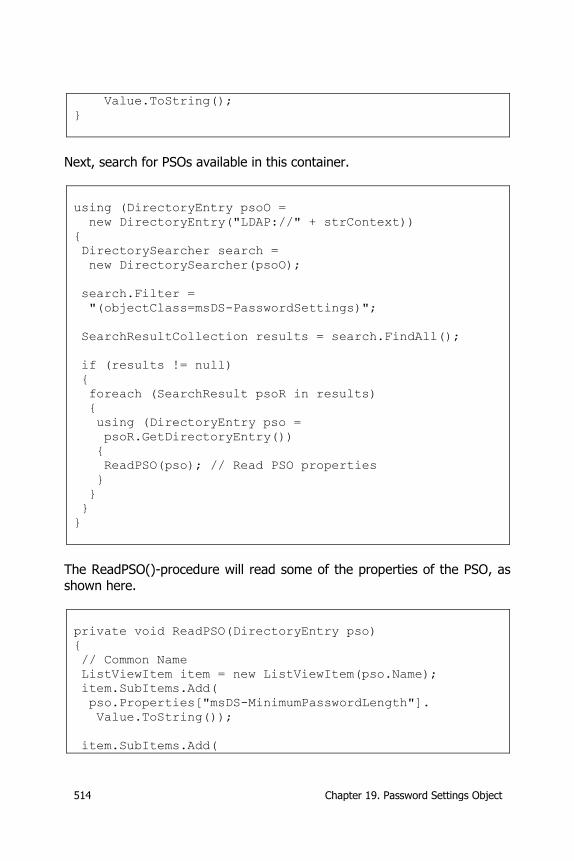
514 Chapter 19. Password Settings Object
Value.ToString();
}
Next, search for PSOs available in this container.
using (DirectoryEntry psoO =
new DirectoryEntry("LDAP://" + strContext))
{
DirectorySearcher search =
new DirectorySearcher(psoO);
search.Filter =
"(objectClass=msDS-PasswordSettings)";
SearchResultCollection results = search.FindAll();
if (results != null)
{
foreach (SearchResult psoR in results)
{
using (DirectoryEntry pso =
psoR.GetDirectoryEntry())
{
ReadPSO(pso); // Read PSO properties
}
}
}
}
The ReadPSO()-procedure will read some of the properties of the PSO, as
shown here.
private void ReadPSO(DirectoryEntry pso)
{
// Common Name
ListViewItem item = new ListViewItem(pso.Name);
item.SubItems.Add(
pso.Properties["msDS-MinimumPasswordLength"].
Value.ToString());
item.SubItems.Add(
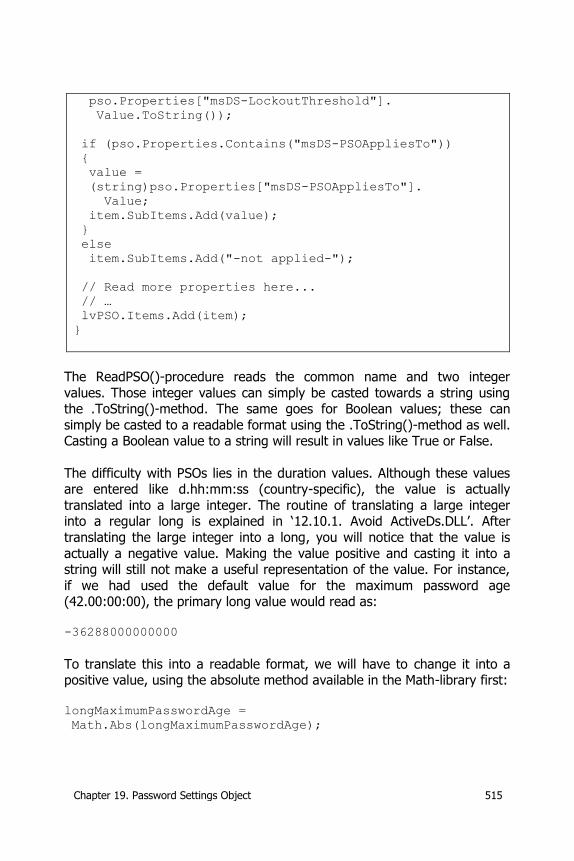
Chapter 19. Password Settings Object 515
pso.Properties["msDS-LockoutThreshold"].
Value.ToString());
if (pso.Properties.Contains("msDS-PSOAppliesTo"))
{
value =
(string)pso.Properties["msDS-PSOAppliesTo"].
Value;
item.SubItems.Add(value);
}
else
item.SubItems.Add("-not applied-");
// Read more properties here...
// …
lvPSO.Items.Add(item);
}
The ReadPSO()-procedure reads the common name and two integer
values. Those integer values can simply be casted towards a string using the .ToString()-method. The same goes for Boolean values; these can
simply be casted to a readable format using the .ToString()-method as well. Casting a Boolean value to a string will result in values like True or False.
The difficulty with PSOs lies in the duration values. Although these values are entered like d.hh:mm:ss (country-specific), the value is actually
translated into a large integer. The routine of translating a large integer into a regular long is explained in ‘12.10.1. Avoid ActiveDs.DLL’. After
translating the large integer into a long, you will notice that the value is
actually a negative value. Making the value positive and casting it into a string will still not make a useful representation of the value. For instance,
if we had used the default value for the maximum password age (42.00:00:00), the primary long value would read as:
-36288000000000
To translate this into a readable format, we will have to change it into a positive value, using the absolute method available in the Math-library first:
longMaximumPasswordAge =
Math.Abs(longMaximumPasswordAge);
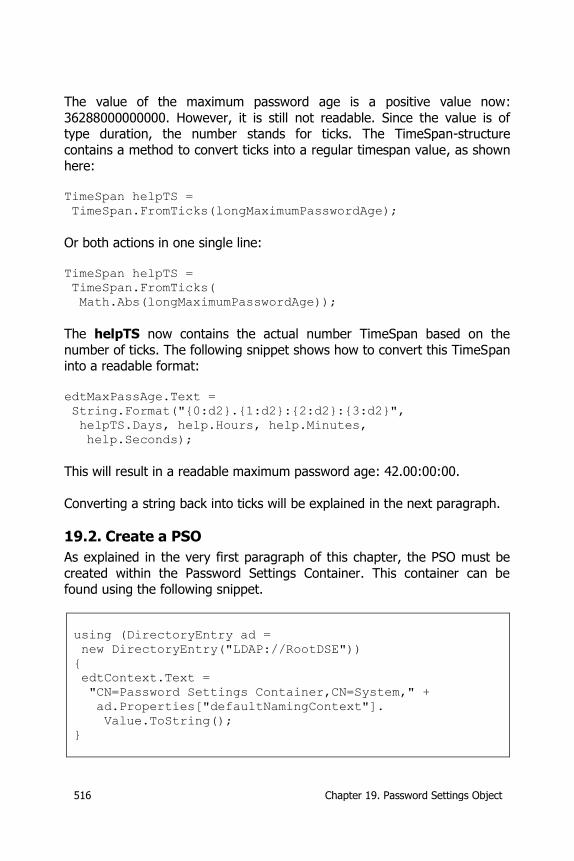
516 Chapter 19. Password Settings Object
The value of the maximum password age is a positive value now:
36288000000000. However, it is still not readable. Since the value is of type duration, the number stands for ticks. The TimeSpan-structure
contains a method to convert ticks into a regular timespan value, as shown here:
TimeSpan helpTS =
TimeSpan.FromTicks(longMaximumPasswordAge);
Or both actions in one single line:
TimeSpan helpTS =
TimeSpan.FromTicks(
Math.Abs(longMaximumPasswordAge));
The helpTS now contains the actual number TimeSpan based on the
number of ticks. The following snippet shows how to convert this TimeSpan into a readable format:
edtMaxPassAge.Text =
String.Format("{0:d2}.{1:d2}:{2:d2}:{3:d2}",
helpTS.Days, help.Hours, help.Minutes,
help.Seconds);
This will result in a readable maximum password age: 42.00:00:00.
Converting a string back into ticks will be explained in the next paragraph.
19.2. Create a PSO
As explained in the very first paragraph of this chapter, the PSO must be
created within the Password Settings Container. This container can be found using the following snippet.
using (DirectoryEntry ad =
new DirectoryEntry("LDAP://RootDSE"))
{
edtContext.Text =
"CN=Password Settings Container,CN=System," +
ad.Properties["defaultNamingContext"].
Value.ToString();
}
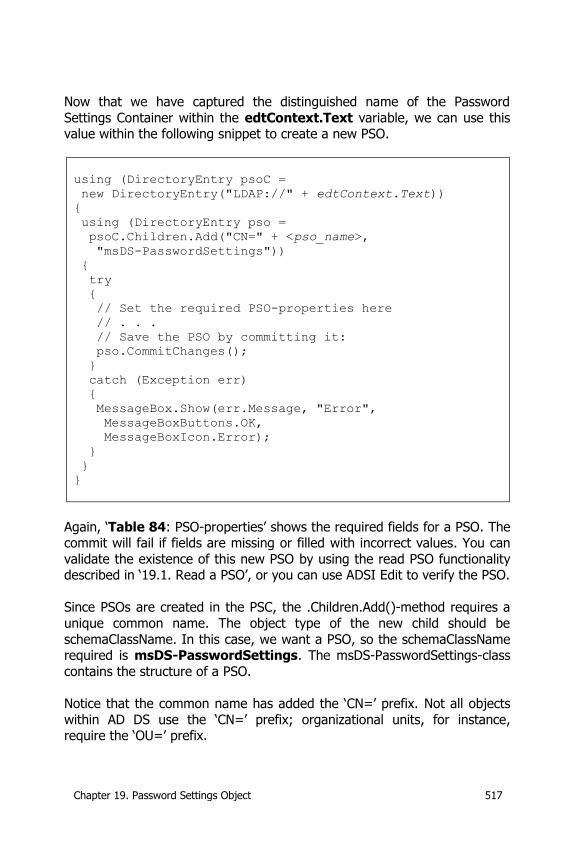
Chapter 19. Password Settings Object 517
Now that we have captured the distinguished name of the Password
Settings Container within the edtContext.Text variable, we can use this value within the following snippet to create a new PSO.
using (DirectoryEntry psoC =
new DirectoryEntry("LDAP://" + edtContext.Text))
{
using (DirectoryEntry pso =
psoC.Children.Add("CN=" + <pso_name>,
"msDS-PasswordSettings"))
{
try
{
// Set the required PSO-properties here
// . . .
// Save the PSO by committing it:
pso.CommitChanges();
}
catch (Exception err)
{
MessageBox.Show(err.Message, "Error",
MessageBoxButtons.OK,
MessageBoxIcon.Error);
}
}
}
Again, ‘Table 84: PSO-properties’ shows the required fields for a PSO. The commit will fail if fields are missing or filled with incorrect values. You can
validate the existence of this new PSO by using the read PSO functionality described in ‘19.1. Read a PSO’, or you can use ADSI Edit to verify the PSO.
Since PSOs are created in the PSC, the .Children.Add()-method requires a
unique common name. The object type of the new child should be
schemaClassName. In this case, we want a PSO, so the schemaClassName required is msDS-PasswordSettings. The msDS-PasswordSettings-class
contains the structure of a PSO.
Notice that the common name has added the ‘CN=’ prefix. Not all objects
within AD DS use the ‘CN=’ prefix; organizational units, for instance, require the ‘OU=’ prefix.
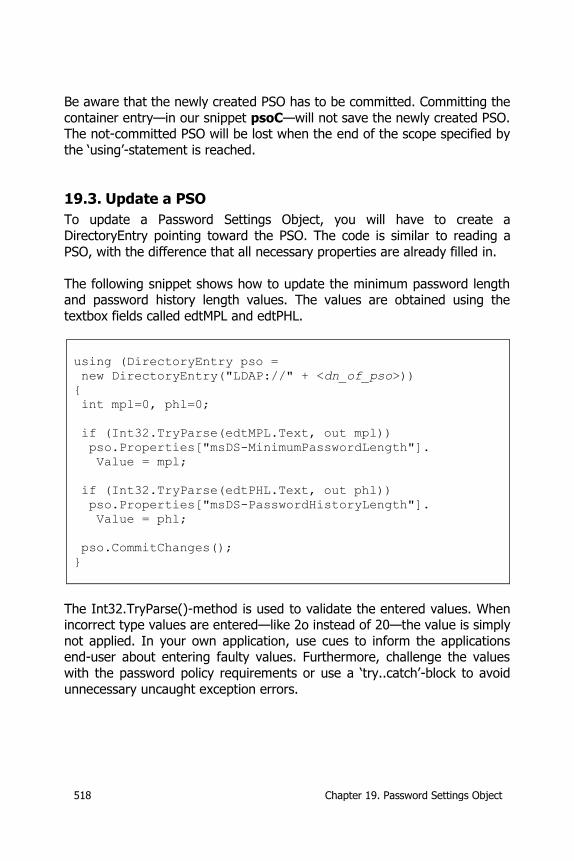
518 Chapter 19. Password Settings Object
Be aware that the newly created PSO has to be committed. Committing the
container entry—in our snippet psoC—will not save the newly created PSO. The not-committed PSO will be lost when the end of the scope specified by
the ‘using’-statement is reached.
19.3. Update a PSO
To update a Password Settings Object, you will have to create a
DirectoryEntry pointing toward the PSO. The code is similar to reading a
PSO, with the difference that all necessary properties are already filled in.
The following snippet shows how to update the minimum password length and password history length values. The values are obtained using the
textbox fields called edtMPL and edtPHL.
using (DirectoryEntry pso =
new DirectoryEntry("LDAP://" + <dn_of_pso>))
{
int mpl=0, phl=0;
if (Int32.TryParse(edtMPL.Text, out mpl))
pso.Properties["msDS-MinimumPasswordLength"].
Value = mpl;
if (Int32.TryParse(edtPHL.Text, out phl))
pso.Properties["msDS-PasswordHistoryLength"].
Value = phl;
pso.CommitChanges();
}
The Int32.TryParse()-method is used to validate the entered values. When incorrect type values are entered—like 2o instead of 20—the value is simply
not applied. In your own application, use cues to inform the applications end-user about entering faulty values. Furthermore, challenge the values
with the password policy requirements or use a ‘try..catch’-block to avoid
unnecessary uncaught exception errors.
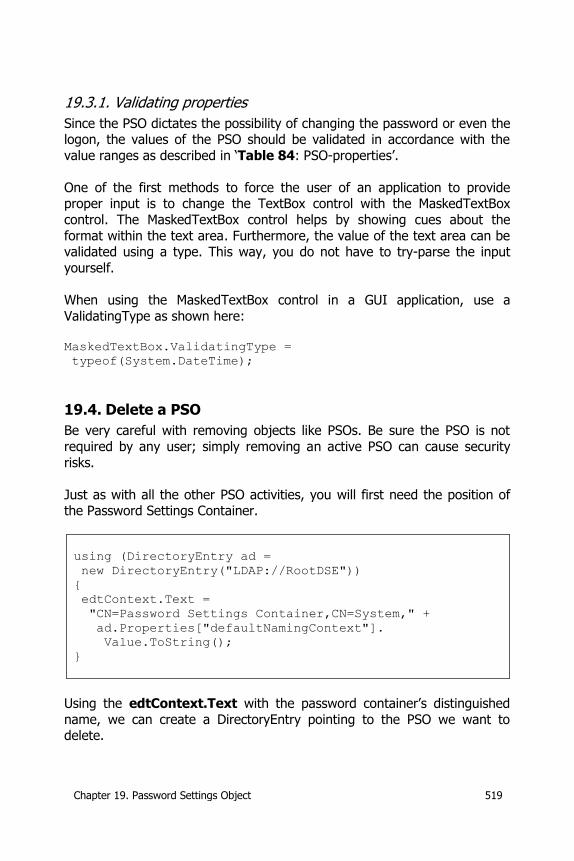
Chapter 19. Password Settings Object 519
19.3.1. Validating properties
Since the PSO dictates the possibility of changing the password or even the logon, the values of the PSO should be validated in accordance with the
value ranges as described in ‘Table 84: PSO-properties’.
One of the first methods to force the user of an application to provide proper input is to change the TextBox control with the MaskedTextBox
control. The MaskedTextBox control helps by showing cues about the
format within the text area. Furthermore, the value of the text area can be validated using a type. This way, you do not have to try-parse the input
yourself.
When using the MaskedTextBox control in a GUI application, use a
ValidatingType as shown here: MaskedTextBox.ValidatingType =
typeof(System.DateTime);
19.4. Delete a PSO
Be very careful with removing objects like PSOs. Be sure the PSO is not
required by any user; simply removing an active PSO can cause security
risks.
Just as with all the other PSO activities, you will first need the position of the Password Settings Container.
using (DirectoryEntry ad =
new DirectoryEntry("LDAP://RootDSE"))
{
edtContext.Text =
"CN=Password Settings Container,CN=System," +
ad.Properties["defaultNamingContext"].
Value.ToString();
}
Using the edtContext.Text with the password container’s distinguished
name, we can create a DirectoryEntry pointing to the PSO we want to delete.

520 Chapter 19. Password Settings Object
using (DirectoryEntry psoC =
new DirectoryEntry("LDAP://" + edtContext.Text))
{
using (DirectoryEntry pso =
new DirectoryEntry("LDAP://CN=" +
<cn_of_pso> + "," + edtContext.Text))
{
try
{
psoC.Children.Remove(pso);
psoC.CommitChanges();
}
catch (Exception err)
{
MessageBox.Show("An error occurred: " +
err.Message, "Error",
MessageBoxButtons.OK, MessageBoxIcon.Error);
}
}
}
A DirectoryEntry object does not contain a .Delete() or .Remove()-method, so we have to ask the parent to remove the object. In this case, we use
the .Children.Remove()-method of the DirectoryEntry of the Password
Settings Container (PSC). To identify the PSO, we must supply a DirectoryEntry pointing to the Password Settings Object. In contrast with
the creation of the object—where we have to commit the PSO—we now have to commit the PSC.
PSC
PSOs
Figure 23: Ask parent to remove child
Committing the PSO will not cause an exception error and will also not
delete the PSO. Only the PSC of the PSO can remove the PSO.
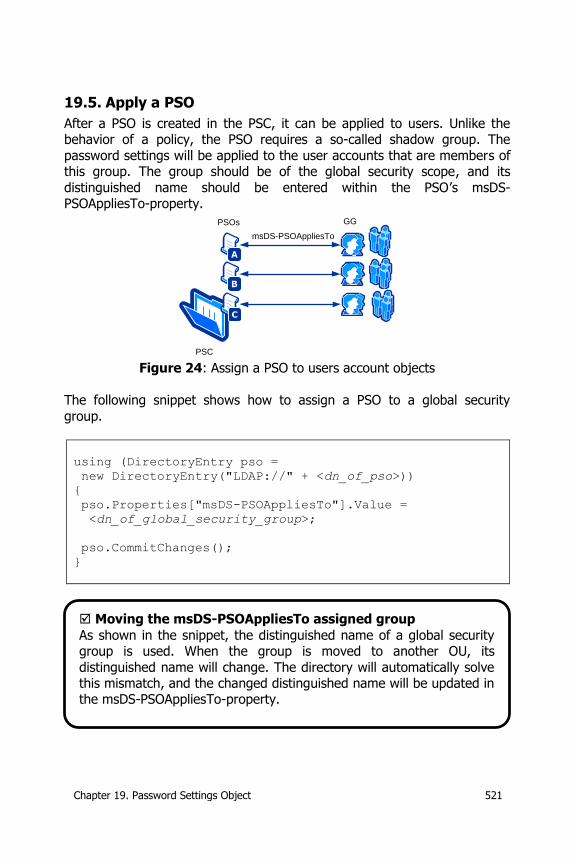
Chapter 19. Password Settings Object 521
19.5. Apply a PSO
After a PSO is created in the PSC, it can be applied to users. Unlike the behavior of a policy, the PSO requires a so-called shadow group. The
password settings will be applied to the user accounts that are members of this group. The group should be of the global security scope, and its
distinguished name should be entered within the PSO’s msDS-PSOAppliesTo-property.
PSC
PSOs
msDS-PSOAppliesTo
GG
Figure 24: Assign a PSO to users account objects
The following snippet shows how to assign a PSO to a global security
group.
using (DirectoryEntry pso =
new DirectoryEntry("LDAP://" + <dn_of_pso>))
{
pso.Properties["msDS-PSOAppliesTo"].Value =
<dn_of_global_security_group>;
pso.CommitChanges();
}
Moving the msDS-PSOAppliesTo assigned group
As shown in the snippet, the distinguished name of a global security group is used. When the group is moved to another OU, its
distinguished name will change. The directory will automatically solve this mismatch, and the changed distinguished name will be updated in the msDS-PSOAppliesTo-property.


Chapter 20. Recover Deleted Objects 523
20. Recover Deleted Objects
One important feature in Microsoft Windows 2008 is the recovery of objects. This feature was partly implemented in Microsoft Windows 2008
and fully implemented in Microsoft Windows 2008 R2. The recovery of deleted objects discussed in this chapter is not the same as an authoritative
restore. This is because no domain controller has to be turned off before
being able to recover items. Using the recovery feature, recovering a directory object will allow all domain controllers to remain operational.
Earlier editions of the directory required additional software before they
could perform a useful recovery of a directory object. Most of the time, an additional repository is used to save the history of directory objects so that
they can be recreated when required. With the release of Microsoft
Windows Server 2008, it became possible to recover directory objects like security principals. But using this release—after recovery—several
important properties of the recovered object would still be lost. The first paragraph explains this recovery, while the last paragraph explains how to
use the ‘Microsoft AD Recycle Bin’-feature that became available with the
release of Microsoft Windows Server 2008 R2.
20.1. Before the AD Recycle Bin
An object can only be recovered within its tombstone lifetime as defined
within the domain. These tombstone lifetimes differ slightly within the
Microsoft Windows Server editions throughout the years. Here is a list with the currently available operating systems:
Microsoft Windows 2003
Only once I was able to restore items in a customer’s Microsoft Windows 2003 production environment. I was not able to replay this
in the lab environment. So for me recovering directory objects starts with Microsoft Windows 2008.
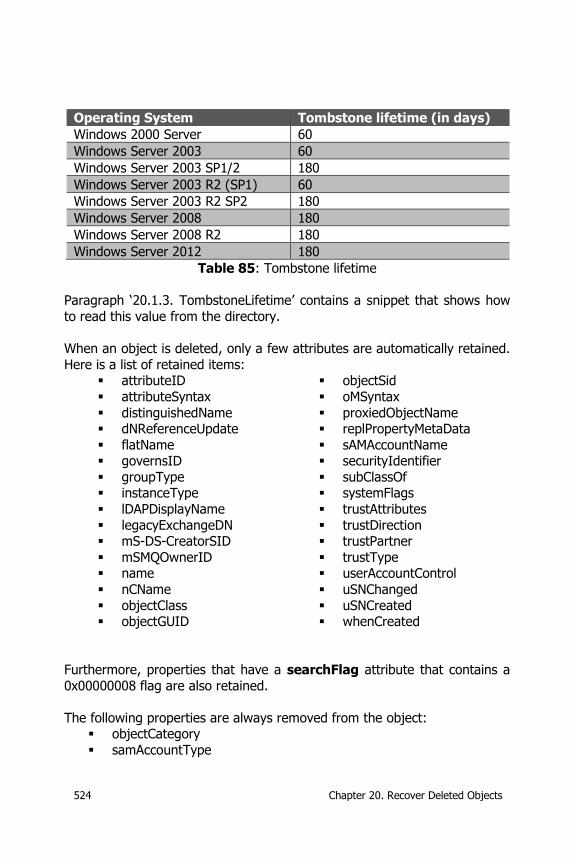
524 Chapter 20. Recover Deleted Objects
Operating System Tombstone lifetime (in days)
Windows 2000 Server 60
Windows Server 2003 60
Windows Server 2003 SP1/2 180
Windows Server 2003 R2 (SP1) 60
Windows Server 2003 R2 SP2 180
Windows Server 2008 180
Windows Server 2008 R2 180
Windows Server 2012 180
Table 85: Tombstone lifetime
Paragraph ‘20.1.3. TombstoneLifetime’ contains a snippet that shows how
to read this value from the directory.
When an object is deleted, only a few attributes are automatically retained.
Here is a list of retained items: attributeID
attributeSyntax
distinguishedName dNReferenceUpdate
flatName governsID
groupType instanceType
lDAPDisplayName
legacyExchangeDN mS-DS-CreatorSID
mSMQOwnerID name
nCName
objectClass objectGUID
objectSid
oMSyntax
proxiedObjectName replPropertyMetaData
sAMAccountName securityIdentifier
subClassOf systemFlags
trustAttributes
trustDirection trustPartner
trustType userAccountControl
uSNChanged
uSNCreated whenCreated
Furthermore, properties that have a searchFlag attribute that contains a
0x00000008 flag are also retained.
The following properties are always removed from the object: objectCategory
samAccountType
Chapter 20. Recover Deleted Objects 525
If the object is deleted from a Microsoft Windows Server 2008 or higher
server, the property called lastKnownParent is added to the deleted object. Using this attribute, an object can be recovered into its last known
organizational unit.
AD DS performs the following steps when an item is deleted: 1. The isDeleted property of the deleted object is set to True.
Deleted items will be purged after the tombstone lifecycle has been
reached. 2. The object is moved to the ‘Deleted Objects’-container.
This move can be prohibited by setting the systemFlag property to 0x02000000.
3. The ‘Deleted Objects’-container does not have a hierarchy, so the
relative distinguished name has to be changed to ensure the uniqueness of the item. This name change is done using the
following rules: a. If the name is longer than 75 characters, it is truncated to
75 characters; b. As a separator, a 0x0A character is added.
c. Next, the string “DEL:” is added as a prefix.
d. Finally, a unique GUID is added in the common name suffix.
Here is an example of how this is shown for the deleted ‘svc_report’-service
account:
CN=svc_reports\0ADEL:f9c8c9b3-2880-488c-8813-
fee07cdec887,CN=Deleted Objects,DC=test,DC=edu
The lastKnownParent attribute contains the following string value:
OU=Posse,DC=test,DC=edu
20.1.1. Read Deleted Objects
Before recovery, it is possible to investigate what objects can be restored within the directory. As mentioned earlier, usually a deleted object will end
up in the ‘Deleted Objects’-container. This container can be referred to by its common name:
DirectoryEntry deleted_objs =
new DirectoryEntry("LDAP://CN=Deleted Objects," +
<dn_domain>);
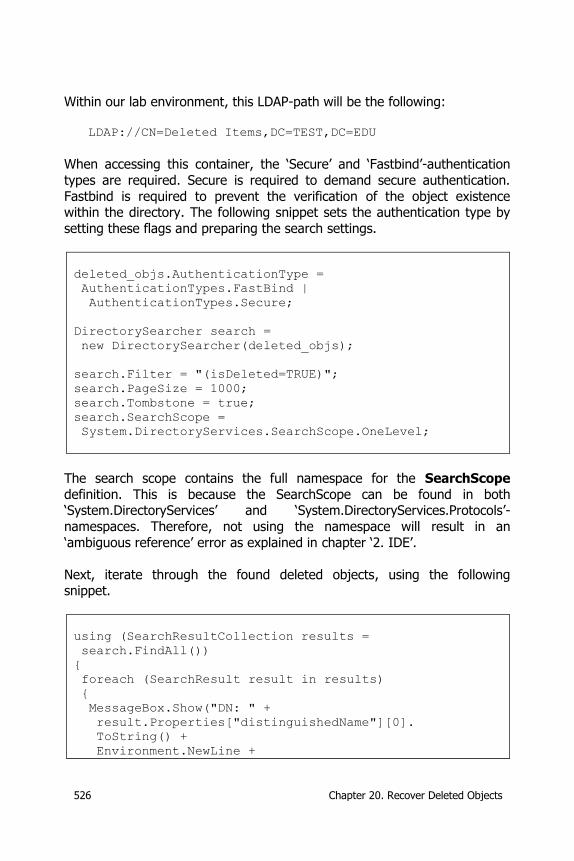
526 Chapter 20. Recover Deleted Objects
Within our lab environment, this LDAP-path will be the following:
LDAP://CN=Deleted Items,DC=TEST,DC=EDU
When accessing this container, the ‘Secure’ and ‘Fastbind’-authentication
types are required. Secure is required to demand secure authentication.
Fastbind is required to prevent the verification of the object existence within the directory. The following snippet sets the authentication type by
setting these flags and preparing the search settings.
deleted_objs.AuthenticationType =
AuthenticationTypes.FastBind |
AuthenticationTypes.Secure;
DirectorySearcher search =
new DirectorySearcher(deleted_objs);
search.Filter = "(isDeleted=TRUE)";
search.PageSize = 1000;
search.Tombstone = true;
search.SearchScope =
System.DirectoryServices.SearchScope.OneLevel;
The search scope contains the full namespace for the SearchScope
definition. This is because the SearchScope can be found in both ‘System.DirectoryServices’ and ‘System.DirectoryServices.Protocols’-
namespaces. Therefore, not using the namespace will result in an
‘ambiguous reference’ error as explained in chapter ‘2. IDE’.
Next, iterate through the found deleted objects, using the following snippet.
using (SearchResultCollection results =
search.FindAll())
{
foreach (SearchResult result in results)
{
MessageBox.Show("DN: " +
result.Properties["distinguishedName"][0].
ToString() +
Environment.NewLine +
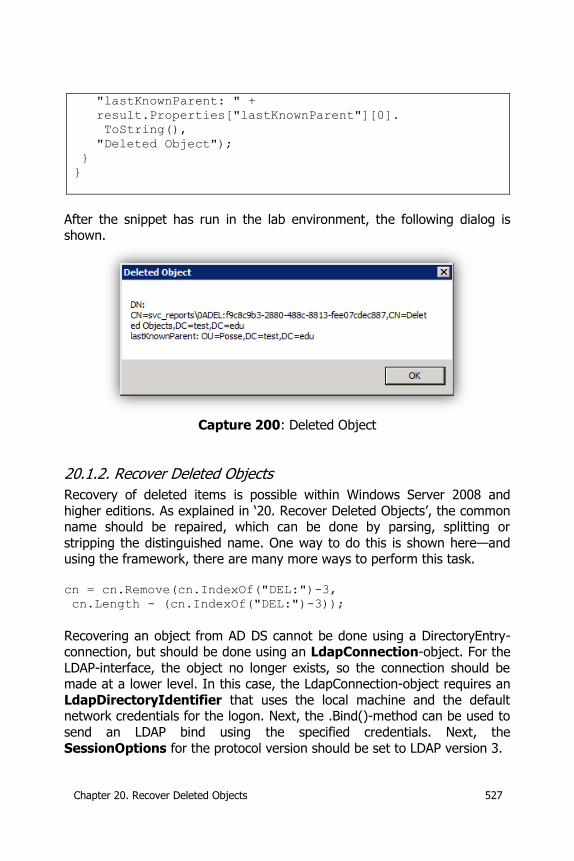
Chapter 20. Recover Deleted Objects 527
"lastKnownParent: " +
result.Properties["lastKnownParent"][0].
ToString(),
"Deleted Object");
}
}
After the snippet has run in the lab environment, the following dialog is shown.
Capture 200: Deleted Object
20.1.2. Recover Deleted Objects
Recovery of deleted items is possible within Windows Server 2008 and
higher editions. As explained in ‘20. Recover Deleted Objects’, the common name should be repaired, which can be done by parsing, splitting or
stripping the distinguished name. One way to do this is shown here—and using the framework, there are many more ways to perform this task.
cn = cn.Remove(cn.IndexOf("DEL:")-3,
cn.Length - (cn.IndexOf("DEL:")-3));
Recovering an object from AD DS cannot be done using a DirectoryEntry-connection, but should be done using an LdapConnection-object. For the
LDAP-interface, the object no longer exists, so the connection should be made at a lower level. In this case, the LdapConnection-object requires an
LdapDirectoryIdentifier that uses the local machine and the default network credentials for the logon. Next, the .Bind()-method can be used to
send an LDAP bind using the specified credentials. Next, the
SessionOptions for the protocol version should be set to LDAP version 3.
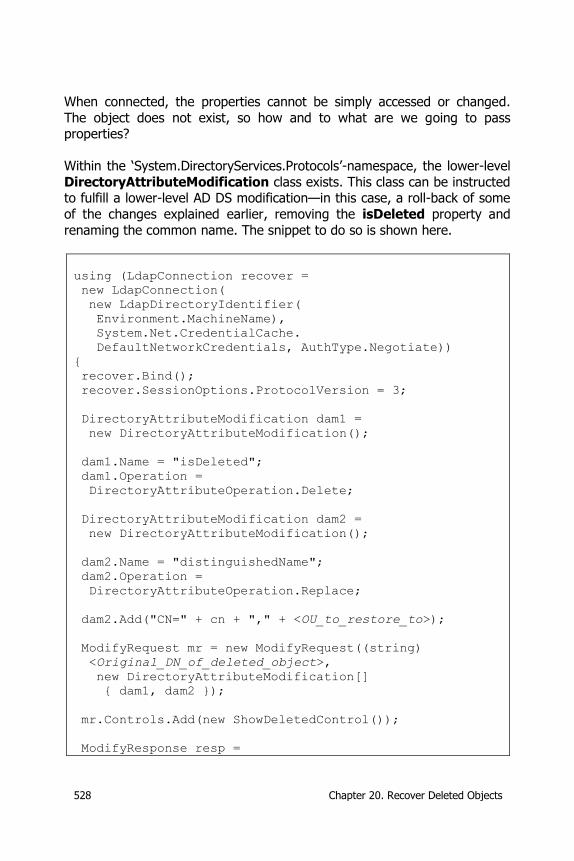
528 Chapter 20. Recover Deleted Objects
When connected, the properties cannot be simply accessed or changed.
The object does not exist, so how and to what are we going to pass properties?
Within the ‘System.DirectoryServices.Protocols’-namespace, the lower-level
DirectoryAttributeModification class exists. This class can be instructed to fulfill a lower-level AD DS modification—in this case, a roll-back of some
of the changes explained earlier, removing the isDeleted property and
renaming the common name. The snippet to do so is shown here.
using (LdapConnection recover =
new LdapConnection(
new LdapDirectoryIdentifier(
Environment.MachineName),
System.Net.CredentialCache.
DefaultNetworkCredentials, AuthType.Negotiate))
{
recover.Bind();
recover.SessionOptions.ProtocolVersion = 3;
DirectoryAttributeModification dam1 =
new DirectoryAttributeModification();
dam1.Name = "isDeleted";
dam1.Operation =
DirectoryAttributeOperation.Delete;
DirectoryAttributeModification dam2 =
new DirectoryAttributeModification();
dam2.Name = "distinguishedName";
dam2.Operation =
DirectoryAttributeOperation.Replace;
dam2.Add("CN=" + cn + "," + <OU_to_restore_to>);
ModifyRequest mr = new ModifyRequest((string)
<Original_DN_of_deleted_object>,
new DirectoryAttributeModification[]
{ dam1, dam2 });
mr.Controls.Add(new ShowDeletedControl());
ModifyResponse resp =
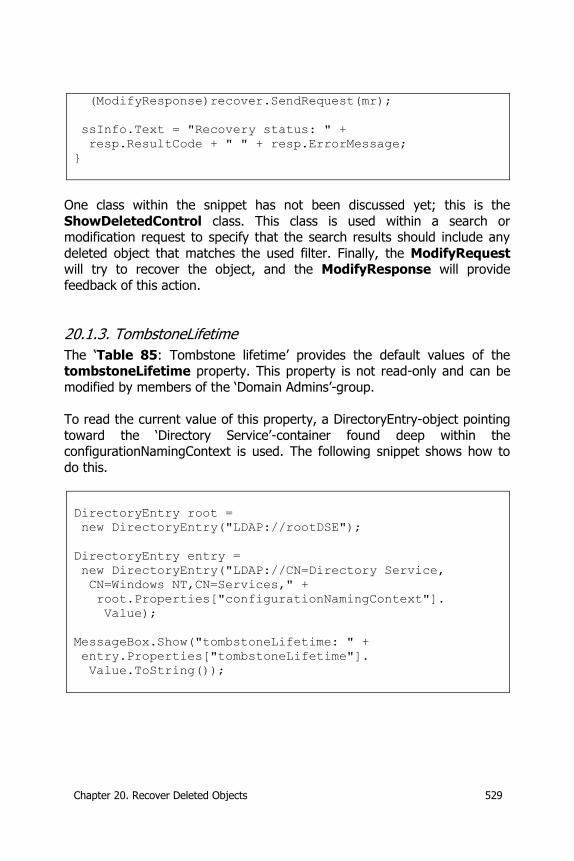
Chapter 20. Recover Deleted Objects 529
(ModifyResponse)recover.SendRequest(mr);
ssInfo.Text = "Recovery status: " +
resp.ResultCode + " " + resp.ErrorMessage;
}
One class within the snippet has not been discussed yet; this is the
ShowDeletedControl class. This class is used within a search or modification request to specify that the search results should include any
deleted object that matches the used filter. Finally, the ModifyRequest will try to recover the object, and the ModifyResponse will provide
feedback of this action.
20.1.3. TombstoneLifetime
The ‘Table 85: Tombstone lifetime’ provides the default values of the tombstoneLifetime property. This property is not read-only and can be
modified by members of the ‘Domain Admins’-group.
To read the current value of this property, a DirectoryEntry-object pointing
toward the ‘Directory Service’-container found deep within the configurationNamingContext is used. The following snippet shows how to
do this.
DirectoryEntry root =
new DirectoryEntry("LDAP://rootDSE");
DirectoryEntry entry =
new DirectoryEntry("LDAP://CN=Directory Service,
CN=Windows NT,CN=Services," +
root.Properties["configurationNamingContext"].
Value);
MessageBox.Show("tombstoneLifetime: " +
entry.Properties["tombstoneLifetime"].
Value.ToString());
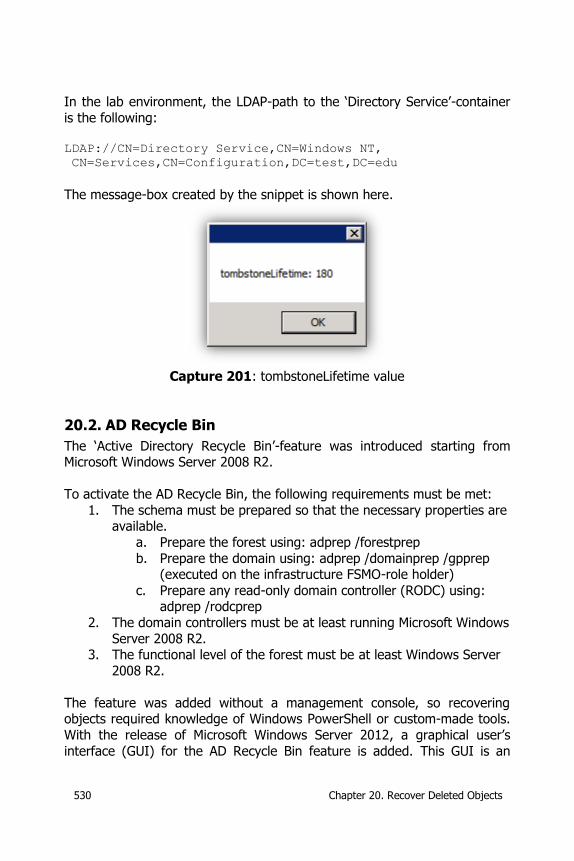
530 Chapter 20. Recover Deleted Objects
In the lab environment, the LDAP-path to the ‘Directory Service’-container
is the following: LDAP://CN=Directory Service,CN=Windows NT,
CN=Services,CN=Configuration,DC=test,DC=edu
The message-box created by the snippet is shown here.
Capture 201: tombstoneLifetime value
20.2. AD Recycle Bin
The ‘Active Directory Recycle Bin’-feature was introduced starting from Microsoft Windows Server 2008 R2.
To activate the AD Recycle Bin, the following requirements must be met:
1. The schema must be prepared so that the necessary properties are available.
a. Prepare the forest using: adprep /forestprep
b. Prepare the domain using: adprep /domainprep /gpprep (executed on the infrastructure FSMO-role holder)
c. Prepare any read-only domain controller (RODC) using: adprep /rodcprep
2. The domain controllers must be at least running Microsoft Windows
Server 2008 R2. 3. The functional level of the forest must be at least Windows Server
2008 R2.
The feature was added without a management console, so recovering objects required knowledge of Windows PowerShell or custom-made tools.
With the release of Microsoft Windows Server 2012, a graphical user’s
interface (GUI) for the AD Recycle Bin feature is added. This GUI is an
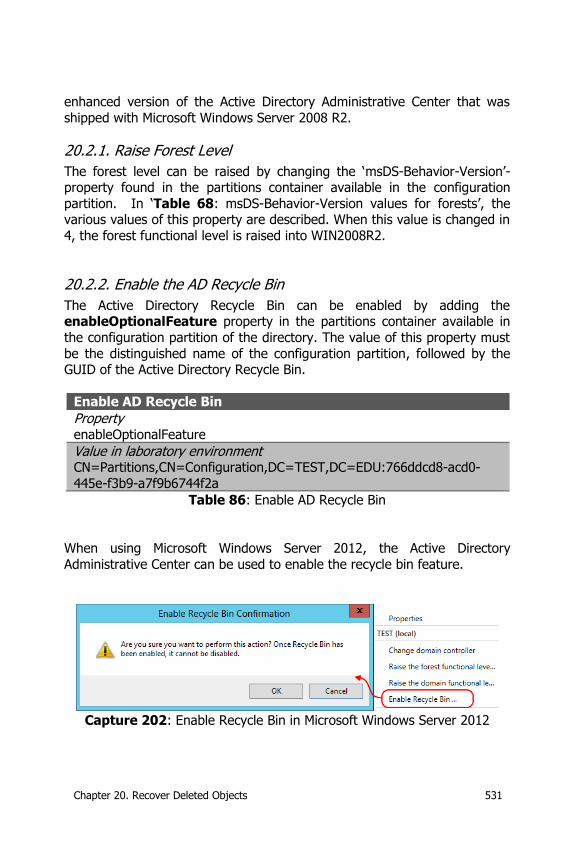
Chapter 20. Recover Deleted Objects 531
enhanced version of the Active Directory Administrative Center that was
shipped with Microsoft Windows Server 2008 R2.
20.2.1. Raise Forest Level
The forest level can be raised by changing the ‘msDS-Behavior-Version’-property found in the partitions container available in the configuration
partition. In ‘Table 68: msDS-Behavior-Version values for forests’, the various values of this property are described. When this value is changed in
4, the forest functional level is raised into WIN2008R2.
20.2.2. Enable the AD Recycle Bin
The Active Directory Recycle Bin can be enabled by adding the enableOptionalFeature property in the partitions container available in
the configuration partition of the directory. The value of this property must
be the distinguished name of the configuration partition, followed by the GUID of the Active Directory Recycle Bin.
Enable AD Recycle Bin
Property enableOptionalFeature
Value in laboratory environment CN=Partitions,CN=Configuration,DC=TEST,DC=EDU:766ddcd8-acd0-
445e-f3b9-a7f9b6744f2a
Table 86: Enable AD Recycle Bin
When using Microsoft Windows Server 2012, the Active Directory
Administrative Center can be used to enable the recycle bin feature.
Capture 202: Enable Recycle Bin in Microsoft Windows Server 2012
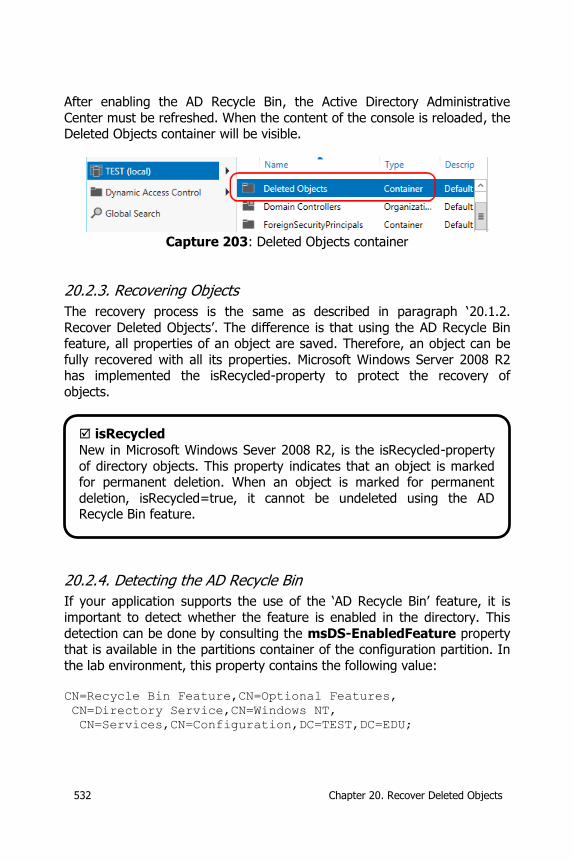
532 Chapter 20. Recover Deleted Objects
After enabling the AD Recycle Bin, the Active Directory Administrative
Center must be refreshed. When the content of the console is reloaded, the Deleted Objects container will be visible.
Capture 203: Deleted Objects container
20.2.3. Recovering Objects
The recovery process is the same as described in paragraph ‘20.1.2.
Recover Deleted Objects’. The difference is that using the AD Recycle Bin feature, all properties of an object are saved. Therefore, an object can be
fully recovered with all its properties. Microsoft Windows Server 2008 R2 has implemented the isRecycled-property to protect the recovery of
objects.
20.2.4. Detecting the AD Recycle Bin
If your application supports the use of the ‘AD Recycle Bin’ feature, it is
important to detect whether the feature is enabled in the directory. This
detection can be done by consulting the msDS-EnabledFeature property that is available in the partitions container of the configuration partition. In
the lab environment, this property contains the following value: CN=Recycle Bin Feature,CN=Optional Features,
CN=Directory Service,CN=Windows NT,
CN=Services,CN=Configuration,DC=TEST,DC=EDU;
isRecycled
New in Microsoft Windows Sever 2008 R2, is the isRecycled-property
of directory objects. This property indicates that an object is marked for permanent deletion. When an object is marked for permanent
deletion, isRecycled=true, it cannot be undeleted using the AD Recycle Bin feature.
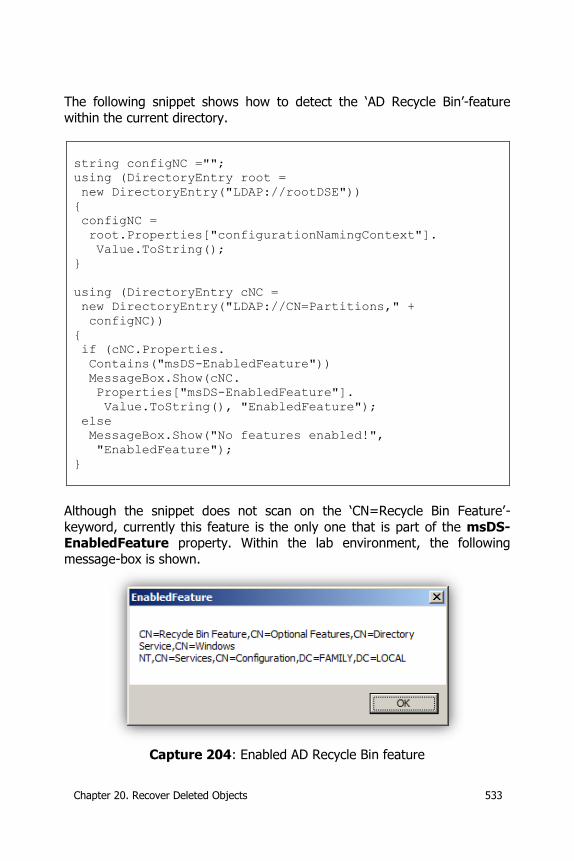
Chapter 20. Recover Deleted Objects 533
The following snippet shows how to detect the ‘AD Recycle Bin’-feature
within the current directory.
string configNC ="";
using (DirectoryEntry root =
new DirectoryEntry("LDAP://rootDSE"))
{
configNC =
root.Properties["configurationNamingContext"].
Value.ToString();
}
using (DirectoryEntry cNC =
new DirectoryEntry("LDAP://CN=Partitions," +
configNC))
{
if (cNC.Properties.
Contains("msDS-EnabledFeature"))
MessageBox.Show(cNC.
Properties["msDS-EnabledFeature"].
Value.ToString(), "EnabledFeature");
else
MessageBox.Show("No features enabled!",
"EnabledFeature");
}
Although the snippet does not scan on the ‘CN=Recycle Bin Feature’-
keyword, currently this feature is the only one that is part of the msDS-EnabledFeature property. Within the lab environment, the following
message-box is shown.
Capture 204: Enabled AD Recycle Bin feature

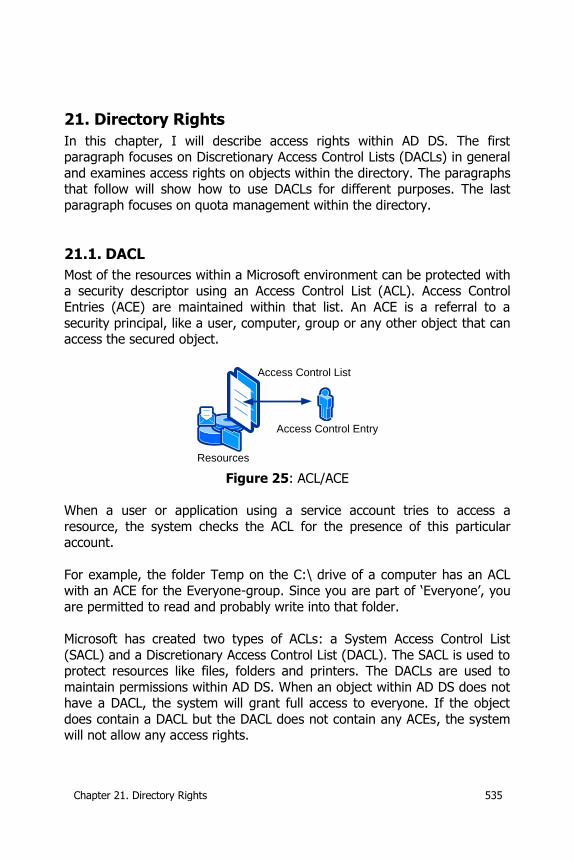
Chapter 21. Directory Rights 535
21. Directory Rights
In this chapter, I will describe access rights within AD DS. The first paragraph focuses on Discretionary Access Control Lists (DACLs) in general
and examines access rights on objects within the directory. The paragraphs that follow will show how to use DACLs for different purposes. The last
paragraph focuses on quota management within the directory.
21.1. DACL
Most of the resources within a Microsoft environment can be protected with a security descriptor using an Access Control List (ACL). Access Control
Entries (ACE) are maintained within that list. An ACE is a referral to a
security principal, like a user, computer, group or any other object that can access the secured object.
Resources
Access Control List
Access Control Entry
Figure 25: ACL/ACE
When a user or application using a service account tries to access a
resource, the system checks the ACL for the presence of this particular account.
For example, the folder Temp on the C:\ drive of a computer has an ACL with an ACE for the Everyone-group. Since you are part of ‘Everyone’, you
are permitted to read and probably write into that folder.
Microsoft has created two types of ACLs: a System Access Control List
(SACL) and a Discretionary Access Control List (DACL). The SACL is used to protect resources like files, folders and printers. The DACLs are used to
maintain permissions within AD DS. When an object within AD DS does not have a DACL, the system will grant full access to everyone. If the object
does contain a DACL but the DACL does not contain any ACEs, the system will not allow any access rights.
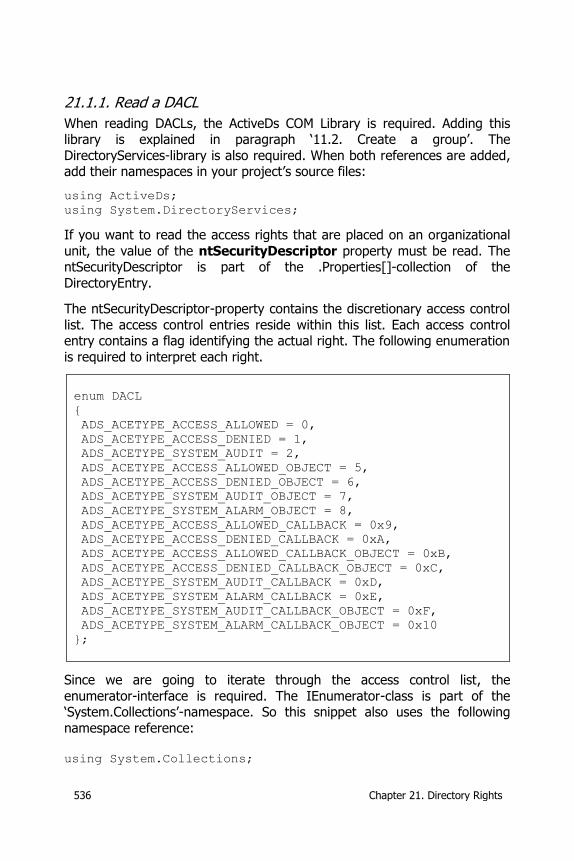
536 Chapter 21. Directory Rights
21.1.1. Read a DACL
When reading DACLs, the ActiveDs COM Library is required. Adding this library is explained in paragraph ‘11.2. Create a group’. The
DirectoryServices-library is also required. When both references are added, add their namespaces in your project’s source files:
using ActiveDs;
using System.DirectoryServices;
If you want to read the access rights that are placed on an organizational
unit, the value of the ntSecurityDescriptor property must be read. The ntSecurityDescriptor is part of the .Properties[]-collection of the
DirectoryEntry.
The ntSecurityDescriptor-property contains the discretionary access control
list. The access control entries reside within this list. Each access control entry contains a flag identifying the actual right. The following enumeration
is required to interpret each right.
enum DACL
{
ADS_ACETYPE_ACCESS_ALLOWED = 0,
ADS_ACETYPE_ACCESS_DENIED = 1,
ADS_ACETYPE_SYSTEM_AUDIT = 2,
ADS_ACETYPE_ACCESS_ALLOWED_OBJECT = 5,
ADS_ACETYPE_ACCESS_DENIED_OBJECT = 6,
ADS_ACETYPE_SYSTEM_AUDIT_OBJECT = 7,
ADS_ACETYPE_SYSTEM_ALARM_OBJECT = 8,
ADS_ACETYPE_ACCESS_ALLOWED_CALLBACK = 0x9,
ADS_ACETYPE_ACCESS_DENIED_CALLBACK = 0xA,
ADS_ACETYPE_ACCESS_ALLOWED_CALLBACK_OBJECT = 0xB,
ADS_ACETYPE_ACCESS_DENIED_CALLBACK_OBJECT = 0xC,
ADS_ACETYPE_SYSTEM_AUDIT_CALLBACK = 0xD,
ADS_ACETYPE_SYSTEM_ALARM_CALLBACK = 0xE,
ADS_ACETYPE_SYSTEM_AUDIT_CALLBACK_OBJECT = 0xF,
ADS_ACETYPE_SYSTEM_ALARM_CALLBACK_OBJECT = 0x10
};
Since we are going to iterate through the access control list, the
enumerator-interface is required. The IEnumerator-class is part of the ‘System.Collections’-namespace. So this snippet also uses the following
namespace reference: using System.Collections;
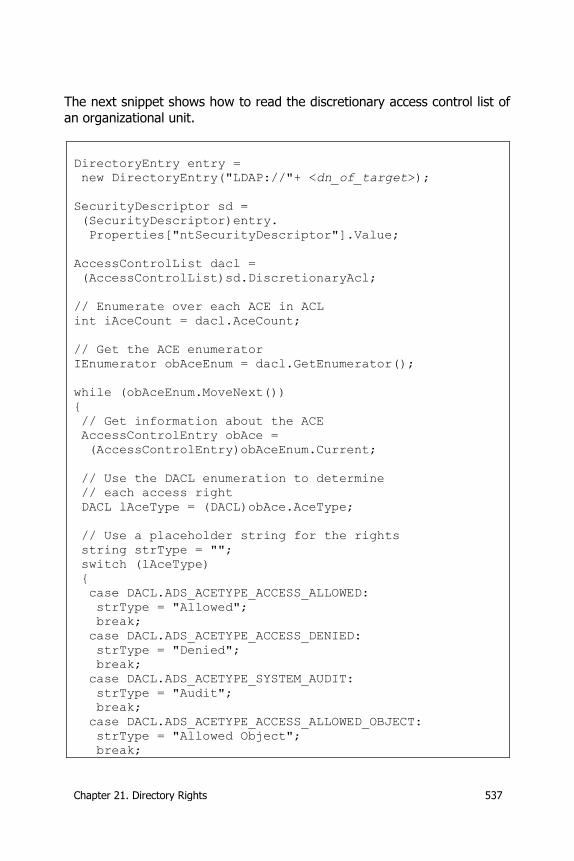
Chapter 21. Directory Rights 537
The next snippet shows how to read the discretionary access control list of
an organizational unit.
DirectoryEntry entry =
new DirectoryEntry("LDAP://"+ <dn_of_target>);
SecurityDescriptor sd =
(SecurityDescriptor)entry.
Properties["ntSecurityDescriptor"].Value;
AccessControlList dacl =
(AccessControlList)sd.DiscretionaryAcl;
// Enumerate over each ACE in ACL
int iAceCount = dacl.AceCount;
// Get the ACE enumerator
IEnumerator obAceEnum = dacl.GetEnumerator();
while (obAceEnum.MoveNext())
{
// Get information about the ACE
AccessControlEntry obAce =
(AccessControlEntry)obAceEnum.Current;
// Use the DACL enumeration to determine
// each access right
DACL lAceType = (DACL)obAce.AceType;
// Use a placeholder string for the rights
string strType = "";
switch (lAceType)
{
case DACL.ADS_ACETYPE_ACCESS_ALLOWED:
strType = "Allowed";
break;
case DACL.ADS_ACETYPE_ACCESS_DENIED:
strType = "Denied";
break;
case DACL.ADS_ACETYPE_SYSTEM_AUDIT:
strType = "Audit";
break;
case DACL.ADS_ACETYPE_ACCESS_ALLOWED_OBJECT:
strType = "Allowed Object";
break;
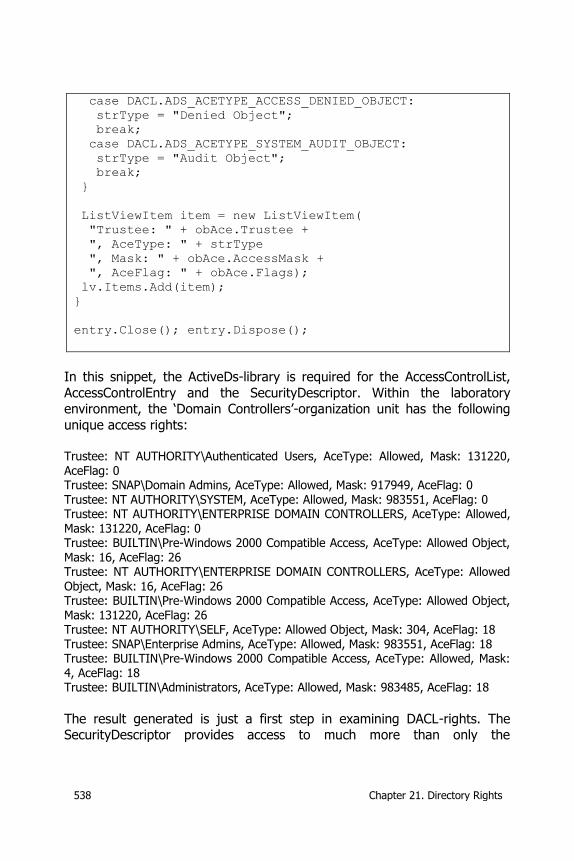
538 Chapter 21. Directory Rights
case DACL.ADS_ACETYPE_ACCESS_DENIED_OBJECT:
strType = "Denied Object";
break;
case DACL.ADS_ACETYPE_SYSTEM_AUDIT_OBJECT:
strType = "Audit Object";
break;
}
ListViewItem item = new ListViewItem(
"Trustee: " + obAce.Trustee +
", AceType: " + strType
", Mask: " + obAce.AccessMask +
", AceFlag: " + obAce.Flags);
lv.Items.Add(item);
}
entry.Close(); entry.Dispose();
In this snippet, the ActiveDs-library is required for the AccessControlList,
AccessControlEntry and the SecurityDescriptor. Within the laboratory environment, the ‘Domain Controllers’-organization unit has the following
unique access rights: Trustee: NT AUTHORITY\Authenticated Users, AceType: Allowed, Mask: 131220, AceFlag: 0 Trustee: SNAP\Domain Admins, AceType: Allowed, Mask: 917949, AceFlag: 0 Trustee: NT AUTHORITY\SYSTEM, AceType: Allowed, Mask: 983551, AceFlag: 0 Trustee: NT AUTHORITY\ENTERPRISE DOMAIN CONTROLLERS, AceType: Allowed, Mask: 131220, AceFlag: 0 Trustee: BUILTIN\Pre-Windows 2000 Compatible Access, AceType: Allowed Object, Mask: 16, AceFlag: 26 Trustee: NT AUTHORITY\ENTERPRISE DOMAIN CONTROLLERS, AceType: Allowed
Object, Mask: 16, AceFlag: 26 Trustee: BUILTIN\Pre-Windows 2000 Compatible Access, AceType: Allowed Object, Mask: 131220, AceFlag: 26 Trustee: NT AUTHORITY\SELF, AceType: Allowed Object, Mask: 304, AceFlag: 18 Trustee: SNAP\Enterprise Admins, AceType: Allowed, Mask: 983551, AceFlag: 18 Trustee: BUILTIN\Pre-Windows 2000 Compatible Access, AceType: Allowed, Mask: 4, AceFlag: 18 Trustee: BUILTIN\Administrators, AceType: Allowed, Mask: 983485, AceFlag: 18
The result generated is just a first step in examining DACL-rights. The SecurityDescriptor provides access to much more than only the
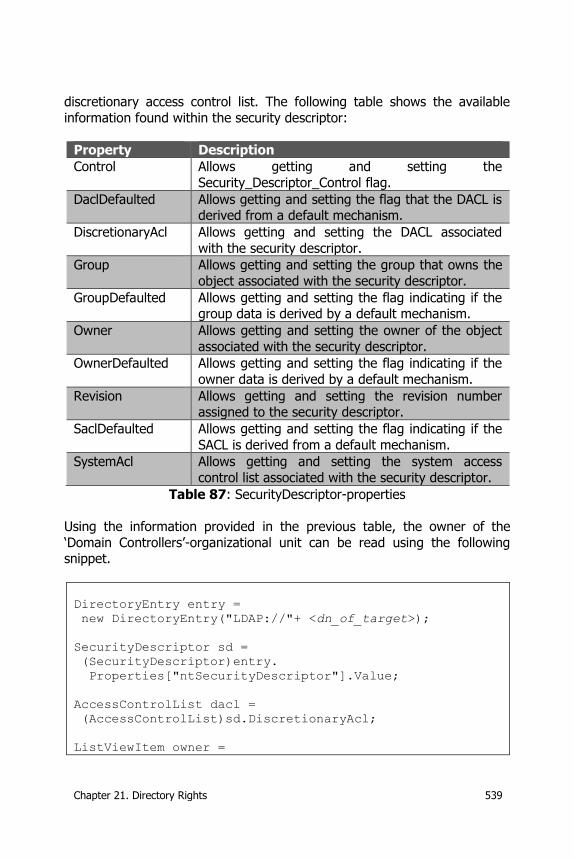
Chapter 21. Directory Rights 539
discretionary access control list. The following table shows the available
information found within the security descriptor:
Property Description
Control Allows getting and setting the
Security_Descriptor_Control flag.
DaclDefaulted Allows getting and setting the flag that the DACL is derived from a default mechanism.
DiscretionaryAcl Allows getting and setting the DACL associated
with the security descriptor.
Group Allows getting and setting the group that owns the
object associated with the security descriptor.
GroupDefaulted Allows getting and setting the flag indicating if the group data is derived by a default mechanism.
Owner Allows getting and setting the owner of the object
associated with the security descriptor.
OwnerDefaulted Allows getting and setting the flag indicating if the
owner data is derived by a default mechanism.
Revision Allows getting and setting the revision number assigned to the security descriptor.
SaclDefaulted Allows getting and setting the flag indicating if the
SACL is derived from a default mechanism.
SystemAcl Allows getting and setting the system access
control list associated with the security descriptor.
Table 87: SecurityDescriptor-properties
Using the information provided in the previous table, the owner of the
‘Domain Controllers’-organizational unit can be read using the following snippet.
DirectoryEntry entry =
new DirectoryEntry("LDAP://"+ <dn_of_target>);
SecurityDescriptor sd =
(SecurityDescriptor)entry.
Properties["ntSecurityDescriptor"].Value;
AccessControlList dacl =
(AccessControlList)sd.DiscretionaryAcl;
ListViewItem owner =
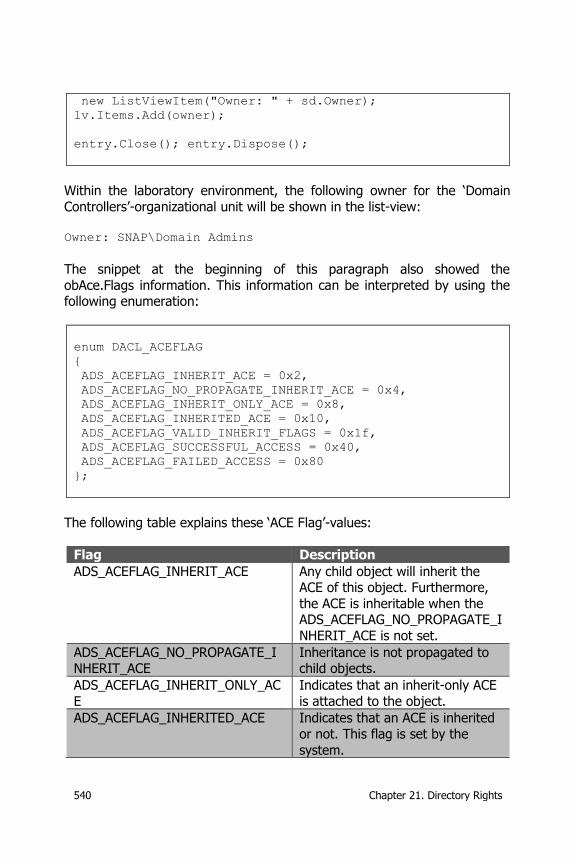
540 Chapter 21. Directory Rights
new ListViewItem("Owner: " + sd.Owner);
lv.Items.Add(owner);
entry.Close(); entry.Dispose();
Within the laboratory environment, the following owner for the ‘Domain
Controllers’-organizational unit will be shown in the list-view: Owner: SNAP\Domain Admins
The snippet at the beginning of this paragraph also showed the
obAce.Flags information. This information can be interpreted by using the following enumeration:
enum DACL_ACEFLAG
{
ADS_ACEFLAG_INHERIT_ACE = 0x2,
ADS_ACEFLAG_NO_PROPAGATE_INHERIT_ACE = 0x4,
ADS_ACEFLAG_INHERIT_ONLY_ACE = 0x8,
ADS_ACEFLAG_INHERITED_ACE = 0x10,
ADS_ACEFLAG_VALID_INHERIT_FLAGS = 0x1f,
ADS_ACEFLAG_SUCCESSFUL_ACCESS = 0x40,
ADS_ACEFLAG_FAILED_ACCESS = 0x80
};
The following table explains these ‘ACE Flag’-values:
Flag Description
ADS_ACEFLAG_INHERIT_ACE Any child object will inherit the ACE of this object. Furthermore,
the ACE is inheritable when the ADS_ACEFLAG_NO_PROPAGATE_I
NHERIT_ACE is not set.
ADS_ACEFLAG_NO_PROPAGATE_INHERIT_ACE
Inheritance is not propagated to child objects.
ADS_ACEFLAG_INHERIT_ONLY_AC
E
Indicates that an inherit-only ACE
is attached to the object.
ADS_ACEFLAG_INHERITED_ACE Indicates that an ACE is inherited
or not. This flag is set by the
system.
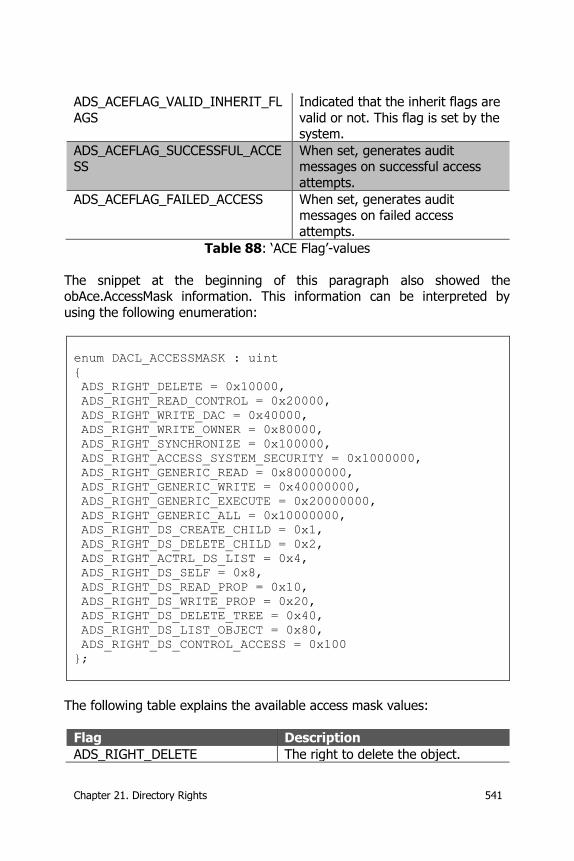
Chapter 21. Directory Rights 541
ADS_ACEFLAG_VALID_INHERIT_FL
AGS
Indicated that the inherit flags are
valid or not. This flag is set by the system.
ADS_ACEFLAG_SUCCESSFUL_ACCESS
When set, generates audit messages on successful access
attempts.
ADS_ACEFLAG_FAILED_ACCESS When set, generates audit messages on failed access
attempts.
Table 88: ‘ACE Flag’-values
The snippet at the beginning of this paragraph also showed the obAce.AccessMask information. This information can be interpreted by
using the following enumeration:
enum DACL_ACCESSMASK : uint
{
ADS_RIGHT_DELETE = 0x10000,
ADS_RIGHT_READ_CONTROL = 0x20000,
ADS_RIGHT_WRITE_DAC = 0x40000,
ADS_RIGHT_WRITE_OWNER = 0x80000,
ADS_RIGHT_SYNCHRONIZE = 0x100000,
ADS_RIGHT_ACCESS_SYSTEM_SECURITY = 0x1000000,
ADS_RIGHT_GENERIC_READ = 0x80000000,
ADS_RIGHT_GENERIC_WRITE = 0x40000000,
ADS_RIGHT_GENERIC_EXECUTE = 0x20000000,
ADS_RIGHT_GENERIC_ALL = 0x10000000,
ADS_RIGHT_DS_CREATE_CHILD = 0x1,
ADS_RIGHT_DS_DELETE_CHILD = 0x2,
ADS_RIGHT_ACTRL_DS_LIST = 0x4,
ADS_RIGHT_DS_SELF = 0x8,
ADS_RIGHT_DS_READ_PROP = 0x10,
ADS_RIGHT_DS_WRITE_PROP = 0x20,
ADS_RIGHT_DS_DELETE_TREE = 0x40,
ADS_RIGHT_DS_LIST_OBJECT = 0x80,
ADS_RIGHT_DS_CONTROL_ACCESS = 0x100
};
The following table explains the available access mask values:
Flag Description
ADS_RIGHT_DELETE The right to delete the object.
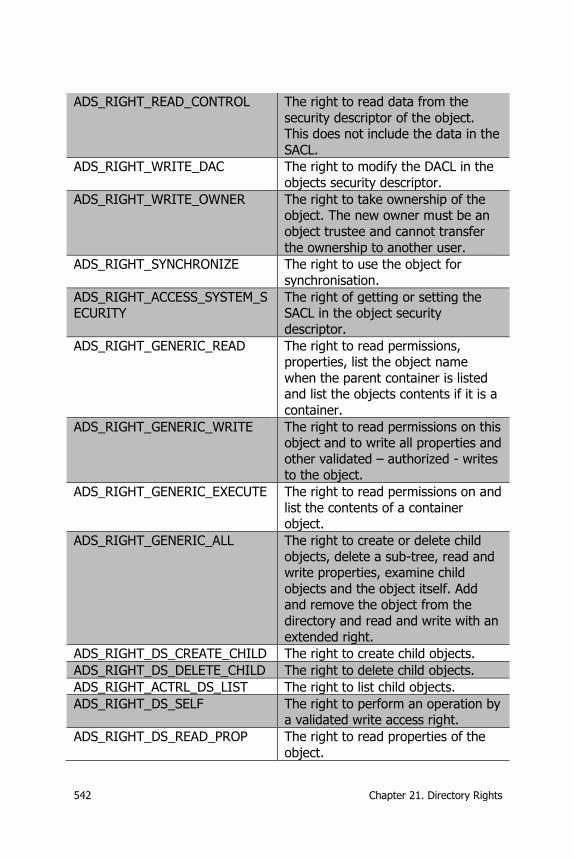
542 Chapter 21. Directory Rights
ADS_RIGHT_READ_CONTROL The right to read data from the
security descriptor of the object. This does not include the data in the
SACL.
ADS_RIGHT_WRITE_DAC The right to modify the DACL in the
objects security descriptor.
ADS_RIGHT_WRITE_OWNER The right to take ownership of the object. The new owner must be an
object trustee and cannot transfer
the ownership to another user.
ADS_RIGHT_SYNCHRONIZE The right to use the object for
synchronisation.
ADS_RIGHT_ACCESS_SYSTEM_SECURITY
The right of getting or setting the SACL in the object security
descriptor.
ADS_RIGHT_GENERIC_READ The right to read permissions, properties, list the object name
when the parent container is listed and list the objects contents if it is a
container.
ADS_RIGHT_GENERIC_WRITE The right to read permissions on this object and to write all properties and
other validated – authorized - writes to the object.
ADS_RIGHT_GENERIC_EXECUTE The right to read permissions on and
list the contents of a container object.
ADS_RIGHT_GENERIC_ALL The right to create or delete child
objects, delete a sub-tree, read and write properties, examine child
objects and the object itself. Add and remove the object from the
directory and read and write with an
extended right.
ADS_RIGHT_DS_CREATE_CHILD The right to create child objects.
ADS_RIGHT_DS_DELETE_CHILD The right to delete child objects.
ADS_RIGHT_ACTRL_DS_LIST The right to list child objects.
ADS_RIGHT_DS_SELF The right to perform an operation by a validated write access right.
ADS_RIGHT_DS_READ_PROP The right to read properties of the
object.
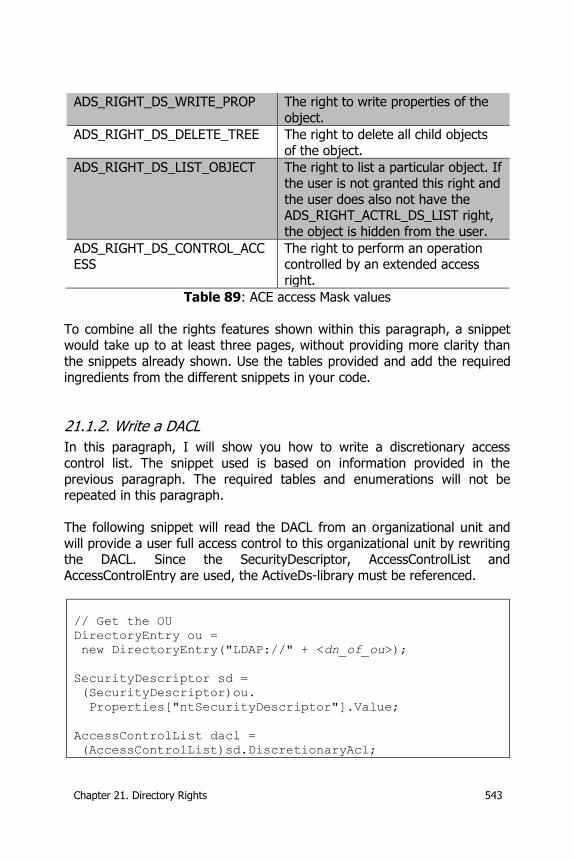
Chapter 21. Directory Rights 543
ADS_RIGHT_DS_WRITE_PROP The right to write properties of the
object.
ADS_RIGHT_DS_DELETE_TREE The right to delete all child objects
of the object.
ADS_RIGHT_DS_LIST_OBJECT The right to list a particular object. If the user is not granted this right and
the user does also not have the ADS_RIGHT_ACTRL_DS_LIST right,
the object is hidden from the user.
ADS_RIGHT_DS_CONTROL_ACCESS
The right to perform an operation controlled by an extended access
right.
Table 89: ACE access Mask values
To combine all the rights features shown within this paragraph, a snippet would take up to at least three pages, without providing more clarity than
the snippets already shown. Use the tables provided and add the required
ingredients from the different snippets in your code.
21.1.2. Write a DACL
In this paragraph, I will show you how to write a discretionary access
control list. The snippet used is based on information provided in the
previous paragraph. The required tables and enumerations will not be repeated in this paragraph.
The following snippet will read the DACL from an organizational unit and
will provide a user full access control to this organizational unit by rewriting the DACL. Since the SecurityDescriptor, AccessControlList and
AccessControlEntry are used, the ActiveDs-library must be referenced.
// Get the OU
DirectoryEntry ou =
new DirectoryEntry("LDAP://" + <dn_of_ou>);
SecurityDescriptor sd =
(SecurityDescriptor)ou.
Properties["ntSecurityDescriptor"].Value;
AccessControlList dacl =
(AccessControlList)sd.DiscretionaryAcl;
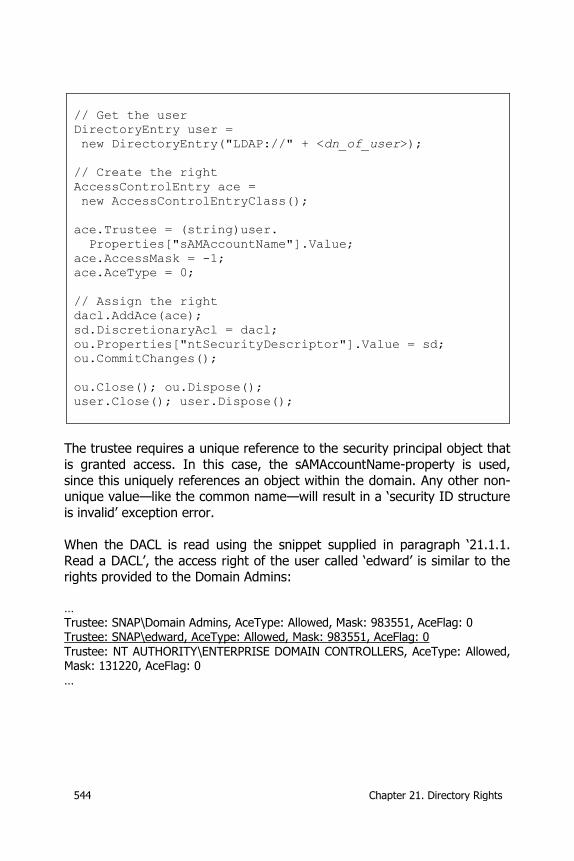
544 Chapter 21. Directory Rights
// Get the user
DirectoryEntry user =
new DirectoryEntry("LDAP://" + <dn_of_user>);
// Create the right
AccessControlEntry ace =
new AccessControlEntryClass();
ace.Trustee = (string)user.
Properties["sAMAccountName"].Value;
ace.AccessMask = -1;
ace.AceType = 0;
// Assign the right
dacl.AddAce(ace);
sd.DiscretionaryAcl = dacl;
ou.Properties["ntSecurityDescriptor"].Value = sd;
ou.CommitChanges();
ou.Close(); ou.Dispose();
user.Close(); user.Dispose();
The trustee requires a unique reference to the security principal object that
is granted access. In this case, the sAMAccountName-property is used,
since this uniquely references an object within the domain. Any other non-unique value—like the common name—will result in a ‘security ID structure
is invalid’ exception error.
When the DACL is read using the snippet supplied in paragraph ‘21.1.1.
Read a DACL’, the access right of the user called ‘edward’ is similar to the rights provided to the Domain Admins:
… Trustee: SNAP\Domain Admins, AceType: Allowed, Mask: 983551, AceFlag: 0 Trustee: SNAP\edward, AceType: Allowed, Mask: 983551, AceFlag: 0 Trustee: NT AUTHORITY\ENTERPRISE DOMAIN CONTROLLERS, AceType: Allowed, Mask: 131220, AceFlag: 0 …
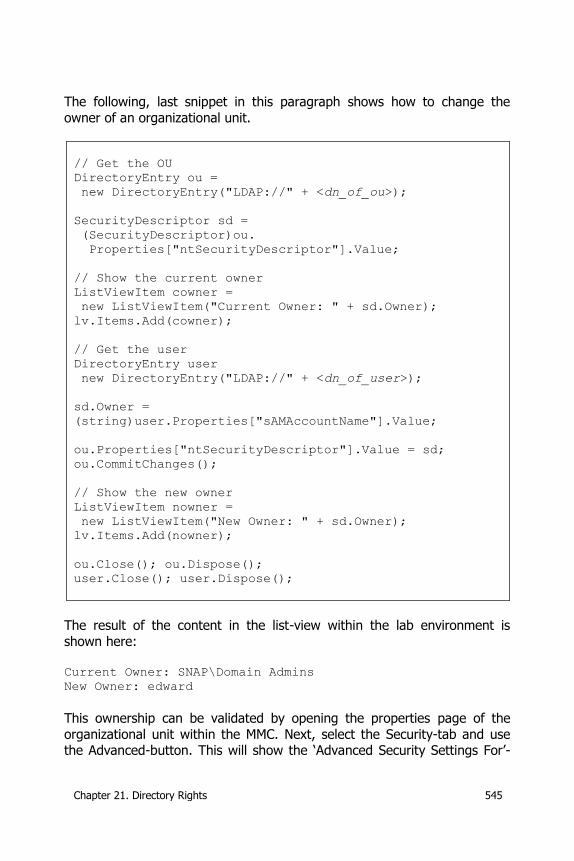
Chapter 21. Directory Rights 545
The following, last snippet in this paragraph shows how to change the
owner of an organizational unit.
// Get the OU
DirectoryEntry ou =
new DirectoryEntry("LDAP://" + <dn_of_ou>);
SecurityDescriptor sd =
(SecurityDescriptor)ou.
Properties["ntSecurityDescriptor"].Value;
// Show the current owner
ListViewItem cowner =
new ListViewItem("Current Owner: " + sd.Owner);
lv.Items.Add(cowner);
// Get the user
DirectoryEntry user
new DirectoryEntry("LDAP://" + <dn_of_user>);
sd.Owner =
(string)user.Properties["sAMAccountName"].Value;
ou.Properties["ntSecurityDescriptor"].Value = sd;
ou.CommitChanges();
// Show the new owner
ListViewItem nowner =
new ListViewItem("New Owner: " + sd.Owner);
lv.Items.Add(nowner);
ou.Close(); ou.Dispose();
user.Close(); user.Dispose();
The result of the content in the list-view within the lab environment is
shown here:
Current Owner: SNAP\Domain Admins
New Owner: edward
This ownership can be validated by opening the properties page of the
organizational unit within the MMC. Next, select the Security-tab and use the Advanced-button. This will show the ‘Advanced Security Settings For’-
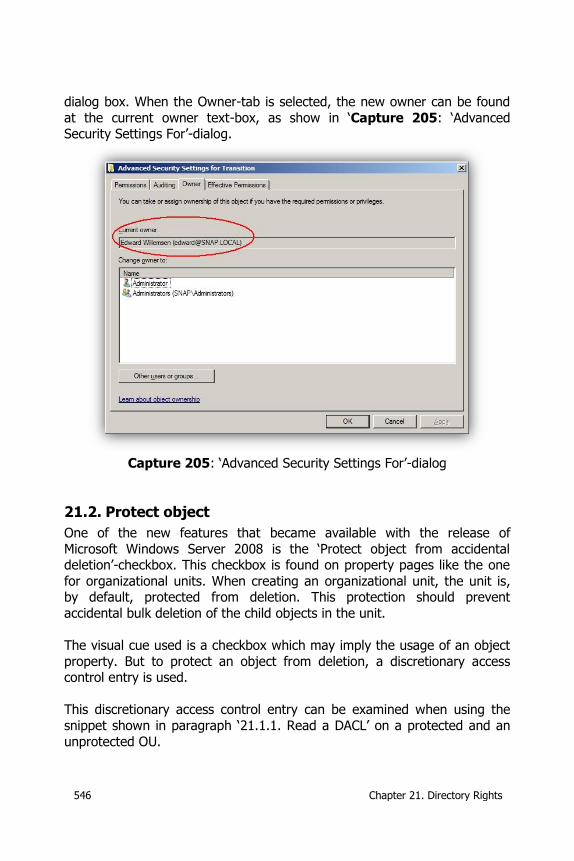
546 Chapter 21. Directory Rights
dialog box. When the Owner-tab is selected, the new owner can be found
at the current owner text-box, as show in ‘Capture 205: ‘Advanced Security Settings For’-dialog.
Capture 205: ‘Advanced Security Settings For’-dialog
21.2. Protect object
One of the new features that became available with the release of
Microsoft Windows Server 2008 is the ‘Protect object from accidental deletion’-checkbox. This checkbox is found on property pages like the one
for organizational units. When creating an organizational unit, the unit is, by default, protected from deletion. This protection should prevent
accidental bulk deletion of the child objects in the unit.
The visual cue used is a checkbox which may imply the usage of an object
property. But to protect an object from deletion, a discretionary access control entry is used.
This discretionary access control entry can be examined when using the
snippet shown in paragraph ‘21.1.1. Read a DACL’ on a protected and an
unprotected OU.
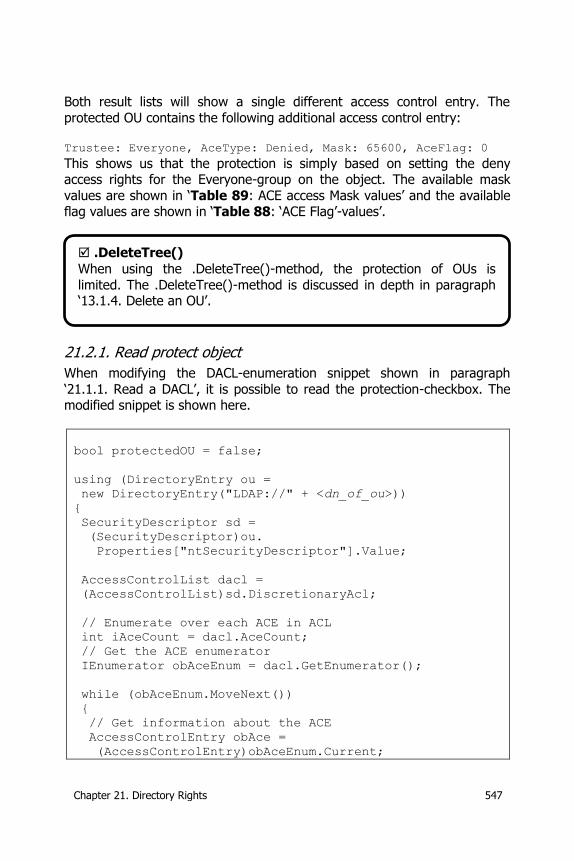
Chapter 21. Directory Rights 547
Both result lists will show a single different access control entry. The
protected OU contains the following additional access control entry: Trustee: Everyone, AceType: Denied, Mask: 65600, AceFlag: 0
This shows us that the protection is simply based on setting the deny access rights for the Everyone-group on the object. The available mask
values are shown in ‘Table 89: ACE access Mask values’ and the available flag values are shown in ‘Table 88: ‘ACE Flag’-values’.
21.2.1. Read protect object
When modifying the DACL-enumeration snippet shown in paragraph
‘21.1.1. Read a DACL’, it is possible to read the protection-checkbox. The modified snippet is shown here.
bool protectedOU = false;
using (DirectoryEntry ou =
new DirectoryEntry("LDAP://" + <dn_of_ou>))
{
SecurityDescriptor sd =
(SecurityDescriptor)ou.
Properties["ntSecurityDescriptor"].Value;
AccessControlList dacl =
(AccessControlList)sd.DiscretionaryAcl;
// Enumerate over each ACE in ACL
int iAceCount = dacl.AceCount;
// Get the ACE enumerator
IEnumerator obAceEnum = dacl.GetEnumerator();
while (obAceEnum.MoveNext())
{
// Get information about the ACE
AccessControlEntry obAce =
(AccessControlEntry)obAceEnum.Current;
.DeleteTree()
When using the .DeleteTree()-method, the protection of OUs is
limited. The .DeleteTree()-method is discussed in depth in paragraph ‘13.1.4. Delete an OU’.
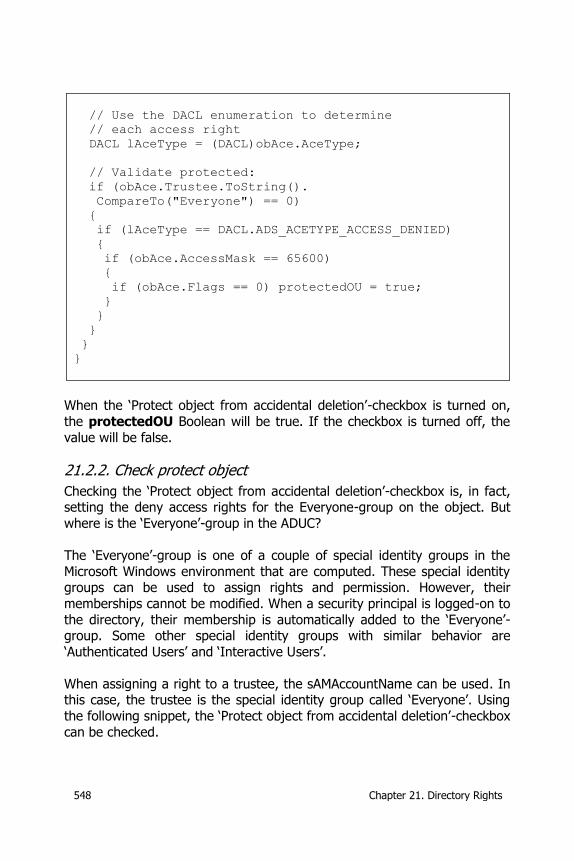
548 Chapter 21. Directory Rights
// Use the DACL enumeration to determine
// each access right
DACL lAceType = (DACL)obAce.AceType;
// Validate protected:
if (obAce.Trustee.ToString().
CompareTo("Everyone") == 0)
{
if (lAceType == DACL.ADS_ACETYPE_ACCESS_DENIED)
{
if (obAce.AccessMask == 65600)
{
if (obAce.Flags == 0) protectedOU = true;
}
}
}
}
}
When the ‘Protect object from accidental deletion’-checkbox is turned on,
the protectedOU Boolean will be true. If the checkbox is turned off, the
value will be false.
21.2.2. Check protect object
Checking the ‘Protect object from accidental deletion’-checkbox is, in fact, setting the deny access rights for the Everyone-group on the object. But
where is the ‘Everyone’-group in the ADUC?
The ‘Everyone’-group is one of a couple of special identity groups in the
Microsoft Windows environment that are computed. These special identity groups can be used to assign rights and permission. However, their
memberships cannot be modified. When a security principal is logged-on to
the directory, their membership is automatically added to the ‘Everyone’-group. Some other special identity groups with similar behavior are
‘Authenticated Users’ and ‘Interactive Users’.
When assigning a right to a trustee, the sAMAccountName can be used. In this case, the trustee is the special identity group called ‘Everyone’. Using
the following snippet, the ‘Protect object from accidental deletion’-checkbox
can be checked.
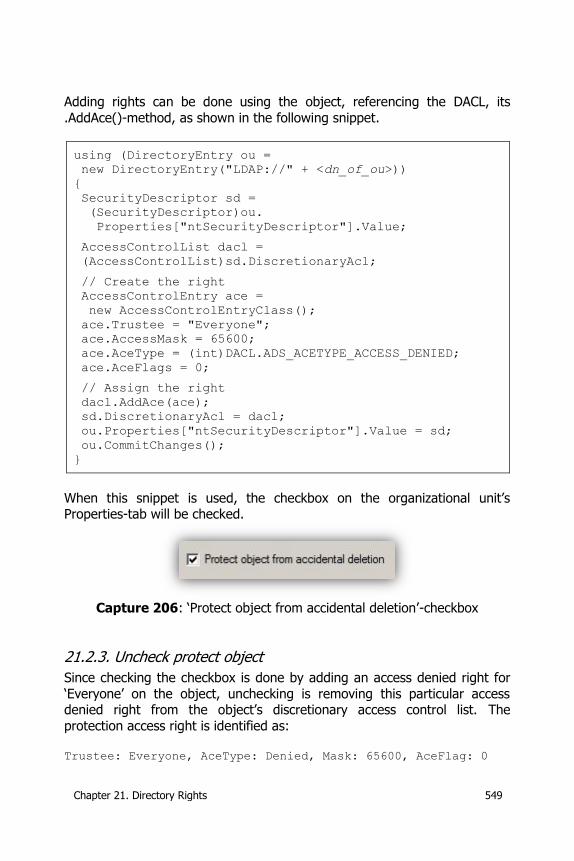
Chapter 21. Directory Rights 549
Adding rights can be done using the object, referencing the DACL, its
.AddAce()-method, as shown in the following snippet.
using (DirectoryEntry ou =
new DirectoryEntry("LDAP://" + <dn_of_ou>))
{
SecurityDescriptor sd =
(SecurityDescriptor)ou.
Properties["ntSecurityDescriptor"].Value;
AccessControlList dacl =
(AccessControlList)sd.DiscretionaryAcl;
// Create the right
AccessControlEntry ace =
new AccessControlEntryClass();
ace.Trustee = "Everyone";
ace.AccessMask = 65600;
ace.AceType = (int)DACL.ADS_ACETYPE_ACCESS_DENIED;
ace.AceFlags = 0;
// Assign the right
dacl.AddAce(ace);
sd.DiscretionaryAcl = dacl;
ou.Properties["ntSecurityDescriptor"].Value = sd;
ou.CommitChanges();
}
When this snippet is used, the checkbox on the organizational unit’s Properties-tab will be checked.
Capture 206: ‘Protect object from accidental deletion’-checkbox
21.2.3. Uncheck protect object
Since checking the checkbox is done by adding an access denied right for
‘Everyone’ on the object, unchecking is removing this particular access denied right from the object’s discretionary access control list. The
protection access right is identified as:
Trustee: Everyone, AceType: Denied, Mask: 65600, AceFlag: 0
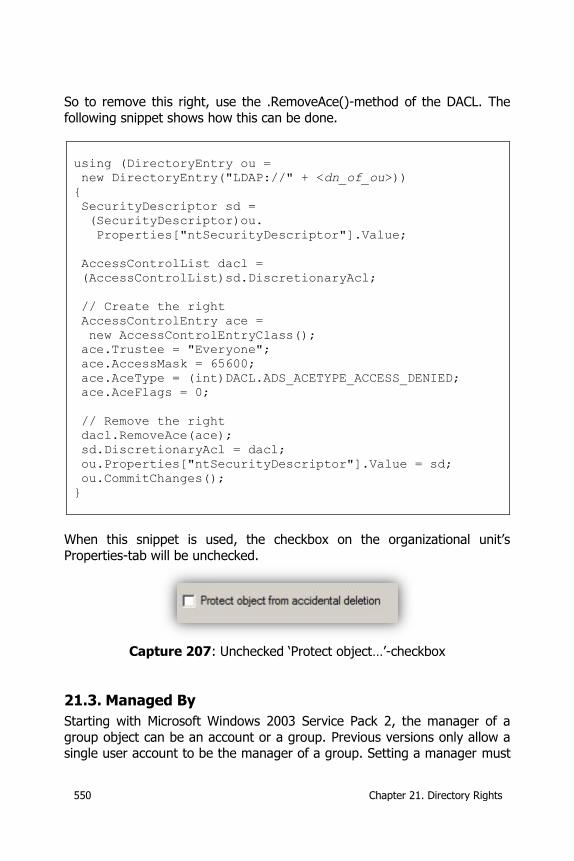
550 Chapter 21. Directory Rights
So to remove this right, use the .RemoveAce()-method of the DACL. The
following snippet shows how this can be done.
using (DirectoryEntry ou =
new DirectoryEntry("LDAP://" + <dn_of_ou>))
{
SecurityDescriptor sd =
(SecurityDescriptor)ou.
Properties["ntSecurityDescriptor"].Value;
AccessControlList dacl =
(AccessControlList)sd.DiscretionaryAcl;
// Create the right
AccessControlEntry ace =
new AccessControlEntryClass();
ace.Trustee = "Everyone";
ace.AccessMask = 65600;
ace.AceType = (int)DACL.ADS_ACETYPE_ACCESS_DENIED;
ace.AceFlags = 0;
// Remove the right
dacl.RemoveAce(ace);
sd.DiscretionaryAcl = dacl;
ou.Properties["ntSecurityDescriptor"].Value = sd;
ou.CommitChanges();
}
When this snippet is used, the checkbox on the organizational unit’s
Properties-tab will be unchecked.
Capture 207: Unchecked ‘Protect object…’-checkbox
21.3. Managed By
Starting with Microsoft Windows 2003 Service Pack 2, the manager of a
group object can be an account or a group. Previous versions only allow a single user account to be the manager of a group. Setting a manager must
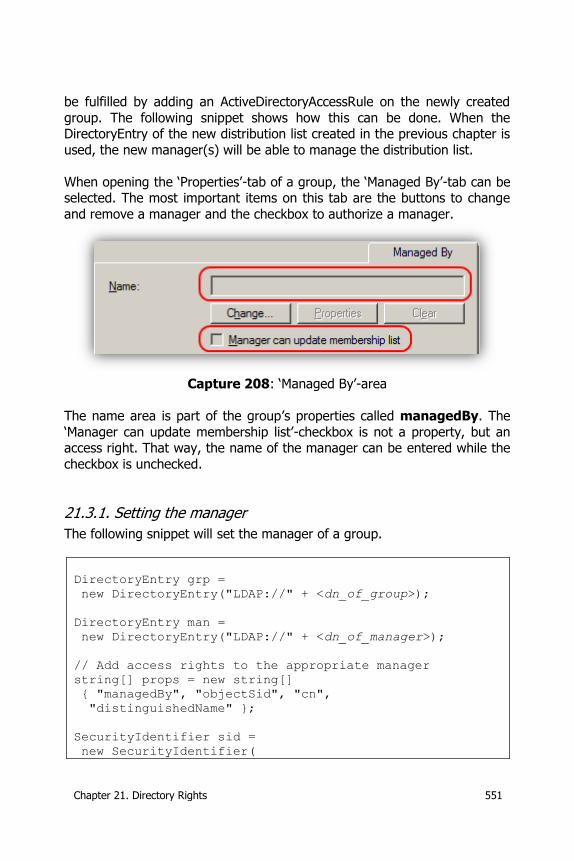
Chapter 21. Directory Rights 551
be fulfilled by adding an ActiveDirectoryAccessRule on the newly created
group. The following snippet shows how this can be done. When the DirectoryEntry of the new distribution list created in the previous chapter is
used, the new manager(s) will be able to manage the distribution list.
When opening the ‘Properties’-tab of a group, the ‘Managed By’-tab can be selected. The most important items on this tab are the buttons to change
and remove a manager and the checkbox to authorize a manager.
Capture 208: ‘Managed By’-area
The name area is part of the group’s properties called managedBy. The
‘Manager can update membership list’-checkbox is not a property, but an access right. That way, the name of the manager can be entered while the
checkbox is unchecked.
21.3.1. Setting the manager
The following snippet will set the manager of a group.
DirectoryEntry grp =
new DirectoryEntry("LDAP://" + <dn_of_group>);
DirectoryEntry man =
new DirectoryEntry("LDAP://" + <dn_of_manager>);
// Add access rights to the appropriate manager
string[] props = new string[]
{ "managedBy", "objectSid", "cn",
"distinguishedName" };
SecurityIdentifier sid =
new SecurityIdentifier(
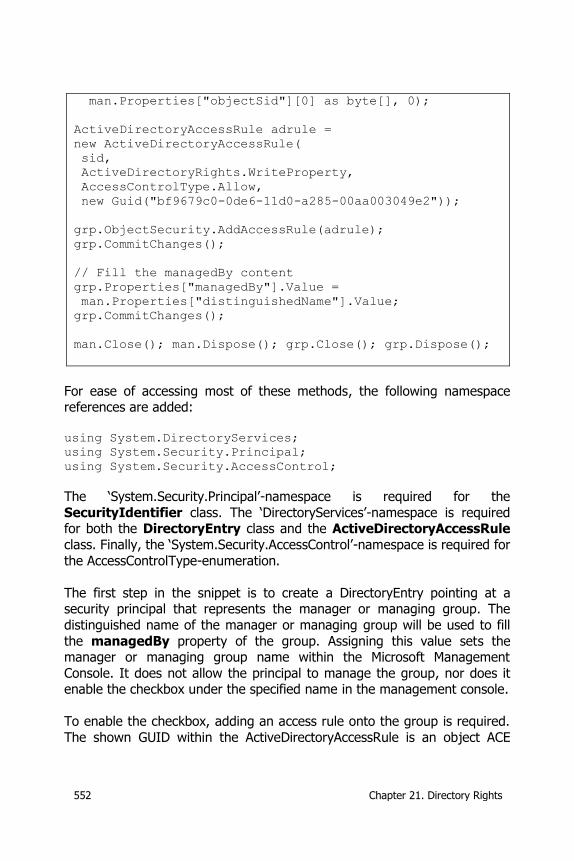
552 Chapter 21. Directory Rights
man.Properties["objectSid"][0] as byte[], 0);
ActiveDirectoryAccessRule adrule =
new ActiveDirectoryAccessRule(
sid,
ActiveDirectoryRights.WriteProperty,
AccessControlType.Allow,
new Guid("bf9679c0-0de6-11d0-a285-00aa003049e2"));
grp.ObjectSecurity.AddAccessRule(adrule);
grp.CommitChanges();
// Fill the managedBy content
grp.Properties["managedBy"].Value =
man.Properties["distinguishedName"].Value;
grp.CommitChanges();
man.Close(); man.Dispose(); grp.Close(); grp.Dispose();
For ease of accessing most of these methods, the following namespace references are added:
using System.DirectoryServices;
using System.Security.Principal;
using System.Security.AccessControl;
The ‘System.Security.Principal’-namespace is required for the
SecurityIdentifier class. The ‘DirectoryServices’-namespace is required for both the DirectoryEntry class and the ActiveDirectoryAccessRule
class. Finally, the ‘System.Security.AccessControl’-namespace is required for
the AccessControlType-enumeration.
The first step in the snippet is to create a DirectoryEntry pointing at a security principal that represents the manager or managing group. The
distinguished name of the manager or managing group will be used to fill
the managedBy property of the group. Assigning this value sets the manager or managing group name within the Microsoft Management
Console. It does not allow the principal to manage the group, nor does it enable the checkbox under the specified name in the management console.
To enable the checkbox, adding an access rule onto the group is required.
The shown GUID within the ActiveDirectoryAccessRule is an object ACE
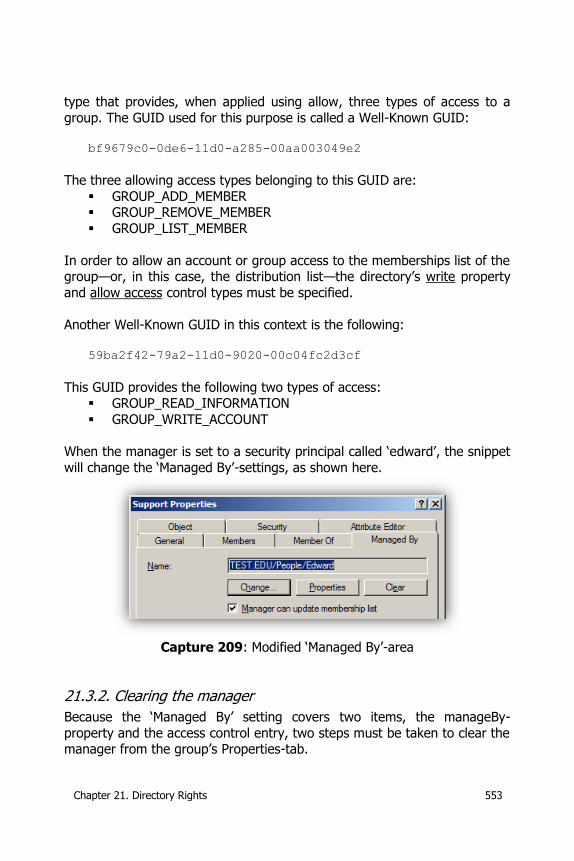
Chapter 21. Directory Rights 553
type that provides, when applied using allow, three types of access to a
group. The GUID used for this purpose is called a Well-Known GUID:
bf9679c0-0de6-11d0-a285-00aa003049e2
The three allowing access types belonging to this GUID are:
GROUP_ADD_MEMBER GROUP_REMOVE_MEMBER
GROUP_LIST_MEMBER
In order to allow an account or group access to the memberships list of the group—or, in this case, the distribution list—the directory’s write property
and allow access control types must be specified.
Another Well-Known GUID in this context is the following:
59ba2f42-79a2-11d0-9020-00c04fc2d3cf
This GUID provides the following two types of access: GROUP_READ_INFORMATION
GROUP_WRITE_ACCOUNT
When the manager is set to a security principal called ‘edward’, the snippet
will change the ‘Managed By’-settings, as shown here.
Capture 209: Modified ‘Managed By’-area
21.3.2. Clearing the manager
Because the ‘Managed By’ setting covers two items, the manageBy-
property and the access control entry, two steps must be taken to clear the manager from the group’s Properties-tab.
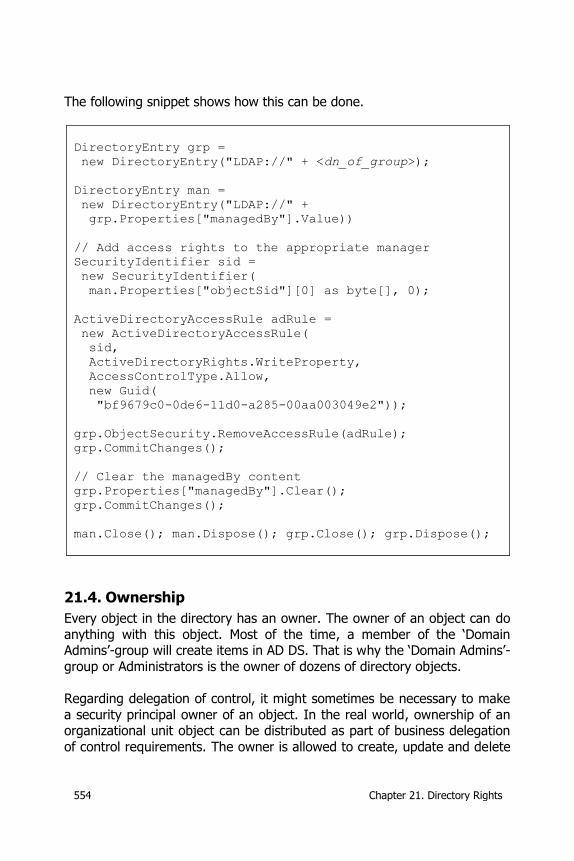
554 Chapter 21. Directory Rights
The following snippet shows how this can be done.
DirectoryEntry grp =
new DirectoryEntry("LDAP://" + <dn_of_group>);
DirectoryEntry man =
new DirectoryEntry("LDAP://" +
grp.Properties["managedBy"].Value))
// Add access rights to the appropriate manager
SecurityIdentifier sid =
new SecurityIdentifier(
man.Properties["objectSid"][0] as byte[], 0);
ActiveDirectoryAccessRule adRule =
new ActiveDirectoryAccessRule(
sid,
ActiveDirectoryRights.WriteProperty,
AccessControlType.Allow,
new Guid(
"bf9679c0-0de6-11d0-a285-00aa003049e2"));
grp.ObjectSecurity.RemoveAccessRule(adRule);
grp.CommitChanges();
// Clear the managedBy content
grp.Properties["managedBy"].Clear();
grp.CommitChanges();
man.Close(); man.Dispose(); grp.Close(); grp.Dispose();
21.4. Ownership
Every object in the directory has an owner. The owner of an object can do
anything with this object. Most of the time, a member of the ‘Domain Admins’-group will create items in AD DS. That is why the ‘Domain Admins’-
group or Administrators is the owner of dozens of directory objects.
Regarding delegation of control, it might sometimes be necessary to make
a security principal owner of an object. In the real world, ownership of an organizational unit object can be distributed as part of business delegation
of control requirements. The owner is allowed to create, update and delete

Chapter 21. Directory Rights 555
items within this organizational unit object and will be the owner of all child
objects. Removing the ‘Domain Admins’ or Administrators-group as owner will create a stricter role separation, and therefore increase security.
21.4.1. Read Ownership
In paragraph ‘21.1.1. Read a DACL’, a snippet was introduced to read the ownership of an Organizational Unit. The snippet shown is based on
reading ownerships using the ActiveDs-library. A slightly different version of
reading ownerships using the ActiveDs-library is shown here.
using (DirectoryEntry obj =
new DirectoryEntry("LDAP://" + <dn_of_object>))
{
// Read Ownership using ActiveDs
SecurityDescriptor sd =
(SecurityDescriptor)obj.
Properties["ntSecurityDescriptor"].Value;
AccessControlList dacl =
(AccessControlList)sd.DiscretionaryAcl;
lb.Items.Add("Owner: " + sd.Owner);
}
Both SecurityDescriptor and AccessControlList-classes are part of the
ActiveDs-library. If you forget to ship the ActiveDs.dll with your application, calling the snippets function will result in the following exception error:
Could not load file or assembly ‘Interop.ActiveDs,
Version1.0.0.0,
Culture=neural, PublicKeyToken=null’ or one of its
dependencies. The system cannot find the file specified.
Within the lab environment, the following owner is shown in the list:
Owner: TEST\Domain Admins
Starting from the .NET 2.0 Framework, more native support is added for reading and writing DACLs. The snippet previously shown can be rewritten
so that no ActiveDs-library is required. To do this, the SecurityDescriptor-class needs to be replaced with the ActiveDirectorySecurity-class that is
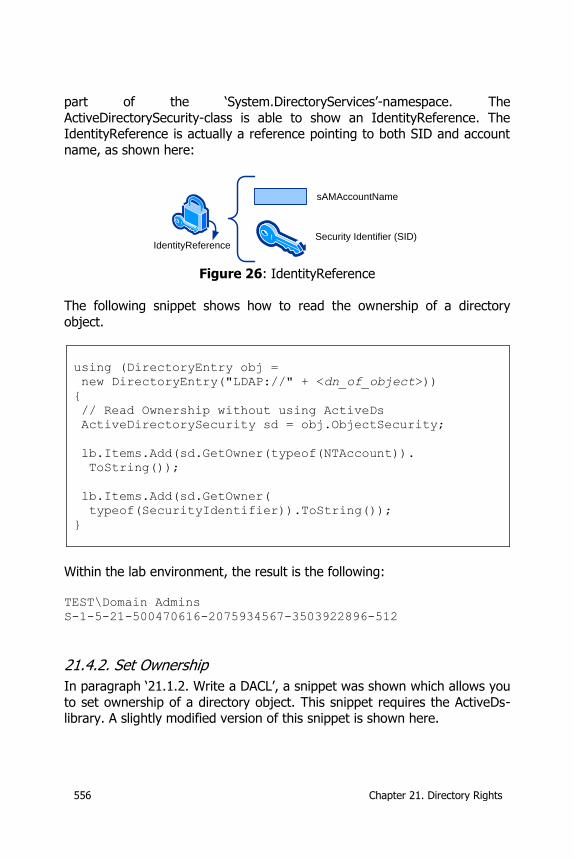
556 Chapter 21. Directory Rights
part of the ‘System.DirectoryServices’-namespace. The
ActiveDirectorySecurity-class is able to show an IdentityReference. The IdentityReference is actually a reference pointing to both SID and account
name, as shown here:
Security Identifier (SID)
sAMAccountName
IdentityReference
Figure 26: IdentityReference
The following snippet shows how to read the ownership of a directory
object.
using (DirectoryEntry obj =
new DirectoryEntry("LDAP://" + <dn_of_object>))
{
// Read Ownership without using ActiveDs
ActiveDirectorySecurity sd = obj.ObjectSecurity;
lb.Items.Add(sd.GetOwner(typeof(NTAccount)).
ToString());
lb.Items.Add(sd.GetOwner(
typeof(SecurityIdentifier)).ToString());
}
Within the lab environment, the result is the following:
TEST\Domain Admins
S-1-5-21-500470616-2075934567-3503922896-512
21.4.2. Set Ownership
In paragraph ‘21.1.2. Write a DACL’, a snippet was shown which allows you
to set ownership of a directory object. This snippet requires the ActiveDs-library. A slightly modified version of this snippet is shown here.
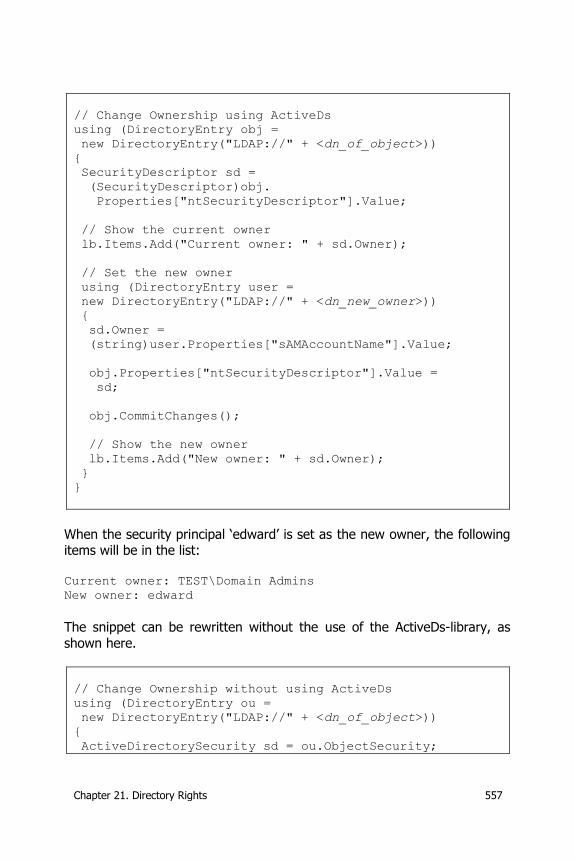
Chapter 21. Directory Rights 557
// Change Ownership using ActiveDs
using (DirectoryEntry obj =
new DirectoryEntry("LDAP://" + <dn_of_object>))
{
SecurityDescriptor sd =
(SecurityDescriptor)obj.
Properties["ntSecurityDescriptor"].Value;
// Show the current owner
lb.Items.Add("Current owner: " + sd.Owner);
// Set the new owner
using (DirectoryEntry user =
new DirectoryEntry("LDAP://" + <dn_new_owner>))
{
sd.Owner =
(string)user.Properties["sAMAccountName"].Value;
obj.Properties["ntSecurityDescriptor"].Value =
sd;
obj.CommitChanges();
// Show the new owner
lb.Items.Add("New owner: " + sd.Owner);
}
}
When the security principal ‘edward’ is set as the new owner, the following items will be in the list:
Current owner: TEST\Domain Admins
New owner: edward
The snippet can be rewritten without the use of the ActiveDs-library, as
shown here.
// Change Ownership without using ActiveDs
using (DirectoryEntry ou =
new DirectoryEntry("LDAP://" + <dn_of_object>))
{
ActiveDirectorySecurity sd = ou.ObjectSecurity;

558 Chapter 21. Directory Rights
// Show the current owner
lb.Items.Add("Current owner: " +
sd.GetOwner(typeof(NTAccount)));
// Set the new owner
using (DirectoryEntry man =
new DirectoryEntry("LDAP://" + <dn_new_owner>))
{
NTAccount acc = new NTAccount(
man.Properties["sAMAccountName"].
Value.ToString());
sd.SetOwner(acc);
ou.CommitChanges();
// Show the new owner
lb.Items.Add("New owner: " +
sd.GetOwner(typeof(NTAccount)));
}
}
When the security principal ‘edward’ is set as the new owner, the following items will be in the list:
Current owner: TEST\Domain Admins
New owner: TEST\edward
The ActiveDirectorySecurity-class is part of the ‘System.DirectoryServices’-namespace. The NTAccount-class is part of the ‘System.Security.Principal’-
namespace.
In both cases, the ownership is given to the security principal called ‘edward’. This can be validated by opening the properties of the target object select the Security-tab Advanced-button Owner-tab.
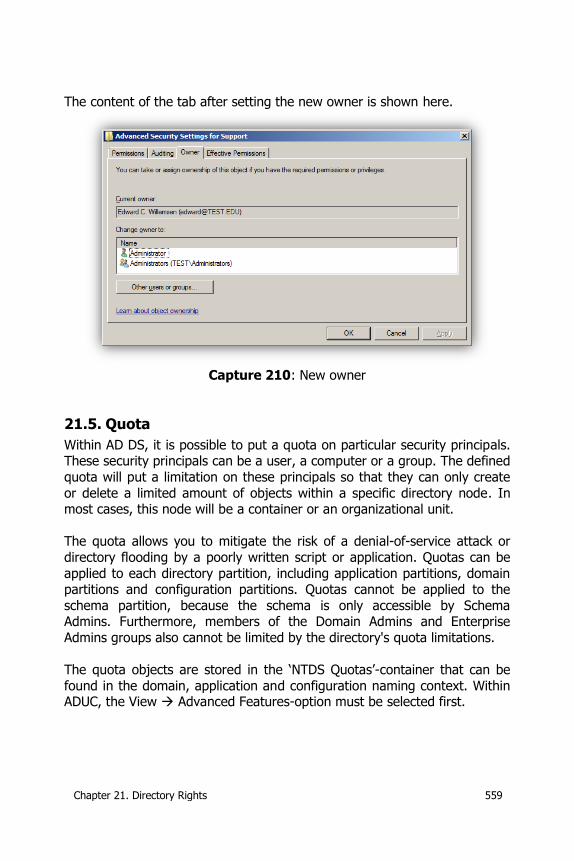
Chapter 21. Directory Rights 559
The content of the tab after setting the new owner is shown here.
Capture 210: New owner
21.5. Quota
Within AD DS, it is possible to put a quota on particular security principals. These security principals can be a user, a computer or a group. The defined
quota will put a limitation on these principals so that they can only create
or delete a limited amount of objects within a specific directory node. In most cases, this node will be a container or an organizational unit.
The quota allows you to mitigate the risk of a denial-of-service attack or
directory flooding by a poorly written script or application. Quotas can be
applied to each directory partition, including application partitions, domain partitions and configuration partitions. Quotas cannot be applied to the
schema partition, because the schema is only accessible by Schema Admins. Furthermore, members of the Domain Admins and Enterprise
Admins groups also cannot be limited by the directory's quota limitations.
The quota objects are stored in the ‘NTDS Quotas’-container that can be
found in the domain, application and configuration naming context. Within ADUC, the View Advanced Features-option must be selected first.
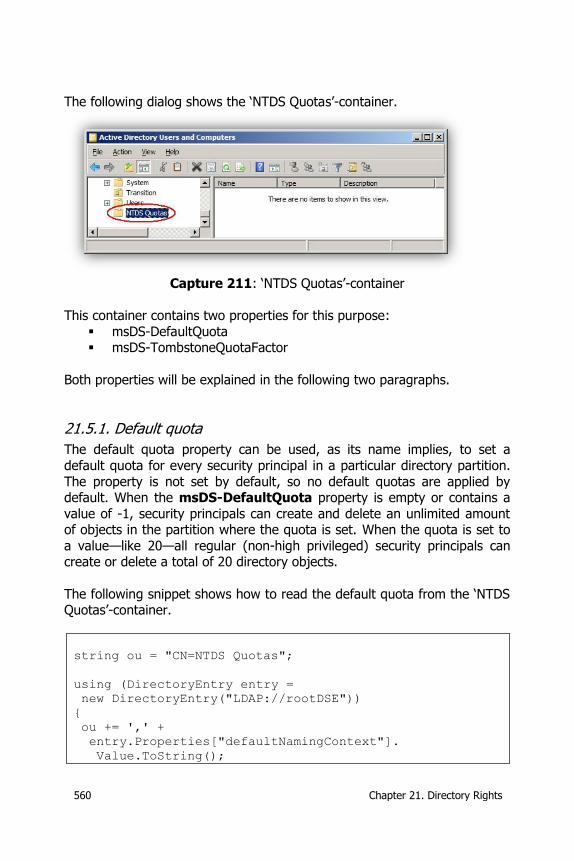
560 Chapter 21. Directory Rights
The following dialog shows the ‘NTDS Quotas’-container.
Capture 211: ‘NTDS Quotas’-container
This container contains two properties for this purpose:
msDS-DefaultQuota msDS-TombstoneQuotaFactor
Both properties will be explained in the following two paragraphs.
21.5.1. Default quota
The default quota property can be used, as its name implies, to set a
default quota for every security principal in a particular directory partition.
The property is not set by default, so no default quotas are applied by default. When the msDS-DefaultQuota property is empty or contains a
value of -1, security principals can create and delete an unlimited amount of objects in the partition where the quota is set. When the quota is set to
a value—like 20—all regular (non-high privileged) security principals can create or delete a total of 20 directory objects.
The following snippet shows how to read the default quota from the ‘NTDS Quotas’-container.
string ou = "CN=NTDS Quotas";
using (DirectoryEntry entry =
new DirectoryEntry("LDAP://rootDSE"))
{
ou += ',' +
entry.Properties["defaultNamingContext"].
Value.ToString();
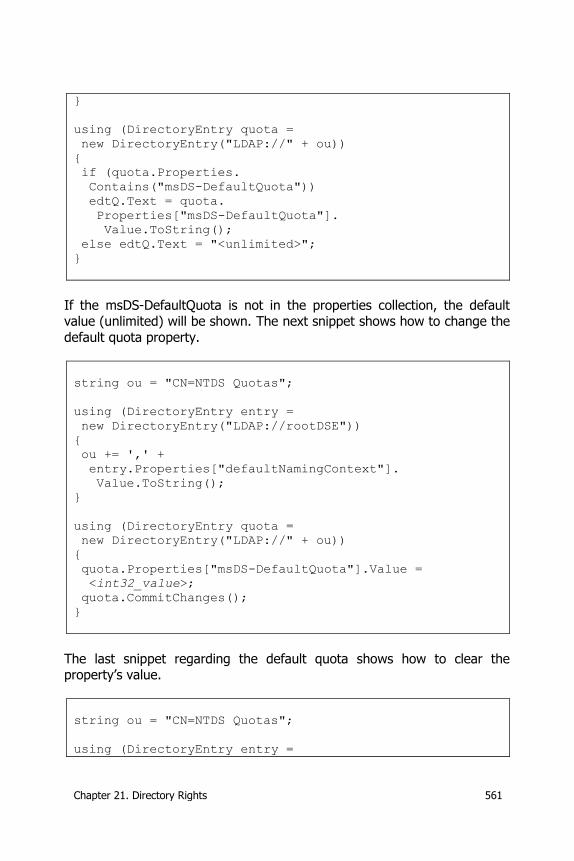
Chapter 21. Directory Rights 561
}
using (DirectoryEntry quota =
new DirectoryEntry("LDAP://" + ou))
{
if (quota.Properties.
Contains("msDS-DefaultQuota"))
edtQ.Text = quota.
Properties["msDS-DefaultQuota"].
Value.ToString();
else edtQ.Text = "<unlimited>";
}
If the msDS-DefaultQuota is not in the properties collection, the default value (unlimited) will be shown. The next snippet shows how to change the
default quota property.
string ou = "CN=NTDS Quotas";
using (DirectoryEntry entry =
new DirectoryEntry("LDAP://rootDSE"))
{
ou += ',' +
entry.Properties["defaultNamingContext"].
Value.ToString();
}
using (DirectoryEntry quota =
new DirectoryEntry("LDAP://" + ou))
{
quota.Properties["msDS-DefaultQuota"].Value =
<int32_value>;
quota.CommitChanges();
}
The last snippet regarding the default quota shows how to clear the property’s value.
string ou = "CN=NTDS Quotas";
using (DirectoryEntry entry =

562 Chapter 21. Directory Rights
new DirectoryEntry("LDAP://rootDSE"))
{
ou += ',' +
entry.Properties["defaultNamingContext"].
Value.ToString();
}
using (DirectoryEntry quota =
new DirectoryEntry("LDAP://" + ou))
{
PropertyValueCollection prop =
quota.Properties["msDS-DefaultQuota"];
prop.Clear();
quota.CommitChanges();
}
21.5.2. Tombstone quota
Tombstone objects are created when an object is deleted from a directory
partition. The msDS-TombstoneQuotaFactor property's value is a
percentage between 1 and 100 by which the tombstone object quota is calculated to a security principal’s quota limit. By default, the value is set to
100, which means that a quota limit of 20 allows a user to add 10 objects and delete 10 objects. Or more simply, the user is allowed to add 20
objects in total.
The following snippet shows how to read the tombstone quota from the
‘NTDS Quotas’-container.
string ou = "CN=NTDS Quotas";
using (DirectoryEntry entry =
new DirectoryEntry("LDAP://rootDSE"))
{
ou += ',' +
entry.Properties["defaultNamingContext"].
Value.ToString();
}
using (DirectoryEntry quota =
new DirectoryEntry("LDAP://" + ou))
{
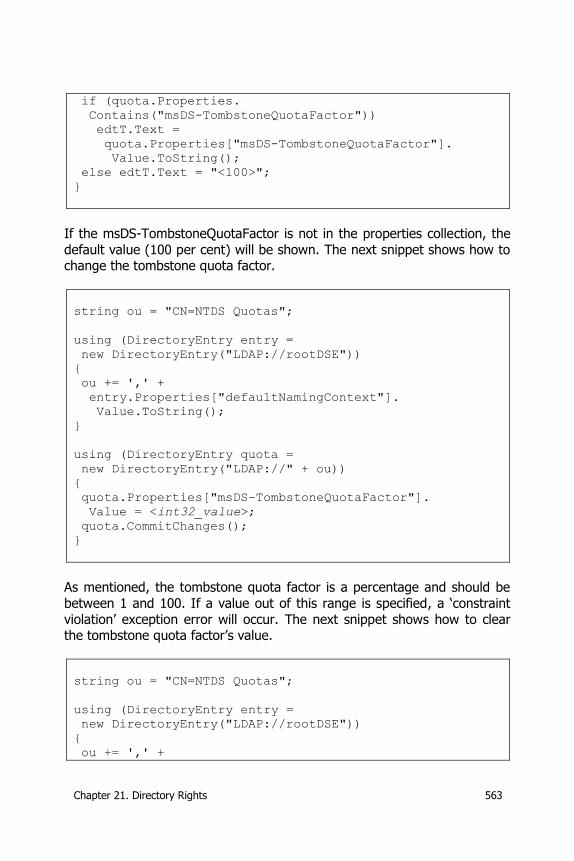
Chapter 21. Directory Rights 563
if (quota.Properties.
Contains("msDS-TombstoneQuotaFactor"))
edtT.Text =
quota.Properties["msDS-TombstoneQuotaFactor"].
Value.ToString();
else edtT.Text = "<100>";
}
If the msDS-TombstoneQuotaFactor is not in the properties collection, the
default value (100 per cent) will be shown. The next snippet shows how to change the tombstone quota factor.
string ou = "CN=NTDS Quotas";
using (DirectoryEntry entry =
new DirectoryEntry("LDAP://rootDSE"))
{
ou += ',' +
entry.Properties["defaultNamingContext"].
Value.ToString();
}
using (DirectoryEntry quota =
new DirectoryEntry("LDAP://" + ou))
{
quota.Properties["msDS-TombstoneQuotaFactor"].
Value = <int32_value>;
quota.CommitChanges();
}
As mentioned, the tombstone quota factor is a percentage and should be
between 1 and 100. If a value out of this range is specified, a ‘constraint
violation’ exception error will occur. The next snippet shows how to clear the tombstone quota factor’s value.
string ou = "CN=NTDS Quotas";
using (DirectoryEntry entry =
new DirectoryEntry("LDAP://rootDSE"))
{
ou += ',' +
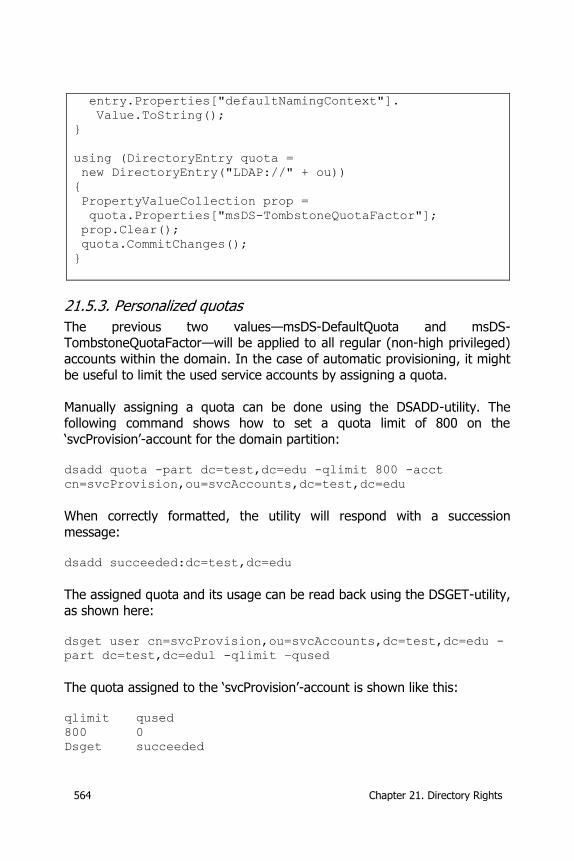
564 Chapter 21. Directory Rights
entry.Properties["defaultNamingContext"].
Value.ToString();
}
using (DirectoryEntry quota =
new DirectoryEntry("LDAP://" + ou))
{
PropertyValueCollection prop =
quota.Properties["msDS-TombstoneQuotaFactor"];
prop.Clear();
quota.CommitChanges();
}
21.5.3. Personalized quotas
The previous two values—msDS-DefaultQuota and msDS-TombstoneQuotaFactor—will be applied to all regular (non-high privileged)
accounts within the domain. In the case of automatic provisioning, it might
be useful to limit the used service accounts by assigning a quota.
Manually assigning a quota can be done using the DSADD-utility. The following command shows how to set a quota limit of 800 on the
‘svcProvision’-account for the domain partition: dsadd quota -part dc=test,dc=edu -qlimit 800 -acct
cn=svcProvision,ou=svcAccounts,dc=test,dc=edu
When correctly formatted, the utility will respond with a succession
message: dsadd succeeded:dc=test,dc=edu
The assigned quota and its usage can be read back using the DSGET-utility,
as shown here: dsget user cn=svcProvision,ou=svcAccounts,dc=test,dc=edu -
part dc=test,dc=edul -qlimit –qused
The quota assigned to the ‘svcProvision’-account is shown like this: qlimit qused
800 0
Dsget succeeded
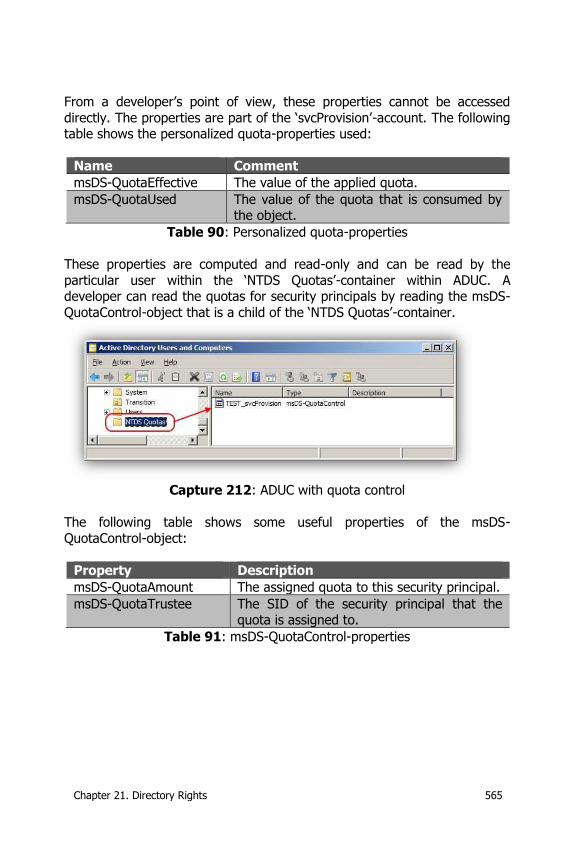
Chapter 21. Directory Rights 565
From a developer’s point of view, these properties cannot be accessed
directly. The properties are part of the ‘svcProvision’-account. The following table shows the personalized quota-properties used:
Name Comment
msDS-QuotaEffective The value of the applied quota.
msDS-QuotaUsed The value of the quota that is consumed by the object.
Table 90: Personalized quota-properties
These properties are computed and read-only and can be read by the
particular user within the ‘NTDS Quotas’-container within ADUC. A developer can read the quotas for security principals by reading the msDS-
QuotaControl-object that is a child of the ‘NTDS Quotas’-container.
Capture 212: ADUC with quota control
The following table shows some useful properties of the msDS-
QuotaControl-object:
Property Description
msDS-QuotaAmount The assigned quota to this security principal.
msDS-QuotaTrustee The SID of the security principal that the quota is assigned to.
Table 91: msDS-QuotaControl-properties
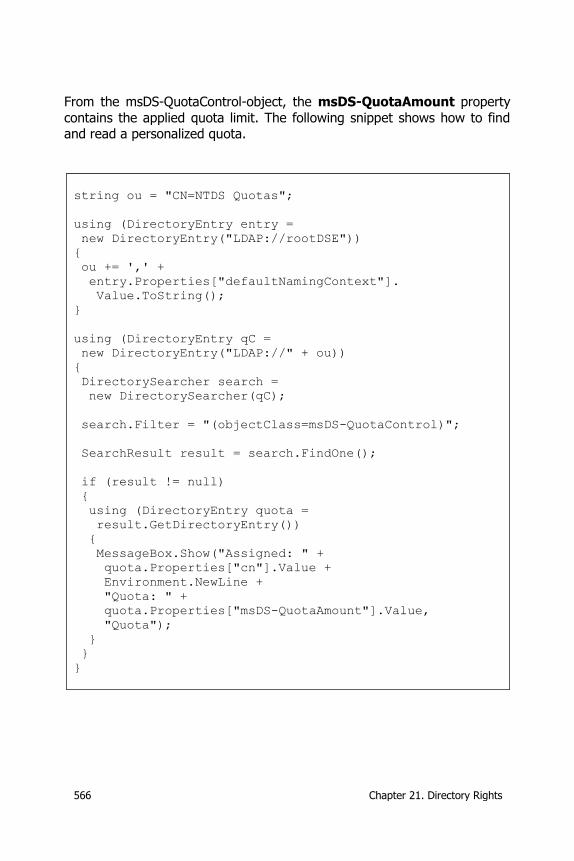
566 Chapter 21. Directory Rights
From the msDS-QuotaControl-object, the msDS-QuotaAmount property
contains the applied quota limit. The following snippet shows how to find and read a personalized quota.
string ou = "CN=NTDS Quotas";
using (DirectoryEntry entry =
new DirectoryEntry("LDAP://rootDSE"))
{
ou += ',' +
entry.Properties["defaultNamingContext"].
Value.ToString();
}
using (DirectoryEntry qC =
new DirectoryEntry("LDAP://" + ou))
{
DirectorySearcher search =
new DirectorySearcher(qC);
search.Filter = "(objectClass=msDS-QuotaControl)";
SearchResult result = search.FindOne();
if (result != null)
{
using (DirectoryEntry quota =
result.GetDirectoryEntry())
{
MessageBox.Show("Assigned: " +
quota.Properties["cn"].Value +
Environment.NewLine +
"Quota: " +
quota.Properties["msDS-QuotaAmount"].Value,
"Quota");
}
}
}
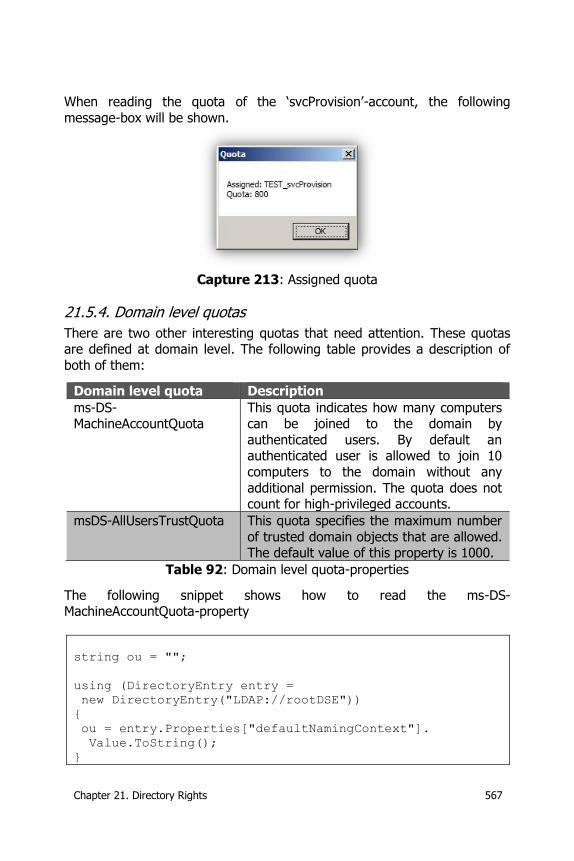
Chapter 21. Directory Rights 567
When reading the quota of the ‘svcProvision’-account, the following
message-box will be shown.
Capture 213: Assigned quota
21.5.4. Domain level quotas
There are two other interesting quotas that need attention. These quotas are defined at domain level. The following table provides a description of
both of them:
Domain level quota Description
ms-DS-MachineAccountQuota
This quota indicates how many computers can be joined to the domain by
authenticated users. By default an authenticated user is allowed to join 10
computers to the domain without any
additional permission. The quota does not count for high-privileged accounts.
msDS-AllUsersTrustQuota This quota specifies the maximum number
of trusted domain objects that are allowed. The default value of this property is 1000.
Table 92: Domain level quota-properties
The following snippet shows how to read the ms-DS-MachineAccountQuota-property
string ou = "";
using (DirectoryEntry entry =
new DirectoryEntry("LDAP://rootDSE"))
{
ou = entry.Properties["defaultNamingContext"].
Value.ToString();
}
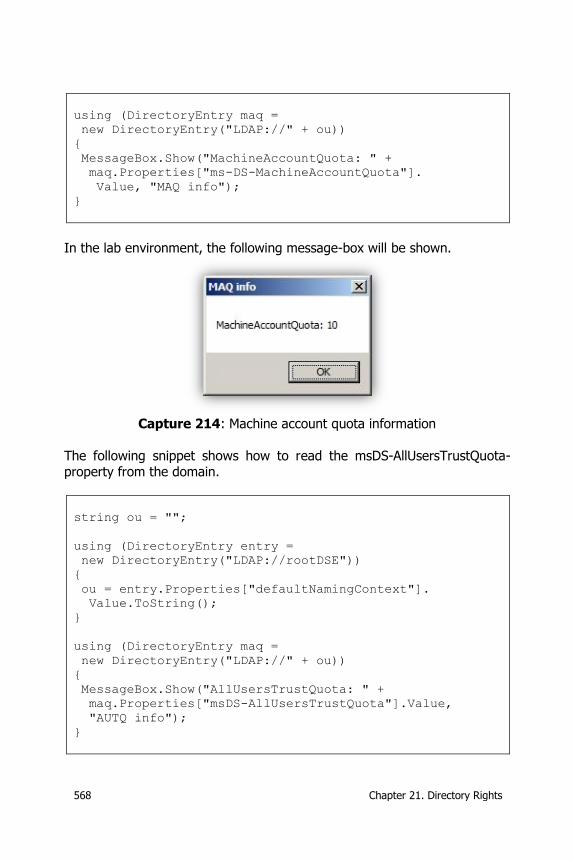
568 Chapter 21. Directory Rights
using (DirectoryEntry maq =
new DirectoryEntry("LDAP://" + ou))
{
MessageBox.Show("MachineAccountQuota: " +
maq.Properties["ms-DS-MachineAccountQuota"].
Value, "MAQ info");
}
In the lab environment, the following message-box will be shown.
Capture 214: Machine account quota information
The following snippet shows how to read the msDS-AllUsersTrustQuota-property from the domain.
string ou = "";
using (DirectoryEntry entry =
new DirectoryEntry("LDAP://rootDSE"))
{
ou = entry.Properties["defaultNamingContext"].
Value.ToString();
}
using (DirectoryEntry maq =
new DirectoryEntry("LDAP://" + ou))
{
MessageBox.Show("AllUsersTrustQuota: " +
maq.Properties["msDS-AllUsersTrustQuota"].Value,
"AUTQ info");
}
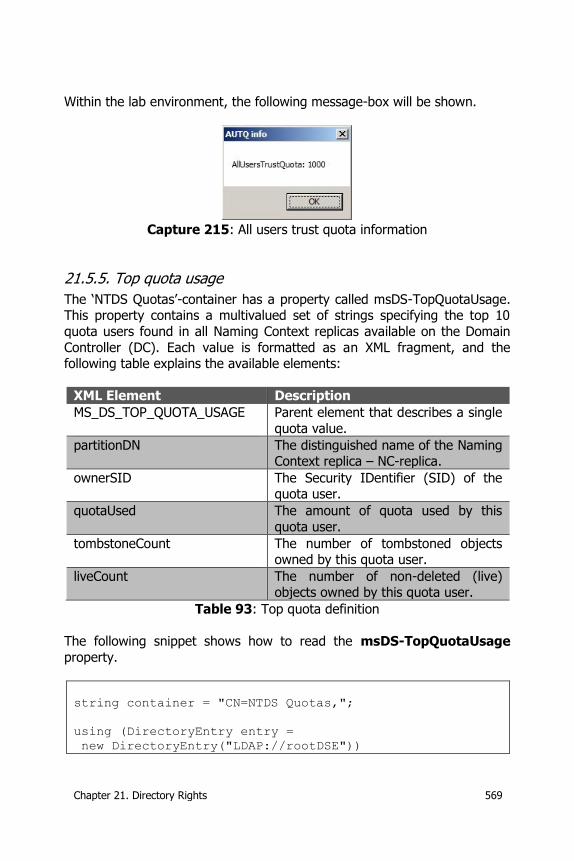
Chapter 21. Directory Rights 569
Within the lab environment, the following message-box will be shown.
Capture 215: All users trust quota information
21.5.5. Top quota usage
The ‘NTDS Quotas’-container has a property called msDS-TopQuotaUsage. This property contains a multivalued set of strings specifying the top 10
quota users found in all Naming Context replicas available on the Domain
Controller (DC). Each value is formatted as an XML fragment, and the following table explains the available elements:
XML Element Description
MS_DS_TOP_QUOTA_USAGE Parent element that describes a single
quota value.
partitionDN The distinguished name of the Naming Context replica – NC-replica.
ownerSID The Security IDentifier (SID) of the quota user.
quotaUsed The amount of quota used by this
quota user.
tombstoneCount The number of tombstoned objects owned by this quota user.
liveCount The number of non-deleted (live) objects owned by this quota user.
Table 93: Top quota definition
The following snippet shows how to read the msDS-TopQuotaUsage
property.
string container = "CN=NTDS Quotas,";
using (DirectoryEntry entry =
new DirectoryEntry("LDAP://rootDSE"))

570 Chapter 21. Directory Rights
{
container += entry.
Properties["configurationNamingContext"].
Value.ToString();
}
using (DirectoryEntry qC =
new DirectoryEntry("LDAP://" + container))
{
DirectorySearcher search =
new DirectorySearcher(qC);
search.PropertiesToLoad.Clear();
search.PropertiesToLoad.Add("msDS-TopQuotaUsage");
SearchResult result = search.FindOne();
foreach (string val in
result.Properties["msDS-TopQuotaUsage"])
{
lb.Items.Add(val);
lb.Items.Add("- - - - -");
}
}
Within the lab environment, the following information will be available in the list-box:
<MS_DS_TOP_QUOTA_USAGE> <partitionDN> CN=Configuration,DC=TEST,DC=EDU </partitionDN> <ownerSID> S-1-5-21-2995686757-1908697468-3644759179-519 </ownerSID>
<quotaUsed> 1726 </quotaUsed> <deletedCount> 0 </deletedCount> <liveCount> 1726 </liveCount> </MS_DS_TOP_QUOTA_USAGE> - - - - - <MS_DS_TOP_QUOTA_USAGE> <partitionDN> CN=Configuration,DC=TEST,DC=EDU </partitionDN> <ownerSID> S-1-5-21-2995686757-1908697468-3644759179-512 </ownerSID> <quotaUsed> 3 </quotaUsed> <deletedCount> 0 </deletedCount> <liveCount> 3 </liveCount> </MS_DS_TOP_QUOTA_USAGE>
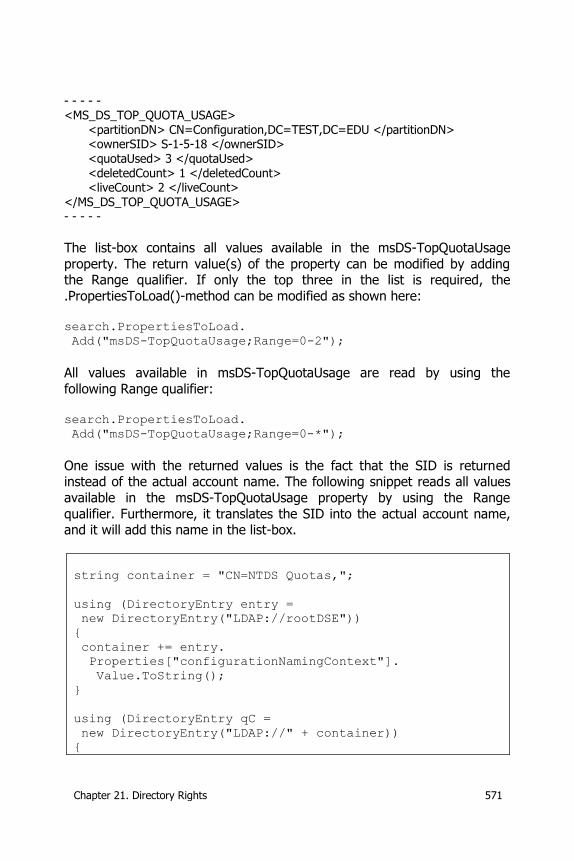
Chapter 21. Directory Rights 571
- - - - - <MS_DS_TOP_QUOTA_USAGE> <partitionDN> CN=Configuration,DC=TEST,DC=EDU </partitionDN> <ownerSID> S-1-5-18 </ownerSID> <quotaUsed> 3 </quotaUsed> <deletedCount> 1 </deletedCount> <liveCount> 2 </liveCount> </MS_DS_TOP_QUOTA_USAGE> - - - - - The list-box contains all values available in the msDS-TopQuotaUsage
property. The return value(s) of the property can be modified by adding the Range qualifier. If only the top three in the list is required, the
.PropertiesToLoad()-method can be modified as shown here:
search.PropertiesToLoad.
Add("msDS-TopQuotaUsage;Range=0-2");
All values available in msDS-TopQuotaUsage are read by using the
following Range qualifier: search.PropertiesToLoad.
Add("msDS-TopQuotaUsage;Range=0-*");
One issue with the returned values is the fact that the SID is returned instead of the actual account name. The following snippet reads all values
available in the msDS-TopQuotaUsage property by using the Range
qualifier. Furthermore, it translates the SID into the actual account name, and it will add this name in the list-box.
string container = "CN=NTDS Quotas,";
using (DirectoryEntry entry =
new DirectoryEntry("LDAP://rootDSE"))
{
container += entry.
Properties["configurationNamingContext"].
Value.ToString();
}
using (DirectoryEntry qC =
new DirectoryEntry("LDAP://" + container))
{
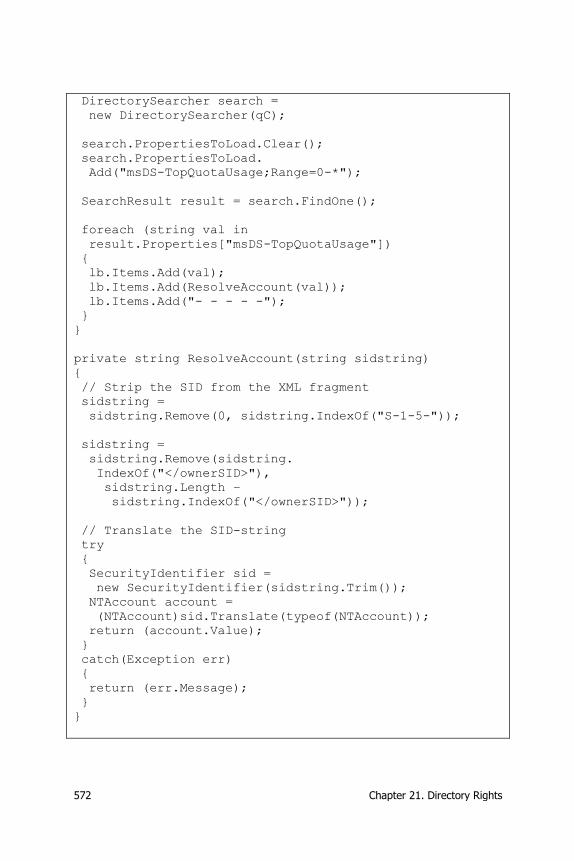
572 Chapter 21. Directory Rights
DirectorySearcher search =
new DirectorySearcher(qC);
search.PropertiesToLoad.Clear();
search.PropertiesToLoad.
Add("msDS-TopQuotaUsage;Range=0-*");
SearchResult result = search.FindOne();
foreach (string val in
result.Properties["msDS-TopQuotaUsage"])
{
lb.Items.Add(val);
lb.Items.Add(ResolveAccount(val));
lb.Items.Add("- - - - -");
}
}
private string ResolveAccount(string sidstring)
{
// Strip the SID from the XML fragment
sidstring =
sidstring.Remove(0, sidstring.IndexOf("S-1-5-"));
sidstring =
sidstring.Remove(sidstring.
IndexOf("</ownerSID>"),
sidstring.Length –
sidstring.IndexOf("</ownerSID>"));
// Translate the SID-string
try
{
SecurityIdentifier sid =
new SecurityIdentifier(sidstring.Trim());
NTAccount account =
(NTAccount)sid.Translate(typeof(NTAccount));
return (account.Value);
}
catch(Exception err)
{
return (err.Message);
}
}
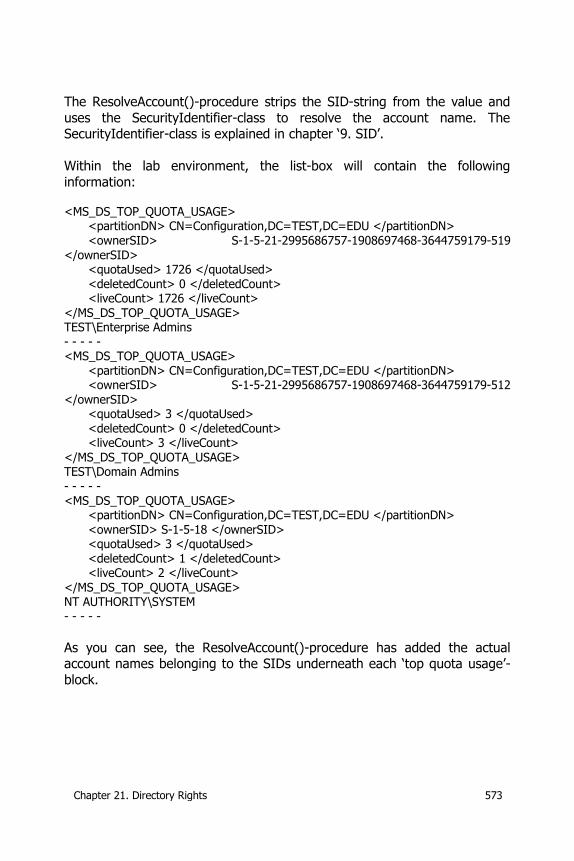
Chapter 21. Directory Rights 573
The ResolveAccount()-procedure strips the SID-string from the value and
uses the SecurityIdentifier-class to resolve the account name. The SecurityIdentifier-class is explained in chapter ‘9. SID’.
Within the lab environment, the list-box will contain the following
information: <MS_DS_TOP_QUOTA_USAGE> <partitionDN> CN=Configuration,DC=TEST,DC=EDU </partitionDN> <ownerSID> S-1-5-21-2995686757-1908697468-3644759179-519
</ownerSID> <quotaUsed> 1726 </quotaUsed> <deletedCount> 0 </deletedCount> <liveCount> 1726 </liveCount> </MS_DS_TOP_QUOTA_USAGE> TEST\Enterprise Admins - - - - - <MS_DS_TOP_QUOTA_USAGE> <partitionDN> CN=Configuration,DC=TEST,DC=EDU </partitionDN> <ownerSID> S-1-5-21-2995686757-1908697468-3644759179-512 </ownerSID> <quotaUsed> 3 </quotaUsed> <deletedCount> 0 </deletedCount> <liveCount> 3 </liveCount> </MS_DS_TOP_QUOTA_USAGE> TEST\Domain Admins - - - - - <MS_DS_TOP_QUOTA_USAGE> <partitionDN> CN=Configuration,DC=TEST,DC=EDU </partitionDN> <ownerSID> S-1-5-18 </ownerSID> <quotaUsed> 3 </quotaUsed> <deletedCount> 1 </deletedCount> <liveCount> 2 </liveCount>
</MS_DS_TOP_QUOTA_USAGE> NT AUTHORITY\SYSTEM - - - - -
As you can see, the ResolveAccount()-procedure has added the actual account names belonging to the SIDs underneath each ‘top quota usage’-
block.

Chapter 22. Exchange Interface Providers 575
22. Exchange Interface Providers
By the term Exchange Interface Providers, we refer to the various options that allow a developer to communicate with Microsoft Exchange and fulfill
Microsoft Exchange management tasks.
22.1. Microsoft Exchange 2003
This paragraph explains how to create a mailbox for a user account object within a Microsoft Exchange 2003 environment.
22.1.1. CDOEXM
When creating applications that need to fulfill Microsoft Exchange 2003
management tasks—like creating mailboxes or mail-enabled distribution
lists—knowledge of CDOEXM is required. CDOEXM stands for Collaboration Data Objects for Exchange Management and is a library that comes with
the Microsoft Exchange Administration Tools for Exchange (the Microsoft Exchange Management Console).
CDOEXM provides the Component Object Model classes and interfaces, and as such, requires a wrapper. Microsoft has created interoperability for the
.NET Framework in three different ways: 1. Interoperability of the .NET Framework with the Common Object
Model Known as: COM InterOp
2. Interoperability of the Common Object Model with the .NET
Framework Known as: .NET InterOp
3. Interoperability of the .NET Framework with Win32 Dynamic Link Libraries
Known as: Platform Invoke
Written as: P/Invoke
The wrapper used while using COM InterOp is called the COM Callable Wrapper (CCW). When .NET InterOp is required, the Runtime Callable
Wrapper (RCW) is used. And finally, when P/Invoke interoperability is required, the .NET Framework can call exported functions from an
unmanaged Dynamic Link Library using the DllImport decoration.
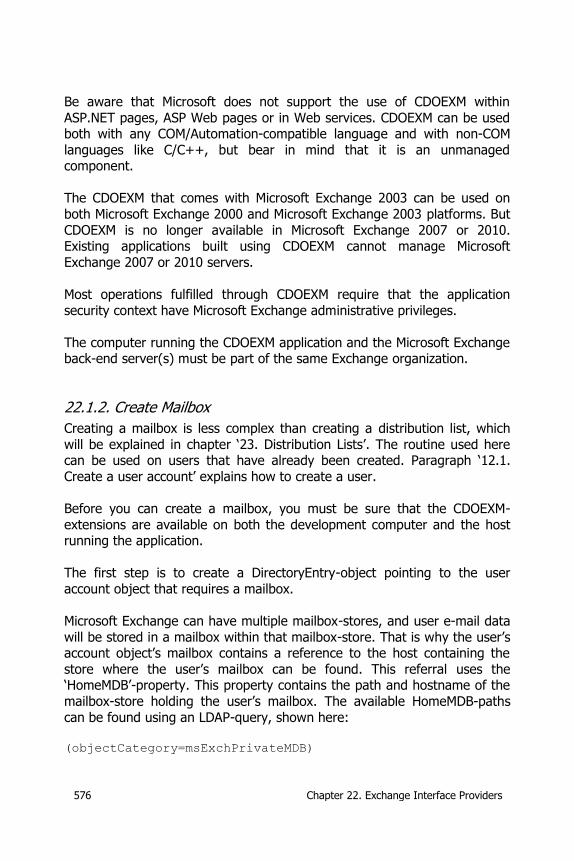
576 Chapter 22. Exchange Interface Providers
Be aware that Microsoft does not support the use of CDOEXM within
ASP.NET pages, ASP Web pages or in Web services. CDOEXM can be used both with any COM/Automation-compatible language and with non-COM
languages like C/C++, but bear in mind that it is an unmanaged component.
The CDOEXM that comes with Microsoft Exchange 2003 can be used on
both Microsoft Exchange 2000 and Microsoft Exchange 2003 platforms. But
CDOEXM is no longer available in Microsoft Exchange 2007 or 2010. Existing applications built using CDOEXM cannot manage Microsoft
Exchange 2007 or 2010 servers.
Most operations fulfilled through CDOEXM require that the application
security context have Microsoft Exchange administrative privileges.
The computer running the CDOEXM application and the Microsoft Exchange back-end server(s) must be part of the same Exchange organization.
22.1.2. Create Mailbox
Creating a mailbox is less complex than creating a distribution list, which
will be explained in chapter ‘23. Distribution Lists’. The routine used here can be used on users that have already been created. Paragraph ‘12.1.
Create a user account’ explains how to create a user.
Before you can create a mailbox, you must be sure that the CDOEXM-
extensions are available on both the development computer and the host running the application.
The first step is to create a DirectoryEntry-object pointing to the user
account object that requires a mailbox.
Microsoft Exchange can have multiple mailbox-stores, and user e-mail data
will be stored in a mailbox within that mailbox-store. That is why the user’s account object’s mailbox contains a reference to the host containing the
store where the user’s mailbox can be found. This referral uses the ‘HomeMDB’-property. This property contains the path and hostname of the
mailbox-store holding the user’s mailbox. The available HomeMDB-paths
can be found using an LDAP-query, shown here: (objectCategory=msExchPrivateMDB)

Chapter 22. Exchange Interface Providers 577
The following snippet shows how to create a mailbox for an existing user
account object.
using (DirectoryEntry user =
new DirectoryEntry(<dn_of_user>))
{
CDOEXM.IMailboxStore mailbox;
mailbox = (IMailboxStore)user.NativeObject;
mailbox.CreateMailbox(
<path_to_mailbox_store_(HomeMDB)>);
user.CommitChanges();
}
One drawback of this snippet is that the person executing it must be able
to create Exchange mailboxes. In Microsoft Exchange Server 2003, the following management roles are available:
Exchange Full Administrators Exchange Administrators
Exchange View-Only Administrators
To delegate the task under Microsoft Exchange Server 2003, a person
should at least be an Exchange Administrator.
For Microsoft Exchange Server 2007, this list of management roles is the
following: Exchange Organization Administrators
Exchange Recipient Administrators Exchange View-Only Administrators
Exchange Server Administrators
In the case described, the person should be an Exchange Recipient
Administrator.
Microsoft Exchange Server 2010 contains some built-in roles, but it also allows you to create custom maintenance roles. The built-in roles are the
following:
Mailbox Recipients (manage mailboxes, contacts and mail users) Transport Rules
Distribution Groups MyPersonalInformation
578 Chapter 22. Exchange Interface Providers
Because it makes available custom maintenance role creation,
Microsoft Exchange 2010 is the first version that actually supports useful Role Based Access Control (RBAC).
22.2. Microsoft Exchange 2007
With the release of Microsoft Exchange 2007, Microsoft also released the Exchange .NET Framework Extensions that can be found within the
Microsoft Exchange Server 2007 SDK. These extensions provide useful
classes and data structures required to manipulate e-mail and related tasks. The following namespaces are included:
Microsoft.Exchange.Data.Mime Enables stream-based and Document Object Model (DOM)-based
access to Multipurpose Internet Mail Extensions (MIME) data,
including the ability to filter MIME content. Microsoft.Exchange.Data.TextConverters
Classes and data structures that enable custom filtering of e-mail body content and conversion between several different formats,
including HTML, RTF and plain text.
Microsoft.Exchange.Data.iCalendar Microsoft.Exchange.Data.Tnef
Classes and data structures for reading and writing calendar items for appointments, meetings, and events.
Microsoft.Exchange.Data.Encoders Classes and data structures for the conversion and encoding of an
e-mail message.
22.3. Microsoft Exchange 2010
As with the previous release, Microsoft Exchange 2010 was also released with the .NET Framework Extensions for Exchange. The release is no
longer a single package, and several specialized SDKs are available. Here is
a brief list of the available namespaces available in the Microsoft Exchange 2010 SDK:
Microsoft.Exchange.Data.ContentTYpes.iCalender Contains the CalendarReader and CalendarWriter-classes that
provide forward-only read and write access to iCalendar data
streams. Microsoft.Exchange.Data.Mime.Encoders
Contains classes that perform bulk conversions of content in
Chapter 22. Exchange Interface Providers 579
memory and one class that performs bulk conversions using
streams. Microsoft.Exchange.Data.Mime
Provides classes that allow creation, access and modification of Multipurpose Internet Mail Extensions (MIME) documents. The
namespace contains the MimeReader and MimeWriter-classes. For Document Object Model (DOM)-based access to MIME data, the
namespace provides the MimeDocument-class.
Microsoft.Exchange.Data.TextConverters Contains types that support the conversion of the contents of e-
mail messages. These types perform transformations on e-mail message bodies. For example, an e-mail message with an RTF
body can be transformed to an HTML-based e-mail message.
Microsoft.Exchange.Data.ContentTypes.Tnef Contains the TnefReader and TnefWriter-classes that provide
forward-only read and write access to Transport Neutral Encapsulation Format (TNEF) data.
Microsoft.Exchange.Data.Transport Contains types that support the extension of the Microsoft
Exchange Server 2010 transport behavior. This namespace also
contains the following underlying namespaces: Microsoft.Exchange.Transport.Email
Contains types that support creating, reading, writing and modifying e-mail messages.
Microsoft.Exchange.Transport.Routing
Supports the extension of the transport routing behavior. Microsoft.Exchange.Transport.Smtp
Supports the extension of the transport SMTP behavior.
In Microsoft Exchange 2010, the msExchMailboxGUID-property is used to assign a mailbox to a user account object in the directory.
22.4. Microsoft Exchange Legacy
Before Microsoft Exchange 2003 and its CDOEXM, several predecessor
interfaces were available that allowed fulfilling Microsoft Exchange management tasks.
22.4.1. CDO
Besides CDOEXM, the legacy Microsoft Exchange editions shipped with Collaboration Data Object (CDO) and ExOLEDB. CDO (v1.2x) is not
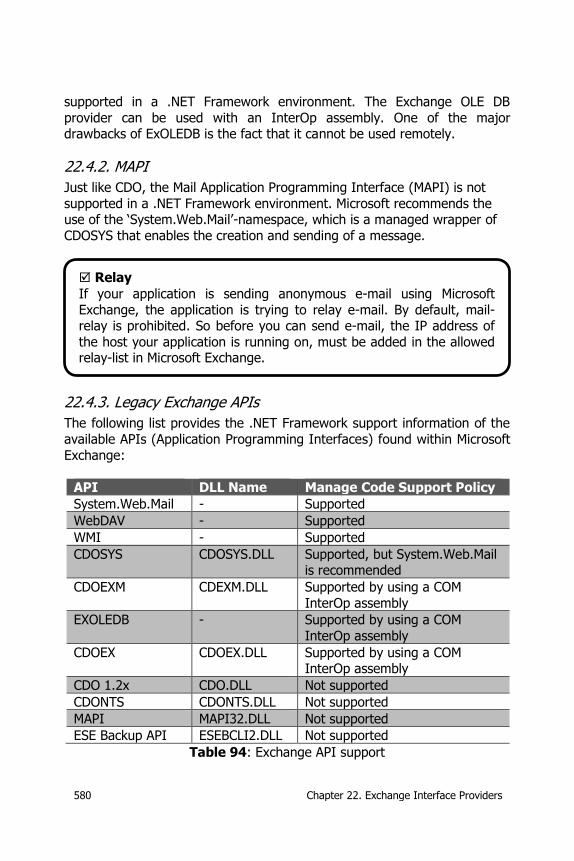
580 Chapter 22. Exchange Interface Providers
supported in a .NET Framework environment. The Exchange OLE DB
provider can be used with an InterOp assembly. One of the major drawbacks of ExOLEDB is the fact that it cannot be used remotely.
22.4.2. MAPI
Just like CDO, the Mail Application Programming Interface (MAPI) is not
supported in a .NET Framework environment. Microsoft recommends the use of the ‘System.Web.Mail’-namespace, which is a managed wrapper of
CDOSYS that enables the creation and sending of a message.
22.4.3. Legacy Exchange APIs
The following list provides the .NET Framework support information of the
available APIs (Application Programming Interfaces) found within Microsoft
Exchange:
API DLL Name Manage Code Support Policy
System.Web.Mail - Supported
WebDAV - Supported
WMI - Supported
CDOSYS CDOSYS.DLL Supported, but System.Web.Mail is recommended
CDOEXM CDEXM.DLL Supported by using a COM
InterOp assembly
EXOLEDB - Supported by using a COM
InterOp assembly
CDOEX CDOEX.DLL Supported by using a COM InterOp assembly
CDO 1.2x CDO.DLL Not supported
CDONTS CDONTS.DLL Not supported
MAPI MAPI32.DLL Not supported
ESE Backup API ESEBCLI2.DLL Not supported
Table 94: Exchange API support
Relay
If your application is sending anonymous e-mail using Microsoft
Exchange, the application is trying to relay e-mail. By default, mail-relay is prohibited. So before you can send e-mail, the IP address of
the host your application is running on, must be added in the allowed relay-list in Microsoft Exchange.
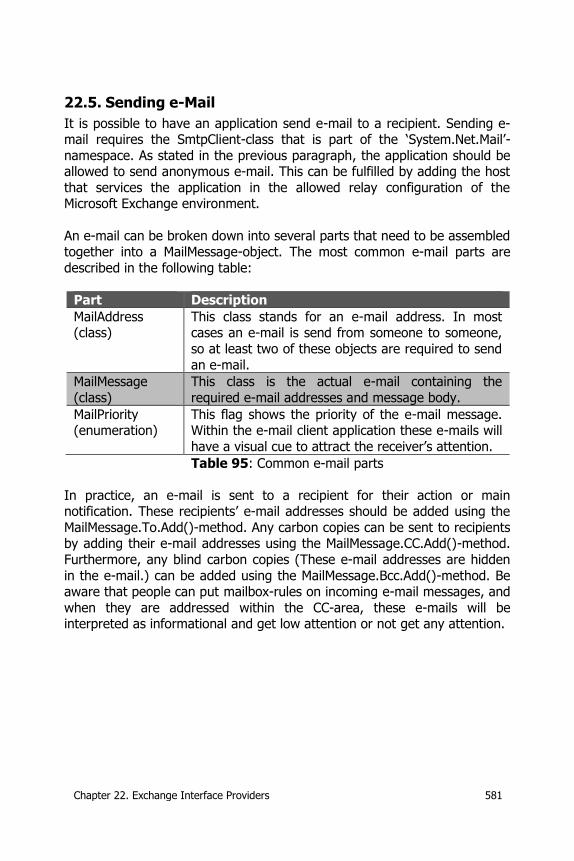
Chapter 22. Exchange Interface Providers 581
22.5. Sending e-Mail
It is possible to have an application send e-mail to a recipient. Sending e-mail requires the SmtpClient-class that is part of the ‘System.Net.Mail’-
namespace. As stated in the previous paragraph, the application should be allowed to send anonymous e-mail. This can be fulfilled by adding the host
that services the application in the allowed relay configuration of the Microsoft Exchange environment.
An e-mail can be broken down into several parts that need to be assembled together into a MailMessage-object. The most common e-mail parts are
described in the following table:
Part Description
MailAddress (class)
This class stands for an e-mail address. In most cases an e-mail is send from someone to someone,
so at least two of these objects are required to send
an e-mail.
MailMessage
(class)
This class is the actual e-mail containing the
required e-mail addresses and message body.
MailPriority (enumeration)
This flag shows the priority of the e-mail message. Within the e-mail client application these e-mails will
have a visual cue to attract the receiver’s attention.
Table 95: Common e-mail parts
In practice, an e-mail is sent to a recipient for their action or main notification. These recipients’ e-mail addresses should be added using the
MailMessage.To.Add()-method. Any carbon copies can be sent to recipients by adding their e-mail addresses using the MailMessage.CC.Add()-method.
Furthermore, any blind carbon copies (These e-mail addresses are hidden
in the e-mail.) can be added using the MailMessage.Bcc.Add()-method. Be aware that people can put mailbox-rules on incoming e-mail messages, and
when they are addressed within the CC-area, these e-mails will be interpreted as informational and get low attention or not get any attention.
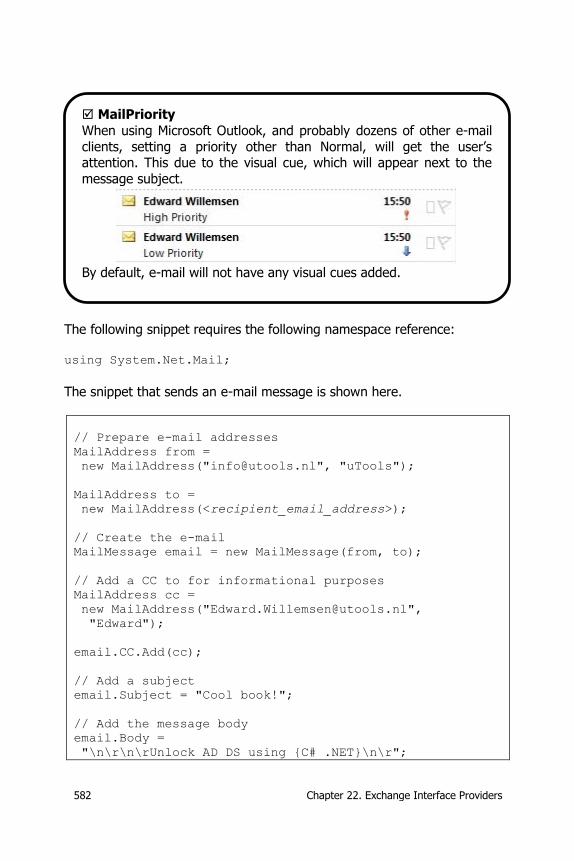
582 Chapter 22. Exchange Interface Providers
The following snippet requires the following namespace reference: using System.Net.Mail;
The snippet that sends an e-mail message is shown here.
// Prepare e-mail addresses
MailAddress from =
new MailAddress("[email protected]", "uTools");
MailAddress to =
new MailAddress(<recipient_email_address>);
// Create the e-mail
MailMessage email = new MailMessage(from, to);
// Add a CC to for informational purposes
MailAddress cc =
new MailAddress("[email protected]",
"Edward");
email.CC.Add(cc);
// Add a subject
email.Subject = "Cool book!";
// Add the message body
email.Body =
"\n\r\n\rUnlock AD DS using {C# .NET}\n\r";
MailPriority
When using Microsoft Outlook, and probably dozens of other e-mail
clients, setting a priority other than Normal, will get the user’s attention. This due to the visual cue, which will appear next to the
message subject.
By default, e-mail will not have any visual cues added.
Chapter 22. Exchange Interface Providers 583
// Set priority to get more user attention
email.Priority = MailPriority.High;
// Create a Simple Mail Transfer Protocol client
// and send the e-mail
SmtpClient smtp =
new SmtpClient(<smtp_servername>);
smtp.Send(email);
If the need arises to add an attachment to the e-mail message, the
.Attachment()-method of the MailMessage-class can be used. Looking at the snippet shown, an attachment can be added after setting the priority.
The following two lines allow adding an attachment to the e-mail:
Attachment attach = new Attachment(<filename>);
email.Attachments.Add(attach);
Depending on the type of attachment that is going to be sent with the e-
mail message, it might be necessary to set the ContentType overload of the .Attachment()-method. The ContentTypes are specified within RFC 2045
section 5.1. Within the .NET Framework, most of the required
ContentTypes are available within the following Multipurpose Internet Mail Extensions (MIME)-namespace:
using System.Net.Mime;
The following table shows some of the common ContentTypes available in the Mime-namespace:
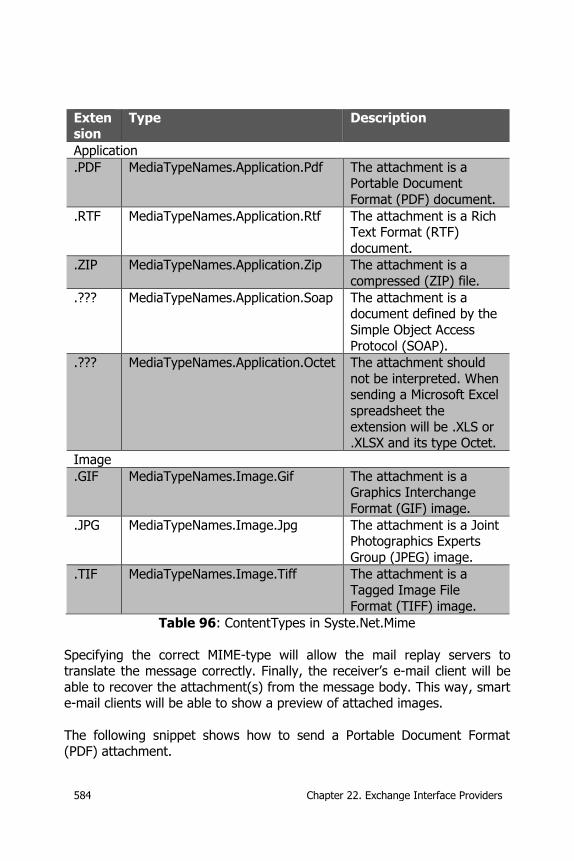
584 Chapter 22. Exchange Interface Providers
Extension
Type Description
Application
.PDF MediaTypeNames.Application.Pdf The attachment is a Portable Document
Format (PDF) document.
.RTF MediaTypeNames.Application.Rtf The attachment is a Rich Text Format (RTF)
document.
.ZIP MediaTypeNames.Application.Zip The attachment is a
compressed (ZIP) file.
.??? MediaTypeNames.Application.Soap The attachment is a document defined by the
Simple Object Access
Protocol (SOAP).
.??? MediaTypeNames.Application.Octet The attachment should
not be interpreted. When sending a Microsoft Excel
spreadsheet the
extension will be .XLS or .XLSX and its type Octet.
Image
.GIF MediaTypeNames.Image.Gif The attachment is a Graphics Interchange
Format (GIF) image.
.JPG MediaTypeNames.Image.Jpg The attachment is a Joint Photographics Experts
Group (JPEG) image.
.TIF MediaTypeNames.Image.Tiff The attachment is a Tagged Image File
Format (TIFF) image.
Table 96: ContentTypes in Syste.Net.Mime
Specifying the correct MIME-type will allow the mail replay servers to translate the message correctly. Finally, the receiver’s e-mail client will be
able to recover the attachment(s) from the message body. This way, smart e-mail clients will be able to show a preview of attached images.
The following snippet shows how to send a Portable Document Format (PDF) attachment.
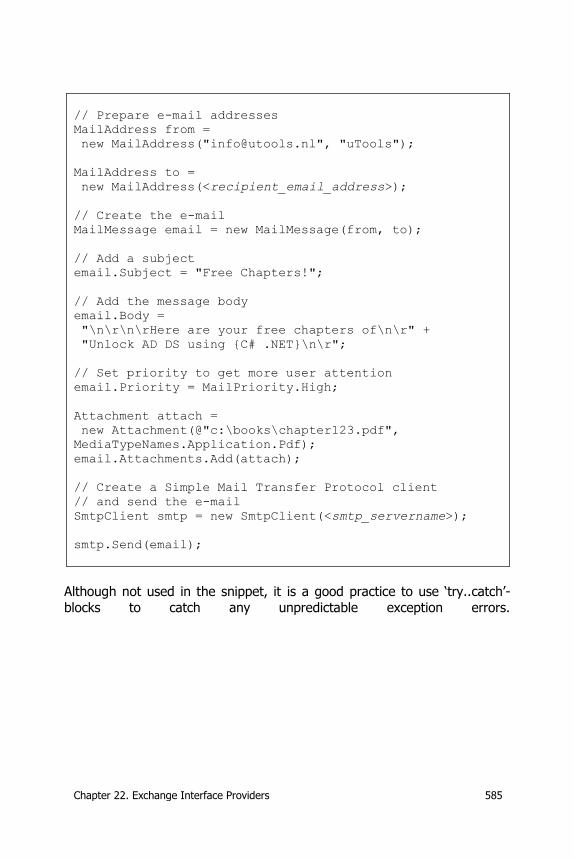
Chapter 22. Exchange Interface Providers 585
// Prepare e-mail addresses
MailAddress from =
new MailAddress("[email protected]", "uTools");
MailAddress to =
new MailAddress(<recipient_email_address>);
// Create the e-mail
MailMessage email = new MailMessage(from, to);
// Add a subject
email.Subject = "Free Chapters!";
// Add the message body
email.Body =
"\n\r\n\rHere are your free chapters of\n\r" +
"Unlock AD DS using {C# .NET}\n\r";
// Set priority to get more user attention
email.Priority = MailPriority.High;
Attachment attach =
new Attachment(@"c:\books\chapter123.pdf",
MediaTypeNames.Application.Pdf);
email.Attachments.Add(attach);
// Create a Simple Mail Transfer Protocol client
// and send the e-mail
SmtpClient smtp = new SmtpClient(<smtp_servername>);
smtp.Send(email);
Although not used in the snippet, it is a good practice to use ‘try..catch’-
blocks to catch any unpredictable exception errors.

Chapter 23. Distribution Lists 587
23. Distribution Lists
A distribution list is a mail-enabled group whose members can be addressed using a single e-mail address assigned to that group. So sending
an e-mail to a distribution list is actually sending an e-mail to the members of the list. The distribution list does not save a copy of the e-mail, so it
does not require any actual storage.
A distribution list can have a manager who is able to add and remove
members to and from the group. Within the MMC, a manager can simply be enabled and selected from the list of security principals.
Before you can programmatically create Microsoft Exchange-based
distribution lists, the Collaboration Data Objects for Exchange Management
must be available on the application host. Paragraph ‘22.1.1. CDOEXM’ provides the necessary information to help with the installation of the
CDOEXM InterOp assembly.
When CDOEXM is installed on the development computer, a reference
towards the CDOEXM InterOp assembly can be created using the following steps:
1. Within the ‘Solution Explorer’, select the References-node.
2. Open the context menu and select the ‘Add Reference’-option.
3. When the ‘Add Reference’-dialog opens, select the COM-tab and search for the ‘Microsoft CDOEXM Library’.
4. When the library is missing, the Microsoft Exchange Management Console is not installed. Examine the information provided in
chapter ‘22. Exchange Interface Providers’ and retry these steps.
When the reference is added, also add the required using statement
referencing the namespace on top of the source: using CDOEXM;
23.1. Creation steps
Take the following steps to create a Microsoft Exchange distribution list within AD DS:
588 Chapter 23. Distribution Lists
1. Create a Global Group.
Scoping the group as distribution group will be sufficient. 2. Create a DirectoryEntry-object pointing towards this new group.
3. Create an object of the type IMailRecipient. 4. Assign the IMailRecipient-object to the native object of the group’s
DirectoryEntry. 5. Add an alias to the IMailRecipient-object.
Aliases must be unique throughout the directory.
6. Invoke the .MailEnable()-method of the IMailRecipient-object and provide null as value.
7. If required, enable or disable the auto e-mail generation flag by setting the IMailRecipient-object AutoGenerateEmailAddresses
value on True or False.
8. Set the primary e-mail address using the IMailRecipient-object SMTPEmail value.
The e-mail addresses must be unique within the directory. No exception will be raised when creating multiple duplicate addresses
using automation. Duplicate addresses will be reported in the Microsoft Exchange event-log, so check this log on a regular basis.
9. When needed, the newly created distribution list can be hidden
from the address book by setting the HideFromAddressBook value of the IMailRecipient-object to True or False.
10. When required, set the manager of the group. 11. Add members to the distribution list.
12. Finally, commit the changes.
Before Microsoft Windows Server 2003 SP2, only a single user could be the
manager of a distribution group. This manager is able to add and remove members from this particular distribution group. After applying SP2 and
also in later Microsoft Windows Server editions, it is possible to add a group as manager of a distribution list.
Although adding a manager using the MMC looks quite simple—tick a checkbox and add a security principal—this task is more complex from a
developer’s perspective. What the MMC actually does is to add the selected manager on the access control list of the group and provide specific rights
to fulfill the required tasks. Applying rights in the directory is discussed in
chapter ‘21. Directory Rights’, and setting the manager is explained in paragraph ‘23.2.3. Setting a manager’.

Chapter 23. Distribution Lists 589
23.2. Creating a Distribution List
The following code snippets can be used within a Microsoft Windows Server 2003 environment using a Microsoft Exchange 2003 back-end. If your
organization is using a higher version of Microsoft Exchange, you can simply port this code to the new version or use Windows PowerShell to
complete similar tasks. (Explaining Windows PowerShell is not within the scope of this book.)
23.2.1. Create a group
This first step is to create a group in the target organizational unit. Usually
a distribution list is based on a global distribution group. The following snippet shows how this can be done.
// Create a group:
string ldapPath =
"LDAP://CN=" + <group_name> + "," + <target_ou>;
using (DirectoryEntry ou =
new DirectoryEntry("LDAP://" + <target_ou>))
{
using (DirectoryEntry group =
ou.Children.Add("CN=" + <name>, "group"))
{
group.Properties["sAMAccountName"].Value =
<name>;
group.Properties["description"].Value =
<description>;
switch (groupType)
{
case (int)grpType.GG_SEC:
group.Properties["groupType"].Value =
ActiveDs.ADS_GROUP_TYPE_ENUM.
ADS_GROUP_TYPE_GLOBAL_GROUP |
ActiveDs.ADS_GROUP_TYPE_ENUM.
ADS_GROUP_TYPE_SECURITY_ENABLED;
break;
case (int)grpType.GG_DIS:
group.Properties["groupType"].Value =
ActiveDs.ADS_GROUP_TYPE_ENUM.
ADS_GROUP_TYPE_GLOBAL_GROUP;
break;
}
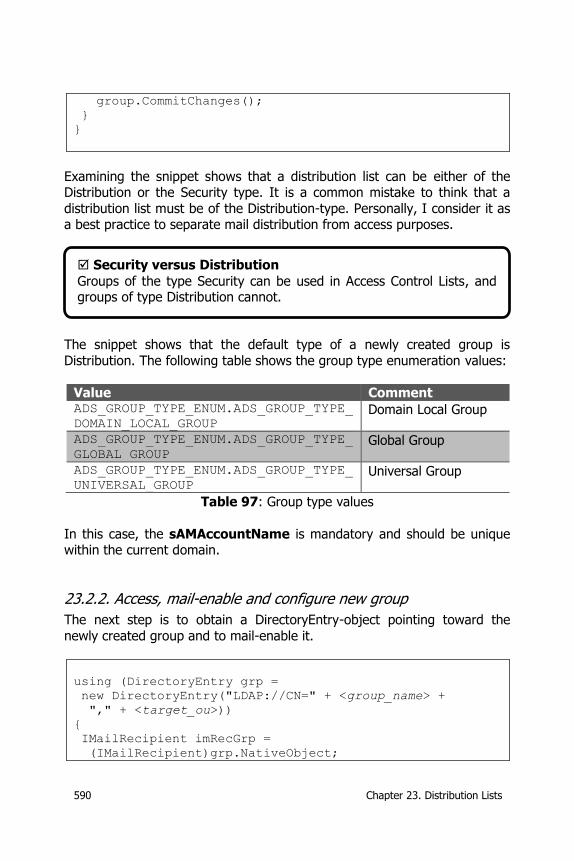
590 Chapter 23. Distribution Lists
group.CommitChanges();
}
}
Examining the snippet shows that a distribution list can be either of the Distribution or the Security type. It is a common mistake to think that a
distribution list must be of the Distribution-type. Personally, I consider it as a best practice to separate mail distribution from access purposes.
The snippet shows that the default type of a newly created group is
Distribution. The following table shows the group type enumeration values:
Value Comment ADS_GROUP_TYPE_ENUM.ADS_GROUP_TYPE_
DOMAIN_LOCAL_GROUP Domain Local Group
ADS_GROUP_TYPE_ENUM.ADS_GROUP_TYPE_
GLOBAL_GROUP Global Group
ADS_GROUP_TYPE_ENUM.ADS_GROUP_TYPE_
UNIVERSAL_GROUP Universal Group
Table 97: Group type values
In this case, the sAMAccountName is mandatory and should be unique within the current domain.
23.2.2. Access, mail-enable and configure new group
The next step is to obtain a DirectoryEntry-object pointing toward the
newly created group and to mail-enable it.
using (DirectoryEntry grp =
new DirectoryEntry("LDAP://CN=" + <group_name> +
"," + <target_ou>))
{
IMailRecipient imRecGrp =
(IMailRecipient)grp.NativeObject;
Security versus Distribution
Groups of the type Security can be used in Access Control Lists, and groups of type Distribution cannot.
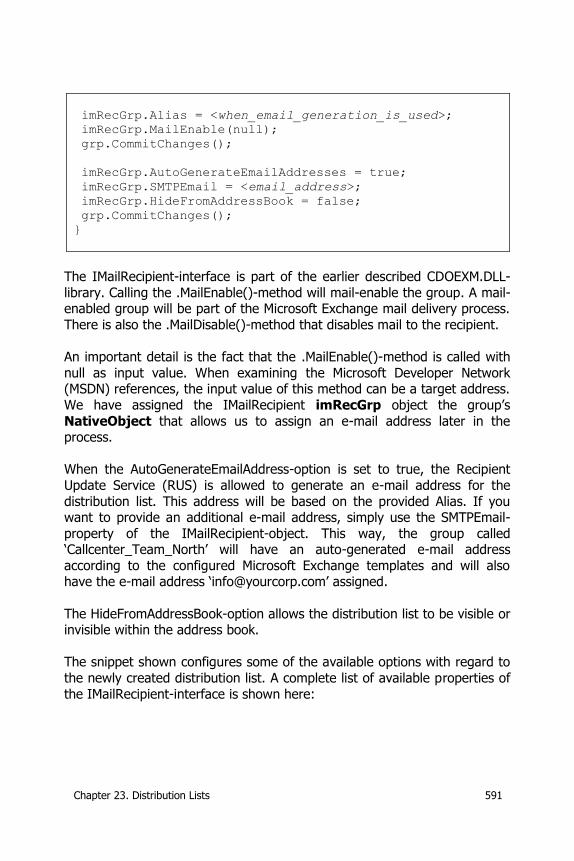
Chapter 23. Distribution Lists 591
imRecGrp.Alias = <when_email_generation_is_used>;
imRecGrp.MailEnable(null);
grp.CommitChanges();
imRecGrp.AutoGenerateEmailAddresses = true;
imRecGrp.SMTPEmail = <email_address>;
imRecGrp.HideFromAddressBook = false;
grp.CommitChanges();
}
The IMailRecipient-interface is part of the earlier described CDOEXM.DLL-
library. Calling the .MailEnable()-method will mail-enable the group. A mail-enabled group will be part of the Microsoft Exchange mail delivery process.
There is also the .MailDisable()-method that disables mail to the recipient.
An important detail is the fact that the .MailEnable()-method is called with
null as input value. When examining the Microsoft Developer Network (MSDN) references, the input value of this method can be a target address.
We have assigned the IMailRecipient imRecGrp object the group’s
NativeObject that allows us to assign an e-mail address later in the process.
When the AutoGenerateEmailAddress-option is set to true, the Recipient
Update Service (RUS) is allowed to generate an e-mail address for the
distribution list. This address will be based on the provided Alias. If you want to provide an additional e-mail address, simply use the SMTPEmail-
property of the IMailRecipient-object. This way, the group called ‘Callcenter_Team_North’ will have an auto-generated e-mail address
according to the configured Microsoft Exchange templates and will also have the e-mail address ‘[email protected]’ assigned.
The HideFromAddressBook-option allows the distribution list to be visible or invisible within the address book.
The snippet shown configures some of the available options with regard to
the newly created distribution list. A complete list of available properties of
the IMailRecipient-interface is shown here:
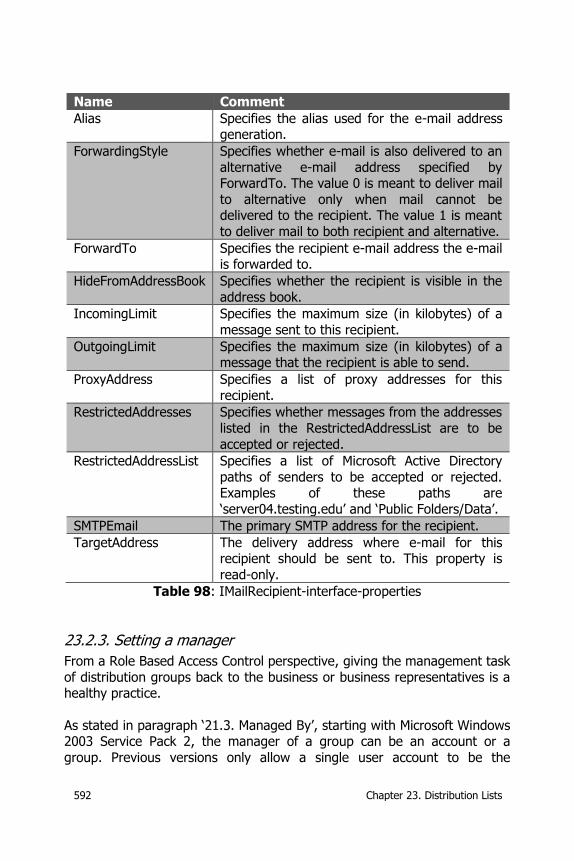
592 Chapter 23. Distribution Lists
Name Comment
Alias Specifies the alias used for the e-mail address generation.
ForwardingStyle Specifies whether e-mail is also delivered to an
alternative e-mail address specified by ForwardTo. The value 0 is meant to deliver mail
to alternative only when mail cannot be delivered to the recipient. The value 1 is meant
to deliver mail to both recipient and alternative.
ForwardTo Specifies the recipient e-mail address the e-mail is forwarded to.
HideFromAddressBook Specifies whether the recipient is visible in the
address book.
IncomingLimit Specifies the maximum size (in kilobytes) of a
message sent to this recipient.
OutgoingLimit Specifies the maximum size (in kilobytes) of a message that the recipient is able to send.
ProxyAddress Specifies a list of proxy addresses for this
recipient.
RestrictedAddresses Specifies whether messages from the addresses
listed in the RestrictedAddressList are to be
accepted or rejected.
RestrictedAddressList Specifies a list of Microsoft Active Directory
paths of senders to be accepted or rejected. Examples of these paths are
‘server04.testing.edu’ and ‘Public Folders/Data’.
SMTPEmail The primary SMTP address for the recipient.
TargetAddress The delivery address where e-mail for this recipient should be sent to. This property is
read-only.
Table 98: IMailRecipient-interface-properties
23.2.3. Setting a manager
From a Role Based Access Control perspective, giving the management task
of distribution groups back to the business or business representatives is a healthy practice.
As stated in paragraph ‘21.3. Managed By’, starting with Microsoft Windows 2003 Service Pack 2, the manager of a group can be an account or a
group. Previous versions only allow a single user account to be the
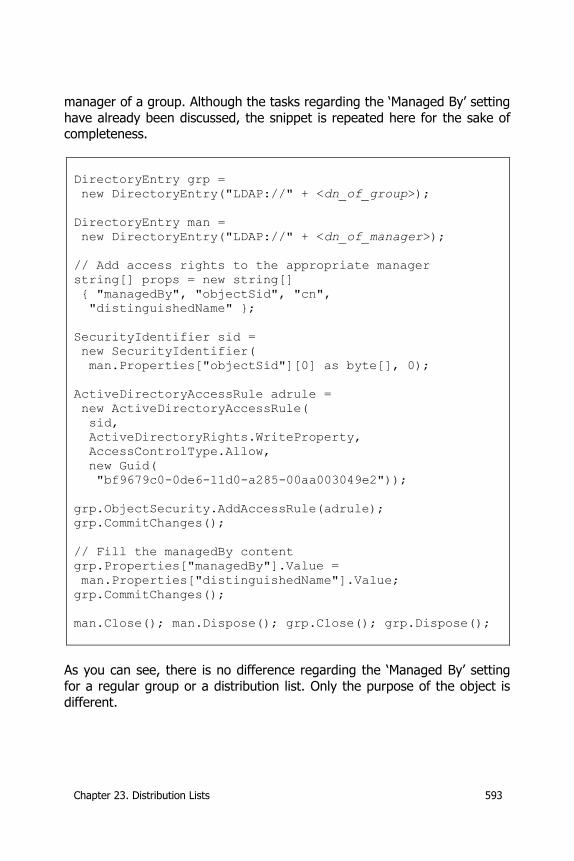
Chapter 23. Distribution Lists 593
manager of a group. Although the tasks regarding the ‘Managed By’ setting
have already been discussed, the snippet is repeated here for the sake of completeness.
DirectoryEntry grp =
new DirectoryEntry("LDAP://" + <dn_of_group>);
DirectoryEntry man =
new DirectoryEntry("LDAP://" + <dn_of_manager>);
// Add access rights to the appropriate manager
string[] props = new string[]
{ "managedBy", "objectSid", "cn",
"distinguishedName" };
SecurityIdentifier sid =
new SecurityIdentifier(
man.Properties["objectSid"][0] as byte[], 0);
ActiveDirectoryAccessRule adrule =
new ActiveDirectoryAccessRule(
sid,
ActiveDirectoryRights.WriteProperty,
AccessControlType.Allow,
new Guid(
"bf9679c0-0de6-11d0-a285-00aa003049e2"));
grp.ObjectSecurity.AddAccessRule(adrule);
grp.CommitChanges();
// Fill the managedBy content
grp.Properties["managedBy"].Value =
man.Properties["distinguishedName"].Value;
grp.CommitChanges();
man.Close(); man.Dispose(); grp.Close(); grp.Dispose();
As you can see, there is no difference regarding the ‘Managed By’ setting
for a regular group or a distribution list. Only the purpose of the object is
different.
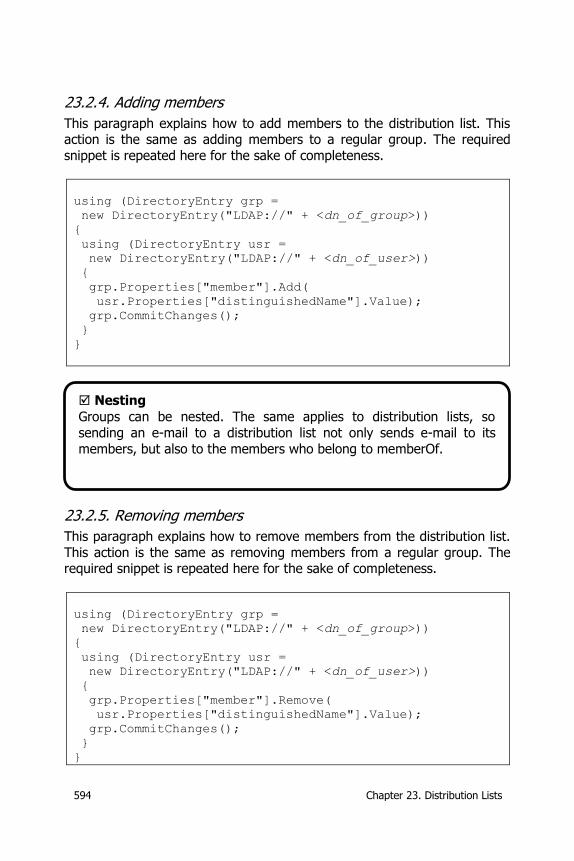
594 Chapter 23. Distribution Lists
23.2.4. Adding members
This paragraph explains how to add members to the distribution list. This action is the same as adding members to a regular group. The required
snippet is repeated here for the sake of completeness.
using (DirectoryEntry grp =
new DirectoryEntry("LDAP://" + <dn_of_group>))
{
using (DirectoryEntry usr =
new DirectoryEntry("LDAP://" + <dn_of_user>))
{
grp.Properties["member"].Add(
usr.Properties["distinguishedName"].Value);
grp.CommitChanges();
}
}
23.2.5. Removing members
This paragraph explains how to remove members from the distribution list.
This action is the same as removing members from a regular group. The required snippet is repeated here for the sake of completeness.
using (DirectoryEntry grp =
new DirectoryEntry("LDAP://" + <dn_of_group>))
{
using (DirectoryEntry usr =
new DirectoryEntry("LDAP://" + <dn_of_user>))
{
grp.Properties["member"].Remove(
usr.Properties["distinguishedName"].Value);
grp.CommitChanges();
}
}
Nesting
Groups can be nested. The same applies to distribution lists, so
sending an e-mail to a distribution list not only sends e-mail to its
members, but also to the members who belong to memberOf.
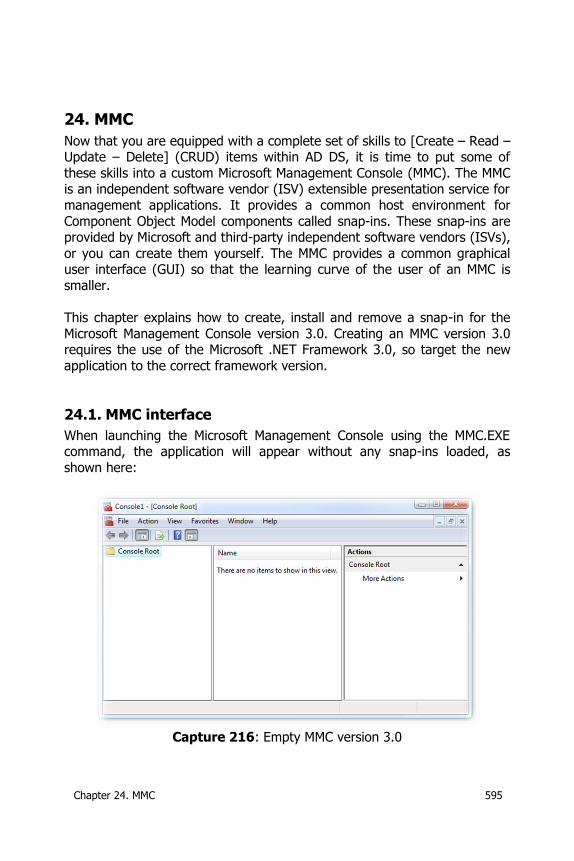
Chapter 24. MMC 595
24. MMC
Now that you are equipped with a complete set of skills to [Create – Read – Update – Delete] (CRUD) items within AD DS, it is time to put some of
these skills into a custom Microsoft Management Console (MMC). The MMC is an independent software vendor (ISV) extensible presentation service for
management applications. It provides a common host environment for
Component Object Model components called snap-ins. These snap-ins are provided by Microsoft and third-party independent software vendors (ISVs),
or you can create them yourself. The MMC provides a common graphical user interface (GUI) so that the learning curve of the user of an MMC is
smaller.
This chapter explains how to create, install and remove a snap-in for the
Microsoft Management Console version 3.0. Creating an MMC version 3.0 requires the use of the Microsoft .NET Framework 3.0, so target the new
application to the correct framework version.
24.1. MMC interface
When launching the Microsoft Management Console using the MMC.EXE command, the application will appear without any snap-ins loaded, as
shown here:
Capture 216: Empty MMC version 3.0
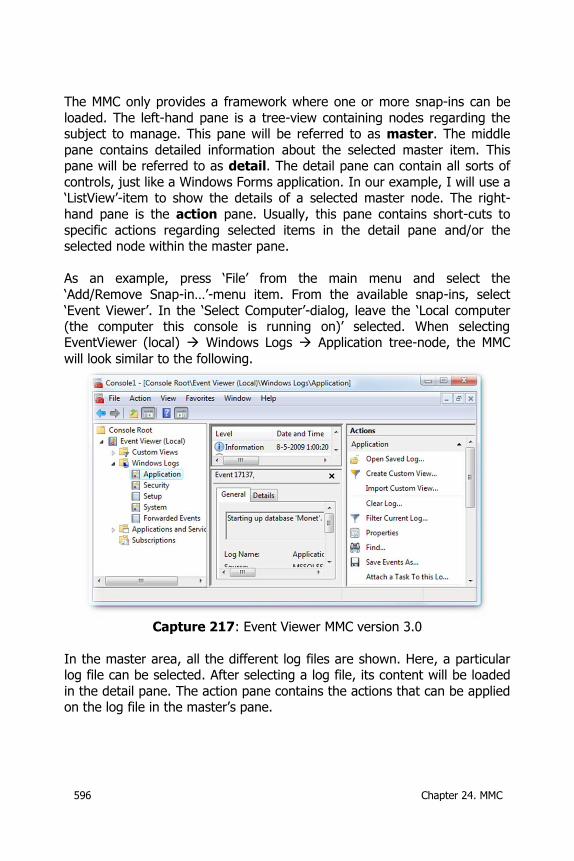
596 Chapter 24. MMC
The MMC only provides a framework where one or more snap-ins can be
loaded. The left-hand pane is a tree-view containing nodes regarding the subject to manage. This pane will be referred to as master. The middle
pane contains detailed information about the selected master item. This pane will be referred to as detail. The detail pane can contain all sorts of
controls, just like a Windows Forms application. In our example, I will use a ‘ListView’-item to show the details of a selected master node. The right-
hand pane is the action pane. Usually, this pane contains short-cuts to
specific actions regarding selected items in the detail pane and/or the selected node within the master pane.
As an example, press ‘File’ from the main menu and select the
‘Add/Remove Snap-in…’-menu item. From the available snap-ins, select
‘Event Viewer’. In the ‘Select Computer’-dialog, leave the ‘Local computer (the computer this console is running on)’ selected. When selecting EventViewer (local) Windows Logs Application tree-node, the MMC
will look similar to the following.
Capture 217: Event Viewer MMC version 3.0
In the master area, all the different log files are shown. Here, a particular log file can be selected. After selecting a log file, its content will be loaded
in the detail pane. The action pane contains the actions that can be applied on the log file in the master’s pane.
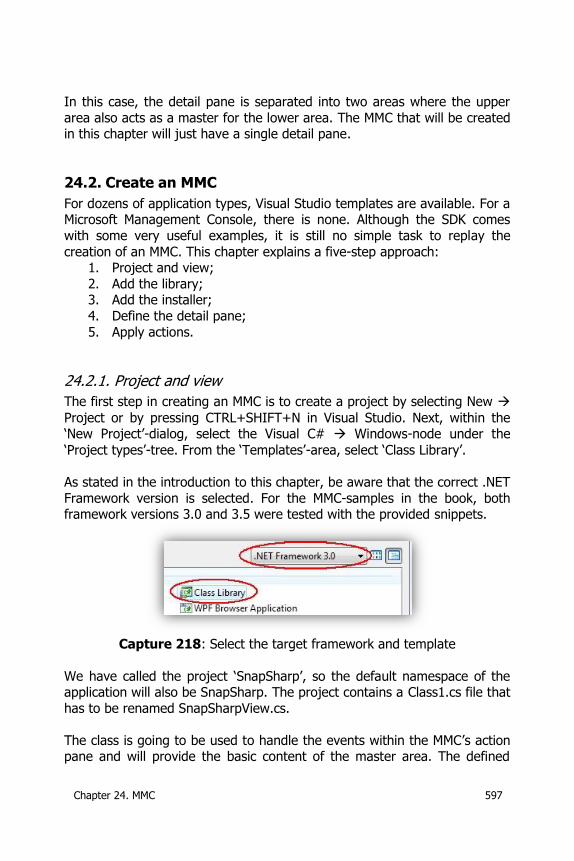
Chapter 24. MMC 597
In this case, the detail pane is separated into two areas where the upper
area also acts as a master for the lower area. The MMC that will be created in this chapter will just have a single detail pane.
24.2. Create an MMC
For dozens of application types, Visual Studio templates are available. For a Microsoft Management Console, there is none. Although the SDK comes
with some very useful examples, it is still no simple task to replay the
creation of an MMC. This chapter explains a five-step approach: 1. Project and view;
2. Add the library; 3. Add the installer;
4. Define the detail pane;
5. Apply actions.
24.2.1. Project and view
The first step in creating an MMC is to create a project by selecting New
Project or by pressing CTRL+SHIFT+N in Visual Studio. Next, within the ‘New Project’-dialog, select the Visual C# Windows-node under the
‘Project types’-tree. From the ‘Templates’-area, select ‘Class Library’.
As stated in the introduction to this chapter, be aware that the correct .NET
Framework version is selected. For the MMC-samples in the book, both framework versions 3.0 and 3.5 were tested with the provided snippets.
Capture 218: Select the target framework and template
We have called the project ‘SnapSharp’, so the default namespace of the application will also be SnapSharp. The project contains a Class1.cs file that
has to be renamed SnapSharpView.cs.
The class is going to be used to handle the events within the MMC’s action pane and will provide the basic content of the master area. The defined
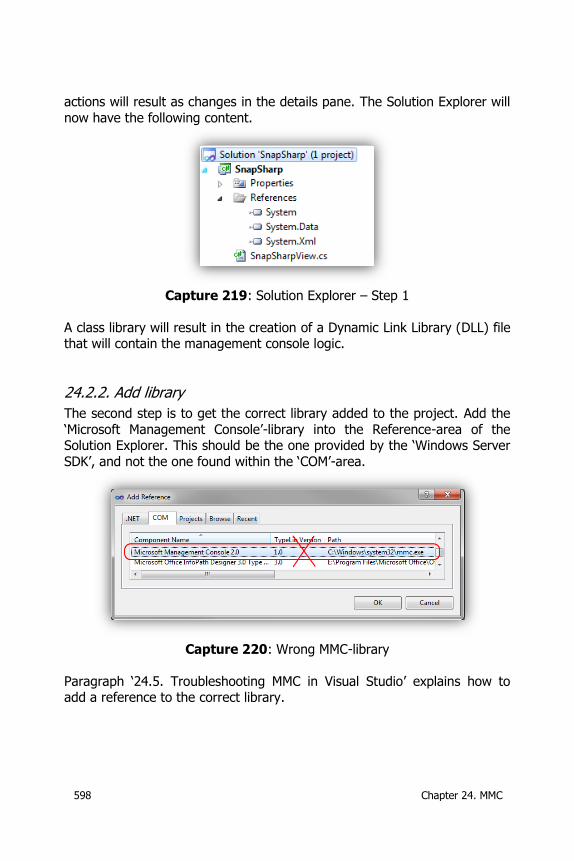
598 Chapter 24. MMC
actions will result as changes in the details pane. The Solution Explorer will
now have the following content.
Capture 219: Solution Explorer – Step 1
A class library will result in the creation of a Dynamic Link Library (DLL) file that will contain the management console logic.
24.2.2. Add library
The second step is to get the correct library added to the project. Add the
‘Microsoft Management Console’-library into the Reference-area of the Solution Explorer. This should be the one provided by the ‘Windows Server
SDK’, and not the one found within the ‘COM’-area.
Capture 220: Wrong MMC-library
Paragraph ‘24.5. Troubleshooting MMC in Visual Studio’ explains how to add a reference to the correct library.
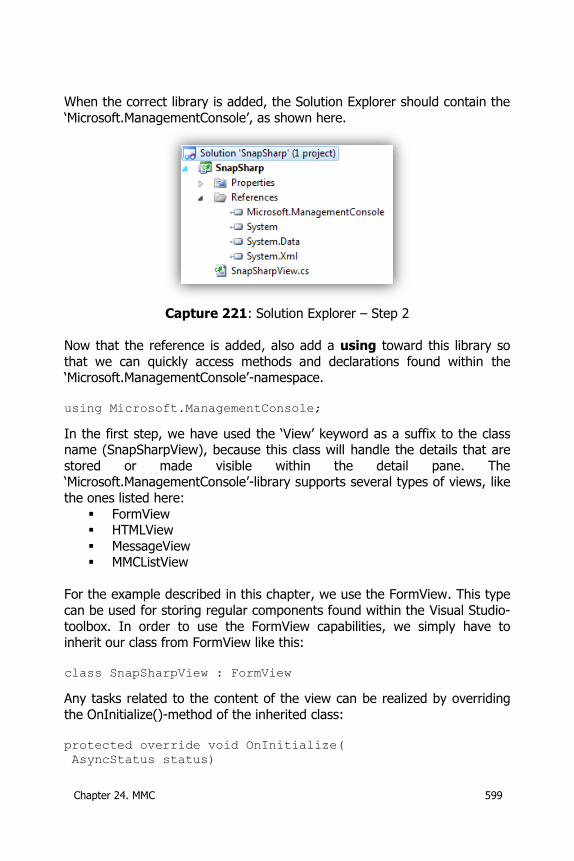
Chapter 24. MMC 599
When the correct library is added, the Solution Explorer should contain the
‘Microsoft.ManagementConsole’, as shown here.
Capture 221: Solution Explorer – Step 2
Now that the reference is added, also add a using toward this library so
that we can quickly access methods and declarations found within the ‘Microsoft.ManagementConsole’-namespace.
using Microsoft.ManagementConsole;
In the first step, we have used the ‘View’ keyword as a suffix to the class name (SnapSharpView), because this class will handle the details that are
stored or made visible within the detail pane. The ‘Microsoft.ManagementConsole’-library supports several types of views, like
the ones listed here:
FormView HTMLView
MessageView MMCListView
For the example described in this chapter, we use the FormView. This type
can be used for storing regular components found within the Visual Studio-
toolbox. In order to use the FormView capabilities, we simply have to inherit our class from FormView like this:
class SnapSharpView : FormView
Any tasks related to the content of the view can be realized by overriding
the OnInitialize()-method of the inherited class:
protected override void OnInitialize(
AsyncStatus status)
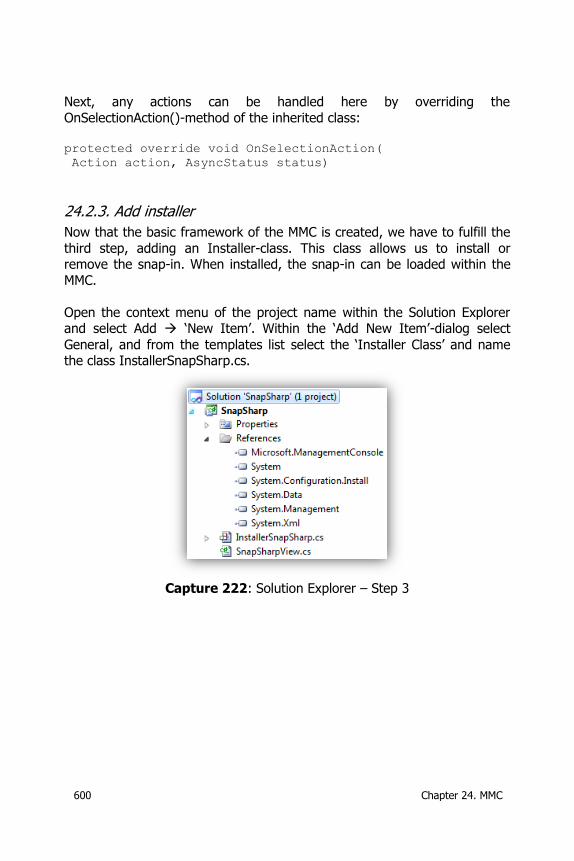
600 Chapter 24. MMC
Next, any actions can be handled here by overriding the
OnSelectionAction()-method of the inherited class: protected override void OnSelectionAction(
Action action, AsyncStatus status)
24.2.3. Add installer
Now that the basic framework of the MMC is created, we have to fulfill the
third step, adding an Installer-class. This class allows us to install or remove the snap-in. When installed, the snap-in can be loaded within the
MMC.
Open the context menu of the project name within the Solution Explorer and select Add ‘New Item’. Within the ‘Add New Item’-dialog select
General, and from the templates list select the ‘Installer Class’ and name the class InstallerSnapSharp.cs.
Capture 222: Solution Explorer – Step 3
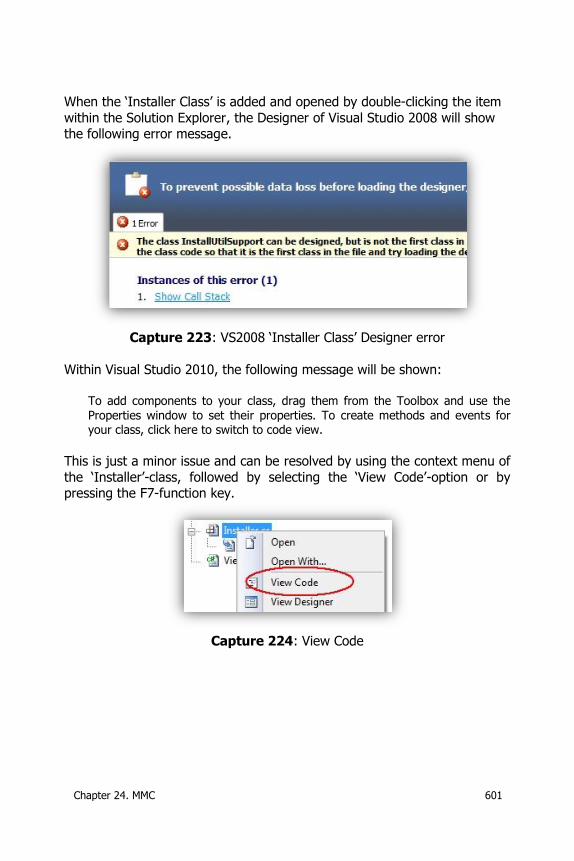
Chapter 24. MMC 601
When the ‘Installer Class’ is added and opened by double-clicking the item
within the Solution Explorer, the Designer of Visual Studio 2008 will show the following error message.
Capture 223: VS2008 ‘Installer Class’ Designer error
Within Visual Studio 2010, the following message will be shown:
To add components to your class, drag them from the Toolbox and use the
Properties window to set their properties. To create methods and events for your class, click here to switch to code view.
This is just a minor issue and can be resolved by using the context menu of
the ‘Installer’-class, followed by selecting the ‘View Code’-option or by pressing the F7-function key.
Capture 224: View Code
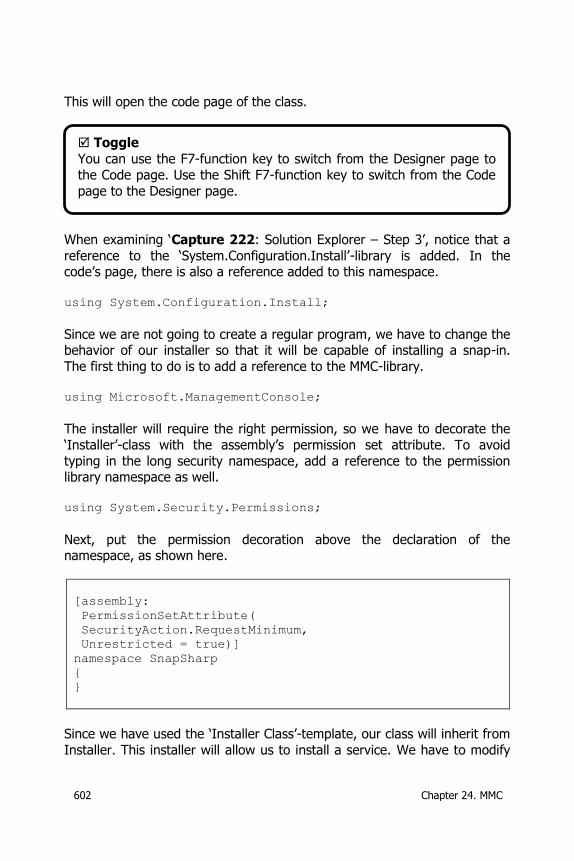
602 Chapter 24. MMC
This will open the code page of the class.
When examining ‘Capture 222: Solution Explorer – Step 3’, notice that a
reference to the ‘System.Configuration.Install’-library is added. In the code’s page, there is also a reference added to this namespace.
using System.Configuration.Install;
Since we are not going to create a regular program, we have to change the behavior of our installer so that it will be capable of installing a snap-in.
The first thing to do is to add a reference to the MMC-library.
using Microsoft.ManagementConsole;
The installer will require the right permission, so we have to decorate the
‘Installer’-class with the assembly’s permission set attribute. To avoid
typing in the long security namespace, add a reference to the permission library namespace as well.
using System.Security.Permissions;
Next, put the permission decoration above the declaration of the namespace, as shown here.
[assembly:
PermissionSetAttribute(
SecurityAction.RequestMinimum,
Unrestricted = true)]
namespace SnapSharp
{
}
Since we have used the ‘Installer Class’-template, our class will inherit from
Installer. This installer will allow us to install a service. We have to modify
Toggle
You can use the F7-function key to switch from the Designer page to
the Code page. Use the Shift F7-function key to switch from the Code
page to the Designer page.

Chapter 24. MMC 603
this, since we want to install our application as a snap-in and not as a
service. From the ‘Microsoft.ManagementConsole’-namespace, we can inherit from the SnapInInstaller-class. This way, it is possible to use the
install utility (InstallUtil.exe) and have it install the snap-in correctly.
The original value is the following.
[RunInstaller(true)]
public partial class InstallerSnapSharp :
System.Configuration.Install.Installer
or
[RunInstaller(true)]
public partial class InstallerSnapSharp : Installer
The inheritance has to be modified from Installer into SnapInInstaller as shown here.
[RunInstaller(true)]
public partial class InstallerSnapSharp :
SnapInInstaller
The next thing to do is to create an entry point for the creation of the snap-in. This can be done by modifying the Installer-class
(InstallerSnapSharp.cs). In the Installer-class, a SnapSharp-class should be
added, and this class should be decorated with the proper SnapInSettings-information. This new class should also inherit from the SnapIn-class that is
part of the ‘Microsoft.ManagementConsole’-namespace. The decoration and inheritance are shown in the next snippet.
[RunInstaller(true)]
public class InstallerSnapSharp : SnapInInstaller
{
}
[SnapInSettings(
"{52219fc9-ab72-47ff-868e-c7061481ad3d}",
DisplayName = "- SnapSharp",
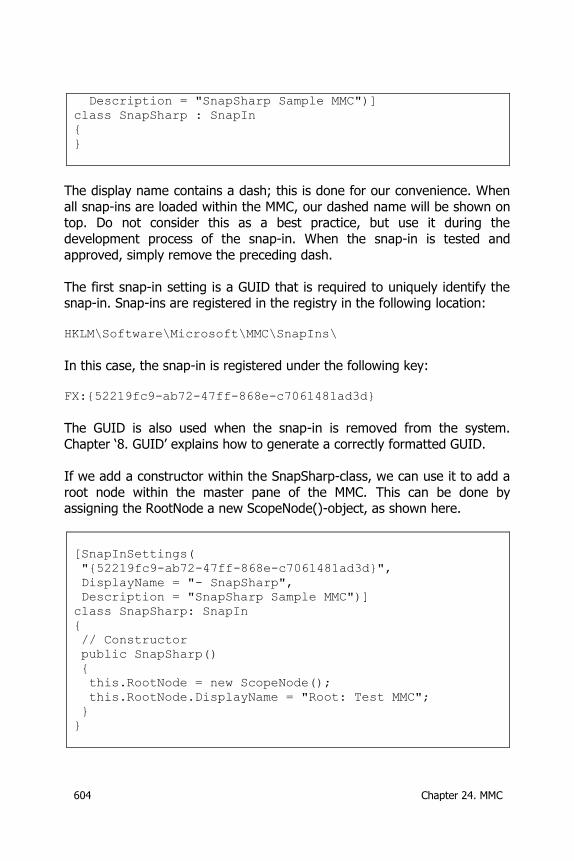
604 Chapter 24. MMC
Description = "SnapSharp Sample MMC")]
class SnapSharp : SnapIn
{
}
The display name contains a dash; this is done for our convenience. When
all snap-ins are loaded within the MMC, our dashed name will be shown on top. Do not consider this as a best practice, but use it during the
development process of the snap-in. When the snap-in is tested and
approved, simply remove the preceding dash.
The first snap-in setting is a GUID that is required to uniquely identify the snap-in. Snap-ins are registered in the registry in the following location:
HKLM\Software\Microsoft\MMC\SnapIns\
In this case, the snap-in is registered under the following key: FX:{52219fc9-ab72-47ff-868e-c7061481ad3d}
The GUID is also used when the snap-in is removed from the system.
Chapter ‘8. GUID’ explains how to generate a correctly formatted GUID.
If we add a constructor within the SnapSharp-class, we can use it to add a
root node within the master pane of the MMC. This can be done by assigning the RootNode a new ScopeNode()-object, as shown here.
[SnapInSettings(
"{52219fc9-ab72-47ff-868e-c7061481ad3d}",
DisplayName = "- SnapSharp",
Description = "SnapSharp Sample MMC")]
class SnapSharp: SnapIn
{
// Constructor
public SnapSharp()
{
this.RootNode = new ScopeNode();
this.RootNode.DisplayName = "Root: Test MMC";
}
}
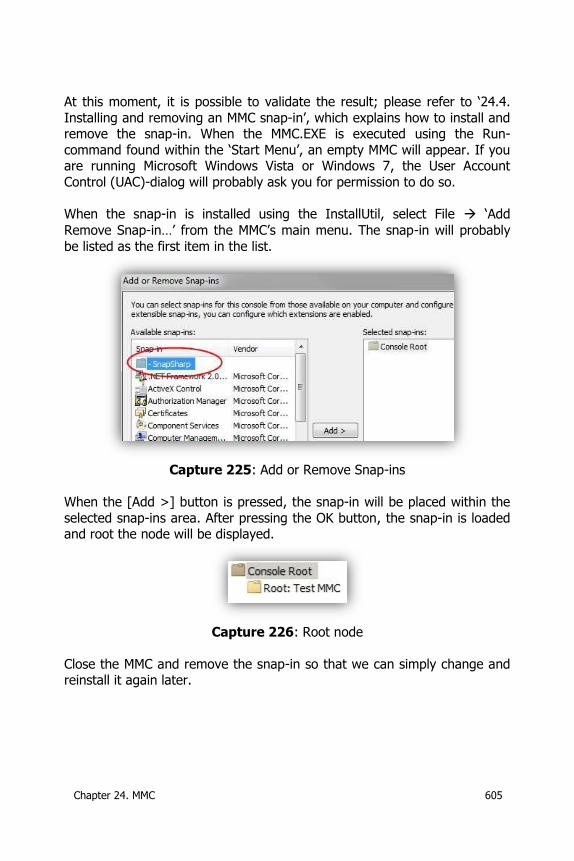
Chapter 24. MMC 605
At this moment, it is possible to validate the result; please refer to ‘24.4.
Installing and removing an MMC snap-in’, which explains how to install and remove the snap-in. When the MMC.EXE is executed using the Run-
command found within the ‘Start Menu’, an empty MMC will appear. If you are running Microsoft Windows Vista or Windows 7, the User Account
Control (UAC)-dialog will probably ask you for permission to do so. When the snap-in is installed using the InstallUtil, select File ‘Add
Remove Snap-in…’ from the MMC’s main menu. The snap-in will probably
be listed as the first item in the list.
Capture 225: Add or Remove Snap-ins
When the [Add >] button is pressed, the snap-in will be placed within the
selected snap-ins area. After pressing the OK button, the snap-in is loaded and root the node will be displayed.
Capture 226: Root node
Close the MMC and remove the snap-in so that we can simply change and reinstall it again later.
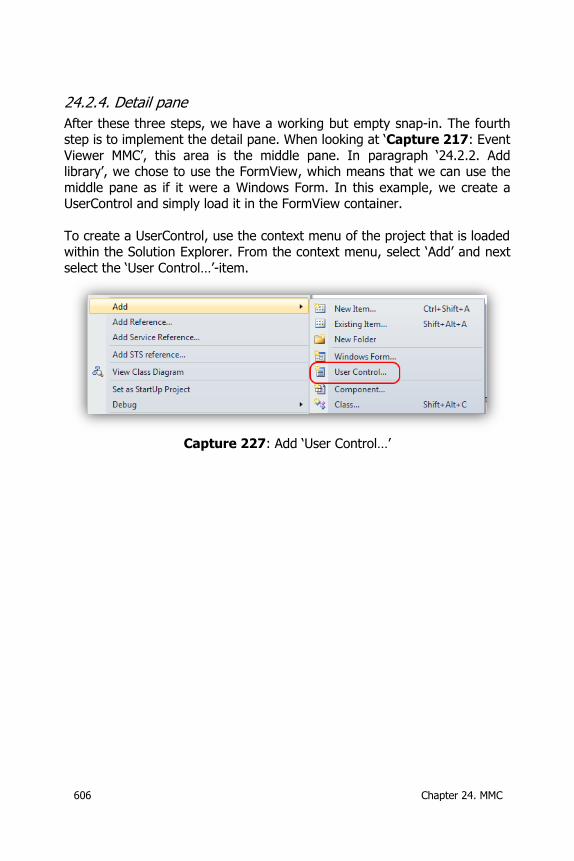
606 Chapter 24. MMC
24.2.4. Detail pane
After these three steps, we have a working but empty snap-in. The fourth step is to implement the detail pane. When looking at ‘Capture 217: Event
Viewer MMC’, this area is the middle pane. In paragraph ‘24.2.2. Add library’, we chose to use the FormView, which means that we can use the
middle pane as if it were a Windows Form. In this example, we create a UserControl and simply load it in the FormView container.
To create a UserControl, use the context menu of the project that is loaded within the Solution Explorer. From the context menu, select ‘Add’ and next
select the ‘User Control…’-item.
Capture 227: Add ‘User Control…’
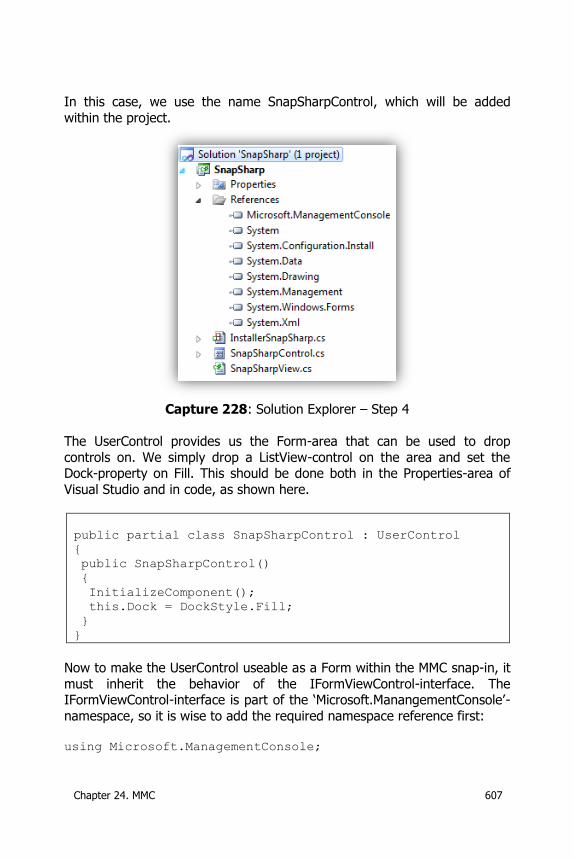
Chapter 24. MMC 607
In this case, we use the name SnapSharpControl, which will be added
within the project.
Capture 228: Solution Explorer – Step 4
The UserControl provides us the Form-area that can be used to drop
controls on. We simply drop a ListView-control on the area and set the Dock-property on Fill. This should be done both in the Properties-area of
Visual Studio and in code, as shown here.
public partial class SnapSharpControl : UserControl
{
public SnapSharpControl()
{
InitializeComponent();
this.Dock = DockStyle.Fill;
}
}
Now to make the UserControl useable as a Form within the MMC snap-in, it
must inherit the behavior of the IFormViewControl-interface. The IFormViewControl-interface is part of the ‘Microsoft.ManangementConsole’-
namespace, so it is wise to add the required namespace reference first:
using Microsoft.ManagementConsole;
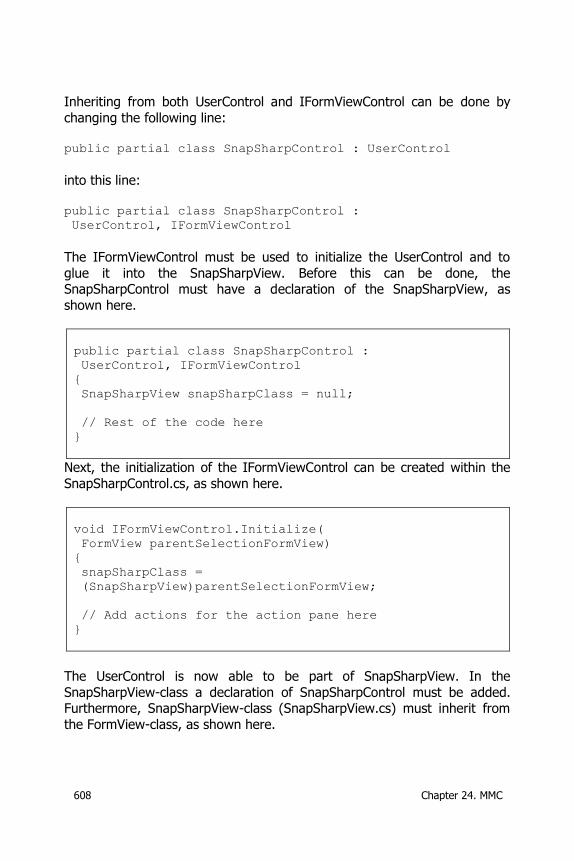
608 Chapter 24. MMC
Inheriting from both UserControl and IFormViewControl can be done by
changing the following line: public partial class SnapSharpControl : UserControl
into this line:
public partial class SnapSharpControl :
UserControl, IFormViewControl
The IFormViewControl must be used to initialize the UserControl and to
glue it into the SnapSharpView. Before this can be done, the SnapSharpControl must have a declaration of the SnapSharpView, as
shown here.
public partial class SnapSharpControl :
UserControl, IFormViewControl
{
SnapSharpView snapSharpClass = null;
// Rest of the code here
}
Next, the initialization of the IFormViewControl can be created within the
SnapSharpControl.cs, as shown here.
void IFormViewControl.Initialize(
FormView parentSelectionFormView)
{
snapSharpClass =
(SnapSharpView)parentSelectionFormView;
// Add actions for the action pane here
}
The UserControl is now able to be part of SnapSharpView. In the
SnapSharpView-class a declaration of SnapSharpControl must be added. Furthermore, SnapSharpView-class (SnapSharpView.cs) must inherit from
the FormView-class, as shown here.
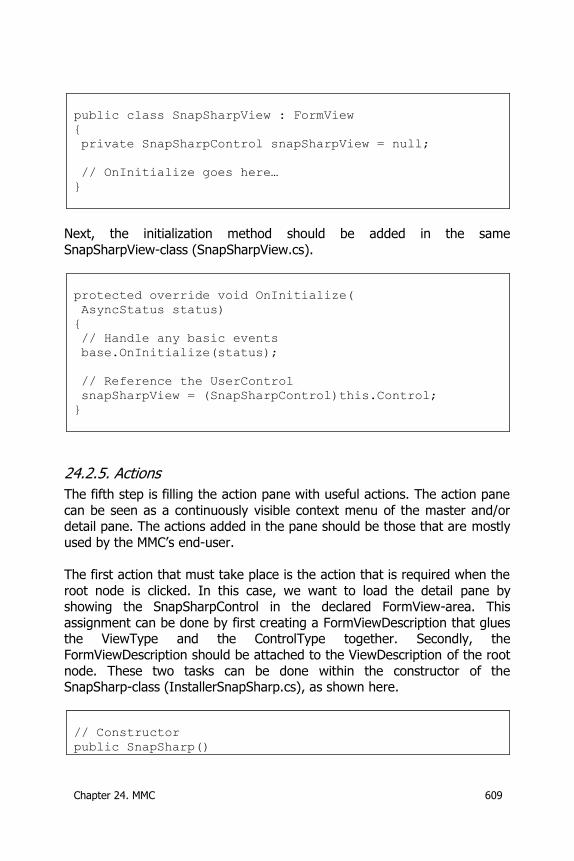
Chapter 24. MMC 609
public class SnapSharpView : FormView
{
private SnapSharpControl snapSharpView = null;
// OnInitialize goes here…
}
Next, the initialization method should be added in the same
SnapSharpView-class (SnapSharpView.cs).
protected override void OnInitialize(
AsyncStatus status)
{
// Handle any basic events
base.OnInitialize(status);
// Reference the UserControl
snapSharpView = (SnapSharpControl)this.Control;
}
24.2.5. Actions
The fifth step is filling the action pane with useful actions. The action pane
can be seen as a continuously visible context menu of the master and/or detail pane. The actions added in the pane should be those that are mostly
used by the MMC’s end-user.
The first action that must take place is the action that is required when the
root node is clicked. In this case, we want to load the detail pane by showing the SnapSharpControl in the declared FormView-area. This
assignment can be done by first creating a FormViewDescription that glues the ViewType and the ControlType together. Secondly, the
FormViewDescription should be attached to the ViewDescription of the root
node. These two tasks can be done within the constructor of the SnapSharp-class (InstallerSnapSharp.cs), as shown here.
// Constructor
public SnapSharp()
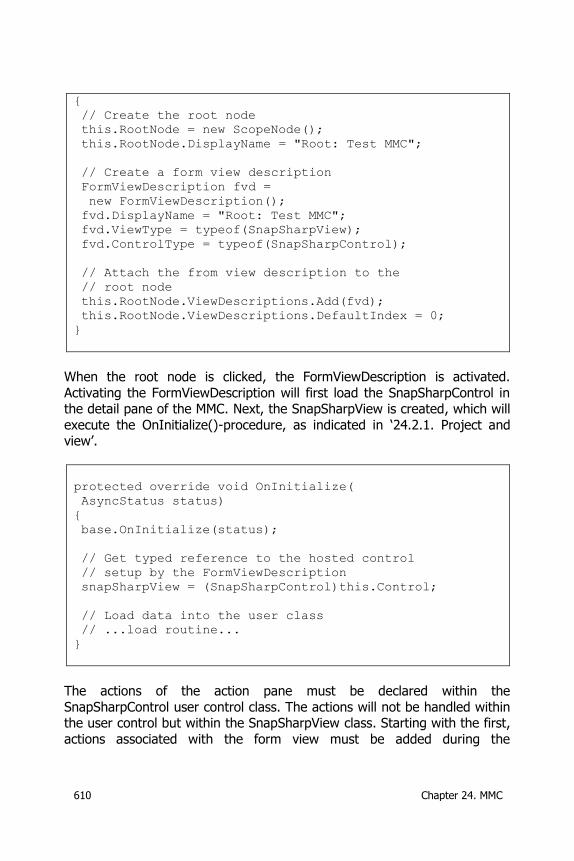
610 Chapter 24. MMC
{
// Create the root node
this.RootNode = new ScopeNode();
this.RootNode.DisplayName = "Root: Test MMC";
// Create a form view description
FormViewDescription fvd =
new FormViewDescription();
fvd.DisplayName = "Root: Test MMC";
fvd.ViewType = typeof(SnapSharpView);
fvd.ControlType = typeof(SnapSharpControl);
// Attach the from view description to the
// root node
this.RootNode.ViewDescriptions.Add(fvd);
this.RootNode.ViewDescriptions.DefaultIndex = 0;
}
When the root node is clicked, the FormViewDescription is activated.
Activating the FormViewDescription will first load the SnapSharpControl in the detail pane of the MMC. Next, the SnapSharpView is created, which will
execute the OnInitialize()-procedure, as indicated in ‘24.2.1. Project and view’.
protected override void OnInitialize(
AsyncStatus status)
{
base.OnInitialize(status);
// Get typed reference to the hosted control
// setup by the FormViewDescription
snapSharpView = (SnapSharpControl)this.Control;
// Load data into the user class
// ...load routine...
}
The actions of the action pane must be declared within the
SnapSharpControl user control class. The actions will not be handled within the user control but within the SnapSharpView class. Starting with the first,
actions associated with the form view must be added during the
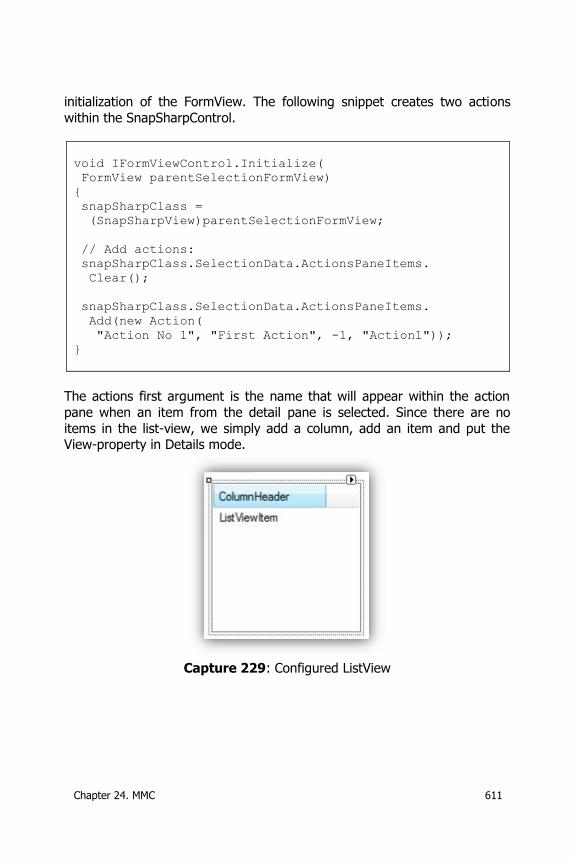
Chapter 24. MMC 611
initialization of the FormView. The following snippet creates two actions
within the SnapSharpControl.
void IFormViewControl.Initialize(
FormView parentSelectionFormView)
{
snapSharpClass =
(SnapSharpView)parentSelectionFormView;
// Add actions:
snapSharpClass.SelectionData.ActionsPaneItems.
Clear();
snapSharpClass.SelectionData.ActionsPaneItems.
Add(new Action(
"Action No 1", "First Action", -1, "Action1"));
}
The actions first argument is the name that will appear within the action
pane when an item from the detail pane is selected. Since there are no
items in the list-view, we simply add a column, add an item and put the View-property in Details mode.
Capture 229: Configured ListView
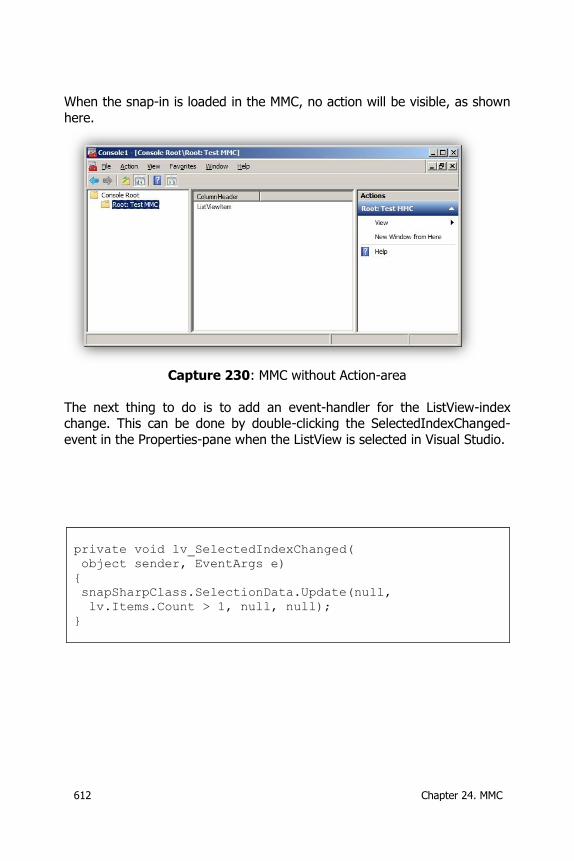
612 Chapter 24. MMC
When the snap-in is loaded in the MMC, no action will be visible, as shown
here.
Capture 230: MMC without Action-area
The next thing to do is to add an event-handler for the ListView-index change. This can be done by double-clicking the SelectedIndexChanged-
event in the Properties-pane when the ListView is selected in Visual Studio.
private void lv_SelectedIndexChanged(
object sender, EventArgs e)
{
snapSharpClass.SelectionData.Update(null,
lv.Items.Count > 1, null, null);
}
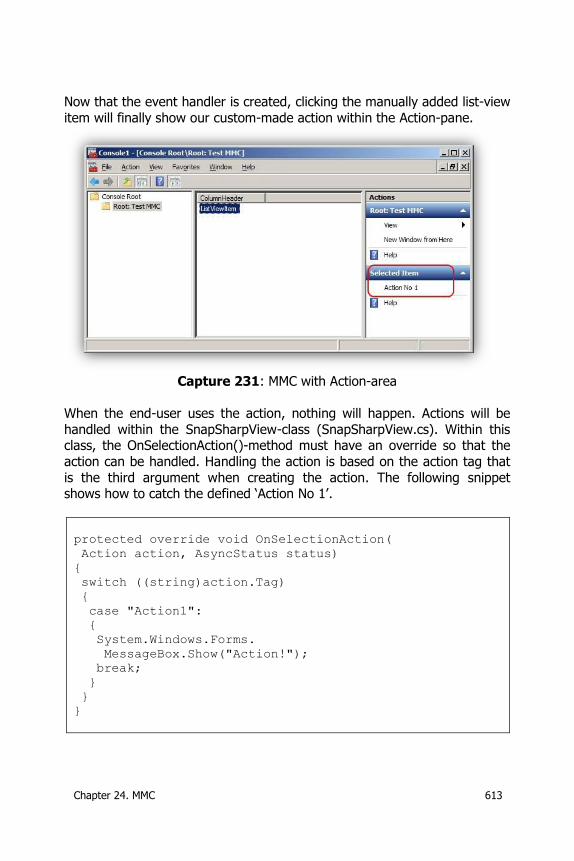
Chapter 24. MMC 613
Now that the event handler is created, clicking the manually added list-view
item will finally show our custom-made action within the Action-pane.
Capture 231: MMC with Action-area
When the end-user uses the action, nothing will happen. Actions will be
handled within the SnapSharpView-class (SnapSharpView.cs). Within this class, the OnSelectionAction()-method must have an override so that the
action can be handled. Handling the action is based on the action tag that
is the third argument when creating the action. The following snippet shows how to catch the defined ‘Action No 1’.
protected override void OnSelectionAction(
Action action, AsyncStatus status)
{
switch ((string)action.Tag)
{
case "Action1":
{
System.Windows.Forms.
MessageBox.Show("Action!");
break;
}
}
}
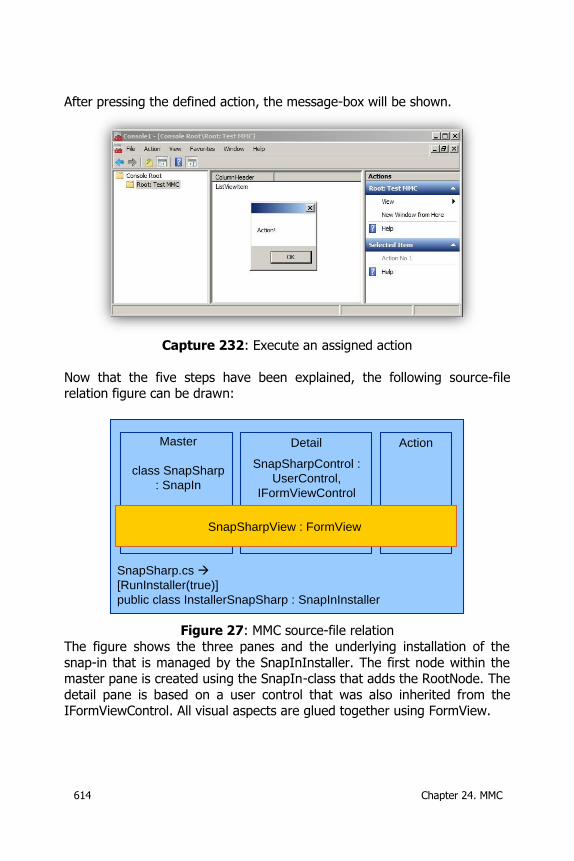
614 Chapter 24. MMC
After pressing the defined action, the message-box will be shown.
Capture 232: Execute an assigned action
Now that the five steps have been explained, the following source-file relation figure can be drawn:
Master
class SnapSharp
: SnapIn
Detail Action
SnapSharpControl :
UserControl,
IFormViewControl
SnapSharpView : FormView
SnapSharp.cs
[RunInstaller(true)]
public class InstallerSnapSharp : SnapInInstaller
Figure 27: MMC source-file relation
The figure shows the three panes and the underlying installation of the
snap-in that is managed by the SnapInInstaller. The first node within the master pane is created using the SnapIn-class that adds the RootNode. The
detail pane is based on a user control that was also inherited from the IFormViewControl. All visual aspects are glued together using FormView.
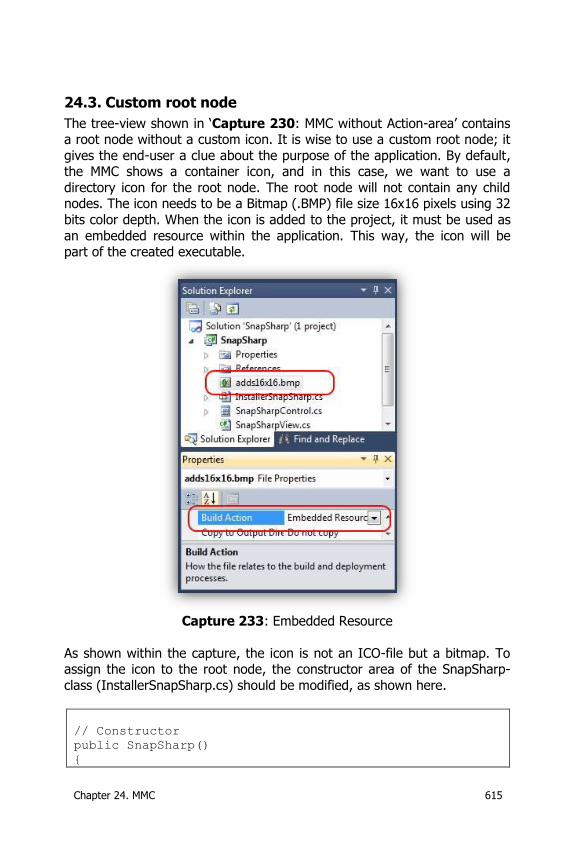
Chapter 24. MMC 615
24.3. Custom root node
The tree-view shown in ‘Capture 230: MMC without Action-area’ contains a root node without a custom icon. It is wise to use a custom root node; it
gives the end-user a clue about the purpose of the application. By default, the MMC shows a container icon, and in this case, we want to use a
directory icon for the root node. The root node will not contain any child nodes. The icon needs to be a Bitmap (.BMP) file size 16x16 pixels using 32
bits color depth. When the icon is added to the project, it must be used as
an embedded resource within the application. This way, the icon will be part of the created executable.
Capture 233: Embedded Resource
As shown within the capture, the icon is not an ICO-file but a bitmap. To assign the icon to the root node, the constructor area of the SnapSharp-
class (InstallerSnapSharp.cs) should be modified, as shown here.
// Constructor
public SnapSharp()
{
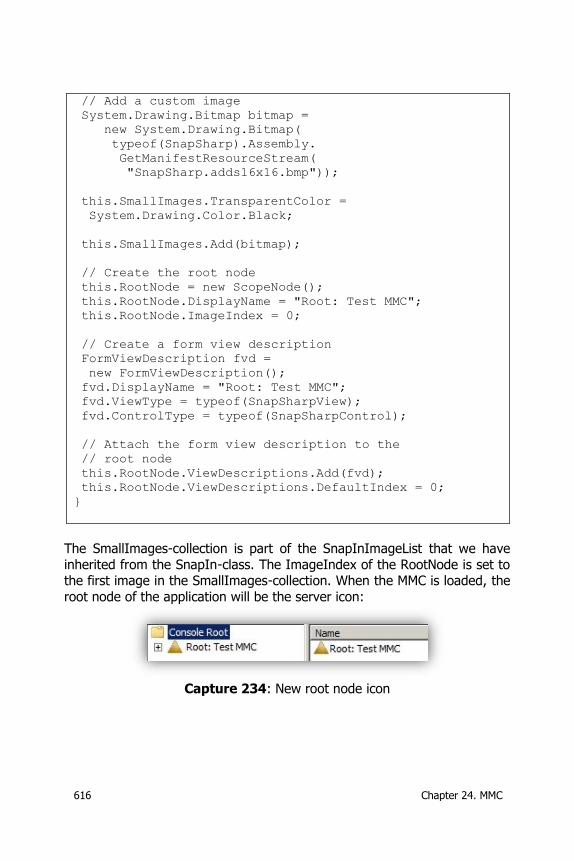
616 Chapter 24. MMC
// Add a custom image
System.Drawing.Bitmap bitmap =
new System.Drawing.Bitmap(
typeof(SnapSharp).Assembly.
GetManifestResourceStream(
"SnapSharp.adds16x16.bmp"));
this.SmallImages.TransparentColor =
System.Drawing.Color.Black;
this.SmallImages.Add(bitmap);
// Create the root node
this.RootNode = new ScopeNode();
this.RootNode.DisplayName = "Root: Test MMC";
this.RootNode.ImageIndex = 0;
// Create a form view description
FormViewDescription fvd =
new FormViewDescription();
fvd.DisplayName = "Root: Test MMC";
fvd.ViewType = typeof(SnapSharpView);
fvd.ControlType = typeof(SnapSharpControl);
// Attach the form view description to the
// root node
this.RootNode.ViewDescriptions.Add(fvd);
this.RootNode.ViewDescriptions.DefaultIndex = 0;
}
The SmallImages-collection is part of the SnapInImageList that we have
inherited from the SnapIn-class. The ImageIndex of the RootNode is set to the first image in the SmallImages-collection. When the MMC is loaded, the
root node of the application will be the server icon:
Capture 234: New root node icon
Chapter 24. MMC 617
24.4. Installing and removing an MMC snap-in
Now that we have a DLL file with the code that performs our required tasks, we have to make it available as a snap-in for the Microsoft
Management Console interface.
This can be done by using the install utility (InstallUtil.exe) found in the .NET Framework folders that belong to the underlying operating systems
version.
24.4.1. 32-bits operating systems
On 32-bits Microsoft Windows operating systems, InstallUtil.exe can be found here:
%windir%\Microsoft.NET\Framework\v2.0.50727
An example is the following command for making the MMC snap-in
available: C:\Windows\Microsoft.NET\Framework\v2.0.50727>
installutil "C:\temp\SnapSharp.dll"
Running this command using a Command Prompt will show the following information:
Microsoft (R) .NET Framework Installation utility Version 2.0.50727.4016 Copyright (c) Microsoft Corporation. All rights reserved. Running a transacted installation.
Beginning the Install phase of the installation. See the contents of the log file for the C:\temp\SnapSharp.dll assembly's progress. The file is located at C:\temp\SnapSharp.InstallLog. Installing assembly 'C:\temp\SnapSharp.dll'. Affected parameters are: logtoconsole = assemblypath = C:\temp\SnapSharp.dll logfile = C:\temp\SnapSharp.InstallLog The Install phase completed successfully, and the Commit phase is beginning. See the contents of the log file for the C:\temp\SnapSharp.dll assembly's progress.
618 Chapter 24. MMC
The file is located at C:\temp\SnapSharp.InstallLog. Committing assembly 'C:\temp\SnapSharp.dll'. Affected parameters are: logtoconsole = assemblypath = C:\temp\SnapSharp.dll logfile = C:\temp\SnapSharp.InstallLog The Commit phase completed successfully. The transacted install has completed.
Removing the snap-in can be done by using the InstallUtil.exe using the –u (uninstall) option.
C:\Windows\Microsoft.NET\Framework\v2.0.50727>
installutil -u "C:\temp\SnapSharp.dll"
Running this command using a Command Prompt will show the following
information:
Microsoft (R) .NET Framework Installation utility Version 2.0.50727.4016
Copyright (c) Microsoft Corporation. All rights reserved. The uninstall is beginning. See the contents of the log file for the C:\temp\SnapSharp.dll assembly's progress. The file is located at C:\temp\SnapSharp.InstallLog. Uninstalling assembly 'C:\temp\SnapSharp.dll'. Affected parameters are: logtoconsole = assemblypath = C:\temp\SnapSharp.dll logfile = C:\temp\SnapSharp.InstallLog The uninstall has completed.
24.4.2. 64-bits operating system
On 64-bits Microsoft Windows operating systems, InstallUtil.exe can be
found here: %windir%\Microsoft.NET\Framework64\v2.0.50727
So use C:\Windows\Microsoft.NET\Framework64\v2.0.50727 instead of the
one in C:\Windows\Microsoft.NET\Framework\v2.0.50727. The 32-bit
Chapter 24. MMC 619
InstallUtil registers the snap-in under the Wow6432Node. The MMC is also
64-bits and does not read information found in this node in the registry.
Running this command using a Command Prompt will show the following information:
Microsoft (R) .NET Framework Installation utility Version 2.0.50727.5420 Copyright (c) Microsoft Corporation. All rights reserved. Running a transacted installation.
Beginning the Install phase of the installation. See the contents of the log file for the C:\temp\SnapSharp.dll assembly's progress. The file is located at C:\temp\SnapSharp.InstallLog. Installing assembly 'C:\temp\SnapSharp.dll'. Affected parameters are: logtoconsole = assemblypath = C:\temp\SnapSharp.dll logfile = C:\temp\SnapSharp.InstallLog The Install phase completed successfully, and the Commit phase is beginning. See the contents of the log file for the C:\temp\SnapSharp.dll assembly's progress. The file is located at C:\temp\SnapSharp.InstallLog. Committing assembly 'C:\temp\SnapSharp.dll'. Affected parameters are: logtoconsole = assemblypath = C:\temp\SnapSharp.dll logfile = C:\temp\SnapSharp.InstallLog The Commit phase completed successfully.
The transacted install has completed.
Removing the snap-in can be done by using the InstallUtil.exe using the –u (uninstall) option.
C:\Windows\Microsoft.NET\Framework64\v2.0.50727>
installutil -u "C:\temp\SnapSharp.dll"
Running this command using a Command Prompt will show the following
information:
Microsoft (R) .NET Framework Installation utility Version 2.0.50727.5420
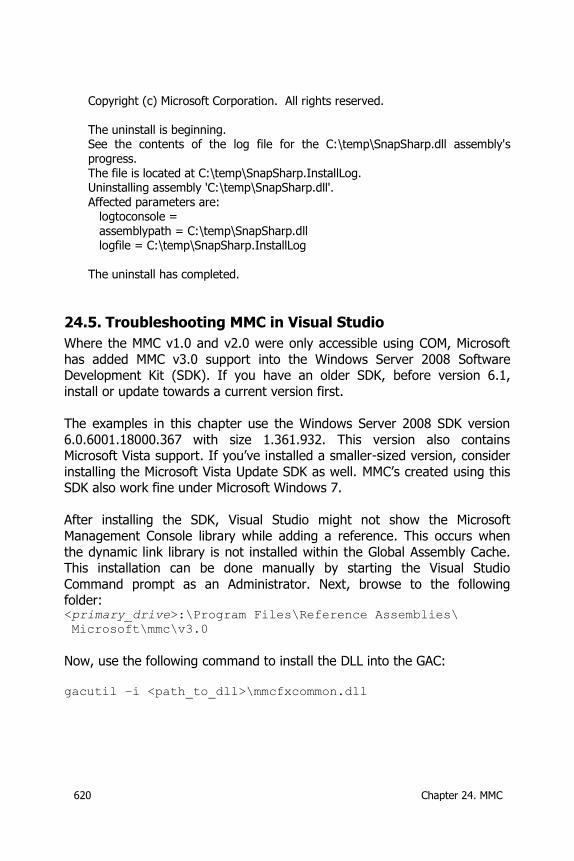
620 Chapter 24. MMC
Copyright (c) Microsoft Corporation. All rights reserved. The uninstall is beginning. See the contents of the log file for the C:\temp\SnapSharp.dll assembly's progress. The file is located at C:\temp\SnapSharp.InstallLog. Uninstalling assembly 'C:\temp\SnapSharp.dll'. Affected parameters are: logtoconsole = assemblypath = C:\temp\SnapSharp.dll logfile = C:\temp\SnapSharp.InstallLog The uninstall has completed.
24.5. Troubleshooting MMC in Visual Studio
Where the MMC v1.0 and v2.0 were only accessible using COM, Microsoft
has added MMC v3.0 support into the Windows Server 2008 Software Development Kit (SDK). If you have an older SDK, before version 6.1,
install or update towards a current version first.
The examples in this chapter use the Windows Server 2008 SDK version
6.0.6001.18000.367 with size 1.361.932. This version also contains Microsoft Vista support. If you’ve installed a smaller-sized version, consider
installing the Microsoft Vista Update SDK as well. MMC’s created using this SDK also work fine under Microsoft Windows 7.
After installing the SDK, Visual Studio might not show the Microsoft
Management Console library while adding a reference. This occurs when
the dynamic link library is not installed within the Global Assembly Cache. This installation can be done manually by starting the Visual Studio
Command prompt as an Administrator. Next, browse to the following folder: <primary_drive>:\Program Files\Reference Assemblies\
Microsoft\mmc\v3.0
Now, use the following command to install the DLL into the GAC: gacutil –i <path_to_dll>\mmcfxcommon.dll
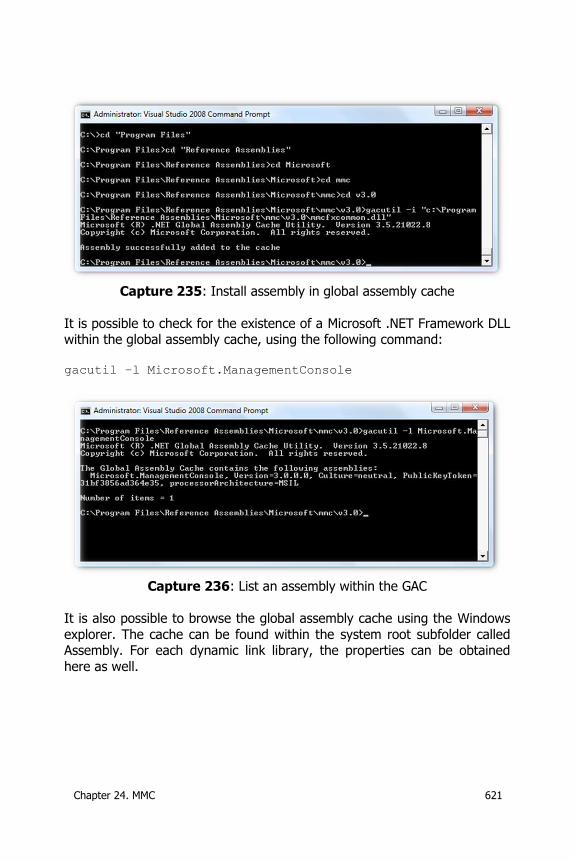
Chapter 24. MMC 621
Capture 235: Install assembly in global assembly cache
It is possible to check for the existence of a Microsoft .NET Framework DLL within the global assembly cache, using the following command:
gacutil –l Microsoft.ManagementConsole
Capture 236: List an assembly within the GAC
It is also possible to browse the global assembly cache using the Windows
explorer. The cache can be found within the system root subfolder called Assembly. For each dynamic link library, the properties can be obtained
here as well.

622 Chapter 24. MMC
Capture 237: Browse the global assembly cache
Now, what if the Microsoft.ManagementConsole.dll is installed within the global assembly cache, and it is still not possible to add a reference using
the Solution Explorer within Visual Studio?
First, close the project within Visual Studio and browse towards the folder containing the projects project file, <project_name>.csproj. All references
used can be found within an XML-section called ItemGroup. Within this section, simply add the following XML code:
<Reference Include="Microsoft.ManagementConsole,
processorArchitecture=MSIL">
<SpecificVersion>False</SpecificVersion>
</Reference>
Now, reopen the project and examine the content of the References-node
within the Solution Explorer. Now the reference should be there and can be
referenced in your class using the following namespace reference:
using Microsoft.ManagementConsole;
Chapter 25. Legacy Windows NT 4.0 623
25. Legacy Windows NT 4.0
Although most companies have upgraded their environments to a directory service, it is still possible to stumble upon legacy domains. This chapter will
explain how to communicate with one of the giants of the past, Microsoft Windows NT 4.0.
The snippets shown in this chapter are created as a Console application. Information retrieved from the domain will be displayed using the
Console.WriteLine()-method. When creating a Console application, the ‘System’-namespace is added by default. This namespace can be
referenced as shown here: using System;
This paragraph only describes the methods required for reading necessary
information of a Microsoft Windows NT 4.0 domain so that you can make
an inventory and eventually migrate the required security principles to a newer (and supported) Microsoft Windows release.
25.1. Managed/Unmanaged
For those who are not familiar with the terms managed code versus unmanaged code, here is a brief explanation of the difference between the
two.
At the beginning of this book, our journey started by adding a reference to
the ‘System.DirectoryServices’-namespace, and we have shown the use of the using command. We selected the library from the .NET-tab found in
the ‘Add Reference’-dialog box in Visual Studio.
Since the framework is providing this interface, the framework is managing
these types and their life-cycle. The framework takes care that our code does not overwrite already used parts of the heap and that the stack
remains healthy.
Unfortunately, not every feature is exposed through the .NET Framework.
There are millions of Application Programming Interfaces (APIs) and Dynamic Link Libraries (DLLs) available in the field that provide very useful
features, like accessing devices or network environments. So being able to access a particular feature requires us to invoke the provided API or DLL.
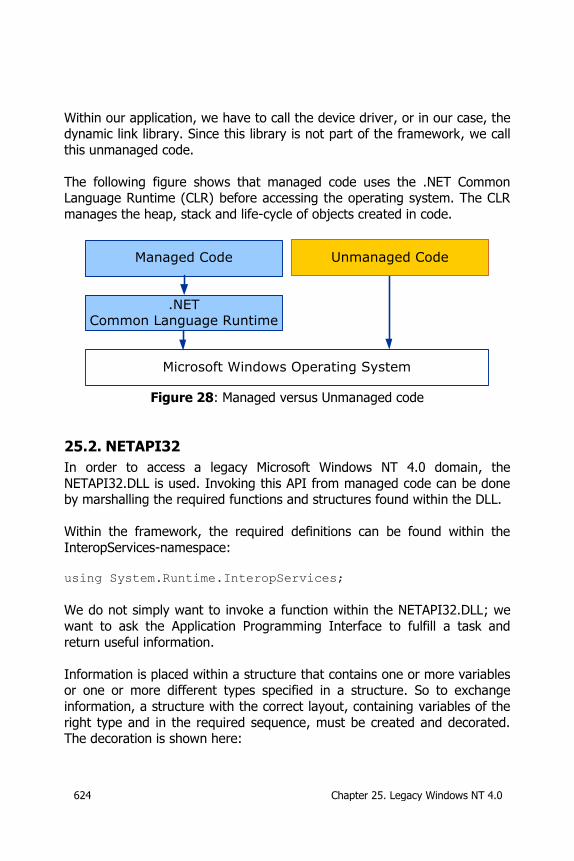
624 Chapter 25. Legacy Windows NT 4.0
Within our application, we have to call the device driver, or in our case, the dynamic link library. Since this library is not part of the framework, we call
this unmanaged code.
The following figure shows that managed code uses the .NET Common Language Runtime (CLR) before accessing the operating system. The CLR
manages the heap, stack and life-cycle of objects created in code.
Microsoft Windows Operating System
.NETCommon Language Runtime
Managed Code Unmanaged Code
Figure 28: Managed versus Unmanaged code
25.2. NETAPI32
In order to access a legacy Microsoft Windows NT 4.0 domain, the
NETAPI32.DLL is used. Invoking this API from managed code can be done by marshalling the required functions and structures found within the DLL.
Within the framework, the required definitions can be found within the
InteropServices-namespace:
using System.Runtime.InteropServices;
We do not simply want to invoke a function within the NETAPI32.DLL; we
want to ask the Application Programming Interface to fulfill a task and
return useful information.
Information is placed within a structure that contains one or more variables or one or more different types specified in a structure. So to exchange
information, a structure with the correct layout, containing variables of the
right type and in the required sequence, must be created and decorated. The decoration is shown here:
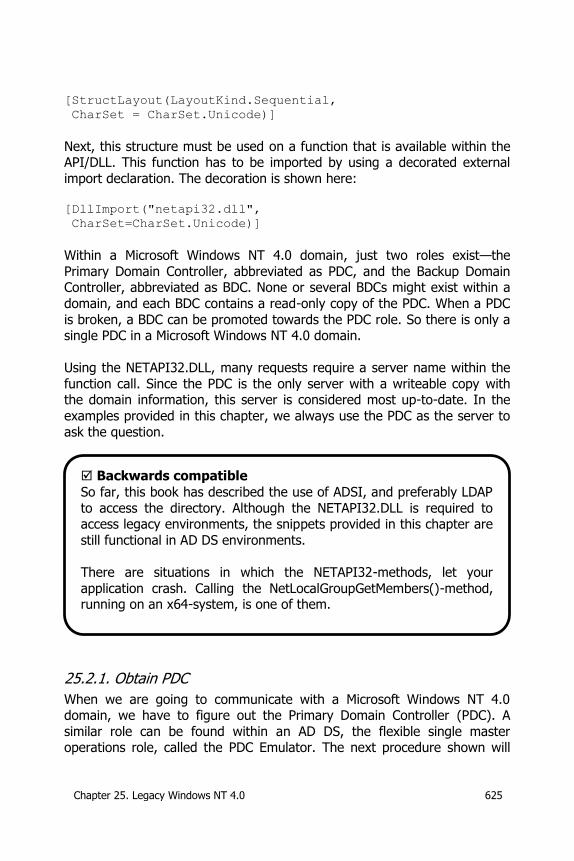
Chapter 25. Legacy Windows NT 4.0 625
[StructLayout(LayoutKind.Sequential,
CharSet = CharSet.Unicode)]
Next, this structure must be used on a function that is available within the API/DLL. This function has to be imported by using a decorated external
import declaration. The decoration is shown here:
[DllImport("netapi32.dll",
CharSet=CharSet.Unicode)]
Within a Microsoft Windows NT 4.0 domain, just two roles exist—the
Primary Domain Controller, abbreviated as PDC, and the Backup Domain Controller, abbreviated as BDC. None or several BDCs might exist within a
domain, and each BDC contains a read-only copy of the PDC. When a PDC
is broken, a BDC can be promoted towards the PDC role. So there is only a single PDC in a Microsoft Windows NT 4.0 domain.
Using the NETAPI32.DLL, many requests require a server name within the
function call. Since the PDC is the only server with a writeable copy with the domain information, this server is considered most up-to-date. In the
examples provided in this chapter, we always use the PDC as the server to
ask the question.
25.2.1. Obtain PDC
When we are going to communicate with a Microsoft Windows NT 4.0 domain, we have to figure out the Primary Domain Controller (PDC). A
similar role can be found within an AD DS, the flexible single master operations role, called the PDC Emulator. The next procedure shown will
Backwards compatible
So far, this book has described the use of ADSI, and preferably LDAP
to access the directory. Although the NETAPI32.DLL is required to access legacy environments, the snippets provided in this chapter are
still functional in AD DS environments.
There are situations in which the NETAPI32-methods, let your
application crash. Calling the NetLocalGroupGetMembers()-method, running on an x64-system, is one of them.
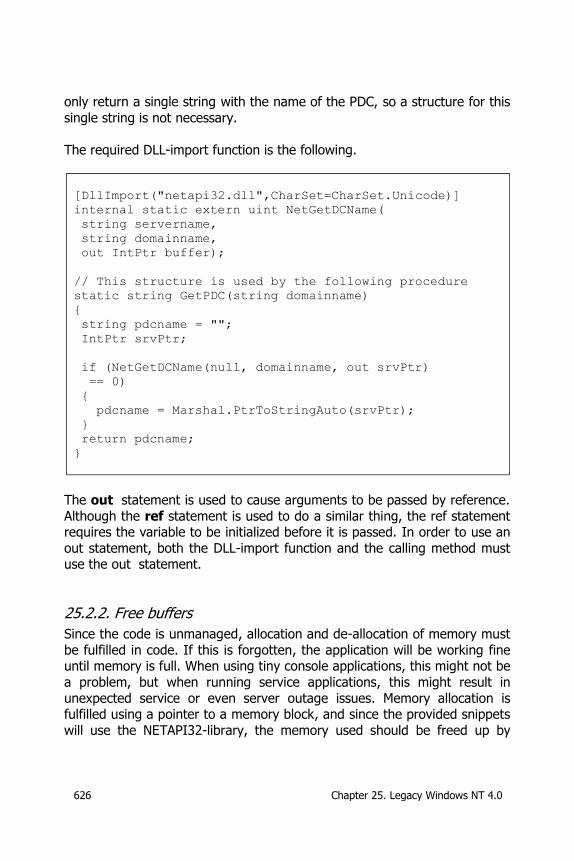
626 Chapter 25. Legacy Windows NT 4.0
only return a single string with the name of the PDC, so a structure for this
single string is not necessary.
The required DLL-import function is the following.
[DllImport("netapi32.dll",CharSet=CharSet.Unicode)]
internal static extern uint NetGetDCName(
string servername,
string domainname,
out IntPtr buffer);
// This structure is used by the following procedure
static string GetPDC(string domainname)
{
string pdcname = "";
IntPtr srvPtr;
if (NetGetDCName(null, domainname, out srvPtr)
== 0)
{
pdcname = Marshal.PtrToStringAuto(srvPtr);
}
return pdcname;
}
The out statement is used to cause arguments to be passed by reference.
Although the ref statement is used to do a similar thing, the ref statement requires the variable to be initialized before it is passed. In order to use an
out statement, both the DLL-import function and the calling method must use the out statement.
25.2.2. Free buffers
Since the code is unmanaged, allocation and de-allocation of memory must
be fulfilled in code. If this is forgotten, the application will be working fine until memory is full. When using tiny console applications, this might not be
a problem, but when running service applications, this might result in
unexpected service or even server outage issues. Memory allocation is fulfilled using a pointer to a memory block, and since the provided snippets
will use the NETAPI32-library, the memory used should be freed up by
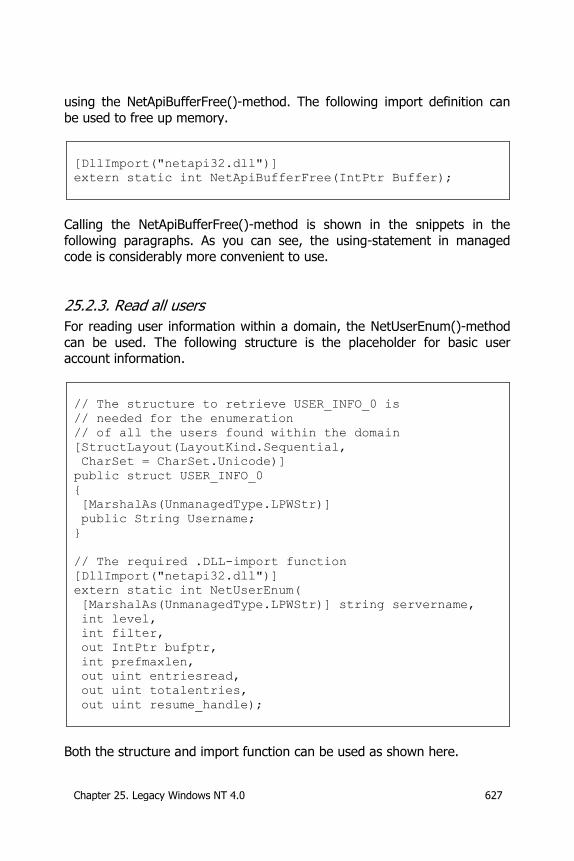
Chapter 25. Legacy Windows NT 4.0 627
using the NetApiBufferFree()-method. The following import definition can
be used to free up memory.
[DllImport("netapi32.dll")]
extern static int NetApiBufferFree(IntPtr Buffer);
Calling the NetApiBufferFree()-method is shown in the snippets in the
following paragraphs. As you can see, the using-statement in managed code is considerably more convenient to use.
25.2.3. Read all users
For reading user information within a domain, the NetUserEnum()-method
can be used. The following structure is the placeholder for basic user account information.
// The structure to retrieve USER_INFO_0 is
// needed for the enumeration
// of all the users found within the domain
[StructLayout(LayoutKind.Sequential,
CharSet = CharSet.Unicode)]
public struct USER_INFO_0
{
[MarshalAs(UnmanagedType.LPWStr)]
public String Username;
}
// The required .DLL-import function
[DllImport("netapi32.dll")]
extern static int NetUserEnum(
[MarshalAs(UnmanagedType.LPWStr)] string servername,
int level,
int filter,
out IntPtr bufptr,
int prefmaxlen,
out uint entriesread,
out uint totalentries,
out uint resume_handle);
Both the structure and import function can be used as shown here.
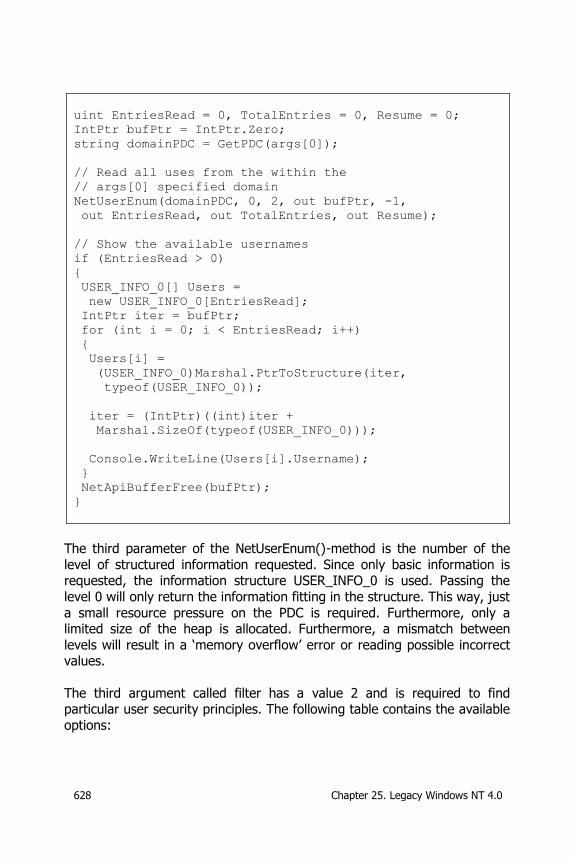
628 Chapter 25. Legacy Windows NT 4.0
uint EntriesRead = 0, TotalEntries = 0, Resume = 0;
IntPtr bufPtr = IntPtr.Zero;
string domainPDC = GetPDC(args[0]);
// Read all uses from the within the
// args[0] specified domain
NetUserEnum(domainPDC, 0, 2, out bufPtr, -1,
out EntriesRead, out TotalEntries, out Resume);
// Show the available usernames
if (EntriesRead > 0)
{
USER_INFO_0[] Users =
new USER_INFO_0[EntriesRead];
IntPtr iter = bufPtr;
for (int i = 0; i < EntriesRead; i++)
{
Users[i] =
(USER_INFO_0)Marshal.PtrToStructure(iter,
typeof(USER_INFO_0));
iter = (IntPtr)((int)iter +
Marshal.SizeOf(typeof(USER_INFO_0)));
Console.WriteLine(Users[i].Username);
}
NetApiBufferFree(bufPtr);
}
The third parameter of the NetUserEnum()-method is the number of the
level of structured information requested. Since only basic information is requested, the information structure USER_INFO_0 is used. Passing the
level 0 will only return the information fitting in the structure. This way, just
a small resource pressure on the PDC is required. Furthermore, only a limited size of the heap is allocated. Furthermore, a mismatch between
levels will result in a ‘memory overflow’ error or reading possible incorrect values.
The third argument called filter has a value 2 and is required to find particular user security principles. The following table contains the available
options:
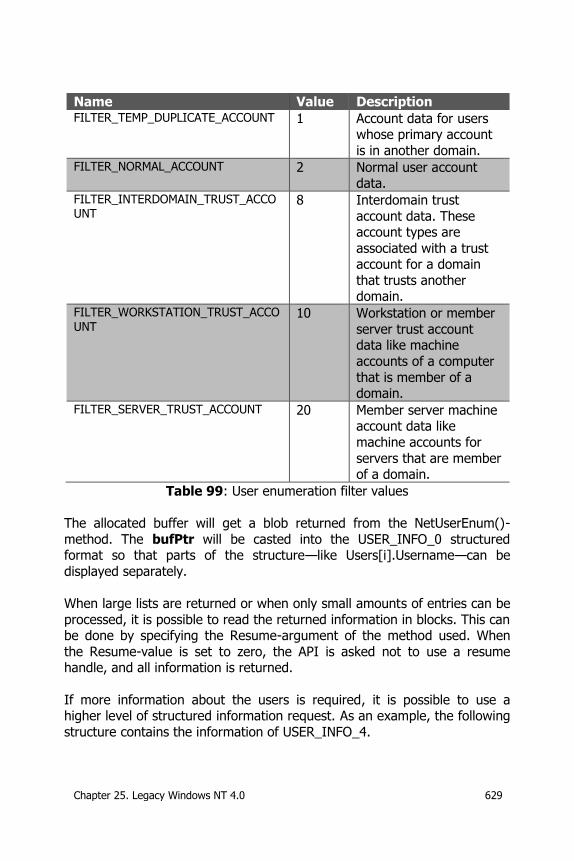
Chapter 25. Legacy Windows NT 4.0 629
Name Value Description FILTER_TEMP_DUPLICATE_ACCOUNT 1 Account data for users
whose primary account
is in another domain. FILTER_NORMAL_ACCOUNT 2 Normal user account
data. FILTER_INTERDOMAIN_TRUST_ACCOUNT
8 Interdomain trust
account data. These account types are
associated with a trust account for a domain
that trusts another domain.
FILTER_WORKSTATION_TRUST_ACCOUNT
10 Workstation or member
server trust account data like machine
accounts of a computer
that is member of a domain.
FILTER_SERVER_TRUST_ACCOUNT 20 Member server machine account data like
machine accounts for
servers that are member of a domain.
Table 99: User enumeration filter values
The allocated buffer will get a blob returned from the NetUserEnum()-
method. The bufPtr will be casted into the USER_INFO_0 structured format so that parts of the structure—like Users[i].Username—can be
displayed separately.
When large lists are returned or when only small amounts of entries can be
processed, it is possible to read the returned information in blocks. This can be done by specifying the Resume-argument of the method used. When
the Resume-value is set to zero, the API is asked not to use a resume handle, and all information is returned.
If more information about the users is required, it is possible to use a higher level of structured information request. As an example, the following
structure contains the information of USER_INFO_4.
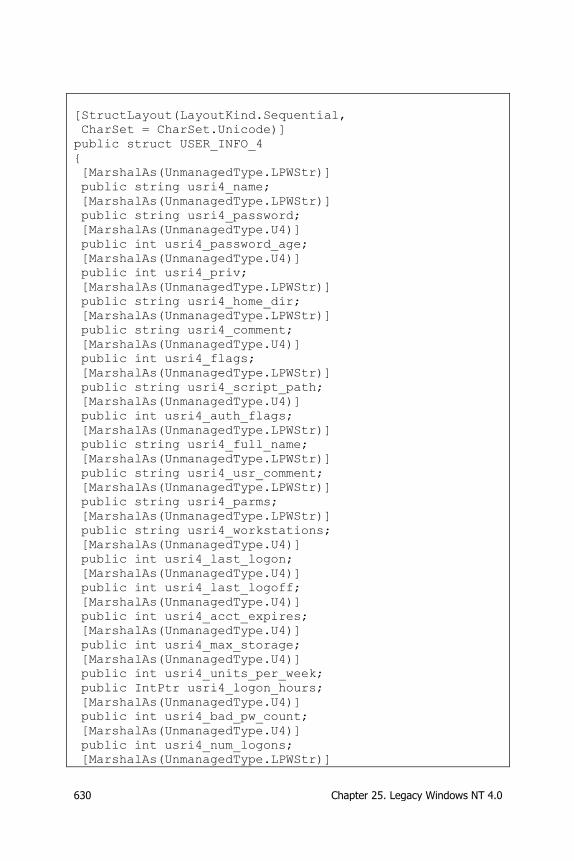
630 Chapter 25. Legacy Windows NT 4.0
[StructLayout(LayoutKind.Sequential,
CharSet = CharSet.Unicode)]
public struct USER_INFO_4
{
[MarshalAs(UnmanagedType.LPWStr)]
public string usri4_name;
[MarshalAs(UnmanagedType.LPWStr)]
public string usri4_password;
[MarshalAs(UnmanagedType.U4)]
public int usri4_password_age;
[MarshalAs(UnmanagedType.U4)]
public int usri4_priv;
[MarshalAs(UnmanagedType.LPWStr)]
public string usri4_home_dir;
[MarshalAs(UnmanagedType.LPWStr)]
public string usri4_comment;
[MarshalAs(UnmanagedType.U4)]
public int usri4_flags;
[MarshalAs(UnmanagedType.LPWStr)]
public string usri4_script_path;
[MarshalAs(UnmanagedType.U4)]
public int usri4_auth_flags;
[MarshalAs(UnmanagedType.LPWStr)]
public string usri4_full_name;
[MarshalAs(UnmanagedType.LPWStr)]
public string usri4_usr_comment;
[MarshalAs(UnmanagedType.LPWStr)]
public string usri4_parms;
[MarshalAs(UnmanagedType.LPWStr)]
public string usri4_workstations;
[MarshalAs(UnmanagedType.U4)]
public int usri4_last_logon;
[MarshalAs(UnmanagedType.U4)]
public int usri4_last_logoff;
[MarshalAs(UnmanagedType.U4)]
public int usri4_acct_expires;
[MarshalAs(UnmanagedType.U4)]
public int usri4_max_storage;
[MarshalAs(UnmanagedType.U4)]
public int usri4_units_per_week;
public IntPtr usri4_logon_hours;
[MarshalAs(UnmanagedType.U4)]
public int usri4_bad_pw_count;
[MarshalAs(UnmanagedType.U4)]
public int usri4_num_logons;
[MarshalAs(UnmanagedType.LPWStr)]
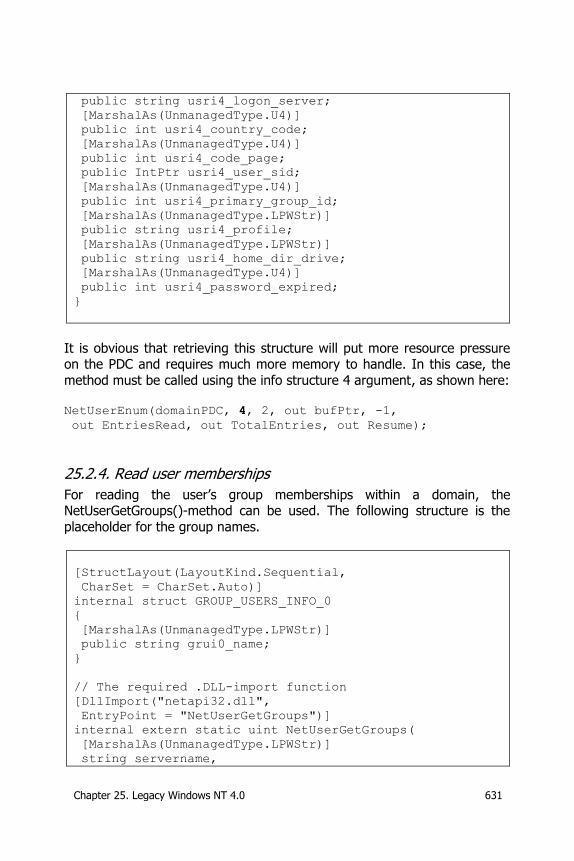
Chapter 25. Legacy Windows NT 4.0 631
public string usri4_logon_server;
[MarshalAs(UnmanagedType.U4)]
public int usri4_country_code;
[MarshalAs(UnmanagedType.U4)]
public int usri4_code_page;
public IntPtr usri4_user_sid;
[MarshalAs(UnmanagedType.U4)]
public int usri4_primary_group_id;
[MarshalAs(UnmanagedType.LPWStr)]
public string usri4_profile;
[MarshalAs(UnmanagedType.LPWStr)]
public string usri4_home_dir_drive;
[MarshalAs(UnmanagedType.U4)]
public int usri4_password_expired;
}
It is obvious that retrieving this structure will put more resource pressure on the PDC and requires much more memory to handle. In this case, the
method must be called using the info structure 4 argument, as shown here: NetUserEnum(domainPDC, 4, 2, out bufPtr, -1,
out EntriesRead, out TotalEntries, out Resume);
25.2.4. Read user memberships
For reading the user’s group memberships within a domain, the NetUserGetGroups()-method can be used. The following structure is the
placeholder for the group names.
[StructLayout(LayoutKind.Sequential,
CharSet = CharSet.Auto)]
internal struct GROUP_USERS_INFO_0
{
[MarshalAs(UnmanagedType.LPWStr)]
public string grui0_name;
}
// The required .DLL-import function
[DllImport("netapi32.dll",
EntryPoint = "NetUserGetGroups")]
internal extern static uint NetUserGetGroups(
[MarshalAs(UnmanagedType.LPWStr)]
string servername,
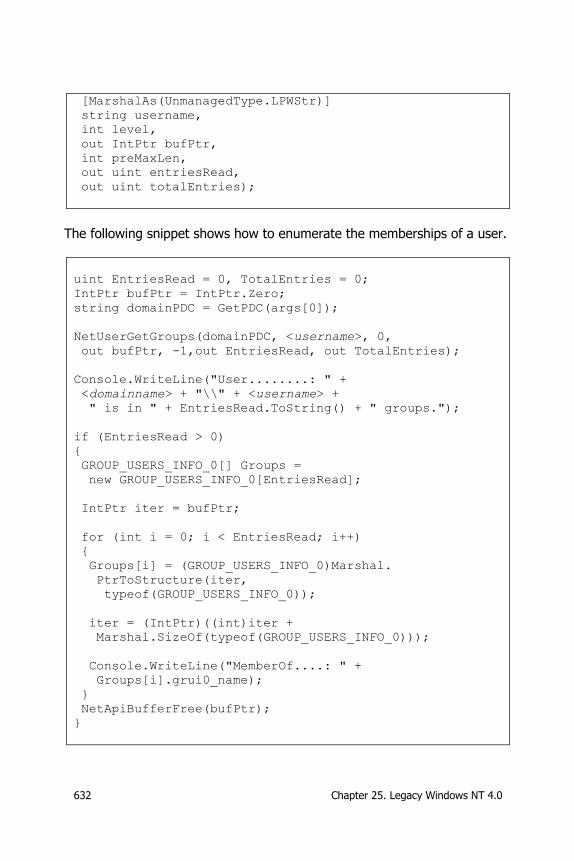
632 Chapter 25. Legacy Windows NT 4.0
[MarshalAs(UnmanagedType.LPWStr)]
string username,
int level,
out IntPtr bufPtr,
int preMaxLen,
out uint entriesRead,
out uint totalEntries);
The following snippet shows how to enumerate the memberships of a user.
uint EntriesRead = 0, TotalEntries = 0;
IntPtr bufPtr = IntPtr.Zero;
string domainPDC = GetPDC(args[0]);
NetUserGetGroups(domainPDC, <username>, 0,
out bufPtr, -1,out EntriesRead, out TotalEntries);
Console.WriteLine("User........: " +
<domainname> + "\\" + <username> +
" is in " + EntriesRead.ToString() + " groups.");
if (EntriesRead > 0)
{
GROUP_USERS_INFO_0[] Groups =
new GROUP_USERS_INFO_0[EntriesRead];
IntPtr iter = bufPtr;
for (int i = 0; i < EntriesRead; i++)
{
Groups[i] = (GROUP_USERS_INFO_0)Marshal.
PtrToStructure(iter,
typeof(GROUP_USERS_INFO_0));
iter = (IntPtr)((int)iter +
Marshal.SizeOf(typeof(GROUP_USERS_INFO_0)));
Console.WriteLine("MemberOf....: " +
Groups[i].grui0_name);
}
NetApiBufferFree(bufPtr);
}
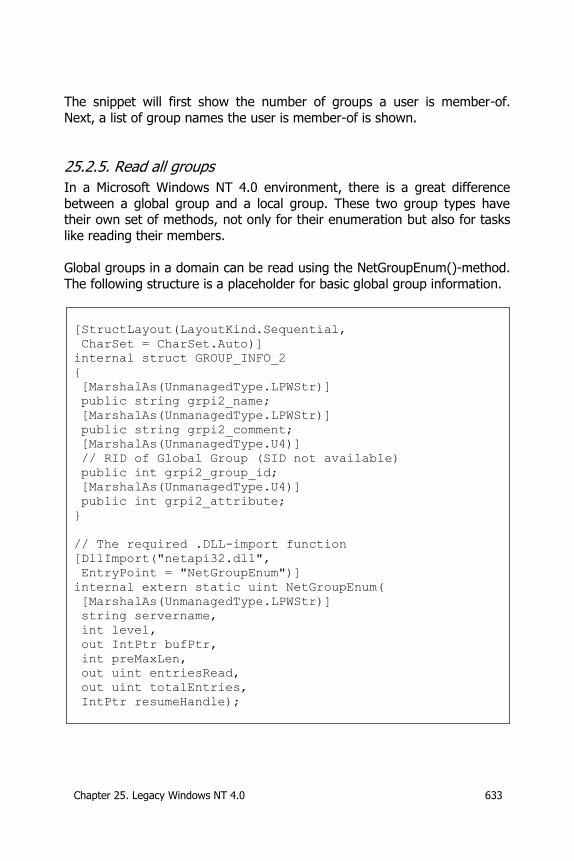
Chapter 25. Legacy Windows NT 4.0 633
The snippet will first show the number of groups a user is member-of.
Next, a list of group names the user is member-of is shown.
25.2.5. Read all groups
In a Microsoft Windows NT 4.0 environment, there is a great difference
between a global group and a local group. These two group types have their own set of methods, not only for their enumeration but also for tasks
like reading their members.
Global groups in a domain can be read using the NetGroupEnum()-method.
The following structure is a placeholder for basic global group information.
[StructLayout(LayoutKind.Sequential,
CharSet = CharSet.Auto)]
internal struct GROUP_INFO_2
{
[MarshalAs(UnmanagedType.LPWStr)]
public string grpi2_name;
[MarshalAs(UnmanagedType.LPWStr)]
public string grpi2_comment;
[MarshalAs(UnmanagedType.U4)]
// RID of Global Group (SID not available)
public int grpi2_group_id;
[MarshalAs(UnmanagedType.U4)]
public int grpi2_attribute;
}
// The required .DLL-import function
[DllImport("netapi32.dll",
EntryPoint = "NetGroupEnum")]
internal extern static uint NetGroupEnum(
[MarshalAs(UnmanagedType.LPWStr)]
string servername,
int level,
out IntPtr bufPtr,
int preMaxLen,
out uint entriesRead,
out uint totalEntries,
IntPtr resumeHandle);

634 Chapter 25. Legacy Windows NT 4.0
The following snippet shows how to enumerate the available global groups
within a domain.
uint EntriesRead = 0, TotalEntries = 0;
IntPtr bufPtr = IntPtr.Zero;
string domainPDC = GetPDC(args[0]);
NetGroupEnum(domainPDC, 2, out bufPtr, -1,
out EntriesRead, out TotalEntries, IntPtr.Zero);
Console.WriteLine("Group(s) found: " +
EntriesRead.ToString());
if (EntriesRead > 0)
{
GROUP_INFO_2[] Groups =
new GROUP_INFO_2[EntriesRead];
IntPtr iter = bufPtr;
for (int i = 0; i < EntriesRead; i++)
{
Groups[i] = (GROUP_INFO_2)Marshal.
PtrToStructure(iter,
typeof(GROUP_INFO_2));
iter = (IntPtr)((int)iter +
Marshal.SizeOf(typeof(GROUP_INFO_2)));
Console.WriteLine(Groups[i].grpi2_name);
}
NetApiBufferFree(bufPtr);
}
The snippet will start with displaying the number of groups found within the domain. Next, the group names will be enumerated.
Local groups in a domain can be read by using the NetLocalGroups()-
method. The following structure is a placeholder for the local group
information.
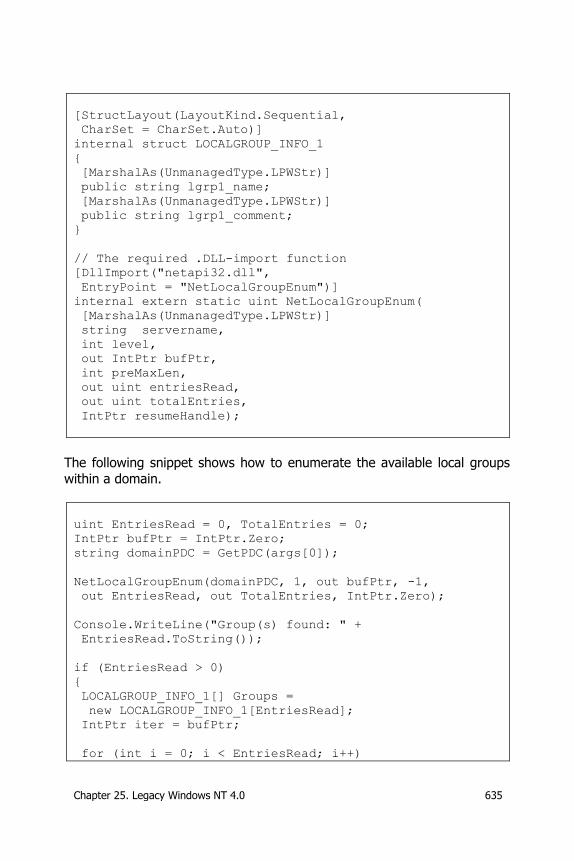
Chapter 25. Legacy Windows NT 4.0 635
[StructLayout(LayoutKind.Sequential,
CharSet = CharSet.Auto)]
internal struct LOCALGROUP_INFO_1
{
[MarshalAs(UnmanagedType.LPWStr)]
public string lgrp1_name;
[MarshalAs(UnmanagedType.LPWStr)]
public string lgrp1_comment;
}
// The required .DLL-import function
[DllImport("netapi32.dll",
EntryPoint = "NetLocalGroupEnum")]
internal extern static uint NetLocalGroupEnum(
[MarshalAs(UnmanagedType.LPWStr)]
string servername,
int level,
out IntPtr bufPtr,
int preMaxLen,
out uint entriesRead,
out uint totalEntries,
IntPtr resumeHandle);
The following snippet shows how to enumerate the available local groups
within a domain.
uint EntriesRead = 0, TotalEntries = 0;
IntPtr bufPtr = IntPtr.Zero;
string domainPDC = GetPDC(args[0]);
NetLocalGroupEnum(domainPDC, 1, out bufPtr, -1,
out EntriesRead, out TotalEntries, IntPtr.Zero);
Console.WriteLine("Group(s) found: " +
EntriesRead.ToString());
if (EntriesRead > 0)
{
LOCALGROUP_INFO_1[] Groups =
new LOCALGROUP_INFO_1[EntriesRead];
IntPtr iter = bufPtr;
for (int i = 0; i < EntriesRead; i++)
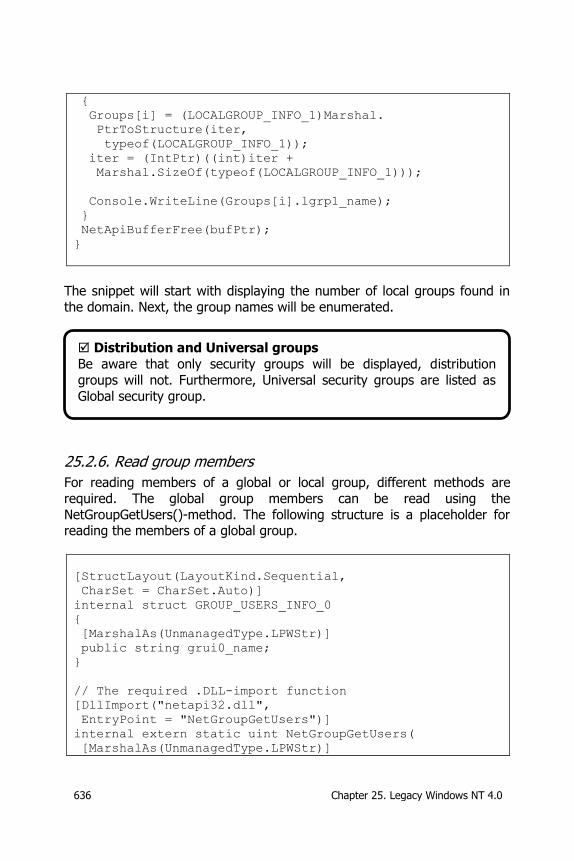
636 Chapter 25. Legacy Windows NT 4.0
{
Groups[i] = (LOCALGROUP_INFO_1)Marshal.
PtrToStructure(iter,
typeof(LOCALGROUP_INFO_1));
iter = (IntPtr)((int)iter +
Marshal.SizeOf(typeof(LOCALGROUP_INFO_1)));
Console.WriteLine(Groups[i].lgrp1_name);
}
NetApiBufferFree(bufPtr);
}
The snippet will start with displaying the number of local groups found in
the domain. Next, the group names will be enumerated.
25.2.6. Read group members
For reading members of a global or local group, different methods are
required. The global group members can be read using the
NetGroupGetUsers()-method. The following structure is a placeholder for reading the members of a global group.
[StructLayout(LayoutKind.Sequential,
CharSet = CharSet.Auto)]
internal struct GROUP_USERS_INFO_0
{
[MarshalAs(UnmanagedType.LPWStr)]
public string grui0_name;
}
// The required .DLL-import function
[DllImport("netapi32.dll",
EntryPoint = "NetGroupGetUsers")]
internal extern static uint NetGroupGetUsers(
[MarshalAs(UnmanagedType.LPWStr)]
Distribution and Universal groups
Be aware that only security groups will be displayed, distribution
groups will not. Furthermore, Universal security groups are listed as
Global security group.
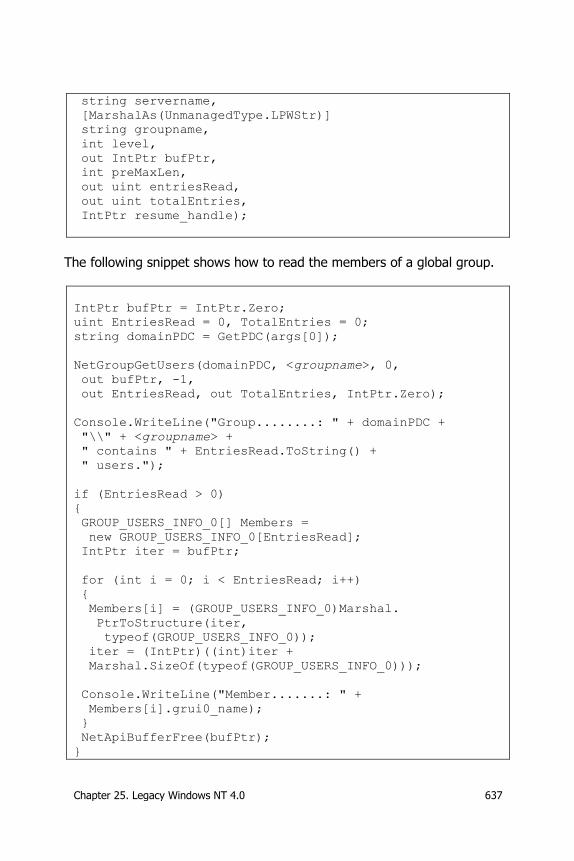
Chapter 25. Legacy Windows NT 4.0 637
string servername,
[MarshalAs(UnmanagedType.LPWStr)]
string groupname,
int level,
out IntPtr bufPtr,
int preMaxLen,
out uint entriesRead,
out uint totalEntries,
IntPtr resume_handle);
The following snippet shows how to read the members of a global group.
IntPtr bufPtr = IntPtr.Zero;
uint EntriesRead = 0, TotalEntries = 0;
string domainPDC = GetPDC(args[0]);
NetGroupGetUsers(domainPDC, <groupname>, 0,
out bufPtr, -1,
out EntriesRead, out TotalEntries, IntPtr.Zero);
Console.WriteLine("Group........: " + domainPDC +
"\\" + <groupname> +
" contains " + EntriesRead.ToString() +
" users.");
if (EntriesRead > 0)
{
GROUP_USERS_INFO_0[] Members =
new GROUP_USERS_INFO_0[EntriesRead];
IntPtr iter = bufPtr;
for (int i = 0; i < EntriesRead; i++)
{
Members[i] = (GROUP_USERS_INFO_0)Marshal.
PtrToStructure(iter,
typeof(GROUP_USERS_INFO_0));
iter = (IntPtr)((int)iter +
Marshal.SizeOf(typeof(GROUP_USERS_INFO_0)));
Console.WriteLine("Member.......: " +
Members[i].grui0_name);
}
NetApiBufferFree(bufPtr);
}
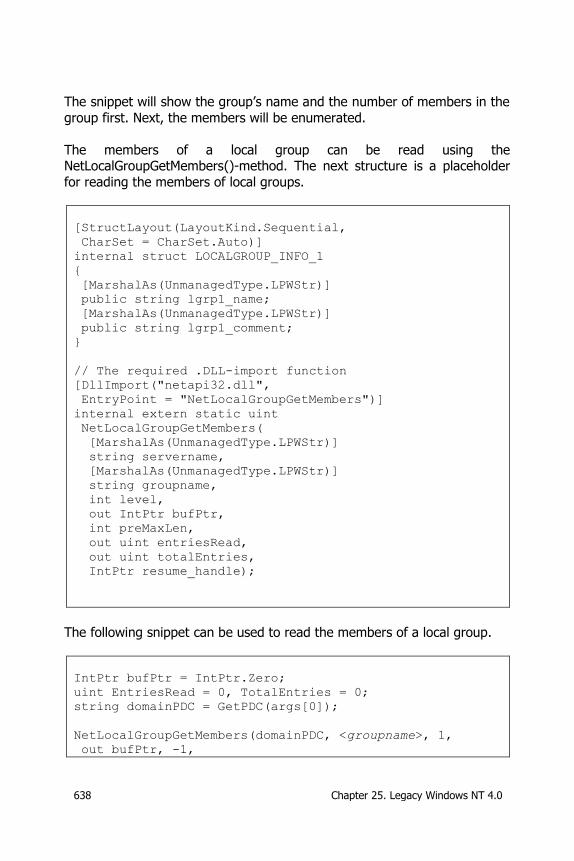
638 Chapter 25. Legacy Windows NT 4.0
The snippet will show the group’s name and the number of members in the
group first. Next, the members will be enumerated.
The members of a local group can be read using the NetLocalGroupGetMembers()-method. The next structure is a placeholder
for reading the members of local groups.
[StructLayout(LayoutKind.Sequential,
CharSet = CharSet.Auto)]
internal struct LOCALGROUP_INFO_1
{
[MarshalAs(UnmanagedType.LPWStr)]
public string lgrp1_name;
[MarshalAs(UnmanagedType.LPWStr)]
public string lgrp1_comment;
}
// The required .DLL-import function
[DllImport("netapi32.dll",
EntryPoint = "NetLocalGroupGetMembers")]
internal extern static uint
NetLocalGroupGetMembers(
[MarshalAs(UnmanagedType.LPWStr)]
string servername,
[MarshalAs(UnmanagedType.LPWStr)]
string groupname,
int level,
out IntPtr bufPtr,
int preMaxLen,
out uint entriesRead,
out uint totalEntries,
IntPtr resume_handle);
The following snippet can be used to read the members of a local group.
IntPtr bufPtr = IntPtr.Zero;
uint EntriesRead = 0, TotalEntries = 0;
string domainPDC = GetPDC(args[0]);
NetLocalGroupGetMembers(domainPDC, <groupname>, 1,
out bufPtr, -1,
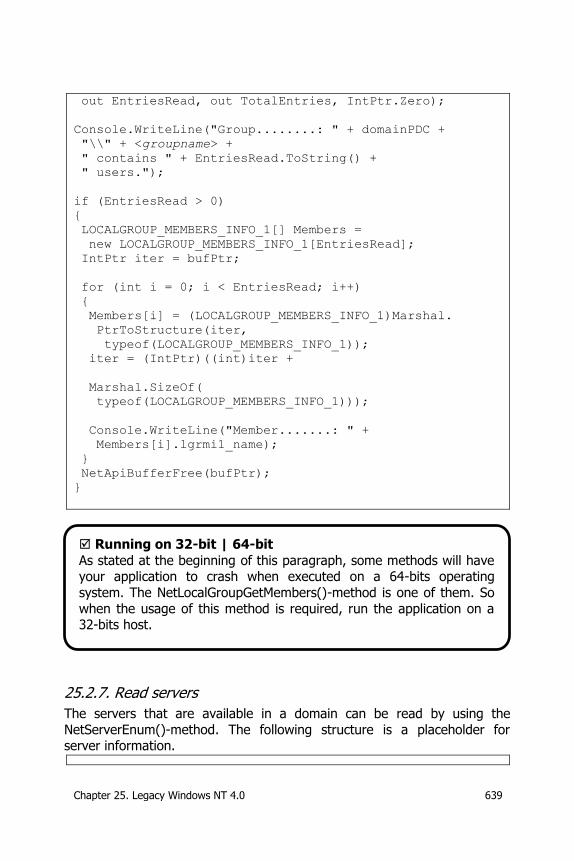
Chapter 25. Legacy Windows NT 4.0 639
out EntriesRead, out TotalEntries, IntPtr.Zero);
Console.WriteLine("Group........: " + domainPDC +
"\\" + <groupname> +
" contains " + EntriesRead.ToString() +
" users.");
if (EntriesRead > 0)
{
LOCALGROUP_MEMBERS_INFO_1[] Members =
new LOCALGROUP_MEMBERS_INFO_1[EntriesRead];
IntPtr iter = bufPtr;
for (int i = 0; i < EntriesRead; i++)
{
Members[i] = (LOCALGROUP_MEMBERS_INFO_1)Marshal.
PtrToStructure(iter,
typeof(LOCALGROUP_MEMBERS_INFO_1));
iter = (IntPtr)((int)iter +
Marshal.SizeOf(
typeof(LOCALGROUP_MEMBERS_INFO_1)));
Console.WriteLine("Member.......: " +
Members[i].lgrmi1_name);
}
NetApiBufferFree(bufPtr);
}
25.2.7. Read servers
The servers that are available in a domain can be read by using the
NetServerEnum()-method. The following structure is a placeholder for server information.
Running on 32-bit | 64-bit
As stated at the beginning of this paragraph, some methods will have your application to crash when executed on a 64-bits operating
system. The NetLocalGroupGetMembers()-method is one of them. So
when the usage of this method is required, run the application on a 32-bits host.
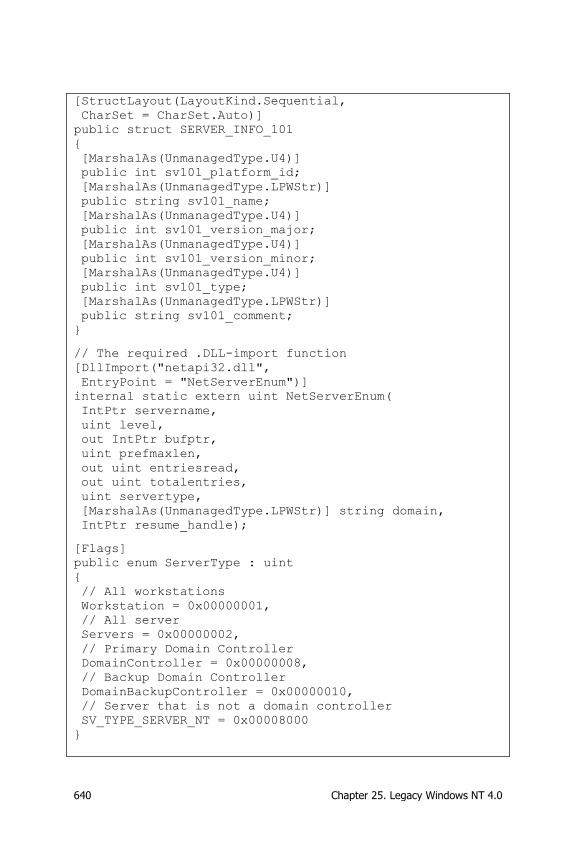
640 Chapter 25. Legacy Windows NT 4.0
[StructLayout(LayoutKind.Sequential,
CharSet = CharSet.Auto)]
public struct SERVER_INFO_101
{
[MarshalAs(UnmanagedType.U4)]
public int sv101_platform_id;
[MarshalAs(UnmanagedType.LPWStr)]
public string sv101_name;
[MarshalAs(UnmanagedType.U4)]
public int sv101_version_major;
[MarshalAs(UnmanagedType.U4)]
public int sv101_version_minor;
[MarshalAs(UnmanagedType.U4)]
public int sv101_type;
[MarshalAs(UnmanagedType.LPWStr)]
public string sv101_comment;
}
// The required .DLL-import function
[DllImport("netapi32.dll",
EntryPoint = "NetServerEnum")]
internal static extern uint NetServerEnum(
IntPtr servername,
uint level,
out IntPtr bufptr,
uint prefmaxlen,
out uint entriesread,
out uint totalentries,
uint servertype,
[MarshalAs(UnmanagedType.LPWStr)] string domain,
IntPtr resume_handle);
[Flags]
public enum ServerType : uint
{
// All workstations
Workstation = 0x00000001,
// All server
Servers = 0x00000002,
// Primary Domain Controller
DomainController = 0x00000008,
// Backup Domain Controller
DomainBackupController = 0x00000010,
// Server that is not a domain controller
SV_TYPE_SERVER_NT = 0x00008000
}
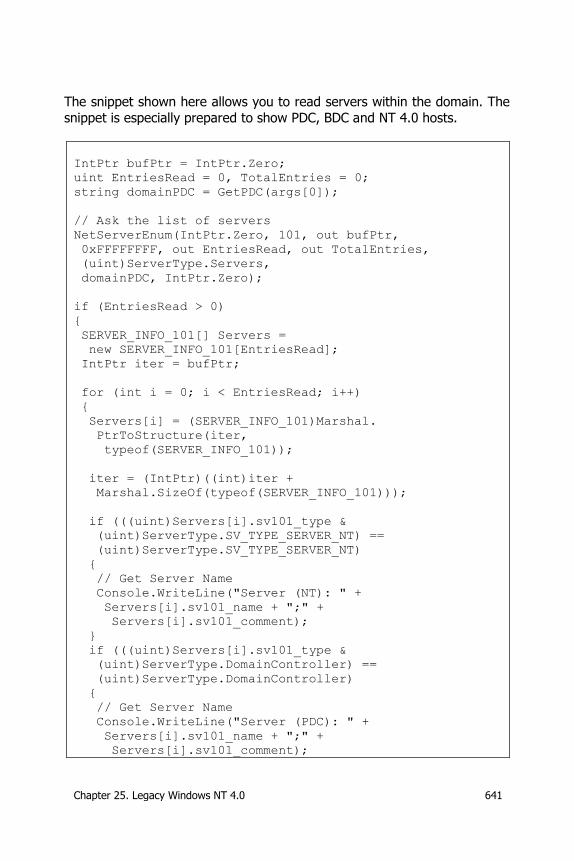
Chapter 25. Legacy Windows NT 4.0 641
The snippet shown here allows you to read servers within the domain. The
snippet is especially prepared to show PDC, BDC and NT 4.0 hosts.
IntPtr bufPtr = IntPtr.Zero;
uint EntriesRead = 0, TotalEntries = 0;
string domainPDC = GetPDC(args[0]);
// Ask the list of servers
NetServerEnum(IntPtr.Zero, 101, out bufPtr,
0xFFFFFFFF, out EntriesRead, out TotalEntries,
(uint)ServerType.Servers,
domainPDC, IntPtr.Zero);
if (EntriesRead > 0)
{
SERVER_INFO_101[] Servers =
new SERVER_INFO_101[EntriesRead];
IntPtr iter = bufPtr;
for (int i = 0; i < EntriesRead; i++)
{
Servers[i] = (SERVER_INFO_101)Marshal.
PtrToStructure(iter,
typeof(SERVER_INFO_101));
iter = (IntPtr)((int)iter +
Marshal.SizeOf(typeof(SERVER_INFO_101)));
if (((uint)Servers[i].sv101_type &
(uint)ServerType.SV_TYPE_SERVER_NT) ==
(uint)ServerType.SV_TYPE_SERVER_NT)
{
// Get Server Name
Console.WriteLine("Server (NT): " +
Servers[i].sv101_name + ";" +
Servers[i].sv101_comment);
}
if (((uint)Servers[i].sv101_type &
(uint)ServerType.DomainController) ==
(uint)ServerType.DomainController)
{
// Get Server Name
Console.WriteLine("Server (PDC): " +
Servers[i].sv101_name + ";" +
Servers[i].sv101_comment);
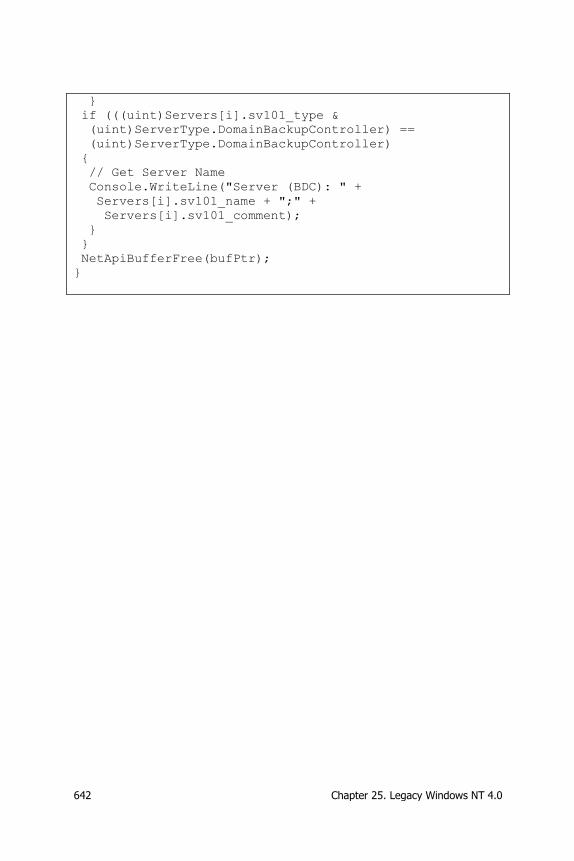
642 Chapter 25. Legacy Windows NT 4.0
}
if (((uint)Servers[i].sv101_type &
(uint)ServerType.DomainBackupController) ==
(uint)ServerType.DomainBackupController)
{
// Get Server Name
Console.WriteLine("Server (BDC): " +
Servers[i].sv101_name + ";" +
Servers[i].sv101_comment);
}
}
NetApiBufferFree(bufPtr);
}
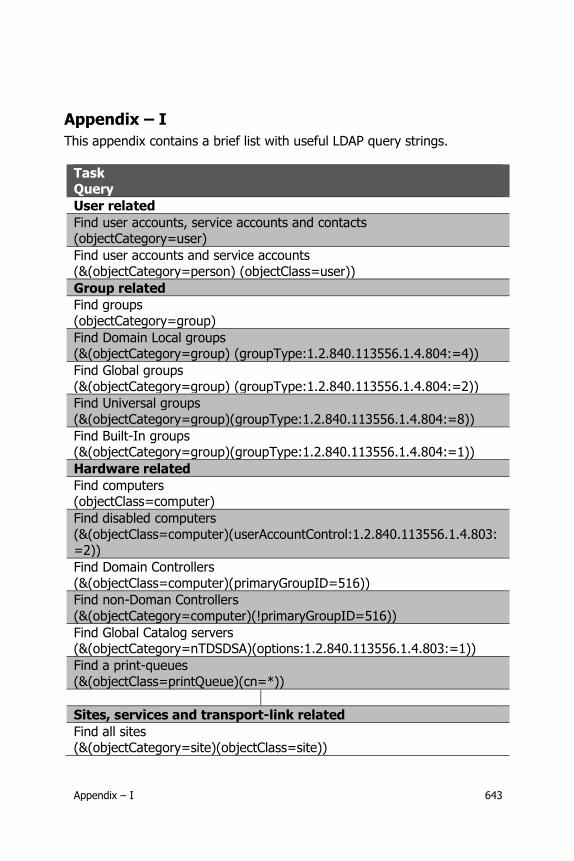
Appendix – I 643
Appendix – I
This appendix contains a brief list with useful LDAP query strings.
Task Query
User related
Find user accounts, service accounts and contacts (objectCategory=user)
Find user accounts and service accounts
(&(objectCategory=person) (objectClass=user))
Group related
Find groups
(objectCategory=group)
Find Domain Local groups (&(objectCategory=group) (groupType:1.2.840.113556.1.4.804:=4))
Find Global groups
(&(objectCategory=group) (groupType:1.2.840.113556.1.4.804:=2))
Find Universal groups
(&(objectCategory=group)(groupType:1.2.840.113556.1.4.804:=8))
Find Built-In groups (&(objectCategory=group)(groupType:1.2.840.113556.1.4.804:=1))
Hardware related
Find computers (objectClass=computer)
Find disabled computers
(&(objectClass=computer)(userAccountControl:1.2.840.113556.1.4.803:=2))
Find Domain Controllers
(&(objectClass=computer)(primaryGroupID=516))
Find non-Doman Controllers
(&(objectCategory=computer)(!primaryGroupID=516))
Find Global Catalog servers (&(objectCategory=nTDSDSA)(options:1.2.840.113556.1.4.803:=1))
Find a print-queues
(&(objectClass=printQueue)(cn=*))
Sites, services and transport-link related
Find all sites (&(objectCategory=site)(objectClass=site))
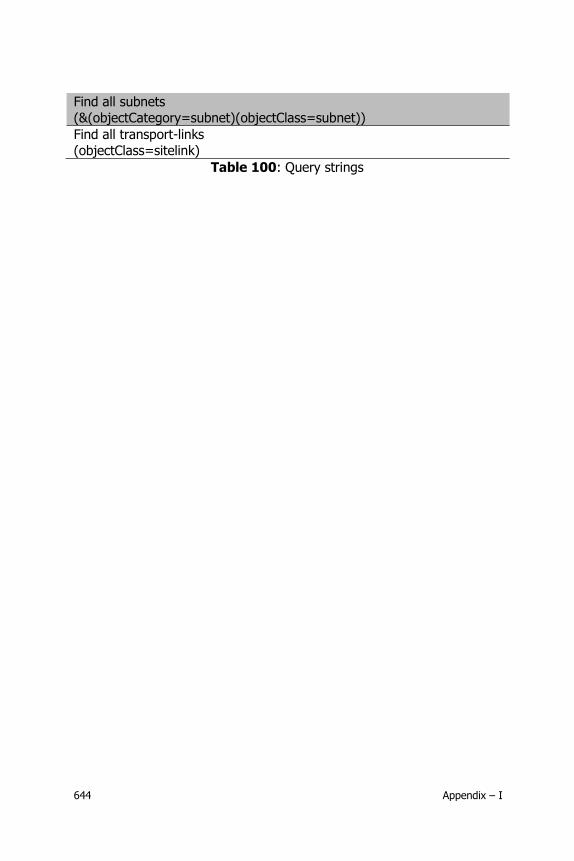
644 Appendix – I
Find all subnets
(&(objectCategory=subnet)(objectClass=subnet))
Find all transport-links
(objectClass=sitelink)
Table 100: Query strings
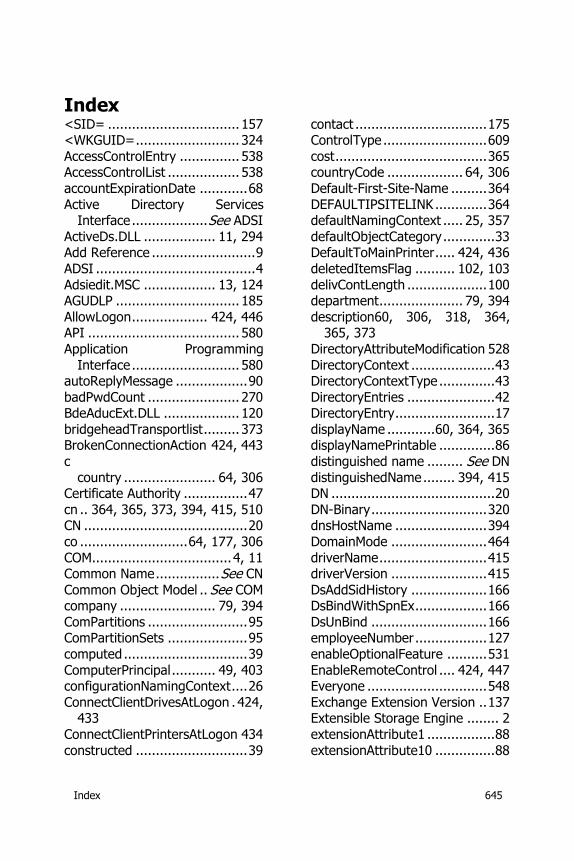
Index 645
Index <SID= ................................. 157 <WKGUID= .......................... 324
AccessControlEntry ............... 538 AccessControlList .................. 538
accountExpirationDate ............ 68
Active Directory Services Interface ................... See ADSI
ActiveDs.DLL .................. 11, 294 Add Reference .......................... 9
ADSI ........................................ 4
Adsiedit.MSC .................. 13, 124 AGUDLP ............................... 185
AllowLogon ................... 424, 446 API ...................................... 580
Application Programming
Interface ........................... 580 autoReplyMessage .................. 90
badPwdCount ....................... 270 BdeAducExt.DLL ................... 120
bridgeheadTransportlist ......... 373 BrokenConnectionAction 424, 443
c
country ....................... 64, 306 Certificate Authority ................ 47
cn .. 364, 365, 373, 394, 415, 510 CN ......................................... 20
co ........................... 64, 177, 306
COM................................... 4, 11 Common Name ................ See CN
Common Object Model .. See COM company ........................ 79, 394
ComPartitions ......................... 95 ComPartitionSets .................... 95
computed ............................... 39
ComputerPrincipal ........... 49, 403 configurationNamingContext .... 26
ConnectClientDrivesAtLogon . 424, 433
ConnectClientPrintersAtLogon 434
constructed ............................ 39
contact ................................. 175 ControlType .......................... 609
cost ...................................... 365 countryCode ................... 64, 306
Default-First-Site-Name ......... 364
DEFAULTIPSITELINK ............. 364 defaultNamingContext ..... 25, 357
defaultObjectCategory ............. 33 DefaultToMainPrinter ..... 424, 436
deletedItemsFlag .......... 102, 103
delivContLength .................... 100 department ..................... 79, 394
description60, 306, 318, 364, 365, 373
DirectoryAttributeModification 528
DirectoryContext ..................... 43 DirectoryContextType .............. 43
DirectoryEntries ...................... 42 DirectoryEntry ......................... 17
displayName ............ 60, 364, 365 displayNamePrintable .............. 86
distinguished name ......... See DN
distinguishedName ........ 394, 415 DN ......................................... 20
DN-Binary ............................. 320 dnsHostName ....................... 394
DomainMode ........................ 464
driverName ........................... 415 driverVersion ........................ 415
DsAddSidHistory ................... 166 DsBindWithSpnEx .................. 166
DsUnBind ............................. 166 employeeNumber .................. 127
enableOptionalFeature .......... 531
EnableRemoteControl .... 424, 447 Everyone .............................. 548
Exchange Extension Version .. 137 Extensible Storage Engine ........ 2
extensionAttribute1 ................. 88
extensionAttribute10 ............... 88
646 Index
extensionAttribute15 ............... 88
facsimileTelephoneNumber ...... 77 Fastbind ............................... 526
ForestMode .......................... 456 FormView ............................. 599
FormViewDescription............. 609 FQDN ..................................... 24
friendlyDomainName466, 479,
487 fSMORoleOwner .................... 340
Fully Qualified Domain Name ... 24 garbageCollPeriod ................. 102
givenName ............................. 60
Global Catalog ........................ 46 Globally Unique Identifier ...... See
GUID GroupPrincipal ................ 48, 195
groupType ...................... 56, 190 GUID.................................... 143
homeDirectory ........................ 75
homeDrive .............................. 75 homeMDB .............................. 99
homePhone ............................ 76 IA5String .............................. 114
IADsLargeInteger ................. 294
IADsTSUserEx . 93, 423, 430, 446 IDE .......................................... 7
IdentityReference ................. 556 IEnumerator ......................... 536
IFormViewControl ................. 607 info ........................................ 77
infrastructureUpdate ............. 340
initials .................................... 60 InstallUtil.exe ....................... 617
InterForest ........................... 159 InteropServices ..................... 624
IntraForest ........................... 159
ipPhone .................................. 77 isCriticalSystemObject ... 326, 345
isDeleted .............................. 525 isRecycled ............................ 532
jpegPhoto ............................. 300
KdcRequired ......................... 489 l
location ................ 64, 177, 306 lastKnownParent ................... 525
lastLogon .............................. 292 lastLogonTimestamp ............. 297
LDAP ....................................... 4
LDAP Matching Rule ................ 55 LdapConnection .................... 527
LdapDirectoryIdentifier .......... 527 linked ..................................... 39
location ......... 364, 365, 394, 415
lockoutDuration .................... 503 lockoutObservationWindow .... 503
lockoutThreshold ................... 503 lockoutTime .................... 67, 270
logonHours ............................. 67 Mail Application Programming
Interface .................. See MAPI
MailMessage ......................... 581 mailNickName ......................... 99
managed code ...................... 623 managedBy .......................... 551
manager ................................. 79
MAPI .................................... 580 MaxConnectionTime .............. 441
MaxDisconnectionTime .. 424, 438 MaxIdleTime ................. 425, 442
maxPwdAge .......................... 503 MaxTokenSize ....................... 206
mDBOverHardQuotaLimit ....... 102
mDBOverQuotaLimit .............. 102 mDBStorageQuota ................ 102
mDBUseDefaults ................... 102 memberOf ............... 40, 104, 209
memberuid ........................... 114
minPwdAge .......................... 503 minPwdLength ...................... 503
mobile .................................... 76 ModifyRequest ...................... 529
Index 647
ModifyResponse .................... 529
msCOM-UserPartitionSetLink ... 94 msDS-AllUsersTrustQuota ...... 567
msDS-Behavior-Version . 453, 461 msDS-cloudExtensionAttribute 302
msDS-DefaultQuota .............. 560 msDS-EnabledFeature ........... 532
msDS-LockoutDuration .......... 512
msDS-LockoutObservationWindow 511
msDS-LockoutThreshold ........ 511 msDS-LogonTimeSyncInterval 297
ms-DS-MachineAccountQuota 567
msDS-ManagedServiceAccount ........................................ 356
msDS-MaximumPasswordAge 511 msDS-MinimumPasswordAge . 511
msDS-MinimumPasswordLength ........................................ 511
msDS-
PasswordComplexityEnabled ........................................ 510
msDS-PasswordHistoryLength ................................ 510, 511
msDS-
PasswordReversibleEncryptionEnabled .............................. 510
msDS-PasswordSettings 510, 517 msDS-
PasswordSettingsPrecedence ........................................ 510
msDS-PSOAppliesTo ...... 512, 521
msDS-QuotaAmount ............. 565 msDS-QuotaControl .............. 565
msDS-QuotaEffective ............ 565 msDS-QuotaTrustee .............. 565
msDS-QuotaUsed .................. 565
msDS-TomstoneQuotaFactor . 562 msDS-TopQuotaUsage .......... 569
ms-DS-User-Account-Control-Computed ........................... 70
msExchangeHideFromAddressList
s ......................................... 86 msExchMailboxGUID ............. 579
ms-Exch-Schema-Version-Pt .. 137 msFVE-KeyPackage ............... 118
msFVE-RecoveryInformation .. 119 msFVE-RecoveryPassword ..... 118
msFVE-VolumeGuid ............... 119
msSFU30GidNumber ..... 113, 115 msSFU30HomeDirectory ........ 113
msSFU30LoginShell ............... 113 msSFU30MemberUid ............. 114
msSFU30Name ............. 113, 115
msSFU30NisDomain ...... 113, 115 msSFU30Password ................ 113
msSFU30PosixMember .. 114, 115 msSFU30PosixMemberOf ....... 113
msSFU30UidNumber ............. 113 msTPM-OwnerInformation .... 118,
123
msTSAllowLogon ................... 127 msTSPrimaryDesktop ............ 117
mxExchRecipLimit ................. 101 name ................................... 394
NETAPI32.DLL ...................... 624
NetApiBufferFree ................... 627 NetBIOS ............................... 466
netbootGUID ........................ 405 NetGroupEnum ..................... 633
NetGroupGetUsers ................ 636 NetLocalGroupGetMembers .... 638
NetLocalGroups ..................... 634
NetServerEnum ..................... 639 NetUserEnum........................ 627
NetUserGetGroups ................ 631 NISPROP.DLL ........................ 111
NTAccount .................... 156, 558
NTDS.DIT ................................ 2 NTDSAPI.DLL ........................ 166
NTDSNoMatch ........................ 88 nTMixedDomain .................... 462
648 Index
ntSecurityDescriptor .............. 536
objectCategory ....................... 32 objectClass ............................. 32
objectVersion ........................ 139 operatingSystem ................... 394
operatingSystemServicePack . 394 operatingSystemVersion ........ 394
Organizational Unit ................. 29
otherFacsimileTelephoneNumber .......................................... 77
otherHomePhone .............. 76, 77 otherIpPhone ......................... 77
otherPager ............................. 76
otherTelephoneNumber ........... 60 otherWellKnownObjects ........ 348
OU ......................................... 29 out ....................................... 626
pager ..................................... 76 PageSize ................................ 30
Password Settings Container .. 509
Password Settings Object ...... 509 personalTitle ........................... 81
physicalDeliveryOfficeName ..... 60 PKI ........................................ 47
portName ............................. 415
postalCode ..................... 64, 306 postOfficeBox ................. 64, 177
Primary Group ...................... 211 primaryGroupId .................... 233
primaryGroupID ............ 104, 477 primaryGroupToken .............. 233
Principal ............................... 257
PrincipalContext .................... 257 printerName ......................... 415
printMemory ......................... 415 priority ................................. 415
profilePath .............................. 75
PropertyValueCollection ........... 41 proxyAddresses ...................... 83
Public Key Infrastructure . See PKI pwdHistoryLength ................. 503
pwdLastSet ....................... 67, 71
pwdProperties ............... 503, 504 rangeUpper .......................... 137
ReconnectionAction ....... 425, 444 REDIRCMP.EXE ..................... 320
REDIRUSR.EXE ..................... 320 ref ........................................ 626
replInterval ........................... 365
rootDomainNamingContext ...... 25 rootDSE .................................. 21
rootDSE attributes ................... 24 sAMAccountName ........... 67, 394
schemaClassName ................ 517
schemaNamingContext ............ 27 SchmMgmt.DLL ..................... 133
scriptPath ............................... 75 SearchResult ........................... 30
SearchResultCollection .... 31, 259 SearchScope ................... 34, 259
SearchScope definition ............ 35
SecurityDescriptor ................. 538 SecurityIdentifier................... 156
serverName .......................... 415 serverReference .................... 372
serversContainer ................... 372
Service Principal Name .......... 129 SessionOptions ..................... 527
setspn .................................. 130 shortServerName .................. 415
ShowDeletedControl .............. 529 showInAddressBook ................ 86
sIDHistory ............................ 158
siteList ................................. 365 siteObject ............................. 365
SMTP ..................................... 83 SmtpClient ............................ 581
sn .......................................... 60
SnapIn ................................. 603 SnapInImageList ................... 616
SnapInInstaller ..................... 603 Solution Explorer ...................... 7
Index 649
SomCollection ....................... 496
Special characters ................... 56 st
state .................... 64, 177, 306 street ................................... 306
streetAddress ................. 64, 177 submissionContLength .......... 100
Subtree .................................. 35
SuppressUnmanagedCodeSecurity ...................................... 166
telephoneNumber ................... 60 telexNumber ......................... 128
templateRoots ...................... 140
TerminalServicesHomeDirectory .................................. 92, 425
TerminalServicesHomeDrive ... 92, 425
TerminalServicesInitialProgram ................................ 106, 425
TerminalServicesProfilePath .... 92,
425 TerminalServicesWorkDirectory
................................ 107, 425 ThowOnUnmappableChar ...... 167
thumbnailLogo ...................... 299
TimeServerRequired .............. 486 title ........................................ 79
TlbImp.exe ........................... 429
tokenGroups ......................... 199 tombstoneLifetime ................ 529
TSUSEREX.DLL ..................... 429 uNCName ............................. 415
unmanaged code .................. 623 url .................................. 60, 415
userAccountControl68, 262, 270,
394 userParameters105, 106, 109,
110 UserPrincipal ................... 48, 256
userPrincipalName .................. 67
userWorkstations .................... 67 using statement ...................... 18
var declaration ........................ 19 versionNumber ..................... 500
ViewDescription .................... 609 ViewType ............................. 609
WellKnownObjects ................ 320
WellKnownSID ...................... 210 whenChanged ........ 125, 394, 415
whenCreated ......... 124, 394, 415 WKGUID ............................... 324
WriteableRequired ................. 477
wWWHomePage ..................... 60
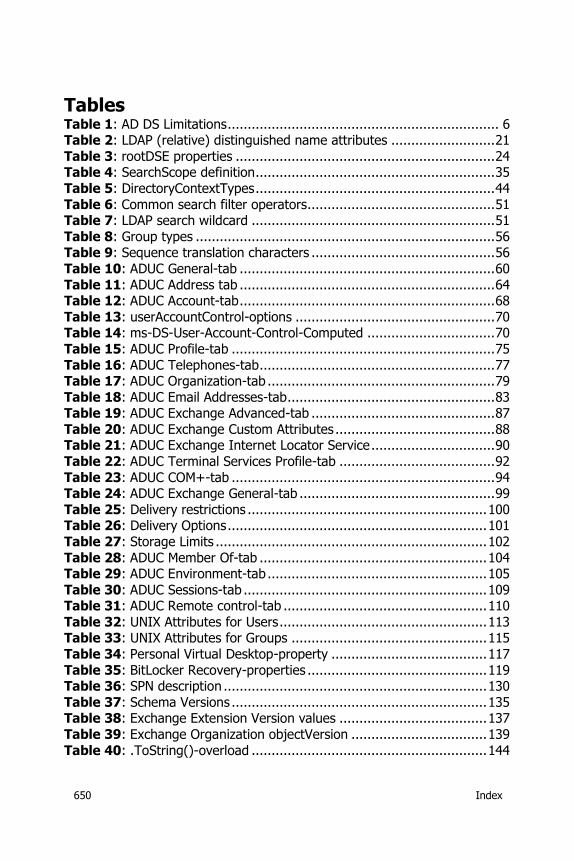
650 Index
Tables
Table 1: AD DS Limitations .................................................................... 6 Table 2: LDAP (relative) distinguished name attributes .......................... 21 Table 3: rootDSE properties ................................................................. 24 Table 4: SearchScope definition ............................................................ 35 Table 5: DirectoryContextTypes ............................................................ 44 Table 6: Common search filter operators ............................................... 51 Table 7: LDAP search wildcard ............................................................. 51 Table 8: Group types ........................................................................... 56 Table 9: Sequence translation characters .............................................. 56 Table 10: ADUC General-tab ................................................................ 60 Table 11: ADUC Address tab ................................................................ 64 Table 12: ADUC Account-tab ................................................................ 68 Table 13: userAccountControl-options .................................................. 70 Table 14: ms-DS-User-Account-Control-Computed ................................ 70 Table 15: ADUC Profile-tab .................................................................. 75 Table 16: ADUC Telephones-tab ........................................................... 77 Table 17: ADUC Organization-tab ......................................................... 79 Table 18: ADUC Email Addresses-tab .................................................... 83 Table 19: ADUC Exchange Advanced-tab .............................................. 87 Table 20: ADUC Exchange Custom Attributes ........................................ 88 Table 21: ADUC Exchange Internet Locator Service ............................... 90 Table 22: ADUC Terminal Services Profile-tab ....................................... 92 Table 23: ADUC COM+-tab .................................................................. 94 Table 24: ADUC Exchange General-tab ................................................. 99 Table 25: Delivery restrictions ............................................................ 100 Table 26: Delivery Options ................................................................. 101 Table 27: Storage Limits .................................................................... 102 Table 28: ADUC Member Of-tab ......................................................... 104 Table 29: ADUC Environment-tab ....................................................... 105 Table 30: ADUC Sessions-tab ............................................................. 109 Table 31: ADUC Remote control-tab ................................................... 110 Table 32: UNIX Attributes for Users .................................................... 113 Table 33: UNIX Attributes for Groups ................................................. 115 Table 34: Personal Virtual Desktop-property ....................................... 117 Table 35: BitLocker Recovery-properties ............................................. 119 Table 36: SPN description .................................................................. 130 Table 37: Schema Versions ................................................................ 135 Table 38: Exchange Extension Version values ..................................... 137 Table 39: Exchange Organization objectVersion .................................. 139 Table 40: .ToString()-overload ........................................................... 144
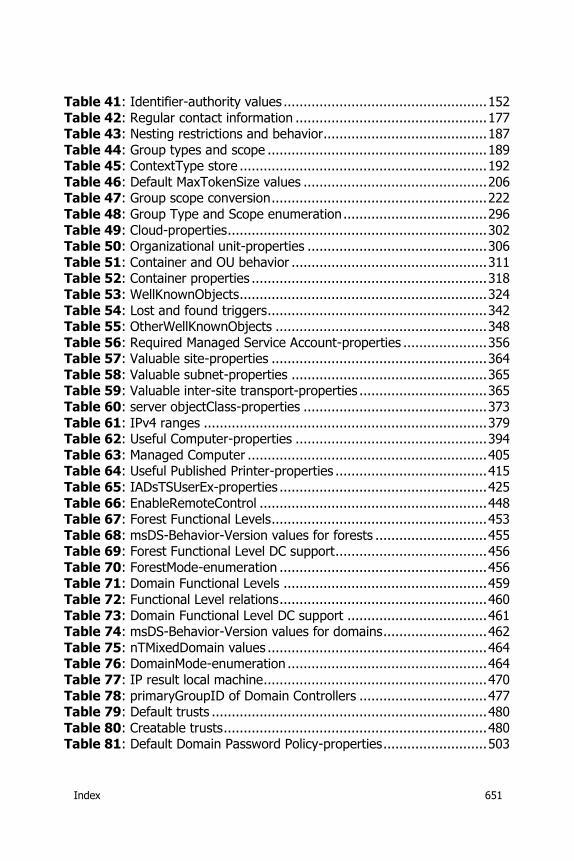
Index 651
Table 41: Identifier-authority values ................................................... 152 Table 42: Regular contact information ................................................ 177 Table 43: Nesting restrictions and behavior......................................... 187 Table 44: Group types and scope ....................................................... 189 Table 45: ContextType store .............................................................. 192 Table 46: Default MaxTokenSize values .............................................. 206 Table 47: Group scope conversion ...................................................... 222 Table 48: Group Type and Scope enumeration .................................... 296 Table 49: Cloud-properties ................................................................. 302 Table 50: Organizational unit-properties ............................................. 306 Table 51: Container and OU behavior ................................................. 311 Table 52: Container properties ........................................................... 318 Table 53: WellKnownObjects .............................................................. 324 Table 54: Lost and found triggers ....................................................... 342 Table 55: OtherWellKnownObjects ..................................................... 348 Table 56: Required Managed Service Account-properties ..................... 356 Table 57: Valuable site-properties ...................................................... 364 Table 58: Valuable subnet-properties ................................................. 365 Table 59: Valuable inter-site transport-properties ................................ 365 Table 60: server objectClass-properties .............................................. 373 Table 61: IPv4 ranges ....................................................................... 379 Table 62: Useful Computer-properties ................................................ 394 Table 63: Managed Computer ............................................................ 405 Table 64: Useful Published Printer-properties ...................................... 415 Table 65: IADsTSUserEx-properties .................................................... 425 Table 66: EnableRemoteControl ......................................................... 448 Table 67: Forest Functional Levels ...................................................... 453 Table 68: msDS-Behavior-Version values for forests ............................ 455 Table 69: Forest Functional Level DC support ...................................... 456 Table 70: ForestMode-enumeration .................................................... 456 Table 71: Domain Functional Levels ................................................... 459 Table 72: Functional Level relations .................................................... 460 Table 73: Domain Functional Level DC support ................................... 461 Table 74: msDS-Behavior-Version values for domains .......................... 462 Table 75: nTMixedDomain values ....................................................... 464 Table 76: DomainMode-enumeration .................................................. 464 Table 77: IP result local machine ........................................................ 470 Table 78: primaryGroupID of Domain Controllers ................................ 477 Table 79: Default trusts ..................................................................... 480 Table 80: Creatable trusts .................................................................. 480 Table 81: Default Domain Password Policy-properties .......................... 503
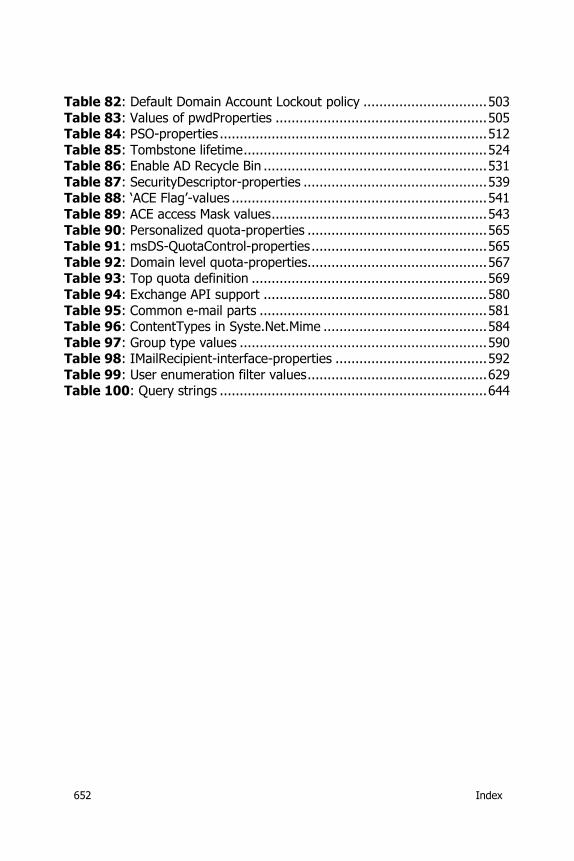
652 Index
Table 82: Default Domain Account Lockout policy ............................... 503 Table 83: Values of pwdProperties ..................................................... 505 Table 84: PSO-properties ................................................................... 512 Table 85: Tombstone lifetime ............................................................. 524 Table 86: Enable AD Recycle Bin ........................................................ 531 Table 87: SecurityDescriptor-properties .............................................. 539 Table 88: ‘ACE Flag’-values ................................................................ 541 Table 89: ACE access Mask values ...................................................... 543 Table 90: Personalized quota-properties ............................................. 565 Table 91: msDS-QuotaControl-properties ............................................ 565 Table 92: Domain level quota-properties............................................. 567 Table 93: Top quota definition ........................................................... 569 Table 94: Exchange API support ........................................................ 580 Table 95: Common e-mail parts ......................................................... 581 Table 96: ContentTypes in Syste.Net.Mime ......................................... 584 Table 97: Group type values .............................................................. 590 Table 98: IMailRecipient-interface-properties ...................................... 592 Table 99: User enumeration filter values ............................................. 629 Table 100: Query strings ................................................................... 644
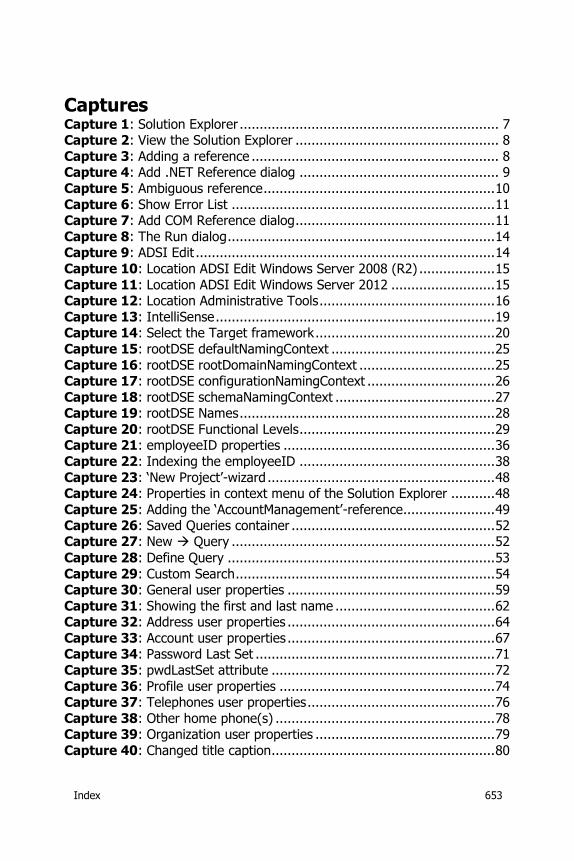
Index 653
Captures Capture 1: Solution Explorer ................................................................. 7 Capture 2: View the Solution Explorer ................................................... 8 Capture 3: Adding a reference .............................................................. 8 Capture 4: Add .NET Reference dialog .................................................. 9 Capture 5: Ambiguous reference .......................................................... 10 Capture 6: Show Error List .................................................................. 11 Capture 7: Add COM Reference dialog .................................................. 11 Capture 8: The Run dialog ................................................................... 14 Capture 9: ADSI Edit ........................................................................... 14 Capture 10: Location ADSI Edit Windows Server 2008 (R2) ................... 15 Capture 11: Location ADSI Edit Windows Server 2012 .......................... 15 Capture 12: Location Administrative Tools ............................................ 16 Capture 13: IntelliSense ...................................................................... 19 Capture 14: Select the Target framework ............................................. 20 Capture 15: rootDSE defaultNamingContext ......................................... 25 Capture 16: rootDSE rootDomainNamingContext .................................. 25 Capture 17: rootDSE configurationNamingContext ................................ 26 Capture 18: rootDSE schemaNamingContext ........................................ 27 Capture 19: rootDSE Names ................................................................ 28 Capture 20: rootDSE Functional Levels ................................................. 29 Capture 21: employeeID properties ..................................................... 36 Capture 22: Indexing the employeeID ................................................. 38 Capture 23: ‘New Project’-wizard ......................................................... 48 Capture 24: Properties in context menu of the Solution Explorer ........... 48 Capture 25: Adding the ‘AccountManagement’-reference....................... 49 Capture 26: Saved Queries container ................................................... 52 Capture 27: New Query .................................................................. 52 Capture 28: Define Query ................................................................... 53 Capture 29: Custom Search ................................................................. 54 Capture 30: General user properties .................................................... 59 Capture 31: Showing the first and last name ........................................ 62 Capture 32: Address user properties .................................................... 64 Capture 33: Account user properties .................................................... 67 Capture 34: Password Last Set ............................................................ 71 Capture 35: pwdLastSet attribute ........................................................ 72 Capture 36: Profile user properties ...................................................... 74 Capture 37: Telephones user properties ............................................... 76 Capture 38: Other home phone(s) ....................................................... 78 Capture 39: Organization user properties ............................................. 79 Capture 40: Changed title caption ........................................................ 80
654 Index
Capture 41: Delegation of control wizard Title ...................................... 80 Capture 42: Delegation of control wizard Job Title ................................ 81 Capture 43: E-mail Addresses for the user ........................................... 82 Capture 44: Exchange Feature for the user account .............................. 85 Capture 45: Exchange Advanced properties.......................................... 86 Capture 46: Custom user attributes ..................................................... 87 Capture 47: Internet Locator Service ................................................... 89 Capture 48: Mailbox permissions ......................................................... 90 Capture 49: The Terminal Services user properties ............................... 91 Capture 50: Remote Desktop Service Profile-tab ................................... 93 Capture 51: COM+ partition selection .................................................. 94 Capture 52: ‘Advanced Features’-tree view ........................................... 95 Capture 53: Partitions ......................................................................... 96 Capture 54: Adding partitions into a partition set .................................. 97 Capture 55: Add users to the partition set ............................................ 98 Capture 56: User assigned to partition set ............................................ 98 Capture 57: General Exchange user properties ..................................... 99 Capture 58: Delivery Restrictions ....................................................... 100 Capture 59: Delivery Options ............................................................. 101 Capture 60: Storage limits ................................................................. 102 Capture 61: Member Of .................................................................... 103 Capture 62: Environment settings of an account ................................. 105 Capture 63: Environment settings ...................................................... 106 Capture 64: TerminalServicesInitialProgram information ..................... 107 Capture 65: Display TerminalServicesWorkDirectory information.......... 108 Capture 66: Terminal Server session configuration ............................. 109 Capture 67: Remote control settings .................................................. 110 Capture 68: UNIX Attributes for Users ................................................ 112 Capture 69: UNIX Attributes for Groups ............................................. 114 Capture 70: Personal Virtual Desktop ................................................. 117 Capture 71: Register the BitLocker Extension ..................................... 120 Capture 72: Add BitLocker Features ................................................... 121 Capture 73: TPM Devices container ................................................... 121 Capture 74: Add BitLocker Drive Encryption ....................................... 122 Capture 75: Run dialog ..................................................................... 134 Capture 76: Successful DLL registration ............................................. 134 Capture 77: Adding the Active Directory Schema MMC ........................ 135 Capture 78: Schema Version information ........................................... 137 Capture 79: Exchange Schema Extension version ............................... 139 Capture 80: Exchange Organization version ....................................... 141 Capture 81: A new GUID ................................................................... 143

Index 655
Capture 82: New GUID using overload D............................................ 144 Capture 83: New GUID using overload N ............................................ 145 Capture 84: New GUID using overload B ............................................ 146 Capture 85: New GUID using overload P ............................................ 146 Capture 86: Show the object GUID .................................................... 147 Capture 87: Result GUID faulty cast ................................................... 149 Capture 88: Show the object SID....................................................... 155 Capture 89: Find and translate a SID ................................................. 158 Capture 90: Edit the Default Domain Policy ........................................ 171 Capture 91: Enable audit account management .................................. 172 Capture 92: ADSI Edit sIDHistory error .............................................. 173 Capture 93: Microsoft Outlook Address Book ...................................... 175 Capture 94: A contact ....................................................................... 175 Capture 95: Create Group dialog ....................................................... 188 Capture 96: Adding a reference ......................................................... 189 Capture 97: Members dialog.............................................................. 193 Capture 98: MMC Limit Notification .................................................... 202 Capture 99: MemberOf ..................................................................... 209 Capture 100: MemberOf-dialog ......................................................... 211 Capture 101: Domain SID ................................................................. 212 Capture 102: MemberOf with Primary Group information .................... 214 Capture 103: Contains-message-box ................................................. 216 Capture 104: Read group scope ........................................................ 221 Capture 105: Unwilling to process request ......................................... 224 Capture 106: Group SID and Primary Group ID .................................. 232 Capture 107: Create random user accounts ....................................... 239 Capture 108: Two random user accounts ........................................... 239 Capture 109: IsMemberOf-message-boxes ......................................... 261 Capture 110: Logon attempt with a disabled account ......................... 262 Capture 111: Disabled account .......................................................... 265 Capture 112: Disabled account checkbox ........................................... 265 Capture 113: User enabled is False.................................................... 267 Capture 114: Default Domain Policy .................................................. 268 Capture 115: Locked-out account ...................................................... 268 Capture 116: Locked-out checkbox .................................................... 268 Capture 117: User locked is True ...................................................... 273 Capture 118: Password never expires ................................................ 274 Capture 119: User password never expires is True ............................. 275 Capture 120: Password will expire ..................................................... 276 Capture 121: User can change password ........................................... 279 Capture 122: Inner exception ............................................................ 281
656 Index
Capture 123: User must change password at next logon ..................... 281 Capture 124: ‘Account expires’-area .................................................. 284 Capture 125: Expiration dates ........................................................... 284 Capture 126: Number enumeration ................................................... 296 Capture 127: Microsoft Windows picture ............................................ 298 Capture 128: Organization Unit Properties ......................................... 306 Capture 129: DN syntax exception error ............................................ 308 Capture 130: Naming violation exception ........................................... 309 Capture 131: Move an OU into a container......................................... 311 Capture 132: Access denied exception ............................................... 313 Capture 133: Unauthorized Access dialog .......................................... 314 Capture 134: Caught Access Denied exception ................................... 315 Capture 135: ADUC Subtree deletion dialog ....................................... 316 Capture 136: Container General Properties ........................................ 317 Capture 137: Unwilling to remove WKO ............................................. 328 Capture 138: Unwilling to add WKO................................................... 329 Capture 139: Constraint violation on wellKnownObjects ...................... 331 Capture 140: FSPs OU in ADUC. ........................................................ 337 Capture 141: FSPs in detailed view. ................................................... 337 Capture 142: Constraint violation on otherWellKnownObjects .............. 352 Capture 143: Managed Service Accounts container ............................. 356 Capture 144: MSA-object .................................................................. 358 Capture 145: Server-properties ......................................................... 374 Capture 146: Server properties with transport .................................... 375 Capture 147: Unassigned subnet ....................................................... 381 Capture 148: TestLink-properties ...................................................... 388 Capture 149: Disabled computer object ............................................. 397 Capture 150: Enabled computer object .............................................. 398 Capture 151: Exception message ...................................................... 399 Capture 152: Inner exception message .............................................. 400 Capture 153: Computer-properties .................................................... 402 Capture 154: ComputerPrincipal creates computer object ................... 404 Capture 155: Managed Computer-dialog ............................................ 405 Capture 156: No netbootGUID is available ......................................... 409 Capture 157: The netbootGUID is available ........................................ 409 Capture 158: Invalid netbootGUID .................................................... 410 Capture 159: netbootGUID within ADUC ............................................ 411 Capture 160: Correct netbootGUID notation ....................................... 412 Capture 161: Octet notation of the netbootGUID ................................ 412 Capture 162: Octet presentation ....................................................... 413 Capture 163: List printer in AD DS ..................................................... 414
Index 657
Capture 164: Print-queues in ADSI Edit ............................................. 417 Capture 165: View objects as container ............................................. 417 Capture 166: Printer queues in ADUC ................................................ 418 Capture 167: Moved print-queue ....................................................... 420 Capture 168: Remove print-queue listing ........................................... 421 Capture 169: Removed printerQueue object....................................... 421 Capture 170: List in the directory ...................................................... 422 Capture 171: Starting program .......................................................... 426 Capture 172: TerminalServicesInitialProgram information ................... 427 Capture 173: TerminalServicesWorkDirectory information ................... 428 Capture 174: Reference the TSUSEREXLib ......................................... 431 Capture 175: Connect client drives at logon ....................................... 432 Capture 176: Connect client printers at logon..................................... 434 Capture 177: Default to main client printer ........................................ 435 Capture 178: TS Client devices .......................................................... 438 Capture 179: End a disconnected session .......................................... 438 Capture 180: Active session limit ....................................................... 440 Capture 181: Idle session limit .......................................................... 441 Capture 182: Session limit action ...................................................... 443 Capture 183: Allow reconnection ....................................................... 444 Capture 184: Remote Desktop Session enabled .................................. 446 Capture 185: Remote Desktop Session disabled ................................. 447 Capture 186: Domain properties ........................................................ 452 Capture 187: Forest Functional Level ................................................. 453 Capture 188: Forest Functional level .................................................. 455 Capture 189: Domain Functional Level ............................................... 459 Capture 190: Domain Level ............................................................... 462 Capture 191: Native or Mixed mode .................................................. 463 Capture 192: IP addresses ................................................................ 471 Capture 193: Windows Time service .................................................. 485 Capture 194: No reliable time server ................................................. 487 Capture 195: A reliable time server is found ....................................... 487 Capture 196: Domain Controller’s current time ................................... 488 Capture 197: No KDC server found .................................................... 490 Capture 198: Locate a KDC server ..................................................... 490 Capture 199: Unlinked GPO .............................................................. 497 Capture 200: Deleted Object ............................................................. 527 Capture 201: tombstoneLifetime value............................................... 530 Capture 202: Enable Recycle Bin in Microsoft Windows Server 2012 .... 531 Capture 203: Deleted Objects container ............................................. 532 Capture 204: Enabled AD Recycle Bin feature .................................... 533
658 Index
Capture 205: ‘Advanced Security Settings For’-dialog .......................... 546 Capture 206: ‘Protect object from accidental deletion’-checkbox .......... 549 Capture 207: Unchecked ‘Protect object…’-checkbox .......................... 550 Capture 208: ‘Managed By’-area ....................................................... 551 Capture 209: Modified ‘Managed By’-area .......................................... 553 Capture 210: New owner .................................................................. 559 Capture 211: ‘NTDS Quotas’-container ............................................... 560 Capture 212: ADUC with quota control .............................................. 565 Capture 213: Assigned quota ............................................................ 567 Capture 214: Machine account quota information ............................... 568 Capture 215: All users trust quota information ................................... 569 Capture 216: Empty MMC version 3.0 ................................................ 595 Capture 217: Event Viewer MMC version 3.0 ...................................... 596 Capture 218: Select the target framework and template ..................... 597 Capture 219: Solution Explorer – Step 1 ............................................ 598 Capture 220: Wrong MMC-library ...................................................... 598 Capture 221: Solution Explorer – Step 2 ............................................ 599 Capture 222: Solution Explorer – Step 3 ............................................ 600 Capture 223: VS2008 ‘Installer Class’ Designer error .......................... 601 Capture 224: View Code ................................................................... 601 Capture 225: Add or Remove Snap-ins .............................................. 605 Capture 226: Root node.................................................................... 605 Capture 227: Add ‘User Control…’...................................................... 606 Capture 228: Solution Explorer – Step 4 ............................................ 607 Capture 229: Configured ListView ...................................................... 611 Capture 230: MMC without Action-area .............................................. 612 Capture 231: MMC with Action-area .................................................. 613 Capture 232: Execute an assigned action ........................................... 614 Capture 233: Embedded Resource ..................................................... 615 Capture 234: New root node icon ...................................................... 616 Capture 235: Install assembly in global assembly cache...................... 621 Capture 236: List an assembly within the GAC ................................... 621 Capture 237: Browse the global assembly cache ................................ 622
Index 659
Figures Figure 1: The development of my knowledge through time ..................... 3 Figure 2: Providing access ................................................................. 151 Figure 3: InterForest migration scenarios ............................................ 159 Figure 4: IntraForest migration scenario ............................................. 160 Figure 5: Filtered trust ....................................................................... 163 Figure 6: AGDLP-nesting .................................................................... 186 Figure 7: memberOf-property scope ................................................... 199 Figure 8: tokenGroups-property scope ................................................ 200 Figure 9: Relation of primaryGroupId to primaryGroupToken ............... 233 Figure 10: User requirements nowadays ............................................. 238 Figure 11: Account is trusted for delegation ........................................ 290 Figure 12: Container versus OU ......................................................... 305 Figure 13: Protected OUs .................................................................. 316 Figure 14: LostAndFound example ..................................................... 342 Figure 15: Sites ................................................................................ 363 Figure 16: Site Cost .......................................................................... 363 Figure 17: Site, subnet and inter-site transport ................................... 364 Figure 18: Trusting and trusted ......................................................... 481 Figure 19: Forest trust ...................................................................... 482 Figure 20: Replication between DCs issue ........................................... 491 Figure 21: Group Policy Object breakdown ......................................... 493 Figure 22: GPO & GPT relation ........................................................... 498 Figure 23: Ask parent to remove child ................................................ 520 Figure 24: Assign a PSO to users account objects ............................... 521 Figure 25: ACL/ACE ........................................................................... 535 Figure 26: IdentityReference ............................................................. 556 Figure 27: MMC source-file relation .................................................... 614 Figure 28: Managed versus Unmanaged code ..................................... 624
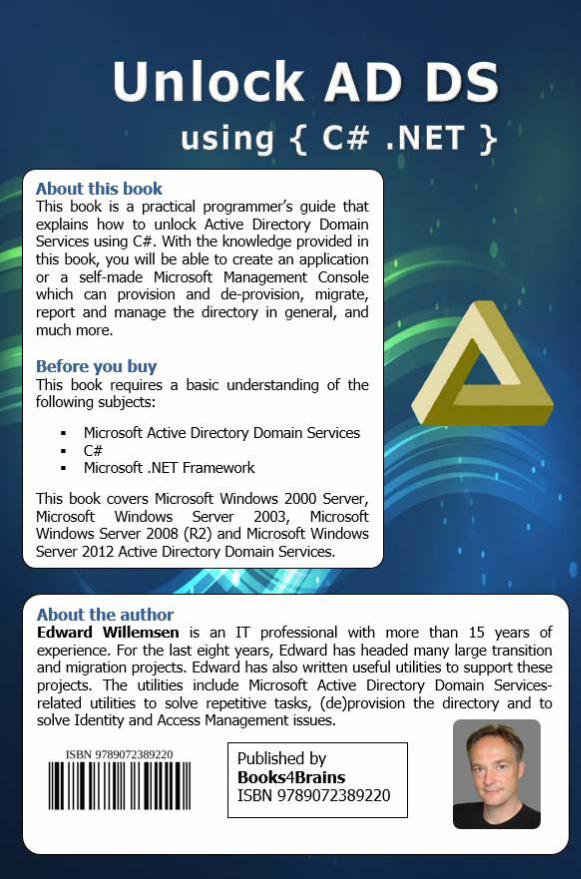


![[] Adele Ramet Creative Writing How to unlock y(Bokos Z1)](https://img.pdfslide.net/doc/110x75/635d3b0ba0f1eac29f0c1710/-adele-ramet-creative-writing-how-to-unlock-ybokos-z1.jpg)


