Embed Size (px)
Citation preview
24in
Hours
SamsTeachYourself
800 East 96th Street, Indianapolis, Indiana, 46240 USA
Aram CooksonRyan DowlingSokaClinton Crumpler
Unreal®
Engine 4 Game Development
Editor-in-Chief
Greg Wiegand
Executive Editor
Laura Lewin
Marketing Manager
Stephane Nakib
Development Editor
Sheri Replin
Managing Editor
Sandra Schroeder
Senior Project
Editor
Lori Lyons
Copy Editor
Kitty Wilson
Indexer
Larry D. Sweazy
Proofreader
Paula Lowell
Technical Editors
Rusel DeMariaJack MamaisMartin Murphy
Editorial Assistant
Olivia Basegio
Cover Designer
Chuti Prasertsith
Compositor
codeMantra
Sams Teach Yourself Unreal® Engine 4 Game Development in 24 HoursCopyright © 2016 by Pearson Education, Inc.
All rights reserved. Printed in the United States of America. This publication is protected by copyright, and permission must be obtained from the publisher prior to any prohibited reproduction, storage in a retrieval system, or transmission in any form or by any means, electronic, mechanical, photocopying, recording, or likewise. For information regarding permissions, request forms, and the appropriate contacts within the Pearson Education Global Rights & Permissions Department, please visit www.pearsoned.com/permissions/. No patent liability is assumed with respect to the use of the information contained herein. Although every precaution has been taken in the preparation of this book, the publisher and author assume no responsibility for errors or omissions. Nor is any liability assumed for damages resulting from the use of the information contained herein.
ISBN-13: 978-0-672-33762-8ISBN-10: 0-672-33762-2
Library of Congress Control Number: 2016904542
First Printing June 2016
TrademarksAll terms mentioned in this book that are known to be trademarks or service marks have been appropriately capitalized. Sams Publishing cannot attest to the accuracy of this information. Use of a term in this book should not be regarded as affecting the validity of any trademark or service mark.
Unreal® is a trademark or registered trademark of Epic Games, Inc. in the United States of America and elsewhere.
Warning and DisclaimerEvery effort has been made to make this book as complete and as accurate as possible, but no warranty or fitness is implied. The information provided is on an “as is” basis. The authors and the publisher shall have neither liability nor responsibility to any person or entity with respect to any loss or damages arising from the information contained in this book or programs accompanying it.
Special SalesFor information about buying this title in bulk quantities, or for special sales opportunities (which may include electronic versions; custom cover designs; and content particular to your business, training goals, marketing focus, or branding interests), please contact our corporate sales department at [email protected] or (800) 382-3419.
For government sales inquiries, please contact [email protected].
For questions about sales outside the U.S., please contact [email protected].
Contents at a Glance
HOUR 1 Introducing Unreal Engine 4 ........................................................................................................1
2 Understanding the Gameplay Framework .....................................................................21
3 Coordinates, Transforms, Units, and Organization . . . . . . . . . . . . . . . . . . . . . . . . . . . . 37
4 Working with Static Mesh Actors . . . . . . . . . . . . . . . . . . . . . . . . . . . . . . . . . . . . . . . . . . . . . . . . . . . . . 53
5 Applying Lighting and Rendering . . . . . . . . . . . . . . . . . . . . . . . . . . . . . . . . . . . . . . . . . . . . . . . . . . . 75
6 Using Materials . . . . . . . . . . . . . . . . . . . . . . . . . . . . . . . . . . . . . . . . . . . . . . . . . . . . . . . . . . . . . . . . . . . . . . . . . . . . . 89
7 Using Audio System Elements . . . . . . . . . . . . . . . . . . . . . . . . . . . . . . . . . . . . . . . . . . . . . . . . . . . . . . . 109
8 Creating Landscapes and Foliage . . . . . . . . . . . . . . . . . . . . . . . . . . . . . . . . . . . . . . . . . . . . . . . . . . 123
9 World Building . . . . . . . . . . . . . . . . . . . . . . . . . . . . . . . . . . . . . . . . . . . . . . . . . . . . . . . . . . . . . . . . . . . . . . . . . . . . 139
10 Crafting Effects with Particle Systems . . . . . . . . . . . . . . . . . . . . . . . . . . . . . . . . . . . . . . . . . . . . . 161
11 Using Skeletal Mesh Actors . . . . . . . . . . . . . . . . . . . . . . . . . . . . . . . . . . . . . . . . . . . . . . . . . . . . . . . . . . . 181
12 Matinee and Cinematics . . . . . . . . . . . . . . . . . . . . . . . . . . . . . . . . . . . . . . . . . . . . . . . . . . . . . . . . . . . . . . 203
13 Learning to Work with Physics . . . . . . . . . . . . . . . . . . . . . . . . . . . . . . . . . . . . . . . . . . . . . . . . . . . . . . 223
14 Introducing Blueprint Visual Scripting System . . . . . . . . . . . . . . . . . . . . . . . . . . . . . . . . 245
15 Working with Level Blueprints . . . . . . . . . . . . . . . . . . . . . . . . . . . . . . . . . . . . . . . . . . . . . . . . . . . . . . 269
16 Working with Blueprint Classes . . . . . . . . . . . . . . . . . . . . . . . . . . . . . . . . . . . . . . . . . . . . . . . . . . . . . 287
17 Using Editable Variables and the Construction Script . . . . . . . . . . . . . . . . . . . . . . 311
18 Making Key Input Events and Spawning Actors . . . . . . . . . . . . . . . . . . . . . . . . . . . . . . 325
19 Making an Action Encounter . . . . . . . . . . . . . . . . . . . . . . . . . . . . . . . . . . . . . . . . . . . . . . . . . . . . . . . . 341
20 Creating an Arcade Shooter: Input Systems and Pawns . . . . . . . . . . . . . . . . . . . 355
21 Creating an Arcade Shooter: Obstacles and Pickups . . . . . . . . . . . . . . . . . . . . . . . . 377
22 Working with UMG . . . . . . . . . . . . . . . . . . . . . . . . . . . . . . . . . . . . . . . . . . . . . . . . . . . . . . . . . . . . . . . . . . . . . . 407
23 Making an Executable . . . . . . . . . . . . . . . . . . . . . . . . . . . . . . . . . . . . . . . . . . . . . . . . . . . . . . . . . . . . . . . . . 429
24 Working with Mobile . . . . . . . . . . . . . . . . . . . . . . . . . . . . . . . . . . . . . . . . . . . . . . . . . . . . . . . . . . . . . . . . . . . 441
Index . . . . . . . . . . . . . . . . . . . . . . . . . . . . . . . . . . . . . . . . . . . . . . . . . . . . . . . . . . . . . . . . . . . . . . . . . . . . . . . . . . . . . . . . . . 465
Companion Files: To gain access to project files and downloads, go to the book’s companion
website at www.sty-ue4.com.
Table of Contents
HOUR 1: Introducing Unreal Engine 4 1
Installing Unreal ......................................................................................................................................................2
Creating Your First Project ...............................................................................................................................4
Learning the Interface .........................................................................................................................................7
View Modes and Visualizers ........................................................................................................................14
Playing a Level .......................................................................................................................................................16
Summary .....................................................................................................................................................................17
Q&A ................................................................................................................................................................................18
Workshop ....................................................................................................................................................................18
Exercise .........................................................................................................................................................................19
HOUR 2: Understanding the Gameplay Framework 21
Available Resources ............................................................................................................................................21
Asset References and the Reference Viewer .....................................................................................29
Gameplay Framework ......................................................................................................................................30
Summary .....................................................................................................................................................................35
Q&A ................................................................................................................................................................................35
Workshop ....................................................................................................................................................................35
Exercise .........................................................................................................................................................................36
HOUR 3: Coordinates, Transforms, Units, and Organization 37
Understanding Cartesian Coordinates ................................................................................................37
Working with Transforms..............................................................................................................................38
Assessing Units and Measurements .......................................................................................................42
Organizing a Scene .............................................................................................................................................45
Summary .....................................................................................................................................................................50
Q&A ................................................................................................................................................................................51
Workshop ....................................................................................................................................................................51
Exercise .........................................................................................................................................................................52
Table of Contents v
HOUR 4: Working with Static Mesh Actors 53
Static Mesh Assets ................................................................................................................................................53
Static Mesh Editor .................................................................................................................................................54
Viewing UV Layouts ...........................................................................................................................................57
Collision Hulls .........................................................................................................................................................59
Static Mesh Actors ................................................................................................................................................66
Summary .....................................................................................................................................................................73
Q&A ................................................................................................................................................................................73
Workshop ....................................................................................................................................................................73
Exercise .........................................................................................................................................................................74
HOUR 5: Applying Lighting and Rendering 75
Learning Light Terminology .......................................................................................................................75
Understanding Light Types ..........................................................................................................................76
Using Light Properties .......................................................................................................................................82
Building Lighting..................................................................................................................................................83
Summary .....................................................................................................................................................................87
Q&A ................................................................................................................................................................................87
Workshop ....................................................................................................................................................................87
Exercise .........................................................................................................................................................................88
HOUR 6: Using Materials 89
Understanding Materials................................................................................................................................89
Physically Based Rendering (PBR) ..........................................................................................................90
Material Input Types .........................................................................................................................................91
Creating Textures .................................................................................................................................................94
Making a Material ..............................................................................................................................................96
Summary ..................................................................................................................................................................105
Q&A .............................................................................................................................................................................105
Workshop .................................................................................................................................................................106
Exercise ......................................................................................................................................................................107
HOUR 7: Using Audio System Elements 109
Introducing Audio Basics ............................................................................................................................109
Using Sound Actors ..........................................................................................................................................112
Controlling Sounds with Audio Volumes .......................................................................................119

vi Sams Teach Yourself Unreal® Engine 4 Game Development in 24 Hours
Summary ..................................................................................................................................................................120
Q&A .............................................................................................................................................................................120
Workshop .................................................................................................................................................................121
Exercise ......................................................................................................................................................................122
HOUR 8: Creating Landscapes and Foliage 123
Working with Landscapes ..........................................................................................................................123
Sculpting Shapes and Volumes ..............................................................................................................127
Using Foliage.........................................................................................................................................................133
Summary ..................................................................................................................................................................136
Q&A .............................................................................................................................................................................136
Workshop .................................................................................................................................................................137
Exercise ......................................................................................................................................................................137
HOUR 9: World Building 139
Building Worlds ..................................................................................................................................................140
World Building Process .................................................................................................................................141
Summary ..................................................................................................................................................................157
Q&A .............................................................................................................................................................................157
Workshop .................................................................................................................................................................158
Exercise ......................................................................................................................................................................159
HOUR 10: Crafting Effects with Particle Systems 161
Understanding Particles and Data Types .......................................................................................161
Working with Cascade ..................................................................................................................................162
Using Common Modules .............................................................................................................................168
Setting Up Materials for Particles .........................................................................................................172
Triggering Particle Systems ........................................................................................................................176
Summary ..................................................................................................................................................................177
Q&A .............................................................................................................................................................................177
Workshop .................................................................................................................................................................178
Exercise ......................................................................................................................................................................179
HOUR 11: Using Skeletal Mesh Actors 181
Defining Skeletal Meshes ............................................................................................................................181
Importing Skeletal Meshes .........................................................................................................................186
Learning Persona ...............................................................................................................................................191
Table of Contents vii
Using Skeletal Mesh Actors ........................................................................................................................199
Summary ..................................................................................................................................................................201
Q&A .............................................................................................................................................................................201
Workshop .................................................................................................................................................................202
Exercise ......................................................................................................................................................................202
HOUR 12: Matinee and Cinematics 203
Matinee Actors .....................................................................................................................................................203
Matinee Editor......................................................................................................................................................206
Curve Editor ...........................................................................................................................................................212
Working with Other Tracks .......................................................................................................................215
Working with Cameras in Matinee ....................................................................................................216
Summary ..................................................................................................................................................................220
Q&A .............................................................................................................................................................................220
Workshop .................................................................................................................................................................221
Exercise ......................................................................................................................................................................222
HOUR 13: Learning to Work with Physics 223
Using Physics in UE4 .......................................................................................................................................223
Simulating Physics ...........................................................................................................................................227
Using Physical Materials .............................................................................................................................230
Working with Constraints ..........................................................................................................................234
Using Force Actors.............................................................................................................................................239
Summary ..................................................................................................................................................................241
Q&A .............................................................................................................................................................................241
Workshop .................................................................................................................................................................242
Exercise ......................................................................................................................................................................242
HOUR 14: Introducing Blueprint Visual Scripting System 245
Visual Scripting Basics ...................................................................................................................................245
Understanding the Blueprint Editor ...................................................................................................247
Fundamental Concepts in Scripting ...................................................................................................252
Summary ..................................................................................................................................................................264
Q&A .............................................................................................................................................................................264
Workshop .................................................................................................................................................................265
Exercise ......................................................................................................................................................................266
viii Sams Teach Yourself Unreal® Engine 4 Game Development in 24 Hours
HOUR 15: Working with Level Blueprints 269
Actor Collision Settings .................................................................................................................................271
Assigning Actors to Events .........................................................................................................................272
Assigning Actors to Reference Variables .........................................................................................274
Summary ..................................................................................................................................................................284
Q&A .............................................................................................................................................................................284
Workshop .................................................................................................................................................................285
Exercise ......................................................................................................................................................................286
HOUR 16: Working with Blueprint Classes 287
Using Blueprint Classes ................................................................................................................................287
The Blueprint Editor Interface .................................................................................................................289
Working with the Components ..............................................................................................................291
Working with the Timeline .......................................................................................................................296
Scripting a Pulsating Light ........................................................................................................................300
Summary ..................................................................................................................................................................307
Q&A .............................................................................................................................................................................308
Workshop .................................................................................................................................................................308
Exercise ......................................................................................................................................................................309
HOUR 17: Using Editable Variables and the Construction Script 311
Setting Up ................................................................................................................................................................311
Making Editable Variables .........................................................................................................................312
Using the Construction Script ..................................................................................................................314
Summary ..................................................................................................................................................................321
Q&A .............................................................................................................................................................................321
Workshop .................................................................................................................................................................322
Exercise ......................................................................................................................................................................323
HOUR 18: Making Key Input Events and Spawning Actors 325
Why Spawning Is Important....................................................................................................................325
Creating a Blueprint Class to Spawn ................................................................................................326
Setting Up the Spawner Blueprint ........................................................................................................329
Spawning an Actor from a Class ..........................................................................................................332
Summary ..................................................................................................................................................................336
Table of Contents ix
Q&A .............................................................................................................................................................................336
Workshop .................................................................................................................................................................336
Exercise ......................................................................................................................................................................337
HOUR 19: Making an Action Encounter 341
Project Game Modes .......................................................................................................................................341
Knowing Characters’ Abilities .................................................................................................................342
Using Blueprint Classes ................................................................................................................................344
Actor and Component Tags ......................................................................................................................350
Summary ..................................................................................................................................................................351
Q&A .............................................................................................................................................................................351
Workshop .................................................................................................................................................................352
Exercise ......................................................................................................................................................................352
HOUR 20: Creating an Arcade Shooter: Input Systems and Pawns 355
Identifying Requirements with a Design Summary ..............................................................356
Creating a Game Project .............................................................................................................................356
Creating a Custom Game Mode ...........................................................................................................359
Creating a Custom Pawn and Player Controller .....................................................................361
Controlling a Pawn’s Movement ..........................................................................................................365
Setting Up a Fixed Camera .......................................................................................................................371
Summary ..................................................................................................................................................................373
Q&A .............................................................................................................................................................................373
Workshop .................................................................................................................................................................374
Exercise ......................................................................................................................................................................375
HOUR 21: Creating an Arcade Shooter: Obstacles and Pickups 377
Creating an Obstacle Base Class ..........................................................................................................378
Making Your Obstacle Move ....................................................................................................................381
Damaging the Pawn .......................................................................................................................................384
Restarting the Game on Death ..............................................................................................................388
Creating a Health Pickup ...........................................................................................................................391
Creating an Actor Spawner .......................................................................................................................397
Cleaning Up Old Obstacles .......................................................................................................................403
Summary ..................................................................................................................................................................403
x Sams Teach Yourself Unreal® Engine 4 Game Development in 24 Hours
Q&A .............................................................................................................................................................................404
Workshop .................................................................................................................................................................405
Exercise ......................................................................................................................................................................405
HOUR 22: Working with UMG 407
Creating a Widget Blueprint ....................................................................................................................407
Navigating the UMG Interface ...............................................................................................................408
Creating a Start Menu ...................................................................................................................................413
Sample Menu System .....................................................................................................................................425
Summary ..................................................................................................................................................................426
Q&A .............................................................................................................................................................................426
Workshop .................................................................................................................................................................427
Exercise ......................................................................................................................................................................427
HOUR 23: Making an Executable 429
Cooking Content ................................................................................................................................................429
Packaging a Project for Windows.........................................................................................................430
Resources for Android and iOS Packaging ...................................................................................435
Accessing Advanced Packaging Settings ........................................................................................436
Summary ..................................................................................................................................................................437
Q&A .............................................................................................................................................................................438
Workshop .................................................................................................................................................................438
Exercise ......................................................................................................................................................................439
HOUR 24: Working with Mobile 441
Developing for Mobile Devices ...............................................................................................................442
Using Touch ...........................................................................................................................................................454
Using a Device’s Motion Data ................................................................................................................459
Summary ..................................................................................................................................................................462
Q&A .............................................................................................................................................................................462
Workshop .................................................................................................................................................................463
Exercise ......................................................................................................................................................................464
Index 465
Preface
Unreal Engine 4 is a powerful game engine used by many professional and indie game
developers. When using a tool such as Unreal Engine for the first time, figuring out where to
begin can be a daunting task. This books provides a starting point by introducing you to the
interface, workflow, and many of the editors and tools Unreal Engine 4 has to offer. It will
help you get a strong foundation you can later build on, and it will spark your interest to
explore Unreal Engine and game design further. Each chapter is designed to get you up and
running quickly in key areas.
Who Should Read This BookIf you want to learn to make games, applications, or interactive experiences but don’t
know where to begin, this book and Unreal Engine are for you. This book is for anyone
interested in understanding the fundamentals of Unreal Engine. Whether you are new to
game development, a hobbyist, or a student learning to become a professional, you will find
something useful in these pages.
How This Book Is Organized and What It CoversFollowing the Sam’s Teach Yourself approach, this book is organized into 24 chapters that
should take approximately 1 hour each to work through:
Hour 1, “Introducing Unreal Engine 4”: This hour gets you up and running by
showing you how to download and install Unreal Engine 4 and introduces you to the
Editor interface.
Hour 2, “Understanding the Gameplay Framework”: This hour introduces you to
the concept of the Gameplay Framework, a key component of every project created
in UE4.
Hour 3, “Coordinates, Transforms, Units, and Organization”: This hour helps you
understand how the measurement, control, and organizational systems work in UE4.
Hour 4, “Working with Static Mesh Actors”: In this hour, you learn how to import
3D models and use the Static Mesh Editor.
xii Sams Teach Yourself Unreal® Engine 4 Game Development in 24 Hours
Hour 5, “Applying Lighting and Rendering”: In this hour, you learn how to place
lights in a level and how to change their properties.
Hour 6, “Using Materials”: This hour teaches you how to use textures and materials
in UE4.
Hour 7, “Using Audio System Elements”: In this hour, you learn to import audio
files, create Sound Cue assets, and place Ambient Sound Actors into a level.
Hour 8, “Creating Landscapes and Foliage”: In this hour, you learn to work with
UE4’s landscape system to create your own landscapes and how to use the foliage
system.
Hour 9, “World Building”: In this hour, you apply what you learned in the previous
hours and create a level.
Hour 10, “Crafting Effects with Particle Systems”: In this hour, you learn the
fundamental controls of Cascade, which you can use to craft dynamic particle effects.
Hour 11, “Using Skeletal Mesh Actors”: In this hour, you learn about the Persona
Editor and the different asset types needed to bring characters and creatures to life.
Hour 12, “Matinee and Cinematics”: In this hour, you learn to use the Matinee
Editor and animate cameras and meshes.
Hour 13, “Learning to Work with Physics “: In this hour, you learn to make Actors
simulate physics to respond to the world around them, and you also learn how to
constrain them.
Hour 14, “Introducing Blueprint Visual Scripting System”: In this hour, you are
introduced to basic scripting concepts and learn to use the Level Blueprint Editor.
Hour 15, “Working with Level Blueprints”: In this hour, you learn about Blueprint
event sequences and create a collision event that responds to the player’s actions.
Hour 16, “Working with Blueprint Classes”: In this hour, you learn how to create a
Blueprint class, use Timeline, and create a simple Pickup Actor.
Hour 17, “Using Editable Variables and the Construction Script”: In this hour, you
learn to use the Construction Script and editable variables to make modifiable Actors.
Hour 18, “Making Key Input Events and Spawning Actors”: In this hour, you learn
to make a keyboard input event that spawns an Actor during gameplay.
Hour 19, “Making an Action Encounter”: In this hour, you use an existing Game
mode and Blueprint classes to design and create your own first- or third-person action-
based obstacle course.

Preface xiii
Hour 20, “Creating an Arcade Shooter: Input System and Pawns”: In this hour, you
begin work on a 1990s arcade-style space shooter. You learn about the input system
and user-controlled Actors called Pawns.
Hour 21, “Creating an Arcade Shooter: Obstacles and Pickups”: In this hour, you
continue working on the arcade shooter game, creating asteroid obstacles and health
pickups, and you learn how to utilize Blueprint class inheritance.
Hour 22, “Working with UMG”: In this hour, you learn to use the Unreal Motion
Graphics UI designer and make a start menu.
Hour 23, “Making an Executable”: In this hour, you learn the quick path to
preparing a project for deployment to other devices.
Hour 24, “Working with Mobile”: In this hour, you learn optimization guidelines
and techniques for working with mobile devices and some simple ways to utilize touch
and motion sensors.
We hope you enjoy this book and benefit from it. Good luck on your journey with the UE4
game engine!
Companion Files: To gain access to project files and downloads, go to the book’s companion
website at www.sty-ue4.com.
About the Authors
Aram Cookson is a professor in the Interactive Design and Game Development (ITGM)
department at the Savannah College of Art and Design (SCAD). He has a B.F.A in Sculpture
and an M.F.A. in Computer Art. After finishing his M.F.A., he went on to help start the ITGM
program and served as the graduate coordinator for 9 years. Over the past 15 years, Aram
has developed and taught a range of game art and design courses in classrooms and online,
utilizing the Unreal Engine technology.
Ryan DowlingSoka is a technical artist working on the Gears of War franchise at Microsoft
Studio’s The Coalition, located in Vancouver, British Columbia. He works primarily on
content features for the team, crafting systems for destruction, foliage, visual effects, post-
processes, and user interfaces in Unreal Engine 4. Previously, he worked at Microsoft,
developing experiences for the Microsoft HoloLens in Unity5. Ryan is an expert in a variety
of entertainment software creation packages, including Maya, Houdini, Substance Designer,
Photoshop, Nuke, and After Effects. Ryan holds a B.F.A. in Visual Effects from Savannah
College of Art and Design. With a passion for interactive storytelling, rooted in playing
1990s console role-playing games (Baldur’s Gate II and Planescape: Torment), Ryan focuses
on applying interactive technical solutions to solving difficult problems in modern gaming.
When not working on video games, Ryan can be found swing dancing his evenings away
with his wife.
Clinton Crumpler is currently a senior environment artist at Microsoft Studio’s
The Coalition, located in Vancouver, British Columbia. Previously an artist at Bethesda’s
Battlecry Studios, KIXEYE, Army Game Studio, and various other independent studios,
Clinton’s primary focus areas are environment art, shader development, and art direction.
Clinton has released multiple video tutorials in collaboration with Digital Tutors, with a
focus on game art development for Unreal Engine. He completed an M.F.A. in Interactive
and Game Design and a B.F.A. in Animation at Savannah College of Art and Design
(SCAD) in Savannah, Georgia. Prior to attending SCAD, he received a B.F.A. in Graphic
Design at Longwood University, located in Farmville, Virginia. More information and his
digital works are available at www.clintoncrumpler.com.
Dedication
Tricia, Naia, and Elle: I love you all. —Aram
To Grandpa Bob: Thank you for the constant support through my education and career. Without your contributions to my future, I would not be where I am today,
and I am ever grateful. —Ryan
To Amanda: Thanks for driving me across the desert while I wrote. —Clinton
Acknowledgments
To my family: Thank you for being so understanding and patient, and for giving me the
time to get this done.
Mom and Dad: Thank you for buying my first computer (TRS-80).
Luis: Thank you for thinking of me. You were an awesome department chair.
To Laura, Sheri, Olivia, and all the reviewers: Thank you for all your efforts.
Epic Games: Thank you for developing, and continuing to develop, such amazing
technology and games.
—Aram
A big thank you to Samantha for tolerating and accommodating my weekends being
entirely consumed at a keyboard. Your patience and support through this process have been
invaluable.
—Ryan
Big thanks go out to my best friend, Brian, for always helping me become a better writer
and editing my works and always increasing my confidence through brotherly support.
Thanks to Amanda and her family for supporting me while I wrote this during our move
cross-country. Your understanding and help are always appreciated.
—Clinton

We Want to Hear from You!
As the reader of this book, you are our most important critic and commentator. We value
your opinion and want to know what we’re doing right, what we could do better, what areas
you’d like to see us publish in, and any other words of wisdom you’re willing to pass our
way.
We welcome your comments. You can email or write to let us know what you did or
didn’t like about this book—as well as what we can do to make our books better.
Please note that we cannot help you with technical problems related to the topic of this book.
When you write, please be sure to include this book’s title and author as well as your name
and email address. We will carefully review your comments and share them with the author
and editors who worked on the book.
Email: [email protected]
Mail: Sams Publishing
ATTN: Reader Feedback
800 East 96th Street
Indianapolis, IN 46240 USA
Reader Services
Register your copy of Sams Teach Yourself Unreal Engine 4 Game Development in 24 Hours
at informit.com for convenient access to updates and corrections as they become available.
To start the registration process, go to informit.com/register and log in or create an account*.
Enter the product ISBN, 9780672337628, and click Submit.
*Be sure to check the box that you would like to hear from us in order to receive exclusive
discounts on future editions of this product.
HOUR 20Creating an Arcade Shooter:
Input Systems and Pawns
What You’ll Learn in This Hour:
Identifying requirements with a design summary
Creating a new project
Making a custom Game Mode
Creating a custom Pawn and Player Controller
Controlling a Pawn’s movement
Setting up a fixed camera
When making a new video game, you almost always have the player take control of something
in the game world. This can mean a full character or a simple object. What is important is
that the player does something, like press a key or pull a trigger, and something in the game
responds. In UE4, you use Player Controllers to interpret those physical actions and Pawns to act
them out. This hour explores these concepts and helps you create your first game—a simple
arcade shooter. You will learn how to determine requirements from a design brief, how to create
and set up a new project, how to spawn and use a Pawn, and how to set up a game camera.
NOTE
Hour 20 SetupIn this hour, you begin to create a game from scratch. You will create a Blank project with Starter Content. In the Hour_20 folder (available on the book’s companion website at www.sty-ue4.com), you will find the assets that you need to work with along with a version of the game called H20_AcradeShooter that you can use to compare your results.
356 HOUR 20: Creating an Arcade Shooter: Input Systems and Pawns
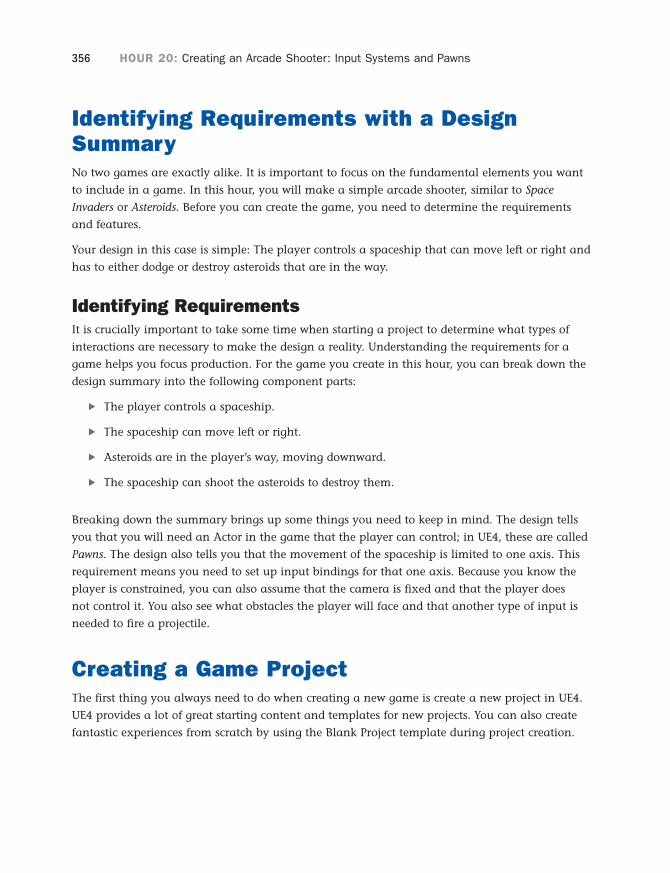
Identifying Requirements with a Design SummaryNo two games are exactly alike. It is important to focus on the fundamental elements you want
to include in a game. In this hour, you will make a simple arcade shooter, similar to Space
Invaders or Asteroids. Before you can create the game, you need to determine the requirements
and features.
Your design in this case is simple: The player controls a spaceship that can move left or right and
has to either dodge or destroy asteroids that are in the way.
Identifying RequirementsIt is crucially important to take some time when starting a project to determine what types of
interactions are necessary to make the design a reality. Understanding the requirements for a
game helps you focus production. For the game you create in this hour, you can break down the
design summary into the following component parts:
The player controls a spaceship.
The spaceship can move left or right.
Asteroids are in the player’s way, moving downward.
The spaceship can shoot the asteroids to destroy them.
Breaking down the summary brings up some things you need to keep in mind. The design tells
you that you will need an Actor in the game that the player can control; in UE4, these are called
Pawns. The design also tells you that the movement of the spaceship is limited to one axis. This
requirement means you need to set up input bindings for that one axis. Because you know the
player is constrained, you can also assume that the camera is fixed and that the player does
not control it. You also see what obstacles the player will face and that another type of input is
needed to fire a projectile.
Creating a Game ProjectThe first thing you always need to do when creating a new game is create a new project in UE4.
UE4 provides a lot of great starting content and templates for new projects. You can also create
fantastic experiences from scratch by using the Blank Project template during project creation.
Creating a Game Project 357
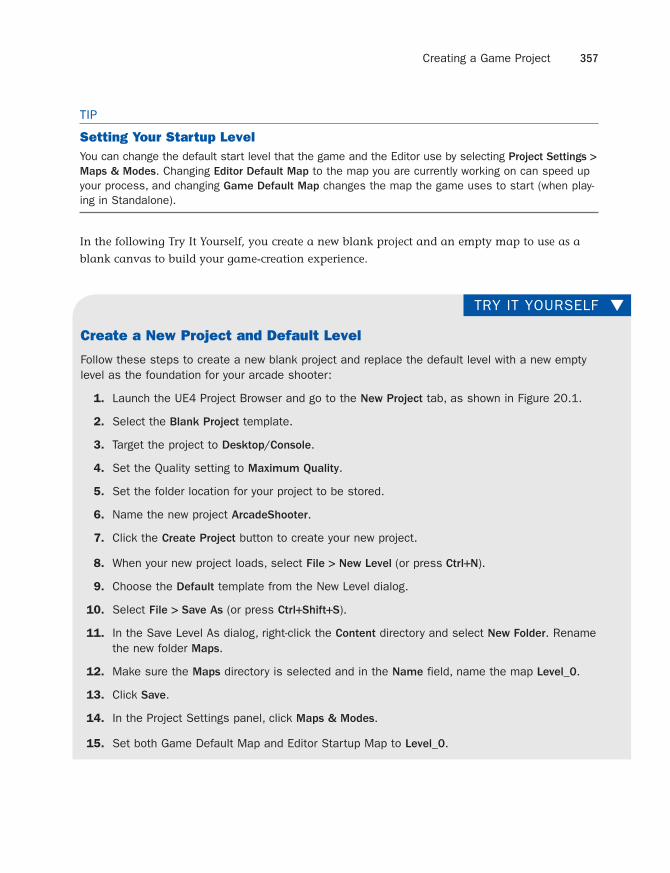
TIP
Setting Your Startup LevelYou can change the default start level that the game and the Editor use by selecting Project Settings >
Maps & Modes. Changing Editor Default Map to the map you are currently working on can speed up your process, and changing Game Default Map changes the map the game uses to start (when play-ing in Standalone).
In the following Try It Yourself, you create a new blank project and an empty map to use as a
blank canvas to build your game-creation experience.
▼TRY IT YOURSELF
Create a New Project and Default Level
Follow these steps to create a new blank project and replace the default level with a new empty level as the foundation for your arcade shooter:
1. Launch the UE4 Project Browser and go to the New Project tab, as shown in Figure 20.1.
2. Select the Blank Project template.
3. Target the project to Desktop/Console.
4. Set the Quality setting to Maximum Quality.
5. Set the folder location for your project to be stored.
6. Name the new project ArcadeShooter.
7. Click the Create Project button to create your new project.
8. When your new project loads, select File > New Level (or press Ctrl+N).
9. Choose the Default template from the New Level dialog.
10. Select File > Save As (or press Ctrl+Shift+S).
11. In the Save Level As dialog, right-click the Content directory and select New Folder. Rename the new folder Maps.
12. Make sure the Maps directory is selected and in the Name field, name the map Level_0.
13. Click Save.
14. In the Project Settings panel, click Maps & Modes.
15. Set both Game Default Map and Editor Startup Map to Level_0.
358 HOUR 20: Creating an Arcade Shooter: Input Systems and Pawns
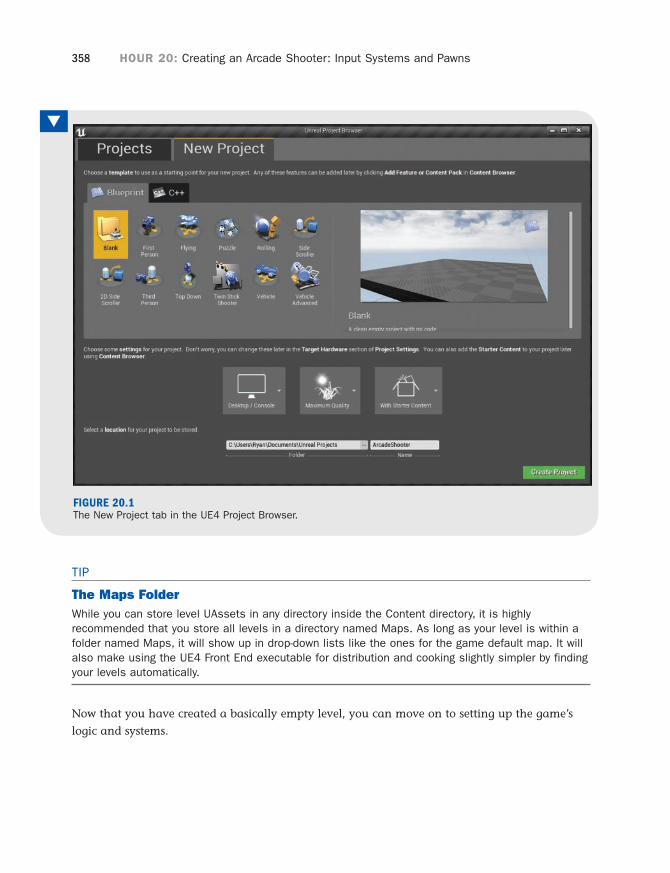
TIP
The Maps FolderWhile you can store level UAssets in any directory inside the Content directory, it is highly recommended that you store all levels in a directory named Maps. As long as your level is within a folder named Maps, it will show up in drop-down lists like the ones for the game default map. It will also make using the UE4 Front End executable for distribution and cooking slightly simpler by finding your levels automatically.
Now that you have created a basically empty level, you can move on to setting up the game’s
logic and systems.
▼
FIGURE 20.1The New Project tab in the UE4 Project Browser.
Creating a Custom Game Mode 359
Creating a Custom Game ModeYou need a place to store your game’s logic and behaviors. In UE4, each level has its own
Blueprint, which is one place to store game logic, but putting too much scripting in the Level
Blueprint means a lot of copying and pasting down the road to transfer that logic to new levels
and maps. Instead, UE4 has the concept of a Game Mode. Like Level Blueprints, Game Modes
can store complex behaviors related to a game, but unlike with Level Blueprints, that behavior
can be shared between multiple levels.
The Game Mode is responsible for defining the behavior of the game being played and enforcing
rules. The Game Mode holds information about items a player begins the game with, what
happens when the player dies or the game ends, game time limits, and scores.
Game modes are the glue between many of the different systems in a game. Game mode
Blueprints hold the characters or Pawns you are using and also reference which HUD class to
use, which spectator class to used, and the game state and player state classes that control the
information necessary for multiplayer experiences.
At the most basic level, the Game Mode sets the rules of the current game—for example, how
many players can join, how level transitions are handled, information about when the game is
paused or active, and game-specific behaviors like win and loss conditions.
Creating a new Game Mode is easy. In the Content Browser, right-click and select Blueprint
Class to open the Pick Parent Class window, which is where you can select Game Mode, as
shown in Figure 20.2.
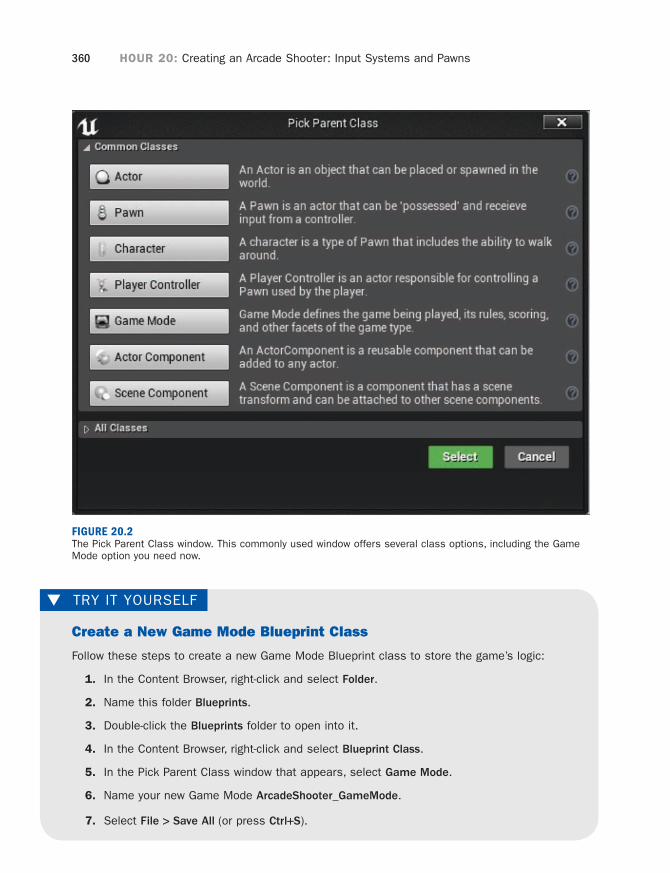
360 HOUR 20: Creating an Arcade Shooter: Input Systems and Pawns
FIGURE 20.2The Pick Parent Class window. This commonly used window offers several class options, including the Game Mode option you need now.
▼ TRY IT YOURSELF
Create a New Game Mode Blueprint Class
Follow these steps to create a new Game Mode Blueprint class to store the game’s logic:
1. In the Content Browser, right-click and select Folder.
2. Name this folder Blueprints.
3. Double-click the Blueprints folder to open into it.
4. In the Content Browser, right-click and select Blueprint Class.
5. In the Pick Parent Class window that appears, select Game Mode.
6. Name your new Game Mode ArcadeShooter_GameMode.
7. Select File > Save All (or press Ctrl+S).
Creating a Custom Pawn and Player Controller 361
Now that you have a new Game Mode, you need to tell UE4 to load it instead of the default
Game Mode. You do this in the Project Settings panel.
TIP
Level OverridesSometimes it is necessary to use different Game Modes during different parts of a game. Each level can also override the Game Mode and class settings. To change these settings on a per-level basis, select Window > World Settings and find the Game Mode Override property. This property works exactly as it does in the Project Settings panel. Also, when you add a Game Mode Override setting, you can override other properties, such as those for Pawns or HUD classes, which can be especially useful when you’re prototyping new features.
There is only ever one Game Mode present per level—either the default Game Mode set in
the Project Settings panel or the Game Mode set on a per-level basis. In a multiplayer game,
the Game Mode only ever runs on the server, and the results of the rules and state are sent
(replicated) to each client.
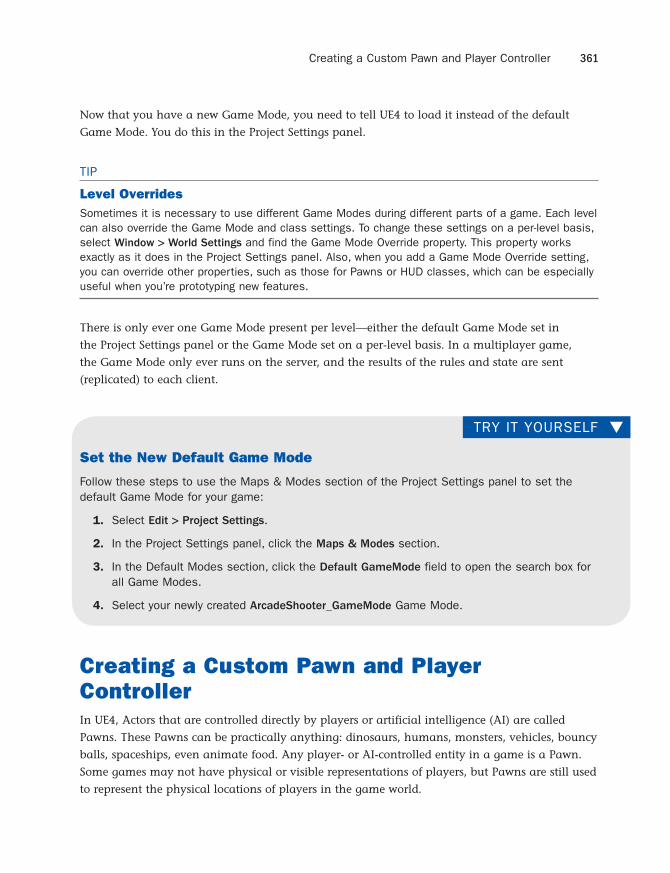
▼TRY IT YOURSELF
Set the New Default Game Mode
Follow these steps to use the Maps & Modes section of the Project Settings panel to set the default Game Mode for your game:
1. Select Edit > Project Settings.
2. In the Project Settings panel, click the Maps & Modes section.
3. In the Default Modes section, click the Default GameMode field to open the search box for all Game Modes.
4. Select your newly created ArcadeShooter_GameMode Game Mode.
Creating a Custom Pawn and Player ControllerIn UE4, Actors that are controlled directly by players or artificial intelligence (AI) are called
Pawns. These Pawns can be practically anything: dinosaurs, humans, monsters, vehicles, bouncy
balls, spaceships, even animate food. Any player- or AI-controlled entity in a game is a Pawn.
Some games may not have physical or visible representations of players, but Pawns are still used
to represent the physical locations of players in the game world.
362 HOUR 20: Creating an Arcade Shooter: Input Systems and Pawns
Pawns define the visible appearance of the controlled objects and also can control movement,
physics, and abilities. It is often useful to think of them as the physical bodies of the player in
the game world.
The non-physical representation of a player is a Controller. Controllers are the interface between
a Pawn and the player or AI controlling it.
Controllers are Actors that can possess and control Pawns. Again, Controllers are non-physical
and usually do not directly determine physical properties (e.g., appearance, movement, physics)
of the possessed Pawn. Instead, they are more the representation of the will or intent of the player.
There is a one-to-one relationship between Controllers and Pawns—in other words, one
Controller per Pawn and one Pawn per Controller. With this in mind, Pawns can be possessed
(i.e., controlled) by AI through an AI Controller or by a player through a Player Controller.
The default Player Controller handles most behavior you need for your game, but you should
create your own Pawn.
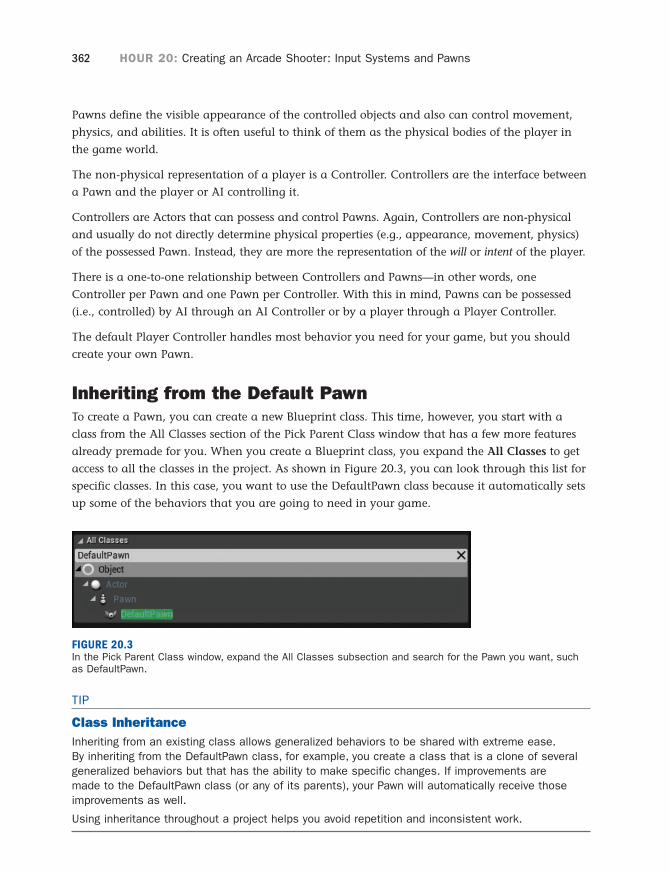
Inheriting from the Default PawnTo create a Pawn, you can create a new Blueprint class. This time, however, you start with a
class from the All Classes section of the Pick Parent Class window that has a few more features
already premade for you. When you create a Blueprint class, you expand the All Classes to get
access to all the classes in the project. As shown in Figure 20.3, you can look through this list for
specific classes. In this case, you want to use the DefaultPawn class because it automatically sets
up some of the behaviors that you are going to need in your game.
FIGURE 20.3In the Pick Parent Class window, expand the All Classes subsection and search for the Pawn you want, such as DefaultPawn.
TIP
Class InheritanceInheriting from an existing class allows generalized behaviors to be shared with extreme ease. By inheriting from the DefaultPawn class, for example, you create a class that is a clone of several generalized behaviors but that has the ability to make specific changes. If improvements are made to the DefaultPawn class (or any of its parents), your Pawn will automatically receive those improvements as well.
Using inheritance throughout a project helps you avoid repetition and inconsistent work.
Creating a Custom Pawn and Player Controller 363
You now have a new Pawn class, and you need to understand the different parts that make up
the class. Double-click your new Hero_Spaceship class in the Content Browser to open it in the
Blueprint Class Editor.
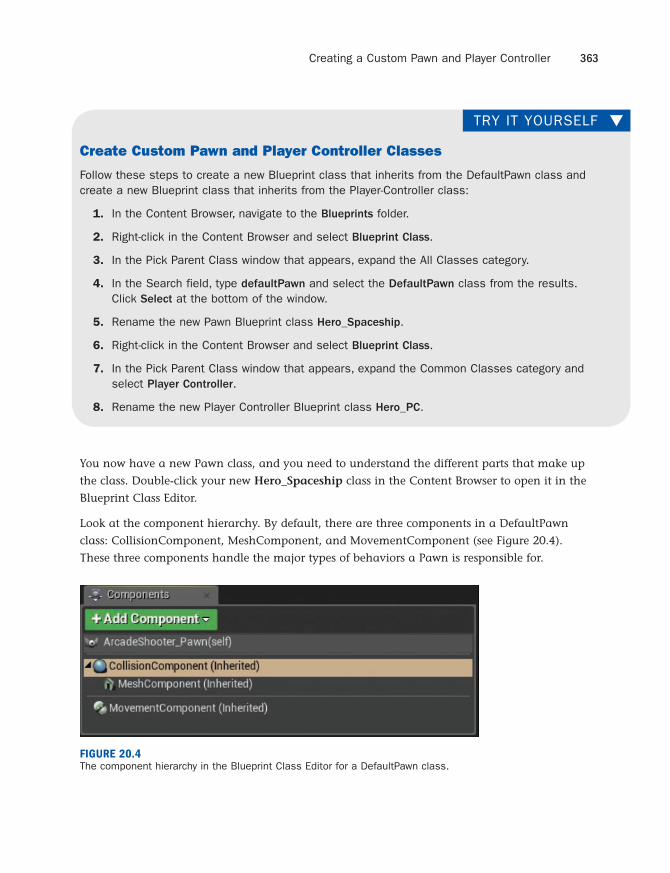
Look at the component hierarchy. By default, there are three components in a DefaultPawn
class: CollisionComponent, MeshComponent, and MovementComponent (see Figure 20.4).
These three components handle the major types of behaviors a Pawn is responsible for.
FIGURE 20.4The component hierarchy in the Blueprint Class Editor for a DefaultPawn class.
▼TRY IT YOURSELF
Create Custom Pawn and Player Controller Classes
Follow these steps to create a new Blueprint class that inherits from the DefaultPawn class and create a new Blueprint class that inherits from the Player-Controller class:
1. In the Content Browser, navigate to the Blueprints folder.
2. Right-click in the Content Browser and select Blueprint Class.
3. In the Pick Parent Class window that appears, expand the All Classes category.
4. In the Search field, type defaultPawn and select the DefaultPawn class from the results. Click Select at the bottom of the window.
5. Rename the new Pawn Blueprint class Hero_Spaceship.
6. Right-click in the Content Browser and select Blueprint Class.
7. In the Pick Parent Class window that appears, expand the Common Classes category and select Player Controller.
8. Rename the new Player Controller Blueprint class Hero_PC.
364 HOUR 20: Creating an Arcade Shooter: Input Systems and Pawns
CollisionComponent handles both physics collisions of the Pawn and trigger overlaps of the
Pawn with volumes or Actors in the level. It represents the physical volume of the Pawn and can
be shaped to fit the Pawn’s simplified form. CollisionComponent does not show up in a game
and is not part of the Pawn’s visual representation.
MeshComponent controls the visuals in a game. Right now for your game, this MeshComponent
class is a sphere, meaning that the visual representation of your Pawn is a sphere. You can
replace or modify MeshComponent to make your Pawn look like anything you desire. You can
add other types of components here to change the visuals, including Particle Emitters, Skeletal
Meshes, 2d Sprites, and complex hierarchies of Static Meshes.
MovementComponent controls your Pawn’s movement. Using MovementComponent is a
convenient way of handling player movement. Complex tasks (such as checking for collision
and handling velocity) are simplified through the convenient interface of MovementComponent.
Because you haven’t changed it yet, your Pawn is currently just a simple sphere. You can change
this by replacing MeshComponent completely or by changing its Static Mesh reference. In the
next Try It Yourself, you will import the UFO mesh used by many of the UE4 content examples
and then replace the current Pawn’s mesh with it.
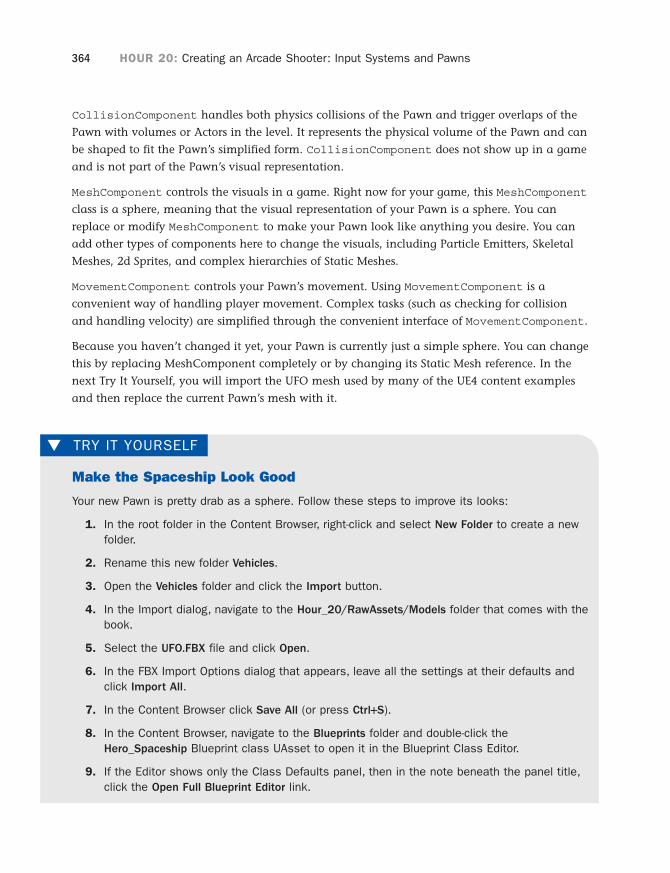
▼ TRY IT YOURSELF
Make the Spaceship Look Good
Your new Pawn is pretty drab as a sphere. Follow these steps to improve its looks:
1. In the root folder in the Content Browser, right-click and select New Folder to create a new folder.
2. Rename this new folder Vehicles.
3. Open the Vehicles folder and click the Import button.
4. In the Import dialog, navigate to the Hour_20/RawAssets/Models folder that comes with the book.
5. Select the UFO.FBX file and click Open.
6. In the FBX Import Options dialog that appears, leave all the settings at their defaults and click Import All.
7. In the Content Browser click Save All (or press Ctrl+S).
8. In the Content Browser, navigate to the Blueprints folder and double-click the Hero_Spaceship Blueprint class UAsset to open it in the Blueprint Class Editor.
9. If the Editor shows only the Class Defaults panel, then in the note beneath the panel title, click the Open Full Blueprint Editor link.
Controlling a Pawn’s Movement 365
Controlling a Pawn’s MovementUE4 makes controlling a Pawn’s movement very easy. Because you inherited your Pawn from
the DefaultPawn class, all the heavy lifting has already been done. To see just how simple it is to
control your Pawn’s movement, you can test your work.
First, you need to tell the Game Mode to spawn the player using your new Hero_Spaceship
Pawn by default. You set this in the class Defaults panel in the Game Mode’s Blueprint Class
Editor or in the Maps & Modes section of the Project Settings panel.
In the next Try It Yourself, you set the Hero_Spaceship Pawn class as the default Pawn class in
ArcadeShooter_GameMode. You also set the Player Controller class to Hero_PC.
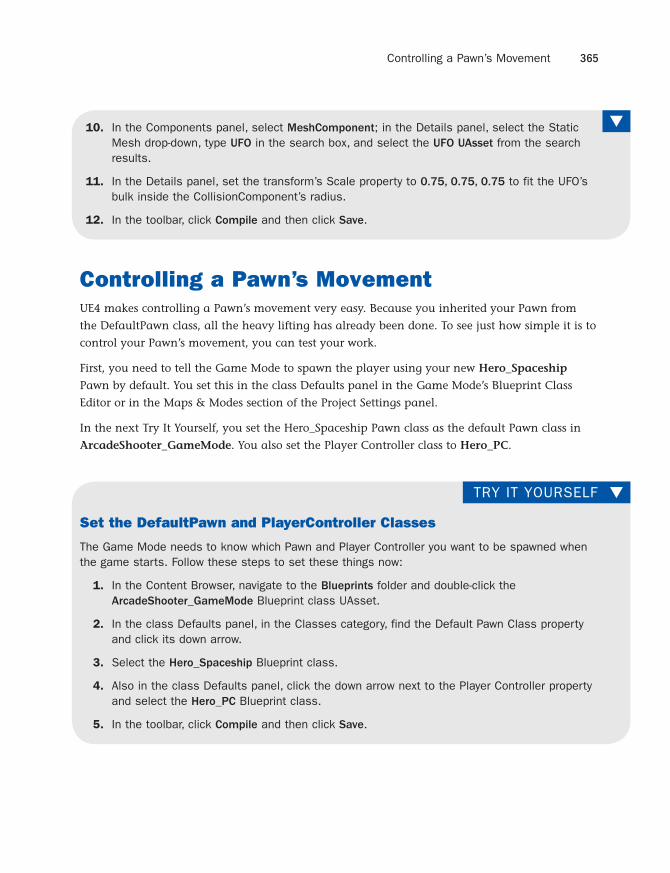
▼ 10. In the Components panel, select MeshComponent; in the Details panel, select the Static Mesh drop-down, type UFO in the search box, and select the UFO UAsset from the search results.
11. In the Details panel, set the transform’s Scale property to 0.75, 0.75, 0.75 to fit the UFO’s bulk inside the CollisionComponent’s radius.
12. In the toolbar, click Compile and then click Save.
▼TRY IT YOURSELF
Set the DefaultPawn and PlayerController Classes
The Game Mode needs to know which Pawn and Player Controller you want to be spawned when the game starts. Follow these steps to set these things now:
1. In the Content Browser, navigate to the Blueprints folder and double-click the ArcadeShooter_GameMode Blueprint class UAsset.
2. In the class Defaults panel, in the Classes category, find the Default Pawn Class property and click its down arrow.
3. Select the Hero_Spaceship Blueprint class.
4. Also in the class Defaults panel, click the down arrow next to the Player Controller property and select the Hero_PC Blueprint class.
5. In the toolbar, click Compile and then click Save.
366 HOUR 20: Creating an Arcade Shooter: Input Systems and Pawns
With Hero_Spaceship set up to be the Game Mode’s default Pawn, you are ready to test your
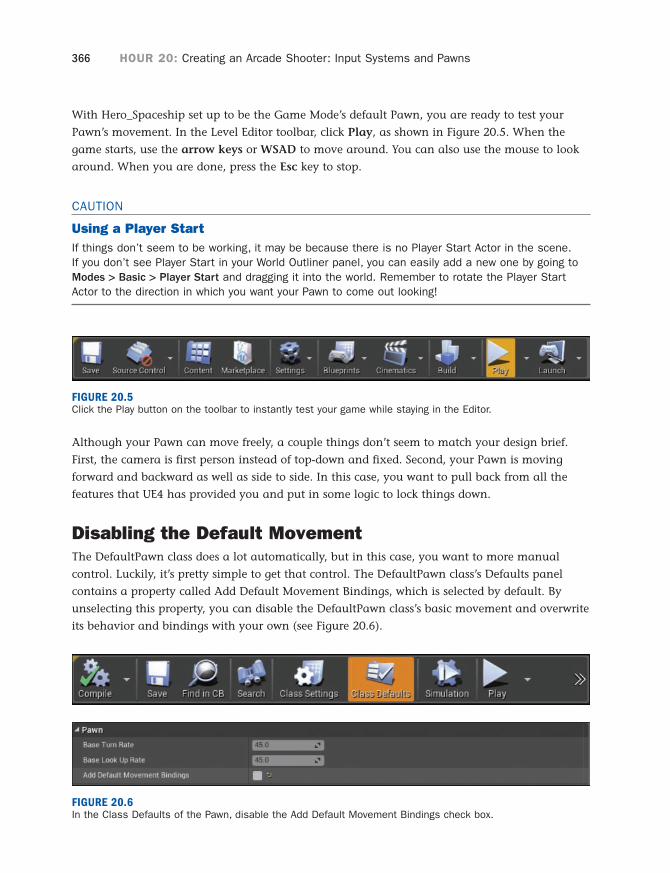
Pawn’s movement. In the Level Editor toolbar, click Play, as shown in Figure 20.5. When the
game starts, use the arrow keys or WSAD to move around. You can also use the mouse to look
around. When you are done, press the Esc key to stop.
CAUTION
Using a Player StartIf things don’t seem to be working, it may be because there is no Player Start Actor in the scene. If you don’t see Player Start in your World Outliner panel, you can easily add a new one by going to Modes > Basic > Player Start and dragging it into the world. Remember to rotate the Player Start Actor to the direction in which you want your Pawn to come out looking!
FIGURE 20.5Click the Play button on the toolbar to instantly test your game while staying in the Editor.
Although your Pawn can move freely, a couple things don’t seem to match your design brief.
First, the camera is first person instead of top-down and fixed. Second, your Pawn is moving
forward and backward as well as side to side. In this case, you want to pull back from all the
features that UE4 has provided you and put in some logic to lock things down.
Disabling the Default MovementThe DefaultPawn class does a lot automatically, but in this case, you want to more manual
control. Luckily, it’s pretty simple to get that control. The DefaultPawn class’s Defaults panel
contains a property called Add Default Movement Bindings, which is selected by default. By
unselecting this property, you can disable the DefaultPawn class’s basic movement and overwrite
its behavior and bindings with your own (see Figure 20.6).
FIGURE 20.6In the Class Defaults of the Pawn, disable the Add Default Movement Bindings check box.
Controlling a Pawn’s Movement 367
Setting Up Input Action and Axis MappingsA locked spaceship isn’t exactly what you want. It looks like you quickly swung from too much
freedom to none at all, and you need to add back some user control. One part of this is binding
different keypresses to different actions. Taking an input—like a joystick movement, a keypress,
or a trigger pull—and registering a specific action with that input is called input binding, and you
do this at the Project level.
To set input binding, select Settings > Project Settings and then open the Input section of the
Project Settings panel. At the top of this section are two lists in the Bindings section: Action
Mappings and Axis Mappings. The difference between these two sections is subtle but important.
Action mappings are for single keypress and release inputs. These are usually used for jumping,
shooting, and other discrete events. Axis mappings are for continuous input, such as movement,
turning, and camera control. Both types of mappings can be used simultaneously and
picking the right type of binding for your actions will make creating complex and rich player
interactions easier.
Axis mappings work slightly differently depending on the hardware generating an input. Some
hardware (such as mice, joysticks, or gamepads) return input values to UE4 in a range from −1
to 1. UE4 can scale that value, depending on how much the user wants to let the input influence
the game. Keyboards, however, separate up and down and left and right to different keys and
don’t provide a continuous range of input. A key is either pressed or it isn’t, so when you’re
binding a key as an axis mapping, UE4 needs to be able to interpret that pressed key as a value
on that same −1 to 1 scale.
▼TRY IT YOURSELF
Disable Default Movement
In the game you are creating, the default Pawn is doing more than you need. Follow these steps to disable this behavior through the Hero_Spaceship Pawn’s Blueprint class defaults:
1. In the Content Browser, navigate to the Blueprints folder and double-click the Hero_Spaceship Blueprint class.
2. In the Class Defaults panel, in the Pawn category, ensure that the Add Default Movement
Bindings property’s check box is unchecked to disable this feature.
3. In the toolbar, click Compile and then click Save.
4. Play again and notice that you can no longer move around. The camera is still in first person, but your spaceship is now locked where it was spawned.
368 HOUR 20: Creating an Arcade Shooter: Input Systems and Pawns
For movement, you use axis mappings, and in your arcade shooter, you are limiting the player’s
movement to a single axis, so the player can move either left or right. In the next Try It Yourself,
you set up the input bindings to support left and right movement for your Pawn.
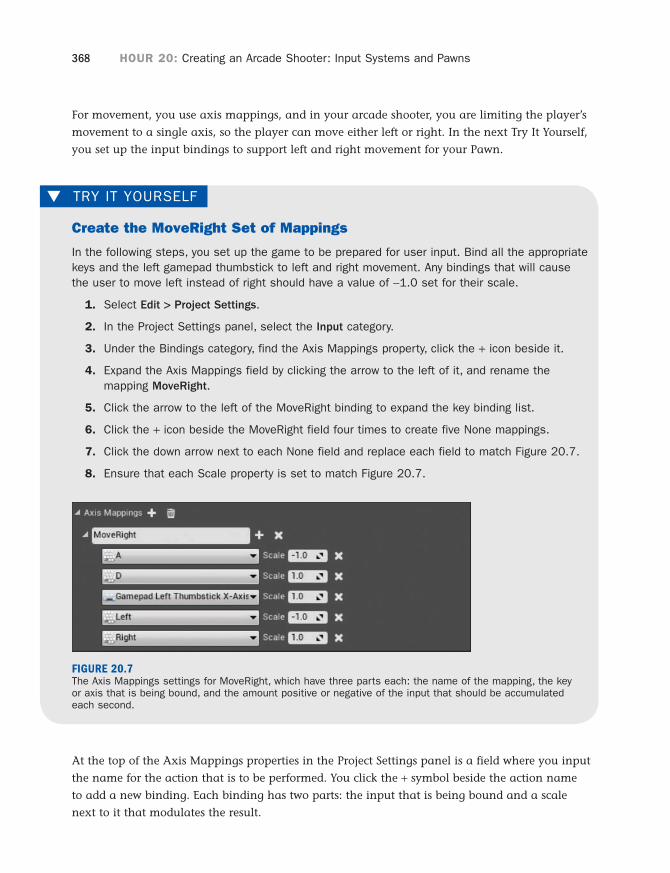
▼ TRY IT YOURSELF
Create the MoveRight Set of Mappings
In the following steps, you set up the game to be prepared for user input. Bind all the appropriate keys and the left gamepad thumbstick to left and right movement. Any bindings that will cause the user to move left instead of right should have a value of −1.0 set for their scale.
1. Select Edit > Project Settings.
2. In the Project Settings panel, select the Input category.
3. Under the Bindings category, find the Axis Mappings property, click the + icon beside it.
4. Expand the Axis Mappings field by clicking the arrow to the left of it, and rename the mapping MoveRight.
5. Click the arrow to the left of the MoveRight binding to expand the key binding list.
6. Click the + icon beside the MoveRight field four times to create five None mappings.
7. Click the down arrow next to each None field and replace each field to match Figure 20.7.
8. Ensure that each Scale property is set to match Figure 20.7.
FIGURE 20.7The Axis Mappings settings for MoveRight, which have three parts each: the name of the mapping, the key or axis that is being bound, and the amount positive or negative of the input that should be accumulated each second.
At the top of the Axis Mappings properties in the Project Settings panel is a field where you input
the name for the action that is to be performed. You click the + symbol beside the action name
to add a new binding. Each binding has two parts: the input that is being bound and a scale
next to it that modulates the result.
Controlling a Pawn’s Movement 369
You want the game to treat keypresses, like A and D, as a continuous axis. To do this, you need
to have some of those keys be negative; in other words, when you press left, you want the axis to
go down, and when you press right, you want the axis to go up.
For thumbstick axes (e.g., Gamepad Left Thumbstick X-Axis), the negative values are already
calculated, so the scale should usually just be 1.0.
In this example, the keys A and D, the left arrow and right arrow keys, and the Gamepad
Left Thumbstick are all being bound to the MoveRight action. This brings up an important
distinction: By using Action Mappings and Axis Mappings, you can bind multiple different
input methods to the same event. This means less testing and duplication of Blueprint scripts
in your project, and it means everything becomes more readable. Instead of having Blueprint
scripts checking whether the A key is pressed, the Blueprint can just update movement when
the MoveRight event is triggered.
But just creating an input binding doesn’t make things move. Now you need to actually use
the MoveRight action.
Using Input Events to Move a PawnYou are now ready to set up movement again. You have a fancy input axis called MoveRight
and a Pawn that is just itching to move again. First, you need to open the Blueprint Class Editor
of your Pawn and go to the Event Graph. Here, you can begin to lay down behaviors that will
fire when your MoveRight action is triggered.
In the Event Graph, right-clicking and searching for your action by name, MoveRight, brings
up the InputAxis MoveRight event into the graph, as shown in Figure 20.8.
FIGURE 20.8Axis mappings show up by name under Axis Events. There are also Axis Values functions and Pawn functions, but these functions are not what you are looking for in this case.
370 HOUR 20: Creating an Arcade Shooter: Input Systems and Pawns
Once you have an axis event, you can query the axis value and convert it into movement.
To do this you need a few more Blueprint nodes, starting with Add Movement Input.
This function works with MovementComponent to interpret a value and a world space direction
to move the Pawn in.
By hooking up the InputAxis MoveRight event’s execution pin and the value that is returned
in Axis Value to Add Movement Input, MovementComponent can take the player’s inputs and
move the Pawn in a world direction.
Since you want the spaceship to move left or right on input, you need to take the vector coming
from the Pawn’s right axis. You can get this vector by using the Get Actor Right Vector node
and plugging its Return Value into the Add Movement Input’s World Direction (see Figure 20.9).
FIGURE 20.9The finished graph of the Add Movement Input.
▼ TRY IT YOURSELF
Hook Up the MoveRight Axis Mapping to the Pawn’s Movement
With the MoveRight axis mapping, the Pawn needs to know how to interpret the values that come from the mapping. Follow these steps to hook up the simple graph required to tell the Pawn how to move on player input:
1. In the Content Browser, navigate to the Blueprints folder and double-click the Hero_Spaceship Pawn’s Blueprint class to open the Blueprint Class Editor.
2. Right-click in an open space in the Event Graph and enter moveright in the search box.
3. Select Axis Events > MoveRight from the search results.
4. Click+drag from the InputAxis MoveRight event node’s exec out pin and place an Add Movement input node.
Setting Up a Fixed Camera 371
TIP
Default Pawn GoodnessIn your game, you use Add Movement Input, which takes a world direction. This powerful function can move the Pawn in any direction. The DefaultPawn class, however, gives you some convenience functions for this exact use case. Try replacing the Add Movement Input and Get Actor Right Vector with the DefaultPawn class’s MoveRight function. This will have exactly the same result, but it keeps the graph a little bit cleaner, as shown in Figure 20.10.
FIGURE 20.10Alternative setup, showing the DefaultPawn class’s MoveRight function instead of the Add Movement Input node.
Setting Up a Fixed CameraRight now, your game has a camera that follows your Pawn around. This is the default, but
for the game you want to make, it isn’t quite right. Instead, you want a camera to stay fixed,
looking down at the spaceship from above. You also don’t want it to move when the Pawn does.
▼ 5. Hook the InputAxis MoveRight event node’s Axis Value output pin to the Add Movement Input node’s Scale Value input pin.
6. Click+drag from the Add Movement Input node’s World Direction input pin and place a Get Actor Right Vector node.
7. On the toolbar, click Compile and then click Save.
8. When this graph is all hooked up, test the game again. Pressing any of the input keys (A, D, left arrow, right arrow) or using a compatible gamepad’s left thumbstick should move the camera either right or left.
372 HOUR 20: Creating an Arcade Shooter: Input Systems and Pawns
To solve this quandary, you can use Camera Actors and view targets and the built-in
PlayerController class to set the view that a player sees. This setup could be done in the Level
Blueprint, but it would then be more difficult to port your game logic to a new level. Instead,
you are going to bundle this camera logic into a Game Mode. When the game begins, the Game
Mode will spawn a camera for your game and then tell the PlayerController class to use that
new camera.
In the next Try It Yourself, you use the BeginPlay event and the SPawn Actor from Class node
to create a new camera and position it with a Make Transform node before setting it as the
PlayerController class’s view target.
▼ TRY IT YOURSELF
Create and Set a Fixed-Position Camera
Follow these steps to use the ArcadeShooter_GameMode to spawn a new camera and set it as the PlayerController class’s view target:
1. In the Content Browser, navigate to the Blueprints folder and double-click the ArcadeShooter_GameMode Blueprint class to open the Blueprint Class Editor.
2. If the Editor shows only the Class Defaults panel, then in the note beneath the panel title, click the Open Full Blueprint Editor link.
3. In the EventGraph, locate the Event BeginPlay node, and if it doesn’t exist, create it by right-clicking and searching for begin play.
4. Click+drag from the Event BeginPlay node’s exec out pin and place a SPawn Actor from
Class node.
5. On the SPawn Actor from Class node, click the down arrow in the Select Class field, and select CameraActor.
6. Click+drag from the SPawnActor CameraActor node’s SPawn Transform property and place a Make Transform node.
7. Set the Make Transform node’s Location property to 0.0, 0.0, 1000.0.
8. Set the Make Transform node’s Rotation property to 0.0, −90.0, 0.0.
9. To the right of the SPawnActor CameraActor node place a new Get Player Controller node.
10. Click+drag from the Get Player Controller node’s Return Value output pin and place a Set
View Target with Blend node.
11. Hook the SPawnActor CameraActor node’s Return Value output pin into the Set View Target with Blend node’s New View Target input pin.
12. Hook the SPawnActor CameraActor node’s Exec Out pin to the Set View Target with Blend node’s exec in pin. Figure 20.11 shows the completed GameMode Event Graph.
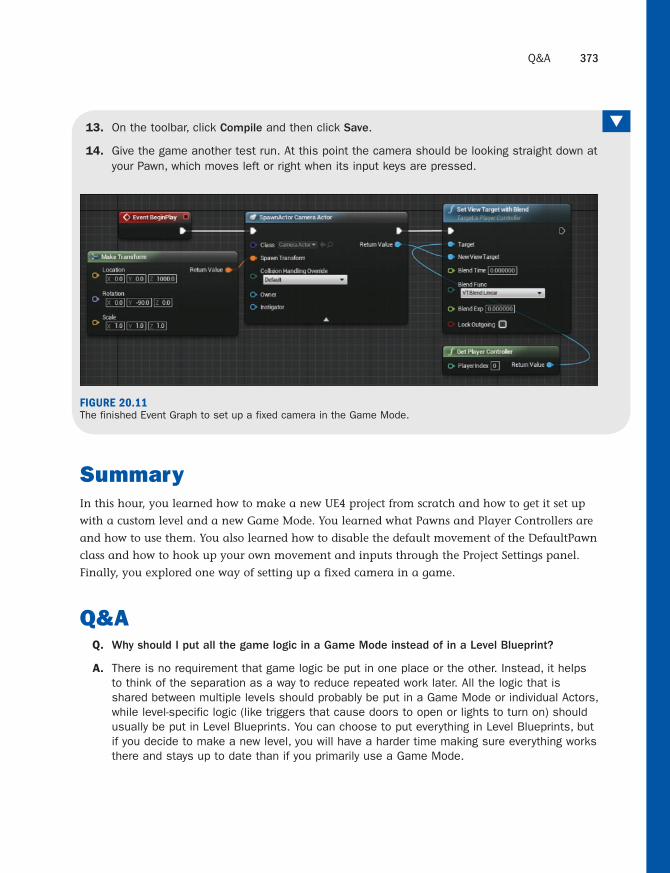
Q&A 373
▼ 13. On the toolbar, click Compile and then click Save.
14. Give the game another test run. At this point the camera should be looking straight down at your Pawn, which moves left or right when its input keys are pressed.
FIGURE 20.11The finished Event Graph to set up a fixed camera in the Game Mode.
SummaryIn this hour, you learned how to make a new UE4 project from scratch and how to get it set up
with a custom level and a new Game Mode. You learned what Pawns and Player Controllers are
and how to use them. You also learned how to disable the default movement of the DefaultPawn
class and how to hook up your own movement and inputs through the Project Settings panel.
Finally, you explored one way of setting up a fixed camera in a game.
Q&A Q. Why should I put all the game logic in a Game Mode instead of in a Level Blueprint?
A. There is no requirement that game logic be put in one place or the other. Instead, it helps to think of the separation as a way to reduce repeated work later. All the logic that is shared between multiple levels should probably be put in a Game Mode or individual Actors, while level-specific logic (like triggers that cause doors to open or lights to turn on) should usually be put in Level Blueprints. You can choose to put everything in Level Blueprints, but if you decide to make a new level, you will have a harder time making sure everything works there and stays up to date than if you primarily use a Game Mode.
374 HOUR 20: Creating an Arcade Shooter: Input Systems and Pawns
Q. Does a Pawn need to inherit from the default Pawn?
A. Not at all! DefaultPawn is just a convenience class, but all its features can be replicated with a bit of work. UE4 also comes with some other convenient Pawn classes, such as the Character class, which contains a Skeletal Mesh component and some logic dedicated to locomotion.
Q. Positioning a camera by inserting raw numbers is difficult. Do I have to spawn a camera this
way?
A. No. Another option is to place a camera in a level and then reference it in level script when calling Set View Target with Blend. This brings the logic out of the Game Mode and makes it level specific, allowing easier artistic control of the camera.
Q. I don’t like the speed at which my Pawn moves. Can I change it?
A. Absolutely. To change the Pawn’s movement speed, open up the Pawn’s Blueprint Class Editor and select MovementComponent. In the Details panel, set the three float values that control the Pawn’s max speed, acceleration, and deceleration.
Q. Do I have to use only the single MeshComponent in the Hero_Spaceship Pawn Blueprint
class?
A. No, you can use any number of components to define the visuals of a Pawn. If you are adding several components (or even if you are sticking with the single one), you might want to disable the physics simulation of your Static Mesh components. You can change the collision presets by clicking on the individual component and finding the Collision Presets property in the Details panel. Setting Collision Presets to No Collision ensures that it incurs the lowest physics cost possible. Make sure CollisionComponent has Pawn Preset and Generate Overlap Events enabled; if you don’t do this, in the next hour nothing will work. Also, if you disable collision of any individual Static Mesh or visual components, make sure the CollisionComponent’s sphere encapsulates your visuals.
WorkshopNow that you have finished the hour, see if you can answer the following questions.
Quiz 1. True or false: Pawns are Actors that players or AI control directly.
2. True or false: UE4 automatically knows which Game Mode to use by detecting it in the Content Browser.
3. True or false: Action bindings and axis bindings only work with fixed names such as MoveRight.
4. True or false: Axis bindings are for continuously pressed inputs like holding down a key or moving a joystick.
Exercise 375
Answers 1. True. Any Actors in the scene that AI or players directly control are called Pawns.
2. False. The Game Mode must be set either in the Project Settings panel or the level’s World Settings panel.
3. False. Any string can be put into the input binding’s Name field and work. For example, you could replace MoveRight with Strafe.
4. True. Any time you need more input information than a simple on or off switch, an axis binding is what you should map your actions to.
ExerciseIn this hour’s exercise, practice setting up new input bindings to control your Pawn, modifying your Pawn, and customizing your level. Hook the left and right movement of your Pawn to your mouse input, and add walls or other affectations to your level. Then make the floors and walls invisible. The following steps should be done in the same Project and Level made for this hour.
1. Select Project Settings > Input and in the Move Right binding found, add a new axis.
2. Set the new axis to Mouse X and the Scale property to 1.0.
3. Preview your game to see the mouse affect your Pawn’s location.
4. Select the MovementComponent of your Pawn in the Pawn’s Blueprint Class Editor.
5. Modify the Max Speed and Acceleration settings of MovementComponent to change how fast the Pawn moves.
6. Select the floor of your level and duplicate it several times by pressing Ctrl+W.
7. Position the duplicated floors to box out the left and right sides of your level and stop your Pawn from being able to leave the camera’s view.
8. Select all the duplicate floors and enable the Actor Hidden in Game property in the Rendering category to make all the floors invisible while the game is running.

This page intentionally left blank
ActivateStomper_BP, 350
activating. See also triggering
Actors
events, 283
properties, 273–281
particles, 176–177
Actors
Ambient Sound Actor, 110,
112–113
attaching, 49–50
BSP (binary space
partitioning), 144
Camera group, 216–218
classes, spawning, 332–335
collisions, configuring,
271–272
combining, 148–150
components, 275
events
activating, 283
assigning, 272–274
fog, 155
grouping, 47, 208
layers, applying, 48–49
Light Actors, 76
materials
modifying, 277
resetting properties, 278
Symbols
3D
coordinate systems, 37–38
transformation tools, 39
A
abilities, characters, 342–344
action encounters, 341
Actor/Component tags,
350–351
Blueprint classes, 344–345,
346
BP_Common folders, 345–346
BP_Levers folder, 349–350
BP_Pickup folder, 349
BP_Respawn folder, 348
BP_Turrets folder, 341–348
character abilities, 342–344
HUDs (heads-up displays), 342
project Game modes, 341
respawn systems, 342
timers, 342
actions, configuring input,
367–369
Index
466 Actors
Matinee, 203–204
moving, 46–47
physics
attaching, 235
constraints, 235–239
radial force, 240
thrusters, 239
post processing volume,
155–156
properties, 273–281,
275–276
reference variables, assigning
to, 274
reflection capture, 155
selecting, 48
Skeletal Mesh Actors, 181.
See also Skeletal Mesh
Actors
applying, 199–201
defining, 181–186
importing, 186–191
Persona Editor, 191–199
sound, applying, 112–113
spawners, creating, 397–403
Static Mesh, 8, 66–70
Static Mesh Actors
animation, 211
properties, 228
tags, 350–351
transformation tools, 41.
See also transformations
visibility, rendering, 270
adding
Actors, 203–204
arrows, 279–281
Blueprint class, 288–289
components (Blueprint class),
291–292
curves, 297
default maps, 425
Directional Lights, 80–81
events, 256
GameMode class, 32–33
health pickups, 391
lighting, 153
multiple cameras, 217
multiple collision hulls, 61
Point Lights, 76–77
Sky Lights, 79–80
Spot Lights, 78
Static Mesh components,
279–283
tracks, 297
Widget Blueprint, 424
AIController class, 31
albedo. See base colors
Ambient Sound Actor, 110,
112–113
anchor points, 412–413
Android, packaging, 435
angular, 224
animation
Blueprints, 185
editing, 206. See also Matinee
interpolation, 214–215
sequences, 185
Static Mesh Actors, 211
Animation mode (Persona Editor),
194–199
applying
assets (Matinee), 220
audio volumes, 119–120
Blueprint class, 287
Cast To Node, 386–388
collision hulls, 62
constraints, 234
Construction Script, 277–278,
326–328
Curve Editor, 166–168
foliage, 133–134
landscapes, 123, 130–133
layers, 48–49
materials, 89
Matinee Editor, 207
modular assets, 148
modulation properties, 115
motion data, 459–462
particle emitters, 164
physics, 223
Skeletal Mesh Actors,
199–201
Sound Actors, 112–113
Sound Track, 215–216
Static Mesh Editor, 54
SubUV textures, 174–176
Timeline, 296–300
World Outliner, 45
arcade shooter games, 355
Actor spawners, creating,
397–403
axis mappings, 367–369
Cast To Node, applying,
386–388
controllers, customizing,
361–362
creating, 356–358
default Pawns, inheriting
from, 362
fixed cameras, configuring,
371–373
Game modes, customizing,
359–361
health pickups, creating,
391–397
input
actions, 367–369
events, 369–371
Obstacle classes, 378–381
obstacles, 377
cleaning up old, 403
moving, 381–384
bounced lighting 467
Pawns
damaging, 384–386
disabling movement,
366–367
moving, 365–366
pickups, 377
requirements
design, 356
identifying, 356
arrows, adding, 279–281
aspect ratios, 412
Asset dialog box, 27
assets
icons, 27
importing, 413–415
Matinee, applying, 220
modular, applying, 148
Physical Materials, 230–234
Physics, 185
placing, 147
references, 29
Sound Attenuation, 110
Sound Cue, 110, 115–119
Sound Wave, 110, 111
Static Mesh, 8, 53. See also
Static Mesh assets
types of, 29–32
assigning
Actors
to events, 272–274
to existing groups, 208
to reference variables, 274
materials to Static Mesh
assets, 59
physics to levels, 224–225
attaching Actors, 49–50, 235
attenuation, configuring, 113–114
Attenuation Radius property, 82
Audacity, 110
audio
attenuation, configuring,
113–114
components, 109–110
importing, 110–112
modulation properties,
applying, 115
overview, 109–110
Sound Actors, applying,
112–113
Sound Cue assets, formatting,
115–119
Sound Track, 215–216
volumes, applying, 119–120
world building, 154–155
Auto Activate setting, 176
auto-generating collision hulls, 64
axis mappings, configuring,
367–369
B
base colors, 91
beam data, 162
binary space partitioning. See
BSP (binary space partitioning)
bind poses, missing bones, 190
blank projects, formatting, 24
blocking world building, 145–147
Blueprint, 5
animation, 185
Level Blueprints, 269–270.
See also Level Blueprints
particles, activating, 176–177
projects, formatting, 23
scripts
Blueprint Context menu,
251
comment boxes, 262
compiling, 246
components, 253
concepts, 252–254
conditionals, 260–261
Event Graph, 250
events, 252
functions, 254–256
managing, 262
My Blueprint panel, 250
node comments, 262
operators, 260–261
overview of, 245–246
reroute nodes, 263
structs, 258
types of, 247
variables, 257–258
Widget Blueprint, creating,
407–408
Blueprint class, 247, 287
action encounters, 344–345,
346
Actors, combining, 148–150
adding, 288–289
applying, 287
components, 291–292
existing classes, deriving
from, 301
pulsing lights, creating, 300
scripting, 294–296
spawning, 326, 329
Timeline, applying, 296–300
Blueprint Context Menu, 251
Blueprint Editor, 247–249,
289–291
Blueprint Interfaces. See BPIs
Blueprint Macros, 247
bones, missing, 190
bounced lighting, 76
468 boxes, comments
boxes, comments, 262
BP_Common folders, 345–346
BPIs (Blueprint Interfaces), 247
BP_Levers folder, 349–350
BP_Pickup folder, 349
BP_Respawn folder, 348
BP_Turrets folder, 348
Brush menu, 129
BSP (binary space partitioning),
144
building
lighting, 83–85
world building, 139–140.
See also world building
buttons
Create, 123
events, scripting, 419
Fill World, 123
Play Cue, 115
Play Node, 115
Selection, 127
widgets, 417
bytecode, 246
C
C++, 245–246
Camera group, 216–218
cameras, configuring fixed,
371–373
Cartesian coordinates, 37
Cascade interfaces, 162–164
Cast Shadows property, 82
Cast To Node, applying, 386–388
channels
green, 92
visualizers, 167
Character classes, 32
characters. See also Actors
abilities, 342–344
movement, 345
Skeletal Mesh Actors, 186.
See also Skeletal Mesh
Actors
Checkpoint_BP, 348
classes
Actors, spawning, 332–335
AIController, 31
Blueprint, 247. See also
Blueprint class
Character, 32
controller, 31
DefaultPawn, 365
defaults, 281
GameMode, 31, 32–33
HUD, 32
inheriting, 362
Obstacle, 378–381
Pawn, 32
PlayerController, 31, 365
Vehicle, 32
cleaning up old obstacles, 403
cloth, 224
CollectionPickup_BP, 349
Collision Enabled setting, 72
collisions
Actors, configuring, 271–272
hulls, 53, 59–63
auto-generating, 64
Convex Decomposition
panel, 64
per-poly, 64–65
presets, 71
responses, flags, 72
Static Mesh Actors, editing,
70
Color Over Life module, 170
colors
base, 91
particles, formatting, 173
shadows, 153
combining Actors, 148–150
comments
boxes, 262
nodes, 262
scripts, 262
common modules, particles,
168–172
communities, 21
compilers, 246
compiling scripts (Blueprint), 246
components
Actors, 275
audio, 109–110
Blueprint class, 291–292
scripting, 253, 294–296
Static Mesh, adding, 279–283
tags, 350–351
conditionals, Blueprint scripts,
260–261
Config folders, 23
configuring
Actor collisions, 271–272
attenuation, 113–114
axis mappings, 367–369
Collision Enabled setting, 72
Default Game Mode, 34
editor targets, 451–454
fixed cameras, 371–373
input
actions, 367–369
events, 369–371
keyframes, 210
Lightmass Importance Volume
setting, 153
mobility, Static Mesh Actors, 67

editable variables 469
Object Type setting, 72
packaging, 436–437
particles, materials, 172
projects, modifying, 6
resolution, 410–412, 424
sequence length, 207
shipping configurations, 432
spawning (Blueprint class), 329
start levels, 357
Timeline, 296–300
touch input, 454
variables, 302
connecting textures to layers, 131
Const Acceleration module, 171
constraints
Actors, physics, 235–239
applying, 234
Construction Script, applying,
277–278, 314, 326–328
content. See also projects
cooking, 429–430
importing, 25–26
migrating, 27–29
Content Browser panel, 11
filters, 29
Content Example Project,
downloading, 22
Content folders, 23, 25–26
content packs, 140
context, units and
measurements, 42
continuity, units and
measurements, 42
controllers
classes, 31
customizing, 361–362
controlling mass, 239
controls
Curve Editor, 168
landscapes, 125
Convert Scene property, 189
Convex Decomposition panel, 64
cooking content, 429–430
coordinates, Cartesian, 37
copying, 11
Static Mesh Actors, 67
Copy tool, 129
C++ projects, 5
Create button, 123
creating. See formatting
Curve Editor, 166–168, 212–213
curves, adding, 297
customizing
collision presets, 71
controllers, 361–362
functions, 256
Game Mode, 359–361
snap tools, 45
D
damaging Pawns, 384–386
damping, 224
Data-Only Blueprint, 247
data types, overview of, 161–162
death states, creating, 389
declaring variables, 259
default classes, 281
Default Game Mode,
configuring, 34
default Game Modes, 361
default levels
creating, 357
formatting, 141
default maps, adding, 425
DefaultPawn class, 365
default Pawns, inheriting from, 362
default root widgets, 409
defining Skeletal Mesh Actors,
181–186
density, 224
deriving classes, 301
Designer mode (UMG UI Designer),
408–409
design requirements, arcade
shooter games, 356
destructible, 224
Details panel, 9–10, 97, 164, 291
developing for mobile devices,
441, 442
dialog boxes
Asset, 27
FBX Import, 187
FBX Import Options, 189
diffuse. See base colors
Directional Lights, 80–81, 141
direct lighting, 75
distribution modules, 165
Door_BP, 350
downloading. See also installing
Content Example Project, 22
Launcher, 2–3
Unreal Engine, 3–4
DPI scaling, 412–413
dragging and dropping textures,
95–96
Drag Grids, 44
duplicating. See also copying
Static Mesh Actors, 67
dynamic lighting, 76
E
edges, 53
editable variables
Construction Script, applying,
277–278
formatting, 312–314
limiting, 283
470 editable variables
Show 3D Widget, 320
Static Mesh components,
adding, 279–283
editing
animation, 206. See also
Matinee
collisions
hulls, 60
Static Mesh Actors, 70
landscapes, 123–124
Editors
Audacity, 110
Blueprint Editor, 248–249,
289–291
Curve Editor, 164, 166–168,
212–213
Level Editor. See Level Editor
Material Editor, 91, 130
Matinee, 203. See also
Matinee
modes, 9
particles, Cascade interfaces,
162–164
Persona Editor, 191–199
PIE (Play in Editor), 22
Sound Cue Editor, 110
Static Mesh Editor, 54.
See also Static Mesh assets
targets, configuring, 451–454
unit scales, 187
effects
Reverb Effects, 119
SubUV textures, 174–176
emitters, particles, 162, 164.
See also particles
Emitters panel, 163
Enable Gravity property, 227
environmental narratives, 140–141
Erosion tool, 128
Event Graph (Blueprint), 250
events
Actors, assigning, 272–274
adding, 256
Blueprint scripts, 252
buttons, scripting, 419
ForLoop, 281
input, configuring, 369–371
OnActorBeginOverlap,
272, 273
OnActorHit, 272
touch input, 456–458
Event Tick, 260, 304
execs, 251
executables
Android, packaging, 435
content, cooking, 429–430
formatting, 429
IOS, packaging, 435
packaging, configuring,
436–437
projects, packaging for
Windows, 430–435
existing projects, migrating
content, 27–29
F
Falloff menu, 129
.fbx files, 186
FBX Import dialog box, 187
FBX Import Options dialog box,
189
files
audio, importing, 110–112
.fbx, 186
textures, 95
types, 26
Fill World button, 123
filters, Content Browser panel, 29
first-person shooter games.
See FPS games
fixed cameras, configuring,
371–373
flags
collision responses, 72
show. See show flags
Flatten tool, 128
float distributions, 165
Fog Actors, 155
folders
BP_Common, 345–346
BP_Levers, 349–350
BP_Pickup, 349
BP_Respawn, 348
BP_Turrets, 341–348
Config, 23
Content, 23, 25–26
creating, 26, 46–47
formatting, 23
InterfaceAssets, 413
Intermediate, 23
Maps, 358
raw asset, creating, 29
Saved, 23, 30
World Outliner, 46
foliage
applying, 133–134
placing, 135
force, 224
ForLoop events, 281
formatting
Actors, spawners, 397–403
arcade shooter games,
356–358
Blueprint class, spawning,
326
characters, 187
Content folders, 25–26
Initial Rotation module 471
death states, 389
default levels, 141, 357
editable variables, 312–314
executables, 429. See also
executables
folders, 46–47
creating, 26
raw asset, 29
health pickups, 391–397
instances, materials, 101–104
landscapes, 125–126,
130–133
levels, world building,
141–142
materials, 91–93, 96–98
particle colors, 173
projects, 4–7, 357
blank, 24
Blueprint, 23
folders, 23
pulsing lights, 300
Sound Cue assets, 115–119
textures, 94–95
Widget Blueprint, 407–408
world beyond, 150–152
FPS (frames per second), 204
FPS (first-person shooter) games,
341
frames per second. See FPS
frameworks (Gameplay
Framework), 30
framing, 147
friction, 224
functions
Blueprint scripts, 254–256
Heal Damage, 395
Play Sound at Location,
281–283
Print String, 257
Spawn Actor from Class, 328
targets, 277
G
Game Mode
customizing, 359–361
defaults, 361
GameMode class, 31, 32–33
Game modes, assigning, 224
Gameplay Framework, 30
games
arcade shooter, 355. See also
arcade shooter games
default maps, adding, 425
project modes, 341
timers, 342
game-style navigation, 16
gloss. See roughness
GPU sprites, 162
Graph mode
Persona Editor, 198–199
UMG UI Designer, 409
Graph panel, 98, 115
gravity, applying, 459–462
green channels, 92
grids, 345
snapping to, 43–45
units, 42
groups, 47
Camera, 216–218
Director, 218–219
Matinee, 208
H
hard drives, space requirements, 3
hardware requirements, 2
heads, shaking, 196
heads-up displays. See HUDs
Heal Damage function, 395
HealthPickup_BP, 349
health pickups, creating,
391–397
height
maps, 124
obstacles, placing, 388
help, 21
HUD class, 32
HUDs (heads-up displays), 342
hulls, collision, 53, 59–63
Hydro Erosion tool, 128
I
icons, assets, 27
IDES (Integrated Development
Environments), 245–246
images, placing widgets, 416, 417
Import Animations property, 189
Import as Skeletal property, 189
importing
assets, 413–415
audio, 110–112
content, 25–26
Skeletal Mesh Actors,
186–191
Static Mesh assets, 56–57
textures, 95–96
Import Materials property, 189
Import Mesh property, 189
impulse, 224
indirect lighting, 76
Inherent Parent Velocity module,
171
inheriting from default Pawns,
362
Initial Color module, 170
Initial distributions, 166
Initial Location module, 172
Initial Rotation module, 172
472 Initial Size module
Initial Size module, 170
Initial Velocity module, 171
input
actions, configuring, 367–369
materials, 98
touch
configuring, 454
events, 456–458
types, 91
Inside Cone Angle property, 82
installing
Launcher, 2–3
Unreal Engine, 2–4
instances, 11. See also copying
materials, 101–104
Integrated Development
Environments. See IDEs
Intensity property, 82
interactive transformations, 41
InterfaceAssets folders, 413
interfaces. See also Blueprint
Editor
Blueprint Editor, 248–249
BPIs (Blueprint Interfaces),
247
Cascade, 162–164
Content Browser panel, 11
Details panel, 9–10
menu bars, 8
Modes panel, 8–9
modifying, 7
navigating, 7–12
Project Browser, navigating, 5
UMG (Unreal Motion Graphics)
UI Designer, navigating, 408
Viewport panel, 12
World Outliner panel, 9
Intermediate folders, 23
interpolation, 214–215
IOS, packaging, 435
IsVariable property, 410
J
joysticks, virtual, 454–456
K
keyframes, 210
keys, 167
KillVolume_BP, 349
L
Landscape button, 123
Landscape panel, 124
landscapes
applying, 123
creating, 125–126
height maps, 124
Manage tab, 124
managing, 127
materials, 130–133
painting, 130
shapes, 127
tools, 123–124, 128–129
volumes, 127
Launcher, installing, 2–3
Launcher_BP, 345
layers
applying, 48–49
textures, connecting, 131
layouts
interfaces, navigating, 7–12
UV, 53, 57–58
Viewport panel, 12
Learn section, 21
length, configuring sequences,
207
Level Blueprints, 247, 269–270
Actors
activating events, 283
activating properties,
273–281
assigning events,
272–274
assigning to reference
variables, 274
collision settings,
271–272
components, 275
properties, 275–276
function targets, 277
Play Sound at Location
function, 281–283
Level Editor. See also interfaces
navigating, 7–12
toolbars, 16
levels
Blueprints, activating particles,
176–177
default
creating, 357
formatting, 141
Level Editor, 7. See also Level
Editor
overriding, 361
physics, assigning to,
224–225
playing, 16–17
previewing, 22
start, configuring, 357
Static Mesh Actors, placing
into, 66
world building, formatting,
141–142
levels of detail. See LODs
Lifetime module, 170
Light Actors, 76
Light Color property, 82
mobile devices 473
lighting
adding, 153
building, 83–85
Directional Lights, 80–81, 141
Mobility, 85–86
Point Lights, adding, 76–77
properties, 82
pulsing lights, formatting, 300
Sky Lights, adding, 79–80
Spot Lights, adding, 78
Swarm Agent, 83
terminology, 75
types of, 76
world building, 152–153
lightmaps, 53
UV channels, 58
Lightmass Importance Volume
setting, 153
Lightmass tool, 83
limiting editable variables, 283
linear, 224
lists, variables, 259
loading options (Matinee), 204
local axis, 53
local transformations, 41
local variables, 281
locations, particles. See particles
LODs (levels of detail), 53, 125
looping, 117
M
Mac requirements, 2
macros (Blueprint Macros), 247
Manage tab, 124
managing
Blueprint scripts, 262
landscapes, 127
manual transformations, 41
maps
axis mappings, configuring,
367–369
default, adding, 425
height, 124
mipmapping, 414
Maps folder, 358
markers, time, 208
mass, 224
controlling, 239
Material Editor, 91, 130
materials, 53, 89
Actors
modifying, 277
resetting properties, 278
base colors, 91
creating, 91–93, 96–98
green channels, 92
inputs, 91, 98
instances, 101–104
landscapes, 130–133
metalness, 91
normal input, 92
outputs, 98
particles, configuring, 172
PBR, 90–91
Physical Materials, 230–234
pickups, creating, 392
roughness, 92
Static Mesh Actors,
replacing, 69
Static Mesh assets,
assigning, 59
value nodes, 99–101
Matinee, 203
Actors, 203–204
assets, applying, 220
Camera group, 216–218
Curve Editor, 212–213
Director group, 218–219
groups, 208
interpolation, 214–215
Matinee Editor, 206–207
Sound Track, 215–216
tracks, 209–210
measurements, units and, 42
menus
bars, 8
Blueprint Context, 251
Brush, 129
Falloff, 129
Start (UMG UI Designer), 413
systems, 425
Tool, 128–129
meshes
data, 162
references, modifying, 68
Skeletal Mesh, 181–186.
See also Skeletal Mesh
Actors
skinning, 183
Static Mesh components,
adding, 279–283
Mesh mode (Persona Editor),
193–199
metalness, 91
mipmapping, 94, 414
missing bones, 190
mixing sound cues, 117
mobile devices
developing for, 441, 442
editor targets, configuring,
451–454
motion data, applying,
459–462
optimizing, 447–451
previewing, 442–446
testing, 441
touch input, 454, 456–458
virtual joysticks, 454–456
474 Mobility
Mobility, 85–86
mobility, configuring Static Mesh
Actors, 67
models, viewing UV layouts, 57–58
modes
Default Game Mode,
configuring, 34
Designer, 408–409
editors, 9
game, assigning, 224
Game Mode, customizing,
359–361
GameMode class, adding,
32–33
Graph, 409
interpolation, 214–215
projects, 341
views, 14–15
Modes panel, 8–9
modifying
Actors, materials, 277
interfaces, 7
landscapes, 125
mesh references, 68
projects, configuring, 6
Static Mesh assets, 54
modular assets, applying, 148
modulation properties, applying,
115
modules
Color Over Life, 170
Const Acceleration, 171
distributions, 165
Inherent Parent Velocity, 171
Initial Color, 170
Initial Location, 172
Initial Rotation, 172
Initial Size, 170
Initial Velocity, 171
Lifetime, 170
particles, 164
common, 168–172
Curve Editor, 166–168
properties, 165–166
requirements, 164–165
Required, 168–169
Rotation Rate, 172
Scale Color/Life, 170
Size by Life, 170
Spawn, 169–170
Sphere, 172
Modules panel, 164
motion data, applying, 459–462
movable lighting, 86
movement, characters, 345
Mover_BP, 345
Move transformations, 40
moving
Actors, 46–47
obstacles, 380, 381–384
Pawns, 365–366
disabling, 366–367
input events, 369–371
Static Mesh assets, 56–57
textures, 95–96
multiple cameras, adding, 217
My Blueprint panel, 250
N
narratives, environmental,
140–141
navigating
game-style navigation, 16
interfaces, 7–12
Landscape panel, 124
Level Editor toolbars, 16
Matinee Editor, 206–207
Project Browser, 5
scenes, 15–16
Static Mesh Editor, 54
UMG (Unreal Motion Graphics)
UI Designer, 408
nodes, 251
comments, 262
reroute, 263
value, materials, 99–101
Noise tool, 129
normal input, materials, 92
O
Object Type setting, 72
Obstacle classes, 378–381
obstacles
arcade shooter games, 377
cleaning up old, 403
moving, 380, 381–384
placing, 388
old obstacles, cleaning up, 403
OnActorBeginOverlap event,
272, 273
OnActorHit event, 272
operating system requirements, 2
operators, Blueprint scripts,
260–261
optimizing
mobile devices, 447–451
Pawns, 364
options
Mobility, 85–86
PIE (Play in Editor), 22
Orthographics Viewports, 12
outputs, materials, 98
Outside Cone Angle property, 82
overlaps, handling, 387
475Point Lights, adding
Over Life distributions, 166
overriding
attenuation, 114
levels, 361
P
packaging
Android, 435
configuring, 436–437
IOS, 435
projects for Windows,
430–435
painting landscapes, 130
Palette panel, 98, 115
panels
Content Browser, 11, 29
Convex Decomposition, 64
Details, 9–10, 97, 164, 291
Emitters, 163
Graph, 98, 115
Landscape, 124
Modes, 8–9
Modules, 164
My Blueprint, 250
Palette, 98, 115
Tracks, 207
Viewport, 12, 97, 163, 292
World Outliner, 9, 141
World Settings, 225–227
particles
activating, 176–177
Auto Activate setting, 176
Cascade interfaces, 162–164
colors, formatting, 173
emitters, applying, 164
materials, configuring, 172
modules, 164
common, 168–172
Curve Editor, 166–168
properties, 165–166
requirements, 164–165
overview of, 161–162
SubUV textures, 174–176
triggering, 176
Paste tool, 129
Pattern_Projectile_BP, 348
PatternTurret_BP, 348
Pawn classes, 32
Pawns
controllers, customizing,
361–362
damaging, 384–386
default, inheriting from, 362
disabling movement, 366–367
input events, 369–371
moving, 365–366
optimizing, 364
PBR (physically based rendering),
90–91
Pendulum_BP, 345
per-poly collisions, 64–65
Persona Editor, 191–199
Perspective Viewports, 12
physically based rendering. See
PBR
Physical Materials, 230–234
physics, 223
Actors
attaching, 235
constraints, 235–239
radial force, 240
thrusters, 239
applying, 223
assets, 185
body, 224
constraints, applying, 234
levels, assigning to, 224–225
Physical Materials, 230–234
properties for Static Mesh
Actors, 229
simulating, 227–229
terminology, 224
World Settings panel,
225–227
PhysicSpawner_BP, 350
PhysicsPickup_BP, 349
pickups
arcade shooter games, 377
health, creating, 391–397
PIE (Play in Editor), 22
pins, 251
pivot points, 53
placing
Ambient Sound Actors, 113
assets, 147
button widgets, 417
foliage, 135
image widgets, 416, 417
obstacles, 388
props, 147
references, scale, 142–143
Skeletal Mesh Actors,
199–201
placing Static Mesh Actors into
levels, 66
Play Cue button, 115
PlayerController class, 31, 365
players, customizing controllers,
361–362
Player Start, 366
play head, 208
Play in Editor. See PIE
playing levels, 16–17
previewing, 22
Play Node button, 115
Play Sound at Location function,
281–283
playtesting, 154
Point Lights, adding, 76–77
476 polygons
polygons, 53
positioning lighting, 86
post processing volume Actors,
155–156
presets, collisions, 71
previewing
mobile devices, 442–446
PIE (Play in Editor), 22
Print String function, 257
Project Browser, navigating, 5
ProjectileTurret_BP, 348
projects
blank, formatting, 24
Blueprint, formatting, 23
C++, 5
configuring, modifying, 6
content, migrating from
existing, 27–29
Content Example Project,
downloading, 22
creating, 4–7
Default Game Mode,
configuring, 34
folders, 23
formatting, 357
GameMode class, adding,
32–33
modes, 341
Windows, packaging for,
430–435
properties
Actors, 275–276
activating, 273–281
Matinee, 204
character movement, 345
IsVariable, 410
lighting, 82
modulation, applying, 115
particle modules, 165–166
Required module, 168
Sound Wave, 112
Spawn module, 169–170
Static Mesh Actors, 228
visualizers, 167
proportions, measurement of, 42
props, placing, 147
pulsing lights, creating, 300
R
Radial Force Actors, physics, 240
Ramp tool, 128
raw asset folders, creating, 29
references
assets, 29
meshes, modifying, 68
scale, placing, 142–143
reference variables, assigning
Actors, 274
Reference Viewer, 29
Reflection Capture Actors, 155
rendering
Actor visibility, 270
PBR, 90–91
replacing materials, Static Mesh
Actors, 69
representation, adding without
lighting, 153
Required module, 164–165,
168–169
requirements
arcade shooter games
design, 356
identifying, 356
hardware/operating systems, 2
particle modules, 164–165
reroute nodes, 263
resolution
configuring, 410–412, 424
textures, 415
resources, 21
respawn systems, 342
responses, collisions
editing, 70
flags, 72
restitution, 224
Retopologize tool, 129
Reverb Effects, 119
ribbon data, 162
rigid body, 224
Rotate transformations, 40
Rotation Grids, 44
Rotation Rate module, 172
roughness, 92
S
Saved folders, 23, 30
scale, 42, 142–143
Scale Color/Life module, 170
Scale Grids, 44
Scale transformations, 40
scaling DPI, 412–413
scenes
foliage, placing, 135
navigating, 15–16
organizing, 45
Point Lights, adding, 77
scope, establishing, 143–144
screen resolutions, 412
scripts
Blueprint
Blueprint Context menu,
251
comment boxes, 262
compiling, 246
components, 253,
294–296
concepts, 252–254
Swarm Agent 477
conditionals, 260–261
Event Graph, 250
events, 252
functions, 254–256
managing, 262
My Blueprint panel, 250
node comments, 262
operators, 260–261
reroute nodes, 263
structs, 258
types of, 247
variables, 257–258
Blueprint Editor interface,
248–249
Construction Script, 277–278,
326–328
overview of, 245–246
UMG (Unreal Motion Graphics)
UI Designer, 418–426
sculpting
shapes, 127
volumes, 127
Sculpt tool, 128
Section Size, 123
selecting Actors, 48
Selection button, 127
Selection tool, 129
sequences
animation, 185
length, configuring, 207
settings. See configuring
shaders, 89
shadows, 76, 153. See also
lighting
shaking heads, 196
shapes, 127
sharing attenuation, 114
shelling, world building, 145–147
shipping configurations, 432
Show 3D Widget, 320
show flags, 15
simulating physics, 227–229
Size by Life modules, 170
sizing textures, 94
Skeletal Mesh Actors, 181
applying, 199–201
defining, 181–186
importing, 186–191
Persona Editor, 191–199
Skeleton mode (Persona Editor),
192–199
Skeleton property, 189
skeletons, 184
skinning, 183
Sky Lights, adding, 79–80
Smasher_BP, 345
Smooth tool, 128
snapping, 146
to grids, 43–45
snaps, 345
tools, customizing, 45
sockets, 53
soft body, 224
sound, 109, 112–113. See also
audio
Sound Attenuation assets, 110
Sound Cue assets, 110
formatting, 115–119
Sound Cue Editor, 110
Sound Track, 215–216
Sound Wave assets, 110, 111
Spawn Actor from Class function,
328
spawners, creating Actors,
397–403
spawning, 325
Actors from classes, 332–335
Blueprint class, configuring,
329
Spawn module, 169–170
Sphere module, 172
SpikeTrap_BP, 346
splines, 127, 212
Spot Lights, adding, 78
sprites, 162
Start Awake property, 227
Starter Content, 5
start levels, configuring, 357
Start menus (UMG UI Designer),
413
static lighting, 76, 85
Static Mesh Actors, 8, 66–70
animation, 211
collisions, editing, 70
duplicating, 67
levels, placing into, 66
materials, replacing, 69
mesh references, modifying,
68
mobility, configuring, 67
Physical Materials, assigning,
231
properties, 228
Static Mesh assets, 8, 53
importing, 56–57
materials, assigning, 59
viewing, 55
Static Mesh components, adding,
279–283
Static Mesh Editor, 54. See also
Static Mesh assets
stationary lighting, 86
Stomper_BP, 346
streaming textures, 415
structs, Blueprint scripts, 258
style, units and measurements,
42
SubUV textures,
174–176
Swarm Agent, 83
478 tabs, Manage
T
tabs, Manage, 124
tags
Actors, 350–351
components, 350–351
targets
editors, configuring, 451–454
functions, 277
Temperature property, 82
testing, 432
mobile devices, 441
physics, 224
playtesting, 154
textures, 53. See also materials
file types, 95
formatting, 94–95
importing, 95–96
layers, connecting, 131
resolution, 415
sizing, 94
streaming, 415
SubUV, 174–176
thrusters, 239
Timeline, applying, 296–300
time markers, 208
timers, 389
toolbars
Blueprint Editor interface,
163, 249
Level Editor, 16
Tool menu, 128–129
tools
Copy, 129
Erosion, 128
Flatten, 128
Hydro Erosion, 128
landscapes, 123–124,
128–129
Lightmass, 83
Noise, 129
Paste, 129
Ramp, 128
Retopologize, 129
Sculpt, 128
Selection, 129
Skinning, 183
Smooth, 128
Snap, customizing, 45
transformations, 39
Move, 40
Rotate, 40
Scale, 40
Visibility, 129
visualization, 15
World Outliner, applying, 45
TouchActivation_BP, 350
touch input
configuring, 454
events, 456–458
TraceTurret_BP, 348
tracks
adding, 297
Director group, 218–219
Matinee, 209–210
Sound Track, 215–216
Tracks panel, 207
transformations
interactive/manual, 41
local/world, 41
Move, 40
Rotate, 40
Scale, 40
tools, 39
types of, 41
Transform property, 189
triggering
collisions, 271
particles, 176
TurretProjectile_BP, 348
types
of assets, 29–32
of data, overview of, 161–162
of files, 26
of files, textures, 95
of grids, 44
of input materials, 91
of lighting, 75–76
Object Type setting, 72
of scripts, 247
of transformations, 39, 41
of Viewports, 12–17
U
UMG (Unreal Motion Graphics) UI
Designer, 407
anchor points, 412–413
assets, importing, 413–415
Designer mode, 408–409
DPI scaling, 412–413
Graph mode, 409
navigating, 408
resolution, configuring,
410–412, 424
scripts, 418–426
Start menus, 413
Widget Blueprint, creating,
407–408
units
grid, 42
and measurements, 42
scales, editors, 187
Unreal Engine, installing, 2–4
Unreal Motion Graphics UI
Designer. See UMG UI Designer
UseKeyLever_BP, 350
Use To as Ref Pose option, 190
UV layouts, 53, 57–58
world transformations 479
V
value nodes, materials, 99–101
variables
Blueprint scripts, 257–258
configuring, 302
declaring, 259
editable. See also editable
variables
exposing, 328
formatting, 312–314
lists, 259
local, 281
vector distributions, 165
Vehicle classes, 32
vertices, 53
skinning, 183
viewing
collision hulls, 59
curves, 213
Reference Viewer, 29
Static Mesh assets, 55
UV layouts, 57–58
Viewport panel, 12, 97, 163, 292
Viewports
scenes, 15–16
types of, 12–17
views, modes, 14–15
virtual joysticks, 454–456
virtual machines, 246
visibility, rendering Actors, 270
Visibility tool, 129
visual attributes, particles. See
particles
visual complexity, 147
visual scripting, Blueprint, 245
visualization tools, 15
visualizers, 14–15
channels, 167
properties, 167
Visual Studio 2013, 5
volume, applying audio, 119–120
W
Widget Blueprint
adding, 424
creating, 407–408
widgets
buttons, 417
images, placing, 416–417
Show 3D Widget, 320
Windows
projects, packaging for,
430–435
requirements, 2
wires, 251
world building, 139–140
Actors, combining, 148–150
assets, placing, 147
audio, 154–155
blocking, 145–147
environmental narratives,
140–141
Fog Actors, 155
framing, 147
Level Editor, 7. See also Level
Editor
levels, formatting, 141–142
lighting, 152–153
Lightmass Importance Volume
setting, 153
modular assets, applying, 148
post processing volume
Actors, 155–156
props, placing, 147
Reflection Capture Actors, 155
scale, placing references for,
142–143
scope, establishing, 143–144
shadow colors, 153
shelling, 145–147
visual complexity, 147
world beyond, creating,
150–152
World Outliner, 141
applying, 45
folders, 46
panels, 9
World Settings panel, 225–227
world transformations, 41


