Embed Size (px)
Citation preview
Veritas NetBackup™Deduplication Guide
UNIX, Windows, and Linux
Release 8.3
Veritas NetBackup™ Deduplication GuideLast updated: 2020-09-13
Legal NoticeCopyright © 2020 Veritas Technologies LLC. All rights reserved.
Veritas, the Veritas Logo, and are trademarks or registered trademarks of Veritas TechnologiesLLC or its affiliates in the U.S. and other countries. Other names may be trademarks of theirrespective owners.
This product may contain third-party software for which Veritas is required to provide attributionto the third party (“Third-party Programs”). Some of the Third-party Programs are availableunder open source or free software licenses. The License Agreement accompanying theSoftware does not alter any rights or obligations you may have under those open source orfree software licenses. Refer to the Third-party Legal Notices document accompanying thisVeritas product or available at:
https://www.veritas.com/about/legal/license-agreements
The product described in this document is distributed under licenses restricting its use, copying,distribution, and decompilation/reverse engineering. No part of this document may bereproduced in any form by any means without prior written authorization of Veritas TechnologiesLLC and its licensors, if any.
THE DOCUMENTATION IS PROVIDED "AS IS" AND ALL EXPRESS OR IMPLIEDCONDITIONS, REPRESENTATIONS AND WARRANTIES, INCLUDING ANY IMPLIEDWARRANTY OF MERCHANTABILITY, FITNESS FOR A PARTICULAR PURPOSE ORNON-INFRINGEMENT, ARE DISCLAIMED, EXCEPT TO THE EXTENT THAT SUCHDISCLAIMERS ARE HELD TO BE LEGALLY INVALID. Veritas Technologies LLC SHALLNOT BE LIABLE FOR INCIDENTAL OR CONSEQUENTIAL DAMAGES IN CONNECTIONWITH THE FURNISHING, PERFORMANCE, OR USE OF THIS DOCUMENTATION. THEINFORMATION CONTAINED IN THIS DOCUMENTATION IS SUBJECT TO CHANGEWITHOUT NOTICE.
The Licensed Software and Documentation are deemed to be commercial computer softwareas defined in FAR 12.212 and subject to restricted rights as defined in FAR Section 52.227-19"Commercial Computer Software - Restricted Rights" and DFARS 227.7202, et seq."Commercial Computer Software and Commercial Computer Software Documentation," asapplicable, and any successor regulations, whether delivered by Veritas as on premises orhosted services. Any use, modification, reproduction release, performance, display or disclosureof the Licensed Software and Documentation by the U.S. Government shall be solely inaccordance with the terms of this Agreement.
Veritas Technologies LLC2625 Augustine DriveSanta Clara, CA 95054
http://www.veritas.com
Technical SupportTechnical Support maintains support centers globally. All support services will be deliveredin accordance with your support agreement and the then-current enterprise technical supportpolicies. For information about our support offerings and how to contact Technical Support,visit our website:
https://www.veritas.com/support
You can manage your Veritas account information at the following URL:
https://my.veritas.com
If you have questions regarding an existing support agreement, please email the supportagreement administration team for your region as follows:
[email protected] (except Japan)
DocumentationMake sure that you have the current version of the documentation. Each document displaysthe date of the last update on page 2. The latest documentation is available on the Veritaswebsite:
https://sort.veritas.com/documents
Documentation feedbackYour feedback is important to us. Suggest improvements or report errors or omissions to thedocumentation. Include the document title, document version, chapter title, and section titleof the text on which you are reporting. Send feedback to:
You can also see documentation information or ask a question on the Veritas community site:
http://www.veritas.com/community/
Veritas Services and Operations Readiness Tools (SORT)Veritas Services and Operations Readiness Tools (SORT) is a website that provides informationand tools to automate and simplify certain time-consuming administrative tasks. Dependingon the product, SORT helps you prepare for installations and upgrades, identify risks in yourdatacenters, and improve operational efficiency. To see what services and tools SORT providesfor your product, see the data sheet:
https://sort.veritas.com/data/support/SORT_Data_Sheet.pdf

Chapter 1 Introducing the NetBackup media serverdeduplication option .................................................... 14
About the NetBackup deduplication options ....................................... 14
Chapter 2 Planning your deployment .............................................. 16
Planning your MSDP deployment .................................................... 17NetBackup naming conventions ...................................................... 18About MSDP deduplication nodes .................................................... 19About the NetBackup deduplication destinations ................................. 19About MSDP storage capacity ......................................................... 20About MSDP storage and connectivity requirements ............................ 21
Fibre Channel and iSCSI comparison for MSDP ........................... 23About NetBackup media server deduplication ..................................... 25
About MSDP storage servers .................................................... 27About MSDP load balancing servers .......................................... 28About MSDP server requirements .............................................. 28About MSDP unsupported configurations .................................... 30
About NetBackup Client Direct deduplication ...................................... 30About MSDP client deduplication requirements and limitations
..................................................................................... 32About MSDP remote office client deduplication ................................... 32
About MSDP remote client data security ..................................... 33About remote client backup scheduling ....................................... 33
About the NetBackup Deduplication Engine credentials ........................ 34About the network interface for MSDP .............................................. 35About MSDP port usage ................................................................ 35About MSDP optimized synthetic backups ......................................... 36About MSDP and SAN Client .......................................................... 37About MSDP optimized duplication and replication .............................. 37About MSDP performance .............................................................. 38
How file size may affect the MSDP deduplication rate .................... 39About MSDP stream handlers ......................................................... 39
Oracle stream handler ............................................................. 39Microsoft SQL Server stream handler ......................................... 40
MSDP deployment best practices .................................................... 41
Contents
Use fully qualified domain names ............................................... 41About scaling MSDP ............................................................... 41Send initial full backups to the storage server ............................... 42Increase the number of MSDP jobs gradually ............................... 43Introduce MSDP load balancing servers gradually ......................... 43Implement MSDP client deduplication gradually ............................ 43Use MSDP compression and encryption ..................................... 44About the optimal number of backup streams for MSDP ................. 44About storage unit groups for MSDP .......................................... 44About protecting the MSDP data ................................................ 45Save the MSDP storage server configuration ............................... 46Plan for disk write caching ........................................................ 46
Chapter 3 Provisioning the storage .................................................. 47
About provisioning the storage for MSDP .......................................... 47Do not modify MSDP storage directories and files ............................... 49About volume management for NetBackup MSDP ............................... 49
Chapter 4 Licensing deduplication ................................................... 51
About the MSDP license ................................................................ 51Licensing NetBackup MSDP ........................................................... 52
Chapter 5 Configuring deduplication ............................................... 53
Configuring MSDP server-side deduplication ...................................... 55Configuring MSDP client-side deduplication ....................................... 58About the MSDP Deduplication Multi-Threaded Agent .......................... 59Configuring the Deduplication Multi-Threaded Agent behavior ............... 61
MSDP mtstrm.conf file parameters ............................................. 62Configuring deduplication plug-in interaction with the Multi-Threaded
Agent ................................................................................... 66About MSDP fingerprinting ............................................................. 67About the MSDP fingerprint cache ................................................... 68Configuring the MSDP fingerprint cache behavior ............................... 69
MSDP fingerprint cache behavior options .................................... 69About seeding the MSDP fingerprint cache for remote client
deduplication ......................................................................... 70Configuring MSDP fingerprint cache seeding on the client .................... 72Configuring MSDP fingerprint cache seeding on the storage server
........................................................................................... 73NetBackup seedutil options ...................................................... 75
Enabling 250-TB support for MSDP .................................................. 76
5Contents
About MSDP Encryption using NetBackup KMS service ....................... 76Upgrading KMS for MSDP ........................................................ 77
About MSDP Encryption using external KMS server ............................ 79Configuring a storage server for a Media Server Deduplication Pool
........................................................................................... 80MSDP storage path properties .................................................. 94MSDP network interface properties ............................................ 97
Configuring a storage server for a PureDisk Deduplication Pool ............. 97About disk pools for NetBackup deduplication ................................... 107Configuring a disk pool for deduplication .......................................... 109
Media Server Deduplication Pool properties ............................... 116Creating the data directories for 250-TB MSDP support ...................... 118Adding volumes to a 250-TB Media Server Deduplication Pool ............. 119Configuring a Media Server Deduplication Pool storage unit ................ 121
Media Server Deduplication Pool storage unit properties ............... 123MSDP storage unit recommendations ....................................... 124
Configuring client attributes for MSDP client-side deduplication ............ 125Disabling MSDP client-side deduplication for a client .......................... 127About MSDP compression ............................................................ 127About MSDP encryption ............................................................... 129MSDP compression and encryption settings matrix ............................ 130Configuring encryption for MSDP backups ....................................... 132Configuring encryption for MSDP optimized duplication and replication
.......................................................................................... 133About the rolling data conversion mechanism for MSDP ..................... 134Modes of rolling data conversion .................................................... 135MSDP encryption behavior and compatibilities .................................. 137Configuring optimized synthetic backups for MSDP ........................... 138About a separate network path for MSDP duplication and replication
.......................................................................................... 139Configuring a separate network path for MSDP duplication and
replication ........................................................................... 140About MSDP optimized duplication within the same domain ................ 141
About the media servers for MSDP optimized duplication withinthe same domain ............................................................ 144
Configuring MSDP optimized duplication within the same NetBackupdomain ............................................................................... 149Configuring NetBackup optimized duplication or replication
behavior ....................................................................... 153About MSDP replication to a different domain ................................... 156Configuring MSDP replication to a different NetBackup domain ............ 158
About NetBackup Auto Image Replication .................................. 159About trusted master servers for Auto Image Replication .............. 167
6Contents
About the certificate to be used for adding a trusted master server.................................................................................... 171
Adding a trusted master server using a NetBackup CA-signed(host ID-based) certificate ................................................. 173
Adding a trusted master server using external CA-signed certificate.................................................................................... 178
Removing a trusted master server ............................................ 179Enabling NetBackup clustered master server inter-node
authentication ................................................................ 180Configuring NetBackup CA and NetBackup host ID-based
certificate for secure communication between the source andthe target MSDP storage servers ....................................... 182
Configuring external CA for secure communication between thesource MSDP storage server and the target MSDP storageserver ........................................................................... 183
Configuring a target for MSDP replication to a remote domain.................................................................................... 184
About configuring MSDP optimized duplication and replicationbandwidth ........................................................................... 191
About storage lifecycle policies ...................................................... 192About the storage lifecycle policies required for Auto Image Replication
.......................................................................................... 192Creating a storage lifecycle policy .................................................. 194
Storage Lifecycle Policy dialog box settings ............................... 197About MSDP backup policy configuration ......................................... 199Creating a backup policy .............................................................. 200Resilient Network properties ......................................................... 200
Resilient connection resource usage ........................................ 203Specifying resilient connections ..................................................... 204Adding an MSDP load balancing server ........................................... 206About variable-length deduplication on NetBackup clients ................... 207About the MSDP pd.conf configuration file ....................................... 209Editing the MSDP pd.conf file ........................................................ 210
MSDP pd.conf file parameters ................................................. 210About the MSDP contentrouter.cfg file ............................................. 227About saving the MSDP storage server configuration ......................... 227Saving the MSDP storage server configuration ................................. 228Editing an MSDP storage server configuration file ............................. 229Setting the MSDP storage server configuration ................................. 230About the MSDP host configuration file ........................................... 231Deleting an MSDP host configuration file ......................................... 232Resetting the MSDP registry ......................................................... 232About protecting the MSDP catalog ................................................ 233
7Contents
About the MSDP shadow catalog ............................................. 233About the MSDP catalog backup policy ..................................... 234
Changing the MSDP shadow catalog path ....................................... 236Changing the MSDP shadow catalog schedule ................................. 237Changing the number of MSDP catalog shadow copies ...................... 238Configuring an MSDP catalog backup ............................................. 239
MSDP drcontrol options ......................................................... 240Updating an MSDP catalog backup policy ........................................ 244About MSDP FIPS compliance ...................................................... 245Configuring the NetBackup client-side deduplication to support multiple
interfaces of MSDP ............................................................... 247About MSDP multi-domain support ................................................. 248About MSDP mutli-domain VLAN Support ........................................ 251
Chapter 6 Configuring deduplication to the cloud withNetBackup Cloud Catalyst ...................................... 253
Using NetBackup Cloud Catalyst to upload deduplicated data to thecloud .................................................................................. 254Optimized duplication is used to copy data from an MSDP storage
server to a Cloud Catalyst storage server (preferred use case).................................................................................... 254
Backups go directly to a Cloud Catalyst storage server ................. 256Cloud Catalyst requirements and limitations ..................................... 257Configuring a Linux media server as a Cloud Catalyst storage server
.......................................................................................... 259Configuring a Cloud Catalyst storage server for deduplication to the
cloud .................................................................................. 261How to configure a NetBackup Cloud Catalyst Appliance .............. 261How to configure a Linux media server as a Cloud Catalyst storage
server ........................................................................... 265Configuring a Cloud Catalyst storage server as the target for the
deduplications from MSDP storage servers .......................... 267Certificate validation using Online Certificate Status Protocol
(OCSP) ........................................................................ 269Managing Cloud Catalyst storage server with IAM Role or
CREDS_CAPS credential broker type ................................. 270Configuring a storage lifecycle policy for NetBackup Cloud Catalyst
.................................................................................... 270About the Cloud Catalyst esfs.json configuration file .......................... 271About the Cloud Catalyst cache ..................................................... 275Controlling data traffic to the cloud when using Cloud Catalyst ............. 276
8Contents
Configuring source control or target control optimized duplication forCloud Catalyst ..................................................................... 277
Configuring a Cloud Catalyst storage server as the source for optimizedduplication .......................................................................... 283
Decommissioning Cloud Catalyst cloud storage ................................ 283NetBackup Cloud Catalyst workflow processes ................................. 284Disaster recovery for Cloud Catalyst ............................................... 289About image sharing in cloud using Cloud Catalyst ............................ 289
Chapter 7 MSDP cloud support ....................................................... 298
About MSDP cloud support ........................................................... 298Operating system requirement for configuration .......................... 299Limitations ........................................................................... 300
Creating a cloud storage unit ......................................................... 300Updating cloud credentials for a cloud LSU ...................................... 304Updating encryption configurations for a cloud LSU ........................... 305Deleting a cloud LSU ................................................................... 306Backup data to cloud by using cloud LSU ........................................ 307Duplicate data cloud by using cloud LSU ......................................... 308Configuring AIR to use cloud LSU .................................................. 308About backward compatibility support ............................................. 311About the configuration items in cloud.json, contentrouter.cfg and
spa.cfg ............................................................................... 312About the tool updates for cloud support .......................................... 316About the disaster recovery for cloud LSU ....................................... 318About Image Sharing using MSDP cloud ......................................... 323
Chapter 8 Monitoring deduplication activity ................................. 325
Monitoring the MSDP deduplication and compression rates ................. 325Viewing MSDP job details ............................................................. 327
MSDP job details .................................................................. 328About MSDP storage capacity and usage reporting ........................... 330About MSDP container files .......................................................... 332Viewing storage usage within MSDP container files ........................... 332Viewing MSDP disk reports ........................................................... 334About monitoring MSDP processes ................................................ 335Reporting on Auto Image Replication jobs ........................................ 335
Chapter 9 Managing deduplication ................................................. 337
Managing MSDP servers .............................................................. 338Viewing MSDP storage servers ............................................... 338
9Contents
Determining the MSDP storage server state ............................... 338Viewing MSDP storage server attributes .................................... 339Setting MSDP storage server attributes ..................................... 340Changing MSDP storage server properties ................................ 341Clearing MSDP storage server attributes ................................... 342About changing the MSDP storage server name or storage path
.................................................................................... 343Changing the MSDP storage server name or storage path ............ 343Removing an MSDP load balancing server ................................ 345Deleting an MSDP storage server ............................................ 346Deleting the MSDP storage server configuration ......................... 347
Managing NetBackup Deduplication Engine credentials ...................... 348Determining which media servers have deduplication credentials
.................................................................................... 348Adding NetBackup Deduplication Engine credentials ................... 348Changing NetBackup Deduplication Engine credentials ................ 349Deleting credentials from a load balancing server ........................ 349
Managing Media Server Deduplication Pools .................................... 350Viewing Media Server Deduplication Pools ................................ 350Determining the Media Server Deduplication Pool state ................ 350Changing Media Server Deduplication Pool state ........................ 351Viewing Media Server Deduplication Pool attributes ..................... 351Setting a Media Server Deduplication Pool attribute ..................... 352Changing a Media Server Deduplication Pool properties ............... 353Clearing a Media Server Deduplication Pool attribute ................... 358Determining the MSDP disk volume state .................................. 359Changing the MSDP disk volume state ...................................... 359Inventorying a NetBackup disk pool .......................................... 360Deleting a Media Server Deduplication Pool ............................... 361
Deleting backup images ............................................................... 361About MSDP queue processing ..................................................... 362Processing the MSDP transaction queue manually ............................ 362About MSDP data integrity checking ............................................... 363Configuring MSDP data integrity checking behavior ........................... 364
MSDP data integrity checking configuration parameters ................ 366About managing MSDP storage read performance ............................ 368About MSDP storage rebasing ...................................................... 368
MSDP server-side rebasing parameters .................................... 370About the MSDP data removal process ........................................... 371Resizing the MSDP storage partition ............................................... 372How MSDP restores work ............................................................. 373Configuring MSDP restores directly to a client .................................. 374About restoring files at a remote site ............................................... 374
10Contents
About restoring from a backup at a target master domain .................... 375Specifying the restore server ......................................................... 375
Chapter 10 Recovering MSDP ........................................................... 377
About recovering the MSDP catalog ............................................... 377Restoring the MSDP catalog from a shadow copy ............................. 378Recovering from an MSDP storage server disk failure ........................ 380Recovering from an MSDP storage server failure .............................. 381Recovering the MSDP storage server after NetBackup catalog recovery
.......................................................................................... 384
Chapter 11 Replacing MSDP hosts .................................................. 385
Replacing the MSDP storage server host computer ........................... 385
Chapter 12 Uninstalling MSDP .......................................................... 388
About uninstalling MSDP .............................................................. 388Deactivating MSDP ..................................................................... 388
Chapter 13 Deduplication architecture ............................................ 390
MSDP server components ............................................................ 390Media server deduplication backup process ..................................... 393MSDP client components ............................................................. 396MSDP client–side deduplication backup process ............................... 396
Chapter 14 Troubleshooting ................................................................ 401
About unified logging ................................................................... 401About using the vxlogview command to view unified logs ............. 402Examples of using vxlogview to view unified logs ........................ 404
About legacy logging ................................................................... 406Creating NetBackup log file directories for MSDP ....................... 406
NetBackup MSDP log files ............................................................ 407Troubleshooting MSDP installation issues ........................................ 413
MSDP installation on SUSE Linux fails ...................................... 413Troubleshooting MSDP configuration issues ..................................... 414
MSDP storage server configuration fails .................................... 414MSDP database system error (220) .......................................... 414MSDP server not found error ................................................... 415License information failure during MSDP configuration ................. 416The disk pool wizard does not display an MSDP volume ............... 416
Troubleshooting MSDP operational issues ....................................... 417
11Contents
Verify that the MSDP server has sufficient memory ...................... 417MSDP backup or duplication job fails ........................................ 417MSDP client deduplication fails ................................................ 420MSDP volume state changes to DOWN when volume is
unmounted .................................................................... 420MSDP errors, delayed response, hangs .................................... 421Cannot delete an MSDP disk pool ............................................ 422MSDP media open error (83) .................................................. 423MSDP media write error (84) ................................................... 425MSDP no images successfully processed (191) .......................... 428MSDP storage full conditions .................................................. 428Troubleshooting MSDP catalog backup ..................................... 429Storage Platform Web Service (spws) does not start .................... 430Disk volume API or command line option does not work ............... 430
Viewing MSDP disk errors and events ............................................. 430MSDP event codes and messages ................................................. 431Troubleshooting Cloud Catalyst issues ............................................ 433
Cloud Catalyst logs ............................................................... 434Problems encountered while using the Cloud Storage Server
Configuration Wizard ....................................................... 435Disk pool problems ............................................................... 437Problems during cloud storage server configuration ..................... 438Status 191: No images were successfully processed .................... 440Media write error (84) if due to a full local cache directory ............. 440Troubleshooting restarting ESFS after the Cloud Catalyst storage
server is down ................................................................ 441Restarting the vxesfsd process ................................................ 441Problems restarting vxesfsd .................................................... 443Unable to create CloudCatalyst with a media server that has
version earlier to 8.2 ........................................................ 443Cloud Catalyst troubleshooting tools ......................................... 444
Unable to obtain the administrator password to use an AWS EC2instance that has a Windows OS .............................................. 446
Trouble shooting multi-domain issues ............................................. 446Unable to configure OpenStorage server from another domain
.................................................................................... 446MSDP storage server is down when you configure an OpenStorage
server ........................................................................... 447MSDP server is overloaded when it is used by multiple NetBackup
domains ....................................................................... 447
12Contents
Appendix A Migrating to MSDP storage .......................................... 449
Migrating from PureDisk to the NetBackup MSDP ............................. 449Migrating from another storage type to MSDP ................................... 450
Index .................................................................................................................. 452
13Contents
Introducing the NetBackupmedia server deduplicationoption
This chapter includes the following topics:
■ About the NetBackup deduplication options
About the NetBackup deduplication optionsVeritas NetBackup provides the deduplication options that let you deduplicate dataeverywhere, as close to the source of data as you require.
Deduplication everywhere provides the following benefits:
■ Reduce the amount of data that is stored.
■ Reduce backup bandwidth.
■ Reduce backup windows.
■ Reduce infrastructure.
Deduplication everywhere lets you choose at which point in the backup process toperform deduplication. NetBackup can manage your deduplication wherever youimplement it in the backup stream.
Table 1-1 describes the options for deduplication.
1Chapter
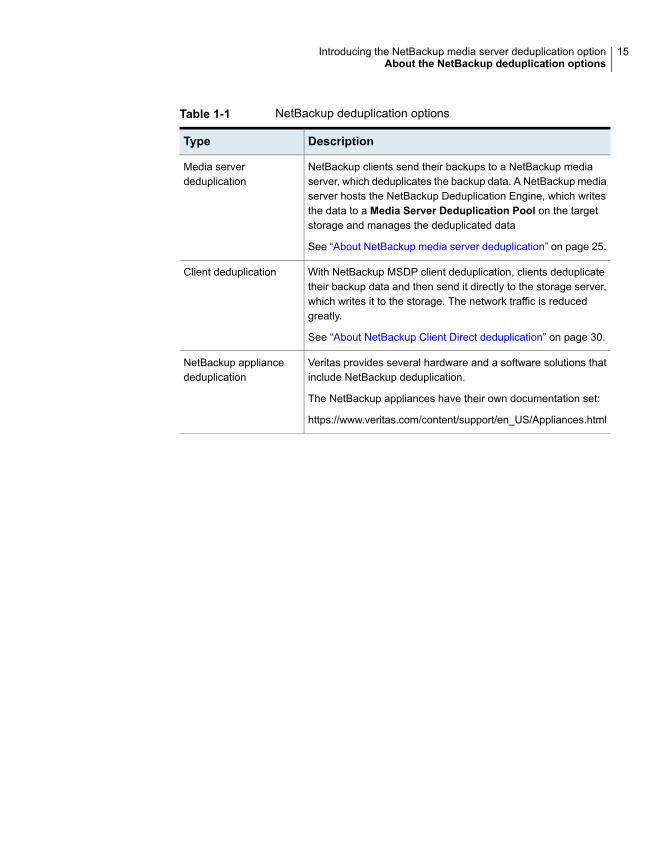
Table 1-1 NetBackup deduplication options
DescriptionType
NetBackup clients send their backups to a NetBackup mediaserver, which deduplicates the backup data. A NetBackup mediaserver hosts the NetBackup Deduplication Engine, which writesthe data to a Media Server Deduplication Pool on the targetstorage and manages the deduplicated data
See “About NetBackup media server deduplication” on page 25.
Media serverdeduplication
With NetBackup MSDP client deduplication, clients deduplicatetheir backup data and then send it directly to the storage server,which writes it to the storage. The network traffic is reducedgreatly.
See “About NetBackup Client Direct deduplication” on page 30.
Client deduplication
Veritas provides several hardware and a software solutions thatinclude NetBackup deduplication.
The NetBackup appliances have their own documentation set:
https://www.veritas.com/content/support/en_US/Appliances.html
NetBackup appliancededuplication
15Introducing the NetBackup media server deduplication optionAbout the NetBackup deduplication options
Planning your deploymentThis chapter includes the following topics:
■ Planning your MSDP deployment
■ NetBackup naming conventions
■ About MSDP deduplication nodes
■ About the NetBackup deduplication destinations
■ About MSDP storage capacity
■ About MSDP storage and connectivity requirements
■ About NetBackup media server deduplication
■ About NetBackup Client Direct deduplication
■ About MSDP remote office client deduplication
■ About the NetBackup Deduplication Engine credentials
■ About the network interface for MSDP
■ About MSDP port usage
■ About MSDP optimized synthetic backups
■ About MSDP and SAN Client
■ About MSDP optimized duplication and replication
■ About MSDP performance
■ About MSDP stream handlers
■ MSDP deployment best practices
2Chapter
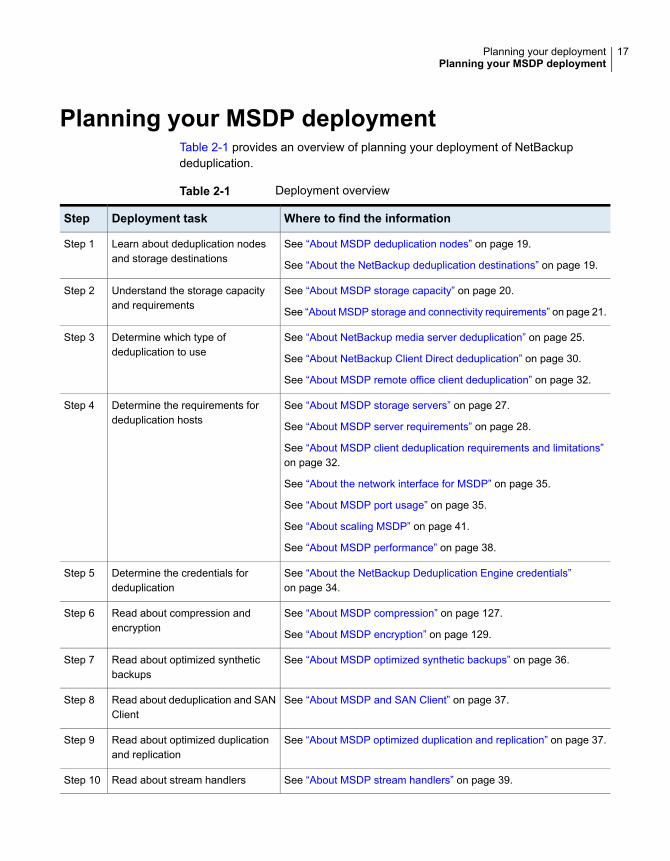
Planning your MSDP deploymentTable 2-1 provides an overview of planning your deployment of NetBackupdeduplication.
Table 2-1 Deployment overview
Where to find the informationDeployment taskStep
See “About MSDP deduplication nodes” on page 19.
See “About the NetBackup deduplication destinations” on page 19.
Learn about deduplication nodesand storage destinations
Step 1
See “About MSDP storage capacity” on page 20.
See “About MSDP storage and connectivity requirements” on page 21.
Understand the storage capacityand requirements
Step 2
See “About NetBackup media server deduplication” on page 25.
See “About NetBackup Client Direct deduplication” on page 30.
See “About MSDP remote office client deduplication” on page 32.
Determine which type ofdeduplication to use
Step 3
See “About MSDP storage servers” on page 27.
See “About MSDP server requirements” on page 28.
See “About MSDP client deduplication requirements and limitations”on page 32.
See “About the network interface for MSDP” on page 35.
See “About MSDP port usage” on page 35.
See “About scaling MSDP” on page 41.
See “About MSDP performance” on page 38.
Determine the requirements fordeduplication hosts
Step 4
See “About the NetBackup Deduplication Engine credentials”on page 34.
Determine the credentials fordeduplication
Step 5
See “About MSDP compression” on page 127.
See “About MSDP encryption” on page 129.
Read about compression andencryption
Step 6
See “About MSDP optimized synthetic backups” on page 36.Read about optimized syntheticbackups
Step 7
See “About MSDP and SAN Client” on page 37.Read about deduplication and SANClient
Step 8
See “About MSDP optimized duplication and replication” on page 37.Read about optimized duplicationand replication
Step 9
See “About MSDP stream handlers” on page 39.Read about stream handlersStep 10
17Planning your deploymentPlanning your MSDP deployment
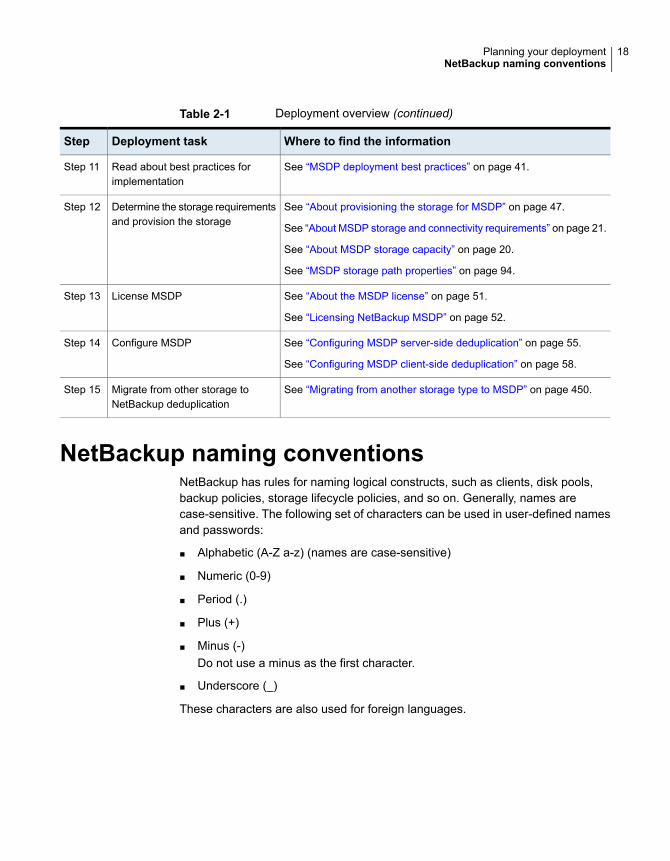
Table 2-1 Deployment overview (continued)
Where to find the informationDeployment taskStep
See “MSDP deployment best practices” on page 41.Read about best practices forimplementation
Step 11
See “About provisioning the storage for MSDP” on page 47.
See “About MSDP storage and connectivity requirements” on page 21.
See “About MSDP storage capacity” on page 20.
See “MSDP storage path properties” on page 94.
Determine the storage requirementsand provision the storage
Step 12
See “About the MSDP license” on page 51.
See “Licensing NetBackup MSDP” on page 52.
License MSDPStep 13
See “Configuring MSDP server-side deduplication” on page 55.
See “Configuring MSDP client-side deduplication” on page 58.
Configure MSDPStep 14
See “Migrating from another storage type to MSDP” on page 450.Migrate from other storage toNetBackup deduplication
Step 15
NetBackup naming conventionsNetBackup has rules for naming logical constructs, such as clients, disk pools,backup policies, storage lifecycle policies, and so on. Generally, names arecase-sensitive. The following set of characters can be used in user-defined namesand passwords:
■ Alphabetic (A-Z a-z) (names are case-sensitive)
■ Numeric (0-9)
■ Period (.)
■ Plus (+)
■ Minus (-)Do not use a minus as the first character.
■ Underscore (_)
These characters are also used for foreign languages.
18Planning your deploymentNetBackup naming conventions
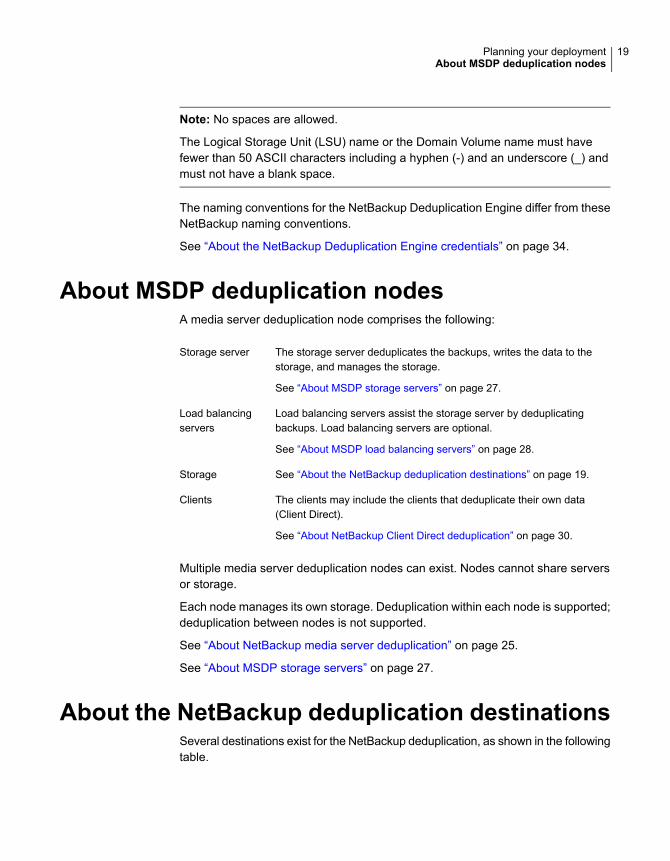
Note: No spaces are allowed.
The Logical Storage Unit (LSU) name or the Domain Volume name must havefewer than 50 ASCII characters including a hyphen (-) and an underscore (_) andmust not have a blank space.
The naming conventions for the NetBackup Deduplication Engine differ from theseNetBackup naming conventions.
See “About the NetBackup Deduplication Engine credentials” on page 34.
About MSDP deduplication nodesA media server deduplication node comprises the following:
The storage server deduplicates the backups, writes the data to thestorage, and manages the storage.
See “About MSDP storage servers” on page 27.
Storage server
Load balancing servers assist the storage server by deduplicatingbackups. Load balancing servers are optional.
See “About MSDP load balancing servers” on page 28.
Load balancingservers
See “About the NetBackup deduplication destinations” on page 19.Storage
The clients may include the clients that deduplicate their own data(Client Direct).
See “About NetBackup Client Direct deduplication” on page 30.
Clients
Multiple media server deduplication nodes can exist. Nodes cannot share serversor storage.
Each node manages its own storage. Deduplication within each node is supported;deduplication between nodes is not supported.
See “About NetBackup media server deduplication” on page 25.
See “About MSDP storage servers” on page 27.
About the NetBackup deduplication destinationsSeveral destinations exist for the NetBackup deduplication, as shown in the followingtable.
19Planning your deploymentAbout MSDP deduplication nodes
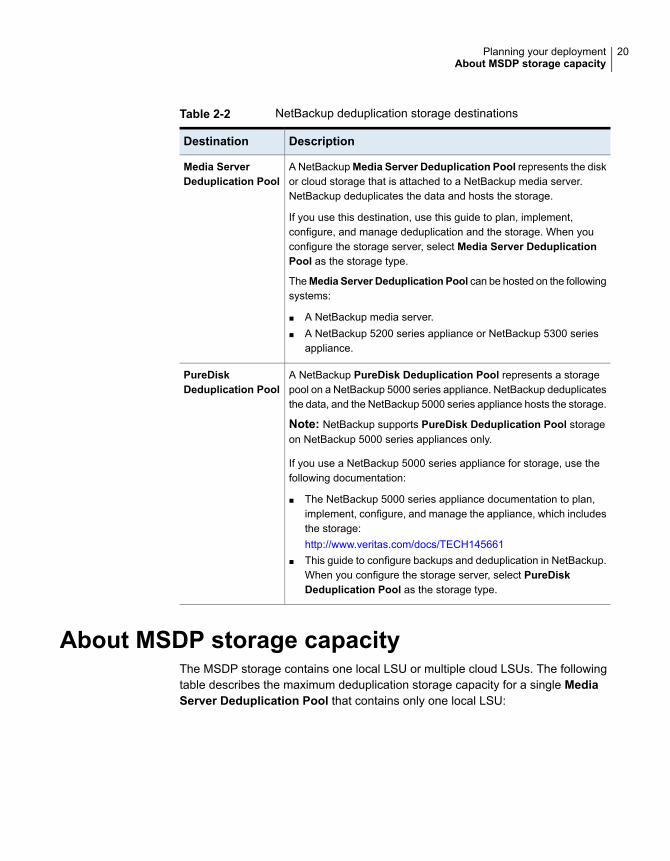
Table 2-2 NetBackup deduplication storage destinations
DescriptionDestination
A NetBackupMedia Server Deduplication Pool represents the diskor cloud storage that is attached to a NetBackup media server.NetBackup deduplicates the data and hosts the storage.
If you use this destination, use this guide to plan, implement,configure, and manage deduplication and the storage. When youconfigure the storage server, select Media Server DeduplicationPool as the storage type.
TheMedia Server Deduplication Pool can be hosted on the followingsystems:
■ A NetBackup media server.■ A NetBackup 5200 series appliance or NetBackup 5300 series
appliance.
Media ServerDeduplication Pool
A NetBackup PureDisk Deduplication Pool represents a storagepool on a NetBackup 5000 series appliance. NetBackup deduplicatesthe data, and the NetBackup 5000 series appliance hosts the storage.
Note: NetBackup supports PureDisk Deduplication Pool storageon NetBackup 5000 series appliances only.
If you use a NetBackup 5000 series appliance for storage, use thefollowing documentation:
■ The NetBackup 5000 series appliance documentation to plan,implement, configure, and manage the appliance, which includesthe storage:http://www.veritas.com/docs/TECH145661
■ This guide to configure backups and deduplication in NetBackup.When you configure the storage server, select PureDiskDeduplication Pool as the storage type.
PureDiskDeduplication Pool
About MSDP storage capacityThe MSDP storage contains one local LSU or multiple cloud LSUs. The followingtable describes the maximum deduplication storage capacity for a single MediaServer Deduplication Pool that contains only one local LSU:
20Planning your deploymentAbout MSDP storage capacity
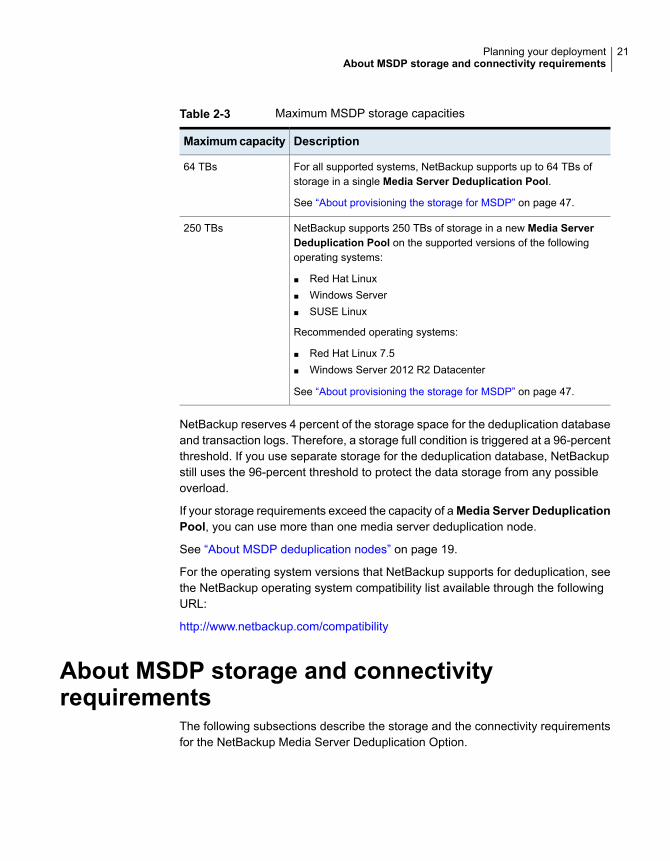
Table 2-3 Maximum MSDP storage capacities
DescriptionMaximumcapacity
For all supported systems, NetBackup supports up to 64 TBs ofstorage in a single Media Server Deduplication Pool.
See “About provisioning the storage for MSDP” on page 47.
64 TBs
NetBackup supports 250 TBs of storage in a new Media ServerDeduplication Pool on the supported versions of the followingoperating systems:
■ Red Hat Linux■ Windows Server■ SUSE Linux
Recommended operating systems:
■ Red Hat Linux 7.5■ Windows Server 2012 R2 Datacenter
See “About provisioning the storage for MSDP” on page 47.
250 TBs
NetBackup reserves 4 percent of the storage space for the deduplication databaseand transaction logs. Therefore, a storage full condition is triggered at a 96-percentthreshold. If you use separate storage for the deduplication database, NetBackupstill uses the 96-percent threshold to protect the data storage from any possibleoverload.
If your storage requirements exceed the capacity of aMedia Server DeduplicationPool, you can use more than one media server deduplication node.
See “About MSDP deduplication nodes” on page 19.
For the operating system versions that NetBackup supports for deduplication, seethe NetBackup operating system compatibility list available through the followingURL:
http://www.netbackup.com/compatibility
About MSDP storage and connectivityrequirements
The following subsections describe the storage and the connectivity requirementsfor the NetBackup Media Server Deduplication Option.
21Planning your deploymentAbout MSDP storage and connectivity requirements
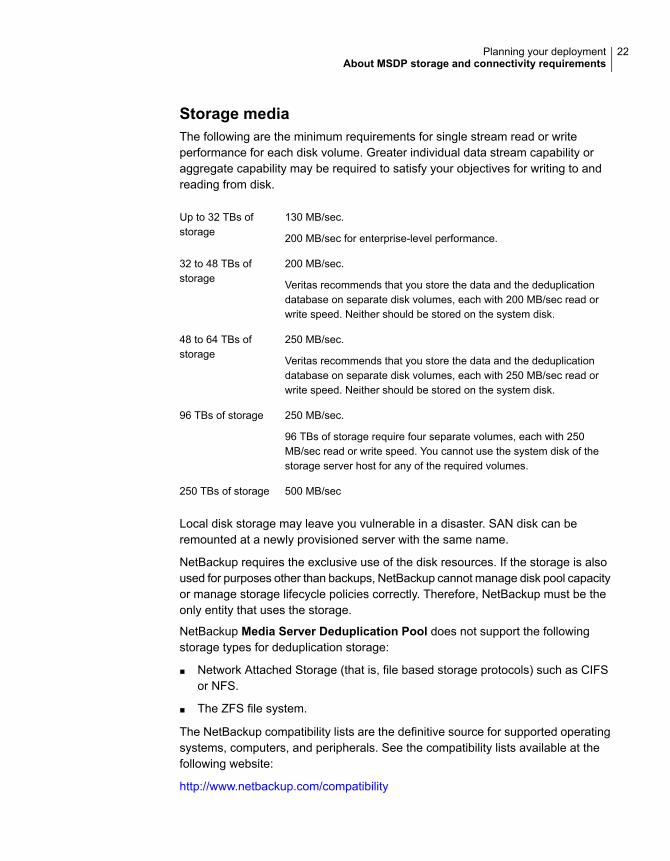
Storage mediaThe following are the minimum requirements for single stream read or writeperformance for each disk volume. Greater individual data stream capability oraggregate capability may be required to satisfy your objectives for writing to andreading from disk.
130 MB/sec.
200 MB/sec for enterprise-level performance.
Up to 32 TBs ofstorage
200 MB/sec.
Veritas recommends that you store the data and the deduplicationdatabase on separate disk volumes, each with 200 MB/sec read orwrite speed. Neither should be stored on the system disk.
32 to 48 TBs ofstorage
250 MB/sec.
Veritas recommends that you store the data and the deduplicationdatabase on separate disk volumes, each with 250 MB/sec read orwrite speed. Neither should be stored on the system disk.
48 to 64 TBs ofstorage
250 MB/sec.
96 TBs of storage require four separate volumes, each with 250MB/sec read or write speed. You cannot use the system disk of thestorage server host for any of the required volumes.
96 TBs of storage
500 MB/sec250 TBs of storage
Local disk storage may leave you vulnerable in a disaster. SAN disk can beremounted at a newly provisioned server with the same name.
NetBackup requires the exclusive use of the disk resources. If the storage is alsoused for purposes other than backups, NetBackup cannot manage disk pool capacityor manage storage lifecycle policies correctly. Therefore, NetBackup must be theonly entity that uses the storage.
NetBackup Media Server Deduplication Pool does not support the followingstorage types for deduplication storage:
■ Network Attached Storage (that is, file based storage protocols) such as CIFSor NFS.
■ The ZFS file system.
The NetBackup compatibility lists are the definitive source for supported operatingsystems, computers, and peripherals. See the compatibility lists available at thefollowing website:
http://www.netbackup.com/compatibility
22Planning your deploymentAbout MSDP storage and connectivity requirements
The storage must be provisioned and operational before you can configurededuplication in NetBackup.
See “About provisioning the storage for MSDP” on page 47.
Storage connectionThe storage must be direct-attached storage (DAS), internal disks, or connectedby a dedicated, low latency storage area network (Fibre Channel or iSCSI).
A storage area network should conform to the following criteria:
Maximum 0.1-millisecond latency per round trip.Latency
Enough bandwidth on the storage network to satisfy your throughputobjectives.
Veritas supports iSCSI on storage networks with at least 10-Gigabit Ethernetnetwork bandwidth.
Veritas recommends the Fibre Channel storage networks with at least4-Gigabit network bandwidth.
Bandwidth
The storage server should have an HBA or HBAs dedicated to the storage.Those HBAs must have enough bandwidth to satisfy your throughputobjectives.
HBAs
See “Fibre Channel and iSCSI comparison for MSDP” on page 23.
Fibre Channel and iSCSI comparison for MSDPDeduplication is a CPU and memory intensive process. It also requires dedicatedand high-speed storage connectivity for the best performance. That connectivityhelps to ensure the following:
■ Consistent storage performance.
■ Reduced packet loss during network congestion.
■ Reduced storage deadlocks.
The following table compares both the Fibre Channel and the iSCSI characteristicsthat affect deduplication storage performance. By design, Fibre Channel providesthe greatest opportunity to meet performance objectives. To achieve the resultsthat are required for NetBackup MSDP storage, iSCSI may require otheroptimizations that are described in the following table.
23Planning your deploymentAbout MSDP storage and connectivity requirements
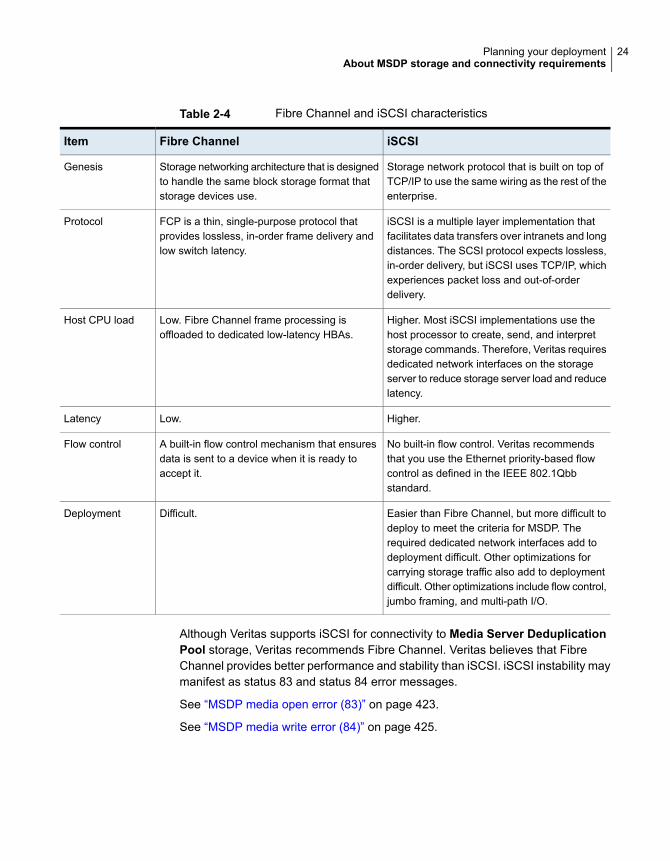
Table 2-4 Fibre Channel and iSCSI characteristics
iSCSIFibre ChannelItem
Storage network protocol that is built on top ofTCP/IP to use the same wiring as the rest of theenterprise.
Storage networking architecture that is designedto handle the same block storage format thatstorage devices use.
Genesis
iSCSI is a multiple layer implementation thatfacilitates data transfers over intranets and longdistances. The SCSI protocol expects lossless,in-order delivery, but iSCSI uses TCP/IP, whichexperiences packet loss and out-of-orderdelivery.
FCP is a thin, single-purpose protocol thatprovides lossless, in-order frame delivery andlow switch latency.
Protocol
Higher. Most iSCSI implementations use thehost processor to create, send, and interpretstorage commands. Therefore, Veritas requiresdedicated network interfaces on the storageserver to reduce storage server load and reducelatency.
Low. Fibre Channel frame processing isoffloaded to dedicated low-latency HBAs.
Host CPU load
Higher.Low.Latency
No built-in flow control. Veritas recommendsthat you use the Ethernet priority-based flowcontrol as defined in the IEEE 802.1Qbbstandard.
A built-in flow control mechanism that ensuresdata is sent to a device when it is ready toaccept it.
Flow control
Easier than Fibre Channel, but more difficult todeploy to meet the criteria for MSDP. Therequired dedicated network interfaces add todeployment difficult. Other optimizations forcarrying storage traffic also add to deploymentdifficult. Other optimizations include flow control,jumbo framing, and multi-path I/O.
Difficult.Deployment
Although Veritas supports iSCSI for connectivity to Media Server DeduplicationPool storage, Veritas recommends Fibre Channel. Veritas believes that FibreChannel provides better performance and stability than iSCSI. iSCSI instability maymanifest as status 83 and status 84 error messages.
See “MSDP media open error (83)” on page 423.
See “MSDP media write error (84)” on page 425.
24Planning your deploymentAbout MSDP storage and connectivity requirements
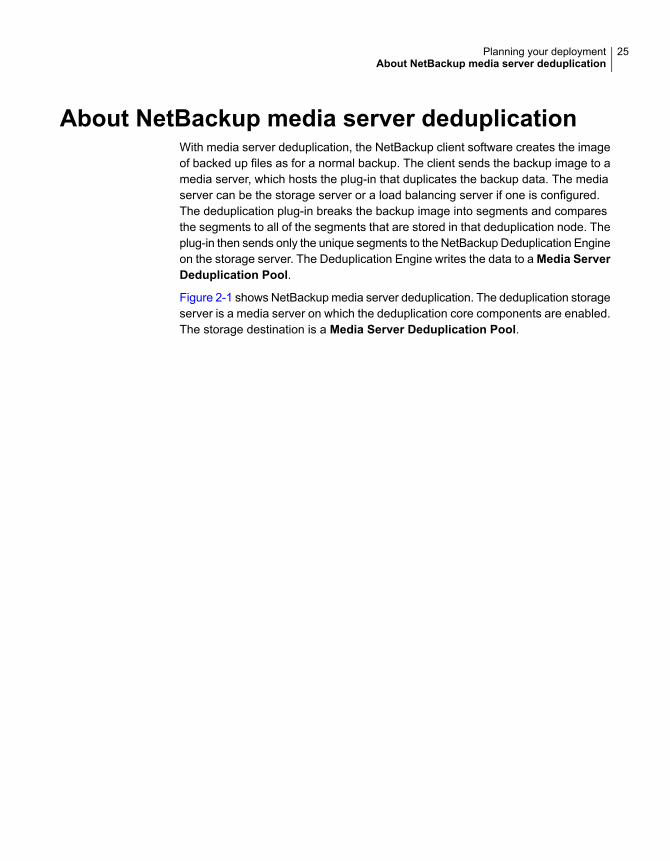
About NetBackup media server deduplicationWith media server deduplication, the NetBackup client software creates the imageof backed up files as for a normal backup. The client sends the backup image to amedia server, which hosts the plug-in that duplicates the backup data. The mediaserver can be the storage server or a load balancing server if one is configured.The deduplication plug-in breaks the backup image into segments and comparesthe segments to all of the segments that are stored in that deduplication node. Theplug-in then sends only the unique segments to the NetBackup Deduplication Engineon the storage server. The Deduplication Engine writes the data to a Media ServerDeduplication Pool.
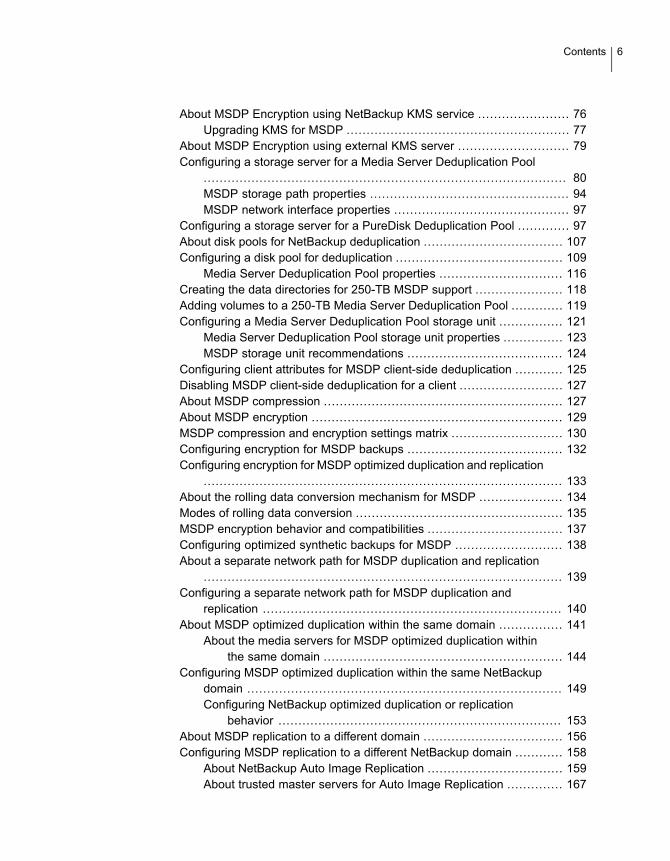
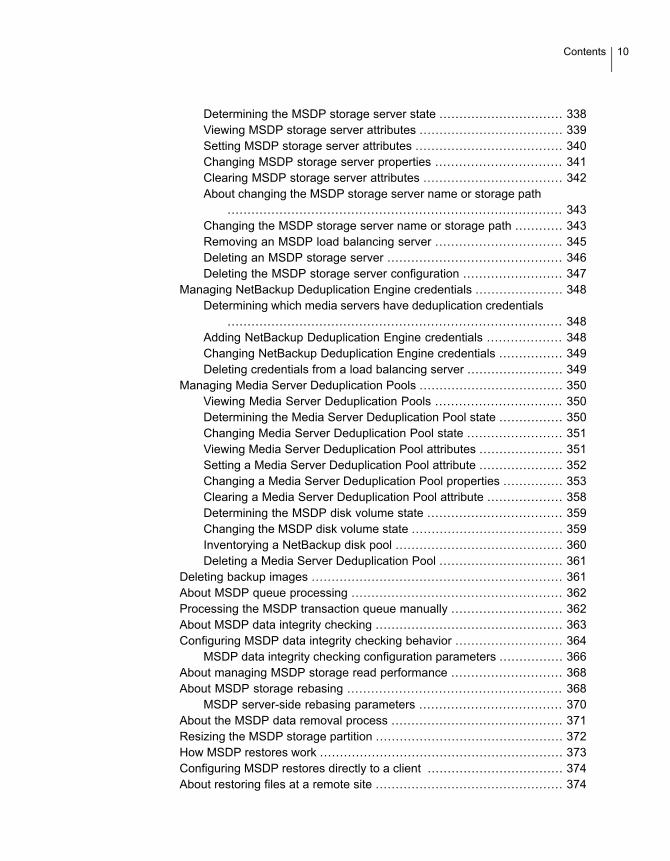
Figure 2-1 shows NetBackup media server deduplication. The deduplication storageserver is a media server on which the deduplication core components are enabled.The storage destination is a Media Server Deduplication Pool.
25Planning your deploymentAbout NetBackup media server deduplication
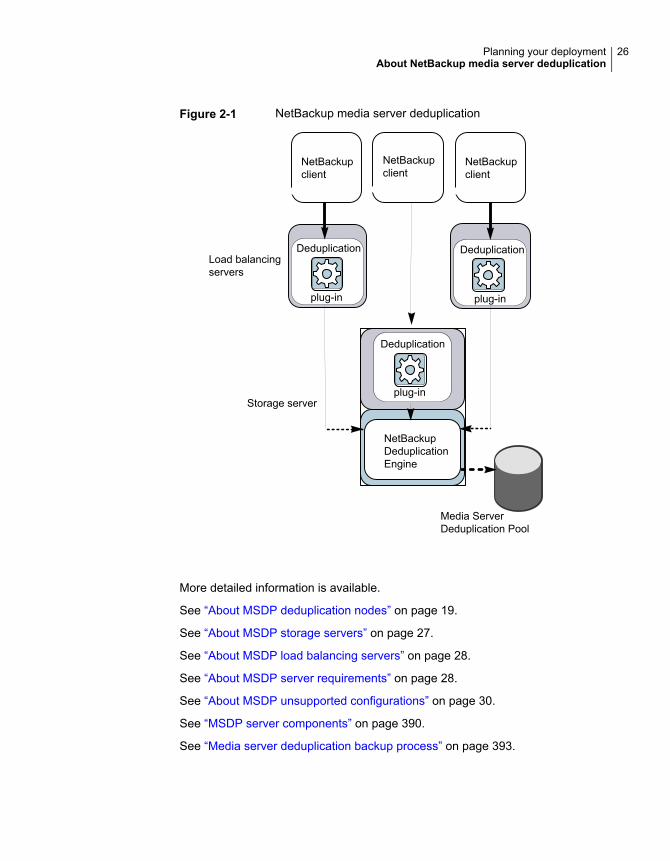
Figure 2-1 NetBackup media server deduplication
NetBackupDeduplicationEngine
plug-in
NetBackupclient
NetBackupclient
NetBackupclient
Media ServerDeduplication Pool
Storage server
Deduplication
plug-in
Deduplication
plug-in
Deduplication
Load balancingservers
More detailed information is available.
See “About MSDP deduplication nodes” on page 19.
See “About MSDP storage servers” on page 27.
See “About MSDP load balancing servers” on page 28.
See “About MSDP server requirements” on page 28.
See “About MSDP unsupported configurations” on page 30.
See “MSDP server components” on page 390.
See “Media server deduplication backup process” on page 393.
26Planning your deploymentAbout NetBackup media server deduplication
About MSDP storage serversA storage server is an entity that writes to and reads from the storage. One hostfunctions as the storage server, and only one storage server exists for eachNetBackup deduplication node. The host must be a NetBackup media server.Although the storage server components run on a media server, the storage serveris a separate logical entity.
See “About MSDP deduplication nodes” on page 19.
The MSDP storage server does the following:
■ Receives the backups from clients and then deduplicates the data.
■ Receives the deduplicated data from clients or from other media servers.You can configure NetBackup clients and other NetBackup media servers todeduplicate data also. In which case, the storage server only receives the dataafter it is deduplicated.See “About NetBackup Client Direct deduplication” on page 30.See “About MSDP load balancing servers” on page 28.
■ Writes the deduplicated data to and reads the deduplicated data from the diskor cloud storage.
■ Manages that storage.
■ Manages the deduplication processes.
How many storage servers (and by extension, nodes) you configure depends onyour storage requirements. It also depends on whether or not you use optimizedduplication or replication, as follows:
■ Optimized duplication between local LSUs in the same domain requires at leasttwo deduplication nodes in the same domain. The following are the requiredstorage servers:
■ One for the backup storage, which is the source for the duplication operations.
■ Another to store the copies of the backup images, which are the target forthe duplication operations.
See “About MSDP optimized duplication within the same domain” on page 141.
■ Auto Image Replication to another domain requires the following storage servers:
■ One for the backups in the originating NetBackup domain. This storageserver writes the NetBackup client backups to the storage. It is the sourcefor the duplication operations.
■ Another in the remote NetBackup domain for the copies of the backupimages. This storage server is the target for the duplication operations thatrun in the originating domain.
27Planning your deploymentAbout NetBackup media server deduplication
See “About NetBackup Auto Image Replication” on page 159.
About MSDP load balancing serversYou can configure other NetBackup media servers to help deduplicate data. Theyperform file fingerprint calculations for deduplication, and they send the unique datasegments to the storage server. These helper media servers are called loadbalancing servers.
A NetBackup media server becomes a load balancing server when two things occur:
■ You enable the media server for deduplication load balancing duties.You do so when you configure the storage server or later by modifying thestorage server properties.
■ You select it in the storage unit for the deduplication pool.
See “Introduce MSDP load balancing servers gradually” on page 43.
Load balancing servers also perform restore and duplication jobs.
Load balancing servers can be any supported server type for deduplication. Theydo not have to be the same type as the storage server.
Note: Load balancing for Cloud Catalyst storage servers or Cloud Catalystappliances is supported. See the following topic for configuration considerations.
See “Configuring source control or target control optimized duplication for CloudCatalyst” on page 277.
About MSDP server requirementsThe host computer’s CPU and memory constrain how many jobs can runconcurrently. The storage server requires enough capability for deduplication andfor storage management unless you offload some of the deduplication to loadbalancing servers.
Table 2-5 shows the minimum requirements for MSDP servers. NetBackupdeduplication servers are always NetBackup media servers.
Processors for deduplication should have a high clock rate and high floating pointperformance. Furthermore, high throughput per core is desirable. Each backupstream uses a separate core.
Intel and AMD have similar performance and perform well on single core throughput.
Newer SPARC processors, such as the SPARC64 VII, provide the single corethroughput that is similar to AMD and Intel. Alternatively, UltraSPARC T1 and T2single core performance does not approach that of the AMD and Intel processors.
28Planning your deploymentAbout NetBackup media server deduplication
Tests show that the UltraSPARC processors can achieve high aggregate throughput.However, they require eight times as many backup streams as AMD and Intelprocessors to do so.
Table 2-5 MSDP server minimum requirements
Load balancing serverStorage serverComponent
Veritas recommends at least a 2.2-GHz clock rate.A 64-bit processor is required.
At least two cores are required. Depending onthroughput requirements, more cores may behelpful.
Veritas recommends at least a 2.2-GHz clock rate.A 64-bit processor is required.
At least four cores are required. Veritasrecommends eight cores.
For 64 TBs of storage, Intel x86-64 architecturerequires eight cores.
CPU
4 GBs.From 8 TBs to 32 TBs of storage, Veritasrecommends 1GB RAM for 1TB of storage.However, beyond 32 TBs storage, Veritasrecommends more than 32GBs of RAM for betterand enhanced performance.
RAM
The operating system must be a supported 64-bitoperating system.
Load balancing for Cloud Catalyst storage serversor Cloud Catalyst appliances is supported. See thefollowing topic for configuration considerations.
See “Configuring source control or target controloptimized duplication for Cloud Catalyst”on page 277.
See the operating system compatibility list for yourNetBackup release on the following website.
http://www.netbackup.com/compatibility
The operating system must be a supported 64-bitoperating system.
See the operating system compatibility list for yourNetBackup release on the Veritas Support website.
http://www.netbackup.com/compatibility
Operatingsystem
A Veritas tech note provides detailed information about and examples for sizingthe hosts for deduplication. Information includes the number of the NICs or theHBAs for each server to support your performance objectives.
For more information, refer to http://veritas.com/docs/TECH77575.
Note: This page has been updated for NetBackup version 7.5.
29Planning your deploymentAbout NetBackup media server deduplication
Note: In some environments, a single host can function as both a NetBackup masterserver and as a deduplication server. Such environments typically run fewer than100 total backup jobs a day. (Total backup jobs means backups to any storagedestination, including deduplication and non-deduplication storage.) If you performmore than 100 backups a day, deduplication operations may affect master serveroperations.
See “About MSDP performance” on page 38.
See “About MSDP queue processing” on page 362.
About MSDP unsupported configurationsThe following items describe some configurations that are not supported:
■ NetBackup media server deduplication and Veritas Backup Exec deduplicationcannot reside on the same host. If you use both NetBackup and Backup Execdeduplication, each product must reside on a separate host.
■ NetBackup does not support clustering of deduplication storage servers or loadbalancing servers.
■ Deduplication within each media server deduplication node is supported; globaldeduplication between nodes is not supported.
About NetBackup Client Direct deduplicationWith NetBackup Client Direct deduplication (also known as client-side deduplication),the client hosts the plug-in that duplicates the backup data. The NetBackup clientsoftware creates the image of backed up files as for a normal backup. Next, thededuplication plug-in breaks the backup image into segments and compares thesegments to all of the segments that are stored in that deduplication node. Theplug-in then sends only the unique segments to the NetBackup Deduplication Engineon the storage server. The engine writes the data to aMedia Server DeduplicationPool.
Client deduplication does the following:
■ Reduces network traffic. The client sends only unique file segments to thestorage server. Duplicate data is not sent over the network.
■ Distributes some deduplication processing load from the storage server to clients.(NetBackup does not balance load between clients; each client deduplicates itsown data.)
NetBackup Client Deduplication is a solution for the following cases:
30Planning your deploymentAbout NetBackup Client Direct deduplication
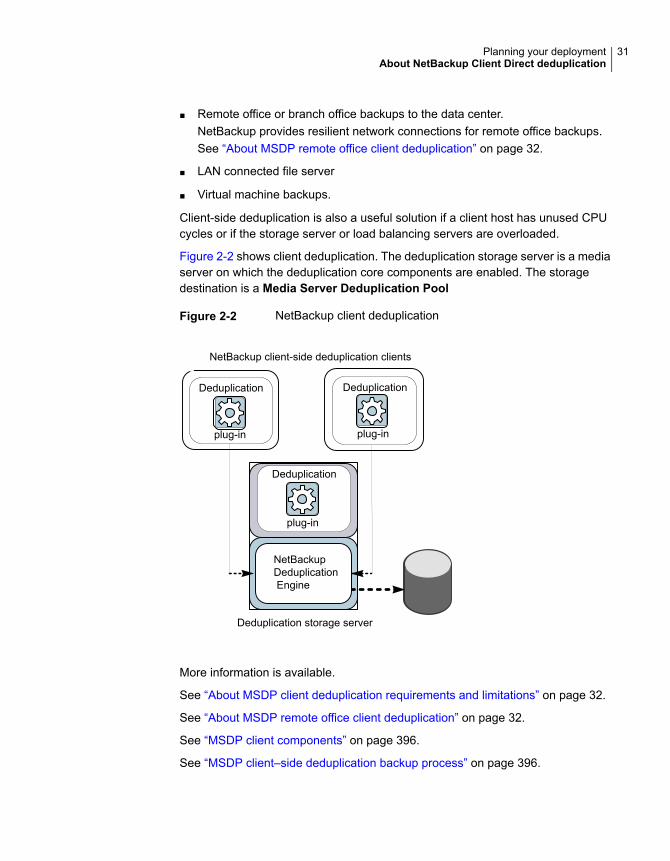
■ Remote office or branch office backups to the data center.NetBackup provides resilient network connections for remote office backups.See “About MSDP remote office client deduplication” on page 32.
■ LAN connected file server
■ Virtual machine backups.
Client-side deduplication is also a useful solution if a client host has unused CPUcycles or if the storage server or load balancing servers are overloaded.
Figure 2-2 shows client deduplication. The deduplication storage server is a mediaserver on which the deduplication core components are enabled. The storagedestination is a Media Server Deduplication Pool
Figure 2-2 NetBackup client deduplication
NetBackupDeduplicationEngine
Deduplication
NetBackup client-side deduplication clients
Deduplication storage server
plug-in
Deduplication
plug-in
Deduplication
plug-in
More information is available.
See “About MSDP client deduplication requirements and limitations” on page 32.
See “About MSDP remote office client deduplication” on page 32.
See “MSDP client components” on page 396.
See “MSDP client–side deduplication backup process” on page 396.
31Planning your deploymentAbout NetBackup Client Direct deduplication
About MSDP client deduplication requirements and limitationsThe clients that deduplicate their own data and the master server must use thesame name to resolve the storage server. The name must be the host name underwhich the NetBackup Deduplication Engine credentials were created. If they do notuse the same name, backups fail. In some environments, careful configuration maybe required to ensure that the client and the master server use the same name forthe storage server. Such environments include those that use VLAN tagging andthose that use multi-homed hosts.
NetBackup does not support the following for client-side deduplication:
■ Multiple copies per job. For the jobs that specify multiple copies, the backupimages are sent to the storage server and may be deduplicated there. Multiplecopies are configured in a NetBackup backup policy.
■ NDMP hosts. The backup jobs fail if you try to use client-side deduplication forNDMP hosts.
For the systems on which NetBackup supports client-side deduplication, see theNetBackup compatibility lists at the following URL:
http://www.netbackup.com/compatibility
The clients that deduplicate their own data conform to the standard NetBackuprelease level compatibility. The NetBackup Release Notes for each release definesthe compatibility between NetBackup releases. To take advantage of any newfeatures, improvements, and fixes, Veritas recommends that the clients and theservers be at the same release and revision.
The NetBackup Release Notes is available through the following URL:
http://www.veritas.com/docs/DOC5332
About MSDP remote office client deduplicationWAN backups require more time than local backups in your own domain. WANbackups have an increased risk of failure when compared to local backups. To helpfacilitate WAN backups, NetBackup provides the capability for resilient networkconnections. A resilient connection allows backup and restore traffic between aclient and NetBackup media servers to function effectively in high-latency,low-bandwidth networks such as WANs.
The use case that benefits the most from resilient connections is client-sidededuplication at a remote office that does not have local backup storage. Thefollowing items describe the advantages:
■ Client deduplication reduces the time that is required for WAN backups byreducing the amount of data that must be transferred.
32Planning your deploymentAbout MSDP remote office client deduplication
■ The resilient connections provide automatic recovery from network failures andlatency (within the parameters from which NetBackup can recover).
When you configure a resilient connection, NetBackup uses that connection for thebackups. Use the NetBackup Resilient Network host properties to configureNetBackup to use resilient network connections.
See “Resilient Network properties” on page 200.
See “Specifying resilient connections” on page 204.
The pd.conf FILE_KEEP_ALIVE_INTERVAL parameter lets you configure thefrequency of keep-alive operations on idle sockets.
See “MSDP pd.conf file parameters” on page 210.
You can improve the performance of the first backup for a remote client.
See “About seeding the MSDP fingerprint cache for remote client deduplication”on page 70.
About MSDP remote client data securityResilient connection traffic is not encrypted. The NetBackup deduplication processcan encrypt the data before it is transmitted over the WAN. Veritas recommendsthat you use the deduplication encryption to protect your data during your remoteclient backups.
See “About MSDP encryption” on page 129.
NetBackup does not encrypt the data during a restore job. Therefore, Veritasrecommends that you restore data to the original remote client over a privatenetwork.
See “How MSDP restores work” on page 373.
About remote client backup schedulingNetBackup backup policies use the time zone of the master server for schedulingjobs. If your remote clients are in a different time zone than your NetBackup masterserver, you must compensate for the difference. For example, suppose the masterserver is in Finland (UTC+2) and the remote client is in London (UTC+0). If thebackup policy has a window from 6pm to 6am, backups can begin at 4pm on theclient. To compensate, you should set the backup window from 8pm to 8am.Alternatively, it may be advisable to use a separate backup policy for each timezone in which remote clients reside.
33Planning your deploymentAbout MSDP remote office client deduplication
About the NetBackup Deduplication Enginecredentials
The NetBackup Deduplication Engine requires credentials. The deduplicationcomponents use the credentials when they communicate with the NetBackupDeduplication Engine. The credentials are for the deduplication engine, not for thehost on which it runs.
You enter the NetBackup Deduplication Engine credentials when you configure thestorage server.
The following are the rules for the credentials:
■ The user name and the password can be up to 62 characters in length. Theuser name and the password cannot be empty.
■ You can use characters in the printable ASCII range (0x20-0x7E) except for thefollowing characters:
■ Asterisk (*)
■ Backward slash (\) and forward slash (/)
■ Double quote (")
■ Left parenthesis [(] and right parenthesis [)]
■ Less than (<) and greater than (>) sign.
■ Caret sign (^).
■ Percent sign (%).
■ United States dollar sign ($).
■ Spaces.
■ Leading and trailing quotes.
Note: Record and save the credentials in case you need them in the future.
Caution: You cannot change the NetBackup Deduplication Engine credentials afteryou enter them. Therefore, carefully choose and enter your credentials. If you mustchange the credentials, contact your Veritas support representative.
34Planning your deploymentAbout the NetBackup Deduplication Engine credentials
About the network interface for MSDPIf the MSDP storage server has more than one network interface, NetBackup usesthe default interface for all deduplication traffic. (Deduplication traffic includesbackups, restores, duplication, and replication.) The host operating systemdetermines which network interface is the default. However, you can configure thenetwork interface or interfaces that NetBackup uses, as follows:
To use a specific interface, you can enter that interface namewhen you configure the deduplication storage server. NetBackupuses this interface for all deduplication traffic unless you alsoconfigure a separate interface for duplication and replication.
See “MSDP network interface properties” on page 97.
See “Configuring a storage server for a Media Server DeduplicationPool” on page 80.
Configure a specificinterface
You can configure a separate network interface for the duplicationand the replication traffic. The backup and restore traffic continuesto use the default interface or the specific configured interface.
See “About a separate network path for MSDP duplication andreplication” on page 139.
See “Configuring a separate network path for MSDP duplicationand replication” on page 140.
Configure an interfacefor duplication andreplication traffic
The NetBackup REQUIRED_INTERFACE setting does not affect deduplicationprocesses.
About MSDP port usageThe following table shows the ports that are used for NetBackup deduplication. Iffirewalls exist between the various deduplication hosts, open the indicated portson the deduplication hosts. Deduplication hosts are the deduplication storage server,the load balancing servers, and the clients that deduplicate their own data.
If you have only a storage server and no load balancing servers or clients thatdeduplicate their own data: you do not have to open firewall ports.
35Planning your deploymentAbout the network interface for MSDP
Table 2-6 Deduplication ports
UsagePort
The NetBackup Deduplication Engine (spoold). Open this port between thehosts that deduplicate data. Hosts include load balancing servers and the clientsthat deduplicate their own data.
10082
The NetBackup Deduplication Manager (spad). Open this port between thehosts that deduplicate data. Hosts include load balancing servers and the clientsthat deduplicate their own data.
10102
About MSDP optimized synthetic backupsOptimized synthetic backups are a more efficient form of synthetic backup. A mediaserver uses messages to instruct the storage server which full and incrementalbackup images to use to create the synthetic backup. The storage server constructs(or synthesizes) the backup image directly on the disk storage. Optimized syntheticbackups require no data movement across the network.
The optimized synthetic backup method provides the following benefits:
■ Faster than a synthetic backup.Regular synthetic backups are constructed on the media server. They are movedacross the network from the storage server to the media server and synthesizedinto one image. The synthetic image is then moved back to the storage server.
■ Requires no data movement across the network.Regular synthetic backups use network traffic.
See “Configuring optimized synthetic backups for MSDP” on page 138.
In NetBackup, theOptimizedlmage attribute enables optimized synthetic backups.It applies to both storage servers and deduplication pools. Beginning with NetBackup7.1, the Optimizedlmage attribute is enabled by default on storage servers andmedia server deduplication pools. For the storage servers and the disk pools thatyou created in NetBackup releases earlier than 7.1, you must set theOptimizedlmage attribute on them so they support optimized synthetic backups.
See “Setting MSDP storage server attributes” on page 340.
See “Setting a Media Server Deduplication Pool attribute” on page 352.
36Planning your deploymentAbout MSDP optimized synthetic backups
Table 2-7 MSDP requirements and limitations for optimized syntheticbackups
DescriptionWhat
The target storage unit's deduplication pool must be the samededuplication pool on which the source images reside.
Requirements
NetBackup does not support storage unit groups as a destination foroptimized synthetic backups. If NetBackup cannot produce the optimizedsynthetic backup, NetBackup creates the more data-movement intensivesynthetic backup.
Limitations
About MSDP and SAN ClientSAN Client is a NetBackup optional feature that provides high speed backups andrestores of NetBackup clients. Fibre Transport is the name of the NetBackuphigh-speed data transport method that is part of the SAN Client feature. The backupand restore traffic occurs over a SAN.
SAN clients can be used with the deduplication option; however, the deduplicationmust occur on the media server, not the client. Configure the media server to beboth a deduplication storage server (or load balancing server) and an FT mediaserver. The SAN client backups are then sent over the SAN to the deduplicationserver/FT media server host. At that media server, the backup stream isdeduplicated.
Do not enable client-side deduplication on SAN Clients. The data processing fordeduplication is incompatible with the high-speed transport method of FibreTransport. Client-side deduplication relies on two-way communication over the LANwith the media server. A SAN client streams the data to the FT media server at ahigh rate over the SAN.
AboutMSDPoptimized duplication and replicationNetBackup supports several methods for optimized duplication and replication ofdeduplicated data.
The following table lists the duplication methods NetBackup supports betweenmedia server deduplication pools.
37Planning your deploymentAbout MSDP and SAN Client
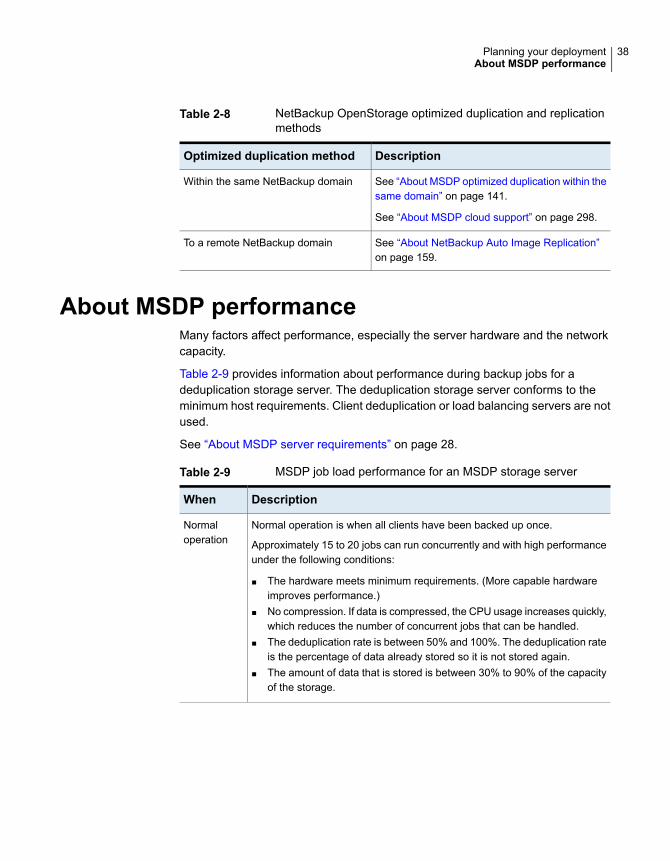
Table 2-8 NetBackup OpenStorage optimized duplication and replicationmethods
DescriptionOptimized duplication method
See “About MSDP optimized duplication within thesame domain” on page 141.
See “About MSDP cloud support” on page 298.
Within the same NetBackup domain
See “About NetBackup Auto Image Replication”on page 159.
To a remote NetBackup domain
About MSDP performanceMany factors affect performance, especially the server hardware and the networkcapacity.
Table 2-9 provides information about performance during backup jobs for adeduplication storage server. The deduplication storage server conforms to theminimum host requirements. Client deduplication or load balancing servers are notused.
See “About MSDP server requirements” on page 28.
Table 2-9 MSDP job load performance for an MSDP storage server
DescriptionWhen
Normal operation is when all clients have been backed up once.
Approximately 15 to 20 jobs can run concurrently and with high performanceunder the following conditions:
■ The hardware meets minimum requirements. (More capable hardwareimproves performance.)
■ No compression. If data is compressed, the CPU usage increases quickly,which reduces the number of concurrent jobs that can be handled.
■ The deduplication rate is between 50% and 100%. The deduplication rateis the percentage of data already stored so it is not stored again.
■ The amount of data that is stored is between 30% to 90% of the capacityof the storage.
Normaloperation
38Planning your deploymentAbout MSDP performance
Table 2-9 MSDP job load performance for an MSDP storage server(continued)
DescriptionWhen
NetBackup maintains the same number of concurrent backup jobs as duringnormal operation under the following conditions:
■ The hardware meets minimum requirements. (More capable hardwareimproves performance.)
■ The amount of data that is stored is between 85% to 90% of the capacityof the storage.
However, the average time to complete the jobs increases significantly.
Storageapproachesfull capacity
How file size may affect the MSDP deduplication rateThe small file sizes that are combined with large file segment sizes may result inlow initial deduplication rates. However, after the deduplication engine performsfile fingerprint processing, deduplication rates improve. For example, a secondbackup of a client shortly after the first does not show high deduplication rates. Butthe deduplication rate improves if the second backup occurs after the file fingerprintprocessing.
How long it takes the NetBackup Deduplication Engine to process the file fingerprintsvaries.
About MSDP stream handlersNetBackup provides the stream handlers that process various backup data streamtypes. Stream handlers improve backup deduplication rates by processing theunderlying data stream.
For data that has already been deduplicated, the first backup with a new streamhandler produces a lower deduplication rate. After that first backup, the deduplicationrate should surpass the rate from before the new stream handler was used.
Veritas continues to develop additional stream handlers to improve backupdeduplication performance.
Oracle stream handlerThe Oracle stream handler is enabled by default for newly created Oracle policiesafter an upgrade to NetBackup 8.3. By default, the Oracle stream handler onlysupports stream-based backups. You can enable and disable the Oracle streamhandler per policy or all policies at once using the cacontrol command line utility.
39Planning your deploymentAbout MSDP stream handlers
When the Oracle stream handler is used, the FILESPERSET variable is more flexible.You can set FILESPERSET > 1 in the policy or the bp.conf without a large decreasein deduplication rates.
The Marker Entry file is used to override the default behavior by using thecacontrol command utility with the --sth flag at a client and or policy level only.
Note: When you use the Oracle stream handler, it is not recommended to usevariable-length deduplication.
Update a Marker Entry policy by using the following cacontrol options:
■ You can create and or update a Marker Entry policy.
cacontrol --sth update
<STHTYPE> <CLIENT> <POLICY> [SPAUSER] <enabled | disabled>
■ You can query the setting for the stream handler per policy.
cacontrol --sth get <STHTYPE> <CLIENT> <POLICY> [SPAUSER]
■ You can delete the settings to use the default behavior.
cacontrol --sth delete <STHTYPE> <CLIENT> <POLICY> [SPAUSER]
Microsoft SQL Server stream handlerYou can apply the Microsoft SQL Server stream handler to all of the Microsoft SQLServer version and Azure SQL Server. You can use the MS-SQL policy or theStandard policy to enable this feature.
You can enable and disable the Microsoft SQL Server stream handler per policyor all policies at once using the cacontrol command line utility.
The Marker Entry file is used to override the default behavior by usingthecacontrol command utility with the --sth flag at a client and or policy levelonly.
The Marker Entry configuration file is stored at the following location:
/MDSP_SERVER/databases/spa/marker.cfg
Update a Marker Entry policy by using the following cacontrol options:
■ You can create and or update a Marker Entry policy.
40Planning your deploymentAbout MSDP stream handlers
cacontrol --sth update <STHTYPE> <CLIENT> <POLICY> [SPAUSER]
<enabled | disabled>
■ You can query the setting for the stream handler per policy.
cacontrol --sth get <STHTYPE> <CLIENT> <POLICY> [SPAUSER]
■ You can delete the settings to use the default behavior.
cacontrol --sth delete <STHTYPE> <CLIENT> <POLICY> [SPAUSER]
When you enable the Microsoft SQL Server stream handler, the Job Details tabin the Administration Console displays the following:
MS-SQL stream handler enabled
MSDP deployment best practicesBecause Veritas recommends minimum host and network requirements only,deduplication performance may vary greatly depending on your environment. Veritasprovides best-practice guidelines to help you use deduplication effectively regardlessof the capabilities of your hosts.
Veritas recommends that you consider the following practices when you implementNetBackup deduplication.
Use fully qualified domain namesVeritas recommends that you use fully qualified domain names for your NetBackupservers (and by extension, your deduplication servers). Fully qualified domain namescan help to avoid host name resolution problems, especially if you use client-sidededuplication.
Deduplication servers include the storage server and the load balancing servers (ifany).
See “MSDP media write error (84)” on page 425.
About scaling MSDPYou can scale deduplication processing to improve performance by using loadbalancing servers or client deduplication or both.
If you configure load balancing servers, those servers also perform deduplication.The deduplication storage server still functions as both a deduplication server andas a storage server. NetBackup uses standard load balancing criteria to select a
41Planning your deploymentMSDP deployment best practices
load balancing server for each job. However, deduplication fingerprint calculationsare not part of the load balancing criteria.
To completely remove the deduplication storage server from deduplication duties,do the following for every storage unit that uses the deduplication disk pool:
■ Select Only use the following media servers.
■ Select all of the load balancing servers but do not select the deduplication storageserver.
The deduplication storage server performs storage server tasks only: storing andmanaging the deduplicated data, file deletion, and optimized duplication.
If you configure client deduplication, the clients deduplicate their own data. Someof the deduplication load is removed from the deduplication storage server andloading balancing servers.
Veritas recommends the following strategies to scale MSDP:
■ For the initial full backups of your clients, use the deduplication storage server.For subsequent backups, use load balancing servers.
■ Enable client-side deduplication gradually.If a client cannot tolerate the deduplication processing workload, be preparedto move the deduplication processing back to a server.
Send initial full backups to the storage serverIf you intend to use load balancing servers or client deduplication, use the storageserver for the initial full backups of the clients. Then, send subsequent backupsthrough the load balancing servers or use client deduplication for the backups.Doing so provides information about the total deduplication load. You can thenallocate jobs to best balance the load among your hosts.
Deduplication uses the same fingerprint list regardless of which host performs thededuplication. So you can deduplicate data on the storage server first, and thensubsequent backups by another host use the same fingerprint list. If the deduplicationplug-in can identify the last full backup for the client and the policy combination, itretrieves the fingerprint list from the server. The list is placed in the fingerprint cachefor the new backup.
See “About MSDP fingerprinting” on page 67.
Veritas also recommends that you implement load balancing servers and clientdeduplication gradually. Therefore, it may be beneficial to use the storage serverfor backups while you implement deduplication on other hosts.
42Planning your deploymentMSDP deployment best practices
Increase the number of MSDP jobs graduallyVeritas recommends that you increase the Maximum concurrent jobs valuegradually. (The Maximum concurrent jobs is a storage unit setting.) Doing soprovides information about the total deduplication load. The initial backup jobs (alsoknown as initial seeding) require more CPU and memory than successive jobs.After initial seeding, the storage server can process more jobs concurrently. Youcan then gradually increase the jobs value over time.
See “About MSDP performance” on page 38.
Introduce MSDP load balancing servers graduallyVeritas recommends that you add load balancing servers only after the storageserver reaches maximum CPU utilization. Then, introduce load balancing serversone at a time. It may be easier to evaluate how your environment handles trafficand easier to troubleshoot any problems with fewer hosts added for deduplication.
Many factors affect deduplication server performance.
See “About MSDP performance” on page 38.
Because of the various factors, Veritas recommends that you maintain realisticexpectations about using multiple servers for deduplication. If you add one mediaserver as a load balancing server, overall throughput should be faster. However,adding one load balancing server may not double the overall throughput rate, addingtwo load balancing servers may not triple the throughput rate, and so on.
If all of the following apply to your MSDP environment, your environment may bea good candidate for load balancing servers:
■ The deduplication storage server is CPU limited on any core.
■ Memory resources are available on the storage server.
■ Network bandwidth is available on the storage server.
■ Back-end I/O bandwidth to the deduplication pool is available.
■ Other NetBackup media servers have CPU available for deduplication.
Gigabit Ethernet should provide sufficient performance in many environments. Ifyour performance objective is the fastest throughput possible with load balancingservers, you should consider 10 Gigabit Ethernet.
Implement MSDP client deduplication graduallyIf you configure clients to deduplicate their own data, do not enable all of thoseclients at the same time. Implement client deduplication gradually, as follows:
43Planning your deploymentMSDP deployment best practices
■ Use the storage server for the initial backup of the clients.
■ Enable deduplication on only a few clients at a time.Doing so provides information about deduplication affects the clients other jobs.It also may be easier to evaluate how your environment handles traffic andeasier to troubleshoot any problems
If a client cannot tolerate the deduplication processing workload, be prepared tomove the deduplication processing back to the storage server.
Use MSDP compression and encryptionDo not use compression or encryption in a NetBackup policy; rather, use thecompression or the encryption that is part of the deduplication process.
See “About MSDP compression” on page 127.
See “About MSDP encryption” on page 129.
About the optimal number of backup streams for MSDPA backup stream appears as a separate job in the NetBackup Activity Monitor.Various methods exist to produce streams. In NetBackup, you can use backuppolicy settings to configure multiple streams. The NetBackup for Oracle agent letsyou configure multiple streams; also for Oracle the RMAN utilities can providemultiple backup channels.
For client deduplication, the optimal number of backup streams is two.
Media server deduplication can process multiple streams on multiple coressimultaneously. For large datasets in applications such as Oracle, media serverdeduplication leverages multiple cores and multiple streams. Therefore, mediaserver deduplication may be a better solution when the application can providemultiple streams or channels.
More detailed information about backup streams is available.
http://www.veritas.com/docs/TECH77575
About storage unit groups for MSDPYou can use a storage unit group as a backup destination for NetBackup MSDP.All of the storage units in the group must have aMedia Server Deduplication Poolas the storage destination.
Storage unit groups avoid a single point of failure that can interrupt backup service.
The best storage savings occur when a backup policy stores its data in the samededuplication destination disk pool instead of across multiple disk pools. For this
44Planning your deploymentMSDP deployment best practices
reason, the Failover method for the Storage unit selection uses the least amountof storage. All of the other methods are designed to use different storage everytime the backup runs. Veritas recommends that you select the Failover method forthe Storage unit selection type.
Table 2-10 MSDP requirements and limitations for storage unit groups
DescriptionWhat
A group must contain storage units of one storage destination type only.That is, a group cannot contain bothMedia Server Deduplication Poolstorage units and storage units with other storage types.
Requirements
NetBackup does not support the following for storage unit groups:
■ Optimized duplication of deduplicated data. If you use a storage unitgroup as a destination for optimized duplication of deduplicateddata, NetBackup uses regular duplication.See “About MSDP optimized duplication within the same domain”on page 141.
■ Optimized synthetic backups. If NetBackup cannot produce theoptimized synthetic backup, NetBackup creates the moredata-movement intensive synthetic backup.See “About MSDP optimized synthetic backups” on page 36.
Limitations
About protecting the MSDP dataVeritas recommends the following methods to protect the deduplicated backupdata:
■ Use NetBackup optimized duplication to copy the images to another deduplicationnode at an off-site location.Optimized duplication copies the primary backup data to another deduplicationpool. It provides the easiest, most efficient method to copy data off-site yetremain in the same NetBackup domain. You then can recover from a disasterthat destroys the storage on which the primary copies reside by retrieving imagesfrom the other deduplication pool.See “Configuring MSDP optimized duplication within the same NetBackupdomain” on page 149.
■ Use NetBackup replication to copy the deduplicated data to another NetBackupdomain off-site.See “Configuring MSDP replication to a different NetBackup domain” on page 158.
Veritas also recommends that you back up the MSDP catalog.
See “About protecting the MSDP catalog” on page 233.
45Planning your deploymentMSDP deployment best practices
Save the MSDP storage server configurationVeritas recommends that you save the storage server configuration. Getting andsaving the configuration can help you with recovery of your environment. For disasterrecovery, you may need to set the storage server configuration by using a savedconfiguration file.
If you save the storage server configuration, you must edit it so that it includes onlythe information that is required for recovery.
See “About saving the MSDP storage server configuration” on page 227.
See “Saving the MSDP storage server configuration” on page 228.
See “Editing an MSDP storage server configuration file” on page 229.
Plan for disk write cachingStorage components may use hardware caches to improve read and writeperformance. Among the storage components that may use a cache are disk arrays,RAID controllers, or the hard disk drives themselves.
If your storage components use caches for disk write operations, ensure that thecaches are protected from power fluctuations or power failure. If you do not protectagainst power fluctuations or failure, data corruption or data loss may occur.
Protection can include the following:
■ A battery backup unit that supplies power to the cache memory so writeoperations can continue if power is restored within sufficient time.
■ An uninterruptible power supply that allows the components to complete theirwrite operations.
If your devices that have caches are not protected, Veritas recommends that youdisable the hardware caches. Read and write performance may decline, but youhelp to avoid data loss.
46Planning your deploymentMSDP deployment best practices
Provisioning the storageThis chapter includes the following topics:
■ About provisioning the storage for MSDP
■ Do not modify MSDP storage directories and files
■ About volume management for NetBackup MSDP
About provisioning the storage for MSDPNetBackup requires that the storage is exposed as a directory path.
Provision the storage as follows:
See Up to 64 TBs of storage.Up to 64 TBs
See 250-TBs of storage.250 TBs
How many storage instances you provision depends on your storage requirementsfor your backups. If your requirements are greater than one deduplication node canaccommodate, you can configure more than one node.
See “About MSDP deduplication nodes” on page 19.
Optimized duplication and replication also can affect the number of nodes youprovision.
See “About MSDP optimized duplication and replication” on page 37.
Other NetBackup requirements may affect how you provision the storage.
See “About MSDP storage and connectivity requirements” on page 21.
How to provision the storage is beyond the scope of the NetBackup documentation.Consult the storage vendor’s documentation.
3Chapter

See “About the NetBackup deduplication destinations” on page 19.
See “Planning your MSDP deployment” on page 17.
Up to 64 TBs of storageProvision the backup storage so that it appears as a single mount point to theoperating system.
Because the storage requires a directory path, do not use only the root node (/) ordrive letter (E:\) as the storage path. (That is, do not mount the storage as a rootnode (/) or a drive letter (E:\).
If you use a separate disk volume for the deduplication database, provision a 1-TBvolume on a different mount point than the backup data storage.
250-TBs of storageNetBackup supports 250 TBs of storage in a single Media Server DeduplicationPool on certain operating systems.
See “About MSDP storage capacity” on page 20.
Before you configure the MSDP storage server, you must provision the volumes.Each volume must conform to the following items:
■ Formatted with a file system that NetBackup supports for MSDP. The same filesystem must be used for all volumes.
■ Reside on a separate disk from the other volumes that you allocate for the MSDPstorage.
■ Mounted on a separate mount point on the computer that you want to use asthe MSDP storage serverVeritas recommends that you use a descriptive naming convention for the mountpoint names.
Steps to configure the 250 TB MSDP using 32 TB volumes1 Create, format, and mount 9 new file systems - one file system must have 1
TB storage space and the other 8 file systems must have 32 TB storage spaceeach.
2 Mount the 1 TB file system at /msdp/cat and the 32 TB file systems on/msdp/vol0, /msdp/vol1 and so on until each volume is mounted.
3 Create a touch a file /etc/nbapp-release if it does not exist.
4 Create a sub-directory named data under each mounted volume. For example,/msdp/vol0/data, /msdp/vol1/data, /msdp/vol2/data, and so on.
48Provisioning the storageAbout provisioning the storage for MSDP
5 Configure MSDP through the Storage Server Configuration Wizard. Ensurethat the Use alternate path for deduplication database option is selected.Provide the storage path as /msdp/vol0/data and the database path as/msdp/cat.
6 Add additional 32 TB file systems to the deduplication pool:
/usr/openv/pdde/pdcr/bin/crcontrol --dsaddpartition /msdp/vol1/data
/usr/openv/pdde/pdcr/bin/crcontrol --dsaddpartition /msdp/vol2/data
till volume 07...
/usr/openv/pdde/pdcr/bin/crcontrol --dsaddpartition /msdp/vol7/data
7 Review the following command output to verify the created volumes:
/usr/openv/pdde/pdcr/bin/crcontrol --dsstat 2 | grep Mount
Mount point count: 7
For additional information, refer to the following article:
How to configure a 250TB Media Server Deduplication Pool (MSDP) on Linux andWindows
See “Resizing the MSDP storage partition” on page 372.
Do not modify MSDP storage directories and filesUnless you are directed to do so by the NetBackup documentation or by a Veritassupport representative, do not do the following:
■ Add files to the deduplication storage directories or database directories.
■ Delete files from the deduplication storage directories or database directories.
■ Modify files in the deduplication storage directories or database directories.
■ Move files within the deduplication storage directories or database directories.
■ Change the permissions of the directories and files within the deduplicationstorage directories or database directories.
Failure to follow these directives can result in operational failures and data loss.
About volumemanagement for NetBackupMSDPIf you use a tool to manage the volumes for NetBackupMedia Server DeduplicationPool storage, Veritas recommends that you use the Veritas InfoScale Storage.InfoScale Storage includes the Veritas Volume Manager and the Veritas File System.
49Provisioning the storageDo not modify MSDP storage directories and files
For supported systems, see the InfoScale hardware compatibility list at the Veritaswebsite:
http://www.veritas.com/
Note: Although InfoScale Storage supports NFS, NetBackup does not support NFStargets for Media Server Deduplication Pool storage. Therefore, Media ServerDeduplication Pool does not support NFS with InfoScale Storage.
50Provisioning the storageAbout volume management for NetBackup MSDP
Licensing deduplicationThis chapter includes the following topics:
■ About the MSDP license
■ Licensing NetBackup MSDP
About the MSDP licenseNetBackup deduplication is licensed separately from base NetBackup.
The license enables both NetBackup media server deduplication and NetBackupclient deduplication. The license is a front-end capacity license. It is based on thesize of the data to be backed up, not on the size of the deduplicated data.
If you remove the license or if it expires, you cannot create new deduplication diskpools. you also cannot create the storage units that reference NetBackupdeduplication pools. NetBackup does not delete the disk pools or the storage unitsthat reference the disk pools. You can use them again if you enter a valid license.
The license also enables the Use Accelerator feature on the NetBackup policyAttributes tab. Accelerator increases the speed of full backups for files systems.Accelerator works with deduplication storage units as well as with other storageunits that do not require the deduplication option. More information about Acceleratoris available.
See the NetBackup Administrator's Guide, Volume I:
http://www.veritas.com/docs/DOC5332
Before you try to install or upgrade to a NetBackup version that supportsdeduplication, you should determine on which operating systems Veritas supportsdeduplication. See the NetBackup operating system compatibility list:
http://www.netbackup.com/compatibility
See “Licensing NetBackup MSDP” on page 52.
4Chapter
Licensing NetBackup MSDPIf you installed the license for deduplication when you installed or upgradedNetBackup, you do not need to perform this procedure.
Enter the license on the NetBackup master server. The following proceduredescribes how to use theNetBackup Administration Console to enter the licensekey.
To license NetBackup MSDP
1 On the Help menu of the NetBackup Administration Console on theNetBackup master server, select License Keys.
2 In the NetBackup License Keys dialog box, click New.
3 In theAdd a New License Key dialog box, enter the license key and clickAddor OK.
4 In the NetBackup License Key dialog box, click Close.
5 Restart all the NetBackup services and daemons.
52Licensing deduplicationLicensing NetBackup MSDP
Configuring deduplicationThis chapter includes the following topics:
■ Configuring MSDP server-side deduplication
■ Configuring MSDP client-side deduplication
■ About the MSDP Deduplication Multi-Threaded Agent
■ Configuring the Deduplication Multi-Threaded Agent behavior
■ Configuring deduplication plug-in interaction with the Multi-Threaded Agent
■ About MSDP fingerprinting
■ About the MSDP fingerprint cache
■ Configuring the MSDP fingerprint cache behavior
■ About seeding the MSDP fingerprint cache for remote client deduplication
■ Configuring MSDP fingerprint cache seeding on the client
■ Configuring MSDP fingerprint cache seeding on the storage server
■ Enabling 250-TB support for MSDP
■ About MSDP Encryption using NetBackup KMS service
■ About MSDP Encryption using external KMS server
■ Configuring a storage server for a Media Server Deduplication Pool
■ Configuring a storage server for a PureDisk Deduplication Pool
■ About disk pools for NetBackup deduplication
■ Configuring a disk pool for deduplication
5Chapter
■ Creating the data directories for 250-TB MSDP support
■ Adding volumes to a 250-TB Media Server Deduplication Pool
■ Configuring a Media Server Deduplication Pool storage unit
■ Configuring client attributes for MSDP client-side deduplication
■ Disabling MSDP client-side deduplication for a client
■ About MSDP compression
■ About MSDP encryption
■ MSDP compression and encryption settings matrix
■ Configuring encryption for MSDP backups
■ Configuring encryption for MSDP optimized duplication and replication
■ About the rolling data conversion mechanism for MSDP
■ Modes of rolling data conversion
■ MSDP encryption behavior and compatibilities
■ Configuring optimized synthetic backups for MSDP
■ About a separate network path for MSDP duplication and replication
■ Configuring a separate network path for MSDP duplication and replication
■ About MSDP optimized duplication within the same domain
■ Configuring MSDP optimized duplication within the same NetBackup domain
■ About MSDP replication to a different domain
■ Configuring MSDP replication to a different NetBackup domain
■ About configuring MSDP optimized duplication and replication bandwidth
■ About storage lifecycle policies
■ About the storage lifecycle policies required for Auto Image Replication
■ Creating a storage lifecycle policy
■ About MSDP backup policy configuration
■ Creating a backup policy
■ Resilient Network properties
54Configuring deduplication
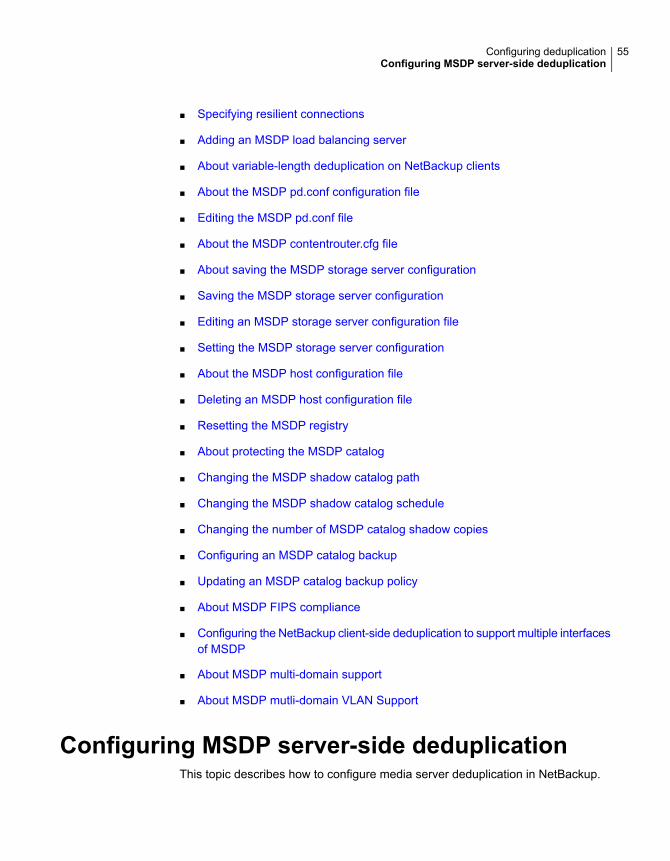
■ Specifying resilient connections
■ Adding an MSDP load balancing server
■ About variable-length deduplication on NetBackup clients
■ About the MSDP pd.conf configuration file
■ Editing the MSDP pd.conf file
■ About the MSDP contentrouter.cfg file
■ About saving the MSDP storage server configuration
■ Saving the MSDP storage server configuration
■ Editing an MSDP storage server configuration file
■ Setting the MSDP storage server configuration
■ About the MSDP host configuration file
■ Deleting an MSDP host configuration file
■ Resetting the MSDP registry
■ About protecting the MSDP catalog
■ Changing the MSDP shadow catalog path
■ Changing the MSDP shadow catalog schedule
■ Changing the number of MSDP catalog shadow copies
■ Configuring an MSDP catalog backup
■ Updating an MSDP catalog backup policy
■ About MSDP FIPS compliance
■ Configuring the NetBackup client-side deduplication to support multiple interfacesof MSDP
■ About MSDP multi-domain support
■ About MSDP mutli-domain VLAN Support
Configuring MSDP server-side deduplicationThis topic describes how to configure media server deduplication in NetBackup.
55Configuring deduplicationConfiguring MSDP server-side deduplication
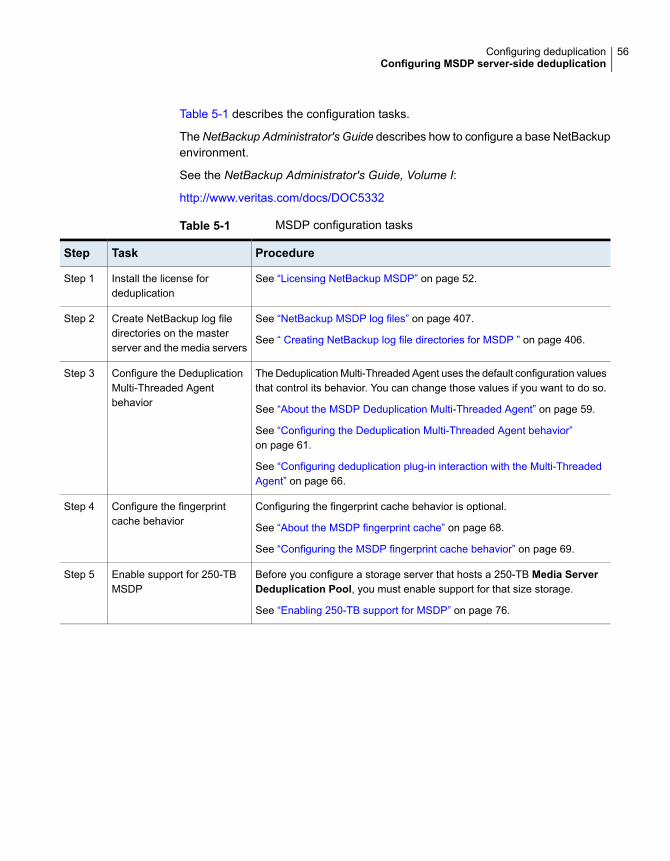
Table 5-1 describes the configuration tasks.
TheNetBackup Administrator's Guide describes how to configure a base NetBackupenvironment.
See the NetBackup Administrator's Guide, Volume I:
http://www.veritas.com/docs/DOC5332
Table 5-1 MSDP configuration tasks
ProcedureTaskStep
See “Licensing NetBackup MSDP” on page 52.Install the license fordeduplication
Step 1
See “NetBackup MSDP log files” on page 407.
See “ Creating NetBackup log file directories for MSDP ” on page 406.
Create NetBackup log filedirectories on the masterserver and the media servers
Step 2
The Deduplication Multi-Threaded Agent uses the default configuration valuesthat control its behavior. You can change those values if you want to do so.
See “About the MSDP Deduplication Multi-Threaded Agent” on page 59.
See “Configuring the Deduplication Multi-Threaded Agent behavior”on page 61.
See “Configuring deduplication plug-in interaction with the Multi-ThreadedAgent” on page 66.
Configure the DeduplicationMulti-Threaded Agentbehavior
Step 3
Configuring the fingerprint cache behavior is optional.
See “About the MSDP fingerprint cache” on page 68.
See “Configuring the MSDP fingerprint cache behavior” on page 69.
Configure the fingerprintcache behavior
Step 4
Before you configure a storage server that hosts a 250-TB Media ServerDeduplication Pool, you must enable support for that size storage.
See “Enabling 250-TB support for MSDP” on page 76.
Enable support for 250-TBMSDP
Step 5
56Configuring deduplicationConfiguring MSDP server-side deduplication
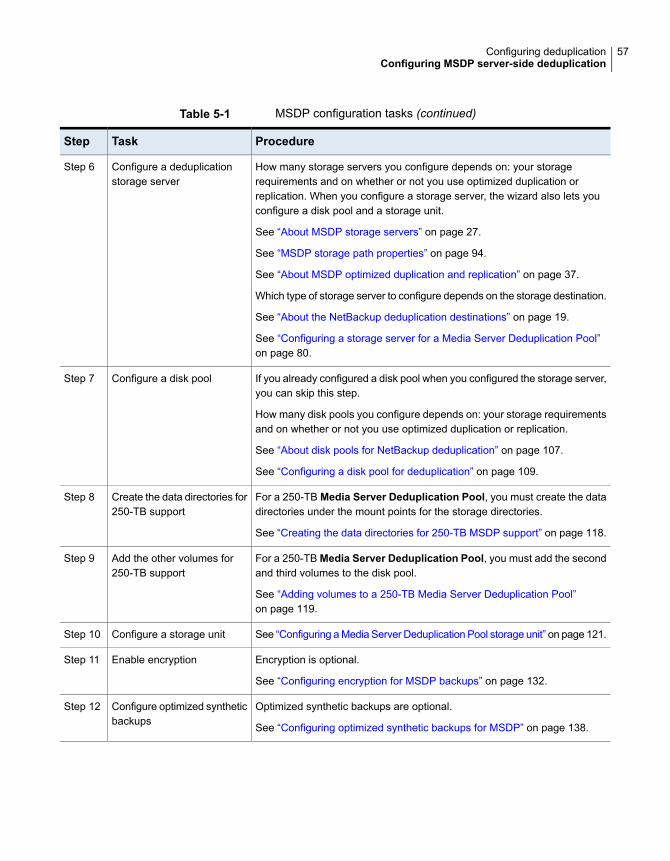
Table 5-1 MSDP configuration tasks (continued)
ProcedureTaskStep
How many storage servers you configure depends on: your storagerequirements and on whether or not you use optimized duplication orreplication. When you configure a storage server, the wizard also lets youconfigure a disk pool and a storage unit.
See “About MSDP storage servers” on page 27.
See “MSDP storage path properties” on page 94.
See “About MSDP optimized duplication and replication” on page 37.
Which type of storage server to configure depends on the storage destination.
See “About the NetBackup deduplication destinations” on page 19.
See “Configuring a storage server for a Media Server Deduplication Pool”on page 80.
Configure a deduplicationstorage server
Step 6
If you already configured a disk pool when you configured the storage server,you can skip this step.
How many disk pools you configure depends on: your storage requirementsand on whether or not you use optimized duplication or replication.
See “About disk pools for NetBackup deduplication” on page 107.
See “Configuring a disk pool for deduplication” on page 109.
Configure a disk poolStep 7
For a 250-TB Media Server Deduplication Pool, you must create the datadirectories under the mount points for the storage directories.
See “Creating the data directories for 250-TB MSDP support” on page 118.
Create the data directories for250-TB support
Step 8
For a 250-TB Media Server Deduplication Pool, you must add the secondand third volumes to the disk pool.
See “Adding volumes to a 250-TB Media Server Deduplication Pool”on page 119.
Add the other volumes for250-TB support
Step 9
See “Configuring a Media Server Deduplication Pool storage unit” on page 121.Configure a storage unitStep 10
Encryption is optional.
See “Configuring encryption for MSDP backups” on page 132.
Enable encryptionStep 11
Optimized synthetic backups are optional.
See “Configuring optimized synthetic backups for MSDP” on page 138.
Configure optimized syntheticbackups
Step 12
57Configuring deduplicationConfiguring MSDP server-side deduplication
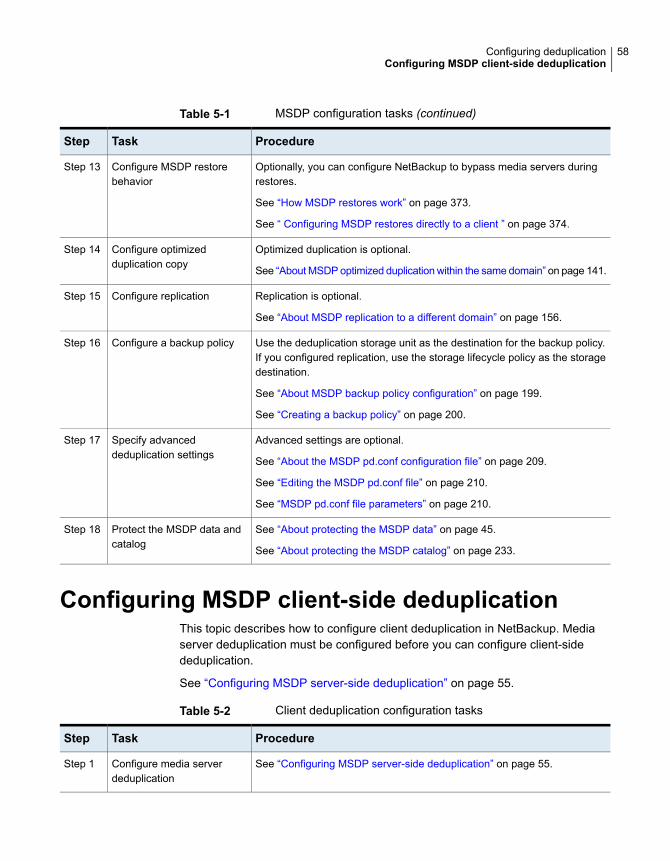
Table 5-1 MSDP configuration tasks (continued)
ProcedureTaskStep
Optionally, you can configure NetBackup to bypass media servers duringrestores.
See “How MSDP restores work” on page 373.
See “ Configuring MSDP restores directly to a client ” on page 374.
Configure MSDP restorebehavior
Step 13
Optimized duplication is optional.
See “About MSDP optimized duplication within the same domain” on page 141.
Configure optimizedduplication copy
Step 14
Replication is optional.
See “About MSDP replication to a different domain” on page 156.
Configure replicationStep 15
Use the deduplication storage unit as the destination for the backup policy.If you configured replication, use the storage lifecycle policy as the storagedestination.
See “About MSDP backup policy configuration” on page 199.
See “Creating a backup policy” on page 200.
Configure a backup policyStep 16
Advanced settings are optional.
See “About the MSDP pd.conf configuration file” on page 209.
See “Editing the MSDP pd.conf file” on page 210.
See “MSDP pd.conf file parameters” on page 210.
Specify advanceddeduplication settings
Step 17
See “About protecting the MSDP data” on page 45.
See “About protecting the MSDP catalog” on page 233.
Protect the MSDP data andcatalog
Step 18
Configuring MSDP client-side deduplicationThis topic describes how to configure client deduplication in NetBackup. Mediaserver deduplication must be configured before you can configure client-sidededuplication.
See “Configuring MSDP server-side deduplication” on page 55.
Table 5-2 Client deduplication configuration tasks
ProcedureTaskStep
See “Configuring MSDP server-side deduplication” on page 55.Configure media serverdeduplication
Step 1
58Configuring deduplicationConfiguring MSDP client-side deduplication
Table 5-2 Client deduplication configuration tasks (continued)
ProcedureTaskStep
See “About NetBackup Client Direct deduplication” on page 30.Learn about clientdeduplication
Step 2
Resilient connections are optional.
See “About MSDP remote office client deduplication” on page 32.
See “Resilient Network properties” on page 200.
See “Specifying resilient connections” on page 204.
Configure a resilientconnection for remote officeclients
Step 3
See “Configuring client attributes for MSDP client-side deduplication”on page 125.
Enable client-sidededuplication
Step 4
Configuring remote client fingerprint cache seeding is optional.
See “Configuring MSDP fingerprint cache seeding on the client” on page 72.
See “About seeding the MSDP fingerprint cache for remote clientdeduplication” on page 70.
See “Configuring MSDP fingerprint cache seeding on the storage server”on page 73.
Configure remote clientfingerprint cache seeding
Step 5
Configuring client-direct restores is optional. If you do not do so, restorestravel through the NetBackup media server components.
See “ Configuring MSDP restores directly to a client ” on page 374.
Configure client-directrestores
Step 6
About the MSDP Deduplication Multi-ThreadedAgent
The MSDP deduplication process can use a Multi-Threaded Agent for most datasources. The Multi-Threaded Agent runs alongside the deduplication plug-in onboth the clients and the media servers. The agent uses multiple threads forasynchronous network I/O and CPU core calculations. During a backup, this agentreceives data from the deduplication plug-in through shared memory and processesit using multiple threads to improve throughput performance. When inactive, theagent uses minimal resources.
The NetBackup Deduplication Multi-Threaded Agent improves backup performancefor any host that deduplicates data: the storage server, load balancing servers, orclients that deduplicate their own data. For each host on which you want to use theMulti-Threaded Agent, you must configure the deduplication plug-in to use it.
59Configuring deduplicationAbout the MSDP Deduplication Multi-Threaded Agent
The Deduplication Multi-Threaded Agent uses the default configuration values thatcontrol its behavior. You can change those values if you want to do so. The followingtable describes the Multi-Threaded Agent interactions and behaviors. It also provideslinks to the topics that describe how to configure those interactions and behaviors.
Table 5-3 Interactions and behaviors
ProcedureInteraction
See “Configuring the DeduplicationMulti-Threaded Agent behavior” on page 61.
Multi-Threaded Agent behavior and resourceusage
See “Configuring deduplication plug-ininteraction with the Multi-Threaded Agent”on page 66.
Whether or not the deduplication plug-insends backups to the Multi-Threaded Agent
See “Configuring deduplication plug-ininteraction with the Multi-Threaded Agent”on page 66.
The clients that should use the DeduplicationMulti-Threaded Agent for backups
See “Configuring deduplication plug-ininteraction with the Multi-Threaded Agent”on page 66.
The backup policies that should use theDeduplication Multi-Threaded Agent
Table 5-4 describes the operational notes for MSDP multithreading. If theMulti-Threaded Agent is not used, NetBackup uses the single-threaded mode.
Table 5-4 Multi-Threaded Agent requirements and limitations
DescriptionItem
NetBackup supports the Multi-Threaded Agent on Linux, Solaris,AIX, and Windows operating systems.
Supported systems
NetBackup does not use the Multi-Threading Agent for thefollowing use cases:
■ Virtual synthetic backups■ NetBackup Accelerator■ SEGKSIZE is greater than 128 (pd.conf file)■ DONT_SEGMENT_TYPES enabled (pd.conf file)■ MATCH_PDRO = 1 (pd.conf file)
See “MSDP pd.conf file parameters” on page 210.
Unsupported use cases
60Configuring deduplicationAbout the MSDP Deduplication Multi-Threaded Agent
Table 5-4 Multi-Threaded Agent requirements and limitations (continued)
DescriptionItem
If NetBackup policy-based compression or encryption is enabledon the backup policy, NetBackup does not use the DeduplicationMulti-Threaded Agent.
Veritas recommends that you use the MSDP compression andencryption rather than NetBackup policy-based compression andencryption.
See “About MSDP compression” on page 127.
See “About MSDP encryption” on page 129.
Policy-basedcompression orencryption
Configuring the Deduplication Multi-ThreadedAgent behavior
The mtstrm.conf configuration file controls the behavior of the NetBackupDeduplication Multi-Threaded Agent.
See “About the MSDP Deduplication Multi-Threaded Agent” on page 59.
If you change the mtstrm.conf file on a host, it changes the settings for that hostonly. If you want the same settings for all of the hosts that deduplicate data, youmust change the mtstrm.conf file on all of the hosts.
To configure the Multi-Threaded Agent behavior
1 Use a text editor to open the mtstrm.conf file.
The mtstrm.conf file resides in the following directories:
■ UNIX: /usr/openv/lib/ost-plugins/
■ Windows: install_path\Veritas\NetBackup\bin\ost-plugins
2 To change a behavior, specify a new value.
See “MSDP mtstrm.conf file parameters” on page 62.
3 Save and close the file.
4 Restart the Multi-Threaded Agent on the host, as follows:
■ On UNIX:
/usr/openv/pdde/pdag/bin/mtstrmd –terminate
/usr/openv/pdde/pdag/bin/mtstrmd
61Configuring deduplicationConfiguring the Deduplication Multi-Threaded Agent behavior
■ On Windows, use the Windows Services manager. The service name isNetBackup Deduplication Multi-Threaded Agent.
MSDP mtstrm.conf file parametersThe mtstrm.conf configuration file controls the behavior of the DeduplicationMulti-threaded Agent. The default values balance performance with resource usage.
A procedure exists that describes how to configure these parameters.
The pd.conf file resides in the following directories:
■ (UNIX) /usr/openv/lib/ost-plugins/
■ (Windows) install_path\Veritas\NetBackup\bin\ost-plugins
See “Configuring the Deduplication Multi-Threaded Agent behavior” on page 61.
The mtstrm.conf file is comprised of three sections. The parameters must remainwithin their sections. For descriptions of the parameters, see the following sections:
■ Logging parameters
■ Process parameters
■ Threads parameters
The mtstrm.conf file resides in the following directories:
■ UNIX: /usr/openv/lib/ost-plugins/
■ Windows: install_path\Veritas\NetBackup\bin\ost-plugins
Logging parametersThe following table describes the logging parameters of the mtstrm.conf
configuration file.
Table 5-5 Logging parameters (mtstrm.conf file)
DescriptionLoggingParameter
The directory in which the mtstrmd.log files are created.
Default values:
■ Windows: LogPath=install_path\Veritas\pdde\\..\netbackup\logs\pdde■ UNIX: LogPath=/var/log/puredisk
LogPath
62Configuring deduplicationConfiguring the Deduplication Multi-Threaded Agent behavior
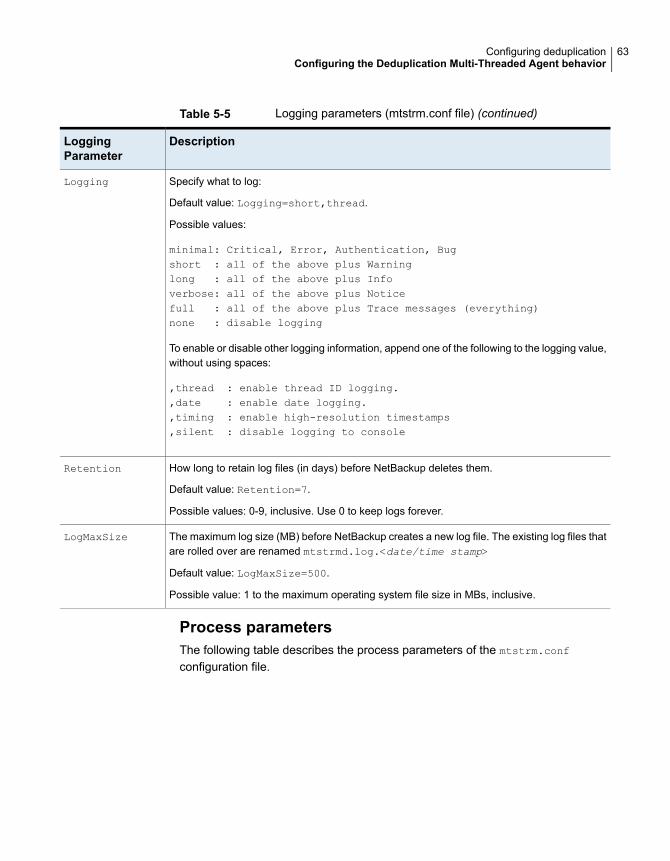
Table 5-5 Logging parameters (mtstrm.conf file) (continued)
DescriptionLoggingParameter
Specify what to log:
Default value: Logging=short,thread.
Possible values:
minimal: Critical, Error, Authentication, Bugshort : all of the above plus Warninglong : all of the above plus Infoverbose: all of the above plus Noticefull : all of the above plus Trace messages (everything)none : disable logging
To enable or disable other logging information, append one of the following to the logging value,without using spaces:
,thread : enable thread ID logging.,date : enable date logging.,timing : enable high-resolution timestamps,silent : disable logging to console
Logging
How long to retain log files (in days) before NetBackup deletes them.
Default value: Retention=7.
Possible values: 0-9, inclusive. Use 0 to keep logs forever.
Retention
The maximum log size (MB) before NetBackup creates a new log file. The existing log files thatare rolled over are renamed mtstrmd.log.<date/time stamp>
Default value: LogMaxSize=500.
Possible value: 1 to the maximum operating system file size in MBs, inclusive.
LogMaxSize
Process parametersThe following table describes the process parameters of the mtstrm.conf
configuration file.
63Configuring deduplicationConfiguring the Deduplication Multi-Threaded Agent behavior
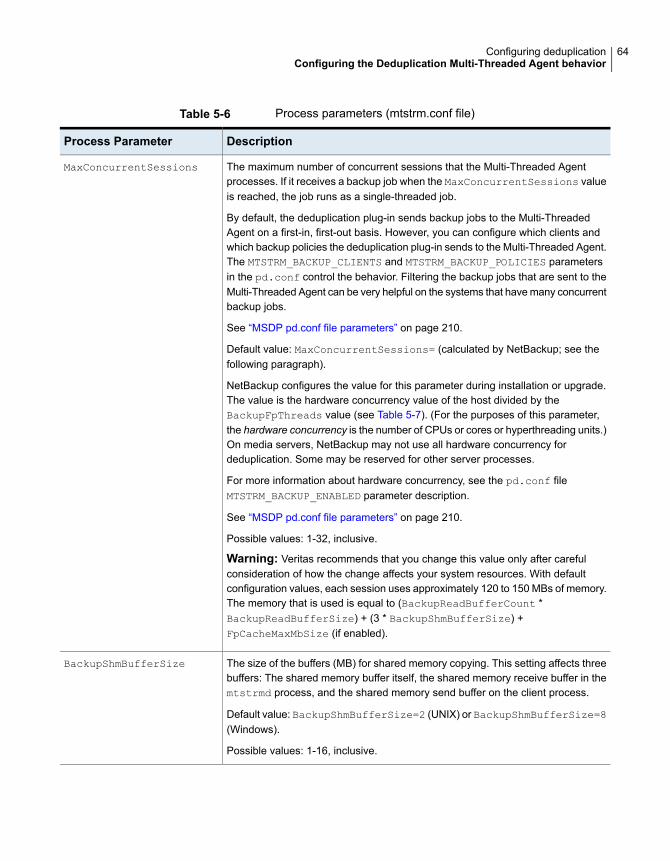
Table 5-6 Process parameters (mtstrm.conf file)
DescriptionProcess Parameter
The maximum number of concurrent sessions that the Multi-Threaded Agentprocesses. If it receives a backup job when the MaxConcurrentSessions valueis reached, the job runs as a single-threaded job.
By default, the deduplication plug-in sends backup jobs to the Multi-ThreadedAgent on a first-in, first-out basis. However, you can configure which clients andwhich backup policies the deduplication plug-in sends to the Multi-Threaded Agent.The MTSTRM_BACKUP_CLIENTS and MTSTRM_BACKUP_POLICIES parametersin the pd.conf control the behavior. Filtering the backup jobs that are sent to theMulti-Threaded Agent can be very helpful on the systems that have many concurrentbackup jobs.
See “MSDP pd.conf file parameters” on page 210.
Default value: MaxConcurrentSessions= (calculated by NetBackup; see thefollowing paragraph).
NetBackup configures the value for this parameter during installation or upgrade.The value is the hardware concurrency value of the host divided by theBackupFpThreads value (see Table 5-7). (For the purposes of this parameter,the hardware concurrency is the number of CPUs or cores or hyperthreading units.)On media servers, NetBackup may not use all hardware concurrency fordeduplication. Some may be reserved for other server processes.
For more information about hardware concurrency, see the pd.conf fileMTSTRM_BACKUP_ENABLED parameter description.
See “MSDP pd.conf file parameters” on page 210.
Possible values: 1-32, inclusive.
Warning: Veritas recommends that you change this value only after carefulconsideration of how the change affects your system resources. With defaultconfiguration values, each session uses approximately 120 to 150 MBs of memory.The memory that is used is equal to (BackupReadBufferCount *BackupReadBufferSize) + (3 * BackupShmBufferSize) +FpCacheMaxMbSize (if enabled).
MaxConcurrentSessions
The size of the buffers (MB) for shared memory copying. This setting affects threebuffers: The shared memory buffer itself, the shared memory receive buffer in themtstrmd process, and the shared memory send buffer on the client process.
Default value: BackupShmBufferSize=2 (UNIX) or BackupShmBufferSize=8(Windows).
Possible values: 1-16, inclusive.
BackupShmBufferSize
64Configuring deduplicationConfiguring the Deduplication Multi-Threaded Agent behavior
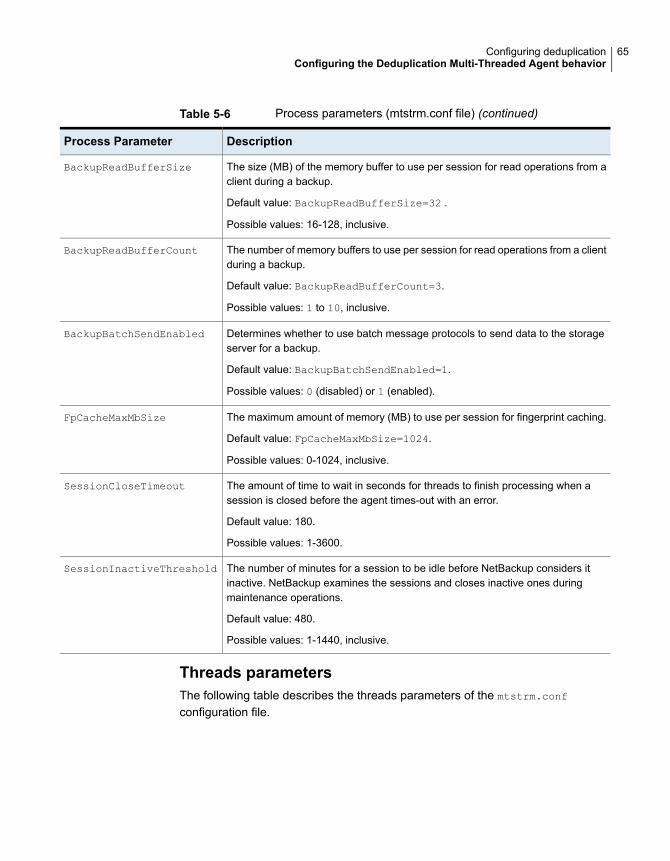
Table 5-6 Process parameters (mtstrm.conf file) (continued)
DescriptionProcess Parameter
The size (MB) of the memory buffer to use per session for read operations from aclient during a backup.
Default value: BackupReadBufferSize=32 .
Possible values: 16-128, inclusive.
BackupReadBufferSize
The number of memory buffers to use per session for read operations from a clientduring a backup.
Default value: BackupReadBufferCount=3.
Possible values: 1 to 10, inclusive.
BackupReadBufferCount
Determines whether to use batch message protocols to send data to the storageserver for a backup.
Default value: BackupBatchSendEnabled=1.
Possible values: 0 (disabled) or 1 (enabled).
BackupBatchSendEnabled
The maximum amount of memory (MB) to use per session for fingerprint caching.
Default value: FpCacheMaxMbSize=1024.
Possible values: 0-1024, inclusive.
FpCacheMaxMbSize
The amount of time to wait in seconds for threads to finish processing when asession is closed before the agent times-out with an error.
Default value: 180.
Possible values: 1-3600.
SessionCloseTimeout
The number of minutes for a session to be idle before NetBackup considers itinactive. NetBackup examines the sessions and closes inactive ones duringmaintenance operations.
Default value: 480.
Possible values: 1-1440, inclusive.
SessionInactiveThreshold
Threads parametersThe following table describes the threads parameters of the mtstrm.conf
configuration file.
65Configuring deduplicationConfiguring the Deduplication Multi-Threaded Agent behavior
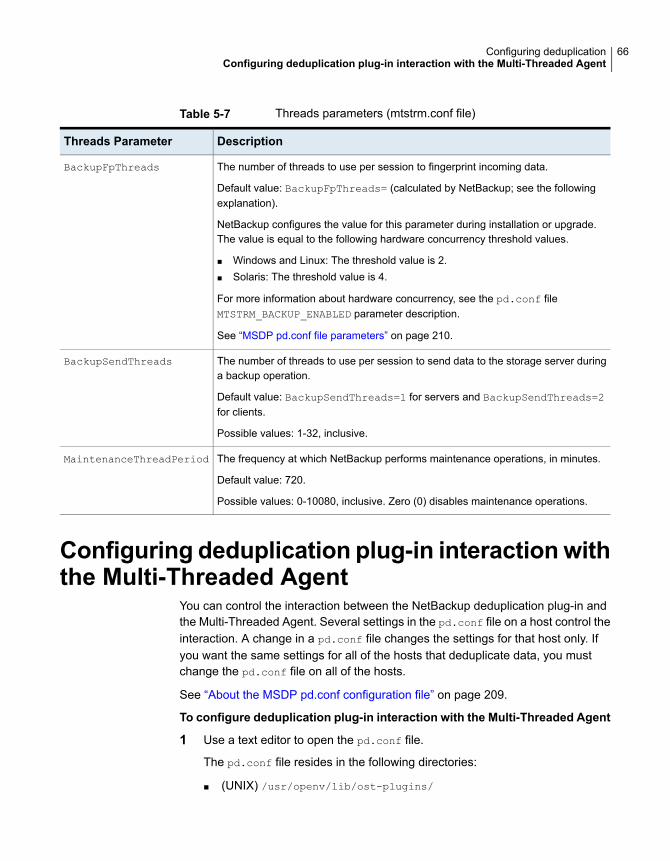
Table 5-7 Threads parameters (mtstrm.conf file)
DescriptionThreads Parameter
The number of threads to use per session to fingerprint incoming data.
Default value: BackupFpThreads= (calculated by NetBackup; see the followingexplanation).
NetBackup configures the value for this parameter during installation or upgrade.The value is equal to the following hardware concurrency threshold values.
■ Windows and Linux: The threshold value is 2.■ Solaris: The threshold value is 4.
For more information about hardware concurrency, see the pd.conf fileMTSTRM_BACKUP_ENABLED parameter description.
See “MSDP pd.conf file parameters” on page 210.
BackupFpThreads
The number of threads to use per session to send data to the storage server duringa backup operation.
Default value: BackupSendThreads=1 for servers and BackupSendThreads=2for clients.
Possible values: 1-32, inclusive.
BackupSendThreads
The frequency at which NetBackup performs maintenance operations, in minutes.
Default value: 720.
Possible values: 0-10080, inclusive. Zero (0) disables maintenance operations.
MaintenanceThreadPeriod
Configuring deduplication plug-in interactionwiththe Multi-Threaded Agent
You can control the interaction between the NetBackup deduplication plug-in andthe Multi-Threaded Agent. Several settings in the pd.conf file on a host control theinteraction. A change in a pd.conf file changes the settings for that host only. Ifyou want the same settings for all of the hosts that deduplicate data, you mustchange the pd.conf file on all of the hosts.
See “About the MSDP pd.conf configuration file” on page 209.
To configure deduplication plug-in interaction with the Multi-Threaded Agent
1 Use a text editor to open the pd.conf file.
The pd.conf file resides in the following directories:
■ (UNIX) /usr/openv/lib/ost-plugins/
66Configuring deduplicationConfiguring deduplication plug-in interaction with the Multi-Threaded Agent
■ (Windows) install_path\Veritas\NetBackup\bin\ost-plugins
2 To change a setting, specify a new value. The following are the settings thatcontrol the interaction:
■ MTSTRM_BACKUP_CLIENTS
■ MTSTRM_BACKUP_ENABLED
■ MTSTRM_BACKUP_POLICIES
■ MTSTRM_IPC_TIMEOUT
These settings are described in another topic.
See “MSDP pd.conf file parameters” on page 210.
3 Save and close the file.
4 Restart the NetBackup Remote Manager and Monitor Service (nbrmms) on thehost.
About MSDP fingerprintingNetBackup uses a unique identifier to identify each file and each file segment thatis backed up. The deduplication plug-in reads the backup image and separates theimage into files. The plug-in separates the files into segments. For each segment,the plug-in calculates the hash key (or fingerprint) that identifies each data segment.To create a hash, every byte of data in the segment is read and added to the hash.
NetBackup 8.0 and previous versions use fingerprinting calculations that are basedon the MD5-like algorithm. Starting with NetBackup 8.1, the fingerprinting calculationsare based on a more secure SHA-2 algorithm. On a system that is upgraded to the8.1 version, every new segment is computed with the SHA-2 algorithm. A datarolling conversion task works in the background to convert the existing MD5-likefingerprints to SHA-2 fingerprints, gradually.
See “About the rolling data conversion mechanism for MSDP” on page 134.
NetBackup 8 .1 can handle both fingerprint types, and the new server is compatiblewith old clients and old servers. When you perform a backup from an old client toa new server or when you duplicate data from an old server to a new server,conversion from MD5-like to SHA-2 occurs inline on the new server before the datais saved to the disk. Similarly, when you duplicate data from a new server to an oldserver, conversion from SHA-2 to MD5-like occurs inline on the new server beforethe data is sent to the old server.
Notes and restrictions that there are some known issues for the compatibility support.
67Configuring deduplicationAbout MSDP fingerprinting
■ The fingerprint conversion requires additional computation time. The interactionbetween old clients and old servers and new server is slower than if both theclient and the server are new.
■ You cannot restore data that is backed up using SHA-2 algorithm on a mediaserver that uses the MD5-like algorithm. However, you may choose to restorethe SHA-2 fingerprint data on a new media server.
■ Similarly, you cannot use client-direct restore to restore data that is backed upusing Client Direct deduplication on a media server that uses the MD5-likealgorithm. However, you may choose to restore the data on a new media server.
■ If you are using two types of media servers for load balancing, where one mediaserver uses MD5-like algorithm and the other media server uses the SHA-2algorithm, the initial backup may lose deduplication ratio. Therefore, split theold media servers and the new media servers into different groups, and createdifferent storage unit for each of them.
■ When data is backed up from a NetBackup 7.5 or previous version client, usingClient Direct deduplication, most of the data is transferred over the network anddeduplicated on the server. This may save storage, but it does not reducenetwork throughput. It is recommended that you upgrade the NetBackup clientto the latest version.
See “About the MSDP fingerprint cache” on page 68.
See “Media server deduplication backup process” on page 393.
See “MSDP client–side deduplication backup process” on page 396.
About the MSDP fingerprint cacheNetBackup uses fingerprints to identify the file segments in the backup data.NetBackup writes only unique data segments to a Media Server DeduplicationPool. If a segment already is in storage, NetBackup does not store it again.
See “About MSDP fingerprinting” on page 67.
The storage server maintains an index cache of the fingerprints in RAM. For eachbackup job, a client requests a list of the fingerprints from its last backup from theserver.
The NetBackup Deduplication Engine (spoold) loads a percentage of the fingerprintsinto the cache at startup. After startup, the Engine loads the remaining fingerprints.
You can configure the cache loading behavior.
See “Configuring the MSDP fingerprint cache behavior” on page 69.
You can also control the fingerprint cache seeding for clients.
68Configuring deduplicationAbout the MSDP fingerprint cache
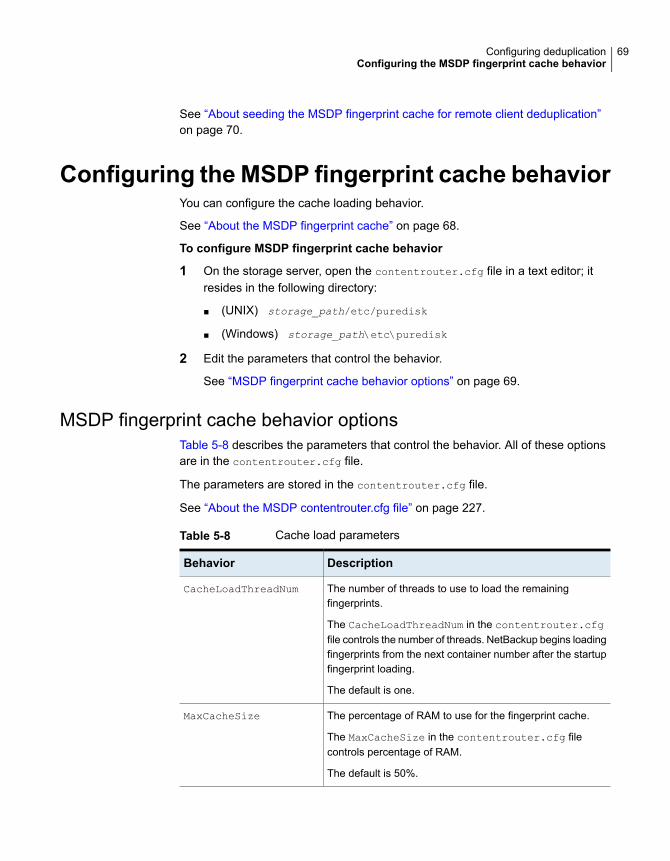
See “About seeding the MSDP fingerprint cache for remote client deduplication”on page 70.
Configuring the MSDP fingerprint cache behaviorYou can configure the cache loading behavior.
See “About the MSDP fingerprint cache” on page 68.
To configure MSDP fingerprint cache behavior
1 On the storage server, open the contentrouter.cfg file in a text editor; itresides in the following directory:
■ (UNIX) storage_path/etc/puredisk
■ (Windows) storage_path\etc\puredisk
2 Edit the parameters that control the behavior.
See “MSDP fingerprint cache behavior options” on page 69.
MSDP fingerprint cache behavior optionsTable 5-8 describes the parameters that control the behavior. All of these optionsare in the contentrouter.cfg file.
The parameters are stored in the contentrouter.cfg file.
See “About the MSDP contentrouter.cfg file” on page 227.
Table 5-8 Cache load parameters
DescriptionBehavior
The number of threads to use to load the remainingfingerprints.
The CacheLoadThreadNum in the contentrouter.cfgfile controls the number of threads. NetBackup begins loadingfingerprints from the next container number after the startupfingerprint loading.
The default is one.
CacheLoadThreadNum
The percentage of RAM to use for the fingerprint cache.
The MaxCacheSize in the contentrouter.cfg filecontrols percentage of RAM.
The default is 50%.
MaxCacheSize
69Configuring deduplicationConfiguring the MSDP fingerprint cache behavior
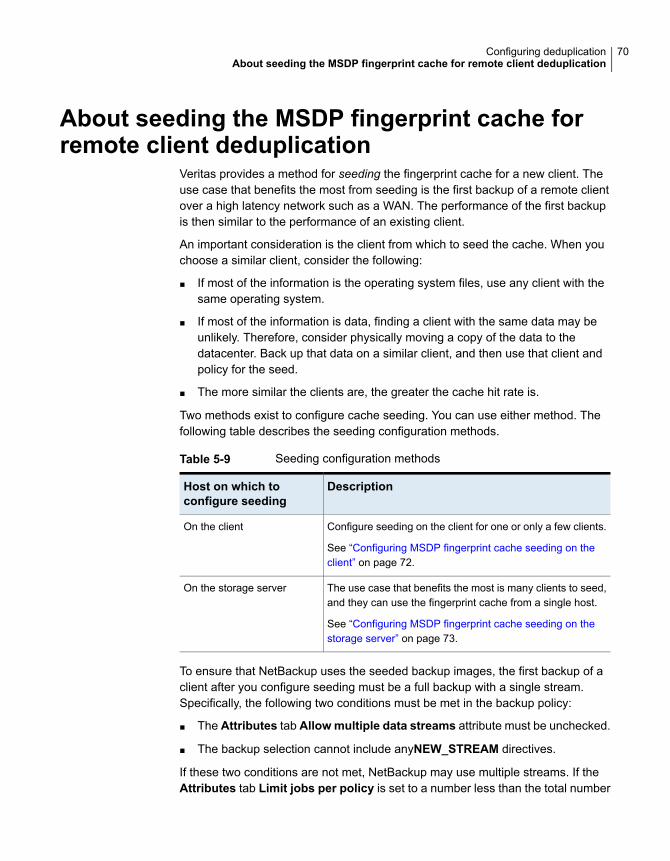
About seeding the MSDP fingerprint cache forremote client deduplication
Veritas provides a method for seeding the fingerprint cache for a new client. Theuse case that benefits the most from seeding is the first backup of a remote clientover a high latency network such as a WAN. The performance of the first backupis then similar to the performance of an existing client.
An important consideration is the client from which to seed the cache. When youchoose a similar client, consider the following:
■ If most of the information is the operating system files, use any client with thesame operating system.
■ If most of the information is data, finding a client with the same data may beunlikely. Therefore, consider physically moving a copy of the data to thedatacenter. Back up that data on a similar client, and then use that client andpolicy for the seed.
■ The more similar the clients are, the greater the cache hit rate is.
Two methods exist to configure cache seeding. You can use either method. Thefollowing table describes the seeding configuration methods.
Table 5-9 Seeding configuration methods
DescriptionHost on which toconfigure seeding
Configure seeding on the client for one or only a few clients.
See “Configuring MSDP fingerprint cache seeding on theclient” on page 72.
On the client
The use case that benefits the most is many clients to seed,and they can use the fingerprint cache from a single host.
See “Configuring MSDP fingerprint cache seeding on thestorage server” on page 73.
On the storage server
To ensure that NetBackup uses the seeded backup images, the first backup of aclient after you configure seeding must be a full backup with a single stream.Specifically, the following two conditions must be met in the backup policy:
■ The Attributes tab Allowmultiple data streams attribute must be unchecked.
■ The backup selection cannot include anyNEW_STREAM directives.
If these two conditions are not met, NetBackup may use multiple streams. If theAttributes tab Limit jobs per policy is set to a number less than the total number
70Configuring deduplicationAbout seeding the MSDP fingerprint cache for remote client deduplication
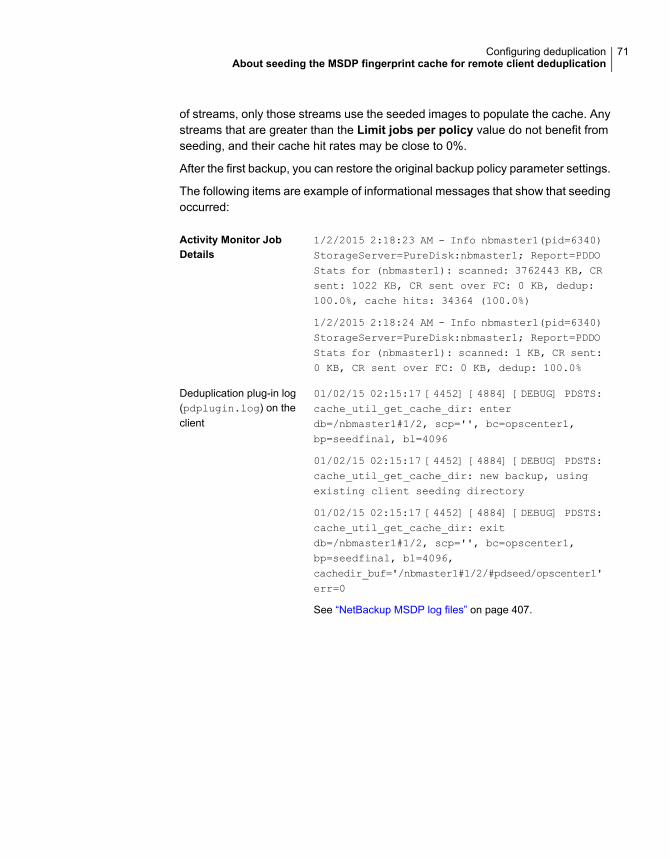
of streams, only those streams use the seeded images to populate the cache. Anystreams that are greater than the Limit jobs per policy value do not benefit fromseeding, and their cache hit rates may be close to 0%.
After the first backup, you can restore the original backup policy parameter settings.
The following items are example of informational messages that show that seedingoccurred:
1/2/2015 2:18:23 AM - Info nbmaster1(pid=6340)StorageServer=PureDisk:nbmaster1; Report=PDDOStats for (nbmaster1): scanned: 3762443 KB, CRsent: 1022 KB, CR sent over FC: 0 KB, dedup:100.0%, cache hits: 34364 (100.0%)
1/2/2015 2:18:24 AM - Info nbmaster1(pid=6340)StorageServer=PureDisk:nbmaster1; Report=PDDOStats for (nbmaster1): scanned: 1 KB, CR sent:0 KB, CR sent over FC: 0 KB, dedup: 100.0%
Activity Monitor JobDetails
01/02/15 02:15:17 [4452] [4884] [DEBUG] PDSTS:cache_util_get_cache_dir: enterdb=/nbmaster1#1/2, scp='', bc=opscenter1,bp=seedfinal, bl=4096
01/02/15 02:15:17 [4452] [4884] [DEBUG] PDSTS:cache_util_get_cache_dir: new backup, usingexisting client seeding directory
01/02/15 02:15:17 [4452] [4884] [DEBUG] PDSTS:cache_util_get_cache_dir: exitdb=/nbmaster1#1/2, scp='', bc=opscenter1,bp=seedfinal, bl=4096,cachedir_buf='/nbmaster1#1/2/#pdseed/opscenter1'err=0
See “NetBackup MSDP log files” on page 407.
Deduplication plug-in log(pdplugin.log) on theclient
71Configuring deduplicationAbout seeding the MSDP fingerprint cache for remote client deduplication
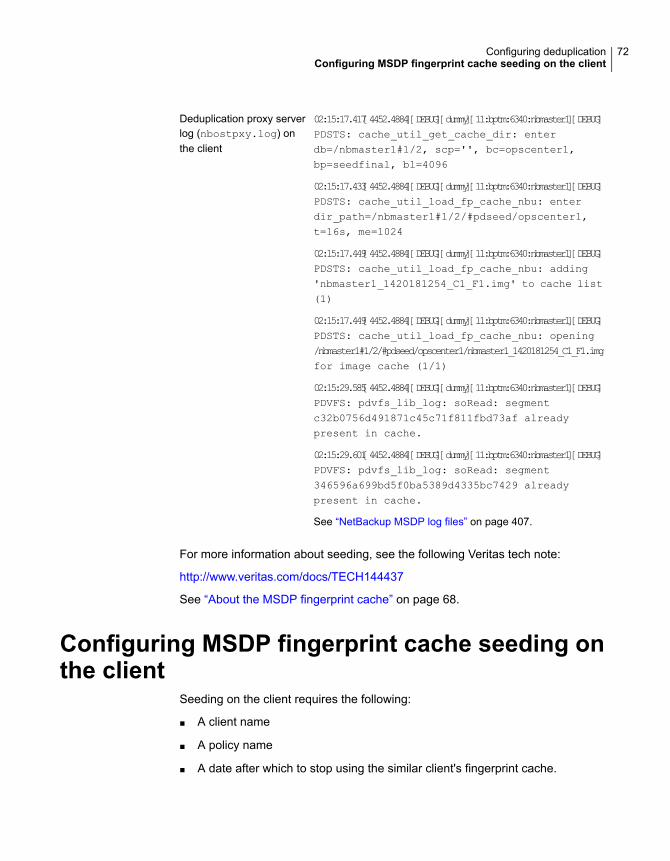
02:15:17.417[4452.4884][DEBUG][dummy][11:bptm:6340:nbmaster1][DEBUG]PDSTS: cache_util_get_cache_dir: enterdb=/nbmaster1#1/2, scp='', bc=opscenter1,bp=seedfinal, bl=4096
02:15:17.433[4452.4884][DEBUG][dummy][11:bptm:6340:nbmaster1][DEBUG]PDSTS: cache_util_load_fp_cache_nbu: enterdir_path=/nbmaster1#1/2/#pdseed/opscenter1,t=16s, me=1024
02:15:17.449[4452.4884][DEBUG][dummy][11:bptm:6340:nbmaster1][DEBUG]PDSTS: cache_util_load_fp_cache_nbu: adding'nbmaster1_1420181254_C1_F1.img' to cache list(1)
02:15:17.449[4452.4884][DEBUG][dummy][11:bptm:6340:nbmaster1][DEBUG]PDSTS: cache_util_load_fp_cache_nbu: opening/nbmaster1#1/2/#pdseed/opscenter1/nbmaster1_1420181254_C1_F1.imgfor image cache (1/1)
02:15:29.585[4452.4884][DEBUG][dummy][11:bptm:6340:nbmaster1][DEBUG]PDVFS: pdvfs_lib_log: soRead: segmentc32b0756d491871c45c71f811fbd73af alreadypresent in cache.
02:15:29.601[4452.4884][DEBUG][dummy][11:bptm:6340:nbmaster1][DEBUG]PDVFS: pdvfs_lib_log: soRead: segment346596a699bd5f0ba5389d4335bc7429 alreadypresent in cache.
See “NetBackup MSDP log files” on page 407.
Deduplication proxy serverlog (nbostpxy.log) onthe client
For more information about seeding, see the following Veritas tech note:
http://www.veritas.com/docs/TECH144437
See “About the MSDP fingerprint cache” on page 68.
Configuring MSDP fingerprint cache seeding onthe client
Seeding on the client requires the following:
■ A client name
■ A policy name
■ A date after which to stop using the similar client's fingerprint cache.
72Configuring deduplicationConfiguring MSDP fingerprint cache seeding on the client
Information about when to use this seeding method and how to choose a clientfrom which to seed is available.
See “About seeding the MSDP fingerprint cache for remote client deduplication”on page 70.
Warning: Do not use this procedure on the storage server or the load balancingserver. If you do, it affects all clients that are backed up by that host.
To seed the MSDP fingerprint cache on the client
◆ Before the first backup of the remote client, edit the FP_CACHE_CLIENT_POLICY
parameter in the pd.conf file on the remote client.
Specify the setting in the following format:
clienthostmachine,backuppolicy,date
The name of the existing similar client from which to seedthe cache.
Note: NetBackup treats long and short host namesdifferently, so ensure that you use the client name as itappears in the policy that backs it up.
clienthostmachine
The backup policy for that client.backuppolicy
The last date in mm/dd/yyyy format to use the fingerprintcache from the existing similar client. After this date,NetBackup uses the fingerprints from the client's own backup.
date
See “Editing the MSDP pd.conf file” on page 210.
See “MSDP pd.conf file parameters” on page 210.
Configuring MSDP fingerprint cache seeding onthe storage server
On the storage server, the NetBackup seedutil utility creates a special seedingdirectory for a client. It populates the seeding directory with image references toanother client and policy’s backup images. The following is the pathname of theseeding directory:
database_path/databases/catalog/2/#pdseed/client_name
73Configuring deduplicationConfiguring MSDP fingerprint cache seeding on the storage server
(By default, NetBackup uses the same path for the storage and the catalog; thedatabase_path and the storage_path are the same. If you configure a separatepath for the deduplication database, the paths are different.)
When a backup runs, NetBackup loads the fingerprints from the #pdseed directoryfor the client. (Assuming that no fingerprints exist for that client in the usual cataloglocation.)
Information about when to use this seeding method and how to choose a clientfrom which to seed is available.
See “About seeding the MSDP fingerprint cache for remote client deduplication”on page 70.
To seed the fingerprint cache from the storage server
1 Before the first backup of the remote client, specify the clients and the policyin the following format:
UNIX: /usr/openv/pdde/pdag/bin/seedutil -seed -sclient client_name
-spolicy policy_name -dclient destination_client_name
Windows: install_path\Veritas\pdde\seedutil -seed -sclient
client_name -spolicy policy_name -dclient destination_client_name
Note: NetBackup treats long and short host names differently, so ensure thatyou use the client name as it appears in the policy that backs it up.
See “NetBackup seedutil options” on page 75.
2 Repeat the command for each client that you want to seed with fingerprints.
3 Verify that the seeding directories for the clients were created by using thefollowing command:
seedutil -list_clients
4 Back up the clients.
5 After the client or clients are backed up, remove the seeding directories for theclients. The following is the command syntax:
seedutil -clear client_name
After one full backup for the client or clients, NetBackup clears the seedingdirectory automatically. If the first backup fails, the seeded data remains forsuccessive attempts. Although NetBackup clears the seeding directoryautomatically, Veritas recommends that you clear the client seeding directoriesmanually.
74Configuring deduplicationConfiguring MSDP fingerprint cache seeding on the storage server
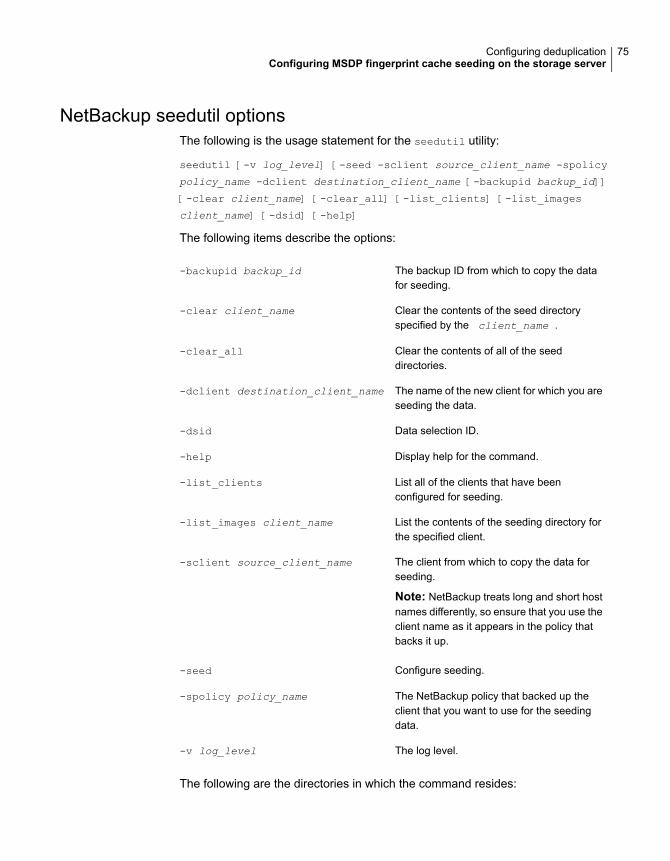
NetBackup seedutil optionsThe following is the usage statement for the seedutil utility:
seedutil [-v log_level] [-seed -sclient source_client_name -spolicy
policy_name -dclient destination_client_name [-backupid backup_id]]
[-clear client_name] [-clear_all] [-list_clients] [-list_images
client_name] [-dsid] [-help]
The following items describe the options:
The backup ID from which to copy the datafor seeding.
-backupid backup_id
Clear the contents of the seed directoryspecified by the client_name .
-clear client_name
Clear the contents of all of the seeddirectories.
-clear_all
The name of the new client for which you areseeding the data.
-dclient destination_client_name
Data selection ID.-dsid
Display help for the command.-help
List all of the clients that have beenconfigured for seeding.
-list_clients
List the contents of the seeding directory forthe specified client.
-list_images client_name
The client from which to copy the data forseeding.
Note: NetBackup treats long and short hostnames differently, so ensure that you use theclient name as it appears in the policy thatbacks it up.
-sclient source_client_name
Configure seeding.-seed
The NetBackup policy that backed up theclient that you want to use for the seedingdata.
-spolicy policy_name
The log level.-v log_level
The following are the directories in which the command resides:
75Configuring deduplicationConfiguring MSDP fingerprint cache seeding on the storage server

■ UNIX: /usr/openv/pdde/pdag/bin
■ Windows: C:\Program Files\Veritas\pdde
Enabling 250-TB support for MSDPBefore you configure a storage server for a 250-TB Media Server DeduplicationPool, you must enable support for the multiple volumes that are required.
See “About MSDP storage capacity” on page 20.
See “About provisioning the storage for MSDP” on page 47.
To enable support for a 250-TB NetBackup MSDP
◆ On the NetBackup media server that you want to use as the MSDP storageserver, create an empty nbapp-release file in the /etc directory. The followingis an example that shows how to use the touch command to create the file:
touch /etc/nbapp-release
Use the following command the create the file on Windows:
mkdir c:\etc
echo Windows_BYO > "c:\etc\nbapp-release"
For additional information, refer to the following article:
How to configure a 250TB Media Server Deduplication Pool (MSDP) on Linux andWindows
About MSDP Encryption using NetBackup KMSservice
NetBackup incorporates Key Management Server (KMS) with Media ServerDeduplication Pool.
MSDP encryption carries out segment-level encryption and assigns a uniqueencryption key for every data segment. A customer key is retrieved from NetBackupKMS to encrypt the segment key.
You can configure the KMS service from the NetBackup Administration Console orthe NetBackup command line during storage server configuration.
76Configuring deduplicationEnabling 250-TB support for MSDP
Note: You cannot disable the MSDP KMS service once you enable it.
If the KMS service is not available for MSDP or the key in the KMS service that isused by MSDP is not available, then MSDP waits in an infinite loop. When MSDPgoes in an infinite loop, few commands that you run might not respond.
After you configure KMS encryption or once the MSDP processes restart, checkthe KMS encryption status after the first backup finishes.
The keys in the key dictionary must not be deleted, deprecated, or terminated.
You can use the following commands to get the status of the KMS mode:
■ For UNIX:/usr/openv/pdde/pdcr/bin/crcontrol --getmode
For MSDP cloud, run the following keydictutil command to check if the LSUis in KMS mode:/usr/openv/pdde/pdcr/bin/keydictutil --list
■ For Windows:<install_path>\Veritas\pdde\crcontrol.exe --getmode
Note: If you use the nbdevconfig command to add a new encrypted cloud LogicalStorage Unit (LSU) and an encrypted LSU exists in this MSDP, the keygroupname
must be the same as the keygroupname in the previous encrypted LSU.
For enabling KMS, refer to the following topics:
See “Configuring a storage server for a Media Server Deduplication Pool”on page 80.
Upgrading KMS for MSDPBefore you upgrade KMS encryption from NetBackup version earlier than 8.1.1,complete the following steps. During the NetBackup upgrade, KMS rolling conversionruns along with MSDP encryption rolling conversion.
For NetBackup version earlier than 8.1.1, the supported NetBackup upgrade pathsare:
■ NetBackup 7.7.3 to 8.1.2 or later
■ NetBackup 8.0 to 8.1.1 or later
■ NetBackup 8.1 to 8.1.1 or later
For additional information, refer to the Configuring KMS section in the VeritasNetBackup Security and Encryption Guide.
77Configuring deduplicationAbout MSDP Encryption using NetBackup KMS service
Before you upgrade KMS, complete the following steps:
Note: The following steps are not supported on Solaris OS. For Solaris, refer tothe following article:
Upgrade KMS encryption for MSDP on the Solaris platform
1 Create an empty database using the following command:
■ For UNIX:/usr/openv/netbackup/bin/nbkms -createemptydb
■ For Windows:<install_path>\Veritas\NetBackup\bin\nbkms.exe -createemptydb
Enter the following parameters when you receive a prompt:
■ Enter the HMK passphraseEnter a password that you want to set as the host master key (HMK)passphrase. Press Enter to use a randomly generated HMK passphrase.The passphrase is not displayed on the screen.
■ Enter HMK IDEnter a unique ID to associate with the host master key. This ID helpsyou to determine an HMK associated with any key store.
■ Enter KPK passphraseEnter a password that you want to set as the key protection key (KPK)passphrase. Press Enter to use a randomly generated HMK passphrase.The passphrase is not displayed on the screen.
■ Enter KPK IDEnter a unique ID to associate with the key protection key. This ID helpsyou to determine a KPK associated with any key store.
After the operation completes successfully, run the following command on themaster server to start KMS:
■ For UNIX:/usr/openv/netbackup/bin/nbkms
■ For Windows:sc start NetBackup Key Management Service
2 Create a key group and an active key by entering the following commands:
■ For UNIX:/usr/openv/netbackup/bin/admincmd/nbkmsutil -createkg -kgname
msdp
78Configuring deduplicationAbout MSDP Encryption using NetBackup KMS service
/usr/openv/netbackup/bin/admincmd/nbkmsutil -createkey -kgname
msdp -keyname name –activate
■ For Windows:<install_path>\Veritas\NetBackup\bin\admincmd\nbkmsutil.exe
-createkg -kgname msdp
<install_path>\Veritas\NetBackup\bin\admincmd\nbkmsutil.exe
-createkey -kgname msdp -keyname name -activate
Enter a password that you want set as the key passphrase.
3 Create a kms.cfg configuration file at the following location on the NetBackupmedia server where you have configured the MSDP storage:
■ On UNIX:/usr/openv/pdde/kms.cfg
■ On Windows:<install_path>\Veritas\pdde\kms.cfg
Add the following content to the kms.cfg file:
[KMSOptions]
KMSEnable=true
KMSKeyGroupName=YourKMSKeyGroupName
KMSServerName=YourKMSServerName
KMSType=0
For KMSServerName, enter the hostname of the server where the KMS serviceruns, mainly the master server hostname.
After completing the steps, you can upgrade MSDP.
About MSDP Encryption using external KMSserver
NetBackup supports keys from an external key management service (KMS) serverthat encrypts data in case of MSDP storage. Keys are retrieved from the externalKMS server to encrypt the backup data.
For information about external KMS support, see the NetBackup Security andEncryption Guide.
The other information remains the same as mentioned in the following topic:
See “About MSDP Encryption using NetBackup KMS service” on page 76.
79Configuring deduplicationAbout MSDP Encryption using external KMS server
Configuring a storage server for a Media ServerDeduplication Pool
Configure in this context means to configure a NetBackup media server as a storageserver for a Media Server Deduplication Pool.
See “About MSDP storage servers” on page 27.
SelectMedia Server Deduplication Pool for the type of diskstorage.
The type of storage.
See “About the NetBackup Deduplication Engine credentials”on page 34.
The credentials for thededuplication engine.
See “MSDP storage path properties” on page 94.The storage paths.
See “About the network interface for MSDP” on page 35.The network interface.
See “About MSDP storage servers” on page 27.The load balancing servers,if any.
When you configure the storage server, the wizard also lets you create a disk pooland storage unit.
For a 96-TB Media Server Deduplication Pool, you must create therequired directories before you configure the storage server.
See “Creating the data directories for 250-TB MSDP support”on page 118.
Prerequisite
To configure a NetBackup storage server for a Media Server DeduplicationPool
1 In the NetBackup Administration Console, select either NetBackupManagement or Media and Device Management.
2 In the right pane, click Configure Disk Storage Servers.
The Storage Server Configuration Wizard Welcome panel appears.
80Configuring deduplicationConfiguring a storage server for a Media Server Deduplication Pool
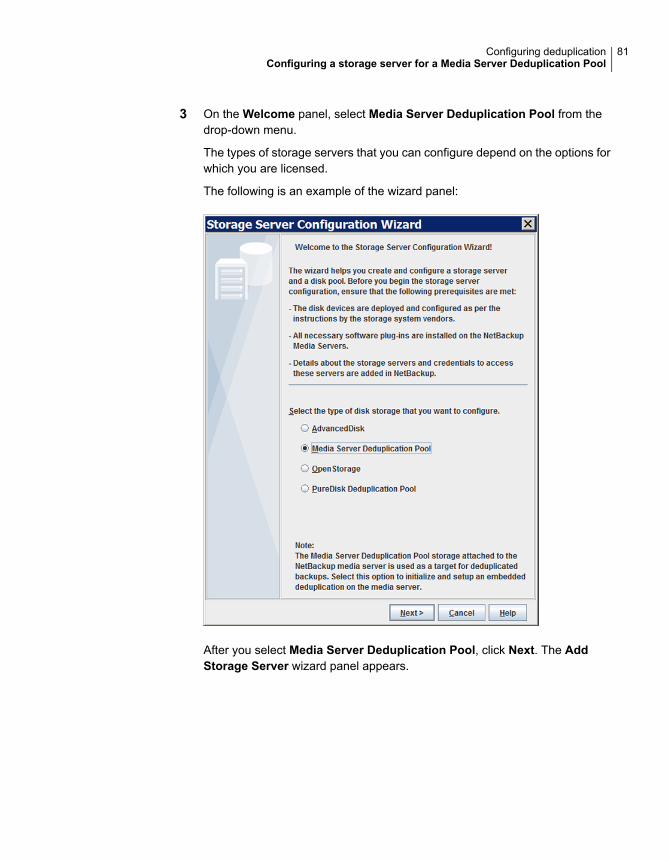
3 On the Welcome panel, select Media Server Deduplication Pool from thedrop-down menu.
The types of storage servers that you can configure depend on the options forwhich you are licensed.
The following is an example of the wizard panel:
After you select Media Server Deduplication Pool, click Next. The AddStorage Server wizard panel appears.
81Configuring deduplicationConfiguring a storage server for a Media Server Deduplication Pool
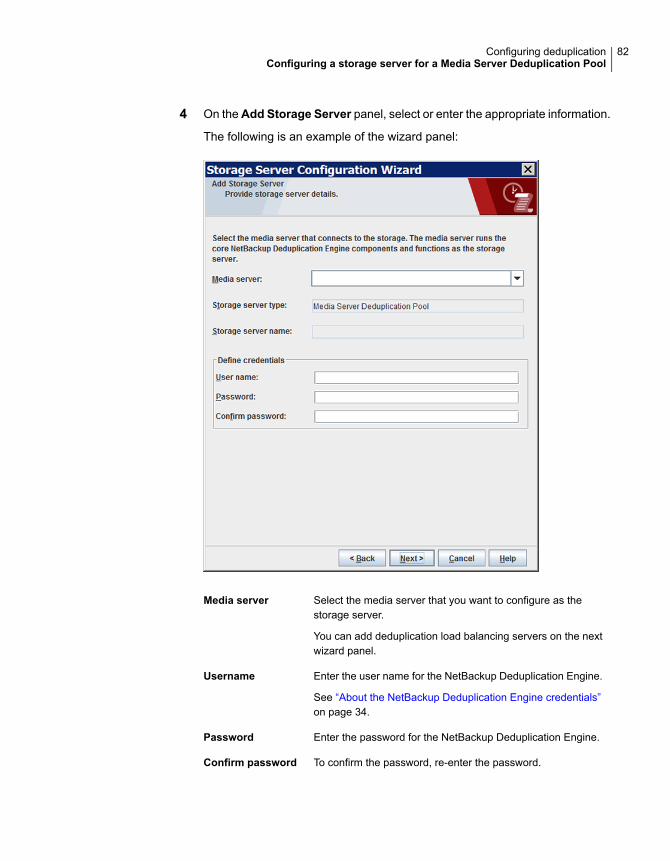
4 On theAdd Storage Server panel, select or enter the appropriate information.
The following is an example of the wizard panel:
Select the media server that you want to configure as thestorage server.
Media server
You can add deduplication load balancing servers on the nextwizard panel.
Enter the user name for the NetBackup Deduplication Engine.Username
See “About the NetBackup Deduplication Engine credentials”on page 34.
Enter the password for the NetBackup Deduplication Engine.Password
To confirm the password, re-enter the password.Confirm password
82Configuring deduplicationConfiguring a storage server for a Media Server Deduplication Pool

After you enter the information, click Next.
The Storage Server Properties panel appears.
83Configuring deduplicationConfiguring a storage server for a Media Server Deduplication Pool
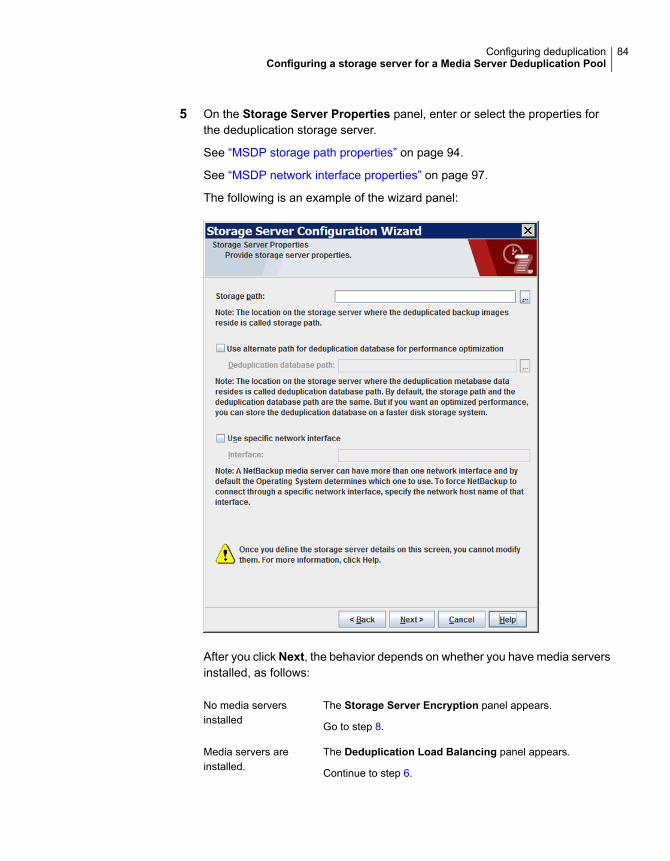
5 On the Storage Server Properties panel, enter or select the properties forthe deduplication storage server.
See “MSDP storage path properties” on page 94.
See “MSDP network interface properties” on page 97.
The following is an example of the wizard panel:
After you clickNext, the behavior depends on whether you have media serversinstalled, as follows:
The Storage Server Encryption panel appears.
Go to step 8.
No media serversinstalled
The Deduplication Load Balancing panel appears.
Continue to step 6.
Media servers areinstalled.
84Configuring deduplicationConfiguring a storage server for a Media Server Deduplication Pool
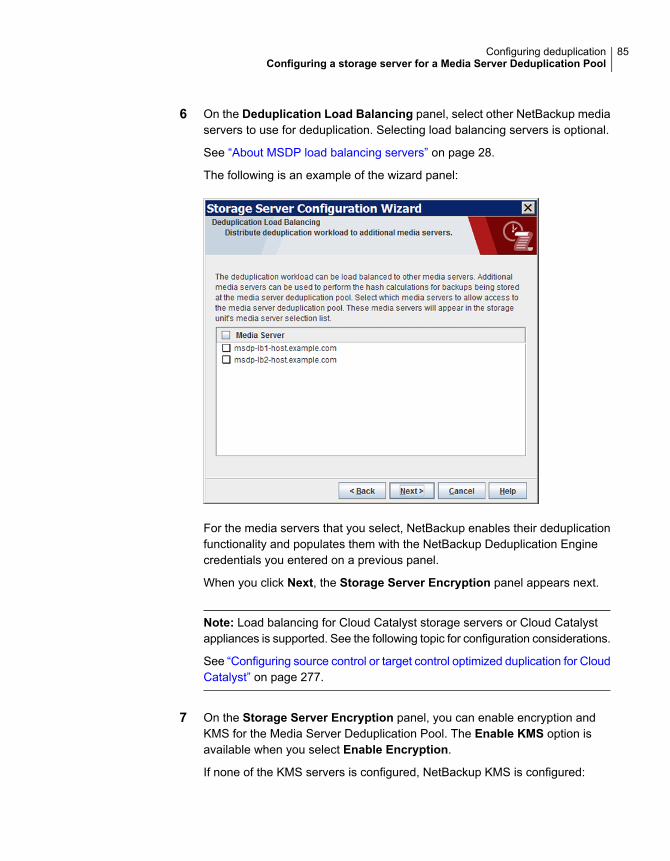
6 On the Deduplication Load Balancing panel, select other NetBackup mediaservers to use for deduplication. Selecting load balancing servers is optional.
See “About MSDP load balancing servers” on page 28.
The following is an example of the wizard panel:
For the media servers that you select, NetBackup enables their deduplicationfunctionality and populates them with the NetBackup Deduplication Enginecredentials you entered on a previous panel.
When you click Next, the Storage Server Encryption panel appears next.
Note: Load balancing for Cloud Catalyst storage servers or Cloud Catalystappliances is supported. See the following topic for configuration considerations.
See “Configuring source control or target control optimized duplication for CloudCatalyst” on page 277.
7 On the Storage Server Encryption panel, you can enable encryption andKMS for the Media Server Deduplication Pool. The Enable KMS option isavailable when you select Enable Encryption.
If none of the KMS servers is configured, NetBackup KMS is configured:
85Configuring deduplicationConfiguring a storage server for a Media Server Deduplication Pool
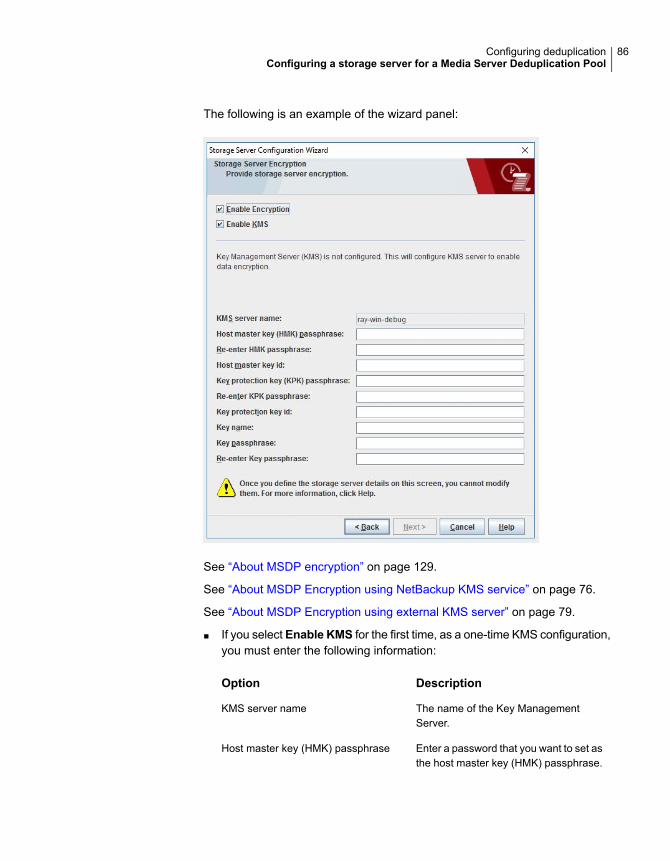
The following is an example of the wizard panel:
See “About MSDP encryption” on page 129.
See “About MSDP Encryption using NetBackup KMS service” on page 76.
See “About MSDP Encryption using external KMS server” on page 79.
■ If you select Enable KMS for the first time, as a one-time KMS configuration,you must enter the following information:
DescriptionOption
The name of the Key ManagementServer.
KMS server name
Enter a password that you want to set asthe host master key (HMK) passphrase.
Host master key (HMK) passphrase
86Configuring deduplicationConfiguring a storage server for a Media Server Deduplication Pool
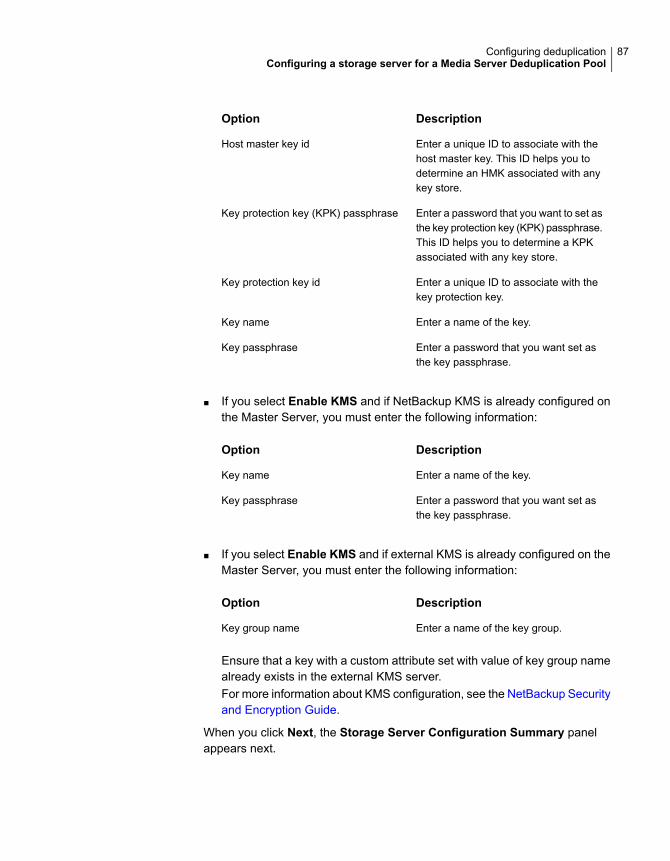
DescriptionOption
Enter a unique ID to associate with thehost master key. This ID helps you todetermine an HMK associated with anykey store.
Host master key id
Enter a password that you want to set asthe key protection key (KPK) passphrase.This ID helps you to determine a KPKassociated with any key store.
Key protection key (KPK) passphrase
Enter a unique ID to associate with thekey protection key.
Key protection key id
Enter a name of the key.Key name
Enter a password that you want set asthe key passphrase.
Key passphrase
■ If you select Enable KMS and if NetBackup KMS is already configured onthe Master Server, you must enter the following information:
DescriptionOption
Enter a name of the key.Key name
Enter a password that you want set asthe key passphrase.
Key passphrase
■ If you select Enable KMS and if external KMS is already configured on theMaster Server, you must enter the following information:
DescriptionOption
Enter a name of the key group.Key group name
Ensure that a key with a custom attribute set with value of key group namealready exists in the external KMS server.For more information about KMS configuration, see the NetBackup Securityand Encryption Guide.
When you click Next, the Storage Server Configuration Summary panelappears next.
87Configuring deduplicationConfiguring a storage server for a Media Server Deduplication Pool
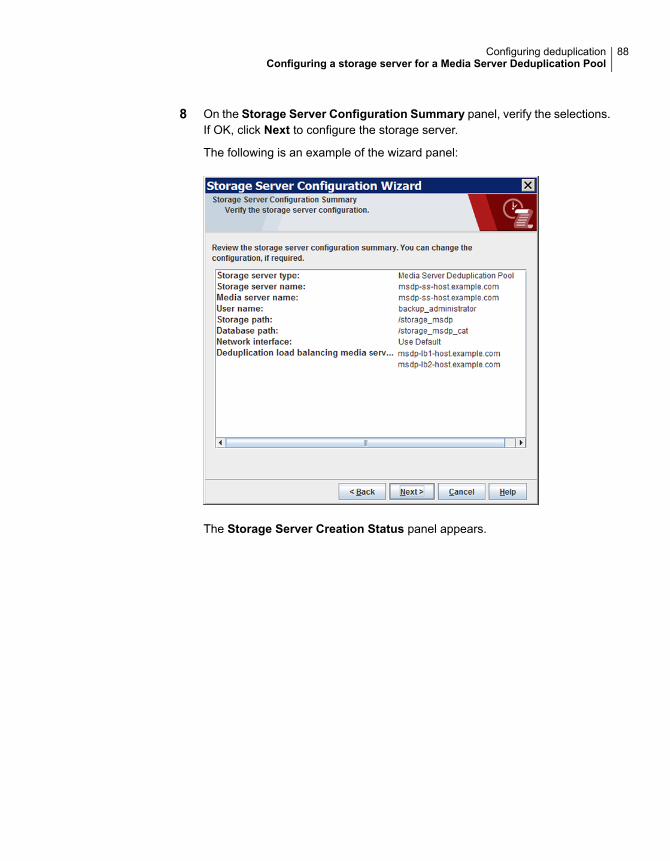
8 On the Storage Server Configuration Summary panel, verify the selections.If OK, click Next to configure the storage server.
The following is an example of the wizard panel:
The Storage Server Creation Status panel appears.
88Configuring deduplicationConfiguring a storage server for a Media Server Deduplication Pool
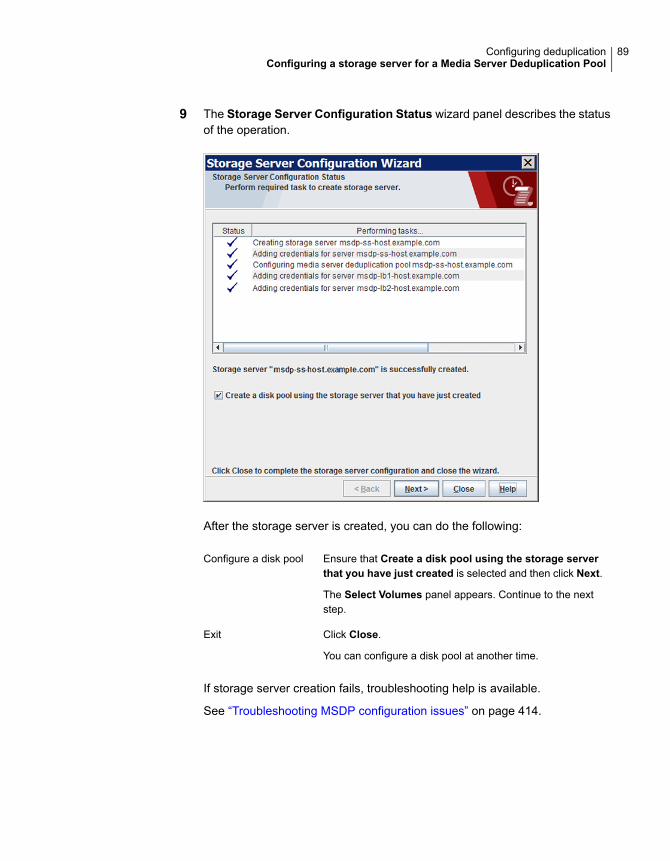
9 The Storage Server Configuration Status wizard panel describes the statusof the operation.
After the storage server is created, you can do the following:
Ensure that Create a disk pool using the storage serverthat you have just created is selected and then click Next.
The Select Volumes panel appears. Continue to the nextstep.
Configure a disk pool
Click Close.
You can configure a disk pool at another time.
Exit
If storage server creation fails, troubleshooting help is available.
See “Troubleshooting MSDP configuration issues” on page 414.
89Configuring deduplicationConfiguring a storage server for a Media Server Deduplication Pool
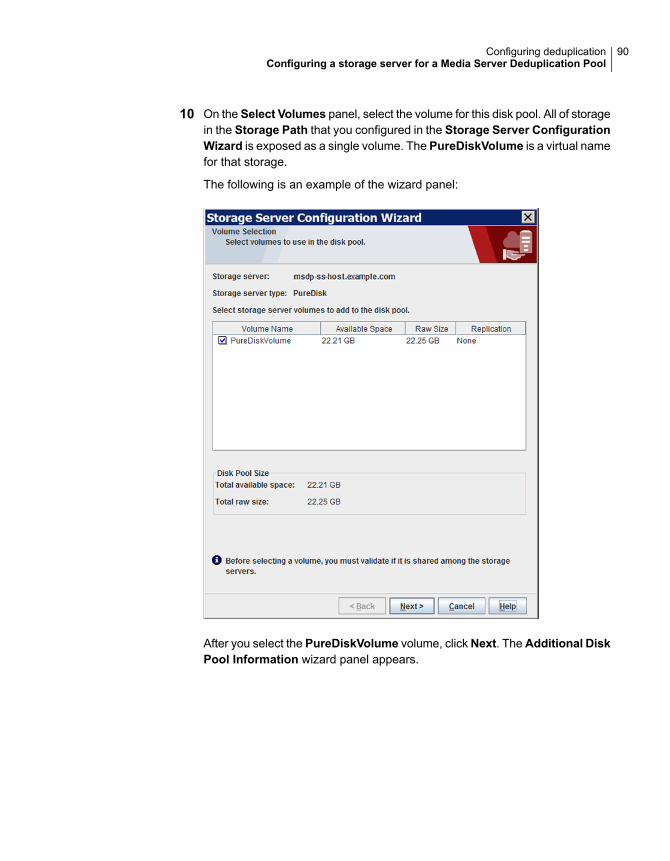
10 On the Select Volumes panel, select the volume for this disk pool. All of storagein the Storage Path that you configured in the Storage Server ConfigurationWizard is exposed as a single volume. The PureDiskVolume is a virtual namefor that storage.
The following is an example of the wizard panel:
After you select the PureDiskVolume volume, clickNext. TheAdditional DiskPool Information wizard panel appears.
90Configuring deduplicationConfiguring a storage server for a Media Server Deduplication Pool

11 On the Additional Disk Pool Information panel, enter the values for this diskpool.
See “Media Server Deduplication Pool properties” on page 116.
The following is an example of the wizard panel:
After you enter the appropriate information or select the necessary options,click Next. The Disk Pool Configuration Summary wizard panel appears.
91Configuring deduplicationConfiguring a storage server for a Media Server Deduplication Pool

12 On the Disk Pool Configuration Summary panel, verify the selections. If OK,click Next.
The following is an example of the wizard panel:
To configure the disk pool, click Next. The Disk Pool Configuration Statuswizard panel appears.
92Configuring deduplicationConfiguring a storage server for a Media Server Deduplication Pool

13 The Disk Pool Configuration Status wizard panel describes the progress ofthe operation.
The following is an example of the wizard panel:
After the disk pool is created, you can do the following:
Ensure that Create a storage unit using the disk pool thatyou have just created is selected and then click Next. TheStorage Unit Creation wizard panel appears. Continue tothe next step.
Configure a storage unit
Click Close.
You can configure one or more storage units later.
See “Configuring a Media Server Deduplication Pool storageunit” on page 121.
Exit
93Configuring deduplicationConfiguring a storage server for a Media Server Deduplication Pool
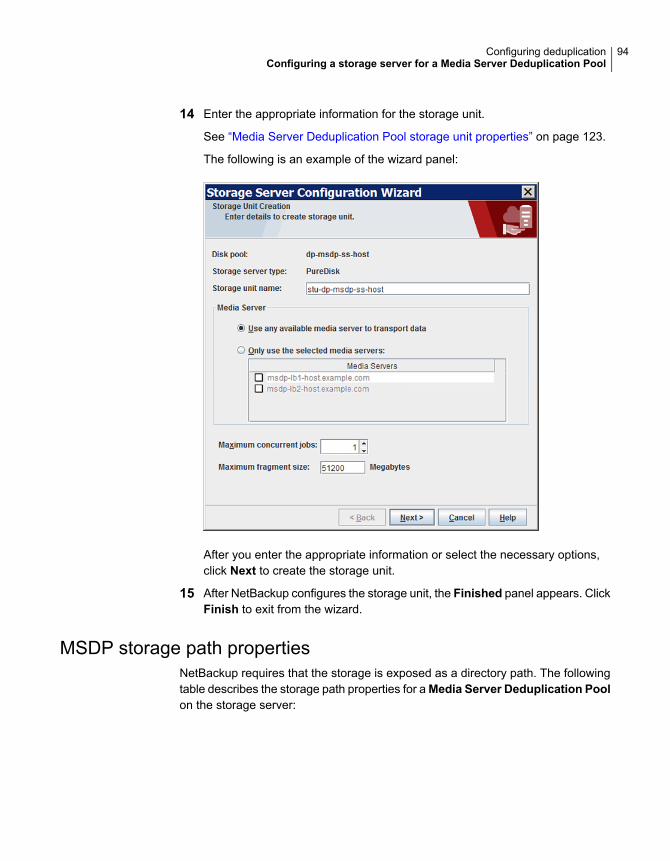
14 Enter the appropriate information for the storage unit.
See “Media Server Deduplication Pool storage unit properties” on page 123.
The following is an example of the wizard panel:
After you enter the appropriate information or select the necessary options,click Next to create the storage unit.
15 After NetBackup configures the storage unit, the Finished panel appears. ClickFinish to exit from the wizard.
MSDP storage path propertiesNetBackup requires that the storage is exposed as a directory path. The followingtable describes the storage path properties for aMedia Server Deduplication Poolon the storage server:
94Configuring deduplicationConfiguring a storage server for a Media Server Deduplication Pool
Table 5-10 MSDP storage path properties
DescriptionProperty
The path to the storage. The storage path is the directory in which NetBackup stores theraw backup data. Backup data should not be stored on the system disk.
Because the storage requires a directory path, do not use only the root node (/) or driveletter (E:\) as the storage path. (That is, do not mount the storage as a root node (/) or adrive letter (E:\).
For a 250-TB Media Server Deduplication Pool, you must enter the path name of themount point for the volume that you consider the first 32-TB storage volume. The followingis an example of a volume naming convention for the mount points for the backups:
/msdp/vol0 <--- The first volume/msdp/vol1/msdp/vol2
NetBackup supports 250-TB deduplication pools on a subset of supported systems.
See “About MSDP storage capacity” on page 20.
See “About provisioning the storage for MSDP” on page 47.
See “Creating the data directories for 250-TB MSDP support” on page 118.
You can use the following characters in the storage path name:
■ Any of the 26 letters of the International Standards Organization (ISO) Latin-scriptalphabet, both uppercase (capital) letters and lowercase (small) letters. These are thesame letters as the English alphabet.
■ Any integer from 0 to 9, inclusive.■ A space character.■ Any of the following characters:
UNIX: _-:./\Windows: _-:.\ (a colon (:) is allowed only after a drive letter (for example,G:\MSDP_Storage)
NetBackup requirements for the deduplication storage paths may affect how you exposethe storage.
See “About MSDP storage and connectivity requirements” on page 21.
Storage path
95Configuring deduplicationConfiguring a storage server for a Media Server Deduplication Pool
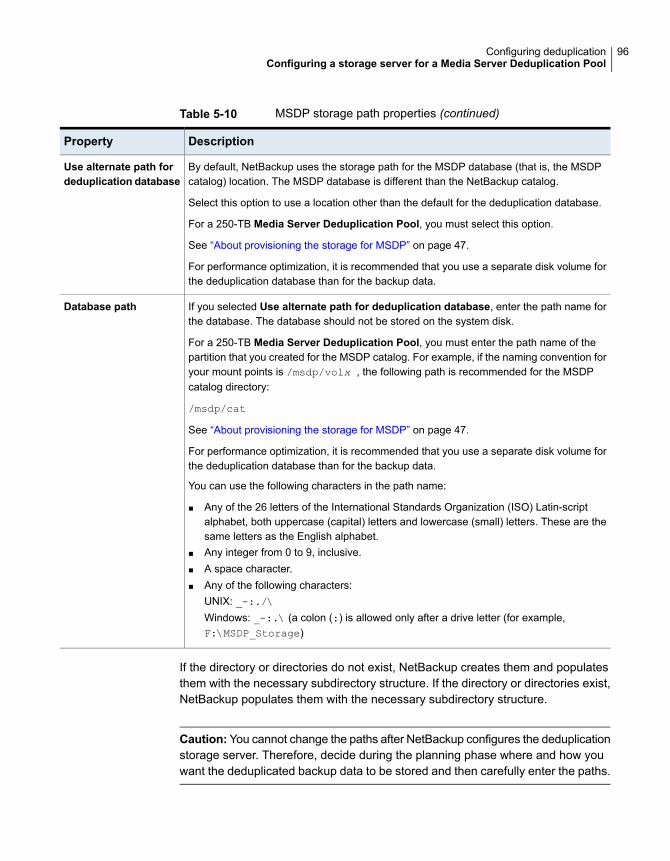
Table 5-10 MSDP storage path properties (continued)
DescriptionProperty
By default, NetBackup uses the storage path for the MSDP database (that is, the MSDPcatalog) location. The MSDP database is different than the NetBackup catalog.
Select this option to use a location other than the default for the deduplication database.
For a 250-TB Media Server Deduplication Pool, you must select this option.
See “About provisioning the storage for MSDP” on page 47.
For performance optimization, it is recommended that you use a separate disk volume forthe deduplication database than for the backup data.
Use alternate path fordeduplication database
If you selected Use alternate path for deduplication database, enter the path name forthe database. The database should not be stored on the system disk.
For a 250-TB Media Server Deduplication Pool, you must enter the path name of thepartition that you created for the MSDP catalog. For example, if the naming convention foryour mount points is /msdp/volx , the following path is recommended for the MSDPcatalog directory:
/msdp/cat
See “About provisioning the storage for MSDP” on page 47.
For performance optimization, it is recommended that you use a separate disk volume forthe deduplication database than for the backup data.
You can use the following characters in the path name:
■ Any of the 26 letters of the International Standards Organization (ISO) Latin-scriptalphabet, both uppercase (capital) letters and lowercase (small) letters. These are thesame letters as the English alphabet.
■ Any integer from 0 to 9, inclusive.■ A space character.■ Any of the following characters:
UNIX: _-:./\Windows: _-:.\ (a colon (:) is allowed only after a drive letter (for example,F:\MSDP_Storage)
Database path
If the directory or directories do not exist, NetBackup creates them and populatesthem with the necessary subdirectory structure. If the directory or directories exist,NetBackup populates them with the necessary subdirectory structure.
Caution:You cannot change the paths after NetBackup configures the deduplicationstorage server. Therefore, decide during the planning phase where and how youwant the deduplicated backup data to be stored and then carefully enter the paths.
96Configuring deduplicationConfiguring a storage server for a Media Server Deduplication Pool
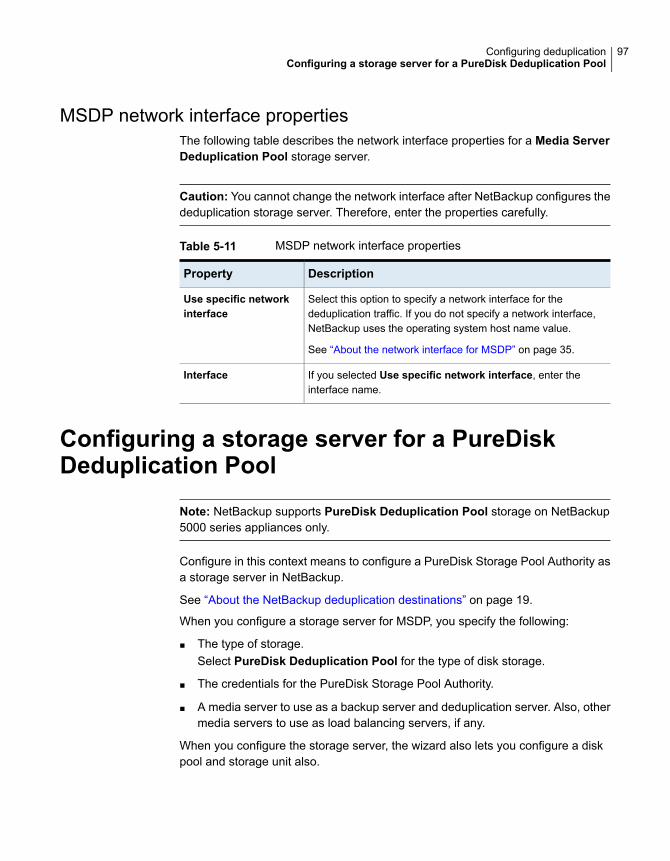
MSDP network interface propertiesThe following table describes the network interface properties for a Media ServerDeduplication Pool storage server.
Caution: You cannot change the network interface after NetBackup configures thededuplication storage server. Therefore, enter the properties carefully.
Table 5-11 MSDP network interface properties
DescriptionProperty
Select this option to specify a network interface for thededuplication traffic. If you do not specify a network interface,NetBackup uses the operating system host name value.
See “About the network interface for MSDP” on page 35.
Use specific networkinterface
If you selected Use specific network interface, enter theinterface name.
Interface
Configuring a storage server for a PureDiskDeduplication Pool
Note: NetBackup supports PureDisk Deduplication Pool storage on NetBackup5000 series appliances only.
Configure in this context means to configure a PureDisk Storage Pool Authority asa storage server in NetBackup.
See “About the NetBackup deduplication destinations” on page 19.
When you configure a storage server for MSDP, you specify the following:
■ The type of storage.Select PureDisk Deduplication Pool for the type of disk storage.
■ The credentials for the PureDisk Storage Pool Authority.
■ A media server to use as a backup server and deduplication server. Also, othermedia servers to use as load balancing servers, if any.
When you configure the storage server, the wizard also lets you configure a diskpool and storage unit also.
97Configuring deduplicationConfiguring a storage server for a PureDisk Deduplication Pool
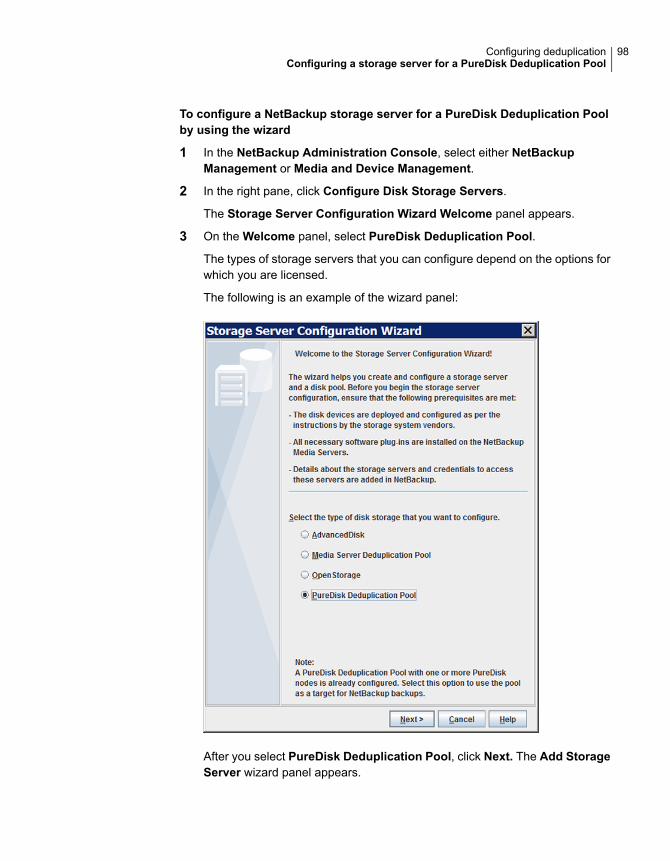
To configure a NetBackup storage server for a PureDisk Deduplication Poolby using the wizard
1 In the NetBackup Administration Console, select either NetBackupManagement or Media and Device Management.
2 In the right pane, click Configure Disk Storage Servers.
The Storage Server Configuration Wizard Welcome panel appears.
3 On the Welcome panel, select PureDisk Deduplication Pool.
The types of storage servers that you can configure depend on the options forwhich you are licensed.
The following is an example of the wizard panel:
After you select PureDisk Deduplication Pool, click Next. The Add StorageServer wizard panel appears.
98Configuring deduplicationConfiguring a storage server for a PureDisk Deduplication Pool
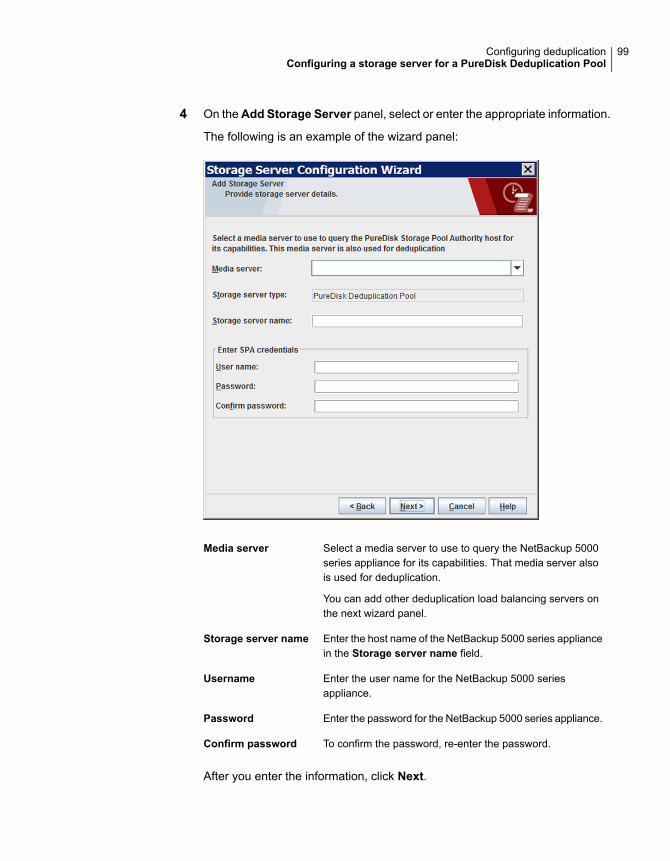
4 On theAdd Storage Server panel, select or enter the appropriate information.
The following is an example of the wizard panel:
Select a media server to use to query the NetBackup 5000series appliance for its capabilities. That media server alsois used for deduplication.
Media server
You can add other deduplication load balancing servers onthe next wizard panel.
Enter the host name of the NetBackup 5000 series appliancein the Storage server name field.
Storage server name
Enter the user name for the NetBackup 5000 seriesappliance.
Username
Enter the password for the NetBackup 5000 series appliance.Password
To confirm the password, re-enter the password.Confirm password
After you enter the information, click Next.
99Configuring deduplicationConfiguring a storage server for a PureDisk Deduplication Pool
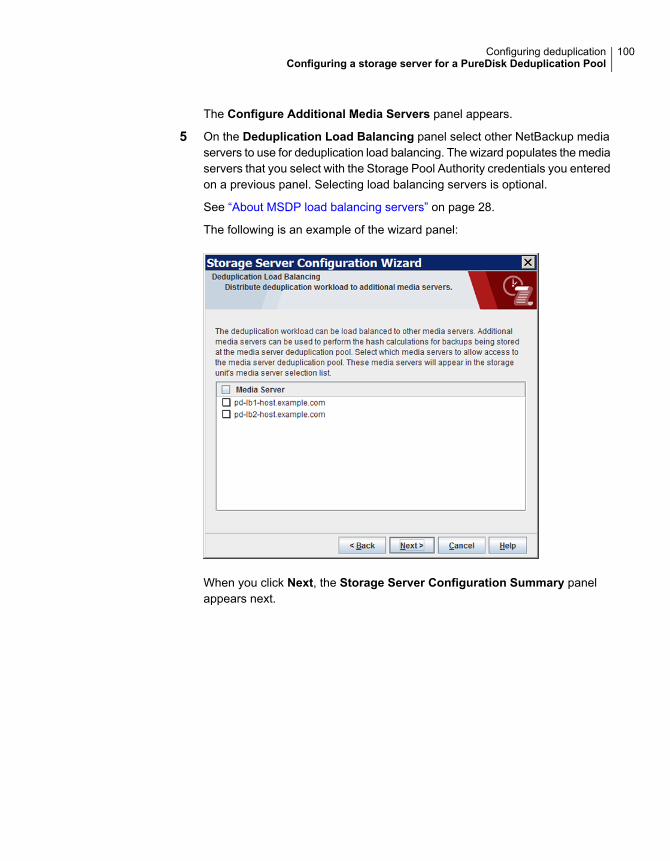
The Configure Additional Media Servers panel appears.
5 On the Deduplication Load Balancing panel select other NetBackup mediaservers to use for deduplication load balancing. The wizard populates the mediaservers that you select with the Storage Pool Authority credentials you enteredon a previous panel. Selecting load balancing servers is optional.
See “About MSDP load balancing servers” on page 28.
The following is an example of the wizard panel:
When you click Next, the Storage Server Configuration Summary panelappears next.
100Configuring deduplicationConfiguring a storage server for a PureDisk Deduplication Pool
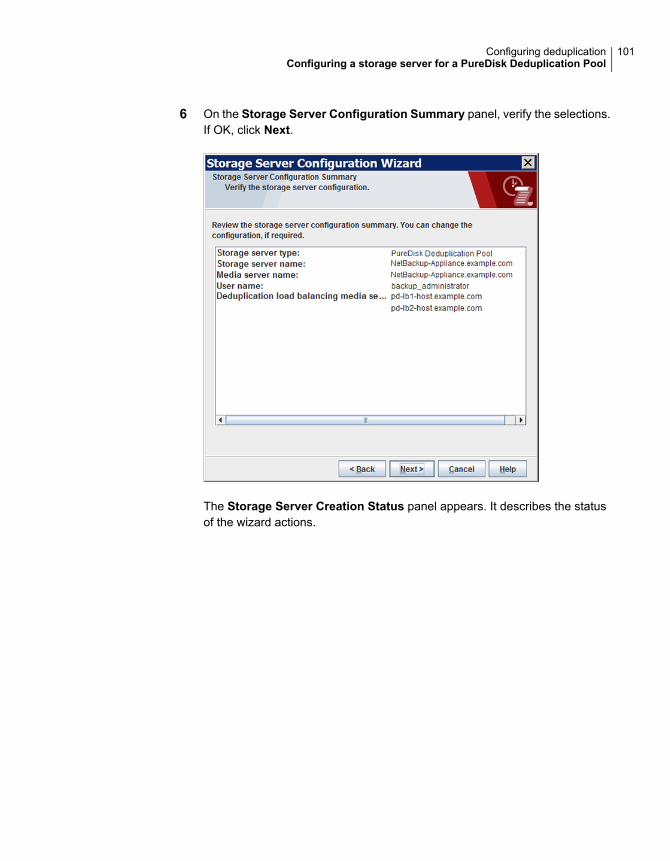
6 On the Storage Server Configuration Summary panel, verify the selections.If OK, click Next.
The Storage Server Creation Status panel appears. It describes the statusof the wizard actions.
101Configuring deduplicationConfiguring a storage server for a PureDisk Deduplication Pool

7 The Storage Server Configuration Status wizard panel describes the statusof the operation, as follows:
After the storage server is created, you can do the following:
Ensure that Create a disk pool using the storage serverthat you have just created is selected and then click Next.
The Select Volumes panel appears. Continue to the nextstep.
Configure a disk pool
Click Close.
You can configure a disk pool at another time.
Exit
If storage server creation fails, troubleshooting help is available.
See “Troubleshooting MSDP configuration issues” on page 414.
102Configuring deduplicationConfiguring a storage server for a PureDisk Deduplication Pool
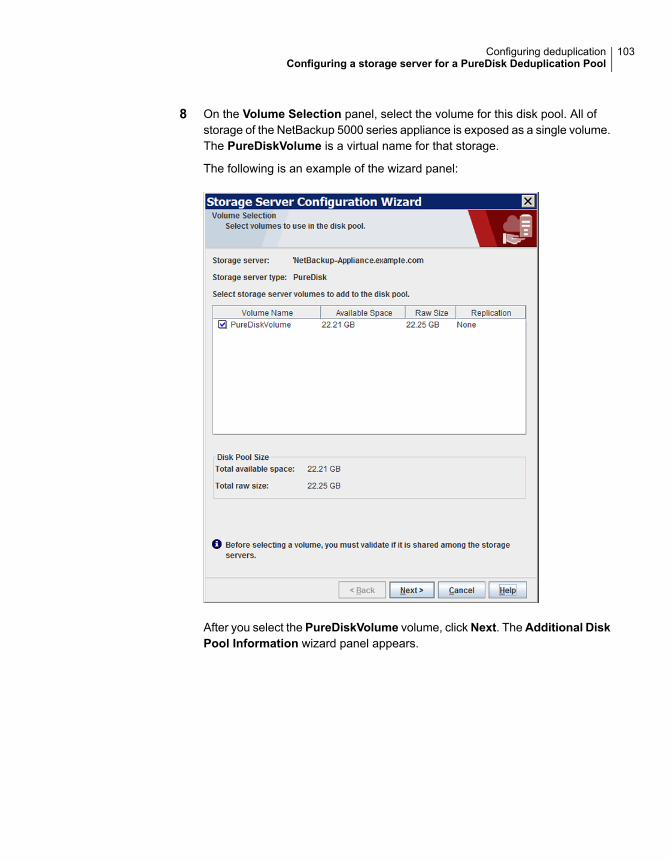
8 On the Volume Selection panel, select the volume for this disk pool. All ofstorage of the NetBackup 5000 series appliance is exposed as a single volume.The PureDiskVolume is a virtual name for that storage.
The following is an example of the wizard panel:
After you select the PureDiskVolume volume, clickNext. TheAdditional DiskPool Information wizard panel appears.
103Configuring deduplicationConfiguring a storage server for a PureDisk Deduplication Pool
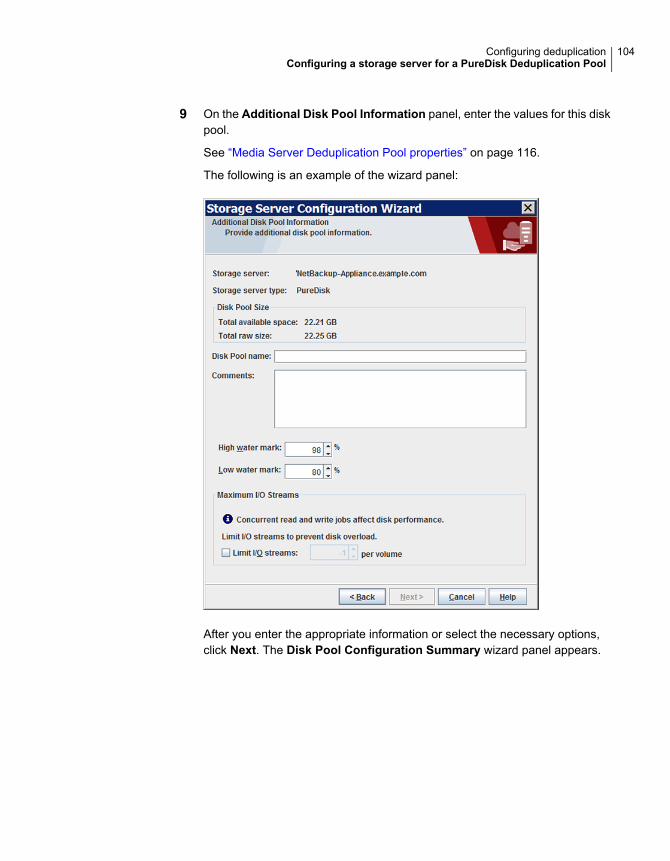
9 On the Additional Disk Pool Information panel, enter the values for this diskpool.
See “Media Server Deduplication Pool properties” on page 116.
The following is an example of the wizard panel:
After you enter the appropriate information or select the necessary options,click Next. The Disk Pool Configuration Summary wizard panel appears.
104Configuring deduplicationConfiguring a storage server for a PureDisk Deduplication Pool
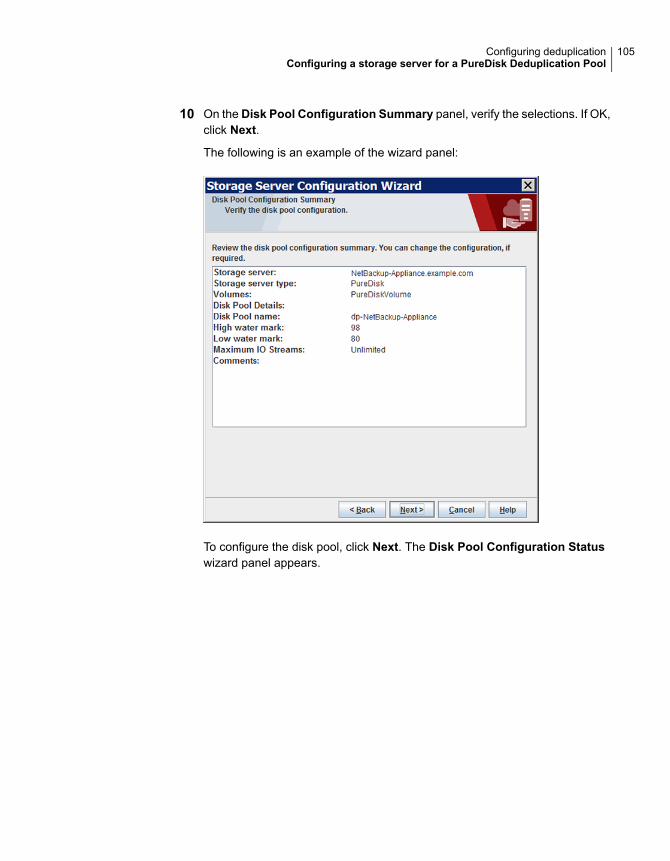
10 On the Disk Pool Configuration Summary panel, verify the selections. If OK,click Next.
The following is an example of the wizard panel:
To configure the disk pool, click Next. The Disk Pool Configuration Statuswizard panel appears.
105Configuring deduplicationConfiguring a storage server for a PureDisk Deduplication Pool
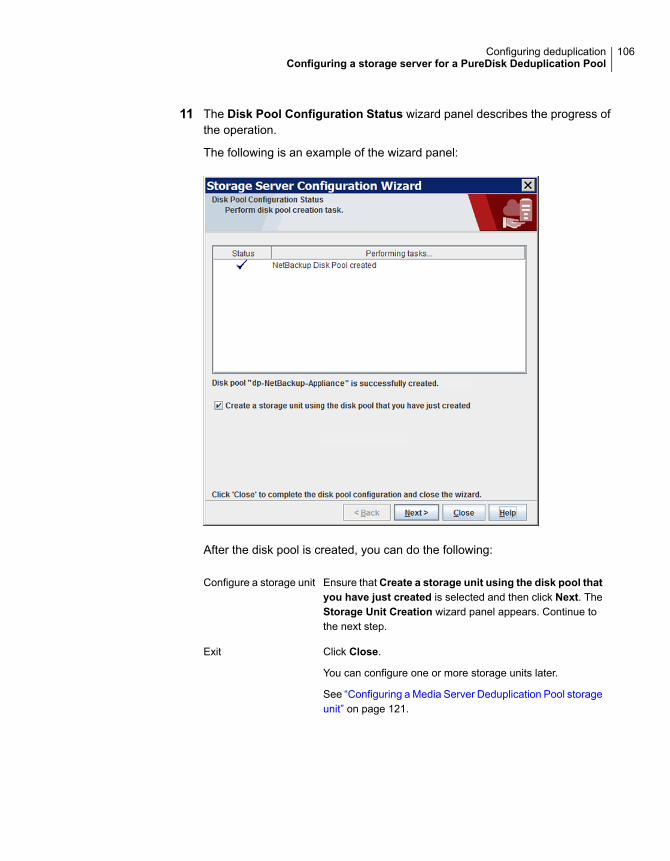
11 The Disk Pool Configuration Status wizard panel describes the progress ofthe operation.
The following is an example of the wizard panel:
After the disk pool is created, you can do the following:
Ensure that Create a storage unit using the disk pool thatyou have just created is selected and then click Next. TheStorage Unit Creation wizard panel appears. Continue tothe next step.
Configure a storage unit
Click Close.
You can configure one or more storage units later.
See “Configuring a Media Server Deduplication Pool storageunit” on page 121.
Exit
106Configuring deduplicationConfiguring a storage server for a PureDisk Deduplication Pool
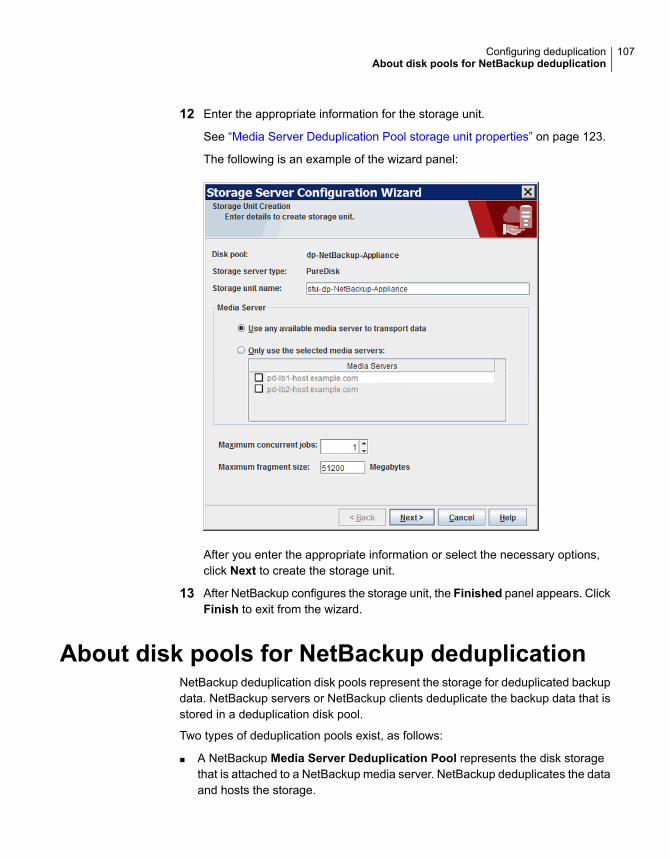
12 Enter the appropriate information for the storage unit.
See “Media Server Deduplication Pool storage unit properties” on page 123.
The following is an example of the wizard panel:
After you enter the appropriate information or select the necessary options,click Next to create the storage unit.
13 After NetBackup configures the storage unit, the Finished panel appears. ClickFinish to exit from the wizard.
About disk pools for NetBackup deduplicationNetBackup deduplication disk pools represent the storage for deduplicated backupdata. NetBackup servers or NetBackup clients deduplicate the backup data that isstored in a deduplication disk pool.
Two types of deduplication pools exist, as follows:
■ A NetBackup Media Server Deduplication Pool represents the disk storagethat is attached to a NetBackup media server. NetBackup deduplicates the dataand hosts the storage.
107Configuring deduplicationAbout disk pools for NetBackup deduplication
NetBackup requires exclusive ownership of the disk resources that comprisethe deduplication pool. If you share those resources with other users, NetBackupcannot manage deduplication pool capacity or storage lifecycle policies correctly.
■ A NetBackup PureDisk Deduplication Pool represents a PureDisk storagepool on a NetBackup 5000 series appliance. NetBackup deduplicates the data,and PureDisk hosts the storage.
Note:NetBackup supportsPureDisk Deduplication Pool storage on NetBackup5000 series appliances only.
How many deduplication pools you configure depends on your storage requirements.It also depends on whether or not you use optimized duplication or replication, asdescribed in the following table:
Table 5-12 Deduplication pools for duplication or replication
RequirementsType
Optimized duplication in the same domain requires the following deduplication pools:
■ At least one for the backup storage, which is the source for the duplicationoperations. The source deduplication pool is in one deduplication node.
■ Another to store the copies of the backup images, which is the target for theduplication operations. The target deduplication pool is in a different deduplicationnode.
See “About MSDP optimized duplication within the same domain” on page 141.
Optimized duplication withinthe same NetBackup domain
Auto Image Replication deduplication pools can be either replication source or replicationtarget. The replication properties denote the purpose of the deduplication pool. Thededuplication pools inherit the replication properties from their volumes.
See “About the replication topology for Auto Image Replication” on page 164.
Auto Image Replication requires the following deduplication pools:
■ At least one replication source deduplication pool in the originating domain. Areplication source deduplication pool is one to which you send your backups. Thebackup images on the source deduplication pool are replicated to a deduplicationpool in the remote domain or domains.
■ At least one replication target deduplication pool in a remote domain or domains.A replication target deduplication pool is the target for the duplication operationsthat run in the originating domain.
See “About NetBackup Auto Image Replication” on page 159.
Auto Image Replication to adifferent NetBackup domain
108Configuring deduplicationAbout disk pools for NetBackup deduplication
Configuring a disk pool for deduplicationThe NetBackupStorage Server ConfigurationWizard lets you configure one diskpool during storage server configuration. To configure additional disk pools, launchthe Disk Pool Configuration Wizard. Before you can configure a NetBackup diskpool, a NetBackup deduplication storage server must exist.
See “About disk pools for NetBackup deduplication” on page 107.
When you configure a deduplication disk pool, you specify the following:
■ The type of disk pool: PureDisk. PureDisk is the type for the following diskpools:
■ A Media Server Deduplication Pool on the disk storage that is attached toa NetBackup deduplication media server.
■ APureDisk Deduplication Pool, which represents storage on a NetBackup5000 series appliance.
■ The deduplication storage server to query for the disk storage to use for thepool.
■ The disk volume to include in the pool.NetBackup exposes the storage as a single volume.
■ The disk pool properties.See “Media Server Deduplication Pool properties” on page 116.
Veritas recommends that disk pool names be unique across your enterprise.
To configure a deduplication disk pool by using the wizard
1 In the NetBackup Administration Console, select either NetBackupManagement or Media and Device Management.
2 From the list of wizards in the right pane, click Configure Disk Pool.
3 Click Next on the welcome panel of the wizard.
The Disk Pool panel appears.
109Configuring deduplicationConfiguring a disk pool for deduplication
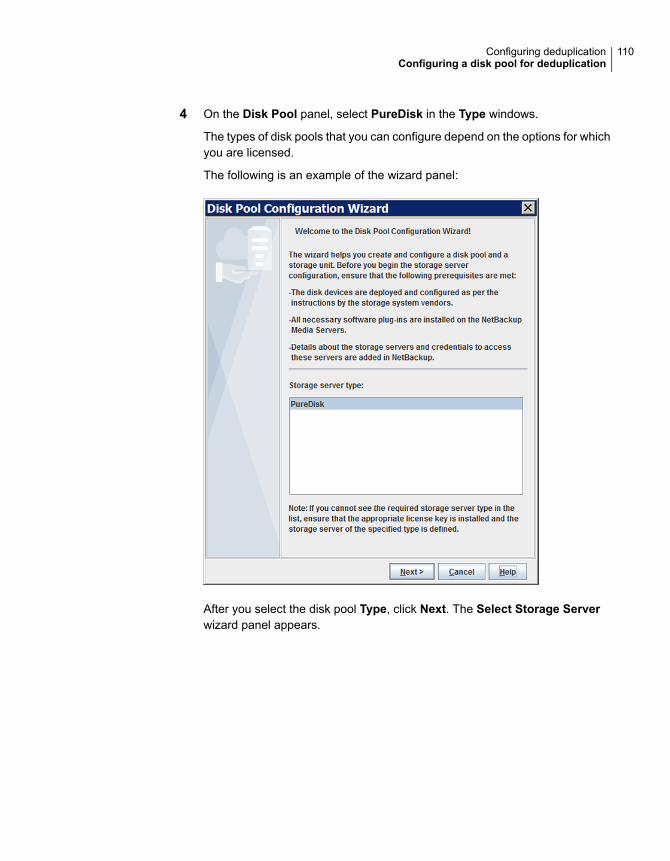
4 On the Disk Pool panel, select PureDisk in the Type windows.
The types of disk pools that you can configure depend on the options for whichyou are licensed.
The following is an example of the wizard panel:
After you select the disk pool Type, click Next. The Select Storage Serverwizard panel appears.
110Configuring deduplicationConfiguring a disk pool for deduplication
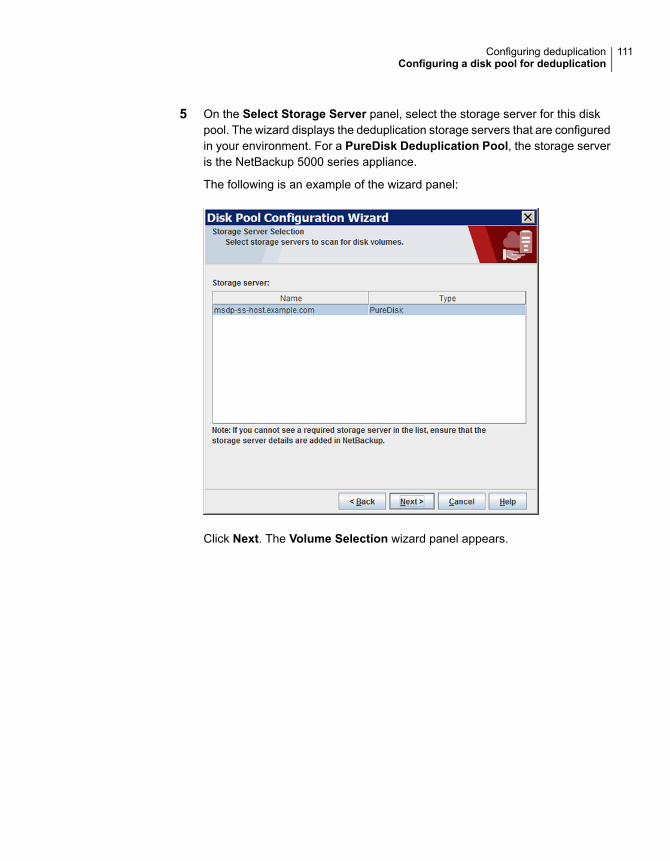
5 On the Select Storage Server panel, select the storage server for this diskpool. The wizard displays the deduplication storage servers that are configuredin your environment. For a PureDisk Deduplication Pool, the storage serveris the NetBackup 5000 series appliance.
The following is an example of the wizard panel:
Click Next. The Volume Selection wizard panel appears.
111Configuring deduplicationConfiguring a disk pool for deduplication
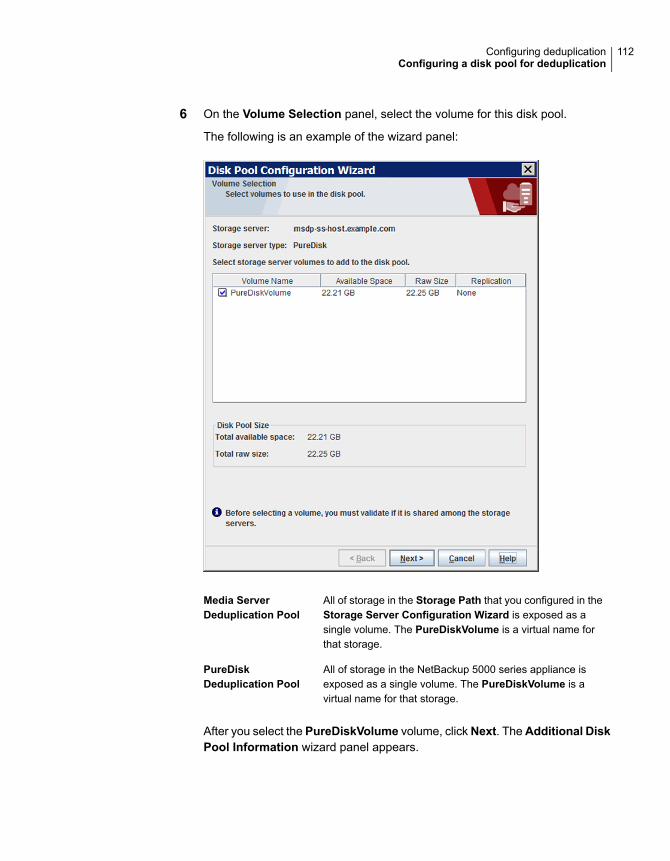
6 On the Volume Selection panel, select the volume for this disk pool.
The following is an example of the wizard panel:
All of storage in the Storage Path that you configured in theStorage Server Configuration Wizard is exposed as asingle volume. The PureDiskVolume is a virtual name forthat storage.
Media ServerDeduplication Pool
All of storage in the NetBackup 5000 series appliance isexposed as a single volume. The PureDiskVolume is avirtual name for that storage.
PureDiskDeduplication Pool
After you select the PureDiskVolume volume, clickNext. TheAdditional DiskPool Information wizard panel appears.
112Configuring deduplicationConfiguring a disk pool for deduplication
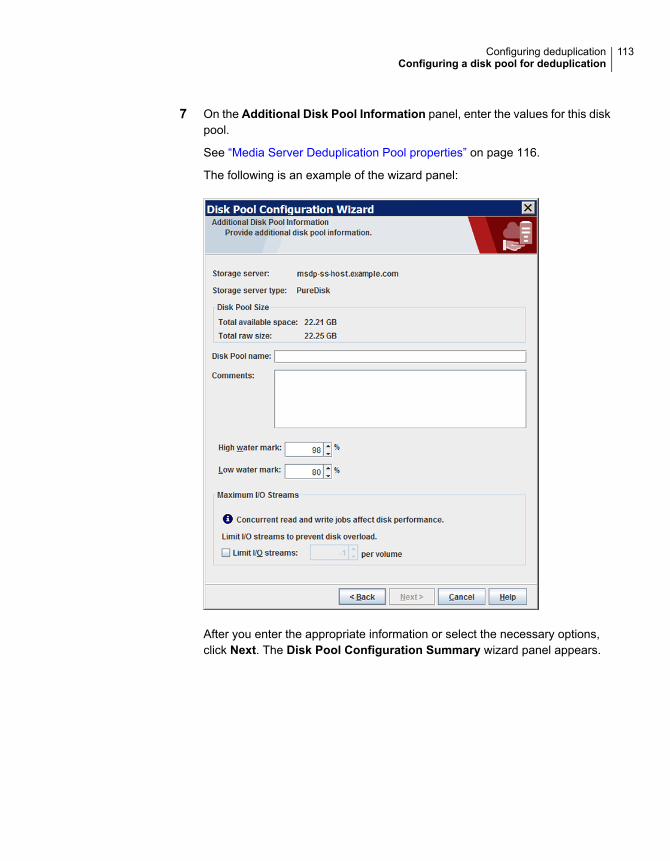
7 On the Additional Disk Pool Information panel, enter the values for this diskpool.
See “Media Server Deduplication Pool properties” on page 116.
The following is an example of the wizard panel:
After you enter the appropriate information or select the necessary options,click Next. The Disk Pool Configuration Summary wizard panel appears.
113Configuring deduplicationConfiguring a disk pool for deduplication
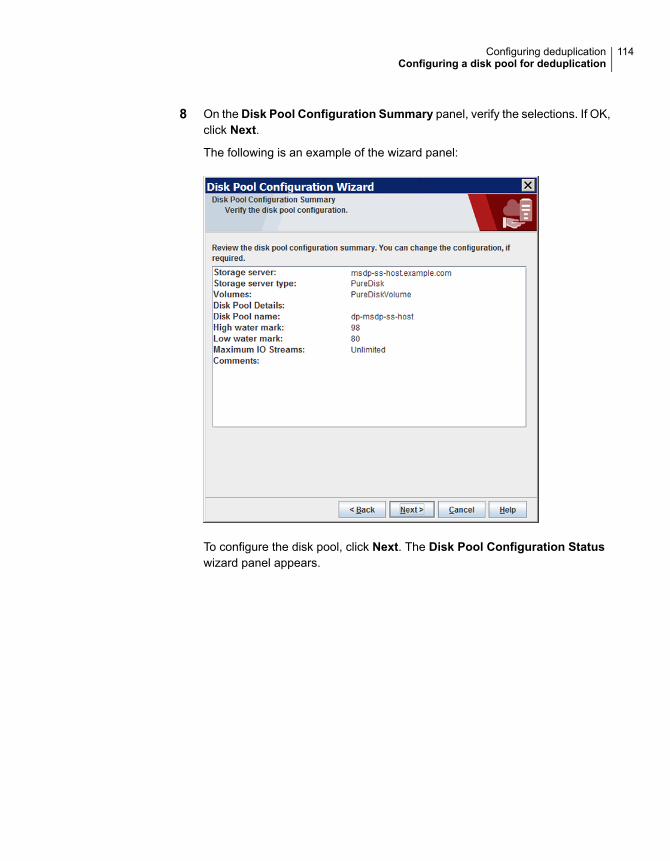
8 On the Disk Pool Configuration Summary panel, verify the selections. If OK,click Next.
The following is an example of the wizard panel:
To configure the disk pool, click Next. The Disk Pool Configuration Statuswizard panel appears.
114Configuring deduplicationConfiguring a disk pool for deduplication
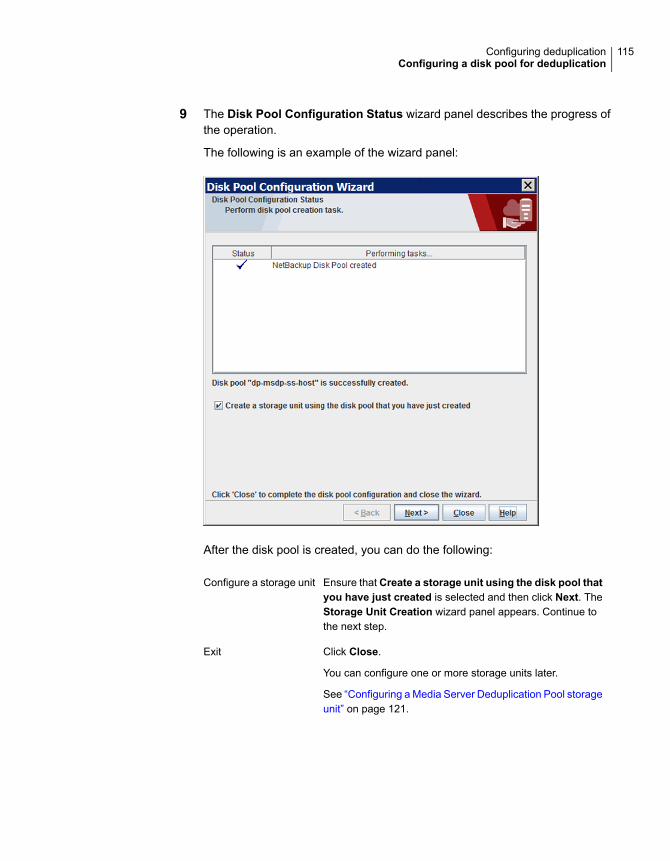
9 The Disk Pool Configuration Status wizard panel describes the progress ofthe operation.
The following is an example of the wizard panel:
After the disk pool is created, you can do the following:
Ensure that Create a storage unit using the disk pool thatyou have just created is selected and then click Next. TheStorage Unit Creation wizard panel appears. Continue tothe next step.
Configure a storage unit
Click Close.
You can configure one or more storage units later.
See “Configuring a Media Server Deduplication Pool storageunit” on page 121.
Exit
115Configuring deduplicationConfiguring a disk pool for deduplication

10 Enter the appropriate information for the storage unit.
See “Media Server Deduplication Pool storage unit properties” on page 123.
The following is an example of the wizard panel:
After you enter the appropriate information or select the necessary options,click Next to create the storage unit.
11 After NetBackup configures the storage unit, the Finished panel appears. ClickFinish to exit from the wizard.
Media Server Deduplication Pool propertiesTable 5-13 describes the disk pool properties.
Table 5-13 Media server deduplication pool properties
DescriptionProperty
The storage server name. The storage server is the same as theNetBackup media server to which the storage is attached.
Storage server
116Configuring deduplicationConfiguring a disk pool for deduplication
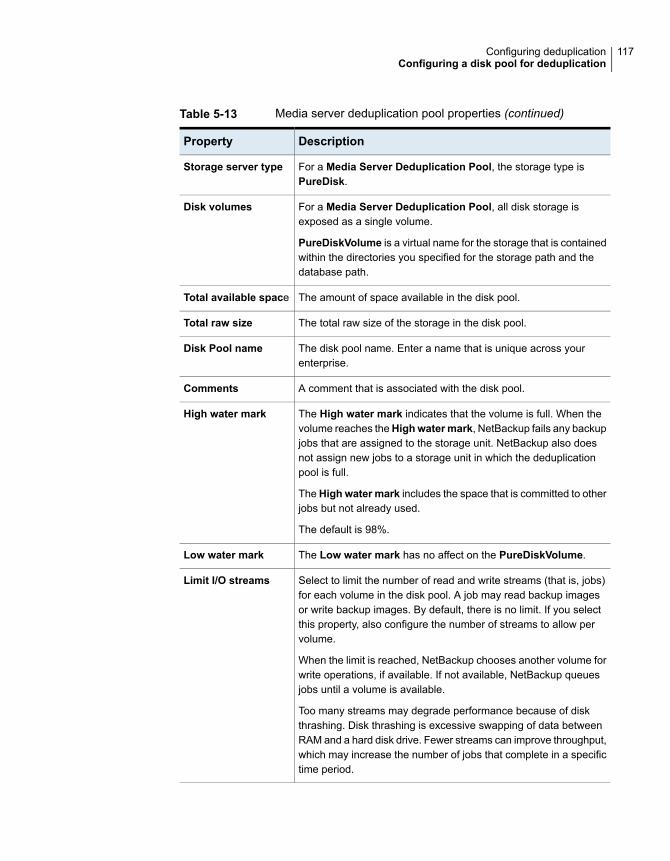
Table 5-13 Media server deduplication pool properties (continued)
DescriptionProperty
For a Media Server Deduplication Pool, the storage type isPureDisk.
Storage server type
For a Media Server Deduplication Pool, all disk storage isexposed as a single volume.
PureDiskVolume is a virtual name for the storage that is containedwithin the directories you specified for the storage path and thedatabase path.
Disk volumes
The amount of space available in the disk pool.Total available space
The total raw size of the storage in the disk pool.Total raw size
The disk pool name. Enter a name that is unique across yourenterprise.
Disk Pool name
A comment that is associated with the disk pool.Comments
The High water mark indicates that the volume is full. When thevolume reaches theHighwatermark, NetBackup fails any backupjobs that are assigned to the storage unit. NetBackup also doesnot assign new jobs to a storage unit in which the deduplicationpool is full.
TheHigh water mark includes the space that is committed to otherjobs but not already used.
The default is 98%.
High water mark
The Low water mark has no affect on the PureDiskVolume.Low water mark
Select to limit the number of read and write streams (that is, jobs)for each volume in the disk pool. A job may read backup imagesor write backup images. By default, there is no limit. If you selectthis property, also configure the number of streams to allow pervolume.
When the limit is reached, NetBackup chooses another volume forwrite operations, if available. If not available, NetBackup queuesjobs until a volume is available.
Too many streams may degrade performance because of diskthrashing. Disk thrashing is excessive swapping of data betweenRAM and a hard disk drive. Fewer streams can improve throughput,which may increase the number of jobs that complete in a specifictime period.
Limit I/O streams
117Configuring deduplicationConfiguring a disk pool for deduplication
Table 5-13 Media server deduplication pool properties (continued)
DescriptionProperty
Select or enter the number of read and write streams to allow pervolume.
Many factors affect the optimal number of streams. Factors includebut are not limited to disk speed, CPU speed, and the amount ofmemory.
per volume
Creating the data directories for 250-TB MSDPsupport
NetBackup requires that each storage volume contain a directory named data.
You must create the data directories on the second and third volumes that arerequired for 250-TB support. (NetBackup creates the required data directory onthe volume that you specify in the Storage Server Configuration Wizard.)
■ The volumes must be formatted with the file systems that NetBackupsupports for MSDP and mounted on the storage server.See “About provisioning the storage for MSDP” on page 47.
■ The storage server must be configured already.See “Configuring a storage server for a Media Server DeduplicationPool” on page 80.
Prerequisite
To create the data directories for 250-TB MSDP support
◆ In both the second and third volumes for the Media Server DeduplicationPool, create a data subdirectory at the volumes's mount points, as follows:
mount_point/data
The following is an example of the mount points for the three required storagevolumes:
/msdp/vol0 <--- Netbackup creates the data directory in this volume
/msdp/vol1 <--- Create a data directory in this volume
/msdp/vol2 <--- Create a data directory in this volume
118Configuring deduplicationCreating the data directories for 250-TB MSDP support
Adding volumes to a 250-TB Media ServerDeduplication Pool
When you configure a storage server for a 250-TB Media Server DeduplicationPool, you specify the pathname of the first storage volume. Before you can usethe Media Server Deduplication Pool, you must add the other two volumes to thedisk pool.
See “About provisioning the storage for MSDP” on page 47.
See “Configuring a storage server for a Media Server Deduplication Pool”on page 80.
119Configuring deduplicationAdding volumes to a 250-TB Media Server Deduplication Pool
To add the other volumes to a 250-TB Media Server Deduplication Pool
1 On the MSDP storage server, use the crcontrol utility to add the second andthird 32-TB volumes to the disk pool. You must include the data directories aspart of the pathname. The following is the command syntax:
/usr/openv/pdde/pdcr/bin/crcontrol --dsaddpartition pathname
The following two examples show how to add the pathnames for /msdp/vol1and /msdp/vol2 volumes:
# /usr/openv/pdde/pdcr/bin/crcontrol --dsaddpartition /msdp/vol1/data
Partition /msdp/vol1/data was added successfully.
# /usr/openv/pdde/pdcr/bin/crcontrol --dsaddpartition /msdp/vol2/data
Partition /msdp/vol2/data was added successfully
After the next polling cycle of the NetBackup Remote Manager and MonitorService, the NetBackup Administration Console displays the new, expandedcapacity for the disk pool.
Note: For a Media Server Deduplication Pool, NetBackup exposes thestorage as a single volume in the NetBackup Administration Console.Therefore, if you have a 250-TBMedia Server Deduplication Pool, the numberof volumes is 1 even though three volumes are used for the storage.
2 On the MSDP storage server, you can use the crcontrol utility to verify thatthe Media Server Deduplication Pool contains the new volumes. If thevolumes were added correctly, there should be three mount points as follows:
/usr/openv/pdde/pdcr/bin/crcontrol --dsstat 2 | grep Mount
Mount point count: 3
=============== Mount point 1 ===============
=============== Mount point 2 ===============
=============== Mount point 3 ===============
3 To display detailed information about the disk pool, use the crcontrol
--dsstat 3 command, as follows:
/usr/openv/pdde/pdcr/bin/crcontrol --dsstat 3
120Configuring deduplicationAdding volumes to a 250-TB Media Server Deduplication Pool
Configuring a Media Server Deduplication Poolstorage unit
A NetBackup deduplication storage unit represents the storage in either a MediaServer Deduplication Pool or a PureDisk Deduplication Pool. Create one ormore storage units that reference the disk pool.
See “About disk pools for NetBackup deduplication” on page 107.
TheDisk Pool ConfigurationWizard lets you create a storage unit; therefore, youmay have created a storage unit when you created a disk pool. To determine ifstorage units exist for the disk pool, see the NetBackup Management > Storage> Storage Units window of the Administration Console.
121Configuring deduplicationConfiguring a Media Server Deduplication Pool storage unit
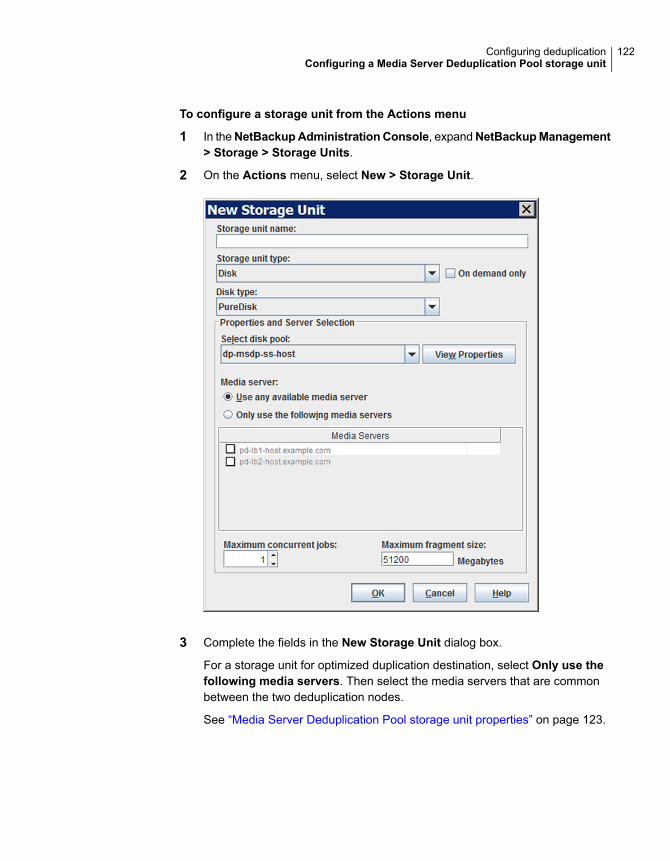
To configure a storage unit from the Actions menu
1 In theNetBackupAdministrationConsole, expandNetBackupManagement> Storage > Storage Units.
2 On the Actions menu, select New > Storage Unit.
3 Complete the fields in the New Storage Unit dialog box.
For a storage unit for optimized duplication destination, select Only use thefollowing media servers. Then select the media servers that are commonbetween the two deduplication nodes.
See “Media Server Deduplication Pool storage unit properties” on page 123.
122Configuring deduplicationConfiguring a Media Server Deduplication Pool storage unit
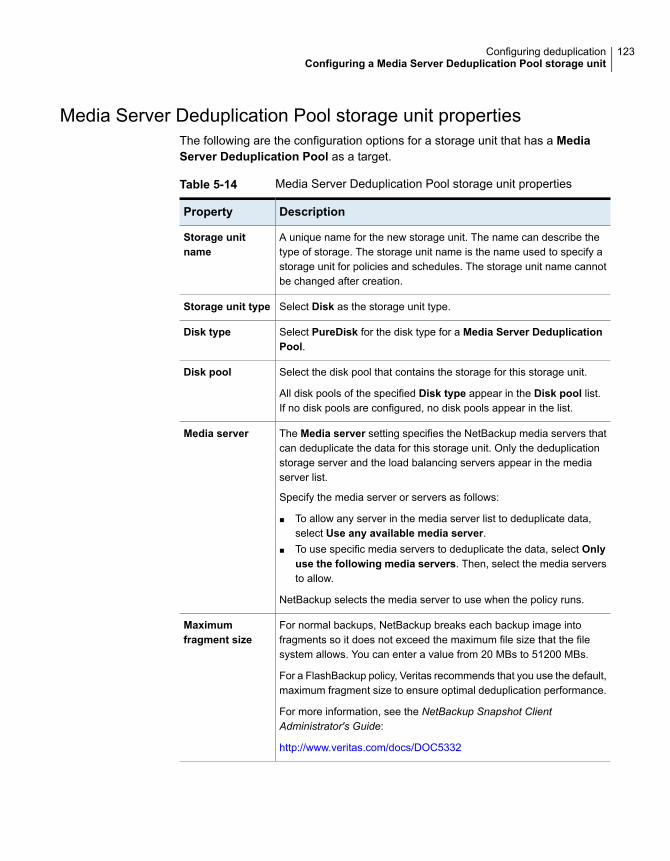
Media Server Deduplication Pool storage unit propertiesThe following are the configuration options for a storage unit that has a MediaServer Deduplication Pool as a target.
Table 5-14 Media Server Deduplication Pool storage unit properties
DescriptionProperty
A unique name for the new storage unit. The name can describe thetype of storage. The storage unit name is the name used to specify astorage unit for policies and schedules. The storage unit name cannotbe changed after creation.
Storage unitname
Select Disk as the storage unit type.Storage unit type
Select PureDisk for the disk type for a Media Server DeduplicationPool.
Disk type
Select the disk pool that contains the storage for this storage unit.
All disk pools of the specified Disk type appear in the Disk pool list.If no disk pools are configured, no disk pools appear in the list.
Disk pool
The Media server setting specifies the NetBackup media servers thatcan deduplicate the data for this storage unit. Only the deduplicationstorage server and the load balancing servers appear in the mediaserver list.
Specify the media server or servers as follows:
■ To allow any server in the media server list to deduplicate data,select Use any available media server.
■ To use specific media servers to deduplicate the data, select Onlyuse the following media servers. Then, select the media serversto allow.
NetBackup selects the media server to use when the policy runs.
Media server
For normal backups, NetBackup breaks each backup image intofragments so it does not exceed the maximum file size that the filesystem allows. You can enter a value from 20 MBs to 51200 MBs.
For a FlashBackup policy, Veritas recommends that you use the default,maximum fragment size to ensure optimal deduplication performance.
For more information, see the NetBackup Snapshot ClientAdministrator's Guide:
http://www.veritas.com/docs/DOC5332
Maximumfragment size
123Configuring deduplicationConfiguring a Media Server Deduplication Pool storage unit
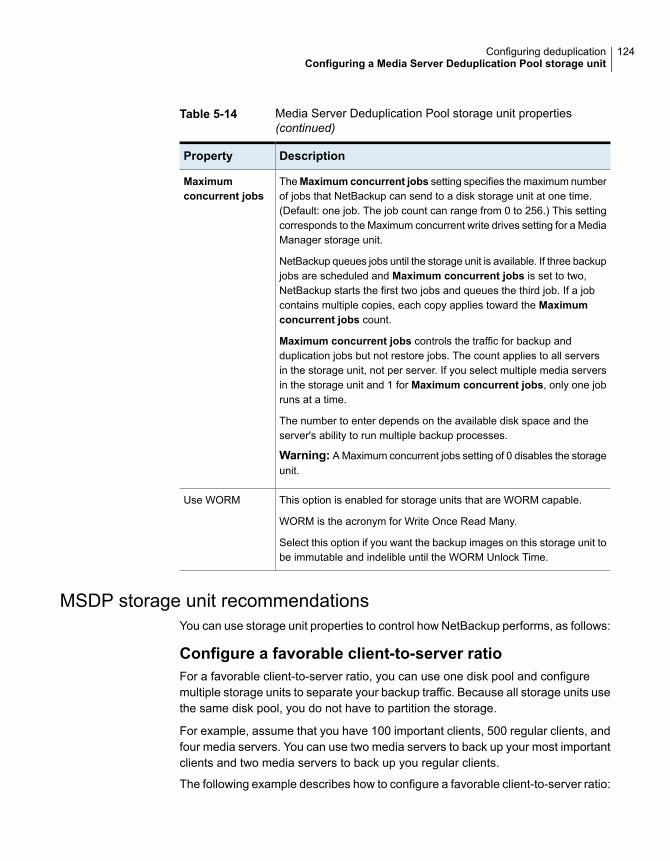
Table 5-14 Media Server Deduplication Pool storage unit properties(continued)
DescriptionProperty
TheMaximumconcurrent jobs setting specifies the maximum numberof jobs that NetBackup can send to a disk storage unit at one time.(Default: one job. The job count can range from 0 to 256.) This settingcorresponds to the Maximum concurrent write drives setting for a MediaManager storage unit.
NetBackup queues jobs until the storage unit is available. If three backupjobs are scheduled and Maximum concurrent jobs is set to two,NetBackup starts the first two jobs and queues the third job. If a jobcontains multiple copies, each copy applies toward the Maximumconcurrent jobs count.
Maximum concurrent jobs controls the traffic for backup andduplication jobs but not restore jobs. The count applies to all serversin the storage unit, not per server. If you select multiple media serversin the storage unit and 1 for Maximum concurrent jobs, only one jobruns at a time.
The number to enter depends on the available disk space and theserver's ability to run multiple backup processes.
Warning: A Maximum concurrent jobs setting of 0 disables the storageunit.
Maximumconcurrent jobs
This option is enabled for storage units that are WORM capable.
WORM is the acronym for Write Once Read Many.
Select this option if you want the backup images on this storage unit tobe immutable and indelible until the WORM Unlock Time.
Use WORM
MSDP storage unit recommendationsYou can use storage unit properties to control how NetBackup performs, as follows:
Configure a favorable client-to-server ratioFor a favorable client-to-server ratio, you can use one disk pool and configuremultiple storage units to separate your backup traffic. Because all storage units usethe same disk pool, you do not have to partition the storage.
For example, assume that you have 100 important clients, 500 regular clients, andfour media servers. You can use two media servers to back up your most importantclients and two media servers to back up you regular clients.
The following example describes how to configure a favorable client-to-server ratio:
124Configuring deduplicationConfiguring a Media Server Deduplication Pool storage unit
■ Configure the media servers for NetBackup deduplication and configure thestorage.
■ Configure a disk pool.
■ Configure a storage unit for your most important clients (such as STU-GOLD).Select the disk pool. Select Only use the following media servers. Select twomedia servers to use for your important backups.
■ Create a backup policy for the 100 important clients and select the STU-GOLDstorage unit. The media servers that are specified in the storage unit move theclient data to the deduplication storage server.
■ Configure another storage unit (such as STU-SILVER). Select the same diskpool. SelectOnly use the followingmedia servers. Select the other two mediaservers.
■ Configure a backup policy for the 500 regular clients and select the STU-SILVERstorage unit. The media servers that are specified in the storage unit move theclient data to the deduplication storage server.
Backup traffic is routed to the wanted data movers by the storage unit settings.
Note: NetBackup uses storage units for media server selection for write activity(backups and duplications) only. For restores, NetBackup chooses among all mediaservers that can access the disk pool.
Throttle traffic to the media serversYou can use the Maximum concurrent jobs settings on disk pool storage units tothrottle the traffic to the media servers. Effectively, this setting also directs higherloads to specific media servers when you use multiple storage units for the samedisk pool. A higher number of concurrent jobs means that the disk can be busierthan if the number is lower.
For example, two storage units use the same set of media servers. One of thestorage units (STU-GOLD) has a higher Maximum concurrent jobs setting thanthe other (STU-SILVER). More client backups occur for the storage unit with thehigher Maximum concurrent jobs setting.
Configuring client attributes for MSDP client-sidededuplication
To configure client deduplication, set an attribute in the NetBackup master serverClient Attributes host properties. If the client is in a backup policy in which the
125Configuring deduplicationConfiguring client attributes for MSDP client-side deduplication

storage destination is a Media Server Deduplication Pool, the client deduplicatesits own data.
To specify the clients that deduplicate backups
1 In theNetBackupAdministrationConsole, expandNetBackupManagement> Host Properties > Master Servers.
2 In the details pane, select the master server.
3 On the Actions menu, select Properties.
4 Select the Client Attributes properties.
5 On the General tab of the Client Attributes properties, add the clients thatyou want to deduplicate their own data to the Clients list, as follows:
■ Click Add.
■ In the Add Client dialog box, enter a client name or browse to select aclient. Then click Add.Repeat for each client that you want to add.
■ When you finish adding clients, click Close.
6 Select one of the following Deduplication Location options:
■ Always use the media server disables client deduplication. By default, allclients are configured with the Always use the media server option.
■ Prefer to use client-side deduplication uses client deduplication if thededuplication plug-in is active on the client. If it is not active, a normal backupoccurs; client deduplication does not occur.
■ Always use client-side deduplication uses client deduplication. If thededuplication backup job fails, NetBackup retries the job.
You can override the Prefer to use client-side deduplication or Always useclient-side deduplication host property in the backup policies.
Note: NetBackup Client Direct deduplication is supported in a Cloud Catalystduplication and also direct or primary backup to cloud scenario. Upgrade theload balancing media servers for a particular Cloud Catalyst server and theaffected clients to NetBackup 8.2.1.
See Disable client-side deduplication in the NetBackup Administrator’sGuide, Volume I:
http://www.veritas.com/docs/DOC5332
See “Disabling MSDP client-side deduplication for a client” on page 127.
126Configuring deduplicationConfiguring client attributes for MSDP client-side deduplication
Disabling MSDP client-side deduplication for aclient
You can remove a client from the list of clients that deduplicate their own data. Ifyou do so, a deduplication server backs up the client and deduplicates the data.
To disable MSDP client deduplication for a client
1 In the NetBackup Administration Console, expand NetBackup Management> Host Properties > Master Servers.
2 In the details pane, select the master server.
3 On the Actions menu, select Properties.
4 On the Host Properties Client Attributes General tab, select the client thatdeduplicates its own data.
5 In the Deduplication Location drop-down list, select Always use the mediaserver.
6 Click OK.
About MSDP compressionNetBackup deduplication hosts provide compression for the deduplicated data. Itis separate from and different than NetBackup policy-based compression.
Compression is configured by default on all MSDP hosts. Therefore, backups,duplication traffic, and replication traffic are compressed on all MSDP hosts. Thedata also is compressed on storage.
Table 5-15 describes the compression options.
A different topic describes the interaction of the encryption and the compressionsettings for MSDP.
See “MSDP compression and encryption settings matrix” on page 130.
127Configuring deduplicationDisabling MSDP client-side deduplication for a client
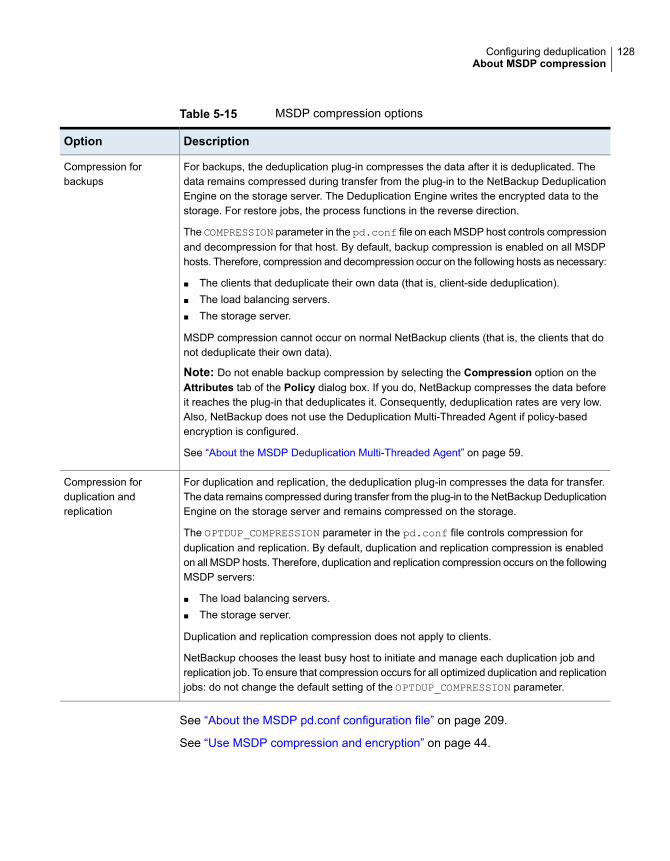
Table 5-15 MSDP compression options
DescriptionOption
For backups, the deduplication plug-in compresses the data after it is deduplicated. Thedata remains compressed during transfer from the plug-in to the NetBackup DeduplicationEngine on the storage server. The Deduplication Engine writes the encrypted data to thestorage. For restore jobs, the process functions in the reverse direction.
The COMPRESSION parameter in the pd.conf file on each MSDP host controls compressionand decompression for that host. By default, backup compression is enabled on all MSDPhosts. Therefore, compression and decompression occur on the following hosts as necessary:
■ The clients that deduplicate their own data (that is, client-side deduplication).■ The load balancing servers.■ The storage server.
MSDP compression cannot occur on normal NetBackup clients (that is, the clients that donot deduplicate their own data).
Note: Do not enable backup compression by selecting the Compression option on theAttributes tab of the Policy dialog box. If you do, NetBackup compresses the data beforeit reaches the plug-in that deduplicates it. Consequently, deduplication rates are very low.Also, NetBackup does not use the Deduplication Multi-Threaded Agent if policy-basedencryption is configured.
See “About the MSDP Deduplication Multi-Threaded Agent” on page 59.
Compression forbackups
For duplication and replication, the deduplication plug-in compresses the data for transfer.The data remains compressed during transfer from the plug-in to the NetBackup DeduplicationEngine on the storage server and remains compressed on the storage.
The OPTDUP_COMPRESSION parameter in the pd.conf file controls compression forduplication and replication. By default, duplication and replication compression is enabledon all MSDP hosts. Therefore, duplication and replication compression occurs on the followingMSDP servers:
■ The load balancing servers.■ The storage server.
Duplication and replication compression does not apply to clients.
NetBackup chooses the least busy host to initiate and manage each duplication job andreplication job. To ensure that compression occurs for all optimized duplication and replicationjobs: do not change the default setting of the OPTDUP_COMPRESSION parameter.
Compression forduplication andreplication
See “About the MSDP pd.conf configuration file” on page 209.
See “Use MSDP compression and encryption” on page 44.
128Configuring deduplicationAbout MSDP compression
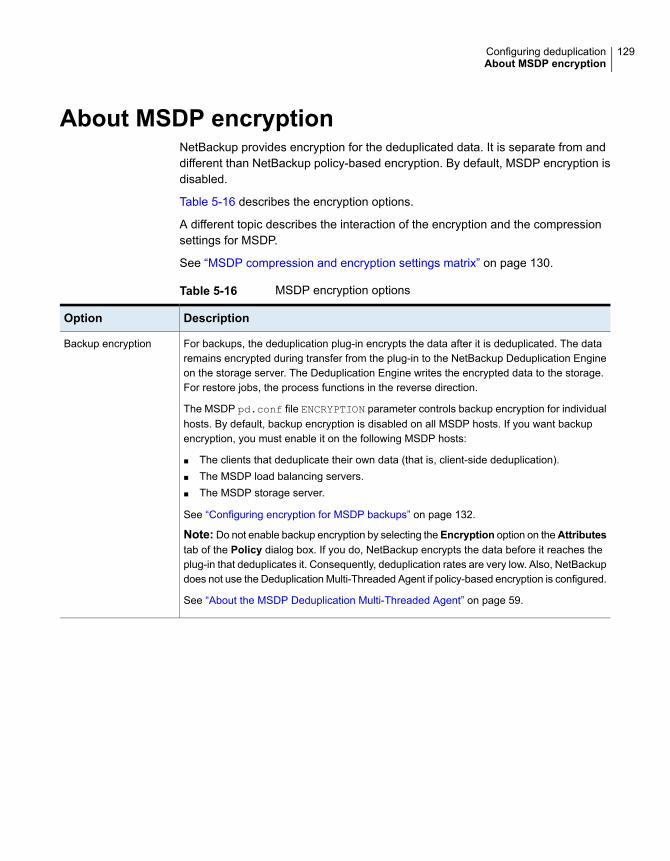
About MSDP encryptionNetBackup provides encryption for the deduplicated data. It is separate from anddifferent than NetBackup policy-based encryption. By default, MSDP encryption isdisabled.
Table 5-16 describes the encryption options.
A different topic describes the interaction of the encryption and the compressionsettings for MSDP.
See “MSDP compression and encryption settings matrix” on page 130.
Table 5-16 MSDP encryption options
DescriptionOption
For backups, the deduplication plug-in encrypts the data after it is deduplicated. The dataremains encrypted during transfer from the plug-in to the NetBackup Deduplication Engineon the storage server. The Deduplication Engine writes the encrypted data to the storage.For restore jobs, the process functions in the reverse direction.
The MSDP pd.conf file ENCRYPTION parameter controls backup encryption for individualhosts. By default, backup encryption is disabled on all MSDP hosts. If you want backupencryption, you must enable it on the following MSDP hosts:
■ The clients that deduplicate their own data (that is, client-side deduplication).■ The MSDP load balancing servers.■ The MSDP storage server.
See “Configuring encryption for MSDP backups” on page 132.
Note: Do not enable backup encryption by selecting theEncryption option on theAttributestab of the Policy dialog box. If you do, NetBackup encrypts the data before it reaches theplug-in that deduplicates it. Consequently, deduplication rates are very low. Also, NetBackupdoes not use the Deduplication Multi-Threaded Agent if policy-based encryption is configured.
See “About the MSDP Deduplication Multi-Threaded Agent” on page 59.
Backup encryption
129Configuring deduplicationAbout MSDP encryption
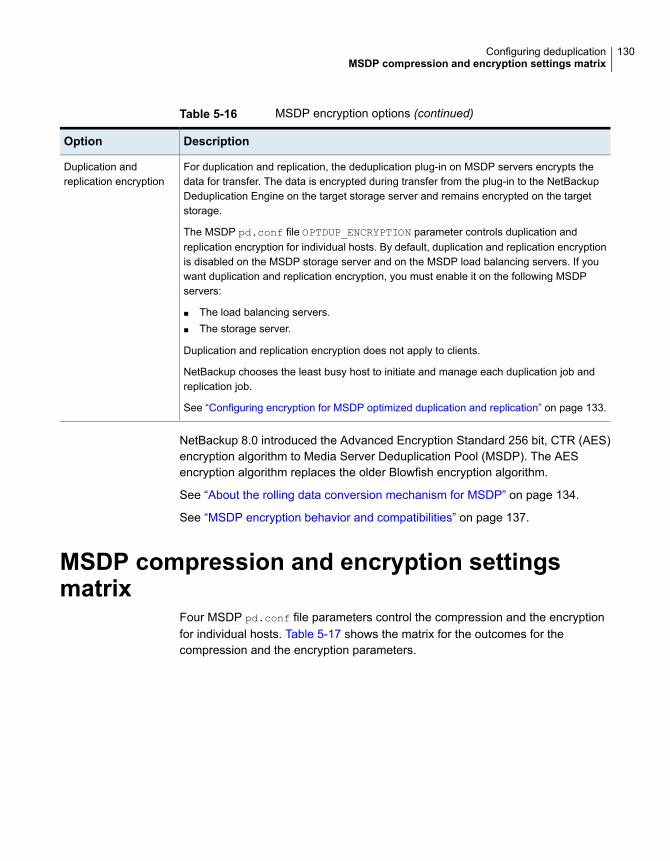
Table 5-16 MSDP encryption options (continued)
DescriptionOption
For duplication and replication, the deduplication plug-in on MSDP servers encrypts thedata for transfer. The data is encrypted during transfer from the plug-in to the NetBackupDeduplication Engine on the target storage server and remains encrypted on the targetstorage.
The MSDP pd.conf file OPTDUP_ENCRYPTION parameter controls duplication andreplication encryption for individual hosts. By default, duplication and replication encryptionis disabled on the MSDP storage server and on the MSDP load balancing servers. If youwant duplication and replication encryption, you must enable it on the following MSDPservers:
■ The load balancing servers.■ The storage server.
Duplication and replication encryption does not apply to clients.
NetBackup chooses the least busy host to initiate and manage each duplication job andreplication job.
See “Configuring encryption for MSDP optimized duplication and replication” on page 133.
Duplication andreplication encryption
NetBackup 8.0 introduced the Advanced Encryption Standard 256 bit, CTR (AES)encryption algorithm to Media Server Deduplication Pool (MSDP). The AESencryption algorithm replaces the older Blowfish encryption algorithm.
See “About the rolling data conversion mechanism for MSDP” on page 134.
See “MSDP encryption behavior and compatibilities” on page 137.
MSDP compression and encryption settingsmatrix
Four MSDP pd.conf file parameters control the compression and the encryptionfor individual hosts. Table 5-17 shows the matrix for the outcomes for thecompression and the encryption parameters.
130Configuring deduplicationMSDP compression and encryption settings matrix
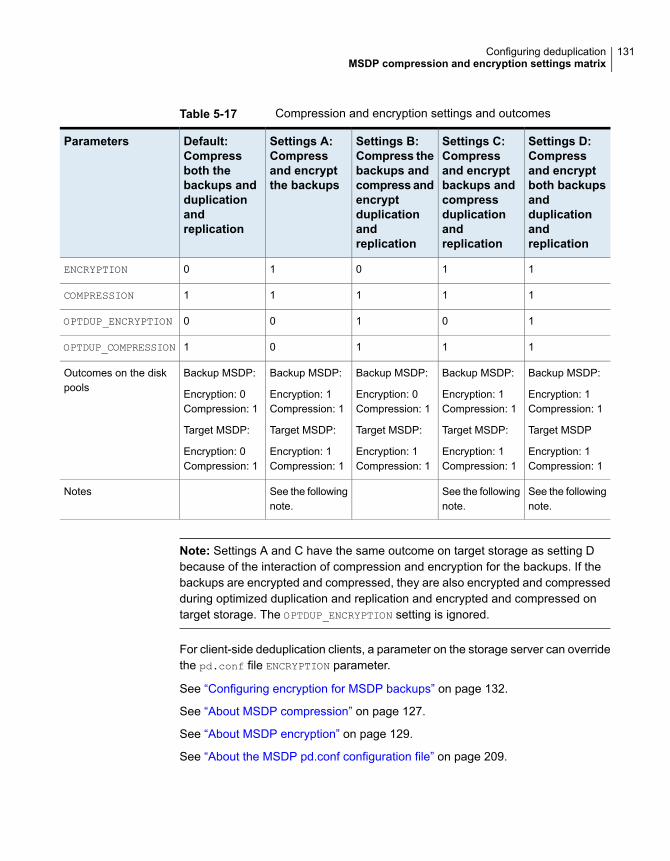
Table 5-17 Compression and encryption settings and outcomes
Settings D:Compressand encryptboth backupsandduplicationandreplication
Settings C:Compressand encryptbackups andcompressduplicationandreplication
Settings B:Compress thebackups andcompress andencryptduplicationandreplication
Settings A:Compressand encryptthe backups
Default:Compressboth thebackups andduplicationandreplication
Parameters
11010ENCRYPTION
11111COMPRESSION
10100OPTDUP_ENCRYPTION
11101OPTDUP_COMPRESSION
Backup MSDP:
Encryption: 1Compression: 1
Target MSDP
Encryption: 1Compression: 1
Backup MSDP:
Encryption: 1Compression: 1
Target MSDP:
Encryption: 1Compression: 1
Backup MSDP:
Encryption: 0Compression: 1
Target MSDP:
Encryption: 1Compression: 1
Backup MSDP:
Encryption: 1Compression: 1
Target MSDP:
Encryption: 1Compression: 1
Backup MSDP:
Encryption: 0Compression: 1
Target MSDP:
Encryption: 0Compression: 1
Outcomes on the diskpools
See the followingnote.
See the followingnote.
See the followingnote.
Notes
Note: Settings A and C have the same outcome on target storage as setting Dbecause of the interaction of compression and encryption for the backups. If thebackups are encrypted and compressed, they are also encrypted and compressedduring optimized duplication and replication and encrypted and compressed ontarget storage. The OPTDUP_ENCRYPTION setting is ignored.
For client-side deduplication clients, a parameter on the storage server can overridethe pd.conf file ENCRYPTION parameter.
See “Configuring encryption for MSDP backups” on page 132.
See “About MSDP compression” on page 127.
See “About MSDP encryption” on page 129.
See “About the MSDP pd.conf configuration file” on page 209.
131Configuring deduplicationMSDP compression and encryption settings matrix
Configuring encryption for MSDP backupsTwo procedures exist to configure encryption during backups for MSDP, as follows:
Use this procedure to configure encryption on individual MSDPhosts.
The ENCRYPTION parameter in the MSDP pd.conf file controlsencryption for that host. The parameter applies only to the hoston which you modify the pd.conf, as follows:
See “To configure backup encryption on a single host”on page 132.
Configure encryption onindividual hosts
Use this procedure to configure encryption for all of your clientsthat deduplicate their own data (that is, client-side deduplication).If you use this procedure, you do not have to configure eachclient-side deduplication client individually.
The ServerOptions parameter in the MSDPcontentrouter.cfg file controls encryption for all client-sidededuplication clients. This parameter supersedes the pd.conffile ENCRYPTION setting on client-side deduplication hosts.
See “To configure backup encryption on all client-sidededuplication clients” on page 133.
Configure encryption forall Client Direct clients
To ensure that encryption occurs for all backups jobs, configure it on all MSDPhosts. MSDP hosts include the MSDP storage server, the MSDP load balancingservers, and the NetBackup Client Direct deduplication clients.
See “About MSDP encryption” on page 129.
To configure backup encryption on a single host
1 Use a text editor to open the pd.conf file on the host.
The pd.conf file resides in the following directories:
■ (UNIX) /usr/openv/lib/ost-plugins/
■ (Windows) install_path\Veritas\NetBackup\bin\ost-plugins
See “MSDP pd.conf file parameters” on page 210.
2 For the line that begins with #ENCRYPTION, remove the pound sign ( or hashsign, #) in column 1.
132Configuring deduplicationConfiguring encryption for MSDP backups

3 In that same line, replace the 0 (zero) with a 1.
Note: The spaces to the left and right of the equal sign (=) in the file aresignificant. Ensure that the space characters appear in the file after you editthe file.
4 On the client-side deduplication clients and on the MSDP load balancingservers, ensure that the LOCAL_SETTINGS parameter in the pd.conf file is setto 1. Doing so ensures that the setting on the current host has precedenceover the server setting.
5 Save and close the file.
6 If the host is the storage server or a load balancing server, restart theNetBackup Remote Manager and Monitor Service (nbrmms) on the host.
To configure backup encryption on all client-side deduplication clients
1 On the storage server, open the contentrouter.cfg file in a text editor; itresides in the following directory:
■ (UNIX) storage_path/etc/puredisk
■ (Windows) storage_path\etc\puredisk
2 Add encrypt to the ServerOptions line of the file. The following line is anexample:
ServerOptions=fast,verify_data_read,encrypt
Configuring encryption for MSDP optimizedduplication and replication
The OPTDUP_ENCRYPTION parameter in the pd.conf file on the MSDP host controlsduplication and replication encryption for that host. The data that is encrypted duringtransfer remains encrypted on the target storage.
Use this procedure to configure encryption for optimized duplication and replicationon MSDP storage servers and on MSDP load balancing servers. To ensure thatencryption occurs for all optimized duplication and replication jobs, configure it onall MSDP servers.
By default, optimized duplication encryption is disabled on all MSDP hosts.
See “About MSDP encryption” on page 129.
133Configuring deduplicationConfiguring encryption for MSDP optimized duplication and replication
To configure replication and duplication encryption on an MSDP server
1 Use a text editor to open the pd.conf file on the MSDP server.
The pd.conf file resides in the following directories:
■ (UNIX) /usr/openv/lib/ost-plugins/
■ (Windows) install_path\Veritas\NetBackup\bin\ost-plugins
2 For the line that begins with #OPTDUP_ENCRYPTION, remove the pound sign (or hash sign, #) in column 1.
3 In that same line, replace the 0 (zero) with a 1.
Note: The spaces to the left and right of the equal sign (=) in the file aresignificant. Ensure that the space characters appear in the file after you editthe file.
See “MSDP pd.conf file parameters” on page 210.
4 On load balancing servers, ensure that the LOCAL_SETTINGS parameter is setto 1. Doing so ensures that the ENCRYPTION setting on the load balancing serveris used.
5 Save and close the file.
6 Restart the NetBackup Remote Manager and Monitor Service (nbrmms) on thehost.
About the rolling data conversion mechanism forMSDP
To ensure that data is encrypted and secured with the highest standards, NetBackupuses the AES encryption algorithm and SHA-2 fingerprinting algorithm beginningwith the 8.1 release. Specifically, MSDP uses AES-256 and SHA-512/256.
In NetBackup 8.1, with the introduction of the AES and the SHA-2 algorithms, wewant to convert the data that is encrypted and computed with the older algorithms(Blowfish and MD5-like) to the newer algorithms (AES-256 and SHA-512/256).
The environments that are upgraded to NetBackup 8.1 may include Blowfishencrypted data and the MD5-like fingerprints that need to be converted to the newformat. To handle the conversion and secure the data, a new internal task convertsthe current data container to the AES-256 encryption and the SHA-512/256fingerprint algorithm. This new task is referred to as the rolling data conversion.
134Configuring deduplicationAbout the rolling data conversion mechanism for MSDP

The conversion begins automatically after an upgrade to NetBackup 8.0. You cancontrol some aspects of the conversion process or stop it entirely.
Rolling data conversion traverses all existing data containers. If the data is encryptedwith the Blowfish algorithm, the data is re-encrypted with the AES-256 algorithm.Then a new SHA-512/256 fingerprint is generated. After the conversion, the datacontainer has an additional .map file, in addition to the .bhd and .bin files. The.map file contains the mapping between the SHA-512/256 and the MD5-likefingerprints. It is used for the compatibility between SHA-512/256 fingerprints andMD5-like fingerprints. The .bhd file includes the SHA-512/256 fingerprints.
When you upgrade to NetBackup 8.1.1, there might be encrypted data that is notencrypted using a customer key. The encrypted data must be encrypted by acustomer key and to handle the data conversion and secure the data, a new internaltask encrypts the existing data using a customer key. After the encryption and thefingerprint rolling conversion completes, the KMS rolling conversion begins.
Modes of rolling data conversionMSDP uses the rolling data conversion mechanism to convert Blowfish encrypteddata to AES-256 encrypted data, and MD5-like fingerprints to SHA-512/256fingerprints, in parallel. There are two modes of data conversion: normal mode andfast mode.
■ Normal mode: By default, the data conversion process starts in a normal modefor an upgraded system. Similar to compaction, the data conversion runs onlywhen no backup, restore, or Content Router Queue Processing (CRQP) jobsare active.In the normal mode, the time for data conversion depends on the followingfactors:
■ Total size of the storage
■ Power of the CPU
■ Workload on the systemData conversion in the normal mode may take a longer time.Veritas tests in a controlled environment showed that for a single 1-TB mountpoint, the conversion speed is about 50MB/s in normal mode.
■ Fast mode: In the fast mode, the data conversion disables cyclic redundancychecks and compaction. The rolling data conversion runs while backup, restore,duplication, or CRQP jobs are active.Veritas tests in a controlled environment showed that for a single 1-TB mountpoint, the conversion speed is about 105MB/s in fast mode.
135Configuring deduplicationModes of rolling data conversion
Note: The performance numbers shown were observed in the Veritas testenvironment and are not a guarantee of performance in your environment.
In a new installation of NetBackup 8.1, the rolling data conversion is marked asFinished and does not start in the future. For an upgrade to NetBackup 8.1, therolling data conversion is enabled by default and works in the background after theMSDP conversion completes. Only the data that existed before upgrade is converted.All new data uses the new SHA-512/256 fingerprint and does not need conversion.
While in Fast mode, the rolling data conversion affects the performance of backup,restore, duplication, and replication jobs. To minimize this effect, use the Normalmode, which pauses the conversion when the system is busy, but slows down theconversion process. The Fast mode keeps the conversion active regardless ofsystem state.
You can manage and monitor the rolling data conversion using the followingcrcontrol command options.
Table 5-18 MSDP crcontrol command options for rolling data conversion
DescriptionOption
To start the data conversion process, use the--dataconverton option:
Windows:install_path\Veritas\pdde\Crcontrol.exe--dataconverton
UNIX: /usr/openv/pdde/pdcr/bin/crcontrol--dataconverton
--dataconverton
To stop the data conversion process, use the--dataconverton option:
Windows:install_path\Veritas\pdde\Crcontrol.exe--dataconvertoff
UNIX: /usr/openv/pdde/pdcr/bin/crcontrol--dataconvertoff
--dataconvertoff
136Configuring deduplicationModes of rolling data conversion
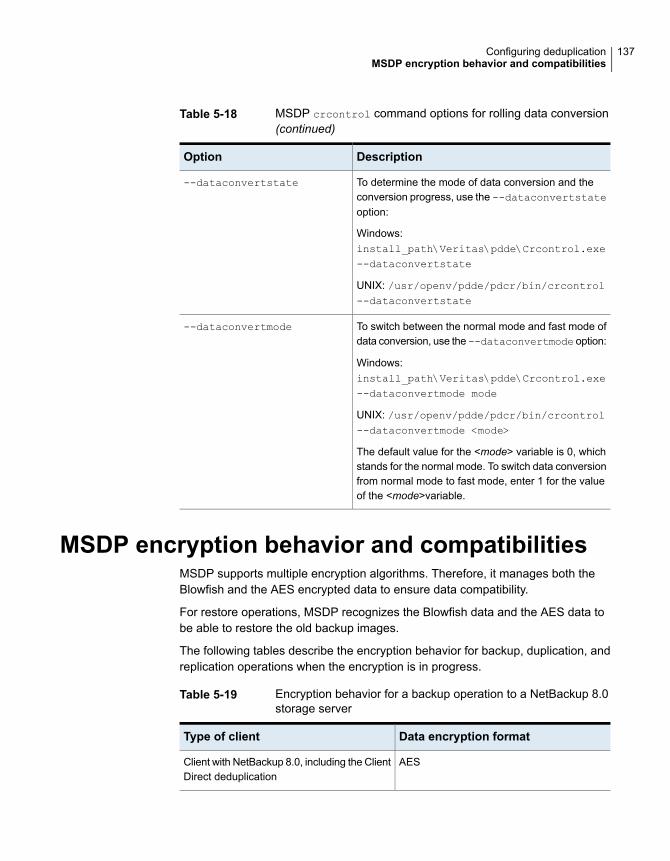
Table 5-18 MSDP crcontrol command options for rolling data conversion(continued)
DescriptionOption
To determine the mode of data conversion and theconversion progress, use the --dataconvertstateoption:
Windows:install_path\Veritas\pdde\Crcontrol.exe--dataconvertstate
UNIX: /usr/openv/pdde/pdcr/bin/crcontrol--dataconvertstate
--dataconvertstate
To switch between the normal mode and fast mode ofdata conversion, use the --dataconvertmode option:
Windows:install_path\Veritas\pdde\Crcontrol.exe--dataconvertmode mode
UNIX: /usr/openv/pdde/pdcr/bin/crcontrol--dataconvertmode <mode>
The default value for the <mode> variable is 0, whichstands for the normal mode. To switch data conversionfrom normal mode to fast mode, enter 1 for the valueof the <mode>variable.
--dataconvertmode
MSDP encryption behavior and compatibilitiesMSDP supports multiple encryption algorithms. Therefore, it manages both theBlowfish and the AES encrypted data to ensure data compatibility.
For restore operations, MSDP recognizes the Blowfish data and the AES data tobe able to restore the old backup images.
The following tables describe the encryption behavior for backup, duplication, andreplication operations when the encryption is in progress.
Table 5-19 Encryption behavior for a backup operation to a NetBackup 8.0storage server
Data encryption formatType of client
AESClient with NetBackup 8.0, including the ClientDirect deduplication
137Configuring deduplicationMSDP encryption behavior and compatibilities
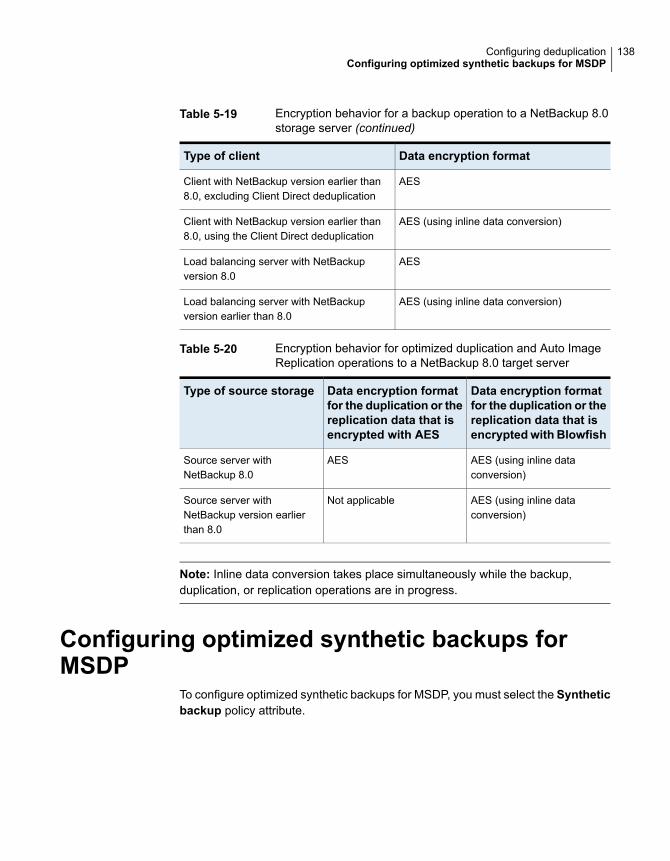
Table 5-19 Encryption behavior for a backup operation to a NetBackup 8.0storage server (continued)
Data encryption formatType of client
AESClient with NetBackup version earlier than8.0, excluding Client Direct deduplication
AES (using inline data conversion)Client with NetBackup version earlier than8.0, using the Client Direct deduplication
AESLoad balancing server with NetBackupversion 8.0
AES (using inline data conversion)Load balancing server with NetBackupversion earlier than 8.0
Table 5-20 Encryption behavior for optimized duplication and Auto ImageReplication operations to a NetBackup 8.0 target server
Data encryption formatfor the duplication or thereplication data that isencryptedwith Blowfish
Data encryption formatfor the duplication or thereplication data that isencrypted with AES
Type of source storage
AES (using inline dataconversion)
AESSource server withNetBackup 8.0
AES (using inline dataconversion)
Not applicableSource server withNetBackup version earlierthan 8.0
Note: Inline data conversion takes place simultaneously while the backup,duplication, or replication operations are in progress.
Configuring optimized synthetic backups forMSDP
To configure optimized synthetic backups for MSDP, you must select the Syntheticbackup policy attribute.
138Configuring deduplicationConfiguring optimized synthetic backups for MSDP
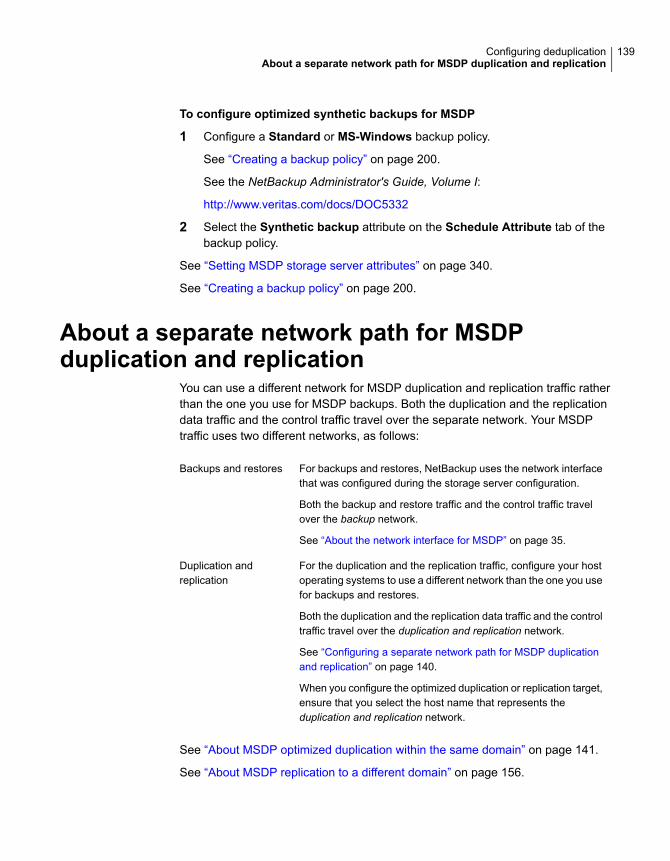
To configure optimized synthetic backups for MSDP
1 Configure a Standard or MS-Windows backup policy.
See “Creating a backup policy” on page 200.
See the NetBackup Administrator's Guide, Volume I:
http://www.veritas.com/docs/DOC5332
2 Select the Synthetic backup attribute on the Schedule Attribute tab of thebackup policy.
See “Setting MSDP storage server attributes” on page 340.
See “Creating a backup policy” on page 200.
About a separate network path for MSDPduplication and replication
You can use a different network for MSDP duplication and replication traffic ratherthan the one you use for MSDP backups. Both the duplication and the replicationdata traffic and the control traffic travel over the separate network. Your MSDPtraffic uses two different networks, as follows:
For backups and restores, NetBackup uses the network interfacethat was configured during the storage server configuration.
Both the backup and restore traffic and the control traffic travelover the backup network.
See “About the network interface for MSDP” on page 35.
Backups and restores
For the duplication and the replication traffic, configure your hostoperating systems to use a different network than the one you usefor backups and restores.
Both the duplication and the replication data traffic and the controltraffic travel over the duplication and replication network.
See “Configuring a separate network path for MSDP duplicationand replication” on page 140.
When you configure the optimized duplication or replication target,ensure that you select the host name that represents theduplication and replication network.
Duplication andreplication
See “About MSDP optimized duplication within the same domain” on page 141.
See “About MSDP replication to a different domain” on page 156.
139Configuring deduplicationAbout a separate network path for MSDP duplication and replication
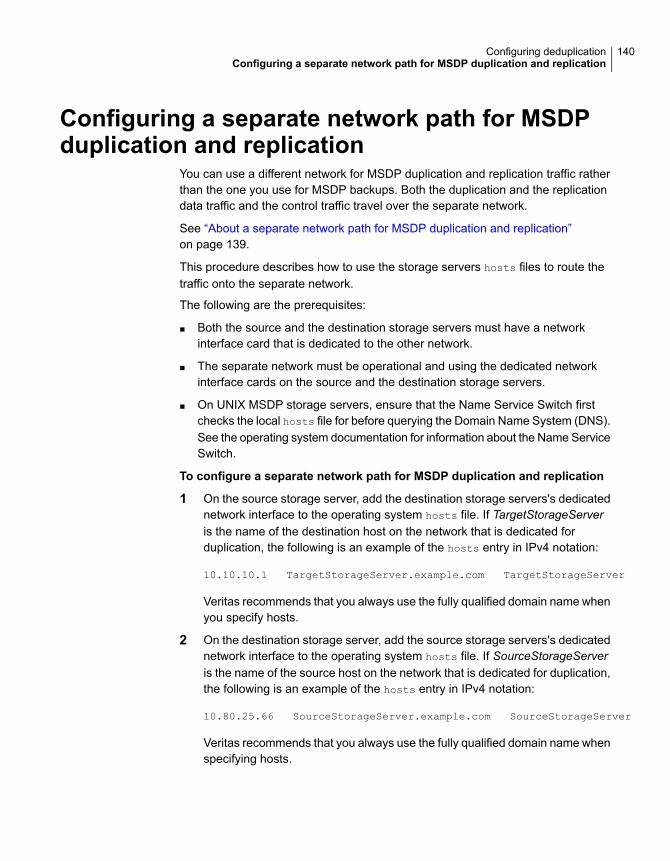
Configuring a separate network path for MSDPduplication and replication
You can use a different network for MSDP duplication and replication traffic ratherthan the one you use for MSDP backups. Both the duplication and the replicationdata traffic and the control traffic travel over the separate network.
See “About a separate network path for MSDP duplication and replication”on page 139.
This procedure describes how to use the storage servers hosts files to route thetraffic onto the separate network.
The following are the prerequisites:
■ Both the source and the destination storage servers must have a networkinterface card that is dedicated to the other network.
■ The separate network must be operational and using the dedicated networkinterface cards on the source and the destination storage servers.
■ On UNIX MSDP storage servers, ensure that the Name Service Switch firstchecks the local hosts file for before querying the Domain Name System (DNS).See the operating system documentation for information about the Name ServiceSwitch.
To configure a separate network path for MSDP duplication and replication
1 On the source storage server, add the destination storage servers's dedicatednetwork interface to the operating system hosts file. If TargetStorageServeris the name of the destination host on the network that is dedicated forduplication, the following is an example of the hosts entry in IPv4 notation:
10.10.10.1 TargetStorageServer.example.com TargetStorageServer
Veritas recommends that you always use the fully qualified domain name whenyou specify hosts.
2 On the destination storage server, add the source storage servers's dedicatednetwork interface to the operating system hosts file. If SourceStorageServeris the name of the source host on the network that is dedicated for duplication,the following is an example of the hosts entry in IPv4 notation:
10.80.25.66 SourceStorageServer.example.com SourceStorageServer
Veritas recommends that you always use the fully qualified domain name whenspecifying hosts.
140Configuring deduplicationConfiguring a separate network path for MSDP duplication and replication
3 To force the changes to take effect immediately, flush the DNS cache. See theoperating system documentation for how to flush the DNS cache.
4 From each host, use the ping command to verify that each host resolves thename of the other host.
SourceStorageServer.example.com> ping TargetStorageServer.example.com
TargetStorageServer.example.com> ping SourceStorageServer.example.com
If the ping command returns positive results, the hosts are configured forduplication and replication over the separate network.
5 When you configure the target storage server, ensure that you select the hostname that represents the alternate network path.
About MSDP optimized duplication within thesame domain
Optimized duplication within the same domain copies the deduplicated backupimages betweenMedia Server Deduplication Poolswithin the same domain. Thesource and the destination storage must use the same NetBackup master server.
The optimized duplication operation is more efficient than normal duplication. Onlythe unique, deduplicated data segments are transferred. Optimized duplicationreduces the amount of data that is transmitted over your network.
Optimized duplication is a good method to copy your backup images off-site fordisaster recovery.
The following table describes the supported sources and targets.
Table 5-21 MSDP optimized duplication source and targets
Target storageSource storage
Media Server Deduplication PoolMedia Server Deduplication Pool
PureDisk Deduplication PoolMedia Server Deduplication Pool
PureDisk Deduplication PoolPureDisk Deduplication Pool
Media Server Deduplication PoolPureDisk Deduplication Pool
Note: A PureDisk Deduplication Pool in NetBackup represents the storage on aNetBackup 5000 series appliance. NetBackup supports PureDisk DeduplicationPool storage on NetBackup 5000 series appliances only.
141Configuring deduplicationAbout MSDP optimized duplication within the same domain
By default, NetBackup does not retry failed optimized duplication jobs invoked byNetBackup Vault of the bpduplicate command. You can change that behavior.
See “Configuring NetBackup optimized duplication or replication behavior”on page 153.
You can use a separate network for the duplication traffic.
See “About a separate network path for MSDP duplication and replication”on page 139.
See “Configuring MSDP optimized duplication within the same NetBackup domain”on page 149.
Review the following requirements and limitations.
About MSDP optimized duplication requirementsThe following are the requirements for optimized duplication within the sameNetBackup domain:
■ The source storage and the destination storage must have at least one mediaserver in common.See “About the media servers for MSDP optimized duplication within the samedomain” on page 144.
■ In the storage unit you use for the destination for the optimized duplication, youmust select only the common media server or media servers.If you select more than one, NetBackup assigns the duplication job to the leastbusy media server. If you select a media server or servers that are not incommon, the optimized duplication job fails.For more information about media server load balancing, see the NetBackupAdministrator's Guide, Volume I:http://www.veritas.com/docs/DOC5332
■ The destination storage unit cannot be the same as the source storage unit.
About MSDP optimized duplication limitationsThe following are limitations for optimized duplication within the same NetBackupdomain:
■ If an optimized duplication job fails after the configured number of retries,NetBackup does not run the job again.By default, NetBackup retries an optimized duplication job three times. You canchange the number of retries.See “Configuring NetBackup optimized duplication or replication behavior”on page 153.
142Configuring deduplicationAbout MSDP optimized duplication within the same domain
■ NetBackup does not support MSDP optimized duplication to storage unit groups.If you use a storage unit group as a destination for optimized duplication,NetBackup uses regular duplication.
■ Optimized duplication does not support multiple copies. If NetBackup isconfigured to make multiple new copies from the (source) copy of the backupimage, the following occurs:
■ In a storage lifecycle policy, one duplication job creates one optimizedduplication copy. If multiple optimized duplication destinations exist, aseparate job exists for each destination. This behavior assumes that thedevice for the optimized duplication destination is compatible with the deviceon which the source image resides.If multiple remaining copies are configured to go to devices that are notoptimized duplication capable, NetBackup uses normal duplication. Oneduplication job creates those multiple copies.
■ For other duplication methods, NetBackup uses normal duplication. Oneduplication job creates all of the copies simultaneously. The other duplicationmethods include the following: NetBackup Vault, the bpduplicate commandline, and the duplication option of the Catalog utility in the NetBackupAdministration Console.
■ For optimized duplication between two PureDisk Deduplication Pools,NetBackup reports that the deduplication rate is 100%. However, deduplicationdoes not occur during optimized duplication. Therefore, ignore the deduplicationrate statistics.
Note:NetBackup supportsPureDisk Deduplication Pool storage on NetBackup5000 series appliances only.
■ The copy operation uses the maximum fragment size of the source storage unit,not the setting for the destination storage unit. The optimized duplication copiesthe image fragments as is. For greater efficiency, the duplication does not resizeand reshuffle the images into a different set of fragments on the destinationstorage unit.
■ If the destination is a PureDisk Deduplication Pool, that PureDisk storagedomain can be the destination of duplication from one NetBackup domain only.If you try to duplicate from MSDP storage in more than one NetBackup domain,optimized duplication does not function correctly.
Note:NetBackup supportsPureDisk Deduplication Pool storage on NetBackup5000 series appliances only.
143Configuring deduplicationAbout MSDP optimized duplication within the same domain
About the media servers for MSDP optimized duplication within thesame domain
For optimized Media Server Deduplication Pool duplication within the samedomain, the source storage and the destination storage must have at least onemedia server in common. The common server initiates, monitors, and verifies theduplication operation. The common server requires credentials for both the sourcestorage and the destination storage. (For deduplication, the credentials are for theNetBackup Deduplication Engine, not for the host on which it runs.)
Which media server initiates the duplication operation determines if it is a push ora pull operation, as follows:
■ If the media server is co-located physically with the source storage server, it ispush duplication.
■ If the media server is co-located physically with the destination storage server,it is a pull duplication.
Technically, no advantage exists with a push duplication or a pull duplication.However, the media server that initiates the duplication operation also becomesthe write host for the new image copies.
A storage server or a load balancing server can be the common server. The commonserver must have the credentials and the connectivity for both the source storageand the destination storage.
About MSDP push duplication within the same domainFigure 5-1 shows a push configuration for optimized duplication within the samedomain. The local deduplication node contains normal backups; the remotededuplication node is the destination for the optimized duplication copies. Loadbalancing server LB_L2 has credentials for both storage servers; it is the commonserver.
144Configuring deduplicationAbout MSDP optimized duplication within the same domain
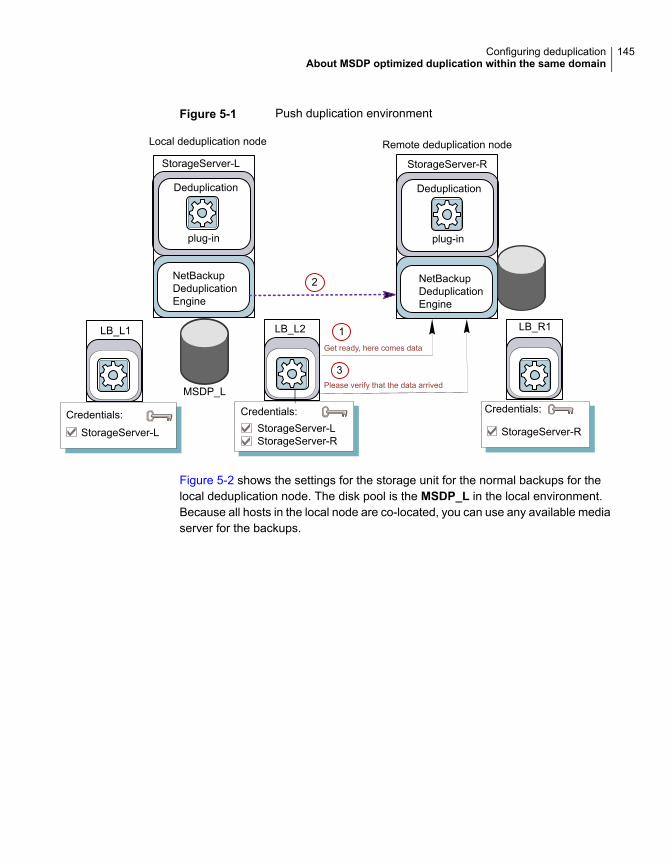
Figure 5-1 Push duplication environment
Please verify that the data arrived
Get ready, here comes data
NetBackupDeduplicationEngine
Local deduplication node
NetBackupDeduplicationEngine
Deduplication
plug-in
MSDP_L
Credentials:StorageServer-LStorageServer-R
StorageServer-L
Credentials:
StorageServer-L StorageServer-R
LB_L1 LB_L2
StorageServer-R
Credentials:
LB_R11
2
3
Deduplication
plug-in
Remote deduplication node
Figure 5-2 shows the settings for the storage unit for the normal backups for thelocal deduplication node. The disk pool is the MSDP_L in the local environment.Because all hosts in the local node are co-located, you can use any available mediaserver for the backups.
145Configuring deduplicationAbout MSDP optimized duplication within the same domain
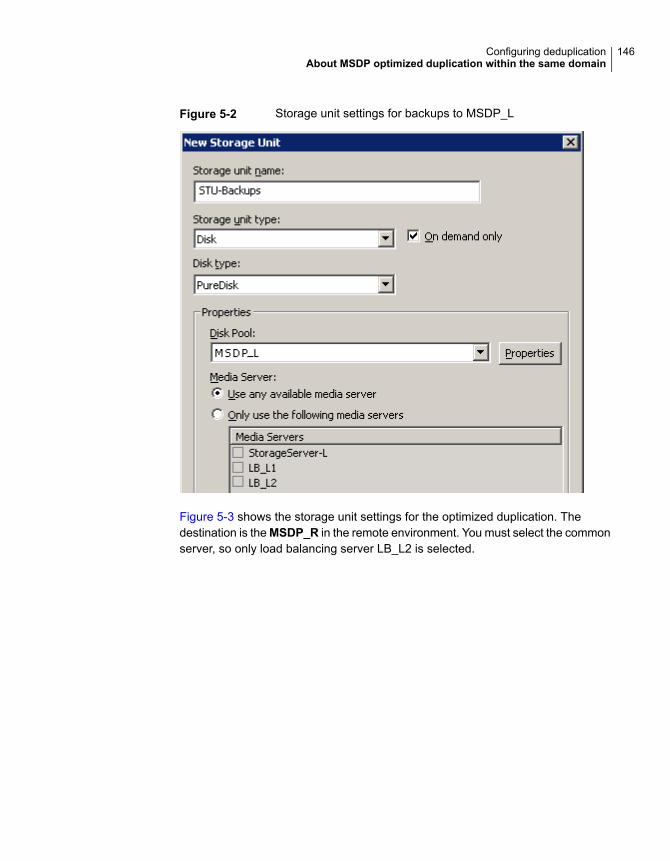
Figure 5-2 Storage unit settings for backups to MSDP_L
Figure 5-3 shows the storage unit settings for the optimized duplication. Thedestination is theMSDP_R in the remote environment. You must select the commonserver, so only load balancing server LB_L2 is selected.
146Configuring deduplicationAbout MSDP optimized duplication within the same domain
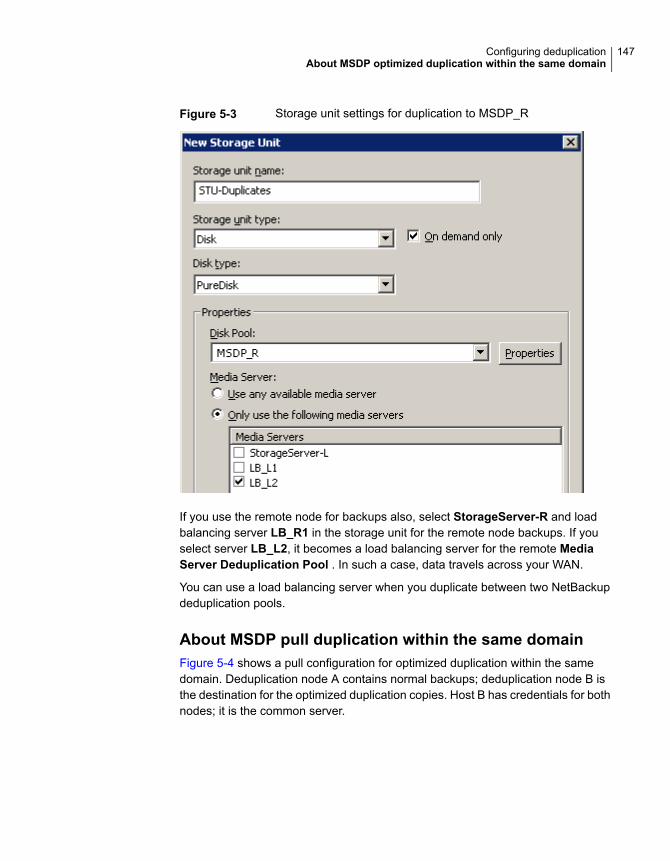
Figure 5-3 Storage unit settings for duplication to MSDP_R
If you use the remote node for backups also, select StorageServer-R and loadbalancing server LB_R1 in the storage unit for the remote node backups. If youselect server LB_L2, it becomes a load balancing server for the remote MediaServer Deduplication Pool . In such a case, data travels across your WAN.
You can use a load balancing server when you duplicate between two NetBackupdeduplication pools.
About MSDP pull duplication within the same domainFigure 5-4 shows a pull configuration for optimized duplication within the samedomain. Deduplication node A contains normal backups; deduplication node B isthe destination for the optimized duplication copies. Host B has credentials for bothnodes; it is the common server.
147Configuring deduplicationAbout MSDP optimized duplication within the same domain
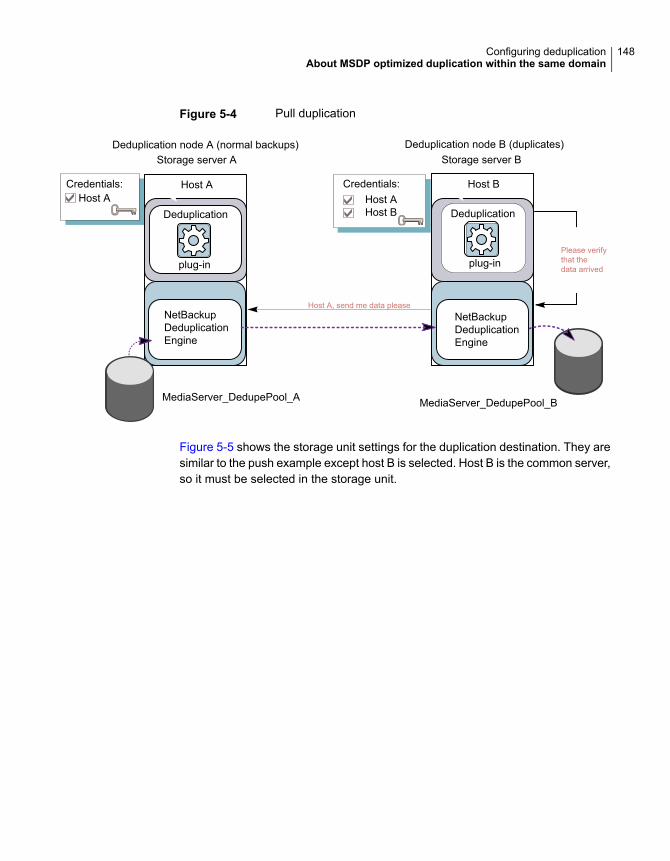
Figure 5-4 Pull duplication
Host A, send me data pleaseNetBackupDeduplicationEngine
plug-in
Deduplication node A (normal backups) Deduplication node B (duplicates)
NetBackupDeduplicationEngine
Deduplication
plug-in
Storage server A Storage server B
Host A Host B
Please verifythat thedata arrived
Credentials:Host AHost B
Host ACredentials:
MediaServer_DedupePool_A MediaServer_DedupePool_B
Deduplication
Figure 5-5 shows the storage unit settings for the duplication destination. They aresimilar to the push example except host B is selected. Host B is the common server,so it must be selected in the storage unit.
148Configuring deduplicationAbout MSDP optimized duplication within the same domain
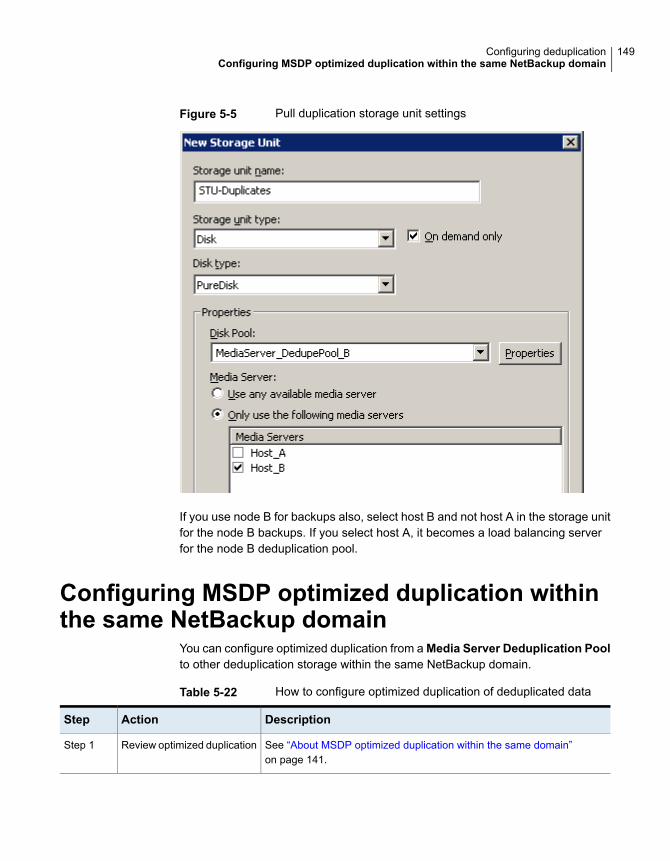
Figure 5-5 Pull duplication storage unit settings
If you use node B for backups also, select host B and not host A in the storage unitfor the node B backups. If you select host A, it becomes a load balancing serverfor the node B deduplication pool.
Configuring MSDP optimized duplication withinthe same NetBackup domain
You can configure optimized duplication from a Media Server Deduplication Poolto other deduplication storage within the same NetBackup domain.
Table 5-22 How to configure optimized duplication of deduplicated data
DescriptionActionStep
See “About MSDP optimized duplication within the same domain”on page 141.
Review optimized duplicationStep 1
149Configuring deduplicationConfiguring MSDP optimized duplication within the same NetBackup domain
Table 5-22 How to configure optimized duplication of deduplicated data(continued)
DescriptionActionStep
See “Configuring a storage server for a Media Server Deduplication Pool”on page 80.
One server must be common between the source storage and thedestination storage. Which you choose depends on whether you want apush or a pull configuration.
See “About the media servers for MSDP optimized duplication within thesame domain” on page 144.
For a push configuration, configure the common server as a load balancingserver for the storage server for your normal backups. For a pullconfiguration, configure the common server as a load balancing server forthe storage server for the copies at your remote site. Alternatively, youcan add a server later to either environment. (A server becomes a loadbalancing server when you select it in the storage unit for the deduplicationpool.)
Configure the storage serversStep 2
If you did not configure the deduplication pools when you configured thestorage servers, use the Disk Pool Configuration Wizard to configurethem.
See “Configuring a disk pool for deduplication” on page 109.
Configure the deduplicationpools
Step 3
In the storage unit for your backups, do the following:
1 For the Disk type, select PureDisk.
2 For the Disk pool, select your Media Server Deduplication Poolor PureDisk Deduplication Pool.
Note: NetBackup supports PureDisk Deduplication Pool storage onNetBackup 5000 series appliances only.
If you use a pull configuration, do not select the common media server inthe backup storage unit. If you do, NetBackup uses it to deduplicate backupdata. (That is, unless you want to use it for a load balancing server for thesource deduplication node.)
See “Configuring a Media Server Deduplication Pool storage unit”on page 121.
Configure the storage unit forbackups
Step 4
150Configuring deduplicationConfiguring MSDP optimized duplication within the same NetBackup domain
Table 5-22 How to configure optimized duplication of deduplicated data(continued)
DescriptionActionStep
Veritas recommends that you configure a storage unit specifically to bethe target for the optimized duplication. Configure the storage unit in thededuplication node that performs your normal backups. Do not configureit in the node that contains the copies.
In the storage unit that is the destination for your duplicatedimages, do the following:
1 For the Disk type, select PureDisk.
2 For the Disk pool, the destination can be a Media ServerDeduplication Pool or a PureDisk Deduplication Pool.
Note: NetBackup supports PureDisk Deduplication Pool storage onNetBackup 5000 series appliances only.
Also selectOnly use the followingmedia servers. Then, select the mediaserver or media servers that are common to both the source storage serverand the destination storage server. If you select more than one, NetBackupassigns the duplication job to the least busy media server.
If you select only a media server (or servers) that is not common, theoptimized duplication job fails.
See “Configuring a Media Server Deduplication Pool storage unit”on page 121.
Configure the storage unit forduplication
Step 5
Optionally, you can configure the bandwidth for replication.
See “About configuring MSDP optimized duplication and replicationbandwidth” on page 191.
Configure optimizedduplication bandwidth
Step 6
Optionally, you can configure the optimized duplication behavior.
See “Configuring NetBackup optimized duplication or replication behavior”on page 153.
See “About configuring MSDP optimized duplication and replicationbandwidth” on page 191.
Configure optimizedduplication behaviors
Step 7
151Configuring deduplicationConfiguring MSDP optimized duplication within the same NetBackup domain
Table 5-22 How to configure optimized duplication of deduplicated data(continued)
DescriptionActionStep
Configure a storage lifecycle policy only if you want to use one to duplicateimages. The storage lifecycle policy manages both the backup jobs andthe duplication jobs. Configure the lifecycle policy in the deduplicationenvironment that performs your normal backups. Do not configure it in theenvironment that contains the copies.
When you configure the storage lifecycle policy, do the following:
■ The first operation must be a Backup. For the Storage for the Backupoperation, select the storage unit that is the target of your backups.That storage unit may use a Media Server Deduplication Pool or aPureDisk Deduplication Pool.These backups are the primary backup copies; they are the sourceimages for the duplication operation.
■ For the second, child Operation, select Duplication. Then, select thestorage unit for the destination deduplication pool. That pool may bea Media Server Deduplication Pool or a PureDisk DeduplicationPool.
Note: NetBackup supports PureDisk Deduplication Pool storage onNetBackup 5000 series appliances only.
See “About storage lifecycle policies” on page 192.
See “Creating a storage lifecycle policy” on page 194.
Configure a storage lifecyclepolicy for the duplication
Step 8
Configure a policy to back up your clients. Configure the backup policy inthe deduplication environment that performs your normal backups. Do notconfigure it in the environment that contains the copies.
■ If you use a storage lifecycle policy to manage the backup job and theduplication job: Select that storage lifecycle policy in the Policy storagefield of the Policy Attributes tab.
■ If you do not use a storage lifecycle policy to manage the backup joband the duplication job: Select the storage unit that contains your normalbackups. These backups are the primary backup copies.
Note: NetBackup supports PureDisk Deduplication Pool storage onNetBackup 5000 series appliances only.
See “About MSDP backup policy configuration” on page 199.
See “Creating a backup policy” on page 200.
Configure a backup policyStep 9
152Configuring deduplicationConfiguring MSDP optimized duplication within the same NetBackup domain
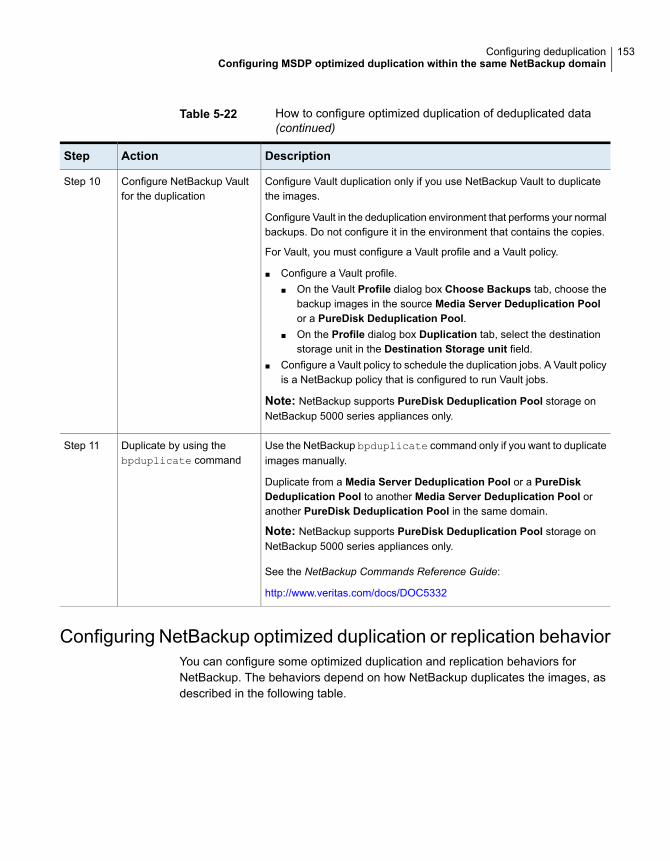
Table 5-22 How to configure optimized duplication of deduplicated data(continued)
DescriptionActionStep
Configure Vault duplication only if you use NetBackup Vault to duplicatethe images.
Configure Vault in the deduplication environment that performs your normalbackups. Do not configure it in the environment that contains the copies.
For Vault, you must configure a Vault profile and a Vault policy.
■ Configure a Vault profile.■ On the Vault Profile dialog box Choose Backups tab, choose the
backup images in the source Media Server Deduplication Poolor a PureDisk Deduplication Pool.
■ On the Profile dialog box Duplication tab, select the destinationstorage unit in the Destination Storage unit field.
■ Configure a Vault policy to schedule the duplication jobs. A Vault policyis a NetBackup policy that is configured to run Vault jobs.
Note: NetBackup supports PureDisk Deduplication Pool storage onNetBackup 5000 series appliances only.
Configure NetBackup Vaultfor the duplication
Step 10
Use the NetBackup bpduplicate command only if you want to duplicateimages manually.
Duplicate from a Media Server Deduplication Pool or a PureDiskDeduplication Pool to another Media Server Deduplication Pool oranother PureDisk Deduplication Pool in the same domain.
Note: NetBackup supports PureDisk Deduplication Pool storage onNetBackup 5000 series appliances only.
See the NetBackup Commands Reference Guide:
http://www.veritas.com/docs/DOC5332
Duplicate by using thebpduplicate command
Step 11
Configuring NetBackup optimized duplication or replication behaviorYou can configure some optimized duplication and replication behaviors forNetBackup. The behaviors depend on how NetBackup duplicates the images, asdescribed in the following table.
153Configuring deduplicationConfiguring MSDP optimized duplication within the same NetBackup domain
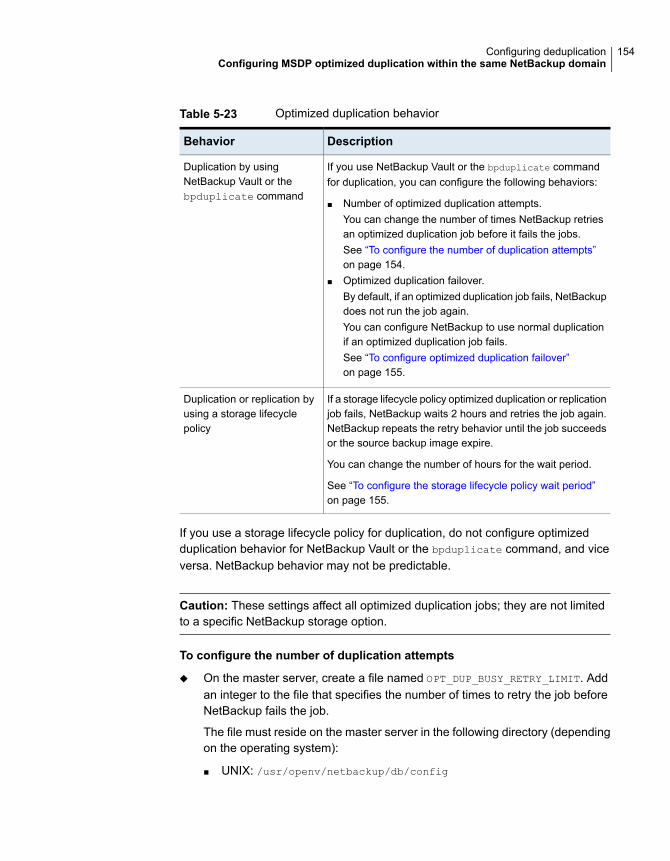
Table 5-23 Optimized duplication behavior
DescriptionBehavior
If you use NetBackup Vault or the bpduplicate commandfor duplication, you can configure the following behaviors:
■ Number of optimized duplication attempts.You can change the number of times NetBackup retriesan optimized duplication job before it fails the jobs.See “To configure the number of duplication attempts”on page 154.
■ Optimized duplication failover.By default, if an optimized duplication job fails, NetBackupdoes not run the job again.You can configure NetBackup to use normal duplicationif an optimized duplication job fails.See “To configure optimized duplication failover”on page 155.
Duplication by usingNetBackup Vault or thebpduplicate command
If a storage lifecycle policy optimized duplication or replicationjob fails, NetBackup waits 2 hours and retries the job again.NetBackup repeats the retry behavior until the job succeedsor the source backup image expire.
You can change the number of hours for the wait period.
See “To configure the storage lifecycle policy wait period”on page 155.
Duplication or replication byusing a storage lifecyclepolicy
If you use a storage lifecycle policy for duplication, do not configure optimizedduplication behavior for NetBackup Vault or the bpduplicate command, and viceversa. NetBackup behavior may not be predictable.
Caution: These settings affect all optimized duplication jobs; they are not limitedto a specific NetBackup storage option.
To configure the number of duplication attempts
◆ On the master server, create a file named OPT_DUP_BUSY_RETRY_LIMIT. Addan integer to the file that specifies the number of times to retry the job beforeNetBackup fails the job.
The file must reside on the master server in the following directory (dependingon the operating system):
■ UNIX: /usr/openv/netbackup/db/config
154Configuring deduplicationConfiguring MSDP optimized duplication within the same NetBackup domain
■ Windows: install_path\NetBackup\db\config.
To configure optimized duplication failover
◆ On the master server, add the following configuration option:
RESUME_ORIG_DUP_ON_OPT_DUP_FAIL = TRUE
See “Setting NetBackup configuration options by using the command line”on page 155.
Alternatively on UNIX systems, you can add the entry to the bp.conf file onthe NetBackup master server.
To configure the storage lifecycle policy wait period
1 in theNetBackupAdministrationConsole, expandNetBackupManagement> Host Properties > Master Servers. Select the master server, and then onthe Actions menu click Properties.
2 Select SLP Parameters.
3 Change the Extended image retry interval to the new value.
4 Click OK.
Setting NetBackup configuration options by using thecommand lineVeritas recommends that you use the NetBackup Administration Console HostProperties to configure NetBackup properties.
However, some properties cannot be set by using the Administration Console.You can set those properties by using the following NetBackup commands:
bpsetconfigFor a NetBackup server:
nbsetconfigFor a NetBackup client:
Configuration options are key and value pairs, as shown in the following examples:
■ CLIENT_READ_TIMEOUT = 300
■ LOCAL_CACHE = NO
■ RESUME_ORIG_DUP_ON_OPT_DUP_FAIL = TRUE
■ SERVER = server1.example.com
You can specify some options multiple times, such as the SERVER option.
155Configuring deduplicationConfiguring MSDP optimized duplication within the same NetBackup domain
To set configuration options by using the command line
1 In a command window or shell window on the host on which you want to setthe property, invoke the appropriate command. The command depends on theoperating system and the NetBackup host type (client or server), as follows:
On a NetBackup client:
/usr/openv/netbackup/bin/nbsetconfig
On a NetBackup server:
/usr/openv/netbackup/bin/admincmd/bpsetconfig
UNIX
On a NetBackup client:
install_path\NetBackup\bin\nbsetconfig.exe
On a NetBackup server:
install_path\NetBackup\bin\admincmd\bpsetconfig.exe
Windows
2 At the command prompt, enter the key and the value pairs of the configurationoptions that you want to set, one pair per line.
You can change existing key and value pairs.
You can add key and value pairs.
Ensure that you understand the values that are allowed and the format of anynew options that you add.
3 To save the configuration changes, type the following, depending on theoperating system:
Windows: Ctrl + Z Enter
UNIX: Ctrl + D Enter
About MSDP replication to a different domainNetBackup supports replication to storage in a different domain. NetBackup AutoImage Replication is the method used to replicate backup images. (Backup imagereplication is not the same as snapshot replication, which may occur in the samedomain.) You can replicate from one source to one or more destinations.
Table 5-24 describes the MSDP replication source and targets that NetBackupsupports.
156Configuring deduplicationAbout MSDP replication to a different domain
Table 5-24 NetBackup media server deduplication replication targets
Target storageSource storage
A Media Server Deduplication Pool, which can behosted on the following systems:
■ A NetBackup media server.■ A NetBackup 5200 series appliance or NetBackup
5300 series appliance.■ A Cloud Catalyst storage server.
Media Server Deduplication Pool
A PureDisk Deduplication Pool on a NetBackup 5000series appliance. A PureDisk Deduplication Pool is aPureDisk Storage Pool exposed to NetBackup by theNetBackup 5000 series appliance .
A PureDisk Deduplication Pool can be the destinationof replication from one NetBackup domain only. If youtry to replicate from MSDP storage in more than oneNetBackup domain, replication does not functioncorrectly.
Note: NetBackup supports PureDisk DeduplicationPool storage on NetBackup 5000 series appliancesonly.
PureDisk Deduplication Pool
■ A disk pool for Cloud Catalyst storage server.■ A Media Server Deduplication Pool
Cloud Catalyst Storage Server
Auto Image Replication does not support replicating from a storage unit group. Thatis, the source copy cannot be in a storage unit group.
If a replication job fails, NetBackup retries the replication until it succeeds or thesource images expire. You can change the retry interval behavior.
See “Configuring NetBackup optimized duplication or replication behavior”on page 153.
If a job fails after it replicates some of the images, NetBackup does not run aseparate image cleanup job for the partially replicated images. The next time thereplication runs, that job cleans up the image fragments before it begins to replicatethe images.
You can use a separate network for the duplication traffic.
See “About a separate network path for MSDP duplication and replication”on page 139.
See “Configuring MSDP replication to a different NetBackup domain” on page 158.
157Configuring deduplicationAbout MSDP replication to a different domain
See “About MSDP optimized duplication and replication” on page 37.
Configuring MSDP replication to a differentNetBackup domain
Table 5-25 describes the tasks that are required to replicate backup images fromoneMedia Server Deduplication Pool to another in a different NetBackup domain.
Optionally, you can use a separate network for the optimized duplication traffic.
See “About a separate network path for MSDP duplication and replication”on page 139.
Table 5-25 NetBackup MSDP replication configuration tasks
ProcedureTaskStep
See “About MSDP replication to a different domain” on page 156.
See “About NetBackup Auto Image Replication” on page 159.
Learn about MSDP replicationStep 1
A trust relationship is optional.
See “About trusted master servers for Auto Image Replication”on page 167.
Determine if you need toconfigure a trust relationship withthe target NetBackup domain
Step 2
See “Configuring a target for MSDP replication to a remote domain”on page 184.
See “Viewing the replication topology for Auto Image Replication”on page 165.
Add the remote storage server asa replication target
Step 3
158Configuring deduplicationConfiguring MSDP replication to a different NetBackup domain
Table 5-25 NetBackup MSDP replication configuration tasks (continued)
ProcedureTaskStep
The following are the options when you configure the SLP operations:
■ If you configured a trust relationship with the target domains, you canspecify one of the following options:■ All replication target storage servers (across different
NetBackup domains)NetBackup automatically creates an import SLP in the targetdomain when the replication job runs.
■ A specific Master Server. If you choose this option, you thenselect Target master server and Target import SLP.You must create an import SLP in the target domain before youconfigure an SLP in the source domain.
■ If you did not configure a trust relationship with the target domains,All replication target storage servers (across different NetBackupdomains) is selected by default. You cannot choose a specific targetstorage server.NetBackup automatically creates an import SLP in the target domainwhen the replication job runs.
See “About storage lifecycle policies” on page 192.
See “About the storage lifecycle policies required for Auto ImageReplication” on page 192.
See “Creating a storage lifecycle policy” on page 194.
Configure a storage lifecyclepolicy
Step 4
Optionally, you can configure the bandwidth for replication.
See “About configuring MSDP optimized duplication and replicationbandwidth” on page 191.
Configure replication bandwidthStep 5
About NetBackup Auto Image ReplicationThe backups that are generated in one NetBackup domain can be replicated tostorage in one or more target NetBackup domains. This process is referred to asAuto Image Replication.
The ability to replicate backups to storage in other NetBackup domains, often acrossvarious geographical sites, helps facilitate the following disaster recovery needs:
■ One-to-one modelA single production datacenter can back up to a disaster recovery site.
■ One-to-many modelA single production datacenter can back up to multiple disaster recovery sites.See “One-to-many Auto Image Replication model” on page 161.
159Configuring deduplicationConfiguring MSDP replication to a different NetBackup domain
■ Many-to-one modelRemote offices in multiple domains can back up to a storage device in a singledomain.
■ Many-to-many modelRemote datacenters in multiple domains can back up multiple disaster recoverysites.
NetBackup supports Auto Image Replication from a Media Server DeduplicationPool in one NetBackup domain to a Media Server Deduplication Pool in anotherdomain.
NetBackup supports Auto Image Replication from a disk volume in a Media ServerDeduplication Pool in one NetBackup domain to a disk volume in a Media ServerDeduplication Pool in another domain.
Notes about Auto Image Replication■ Although Auto Image Replication is a disaster recovery solution, you cannot
restore to clients in the primary (or originating) domain from the target masterdomain.
■ Auto Image Replication does not support synthetic backups or optimized syntheticbackups.
■ Auto Image Replication does not support spanning volumes in a disk pool.NetBackup fails backup jobs to the disk pools that span volumes if the backupjob is in a storage lifecycle policy that also contains a replication operation.
■ Auto Image Replication does not support replicating from a storage unit group.That is, the source copy cannot be in a storage unit group.
■ The ability to perform Auto Image Replication between different versions ofNetBackup does not overrule the basic image compatibility rules. For example,a database backup that was taken in one NetBackup domain can be replicatedto a NetBackup domain of an earlier version. However, the older server maynot be able to successfully restore from the newer image.For information about version compatibility and interoperability, see theNetBackup Enterprise Server and Server - Software Compatibility List at thefollowing URL:http://www.netbackup.com/compatibility
■ Synchronize the clocks of the master servers in the source and the targetdomains so that the master server in the target domain can import the imagesas soon as they are ready. The master server in the target domain cannot importan image until the image creation time is reached. Time zone differences arenot a factor because the images use Coordinated Universal Time (UTC).
160Configuring deduplicationConfiguring MSDP replication to a different NetBackup domain

Process OverviewTable 5-26 is an overview of the process, generally describing the events in theoriginating and target domains.
NetBackup uses storage lifecycle policies in the source domain and the targetdomain to manage the Auto Image Replication operations.
See “About the storage lifecycle policies required for Auto Image Replication”on page 192.
Table 5-26 Auto Image Replication process overview
Event descriptionDomain in which eventoccurs
Event
Clients are backed up according to a backup policy that indicates a storagelifecycle policy as the Policy storage selection. The SLP must include at leastone Replication operation to similar storage in the target domain.
Originating master server(Domain 1)
1
The storage server in the target domain recognizes that a replication eventhas occurred. It notifies the NetBackup master server in the target domain.
Target master server(Domain 2)
2
NetBackup imports the image immediately, based on an SLP that contains animport operation. NetBackup can import the image quickly because themetadata is replicated as part of the image. (This import process is not thesame as the import process available in the Catalog utility.)
Target master server(Domain 2)
3
After the image is imported into the target domain, NetBackup continues tomanage the copies in that domain. Depending on the configuration, the mediaserver in Domain 2 can replicate the images to a media server in Domain 3.
Target master server(Domain 2)
4
One-to-many Auto Image Replication modelIn this configuration, all copies are made in parallel. The copies are made withinthe context of one NetBackup job and simultaneously within the originating storageserver context. If one target storage server fails, the entire job fails and is retriedlater.
All copies have the same Target Retention. To achieve different Target Retentionsettings in each target master server domain, either create multiple source copiesor cascade duplication to target master servers.
Cascading Auto Image Replication modelReplications can be cascaded from the originating domain to multiple domains.Storage lifecycle policies are set up in each domain to anticipate the originatingimage, import it and then replicate it to the next target master.
161Configuring deduplicationConfiguring MSDP replication to a different NetBackup domain
Figure 5-6 represents the following cascading configuration across three domains.
■ The image is created in Domain 1, and then replicated to the target Domain 2.
■ The image is imported in Domain 2, and then replicated to a target Domain 3.
■ The image is then imported into Domain 3.
Figure 5-6 Cascading Auto Image Replication
SLP (D1toD2toD3)Import
Duplication to local storage
SLP (D1toD2toD3)Backup
Replication to target master
SLP (D1toD2toD3)Import
Replication to target server
All copies have the sameTarget retention, asindicated in Domain 1.
Import
Domain 1
Domain 2
Domain 3
Import
In the cascading model, the originating master server for Domain 2 and Domain 3is the master server in Domain 1.
Note: When the image is replicated in Domain 3, the replication notification eventindicates that the master server in Domain 2 is the originating master server.However, after the image is imported successfully into Domain 3, NetBackupcorrectly indicates that the originating master server is in Domain 1.
The cascading model presents a special case for the Import SLP that replicatesthe imported copy to a target master. (This master server that is neither the firstnor the last in the string of target master servers.)
The Import SLP must include at least one operation that uses a Fixed retentiontype and at least one operation that uses a Target Retention type. So that theImport SLP can satisfy these requirements, the import operation must use a TargetRetention.
Table 5-27 shows the difference in the import operation setup.
162Configuring deduplicationConfiguring MSDP replication to a different NetBackup domain
Table 5-27 Import operation difference in an SLP configured to replicate theimported copy
Import operation in a cascadingmodel
Import operation criteria
Same; no difference.The first operation must be an importoperation.
Same; no difference.A replication to target master must use aFixed retention type
Here is the difference:
To meet the criteria, the import operationmust use Target retention.
At least one operation must use the Targetretention.
The target retention is embedded in the source image.
In the cascading model that is represented in Figure 5-6, all copies have the sameTarget Retention—the Target Retention indicated in Domain 1.
For the copy in Domain 3 to have a different target retention, add an intermediaryreplication operation to the Domain 2 storage lifecycle policy. The intermediaryreplication operation acts as the source for the replication to target master. Sincethe target retention is embedded in the source image, the copy in Domain 3 honorsthe retention level that is set for the intermediary replication operation.
163Configuring deduplicationConfiguring MSDP replication to a different NetBackup domain
Figure 5-7 Cascading replications to target master servers, with varioustarget retentions
Domain 3
SLP (D1toD2toD3)Import
Duplication
Domain 2
Domain 1
SLP (D1toD2toD3)Backup
Replication to target master
The copy in Domain 3 has theretention indicated by thesource replication in Domain 2.
SLP (D1toD2toD3)Import
DuplicationReplication to target master
Import
Import
About the domain relationship for replicationFor a Media Server Deduplication Pool target: the relationship between theoriginating domain and the target domain or domains is established in the originatingdomain. Specifically, by configuring the target storage server in the Replicationtab of the Change Storage Server dialog box of the source storage server.
See “Configuring a target for MSDP replication to a remote domain” on page 184.
Before you configure the replication relationship, you can add the target masterserver as a trusted host.
See “About trusted master servers for Auto Image Replication” on page 167.
Caution: Choose the target storage server carefully. A target storage server mustnot also be a storage server for the originating domain.
About the replication topology for Auto Image ReplicationFor Auto Image Replication, the disk volumes have the properties that define thereplication relationships between the volumes. The knowledge of the volumeproperties is considered the replication topology. The following are the replicationproperties that a volume can have:
164Configuring deduplicationConfiguring MSDP replication to a different NetBackup domain
A source volume contains the backups of your clients. The volume is thesource for the images that are replicated to a remote NetBackup domain.Each source volume in an originating domain has one or more replicationpartner target volumes in a target domain.
Source
A target volume in the remote domain is the replication partner of a sourcevolume in the originating domain.
Target
The volume does not have a replication attribute.None
NetBackup exposes the storage for a Media Server Deduplication Pool as asingle volume. Therefore, there is always a one-to-one volume relationship forMSDP.
You configure the replication relationships in the source domain. To do so, you addtarget storage servers in theReplication tab of theChange Storage Server dialogbox of the source storage server.
See “Configuring a target for MSDP replication to a remote domain” on page 184.
NetBackup discovers the replication topology when you configure the replicationrelationships. NetBackup discovers topology changes when you use the Refreshoption of the Change Disk Pool dialog box.
See “Changing a Media Server Deduplication Pool properties” on page 353.
NetBackup includes a command that can help you understand your replicationtopology. Use the command in the following situations:
■ After you configure the replication targets.
■ After you configure the storage server and before you configure disk pools.
■ After changes to the volumes that comprise the storage.
See “Viewing the replication topology for Auto Image Replication” on page 165.
Viewing the replication topology for Auto ImageReplicationA volume that is a source of replication must have at least one replication partnerthat is the target of the replication. NetBackup lets you view the replication topologyof the storage.
See “About the replication topology for Auto Image Replication” on page 164.
To view the replication topology for Auto Image Replication
◆ Run the bpstsinfo command, specifying the storage server name and theserver type. The following is the command syntax:
165Configuring deduplicationConfiguring MSDP replication to a different NetBackup domain
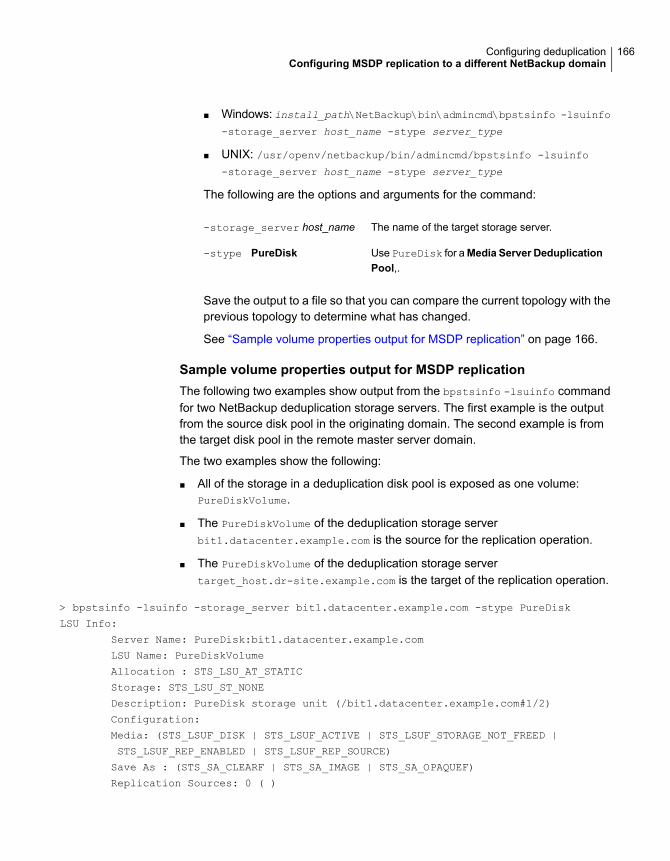
■ Windows: install_path\NetBackup\bin\admincmd\bpstsinfo -lsuinfo
-storage_server host_name -stype server_type
■ UNIX: /usr/openv/netbackup/bin/admincmd/bpstsinfo -lsuinfo
-storage_server host_name -stype server_type
The following are the options and arguments for the command:
The name of the target storage server.-storage_server host_name
Use PureDisk for aMedia Server DeduplicationPool,.
-stype PureDisk
Save the output to a file so that you can compare the current topology with theprevious topology to determine what has changed.
See “Sample volume properties output for MSDP replication” on page 166.
Sample volume properties output for MSDP replicationThe following two examples show output from the bpstsinfo -lsuinfo commandfor two NetBackup deduplication storage servers. The first example is the outputfrom the source disk pool in the originating domain. The second example is fromthe target disk pool in the remote master server domain.
The two examples show the following:
■ All of the storage in a deduplication disk pool is exposed as one volume:PureDiskVolume.
■ The PureDiskVolume of the deduplication storage serverbit1.datacenter.example.com is the source for the replication operation.
■ The PureDiskVolume of the deduplication storage servertarget_host.dr-site.example.com is the target of the replication operation.
> bpstsinfo -lsuinfo -storage_server bit1.datacenter.example.com -stype PureDisk
LSU Info:
Server Name: PureDisk:bit1.datacenter.example.com
LSU Name: PureDiskVolume
Allocation : STS_LSU_AT_STATIC
Storage: STS_LSU_ST_NONE
Description: PureDisk storage unit (/bit1.datacenter.example.com#1/2)
Configuration:
Media: (STS_LSUF_DISK | STS_LSUF_ACTIVE | STS_LSUF_STORAGE_NOT_FREED |
STS_LSUF_REP_ENABLED | STS_LSUF_REP_SOURCE)
Save As : (STS_SA_CLEARF | STS_SA_IMAGE | STS_SA_OPAQUEF)
Replication Sources: 0 ( )
166Configuring deduplicationConfiguring MSDP replication to a different NetBackup domain
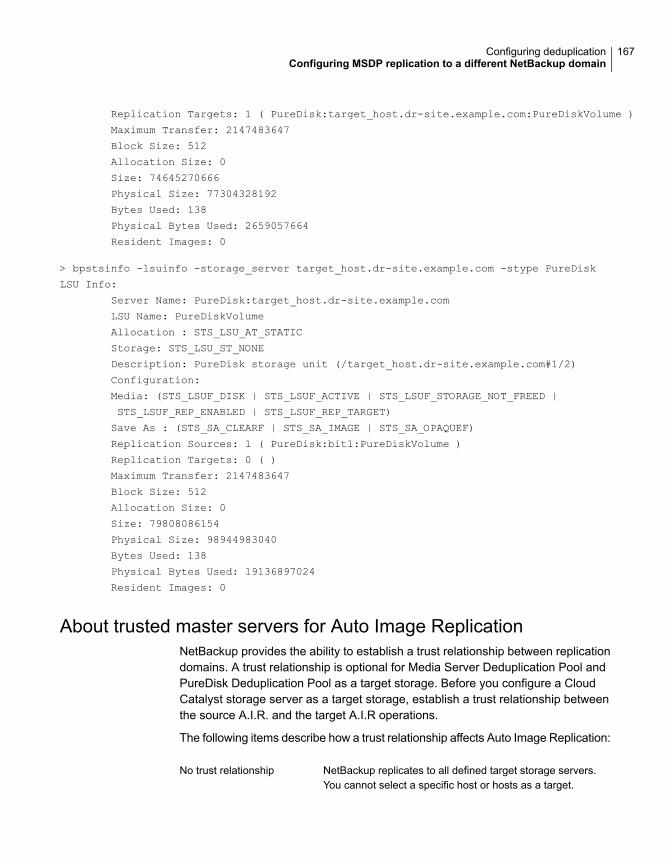
Replication Targets: 1 ( PureDisk:target_host.dr-site.example.com:PureDiskVolume )
Maximum Transfer: 2147483647
Block Size: 512
Allocation Size: 0
Size: 74645270666
Physical Size: 77304328192
Bytes Used: 138
Physical Bytes Used: 2659057664
Resident Images: 0
> bpstsinfo -lsuinfo -storage_server target_host.dr-site.example.com -stype PureDisk
LSU Info:
Server Name: PureDisk:target_host.dr-site.example.com
LSU Name: PureDiskVolume
Allocation : STS_LSU_AT_STATIC
Storage: STS_LSU_ST_NONE
Description: PureDisk storage unit (/target_host.dr-site.example.com#1/2)
Configuration:
Media: (STS_LSUF_DISK | STS_LSUF_ACTIVE | STS_LSUF_STORAGE_NOT_FREED |
STS_LSUF_REP_ENABLED | STS_LSUF_REP_TARGET)
Save As : (STS_SA_CLEARF | STS_SA_IMAGE | STS_SA_OPAQUEF)
Replication Sources: 1 ( PureDisk:bit1:PureDiskVolume )
Replication Targets: 0 ( )
Maximum Transfer: 2147483647
Block Size: 512
Allocation Size: 0
Size: 79808086154
Physical Size: 98944983040
Bytes Used: 138
Physical Bytes Used: 19136897024
Resident Images: 0
About trusted master servers for Auto Image ReplicationNetBackup provides the ability to establish a trust relationship between replicationdomains. A trust relationship is optional for Media Server Deduplication Pool andPureDisk Deduplication Pool as a target storage. Before you configure a CloudCatalyst storage server as a target storage, establish a trust relationship betweenthe source A.I.R. and the target A.I.R operations.
The following items describe how a trust relationship affects Auto Image Replication:
NetBackup replicates to all defined target storage servers.You cannot select a specific host or hosts as a target.
No trust relationship
167Configuring deduplicationConfiguring MSDP replication to a different NetBackup domain
You can select a subset of your trusted domains as a targetfor replication. NetBackup then replicates to the specifieddomains only rather than to all configured replication targets.This type of Auto Image Replication is known as targetedA.I.R.
Trust relationship
About adding trusted master server using NetBackupCA-signed certificateWith targeted A.I.R., when establishing trust between the source and the remotetarget server, you need to establish trust in both the domains.
1. In the source master server, add the target master server as a trusted server.
2. In the target master server, add the source master server as a trusted server.
Note: TheNetBackup Administration Console does not support adding a trustedmaster server using an external CA-signed certificate.
See “Adding a trusted master server using external CA-signed certificate”on page 178.
See “About the certificate to be used for adding a trusted master server” on page 171.
The following diagram illustrates the different tasks for adding trusted master serverswhen NetBackup CA-signed certificate (or host ID-based certificate) is used forestablishing trust between the source and the target master servers.
168Configuring deduplicationConfiguring MSDP replication to a different NetBackup domain
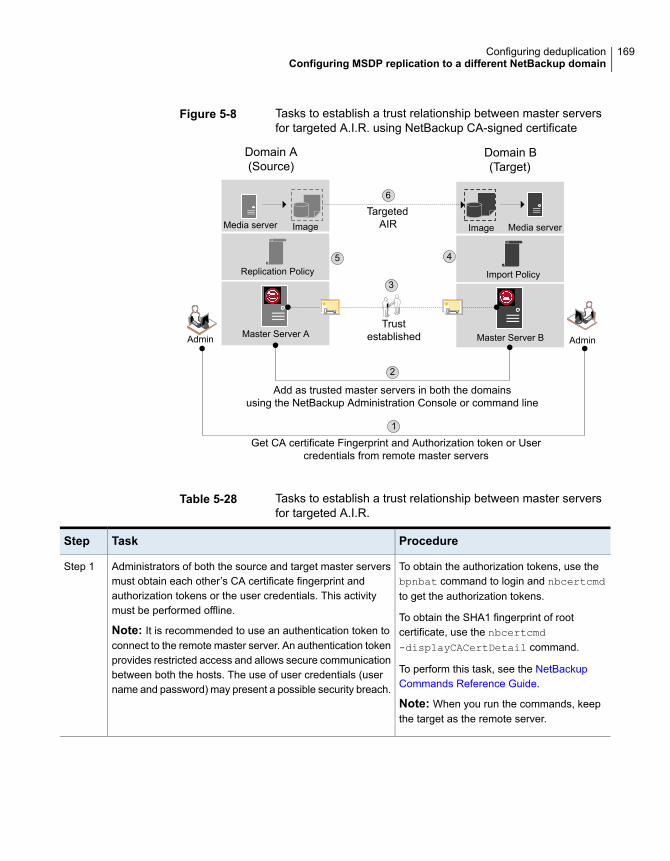
Figure 5-8 Tasks to establish a trust relationship between master serversfor targeted A.I.R. using NetBackup CA-signed certificate
Media server Image
Replication Policy
Master Server A
Media serverImage
Import Policy
Master Server BAdmin Admin
Get CA certificate Fingerprint and Authorization token or Usercredentials from remote master servers
Add as trusted master servers in both the domainsusing the NetBackup Administration Console or command line
6
Domain A(Source)
Domain B(Target)
TargetedAIR
5 4
3
2
1
Trustestablished
Table 5-28 Tasks to establish a trust relationship between master serversfor targeted A.I.R.
ProcedureTaskStep
To obtain the authorization tokens, use thebpnbat command to login and nbcertcmdto get the authorization tokens.
To obtain the SHA1 fingerprint of rootcertificate, use the nbcertcmd-displayCACertDetail command.
To perform this task, see the NetBackupCommands Reference Guide.
Note: When you run the commands, keepthe target as the remote server.
Administrators of both the source and target master serversmust obtain each other’s CA certificate fingerprint andauthorization tokens or the user credentials. This activitymust be performed offline.
Note: It is recommended to use an authentication token toconnect to the remote master server. An authentication tokenprovides restricted access and allows secure communicationbetween both the hosts. The use of user credentials (username and password) may present a possible security breach.
Step 1
169Configuring deduplicationConfiguring MSDP replication to a different NetBackup domain
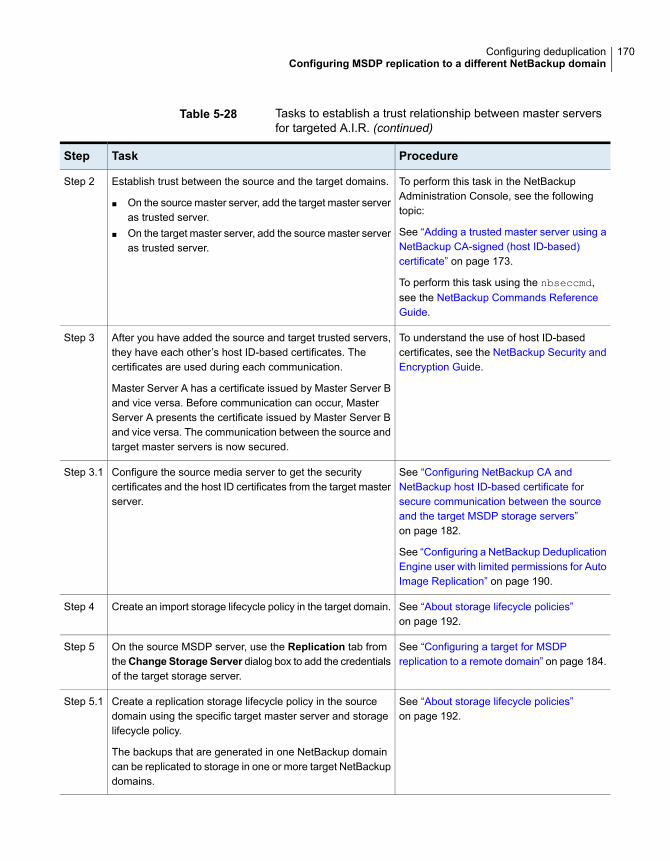
Table 5-28 Tasks to establish a trust relationship between master serversfor targeted A.I.R. (continued)
ProcedureTaskStep
To perform this task in the NetBackupAdministration Console, see the followingtopic:
See “Adding a trusted master server using aNetBackup CA-signed (host ID-based)certificate” on page 173.
To perform this task using the nbseccmd,see the NetBackup Commands ReferenceGuide.
Establish trust between the source and the target domains.
■ On the source master server, add the target master serveras trusted server.
■ On the target master server, add the source master serveras trusted server.
Step 2
To understand the use of host ID-basedcertificates, see the NetBackup Security andEncryption Guide.
After you have added the source and target trusted servers,they have each other’s host ID-based certificates. Thecertificates are used during each communication.
Master Server A has a certificate issued by Master Server Band vice versa. Before communication can occur, MasterServer A presents the certificate issued by Master Server Band vice versa. The communication between the source andtarget master servers is now secured.
Step 3
See “Configuring NetBackup CA andNetBackup host ID-based certificate forsecure communication between the sourceand the target MSDP storage servers”on page 182.
See “Configuring a NetBackup DeduplicationEngine user with limited permissions for AutoImage Replication” on page 190.
Configure the source media server to get the securitycertificates and the host ID certificates from the target masterserver.
Step 3.1
See “About storage lifecycle policies”on page 192.
Create an import storage lifecycle policy in the target domain.Step 4
See “Configuring a target for MSDPreplication to a remote domain” on page 184.
On the source MSDP server, use the Replication tab fromtheChange Storage Server dialog box to add the credentialsof the target storage server.
Step 5
See “About storage lifecycle policies”on page 192.
Create a replication storage lifecycle policy in the sourcedomain using the specific target master server and storagelifecycle policy.
The backups that are generated in one NetBackup domaincan be replicated to storage in one or more target NetBackupdomains.
Step 5.1
170Configuring deduplicationConfiguring MSDP replication to a different NetBackup domain

Table 5-28 Tasks to establish a trust relationship between master serversfor targeted A.I.R. (continued)
ProcedureTaskStep
See “About NetBackup Auto ImageReplication” on page 159.
The backups that are generated in one NetBackup domaincan be replicated to storage in one or more target NetBackupdomains. This process is referred to as Auto ImageReplication.
Step 6
If your source and target trusted servers use different NetBackup versions, considerthe following.
Note: When you upgrade both the source and the target master server to version8.1 or later, you need to update the trust relationship. Run the following command:
nbseccmd -setuptrustedmaster -update
See the NetBackup Commands Reference Guide.
Table 5-29 Trust setup methods for different NetBackup versions
Trust setup methodTarget server versionSource server version
Add a trusted master server usingauthorization token.
Complete action on both the servers.
8.1 and later8.1 and later
On the source server, add the targetas the trusted master server using theremote (target) server’s credentials.
8.0 or earlier8.1 and later
On the source server, add the targetas the trusted master server using theremote (target) server’s credentials.
8.1 and later8.0 or earlier
About the certificate to be used for adding a trusted master serverSource or target master servers may use NetBackup CA-signed certificates (hostID-based certificates) or external CA-signed certificates.
For more information on NetBackup host ID-based certificates and external CAsupport, refer to the NetBackup Security and Encryption Guide.
To establish trust between source and target master servers, NetBackup verifiesthe following:
171Configuring deduplicationConfiguring MSDP replication to a different NetBackup domain

If the external CA configuration options - ECA_CERT_PATH,ECA_PRIVATE_KEY_PATH, and ECA_TRUST_STORE_PATH - aredefined in the NetBackup configuration file of the source master server,it can establish the trust using an external certificate.
In case of Windows certificate trust store, only ECA_CERT_PATH isdefined.
For more information on the configuration options, refer to theNetBackup Administrator's Guide, Volume I.
Can the sourcemaster serverestablish trust usingexternal CA-signedcertificate?
The target master server may support external CA, NetBackup CA, orboth. The following settings show the CA usage information of themaster server:
■ In the NetBackup Administration Console - NetBackupManagement >SecurityManagement >Global Security Settings
■ In the NetBackup web user interface - Security > Global SecuritySettings > Secure Communication.
Which certificateauthorities (CA)does the targetmaster serversupport?
The following table lists CA support scenarios and certificate to be used to establishtrust between the source and the target master servers.
Table 5-30 Certificate to be used for trust setup
Certificate to be used for trust setupCA usage of thetarget master server
Source masterserver capabilityto use externalcertificate
External CA
See “Adding a trusted master server using external CA-signedcertificate” on page 178.
External CAYes
The source masterserver can useNetBackup CA andexternal CA forcommunication with aremote master server
NetBackup CA
See “Adding a trusted master server using a NetBackup CA-signed(host ID-based) certificate” on page 173.
NetBackup CA
NetBackup prompts to select the CA that you want to use for trustsetup
■ If you choose to use external CA, do the following:See “Adding a trusted master server using external CA-signedcertificate” on page 178.
■ If you choose to use NetBackup CA, do the following:See “Adding a trusted master server using a NetBackupCA-signed (host ID-based) certificate” on page 173.
External CA andNetBackup CA
172Configuring deduplicationConfiguring MSDP replication to a different NetBackup domain
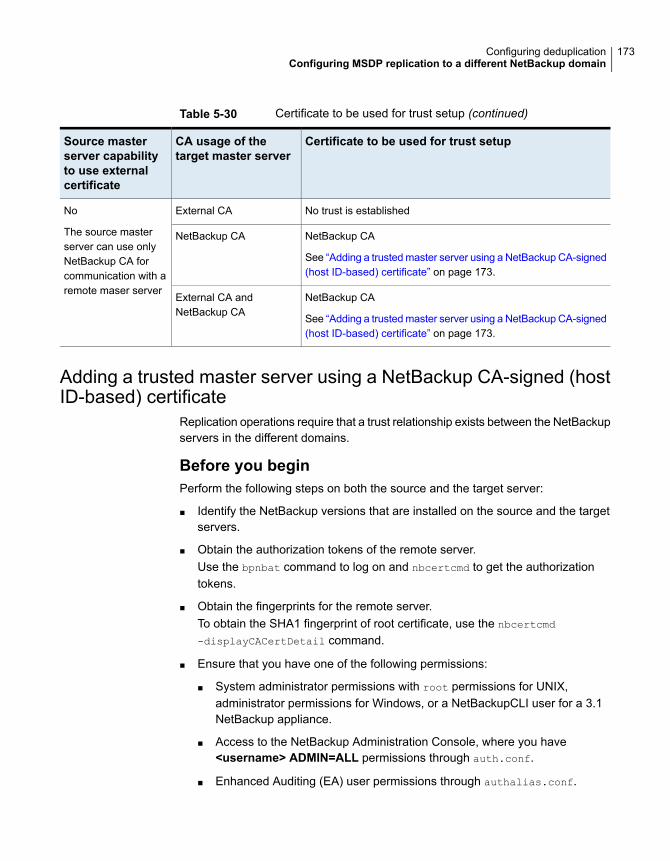
Table 5-30 Certificate to be used for trust setup (continued)
Certificate to be used for trust setupCA usage of thetarget master server
Source masterserver capabilityto use externalcertificate
No trust is establishedExternal CANo
The source masterserver can use onlyNetBackup CA forcommunication with aremote maser server
NetBackup CA
See “Adding a trusted master server using a NetBackup CA-signed(host ID-based) certificate” on page 173.
NetBackup CA
NetBackup CA
See “Adding a trusted master server using a NetBackup CA-signed(host ID-based) certificate” on page 173.
External CA andNetBackup CA
Adding a trusted master server using a NetBackup CA-signed (hostID-based) certificate
Replication operations require that a trust relationship exists between the NetBackupservers in the different domains.
Before you beginPerform the following steps on both the source and the target server:
■ Identify the NetBackup versions that are installed on the source and the targetservers.
■ Obtain the authorization tokens of the remote server.Use the bpnbat command to log on and nbcertcmd to get the authorizationtokens.
■ Obtain the fingerprints for the remote server.To obtain the SHA1 fingerprint of root certificate, use the nbcertcmd
-displayCACertDetail command.
■ Ensure that you have one of the following permissions:
■ System administrator permissions with root permissions for UNIX,administrator permissions for Windows, or a NetBackupCLI user for a 3.1NetBackup appliance.
■ Access to the NetBackup Administration Console, where you have<username> ADMIN=ALL permissions through auth.conf.
■ Enhanced Auditing (EA) user permissions through authalias.conf.
173Configuring deduplicationConfiguring MSDP replication to a different NetBackup domain
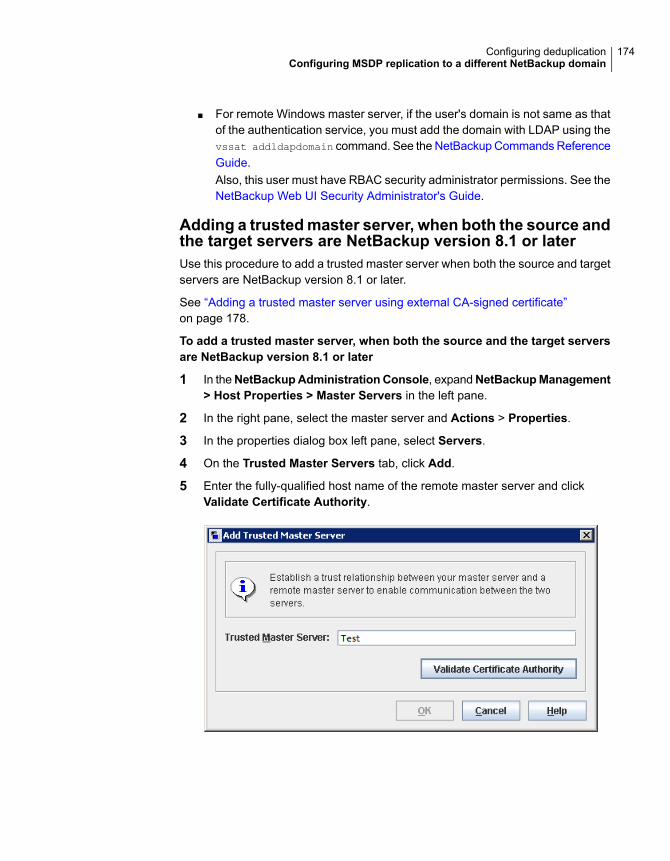
■ For remote Windows master server, if the user's domain is not same as thatof the authentication service, you must add the domain with LDAP using thevssat addldapdomain command. See the NetBackup Commands ReferenceGuide.Also, this user must have RBAC security administrator permissions. See theNetBackup Web UI Security Administrator's Guide.
Adding a trustedmaster server, when both the source andthe target servers are NetBackup version 8.1 or laterUse this procedure to add a trusted master server when both the source and targetservers are NetBackup version 8.1 or later.
See “Adding a trusted master server using external CA-signed certificate”on page 178.
To add a trusted master server, when both the source and the target serversare NetBackup version 8.1 or later
1 In theNetBackupAdministrationConsole, expandNetBackupManagement> Host Properties > Master Servers in the left pane.
2 In the right pane, select the master server and Actions > Properties.
3 In the properties dialog box left pane, select Servers.
4 On the Trusted Master Servers tab, click Add.
5 Enter the fully-qualified host name of the remote master server and clickValidate Certificate Authority.
174Configuring deduplicationConfiguring MSDP replication to a different NetBackup domain
6 In the Validate Certificate Authority dialog box, verify if the CA certificatefingerprint of the remote server is correct.
To proceed, click Yes.
If the fingerprints don’t match, click No. Contact the remote server admin toprovide the correct fingerprints.
7 Enter the trusted master server details using one of the following methods.
■ (Recommended) Select Specify authentication token of the trustedmaster server and enter the token details of the remote master server.
■ Select Specify credentials of the trusted master server and enter theuser name and password. Note that this method may present a possiblesecurity breach. Only an authentication token can provide restricted accessand allow secure communication between both the hosts.To establish trust with a 3.1 NetBackup master appliance, use theNetBackup CLI credentials.
175Configuring deduplicationConfiguring MSDP replication to a different NetBackup domain
8 Click OK.
9 Perform the same procedure on the remote master server that you added instep 5.
Adding a trustedmaster server, when both the source andthe target server are NetBackup version 8.0Use this procedure to add a trusted master server when both the source and targetservers are NetBackup version 8.0.
176Configuring deduplicationConfiguring MSDP replication to a different NetBackup domain
To add a trusted master server, when both the source and the target serverare NetBackup version 8.0
1 Ensure that the Enable insecure communication with NetBackup 8.0 andearlier hosts option is enabled in the global security settings.
2 In theNetBackupAdministrationConsole, expandNetBackupManagement> Host Properties > Master Servers in the left pane.
3 In the right pane, select the master server and Actions > Properties.
4 In the properties dialog box left pane, select Servers.
5 On the Trusted Master Servers tab, click Add.
6 Enter the fully-qualified host name of the remote master server and clickValidate Certificate Authority.
177Configuring deduplicationConfiguring MSDP replication to a different NetBackup domain
7 Enter the Username and Password of the remote master server host.
8 Click OK.
More informationSee “About trusted master servers for Auto Image Replication” on page 167.
See “Configuring MSDP replication to a different NetBackup domain” on page 158.
For details on usage reporting in the web UI, see the NetBackupWeb UI for BackupAdministrator's Guide.
For more information on commands, see the NetBackup Commands ReferenceGuide. For details on the authalias.conf, see the NetBackup Security andEncryption Guide.
Adding a trusted master server using external CA-signed certificateYou can now establish a trust between source and target master servers using anexternal CA-signed certificate.
For more information on the external CA support, refer to the NetBackup Securityand Encryption Guide.
178Configuring deduplicationConfiguring MSDP replication to a different NetBackup domain
See “About the certificate to be used for adding a trusted master server” on page 171.
Note: TheNetBackup Administration Console does not support adding a trustedmaster server using an external certificate.
If you try to add a trusted master server with an external certificate using theNetBackup Administration Console, an error is displayed.
To add a trusted master server using an external certificate
1 Configure the following external certificate configuration options on the sourcemaster server:
■ ECA_CERT_PATH
■ ECA_PRIVATE_KEY_PATH
■ ECA_TRUST_STORE_PATH
■ ECA_KEY_PASSPHRASEFILE (optional)
Note: In case of Windows certificate store, configure only the ECA_CERT_PATH
configuration option.
2 Run the nbseccmd -setuptrustedmaster command on the source masterserver.
For more information on the commands, refer to the NetBackup CommandsReference Guide.
If the source and target master servers are configured with external certificates thatare issued by different certificate authorities, refer to the following section from theNetBackup Deduplication Guide: Configuring external CA for secure communicationbetween the source MSDP storage server and the target MSDP storage server.
Removing a trusted master serverTo remove a trusted master server, you must perform the following procedure onboth the source and the target server.
Note: If either your source or the target server is on version 8.0 or earlier, followthe procedure that is prescribed in the respective guide.
179Configuring deduplicationConfiguring MSDP replication to a different NetBackup domain
To remove a trusted master server
1 Ensure that all replication jobs to the trusted target master server are complete.You can use nbstlutil stlilist to list the state of all storage lifecyclepolicy-managed operations. To cancel jobs use nbstlutil cancel.
See the NetBackup Commands Reference Guide for information about thenbstlutil command.
2 Delete all storage lifecycle policies (SLPs) that use the trusted master as adestination.
Note: Before deleting a storage lifecycle policy, ensure that there are no backuppolicies that indicate the SLP for the Policy storage.
3 In theNetBackupAdministrationConsole, expandNetBackupManagement> Host Properties > Master Servers in the left pane.
4 In the right pane, select the master server.
5 On the Actions menu, click Properties.
6 In the properties dialog box left pane, select Servers.
7 In the Servers dialog box, select the Trusted Master Servers tab.
8 On the Trusted Master Servers tab, select the trusted master server that youwant to remove and click Remove.
The Remove Server confirmation dialog box is displayed.
9 Click Yes.
10 When you finish removing trusted master servers, click OK.
11 Restart the nbsl service.
12 Repeat the steps on the source master server.
Note: In case of multiple NICs, if you have established trust using more that onehost NIC and if you remove the trust relationship with any one host NIC, the trustwith all the other host NICs is broken.
Enabling NetBackup clustered master server inter-nodeauthentication
NetBackup requires inter-node authentication among the master servers in a cluster.For authentication, you must provision an authentication certificate on all of the
180Configuring deduplicationConfiguring MSDP replication to a different NetBackup domain
nodes of the cluster. The certificates are used to establish SSL connections betweenthe NetBackup hosts. The inter-node authentication allows the following NetBackupfunctionality:
The NetBackup Administration Console in master serverclusters requires the NetBackup authentication certificatesfor correct functionality.
NetBackup AdministrationConsole
Auto Image Replication in which a master server is in a clusterrequires inter-node authentication among the hosts in thatcluster. The NetBackup authentication certificates providethe means to establish the proper trust relationships.
Provision the certificates on the cluster hosts before you addthe trusted master server. This requirement applies regardlessof whether the clustered mastered server is the source of thereplication operation or the target.
See “About trusted master servers for Auto ImageReplication” on page 167.
Targeted A.I.R. (Auto ImageReplication)
To enable clustered master server inter-node authentication
◆ On the active node of the NetBackup master server cluster, run the followingNetBackup command:
■ Windows: install_path\NetBackup\bin\admincmd\bpnbaz -setupat
■ UNIX: /usr/openv/netbackup/bin/admincmd/bpnbaz -setupat
NetBackup creates the certificates on every node in the master server cluster.
The following is example output:
# bpnbaz -setupat
You will have to restart Netbackup services on this machine after
the command completes successfully.
Do you want to continue(y/n)y
Gathering configuration information.
Please be patient as we wait for 10 sec for the security services
to start their operation.
Generating identity for host 'bit1.remote.example.com'
Setting up security on target host: bit1.remote.example.com
nbatd is successfully configured on Netbackup Master Server.
Operation completed successfully.
181Configuring deduplicationConfiguring MSDP replication to a different NetBackup domain
Configuring NetBackup CA and NetBackup host ID-based certificatefor secure communication between the source and the target MSDPstorage servers
MSDP now supports secure communications between two media servers from twodifferent NetBackup domains. The secure communication is set up when you runAuto Image Replication (A.I.R.). The two media servers must use the same CA todo the certificate security check. The source MSDP server uses the CA of the targetNetBackup domain and the certificate that is authorized by the target NetBackupdomain. You must manually deploy CA and the certificate on the source MSDPserver before using Auto Image Replication.
Note: After you upgrade to NetBackup 8.1.2 or later, manually deploy NetBackupCA and the NetBackup host ID-based certificate on the source MSDP server to usethe existing Auto Image Replication.
To configure the NetBackup CA and a NetBackup host ID-based certificate, completethe following steps:
1. On the target NetBackup master server, run the following command to displaythe NetBackup CA fingerprint:
■ Windowsinstall_path\NetBackup\bin\nbcertcmd -displayCACertDetail
■ UNIX/usr/openv/netbackup/bin/nbcertcmd -displayCACertDetail
2. On the source MSDP storage server, run the following command to get theNetBackup CA from target NetBackup master server:
■ Windowsinstall_path\NetBackup\bin\nbcertcmd -getCACertificate -server
target_master_server
■ UNIX/usr/openv/netbackup/bin/nbcertcmd -getCACertificate -server
target_master_server
When you accept the CA, ensure that the CA fingerprint is the same asdisplayed in the previous step.
3. On the source MSDP storage server, run the following command to get acertificate generated by target NetBackup master server:
■ Windows
182Configuring deduplicationConfiguring MSDP replication to a different NetBackup domain

install_path\NetBackup\bin\nbcertcmd -getCertificate -server
target_master_server -token token_string
■ UNIX/usr/openv/netbackup/bin/nbcertcmd -getCertificate -server
target_master_server -token token_string
4. Use either of these two methods to obtain the authorization tokens:
■ NetBackup Administration Console
■ Log on the target NetBackup master server and open SecurityManagement > Certificate Management > Token Management.
■ Click the Create Token option to create a token, or right-click the blankarea of the Token records list view and select the New Token menuitem to create a token.
■ NetBackup Commands
■ Use the bpnbat command to log on the target NetBackup master server.
■ Use the nbcertcmd command to get the authorization tokens.For more information on the commands, refer to the NetBackup CommandsReference Guide.
Configuring external CA for secure communication between thesource MSDP storage server and the target MSDP storage server
MSDP now supports use of an external CA for secure communication between twomedia servers that are from two different NetBackup domains. The securecommunication is set up when you run Auto Image Replication (A.I.R.). If the twomedia servers use different external CAs, then you must exchange the externalcertificates before you use Auto Image Replication.
To exchange the external certificates, complete the following steps:
1. Copy the root certificate file from the source MSDP storage server to the targetMSDP storage server. Combine the certificate files on the target MSDP storageserver.
2. Copy the root certificate file from the target MSDP storage server to the sourceMSDP storage server. Combine the certificate files on the source MSDP storageserver.
If the Windows certificate store is used to store the root certificate, add the rootcertificate to the certificate store. You can use the certutil tool to add the rootcertificate to the certificate store, or just right-click the root certificate file and select
183Configuring deduplicationConfiguring MSDP replication to a different NetBackup domain
Install Certificate. When you use the certutil tool to install the root certificate,the store name parameter must beRoot. When you use Windows explorer to installthe root certificate, the store location must be Local Machine and store name mustbe Trusted Root Certification Authorities.
Configuring a target for MSDP replication to a remote domainUse the following procedure to configure a target for replication from aMedia ServerDeduplication Pool in an originating domain to a deduplication pool in anothertarget domain. NetBackup supports several deduplication targets.
See “About MSDP replication to a different domain” on page 156.
Configuring the target storage server is only one step in the process of configuringMSDP replication.
See “Configuring MSDP replication to a different NetBackup domain” on page 158.
Note: About clustered master servers: If you add a trusted master server forreplication operations, you must enable inter-node authentication on all of the nodesin the cluster. Enable the authentication before you begin the following procedure.This requirement applies regardless of whether the clustered mastered server isthe source of the replication operation or the target.
See “About trusted master servers for Auto Image Replication” on page 167.
See “Enabling NetBackup clustered master server inter-node authentication”on page 180.
Caution: Choose the target storage server or servers carefully. A target storageserver must not also be a storage server for the source domain. Also, a disk volumemust not be shared among multiple NetBackup domains.
To configure a Media Server Deduplication Pool as a replication target
1 In the NetBackup Administration Console, expand Media and DeviceManagement > Credentials > Storage Server.
2 Select the MSDP storage server.
3 On the Edit menu, select Change.
184Configuring deduplicationConfiguring MSDP replication to a different NetBackup domain
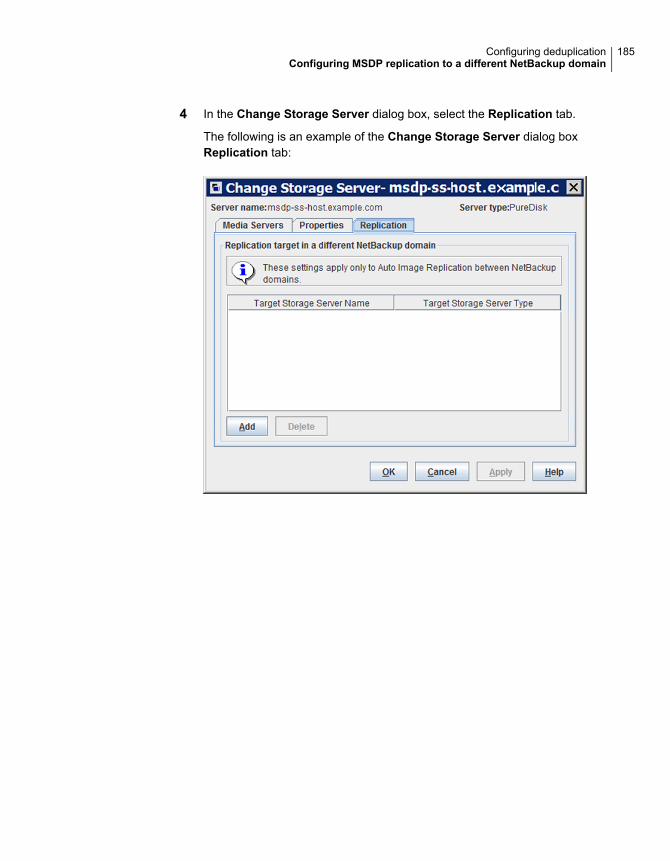
4 In the Change Storage Server dialog box, select the Replication tab.
The following is an example of the Change Storage Server dialog boxReplication tab:
185Configuring deduplicationConfiguring MSDP replication to a different NetBackup domain
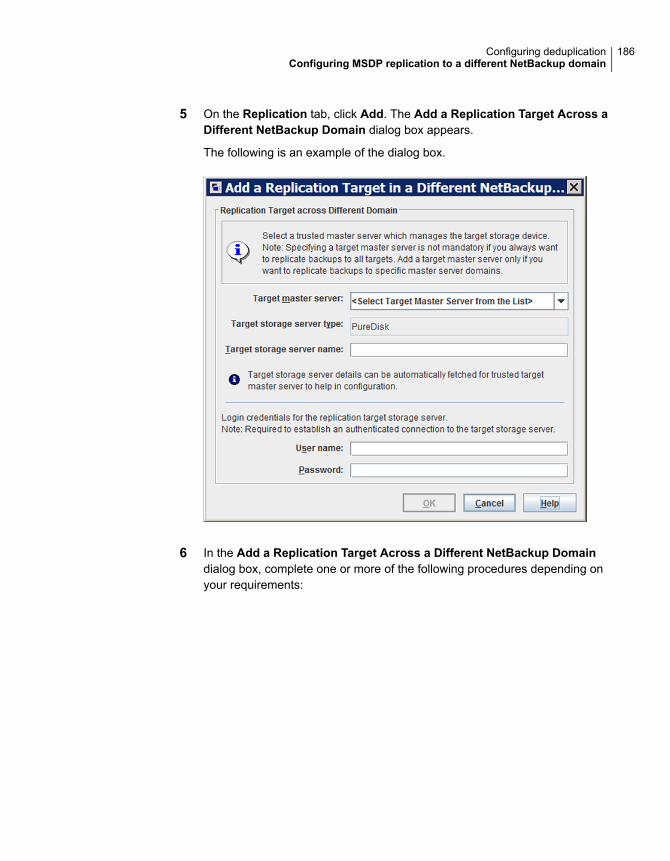
5 On the Replication tab, click Add. The Add a Replication Target Across aDifferent NetBackup Domain dialog box appears.
The following is an example of the dialog box.
6 In the Add a Replication Target Across a Different NetBackup Domaindialog box, complete one or more of the following procedures depending onyour requirements:
186Configuring deduplicationConfiguring MSDP replication to a different NetBackup domain
Add a trusted master server if you want to replicate backupimages to a subset of available targets.
To add a trusted master server
1 In the Target master server drop-down list, select Adda new trusted master server.
2 Complete the fields in the Add a New Trusted MasterServer dialog box. Click OK after you complete thefields.
See “Target options for MSDP replication” on page 188.
3 Repeat the first two steps until you have finished addingtrusted master servers.
4 To add a replication target, continue with the nextprocedure.
See “About trusted master servers for Auto ImageReplication” on page 167.
Add a trusted masterserver
Select a trusted master server if you want to replicate backupimages to a subset of available targets.
To select a trusted master server and replication target
1 In the Target master server drop-down list, select themaster server of the domain to which you want toreplicate data.
All trusted master servers are in the drop-down list.
2 In the Target storage server type drop-down list, selectthe type of target storage server.
All available target types are in the drop-down list.
3 In the Target storage server name drop-down list,select the storage server that hosts the targetdeduplication pool. All available storage servers in thetarget domain are in the drop-down list.
After you select the target storage server, NetBackuppopulates the User name field with the User name ofthe NetBackup Deduplication Engine of the target host.
4 Enter the Password for the deduplication service onthe target storage server.
5 Click OK.
See “Target options for MSDP replication” on page 188.
Select a trusted masterserver and replicationtarget
187Configuring deduplicationConfiguring MSDP replication to a different NetBackup domain

Enter a replication target, except the Cloud Catalyst storageserver, if you did not configure trusted master servers.
To enter a replication target
1 In the Target storage server name field, enter thename of the target storage server.
2 Enter theUser name and Password for the NetBackupDeduplication Engine on the target storage server.
3 Click OK.
See “Target options for MSDP replication” on page 188.
Enter a replication target
7 After all replication targets are added, click OK.
8 For the deduplication pools in each domain, open theChange Disk Pool dialogbox and click Refresh.
Configuring a replication target configures the replication properties of the diskvolumes in both domains. However, you must refresh the deduplication poolsso thatNetBackup reads the new volume properties.
See “Changing a Media Server Deduplication Pool properties” on page 353.
Target options for MSDP replicationThe following table describes the target options for replication to a NetBackupMediaServer Deduplication Pool.
Table 5-31 MSDP target replication options
DescriptionOption
All trusted master servers are in the drop-down list.
Select the master server for the target domain towhich you want to replicate backups.
To add the master server of another domain as atrusted master, select Add a new Trusted MasterServer. Configuring a trust relationship is requiredonly if you want to choose a specific target forreplication.
Target master server
If a trusted master server is configured, the valueis Target storage server name.
If a trusted master server is not configured, thevalue is PureDisk.
Target storage server type
188Configuring deduplicationConfiguring MSDP replication to a different NetBackup domain
Table 5-31 MSDP target replication options (continued)
DescriptionOption
Select the Cloud Catalyst storage server nameonly from the drop-down list of the trusted masterserver.
If a trusted master server is configured, select thetarget storage server. If a trusted master server isnot configured, enter the name of the target storageserver.
The drop-down list shows all the storage serversthat match the Target storage server type.
Target storage server name
When you configure a replication target, NetBackuppopulates the User name field with user accountof the target storage server, as follows:
■ For an MSDP target, the NetBackupDeduplication Engine user name.
■ For a PureDisk storage target, the PureDiskStorage Pool Authority user name.NetBackup supports PureDisk DeduplicationPool storage on NetBackup 5000 seriesappliances only.
■ For a Cloud Catalyst storage server target, theAccess Key ID of the cloud account.
For additional security, you can give limitedpermissions to the deduplication engine user.
See “Configuring a NetBackup DeduplicationEngine user with limited permissions for AutoImage Replication” on page 190.
Note: For Cloud Catalyst storage serverconfigured using AWS IAM Role or credentialbroker type (CREDS_CAP), provide the credentialsyou had entered when configuring the CloudCatalyst storage server.
See “Managing Cloud Catalyst storage server withIAM Role or CREDS_CAPS credential broker type”on page 270.
User name
189Configuring deduplicationConfiguring MSDP replication to a different NetBackup domain
Table 5-31 MSDP target replication options (continued)
DescriptionOption
Enter the password for the NetBackupDeduplication Engine, or enter the secret accesskey for the Cloud Catalyst storage server.
Note: For Cloud Catalyst storage serverconfigured using AWS IAM Role or credentialbroker type (CREDS_CAP), provide the credentialsyou had entered when configuring the CloudCatalyst storage server.
See “Managing Cloud Catalyst storage server withIAM Role or CREDS_CAPS credential broker type”on page 270.
Password
Configuring a NetBackup Deduplication Engine user withlimited permissions for Auto Image ReplicationMSDP supports the creation of a user specifically for Auto Image Replication. Auser with permissions limited to Auto Image Replication is more secure than a userwith administrative permissions.
To configure a NetBackup Deduplication Engine user with limited permissions forAuto Image Replication, complete the following steps:
1. Run the following command on the target MSDP server to add a user for AIR:
Windows
<install_path>\pdde\spauser -a -u <username> -p <password> --role
air
UNIX
/usr/openv/pdde/pdcr/bin/spauser -a -u <username> -p <password>
--role air
2. During configuration of MSDP as a replication target on the source NetBackupmaster server, enter the user name and password of the user with limitedpermissions for AIR.
190Configuring deduplicationConfiguring MSDP replication to a different NetBackup domain
About configuring MSDP optimized duplicationand replication bandwidth
Each optimized duplication or Auto Image Replication job is a separate process orstream. The number of duplication or replication jobs that run concurrentlydetermines the number of jobs that contend for bandwidth. You can control howmuch network bandwidth that optimized duplication and Auto Image Replicationjobs consume.
Two different configuration file settings control the bandwidth that is used, as follows:
The bandwidthlimit parameter in the agent.cfg file is theglobal bandwidth setting. You can use this parameter to limit thebandwidth that all replication jobs use. It applies to jobs in which aMedia Server Deduplication Pool is the source. Therefore,configure it on the source storage server.
If bandwidthlimit is greater than zero, all of the jobs share thebandwidth. That is, the bandwidth for each job is thebandwidthlimit divided by the number of jobs.
If bandwidthlimit=0, total bandwidth is not limited. However,you can limit the bandwidth that each job uses. See the followingOPTDUP_BANDWIDTH description.
If you specify bandwidth limits, optimized duplication and replicationtraffic to any destination is limited.
By default, bandwidthlimit=0.
The agent.cfg file resides in the following directory:
■ UNIX: storage_path/etc/puredisk
■ Windows: storage_path\etc\puredisk
bandwidthlimit
The OPTDUP_BANDWIDTH parameter in the pd.conf file specifiesthe per job bandwidth.
OPTDUP_BANDWIDTH applies only if the bandwidthlimitparameter in the agent.cfg file is zero.
If OPTDUP_BANDWIDTH and bandwidthlimit are both 0,bandwidth per replication job is not limited.
By default, OPTDUP_BANDWIDTH = 0.
See “About the MSDP pd.conf configuration file” on page 209.
See “Editing the MSDP pd.conf file” on page 210.
See “MSDP pd.conf file parameters” on page 210.
OPTDUP_BANDWIDTH
191Configuring deduplicationAbout configuring MSDP optimized duplication and replication bandwidth

See “Configuring MSDP optimized duplication within the same NetBackup domain”on page 149.
See “Configuring MSDP replication to a different NetBackup domain” on page 158.
About storage lifecycle policiesA storage lifecycle policy (SLP) is a storage plan for a set of backups. An SLP isconfigured within the Storage Lifecycle Policies utility.
An SLP contains instructions in the form of storage operations, to be applied to thedata that is backed up by a backup policy. Operations are added to the SLP thatdetermine how the data is stored, copied, replicated, and retained. NetBackupretries the copies as necessary to ensure that all copies are created.
SLPs offer the opportunity for users to assign a classification to the data at thepolicy level. A data classification represents a set of backup requirements, whichmakes it easier to configure backups for data with different requirements. Forexample, email data and financial data.
SLPs can be set up to provide staged backup behavior. They simplify datamanagement by applying a prescribed behavior to all the backup images that areincluded in the SLP. This process allows the NetBackup administrator to leveragethe advantages of disk-based backups in the near term. It also preserves theadvantages of tape-based backups for long-term storage.
TheSLPParameters properties in theNetBackupAdministration Console allowadministrators to customize how SLPs are maintained and how SLP jobs run.
Best-practice information about SLPs appears in the following document:
http://www.veritas.com/docs/TECH208536
For more information, see the NetBackup Administrator's Guide, Volume I.
About the storage lifecycle policies required forAuto Image Replication
To replicate images from one NetBackup domain to another NetBackup domainrequires two storage lifecycle policies. The following table describes the policiesand their requirements:
192Configuring deduplicationAbout storage lifecycle policies
Table 5-32 SLP requirements for Auto Image Replication
Storage lifecycle policy requirementsDomain
The Auto Image Replication SLP in the source domain must meet the following criteria:
■ The first operation must be a Backup operation to a Media Server Deduplication Pool.Indicate the exact storage unit from the drop-down list. Do not select Any Available.
Note: The target domain must contain the same type of storage to import the image.
■ At least one operation must be a Replication operation to a Media Server Deduplication Poolin another NetBackup domain.You can configure multiple Replication operations in an Auto Image Replication SLP. TheReplication operation settings determine whether the backup is replicated to all replication targetsin all master server domains or only to specific replication targets.See “About trusted master servers for Auto Image Replication” on page 167.
■ The SLP must be of the same data classification as the Import SLP in Domain 2.
Domain 1
(Sourcedomain)
If replicating to all targets in all domains, in each domain NetBackup automatically creates an ImportSLP that meets all the necessary criteria.
Note: If replicating to specific targets, you must create the Import SLP before creating the AutoImage Replication SLP in the originating domain.
The Import SLP must meet the following criteria:
■ The first operation in the SLP must be an Import operation. NetBackup must support theDestination storage as a target for replication from the source storage.Indicate the exact storage unit from the drop-down list. Do not select Any Available.
■ The SLP must contain at least one operation that has the Target retention specified.■ The SLP must be of the same data classification as the SLP in Domain 1. Matching the data
classification keeps a consistent meaning to the classification and facilitates global reporting bydata classification.
See the following topic for more information about Replication operation configuration:
Domain 2
(Targetdomain)
Figure 5-9 shows how the SLP in the target domain is set up to replicate the imagesfrom the originating master server domain.
193Configuring deduplicationAbout the storage lifecycle policies required for Auto Image Replication

Figure 5-9 Storage lifecycle policy pair required for Auto Image Replication
SLP on master server in the source domain
Import
Replication operation indicatesa target master
Import operationimports copies
SLP that imports the copies to the target domain
Note: Restart nbstserv after you make changes to the underlying storage for anyoperation in an SLP.
Creating a storage lifecycle policyA storage lifecycle policy (SLP) is a storage plan for a set of backups. The operationsin an SLP are the backup instructions for the data. Use the following procedure tocreate an SLP that contains multiple storage operations.
194Configuring deduplicationCreating a storage lifecycle policy
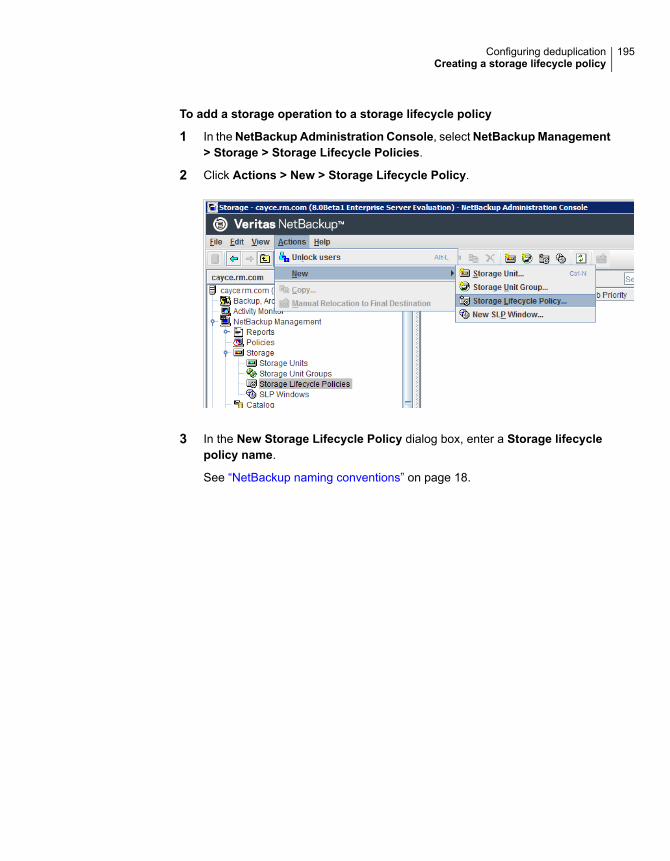
To add a storage operation to a storage lifecycle policy
1 In theNetBackup Administration Console, selectNetBackupManagement> Storage > Storage Lifecycle Policies.
2 Click Actions > New > Storage Lifecycle Policy.
3 In the New Storage Lifecycle Policy dialog box, enter a Storage lifecyclepolicy name.
See “NetBackup naming conventions” on page 18.
195Configuring deduplicationCreating a storage lifecycle policy
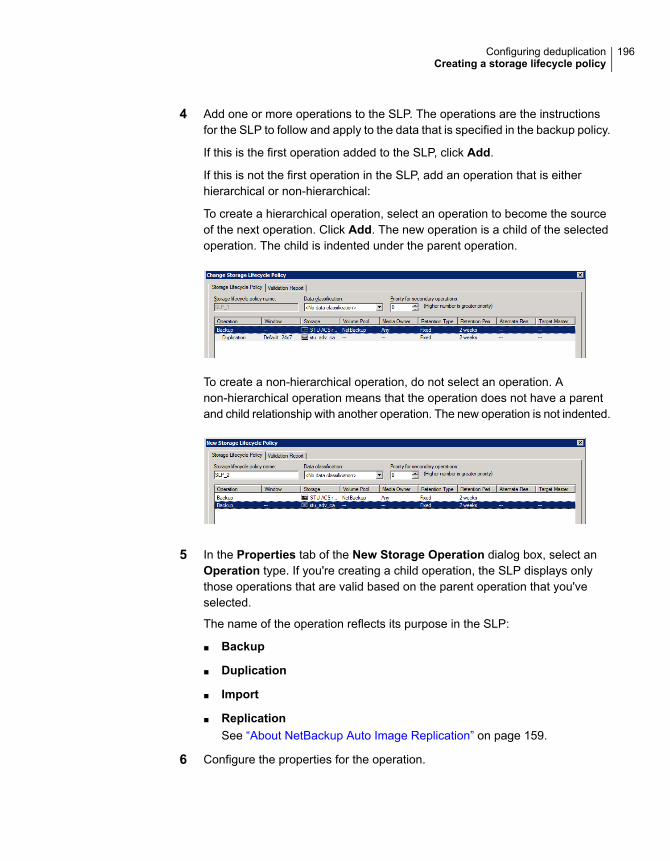
4 Add one or more operations to the SLP. The operations are the instructionsfor the SLP to follow and apply to the data that is specified in the backup policy.
If this is the first operation added to the SLP, click Add.
If this is not the first operation in the SLP, add an operation that is eitherhierarchical or non-hierarchical:
To create a hierarchical operation, select an operation to become the sourceof the next operation. Click Add. The new operation is a child of the selectedoperation. The child is indented under the parent operation.
To create a non-hierarchical operation, do not select an operation. Anon-hierarchical operation means that the operation does not have a parentand child relationship with another operation. The new operation is not indented.
5 In the Properties tab of the New Storage Operation dialog box, select anOperation type. If you're creating a child operation, the SLP displays onlythose operations that are valid based on the parent operation that you'veselected.
The name of the operation reflects its purpose in the SLP:
■ Backup
■ Duplication
■ Import
■ ReplicationSee “About NetBackup Auto Image Replication” on page 159.
6 Configure the properties for the operation.
196Configuring deduplicationCreating a storage lifecycle policy
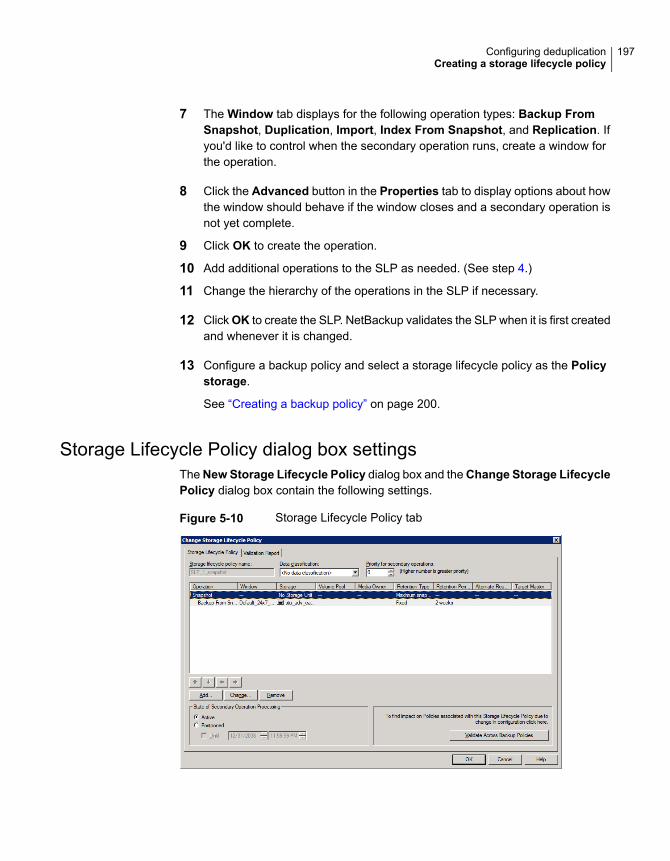
7 The Window tab displays for the following operation types: Backup FromSnapshot, Duplication, Import, Index From Snapshot, and Replication. Ifyou'd like to control when the secondary operation runs, create a window forthe operation.
8 Click the Advanced button in the Properties tab to display options about howthe window should behave if the window closes and a secondary operation isnot yet complete.
9 Click OK to create the operation.
10 Add additional operations to the SLP as needed. (See step 4.)
11 Change the hierarchy of the operations in the SLP if necessary.
12 ClickOK to create the SLP. NetBackup validates the SLP when it is first createdand whenever it is changed.
13 Configure a backup policy and select a storage lifecycle policy as the Policystorage.
See “Creating a backup policy” on page 200.
Storage Lifecycle Policy dialog box settingsTheNew Storage Lifecycle Policy dialog box and theChange Storage LifecyclePolicy dialog box contain the following settings.
Figure 5-10 Storage Lifecycle Policy tab
197Configuring deduplicationCreating a storage lifecycle policy
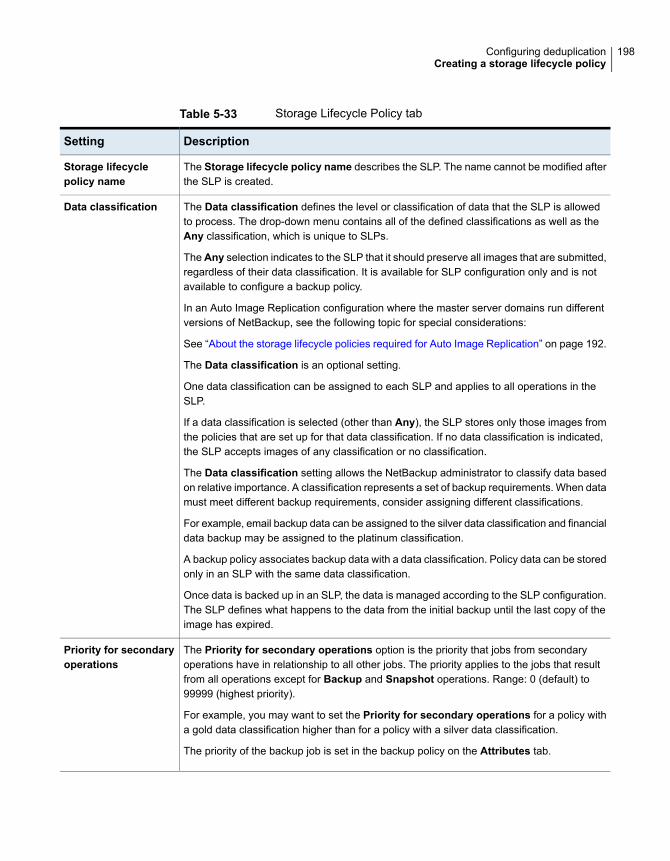
Table 5-33 Storage Lifecycle Policy tab
DescriptionSetting
The Storage lifecycle policy name describes the SLP. The name cannot be modified afterthe SLP is created.
Storage lifecyclepolicy name
The Data classification defines the level or classification of data that the SLP is allowedto process. The drop-down menu contains all of the defined classifications as well as theAny classification, which is unique to SLPs.
TheAny selection indicates to the SLP that it should preserve all images that are submitted,regardless of their data classification. It is available for SLP configuration only and is notavailable to configure a backup policy.
In an Auto Image Replication configuration where the master server domains run differentversions of NetBackup, see the following topic for special considerations:
See “About the storage lifecycle policies required for Auto Image Replication” on page 192.
The Data classification is an optional setting.
One data classification can be assigned to each SLP and applies to all operations in theSLP.
If a data classification is selected (other than Any), the SLP stores only those images fromthe policies that are set up for that data classification. If no data classification is indicated,the SLP accepts images of any classification or no classification.
The Data classification setting allows the NetBackup administrator to classify data basedon relative importance. A classification represents a set of backup requirements. When datamust meet different backup requirements, consider assigning different classifications.
For example, email backup data can be assigned to the silver data classification and financialdata backup may be assigned to the platinum classification.
A backup policy associates backup data with a data classification. Policy data can be storedonly in an SLP with the same data classification.
Once data is backed up in an SLP, the data is managed according to the SLP configuration.The SLP defines what happens to the data from the initial backup until the last copy of theimage has expired.
Data classification
The Priority for secondary operations option is the priority that jobs from secondaryoperations have in relationship to all other jobs. The priority applies to the jobs that resultfrom all operations except for Backup and Snapshot operations. Range: 0 (default) to99999 (highest priority).
For example, you may want to set the Priority for secondary operations for a policy witha gold data classification higher than for a policy with a silver data classification.
The priority of the backup job is set in the backup policy on the Attributes tab.
Priority for secondaryoperations
198Configuring deduplicationCreating a storage lifecycle policy
Table 5-33 Storage Lifecycle Policy tab (continued)
DescriptionSetting
Use the Add, Change, and Remove buttons to create a list of operations in the SLP. AnSLP must contain one or more operations. Multiple operations imply that multiple copiesare created.
The list also contains the columns that display information about each operation. Not allcolumns display by default.
For column descriptions, see the following topic:
Operations
Use the arrows to indicate the indentation (or hierarchy) of the source for each copy. Onecopy can be the source for many other copies.
Arrows
The Active and Postponed options appear under State of Secondary OperationProcessing and refer to the processing of all duplication operations in the SLP.
Note: The Active and Postponed options apply to duplication operations that createtar-formatted images. For example, those created with bpduplicate. The Active andPostponed options do not affect the images that are duplicated as a result of OpenStorageoptimized duplication, NDMP, or if one or more destination storage units are specified aspart of a storage unit group.
■ EnableActive to let secondary operations continue as soon as possible. When changedfrom Postponed to Active, NetBackup continues to process the images, picking upwhere it left off when secondary operations were made inactive.
■ Enable Postponed to postpone the secondary operations for the entire SLP. Postponeddoes not postpone the creation of duplication jobs, it postpones the creation of imagesinstead. The duplication jobs continue to be created, but they are not run until secondaryoperations are active again.All secondary operations in the SLP are inactive indefinitely unless the administratorselects Active or until the Until option is selected and an activation date is indicated.
Active
and
Postponed
Click this button to see how changes to this SLP can affect the policies that are associatedwith this SLP. The button generates a report that displays on the Validation Report tab.
This button performs the same validation as the -conflict option performs when usedwith the nbstl command.
Validate AcrossBackup Policies button
About MSDP backup policy configurationWhen you configure a backup policy, for the Policy storage select a storage unitthat uses a deduplication pool.
For a storage lifecycle policy, for the Storage unit select a storage unit that usesa deduplication pool.
199Configuring deduplicationAbout MSDP backup policy configuration
For VMware backups, select the Enable file recovery from VM backup optionwhen you configure a VMware backup policy. The Enable file recovery from VMbackup option provides the best deduplication rates.
NetBackup deduplicates the client data that it sends to a deduplication storage unit.
Creating a backup policyUse the following procedure to create a backup policy.
To create a policy
1 In theNetBackupAdministrationConsole, expandNetBackupManagement> Policies.
2 Select Actions > New > Policy.
3 Type a unique name for the policy.
See “NetBackup naming conventions” on page 18.
4 Clear the Use Policy Configuration Wizard and click OK.
5 Configure the attributes, the schedules, the clients, and the backup selectionsfor the new policy.
Resilient Network propertiesThe Resilient Network properties appear for the master server, for media servers,and for clients. For media servers and clients, the Resilient Network propertiesare read only. When a job runs, the master server updates the media server andthe client with the current properties.
The Resilient Network properties let you configure NetBackup to use resilientnetwork connections for backups and restores. A resilient connection allows backupand restore traffic between a client and a NetBackup media server to functioneffectively in high-latency, low-bandwidth networks such as WANs. The data travelsacross a wide area network (WAN) to media servers in a central datacenter.
NetBackup monitors the socket connections between the remote client and theNetBackup media server. If possible, NetBackup re-establishes dropped connectionsand resynchronizes the data stream. NetBackup also overcomes latency issues tomaintain an unbroken data stream. A resilient connection can survive networkinterruptions of up to 80 seconds. A resilient connection may survive interruptionslonger than 80 seconds.
The NetBackup Remote Network Transport Service manages the connectionbetween the computers. The Remote Network Transport Service runs on the master
200Configuring deduplicationCreating a backup policy
server, the client, and the media server that processes the backup or restore job.If the connection is interrupted or fails, the services attempt to re-establish aconnection and synchronize the data.
NetBackup protects only the network socket connections that the NetBackup RemoteNetwork Transport Service (nbrntd) creates. Examples of the connections that arenot supported are:
■ Clients that back up their own data (deduplication clients and SAN clients)
■ Granular Recovery Technology (GRT) for Exchange Server or SharePoint Server
■ NetBackup nbfsd process.
NetBackup protects connections only after they are established. If NetBackup cannotcreate a connection because of network problems, there is nothing to protect.
Resilient connections apply between clients and NetBackup media servers, whichincludes master servers when they function as media servers. Resilient connectionsdo not apply to master servers or media servers if they function as clients and backup data to a media server.
Resilient connections can apply to all of the clients or to a subset of clients.
Note: If a client is in a different subdomain than the server, add the fully qualifieddomain name of the server to the client’s hosts file. For example,india.veritas.org is a different subdomain than china.veritas.org.
When a backup or restore job for a client starts, NetBackup searches the ResilientNetwork list from top to bottom looking for the client. If NetBackup finds the client,NetBackup updates the resilient network setting of the client and the media serverthat runs the job. NetBackup then uses a resilient connection.
201Configuring deduplicationResilient Network properties
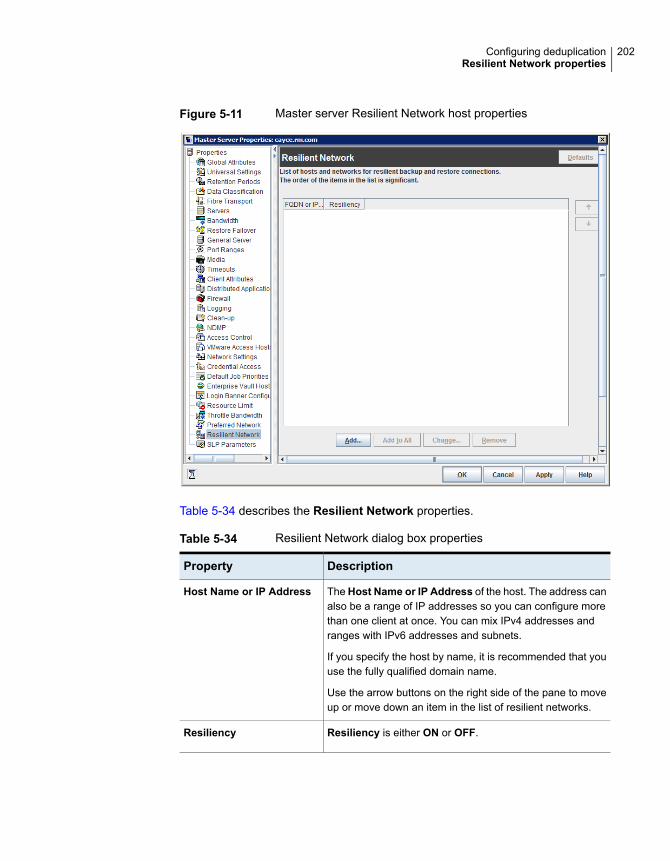
Figure 5-11 Master server Resilient Network host properties
Table 5-34 describes the Resilient Network properties.
Table 5-34 Resilient Network dialog box properties
DescriptionProperty
TheHost Name or IP Address of the host. The address canalso be a range of IP addresses so you can configure morethan one client at once. You can mix IPv4 addresses andranges with IPv6 addresses and subnets.
If you specify the host by name, it is recommended that youuse the fully qualified domain name.
Use the arrow buttons on the right side of the pane to moveup or move down an item in the list of resilient networks.
Host Name or IP Address
Resiliency is either ON or OFF.Resiliency
202Configuring deduplicationResilient Network properties
Note: The order is significant for the items in the list of resilient networks. If a clientis in the list more than once, the first match determines its resilient connectionstatus. For example, suppose you add a client and specify the client IP addressand specify On for Resiliency. Suppose also that you add a range of IP addressesas Off, and the client IP address is within that range. If the client IP address appearsbefore the address range, the client connection is resilient. Conversely, if the IPrange appears first, the client connection is not resilient.
The resilient status of each client also appears as follows:
■ In the NetBackup Administration Console, select NetBackup Management> Policies in the left pane and then select a policy. In the right pane, aResiliency column shows the status for each client in the policy.
■ In the NetBackup Administration Console, select NetBackup Management> Host Properties > Clients in the left pane. In the right pane, a Resiliencycolumn shows the status for each client.
Other NetBackup properties control the order in which NetBackup uses networkaddresses.
The NetBackup resilient connections use the SOCKS protocol version 5.
Resilient connection traffic is not encrypted. It is recommended that you encryptyour backups. For deduplication backups, use the deduplication-based encryption.For other backups, use policy-based encryption.
Resilient connections apply to backup connections. Therefore, no additional networkports or firewall ports must be opened.
Note: If multiple backup streams run concurrently, the Remote Network TransportService writes a large amount of information to the log files. In such a scenario, itis recommended that you set the logging level for the Remote Network TransportService to 2 or less. Instructions to configure unified logs are in a different guide.
See the NetBackup Logging Reference Guide.
Resilient connection resource usageResilient connections consume more resources than regular connections, as follows:
■ More socket connections are required per data stream. Three socket connectionsare required to accommodate the Remote Network Transport Service that runson both the media server and the client. Only one socket connection is requiredfor a non-resilient connection.
203Configuring deduplicationResilient Network properties
■ More sockets are open on media servers and clients. Three open sockets arerequired rather than one for a non-resilient connection. The increased numberof open sockets may cause issues on busy media servers.
■ More processes run on media servers and clients. Usually, only one moreprocess per host runs even if multiple connections exist.
■ The processing that is required to maintain a resilient connection may reduceperformance slightly.
Specifying resilient connectionsUse the following procedure to specify resilient connections for NetBackup clients.
See “Resilient Network properties” on page 200.
Alternatively, you can use the resilient_clients script to specify resilientconnections for clients:
■ Windows: install_path\NetBackup\bin\admincmd\resilient_clients
■ UNIX: /usr/openv/netbackup/bin/admincmd/resilient_clients
To specify resilient connections
1 In theNetBackupAdministrationConsole, expandNetBackupManagement> Host Properties > Master Servers in the left pane.
2 In the right pane, select the master server on which to specify properties.
3 On the Actions menu, click Properties.
4 In the properties dialog box left pane, select Resilient Network.
5 In the Resilient Network dialog box, use the following buttons to manageresiliency for clients:
204Configuring deduplicationSpecifying resilient connections
To add resilient settings
1 Click Add.
The Add Resilient Network Settings dialog box appears
2 Enter a client host name, an IP address, or an address range.
If you specify the client host by name, it is recommended that youuse the fully qualified domain name.
For address ranges, use Classless Inter-Domain Routing (CIDR)notation (for example, 192.168.100.0/24 or fd00::/8).
3 Ensure that the Resiliency On option is selected.
4 Click Add.
5 Repeat until you have finished entering clients or address ranges.
6 When you finish adding network settings, click Close.
Add
If you select multiple hosts in theNetBackup Administration Console,the entries in the Resilient Network list may appear in different colors,as follows:
■ The entries that appear in black type are configured on all of thehosts.
■ The entries that appear in gray type are configured on some of thehosts only.
For the entries that are configured on some of the hosts only, you canadd them to all of the hosts. To do so, select them and click Add To All.
Add To All
To change resilient settings
1 Select the client host name, the IP address, or the address range.
2 Click Change.
The Change Resilient Network Settings dialog box appears
3 Select the desired Resiliency setting.
4 Click OK.
Change
Remove the select host or address rang
1 Select the client host name, the IP address, or the address range.
2 Click Remove.
The client is removed immediately; a confirmation dialog box doesnot appear.
Remove
205Configuring deduplicationSpecifying resilient connections
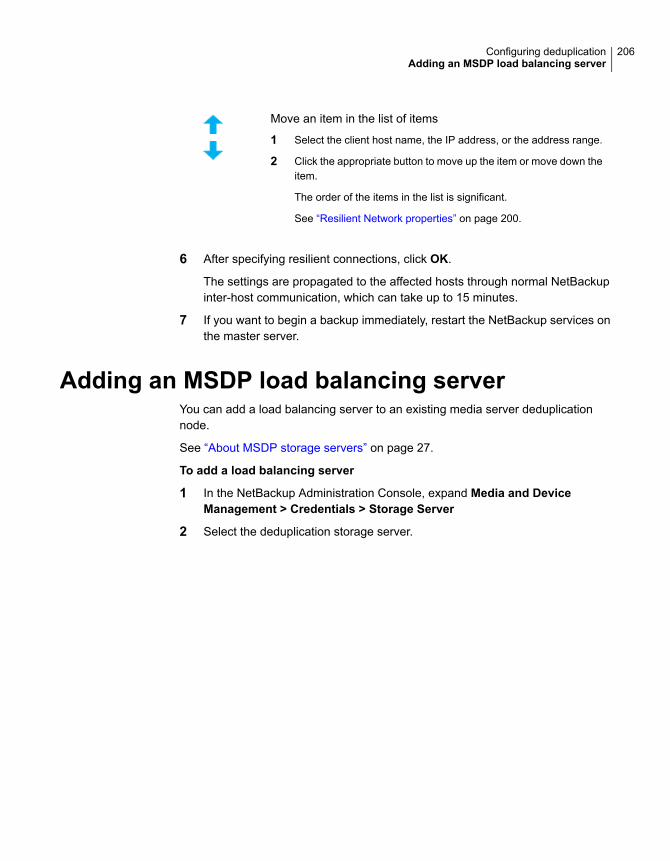
Move an item in the list of items
1 Select the client host name, the IP address, or the address range.
2 Click the appropriate button to move up the item or move down theitem.
The order of the items in the list is significant.
See “Resilient Network properties” on page 200.
6 After specifying resilient connections, click OK.
The settings are propagated to the affected hosts through normal NetBackupinter-host communication, which can take up to 15 minutes.
7 If you want to begin a backup immediately, restart the NetBackup services onthe master server.
Adding an MSDP load balancing serverYou can add a load balancing server to an existing media server deduplicationnode.
See “About MSDP storage servers” on page 27.
To add a load balancing server
1 In the NetBackup Administration Console, expand Media and DeviceManagement > Credentials > Storage Server
2 Select the deduplication storage server.
206Configuring deduplicationAdding an MSDP load balancing server
3 On the Edit, select Change.
4 In the Change Storage Server dialog box, select the Media Servers tab
5 Select the media server or servers that you want to use as a load balancingserver. It must be a supported host.
The media servers that are checked are configured as load balancing servers.
6 Click OK.
7 For all storage units in which Only use the following media servers isconfigured, ensure that the new load balancing server is selected.
About variable-length deduplication onNetBackupclients
Currently, NetBackup deduplication follows a fixed-length deduplication methodwhere the data streams are chunked into fixed-length segments (128 KB) and thenprocessed for deduplication. Fixed-length deduplication has the advantage of beinga swift method and it consumes less computing resources. Fixed-lengthdeduplication handles most kinds of data streams efficiently. However, there canbe cases where fixed-length deduplication might result in low deduplication ratios.
207Configuring deduplicationAbout variable-length deduplication on NetBackup clients

If your data was modified in a shifting mode, that is, if some data was inserted inthe middle of a file, then variable-length deduplication enables you to get higherdeduplication ratios when you back up the data. Variable-length deduplicationreduces backup storage, improves the backup performance, and lowers the overallcost that is spent on data protection.
Note: Use variable-length deduplication for data types that do not show a gooddeduplication ratio with the current MSDP intelligent deduplication algorithm andaffiliated streamers. Enabling Variable-length deduplication might improve thededuplication ratio, but consider that the CPU performance might get affected.
In variable-length deduplication, every segment has a variable size with configurablesize boundaries. The NetBackup client examines and applies a secure hashalgorithm (SHA-2) to the variable-length segments of the data. Each data segmentis assigned a unique ID and NetBackup evaluates if any data segment with thesame ID exists in the backup. If the data segment already exists, then the segmentdata is not stored again.
Warning: If you enable compression for the backup policy, variable-lengthdeduplication does not work even when you configure it.
The following table describes the effect of variable-length deduplication on the databackup:
Table 5-35 Effect of variable-length deduplication
Variable-length deduplication is beneficial if thedata file is modified in a shifting mode, that is whendata is inserted, removed, or modified at a binarylevel. When such modified data is backed up again,variable-length deduplication achieves a higherdeduplication ratio. Thus, the second orsubsequent backups have higher deduplicationratios.
Effect on the deduplication ratio
Variable-length deduplication can be a bit moreresource-intensive than fixed-length deduplicationto achieve a better deduplication ratio.Variable-length deduplication needs more CPUcycles to compute segment boundaries and thebackup time might be more than the fixed-lengthdeduplication method.
Effect on the CPU
208Configuring deduplicationAbout variable-length deduplication on NetBackup clients
Table 5-35 Effect of variable-length deduplication (continued)
Variable-length deduplication does not affect thedata restore process.
Effect on data restore
Configure variable-length deduplicationBy default, the variable-length deduplication is disabled on a NetBackup client. Youcan enable variable-length deduplication by adding parameters in the pd.conf file.To enable the same settings for all NetBackup clients or policies, you must specifyall the clients or policies in the pd.conf file.
In a deduplication load balancing scenario, you must upgrade the media serversto NetBackup 8.1.1 or later and modify the pd.conf file on all the media servers. Ifa backup job selects an older media server (earlier than NetBackup 8.1.1) for theload balancing pool, fixed-length deduplication is used instead of variable-lengthdeduplication. Avoid configuring media servers with different NetBackup versionsin a load balancing scenario. The data segments generated from variable-lengthdeduplication are different from the data segments generated from fixed-lengthdeduplication. Therefore, load balancing media servers with different NetBackupversions results in a low deduplication ratio.
See “About the MSDP pd.conf configuration file” on page 209.
See “Editing the MSDP pd.conf file” on page 210.
See “MSDP pd.conf file parameters” on page 210.
About the MSDP pd.conf configuration fileOn each NetBackup host that deduplicates data, a pd.conf file contains the variousconfiguration settings that control the operation of deduplication for the host. Bydefault, the pd.conf file settings on the deduplication storage server apply to allload balancing servers and all clients that deduplicate their own data.
You can edit the file to configure advanced settings for that host. If a configurationsetting does not exist in a pd.conf file, you can add it. If you change the pd.conf
file on a host, it changes the settings for that host only. If you want the same settingsfor all of the hosts that deduplicate data, you must change the pd.conf file on allof the hosts.
The pd.conf file settings may change between releases. During upgrades,NetBackup adds only the required settings to existing pd.conf files.
The pd.conf file resides in the following directories:
■ (UNIX) /usr/openv/lib/ost-plugins/
209Configuring deduplicationAbout the MSDP pd.conf configuration file
■ (Windows) install_path\Veritas\NetBackup\bin\ost-plugins
See “MSDP pd.conf file parameters” on page 210.
See “Editing the MSDP pd.conf file” on page 210.
Editing the MSDP pd.conf fileIf you change the pd.conf file on a host, it changes the settings for that host only.If you want the same settings for all of the hosts that deduplicate data, you mustchange the pd.conf file on all of the hosts.
Note: Veritas recommends that you make a backup copy of the file before you editit.
See “About the MSDP pd.conf configuration file” on page 209.
See “MSDP pd.conf file parameters” on page 210.
To edit the pd.conf file
1 Use a text editor to open the pd.conf file.
The pd.conf file resides in the following directories:
■ (UNIX) /usr/openv/lib/ost-plugins/
■ (Windows) install_path\Veritas\NetBackup\bin\ost-plugins
2 To activate a setting, remove the pound character (#) in column 1 from eachline that you want to edit.
3 To change a setting, specify a new value.
Note: The spaces to the left and right of the equal sign (=) in the file aresignificant. Ensure that the space characters appear in the file after you editthe file.
4 Save and close the file.
5 Restart the NetBackup Remote Manager and Monitor Service (nbrmms) on thehost.
MSDP pd.conf file parametersTable 5-36 describes the deduplication parameters that you can configure for aNetBackup Media Server Deduplication Pool environment.
210Configuring deduplicationEditing the MSDP pd.conf file
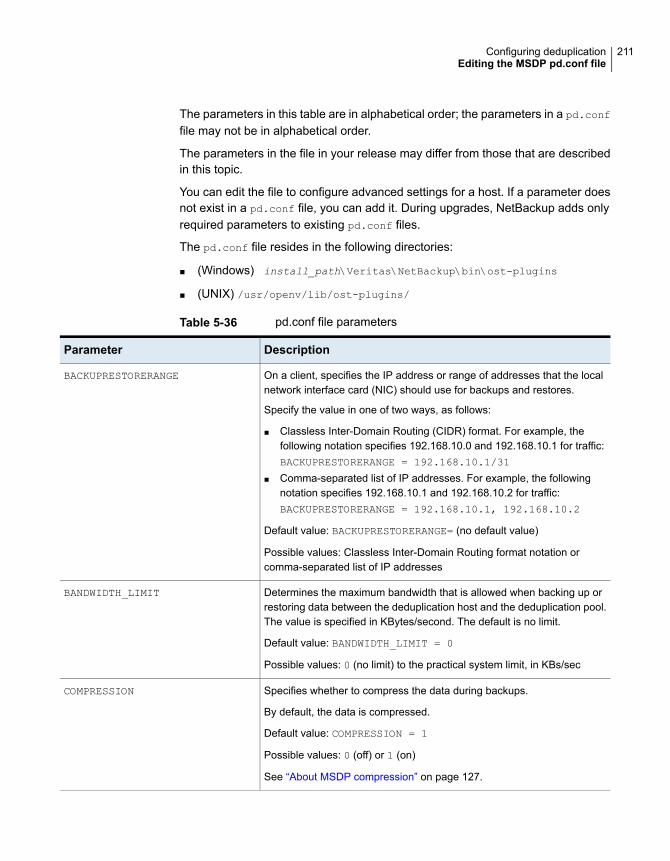
The parameters in this table are in alphabetical order; the parameters in a pd.conf
file may not be in alphabetical order.
The parameters in the file in your release may differ from those that are describedin this topic.
You can edit the file to configure advanced settings for a host. If a parameter doesnot exist in a pd.conf file, you can add it. During upgrades, NetBackup adds onlyrequired parameters to existing pd.conf files.
The pd.conf file resides in the following directories:
■ (Windows) install_path\Veritas\NetBackup\bin\ost-plugins
■ (UNIX) /usr/openv/lib/ost-plugins/
Table 5-36 pd.conf file parameters
DescriptionParameter
On a client, specifies the IP address or range of addresses that the localnetwork interface card (NIC) should use for backups and restores.
Specify the value in one of two ways, as follows:
■ Classless Inter-Domain Routing (CIDR) format. For example, thefollowing notation specifies 192.168.10.0 and 192.168.10.1 for traffic:BACKUPRESTORERANGE = 192.168.10.1/31
■ Comma-separated list of IP addresses. For example, the followingnotation specifies 192.168.10.1 and 192.168.10.2 for traffic:BACKUPRESTORERANGE = 192.168.10.1, 192.168.10.2
Default value: BACKUPRESTORERANGE= (no default value)
Possible values: Classless Inter-Domain Routing format notation orcomma-separated list of IP addresses
BACKUPRESTORERANGE
Determines the maximum bandwidth that is allowed when backing up orrestoring data between the deduplication host and the deduplication pool.The value is specified in KBytes/second. The default is no limit.
Default value: BANDWIDTH_LIMIT = 0
Possible values: 0 (no limit) to the practical system limit, in KBs/sec
BANDWIDTH_LIMIT
Specifies whether to compress the data during backups.
By default, the data is compressed.
Default value: COMPRESSION = 1
Possible values: 0 (off) or 1 (on)
See “About MSDP compression” on page 127.
COMPRESSION
211Configuring deduplicationEditing the MSDP pd.conf file
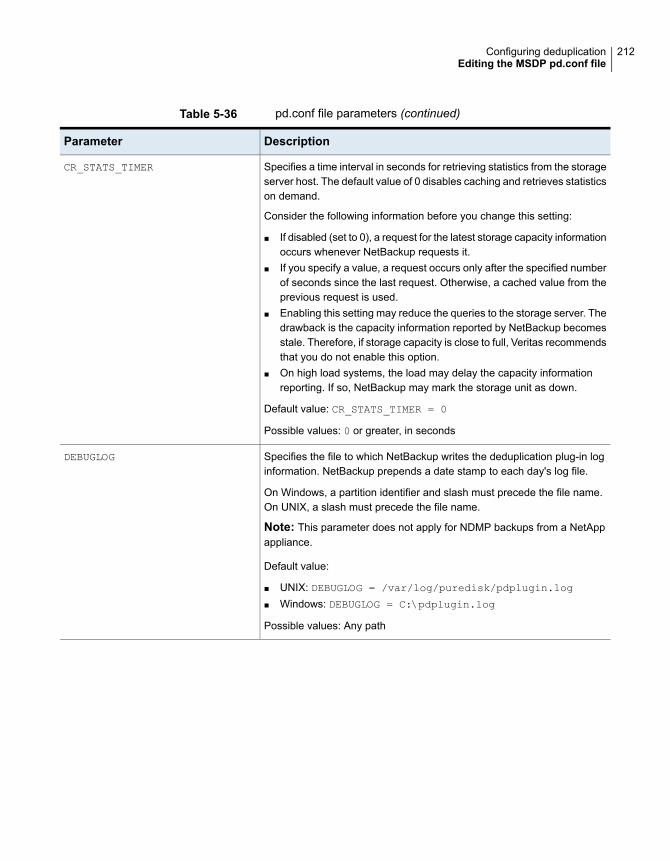
Table 5-36 pd.conf file parameters (continued)
DescriptionParameter
Specifies a time interval in seconds for retrieving statistics from the storageserver host. The default value of 0 disables caching and retrieves statisticson demand.
Consider the following information before you change this setting:
■ If disabled (set to 0), a request for the latest storage capacity informationoccurs whenever NetBackup requests it.
■ If you specify a value, a request occurs only after the specified numberof seconds since the last request. Otherwise, a cached value from theprevious request is used.
■ Enabling this setting may reduce the queries to the storage server. Thedrawback is the capacity information reported by NetBackup becomesstale. Therefore, if storage capacity is close to full, Veritas recommendsthat you do not enable this option.
■ On high load systems, the load may delay the capacity informationreporting. If so, NetBackup may mark the storage unit as down.
Default value: CR_STATS_TIMER = 0
Possible values: 0 or greater, in seconds
CR_STATS_TIMER
Specifies the file to which NetBackup writes the deduplication plug-in loginformation. NetBackup prepends a date stamp to each day's log file.
On Windows, a partition identifier and slash must precede the file name.On UNIX, a slash must precede the file name.
Note: This parameter does not apply for NDMP backups from a NetAppappliance.
Default value:
■ UNIX: DEBUGLOG = /var/log/puredisk/pdplugin.log
■ Windows: DEBUGLOG = C:\pdplugin.log
Possible values: Any path
DEBUGLOG
212Configuring deduplicationEditing the MSDP pd.conf file
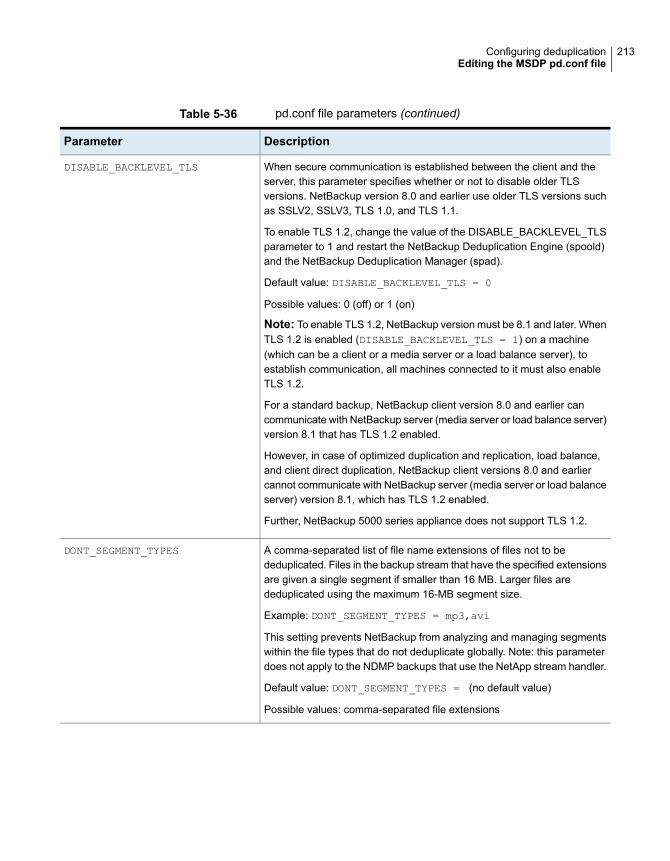
Table 5-36 pd.conf file parameters (continued)
DescriptionParameter
When secure communication is established between the client and theserver, this parameter specifies whether or not to disable older TLSversions. NetBackup version 8.0 and earlier use older TLS versions suchas SSLV2, SSLV3, TLS 1.0, and TLS 1.1.
To enable TLS 1.2, change the value of the DISABLE_BACKLEVEL_TLSparameter to 1 and restart the NetBackup Deduplication Engine (spoold)and the NetBackup Deduplication Manager (spad).
Default value: DISABLE_BACKLEVEL_TLS = 0
Possible values: 0 (off) or 1 (on)
Note: To enable TLS 1.2, NetBackup version must be 8.1 and later. WhenTLS 1.2 is enabled (DISABLE_BACKLEVEL_TLS = 1) on a machine(which can be a client or a media server or a load balance server), toestablish communication, all machines connected to it must also enableTLS 1.2.
For a standard backup, NetBackup client version 8.0 and earlier cancommunicate with NetBackup server (media server or load balance server)version 8.1 that has TLS 1.2 enabled.
However, in case of optimized duplication and replication, load balance,and client direct duplication, NetBackup client versions 8.0 and earliercannot communicate with NetBackup server (media server or load balanceserver) version 8.1, which has TLS 1.2 enabled.
Further, NetBackup 5000 series appliance does not support TLS 1.2.
DISABLE_BACKLEVEL_TLS
A comma-separated list of file name extensions of files not to bededuplicated. Files in the backup stream that have the specified extensionsare given a single segment if smaller than 16 MB. Larger files arededuplicated using the maximum 16-MB segment size.
Example: DONT_SEGMENT_TYPES = mp3,avi
This setting prevents NetBackup from analyzing and managing segmentswithin the file types that do not deduplicate globally. Note: this parameterdoes not apply to the NDMP backups that use the NetApp stream handler.
Default value: DONT_SEGMENT_TYPES = (no default value)
Possible values: comma-separated file extensions
DONT_SEGMENT_TYPES
213Configuring deduplicationEditing the MSDP pd.conf file

Table 5-36 pd.conf file parameters (continued)
DescriptionParameter
Specifies whether to encrypt the data during backups. By default, files arenot encrypted.
If you set this parameter to 1 on all hosts, the data is encrypted duringtransfer and on the storage.
Default value: ENCRYPTION = 0
Possible values: 0 (no encryption) or 1 (encryption)
See “About MSDP encryption” on page 129.
ENCRYPTION
Enable Fibre Channel for backup and restore traffic to and from aNetBackup series appliance.
Default value: FIBRECHANNEL = 0
Possible values: 0 (off) or 1 (on)
FIBRECHANNEL
214Configuring deduplicationEditing the MSDP pd.conf file
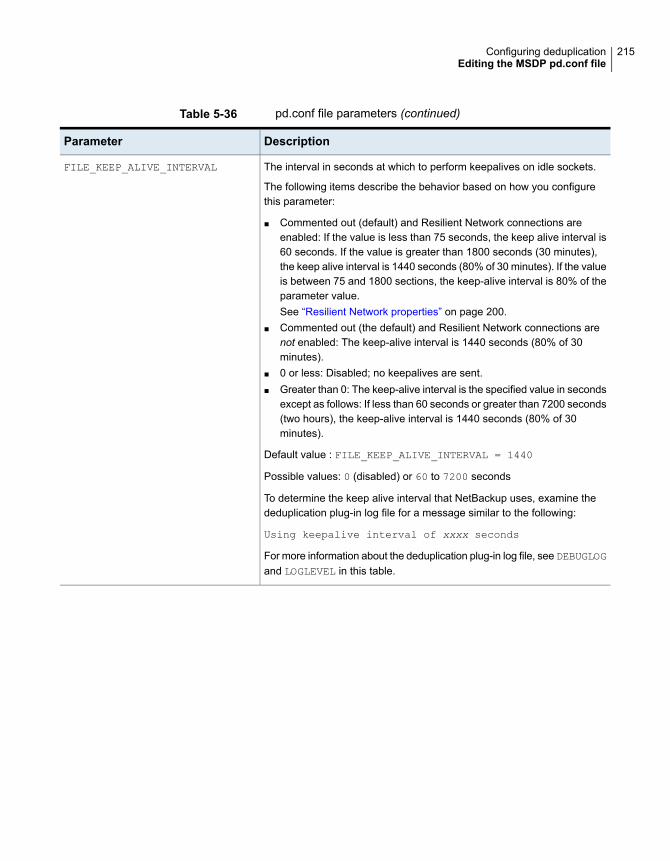
Table 5-36 pd.conf file parameters (continued)
DescriptionParameter
The interval in seconds at which to perform keepalives on idle sockets.
The following items describe the behavior based on how you configurethis parameter:
■ Commented out (default) and Resilient Network connections areenabled: If the value is less than 75 seconds, the keep alive interval is60 seconds. If the value is greater than 1800 seconds (30 minutes),the keep alive interval is 1440 seconds (80% of 30 minutes). If the valueis between 75 and 1800 sections, the keep-alive interval is 80% of theparameter value.See “Resilient Network properties” on page 200.
■ Commented out (the default) and Resilient Network connections arenot enabled: The keep-alive interval is 1440 seconds (80% of 30minutes).
■ 0 or less: Disabled; no keepalives are sent.■ Greater than 0: The keep-alive interval is the specified value in seconds
except as follows: If less than 60 seconds or greater than 7200 seconds(two hours), the keep-alive interval is 1440 seconds (80% of 30minutes).
Default value : FILE_KEEP_ALIVE_INTERVAL = 1440
Possible values: 0 (disabled) or 60 to 7200 seconds
To determine the keep alive interval that NetBackup uses, examine thededuplication plug-in log file for a message similar to the following:
Using keepalive interval of xxxx seconds
For more information about the deduplication plug-in log file, see DEBUGLOGand LOGLEVEL in this table.
FILE_KEEP_ALIVE_INTERVAL
215Configuring deduplicationEditing the MSDP pd.conf file
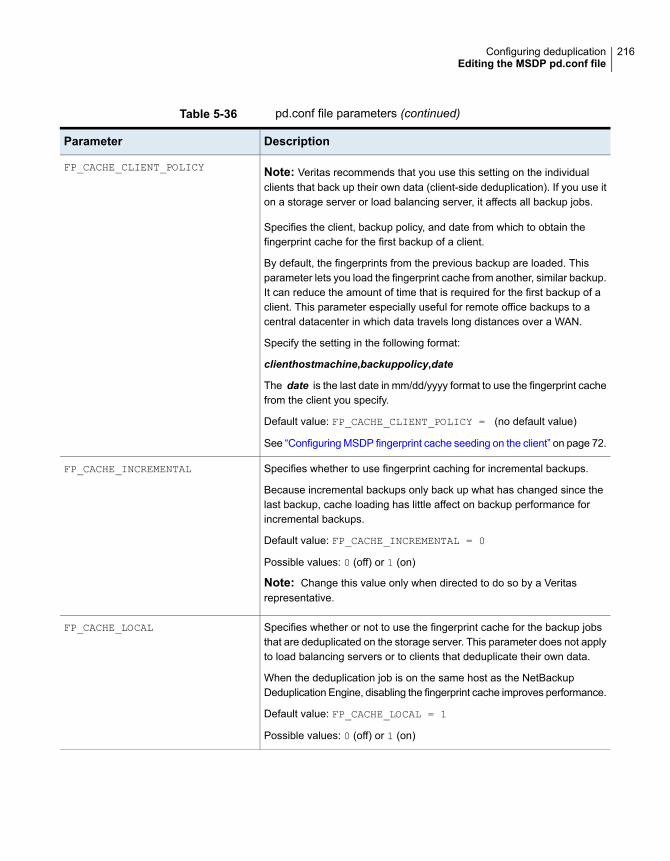
Table 5-36 pd.conf file parameters (continued)
DescriptionParameter
Note: Veritas recommends that you use this setting on the individualclients that back up their own data (client-side deduplication). If you use iton a storage server or load balancing server, it affects all backup jobs.
Specifies the client, backup policy, and date from which to obtain thefingerprint cache for the first backup of a client.
By default, the fingerprints from the previous backup are loaded. Thisparameter lets you load the fingerprint cache from another, similar backup.It can reduce the amount of time that is required for the first backup of aclient. This parameter especially useful for remote office backups to acentral datacenter in which data travels long distances over a WAN.
Specify the setting in the following format:
clienthostmachine,backuppolicy,date
The date is the last date in mm/dd/yyyy format to use the fingerprint cachefrom the client you specify.
Default value: FP_CACHE_CLIENT_POLICY = (no default value)
See “Configuring MSDP fingerprint cache seeding on the client” on page 72.
FP_CACHE_CLIENT_POLICY
Specifies whether to use fingerprint caching for incremental backups.
Because incremental backups only back up what has changed since thelast backup, cache loading has little affect on backup performance forincremental backups.
Default value: FP_CACHE_INCREMENTAL = 0
Possible values: 0 (off) or 1 (on)
Note: Change this value only when directed to do so by a Veritasrepresentative.
FP_CACHE_INCREMENTAL
Specifies whether or not to use the fingerprint cache for the backup jobsthat are deduplicated on the storage server. This parameter does not applyto load balancing servers or to clients that deduplicate their own data.
When the deduplication job is on the same host as the NetBackupDeduplication Engine, disabling the fingerprint cache improves performance.
Default value: FP_CACHE_LOCAL = 1
Possible values: 0 (off) or 1 (on)
FP_CACHE_LOCAL
216Configuring deduplicationEditing the MSDP pd.conf file
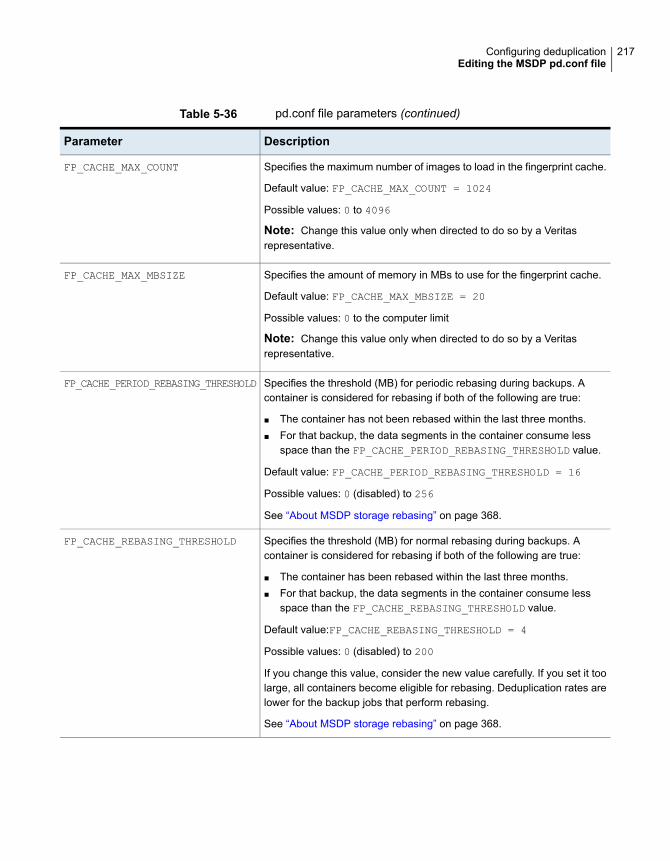
Table 5-36 pd.conf file parameters (continued)
DescriptionParameter
Specifies the maximum number of images to load in the fingerprint cache.
Default value: FP_CACHE_MAX_COUNT = 1024
Possible values: 0 to 4096
Note: Change this value only when directed to do so by a Veritasrepresentative.
FP_CACHE_MAX_COUNT
Specifies the amount of memory in MBs to use for the fingerprint cache.
Default value: FP_CACHE_MAX_MBSIZE = 20
Possible values: 0 to the computer limit
Note: Change this value only when directed to do so by a Veritasrepresentative.
FP_CACHE_MAX_MBSIZE
Specifies the threshold (MB) for periodic rebasing during backups. Acontainer is considered for rebasing if both of the following are true:
■ The container has not been rebased within the last three months.■ For that backup, the data segments in the container consume less
space than the FP_CACHE_PERIOD_REBASING_THRESHOLD value.
Default value: FP_CACHE_PERIOD_REBASING_THRESHOLD = 16
Possible values: 0 (disabled) to 256
See “About MSDP storage rebasing” on page 368.
FP_CACHE_PERIOD_REBASING_THRESHOLD
Specifies the threshold (MB) for normal rebasing during backups. Acontainer is considered for rebasing if both of the following are true:
■ The container has been rebased within the last three months.■ For that backup, the data segments in the container consume less
space than the FP_CACHE_REBASING_THRESHOLD value.
Default value:FP_CACHE_REBASING_THRESHOLD = 4
Possible values: 0 (disabled) to 200
If you change this value, consider the new value carefully. If you set it toolarge, all containers become eligible for rebasing. Deduplication rates arelower for the backup jobs that perform rebasing.
See “About MSDP storage rebasing” on page 368.
FP_CACHE_REBASING_THRESHOLD
217Configuring deduplicationEditing the MSDP pd.conf file
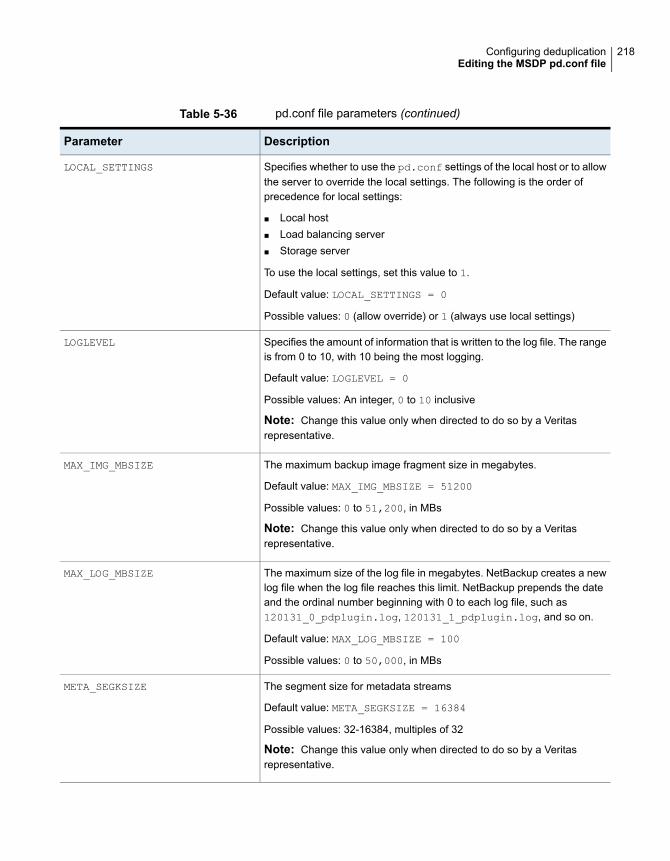
Table 5-36 pd.conf file parameters (continued)
DescriptionParameter
Specifies whether to use the pd.conf settings of the local host or to allowthe server to override the local settings. The following is the order ofprecedence for local settings:
■ Local host■ Load balancing server■ Storage server
To use the local settings, set this value to 1.
Default value: LOCAL_SETTINGS = 0
Possible values: 0 (allow override) or 1 (always use local settings)
LOCAL_SETTINGS
Specifies the amount of information that is written to the log file. The rangeis from 0 to 10, with 10 being the most logging.
Default value: LOGLEVEL = 0
Possible values: An integer, 0 to 10 inclusive
Note: Change this value only when directed to do so by a Veritasrepresentative.
LOGLEVEL
The maximum backup image fragment size in megabytes.
Default value: MAX_IMG_MBSIZE = 51200
Possible values: 0 to 51,200, in MBs
Note: Change this value only when directed to do so by a Veritasrepresentative.
MAX_IMG_MBSIZE
The maximum size of the log file in megabytes. NetBackup creates a newlog file when the log file reaches this limit. NetBackup prepends the dateand the ordinal number beginning with 0 to each log file, such as120131_0_pdplugin.log, 120131_1_pdplugin.log, and so on.
Default value: MAX_LOG_MBSIZE = 100
Possible values: 0 to 50,000, in MBs
MAX_LOG_MBSIZE
The segment size for metadata streams
Default value: META_SEGKSIZE = 16384
Possible values: 32-16384, multiples of 32
Note: Change this value only when directed to do so by a Veritasrepresentative.
META_SEGKSIZE
218Configuring deduplicationEditing the MSDP pd.conf file

Table 5-36 pd.conf file parameters (continued)
DescriptionParameter
If set, limits the use of the Multi-Threaded Agent to the backups of thespecified clients. The clients that are not specified use single-threading.
This setting does not guarantee that the specified clients use theMulti-Threaded Agent. The MaxConcurrentSessions parameter in themtstrm.conf file controls the number of backups the Multi-ThreadedAgent processes concurrently. If you specify more clients than theMaxConcurrentSessions value, some of the clients may usesingle-threaded processing.
See “MSDP mtstrm.conf file parameters” on page 62.
The format is a comma-separated list of the clients, case insensitive (forexample,MTSTRM_BACKUP_CLIENTS = client1,client2,client3).
Default value: MTSTRM_BACKUP_CLIENTS = (no default value)
Possible values: comma separated client names
See “About the MSDP Deduplication Multi-Threaded Agent” on page 59.
MTSTRM_BACKUP_CLIENTS
219Configuring deduplicationEditing the MSDP pd.conf file
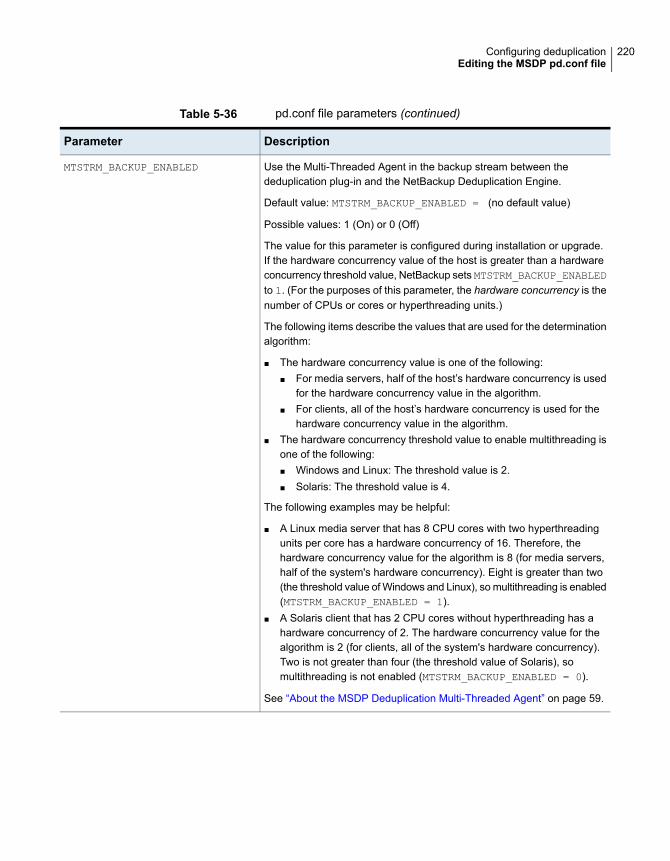
Table 5-36 pd.conf file parameters (continued)
DescriptionParameter
Use the Multi-Threaded Agent in the backup stream between thededuplication plug-in and the NetBackup Deduplication Engine.
Default value: MTSTRM_BACKUP_ENABLED = (no default value)
Possible values: 1 (On) or 0 (Off)
The value for this parameter is configured during installation or upgrade.If the hardware concurrency value of the host is greater than a hardwareconcurrency threshold value, NetBackup sets MTSTRM_BACKUP_ENABLEDto 1. (For the purposes of this parameter, the hardware concurrency is thenumber of CPUs or cores or hyperthreading units.)
The following items describe the values that are used for the determinationalgorithm:
■ The hardware concurrency value is one of the following:■ For media servers, half of the host’s hardware concurrency is used
for the hardware concurrency value in the algorithm.■ For clients, all of the host’s hardware concurrency is used for the
hardware concurrency value in the algorithm.■ The hardware concurrency threshold value to enable multithreading is
one of the following:■ Windows and Linux: The threshold value is 2.■ Solaris: The threshold value is 4.
The following examples may be helpful:
■ A Linux media server that has 8 CPU cores with two hyperthreadingunits per core has a hardware concurrency of 16. Therefore, thehardware concurrency value for the algorithm is 8 (for media servers,half of the system's hardware concurrency). Eight is greater than two(the threshold value of Windows and Linux), so multithreading is enabled(MTSTRM_BACKUP_ENABLED = 1).
■ A Solaris client that has 2 CPU cores without hyperthreading has ahardware concurrency of 2. The hardware concurrency value for thealgorithm is 2 (for clients, all of the system's hardware concurrency).Two is not greater than four (the threshold value of Solaris), somultithreading is not enabled (MTSTRM_BACKUP_ENABLED = 0).
See “About the MSDP Deduplication Multi-Threaded Agent” on page 59.
MTSTRM_BACKUP_ENABLED
220Configuring deduplicationEditing the MSDP pd.conf file
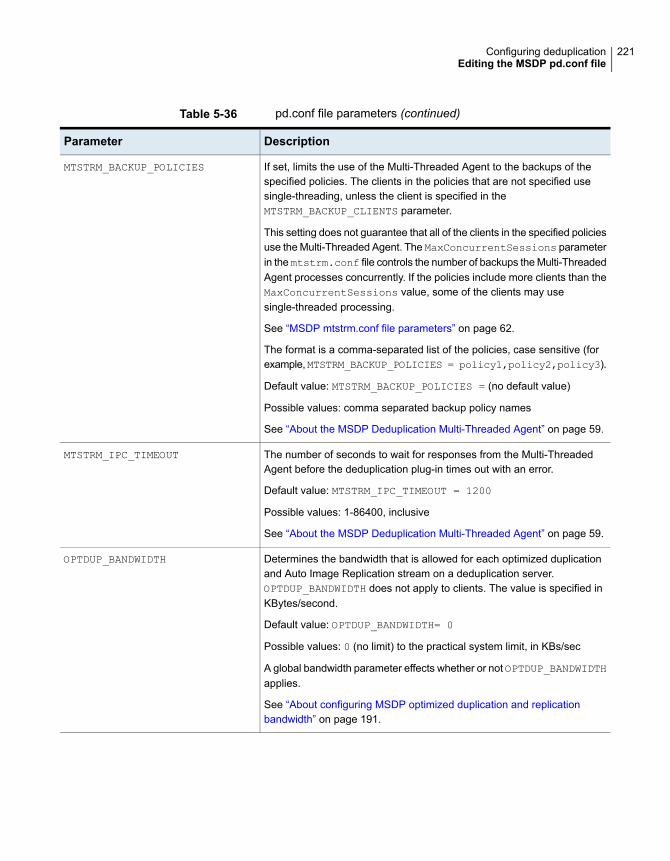
Table 5-36 pd.conf file parameters (continued)
DescriptionParameter
If set, limits the use of the Multi-Threaded Agent to the backups of thespecified policies. The clients in the policies that are not specified usesingle-threading, unless the client is specified in theMTSTRM_BACKUP_CLIENTS parameter.
This setting does not guarantee that all of the clients in the specified policiesuse the Multi-Threaded Agent. The MaxConcurrentSessions parameterin the mtstrm.conf file controls the number of backups the Multi-ThreadedAgent processes concurrently. If the policies include more clients than theMaxConcurrentSessions value, some of the clients may usesingle-threaded processing.
See “MSDP mtstrm.conf file parameters” on page 62.
The format is a comma-separated list of the policies, case sensitive (forexample,MTSTRM_BACKUP_POLICIES = policy1,policy2,policy3).
Default value: MTSTRM_BACKUP_POLICIES = (no default value)
Possible values: comma separated backup policy names
See “About the MSDP Deduplication Multi-Threaded Agent” on page 59.
MTSTRM_BACKUP_POLICIES
The number of seconds to wait for responses from the Multi-ThreadedAgent before the deduplication plug-in times out with an error.
Default value: MTSTRM_IPC_TIMEOUT = 1200
Possible values: 1-86400, inclusive
See “About the MSDP Deduplication Multi-Threaded Agent” on page 59.
MTSTRM_IPC_TIMEOUT
Determines the bandwidth that is allowed for each optimized duplicationand Auto Image Replication stream on a deduplication server.OPTDUP_BANDWIDTH does not apply to clients. The value is specified inKBytes/second.
Default value: OPTDUP_BANDWIDTH= 0
Possible values: 0 (no limit) to the practical system limit, in KBs/sec
A global bandwidth parameter effects whether or not OPTDUP_BANDWIDTHapplies.
See “About configuring MSDP optimized duplication and replicationbandwidth” on page 191.
OPTDUP_BANDWIDTH
221Configuring deduplicationEditing the MSDP pd.conf file
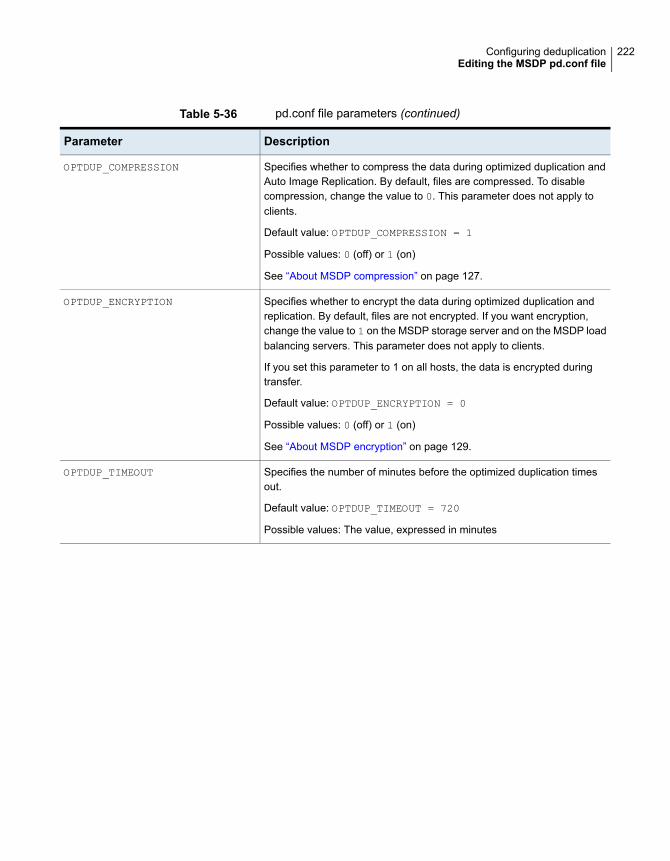
Table 5-36 pd.conf file parameters (continued)
DescriptionParameter
Specifies whether to compress the data during optimized duplication andAuto Image Replication. By default, files are compressed. To disablecompression, change the value to 0. This parameter does not apply toclients.
Default value: OPTDUP_COMPRESSION = 1
Possible values: 0 (off) or 1 (on)
See “About MSDP compression” on page 127.
OPTDUP_COMPRESSION
Specifies whether to encrypt the data during optimized duplication andreplication. By default, files are not encrypted. If you want encryption,change the value to 1 on the MSDP storage server and on the MSDP loadbalancing servers. This parameter does not apply to clients.
If you set this parameter to 1 on all hosts, the data is encrypted duringtransfer.
Default value: OPTDUP_ENCRYPTION = 0
Possible values: 0 (off) or 1 (on)
See “About MSDP encryption” on page 129.
OPTDUP_ENCRYPTION
Specifies the number of minutes before the optimized duplication timesout.
Default value: OPTDUP_TIMEOUT = 720
Possible values: The value, expressed in minutes
OPTDUP_TIMEOUT
222Configuring deduplicationEditing the MSDP pd.conf file
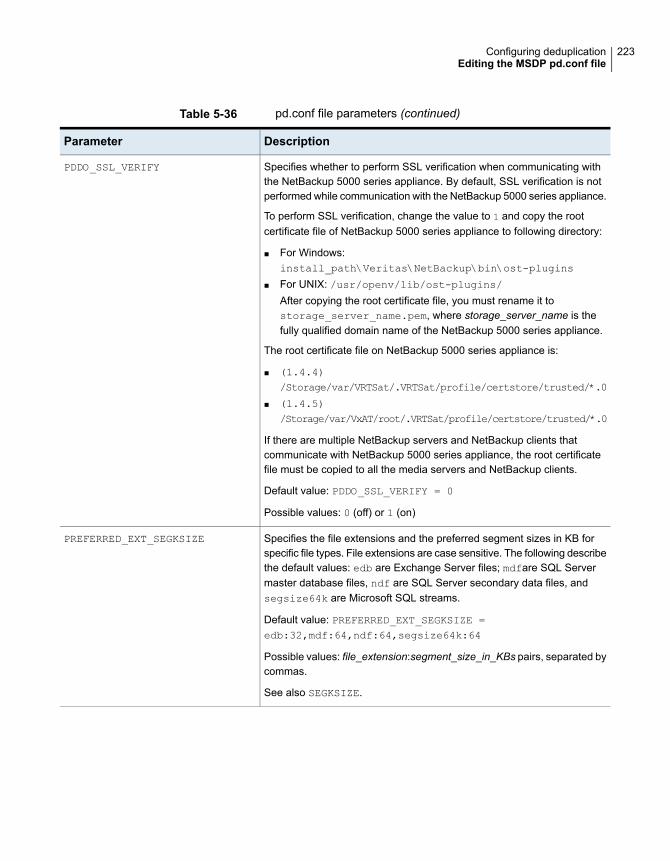
Table 5-36 pd.conf file parameters (continued)
DescriptionParameter
Specifies whether to perform SSL verification when communicating withthe NetBackup 5000 series appliance. By default, SSL verification is notperformed while communication with the NetBackup 5000 series appliance.
To perform SSL verification, change the value to 1 and copy the rootcertificate file of NetBackup 5000 series appliance to following directory:
■ For Windows:install_path\Veritas\NetBackup\bin\ost-plugins
■ For UNIX: /usr/openv/lib/ost-plugins/After copying the root certificate file, you must rename it tostorage_server_name.pem, where storage_server_name is thefully qualified domain name of the NetBackup 5000 series appliance.
The root certificate file on NetBackup 5000 series appliance is:
■ (1.4.4)/Storage/var/VRTSat/.VRTSat/profile/certstore/trusted/*.0
■ (1.4.5)/Storage/var/VxAT/root/.VRTSat/profile/certstore/trusted/*.0
If there are multiple NetBackup servers and NetBackup clients thatcommunicate with NetBackup 5000 series appliance, the root certificatefile must be copied to all the media servers and NetBackup clients.
Default value: PDDO_SSL_VERIFY = 0
Possible values: 0 (off) or 1 (on)
PDDO_SSL_VERIFY
Specifies the file extensions and the preferred segment sizes in KB forspecific file types. File extensions are case sensitive. The following describethe default values: edb are Exchange Server files; mdfare SQL Servermaster database files, ndf are SQL Server secondary data files, andsegsize64k are Microsoft SQL streams.
Default value: PREFERRED_EXT_SEGKSIZE =edb:32,mdf:64,ndf:64,segsize64k:64
Possible values: file_extension:segment_size_in_KBs pairs, separated bycommas.
See also SEGKSIZE.
PREFERRED_EXT_SEGKSIZE
223Configuring deduplicationEditing the MSDP pd.conf file
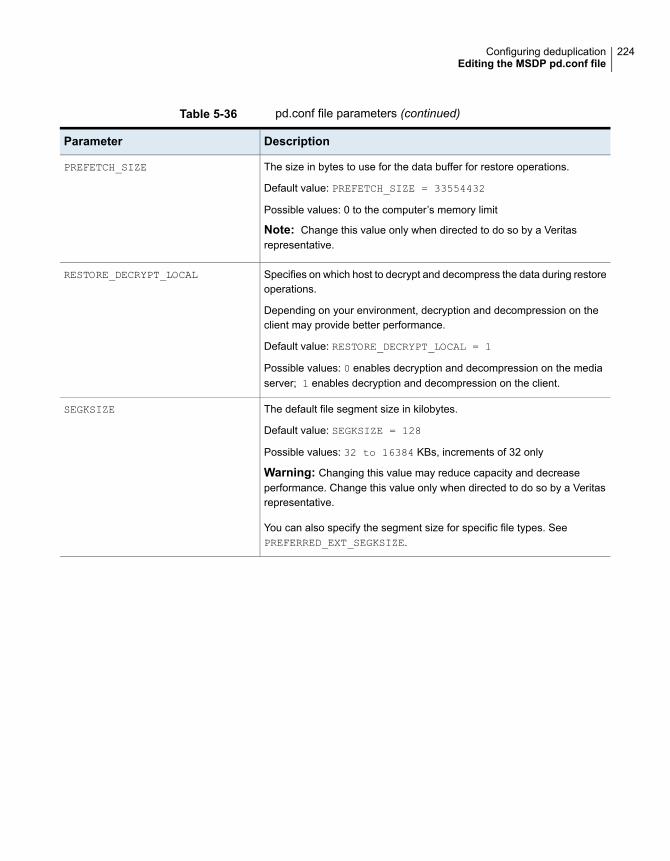
Table 5-36 pd.conf file parameters (continued)
DescriptionParameter
The size in bytes to use for the data buffer for restore operations.
Default value: PREFETCH_SIZE = 33554432
Possible values: 0 to the computer’s memory limit
Note: Change this value only when directed to do so by a Veritasrepresentative.
PREFETCH_SIZE
Specifies on which host to decrypt and decompress the data during restoreoperations.
Depending on your environment, decryption and decompression on theclient may provide better performance.
Default value: RESTORE_DECRYPT_LOCAL = 1
Possible values: 0 enables decryption and decompression on the mediaserver; 1 enables decryption and decompression on the client.
RESTORE_DECRYPT_LOCAL
The default file segment size in kilobytes.
Default value: SEGKSIZE = 128
Possible values: 32 to 16384 KBs, increments of 32 only
Warning: Changing this value may reduce capacity and decreaseperformance. Change this value only when directed to do so by a Veritasrepresentative.
You can also specify the segment size for specific file types. SeePREFERRED_EXT_SEGKSIZE.
SEGKSIZE
224Configuring deduplicationEditing the MSDP pd.conf file
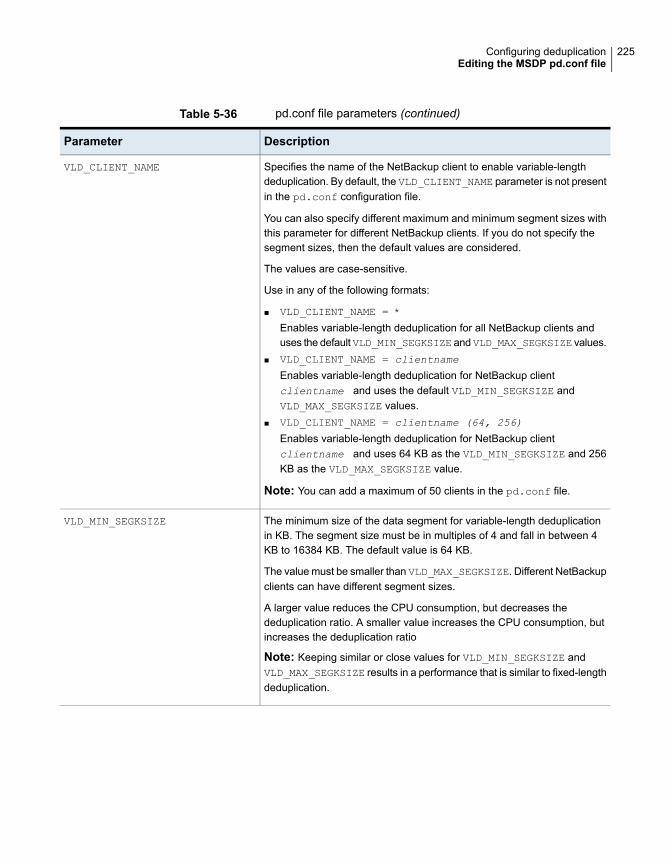
Table 5-36 pd.conf file parameters (continued)
DescriptionParameter
Specifies the name of the NetBackup client to enable variable-lengthdeduplication. By default, the VLD_CLIENT_NAME parameter is not presentin the pd.conf configuration file.
You can also specify different maximum and minimum segment sizes withthis parameter for different NetBackup clients. If you do not specify thesegment sizes, then the default values are considered.
The values are case-sensitive.
Use in any of the following formats:
■ VLD_CLIENT_NAME = *
Enables variable-length deduplication for all NetBackup clients anduses the defaultVLD_MIN_SEGKSIZE andVLD_MAX_SEGKSIZE values.
■ VLD_CLIENT_NAME = clientname
Enables variable-length deduplication for NetBackup clientclientname and uses the default VLD_MIN_SEGKSIZE andVLD_MAX_SEGKSIZE values.
■ VLD_CLIENT_NAME = clientname (64, 256)
Enables variable-length deduplication for NetBackup clientclientname and uses 64 KB as the VLD_MIN_SEGKSIZE and 256KB as the VLD_MAX_SEGKSIZE value.
Note: You can add a maximum of 50 clients in the pd.conf file.
VLD_CLIENT_NAME
The minimum size of the data segment for variable-length deduplicationin KB. The segment size must be in multiples of 4 and fall in between 4KB to 16384 KB. The default value is 64 KB.
The value must be smaller than VLD_MAX_SEGKSIZE. Different NetBackupclients can have different segment sizes.
A larger value reduces the CPU consumption, but decreases thededuplication ratio. A smaller value increases the CPU consumption, butincreases the deduplication ratio
Note: Keeping similar or close values for VLD_MIN_SEGKSIZE andVLD_MAX_SEGKSIZE results in a performance that is similar to fixed-lengthdeduplication.
VLD_MIN_SEGKSIZE
225Configuring deduplicationEditing the MSDP pd.conf file
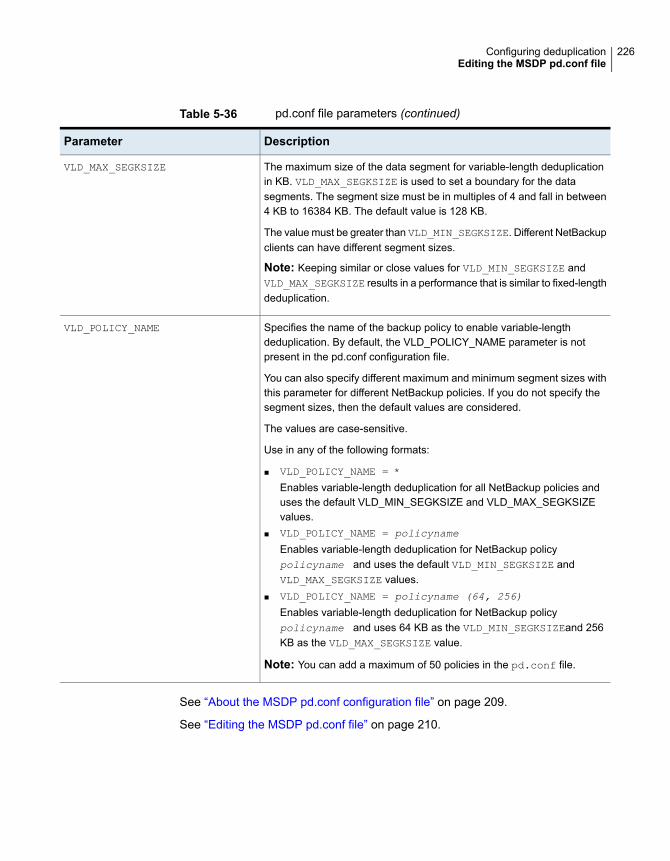
Table 5-36 pd.conf file parameters (continued)
DescriptionParameter
The maximum size of the data segment for variable-length deduplicationin KB. VLD_MAX_SEGKSIZE is used to set a boundary for the datasegments. The segment size must be in multiples of 4 and fall in between4 KB to 16384 KB. The default value is 128 KB.
The value must be greater than VLD_MIN_SEGKSIZE. Different NetBackupclients can have different segment sizes.
Note: Keeping similar or close values for VLD_MIN_SEGKSIZE andVLD_MAX_SEGKSIZE results in a performance that is similar to fixed-lengthdeduplication.
VLD_MAX_SEGKSIZE
Specifies the name of the backup policy to enable variable-lengthdeduplication. By default, the VLD_POLICY_NAME parameter is notpresent in the pd.conf configuration file.
You can also specify different maximum and minimum segment sizes withthis parameter for different NetBackup policies. If you do not specify thesegment sizes, then the default values are considered.
The values are case-sensitive.
Use in any of the following formats:
■ VLD_POLICY_NAME = *
Enables variable-length deduplication for all NetBackup policies anduses the default VLD_MIN_SEGKSIZE and VLD_MAX_SEGKSIZEvalues.
■ VLD_POLICY_NAME = policyname
Enables variable-length deduplication for NetBackup policypolicyname and uses the default VLD_MIN_SEGKSIZE andVLD_MAX_SEGKSIZE values.
■ VLD_POLICY_NAME = policyname (64, 256)
Enables variable-length deduplication for NetBackup policypolicyname and uses 64 KB as the VLD_MIN_SEGKSIZEand 256KB as the VLD_MAX_SEGKSIZE value.
Note: You can add a maximum of 50 policies in the pd.conf file.
VLD_POLICY_NAME
See “About the MSDP pd.conf configuration file” on page 209.
See “Editing the MSDP pd.conf file” on page 210.
226Configuring deduplicationEditing the MSDP pd.conf file
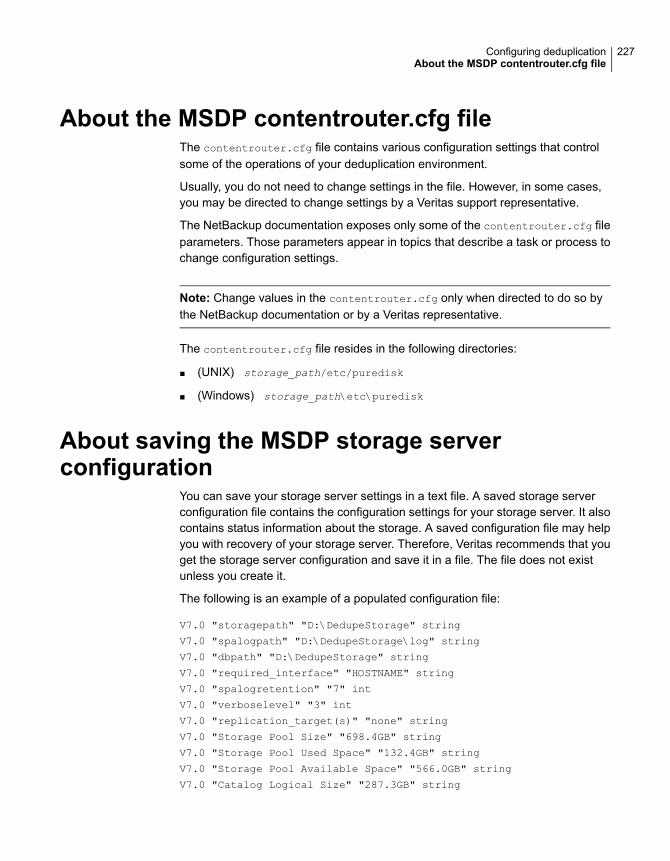
About the MSDP contentrouter.cfg fileThe contentrouter.cfg file contains various configuration settings that controlsome of the operations of your deduplication environment.
Usually, you do not need to change settings in the file. However, in some cases,you may be directed to change settings by a Veritas support representative.
The NetBackup documentation exposes only some of the contentrouter.cfg fileparameters. Those parameters appear in topics that describe a task or process tochange configuration settings.
Note: Change values in the contentrouter.cfg only when directed to do so bythe NetBackup documentation or by a Veritas representative.
The contentrouter.cfg file resides in the following directories:
■ (UNIX) storage_path/etc/puredisk
■ (Windows) storage_path\etc\puredisk
About saving the MSDP storage serverconfiguration
You can save your storage server settings in a text file. A saved storage serverconfiguration file contains the configuration settings for your storage server. It alsocontains status information about the storage. A saved configuration file may helpyou with recovery of your storage server. Therefore, Veritas recommends that youget the storage server configuration and save it in a file. The file does not existunless you create it.
The following is an example of a populated configuration file:
V7.0 "storagepath" "D:\DedupeStorage" string
V7.0 "spalogpath" "D:\DedupeStorage\log" string
V7.0 "dbpath" "D:\DedupeStorage" string
V7.0 "required_interface" "HOSTNAME" string
V7.0 "spalogretention" "7" int
V7.0 "verboselevel" "3" int
V7.0 "replication_target(s)" "none" string
V7.0 "Storage Pool Size" "698.4GB" string
V7.0 "Storage Pool Used Space" "132.4GB" string
V7.0 "Storage Pool Available Space" "566.0GB" string
V7.0 "Catalog Logical Size" "287.3GB" string
227Configuring deduplicationAbout the MSDP contentrouter.cfg file
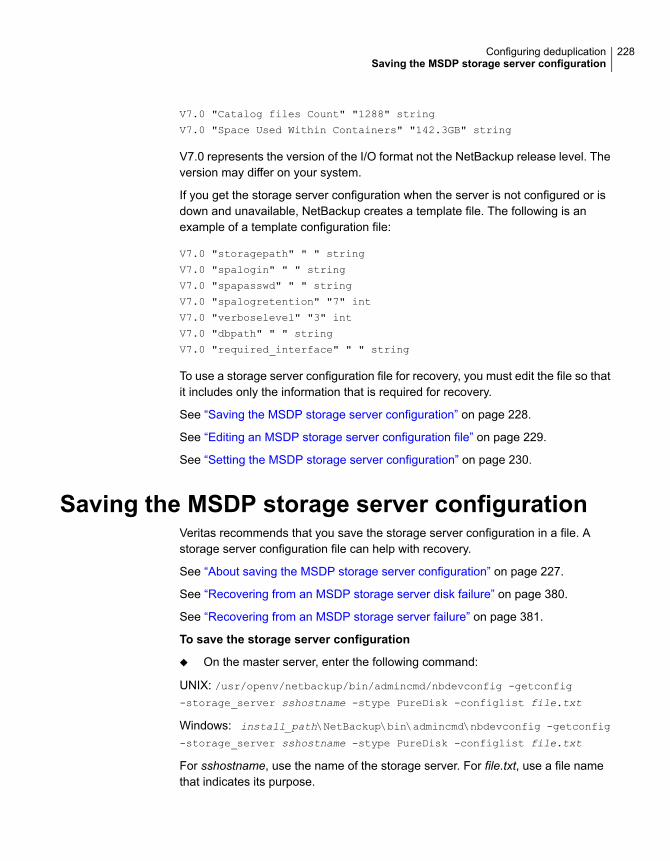
V7.0 "Catalog files Count" "1288" string
V7.0 "Space Used Within Containers" "142.3GB" string
V7.0 represents the version of the I/O format not the NetBackup release level. Theversion may differ on your system.
If you get the storage server configuration when the server is not configured or isdown and unavailable, NetBackup creates a template file. The following is anexample of a template configuration file:
V7.0 "storagepath" " " string
V7.0 "spalogin" " " string
V7.0 "spapasswd" " " string
V7.0 "spalogretention" "7" int
V7.0 "verboselevel" "3" int
V7.0 "dbpath" " " string
V7.0 "required_interface" " " string
To use a storage server configuration file for recovery, you must edit the file so thatit includes only the information that is required for recovery.
See “Saving the MSDP storage server configuration” on page 228.
See “Editing an MSDP storage server configuration file” on page 229.
See “Setting the MSDP storage server configuration” on page 230.
Saving the MSDP storage server configurationVeritas recommends that you save the storage server configuration in a file. Astorage server configuration file can help with recovery.
See “About saving the MSDP storage server configuration” on page 227.
See “Recovering from an MSDP storage server disk failure” on page 380.
See “Recovering from an MSDP storage server failure” on page 381.
To save the storage server configuration
◆ On the master server, enter the following command:
UNIX: /usr/openv/netbackup/bin/admincmd/nbdevconfig -getconfig
-storage_server sshostname -stype PureDisk -configlist file.txt
Windows: install_path\NetBackup\bin\admincmd\nbdevconfig -getconfig
-storage_server sshostname -stype PureDisk -configlist file.txt
For sshostname, use the name of the storage server. For file.txt, use a file namethat indicates its purpose.
228Configuring deduplicationSaving the MSDP storage server configuration
If you get the file when a storage server is not configured or is down and unavailable,NetBackup creates a template file.
Editing anMSDP storage server configuration fileTo use a storage server configuration file for recovery, it must contain only therequired information. You must remove any point–in–time status information. (Statusinformation is only in a configuration file that was saved on an active storage server.)You also must add several configuration settings that are not included in a savedconfiguration file or a template configuration file.
Table 5-37 shows the configuration lines that are required.
Table 5-37 Required lines for a recovery file
DescriptionConfiguration setting
The value should be the same as the value that was usedwhen you configured the storage server.
V7.0 "storagepath" " " string
For the spalogpath, use the storagepath value andappend log to the path. For example, if the storagepathis D:\DedupeStorage, enter D:\DedupeStorage\log.
V7.0 "spalogpath" " " string
If the database path is the same as the storagepathvalue, enter the same value for dbpath. Otherwise, enterthe path to the database.
V7.0 "dbpath" " " string
A value for required_interface is required only if youconfigured one initially; if a specific interface is notrequired, leave it blank. In a saved configuration file, therequired interface defaults to the computer's hostname.
V7.0 "required_interface" " " string
Do not change this value.V7.0 "spalogretention" "7" int
Do not change this value.V7.0 "verboselevel" "3" int
A value for replication_target(s) is required onlyif you configured optimized duplication. Otherwise, do notedit this line.
V7.0 "replication_target(s)" "none" string
Replace username with the NetBackup DeduplicationEngine user ID.
V7.0 "spalogin" "username" string
Replace password with the password for the NetBackupDeduplication Engine user ID.
V7.0 "spapasswd" "password" string
229Configuring deduplicationEditing an MSDP storage server configuration file
Table 5-37 Required lines for a recovery file (continued)
DescriptionConfiguration setting
The value should be the same as the value that was usedwhen you configured the storage server.
V7.0 "encryption" " " int
The value is used to enable or disable MSDP KMSconfiguration. The value should be the same as the valuethat was used when you configured the storage server.
V7.0 "kmsenabled" " " int
The value is KMS server type. This value should be 0.V7.0 "kmsservertype" " " int
The value is NBU Key Management Server. The valueshould be the same as the value that was used when youconfigured the storage server.
If you use an external KMS as a KMS server, the valuemust be the NetBackup master server name. See ExternalKMS support in NetBackup in theNetBackup Security andEncryption Guide.
V7.0 "kmsservername" " " string
The value should be the same as the value that was usedwhen you configured the storage server.
V7.0 "keygroupname" " " string
See “About saving the MSDP storage server configuration” on page 227.
See “Recovering from an MSDP storage server disk failure” on page 380.
See “Recovering from an MSDP storage server failure” on page 381.
To edit the storage server configuration
1 If you did not save a storage server configuration file, get a storage serverconfiguration file.
See “Saving the MSDP storage server configuration” on page 228.
2 Use a text editor to enter, change, or remove values.
Remove lines from and add lines to your file until only the required lines (seeTable 5-37) are in the configuration file. Enter or change the values betweenthe second set of quotation marks in each line. A template configuration filehas a space character (" ") between the second set of quotation marks.
Setting the MSDP storage server configurationYou can set the storage server configuration (that is, configure the storage server)by importing the configuration from a file. Setting the configuration can help youwith recovery of your environment.
230Configuring deduplicationSetting the MSDP storage server configuration
See “Recovering from an MSDP storage server disk failure” on page 380.
See “Recovering from an MSDP storage server failure” on page 381.
To set the configuration, you must have an edited storage server configuration file.
See “About saving the MSDP storage server configuration” on page 227.
See “Saving the MSDP storage server configuration” on page 228.
See “Editing an MSDP storage server configuration file” on page 229.
Note: The only time you should use the nbdevconfig command with the -setconfig
option is for recovery of the host or the host disk.
To set the storage server configuration
◆ On the master server, run the following command:
UNIX: /usr/openv/netbackup/bin/admincmd/nbdevconfig -setconfig
-storage_server sshostname -stype PureDisk -configlist file.txt
Windows: install_path\NetBackup\bin\admincmd\nbdevconfig
-setconfig -storage_server sshostname -stype PureDisk -configlist
file.txt
For sshostname, use the name of the storage server. For file.txt, use the nameof the file that contains the configuration.
About the MSDP host configuration fileEach NetBackup host that is used for deduplication has a configuration file; the filename matches the name of the storage server, as follows:
storage_server_name.cfg
The storage_server_name is the fully qualified domain name if that was used toconfigure the storage server. For example, if the storage server name isDedupeServer.example.com, the configuration file name isDedupeServer.example.com.cfg.
The following is the location of the file:
Windows: install_path\Veritas\NetBackup\bin\ost-plugins
UNIX: /usr/openv/lib/ost-plugins
231Configuring deduplicationAbout the MSDP host configuration file
Deleting an MSDP host configuration fileYou may need to delete the configuration file from the deduplication hosts. Forexample, to reconfigure your deduplication environment or disaster recovery mayrequire that you delete the configuration file on the servers on which it exists.
See “About the MSDP host configuration file” on page 231.
To delete the host configuration file
◆ Delete the file on the deduplication host; its location depends on the operatingsystem type, as follows:
UNIX: /usr/openv/lib/ost-plugins
Windows: install_path\Veritas\NetBackup\bin\ost-plugins
The following is an example of the host configuration file name of a server thathas a fully qualified domain name:
DedupeServer.example.com.cfg
Resetting the MSDP registryIf you reconfigure your deduplication environment, one of the steps is to reset thededuplication registry.
See “Changing the MSDP storage server name or storage path” on page 343.
Warning:Only follow these procedures if you are reconfiguring your storage serverand storage paths.
The procedure differs on UNIX and on Windows.
To reset the MSDP registry file on UNIX and Linux
◆ Enter the following commands on the storage server to reset the deduplicationregistry file:
rm /etc/pdregistry.cfg
cp -f /usr/openv/pdde/pdconfigure/cfg/userconfigs/pdregistry.cfg
/etc/pdregistry.cfg
To reset the MSDP registry on Windows
◆ Delete the contents of the following keys in the Windows registry:
■ HKLM\SOFTWARE\Symantec\PureDisk\Agent\ConfigFilePath
232Configuring deduplicationDeleting an MSDP host configuration file
■ HKLM\SOFTWARE\Symantec\PureDisk\Agent\EtcPath
Warning: Editing the Windows registry may cause unforeseen results.
About protecting the MSDP catalogTo increase availability, NetBackup provides a two-tier approach to protect theMSDP catalog, as follows:
NetBackup automatically creates copies of the MSDP catalog.
See “About the MSDP shadow catalog” on page 233.
Daily shadow copies
Veritas provides a utility that you can use to configure a NetBackuppolicy that backs up the MSDP catalog.
See “About the MSDP catalog backup policy” on page 234.
Catalog backup policy
See “About recovering the MSDP catalog” on page 377.
About the MSDP shadow catalogThe NetBackup Deduplication Manager automatically creates a shadow copy ofthe catalog daily. The Deduplication Manager also builds a transaction log for eachshadow copy. If NetBackup detects corruption in the MSDP catalog, theDeduplication Manager restores the catalog automatically from the most recentshadow copy. That restore process also plays the transaction log so that therecovered MSDP catalog is current.
By default, the NetBackup Deduplication Manager stores the shadow copies onthe same volume as the catalog itself. Veritas recommends that you store theshadow copies on a different volume.
Warning: You can change the path only during initial MSDP configuration only. Ifyou change it after MSDP backups exist, data loss may occur.
See “Changing the MSDP shadow catalog path” on page 236.
The NetBackup Deduplication Manager creates a shadow copy at 0340 hours daily,host time. To change the schedule, you must change the scheduler definition file.
See “Changing the MSDP shadow catalog schedule” on page 237.
233Configuring deduplicationAbout protecting the MSDP catalog
By default, the NetBackup Deduplication Manager keeps five shadow copies of thecatalog. You can change the number of copies.
See “Changing the number of MSDP catalog shadow copies” on page 238.
About the MSDP catalog backup policyVeritas recommends that you protect the MSDP catalog by backing it up. (ANetBackup catalog backup does not include the MSDP catalog.) The NetBackupDeduplication Catalog Policy Administration and Catalog Disaster Recovery utility(the drcontrol utility) configures a backup policy for the MSDP catalog. The policyalso includes other important MSDP configuration information.
The MSDP catalog backups provide the second tier of catalog protection. Thecatalog backups are available if the shadow copies are not available or corrupt.
The following are the attributes for the catalog backup policy that the drcontrol
utility creates:
Weekly Full Backup and daily Differential Incremental Backup.Schedule
6:00 A.M. to 6:00 P.M.Backup window
2 weeksRetention
234Configuring deduplicationAbout protecting the MSDP catalog
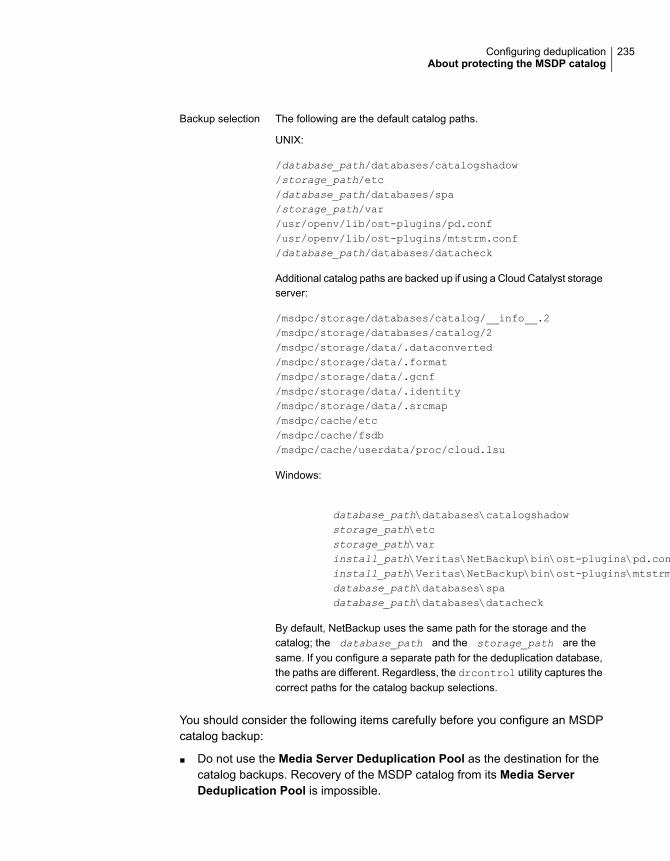
The following are the default catalog paths.
UNIX:
/database_path/databases/catalogshadow/storage_path/etc/database_path/databases/spa/storage_path/var/usr/openv/lib/ost-plugins/pd.conf/usr/openv/lib/ost-plugins/mtstrm.conf/database_path/databases/datacheck
Additional catalog paths are backed up if using a Cloud Catalyst storageserver:
/msdpc/storage/databases/catalog/__info__.2/msdpc/storage/databases/catalog/2/msdpc/storage/data/.dataconverted/msdpc/storage/data/.format/msdpc/storage/data/.gcnf/msdpc/storage/data/.identity/msdpc/storage/data/.srcmap/msdpc/cache/etc/msdpc/cache/fsdb/msdpc/cache/userdata/proc/cloud.lsu
Windows:
database_path\databases\catalogshadowstorage_path\etcstorage_path\varinstall_path\Veritas\NetBackup\bin\ost-plugins\pd.confinstall_path\Veritas\NetBackup\bin\ost-plugins\mtstrm.confdatabase_path\databases\spadatabase_path\databases\datacheck
By default, NetBackup uses the same path for the storage and thecatalog; the database_path and the storage_path are thesame. If you configure a separate path for the deduplication database,the paths are different. Regardless, the drcontrol utility captures thecorrect paths for the catalog backup selections.
Backup selection
You should consider the following items carefully before you configure an MSDPcatalog backup:
■ Do not use the Media Server Deduplication Pool as the destination for thecatalog backups. Recovery of the MSDP catalog from its Media ServerDeduplication Pool is impossible.
235Configuring deduplicationAbout protecting the MSDP catalog
■ Use a storage unit that is attached to a NetBackup host other than the MSDPstorage server.
■ Use a separate MSDP catalog backup policy for each MSDP storage server.The drcontrol utility does not verify that the backup selections are the samefor multiple storage servers. If the backup policy includes more than one MSDPstorage server, the backup selection is the union of the backup selections foreach host.
■ You cannot use one policy to protect MSDP storage servers on both UNIX hostsand Windows hosts.UNIX MSDP storage servers require a Standard backup policy and WindowsMSDP storage servers require an MS-Windows policy.
See “Configuring an MSDP catalog backup” on page 239.
See “Updating an MSDP catalog backup policy” on page 244.
Changing the MSDP shadow catalog pathYou can change the location of the catalog shadow copies. It is recommended thatyou store the copies on a different volume than both the storage_path and thedatabase_path . (If you configured a separate path for the deduplication database,the paths are different.)
NetBackup stores the MSDP catalog shadow copies in the following location:
UNIX: /database_path/databases/catalogshadow
Windows: database_path\databases\catalogshadow
Warning:You can change the shadow catalog path during initial MSDP configurationonly. If you change it after MSDP backups exist, data loss may occur.
See “About protecting the MSDP catalog” on page 233.
To change the MSDP catalog shadow path
1 Open the following file in a text editor:
UNIX: /storage_path/etc/puredisk/spa.cfg
Windows: storage_path\etc\puredisk\spa.cfg
2 Find the CatalogShadowPath parameter and change the value to the wantedpath.
The volume must be mounted and available.
236Configuring deduplicationChanging the MSDP shadow catalog path
3 After your changes, save the file.
4 Create the .catalog_shadow_identity file in the catalog shadow path thatyou have specified in step 1.
Note: There is a period (.) in front of the file name that denotes a hidden file.
5 Restart the NetBackup Deduplication Manager (spad).
6 Create the shadow catalog directories by invoking the following command onthe MSDP storage server:
UNIX: /usr/openv/pdde/pdcr/bin/cacontrol --catalog backup all
Windows: install_path\Veritas\pdde\cacontrol --catalog backup
all
7 If an MSDP catalog backup policy exists, update the policy with the new shadowcatalog directories. To do so, invoke the following command on the MSDPstorage server:
UNIX: /usr/openv/pdde/pdcr/bin/drcontrol --update_policy --policy
policy_name
Windows: install_path\Veritas\pdde\drcontrol --update_policy
--policy policy_name
Changing the MSDP shadow catalog scheduleNetBackup automatically creates a copy of the MSDP catalog at 0340 hours daily,host time. You can change the default schedule.
See “About protecting the MSDP catalog” on page 233.
237Configuring deduplicationChanging the MSDP shadow catalog schedule
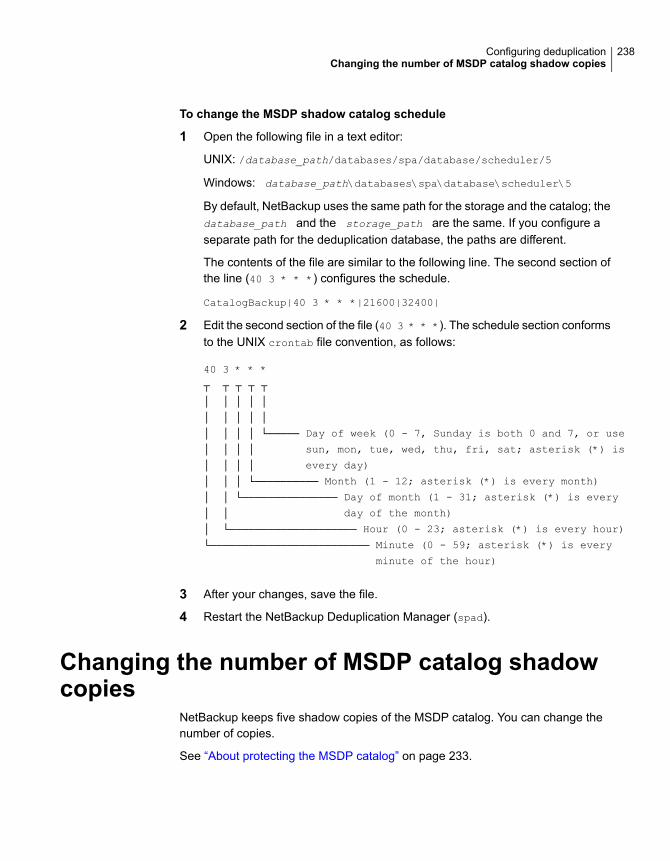
To change the MSDP shadow catalog schedule
1 Open the following file in a text editor:
UNIX: /database_path/databases/spa/database/scheduler/5
Windows: database_path\databases\spa\database\scheduler\5
By default, NetBackup uses the same path for the storage and the catalog; thedatabase_path and the storage_path are the same. If you configure aseparate path for the deduplication database, the paths are different.
The contents of the file are similar to the following line. The second section ofthe line (40 3 * * *) configures the schedule.
CatalogBackup|40 3 * * *|21600|32400|
2 Edit the second section of the file (40 3 * * *). The schedule section conformsto the UNIX crontab file convention, as follows:
40 3 * * *
┬ ┬ ┬ ┬ ┬
│ │ │ │ │
│ │ │ │ │
│ │ │ │ └───── Day of week (0 - 7, Sunday is both 0 and 7, or use
│ │ │ │ sun, mon, tue, wed, thu, fri, sat; asterisk (*) is
│ │ │ │ every day)
│ │ │ └────────── Month (1 - 12; asterisk (*) is every month)
│ │ └─────────────── Day of month (1 - 31; asterisk (*) is every
│ │ day of the month)
│ └──────────────────── Hour (0 - 23; asterisk (*) is every hour)
└───────────────────────── Minute (0 - 59; asterisk (*) is every
minute of the hour)
3 After your changes, save the file.
4 Restart the NetBackup Deduplication Manager (spad).
Changing the number of MSDP catalog shadowcopies
NetBackup keeps five shadow copies of the MSDP catalog. You can change thenumber of copies.
See “About protecting the MSDP catalog” on page 233.
238Configuring deduplicationChanging the number of MSDP catalog shadow copies
To change the number of MSDP catalog shadow copies
1 Open the following file in a text editor:
UNIX: /storage_path/etc/puredisk/spa.cfg
Windows: storage_path\etc\puredisk\spa.cfg
2 Find the CatalogBackupVersions parameter and change the value to thewanted number of shadow copies. The valid values are 1 to 256, inclusive.
3 After your changes, save the file.
4 Restart the NetBackup Deduplication Manager (spad).
Configuring an MSDP catalog backupUse the following procedure to configure a backup policy for the NetBackup MSDPcatalog.
See “About protecting the MSDP data” on page 45.
See “Troubleshooting MSDP catalog backup” on page 429.
239Configuring deduplicationConfiguring an MSDP catalog backup
To configure an MSDP catalog backup
1 Verify that the MSDP storage server host (that is, the media server) is anadditional server for the NetBackup master server. See NetBackupManagement > Host Properties > masterserver_name > Servers >Additional Servers in the NetBackup Administration Console.
If the storage server is not in theAdditional Servers list, add the MSDP storageserver host to the Additional Servers list. The host must be in the AdditionalServers list and cannot be in the Media Servers list.
2 On the MSDP storage server, invoke the drcontrol utility and use theappropriate options for your needs. The following is the syntax for the utility:
Windows: install_path\Veritas\pdde\drcontrol --new_policy
--residence residence [--policy policy_name] [--client host_name]
[--hardware machine_type] [--OS operating_system] [--dsid
data_selection_ID] [--NB_install_dir install_directory]
UNIX: /usr/openv/pdde/pdcr/bin/drcontrol --new_policy --residence
residence [--policy policy_name] [--disk_pool disk_pool_name]
[--client host_name] [--hardware machine_type] [--OS
operating_system] [--dsid data_selection_ID]
Descriptions of the options are available in another topic. Note: To ensure thatNetBackup activates the policy, you must specify the --residence residence
option.
See “MSDP drcontrol options” on page 240.
The utility creates a log file and displays its path in the command output.
See “NetBackup MSDP log files” on page 407.
MSDP drcontrol optionsThe drcontrol utility resides in the following directories, depending on host type:
■ UNIX: /usr/openv/pdde/pdcr/bin
■ Windows: install_path\Veritas\pdde
The drcontrol utility creates a log file.
See “NetBackup MSDP log files” on page 407.
Table 5-38 describes the options for creating and updating an MSDP catalog backuppolicy.
240Configuring deduplicationConfiguring an MSDP catalog backup

Table 5-38 MSDP drcontrol options for catalog backup and recovery
DescriptionOption
Recover the MSDP catalog from the most recent backup image.This option automatically recovers the catalog and performs all ofthe actions necessary to return MSDP to full functionality.
This option requires the --policy policy_name option.
To recover the catalog from a backup other than the most recent,contact your Veritas Support representative.
--auto_recover_DR
The client to back up (that is, the host name of the MSDP storageserver).
Default: the value that bpgetconfig CLIENT_NAME returns.
--client host_name
Remove all of the old MSDP catalog directories during the catalogrecovery process. Those directories are renamed during therecovery.
--cleanup
Deletes the existing deduplication catalog files before restoring themfrom the last backup in the recover_last_image step. Used fora cloud media server after the file system has been recovered in therecover_last_cloud_catalyst_image step.
--delete_old_files_for_cloud_catalyst
In a NetBackup Cloud Catalyst recovery scenario, you must specifythe disk pool name that is configured for the cloud storage server.This option is required for auto_recover_DR when the disk poolname cannot be determined from the host name. For example, fora cloud storage server that is configured for Cloud Catalyst.
--disk_pool
The data selection ID is the catalog directory for one of theNetBackup domains.
In a multi-domain scenario when you recover the catalog fromanother domain, the dsid of the other NetBackup domain is used.To obtain the dsid of the other NetBackup domain, run the spausercommand to list the dsid.
The default value is 2.
--dsid
The hardware type or the computer type for the host.
Spaces are not allowed. If the string contains special characters,enclose it in double quotation marks (").
Default: Unknown.
--hardware machine_type
241Configuring deduplicationConfiguring an MSDP catalog backup
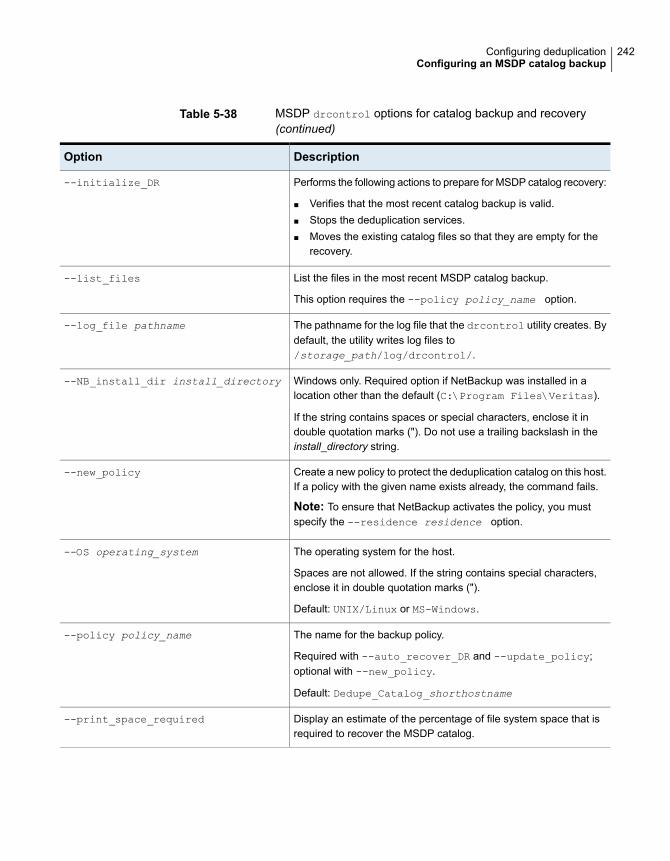
Table 5-38 MSDP drcontrol options for catalog backup and recovery(continued)
DescriptionOption
Performs the following actions to prepare for MSDP catalog recovery:
■ Verifies that the most recent catalog backup is valid.■ Stops the deduplication services.■ Moves the existing catalog files so that they are empty for the
recovery.
--initialize_DR
List the files in the most recent MSDP catalog backup.
This option requires the --policy policy_name option.
--list_files
The pathname for the log file that the drcontrol utility creates. Bydefault, the utility writes log files to/storage_path/log/drcontrol/.
--log_file pathname
Windows only. Required option if NetBackup was installed in alocation other than the default (C:\Program Files\Veritas).
If the string contains spaces or special characters, enclose it indouble quotation marks ("). Do not use a trailing backslash in theinstall_directory string.
--NB_install_dir install_directory
Create a new policy to protect the deduplication catalog on this host.If a policy with the given name exists already, the command fails.
Note: To ensure that NetBackup activates the policy, you mustspecify the --residence residence option.
--new_policy
The operating system for the host.
Spaces are not allowed. If the string contains special characters,enclose it in double quotation marks (").
Default: UNIX/Linux or MS-Windows.
--OS operating_system
The name for the backup policy.
Required with --auto_recover_DR and --update_policy;optional with --new_policy.
Default: Dedupe_Catalog_shorthostname
--policy policy_name
Display an estimate of the percentage of file system space that isrequired to recover the MSDP catalog.
--print_space_required
242Configuring deduplicationConfiguring an MSDP catalog backup
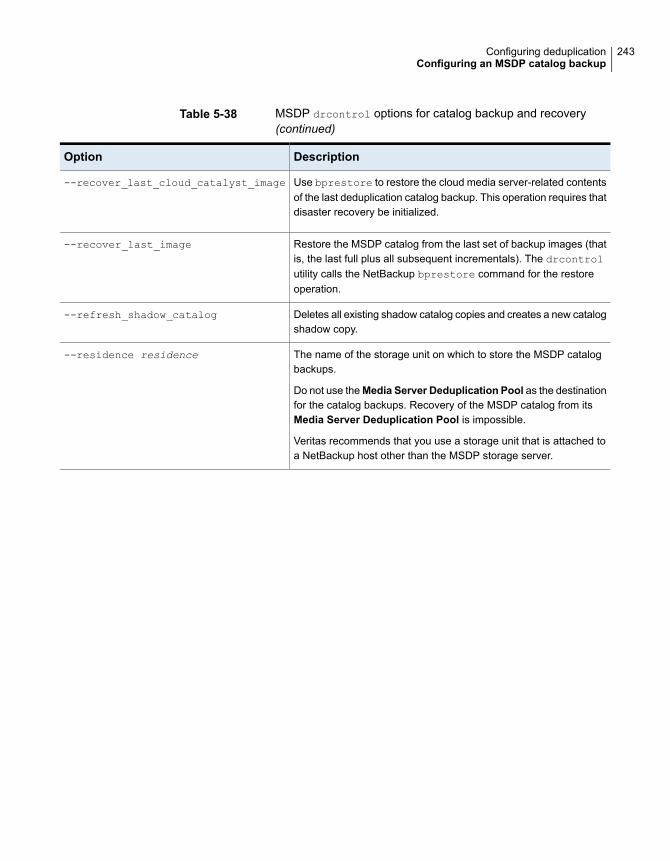
Table 5-38 MSDP drcontrol options for catalog backup and recovery(continued)
DescriptionOption
Use bprestore to restore the cloud media server-related contentsof the last deduplication catalog backup. This operation requires thatdisaster recovery be initialized.
--recover_last_cloud_catalyst_image
Restore the MSDP catalog from the last set of backup images (thatis, the last full plus all subsequent incrementals). The drcontrolutility calls the NetBackup bprestore command for the restoreoperation.
--recover_last_image
Deletes all existing shadow catalog copies and creates a new catalogshadow copy.
--refresh_shadow_catalog
The name of the storage unit on which to store the MSDP catalogbackups.
Do not use theMedia Server Deduplication Pool as the destinationfor the catalog backups. Recovery of the MSDP catalog from itsMedia Server Deduplication Pool is impossible.
Veritas recommends that you use a storage unit that is attached toa NetBackup host other than the MSDP storage server.
--residence residence
243Configuring deduplicationConfiguring an MSDP catalog backup
Table 5-38 MSDP drcontrol options for catalog backup and recovery(continued)
DescriptionOption
Update a policy, as follows:
■ If the client name (of this media server) is not in the policy’s clientlist, add the client name to the policy’s client list.
■ If you specify the --OS or --hardware options, replace thevalues currently in the policy with the new values.
■ Update the backup selection based on the locations of the MSDPstorage directories and configuration files. Therefore, if you modifyany of the following, you must use this option to update thecatalog backup policy:■ Any of the following values in the spa.cfg file
(section:variable pairs):■ StorageDatabase:CatalogShadowPath
■ StorageDatabase:Path
■ Paths:Var
■ The spa.cfg or contentrouter.cfg locations in thepdregistry.cfg file.
This option fails if there is no policy with the given policy name. Italso fails if the existing policy type is incompatible with the operatingsystem of the host on which you run the command.
This option requires the --policy policy_name option.
--update_policy
Echo all drcontrol log statements to stdout.--verbose
See “Configuring an MSDP catalog backup” on page 239.
Updating an MSDP catalog backup policyYou can use any NetBackup method to update an MSDP catalog backup policymanually. However, you should use the NetBackup Deduplication Catalog PolicyAdministration and Catalog Disaster Recovery (drcontrol) under the followingcircumstances:
■ To add the client name of the storage server to the policy’s client list.
■ To update the --OS value.
■ To update the --hardware value.
■ To update the backup selection if you modified any of the following configurationvalues:
244Configuring deduplicationUpdating an MSDP catalog backup policy
■ Any of the following values in the spa.cfg file (section:variable pairs):
■ StorageDatabase:CatalogShadowPath
■ StorageDatabase:Path
■ Paths:Var
■ The spa.cfg or contentrouter.cfg locations in the pdregistry.cfg file.
See “About protecting the MSDP data” on page 45.
See “Troubleshooting MSDP catalog backup” on page 429.
To update an MSDP catalog backup
◆ On the MSDP storage server, invoke the drcontrol utility and use theappropriate options for your needs. The following is the syntax for an updateoperation:
UNIX: /usr/openv/pdde/pdcr/bin/drcontrol --update_policy --policy
policy_name [--client host_name] [--hardware machine_type] [--OS
operating_system]
Windows: install_path\Veritas\pdde\drcontrol --update_policy
--policy policy_name [--client host_name] [--hardware
machine_type] [--OS operating_system] [--OS operating_system]
[--NB_install_dir install_directory]
Descriptions of the options are available in another topic.
See “MSDP drcontrol options” on page 240.
The utility creates a log file and displays its path in the command output.
See “NetBackup MSDP log files” on page 407.
About MSDP FIPS complianceThe Federal Information Processing Standards (FIPS) define U.S. and CanadianGovernment security and interoperability requirements for computer systems. TheFIPS 140-2 standard specifies the security requirements for cryptographic modules.It describes the approved security functions for symmetric and asymmetric keyencryption, message authentication, and hashing.
For more information about the FIPS 140-2 standard and its validation program,see the National Institute of Standards and Technology (NIST) and theCommunications Security Establishment Canada (CSEC) Cryptographic ModuleValidation Program website athttps://csrc.nist.gov/projects/cryptographic-module-validation-program.
245Configuring deduplicationAbout MSDP FIPS compliance
The NetBackup MSDP is now FIPS validated and can be operated in FIPS mode.
Note: You must run FIPS mode on a new installation of NetBackup 8.1.1.
Enabling MSDP FIPS modeEnsure that you configure the storage server before you enable the MSDP FIPSmode.
Caution: Enabling MSDP FIPS mode might affect the NetBackup performance ona server with the Solaris operating system.
Enable the FIPS mode for MSDP by running the following commands:
■ For UNIX:/usr/openv/pdde/pdag/scripts/set_fips_mode.sh 1
For Windows:<install_path>\Veritas\pdde\set_fips_mode.bat 1
■ Restart the NetBackup service on the server and the client.
■ For UNIX:
■ /usr/openv/netbackup/bin/bp.kill_all
■ /usr/openv/netbackup/bin/bp.start_all
■ For Windows:
■ <install_path>\NetBackup\bin\bpdown
■ <install_path>\NetBackup\bin\bpup
Warning: It is recommended that you do not disable the MSDP FIPS mode onceyou enable it, for security reasons.
Getting the status of MSDP FIPS modeTo get status of the MSDP FIPS mode, enter the following commands:
For UNIX:
/usr/openv/pdde/pdcr/bin/crcontrol --getmode
For Windows:
<install_path>\Veritas\pdde\crcontrol.exe --getmode
Other things to note:
246Configuring deduplicationAbout MSDP FIPS compliance
■ FIPS must be enabled on all the NetBackup components to establish aconnection. When the FIPS mode is not enabled, communication can occurbetween the NetBackup clients and the servers that have earlier, supportedNetBackup versions.
■ The MSDP FIPS mode does not support NetBackup Cloud Catalyst.
Configuring the NetBackup client-sidededuplication to support multiple interfaces ofMSDP
If you have network configurations like VLAN or Subnet with NetBackup client, thenthe MSDP server has multiple network interfaces. These interfaces are connectedto different switches or VLANs. As MSDP has only one storage server, NetBackupclients cannot access the MSDP server using the storage server name. Thededuplication can fail on the clients.
You can add support for up to 30 interfaces.
Run the following steps to use the cacontrol command option (Location:/usr/openv/pdde/pdcr/bin/) to configure MSDP and specify the network interfacesthat the NetBackup client can use:
1 Log on the MSDP server.
2 Use the following command to add the alternate interfaces:
cacontrol --interface add msdp-a.server.com
You can remove an added interface using the following command:
cacontrol --interface remove msdp-a.server.com
3 Use either of the following options to validate the interface configuration:
■ cacontrol --interface list
■ bpstsinfo -si -storage_server msdp-a.server.com -stype PureDisk
Location of the bpstsinfo command:/usr/openv/netbackup/bin/admincmd/
4 Configure the NetBackup client-side deduplication backup policy and run thebackup operation.
247Configuring deduplicationConfiguring the NetBackup client-side deduplication to support multiple interfaces of MSDP
About MSDP multi-domain supportAn MSDP storage server is configured in a NetBackup media server. The NetBackupmedia servers and clients in the NetBackup domain can use this storage server.By default, the NetBackup media servers and clients cannot directly use an MSDPstorage server from another NetBackup domain. For example, NetBackup mediaservers or clients cannot backup data to an MSDP storage server from anotherNetBackup domain.
To use an MSDP storage server from another NetBackup domain, the MSDP storageserver must have multiple MSDP users. Then NetBackup media servers or clientscan use the MSDP storage server from another NetBackup domain by using adifferent MSDP user. Multiple NetBackup domains can use the same MSDP storageserver, but each NetBackup domain must use a different MSDP user to access thatMSDP storage server.
To add an MSDP user on an MSDP storage server, run the following command:
■ Windows<install_path>\pdde\spauser -a -u <username> -p <password>
■ UNIX/usr/openv/pdde/pdcr/bin/spauser -a -u <username> -p <password>
To list all the MSDP users, run the following command on the MSDP storage server:
■ Windows<install_path>\pdde\spauser -l
■ UNIX/usr/openv/pdde/pdcr/bin/spauser -l
To use an MSDP storage server from another NetBackup domain, you must obtaina NetBackup certificate from another NetBackup domain.
Run the following commands on every NetBackup media server or client that wantsto use an MSDP storage server from another domain:
■ Windowsinstall_path\NetBackup\bin\nbcertcmd -getCACertificate –server
another_master_server
install_path\NetBackup\bin\nbcertcmd -getCertificate –server
another_master_server -token token_string
■ UNIX/usr/openv/netbackup/bin/nbcertcmd -getCACertificate –server
another_master_server
248Configuring deduplicationAbout MSDP multi-domain support
/usr/openv/netbackup/bin/nbcertcmd -getCertificate –server
another_master_server -token token_string
Use either of these two methods to obtain the authorization tokens:
■ NetBackup Administration Console
■ Log on the target NetBackup master server and open Security Management> Certificate Management > Token Management.
■ Click Create Token or right-click in the blank area of the Token records listview and select New Token to create a token.
■ NetBackup Commands
■ Use the bpnbat command to log on the target NetBackup master server.
■ Use the nbcertcmd command to get the authorization tokens.For more information on the commands, refer to the NetBackup CommandsReference Guide.
An example for using an MSDP storage server fromanother NetBackup domainThe following table describes the hierarchy that is used in the example:
NetBackup domain BNetBackup domain A
masterB
mediaB
masterA
mediaA1
mediaA2
clientA
MasterA is the host name of the master server of NetBackup domain A and thedomain contains two media servers (mediaA1, mediaA2), and one client (clientA).MasterB is the host name of the master server of NetBackup domain B and thedomain contains one media server (mediaB).
Using the following sample steps, create an MSDP storage server in domain B andlet domain A use the MSDP storage server:
1. Create an MSDP storage server on media server mediaB of NetBackup domainB. (NetBackup Administration Console > Media and Device Management >Configure Disk storage servers > Media Server Deduplication Pool)
2. Run the following command on mediaB to create a new MSDP user testuser1with password as testuser1pass.
249Configuring deduplicationAbout MSDP multi-domain support
spauser -a -u “testuser1” -p “testuser1pass”
3. Run the following command on mediaA1 to get a CA certificate and a hostcertificate from masterB.
nbcertcmd -GetCACertificate -server masterB
nbcertcmd -GetCertificate -server masterB -token <token_string>
4. Create an MSDP OpenStorage server on mediaA1 of NetBackup domain A.(NetBackup Administration Console > Media and Device Management >Configure Disk storage servers > OpenStorage).
OpenStorage server type is PureDisk, Storage server name is mediaB, username is testuser1, and password is testuser1pass.
You must enter the server type as PureDisk.
Now mediaA1 of NetBackup domain can use the MSDP storage server mediaB.To use mediaA2 as a load balance server of the MSDP storage server, youcan run the following certificate command on mediaA2:
■ nbcertcmd -GetCACertificate -server masterB
■ nbcertcmd -GetCertificate -server masterB -token <token_string>
To run client-direct backup from clientA to MSDP storage server mediaB, runthe following certificate command on clientA:
■ nbcertcmd -GetCACertificate -server masterB
■ nbcertcmd -GetCertificate -server masterB -token <token_string>
5. After creating the MSDP OpenStorage server, create a related NetBackup diskpool and storage unit. Use the storage unit to run all the related NetBackupjobs.
When optimized duplication and multi-domain are used together, there iscommunication between the MSDP storage servers from two different NetBackupdomains. The MSDP storage server from the other domain must have a certificategenerated by master server of the local NetBackup domain. Run the nbcertcmd
commands on source side MSDP storage server to request a certificate from theNetBackup master server of target MSDP storage server.
When backup and restore jobs on the client and multi-domain are used together,there is communication between the NetBackup client and MSDP storage serverfrom two different NetBackup domains. Run the nbcertcmd commands on theNetBackup client to request a certificate from the NetBackup master server of MSDPstorage server.
250Configuring deduplicationAbout MSDP multi-domain support
When one NetBackup domain uses the MSDP storage server of another NetBackupdomain, the MSDP storage server cannot be the A.I.R target of that NetBackupdomain.
If an external CA is used in the NetBackup setup, you do not need to run thenbcertcmd –GetCACertificate and the nbcertcmd –GetCertificate commands.If NetBackup domains A and B do not use the same external CA, synchronize theexternal root CA between the two NetBackup domains for MSDP communication.
For more information of the external CA, refer to NetBackup Security and EncryptionGuide.
When one NetBackup domain uses an MSDP storage server that has multiplenetwork interfaces and related host names, another NetBackup domain can useany one host name to configure the OpenStorage server. If the MSDP storageserver that has multiple host names uses an external CA, the Subject AlternativeName field of the external certificate must contain all the host names that are usedto configure the OpenStorage server.
About MSDP mutli-domain VLAN SupportMSDP supports multi-domain NetBackup setups. In a multi-domain set-up, it isimportant for master servers from other domains to connect with the MSDP storageserver and the master server of the NetBackup domain that contains the MSDPserver. The master servers and media servers must have multiple network interfacesand host names in a multi-domain setup.
When you configure MSDP VLAN, the local NetBackup domain and the otherNetBackup domain must have the NetBackup version 8.2 or later.
An example for using an MSDP VLANThe following table describes the hierarchy that is used in the example:
NetBackup domain BNetBackup domain A
masterB - (10.XX.40.3/24)
mediaB - (10.XX.40.4/24)
masterA - (10.XX.30.1/24)
masterA2 - (10.XX.40.1/24)
mediaA - (10.XX.30.2/24)
mediaA2 - (10.XX.40.2/24)
masterA is the master server of domain A and has two host names and IPaddresses. mediaA is the media server of domain A and has two host names andIP addresses. MSDP storage server is created on media server mediaA.
251Configuring deduplicationAbout MSDP mutli-domain VLAN Support
To let domain B access the MSDP storage server on mediaA of domain A, run thefollowing steps:
1. Create an MSDP storage server on media server mediaA of NetBackup domainA. (NetBackup Administration Console > Media and Device Management >Configure Disk storage servers > Media Server Deduplication Pool)
2. Run following command on mediaA to create a new MSDP user testuser1with password testuser1pass:
spauser -a -u “testuser1” -p “testuser1pass”
3. Servers in the domain B can only access IP like 10.XX.40.*, so masterA2 isused as the master server host name of domain A.
Run following command on mediaB to get a CA certificate and a host certificatefrom masterA:
nbcertcmd -GetCACertificate -server masterA2
nbcertcmd -GetCertificate -server masterA2 -token <token_string>
If the nbcertcmd –GetCACertificate displays the error "The server namedoes not match any of the host names listed in the server's certificate”, referto the following article to add more host name to master server:
https://www.veritas.com/support/en_US/article.100034092
4. Create an MSDP OpenStorage server on mediaB of NetBackup domain B.NetBackup Administration Console > Media and Device Management >Configure Disk storage servers > OpenStorage).
The OpenStorage server name mediaA2 is used as the host name that has theIP address 10.XX.40.*.
OpenStorage server type is PureDisk, user name is testuser1, and passwordis testuser1pass. You must enter the server type as PureDisk.
Now mediaB of NetBackup domain B can use the MSDP storage server mediaA2and the network IP address 10.XX.40.*
If an external CA is used in the NetBackup setup, you do not need to run thenbcertcmd –GetCACertificate and the nbcertcmd –GetCertificate commands.If NetBackup domain A and NetBackup domain B do not use the same externalCA, you must synchronize the external root CA between the two NetBackup domainsfor MSDP communication. If the servers have multiple host names, then the SubjectAlternative Name field of the external certificate must contain all the host names.
252Configuring deduplicationAbout MSDP mutli-domain VLAN Support
Configuring deduplicationto the cloud withNetBackup Cloud Catalyst
This chapter includes the following topics:
■ Using NetBackup Cloud Catalyst to upload deduplicated data to the cloud
■ Cloud Catalyst requirements and limitations
■ Configuring a Linux media server as a Cloud Catalyst storage server
■ Configuring a Cloud Catalyst storage server for deduplication to the cloud
■ About the Cloud Catalyst esfs.json configuration file
■ About the Cloud Catalyst cache
■ Controlling data traffic to the cloud when using Cloud Catalyst
■ Configuring source control or target control optimized duplication for CloudCatalyst
■ Configuring a Cloud Catalyst storage server as the source for optimizedduplication
■ Decommissioning Cloud Catalyst cloud storage
■ NetBackup Cloud Catalyst workflow processes
■ Disaster recovery for Cloud Catalyst
■ About image sharing in cloud using Cloud Catalyst
6Chapter
Using NetBackup Cloud Catalyst to uploaddeduplicated data to the cloud
NetBackup Cloud Catalyst uses MSDP deduplication technology to uploaddeduplicated data to the cloud. The data is uploaded by a Cloud Catalyst storageserver, which first stores data in a local cache before uploading it to cloud storage.This cloud storage server is a dedicated host that can be either a NetBackupappliance or a media server configured for NetBackup Cloud Catalyst.
The following topics describe scenarios that use NetBackup Cloud Catalyst:
■ See “Optimized duplication is used to copy data from an MSDP storage serverto a Cloud Catalyst storage server (preferred use case)” on page 254.This is the preferred use case because it uses the Cloud Catalyst storage serveras a target for secondary copies. These copies usually have a longer retentionand are uploaded to the cloud.
■ See “Backups go directly to a Cloud Catalyst storage server” on page 256.While this configuration is supported, it is not the preferred use case. In this usecase, the Cloud Catalyst storage server is required to back up, deduplicate, andupload the data to cloud storage.
Optimized duplication is used to copy data from an MSDP storageserver to a Cloud Catalyst storage server (preferred use case)
This is the preferred Cloud Catalyst use case. In this scenario, the NetBackupenvironment contains two media servers: one is an MSDP storage server and oneis a Cloud Catalyst storage server.
■ First, client data is backed up to the MSDP storage server, which is used forshort-term data retention. In subsequent backups, the data is deduplicated. (SeeFigure 6-1.)
■ A storage lifecycle policy then copies the data to a Cloud Catalyst storage serverusing optimized duplication. Data is uploaded from the Cloud Catalyst localcache to the cloud when an MSDP container file is full. This occurs soon afterthe backup or duplication job begins, but not immediately.The cloud storage is used for long-term data retention. Deduplication makes itpossible for subsequent jobs to transfer substantially less data to the cloud,depending on the deduplication rate.
254Configuring deduplication to the cloud with NetBackup Cloud CatalystUsing NetBackup Cloud Catalyst to upload deduplicated data to the cloud
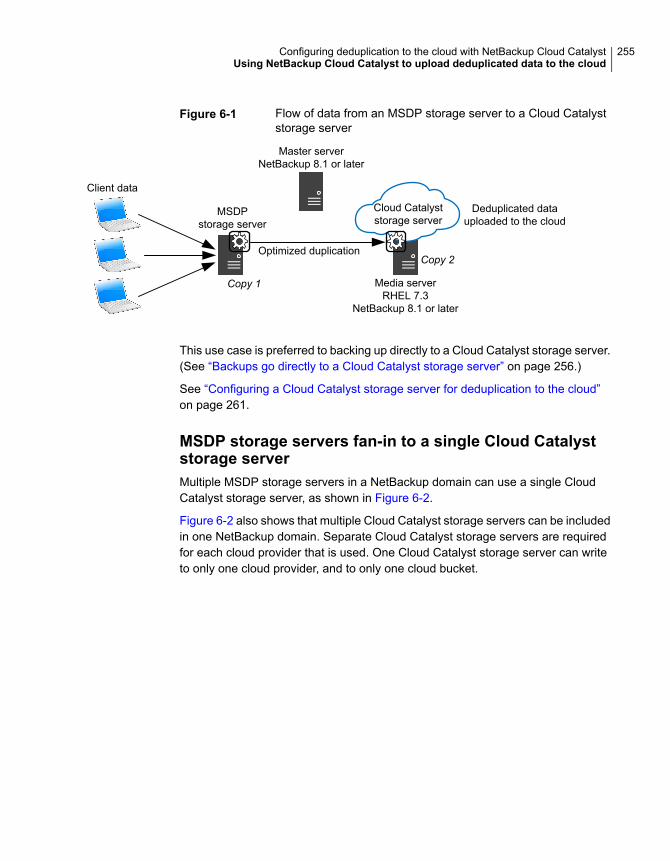
Figure 6-1 Flow of data from an MSDP storage server to a Cloud Catalyststorage server
Client data
MSDPstorage server
Copy 1
Cloud Catalyststorage server
Optimized duplicationCopy 2
Deduplicated datauploaded to the cloud
Master serverNetBackup 8.1 or later
Media serverRHEL 7.3
NetBackup 8.1 or later
This use case is preferred to backing up directly to a Cloud Catalyst storage server.(See “Backups go directly to a Cloud Catalyst storage server” on page 256.)
See “Configuring a Cloud Catalyst storage server for deduplication to the cloud”on page 261.
MSDP storage servers fan-in to a single Cloud Catalyststorage serverMultiple MSDP storage servers in a NetBackup domain can use a single CloudCatalyst storage server, as shown in Figure 6-2.
Figure 6-2 also shows that multiple Cloud Catalyst storage servers can be includedin one NetBackup domain. Separate Cloud Catalyst storage servers are requiredfor each cloud provider that is used. One Cloud Catalyst storage server can writeto only one cloud provider, and to only one cloud bucket.
255Configuring deduplication to the cloud with NetBackup Cloud CatalystUsing NetBackup Cloud Catalyst to upload deduplicated data to the cloud

Figure 6-2 Fan-in MSDP storage servers and multiple Cloud Catalyst storageservers
MSDPstorage serversClient data
Cloud Catalyststorage server
Cloud provider A
Cloud provider B
Master serverNetBackup 8.1 or later
Cloud Catalyststorage server
Media serverRHEL 7.3
NetBackup 8.1 or later
NetBackup CloudCatalyst Appliance
Optimized duplication
Optimizedduplication
Backups go directly to a Cloud Catalyst storage serverIn this scenario, the NetBackup environment does not use an MSDP storage server;it contains only a Cloud Catalyst storage server. The Cloud Catalyst storage servermust back up, deduplicate, and upload the data to cloud storage.
This scenario is not the preferred Cloud Catalyst use case. This scenario may bea good solution for some users depending on the size of the environment, thedesired backup window, and other factors. However, it is expected that most usersget better results from the preferred use case.
See “Optimized duplication is used to copy data from an MSDP storage server toa Cloud Catalyst storage server (preferred use case)” on page 254.
Note the following disadvantages to backing up directly to the Cloud Catalyst storageserver:
■ Since the data needs to be uploaded to the cloud before a job can be consideredcomplete, the job may not complete within the backup window.
256Configuring deduplication to the cloud with NetBackup Cloud CatalystUsing NetBackup Cloud Catalyst to upload deduplicated data to the cloud
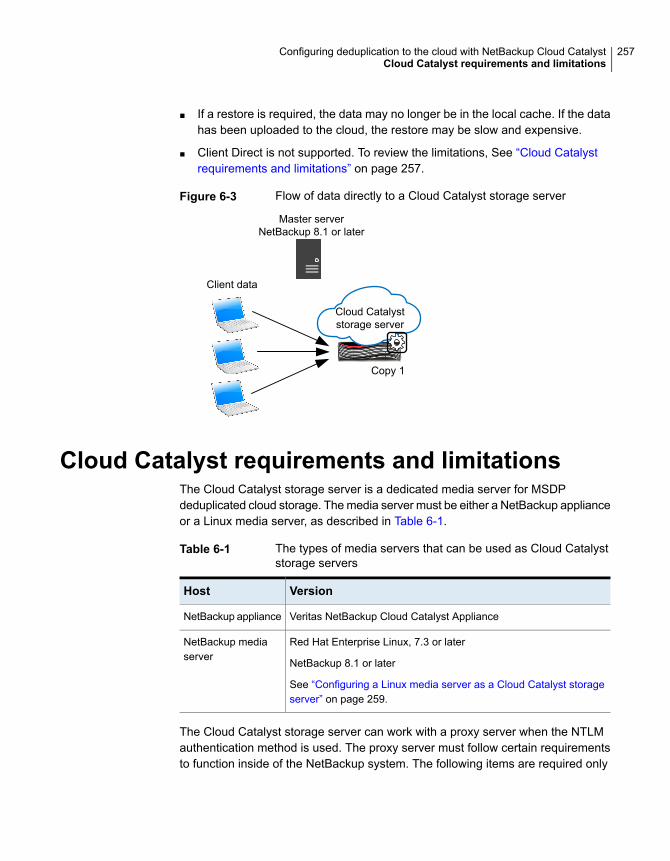
■ If a restore is required, the data may no longer be in the local cache. If the datahas been uploaded to the cloud, the restore may be slow and expensive.
■ Client Direct is not supported. To review the limitations, See “Cloud Catalystrequirements and limitations” on page 257.
Figure 6-3 Flow of data directly to a Cloud Catalyst storage server
Client data
Copy 1
Cloud Catalyststorage server
Master serverNetBackup 8.1 or later
Cloud Catalyst requirements and limitationsThe Cloud Catalyst storage server is a dedicated media server for MSDPdeduplicated cloud storage. The media server must be either a NetBackup applianceor a Linux media server, as described in Table 6-1.
Table 6-1 The types of media servers that can be used as Cloud Catalyststorage servers
VersionHost
Veritas NetBackup Cloud Catalyst ApplianceNetBackup appliance
Red Hat Enterprise Linux, 7.3 or later
NetBackup 8.1 or later
See “Configuring a Linux media server as a Cloud Catalyst storageserver” on page 259.
NetBackup mediaserver
The Cloud Catalyst storage server can work with a proxy server when the NTLMauthentication method is used. The proxy server must follow certain requirementsto function inside of the NetBackup system. The following items are required only
257Configuring deduplication to the cloud with NetBackup Cloud CatalystCloud Catalyst requirements and limitations
when the NTLM authentication method is used. When the BASIC authenticationmethod or NONE is selected, there is no such requirement.
Requirements for a proxy server:
■ The proxy server must support both NTLMv1 and NTLMv2.
■ Cloud Catalyst is dependent on Classic Cloud Connector to get the list of buckets.
■ The Classic Cloud Connector only supports NTLMv1, and not NTLMv2.
■ Cloud Catalyst only supports NTLMv2.
Note: A Cloud Catalyst storage server is supported for Auto Image Replication(A.I.R.) and Target A.I.R. as the source and the target from NetBackup 8.3 or later.
LimitationsNetBackup Cloud Catalyst recognizes nearly all other MSDP features andcapabilities.
See the NetBackup compatibility lists for updated information on supported cloudvendors and feature support:
http://www.netbackup.com/compatibility
The following are current exclusions or limitations:
■ Support limitations as listed in the NetBackup Cloud Administrator's Guide:http://www.veritas.com/docs/DOC5332
■ The NetBackup media servers that you use as Cloud Catalyst storage serversmust be the same NetBackup version as the master server.
■ Load balancing for Cloud Catalyst storage servers or Cloud Catalyst appliancesis supported. See the following topic for configuration considerations.See “Configuring source control or target control optimized duplication for CloudCatalyst” on page 277.
■ OpsCenter cannot report on the data that Cloud Catalyst storage servers uploadto the cloud.
■ A single media server cannot be both an MSDP storage server and a CloudCatalyst storage server.
■ A Cloud Catalyst storage server is supported as the target for A.I.R. when thestorage server is selected from the drop-down list of the trusted master server.
■ NetBackup Client Direct deduplication is supported in a Cloud Catalyst duplicationto cloud scenario. However, Client Direct deduplication is not supported in a
258Configuring deduplication to the cloud with NetBackup Cloud CatalystCloud Catalyst requirements and limitations
scenario where the backup is uploaded directly to the cloud and no duplicationis configured.
■ Direct backup to Cloud Catalyst using the accelerator option is not supportedwhen Amazon S3 Glacier or Amazon S3 Glacier Deep Archive storage classesare used. Backup to an MSDP with accelerator and then optimized duplicationto Cloud Catalyst is supported.
■ NetBackup clients must be on version 8.3 or later to support Client Direct enabledbackups to the Cloud Catalyst media server.
Configuring a Linux media server as a CloudCatalyst storage server
The Cloud Catalyst storage server is a dedicated media server for MSDPdeduplicated cloud storage.
The media server that is configured as the Cloud Catalyst storage server must beone of the following host types:
■ NetBackup Cloud Catalyst ApplianceDocumentation for the Cloud Catalyst Appliance can be found at the followingwebsite:https://www.veritas.com/content/support/en_US/Appliances.html
■ A Linux media server with specifications similar to the NetBackup Cloud CatalystAppliance. The following section lists the software and hardware requirementsfor this media server.
Specifications for a Linux media serverThe dedicated media server that will be configured as a Cloud Catalyst storageserver should meet or exceed the specifications of the NetBackup Cloud CatalystAppliance. The requirements for this MSDP media server are greater than theminimum MSDP server requirements:
See “About MSDP server requirements” on page 28.
In addition to the technical requirements that are listed in Table 6-2, the mediaserver must also contain the following:
■ Red Hat Enterprise Linux 7.3 or later.
■ NetBackup 8.1 or later.
■ A minimum of 4 TB available for the Cloud Catalyst local cache directory.See “About the Cloud Catalyst cache” on page 275.
■ The processor must support the SSE4.2 instruction set.
259Configuring deduplication to the cloud with NetBackup Cloud CatalystConfiguring a Linux media server as a Cloud Catalyst storage server
The technical specifications for the NetBackup 5240 Appliance are listed in theappendix of the NetBackup 5240 Appliance Product Description. Table 6-2 lists asubset of minimum requirements for the media server.
Table 6-2 NetBackup 5240 Appliance technical specifications
NetBackup 5240 ApplianceTechnical Specification
Two Intel® Xenon® E5-2630 v3 2.40 GHz processorsProcessor
2.40 GHzCPU speed
16 (8 per processor)Cores
192 GB
DDR4 RDIMM
System memory
14 TB with 1 GB RAID 6 cache
Note: If a Linux media server (non-appliance) is used, itmust have a minimum of 4 TB available for the CloudCatalyst local cache directory.
See “About the Cloud Catalyst cache” on page 275.
Usable MSDP storage capacity
510 Gb Ethernet ports
If you don’t use a NetBackup appliance, the following table describes the minimumsystem requirements for a media server that is configured for Cloud Catalyst.
Table 6-3 NetBackup minimum system requirements
Minimum specificationsHardware
2.4 GHzCPU speed
4Cores
16 GBSystem memory
1
Note: Multiple networking interface cards (NIC) may bedesired for redundancy and connectivity reasons.
10 Gb Ethernet ports
1 TBCache size
SSE 4.2CPU instruction set support
1,000 MB/sAggregate throughput
260Configuring deduplication to the cloud with NetBackup Cloud CatalystConfiguring a Linux media server as a Cloud Catalyst storage server
Table 6-3 NetBackup minimum system requirements (continued)
Minimum specificationsHardware
16Optimal streams
Configuring a Cloud Catalyst storage server fordeduplication to the cloud
The configuration of deduplication to the cloud differs, depending on the type ofhost that is used for the Cloud Catalyst storage server.
■ See the following procedure if you use a NetBackup Cloud Catalyst Appliance:See “How to configure a NetBackup Cloud Catalyst Appliance” on page 261.
■ See the following procedure if you use a Linux media server (non-appliance):See “How to configure a Linux media server as a Cloud Catalyst storage server”on page 265.
Note: Cloud Catalyst uses cloud connectors during initial configuration. Certificatevalidation against Certificate Revocation List (CRL) secures the calls that the cloudconnectors initiate. After configuration, nbrmms periodically polls Cloud Catalyststorage server and makes a call to the cloud connector to check its state using thecloud connector’s CRL.
For more information on Certificate Revocation List (CRL), Review the sectionCertificate validation against Certificate Revocation List (CRL) in NetBackup CloudAdministrator’s Guide.
After initial configuration, Cloud Catalyst uses Online Certificate Status Protocol(OCSP) for securing calls during data transfer to and from the cloud. Review thefollowing section for more information on OCSP:
See “Certificate validation using Online Certificate Status Protocol (OCSP)”on page 269.
How to configure a NetBackup Cloud Catalyst ApplianceUse the following procedure to configure a NetBackup Cloud Catalyst Applianceas a Cloud Catalyst storage server.
This procedure assumes that the preferred use case is configured. The preferreduse case is described in the following topic:
261Configuring deduplication to the cloud with NetBackup Cloud CatalystConfiguring a Cloud Catalyst storage server for deduplication to the cloud
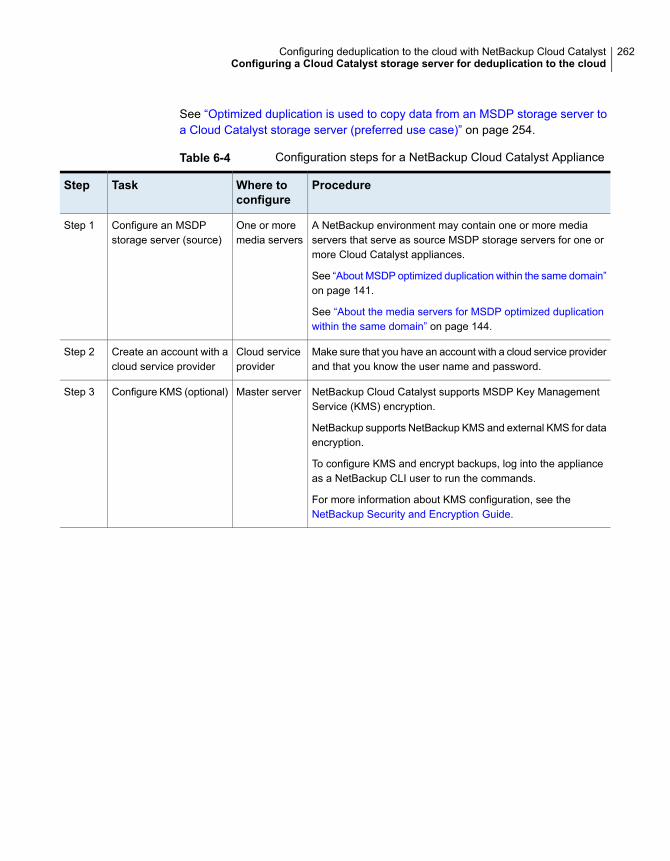
See “Optimized duplication is used to copy data from an MSDP storage server toa Cloud Catalyst storage server (preferred use case)” on page 254.
Table 6-4 Configuration steps for a NetBackup Cloud Catalyst Appliance
ProcedureWhere toconfigure
TaskStep
A NetBackup environment may contain one or more mediaservers that serve as source MSDP storage servers for one ormore Cloud Catalyst appliances.
See “About MSDP optimized duplication within the same domain”on page 141.
See “About the media servers for MSDP optimized duplicationwithin the same domain” on page 144.
One or moremedia servers
Configure an MSDPstorage server (source)
Step 1
Make sure that you have an account with a cloud service providerand that you know the user name and password.
Cloud serviceprovider
Create an account with acloud service provider
Step 2
NetBackup Cloud Catalyst supports MSDP Key ManagementService (KMS) encryption.
NetBackup supports NetBackup KMS and external KMS for dataencryption.
To configure KMS and encrypt backups, log into the applianceas a NetBackup CLI user to run the commands.
For more information about KMS configuration, see theNetBackup Security and Encryption Guide.
Master serverConfigure KMS (optional)Step 3
262Configuring deduplication to the cloud with NetBackup Cloud CatalystConfiguring a Cloud Catalyst storage server for deduplication to the cloud
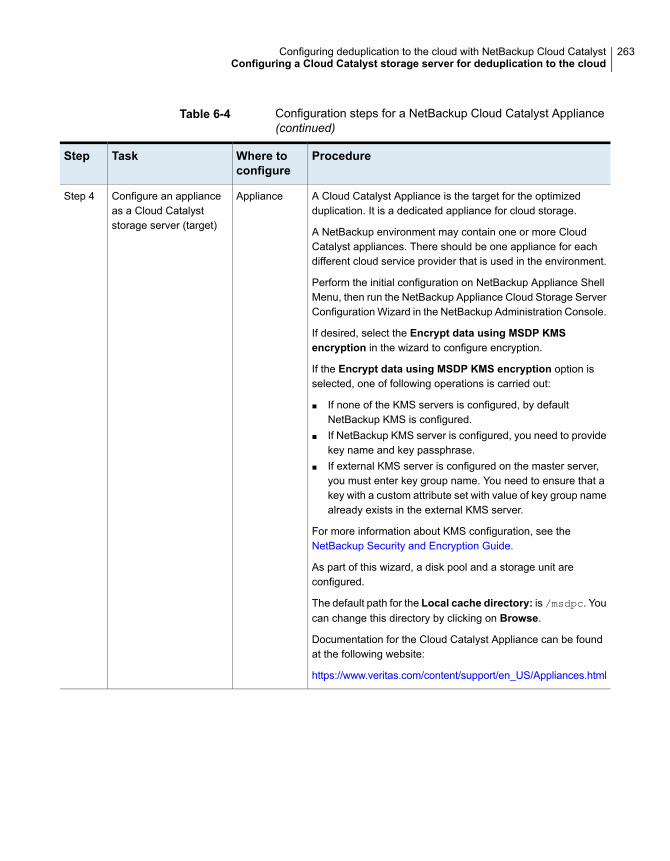
Table 6-4 Configuration steps for a NetBackup Cloud Catalyst Appliance(continued)
ProcedureWhere toconfigure
TaskStep
A Cloud Catalyst Appliance is the target for the optimizedduplication. It is a dedicated appliance for cloud storage.
A NetBackup environment may contain one or more CloudCatalyst appliances. There should be one appliance for eachdifferent cloud service provider that is used in the environment.
Perform the initial configuration on NetBackup Appliance ShellMenu, then run the NetBackup Appliance Cloud Storage ServerConfiguration Wizard in the NetBackup Administration Console.
If desired, select the Encrypt data using MSDP KMSencryption in the wizard to configure encryption.
If the Encrypt data using MSDP KMS encryption option isselected, one of following operations is carried out:
■ If none of the KMS servers is configured, by defaultNetBackup KMS is configured.
■ If NetBackup KMS server is configured, you need to providekey name and key passphrase.
■ If external KMS server is configured on the master server,you must enter key group name. You need to ensure that akey with a custom attribute set with value of key group namealready exists in the external KMS server.
For more information about KMS configuration, see theNetBackup Security and Encryption Guide.
As part of this wizard, a disk pool and a storage unit areconfigured.
The default path for the Local cache directory: is /msdpc. Youcan change this directory by clicking on Browse.
Documentation for the Cloud Catalyst Appliance can be foundat the following website:
https://www.veritas.com/content/support/en_US/Appliances.html
ApplianceConfigure an applianceas a Cloud Catalyststorage server (target)
Step 4
263Configuring deduplication to the cloud with NetBackup Cloud CatalystConfiguring a Cloud Catalyst storage server for deduplication to the cloud
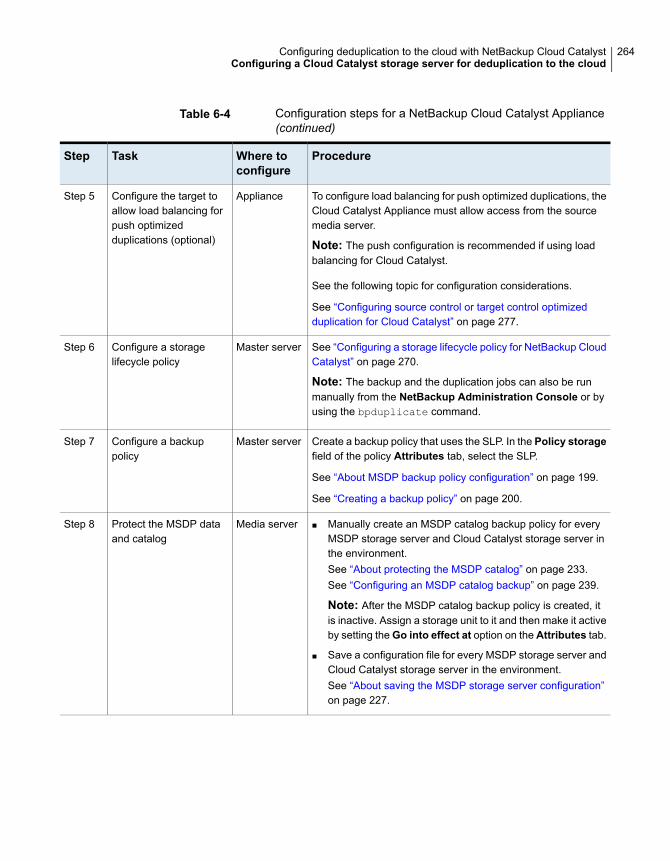
Table 6-4 Configuration steps for a NetBackup Cloud Catalyst Appliance(continued)
ProcedureWhere toconfigure
TaskStep
To configure load balancing for push optimized duplications, theCloud Catalyst Appliance must allow access from the sourcemedia server.
Note: The push configuration is recommended if using loadbalancing for Cloud Catalyst.
See the following topic for configuration considerations.
See “Configuring source control or target control optimizedduplication for Cloud Catalyst” on page 277.
ApplianceConfigure the target toallow load balancing forpush optimizedduplications (optional)
Step 5
See “Configuring a storage lifecycle policy for NetBackup CloudCatalyst” on page 270.
Note: The backup and the duplication jobs can also be runmanually from the NetBackup Administration Console or byusing the bpduplicate command.
Master serverConfigure a storagelifecycle policy
Step 6
Create a backup policy that uses the SLP. In the Policy storagefield of the policy Attributes tab, select the SLP.
See “About MSDP backup policy configuration” on page 199.
See “Creating a backup policy” on page 200.
Master serverConfigure a backuppolicy
Step 7
■ Manually create an MSDP catalog backup policy for everyMSDP storage server and Cloud Catalyst storage server inthe environment.See “About protecting the MSDP catalog” on page 233.See “Configuring an MSDP catalog backup” on page 239.
Note: After the MSDP catalog backup policy is created, itis inactive. Assign a storage unit to it and then make it activeby setting the Go into effect at option on the Attributes tab.
■ Save a configuration file for every MSDP storage server andCloud Catalyst storage server in the environment.See “About saving the MSDP storage server configuration”on page 227.
Media serverProtect the MSDP dataand catalog
Step 8
264Configuring deduplication to the cloud with NetBackup Cloud CatalystConfiguring a Cloud Catalyst storage server for deduplication to the cloud
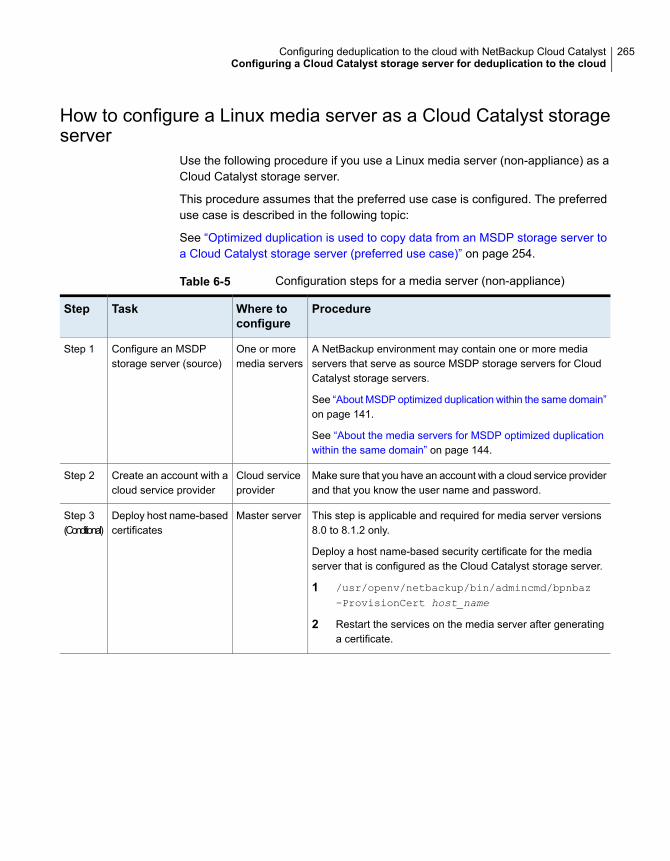
How to configure a Linux media server as a Cloud Catalyst storageserver
Use the following procedure if you use a Linux media server (non-appliance) as aCloud Catalyst storage server.
This procedure assumes that the preferred use case is configured. The preferreduse case is described in the following topic:
See “Optimized duplication is used to copy data from an MSDP storage server toa Cloud Catalyst storage server (preferred use case)” on page 254.
Table 6-5 Configuration steps for a media server (non-appliance)
ProcedureWhere toconfigure
TaskStep
A NetBackup environment may contain one or more mediaservers that serve as source MSDP storage servers for CloudCatalyst storage servers.
See “About MSDP optimized duplication within the same domain”on page 141.
See “About the media servers for MSDP optimized duplicationwithin the same domain” on page 144.
One or moremedia servers
Configure an MSDPstorage server (source)
Step 1
Make sure that you have an account with a cloud service providerand that you know the user name and password.
Cloud serviceprovider
Create an account with acloud service provider
Step 2
This step is applicable and required for media server versions8.0 to 8.1.2 only.
Deploy a host name-based security certificate for the mediaserver that is configured as the Cloud Catalyst storage server.
1 /usr/openv/netbackup/bin/admincmd/bpnbaz–ProvisionCert host_name
2 Restart the services on the media server after generatinga certificate.
Master serverDeploy host name-basedcertificates
Step 3(Conditional)
265Configuring deduplication to the cloud with NetBackup Cloud CatalystConfiguring a Cloud Catalyst storage server for deduplication to the cloud
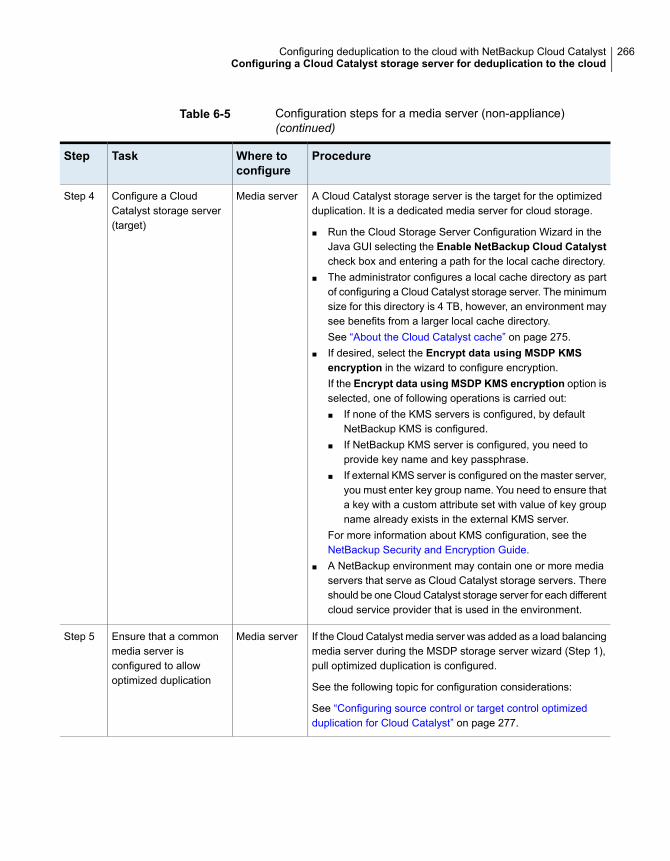
Table 6-5 Configuration steps for a media server (non-appliance)(continued)
ProcedureWhere toconfigure
TaskStep
A Cloud Catalyst storage server is the target for the optimizedduplication. It is a dedicated media server for cloud storage.
■ Run the Cloud Storage Server Configuration Wizard in theJava GUI selecting the Enable NetBackup Cloud Catalystcheck box and entering a path for the local cache directory.
■ The administrator configures a local cache directory as partof configuring a Cloud Catalyst storage server. The minimumsize for this directory is 4 TB, however, an environment maysee benefits from a larger local cache directory.See “About the Cloud Catalyst cache” on page 275.
■ If desired, select the Encrypt data using MSDP KMSencryption in the wizard to configure encryption.If the Encrypt data using MSDP KMS encryption option isselected, one of following operations is carried out:■ If none of the KMS servers is configured, by default
NetBackup KMS is configured.■ If NetBackup KMS server is configured, you need to
provide key name and key passphrase.■ If external KMS server is configured on the master server,
you must enter key group name. You need to ensure thata key with a custom attribute set with value of key groupname already exists in the external KMS server.
For more information about KMS configuration, see theNetBackup Security and Encryption Guide.
■ A NetBackup environment may contain one or more mediaservers that serve as Cloud Catalyst storage servers. Thereshould be one Cloud Catalyst storage server for each differentcloud service provider that is used in the environment.
Media serverConfigure a CloudCatalyst storage server(target)
Step 4
If the Cloud Catalyst media server was added as a load balancingmedia server during the MSDP storage server wizard (Step 1),pull optimized duplication is configured.
See the following topic for configuration considerations:
See “Configuring source control or target control optimizedduplication for Cloud Catalyst” on page 277.
Media serverEnsure that a commonmedia server isconfigured to allowoptimized duplication
Step 5
266Configuring deduplication to the cloud with NetBackup Cloud CatalystConfiguring a Cloud Catalyst storage server for deduplication to the cloud
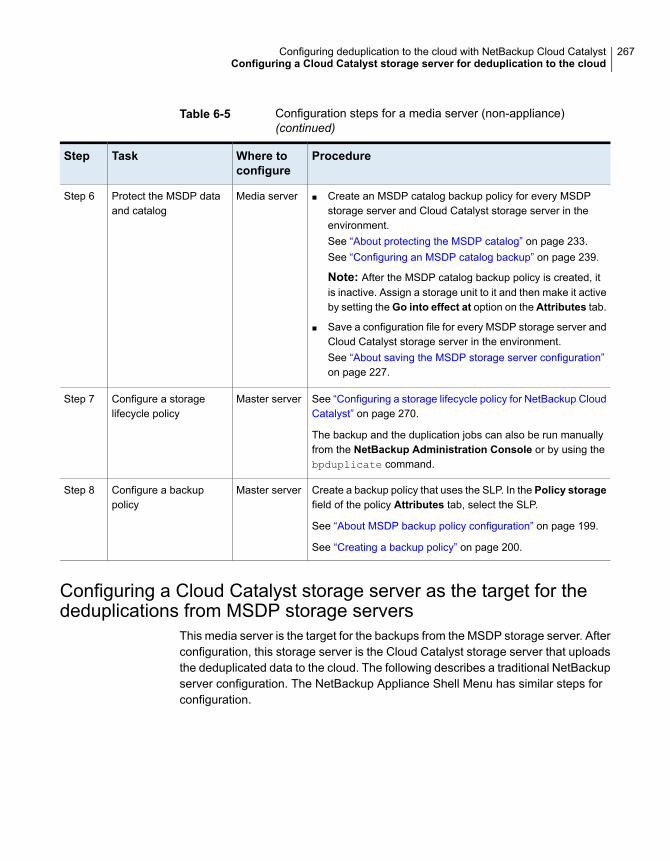
Table 6-5 Configuration steps for a media server (non-appliance)(continued)
ProcedureWhere toconfigure
TaskStep
■ Create an MSDP catalog backup policy for every MSDPstorage server and Cloud Catalyst storage server in theenvironment.See “About protecting the MSDP catalog” on page 233.See “Configuring an MSDP catalog backup” on page 239.
Note: After the MSDP catalog backup policy is created, itis inactive. Assign a storage unit to it and then make it activeby setting the Go into effect at option on the Attributes tab.
■ Save a configuration file for every MSDP storage server andCloud Catalyst storage server in the environment.See “About saving the MSDP storage server configuration”on page 227.
Media serverProtect the MSDP dataand catalog
Step 6
See “Configuring a storage lifecycle policy for NetBackup CloudCatalyst” on page 270.
The backup and the duplication jobs can also be run manuallyfrom the NetBackup Administration Console or by using thebpduplicate command.
Master serverConfigure a storagelifecycle policy
Step 7
Create a backup policy that uses the SLP. In the Policy storagefield of the policy Attributes tab, select the SLP.
See “About MSDP backup policy configuration” on page 199.
See “Creating a backup policy” on page 200.
Master serverConfigure a backuppolicy
Step 8
Configuring a Cloud Catalyst storage server as the target for thededuplications from MSDP storage servers
This media server is the target for the backups from the MSDP storage server. Afterconfiguration, this storage server is the Cloud Catalyst storage server that uploadsthe deduplicated data to the cloud. The following describes a traditional NetBackupserver configuration. The NetBackup Appliance Shell Menu has similar steps forconfiguration.
267Configuring deduplication to the cloud with NetBackup Cloud CatalystConfiguring a Cloud Catalyst storage server for deduplication to the cloud
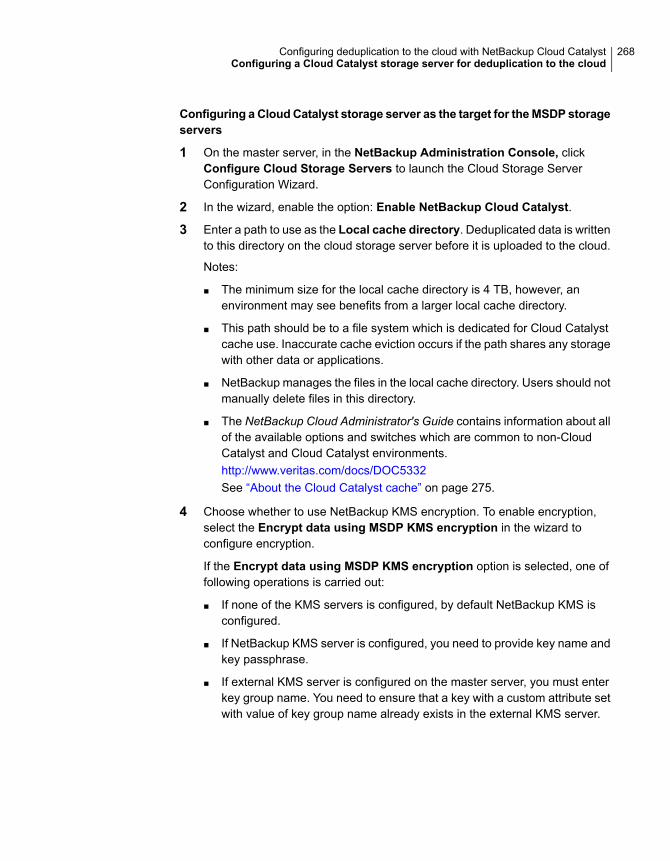
Configuring a CloudCatalyst storage server as the target for theMSDP storageservers
1 On the master server, in the NetBackup Administration Console, clickConfigure Cloud Storage Servers to launch the Cloud Storage ServerConfiguration Wizard.
2 In the wizard, enable the option: Enable NetBackup Cloud Catalyst.
3 Enter a path to use as the Local cache directory. Deduplicated data is writtento this directory on the cloud storage server before it is uploaded to the cloud.
Notes:
■ The minimum size for the local cache directory is 4 TB, however, anenvironment may see benefits from a larger local cache directory.
■ This path should be to a file system which is dedicated for Cloud Catalystcache use. Inaccurate cache eviction occurs if the path shares any storagewith other data or applications.
■ NetBackup manages the files in the local cache directory. Users should notmanually delete files in this directory.
■ The NetBackup Cloud Administrator's Guide contains information about allof the available options and switches which are common to non-CloudCatalyst and Cloud Catalyst environments.http://www.veritas.com/docs/DOC5332See “About the Cloud Catalyst cache” on page 275.
4 Choose whether to use NetBackup KMS encryption. To enable encryption,select the Encrypt data using MSDP KMS encryption in the wizard toconfigure encryption.
If the Encrypt data using MSDP KMS encryption option is selected, one offollowing operations is carried out:
■ If none of the KMS servers is configured, by default NetBackup KMS isconfigured.
■ If NetBackup KMS server is configured, you need to provide key name andkey passphrase.
■ If external KMS server is configured on the master server, you must enterkey group name. You need to ensure that a key with a custom attribute setwith value of key group name already exists in the external KMS server.
268Configuring deduplication to the cloud with NetBackup Cloud CatalystConfiguring a Cloud Catalyst storage server for deduplication to the cloud
For more information about KMS configuration, see the NetBackup Securityand Encryption Guide.
5 As part of the storage server wizard, a disk pool and a storage unit areconfigured.
When the storage lifecycle policy is created, this storage unit name is used inthe Storage unit field for the Duplication operation.
See “Configuring a storage lifecycle policy for NetBackup Cloud Catalyst”on page 270.
Certificate validation using Online Certificate Status Protocol (OCSP)For all the cloud providers, Cloud Catalyst provides a capability to verify the SSLcertificates. Cloud Catalyst uses a combination of Certificate Revocation List (CRL)and Online Certificate Status Protocol (OCSP). During initial configuration, CloudCatalyst cloud connectors perform certificate validation using CRL. After initialconfiguration, Cloud Catalyst uses OCSP for securing calls during data transfer toand from the cloud. OCSP can be enabled along with CRL and if SSL and CRLoptions are enabled, each externally signed SSL certificate is verified using theOCSP. If the certificate is revoked, Cloud Catalyst does not connect to the cloudprovider.
You can enable validation using OCSP in the same way as CRL. Refer to Certificatevalidation against Certificate Revocation List (CRL) in NetBackup CloudAdministrator’s Guide for more details.
Requirements for enabling the certificate validation using OCSP:
■ OCSP responder endpoints are HTTP. Disable any firewall rule that blocks HTTP
(port 80) connection to external network. For example, http://ocsp.msocsp.com.
■ OCSP responder URL is dynamically fetched from the certificate. Disable anyfirewall rule that blocks unknown URLs.
■ OCSP responder URL must be present in the x.509 certificate. The type ofOCSP responder URL must be HTTP.
■ Private Clouds typically have a self-signed certificate and don't need certificateverification. The OCSP check is skipped in this case, regardless of whether CRLor OCSP is enabled or not.
Note: When a storage server has SSL enabled, the OCSP validation is enabledby default when you upgrade to NetBackup Cloud Catalyst 8.2.1.
269Configuring deduplication to the cloud with NetBackup Cloud CatalystConfiguring a Cloud Catalyst storage server for deduplication to the cloud
Managing Cloud Catalyst storage server with IAM Role orCREDS_CAPS credential broker type
When you use theNetBackupAdministration Console to configure Cloud Catalyststorage server using IAM Role or CREDS_CAPS credential broker type, the defaultcredentials are set as user name: admin and password: password.
You can update these credentials using the -tpconfig command. Use the samecommand, to configure the Cloud Catalyst storage server using the command line.
Example:
tpconfig -add -storage_server storage_server_name -stype
PureDisk_amazon_rawd -sts_user_id "my-username" -password
"my-password"
Note: Remember these credentials because the same credentials are requiredduring disaster recovery of the Cloud Catalyst storage server.
Configuring a storage lifecycle policy for NetBackup Cloud CatalystA storage lifecycle policy (SLP) manages the backup jobs and the duplication jobsfrom a MSDP storage server to a MSDP cloud storage server. The backup andduplication jobs can also be run manually from the NetBackup AdministrationConsole or by using the bpduplicate command.
This procedure assumes that the preferred use case is being configured. Thepreferred use case is described in the following topic:
See “Optimized duplication is used to copy data from an MSDP storage server toa Cloud Catalyst storage server (preferred use case)” on page 254.
If an SLP is used, it must contain a Backup operation and a child Duplicationoperation.
Configuring a storage lifecycle policy for deduplication to the cloud
1 The first operation must be a Backup operation. In the Storage unit field,select the storage unit that was created for the MSDP storage server.
2 Create a second operation that is a child of the Backup operation. The secondoperation must be a Duplication operation. In the Storage unit field, selectthe storage unit that was created for the Cloud Catalyst storage server.
See “Configuring a Cloud Catalyst storage server as the target for thededuplications from MSDP storage servers” on page 267.
270Configuring deduplication to the cloud with NetBackup Cloud CatalystConfiguring a Cloud Catalyst storage server for deduplication to the cloud
About the Cloud Catalyst esfs.json configurationfile
NetBackup Cloud Catalyst uses the configuration options that are included in theesfs.json file for many operations. They include the options that determine whenthe files that have been uploaded to cloud storage are removed (evicted) from thelocal cache. Some of the options are configurable by the NetBackup administrator.The location of the esfs.json file depends on the location of the local cachedirectory.
As part of the Cloud Storage Server Configuration Wizard, the administratorconfigures a local cache directory. The local cache directory ( local_cache_dir
in the following topic) determines the location of other directories which are installedautomatically and are critical to Cloud Catalyst operations:
■ A mount path (/storage): local_cache_dir/storage
The Veritas NetBackup Extendable Storage File System process (vxesfsd)runs on the mount path.
■ A cache path (/cache): local_cache_dir/cache/etc/esfs.json
This directory is the location of the esfs.json file.
Configuring the options in the esfs.json fileThe NetBackup Cloud Catalyst configuration options are listed in Table 6-6.
To change the configuration items in the esfs.json configuration
1 Change one or more of the configuration items in the esfs.json file. The fileis found in the following location:
local_cache_dir/cache/etc/esfs.json
2 Save and close the file.
3 If vxesfsd is running, run the esfs_reconfig command (enter the mount path)as follows:
/usr/openv/esfs/bin/esfs_reconfig local_cache_dir/storage
If esfs.json is changed while vxesfsd is stopped, the changes take effect thenext time vxesfsd starts.
4 Some items require that you restart vxesfsd before the new configuration cantake effect.
These items are indicated in Table 6-6.
■ Before vxesfsd is stopped, verify that no processes currently use vxesfsd,including the current working directory of any user.
271Configuring deduplication to the cloud with NetBackup Cloud CatalystAbout the Cloud Catalyst esfs.json configuration file
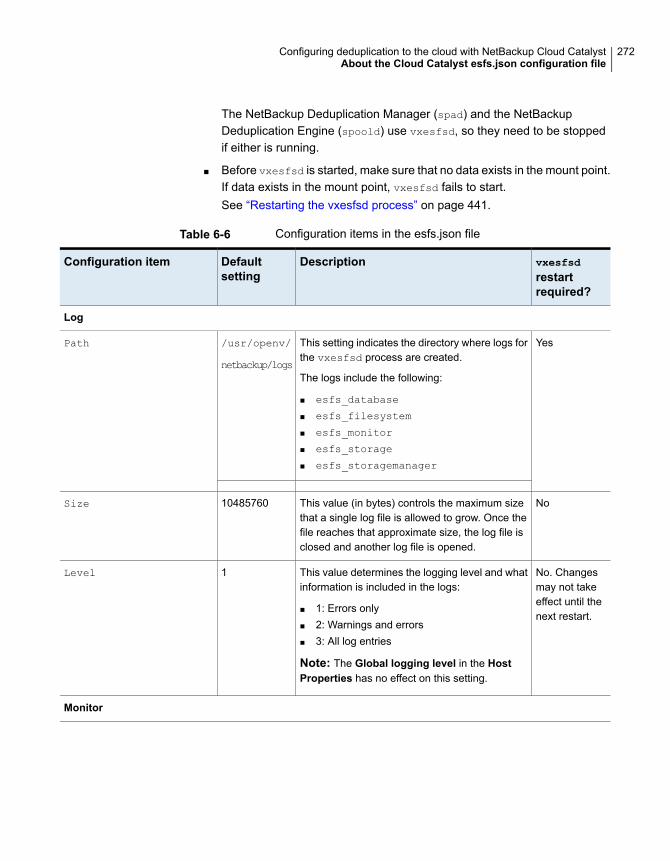
The NetBackup Deduplication Manager (spad) and the NetBackupDeduplication Engine (spoold) use vxesfsd, so they need to be stoppedif either is running.
■ Before vxesfsd is started, make sure that no data exists in the mount point.If data exists in the mount point, vxesfsd fails to start.See “Restarting the vxesfsd process” on page 441.
Table 6-6 Configuration items in the esfs.json file
vxesfsdrestartrequired?
DescriptionDefaultsetting
Configuration item
Log
YesThis setting indicates the directory where logs forthe vxesfsd process are created.
The logs include the following:
■ esfs_database
■ esfs_filesystem
■ esfs_monitor
■ esfs_storage
■ esfs_storagemanager
/usr/openv/
netbackup/logs
Path
NoThis value (in bytes) controls the maximum sizethat a single log file is allowed to grow. Once thefile reaches that approximate size, the log file isclosed and another log file is opened.
10485760Size
No. Changesmay not takeeffect until thenext restart.
This value determines the logging level and whatinformation is included in the logs:
■ 1: Errors only■ 2: Warnings and errors■ 3: All log entries
Note: The Global logging level in the HostProperties has no effect on this setting.
1Level
Monitor
272Configuring deduplication to the cloud with NetBackup Cloud CatalystAbout the Cloud Catalyst esfs.json configuration file
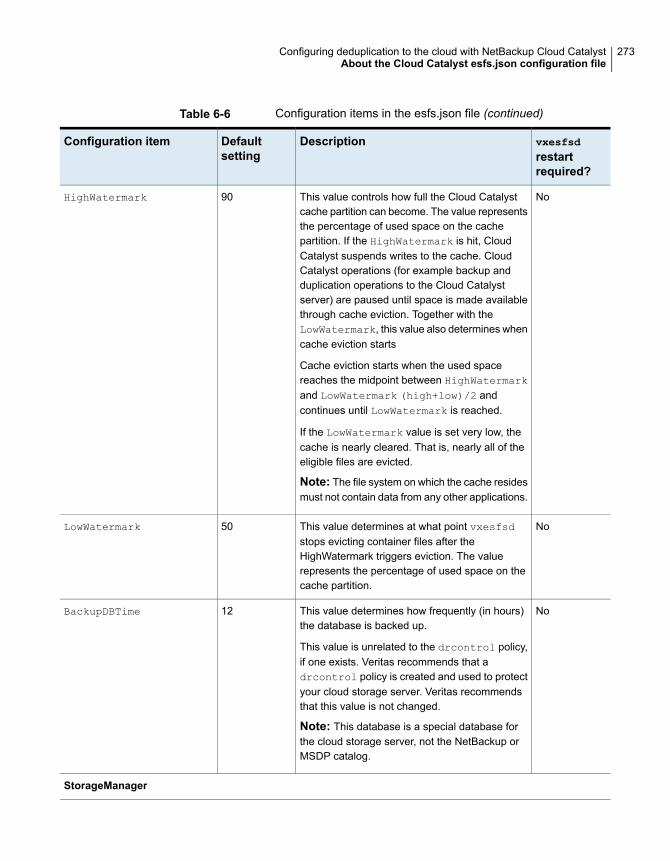
Table 6-6 Configuration items in the esfs.json file (continued)
vxesfsdrestartrequired?
DescriptionDefaultsetting
Configuration item
NoThis value controls how full the Cloud Catalystcache partition can become. The value representsthe percentage of used space on the cachepartition. If the HighWatermark is hit, CloudCatalyst suspends writes to the cache. CloudCatalyst operations (for example backup andduplication operations to the Cloud Catalystserver) are paused until space is made availablethrough cache eviction. Together with theLowWatermark, this value also determines whencache eviction starts
Cache eviction starts when the used spacereaches the midpoint between HighWatermarkand LowWatermark (high+low)/2 andcontinues until LowWatermark is reached.
If the LowWatermark value is set very low, thecache is nearly cleared. That is, nearly all of theeligible files are evicted.
Note: The file system on which the cache residesmust not contain data from any other applications.
90HighWatermark
NoThis value determines at what point vxesfsdstops evicting container files after theHighWatermark triggers eviction. The valuerepresents the percentage of used space on thecache partition.
50LowWatermark
NoThis value determines how frequently (in hours)the database is backed up.
This value is unrelated to the drcontrol policy,if one exists. Veritas recommends that adrcontrol policy is created and used to protectyour cloud storage server. Veritas recommendsthat this value is not changed.
Note: This database is a special database forthe cloud storage server, not the NetBackup orMSDP catalog.
12BackupDBTime
StorageManager
273Configuring deduplication to the cloud with NetBackup Cloud CatalystAbout the Cloud Catalyst esfs.json configuration file
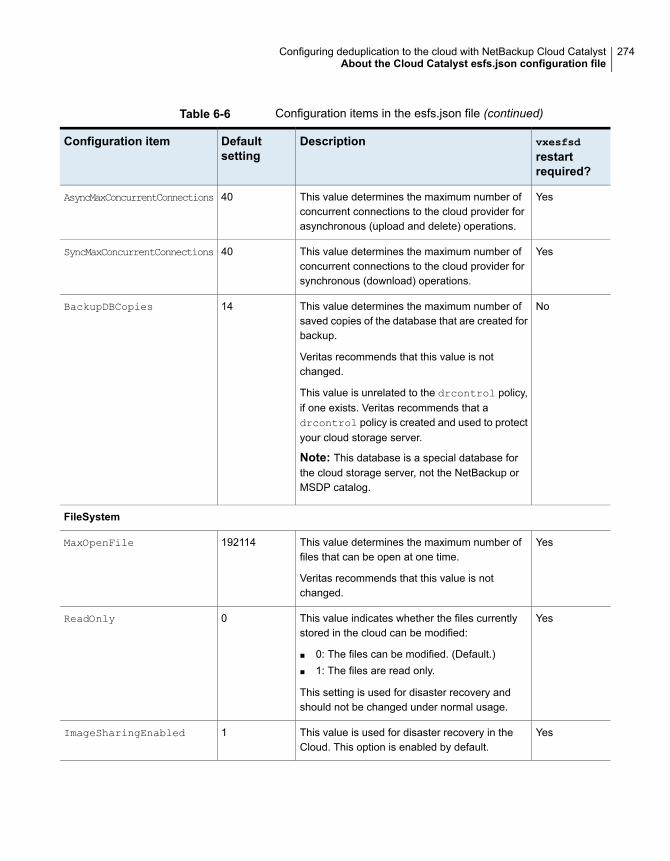
Table 6-6 Configuration items in the esfs.json file (continued)
vxesfsdrestartrequired?
DescriptionDefaultsetting
Configuration item
YesThis value determines the maximum number ofconcurrent connections to the cloud provider forasynchronous (upload and delete) operations.
40AsyncMaxConcurrentConnections
YesThis value determines the maximum number ofconcurrent connections to the cloud provider forsynchronous (download) operations.
40SyncMaxConcurrentConnections
NoThis value determines the maximum number ofsaved copies of the database that are created forbackup.
Veritas recommends that this value is notchanged.
This value is unrelated to the drcontrol policy,if one exists. Veritas recommends that adrcontrol policy is created and used to protectyour cloud storage server.
Note: This database is a special database forthe cloud storage server, not the NetBackup orMSDP catalog.
14BackupDBCopies
FileSystem
YesThis value determines the maximum number offiles that can be open at one time.
Veritas recommends that this value is notchanged.
192114MaxOpenFile
YesThis value indicates whether the files currentlystored in the cloud can be modified:
■ 0: The files can be modified. (Default.)■ 1: The files are read only.
This setting is used for disaster recovery andshould not be changed under normal usage.
0ReadOnly
YesThis value is used for disaster recovery in theCloud. This option is enabled by default.
1ImageSharingEnabled
274Configuring deduplication to the cloud with NetBackup Cloud CatalystAbout the Cloud Catalyst esfs.json configuration file
About the Cloud Catalyst cacheThe administrator configures a local cache directory as part of configuring a CloudCatalyst storage server. The primary function of the local cache directory (or CloudCatalyst cache) is to allow the Cloud Catalyst to continue to deduplicate data.Deduplication of data occurs even if the ingest rate from targeted backup andduplication jobs temporarily exceeds the available upload throughput to thedestination cloud storage.
For example, if backup and duplication jobs transfer 10 TB of data per hour to theCloud Catalyst storage server, and the Cloud Catalyst deduplicates the data at aratio of 10:1, the 1 TB of deduplicated data may exceed the upload capacity of .7TB per hour of writes to cloud storage. The cache allows the jobs to continue tosend and process the data, assuming that at some point the incoming data rateslows. The Cloud Catalyst cache only stores the deduplicated data. Jobs are notmarked as complete until all data is uploaded to the cloud.
While a Cloud Catalyst cache of 4 TB is recommended, a larger cache has thefollowing benefits:
■ For restores:If the data exists in the Cloud Catalyst cache, it is restored from the cache insteadof the cloud. The larger the cache, the more deduplicated objects can reside inthe cache.
■ For data with poor deduplication rates:A larger cache may be required since the poor deduplication ratios require thatlarger amounts of data be uploaded to the cloud.
■ For job windows that experience bursts of activity:A larger cache can be helpful if frequent jobs are targeted to the Cloud Catalyststorage server within a narrow window of time.
While a larger cache can be beneficial, jobs are not marked as complete until alldata is uploaded to the cloud. Data is uploaded from the cache to the cloud whenan MSDP container file is full. This occurs soon after the backup or duplication jobbegins, but not immediately. Deduplication makes it possible for second andsubsequent backup jobs to transfer substantially less data to the cloud, dependingon the deduplication rate.
See “Optimized duplication is used to copy data from an MSDP storage server toa Cloud Catalyst storage server (preferred use case)” on page 254.
For example, 4 TB of cache is expected to manage 1 PB of data in the cloud withoutissue.
275Configuring deduplication to the cloud with NetBackup Cloud CatalystAbout the Cloud Catalyst cache
Note: If you initiate a restore from Glacier or Glacier Deep Archive, NetBackupinitiates a warming step. NetBackup does not proceed with the restore until all thedata is available in S3 storage to be read.
The warming step is always done if using Amazon, even if the data is in the CloudCatalyst cache. For storage classes other than Glacier and Glacier Deep Archive,the warming step is almost immediate with no meaningful delay. For Glacier andGlacier Deep Archive, the warming step may be immediate if files were previouslywarmed and are still in S3 Standard storage. However, it may take several minutes,hours, or days depending on settings being used.
How Cloud Catalyst manages the cacheThe Cloud Catalyst manages the cache based on the configuration settings in theesfs.json file. Once the high watermark is reached, data is purged when the usedspace reaches the midpoint between HighWatermark and LowWatermark
(high+low)/2 and continues until LowWatermark is reached. If the rate of incomingdata exceeds the rate where the watermark can be maintained, the jobs begin tofail. Administrators should not manually delete or purge the managed data in thecache storage unless directed to do so by NetBackup Technical Support.
See “About the Cloud Catalyst esfs.json configuration file” on page 271.
Controlling data traffic to the cloud when usingCloud Catalyst
Cloud Catalyst offers a throttling configuration option to limit the internet bandwidththat is used for uploading and downloading cloud data. Use this topic to enablethrottling.
Note: By default, throttling is not enabled for NetBackup storage servers.
Change the Scalable Storage media server host properties:
1 In theNetBackupAdministrationConsole, expandNetBackupManagement> Host Properties > Media Servers.
2 In the details pane, select the media server that is the Cloud Catalyst storageserver.
3 On the Actions menu, select Properties.
4 Select the Scalable Storage properties.
5 Set Total available bandwidth to the desired bandwidth limit.
276Configuring deduplication to the cloud with NetBackup Cloud CatalystControlling data traffic to the cloud when using Cloud Catalyst
6 Set the Sampling interval to one or more to enable throttling (zero means thatthrottling is disabled).
7 Click Apply and OK to close the dialog.
See “About the Cloud Catalyst esfs.json configuration file” on page 271.
Configuring source control or target controloptimized duplication for Cloud Catalyst
Optimized duplication requires the source storage server and the destination storageserver to have at least one media server in common. For example, in a NetBackupCloud Catalyst environment that includes an MSDP media server (the source storageserver) and one Cloud Catalyst storage server (destination/target), either of thesehosts could be the shared media server to perform optimized duplication.
The shared media server requires credentials for both the source storage serverand the target storage server. (Credentials are granted in the Media Servers tabof the storage server properties for each storage server.) This point is important indetermining whether your environment can support a source control or a targetcontrol operation.
The media server which manages the duplication operation determines whetherthe operation is a source controlled or a target controlled operation, as follows:
■ If the MSDP media server manages the duplication operation, it is sourcecontrolled duplication. The Cloud Catalyst storage server must allow accessfrom the MSDP media server. (See Example source controlled configuration:Source media server must be RHEL and NetBackup 8.1 or later.)
■ The Cloud Catalyst can allow access only if the MSDP media server is RHEL(any version) and NetBackup 8.1 or later.
■ If the MSDP media server is non-RHEL, it appears as a selection, butupon applying the credential, it fails with an Add credentials failedmessage.
■ If the MSDP media server is non-8.1, it does not appear in the MediaServers tab.
■ If the MSDP media server is not RHEL or is not at NetBackup 8.1 or later,a target control operation must be used instead.
■ If the Cloud Catalyst media server manages the duplication operation, it is targetcontrolled duplication. The MSDP media server must allow access from theCloud Catalyst media server. (See Example target controlled configuration:Source media storage server is not RHEL or is pre-8.1.)
277Configuring deduplication to the cloud with NetBackup Cloud CatalystConfiguring source control or target control optimized duplication for Cloud Catalyst
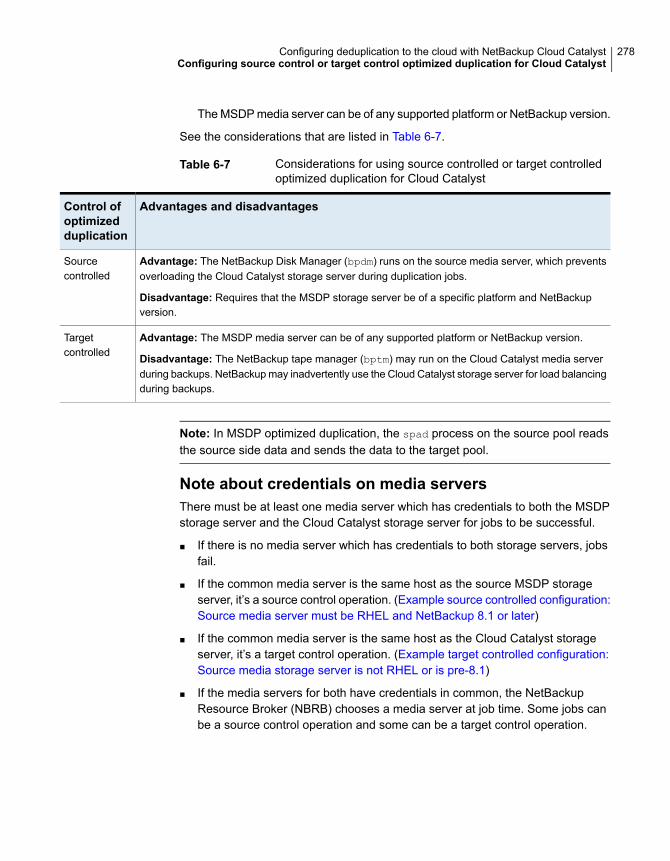
The MSDP media server can be of any supported platform or NetBackup version.
See the considerations that are listed in Table 6-7.
Table 6-7 Considerations for using source controlled or target controlledoptimized duplication for Cloud Catalyst
Advantages and disadvantagesControl ofoptimizedduplication
Advantage: The NetBackup Disk Manager (bpdm) runs on the source media server, which preventsoverloading the Cloud Catalyst storage server during duplication jobs.
Disadvantage: Requires that the MSDP storage server be of a specific platform and NetBackupversion.
Sourcecontrolled
Advantage: The MSDP media server can be of any supported platform or NetBackup version.
Disadvantage: The NetBackup tape manager (bptm) may run on the Cloud Catalyst media serverduring backups. NetBackup may inadvertently use the Cloud Catalyst storage server for load balancingduring backups.
Targetcontrolled
Note: In MSDP optimized duplication, the spad process on the source pool readsthe source side data and sends the data to the target pool.
Note about credentials on media serversThere must be at least one media server which has credentials to both the MSDPstorage server and the Cloud Catalyst storage server for jobs to be successful.
■ If there is no media server which has credentials to both storage servers, jobsfail.
■ If the common media server is the same host as the source MSDP storageserver, it’s a source control operation. (Example source controlled configuration:Source media server must be RHEL and NetBackup 8.1 or later)
■ If the common media server is the same host as the Cloud Catalyst storageserver, it’s a target control operation. (Example target controlled configuration:Source media storage server is not RHEL or is pre-8.1)
■ If the media servers for both have credentials in common, the NetBackupResource Broker (NBRB) chooses a media server at job time. Some jobs canbe a source control operation and some can be a target control operation.
278Configuring deduplication to the cloud with NetBackup Cloud CatalystConfiguring source control or target control optimized duplication for Cloud Catalyst
Example source controlled configuration: Source mediaserver must be RHEL and NetBackup 8.1 or laterIn Figure 6-4, the source media server (the MSDP storage server) is configured fora source control duplication to the target. Note that the source is Red Hat EnterpriseLinux and has NetBackup 8.1 installed.
Two configuration items allow for source controlled duplication:
■ The target (the Cloud Catalyst storage server) allows access from the sourcemedia server. The credential is granted in the storage server properties of each.
■ The storage unit settings on the source and the target specifically point to thesource media server. (Enable Only use the following media servers andselect the source media server.)
279Configuring deduplication to the cloud with NetBackup Cloud CatalystConfiguring source control or target control optimized duplication for Cloud Catalyst
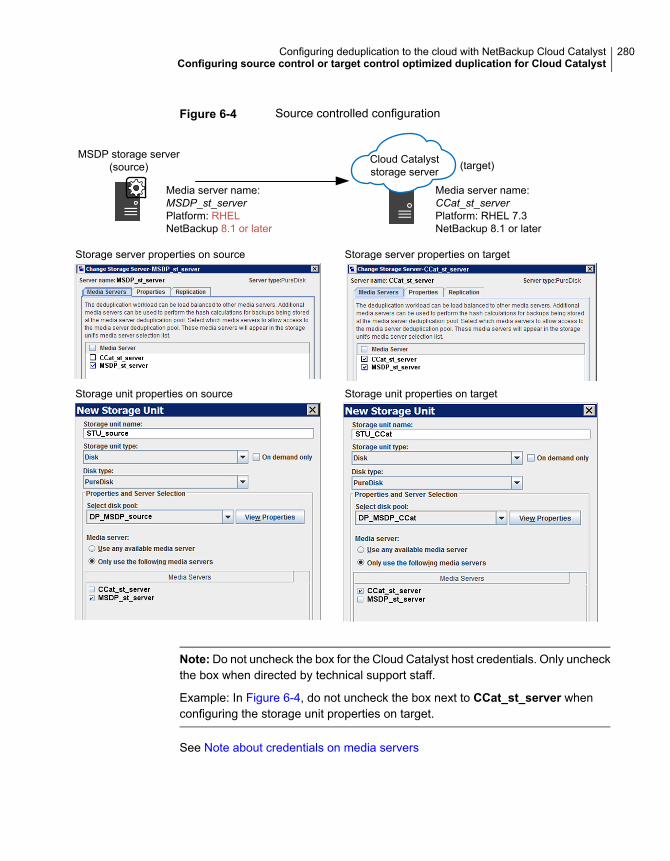
Figure 6-4 Source controlled configuration
MSDP storage server(source)
Cloud Catalyststorage server
Media server name:CCat_st_serverPlatform: RHEL 7.3NetBackup 8.1 or later
Media server name:MSDP_st_serverPlatform: RHELNetBackup 8.1 or later
Storage server properties on source
Storage unit properties on source
(target)
Storage unit properties on target
Storage server properties on target
Note:Do not uncheck the box for the Cloud Catalyst host credentials. Only uncheckthe box when directed by technical support staff.
Example: In Figure 6-4, do not uncheck the box next to CCat_st_server whenconfiguring the storage unit properties on target.
See Note about credentials on media servers
280Configuring deduplication to the cloud with NetBackup Cloud CatalystConfiguring source control or target control optimized duplication for Cloud Catalyst
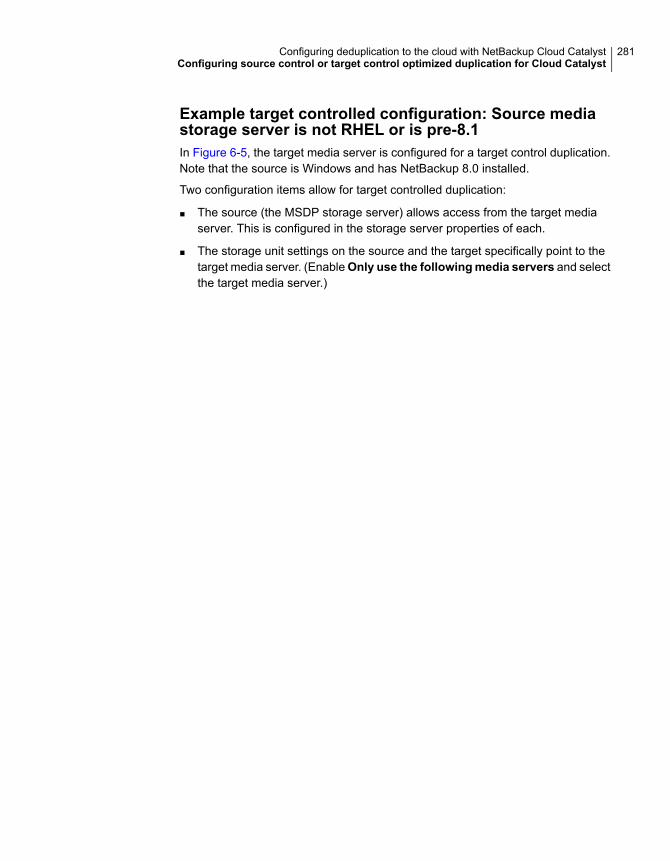
Example target controlled configuration: Source mediastorage server is not RHEL or is pre-8.1In Figure 6-5, the target media server is configured for a target control duplication.Note that the source is Windows and has NetBackup 8.0 installed.
Two configuration items allow for target controlled duplication:
■ The source (the MSDP storage server) allows access from the target mediaserver. This is configured in the storage server properties of each.
■ The storage unit settings on the source and the target specifically point to thetarget media server. (EnableOnly use the followingmedia servers and selectthe target media server.)
281Configuring deduplication to the cloud with NetBackup Cloud CatalystConfiguring source control or target control optimized duplication for Cloud Catalyst
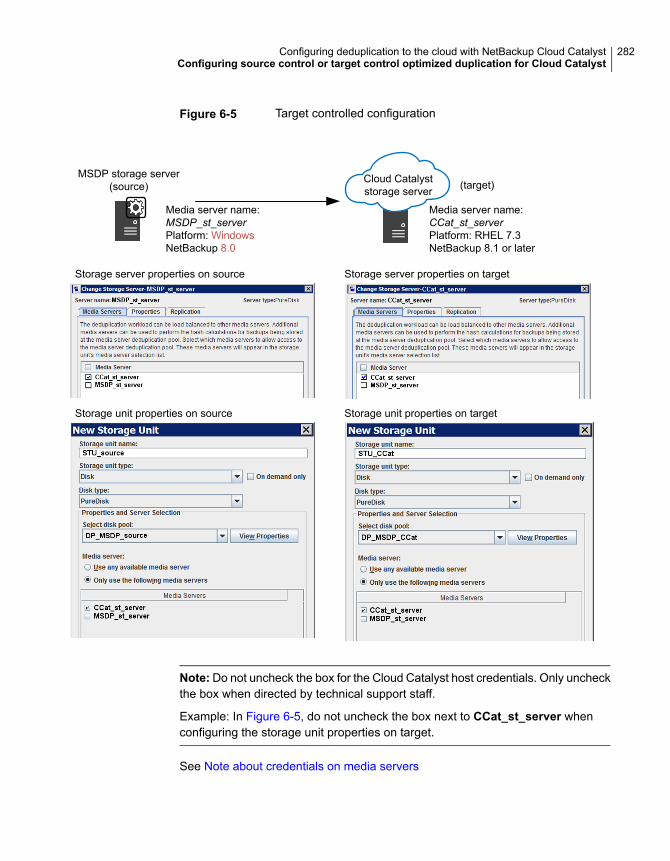
Figure 6-5 Target controlled configuration
Cloud Catalyststorage server
Media server name:CCat_st_serverPlatform: RHEL 7.3NetBackup 8.1 or later
Media server name:MSDP_st_serverPlatform: WindowsNetBackup 8.0
Storage server properties on source Storage server properties on target
Storage unit properties on source Storage unit properties on target
MSDP storage server(source) (target)
Note:Do not uncheck the box for the Cloud Catalyst host credentials. Only uncheckthe box when directed by technical support staff.
Example: In Figure 6-5, do not uncheck the box next to CCat_st_server whenconfiguring the storage unit properties on target.
See Note about credentials on media servers
282Configuring deduplication to the cloud with NetBackup Cloud CatalystConfiguring source control or target control optimized duplication for Cloud Catalyst
Configuring a Cloud Catalyst storage server asthe source for optimized duplication
Starting from NetBackup 8.2, a Cloud Catalyst storage server is supported as thesource for optimized duplication.
See “Configuring a Cloud Catalyst storage server as the target for the deduplicationsfrom MSDP storage servers” on page 267.
When you configure a storage lifecycle policy for the backup operation, you canselect the storage unit that was created for the Cloud Catalyst storage server. Thefollowing table lists the version requirements for configuring source control or targetcontrol optimized duplication for Cloud Catalyst.
Table 6-8 Version requirements for optimized duplication using CloudCatalyst
Requirements for targetcontrol
Requirements for sourcecontrol
Optimizedduplicationtarget
Optimizedduplicationsource
TargetSourceTargetSource
RHEL 7.3 orlater andNetBackup8.1 or later.
NoneRHEL 7.3 orlater andNetBackup8.1 or later.
RHEL 7.3 orlater andNetBackup8.1 or later.
CloudCatalyststorageserver
Media ServerDeduplicationPool
RHEL 7.3 orlater andNetBackup8.2 or later.
RHEL 7.3 orlater andNetBackup8.2 or later.
NoneRHEL 7.3 orlater andNetBackup8.2 or later.
Media ServerDeduplicationPool
CloudCatalyststorageserver
RHEL 7.3 orlater andNetBackup8.1 or later.
RHEL 7.3 orlater andNetBackup8.1 or later.
RHEL 7.3 orlater andNetBackup8.1 or later.
RHEL 7.3 orlater andNetBackup8.1 or later.
CloudCatalyststorageserver
CloudCatalyststorageserver
Decommissioning Cloud Catalyst cloud storagePerform the following procedure before manually deleting any data from the cloud.
To decommission Cloud Catalyst cloud storage
1 Delete the storage unit that uses the disk pool.
2 Delete the disk pool.
See “Deleting a Media Server Deduplication Pool” on page 361.
283Configuring deduplication to the cloud with NetBackup Cloud CatalystConfiguring a Cloud Catalyst storage server as the source for optimized duplication
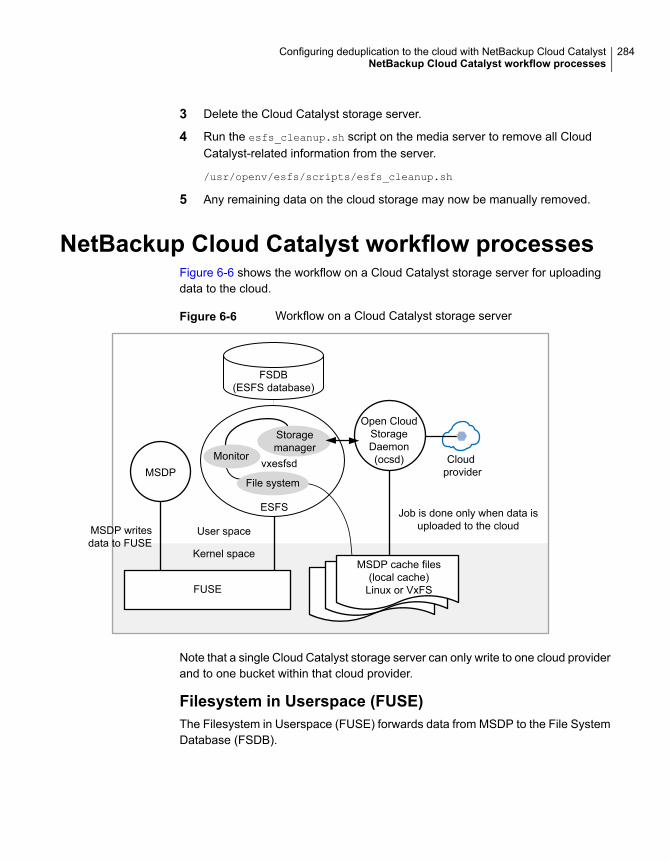
3 Delete the Cloud Catalyst storage server.
4 Run the esfs_cleanup.sh script on the media server to remove all CloudCatalyst-related information from the server.
/usr/openv/esfs/scripts/esfs_cleanup.sh
5 Any remaining data on the cloud storage may now be manually removed.
NetBackup Cloud Catalyst workflow processesFigure 6-6 shows the workflow on a Cloud Catalyst storage server for uploadingdata to the cloud.
Figure 6-6 Workflow on a Cloud Catalyst storage server
FUSE
Kernel space
MSDP
Open CloudStorageDaemon(ocsd)
User space
ESFS
Storagemanager
Monitor Cloudprovider
MSDP cache files(local cache)
Linux or VxFS
File system
MSDP writesdata to FUSE
Job is done only when data isuploaded to the cloud
vxesfsd
FSDB(ESFS database)
Note that a single Cloud Catalyst storage server can only write to one cloud providerand to one bucket within that cloud provider.
Filesystem in Userspace (FUSE)The Filesystem in Userspace (FUSE) forwards data from MSDP to the File SystemDatabase (FSDB).
284Configuring deduplication to the cloud with NetBackup Cloud CatalystNetBackup Cloud Catalyst workflow processes
File System Database (FSDB)The File System Database (FSDB) tracks and stores metadata about all of the filesthat are written to the NetBackup Extendable Storage File System (ESFS).
NetBackup Extendable Storage File System (ESFS)NetBackup Cloud Catalyst uses the NetBackup Extendable Storage File SystemService (vxesfsd) and its subcomponents to move and manage files in the localcache directory and the cloud.
ESFS uses daemons to perform the following functions in its database:
■ Veritas NetBackup Extendable Storage File System Service daemon (vxesfsd):This process is the primary file system daemon. This process is responsible forwriting data into the MSDP cache files.
■ Open Cloud Storage Daemon (ocsd): This daemon is responsible for interactingwith the cloud. Under normal circumstances, there is only one ocsd processrunning.The ocsd daemon produces the following log:/usr/openv/netbackup/logs/esfs_storage
vxesfsd includes three subcomponents that perform various tasks as part of ESFS:
■ File system component: Interacts with the ESFS database.
■ Monitor component: The monitor component checks the file queue for files tobe uploaded and checks the local cache directory for cache eviction purposes,among other activities.
■ Storage manager component: Notifies ocsd processes when there’s work to bedone. Some of the activities that this component manages are synchronous(downloads from the cloud), asynchronous (uploads to and deletions in thecloud), and shared memory.
The vxesfsd daemon produces the following logs in /usr/openv/netbackup/logs/:
Logs the FUSE operations.esfs_filesystem
Logs the interactions of the ESFS storage manager withvxesp.
esfs_storagemanager
Logs the job status updates and periodic tasks such as cacheeviction and FSDB backups.
esfs_monitor
Logs the FSDB actions that are specific to the ESFSdatabase.
esfs_database
285Configuring deduplication to the cloud with NetBackup Cloud CatalystNetBackup Cloud Catalyst workflow processes
MSDP cache filesAs part of the Cloud Storage Server Configuration Wizard, the administratorconfigures a local cache directory ( local_cache_dir ). The directory must be oneither a Linux file system or, in the case of an appliance, a VxFS file system.
The directory is then split into two:
■ A cache directory: local_cache_dir/cache/userdata
ESFS writes out the data and the metadata in this location. This directory ismapped directly to the storage directory ( local_cache_dir/storage). Twocopies of each file do not exist on this media server.
■ A storage directory: local_cache_dir/storage
This path is the mount point to the ESFS file system. This path is what MSDPknows as its storage directory.
NetBackup periodically performs data eviction tasks in the cache directory to createspace for new backups. If necessary, the administrator can change when or howoften data eviction occurs. These options are configured in the esfs.json file.
See “About the Cloud Catalyst esfs.json configuration file” on page 271.
286Configuring deduplication to the cloud with NetBackup Cloud CatalystNetBackup Cloud Catalyst workflow processes
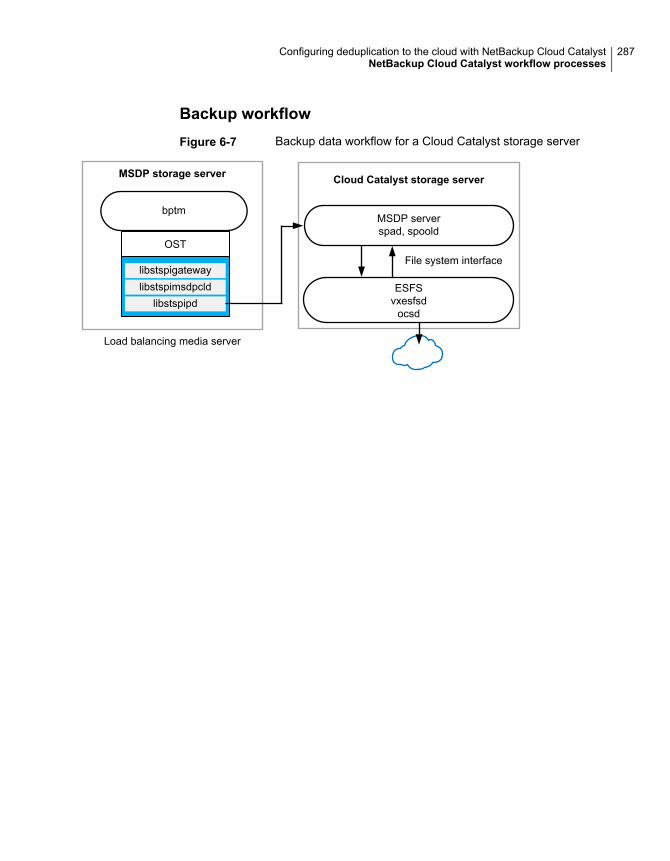
Backup workflowFigure 6-7 Backup data workflow for a Cloud Catalyst storage server
MSDP storage server
File system interface
MSDP serverspad, spoold
bptm
Load balancing media server
Cloud Catalyst storage server
libstspigatewaylibstspimsdpcld
libstspipd
OST
ESFSvxesfsd
ocsd
287Configuring deduplication to the cloud with NetBackup Cloud CatalystNetBackup Cloud Catalyst workflow processes
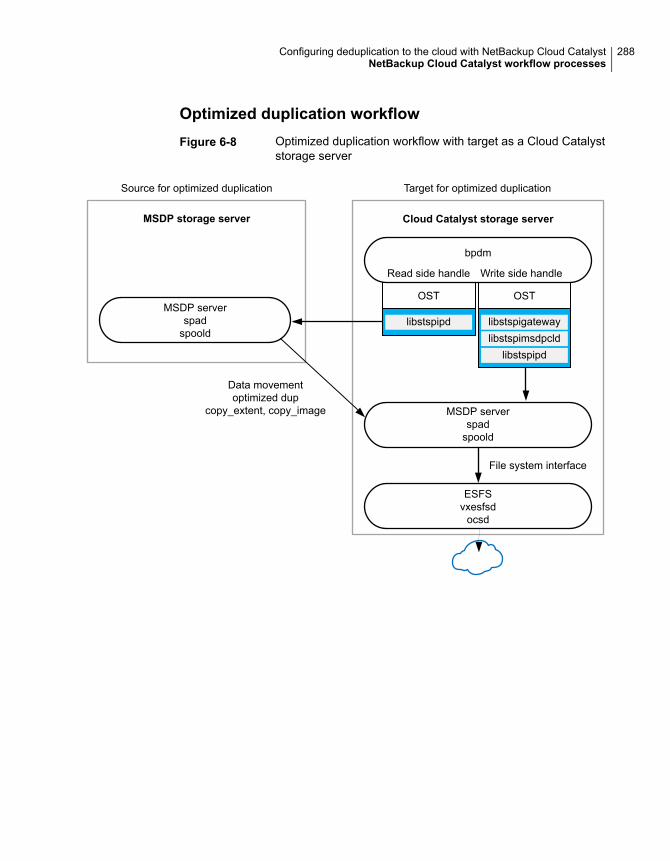
Optimized duplication workflowFigure 6-8 Optimized duplication workflow with target as a Cloud Catalyst
storage server
Cloud Catalyst storage server
Target for optimized duplication
MSDP serverspad
spoold
Data movementoptimized dup
copy_extent, copy_image
bpdm
libstspigatewaylibstspimsdpcld
libstspipd
OST
libstspipd
OST
MSDP serverspad
spoold
File system interface
Read side handle Write side handle
MSDP storage server
Source for optimized duplication
ESFSvxesfsd
ocsd
288Configuring deduplication to the cloud with NetBackup Cloud CatalystNetBackup Cloud Catalyst workflow processes
Disaster recovery for Cloud CatalystNetBackup Cloud Catalyst uses a media server that is configured as a Cloud Catalyststorage server for deduplication to the cloud. The media server can be either aCloud Catalyst appliance or a non-appliance host. The following link is a documentthat contains disaster recovery procedures in environments where NetBackup CloudCatalyst is used.
The document contains two disaster recovery procedures and they have the followingconditions:
■ The procedures assume that an MSDP catalog backup exists.See “About protecting the MSDP catalog” on page 233.
■ The procedures recover the MSDP cloud storage server, whether it was anappliance or a non-appliance host.
If you encounter any issues with disaster recovery, we recommend that you navigateto support.veritas.com. The Veritas Support site offers additional information to helpyou complete the process.
https://www.veritas.com/content/support/en_US/doc/Cloud Catalyst_dr_82
About image sharing in cloud using CloudCatalyst
Image sharing, which was earlier known as Automated disaster recovery (DR),provides a self-describing storage solution over Cloud Catalyst. Cloud Catalyst withImage sharing in cloud is a self-describing storage server. Cloud Catalyst withoutImage sharing in cloud is not a self-describing storage server.
Image sharing helps users with an easy and a visualized way to manage andprovision images in cloud object storage and even the ability to convert backed upVMs as AWS instances in certain scenarios.
This topic contains the following sections:
■ Important features of image sharing
■ Things to consider before you use image sharing
■ Configure image sharing
■ Using image sharing using NetBackup Web UI
■ Using image sharing with the nbimageshare command
■ Manual KMS key transfer in Image sharing in case of NetBackup KMS
■ Manual steps in image sharing in case of external KMS
289Configuring deduplication to the cloud with NetBackup Cloud CatalystDisaster recovery for Cloud Catalyst
■ Additional information about image sharing
Important features of image sharing■ In a situation where Cloud Catalyst backed up the deduplicated data to cloud,
but the NetBackup catalog was available only on the on-premises NetBackupserver. There, the data cannot be restored from the cloud without the on-premisesNetBackup server.Image sharing in cloud uploads the NetBackup catalog along with the backupimages and lets you restore data from the cloud without the on-premisesNetBackup server.
■ You can launch an all-in-one NetBackup in the cloud on demand called thecloud recovery host, and recover the backup images from cloud.
■ Image sharing discovers the backup images that are stored in AWS S3 throughthe REST APIs, recovers the NetBackup catalog, and restores the images.
■ You can use command line options or NetBackup Web UI that have the functionas REST APIs.
Things to consider before you use image sharing■ Before you install NetBackup, create an instance based on RHEL 7.3 or later
(up to RHEL 8.0) in AWS. You can also set up a computer based on RHEL 7.3or later (up to RHEL 8.0). The recommendation is that the instance has morethan 64 GB of memory, 8 CPUs.
■ The HTTPS port 443 is enabled.
■ Change host name to the server's FQDN.
■ Add the following items in the /etc/hosts file:"External IP" "Server's FQDN""Internal IP" "Server's FQDN"For a computer, add the following items in the /etc/hosts file:“IP address” "Server's FQDN"
■ For an instance in AWS, change the search domain order in the/etc/resolv.conf file to search external domains before internal domains.
■ NetBackup should be an all-in-one setup.Refer to the NetBackup Installation Guide for more information.
Configure image sharingAfter installing NetBackup, you can run the ims_system_config.py script toconfigure image sharing.
The path to access the command is: /usr/openv/pdde/pdag/scripts/.
290Configuring deduplication to the cloud with NetBackup Cloud CatalystAbout image sharing in cloud using Cloud Catalyst
Use the following command to run the ims_system_config.py script:
Amazon Web Service cloud provider:
ims_system_config.py -k <AWS_access_key> -s <AWS_secret_access_key>
-b <name_S3_bucket>
If you have configured IAM role in the EC2 instance, use the following command:
-python /usr/openv/pdde/pdag/scripts/ims_system_config.py
-k dummy -s dummy -b <name_S3_bucket>
Microsoft Azure cloud provider:
ims_system_config.py -cp 2 -k <key_id> -s <secret_key> -b <container_name>
Other S3 compatible cloud provider (For example, Hitachi HCP):
If Cloud Instance has been existed in NetBackup, use the following command:
ims_system_config.py -cp 3 -t PureDisk -k <key_id> -s <secret_key>
-b <bucket_name> -bs <bucket_sub_name> -c <Cloud_instance_name> [-p
<mount_point>]
Or use the following command:
ims_system_config.py -cp 3 -t PureDisk -k <key_id> -s <secret_key>
-b <bucket_name> -pt <cloud_provider_type> -sh <s3_hostname> -sp
<s3_http_port> -sps <s3_https_port> -ssl <ssl_usage> [-p
<mount_point>]
Example for HCP provider:
ims_system_config.py -cp 3 -t PureDisk -k xxx -s xxx -b emma -bs
subtest -pt hitachicp -sh yyy.veritas.com -sp 80 -sps 443 -ssl 0
Description: (Specify the following options to use HCP cloud)
-cp 3: Specify third-party S3 cloud provider that is used.
-pt hitachicp: Specify cloud provider type as hitachicp (HCP LAN)
-t PureDisk_hitachicp_rawd: Specify storage server type asPureDisk_hitachicp_rawd
-sh <s3_hostname>: Specify HCP storage server host name
-sp <s3_http_port>: Specify HCP storage server HTTP port (Default is 80)
-sps <s3_https_port>: Specify HCP storage server HTTP port (Default is 443)
291Configuring deduplication to the cloud with NetBackup Cloud CatalystAbout image sharing in cloud using Cloud Catalyst
-ssl <ssl_usage>: Specify whether to use SSL. (0- Disable SSL. 1- Enable SSL.Default is 1.) If SSL is disabled, it uses <s3_http_port> to make connection to<s3_hostname>. Otherwise, it uses <s3_https_port>.
Using image sharing using NetBackup Web UIYou can access NetBackup Web UI to use image sharing. For more information,refer to the Using image sharing from the NetBackupWeb UI topic in the NetBackupWeb UI Administrator's Guide.
Using image sharing with the nbimageshare commandYou can use the nbimageshare command to use image sharing.
Run the nbimageshare command to list and import the virtual machine and standardimages and then recover the virtual machines.
The path to access the command is: /usr/openv/netbackup/bin/admincmd/
For more information about the nbimageshare command, refer to the NetBackupCommands Reference Guide.
The following table lists the steps for image sharing and the command options:
Table 6-9 Steps for image sharing and the command options
CommandStep
nbimageshare --login <username> <password>
nbimageshare --login -interact
Log on to NetBackup
nbimageshare --listimage
Note: In the list of images, the increment schedule typemight be differential incremental or cumulative incremental.
List all the backup images that are in the cloud
292Configuring deduplication to the cloud with NetBackup Cloud CatalystAbout image sharing in cloud using Cloud Catalyst
Table 6-9 Steps for image sharing and the command options (continued)
CommandStep
Import a single image:
nbimageshare --singleimport<client> <policy> <backupID>
Import multiple images:
nbimageshare --batchimport<image_list_file_path>
Note: The format of the image_list_file_path issame as the output of "list images".
The multiple images number must be equal to or less than64.
You can import an already imported image. This actiondoes not affect the NetBackup image catalog.
Import the backup images to NetBackup
nbimageshare --recovervm<client> <policy> <backupID>
■ Only VM images are supported.■ The AWS account must have the following read and
write permissions to S3:
"ec2:CreateTags""ec2:DescribeImportImageTasks""ec2:ImportImage""iam:ListRolePolicies""iam:ListRoles""iam:GetRole""iam:GetRolePolicy""iam:CreateRole""iam:PutRolePolicy"
Recover the VM as an AWS EC2 instance
Manual KMS key transfer in Image sharing in case ofNetBackup KMSWhen KMS encryption is enabled, you can share the images in S3 bucket to thecloud recovery host with manual KMS key transfer.
On-premises side:
1. Storage server: Find the key group name for the given Storage server
293Configuring deduplication to the cloud with NetBackup Cloud CatalystAbout image sharing in cloud using Cloud Catalyst
Find contentrouter.cfg in /etc/pdregistry.cfg
Find key group name is in contentrouter.cfg under [KMSOptions]
(Example KMSKeyGroupName=amazon.com:test1)
2. NetBackup master server: Exports the key group with a passphrase to a file:
/usr/openv/netbackup/bin/admincmd/nbkmsutil -export -key_groups
<key-group-name> -path <key file path>
Cloud recovery host (cloud side):
1. Copy the exported key to the cloud recovery host
2. Config KMS server
/usr/openv/netbackup/bin/nbkms -createemptydb
/usr/openv/netbackup/bin/nbkms
/usr/openv/netbackup/bin/nbkmscmd -discovernbkms -autodiscover
3. Import keys to KMS service.
/usr/openv/netbackup/bin/admincmd/nbkmsutil -import -path <key
file path> -preserve_kgname
4. Configure the cloud recovery host with ims_system_config.py
On-premises KMS key changesIn case of KMS key changes for the given group for on-premises storage serverafter the cloud recovery host is set up, you must export the key file from on-premisesKMS server and import that key file on the cloud recovery host.
1. On-premises NetBackup master server: Exports the key group with apassphrase to a file
/usr/openv/netbackup/bin/admincmd/nbkmsutil -export -key_groups
<key-group-name> -path <key file path>
2. Cloud recovery host:
/usr/openv/netbackup/bin/admincmd/nbkmsutil -deletekg -kgname
<key-group-name> -force
/usr/openv/netbackup/bin/admincmd/nbkmsutil -import -path <key
file path> -preserve_kgname
Manual steps in image sharing in case of external KMSIf an on-premises storage server is configured to use keys from external KMSserver, then make sure that the same KMS server is configured on the cloud
294Configuring deduplication to the cloud with NetBackup Cloud CatalystAbout image sharing in cloud using Cloud Catalyst
recovery host before running ims_system_config.py. To know more aboutconfiguring an external KMS server in NetBackup, refer to NetBackup Security andEncryption Guide.
Make sure that the external KMS server is reachable from the cloud recovery hoston a specific port.
Additional information about image sharing■ Before you run ims_system_config.py to configure the cloud recovery host on
RHEL 8, install Python 2, and create a soft link from Python 2 to Python.Theims_system_config.py script uses Python 2.
■ After the image is imported to cloud, the image catalog still exists on the cloud.If the image is expired on the on-premises storage, then restoring the image onthe cloud fails even though the image catalog exists on the cloud.
■ If the image expires on the cloud storage, the image catalog in the cloud isremoved but the image data in the bucket is not removed.
■ You can restore any image that you import. For the recover the VM as an AWSEC2 instance option, you can recover only the VM images that are full backupimages or accelerator-enabled incremental backup images to cloud.
■ Image sharing supports many policy types from NetBackup 8.2 or later. In thescenarios, CloudCatalyst, where the images are shared, must have a newinstallation of NetBackup 8.2 or later.See the NetBackup compatibility lists for the latest information on the supportedpolicy types.
■ After the image sharing is configured, the storage server is in a read-only mode.
■ For information on the VM recovery limitations, refer to the AWS VM importinformation in AWS help.
■ You can configure the maximum active jobs when the images are imported tocloud storage.Modify the file path /usr/openv/var/global/wsl/config/web.conf to addthe configuration item as imageshare.maxActiveJobLimit.For example, imageshare.maxActiveJobLimit=16.The default value is 16 and the configurable range is 1 to 100.If the import request is made and the active job count exceeds the configuredlimit, the following message is displayed:"Current active job count exceeded active job count limitation".
■ The images that are direct to cloud storage can be shared.In optimized deduplication or AIR cascading scenarios, only the images in CloudCatalyst that has optimized deduplication or has an AIR target can be shared.
295Configuring deduplication to the cloud with NetBackup Cloud CatalystAbout image sharing in cloud using Cloud Catalyst
If Cloud Catalyst is not set for optimized deduplication or is not an AIR target,you cannot use image sharing. If Amazon Glacier is enabled in Cloud Catalyst,you cannot use image sharing.In these scenarios to disable image sharing:Modify the <install_directory>/etc/puredisk/spa.cfg file and add thefollowing configuration item:EnableIMandTIR=false
■ Regarding the errors about role policy size limitation:Errors that occur when the role policy size exceeds the maximum size is anAWS limitation. You can find the following error in a failed restore job:
“error occurred (LimitExceeded) when calling the PutRolePolicy operation:
Maximum policy size of 10240 bytes exceeded for role vmimport”
Workaround:
■ You can change the maximum policy size limit for the vmimport role.
■ You can list and delete the existing policies using the following commands:
aws iam list-role-policies --role-name vmimport
aws iam delete-role-policy --role-name vmimport --policy-name
<bucketname> -vmimport
■ The recover operation includes AWS import process. Therefore, a vmdk imagecannot be recovered concurrently in two restore jobs at the same time.
■ The image sharing feature can recover the virtual machines that satisfy theAmazon Web Services VM import prerequisites.For more information about the prerequisites, refer to the following article:https://docs.aws.amazon.com/vm-import/latest/userguide/vmie_prereqs.html
■ If you cannot obtain the administrator password to use an AWS EC2 instancethat has a Windows OS, the following error is displayed:Password is not available. This instance was launched from a custom
AMI, or the default password has changed. A password cannot be
retrieved for this instance. If you have forgotten your password,
you can reset it using the Amazon EC2 configuration service. For
more information, see Passwords for a Windows Server Instance.
This error occurs after the instance is launched from an AMI that is convertedusing image sharing.
For more information, refer to the following articles:
■ Amazon Elastic Compute Cloud Common Messages
296Configuring deduplication to the cloud with NetBackup Cloud CatalystAbout image sharing in cloud using Cloud Catalyst
■ How to migrate your on-premises domain to AWS Managed Microsoft ADusing ADMT
■ You cannot cancel an import job on the cloud recovery host.
■ If there is data optimization done on the on-premises image, you might not beable to restore the image that you have imported on the cloud recovery host.You can expire this image, import it again on the image-sharing server, andthen restore the image.
■ After the backup job, duplication job, or AIR import job completes, you can importthe images on a cloud recovery host.
297Configuring deduplication to the cloud with NetBackup Cloud CatalystAbout image sharing in cloud using Cloud Catalyst
MSDP cloud supportThis chapter includes the following topics:
■ About MSDP cloud support
■ Creating a cloud storage unit
■ Updating cloud credentials for a cloud LSU
■ Updating encryption configurations for a cloud LSU
■ Deleting a cloud LSU
■ Backup data to cloud by using cloud LSU
■ Duplicate data cloud by using cloud LSU
■ Configuring AIR to use cloud LSU
■ About backward compatibility support
■ About the configuration items in cloud.json, contentrouter.cfg and spa.cfg
■ About the tool updates for cloud support
■ About the disaster recovery for cloud LSU
■ About Image Sharing using MSDP cloud
About MSDP cloud supportIn this release, NetBackup MSDP cloud support is enhanced to provide a flexible,scalable, high performing, and easy to configure solution, that enables you toleverage cloud storage more efficiently.
Here are the highlights of this feature:
7Chapter
■ One MSDP storage server can be configured to support multiple storage targets,including one local storage target and zero or more cloud storage targets. Youcan move data to local and multiple cloud targets simultaneously.
■ The cloud targets can be from the same or different providers, either public, orprivate. For example, AWS, Azure, HCP, etc.
■ The cloud targets can be added on demand after the MSDP server is configuredand active.
■ Multiple cloud targets can coexist in a single cloud bucket or multiple bucketsthat are distributed in a single or different cloud providers.
■ The data and metadata for local storage and multiple cloud targets are isolatedto support Multiple Tenant usage.
■ Optimized deduplication is supported within one MSDP server scope so thatdata can be stored to local storage first and then duplicated to cloud targets inthe same media server.
■ Disaster recovery from the cloud targets is enhanced and more straightforward.
■ Feature is well integrated with the MSDP cluster solution.
Based on the OpenStorage Technology (OST), the new architecture uses multipleLogical storage unit (LSU) to manage and move data. These LSUs can becustomized independently to meet different customer requirements. For example,as pure local target (same as MSDP in NetBackup 8.2 or earlier), or local targetplus one or more cloud targets.
Starting with NetBackup 8.3, you can configure MSDP from the NetBackup WebUI. You can refer to the NetBackup Web UI documentation for more details.
This chapter focuses on how to use the command line interface to configure MSDP.
Note: To enable OCSD logging information or MSDP cloud, add loglevel=3 inthe section [Symantec/PureDisk/OpenCloudStorageDaemon] in/etc/pdregistry.cfg on media server and restart the services.
Check the logs at /usr/openv/netbackup/esfs_storage/.
Operating system requirement for configurationCloud LSUs can be configured on the storage servers running on Red Hat LinuxEnterprise or CentOS platforms. No platform limitations for clients and load balancingservers.
299MSDP cloud supportAbout MSDP cloud support
Limitations■ Instant Access for cloud LSU is not supported.
■ Universal share for cloud LSU is not supported.
■ Accelerator for cloud LSU of AWS Glacier and Deep Archive is not supported.
■ Cloud DR for cloud LSU of AWS Glacier and Deep Archive is not supported ifthe storage server name changes.
■ AIR for cloud LSU of AWS Glacier and Deep Archive is not supported.
■ Classic AIR for cloud LSU as replication target is not supported.
■ Synthetic backup for cloud LSU of AWS Glacier and Deep Archive is notsupported.
■ Snowball is not supported.
■ FIPS is not supported.
■ Multi-threaded Agent must be disabled when a Client-Direct backup is used byNetBackup clients that have NetBackup version earlier than 8.3.
■ If you select a load balancing media server that has NetBackup version earlierthan 8.3, then the cloud LSUs are not listed. Even if you select cloud LSUs withmedia servers that have NetBackup version earlier than 8.3, the backups canfail.
Creating a cloud storage unitUse the NetBackup Web UI or the command line to create a cloud storage unit.
300MSDP cloud supportCreating a cloud storage unit
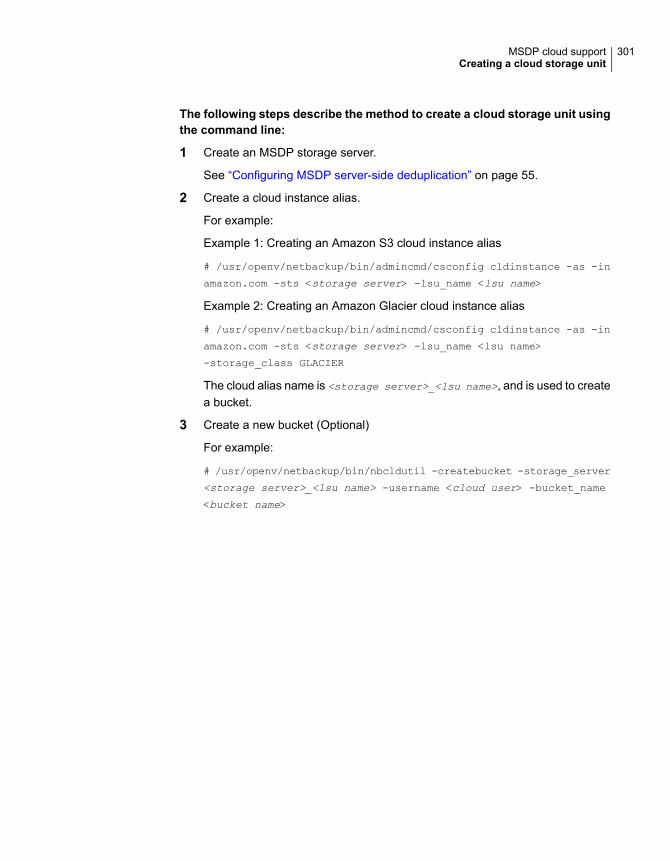
The following steps describe the method to create a cloud storage unit usingthe command line:
1 Create an MSDP storage server.
See “Configuring MSDP server-side deduplication” on page 55.
2 Create a cloud instance alias.
For example:
Example 1: Creating an Amazon S3 cloud instance alias
# /usr/openv/netbackup/bin/admincmd/csconfig cldinstance -as -in
amazon.com -sts <storage server> -lsu_name <lsu name>
Example 2: Creating an Amazon Glacier cloud instance alias
# /usr/openv/netbackup/bin/admincmd/csconfig cldinstance -as -in
amazon.com -sts <storage server> -lsu_name <lsu name>
-storage_class GLACIER
The cloud alias name is <storage server>_<lsu name>, and is used to createa bucket.
3 Create a new bucket (Optional)
For example:
# /usr/openv/netbackup/bin/nbcldutil -createbucket -storage_server
<storage server>_<lsu name> -username <cloud user> -bucket_name
<bucket name>
301MSDP cloud supportCreating a cloud storage unit
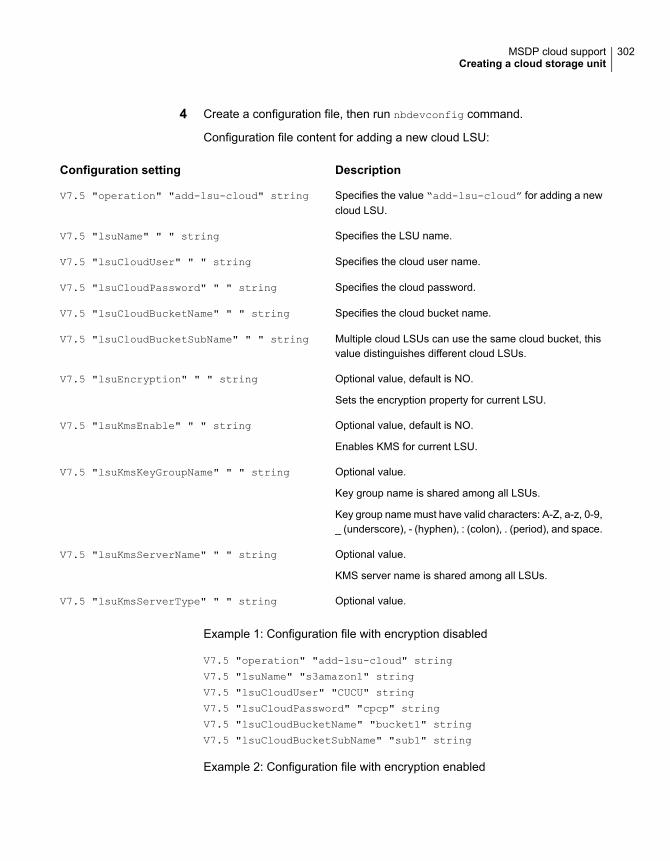
4 Create a configuration file, then run nbdevconfig command.
Configuration file content for adding a new cloud LSU:
DescriptionConfiguration setting
Specifies the value “add-lsu-cloud” for adding a newcloud LSU.
V7.5 "operation" "add-lsu-cloud" string
Specifies the LSU name.V7.5 "lsuName" " " string
Specifies the cloud user name.V7.5 "lsuCloudUser" " " string
Specifies the cloud password.V7.5 "lsuCloudPassword" " " string
Specifies the cloud bucket name.V7.5 "lsuCloudBucketName" " " string
Multiple cloud LSUs can use the same cloud bucket, thisvalue distinguishes different cloud LSUs.
V7.5 "lsuCloudBucketSubName" " " string
Optional value, default is NO.V7.5 "lsuEncryption" " " string
Sets the encryption property for current LSU.
Optional value, default is NO.V7.5 "lsuKmsEnable" " " string
Enables KMS for current LSU.
Optional value.V7.5 "lsuKmsKeyGroupName" " " string
Key group name is shared among all LSUs.
Key group name must have valid characters: A-Z, a-z, 0-9,_ (underscore), - (hyphen), : (colon), . (period), and space.
Optional value.V7.5 "lsuKmsServerName" " " string
KMS server name is shared among all LSUs.
Optional value.V7.5 "lsuKmsServerType" " " string
Example 1: Configuration file with encryption disabled
V7.5 "operation" "add-lsu-cloud" string
V7.5 "lsuName" "s3amazon1" string
V7.5 "lsuCloudUser" "CUCU" string
V7.5 "lsuCloudPassword" "cpcp" string
V7.5 "lsuCloudBucketName" "bucket1" string
V7.5 "lsuCloudBucketSubName" "sub1" string
Example 2: Configuration file with encryption enabled
302MSDP cloud supportCreating a cloud storage unit
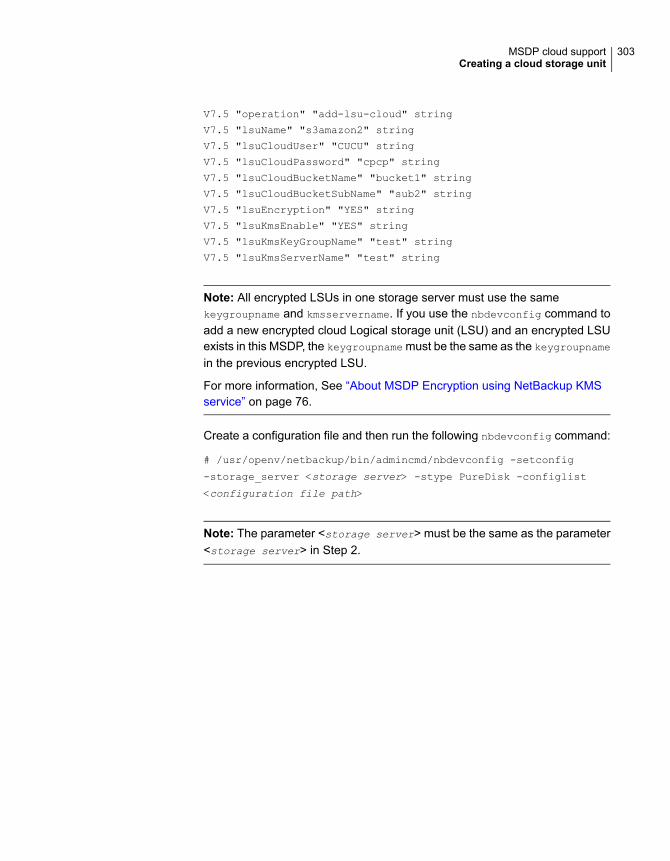
V7.5 "operation" "add-lsu-cloud" string
V7.5 "lsuName" "s3amazon2" string
V7.5 "lsuCloudUser" "CUCU" string
V7.5 "lsuCloudPassword" "cpcp" string
V7.5 "lsuCloudBucketName" "bucket1" string
V7.5 "lsuCloudBucketSubName" "sub2" string
V7.5 "lsuEncryption" "YES" string
V7.5 "lsuKmsEnable" "YES" string
V7.5 "lsuKmsKeyGroupName" "test" string
V7.5 "lsuKmsServerName" "test" string
Note: All encrypted LSUs in one storage server must use the samekeygroupname and kmsservername. If you use the nbdevconfig command toadd a new encrypted cloud Logical storage unit (LSU) and an encrypted LSUexists in this MSDP, the keygroupname must be the same as the keygroupname
in the previous encrypted LSU.
For more information, See “About MSDP Encryption using NetBackup KMSservice” on page 76.
Create a configuration file and then run the following nbdevconfig command:
# /usr/openv/netbackup/bin/admincmd/nbdevconfig -setconfig
-storage_server <storage server> -stype PureDisk -configlist
<configuration file path>
Note: The parameter <storage server> must be the same as the parameter<storage server> in Step 2.
303MSDP cloud supportCreating a cloud storage unit
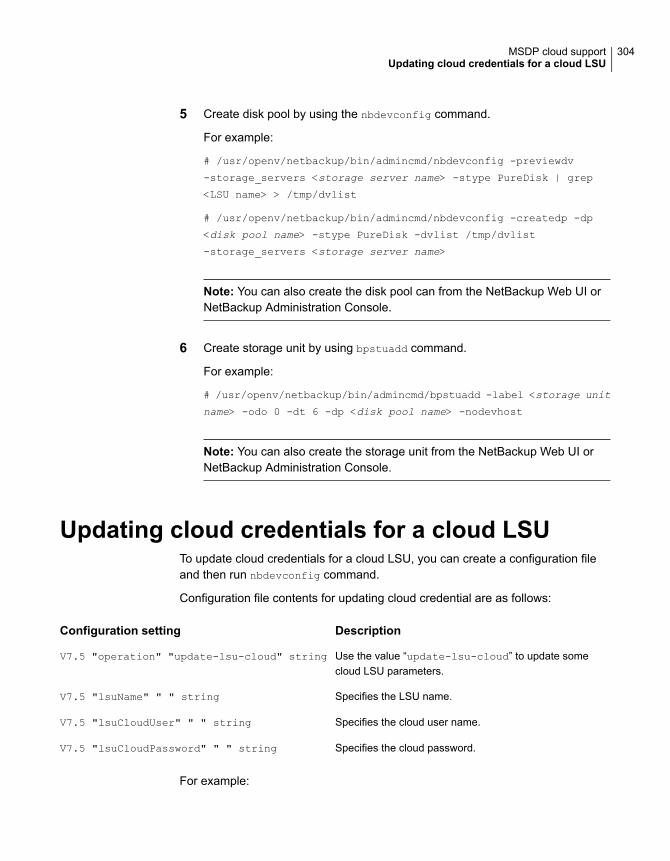
5 Create disk pool by using the nbdevconfig command.
For example:
# /usr/openv/netbackup/bin/admincmd/nbdevconfig -previewdv
-storage_servers <storage server name> -stype PureDisk | grep
<LSU name> > /tmp/dvlist
# /usr/openv/netbackup/bin/admincmd/nbdevconfig -createdp -dp
<disk pool name> -stype PureDisk -dvlist /tmp/dvlist
-storage_servers <storage server name>
Note: You can also create the disk pool can from the NetBackup Web UI orNetBackup Administration Console.
6 Create storage unit by using bpstuadd command.
For example:
# /usr/openv/netbackup/bin/admincmd/bpstuadd -label <storage unit
name> -odo 0 -dt 6 -dp <disk pool name> -nodevhost
Note: You can also create the storage unit from the NetBackup Web UI orNetBackup Administration Console.
Updating cloud credentials for a cloud LSUTo update cloud credentials for a cloud LSU, you can create a configuration fileand then run nbdevconfig command.
Configuration file contents for updating cloud credential are as follows:
DescriptionConfiguration setting
Use the value “update-lsu-cloud” to update somecloud LSU parameters.
V7.5 "operation" "update-lsu-cloud" string
Specifies the LSU name.V7.5 "lsuName" " " string
Specifies the cloud user name.V7.5 "lsuCloudUser" " " string
Specifies the cloud password.V7.5 "lsuCloudPassword" " " string
For example:
304MSDP cloud supportUpdating cloud credentials for a cloud LSU
V7.5 "operation" "update-lsu-cloud" string
V7.5 "lsuName" "s3amazon1" string
V7.5 "lsuCloudAlias" "amazon_1" string
V7.5 "lsuCloudUser" "ChangedCloudUser" string
V7.5 "lsuCloudPassword" "changedpassword" string
After creating the configuration file, run the following command:
# /usr/openv/netbackup/bin/admincmd/nbdevconfig -setconfig
-storage_server <storage server> -stype PureDisk -configlist
<configuration file path>
Updating encryption configurations for a cloudLSU
To enable KMS encryption configurations for a Cloud LSU, you can create aconfiguration file and then run nbdevconfig command.
Configuration file contents for updating encryption configurations are as follows:
DescriptionConfiguration setting
You can only update the KMS status from disabled toenabled.
V7.5 "operation" "update-lsu-cloud" string
Specifies the LSU name.V7.5 "lsuName" " " string
Specifies the KMS status for the cloud LSU.V7.5 "lsuKmsEnable" "YES" string
Optional value.
KMS server name that is shared among all LSUs.
V7.5 "lsuKmsServerName" "" string
Optional value.
Key group name that is shared among all LSUs.
Key group name must have valid characters: A-Z, a-z, 0-9,_ (underscore), - (hyphen), : (colon), . (period), and space.
V7.5 "lsuKmsKeyGroupName" "" string
Example to enable KMS status from disabled status to enabled status for cloudLSU “s3amazon”:
V7.5 "operation" "update-lsu-cloud" string
V7.5 "lsuName" "s3amazon" string
V7.5 "lsuKmsEnable" "YES" string
305MSDP cloud supportUpdating encryption configurations for a cloud LSU
V7.5 "lsuKmsServerName" "XXX" string
V7.5 "lsuKmsKeyGroupName" "XXX" string
Note: All encrypted LSUs in one storage server must use the same keygroupname
and kmsservername. If you use the nbdevconfig command to add a new encryptedcloud Logical storage unit (LSU) and an encrypted LSU exists in this MSDP, thekeygroupname must be the same as the keygroupname in the previous encryptedLSU.
For more information, See “About MSDP Encryption using NetBackup KMS service”on page 76.
After creating the configuration file, run the following command:
# /usr/openv/netbackup/bin/admincmd/nbdevconfig -setconfig
-storage_server <storage server> -stype PureDisk -configlist
<configuration file path>
Deleting a cloud LSUUse the following steps carefully to remove an MSDP cloud LSU:
1 Expire all images of the cloud LSU in NetBackup.
2 Remove the storage unit and disk pool of this MSDP cloud LSU.
3 To delete a cloud LSU, storageId and CachePath are needed.
Run following command to get the information of one cloud LSU:
/usr/openv/pdde/pdcr/bin/pddecfg -a listcloudlsu
dsid, lsuname, storageId, CachePath
3, S3Volume, server1_ S3Volume/cloud-bucket1/sub1, /msdp/data/ds_3
4, S3Volume2, server1_ S3Volume2/cloud-bucket1/sub2,
/msdp/data/ds_4
Here the storageId of the cloud LSU is “server1_S3Volume/cloud-bucket1/sub1” and CachePath of the cloud LSU is“/msdp/data/ds_3”
4 Run CRQP to make sure no tlog entries are present in<msdp_storage_path>/spool folder and <msdp_storage_path>/queue folder.
306MSDP cloud supportDeleting a cloud LSU

5 Delete LSU configurations in spad by using nbdevconfig command.
Configuration file contents for deleting an MSDP cloud LSU configuration areas follows:
DescriptionConfiguration setting
The value “delete-lsu-cloud” for deleting the MSDPcloud LSU configurations in spad.
V7.5 "operation" "delete-lsu-cloud" string
Specifies the LSU name.V7.5 "lsuName" " " string
For example:
V7.5 "operation" "delete-lsu-cloud" string
V7.5 "lsuName" "s3amazon1" string
After creating the configuration file, run the following command:
# /usr/openv/netbackup/bin/admincmd/nbdevconfig -setconfig
-storage_server <storage server> -stype PureDisk -configlist
<configuration file path>
6 Stop the MSDP service and its monitor service.
# /usr/openv/netbackup/bin/nbsvcmon -terminate
# /usr/openv/pdde/pdconfigure/pdde stop
7 Delete LSU configurations in spoold using the following command:
# /usr/openv/pdde/pdcr/bin/spoold --removepartition <storageId>
8 Remove the cache folder by using the following command (Optional):
# rm -r <CachePath>
9 Remove the entire sub-bucket folder in cloud. (Optional)
10 Start the MSDP service and its monitor service.
# /usr/openv/pdde/pdconfigure/pdde start
# /usr/openv/netbackup/bin/nbsvcmon
Backup data to cloud by using cloud LSURun the following steps to backup data to cloud LSU:
■ Create a cloud LSU and related disk pool and storage unit (cloud storage unit).
■ Create a backup policy and use cloud storage unit as policy storage.
307MSDP cloud supportBackup data to cloud by using cloud LSU
■ Run the backup and the data is written to cloud storage.
You can create and back up to multiple Cloud LSUs at the same storage server.
Duplicate data cloud by using cloud LSURun the following steps to duplicate backup images from local MSDP to cloud LSU:
■ Configure an MSDP storage server and create a disk pool by using“PureDiskVolume” and then create a storage unit (local storage unit).
■ Create a cloud LSU and related disk pool and storage unit (cloud storage unit).
■ Create a Storage Lifecycle Policy and add “Backup” and “Duplication” values.Data is backs up to local storage unit and then duplicates to a cloud storageunit.
■ Create a backup policy and use storage lifecycle policy as policy storage.
■ Run the backup and the data is written to local storage and then duplicated tocloud storage.
Duplication can also be done from cloud LSU to local MSDP and between two cloudLSUs.
Configuring AIR to use cloud LSUThe following steps describe the tasks that are required to replicate the backupimages from one LSU to another in a different NetBackup domain:
■ See “Configuring MSDP replication to a different NetBackup domain” on page 158.
■ Configure a trust relationship with the target NetBackup domain.See “About trusted master servers for Auto Image Replication” on page 167.
■ Add an LSU in the remote storage server as a replication target.To add a replication target in a different NetBackup domain, you can useNetBackup Web UI or use the command line interface.
308MSDP cloud supportDuplicate data cloud by using cloud LSU
1 Create a configuration file for adding a replication target.
Configuration file content for adding a replication target:
DescriptionConfiguration setting
The value must be “set-replication” for adding a newreplication target.
V7.5 "operation" " " string
Specifies the replication target's host name.V7.5 " rephostname" " " string
Specifies the replication target storage server's user name.V7.5 "replogin" " " string
Specifies the replication target storage server's password.V7.5 "reppasswd" " " string
Specifies the replication source volume name.V7.5 "repsourcevolume" " " string
Specifies the replication target volume name.V7.5 "reptargetvolume" " " string
Example:
[root@sourceserver~]# cat add-replication-local2cloud.txt
V7.5 "operation" "set-replication" string
V7.5 "rephostname" "targetserver1.example.com" string
V7.5 "replogin" "root" string
V7.5 "reppasswd" "root" string
V7.5 "repsourcevolume" "PureDiskVolume" string
V7.5 "reptargetvolume" "s3amamzon1" string
After creating the configuration file, run the nbdevconfig command.
For example:
# /usr/openv/netbackup/bin/admincmd/nbdevconfig -setconfig
-storage_server <storage server> -stype PureDisk -configlist
<configuration file path>
2 Run nbdevconfig to update the disk volume.
For example:
# /usr/openv/netbackup/bin/admincmd/nbdevconfig -updatedv -stype
PureDisk -dp diskpool1 -media_server sourceserver.example.com
■ Configure a storage lifecycle policy.You must create an import SLP in the target domain before you configure anSLP in the source domain.See “About storage lifecycle policies” on page 192.
309MSDP cloud supportConfiguring AIR to use cloud LSU
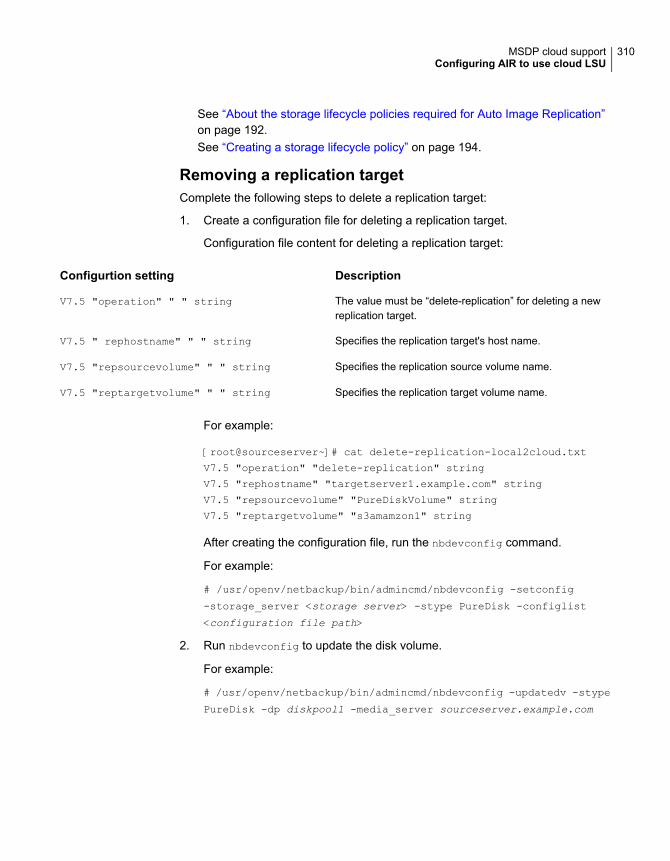
See “About the storage lifecycle policies required for Auto Image Replication”on page 192.See “Creating a storage lifecycle policy” on page 194.
Removing a replication targetComplete the following steps to delete a replication target:
1. Create a configuration file for deleting a replication target.
Configuration file content for deleting a replication target:
DescriptionConfigurtion setting
The value must be “delete-replication” for deleting a newreplication target.
V7.5 "operation" " " string
Specifies the replication target's host name.V7.5 " rephostname" " " string
Specifies the replication source volume name.V7.5 "repsourcevolume" " " string
Specifies the replication target volume name.V7.5 "reptargetvolume" " " string
For example:
[root@sourceserver~]# cat delete-replication-local2cloud.txt
V7.5 "operation" "delete-replication" string
V7.5 "rephostname" "targetserver1.example.com" string
V7.5 "repsourcevolume" "PureDiskVolume" string
V7.5 "reptargetvolume" "s3amamzon1" string
After creating the configuration file, run the nbdevconfig command.
For example:
# /usr/openv/netbackup/bin/admincmd/nbdevconfig -setconfig
-storage_server <storage server> -stype PureDisk -configlist
<configuration file path>
2. Run nbdevconfig to update the disk volume.
For example:
# /usr/openv/netbackup/bin/admincmd/nbdevconfig -updatedv -stype
PureDisk -dp diskpool1 -media_server sourceserver.example.com
310MSDP cloud supportConfiguring AIR to use cloud LSU

About backward compatibility supportIf an Auto Image Replication (A.I.R) source storage server has NetBackup 8.2 orearlier, the target disk volume cannot be a cloud LSU.
To replicate image from an earlier version of an MSDP server to the cloud LSU oftarget MSDP server, you need a user name with the cloud LSU name when youadd the A.I.R target. The format of the user name with the target cloud LSU is:
<username>?LSU=<target cloud LSU>
For example, there is a target storage server and user name of the server is userA
and there is a cloud LSU s3cloud1 in the target storage server. To replicate imagefrom an old storage server to the cloud LSU of the target server, you can use thefollowing user name while adding the A.I.R target:
userA?LSU=s3cloud1
You must also create an import SLP to local volume of target storage server in thetarget master server. Then select the imported SLP while creating the target A.I.RSLP on the source side. When A.I.R runs, the import job in target side shows thepolicy name as SLP_No_Target_SLP in the Activity Monitor, but the data is sentto cloud.
If the NetBackup client version is 8.2 or earlier, the client direct backup from theold client to cloud LSU of one storage server might fail. During the backup if mtstrmdis used on the client side, the job fails with a media write error. To disable mtstrmd
at the client side, open the configuration file pd.conf on the client and change thefollowing:
MTSTRM_BACKUP_ENABLED = 1 to MTSTRM_BACKUP_ENABLED = 0.
The pd.conf file is located in the following directories:
■ UNIX/usr/openv/lib/ost-plugins/
■ Windowsinstall_path\Veritas\NetBackup\bin\ost-plugins
When doing a client direct backup with a cloud LSU and an old client, the clientdoes only client-side deduplication.
To use cloud LSU, the load balance server of the storage server must not be anearlier version (NetBackup 8.2 or earlier). If there are new and old load balancers,new load balance server is selected automatically to make sure that the job can bedone successfully. When you are restoring a backup image on cloud LSU and youselect the media server explicitly, the media server selected must not be an earlierversion of NetBackup.
311MSDP cloud supportAbout backward compatibility support
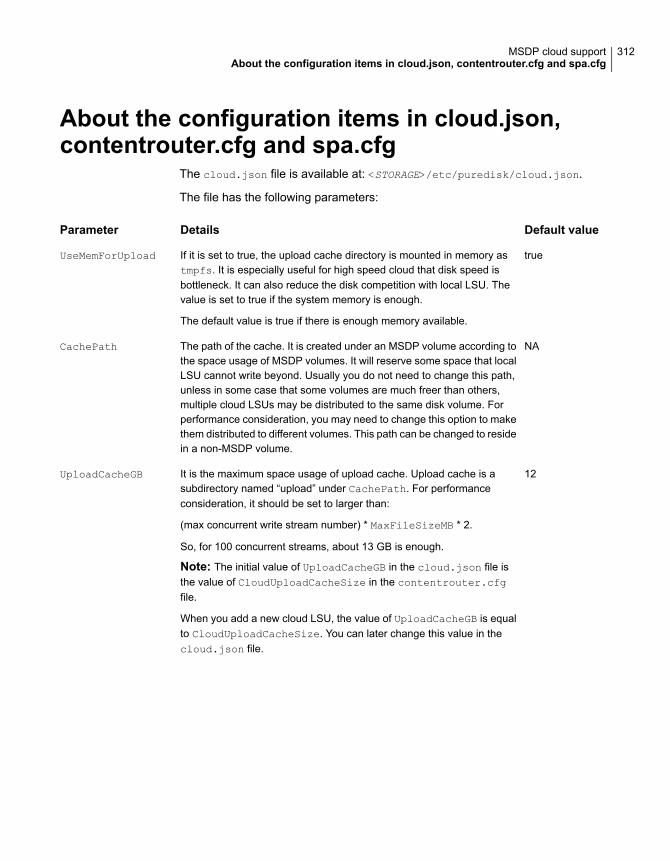
About the configuration items in cloud.json,contentrouter.cfg and spa.cfg
The cloud.json file is available at: <STORAGE>/etc/puredisk/cloud.json.
The file has the following parameters:
Default valueDetailsParameter
trueIf it is set to true, the upload cache directory is mounted in memory astmpfs. It is especially useful for high speed cloud that disk speed isbottleneck. It can also reduce the disk competition with local LSU. Thevalue is set to true if the system memory is enough.
The default value is true if there is enough memory available.
UseMemForUpload
NAThe path of the cache. It is created under an MSDP volume according tothe space usage of MSDP volumes. It will reserve some space that localLSU cannot write beyond. Usually you do not need to change this path,unless in some case that some volumes are much freer than others,multiple cloud LSUs may be distributed to the same disk volume. Forperformance consideration, you may need to change this option to makethem distributed to different volumes. This path can be changed to residein a non-MSDP volume.
CachePath
12It is the maximum space usage of upload cache. Upload cache is asubdirectory named “upload” under CachePath. For performanceconsideration, it should be set to larger than:
(max concurrent write stream number) * MaxFileSizeMB * 2.
So, for 100 concurrent streams, about 13 GB is enough.
Note: The initial value of UploadCacheGB in the cloud.json file isthe value of CloudUploadCacheSize in the contentrouter.cfgfile.
When you add a new cloud LSU, the value of UploadCacheGB is equalto CloudUploadCacheSize. You can later change this value in thecloud.json file.
UploadCacheGB
312MSDP cloud supportAbout the configuration items in cloud.json, contentrouter.cfg and spa.cfg
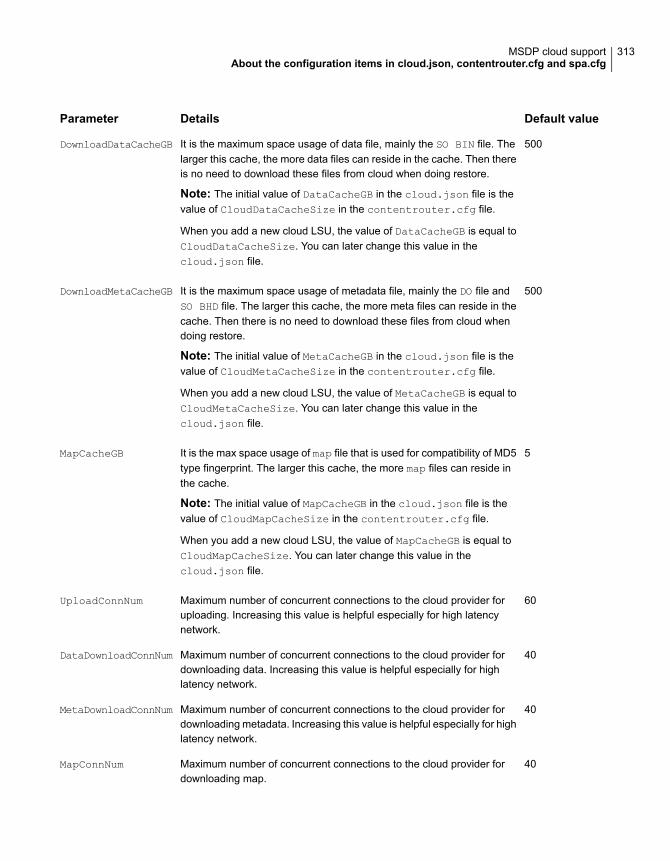
Default valueDetailsParameter
500It is the maximum space usage of data file, mainly the SO BIN file. Thelarger this cache, the more data files can reside in the cache. Then thereis no need to download these files from cloud when doing restore.
Note: The initial value of DataCacheGB in the cloud.json file is thevalue of CloudDataCacheSize in the contentrouter.cfg file.
When you add a new cloud LSU, the value of DataCacheGB is equal toCloudDataCacheSize. You can later change this value in thecloud.json file.
DownloadDataCacheGB
500It is the maximum space usage of metadata file, mainly the DO file andSO BHD file. The larger this cache, the more meta files can reside in thecache. Then there is no need to download these files from cloud whendoing restore.
Note: The initial value of MetaCacheGB in the cloud.json file is thevalue of CloudMetaCacheSize in the contentrouter.cfg file.
When you add a new cloud LSU, the value of MetaCacheGB is equal toCloudMetaCacheSize. You can later change this value in thecloud.json file.
DownloadMetaCacheGB
5It is the max space usage of map file that is used for compatibility of MD5type fingerprint. The larger this cache, the more map files can reside inthe cache.
Note: The initial value of MapCacheGB in the cloud.json file is thevalue of CloudMapCacheSize in the contentrouter.cfg file.
When you add a new cloud LSU, the value of MapCacheGB is equal toCloudMapCacheSize. You can later change this value in thecloud.json file.
MapCacheGB
60Maximum number of concurrent connections to the cloud provider foruploading. Increasing this value is helpful especially for high latencynetwork.
UploadConnNum
40Maximum number of concurrent connections to the cloud provider fordownloading data. Increasing this value is helpful especially for highlatency network.
DataDownloadConnNum
40Maximum number of concurrent connections to the cloud provider fordownloading metadata. Increasing this value is helpful especially for highlatency network.
MetaDownloadConnNum
40Maximum number of concurrent connections to the cloud provider fordownloading map.
MapConnNum
313MSDP cloud supportAbout the configuration items in cloud.json, contentrouter.cfg and spa.cfg
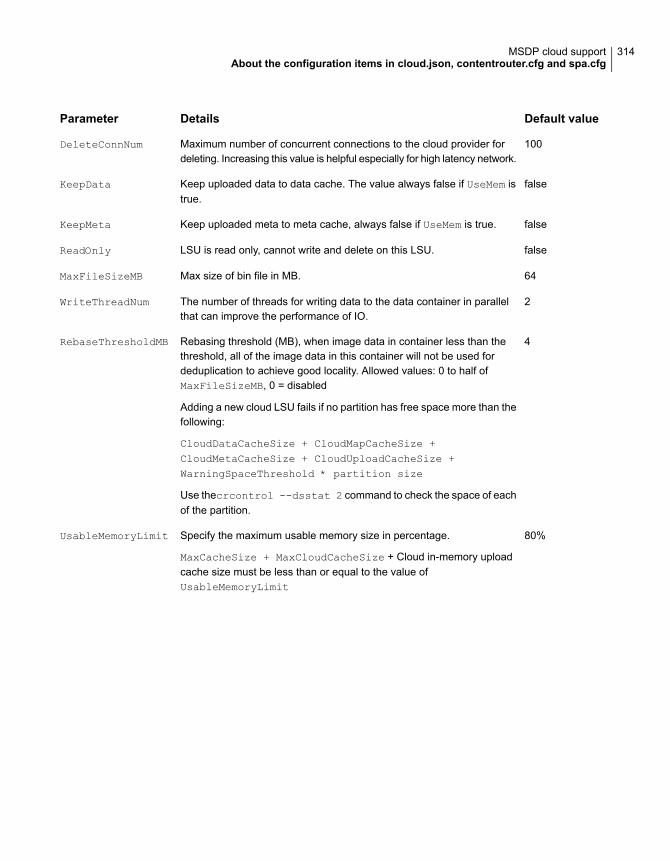
Default valueDetailsParameter
100Maximum number of concurrent connections to the cloud provider fordeleting. Increasing this value is helpful especially for high latency network.
DeleteConnNum
falseKeep uploaded data to data cache. The value always false if UseMem istrue.
KeepData
falseKeep uploaded meta to meta cache, always false if UseMem is true.KeepMeta
falseLSU is read only, cannot write and delete on this LSU.ReadOnly
64Max size of bin file in MB.MaxFileSizeMB
2The number of threads for writing data to the data container in parallelthat can improve the performance of IO.
WriteThreadNum
4Rebasing threshold (MB), when image data in container less than thethreshold, all of the image data in this container will not be used fordeduplication to achieve good locality. Allowed values: 0 to half ofMaxFileSizeMB, 0 = disabled
Adding a new cloud LSU fails if no partition has free space more than thefollowing:
CloudDataCacheSize + CloudMapCacheSize +CloudMetaCacheSize + CloudUploadCacheSize +WarningSpaceThreshold * partition size
Use thecrcontrol --dsstat 2 command to check the space of eachof the partition.
RebaseThresholdMB
80%Specify the maximum usable memory size in percentage.
MaxCacheSize + MaxCloudCacheSize + Cloud in-memory uploadcache size must be less than or equal to the value ofUsableMemoryLimit
UsableMemoryLimit
314MSDP cloud supportAbout the configuration items in cloud.json, contentrouter.cfg and spa.cfg
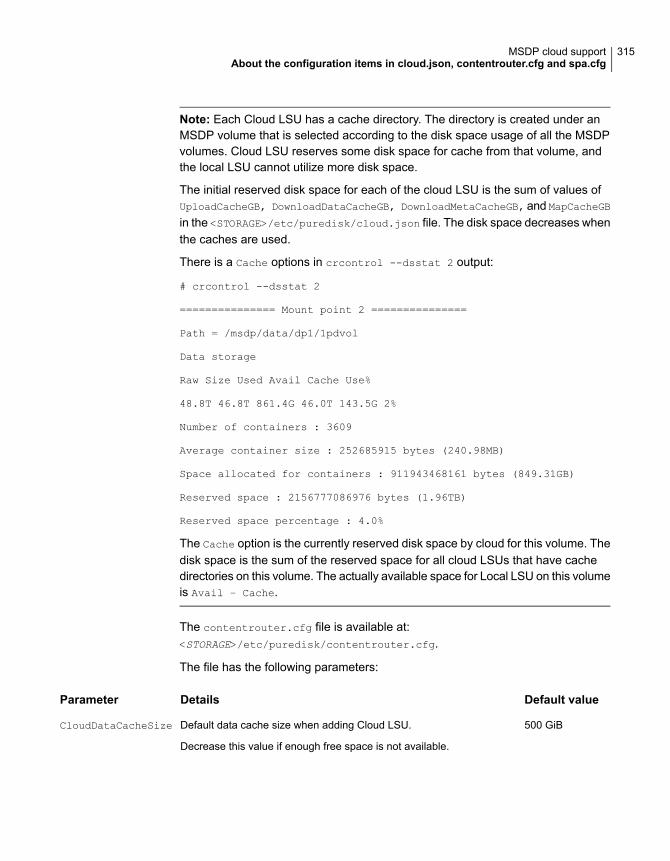
Note: Each Cloud LSU has a cache directory. The directory is created under anMSDP volume that is selected according to the disk space usage of all the MSDPvolumes. Cloud LSU reserves some disk space for cache from that volume, andthe local LSU cannot utilize more disk space.
The initial reserved disk space for each of the cloud LSU is the sum of values ofUploadCacheGB, DownloadDataCacheGB, DownloadMetaCacheGB, and MapCacheGB
in the <STORAGE>/etc/puredisk/cloud.json file. The disk space decreases whenthe caches are used.
There is a Cache options in crcontrol --dsstat 2 output:
# crcontrol --dsstat 2
=============== Mount point 2 ===============
Path = /msdp/data/dp1/1pdvol
Data storage
Raw Size Used Avail Cache Use%
48.8T 46.8T 861.4G 46.0T 143.5G 2%
Number of containers : 3609
Average container size : 252685915 bytes (240.98MB)
Space allocated for containers : 911943468161 bytes (849.31GB)
Reserved space : 2156777086976 bytes (1.96TB)
Reserved space percentage : 4.0%
The Cache option is the currently reserved disk space by cloud for this volume. Thedisk space is the sum of the reserved space for all cloud LSUs that have cachedirectories on this volume. The actually available space for Local LSU on this volumeis Avail – Cache.
The contentrouter.cfg file is available at:<STORAGE>/etc/puredisk/contentrouter.cfg.
The file has the following parameters:
Default valueDetailsParameter
500 GiBDefault data cache size when adding Cloud LSU.
Decrease this value if enough free space is not available.
CloudDataCacheSize
315MSDP cloud supportAbout the configuration items in cloud.json, contentrouter.cfg and spa.cfg
Default valueDetailsParameter
5 GiBDefault map cache size when adding Cloud LSU.
Decrease this value if enough free space is not available.
CloudMapCacheSize
500 GiBDefault meta cache size when adding Cloud LSU.
Decrease this value if enough free space is not available.
CloudMetaCacheSize
12 GiBDefault upload cache size when adding Cloud LSU.
The minimum value is 12 GiB.
CloudUploadCacheSize
20 %Specify the maximum cloud cache size in percentage. It is based on totalsystem memory, swap space excluded.
MaxCloudCacheSize
Auto-sizedaccording toMaxCloudCacheSize
The number of top-level entries in the cloud cache. This number is(2^CloudBits). Increasing this value improves cache performance, atthe expense of extra memory usage. Minimum value = 16, maximumvalue = 48.
CloudBits
disabledWhile using the dcscan to check cloud LSU, data gets downloaded tothis folder. For details, see the dcscan tool in cloud support section.
DCSCANDownloadTmpPath
The spa.cfg file is available at: <STORAGE>/etc/puredisk/spa.cfg.
The file has the following parameters:
Default valueDetailsParameter
1800The check cloud LSU status interval in seconds.CloudLSUCheckInterval
About the tool updates for cloud supportDCSCAN:
Dcscan downloads data container from the cloud. The default download path is<STORAGE>/tmp/DSID_#dsid, where #dsid is dependent on the cloud LSU DSIDvalue. Different cloud storage providers have different DSID values. You do notneed to know the DSID value, dcscan gets the DSID value automatically. Thedefault download path can be modified in the contentrouter.cfg file using theDCSCANDownloadTmpPath field.
While using the dcscan tool to look at cloud data, -a option is disabled, because itdownloads all data containers from cloud, it is an expensive operation. The -fixdo
option is disabled as well, because dcscan only downloads data container from thecloud. Others operations are same as the local LSU.
316MSDP cloud supportAbout the tool updates for cloud support
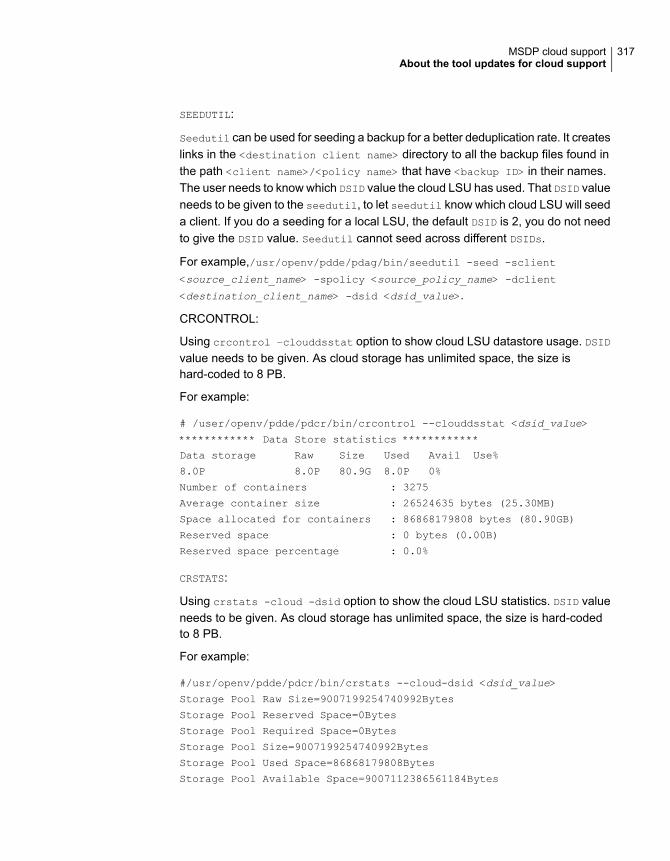
SEEDUTIL:
Seedutil can be used for seeding a backup for a better deduplication rate. It createslinks in the <destination client name> directory to all the backup files found inthe path <client name>/<policy name> that have <backup ID> in their names.The user needs to know which DSID value the cloud LSU has used. That DSID valueneeds to be given to the seedutil, to let seedutil know which cloud LSU will seeda client. If you do a seeding for a local LSU, the default DSID is 2, you do not needto give the DSID value. Seedutil cannot seed across different DSIDs.
For example,/usr/openv/pdde/pdag/bin/seedutil -seed -sclient
<source_client_name> -spolicy <source_policy_name> -dclient
<destination_client_name> -dsid <dsid_value>.
CRCONTROL:
Using crcontrol –clouddsstat option to show cloud LSU datastore usage. DSIDvalue needs to be given. As cloud storage has unlimited space, the size ishard-coded to 8 PB.
For example:
# /user/openv/pdde/pdcr/bin/crcontrol --clouddsstat <dsid_value>
************ Data Store statistics ************
Data storage Raw Size Used Avail Use%
8.0P 8.0P 80.9G 8.0P 0%
Number of containers : 3275
Average container size : 26524635 bytes (25.30MB)
Space allocated for containers : 86868179808 bytes (80.90GB)
Reserved space : 0 bytes (0.00B)
Reserved space percentage : 0.0%
CRSTATS:
Using crstats -cloud -dsid option to show the cloud LSU statistics. DSID valueneeds to be given. As cloud storage has unlimited space, the size is hard-codedto 8 PB.
For example:
#/usr/openv/pdde/pdcr/bin/crstats --cloud-dsid <dsid_value>
Storage Pool Raw Size=9007199254740992Bytes
Storage Pool Reserved Space=0Bytes
Storage Pool Required Space=0Bytes
Storage Pool Size=9007199254740992Bytes
Storage Pool Used Space=86868179808Bytes
Storage Pool Available Space=9007112386561184Bytes
317MSDP cloud supportAbout the tool updates for cloud support
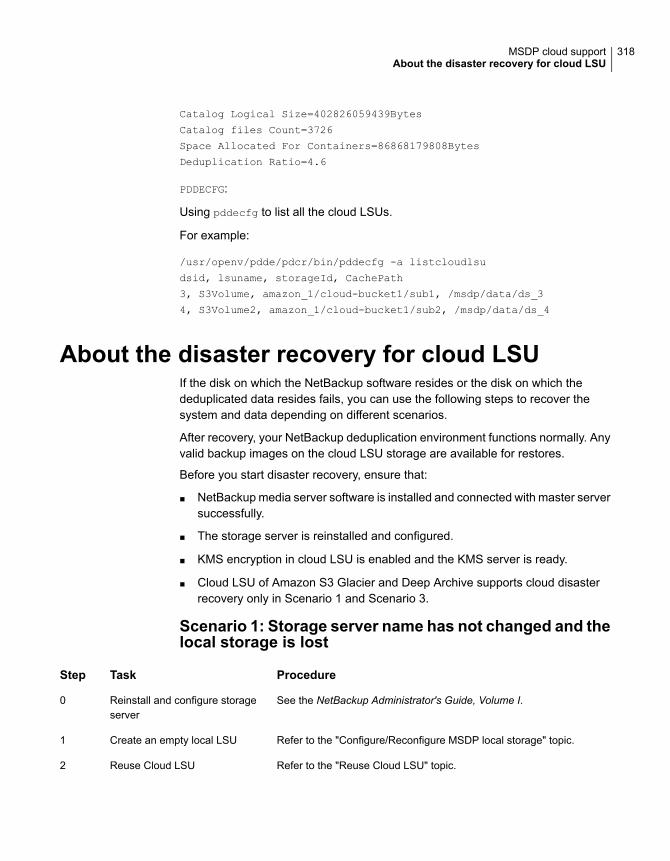
Catalog Logical Size=402826059439Bytes
Catalog files Count=3726
Space Allocated For Containers=86868179808Bytes
Deduplication Ratio=4.6
PDDECFG:
Using pddecfg to list all the cloud LSUs.
For example:
/usr/openv/pdde/pdcr/bin/pddecfg -a listcloudlsu
dsid, lsuname, storageId, CachePath
3, S3Volume, amazon_1/cloud-bucket1/sub1, /msdp/data/ds_3
4, S3Volume2, amazon_1/cloud-bucket1/sub2, /msdp/data/ds_4
About the disaster recovery for cloud LSUIf the disk on which the NetBackup software resides or the disk on which thededuplicated data resides fails, you can use the following steps to recover thesystem and data depending on different scenarios.
After recovery, your NetBackup deduplication environment functions normally. Anyvalid backup images on the cloud LSU storage are available for restores.
Before you start disaster recovery, ensure that:
■ NetBackup media server software is installed and connected with master serversuccessfully.
■ The storage server is reinstalled and configured.
■ KMS encryption in cloud LSU is enabled and the KMS server is ready.
■ Cloud LSU of Amazon S3 Glacier and Deep Archive supports cloud disasterrecovery only in Scenario 1 and Scenario 3.
Scenario 1: Storage server name has not changed and thelocal storage is lost
ProcedureTaskStep
See the NetBackup Administrator's Guide, Volume I.Reinstall and configure storageserver
0
Refer to the "Configure/Reconfigure MSDP local storage" topic.Create an empty local LSU1
Refer to the "Reuse Cloud LSU" topic.Reuse Cloud LSU2
318MSDP cloud supportAbout the disaster recovery for cloud LSU
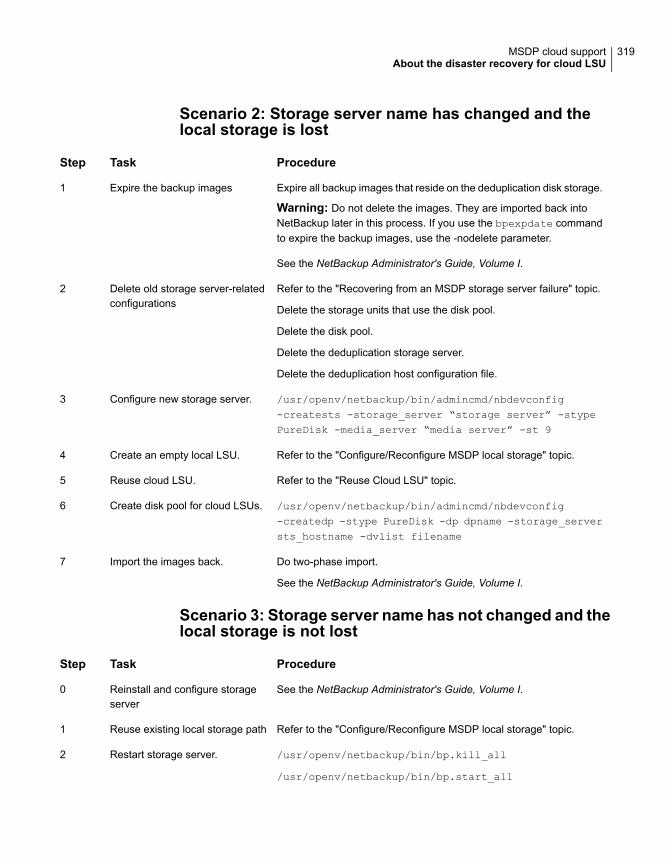
Scenario 2: Storage server name has changed and thelocal storage is lost
ProcedureTaskStep
Expire all backup images that reside on the deduplication disk storage.
Warning: Do not delete the images. They are imported back intoNetBackup later in this process. If you use the bpexpdate commandto expire the backup images, use the -nodelete parameter.
See the NetBackup Administrator's Guide, Volume I.
Expire the backup images1
Refer to the "Recovering from an MSDP storage server failure" topic.
Delete the storage units that use the disk pool.
Delete the disk pool.
Delete the deduplication storage server.
Delete the deduplication host configuration file.
Delete old storage server-relatedconfigurations
2
/usr/openv/netbackup/bin/admincmd/nbdevconfig-creatests -storage_server “storage server” -stypePureDisk -media_server “media server” -st 9
Configure new storage server.3
Refer to the "Configure/Reconfigure MSDP local storage" topic.Create an empty local LSU.4
Refer to the "Reuse Cloud LSU" topic.Reuse cloud LSU.5
/usr/openv/netbackup/bin/admincmd/nbdevconfig-createdp -stype PureDisk -dp dpname -storage_serversts_hostname -dvlist filename
Create disk pool for cloud LSUs.6
Do two-phase import.
See the NetBackup Administrator's Guide, Volume I.
Import the images back.7
Scenario 3: Storage server name has not changed and thelocal storage is not lost
ProcedureTaskStep
See the NetBackup Administrator's Guide, Volume I.Reinstall and configure storageserver
0
Refer to the "Configure/Reconfigure MSDP local storage" topic.Reuse existing local storage path1
/usr/openv/netbackup/bin/bp.kill_all
/usr/openv/netbackup/bin/bp.start_all
Restart storage server.2
319MSDP cloud supportAbout the disaster recovery for cloud LSU
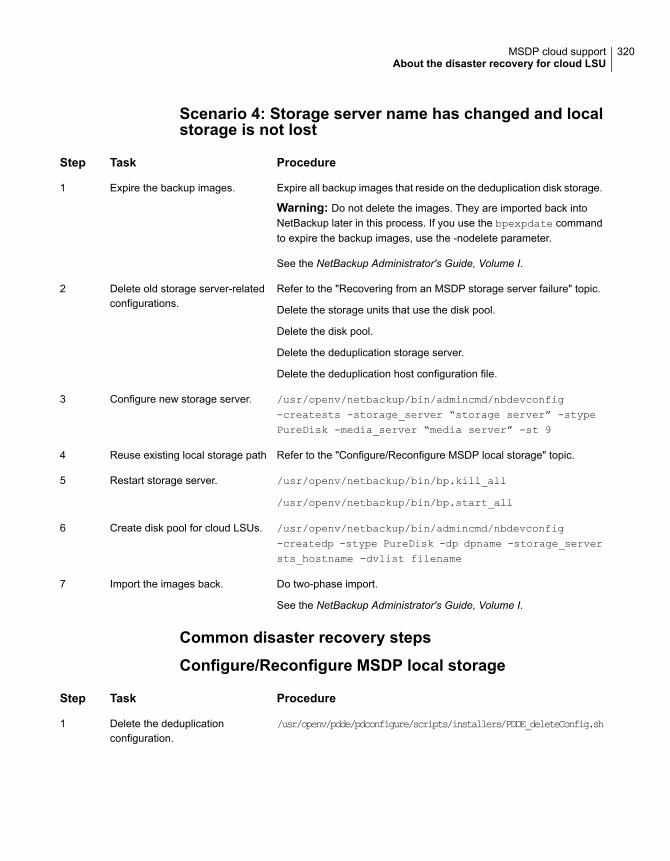
Scenario 4: Storage server name has changed and localstorage is not lost
ProcedureTaskStep
Expire all backup images that reside on the deduplication disk storage.
Warning: Do not delete the images. They are imported back intoNetBackup later in this process. If you use the bpexpdate commandto expire the backup images, use the -nodelete parameter.
See the NetBackup Administrator's Guide, Volume I.
Expire the backup images.1
Refer to the "Recovering from an MSDP storage server failure" topic.
Delete the storage units that use the disk pool.
Delete the disk pool.
Delete the deduplication storage server.
Delete the deduplication host configuration file.
Delete old storage server-relatedconfigurations.
2
/usr/openv/netbackup/bin/admincmd/nbdevconfig-creatests -storage_server “storage server” -stypePureDisk -media_server “media server” -st 9
Configure new storage server.3
Refer to the "Configure/Reconfigure MSDP local storage" topic.Reuse existing local storage path4
/usr/openv/netbackup/bin/bp.kill_all
/usr/openv/netbackup/bin/bp.start_all
Restart storage server.5
/usr/openv/netbackup/bin/admincmd/nbdevconfig-createdp -stype PureDisk -dp dpname -storage_serversts_hostname -dvlist filename
Create disk pool for cloud LSUs.6
Do two-phase import.
See the NetBackup Administrator's Guide, Volume I.
Import the images back.7
Common disaster recovery steps
Configure/Reconfigure MSDP local storage
ProcedureTaskStep
/usr/openv/pdde/pdconfigure/scripts/installers/PDDE_deleteConfig.shDelete the deduplicationconfiguration.
1
320MSDP cloud supportAbout the disaster recovery for cloud LSU
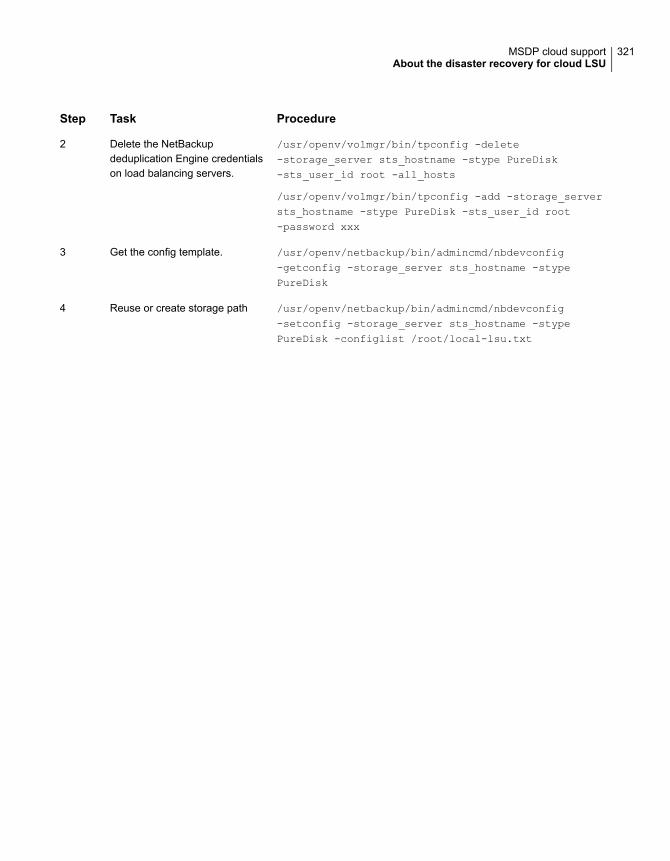
ProcedureTaskStep
/usr/openv/volmgr/bin/tpconfig -delete-storage_server sts_hostname -stype PureDisk-sts_user_id root -all_hosts
/usr/openv/volmgr/bin/tpconfig -add -storage_serversts_hostname -stype PureDisk -sts_user_id root-password xxx
Delete the NetBackupdeduplication Engine credentialson load balancing servers.
2
/usr/openv/netbackup/bin/admincmd/nbdevconfig-getconfig -storage_server sts_hostname -stypePureDisk
Get the config template.3
/usr/openv/netbackup/bin/admincmd/nbdevconfig-setconfig -storage_server sts_hostname -stypePureDisk -configlist /root/local-lsu.txt
Reuse or create storage path4
321MSDP cloud supportAbout the disaster recovery for cloud LSU
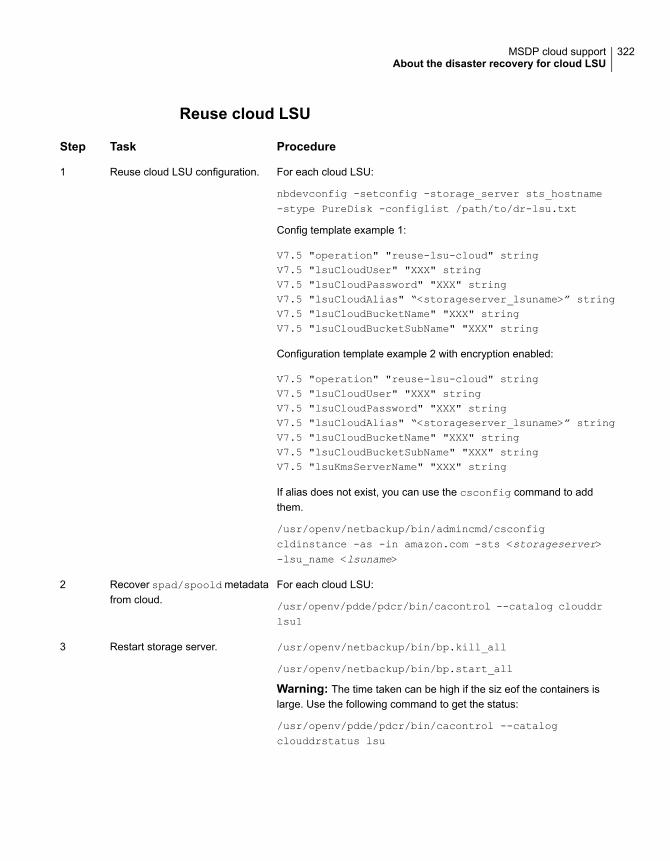
Reuse cloud LSU
ProcedureTaskStep
For each cloud LSU:
nbdevconfig -setconfig -storage_server sts_hostname-stype PureDisk -configlist /path/to/dr-lsu.txt
Config template example 1:
V7.5 "operation" "reuse-lsu-cloud" stringV7.5 "lsuCloudUser" "XXX" stringV7.5 "lsuCloudPassword" "XXX" stringV7.5 "lsuCloudAlias" “<storageserver_lsuname>” stringV7.5 "lsuCloudBucketName" "XXX" stringV7.5 "lsuCloudBucketSubName" "XXX" string
Configuration template example 2 with encryption enabled:
V7.5 "operation" "reuse-lsu-cloud" stringV7.5 "lsuCloudUser" "XXX" stringV7.5 "lsuCloudPassword" "XXX" stringV7.5 "lsuCloudAlias" “<storageserver_lsuname>” stringV7.5 "lsuCloudBucketName" "XXX" stringV7.5 "lsuCloudBucketSubName" "XXX" stringV7.5 "lsuKmsServerName" "XXX" string
If alias does not exist, you can use the csconfig command to addthem.
/usr/openv/netbackup/bin/admincmd/csconfigcldinstance -as -in amazon.com -sts <storageserver>-lsu_name <lsuname>
Reuse cloud LSU configuration.1
For each cloud LSU:
/usr/openv/pdde/pdcr/bin/cacontrol --catalog clouddrlsu1
Recover spad/spoold metadatafrom cloud.
2
/usr/openv/netbackup/bin/bp.kill_all
/usr/openv/netbackup/bin/bp.start_all
Warning: The time taken can be high if the siz eof the containers islarge. Use the following command to get the status:
/usr/openv/pdde/pdcr/bin/cacontrol --catalogclouddrstatus lsu
Restart storage server.3
322MSDP cloud supportAbout the disaster recovery for cloud LSU
ProcedureTaskStep
/usr/openv/pdde/pdcr/bin/pddecfg -aenabledataintegritycheck
/usr/openv/pdde/pdcr/bin/pddecfg -astartdatafullcheck
/usr/openv/pdde/pdcr/bin/crcontrol --processqueue
Start MSDP online check torecreate refdb.
4
About Image Sharing using MSDP cloudImage Sharing lets you use an easy and visualized way to manage and provisionimages in cloud object storage and even the ability to convert backed up VMs asAWS instances in certain scenarios. Image sharing also supports MSDP cloud.
Before you begin, see the following topics:
■ Things to consider before you use Image sharing: See “About image sharing incloud using Cloud Catalyst” on page 289.
■ Using Image sharing: See “About image sharing in cloud using Cloud Catalyst”on page 289.
■ Additional information about Image sharing: See “About image sharing in cloudusing Cloud Catalyst” on page 289.
Configure Image sharing using MSDP cloudAfter installing NetBackup, you can run the ims_system_config.py script toconfigure Image sharing.
The path to access the command is: /usr/openv/pdde/pdag/scripts/
Amazon Web Service cloud providerUse the following command:
ims_system_config.py -t PureDisk -k <key_id> -s <secret_key> -b
<bucket_name> -bs <bucket_sub_name> [-r <bucket_region>] [-p
<mount_point>]
Microsoft Azure cloud providerUse the following command:
ims_system_config.py -cp 2 -t PureDisk -k <key_id> -s <secret_key>
-b <container_name> -bs <bucket_sub_name> [-p <mount_point>]
323MSDP cloud supportAbout Image Sharing using MSDP cloud
Other S3 compatible cloud provider (For example, HitachiHCP)Use the following command:
# ims_system_config.py -cp 3 -t PureDisk -k <key_id> -s <secret_key>
-b <bucket_name> -bs <bucket_sub_name> -pt <cloud_provider_type> -sh
<s3_hostname> -sp <s3_http_port> -sps <s3_https_port> -ssl <ssl_usage>
Note:Do not use nbdevconfig to modify cloud LSU or add new cloud LSU in imagesharing server, that might cause an issue in the image sharing server.
If Amazon Glacier or deep Archive is enabled in MSDP cloud, you cannot use Imagesharing.
As there is a requirement of free disk spaces by cloud LSU, ensure that you haveenough disk space in the default mount point /storage, or you can use -p parameterof ims_system_config.py to specify a different mount point to meet the requirementof free disk spaces.
324MSDP cloud supportAbout Image Sharing using MSDP cloud
Monitoring deduplicationactivity
This chapter includes the following topics:
■ Monitoring the MSDP deduplication and compression rates
■ Viewing MSDP job details
■ About MSDP storage capacity and usage reporting
■ About MSDP container files
■ Viewing storage usage within MSDP container files
■ Viewing MSDP disk reports
■ About monitoring MSDP processes
■ Reporting on Auto Image Replication jobs
Monitoring the MSDP deduplication andcompression rates
The deduplication rate is the percentage of data that was stored by the deduplicationengine. That data is not stored again. The compression rate is the percentage ofspace that is saved by compressing the backup data before it is stored.
The following methods show the MSDP deduplication rate:
■ To view the global MSDP deduplication ratio
■ To view the MSDP deduplication rate for a backup job in the Activity Monitor
8Chapter
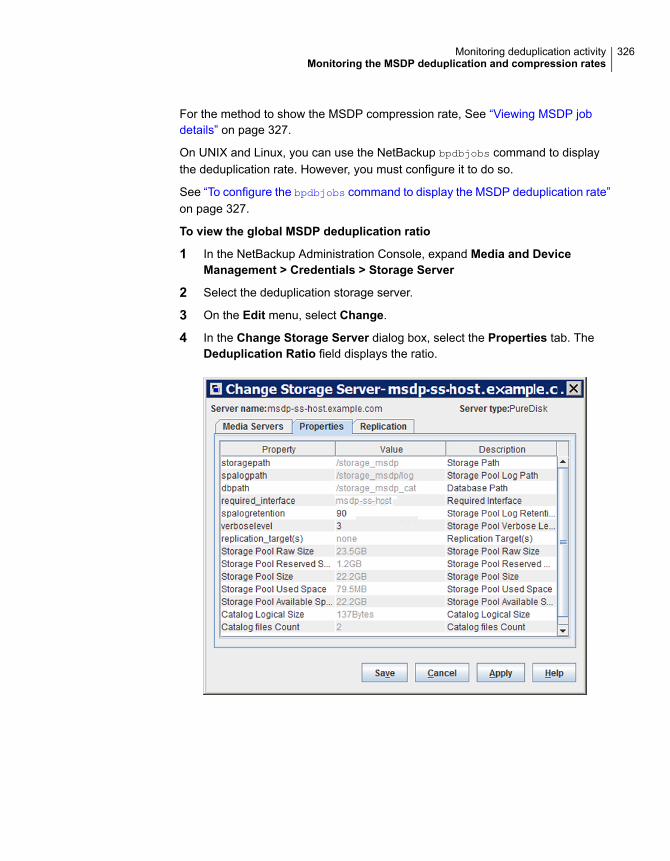
For the method to show the MSDP compression rate, See “Viewing MSDP jobdetails” on page 327.
On UNIX and Linux, you can use the NetBackup bpdbjobs command to displaythe deduplication rate. However, you must configure it to do so.
See “To configure the bpdbjobs command to display the MSDP deduplication rate”on page 327.
To view the global MSDP deduplication ratio
1 In the NetBackup Administration Console, expand Media and DeviceManagement > Credentials > Storage Server
2 Select the deduplication storage server.
3 On the Edit menu, select Change.
4 In the Change Storage Server dialog box, select the Properties tab. TheDeduplication Ratio field displays the ratio.
326Monitoring deduplication activityMonitoring the MSDP deduplication and compression rates
To view the MSDP deduplication rate for a backup job in the Activity Monitor
1 In the NetBackup Administration Console, click Activity Monitor.
2 Click the Jobs tab.
The Deduplication Rate column shows the rate for each job.
Not all columns appear by default. Click View > Column Layout to show orhide columns.
To configure the bpdbjobs command to display the MSDP deduplication rate
◆ Add a DEDUPRATIO BPDBJOBS_COLDEFS entry in the bp.conf file on the mediaserver on which you run the command.
The bpdbjobs command then shows the deduplication rate in its output.
Disable the display of separate deduplication andcompression ratesTo disable the display of the compression rate separately:
■ Open the pd.conf file that is available at the following locations:Windows<install_location>\lib\ost-plugins\pd.conf
UNIX/usr/openv/lib/ost-plugins/pd.conf
■ Add the following parameter in the file:DISPLAY_COMPRESSION_SPACE_SAVING = 0
You can remove this parameter or change the value to 1 to turn on the displayof compression rate as a separate value.
Many factors affect deduplication performance.
See “About MSDP performance” on page 38.
Viewing MSDP job detailsUse the NetBackup Activity Monitor to view deduplication job details.
To view MSDP job details
1 In the NetBackup Administration Console, click Activity Monitor.
2 Click the Jobs tab.
327Monitoring deduplication activityViewing MSDP job details
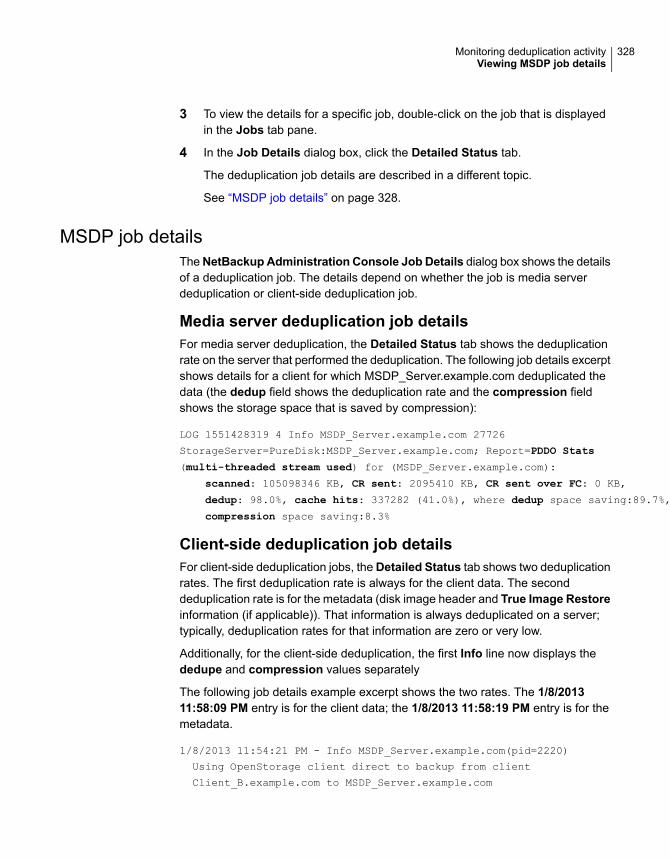
3 To view the details for a specific job, double-click on the job that is displayedin the Jobs tab pane.
4 In the Job Details dialog box, click the Detailed Status tab.
The deduplication job details are described in a different topic.
See “MSDP job details” on page 328.
MSDP job detailsTheNetBackup Administration Console Job Details dialog box shows the detailsof a deduplication job. The details depend on whether the job is media serverdeduplication or client-side deduplication job.
Media server deduplication job detailsFor media server deduplication, the Detailed Status tab shows the deduplicationrate on the server that performed the deduplication. The following job details excerptshows details for a client for which MSDP_Server.example.com deduplicated thedata (the dedup field shows the deduplication rate and the compression fieldshows the storage space that is saved by compression):
LOG 1551428319 4 Info MSDP_Server.example.com 27726
StorageServer=PureDisk:MSDP_Server.example.com; Report=PDDO Stats
(multi-threaded stream used) for (MSDP_Server.example.com):
scanned: 105098346 KB, CR sent: 2095410 KB, CR sent over FC: 0 KB,
dedup: 98.0%, cache hits: 337282 (41.0%), where dedup space saving:89.7%,
compression space saving:8.3%
Client-side deduplication job detailsFor client-side deduplication jobs, the Detailed Status tab shows two deduplicationrates. The first deduplication rate is always for the client data. The seconddeduplication rate is for the metadata (disk image header and True Image Restoreinformation (if applicable)). That information is always deduplicated on a server;typically, deduplication rates for that information are zero or very low.
Additionally, for the client-side deduplication, the first Info line now displays thededupe and compression values separately
The following job details example excerpt shows the two rates. The 1/8/201311:58:09 PM entry is for the client data; the 1/8/2013 11:58:19 PM entry is for themetadata.
1/8/2013 11:54:21 PM - Info MSDP_Server.example.com(pid=2220)
Using OpenStorage client direct to backup from client
Client_B.example.com to MSDP_Server.example.com
328Monitoring deduplication activityViewing MSDP job details
1/8/2013 11:58:09 PM - Info MSDP_Server.example.com(pid=2220)
StorageServer=PureDisk:MSDP_Server.example.com; Report=PDDO
Stats for (MSDP_Server.example.com: scanned: 110028 KB,
CR sent: 16654 KB, CR sent over FC: 0 KB, dedup: 84.9%,
cache disabled, where dedup space saving:3.8%,
compression space saving:81.1%
1/8/2013 11:58:09 PM - Info MSDP_Server.example.com(pid=2220)
Using the media server to write NBU data for backup
Client_B_1254987197.example.com to MSDP_Server.example.com
1/8/2013 11:58:19 PM - Info MSDP_Server.example.com(pid=2220)
StorageServer=PureDisk:MSDP_Server.example.com; Report=PDDO
Stats for (MSDP_Server.example.com: scanned: 17161 KB,
CR sent: 17170 KB, dedup: 0.0%, cache hits: 0 (0.0%)
Field descriptionsTable 8-1 describes the deduplication activity fields.
Table 8-1 MSDP activity field descriptions
DescriptionField
The percentage of space that is saved by data deduplication (data is not written again).Dedup space saving
The percentage of space that is saved because the deduplication engine compressed somedata before writing it to storage.
Compression spacesaving
The percentage of data segments in the backup that is represented in the local fingerprintcache. The deduplication plug-in did not have to query the database about those segments
If the pd.conf file FP_CACHE_LOCAL parameter is set to 0 on the storage, the cache hitsoutput is not included for the jobs that run on the storage server.
See “MSDP pd.conf file parameters” on page 210.
cache hits
The amount of data that is sent from the deduplication plug-in to the component that storesthe data. In NetBackup, the NetBackup Deduplication Engine stores the data.
If the storage server deduplicates the data, it does not travel over the network. Thededuplicated data travels over the network when the deduplication plug-in runs on a computerother than the storage server, as follows:
■ On a NetBackup client that deduplicates its own data (client-side deduplication).■ On a fingerprinting media server that deduplicates the data. The deduplication plug-in
on the fingerprinting server sends the data to the storage server, which writes it to aMedia Server Deduplication Pool.
■ On a media server that then sends the data to a NetBackup 5000 series appliance forstorage. (In NetBackup, aPureDisk Storage Pool represents the storage on a NetBackup5000 series appliance.)
CR sent
329Monitoring deduplication activityViewing MSDP job details
Table 8-1 MSDP activity field descriptions (continued)
DescriptionField
The amount of data that is sent from the deduplication plug-in over Fibre Channel to thecomponent that stores the data. In NetBackup, the NetBackup Deduplication Engine storesthe data.
CR sent over FC
The percentage of data that was stored already. That data is not stored again.dedup
Indicates that the Deduplication Multi-Threaded Agent processed the backup.
See “About the MSDP Deduplication Multi-Threaded Agent” on page 59.
multi-threaded streamused
Indicates that the job details are for storage on the following destinations:
■ Media Server Deduplication Pool■ A NetBackup 5000 series appliance, exposed to NetBackup through a PureDisk
Deduplication Pool.
PDDO stats
The percentage of segments that were rebased (that is, defragmented) during the backup.Those segments had poor data locality.
NetBackup reports backup job completion only after backup rebasing is completed.
See “About MSDP storage rebasing” on page 368.
rebased
The amount of data that the deduplication plug-in scanned.scanned
Indicates that the restore travels over the client-direct data path and does not use NetBackupmedia server components to process the data.
Using OpenStorageclient direct torestore...
AboutMSDPstorage capacity and usage reportingSeveral factors affect the expected NetBackup deduplication capacity and usageresults, as follows:
■ Expired backups may not change the available size and the used size. Anexpired backup may have no unique data segments. Therefore, the segmentsremain valid for other backups.
■ NetBackup Deduplication Manager clean-up may not have run yet. TheDeduplication Manager performs clean up twice a day. Until it performs clean-up,deleted image fragments remain on disk.
If you use operating system tools to examine storage space usage, their resultsmay differ from the usage reported by NetBackup, as follows:
■ NetBackup usage data includes the reserved space that the operating systemtools do not include.
330Monitoring deduplication activityAbout MSDP storage capacity and usage reporting
■ If other applications use the storage, NetBackup cannot report usage accurately.NetBackup requires exclusive use of the storage.
Table 8-2 describes the options for monitoring capacity and usage.
Table 8-2 Capacity and usage reporting
DescriptionOption
TheChange Storage Server dialog box Properties tab displaysstorage capacity and usage. It also displays the globaldeduplication ratio.
This dialog box displays the most current capacity usage that isavailable in the NetBackup Administration Console.
You can see an example of the dialog box in a different topic.
See “Monitoring the MSDP deduplication and compression rates”on page 325.
Change Storage Serverdialog box
The Disk Pools window of the Administration Console displaysthe values that were stored when NetBackup polled the diskpools. NetBackup polls every 5 minutes; therefore, the value maynot be as current as the value that is displayed in the ChangeStorage Server dialog box.
To display the window, expandMedia and Device Management> Devices > Disk Pools.
Disk Pools window
A command that is installed with NetBackup provides a view ofstorage capacity and usage within the deduplication containerfiles.
See “About MSDP container files” on page 332.
See “Viewing storage usage within MSDP container files”on page 332.
View container command
The Disk Pool Status report displays the state of the disk pooland usage information.
See “Viewing MSDP disk reports” on page 334.
Disk Pool Status report
331Monitoring deduplication activityAbout MSDP storage capacity and usage reporting
Table 8-2 Capacity and usage reporting (continued)
DescriptionOption
The Disk Logs report displays event and message information.A useful event for monitoring capacity is event 1044; the followingis the description of the event in theDisk Logs report:The usageof one or more system resources has exceeded awarning level.
By default, the threshold (high-water mark) for this message isat 98% capacity. No more data can be stored.
See “Viewing MSDP disk reports” on page 334.
See “MSDP event codes and messages” on page 431.
Disk Logs report
The nbdevquery command shows the state of the disk volumeand its properties and attributes. It also shows capacity, usage,and percent used.
See “Determining the MSDP disk volume state” on page 359.
The nbdevquerycommand
The NetBackup OpsCenter also provides information aboutstorage capacity and usage.
See NetBackup OpsCenter Administrator's Guide:
http://www.veritas.com/docs/DOC5332
NetBackup OpsCenter
About MSDP container filesThe deduplication storage implementation allocates container files to hold backupdata. Deleted segments can leave free space in containers files, but the containerfile sizes do not change. Segments are deleted from containers when backup imagesexpire and the NetBackup Deduplication Manager performs clean-up.
The NetBackup Deduplication Manager checks the storage space every 20 seconds.It then periodically compacts the space available inside the container files. Therefore,space within a container is not available as soon as it is free. Various internalparameters control whether a container file is compacted. Although space may beavailable within a container file, the file may not be eligible for compaction.
Viewing storage usage within MSDP containerfiles
The NetBackup crcontrol command reports on storage usage within containers.
332Monitoring deduplication activityAbout MSDP container files
To view storage usage within MSDP container files
◆ Use the crcontrol command and the --dsstat option on the deduplicationstorage server. (For help with the command options, use the --help option.)
The following is an example of the command usage:
■ UNIX and Linux: /usr/openv/pdde/pdcr/bin/crcontrol --dsstat
■ Windows: install_path\Veritas\pdde\Crcontrol.exe --dsstat
The following is an example of the output:
************ Data Store statistics ************
Data storage Raw Size Used Avail Use%
1.0T 988.9G 666.0G 322.9G 68%
Number of containers : 2981
Average container size : 219740494 bytes (209.56MB)
Space allocated for containers : 655046415189 bytes (610.06GB)
Reserved space : 45360705536 bytes (42.25GB)
Reserved space percentage : 4.1%
For systems that host a Media Server Deduplication Pool, you can use thefollowing crcontrol command to show information about each partition:
/usr/openv/pdde/pdcr/bin/crcontrol --dsstat 3
From the command output, you can determine the following:
The raw size of the storage.Raw
The size of the storage that NetBackup can use: the Raw size of thestorage minus the file system Reserved space.
If the file system has a concept of root reserved space (such as EXT3or VxFS), that space cannot be used for storage. The crcontrolcommand does not include reserved space in the available space.Unlike the crcontrol command, some operating system tools reportroot reserved space as usable space.
Size
The amount of deduplicated data that is stored on the file system.NetBackup obtains the file system used space from the operatingsystem.
Used
The Size minus the Used space.Avail
The Used space divided by the Size.Use%
333Monitoring deduplication activityViewing storage usage within MSDP container files
Viewing MSDP disk reportsThe NetBackup disk reports include information about the disk pools, disk storageunits, disk logs, images that are stored on disk media, and storage capacity.
Table 8-3 describes the disk reports available.
Table 8-3 Disk reports
DescriptionReport
The Images on Disk report generates the image list present on thedisk storage units that are connected to the media server. Thereport is a subset of the Images on Media report; it shows onlydisk-specific columns.
The report provides a summary of the storage unit contents. If adisk becomes bad or if a media server crashes, this report can letyou know what data is lost.
Images on Disk
The Disk Logs report displays the media errors or the informationalmessages that are recorded in the NetBackup error catalog. Thereport is a subset of the Media Logs report; it shows onlydisk-specific columns.
The report also includes information about deduplicated dataintegrity checking.
See “About MSDP data integrity checking” on page 363.
Either PureDisk or Veritas Deduplication Engine in thedescription identifies a deduplication message. The identifiers aregeneric because the deduplication engine does not know whichapplication consumes its resources. NetBackup and Veritas BackupExec are Veritas applications that use deduplication.
Disk Logs
The Disk Storage Unit Status report displays the state of diskstorage units in the current NetBackup configuration.
For disk pool capacity, see the disk pools window in Media andDevice Management > Devices > Disk Pools.
Multiple storage units can point to the same disk pool. When thereport query is by storage unit, the report counts the capacity ofdisk pool storage multiple times.
Disk Storage UnitStatus
The Disk Pool Status report displays the state of disk pool andusage information. This report displays only when a license thatenables NetBackup disk features is installed.
Disk Pool Status
334Monitoring deduplication activityViewing MSDP disk reports
To view disk reports
1 In the NetBackup Administration Console, expand NetBackup Management> Reports > Disk Reports.
2 Select the name of a disk report.
3 In the right pane, select the report settings.
4 Click Run Report.
About monitoring MSDP processesThe following table shows the deduplication processes about which NetBackupreports:
See “MSDP server components” on page 390.
Table 8-4 Where to monitor the main MSDP processes
Where to monitor itWhat
In the NetBackup Administration Console, the NetBackupDeduplication Engine appears as spoold on the Daemons tab ofthe Activity Monitor.
The NetBackup bpps command also shows the spoold process.
NetBackupDeduplication Engine
In the NetBackup Administration Console, the NetBackupDeduplication Manager appears as spad on the Daemons tab ofthe Activity Monitor.
The NetBackup bpps command also shows the spad process.
NetBackupDeduplication Manager
Reporting on Auto Image Replication jobsThe Activity Monitor displays both the Replication job and the Import job in aconfiguration that replicates to a target master server domain.
335Monitoring deduplication activityAbout monitoring MSDP processes
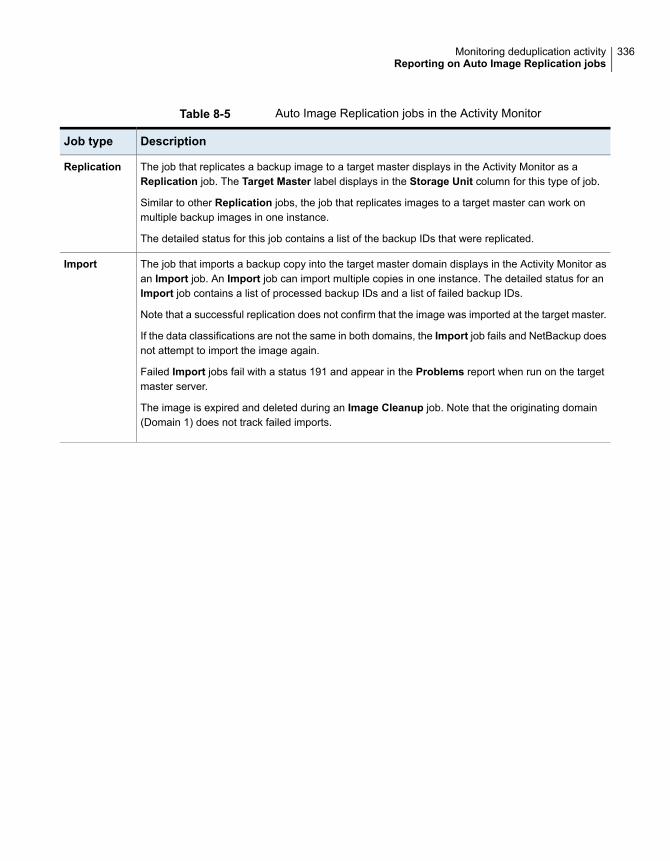
Table 8-5 Auto Image Replication jobs in the Activity Monitor
DescriptionJob type
The job that replicates a backup image to a target master displays in the Activity Monitor as aReplication job. The Target Master label displays in the Storage Unit column for this type of job.
Similar to other Replication jobs, the job that replicates images to a target master can work onmultiple backup images in one instance.
The detailed status for this job contains a list of the backup IDs that were replicated.
Replication
The job that imports a backup copy into the target master domain displays in the Activity Monitor asan Import job. An Import job can import multiple copies in one instance. The detailed status for anImport job contains a list of processed backup IDs and a list of failed backup IDs.
Note that a successful replication does not confirm that the image was imported at the target master.
If the data classifications are not the same in both domains, the Import job fails and NetBackup doesnot attempt to import the image again.
Failed Import jobs fail with a status 191 and appear in the Problems report when run on the targetmaster server.
The image is expired and deleted during an Image Cleanup job. Note that the originating domain(Domain 1) does not track failed imports.
Import
336Monitoring deduplication activityReporting on Auto Image Replication jobs
Managing deduplicationThis chapter includes the following topics:
■ Managing MSDP servers
■ Managing NetBackup Deduplication Engine credentials
■ Managing Media Server Deduplication Pools
■ Deleting backup images
■ About MSDP queue processing
■ Processing the MSDP transaction queue manually
■ About MSDP data integrity checking
■ Configuring MSDP data integrity checking behavior
■ About managing MSDP storage read performance
■ About MSDP storage rebasing
■ About the MSDP data removal process
■ Resizing the MSDP storage partition
■ How MSDP restores work
■ Configuring MSDP restores directly to a client
■ About restoring files at a remote site
■ About restoring from a backup at a target master domain
■ Specifying the restore server
9Chapter
Managing MSDP serversAfter you configure deduplication, you can perform various tasks to managededuplication servers.
See “Viewing MSDP storage servers” on page 338.
See “Determining the MSDP storage server state” on page 338.
See “Viewing MSDP storage server attributes” on page 339.
See “Setting MSDP storage server attributes” on page 340.
See “Changing MSDP storage server properties” on page 341.
See “Clearing MSDP storage server attributes” on page 342.
See “About changing the MSDP storage server name or storage path” on page 343.
See “Changing the MSDP storage server name or storage path” on page 343.
See “Removing an MSDP load balancing server” on page 345.
See “Deleting an MSDP storage server” on page 346.
See “Deleting the MSDP storage server configuration” on page 347.
Viewing MSDP storage serversUse the NetBackup Administration Console to view a list of deduplication storageservers already configured.
To view MSDP storage servers
◆ In the NetBackup Administration Console, expand Media and DeviceManagement > Credentials > Storage Server.
The All Storage Servers pane shows all configured deduplication storageservers. Deduplication storage servers show PureDisk in the Server Typecolumn.
Determining the MSDP storage server stateUse the NetBackup nbdevquery command to determine the state of a deduplicationstorage server. The state is either UP or DOWN.
338Managing deduplicationManaging MSDP servers
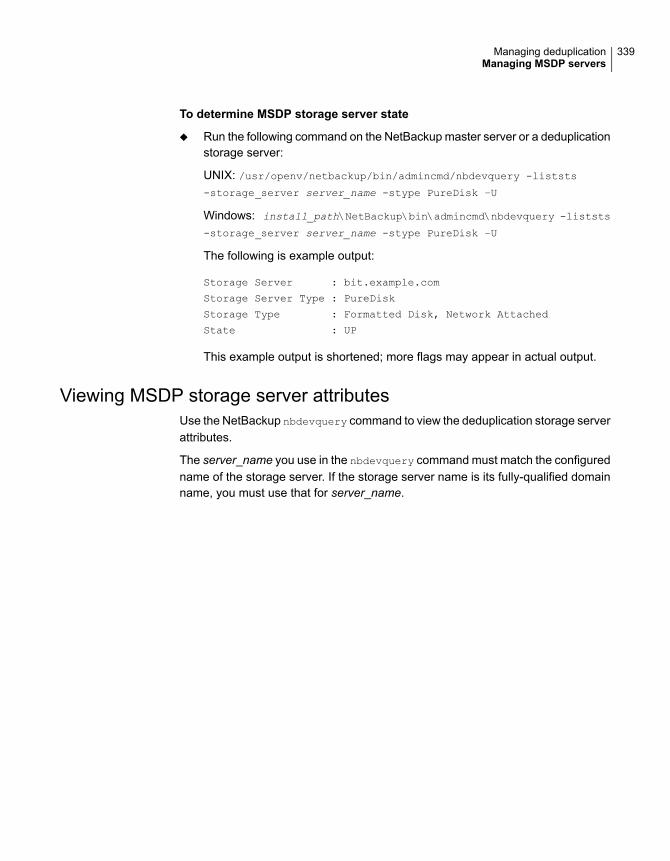
To determine MSDP storage server state
◆ Run the following command on the NetBackup master server or a deduplicationstorage server:
UNIX: /usr/openv/netbackup/bin/admincmd/nbdevquery -liststs
-storage_server server_name -stype PureDisk –U
Windows: install_path\NetBackup\bin\admincmd\nbdevquery -liststs
-storage_server server_name -stype PureDisk –U
The following is example output:
Storage Server : bit.example.com
Storage Server Type : PureDisk
Storage Type : Formatted Disk, Network Attached
State : UP
This example output is shortened; more flags may appear in actual output.
Viewing MSDP storage server attributesUse the NetBackup nbdevquery command to view the deduplication storage serverattributes.
The server_name you use in the nbdevquery command must match the configuredname of the storage server. If the storage server name is its fully-qualified domainname, you must use that for server_name.
339Managing deduplicationManaging MSDP servers
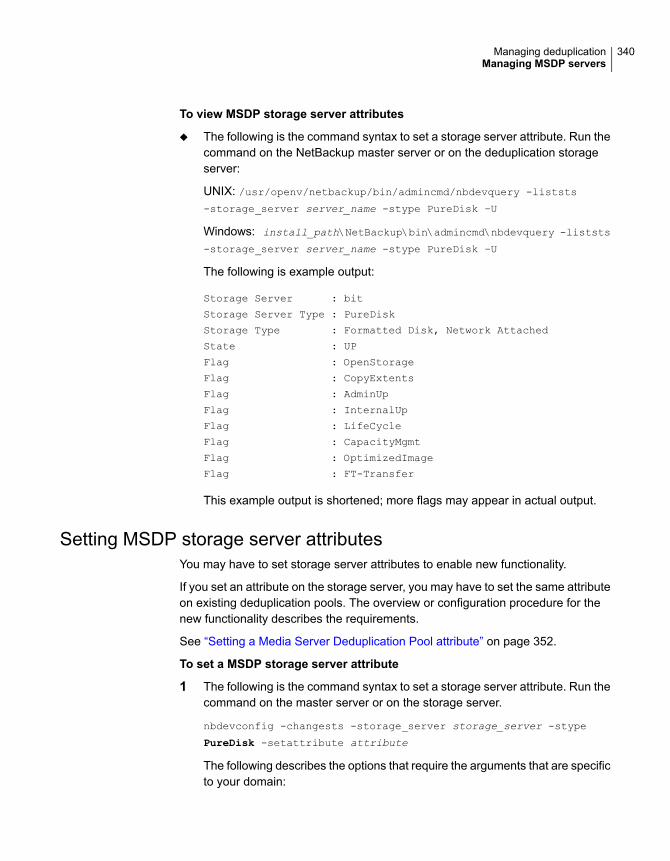
To view MSDP storage server attributes
◆ The following is the command syntax to set a storage server attribute. Run thecommand on the NetBackup master server or on the deduplication storageserver:
UNIX: /usr/openv/netbackup/bin/admincmd/nbdevquery -liststs
-storage_server server_name -stype PureDisk –U
Windows: install_path\NetBackup\bin\admincmd\nbdevquery -liststs
-storage_server server_name -stype PureDisk –U
The following is example output:
Storage Server : bit
Storage Server Type : PureDisk
Storage Type : Formatted Disk, Network Attached
State : UP
Flag : OpenStorage
Flag : CopyExtents
Flag : AdminUp
Flag : InternalUp
Flag : LifeCycle
Flag : CapacityMgmt
Flag : OptimizedImage
Flag : FT-Transfer
This example output is shortened; more flags may appear in actual output.
Setting MSDP storage server attributesYou may have to set storage server attributes to enable new functionality.
If you set an attribute on the storage server, you may have to set the same attributeon existing deduplication pools. The overview or configuration procedure for thenew functionality describes the requirements.
See “Setting a Media Server Deduplication Pool attribute” on page 352.
To set a MSDP storage server attribute
1 The following is the command syntax to set a storage server attribute. Run thecommand on the master server or on the storage server.
nbdevconfig -changests -storage_server storage_server -stype
PureDisk -setattribute attribute
The following describes the options that require the arguments that are specificto your domain:
340Managing deduplicationManaging MSDP servers
The name of the storage server.-storage_serverstorage_server
The attribute is the name of the argument that represents thenew functionality.
For example,OptimizedImage specifies that the environmentsupports the optimized synthetic backup method.
-setattributeattribute
The following is the path to the nbdevconfig command:
■ UNIX: /usr/openv/netbackup/bin/admincmd
■ Windows: install_path\NetBackup\bin\admincmd
2 To verify, view the storage server attributes.
See “Viewing MSDP storage server attributes” on page 339.
See “About MSDP optimized synthetic backups” on page 36.
Changing MSDP storage server propertiesYou can change the retention period and logging level for the NetBackupDeduplication Manager.
To change MSDP storage server properties
1 In the NetBackup Administration Console, expand Media and DeviceManagement > Credentials > Storage Servers.
2 Select the deduplication storage server.
Warning: If you have load balancing servers, do not select any or all of themin the Media Servers pane of the NetBackup Administration Console. Ifyou do, the change operation fails.
3 On the Edit menu, select Change.
341Managing deduplicationManaging MSDP servers
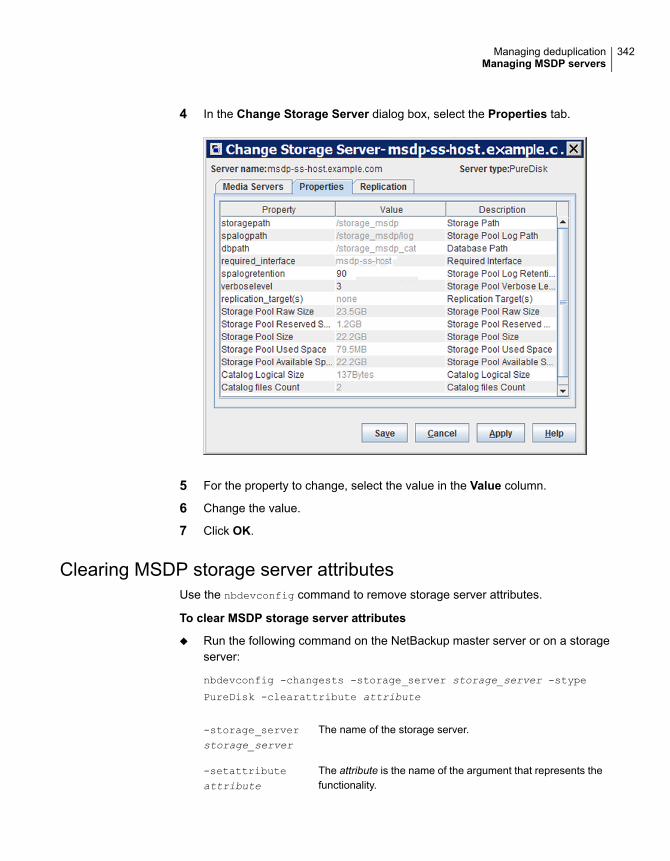
4 In the Change Storage Server dialog box, select the Properties tab.
5 For the property to change, select the value in the Value column.
6 Change the value.
7 Click OK.
Clearing MSDP storage server attributesUse the nbdevconfig command to remove storage server attributes.
To clear MSDP storage server attributes
◆ Run the following command on the NetBackup master server or on a storageserver:
nbdevconfig -changests -storage_server storage_server -stype
PureDisk -clearattribute attribute
The name of the storage server.-storage_serverstorage_server
The attribute is the name of the argument that represents thefunctionality.
-setattributeattribute
342Managing deduplicationManaging MSDP servers
The following is the path to the nbdevconfig command:
■ UNIX: /usr/openv/netbackup/bin/admincmd
■ Windows: install_path\NetBackup\bin\admincmd
About changing the MSDP storage server name or storage pathYou can change the storage server host name and the storage path of an existingNetBackup deduplication environment.
The following are several use cases that require changing an existing deduplicationenvironment:
■ You want to change the host name. For example, the name of host A waschanged to B or a new network card was installed with a private interface C. Touse the host name B or the private interface C, you must reconfigure the storageserver.See “Changing the MSDP storage server name or storage path” on page 343.
■ You want to change the storage path. To do so, you must reconfigure the storageserver with the new path.See “Changing the MSDP storage server name or storage path” on page 343.
■ You need to reuse the storage for disaster recovery. The storage is intact, butthe storage server was destroyed. To recover, you must configure a new storageserver.In this scenario, you can use the same host name and storage path or usedifferent ones.See “Recovering from an MSDP storage server failure” on page 381.
Changing the MSDP storage server name or storage pathTwo aspects of a NetBackup deduplication configuration exist: the record of thededuplication storage in the EMM database and the physical presence of the storageon disk (the populated storage directory).
Warning: Deleting valid backup images may cause data loss.
See “About changing the MSDP storage server name or storage path” on page 343.
343Managing deduplicationManaging MSDP servers
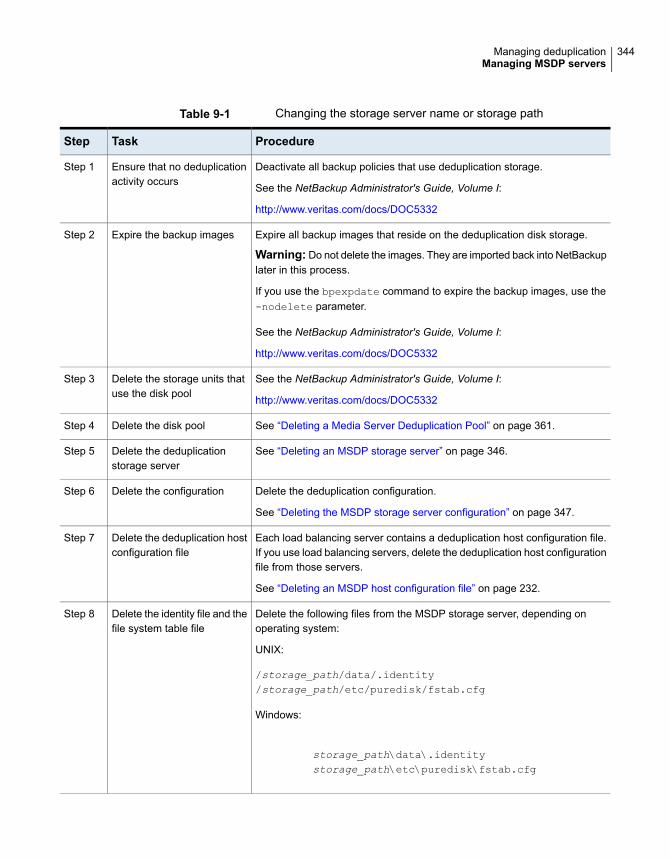
Table 9-1 Changing the storage server name or storage path
ProcedureTaskStep
Deactivate all backup policies that use deduplication storage.
See the NetBackup Administrator's Guide, Volume I:
http://www.veritas.com/docs/DOC5332
Ensure that no deduplicationactivity occurs
Step 1
Expire all backup images that reside on the deduplication disk storage.
Warning: Do not delete the images. They are imported back into NetBackuplater in this process.
If you use the bpexpdate command to expire the backup images, use the-nodelete parameter.
See the NetBackup Administrator's Guide, Volume I:
http://www.veritas.com/docs/DOC5332
Expire the backup imagesStep 2
See the NetBackup Administrator's Guide, Volume I:
http://www.veritas.com/docs/DOC5332
Delete the storage units thatuse the disk pool
Step 3
See “Deleting a Media Server Deduplication Pool” on page 361.Delete the disk poolStep 4
See “Deleting an MSDP storage server” on page 346.Delete the deduplicationstorage server
Step 5
Delete the deduplication configuration.
See “Deleting the MSDP storage server configuration” on page 347.
Delete the configurationStep 6
Each load balancing server contains a deduplication host configuration file.If you use load balancing servers, delete the deduplication host configurationfile from those servers.
See “Deleting an MSDP host configuration file” on page 232.
Delete the deduplication hostconfiguration file
Step 7
Delete the following files from the MSDP storage server, depending onoperating system:
UNIX:
/storage_path/data/.identity/storage_path/etc/puredisk/fstab.cfg
Windows:
storage_path\data\.identitystorage_path\etc\puredisk\fstab.cfg
Delete the identity file and thefile system table file
Step 8
344Managing deduplicationManaging MSDP servers
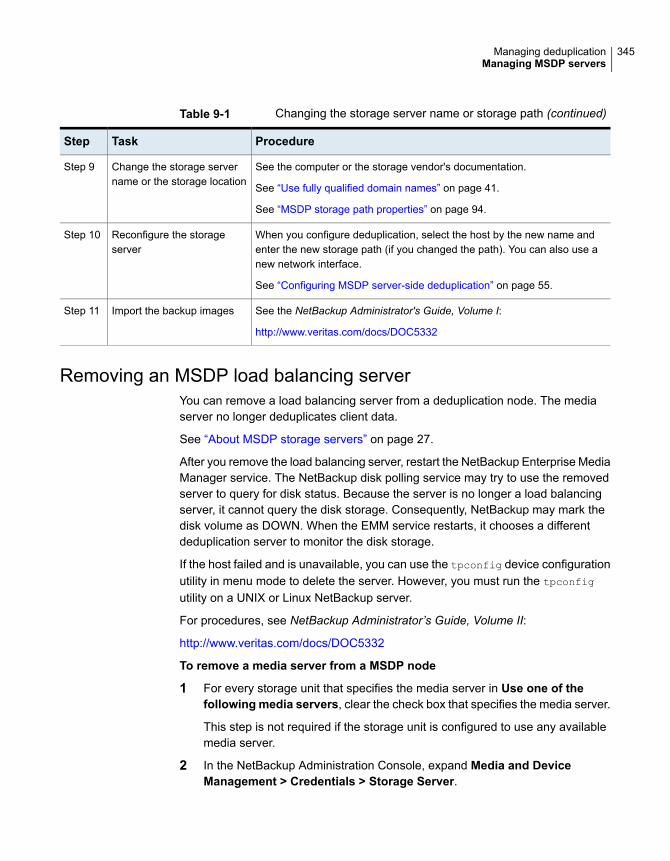
Table 9-1 Changing the storage server name or storage path (continued)
ProcedureTaskStep
See the computer or the storage vendor's documentation.
See “Use fully qualified domain names” on page 41.
See “MSDP storage path properties” on page 94.
Change the storage servername or the storage location
Step 9
When you configure deduplication, select the host by the new name andenter the new storage path (if you changed the path). You can also use anew network interface.
See “Configuring MSDP server-side deduplication” on page 55.
Reconfigure the storageserver
Step 10
See the NetBackup Administrator's Guide, Volume I:
http://www.veritas.com/docs/DOC5332
Import the backup imagesStep 11
Removing an MSDP load balancing serverYou can remove a load balancing server from a deduplication node. The mediaserver no longer deduplicates client data.
See “About MSDP storage servers” on page 27.
After you remove the load balancing server, restart the NetBackup Enterprise MediaManager service. The NetBackup disk polling service may try to use the removedserver to query for disk status. Because the server is no longer a load balancingserver, it cannot query the disk storage. Consequently, NetBackup may mark thedisk volume as DOWN. When the EMM service restarts, it chooses a differentdeduplication server to monitor the disk storage.
If the host failed and is unavailable, you can use the tpconfig device configurationutility in menu mode to delete the server. However, you must run the tpconfig
utility on a UNIX or Linux NetBackup server.
For procedures, see NetBackup Administrator’s Guide, Volume II:
http://www.veritas.com/docs/DOC5332
To remove a media server from a MSDP node
1 For every storage unit that specifies the media server in Use one of thefollowingmedia servers, clear the check box that specifies the media server.
This step is not required if the storage unit is configured to use any availablemedia server.
2 In the NetBackup Administration Console, expand Media and DeviceManagement > Credentials > Storage Server.
345Managing deduplicationManaging MSDP servers
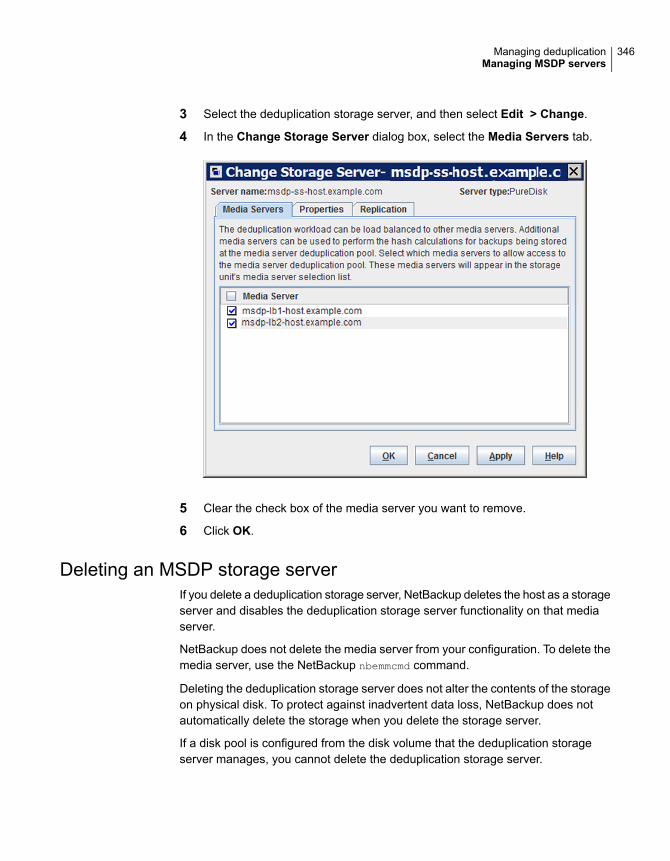
3 Select the deduplication storage server, and then select Edit > Change.
4 In the Change Storage Server dialog box, select the Media Servers tab.
5 Clear the check box of the media server you want to remove.
6 Click OK.
Deleting an MSDP storage serverIf you delete a deduplication storage server, NetBackup deletes the host as a storageserver and disables the deduplication storage server functionality on that mediaserver.
NetBackup does not delete the media server from your configuration. To delete themedia server, use the NetBackup nbemmcmd command.
Deleting the deduplication storage server does not alter the contents of the storageon physical disk. To protect against inadvertent data loss, NetBackup does notautomatically delete the storage when you delete the storage server.
If a disk pool is configured from the disk volume that the deduplication storageserver manages, you cannot delete the deduplication storage server.
346Managing deduplicationManaging MSDP servers
Warning: Do not delete a deduplication storage server if its storage containsunexpired NetBackup images; if you do, data loss may occur.
To delete an MSDP storage server
1 In the NetBackup Administration Console, expand Media and DeviceManagement > Credentials > Storage Server
2 On the Edit menu, select Delete.
3 Click Yes in the confirmation dialog box.
See “Changing the MSDP storage server name or storage path” on page 343.
Deleting the MSDP storage server configurationUse this procedure to delete a deduplication storage server configuration. The scriptthat is used in this procedure deletes the active configuration and returns theconfiguration files to their installed, preconfigured state.
Only use this procedure when directed to from a process topic. A process topic isa high-level user task made up of a series of separate procedures.
See “Changing the MSDP storage server name or storage path” on page 343.
See “Deactivating MSDP” on page 388.
To delete the MSDP storage server configuration
1 Use the NetBackup Administration Console to stop the NetBackup DeduplicationEngine (spoold) and the NetBackup Deduplication Manager (spad).
2 On the storage server, run one of the following scripts, depending on youroperating system:
UNIX:/usr/openv/pdde/pdconfigure/scripts/installers/PDDE_deleteConfig.sh
Windows: install_path\ProgramFiles\Veritas\pdde\PDDE_deleteConfig.bat
The command output includes the following:
**** Starting PDDE_deleteConfig.sh ***
You need to stop the spad and spoold daemons to proceed
This script will delete the PDDE configuration on this system
Would you want to continue? [ y | n ]
3 Type y and then press Enter.
347Managing deduplicationManaging MSDP servers
Managing NetBackup Deduplication Enginecredentials
You can manage existing credentials in NetBackup.
See “Determining which media servers have deduplication credentials” on page 348.
See “Adding NetBackup Deduplication Engine credentials” on page 348.
See “Changing NetBackup Deduplication Engine credentials” on page 349.
See “Deleting credentials from a load balancing server” on page 349.
Determining which media servers have deduplication credentialsYou can determine which media servers have credentials configured for theNetBackup Deduplication Engine. The servers with credentials are load balancingservers.
To determine if NetBackup Deduplication Engine credentials exist
1 In the NetBackup Administration Console, expand Media and DeviceManagement > Credentials > Storage Server.
2 Select the storage server, and then select Edit > Change.
3 In the Change Storage Server dialog box, select the Media Servers tab.
The media servers for which credentials are configured are checked.
Adding NetBackup Deduplication Engine credentialsYou may need to add the NetBackup Deduplication Engine credentials to an existingstorage server or load balancing server. For example, disaster recovery may requirethat you add the credentials.
Add the same credentials that you already use in your environment.
Another procedure exists to add a load balancing server to your configuration.
See “Adding an MSDP load balancing server” on page 206.
348Managing deduplicationManaging NetBackup Deduplication Engine credentials
To add NetBackup Deduplication Engine credentials by using the tpconfigcommand
◆ On the host to which you want to add credentials, run the following command:
On Windows:
install_path\Veritas\NetBackup\Volmgr\bin\tpconfig -add
-storage_server sshostname -stype PureDisk -sts_user_id UserID
-password PassWord
On UNIX/Linux:
/usr/openv/volmgr/bin/tpconfig -add -storage_server sshostname
-stype PureDisk -sts_user_id UserID -password PassWord
For sshostname, use the name of the storage server.
Changing NetBackup Deduplication Engine credentialsYou cannot change the NetBackup Deduplication Engine credentials after you enterthem. If you must change the credentials, contact your Veritas supportrepresentative.
See “About the NetBackup Deduplication Engine credentials” on page 34.
Deleting credentials from a load balancing serverYou may need to delete the NetBackup Deduplication Engine credentials from aload balancing server. For example, disaster recovery may require that you deletethe credentials on a load balancing server.
Another procedure exists to remove a load balancing server from a deduplicationnode.
See “Removing an MSDP load balancing server” on page 345.
To delete credentials from a load balancing server
◆ On the load balancing server, run the following command:
On Windows:
install_path\Veritas\NetBackup\Volmgr\bin\tpconfig -delete
-storage_server sshostname -stype PureDisk -sts_user_id UserID
On UNIX/Linux:
/usr/openv/volmgr/bin/tpconfig -delete -storage_server sshostname
-stype PureDisk -sts_user_id UserID
For sshostname, use the name of the storage server.
349Managing deduplicationManaging NetBackup Deduplication Engine credentials
Managing Media Server Deduplication PoolsAfter you configure NetBackup deduplication, you can perform various tasks tomanage your deduplication disk pools.
See “Viewing Media Server Deduplication Pools” on page 350.
See “Changing a Media Server Deduplication Pool properties” on page 353.
See “Determining the Media Server Deduplication Pool state” on page 350.
See “ Changing Media Server Deduplication Pool state” on page 351.
See “Determining the MSDP disk volume state” on page 359.
See “Changing the MSDP disk volume state” on page 359.
See “Viewing Media Server Deduplication Pool attributes” on page 351.
See “Setting a Media Server Deduplication Pool attribute” on page 352.
See “Clearing a Media Server Deduplication Pool attribute” on page 358.
See “Resizing the MSDP storage partition” on page 372.
See “Inventorying a NetBackup disk pool” on page 360.
See “Deleting a Media Server Deduplication Pool” on page 361.
Viewing Media Server Deduplication PoolsUse the NetBackup Administration Console to view configured disk pools.
To view disk pools
◆ In the NetBackup Administration Console, expand Media and DeviceManagement > Devices > Disk Pools.
Determining the Media Server Deduplication Pool stateThe disk pool state is UP or DOWN.
To determine disk pool state
1 In the NetBackup Administration Console, expand Media and DeviceManagement > Device Monitor.
2 Select the Disk Pools tab.
3 The state is displayed in the Status column.
350Managing deduplicationManaging Media Server Deduplication Pools
Changing Media Server Deduplication Pool stateYou can change the state of a NetBackup disk pool. Pool states are UP or DOWN.
To change the state to DOWN, the disk pool must not be busy. If backup jobs areassigned to the disk pool, the state change fails. Cancel the backup jobs or waituntil the jobs complete.
To change Media Server Deduplication Pool state
1 In the NetBackup Administration Console, in the left pane, select Mediaand Device Management > Device Monitor.
2 Select the Disk Pools tab.
3 Select the disk pool.
4 Select either Actions > Up or Actions > Down.
Viewing Media Server Deduplication Pool attributesUse the NetBackup nbdevquery command to view deduplication pool attributes.
351Managing deduplicationManaging Media Server Deduplication Pools
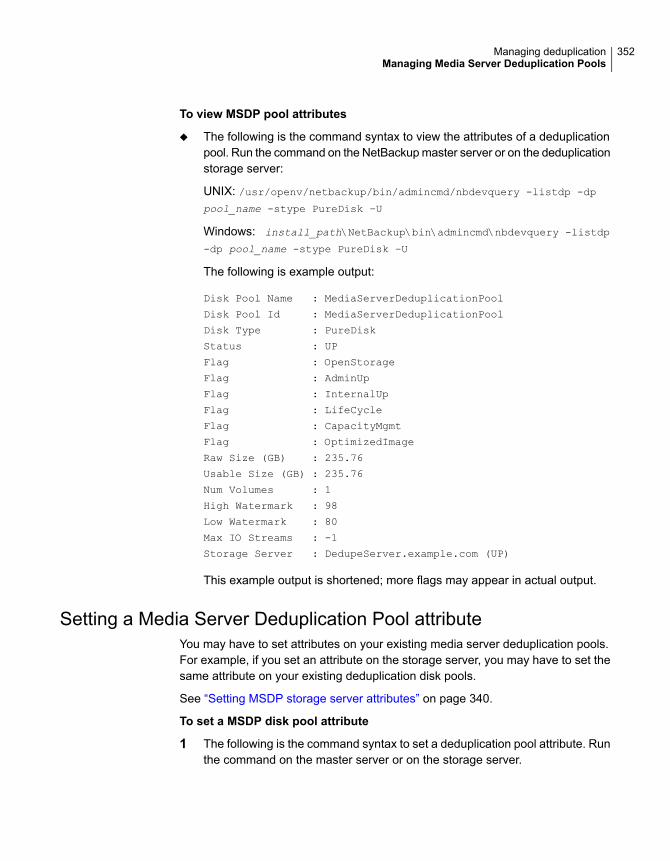
To view MSDP pool attributes
◆ The following is the command syntax to view the attributes of a deduplicationpool. Run the command on the NetBackup master server or on the deduplicationstorage server:
UNIX: /usr/openv/netbackup/bin/admincmd/nbdevquery -listdp -dp
pool_name -stype PureDisk –U
Windows: install_path\NetBackup\bin\admincmd\nbdevquery -listdp
-dp pool_name -stype PureDisk –U
The following is example output:
Disk Pool Name : MediaServerDeduplicationPool
Disk Pool Id : MediaServerDeduplicationPool
Disk Type : PureDisk
Status : UP
Flag : OpenStorage
Flag : AdminUp
Flag : InternalUp
Flag : LifeCycle
Flag : CapacityMgmt
Flag : OptimizedImage
Raw Size (GB) : 235.76
Usable Size (GB) : 235.76
Num Volumes : 1
High Watermark : 98
Low Watermark : 80
Max IO Streams : -1
Storage Server : DedupeServer.example.com (UP)
This example output is shortened; more flags may appear in actual output.
Setting a Media Server Deduplication Pool attributeYou may have to set attributes on your existing media server deduplication pools.For example, if you set an attribute on the storage server, you may have to set thesame attribute on your existing deduplication disk pools.
See “Setting MSDP storage server attributes” on page 340.
To set a MSDP disk pool attribute
1 The following is the command syntax to set a deduplication pool attribute. Runthe command on the master server or on the storage server.
352Managing deduplicationManaging Media Server Deduplication Pools
nbdevconfig -changedp -dp pool_name -stype PureDisk -setattribute
attribute
The following describes the options that require the arguments that are specificto your domain:
The name of the disk pool.-changedppool_name
The attribute is the name of the argument that represents thenew functionality.
For example,OptimizedImage specifies that the environmentsupports the optimized synthetic backup method.
-setattributeattribute
The following is the path to the nbdevconfig command:
■ UNIX: /usr/openv/netbackup/bin/admincmd
■ Windows: install_path\NetBackup\bin\admincmd
2 To verify, view the disk pool attributes.
See “Viewing Media Server Deduplication Pool attributes” on page 351.
Changing a Media Server Deduplication Pool propertiesYou can change the properties of a deduplication disk pool.
To change disk pool properties
1 In the NetBackup Administration Console, expand Media and DeviceManagement > Devices > Disk Pools.
2 Select the disk pool you want to change in the details pane.
353Managing deduplicationManaging Media Server Deduplication Pools
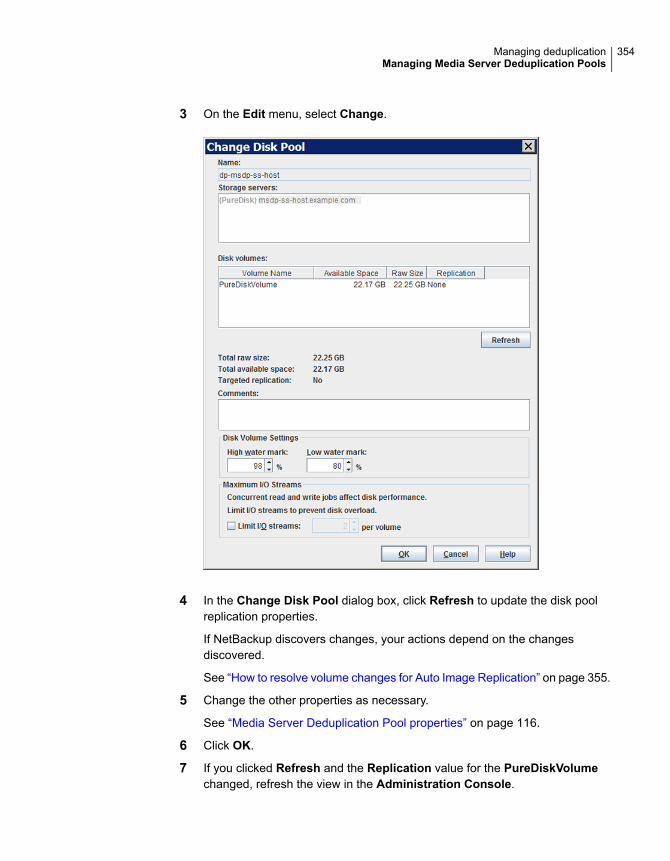
3 On the Edit menu, select Change.
4 In the Change Disk Pool dialog box, click Refresh to update the disk poolreplication properties.
If NetBackup discovers changes, your actions depend on the changesdiscovered.
See “How to resolve volume changes for Auto Image Replication” on page 355.
5 Change the other properties as necessary.
See “Media Server Deduplication Pool properties” on page 116.
6 Click OK.
7 If you clicked Refresh and the Replication value for the PureDiskVolumechanged, refresh the view in the Administration Console.
354Managing deduplicationManaging Media Server Deduplication Pools
How to resolve volume changes for Auto ImageReplicationWhen you open the Change Disk Pool dialog box, NetBackup loads the disk poolproperties from the catalog. NetBackup queries the storage server for changeswhen you either click the Refresh button in the Change Disk Pool dialog box orwhen you configure a new disk pool for the storage server.
It is recommended that you take the following actions when the volume topologychanges:
■ Discuss the changes with the storage administrator. You need to understandthe changes so you can change your disk pools (if required) so that NetBackupcan continue to use them.
■ If the changes were not planned for NetBackup, ask your storage administratorto revert the changes so that NetBackup functions correctly again.
NetBackup can process changes to the following volume properties:
■ Replication Source
■ Replication Target
■ None
If these volume properties change, NetBackup can update the disk pool to matchthe changes. NetBackup can continue to use the disk pool, although the disk poolmay no longer match the storage unit or storage lifecycle purpose.
The following table describes the possible outcomes and how to resolve them.
Table 9-2 Refresh outcomes
DescriptionOutcome
No changes are required.No changes are discovered.
The new volumes appear in the Change Disk Pool dialog box. Text in the dialog boxchanges to indicate that you can add the new volumes to the disk pool.
NetBackup discovers the newvolumes that you can add to thedisk pool.
355Managing deduplicationManaging Media Server Deduplication Pools
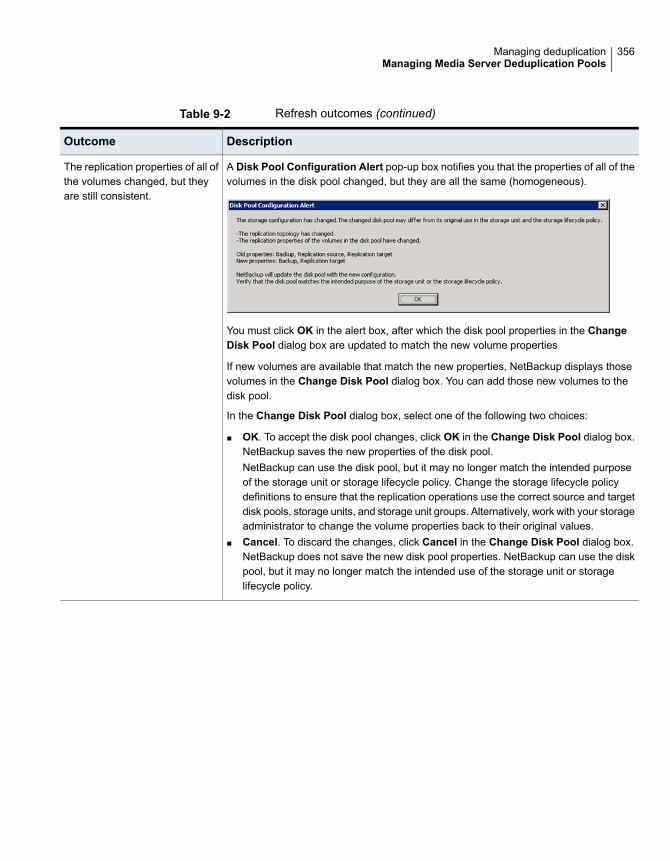
Table 9-2 Refresh outcomes (continued)
DescriptionOutcome
A Disk Pool Configuration Alert pop-up box notifies you that the properties of all of thevolumes in the disk pool changed, but they are all the same (homogeneous).
You must click OK in the alert box, after which the disk pool properties in the ChangeDisk Pool dialog box are updated to match the new volume properties
If new volumes are available that match the new properties, NetBackup displays thosevolumes in the Change Disk Pool dialog box. You can add those new volumes to thedisk pool.
In the Change Disk Pool dialog box, select one of the following two choices:
■ OK. To accept the disk pool changes, click OK in the Change Disk Pool dialog box.NetBackup saves the new properties of the disk pool.NetBackup can use the disk pool, but it may no longer match the intended purposeof the storage unit or storage lifecycle policy. Change the storage lifecycle policydefinitions to ensure that the replication operations use the correct source and targetdisk pools, storage units, and storage unit groups. Alternatively, work with your storageadministrator to change the volume properties back to their original values.
■ Cancel. To discard the changes, click Cancel in the Change Disk Pool dialog box.NetBackup does not save the new disk pool properties. NetBackup can use the diskpool, but it may no longer match the intended use of the storage unit or storagelifecycle policy.
The replication properties of all ofthe volumes changed, but theyare still consistent.
356Managing deduplicationManaging Media Server Deduplication Pools
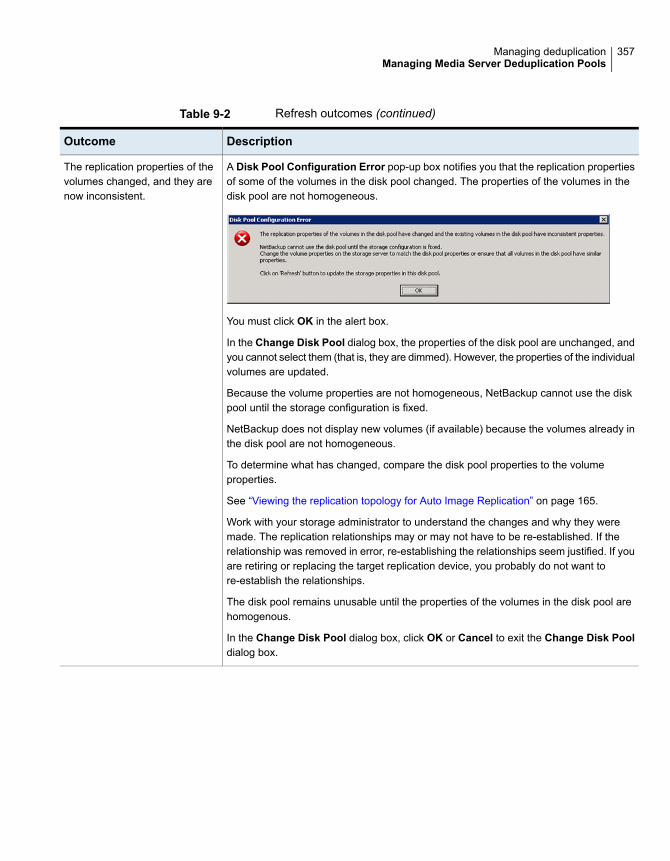
Table 9-2 Refresh outcomes (continued)
DescriptionOutcome
A Disk Pool Configuration Error pop-up box notifies you that the replication propertiesof some of the volumes in the disk pool changed. The properties of the volumes in thedisk pool are not homogeneous.
You must click OK in the alert box.
In the Change Disk Pool dialog box, the properties of the disk pool are unchanged, andyou cannot select them (that is, they are dimmed). However, the properties of the individualvolumes are updated.
Because the volume properties are not homogeneous, NetBackup cannot use the diskpool until the storage configuration is fixed.
NetBackup does not display new volumes (if available) because the volumes already inthe disk pool are not homogeneous.
To determine what has changed, compare the disk pool properties to the volumeproperties.
See “Viewing the replication topology for Auto Image Replication” on page 165.
Work with your storage administrator to understand the changes and why they weremade. The replication relationships may or may not have to be re-established. If therelationship was removed in error, re-establishing the relationships seem justified. If youare retiring or replacing the target replication device, you probably do not want tore-establish the relationships.
The disk pool remains unusable until the properties of the volumes in the disk pool arehomogenous.
In the Change Disk Pool dialog box, click OK or Cancel to exit the Change Disk Pooldialog box.
The replication properties of thevolumes changed, and they arenow inconsistent.
357Managing deduplicationManaging Media Server Deduplication Pools
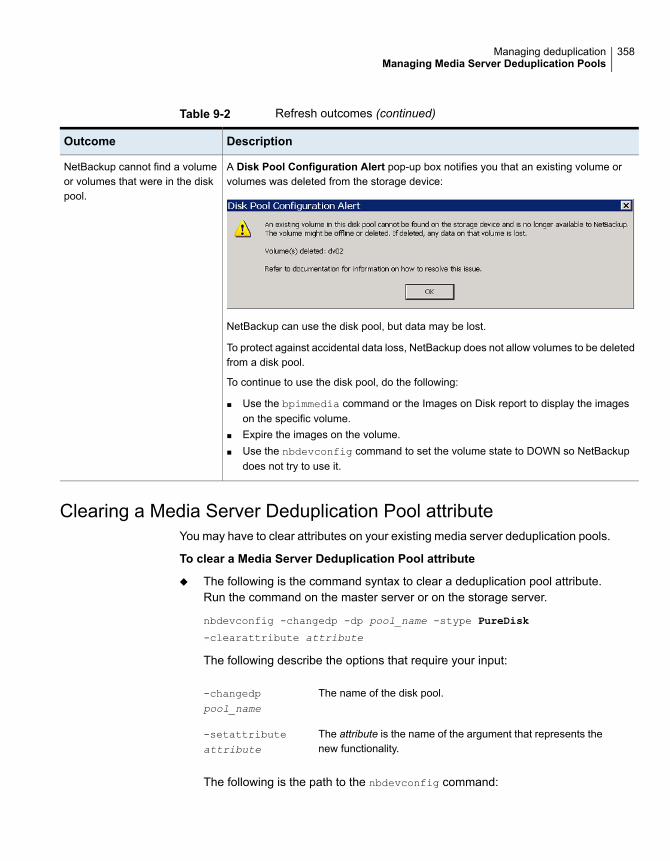
Table 9-2 Refresh outcomes (continued)
DescriptionOutcome
A Disk Pool Configuration Alert pop-up box notifies you that an existing volume orvolumes was deleted from the storage device:
NetBackup can use the disk pool, but data may be lost.
To protect against accidental data loss, NetBackup does not allow volumes to be deletedfrom a disk pool.
To continue to use the disk pool, do the following:
■ Use the bpimmedia command or the Images on Disk report to display the imageson the specific volume.
■ Expire the images on the volume.■ Use the nbdevconfig command to set the volume state to DOWN so NetBackup
does not try to use it.
NetBackup cannot find a volumeor volumes that were in the diskpool.
Clearing a Media Server Deduplication Pool attributeYou may have to clear attributes on your existing media server deduplication pools.
To clear a Media Server Deduplication Pool attribute
◆ The following is the command syntax to clear a deduplication pool attribute.Run the command on the master server or on the storage server.
nbdevconfig -changedp -dp pool_name -stype PureDisk
-clearattribute attribute
The following describe the options that require your input:
The name of the disk pool.-changedppool_name
The attribute is the name of the argument that represents thenew functionality.
-setattributeattribute
The following is the path to the nbdevconfig command:
358Managing deduplicationManaging Media Server Deduplication Pools
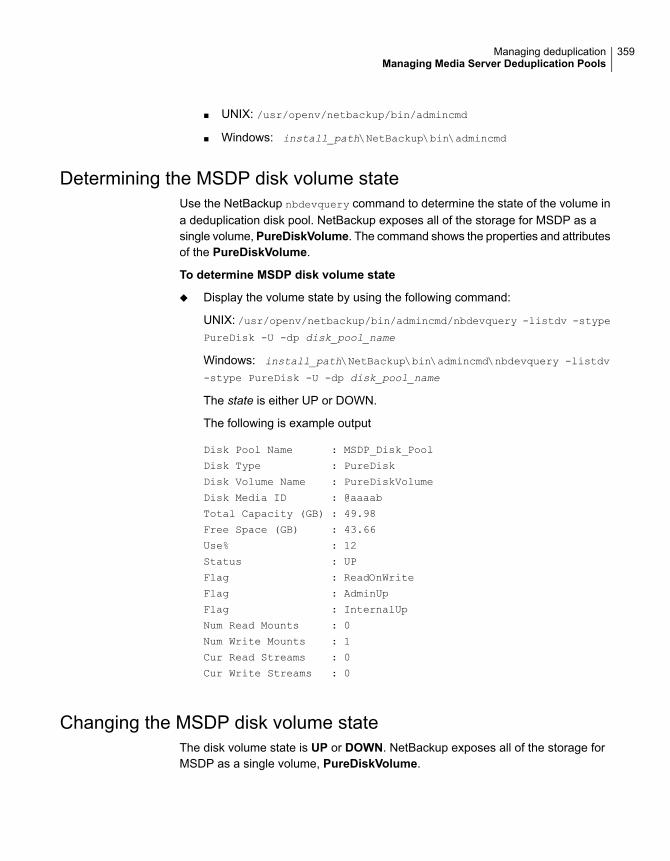
■ UNIX: /usr/openv/netbackup/bin/admincmd
■ Windows: install_path\NetBackup\bin\admincmd
Determining the MSDP disk volume stateUse the NetBackup nbdevquery command to determine the state of the volume ina deduplication disk pool. NetBackup exposes all of the storage for MSDP as asingle volume,PureDiskVolume. The command shows the properties and attributesof the PureDiskVolume.
To determine MSDP disk volume state
◆ Display the volume state by using the following command:
UNIX: /usr/openv/netbackup/bin/admincmd/nbdevquery -listdv -stype
PureDisk -U -dp disk_pool_name
Windows: install_path\NetBackup\bin\admincmd\nbdevquery -listdv
-stype PureDisk -U -dp disk_pool_name
The state is either UP or DOWN.
The following is example output
Disk Pool Name : MSDP_Disk_Pool
Disk Type : PureDisk
Disk Volume Name : PureDiskVolume
Disk Media ID : @aaaab
Total Capacity (GB) : 49.98
Free Space (GB) : 43.66
Use% : 12
Status : UP
Flag : ReadOnWrite
Flag : AdminUp
Flag : InternalUp
Num Read Mounts : 0
Num Write Mounts : 1
Cur Read Streams : 0
Cur Write Streams : 0
Changing the MSDP disk volume stateThe disk volume state is UP or DOWN. NetBackup exposes all of the storage forMSDP as a single volume, PureDiskVolume.
359Managing deduplicationManaging Media Server Deduplication Pools
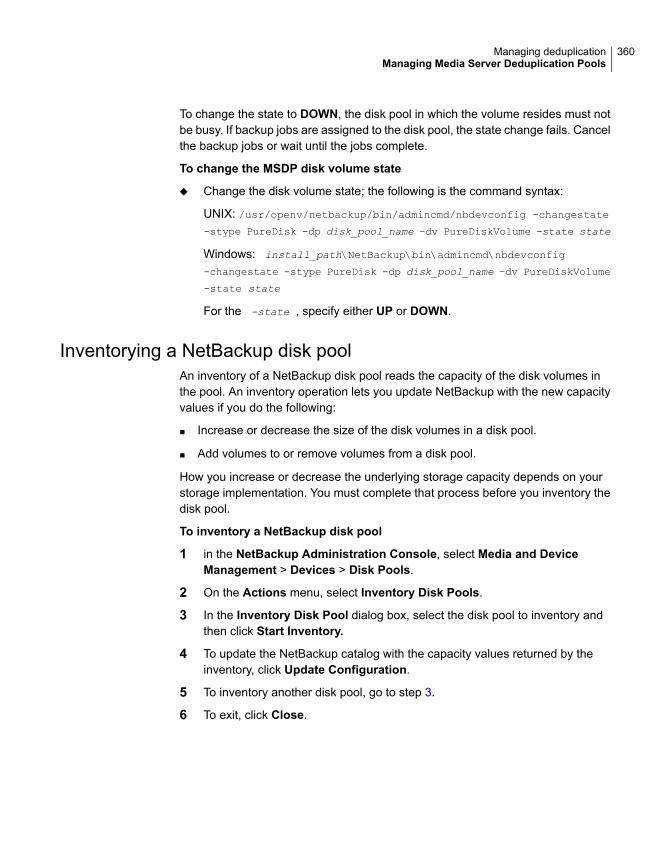
To change the state to DOWN, the disk pool in which the volume resides must notbe busy. If backup jobs are assigned to the disk pool, the state change fails. Cancelthe backup jobs or wait until the jobs complete.
To change the MSDP disk volume state
◆ Change the disk volume state; the following is the command syntax:
UNIX: /usr/openv/netbackup/bin/admincmd/nbdevconfig -changestate
-stype PureDisk -dp disk_pool_name –dv PureDiskVolume -state state
Windows: install_path\NetBackup\bin\admincmd\nbdevconfig
-changestate -stype PureDisk -dp disk_pool_name –dv PureDiskVolume
-state state
For the -state , specify either UP or DOWN.
Inventorying a NetBackup disk poolAn inventory of a NetBackup disk pool reads the capacity of the disk volumes inthe pool. An inventory operation lets you update NetBackup with the new capacityvalues if you do the following:
■ Increase or decrease the size of the disk volumes in a disk pool.
■ Add volumes to or remove volumes from a disk pool.
How you increase or decrease the underlying storage capacity depends on yourstorage implementation. You must complete that process before you inventory thedisk pool.
To inventory a NetBackup disk pool
1 in the NetBackup Administration Console, select Media and DeviceManagement > Devices > Disk Pools.
2 On the Actions menu, select Inventory Disk Pools.
3 In the Inventory Disk Pool dialog box, select the disk pool to inventory andthen click Start Inventory.
4 To update the NetBackup catalog with the capacity values returned by theinventory, click Update Configuration.
5 To inventory another disk pool, go to step 3.
6 To exit, click Close.
360Managing deduplicationManaging Media Server Deduplication Pools
Deleting a Media Server Deduplication PoolYou can delete a disk pool if it does not contain valid NetBackup backup imagesor image fragments. If it does, you must first expire and delete those images orfragments. If expired image fragments remain on disk, you must remove those also.
See “Cannot delete an MSDP disk pool” on page 422.
If you delete a disk pool, NetBackup removes it from your configuration.
If a disk pool is the storage destination of a storage unit, you must first delete thestorage unit.
To delete an MSDP disk pool
1 In the NetBackup Administration Console, expand Media and DeviceManagement > Devices > Disk Pools.
2 Select a disk pool
3 On the Edit menu, select Delete.
4 In the Delete Disk Pool dialog box, verify that the disk pool is the one youwant to delete and then click OK.
Deleting backup imagesImage deletion may be time consuming. Therefore, if you delete images manually,Veritas recommends the following approach.
See “About the MSDP data removal process” on page 371.
To delete backup images manually
1 Expire all of the images by using the bpexpdate command and the-notimmediate option. The -notimmediate option prevents bpexpdate fromcalling the nbdelete command, which deletes the image.
Without this option, bpexpdate calls nbdelete to delete images. Each call tonbdelete creates a job in the Activity Monitor, allocates resources, andlaunches processes on the media server.
2 After you expire the last image, delete all of the images by using the nbdelete
command with the –allvolumes option.
Only one job is created in the Activity Monitor, fewer resources are allocated,and fewer processes are started on the media servers. The entire process ofexpiring images and deleting images takes less time.
361Managing deduplicationDeleting backup images
About MSDP queue processingOperations that require database updates accumulate in a transaction queue. Twicea day, the NetBackup Deduplication Manager directs the Deduplication Engine toprocess the queue as one batch. By default, queue processing occurs every 12hours, 20 minutes past the hour.
Primarily, the transaction queue contains clean-up and integrity checkingtransactions. These transactions update the reference database.
Queue processing writes status information to the deduplication enginestoraged.log file.
See “NetBackup MSDP log files” on page 407.
Because queue processing does not block any other deduplication process,rescheduling should not be necessary. Users cannot change the maintenanceprocess schedules. However, if you must reschedule these processes, contact yourVeritas support representative.
Because queue processing occurs automatically, you should not need to invoke itmanually. However, you may do so.
See “Processing the MSDP transaction queue manually” on page 362.
See “About MSDP server requirements” on page 28.
Processing theMSDP transaction queuemanuallyNetBackup maintains a queue for MSDP database transactions.
See “About MSDP queue processing” on page 362.
Usually, you should not need to run the deduplication database transaction queueprocesses manually. However, when you recover the MSDP catalog from a backup,you must process the MSDP transaction queue. Processing the transaction queueis part of a larger process.
362Managing deduplicationAbout MSDP queue processing
To process the MSDP transaction queue manually
1 On the MSDP storage server, run the following command:
UNIX: /usr/openv/pdde/pdcr/bin/crcontrol --processqueue
Windows: install_path\Veritas\pdde\Crcontrol.exe --processqueue
2 To determine if the queue processing is still active, run the following command:
UNIX: /usr/openv/pdde/pdcr/bin/crcontrol --processqueueinfo
Windows: install_path\Veritas\pdde\Crcontrol.exe
--processqueueinfo
If the output shows Busy : yes, the queue is still active.
3 To examine the results, run the following command (number 1 not lowercaseletter l):
UNIX: /usr/openv/pdde/pdcr/bin/crcontrol --dsstat 1
Windows: install_path\Veritas\pdde\Crcontrol.exe --dsstat 1
The command may run for a long time; if you omit the 1, results return morequickly but they are not as accurate.
About MSDP data integrity checkingDeduplication metadata and data may become inconsistent or corrupted becauseof disk failures, I/O errors, database corruption, and operational errors. NetBackupchecks the integrity of the deduplicated data on a regular basis. NetBackup performssome of the integrity checking when the storage server is idle. Other integritychecking is designed to use few storage server resources so as not to interfere withoperations.
The data integrity checking process includes the following checks and actions:
■ Automatically constrains data loss or corruption to ensure that new backups areintact.
■ Automatically runs a cyclic redundancy check (CRC) for the data containers.
■ Automatically collects and cleans up storage garbage.
■ Automatically recovers the container-based reference database (or parts of thedatabase) if it is corrupt or missing.
■ Automatically finds storage leaks and fixes them.
NetBackup resolves many integrity issues without user intervention, and someissues are fixed when the next backup runs. However, a severe issue may require
363Managing deduplicationAbout MSDP data integrity checking
intervention by Veritas Support. In such cases, NetBackup writes a message to theNetBackup Disk Logs report.
See “Viewing MSDP disk reports” on page 334.
The data integrity message code is 1057.
See “MSDP event codes and messages” on page 431.
NetBackup writes the integrity checking activity messages to the NetBackupDeduplication Engine storaged.log file.
See “NetBackup MSDP log files” on page 407.
You can configure some of the data integrity checking behaviors.
See “Configuring MSDP data integrity checking behavior” on page 364.
Configuring MSDP data integrity checkingbehavior
NetBackup performs several data integrity checks. You can configure the behaviorof the integrity checks.
Two methods exist to configure MSDP data integrity checking behavior, as follows:
■ Run a command.See “To configure data integrity checking behavior by using a command”on page 364.
■ Edit configuration file parameters.See “To configure data integrity checking behavior by editing the configurationfiles” on page 366.
Warning: Veritas recommends that you do not disable the data integrity checking.If you do so, NetBackup cannot find and repair or report data corruption.
See “About MSDP data integrity checking” on page 363.
See “MSDP data integrity checking configuration parameters” on page 366.
To configure data integrity checking behavior by using a command
◆ To configure behavior, specify a value for each of the data integrity checks, asfollows:
■ Data consistency checking. Use the following commands to configurebehavior:
364Managing deduplicationConfiguring MSDP data integrity checking behavior
UNIX: /usr/openv/pdde/pdcr/bin/pddecfg –aenabledataintegritycheck
Windows: install_path\Veritas\pdde\pddecfg –aenabledataintegritycheck
Enable
UNIX: /usr/openv/pdde/pdcr/bin/pddecfg –adisabledataintegritycheck
Windows: install_path\Veritas\pdde\pddecfg –adisabledataintegritycheck
Disable
UNIX: /usr/openv/pdde/pdcr/bin/pddecfg –agetdataintegritycheck
Windows: install_path\Veritas\pdde\pddecfg –agetdataintegritycheck
Get the status
■ Cyclic redundancy checking. Use the following commands to configurebehavior:
CRC does not run if queue processing is active or during disk reador write operations.
UNIX: /usr/openv/pdde/pdcr/bin/crcontrol--crccheckon
Windows: install_path\Veritas\pdde\Crcontrol.exe--crccheckon
Enable
UNIX: /usr/openv/pdde/pdcr/bin/crcontrol--crccheckoff
Windows: install_path\Veritas\pdde\Crcontrol.exe--crccheckoff
Disable
Fast check CRC mode begins the check from container 64 anddoes not sleep between checking containers.
When the fast CRC ends, CRC behavior reverts to the behaviorbefore fast checking was invoked.
UNIX: /usr/openv/pdde/pdcr/bin/crcontrol--crccheckrestart
Windows: install_path\Veritas\pdde\Crcontrol.exe--crccheckrestart
Enable fastchecking
365Managing deduplicationConfiguring MSDP data integrity checking behavior

UNIX: /usr/openv/pdde/pdcr/bin/crcontrol--crccheckstate
Windows: install_path\Veritas\pdde\Crcontrol.exe--crccheckstate
Get the status
To configure data integrity checking behavior by editing the configurationfiles
1 Use a text editor to open the contentrouter.cfg file or the spa.cfg file, whichcontrol the data integrity checking behavior.
The files reside in the following directories:
■ UNIX: storage_path/etc/puredisk
■ Windows: storage_path\etc\puredisk
2 To change a parameter, specify a new value.
See “MSDP data integrity checking configuration parameters” on page 366.
3 Save and close the file.
4 Restart the NetBackup Deduplication Engine and the NetBackup DeduplicationManager.
You can do this from the Daemons tab in the Activity Monitor.
MSDP data integrity checking configuration parametersThe configuration file parameters that control the deduplication data integritychecking are in two different configuration files, as follows:
■ The contentrouter.cfg file.The parameters are described in Table 9-3.See “About the MSDP contentrouter.cfg file” on page 227.
■ The spa.cfg file.The parameters are described in Table 9-3.
Those files reside in the following directories:
■ UNIX: storage_path/etc/puredisk
■ Windows: storage_path\etc\puredisk
Warning: Veritas recommends that you do not disable the data integrity checking.If you do so, NetBackup cannot find and repair or report data corruption.
366Managing deduplicationConfiguring MSDP data integrity checking behavior
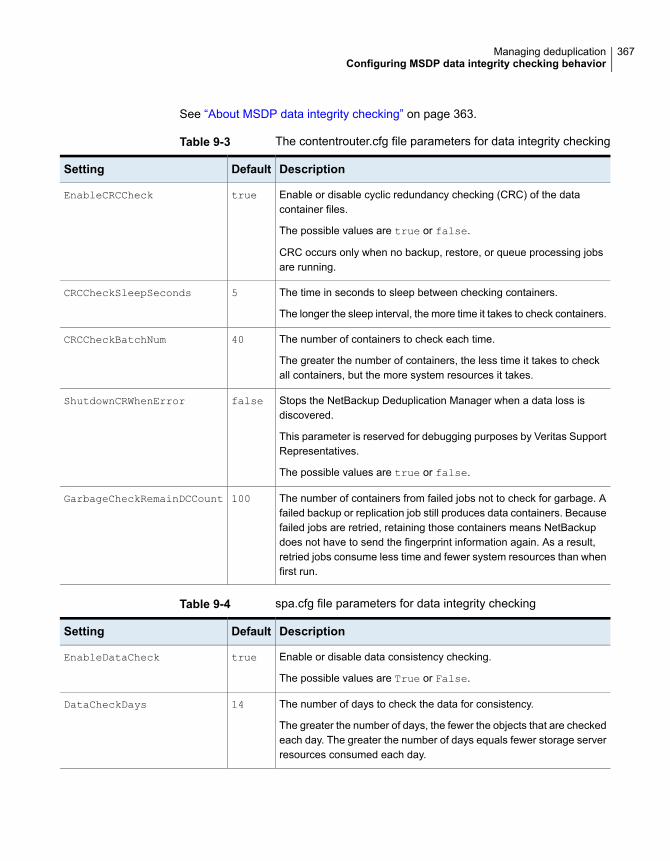
See “About MSDP data integrity checking” on page 363.
Table 9-3 The contentrouter.cfg file parameters for data integrity checking
DescriptionDefaultSetting
Enable or disable cyclic redundancy checking (CRC) of the datacontainer files.
The possible values are true or false.
CRC occurs only when no backup, restore, or queue processing jobsare running.
trueEnableCRCCheck
The time in seconds to sleep between checking containers.
The longer the sleep interval, the more time it takes to check containers.
5CRCCheckSleepSeconds
The number of containers to check each time.
The greater the number of containers, the less time it takes to checkall containers, but the more system resources it takes.
40CRCCheckBatchNum
Stops the NetBackup Deduplication Manager when a data loss isdiscovered.
This parameter is reserved for debugging purposes by Veritas SupportRepresentatives.
The possible values are true or false.
falseShutdownCRWhenError
The number of containers from failed jobs not to check for garbage. Afailed backup or replication job still produces data containers. Becausefailed jobs are retried, retaining those containers means NetBackupdoes not have to send the fingerprint information again. As a result,retried jobs consume less time and fewer system resources than whenfirst run.
100GarbageCheckRemainDCCount
Table 9-4 spa.cfg file parameters for data integrity checking
DescriptionDefaultSetting
Enable or disable data consistency checking.
The possible values are True or False.
trueEnableDataCheck
The number of days to check the data for consistency.
The greater the number of days, the fewer the objects that are checkedeach day. The greater the number of days equals fewer storage serverresources consumed each day.
14DataCheckDays
367Managing deduplicationConfiguring MSDP data integrity checking behavior
Table 9-4 spa.cfg file parameters for data integrity checking (continued)
DescriptionDefaultSetting
Enable or disable alerts.
If true, NetBackup writes a message to the Disk Logs report when itdetects a lost data segment.
See “NetBackup MSDP log files” on page 407.
trueEnableDataCheckAlert
AboutmanagingMSDP storage read performanceNetBackup provides some control over the processes that are used for readoperations. The read operation controls can improve performance for the jobs thatread from the storage. Such jobs include restore jobs, duplication jobs, andreplication jobs.
In most cases, you should change configuration file options only when directed todo so by a Veritas support representative.
Defragment the storageNetBackup includes a process, called rebasing, which defragments the backupimages in a deduplication pool. Read performance improves when the file segmentsfrom a client backup are close to each other on deduplication storage.
See “About MSDP storage rebasing” on page 368.
Decrypt the data on the client rather than the serverThe RESTORE_DECRYPT_LOCAL parameter in the pd.conf file specifies on which hostto decrypt and decompress the data during restore operations.
See “About the MSDP pd.conf configuration file” on page 209.
See “MSDP pd.conf file parameters” on page 210.
About MSDP storage rebasingDuring an initial backup, NetBackup writes the data segments from a backup to asfew container files as possible. Read performance is best when the data segmentsfrom a client backup are close to each other on deduplication storage. NetBackupconsumes less time finding and reassembling backed up files when their segmentsare near each other.
368Managing deduplicationAbout managing MSDP storage read performance
However, the data segments in a backup may become scattered across the diskstorage each time the client is backed up. Such scattering is a normal consequenceof deduplication.
NetBackup includes a process, called rebasing, that helps to maintain the datasegments in as few container files as possible. Rebasing improves performancefor the operations that read from the storage, such as restores and duplications.NetBackup writes all of the data segments from a backup into new container fileseven though the segments exist on storage already. Future backups then refer tothe new copies of those segments rather than the old copies until any changesbecause of future rebasing. Deduplication rates for the backup jobs that performrebasing are lower than for the jobs that do not rebase the data.
After the rebasing, NetBackup reclaims the storage space that the rebased datasegments used.
Table 9-5 describes the rebasing operations.
Table 9-5 Types of rebasing
DescriptionType
The rebasing that occurs during a backup if the normal rebasingcriteria are met, as follows:
■ The container has been rebased within the last 3 months.■ For that backup, the data segments in the container consume less
space than the FP_CACHE_PERIOD_REBASING_THRESHOLDvalue. The FP_CACHE_PERIOD_REBASING_THRESHOLDparameter is in the pd.conf file.See “MSDP pd.conf file parameters” on page 210.
Backup rebasing occurs only for the full backups that pass throughthe normal MSDP backup process. For example, the NetBackupAccelerator backups do not pass through the MSDP backup process.
NetBackup reports backup job completion after the rebasing iscompleted.
Normal backuprebasing
369Managing deduplicationAbout MSDP storage rebasing
Table 9-5 Types of rebasing (continued)
DescriptionType
The rebasing that occurs during a backup if the periodic rebasingcriteria are met, as follows:
■ The container has not been rebased within the last 3 months.■ For that backup, the data segments in the container consume less
space than the FP_CACHE_REBASING_THRESHOLD value. TheFP_CACHE_REBASING_THRESHOLD parameter is in the pd.conffile.See “MSDP pd.conf file parameters” on page 210.
Backup rebasing occurs only for the full backups that pass throughthe normal MSDP backup process. For example, the NetBackupAccelerator backups do not pass through the MSDP backup process.
NetBackup reports backup job completion after the rebasing iscompleted.
Periodic backuprebasing
The storage rebasing that occurs on the server if the rebasing criteriaare met. Server-side rebasing includes the deduplicated data thatdoes not pass through the normal MSDP backup process. Forexample, the NetBackup Accelerator backups do not pass throughthe MSDP backup process.
Some parameters in the contentrouter.cfg file control theserver-side rebasing behavior.
See “MSDP server-side rebasing parameters” on page 370.
Server-side rebasing
MSDP server-side rebasing parametersTable 9-6 describes the parameters that control server-side rebasing.
See “About MSDP storage rebasing” on page 368.
Usually, you do not need to change parameter values. However, in some cases,you may be directed to change settings by a Veritas support representative.
The parameters are stored in the contentrouter.cfg file.
See “About the MSDP contentrouter.cfg file” on page 227.
370Managing deduplicationAbout MSDP storage rebasing
Table 9-6 The server-side rebasing parameters
DescriptionParameter
The maximum percentage of the data segments to be rebased in a file. For anyfile, if the percentage of the data segments reaches this threshold, the remainderof the data segments are not rebased.
By default, this parameter is RebaseMaxPercentage=5.
RebaseMaxPercentage
The maximum time span in seconds of data segments to be rebased in a file. Ifthis threshold is reached, NetBackup does not rebase the remainder of the datasegments.
By default, this parameter is RebaseMaxTime=150.
RebaseMaxTime
The minimum number of containers in which a file’s data segments are stored forthe file to be eligible for rebasing. If the number of containers in which a file’s datasegments are stored is less than RebaseMinContainers, NetBackup does notrebase the data segments.
By default, this parameter is RebaseMinContainers=4.
RebaseMinContainers
The data locality threshold for a container. If the total size of a file’s data segmentsin a container is less than RebaseScatterThreshold, NetBackup rebases allof the file’s data segments.
By default, this parameter is RebaseScatterThreshold=64MB.
RebaseScatterThreshold
About the MSDP data removal processThe data removal process removes the data segments that comprise a NetBackupbackup image. Only those segments that are not referred to by a backup imageare removed.
The following list describes the data removal process for expired backup images:
■ NetBackup removes the image record from the NetBackup catalog.NetBackup directs the NetBackup Deduplication Manager to remove the image.
■ The deduplication manager immediately removes the image entry in thededuplication catalog and adds a removal request to the NetBackupDeduplication Engine’s transaction queue.From this point on, the expired backup image is no longer accessible.
■ When the NetBackup Deduplication Engine processes the queue, all of theremoval requests are processed. A removal request for the image is notgenerated again.
371Managing deduplicationAbout the MSDP data removal process
During the queue processing, the Deduplication Engine reclaims some of thestorage space on which the data segments reside. Some is reclaimed duringdata compaction. If a different backup image requires a data segment, thesegment is not removed.Various internal parameters control whether a container file is compacted.See “About MSDP container files” on page 332.
If you manually delete an image that has expired within the previous 24 hours, thedata becomes garbage. It remains on disk until removed by the next garbagecollection process. Garbage collection occurs during data integrity checking.
See “About MSDP data integrity checking” on page 363.
See “Deleting backup images” on page 361.
Resizing the MSDP storage partitionIf the volume that contains the deduplication storage is resized dynamically, restartthe NetBackup services on the storage server. You must restart the services sothat NetBackup can use the resized partition correctly. If you do not restart theservices, NetBackup reports the capacity as full prematurely.
To resize the MSDP storage
1 Stop all NetBackup jobs on the storage on which you want to change the diskpartition sizes and wait for the jobs to end.
2 Deactivate the media server that hosts the storage server.
See the NetBackup Administrator's Guide, Volume I:
http://www.veritas.com/docs/DOC5332
3 Stop the NetBackup services on the storage server.
Be sure to wait for all services to stop.
4 Use the operating system or disk manager tools to dynamically increase ordecrease the deduplication storage area.
5 Restart the NetBackup services.
6 Activate the media server that hosts the storage server.
See the NetBackup Administrator's Guide, Volume I:
http://www.veritas.com/docs/DOC5332
7 Restart the deduplication jobs.
372Managing deduplicationResizing the MSDP storage partition
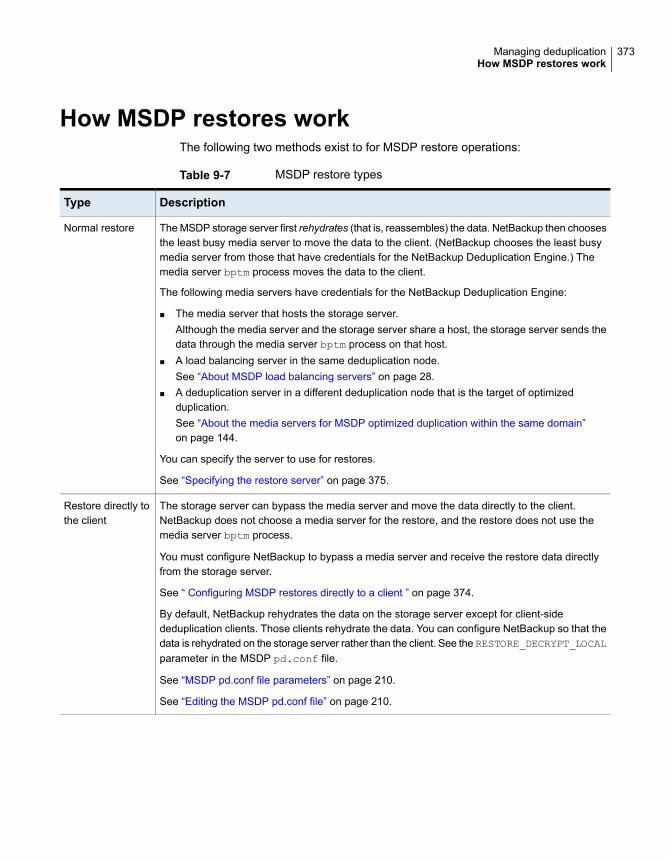
How MSDP restores workThe following two methods exist to for MSDP restore operations:
Table 9-7 MSDP restore types
DescriptionType
The MSDP storage server first rehydrates (that is, reassembles) the data. NetBackup then choosesthe least busy media server to move the data to the client. (NetBackup chooses the least busymedia server from those that have credentials for the NetBackup Deduplication Engine.) Themedia server bptm process moves the data to the client.
The following media servers have credentials for the NetBackup Deduplication Engine:
■ The media server that hosts the storage server.Although the media server and the storage server share a host, the storage server sends thedata through the media server bptm process on that host.
■ A load balancing server in the same deduplication node.See “About MSDP load balancing servers” on page 28.
■ A deduplication server in a different deduplication node that is the target of optimizedduplication.See “About the media servers for MSDP optimized duplication within the same domain”on page 144.
You can specify the server to use for restores.
See “Specifying the restore server” on page 375.
Normal restore
The storage server can bypass the media server and move the data directly to the client.NetBackup does not choose a media server for the restore, and the restore does not use themedia server bptm process.
You must configure NetBackup to bypass a media server and receive the restore data directlyfrom the storage server.
See “ Configuring MSDP restores directly to a client ” on page 374.
By default, NetBackup rehydrates the data on the storage server except for client-sidededuplication clients. Those clients rehydrate the data. You can configure NetBackup so that thedata is rehydrated on the storage server rather than the client. See the RESTORE_DECRYPT_LOCALparameter in the MSDP pd.conf file.
See “MSDP pd.conf file parameters” on page 210.
See “Editing the MSDP pd.conf file” on page 210.
Restore directly tothe client
373Managing deduplicationHow MSDP restores work
Configuring MSDP restores directly to a clientThe NetBackup MSDP storage server can move restore data directly to an MSDPclient, bypassing the media server components.
See “How MSDP restores work” on page 373.
To enable restores directly to a client
1 Set the OLD_VNETD_CALLBACK option to YES on the client. TheOLD_VNETD_CALLBACK option is stored in the bp.conf file on UNIX systemsand the registry on Windows systems.
See “Setting NetBackup configuration options by using the command line”on page 155.
2 On the master server, run the following command to configure NetBackup touse client-direct restores for the client:
UNIX: /usr/openv/netbackup/bin/admincmd/bpclient -client
client_name -update -client_direct_restore 2
Windows: install_path\NetBackup\bin\admincmd\bpclient -client
client_name -update -client_direct_restore 2
About restoring files at a remote siteIf you use optimized duplication to copy images from a local site to a remote site,you can restore from the copies at the remote site to clients at the remote site. Todo so, use a server-directed restore or a client-redirected restore, which restoresfiles to a client other than the original client.
Information about how to redirect restores is in a different guide.
See “Managing client restores” in the NetBackup Administrator's Guide, Volume I:
http://www.veritas.com/docs/DOC5332
You may have to configure which media server performs the restore. In optimizedduplication, the media server that initiates the duplication operation becomes thewrite host for the new image copies. The write host restores from those imagecopies. If the write host is at the local site, it restores from those images at theremote site to the alternate client at the remote site. That host reads the imageacross the WAN and then writes the image back across the WAN to the alternateclient. In this case, you can specify that the media server at the remote site as therestore server.
374Managing deduplicationConfiguring MSDP restores directly to a client
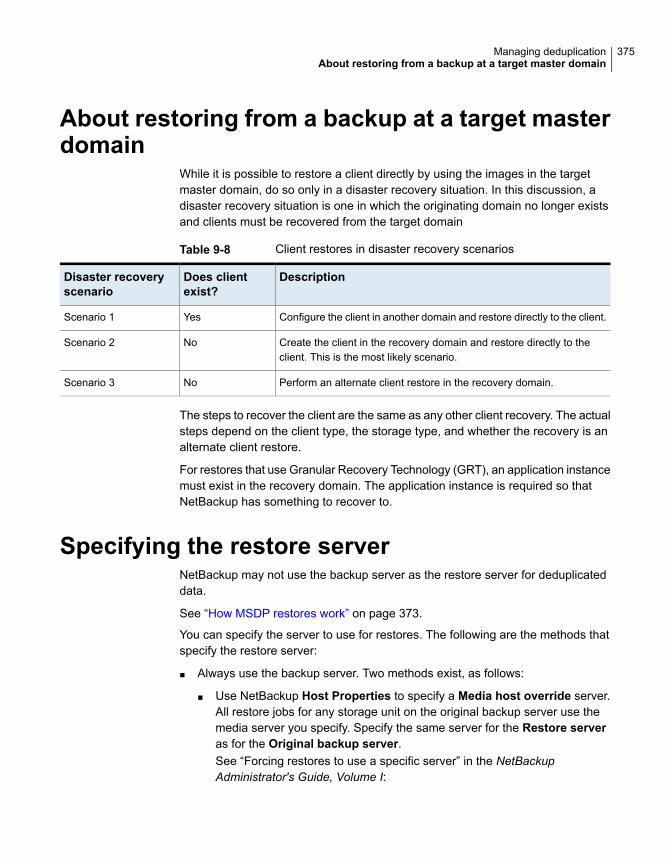
About restoring from a backup at a target masterdomain
While it is possible to restore a client directly by using the images in the targetmaster domain, do so only in a disaster recovery situation. In this discussion, adisaster recovery situation is one in which the originating domain no longer existsand clients must be recovered from the target domain
Table 9-8 Client restores in disaster recovery scenarios
DescriptionDoes clientexist?
Disaster recoveryscenario
Configure the client in another domain and restore directly to the client.YesScenario 1
Create the client in the recovery domain and restore directly to theclient. This is the most likely scenario.
NoScenario 2
Perform an alternate client restore in the recovery domain.NoScenario 3
The steps to recover the client are the same as any other client recovery. The actualsteps depend on the client type, the storage type, and whether the recovery is analternate client restore.
For restores that use Granular Recovery Technology (GRT), an application instancemust exist in the recovery domain. The application instance is required so thatNetBackup has something to recover to.
Specifying the restore serverNetBackup may not use the backup server as the restore server for deduplicateddata.
See “How MSDP restores work” on page 373.
You can specify the server to use for restores. The following are the methods thatspecify the restore server:
■ Always use the backup server. Two methods exist, as follows:
■ Use NetBackup Host Properties to specify a Media host override server.All restore jobs for any storage unit on the original backup server use themedia server you specify. Specify the same server for the Restore serveras for the Original backup server.See “Forcing restores to use a specific server” in the NetBackupAdministrator's Guide, Volume I:
375Managing deduplicationAbout restoring from a backup at a target master domain
http://www.veritas.com/docs/DOC5332This procedure sets the FORCE_RESTORE_MEDIA_SERVER option. Configurationoptions are stored in the bp.conf file on UNIX systems and the registry onWindows systems.
■ Create the touch file USE_BACKUP_MEDIA_SERVER_FOR_RESTORE on theNetBackup master server in the following directory:UNIX: usr/openv/netbackup/db/configWindows: install_path\Veritas\Netbackup\db\config
This global setting always forces restores to the server that did the backup.It applies to all NetBackup restore jobs, not just deduplication restore jobs.If this touch file exists, NetBackup ignores the FORCE_RESTORE_MEDIA_SERVER
and FAILOVER_RESTORE_MEDIA_SERVER settings.
■ Always use a different server.Use NetBackup Host Properties to specify a Media host override server.See the previous explanation about Media host override, except: Specify thedifferent server for the Restore server.
■ A single restore instance. Use the bprestore command with the-disk_media_server option.Restore jobs for each instance of the command use the media server you specify.See the NetBackup Commands Reference Guide:http://www.veritas.com/docs/DOC5332
376Managing deduplicationSpecifying the restore server
Recovering MSDPThis chapter includes the following topics:
■ About recovering the MSDP catalog
■ Restoring the MSDP catalog from a shadow copy
■ Recovering from an MSDP storage server disk failure
■ Recovering from an MSDP storage server failure
■ Recovering the MSDP storage server after NetBackup catalog recovery
About recovering the MSDP catalogThe following are the recovery options for the NetBackup MSDP catalog:
Table 10-1 MSDP catalog backup recovery options
DescriptionRecovery option
If NetBackup detects corruption in the MSDP catalog, the Deduplication Manager restoresthe catalog automatically from the most recent shadow copy. The automatic restore processalso plays a transaction log so that the recovered MSDP catalog is current.
Although the shadow copy restore process is automatic, a restore procedure is available ifyou need to recover from a shadow copy manually.
See “About the MSDP shadow catalog” on page 233.
See “Restoring the MSDP catalog from a shadow copy” on page 378.
Restore from a shadowcopy
10Chapter
Table 10-1 MSDP catalog backup recovery options (continued)
DescriptionRecovery option
If you configured an MSDP catalog backup policy and a valid backup exists, you can recoverthe catalog from a backup. As a general rule, you should only attempt to recover the MSDPcatalog from a backup if you have no alternatives. As an example: A hardware problem ora software problem results in the complete loss of the MSDP catalog and the shadow copies.
The greatest chance for a successful outcome when you recover the MSDP catalog froma backup is when the recovery is guided. An unsuccessful outcome may cause data loss.For the customers who need to recover the MSDP catalog, Veritas wants to guide themthrough the process. Therefore, to recover the MSDP catalog from a backup, contact yourVeritas support representative. You can refer the support representative to Knowledge BaseArticle 000047346, which contains the recovery instructions.
Recover from a backup
Caution: You must determine if your situation is severe enough to recover thecatalog. Veritas recommends that you contact your Veritas Support representativebefore you restore or recover the MSDP catalog. The Support representative canhelp you determine if you need to recover the catalog or if other solutions areavailable.
See “About protecting the MSDP catalog” on page 233.
Restoring the MSDP catalog from a shadow copyNetBackup automatically restores the necessary parts of the MSDP catalog ifcorruption is detected. However, you can restore the MSDP catalog from a shadowcopy manually, although in normal circumstances it is not necessary. Veritasrecommends that you contact your Veritas Support representative before you restoreall or part of the MSDP catalog from a shadow copy.
The procedure that you use depends on the restore scenario, as follows:
In this scenario, you want to restore the entire catalog fromone of the shadow copies.
See “To restore the entire MSDP catalog from a shadowcopy” on page 379.
Restore the entire MSDPcatalog from a shadow copy
378Recovering MSDPRestoring the MSDP catalog from a shadow copy
The MSDP catalog is composed of multiple small databasefiles. Those files are organized in the file system by the clientname and policy name, as follows:
UNIX:/database_path/databases/catalogshadow/2/ClientName/PolicyName
Windows:database_path\databases\catalogshadow\2\ClientName\PolicyName
You can restore the database files for a client and a policycombination. The restore of a specific client’s and policy’sdatabase files is always from the most recent shadow copy.
See “To restore a specific MSDP database file from a shadowcopy” on page 379.
Restore a specific MSDPdatabase file
See “About recovering the MSDP catalog” on page 377.
To restore the entire MSDP catalog from a shadow copy
1 If any MSDP jobs are active, either cancel them or wait until they complete.
2 Disable all policies and storage lifecycle policies that back up to the MediaServer Deduplication Pool.
3 On the MSDP storage server, run the following command, depending on hosttype:
■ UNIX: /usr/openv/pdde/pdcr/bin/cacontrol --catalog recover all
■ Windows: install_path\Veritas\pdde\cacontrol --catalog recover
all
4 Enable all policies and storage lifecycle policies that back up to the MediaServer Deduplication Pool.
5 Restart the jobs that were canceled before the recovery.
To restore a specific MSDP database file from a shadow copy
1 If any MSDP jobs are active for the client and the backup policy combination,either cancel them or wait until they complete.
2 Disable the policies and storage lifecycle policies for the client and the backuppolicy combination that back up to the Media Server Deduplication Pool.
379Recovering MSDPRestoring the MSDP catalog from a shadow copy
3 Change to the shadow directory for the client and policy from which you wantto recover that database file. That directory contains the database files fromwhich to recover. The following are the pathname formats:
UNIX:/database_path/databases/catalogshadow/2/ClientName/PolicyName
Windows:database_path\databases\catalogshadow\2\ClientName\PolicyName
4 Run the following command, depending on host type:
■ UNIX: /usr/openv/pdde/pdcr/bin/cacontrol --catalog recover 2
"/ClientName/PolicyName"
■ Windows: install_path\Veritas\pdde\cacontrol --catalog recover
2 "\ClientName\PolicyName"
5 Enable all policies and storage lifecycle policies that back up to the MediaServer Deduplication Pool.
6 If you canceled jobs before you recovered the database files, restart them.
Recovering from an MSDP storage server diskfailure
If recovery mechanisms do not protect the disk on which the NetBackup softwareresides, the deduplication storage server configuration is lost if the disk fails. Thistopic describes how to recover from a system disk or program disk failure wherethe disk was not backed up.
Note: This procedure describes recovery of the disk on which the NetBackup mediaserver software resides not the disk on which the deduplicated data resides. Thedisk may or may not be the system boot disk.
After recovery, your NetBackup deduplication environment should function normally.Any valid backup images on the deduplication storage should be available forrestores.
Veritas recommends that you use NetBackup to protect the deduplication storageserver system or program disks. You then can use NetBackup to restore that mediaserver if the disk on which NetBackup resides fails and you have to replace it.
380Recovering MSDPRecovering from an MSDP storage server disk failure
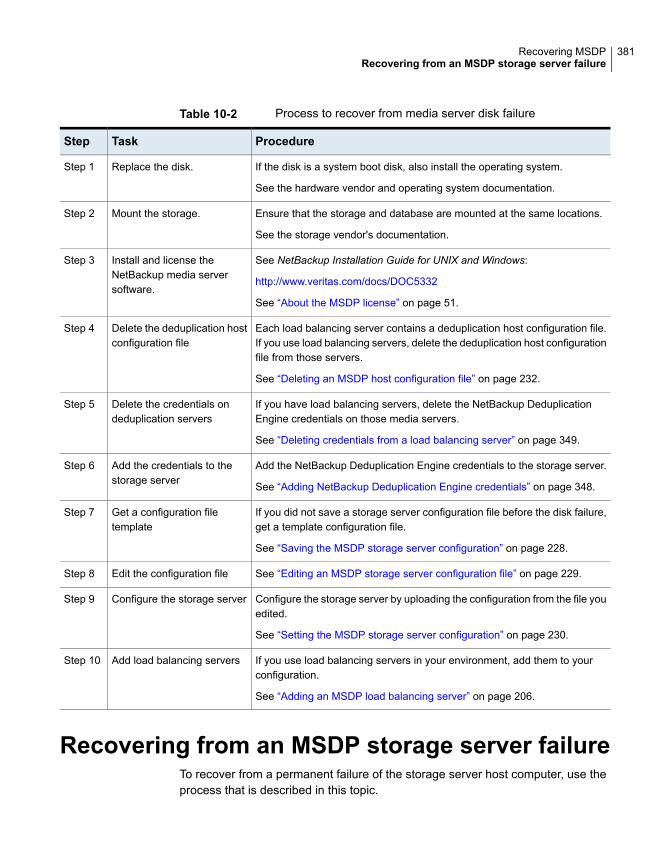
Table 10-2 Process to recover from media server disk failure
ProcedureTaskStep
If the disk is a system boot disk, also install the operating system.
See the hardware vendor and operating system documentation.
Replace the disk.Step 1
Ensure that the storage and database are mounted at the same locations.
See the storage vendor's documentation.
Mount the storage.Step 2
See NetBackup Installation Guide for UNIX and Windows:
http://www.veritas.com/docs/DOC5332
See “About the MSDP license” on page 51.
Install and license theNetBackup media serversoftware.
Step 3
Each load balancing server contains a deduplication host configuration file.If you use load balancing servers, delete the deduplication host configurationfile from those servers.
See “Deleting an MSDP host configuration file” on page 232.
Delete the deduplication hostconfiguration file
Step 4
If you have load balancing servers, delete the NetBackup DeduplicationEngine credentials on those media servers.
See “Deleting credentials from a load balancing server” on page 349.
Delete the credentials ondeduplication servers
Step 5
Add the NetBackup Deduplication Engine credentials to the storage server.
See “Adding NetBackup Deduplication Engine credentials” on page 348.
Add the credentials to thestorage server
Step 6
If you did not save a storage server configuration file before the disk failure,get a template configuration file.
See “Saving the MSDP storage server configuration” on page 228.
Get a configuration filetemplate
Step 7
See “Editing an MSDP storage server configuration file” on page 229.Edit the configuration fileStep 8
Configure the storage server by uploading the configuration from the file youedited.
See “Setting the MSDP storage server configuration” on page 230.
Configure the storage serverStep 9
If you use load balancing servers in your environment, add them to yourconfiguration.
See “Adding an MSDP load balancing server” on page 206.
Add load balancing serversStep 10
Recovering from an MSDP storage server failureTo recover from a permanent failure of the storage server host computer, use theprocess that is described in this topic.
381Recovering MSDPRecovering from an MSDP storage server failure
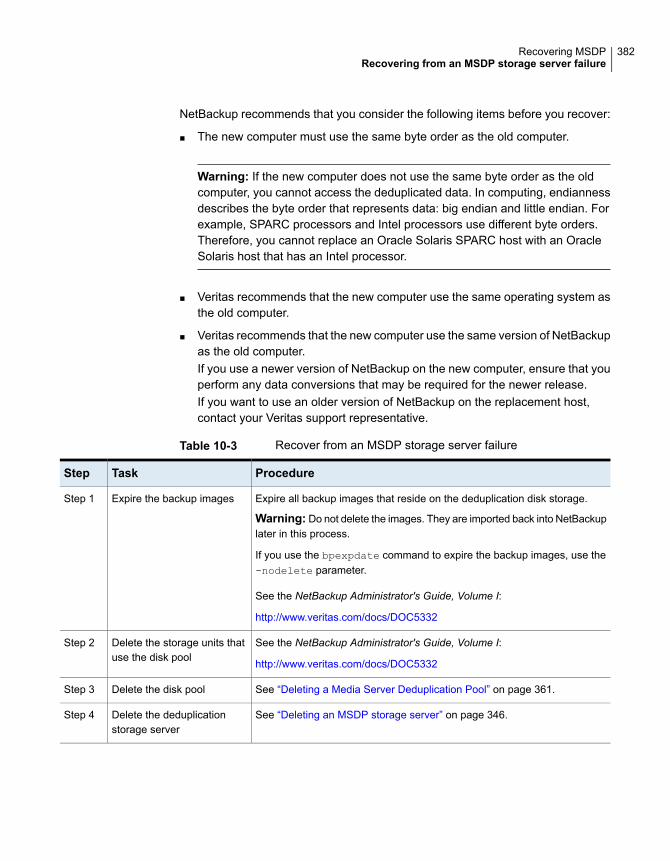
NetBackup recommends that you consider the following items before you recover:
■ The new computer must use the same byte order as the old computer.
Warning: If the new computer does not use the same byte order as the oldcomputer, you cannot access the deduplicated data. In computing, endiannessdescribes the byte order that represents data: big endian and little endian. Forexample, SPARC processors and Intel processors use different byte orders.Therefore, you cannot replace an Oracle Solaris SPARC host with an OracleSolaris host that has an Intel processor.
■ Veritas recommends that the new computer use the same operating system asthe old computer.
■ Veritas recommends that the new computer use the same version of NetBackupas the old computer.If you use a newer version of NetBackup on the new computer, ensure that youperform any data conversions that may be required for the newer release.If you want to use an older version of NetBackup on the replacement host,contact your Veritas support representative.
Table 10-3 Recover from an MSDP storage server failure
ProcedureTaskStep
Expire all backup images that reside on the deduplication disk storage.
Warning: Do not delete the images. They are imported back into NetBackuplater in this process.
If you use the bpexpdate command to expire the backup images, use the-nodelete parameter.
See the NetBackup Administrator's Guide, Volume I:
http://www.veritas.com/docs/DOC5332
Expire the backup imagesStep 1
See the NetBackup Administrator's Guide, Volume I:
http://www.veritas.com/docs/DOC5332
Delete the storage units thatuse the disk pool
Step 2
See “Deleting a Media Server Deduplication Pool” on page 361.Delete the disk poolStep 3
See “Deleting an MSDP storage server” on page 346.Delete the deduplicationstorage server
Step 4
382Recovering MSDPRecovering from an MSDP storage server failure
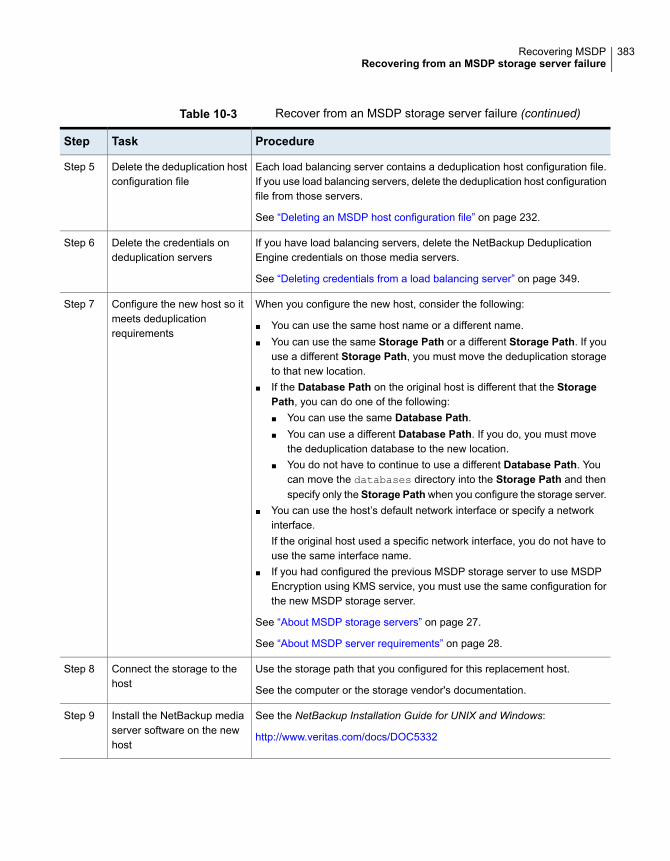
Table 10-3 Recover from an MSDP storage server failure (continued)
ProcedureTaskStep
Each load balancing server contains a deduplication host configuration file.If you use load balancing servers, delete the deduplication host configurationfile from those servers.
See “Deleting an MSDP host configuration file” on page 232.
Delete the deduplication hostconfiguration file
Step 5
If you have load balancing servers, delete the NetBackup DeduplicationEngine credentials on those media servers.
See “Deleting credentials from a load balancing server” on page 349.
Delete the credentials ondeduplication servers
Step 6
When you configure the new host, consider the following:
■ You can use the same host name or a different name.■ You can use the same Storage Path or a different Storage Path. If you
use a different Storage Path, you must move the deduplication storageto that new location.
■ If the Database Path on the original host is different that the StoragePath, you can do one of the following:■ You can use the same Database Path.■ You can use a different Database Path. If you do, you must move
the deduplication database to the new location.■ You do not have to continue to use a different Database Path. You
can move the databases directory into the Storage Path and thenspecify only the Storage Pathwhen you configure the storage server.
■ You can use the host’s default network interface or specify a networkinterface.If the original host used a specific network interface, you do not have touse the same interface name.
■ If you had configured the previous MSDP storage server to use MSDPEncryption using KMS service, you must use the same configuration forthe new MSDP storage server.
See “About MSDP storage servers” on page 27.
See “About MSDP server requirements” on page 28.
Configure the new host so itmeets deduplicationrequirements
Step 7
Use the storage path that you configured for this replacement host.
See the computer or the storage vendor's documentation.
Connect the storage to thehost
Step 8
See the NetBackup Installation Guide for UNIX and Windows:
http://www.veritas.com/docs/DOC5332
Install the NetBackup mediaserver software on the newhost
Step 9
383Recovering MSDPRecovering from an MSDP storage server failure
Table 10-3 Recover from an MSDP storage server failure (continued)
ProcedureTaskStep
You must use the same credentials for the NetBackup Deduplication Engine.
See “Configuring MSDP server-side deduplication” on page 55.
Reconfigure deduplicationStep 10
See the NetBackup Administrator's Guide, Volume I:
http://www.veritas.com/docs/DOC5332
Import the backup imagesStep 11
Recovering the MSDP storage server afterNetBackup catalog recovery
If a disaster requires a recovery of the NetBackup catalog, you must set the storageserver configuration after the NetBackup catalog is recovered.
See “Setting the MSDP storage server configuration” on page 230.
Veritas recommends that you save your storage server configuration.
See “Save the MSDP storage server configuration” on page 46.
Information about recovering the master server is available.
See NetBackup Troubleshooting Guide:
http://www.veritas.com/docs/DOC5332
384Recovering MSDPRecovering the MSDP storage server after NetBackup catalog recovery

Replacing MSDP hostsThis chapter includes the following topics:
■ Replacing the MSDP storage server host computer
Replacing theMSDPstorage server host computerIf you replace the deduplication storage server host computer, use these instructionsto install NetBackup and reconfigure the deduplication storage server. The newhost cannot host a deduplication storage server already.
Reasons to replace the computer include a lease swap or perhaps the currentdeduplication storage server computer does not meet your performancerequirements.
NetBackup recommends that you consider the following items before you recover:
■ The new computer must use the same byte order as the old computer.
Warning: If the new computer does not use the same byte order as the oldcomputer, you cannot access the deduplicated data. In computing, endiannessdescribes the byte order that represents data: Big endian and little endian. Forexample, SPARC processors and Intel processors use different byte orders.Therefore, you cannot replace an Oracle Solaris SPARC host with an OracleSolaris host that has an Intel processor.
■ Veritas recommends that the new computer use the same operating system asthe old computer.
■ Veritas recommends that the new computer use the same version of NetBackupas the old computer.If you use a newer version of NetBackup on the new computer, ensure that youperform any data conversions that may be required for the newer release.
11Chapter
If you want to use an older version of NetBackup on the replacement host,contact your Veritas support representative.
Table 11-1 Replacing an MSDP storage server host computer
ProcedureTaskStep
Expire all backup images that reside on the deduplication disk storage.
Warning: Do not delete the images. They are imported back into NetBackuplater in this process.
If you use the bpexpdate command to expire the backup images, use the-nodelete parameter.
See the NetBackup Administrator's Guide, Volume I:
http://www.veritas.com/docs/DOC5332
Expire the backup imagesStep 1
See the NetBackup Administrator's Guide, Volume I:
http://www.veritas.com/docs/DOC5332
Delete the storage units thatuse the disk pool
Step 2
See “Deleting a Media Server Deduplication Pool” on page 361.Delete the disk poolStep 3
See “Deleting an MSDP storage server” on page 346.Delete the deduplicationstorage server
Step 4
Each load balancing server contains a deduplication host configuration file.If you use load balancing servers, delete the deduplication host configurationfile from those servers.
See “Deleting an MSDP host configuration file” on page 232.
Delete the deduplication hostconfiguration file
Step 5
If you have load balancing servers, delete the NetBackup DeduplicationEngine credentials on those media servers.
See “Deleting credentials from a load balancing server” on page 349.
Delete the credentials ondeduplication servers
Step 6
386Replacing MSDP hostsReplacing the MSDP storage server host computer
Table 11-1 Replacing an MSDP storage server host computer (continued)
ProcedureTaskStep
When you configure the new host, consider the following:
■ You can use the same host name or a different name.■ You can use the same Storage Path or a different Storage Path. If you
use a different Storage Path, you must move the deduplication storageto that new location.
■ If the Database Path on the original host is different that the StoragePath, you can do one of the following:■ You can use the same Database Path.■ You can use a different Database Path. If you do, you must move
the deduplication database to the new location.■ You do not have to continue to use a different Database Path. You
can move the databases directory into the Storage Path and thenspecify only the Storage Pathwhen you configure the storage server.
■ You can use the host’s default network interface or specify a networkinterface.If the original host used a specific network interface, you do not have touse the same interface name.
■ If you had configured the previous MSDP storage server to use MSDPEncryption using KMS service, you must use the same configuration forthe new MSDP storage server.
See “About MSDP storage servers” on page 27.
See “About MSDP server requirements” on page 28.
Configure the new host so itmeets deduplicationrequirements
Step 7
Use the storage path that you configured for this replacement host.
See the computer or the storage vendor's documentation.
Connect the storage to thehost
Step 8
See the NetBackup Installation Guide for UNIX and Windows:
http://www.veritas.com/docs/DOC5332
Install the NetBackup mediaserver software on the newhost
Step 9
See “Configuring MSDP server-side deduplication” on page 55.Reconfigure deduplicationStep 10
See the NetBackup Administrator's Guide, Volume I:
http://www.veritas.com/docs/DOC5332
Import the backup imagesStep 11
387Replacing MSDP hostsReplacing the MSDP storage server host computer
Uninstalling MSDPThis chapter includes the following topics:
■ About uninstalling MSDP
■ Deactivating MSDP
About uninstalling MSDPYou cannot uninstall media server deduplication components separately fromNetBackup. The deduplication components are installed when you install NetBackupsoftware, and they are uninstalled when you uninstall NetBackup software.
Other topics describe related procedures, as follow:
■ Reconfigure an existing deduplication environment.See “Changing the MSDP storage server name or storage path” on page 343.
■ Deactivate deduplication and remove the configuration files and the storagefiles.See “Deactivating MSDP” on page 388.
Deactivating MSDPYou cannot remove the deduplication components from a NetBackup media server.You can disable the components and remove the deduplication storage files andthe catalog files. The host remains a NetBackup media server.
This process assumes that all backup images that reside on the deduplication diskstorage have expired.
Warning: If you remove deduplication and valid NetBackup images reside on thededuplication storage, data loss may occur.
12Chapter
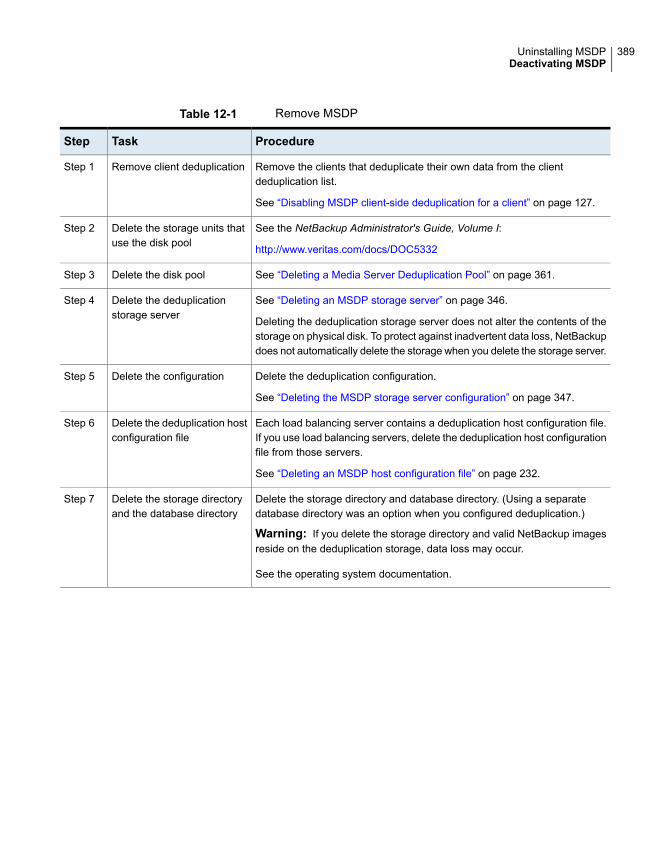
Table 12-1 Remove MSDP
ProcedureTaskStep
Remove the clients that deduplicate their own data from the clientdeduplication list.
See “Disabling MSDP client-side deduplication for a client” on page 127.
Remove client deduplicationStep 1
See the NetBackup Administrator's Guide, Volume I:
http://www.veritas.com/docs/DOC5332
Delete the storage units thatuse the disk pool
Step 2
See “Deleting a Media Server Deduplication Pool” on page 361.Delete the disk poolStep 3
See “Deleting an MSDP storage server” on page 346.
Deleting the deduplication storage server does not alter the contents of thestorage on physical disk. To protect against inadvertent data loss, NetBackupdoes not automatically delete the storage when you delete the storage server.
Delete the deduplicationstorage server
Step 4
Delete the deduplication configuration.
See “Deleting the MSDP storage server configuration” on page 347.
Delete the configurationStep 5
Each load balancing server contains a deduplication host configuration file.If you use load balancing servers, delete the deduplication host configurationfile from those servers.
See “Deleting an MSDP host configuration file” on page 232.
Delete the deduplication hostconfiguration file
Step 6
Delete the storage directory and database directory. (Using a separatedatabase directory was an option when you configured deduplication.)
Warning: If you delete the storage directory and valid NetBackup imagesreside on the deduplication storage, data loss may occur.
See the operating system documentation.
Delete the storage directoryand the database directory
Step 7
389Uninstalling MSDPDeactivating MSDP
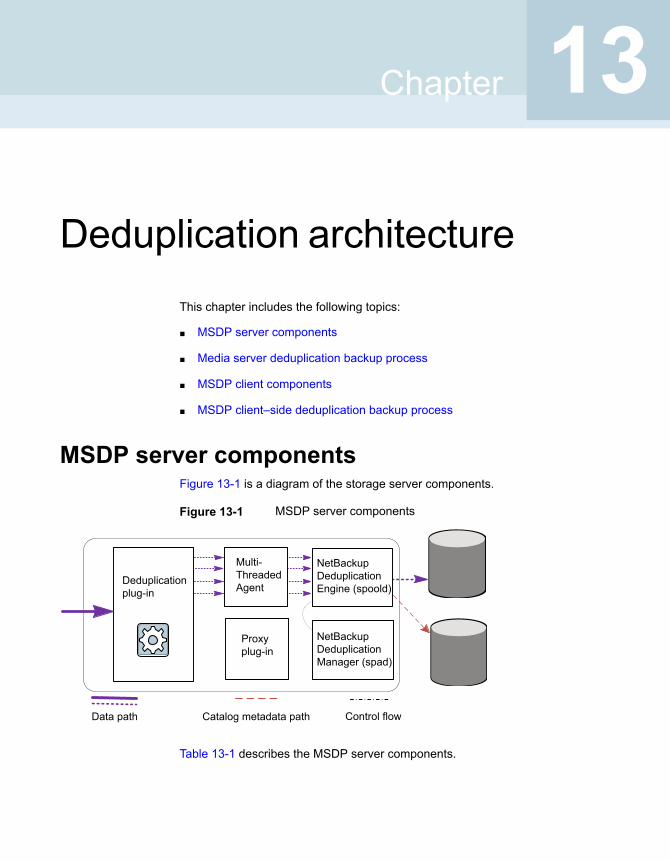
Deduplication architectureThis chapter includes the following topics:
■ MSDP server components
■ Media server deduplication backup process
■ MSDP client components
■ MSDP client–side deduplication backup process
MSDP server componentsFigure 13-1 is a diagram of the storage server components.
Figure 13-1 MSDP server components
Deduplicationplug-in
NetBackupDeduplicationEngine (spoold)
Catalog metadata pathData path
NetBackupDeduplicationManager (spad)
Control flow
Multi-ThreadedAgent
Proxyplug-in
Table 13-1 describes the MSDP server components.
13Chapter
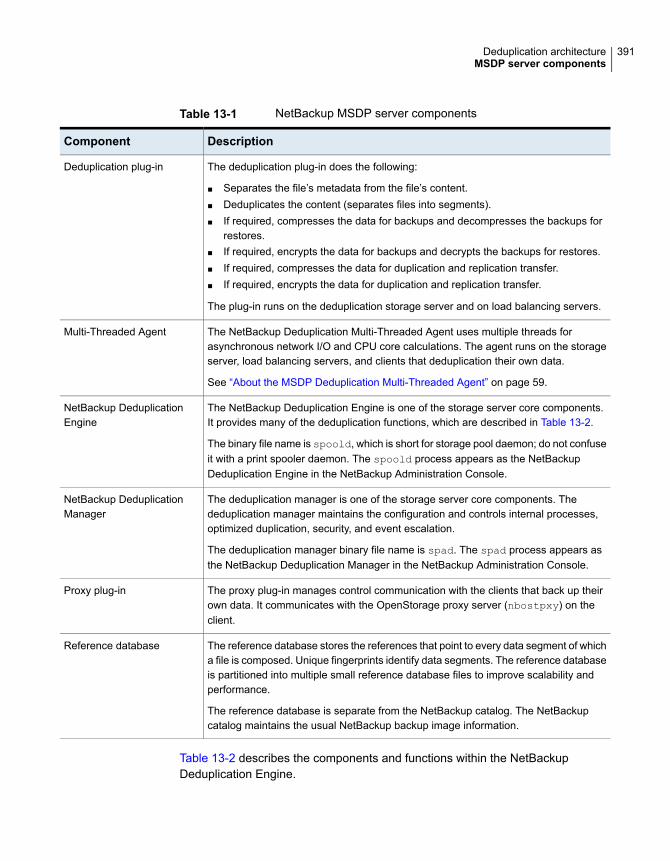
Table 13-1 NetBackup MSDP server components
DescriptionComponent
The deduplication plug-in does the following:
■ Separates the file’s metadata from the file’s content.■ Deduplicates the content (separates files into segments).■ If required, compresses the data for backups and decompresses the backups for
restores.■ If required, encrypts the data for backups and decrypts the backups for restores.■ If required, compresses the data for duplication and replication transfer.■ If required, encrypts the data for duplication and replication transfer.
The plug-in runs on the deduplication storage server and on load balancing servers.
Deduplication plug-in
The NetBackup Deduplication Multi-Threaded Agent uses multiple threads forasynchronous network I/O and CPU core calculations. The agent runs on the storageserver, load balancing servers, and clients that deduplication their own data.
See “About the MSDP Deduplication Multi-Threaded Agent” on page 59.
Multi-Threaded Agent
The NetBackup Deduplication Engine is one of the storage server core components.It provides many of the deduplication functions, which are described in Table 13-2.
The binary file name is spoold, which is short for storage pool daemon; do not confuseit with a print spooler daemon. The spoold process appears as the NetBackupDeduplication Engine in the NetBackup Administration Console.
NetBackup DeduplicationEngine
The deduplication manager is one of the storage server core components. Thededuplication manager maintains the configuration and controls internal processes,optimized duplication, security, and event escalation.
The deduplication manager binary file name is spad. The spad process appears asthe NetBackup Deduplication Manager in the NetBackup Administration Console.
NetBackup DeduplicationManager
The proxy plug-in manages control communication with the clients that back up theirown data. It communicates with the OpenStorage proxy server (nbostpxy) on theclient.
Proxy plug-in
The reference database stores the references that point to every data segment of whicha file is composed. Unique fingerprints identify data segments. The reference databaseis partitioned into multiple small reference database files to improve scalability andperformance.
The reference database is separate from the NetBackup catalog. The NetBackupcatalog maintains the usual NetBackup backup image information.
Reference database
Table 13-2 describes the components and functions within the NetBackupDeduplication Engine.
391Deduplication architectureMSDP server components
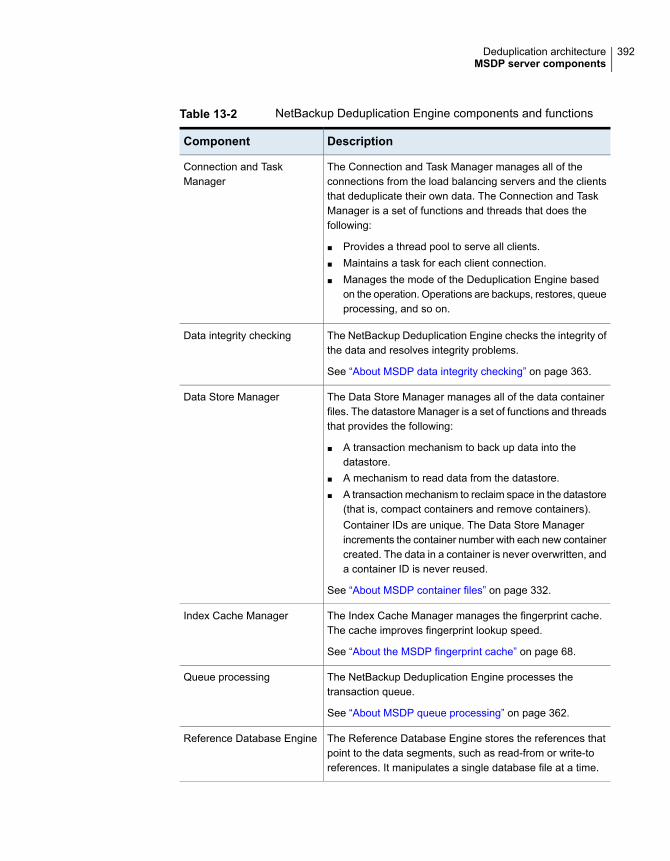
Table 13-2 NetBackup Deduplication Engine components and functions
DescriptionComponent
The Connection and Task Manager manages all of theconnections from the load balancing servers and the clientsthat deduplicate their own data. The Connection and TaskManager is a set of functions and threads that does thefollowing:
■ Provides a thread pool to serve all clients.■ Maintains a task for each client connection.■ Manages the mode of the Deduplication Engine based
on the operation. Operations are backups, restores, queueprocessing, and so on.
Connection and TaskManager
The NetBackup Deduplication Engine checks the integrity ofthe data and resolves integrity problems.
See “About MSDP data integrity checking” on page 363.
Data integrity checking
The Data Store Manager manages all of the data containerfiles. The datastore Manager is a set of functions and threadsthat provides the following:
■ A transaction mechanism to back up data into thedatastore.
■ A mechanism to read data from the datastore.■ A transaction mechanism to reclaim space in the datastore
(that is, compact containers and remove containers).Container IDs are unique. The Data Store Managerincrements the container number with each new containercreated. The data in a container is never overwritten, anda container ID is never reused.
See “About MSDP container files” on page 332.
Data Store Manager
The Index Cache Manager manages the fingerprint cache.The cache improves fingerprint lookup speed.
See “About the MSDP fingerprint cache” on page 68.
Index Cache Manager
The NetBackup Deduplication Engine processes thetransaction queue.
See “About MSDP queue processing” on page 362.
Queue processing
The Reference Database Engine stores the references thatpoint to the data segments, such as read-from or write-toreferences. It manipulates a single database file at a time.
Reference Database Engine
392Deduplication architectureMSDP server components
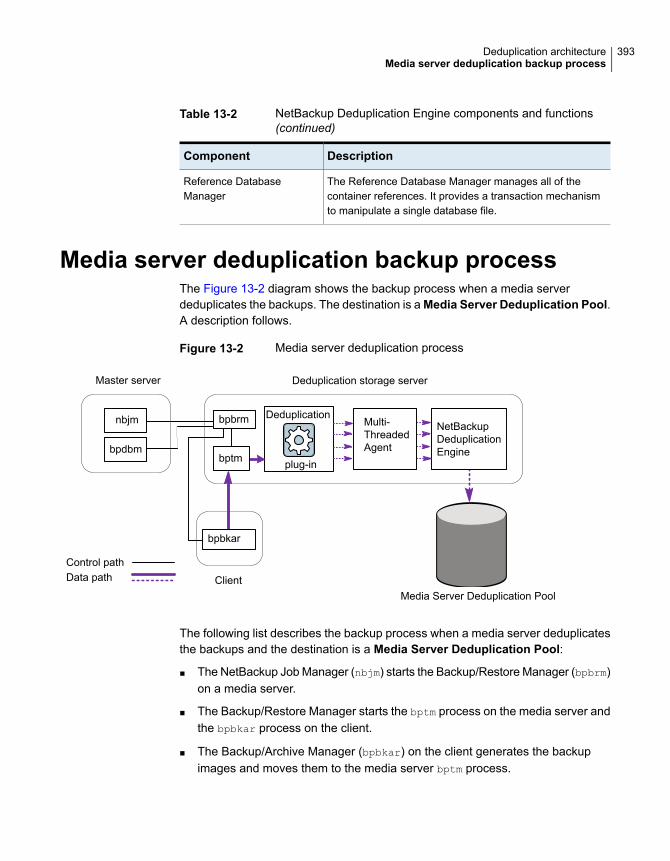
Table 13-2 NetBackup Deduplication Engine components and functions(continued)
DescriptionComponent
The Reference Database Manager manages all of thecontainer references. It provides a transaction mechanismto manipulate a single database file.
Reference DatabaseManager
Media server deduplication backup processThe Figure 13-2 diagram shows the backup process when a media serverdeduplicates the backups. The destination is a Media Server Deduplication Pool.A description follows.
Figure 13-2 Media server deduplication process
nbjm bpbrm
bptm
Deduplication storage serverMaster server
Client
DeduplicationNetBackupDeduplicationEngine
Control path
bpbkar
Media Server Deduplication Pool
Data path
bpdbmplug-in
Multi-ThreadedAgent
The following list describes the backup process when a media server deduplicatesthe backups and the destination is a Media Server Deduplication Pool:
■ The NetBackup Job Manager (nbjm) starts the Backup/Restore Manager (bpbrm)on a media server.
■ The Backup/Restore Manager starts the bptm process on the media server andthe bpbkar process on the client.
■ The Backup/Archive Manager (bpbkar) on the client generates the backupimages and moves them to the media server bptm process.
393Deduplication architectureMedia server deduplication backup process
The Backup/Archive Manager also sends the information about files within theimage to the Backup/Restore Manager (bpbrm). The Backup/Restore Managersends the file information to the bpdbm process on the master server for theNetBackup database.
■ The bptm process moves the data to the deduplication plug-in.
■ The deduplication plug-in retrieves a list of IDs of the container files from theNetBackup Deduplication Engine. Those container files contain the fingerprintsfrom the last full backup for the client. The list is used as a cache so the plug-indoes not have to request each fingerprint from the engine.
■ The deduplication plug-in separates the files in the backup image into segments.
■ The deduplication plug-in buffers the segments and then sends batches of themto the Deduplication Multi-Threaded Agent. Multiple threads and shared memoryare used for the data transfer.
■ The NetBackup Deduplication Multi-Threaded Agent processes the datasegments in parallel using multiple threads to improve throughput performance.The agent then sends only the unique data segments to the NetBackupDeduplication Engine.If the host is a load balancing server, the Deduplication Engine is on a differenthost, the storage server.
■ The NetBackup Deduplication Engine writes the data to the Media ServerDeduplication Pool.The first backup may have a 0% deduplication rate, although a 0% rate isunlikely. Zero percent means that all file segments in the backup data are unique.
The Figure 13-3 diagram shows the backup process when a media serverdeduplicates the backups. The destination is a PureDisk Deduplication Pool. Adescription follows.
Note: NetBackup supports PureDisk Deduplication Pool storage on NetBackup5000 series appliances only.
394Deduplication architectureMedia server deduplication backup process
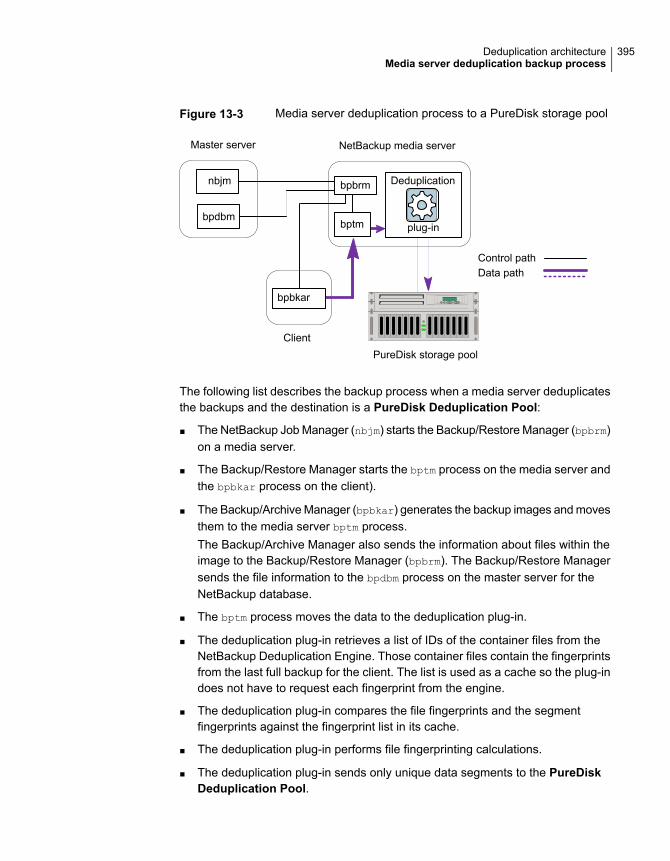
Figure 13-3 Media server deduplication process to a PureDisk storage pool
nbjm bpbrm
bptm
NetBackup media serverMaster server
Client
Deduplication
bpbkar
PureDisk storage pool
Control pathData path
bpdbmplug-in
The following list describes the backup process when a media server deduplicatesthe backups and the destination is a PureDisk Deduplication Pool:
■ The NetBackup Job Manager (nbjm) starts the Backup/Restore Manager (bpbrm)on a media server.
■ The Backup/Restore Manager starts the bptm process on the media server andthe bpbkar process on the client).
■ The Backup/Archive Manager (bpbkar) generates the backup images and movesthem to the media server bptm process.The Backup/Archive Manager also sends the information about files within theimage to the Backup/Restore Manager (bpbrm). The Backup/Restore Managersends the file information to the bpdbm process on the master server for theNetBackup database.
■ The bptm process moves the data to the deduplication plug-in.
■ The deduplication plug-in retrieves a list of IDs of the container files from theNetBackup Deduplication Engine. Those container files contain the fingerprintsfrom the last full backup for the client. The list is used as a cache so the plug-indoes not have to request each fingerprint from the engine.
■ The deduplication plug-in compares the file fingerprints and the segmentfingerprints against the fingerprint list in its cache.
■ The deduplication plug-in performs file fingerprinting calculations.
■ The deduplication plug-in sends only unique data segments to the PureDiskDeduplication Pool.
395Deduplication architectureMedia server deduplication backup process
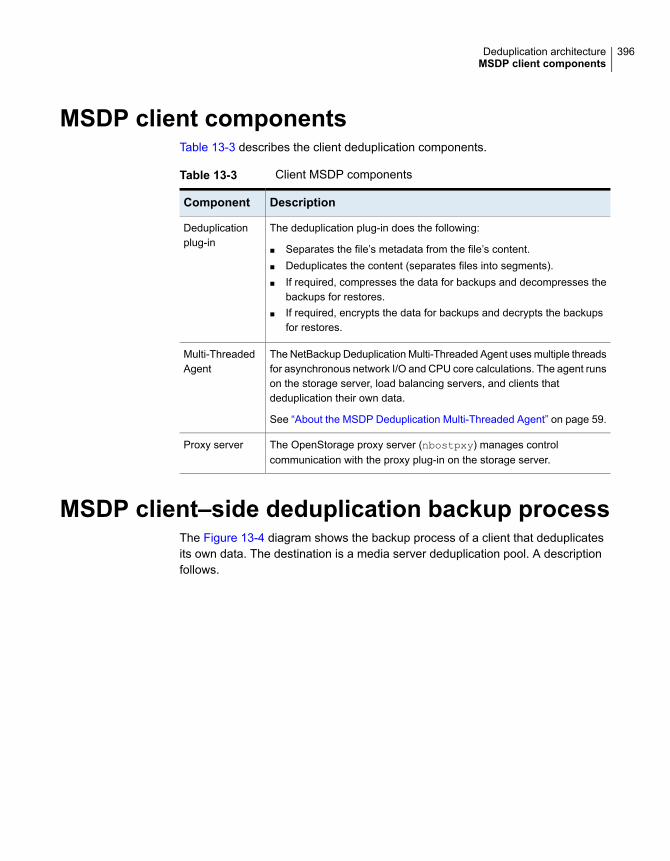
MSDP client componentsTable 13-3 describes the client deduplication components.
Table 13-3 Client MSDP components
DescriptionComponent
The deduplication plug-in does the following:
■ Separates the file’s metadata from the file’s content.■ Deduplicates the content (separates files into segments).■ If required, compresses the data for backups and decompresses the
backups for restores.■ If required, encrypts the data for backups and decrypts the backups
for restores.
Deduplicationplug-in
The NetBackup Deduplication Multi-Threaded Agent uses multiple threadsfor asynchronous network I/O and CPU core calculations. The agent runson the storage server, load balancing servers, and clients thatdeduplication their own data.
See “About the MSDP Deduplication Multi-Threaded Agent” on page 59.
Multi-ThreadedAgent
The OpenStorage proxy server (nbostpxy) manages controlcommunication with the proxy plug-in on the storage server.
Proxy server
MSDP client–side deduplication backup processThe Figure 13-4 diagram shows the backup process of a client that deduplicatesits own data. The destination is a media server deduplication pool. A descriptionfollows.
396Deduplication architectureMSDP client components
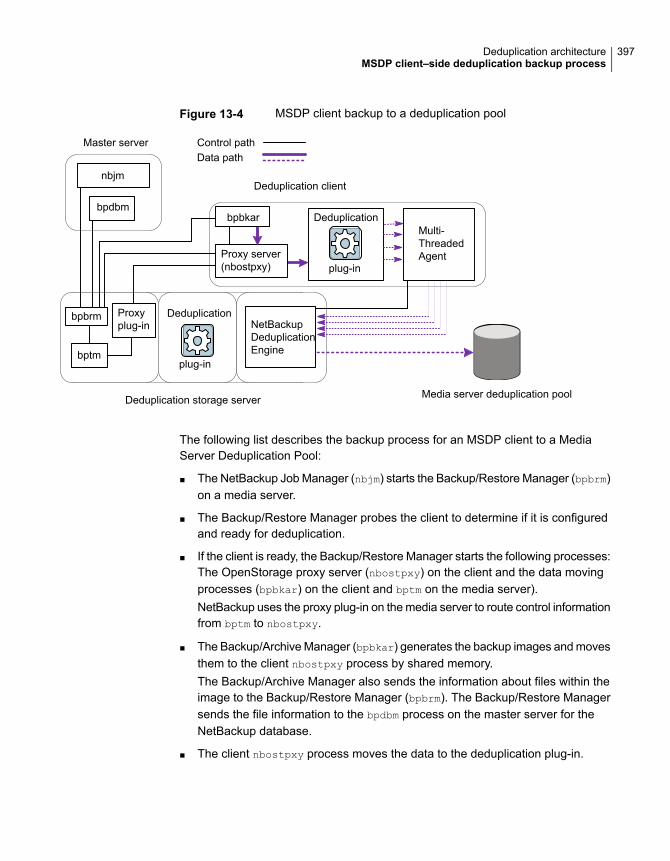
Figure 13-4 MSDP client backup to a deduplication pool
nbjm
bpbrm
bptm
Proxyplug-in
Deduplication storage server
Master server
Deduplication client
Deduplication
NetBackupDeduplicationEngine
Control path
bpbkar
Proxy server(nbostpxy)
Media server deduplication pool
Data path
bpdbm
plug-in
Deduplication
plug-in
Multi-ThreadedAgent
The following list describes the backup process for an MSDP client to a MediaServer Deduplication Pool:
■ The NetBackup Job Manager (nbjm) starts the Backup/Restore Manager (bpbrm)on a media server.
■ The Backup/Restore Manager probes the client to determine if it is configuredand ready for deduplication.
■ If the client is ready, the Backup/Restore Manager starts the following processes:The OpenStorage proxy server (nbostpxy) on the client and the data movingprocesses (bpbkar) on the client and bptm on the media server).NetBackup uses the proxy plug-in on the media server to route control informationfrom bptm to nbostpxy.
■ The Backup/Archive Manager (bpbkar) generates the backup images and movesthem to the client nbostpxy process by shared memory.The Backup/Archive Manager also sends the information about files within theimage to the Backup/Restore Manager (bpbrm). The Backup/Restore Managersends the file information to the bpdbm process on the master server for theNetBackup database.
■ The client nbostpxy process moves the data to the deduplication plug-in.
397Deduplication architectureMSDP client–side deduplication backup process
■ The deduplication plug-in on the client tries to retrieve a list of fingerprints, inthe following order:
■ From a client and a policy that is configured in the client’s pd.conf file. TheFP_CACHE_CLIENT_POLICY entry defines the client and policy to use for thefingerprint cache. The entry must be valid (that is, not expired).See “About seeding the MSDP fingerprint cache for remote clientdeduplication” on page 70.
■ From the previous backup for the client and policy.
■ From the special seeding directory on the storage server.See “About seeding the MSDP fingerprint cache for remote clientdeduplication” on page 70.
The list of fingerprints is used as a cache so the plug-in does not have to requesteach fingerprint from the engine.If no fingerprints are loaded into the cache, the deduplication rate may be verylow for the backup.
■ The deduplication plug-in separates the files in the backup image into segments.
■ The deduplication plug-in buffers the segments and then sends batches of themto the Deduplication Multi-Threaded Agent. Multiple threads and shared memoryare used for the data transfer.
■ The NetBackup Deduplication Multi-Threaded Agent processes the datasegments in parallel using multiple threads to improve throughput performance.The agent then sends only the unique data segments to theNetBackupDeduplication Engine.
■ The NetBackup Deduplication Engine writes the data to the Media ServerDeduplication Pool.The first backup may have a 0% deduplication rate, although a 0% deduplicationrate is unlikely. Zero percent means that all file segments in the backup dataare unique.
The Figure 13-5 diagram shows the backup process of a client that deduplicatesits own data. The destination is a PureDisk storage pool. A description follows.
Note: NetBackup supports PureDisk Deduplication Pool storage on NetBackup5000 series appliances only.
398Deduplication architectureMSDP client–side deduplication backup process
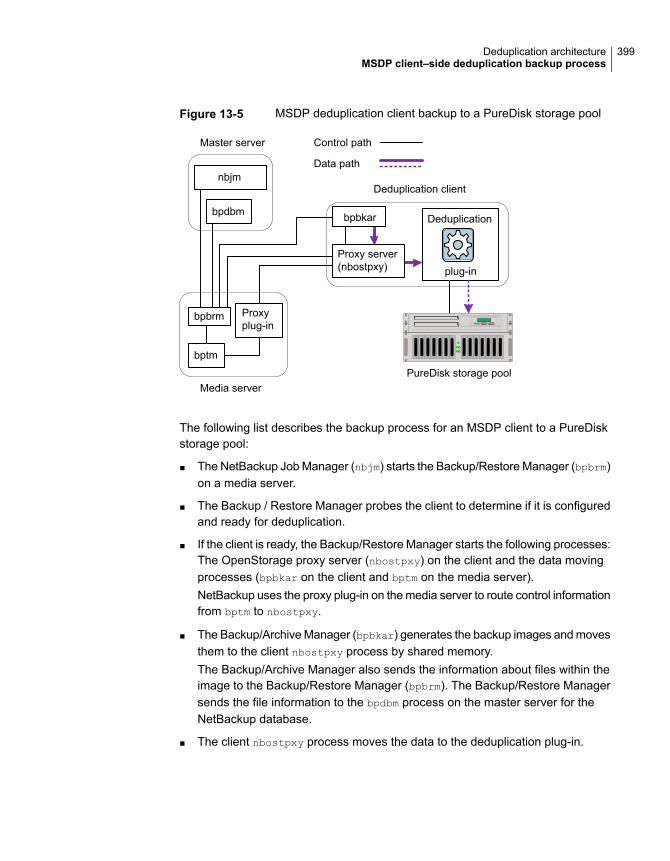
Figure 13-5 MSDP deduplication client backup to a PureDisk storage pool
nbjm
bpbrm
bptm
Proxyplug-in
Media server
Master server
Deduplication client
Deduplication
Control path
Data path
bpbkar
Proxy server(nbostpxy)
PureDisk storage pool
bpdbm
plug-in
The following list describes the backup process for an MSDP client to a PureDiskstorage pool:
■ The NetBackup Job Manager (nbjm) starts the Backup/Restore Manager (bpbrm)on a media server.
■ The Backup / Restore Manager probes the client to determine if it is configuredand ready for deduplication.
■ If the client is ready, the Backup/Restore Manager starts the following processes:The OpenStorage proxy server (nbostpxy) on the client and the data movingprocesses (bpbkar on the client and bptm on the media server).NetBackup uses the proxy plug-in on the media server to route control informationfrom bptm to nbostpxy.
■ The Backup/Archive Manager (bpbkar) generates the backup images and movesthem to the client nbostpxy process by shared memory.The Backup/Archive Manager also sends the information about files within theimage to the Backup/Restore Manager (bpbrm). The Backup/Restore Managersends the file information to the bpdbm process on the master server for theNetBackup database.
■ The client nbostpxy process moves the data to the deduplication plug-in.
399Deduplication architectureMSDP client–side deduplication backup process
■ The deduplication plug-in retrieves a list of fingerprints from the last full backupof the client. The list is used as a cache so the plug-in does not have to requesteach fingerprint from the engine.
■ The deduplication plug-in performs file fingerprint calculations.
■ The deduplication plug-in sends only unique data segments to the PureDiskstorage pool.
400Deduplication architectureMSDP client–side deduplication backup process
TroubleshootingThis chapter includes the following topics:
■ About unified logging
■ About legacy logging
■ NetBackup MSDP log files
■ Troubleshooting MSDP installation issues
■ Troubleshooting MSDP configuration issues
■ Troubleshooting MSDP operational issues
■ Viewing MSDP disk errors and events
■ MSDP event codes and messages
■ Troubleshooting Cloud Catalyst issues
■ Unable to obtain the administrator password to use an AWS EC2 instance thathas a Windows OS
■ Trouble shooting multi-domain issues
About unified loggingUnified logging creates log file names and messages in a format that is standardizedacross Veritas products. Only the vxlogview command can assemble and displaythe log information correctly. Server processes and client processes use unifiedlogging.
Log files for originator IDs are written to a subdirectory with the name specified inthe log configuration file. All unified logs are written to subdirectories in the followingdirectory:
14Chapter
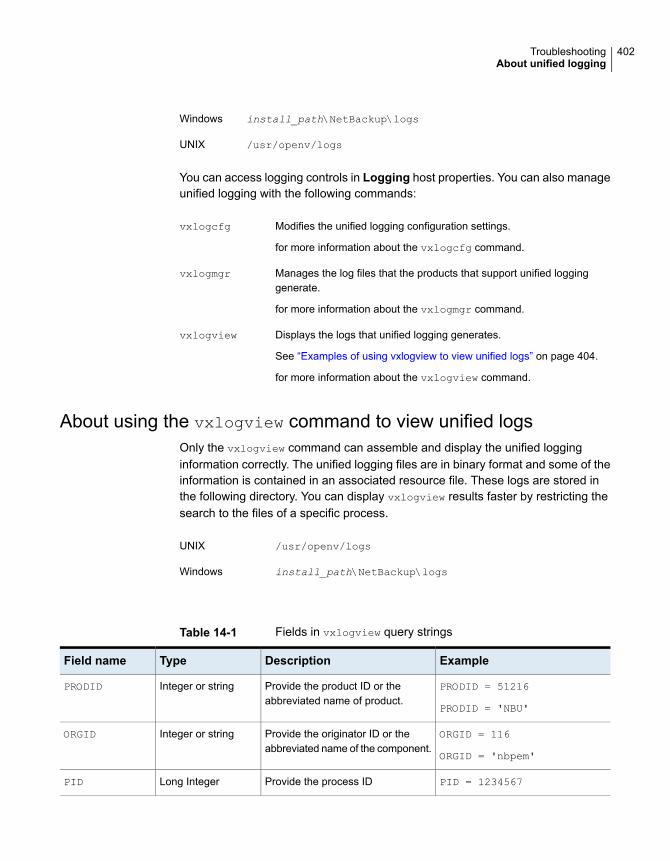
install_path\NetBackup\logsWindows
/usr/openv/logsUNIX
You can access logging controls in Logging host properties. You can also manageunified logging with the following commands:
Modifies the unified logging configuration settings.
for more information about the vxlogcfg command.
vxlogcfg
Manages the log files that the products that support unified logginggenerate.
for more information about the vxlogmgr command.
vxlogmgr
Displays the logs that unified logging generates.
See “Examples of using vxlogview to view unified logs” on page 404.
for more information about the vxlogview command.
vxlogview
About using the vxlogview command to view unified logsOnly the vxlogview command can assemble and display the unified logginginformation correctly. The unified logging files are in binary format and some of theinformation is contained in an associated resource file. These logs are stored inthe following directory. You can display vxlogview results faster by restricting thesearch to the files of a specific process.
/usr/openv/logsUNIX
install_path\NetBackup\logsWindows
Table 14-1 Fields in vxlogview query strings
ExampleDescriptionTypeField name
PRODID = 51216
PRODID = 'NBU'
Provide the product ID or theabbreviated name of product.
Integer or stringPRODID
ORGID = 116
ORGID = 'nbpem'
Provide the originator ID or theabbreviated name of the component.
Integer or stringORGID
PID = 1234567Provide the process IDLong IntegerPID
402TroubleshootingAbout unified logging
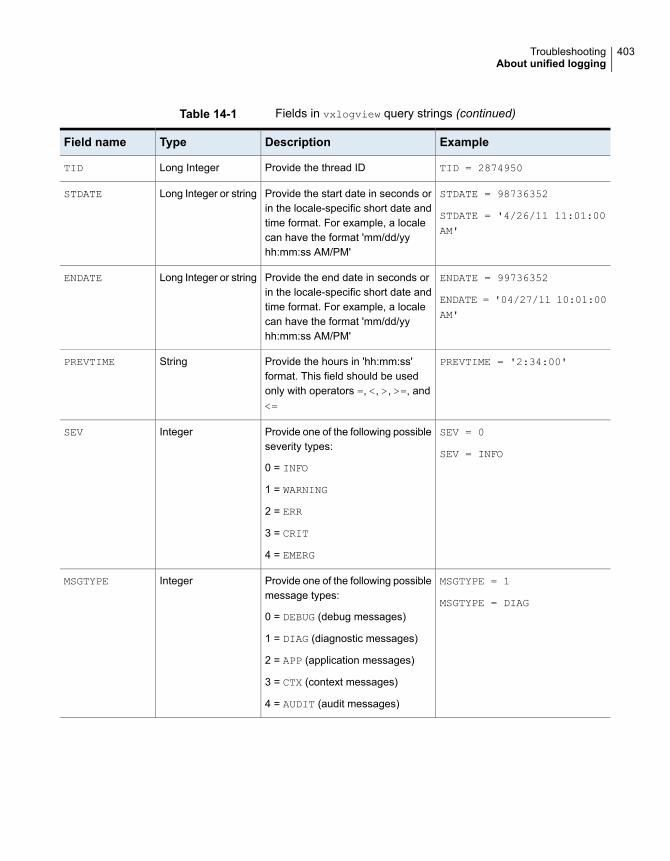
Table 14-1 Fields in vxlogview query strings (continued)
ExampleDescriptionTypeField name
TID = 2874950Provide the thread IDLong IntegerTID
STDATE = 98736352
STDATE = '4/26/11 11:01:00AM'
Provide the start date in seconds orin the locale-specific short date andtime format. For example, a localecan have the format 'mm/dd/yyhh:mm:ss AM/PM'
Long Integer or stringSTDATE
ENDATE = 99736352
ENDATE = '04/27/11 10:01:00AM'
Provide the end date in seconds orin the locale-specific short date andtime format. For example, a localecan have the format 'mm/dd/yyhh:mm:ss AM/PM'
Long Integer or stringENDATE
PREVTIME = '2:34:00'Provide the hours in 'hh:mm:ss'format. This field should be usedonly with operators =, <, >, >=, and<=
StringPREVTIME
SEV = 0
SEV = INFO
Provide one of the following possibleseverity types:
0 = INFO
1 = WARNING
2 = ERR
3 = CRIT
4 = EMERG
IntegerSEV
MSGTYPE = 1
MSGTYPE = DIAG
Provide one of the following possiblemessage types:
0 = DEBUG (debug messages)
1 = DIAG (diagnostic messages)
2 = APP (application messages)
3 = CTX (context messages)
4 = AUDIT (audit messages)
IntegerMSGTYPE
403TroubleshootingAbout unified logging
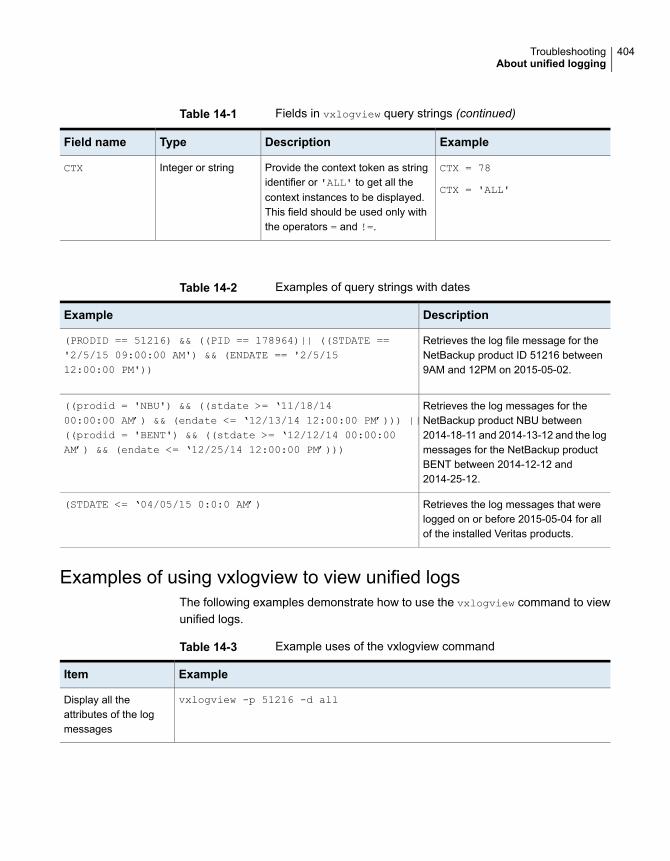
Table 14-1 Fields in vxlogview query strings (continued)
ExampleDescriptionTypeField name
CTX = 78
CTX = 'ALL'
Provide the context token as stringidentifier or 'ALL' to get all thecontext instances to be displayed.This field should be used only withthe operators = and !=.
Integer or stringCTX
Table 14-2 Examples of query strings with dates
DescriptionExample
Retrieves the log file message for theNetBackup product ID 51216 between9AM and 12PM on 2015-05-02.
(PRODID == 51216) && ((PID == 178964)|| ((STDATE =='2/5/15 09:00:00 AM') && (ENDATE == '2/5/1512:00:00 PM'))
Retrieves the log messages for theNetBackup product NBU between2014-18-11 and 2014-13-12 and the logmessages for the NetBackup productBENT between 2014-12-12 and2014-25-12.
((prodid = 'NBU') && ((stdate >= ‘11/18/1400:00:00 AM’) && (endate <= ‘12/13/14 12:00:00 PM’))) ||((prodid = 'BENT') && ((stdate >= ‘12/12/14 00:00:00AM’) && (endate <= ‘12/25/14 12:00:00 PM’)))
Retrieves the log messages that werelogged on or before 2015-05-04 for allof the installed Veritas products.
(STDATE <= ‘04/05/15 0:0:0 AM’)
Examples of using vxlogview to view unified logsThe following examples demonstrate how to use the vxlogview command to viewunified logs.
Table 14-3 Example uses of the vxlogview command
ExampleItem
vxlogview -p 51216 -d allDisplay all theattributes of the logmessages
404TroubleshootingAbout unified logging
Table 14-3 Example uses of the vxlogview command (continued)
ExampleItem
Display the log messages for NetBackup (51216) that show only the date, time, messagetype, and message text:
vxlogview --prodid 51216 --display D,T,m,x
Display specificattributes of the logmessages
Display the log messages for originator 116 (nbpem) that were issued during the last 20minutes. Note that you can specify -o nbpem instead of -o 116:
# vxlogview -o 116 -t 00:20:00
Display the latest logmessages
Display the log messages for nbpem that were issued during the specified time period:
# vxlogview -o nbpem -b "05/03/15 06:51:48 AM"-e "05/03/15 06:52:48 AM"
Display the logmessages from aspecific time period
You can use the -i option to specify an originator for a process:
# vxlogview -i nbpem
The vxlogview -i option searches only the log files that the specified process (nbpem)creates. By limiting the log files that it has to search, vxlogview returns a result faster. Bycomparison, the vxlogview -o option searches all unified log files for the messages thatthe specified process has logged.
Note: If you use the -i option with a process that is not a service, vxlogview returns themessage "No log files found." A process that is not a service has no originator ID in the filename. In this case, use the -o option instead of the -i option.
The -i option displays entries for all OIDs that are part of that process including libraries (137,156, 309, etc.).
Display results faster
You can search the logs for a particular job ID:
# vxlogview -i nbpem | grep "jobid=job_ID"
The jobid= search key should contain no spaces and must be lowercase.
When searching for a job ID, you can use any vxlogview command option. This exampleuses the -i option with the name of the process (nbpem). The command returns only thelog entries that contain the job ID. It misses related entries for the job that do not explicitlycontain the jobid=job_ID.
Search for a job ID
405TroubleshootingAbout unified logging
About legacy loggingIn NetBackup legacy debug logging, a process creates log files of debug activity inits own logging directory. By default, NetBackup creates only a subset of loggingdirectories, in the following locations:
install_path\NetBackup\logsinstall_path\Volmgr\debug
Windows
/usr/openv/netbackup/logs/usr/openv/volmgr/debug
UNIX
It is recommended that you do not use symbolic links or hard links inside legacylog folders.
If any process runs for a non-root or non-admin user and there is no logginghappening under legacy log folders, you can create a folder using the mklogdir
command for the required user.
To run a command line for a non-root or non-admin user (troubleshooting when theNetBackup services are not running), it is recommended that you create user foldersfor the specific command line. You can create the folders either using the mklogdir
command or manually with the non-root or non-admin user privileges.
To use legacy logging, a log file directory must exist for a process. If the directoryis not created by default, you can use the Logging Assistant or the mklogdir batchfiles to create the directories. Or, you can manually create the directories. Whenlogging is enabled for a process, a log file is created when the process begins.Each log file grows to a certain size before the NetBackup process closes it andcreates a new log file.
You can use the following batch files to create all of the log directories:
■ Windows: install_path\NetBackup\Logs\mklogdir.bat
■ UNIX: /usr/openv/netbackup/logs/mklogdir
More informationSee the NetBackup Commands Reference Guide for a complete description aboutthe mklogdir command.
Creating NetBackup log file directories for MSDPBefore you configure your NetBackup feature, create the directories into which theNetBackup commands write log files. Create the directories on the master server
406TroubleshootingAbout legacy logging
and on each media server that you use for your feature. The log files reside in thefollowing directories:
■ UNIX: /usr/openv/netbackup/logs/
■ Windows: install_path\NetBackup\logs\
More information about NetBackup logging is available in the NetBackup LoggingReference Guide, available through the following URL:
http://www.veritas.com/docs/DOC5332
To create log directories for NetBackup commands
◆ Depending on the operating system, run one of the following scripts:
UNIX: /usr/openv/netbackup/logs/mklogdir
Windows: install_path\NetBackup\logs\mklogdir.bat
To create the tpconfig command log directory
◆ Depending on the operating system, create the debug directory and thetpcommand directory (by default, the debug directory and the tpcommand directorydo not exist). The pathnames of the directories are as follows:
UNIX: /usr/openv/volmgr/debug/tpcommand
Windows: install_path\Veritas\Volmgr\debug\tpcommand
NetBackup MSDP log filesThe NetBackup deduplication components write information to various log files.Some NetBackup commands or processes write messages to their own log files.Other processes use Other processes use Veritas Unified Logging (VxUL) log files.VxUL uses a standardized name and file format for log files. An originator ID (OID)identifies the process that writes the log messages.
See “About legacy logging” on page 406.
See “About unified logging” on page 401.
In VxUL logs, the messages that begin with an sts prefix relate to the interactionwith the deduplication plug-in. Most interaction occurs on the NetBackup mediaservers. To view and manage VxUL log files, you must use NetBackup logcommands. For information about how to use and manage logs on NetBackupservers, see the NetBackup Logging Reference Guide. The guide is availablethrough the following URL:
http://www.veritas.com/docs/DOC5332
407TroubleshootingNetBackup MSDP log files
Most interaction occurs on the NetBackup media servers. Therefore, the log fileson the media servers that you use for disk operations are of most interest.
Warning: The higher the log level, the greater the affect on NetBackup performance.Use a log level of 5 (the highest) only when directed to do so by a Veritasrepresentative. A log level of 5 is for troubleshooting only.
Specify the NetBackup log levels in the Logging host properties on the NetBackupmaster server. The log levels for some processes specific to certain options are setin configuration files as described in Table 14-4.
Table 14-4 describes the log files for each component.
Table 14-4 Logs for NetBackup MSDP activity
DescriptionVxULOID
Component
The nbjm Job Manager.117Backups and restores
Messages appear in the log files for the following processes:
■ The bpbrm backup and restore manager. The following is the path to the logfiles:UNIX: /usr/openv/netbackup/logs/bpbrmWindows: install_path\Veritas\NetBackup\logs\bpbrm
■ The bpdbm database manager. The following is the path to the log files:UNIX: /usr/openv/netbackup/logs/bpdbmWindows: install_path\Veritas\NetBackup\logs\bpdbm
■ The bptm tape manager for I/O operations. The following is the path to thelog files:UNIX: /usr/openv/netbackup/logs/bptmWindows: install_path\Veritas\NetBackup\logs\bptm
N/ABackups and restores
408TroubleshootingNetBackup MSDP log files
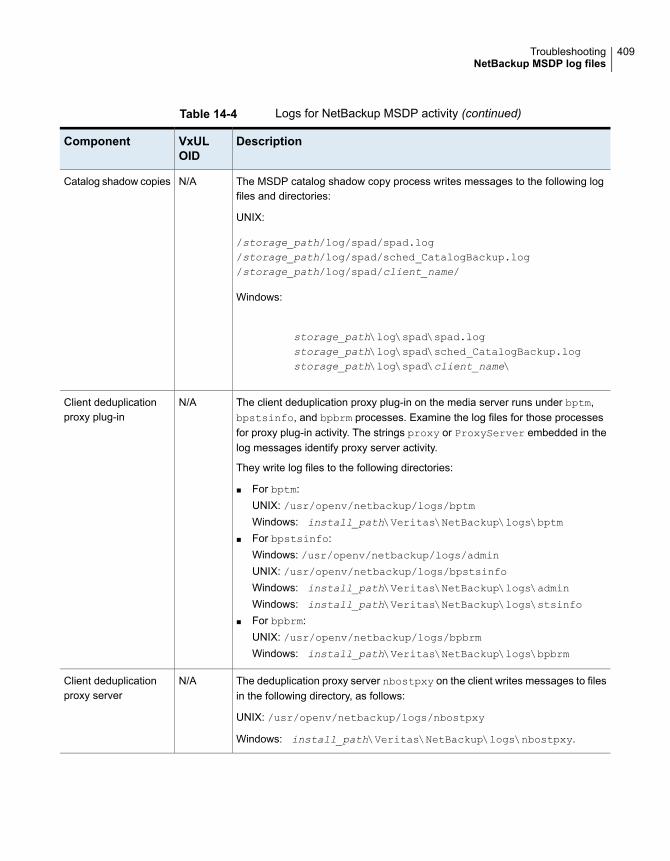
Table 14-4 Logs for NetBackup MSDP activity (continued)
DescriptionVxULOID
Component
The MSDP catalog shadow copy process writes messages to the following logfiles and directories:
UNIX:
/storage_path/log/spad/spad.log/storage_path/log/spad/sched_CatalogBackup.log/storage_path/log/spad/client_name/
Windows:
storage_path\log\spad\spad.logstorage_path\log\spad\sched_CatalogBackup.logstorage_path\log\spad\client_name\
N/ACatalog shadow copies
The client deduplication proxy plug-in on the media server runs under bptm,bpstsinfo, and bpbrm processes. Examine the log files for those processesfor proxy plug-in activity. The strings proxy or ProxyServer embedded in thelog messages identify proxy server activity.
They write log files to the following directories:
■ For bptm:UNIX: /usr/openv/netbackup/logs/bptmWindows: install_path\Veritas\NetBackup\logs\bptm
■ For bpstsinfo:Windows: /usr/openv/netbackup/logs/adminUNIX: /usr/openv/netbackup/logs/bpstsinfoWindows: install_path\Veritas\NetBackup\logs\admin
Windows: install_path\Veritas\NetBackup\logs\stsinfo
■ For bpbrm:UNIX: /usr/openv/netbackup/logs/bpbrmWindows: install_path\Veritas\NetBackup\logs\bpbrm
N/AClient deduplicationproxy plug-in
The deduplication proxy server nbostpxy on the client writes messages to filesin the following directory, as follows:
UNIX: /usr/openv/netbackup/logs/nbostpxy
Windows: install_path\Veritas\NetBackup\logs\nbostpxy.
N/AClient deduplicationproxy server
409TroubleshootingNetBackup MSDP log files
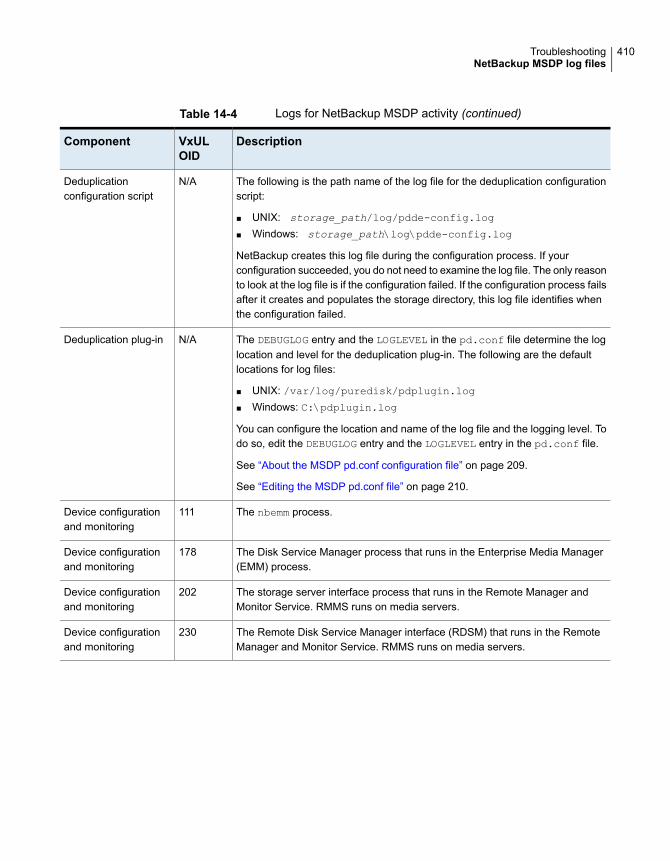
Table 14-4 Logs for NetBackup MSDP activity (continued)
DescriptionVxULOID
Component
The following is the path name of the log file for the deduplication configurationscript:
■ UNIX: storage_path/log/pdde-config.log
■ Windows: storage_path\log\pdde-config.log
NetBackup creates this log file during the configuration process. If yourconfiguration succeeded, you do not need to examine the log file. The only reasonto look at the log file is if the configuration failed. If the configuration process failsafter it creates and populates the storage directory, this log file identifies whenthe configuration failed.
N/ADeduplicationconfiguration script
The DEBUGLOG entry and the LOGLEVEL in the pd.conf file determine the loglocation and level for the deduplication plug-in. The following are the defaultlocations for log files:
■ UNIX: /var/log/puredisk/pdplugin.log■ Windows: C:\pdplugin.log
You can configure the location and name of the log file and the logging level. Todo so, edit the DEBUGLOG entry and the LOGLEVEL entry in the pd.conf file.
See “About the MSDP pd.conf configuration file” on page 209.
See “Editing the MSDP pd.conf file” on page 210.
N/ADeduplication plug-in
The nbemm process.111Device configurationand monitoring
The Disk Service Manager process that runs in the Enterprise Media Manager(EMM) process.
178Device configurationand monitoring
The storage server interface process that runs in the Remote Manager andMonitor Service. RMMS runs on media servers.
202Device configurationand monitoring
The Remote Disk Service Manager interface (RDSM) that runs in the RemoteManager and Monitor Service. RMMS runs on media servers.
230Device configurationand monitoring
410TroubleshootingNetBackup MSDP log files
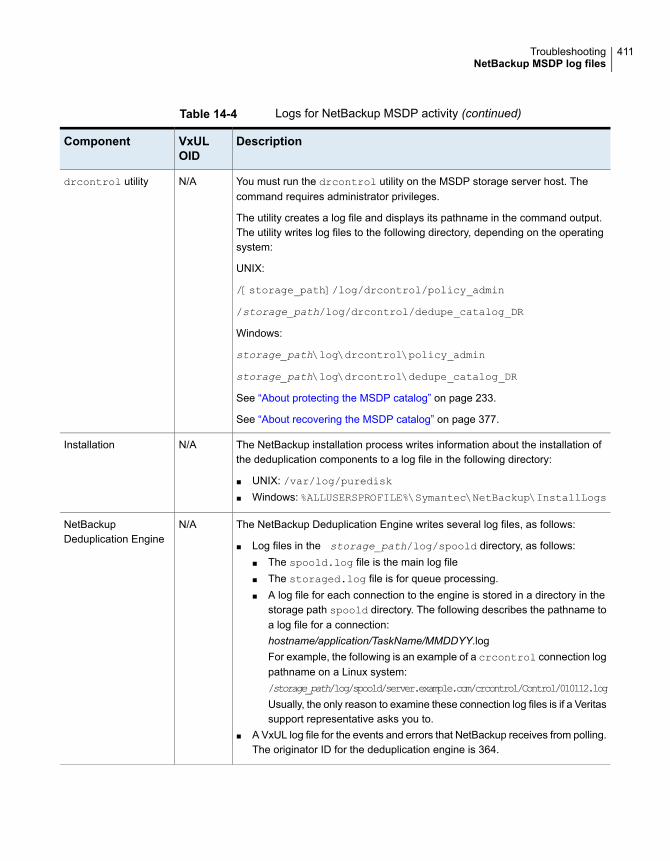
Table 14-4 Logs for NetBackup MSDP activity (continued)
DescriptionVxULOID
Component
You must run the drcontrol utility on the MSDP storage server host. Thecommand requires administrator privileges.
The utility creates a log file and displays its pathname in the command output.The utility writes log files to the following directory, depending on the operatingsystem:
UNIX:
/[storage_path]/log/drcontrol/policy_admin
/storage_path/log/drcontrol/dedupe_catalog_DR
Windows:
storage_path\log\drcontrol\policy_admin
storage_path\log\drcontrol\dedupe_catalog_DR
See “About protecting the MSDP catalog” on page 233.
See “About recovering the MSDP catalog” on page 377.
N/Adrcontrol utility
The NetBackup installation process writes information about the installation ofthe deduplication components to a log file in the following directory:
■ UNIX: /var/log/puredisk■ Windows: %ALLUSERSPROFILE%\Symantec\NetBackup\InstallLogs
N/AInstallation
The NetBackup Deduplication Engine writes several log files, as follows:
■ Log files in the storage_path/log/spoold directory, as follows:■ The spoold.log file is the main log file■ The storaged.log file is for queue processing.■ A log file for each connection to the engine is stored in a directory in the
storage path spoold directory. The following describes the pathname toa log file for a connection:hostname/application/TaskName/MMDDYY.logFor example, the following is an example of a crcontrol connection logpathname on a Linux system:/storage_path/log/spoold/server.example.com/crcontrol/Control/010112.log
Usually, the only reason to examine these connection log files is if a Veritassupport representative asks you to.
■ A VxUL log file for the events and errors that NetBackup receives from polling.The originator ID for the deduplication engine is 364.
N/ANetBackupDeduplication Engine
411TroubleshootingNetBackup MSDP log files
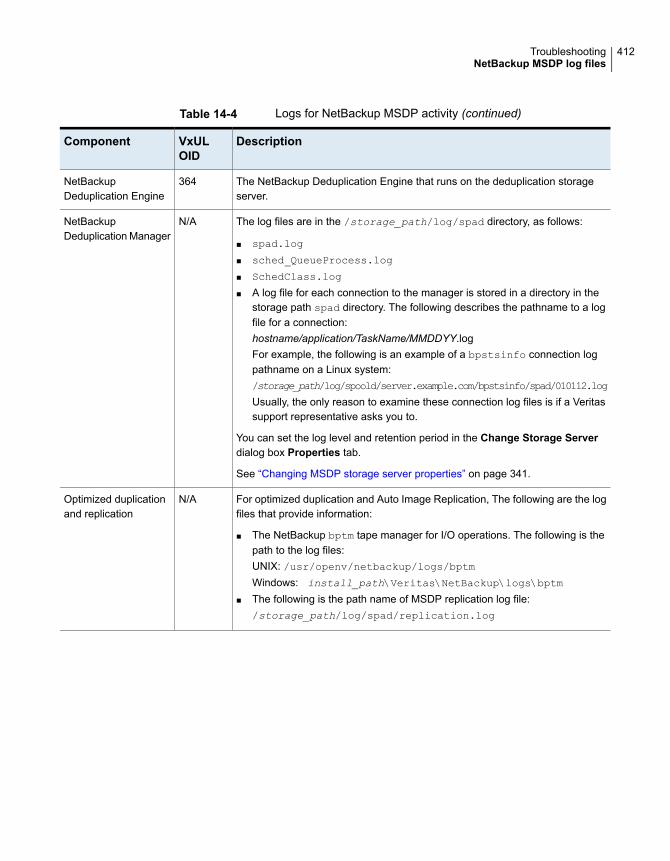
Table 14-4 Logs for NetBackup MSDP activity (continued)
DescriptionVxULOID
Component
The NetBackup Deduplication Engine that runs on the deduplication storageserver.
364NetBackupDeduplication Engine
The log files are in the /storage_path/log/spad directory, as follows:
■ spad.log
■ sched_QueueProcess.log
■ SchedClass.log
■ A log file for each connection to the manager is stored in a directory in thestorage path spad directory. The following describes the pathname to a logfile for a connection:hostname/application/TaskName/MMDDYY.logFor example, the following is an example of a bpstsinfo connection logpathname on a Linux system:/storage_path/log/spoold/server.example.com/bpstsinfo/spad/010112.log
Usually, the only reason to examine these connection log files is if a Veritassupport representative asks you to.
You can set the log level and retention period in the Change Storage Serverdialog box Properties tab.
See “Changing MSDP storage server properties” on page 341.
N/ANetBackupDeduplication Manager
For optimized duplication and Auto Image Replication, The following are the logfiles that provide information:
■ The NetBackup bptm tape manager for I/O operations. The following is thepath to the log files:UNIX: /usr/openv/netbackup/logs/bptmWindows: install_path\Veritas\NetBackup\logs\bptm
■ The following is the path name of MSDP replication log file:/storage_path/log/spad/replication.log
N/AOptimized duplicationand replication
412TroubleshootingNetBackup MSDP log files
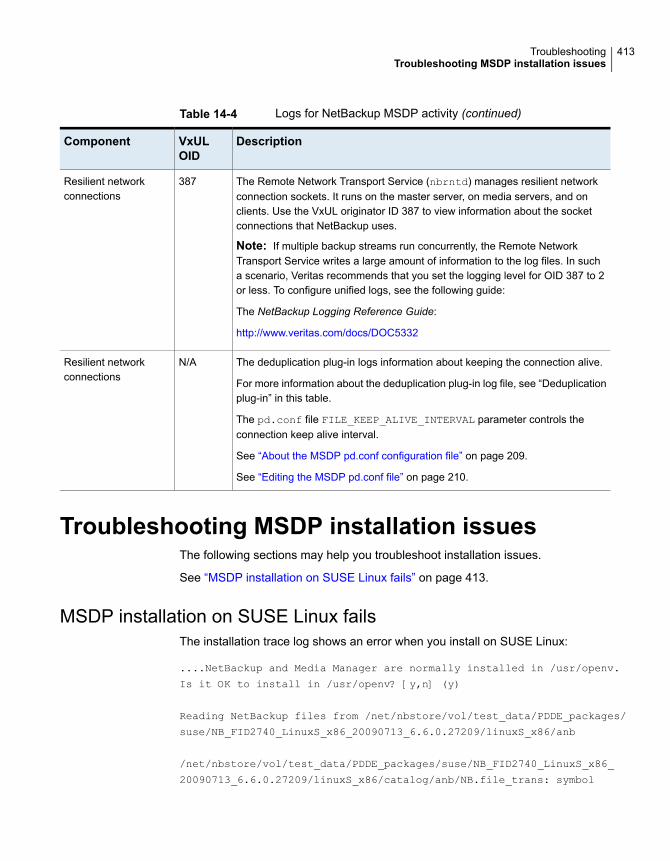
Table 14-4 Logs for NetBackup MSDP activity (continued)
DescriptionVxULOID
Component
The Remote Network Transport Service (nbrntd) manages resilient networkconnection sockets. It runs on the master server, on media servers, and onclients. Use the VxUL originator ID 387 to view information about the socketconnections that NetBackup uses.
Note: If multiple backup streams run concurrently, the Remote NetworkTransport Service writes a large amount of information to the log files. In sucha scenario, Veritas recommends that you set the logging level for OID 387 to 2or less. To configure unified logs, see the following guide:
The NetBackup Logging Reference Guide:
http://www.veritas.com/docs/DOC5332
387Resilient networkconnections
The deduplication plug-in logs information about keeping the connection alive.
For more information about the deduplication plug-in log file, see “Deduplicationplug-in” in this table.
The pd.conf file FILE_KEEP_ALIVE_INTERVAL parameter controls theconnection keep alive interval.
See “About the MSDP pd.conf configuration file” on page 209.
See “Editing the MSDP pd.conf file” on page 210.
N/AResilient networkconnections
Troubleshooting MSDP installation issuesThe following sections may help you troubleshoot installation issues.
See “MSDP installation on SUSE Linux fails” on page 413.
MSDP installation on SUSE Linux failsThe installation trace log shows an error when you install on SUSE Linux:
....NetBackup and Media Manager are normally installed in /usr/openv.
Is it OK to install in /usr/openv? [y,n] (y)
Reading NetBackup files from /net/nbstore/vol/test_data/PDDE_packages/
suse/NB_FID2740_LinuxS_x86_20090713_6.6.0.27209/linuxS_x86/anb
/net/nbstore/vol/test_data/PDDE_packages/suse/NB_FID2740_LinuxS_x86_
20090713_6.6.0.27209/linuxS_x86/catalog/anb/NB.file_trans: symbol
413TroubleshootingTroubleshooting MSDP installation issues
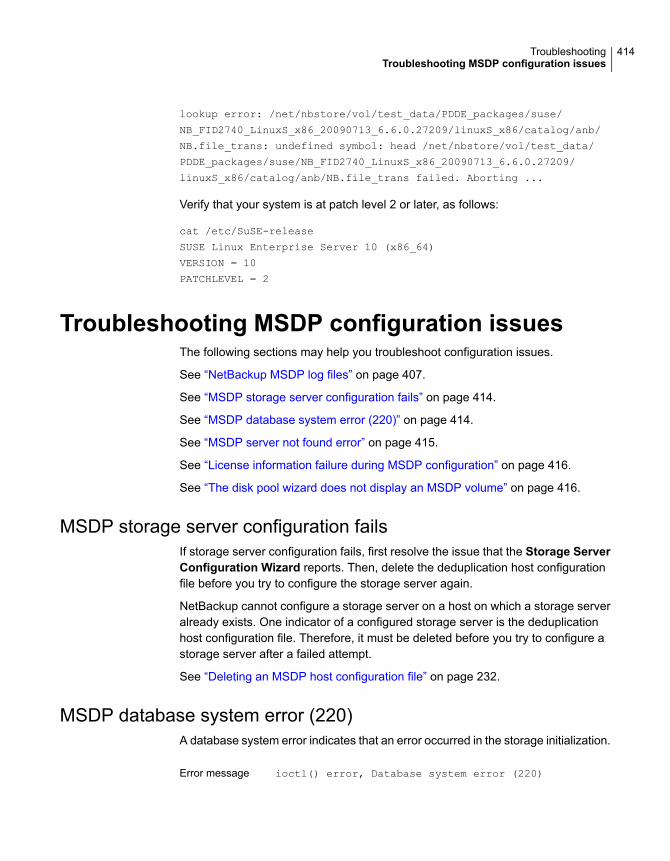
lookup error: /net/nbstore/vol/test_data/PDDE_packages/suse/
NB_FID2740_LinuxS_x86_20090713_6.6.0.27209/linuxS_x86/catalog/anb/
NB.file_trans: undefined symbol: head /net/nbstore/vol/test_data/
PDDE_packages/suse/NB_FID2740_LinuxS_x86_20090713_6.6.0.27209/
linuxS_x86/catalog/anb/NB.file_trans failed. Aborting ...
Verify that your system is at patch level 2 or later, as follows:
cat /etc/SuSE-release
SUSE Linux Enterprise Server 10 (x86_64)
VERSION = 10
PATCHLEVEL = 2
Troubleshooting MSDP configuration issuesThe following sections may help you troubleshoot configuration issues.
See “NetBackup MSDP log files” on page 407.
See “MSDP storage server configuration fails” on page 414.
See “MSDP database system error (220)” on page 414.
See “MSDP server not found error” on page 415.
See “License information failure during MSDP configuration” on page 416.
See “The disk pool wizard does not display an MSDP volume” on page 416.
MSDP storage server configuration failsIf storage server configuration fails, first resolve the issue that the Storage ServerConfiguration Wizard reports. Then, delete the deduplication host configurationfile before you try to configure the storage server again.
NetBackup cannot configure a storage server on a host on which a storage serveralready exists. One indicator of a configured storage server is the deduplicationhost configuration file. Therefore, it must be deleted before you try to configure astorage server after a failed attempt.
See “Deleting an MSDP host configuration file” on page 232.
MSDP database system error (220)A database system error indicates that an error occurred in the storage initialization.
ioctl() error, Database system error (220)Error message
414TroubleshootingTroubleshooting MSDP configuration issues
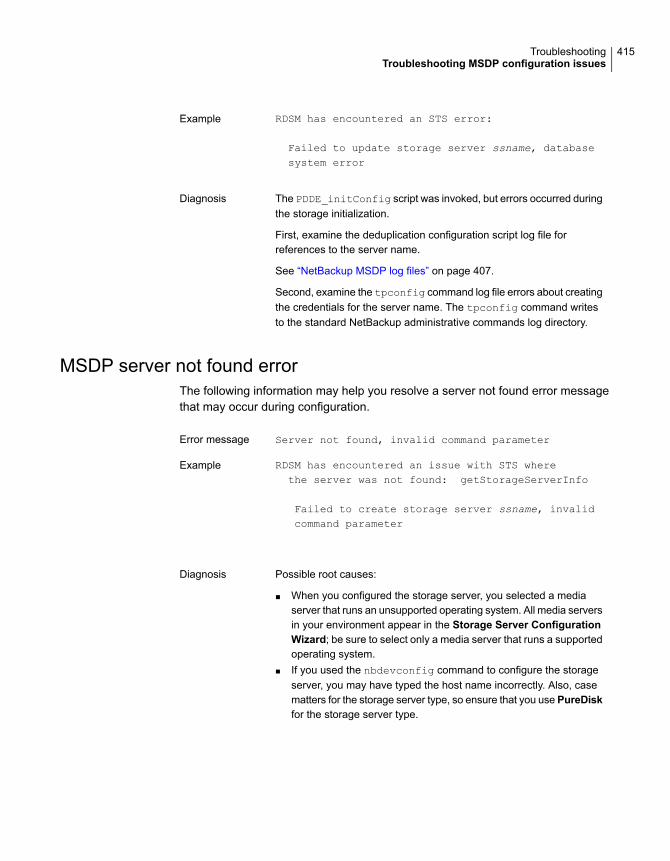
RDSM has encountered an STS error:
Failed to update storage server ssname, databasesystem error
Example
The PDDE_initConfig script was invoked, but errors occurred duringthe storage initialization.
First, examine the deduplication configuration script log file forreferences to the server name.
See “NetBackup MSDP log files” on page 407.
Second, examine the tpconfig command log file errors about creatingthe credentials for the server name. The tpconfig command writesto the standard NetBackup administrative commands log directory.
Diagnosis
MSDP server not found errorThe following information may help you resolve a server not found error messagethat may occur during configuration.
Server not found, invalid command parameterError message
RDSM has encountered an issue with STS wherethe server was not found: getStorageServerInfo
Failed to create storage server ssname, invalidcommand parameter
Example
Possible root causes:
■ When you configured the storage server, you selected a mediaserver that runs an unsupported operating system. All media serversin your environment appear in the Storage Server ConfigurationWizard; be sure to select only a media server that runs a supportedoperating system.
■ If you used the nbdevconfig command to configure the storageserver, you may have typed the host name incorrectly. Also, casematters for the storage server type, so ensure that you use PureDiskfor the storage server type.
Diagnosis
415TroubleshootingTroubleshooting MSDP configuration issues
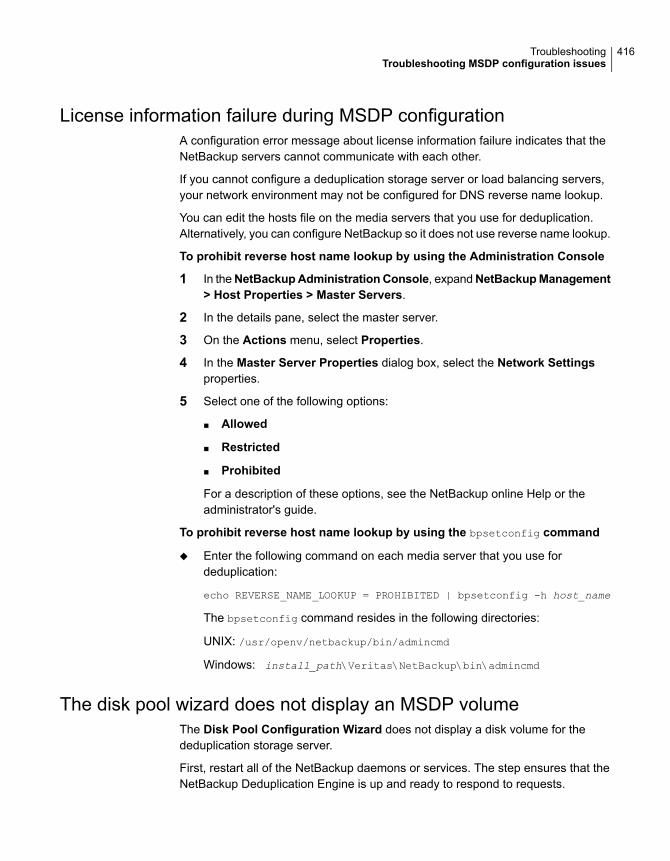
License information failure during MSDP configurationA configuration error message about license information failure indicates that theNetBackup servers cannot communicate with each other.
If you cannot configure a deduplication storage server or load balancing servers,your network environment may not be configured for DNS reverse name lookup.
You can edit the hosts file on the media servers that you use for deduplication.Alternatively, you can configure NetBackup so it does not use reverse name lookup.
To prohibit reverse host name lookup by using the Administration Console
1 In theNetBackupAdministrationConsole, expandNetBackupManagement> Host Properties > Master Servers.
2 In the details pane, select the master server.
3 On the Actions menu, select Properties.
4 In the Master Server Properties dialog box, select the Network Settingsproperties.
5 Select one of the following options:
■ Allowed
■ Restricted
■ Prohibited
For a description of these options, see the NetBackup online Help or theadministrator's guide.
To prohibit reverse host name lookup by using the bpsetconfig command
◆ Enter the following command on each media server that you use fordeduplication:
echo REVERSE_NAME_LOOKUP = PROHIBITED | bpsetconfig -h host_name
The bpsetconfig command resides in the following directories:
UNIX: /usr/openv/netbackup/bin/admincmd
Windows: install_path\Veritas\NetBackup\bin\admincmd
The disk pool wizard does not display an MSDP volumeThe Disk Pool Configuration Wizard does not display a disk volume for thededuplication storage server.
First, restart all of the NetBackup daemons or services. The step ensures that theNetBackup Deduplication Engine is up and ready to respond to requests.
416TroubleshootingTroubleshooting MSDP configuration issues
Second, restart the NetBackup Administration Console. This step clears cachedinformation from the failed attempt to display the disk volume.
Troubleshooting MSDP operational issuesThe following sections may help you troubleshoot operational issues.
See “Verify that the MSDP server has sufficient memory” on page 417.
See “MSDP backup or duplication job fails” on page 417.
See “MSDP client deduplication fails” on page 420.
See “MSDP volume state changes to DOWN when volume is unmounted”on page 420.
See “MSDP errors, delayed response, hangs” on page 421.
See “Cannot delete an MSDP disk pool” on page 422.
See “MSDP media open error (83)” on page 423.
See “MSDP media write error (84)” on page 425.
See “MSDP no images successfully processed (191)” on page 428.
See “MSDP storage full conditions” on page 428.
See “Troubleshooting MSDP catalog backup” on page 429.
Verify that the MSDP server has sufficient memoryInsufficient memory on the storage server can cause operation problems. If youhave operation issues, you should verify that your storage server has sufficientmemory.
See “About MSDP server requirements” on page 28.
If the NetBackup deduplication processes do no start on Red Hat Linux, configureshared memory to be at least 128 MB (SHMMAX=128MB).
MSDP backup or duplication job failsThe following subsections describe some potential failures for backup ordeduplication jobs and how to resolve them.
■ Disk volume is down
■ Storage server is down or unavailable
■ Backup job: System error occurred (174)
417TroubleshootingTroubleshooting MSDP operational issues
■ Failure to open storage path or to prepare CRQP transaction
Disk volume is downA message similar to the following appears in the job details:
Error 800: Disk Volume is Down
Examine the disk error logs to determine why the volume was marked DOWN.
If the storage server is busy with jobs, it may not respond to master server diskpolling requests in a timely manner. A busy load balancing server also may causethis error. Consequently, the query times out and the master server marks thevolume DOWN.
If the error occurs for an optimized duplication job: verify that source storage serveris configured as a load balancing server for the target storage server. Also verifythat the target storage server is configured as a load balancing server for the sourcestorage server.
See “Viewing MSDP disk errors and events” on page 430.
Storage server is down or unavailableWindows servers only.
A message similar to the following appears in the job details:
Error nbjm(pid=6384) NBU status: 2106, EMM status: Storage Server is
down or unavailable Disk storage server is down(2106)
The NetBackup Deduplication Manager (spad.exe) and the NetBackup DeduplicationEngine (spoold.exe) have different shared memory configuration values. Thisproblem can occur when you use a command to change the shared memory valueof only one of these two components.
To resolve the issue, specify the following shared memory value in the configurationfile:
SharedMemoryEnabled=1
Then, restart both components. Do not change the values of the other two sharedmemory parameters.
The SharedMemoryEnabled parameter is stored in the following file:
storage_path\etc\puredisk\agent.cfg
Backup job: System error occurred (174)A message similar to the following appears in the job details:
media manager - system error occurred (174)
418TroubleshootingTroubleshooting MSDP operational issues
If the job details also include errors similar to the following, it indicates that an imageclean-up job failed:
Critical bpdm (pid=610364) sts_delete_image
failed: error 2060018 file not found
Critical bpdm (pid=610364) image delete
failed: error 2060018: file not found
This error occurs if a deduplication backup job fails after the job writes part of thebackup to the Media Server Deduplication Pool. NetBackup starts an imagecleanup job, but that job fails because the data necessary to complete the imageclean-up was not written to the Media Server Deduplication Pool.
Deduplication queue processing cleans up the image objects, so you do not needto take corrective action. However, examine the job logs and the deduplication logsto determine why the backup job failed.
See “About MSDP queue processing” on page 362.
See “NetBackup MSDP log files” on page 407.
Failure to open storage path or to prepare CRQPtransactionError messages similar to the following appear in one of the NetBackupDeduplication Engine (spoold) log files.
RefDBEngine::write_prepare fail to open
/storage_path/databases/refdb/prepare/64.ref.prepare
RefDBManager::write_prepare fail to prepare CRQP transaction for
refdb 64
See “NetBackup MSDP log files” on page 407.
This error occurs if the /storage_path/databases/refdb/prepare directory isdeleted.
To fix this problem, do one of the following:
■ Create the missing directory manually.
■ Restart the NetBackup Deduplication Engine (spoold). First ensure that nobackups are running on the storage unit on that media server.
Note: RefDBEngine and refdb do not refer to nor are they related to the opensource RefDB reference database and bibliography tool.
419TroubleshootingTroubleshooting MSDP operational issues
MSDP client deduplication failsNetBackup client-side agents (including client deduplication) depend on reversehost name look up of NetBackup server names. Conversely, regular backups dependon forward host name resolution. Therefore, the backup of a client that deduplicatesit's own data may fail, while a normal backup of the client may succeed.
If a client-side deduplication backup fails, verify that your Domain Name Serverincludes all permutations of the storage server name.
Also, Veritas recommends that you use fully-qualified domain names for yourNetBackup environment.
See “Use fully qualified domain names” on page 41.
MSDP volume state changes to DOWN when volume is unmountedIf a volume becomes unmounted, NetBackup changes the volume state to DOWN.NetBackup jobs that require that volume fail.
420TroubleshootingTroubleshooting MSDP operational issues
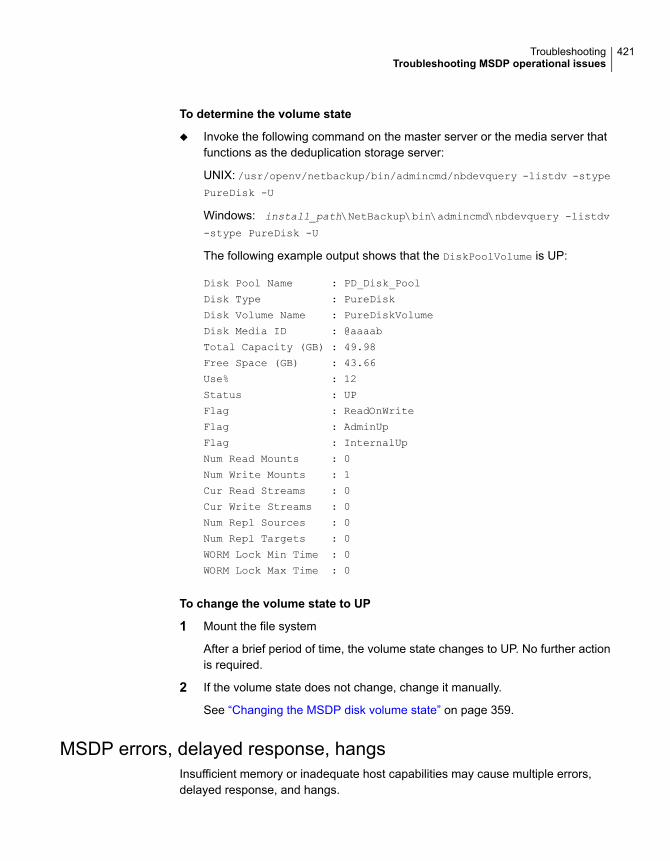
To determine the volume state
◆ Invoke the following command on the master server or the media server thatfunctions as the deduplication storage server:
UNIX: /usr/openv/netbackup/bin/admincmd/nbdevquery -listdv -stype
PureDisk -U
Windows: install_path\NetBackup\bin\admincmd\nbdevquery -listdv
-stype PureDisk -U
The following example output shows that the DiskPoolVolume is UP:
Disk Pool Name : PD_Disk_Pool
Disk Type : PureDisk
Disk Volume Name : PureDiskVolume
Disk Media ID : @aaaab
Total Capacity (GB) : 49.98
Free Space (GB) : 43.66
Use% : 12
Status : UP
Flag : ReadOnWrite
Flag : AdminUp
Flag : InternalUp
Num Read Mounts : 0
Num Write Mounts : 1
Cur Read Streams : 0
Cur Write Streams : 0
Num Repl Sources : 0
Num Repl Targets : 0
WORM Lock Min Time : 0
WORM Lock Max Time : 0
To change the volume state to UP
1 Mount the file system
After a brief period of time, the volume state changes to UP. No further actionis required.
2 If the volume state does not change, change it manually.
See “Changing the MSDP disk volume state” on page 359.
MSDP errors, delayed response, hangsInsufficient memory or inadequate host capabilities may cause multiple errors,delayed response, and hangs.
421TroubleshootingTroubleshooting MSDP operational issues
See “About MSDP server requirements” on page 28.
For virtual machines, Veritas recommends that you do the following:
■ Set the memory size of each virtual machine to double the physical memory ofthe host.
■ Set the minimum and the maximum values of each virtual machine to the samevalue (double the physical memory of the host). These memory settings preventthe virtual memory from becoming fragmented on the disk because it does notgrow or shrink.
These recommendations may not be the best configuration for every virtual machine.However, Veritas recommends that you try this solution first when troubleshootingperformance issues.
Cannot delete an MSDP disk poolIf you cannot delete a disk pool that you believe contains no valid backup images,the following information may help you troubleshoot the problem.
■ Expired fragments remain on MSDP disk
■ Incomplete SLP duplication jobs
Expired fragments remain on MSDP diskUnder some circumstances, the fragments that compose an expired backup imagemay remain on disk even though the images have expired. For example, if thestorage server crashes, normal clean-up processes may not run. In thosecircumstances, you cannot delete a disk pool because image fragment records stillexist. The error message may be similar to the following:
DSM has found that one or more volumes in the disk pool diskpoolname
has image fragments.
To delete the disk pool, you must first delete the image fragments. The nbdelete
command deletes expired image fragments from disk volumes.
To delete the fragments of expired images
◆ Run the following command on the master server:
UNIX: /usr/openv/netbackup/bin/admincmd/nbdelete -allvolumes -force
Windows: install_path\NetBackup\bin\admincmd\nbdelete -allvolumes
-force
The -allvolumes option deletes expired image fragments from all volumes thatcontain them.
422TroubleshootingTroubleshooting MSDP operational issues
The -force option removes the database entries of the image fragments even iffragment deletion fails.
Incomplete SLP duplication jobsIncomplete storage lifecycle policy duplication jobs may prevent disk pool deletion.You can determine if incomplete jobs exist and then cancel them.
To cancel storage lifecycle policy duplication jobs
1 Determine if incomplete SLP duplication jobs exist by running the followingcommand on the master server:
UNIX: /usr/openv/netbackup/bin/admincmd/nbstlutil stlilist
-image_incomplete
Windows: install_path\NetBackup\bin\admincmd\nbstlutil stlilist
-image_incomplete
2 Cancel the incomplete jobs by running the following command for each backupID returned by the previous command (xxxxx represents the backup ID):
UNIX: /usr/openv/netbackup/bin/admincmd/nbstlutil cancel -backupid
xxxxx
Windows: install_path\NetBackup\bin\admincmd\nbstlutil cancel
-backupid xxxxx
MSDP media open error (83)The media open error (83) message is a generic error for the duplication. Theerror appears in the NetBackup Administration Console Activity Monitor.
Often, the NetBackup Deduplication Engine (spoold) or the NetBackup DeduplicationManager (spad) were too busy to respond to the deduplication process in a timelymanner. External factors may cause the Deduplication Engine or the DeduplicationManager to be unresponsive. Were they temporarily busy (such as queue processingin progress)? Do too many jobs run concurrently?
See “About MSDP performance” on page 38.
Usually but not always the NetBackup bpdm log provides additional informationabout status 83.
The following subsections describe use cases that generated an error 83.
SQL Server client-side backups failClient-side backups of a SQL Server database may fail in the followingcircumstances:
423TroubleshootingTroubleshooting MSDP operational issues
■ The Both IPv4 and IPv6 option is enabled for the master server, the mediaserver that hosts the NetBackup Deduplication Engine, and the client. TheBothIPv4 and IPv6 option is configured in the Network Settings host properties.
■ The IPv6 network is configured as a preferred network for the master server,the media server that hosts the NetBackup Deduplication Engine, and the client.The preferred network Match (Above network will be preferred forcommunication) property also is enabled. Preferred networks are configuredin the Preferred Networks host properties.
■ The IPv6 network is chosen for the backup.
Examine the bpbrm log file for an error similar to the following:
probe_ost_plugin: sts_get_server_prop_byname failed: error 2060057
If the error message appears, the NetBackup host name cache may not containthe correct host name mapping information. The cache may be out of sync if DNSchanges in your network environment were not fully propagated throughout yourenvironment. It takes some amount of time for DNS changes to propagate throughouta network environment.
To resolve the problem, do the following on the NetBackup master server and onthe MSDP storage server:
1. Stop the NetBackup services.
2. Run the following command:
UNIX: /usr/openv/netbackup/bin/bpclntcmd -clearhostcache
Windows: install_path\NetBackup\bin\bpclntcmd.exe -clearhostcache
3. Start the NetBackup services.
For more information about client deduplication logging, see the description of“Client deduplication proxy plug-in” in the “MSDP log files” topic.
See “NetBackup MSDP log files” on page 407.
Restore or duplication failsThe media open error (83) message appears in theNetBackup AdministrationConsole Activity Monitor.
Table 14-5 describes other messages that may appear.
424TroubleshootingTroubleshooting MSDP operational issues
Table 14-5 Case sensitivity error messages
Status in bpdm and bptmlog files
Activity Monitor jobdetails
Operation
sts_open_image failed:error 2060018
Image open failed:error 2060018: filenot found
Restore
sts_open_image failed:error 2060018
Image open failed:error 2060018: filenot found
Duplication (MSDP source)
rpl_add_image_set:rpl_get_image_info()failed, error 2060013
get image propertiesfailed: error 2060013:no more entries
Replication (MSDP source)
sts_open_image failed:error 2060018
Image open failed:error 2060018: filenot found
Duplication (NetBackup 5000series appliance source)
rpl_add_image_set:rpl_get_image_info()failed, error 2060013
get image propertiesfailed: error 2060013:no more entries
Replication (NetBackup 5000series appliance source)
The messages may indicate a client name case sensitivity issue in your MSDPenvironment. For a description of the problem and the procedures to resolve it, seethe following Veritas tech note:
http://www.veritas.com/docs/TECH207194
MSDP media write error (84)Table 14-6 describes solutions to the media write errors that may occur duringMedia Server Deduplication Pool backups, duplication, or replication.
Also see the following subsections for descriptions of more complicated solutions:
■ Host name resolution problems
425TroubleshootingTroubleshooting MSDP operational issues
Table 14-6 Media write error causes
Examine the Disk Logs report for errors that includethe name PureDisk. Examine the disk monitoringservices log files for details from the deduplicationplug-in.
See “Viewing MSDP disk reports” on page 334.
The NetBackup Deduplication Engine(spoold) was too busy to respond.
Data cannot be backed up at the same time as itis removed.
See “About MSDP queue processing” on page 362.
Data removal is running.
Users must not add files to, change files on, deletefiles from, or change file permissions on thestorage. If a file was added, remove it.
A user tampered with the storage.
If you grew the storage, you must restart theNetBackup services on the storage server so thenew capacity is recognized.
Storage capacity was increased.
If possible, increase the storage capacity.
See “About provisioning the storage for MSDP”on page 47.
The storage is full.
Change the state to up.
See “ Changing Media Server Deduplication Poolstate” on page 351.
The deduplication pool is down.
Ensure that ports 10082 and 10102 are open inany firewalls between the deduplication hosts.
Firewall ports are not open.
Host name resolution problemsClient-side deduplication can fail if the client cannot resolve the host name of theserver. More specifically, the error can occur if the storage server was configuredwith a short name and the client tries to resolve a fully qualified domain name
To determine which name the client uses for the storage server, examine thededuplication host configuration file on the client.
See “About the MSDP host configuration file” on page 231.
To fix this problem, configure your network environment so that all permutations ofthe storage server name resolve.
Veritas recommends that you use fully qualified domain names.
426TroubleshootingTroubleshooting MSDP operational issues
See “Use fully qualified domain names” on page 41.
Duplication job to PureDisk storage fails
Note: NetBackup supports PureDisk Deduplication Pool storage on NetBackup5000 series appliances only.
A duplication job to PureDisk storage may fail for a large number of small files. Thisfailure may occur if the storage unit maximum fragment is at the default setting.
Messages similar to the following may appear in the NetBackup job details:
2/12/2013 2:33:20 AM - Critical bpdm(pid=25204) Storage Server Error:
(Storage server: PureDisk: msdp.example.com) async_get_job_status:
Replication started but failed to complete successfully: __process_batch:
CRStoreDO failed: broken pipe, DO fingerprint d6f2521a5c66c54225ecd6a4c92.
Look at the replication logs on the source storage server for more
information. V-454-105
2/12/2013 2:33:22 AM - Critical bpdm(pid=25204) sts_copy_extent failed:
error 2060014 operation aborted
2/12/2013 2:33:22 AM - end writing; write time: 3:39:53
2/12/2013 2:33:39 AM - Error bpduplicate(pid=5300) host
msdp.example.com backup id msdp.example.com_1360303271 optimized
duplication failed, media write error (84).
2/12/2013 2:33:39 AM - Info msdp.example.com(pid=25204)
StorageServer=PureDisk:msdp.example.com; Report=PDDO Stats for
(msdp.example.com): scanned: 0 KB, CR sent: 0 KB, CR sent over FC:
0 KB, dedup: 0.0%, cache disabled
2/12/2013 2:33:40 AM - Error bpduplicate(pid=5300) Duplicate of backupid
msdp.example.com_1360303271 failed, media write error (84).
2/12/2013 2:33:40 AM - Error bpduplicate(pid=5300) Status = no images
were successfully processed.
2/12/2013 2:33:40 AM - end Duplicate; elapsed time: 3:41:03 media write
error(84)
Messages similar to the following also may appear in a log file on the PureDiskcontent router that processed the duplication operation. The log file resides in adirectory that corresponds to the connection to the content router for the duplicationoperation. The name of the directory is the NetBackup storage server IP address,and it resides in the /Storage/log/spoold directory on the content router.
spad/Store/2/266020624-1360833685.log:July 14 04:12:03 ERR [1081665856]:
25112: DO: DO 065ab494d80277148c559071d007bde1: DO record size of
378652257 bytes is larger than the maximum allowed size of 335544320
427TroubleshootingTroubleshooting MSDP operational issues
bytes: DO has too many segments
spad/Store/2/266020624-1360833685.log:February 14 04:12:03 ERR
[1081665856]: 8413608: Store terminated due to a local processing
error at: Sun Jul 14 04:12:03 2013
To resolve this problem, reduce the fragment size of the NetBackup storage unitthat represents the PureDisk storage. Depending on the source storage content,you may have to reduce the fragment size significantly.
MSDP no images successfully processed (191)The no images successfully processed (191) message appears in theNetBackup Administration Console Activity Monitor.
Table 14-7 describes other messages that may appear.
Table 14-7 Case sensitivity error messages
Status in bpdm and bptm logfiles
Activity Monitor job detailsOperation
sts_open_image failed:error 2060018
image open failed: error2060018: file not found
Verify
The message may indicate a client name case sensitivity issue in your MSDPenvironment. For a description of the problem and the procedures to resolve it, seethe following Veritas tech note:
http://www.veritas.com/docs/TECH207194
MSDP storage full conditionsOperating system tools such as the UNIX df command do not report deduplicationdisk usage accurately. The operating system commands may report that the storageis full when it is not. NetBackup tools let you monitor storage capacity and usagemore accurately.
Note: In a Cloud Catalyst environment, however, the UNIX df command can beused to determine the disk space in the local cache directory.
See “About MSDP storage capacity and usage reporting” on page 330.
See “About MSDP container files” on page 332.
See “Viewing storage usage within MSDP container files” on page 332.
428TroubleshootingTroubleshooting MSDP operational issues
Examining the disk log reports for threshold warnings can give you an idea of whena storage full condition may occur.
How NetBackup performs maintenance can affect when storage is freed up for use.
See “About MSDP queue processing” on page 362.
See “About the MSDP data removal process” on page 371.
Although not advised, you can reclaim free space manually.
See “Processing the MSDP transaction queue manually” on page 362.
Troubleshooting MSDP catalog backupThe following subsections provide information about MSDP catalog backup andrecovery.
Catalog backupTable 14-8 describes error messages that may occur when you create or updatea catalog backup policy. The messages are displayed in the shell window in whichyou ran the drcontrol utility. The utility also writes the messages to its log file.
Table 14-8 MSDP drcontrol codes and messages
DescriptionCode ormessage
Fatal error in an operating system or deduplication command that the drcontrol utility calls.1
The command cannot find the necessary NetBackup configuration information.110
The user who invoked the command does not have administrator privileges.140
A command option or argument is required.144
The policy name that you specified already exists.226
This error code is passed from the NetBackup bplist command. The MSDP catalog backup policyyou specified does not exist or no backups exist for the given policy name.
227
Fatal error in the drcontrol utility.255
For more information about status codes and error messages, see the following:
■ The Troubleshooter in the NetBackup Administration Console.
■ The NetBackup Status Codes Reference Guide available through the followingwebpage:http://www.veritas.com/docs/DOC5332
429TroubleshootingTroubleshooting MSDP operational issues
Catalog recovery from a shadow copyIf NetBackup detects corruption in the MSDP catalog, the Deduplication Managerrecovers the catalog automatically from the most recent shadow copy. That recoveryprocess also plays a transaction log so that the recovered MSDP catalog is current.
Although the shadow copy recovery process is automatic, a recovery procedure isavailable if you need to recover from a shadow copy manually.
See “Restoring the MSDP catalog from a shadow copy” on page 378.
Storage Platform Web Service (spws) does not startStorage Platform Web Service (spws) does not start when you run bp.start_all.
Workaround:
If spws does not start when you run bp.start_all, run the following command toreconfigure vpfs and spws:
vpfs_config.sh --configure_byo
Disk volume API or command line option does not workYou have an MSDP storage server that has NetBackup version earlier than 8.3 andyou have not enabled the encryption and KMS details. If you try to update theencryption and KMS details for a local volume using the new disk volume updateAPI, the API operation succeeds. However, the actual values are not updated.
This issue occurs for both the API and command line option.
Viewing MSDP disk errors and eventsYou can view disk errors and events in several ways, as follows:
■ The Disk Logs report.See “Viewing MSDP disk reports” on page 334.
■ The NetBackup bperror command with the -disk option reports on disk errors.The command resides in the following directories:UNIX: /usr/openv/netbackup/bin/admincmdWindows: install_path\Veritas\NetBackup\bin\admincmd
430TroubleshootingViewing MSDP disk errors and events
MSDP event codes and messagesThe following table shows the deduplication event codes and their messages. Eventcodes appear in the bperror command -disk output and in the disk reports in theNetBackup Administration Console.
Table 14-9 MSDP event codes and messages
Message exampleNetBackupSeverity
EventSeverity
Event #
Operation configload/reload failed on serverPureDisk:server1.example.com on host server1.example.com.
Error21000
Operation configload/reload failed on serverPureDisk:server1.example.com on host server1.example.com.
Error21001
The open file limit exceeded in serverPureDisk:server1.example.com on host server1.example.com.Will attempt to continue further.
Warning41002
A connection request was denied on the serverPureDisk:server1.example.com on host server1.example.com.
Error21003
Network failure occurred in serverPureDisk:server1.example.com on host server1.example.com.
Critical11004
Task Aborted; An unexpected error occurred duringcommunication with remote system in serverPureDisk:server1.example.com on host server1.example.com.
Error21008
Authorization request from <IP> for user <USER> denied(<REASON>).
Authorization81009
Task initialization on server PureDisk:server1.example.comon host server1.example.com got an unexpected error.
Error21010
Task ended on server PureDisk:server1.example.com on hostserver1.example.com.
Info161011
Task session start request on serverPureDisk:server1.example.com on host server1.example.comgot an unexpected error.
Critical11013
A request for agent task was denied on serverPureDisk:server1.example.com on host server1.example.com.
Error21012
431TroubleshootingMSDP event codes and messages
Table 14-9 MSDP event codes and messages (continued)
Message exampleNetBackupSeverity
EventSeverity
Event #
Task session start request on serverPureDisk:server1.example.com on host server1.example.comgot an unexpected error.
Critical11014
Task creation failed, could not initialize task class onserver PureDisk:server1.example.com on hostserver1.example.com.
Critical11015
Service Veritas DeduplicationEngine exit on serverPureDisk:server1.example.com on host server1.example.com.Please check the server log for the probable cause of thiserror. The application has terminated.
Critical11017
Startup of Veritas Deduplication Engine completedsuccessfully on server1.example.com.
Info161018
Service Veritas DeduplicationEngine restart on serverPureDisk:server1.example.com on host server1.example.com.Please check the server log for the probable cause of thiserror. The application has restarted.
Critical11019
Service Veritas Deduplication Engine connection managerrestart failed on server PureDisk:server1.example.com onhost server1.example.com. Please check the server log forthe probable cause of this error.The application has failedto restart.
Critical11020
Service Veritas DeduplicationEngine abort on serverPureDisk:server1.example.com on host server1.example.com.Please check the server log for the probable cause of thiserror.The application has caught an unexpected signal.
Critical11028
Double backend initialization failure; Could not initializestorage backend or cache failure detected on hostPureDisk:server1.example.com in server server1.example.com.
Critical11029
Operation Storage Database Initialization failed on serverPureDisk:server1.example.com on host server1.example.com.
Critical11030
Operation Content router context initialization failed onserver PureDisk:server1.example.com on hostserver1.example.com.
Critical11031
432TroubleshootingMSDP event codes and messages
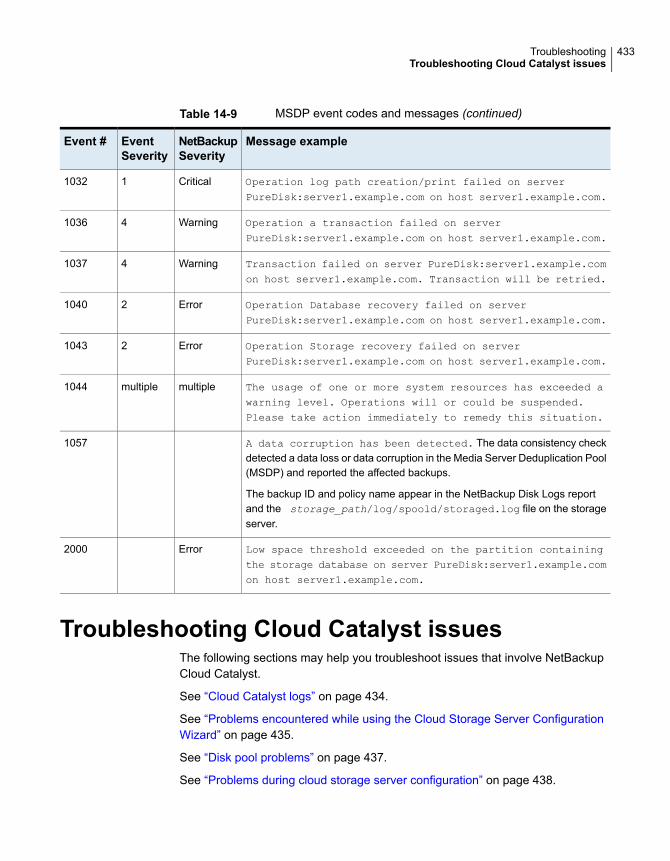
Table 14-9 MSDP event codes and messages (continued)
Message exampleNetBackupSeverity
EventSeverity
Event #
Operation log path creation/print failed on serverPureDisk:server1.example.com on host server1.example.com.
Critical11032
Operation a transaction failed on serverPureDisk:server1.example.com on host server1.example.com.
Warning41036
Transaction failed on server PureDisk:server1.example.comon host server1.example.com. Transaction will be retried.
Warning41037
Operation Database recovery failed on serverPureDisk:server1.example.com on host server1.example.com.
Error21040
Operation Storage recovery failed on serverPureDisk:server1.example.com on host server1.example.com.
Error21043
The usage of one or more system resources has exceeded awarning level. Operations will or could be suspended.Please take action immediately to remedy this situation.
multiplemultiple1044
A data corruption has been detected. The data consistency checkdetected a data loss or data corruption in the Media Server Deduplication Pool(MSDP) and reported the affected backups.
The backup ID and policy name appear in the NetBackup Disk Logs reportand the storage_path/log/spoold/storaged.log file on the storageserver.
1057
Low space threshold exceeded on the partition containingthe storage database on server PureDisk:server1.example.comon host server1.example.com.
Error2000
Troubleshooting Cloud Catalyst issuesThe following sections may help you troubleshoot issues that involve NetBackupCloud Catalyst.
See “Cloud Catalyst logs” on page 434.
See “Problems encountered while using the Cloud Storage Server ConfigurationWizard” on page 435.
See “Disk pool problems” on page 437.
See “Problems during cloud storage server configuration” on page 438.
433TroubleshootingTroubleshooting Cloud Catalyst issues
See “Status 191: No images were successfully processed” on page 440.
See “Media write error (84) if due to a full local cache directory” on page 440.
See “Restarting the vxesfsd process” on page 441.
See “Problems restarting vxesfsd” on page 443.
See “Cloud Catalyst troubleshooting tools” on page 444.
See “Unable to create CloudCatalyst with a media server that has version earlierto 8.2” on page 443.
Cloud Catalyst logsIn addition to the MSDP logs, NetBackup Cloud Catalyst creates additional logs.
The logs for the vxesfsd and the ocsd process are located in the followingdirectories:
■ /usr/openv/netbackup/logs/esfs_database
■ /usr/openv/netbackup/logs/esfs_filesystem
■ /usr/openv/netbackup/logs/esfs_monitor
■ /usr/openv/netbackup/logs/esfs_storage
■ /usr/openv/netbackup/logs/esfs_storagemanager
The location of the logs is configurable in the esfs.json file.
See “About the Cloud Catalyst esfs.json configuration file” on page 271.
Additional logs (start and stop operations, configuration, upgrade, and more) arefound in:
■ /usr/openv/esfs/log/ops
Error messages in esfs_filesystemThe following error message may be found in the esfs_filesystem log:
/usr/openv/netbackup/logs/esfs_filesystem:
ERROR - "Failed to write /data/521/534297.bhdallow_write F skip_write_fail F"
Error message
434TroubleshootingTroubleshooting Cloud Catalyst issues
One possible cause is that cache eviction cannot clean up anydata from the local cache directory for non-MSDP system file writes.
The cache eviction is triggered when the high watermark setting(HighWatermark) for the directory is reached. Once the highwatermark is reached, data is purged when the used space reachesthe midpoint between HighWatermark and LowWatermark(high+low)/2 and continues until LowWatermark is reached.If the rate of incoming data exceeds the rate where the watermarkcan be maintained, the jobs begin to fail.
Since the upload speed to the cloud is slower than the hard diskdrive write speed, this situation can arise when the partition for thelocal cache directory is small. Increase the space that is allowedfor the local cache directory.
Diagnosis
Problems encountered while using the Cloud Storage ServerConfiguration Wizard
The following topics are problems that a user might encounter while using the CloudStorage Server Configuration Wizard to configure a Cloud Catalyst storage server.
Unable to select the desired media serverIn the Add Storage Server wizard screen, the user selects a media server in thedrop-down menu that will become the Cloud Catalyst storage server.
If the media server that you want to use does not appear in the drop-down menu,check the following:
Media server versionThe NetBackup media servers that you use as Cloud Catalyst storage servers mustbe the same NetBackup version as the master server.
Host name-based security certificateThis is applicable for media server versions 8.0 to 8.1.2 only.
If the media server that you want to use does not appear in the drop-down menu,make sure that a host name-based security certificate has been deployed for thatmedia server. Use the following procedure to deploy a certificate if needed.
1. /usr/openv/netbackup/bin/admincmd/bpnbaz -ProvisionCert host_name
2. Restart the services on the media server after generating a certificate.
435TroubleshootingTroubleshooting Cloud Catalyst issues
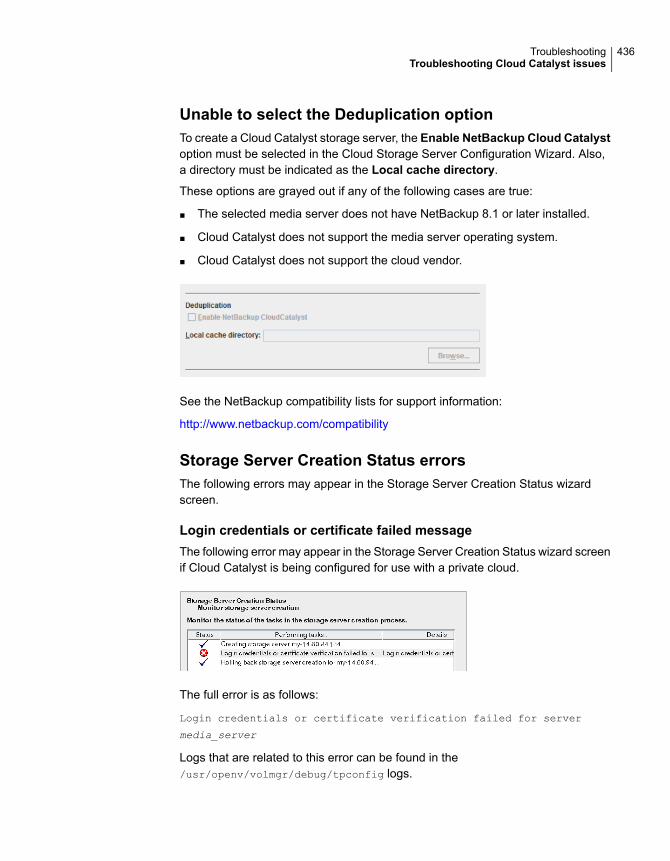
Unable to select the Deduplication optionTo create a Cloud Catalyst storage server, the Enable NetBackup Cloud Catalystoption must be selected in the Cloud Storage Server Configuration Wizard. Also,a directory must be indicated as the Local cache directory.
These options are grayed out if any of the following cases are true:
■ The selected media server does not have NetBackup 8.1 or later installed.
■ Cloud Catalyst does not support the media server operating system.
■ Cloud Catalyst does not support the cloud vendor.
See the NetBackup compatibility lists for support information:
http://www.netbackup.com/compatibility
Storage Server Creation Status errorsThe following errors may appear in the Storage Server Creation Status wizardscreen.
Login credentials or certificate failed messageThe following error may appear in the Storage Server Creation Status wizard screenif Cloud Catalyst is being configured for use with a private cloud.
The full error is as follows:
Login credentials or certificate verification failed for server
media_server
Logs that are related to this error can be found in the/usr/openv/volmgr/debug/tpconfig logs.
436TroubleshootingTroubleshooting Cloud Catalyst issues
Make sure the SSL (Secure Sockets Layer) is configured properly on the privatecloud server.
NetBackup supports only Certificate Authority (CA)-signed certificates while itcommunicates with cloud storage in the SSL mode. Ensure that the cloud serverhas CA-signed certificate. If it does not have the CA-signed certificate, data transferbetween NetBackup and the cloud provider fails in the SSL mode.
The NetBackup Cloud Administrator's Guide contains information about SSL modein private clouds:
http://www.veritas.com/docs/DOC5332
Failure to add credentialsThe wizard may display a failure to add credentials if the media server had previouslybeen configured as a Cloud Catalyst storage server. It also fails if the media serveris currently configured as a Cloud Catalyst storage server.
Run the esfs_cleanup.sh script on the media server to remove all CloudCatalyst-related information from the server.
The script is located in the following directory:
/usr/openv/esfs/scripts/esfs_cleanup.sh
Disk pool problemsThe following topics present issues concerning disk pools and Cloud Catalyststorage servers.
See “Disk pool creation problem due to timeout issue” on page 437.
See “One disk pool for each Cloud Catalyst storage server” on page 438.
Disk pool creation problem due to timeout issueFor disk pool failures while creating a disk pool for a Cloud Catalyst storage server,search for an error message that is similar to the following:
Test upload failed, done 5 error code 0, tried 300 times
The log is located in /usr/openv/netbackup/logs/esfs_filesystem.
If the error shows that 300 attempts were made, the failure was due to a timeoutissue. A slow network connection to the cloud is often the cause. Check networkconnections before contacting Veritas Support.
437TroubleshootingTroubleshooting Cloud Catalyst issues
One disk pool for each Cloud Catalyst storage serverEach Cloud Catalyst storage server may have only one disk pool.
The following error message appears if the user attempts to create a second diskpool for the cloud storage server:
The Cloud Catalyst disk volume cannot be reconfigured for this storage
server.
Problems during cloud storage server configurationThe following errors may appear during configuration of a Cloud Catalyst storageserver.
Table 14-10 Cloud storage server configuration errors
ReasonError
This is a general configuration error.
Check the following log for more specific information:
/usr/openv/esfs/log/ops/esfs-config.log.*
Contact Veritas Support to determine a corrective action.
An unknown error occurred in the CloudCatalyst subsystem
This error may occur if the esfs_init.sh script is run without all ofthe required parameters.
Check the following log for more specific information:
/usr/openv/esfs/log/ops/esfs-config.log.*
An error occurred in ESFS initialization
NetBackup installs the Filesystem in Userspace (FUSE) upon installation.If the FUSE version is too old, this message appears.
Contact Veritas Support to determine the correct version of FUSE toinstall it.
FUSE not installed
A Cloud Catalyst storage server can be configured on a media serveronly if the host is running Red Hat Enterprise Linux 7.3 or later.
See the NetBackup compatibility lists for support information:
http://www.netbackup.com/compatibility
Unsupported ESFS operating system
Check that the vxesfsd daemon has sufficient memory to run.
Check the following log for more specific information:
/usr/openv/esfs/log/ops/esfs-config.log. *
The Cloud Catalyst service could not bestarted
438TroubleshootingTroubleshooting Cloud Catalyst issues
Table 14-10 Cloud storage server configuration errors (continued)
ReasonError
This error indicates that something is preventing the NetBackupExtendable Storage File System (ESFS) from starting properly. Theremay also be a problem with the vxesfsd process.
Check the following log for more specific information:
/usr/openv/esfs/log/ops/esfs-config.log. *
Contact Veritas Support to determine a corrective action.
An ESFS mount could not be found
Media server not available in Media Servers tab to addcredentialsThe Cloud Catalyst storage server can allow access to media servers only if theyare Red Hat Enterprise Linux (any version) and have NetBackup 8.1 or later installed.Access is given to media servers by granting them credentials in theMedia Serverstab of the Cloud Catalyst storage server properties.
If the media server does not have NetBackup 8.1 or later installed, it does not appearin the Media Servers tab, so it cannot be selected.
See “Configuring source control or target control optimized duplication for CloudCatalyst” on page 277.
Add credentials failed message for media serverThe Cloud Catalyst storage server can allow access to media servers only if theyare Red Hat Enterprise Linux (any version) and have NetBackup 8.1 or later installed.Access is given to media servers by granting them credentials in theMedia Serverstab of the Cloud Catalyst storage server properties.
If the media server is non-RHEL, it appears in the Media Servers tab. However, ifit is selected to have access to the Cloud Catalyst storage server, the operationfails with an Add credentials failed message.
439TroubleshootingTroubleshooting Cloud Catalyst issues
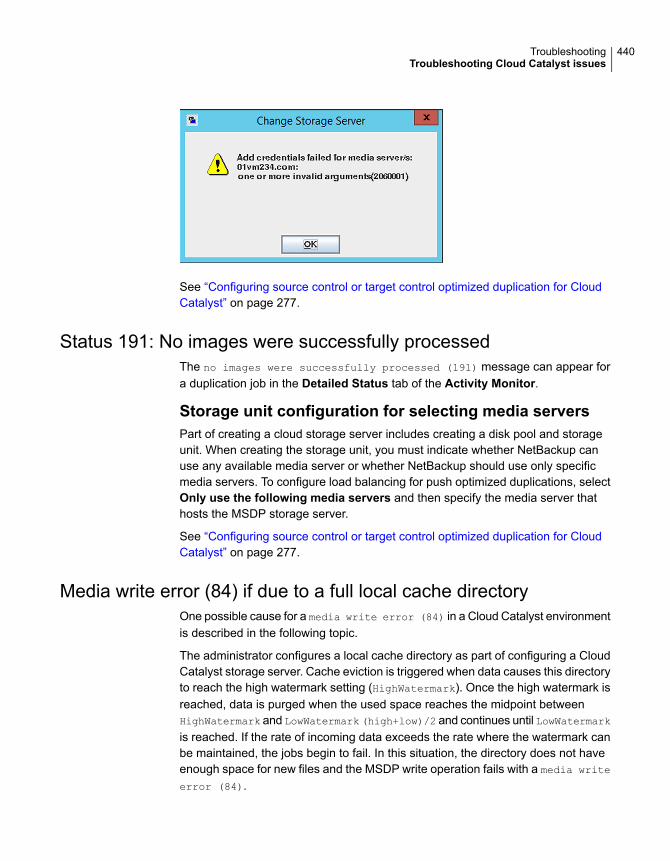
See “Configuring source control or target control optimized duplication for CloudCatalyst” on page 277.
Status 191: No images were successfully processedThe no images were successfully processed (191) message can appear fora duplication job in the Detailed Status tab of the Activity Monitor.
Storage unit configuration for selecting media serversPart of creating a cloud storage server includes creating a disk pool and storageunit. When creating the storage unit, you must indicate whether NetBackup canuse any available media server or whether NetBackup should use only specificmedia servers. To configure load balancing for push optimized duplications, selectOnly use the following media servers and then specify the media server thathosts the MSDP storage server.
See “Configuring source control or target control optimized duplication for CloudCatalyst” on page 277.
Media write error (84) if due to a full local cache directoryOne possible cause for a media write error (84) in a Cloud Catalyst environmentis described in the following topic.
The administrator configures a local cache directory as part of configuring a CloudCatalyst storage server. Cache eviction is triggered when data causes this directoryto reach the high watermark setting (HighWatermark). Once the high watermark isreached, data is purged when the used space reaches the midpoint betweenHighWatermark and LowWatermark (high+low)/2 and continues until LowWatermarkis reached. If the rate of incoming data exceeds the rate where the watermark canbe maintained, the jobs begin to fail. In this situation, the directory does not haveenough space for new files and the MSDP write operation fails with a media write
error (84).
440TroubleshootingTroubleshooting Cloud Catalyst issues
This error is more likely to occur when a relatively small disk is used fordemonstration or proof-of-concept testing. To prevent this error in a productionenvironment, make sure that there is at least 4 TB of disk space available for thecache. Make sure that the cache is located on a dedicated file system that is usedonly for the Cloud Catalyst local cache.
After receiving a media write error (84) and addressing the cause, restart allNetBackup services to avoid a media open error (83).
The UNIX df command can be used to determine the disk space in the local cachedirectory. For example:
df /esfs
Filesystem 1K-blocks Used Available Use% Mounted on
/dev/loop0 1007896 1007896 0 100% /esfs
See the following topic for more information about Cloud Catalyst local cacheconsiderations:
See “About the Cloud Catalyst cache” on page 275.
Troubleshooting restarting ESFS after the Cloud Catalyst storageserver is down
If the Cloud Catalyst storage server goes down abnormally, ESFS (vxesfsd) maynot restart when NetBackup is restarted.
To allow vxesfsd to start, check the following location to see if a rocksdb.log filewas created:
/cache/fsdb/log
Remove the rocksdb.log file and restart the NetBackup services.
Restarting the vxesfsd processTo restart the Veritas NetBackup Extendable Storage File System Service (vxesfsd),the process must first be stopped.
■ Before stopping the vxesfsdcommand, verify that vxesfsd is not in use by anyother process, including the current working directory of any user.The NetBackup Deduplication Manager (spad) and the NetBackup DeduplicationEngine (spoold) use vxesfsd, so they need to be stopped if either is running.
■ Before starting the vxesfsd command, verify that no data exists in the mountpoint. If data exists in the mount point, vxesfsd fails to restart.
441TroubleshootingTroubleshooting Cloud Catalyst issues
The following methods assume that no jobs are running.
Using the Activity Monitor to stop and start processesspecific to vxesfsdUsing the Activity Monitor to stop the processes specific to vxesfsd
1 In the NetBackup Administration Console, click Activity Monitor.
2 On the Daemons tab, select the spoold.
3 On the Actions menu, select Stop Daemon.
4 Stop spad and stop spoold.
5 Stop vxesfsd.
Using the Activity Monitor to start the processes specific to vxesfsd
1 In the NetBackup Administration Console, click Activity Monitor.
2 On the Daemons tab, select vxesfsd.
3 On the Actions menu, select Start Daemon.
4 Start spoold.
5 Start spad.
Using the command line to stop and start processesspecific to vxesfsdTo stop and start the processes that are specific to vxesfsd (and to avoid stoppingall NetBackup processes), run:
/usr/openv/netbackup/bin/nbsvcmon -terminate
/usr/openv/pdde/pdconfigure/pdde stop
/usr/openv/esfs/bin/vxesfsd stop
To start these processes:
■ To start vxesfsd, run:
/usr/openv/esfs/bin/vxesfsd start
/usr/openv/pdde/pdconfigure/pdde start
■ To start nbsvcmon, run:
/usr/openv/netbackup/bin/nbsvcmon &
442TroubleshootingTroubleshooting Cloud Catalyst issues
Stopping and starting all NetBackup processesTo stop and start all processes, run the following command on the Cloud Catalyststorage server:
/etc/init.d/NetBackup stop
/etc/init.d/NetBackup start
Problems restarting vxesfsdRestarting vxesfsd fails if a process accesses the ESFS mount point whenNetBackup attempts to shut it down.
See the following log to determine if this issue is the problem:
/usr/openv/esfs/log/ops/vxesfs-run.process_id
Note that after the hard kill of vxesfsd, the target remains busy.
To verify if the ESFS mount point is used by any processes
1 Unmount the mount directory:
umount mount_dir
Or
lsof mount_dir
2 Verify that the directory is not mounted:
mount | grep mount_dir
Or
lsof | grep mount_dir
3 Restart vxesfsd :
/usr/openv/esfs/bin/vxesfsd start
/usr/openv/pdde/pdconfigure/pdde start
Unable to create CloudCatalyst with a media server that has versionearlier to 8.2
If you have upgraded only your NetBackup master server to version 8.2, and wantto use CloudCatalyst with a media server that has a version earlier than 8.2, runthe following command to enable the cloud web application:
/usr/openv/wmc/bin/install/configurePorts -addLegacyCloudService
(Or an equivalent path for Windows operating system)
443TroubleshootingTroubleshooting Cloud Catalyst issues
This command adds a new legacy cloud service or connector to Tomcat server'sserver.xml file. Restart the nbwmc service.
Cloud Catalyst troubleshooting toolsNetBackup offers several tools that can help to troubleshoot Cloud Catalystproblems.
See “esfs_cleanup.sh script” on page 444.
See “esfs_check consistency checking tool” on page 444.
See “setlsu_ioctl tool” on page 445.
esfs_cleanup.sh scriptIn certain conditions, use the esfs_cleanup.sh script on the Cloud Catalyst storageserver to remove all Cloud Catalyst-related information from the host.
For example, when Cloud Catalyst cloud storage is decommissioned. (See“Decommissioning Cloud Catalyst cloud storage” on page 283.)
The script is located in the following directory:
/usr/openv/esfs/scripts/esfs_cleanup.sh
Note: Use this script with care as it deletes all data, data loss occurs if usedincorrectly. Contact Veritas Technical Support for assistance.
esfs_check consistency checking toolThe esfs_check tool determines whether the data that is stored in the cloud andthe data in the ESFS database are consistent. This check reports any inconsistenciesbetween the two.
Note: Since the tool reads data from the cloud, it is likely that the NetBackupcustomer might incur a financial cost by the cloud vendor. Consider contactingVeritas Support before running the tool.
The esfs_check tool is located in the following directory: /usr/openv/esfs/bin
It uses the following syntax:
esfs_check -cachedir path_to_local_cache [-strict] [-verbose]
Where:
■ path_to_local_cache is the path to the local cache directory.
444TroubleshootingTroubleshooting Cloud Catalyst issues
■ The -strict option provides an additional check to compare the file size in thelocal cache with the file size in the ESFS database.
■ The -verbose option enables logging to the following directory:/usr/openv/esfs/log/ops/esfs_check
Before you run the esfs_check tool:
■ To ensure accurate results, the system should not have any active backup orduplication jobs to the cloud.
■ Shut down NetBackup services except for the ESFS daemons. Only vxesfsd
and ocsd should be running.
Example where the data is consistentThe following example output shows that the data that is stored in the cloud isconsistent with the ESFS database.
esfs_check -cachedir /root/cache/msdp/ -verbose
consistency check successful
Example where the data is inconsistentThe following example output shows that there are inconsistencies between thecloud and the ESFS database.
esfs_check -cachedir /root/cache/msdp/ -verbose
File /data/2/97.bin not exist in cloud, expect in cloud
File /data/2/97.bin not exist in cache/cloud
Output line 1 means that file /data/2/97.bin appears in the ESFS database andshould also be in the cloud, but it is not.
Output line 2 means that file /data/2/97.bin appears in the ESFS database, butis neither in the cloud nor the local cache.
If the esfs_check tool finds an inconsistency, contact Veritas Support.
setlsu_ioctl toolThis tool is used in a disaster recovery scenario to set the cloud bucket name.
The setlsu_ioctl tool is located in the following directory: /usr/openv/esfs/bin
It uses the following syntax:
./setlsu_ioctl /cache_directory/storage/proc/cloud.lsu name_of bucket
445TroubleshootingTroubleshooting Cloud Catalyst issues
cred_ioctl toolThis tool is used in a disaster recovery scenario to set the cloud credentials.
The cred_ioctl tool is located in the following directory: /usr/openv/esfs/bin
The cred_ioctl uses this syntax:./cred_ioctl [-update] <mountPath>
<cloud_username> <cloud_password>
Unable to obtain the administrator password touse an AWS EC2 instance that has aWindowsOS
This error occurs after the instance is launched from an AMI that is converted usingautomated disaster recovery.
The following error is displayed:
Password is not available. This instance was launched from a custom
AMI, or the default password has changed. A password cannot be
retrieved for this instance. If you have forgotten your password,
you can reset it using the Amazon EC2 configuration service. For more
information, see Passwords for a Windows Server Instance.
For more information, refer to the following articles:
■ Amazon Elastic Compute Cloud Common Messages
■ How to migrate your on-premises domain to AWS Managed Microsoft AD usingADMT
Trouble shooting multi-domain issuesThe following sections may help you troubleshoot issues that involve multi-domainscenarios for NetBackup:
See “Unable to configure OpenStorage server from another domain” on page 446.
See “MSDP storage server is down when you configure an OpenStorage server”on page 447.
Unable to configure OpenStorage server from another domainWhen you try to configure an OpenStorage server from another domain and theerror Login credentials verification failed for server xxxxxx is displayed,try the following steps to find the root cause:
■ Check if the user name and password are correct.
446TroubleshootingUnable to obtain the administrator password to use an AWS EC2 instance that has a Windows OS
■ Check if the NetBackup certificate is deployed to the media server that is usedto configure the OpenStorage server. When certificate is not correctly deployed,the following error logs can be found in pdplugin log:
[ERROR] PDSTS: pd_register: PdvfsRegisterOST(egsuse1) failed
(30000:Unknown error 30000
[ERROR] PDSTS: get_agent_cfg_file_path_for_mount: pd_register()
failed for configuration file:</openv/lib/ost-plugins/egsuse1.cfg>
(2060401:UNKNOWN STS ERROR CODE)
For more information on using the nbcertcmd command to deploy NetBackupcertificate for multi-domain, See “About MSDP multi-domain support” on page 248.
MSDP storage server is down when you configure an OpenStorageserver
After configuring an OpenStorage server from another domain if the MSDP storageserver is down or unresponsive, run the following steps find the root cause:
■ Check if the same MSDP user is used by two or more NetBackup domains.
■ Check if there is log entry in spad.log as follows:
ERR [44] [140589294249728]: 25000: spaProcessing(), It's found that same
msdp user "user1" is used by multiple NBU domains. This is wrong
MultiDomainvconfiguration which will cause potential data loss issue.
Now other NBU domains cannot use msdp user "user1" to access MSDP
services in this server.
If there is an error log, the issue is that different NetBackup domains use thesame MSDP user to access one MSDP storage server that is not supported bymulti-domain.
MSDP server is overloaded when it is used by multiple NetBackupdomains
When the MSDP server is used by multiple NetBackup domains and the MSDPserver has a high overload, run the following steps to check the workloads from thedifferent domains:
1. Run the following command to get the current tasks status:
For UNIX:
/usr/openv/pdde/pdcr/bin/crcontrol --taskstat
447TroubleshootingTrouble shooting multi-domain issues
For Windows:
<install_path>\Veritas\pdde\crcontrol.exe --taskstat
2. Check the client column for the list of clients that belong to the NetBackupdomain, identify the work load of the clients from one domain, and then workload of one domain.
3. Run the bpplclients command on one NetBackup domain to list all clientsof that domain.
448TroubleshootingTrouble shooting multi-domain issues
Migrating to MSDPstorage
This appendix includes the following topics:
■ Migrating from PureDisk to the NetBackup MSDP
■ Migrating from another storage type to MSDP
Migrating from PureDisk to the NetBackup MSDP
Note: NetBackup supports PureDisk Deduplication Pool storage on NetBackup5000 series appliances only.
NetBackup cannot use the storage hardware while PureDisk uses it for storage.The structure of the PureDisk storage is different than the structure of the storagefor integrated NetBackup deduplication. The disk systems cannot be usedsimultaneously by both NetBackup and PureDisk. The PureDisk images on thestorage cannot be transferred to the deduplication storage server storage.
Therefore, to replace a NetBackup 5000 series appliance with the NetBackup MediaServer Deduplication Option, migrate the storage to a NetBackup Media ServerDeduplication Pool.
Table A-1 To migrate from PureDisk to NetBackup MSDP
ProcedureTaskStep
See the NetBackup Installation Guide for UNIX andWindows:
http://www.veritas.com/docs/DOC5332
Install and configureNetBackup
Step 1
AAppendix
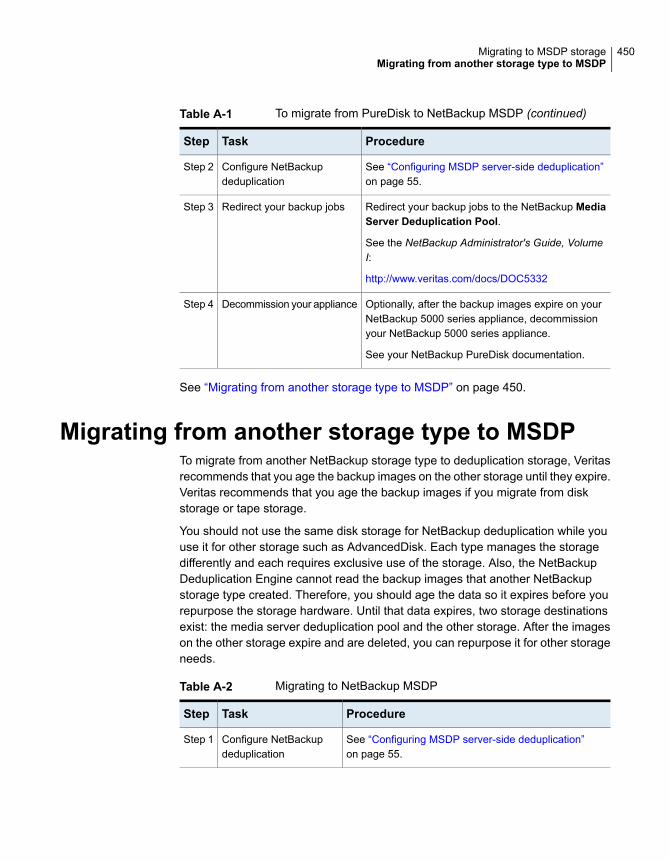
Table A-1 To migrate from PureDisk to NetBackup MSDP (continued)
ProcedureTaskStep
See “Configuring MSDP server-side deduplication”on page 55.
Configure NetBackupdeduplication
Step 2
Redirect your backup jobs to the NetBackup MediaServer Deduplication Pool.
See the NetBackup Administrator's Guide, VolumeI:
http://www.veritas.com/docs/DOC5332
Redirect your backup jobsStep 3
Optionally, after the backup images expire on yourNetBackup 5000 series appliance, decommissionyour NetBackup 5000 series appliance.
See your NetBackup PureDisk documentation.
Decommission your applianceStep 4
See “Migrating from another storage type to MSDP” on page 450.
Migrating from another storage type to MSDPTo migrate from another NetBackup storage type to deduplication storage, Veritasrecommends that you age the backup images on the other storage until they expire.Veritas recommends that you age the backup images if you migrate from diskstorage or tape storage.
You should not use the same disk storage for NetBackup deduplication while youuse it for other storage such as AdvancedDisk. Each type manages the storagedifferently and each requires exclusive use of the storage. Also, the NetBackupDeduplication Engine cannot read the backup images that another NetBackupstorage type created. Therefore, you should age the data so it expires before yourepurpose the storage hardware. Until that data expires, two storage destinationsexist: the media server deduplication pool and the other storage. After the imageson the other storage expire and are deleted, you can repurpose it for other storageneeds.
Table A-2 Migrating to NetBackup MSDP
ProcedureTaskStep
See “Configuring MSDP server-side deduplication”on page 55.
Configure NetBackupdeduplication
Step 1
450Migrating to MSDP storageMigrating from another storage type to MSDP
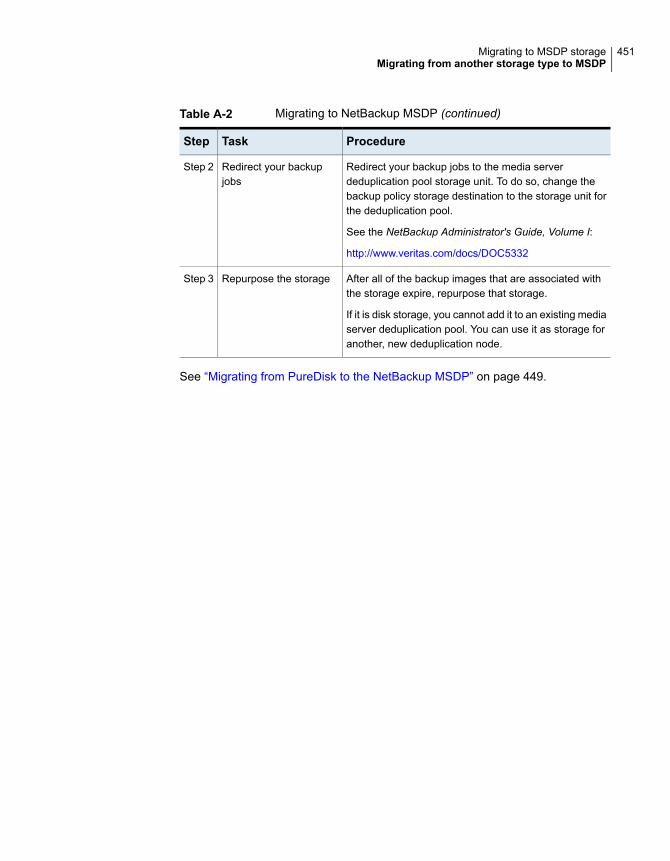
Table A-2 Migrating to NetBackup MSDP (continued)
ProcedureTaskStep
Redirect your backup jobs to the media serverdeduplication pool storage unit. To do so, change thebackup policy storage destination to the storage unit forthe deduplication pool.
See the NetBackup Administrator's Guide, Volume I:
http://www.veritas.com/docs/DOC5332
Redirect your backupjobs
Step 2
After all of the backup images that are associated withthe storage expire, repurpose that storage.
If it is disk storage, you cannot add it to an existing mediaserver deduplication pool. You can use it as storage foranother, new deduplication node.
Repurpose the storageStep 3
See “Migrating from PureDisk to the NetBackup MSDP” on page 449.
451Migrating to MSDP storageMigrating from another storage type to MSDP
AActive secondary operations 199Add at least one index marker 119Add credentials failed 277, 439adding trusted master server using external
certificate 178Advanced Encryption Standard (AES) encryption 130AES encryption
Blowfish encryption 137AES-256 134–135appliance deduplication 15attributes
clearing deduplication pool 358clearing deduplication storage server 342OptimizedImage 36setting deduplication pool 352setting deduplication storage server 340viewing deduplication pool 351viewing deduplication storage server 339
Auto Image Replicationabout 159and trusted master servers 167Backup operation in source domain 157, 160configuring MSDP replication to a different
domain 158for MSDP 184no disk spanning support 160overview 159supported for Cloud Catalyst 258synchronizing clocks of master servers 160Targeted 181targeted 168topology of storage 164
BBackup
operation 198backup
client deduplication process 396big endian 382, 385bpstsinfo command 165
byte order 382, 385
Ccache hits field of the job details 329Cannot upload MSDP system files error 437capacity and usage reporting for deduplication 330case sensitivity
in NetBackup names 18catalog, MSDP. See about recovering the MSDP
catalog. See MSDP catalogcertificate, generating for Cloud Catalyst storage
server 265changing deduplication server hostname 343changing the deduplication storage server name and
path 343CIFS 22clearing deduplication pool attributes 358client deduplication
components 396disabling for a specific client 127host requirements 32
Client Direct deduplicationload balancing 126where not supported 259
Cloud Catalystadditional drcontrol option 241additional MSDP catalog paths 235Appliance
configuring 261documentation 259for deduplication to the cloud 254technical specifications 260
direct to cloud (not the preferred use case) 254, 256
disaster recovery 289limitations 257–258load balancing 28–29, 85, 126, 258Local cache directory 271local cache directory 268, 275–276logs
esfs_filesystem 434
Index
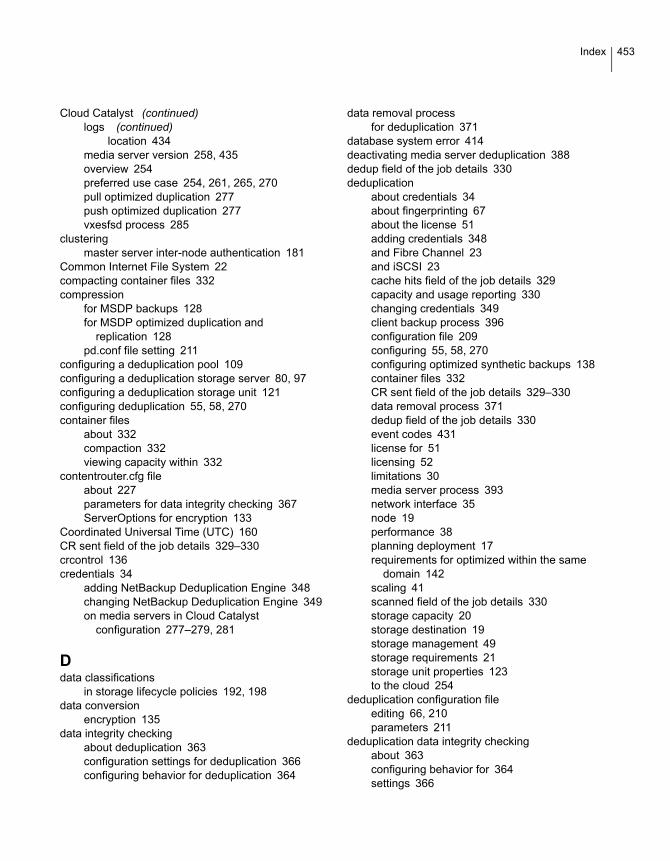
Cloud Catalyst (continued)logs (continued)
location 434media server version 258, 435overview 254preferred use case 254, 261, 265, 270pull optimized duplication 277push optimized duplication 277vxesfsd process 285
clusteringmaster server inter-node authentication 181
Common Internet File System 22compacting container files 332compression
for MSDP backups 128for MSDP optimized duplication and
replication 128pd.conf file setting 211
configuring a deduplication pool 109configuring a deduplication storage server 80, 97configuring a deduplication storage unit 121configuring deduplication 55, 58, 270container files
about 332compaction 332viewing capacity within 332
contentrouter.cfg fileabout 227parameters for data integrity checking 367ServerOptions for encryption 133
Coordinated Universal Time (UTC) 160CR sent field of the job details 329–330crcontrol 136credentials 34
adding NetBackup Deduplication Engine 348changing NetBackup Deduplication Engine 349on media servers in Cloud Catalyst
configuration 277–279, 281
Ddata classifications
in storage lifecycle policies 192, 198data conversion
encryption 135data integrity checking
about deduplication 363configuration settings for deduplication 366configuring behavior for deduplication 364
data removal processfor deduplication 371
database system error 414deactivating media server deduplication 388dedup field of the job details 330deduplication
about credentials 34about fingerprinting 67about the license 51adding credentials 348and Fibre Channel 23and iSCSI 23cache hits field of the job details 329capacity and usage reporting 330changing credentials 349client backup process 396configuration file 209configuring 55, 58, 270configuring optimized synthetic backups 138container files 332CR sent field of the job details 329–330data removal process 371dedup field of the job details 330event codes 431license for 51licensing 52limitations 30media server process 393network interface 35node 19performance 38planning deployment 17requirements for optimized within the same
domain 142scaling 41scanned field of the job details 330storage capacity 20storage destination 19storage management 49storage requirements 21storage unit properties 123to the cloud 254
deduplication configuration fileediting 66, 210parameters 211
deduplication data integrity checkingabout 363configuring behavior for 364settings 366
453Index
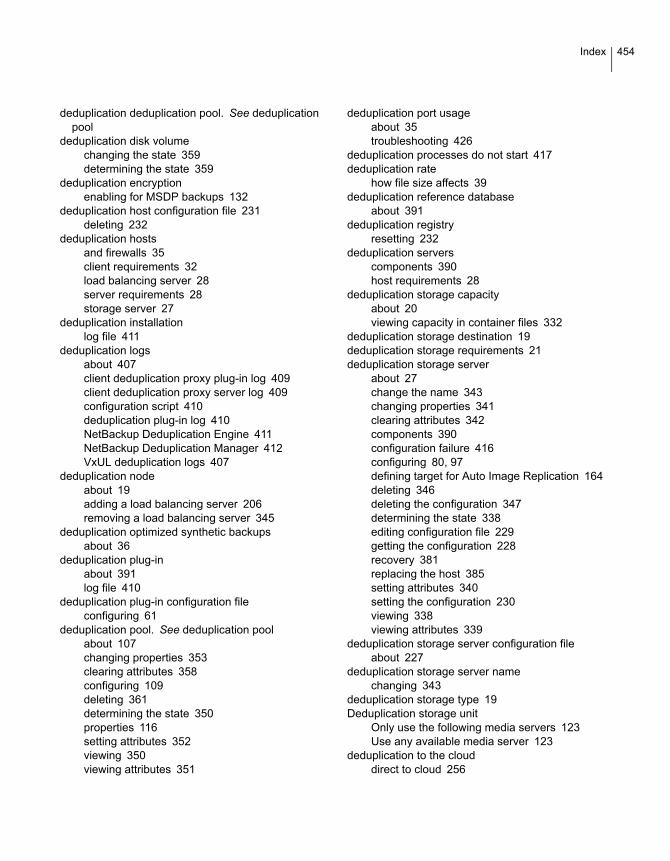
deduplication deduplication pool. See deduplicationpool
deduplication disk volumechanging the state 359determining the state 359
deduplication encryptionenabling for MSDP backups 132
deduplication host configuration file 231deleting 232
deduplication hostsand firewalls 35client requirements 32load balancing server 28server requirements 28storage server 27
deduplication installationlog file 411
deduplication logsabout 407client deduplication proxy plug-in log 409client deduplication proxy server log 409configuration script 410deduplication plug-in log 410NetBackup Deduplication Engine 411NetBackup Deduplication Manager 412VxUL deduplication logs 407
deduplication nodeabout 19adding a load balancing server 206removing a load balancing server 345
deduplication optimized synthetic backupsabout 36
deduplication plug-inabout 391log file 410
deduplication plug-in configuration fileconfiguring 61
deduplication pool. See deduplication poolabout 107changing properties 353clearing attributes 358configuring 109deleting 361determining the state 350properties 116setting attributes 352viewing 350viewing attributes 351
deduplication port usageabout 35troubleshooting 426
deduplication processes do not start 417deduplication rate
how file size affects 39deduplication reference database
about 391deduplication registry
resetting 232deduplication servers
components 390host requirements 28
deduplication storage capacityabout 20viewing capacity in container files 332
deduplication storage destination 19deduplication storage requirements 21deduplication storage server
about 27change the name 343changing properties 341clearing attributes 342components 390configuration failure 416configuring 80, 97defining target for Auto Image Replication 164deleting 346deleting the configuration 347determining the state 338editing configuration file 229getting the configuration 228recovery 381replacing the host 385setting attributes 340setting the configuration 230viewing 338viewing attributes 339
deduplication storage server configuration fileabout 227
deduplication storage server namechanging 343
deduplication storage type 19Deduplication storage unit
Only use the following media servers 123Use any available media server 123
deduplication to the clouddirect to cloud 256
454Index
deduplication, compression ratemonitoring 325
deleting backup images 361deleting Cloud Catalyst cloud storage 283deleting deduplication host configuration file 232df command 428, 441disaster recovery
for Cloud Catalyst 289protecting the data 45recovering the storage server after catalog
recovery 384disk failure
deduplication storage server 380disk logs 334disk logs report 332disk pool status report 331, 334disk pools
cannot delete 422changing the state 351creation failure for Cloud Catalyst 437failure for Cloud Catalyst 438
disk storage unit report 334Disk type 123disk volume
changing the state 359determining the state of a deduplication 359volume state changes to down 420
domainsreplicating backups to another. See Auto Image
ReplicationDownloadThreads Cloud Catalyst setting 274Duplication
optimized 199duplication jobs, cancelling 423Duplication to remote master. See Auto Image
Replication
EEnable file recovery from VM backup 200encryption
enabling for MSDP backups 132pd.conf file setting 214SHA-2 67, 134–135
endianbig 382, 385little 382, 385
ESFS database 434, 444esfs.json configuration file 271, 274esfs_check tool 444
esfs_cleanup.sh script 284, 437, 444event codes
deduplication 431
FFibre Channel
and iSCSI comparison 23support for 23
Fibre Channel and iSCSI comparison for MSDP 23file system
CIFS 22NFS 22Veritas File System for deduplication storage 49ZFS 22
File System Database (FSDB) 284–285Filesystem in Userspace (FUSE) 284–285, 438fingerprinting
about deduplication 67firewalls and deduplication hosts 35FlashBackup policy
Maximum fragment size (storage unit setting) 123FQDN or IP Address property in Resilient Network
host properties 202FSDB (File System Database) 284–285FUSE (Filesystem in Userspace) 284–285, 438
Ggarbage collection. See queue processingGlobal logging level property 272
HHighWatermark Cloud Catalyst setting 273, 435, 440host requirements 28
II AM Role 270images on disk report 334Import
operation 193iSCSI
and Fibre Channel comparison 23support for 23
Jjob ID search in unified logs 405
455Index
KKMS encryption 262, 266, 268
Llegacy logging 406Level (logging) Cloud Catalyst setting 272license
for deduplication 51license information failure
for deduplication 416licensing deduplication 52limitations
media server deduplication 30little endian 382, 385load balancing server
about 28adding to a deduplication node 206for deduplication 28removing from deduplication node 345
Local cache directory for Cloud Catalyst 266, 268, 271, 428
logginglegacy 406level default for Cloud Catalyst 272
logsabout deduplication 407Auto Image Replication 412client deduplication proxy plug-in log 409client deduplication proxy server log 409deduplication configuration script log 410deduplication installation 411deduplication plug-in log 410disk 334NetBackup Deduplication Engine log 411NetBackup Deduplication Manager log 412optimized duplication 412VxUL deduplication logs 407
LowWatermark Cloud Catalyst setting 273
Mmaintenance processing. See queue processingmaster servers
inter-node authentication for clustering 181Maximum concurrent jobs 124Maximum fragment size 123Media open error (83) 441media server deduplication
process 393
Media Server Deduplication Pool 107, 184changing the state 351creating directories for 250-TB support 118enable 250-TB support 76
media server deduplication pool. See deduplicationpool
Media write error (84) 440migrating from PureDisk to NetBackup
deduplication 449migrating to NetBackup deduplication 450mklogdir.bat 406MSDP
replication 156replication target, configuring 184
MSDP catalog 233, 377See also MSDP catalog backupSee also MSDP catalog recoveryabout the catalog backup policy 234about the shadow catalog 233changing the number of shadow copies 238changing the shadow catalog path 236changing the shadow catalog schedule 237shadow copy log files 409
MSDP catalog backupabout protecting the MSDP catalog 234configuring 239, 244
MSDP catalog recoveryabout 377error codes 429process the transation queue. 362recover from a shadow copy 378
MSDP drcontrol utilityoptions 240
MSDP replicationabout 37
MSDP storage rebasing. See rebasingmtstrm.conf file
configuring 61
Nnbstserv process 194NDMP
storage units 199NetBackup
naming conventions 18NetBackup 5200 series appliance
as a storage destination 20NetBackup 5300 series appliance
as a storage destination 20
456Index
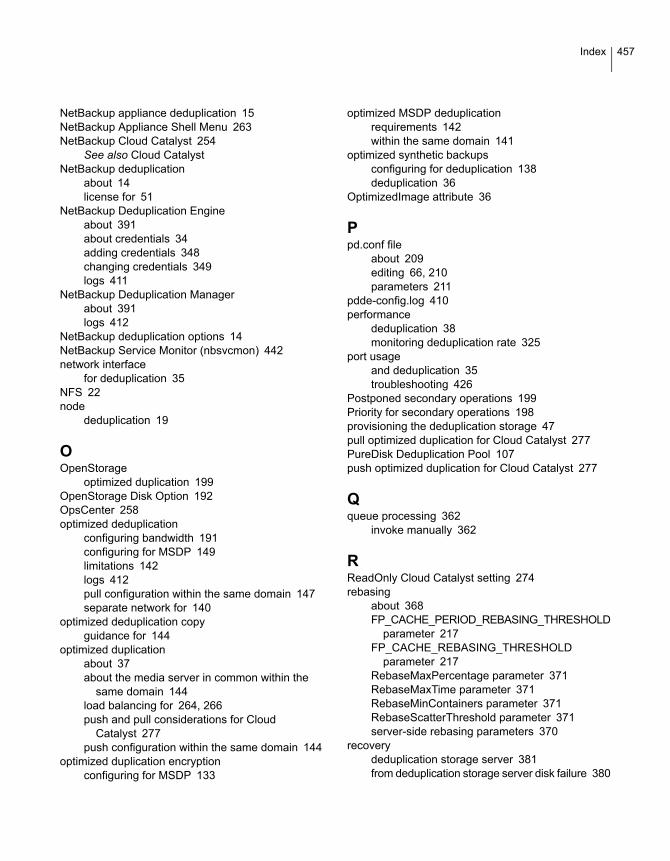
NetBackup appliance deduplication 15NetBackup Appliance Shell Menu 263NetBackup Cloud Catalyst 254
See also Cloud CatalystNetBackup deduplication
about 14license for 51
NetBackup Deduplication Engineabout 391about credentials 34adding credentials 348changing credentials 349logs 411
NetBackup Deduplication Managerabout 391logs 412
NetBackup deduplication options 14NetBackup Service Monitor (nbsvcmon) 442network interface
for deduplication 35NFS 22node
deduplication 19
OOpenStorage
optimized duplication 199OpenStorage Disk Option 192OpsCenter 258optimized deduplication
configuring bandwidth 191configuring for MSDP 149limitations 142logs 412pull configuration within the same domain 147separate network for 140
optimized deduplication copyguidance for 144
optimized duplicationabout 37about the media server in common within the
same domain 144load balancing for 264, 266push and pull considerations for Cloud
Catalyst 277push configuration within the same domain 144
optimized duplication encryptionconfiguring for MSDP 133
optimized MSDP deduplicationrequirements 142within the same domain 141
optimized synthetic backupsconfiguring for deduplication 138deduplication 36
OptimizedImage attribute 36
Ppd.conf file
about 209editing 66, 210parameters 211
pdde-config.log 410performance
deduplication 38monitoring deduplication rate 325
port usageand deduplication 35troubleshooting 426
Postponed secondary operations 199Priority for secondary operations 198provisioning the deduplication storage 47pull optimized duplication for Cloud Catalyst 277PureDisk Deduplication Pool 107push optimized duplication for Cloud Catalyst 277
Qqueue processing 362
invoke manually 362
RReadOnly Cloud Catalyst setting 274rebasing
about 368FP_CACHE_PERIOD_REBASING_THRESHOLD
parameter 217FP_CACHE_REBASING_THRESHOLD
parameter 217RebaseMaxPercentage parameter 371RebaseMaxTime parameter 371RebaseMinContainers parameter 371RebaseScatterThreshold parameter 371server-side rebasing parameters 370
recoverydeduplication storage server 381from deduplication storage server disk failure 380
457Index
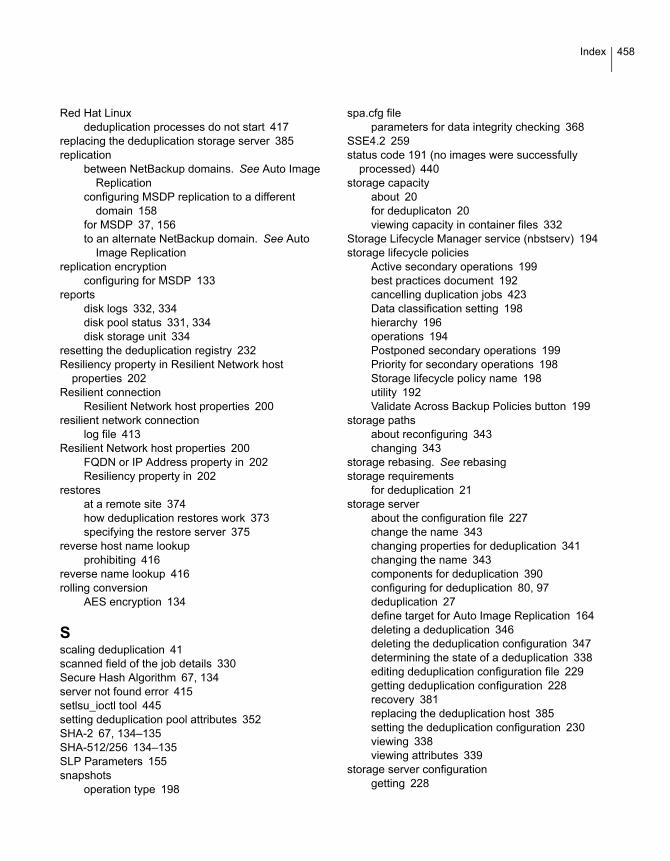
Red Hat Linuxdeduplication processes do not start 417
replacing the deduplication storage server 385replication
between NetBackup domains. See Auto ImageReplication
configuring MSDP replication to a differentdomain 158
for MSDP 37, 156to an alternate NetBackup domain. See Auto
Image Replicationreplication encryption
configuring for MSDP 133reports
disk logs 332, 334disk pool status 331, 334disk storage unit 334
resetting the deduplication registry 232Resiliency property in Resilient Network host
properties 202Resilient connection
Resilient Network host properties 200resilient network connection
log file 413Resilient Network host properties 200
FQDN or IP Address property in 202Resiliency property in 202
restoresat a remote site 374how deduplication restores work 373specifying the restore server 375
reverse host name lookupprohibiting 416
reverse name lookup 416rolling conversion
AES encryption 134
Sscaling deduplication 41scanned field of the job details 330Secure Hash Algorithm 67, 134server not found error 415setlsu_ioctl tool 445setting deduplication pool attributes 352SHA-2 67, 134–135SHA-512/256 134–135SLP Parameters 155snapshots
operation type 198
spa.cfg fileparameters for data integrity checking 368
SSE4.2 259status code 191 (no images were successfully
processed) 440storage capacity
about 20for deduplicaton 20viewing capacity in container files 332
Storage Lifecycle Manager service (nbstserv) 194storage lifecycle policies
Active secondary operations 199best practices document 192cancelling duplication jobs 423Data classification setting 198hierarchy 196operations 194Postponed secondary operations 199Priority for secondary operations 198Storage lifecycle policy name 198utility 192Validate Across Backup Policies button 199
storage pathsabout reconfiguring 343changing 343
storage rebasing. See rebasingstorage requirements
for deduplication 21storage server
about the configuration file 227change the name 343changing properties for deduplication 341changing the name 343components for deduplication 390configuring for deduplication 80, 97deduplication 27define target for Auto Image Replication 164deleting a deduplication 346deleting the deduplication configuration 347determining the state of a deduplication 338editing deduplication configuration file 229getting deduplication configuration 228recovery 381replacing the deduplication host 385setting the deduplication configuration 230viewing 338viewing attributes 339
storage server configurationgetting 228
458Index
storage server configuration (continued)setting 230
storage server configuration fileediting 229
storage typefor deduplication 19
storage unitconfiguring for deduplication 121properties for deduplication 123recommendations for deduplication 124
storage unit groupsand storage lifecycle polices 199not supported for Auto Image Replication
source 157, 160Storage unit name 123Storage unit type 123stream handlers
NetBackup 39synthetic backups
no Auto Image Replication support 160
TTargeted A.I.R. 181throttling, configuring for Cloud Catalyst 435topology of storage 164–165troubleshooting
database system error 414deduplication backup jobs fail 417deduplication processes do not start 417general operational problems 421host name lookup 416installation fails on Linux 413no volume appears in disk pool wizard 416server not found error 415
trusted master serversadding 173for Auto Image Replication 167removing 179
Uunified logging 401
format of files 402uninstalling media server deduplication 388UploadThreads Cloud Catalyst setting 274UTC (Coordinated Universal Time) 160
VValidate Across Backup Policies button in SLP 199
Validation Report tab 199Veritas NetBackup Extendable Storage File System
Service (vxesfsd) 271, 285, 441, 443, 445Veritas NetBackup Extendable Storage Proxy
(vxesp) 445viewing deduplication pool attributes 351viewing storage server attributes 339VM backup 200volume manager
Veritas Volume Manager for deduplicationstorage 49
VxESFS (Veritas NetBackup Extendable Storage FileSystem) 271
vxesfsd (Veritas NetBackup Extendable Storage FileSystem Service) 285, 441, 443, 445
vxlogview command 402with job ID option 405
ZZFS 22
459Index


