Embed Size (px)
Citation preview
Before using your air conditioner, please read
this manual carefully and keep it for future reference.
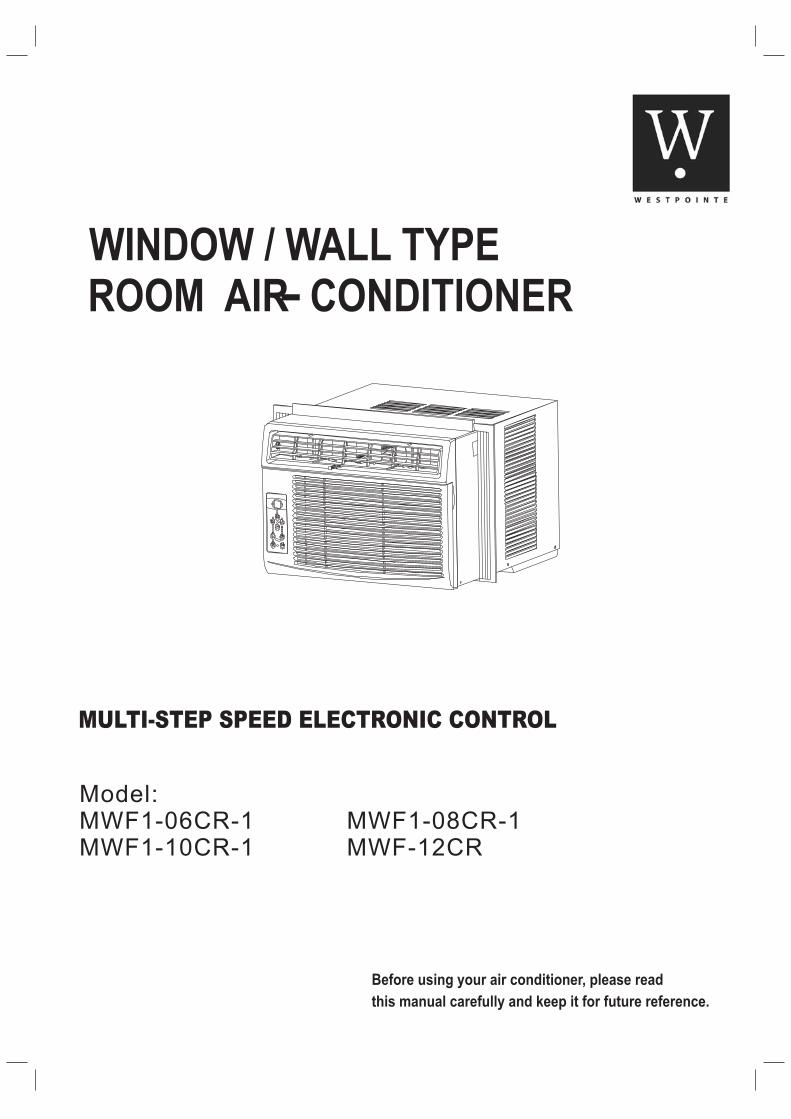
WINDOW / WALL TYPEROOM AIR CONDITIONER-
MULTI-STEP SPEED ELECTRONIC CONTROL
Model:MWF1-06CR-1 MWF1-08CR-1MWF1-10CR-1 MWF-12CR

CONTENTS
Inside you will find many helpful hints on how to use and maintain your air conditionerproperly. Just a little preventive care on your part can save you a great deal of timeand money over the life of your air conditioner. You'll find many answers to commonproblems in the chart of troubleshooting tips. If you review our chart of TroubleshootingTips first, you may not need to call for service at all.
Contact the installer for installation of this unit.The air conditioner is not intended for use by young children or infirm personswithout supervision.Young children should be supervised to ensure that they do not play with the airconditioner.If the power cord is to be replaced, replacement work shall be performed byauthorised personnel only.Installation work must be performed in accordance with the national wiringstandards
! CAUTION
Read This Manual
1
1. SAFETY PRECAUTIONS..................................................................2
2. IMPORTANT SAFETY INSTRUCTIONS ..........................................4
3. NORMAL SOUNDS ...........................................................................5
4. AIR CONDITIONER FEATURES .......................................................5
5. INSTALLATION INSTRUCTIONS......................................................10
6. CARE AND CLEANING ....................................................................14
7. TROUBLESHOOTING TIPS...............................................................15
Contact the authorized service technician for repair or maintenance of this unit.
by authorized personnel only.

To prevent injury to the user or other people and property damage, the following instructions
must be followed. Incorrect operation due to ignoring of instructions may cause harm or
damage. The seriousness is classified by the following indications.
Safety Precautions
This symbol indicates the possibility of death or serious injury.
Meanings of symbols used in this manual are as shown below.
!
!
WARNING
Always do this.
Never do this.
! CAUTION This symbol indicates the possibility of injury or damage to property.
Plug in power plugproperly.
Do not modify power cordlength or share the outletwith other appliances.
Always ensure effectivegrounding.
Unplug the unit if strangesounds, smell, or smokecomes from it.
Keep firearms away.
Ventilate room before operating airconditioner if there is a gas leakage fromanother appliance.
Otherwise, it may cause electricshock or fire due to heatgeneration.
excess
It may cause electric shock orfire due to heat generation.
Incorrect grounding may causeelectric shock.
It may cause fire and electricshock.
It may cause fire.
It may cause explosion, fire and, burns.
It may cause electric shock or firedue to heat generation.
It may cause electric shock.
It may cause failure of machineor electric shock.
It may cause fire and electricshock.
It may cause fire and electricshock.
It may cause electric shock or fire.If the power cord is damaged, itmust be replaced by the manufac-turer or an authorized servicecenter or a similarly qualified per-son in order to avoid a hazard.
This could damage your health.
Incorrect installation may causefire and electric shock.
It may cause electric shock.
It may cause an explosion or fire.
It may cause failure and electric shock.
Do not operate or stop theunit by inserting or pullingout the power plug.
Do not operate with wethands or in dampenvironment.
Do not allow water to runinto electric parts.
Do not use the socket if it isloose or damaged.
Do not use the power cordclose to heating appliances.
Do not damage or use anunspecified power cord.
Do not direct airflow atroom occupants only.
Always install circuitbreaker and a dedicatedpower circuit.
Do not open the unitduring operation.
Do not use the power cord nearflammable gas or combustibles, suchas gasoline, benzene, thinner, etc.
Do not disassemble or modify unit.
!
!
!
!
!
!
WARNING!
2
! !!

! CAUTION
When the air filter is to beremoved, do not touch themetal parts of the unit.
It may cause an injury.
Do not clean unit whenpower is on as it may causefire and electric shock, it maycause an injury.
Operation with windowsopened may cause wettingof indoor and soaking ofhousehold furniture.
When the unit is to becleaned, switch off, and turnoff the circuit breaker.
Stop operation and closethe window in storm orhurricane.
Use caution when unpacking andinstalling. Sharp edges could cause injury.
Do not clean the airconditioner with water.
Water may enter the unit anddegrade the insulation. It maycause an electric shock.
This could injure the pet orplant.
It may cause electric shockand damage.
Do not put a pet or houseplant where it will beexposed to direct air flow.
Hold the plug by the headof the power plug whentaking it out.
Ventilate the room well whenused together with a stove,etc.
An oxygen shortage may occur.
Do not use this air conditioner topreserve precision devices, food,pets, plants, and art objects.It may cause deterioration ofquality, etc.
It may cause failure of productor fire.
Do not use for specialpurposes.
Turn off the main powerswitch when not sing theunit for a long time.
u
If water enters the unit, turn the unit off at the poweroutlet and switch off the circuit breaker. Isolatesupply by taking the power-plug out and contact aqualified service technician.
3
!
!
!
!
! !
!
It may cause failure ofappliance or accident.
Appearance may bedeteriorated due to changeof product color orscratching of its surface.
Do not place obstaclesaround air-inlets or insideof air-outlet.
Do not use strong deter-gent such as wax orthinner but use a soft cloth.
If bracket is damaged, thereis concern of damage due tofalling of unit.
There is danger of fire orelectric shock.
Ensure that the installation bracket ofthe outdoor appliance is not damageddue to prolonged exposure.
Do not place heavy object on thepower cord and ensure that the cordis not compressed.
Operation without filters maycause failure.
It contains contaminants andcould make you sick.
Always insert the filterssecurely. Clean filter onceevery two weeks.
Do not drink water drainedfrom air conditioner.
! !

IMPORTANT SAFETY INSTRUCTIONS
Be sure the electrical service is adequate for the model you have
chosen. This information can be found on the serial plate, which
is located on the side of the cabinet and behind the grille.
Be sure the air conditioner is properly grounded. To minimize
shock and fire hazards, proper grounding is important. The power
cord is equipped with a three-prong grounding plug for protection
against shock hazards.
Your air conditioner must be used in a properly grounded wall
receptacle. If the wall receptacle you intend to use is not adequately
grounded or protected by a time delay fuse or circuit breaker,
have a qualified electrician install the proper receptacle.
Ensure the receptacle is accessible after the unit installation.
Do not run air conditioner without side protective cover in place.
This could result in mechanical damage within the air conditioner.
Do not use an extension cord or an adapter plug.
WARNING For your safety
Do not store or use gasoline or other flammable vapors and liquids in
the vicinity of this or any other appliance.
Avoid fire hazard or electric shock. Do not use an extension cord or an
adaptor plug. Do not remove any prong from the power cord.
WARNING Electrical Information
NOTE The power supply cord with
this air conditioner contains a current
detection device designed to reduce
the risk of fire.
Please refer to the section Operation
of Current Device for details.
In the event that the power supply
cord is damaged, it cannot be
repaired-it must be replaced with a
cord from the Product Manufacturer.
,
,
Do not, under anycircumstances, cut,remove, or bypassthe grounding prong.
Power supply cordwith 3-prong grounding plugand current detection device
Operation of Current Device
The power supply cord contains a current device that senses damage to the power cord. To test your power
supply cord do the following:
1. Plug in the Air Conditioner.
2. The power supply cord will have TWO buttons on the plug head. Press the TEST button, you will notice a
click as the RESET button pops out.
3. Press the RESET button, again you will notice a click as the button engages.
4. The power supply cord is now supplying electricity to the unit. (On some products this it also indicated by
a light on the plug head.)
Do not use this device to turn the unit on or off.
Always make sure the RESET button is pushed in for correct operation.
The power supply must be replaced if it fails reset when either the TEST button is pushed, or it cannot be
reset. A new one can be obtained from the product manufacturer.
If power supply cord is damaged, it cannot be repaired. It MUST be replaced by one
NOTES:
obtained from the
product manufacturer.
4

NORMAL SOUNDS
AIR CONDITIONER FEATURES
Sound of Rushing Air
At the front of the unit, you mayhear the sound of rushing airbeing moved by the fan
High Pitched Chatter
High efficiency compressorsmay have a high pitched chatterduring the cooling cycle.
Gurgle/Hiss
Gurgling or hissing noise maybe heard due to refrigerantpassing through evaporatorduring normal operation.
Pinging or Switching
Droplets of water hitting condenserduring normal operation may causepinging or switching sounds.
Before you begin, thoroughly familiarize yourself with the control panel and remote as shown belowand all its functions, then follow the symbol for the functions you desire. The unit can be controlledby the unit control alone or with the remote.
Vibration
Unit may vibrate and make noisebecause of poor wall or windowconstruction or incorrect installation.
ELECTRONIC CONTROL OPERATING INSTRUCTIONS
ADJUSTSTEMPERATUREOR TIME
ADJUSTSTEMPERATUREOR TIME
DISPLAYSTEMPERATUREOR TIME
ACTIVATESTIMER
CHECK FILTERRESET BUTTON
SETS MODE
ENERGYSAVER MODE
SLEEP MODE
CLEAN AIR MODE(on some models)
SET FAN SPEED
TURNS UNITON OR OFF
UNIT CONTROL
Temp Temp
Timer Timer
On
Off
SleepCheckFilter
Timer
Auto
Cool
Dry
Fan
Low
Auto
Med
High
CleanAir
FanMode
FollowMe
EnergySaver On/Off
5
FOLLOW ME INDICATOR(on some models)

AIR CONDITIONER FEATURES(CONTINUED)
TO TURN UNIT ON:
NOTE: The following instructions represent the Unit Controls, the same instructions can be usedfor the Remote Control.
TO CHANGE TEMPERATURE
SETTING:
Press the On/Off button.
Auto
Cool
Dry
Fan
Low
Auto
Med
High
CleanAir
FanMode
FollowMe
EnergySaver On/Off
DO THIS:
Temp Temp
Timer Timer
On
Off
SleepCheckFilter
Timer
Auto Auto
Press to raise
DO THIS:
Press to lower
Press or hold either Left( <) or Right (>) buttonuntil the desired temperature is seen on thedisplay. This temperature will be automaticallymaintained anywhere between 62 F(17 C) and88 F(30 C). If you want the display to read theactual room temperature, see To Operate onFan Only section.
NOTE:
TO ADJUST FAN SPEEDS:
Auto
Cool
Dry
Fan
Low
Auto
Med
High
CleanAir
FanMode
FollowMe
EnergySaver On/Off
Press to selectappropriate fanspeed
DO THIS:
Used to select the Fan Speed in four steps-Auto, Low, Med or High. Each time the buttonis pressed, the fan speed mode is shifted.
NOTE:
6

AIR CONDITIONER FEATURES(CONTINUED)
TO SELECT THE
OPERATING MODE:
Press the Modebutton.
Auto
Cool
Dry
Fan
Low
Auto
Med
High
CleanAir
FanMode
FollowMe
EnergySaver On/Off
DO THIS:
To choose operating mode, press the Mode button.Each time you press the button, a mode is selectedin a sequence that goes from Auto, Cool, Dry andFan. The indicator light beside will be illuminatedand remained on once the mode is selected.
NOTE:
To operate on Auto feature:
In this mode, the fan speed cannot be adjusted, itstarts automatically at a speed according to theroom temperature. If the room does not get toowarm, it will stay at Low speed.
To operate on Fan Only:
Use this function only when cooling is not desired,such as for room air circulation or to exhaust staleair(on some models). (Remember to open the ventduring this function, but keep it closed duringcooling for maximum cooling efficiency.) You canchoose any fan speed you prefer.During this function, the display will show the actualroom temperature, not the set temperature as in thecooling mode.
TO USE THE ENERGY
SAVER FEATURE:
Press the button
Auto
Cool
Dry
Fan
Low
Auto
Med
High
CleanAir
FanMode
FollowMe
EnergySaver On/Off
DO THIS:In this mode, the fan will continue to run for 3 minutesafter the compressor shuts off. The fan then cycleson for 2 minutes at 10 minute intervals until the roomtemperature is above the set temperature, at whichtime the compressor turns back on and cooling stars.
NOTE:
Temp Temp
Timer Timer
On
Off
SleepCheckFilter
Timer
Auto
Cool
Dry
Fan
Low
Auto
Med
High
CleanAir
SLEEP FEATURE:
Press Sleepbutton
DO THIS:
In this mode the selected temperature will increase by2 degrees F 30 minutes after the mode is selected.The temperature will then increase by another 2degrees F after an additional 30 minutes. This newtemperature will be maintained for 7 hours before itreturns to the originally selected temperature. Thisends the Sleep mode and the unit will continue tooperate as originally programmed. The Sleep modeprogram can be cancelled at any time during operationby again pressing the Sleep button.
NOTE:
7

Temp Temp
Timer Timer
On
Off
SleepCheckFilter
Timer
Auto
Cool
Dry
Fan
Low
Auto
Med
High
CleanAir
TIMER: AUTO START/
STOP FEATURE:
Press Timerbutton
DO THIS:
AIR CONDITIONER FEATURES(CONTINUED)
First press the Timer button, the indicator lightbesides word On illuminates. It indicates the AutoStart program is initiated.Press or hold the Left arrow or Right arrow to changethe Auto time by 0.5 hour increments, up to 10 hours,then at 1 hour increments up to 24 hours. The controlwill count down the time remaining until start.The selected time will register in 5 second and thesystem will automatically revert back to display theprevious temperature setting.Turning the unit ON or OFF at any time will cancel theAuto Start/Stop function.
NOTE:
Temp Temp
Timer Timer
On
Off
SleepCheckFilter
Timer
Auto
Cool
Dry
Fan
Low
Auto
Med
High
CleanAir
CHECK FILTER FEATURE:
Press CheckFilter button
DO THIS:
Temp Temp
Timer Timer
On
Off
SleepCheckFilter
Timer
Auto
Cool
Dry
Fan
Med
High
CleanAir
CLEAN AIR FEATURE:
(on some models)
Press CleanAir button
DO THIS:
This feature is a reminder to clean the Air Filter formore efficient operation. The LED(light) will illumi-nate after 250 hours of operation. To reset aftercleaning the filter, press the Check Filter button andthe light will go off.
NOTE:
Press the Clean Air button, the ion generator is ener-gized and will help to remove pollen and impuritiesfrom the air, and trap them in the filter.
NOTE:
8

AIR CONDITIONER FEATURES(CONTINUED)FOLLOW ME FEATURE:
(on some models)
Light flashing
Auto
Cool
Dry
Fan
Low
Auto
Med
High
CleanAir
FanMode
FollowMe
EnergySaver On/Off
NOTE:
To activate the Follow Me feature, point the remotecontrol towards the unit and press the Follow Mebutton. T
If the unitdoes not receive the Follow Me signal during any 7minute interval, the unit will beep to indicate theFollow Me mode has ended.The actual temperature can be displayed at the unitby pressing the Fan Only mode. When in the Coolmode, the unit display indicates the set temperature.
he remote display is actual temperatureat its location. The remote control will send thissignal to the air conditioner every 3 minutes intervaluntil press the Follow Me button again.
This feature can be activated from the remotecontrol ONLY. The remote control serves as aremote thermostat allowing for the precisetemperature control at its location.
ADDITIONAL THINGS YOU SHOULD KNOW
Now that you have mastered the operating procedure, here are more features in your control thatyou should become familiar with.
The Cool circuit has an automatic 3 minute time delayed start if the unit is turned off and onquickly. This prevents overheating of the compressor and possible circuit breaker tripping.The fan will continue to run during this time.The control will maintain any set temperature within 2 F, between 60 F and 90 F degrees.The control is capable of displaying temperature in degrees Fahrenheit or degrees Celsius.To convert from one to the other, press and hold the Left and Right Temp/Timer buttons at thesame time, for 3 seconds.
Fresh Air Vent Control(on some models):
Figure 1 (VENT CLOSED)
Figure 2 (VENT OPEN)
The Fresh Air Vent allows the air conditioner to:1. Recirculate inside air - Vent Closed (See Fig.1)2. Draw fresh air into the room- Vent Open (see Fig.2)3. Exchange air from the room and draws fresh air into
the room - Vent and Exhaust Open (see Fig.3)
Figure 3 (VENT & EXHAUST OPEN)
9

Air Directional Louvers
The louvers will allow you to direct the air flow Upor Down and Left or Right throughout the room asneeded. Pivot horizontal louvers until the desiredUp/Down direction is obtained.
Move the Levers from side to side until the desiredLeft/Right direction is obtained.
Levers
Air Direction
INSTALLATION INSTRUCTIONS
Your air conditioner is designed to install in standard double hung windows with opening widths of22 to 36 inches(559mm to 914mm) (See Fig.1).
Lower sash must open sufficiently to allow a clear verticalopening of 14-1/2 inches (368mm). Side louvers and the rearof the AC must have clear air space to allow enough airflowthrough the condenser, for heat removal. The rear of the unitmust be outdoors, not inside a building or garage.
NOTE: Carton Installation InstructionsSave and thesefor future reference. The carton is the best way to store unitduring winter, or when not in use.
3 4 Screws(7)
Lock Frame(2)
Sash Lock(1)
Mounting Hardware TOOLS NEEDED:
CAUTION:
Phillips Screw DriverDrill(If pilot holes are needed)
When handling unit, be careful to avoid cuts fromsharp metal edges and aluminum fins on front and rear coils.
Top Rail Hardware
3 8 Screws(4)
Top Rail(1)
Before installing unit, the top rail must be assembledon the unit (For <10000Btu/h models only).
Tool Needed: Phillips Screwdriver
A: Remove the air conditioner from the carton and placeon a flat surface.
B: Remove top rail from the bottom of the packagingmaterial as shown in Fig.A
10
Fig.1
OFFSETEX ERIORWALL
T
STOOLSILL
INTERIORWALL
22 to 36559mm to 914mm
14 1 4 min./(337 mm)
NOTE:more
than 10000Btu/h.
The top rail hardware and the following Fig.A,Fig.B and Fig.C are not applicable to the units

C: Align the hole in the top rail with those in thetop of the unit as shown in Fig.B
Fig.B Fig.C
D: Secure the top rail to the unit with the 3/8Screws as shown in Fig.C.
For safety reasons, all four(4) screwsbe securely fastened.
NOTE:MUST
,,
HOW TO INSTALL
NOTE: Top rail and Sliding Panels at each side are offset to provide the proper pitch to the rear of(5/16 ). This is
Place unit on floor, a bench or a table. There is a Left and Right Window Filler Panel- be sureto use the proper panel for each side. When installed the flange for securing the panel in place tothe window sill will be facing into the room.
necessary for proper condensed water utilization and drainage. If you arenot using the Side Panels for any reason, this pitch to the rear must be maintained.
,,
1
Fig.1
A. Hold the Accordion Panelin one hand and gentlypull back the center to freethe open end. See Fig.1.
Fig.2A
Fig.2B
B. Slide the free and (I section)of the panel into the cabinetas shown in Fig. 2A, 2B & 3.Slide the panel down., Besure to leave enough spaceto slip the top and bottom ofthe frame into the rails onthe cabinet.
Fig.3
11

Keep a firm grip on the air conditioner, carefullyplace the unit into the window opening so the bottomof the air conditioner frame is against the windowsill (Fig.5). Carefully close the window behind the toprail of the unit.
2Fig.5
Fig.6
Extend the side panels out against the windowframe (Fig.6).
3
Place the frame lock between the frameextensions and the window sill as shown(Fig.7). Drive 3 / 4 (19mm) locking screwsthrough the frame lock and into the sill(Fig.8).NOTE: To prevent window sill from splitting,drill 1 / 8 (3mm) pilot holes before drivingscrews.
4,,
,,
Fig.7
Fig.8
12
Fig.4C. Once the panel has been installed on the side of the
cabinet, make sure it sits securely inside the framechannel by making slight adjustments. Slide the topand bottom ends of the frame into the top and bottomends of the frame into the top and bottom rails ofthe cabinet. Fig.4.
D. Slide the panel all the way in and repeat on the otherside.
If storm window blocks AC, see Fig. 13.NOTE:

Fig.9
Fig.10
Drive 1 / 2 (13mm) locking screws through frameholes into window sash (Fig.9/10)
5 ,,
To secure lower sash in place, attach right anglesash lock with 3 / 4 (19mm) screw as shown(Fig.11).
6,,
Fig.11
Cut foam seal and insert in the space between theupper and lower sashes (Fig.12).
7Fig.12
If AC is Blocked by Storm Window
Add wood as shown in Fig.13, or remove stormwindow before air conditioner is installed.
If Storm Window Frame must remain, be sure thedrain holes or slots are not caulked or painted shut.Accumulated Rain Water or Condensation must beallowed to drain out.Storm window
frame or otherobstruction
11/2 MIN(38 mm)
,,
Sash
Boardthicknessas required,for properpitch to rear,along entiresill. Fastenwith nails orscrews.
Fig.13
Removing AC From Window
13
Turn AC off, and disconnect power cord.Remove sash seal from between windows, andunscrew safety lock.Remove screws installed through frame and framelock.Close (slide) side panels into frame.Keeping a firm grip on air conditioner, raise sashand carefully rock air conditioner backward todrain any condensate water in base of unit. Becareful not to spill any remaining water whilelifting unit form window. Store parts WITH airconditioner.
,,,,
CARE AND CLEANING
Clean your air conditioner occasionally to keep it looking new. Be sure to unplug the unit
CAUTION
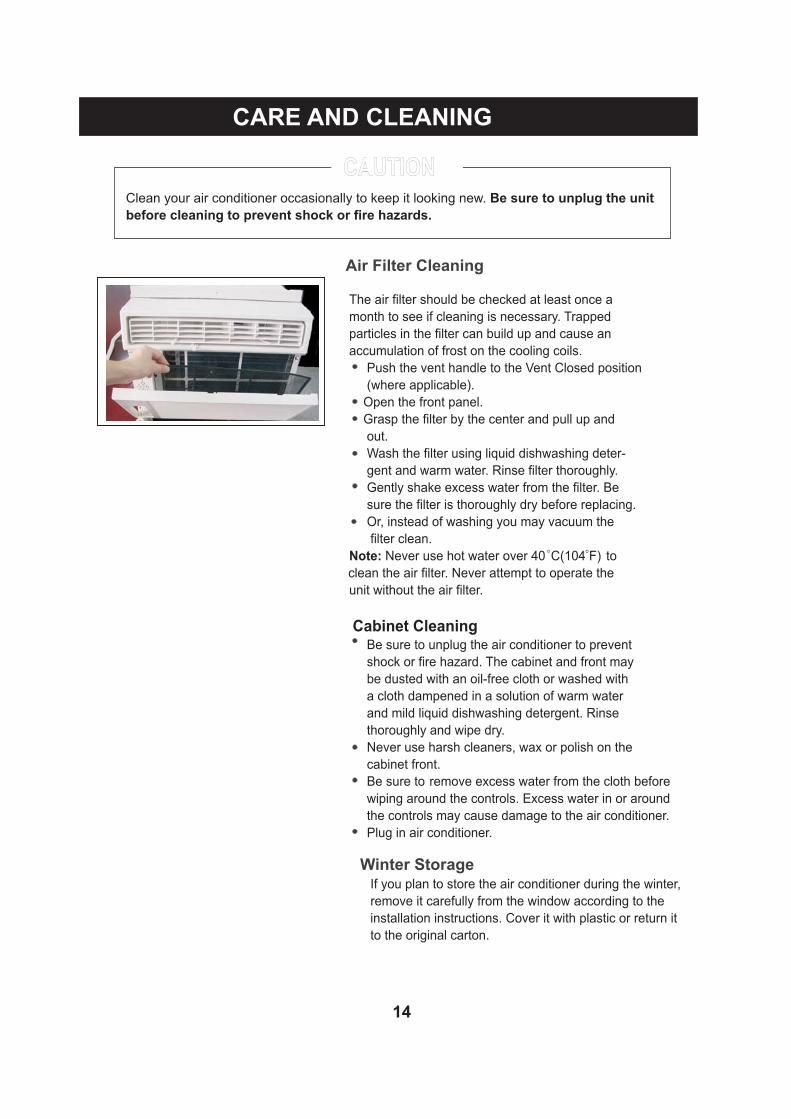
Air Filter Cleaning
The air filter should be checked at least once a
month to see if cleaning is necessary. Trapped
particles in the filter can build up and cause an
accumulation of frost on the cooling coils.
Push the vent handle to the Vent Closed position
(where applicable).
Open the front panel.
Grasp the filter by the center and pull up and
out.
Wash the filter using liquid dishwashing deter-
gent and warm water. Rinse filter thoroughly.
Gently shake excess water from the filter. Be
sure the filter is thoroughly dry before replacing.
Or, instead of washing you may vacuum the
filter clean.
Never use hot water over 40 C(104 F) to
clean the air filter. Never attempt to operate the
unit without the air filter.
Be sure to unplug the air conditioner to prevent
shock or fire hazard. The cabinet and front may
be dusted with an oil-free cloth or washed with
a cloth dampened in a solution of warm water
and mild liquid dishwashing detergent. Rinse
thoroughly and wipe dry.
Never use harsh cleaners, wax or polish on the
cabinet front.
wiping around the controls. Excess water in or around
the controls may cause damage to the air conditioner.
Plug in air conditioner.
If you plan to store the air conditioner during the winter,
remove it carefully from the window according to the
installation instructions. Cover it with plastic or return it
to the original carton.
Note:
Cabinet Cleaning
Winter Storage
14
before cleaning to prevent shock or fire hazards.
Be sure to remove excess water from the cloth before

Before calling for service, review this list. It may save you time and expense. This list includes common
occurrences that are not the result of defective workman-ship or materials in this appliance.
Solution
Air conditioner
does not start
Wall plug disconnected. Push plug firmly into wall outlet.
House fuse blown or circuit breaker tripped. Replace fuse with time delay type or
reset circuit breaker.
Plug Current Device Tripped. Press the RESET button.
TROUBLESHOOTING TIPS
Problem
Air from unit does
not feel cold
enough
Reset to a Lower temperature.
Room temperature below 17 C(62 F). Cooling may not occur until room temperaturerises above 17 C(62 F).
Thermostat set too cold for night-time cooling. To defrost the coil, set to FAN ONLYmode. Then, set temperature to a Higher setting.
Temperature sensing element touching cold coil, located behind air filter. Straighten
tube away from coil.
Air filter may be dirty. Clean filter. Refer to Care and Cleaning section. To defrost,
set to FAN ONLY mode.
Dirty air filter- air restricted. Clean air filter. Refer to Care and Cleaning section.
Unit recently turned on in hot room. Allow additional time to remove Stored heat from
walls, ceiling, floor and furniture.
Control is OFF. Turn Control ON and set to desired setting.
O O
OO
Air conditioner
cooling, but room
is too warm- ice
forming on cooling
coil behind
decorative front.
Outdoor temperature below 18 C(64 F). To defrost the coil, set FAN ONLY mode.O O
Air conditioner
cooling, but room
is too warm- NO
ice forming on
cooling coil behind
decorative front.
Temperature is set too High, set temperature to a Lower setting.
Air directional louvers positioned improperly. Position louvers for better air distribution.
Front of units is blocked by drapes, blinds, furniture, etc. - restricts air distribution.
Clear blockage in front of unit.
Doors, windows, registers, etc. Open- cold air escapes. Close doors, windows, registers.
Compressor shut-off by changing modes. Wait approximately 3 minutes and listen for
compressor to restart when set in the COOL mode.
Air conditioner turns on
and off rapidly
Noise when unit is
cooling
Water dripping
INSIDE when
unit is cooling.
Improper installation. Tilt air conditioner slightly to the outside to allow water drainage.
Refer to installation instructions - check with installer.
Dirty air filter- air restricted. Clean air filter.
Air movement sound. This is normal . If too loud, set to a slower FAN setting.
Outside temperature extremely hot. Set FAN speed to a Higher setting to bring air past
cooling coils more frequently.
Window vibration - poor installation. Refer to installation instructions or check with installer.
15

SolutionProblem
Water dripping
OUTSIDE when
unit is cooling.
Unit removing large quantity of moisture from humid room. This is normal during
excessively humid days.
Remote Sensing
Deactivating
Prematurely
(some models)
Remote control not located within range. Place remote control within 20 feet & 180 ,
radius of the front of the unit.
Remote control signal obstructed. Remove obstruction.
Room too cold Set temperature too low. Increase set temperature.
16

Air Conditioner Warranty Your product is protected by this warranty: Warranty service must be obtained from Midea Consumer Services or an authorized Midea servicer.
WARRANTY PERIOD
MIDEA, THROUGH ITS AUTHORIZED SERVICERS, WILL:
THE CONSUMER WILL BE RESPONSIBLE FOR:
FULL ONE-YEAR WARRANTY
One year from original purchase date
Pay all costs for repairing or replacing parts of this appliance which prove to be defective in materials or workmanship.
Transportation and costs of service calls that are listed under NORMAL RESPONSIBILITIESOF THE CONSUMER*
LIMITED 2ND-5TH
YEAR WARRANTY (sealed system)
Second through fifth years from original purchase date
Repair or replace any parts in the Sealed Refrigeration System (compressor, condenser, evaporator and tubing) proves to be defective in materials workmanship.
Diagnostic, removal, transportation and reinstallation costs required because of service.Costs for labor, parts and transportation other than with respect to the Sealed Refrigeration System.
LIMITED 10 YEAR COMPRESSOR WARRANTY
First to tenth year from original date of purchase
Repair or replace compressor ONLY in the event it becomes defective during the warranty period
Diagnostic, removal, transportation and reinstallation costs required because of service.Costs for labor, parts and transportation other than with respect to the Sealed Refrigeration System.
Midea replacement parts shall be used and will be warranted only for the period remaining on the original warranty. NORMAL RESPONSIBILITIES OF THE CONSUMER* This warranty applies only to products in ordinary household use, and the consumer is responsible for the items listed below:
1. Proper use of the appliance in accordance with instructions provided with the product. 2. Proper installation by an authorized service professional in accordance with instructions provided with the appliance and in accordance with all
local plumbing, electrical and / or gas codes. 3. Proper connection to a grounded power supply of sufficient voltage, replacement of blown fuses, repair of loosen connections or defects in
house wiring. 4. Expenses for making the appliance accessible for servicing. 5. Damages to finish after installation.
EXCLUSIONS This warranty does not cover the following:
1) Failure caused by damage to the unit while in your possession (other than damage caused by defect or malfunction), by its improper installation, or by unreasonable use of the unit, including without limitation, failure to provide reasonable and necessary maintenance or to follow the written Installation and Operating Instructions.
2) Damages caused by services performed by persons other than authorized Midea servicers; use of parts other than Midea replacement parts; obtained from persons other than such Midea customer service; or external causes such as abuse, misuse, inadequate power supply
3)
If the unit is put to commercial, business, rental, or other use or application other than for consumer use, we make no warranties, express or implied, including but not limited to, any implied warranty of merchantability or fitness for particular use or purpose.
4)
Products without original serial numbers or products that have serial numbers which have been altered or cannot be readily determined.
Note: Some states do not allow the exclusion or limitation of incidental or consequential damages. So this limitation or exclusion may not apply to you.
IF YOU NEED SERVICE Keep your bill of sale, delivery slip, or some other appropriate payment record. The date on the bill established the warranty period should service be required. If service is performed, it is your best interest to obtain and keep all receipts. This written warranty gives you specific legal rights. You may also have other rights that vary from state to state. Service under this warranty must be obtained by following these steps, in order: 1. Contact Midea Consumer Services or an authorized Midea servicer at 1 866 64 MIDEA. 2. If there is a question as to where to obtain service, contact our consumer relations Department.
.

CS356-U2200019005


