Embed Size (px)
Citation preview

1Ardennes ‘44 : The Battle of the Bulge
© 2004 GMT Games, LLC — Living Rules 11-22-05
GMT GamesP.O. Box 1308, Hanford, CA 93232-1308www.GMTGames.com
1. Introduction ................................................................ 22. Game Equipment ........................................................ 23. Prepare for Play .......................................................... 34. Sequence of Play Outline ........................................... 45. The Artillery Supply Phase ........................................ 46. The Fuel Shortage Phase ............................................ 47. Building and Blowing Bridges ................................... 48. Stacking ...................................................................... 59. Zones of Control ......................................................... 610. ZOC Bonds ................................................................. 611. Basic Rules of Movement .......................................... 612. Strategic Movement and Truck Markers .................... 813. Reinforcements and Entry Hexes ............................... 914. Basic Rules of Combat ............................................. 1015. Combat Modifiers ..................................................... 1016. Combat Results ......................................................... 1117. Retreats ..................................................................... 1318. Disruption and Rally ................................................ 1419. Advance After Combat ............................................. 14
20. Disengagement and Removing Engaged Markers ...........1521. Tank and Recon Units .............................................. 1622. Artillery Units ........................................................... 1623. Supply and Surrender ............................................... 1724. Traffic Markers, Bottleneck Hexes and Roadblocks 1825. Night Turns and Replacements ................................ 1926. Breakdown Units ...................................................... 2027. Special Units ............................................................. 2028. Weather ..................................................................... 2129. Turn 1 Special Rules................................................. 2230. How to Win ............................................................... 2231. Scenarios ................................................................... 2232. Fuel Dumps ............................................................... 2333. Optional Units ........................................................... 2334. Optional Night Infiltration ....................................... 23
Reinforcement Schedule .................................................. 24Index ................................................................................. 26Expanded Sequence of Play ............................................. 27
T A B L E O F C O N T E N T S
#0304
2 Ardennes ‘44 : The Battle of the Bulge
© 2004 GMT Games, LLC — Living Rules 11-22-05
2.2 Combat Units and MarkersThere are two basic types of playing pieces: combat units and gamemarkers.
2.3 Unit Sizes X = Brigade III = Regiment II = Battalion TF = Task Force Gp = Group XXX = Corps Sq = Squadron CC = Combat Command (-) = Part of unit detached or missing
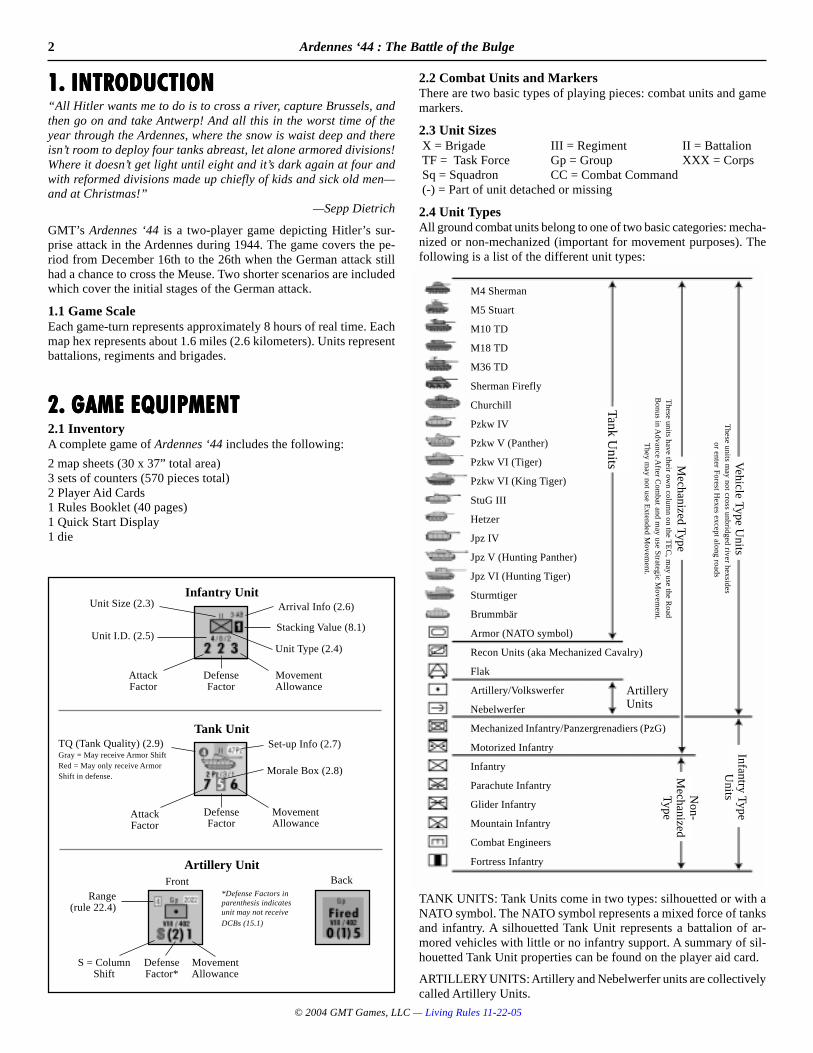
2.4 Unit TypesAll ground combat units belong to one of two basic categories: mecha-nized or non-mechanized (important for movement purposes). Thefollowing is a list of the different unit types:
TANK UNITS: Tank Units come in two types: silhouetted or with aNATO symbol. The NATO symbol represents a mixed force of tanksand infantry. A silhouetted Tank Unit represents a battalion of ar-mored vehicles with little or no infantry support. A summary of sil-houetted Tank Unit properties can be found on the player aid card.
ARTILLERY UNITS: Artillery and Nebelwerfer units are collectivelycalled Artillery Units.
M4 Sherman
M5 Stuart
M10 TD
M18 TD
M36 TD
Sherman Firefly
Churchill
Pzkw IV
Pzkw V (Panther)
Pzkw VI (Tiger)
Pzkw VI (King Tiger)
StuG III
Hetzer
Jpz IV
Jpz V (Hunting Panther)
Jpz VI (Hunting Tiger)
Sturmtiger
Brummbär
Armor (NATO symbol)
Recon Units (aka Mechanized Cavalry)
Flak
Artillery/Volkswerfer
Nebelwerfer
Mechanized Infantry/Panzergrenadiers (PzG)
Motorized Infantry
Infantry
Parachute Infantry
Glider Infantry
Mountain Infantry
Combat Engineers
Fortress Infantry
1. INTRODUCTION1. INTRODUCTION1. INTRODUCTION1. INTRODUCTION1. INTRODUCTION“All Hitler wants me to do is to cross a river, capture Brussels, andthen go on and take Antwerp! And all this in the worst time of theyear through the Ardennes, where the snow is waist deep and thereisn’t room to deploy four tanks abreast, let alone armored divisions!Where it doesn’t get light until eight and it’s dark again at four andwith reformed divisions made up chiefly of kids and sick old men—and at Christmas!”
—Sepp Dietrich
GMT’s Ardennes ‘44 is a two-player game depicting Hitler’s sur-prise attack in the Ardennes during 1944. The game covers the pe-riod from December 16th to the 26th when the German attack stillhad a chance to cross the Meuse. Two shorter scenarios are includedwhich cover the initial stages of the German attack.
1.1 Game ScaleEach game-turn represents approximately 8 hours of real time. Eachmap hex represents about 1.6 miles (2.6 kilometers). Units representbattalions, regiments and brigades.
2. GAME EQUIPMENT2. GAME EQUIPMENT2. GAME EQUIPMENT2. GAME EQUIPMENT2. GAME EQUIPMENT2.1 InventoryA complete game of Ardennes ‘44 includes the following:
2 map sheets (30 x 37” total area)3 sets of counters (570 pieces total)2 Player Aid Cards1 Rules Booklet (40 pages)1 Quick Start Display1 die
ArtilleryUnits
Set-up Info (2.7)Tank Unit
TQ (Tank Quality) (2.9)Gray = May receive Armor ShiftRed = May only receive ArmorShift in defense.
Morale Box (2.8)
AttackFactor
DefenseFactor
MovementAllowance
AttackFactor
DefenseFactor
MovementAllowance
Arrival Info (2.6)
Stacking Value (8.1)
Unit Size (2.3)
Unit Type (2.4)Unit I.D. (2.5)
Infantry Unit
Artillery UnitBackFront
S = ColumnShift
DefenseFactor*
MovementAllowance
Range(rule 22.4)
No
n-
Me
cha
nize
dTyp
e
*Defense Factors inparenthesis indicatesunit may not receive
DCBs (15.1)
Infa
ntry Typ
eU
nits
Me
cha
nize
d Typ
eT
he
se u
nits h
ave
the
ir ow
n co
lum
n o
n th
e T
EC
, ma
y use
the
Ro
ad
Bo
nu
s in A
dva
nce
Afte
r Co
mb
at a
nd
ma
y use
Stra
teg
ic Mo
vem
en
t.T
he
y ma
y no
t use
Exte
nd
ed
Mo
vem
en
t.
Veh
icle Typ
e U
nits
Th
ese
un
its ma
y no
t cross u
nb
ridg
ed
river h
exsid
es
or e
nte
r Fo
rest H
exe
s exce
pt a
lon
g ro
ad
s
Tan
k Un
its
3Ardennes ‘44 : The Battle of the Bulge
© 2004 GMT Games, LLC — Living Rules 11-22-05
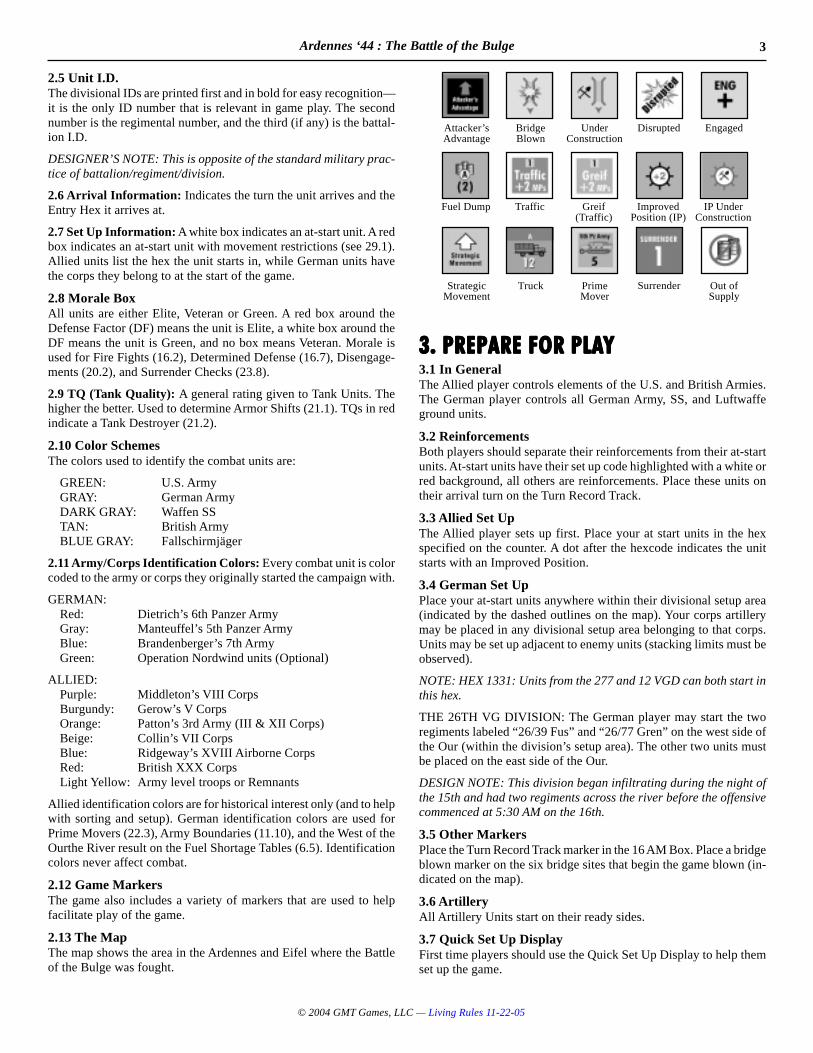
2.5 Unit I.D.The divisional IDs are printed first and in bold for easy recognition—it is the only ID number that is relevant in game play. The secondnumber is the regimental number, and the third (if any) is the battal-ion I.D.
DESIGNER’S NOTE: This is opposite of the standard military prac-tice of battalion/regiment/division.
2.6 Arrival Information: Indicates the turn the unit arrives and theEntry Hex it arrives at.
2.7 Set Up Information: A white box indicates an at-start unit. A redbox indicates an at-start unit with movement restrictions (see 29.1).Allied units list the hex the unit starts in, while German units havethe corps they belong to at the start of the game.
2.8 Morale BoxAll units are either Elite, Veteran or Green. A red box around theDefense Factor (DF) means the unit is Elite, a white box around theDF means the unit is Green, and no box means Veteran. Morale isused for Fire Fights (16.2), Determined Defense (16.7), Disengage-ments (20.2), and Surrender Checks (23.8).
2.9 TQ (Tank Quality): A general rating given to Tank Units. Thehigher the better. Used to determine Armor Shifts (21.1). TQs in redindicate a Tank Destroyer (21.2).
2.10 Color SchemesThe colors used to identify the combat units are:
GREEN: U.S. ArmyGRAY: German ArmyDARK GRAY: Waffen SSTAN: British ArmyBLUE GRAY: Fallschirmjäger
2.11 Army/Corps Identification Colors: Every combat unit is colorcoded to the army or corps they originally started the campaign with.
GERMAN:Red: Dietrich’s 6th Panzer ArmyGray: Manteuffel’s 5th Panzer ArmyBlue: Brandenberger’s 7th ArmyGreen: Operation Nordwind units (Optional)
ALLIED:Purple: Middleton’s VIII CorpsBurgundy: Gerow’s V CorpsOrange: Patton’s 3rd Army (III & XII Corps)Beige: Collin’s VII CorpsBlue: Ridgeway’s XVIII Airborne CorpsRed: British XXX CorpsLight Yellow: Army level troops or Remnants
Allied identification colors are for historical interest only (and to helpwith sorting and setup). German identification colors are used forPrime Movers (22.3), Army Boundaries (11.10), and the West of theOurthe River result on the Fuel Shortage Tables (6.5). Identificationcolors never affect combat.
2.12 Game MarkersThe game also includes a variety of markers that are used to helpfacilitate play of the game.
2.13 The MapThe map shows the area in the Ardennes and Eifel where the Battleof the Bulge was fought.
3. PREPARE FOR PLAY3. PREPARE FOR PLAY3. PREPARE FOR PLAY3. PREPARE FOR PLAY3. PREPARE FOR PLAY3.1 In GeneralThe Allied player controls elements of the U.S. and British Armies.The German player controls all German Army, SS, and Luftwaffeground units.
3.2 ReinforcementsBoth players should separate their reinforcements from their at-startunits. At-start units have their set up code highlighted with a white orred background, all others are reinforcements. Place these units ontheir arrival turn on the Turn Record Track.
3.3 Allied Set UpThe Allied player sets up first. Place your at start units in the hexspecified on the counter. A dot after the hexcode indicates the unitstarts with an Improved Position.
3.4 German Set UpPlace your at-start units anywhere within their divisional setup area(indicated by the dashed outlines on the map). Your corps artillerymay be placed in any divisional setup area belonging to that corps.Units may be set up adjacent to enemy units (stacking limits must beobserved).
NOTE: HEX 1331: Units from the 277 and 12 VGD can both start inthis hex.
THE 26TH VG DIVISION: The German player may start the tworegiments labeled “26/39 Fus” and “26/77 Gren” on the west side ofthe Our (within the division’s setup area). The other two units mustbe placed on the east side of the Our.
DESIGN NOTE: This division began infiltrating during the night ofthe 15th and had two regiments across the river before the offensivecommenced at 5:30 AM on the 16th.
3.5 Other MarkersPlace the Turn Record Track marker in the 16 AM Box. Place a bridgeblown marker on the six bridge sites that begin the game blown (in-dicated on the map).
3.6 ArtilleryAll Artillery Units start on their ready sides.
3.7 Quick Set Up DisplayFirst time players should use the Quick Set Up Display to help themset up the game.
BridgeBlown
Attacker’sAdvantage
UnderConstruction
Disrupted Engaged
TrafficFuel Dump Greif(Traffic)
ImprovedPosition (IP)
IP UnderConstruction
TruckStrategicMovement
PrimeMover
Surrender Out ofSupply
4 Ardennes ‘44 : The Battle of the Bulge
© 2004 GMT Games, LLC — Living Rules 11-22-05
4. SEQUENCE OF PLAY OUTLINE4. SEQUENCE OF PLAY OUTLINE4. SEQUENCE OF PLAY OUTLINE4. SEQUENCE OF PLAY OUTLINE4. SEQUENCE OF PLAY OUTLINEEach game-turn consists of a German Player Turn followed by anAllied Player Turn. The sequence of each game-turn must be strictlyfollowed.
A. GERMAN PLAYER TURN1. The Artillery Supply Phase2. The Fuel Shortage Phase (German Turn only)3. The Bridge Phase4. The Movement Phase
A. All German units may move.B. Remove Replacement markers from German units.
5. The Rally Phase (remove Disrupted markers)6. The Combat Phase
A. Remove ENG markers and conduct DisengagementsB. Conduct all Combats
7. The Traffic Marker Phase8. The Supply and Surrender Phase
A. Check Supply for all Friendly Units.B. Roll for Surrender of all Friendly Units Isolated.
9. The Victory Check Phase (Allied Turn only)
PLAY NOTE: Night Turns (rule 25) follow a different and much shortersequence.
B. ALLIED PLAYER TURNThe Allied Player Turn is identical to the German Player Turn (switch-ing the term German for Allied), except the Allied player has a Vic-tory Check Phase and no Fuel Shortage Phase.
C. END TURNRecord the completion of a game-turn by advancing the Game TurnMarker one box.
5. THE ARTILLERY SUPPLY PHASE5. THE ARTILLERY SUPPLY PHASE5. THE ARTILLERY SUPPLY PHASE5. THE ARTILLERY SUPPLY PHASE5. THE ARTILLERY SUPPLY PHASE5.1 In GeneralDuring this phase the phasing player flips over a number of his Artil-lery Units from their fired side to their ready side. If it is the GermanTurn, the German player may remove all his Prime Mover/StrategicMovement marker from the map in order to take stock of these im-portant markers and better view his Artillery Units (see 12.7).
5.2 Artillery Supply ProcedureArtillery supply may not be accumulated, those not used are lost.The number of Artillery Units each side may flip over each friendlyArtillery Supply Phase is:
GERMAN: 3 per turn (exception: 5.4)ALLIED: All units may flip
5.3 Artillery Supply RestrictionsArtillery Units that are Disrupted (rule 18), out of supply (23.4), orusing Strategic Movement (12.1), may not be flipped to their readyside. Artillery Units adjacent to an enemy unit, or in a hex with anEngaged marker (16.5) may be flipped.
5.4 Special 2nd Turn Artillery SupplyTo reflect the accumulation of supply for the offensive, the Germanplayer may flip to their ready side six Artillery Units on the 16 PMturn.
6. THE FUEL SHORTAGE PHASE6. THE FUEL SHORTAGE PHASE6. THE FUEL SHORTAGE PHASE6. THE FUEL SHORTAGE PHASE6. THE FUEL SHORTAGE PHASE6.1 ProcedureOnly the German player checks for fuel shortage and only on or afterthe 19 AM turn. Fuel Shortage is checked using the Fuel ShortageTables. Roll once for each table. If the result indicates a division (theFührer Begleit and the Führer Grenadier brigades are considered di-visions for this rule), then all units in that division are considered outof supply and suffer all the penalties of that status (see 23.4). Theresult often gives a choice of two divisions; the German player maychoose either one.
6.3 Fuel Shortage Die Roll ModifierStarting on the 23 AM turn the German player must modify his dieroll by +1 to account for Allied bombing of the rail net west of theRhine.
6.4 Fuel Shortage and ReinforcementsIf fuel shortage targets a division that is arriving as a reinforcementthat turn, it arrives in an unsupplied state (it may move a maximumof two hexes). If only one of the formations listed has arrived, theGerman player must select the one that is on the map. If neither divi-sion has arrived the result is treated as a “No Fuel Shortage” result.
6.5 West of the Ourthe RiverIf the result says “West of Ourthe River” the Allied player, instead ofthe German player, selects the German division to be subject to fuelshortage. He must pick a division belonging to the appropriate army(5 PzA or 6 PzA). Only the units of that division that are west of theOurthe River at that moment are affected. See the Victory Hex Mapfor a precise definition of “West of the Ourthe.”
7. BUILDING AND BLOWING BRIDGES7. BUILDING AND BLOWING BRIDGES7. BUILDING AND BLOWING BRIDGES7. BUILDING AND BLOWING BRIDGES7. BUILDING AND BLOWING BRIDGES7.1 The Bridge PhaseDuring this phase the phasing player may destroy or rebuild bridges.
7.2 Bridge Demolition in GeneralBoth players may destroy (or the colloquial “blow”) bridges. Bridgedemolition occurs in the friendly Bridge Phase or during youropponent’s Combat Phase. Only one attempt on each bridge is al-lowed per player turn. Supply has no affect on blowing bridges.
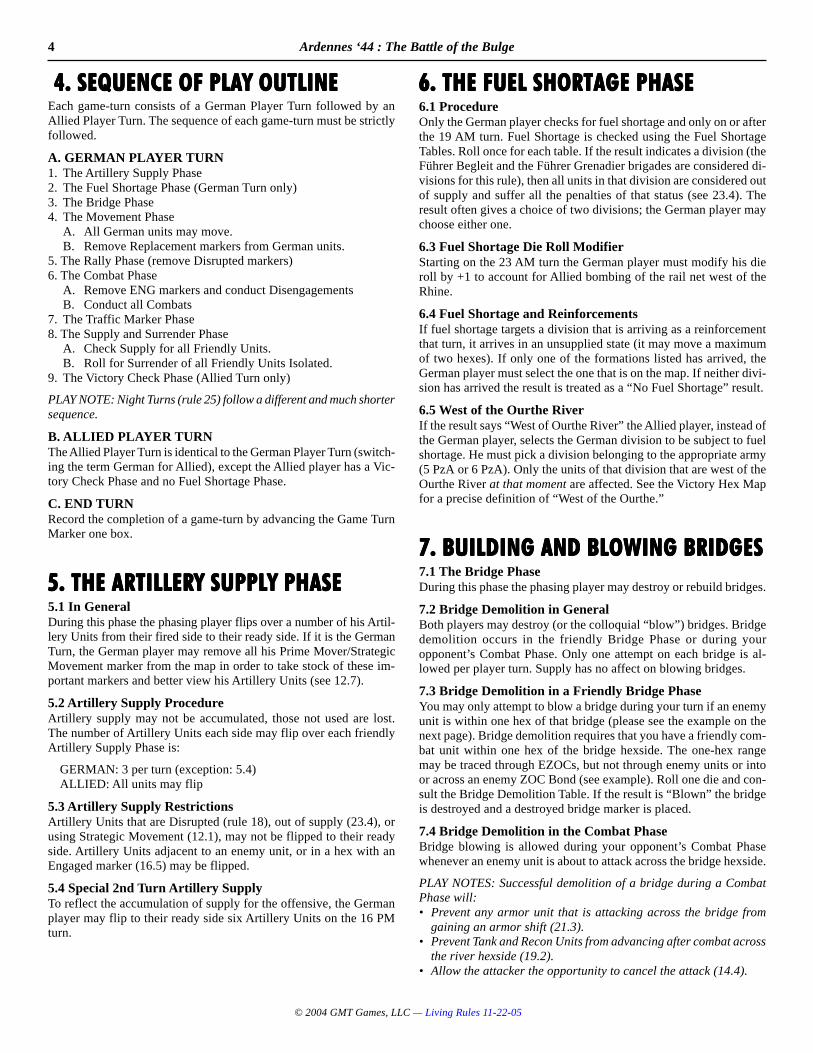
7.3 Bridge Demolition in a Friendly Bridge PhaseYou may only attempt to blow a bridge during your turn if an enemyunit is within one hex of that bridge (please see the example on thenext page). Bridge demolition requires that you have a friendly com-bat unit within one hex of the bridge hexside. The one-hex rangemay be traced through EZOCs, but not through enemy units or intoor across an enemy ZOC Bond (see example). Roll one die and con-sult the Bridge Demolition Table. If the result is “Blown” the bridgeis destroyed and a destroyed bridge marker is placed.
7.4 Bridge Demolition in the Combat PhaseBridge blowing is allowed during your opponent’s Combat Phasewhenever an enemy unit is about to attack across the bridge hexside.
PLAY NOTES: Successful demolition of a bridge during a CombatPhase will:• Prevent any armor unit that is attacking across the bridge from
gaining an armor shift (21.3).• Prevent Tank and Recon Units from advancing after combat across
the river hexside (19.2).• Allow the attacker the opportunity to cancel the attack (14.4).
5Ardennes ‘44 : The Battle of the Bulge
© 2004 GMT Games, LLC — Living Rules 11-22-05
B
BB
B
B
B
B
A
AA
A
A
A
A
7.5 Bridge Demolition Modifiers (cumulative)+1 If the attempt is made during your opponent’s Combat Phase.+2 If the friendly unit conducting the demolition is either Disrupted,
Engaged or under a Strategic Movement marker.
7.6 Effects of Blown BridgesBoth players must treat a blown bridge as an unbridged river hex-side.
7.7 Demolition RestrictionFIRST DAY: No bridge blowing is allowed on Game Turns 1 and 2(including the first Night Turn) with the exception of the Ouren bridge(7.8).
RIVERS THROUGH TOWNS: When a river flows through themiddle of a town hex (example Clervaux and Houffalize), no demo-lition is possible in that hex.
7.8 The Ouren BridgeDESIGN NOTE: The bridge near Ouren (2020) actually representstwo weak bridges. These were crucial to the advance of the 116thPanzer division which, upon reaching the bridges on the second dayof the offensive, found the bridges inadequate for tanks and heavyequipment. In this game there is a chance one of the bridges is ad-equate.
The first time the German player attempts to move, attack or advanceacross the Ouren Bridge (2020) with a combat unit the Allied playerrolls a die. On a die roll of 1-4 the bridge is considered destroyed (anda blown bridge marker is placed). On a die roll of 5 or 6 the bridge isconsidered normal and remains intact. This special die roll occurs onlyonce: if the bridge is blown and later rebuilt it is considered a normalbridge in all respects; if the bridge remains intact it can be blown likeall other bridges starting on the 17 AM turn.
7.9 Rebuilding BridgesBridges may be rebuilt by either player at original bridge sites. Tobuild a bridge the following two conditions are necessary:
• Both hexes tangent to the bridge hexside must be clear of enemyunits and either: a) occupied by friendly units, or b) clear of enemy
Zones of Control (rule 9).• A supply path using roads only (23.3) must be possible from at
least one of the hexes tangent to the bridge hexside.
PROCEDURE: Bridge construction is conducted in a two-part pro-cess. In the first friendly Bridge Phase that the two conditions aboveare satisfied, the Bridge Blown marker is flipped to it’s Under Con-struction side. In the next friendly Bridge Phase, if the two condi-tions above are still met, the bridge marker is removed and the bridgemay be used normally that turn.
7.10 The Dasburg and Gemünd BridgesThe construction of these two bridges were planned weeks beforethe offensive and each had an engineer battalion and bridging equip-ment committed to its construction, hence these two bridges werecompleted quickly (approximately by 4 PM on the 16th). Therefore,these two bridges are considered completed in the bridge phase ofthe 16 PM turn. If either bridge is later blown, then reconstructionoccurs normally.
PLAY NOTE: It may be helpful to flip the Dasburg and Gemünd BridgeBlown markers to their Under Construction sides on Game Turn 1,to serve as a visual reminder that they are removed during the BridgePhase on Game Turn 2.
LOCATION: The Dasburg bridge = 2115, Gemünd bridge = 2013.
8. STACKING8. STACKING8. STACKING8. STACKING8. STACKINGDESIGN NOTE: The emphasis of this game is on limited stacking.Generally, players will be limited to three battalions of infantry andone battalion of tanks to a hex.
8.1 Stacking Point LimitNo more than 3 stacking points in a hex.
NOTE: Silhouetted Tank Units and Artillery Units have no stackingpoint value, but the number of such units in a hex is limited by therules of 8.2.
8.2 Unit LimitNo more than two units are allowed in a hex, with the followingexceptions:• All the components of an infantry or PzG regiment may stack to-
gether and be counted as a single unit (these units are indicatedwith a color bar behind their regiment I.D.). Likewise, the twosquadrons that make up a Cavalry Group and the two units of the 9Arm/CCA count as one unit for stacking purposes.
• Two single-step silhouetted Tank Units from the same division countas a single unit for stacking purposes ("single-step" includes a re-duced 2-step unit). For example, if both tank battalions of the 2ndPanzer Division are on their reduced side, they could stack to-gether and be counted as one unit.
• BATTLE GROUP: Any three non-Artillery Units may stack in ahex, as long as their combined defense strength does not exceed 7.
8.3 Overstacking PenaltyThe stacking limit can never be voluntarily exceeded except duringthe course of movement and after a retreat. The stacking limit mustbe strictly observed at the completion of movement or an AdvanceAfter Combat (19.1). The owning player must correct all stackingviolations at these times by eliminating enough units from the hex tosatisfy the stacking limit. Overstacking is allowed after a retreat (17.4),but the stacking limit must be complied with at the completion of thenext friendly movement phase, or any excess units must be elimi-nated by the owning player.
ZO
C B
on
d
EXAMPLE: The American player selects the unit in the centerto blow as many bridges as possible. The seven bridges markedA may not be blown because a German unit is not within onehex. The seven bridges marked B may not be blown because theone-hex range may not enter or cross an enemy ZOC Bond or ahex containing an enemy unit. All other bridges may be blownby the Allied unit on a die roll of 1–4.
6 Ardennes ‘44 : The Battle of the Bulge
© 2004 GMT Games, LLC — Living Rules 11-22-05
9. ZONES OF CONTROL (ZOC)9. ZONES OF CONTROL (ZOC)9. ZONES OF CONTROL (ZOC)9. ZONES OF CONTROL (ZOC)9. ZONES OF CONTROL (ZOC)9.1 General RuleThe six hexes immediately surrounding a hex occupied by one ormore combat units constitute the Zone of Control (ZOC) of thoseunits. All combat units exert a ZOC (even Disrupted units [18.2], andArtillery Units).
9.2 ZOCs and MovementUnits must stop upon entering an enemy Zone of Control (EZOC).Units that start their movement in an EZOC may move away. It costsall units one additional movement points (+1 MP) to exit an EZOC.It costs no additional movement points to enter an EZOC.
9.3 ZOC to ZOC MovementA unit that starts its move in an EZOC may move directly into an-other EZOC (and stop) of the same or different enemy unit as long asit does not cross or enter a ZOC Bond (rule 10).
9.4 ZOCs and Silhouetted Tank UnitsZOCs from Silhouetted Tank Units do not extend into or out of aWooded Rough hex except along a road (Primary or Secondary).
9.5 Other Effects of ZOCs• EZOCs and Retreats: see 17.1, 17.2• EZOCs and Advances: see 19.3• EZOCs and Supply Paths: see 23.3
10. ZOC BONDS10. ZOC BONDS10. ZOC BONDS10. ZOC BONDS10. ZOC BONDS10.1 General RuleWhen two friendly units are two hexes apart (with one vacant inter-vening hex), they create a bond between them that no enemy unitmay enter or cross. Due to the pattern of a hex grid, there are twotypes of ZOC Bonds—Hex Bonds and Hexside Bonds.
10.2 Effects of ZOC Bonds:• Units may not enter an enemy Hex Bond or cross an enemy Hex-
side Bond during the Movement Phase.• Units forced to Retreat into an enemy Hex Bond or across an en-
emy Hexside Bond are eliminated (17.2).• Supply can never be traced into an enemy Hex Bond or across an
enemy Hexside Bond.
10.3 ZOC Bonds and TerrainA ZOC Bond cannot extend:• Across two river hexsides (as in a loop of a river)• Across two Wooded Rough hexsides. A ZOC Bond can extend along
a Wooded Rough hexside as long as that hexside does not join twoWooded Rough hexes. Example: a ZOC Bond is not possible be-tween 1305 and 1505, nor between 1506 and 1305.
PLAY NOTE: A ZOC Bond may extend across a Lake hexside.
10.4 Negating ZOC BondsA Hexside Bond is negated when enemy units are located on eachside of the intervening hexside (as with units D and E in the diagramon the opposite page). A Hex Bond is negated when the interveninghex contains an enemy unit (as with units E and F in the same dia-gram).
10.5 Intersecting ZOC BondsIf both players have intersecting ZOC Bonds, then neither player maycross the other’s ZOC Bond until it is negated.
10.6 ZOC Bonds With the Map EdgeA unit can form a ZOC Hexside Bond with the map edge, but not aZOC Hex Bond.
11. BASIC RULES OF MOVEMENT11. BASIC RULES OF MOVEMENT11. BASIC RULES OF MOVEMENT11. BASIC RULES OF MOVEMENT11. BASIC RULES OF MOVEMENT11.1 The Movement ProcedureDuring the Movement Phase the phasing player may move all, some,or none of his combat units. Each unit has a Movement Allowance(MA) that is the maximum number of Movement Points (MPs) itmay expend for movement during the Movement Phase and still beable to attack in the Combat Phase. Each hex entered costs a certainnumber of MPs to enter as determined on the Terrain Effects Chart(TEC). You must complete the movement of one unit (or stack) be-fore starting to move another.
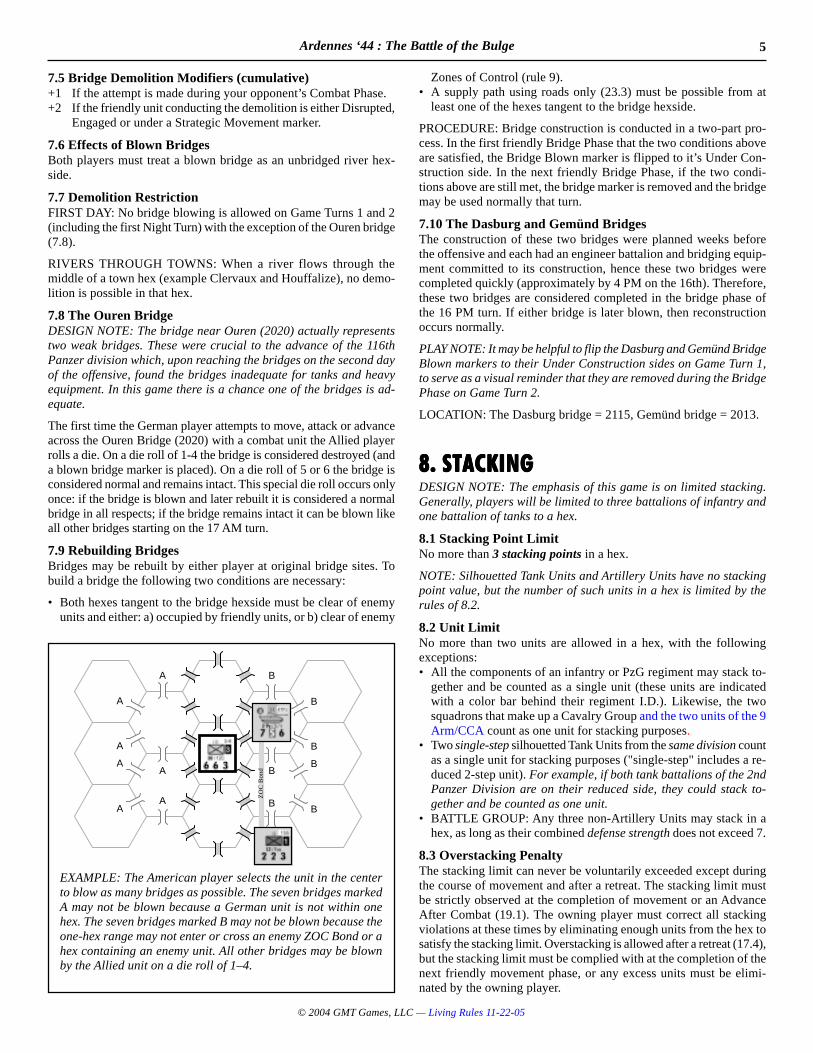
These 2 single-step TankUnits belong to the samedivision and so count as 1unit for stacking purposes.
BATTLE GROUP
Count as 1 unitfor stacking
(part of the same regiment)
EXAMPLES OF ILLEGAL STACKING:
No!Reason: Stacking Point Limit exceeded.
No!Reason: No more than two unitsper hex (except Battle Groups[8.2]).
EXAMPLES OF LEGAL STACKING:
No!Reason: No more than two unitsper hex (except Battle Groups[8.2]).
HEXSIDEBOND
HEX BOND

7Ardennes ‘44 : The Battle of the Bulge
© 2004 GMT Games, LLC — Living Rules 11-22-05
11.2 Extended MovementNon-Mechanized units may use Extended Movement to increase theirMovement Allowance by 2 MPs. Mechanized Type units may notuse Extended Movement (Mechanized units have Strategic Move-ment). Units that use Extended Movement may not end their moveadjacent to an enemy unit. A unit may start adjacent to an enemy unitand use Extended Movement.
11.3 Tactical MovementA unit may ignore all MP cost and move up to two hexes, this iscalled Tactical Movement. Units that use Tactical Movement muststill stop upon entering an EZOC, may not cross enemy ZOC Bondsand may not enter or cross prohibited terrain. Units that use TacticalMovement may attack normally in the following Combat Phase.
NOTE: Vehicle Units cannot use Tactical Movement to move throughnon-road Forest hexes.
DELAY MARKERS: Traffic Markers, Roadblocks and St-Vith Bottle-neck hexes (rule 24) are ignored when using Tactical Movement.
11.4 Movement and RiversRIVERS: Vehicle Type Units (see 2.4) may not cross an unbridgedriver hexside—they must use bridges. Infantry Type units may onlycross if they start adjacent to the river hexside and use Tactical Move-ment (move a maximum of two hexes). Infantry Type units may notcross two unbridged river hexsides in the same Movement Phase.
THE MEUSE: Is treated as a regular river for movement and combatpurposes. See 17.2 for the one exception.
RIVERS THAT FLOW THROUGH TOWNS: Ignore rivers that flowthrough the middle of a town (such as at Malmédy). The importanceof the river as a movement barrier and defensive terrain has beenmitigated by the urban surroundings.
See this Think this
11.5 Forest and West Wall HexesVehicle Type Units may only enter and exit Forest and West Wallhexes if following the path of a road.
See this Think this
11.6 Wooded Rough (Dark Green) HexsidesWooded Rough represents a small wooded valley with a river or streamrunning through the middle of the hex.
Crossing a non-road dark green hexside is the same as crossing anunbridged River hexside. Vehicle Type Units may not cross. Infan-try Type units may only cross if they start adjacent to the WoodedRough hexside and use Tactical Movement (move a maximum oftwo hexes). Infantry Type units may not cross two non-road WoodedRough hexsides in the same Movement Phase.
11.7 Road Movement and Forest RoadsA unit that follows the path of a road when it moves may use thereduced rate of the road. The road rate may be used when movinginto or out of an enemy ZOC.
FOREST ROADS: A secondary road in a forest or wooded roughhex costs 2 MPs for mechanized units.
11.8 Artillery and MovementSee 22.1–22.3
11.9 Exiting the Map and Off Map BoxesIN GENERAL: An Allied unit that exits the map by movement isplaced in the Off Map Box associated with that map edge. The MPcost to exit the map from a Map Edge hex is always 1 MP. In thefollowing turn the unit may reenter the map at any Entry Hex associ-ated with that Off Map Box or move to an adjacent Off Map Box andend their turn. German units may never enter Off Map Boxes, andmay only exit the map to fulfill their victory conditions. No unit fromeither side may exit the east edge.
EXAMPLE: Allied units in the Southeast Off Map Box may enter themap at A, B or C Entry hexes or move to the Southwest Off Map Box.
TO ANTWERP: German units that exit the map between W3420 and
Unit
A
EnemyUnit
Unit
G
EnemyUnit
EnemyUnit
Unit
FUnit
B
Unit
C
Unit
D
Unit
EEnemyUnit
EnemyUnit
Unit
H
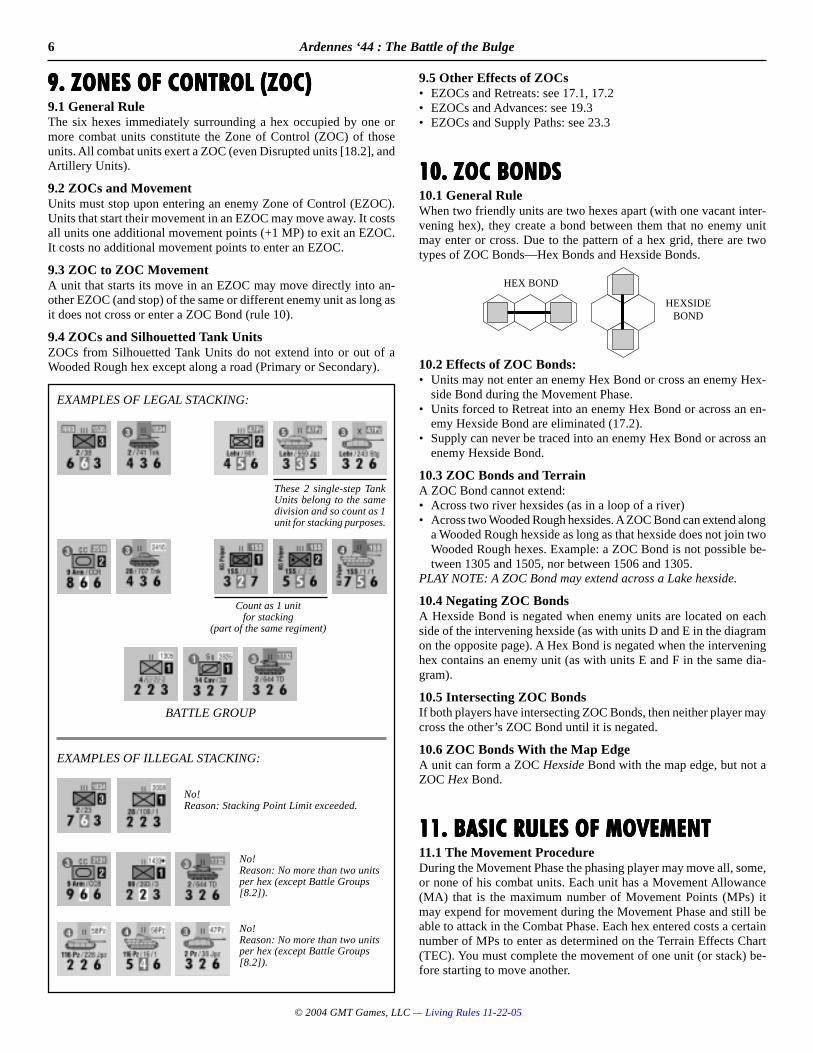
EXAMPLES OF ZOC BONDS: Black lines indicate friendly ZOCBonds, gray solid lines indicate enemy ZOC Bonds. Dashed linesindicate negated ZOC Bonds. Note that Unit F and G still have a
ZOC Bond even though it is intersected by the enemy ZOC Bond.Also note how Unit H has Hexside Bonds with the map edge.
8 Ardennes ‘44 : The Battle of the Bulge
© 2004 GMT Games, LLC — Living Rules 11-22-05
Liege (across the Meuse) to fulfill their victory conditions are notplaced in an off map box, but are set aside. They may not re-enter themap after exiting.
RETREAT OFF MAP: An Allied unit that retreats off the map be-comes Disrupted and is placed in the appropriate Off Map Box. ADisrupted unit may not exit an Off Map Box until it Rallies (18.4).
11.10 Army BoundariesMOVEMENT RESTRICTION: German units may not cross the ArmyBoundary Lines before the 18 AM game turn. Army Boundary Linerestrictions are removed at the start of the 18 AM game turn. Theboundary lines do not extend beyond the hexes marked on the map—so German units that move west of the boundary lines may move inany direction.
EFFECTS ON COMBAT: German units may attack across armyboundaries but may not advance after combat across them. If a Ger-man unit is forced to retreat across an Army Boundary Line the unitis automatically Disrupted (18.2) and may not rally (18.4) until it hasrecrossed the boundary line or until 18 AM. Army Boundaries haveno affect on ZOCs or ZOC Bonds.
REPLACEMENTS: While the boundary line is in effect, units thatreturn to play due to replacements must be placed within their armyboundary.
12. STRATEGIC MOVEMENT AND12. STRATEGIC MOVEMENT AND12. STRATEGIC MOVEMENT AND12. STRATEGIC MOVEMENT AND12. STRATEGIC MOVEMENT ANDTRUCK MARKERSTRUCK MARKERSTRUCK MARKERSTRUCK MARKERSTRUCK MARKERS12.1 Strategic Movement in GeneralMechanized units (including Allied Artillery Units) may use StrategicMovement to double their MA. Strategic Movement is not available tonon-mechanized units, German Prime Movers, or units out of supply.Units using Strategic Movement must move entirely along roads (pri-mary or secondary). Reinforcements entering the map may arrive us-ing Strategic Movement.
12.2 RestrictionsUnits that use Strategic Movement or Trucks may start stacked withother units but are under the following restrictions:• May not start their move in an EZOC nor at any time enter an
EZOC.• May not end their move stacked with any unit.• May not end their move adjacent to another unit that bears a Stra-
tegic Movement/Truck marker. If the unit is adjacent but on a dif-ferent road, then it is not considered adjacent for this rule.
12.3 Strategic Movement and Traffic MarkersUnits using Strategic Movement must pay the applicable MP costsfor entering a St-Vith Bottleneck hex or hex containing a TrafficMarker. Units using Strategic Movement must stop if they enter ahex with an enemy Roadblock marker (24.8).
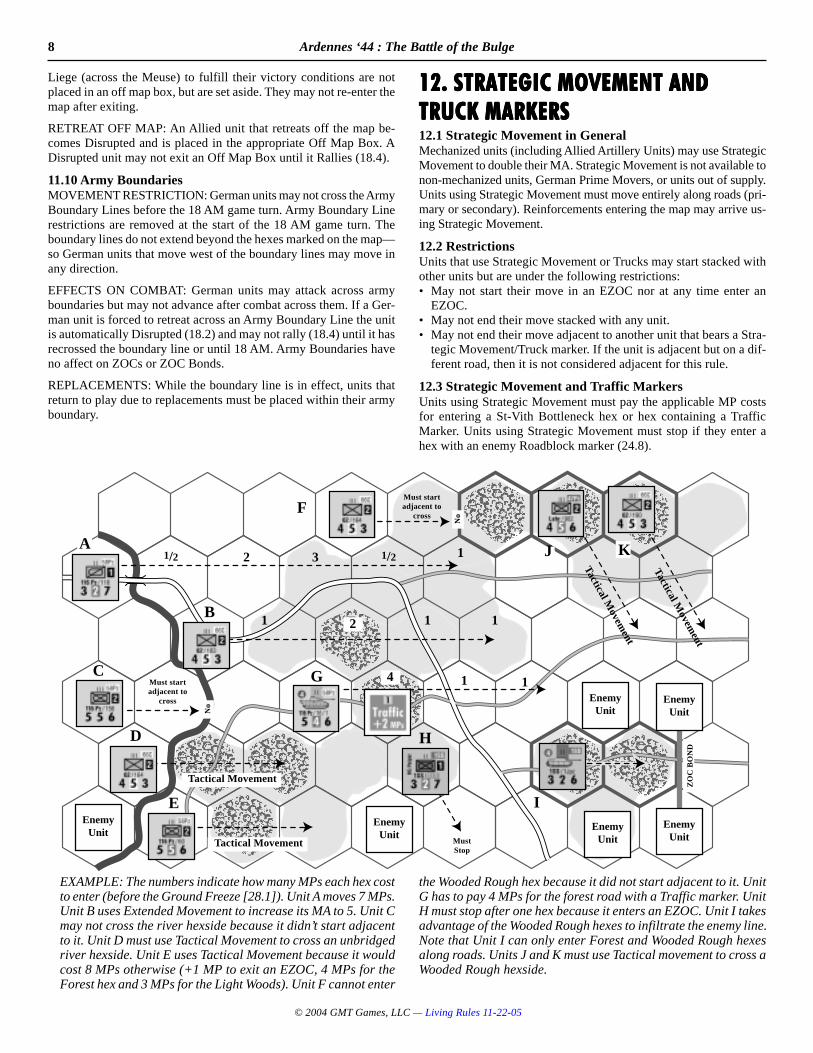
EXAMPLE: The numbers indicate how many MPs each hex costto enter (before the Ground Freeze [28.1]). Unit A moves 7 MPs.Unit B uses Extended Movement to increase its MA to 5. Unit Cmay not cross the river hexside because it didn’t start adjacentto it. Unit D must use Tactical Movement to cross an unbridgedriver hexside. Unit E uses Tactical Movement because it wouldcost 8 MPs otherwise (+1 MP to exit an EZOC, 4 MPs for theForest hex and 3 MPs for the Light Woods). Unit F cannot enter
1
the Wooded Rough hex because it did not start adjacent to it. UnitG has to pay 4 MPs for the forest road with a Traffic marker. UnitH must stop after one hex because it enters an EZOC. Unit I takesadvantage of the Wooded Rough hexes to infiltrate the enemy line.Note that Unit I can only enter Forest and Wooded Rough hexesalong roads. Units J and K must use Tactical movement to cross aWooded Rough hexside.
2 31/2 1/2
1 14
11
C
E
H
B
D
G
MustStop
EnemyUnit
EnemyUnit
IEnemyUnit
EnemyUnit
EnemyUnit
ZO
C B
ON
D
Must startadjacent to
crossF
J KA
Must startadjacent to
cross
Tactical Movement
Tactical Movement
No
No
1
Tactical Movem
ent
Tactical Movem
ent
2
EnemyUnit
9Ardennes ‘44 : The Battle of the Bulge
© 2004 GMT Games, LLC — Living Rules 11-22-05
12.4 Strategic Movement (SM) MarkersThe number of units that may use Strategic Movement in a singleMovement Phase is strictly limited to the number of SM markersavailable to each side (6 for the German player, 10 for the Alliedplayer). Place a SM marker on every unit (including Reinforcements)that used Strategic Movement.
12.5 Strategic Movement and CombatUnits attacked with an SM marker receive no Defensive CombatBonuses (DCBs) (15.1) and provide the attacker with one shift righton the CRT. TQ ratings and ZOCs are unaffected by SM. If forced toretreat or become engaged, the SM marker is removed.
12.6 Truck Markers12.61 GENERAL RULE: Allied non-Mechanized units may be movedin trucks. An infantry unit moving in trucks is identical to a Mecha-nized unit using Strategic Movement. An Allied non-Mechanized unitmay be assigned trucks if it starts its Movement Phase on a road(either type) and at least two hexes from an enemy unit, or it is cur-rently in an Off Map Box. A unit must expend its entire MA to loadup on the trucks (i.e., the first turn it may not move).
Exception: Allied non-Mechanized reinforcements may enter the mapin trucks if Truck markers are available—they do not need to spendtheir first turn loading.
Truck markers are printed on the back of SM markers. This meansthat for every infantry unit trucked, one less Allied mechanized unitcan use Strategic Movement.
12.62 TRUCK PROPERTIES: Allied infantry trucked receive 12 MPsand move at the rate of mechanized units. Units in trucks are consid-ered to be using Strategic Movement and must abide by all the rulesof Strategic Movement. However, do not double the 12 MPs, themovement rate has already been adjusted for Strategic Movement.
EXAMPLE: An infantry unit being transported in a truck could move24 hexes along a primary road.
12.7 Removing SM/Truck MarkersIf a unit uses a SM/Truck marker then the marker must remain on theunit until the next friendly Movement phase, unless it is removed inone of the following three cases:• In the next friendly Movement Phase if the unit will not be using
Strategic Movement that phase. The marker is immediately avail-able for use with other units.
• The unit suffers an engaged result or is forced to retreat.• The German player may remove his SM markers in the Artillery
Supply Phase in order to take stock of his SM/Prime Mover mark-ers. The Allied player should not do this because an Allied Artil-lery Unit using SM may not be flipped to its ready side (5.3).
13. REINFORCEMENTS & ENTRY HEXES13. REINFORCEMENTS & ENTRY HEXES13. REINFORCEMENTS & ENTRY HEXES13. REINFORCEMENTS & ENTRY HEXES13. REINFORCEMENTS & ENTRY HEXES13.1 ReinforcementsReinforcements receive their full MA on their turn of entry and enterplay during the Movement Phase by paying the terrain cost (the roadrate) of the first hex entered. Reinforcements must enter through EntryHexes, they may not enter through hexes between two Entry Hexes.Reinforcements may enter the map by moving into an enemy ZOCbut must stop and move no farther. Reinforcements may use StrategicMovement on the turn of entry. Allied non-Mechanized reinforcementsmay enter the map in trucks if Truck markers are available. In lieu ofentering the map, a reinforcement may be placed in the Off Map Boxassociated with the unit’s entry hex. In the following turn they may
move to an adjacent Off Map Box or enter any Entry Hex associatedwith that Off Map Box.
EXAMPLE: The American 4/8/2 infantry battalion scheduled to ar-rive on Turn 3 may either enter the map at A or B Entry Hex or beplaced in the Allied Southeast Off Map Box.
13.2 US Engineer ReinforcementsAmerican Engineer Units do not arrive from off map. On their turnof arrival the Allied player may place them in friendly controlledtown or city hexes (no villages) outside of all EZOCs, with no morethan one in each town/city hex—one may be placed in each of thetwo Bastogne hexes for a total of two. They may exceed stackinglimits upon placement. They may not be placed in towns or city hexescontaining enemy Roadblocks (24.8).
MOVEMENT RESTRICTION: American Engineer units may movea maximum of two hexes on the turn they arrive.
DESIGN NOTE: During the panic of the first three days the US mo-bilized the corps and army engineer battalions in the area to fight asinfantry. These units were operating in the area repairing roads, cut-ting trees, etc.
13.3 Artillery ReinforcementsAll Artillery Units arrive on their fired side.
13.4 German Capture of Entry HexesIf a German unit occupies an Entry Hex, Allied reinforcements sched-uled to arrive there may either fight their way onto the map (13.5),wait in the Off Map Box until the Entry Hex is open, or follow theprocedures of 13.1 to enter at a different location.
BLOCKING: If an Entry Hex is occupied by a German combat unitthen no Allied reinforcements scheduled to enter that “sector” mayenter the map (or move to a different Off Map Box) until the Germanunit is “blocked.” A Sector is defined as an Off Map Box and allEntry Hexes associated with that Off Map Box. To block a Germanunit on an Entry Hex, an Allied unit with a Defense Factor of at least6 (or two or more units with a combined Defense Factor of at least 6)must be placed off map and adjacent to the German unit. The follow-ing Allied units are eligible to be blocking units:
• a reinforcement that can arrive through that Entry Hex that turn.• any Allied unit (including artillery) in that sector’s Off Map Box.
Artillery may use its parenthetical Defense Factor. Allied units inan Off Map Box that are Routed and Disrupted may be countedusing their full defense Factor.
EXAMPLE: Say the Germans have a unit in Entry hex A. This meansthat no US reinforcements can enter through either A, B or C Entryhexes until the US places unit(s) with at least 6 Defence Factors as"blocking" units. It also means units in the Allied Southeast Off MapBox may not move to the Allied Southwest box either.
BLOCKING AND ZOCS: Allied units that are blocking do not projecta ZOC onto the map, and are not considered in an EZOC. Hence,they may recover from Rout and Disruption without making a dieroll (18.4).
BLOCKING UNITS: During an Allied Movement Phase, AlliedBlocking units may do one of three things:• Remain in place.• Move back to the Off Map Box.• Attack onto the map (see 13.5).
DESIGN NOTE: It is extremely important that the Allied player holdhis flanks. If he cannot do it, he will have his reinforcements pulledfrom him to do it.
10 Ardennes ‘44 : The Battle of the Bulge
© 2004 GMT Games, LLC — Living Rules 11-22-05
STRATEGY TIP: The German player should use the 7th Army to cap-ture south edge Entry Hexes—this will prevent the 10th Armored Di-vision from reinforcing the Bastogne area.
13.5 Allied Attacks onto the MapAllied units (either reinforcements that can enter through that hex,units assigned to block that Entry Hex, or units from that sector’s OffMap Box) may be placed adjacent to an Entry Hex and attack ontothe map. The number of Allied stacks from off map that may attackan Entry Hex is equal to the number of roads in the Entry Hex thatlead off the map. For example, two stacks could attack onto the mapat 1601. Artillery on its Ready side (22.5) from the sector’s Off MapBox and air support can be utilized. All rules of combat apply.
RESTRICTION: An attack onto the map is only allowed if all en-emy-occupied Entry Hexes in that sector are blocked (have at least 6Allied Defense Factors assigned to them). In other words, you can’tattack onto the map until your flanks are covered
FAILED ATTACKS: If the Allied attack onto the map does not suc-ceed in removing the defender from the hex, the attackers becomeblocking units for that Entry Hex.
SUCCESSFUL ATTACKS: If the attack succeeds in removing thedefender from the hex, all participating units may advance after com-bat—the first hex of the advance must be the Entry Hex. Any unitsthat do not or could not advance (due to stacking restrictions) mustreturn to the sector’s Off Map Box.
IMPORTANT: No unit from either side is allowed to attack an OffMap Box or a blocking unit.
14. BASIC RULES OF COMBAT14. BASIC RULES OF COMBAT14. BASIC RULES OF COMBAT14. BASIC RULES OF COMBAT14. BASIC RULES OF COMBAT14.1 General RulePhasing units may attack adjacent enemy units in the Combat Phase.Attacking is voluntary; no unit is forced to attack. No unit may attackor be attacked more than once per Combat Phase (exception: Break-through Combat [19.4]). All defending units in a hex must be at-tacked as one combined defense strength. The attacker may conducthis attacks in any order and need not predesignate them.
14.2 Multi-Hex Combat• The attacker may attack only one hex at a time; he may not target
two hexes in a single combat.• Units in the same hex may attack adjacent defenders in different
hexes as long as each attack is conducted separately.• No unit may split its attack strength to attack a second hex in a
separate attack.
NOTE: unlike some other game systems, attacking units are not re-quired to attack all adjacent defending units.
14.3 Command and ControlGENERAL RULE: The attacker may have a maximum of two differ-ent divisions participate in each attack. Artillery is not restricted byCommand and Control and army/corps identification colors have noeffect.
NON-DIVISIONAL UNITS: Each non-divisional unit (a unit with-out a division number in bold) is treated as a separate division if notstacked with another unit. If stacked with a divisional unit, then it isconsidered a part of that division for Command and Control pur-poses (temporarily attached). If stacked with another non-divisionalunit, then the two units together are counted as one division for Com-mand and Control.
BRIGADES AND GROUPS: The Führer Begleit Brigade, the FührerGrenadier Brigade and all U.S. Mechanized Cavalry Groups (eachcomposed of two squadrons) are all considered divisions for this rule.
The German 150 Pz Brig (Skorzeny) is considered an independentunit if it stacks with a divisional unit. Otherwise, its considered a fulldivision.
14.4 Combat ProcedureFollow these steps for each combat:
STEP ONE: The defender may roll for bridge demolition before theattack takes place (7.4). If the bridge is blown the attacker may can-cel the attack.
STEP TWO: Compare the combined attack strength of the partici-pating attacking units against the total defense strength (plus Defen-sive Combat Bonuses [15.1]) of the involved defending units andexpress the comparison as a numerical odds ratio (attacker to de-fender). Round off this odds ratio downward to conform to one of theodds ratio categories found on the CRT.
EXAMPLE: a 15 to 4 would be a 3-1.
STEP THREE: The attacker, followed by the defender declareswhether he will use Artillery Support (22.6) and, if so, which Artil-lery Units are providing the support.
STEP FOUR: After taking into account column shifts, the die is rolledand the results are implemented. Players immediately remove anystep losses (16.3), and perform Retreats, Determined Defense (16.7),Advance After Combat, and Breakthrough Combat (19.4).
14.5 Minimum and Maximum OddsCombat at odds less than 1-3 is resolved on the 1-3 column. Combatat odds greater than 7-1 is resolved on the 7-1 column. Attacker anddefender column shifts are applied before the minimum and maxi-mum restriction.
EXAMPLE: 9-1 odds with 1 shift left would use the 7-1 column.
15. COMBAT MODIFIERS15. COMBAT MODIFIERS15. COMBAT MODIFIERS15. COMBAT MODIFIERS15. COMBAT MODIFIERS15.1 Defensive Combat Bonuses (DCBs)Instead of column shifts for terrain the defender receives DefensiveCombat Bonuses (DCBs). These are strength point additions to thehex (not per unit). Refer to the Terrain Effects Chart (TEC) for acomplete list of DCBs. A defender can receive only one DCB—always use the most favorable to the defender.
EXAMPLE: A 1-1-3 Engineer unit in a town hex (+3) would have adefense strength of 4.
RESTRICTIONS:• Units with their Defense Factor in parenthesis may never receive
DCBs.• Units using Strategic Movement cannot receive DCBs (12.5).• Due to their lack of infantry support, all silhouetted Tank Units are
restricted to a maximum DCB of +1.
15.2 HalvingWhen halving, always halve by individual unit (not stack), and roundany fractions up to the next higher whole number (Example: 5 halvedwould equal 3). An attacking unit may never have its attack strengthhalved more than once for a given attack.
15.3 RiversCombat Units attacking across a river hexside (including the Meuse),
11Ardennes ‘44 : The Battle of the Bulge
© 2004 GMT Games, LLC — Living Rules 11-22-05
A C ED
have their attack strength halved. An intact bridge allows a Tank Unitto gain an Armor Shift (21.3) but does not cancel the halving of At-tack Factors.
15.4 Vehicle Units and CombatVehicle Units have their Attack Factor halved (rounded up) if attack-ing into or out of a Forest, West Wall or Wooded Rough hex, unlessfollowing the path of a road. In other words, if they can’t move acrossthe hexside they are attacking across, they are halved.
15.5 Wooded Rough and Height AdvantageCombat units attacking out of a Wooded Rough hex or from oneWooded Rough Hex to another, have their Attack Factor halved. Unitsare not halved attacking into a Wooded Rough hex from a non-WoodedRough hex (this is called Height Advantage). A Vehicle Unit mustattack along a road to get Height Advantage (due to 15.4).
DESIGN NOTE: Think of a unit in a Wooded Rough hex as being ina small valley. If it attacks up and out of the valley it is halved. If it isattacked from above, the attacker is not halved. A wooded rough hexis not necessarily a good defensive position in this game.
RIVERS & WOODED ROUGH HEXES: Always ignore rivers in-side Wooded Rough hexes—the Wooded Rough hexside benefit takesaccount of the river. Exception: Units attacking into a Wooded Roughhex across a hexside containing a bridge (blown or intact) are alwayshalved (example: hex 2828 to 2928).
15.6 Allied Air SupportStarting on the December 23rd AM turn the Allied player receivesAllied Air Support.
OFFENSIVE AIR SUPPORT: During the Allied player turn, the Al-lied player uses Ground Support markers to indicate which attacks willreceive air support. The Allied player determines the number of AirSupport markers available that turn by rolling a die (any time during
his Movement Phase) and halving the result (round fractions up). Forexample, a die roll of 5 would result in three Air Support markers.Each marker provides a favorable shift of one column to the right onthe CRT. A maximum of one marker may be used in each combat. AirSupport markers may not be accumulated and any not used are for-feited. The markers are removed after the combat is resolved.
DEFENSIVE AIR SUPPORT: During the German player turn, Al-lied Air Support is random and is determined by a die roll on theJabos Table immediately before each attack is conducted (but afterartillery commitment). The result on the Jabos Table indicates col-umn shifts to the left. Defensive Air Support is applied to all Germanattacks and is not tied into the number of Allied Air Support markers.
NIGHT: No Air support is allowed during a Night Turn.
15.7 West WallOnly German units may benefit from the +3 for the West Wall (themovement restrictions of 11.5 apply to both players). Allied Tankand Recon Units attacking into a West Wall hex have their AttackFactor halved.
15.8 Improved PositionsCOMBAT EFFECTS: Units defending in a hex with an ImprovedPosition (IP) may use Determined Defense and receive a DCB of +2(see below for exceptions). This +2 DCB is not cumulative with Ter-rain DCBs.
EXCEPTIONS: Units currently using Strategic Movement and unitswith their Defense Factor in parenthesis receive no benefit from IPs.Silhouetted Tank Units can never receive more than a +1 DCB.
HOW TO BUILD: Both sides may build IPs. IPs may be built in anyhex except those containing a city, town, village or West Wall (thesehexes are already a ready-made improved position). Any non-Dis-rupted, non-engaged, Infantry Type Unit that is in supply may buildan IP. Construction is a two-part process—an eligible unit that doesnot move in its Movement Phase may begin to build an IP. Place anIP Under Construction marker in the hex at that time. It may notattack in the following Combat Phase. If the unit is still there in thenext friendly Movement Phase and is not Disrupted or under an en-gaged marker, it may complete the IP (flip the marker over). The unitmay move in the same Movement Phase that it completes the IP.
DELAYED CONSTRUCTION: IPs under construction may not becompleted if the hex contains an Engaged Marker or all the units areDisrupted, however, the IP construction marker can remain in thehex and be completed in a later turn (including by a different friendlyunit). Once an IP is under construction, supply has no effect. Once anIP is begun, the only way to remove it is to dislodge all defendersfrom the hex.
REMOVING IPS: At the end of each Movement Phase remove anyIPs left vacant. During the Combat Phase remove IPs immediately ifthe occupants are eliminated or forced to retreat.
15.9 Miscellaneous Modifiers• Units attacked while in Strategic Movement give the attacker one
shift right (12.5)• Tank Units with a Gray TQ may provide an Armor Shift (21.1)• Artillery provides shifts on the CRT. Both the attacker and the de-
fender may use artillery (22.6)• Out of Supply Shift (23.4)
Up
Up UpUp
Up
Up
Down
Down
Down
Down Down
Down
DownUp
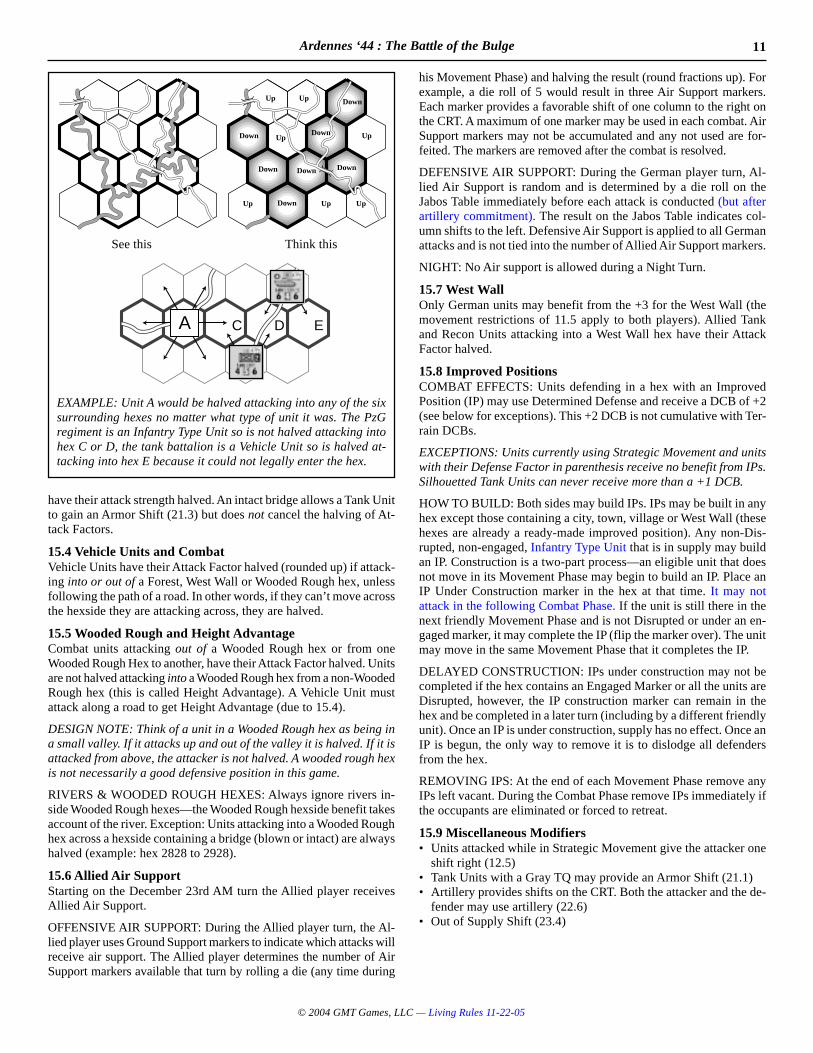
See this Think this
EXAMPLE: Unit A would be halved attacking into any of the sixsurrounding hexes no matter what type of unit it was. The PzGregiment is an Infantry Type Unit so is not halved attacking intohex C or D, the tank battalion is a Vehicle Unit so is halved at-tacking into hex E because it could not legally enter the hex.
12 Ardennes ‘44 : The Battle of the Bulge
© 2004 GMT Games, LLC — Living Rules 11-22-05
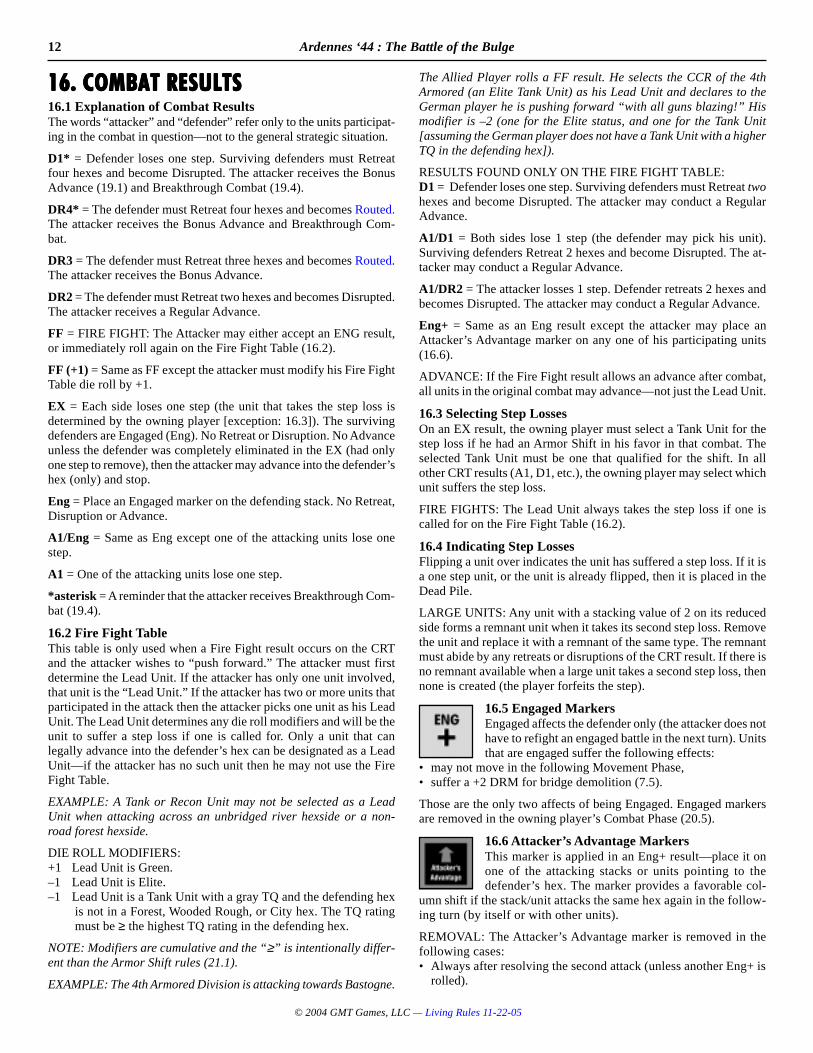
16. COMBAT RESULTS16. COMBAT RESULTS16. COMBAT RESULTS16. COMBAT RESULTS16. COMBAT RESULTS16.1 Explanation of Combat ResultsThe words “attacker” and “defender” refer only to the units participat-ing in the combat in question—not to the general strategic situation.
D1* = Defender loses one step. Surviving defenders must Retreatfour hexes and become Disrupted. The attacker receives the BonusAdvance (19.1) and Breakthrough Combat (19.4).
DR4* = The defender must Retreat four hexes and becomes Routed.The attacker receives the Bonus Advance and Breakthrough Com-bat.
DR3 = The defender must Retreat three hexes and becomes Routed.The attacker receives the Bonus Advance.
DR2 = The defender must Retreat two hexes and becomes Disrupted.The attacker receives a Regular Advance.
FF = FIRE FIGHT: The Attacker may either accept an ENG result,or immediately roll again on the Fire Fight Table (16.2).
FF (+1) = Same as FF except the attacker must modify his Fire FightTable die roll by +1.
EX = Each side loses one step (the unit that takes the step loss isdetermined by the owning player [exception: 16.3]). The survivingdefenders are Engaged (Eng). No Retreat or Disruption. No Advanceunless the defender was completely eliminated in the EX (had onlyone step to remove), then the attacker may advance into the defender’shex (only) and stop.
Eng = Place an Engaged marker on the defending stack. No Retreat,Disruption or Advance.
A1/Eng = Same as Eng except one of the attacking units lose onestep.
A1 = One of the attacking units lose one step.
*asterisk = A reminder that the attacker receives Breakthrough Com-bat (19.4).
16.2 Fire Fight TableThis table is only used when a Fire Fight result occurs on the CRTand the attacker wishes to “push forward.” The attacker must firstdetermine the Lead Unit. If the attacker has only one unit involved,that unit is the “Lead Unit.” If the attacker has two or more units thatparticipated in the attack then the attacker picks one unit as his LeadUnit. The Lead Unit determines any die roll modifiers and will be theunit to suffer a step loss if one is called for. Only a unit that canlegally advance into the defender’s hex can be designated as a LeadUnit—if the attacker has no such unit then he may not use the FireFight Table.
EXAMPLE: A Tank or Recon Unit may not be selected as a LeadUnit when attacking across an unbridged river hexside or a non-road forest hexside.
DIE ROLL MODIFIERS:+1 Lead Unit is Green.–1 Lead Unit is Elite.–1 Lead Unit is a Tank Unit with a gray TQ and the defending hex
is not in a Forest, Wooded Rough, or City hex. The TQ ratingmust be ≥ the highest TQ rating in the defending hex.
NOTE: Modifiers are cumulative and the “≥” is intentionally differ-ent than the Armor Shift rules (21.1).
EXAMPLE: The 4th Armored Division is attacking towards Bastogne.
The Allied Player rolls a FF result. He selects the CCR of the 4thArmored (an Elite Tank Unit) as his Lead Unit and declares to theGerman player he is pushing forward “with all guns blazing!” Hismodifier is –2 (one for the Elite status, and one for the Tank Unit[assuming the German player does not have a Tank Unit with a higherTQ in the defending hex]).
RESULTS FOUND ONLY ON THE FIRE FIGHT TABLE:D1 = Defender loses one step. Surviving defenders must Retreat twohexes and become Disrupted. The attacker may conduct a RegularAdvance.
A1/D1 = Both sides lose 1 step (the defender may pick his unit).Surviving defenders Retreat 2 hexes and become Disrupted. The at-tacker may conduct a Regular Advance.
A1/DR2 = The attacker losses 1 step. Defender retreats 2 hexes andbecomes Disrupted. The attacker may conduct a Regular Advance.
Eng+ = Same as an Eng result except the attacker may place anAttacker’s Advantage marker on any one of his participating units(16.6).
ADVANCE: If the Fire Fight result allows an advance after combat,all units in the original combat may advance—not just the Lead Unit.
16.3 Selecting Step LossesOn an EX result, the owning player must select a Tank Unit for thestep loss if he had an Armor Shift in his favor in that combat. Theselected Tank Unit must be one that qualified for the shift. In allother CRT results (A1, D1, etc.), the owning player may select whichunit suffers the step loss.
FIRE FIGHTS: The Lead Unit always takes the step loss if one iscalled for on the Fire Fight Table (16.2).
16.4 Indicating Step LossesFlipping a unit over indicates the unit has suffered a step loss. If it isa one step unit, or the unit is already flipped, then it is placed in theDead Pile.
LARGE UNITS: Any unit with a stacking value of 2 on its reducedside forms a remnant unit when it takes its second step loss. Removethe unit and replace it with a remnant of the same type. The remnantmust abide by any retreats or disruptions of the CRT result. If there isno remnant available when a large unit takes a second step loss, thennone is created (the player forfeits the step).
16.5 Engaged MarkersEngaged affects the defender only (the attacker does nothave to refight an engaged battle in the next turn). Unitsthat are engaged suffer the following effects:
• may not move in the following Movement Phase,• suffer a +2 DRM for bridge demolition (7.5).
Those are the only two affects of being Engaged. Engaged markersare removed in the owning player’s Combat Phase (20.5).
16.6 Attacker’s Advantage MarkersThis marker is applied in an Eng+ result—place it onone of the attacking stacks or units pointing to thedefender’s hex. The marker provides a favorable col-
umn shift if the stack/unit attacks the same hex again in the follow-ing turn (by itself or with other units).
REMOVAL: The Attacker’s Advantage marker is removed in thefollowing cases:• Always after resolving the second attack (unless another Eng+ is
rolled).
13Ardennes ‘44 : The Battle of the Bulge
© 2004 GMT Games, LLC — Living Rules 11-22-05
• If the target hex is vacant of enemy units at the start of the own-ing player’s combat phase.
• If all units originally under the marker exit the hex—it does notmatter if other friendly units take their place. One or more unitscan exit the hex as long as at least one of the original attackingunits remain.
• The units in the hex containing the Attacker’s Advantage markersuffer a Retreat result.
16.7 Determined DefenseA determined defense represents a counterattack or a hold-at-all-cost order.
16.71 PROCEDURE: The defender may attempt to cancel a Regu-lar Advance (from the CRT or the Fire Fight Table) by using theDetermined Defense Table—a Bonus Advance may not be cancelled.Only units defending in a village, town, city, West Wall or IP (15.8)may attempt a Determined Defense. A successful result on this tablewill allow the unit or stack to ignore the retreat and the associatedDisruption and the attacker’s advance is cancelled. If there are twoor more units in the defending stack, then the defender picks onenon-Disrupted unit as the Lead Unit; this unit determines any dieroll modifiers and will be the unit to suffer the step loss if one iscalled for. If all units in the stack are Disrupted, then no Deter-mined Defense is possible.
CLARIFICATION: A successful Determined Defense does not can-cel the step loss on a Fire Fight Table D1 result.
16.72 EXPLANATION OF RESULTS:Yes Successful: the retreat is cancelled (along with the Disrup-
tion and the attacker’s advance, however, see 16.74)No The counterattack or hold-at-all-cost order is not carried out
or fails; the retreat result stays in effect.
Yes and No results can be accompanied by the following:EX Both sides suffer a step loss (the attacker may pick his step
loss, the defender’s Lead Unit must take the step loss).–1 The Lead Unit suffers a step loss.CA The defender retreats only one hex and is not Disrupted. The
Attacker receives only a Limited Advance. After the advanceis complete the defender (if they survived the retreat) mayimmediately conduct a counterattack against the hex they justleft. The counterattack is resolved as a normal combat exceptno artillery or air support is allowed. If the attacker did notadvance into the vacated hex, the defending units may freelyreenter the hex and stop.
16.73 DIE ROLL MODIFIERS: Same as Fire Fight Table (16.2)except the defender receives a –1 if in a City hex. Also, Tank Unitswith a red TQ can receive the –1 modifier for a Determined Defense(but not in a Fire Fight).
EXAMPLE: The Allied player has a 2-2-3 infantry battalion and a4-3-6 tank battalion in Clervaux and has just suffered a DR2 result.Instead of retreating he declares he is making a Determined De-fense and selects the tank battalion (with a 3 TQ) as his Lead Unit.The highest TQ rating of the German attackers is 3 so the Alliedplayer qualifies for the –1 modifier. He rolls a 2 which is modifiedto a 1 and achieves an EX result. The Allied player reduces his tankbattalion by one step and the German player removes one step. Theretreat and disruption are cancelled.
16.74 SINGLE STEP DEFENDERS: If the defender had only onestep, and that step was lost in the Determined Defense, then theattacker may advance into the defender’s vacated hex (only) andstop (a Limited Advance).
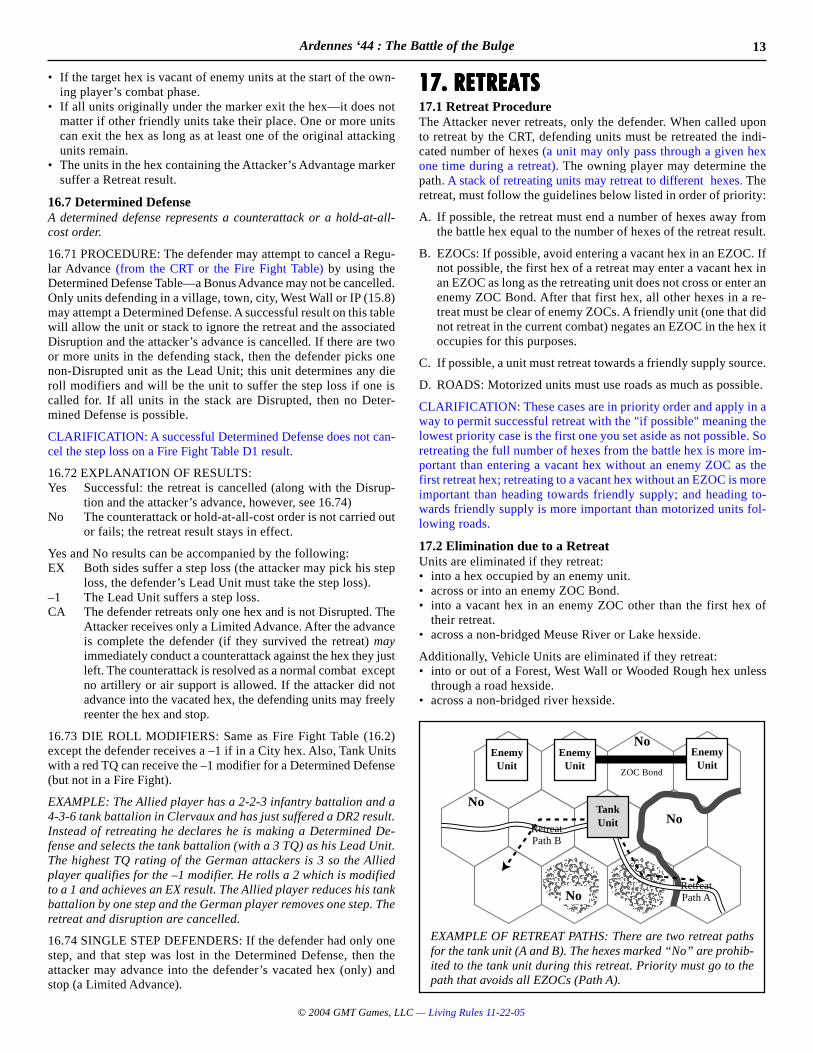
17. RETREATS17. RETREATS17. RETREATS17. RETREATS17. RETREATS17.1 Retreat ProcedureThe Attacker never retreats, only the defender. When called uponto retreat by the CRT, defending units must be retreated the indi-cated number of hexes (a unit may only pass through a given hexone time during a retreat). The owning player may determine thepath. A stack of retreating units may retreat to different hexes. Theretreat, must follow the guidelines below listed in order of priority:
A. If possible, the retreat must end a number of hexes away fromthe battle hex equal to the number of hexes of the retreat result.
B. EZOCs: If possible, avoid entering a vacant hex in an EZOC. Ifnot possible, the first hex of a retreat may enter a vacant hex inan EZOC as long as the retreating unit does not cross or enter anenemy ZOC Bond. After that first hex, all other hexes in a re-treat must be clear of enemy ZOCs. A friendly unit (one that didnot retreat in the current combat) negates an EZOC in the hex itoccupies for this purposes.
C. If possible, a unit must retreat towards a friendly supply source.
D. ROADS: Motorized units must use roads as much as possible.
CLARIFICATION: These cases are in priority order and apply in away to permit successful retreat with the "if possible" meaning thelowest priority case is the first one you set aside as not possible. Soretreating the full number of hexes from the battle hex is more im-portant than entering a vacant hex without an enemy ZOC as thefirst retreat hex; retreating to a vacant hex without an EZOC is moreimportant than heading towards friendly supply; and heading to-wards friendly supply is more important than motorized units fol-lowing roads.
17.2 Elimination due to a RetreatUnits are eliminated if they retreat:• into a hex occupied by an enemy unit.• across or into an enemy ZOC Bond.• into a vacant hex in an enemy ZOC other than the first hex of
their retreat.• across a non-bridged Meuse River or Lake hexside.
Additionally, Vehicle Units are eliminated if they retreat:• into or out of a Forest, West Wall or Wooded Rough hex unless
through a road hexside.• across a non-bridged river hexside.
EXAMPLE OF RETREAT PATHS: There are two retreat pathsfor the tank unit (A and B). The hexes marked “No” are prohib-ited to the tank unit during this retreat. Priority must go to thepath that avoids all EZOCs (Path A).
TankUnit
NoNo
No
RetreatPath A
RetreatPath B
No
EnemyUnit
EnemyUnit
ZOC Bond
EnemyUnit
14 Ardennes ‘44 : The Battle of the Bulge
© 2004 GMT Games, LLC — Living Rules 11-22-05
17.3 Unfulfilled RetreatsIf the defender does not retreat because it is eliminated, the attackerstill receives his full Advance opportunity.
17.4 Overstacking in a RetreatOverstacking is allowed after a retreat but the owning player mustcorrect it by the end of his next Movement Phase or suffer the pen-alties of 8.3.
17.5 Combat Against Previously Retreated UnitsIf a unit or stack is retreated into a friendly occupied hex and thathex undergoes an attack in the same Combat Phase, the retreatedunits do not add their strength to the combat, and if required toretreat again are eliminated.
17.6 Retreat Off the MapGerman units that retreat off any map edge, and Allied Units thatretreat off the East map edge are eliminated. Allied units that retreatoff the south, west or north map edge, are disrupted and placed inthe appropriate Off Map Box. They may reenter the map again afterthey Rally (18.4).
17.7 Artillery and Retreats• Artillery Units retreat like other units—flip them to their fired
side first.• German Artillery Units without a Prime Mover marker are elimi-
nated if forced to retreat more than one hex.
17.8 Retreating Units Bearing Engaged MarkersRemove the Engaged marker from the retreating units and retreatnormally. Note this can only happen if the unit was engaged in theNight Turn and attacked in the following AM turn.
18. DISRUPTION, ROUT AND RALLY18. DISRUPTION, ROUT AND RALLY18. DISRUPTION, ROUT AND RALLY18. DISRUPTION, ROUT AND RALLY18. DISRUPTION, ROUT AND RALLY18.1 How Units Become Disrupted or RoutedAny unit that is retreated 2 hexes becomes Disrupted. Any unit thatis retreated 3 or 4 hexes becomes Routed. Disrupted units that re-treat again (2, 3, or 4 hexes) are Routed. Routed units that retreatagain are eliminated.
18.2 Effects of Disruptions and RoutA Disrupted OR Routed unit suffers the following penalties:• May only use Tactical Movement and may not enter an EZOC. If
the unit starts in an EZOC, it must move away if possible.• May not attack or (if Artillery) provide support.• May not build an Improved Position (15.8), use Determined De-
fense (16.7), use the Disengagement Table (20.1), or performbreakdown (26.1).
NOTE: US Truck markers are immediately removed from a unit if itretreats. A Prime Mover marker remains on a Disrupted GermanArtillery Unit to indicate the unit may not fire.
Combat Penalties for Disruption and Rout• If the defending stack contains one or more Disrupted units the
attacker receives one shift right on the CRT.• If the defending stack contains one or more Routed units the at-
tacker receives two shifts right on the CRT. This is not cumula-tive with the one column shift for Disruption.
18.3 Abilities of Disrupted UnitsDisrupted and Routed units retain their ZOC and their ability toform ZOC Bonds. Disrupted and Routed units retain their full de-fense strength and can benefit from DCBs.
18.4 Rally PhaseDuring the Rally Phase, all Disrupted units that are not adjacent to anenemy unit rally (remove disruption markers) and all Routed unitsthat are not adjacent to an enemy unit become Disrupted. If the Dis-rupted or Routed unit is adjacent to an enemy unit (remember unitsmust move out of an EZOC if possible) then roll one die. On a dieroll of 1–2 the Disrupted unit rallies or the Routed unit becomes Dis-rupted. On a die roll of 3–6 the unit remains in its present state. Modifythe die roll by +1 if the unit is Green, and by –1 if the unit is Elite.
DESIGN NOTE: The reason for adding a Rout result was that theAmerican line was repairing itself too quickly. The rule corrects that,but also helps the American player by making Disengagements lessrisky. Players will need to supply there own Rout markers.
19. ADVANCE AFTER COMBAT19. ADVANCE AFTER COMBAT19. ADVANCE AFTER COMBAT19. ADVANCE AFTER COMBAT19. ADVANCE AFTER COMBAT19.1 Advance in GeneralThere are three types of Advances: Limited, Regular and Bonus.Artillery Units may never Advance.
LIMITED ADVANCE: This occurs when the defender is eliminatedbut was not required to retreat (in an EX result or a successful Deter-mined Defense by a 1-step defender)—the attacker may only oc-cupy the defender’s vacated hex.
REGULAR ADVANCE: The attacker may advance one hex in anydirection.
BONUS ADVANCE: The attacker may advance two hexes in anydirection. This occurs on a DR3, DR4* and a D1* result.
ROAD BONUS: If a mechanized unit follows the path of a primaryroad and/or a non-Forest/non-Wooded Rough secondary roadthroughout its advance, it may increase its advance rate by one hex.In this way a mechanized unit could advance two hexes in a regularadvance and three hexes in a Bonus Advance. Due to their poorcondition, a secondary road in a Forest hex (Forest Roads) may notbe used in a Road Bonus.
NOTE: Traffic Markers have no effect on Advance (24.2).
19.2 Terrain and Advance• No unit may advance into a hex or across a hexside that is pro-
hibited to it in normal movement.• Infantry Type Units may only advance into a Forest hex if it’s the
first hex of the advance, or the unit enters the hex via a road.Vehicle Units may never enter such hexes unless following thepath of a road.
• Infantry Type Units may only advance across a non-road WoodedRough hexside or an unbridged river hexside if it is the first hexof their advance. Vehicle Units may never cross such hexsides.
19.3 EZOCs and AdvanceZOC BONDS: May never be entered or crossed during an Advanceexcept when entering the defender’s vacated hex.
EZOCs: Generally do not stop Advances, but no unit may advancefrom one EZOC directly into another EZOC of the same enemyunit, except when entering the first hex of its Advance. See examplebelow.
19.4 Breakthrough CombatIf the CRT result contains an asterisk (*), then the attacking unitsmay attack again after advancing. This second combat is calledBreakthrough Combat. Only one stack of units in the group may
15Ardennes ‘44 : The Battle of the Bulge
© 2004 GMT Games, LLC — Living Rules 11-22-05
participate in this second attack, but you are allowed to form thestack (henceforth called the Breakthrough Group) during the ad-vance. A mechanized Breakthrough Group may use its full advanceand attack again; a non-mechanized Breakthrough Group, or a mixof both, may advance only one hex and attack again.
PROCEDURE: The Breakthrough Group is limited to one addi-tional attack—it may not split up and attack two or more targethexes. Finish advancing units from the initial combat before con-ducting the Breakthrough Combat. The Breakthrough Combat mustbe conducted before the attacker conducts the next regular attack.Breakthrough Combat is resolved in the same manner as normalcombat using all the same rules. Artillery on its ready side may beused (offensively and defensively).
RESTRICTIONS: If the Breakthrough Combat achieves another Bo-nus Advance, then the Breakthrough Group is limited to a RegularAdvance. The Breakthrough Group is limited to one attack—if theattack achieves another asterisk (*) result, they may not attack again.
19.5 The Breakthrough Group Assisting Other AttacksIf the Breakthrough Group advances adjacent to a defending hexwhich is about to be attacked by other friendly units, the Break-
through Group may add their strength to the combat and take partin the attack if allowed by Command and Control (14.3). If thishappens, this attack must be resolved next.
19.6 Supply and AdvanceUnits currently Out of Supply may advance a maximum of one hexand may not conduct Breakthrough Combat.
19.7 Friendly Units and AdvanceStacking restrictions must be observed at the end of an Advance.Units may not end their advance in a hex containing a friendly unit inStrategic Movement.
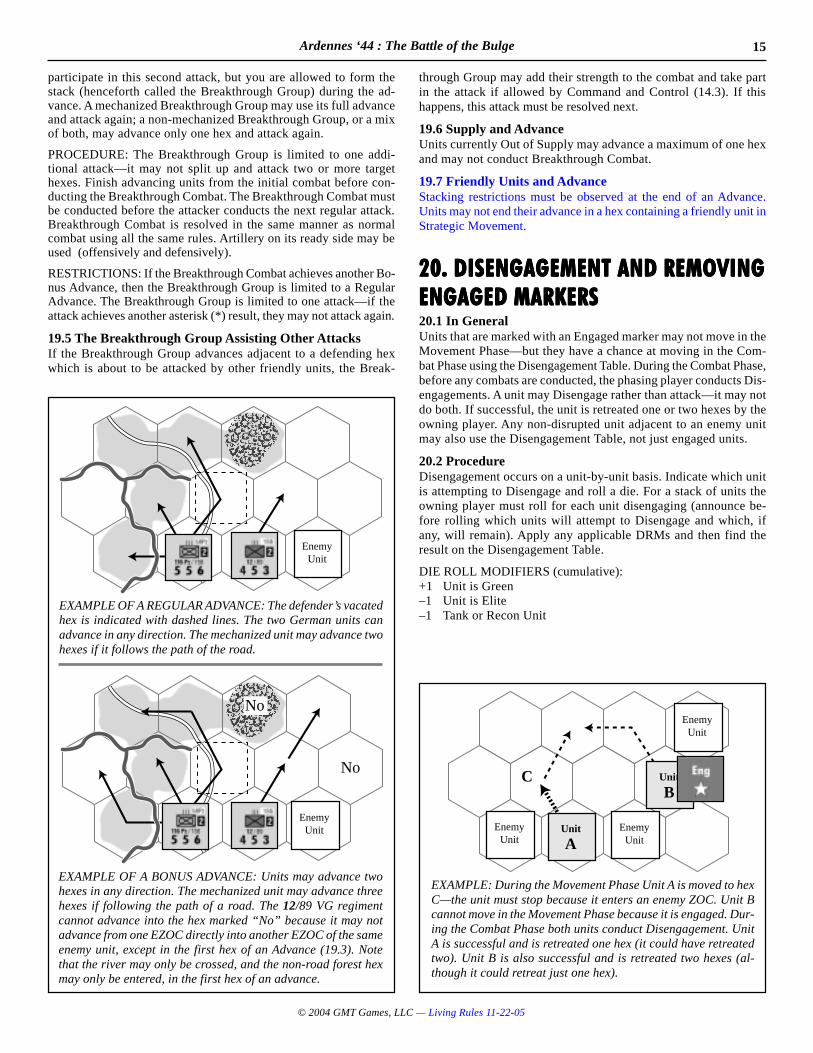
20. DISENGAGEMENT AND REMOVING20. DISENGAGEMENT AND REMOVING20. DISENGAGEMENT AND REMOVING20. DISENGAGEMENT AND REMOVING20. DISENGAGEMENT AND REMOVINGENGAGED MARKERSENGAGED MARKERSENGAGED MARKERSENGAGED MARKERSENGAGED MARKERS20.1 In GeneralUnits that are marked with an Engaged marker may not move in theMovement Phase—but they have a chance at moving in the Com-bat Phase using the Disengagement Table. During the Combat Phase,before any combats are conducted, the phasing player conducts Dis-engagements. A unit may Disengage rather than attack—it may notdo both. If successful, the unit is retreated one or two hexes by theowning player. Any non-disrupted unit adjacent to an enemy unitmay also use the Disengagement Table, not just engaged units.
20.2 ProcedureDisengagement occurs on a unit-by-unit basis. Indicate which unitis attempting to Disengage and roll a die. For a stack of units theowning player must roll for each unit disengaging (announce be-fore rolling which units will attempt to Disengage and which, ifany, will remain). Apply any applicable DRMs and then find theresult on the Disengagement Table.
DIE ROLL MODIFIERS (cumulative):+1 Unit is Green–1 Unit is Elite–1 Tank or Recon Unit
EXAMPLE: During the Movement Phase Unit A is moved to hexC—the unit must stop because it enters an enemy ZOC. Unit Bcannot move in the Movement Phase because it is engaged. Dur-ing the Combat Phase both units conduct Disengagement. UnitA is successful and is retreated one hex (it could have retreatedtwo). Unit B is also successful and is retreated two hexes (al-though it could retreat just one hex).
C
EnemyUnit
EnemyUnit
Unit
A
Unit
B
EnemyUnit
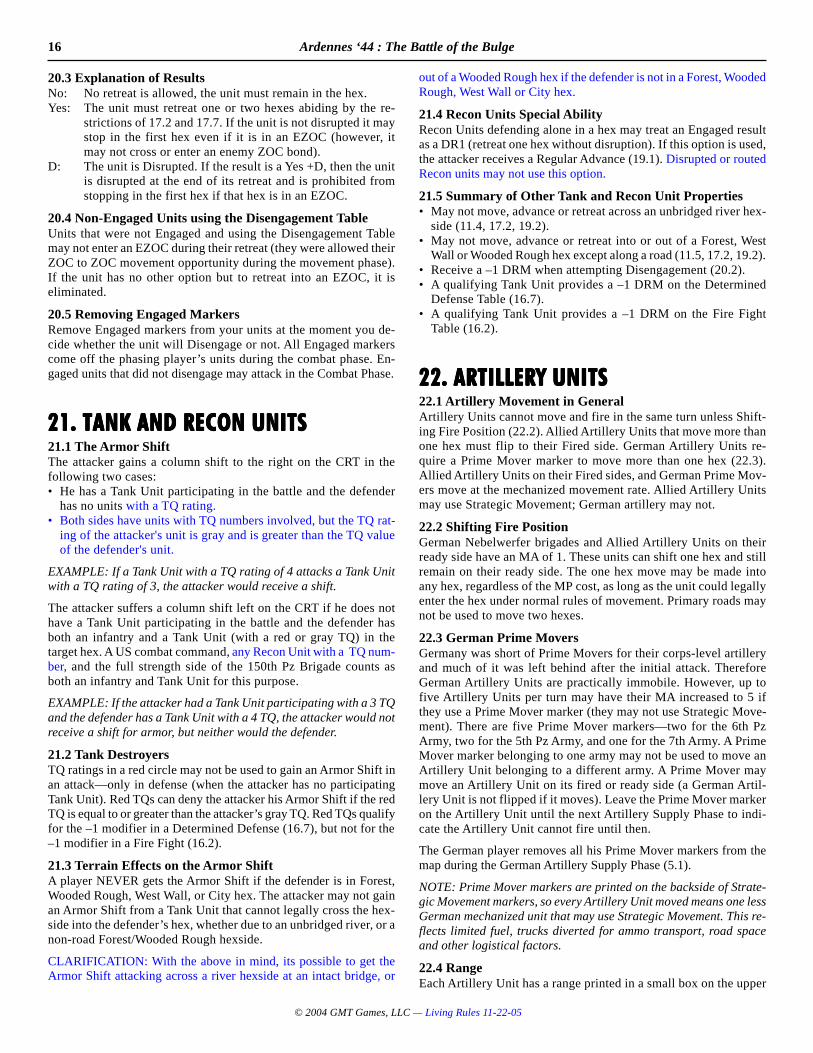
EXAMPLE OF A BONUS ADVANCE: Units may advance twohexes in any direction. The mechanized unit may advance threehexes if following the path of a road. The 12/89 VG regimentcannot advance into the hex marked “No” because it may notadvance from one EZOC directly into another EZOC of the sameenemy unit, except in the first hex of an Advance (19.3). Notethat the river may only be crossed, and the non-road forest hexmay only be entered, in the first hex of an advance.
No
EnemyUnit
No
EXAMPLE OF A REGULAR ADVANCE: The defender’s vacatedhex is indicated with dashed lines. The two German units canadvance in any direction. The mechanized unit may advance twohexes if it follows the path of the road.
EnemyUnit
16 Ardennes ‘44 : The Battle of the Bulge
© 2004 GMT Games, LLC — Living Rules 11-22-05
20.3 Explanation of ResultsNo: No retreat is allowed, the unit must remain in the hex.Yes: The unit must retreat one or two hexes abiding by the re-
strictions of 17.2 and 17.7. If the unit is not disrupted it maystop in the first hex even if it is in an EZOC (however, itmay not cross or enter an enemy ZOC bond).
D: The unit is Disrupted. If the result is a Yes +D, then the unitis disrupted at the end of its retreat and is prohibited fromstopping in the first hex if that hex is in an EZOC.
20.4 Non-Engaged Units using the Disengagement TableUnits that were not Engaged and using the Disengagement Tablemay not enter an EZOC during their retreat (they were allowed theirZOC to ZOC movement opportunity during the movement phase).If the unit has no other option but to retreat into an EZOC, it iseliminated.
20.5 Removing Engaged MarkersRemove Engaged markers from your units at the moment you de-cide whether the unit will Disengage or not. All Engaged markerscome off the phasing player’s units during the combat phase. En-gaged units that did not disengage may attack in the Combat Phase.
21. TANK AND RECON UNITS21. TANK AND RECON UNITS21. TANK AND RECON UNITS21. TANK AND RECON UNITS21. TANK AND RECON UNITS21.1 The Armor ShiftThe attacker gains a column shift to the right on the CRT in thefollowing two cases:• He has a Tank Unit participating in the battle and the defender
has no units with a TQ rating.• Both sides have units with TQ numbers involved, but the TQ rat-
ing of the attacker's unit is gray and is greater than the TQ valueof the defender's unit.
EXAMPLE: If a Tank Unit with a TQ rating of 4 attacks a Tank Unitwith a TQ rating of 3, the attacker would receive a shift.
The attacker suffers a column shift left on the CRT if he does nothave a Tank Unit participating in the battle and the defender hasboth an infantry and a Tank Unit (with a red or gray TQ) in thetarget hex. A US combat command, any Recon Unit with a TQ num-ber, and the full strength side of the 150th Pz Brigade counts asboth an infantry and Tank Unit for this purpose.
EXAMPLE: If the attacker had a Tank Unit participating with a 3 TQand the defender has a Tank Unit with a 4 TQ, the attacker would notreceive a shift for armor, but neither would the defender.
21.2 Tank DestroyersTQ ratings in a red circle may not be used to gain an Armor Shift inan attack—only in defense (when the attacker has no participatingTank Unit). Red TQs can deny the attacker his Armor Shift if the redTQ is equal to or greater than the attacker’s gray TQ. Red TQs qualifyfor the –1 modifier in a Determined Defense (16.7), but not for the–1 modifier in a Fire Fight (16.2).
21.3 Terrain Effects on the Armor ShiftA player NEVER gets the Armor Shift if the defender is in Forest,Wooded Rough, West Wall, or City hex. The attacker may not gainan Armor Shift from a Tank Unit that cannot legally cross the hex-side into the defender’s hex, whether due to an unbridged river, or anon-road Forest/Wooded Rough hexside.
CLARIFICATION: With the above in mind, its possible to get theArmor Shift attacking across a river hexside at an intact bridge, or
out of a Wooded Rough hex if the defender is not in a Forest, WoodedRough, West Wall or City hex.
21.4 Recon Units Special AbilityRecon Units defending alone in a hex may treat an Engaged resultas a DR1 (retreat one hex without disruption). If this option is used,the attacker receives a Regular Advance (19.1). Disrupted or routedRecon units may not use this option.
21.5 Summary of Other Tank and Recon Unit Properties• May not move, advance or retreat across an unbridged river hex-
side (11.4, 17.2, 19.2).• May not move, advance or retreat into or out of a Forest, West
Wall or Wooded Rough hex except along a road (11.5, 17.2, 19.2).• Receive a –1 DRM when attempting Disengagement (20.2).• A qualifying Tank Unit provides a –1 DRM on the Determined
Defense Table (16.7).• A qualifying Tank Unit provides a –1 DRM on the Fire Fight
Table (16.2).
22. ARTILLERY UNITS22. ARTILLERY UNITS22. ARTILLERY UNITS22. ARTILLERY UNITS22. ARTILLERY UNITS22.1 Artillery Movement in GeneralArtillery Units cannot move and fire in the same turn unless Shift-ing Fire Position (22.2). Allied Artillery Units that move more thanone hex must flip to their Fired side. German Artillery Units re-quire a Prime Mover marker to move more than one hex (22.3).Allied Artillery Units on their Fired sides, and German Prime Mov-ers move at the mechanized movement rate. Allied Artillery Unitsmay use Strategic Movement; German artillery may not.
22.2 Shifting Fire PositionGerman Nebelwerfer brigades and Allied Artillery Units on theirready side have an MA of 1. These units can shift one hex and stillremain on their ready side. The one hex move may be made intoany hex, regardless of the MP cost, as long as the unit could legallyenter the hex under normal rules of movement. Primary roads maynot be used to move two hexes.
22.3 German Prime MoversGermany was short of Prime Movers for their corps-level artilleryand much of it was left behind after the initial attack. ThereforeGerman Artillery Units are practically immobile. However, up tofive Artillery Units per turn may have their MA increased to 5 ifthey use a Prime Mover marker (they may not use Strategic Move-ment). There are five Prime Mover markers—two for the 6th PzArmy, two for the 5th Pz Army, and one for the 7th Army. A PrimeMover marker belonging to one army may not be used to move anArtillery Unit belonging to a different army. A Prime Mover maymove an Artillery Unit on its fired or ready side (a German Artil-lery Unit is not flipped if it moves). Leave the Prime Mover markeron the Artillery Unit until the next Artillery Supply Phase to indi-cate the Artillery Unit cannot fire until then.
The German player removes all his Prime Mover markers from themap during the German Artillery Supply Phase (5.1).
NOTE: Prime Mover markers are printed on the backside of Strate-gic Movement markers, so every Artillery Unit moved means one lessGerman mechanized unit that may use Strategic Movement. This re-flects limited fuel, trucks diverted for ammo transport, road spaceand other logistical factors.
22.4 RangeEach Artillery Unit has a range printed in a small box on the upper
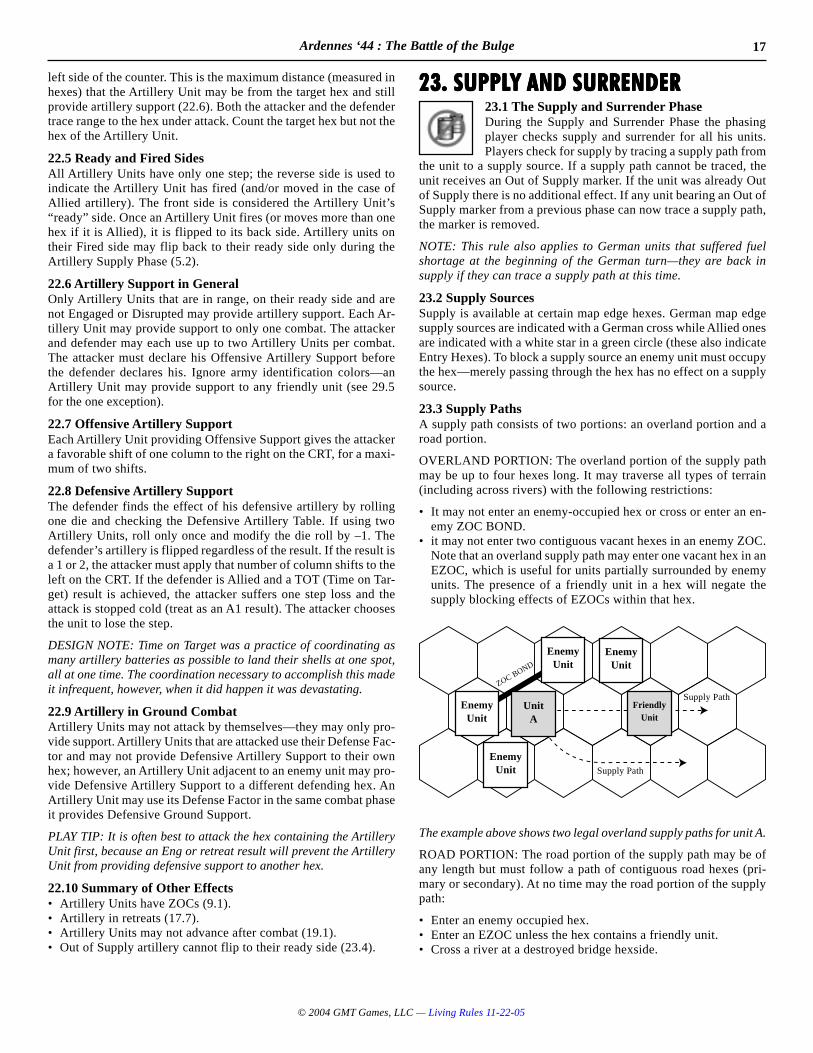
17Ardennes ‘44 : The Battle of the Bulge
© 2004 GMT Games, LLC — Living Rules 11-22-05
left side of the counter. This is the maximum distance (measured inhexes) that the Artillery Unit may be from the target hex and stillprovide artillery support (22.6). Both the attacker and the defendertrace range to the hex under attack. Count the target hex but not thehex of the Artillery Unit.
22.5 Ready and Fired SidesAll Artillery Units have only one step; the reverse side is used toindicate the Artillery Unit has fired (and/or moved in the case ofAllied artillery). The front side is considered the Artillery Unit’s“ready” side. Once an Artillery Unit fires (or moves more than onehex if it is Allied), it is flipped to its back side. Artillery units ontheir Fired side may flip back to their ready side only during theArtillery Supply Phase (5.2).
22.6 Artillery Support in GeneralOnly Artillery Units that are in range, on their ready side and arenot Engaged or Disrupted may provide artillery support. Each Ar-tillery Unit may provide support to only one combat. The attackerand defender may each use up to two Artillery Units per combat.The attacker must declare his Offensive Artillery Support beforethe defender declares his. Ignore army identification colors—anArtillery Unit may provide support to any friendly unit (see 29.5for the one exception).
22.7 Offensive Artillery SupportEach Artillery Unit providing Offensive Support gives the attackera favorable shift of one column to the right on the CRT, for a maxi-mum of two shifts.
22.8 Defensive Artillery SupportThe defender finds the effect of his defensive artillery by rollingone die and checking the Defensive Artillery Table. If using twoArtillery Units, roll only once and modify the die roll by –1. Thedefender’s artillery is flipped regardless of the result. If the result isa 1 or 2, the attacker must apply that number of column shifts to theleft on the CRT. If the defender is Allied and a TOT (Time on Tar-get) result is achieved, the attacker suffers one step loss and theattack is stopped cold (treat as an A1 result). The attacker choosesthe unit to lose the step.
DESIGN NOTE: Time on Target was a practice of coordinating asmany artillery batteries as possible to land their shells at one spot,all at one time. The coordination necessary to accomplish this madeit infrequent, however, when it did happen it was devastating.
22.9 Artillery in Ground CombatArtillery Units may not attack by themselves—they may only pro-vide support. Artillery Units that are attacked use their Defense Fac-tor and may not provide Defensive Artillery Support to their ownhex; however, an Artillery Unit adjacent to an enemy unit may pro-vide Defensive Artillery Support to a different defending hex. AnArtillery Unit may use its Defense Factor in the same combat phaseit provides Defensive Ground Support.
PLAY TIP: It is often best to attack the hex containing the ArtilleryUnit first, because an Eng or retreat result will prevent the ArtilleryUnit from providing defensive support to another hex.
22.10 Summary of Other Effects• Artillery Units have ZOCs (9.1).• Artillery in retreats (17.7).• Artillery Units may not advance after combat (19.1).• Out of Supply artillery cannot flip to their ready side (23.4).
23. SUPPLY AND SURRENDER23. SUPPLY AND SURRENDER23. SUPPLY AND SURRENDER23. SUPPLY AND SURRENDER23. SUPPLY AND SURRENDER23.1 The Supply and Surrender PhaseDuring the Supply and Surrender Phase the phasingplayer checks supply and surrender for all his units.Players check for supply by tracing a supply path from
the unit to a supply source. If a supply path cannot be traced, theunit receives an Out of Supply marker. If the unit was already Outof Supply there is no additional effect. If any unit bearing an Out ofSupply marker from a previous phase can now trace a supply path,the marker is removed.
NOTE: This rule also applies to German units that suffered fuelshortage at the beginning of the German turn—they are back insupply if they can trace a supply path at this time.
23.2 Supply SourcesSupply is available at certain map edge hexes. German map edgesupply sources are indicated with a German cross while Allied onesare indicated with a white star in a green circle (these also indicateEntry Hexes). To block a supply source an enemy unit must occupythe hex—merely passing through the hex has no effect on a supplysource.
23.3 Supply PathsA supply path consists of two portions: an overland portion and aroad portion.
OVERLAND PORTION: The overland portion of the supply pathmay be up to four hexes long. It may traverse all types of terrain(including across rivers) with the following restrictions:
• It may not enter an enemy-occupied hex or cross or enter an en-emy ZOC BOND.
• it may not enter two contiguous vacant hexes in an enemy ZOC.Note that an overland supply path may enter one vacant hex in anEZOC, which is useful for units partially surrounded by enemyunits. The presence of a friendly unit in a hex will negate thesupply blocking effects of EZOCs within that hex.
The example above shows two legal overland supply paths for unit A.
ROAD PORTION: The road portion of the supply path may be ofany length but must follow a path of contiguous road hexes (pri-mary or secondary). At no time may the road portion of the supplypath:
• Enter an enemy occupied hex.• Enter an EZOC unless the hex contains a friendly unit.• Cross a river at a destroyed bridge hexside.
EnemyUnit
FriendlyUnit
EnemyUnit
EnemyUnit
EnemyUnit
UnitA
Supply Path
Supply Path
ZOC BOND
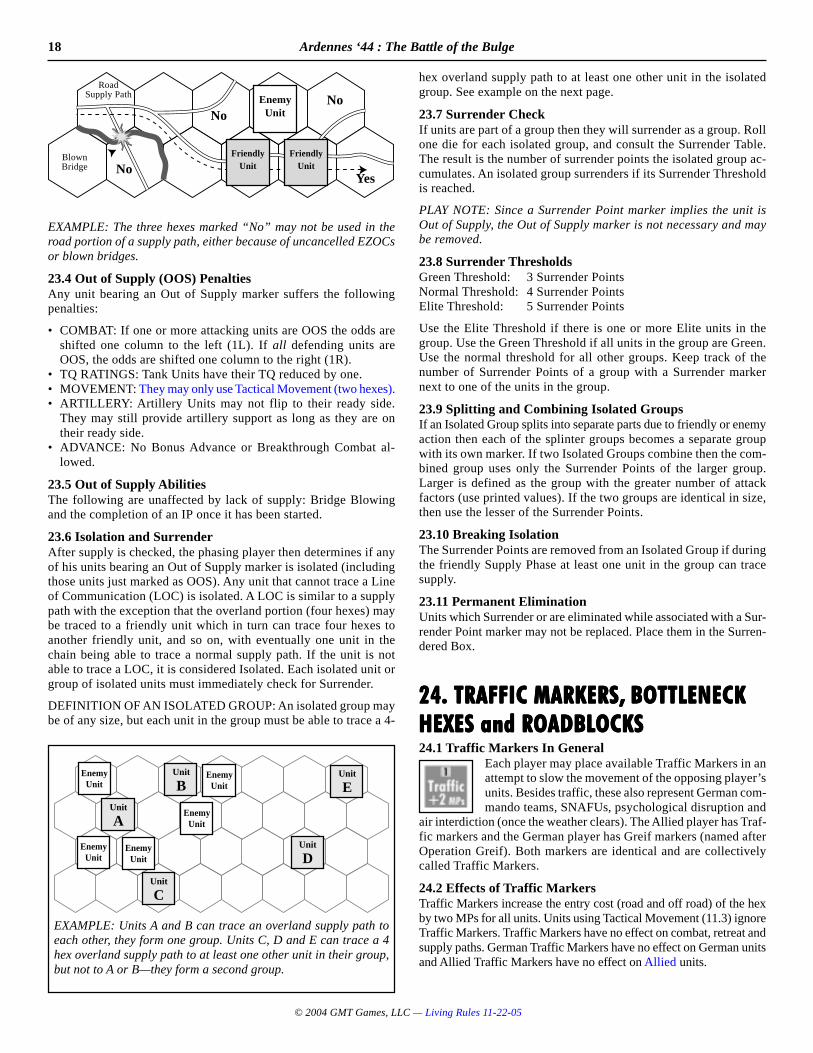
18 Ardennes ‘44 : The Battle of the Bulge
© 2004 GMT Games, LLC — Living Rules 11-22-05
EXAMPLE: The three hexes marked “No” may not be used in theroad portion of a supply path, either because of uncancelled EZOCsor blown bridges.
23.4 Out of Supply (OOS) PenaltiesAny unit bearing an Out of Supply marker suffers the followingpenalties:
• COMBAT: If one or more attacking units are OOS the odds areshifted one column to the left (1L). If all defending units areOOS, the odds are shifted one column to the right (1R).
• TQ RATINGS: Tank Units have their TQ reduced by one.• MOVEMENT: They may only use Tactical Movement (two hexes).• ARTILLERY: Artillery Units may not flip to their ready side.
They may still provide artillery support as long as they are ontheir ready side.
• ADVANCE: No Bonus Advance or Breakthrough Combat al-lowed.
23.5 Out of Supply AbilitiesThe following are unaffected by lack of supply: Bridge Blowingand the completion of an IP once it has been started.
23.6 Isolation and SurrenderAfter supply is checked, the phasing player then determines if anyof his units bearing an Out of Supply marker is isolated (includingthose units just marked as OOS). Any unit that cannot trace a Lineof Communication (LOC) is isolated. A LOC is similar to a supplypath with the exception that the overland portion (four hexes) maybe traced to a friendly unit which in turn can trace four hexes toanother friendly unit, and so on, with eventually one unit in thechain being able to trace a normal supply path. If the unit is notable to trace a LOC, it is considered Isolated. Each isolated unit orgroup of isolated units must immediately check for Surrender.
DEFINITION OF AN ISOLATED GROUP: An isolated group maybe of any size, but each unit in the group must be able to trace a 4-
hex overland supply path to at least one other unit in the isolatedgroup. See example on the next page.
23.7 Surrender CheckIf units are part of a group then they will surrender as a group. Rollone die for each isolated group, and consult the Surrender Table.The result is the number of surrender points the isolated group ac-cumulates. An isolated group surrenders if its Surrender Thresholdis reached.
PLAY NOTE: Since a Surrender Point marker implies the unit isOut of Supply, the Out of Supply marker is not necessary and maybe removed.
23.8 Surrender ThresholdsGreen Threshold: 3 Surrender PointsNormal Threshold: 4 Surrender PointsElite Threshold: 5 Surrender Points
Use the Elite Threshold if there is one or more Elite units in thegroup. Use the Green Threshold if all units in the group are Green.Use the normal threshold for all other groups. Keep track of thenumber of Surrender Points of a group with a Surrender markernext to one of the units in the group.
23.9 Splitting and Combining Isolated GroupsIf an Isolated Group splits into separate parts due to friendly or enemyaction then each of the splinter groups becomes a separate groupwith its own marker. If two Isolated Groups combine then the com-bined group uses only the Surrender Points of the larger group.Larger is defined as the group with the greater number of attackfactors (use printed values). If the two groups are identical in size,then use the lesser of the Surrender Points.
23.10 Breaking IsolationThe Surrender Points are removed from an Isolated Group if duringthe friendly Supply Phase at least one unit in the group can tracesupply.
23.11 Permanent EliminationUnits which Surrender or are eliminated while associated with a Sur-render Point marker may not be replaced. Place them in the Surren-dered Box.
24. TRAFFIC MARKERS,24. TRAFFIC MARKERS,24. TRAFFIC MARKERS,24. TRAFFIC MARKERS,24. TRAFFIC MARKERS, BOTTLENECKBOTTLENECKBOTTLENECKBOTTLENECKBOTTLENECKHEXES and ROADBLOCKSHEXES and ROADBLOCKSHEXES and ROADBLOCKSHEXES and ROADBLOCKSHEXES and ROADBLOCKS24.1 Traffic Markers In General
Each player may place available Traffic Markers in anattempt to slow the movement of the opposing player’sunits. Besides traffic, these also represent German com-mando teams, SNAFUs, psychological disruption and
air interdiction (once the weather clears). The Allied player has Traf-fic markers and the German player has Greif markers (named afterOperation Greif). Both markers are identical and are collectivelycalled Traffic Markers.
24.2 Effects of Traffic MarkersTraffic Markers increase the entry cost (road and off road) of the hexby two MPs for all units. Units using Tactical Movement (11.3) ignoreTraffic Markers. Traffic Markers have no effect on combat, retreat andsupply paths. German Traffic Markers have no effect on German unitsand Allied Traffic Markers have no effect on Allied units.
FriendlyUnit
EnemyUnit
FriendlyUnit
NoNo
No
RoadSupply Path
BlownBridge
Yes
Unit
A
Unit
BEnemyUnit
EnemyUnit
EnemyUnit
EnemyUnit
Unit
E
Unit
C
EnemyUnit
Unit
D
EXAMPLE: Units A and B can trace an overland supply path toeach other, they form one group. Units C, D and E can trace a 4hex overland supply path to at least one other unit in their group,but not to A or B—they form a second group.
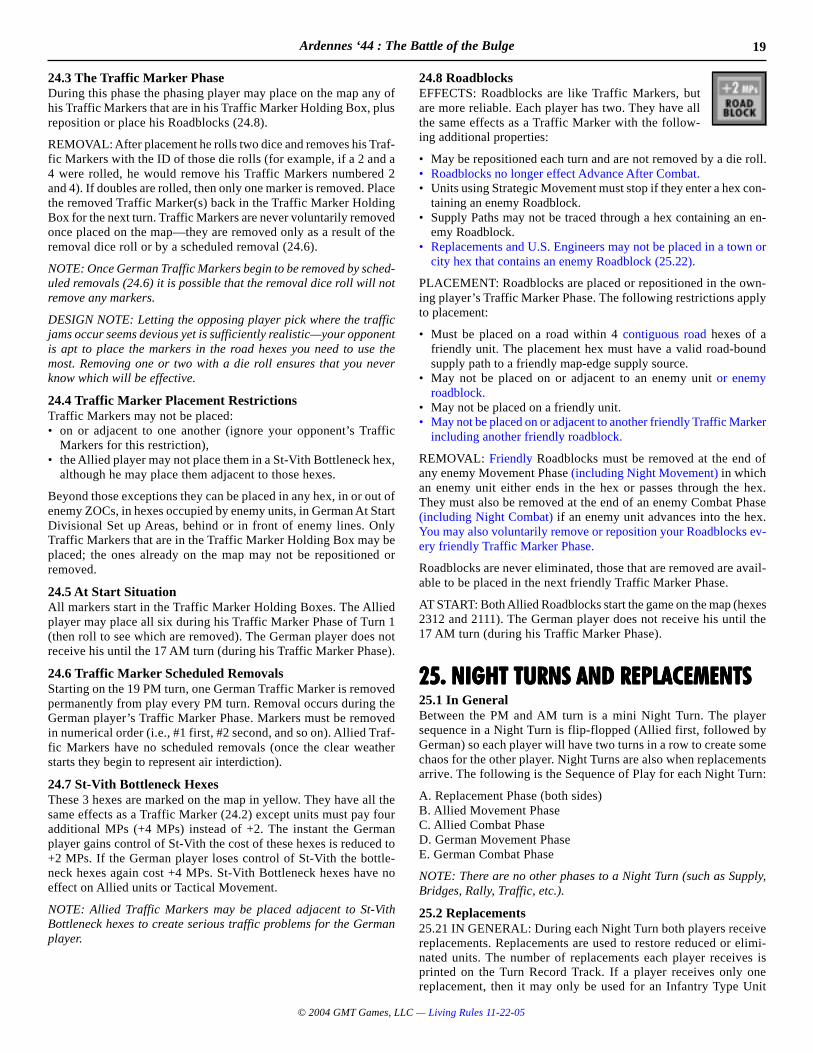
19Ardennes ‘44 : The Battle of the Bulge
© 2004 GMT Games, LLC — Living Rules 11-22-05
24.3 The Traffic Marker PhaseDuring this phase the phasing player may place on the map any ofhis Traffic Markers that are in his Traffic Marker Holding Box, plusreposition or place his Roadblocks (24.8).
REMOVAL: After placement he rolls two dice and removes his Traf-fic Markers with the ID of those die rolls (for example, if a 2 and a4 were rolled, he would remove his Traffic Markers numbered 2and 4). If doubles are rolled, then only one marker is removed. Placethe removed Traffic Marker(s) back in the Traffic Marker HoldingBox for the next turn. Traffic Markers are never voluntarily removedonce placed on the map—they are removed only as a result of theremoval dice roll or by a scheduled removal (24.6).
NOTE: Once German Traffic Markers begin to be removed by sched-uled removals (24.6) it is possible that the removal dice roll will notremove any markers.
DESIGN NOTE: Letting the opposing player pick where the trafficjams occur seems devious yet is sufficiently realistic—your opponentis apt to place the markers in the road hexes you need to use themost. Removing one or two with a die roll ensures that you neverknow which will be effective.
24.4 Traffic Marker Placement RestrictionsTraffic Markers may not be placed:• on or adjacent to one another (ignore your opponent’s Traffic
Markers for this restriction),• the Allied player may not place them in a St-Vith Bottleneck hex,
although he may place them adjacent to those hexes.
Beyond those exceptions they can be placed in any hex, in or out ofenemy ZOCs, in hexes occupied by enemy units, in German At StartDivisional Set up Areas, behind or in front of enemy lines. OnlyTraffic Markers that are in the Traffic Marker Holding Box may beplaced; the ones already on the map may not be repositioned orremoved.
24.5 At Start SituationAll markers start in the Traffic Marker Holding Boxes. The Alliedplayer may place all six during his Traffic Marker Phase of Turn 1(then roll to see which are removed). The German player does notreceive his until the 17 AM turn (during his Traffic Marker Phase).
24.6 Traffic Marker Scheduled RemovalsStarting on the 19 PM turn, one German Traffic Marker is removedpermanently from play every PM turn. Removal occurs during theGerman player’s Traffic Marker Phase. Markers must be removedin numerical order (i.e., #1 first, #2 second, and so on). Allied Traf-fic Markers have no scheduled removals (once the clear weatherstarts they begin to represent air interdiction).
24.7 St-Vith Bottleneck HexesThese 3 hexes are marked on the map in yellow. They have all thesame effects as a Traffic Marker (24.2) except units must pay fouradditional MPs (+4 MPs) instead of +2. The instant the Germanplayer gains control of St-Vith the cost of these hexes is reduced to+2 MPs. If the German player loses control of St-Vith the bottle-neck hexes again cost +4 MPs. St-Vith Bottleneck hexes have noeffect on Allied units or Tactical Movement.
NOTE: Allied Traffic Markers may be placed adjacent to St-VithBottleneck hexes to create serious traffic problems for the Germanplayer.
24.8 RoadblocksEFFECTS: Roadblocks are like Traffic Markers, butare more reliable. Each player has two. They have allthe same effects as a Traffic Marker with the follow-ing additional properties:
• May be repositioned each turn and are not removed by a die roll.• Roadblocks no longer effect Advance After Combat.• Units using Strategic Movement must stop if they enter a hex con-
taining an enemy Roadblock.• Supply Paths may not be traced through a hex containing an en-
emy Roadblock.• Replacements and U.S. Engineers may not be placed in a town or
city hex that contains an enemy Roadblock (25.22).
PLACEMENT: Roadblocks are placed or repositioned in the own-ing player’s Traffic Marker Phase. The following restrictions applyto placement:
• Must be placed on a road within 4 contiguous road hexes of afriendly unit. The placement hex must have a valid road-boundsupply path to a friendly map-edge supply source.
• May not be placed on or adjacent to an enemy unit or enemyroadblock.
• May not be placed on a friendly unit.• May not be placed on or adjacent to another friendly Traffic Marker
including another friendly roadblock.
REMOVAL: Friendly Roadblocks must be removed at the end ofany enemy Movement Phase (including Night Movement) in whichan enemy unit either ends in the hex or passes through the hex.They must also be removed at the end of an enemy Combat Phase(including Night Combat) if an enemy unit advances into the hex.You may also voluntarily remove or reposition your Roadblocks ev-ery friendly Traffic Marker Phase.
Roadblocks are never eliminated, those that are removed are avail-able to be placed in the next friendly Traffic Marker Phase.
AT START: Both Allied Roadblocks start the game on the map (hexes2312 and 2111). The German player does not receive his until the17 AM turn (during his Traffic Marker Phase).
25. NIGHT TURNS AND REPLACEMENTS25. NIGHT TURNS AND REPLACEMENTS25. NIGHT TURNS AND REPLACEMENTS25. NIGHT TURNS AND REPLACEMENTS25. NIGHT TURNS AND REPLACEMENTS25.1 In GeneralBetween the PM and AM turn is a mini Night Turn. The playersequence in a Night Turn is flip-flopped (Allied first, followed byGerman) so each player will have two turns in a row to create somechaos for the other player. Night Turns are also when replacementsarrive. The following is the Sequence of Play for each Night Turn:
A. Replacement Phase (both sides)B. Allied Movement PhaseC. Allied Combat PhaseD. German Movement PhaseE. German Combat Phase
NOTE: There are no other phases to a Night Turn (such as Supply,Bridges, Rally, Traffic, etc.).
25.2 Replacements25.21 IN GENERAL: During each Night Turn both players receivereplacements. Replacements are used to restore reduced or elimi-nated units. The number of replacements each player receives isprinted on the Turn Record Track. If a player receives only onereplacement, then it may only be used for an Infantry Type Unit
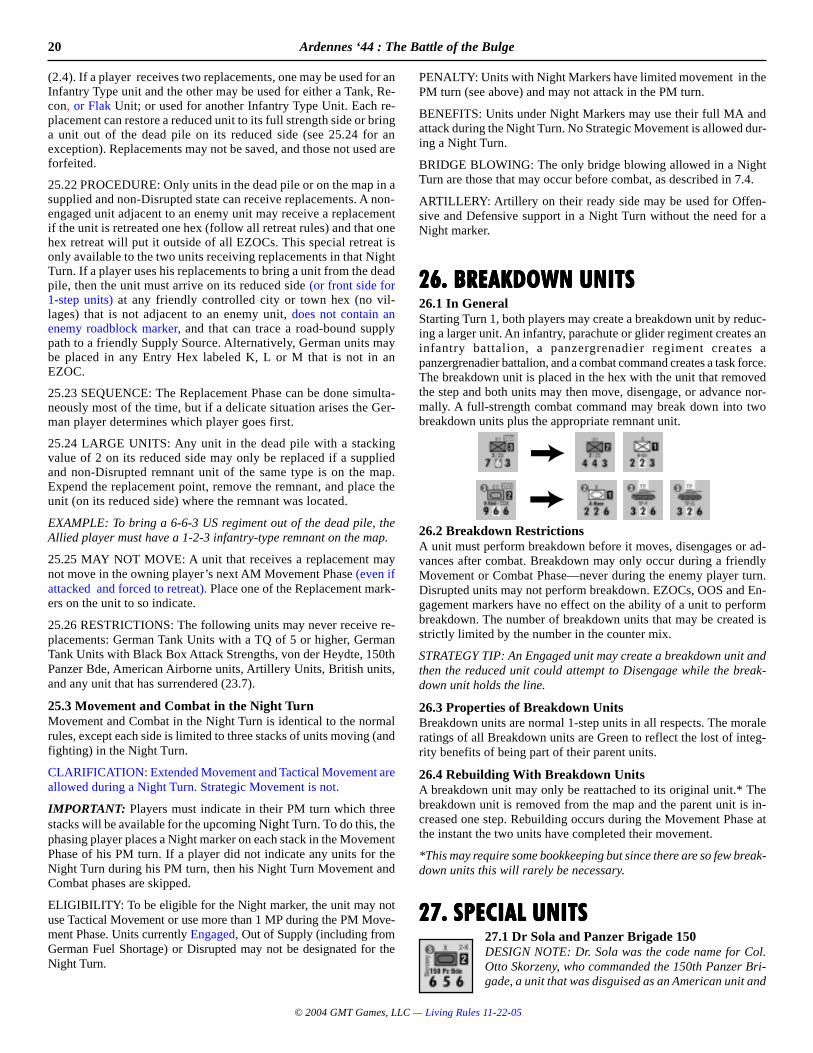
20 Ardennes ‘44 : The Battle of the Bulge
© 2004 GMT Games, LLC — Living Rules 11-22-05
(2.4). If a player receives two replacements, one may be used for anInfantry Type unit and the other may be used for either a Tank, Re-con, or Flak Unit; or used for another Infantry Type Unit. Each re-placement can restore a reduced unit to its full strength side or bringa unit out of the dead pile on its reduced side (see 25.24 for anexception). Replacements may not be saved, and those not used areforfeited.
25.22 PROCEDURE: Only units in the dead pile or on the map in asupplied and non-Disrupted state can receive replacements. A non-engaged unit adjacent to an enemy unit may receive a replacementif the unit is retreated one hex (follow all retreat rules) and that onehex retreat will put it outside of all EZOCs. This special retreat isonly available to the two units receiving replacements in that NightTurn. If a player uses his replacements to bring a unit from the deadpile, then the unit must arrive on its reduced side (or front side for1-step units) at any friendly controlled city or town hex (no vil-lages) that is not adjacent to an enemy unit, does not contain anenemy roadblock marker, and that can trace a road-bound supplypath to a friendly Supply Source. Alternatively, German units maybe placed in any Entry Hex labeled K, L or M that is not in anEZOC.
25.23 SEQUENCE: The Replacement Phase can be done simulta-neously most of the time, but if a delicate situation arises the Ger-man player determines which player goes first.
25.24 LARGE UNITS: Any unit in the dead pile with a stackingvalue of 2 on its reduced side may only be replaced if a suppliedand non-Disrupted remnant unit of the same type is on the map.Expend the replacement point, remove the remnant, and place theunit (on its reduced side) where the remnant was located.
EXAMPLE: To bring a 6-6-3 US regiment out of the dead pile, theAllied player must have a 1-2-3 infantry-type remnant on the map.
25.25 MAY NOT MOVE: A unit that receives a replacement maynot move in the owning player’s next AM Movement Phase (even ifattacked and forced to retreat). Place one of the Replacement mark-ers on the unit to so indicate.
25.26 RESTRICTIONS: The following units may never receive re-placements: German Tank Units with a TQ of 5 or higher, GermanTank Units with Black Box Attack Strengths, von der Heydte, 150thPanzer Bde, American Airborne units, Artillery Units, British units,and any unit that has surrendered (23.7).
25.3 Movement and Combat in the Night TurnMovement and Combat in the Night Turn is identical to the normalrules, except each side is limited to three stacks of units moving (andfighting) in the Night Turn.
CLARIFICATION: Extended Movement and Tactical Movement areallowed during a Night Turn. Strategic Movement is not.
IMPORTANT: Players must indicate in their PM turn which threestacks will be available for the upcoming Night Turn. To do this, thephasing player places a Night marker on each stack in the MovementPhase of his PM turn. If a player did not indicate any units for theNight Turn during his PM turn, then his Night Turn Movement andCombat phases are skipped.
ELIGIBILITY: To be eligible for the Night marker, the unit may notuse Tactical Movement or use more than 1 MP during the PM Move-ment Phase. Units currently Engaged, Out of Supply (including fromGerman Fuel Shortage) or Disrupted may not be designated for theNight Turn.
PENALTY: Units with Night Markers have limited movement in thePM turn (see above) and may not attack in the PM turn.
BENEFITS: Units under Night Markers may use their full MA andattack during the Night Turn. No Strategic Movement is allowed dur-ing a Night Turn.
BRIDGE BLOWING: The only bridge blowing allowed in a NightTurn are those that may occur before combat, as described in 7.4.
ARTILLERY: Artillery on their ready side may be used for Offen-sive and Defensive support in a Night Turn without the need for aNight marker.
26. BREAKDOWN UNITS26. BREAKDOWN UNITS26. BREAKDOWN UNITS26. BREAKDOWN UNITS26. BREAKDOWN UNITS26.1 In GeneralStarting Turn 1, both players may create a breakdown unit by reduc-ing a larger unit. An infantry, parachute or glider regiment creates aninfantry battalion, a panzergrenadier regiment creates apanzergrenadier battalion, and a combat command creates a task force.The breakdown unit is placed in the hex with the unit that removedthe step and both units may then move, disengage, or advance nor-mally. A full-strength combat command may break down into twobreakdown units plus the appropriate remnant unit.
26.2 Breakdown RestrictionsA unit must perform breakdown before it moves, disengages or ad-vances after combat. Breakdown may only occur during a friendlyMovement or Combat Phase—never during the enemy player turn.Disrupted units may not perform breakdown. EZOCs, OOS and En-gagement markers have no effect on the ability of a unit to performbreakdown. The number of breakdown units that may be created isstrictly limited by the number in the counter mix.
STRATEGY TIP: An Engaged unit may create a breakdown unit andthen the reduced unit could attempt to Disengage while the break-down unit holds the line.
26.3 Properties of Breakdown UnitsBreakdown units are normal 1-step units in all respects. The moraleratings of all Breakdown units are Green to reflect the lost of integ-rity benefits of being part of their parent units.
26.4 Rebuilding With Breakdown UnitsA breakdown unit may only be reattached to its original unit.* Thebreakdown unit is removed from the map and the parent unit is in-creased one step. Rebuilding occurs during the Movement Phase atthe instant the two units have completed their movement.
*This may require some bookkeeping but since there are so few break-down units this will rarely be necessary.
27. SPECIAL UNITS27. SPECIAL UNITS27. SPECIAL UNITS27. SPECIAL UNITS27. SPECIAL UNITS27.1 Dr Sola and Panzer Brigade 150DESIGN NOTE: Dr. Sola was the code name for Col.Otto Skorzeny, who commanded the 150th Panzer Bri-gade, a unit that was disguised as an American unit and
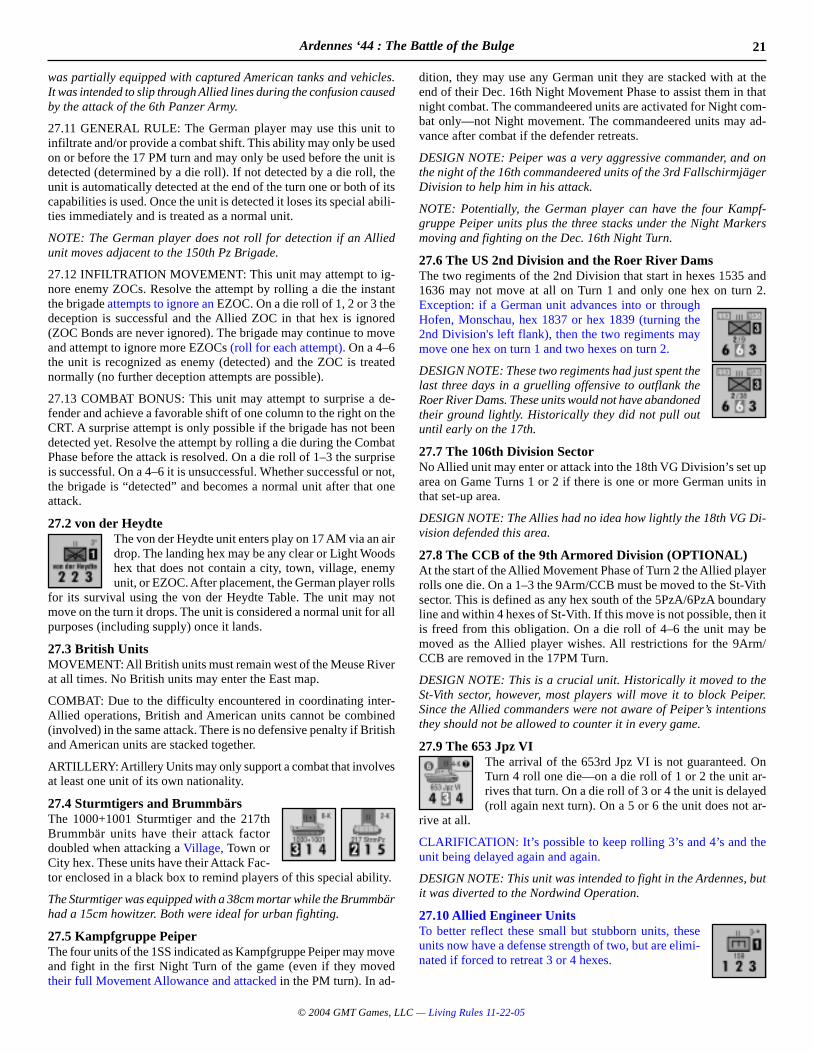
21Ardennes ‘44 : The Battle of the Bulge
© 2004 GMT Games, LLC — Living Rules 11-22-05
was partially equipped with captured American tanks and vehicles.It was intended to slip through Allied lines during the confusion causedby the attack of the 6th Panzer Army.
27.11 GENERAL RULE: The German player may use this unit toinfiltrate and/or provide a combat shift. This ability may only be usedon or before the 17 PM turn and may only be used before the unit isdetected (determined by a die roll). If not detected by a die roll, theunit is automatically detected at the end of the turn one or both of itscapabilities is used. Once the unit is detected it loses its special abili-ties immediately and is treated as a normal unit.
NOTE: The German player does not roll for detection if an Alliedunit moves adjacent to the 150th Pz Brigade.
27.12 INFILTRATION MOVEMENT: This unit may attempt to ig-nore enemy ZOCs. Resolve the attempt by rolling a die the instantthe brigade attempts to ignore an EZOC. On a die roll of 1, 2 or 3 thedeception is successful and the Allied ZOC in that hex is ignored(ZOC Bonds are never ignored). The brigade may continue to moveand attempt to ignore more EZOCs (roll for each attempt). On a 4–6the unit is recognized as enemy (detected) and the ZOC is treatednormally (no further deception attempts are possible).
27.13 COMBAT BONUS: This unit may attempt to surprise a de-fender and achieve a favorable shift of one column to the right on theCRT. A surprise attempt is only possible if the brigade has not beendetected yet. Resolve the attempt by rolling a die during the CombatPhase before the attack is resolved. On a die roll of 1–3 the surpriseis successful. On a 4–6 it is unsuccessful. Whether successful or not,the brigade is “detected” and becomes a normal unit after that oneattack.
27.2 von der HeydteThe von der Heydte unit enters play on 17 AM via an airdrop. The landing hex may be any clear or Light Woodshex that does not contain a city, town, village, enemyunit, or EZOC. After placement, the German player rolls
for its survival using the von der Heydte Table. The unit may notmove on the turn it drops. The unit is considered a normal unit for allpurposes (including supply) once it lands.
27.3 British UnitsMOVEMENT: All British units must remain west of the Meuse Riverat all times. No British units may enter the East map.
COMBAT: Due to the difficulty encountered in coordinating inter-Allied operations, British and American units cannot be combined(involved) in the same attack. There is no defensive penalty if Britishand American units are stacked together.
ARTILLERY: Artillery Units may only support a combat that involvesat least one unit of its own nationality.
27.4 Sturmtigers and BrummbärsThe 1000+1001 Sturmtiger and the 217thBrummbär units have their attack factordoubled when attacking a Village, Town orCity hex. These units have their Attack Fac-tor enclosed in a black box to remind players of this special ability.
The Sturmtiger was equipped with a 38cm mortar while the Brummbärhad a 15cm howitzer. Both were ideal for urban fighting.
27.5 Kampfgruppe PeiperThe four units of the 1SS indicated as Kampfgruppe Peiper may moveand fight in the first Night Turn of the game (even if they movedtheir full Movement Allowance and attacked in the PM turn). In ad-
dition, they may use any German unit they are stacked with at theend of their Dec. 16th Night Movement Phase to assist them in thatnight combat. The commandeered units are activated for Night com-bat only—not Night movement. The commandeered units may ad-vance after combat if the defender retreats.
DESIGN NOTE: Peiper was a very aggressive commander, and onthe night of the 16th commandeered units of the 3rd FallschirmjägerDivision to help him in his attack.
NOTE: Potentially, the German player can have the four Kampf-gruppe Peiper units plus the three stacks under the Night Markersmoving and fighting on the Dec. 16th Night Turn.
27.6 The US 2nd Division and the Roer River DamsThe two regiments of the 2nd Division that start in hexes 1535 and1636 may not move at all on Turn 1 and only one hex on turn 2.Exception: if a German unit advances into or throughHofen, Monschau, hex 1837 or hex 1839 (turning the2nd Division's left flank), then the two regiments maymove one hex on turn 1 and two hexes on turn 2.
DESIGN NOTE: These two regiments had just spent thelast three days in a gruelling offensive to outflank theRoer River Dams. These units would not have abandonedtheir ground lightly. Historically they did not pull outuntil early on the 17th.
27.7 The 106th Division SectorNo Allied unit may enter or attack into the 18th VG Division’s set uparea on Game Turns 1 or 2 if there is one or more German units inthat set-up area.
DESIGN NOTE: The Allies had no idea how lightly the 18th VG Di-vision defended this area.
27.8 The CCB of the 9th Armored Division (OPTIONAL)At the start of the Allied Movement Phase of Turn 2 the Allied playerrolls one die. On a 1–3 the 9Arm/CCB must be moved to the St-Vithsector. This is defined as any hex south of the 5PzA/6PzA boundaryline and within 4 hexes of St-Vith. If this move is not possible, then itis freed from this obligation. On a die roll of 4–6 the unit may bemoved as the Allied player wishes. All restrictions for the 9Arm/CCB are removed in the 17PM Turn.
DESIGN NOTE: This is a crucial unit. Historically it moved to theSt-Vith sector, however, most players will move it to block Peiper.Since the Allied commanders were not aware of Peiper’s intentionsthey should not be allowed to counter it in every game.
27.9 The 653 Jpz VIThe arrival of the 653rd Jpz VI is not guaranteed. OnTurn 4 roll one die—on a die roll of 1 or 2 the unit ar-rives that turn. On a die roll of 3 or 4 the unit is delayed(roll again next turn). On a 5 or 6 the unit does not ar-
rive at all.
CLARIFICATION: It’s possible to keep rolling 3’s and 4’s and theunit being delayed again and again.
DESIGN NOTE: This unit was intended to fight in the Ardennes, butit was diverted to the Nordwind Operation.
27.10 Allied Engineer UnitsTo better reflect these small but stubborn units, theseunits now have a defense strength of two, but are elimi-nated if forced to retreat 3 or 4 hexes.
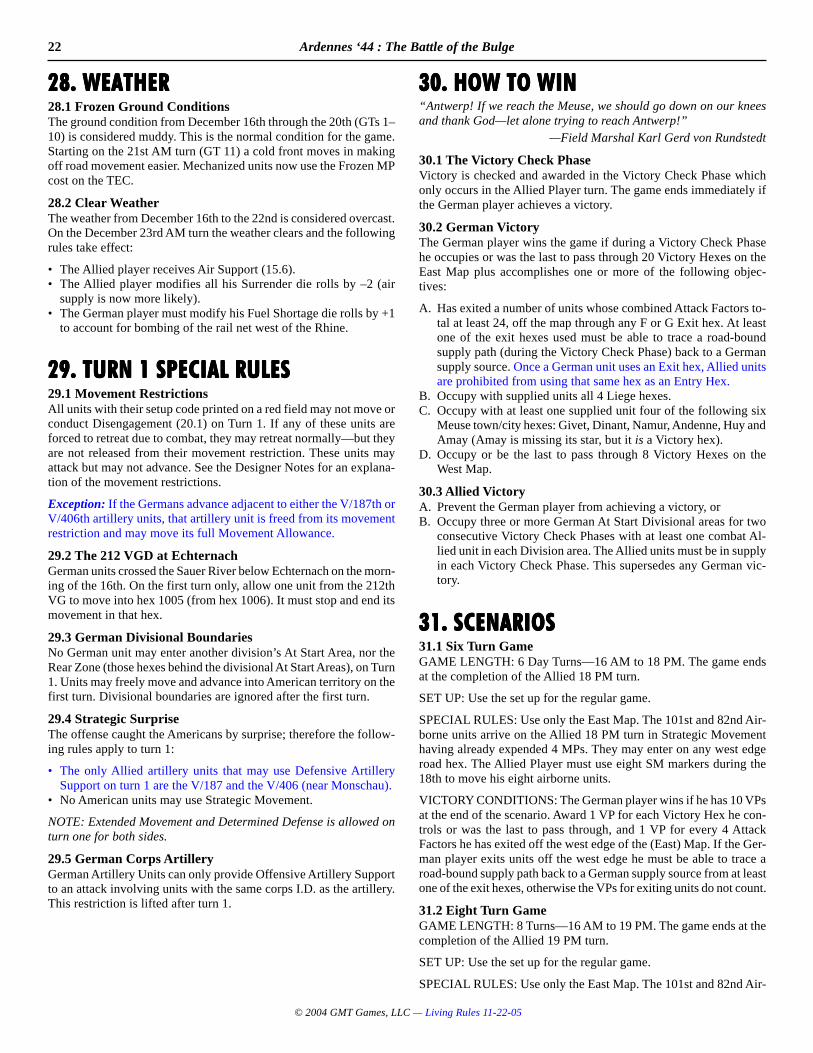
22 Ardennes ‘44 : The Battle of the Bulge
© 2004 GMT Games, LLC — Living Rules 11-22-05
28. WEATHER28. WEATHER28. WEATHER28. WEATHER28. WEATHER28.1 Frozen Ground ConditionsThe ground condition from December 16th through the 20th (GTs 1–10) is considered muddy. This is the normal condition for the game.Starting on the 21st AM turn (GT 11) a cold front moves in makingoff road movement easier. Mechanized units now use the Frozen MPcost on the TEC.
28.2 Clear WeatherThe weather from December 16th to the 22nd is considered overcast.On the December 23rd AM turn the weather clears and the followingrules take effect:
• The Allied player receives Air Support (15.6).• The Allied player modifies all his Surrender die rolls by –2 (air
supply is now more likely).• The German player must modify his Fuel Shortage die rolls by +1
to account for bombing of the rail net west of the Rhine.
29. TURN 1 SPECIAL RULES29. TURN 1 SPECIAL RULES29. TURN 1 SPECIAL RULES29. TURN 1 SPECIAL RULES29. TURN 1 SPECIAL RULES29.1 Movement RestrictionsAll units with their setup code printed on a red field may not move orconduct Disengagement (20.1) on Turn 1. If any of these units areforced to retreat due to combat, they may retreat normally—but theyare not released from their movement restriction. These units mayattack but may not advance. See the Designer Notes for an explana-tion of the movement restrictions.
Exception: If the Germans advance adjacent to either the V/187th orV/406th artillery units, that artillery unit is freed from its movementrestriction and may move its full Movement Allowance.
29.2 The 212 VGD at EchternachGerman units crossed the Sauer River below Echternach on the morn-ing of the 16th. On the first turn only, allow one unit from the 212thVG to move into hex 1005 (from hex 1006). It must stop and end itsmovement in that hex.
29.3 German Divisional BoundariesNo German unit may enter another division’s At Start Area, nor theRear Zone (those hexes behind the divisional At Start Areas), on Turn1. Units may freely move and advance into American territory on thefirst turn. Divisional boundaries are ignored after the first turn.
29.4 Strategic SurpriseThe offense caught the Americans by surprise; therefore the follow-ing rules apply to turn 1:
• The only Allied artillery units that may use Defensive ArtillerySupport on turn 1 are the V/187 and the V/406 (near Monschau).
• No American units may use Strategic Movement.
NOTE: Extended Movement and Determined Defense is allowed onturn one for both sides.
29.5 German Corps ArtilleryGerman Artillery Units can only provide Offensive Artillery Supportto an attack involving units with the same corps I.D. as the artillery.This restriction is lifted after turn 1.
30. HOW TO WIN30. HOW TO WIN30. HOW TO WIN30. HOW TO WIN30. HOW TO WIN“Antwerp! If we reach the Meuse, we should go down on our kneesand thank God—let alone trying to reach Antwerp!”
—Field Marshal Karl Gerd von Rundstedt
30.1 The Victory Check PhaseVictory is checked and awarded in the Victory Check Phase whichonly occurs in the Allied Player turn. The game ends immediately ifthe German player achieves a victory.
30.2 German VictoryThe German player wins the game if during a Victory Check Phasehe occupies or was the last to pass through 20 Victory Hexes on theEast Map plus accomplishes one or more of the following objec-tives:
A. Has exited a number of units whose combined Attack Factors to-tal at least 24, off the map through any F or G Exit hex. At leastone of the exit hexes used must be able to trace a road-boundsupply path (during the Victory Check Phase) back to a Germansupply source. Once a German unit uses an Exit hex, Allied unitsare prohibited from using that same hex as an Entry Hex.
B. Occupy with supplied units all 4 Liege hexes.C. Occupy with at least one supplied unit four of the following six
Meuse town/city hexes: Givet, Dinant, Namur, Andenne, Huy andAmay (Amay is missing its star, but it is a Victory hex).
D. Occupy or be the last to pass through 8 Victory Hexes on theWest Map.
30.3 Allied VictoryA. Prevent the German player from achieving a victory, orB. Occupy three or more German At Start Divisional areas for two
consecutive Victory Check Phases with at least one combat Al-lied unit in each Division area. The Allied units must be in supplyin each Victory Check Phase. This supersedes any German vic-tory.
31. SCENARIOS31. SCENARIOS31. SCENARIOS31. SCENARIOS31. SCENARIOS31.1 Six Turn GameGAME LENGTH: 6 Day Turns—16 AM to 18 PM. The game endsat the completion of the Allied 18 PM turn.
SET UP: Use the set up for the regular game.
SPECIAL RULES: Use only the East Map. The 101st and 82nd Air-borne units arrive on the Allied 18 PM turn in Strategic Movementhaving already expended 4 MPs. They may enter on any west edgeroad hex. The Allied Player must use eight SM markers during the18th to move his eight airborne units.
VICTORY CONDITIONS: The German player wins if he has 10 VPsat the end of the scenario. Award 1 VP for each Victory Hex he con-trols or was the last to pass through, and 1 VP for every 4 AttackFactors he has exited off the west edge of the (East) Map. If the Ger-man player exits units off the west edge he must be able to trace aroad-bound supply path back to a German supply source from at leastone of the exit hexes, otherwise the VPs for exiting units do not count.
31.2 Eight Turn GameGAME LENGTH: 8 Turns—16 AM to 19 PM. The game ends at thecompletion of the Allied 19 PM turn.
SET UP: Use the set up for the regular game.
SPECIAL RULES: Use only the East Map. The 101st and 82nd Air-
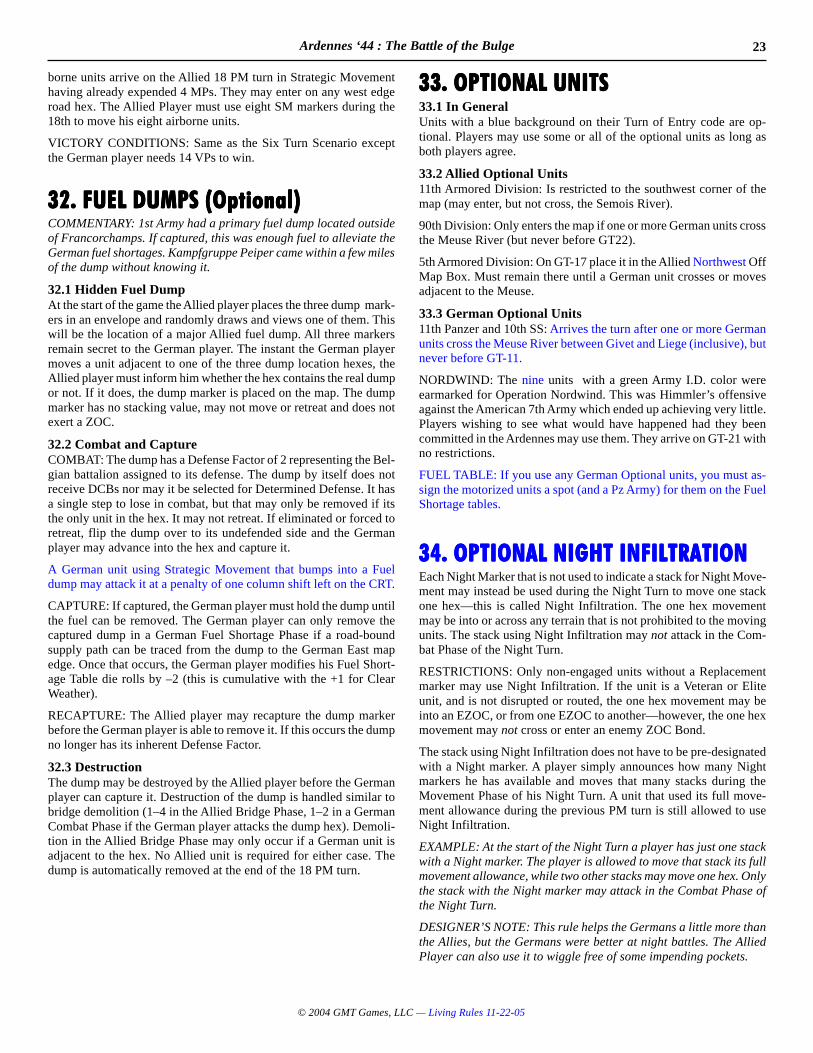
23Ardennes ‘44 : The Battle of the Bulge
© 2004 GMT Games, LLC — Living Rules 11-22-05
borne units arrive on the Allied 18 PM turn in Strategic Movementhaving already expended 4 MPs. They may enter on any west edgeroad hex. The Allied Player must use eight SM markers during the18th to move his eight airborne units.
VICTORY CONDITIONS: Same as the Six Turn Scenario exceptthe German player needs 14 VPs to win.
32. FUEL DUMPS (Optional)32. FUEL DUMPS (Optional)32. FUEL DUMPS (Optional)32. FUEL DUMPS (Optional)32. FUEL DUMPS (Optional)COMMENTARY: 1st Army had a primary fuel dump located outsideof Francorchamps. If captured, this was enough fuel to alleviate theGerman fuel shortages. Kampfgruppe Peiper came within a few milesof the dump without knowing it.
32.1 Hidden Fuel DumpAt the start of the game the Allied player places the three dump mark-ers in an envelope and randomly draws and views one of them. Thiswill be the location of a major Allied fuel dump. All three markersremain secret to the German player. The instant the German playermoves a unit adjacent to one of the three dump location hexes, theAllied player must inform him whether the hex contains the real dumpor not. If it does, the dump marker is placed on the map. The dumpmarker has no stacking value, may not move or retreat and does notexert a ZOC.
32.2 Combat and CaptureCOMBAT: The dump has a Defense Factor of 2 representing the Bel-gian battalion assigned to its defense. The dump by itself does notreceive DCBs nor may it be selected for Determined Defense. It hasa single step to lose in combat, but that may only be removed if itsthe only unit in the hex. It may not retreat. If eliminated or forced toretreat, flip the dump over to its undefended side and the Germanplayer may advance into the hex and capture it.
A German unit using Strategic Movement that bumps into a Fueldump may attack it at a penalty of one column shift left on the CRT.
CAPTURE: If captured, the German player must hold the dump untilthe fuel can be removed. The German player can only remove thecaptured dump in a German Fuel Shortage Phase if a road-boundsupply path can be traced from the dump to the German East mapedge. Once that occurs, the German player modifies his Fuel Short-age Table die rolls by –2 (this is cumulative with the +1 for ClearWeather).
RECAPTURE: The Allied player may recapture the dump markerbefore the German player is able to remove it. If this occurs the dumpno longer has its inherent Defense Factor.
32.3 DestructionThe dump may be destroyed by the Allied player before the Germanplayer can capture it. Destruction of the dump is handled similar tobridge demolition (1–4 in the Allied Bridge Phase, 1–2 in a GermanCombat Phase if the German player attacks the dump hex). Demoli-tion in the Allied Bridge Phase may only occur if a German unit isadjacent to the hex. No Allied unit is required for either case. Thedump is automatically removed at the end of the 18 PM turn.
33. OPTIONAL UNITS33. OPTIONAL UNITS33. OPTIONAL UNITS33. OPTIONAL UNITS33. OPTIONAL UNITS33.1 In GeneralUnits with a blue background on their Turn of Entry code are op-tional. Players may use some or all of the optional units as long asboth players agree.
33.2 Allied Optional Units11th Armored Division: Is restricted to the southwest corner of themap (may enter, but not cross, the Semois River).
90th Division: Only enters the map if one or more German units crossthe Meuse River (but never before GT22).
5th Armored Division: On GT-17 place it in the Allied Northwest OffMap Box. Must remain there until a German unit crosses or movesadjacent to the Meuse.
33.3 German Optional Units11th Panzer and 10th SS: Arrives the turn after one or more Germanunits cross the Meuse River between Givet and Liege (inclusive), butnever before GT-11.
NORDWIND: The nine units with a green Army I.D. color wereearmarked for Operation Nordwind. This was Himmler’s offensiveagainst the American 7th Army which ended up achieving very little.Players wishing to see what would have happened had they beencommitted in the Ardennes may use them. They arrive on GT-21 withno restrictions.
FUEL TABLE: If you use any German Optional units, you must as-sign the motorized units a spot (and a Pz Army) for them on the FuelShortage tables.
34. OPTIONAL NIGHT INFILTRATION34. OPTIONAL NIGHT INFILTRATION34. OPTIONAL NIGHT INFILTRATION34. OPTIONAL NIGHT INFILTRATION34. OPTIONAL NIGHT INFILTRATIONEach Night Marker that is not used to indicate a stack for Night Move-ment may instead be used during the Night Turn to move one stackone hex—this is called Night Infiltration. The one hex movementmay be into or across any terrain that is not prohibited to the movingunits. The stack using Night Infiltration may not attack in the Com-bat Phase of the Night Turn.
RESTRICTIONS: Only non-engaged units without a Replacementmarker may use Night Infiltration. If the unit is a Veteran or Eliteunit, and is not disrupted or routed, the one hex movement may beinto an EZOC, or from one EZOC to another—however, the one hexmovement may not cross or enter an enemy ZOC Bond.
The stack using Night Infiltration does not have to be pre-designatedwith a Night marker. A player simply announces how many Nightmarkers he has available and moves that many stacks during theMovement Phase of his Night Turn. A unit that used its full move-ment allowance during the previous PM turn is still allowed to useNight Infiltration.
EXAMPLE: At the start of the Night Turn a player has just one stackwith a Night marker. The player is allowed to move that stack its fullmovement allowance, while two other stacks may move one hex. Onlythe stack with the Night marker may attack in the Combat Phase ofthe Night Turn.
DESIGNER’S NOTE: This rule helps the Germans a little more thanthe Allies, but the Germans were better at night battles. The AlliedPlayer can also use it to wiggle free of some impending pockets.
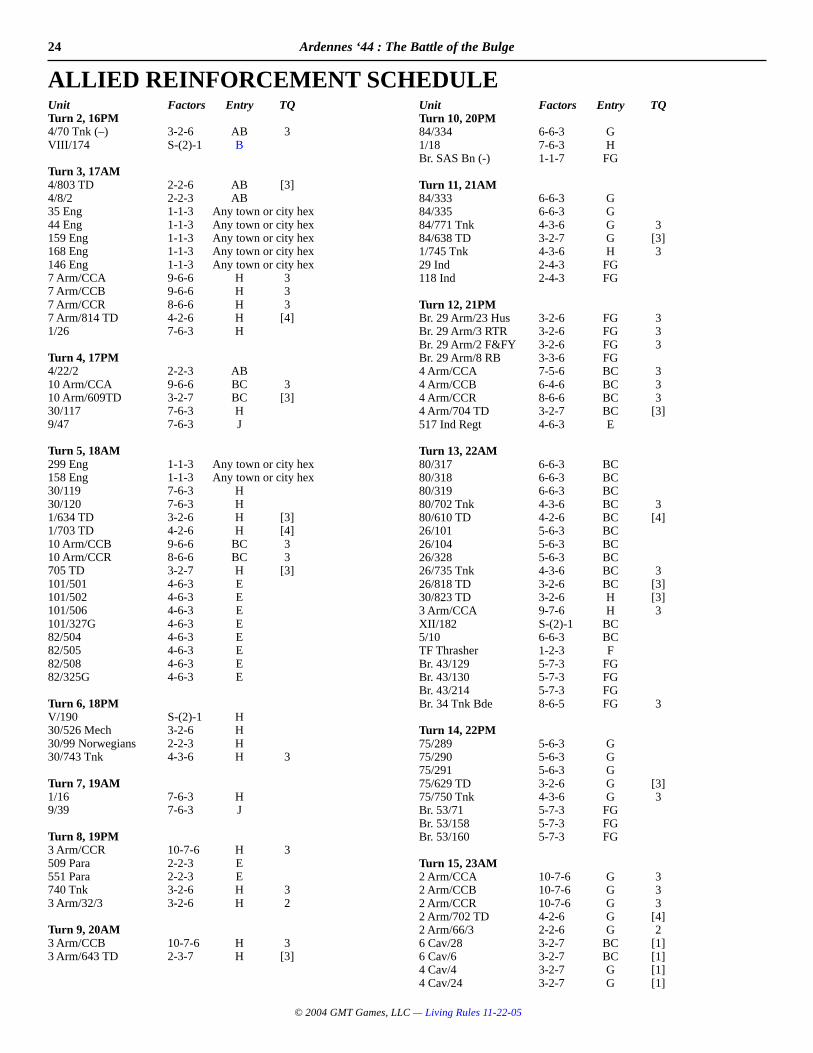
24 Ardennes ‘44 : The Battle of the Bulge
© 2004 GMT Games, LLC — Living Rules 11-22-05
Unit Factors Entry TQTurn 2, 16PM4/70 Tnk (–) 3-2-6 AB 3VIII/174 S-(2)-1 B
Turn 3, 17AM4/803 TD 2-2-6 AB [3]4/8/2 2-2-3 AB35 Eng 1-1-3 Any town or city hex44 Eng 1-1-3 Any town or city hex159 Eng 1-1-3 Any town or city hex168 Eng 1-1-3 Any town or city hex146 Eng 1-1-3 Any town or city hex7 Arm/CCA 9-6-6 H 37 Arm/CCB 9-6-6 H 37 Arm/CCR 8-6-6 H 37 Arm/814 TD 4-2-6 H [4]1/26 7-6-3 H
Turn 4, 17PM4/22/2 2-2-3 AB10 Arm/CCA 9-6-6 BC 310 Arm/609TD 3-2-7 BC [3]30/117 7-6-3 H9/47 7-6-3 J
Turn 5, 18AM299 Eng 1-1-3 Any town or city hex158 Eng 1-1-3 Any town or city hex30/119 7-6-3 H30/120 7-6-3 H1/634 TD 3-2-6 H [3]1/703 TD 4-2-6 H [4]10 Arm/CCB 9-6-6 BC 310 Arm/CCR 8-6-6 BC 3705 TD 3-2-7 H [3]101/501 4-6-3 E101/502 4-6-3 E101/506 4-6-3 E101/327G 4-6-3 E82/504 4-6-3 E82/505 4-6-3 E82/508 4-6-3 E82/325G 4-6-3 E
Turn 6, 18PMV/190 S-(2)-1 H30/526 Mech 3-2-6 H30/99 Norwegians 2-2-3 H30/743 Tnk 4-3-6 H 3
Turn 7, 19AM1/16 7-6-3 H9/39 7-6-3 J
Turn 8, 19PM3 Arm/CCR 10-7-6 H 3509 Para 2-2-3 E551 Para 2-2-3 E740 Tnk 3-2-6 H 33 Arm/32/3 3-2-6 H 2
Turn 9, 20AM3 Arm/CCB 10-7-6 H 33 Arm/643 TD 2-3-7 H [3]
Unit Factors Entry TQTurn 10, 20PM84/334 6-6-3 G1/18 7-6-3 HBr. SAS Bn (-) 1-1-7 FG
Turn 11, 21AM84/333 6-6-3 G84/335 6-6-3 G84/771 Tnk 4-3-6 G 384/638 TD 3-2-7 G [3]1/745 Tnk 4-3-6 H 329 Ind 2-4-3 FG118 Ind 2-4-3 FG
Turn 12, 21PMBr. 29 Arm/23 Hus 3-2-6 FG 3Br. 29 Arm/3 RTR 3-2-6 FG 3Br. 29 Arm/2 F&FY 3-2-6 FG 3Br. 29 Arm/8 RB 3-3-6 FG4 Arm/CCA 7-5-6 BC 34 Arm/CCB 6-4-6 BC 34 Arm/CCR 8-6-6 BC 34 Arm/704 TD 3-2-7 BC [3]517 Ind Regt 4-6-3 E
Turn 13, 22AM80/317 6-6-3 BC80/318 6-6-3 BC80/319 6-6-3 BC80/702 Tnk 4-3-6 BC 380/610 TD 4-2-6 BC [4]26/101 5-6-3 BC26/104 5-6-3 BC26/328 5-6-3 BC26/735 Tnk 4-3-6 BC 326/818 TD 3-2-6 BC [3]30/823 TD 3-2-6 H [3]3 Arm/CCA 9-7-6 H 3XII/182 S-(2)-1 BC5/10 6-6-3 BCTF Thrasher 1-2-3 FBr. 43/129 5-7-3 FGBr. 43/130 5-7-3 FGBr. 43/214 5-7-3 FGBr. 34 Tnk Bde 8-6-5 FG 3
Turn 14, 22PM75/289 5-6-3 G75/290 5-6-3 G75/291 5-6-3 G75/629 TD 3-2-6 G [3]75/750 Tnk 4-3-6 G 3Br. 53/71 5-7-3 FGBr. 53/158 5-7-3 FGBr. 53/160 5-7-3 FG
Turn 15, 23AM2 Arm/CCA 10-7-6 G 32 Arm/CCB 10-7-6 G 32 Arm/CCR 10-7-6 G 32 Arm/702 TD 4-2-6 G [4]2 Arm/66/3 2-2-6 G 26 Cav/28 3-2-7 BC [1]6 Cav/6 3-2-7 BC [1]4 Cav/4 3-2-7 G [1]4 Cav/24 3-2-7 G [1]
ALLIED REINFORCEMENT SCHEDULE
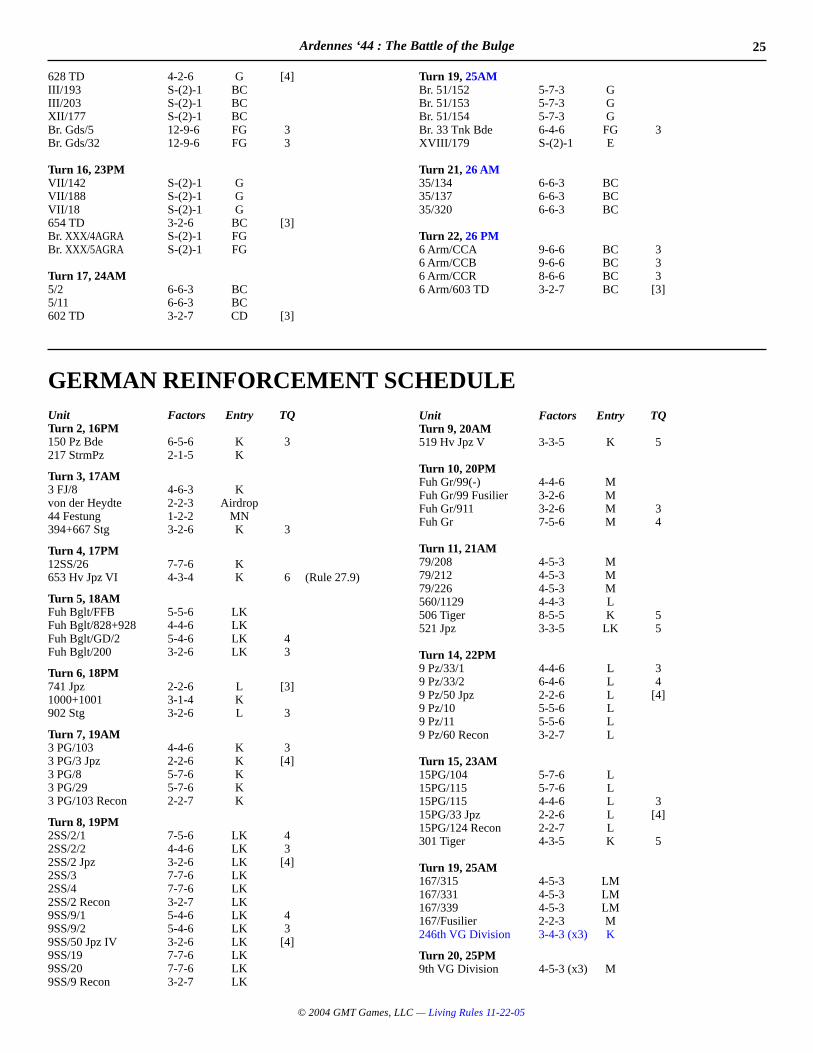
25Ardennes ‘44 : The Battle of the Bulge
© 2004 GMT Games, LLC — Living Rules 11-22-05
628 TD 4-2-6 G [4]III/193 S-(2)-1 BCIII/203 S-(2)-1 BCXII/177 S-(2)-1 BCBr. Gds/5 12-9-6 FG 3Br. Gds/32 12-9-6 FG 3
Turn 16, 23PMVII/142 S-(2)-1 GVII/188 S-(2)-1 GVII/18 S-(2)-1 G654 TD 3-2-6 BC [3]Br. XXX/4AGRA S-(2)-1 FGBr. XXX/5AGRA S-(2)-1 FG
Turn 17, 24AM5/2 6-6-3 BC5/11 6-6-3 BC602 TD 3-2-7 CD [3]
Turn 19, 25AMBr. 51/152 5-7-3 GBr. 51/153 5-7-3 GBr. 51/154 5-7-3 GBr. 33 Tnk Bde 6-4-6 FG 3XVIII/179 S-(2)-1 E
Turn 21, 26 AM35/134 6-6-3 BC35/137 6-6-3 BC35/320 6-6-3 BC
Turn 22, 26 PM6 Arm/CCA 9-6-6 BC 36 Arm/CCB 9-6-6 BC 36 Arm/CCR 8-6-6 BC 36 Arm/603 TD 3-2-7 BC [3]
Unit Factors Entry TQTurn 2, 16PM150 Pz Bde 6-5-6 K 3217 StrmPz 2-1-5 K
Turn 3, 17AM3 FJ/8 4-6-3 Kvon der Heydte 2-2-3 Airdrop44 Festung 1-2-2 MN394+667 Stg 3-2-6 K 3
Turn 4, 17PM12SS/26 7-7-6 K653 Hv Jpz VI 4-3-4 K 6 (Rule 27.9)
Turn 5, 18AMFuh Bglt/FFB 5-5-6 LKFuh Bglt/828+928 4-4-6 LKFuh Bglt/GD/2 5-4-6 LK 4Fuh Bglt/200 3-2-6 LK 3
Turn 6, 18PM741 Jpz 2-2-6 L [3]1000+1001 3-1-4 K902 Stg 3-2-6 L 3
Turn 7, 19AM3 PG/103 4-4-6 K 33 PG/3 Jpz 2-2-6 K [4]3 PG/8 5-7-6 K3 PG/29 5-7-6 K3 PG/103 Recon 2-2-7 K
Turn 8, 19PM2SS/2/1 7-5-6 LK 42SS/2/2 4-4-6 LK 32SS/2 Jpz 3-2-6 LK [4]2SS/3 7-7-6 LK2SS/4 7-7-6 LK2SS/2 Recon 3-2-7 LK9SS/9/1 5-4-6 LK 49SS/9/2 5-4-6 LK 39SS/50 Jpz IV 3-2-6 LK [4]9SS/19 7-7-6 LK9SS/20 7-7-6 LK9SS/9 Recon 3-2-7 LK
Unit Factors Entry TQTurn 9, 20AM519 Hv Jpz V 3-3-5 K 5
Turn 10, 20PMFuh Gr/99(-) 4-4-6 MFuh Gr/99 Fusilier 3-2-6 MFuh Gr/911 3-2-6 M 3Fuh Gr 7-5-6 M 4
Turn 11, 21AM79/208 4-5-3 M79/212 4-5-3 M79/226 4-5-3 M560/1129 4-4-3 L506 Tiger 8-5-5 K 5521 Jpz 3-3-5 LK 5
Turn 14, 22PM9 Pz/33/1 4-4-6 L 39 Pz/33/2 6-4-6 L 49 Pz/50 Jpz 2-2-6 L [4]9 Pz/10 5-5-6 L9 Pz/11 5-5-6 L9 Pz/60 Recon 3-2-7 L
Turn 15, 23AM15PG/104 5-7-6 L15PG/115 5-7-6 L15PG/115 4-4-6 L 315PG/33 Jpz 2-2-6 L [4]15PG/124 Recon 2-2-7 L301 Tiger 4-3-5 K 5
Turn 19, 25AM167/315 4-5-3 LM167/331 4-5-3 LM167/339 4-5-3 LM167/Fusilier 2-2-3 M246th VG Division 3-4-3 (x3) K
Turn 20, 25PM9th VG Division 4-5-3 (x3) M
GERMAN REINFORCEMENT SCHEDULE

26 Ardennes ‘44 : The Battle of the Bulge
© 2004 GMT Games, LLC — Living Rules 11-22-05
INDEXAdvance: 19.0Allied Attacks onto the Map: 13.5Allied Air Support: 15.6Allied Units Special Rules
British Units: 27.32nd Division: 27.6106th Division: 27.7
Army Boundaries: 11.10Artillery
Movement and Combat: 22.1–22.9Ammo Supply: 5.0See 22.10 for a summary of other artillery effects.
Attacker’s Advantage Markers: 16.6Bonus Advance: 19.1Breakdown Units: 26.0Breakthrough Combat: 19.4Bridges: 7.0Combat Modifiers: 15.0Combat Results: 16.0Command and Control: 14.3Dasburg Bridge: 7.10DCBs: 15.1Determined Defense: 16.7Disengagement: 20.0Disruption/Disrupted: 18.0Echternach: 29.2Engaged Markers: 16.5Engineer Reinforcements: 13.2Entry Hexes: 13.1, 13.4Exiting the Map: 11.9Extended Movement: 11.2EZOC:
Effects on Movement: 9.2Effects on Advance: 19.3Effects on Retreat: 17.1 & 17.2Effects on Supply Paths: 23.3
Forest Hexes: 11.5, 15.4, 17.2, 19.2Forest Roads: 11.7, 19.1Frozen Ground Conditions: 28.1Fuel Dumps: 32.0Fuel Shortage Phase: 6.0Gemünd Bridge: 7.10German Divisional Boundaries: 29.3German Prime Movers: 22.1, 22.3German Units Special Rules
150 Panzer Brigade: 27.1Sturmtigers and Brummbärs: 27.426th VG Division: 3.4Kampfgruppe Peiper: 27.5von der Heydte: 27.2
Ground Freeze: 28.1Improved Positions: 15.8Isolation/Isolated: 23.6Jabos: 15.6Large Units: 16.4, 25.24
Meuse River: 17.2 (retreats)Morale
Morale and Determined Defense: 16.7Morale and Disengagements: 20.2Morale and Fire Fights: 16.2Morale and Surrender: 23.8
Mud: 28.1Night Turns: 25.1, 25.3Ouren Bridge: 7.8Overcast: 28.2Rally Phase: 18.4Range: 22.4Recon Units: 21.4, 21.5Rivers:
Advance: 19.2Combat Across: 15.3Movement Across: 11.4Retreat: 17.2
Reinforcements: 13.1Remnants: 16.4, 25.24Replacements: 25.2Retreats: 17.0Roadblocks: 24.8Road Movement: 11.7Roer River Dams: 27.6St-Vith Bottleneck Hexes: 24.7Stacking: 8.0Step Losses: 16.3, 16.4Strategic Movement: 12.0Strategic Surprise: 29.4Sturmtigers: 27.4Supply:
Supply Phase: 23.1Supply Sources: 23.2Supply Paths: 23.3
Surrender Checks: 23.7Surrender Thresholds: 23.8T.O.T. (Time on Target): 22.8TQ Ratings: 21.1 (Combat), 23.4 (supply)Tactical Movement: 11.3Tank Destroyers: 21.2Tank Units: 21.0Traffic Markers: 24.0Truck Markers: 12.6Von der Heydte: 27.2Weather: 28.0West of the Ourthe River: 6.5Wooded Rough:
Advances: 19.2Combat: 15.5Movement: 11.6Retreats: 17.2ZOCs: 9.4ZOC Bonds: 10.3
INDEX
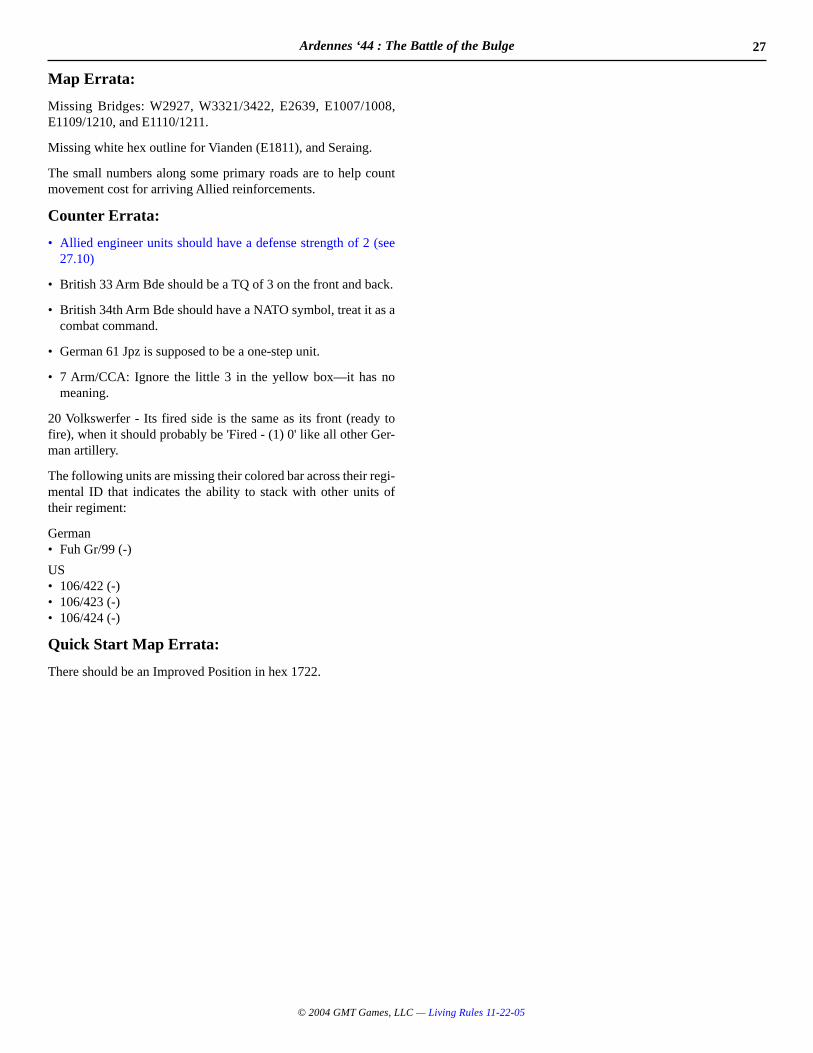
27Ardennes ‘44 : The Battle of the Bulge
© 2004 GMT Games, LLC — Living Rules 11-22-05
Map Errata:
Missing Bridges: W2927, W3321/3422, E2639, E1007/1008,E1109/1210, and E1110/1211.
Missing white hex outline for Vianden (E1811), and Seraing.
The small numbers along some primary roads are to help countmovement cost for arriving Allied reinforcements.
Counter Errata:
• Allied engineer units should have a defense strength of 2 (see27.10)
• British 33 Arm Bde should be a TQ of 3 on the front and back.
• British 34th Arm Bde should have a NATO symbol, treat it as acombat command.
• German 61 Jpz is supposed to be a one-step unit.
• 7 Arm/CCA: Ignore the little 3 in the yellow box—it has nomeaning.
20 Volkswerfer - Its fired side is the same as its front (ready tofire), when it should probably be 'Fired - (1) 0' like all other Ger-man artillery.
The following units are missing their colored bar across their regi-mental ID that indicates the ability to stack with other units oftheir regiment:
German• Fuh Gr/99 (-)
US• 106/422 (-)• 106/423 (-)• 106/424 (-)
Quick Start Map Errata:
There should be an Improved Position in hex 1722.
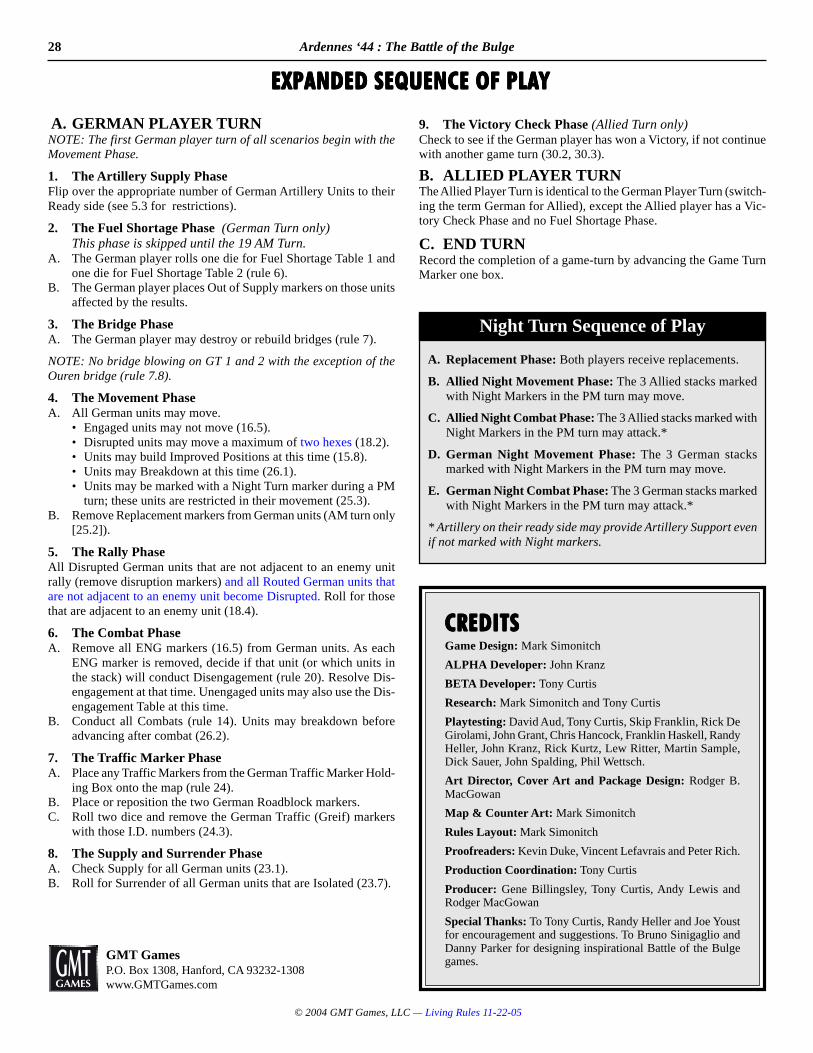
28 Ardennes ‘44 : The Battle of the Bulge
© 2004 GMT Games, LLC — Living Rules 11-22-05
A. GERMAN PLAYER TURNNOTE: The first German player turn of all scenarios begin with theMovement Phase.
1. The Artillery Supply PhaseFlip over the appropriate number of German Artillery Units to theirReady side (see 5.3 for restrictions).
2. The Fuel Shortage Phase (German Turn only)This phase is skipped until the 19 AM Turn.
A. The German player rolls one die for Fuel Shortage Table 1 andone die for Fuel Shortage Table 2 (rule 6).
B. The German player places Out of Supply markers on those unitsaffected by the results.
3. The Bridge PhaseA. The German player may destroy or rebuild bridges (rule 7).
NOTE: No bridge blowing on GT 1 and 2 with the exception of theOuren bridge (rule 7.8).
4. The Movement PhaseA. All German units may move.
• Engaged units may not move (16.5).• Disrupted units may move a maximum of two hexes (18.2).• Units may build Improved Positions at this time (15.8).• Units may Breakdown at this time (26.1).• Units may be marked with a Night Turn marker during a PM
turn; these units are restricted in their movement (25.3).B. Remove Replacement markers from German units (AM turn only
[25.2]).
5. The Rally PhaseAll Disrupted German units that are not adjacent to an enemy unitrally (remove disruption markers) and all Routed German units thatare not adjacent to an enemy unit become Disrupted. Roll for thosethat are adjacent to an enemy unit (18.4).
6. The Combat PhaseA. Remove all ENG markers (16.5) from German units. As each
ENG marker is removed, decide if that unit (or which units inthe stack) will conduct Disengagement (rule 20). Resolve Dis-engagement at that time. Unengaged units may also use the Dis-engagement Table at this time.
B. Conduct all Combats (rule 14). Units may breakdown beforeadvancing after combat (26.2).
7. The Traffic Marker PhaseA. Place any Traffic Markers from the German Traffic Marker Hold-
ing Box onto the map (rule 24).B. Place or reposition the two German Roadblock markers.C. Roll two dice and remove the German Traffic (Greif) markers
with those I.D. numbers (24.3).
8. The Supply and Surrender PhaseA. Check Supply for all German units (23.1).B. Roll for Surrender of all German units that are Isolated (23.7).
EXPANDED SEQUENCE OF PLAY EXPANDED SEQUENCE OF PLAY EXPANDED SEQUENCE OF PLAY EXPANDED SEQUENCE OF PLAY EXPANDED SEQUENCE OF PLAY
9. The Victory Check Phase (Allied Turn only)Check to see if the German player has won a Victory, if not continuewith another game turn (30.2, 30.3).
B. ALLIED PLAYER TURNThe Allied Player Turn is identical to the German Player Turn (switch-ing the term German for Allied), except the Allied player has a Vic-tory Check Phase and no Fuel Shortage Phase.
C. END TURNRecord the completion of a game-turn by advancing the Game TurnMarker one box.
CREDITSCREDITSCREDITSCREDITSCREDITSGame Design: Mark Simonitch
ALPHA Developer: John Kranz
BETA Developer: Tony Curtis
Research: Mark Simonitch and Tony Curtis
Playtesting: David Aud, Tony Curtis, Skip Franklin, Rick DeGirolami, John Grant, Chris Hancock, Franklin Haskell, RandyHeller, John Kranz, Rick Kurtz, Lew Ritter, Martin Sample,Dick Sauer, John Spalding, Phil Wettsch.
Art Director, Cover Art and Package Design: Rodger B.MacGowan
Map & Counter Art: Mark Simonitch
Rules Layout: Mark Simonitch
Proofreaders: Kevin Duke, Vincent Lefavrais and Peter Rich.
Production Coordination: Tony Curtis
Producer: Gene Billingsley, Tony Curtis, Andy Lewis andRodger MacGowan
Special Thanks: To Tony Curtis, Randy Heller and Joe Youstfor encouragement and suggestions. To Bruno Sinigaglio andDanny Parker for designing inspirational Battle of the Bulgegames.
A. Replacement Phase: Both players receive replacements.
B. Allied Night Movement Phase: The 3 Allied stacks markedwith Night Markers in the PM turn may move.
C. Allied Night Combat Phase: The 3 Allied stacks marked withNight Markers in the PM turn may attack.*
D. German Night Movement Phase: The 3 German stacksmarked with Night Markers in the PM turn may move.
E. German Night Combat Phase: The 3 German stacks markedwith Night Markers in the PM turn may attack.*
* Artillery on their ready side may provide Artillery Support evenif not marked with Night markers.
Night Turn Sequence of Play
GMT GamesP.O. Box 1308, Hanford, CA 93232-1308www.GMTGames.com