Embed Size (px)
Citation preview

© Copyright 2015. All Rights Reserved. This manual contains material protected under International and
United States Federal Copyright Laws and Treaties. No part of this publication may be reproduced in any form or by any means, electronic, mechanical, scanning, photocopying, or otherwise without prior written permission of the copyright holder.
The author and publisher of this manual and the accompanying materials have used their best efforts in preparing this material. Considering they have no idea how you’ll actually implement this content, the author and publisher shall in no event be held liable for any loss or other damages. This information should not be considered a source of legal, accounting or other professional services.

Table of Contents
Step 1: Know Why Pruning is Critical for Healthy Plants ............. 4
Step 2: How to Select the Right Pruning Tools .................................. 8
Step 3: Learn the Best Time to Prune Your Plants ........................ 12
Step 4: Simple Pruning Techniques for Indoor Plants ................ 15
Step 5: Basic Pruning Methods for Outdoor Plants ...................... 19
Step 6: Essential Post-Pruning Plant Care ........................................ 23
Step 7: Avoid Common Pruning Mistakes ........................................ 26
Maintenance Instructions for Your Shears ...................................... 29
4
Step 1: Know Why Pruning is Critical for Healthy Plants
Lots of people love to fill their yard with lovely
ornamental plants. In the beginning, the landscaping looks
amazing. It enhances the property’s assets and hides some
of the flaws. What frustrates many homeowners is that the
effect never seems to last. After a few years, the outdoor
plants start to look ragged, and some will start to die. Since
most homeowners have been good about watering and
fertilizing their ornamental bushes and trees, they cannot
understand why the plants fail to thrive.
More often than not, the problem has to do with the fact
that the outdoor plants haven’t been properly pruned. Most
people assume that the only reason they need to prune the
plants they’ve used to landscape their property is to
maintain the plant’s shape. Horticulture experts know better.
They have learned that good pruning is an important part of
keeping all plants healthy.
Pruning Encourages the Growth of Roots
If a tree was started as a seed in your yard, it likely has
a very healthy root system. However any trees that you
purchased and incorporated into your landscaping project
will be a different story. No matter how careful you are, the
young tree will have experienced some root damage. Since
some ornamental trees have been moved three or four times
before making their way to your home, the damage could
be significant.
5
Oddly, the best way to convince the newly transplanted
tree to generate more roots will be to get out your pruning
shears. Ideally, the amount you prune from the top of the
tree should match the amount of root loss.
Pruning Conserves Energy
The larger an ornamental tree gets, the more energy it
has to devote to its continued growth. This leaves it more
susceptible to insect infestations and diseases. Regularly
pruning trees and rose bushes makes it easier for the plants
to maintain optimum health. If you have fruit trees in your
yard, the amount of energy they conserve after you have
pruned them back goes into the fruit they produce, resulting
in a bountiful harvest.
Pruning Prevents Disease from Spreading
Plants are not all that different from people. If you get
an infection in your hand, and it goes untreated, it can
spread to the rest of your body. The same can happen to
your yard plants. Every few months you want to carefully
inspect each of the plants you have used to landscape your
yard. If you see signs that one section of the tree or bush
does not look healthy, you need to get out your pruning
shears and remove that particular section. Do not worry
about what the final results will look like; your first priority
has to be removing the sick section before it can spread to
the rest of the plant. Not only will pruning the section help
save the life of that particular plant, but it also prevents the
disease from spreading to your other outdoor plants.
6
Pruning Keeps Trees Strong
When ornamental trees are left to their own devices,
they can split into two, resulting in crotches and multiple
branches. While this creates some interesting looks and can
even make for some great tree climbing experiences, the
splitting of the trunk and limbs weakens the tree, increasing
the chances of the tree getting severely damaged during
wind storms or heavy snowfall.
Pruning Keeps Your Yard Safe
Pruning is not just good for the health of your yard
plants; it is also good for your health. Not only will the
time outside be good for your mental health since you will
find it relaxing, but by pruning the branches that have
started to grow too long, you decrease the chances of them
snapping and potentially falling on you or one of your pets.
The more diligent you are about pruning, the safer your
yard will be.
Your Plants Will be Rejuvenated
If a great deal of time has passed since the last time
your plants were pruned, you might notice that they seem
to be tired. The color of their leaves is not as deeply green
as it was a few years ago, and the blooms are not as
plentiful or big. Pruning your plant will give it a fresh lease
on life. It will be completely rejuvenated. Some people opt
to prune the plant to about half its current size when they
want to rejuvenate it, while others will prune it even shorter,
basically starting all over again from scratch.

7
The best time to prune your trees and other lawn plants
is in the late fall, after the leaves have fallen.
8
Step 2: How to Select the Right Pruning Tools
You already know that regularly pruning your yard and
houseplants is an important part of keeping them looking
great and is also critical for maintaining their health. In
order to get the job done properly, you need to have the
right tools.
Hand Pruners
Hand pruners allow you to do more delicate work than
you can accomplish with a pair of large pruning shears. The
pruners let you get in and nip small branches and to clean
up the shape of the plant. Make sure they feel comfortable
in your hand. You want a pair that is easy to handle. The
best hand pruners will have coated steel blades and the
handles will be padded.
Hedge Shears
No pruning kit can be considered complete until you
have added a good quality pair of hedge shears. You are
going to use these shears for the big jobs. They are perfect
when you need to remove a significant amount of a plant,
such as a rose bush that needs to be rejuvenated. They work
best when used on plants that have thin to medium width
branches. Landscapers love to use hedge shears when they
have to sculpt evergreen bushes or are working with young
fruit trees.
9
Loppers with Long Handles
It can take some time to get used to using long handled
loppers, but once you are comfortable with them, you are
going to love them. They allow you to remove branches
and vines that are overhead without you having to get out a
ladder. They work especially well on fruit trees.
Where to Find Pruning Tools
When it comes to purchasing your set of pruning tools,
you have several different places you can choose from…
Online Stores
The online stores, like Amazon.com, often have the
best prices, but you will not be able to handle the tools
before making a purchase. Make sure you read the online
reviews from other customers or, at the very least, make
sure the product or store has a great guarantee (like
Zavaland’s Ironclad Lifetime Satisfaction Guarantee).
When considering getting your tools from an online retailer,
remember to calculate the cost of shipping into the
purchase price.
Local Garden Supply Stores
Garden supply stores usually have a great selection of
pruning tools, but they can also be a bit pricy. They are a
great place to go if you want to learn how well a particular
brand fits your hand, or you have questions about how a
10
tool works. However, in the end, most people use an online
retailer for the purchase.
Estate Sales
If someone in your area has a beautiful yard and garden
and announces that they are going to be hosting an estate
sale, it is in your best interest to go. Chances are pretty
good that you will find some beautiful pruning tools for a
great price.
Consider Your Pruning Tools an Investment
While you do not have to spend a small fortune on your
pruning tools, you also do not want to scrape by with the
cheapest set of tools you can find. Remember that your
tools preserve the health of your plants and help maintain
your property’s beauty. When you purchase your first set of
pruning tools you need to think of them as a long term
investment.
Care for the Pruning Tools Properly
As long as you are willing to take the time needed to
care for the tools properly, they will last you for several
decades. You might even be able to pass them onto your
children someday.
Make sure you never leave the tools outside, not even
for one night. Leaving the tools lying around invites kids to
play with them, which could result in serious injury.
Another problem with leaving the tools outside is that
exposure to the elements can cause them to rust.

11
If the shears do not open and close easily, you should
not try forcing them to work properly, as that increases the
chances of breaking the tool. What you need to do is oil the
hinges and pins. After a minute or two, the tool should
work just as easily as it did when you first bought it.
Keep your tools in good condition. Most garden shops
and local plant nurseries will be happy to make any repairs
you need, or to sharpen blades that get dull. You can also
get many of these repair tools online, at sites like
Amazon.com. This type of work can add several years of
life to each of your pruning tools.
12
Step 3: Learn the Best Time to Prune Your Plants
Just before the cold weather sets in and everything is
still growing, you are going to want to walk through your
yard and take note of the condition of your plants. Assess
which ones did well, which ones did not seem as vibrant as
they used to be, and which ones seem to be really
struggling. You also need to make note of any signs of
insect infestation or disease that could be compromising the
health of your plants. When you decide to prune your
plants, the notes you take will help you create a plan of
attack.
When is the Best Time to Prune?
The best time to prune has always been a matter of
debate. Most people say that the ideal time to prune is late
in the winter/early spring when the plants are not quite
ready to come out of their dormant stage. While this is
good advice, it can also be tricky. The weather the past few
years has been funny, with springtime temperatures
catching everyone by surprise and causing the plants to
burst from their dormant phase several weeks sooner than
anyone anticipated. Once they leave the dormant phase,
they generally should not be pruned.
If you are confident that you will be able to get your
plants pruned before the sap starts to flow, then by all
means, you should hold off until the late winter. But if you
are worried, you should take note of the commercial fruit
orchards and start your pruning in November. Your yard
plants will still be in a dormant state and you’ll be able to
13
relax and do a good job of pruning instead of trying to rush
through the process.
Also, if you have any intention of grafting any of your
yard plants together, you will have to put off your pruning
until the late winter or else you will have a difficult time
getting the graft to take.
One Summertime Exception
Even though you should not plan on a complete pruning
session during the spring and summer when your plants are
producing sap, there are some exceptions. If you have had a
storm and a branch has gotten damaged, it is in your best
interest to get your long handled lopper out and remove it
right way. You will want to trim it just behind the broken
part. Cut in one smooth, sharp stroke. The cut will provide
a bit of seal, decreasing the amount of sap the tree loses.
More importantly, by removing the broken branch
yourself, you do not have to worry about it breaking loose
and striking a human or pet walking beneath the tree. Nor
will you have to worry about it doing additional damage to
your ornamental tree.
What Should You Prune
By this point, you should have a pretty good idea of
what you want your yard to look like. Get out your pruning
shears and give yourself plenty of time to carefully shape
your trees, shrubs, and bushes. This will be a gradual
process with you taking a step back to survey your work
every few snips.
14
If you noticed any plants that showed signs of stress
during the fall, you will want to remove the part that was
struggling. Even though removing a major limb might not
create the look you seek, it is an important step that will
help keep your tree healthy.
Most landscaping artists suggest setting up an afternoon
where you focus on pruning the dead or sick parts from the
plants before you start to shape the plants.
Take a Class
Pruning, especially if you are trying to create specific
shapes, is an art. You should not expect to grab a pair of
hedge trimmers and immediately create the look you seek.
There is going to be a great deal of trial and error in the
beginning, which is why you should probably use the
bushes located in your backyard to practice. Consider
taking a master gardener class where you will get great tips
about how to properly care for the plants you have on your
property.
What to Do if You Notice a Problem
If one of your yard plants has been impacted by insects
or seems to have developed a disease, you do not want to
ignore the situation. You want to get the problem diagnosed
by a professional and then take the steps needed to keep the
problem away from the rest of your yard’s plants. The best
people to consult in this situation are professional
horticulturists or cooperative extension agents.
15
Step 4: Simple Pruning Techniques for Indoor Plants
Houseplants are a great way to make the interior of
your home just a little cozier, plus they help ensure that you
have plenty of fresh air to breathe. Do not, however, fool
yourself into thinking that as long as your houseplants get
plenty of water and sunlight that they will remain healthy
and happy.
Indoor plants, just like the ones you use to landscape
your yard, occasionally need to be pruned in order to stay
healthy.
Keep the Plant from Getting Too Big
Let’s face it: There is a limited amount of space in your
home. The last thing anyone needs is a houseplant that
grows and grows. By taking the time to regularly prune the
plant, you don’t have to worry about it taking over the
room. Keeping the visible part of the plant trimmed back to
a manageable size means that the roots will not outgrow the
pot, and you do not have to transfer the plant to a bigger pot
(a process that houseplants find very stressful).
When to Prune
Unlike outdoor plants, which have a dormant period, a
large portion of houseplants stay awake and healthy all year
long. This makes knowing the best time to prune your
houseplants tricky. Horticulture experts recommend
observing your houseplants and trying to identify the
periods of time when they do not seem in an active growth
16
phase. For example, a couple of weeks after the plant has
stopped blooming would be a great time to get out your
hand pruners and trim it back a little bit.
Keep Your Hand Pruners Sharp and Clean
Plants are made up of living tissue, and if bacteria get
into a cut in the tissue, the plant could develop a life-
threatening illness. While pruning, remember that fungus
can be just as deadly to houseplants as bacteria, so be on
the lookout.
One of the best ways to make sure you do not
accidently compromise the health of your houseplants after
they have been pruned is by paying careful attention to
your hand pruners. Keep the blades sharp, so that they seal
up the cut, decreasing the amount of time it takes the
houseplant to heal.
Whenever you have been working with a plant that
does not seem completely healthy, you need to sanitize
your hand pruners in order to avoid deadly cross-
contamination.
Certain Pruning Techniques Encourage Growth
If you want your houseplants to have a specific look,
you need to adjust your pruning style so that the plant
wants to grow. The simplest way to do this is by picking a
few stems that have dominant buds on them. After they
have been snipped, the stems will grow rapidly. Many
horticulture experts suggest snipping every other latent
stem so the entire plant grows. Once the plant has expanded,
you can go back and start to shape it.

17
Pruning Vines
Houseplant vines, like ivy, look stunning, but they can
quickly get out of control. With a little careful pruning, you
will be able to control the ivy’s growth and also train it to
grow in certain ways. It is in your best interest to remove
any side shoots the vine ends up developing and convince
the plant to focus all its energy on the main vine. You can
use popsicle sticks and a little bit of floss tied to the vine to
encourage it to grow up the support chain.
Watch for Dead Leaves
Each time you water your houseplants, give them a
careful inspection. Even though it might be a few months
before you have to prune them, if you spot any dead leaves
or buds that never bloomed, you should get a pair of hand
pruners and remove them from the plant. Do not pull the
leaves off, as pulling causes the plant to hemorrhage sap.
Don’t Overdo Things
It’s easy to get carried away while pruning houseplants.
The rule of thumb is that unless it’s a plant that basically
likes to start out from scratch each year, you shouldn’t
prune more than 25% of the plant. Over-pruning could kill
your houseplant or cause it to grow back in a deformed
manner

18
Check to Make Sure the House Plant Should Get
Pruned
Not all houseplants can handle being pruned, especially
on a regular basis. It is important to know the needs of your
particular plants, and thanks to Google, this is easier than
ever.
For instance, if you grow orchids, you should only
remove the dead flowers from the spikes. If you have added
a Norfolk pine or any miniature palm trees to your home,
avoid pruning them. The pruning could kill the plant.
19
Step 5: Basic Pruning Methods for Outdoor Plants
Having a good looking, beautifully landscaped yard
will take a great deal of commitment on your part. In
addition to mowing the lawn, pulling weeds out of the
flowerbeds, and raking leaves, you also have to take
responsibility for pruning your outdoor plants.
If you are not thrilled about the idea of getting out the
hedge clippers at least once a year and reshaping all of your
bushes, hedges, and ornamental trees, that is okay! You can
choose to landscape your property with trees and bushes
that do not need to be pruned. However, know your options
will be limited.
The good news is that there are some basic methods for
pruning outdoor plants that make it easy to keep your lawn
looking great and stocked with healthy plants. Pruning does
not need to be nearly as complicated as most think it is.
Get Your Equipment Ready for the Task
Pruning your outdoor plants will be an impossible task
if your pruning tools are dull. Before you start to prune
your plants, oil your shears and loppers so they open and
close smoothly. You may also take your pruning tools to a
garden supply store and make arrangements for them to
sharpen the blades (assuming you do not just want to
replace the blades, which is also a viable option).
20
Study Your Plants
The first step to pruning any outdoor plant will always
be removing the dead branches and twigs. Not only does
the dead matter look unattractive, but during storms, if the
dead matter snaps off in the wind, it could damage the rest
of the tree or hedge.
Once the dead matter has been removed, you need to
take a step back and really look at the plants. You need to
determine which branches are part of the central unit and
which are offshoots. You want to stay away from the
central branches as much as you possibly can and focus on
only trimming the offshoots.
Take Your Time and Study Your Work
Give yourself plenty of time to complete the project. It
is okay if it takes several days to get one bush trimmed.
Remember, every time you prune a bit of a bush or tree,
you should take a step back and really study the results.
Make sure that the shape being formed is exactly what you
want, and that you have not inadvertently created
something that is not visually pleasing.
If you do make a mistake and accidentally take too
much, don’t sweat it. Sure, you may have to live with an
oddly-shaped tree for a little while, but eventually it will
grow enough that you can correct the mistake. Plus, it is
quite possible that, as time passes, you will learn to love
your new shape.
Don’t Get too Aggressive with your Trimming
21
As you start pruning your plant, make sure you exercise
caution. As a rule of thumb, you should generally not take
more than 30% of the plant each time you prune. It should
be enough that you can control the growth, but not so much
that the plant cannot recover. If you take too much off
during one pruning session, it can overwhelm your plant
and ultimately cause it to die. As long as you prune
carefully and make small cuts, you should be fine.
Start at the Sides and Work Your Way Up
A common mistake many people make is starting at the
very top of the plants. More often than not, this results in a
strangely shaped plant. The best way to prune is by tackling
the sides and working your way upward. By doing this, you
can gradually taper the top, creating a pleasing looking tree
or shrub.
Crawl Under the Plant if Possible
When you crawl under the bush or shrub you are
pruning, it is likely that you will identify many little shoots
coming out of the base. These might look harmless, but if
you ignore them, you will quickly learn that they grow
aggressively. It is a great deal easier to take your hand
pruners and snip these shoots while they are still small and
easy to reach, and before they have an entire season to
grow.
Remember, the only time you should get out your
pruning tools after the sap has started to flow is if a part of
the tree or bush has gotten damaged or infected and needs

22
to be removed. Regular, maintenance-style pruning should
only be done during a plant’s dormant period.
23
Step 6: Essential Post-Pruning Plant Care
As you know by now, pruning is an essential part of
caring for your plants. The good news is that most plants
handle pruning well and do not need a great deal of special
post-pruning care, especially if you did not take more than
30% of the plant when you trimmed it. However, it is still
in your plant’s interest for you to pay attention and be on
the lookout for signs of stress.
What to Do If a House Plant Exhibits Post-Pruning
Trauma
Traditionally, houseplants have a harder time
recovering from pruning sessions than your outdoor plants
do. It is likely that the reason they struggle has to do with
the fact that they do not go into a dormant phase and have
to be pruned while their sap still flows. Give your
houseplants a great deal of “TLC” after you have pruned
them, as this encourages fast healing.
In addition to placing the plant in an area where it gets
direct sunlight and keeping the soil properly aerated and
watered, you need to make sure the plant is kept warm.
This will also be a good time to fertilize your plant. Within
a few weeks, your houseplant should be good as new.
One thing you should not do during this time is change
the pot you have your plant in. Plants can only handle so
much stress at once. Wait at least a month before you try to
do any transplanting.
24
Post-Pruning Care for Outdoor Plants
The good thing about outdoor plants is that they are
tough. Even plants that people typically think of as delicate,
like roses, can actually withstand a great deal. They can be
broken by falling trees and even ripped apart by the wind,
but will often will regenerate and carry on. Pruning usually
does not hurt them.
Even though it is likely your outdoor plants are tough,
that does not mean you should skip indulging them in a
little post-pruning care. The best thing you can do for your
outdoor plants is make sure they have the proper food to
start growing again once the weather gets warm. On the
first few warm days of spring, take the time to thoroughly
fertilize all of your outdoor plants. The added boost of
nutrition will be enough to get them over the lingering
trauma of being pruned.
Dealing with Bleeding
The biggest risk associated with pruning has always
been bleeding. This is a condition that can impact the
health of both indoor and outdoor plants. Just like when
you cut the tip of your finger and bleed, if a plant has an
unclosed wound, it also bleeds. The only difference is that
the plant oozes sap instead of actual blood.
A plant that is bleeding experiences the same potential
health problems you do from your sliced finger. Not only
are you losing energy that will eventually have to be
replaced, but the wound is the perfect place for bacteria to
get into the plant and compromise its overall health. The
oozing sap can also attract all sorts of insects that you
25
would rather not have on your property. As the owner of
the plant, you need to take steps to get the bleeding stopped.
For generations, horticulturists treated bleeding plants
with a binding process. The results were mixed. Sometimes
it worked, and other times they put the plant under so much
stress that it was unable to survive. Today, most
horticulturists try to let the plants heal themselves. They
have found that exposure to the open-air helps clot the sap,
which forms a natural bandage. If the bleeding continues,
pruning the site again and using a different angle or sharper
pair of pruning shears can sometimes close the wound and
stop the oozing sap.
Make note of any plants that had bleeding issues after
you pruned them. If the problem occurs after each pruning,
you may need to forgo pruning them and simply let them
grow wild and unchecked, or you will have to replace them
altogether.
If you are worried about post-pruning plant care, you
should make sure you avoid using plants that are
susceptible to pruning stress in your landscaping. Yard
plants that tend to be especially susceptible to bleeding
include birch trees, ornamental vines, and walnut trees.
When pruning any of these, you should be extra careful and
really watch the pruning sites once the sap starts to flow in
the springtime.
26
Step 7: Avoid Common Pruning Mistakes
When you first start taking care of the plants, you
should expect to make some mistakes. It is inevitable.
Pruning is an art, and it takes time to learn how to do it
properly. Do not feel bad if you notice your plants are not
quite the shape you wanted or when you accidently prune
too much off the bush. Everyone does these things; it is part
of the learning process. The good news is that there are
some mistakes that you can avoid altogether if you know
about them first.
Don’t Be Afraid of Pruning
Some people never prune their lawn plants because they
are afraid of making a mistake. Do not let this fear get the
better of you. Grab your pruning tools and start snipping at
your hedges! Once you start, you will find yourself relaxing
and beginning to enjoy yourself.
Don’t Focus Exclusively on the Top of the
Tree/Bushes
Have you ever driven past a house where every single
shrub and tree was short and incredibly fat? This effect is
created because the homeowner only pruned the very top of
everything, and hoped that it would be enough to keep the
growth in check. It is not.
Trees and bushes do not only grow upwards, they also
grow out, especially when they are in the middle of a nice
open yard. Instead of trimming off the top of your trees and
27
decorative shrubs, you need to start near the bottom and
work your way around the sides. The top should be the last
thing you prune.
Don’t Start in Your Front Yard
It is one thing for you to know you may make mistakes
the first time you try to prune your plants, but that does not
mean your neighbors and every passerby need to know
about them. When it comes to pruning, start in the backyard
where you have a little more privacy and won’t have to
worry about the fact that you took a little too much of the
crabapple tree or that the shrubs seem to list to one side. By
the time you’re done pruning in the backyard, you will
have steadier hands and a more practiced eye. Then you are
ready to take on the trees, hedges, and rose bushes planted
in the front yard.
Only Focusing on the Tips of the Branches
Fear of making a mistake or taking too much off the
plant can drive you to only removing an inch or two from
the end of each branch. By just taking the tips, you are
actually encouraging the plant to accelerate its growth. If
you remove just an inch or two of branch, the plant usually
responds by growing more than you removed. Remember,
as long as you do not take more than 30% of the plant’s
total mass, you are free to get in and really cut off a
significant portion of the branch. Even if you make a
mistake, usually the plant will grow out enough that you
can correct it.

28
Deal with Offshoots Right Away
When you look at the base of your ornamental trees,
you might be surprised to see some small leafy branches
growing from the trunk. Most people think these will be
harmless and ignore them. Don’t. Remember, the offshoots
grow fast and pruning them back the next year will be more
difficult. It is best to remove them from the trees while you
are pruning the branches.
Don’t Cut Off the Long Conifer Branches and
Consider the Tree Pruned
Unlike hardwood trees, which will sometimes
regenerate their branches, once a conifer branch has been
trimmed, it does not regrow. The entire branch dies. When
you need to remove one of the long branches from a conifer
because the tree has gotten too large, you need to make sure
you prune the limb right next to the tree’s trunk.
Don’t Be Afraid to Ask for Help
There are lots of ways that you can learn how to
properly prune all of the plants in your yard and house. You
just have to know where to look. The Internet and YouTube
have all types of videos and advice about how different
types of plants should be pruned.
When you speak to your horticulture suppliers, they can
provide you with information about the best pruning tools
and strategies for your situation. Even your next door
neighbor might have some advice and tips you find helpful.
Get in there and get started!
29
Maintenance Instructions for Your Shears
Maintaining your pruning shears is easy. As long as you
give them the proper care, they’ll be around for a long time.
Remember, your shears are for flowers, bushes and
small branches (the shears are rated to 20mm). Cutting
stones or other hard objects will damage your shears…and
risk injury to you.
Also, the steel blades have excellent anti-rush
properties, but we still recommend that you keep your
shears away from fire, water and other corrosive substances.
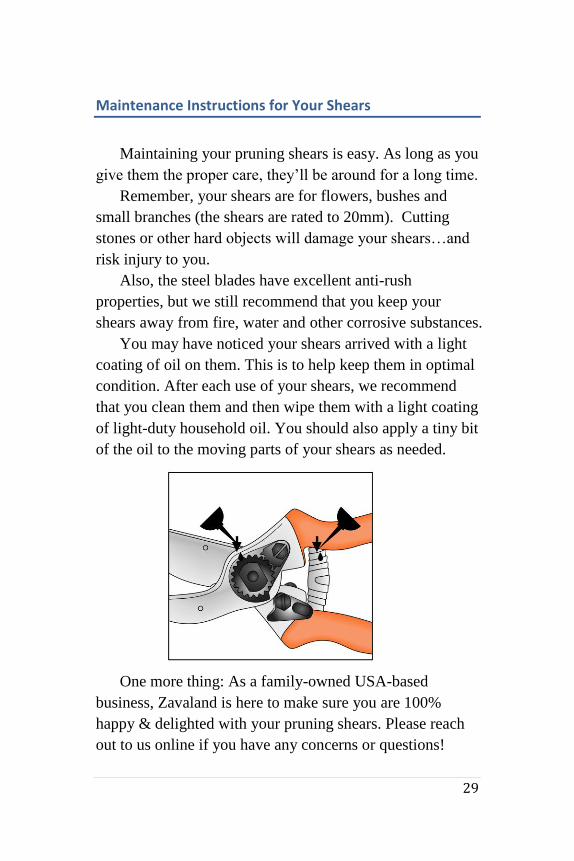
You may have noticed your shears arrived with a light
coating of oil on them. This is to help keep them in optimal
condition. After each use of your shears, we recommend
that you clean them and then wipe them with a light coating
of light-duty household oil. You should also apply a tiny bit
of the oil to the moving parts of your shears as needed.
One more thing: As a family-owned USA-based
business, Zavaland is here to make sure you are 100%
happy & delighted with your pruning shears. Please reach
out to us online if you have any concerns or questions!