Embed Size (px)
Citation preview

®
IBM Software Group
© 2006 IBM Corporation
Creating JSF/EGL Template Pages
This section describes how to create .JTPL (Java Template Pages) using the Page Designer software. And how to integrate with EGL Server-Side U.I. logic.

2Last update: 12/04/2007
Effective Web Site Design with JSF and EGL
The elements of effective Web Site Design include: .CSS file:.CSS file:
Covered earlier in this course, your shop’s .css will control all HTML text and color Website-Navigation:Website-Navigation:
Covered in the EGL Foundation course, you will create a site-map for your application that provides an architect’s view of the user page-navigation experience. Note that you also may use the SiteMap to manipulate page/template assignment – and for prototypes, to create live page-links.
Template pages:Template pages: You will create your own .JTPL and .HTPL pages from scratch
– Alternatively, you may want to start with the IBM template pages, just to learn some basic page design patterns

3Last update: 12/04/2007
What is a Template Page?
A template is a special web page that allows you to create a customized page framework, that can consist of:
.HTPL Template pages.HTPL Template pages- Static text- Static graphics- HTML controls and a consistent page layout (typically through HTML tables and DIV tags)
.JTPL Template pages.JTPL Template pages- All of the above +- Dynamic text and graphics – available through EGL and JSF components- JSF Components
Once created, you may use Template pages to provide your EGL/JSF project web pages with: A consistent look and feel Boilerplate onConstruction processing – (.JTPL pages only)
Let’s have a look at a project Web Page that uses a custom .JTPL page

4Last update: 12/04/2007
Our Target Web Page – with a Template Page
Can you spot all the JSF and EGL elements here?
5Last update: 12/04/2007
.JTPL Template Page Elements
HTML table 4 rows/3 columns
Top row: Static Graphic Static Text EGL variable
2nd row Static text Horizontal rule
3rd row An embedded
HTML table – 3 rows/1 column
A custom menu Static text White
background
4th row A boilerplate web
footer
Let’s follow the steps to build a custom template page like this!

6Last update: 12/04/2007
Create a New Custom .JTPL Template Page
From Project Explorer, right-click over \WebContent\ and select: New Web Page Template
Name the page template: myTemplatemyTemplate
Note – do note type the .jsp extension you use on a web page (this is a template)
Check Design-time Template
Click Finish
Note – you will get a warning to add a Content Area to the template. Which you will do, so just click OK to clear the warning and continue.

7Last update: 12/04/2007
Create the JSFHandler for the Custom Template
Right-click over the template page and select Edit Page Code… As you can see, you can add EGL to
template pages to perform dynamic processing
Add the two statements shown here, to the boilerplate JSFHandler code: Comments optional
Press Ctrl/S and close the JSFHandler (return to Page Designer)
8Last update: 12/04/2007
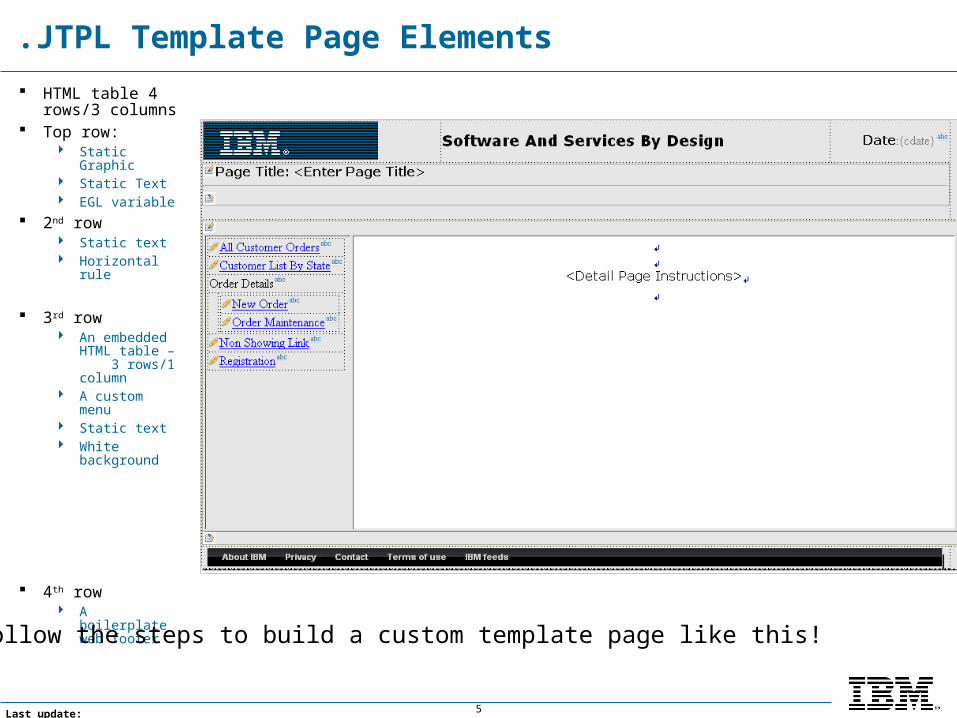
Create a New Custom .JTPL Template Page – Add the HTML Table
Your new template page will open in Page Designer, and you will get a warning to add a Content Area to the template. Content Areas are JSF tags that allow pages that use this template to add their own content (JSF components, EGL variables, etc.). All areas of a .JTPL outside of the Content Area will be “read-only” for pages that use the template.
Add a 4X3 HTML table
Width: 950 pixels

9Last update: 12/04/2007
Create a New Custom .JTPL Template Page – Customize the Top Row
In the top row of the HTML table (as shown below) add a: Static Graphic (from the \WebContent\images\ folder) – (see notes on the File property) Static text
Optionally customize the text size and font (we’re using Verdana) An Enhanced Faces Component – Output text Right-justify the right-hand cell

10Last update: 12/04/2007
Create a New Custom .JTPL Template Page – Customize the 2nd Row
In the second row of the HTML table (as shown below): Select all three cells. Right-click and from the Table menu, join the selected cells Make this new row’s vertical alignment top (from Properties) From the Page Template drawer in the Palette, add a Content area
Modify the default text in the Content Area, and with the Static text shown below Optionally customize the text size and font (we’re using Verdana)
Add a Horizontal Rule below the static text Delete any superfluous blank links

11Last update: 12/04/2007
Create a New Custom .JTPL Template Page – Customize the 3rd Row – 1 of 2
In the 3rd row of the HTML table (as shown below) do the following: Select all three cells. Right-click and from the Table menu, join the selected cells Make this new row’s alignment top (from Properties) From the Page Template drawer in the Palette, add another Content area to the 3rd row Inside the new Content Area add a 2nd HTML table: 1 row/2 columns, width: 100% In the right-hand column of the row, add the text and line breaks as shown The next slide details out how to build the vertical menu bar

12Last update: 12/04/2007
Create a New Custom .JTPL Template Page – Customize the 3rd Row – 2 of 2
In the left-hand column of the 3rd row: Align top, and add a new Menu Bar component.
From the menu’s Properties: The initial Orientation will be Horizontal. Select Vertical from the combo-box
From -Items Add 2 Output links. Then add a Sub-panel with two more output links (you will need to click on the new sub-panels area to access -
Items within the sub-panel). When you’ve added the sub-panel, reselect the outer items area. Add two more output links as shown in the screen capture Select the “Non Showing Link” – and go to Properties/All Attributes. Specify the render property. Bind its value
to the vis field in the JSFHandler (which will hide the Non Showing Link at run-time, when vis is false. Add one more option (see picture below)
Note: you can customize the links as shown – make up your own link labels, etc. The details are not as important as having a menu on the page (and doing the rendered link is useful)

13Last update: 12/04/2007
Create a New Custom .JTPL Template Page – Customize the Bottom Row
In the bottom row of the HTML table (as shown below): Select all three cells. Right-click and from the Table menu, join the selected cells From some web site ( we’ve used IBM’s www.ibm.com ) copy down a graphic to insert into
this new row. Note your \images\ folder may also have this graphic Optionally center the graphic in the row

14Last update: 12/04/2007
Customize the .JTPL Template Colors
Select the entire outer HTML table and specify: Border: 0, Color: #E7E7E7#E7E7E7
Select the middle cell in the inner table, and make it white

15Last update: 12/04/2007
Customize the .CSS Colors and Fonts
It’s usually a good idea to get all of your page’s fonts and colors in agreement. Optionally do the following: From \theme\ open stylesheet.css Scroll down to find .headerClass.headerClass Change the fonts and colors to line up with your .JTPL’s
#E7E7E7#E7E7E7 – background color VerdanaVerdana – font-family
Save your changes (Ctrl/SCtrl/S)

16Last update: 12/04/2007
Create a New Web Page using the Custom .JTPL Template
Create a new Web Page, selecting myTemplate.jtplmyTemplate.jtpl

17Last update: 12/04/2007
Create the JSFHandler for the Web Page
Right-click over the template page and select Edit Page Code…
Add the statements shown here, to the boilerplate JSFHandler code: Note: Add the customers variable declaration
– Press Ctrl/Shift/O – which resolves imports
Press Ctrl/S and close the JSFHandler (return to Page Designer)

18Last update: 12/04/2007
Add the customers dataTable
From Page Designer/Page Data – drag and drop customers onto the page. Create a read/only dataTable with only the first 5 columns Optionally add a JSF Link to the LastName field *** SEE ADDITIONAL INSTRUCTIONS IN THE NOTES ****** SEE ADDITIONAL INSTRUCTIONS IN THE NOTES ***
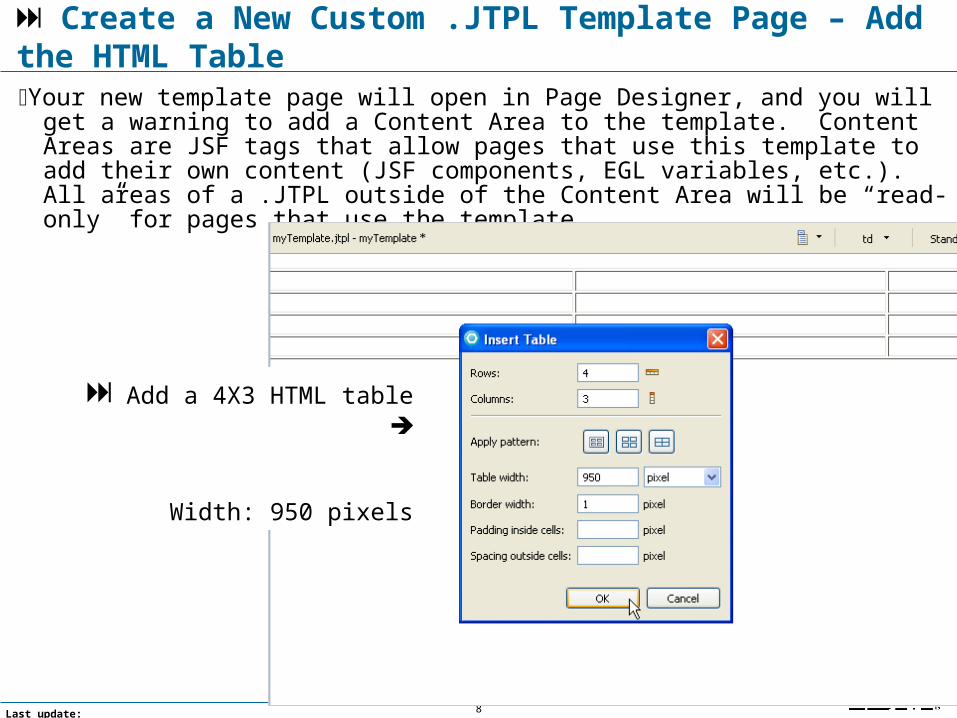
19Last update: 12/04/2007
Run the Page on the ServerNote that none of the links will work, unless you’ve entered URL properties…