Embed Size (px)
Citation preview
• MP 350
• MP 450
• MP 550
• MP 600
P.O. Box 16625, Jackson, MS 39236-6625 280 South Perkins St., Ridgeland, MS 39157
e-mail: [email protected] - website: www.robotcoupeusa.comPhone : 1-800-824-1646
WARNING: In order to limit accidents such as electric shocks, personal injury or fire, and in order to limit material damage due tomisuse of the appliance, please read these instructions carefully and follow them strictly. Reading the operating instructions willhelp you get to know your appliance and enable you to use the equipment correctly. The operation manual should be kept withineasy access to all users for reference and should be read completely by all first time users of the machine.
IMPORTANT WARNING
UNPACKING
• Carefully remove the equipment from the packagingand take out all the boxes or packets containing attachments or specific items.
WARNING- some parts are very sharp E.G. blade.Wear cut-resistant gloves when handling theblade.
STORAGE
• You are advised to install the wall support providedwith the machine and to store your machine on it.
POWER SUPPLY
• Always check that your power supply correspondsto that indicated on the serial number plate on themotor unit and that it can take the amperage.
SPECIFICATIONS
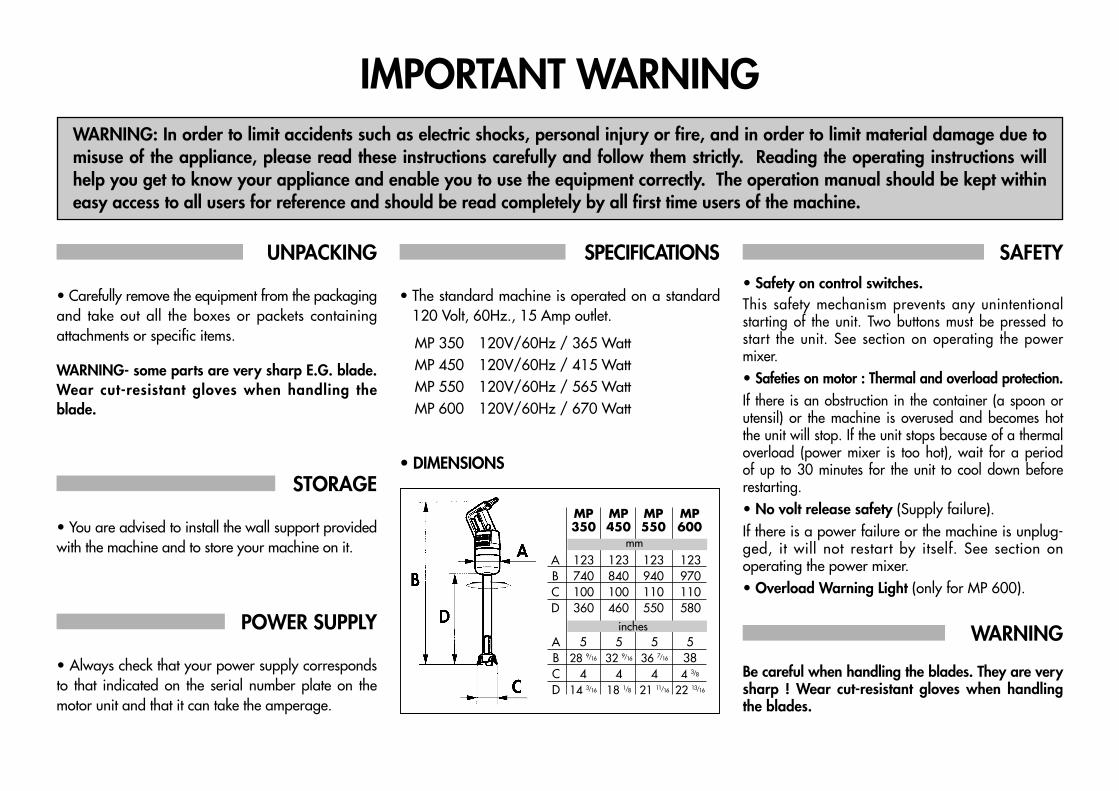
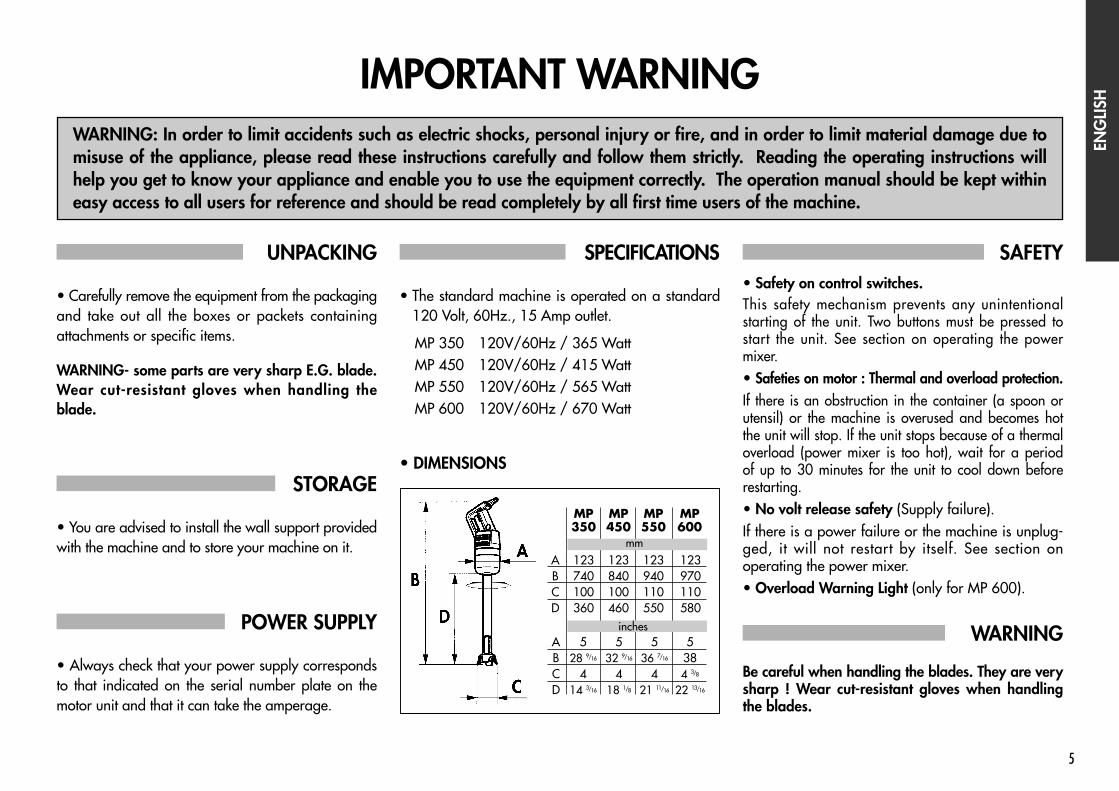
• The standard machine is operated on a standard120 Volt, 60Hz., 15 Amp outlet.
MP 350 120V/60Hz / 365 WattMP 450 120V/60Hz / 415 WattMP 550 120V/60Hz / 565 WattMP 600 120V/60Hz / 670 Watt
• DIMENSIONS
SAFETY• Safety on control switches. This safety mechanism prevents any unintentional starting of the unit. Two buttons must be pressed tostart the unit. See section on operating the powermixer.• Safeties on motor : Thermal and overload protection.If there is an obstruction in the container (a spoon orutensil) or the machine is overused and becomes hotthe unit will stop. If the unit stops because of a thermaloverload (power mixer is too hot), wait for a period of up to 30 minutes for the unit to cool down beforerestarting.• No volt release safety (Supply failure).If there is a power failure or the machine is unplug-ged, it will not restart by itself. See section on operating the power mixer.• Overload Warning Light (only for MP 600).
WARNING
Be careful when handling the blades. They are verysharp ! Wear cut-resistant gloves when handling the blades.
MP350
123740100360
ABCD
123840100460
123940110550
123970110580
MP450
MP550
MP600
528 9/16
414 3/16
ABCD
532 9/16
418 1/8
536 7/16
421 11/16
5384 3/8
22 13/16
inches
mm
1
ENG
LISH
FRA
NÇA
IS
OPERATING INSTRUCTIONS
MANUAL DE INSTRUCCIÓN
NOTICE D’INSTRUCTION
We reserve the right to alter at any time without notice the technical specifications of this appliance. © All rights reserved for all countries by: ROBOT-COUPE S.N.C.
Nos reservamos el derecho de modificar en todo momento y sin previo aviso las características técnicas de este aparato. © Todos los derechos para cada pais reservados por : ROBOT-COUPE S.N.C.
Nous nous réservons le droit de modifier à tout moment et sans préavis les caractéristiques techniques de cet appareil. © Tous droits réservés pour tous pays par : ROBOT-COUPE S.N.C.
ESPA
ÑO
L
3
ENG
LISHCONTENTS
WARRANTY
IMPORTANT WARNING• Unpacking• Storage• Power• Specifications• Dimensions• Safety • Warning
INTRODUCTION
USES
OPERATING THE POWER MIXER• Preparation• Operation• Continuous Operation
ASSEMBLY/DISASSEMBLY• Assembling the bell on the foot• Disassembling the bell from the foot• Disassembling the blade
CLEANING• Cleaning the motor housing• Cleaning the foot and bell• Blade• Splash guard• Aluminum• Plastic
MAINTENANCE• Blade• Foot Seal• Seal Ring
TROUBLE SHOOTING
WARNING
SERVICE
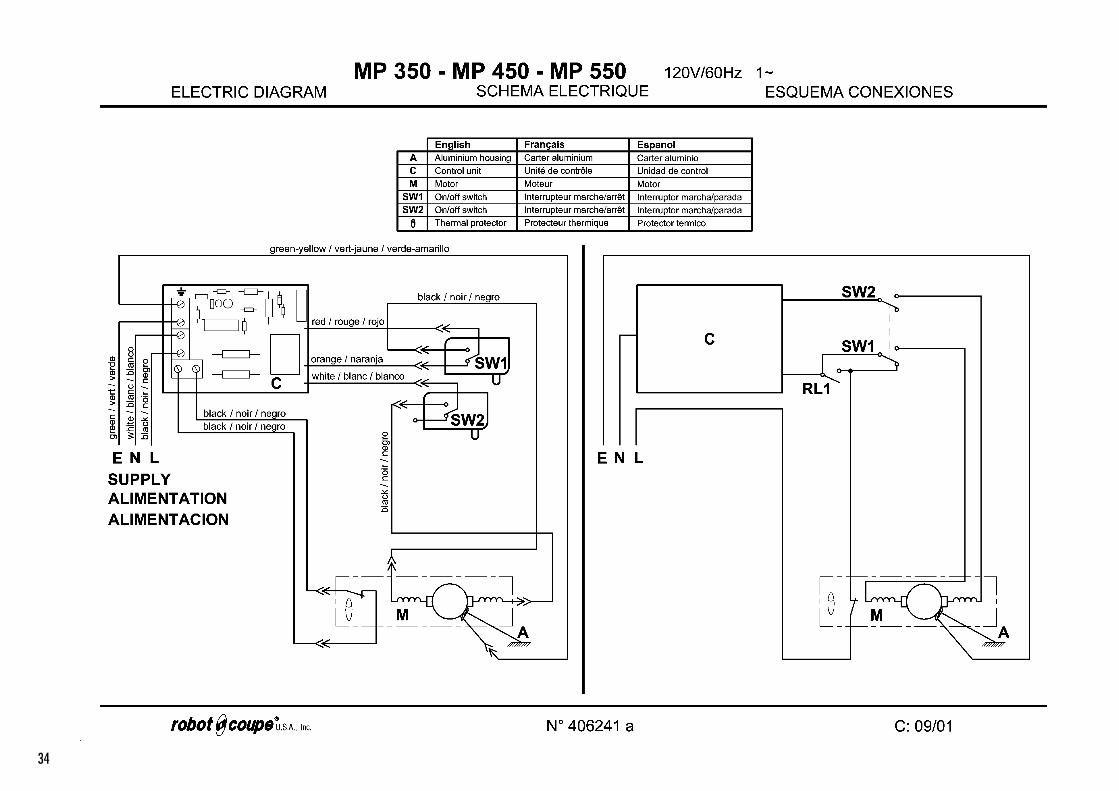
TECHNICAL DATA (page 25)• Exploded views• Electrical and wiring diagrams

4
ROBOT-COUPE U.S.A., INC. LIMITED WARRANTY
YOUR NEW ROBOT-COUPE PRODUCT ISWARRANTED TO THE ORIGINAL PURCHASERFOR A PERIOD OF ONE YEAR FROM THEDATE OF PURCHASE.
This LIMITED WARRANTY is against defects inthe material and/or workmanship, and includes labor for replacement of defectiveparts, provided repairs are performed by anauthorized service agency (see attached list).The CUSTOMER must inform the ServiceAgency of the possibility of warranty coverageand provide a copy of the dated sales or deliver y receipt BEFORE WARRANTY REPAIRS ARE BEGUN. Replacement partsand accessories are warranted for ninety(90) days from the date of purchase whenpurchased separately and will be verified bydated sales receipt OR packing slip whichlists that item. All par ts or accessories replaced under warranty must be returned tothe Service Agency.
THIS WARRANTY IS GIVEN EXPRESSLY ANDIN LIEU OF ALL OTHER WARRANTIES, EXPRESSED OR IMPLIED, FOR MERCHANTA-BILITY AND FOR FITNESS TOWARD A PARTI-CULAR PURPOSE AND CONSTITUTES THEONLY WARRANTY MADE BY ROBOT-COUPE, U.S.A., Inc.
THE FOLLOWING ARE “NOT” COVE-RED UNDER WARRANTY :
1 - Damage caused by abuse, misuse, dropping,or other similar incidental damage caused by or
as a result of failure to follow assembly, operating,cleaning, user maintenance, or storage instructions.
2 - Labor to sharpen and/or parts to replaceknife assemblies or blades which have becomedull, chipped, or worn due to normal use.
3 - Material or labor to renew or repair scratched, stained, chipped, dented or discolored surfaces, blades, knives, attachments,or accessories.
4 - Transportation charges to or from an authorized service agency for repairs of a machine designated as "CARRY IN SERVICE"(table top models).
5 - Labor charges to install or test attachmentsor accessories (i.e., bowls, cutting plates, blades,attachments) which are replaced for any reason.
6 - Charges to change Direction-of-Rotation of Three Phase electric motors (INSTALLER IS RESPONSIBLE).
7 - SHIPPING DAMAGE IS NOT COVERED BYWARRANTY. Visible and hidden damages are the responsibility of the freight carrier. Theconsignee must file a damage claim promptlyagainst the carrier, or upon discovery in the caseof hidden damage.
KEEP ALL ORIGINAL CONTAINERS AND PAC-KING MATERIALS FOR CARRIER INSPECTION.
Robot-Coupe U.S.A., Inc., Robot-Coupe S.A. or any of their affiliates, distributors, officers, directors, agents, employees, or insurers will notbe obligated for consequential or other damages, losses, or expenses in connection withor by reason of the use of or inability to use themachine for any purpose.
5
ENG
LISH
WARNING: In order to limit accidents such as electric shocks, personal injury or fire, and in order to limit material damage due tomisuse of the appliance, please read these instructions carefully and follow them strictly. Reading the operating instructions willhelp you get to know your appliance and enable you to use the equipment correctly. The operation manual should be kept withineasy access to all users for reference and should be read completely by all first time users of the machine.
IMPORTANT WARNING
UNPACKING
• Carefully remove the equipment from the packagingand take out all the boxes or packets containing attachments or specific items.
WARNING- some parts are very sharp E.G. blade.Wear cut-resistant gloves when handling theblade.
STORAGE
• You are advised to install the wall support providedwith the machine and to store your machine on it.
POWER SUPPLY
• Always check that your power supply correspondsto that indicated on the serial number plate on themotor unit and that it can take the amperage.
SPECIFICATIONS
• The standard machine is operated on a standard120 Volt, 60Hz., 15 Amp outlet.
MP 350 120V/60Hz / 365 WattMP 450 120V/60Hz / 415 WattMP 550 120V/60Hz / 565 WattMP 600 120V/60Hz / 670 Watt
• DIMENSIONS
SAFETY• Safety on control switches. This safety mechanism prevents any unintentional starting of the unit. Two buttons must be pressed tostart the unit. See section on operating the powermixer.• Safeties on motor : Thermal and overload protection.If there is an obstruction in the container (a spoon orutensil) or the machine is overused and becomes hotthe unit will stop. If the unit stops because of a thermaloverload (power mixer is too hot), wait for a period of up to 30 minutes for the unit to cool down beforerestarting.• No volt release safety (Supply failure).If there is a power failure or the machine is unplug-ged, it will not restart by itself. See section on operating the power mixer.• Overload Warning Light (only for MP 600).
WARNING
Be careful when handling the blades. They are verysharp ! Wear cut-resistant gloves when handling the blades.
MP350
123740100360
ABCD
123840100460
123940110550
123970110580
MP450
MP550
MP600
528 9/16
414 3/16
ABCD
532 9/16
418 1/8
536 7/16
421 11/16
5384 3/8
22 13/16
inches
mm

6
INTRODUCTION TO YOURROBOT COUPE POWER MIXER
MP 350 • MP 450 • MP 550 • MP 600
The Robot Coupe power mixer performs a host ofculinary feats, It will facilitate the making of soups,cream soups, vegetable purees, and pulps.
USES
Soups/cream soupsVegetable purees : carrots, spinach, celery, turnips,French beans, ect..Mousses : vegetable, fishFruit compotesSauces : green, mayonnaise, remoulade, creamemulsions, tomato or parsleyBisques : langoustines and crustaceansPancake mixtureThe machine is easily assembled and disassembledfor maintenance and cleaning.
OPERATING THEPOWER MIXER
• A. PREPARATION
Working position
1. Hold the power mixerfirmly by the handleand the motor base andtilt it at a slight angle toprevent the bell fromhitting the bottom of thecontainer.
2. The power mixer canbe rested against therim of the containerbut must be tilted. Thebell must not touchthe bottom of thecontainer !
3. I f using the powermixer support (optio-nal accessory), on thetop of the container,the power mixershould be positionedin the middle of thesuppor t and at aslight angle. The bell must not touch the bottomof the container!
4. The splash guard should always be in place before operating the power mixer.
5. For optimum efficiency two thirds (2/3) of thetube should be immersed in the product.
6. Always make sure that the bell is completelyimmersed to avoid splashing and that the ventilation openings do not come into contactwith any liquid!
• B. OPERATION
1. Read all of section A. before continuing.
2. Before operating the power mixer, check theon/off trigger (TR). The trigger should be in theout/released position.
3. Connect the cord to the power supply.
4. Put the tube into the product with the bellcompletely immersedand the splash guardin place.
5. Press and hold downthe safety button
6. Press the on/off trigger(TR), and the unit willstart.
7. Release the safety button (SB).
8. Release the on/of f trigger (TR), to stop theunit.
• C. CONTINUOUS OPERATION
9. Follow steps 1 through 6 above, then: While theon/off trigger (TR), is pressed, press the lock button (LB).
10. Release the on/off trigger (TR).
11. Release the lock button (LB), and the powermixer will run continuously.
12. To stop the power mixer, press and release theon/off trigger (TR).
13. The unit is equipped with current and temperatureoverload protection. If the unit stops unexpectedlyyou may try to restart it by following steps 3-5above. If the unit does not restart, allow it to coolfor a period of up to 30 minutes and the tempera-ture overload will automatically reset. You shouldthen be able to restart following steps 3-6 above.
(SB)
(TR)
(LB)
Power mixeron the supportcontainer
MOTORHOUSING
BELL
TUBESPLASHGUARD

7
ENG
LISH
Unplug the machine. Turn the bell in the direction ofthe arrow (1) (see next figure) to separate the bell(E) from the foot lug (F). Remove the bell. If stuck,turn the blades inside the bell in the direction of thearrow (2) to loosen from the drive shaft.
• DISASSEMBLING THE BLADE
ASSEMBLY/DISASSEMBLY
• ASSEMBLING THE BELL ON THE FOOT
Unplug the machine. Align face (A) on the conicalpart of the foot with catch (B) on the inside of thebell. Insert the conical part (C) into the bell. Withthe washer touching the foot seal (D), turn the bellin the direction of the arrow (see figure) andconnect the bell lug (E) with the foot lug(F). Tightenusing moderate pressure.
• DISASSEMBLING THE BELL FROM THE FOOT
To safely remove the sharp blades, hold with the provided blade locking tool. Using the blade disassembling tool, unscrew the female drive coupling. As the drive coupling is unscrewed disengage the blade for easy cleaning.
CLEANING
Cleaning the motor housingThe equipment must be clean through all stages of production. Clean between each job using a detergent or disinfectant. Dilute the detergent/disinfectant following the instructions normally specified on it’s packaging container. Use a clothlightly dampened with the cleaning solution. Do notallow liquid to come into contact with the electrical components contained within the housing. Be careful when cleaning around vents do not allowliquid to drip or seep into the housing. Use a clothlightly dampened with water to removedetergent/disinfectant then dry using a clean cloth.After using the power mixer in a hot mixture, cool the bottom of the foot in cold water before disassembling the bell from the foot.Clean immediately after use to prevent product fromsticking to surfaces.
D
A
F
C
B
E
E
F
2
1
Face
Foot sealFoot lug
Bell lug
Foot lug
Conical part
Catch
Bell lug
Assemblingrotating direction
Disassembydirection
Disassembly rotatingdirection
Blade disassemblyrotating direction
Knife locking tool
Knife assembly with watertight seals
Bell
Male drive coupling
Knife disassembling tool
Blade locking tool
Blade assembly with watertight seals
Bell
Female drive coupling
Remove
Reinstall
Knife disassembling tool
• MP 350• MP 450
• MP 550• MP 600
As a precaution, always unplug your ap-pliance before cleaning it (risk of electrocution).
W A R N I N G
NEVER IMMERSE MOTOR HOUSING AND/ORHANDLE IN LIQUID! THE HOUSING CONTAINS THEELECRICAL COMPONENTS AND IS NOT SEALEDAGAINST LIQUID. CONTACT WITH LIQUID CANCAUSE DAMAGE TO THE POWER MIXER AND SERIOUS INJURY TO THE OPERATOR.
W A R N I N G
8
• CLEANING THE FOOT AND BELLThere are two ways to proceed :Simple cleaning procedureHaving plenty of water in a container, immerse thefoot and bell and run for a few seconds to clean.Unplug the container and rinse the bell.Complete cleaning procedureUnplug the power mixer. rinse the bell under a watertap. Remove the bell from the foot, then remove theblade. Be careful to avoid damaging the surface of theblade shaft and the watertight seals. Always dilutethe detergent/disinfectant (see above). Thoroughlydry all parts before reassembly.
• BLADEThe blade can be removed from the bell for thoroughcleaning. Always dry thoroughly to avoid spotting.
• SPLASH GUARDWith the bell removed, the splash guard can be removed and cleaned using standarddetergents/disinfectants.
• ALUMINUMUse “soft metal safe” cleaning agents.
• PLASTICDo not use too alkaline detergent (having a highconcentration of soda or ammonia).
MAINTENANCE
• BLADEOver time the blades will become worn and will needto be replaced. The washer and seals should also bereplaced at this time. A blade service kit is available.
• FOOT SEALIn order to maintain a watertight seal between thefoot and bell, inspect the seal for wear and replace itif necessary.
• SEAL RINGThe seal ring can be lubricated using a suitable foodgrade greese. In order to maintain watertightness,check the seal ring for wear and replace if necessary.
TROUBLE SHOOTING
• THE UNIT DOES NOT START.1. Did you follow the previous operating instructions ?2. Is the machine hot ? Allow the unit to cool (see 1
below).3. Pull the plug and try another outlet.4. Check outlet for current (breaker or fuse).5. Call local factory authorized service agency.
• THE UNIT STOPS DURING (WHILE)PROCESSING.
1. See section C under Operating the power mixer.Number 13 explains the overload protection. Itmay be necessary to allow the machine to coolfor up to 30 minutes before restarting.
• THE UNIT STARTS TO SMELL OR SMOKE.1. Turn the unit off, unplug it, call local factory
authorized service agency.
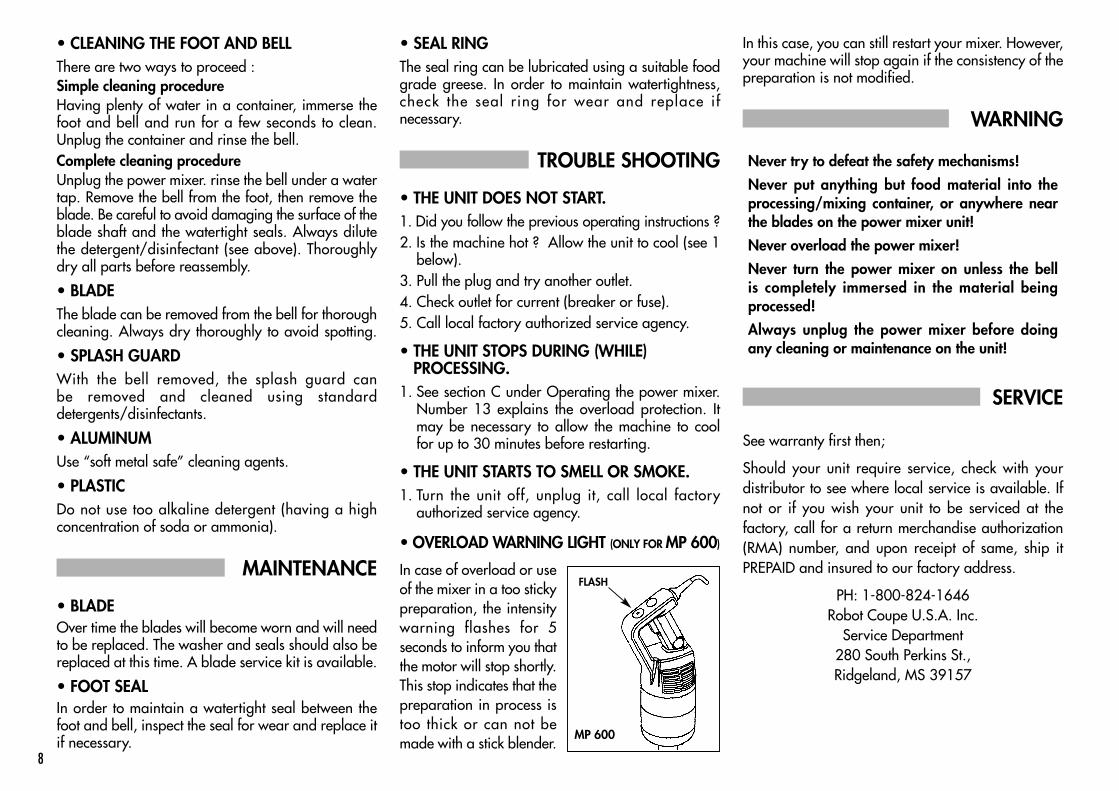
• OVERLOAD WARNING LIGHT (ONLY FOR MP 600)
In case of overload or useof the mixer in a too stickypreparation, the intensitywarning flashes for 5seconds to inform you thatthe motor will stop shortly.This stop indicates that thepreparation in process istoo thick or can not bemade with a stick blender.
In this case, you can still restart your mixer. However,your machine will stop again if the consistency of thepreparation is not modified.
WARNING
SERVICE
See warranty first then;
Should your unit require service, check with yourdistributor to see where local service is available. Ifnot or if you wish your unit to be serviced at thefactory, call for a return merchandise authorization(RMA) number, and upon receipt of same, ship itPREPAID and insured to our factory address.
PH: 1-800-824-1646Robot Coupe U.S.A. Inc.
Service Department280 South Perkins St.,Ridgeland, MS 39157
FLASH
MP 600
Never try to defeat the safety mechanisms!
Never put anything but food material into the processing/mixing container, or anywhere nearthe blades on the power mixer unit!
Never overload the power mixer!
Never turn the power mixer on unless the bell is completely immersed in the material being processed!
Always unplug the power mixer before doingany cleaning or maintenance on the unit!

25
TECHNICAL DATA
DATOS TÉCNICOS
DONNÉES TECHNIQUES

26
27

28

29

30

31
32

33
34

35
© A
ll rig
hts r
eser
ved
for a
ll co
untri
es b
y: R
OBO
T-CO
UPE
S.N.C
.Ré
f. 40
6 24
0 - 1
1/20
02 -
MP
350
• M
P45
0 •
MP
550
• M
P 60
0 - U
SA
P.O. Box 16625, Jackson, MS 39236-6625 280 South Perkins St., Ridgeland, MS 39157
e-mail: [email protected]: www.robotcoupeusa.com
Phone : 1-800-824-1646


![EX-PROTECTION - Wandfluh AG · 2017. 4. 3. · 25 40 80 150 15 40 25 100 6 6 60 25 25 25 Pmax [bar] 350 350 350 315 350 350 350 350 350 350 350 350 40 100 350 350 350 350 VALVES EX](https://img.pdfslide.net/doc/110x75/610826360cc123139028f4a3/ex-protection-wandfluh-ag-2017-4-3-25-40-80-150-15-40-25-100-6-6-60-25-25.jpg)