Embed Size (px)
Citation preview

Delphi Corporation1441 West Long Lake RoadTroy, Michigan 48098-5090U.S.A.Customer Service: [1] 877.GO DELPHI
www.delphi.com
Printed on Recycled Paper©2002 Delphi Corporation. All rights reserved.DAO-02-E-067
The SKYFi name, XM name, and related logos aretrademarks of XM Satellite Radio Inc.

GuideOperating
Radio to the power of X™
SKYFi™
Warning: This manual andthe SKYFi Installation Guide containimportant safety and operatinginformation. Please read and followthe instructions in these manuals.Failure to do so could result in personal injury or damage to yourSKYFi or to your vehicle.


Welcome
Thank you for purchasing a SKYFi™ Receiverby Delphi. Your SKYFi Receiver gives youaccess to over 100 XM® Satellite Radio chan-nels of music, news, and information.
Your SKYFi Receiver must be used with aSKYFi adaptor kit, such as the SKYFi Home Kitor SKYFi Vehicle Kit. These kits are available atretailers where SKYFi main units are sold.
SKYFi Home KitSA10004
SKYFi Vehicle KitSA10002

CONTENTS
Section 1Getting Started: Activating SKYFi· · · · · · 2
Section 2 SKYFi Receiver
SKYFi Receiver Controls· · · · · · · · · · · · 4SKYFi Display Screen · · · · · · · · · · · · · · 5SKYFi Remote Control · · · · · · · · · · · · · 6
Section 3 Basic Operations
Turning SKYFi On and Off · · · · · · · · · · 7Basic Channel Selection· · · · · · · · · · · · 7-10Enlarging Display Text · · · · · · · · · · · · · 10Save and Recall Artist Name
and Song Title · · · · · · · · · · · · · · · · · · 10
Section 4 Menu Commands and Settings· · · · · · · · 11-12
Section 5 Reference
Taking Care of Your SKYFi · · · · · · · · · · 13Replacing SKYFi Remote Control
Batteries · · · · · · · · · · · · · · · · · · · · · · · 13Technical Information · · · · · · · · · · · · · · 14 Troubleshooting · · · · · · · · · · · · · · · · · · · 15-16Contacting Customer Service · · · · · · · · 16
Section 6Warranty · · · · · · · · · · · · · · · · · · · · · · · · · · · 17-18
1
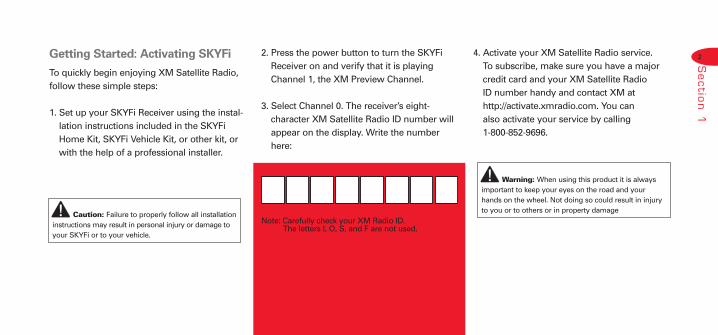
Getting Started: Activating SKYFi
To quickly begin enjoying XM Satellite Radio,follow these simple steps:
1. Set up your SKYFi Receiver using the instal-lation instructions included in the SKYFiHome Kit, SKYFi Vehicle Kit, or other kit, orwith the help of a professional installer.
2. Press the power button to turn the SKYFiReceiver on and verify that it is playingChannel 1, the XM Preview Channel.
3. Select Channel 0. The receiver’s eight-character XM Satellite Radio ID number willappear on the display. Write the numberhere:
Note: Carefully check your XM Radio ID.The letters I, O, S, and F are not used.
4. Activate your XM Satellite Radio service. To subscribe, make sure you have a majorcredit card and your XM Satellite Radio ID number handy and contact XM athttp://activate.xmradio.com. You can also activate your service by calling 1-800-852-9696.
2
Sectio
n 1
Caution: Failure to properly follow all installationinstructions may result in personal injury or damage toyour SKYFi or to your vehicle.
Warning: When using this product it is alwaysimportant to keep your eyes on the road and yourhands on the wheel. Not doing so could result in injuryto you or to others or in property damage
3
Sectio
n 2
Number keys
Category search
Scroll wheel
Enter button
Power buttonControl keys
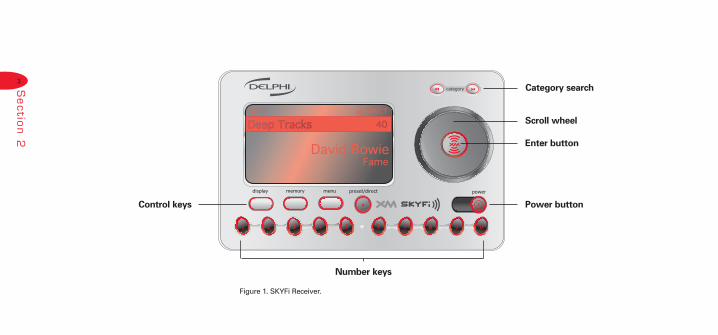
Figure 1. SKYFi Receiver.

SKYFi Receiver
SKYFi Receiver controls
The SKYFi unit has eight control buttons, a scroll wheel, and 10 number keys.
Turns the SKYFi Receiver on or off.
With normal channel display, the display button toggles between normal display, large channel num-ber, and scrolling text. When on thechannel navigation screen, the displaybutton toggles between channelname, artist name, and song title.
Memory saves whatever informationis on the display screen for laterrecall. Press and hold memory key to recall information.
Press menu to select and changereceiver configuration options.
Switches between DIRECT entry, Preset A, and Preset B.
Enters category search and displayschannels grouped by category.Continued presses step throughavailable categories. Category search times out after 6 seconds ifno channels are selected.
The enter button is used to selectchannels and menu options.
Use the scroll wheel to scroll throughand select a channel or a menu option.
Number keys are used to select achannel directly (when in DIRECTentry mode) by entering its number.Select presets (when in Preset A orPreset B mode) by entering the number of the preset.
4
Sectio
n 2

SKYFi Receiver display screen
While tuned to an XM channel, the SKYFidefault display contains information about that channel and the SKYFi settings.See figure 2.
Your SKYFi display can be customized.See the Basic Operations section, beginningon page 7.
Figure 2. SKYFi Receiver display screen.
Signal strength indicator
(zero to three bars)
Keypad mode (DIRECT,
Preset A, or Preset B)
Channel category
Channel nameand number
Artist name
Song title
5
Sectio
n 2

Figure 3. SKYFi Remote Control.
SKYFi Remote Control
Turns the SKYFi Receiver on and off.
Enters category search and stepsthrough available categories.
Enters channel search and selectsamong different channel/menu optionson the screen.
The enter button is used in selectingchannels and menu options.
Mutes the audio.
Switches between DIRECT entry, PresetA, and Preset B.
Changes to the next (+) or previous (-)channel.*
Number keys are used to select a channel directly (when in DIRECT entrymode) by entering its number. Selectpresets (when in Preset A or Preset Bmode) by entering the number of thepreset.
With normal channel display, the display button toggles between normaldisplay, large channel number, andscrolling text. When on the channelnavigation screen, the display buttontoggles between channel name, artistname, and song title.
Memory saves whatever information is on the display screen for later recall.Press and hold memory key to recallinformation.
6
Sectio
n 2
*When SKYFi is connected to the SKYFi Audio System, these buttons control the volume, andother channel-selection methods should be used.

Basic Operations
Turning SKYFi on and off
Press on the SKYFi Receiver or SKYFiRemote Control. When first turned on, thereceiver will automatically tune in to the last channel listened to and recall the previoussettings.
Please turn off SKYFi and wait for the screento go blank before removing it from the homestand or car cradle. This will ensure that all ofthe current settings are saved.
Basic channel selection
SKYFi allows you to select a channel by directlyentering its number, using a preset key, or bytuning up or down to reach the channel.
Select a channel by number1. Verify that SKYFi is in DIRECT entry mode.
DIRECT should appear in the upper rightcorner of the display. If A or B appears,press until the display says DIRECT.
2. Enter channel number using the numberkeys.
7
Sectio
n 3

Set/select channel presetsYour SKYFi Receiver can store up to 20 presetchannels. They are organized into two differ-ent groups, or memory banks, Preset A andPreset B, each with 10 channels correspondingto the 10 number keys.
Setting channel presets
1. Tune in the channel you want to register as a preset.
2. Select either Preset A or Preset B by pressing until an A or B appears in the upper right corner of the display.
3. Press and hold the number key correspon-ding to the preset you would like to set. Thechannel name and number will highlightand the audio will mute for 2 seconds toindicate that the preset is registered.
Selecting channel presets
Press until an A or B appears in the upperright corner of the display. Press the numberkey corresponding to the desired preset.
Tune to a channel Tune up and down the channel list using the SKYFi scroll wheel or the buttons on the remote.*
Skip channels in the lineup using the ChannelSkip/Add function described in Section 4,“Menu Commands and Settings.” This will allow you to tune across only the XMchannels you listen to regularly.
*When SKYFi is connected to the SKYFi Audio System,these buttons control the volume, and other channel-selection methods should be used.
8
Sectio
n 3

Preview and select a channel basedon channel name or the currentsong or artist
You can use your SKYFi to scan through theXM channel lineup, see what channels areavailable and what is currently playing, andthen decide if you want to leave your currentchannel. 1. Press or on the remote control to
enter channel search and display the currentchannel plus the two channels above andthe two below it on the lineup.
2. Press or repeatedly (or press andhold to move quickly) to scroll through thechannel lineup.
3. Press to change the channel informa-tion displayed from channel name to artistname or song title.
4. Select a channel with . If you do notselect a channel, the display will time out andreturn to the channel you are listening to.
Select a channel by category Press either of the category keys to enter category search. 1. Continue pressing one of the category
keys until a category you areinterested in appears.
2. Use the SKYFi scroll wheel or theremote keys to highlight a channel within the given category.
3. Press to select a channel.4. If you do not select a channel, category
search will time out after several seconds.
Preview favorite channels You can use the preset keys and categorysearch to preview the artists and songs cur-rently playing on your favorite channelsbefore deciding whether or not to select anyof them.1. Set your favorite XM channels as presets,
as explained in “Setting channel presets” on page 8. Your SKYFi will automaticallycreate new categories, called Preset A and Preset B, when presets are set in either bank.
2. Press the category keys to entercategory search, and continue pressing ituntil either Preset A or Preset B appears onthe display.
9
Sectio
n 3
3. Press to display the channel name,artist name, or song title for each preset.
4. Your SKYFi Receiver will remember if youwere in the preset section of categorysearch so that the next time you press a category key it will immediatelydisplay the information on those presetchannels.
Enlarging display text
Your SKYFi display can be reconfigured to bemore readable from across a room in thehome or office.1. Press while on a normal play screen
to switch to a larger-text channel-numberconfiguration.
2. Press a second time to continuouslyscroll the artist and song title informationacross the display in large text.
3. Press again to return to the default display.
Save and recall artist name and song title
You can save the artist name and song title onthe current channel for future reference.1. Press and release to save the current
screen information. Up to 10 different artistnames/song titles can be saved at once,after which any new information that issaved will replace the oldest information inmemory.
2. To recall saved artist name/song title information, press and hold for 2-1/2seconds. Next, use the SKYFi scroll wheel or the remote keysto display each saved artist name/songtitle.
10
Sectio
n 3
Menu Commands and Settings
Pressing enters the menu section ofSKYFi. Here, you can change each of the fol-lowing options using the scroll wheel on the receiver or the keys andon the remote control. While in the menu section, acts as a “back” button, allow-ing you to back out of existing sections.Following are the settings that can bechanged:
Brightness + ContrastThis control allows you to adjust the bright-ness and contrast of your display. You mayfind you need to use this when you switchbetween in-car and indoor use.
Memory RecallThis is an alternative way of entering memoryrecall mode. It functions the same as pressingand holding .
Channel Skip/AddYou can skip channels in your SKYFi channellist to prevent them from being accessiblewith the SKYFi scroll wheel or the remote
or keys. Deleted channels canstill be accessed by DIRECT entry or by usinga preset key. They can also be added back tothe list later.
To completely lock SKYFi from receiving a chan-nel, call XM Customer Care at 1-800-852-9696.
Line Out LevelUse this to adjust the SKYFi Receiver audio-level output if it is too high, causing distortion,or too low for your car or home/office stereo.Most users will NOT need to change this levelfrom the factory setting. This is not a volumecontrol. You should set the volume using theaudio system connected to your SKYFiReceiver.
11
Sectio
n 4

Auto ShutdownYou can set your radio to automatically shutoff 60, 120, or 180 minutes after it is turned on.This should be used to keep your car batterycharged if you power your radio in your vehicle via the cigarette lighter/auxiliary power.
If your vehicle continues to power the
cigarette lighter/auxiliary power after you
remove your key and you leave SKYFi on,
SKYFi will shut down automatically after
the time period you select and will not drain
your battery.
Antenna AimingYou can optimize the position of your homeantenna, as described in the SKYFi InstallationGuide, using this screen. Press to returnto the main play screen.
Factory DefaultSelecting this option restores all of the set-tings to their original factory setting. This isuseful if you alter a number of settings, thenchange your mind but don’t know how toeliminate the changes you made. Remember,restoring the factory settings will erase all ofthe presets. You will have to reset them if yourestore the factory-default settings.
12
Sectio
n 4

Reference
Taking care of your SKYFi
(Failure to follow these instructions may
result in personal injury or damage to your
SKYFi Receiver or to your vehicle.)
• Use only a soft, dry cloth to clean the
outside of your SKYFi and any peripherals.
• Do not use any solvents, chemicals, or
cleaning solutions containing alcohol,
ammonia, or abrasives.
• Do not allow liquids to spill on the unit.
• Do not use sprays near your SKYFi.
• It is best to keep SKYFi out of direct sunlight
or other sources of extreme heat.
• Avoid placing SKYFi in a setting where air
cannot circulate around the unit.
Replacing SKYFi Remote Control
batteries
Your SKYFi Remote Control uses a 3V CR2032Lithium battery, available at most retailers thatcarry electronic products. To replace battery,slide the battery door off the back of yourremote control, press down on the battery,and slide it out. Replace battery with positiveend facing the battery door. Replace batterydoor.
13
Sectio
n 5
Figure 4. SKYFi Remote Control battery replacement.
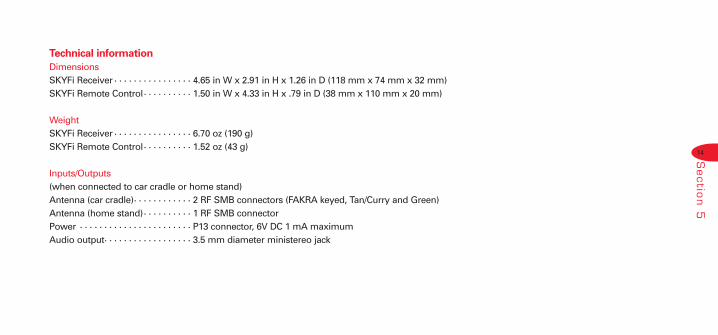
Technical information
DimensionsSKYFi Receiver · · · · · · · · · · · · · · · · 4.65 in W x 2.91 in H x 1.26 in D (118 mm x 74 mm x 32 mm)SKYFi Remote Control· · · · · · · · · · 1.50 in W x 4.33 in H x .79 in D (38 mm x 110 mm x 20 mm)
WeightSKYFi Receiver · · · · · · · · · · · · · · · · 6.70 oz (190 g)SKYFi Remote Control· · · · · · · · · · 1.52 oz (43 g)
Inputs/Outputs (when connected to car cradle or home stand)Antenna (car cradle)· · · · · · · · · · · · 2 RF SMB connectors (FAKRA keyed, Tan/Curry and Green)Antenna (home stand)· · · · · · · · · · 1 RF SMB connectorPower · · · · · · · · · · · · · · · · · · · · · · · P13 connector, 6V DC 1 mA maximumAudio output· · · · · · · · · · · · · · · · · · 3.5 mm diameter ministereo jack
14
Sectio
n 5

Troubleshooting
Your SKYFi Receiver is designed and builtto provide you with trouble-free perform-ance without the need for service. If it doesnot appear to be functioning correctly,please follow these troubleshooting steps:
1. Make sure SKYFi is properly seated in its cradle or stand.
2. Make sure all connectors are properlyattached in the back of the cradle orstand.
3. If you are using the cigarette lighter/auxiliary power adaptor to power yourSKYFi and cannot turn it on:• Make sure the cigarette lighter/auxiliary
power socket is clean and free of corrosion.
• Make sure the adaptor is firmly seated in the cigarette lighter/auxiliary powersocket.
• Check the adaptor fuse by unscrewingthe ribbed end of the adaptor andexamining it. If required, replace witha 1-amp fuse only. If your cigarettelighter adaptor does not have aremovable end cap, then it isequipped with an internal fuse thatresets itself after it is left unpoweredfor a period of time.
4. If you are using the A/C adaptor in thehome or office, make sure it is pluggedin and that there is power at the outlet.
15
Sectio
n 5
If you see this on the display:
NO SIGNAL Cause: The XM signal is out
of range.
ANTENNA
OFF AIR Cause: The channel selected is
not currently broadcasting.
You should:
If you are using SKYFi athome, reposition the antenna.
If you are using SKYFi in yourcar, the message should dis-appear as soon as you moveout of an obstructed area suchas an indoor garage. If theproblem persists, make sureyour antenna is mounted out-side and on top of your carwith a clear view of the sky.
Make sure antenna is cor-rectly attached to the SKYFiHome Stand or SKYFi CarCradle and that antennacable is undamaged and free from kinks. Turn theSKYFi Receiver off and backon to reset this message.
Tune in to another channel.

16
Sectio
n 5
If this happens:
You can only receive XM channels0 and 1Cause: Your SKYFi Receiver is
not activated.
The audio sounds distorted
The audio level is too low
You cannot tune in to a channel
No song title or artist name displays
You should:
Contact XM as described in “Getting Started: ActivatingSKYFi” on page 2.
Reduce audio output level as described under “MenuCommands and Settings: Line Out Level” on page 11.
Increase audio output level as described in “MenuCommands and Settings: Line Out Level” on page 11.
1. Make sure the channel has not been skipped (see the“Channel Skip/Add” function covered on page 11).
2. Verify that you are authorized to receive that channelas part of your subscription with XM and that youhave not asked XM to block that channel on yourSKYFi unit.
Nothing is wrong with your receiver. This is normal onmany talk and news channels where there is no songplaying. Also, this information may not yet be in thedatabase for some music channels.
Contacting Customer Service
For additional information in solving problems with your SKYFi Receiver, contact Delphi at 1.877.GO DELPHI(1.877.463.3574) Monday – Friday, 8:00 am – 4:30 pmEastern Standard Time, or visit www.delphi.com.

Portable XM Satellite Radio LimitedConsumer Warranty
Delphi Product and Service Solutions(“Delphi”) warrants all Portable XM SatelliteRadio Products sold by Delphi (“Products”) tobe free of defects in material and workman-ship, subject to the following conditions.
The duration of Delphi’s warranty with respectto Delphi Portable XM Satellite Radio Productsis limited to one (1) year from the date of saleto the original consumer purchaser.
No other express warranties are made with
respect to any Product. All implied warranties,
including warranties of merchantability and
fitness for a particular purpose are limited to
the warranty period set forth above. This
warranty is not transferable and applies only
to the original consumer purchaser of the
Product.
Delphi will, as its sole obligation under thiswarranty, replace or repair, at its option, any Product that does not conform to this warranty. Under no circumstances will Delphibe liable for any incidental or consequentialdamages under this warranty or any impliedwarranties.
Delphi will not be responsible for damageresulting from any (i) deviation from Delphi’soperating instructions as printed in Delphi’scatalog or on any packaging, labels or other literature provided with a Product, (ii)installation of a Product in a manner which isinconsistent with Delphi’s written instructions,(iii) alteration or modification of a Product, (iv)misuse, (v) neglect, (vi) abuse, (vii) accident,
17
Sectio
n 6

(viii) normal wear and tear, (ix) commercialuse, (x) service by anyone other than a Delphiauthorized repair facility, or (xi) other improperapplication, installation or operation of theProduct.
How you (the Customer) can get service:
To obtain warranty service during the first thirty (30) days after the date of purchase, you must return the defective Product with the original receipt to the original place of purchase. To obtain warranty service duringthe remainder of the warranty period, youmust contact Delphi by phone at 1-877-GO DELPHI(1-877-463-3574) or by fax at 1-866-790-3675.
When contacting Delphi by fax, please include a letter detailing your complaint andprovide a daytime phone number where youcan be reached. If further clarification or additional information is required from Delphi, you may call Delphi at 1-877-GO DELPHI(1-877-463-3574).
If warranty service is needed at any time
during the warranty period, the purchaser
will be required to furnish a sales receipt/
proof of purchase indicating the date of
purchase, amount paid and place of
purchase. Customers who fail to provide
such proof of purchase will be charged for
the repair of any Product.
How state law relates to the warranty:
Some states do not allow limitations on howlong implied warranties last, or the exclusionor the limitation of incidental or consequentialdamages. So the above limitations or exclu-sions may not apply to you. This warrantygives you specific legal rights. You may alsohave other rights that may vary from state tostate.
NO PERSON IS AUTHORIZED BY DELPHI
TO MODIFY OR ADD TO THIS LIMITED
WARRANTY.
18
Sectio
n 6

19
This device complies with part 15 of the FCC Rules.
Operation is subject to the following two conditions:
(1) This device may not cause harmful interference,
and (2) this device must accept any interference
received, including interference that may cause
undesired operation.
Changes or modifications not expressly approved
by Delphi could void the user’s authority to operate
this equipment.