Embed Size (px)
Citation preview
Production Logs
04/01/11 - 10/01/11
Today we created a production schedule, where we individually assigned each week with a specific job that had to be done, in which we listed the resources we would require and a date that we planned to have it done by. Creating this plan will allow us to be able to meet all of our deadlines and make sure we are working in the correct order to ensure no continuity occurs within our project. continuing with our work we begin writing drafts of our script, each inputting ideas from what we had studied in our secondary research, i.e. from 'Goodfellas' and the language that is used. After concluding the final draft we typed the script in the correct format and layout, including location setting, actions, dialogue and brief camera shots. Using our script we were able to draw up our storyboards which show specifically what we intend to be shooting, listing the shot type and length along with other significant notes. When we come to production and begin shooting we will be prepared and in a position to see how the scenes should be set out and what and where everybody should be and what they should be doing to ensure the production is successful.
11/01/11 - 17/01/11
Today I created 3 site plans for the different locations we were using. Drawing up plans for the locations I was able to list the designated camera positions and look at where props and characters went. By doing this I was able to form a plan of what went where and see how everything would work, in terms of the actors and equipment. I was also able to interpret all the possible hazards that could occur therefore taking into consider health and safety. These site plans will also help us in production, allowing us to set up the scenes and thoroughly explain everything to the actors to ensure everything is carried out sufficiently. From these plans I have been able to create a risk assessment in which we can determine the possible dangers and hazards and take into account the severity of 'if the worse happens' in which we have discussed the procedures that will be undertaken should the worst happen. Creating a risk assessment means we are fully aware of the dangers that could arise and we have been able to inform everybody we will be working with to ensure that we can cope with any situation.
Continuing with our Pre Production we created a hypothetical budget spreadsheet, researching and obtaining quotes for the different equipment and resources we will need, summing up a proposed budget. We looked to retain the best and most competitive prices for the things we will need in order to present our projects ideas in our treatment.

18/01/11 - 24/01/11
Today I Wrote up the treatment which consisted of explaining our product, discussing the narrative, the running time, the completion date, the budget, research that was undertaken and any problems that could occur within our film. I wrote this treatment intentionally to 'sell' our film and present how our ideas have progressed into a working production, informing how it will continue to develop. The finished document covers all relevant information on the film and describes our product very well. on conclusion this treatment proposes our film well in terms of as a student but also in a hypothetical situation, i.e. looking for investment.
Finishing off with our Pre Production we completed all of the release forms, ensuring they went through the correct process, to which we have been able to keep for any legal reasons and also to show as evidence of our work. Consisting of location scouting, location release, talent release and call sheets we have successfully drawn these documents up and had them signed by the people who allow us access to their property for filming rights, and to receive permission for the talent who we wish to film. Making sure these documents have been correctly completed is essential in assuring we have all the rights we require in the process of filming our production.
25/01/11 - 31/01/11
This week we began filming our second scene from the script, involving two characters, Darren and nick. We filmed on location in North Welad at the 'Kings Head Public house'. This location was chosen as we thought it would create a sense of verisimilitude through a strong mise-en-scene, that of which is similar to many gangster films (typically involving some scene in a bar or pub). During filming we had a greater understanding and more experience, being our third project we where more aware of the possible mishaps that could occur and it also allowed us to film the scene with better quality in terms of the camera angles and shot types as well as being more confident to avoid any continuity. However this was the first time we used a boom mic to film any scenes. We decided to use it to gain a better sound quality within our film and to cut out any unwanted background noise, capturing just the conversation of the characters. Due to the mic's settings the outcome of the sound quality wasn’t as good as we expected with a constant background noise playing over the scene, although we intend to amend this during post production. Overall the scene was filmed well, and was what we expected when we scripted our film, despite adjustments to the dialogue. After looking through the clips there appears to be no huge continuity, which is something we have improved on from previous work.
01/02/11 - 07/02/11
This week we shot our 1st, 3rd and 5th scene in Epping in an office room, again creating mise en scene to add to the realism of our film and to emphasize the narrative. This time we were aware of the problem from the last time of using the mic and was able to avoid that problem again by ensuring it was set up properly. This scene was particularly hard due to the amount of having all characters present on location and 3 in the scenes at all times, meaning we had a huge amount of takes for just one shot. Also, being a small location it was extremely hard to position the tripod for the camera, operating the boom mic as well as having 5 people in the room. Due to these scenes being the longest involving dialogue was also an issue for our actors in terms of remembering dialogue, or having to re shoot because of mistakes. These scenes proved to be very time-consuming resulting in a lot of clips that aren't at all useful. Another issue was the natural lighting that was being picked up by the camera, meaning it auto focused frequently so it blurs into and out of focus a lot; however there was nothing we could do, despite reducing the light. Due to this some shots are of a higher brightness, although we intend to alter this problem during post-production.
08/02/11 - 14/02/11
Today I began using Final cut pro again, after almost a year I found it difficult to use although given time I was able to familiarize myself with the program again. I went through the raw footage using an edit decision list, and sorted through the clips which were relevant, discarding the ones that had no use. Using the most suitable clip I could find, I dragged it into the timeline, cutting it to obtain the footage I needed. This was the clip we would be using as CCTV for a prop in scene 4 so we had to edit this before filming cold resume. Whilst we knew this would be awkward and alter our schedule we were able to work around it.
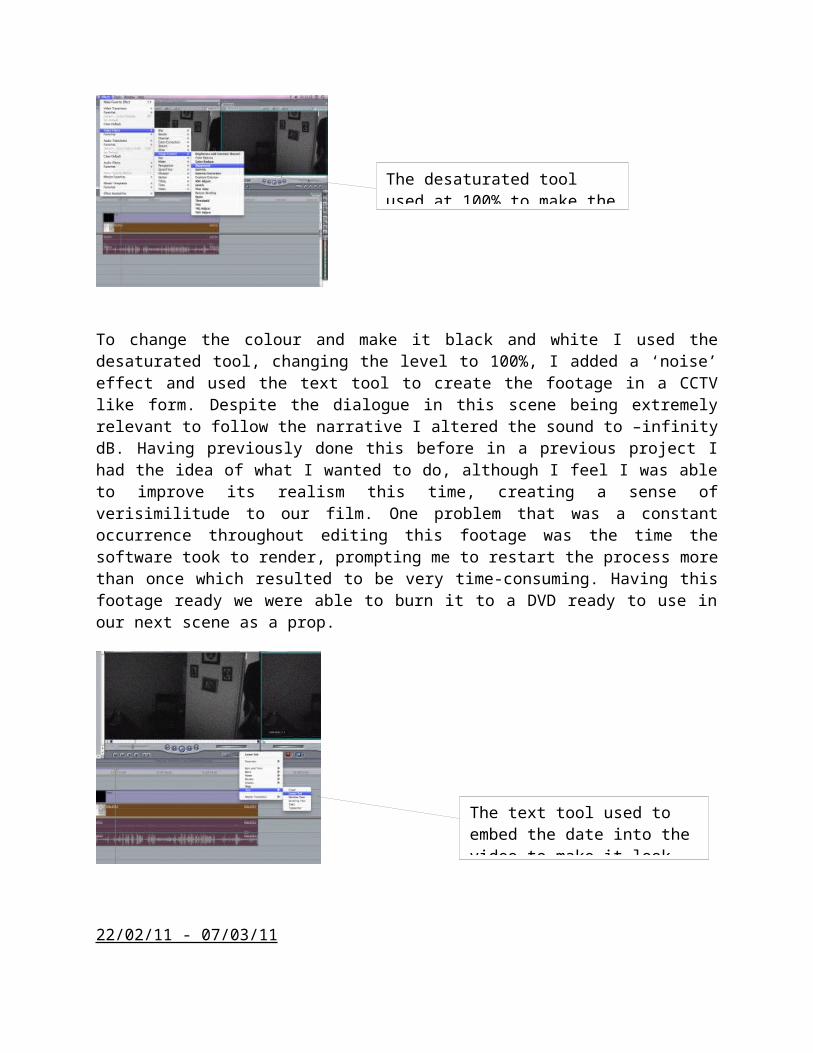
To change the colour and make it black and white I used the desaturated tool, changing the level to 100%, I added a ‘noise’ effect and used the text tool to create the footage in a CCTV like form. Despite the dialogue in this scene being extremely relevant to follow the narrative I altered the sound to –infinity dB. Having previously done this before in a previous project I had the idea of what I wanted to do, although I feel I was able to improve its realism this time, creating a sense of verisimilitude to our film. One problem that was a constant occurrence throughout editing this footage was the time the software took to render, prompting me to restart the process more than once which resulted to be very time-consuming. Having this footage ready we were able to burn it to a DVD ready to use in our next scene as a prop.
The desaturated tool used at 100% to make the video black and white.
The text tool used to embed the date into the video to make it look like CCTV footage.

22/02/11 - 07/03/11
This week I began designing the magazine film review double page spread. Based on my textual analysis of existing film magazine reviews and the knowledge and further research I have from my secondary findings I created a mock drawing using A3 paper (representing a double page spread) of rough ideas before implementing them onto computer using Photoshop. Being the first time I had used this program I was concerned with how well I would be able to construct the layout of this review, however whilst going through it I was able to continue along each step from the mock up. Like expected though I did encounter problems during certain stages which I struggled to overcome which resulted in taking a lot of time. The images which have been used in the magazine have come straight from the raw footage with every other element being created on Photoshop. Whilst using this program I have extremely improved my skills (considering I had none) and I feel I have created a strong product to accompany my film, as well I’m now in a better situation to be able to create a film poster, having more experience in using the tools and functions of Photoshop.
08/03/11 - 14/03/11
This week I began designing the 3rd piece to accompany our short film, the poster to go alongside it. Like with the previous task, I have again completed textual analysis on 3 film posters, to get ideas and study the conventions, especially in this genre. To further my research I also looked at secondary research to enhance my knowledge and to gain more ideas and a better concept of creating a film poster. I used A4 paper to draw 2 mock ups, designing a poster which featured the generic conventions of a film poster, although I chose to use the same design as the magazine review so it was like the project conversed through a vertical synergy, promoting the item through itself. After I had the mock up drawn I started to create it on Photoshop, again going through the different stages as I applied each element to build up the structure of the poster. Whilst I was still new to using this program I did still encounter certain problems although nowhere near as many as before as I was now familiar with it and had more experience in the program so i was able to manipulate certain designs to create what I wanted using the tools I now knew as well as experimenting with new ones. Reflecting on my time spent constructing this piece, i can say it took less time, due to being better with the software and I am happy with the final outcome, thinking it looks professional; works well alongside the magazine review and promotes the film successfully.
15/02/11 - 21/02/11
This week we filmed our final scene, Scene 4 involving Darren. This scene proved to be by far the easiest scene, despite having to film and have our act in sync with what he was watching on TV. During cuts this was difficult to time right and ensure no continuity was present. Despite this the scene involved just one character, and no dialogue so filming was the easier than the previous scenes and there are a lot less re takes. As well we were in a bigger space with fewer people so moving around to get into the right filming positions was a lot easier and less time-consuming. This scene involved a lot less shots than the previous due to it being a slow scene we intended to match the editing with the speed of the narrative, meaning a lot less shots were needed, again being easier and less time-consuming. One issue we did encounter was the time between filming this and the previous scenes as we had to edit part of the last takes to edit and burn onto a disk to use as a prop in this scene. We planned in our schedule so that we would have enough time to edit the footage we needed and this worked for us as the prop was available at the planned time, however completing it to the perfection we wanted was straining.
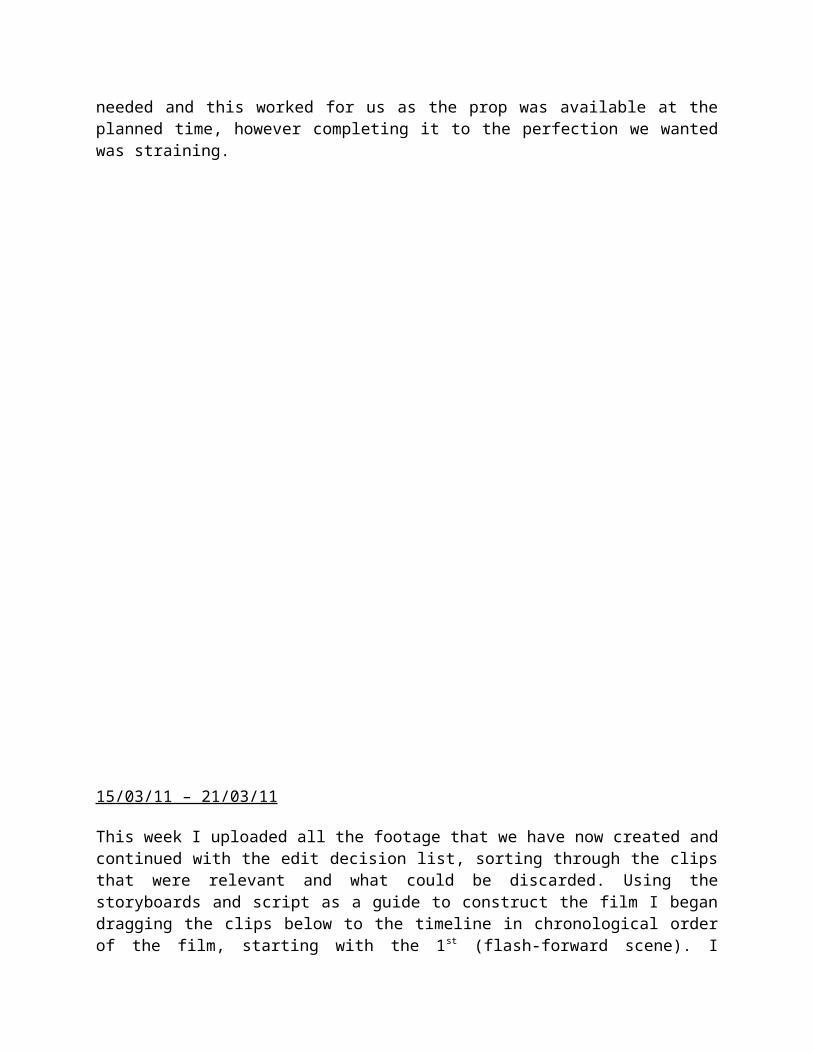
15/03/11 – 21/03/11
This week I uploaded all the footage that we have now created and continued with the edit decision list, sorting through the clips that were relevant and what could be discarded. Using the storyboards and script as a guide to construct the film I began dragging the clips below to the timeline in chronological order of the film, starting with the 1st (flash-forward scene). I started the film off using a manual fade in, where I used the pen tool to create the opening in a conventional style. Again I used the desaturated tool to 100% to establish the time of the film, being a flash-forward. The recorded sound for the shot of the gun was not at all realistic so I used a copyright free source to extract sound effects from (www.freesound.com) where I found a suitable gunshot, importing it into final cut pro and placing it on the timeline in reaction to the footage.
I manually increased the dB to make the sound louder, as it was Darren, the protagonist shooting to emphasize his status and position within the film – another conventional theme in crime films.
How I imported a sound file used as the 1st gunshot.
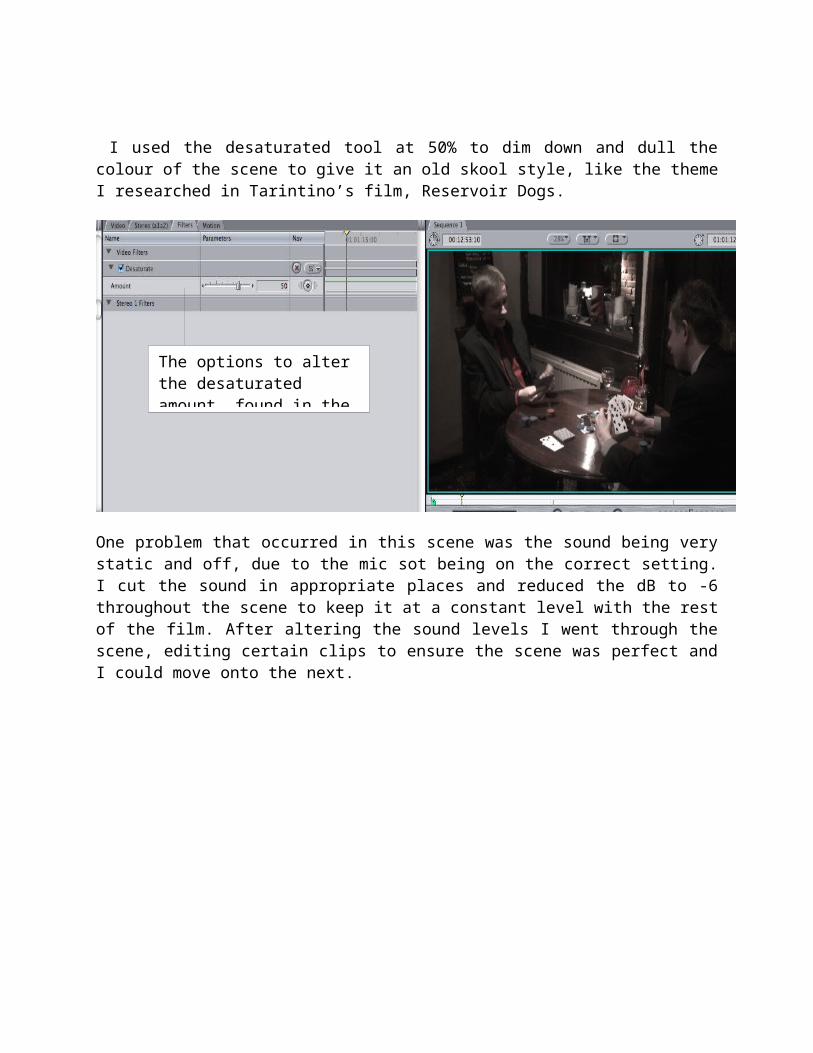
The sound bars I used to edit the dB, found under the header- Stereo (a1a2).
For the rest of the lesson I worked on putting together the 2nd scene of the film which involved Darren and Nick, again I used an EDL to distinguish between the shots which was needed and the shots which weren’t. Fortunately there weren’t a lot of unused clips to sort through, reducing the time this took. I began dragging the clips into the time line creating the scene, ensuring each clip was cut to make sure no continuity occurred. The scene went together well and flowed thoroughly; although at 3 points I put a cross dissolve to show the passing of time and to keep the scene flowing, avoiding it dragging on.
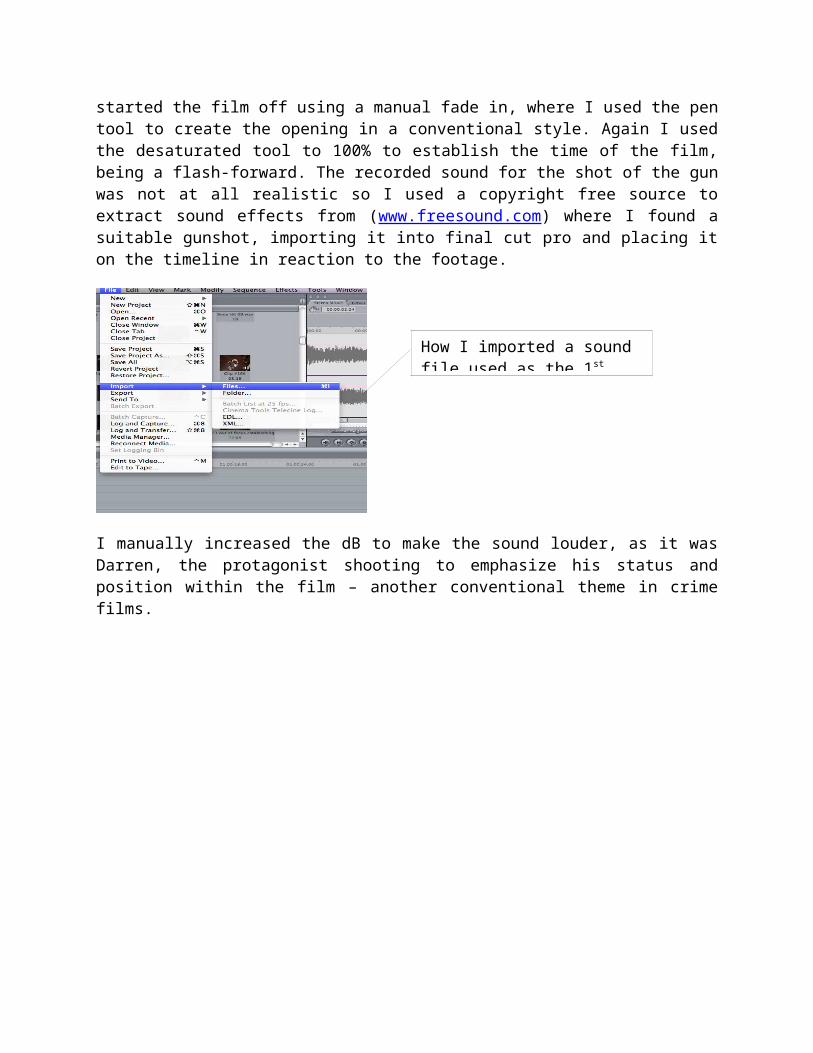
I used the desaturated tool at 50% to dim down and dull the colour of the scene to give it an old skool style, like the theme I researched in Tarintino’s film, Reservoir Dogs.
The location and the path I used to insert a cross dissolve to show the passing of time.
The options to alter the desaturated amount, found in the filters bar.
One problem that occurred in this scene was the sound being very static and off, due to the mic sot being on the correct setting. I cut the sound in appropriate places and reduced the dB to -6 throughout the scene to keep it at a constant level with the rest of the film. After altering the sound levels I went through the scene, editing certain clips to ensure the scene was perfect and I could move onto the next.
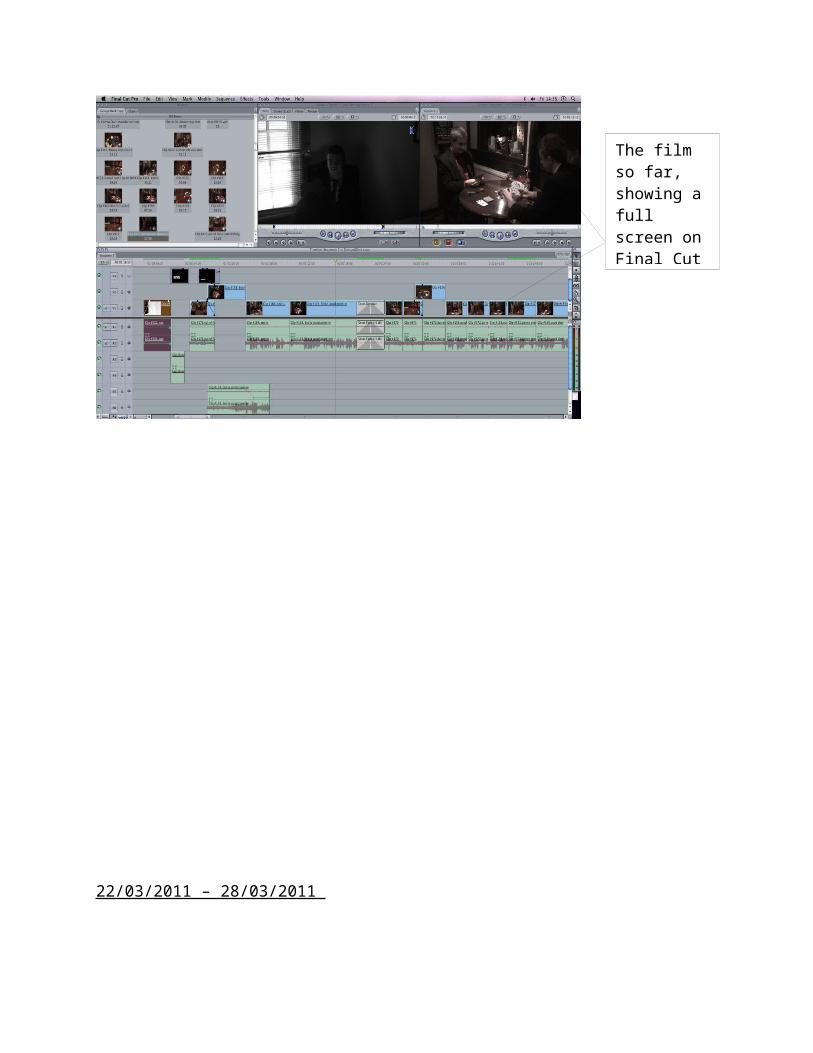
The film so far, showing a full screen on Final Cut pro of Scene’s 1 and 2 finished.
22/03/2011 – 28/03/2011
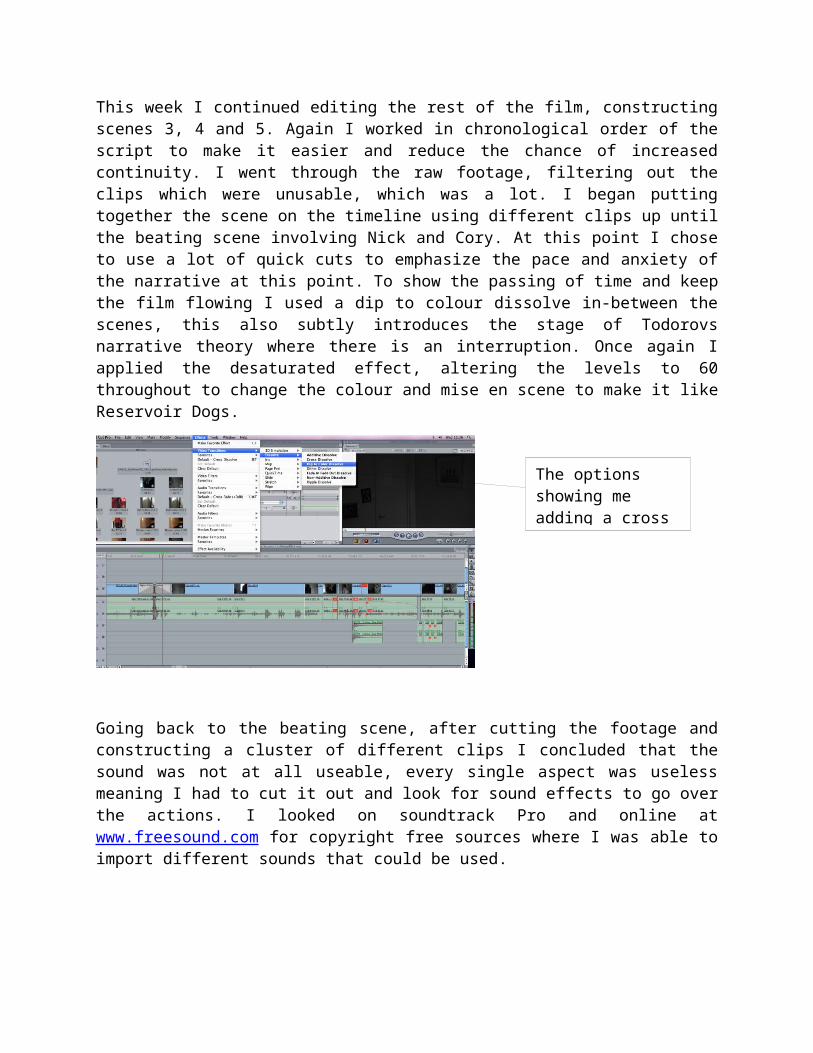
This week I continued editing the rest of the film, constructing scenes 3, 4 and 5. Again I worked in chronological order of the script to make it easier and reduce the chance of increased continuity. I went through the raw footage, filtering out the clips which were unusable, which was a lot. I began putting together the scene on the timeline using different clips up until the beating scene involving Nick and Cory. At this point I chose to use a lot of quick cuts to emphasize the pace and anxiety of the narrative at this point. To show the passing of time and keep the film flowing I used a dip to colour dissolve in-between the scenes, this also subtly introduces the stage of Todorovs narrative theory where there is an interruption. Once again I applied the desaturated effect, altering the levels to 60 throughout to change the colour and mise en scene to make it like Reservoir Dogs.
Going back to the beating scene, after cutting the footage and constructing a cluster of different clips I concluded that the sound was not at all useable, every single aspect was useless meaning I had to cut it out and look for sound effects to go over the actions. I looked on soundtrack Pro and online at www.freesound.com for copyright free sources where I was able to import different sounds that could be used.
The options showing me adding a cross dissolve transition.

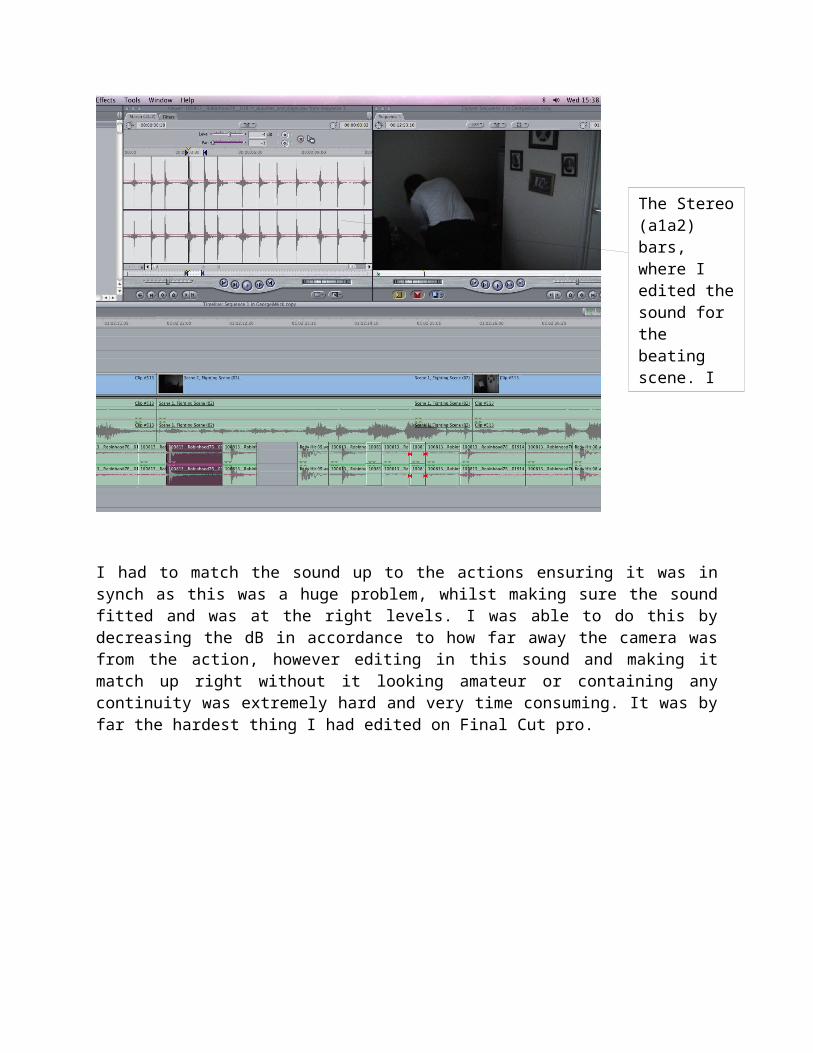
I had to match the sound up to the actions ensuring it was in synch as this was a huge problem, whilst making sure the sound fitted and was at the right levels. I was able to do this by decreasing the dB in accordance to how far away the camera was from the action, however editing in this sound and making it match up right without it looking amateur or containing any continuity was extremely hard and very time consuming. It was by far the hardest thing I had edited on Final Cut pro.
The Stereo (a1a2) bars, where I edited the sound for the beating scene. I used the dB to drop in the sound to match the footage.
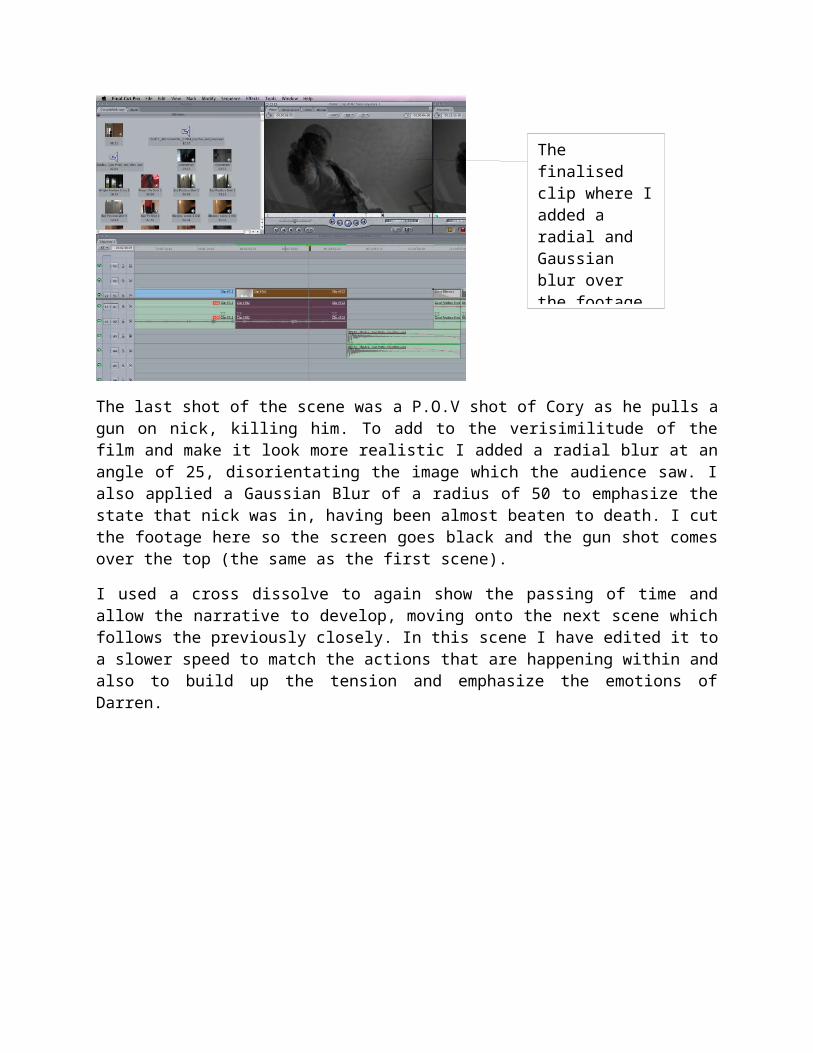
The last shot of the scene was a P.O.V shot of Cory as he pulls a gun on nick, killing him. To add to the verisimilitude of the film and make it look more realistic I added a radial blur at an angle of 25, disorientating the image which the audience saw. I also applied a Gaussian Blur of a radius of 50 to emphasize the state that nick was in, having been almost beaten to death. I cut the footage here so the screen goes black and the gun shot comes over the top (the same as the first scene).
I used a cross dissolve to again show the passing of time and allow the narrative to develop, moving onto the next scene which follows the previously closely. In this scene I have edited it to a slower speed to match the actions that are happening within and also to build up the tension and emphasize the emotions of Darren.
The finalised clip where I added a radial and Gaussian blur over the footage the show the state of the character, with the shot being his P.O.V.
Screen grab of editing to show where I put a cross dissolve and how I did it.
Using the storyboards I followed the narrative closely and what we had drawn up, constructing the scene on the timeline. One problem that did occur was that continuity occurred with the positioning of a character and we had no replacement shot to avoid this. Although I was Able to fix this by using the same clip as before and reversing the play so he bends down and stands up again, fortunately this worked extremely well and looks like it was filmed with exactly those actions.
The speed controls, this is where I revered the play in order to compensate for the continuity that was present.
I applied another cross dissolve to show the time of waiting for the DVD to come on, building tension as the audience and character himself are anxious to see what it is. From here on the scene involved just straight cuts, ensuring the film flowed and no errors were present. The last effect that had to be added was the desaturated at 50% to keep in tone with the rest of the film. In conclusion to editing this scene I can say it was by far the easiest and less time consuming, obviously because there was less to edit, with one character and less happening so I just had to ensure the scene progressed the film, explaining the narrative. At this point of the film Todorovs narrative theory also begins to develop where the audience now know that the problem has been identified and they can expect the problem to be solved.
An overview of the scene so far, the image on the top right is from this scene.
To edit the last scene I used a dip to colour dissolve, once again to show the progression of time and to distinguish that the scene had changed. The scene jumps to a P.O.V of Darren pointing the gun straight at the viewer, however in this scene the camera auto focused (due to the back wall being white) meaning it blurred slightly. I looked to see if there was a double of this clip so this problem could be avoided however I had no choice but to use it. I continued dropping the clips onto the timeline in accordance to the screenplay and storyboards. Like before I cut the footage just before Cory was shot, inserting the gunshot sounds so the scene goes black, bending into the next clip, we then used this technique again at the end when Darren shoots Darrell. Once again I applied the desaturated effect, to 50% to match up with the rest of the film. Throughout the film I have applied dissolve transitions in-between the scenes to show a passing of time, but also to establish and progress the storyline.
Whilst editing I have closely used Todorovs narrative structure theory where There is an equilibrium in the 2nd scene and it is interrupted in the 3rd scene, it is then identified in scene 4th. However like Tarintino’s style I chose to end the film without creating a new equilibrium, allowing the audience to presume it themselves. Something else which I have attempted to do is leave my mark on the film through my editing style, creating an auter style through the techniques I have used. This makes the film recognisable as my own work, just like you can with a Tarintino or Scorsese film. 4 times I cut the footage to a black screen then played the gun shot; this is a recurring theme in my film and is recognisable. Also the colour of my film is unique, whilst it isn’t black and white it is very dull and at some points looks like it isn’t in colour at all, making it have an ‘old skool’ feel. I have purposely chosen to link the film together with dissolve transitions, this is so the film flows thoroughly and the audience can keep intrigued with the storyline. These techniques have been edited in specifically so I can create a style which is recognisable as my own work, making an auter style for myself.
This is how I altered the % of the desaturate to match up with the rest of the film.
Lastly I used the text tool to create the credits, manually inserting the roles into the timeline using a 36 font size, with Stencil STD font. This was the same font used in all my 3 media products, created through vertical synergy, which is evident through this. The credits were essential in displaying all the roles that have been fulfilled in making this film and show that has done what. I use the pen tool to manually dip to colour the credits, overlaying them so as 1 dissolved in, the other faded out.
This is where I blanked the footage out and played the sound over the black screen, creating an auter style to my work.
The screen from the right is where I watched the timeline footage. The screen on the left is where I watched the raw footage.
The list of raw footage, which I dragged onto the timeline.
The timeline showing the finished film and all the footage.