Embed Size (px)
Citation preview

document.docx
Picture Lab is one of the three official AP Computer Science labs from the College Board. Believe it or not this is a shorter version, edited by me (Haas), with the intent of removing some of the extraneous material. The original lab is 27 pages! That’s right - I reduced it by 18 pages (you’re welcome) . As a result - make sure you read every word!!!
A copy of Picture Lab has been placed in your classes folder: From BlueJ Open: pixLab - NOT COMPLETE > classes
I know it looks like a lot of classes!! The good news is that you will only need to write code in the Picture Class and then uncomment a few lines in the PictureTester class to run the code that you write.
A1: Introduction to digital pictures and color
A digital camera has sensors that record color at millions of points arranged in rows and columns. Each point is a pixel or picture (abbreviated pix) element.
A megapixel is one million pixels. A 12-megapixel camera can store the color at over 12 million pixels. That’s a lot of pixels!
The color of each pixel can be represented using the RGB (Red, Green, Blue) color model, which stores values for red, green, and blue, each ranging from 0 to 255.
You can make any color by combining different levels of red, green and blue. The RGB color model sometimes also stores an alpha value as well as the red, green, and blue values. The alpha value indicates how transparent or opaque the color is.
Why are the color values from 0 to 255? Computers store numbers in binary. A bit is a binary digit, which can be either 0 or 1. A group of 8 bits is called a byte.
Questions
1. How many bits does it take to represent the values from 0 to 255? _________
2. How many bytes does it take to represent a color in the RGB color model? ____________

Java represents color using the java.awt.Color class. This is the full name for the Color class, which includes the package name of java.awt followed by a period and then the class name Color. Java groups related classes into packages. The awt stands for Abstract Windowing Toolkit, which is the package that contains the original Graphical User Interface (GUI) classes developed for Java. You can use just the short name for a class, like Color, as long as you include an import statement at the beginning of a class source file, as shown below. The Picture class contains the following import statement.
import java.awt.Color;
A2: Exploring a picture
Run the main method in PictureExplorer.java. This will load a picture from a file and show it in the explorer tool.
Click any location (pixel) in the picture and it will display the row index, column index, and red, green, and blue values for that location. The location will be highlighted with yellow crosshairs. You can click on the arrow keys or even type in values and hit the enter button to update the display. You can also use the menu to change the zoom level.
Questions – there is more than one possible answer.
What are the RGB values of the following?
1. The orange hat? Red______ Green______ Blue______
2. The yellow jacket? Red______ Green______ Blue______
3. The white snow? Red______ Green______ Blue______
4. The black sunglasses? Red______ Green______ Blue______
5. What is the row index for the top left corner of the picture? _______
6. What is the column index for the top left corner of the picture? _______
7. Does the row index increase from left to right or top to bottom? _________________________
8. Does the column index increase from left to right or top to bottom? __________________________
9. Set the zoom to (in the upper left corner) to different amounts. At what zoom % can you see pixilation? Pixelation means displaying a picture so magnified that the individual pixels look like small squares.
__________________________

A3: Modifying Colors - now is when you will begin to write code
The method zeroBlue in the Picture class gets a two-dimensional array of Pixel objects from the current picture (the picture the method was called on). It then declares a variable that will refer to a Pixel object named pixelObj. It uses a nested for-each loop to loop through all the pixels in the picture. Inside the body of the nested for-each loop it sets the blue value for the current pixel to zero.
The following code is the zeroBlue method in the Picture class.
public void zeroBlue() { Pixel[][] pixels = this.getPixels2D(); for (Pixel[] rowArray : pixels) { for (Pixel pixelObj : rowArray) { pixelObj.setBlue(0); } } }
The getPixels2D() method in the SimplePicture class returns a two-dimensional array of Pixel objects. Look at the Quick Reference at the end of this document to see all of the methods which can be run on Pixel objects.
The main method in the PictureTester class calls a method to display the snow picture, then set the blue levels to zero and redisplays the picture.
public static void testZeroBlue() { Picture snow = new Picture("snow.jpg"); snow.explore(); snow.zeroBlue(); snow.explore(); }
Uncomment the testZeroBlue() method call in the main method of PictureTester class to run testZeroBlue. You can comment out the tests you don’t want to run. Now run the main method of PictureTester class.

Exercises1. Using the zeroBlue method as a starting point, write the method keepOnlyBlue that will keep only the blue values, that is, it will set the red and green values to zero. Be sure to uncomment the call to testKeepOnlyBlue in the main method in PictureTester.
2. Write the negate method to negate all the pixels in a picture. To negate a picture, set the red value to 255 minus the current red value, the green value to 255 minus the current green value and the blue value to 255 minus the current blue value. Be sure to uncomment the call to testNegate in the main method in PictureTester.
3. Write the grayscale method to turn the picture into shades of gray. Set the red, green, and blue values to the average of the current red, green, and blue values (add all three values and divide by 3). Be sure to uncomment the call to testGrayscale in the main method in PictureTester.

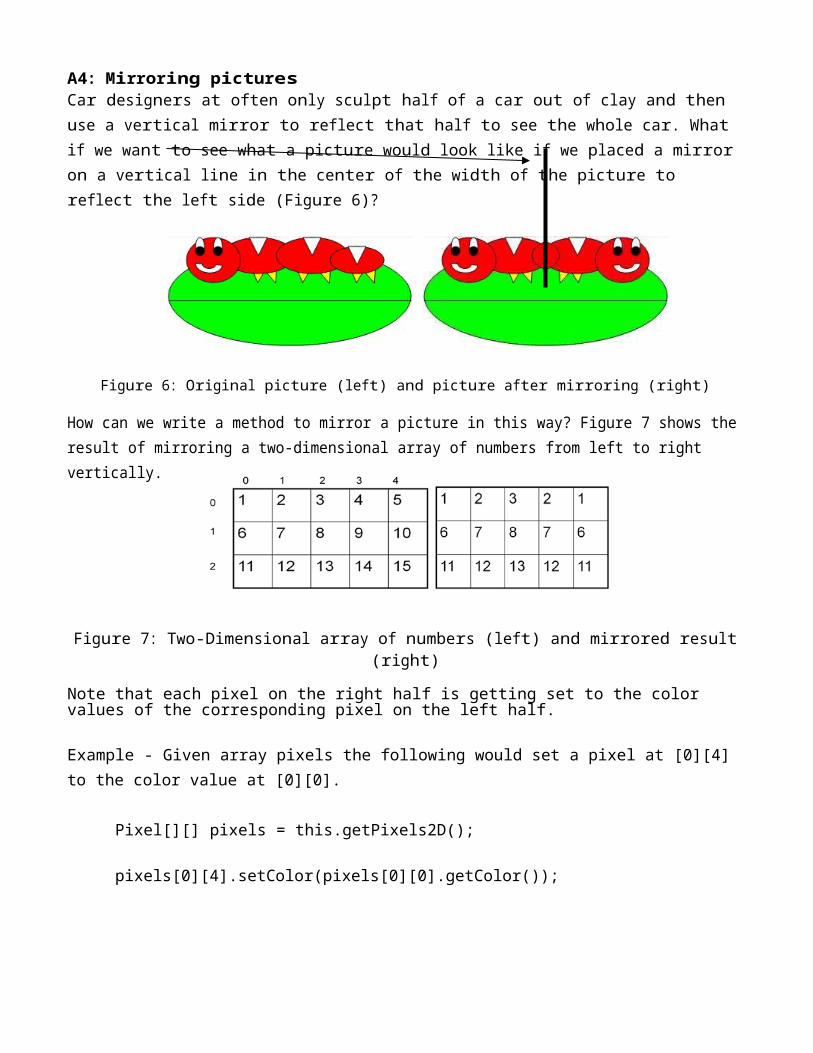
A4: Mirroring picturesCar designers at often only sculpt half of a car out of clay and then use a vertical mirror to reflect that half to see the whole car. What if we want to see what a picture would look like if we placed a mirror on a vertical line in the center of the width of the picture to reflect the left side (Figure 6)?
Figure 6: Original picture (left) and picture after mirroring (right)
How can we write a method to mirror a picture in this way? Figure 7 shows the result of mirroring a two-dimensional array of numbers from left to right vertically.
Figure 7: Two-Dimensional array of numbers (left) and mirrored result (right)
Note that each pixel on the right half is getting set to the color values of the corresponding pixel on the left half.
Example - Given array pixels the following would set a pixel at [0][4] to the color value at [0][0].
Pixel[][] pixels = this.getPixels2D();
pixels[0][4].setColor(pixels[0][0].getColor());

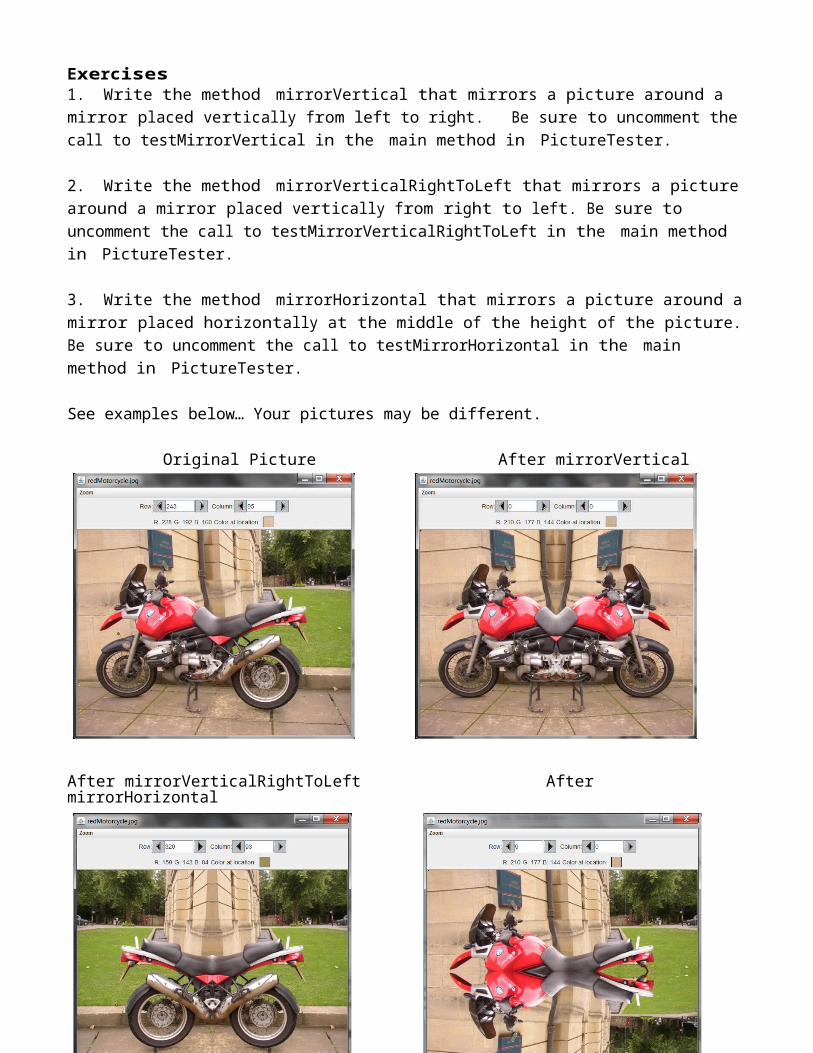
Exercises1. Write the method mirrorVertical that mirrors a picture around a mirror placed vertically from left to right. Be sure to uncomment the call to testMirrorVertical in the main method in PictureTester.
2. Write the method mirrorVerticalRightToLeft that mirrors a picture around a mirror placed vertically from right to left. Be sure to uncomment the call to testMirrorVerticalRightToLeft in the main method in PictureTester.
3. Write the method mirrorHorizontal that mirrors a picture around a mirror placed horizontally at the middle of the height of the picture. Be sure to uncomment the call to testMirrorHorizontal in the main method in PictureTester.
See examples below… Your pictures may be different.
Original Picture After mirrorVertical
After mirrorVerticalRightToLeft After mirrorHorizontal

A5: Mirroring part of a picture
Sometimes you only want to mirror part of a picture. For example, a temple in Greece that is missing a part of the roof called the pediment. You can use the explorer tool to find the area that you want to mirror to produce the picture on the right. If you do this you will find that you can mirror the rows from 27 to 96 (inclusive) and the columns from 13 to 275 (inclusive). You can change the starting and ending points for the row and column values to mirror just part of the picture.
Greek temple before (left) and after (right) mirroring the pediment
To work with just part of a picture, change the starting and ending values for the nested for loops as shown in the following example.
// loop through the rows for (int row = 27; row < 97; row++) { // loop from 13 to just before the mirror point for (int col = 13; col < 276; col++) {
// additional code not shown
Exercise:Complete the method mirrorTemple above to mirror the temple - rows from 27 to 96 (inclusive) and columns from 13 to 275 (inclusive). Be sure to uncomment the call to testMirrorTemple in the main method in PictureTester
A6: Simple edge detection
Detecting edges is a common image processing problem. For example, digital cameras often feature face detection.
One way to look for an edge in a picture is to compare the color at the current pixel with the pixel in the next column to the right and the pixel in the next row below. If the colors differ by more than some specified amount, this indicates that an edge has been detected and the current pixel color should be set to black. Otherwise, the current pixel is not part of an edge and its color should be set to white.
Example of original picture and after edge detection
How do you calculate the difference between two colors? The difference between two colors (red1,green1,blue1) and (red2,green2,blue2) is the square root of ((red2 - red1)2 +(green2 - green1)2 +(blue2 - blue1)2).
Exercise: 1. Write the colorDistance method in the Pixel class to use this calculation to return the difference between the current pixel color and a passed pixel.
public double colorDistance(Pixel other)
2. Write the edgeDetection method in the Picture class to use to look for an edge in a picture as described above. It should compare the color at the current pixel with the pixel in the next column to the right and the pixel in the next row below. If the colors differ by more than some specified amount, this indicates that an edge has been detected and the current pixel color should be set to black. Otherwise, the current pixel is not part of an edge and its color should be set to white.
public void edgeDetection(int edgeDist)
You can test this with the testEdgeDetection method in PictureTester.
Quick Reference
DigitalPicture Interface Pixel[][] getPixels2D() // implemented in SimplePicture void explore() // implemented in SimplePicture boolean write(String fileName) // implemented in SimplePicture
SimplePicture Class ( implements Digital Picture ) public SimplePicture() public SimplePicture(int width, int height) public SimplePicture(SimplePicture copyPicture) public SimplePicture(String fileName) public Pixel[][] getPixels2D() public void explore() public boolean write(String fileName)
Picture Class ( extends SimplePicture ) public Picture() public Picture(int height, int width) public Picture(Picture copyPicture) public Picture(String fileName) public Pixel[][] getPixels2D() // from SimplePicture public void explore() // from SimplePicture public boolean write(String fileName) // from SimplePicture
Pixel Class public double colorDistance(Color testColor) public double getAverage() public int getRed() public int getGreen() public int getBlue() public Color getColor() public int getRow() public int getCol() public void setRed(int value) public void setGreen(int value) public void setBlue(int value) public void setColor(Color newColor)
java.awt.Color Class public Color(int r, int g, int b) public int getRed() public int getGreen() public int getBlue()


![EMISSION SYSTEM LOCATION INDEX [LF] - mellens.net · 2007 ENGINE PERFORMANCE Emission System - MX-5 Miata EMISSION SYSTEM LOCATION INDEX [LF] ENGINE COMPARTMENT SIDE Fig. 1: Identifying](https://img.pdfslide.net/doc/110x75/5b583af77f8b9a527f8be4ff/emission-system-location-index-lf-2007-engine-performance-emission-system.jpg)

![CHARGING SYSTEM LOCATION INDEX [LF] · 2010-12-28 · 2007 ELECTRICAL Charging System - MX-5 Miata CHARGING SYSTEM LOCATION INDEX [LF] Fig. 1: Identifying Location Of Charging System](https://img.pdfslide.net/doc/110x75/5e6fabe276dc3c268a2cd05c/charging-system-location-index-lf-2010-12-28-2007-electrical-charging-system.jpg)


![EMISSION SYSTEM LOCATION INDEX [LF] - mellens.net · 2008 ENGINE PERFORMANCE Emission System - MX-5 Miata EMISSION SYSTEM LOCATION INDEX [LF] ENGINE COMPARTMENT SIDE Fig. 1: Identifying](https://img.pdfslide.net/doc/110x75/5b4b19ba7f8b9aa82c8c981b/emission-system-location-index-lf-2008-engine-performance-emission-system.jpg)


![LUBRICATION SYSTEM LOCATION INDEX [LF] - · PDF fileLUBRICATION SYSTEM LOCATION INDEX [LF] Fig. 1: Identifying Location Of Lubrication System Components Courtesy of MAZDA MOTORS CORP](https://img.pdfslide.net/doc/110x75/5a902be07f8b9a4a268e146e/lubrication-system-location-index-lf-system-location-index-lf-fig-1.jpg)

![INTAKE AIR SYSTEM LOCATION INDEX [LF] - · PDF fileIntake Air System Location Index [LF] 1 Intake-air system 2 Air cleaner 3 Fresh-air duct ... Remove the MAP sensor. (See MANIFOLD](https://img.pdfslide.net/doc/110x75/5aaee91c7f8b9a59478ca955/intake-air-system-location-index-lf-air-system-location-index-lf-1-intake-air.jpg)