Embed Size (px)
Citation preview

Retention
Introduction Many dentists look at the topic of retention as which type of retainer should I use, but the first step for YOU is to establish a retention philosophy. You must know what you are retaining and what your policy will be when there is a relapse. Then you can choose the appliance. It is my opinion that you should give the patient a retainer. It is “known” by all patients that they will get a retainer, since their friends all have one. I have known only one orthodontist who did not give retainers to his patients, and got away with it (Lee Boese). I first heard him at an AAO annual meeting, and after designing the IP appliance, I drove to his practice in Northern California to meet personally with him to confirm that he still was not giving retainers and that he was still doing the same. He was. The principles used by Lee Boese to avoid retainers are:1. Full corrections of rotations established early in treatment. He made
finishing bends in every archwire. IP rotation brackets do this with the first alignment wire.
2. No expansion of the [lower] inter-canine width . He contoured all his archwires to fit the original archform of the patient, paying special attention to maintaining inter-canine width. In IP, we can do this with archwire diagnosis and selection since we have the 18 shapes available in preformed condition.
3. Full correction of single tooth torque . If a tooth was blocked out, he would torque the nitie archwire (yes nitie) with a torquing key (single tooth) to move the root forward to be consistent with the adjacent teeth. In the IP appliance, we can do this with variable torque brackets.
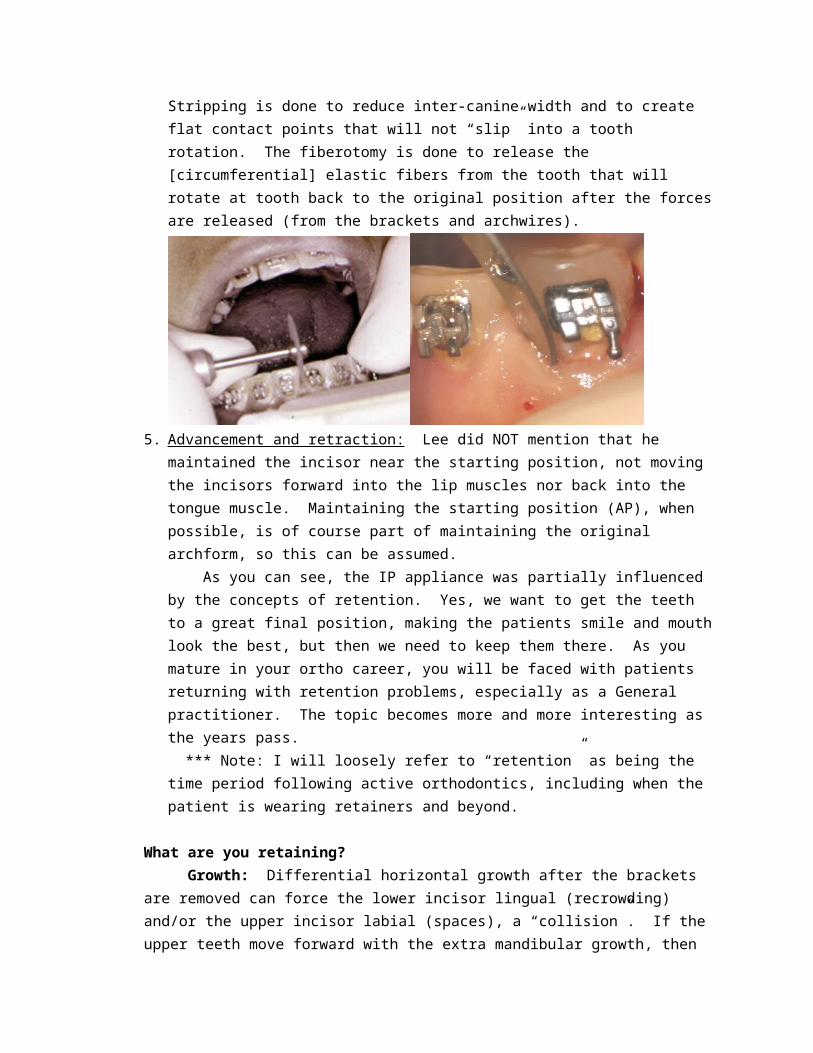
4. Stripping and fiberotomy: He is known for this, the orthodontists did not want to hear the first three, or maybe it was assumed that everyone does this (yeah, right). Stripping is done to reduce inter-canine width and to create flat contact points that will not “slip” into a tooth rotation. The fiberotomy is done to release the [circumferential] elastic fibers from the tooth that will rotate at tooth back to the original position after the forces are released (from the brackets and archwires).
5. Advancement and retraction: Lee did NOT mention that he maintained the incisor near the starting position, not moving the incisors forward into the lip muscles nor back into the tongue muscle. Maintaining the starting position (AP), when possible, is of course part of maintaining the original archform, so this can be assumed. As you can see, the IP appliance was partially influenced by the concepts of retention. Yes, we want to get the teeth to a great final position, making the patients smile and mouth look the best, but then we need to keep them there. As you mature in your ortho career, you will be faced with patients returning with retention problems, especially as a General practitioner. The topic becomes more and more interesting as the years pass. *** Note: I will loosely refer to “retention” as being the time period following active orthodontics, including when the patient is wearing retainers and beyond.
What are you retaining? Growth: Differential horizontal growth after the brackets are removed can force the lower incisor lingual (recrowding) and/or the upper incisor labial (spaces), a “collision”. If the upper teeth move forward with the extra mandibular growth, then the incisors should remain stable, but if the upper incisors do NOT move forward [enough], and there is good coupling of the incisors on the final occlusion, then there is “collision” pressure on the upper and lower incisors. The lower 3x3 retainer was invented to prevent the lower incisors from moving lingual and to maintain the inter-canine width. Inter-canine width: It is accepted in the field of orthodontics that the LOWER cuspids cannot be expanded, and if they are, they will cause recrowding of the lower incisors. McGann feels that this may be due to tipping of the cuspid crowns over the crest of the labial cortical plate, which then ‘upright’ over the roots after the brackets are removed. To do something about this, McGann invented the Labial root torque bracket (La) to be used when expanded archwires are used in the lower arch. Assuming the archwires are eventually rectangular during treatment, and these archwires
engage the bracket slot, the roots move labial, compensating for the labial crown tipping. The archwire shape and size is the most important influence on inter-canine width. The patented concept of using the lingual shadow of the lower arch to determine the shape of the archwire, can also be important in retention. The lingual shadow represents the shape of the mandible, which could be the dento-alveolar bone (more superior shadow) or the basal bone (inferior shadow). It makes sense to match the shape of the mandible at the same time that you are diagnosing which shape is best for the dental arch. Matching the two should lead to improved retention. Before the invention of the IP archwire system, nearly all archwire shapes were ‘ovoid’, this being because it is the easiest shape to manufacture. In the time before these preformed ‘generic’ shapes and sizes, each distributor must have their own shape, the orthodontist had to make an archwire for each patient, matching the dental archform and size. This was called the “diagnostic arch” concept. But that was time consuming, so preformed archwires quickly took over private practice, no matter what was taught in ortho school. The lingual shadow discovery formed the basis for an excellent archwire system. In general you want to maintain the original size and shape, but on occasion, we use non-coordinated archforms and shapes that are different than the lingual shadow. When this is done, we are changing the original starting condition of that individual patients mouth, which should be considered the most stable position…the teeth are in that position for a reason, in balance with the patients muscles, speech, and habits. ** lower 3x3 and clear overlay retainers maintain inter-canine width quite well.
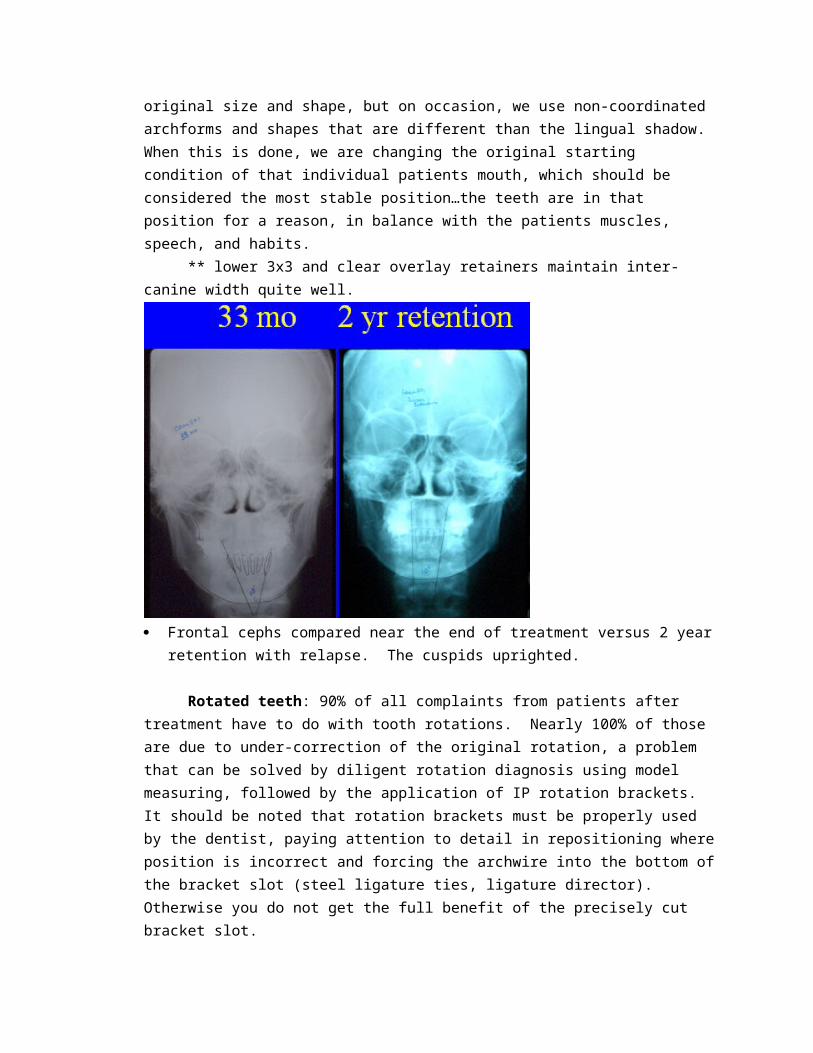
Frontal cephs compared near the end of treatment versus 2 year retention with relapse. The cuspids uprighted.
Rotated teeth: 90% of all complaints from patients after treatment have to do with tooth rotations. Nearly 100% of those are due to under-correction of the original rotation, a problem that can be solved by diligent rotation diagnosis using model measuring, followed by the application of IP rotation brackets. It should be noted that rotation brackets must be properly used by the dentist, paying attention to detail in repositioning where position is incorrect and forcing the archwire into the bottom of the bracket slot (steel ligature ties, ligature director). Otherwise you do not get the full benefit of the precisely cut bracket slot. As of this writing, there are no other brackets on the market except for the IP appliance that have rotation brackets. The zero degree slot (for rotation) in all straight wire type brackets will routinely result in an under-correction of the tooth rotation. To compensate for this, orthodontists will (I did too in the past), a) Move the bracket off-center to the side of the [lingual] rotationb) Vary the adhesive thickness on the bonding pad to compensate for the
under-correctionc) Make second order wire bends to rotate teeth beyond where the bracket
and archwire would take them. Most orthodontists are not going to do this, as it is very time consuming and stressful on the mind.
The period of time that the teeth are in their final (straight) position is important for stability in retention. Evidence can be pointed to cases that are treated in a short time period, maybe 6 months, and the experience of instability is very poor. I have a minimum of 1 year in my mind to treat an ortho case (with rotations), even if the case is perfect after 6 months. The supporting tissues of the teeth need this time to re-organize the tissue cells and fibers, the process is at least 6 months for the exchange.
With this in mind, the capability to FULLY correct tooth rotations on the first alignment wires is fantastic. Then during the mechanics and finishing, the tooth is fully corrected. This is similar to what Lee Beose was doing with his wire bending early in the case treatment, where most would only bend wires, if at all, at the end of the treatment in “finishing”. Correcting rotations in finishing is NOT good for retention as the brackets are likely removed the minute the rotation is finally corrected. Expect these teeth to be unstabile in retention.
Supracrestal circumferential fiberotomy (“fiberotomy”) was first presented by Edwards in 1981. He showed the elasticity of the gingival fibers surrounding the teeth (circumferential fibers) influenced if a tooth stayed straight or returned to the starting rotation position. He placed tattoo dots
vertically on the labial of a rotated lower incisor, straightened the tooth (the tattoo dots moved to the side), and then released the archwire and the dots returned to the original position as the tooth relapsed.
In POS, I recommend the use of ‘fiberotomy’, separating the gingival fibers from the previously rotated tooth and then let them reattach in the new position. Yes, 360 degrees, “circumferential” and I put the blade into the sulcus and sever the fibers all the way to the bone (or PDL). Which teeth? The ones that a patient would “see” and complain if it rotated again, but for sure moderate to severe rotations. I feel “which teeth” should be decided at the original diagnosis, when you have the information from model measuring handy. The purpose is to improve the retention experience.
** notice that I have dealt with everything that the very skilled orthodontist Lee Beose was doing and YOU can easily to the same, with ¼ the effort and skill. From the retention experience shown on the “life change” reports in this seminar, the IP experience is definitely improved over the days of straight wire.
When selecting the type of retainer for tooth rotations, think of these concepts:
1. Lower 3x3. These retainers are good to maintain inter-canine width, to prevent the constriction on the incisors, andto prevent the lingual drifting AS LONG AS the lingual bar is in contact with the mesial AND distal line angles of the tooth (or is bonded to the tooth). But what if a tooth rotates labial, away from the lingual bar? The concept is that the upper incisors are supposed to prevent that from happening. OK, in a perfect world. When a tooth rotates with the retainer securely in place, then YOUR retainer did not work and it is your responsibility to align the teeth again, for free, right? If one side or any bonding point debonds, and a tooth rotates, then your retainer ‘broke’, must not have been made right, so it is your responsibility to realign, right? NO, we want to shift the responsibility to the patient, off our shoulders, and this is best done with a removable retainer.
2. Hawley: I used hawleys and 3x3s BEFORE inventing the current clear overlay retainer in 1984-85. Hawley’s were not routinely worn by the patient, even when they were well adapted (I used a biostar machine). They are simply too bulky and more difficult to wear than the brackets and bands were. The labial bow did NOT maintain rotations well, and I was a master at bending that bow to contact the key points on each tooth to maintain the rotation.
3. Clear overlay: this is the best overall retainer to retain tooth rotations, assuming that you have a perfect adaptation of the acrylic to the teeth. The teeth simply cannot rotate if the retainer is being worn. Now, if a
patient presents with a rotated tooth, you can simply say they did not wear the [clear] retainer enough, and sure enough the retainer does not fit anymore. Responsibility shifted to the patient for realignment. ** note: if the retainer is NOT well adapted, as can be with vacuum formers and even models that are processed when they are too wet (the heat creates steam that ruins the adaptation), the teeth can rotate within the retainer and now the retainer still ‘fits’ with the rotated tooth…ooops, your responsibility.
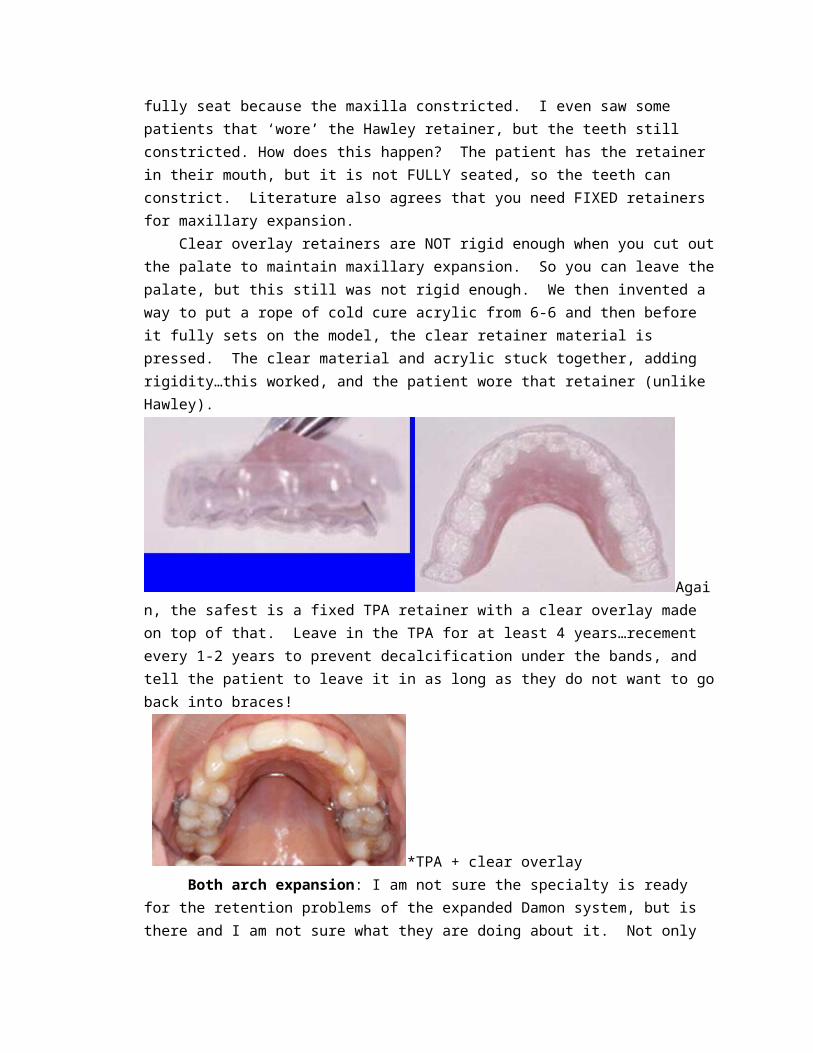
Maxillary expansion: Clear overlay and hawley retainers do NOT retain expansion well, so if you have expanded in a case (eg. RPE, not simply non coordinated archwires), then use a TPA (fixed retainer, straight wire soldered to blank bands) with a clear overlay retainer (retain tooth rotations) on top. Hawley retainers would seem to do the job, being rigid in the cross palatal dimension, BUT patients generally do not consistently wear Hawley retainers, so they eventually come in saying the ‘retainer does not fit anymore’. The acrylic does not fully seat because the maxilla constricted. I even saw some patients that ‘wore’ the Hawley retainer, but the teeth still constricted. How does this happen? The patient has the retainer in their mouth, but it is not FULLY seated, so the teeth can constrict. Literature also agrees that you need FIXED retainers for maxillary expansion. Clear overlay retainers are NOT rigid enough when you cut out the palate to maintain maxillary expansion. So you can leave the palate, but this still was not rigid enough. We then invented a way to put a rope of cold cure acrylic from 6-6 and then before it fully sets on the model, the clear retainer material is pressed. The clear material and acrylic stuck together, adding rigidity…this worked, and the patient wore that retainer (unlike Hawley).
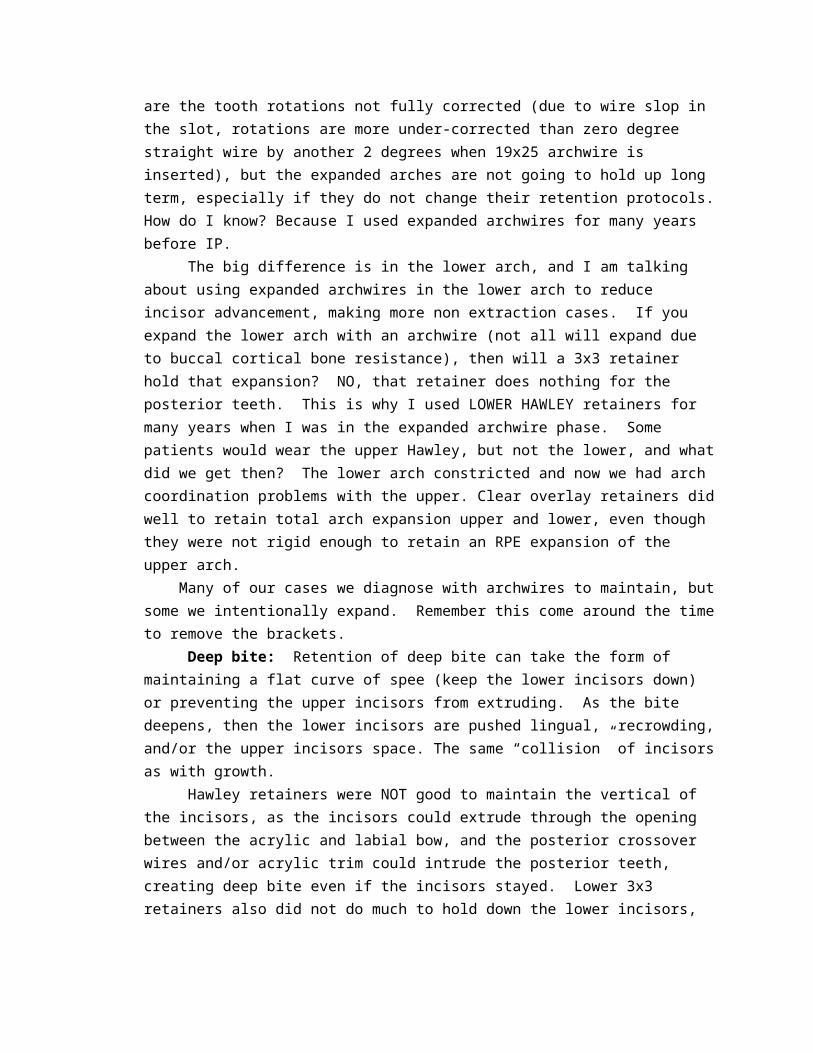
Again, the safest is a fixed TPA retainer with a clear overlay made on top of that. Leave in the TPA for at least 4 years…recement every 1-2 years to prevent decalcification under the bands, and tell the patient to leave it in as long as
they do not want to go back into braces!
*TPA + clear overlay Both arch expansion: I am not sure the specialty is ready for the retention problems of the expanded Damon system, but is there and I am not sure what they are doing about it. Not only are the tooth rotations not fully corrected (due to wire slop in the slot, rotations are more under-corrected than zero degree straight wire by another 2 degrees when 19x25 archwire is inserted), but the expanded arches are not going to hold up long term, especially if they do not change their retention protocols. How do I know? Because I used expanded archwires for many years before IP. The big difference is in the lower arch, and I am talking about using expanded archwires in the lower arch to reduce incisor advancement, making more non extraction cases. If you expand the lower arch with an archwire (not all will expand due to buccal cortical bone resistance), then will a 3x3 retainer hold that expansion? NO, that retainer does nothing for the posterior teeth. This is why I used LOWER HAWLEY retainers for many years when I was in the expanded archwire phase. Some patients would wear the upper Hawley, but not the lower, and what did we get then? The lower arch constricted and now we had arch coordination problems with the upper. Clear overlay retainers did well to retain total arch expansion upper and lower, even though they were not rigid enough to retain an RPE expansion of the upper arch. Many of our cases we diagnose with archwires to maintain, but some we intentionally expand. Remember this come around the time to remove the brackets. Deep bite: Retention of deep bite can take the form of maintaining a flat curve of spee (keep the lower incisors down) or preventing the upper incisors from extruding. As the bite deepens, then the lower incisors are pushed lingual, recrowding, and/or the upper incisors space. The same “collision” of incisors as with growth. Hawley retainers were NOT good to maintain the vertical of the incisors, as the incisors could extrude through the opening between the acrylic and labial bow, and the posterior crossover wires and/or acrylic trim could intrude the posterior teeth, creating deep bite even if the incisors stayed. Lower 3x3 retainers also did not do much to hold down the lower incisors, as the entire segment 3-3 could extrude, the concept being that the perfect occlusion with the upper incisors would prevent this.
Again, clear overlay retainers came to the rescue to retain the vertical position of the incisors. The patients could be expected to wear these retainers, unlike the Hawley. Open bite: Whenever you are thinking how to retain a case, try to imagine (or look on an overlay!) where the teeth moved. If you intruded the upper molars to correct the open bite (skeletal anchorage), then you need to retain the molars from extruding. If the incisors extruded to close the anterior open bite, then you need to prevent these teeth from intruding again. Do hawleys do a good job of this? No. clear overlays have the best chance, just do not block out the labial undercut on the incisors, so the retainer locks into that area (harder to remove and can then have more frequent breakage problems). Just think about what you are retaining and decide what design is best. The #1 reason that anterior open bites reopen is because of relapse of the maxillary constriction. Most open bite cases have a low tongue position and a high frequency of breathing through their mouth. As a result, the upper molars extruded and constricted relative to the lower molars. Yes, the tongue is likely protruding into the space to keep air from being swallowed, but this does not seem to be the cause of open bite relapse. For this reason, anterior open bite retention looks very similar to RPE retention…TPA, straight wire soldered to blank bands with a clear overlay on top. Leave this in for at least 4 years. Spaces: Spacing between incisor teeth is a special retention problem. You canNOT over-correct the spaces, with the tooth movement stopping as soon as the teeth touch! Spacing has the following retention features: a. Compressed gingival tissue between the teeth, can separate the teeth.
For this you can improve your chances by doing a perio procedure in the interproximal spaces (not a fiberotomy, that is for rotations) to relieve the fibrous, elastic tissue from between the teeth. Inverse bevel incisions, leaving the full papilla on labial and palatal, removing the interproximal tissue and NO suture, let it granulate in. Since we are usually referring to upper incisor spacing, this surgery should make you nervous as a loss of papilla height could make dark WINDOWS. These may be a good case to refer to the periodontist.
b. Deep bite: as the bite deepens, which is a feature in most of the ‘spacing’ cases, the spaces reopen. These are the most difficult to retain. Do the best you can with bonded 3-3 (bond each tooth) and clear overlay on top, but eventually you may need some bonding or veneers to close a space that reopened. I consider these the most difficult to retain.
c. Small teeth : the most common is small upper lateral incisors, so retention should be to restore the lateral incisors to the normal size. This should NOT be done for at least 6 months after the brackets have been removed, to allow time for any spaces to relapse, so you do not get spaces between
your veneers! Of course a new retainer for a long time needs to be used after the restorative.
d. Growth : reopens spaces if there is DHG and you have made it so the lower incisors cannot move to the lingual through your lower retention efforts. Nothing much to say here except that you should be cautious about removing the brackets too early in a case (stage 3 growth), especially in boys that grow later.
e. Lingual/palatal cortical plate : Sometimes the spaces are there in the first place since the lingual cortical plate is WIDE…you especially see this in the lower arches with spacing. Treatment in those cases should be to move the posterior teeth forward, instead of the incisor teeth back to close the spaces. No special retention trick for this problem.
f. Extraction spaces: The basic orthodontic criteria is to parallel the roots on either side of the extraction space, and we do that in POS. Amazing that we can retract anterior teeth a major amount in these bimaxillary protrusive cases (lots of experience there) and not have the extraction spaces reopen. Shouldn’t the tongue push the teeth back, reopening the space? Guess not. That said, there are cases where the gingival tissue piles up in the extraction space, or the space was especially difficult to close. Again, you cannot over-correct space closure. If in doubt, do an ‘extraction space’ fiberotomy, a procedure with inverse bevel incisions on both sides removing the interproximal tissue (not really a fiberotomy). There is a video on this in your ‘extra study videos’, seminar 11.
Removable or Fixed retainer (or both) If the retainer is fixed, then the patient looks at any failures as YOUR failure. This is the most common problem with 3x3 fixed retainers. If the retainer is removable, then if anything moves, then the patient must not have worn the retainer enough, their responsibility [if the retainer does not fit anymore]. If the retainer is difficult to wear, even worse than the brackets themselves, then of course it is not going to do the job. Patients universally do NOT wear hawley retainers as they are more uncomfortable than the brackets that were just removed. I even demanded that they get the Hawley the same day the brackets were removed, not so much that the teeth would move, but so the patient would not get that WONDERFUL feeling of nothing in their mouth and 3 days later slamming in a hunk of acrylic. You should have seen the way they looked at me! Deliver the Hawley more than 3 days after deband and expect the Hawley will not fit, a remake. If you cannot get this service where you practice, then you need to make a clear overlay (vacuum machine is ok) for the period needed by the lab to make the Hawley.
Hawley retainers often do NOT retain tooth rotations, and frequently open spaces between the teeth (crossover wires or the acrylic between the teeth) or open the bite as the acrylic settles. Patients WILL universally wear a clear overlay retainer. Most of these principles were developed by Me and my lab tech Heinz Rief in 1984-5. I still like the clear overlay retainer, 030 trutain as being the best OVERALL retainer material. Use a thicker material (to prevent breakage) and it will be too bulky and difficult to insert and remove for the patient.
Types of Retainers
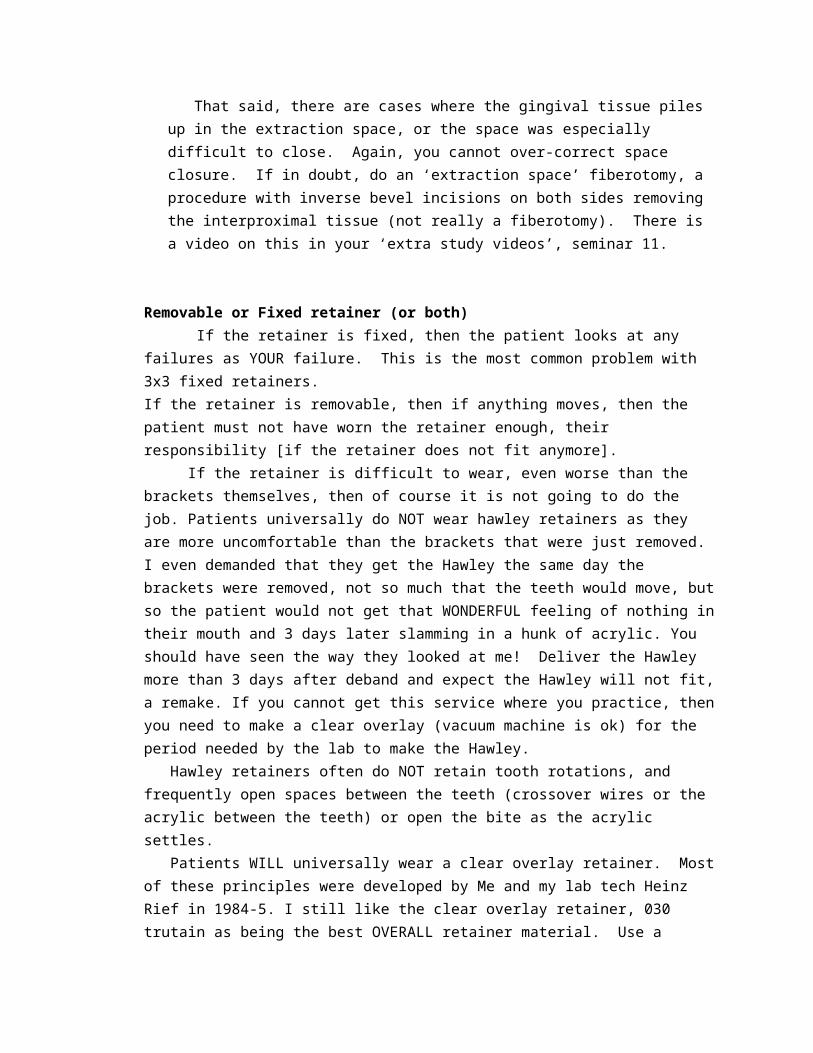
*clear overlay retainers (above). It is common to have “fog” when first delivered, but this will go away as the saliva coats the retainer (similar to a mask for seeing under the water).
a. Clear overlay: (“essex” is another word used for these in the specialty) This is a wonderful retainer, BUT you MUST get the teeth visually in occlusion to use this retainer, since “settling” of teeth that are open will be much less than with the other retainers. That means you must do a good job in finishing with archwires and bracket repositioning!! Once this retainer has been chosen, you need a VERY ACCURATE impression. At deband, I would take 2 alginate impressions. The most accurate was used to make the retainer, the second was used for the final study models. Do NOT use one impression for both. I know you can first made the clear overlay, then repour for the study models, but the study models will be DISTORTED, and that is NOT what you want with your final records. Preparing the study model is critical, blocking out undercuts, especially on the palatal and lower lingual. Heinz used cold cure acrylic for this, as the wax would melt in the biostar processing. The machine that either sucks down the material onto the study model (vacuum form) or positive pressure (biostar) is the MOST critical to the success of this retainer. You need a great adaptation, with no spaces between the teeth and the material (and be sure to cover at least part of the 7s or the bite will open as they extrude). Positive pressure machines (biostar, minister from great lakes ortho…link below) give a superior fit when compared to vacuum formers. **If the retainer is not supported underneath with tooth (good
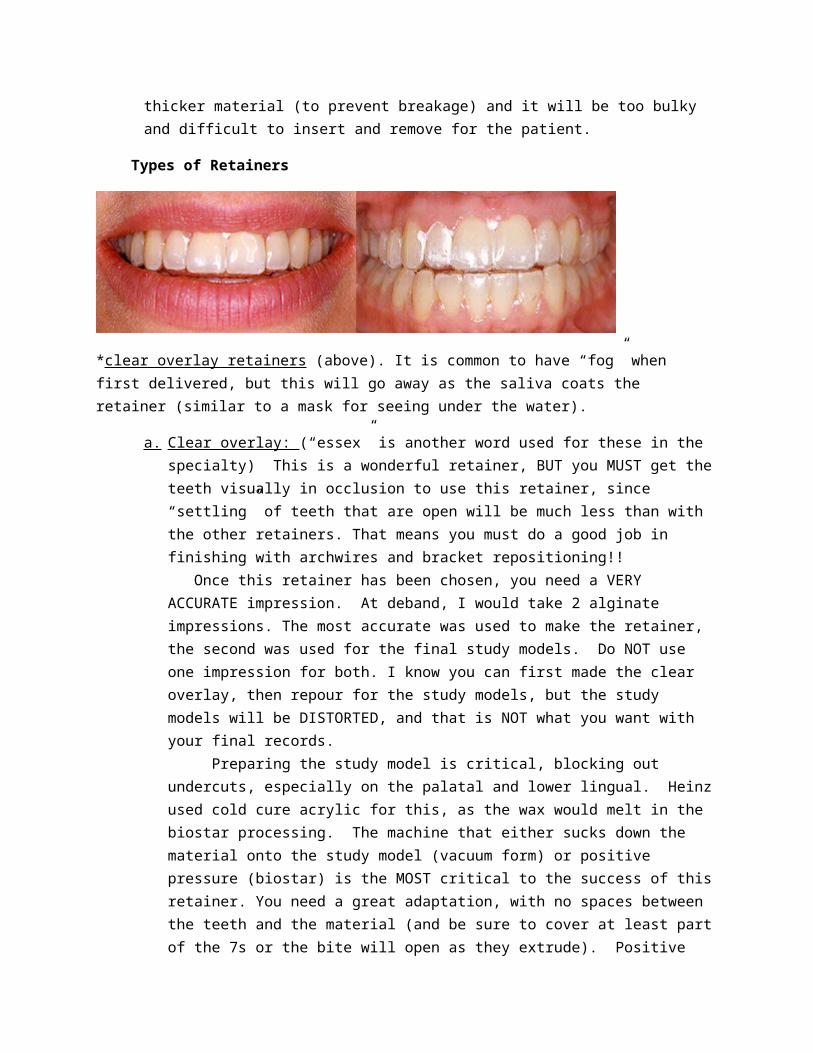
adaptation), it will break. Breakage: If the clear overlay retainer splits at the midline, then this is from insertion and removal. If the patient struggles to remove the retainer, then it will split...and is really then YOUR fault, as you need to trim the retainer (and prepare the study model) so the patient can easily remove the retainer and insert it...instructions are very important. Tell the patient to remove the retainer BOTH sides at the same time, not one side, then the other, or it will split at the midline. Also, do not bite the retainer to place, finger pressure only. Using thicker material will make the retainer uncomfortable to the patient and difficult to insert and remove.
**trim so the upper anterior labial 3-3 ends 2mm onto gingival tissue, then is trimmed on the buccal to the height of contour of bicuspids and molars for easy removal.
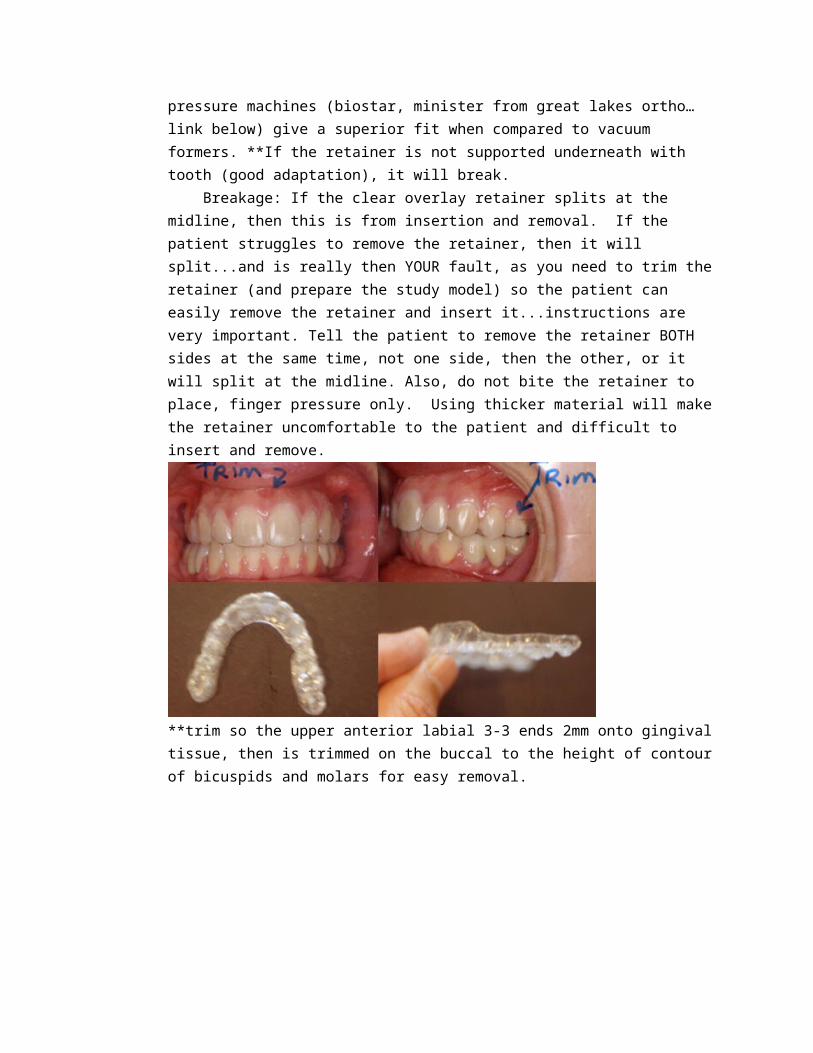
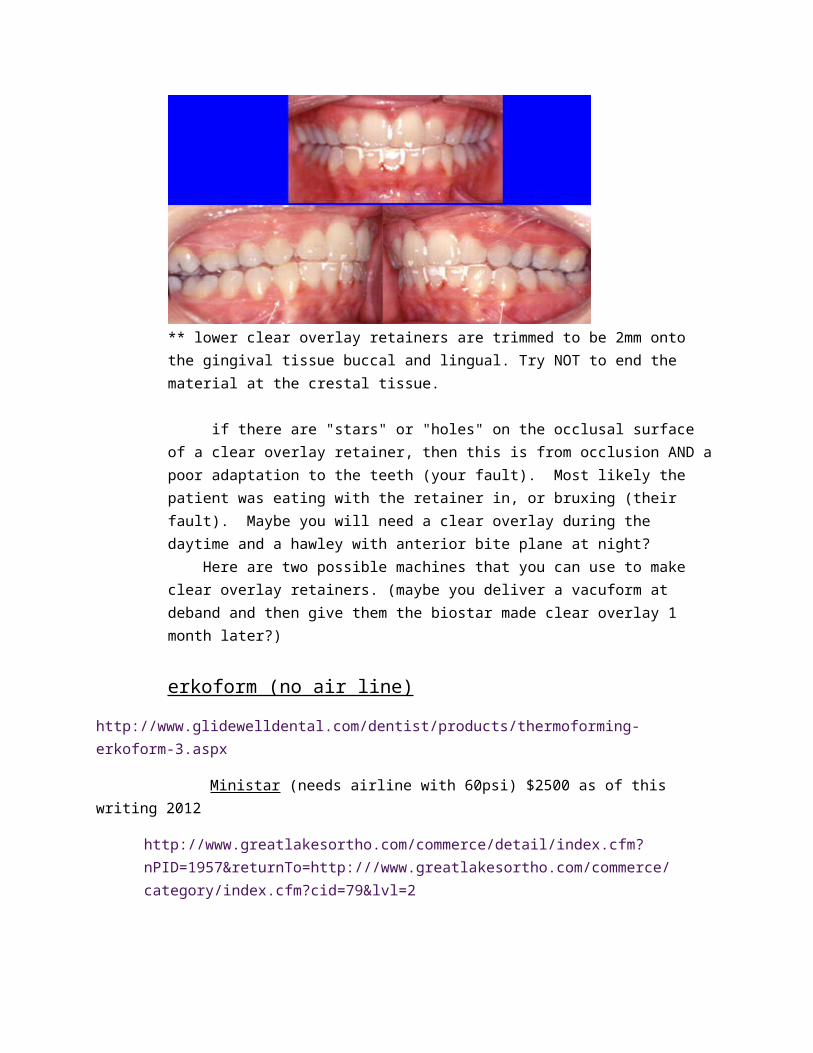
** lower clear overlay retainers are trimmed to be 2mm onto the gingival tissue buccal and lingual. Try NOT to end the material at the crestal tissue.
if there are "stars" or "holes" on the occlusal surface of a clear overlay retainer, then this is from occlusion AND a poor adaptation to the teeth
(your fault). Most likely the patient was eating with the retainer in, or bruxing (their fault). Maybe you will need a clear overlay during the daytime and a hawley with anterior bite plane at night? Here are two possible machines that you can use to make clear overlay retainers. (maybe you deliver a vacuform at deband and then give them the biostar made clear overlay 1 month later?)
erkoform (no air line)
http://www.glidewelldental.com/dentist/products/thermoforming-erkoform-3.aspx
Ministar (needs airline with 60psi) $2500 as of this writing 2012
http://www.greatlakesortho.com/commerce/detail/index.cfm?nPID=1957&returnTo=http:///www.greatlakesortho.com/commerce/category/index.cfm?cid=79&lvl=2
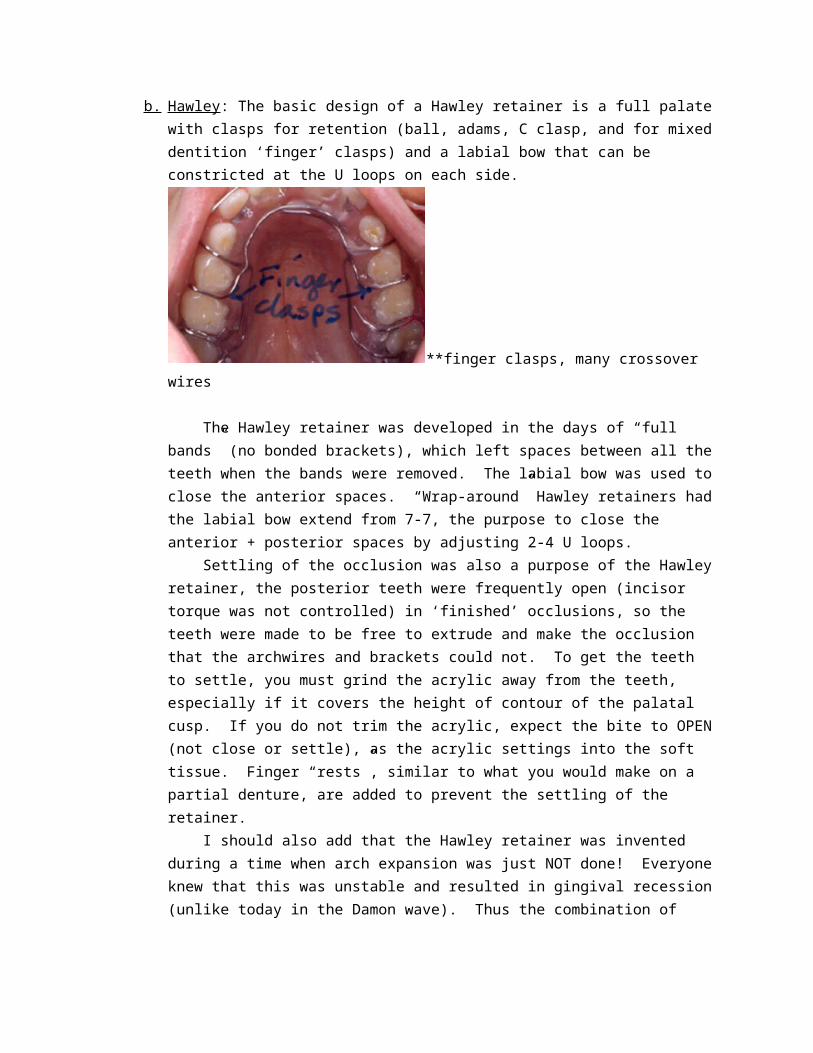
b. Hawley : The basic design of a Hawley retainer is a full palate with clasps for retention (ball, adams, C clasp, and for mixed dentition ‘finger’ clasps) and a labial bow that can be constricted at the U loops on each side.
**finger clasps, many crossover wires
The Hawley retainer was developed in the days of “full bands” (no bonded brackets), which left spaces between all the teeth when the bands were removed. The labial bow was used to close the anterior spaces. “Wrap-around” Hawley retainers had the labial bow extend from 7-7, the purpose to close the anterior + posterior spaces by adjusting 2-4 U loops. Settling of the occlusion was also a purpose of the Hawley retainer, the posterior teeth were frequently open (incisor torque was not controlled) in ‘finished’ occlusions, so the teeth were made to be free to extrude and make the occlusion that the archwires and brackets could not. To get the teeth to settle, you must grind the acrylic away from the teeth, especially if it covers the height of contour of the palatal cusp. If you do not trim the acrylic, expect the bite to OPEN (not close or settle), as the acrylic settings into the soft tissue. Finger “rests”, similar to what you would make on a partial denture, are added to prevent the settling of the retainer.
I should also add that the Hawley retainer was invented during a time when arch expansion was just NOT done! Everyone knew that this was unstable and resulted in gingival recession (unlike today in the Damon wave). Thus the combination of upper Hawley and lower 3x3 did not result in arch coordination problems as it would today if expanded archwires were used. LOWER hawleys have the same design, except that there cannot be the support from the cross arch acrylic (tongue is in the way). For this reason, if you use cold cure acrylic in a pressure pot, a lower Hawley will predictably break. The ONLY method to make a lower Hawley that works is on a biostar and this is very labor intensive after the plate is pressed onto the model.
**lower Hawley with soldered clasp from labial bow to the 4s (avoids crossover wire for clasping)
Models used to make Hawley retainers are destroyed as the Hawley is removed from the model. *** note: I also used biostar machine to make upper hawleys, the advantage being that I could make a partial palate, relieving that ‘gagging’ feeling which cuts into the retainer wear faster than they can make it to the front door.
**tooth rotated even though the Hawley retainers were worn and still fit
Clasps: Having used them all, I preferred using ‘ball’ clasps on permanent dentition cases. The only requirement was that you canNOT pass the crossover wire (wire passes over the occlusal surface) through the extraction space! If you did, then the extraction space would reopen as the retainer settled.
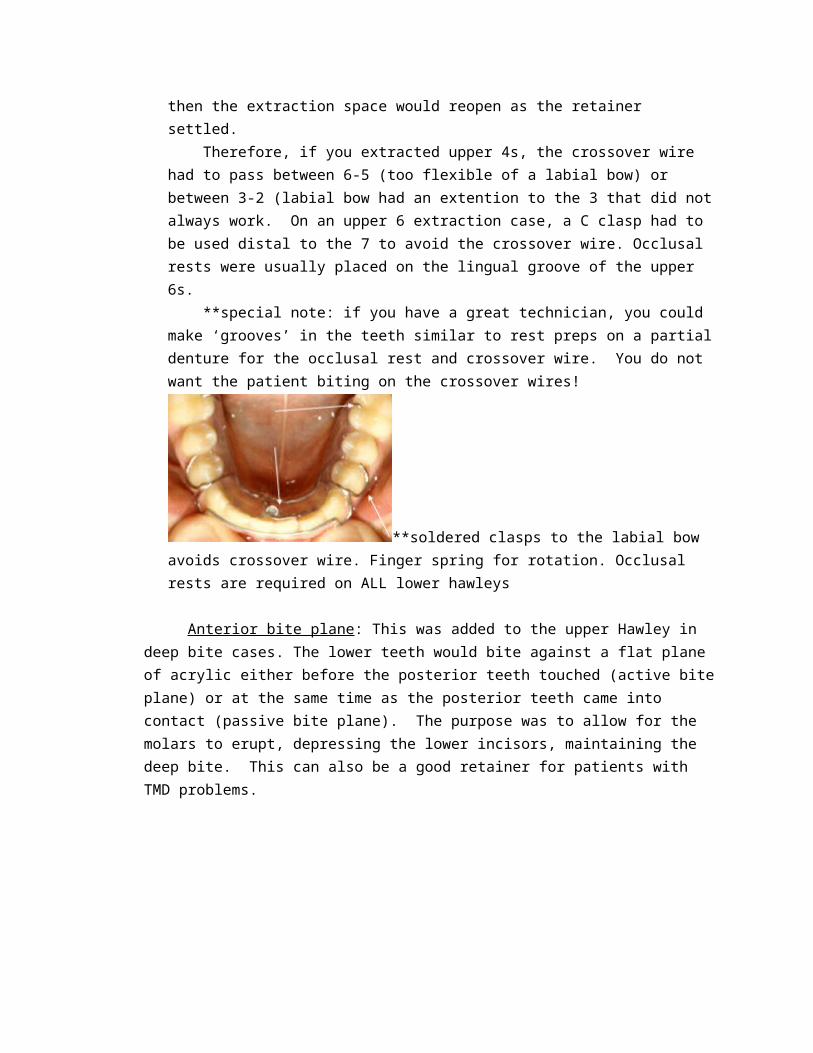
Therefore, if you extracted upper 4s, the crossover wire had to pass between 6-5 (too flexible of a labial bow) or between 3-2 (labial bow had an extention to the 3 that did not always work. On an upper 6 extraction case, a C clasp had to be used distal to the 7 to avoid the crossover wire. Occlusal rests were usually placed on the lingual groove of the upper 6s. **special note: if you have a great technician, you could make ‘grooves’ in the teeth similar to rest preps on a partial denture for the occlusal rest and crossover wire. You do not want the patient biting on the crossover wires!
**soldered clasps to the labial bow avoids crossover wire. Finger spring for rotation. Occlusal rests are required on ALL lower hawleys
Anterior bite plane: This was added to the upper Hawley in deep bite cases. The lower teeth would bite against a flat plane of acrylic either before the posterior teeth touched (active bite plane) or at the same time as the posterior teeth came into contact (passive bite plane). The purpose was to allow for the molars to erupt, depressing the lower incisors, maintaining the deep bite. This can also be a good retainer for patients with TMD problems.
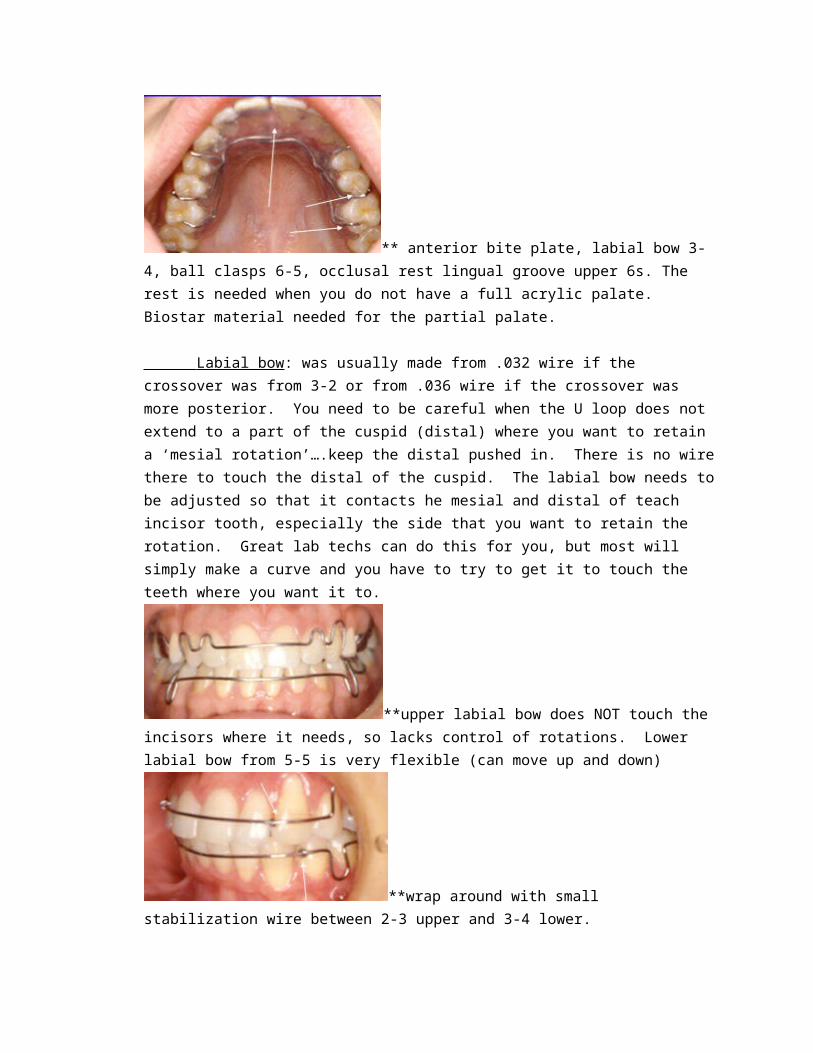
** anterior bite plate, labial bow 3-4, ball clasps 6-5, occlusal rest lingual groove upper 6s. The rest is needed when you do not have a full acrylic palate. Biostar material needed for the partial palate.
Labial bow : was usually made from .032 wire if the crossover was from 3-2 or from .036 wire if the crossover was more posterior. You need to be careful when the U loop does not extend to a part of the cuspid (distal) where you want to retain a ‘mesial rotation’….keep the distal pushed in. There is no wire there to touch the distal of the cuspid. The labial bow needs to be
adjusted so that it contacts he mesial and distal of teach incisor tooth, especially the side that you want to retain the rotation. Great lab techs can do this for you, but most will simply make a curve and you have to try to get it to touch the teeth where you want it to.
**upper labial bow does NOT touch the incisors where it needs, so lacks control of rotations. Lower labial bow from 5-5 is very flexible (can move up and down)
**wrap around with small stabilization wire between 2-3 upper and 3-4 lower.
“Wrap around” labial bow extends from 7-7, with small crossover wires often placed to the wire into the palatal acrylic to stabilize the bow. It is too flexible and moves up and down. To close spaces, be sure you have relieved the acrylic from the interproximal space on the palate.
** wrap around with supporting wires between 2-3. Clasping wraps around distal to 7s.
**wrap around retainers: above
**trim acrylic away from the extraction space upper 5s. C clasp distal to the 7s, labial bow with crossover 3-4.
Palatal Acrylic: needs to be adjusted on every Hawley retainer you deliver. Simply take the retainer out of the box and insert it without adjustment and you will be very disappointed! Contact points will open, bites will open, and teeth will rotate.
** acrylic covering the height of contour of the bicuspids will open the bite. Soldered clasps to the labial bow avoid crossover wires, anterior bite plane in the partial acrylic palate.
With a bur on a high speed handpiece or small acrylic bur on a lathe, thin the acrylic between the interproximal contacts of the teeth. If you want to hold a space, then grind the acrylic in the space and keep the acrylic touching on the opposite side of the adjacent teeth. Also trim the acrylic covering the height of contours, especially on the palatal cusps of bicuspids or the retainer may intrude these teeth!
Hawley with a ‘rake’ to discourage anterior tongue trust

**finger spring soldered to labial bow for rotated tooth correction
3x3 (bonded): 3x3 retainers were intended to be soldered to bands on the lower 3s, retaining the inter-canine width and preventing the lower incisors from drifting (or being pushed) lingual by growth after the brackets were removed. Patients did not like the silver band on their front teeth, so Bonded 3x3 retainers came into use.
**banded 3x3 We soon found out that a rigid stainless steel wire that was used on banded 3x3 retainers led to almost immediate debonding as the teeth are moving up and down in the socket. A more flexible wire needed to be used. Braided stainless steel or twisted stainless steel wires became the standard not only for the needed flexibility, but also that the bonding agent could be placed “into” the wire without having to weld a bonding pad to the lingual wire. Many of these failed, with debonding of one side and teeth moving before the patient realized it and/or was able to return for the repair. Then bonding was extended to include ALL the incisors and cuspids 3-3, and the need for even more flexible wires became evident as the bond failure was now very common, but on one or more of the 6 bonded teeth. Now what do you do? Fortunately, the bonding agents improved, so now it is fairly acceptable to bond the 6 teeth together without expecting big problems with debonding. Now the problem is compromised hygiene around the bonded teeth!!
**spiral wire with ligature wires holding the wire to the teeth as bonding is completed. A transfer tray can be made at the lab with flowable composite pushed through holes in the transfer tray if you do not want to do this.
If you think the patient is NOT going to wear a clear overlay retainer, then I would suggest a bonded 3x3 with a clear overlay on top.
**2 cases with teeth that rotated ‘away’ from the lingual bar. Now what?
Positioner: soft acrylic made over the models with the teeth reset into an acceptable occlusion. This is more a finishing device for those that cannot get the teeth into an acceptable occlusion with archwires and brackets and elastics. Very difficult to wear, so many are completely unsuccessful with this finishing device. My experience was with patients treated with lingual brackets, a highly motivated adult population, and I would say that only 20% were successful with the positioned. Some have used positioners as retainers for class III growing patients, thinking this will keep the teeth together as the lower jaw keeps growing. Forget that idea, the patient is not going to wear that appliance for that long!! A terrible retainer! Positioned below
wear time: I would suggest you use this as your standard:
First 6 months: wear the retainer full time, day and night except when you eat or brush your teeth or have a special occasion. You did not go through braces to have them go back to their original position and then have to do braces again. **1-month retainer check: see if they are still wearing it, check the retainer for signs of fracture, settling, etc. it better NOT look new! Reschedule for 6 months to give the ok to wear at night only.
1 year: wear 2-3 nights per week. If the retainer is tight when you put it in, then that means to wear it more. If it slips right in, then that means you can wear it less. The patient can feel this, you cannot. Wear indefinitely (as long as you want to keep this great look) 1 night per week.