Embed Size (px)
Citation preview
Welcome to “The Deadly Device” (DED) Walkthrough! If it’s your first time to play any Nancy Drew game, then start on Amateur Detective because the puzzles are easier. However, if it’s not your first Nancy Drew game, choose whatever difficulty you want (Amateur or Master). All spoilers that appear in this walkthrough will be in red, italicized, and have the word “spoiler” in front of them.
An Electric Inception
The beginning scene opens at the laboratory of Technology of Tomorrow Today, where Niko Jovic is adjusting the Tesla Coil. He is then killed by the electric beams from the Tesla Coil while he’s adjusting it. Foul play—murder—is suspected in his death. Nancy’s called in to investigate by Victor Lossett, co-owner of the lab. Victor calls her when she arrives via video chat to give her more details and tells her to check Niko’s office for clues. He gives Nancy the password to one of Niko’s drawers: 171943.
She’ll automatically go to Niko’s office and won’t leave until she’s searched everything she can. Look around the room and notice that there’s something missing from the candy machine and the mechanical bird on the weird machine. Also notice that the bookshelves on Nancy’s left are locked. Then go to Niko’s desk. Notice that the media player isn’t working and then enter the password to Niko’s drawer. Read the case file, which mentions a security video called LBTY510258 and that someone entered before Niko’s death, yet the camera shows someone enter after his death. Then leave the office.
Notice the red button on the wall at the bottom of the stairs. That’ll come in handy later. Go around to the other side of the room and look at the board next to the doors going to the main lab. Look at the periodic table of elements and then go to the doors leading to the main lab. Click on the doors and Nancy will mention that they’re locked. Look at the keypad next to the door and Nancy mentions that she’ll need a key—a key card, that is. Turn around and go to Nancy’s right. Notice the door leading to the Security booth is locked. Then go to the elevator that’s Nancy passed on the way to the main lab. Enter them and go upstairs.
Go to Nancy’s right and enter the orange door to the Ellie York’s and Mason Quinto’s offices. They’re the research assistants for the lab. Mason will be there during the day, while Ellie’s there at night. Go to the middle cubicle, the lounge area for Mason and Ellie. Pick up the book and look through it, then put it into Nancy’s inventory. Turn around and go into Mason’s office on the left. Talk to him and then leave. Mason won’t let Nancy into Ellie’s office, so Nancy will have to find some way to look through both of their offices without them there.
Head to the other side of the hallway and look at the sign about electricity and notice the numbers are in binary right as well as normal numbers. Then go back, turn around, and enter the blue double doors. Something will fly towards Nancy and miss from Ryan’s workspace where she’s currently working at. Ryan apologizes for what happened. Continue talking to her and then look around. Look in the upper left cabinet next to Ryan’s workspace and take the empty key card and the sheet with color squares on it. Then back up and look at the motorcycle. Click on it and Nancy will ask Ryan if it’s hers. She’ll say it is, but it’s not ready yet. Then leave and go downstairs.
Go through the double doors on the left side of the elevators to the lounge, but is before Niko’s office. There will be a power outage and Victor will call Nancy and reassure her that Gray will get things back up and to get some rest. Head to the room in the back and set the alarm on the nightstand to day or night to get some sleep.
Nancy’s Alarming Night
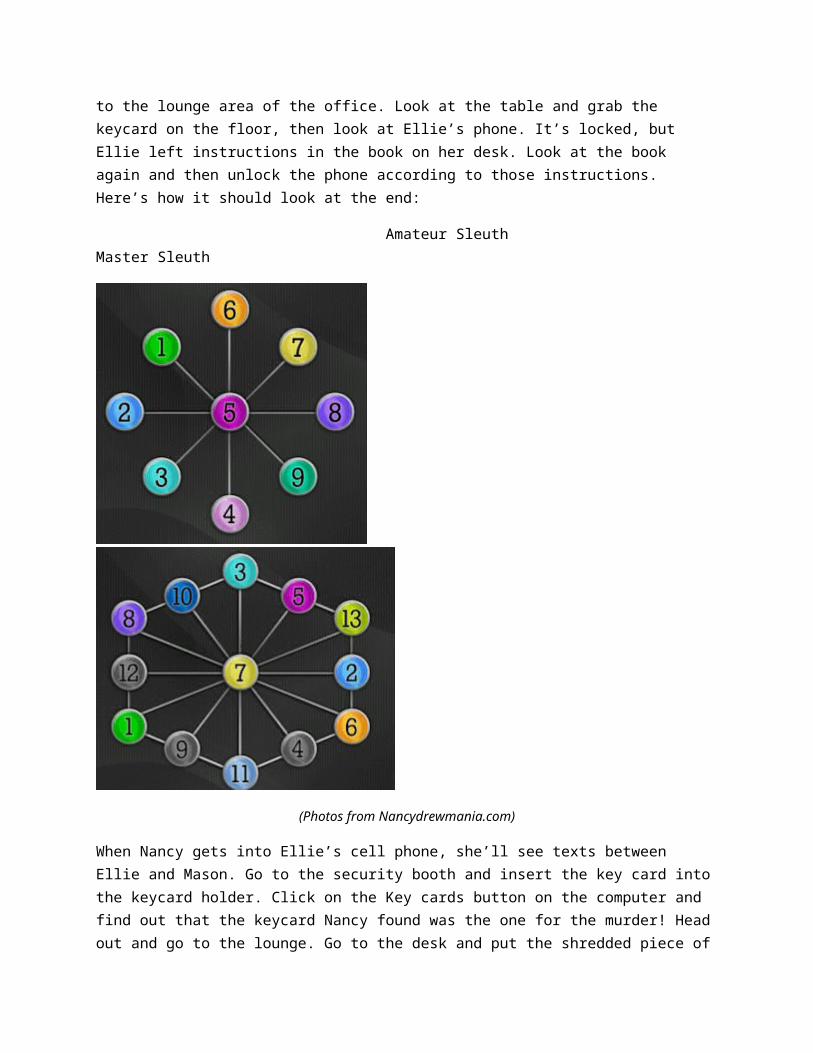
The alarm warning everyone that something’s wrong (henceforth known as the warning alarm) will wake Nancy up in the middle of the night. Get up and exit the lounge see what’s going on. Nancy will bump into Gray, the security guard. He’ll take Nancy to the electrical grid in the lab, which she has to fix. Pick up the zip ties that are holding some of the levers on the power grid in the lower right corner, and then turn the electrical grid by switching the levers so all of the lights on them are completely black. Here’s the order they should be turned in to turn off the power:
Amateur Sleuth Master sleuth
(Photos taken from Nancydrewmania.com)
After Nancy shuts the power off to the electrical grid, Gray will introduce himself and kick Nancy out of the lab. Go to the security booth and find him at his desk. Talk to him and then look at the whiteboard in his office.
The Security Booth
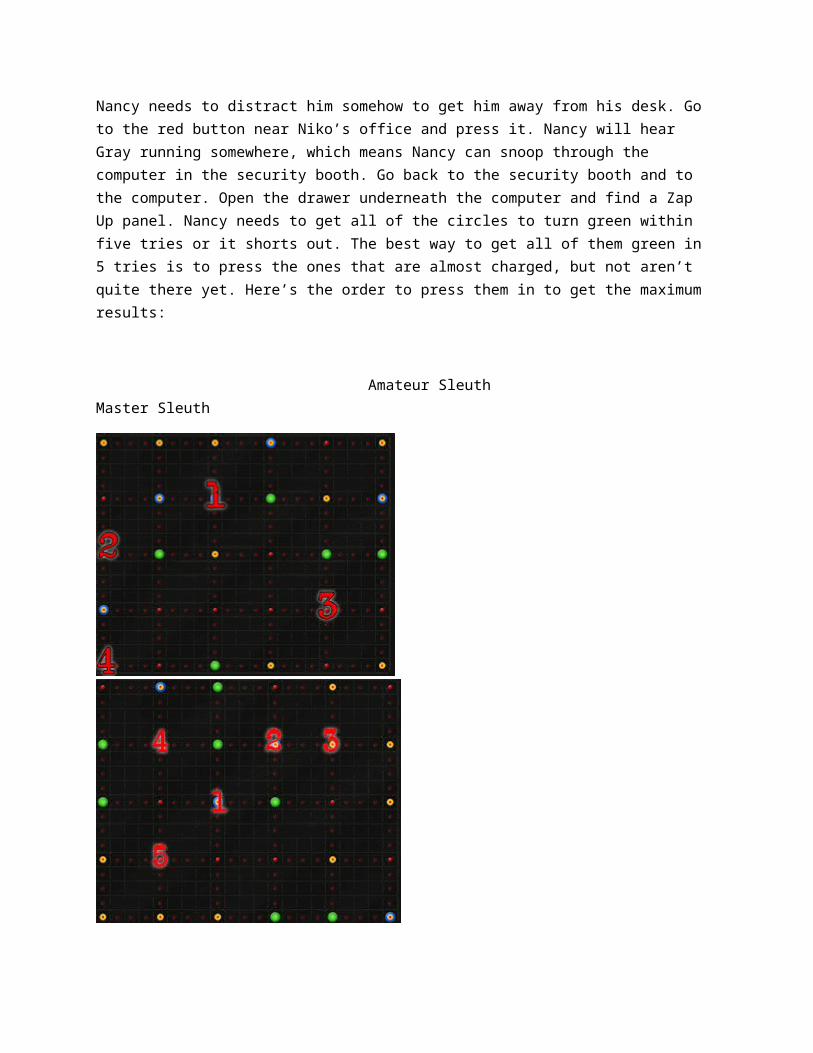
Nancy needs to distract him somehow to get him away from his desk. Go to the red button near Niko’s office and press it. Nancy will hear Gray running somewhere, which means Nancy can snoop through the computer in the security booth. Go back to the security booth and to the computer. Open the drawer underneath the computer and find a Zap Up panel. Nancy needs to get all of the circles to turn green within five tries or it shorts out. The best way to get all of them green in 5 tries is to press the ones that
are almost charged, but not aren’t quite there yet. Here’s the order to press them in to get the maximum results:
Amateur Sleuth Master Sleuth
(Photos from Nancydrewmania.com)
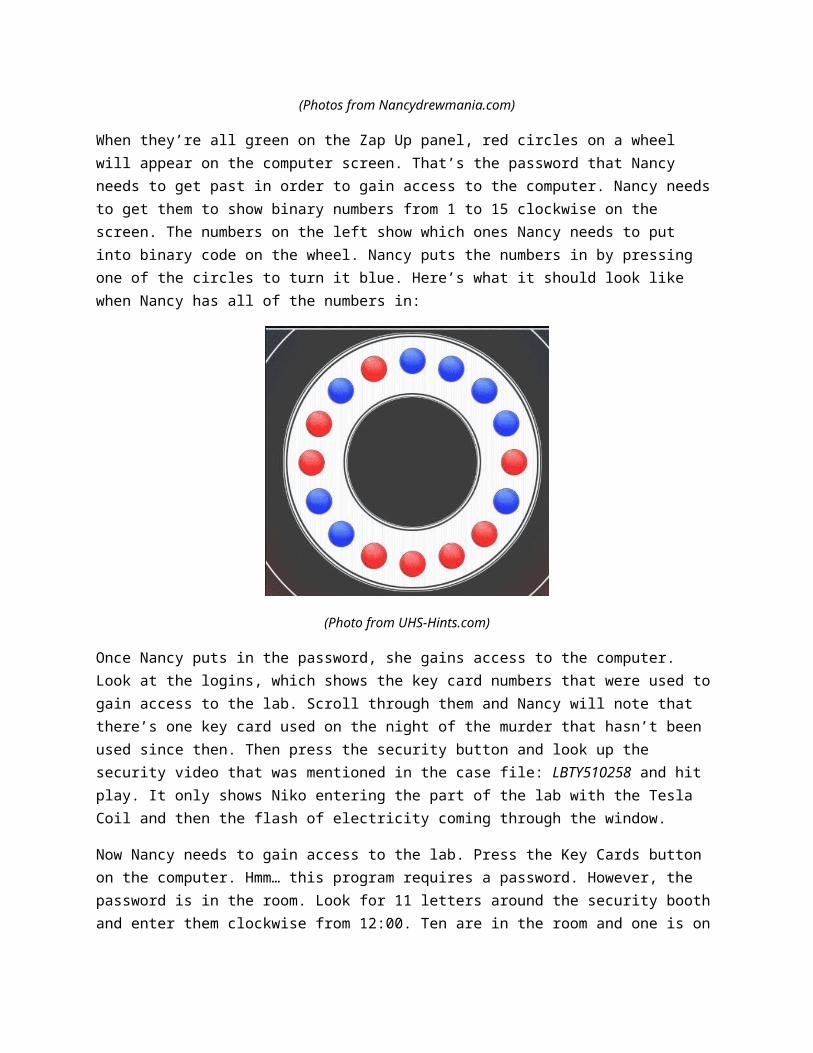
When they’re all green on the Zap Up panel, red circles on a wheel will appear on the computer screen. That’s the password that Nancy needs to get past in order to gain access to the computer. Nancy needs to get them to show binary numbers from 1 to 15 clockwise on the screen. The numbers on the left show which ones Nancy needs to put into binary code on the wheel. Nancy puts the numbers in by pressing one of the circles to turn it blue. Here’s what it should look like when Nancy has all of the numbers in:
(Photo from UHS-Hints.com)
Once Nancy puts in the password, she gains access to the computer. Look at the logins, which shows the key card numbers that were used to gain access to the lab. Scroll through them and Nancy will note that there’s one key card used on the night of the murder that hasn’t been used since then. Then press the security button and look up the security video that was mentioned in the case file: LBTY510258 and hit play. It only shows Niko entering the part of the lab with the Tesla Coil and then the flash of electricity coming through the window.
Now Nancy needs to gain access to the lab. Press the Key Cards button on the computer. Hmm… this program requires a password. However, the password is in the room. Look for 11 letters around the security booth and enter them clockwise from 12:00. Ten are in the room and one is on the remote Ryan has on a workbench. The arrow that points in a direction indicates the order it goes in.
Spoiler: the password is: vfrwodqgguhz.
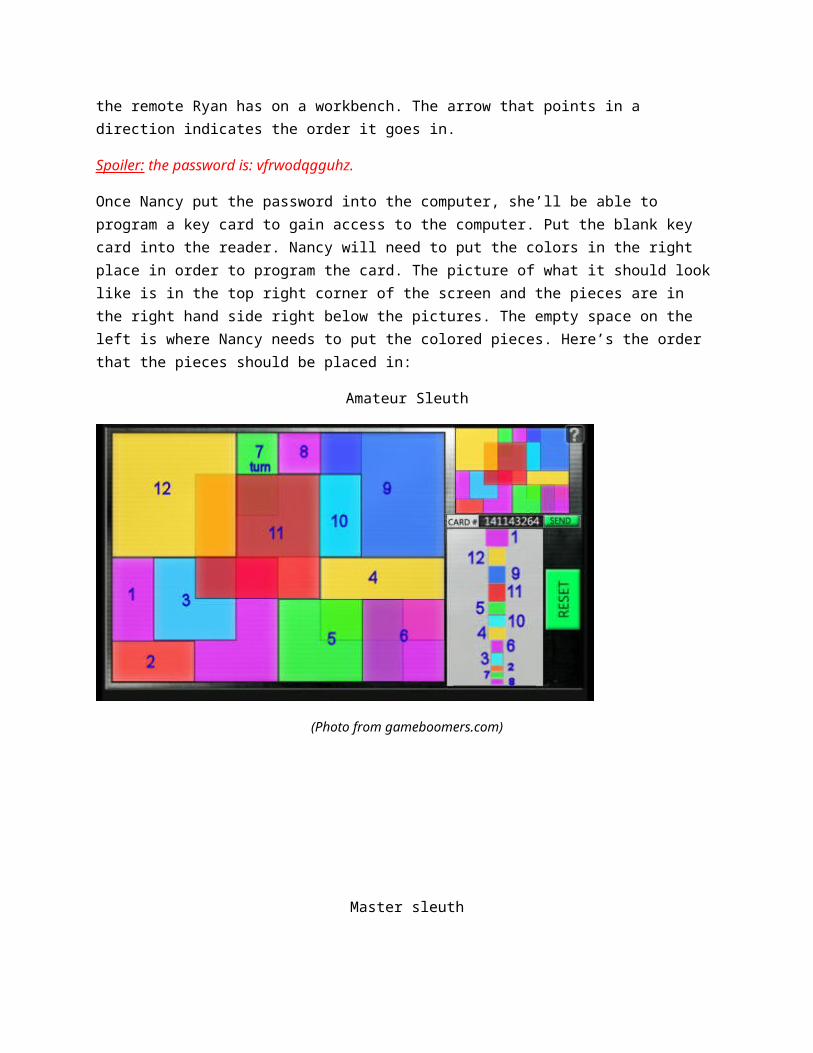
Once Nancy put the password into the computer, she’ll be able to program a key card to gain access to the computer. Put the blank key card into the reader. Nancy will need to put the colors in the right place in order to program the card. The picture of what it should look like is in the top right corner of the screen and the pieces are in the right hand side right below the pictures. The empty space on the left is where Nancy needs to put the colored pieces. Here’s the order that the pieces should be placed in:
Amateur Sleuth
(Photo from gameboomers.com)
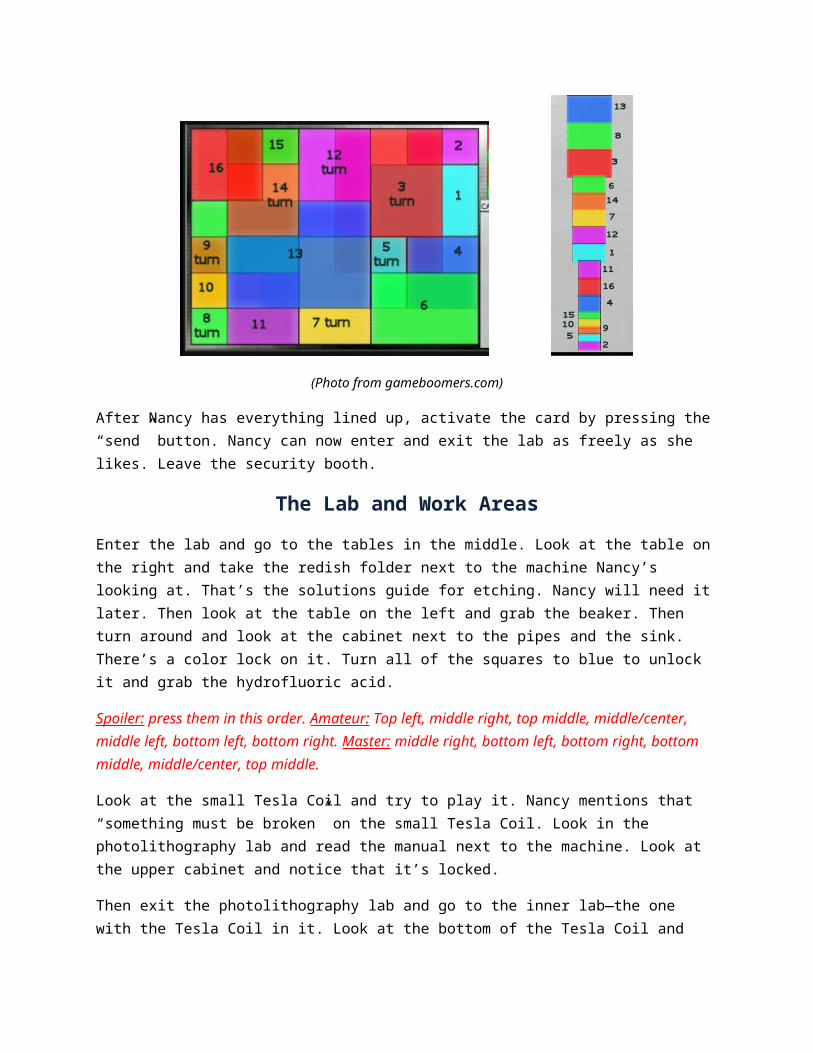
Master sleuth
(Photo from gameboomers.com)
After Nancy has everything lined up, activate the card by pressing the “send” button. Nancy can now enter and exit the lab as freely as she likes. Leave the security booth.
The Lab and Work Areas
Enter the lab and go to the tables in the middle. Look at the table on the right and take the redish folder next to the machine Nancy’s looking at. That’s the solutions guide for etching. Nancy will need it later. Then look at the table on the left and grab the beaker. Then turn around and look at the cabinet next to the pipes and the sink. There’s a color lock on it. Turn all of the squares to blue to unlock it and grab the hydrofluoric acid.
Spoiler: press them in this order. Amateur: Top left, middle right, top middle, middle/center, middle left, bottom left, bottom right. Master: middle right, bottom left, bottom right, bottom middle, middle/center, top middle.
Look at the small Tesla Coil and try to play it. Nancy mentions that “something must be broken” on the small Tesla Coil. Look in the photolithography lab and read the manual next to the machine. Look at the upper cabinet and notice that it’s locked.
Then exit the photolithography lab and go to the inner lab—the one with the Tesla Coil in it. Look at the bottom of the Tesla Coil and pull out the circuit board and the compartment above the emergency shut off switch. There are some capacitors and another piece missing from the Tesla Coil. Then go into the wire cage in the middle of the room—called the Faraday Cage—and notice the lightening rod needs to be fixed. Go upstairs and look at the lock on the door. Nancy needs help to solve the lock.
Exit the lab and go upstairs and through the orange door to talk to Ellie. She’ll show Nancy how the Tesla Coil works. Keep talking to her after she shows Nancy the Tesla Coil. When done, try entering Mason’s
workstation, since he’s not there. Ellie won’t let Nancy go into his workstation unless Nancy beats his high score at Aggregation, which is the arcade game in the lounge. Leave the office and go to the lounge. Look at countertop stove in the kitchenette and notice the knob’s missing. Then turn around and look at the exit. The Aggregation arcade game is right next to it. Play it until Nancy beats Mason’s high score, then go back to Ellie and tell her Nancy beat the score. She’ll let Nancy look around at Mason’s workstation.
Turn around and go see what Mason has in his office. Go to his desk and flip through the book that’s on the computer processor and the sticky note. Nancy can mess with his stuff a little by messing up his paper clips, stack of sticky notes, markers and pencils. Then look at his computer. Its password protected, but the hint is on the whiteboard and the sticky note. Look at the whiteboard and rearrange the orange letters to make two words. Use the sticky note to guide Nancy on picking which letter goes where. When Nancy finds the hint, go to the locker in her room (the room in the back of the lounge) and look at the book to find the answer. Then go back to Mason’s computer and put it in.
Spoiler: The whiteboard spells “Tesla’s Hometown” and the password is “Smiljan”.
When Nancy gets into Mason’s computer, look in the trash bin and find another security video—HLLW510257—to watch. This time, it’s on Ryan. Also look at the component designer and the record repository. Then go downstairs and press the red button to distract Gray. Once he’s gone, go into the security booth and watch the video. As Nancy exits the security booth, she’ll hear a humming sound coming from the main lab. Go upstairs and tell Ellie, who’ll go down and try to stop it.
Now is the time to snoop through Ellie’s workstation. Look at the left side of her desk. Flip through the book and then look through the little drawer. Take the key, the floppy drive, and the control booth note. Then go look at the right side of her desk. Look at the letter on the board and take the capacitors in the container with the green lid on the desk.
The Two Coils of Nikola Tesla
Head back to the lab and go to the cabinet in the photo lab. Take the key that Nancy got from Ellie’s desk and use it to unlock the cabinet. Grab one of the bags and put the silicon wafer into inventory. Exit the lab and go to Nancy’s room. Set the alarm to day. When Nancy wakes up, back up from the alarm and Deidre, a girl from Nancy’s hometown River Heights, will call. When Deidre and Nancy are done talking, go talk to Ryan. Ryan will scream because there’s a robotic cat’s head on her workstation. Nancy volunteers to find the pieces and put them together. Now, putting the mechanical cat isn’t necessary to solve the mystery, but Nancy will get an award at the end. If you don’t want the award, skip the parts about getting the robotic cat’s parts and putting them together.
Ask Ryan about repairing the Tesla Coils. For the small one, she’ll tell Nancy that the circuit board’s broken, but it’s easy for Nancy to fix it herself by using the photo lab. For the large Tesla Coil, Ryan will give Nancy the diagram for the missing piece that goes into the drawer above the emergency shut off switch. Then ask Ryan about playing the media card. She says she’ll fix the machine in Niko’s office if
Nancy gets her Koko Mallos from the candy machine. Ryan will hand Nancy the mechanism for the candy machine. Then confront her about bypassing the security system. She said she lost her keys.
After talking to Ryan, go to Niko’s office and put the mechanism into the candy machine. It’s a memory lock. To unlock the candy machine, Nancy needs to remember the sequence of lights that the lock shows. Press the yellow button to begin. The pattern is different each time it’s played, so there’s no spoiler for the lock. Writing the sequence down is a good idea and the game can be paused by hitting the menu button on the bottom left of the screen if you need it. Play the lock until the candy machine opens, then get the Koko Mallos. Go back to Ryan and give her the candy. She’ll leave to go fix the media card player. Go to her workspace and pick up the mechanical cat’s head.
Head back to the lab. Turn left and go to the sink near the cabinet where Nancy got the hydrofluoric acid from. The hydrofluoric acid will automatically be placed above the sink by Nancy. Nancy will mix the solution to etch the design on the silicon wafer to fix the small Tesla coil with. She’ll need to mix the solution carefully or else it’ll explode. Look at the solution guide. It says that Nancy needs to mix Hydrofluoric acid (HF), Nitric Acid (HNO3), and water (H2O). She needs to put the liquid into the measuring cup and then into the beaker. For Amateur sleuth, Nancy needs 3 parts HF, 1 part HNO3, and 4 parts H2O. For Master sleuth, Nancy needs 2 parts HF, 2 parts HNO3, and 1 part H2O. When Nancy has put all of the solution into the beaker, she needs to put it into one of the brown bottles on the shelf next to the hydrofluoric acid.
Spoiler: Here’s how to get the right amount of liquid into the beaker. Amateur sleuth: put HF into the 3 measuring cup, then pour into beaker. Put HNO3 into the 4 measuring cup, then pour the 4 into the 3. Pour the remaining liquid in the 4 into the beaker. Pour the liquid in 3 into the HF container. Pour H2O into the 4 and pour that into the beaker.
Master Sleuth: Pour HF into 4 measuring cup. Pour 4 into 3. Pour 4 into beaker. Pour 3 into HF container. Repeat last 4 steps again for HF. Pour H20 into the 4. Pour the 4 into the 3. Pour what's left in the 4 into the beaker. Pour the 3 measuring cup back into the H20 container. Pour HNO3 into 4. Pour 4 into 3. Pour 4 into beaker. Pour 3 into HNO3 container. Repeat last four steps again for HNO3. Pour beaker into bottle.
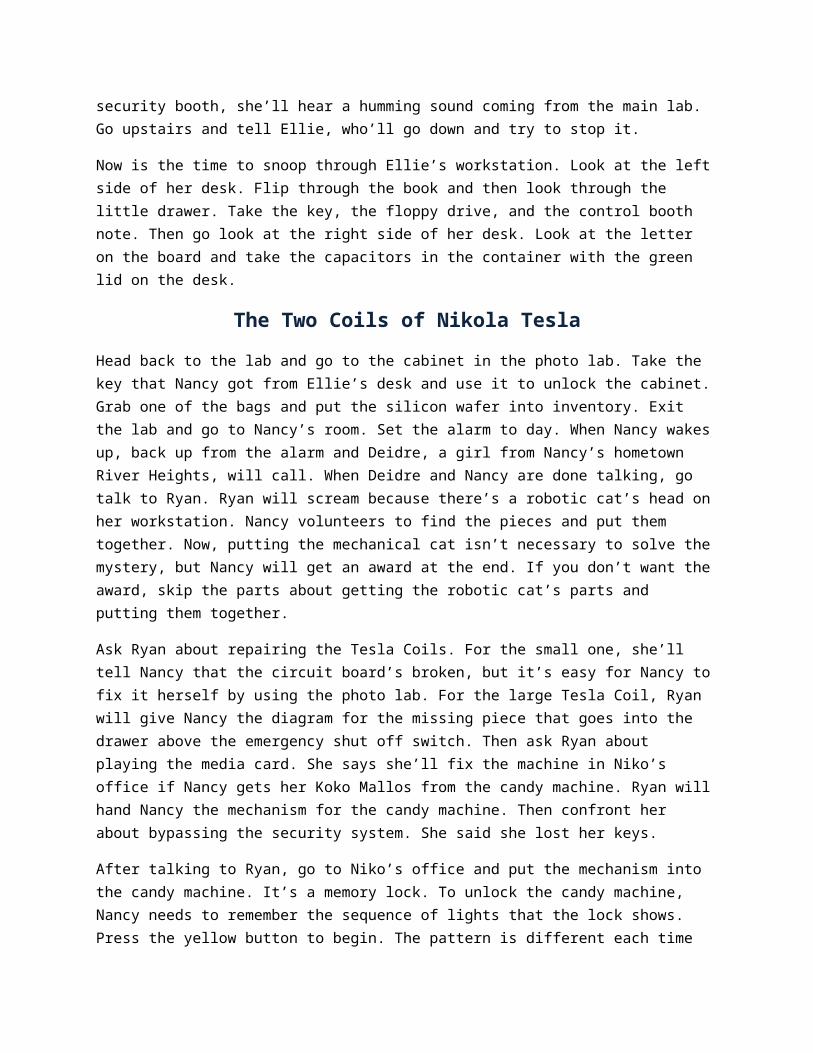
After Nancy has the solution, it’s time for etching the silicon wafer. Go to the photo lab. Grab the one of the robot cat’s legs on the desk in front of Nancy as she walks in. Then go to the computer in the corner to wire the circuits. Nancy needs to align all the circuits so every red colored end is lit up. She doesn’t have to use all the wires to align the circuits, but most solutions use all of them. Here’s the solution to them:
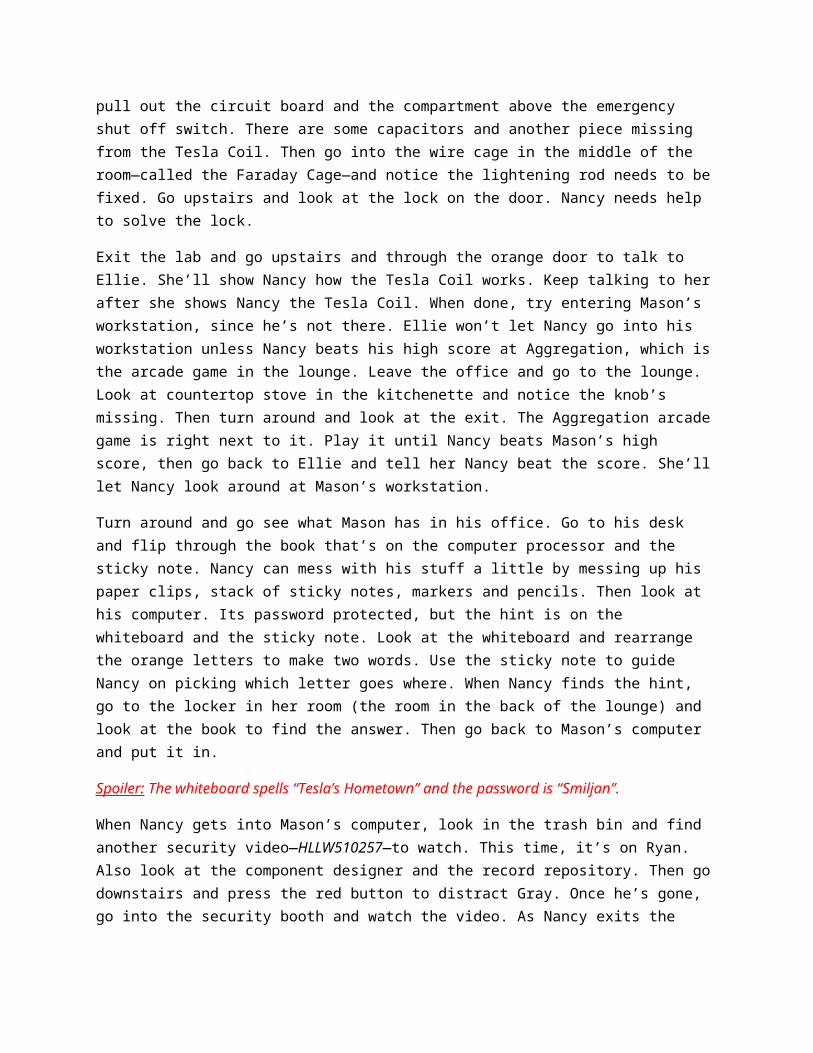
Amateur Sleuth Master Sleuth
(Photos from Gameboomers.com)
Once Nancy’s done, take the design from the printer next to the printer. Then turn right to etch the design onto the silicon wafer. If Nancy needs help, check the book on top of the tv screen called “From Dreams to Reality: Manufacturing Design.” Put the solution in the brown bottle onto the solution tank through the hole in the top left of the machine. Then enter the design in the image tray below the tv. After that, put in the silicon wafer into the wafer tray below the microscope. Then press start. The etching process takes half a day, so check back in later.
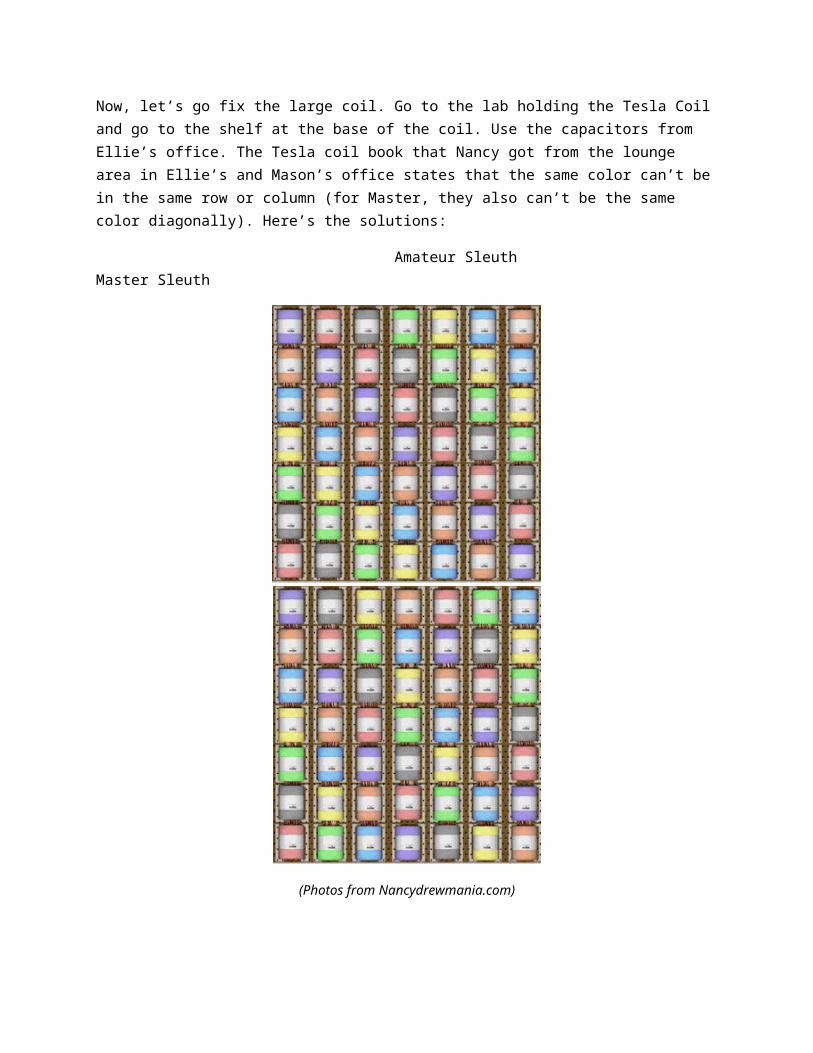
Now, let’s go fix the large coil. Go to the lab holding the Tesla Coil and go to the shelf at the base of the coil. Use the capacitors from Ellie’s office. The Tesla coil book that Nancy got from the lounge area in Ellie’s and Mason’s office states that the same color can’t be in the same row or column (for Master, they also can’t be the same color diagonally). Here’s the solutions:
Amateur Sleuth Master Sleuth
(Photos from Nancydrewmania.com)
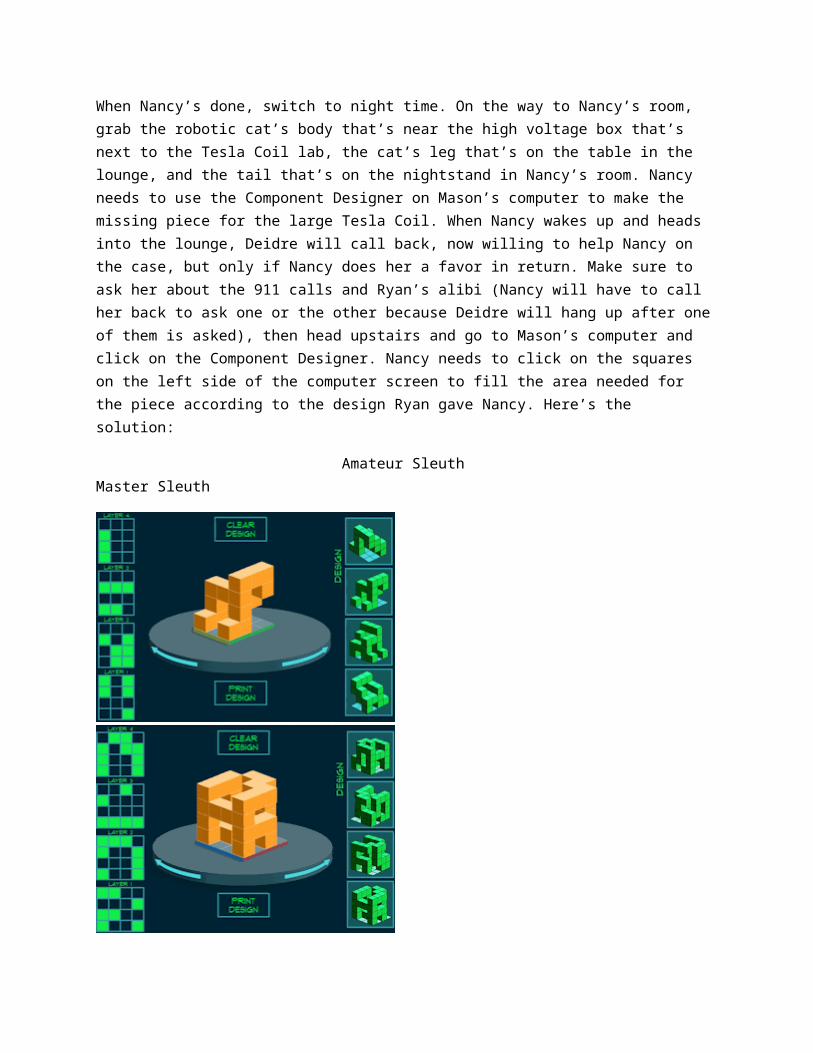
When Nancy’s done, switch to night time. On the way to Nancy’s room, grab the robotic cat’s body that’s near the high voltage box that’s next to the Tesla Coil lab, the cat’s leg that’s on the table in the lounge, and the tail that’s on the nightstand in Nancy’s room. Nancy needs to use the Component Designer on Mason’s computer to make the missing piece for the large Tesla Coil. When Nancy wakes up and heads into the lounge, Deidre will call back, now willing to help Nancy on the case, but only if Nancy does her a favor in return. Make sure to ask her about the 911 calls and Ryan’s alibi (Nancy will have to call her back to ask one or the other because Deidre will hang up after one of them is asked), then head upstairs and go to Mason’s computer and click on the Component Designer. Nancy needs to click on the squares on the left side of the computer screen to fill the area needed for the piece according to the design Ryan gave Nancy. Here’s the solution:
Amateur Sleuth Master Sleuth
(Photos from Nancydrewmania.com)
Once Nancy’s done filling in the squares, hit print design. If Nancy said “I think that’s right”, then the design’s wrong and will need to be looked at again. The design will be sent to the 3D printer in the lab. If it’s right, back away from the computer and grab the cat leg that’s on top of the file cabinet next to the computer processor. Then go downstairs and turn to the right. Go to the printer and look at the screen. Hit print on the design and it’ll start making it. This, like the silicon wafer, also takes half a day to make, so Nancy has to wait for it. While she’s waiting, go back to the photo lab and grab the silicon wafer that should be done by now. Take it, go to the small Tesla Coil, and put it in. The small Tesla coil is fixed and running.
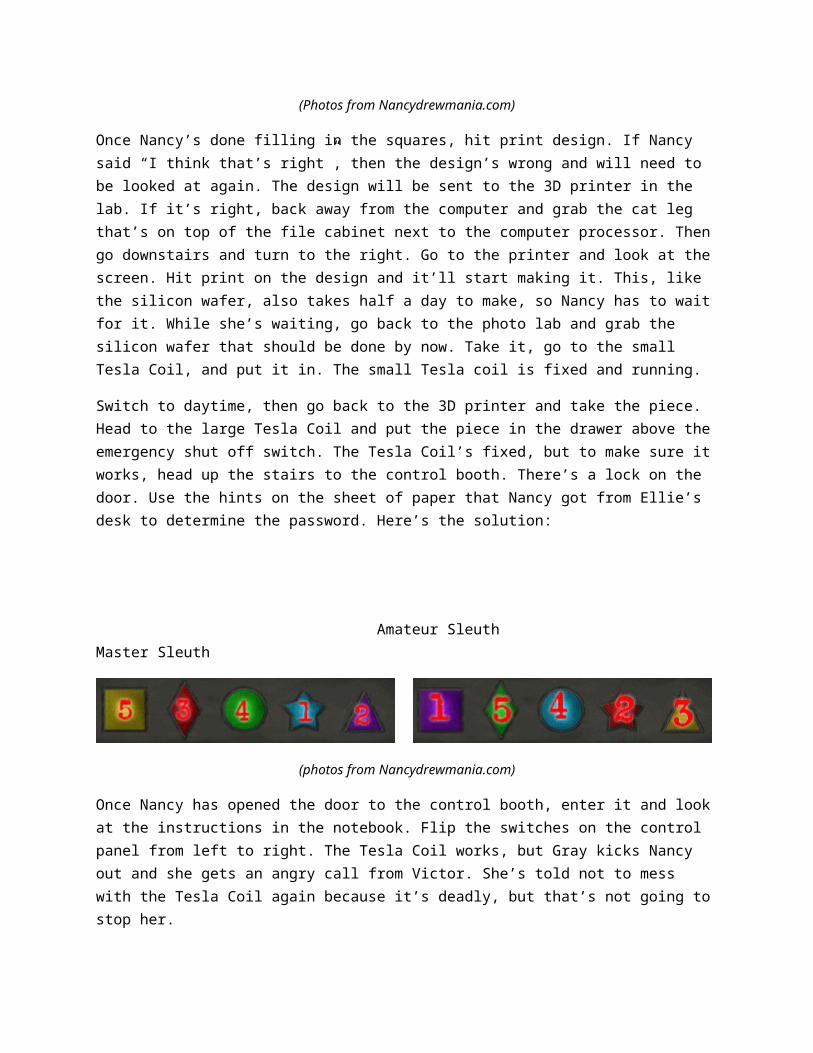
Switch to daytime, then go back to the 3D printer and take the piece. Head to the large Tesla Coil and put the piece in the drawer above the emergency shut off switch. The Tesla Coil’s fixed, but to make sure it works, head up the stairs to the control booth. There’s a lock on the door. Use the hints on the sheet of paper that Nancy got from Ellie’s desk to determine the password. Here’s the solution:
Amateur Sleuth Master Sleuth
(photos from Nancydrewmania.com)
Once Nancy has opened the door to the control booth, enter it and look at the instructions in the notebook. Flip the switches on the control panel from left to right. The Tesla Coil works, but Gray kicks Nancy out and she gets an angry call from Victor. She’s told not to mess with the Tesla Coil again because it’s deadly, but that’s not going to stop her.
Ryan’s Threats, Danger, and Another Video
Ryan fixed the media player in Niko’s office, so go listen to the media card Nancy has. Niko mentioned that Ryan threatened him via notes and he had them in the lounge. Maybe they’re still there. Bingo! They’re still there, tucked away in the chair near Nancy’s room. Pick them up and read them. Notice the last one mentions that Ryan’s accepted an award at the Visionaries in Science Conference the day of the murder. Go talk to Ryan, who says they’re warnings and not threats. Call Deidre about the notes and ask what she found in the database about Ryan. Deidre says Ryan’s alibi is airtight—that she couldn’t have done it because there are two photos of her standing near a clock. Then call Victor and give him an update on Ryan. Ask him everything else Nancy has to ask.
Go talk to Ryan again and tell her what Nancy found out. When she asks about Nancy’s real purpose, admit that she’s at the lab looking for Niko’s murderer. Ryan will offer her services to help find the killer. On the way to the elevator, Nancy’s knocked over the head. When she wakes up, she’s locked in the photo lab. There’s a limited amount of air in the room. Use the intercom to the right of the door to contact someone. Ellie’s on the other side, but she can’t help because she’s locked in the booth. If Nancy bugs her enough times, Ellie will suggest going through the vent. Head through the vent that’s above Nancy’s head and opposite of the desk and equipment to escape.
Spoiler: here are the directions to get out of the photo lab. Amateur : Fx3, L, F (173), R, Lx2, Rx2, L, Rx2, L, F to vent on floor. Master : F, first L, F, R, F, R, Lx3, Rx2, Lx2, R, Lx2, Rx2, far Rx2, R, L, R, L, F to the vent on the floor.
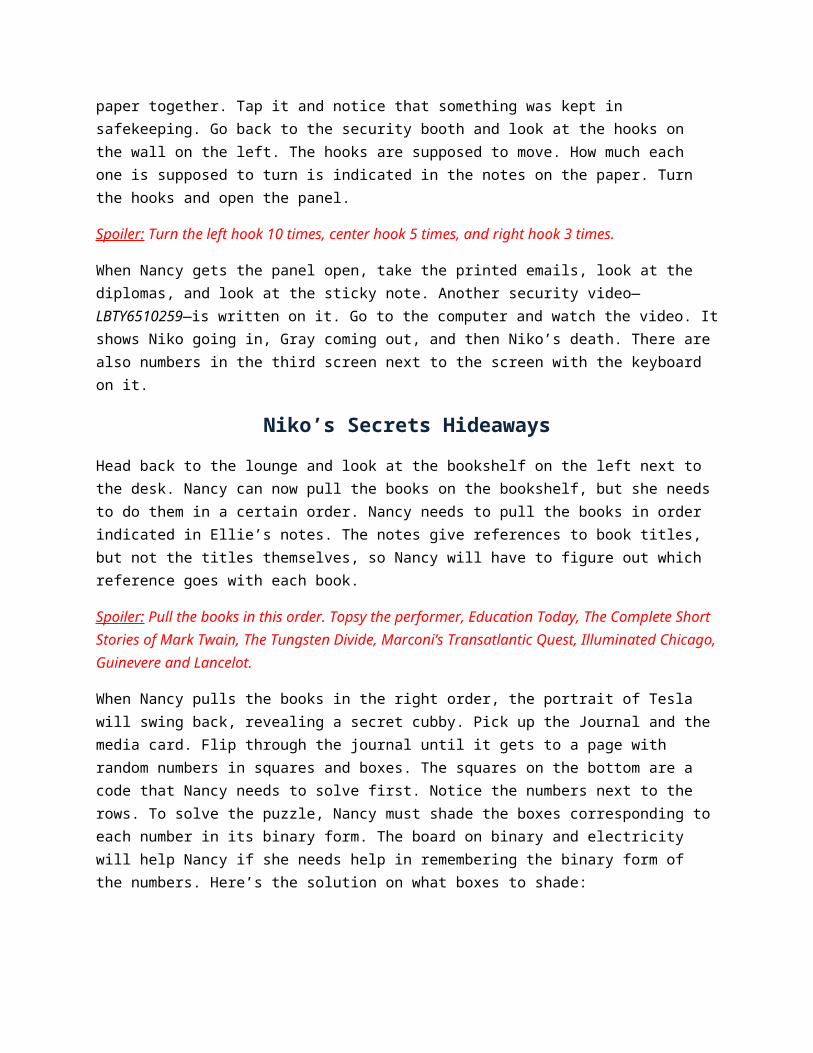
When Nancy gets to the other air vent opening, she hears Mason and Gray arguing over something. What’s Mason doing in the lab after hours? Exit the air vent and go talk to the security booth. Nancy will hear Gray shredding something. Go talk to Gray, then distract him with the red button. Once he’s gone, go back into the security booth and look at the shredder. Grab the red knob—the knob to the emergency switch—the cat’s leg, and grab the shredded pieces of paper in the shredder. Then go upstairs and look around at Ellie’s workspace. Look at the left side of the desk and grab the grey sheet of paper. Then go to the lounge area of the office. Look at the table and grab the keycard on the floor, then
look at Ellie’s phone. It’s locked, but Ellie left instructions in the book on her desk. Look at the book again and then unlock the phone according to those instructions. Here’s how it should look at the end:
Amateur Sleuth Master Sleuth
(Photos from Nancydrewmania.com)
When Nancy gets into Ellie’s cell phone, she’ll see texts between Ellie and Mason. Go to the security booth and insert the key card into the keycard holder. Click on the Key cards button on the computer and find out that the keycard Nancy found was the one for the murder! Head out and go to the lounge. Go to the desk and put the shredded piece of paper together. Tap it and notice that something was kept in safekeeping. Go back to the security booth and look at the hooks on the wall on the left. The hooks are supposed to move. How much each one is supposed to turn is indicated in the notes on the paper. Turn the hooks and open the panel.
Spoiler: Turn the left hook 10 times, center hook 5 times, and right hook 3 times.
When Nancy gets the panel open, take the printed emails, look at the diplomas, and look at the sticky note. Another security video—LBTY6510259—is written on it. Go to the computer and watch the video. It shows Niko going in, Gray coming out, and then Niko’s death. There are also numbers in the third screen next to the screen with the keyboard on it.
Niko’s Secrets Hideaways
Head back to the lounge and look at the bookshelf on the left next to the desk. Nancy can now pull the books on the bookshelf, but she needs to do them in a certain order. Nancy needs to pull the books in order indicated in Ellie’s notes. The notes give references to book titles, but not the titles themselves, so Nancy will have to figure out which reference goes with each book.
Spoiler: Pull the books in this order. Topsy the performer, Education Today, The Complete Short Stories of Mark Twain, The Tungsten Divide, Marconi’s Transatlantic Quest, Illuminated Chicago, Guinevere and Lancelot.
When Nancy pulls the books in the right order, the portrait of Tesla will swing back, revealing a secret cubby. Pick up the Journal and the media card. Flip through the journal until it gets to a page with random numbers in squares and boxes. The squares on the bottom are a code that Nancy needs to solve first. Notice the numbers next to the rows. To solve the puzzle, Nancy must shade the boxes corresponding to each number in its binary form. The board on binary and electricity will help Nancy if she needs help in remembering the binary form of the numbers. Here’s the solution on what boxes to shade:
(Photo from UHS-Hints.com)
It reads: “every fifth letter above play on the coil.” Now, Nancy’s ready to solve the top row of squares. For this puzzle, do what the message for the bottom puzzle and count to every fifth letter and circle it. It should look like this when Nancy’s done:
(Photo from UHS-hints.com)
The coil mentioned in the message from the bottom puzzle is the small Tesla Coil in the lab. It’s a musical instrument of its own sort. Before Nancy plays the small Tesla Coil, head over to Niko’s office and listen to the media card Nancy found in the cubby. Then go confront Gray about what Nancy found behind the hooks in the security booth. Pick up the knob that’s next to the keycard. After that, head over to the lab
and look at the small Tesla coil. Touch the pad to start playing the notes from the message. If Nancy needs help with knowing which note goes with which key, Mason has a drawing of it on his whiteboard. Nancy needs to press the keys in order that the message puts them. Here’s the solution if Nancy’s stuck on it:
(photo from Gameboomers.com)
A panel will open up, revealing another secret hiding place. Pick up the only item in the panel: a note. It mentions that using “a black light under the glow,” Nancy will find hidden knowledge. The glow is the large Tesla coil.
Switch to daytime, then head to Ryan’s workshop. Take the black light from the blue toolbox. If you want, assemble the cat since Nancy has all of the pieces. Then talk to Ryan about the numbers at the bottom of the video Nancy saw. Ryan will take Nancy to the security booth and inspect the video. She says that the video has been tampered with—someone edited themselves out of the video! They also flagged it, which means that they know that Nancy knows that the video was tampered with.
Exit the lab and Nancy will hear that there’s a security breach in the Tesla Coil lab. Head over there to find out what’s going on. Nancy will find Mason working at the base of the Tesla Coil. Nancy and Mason will talk, and then an alarm will go off, indicating that the power has been activated. Mason can’t get himself free from the Tesla Coil—he’s stuck and Nancy needs to help him out! Nancy will automatically go to the electrical panel. It’s set up slightly different than at the beginning of the game when Nancy helped Gray out shutting the power off. Each time Nancy flips one switch, other switches turn a different color. It’s recommended that Nancy flip the switches that are green to turn them black (off). The reset button is the red button at the bottom of the panel, just in case Nancy needs to reset the panel to its original setup.
Spoiler: Number the rows A through D and columns 1 to 4. Amateur: A3, B4, B1, C2, D3. Master: D1, C1, D4, C4, B2, B3.
Once Nancy shuts the power off, Mason is able to get himself free and Victor shows up. He’s not happy that Nancy’s in the lab, takes her to Niko’s office, and removes her from the case. He also takes the keycard to the lab away, so Nancy has to find another way in. He’ll also be in the office unless someone distracts him. Go talk to Ryan and tell her that Nancy needs another way to get into the lab. She’ll give Nancy her keycard. Head back to the lab and go to the control booth in the Tesla Coil lab. Make sure the
leaver is on low and flip the switches. It’s safe to enter the Tesla Coil lab when the coil’s on low. Head back downstairs and use the black light to find what Niko was talking about in his note. Go towards the hexagon on the floor near the Tesla Coil. The black light will show words “enter the hex” on the hexagon. Open it up and climb down the ladder. Go towards the door and look at the lock. It’s a biometric finger scanner. The book in Mason’s workstation has information on this and Deidre can help. Call Deidre and have her help Nancy to find some way to bypass the lock.
Go talk to Mason about the texts between him and Ellie. He’ll deny the fact that they were. Then go talk to Ryan. Ask her to give Nancy some gummy bears. Nancy needs them to make a mold of one of Niko’s fingerprints. She’ll only give Nancy gummy bears if Nancy gets some of Victor’s candy. Go to Victor and ask him for the candy. Once Nancy has his candy, go back to Ryan and give it to her. She’ll give you the gummy bears. Now, Nancy needs to distract Victor so she can look for and get one of Niko’s fingerprints. Ask Ryan to distract Victor. She’ll distract Victor, but it won’t be for a long time, so Nancy will have to make it quick. Head down to Niko’s office. On the way, the elevator will get stuck. Nancy has to fix the elevator. So, go to the panel on the right and replace the gears. Here’s the solution:
Amateur Sleuth Master Sleuth
(Photos from Nancydrewmania.com)
Once Nancy fixes the elevator, continue to Niko’s office. Victor won’t be there, so grab the key from the desk. Unlock the doors between Niko’s bookshelves with the key and find Niko’s fingerprints on the mechanism on the right. Nancy will need something to pull on of them off, so go get a piece of tape from the desk in the lounge. Once Nancy has a fingerprint on a piece of tape, close the door to the shelves and a piece of paper will fall to the ground. Pick it up and notice that it’s about patenting what the team is doing.
Now, it’s time to make a mold of the fingerprint. First, go the lab and back to the sink. Mix the same solution that Nancy mixed earlier to fix the small Tesla Coil. Then go to the photo lab, get another silicon wafer from the cabinet. Then look at the equipment, put everything in its place (look at the book for a reminder)—the fingerprint goes in the design drawer, and press start. It’ll take half a day to put the fingerprint on the silicon wafer.
Switch to daytime and then go back to the photo lab to pick up the silicon wafer. Then go back into the lounge and go to the counter top stove, the one that’s missing the knob. Put the knob that Nancy found next to keycard holder in the security booth into the stove. Put the beaker on the stove, then put the gummy bears in the beaker. Turn the stove on to melt the gummy bears. When they’re melted, put them on the silicon wafer to make the imprint of the fingerprint. That’s what’s going to help Nancy bypass the locked door in the lab.
Head to the lab and to the locked door underneath the Tesla Coil. Use the fingerprint mold to bypass the system. Enter the room….
Niko’s Study and the Culprit
Which happens to be Niko’s hidden study. Look to Nancy’s right and pick up the red rings—magnets—on the table. Then look at the bookshelf on the right of the desk. Read the diary and pick up the magnet. Then go to the desk. Pick up the two magnets. There’s another Zap Up machine at the desk below the computer, but Nancy will need a key to turn it on. Look at the monitor. It needs power. Read the note. Turn around and look at the door. Go to the table on the left and pick up the media card and the magnets.
Exit Niko’s study and switch to daytime. Have Ryan distract Victor. Enter Niko’s office and listen to the media card. Niko mentions two important clues: Wardenclyffe’s frequency 37 and the pigeon—the mechanical bird in his office. Two clues for two puzzles. Let’s do the pigeon first. Turn around and look at it the pigeon. Niko mentioned the numbers 13, 6, and 5 in connection to the pigeon. Use the magnets on the tray below the pigeon to put the binary forms of the numbers 13, 6, and 5. Here’s what it should look like when Nancy has it right:
(Photo from Nancydrewmania.com)
When Nancy has the magnets in the right order, press the button on the upper right of the machine. The pigeon will show a message on the other wall: 1902 Patent. Go to Nancy’s room and look at the back pages of the book in the locker. Look for the 1902 patent that Tesla had. Pay attention to the patent number. Nancy will need that for later. Now, go to Niko’s study and to the table on the left. Grab the Wardenclyffe building model and then go to the main lab. Go to the grey box near the table in the middle of the room. Put the building in the box and then look at the valves. The valves have numbers
assigned to them: (left to right) 13, 11, 9, 7, 5, and 4. The number needs to equal 37, so turn the valves to equal 37.
Spoiler: turn 13, 11, 9, and 4.(all three on the left and the far right one)
Once the frequency is 37, the model building will open up, revealing a key. Take the key and go back to Niko’s study. Put the key into the Zap Up machine on the desk. Do the same thing that Nancy did to unlock Gray’s computer. Once she got passed the Zap Up part, the monitor will pop up and Nancy will have to enter another password. However, Nancy knows this because she knows the patent number for Tesla’s 1902 patent. Enter that number and Nancy will get into Niko’s system.
Spoiler: enter 1119732.
Once Nancy’s in the system, a video will pop up. Play the video. It’s the unedited version of Niko’s death! It shows who the real culprit is. It’s also on the USB stick, so grab it. Unfortunately, Niko had a security system. Nancy will be able to get out, but all of the electronic devices she has will be zapped, so they won’t work. That means that the USB stick with the video will be fried and Nancy will have to find another way to get the culprit. Go talk to Ryan. She’ll help Nancy out by giving her components and a box for Nancy to make a portable Faraday Cage with. Take the USB stick that’s in a box labeled “spare USB Drives” from the other workstation.
Exit Ryan’s workplace and go to the photo lab. Grab the silicon wafer wrapper in the upper cabinet. Then head to the lounge and to the desk. Take the box and put it on the desk. Wrap it in the foil from the silicon wafer wrapper. Then tap a paper clip from the blue box on the desk. Put a binder clip on top of the paper clip. Then take the box to Niko’s study. Transfer the video to the USB stick and put it into the portable faraday cage. Exit the study and go to the main lab. Find Gray on the ground, unconscious. Nancy needs to go get help.
Try to exit the lab and the culprit will enter. He’ll grab Nancy and put her in the Faraday cage, which won’t hold for long when the Tesla Coil is in full swing. The culprit turns the Tesla Coil on and Nancy has to find out how to stay alive in the Faraday cage. Turn to the lightning rod lift box near the door of the cage and pull out the components that Ryan gave Nancy. Use the schematic diagram to place the components on the board. Here’s where the components are supposed to be placed:
Amateur Sleuth Master Sleuth
(Photos from Nancydrewmania.com)
Once Nancy’s done with that, the lightning rod will come out and the electricity from the Tesla Coil will direct itself to the rod. The culprit will come out and will get hurt by some electricity that’s near the control booth.
The End
Congratulations on completing The Deadly Device! If this is your first time playing, I hope you found this walkthrough helpful and the game super fun. If it is or isn’t your first game, hopefully it’ll lead you to play the other, fun Nancy Drew games done by HerInteractive. Thanks for playing! NDFan.


![Operating instructions Temperature transmitter · 2019. 10. 9. · Warning Alarm Failure 1 Drift warning threshold [drW] exceeded 2 Limit temperature internal electronics exceeded](https://img.pdfslide.net/doc/110x75/608590466c5b907c5c5fe51d/operating-instructions-temperature-transmitter-2019-10-9-warning-alarm-failure.jpg)