Embed Size (px)
Citation preview
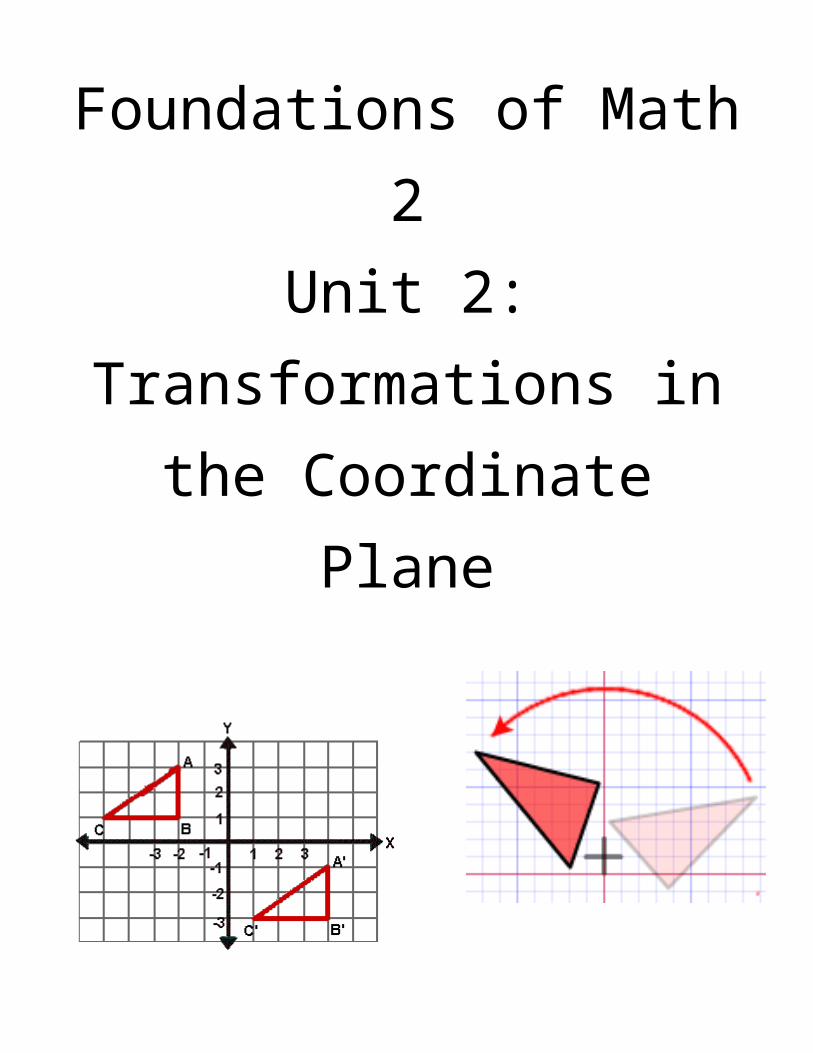
Foundations of Math 2Unit 2:
Transformations in the Coordinate Plane
AcademicsHigh School Mathematics
2.1 Warm Up

1. Draw the image of stick-man m when translated using arrow p. What motion will take stick-man m’ back onto man m?
2. Which of the figures shown is the image of figure a, if figure a were rotated using center X? Explain why or why not for each figure.
Adapted from Geometry: A Moving Experience developed by the Curriculum Research & Development Group, College of Education at the University of HawaiiTransformations: Examples and CounterexamplesThe images are indicated using gray.
1
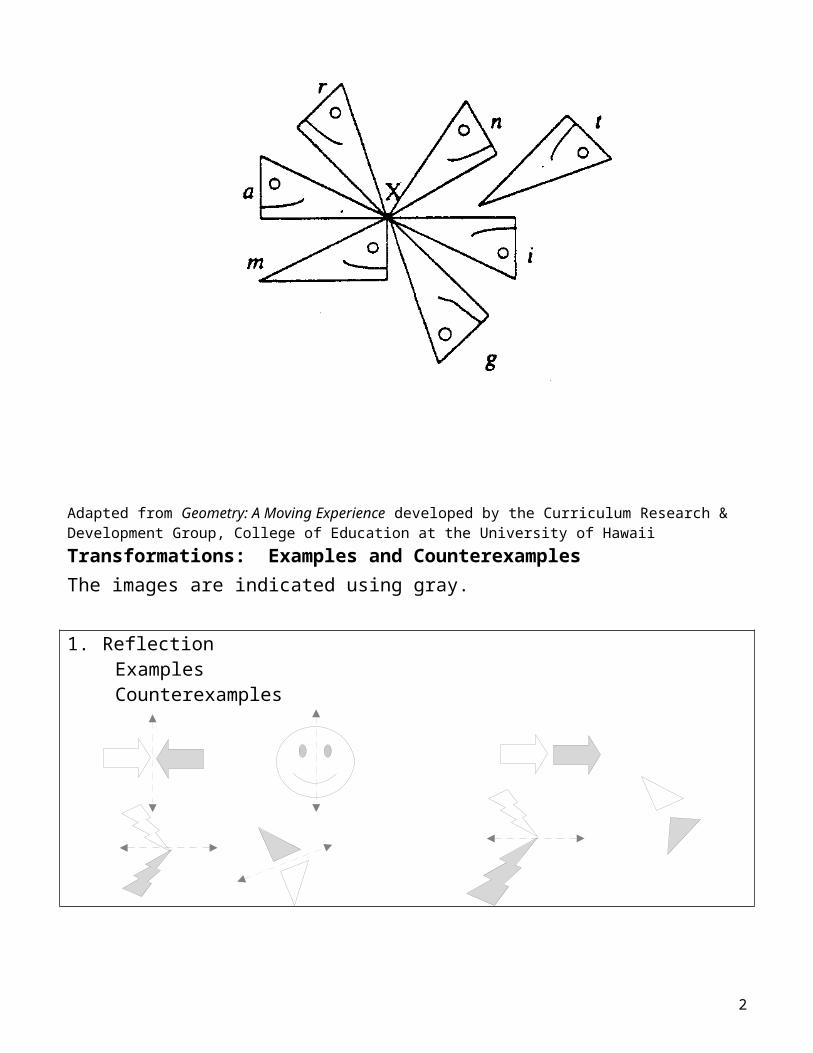
1. ReflectionExamples Counterexamples
2. RotationExamples Counterexamples
before after
3. TranslationExamples Counterexamples
2.1 Show What You Know!
2

For each set of points, apply the rule and graph the pre-image and the image. Describe what transformation occurred.1. A(2, -2), B(4, 5), C(-5, 1)
(x, y) (x + 2, y – 4)
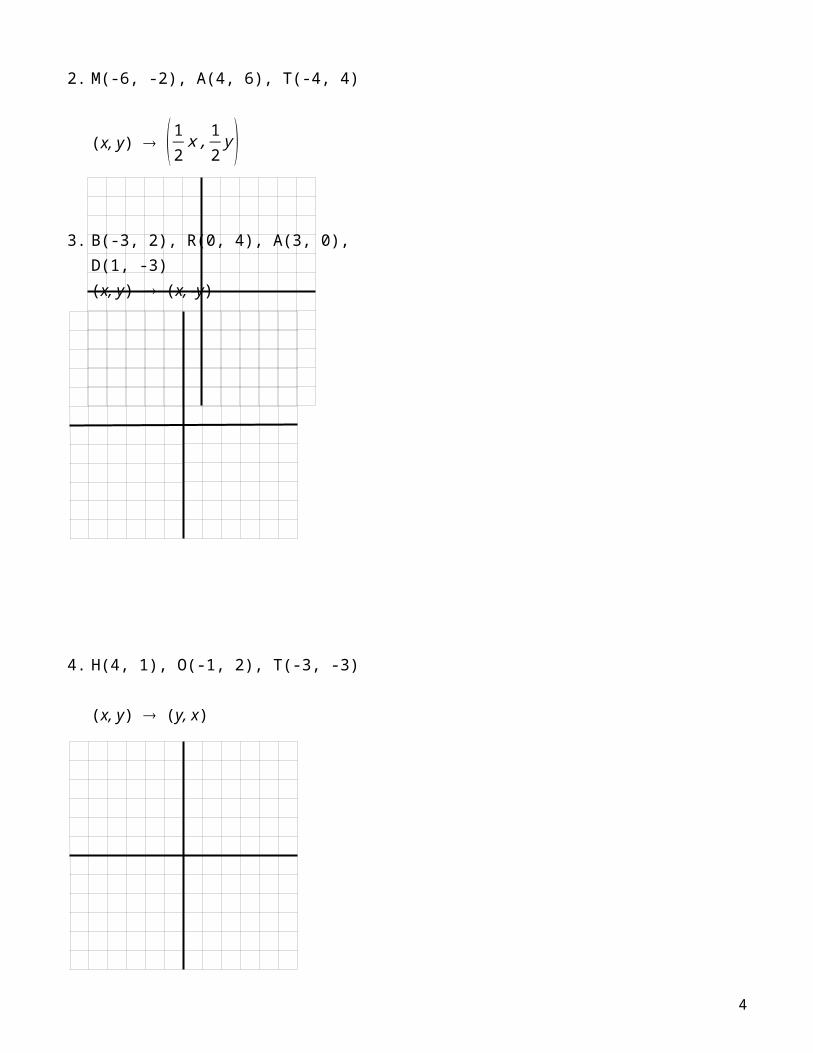
2. M(-6, -2), A(4, 6), T(-4, 4)
(x, y) ( 12x , 1
2y )
3. B(-3, 2), R(0, 4), A(3, 0), D(1, -3) (x, y) (x, -y)
4. H(4, 1), O(-1, 2), T(-3, -3)(x, y) (y, x)
3
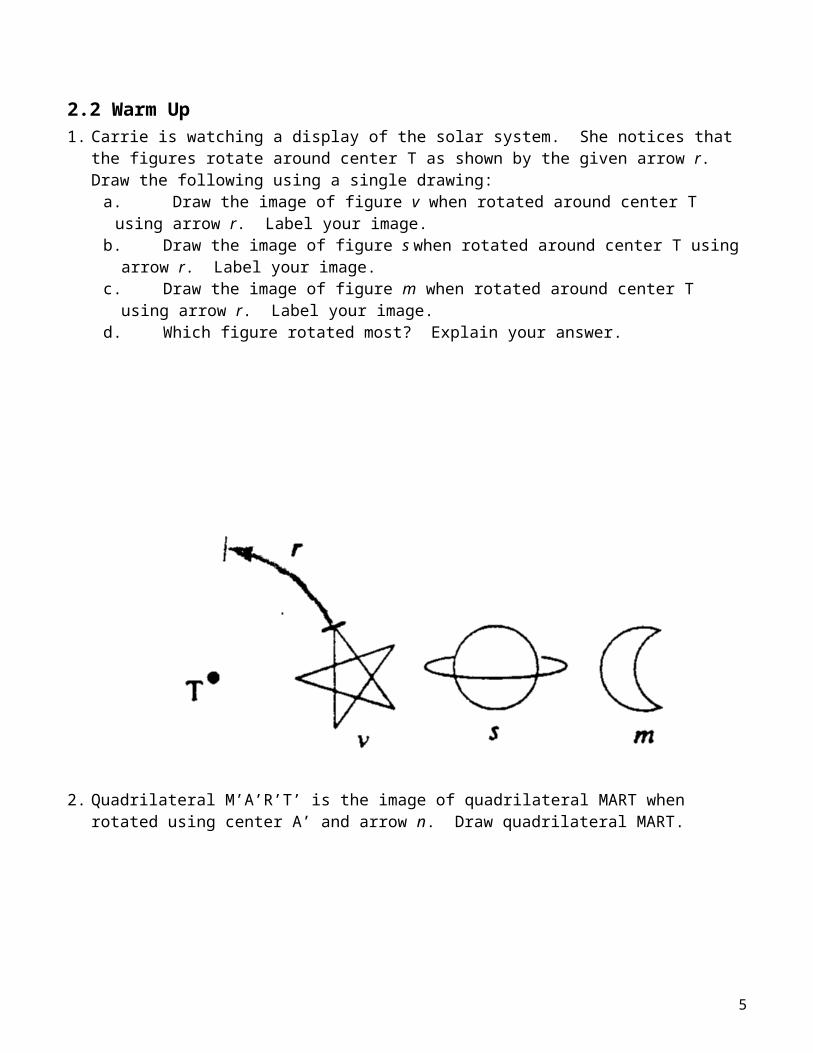
2.2 Warm Up1. Carrie is watching a display of the solar system. She notices that the figures rotate around
center T as shown by the given arrow r. Draw the following using a single drawing:a. Draw the image of figure v when rotated around center T using arrow r. Label your image.b. Draw the image of figure s when rotated around center T using arrow r. Label your image.c. Draw the image of figure m when rotated around center T using arrow r. Label your image.d. Which figure rotated most? Explain your answer.
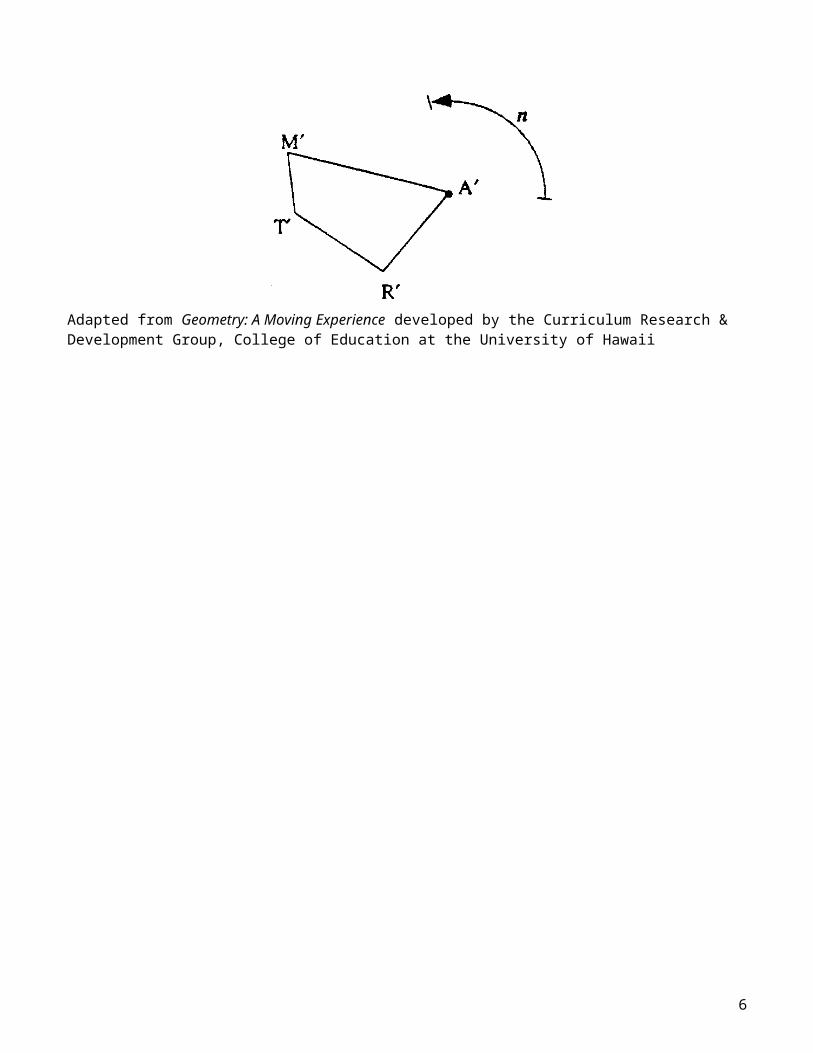
2. Quadrilateral M’A’R’T’ is the image of quadrilateral MART when rotated using center A’ and arrow n. Draw quadrilateral MART.
Adapted from Geometry: A Moving Experience developed by the Curriculum Research & Development Group, College of Education at the University of Hawaii
4
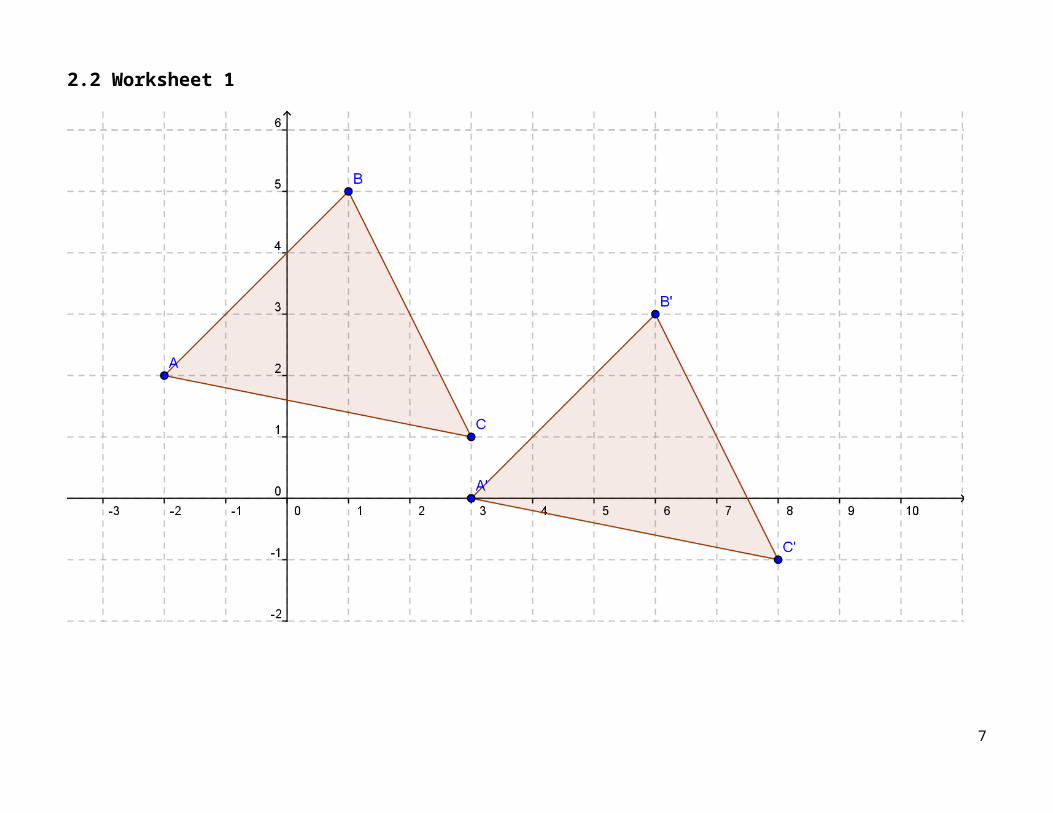
2.2 Worksheet 1
5
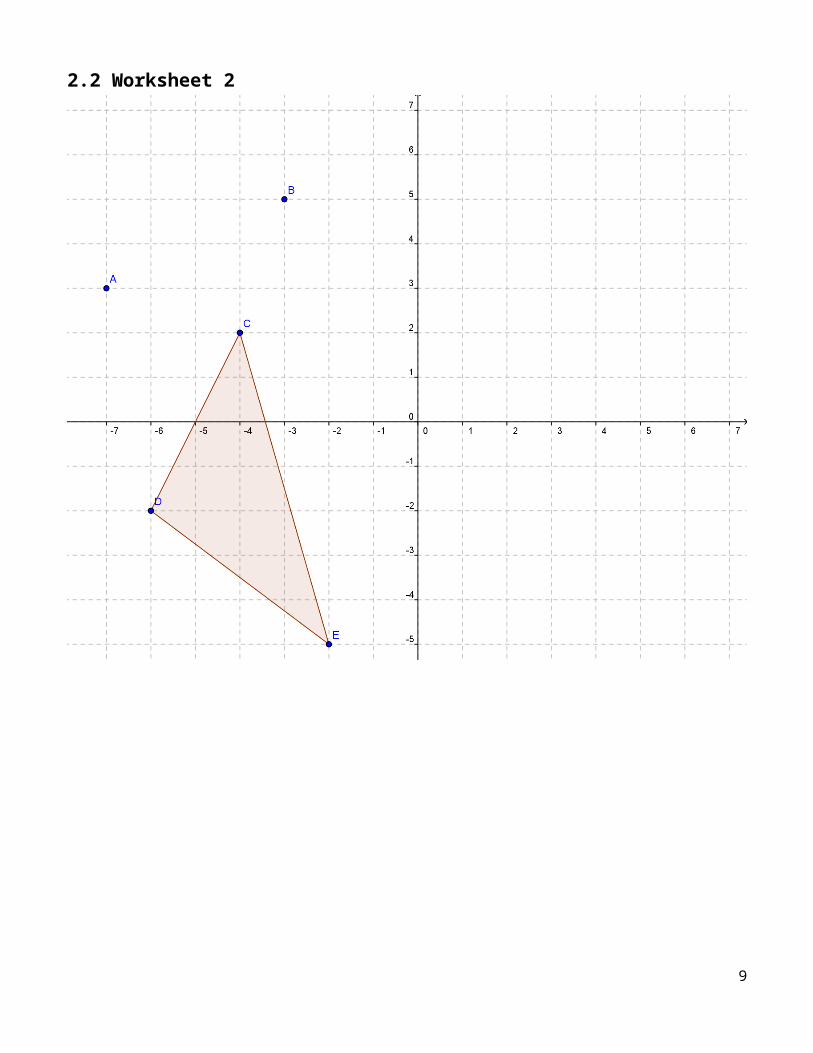
2.2 Worksheet 2
6
7

8
9
10
2.3 Worksheet 1
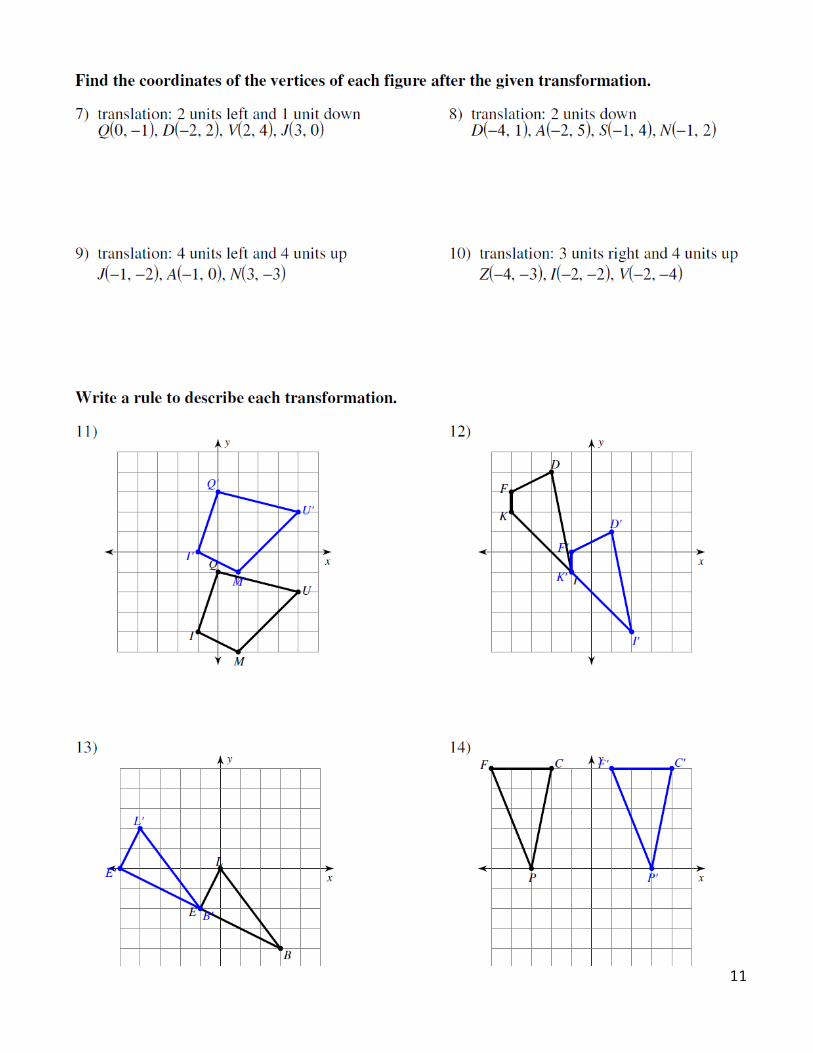
11
2.3 Worksheet 2
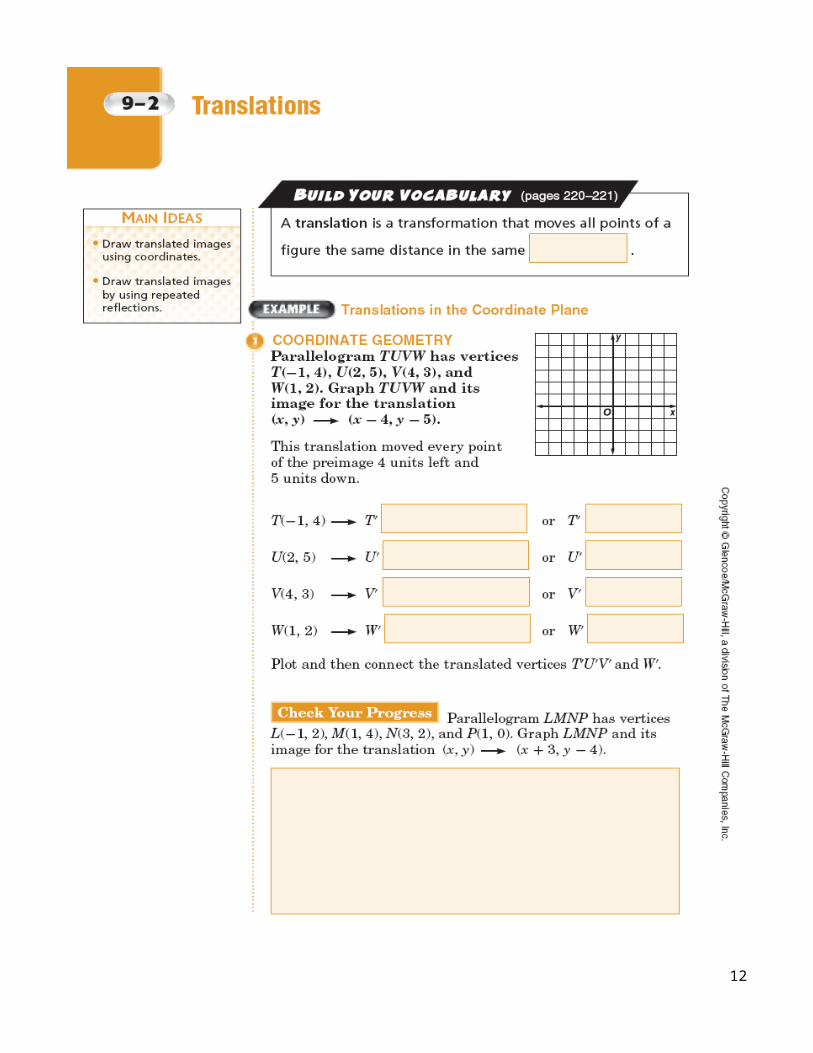
12
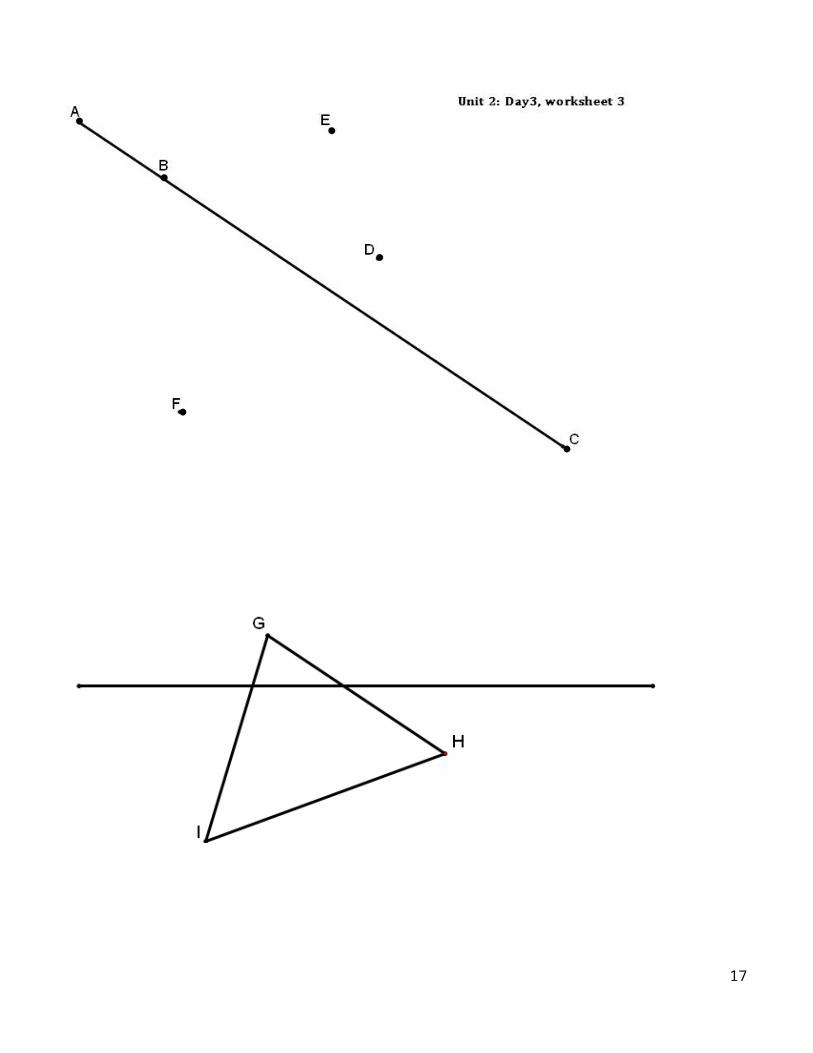
2.3 Worksheet 3
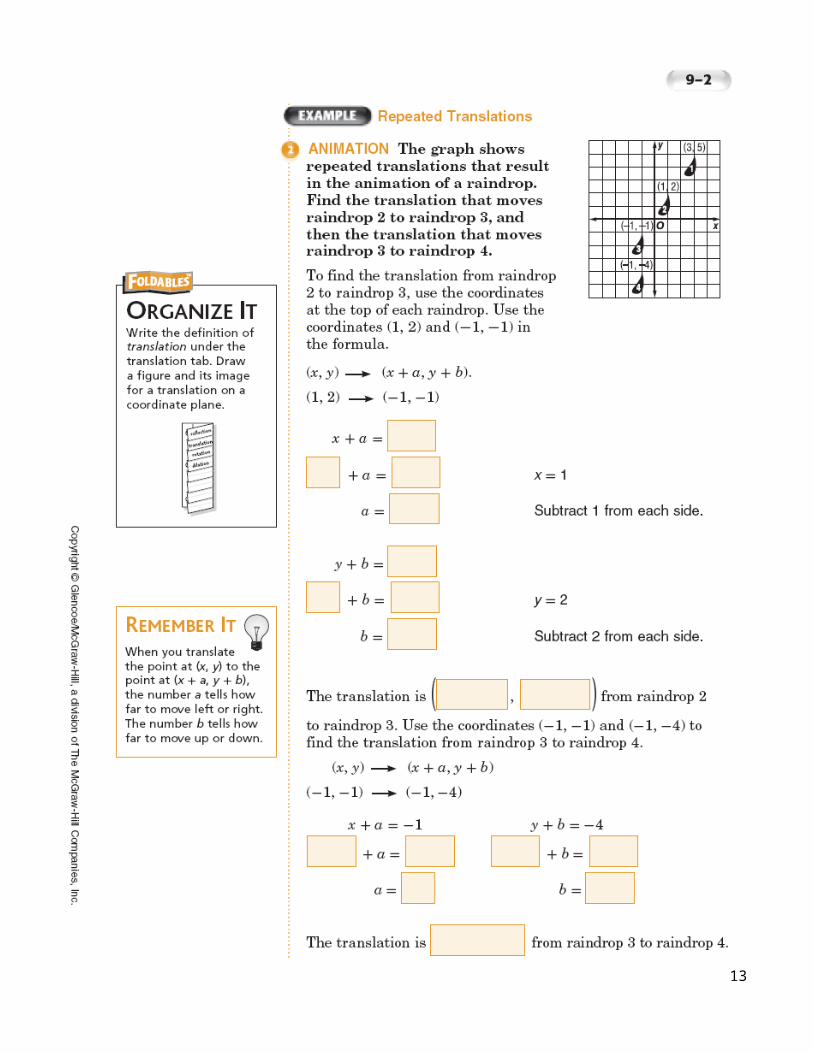
13
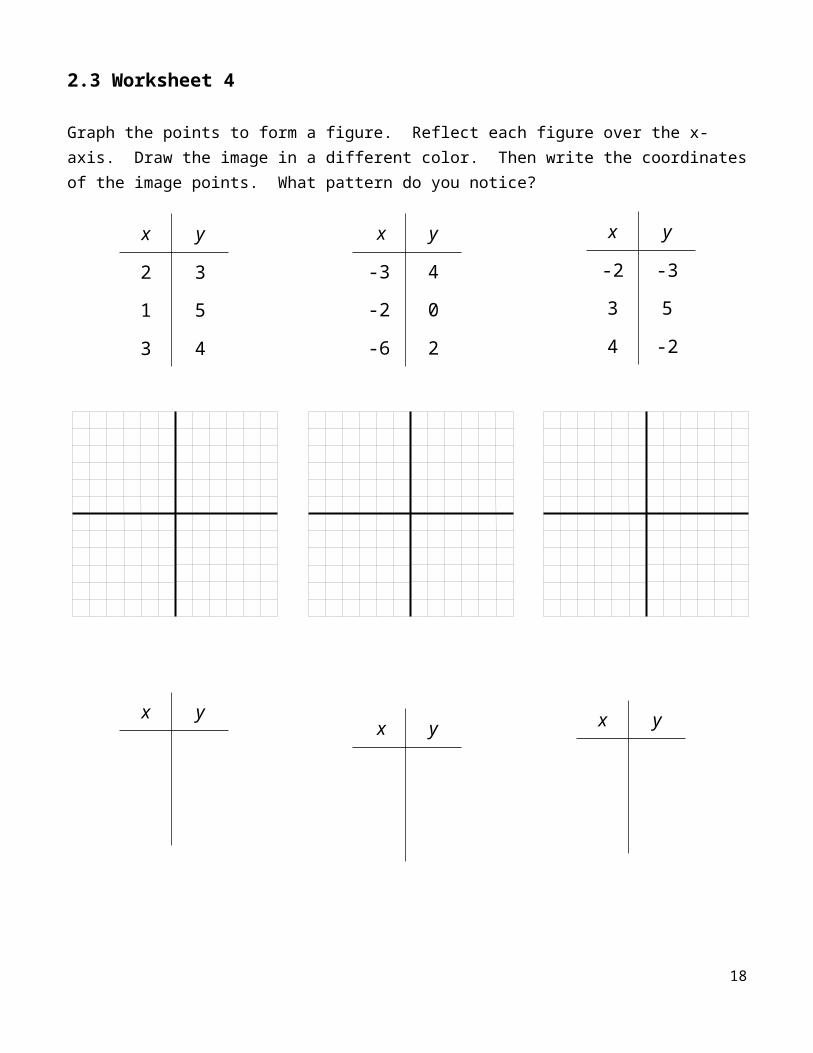
2.3 Worksheet 4
Graph the points to form a figure. Reflect each figure over the x-axis. Draw the image in a different color. Then write the coordinates of the image points. What pattern do you notice?
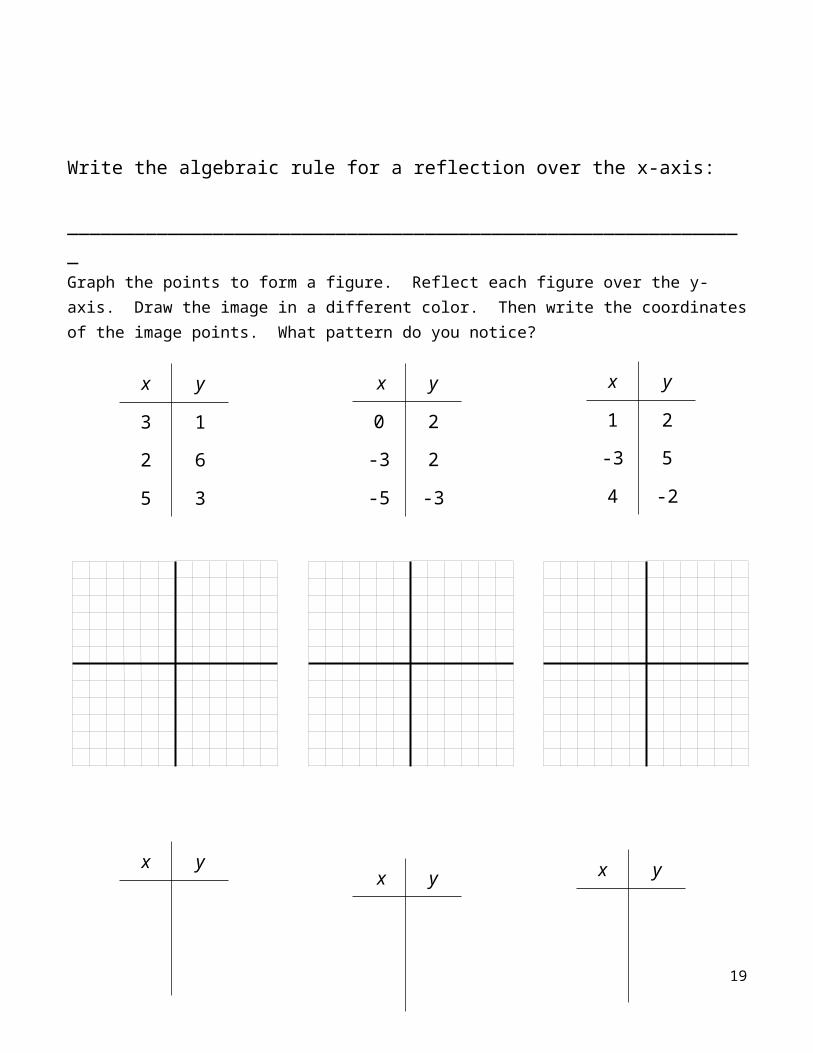
Write the algebraic rule for a reflection over the x-axis:
_____________________________________________________________
14
x y
-2 -3
3 5
4 -2
x y
2 3
1 5
3 4
x y
-3 4
-2 0
-6 2
x y x y x y

Graph the points to form a figure. Reflect each figure over the y-axis. Draw the image in a different color. Then write the coordinates of the image points. What pattern do you notice?
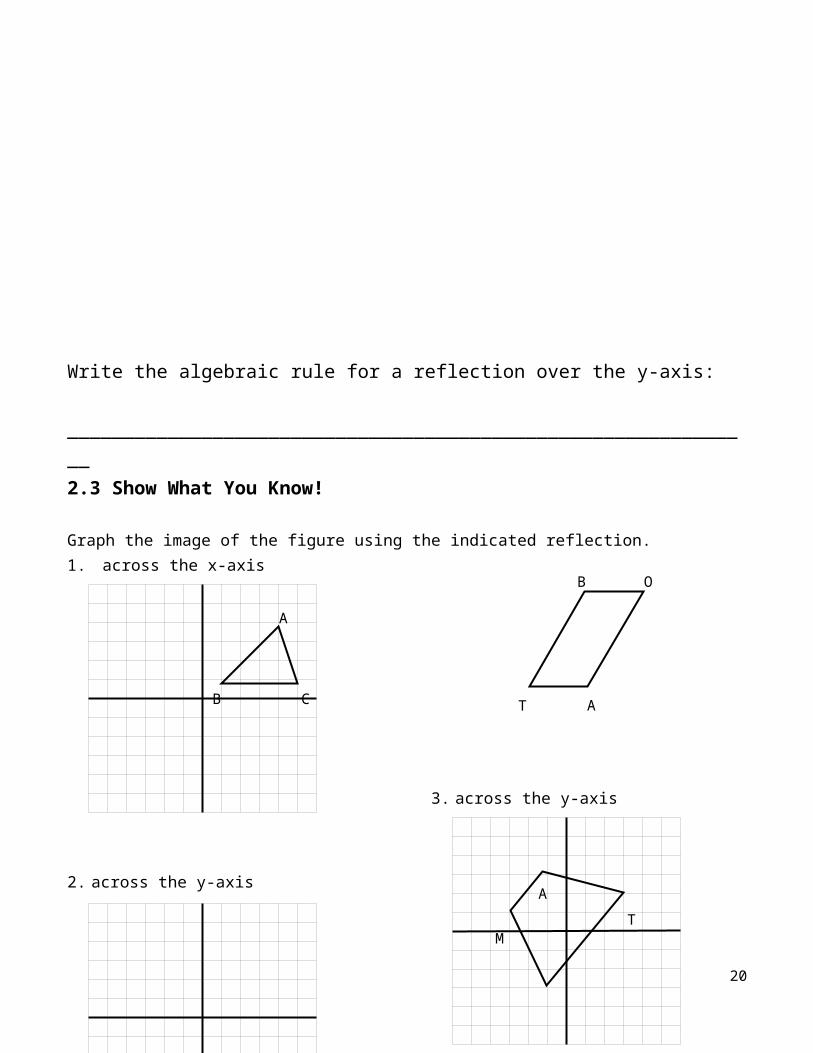
Write the algebraic rule for a reflection over the y-axis:
______________________________________________________________
15
x y
1 2
-3 5
4 -2
x y
3 1
2 6
5 3
x y
0 2
-3 2
-5 -3
x y x y x y
2.3 Show What You Know!
Graph the image of the figure using the indicated reflection.1. across the x-axis
2. across the y-axis
3. across the y-axis
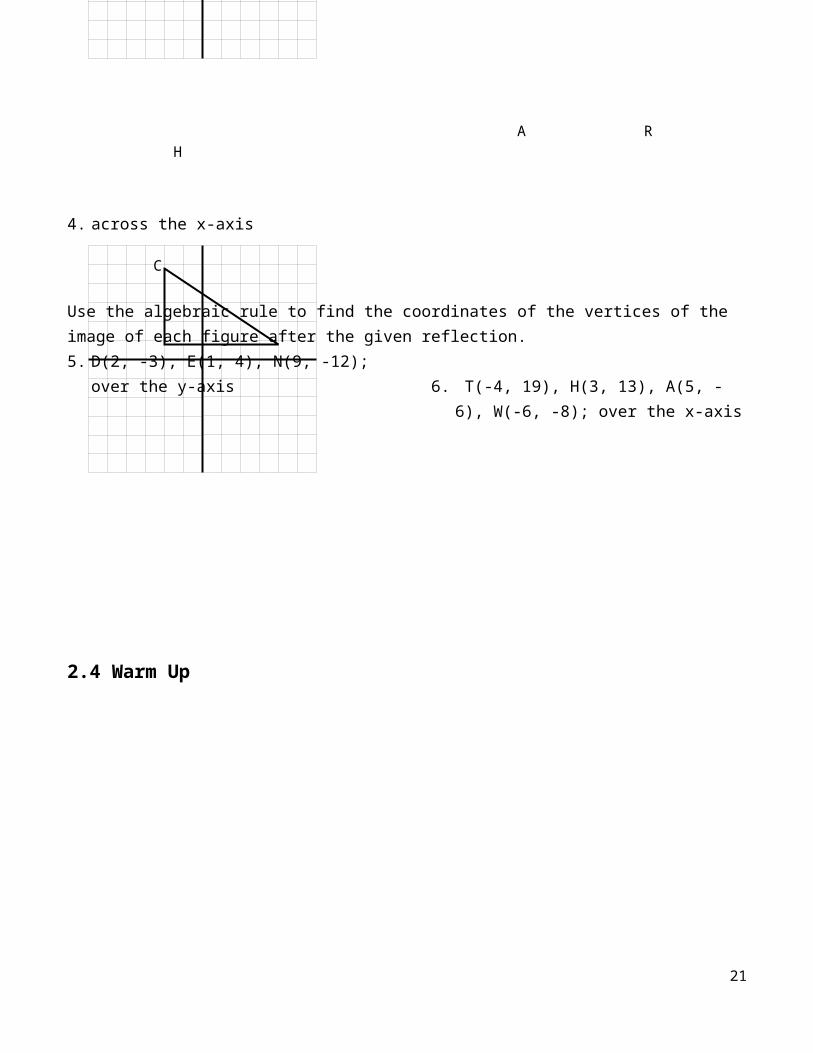
4. across the x-axis
Use the algebraic rule to find the coordinates of the vertices of the image of each figure after the given reflection.5. D(2, -3), E(1, 4), N(9, -12); over the y-axis 6. T(-4, 19), H(3, 13), A(5, -6), W(-6, -8);
over the x-axis
16
A
CB
H
M
AT
A R
C
B O
AT
2.4 Warm Up
17
18
19
20
21
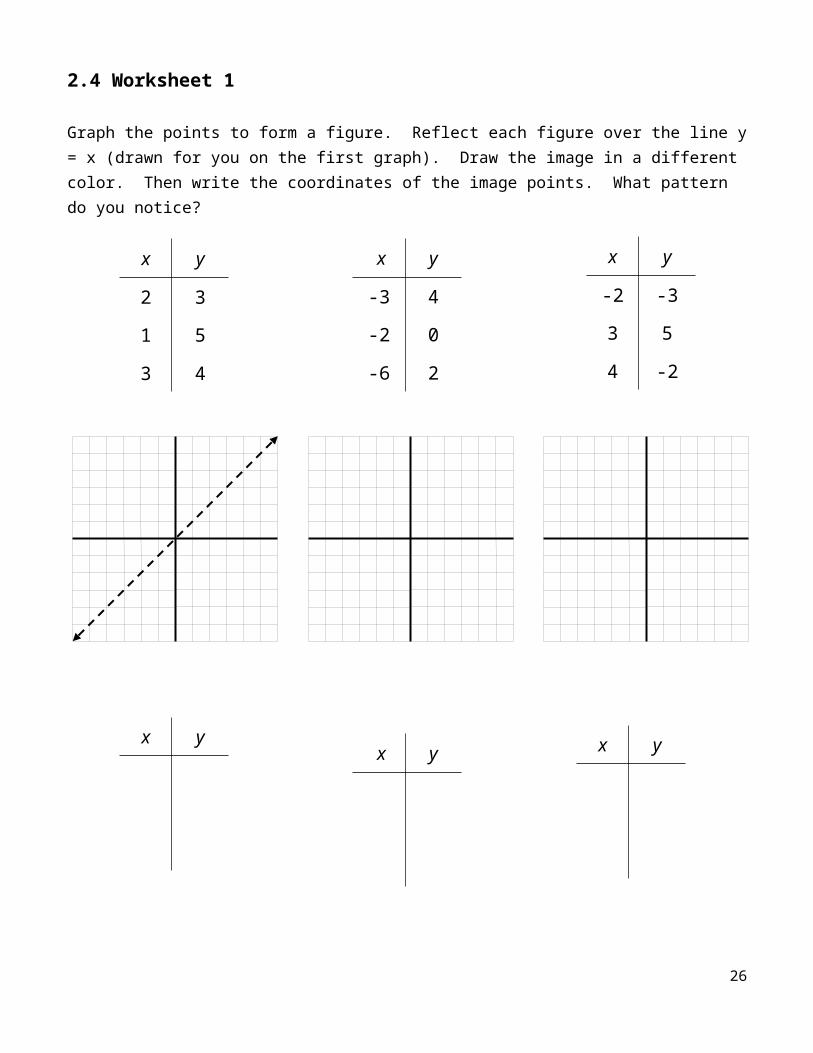
2.4 Worksheet 1
Graph the points to form a figure. Reflect each figure over the line y = x (drawn for you on the first graph). Draw the image in a different color. Then write the coordinates of the image points. What pattern do you notice?
Write the algebraic rule for a reflection over the line y = x:
_____________________________________________________________
22
x yx y
x y
-3 4
-2 0
-6 2
x y
x y
-2 -3
3 5
4 -2
x y
2 3
1 5
3 4
Graph the points to form a figure. Reflect each figure over the line y = -x (drawn for you on the first graph). Draw the image in a different color. Then write the coordinates of the image points. What pattern do you notice?
Write the algebraic rule for a reflection over the line y = -x:
______________________________________________________________
23
x y
1 2
-3 5
4 -2
x yx y
x y
0 2
-3 2
-5 -3
x y
x y
3 1
2 6
5 3
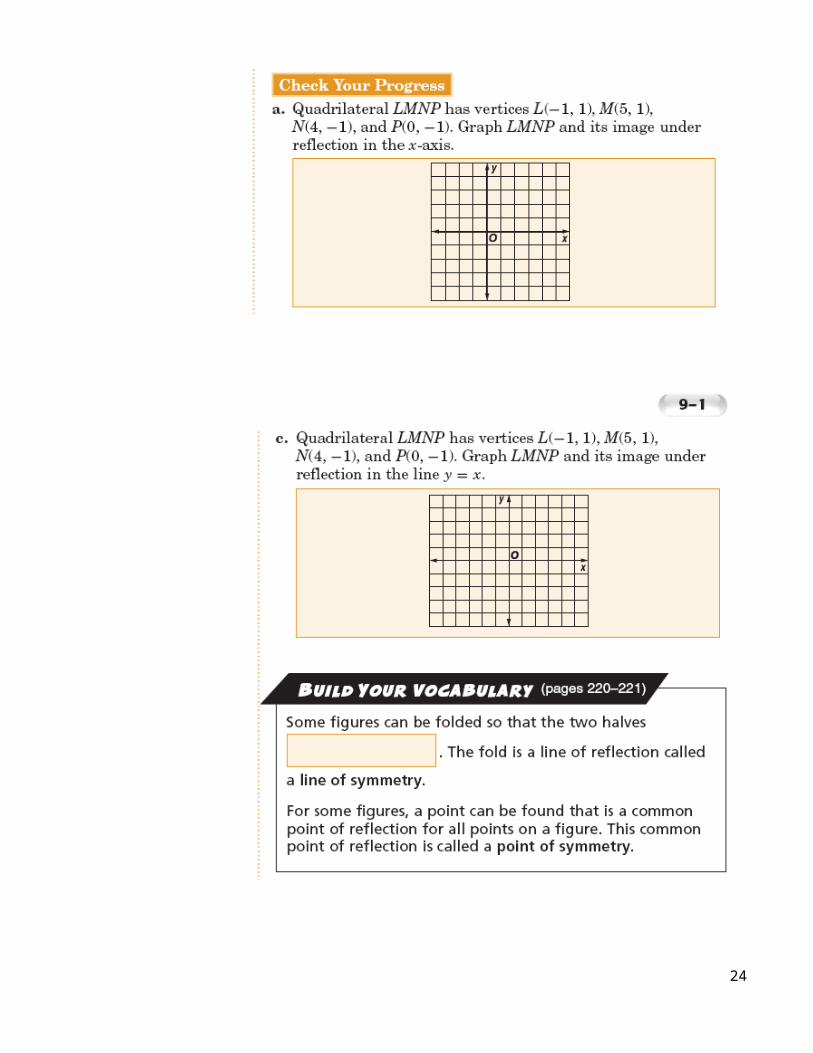
24
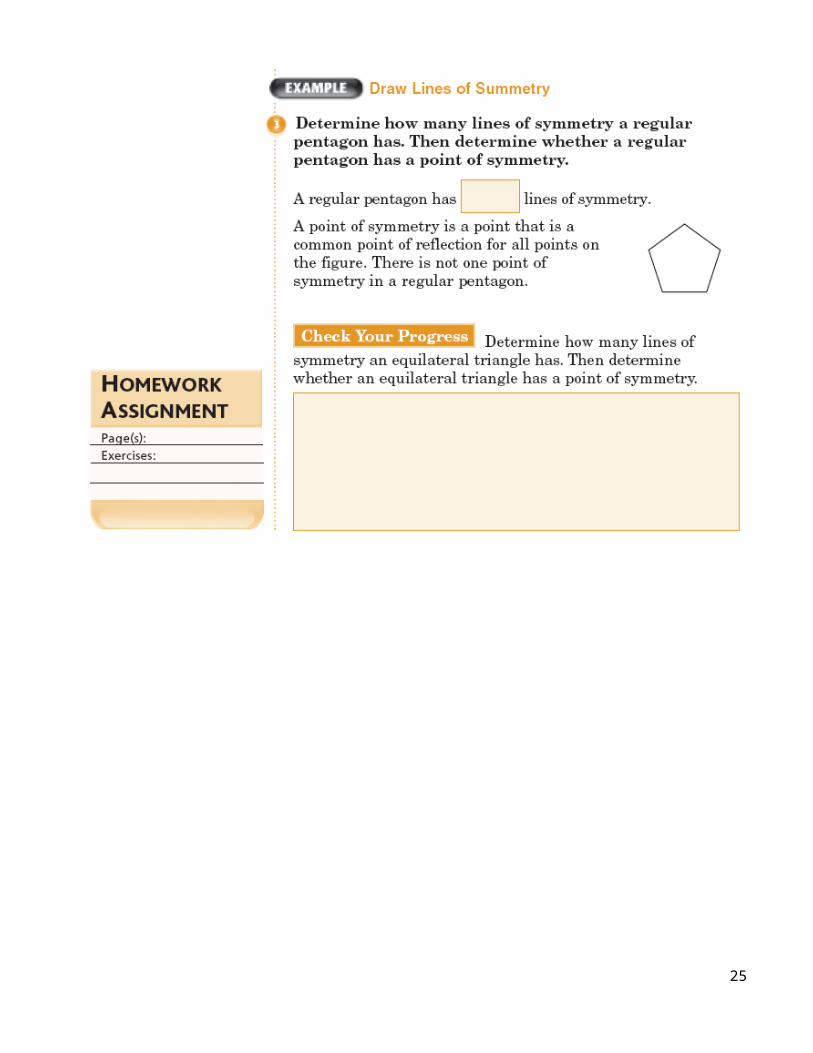
25
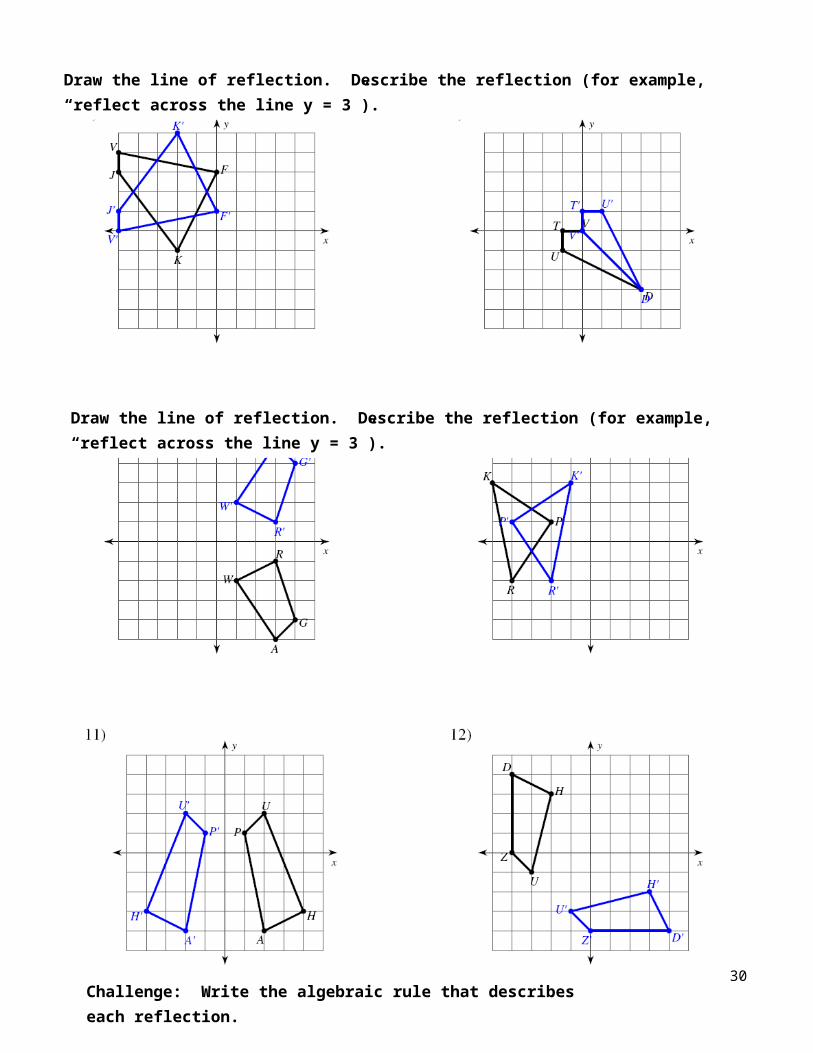
Draw the line of reflection. Describe the reflection (for example, “reflect across the line y = 3”).
Challenge: Write the algebraic rule that describes each reflection.
Draw the line of reflection. Describe the reflection (for example, “reflect across the line y = 3”).
26

27
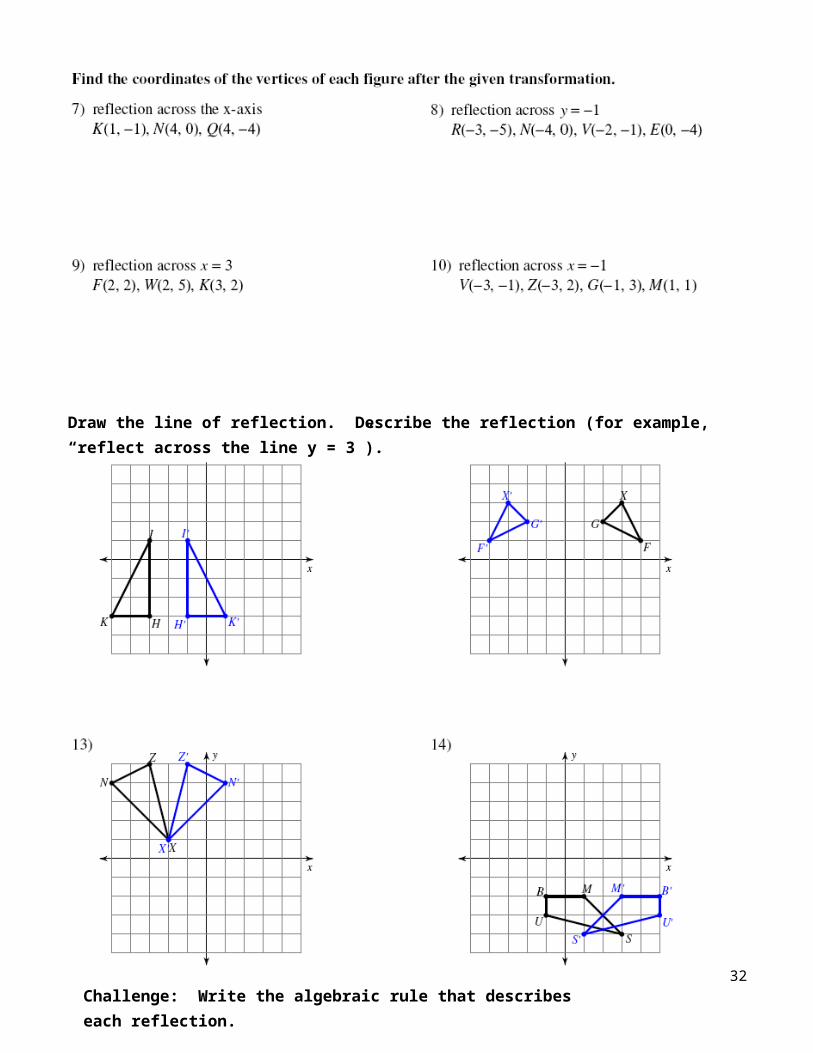
Draw the line of reflection. Describe the reflection (for example, “reflect across the line y = 3”).
Challenge: Write the algebraic rule that describes each reflection.
P
S
T Q
R
P’
Q’
R’
2.5 Warm Up1. a. Accurately draw a rotation arrow so that figure d’ is the image of figure d.
b. Accurately draw a different rotation arrow so that figure d’ is the image of figure d.c. Compare your two arrows. What do you notice?
2. Complete figure P’Q’R’S’T’, the image of PQRST using the given motion. Describe the motion used.
Adapted from Geometry: A Moving Experience developed by the Curriculum Research & Development Group,
College of Education at the University of Hawaii
28
C
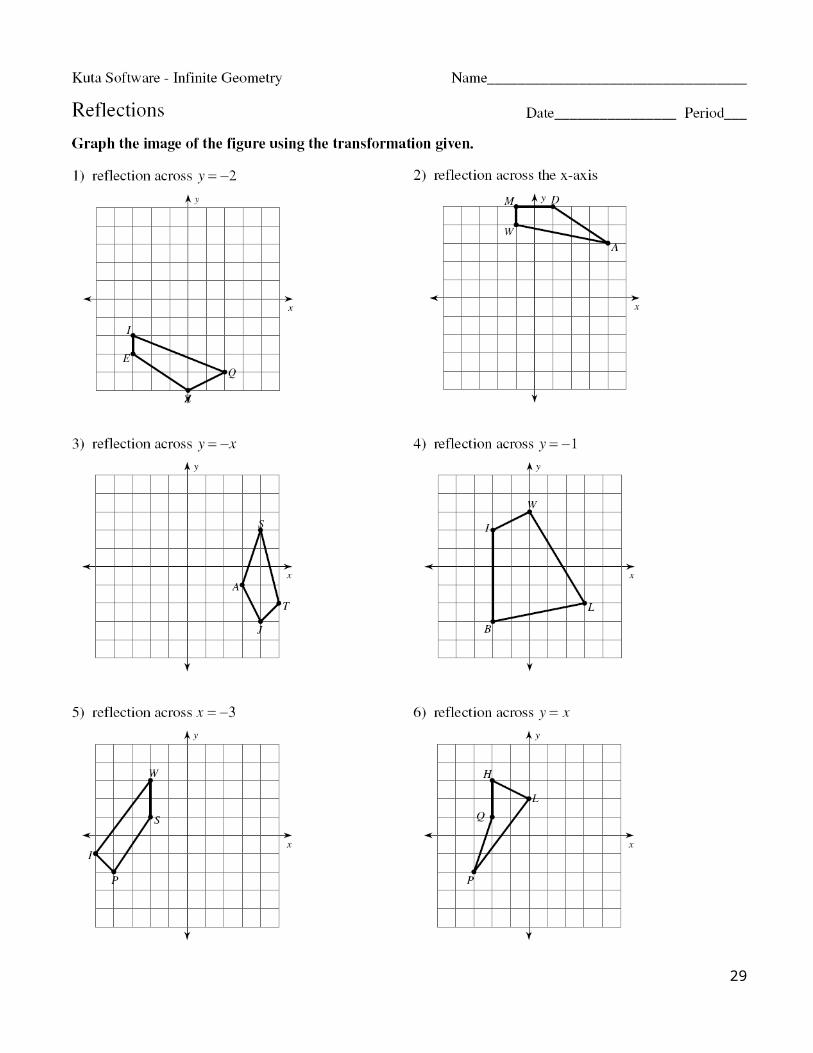
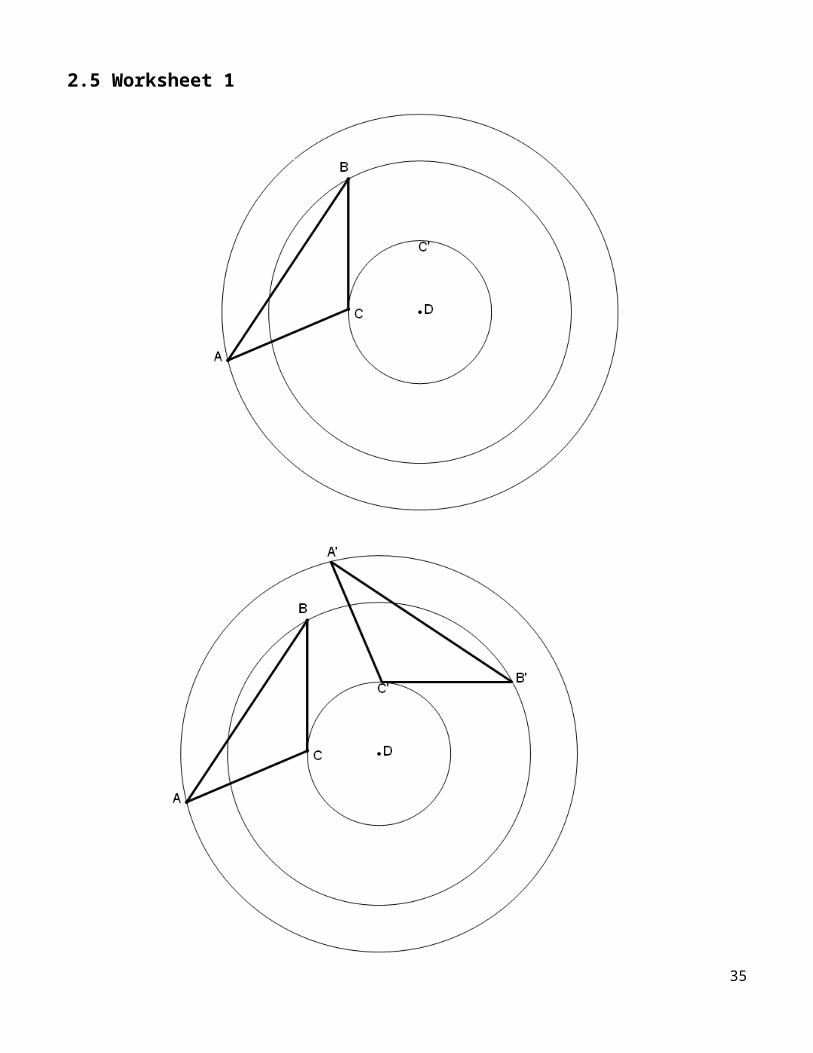
2.5 Worksheet 1
29
30
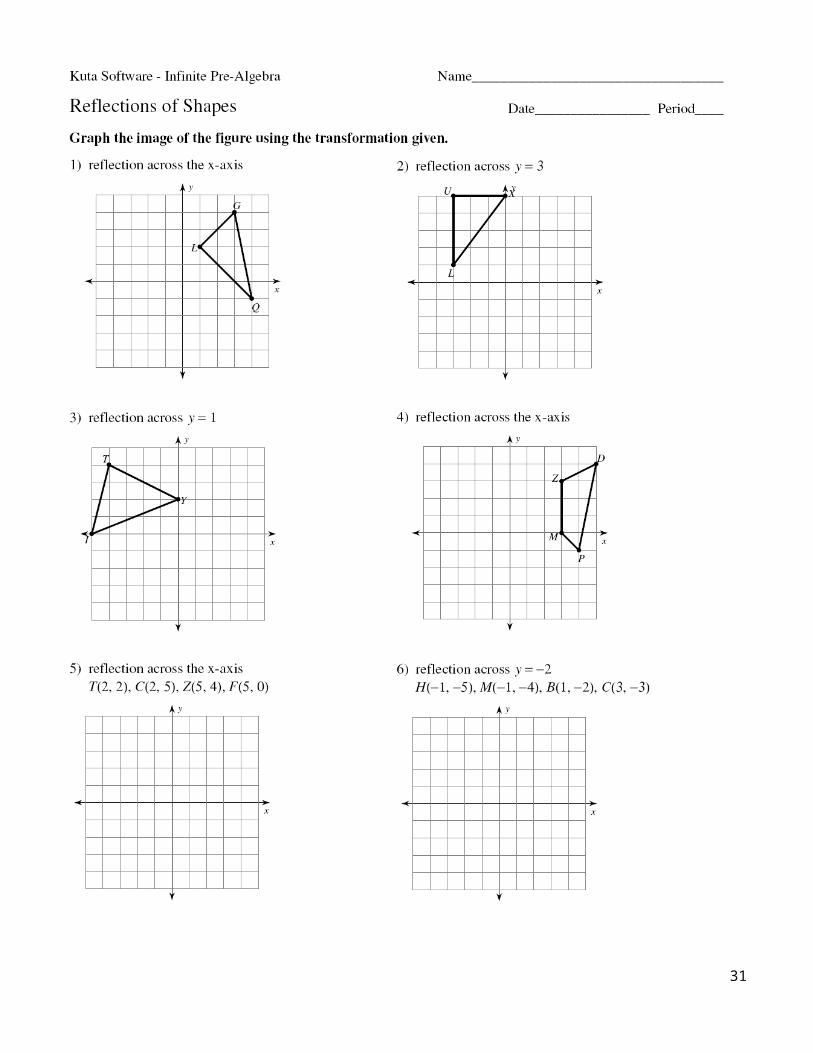
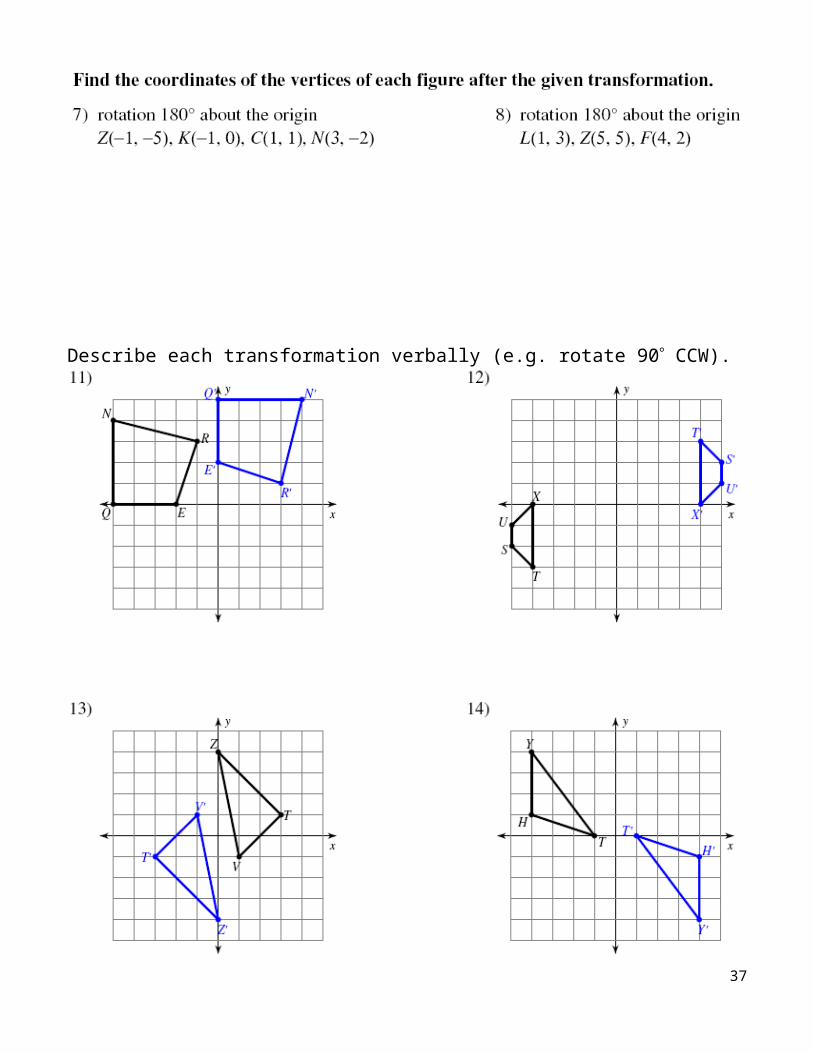
Describe each transformation verbally (e.g. rotate 90 CCW).
31
32

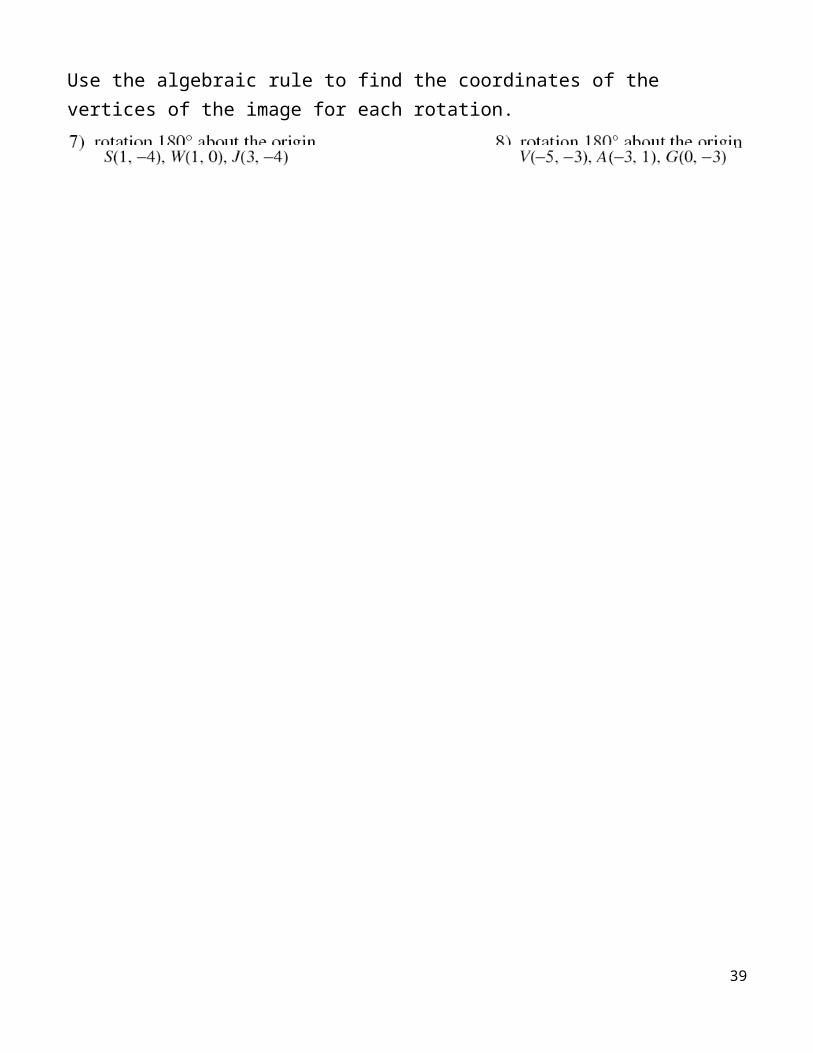
Use the algebraic rule to find the coordinates of the vertices of the image for each rotation.
33
A G
b
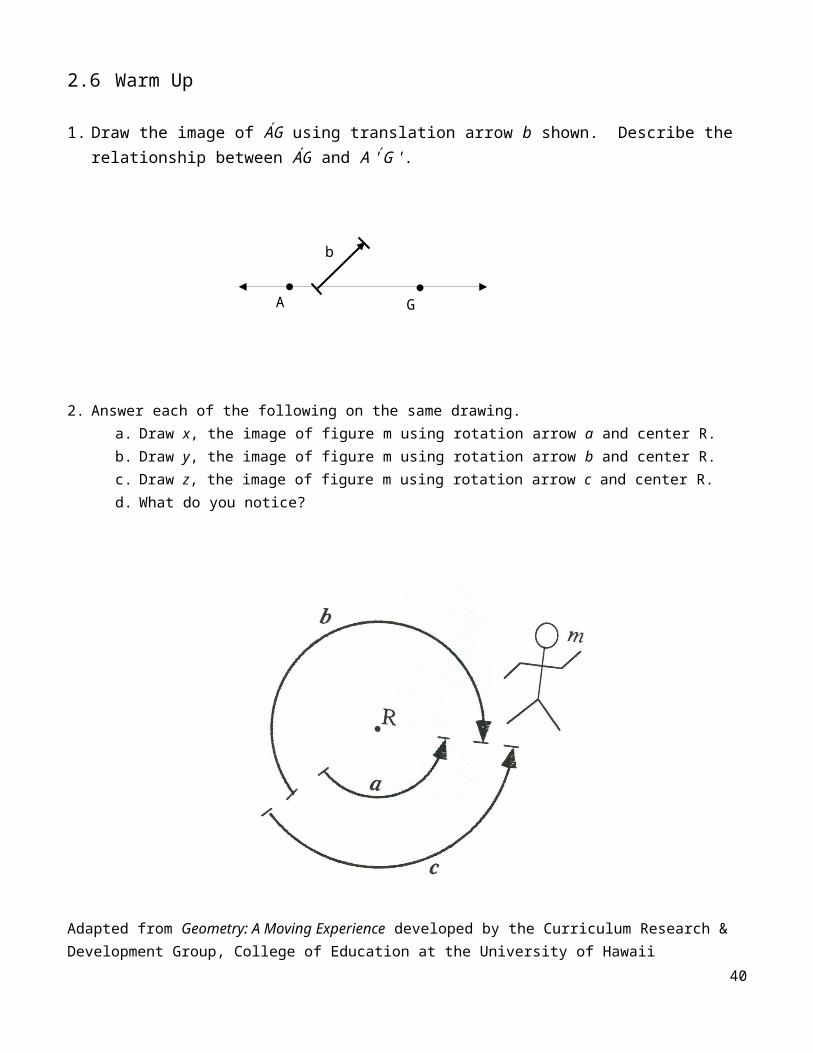
2.6 Warm Up
1. Draw the image of AG using translation arrow b shown. Describe the relationship between AG and ´A 'G '.
2. Answer each of the following on the same drawing.a. Draw x, the image of figure m using rotation arrow a and center R.b. Draw y, the image of figure m using rotation arrow b and center R.c. Draw z, the image of figure m using rotation arrow c and center R.d. What do you notice?
Adapted from Geometry: A Moving Experience developed by the Curriculum Research & Development Group, College of Education at the University of Hawaii
34
2.6 Activity 1
1. On a clean sheet of graph paper, each group member should draw a triangle.
2. Record the coordinates of the vertices of the triangle in the table below.
3. Trace the figure with patty paper and rotate 90 counter-clockwise.
4. Record the coordinates of the vertices of the image in the table.
5. Look at the coordinates of corresponding vertices. What patterns do you notice?
6. Discuss your findings with your group members. Check to see if the same pattern works for each group member’s figure.
7. Write an algebraic rule for a 90 counter-clockwise rotation.
8. Now rotate the figure 90 clockwise.
9. Record the coordinates of the vertices of the image in the table.
10. Look at the coordinates of corresponding vertices. What patterns do you notice?
11. Discuss your findings with your group members. Check to see if the same pattern works for each group member’s figure.
12. Write an algebraic rule for a 90 clockwise rotation.
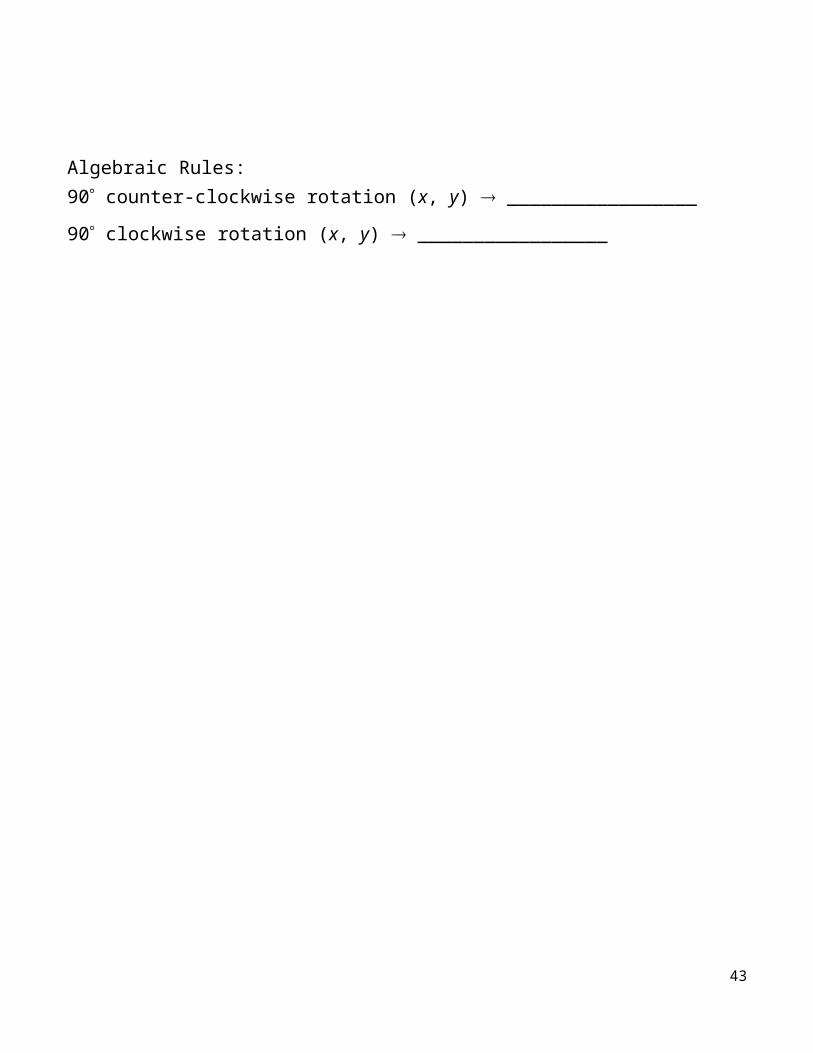
Algebraic Rules:90 counter-clockwise rotation (x, y) _________________
90 clockwise rotation (x, y) _________________
35
Preimage90 counter-
clockwise rotation
90 clockwise rotation
x y x y x y
36
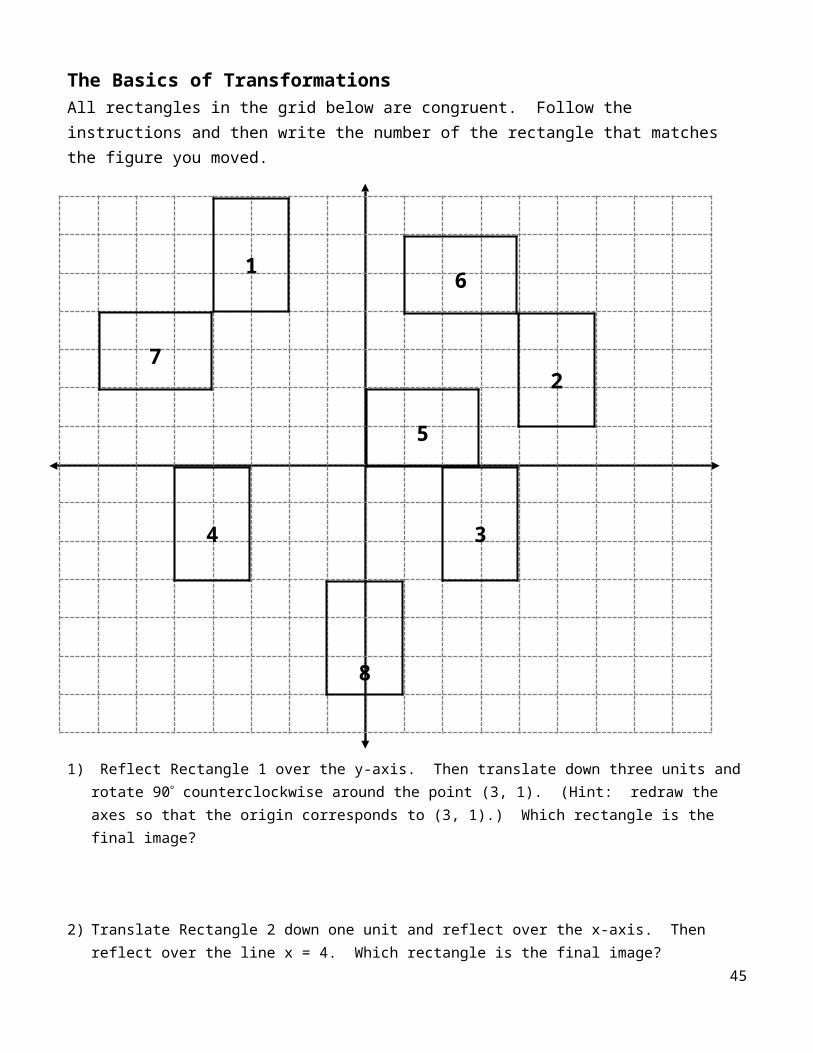
The Basics of TransformationsAll rectangles in the grid below are congruent. Follow the instructions and then write the number of the rectangle that matches the figure you moved.
37
1
2
34
7
6
5

1) Reflect Rectangle 1 over the y-axis. Then translate down three units and rotate 90 counterclockwise around the point (3, 1). (Hint: redraw the axes so that the origin corresponds to (3, 1).) Which rectangle is the final image?
2) Translate Rectangle 2 down one unit and reflect over the x-axis. Then reflect over the line x = 4. Which rectangle is the final image?
3) Reflect Rectangle 3 over the y-axis and then rotate 90 clockwise around the point (-2, 0). Finally, glide five units to the right. Which rectangle is the final image?
4) Rotate Rectangle 4 90 clockwise around the point (-3, 0). Reflect over the line y =2 and then translate one unit left. Which rectangle is the final image?
5) Translate Rectangle 5 left five units. Rotate 90 clockwise around the point (-2, 2) and glide up two spaces. Which rectangle is the final image?
6) Rotate Rectangle 6 90 clockwise around the point (4, 4) and translate down three units. Which rectangle is the final image?
38
8
7) Rotate Rectangle 7 90 clockwise around (-4, 4) and reflect over the line x = -4. Which rectangle is the final image?
8) Reflect Rectangle 8 over the x-axis. Translate four units left and reflect over the line y = 1.5. Which rectangle is the final image?
Adapted from Geometry Teacher’s Activities Kit by Muschla & Muschla
39
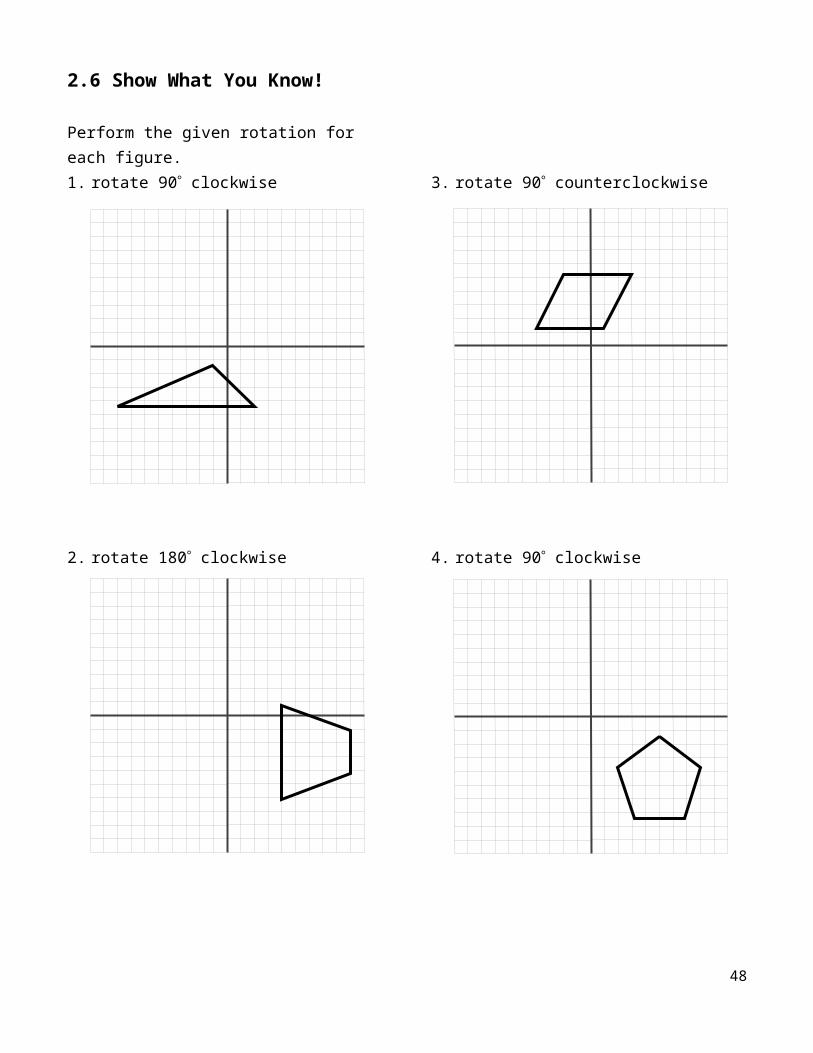
2.6 Show What You Know!
Perform the given rotation for each figure.1. rotate 90 clockwise
2. rotate 180 clockwise
3. rotate 90 counterclockwise
4. rotate 90 clockwise
40

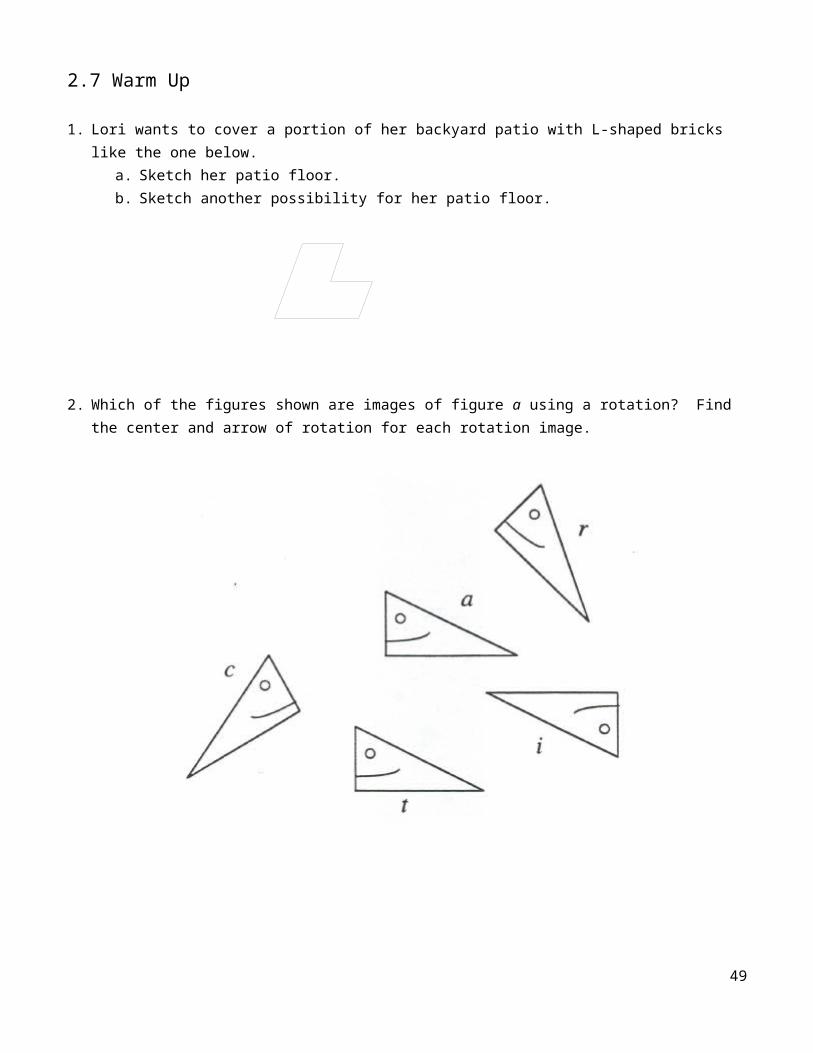
2.7 Warm Up
1. Lori wants to cover a portion of her backyard patio with L-shaped bricks like the one below.
a. Sketch her patio floor.b. Sketch another possibility for her patio floor.
2. Which of the figures shown are images of figure a using a rotation? Find the center and arrow of rotation for each rotation image.
Adapted from Geometry: A Moving Experience developed by the Curriculum Research & Development Group, College of Education at the University of Hawaii
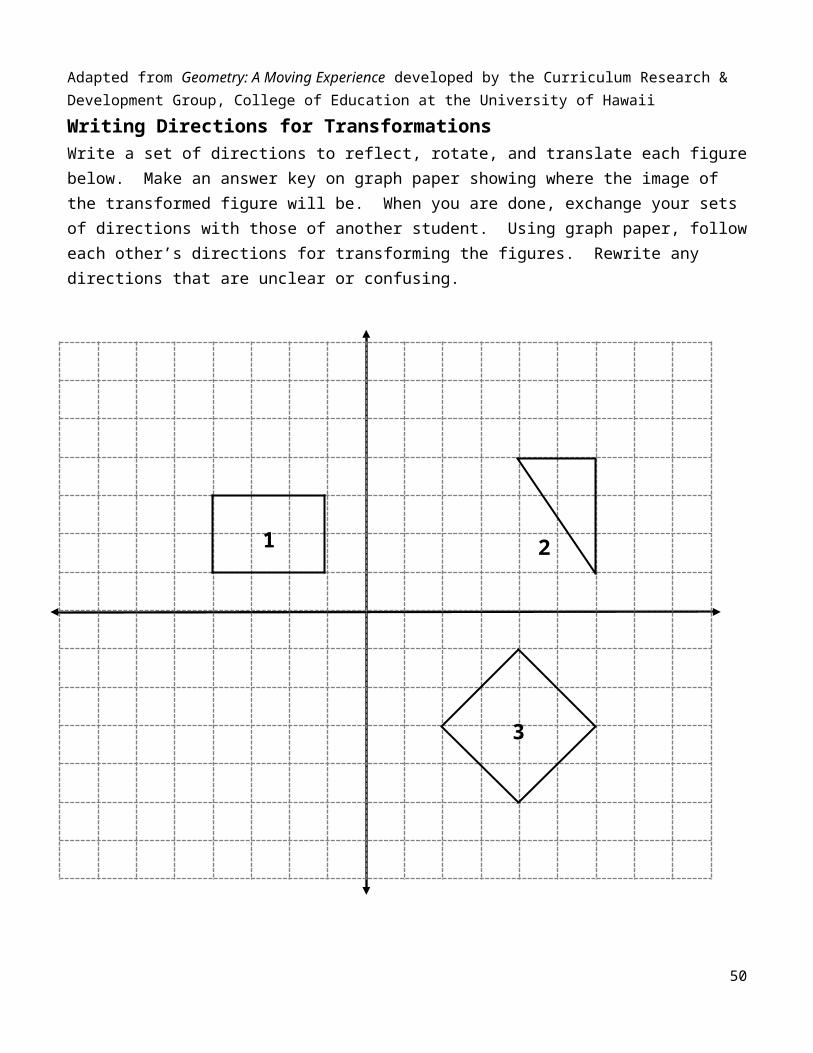
Writing Directions for Transformations
41

Write a set of directions to reflect, rotate, and translate each figure below. Make an answer key on graph paper showing where the image of the transformed figure will be. When you are done, exchange your sets of directions with those of another student. Using graph paper, follow each other’s directions for transforming the figures. Rewrite any directions that are unclear or confusing.
42
2
3
1
Adapted from Geometry Teacher’s Activities Kit by Muschla & Muschla
TransmoGrapher Exploration Questions
1. Pick a partner. Go to the following link: http://www.shodor.org/interactivate/activities/Transmographer/ Each of you should perform 2 transformations (translation, reflection, or rotation) on a triangle. Make sure you keep track of the transformations you use. Also, be sure to click on “Show Original Polygon” and unclick “Show Pre-image.” Now switch computers and see if you can get your partner’s triangle back to its home position (also keeping track of the transformations you make). Now compare the transformations you made to move the triangle with your partner's moves to get it back to its original position. Are they the same? Explain.
3. Now each of you should perform 3 transformations (translation, reflection, or rotation) on a square. Make sure you keep track of the transformations you use. Now switch computers and see if you can get your partner’s square back in to its home position (also keeping track of the transformations you use). Now compare the moves you did to move the square with your partner's moves to get it back. Are they the same? Explain.
4. Now you and your partner should perform 2 transformations (translation, reflection, or rotation) on a parallelogram. Make sure you keep track of the transformations you use. Now switch computers and see if you can get your partners parallelogram back in to its home position also keeping track of the transformations you use). Now compare the moves you did to
43
move the parallelogram with your partner's moves to get it back. Are they the same? Explain.
44
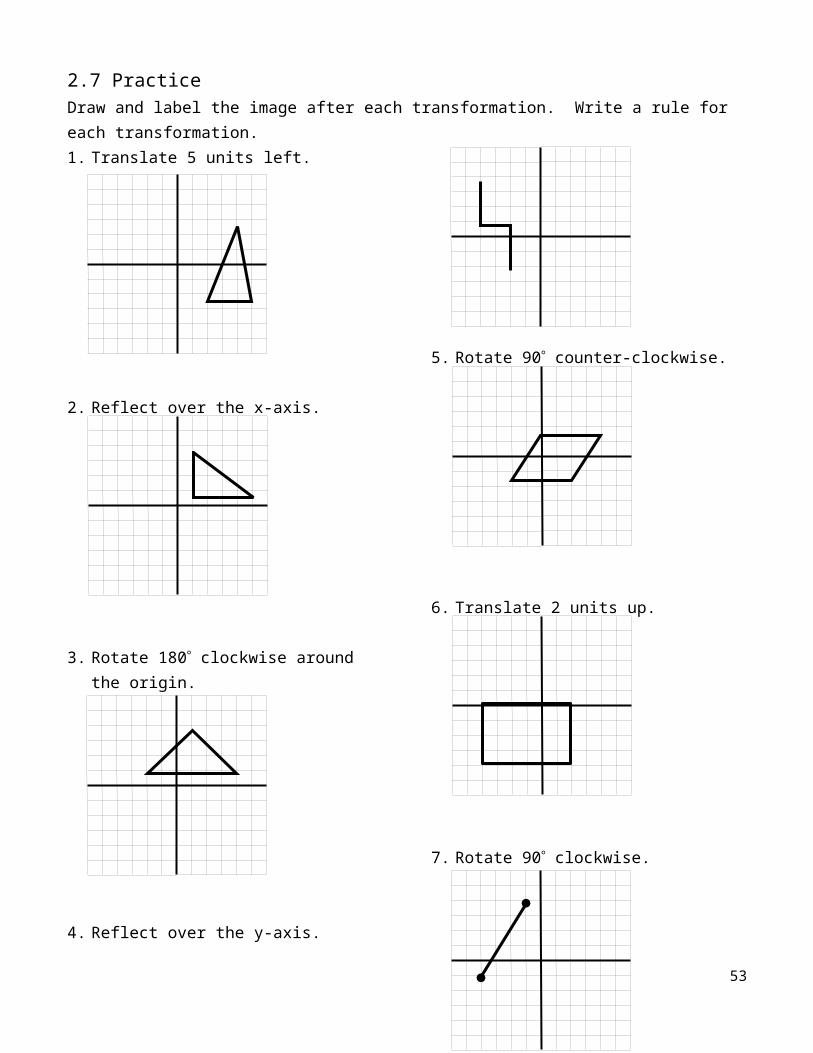
2.7 PracticeDraw and label the image after each transformation. Write a rule for each transformation.1. Translate 5 units left.
2. Reflect over the x-axis.
3. Rotate 180 clockwise around the origin.
4. Reflect over the y-axis.
5. Rotate 90 counter-clockwise.
6. Translate 2 units up.
7. Rotate 90 clockwise.
8. Translate 4 units right and 7 units down.
45

2.7 Show What You Know! Practice QuizPart 1: VocabularyFill in the blank with the appropriate term.
1. A(n) ____________________________ is a change in position, orientation, or size of a figure.2. A(n) ____________________________ is a transformation in which all points of a figure move the same
distance in the same direction.3. A(n) ____________________________ is a transformation in which the preimage and the image are
congruent.4. A(n) ___________________________ is a transformation in which a figure and its image have opposite
orientations.5. A(n) ___________________________ is a transformation in which a figure is turned around a fixed point.
Part 2: Graphing Transformations on the Coordinate PlaneGraph each figure. Then find the image after the given transformation. 1. HIJ with vertices H(-2, 1), I(2, 3), and J(0,
0) translated right two and up three.
2. Quadrilateral QRST with vertices Q(1, 0), R(2, -3), S(0, -3), and T(-3, -1) reflected over the y-axis.
3. JK with endpoints J(-3, -2) and (2, 4) rotated 90 clockwise.
4. ABC with vertices A(-4, -2), B(-1, -4), C(2, -2) reflected over the x-axis.
46
5. STR with vertices S(-2, 0), T(0, -1), and R(-3, -3) rotated 180 clockwise.
6. EFG with vertices E(2, 0), F(-1, -1), and G(1, 3) translated left three and up one.
7. PQ with endpoints P(4, 2) and Q (-1, 5) reflected across the line y = x.
8. TAM with vertices T(0, 5), A(4, 1) and M(3, 6) rotated 90 counter-clockwise.
Part 3: Writing a Rule1. Write a rule to describe each translation.
a. b.
47
V
V’
W’
W
G’
O’D’
G
OD
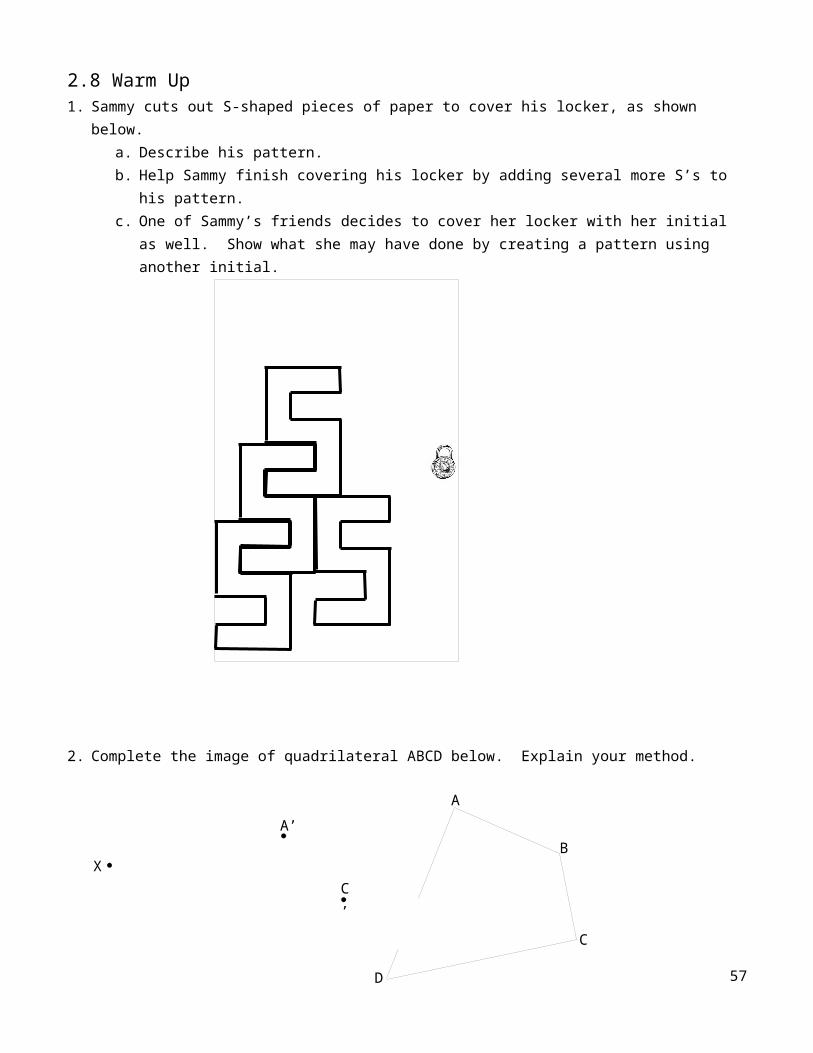
2.8 Warm Up1. Sammy cuts out S-shaped pieces of paper to cover his locker, as shown below.
a. Describe his pattern.b. Help Sammy finish covering his locker by adding several more S’s to his pattern.c. One of Sammy’s friends decides to cover her locker with her initial as well. Show
what she may have done by creating a pattern using another initial.
2. Complete the image of quadrilateral ABCD below. Explain your method.
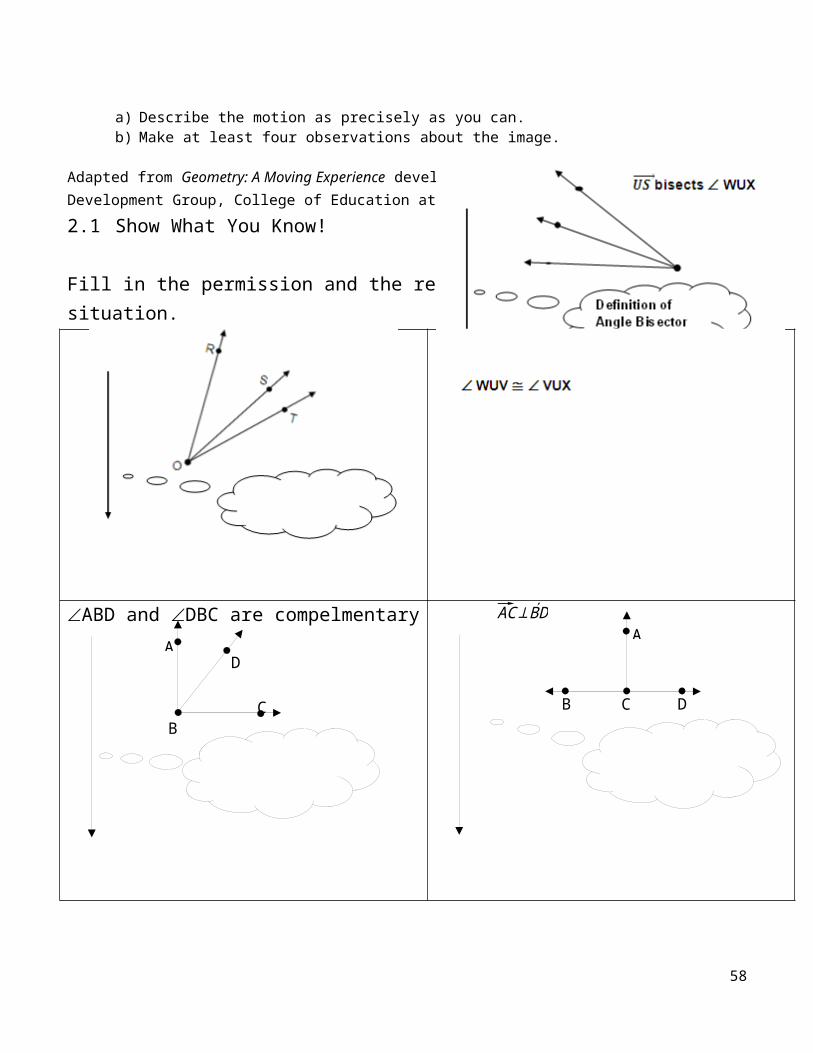
a) Describe the motion as precisely as you can.b) Make at least four observations about the image.
Adapted from Geometry: A Moving Experience developed by the Curriculum Research & Development Group, College of Education at the University of Hawaii
2.7 Show What You Know!
48
X
C
A’
D
C’
A
B
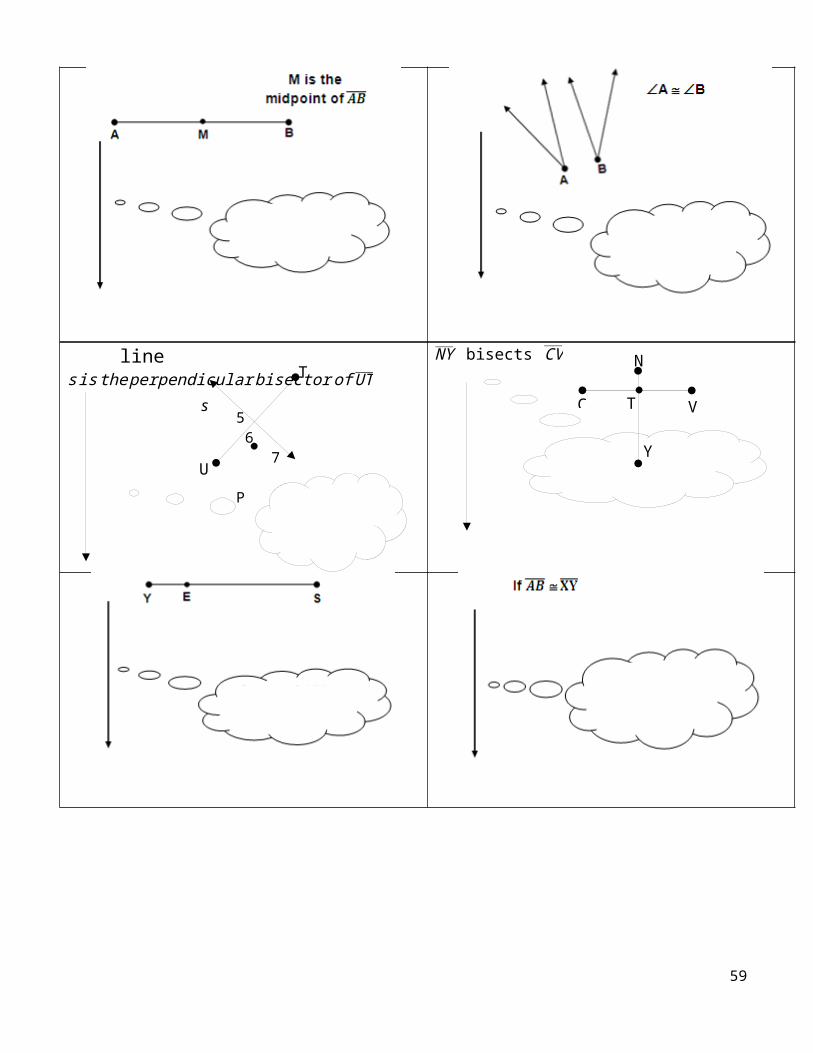
Fill in the permission and the response for each given situation.
ABD and DBC are compelmentary AC⊥ BD
49
A
BC
D
A
B C D
T
5 6 7 P
U
line s isthe perpendicular bisector of UT NY bisects CV
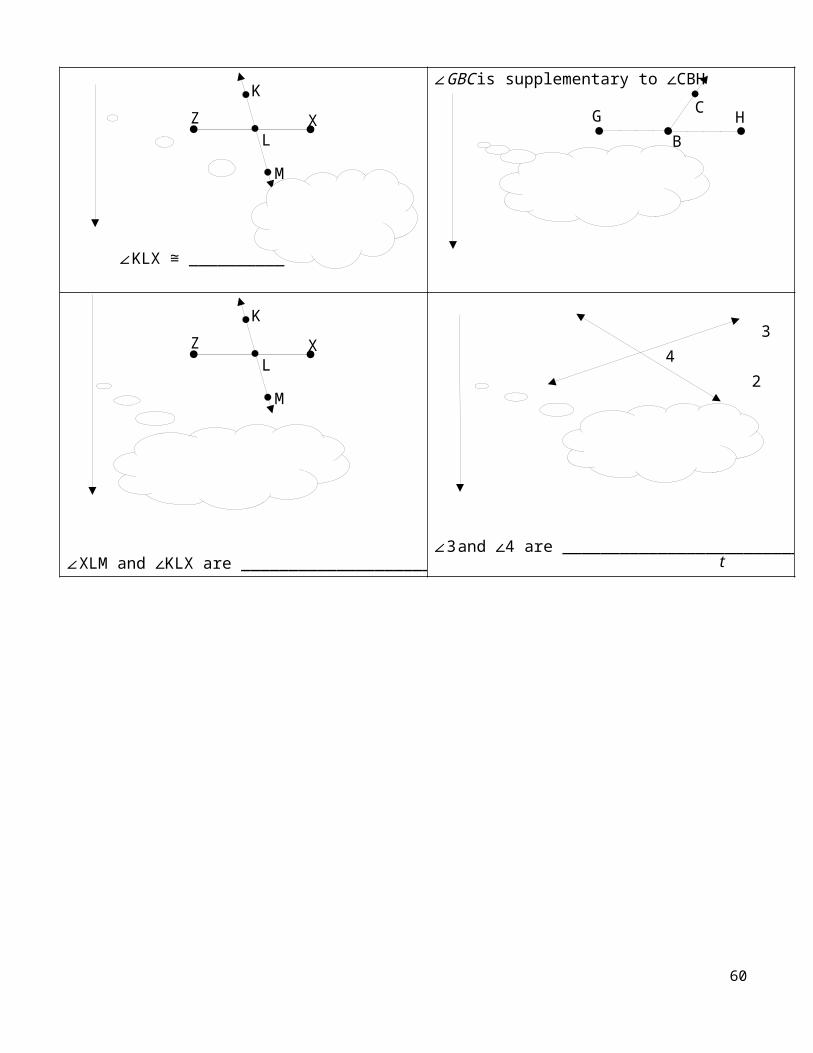
∠KLX __________≅
∠GBC is supplementary to CBH∠
50
K
Z XL
M
C HG
B
sC
N
Y
VT
∠XLM and KLX are ____________________∠ ∠3 and 4 are _________________________∠
51
K
Z XL
M
3 4 1 2
t
2.9 Warm Up
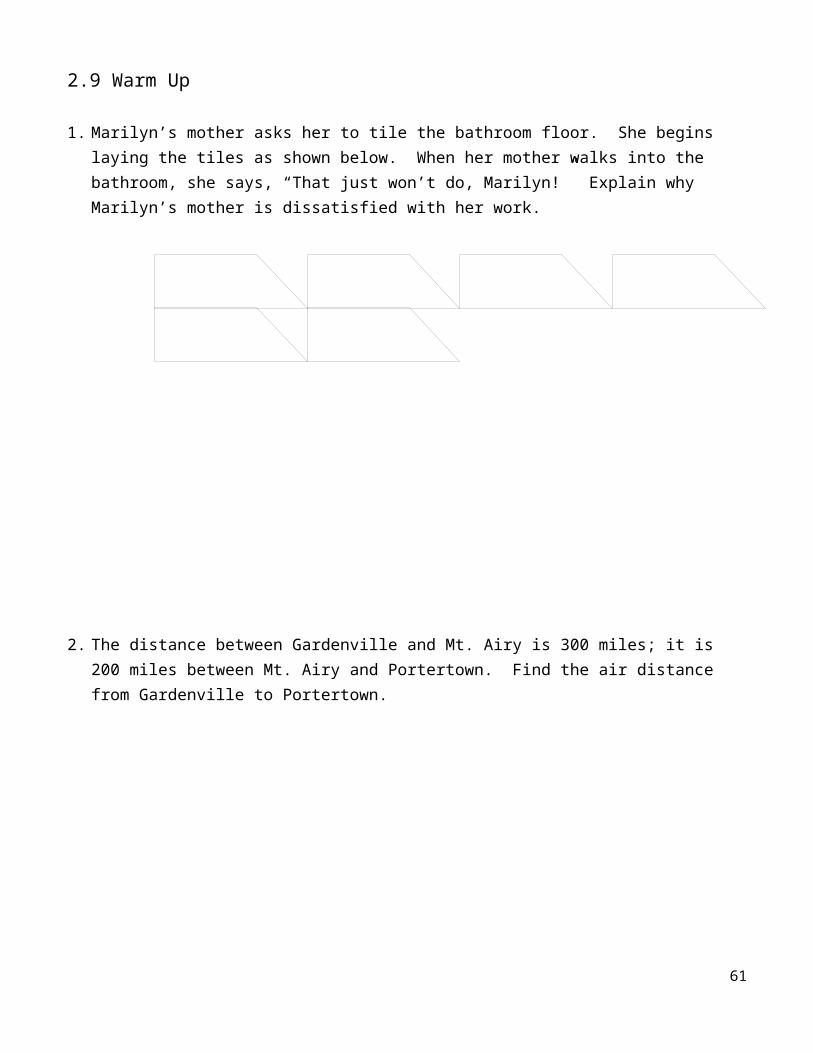
1. Marilyn’s mother asks her to tile the bathroom floor. She begins laying the tiles as shown below. When her mother walks into the bathroom, she says, “That just won’t do, Marilyn!” Explain why Marilyn’s mother is dissatisfied with her work.
2. The distance between Gardenville and Mt. Airy is 300 miles; it is 200 miles between Mt. Airy and Portertown. Find the air distance from Gardenville to Portertown.
Adapted from Geometry: A Moving Experience developed by the Curriculum Research & Development Group, College of Education at the University of Hawaii
52
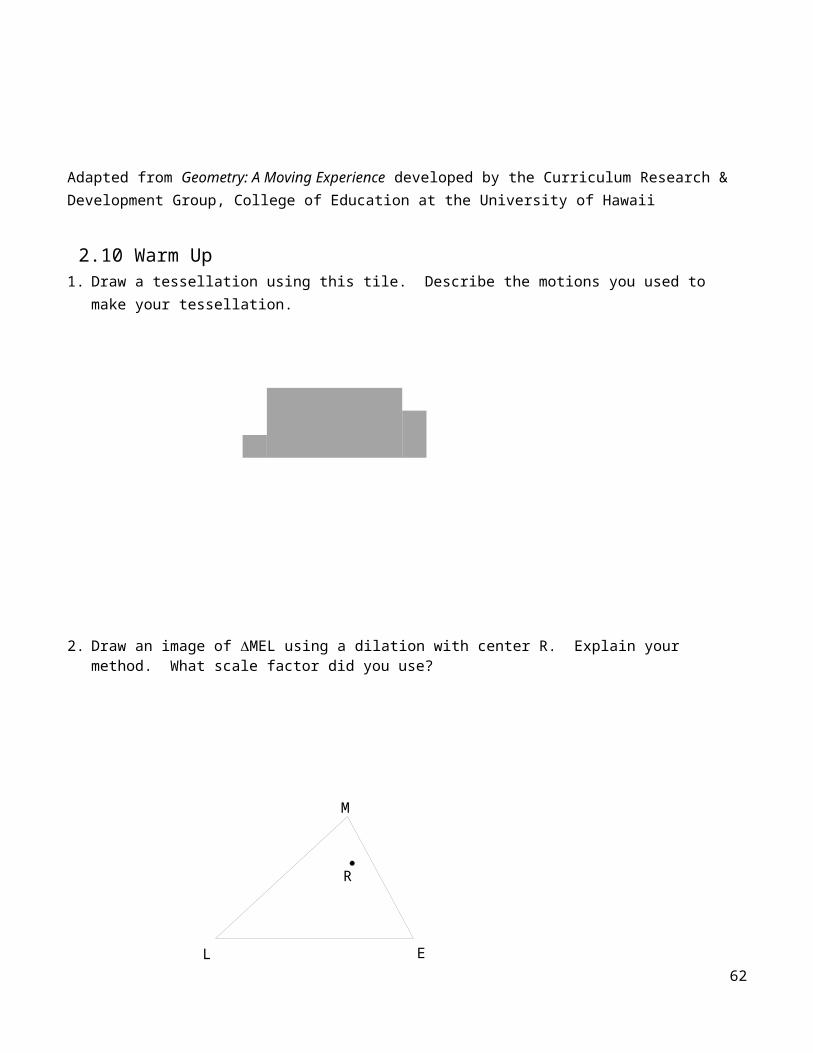
2.10 Warm Up1. Draw a tessellation using this tile. Describe the motions you used to make your
tessellation.
2. Draw an image of MEL using a dilation with center R. Explain your method. What scale factor did you use?
a) Draw a different image of MEL using a dilation with center R. What scale factor did you use?
b) Draw a very different image of MEL using a dilation with center R. What scale factor did you use?
Adapted from Geometry: A Moving Experience developed by the Curriculum Research & Development Group, College of Education at the University of Hawaii
53
M
L E
R

54
CCW about the origin. reflected across the x-axis.
2.10

C
H
S
R
2.11Warm Up1. Draw a dilation of quadrilateral CHRS using X as the center of dilation and the following
scale factors:a. 50%; label the image LOVY.b. 200%; label the image FIJU.c. 100%; label the image DEGA.
2. Sean connects a rubber band (BN) between two pegs on the hands of a clock as shown, where BE = 4 units and EN = 3 units.
a) What happens to the length of his rubber band (BN) as the hands move through a full hour?b) What lengths are possible for BN?
Adapted from Geometry: A Moving Experience developed by the Curriculum Research & Development Group, College of Education at the University of Hawaii
55
NE
B
X

56
CCW about the origin. reflected across the x-axis.
2.11
Vocabulary Word
Definition CharacteristicsPicture and/or
SymbolReal Life Examples
congruence motion
image
preimage
reflection
rotation
57
Vocabulary Word
Definition CharacteristicsPicture and/or
SymbolReal Life Examples
tessellation
transformation
translation
58
59
TESSELLATION PROJECT DIRECTIONS
You are to create your own tessellation masterpiece. Your tessellation will be created based on specific criteria. You MUST follow the guidelines given in order to receive full credit. The tessellation will be constructed on white legal size graph paper (I will supply). Your grade will be based on the following.
Tessellation WebQuest (20)Escher Essay (1-2 page paper and reference page) (20)Tessellation Creation
Pattern Tessellates the plane (10)Template with modifications turned in (5)Appearance and Neatness (10)Creativity/Originality/Difficulty (10)
Total Points (75)
Part 1 – Tessellation WebQuest (SAS Curriculum Pathways 736)The tessellation WebQuest is an introduction to the world of tessellations. You will define a tessellation, identify the properties of tessellations, and take a look at the history of tessellations. In this quest you will also have to find specific examples of tessellations in nature as well as man-made tessellations.
Part 2 – M.C. Escher EssayYou are to write a 1-2 page essay on the Mathematical art of M.C Escher. Your essay should include
His background. Who is M.C. Escher? Where he was born? What was his education? Etc. Escher’s contributions to art and mathematics. How does he integrate Mathematics with
art? Also give specific examples of his work. What is his nickname? and any additional interesting facts about him.
The paper should be typed, 12 point font, Times New Roman, double spaced, and 1 inch margins. In addition to the 1-2 pages you are to have a reference page of the websites, or books you used to write your essay. Spelling and grammar count!
Part 3 – Create your own TessellationThe appearance of your tessellation should be neat! Your tessellation (pattern) should cover the ENTIRE page (no gaps or unintentional white spaces). You are to turn in the template figure you used to create your tessellation. Coloring should be in between the lines, and NO wrinkled or torn projects! Your project will also be based on Creativity and Difficulty. The more difficult and complex the tessellation is, then the higher the grade. You may not simply take a polygon and slide, rotate, or reflect it over and over again to create your tessellation. You must use a figure created using one of the nibbling methods.
What to do1. Begin by creating a “template” using at least 1 of the nibbling methods. Be sure to label
all the pieces.
60
2. Once the template has been created, place your template at any of the four corners of your graph paper and trace your first figure. (the squares on the graph paper should align with the original square you started with, and therefore your template may hang off the edge of the paper.
3. Once your figure has been traced slide it or reflect it and trace your next figure (whether you reflect or slide it depends on the nibbling technique you used)
4. Continue step 3 until the entire page is covered. All your figures on the paper should fit together so that it looks like a puzzle. Figures at the edge will only be partial images
5. Once you have the page covered in your tessellation, begin to add color in the figure. The figure can be animated as well (see attached examples for animations).
6. Be creative and have fun with the project!
**Remember the more creative your tessellation is the more points!
WHAT TO TURN INCover page (with Title, Name, Date, Period)Completed WebQuestEscher Essay (1-2 pages typed)Tessellation Creation with template
61
This project is DUE
CREATING YOUR TEMPLATE
METHOD 1: The nibbling technique for geometric transformations: 1. Begin with a square and design from one corner of the square to an adjacent corner. (Do
not draw diagonally). Do not stop halfway across!
2. Cut on the design line, being sure to have 2 pieces when done -the nibble and the rest of the sheet. There should be no other pieces laying around. This is very important! No trimming allowed.
3. Slide the nibble across the sheet to the opposite side and tape the straight edges together. (Do not attach it to an adjacent edge. Do not flip the nibble around. Do not overlap the edges when taping.) The corners of the piece and the nibble should match perfectly.
4. Repeat the procedure for the other sides METHOD 2: The Rotating and nibbling technique for geometric transformations:
62
1. Begin with a rectangle and design from one corner of the rectangle to an adjacent corner. (Do not draw diagonally). Do not stop halfway across!
2. Cut on the design line, being sure to have 2 pieces when done -the nibble and the rest of the sheet. There should be no other pieces laying around. This is very important! No trimming allowed.
3. Instead of sliding the nibble, rotate the nibble at its end point to an adjacent side of their square (not an opposite side). Mark your point of rotation and tape the straight edges together. (Do not overlap the edges when taping.) The corners of the piece and the nibble should match perfectly.
4. Repeat the procedure for the other sides
Creating a Tessellation Using Reflections:
63
1. Select any figure you want to use as your pattern (can use a figure from the nibbling Methods or a combination of both.
2. Then reflect or “flip” the figure repeatedly vertically (over the y-axis). 3. Once you have a row of “flips”, take that row and reflect it horizontally (over the x-axis)4. Continue Steps 2 and 3 until your paper is covered.
Example
EXAMPLES OF TEMPLTAES AND THEIR TESSELLATIONSTwo specific silhouettes or illustrations of animate figures are shown below. They are examples of alterations of opposites sides of a regular grid by translations
64

Tessellating shapes can be formed by applying the “nibbling” techniques to both pairs of parallel sides. An example is shown below.
Creating Animate Figures with TessellationsThere are two approaches to altering tessellating polygons into animate figures
65

1. Have a specific object in mind and to alter the original polygons (rectangle, square, or parallelogram) sides to make the shape look like the object (nibbling techniques). This approach may require a bit of trial and error.
2. Create a new shape using the nibbling techniques and then use you imagination to see that you think it “look like”. Below are two examples
Does the new shape look like anything special to you ? Does it remind you of anything? There are many things it could be. It could be the head of a person wearing a feather in his cap
Here is a different altered square. What does it look like to you? Maybe a flying owl?
66


![[ 'pxlIs ] Read and translate: [ 'pqVstq ] Read and translate:](https://img.pdfslide.net/doc/110x75/56649e205503460f94b0b923/-pxlis-read-and-translate-pqvstq-read-and-translate.jpg)