Embed Size (px)
Citation preview
8/13/2019 012 Capitulo 12
http://slidepdf.com/reader/full/012-capitulo-12 1/22
12Cowls
chapter
208
COWLS . . . . . . . . . . . . . . . . . . . . . . . . . . . . . . . . . . . .209
Types of Cowls . . . . . . . . . . . . . . . . . . . . . . . . . .209
Nature of the Bias Cut . . . . . . . . . . . . . . . . . . . .210
Twisting . . . . . . . . . . . . . . . . . . . . . . . . . . . . . . . .210
Making Patterns for Bias-Cut Cowls . . . . . . . . .210
Finding True Bias . . . . . . . . . . . . . . . . . . . . . . . . .211
Fitting the Cowl Drape . . . . . . . . . . . . . . . . . . .211
Correcting the Pattern . . . . . . . . . . . . . . . . . . .211
High Relaxed Cowl . . . . . . . . . . . . . . . . . . . . . .212
Mid-Depth Cowl . . . . . . . . . . . . . . . . . . . . . . . .214
Low Cowl . . . . . . . . . . . . . . . . . . . . . . . . . . . . . .216
Deep Cowl . . . . . . . . . . . . . . . . . . . . . . . . . . . . .217
Strapless Top . . . . . . . . . . . . . . . . . . . . . . . . . . . .218
BACK COWLS . . . . . . . . . . . . . . . . . . . . . . . . . . . . . . .219
High-Back Cowl . . . . . . . . . . . . . . . . . . . . . . . . .219Mid-Back Cowl . . . . . . . . . . . . . . . . . . . . . . . . .221
Low-Back Cowl . . . . . . . . . . . . . . . . . . . . . . . . .221
ONE-PIECE ARMHOLE COWLS . . . . . . . . . . . . . . . . . .222
PLEATED COWLS . . . . . . . . . . . . . . . . . . . . . . . . . . . . .224
Pleated Shoulder Cowl . . . . . . . . . . . . . . . . . . .224
EXAGGERATED COWLS . . . . . . . . . . . . . . . . . . . . . . .226
High Exaggerated Cowl . . . . . . . . . . . . . . . . . .226
INSET COWLS . . . . . . . . . . . . . . . . . . . . . . . . . . . . . . .228
V-Inset Cowl . . . . . . . . . . . . . . . . . . . . . . . . . . . .228
SELF-EVALUATION TEST . . . . . . . . . . . . . . . . . . . . . . . .229
8/13/2019 012 Capitulo 12
http://slidepdf.com/reader/full/012-capitulo-12 2/22
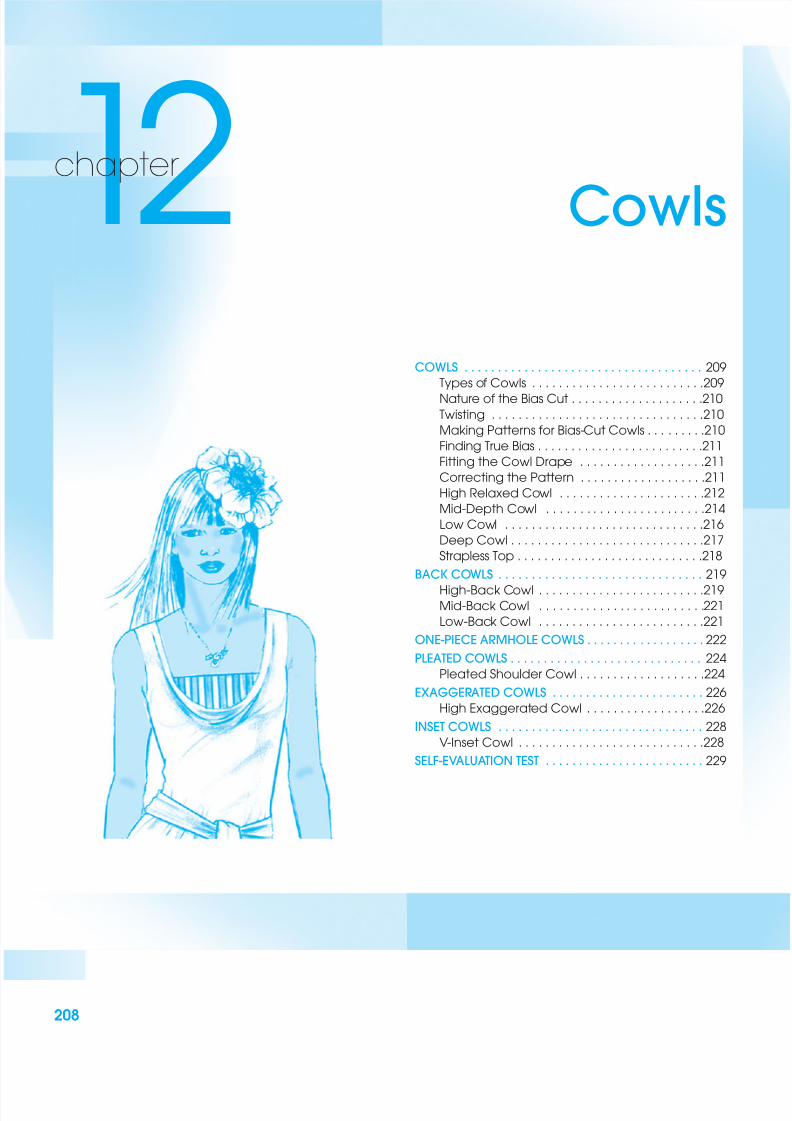
COWLSCowl folds are created by allowing fabric to fall todesired depths from secured ends of a bias triangle.Cowls drape best on true bias and when cut in soft,
loosely woven fabrics—crepe, silk, gauze, rayon,satin, chiffon, and certain knits. The bodice cowl de-pends on excess taken from the basic dart—the lowerthe depth of the cowl, the greater the amount of ex-cess needed—an application of Dart Manipulation.
Types of CowlsCowls can be designed with or without pleats and/orgathers and with few or many folds. They fall at vary-ing depths, creating a soft look to any garment.Cowls fall from the shoulder at necklines, at arm-
holes, or from the waist of dresses, gowns, blouses,pants, jackets, and coats. Cowls can also be designedto fall from the cap area of the sleeve. Cowls can bein-one with the garment or be set-in to save fabric.With the help of a broach or clip, the cowl can bepulled in any direction to create interesting effects.
French darts rather than waist darts may bepreferred.
COWLS 209
8/13/2019 012 Capitulo 12
http://slidepdf.com/reader/full/012-capitulo-12 3/22
210 Chapter 12
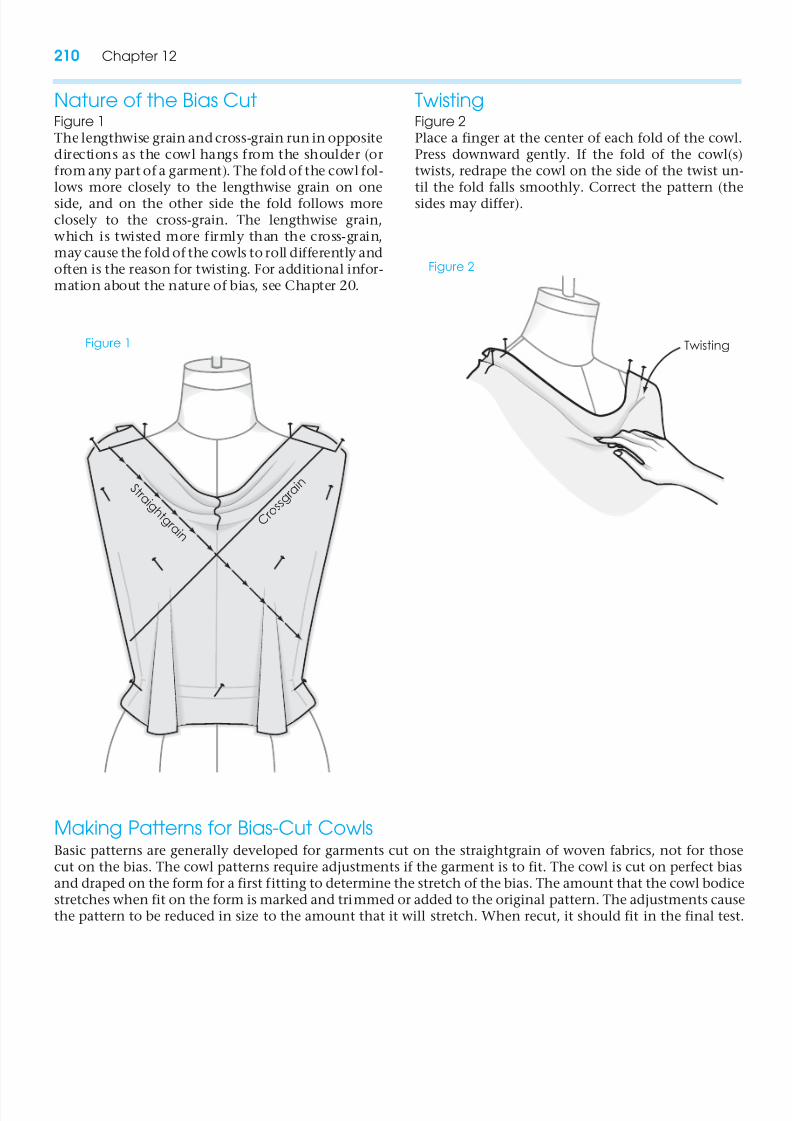
Twisting
Figure 2
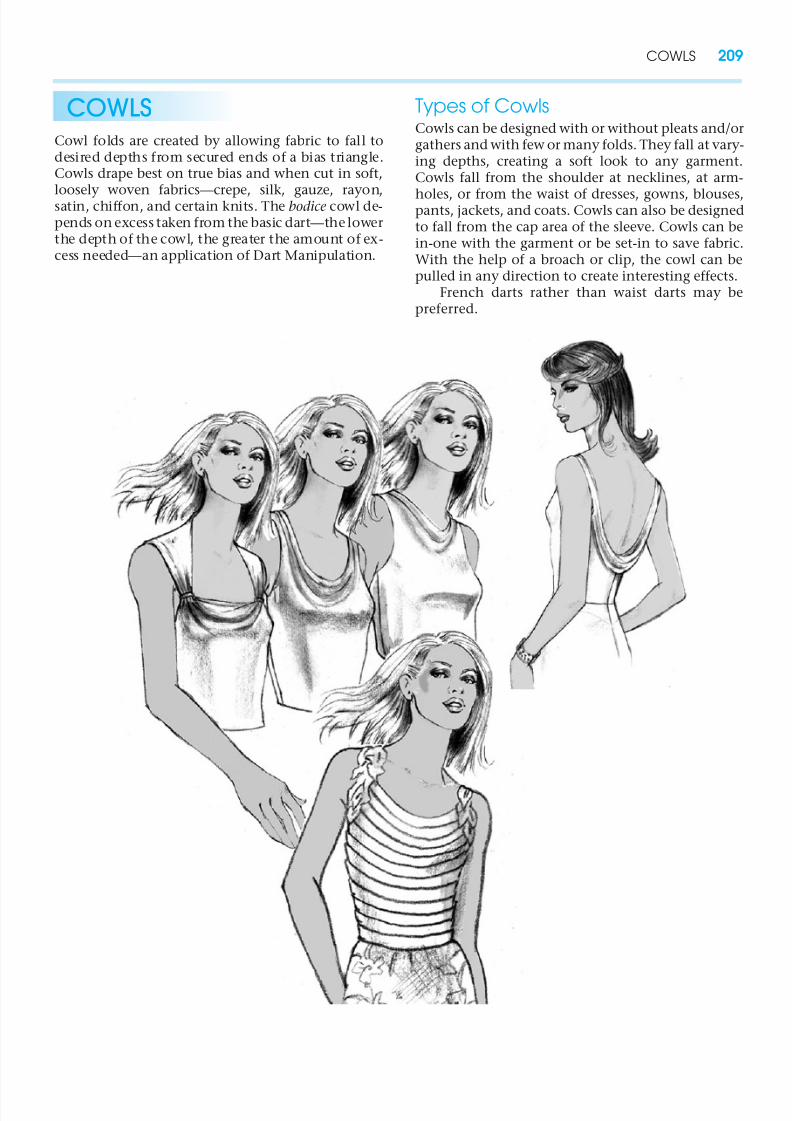
Nature of the Bias CutFigure 1The lengthwise grain and cross-grain run in oppositedirections as the cowl hangs from the shoulder (orfrom any part of a garment). The fold of the cowl fol-lows more closely to the lengthwise grain on oneside, and on the other side the fold follows moreclosely to the cross-grain. The lengthwise grain,which is twisted more firmly than the cross-grain,may cause the fold of the cowls to roll differently andoften is the reason for twisting. For additional infor-mation about the nature of bias, see Chapter 20.
TwistingFigure 2Place a finger at the center of each fold of the cowl.Press downward gently. If the fold of the cowl(s)twists, redrape the cowl on the side of the twist un-til the fold falls smoothly. Correct the pattern (thesides may differ).
C r o s s g r a i nS t r a i g h t g r a i n
Figure 1
Making Patterns for Bias-Cut CowlsBasic patterns are generally developed for garments cut on the straightgrain of woven fabrics, not for thosecut on the bias. The cowl patterns require adjustments if the garment is to fit. The cowl is cut on perfect biasand draped on the form for a first fitting to determine the stretch of the bias. The amount that the cowl bodicestretches when fit on the form is marked and trimmed or added to the original pattern. The adjustments causethe pattern to be reduced in size to the amount that it will stretch. When recut, it should fit in the final test.
8/13/2019 012 Capitulo 12
http://slidepdf.com/reader/full/012-capitulo-12 4/22
COWLS 211
Add 1 "
allowance
Fabr ic
Tissue
T r u e
b i a
s
F o l d
F R O N
T C O W L
Figure 3
Raise
Ad justedar mhole
Ad justedside seam
Ad justedwaistline
Figure 4
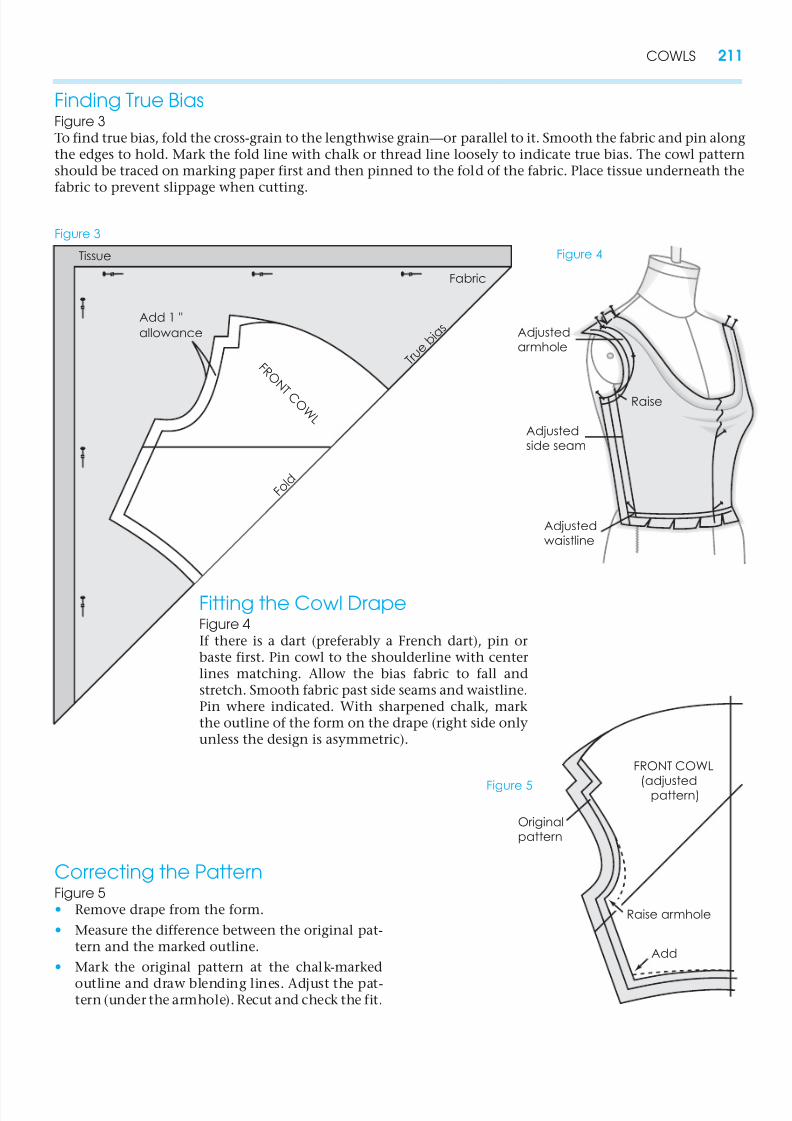
Finding True BiasFigure 3To find true bias, fold the cross-grain to the lengthwise grain—or parallel to it. Smooth the fabric and pin alongthe edges to hold. Mark the fold line with chalk or thread line loosely to indicate true bias. The cowl patternshould be traced on marking paper first and then pinned to the fold of the fabric. Place tissue underneath thefabric to prevent slippage when cutting.
Correcting the PatternFigure 5• Remove drape from the form.
• Measure the difference between the original pat-tern and the marked outline.
• Mark the original pattern at the chalk-marked
outline and draw blending lines. Adjust the pat-tern (under the armhole). Recut and check the fit.
Raise ar mhole
Or iginalpatter n
FRONT COWL
(ad ju
sted
patter n)
Add
Figure 5
Fitting the Cowl DrapeFigure 4If there is a dart (preferably a French dart), pin orbaste first. Pin cowl to the shoulderline with centerlines matching. Allow the bias fabric to fall andstretch. Smooth fabric past side seams and waistline.Pin where indicated. With sharpened chalk, markthe outline of the form on the drape (right side onlyunless the design is asymmetric).
8/13/2019 012 Capitulo 12
http://slidepdf.com/reader/full/012-capitulo-12 5/22
212 Chapter 12
Design 1
3/4 "
3/4 "BC
A
S l a s h
SlashBust point
C e n t e r f r o n t
C.F. bust
Figure 1
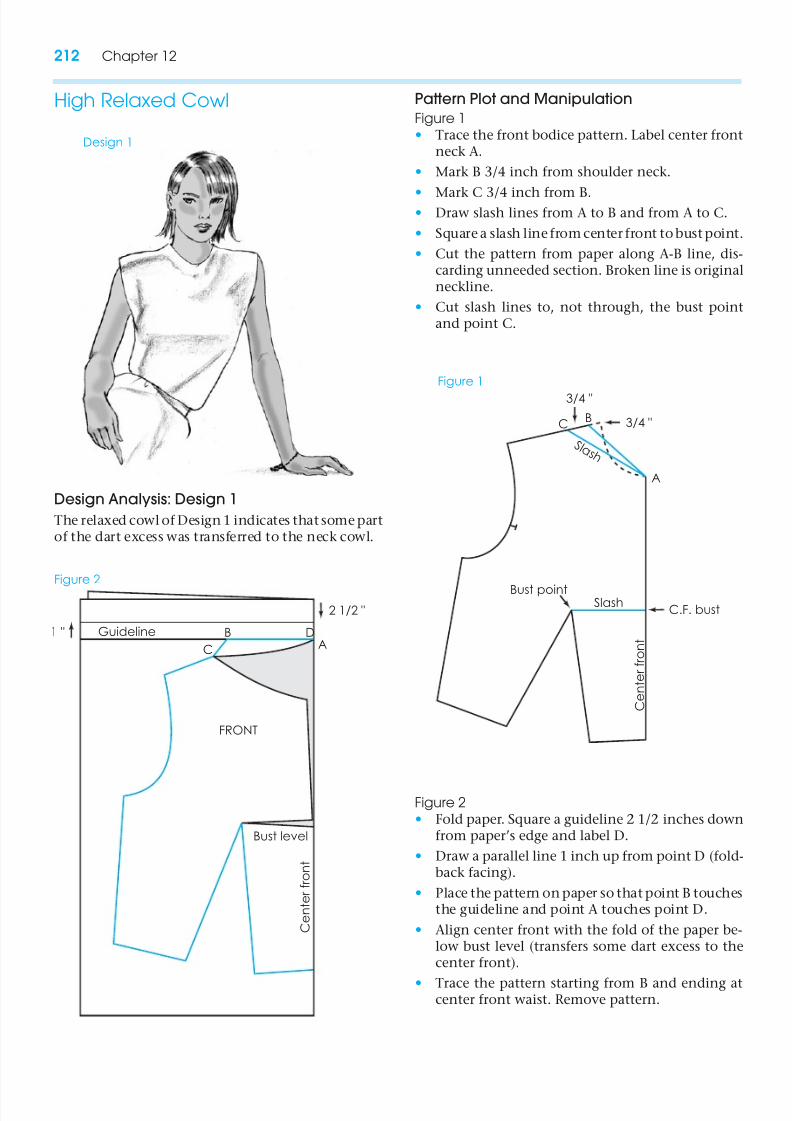
High Relaxed Cowl Pattern Plot and Manipulation
Figure 1
• Trace the front bodice pattern. Label center frontneck A.
• Mark B 3/4 inch from shoulder neck.
•
Mark C 3/4 inch from B.• Draw slash lines from A to B and from A to C.
• Square a slash line from center front to bustpoint.
• Cut the pattern from paper along A-B line, dis-carding unneeded section. Broken line is originalneckline.
• Cut slash lines to, not through, the bust pointand point C.
Guideline
FRONT
Bust level
C e n t e r f r o n t
C
B DA
1 "
2 1/2 "
Figure 2
Design Analysis: Design 1
The relaxed cowl of Design 1 indicates that some partof the dart excess was transferred to the neck cowl.
Figure 2
• Fold paper. Square a guideline 2 1/2 inches downfrom paper’s edge and label D.
• Draw a parallel line 1 inch up from point D (fold-back facing).
• Place the pattern on paper so that point B touchesthe guideline and point A touches point D.
• Align center front with the fold of the paper be-low bust level (transfers some dart excess to thecenter front).
• Trace the pattern starting from B and ending atcenter front waist. Remove pattern.
8/13/2019 012 Capitulo 12
http://slidepdf.com/reader/full/012-capitulo-12 6/22
COWLS 213
FRONT
Tr ace
and
blend
Fold line B A
Figure 3
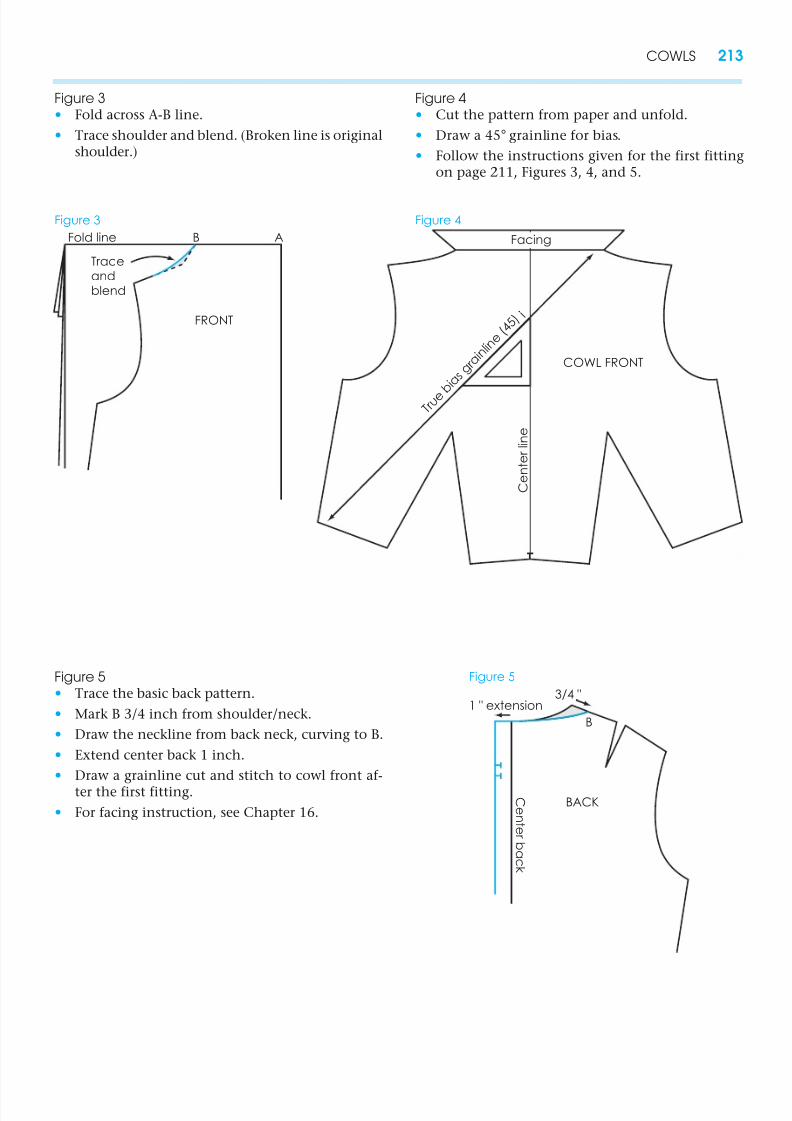
Figure 3
• Fold across A-B line.
• Trace shoulder and blend. (Broken line is originalshoulder.)
Figure 4
• Cut the pattern from paper and unfold.
• Draw a 45° grainline for bias.
• Follow the instructions given for the first fittingon page 211, Figures 3, 4, and 5.
COWL FRONT
T r u e b
i a s g
r a i n l i n
e ( 4 5 )
¡
C e n t e r l i n e
Facing
Figure 4
Figure 5• Trace the basic back pattern.
• Mark B 3/4 inch from shoulder/neck.
• Draw the neckline from back neck, curving to B.
• Extend center back 1 inch.
• Draw a grainline cut and stitch to cowl front af-ter the first fitting.
• For facing instruction, see Chapter 16.BACK
3/4 "
B
1 " extension
C ent er b a ck
Figure 5
8/13/2019 012 Capitulo 12
http://slidepdf.com/reader/full/012-capitulo-12 7/22
214 Chapter 12
Design 2
Mid-Depth Cowl
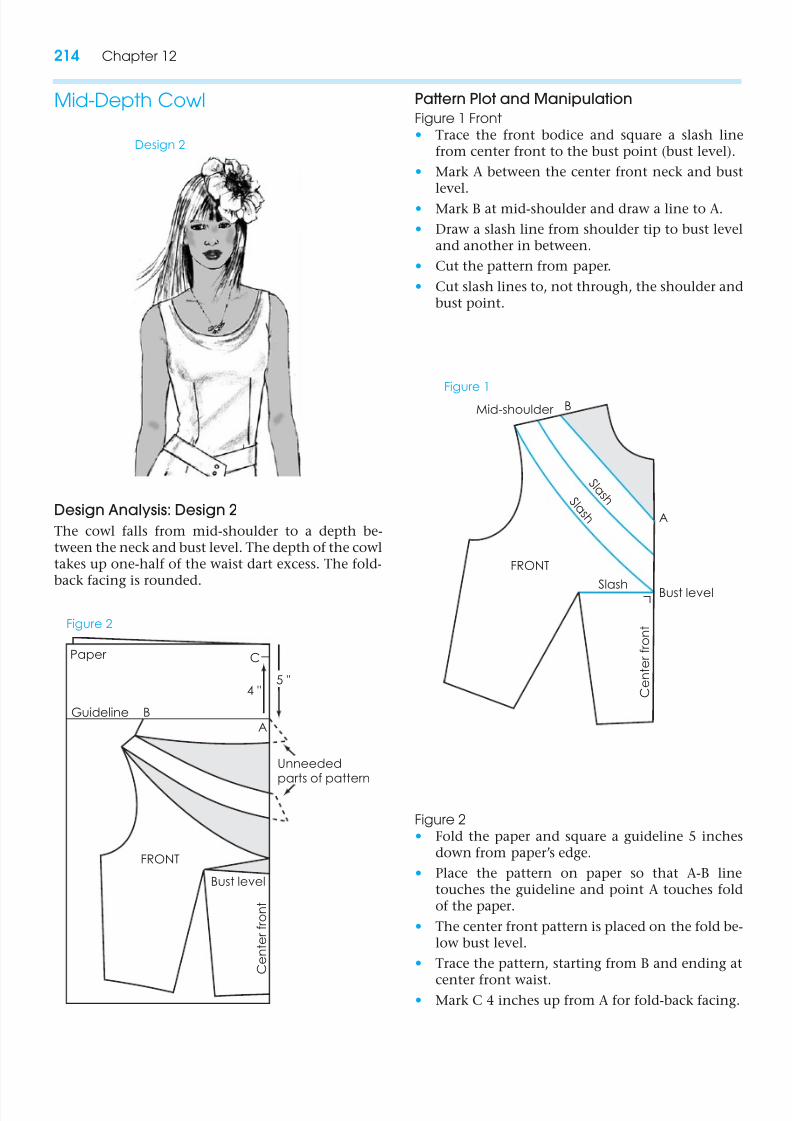
Design Analysis: Design 2
The cowl falls from mid-shoulder to a depth be-tween the neck and bust level. The depth of the cowltakes up one-half of the waist dart excess. The fold-back facing is rounded.
FRONT
S l a s h S l a
s h
Mid-shoulder B
A
C e n t e r f r o n t
Slash Bust level
Fig
ure 1
FRONT
Guideline B
A
4 "
C
Unneededparts of pattern
C e n t e r f r o n t
Bust level
5 "
Paper
Figure 2
Pattern Plot and Manipulation
Figure 1 Front
• Trace the front bodice and square a slash linefrom center front to the bust point (bust level).
• Mark A between the center front neck and bustlevel.
• Mark B at mid-shoulder and draw a line to A.
• Draw a slash line from shoulder tip to bust leveland another in between.
• Cut the pattern from paper.
• Cut slash lines to, not through, the shoulder andbust point.
Figure 2
• Fold the paper and square a guideline 5 inchesdown from paper’s edge.
• Place the pattern on paper so that A-B linetouches the guideline and point A touches foldof the paper.
• The center front pattern is placed on the fold be-low bust level.
• Trace the pattern, starting from B and ending at
center front waist.• Mark C 4 inches up from A for fold-back facing.
8/13/2019 012 Capitulo 12
http://slidepdf.com/reader/full/012-capitulo-12 8/22
COWLS 215
FRONT
Tr ace
and
blend
Fold line B
Tr ace for facing
Figure 3
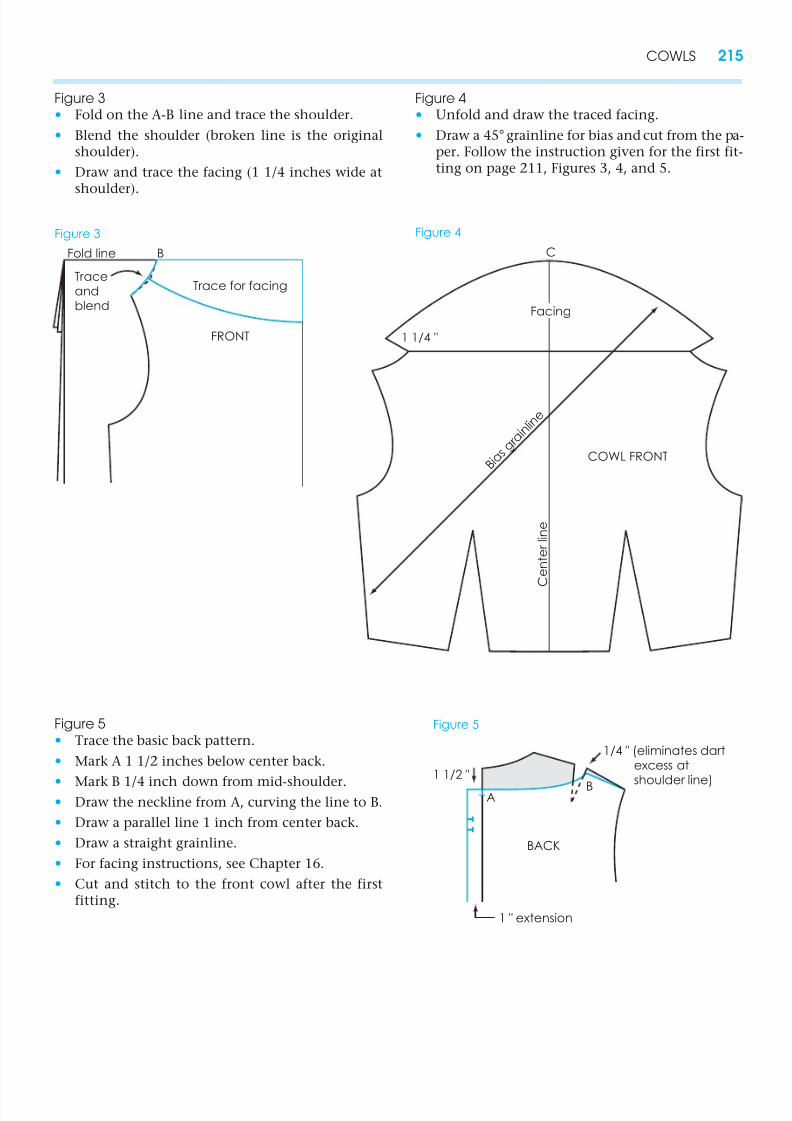
Figure 3
• Fold on the A-B line and trace the shoulder.
• Blend the shoulder (broken line is the originalshoulder).
• Draw and trace the facing (1 1/4 inches wide at
shoulder).
Figure 4
• Unfold and draw the traced facing.
• Draw a 45° grainline for bias and cut from the pa-per. Follow the instruction given for the first fit-ting on page 211, Figures 3, 4, and 5.
Figure 5
• Trace the basic back pattern.
• Mark A 1 1/2 inches below center back.
•
Mark B 1/4 inch down from mid-shoulder.• Draw the neckline from A, curving the line to B.
• Draw a parallel line 1 inch from center back.
• Draw a straight grainline.
• For facing instructions, see Chapter 16.
• Cut and stitch to the front cowl after the firstfitting.
COWL FRONT
C
1 1/4 "
B i a
s g r a i n l i n
e
Facing
C e n t e r l i n e
Figure 4
1 " extension
BACK
1 1/2 "
AB
1/4 " (eliminates dartexcess at
shoulder line)
Figure 5

8/13/2019 012 Capitulo 12
http://slidepdf.com/reader/full/012-capitulo-12 9/22
216 Chapter 12
Design 3
Low Cowl
Design Analysis: Design 3
The low cowl drapes at or slightly below bust level.All of the waist dart excess is transferred to the neck-line for a cowl of this depth.
FRONT
S l a s h
B1 1/2 "
C e n t e r f r o n t
A Bust levelSlash
Trim
Figure 1
COWL FRONT
Close
5 "
A
B Guideline
C e n t e r f r o n t
Paper
Figure 2
Pattern Plot and Manipulation
Figure 1
• Trace front bodice.
• Square a line from center front to the bust point.Label A (bust level).
•
Mark B 1 1/2 inches from shoulder tip. Draw aline from A to B.
• Draw a slash line between the shoulder tip andpoint B, ending at point A.
• Cut from paper.
• Cut slash lines to, not through, the shoulder andbust point.
• Close dart leg. Tape.
Figure 2
• Fold the paper and square a guideline 5 inchesdown from paper’s edge at fold.
• Place the pattern with center front on fold andpoint B on the guideline. Spread sections untilpoint A touches center front fold.
• Secure and trace from B to center front waist.
• Draw fold-back facing. See page 218, Figure 3.
• Develop the back pattern using instructions on
page 218, Figure 4, as a guide.• Complete the pattern for test fit.
8/13/2019 012 Capitulo 12
http://slidepdf.com/reader/full/012-capitulo-12 10/22
COWLS 217
Design 4
A
B
2 "
1 1/2 "
Trim
Figure 1
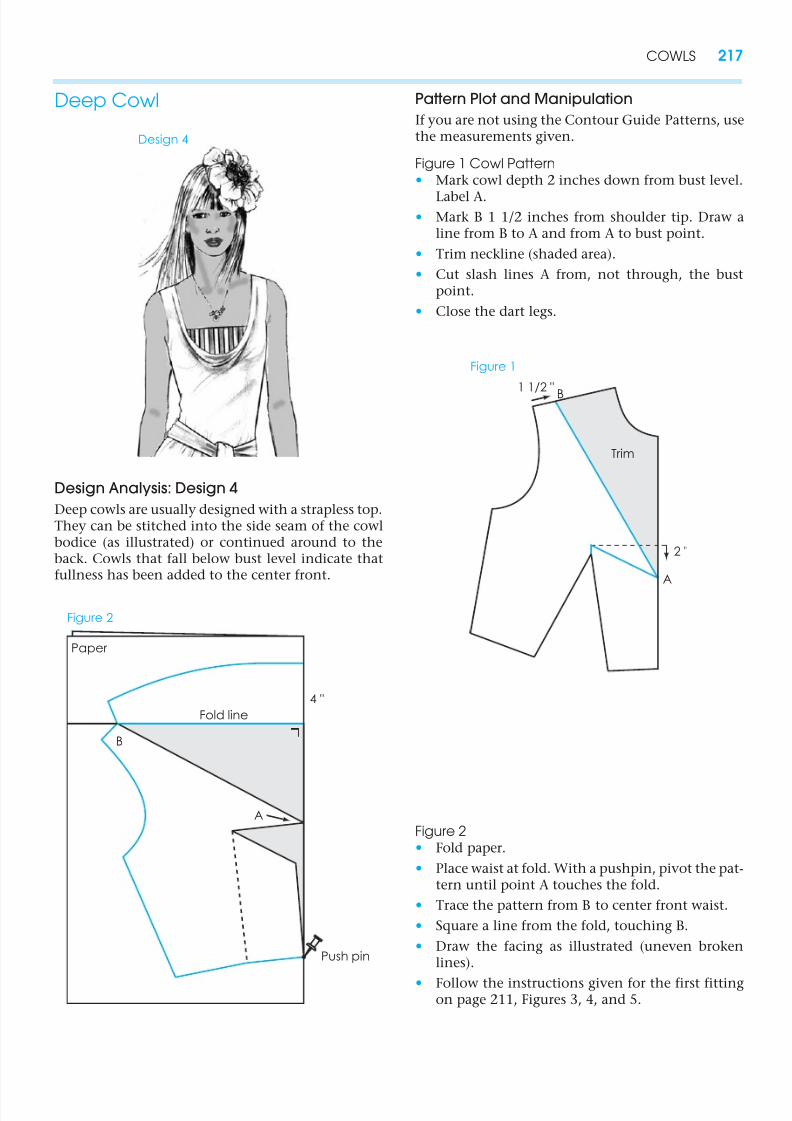
Deep Cowl
Design Analysis: Design 4
Deep cowls are usually designed with a strapless top.They can be stitched into the side seam of the cowlbodice (as illustrated) or continued around to theback. Cowls that fall below bust level indicate thatfullness has been added to the center front.
Pattern Plot and Manipulation
If you are not using the Contour Guide Patterns, usethe measurements given.
Figure 1 Cowl Pattern
• Mark cowl depth 2 inches down from bust level.
Label A.• Mark B 1 1/2 inches from shoulder tip. Draw a
line from B to A and from A to bust point.
• Trim neckline (shaded area).
• Cut slash lines A from, not through, the bustpoint.
• Close the dart legs.
Figure 2
• Fold paper.
• Place waist at fold. With a pushpin, pivot the pat-tern until point A touches the fold.
• Trace the pattern from B to center front waist.
• Square a line from the fold, touching B.
• Draw the facing as illustrated (uneven brokenlines).
• Follow the instructions given for the first fittingon page 211, Figures 3, 4, and 5.
A
B
Push pin
Fold line
4 "
Paper
Figure 2
8/13/2019 012 Capitulo 12
http://slidepdf.com/reader/full/012-capitulo-12 11/22
218 Chapter 12
1 " extension
BACK
1 1/2 "
AB
1/8 " (eliminates dart
excess atshoulder line
Trace facing
Figure 4
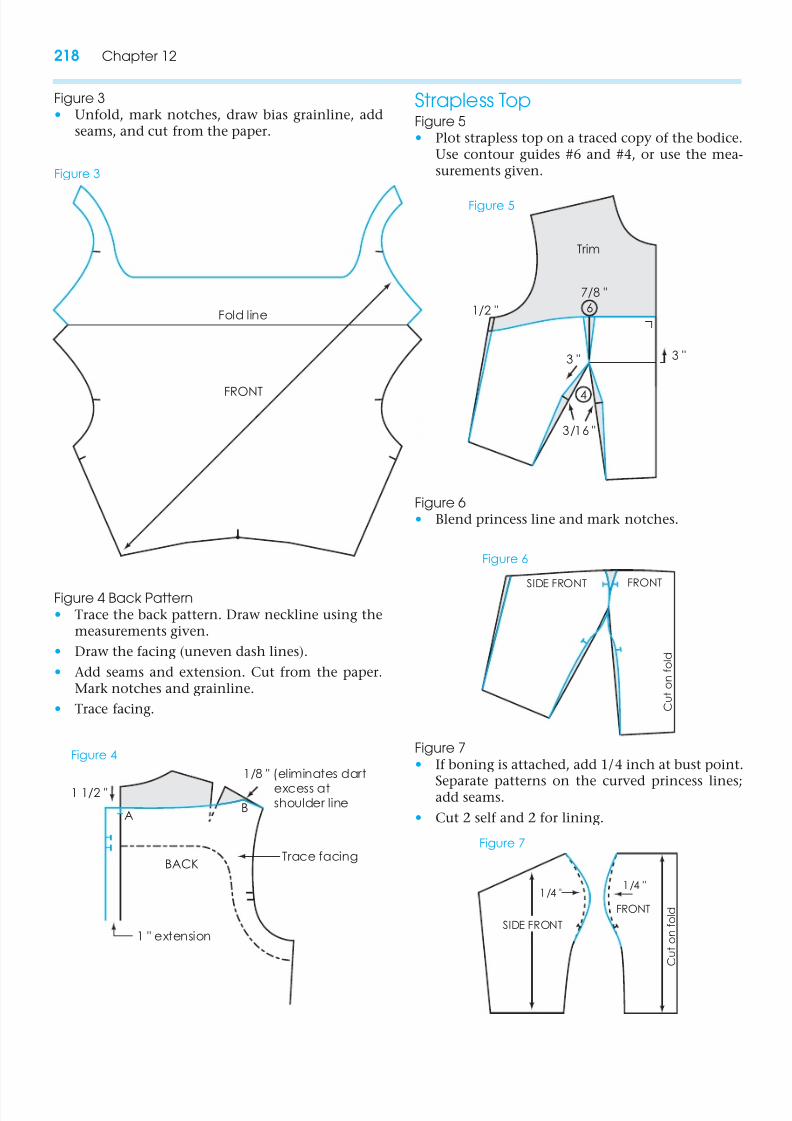
Figure 3
• Unfold, mark notches, draw bias grainline, addseams, and cut from the paper.
Fold line
FRONT
Figure 3
4
3 "3 "
1/2 "
3/16 "
7/8 "
6
Trim
Figure 5
SIDE FRONTFRONT
C u
t o
n f o l d
Figure 6
FRONT
C u
t o
n f o l d
1/4 "1/4 "
SIDE FRONT
Figure 7
Strapless TopFigure 5• Plot strapless top on a traced copy of the bodice.
Use contour guides #6 and #4, or use the mea-surements given.
Figure 4 Back Pattern
• Trace the back pattern. Draw neckline using themeasurements given.
• Draw the facing (uneven dash lines).
• Add seams and extension. Cut from the paper.Mark notches and grainline.
• Trace facing.
Figure 6
• Blend princess line and mark notches.
Figure 7
• If boning is attached, add 1/4 inch at bust point.
Separate patterns on the curved princess lines;add seams.
• Cut 2 self and 2 for lining.
8/13/2019 012 Capitulo 12
http://slidepdf.com/reader/full/012-capitulo-12 12/22
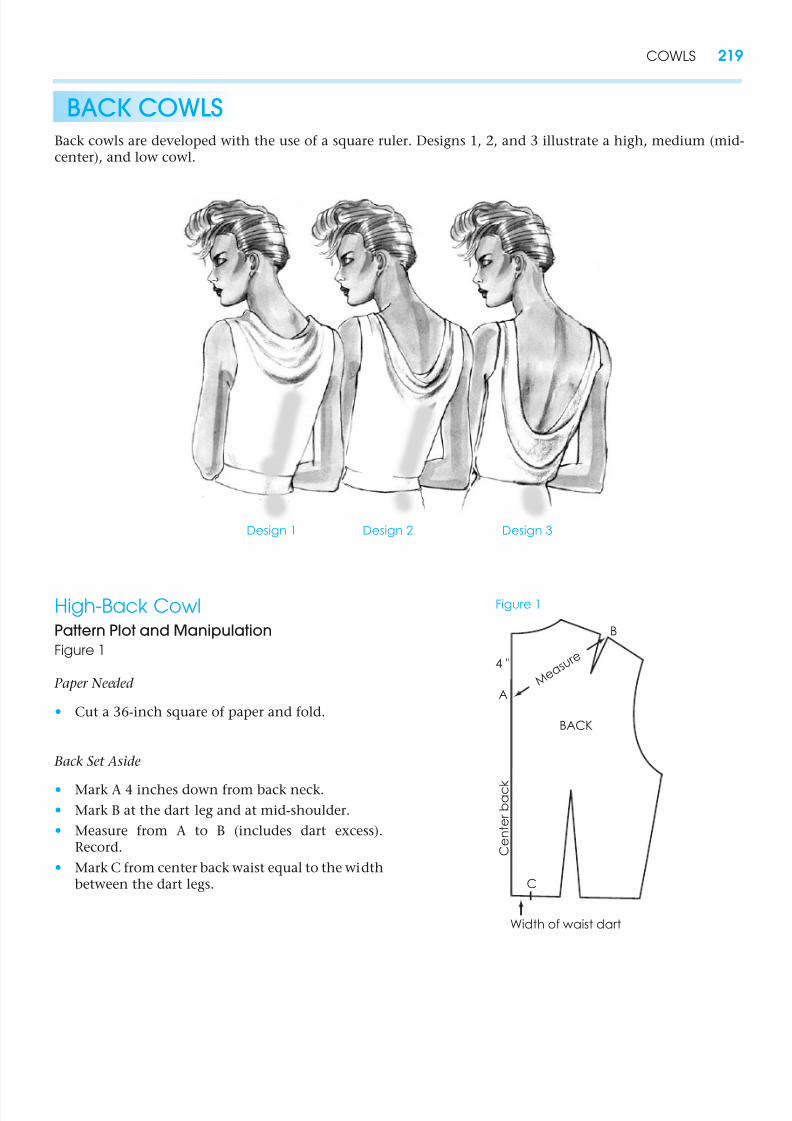
COWLS 219
BACK COWLSBack cowls are developed with the use of a square ruler. Designs 1, 2, and 3 illustrate a high, medium (mid-center), and low cowl.
Design 1 Design 2 Design 3
High-Back CowlPattern Plot and Manipulation
Figure 1
Paper Needed
• Cut a 36-inch square of paper and fold.
Back Set Aside
• Mark A 4 inches down from back neck.
• Mark B at the dart leg and at mid-shoulder.
• Measure from A to B (includes dart excess).Record.
• Mark C from center back waist equal to the widthbetween the dart legs.
M e a s u r e
A
B
4 "
BACK
C e n t e r b a c k
C
Width of waist dart
Figure 1
8/13/2019 012 Capitulo 12
http://slidepdf.com/reader/full/012-capitulo-12 13/22
220 Chapter 12
A
BACK
1/16 "
B
Curve line
C
4 "
1
1
2
3
4
5
6
7
8
9
1 0
1 1
1 2
1 3
1 4
1 5
1 6
1 7
1 8
1 9
2 0
2 1
2 2
2 3
2 4
2 3 4 5 6 7 8 9 1 0 1 1 1 2 1 3 1 4
Paper
Figure 2
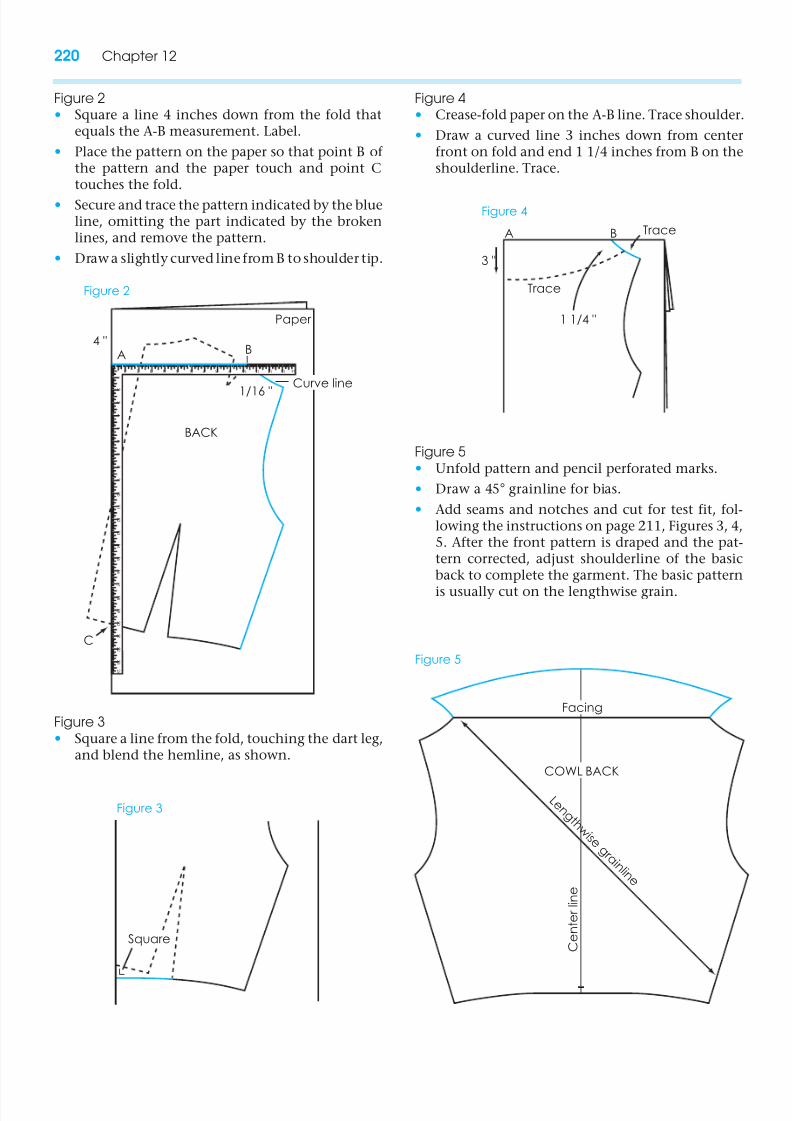
Figure 2
• Square a line 4 inches down from the fold thatequals the A-B measurement. Label.
• Place the pattern on the paper so that point B of the pattern and the paper touch and point Ctouches the fold.
• Secure and trace the pattern indicated by the blueline, omitting the part indicated by the brokenlines, and remove the pattern.
• Draw a slightly curved line from B to shoulder tip.
Figure 4
• Crease-fold paper on the A-B line. Trace shoulder.
• Draw a curved line 3 inches down from centerfront on fold and end 1 1/4 inches from B on theshoulderline. Trace.
Square
Figure 3
TraceA B
3 "
1 1/4 "
Trace
Figure 4
L e n g t h w i s e
g r a i n l i n e
COWL BACK
Facing
C e n t e r l i n e
Figure 5
Figure 3
• Square a line from the fold, touching the dart leg,and blend the hemline, as shown.
Figure 5
• Unfold pattern and pencil perforated marks.
• Draw a 45° grainline for bias.
• Add seams and notches and cut for test fit, fol-lowing the instructions on page 211, Figures 3, 4,5. After the front pattern is draped and the pat-tern corrected, adjust shoulderline of the basicback to complete the garment. The basic pattern
is usually cut on the lengthwise grain.
8/13/2019 012 Capitulo 12
http://slidepdf.com/reader/full/012-capitulo-12 14/22
COWLS 221
M e a
s u r e
Mid-back A
B 2 "
C e n t e r b a c k
C
Width of waist dart
Figure 1
A
BACK
1
1
2
3
4
5
6
7
8
9
1 0
1 1
1 2
1 3
1 4
1 5
1 6
1 7
1 8
1 9
2 0
2 1
2 2
2 3
2 4
2 3 4 5 6 7 8 9 1 0 1 1 1 2 1 3 1 4
B
C
Paper
Square corner
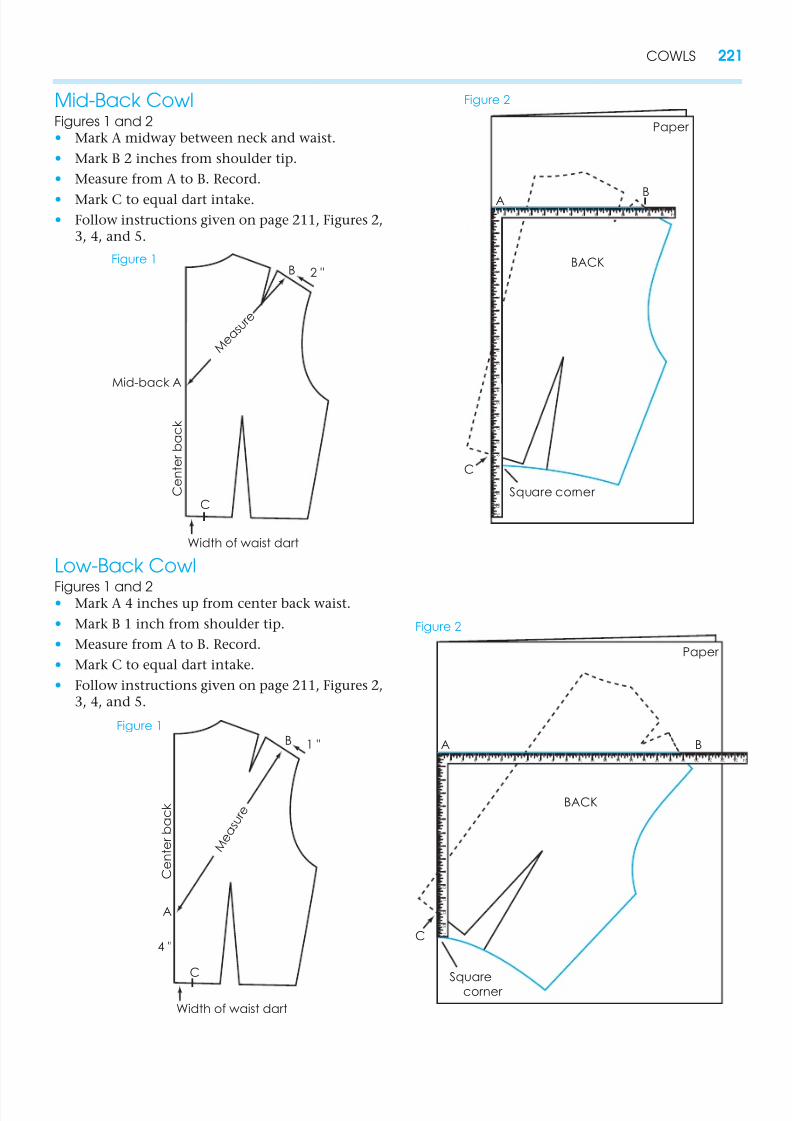
Figure 2Mid-Back CowlFigures 1 and 2• Mark A midway between neck and waist.
• Mark B 2 inches from shoulder tip.
• Measure from A to B. Record.
• Mark C to equal dart intake.
• Follow instructions given on page 211, Figures 2,3, 4, and 5.
Low-Back Cowl
Figures 1 and 2• Mark A 4 inches up from center back waist.
• Mark B 1 inch from shoulder tip.
• Measure from A to B. Record.
• Mark C to equal dart intake.
• Follow instructions given on page 211, Figures 2,3, 4, and 5.
M e a s u r e
A
C e n t e r b a c k
B 1 "
C
Width of waist dart
4 "
Figure 1
BACK
1
1 2 3 4 5 6 7 8 9 1 0 1 1 1 2 1 3 1 4 1 5 1 6 1 7 1 8 1 9 2 0 2 1 2 2 2 3 2 4
2
3
4
5
6
7
8
9
1 0
1 1
1 2
1 3
1 4 C
A B
Paper
Squarecorner
Figure 2
8/13/2019 012 Capitulo 12
http://slidepdf.com/reader/full/012-capitulo-12 15/22
222 Chapter 12
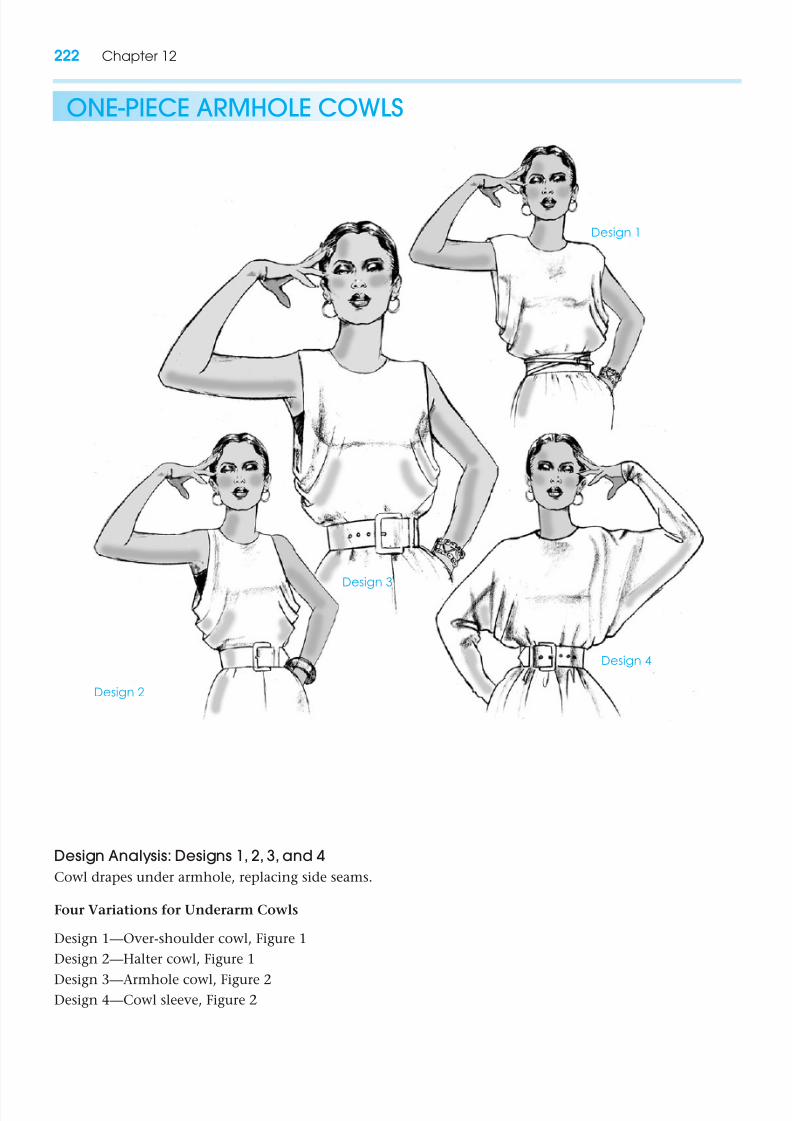
ONE-PIECE ARMHOLE COWLS
Design Analysis: Designs 1, 2, 3, and 4
Cowl drapes under armhole, replacing side seams.
Four Variations for Underarm Cowls
Design 1—Over-shoulder cowl, Figure 1
Design 2—Halter cowl, Figure 1
Design 3—Armhole cowl, Figure 2Design 4—Cowl sleeve, Figure 2
Design 2
Design 1
Design 4
Design 3

8/13/2019 012 Capitulo 12
http://slidepdf.com/reader/full/012-capitulo-12 16/22
COWLS 223
Figure 1
• Use front and back basic two-dart bodice, withshoulder dart transferred to the armhole.
• Draw a square line on paper. Label A, B, and C.
• Place front bodice on A-B line. Place back bodice
1 inch in from B-C line (for extension), with a1-inch space between the front and back sidewaists for ease.
• Secure and trace the front and back pattern,omitting sections indicated by the broken lines.Remove patterns.
• Blend a curved line between front and back waist.
Design 1 Over-Shoulder Cowl
• Stitch shoulder and continue 3 inches more.
Design 2 Halter Cowl
• Draw a line from front mid-shoulder to backmid-shoulder.
Figure 2
Design 3 Sleeveless Cowl• Draw a line connecting the front and back shoul-
der tips. Label D-E.
Design 4 Long-Sleeve Cowl
• Draw a line connecting the shoulder tips. LabelD-E.
• Mark the center of the D-E line and draw a lineto the side waist. From this point, extend the lineto equal the desired sleeve length. (Add length if gathers are desired.)
• Square a line out from both sides that equals thewrist measurement plus 1 1/2 inches (one-half on each side).
• Drawa lineto pointsD and E (over the arm seam).
1 " extensionCenter back
E
D
1 "
A
BC
C e n t e r f r o n t
3 "
3 "
D e s i g
n 1 ( o v e
r s h o
u l d e r )
D e s i g n
2 ( h a
l t e r )
Figure 1
1 " ex t en
s i on
C e n t e r b a c k
E
D
1 "
AB
C
Center front
D e s i g
n 4 c
o w l s l e
e v e
D e s i g n 3
Figure 2
8/13/2019 012 Capitulo 12
http://slidepdf.com/reader/full/012-capitulo-12 17/22
224 Chapter 12
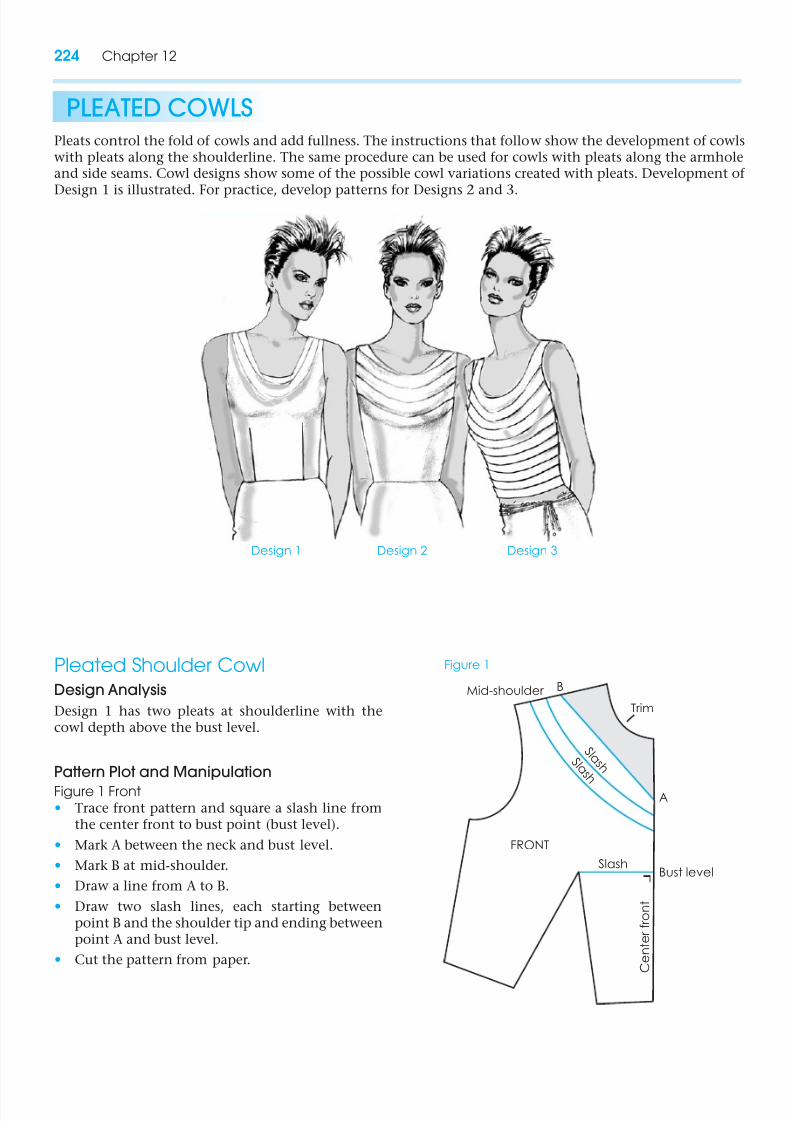
PLEATED COWLSPleats control the fold of cowls and add fullness. The instructions that follow show the development of cowlswith pleats along the shoulderline. The same procedure can be used for cowls with pleats along the armholeand side seams. Cowl designs show some of the possible cowl variations created with pleats. Development of
Design 1 is illustrated. For practice, develop patterns for Designs 2 and 3.
Pleated Shoulder CowlDesign Analysis
Design 1 has two pleats at shoulderline with thecowl depth above the bust level.
Pattern Plot and Manipulation
Figure 1 Front
• Trace front pattern and square a slash line fromthe center front to bust point (bust level).
• Mark A between the neck and bust level.
• Mark B at mid-shoulder.
• Draw a line from A to B.
• Draw two slash lines, each starting betweenpoint B and the shoulder tip and ending betweenpoint A and bust level.
• Cut the pattern from paper.
Design 1 Design 2 Design 3
FRONT
S l a s h
S l a s h
Mid-shoulder B
A
C e n t e r f r o n t
SlashBust level
Trim
Figure 1
8/13/2019 012 Capitulo 12
http://slidepdf.com/reader/full/012-capitulo-12 18/22
COWLS 225
FRONT
C e n t e
r f r o n t
G u i d e l i n e
B A
4 "
Paper
Figure 2
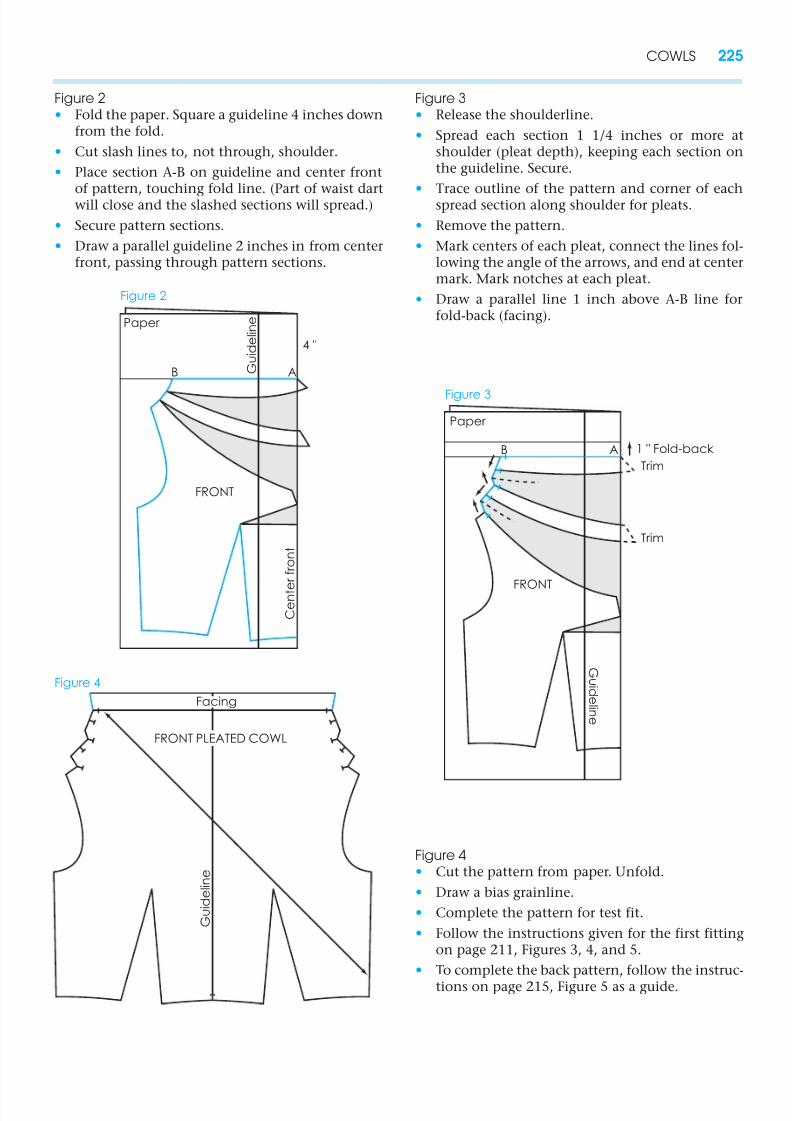
Figure 2
• Fold the paper. Square a guideline 4 inches downfrom the fold.
• Cut slash lines to, not through, shoulder.
• Place section A-B on guideline and center front
of pattern, touching fold line. (Part of waist dartwill close and the slashed sections will spread.)
• Secure pattern sections.
• Draw a parallel guideline 2 inches in from centerfront, passing through pattern sections.
Figure 3
• Release the shoulderline.
• Spread each section 1 1/4 inches or more atshoulder (pleat depth), keeping each section onthe guideline. Secure.
•
Trace outline of the pattern and corner of eachspread section along shoulder for pleats.
• Remove the pattern.
• Mark centers of each pleat, connect the lines fol-lowing the angle of the arrows, and end at centermark. Mark notches at each pleat.
• Draw a parallel line 1 inch above A-B line forfold-back (facing).
Figure 4• Cut the pattern from paper. Unfold.
• Draw a bias grainline.
• Complete the pattern for test fit.
• Follow the instructions given for the first fittingon page 211, Figures 3, 4, and 5.
• To complete the back pattern, follow the instruc-
tions on page 215, Figure 5 as a guide.
FRONT
1 " Fold-back
G ui d el i n e
B A
Trim
Trim
Paper
Figure 3
FRONT PLEATED COWL
G u i d e l i n e
Facing
Figure 4
8/13/2019 012 Capitulo 12
http://slidepdf.com/reader/full/012-capitulo-12 19/22
226 Chapter 12
Design 1
B A
Blend
C ent er f r ont
MIDRIFF
Figure 1
EXAGGERATED COWLSFuller cowls can be achieved without pleats byspreading the pattern beyond the 90° square line atcenter front. This type of design requires a seam at
the center line. The empire pattern was used to de-velop the design illustrated; however, any patternmay be used.
High Exaggerated Cowl
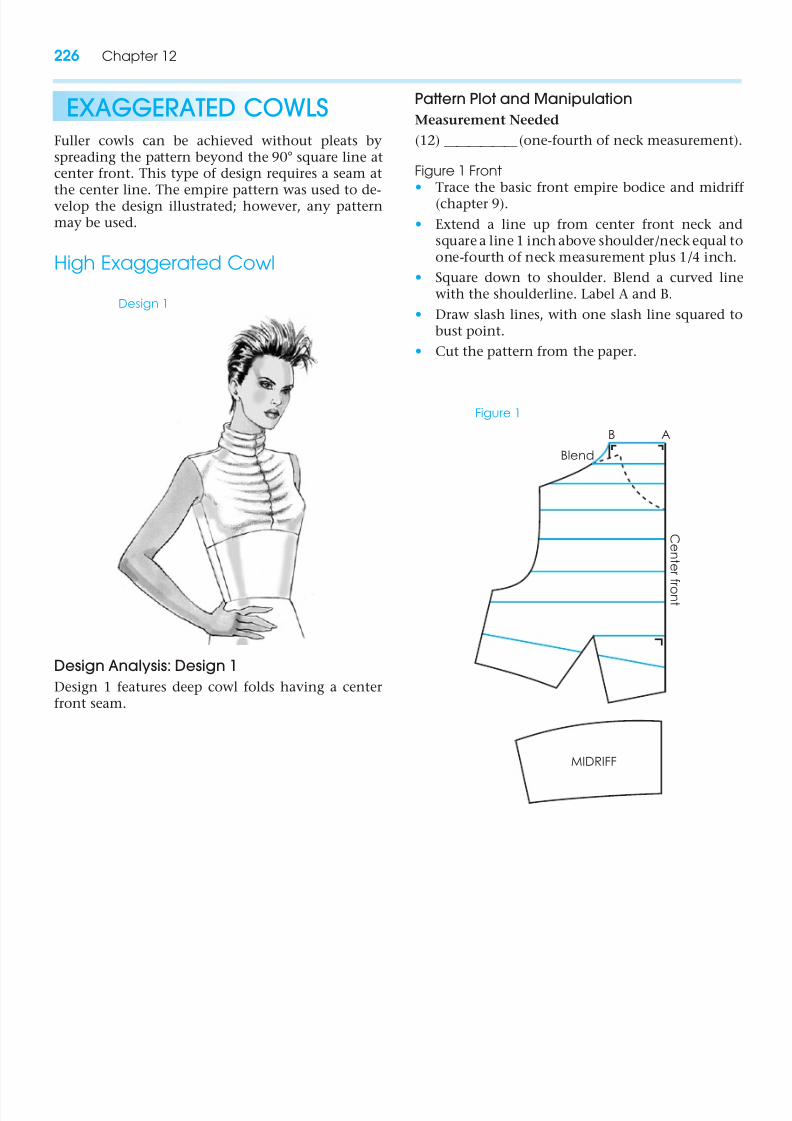
Design Analysis: Design 1
Design 1 features deep cowl folds having a centerfront seam.
Pattern Plot and Manipulation
Measurement Needed
(12) ____________(one-fourth of neck measurement).
Figure 1 Front• Trace the basic front empire bodice and midriff
(chapter 9).
• Extend a line up from center front neck andsquare a line 1 inch above shoulder/neck equal toone-fourth of neck measurement plus 1/4 inch.
• Square down to shoulder. Blend a curved linewith the shoulderline. Label A and B.
• Draw slash lines, with one slash line squared tobust point.
• Cut the pattern from the paper.
8/13/2019 012 Capitulo 12
http://slidepdf.com/reader/full/012-capitulo-12 20/22
COWLS 227
Figure 2
S i d e
A r m h o
l e
W a i s t l i n
e
S h o u l d e r
Neck
C e n t e r f r o
n t
Figure 3
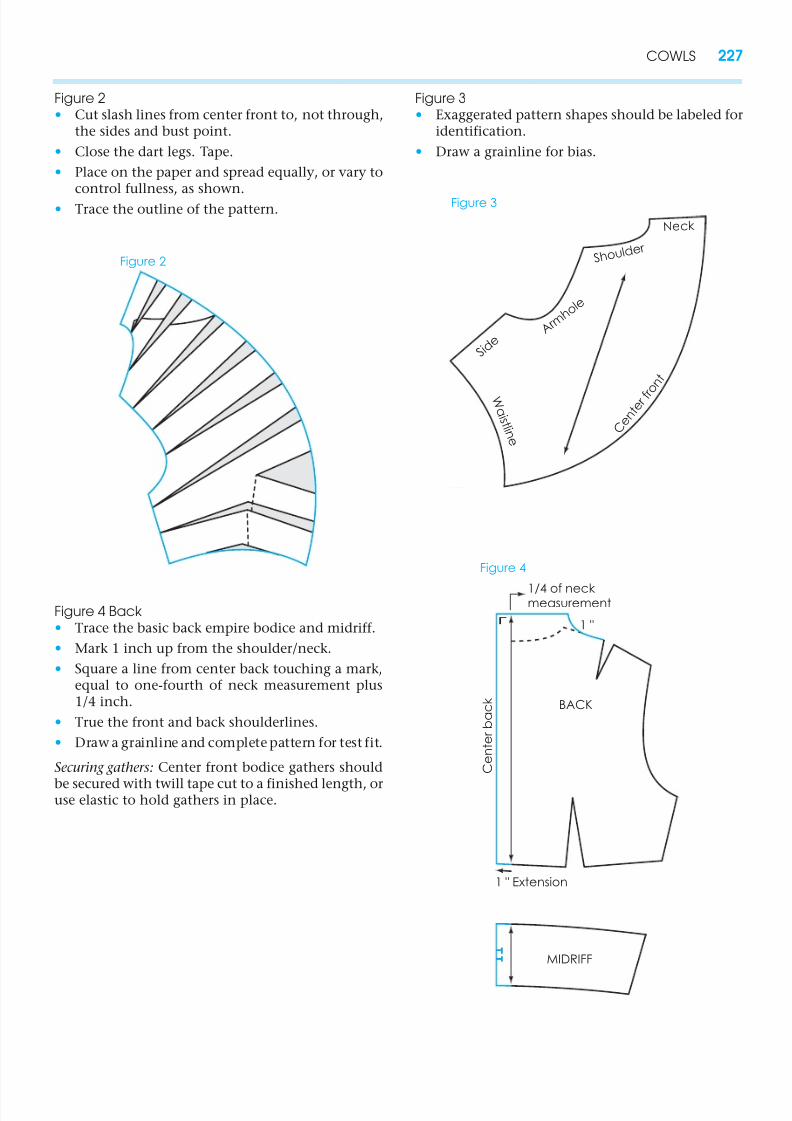
Figure 2
• Cut slash lines from center front to, not through,the sides and bust point.
• Close the dart legs. Tape.
• Place on the paper and spread equally, or vary to
control fullness, as shown.• Trace the outline of the pattern.
BACK
C e n t e r b a c k
MIDRIFF
1 "
1/4 of neck measurement
1 " Extension
Figure 4
Figure 3
• Exaggerated pattern shapes should be labeled foridentification.
• Draw a grainline for bias.
Figure 4 Back
• Trace the basic back empire bodice and midriff.
• Mark 1 inch up from the shoulder/neck.
• Square a line from center back touching a mark,equal to one-fourth of neck measurement plus1/4 inch.
• True the front and back shoulderlines.
• Draw a grainline and complete pattern for test fit.
Securing gathers: Center front bodice gathers should
be secured with twill tape cut to a finished length, oruse elastic to hold gathers in place.

8/13/2019 012 Capitulo 12
http://slidepdf.com/reader/full/012-capitulo-12 21/22
228 Chapter 12
Design 1 Design 2 Design 3
Notch
D
CB
1 1/2 "
2 "
3 "
A
1 "Bust level
Figure 1
INSET COWLSInset cowls can be developed on any bodice, torso, or similar garment. Any styleline cowl inset can be de-signed. For purposes of instruction, the cowl inset is developed and does not represent a complete pattern.Back patterns are not illustrated. Designs 2 and 3 are included as practice problems; use the torso foundation
(see chapter 18).
V-Inset Cowl
Pattern Plot and Manipulation
Figure 1
•Trace the front two-dart pattern. Square a guide-line from center front to bust point (bust level).Plot the pattern as illustrated.
• Measure down 1/16 inch from the shoulder be-tween B and C, and draw a curved line (controlsfolds of the cowl when stitched to back shoulder).
• Crossmark for notch between C and D.
• Cut the pattern from paper.
• Cut the inset from the pattern (A, B, C, and D ar-eas). (Lower section of pattern is used to com-plete the design.)
8/13/2019 012 Capitulo 12
http://slidepdf.com/reader/full/012-capitulo-12 22/22
COWLS 229
1
1 2 3 6 5 4 8 7 1 0 9 1 1 2 1
2
3
4
5
6
7
8
9
1 0
1 1
1 2
1 3
1 4
A
A
B
C
D
Figure 2
B
D
C
Cowl inset
Paper
Facing 1 "
A
Figure 3
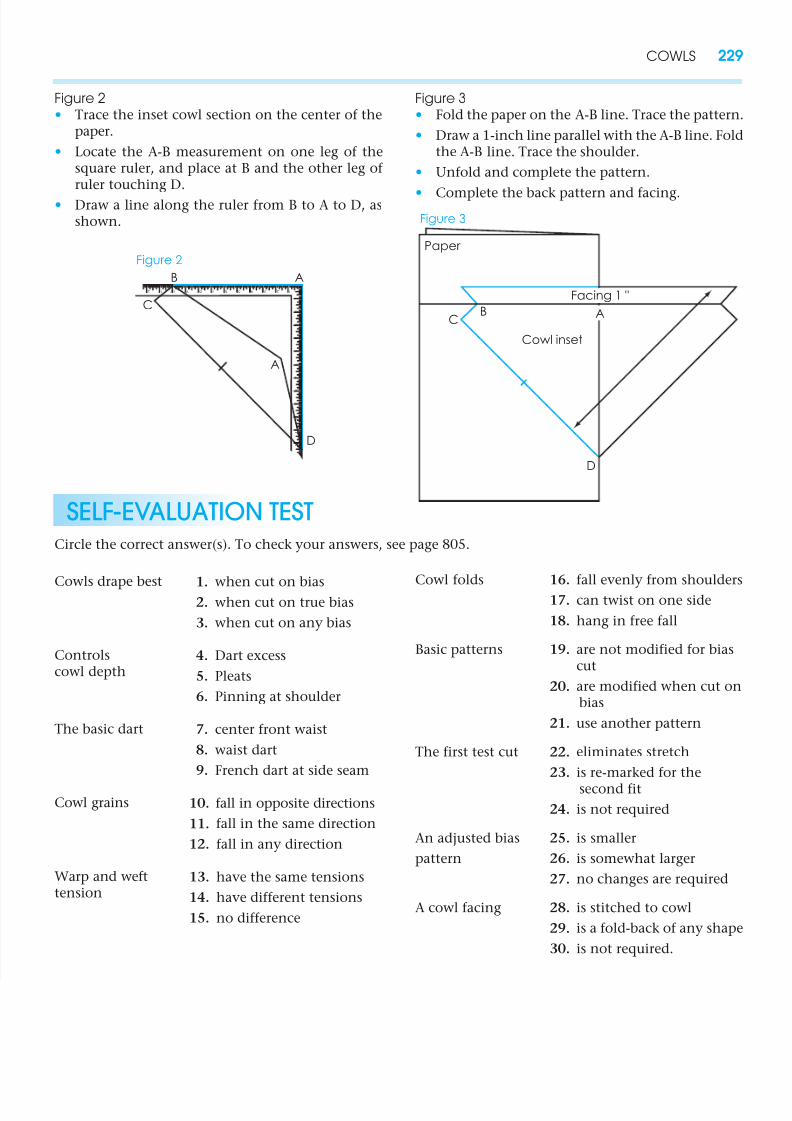
Figure 2
• Trace the inset cowl section on the center of thepaper.
• Locate the A-B measurement on one leg of thesquare ruler, and place at B and the other leg of ruler touching D.
• Draw a line along the ruler from B to A to D, asshown.
Figure 3
• Fold the paper on the A-B line. Trace the pattern.
• Draw a 1-inch line parallel with the A-B line. Foldthe A-B line. Trace the shoulder.
• Unfold and complete the pattern.
•Complete the back pattern and facing.
SELF-EVALUATION TESTCircle the correct answer(s). To check your answers, see page 805.
Cowls drape best
Controlscowl depth
The basic dart
Cowl grains
Warp and wefttension
Cowl folds 16. fall evenly from shoulders
17. can twist on one side
18. hang in free fall
Basic patterns 19. are not modified for biascut
20. are modified when cut onbias
21. use another pattern
The first test cut 22. eliminates stretch
23. is re-marked for the
second fit
24. is not required
An adjusted bias 25. is smaller
pattern 26. is somewhat larger
27. no changes are required
A cowl facing 28. is stitched to cowl
29. is a fold-back of any shape
30. is not required.
1.
when cut on bias2. when cut on true bias
3. when cut on any bias
4. Dart excess
5. Pleats
6. Pinning at shoulder
7. center front waist
8. waist dart
9. French dart at side seam
10. fall in opposite directions
11. fall in the same direction
12. fall in any direction
13. have the same tensions
14. have different tensions
15. no difference