Embed Size (px)
Citation preview

Carro BasculantePara De 10 Pies Cúbicos
Manual del PropietarioModelo NTE2530-D
Tricam 7677 Equitable DriveEden Prairie, MN 553441-800-867-6763www.tricam.com
08/09
• Instrucciones Importantes de Seguridad• Instrucciones de Ensamblaje• Identificación de Piezas y Herrajes
PRECAUCIÓN :Antes de utilizar este producto, lea y siga TODAS las instrucciones.
U.S. Patente # 6,851,756, 7,390,065,7,210,697 y 7,441,792Otras Patentes de los EE.UU. yPatentes Extranjeras Pendientes
10 cubic footDump Cart
Owners ManualModel NTE2530-D
Tricam 7677 Equitable DriveEden Prairie, MN 553441-800-867-6763www.tricam.com
08/09
• Important Safety Instructions• Assembly Instructions• Parts and Hardware Identification
CAUTION: Read, understand and follow ALL instructions before using this product.
U.S. Patent #'s 6,851,756, 7,390,065,7,210,697, and 7,441,792Other U.S. and Foreign Patents Pending
NTE2530-D manual 8/26/09 12:16 PM Page 1
A.
B.
D.
C.
E.
F.
G.
H.
I.
J
K.
A. Tub (1)B. Lock Assembly (1)C. Rear Frame (1)D. Rear Axle Assembly (1)E. Front Frame (1)F. Front Struts (2)G. Front Axle Assembly (1)H. Steering Linkage Bar (1)I. 15” Tires (4)J. Handle (1)K. Handle yoke (1)
Exploded Drawing for Assembly
Parts List
A. M8x60 round head bolt (1)B. M8x30 rounded truss head bolts (9)C. M8x20 hex bolts (10)D. 8.5x17 washers (22)E. Spacers (4)F. M12 Flat washers (4)G. M8x23 Flat washers (9)H. M8 lock nuts (20)I. M12 lock nuts (4)J. M6x20 sholder bolts (2)K. M6 washers (2)L. M6 lock nuts (2)
Hardware List Images are not to scale
A.
B.
D.
C.
E.
F.
G.
H.
A.
B.
D.
C.
E.
F.
G.
H.
I.
I.
J
K.
A.Caja (1)B.Ensamblaje de Bloqueo (1)C.Estructura Trasera (1)D.Ensamblaje del Eje Trasero (1)E.Estructura Delantera (1)F.Puntales Delanteros(2)G.Ensamblaje del Eje Delantero (1)H.Barra de Conexión de
Dirección (1)I.Neumáticos de 15 Pulgadas (4)J.Mango(1)K.Horquilla del Mango (1)
Plano Esquemático de Ensamblaje
Lista de piezas
A.Tornillo de cabeza redonda M8x60 (1)B.Tornillo para ménsulas de cabeza
redonda M8x30 (9)C.Tornillo de hexagonel M8x20 (10)D.Arandelas de 8.5 x 17 (22)E.Espaciadores (4)F.Arandela M12 (4)G.Arandelas llana M8x23 (9)H.Tuerca de bloqueo M8 (17)I.Tuerca de bloqueo M12 (7)J.Tornillade hombro M6x20 (2)K.Arandelas de M6 (2)L.Tuerca de bloqueo M6 (2)
Lista de HerrajesLas imágenes no son a escala
J
K.
L.
A.
B.
D.
C.
E.
F.
G.
H.
I.
J
K.
L.
NTE2530-D manual 8/26/09 12:16 PM Page 3
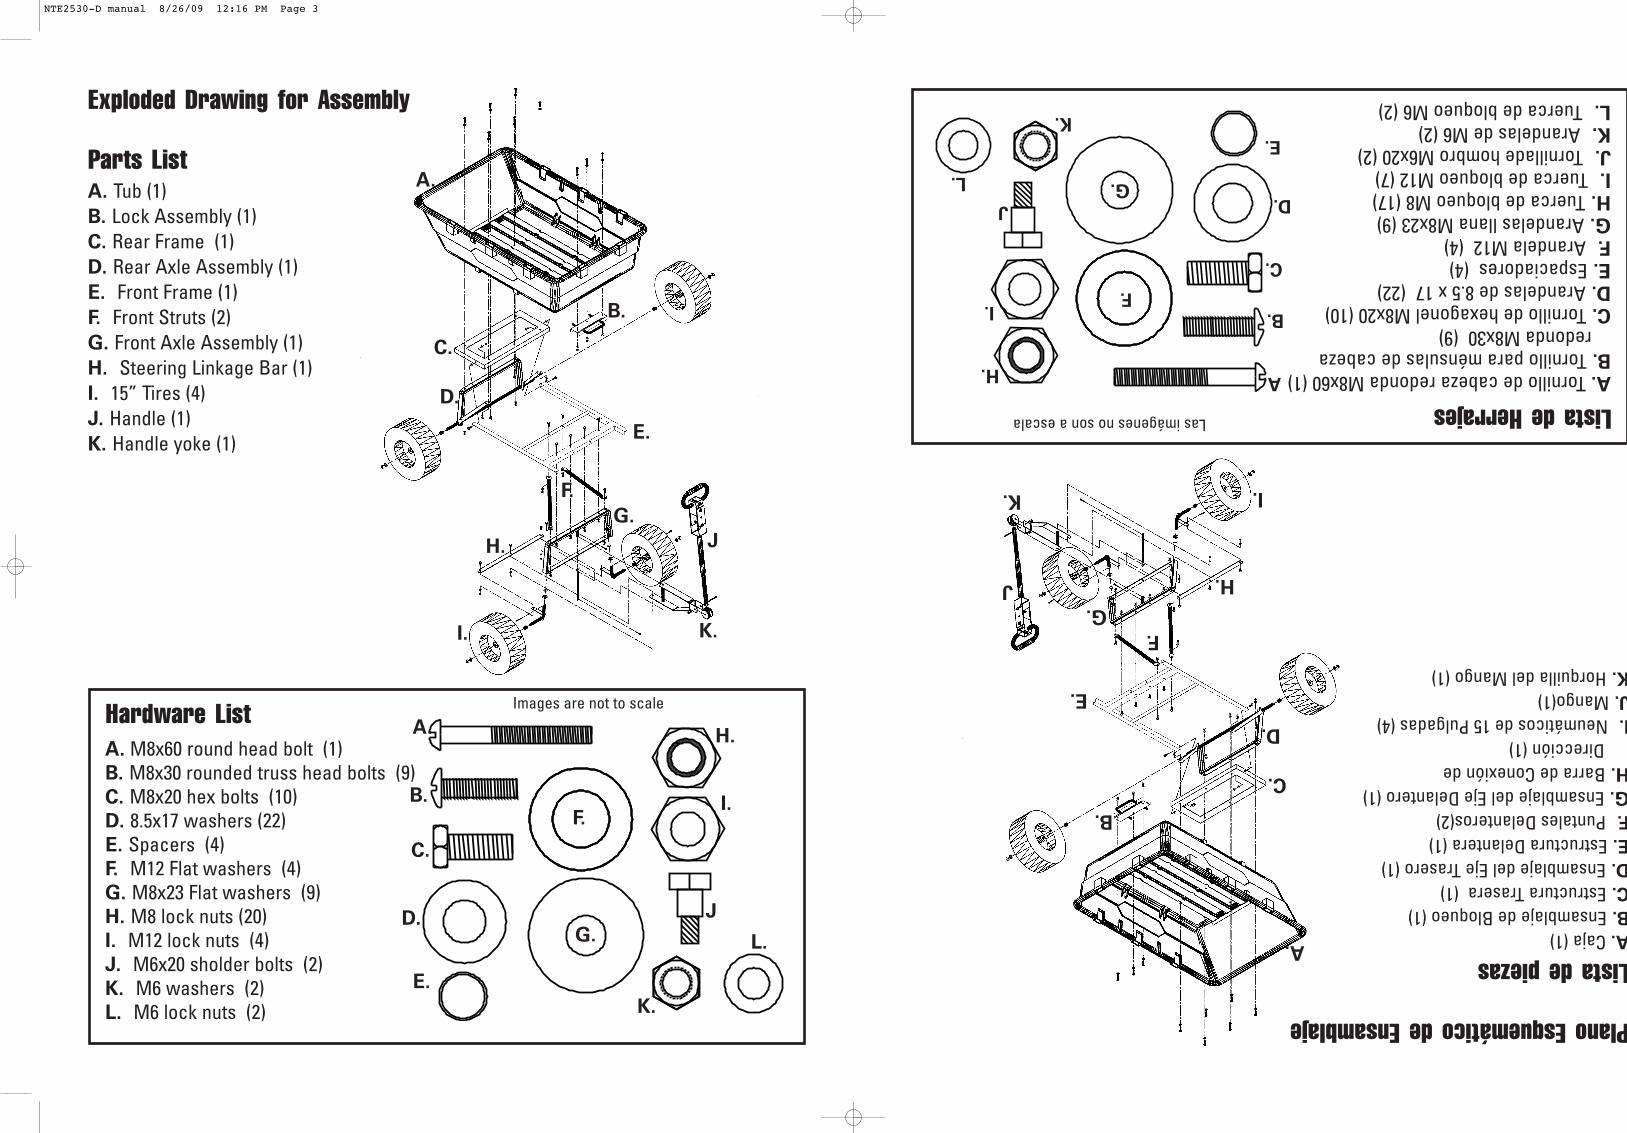
Step 2Assemble the frontstruts to the front axleassembly using M8x20hex bolts (2pcs),8.5x17 flat washers(2pcs) and M8 locknuts (2pcs). Tightensecurely.
1. READ ALL INSTRUCTIONS CAREFULLY AND BE SURE THEY ARE FULLY UNDERSTOOD BEFORE USING THIS DUMPCART. If you do not understand these instructions, need clarification or further explanation, please call our toll freenumber for assistance at 1-800-867-6763.
2. Do not load the Tractor Dump Cart with more than 1,200 lb (544 kg). Do not use the dumping feature of this cart with aload of more than 600 lb (272 kg).
3. Distribute load evenly over the surface of the tub.4. Do not load any items on the top edges of the plastic tub.5. Do not allow children to use this cart without supervision. This cart is NOT A TOY.6. Do not use this cart for transporting passengers.7. Do not use this cart for highway use.8. Do not exceed 5 mph.9. Do not use this cart on surfaces or transport objects on surfaces that can cause damage to the pneumatic tires or
tubes. DO NOT INFLATE TIRES TO MORE THAN 32 PSI (2.20 BAR).10.If any parts become damaged, broken, or misplaced – do not use this cart until replacement parts can be repaired or
replaced.11.It is recommended this cart be inspected for damage before each use.12.KEEP THESE INSTRUCTIONS FOR FUTURE REFERENCE.
Verify that all parts and hardware are accounted for before beginning assembly. Do not assemble or use this cart if any partsare missing or damaged.Tools required for assembly: standard screwdriver, phillips screwdriver and metric socket set (or two adjustable wrenches).
Step 1Attach the rear frame tothe rear axle assemblyand tub using M8x30rounded truss headbolts (6 pcs), 8.5x17 flatwashers (6pcs), 8x23 flatwashers (6 pcs) and M8lock nuts (6 pcs).Tighten securely.
Step 4Secure the ends of the steeringlinkage bar to the front axleassembly using M6x20shoulder bolts (2pcs), M6washers (2pcs) and M6 locknuts (2pcs). Tighten securely.
Important Safety Instructions
Assembly Instructions
Step 3Assemble the front frameto the front struts and frontaxle assembly usingM8x20 hex bolts (6pcs),8.5x17 flat washers (6pcs)and M8 lock nuts (6pcs).Tighten securely.
Step 5Assemble the rear frameto the front frame usingM8x20 hex bolts (2pcs),8.5x17 flat washers (4pcs)and M8 lock nuts (2pcs).Tighten securely.
Paso 2Ensamble los puntalesdelanteros al ensamblaje deleje delantero utilizandopernos hexagonales M8x20(2 piezas), arandelas planas8.5x17 (2 piezas) y tuercas debloqueo M8 (2 piezas).Ajuste firmemente.
1.ANTES DE USAR ESTE CARRO BASCULANTE LEA ATENTAMENTE TODAS LAS INSTRUCCIONES Y ASEGÚRESE DEHABERLAS ENTENDIDO BIEN. Si no entendió las instrucciones, necesita disipar alguna duda o necesita unaexplicación más exhaustiva, solicite asistencia llamando a nuestro número gratuito 1-800-867-6763.
2.No cargue el Carro Basculante para Tractor con más de 1,200 lbs (544 kg). No use el accesorio de descarga deeste carro con una carga de más de 600 lbs (272 kg).
3.Distribuya la carga en forma uniforme sobre la superficie de la caja.4.No cargue ningún elemento por sobre los bordes de la caja plástica.5.No permita que los niños usen este carro sin supervisión. Este carro NO ES UN JUGUETE.6.No use este carro para transportar personas.7.No use este carro en autopistas.8.No exceda los 18 Km/n.9.No use este carro en superficies que puedan dañar los neumáticos o los contenedores o para transportar objetos
en dichas superficies. NO INFLAR LOS NEUMÁTICOS A MÁS DE 32 PSI (2.20 BAR).10.Si alguna de las piezas se daña, rompe o desubica, no use el carro hasta que no haya reparado o reemplazado
dicha pieza.11.Se recomienda inspeccionar el carro después de cada uso.12.GUARDE ESTAS INSTRUCCIONES PARA CONSULTARLAS EN EL FUTURO.
Verifique que no falte ninguna de las piezas ni los herrajes antes de comenzar el montaje. No ensamble ni use este carrosi alguna de las piezas falta o está dañada.Herramientas necesarias para el ensamblaje:Destornillador Estándar, Destornillador Phillips, Juego de Casquillos
(o dos llaves ajustables)
Paso 1Una el ensamblaje de laestructura trasera alensamblaje del ejetrasero y a la cajautilizando pernos M8x30de cabeza redonda paraménsulas (6 piezas),arandelas planas 8x23 (6piezas) y tuercas debloqueo M8 (6 piezas).Ajuste firmemente.
Paso 4Ubique el ensamblaje del ejedelantero.Una la barra de direcciónarticulada al ensamblaje deleje delantero utilizando pernoscon reborde M6x20 (2 piezas),arandelas M6 (2 piezas) ytuercas de bloqueo M6 (2piezas). Ajústelos firmemente.
Información Importante sobre Seguridad
Instrucciones de Ensamblaje
Paso 3Ensamble la estructura delantera alos puntales delanteros y alensamblaje del eje delanteroutilizando pernos hexagonalesM8x20 (6 piezas), arandelas planas8.5x17 (6 piezas) y tuercas debloqueo M8 (6 piezas). Ajustefirmemente
Paso 5Ensamble la estructuratrasera a la delanterautilizando pernoshexagonales M8x20 (2piezas), arandelas M6 (2piezas) y tuercas debloqueo M7 (2 piezas).Ajuste firmemente.
NTE2530-D manual 8/26/09 12:16 PM Page 5

Paso 6Ensamble los cuatroneumáticos utilizandoseparadores (4 piezas),arandelas planas M12 (4piezas) y tuercas debloqueo M12 (4 piezas).
Instrucciones Para Operar ElMango GiratorioPaso 1Quite los sujetadores y los pasadores partidos.Paso 2Gire el mango e inserte el pasador partido. Asegure el mango en su lugar uniéndolo con el sujetador.Paso 3Utilice el segundo pasador partido para unir el mango con el enganche para remolque.
Paso 7Una el ensamblaje debloqueo al contenedorutilizando pernosM8x30 de cabezaredonda paraménsulas (3 piezas),arandelas planas8.5x17 (3 piezas) ytuercas de bloqueoM8 (3 piezas).
NO EXCEDA LA CAPACIDAD MÁXIMA DE CARGA TOTAL DE 544 kg O LA CARGAMÁXIMA DE DESCARGA DE 272 kg.EL PESO QUE SOPORTA SE CALCULA CONLA CARGA DISTRIBUIDA EN FORMA UNIFORME. PRECAUCIÓN
Cómo Usar El Accesorio DeDescargaPara utilizar el accesoriode descarga, tire delmango de liberación dedescarga para liberar elmecanismo de bloqueo dela caja. Levante el mangode liberación para girar lacaja hacia la posición dedescarga.
Paso 8Una el mango al ensamblaje dela horquilla utilizando un pernoM8x60 de cabeza redonda (1pieza), una arandela plana8.5x17 (1 pieza) y una tuerca debloqueo M8 (1 pieza).
Step 6Assemble the fourtires usingspacers (4pcs),M12 flat washers(4pcs) and M12lock nuts (4pcs).
Step 7Attach the lockassembly to the tubusing M8x30 roundedtruss head bolts(3pcs), 8.5x17 flatwashers (3pcs),M8x23 flat washers(3pcs) and M8 locknuts (3pcs).
DO NOT EXCEED THE OVERALL MAXIMUM LOAD CAPACITY OF 1,200 lb OR THE MAXIMUM DUMPING LOAD CAPACITY OF 600 lb. THE WEIGHT RATING IS BASED ON AN EVENLY DISTRIBUTED LOAD.
CAUTION
Using the Dumping Feature
Step 8Attach the handle to the yokeassembly using the M8x60round head bolt (1pc), 8.5x17flat washer (1pc) and M8 locknut (1pc).
To use the dumpingfeature, pull the dumpingrelease handle forward inorder to release the tubfrom the lockingmechanism. Lift therelease handle in order torotate the tub upward intothe dumping position.
Stake out SidesTo increase the cubic foot capacity of this item, these 8pockets can be used to fit stake out side panels as shown.Actual pocket dimensions: 0.75in x 2.0in
Bolsillos LateralesPara incrementar los pies cúbicos de este artículo, estos8 bolsillos pueden utilizarse en los paneles lateralescomo se muestra. Estos bolsillos eal dimensionada de1.9cm x 5.08cm
Cómo Volver La Caja A LaPosición Más BajaColoque nuevamente lacaja en la posición másbaja y verifique que elmango de liberación dedescarga esté bloqueadoen su lugar.
PRECAUCIÓN- EVITEPUNTOS DEENGANCHE
Returning The Tub To TheLowered PositionReturn the tub back to thelowered position andverify that the dumpingrelease handle locks in place.
CAUTION – AVOIDPINCH POINTS
Swivel Handle InstructionsStep 1Remove the clips and the cotter pins.Step 2Rotate the handle and insertthe cotter pin. Secure the handle in place by attaching the clip.Step 3Use the second cotter pin to attach the handle to the trailer hitch.
NTE2530-D manual 8/26/09 12:16 PM Page 7