Embed Size (px)
Citation preview

EPSONHX-20 OPERATIONS MANUAL
BY
Kenneth SkierPresident
SkiSoft, Inc.Cambridge, Massachusetts

All rights reserved. No part of this publication may be reproduced, stored in aretrieval system, or transmitted, in any form or by any means, electronic, mechan-ical, photocopying, recording or otherwise, without the prior written permission ofEpson America, Inc. No patent liability is assumed with respect to the use of theinformation contained herein. While every precaution has been taken in thepreparation of this book, the publisher and author assume no responsibility forerrors or omissions. Neither is any liability assumed for damages resulting from theuse of the information contained herein.
The Source”’ is a service mark of Source Telecomputing Corporation. a subsidiary of theReaders Digest Association. Inc.
CompuServe® is a registered trademark of CompuServe. Inc.
Copyright® 1982 by Epson America, Inc.Torrance, California 90505
ii
Federal Communications CommissionRadio Frequency Interference
Statement“This equipment generates and uses radio frequency energy and ifnot installed and used properly, that is, in strict accordance with themanufacturer’s instructions, may cause interference to radio andtelevision reception. It has been type tested and found to complywith the limits for a Class B computing device in accordance withthe specifications in Subpart J of Part 15 of FCC Rules, which aredesigned to provide reasonable protection against such interferencein a residential installation. However, there is no guarantee thatinterference will not occur in a particular installation. If this equip-ment does cause interference to radio or television reception, whichcan be determined by turning the equipment off and on, the user isencouraged to try to correct the interference by one or more of thefollowing measures:l Reorient the receiving antennal Relocate the computer with respect to the receiverl Move the computer away from the receiverl Plug the computer into a different outlet so that com-
puter and receiver are on different branch circuits.
If necessary, the user should consult the dealer or an experiencedradio/ television technician for additional suggestions. The usermay find the following booklet prepared by the Federal Communica-tions Commission helpful:
“How to identify and Resolve Radio-TV Interference Problems.”This booklet is available from the US Government Printing Office,Washington, D.C., 20402, Stock No. 004-000-00345-4.
CONTENTS1 Congratulations! . . . . . . . . . . . . . . . . . . . . . . . . . . . . . . . . . . .
2 Cautions . . . . . . . . . . . . . . . . . . . . . . . . . . . . . . . . . . . . . . . . .
Case . . . . . . . . . . . . . . . . . . . . . . . . . . . . . . . . . . . . . . . . . . . . . .Dummy cartridge . . . . . . . . . . . . . . . . . . . . . . . . . . . . . . . . . .
System bus cover . . . . . . . . . . . . . . . . . . . . . . . . . . . . . . . . . . .
Circuitry cover . . . . . . . . . . . . . . . . . . . . . . . . . . . . . . . . . . . . .
Battery charger . . . . . . . . . . . . . . . . . . . . . . . . . . . . . . . . . . . .
Batteries . . . . . . . . . . . . . . . . . . . . . . . . . . . . . . . . . . . . . . . . . .
Printer . . . . . . . . . . . . . . . . . . . . . . . . . . . . . . . . . . . . . . . . . . . .
Peripherals . . . . . . . . . . . . . . . . . . . . . . . . . . . . . . . . . . . . . . . .Physicalshock . . . . . . . . . . . . . . . . . . . . . . . . . . . . . . . . . . . . .Humidity . . . . . . . . . . . . . . . . . . . . . . . . . . . . . . . . . . . . . . . . .
Extreme temperatures . . . . . . . . . . . . . . . . . . . . . . . . . . . . . . .
3 Preparing your HX-20 for use . . . . . . . . . . . . . . . . . . . . . . .
Unpackingthe HX-20 . . . . . . . . . . . . . . . . . . . . . . . . . . . . . .
Charging the batteries . . . . . . . . . . . . . . . . . . . . . . . . . . . . . .
Preparing the printer for use . . . . . . . . . . . . . . . . . . . . . . . . .
Removing the printer cover. . . . . . . . . . . . . . . . . . . . . .
Inserting the paper roll. . . . . . . . . . . . . . . . . . . . . . . . . .
Inserting the ribbon cartridge . . . . . . . . . . . . . . . . . . . .
Replacing the printer cover. . . . . . . . . . . . . . . . . . . . . .
Adjusting the viewing angle . . . . . . . . . . . . . . . . . . . . . .
initializing memory and the calendar clock . . . . . . . . . . . .
Selecting a different character set. . . . . . . . . . . . . . . . . . . . .
4 Using the HX-20 . . . . . . . . . . . . . . . . . . . . . . . . . . . . . . . . . . .
Turning it on . . . . . . . . . . . . . . . . . . . . . . . . . . . . . . . . . . . . . .
Viewing the menu.. . . . . . . . . . . . . . . . . . . . . . . . . . . . . . . . .
Choosing an item from the menu . . . . . . . . . . . . . . . . . . . . .
5 The screen editor. . . . . . . . . . . . . . . . . . . . . . . . . . . . . . . . . . .
The virtual screen . . . . . . . . . . . . . . . . . . . . . . . . . . . . . . . . . .
Thecursor . . . . . . . . . . . . . . . . . . . . . . . . . . . . . . . . . . . . . . . .
Scrolling . . . . . . . . . . . . . . . . . . . . . . . . . . . . . . . . . . . . . . . . . .Homing the cursor . . . . . . . . . . . . . . . . . . . . . . . . . . . . . . . . .
Clearing the screen . . . . . . . . . . . . . . . . . . . . . . . . . . . . . . . . .
Typing on the virtual screen . . . . . . . . . . . . . . . . . . . . . . . . .
Automatic scrolling. . . . . . . . . . . . . . . . . . . . . . . . . . . . . . . . .
1
555677
8
9
9
101011
1313141516
172122232527
3131
3133
3535364040414141
V

Virtual screen width . . . . . . . . . . . . . . . . . . . . . . . . . . . . . . . . 42
Logical lines vs. physical lines. . . . . . . . . . . . . . . . . . . . . . . . 43
Retyping . . . . . . . . . . . . . . . . . . . . . . . . . . . . . . . . . . . . . . . . . . 44
Deleting text . . . . . . . . . . . . . . . . . . . . . . . . . . . . . . . . . . . . . . 44
Insert mode . . . . . . . . . . . . . . . . . . . . . . . . . . . . . . . . . . . . . . . 45
Upper and lower case. . . . . . . . . . . . . . . . . . . . . . . . . . . . . . . 46
Numeric mode . . . . . . . . . . . . . . . . . . . . . . . . . . . . . . . . . . . . . 47
Graphic characters . . . . . . . . . . . . . . . . . . . . . . . . . . . . . . . . . 49
Printing the screen . . . . . . . . . . . . . . . . . . . . . . . . . . . . . . . . . 50
Using the special function keys . . . . . . . . . . . . . . . . . . . . . . . 52
6 Connecting your HX-20 to other devices . . . . . . . . . . . . . . 55-to a cassette recorder . . . . . . . . . . . . . . . . . . . . . . . . . . . . . 55
-to an RS-232 device . . . . . . . . . . . . . . . . . . . . . . . . . . . . . . 57
-to a bar code reader . . . . . . . . . . . . . . . . . . . . . . . . . . . . . . 58
7 What if you have problems? . . . . . . . . . . . . . . . . . . . . . . . . . 61
If you can’t turn off your HX-20 . . . . . . . . . . . . . . . . . . . . . 61
If the menu displays garbage . . . . . . . . . . . . . . . . . . . . . . . . . 62
If you encounter other problems . . . . . . . . . . . . . . . . . . . . . 62
8 Storing your HX-20 . . . . . . . . . . . . . . . . . . . . . . . . . . . . . . . . 63- for a few minutes to a few hours . . . . . . . . . . . . . . . . . . 63
- for a few hours to a few weeks . . . . . . . . . . . . . . . . . . . . 63
-for a few weeks to a few months . . . . . . . . . . . . . . . . . . . 63
9 Specifications. . . . . . . . . . . . . . . . . . . . . . . . . . . . . . . . . . . . . . 65
Architecture.. . . . . . . . . . . . . . . . . . . . . . . . . . . . . . . . . . . . . . 65
Expansion . . . . . . . . . . . . . . . . . . . . . . . . . . . . . . . . . . . . . . . . . 67
Help! . . . . . . . . . . . . . . . . . . . . . . . . . . . . . . . . . . . . . . . . . . . . . . . 73
vi
Chapter 1
Congratulations!Congratulations! You have justpurchased the first of a new gen-eration of personal computers.The Epson HX-20 is unlike anyproduct ever built, combiningthe power and usefulness of adesktop computer with the port-ability of a pocket calculator.
I t ’ s a go -anywhere , do -anything system designed fromthe start to be user-friendly-which means you don’t have toknow anything about comput-ers to use it. Powered by its owninternal batteries, with no dan-gling cords or external parapher-nalia, the HX-20 is a compactand uncluttered system, at homein the classroom or the confer-ence room, on your desk or inyour lap.
Unlike most other personalcomputers, the HX-20 can storeup to seventeen programs in itsmemory. (Five of these may beBASIC programs.) When youturn on the HX-20, a menu ap-pears on the screen, listing thenames of these programs. Youcan make the HX-20 run anyprogram on the menu simply bypressing a single key.
Furthermore, the HX-20 hasa memory like an elephant. Un-like most personal computers,which forget any program inmemory as soon as they are“powered down,” the HX-20remembers all programs in its
1
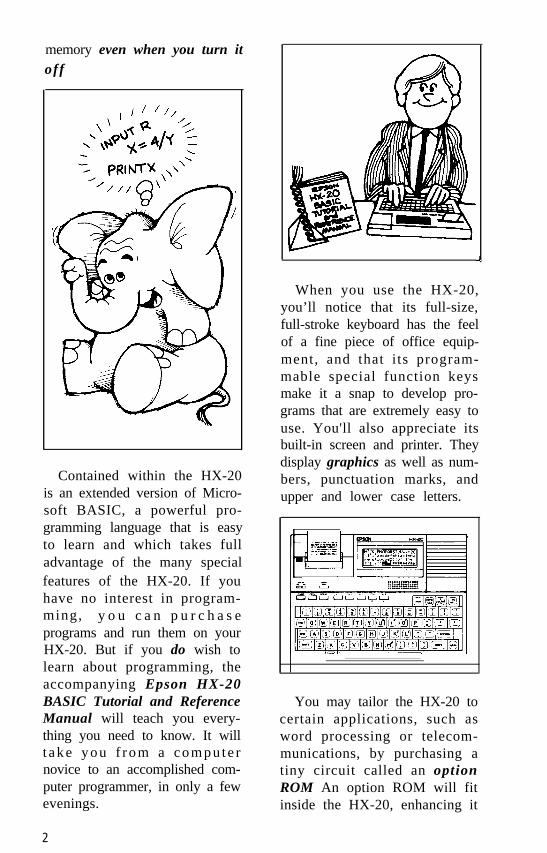
memory even when you turn itoff
Contained within the HX-20is an extended version of Micro-soft BASIC, a powerful pro-gramming language that is easyto learn and which takes fulladvantage of the many specialfeatures of the HX-20. If youhave no interest in program-ming, y o u c a n p u r c h a s eprograms and run them on yourHX-20. But if you do wish tolearn about programming, theaccompanying Epson HX-20BASIC Tutorial and ReferenceManual will teach you every-thing you need to know. It willt ake you f rom a compu te rnovice to an accomplished com-puter programmer, in only a fewevenings.
J
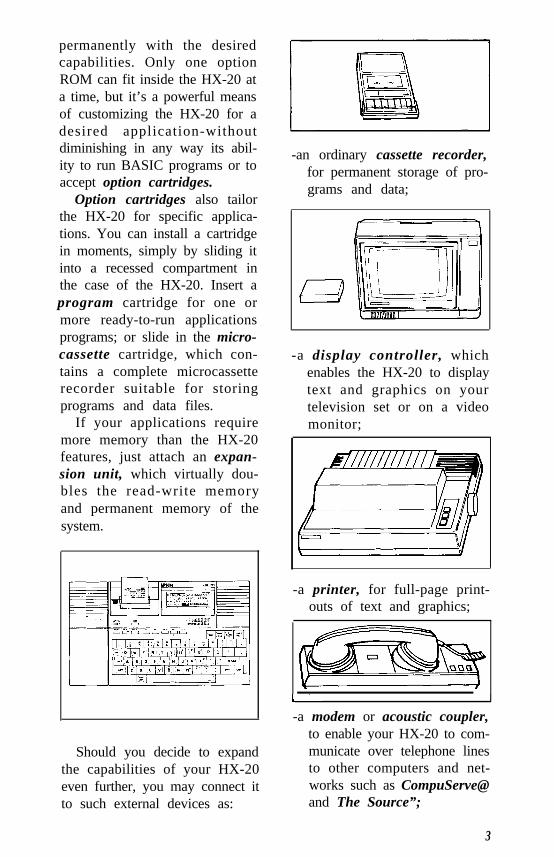
When you use the HX-20,you’ll notice that its full-size,full-stroke keyboard has the feelof a fine piece of office equip-ment, and that its program-mable special function keysmake it a snap to develop pro-grams that are extremely easy touse. You'll also appreciate itsbuilt-in screen and printer. Theydisplay graphics as well as num-bers, punctuation marks, andupper and lower case letters.
You may tailor the HX-20 tocertain applications, such asword processing or telecom-munications, by purchasing atiny circuit called an optionROM An option ROM will fitinside the HX-20, enhancing it
2
permanently with the desiredcapabilities. Only one optionROM can fit inside the HX-20 ata time, but it’s a powerful meansof customizing the HX-20 for adesired application-withoutdiminishing in any way its abil-ity to run BASIC programs or toaccept option cartridges.
Option cartridges also tailorthe HX-20 for specific applica-tions. You can install a cartridgein moments, simply by sliding itinto a recessed compartment inthe case of the HX-20. Insert aprogram cartridge for one ormore ready-to-run applicationsprograms; or slide in the micro-cassette cartridge, which con-tains a complete microcassetterecorder suitable for storingprograms and data files.
If your applications requiremore memory than the HX-20features, just attach an expan-sion unit, which virtually dou-bles the read-write memoryand permanent memory of thesystem.
Should you decide to expandthe capabilities of your HX-20even further, you may connect itto such external devices as:
-an ordinary cassette recorder,for permanent storage of pro-grams and data;
-a display controller, whichenables the HX-20 to displaytext and graphics on yourtelevision set or on a videomonitor;
-a printer, for full-page print-outs of text and graphics;
1- I
-a modem or acoustic coupler,to enable your HX-20 to com-municate over telephone linesto other computers and net-works such as CompuServe@and The Source”;
3
I I
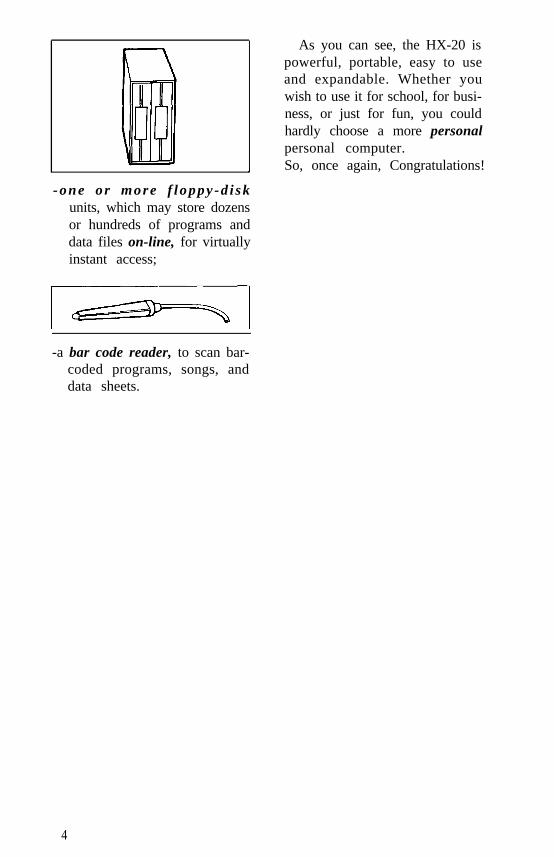
-one or more f loppy-d i skunits, which may store dozensor hundreds of programs anddata files on-line, for virtuallyinstant access;
As you can see, the HX-20 ispowerful, portable, easy to useand expandable. Whether youwish to use it for school, for busi-ness, or just for fun, you couldhardly choose a more personalpersonal computer.So, once again, Congratulations!
-a bar code reader, to scan bar-coded programs, songs, anddata sheets.
4
Chapter 2
CautionsThe HX-20 is not a toy. Although it is solid and well-built, it is notinvulnerable. Treat it with the care it deserves, and it should pro-vide you with years of reliable service.
The warnings on these pages concern only the HX-20. If you con-nect your HX-20 to any peripherals, be sure to heed any warningscontained within the documentation for those peripherals.
(Note: failure to observe the following cautions may void thewarranty on your HX-20.)
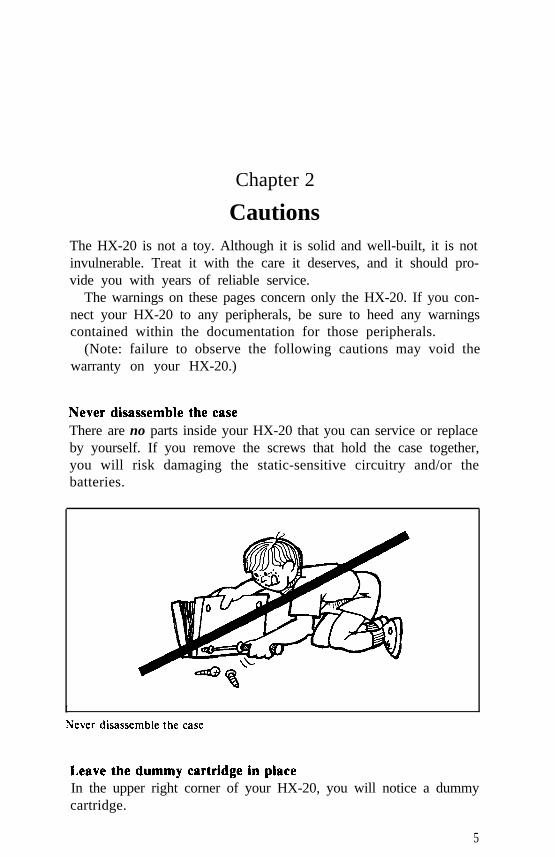
Never disassemble the caseThere are no parts inside your HX-20 that you can service or replaceby yourself. If you remove the screws that hold the case together,you will risk damaging the static-sensitive circuitry and/or thebatteries.
I
Never disassemble the case
Leave the dummy cartridge in placeIn the upper right corner of your HX-20, you will notice a dummycartridge.
5
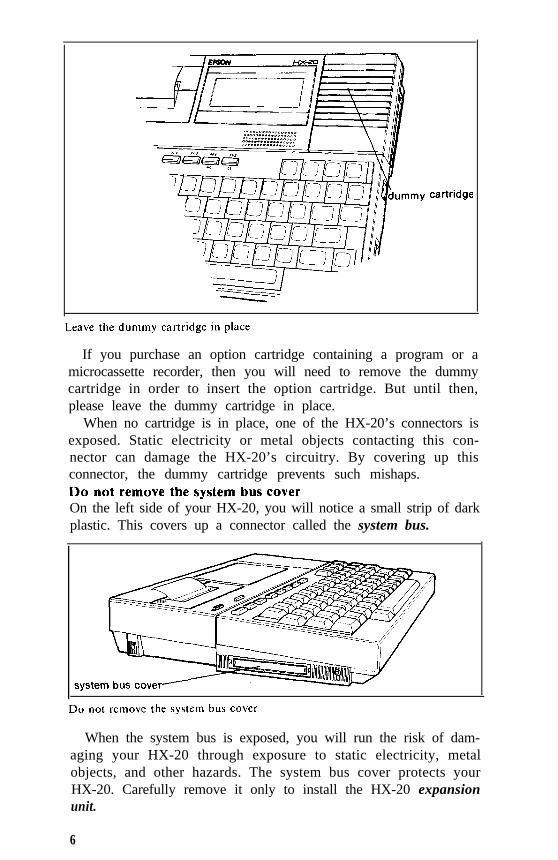
cartridge
Leave the dummy cartridge in place
If you purchase an option cartridge containing a program or amicrocassette recorder, then you will need to remove the dummycartridge in order to insert the option cartridge. But until then,please leave the dummy cartridge in place.
When no cartridge is in place, one of the HX-20’s connectors isexposed. Static electricity or metal objects contacting this con-nector can damage the HX-20’s circuitry. By covering up thisconnector, the dummy cartridge prevents such mishaps.Do not remove the system bus coverOn the left side of your HX-20, you will notice a small strip of darkplastic. This covers up a connector called the system bus.
system bus cover
Do not remove the system bus cover
When the system bus is exposed, you will run the risk of dam-aging your HX-20 through exposure to static electricity, metalobjects, and other hazards. The system bus cover protects yourHX-20. Carefully remove it only to install the HX-20 expansionunit.
6
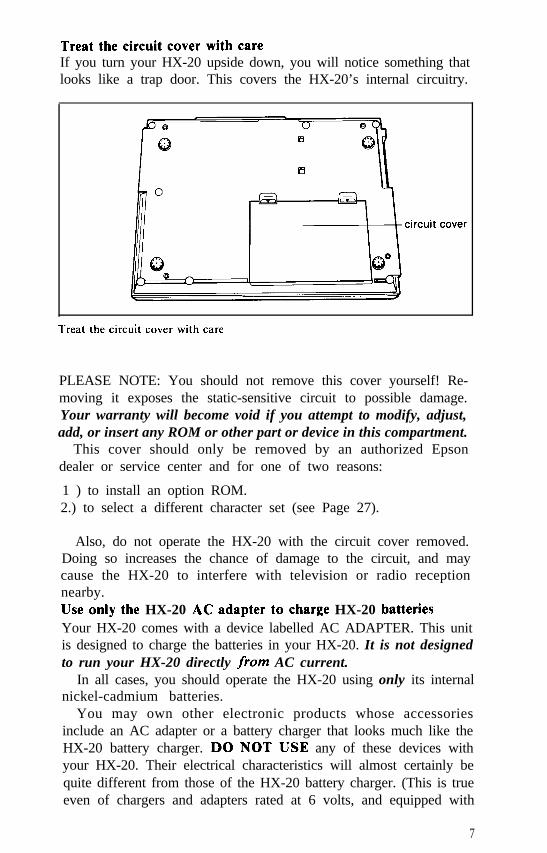
Treat the circuit cover with careIf you turn your HX-20 upside down, you will notice something thatlooks like a trap door. This covers the HX-20’s internal circuitry.
circuit cover
Treat the circuit cover with care
PLEASE NOTE: You should not remove this cover yourself! Re-moving it exposes the static-sensitive circuit to possible damage.Your warranty will become void if you attempt to modify, adjust,add, or insert any ROM or other part or device in this compartment.
This cover should only be removed by an authorized Epsondealer or service center and for one of two reasons:
1 ) to install an option ROM.2.) to select a different character set (see Page 27).
Also, do not operate the HX-20 with the circuit cover removed.Doing so increases the chance of damage to the circuit, and maycause the HX-20 to interfere with television or radio receptionnearby.Use only the HX-20 AC adapter to charge HX-20 batteriesYour HX-20 comes with a device labelled AC ADAPTER. This unitis designed to charge the batteries in your HX-20. It is not designedto run your HX-20 directly from AC current.
In all cases, you should operate the HX-20 using only its internalnickel-cadmium batteries.
You may own other electronic products whose accessoriesinclude an AC adapter or a battery charger that looks much like theHX-20 battery charger. DO NOT USE any of these devices withyour HX-20. Their electrical characteristics will almost certainly bequite different from those of the HX-20 battery charger. (This is trueeven of chargers and adapters rated at 6 volts, and equipped with
7
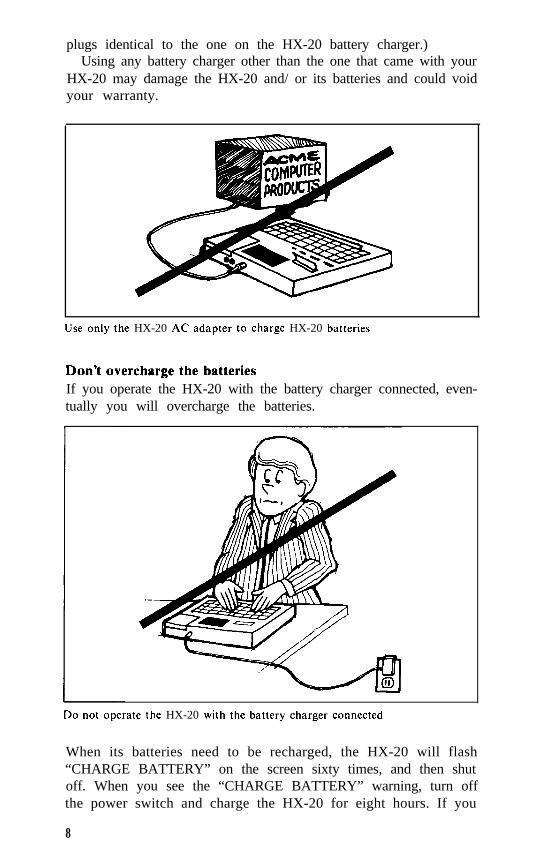
plugs identical to the one on the HX-20 battery charger.)Using any battery charger other than the one that came with your
HX-20 may damage the HX-20 and/ or its batteries and could voidyour warranty.
Use only the HX-20 AC adapter to charge HX-20 batteries
Don’t overcharge the batteriesIf you operate the HX-20 with the battery charger connected, even-tually you will overcharge the batteries.
Do not operate the HX-20 with the battery charger connected
When its batteries need to be recharged, the HX-20 will flash“CHARGE BATTERY” on the screen sixty times, and then shutoff. When you see the “CHARGE BATTERY” warning, turn offthe power switch and charge the HX-20 for eight hours. If you
8

recharge the HX-20 before you see that message, you will onlyshorten the useful life of the batteries.
Charging the batteries for more than eight hours at a time willshorten their life. Charging them continuously for more than sevendays can destroy them.
I
Don’t overcharge the batteries
If your batteries fail to hold a charge, take your HX-20 to anEpson Service Center. DO NOT ATTEMPT TO REMOVE THEBATTERIES YOURSELF, or you could damage your HX-20.Don’t pull on the paper when the printer is activeYou may damage the HX-20’s built-in microprinter if you pull onthe paper while the printer is working.
Don’t pull on the paper when the printer is active
You may, however, pull on the paper when the printer is inactive;this will cause no damage to the printer.Connect the HX-20 only to appropriate peripheralsThe sockets on the back of the HX-20 enable you to connect it to anEpson disk drive or an RS-232 serial device such as a modem or aprinter. Sockets on the side of the HX-20 enable you to plug in abar-code reader or a cassette recorder.
Do not plug any device into these sockets unless it conforms tothe interface specifications listed at the back of this manual.
9
Plugging in a device that does not conform to these specificationsmay damage the HX-20 and/or the device you plug in, and mayvoid your warranty.
Connect the HX-20 only to appropriate peripherals
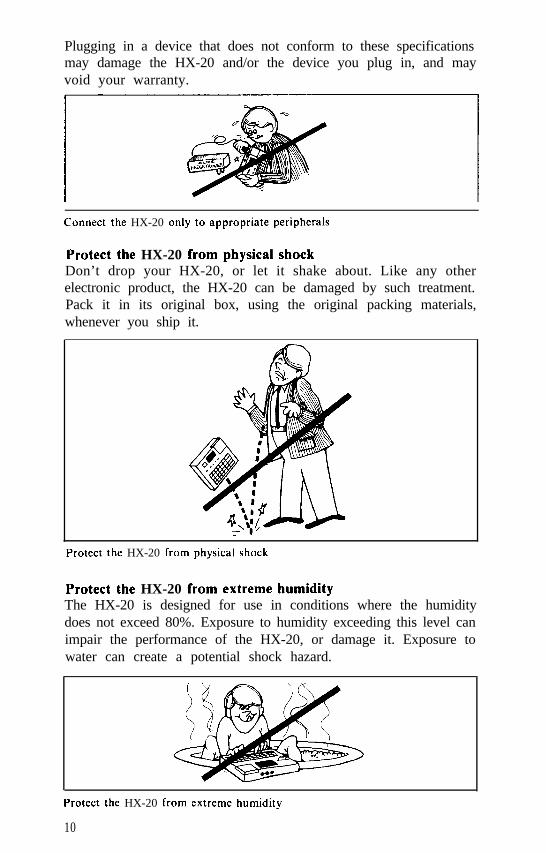
Protect the HX-20 from physical shockDon’t drop your HX-20, or let it shake about. Like any otherelectronic product, the HX-20 can be damaged by such treatment.Pack it in its original box, using the original packing materials,whenever you ship it.
Protect the HX-20 from physical shock
Protect the HX-20 from extreme humidityThe HX-20 is designed for use in conditions where the humiditydoes not exceed 80%. Exposure to humidity exceeding this level canimpair the performance of the HX-20, or damage it. Exposure towater can create a potential shock hazard.
Protect the HX-20 from extreme humidity
10
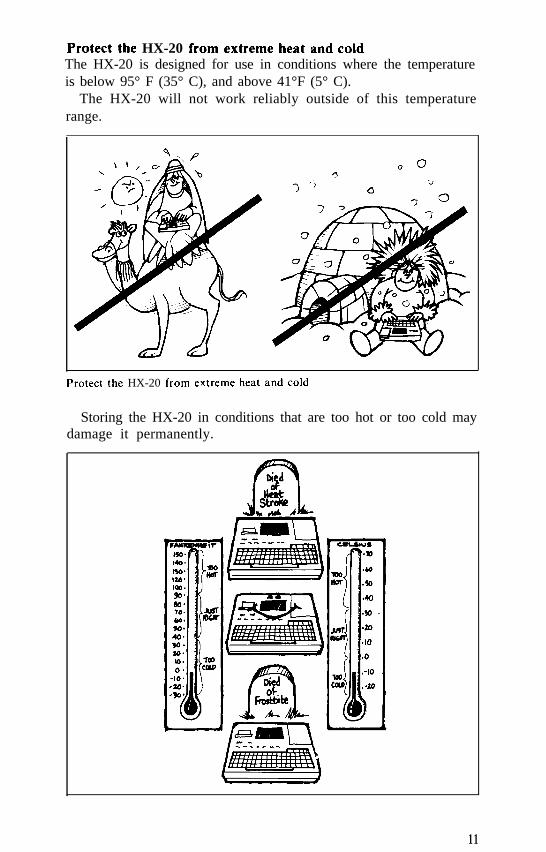
Protect the HX-20 from extreme heat and coldThe HX-20 is designed for use in conditions where the temperatureis below 95° F (35° C), and above 41°F (5° C).
The HX-20 will not work reliably outside of this temperaturerange.
Protect the HX-20 from extreme heat and cold
Storing the HX-20 in conditions that are too hot or too cold maydamage it permanently.
11

N
1 I 1 , , / ,

Chapter 3
Preparing your HX-20 for useBefore you use your HX-20 for the first time, you must take severalsteps:I) Unpack it.2) Charge the batteries.3) Put paper and a ribbon in the printer.4) Adjust the LCD display.5) Initialize memory and the calendar clock.
If you need to work with special symbols, you might also wish toselect a different character set. See page 27.
Unpacking the HX-20Remove the HX-20, the battery charger, and all packing materialsfrom the box. Check the packing materials for small parts andpapers.
DO NOT DISCARD THE PACKING MATERIALS!You will need them if you ever ship the HX-20, to protect it duringshipment.
You should have the following:1) The Epson HX-20 computer and carrying case.
2) The battery charger.
13

3) A roll of paper for the printer.
4) A ribbon cartridge for the printer.
5) This manual.
6) The Epson HX-20 BASIC Tutorial and Reference Manual.
7) The registration card.8) A warning sheet concerning the battery charger.Fill out the registration card at the time of purchase and mail it
to Epson.With your registration card on file, Epson can provide continuing
software and hardware support to help you in using your HX-20.Charging the batteriesThe nickel-cadmium batteries in your HX-20 hold very little chargewhen they are new. So charge them now, before using the HX-20.A full charge is necessary to maintain maximum battery efficiency.For optimum battery life, only recharge the batteries when theHX-20 tells you to do so.
Plug the battery charger into an AC outlet:
14
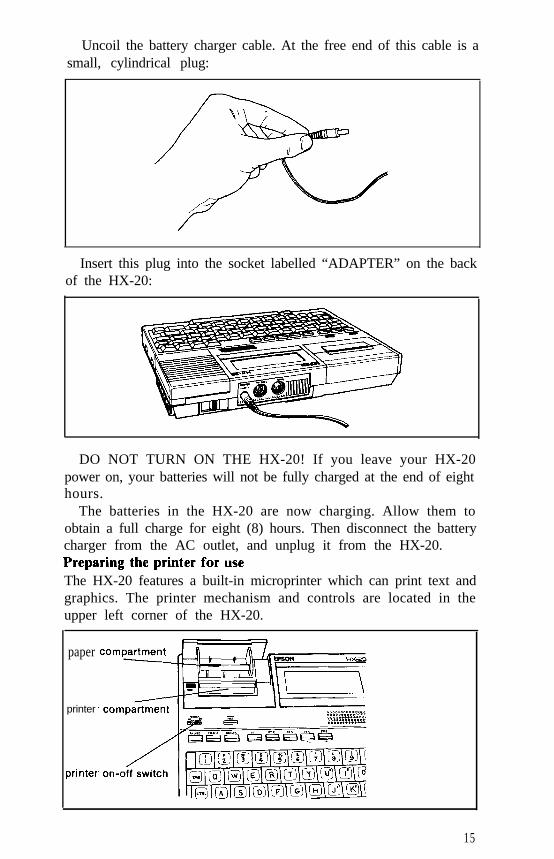
Uncoil the battery charger cable. At the free end of this cable is asmall, cylindrical plug:
Insert this plug into the socket labelled “ADAPTER” on the backof the HX-20:
DO NOT TURN ON THE HX-20! If you leave your HX-20power on, your batteries will not be fully charged at the end of eighthours.
The batteries in the HX-20 are now charging. Allow them toobtain a full charge for eight (8) hours. Then disconnect the batterycharger from the AC outlet, and unplug it from the HX-20.Preparing the printer for useThe HX-20 features a built-in microprinter which can print text andgraphics. The printer mechanism and controls are located in theupper left corner of the HX-20.
paper
printer
printer
15
When the HX-20 is shipped from the factory, the ribbon andpaper are not installed in the printer. To prepare the printer for use,you must perform the following steps:
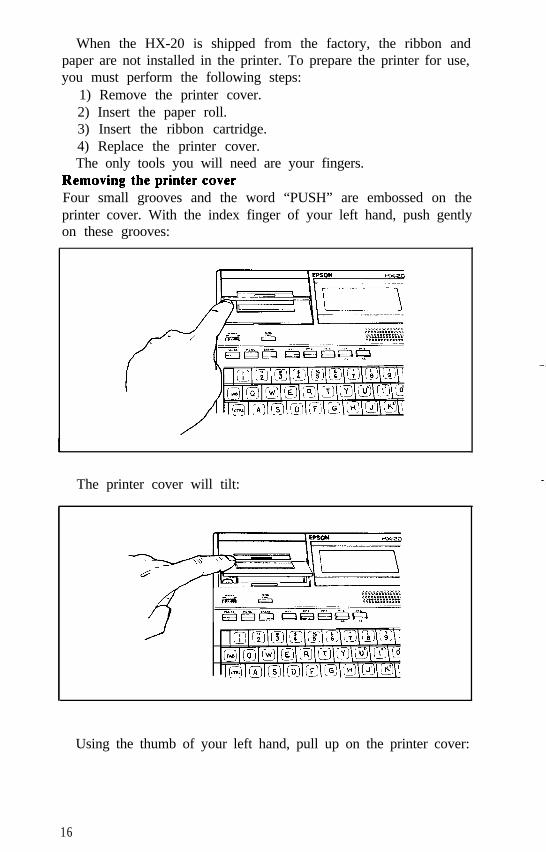
1) Remove the printer cover.2) Insert the paper roll.3) Insert the ribbon cartridge.4) Replace the printer cover.The only tools you will need are your fingers.
Removing the printer coverFour small grooves and the word “PUSH” are embossed on theprinter cover. With the index finger of your left hand, push gentlyon these grooves:
The printer cover will tilt:
Using the thumb of your left hand, pull up on the printer cover:
16
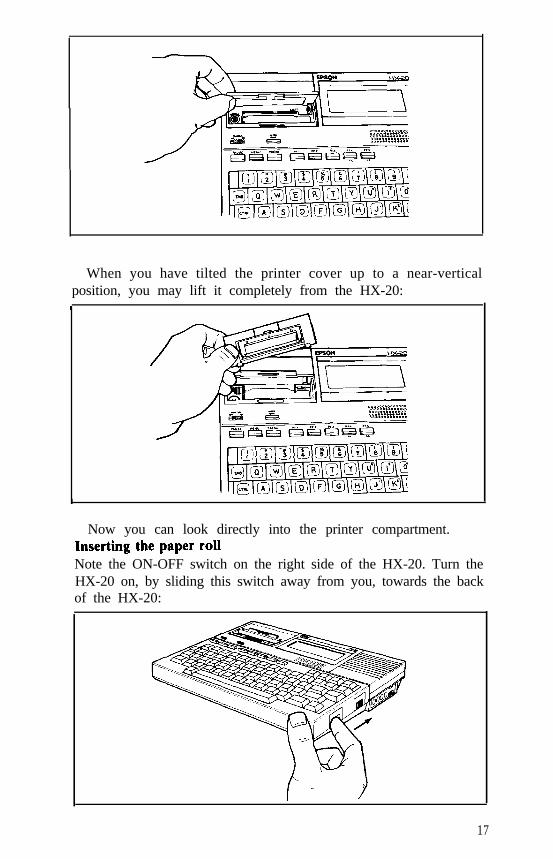
When you have tilted the printer cover up to a near-verticalposition, you may lift it completely from the HX-20:
I
I
Now you can look directly into the printer compartment.Inserting the paper rollNote the ON-OFF switch on the right side of the HX-20. Turn theHX-20 on, by sliding this switch away from you, towards the backof the HX-20:
17
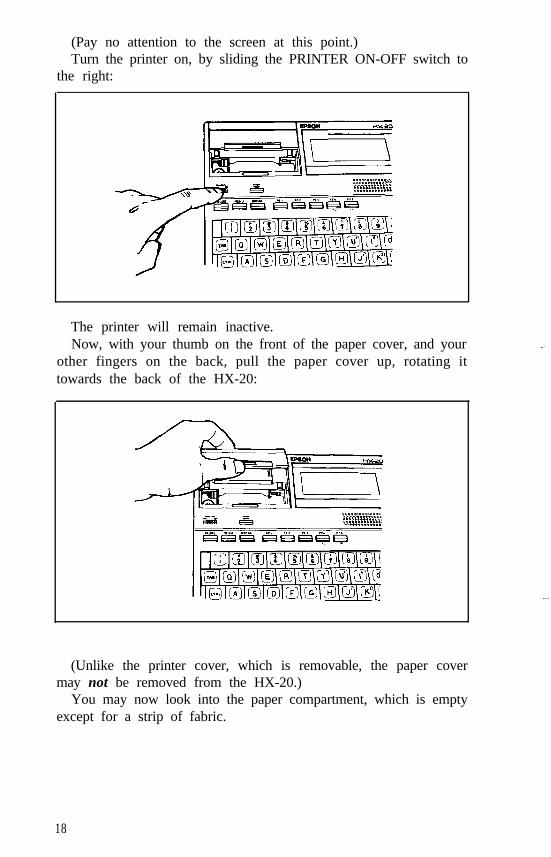
(Pay no attention to the screen at this point.)Turn the printer on, by sliding the PRINTER ON-OFF switch to
the right:
The printer will remain inactive.Now, with your thumb on the front of the paper cover, and your
other fingers on the back, pull the paper cover up, rotating ittowards the back of the HX-20:
(Unlike the printer cover, which is removable, the paper covermay not be removed from the HX-20.)
You may now look into the paper compartment, which is emptyexcept for a strip of fabric.
18
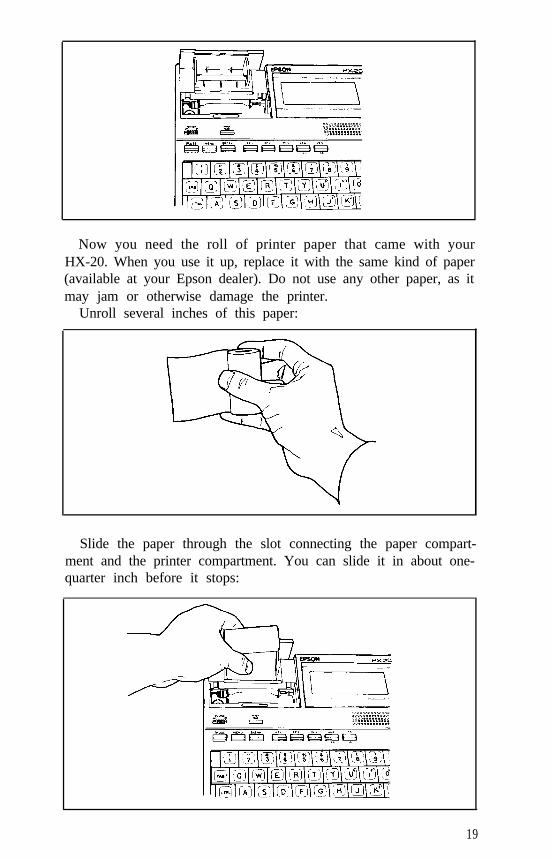
Now you need the roll of printer paper that came with yourHX-20. When you use it up, replace it with the same kind of paper(available at your Epson dealer). Do not use any other paper, as itmay jam or otherwise damage the printer.
Unroll several inches of this paper:
Slide the paper through the slot connecting the paper compart-ment and the printer compartment. You can slide it in about one-quarter inch before it stops:
19

While holding the paper in place, press the PAPER FEEDbutton. The printer will activate, and a rubber roller will pull thepaper into the printer compartment. Hold the PAPER FEED but-ton down until the paper emerges from the top of the printer mech-anism. When an inch of paper has emerged from the top of theprinter, release the PAPER FEED button:
Now pull the paper through the printer, until several inches areexposed:
Put the roll of paper into the paper compartment on top of thestrip of fabric. If you ever wish to remove the paper roll, lift thefabric strip.
20

Close the paper compartment by pulling the paper cover all theway forward. Be sure that you don’t close the paper cover on thefree end of the paper roll.
Inserting the ribbon cartridgePackaged with your HX-20 is an L-shaped ink ribbon cartridge:
Holding it as shown, you may slide it over the paper and into theprinter compartment. Be sure the paper goes between the ribboncartridge and the ink ribbon.
21
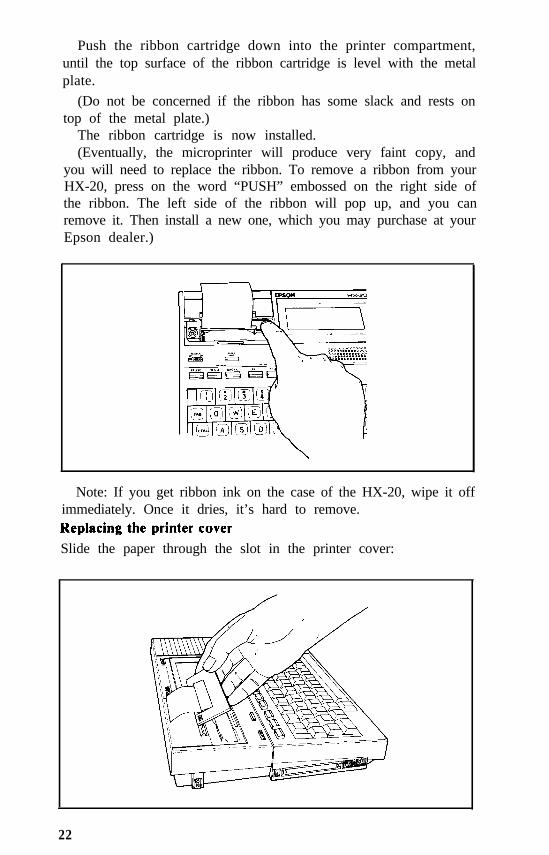
Push the ribbon cartridge down into the printer compartment,until the top surface of the ribbon cartridge is level with the metalplate.
(Do not be concerned if the ribbon has some slack and rests ontop of the metal plate.)
The ribbon cartridge is now installed.(Eventually, the microprinter will produce very faint copy, and
you will need to replace the ribbon. To remove a ribbon from yourHX-20, press on the word “PUSH” embossed on the right side ofthe ribbon. The left side of the ribbon will pop up, and you canremove it. Then install a new one, which you may purchase at yourEpson dealer.)
1
Note: If you get ribbon ink on the case of the HX-20, wipe it offimmediately. Once it dries, it’s hard to remove.Replacing the printer coverSlide the paper through the slot in the printer cover:
22
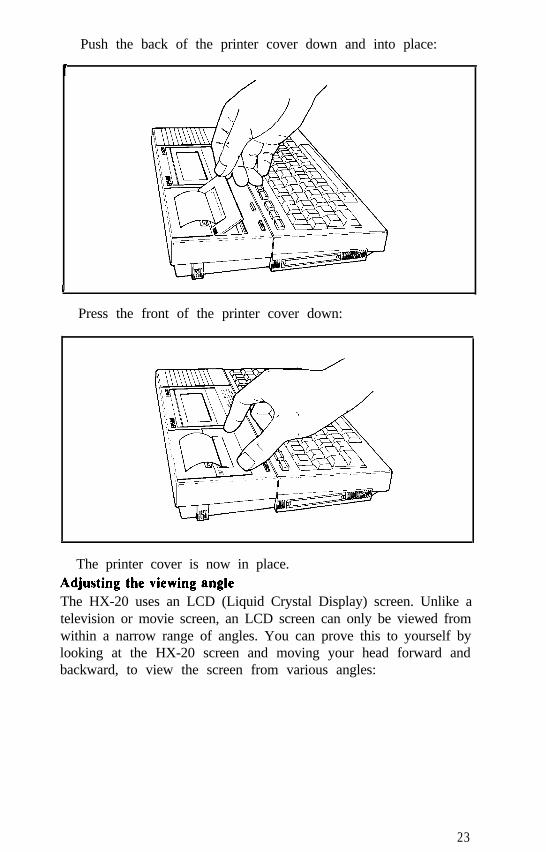
Push the back of the printer cover down and into place:
I
I
Press the front of the printer cover down:
The printer cover is now in place.Adjusting the viewing angleThe HX-20 uses an LCD (Liquid Crystal Display) screen. Unlike atelevision or movie screen, an LCD screen can only be viewed fromwithin a narrow range of angles. You can prove this to yourself bylooking at the HX-20 screen and moving your head forward andbackward, to view the screen from various angles:
23

At one angle you might not see any text at all on the screen. Atanother angle the entire screen may look black. But you willdiscover an optimal viewing angle: an angle from which you willfind it very easy to read the screen.
Nevertheless, you won’t have to sit in any particular positionwhile using the HX-20. To adjust the LCD screen to your position,place your finger on the VIEW ANGLE adjustment knob, locatedon the right side of the HX-20:
Turn the VIEW ANGLE adjustment knob until the screen showsyou crisp black characters against a light gray background.
(If you view the LCD screen from a different angle, you mayneed to adjust the viewing angle again. You might also have toadjust the VIEW ANGLE if the temperature changes, because theLCD display is temperature-sensitive.)
24
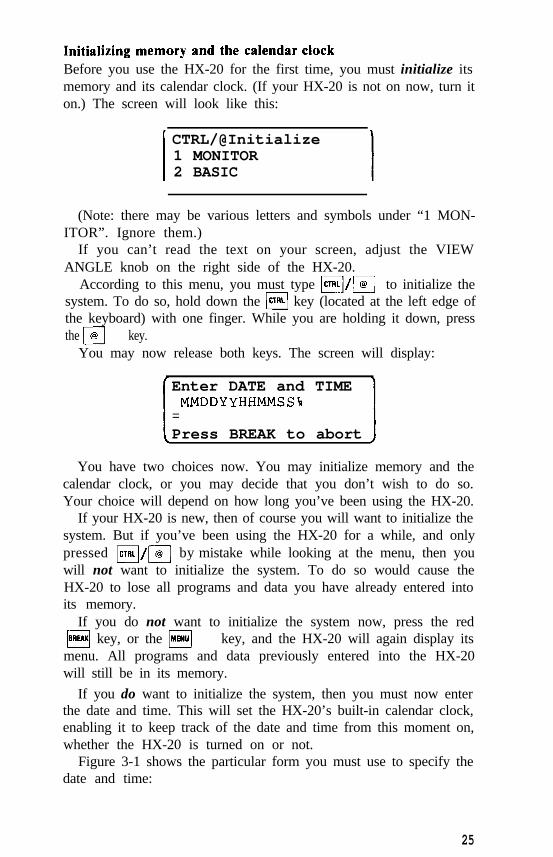
Initializing memory and the calendar clockBefore you use the HX-20 for the first time, you must initialize itsmemory and its calendar clock. (If your HX-20 is not on now, turn iton.) The screen will look like this:
I CTRL/@Initialize1 MONITOR2 BASIC I
(Note: there may be various letters and symbols under “1 MON-ITOR”. Ignore them.)
If you can’t read the text on your screen, adjust the VIEWANGLE knob on the right side of the HX-20.
According to this menu, you must type ICTRL]/I@ to initialize thesystem. To do so, hold down the m key (located at the left edge ofthe keyboard) with one finger. While you are holding it down, pressthe q key.
You may now release both keys. The screen will display:
Enter DATE and TIMEMMDDYYHHMMSSG 1
=Press BREAK to abort
You have two choices now. You may initialize memory and thecalendar clock, or you may decide that you don’t wish to do so.Your choice will depend on how long you’ve been using the HX-20.
If your HX-20 is new, then of course you will want to initialize thesystem. But if you’ve been using the HX-20 for a while, and onlypressed m/m by mistake while looking at the menu, then youwill not want to initialize the system. To do so would cause theHX-20 to lose all programs and data you have already entered intoits memory.
If you do not want to initialize the system now, press the redw key, or the q key, and the HX-20 will again display itsmenu. All programs and data previously entered into the HX-20will still be in its memory.
If you do want to initialize the system, then you must now enterthe date and time. This will set the HX-20’s built-in calendar clock,enabling it to keep track of the date and time from this moment on,whether the HX-20 is turned on or not.
Figure 3-1 shows the particular form you must use to specify thedate and time:
25
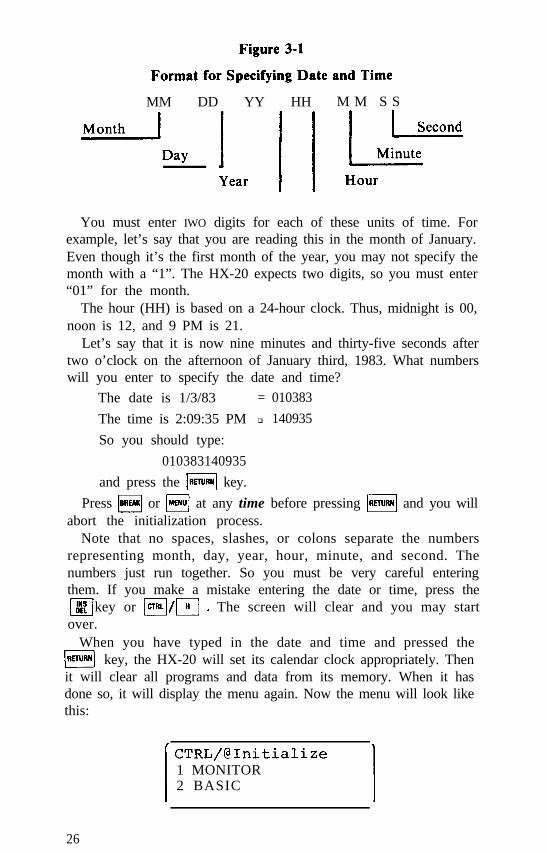
Figure 3-1
Format for Specifying Date and Time
MM DD YY HH M M S S
+ay !.,. / j ?,.k=
You must enter IWO digits for each of these units of time. Forexample, let’s say that you are reading this in the month of January.Even though it’s the first month of the year, you may not specify themonth with a “1”. The HX-20 expects two digits, so you must enter“01” for the month.
The hour (HH) is based on a 24-hour clock. Thus, midnight is 00,noon is 12, and 9 PM is 21.
Let’s say that it is now nine minutes and thirty-five seconds aftertwo o’clock on the afternoon of January third, 1983. What numberswill you enter to specify the date and time?
The date is 1/3/83
The time is 2:09:35 PM
So you should type:
= 010383
q 140935
010383140935
and press the m key.
Press H or m at any time before pressing m and you willabort the initialization process.
Note that no spaces, slashes, or colons separate the numbersrepresenting month, day, year, hour, minute, and second. Thenumbers just run together. So you must be very careful enteringthem. If you make a mistake entering the date or time, press theI-JINS key or m/m . The screen will clear and you may startover.
When you have typed in the date and time and pressed them key, the HX-20 will set its calendar clock appropriately. Thenit will clear all programs and data from its memory. When it hasdone so, it will display the menu again. Now the menu will look likethis:
I CTRL/@Initialize1 MONITOR2 BASIC
1
26
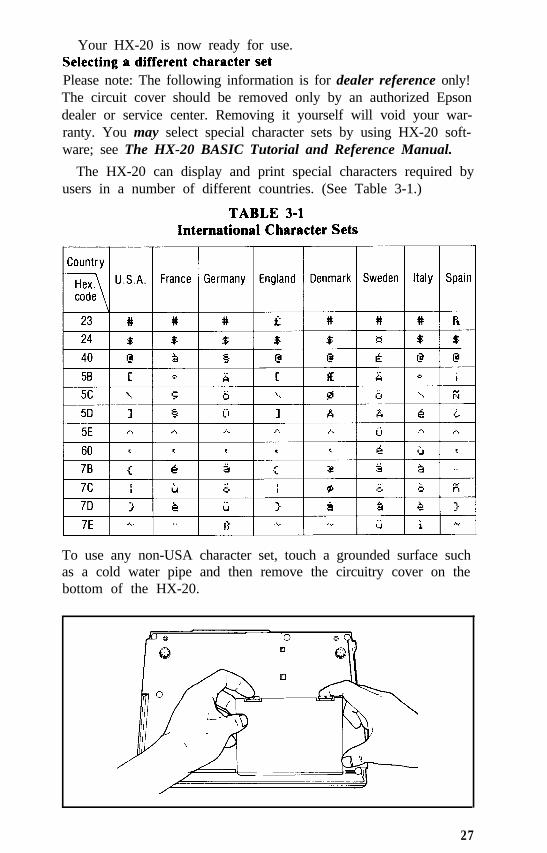
Your HX-20 is now ready for use.Selecting a different character setPlease note: The following information is for dealer reference only!The circuit cover should be removed only by an authorized Epsondealer or service center. Removing it yourself will void your war-ranty. You may select special character sets by using HX-20 soft-ware; see The HX-20 BASIC Tutorial and Reference Manual.
The HX-20 can display and print special characters required byusers in a number of different countries. (See Table 3-1.)
TABLE 3-1International Character Sets
To use any non-USA character set, touch a grounded surface suchas a cold water pipe and then remove the circuitry cover on thebottom of the HX-20.
27

You will see a shiny, flexible flap. Carefully lift this up and out ofthe way.
One component, called a DIP switch, looks like this (enlarged toshow detail):
The DIP switch is actually a set of four switches. To specify thecharacter set of a given country, look up the appropriate switchsettings in Table 3-2, and set the individual switches with a ballpoint pen or similar object.
28
TABLE 3-2DIP Switch Settings for
International Character Sets
Desired SwitchCountry 1
Denmark On
England Off
France Off
Germany On
Italy On
Spain Off
Sweden Off
USA On
Switch2
On
Off
On
Off
Off
Off
On
On
Switch3
Off
On
On
On
Off
Off
Off
On
(Switch 4 has no effect on the HX-20’s character set. Leave it inthe off position.)
When you have adjusted the DIP switch for the desired characterset, let the shiny flap fall back into place, and put the circuitry coverback into position.
29

Chapter 4
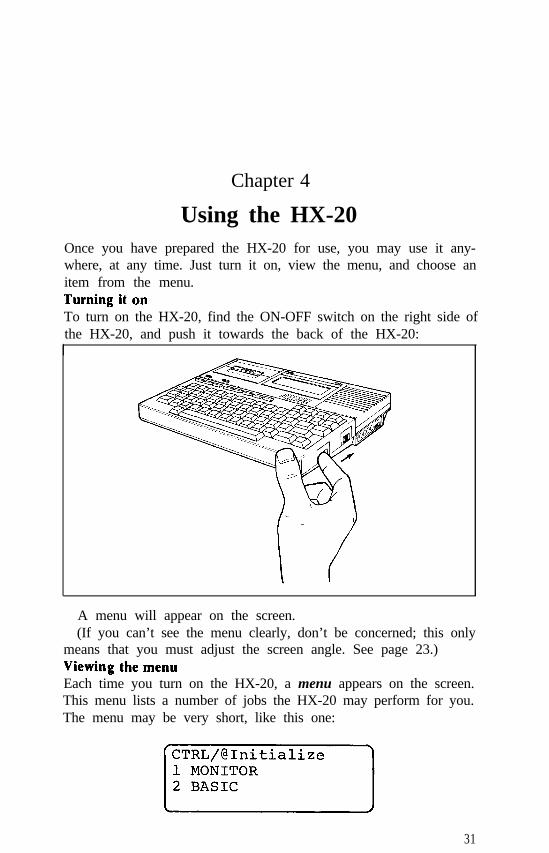
Using the HX-20Once you have prepared the HX-20 for use, you may use it any-where, at any time. Just turn it on, view the menu, and choose anitem from the menu.Turning it onTo turn on the HX-20, find the ON-OFF switch on the right side ofthe HX-20, and push it towards the back of the HX-20:
A menu will appear on the screen.(If you can’t see the menu clearly, don’t be concerned; this only
means that you must adjust the screen angle. See page 23.)Viewing the menuEach time you turn on the HX-20, a menu appears on the screen.This menu lists a number of jobs the HX-20 may perform for you.The menu may be very short, like this one:
31
Or it might be much longer. However, if it is longer, its first fewlines will look exactly like the above menu.
The above menu is three lines long, so you can see all of it on thescreen at one time. But a menu might list as many as seventeenjobs-far too many to fit in one screen. How can you view such along menu?long menu?
Just press the B key. If additional items are stored in theJust press the B key. If additional items are stored in themenu, the screen will move up. If you continue to press m , themenu, the screen will move up. If you continue to press m , themenu will scroll up until it reaches the end of the list; then it willmenu will scroll up until it reaches the end of the list; then it willshow you item “1” again.
To scroll text down down the screen, press the q key (locatednear the upper right corner of the keyboard).
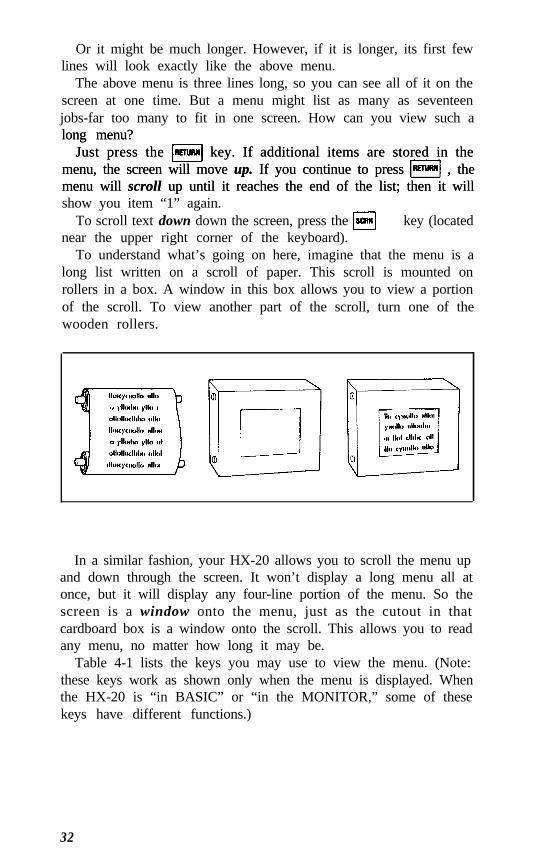
To understand what’s going on here, imagine that the menu is along list written on a scroll of paper. This scroll is mounted onrollers in a box. A window in this box allows you to view a portionof the scroll. To view another part of the scroll, turn one of thewooden rollers.
In a similar fashion, your HX-20 allows you to scroll the menu upand down through the screen. It won’t display a long menu all atonce, but it will display any four-line portion of the menu. So thescreen is a window onto the menu, just as the cutout in thatcardboard box is a window onto the scroll. This allows you to readany menu, no matter how long it may be.
Table 4-1 lists the keys you may use to view the menu. (Note:these keys work as shown only when the menu is displayed. Whenthe HX-20 is “in BASIC” or “in the MONITOR,” some of thesekeys have different functions.)
32
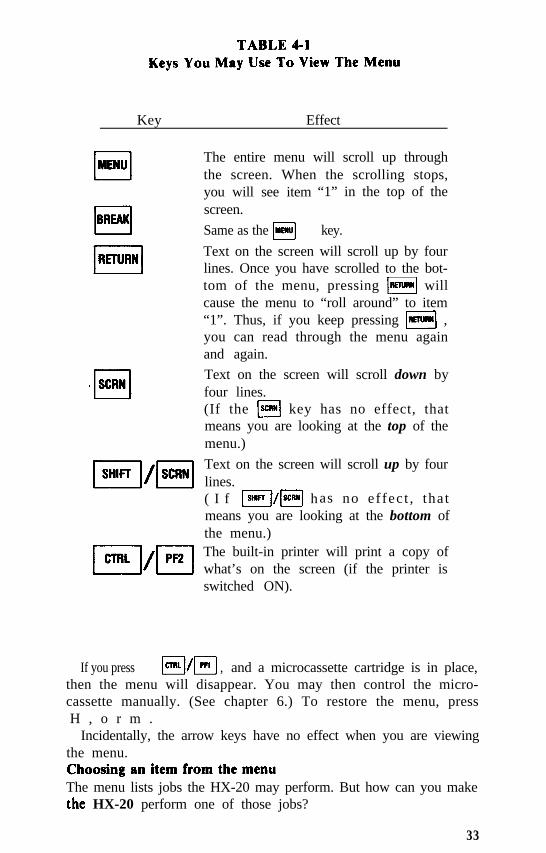
TABLE 4-1Keys You May Use To View The Menu
Key Effect
The entire menu will scroll up throughthe screen. When the scrolling stops,you will see item “1” in the top of thescreen.
Same as the q key.
Text on the screen will scroll up by fourlines. Once you have scrolled to the bot-tom of the menu, pressing m willcause the menu to “roll around” to item“1”. Thus, if you keep pressing m ,you can read through the menu againand again.
Text on the screen will scroll down byfour lines.(If the @ key has no effect, thatmeans you are looking at the top of themenu.)
Text on the screen will scroll up by fourlines.( I f m/m has no ef fec t , tha tmeans you are looking at the bottom ofthe menu.)The built-in printer will print a copy ofwhat’s on the screen (if the printer isswitched ON).
If you press , and a microcassette cartridge is in place,then the menu will disappear. You may then control the micro-cassette manually. (See chapter 6.) To restore the menu, pressH , o r m .
Incidentally, the arrow keys have no effect when you are viewingthe menu.Choosing an item from the menuThe menu lists jobs the HX-20 may perform. But how can you makethe HX-20 perform one of those jobs?
33
To answer that question, let’s take a look at a particular menu:
(Press q to see the top line of this menu on your screen.)Each line in the menu lists a job the HX-20 may perform, by spec-
ifying a key and the job associated with that key. To choose an itemfrom the menu, press the key listed next to that item. Thus,press m/I@ t o initialize the system, press q to select theMonitor, or press q to select BASIC. What could be simpler?
Some jobs are always available:INITIALIZE Initialize memory and the calendar clock. See page 25.
MONITOR The monitor lets you enter and modify machinelanguage programs. For more information, see theEpson HX-20 Technical Reference Manual.
BASIC BASIC lets you enter, change, and run BASIC pro-grams. See the Epson HX-20 BASIC Tutorialand Reference Manual.
Your menu may list other jobs as well. For example, one or morejobs will be listed in your menu if you have installed option ROMfor word processing, telecommunications, or some other applica-tion. The menu may also list BASIC and machine language pro-grams that you have stored in memory.
When you press the key for a given item, the menu will disappearand the HX-20 will begin to perform the job you requested. Thus,the menu will no longer be active. Instead, the program you selectedwill be active. The HX-20 will not be “in the menu” any more, butwill rather be “in BASIC,” or “in the MONITOR,“ or in some otherapplication. Instead of responding to the menu-viewing keys listedin Table 4-1, the HX-20 will respond only to keystrokes andcommands recognized by the application you choose.
To use almost any application, however, you must learn to usethe screen editor.
34
Chapter 5
The screen editorWhen you use BASIC or almost any application program, you willinteract with the HX-20 by typing on the keyboard, and it willrespond by displaying text and graphics on the screen. This is madepossible by the screen editor. Because the screen editor is central toalmost all HX-20 applications, you can do little with the HX-20until you learn how to use it.
Since the screen editor is so important, this chapter will show youhow to use it in a “hands-on” fashion.The virtual screenThe LCD screen can display four lines of text, with twentycharacters per line. That won’t let you display a lot of information.
That’s where the screen editor comes in. By using the screeneditor, the HX-20 can display information on a very large virtualscreen. The virtual screen doesn’t have a physical existence, like theLCD screen, but is rather an imaginary screen. You can think of it aslying just behind the LCD screen.
The dimensions of the virtual screen can vary according to theprogram you run, but in most cases the virtual screen will be eightlines high and forty characters wide-twice as high and twice aswide as the LCD screen itself. The LCD screen is merely a windowonto this virtual screen. By pressing appropriate keys, you maymove this window up, down, left, and right, thus bringing into viewany desired portion of the virtual screen.
This means that you won’t be limited by the size of the LCDscreen, but can interact with the HX-20 as if it had a much biggerdisplay.
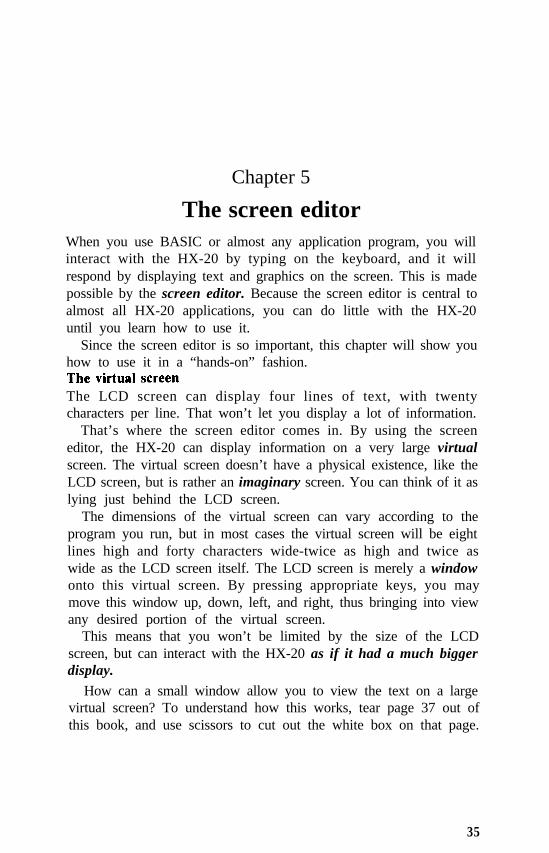
How can a small window allow you to view the text on a largevirtual screen? To understand how this works, tear page 37 out ofthis book, and use scissors to cut out the white box on that page.
35
If you place that piece of paper on any page in this book, it willcover up all but a small portion of the page. Yet by moving thatwindow horizontally and vertically, you can bring any desired por-tion of the page into view:
Moving the window does not change what’s on the page. It justchanges what’s in the window. The text on the page is still there,whether you can see it or not.
In addition to letting you view any desired portion of the virtualscreen, the screen editor will let you place words, numbers andcharacter graphics on the virtual screen, and make it easy for you toinsert and delete text at any point.
Turn on your HX-20 now and select BASIC from the menu. Youwon’t actually learn any BASIC programming in the followingpages, but you must enter BASIC in order to learn how to use thescreen editor.The cursorWhen you select BASIC from the menu, a message will appear onthe screen. For now, ignore that message.
36

At the bottom of the screen, you will see a symbol that looks likethis:
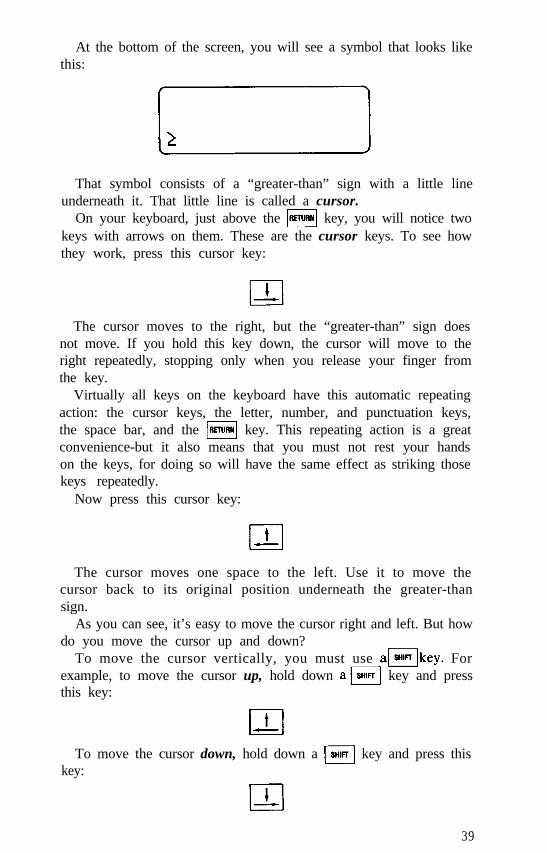
That symbol consists of a “greater-than” sign with a little lineunderneath it. That little line is called a cursor.
On your keyboard, just above the m key, you will notice twokeys with arrows on them. These are the cursor keys. To see howthey work, press this cursor key:
The cursor moves to the right, but the “greater-than” sign doesnot move. If you hold this key down, the cursor will move to theright repeatedly, stopping only when you release your finger fromthe key.
Virtually all keys on the keyboard have this automatic repeatingaction: the cursor keys, the letter, number, and punctuation keys,the space bar, and the IRETURI(( key. This repeating action is a greatconvenience-but it also means that you must not rest your handson the keys, for doing so will have the same effect as striking thosekeys repeatedly.
Now press this cursor key:
The cursor moves one space to the left. Use it to move thecursor back to its original position underneath the greater-thansign.
As you can see, it’s easy to move the cursor right and left. But howdo you move the cursor up and down?
To move the cursor vertically, you must use alkey. Forexample, to move the cursor up, hold down aI key and pressthis key:
IL
To move the cursor down, hold down a m key and press thiskey:
39
Thus, themkeys enable two cursor keys to move the cursor inany of four different directions: left, right, up, and down. To selecthorizontal movement, do not use alkey. To select verticalmovement, you must use alkey.ScrollingSomething special happens when you try to move the cursor beyondthe edge of the LCD screen. The cursor doesn’t move off the screen;instead, the cursor stays in place and the text on the screen moves inthe opposite direction.
To see how this works, move the cursor down to the bottom rowof the screen. When you try to move the cursor down one more time,the cursor doesn’t move-instead, all the text on the screen scrollsup. In a similar manner, trying to move the cursor off the top orright edge of the screen will cause the text to scroll appropriately.
This scrolling demonstrates that the LCD screen is acting as awindow onto the virtual screen. You can move the cursor anywhereyou like within the virtual screen, and the text will scroll automat-ically, whenever necessary, to keep the cursor in view.
You can also scroll text with the q key. Press the q key andtext moves down the screen. Hold down am key and press q ,and text scrolls up the screen. Whether you use q or m/m,you will note that the cursor remains in its position on the LCDscreen. (However, because q and m/I/ISCRWJ scroll the textvertically, they each move the cursor to a new line in the virtualscreen.)
If you keep pressing the q key, you will discover at some pointthat it has no effect. This occurs when the LCD screen is displayingthe top of the virtual screen.
Similarly, if you press m/I/(SCM enough times, at some point theLCD screen will display the bottom of the virtual screen.Pressing m/I/(SCRNI will then have no effect.Homing the cursorAt any point you can move the cursor to the upper left corner of thevirtual screen, by homing the cursor. To home the cursor, holddown alkey and press this key:
The LCD window will display the upper left portion of thevirtual screen, and in the upper left corner of the window you willsee the cursor. Bear in mind that homing the cursor does not changeany of the text in the virtual screen, although it may cause a differentportion of the virtual screen to appear in the window.
40

Clearing the screenYou can erase the entire virtual screen, just by pressing a single key:
This clears the virtual screen, and homes the cursor.Typing on the virtual screenTyping on the virtual screen is as easy as...well, as easy as typing.For example, let’s say you want to type the expression, “NOW ISTHE TIME FOR ALL GOOD MEN TO COME TO THE AID OFTHEIR PARTY.” (Don’t type anything yet.) You’ve just pressedthe q key, so you’re looking at a blank screen, with a cursor in theupper left corner.
To begin typing the expression, press the I”] key. Two thingswill happen: first, an “N” will appear on the screen at the cursorlocation, and the cursor will move one space to the right. So thescreen will change from this:
to this:
The cursor shows you where the next character will appear. Eachtime you press a letter, number, or punctuation key, the correspond-ing character appears on the screen at the cursor location, and thecursor moves one space to the right.
This cursor behavior will continue for a while. When the cursornears the right edge of the screen, however, something calledautomatic scrolling will occur.Automatic scrollingWhen you have typed the first 17 letters of the expression, yourscreen will look like this:
NOW IS THE TIME F-
41
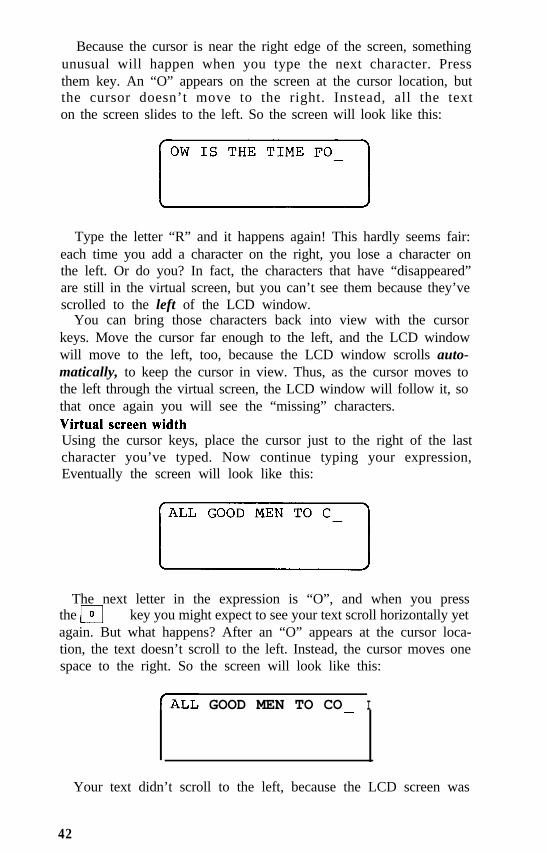
Because the cursor is near the right edge of the screen, somethingunusual will happen when you type the next character. Pressthem key. An “O” appears on the screen at the cursor location, butthe cursor doesn’t move to the right. Instead, all the texton the screen slides to the left. So the screen will look like this:
Type the letter “R” and it happens again! This hardly seems fair:each time you add a character on the right, you lose a character onthe left. Or do you? In fact, the characters that have “disappeared”are still in the virtual screen, but you can’t see them because they’vescrolled to the left of the LCD window.
You can bring those characters back into view with the cursorkeys. Move the cursor far enough to the left, and the LCD windowwill move to the left, too, because the LCD window scrolls auto-matically, to keep the cursor in view. Thus, as the cursor moves tothe left through the virtual screen, the LCD window will follow it, sothat once again you will see the “missing” characters.Virtual screen widthUsing the cursor keys, place the cursor just to the right of the lastcharacter you’ve typed. Now continue typing your expression,Eventually the screen will look like this:
The next letter in the expression is “O”, and when you pressthe q key you might expect to see your text scroll horizontally yetagain. But what happens? After an “O” appears at the cursor loca-tion, the text doesn’t scroll to the left. Instead, the cursor moves onespace to the right. So the screen will look like this:
f-ALL GOOD MEN TO CO I-
Your text didn’t scroll to the left, because the LCD screen was
42
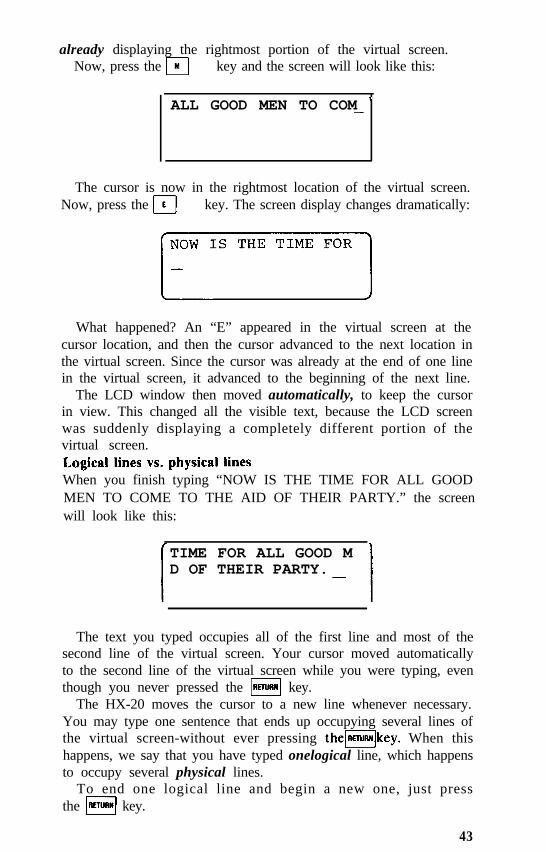
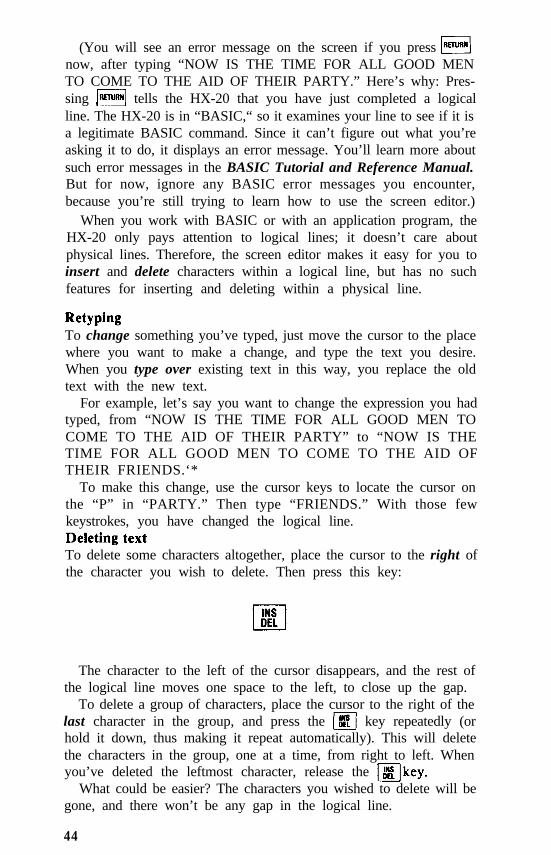
already displaying the rightmost portion of the virtual screen.Now, press the q key and the screen will look like this:
ALL GOOD MEN TO COM '-
The cursor is now in the rightmost location of the virtual screen.Now, press the q key. The screen display changes dramatically:
What happened? An “E” appeared in the virtual screen at thecursor location, and then the cursor advanced to the next location inthe virtual screen. Since the cursor was already at the end of one linein the virtual screen, it advanced to the beginning of the next line.
The LCD window then moved automatically, to keep the cursorin view. This changed all the visible text, because the LCD screenwas suddenly displaying a completely different portion of thevirtual screen.Logical lines vs. physical linesWhen you finish typing “NOW IS THE TIME FOR ALL GOODMEN TO COME TO THE AID OF THEIR PARTY.” the screenwill look like this:
TIME FOR ALL GOOD MD OF THEIR PARTY. 1
The text you typed occupies all of the first line and most of thesecond line of the virtual screen. Your cursor moved automaticallyto the second line of the virtual screen while you were typing, eventhough you never pressed the m key.
The HX-20 moves the cursor to a new line whenever necessary.You may type one sentence that ends up occupying several lines ofthe virtual screen-without ever pressing the(lmrawlkey. When thishappens, we say that you have typed onelogical line, which happensto occupy several physical lines.
To end one logical line and begin a new one, just pressthe m key.
43
(You will see an error message on the screen if you press piiiJJ
now, after typing “NOW IS THE TIME FOR ALL GOOD MENTO COME TO THE AID OF THEIR PARTY.” Here’s why: Pres-sing m tells the HX-20 that you have just completed a logicalline. The HX-20 is in “BASIC,“ so it examines your line to see if it isa legitimate BASIC command. Since it can’t figure out what you’reasking it to do, it displays an error message. You’ll learn more aboutsuch error messages in the BASIC Tutorial and Reference Manual.But for now, ignore any BASIC error messages you encounter,because you’re still trying to learn how to use the screen editor.)
When you work with BASIC or with an application program, theHX-20 only pays attention to logical lines; it doesn’t care aboutphysical lines. Therefore, the screen editor makes it easy for you toinsert and delete characters within a logical line, but has no suchfeatures for inserting and deleting within a physical line.
RetypingTo change something you’ve typed, just move the cursor to the placewhere you want to make a change, and type the text you desire.When you type over existing text in this way, you replace the oldtext with the new text.
For example, let’s say you want to change the expression you hadtyped, from “NOW IS THE TIME FOR ALL GOOD MEN TOCOME TO THE AID OF THEIR PARTY” to “NOW IS THETIME FOR ALL GOOD MEN TO COME TO THE AID OFTHEIR FRIENDS.‘*
To make this change, use the cursor keys to locate the cursor onthe “P” in “PARTY.” Then type “FRIENDS.” With those fewkeystrokes, you have changed the logical line.Deleting textTo delete some characters altogether, place the cursor to the right ofthe character you wish to delete. Then press this key:
The character to the left of the cursor disappears, and the rest ofthe logical line moves one space to the left, to close up the gap.
To delete a group of characters, place the cursor to the right of thelast character in the group, and press the m key repeatedly (orhold it down, thus making it repeat automatically). This will deletethe characters in the group, one at a time, from right to left. Whenyou’ve deleted the leftmost character, release the Ikey.
What could be easier? The characters you wished to delete will begone, and there won’t be any gap in the logical line.
44
(Note: if the cursor is at the beginning of a logical line, thenpressing a will not delete the preceding character, but will insteaddelete the character at the cursor.)
You will find the 111 key extremely helpful when you are typingnew text. With it, you can correct typographical errors as soon asyou make them. Whenever you strike the wrong key, pressthe II/ key immediately afterwards. That will move the cursor tothe left, deleting the incorrect character. Then you can type thecharacter you had intended to type, and continue from there.Insert modeLet’s say you want to insert the word “NOT” into your expression,to make it read: “NOW IS NOT THE TIME FOR ALL GOODMEN TO COME TO THE AID OF THEIR FRIENDS.”
The screen editor makes it very easy for you to insert such textinto a logical line.
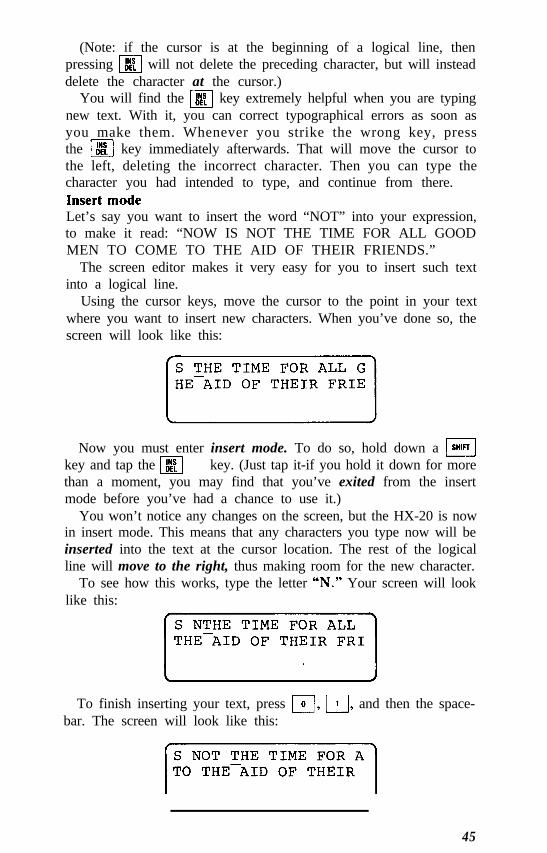
Using the cursor keys, move the cursor to the point in your textwhere you want to insert new characters. When you’ve done so, thescreen will look like this:
Now you must enter insert mode. To do so, hold down a mkey and tap the q key. (Just tap it-if you hold it down for morethan a moment, you may find that you’ve exited from the insertmode before you’ve had a chance to use it.)
You won’t notice any changes on the screen, but the HX-20 is nowin insert mode. This means that any characters you type now will beinserted into the text at the cursor location. The rest of the logicalline will move to the right, thus making room for the new character.
To see how this works, type the letter “N.” Your screen will looklike this:
To finish inserting your text, press r;;?, [, and then the space-bar. The screen will look like this:
45
Eventually, you’ll want to stop inserting text. To exit from insertmode, hold down a m key and tap magain. Or press anycursor key. Either action will take the HX-20 out of insert mode.Upper and lower caseSo far, you’ve only typed UPPER CASE LETTERS on the virtualscreen. But with the screen editor, you can type lower case letters,too.
To explore the use of upper and lower case letters, begin byclearing the screen. This will give you a clean slate, making it easyfor you to pay close attention to the letters you will type.
When you first enter the screen editor, it is in upper case mode.When you press a letter key, you will see the corresponding UPPERCASE letter on the screen. For example, press the q key. AnUPPER CASE “A” will appear on the screen:
When the screen editor is in upper case mode, you can use theSHIFT key to produce lower case letters. To see how this works,press the q key while you are holding down amkey. You’llplace a lower case “a” on the screen:
If you are accustomed to using a typewriter, this behavior maystrike you as “backwards.” After all, when you use a typewriter, youget lower case letters as a matter of course, and upper case lettersonly when you use a m key.
To make the screen editor handle the m key just like a type-writer, put the screen editor into lower case mode, by pressing thiskey:
The screen editor is now in lower case mode, as you candemonstrate by pressing the q key. (Leave your fingers offthe m keys when you press “H.“) A lower case “h” will appear onthe screen:
46

When the screen editor is in lower case mode, the w keyswork the same way they do on a typewriter. Use no m key andyou get a lower case letter; use either [ key and you get anupper case letter.
To put the screen editor back into upper case mode, simply pressthe q key again.
Numeric modeWhen you use BASIC or run an application program, you may wishto type only numbers, instead of conventional text. You can, ofcourse, type numbers by pressing the numeric keys in the top rowof the keyboard.
But if you are accustomed to using a calculator or addingmachine, you may find it awkward to use these keys. You mightprefer the pattern of keys that you find on your calculator:
7 8 94 5 61 2 30
If so, do not despair. You won’t have to teach your fingers a wholenew pattern of numeric keys. Instead, just press the q key.Nothing will change on the screen, but the HX-20 is now innumericmode, which changes the behavior of many keys.
For example, press the q key. Instead of placing a “U” on thescreen, you’ll see a “4” appear. Why?
If you look carefully at your HX-20 keyboard, you’ll notice thatsmall numbers appear in the upper right corner of several keys.These keys will generate those numbers when the HX-20 is innumeric mode. Thus, when the HX-20 is in numeric mode, thisgroup of keys:
7 8 9U I J K LM
will generate these numbers:
7 8 94 5 61 2 30 47
That’s the same pattern of numbers you’ll find on the keyboard ofany calculator or adding machine.
When the HX-20 is in numeric mode, you cannot type any let-ters. (Go ahead. Press the q key. See? Nothing happens. In thismode, all letter keys are disabled.)
The number keys in the top row of the keyboard will also work-although presumably you put the HX-20 into numeric modebecause you’d rather not use those keys. However, the numeric keyswill not function if pressed in conjunction with alkey.
The following keys work normally when the HX-20 is in numericmode:
If you don’t press a m key, the following keys will generate theindicated characters when the HX-20 is in numeric mode:
TABLE 5-1Non-Numeric Characters
Available in Numeric Mode
Press To CreateThis ThisKEY CHARACTER Description
,
I?
Minus sign
Plus sign
Asterisk
Comma
Period
Slash
Question Mark
The above keys will not function if used in conjunction with aSHIFT key.
When you want to take the HX-20 out of numeric mode, justpress the q key or the 191 key. If you press the q key, you willput the HX-20 into upper case mode. But if you end numeric modeby pressing q , you’ll put the HX-20 into lower case mode. Figure5-1 summarizes the ways in which you may change screen editormodes.
48

Figure 5-1Screen Editor Modes
Graphic charactersSo far you’ve typed letters, numbers, and punctuation marks, butwith the screen editor you may type many graphic characters aswell. To generate these graphic characters, the screen editor must bein upper case mode, and you must use the q key (located in thelower right corner of the HX-20 keyboard).
For example, hold down the q key, and (while holding itdown) press the q key. Instead of seeing a “K” or a “k” on thescreen, you’ll see a little musical note. Now hold down q andpress the letter “V”. A tiny telephone appears. q /i puts asmall person on the screen. q /m yields a subcompact car.
Figure 5-2 shows the graphic characters available from the key-board. There are 32 graphic characters in all.
Figure 5-2Graphic Characters Available From
HX-20 Keyboard
I I I I I II I I I I
JI A II -01 _ 4 -4 I
49
Printing the screenNow you’ve learned enough to make the LCD screen display textand graphics. At some point, you may decide that you’d like to savea copy of what you see on the screen.
You can make a hard copy of the LCD screen whenever you’dlike. To do so, you’ll use one of the specialfunction keys. which arelocated just above the row of numeric keys on your HX-20keyboard.
To print a copy of the LCD screen, just hold down the q key(located at the left edge of the keyboard) and press functionkey q . The HX-20’s built-in printer will activate and print a hardcopy of the LCD display. (If m/1/1 does not activate theprinter, make sure that the printer has paper in it, and that thePRINTER ON-OFF switch, located just above the H key, is inthe ON position.)
Once you’ve printed the screen, you may pull on the paper tobr ing your pr intout into view. (Or you may hold downthe [PAPER key for this purpose-but that’s slow, and uses batterypower. Pulling on the paper will harm nothing as long as the printeris inactive.)
Note that m/m causes the printer to print a copy of theLCD screen, not the entire virtual screen. If you want hard copy ofthe entire virtual screen, you must scroll the LCD window througheach portion of the virtual screen, and use (cnnl/m to print eachportion of the virtual screen that you display in this manner.
TABLE 5-2Screen Editor Key Functions
Key Function
Move cursor left by one column. Termi-nates insert mode.
Move cursor right by one column. Termi-nates insert mode.
Move cursor up by one line. Terminatesinsert mode.
Move cursor down by one line. Terminatesinsert mode.
Move cursor left to a multiple of n columns.(Originally, n = 10, but n must be changedwith the BASIC scroll command.)
Move cursor right to a multiple of n col-umns. (Originally n = 10, but n may bechanged with the BASIC scroll command.)
Clear virtual screen and home the cursor.
Home the cursor.
Move cursor right by 8 columns.
Scroll text up the screen by four lines (or bythe amount set with the BASIC SCROLLcommand.)
Scroll text down the screen by four lines (orby the amount set with the BASIC SCROLLcommand.)
Change modes:upper case to lower case,lower case to upper case, ornumeric mode to lower case.
If cursor is at beginning of a logical line,delete character at cursor. Otherwise, deletecharacter to left of cursor.
Enter insert mode. or exit from insert mode.
Enter numeric mode, or exit from numericmode to upper case mode.
In conjunction with any key but a letter key,Iyields the upper character or functionon the given key. In conjunction with a let-ter key, m yields a lower case character ifHX-20 is in upper case mode, or an uppercase letter if HX-20 is in lower case mode.
If HX-20 is in upper case mode, press-ing q and another key yields a graphicscharacter. In lower case or numeric mode,
IGRPH has no effect.
51
Display leftmost portion of virtual screen.
Scroll right.
Delete from cursor to end of logical line.
Move cursor to rightmost portion of virtualscreen.
Same as q Horizontal tab (8 columns).
Move cursor down by one line. (Has noeffect in BASIC immediate mode.)
Home the cursor.
Clear virtual screen and home the cursor.
Carriage return.
Scroll text down by four lines, or by amountset with BASIC SCROLL command.
Scroll text up by four lines, or by amountset with BASIC SCROLL command.
Enter insert mode, or exit from insert mode.
Scroll left.
Make cursor visible.
Make cursor invisible.
Delete from cursor to end of virtual screen.
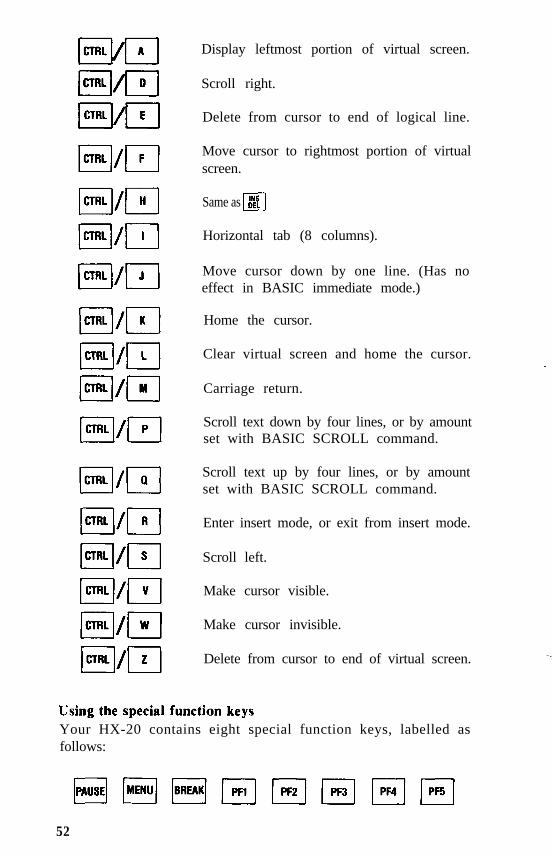
Using the special function keysYour HX-20 contains eight special function keys, labelled asfollows:
52
B lets you change the rate at which the HX-20 LISTS aBASIC program on the screen. To change this rate, press w whena program is LISTing on the screen, and then press a key from 0 to 9.0 sets the slowest LIST rate; 9 sets the fastest LIST rate. Other keysset intermediate LIST rates.q lets you see the HX-20 menu. Even if the HX-20 is in
BASIC, or is running some program, it will return to the menu ifyou press the q key.
m interrupts an operation in progress, such as a BASIC pro-gram or a cassette SAVE or LOAD.
The keys ( through q are programmable special functionkeys. This means that you can change the functions associated withthese keys. See the Epson HX-20 BASIC Tutorial and ReferenceManual.
mjlcauses the microprinter to print a hard copy of the LCDscreen display.
q /m enables you to control a microcassette manually. Thisworks only when a microcassette is installed.
When you press q /i , the LCD screen displays the valueof the microcassette’s digital tape counter. This indicates that theHX-20 is in manual microcassette mode. While in this mode, theprogrammable function keys have the following effect:
: Fast forward.
: Slow forward,
: stop.
: Rewind.
: Exit from manual microcassette mode.
Reset microcassette’s digital tapecounter to zero.
53

Chapter 6
Connecting your HX-20 to other devicesYou can connect your HX-20 to a number of other devices-forexample, to a cassette recorder, a printer, and a bar code reader, toname but a few. In this chapter you’ll learn how to connect theHX-20 to such peripherals.Connecting your HX-20 to a cassette recorderYou can connect your HX-20 to any portable cassette recorder.However, it’s best to avoid the cheapest cassette recorders, becauseon these units the tape speed can fluctuate dramatically. Such fluctu-ations in tape speed can make it impossible for you to recover pro-grams and data you have stored on your cassettes. To ensure a con-sistent tape speed, you should use fresh batteries if your cassetterecorder is powered only by batteries, as the tape speed on theseunits will change as the batteries drain down. Even better, use anAC-powered cassette recorder, or get an AC adapter for your bat-tery-powered unit.
One very desirable feature is a digital tape counter, which makesit easy to advance or rewind a cassette to the exact location of anypreviously-saved program or data file. Without a digital tapecounter, you may only be able to save one program or data file on acassette.
Tone and volume controls are also useful. A REM jack is essen-tial for all but the simplest applications. A good quality micro-cassette recorder will serve as well as a unit that uses full-sizecassettes.
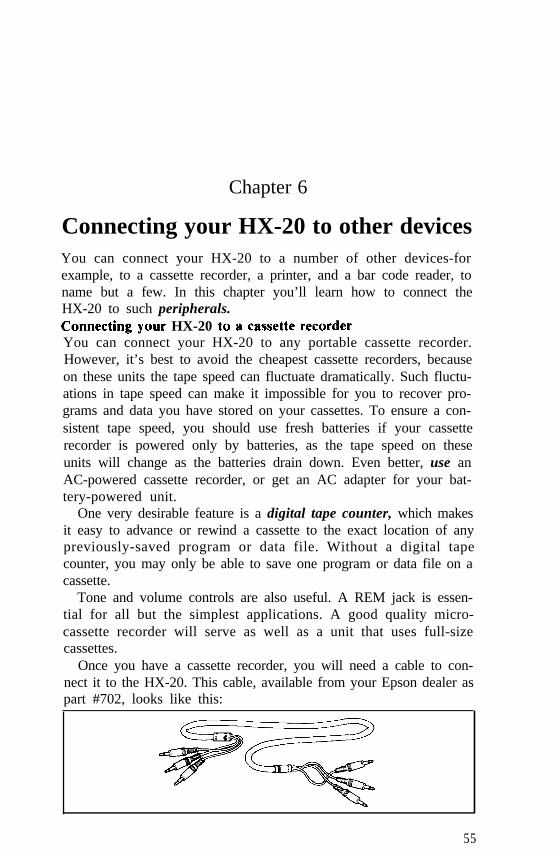
Once you have a cassette recorder, you will need a cable to con-nect it to the HX-20. This cable, available from your Epson dealer aspart #702, looks like this:
55
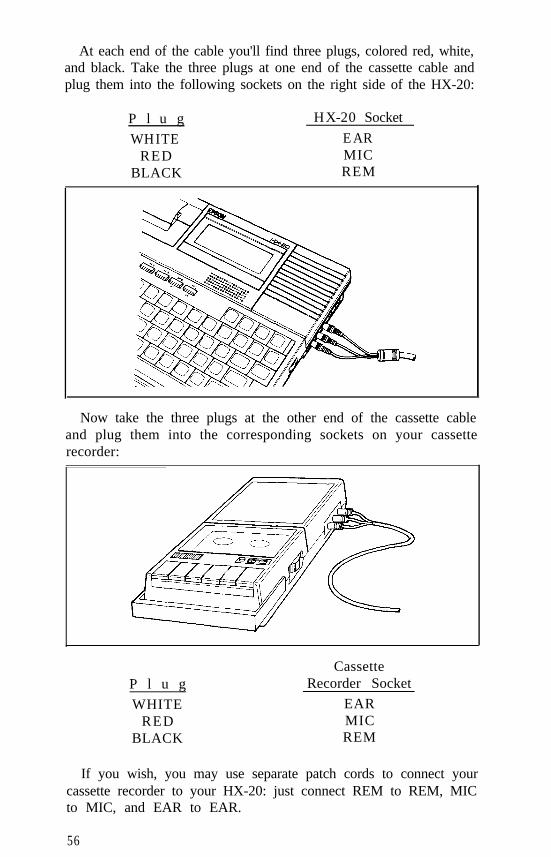
At each end of the cable you'll find three plugs, colored red, white,and black. Take the three plugs at one end of the cassette cable andplug them into the following sockets on the right side of the HX-20:
P l u g HX-20 Socket
WHITE EARRED MIC
BLACK REM
Now take the three plugs at the other end of the cassette cableand plug them into the corresponding sockets on your cassetterecorder:
P l u g
WHITERED
BLACK
CassetteRecorder Socket
EARMICREM
If you wish, you may use separate patch cords to connect yourcassette recorder to your HX-20: just connect REM to REM, MICto MIC, and EAR to EAR.
56
Your cassette recorder is now connected to your HX-20. You mayuse it to save and load BASIC programs, as described in the EpsonHX-20 BASIC Tutorial and Reference Manual. Or you may use itwith various applications programs, as described in the documen-tation for those programs.
One word of caution: all cassette recorders vary, in tape speed andin the position of their record/ playback heads. These variations canbe very frustrating, because a program recorded on one cassetterecorder might not load back when you use another cassetterecorder. You’ll find that your cassettes work most reliably if youuse only one cassette recorder with your HX-20.
Connecting your HX-20 to an RS-232 deviceThe RS-232 socket on the back of your HX-20 enables it to com-municate with an external printer, modem, or other RS-232compatible device. (Note that you cannot connect the HX-20 to aprinter or other device that features only a parallel interface.) Youcan only connect the HX-20 to one RS-232 device at a time.
To connect such a device, purchase the appropriate HX-20 ,RS-232 cable from your Epson dealer. Then consult the documentationthat came with your RS-232 device, and correlate it with the infor-mation in Table 6-1.
TABLE 6-1RS-232 Signals
Signal DIN Pin DB-25 Pin
GND (Signal Ground) 1 7TXD (Signal Out*) 2 2RXD (Signal In*) 3 3RTS 4 4CTS 5 5DSR 6 6DTR 7 20CD 8 8Case Ground DIN Case 1
* From HX-20’s point of view.
(In Table 6-1, “DIN Pin” refers to pins in the 8-pin DIN socketlabelled “RS-232” at the back of the HX-20, and “DB-25 Pin” refersto pins in the large trapezoidal plug you’ll find at one end of theHX-20 RS-232 cable. This large plug is called a DB-25 connector.)
57
Plug the small, rounded end of the RS-232 cable into the DINsocket labelled “RS-232” in the back of your HX-20. Then plug theother end of the cable into the corresponding socket on your RS-232device.
Now the HX-20 and the RS-232 device are connected. In orderfor them to communicate, however, they must share a commonprotocol. Two devices may be connected electrically, but nevercommunicate properly, if they don’t share a common communica-tions protocol. Try to configure your RS-232 device so that it will becompatible with the initial or default protocol of the HX-20, asdefined in Table 6-2.
TABLE 6-2HX-20 Default Protocol
for RS-232 Port
Data rate: 4800 BaudWord length: 8 bitsParity: noneStop bits: 2CD (Carrier Detect): ignoredRTS (Request to Send): held “high” by HX-20DSR (Data Set Ready): controlled by external
device; “high” meansHX-20 may transmitdata; “low” causes HX-20to wait
CTS (Clear to Send): ignored
If you configure the RS-232 device according to this protocol,you will find it very easy to transmit text and data to the device.However, by using appropriate parameters with the OPENstatement, you can command the HX-20 to use any desired proto-col. (See the Epson HX-20 BASIC Tutorial and Reference Manual.)Connecting your HX-20 to a bar code readerOn the right side of your HX-20, you will notice a socket marked“BAR CODE.”
58
A bar code reader can “read” bar codes-those patterns of blackand white stripes you find on groceries, magazines, and so manyother products today.
As of this printing, Epson has provided only the hardware inter-face for a bar code reader. But when you read this, a bar code readermight be available. Contact your Epson dealer. If you purchase abar code reader, be sure to see what software is available for use withit.
59

m0
Chapter 7
What if you have problems?Your HX-20 is a highly sophisticated computer, controlled by veryadvanced software. Epson built reliability into this software, so it’squite likely that your HX-20 will give you trouble-free service foryears. Nevertheless, even the most intelligent systems can becomeconfused.
This chapter will show you what to do if your HX-20 fails to workproperly.If you can’t turn off your HX-20...Symptom: Text and/ or graphics remain on the screen, even
when the ON-OFF switch is in the OFF position.
Cause: The “ON-OFF” switch does not shut off power,but merely suggests to the HX-20 that it stop pro-cessing. (If the ON-OFF switch did shut offpower, turning it off would make the HX-20 for-get every program in its memory!) For some rea-son, the HX-20 is so busy processing that it hasfailed to notice the position of the ON-OFFswitch.
Recommended With the power switch off, use your finger or aAction: blunt object to press the RESET switch on the
right side of the HX-20.
61
The RESET switch will interrupt the HX-20, no matter how busyit may be. Once interrupted, the HX-20 will notice that the ON-OFFswitch is in the “OFF” position, and it will stop processing. This willmake the screen go blank.If the menu displays garbage...Symptom:
Cause:
RecommendedAction:
The menu displays garbage-a hodgepodge ofletters, numbers, and/ or graphics characters.
The Operating System of the HX-20-the soft-ware that controls its menu-has become veryconfused. This may have been caused by a pro-gram that interfered with reserved portions ofmemory.
Did you store any programs in memory? If so,select each program from the menu and LIST it.If any program is intact, take this opportunity tosave it on a cassette. (See the Epson HX-20 BASICTutorial and Reference Manual.) Unfortunately,whatever garbled your menu may have garbledyour programs, too. If the listings of your pro-grams look like garbage, there’s no point in savingthem.
Now, to clean up your menu you must re-initializememory and the calendar clock, as described onpage 25. This will make the HX-20 start with aclean slate, forgetting any programs that were inits memory. But at least the menu will no longerhave garbage in it.
Having re-initialized memory, you can onceagain enter your programs into the HX-20, byhand or by loading them from cassette.
If you encounter other problems...If you encounter problems not discussed in this chapter, or if therecommended action fails to correct the problem, contact yourEpson dealer.
62

Chapter 8
Storing your HX-20Because of its sensitive components, the HX-20 requires some careeven when you’re not using it. This chapter tells you how to storeyour HX-20, for a few minutes, a few days, or even a few months.Storing your HX-20...for a few minutes to a few hoursIf you won’t be using your HX-20 for a few minutes, you don’t needto take any special precautions. You don’t even need to turn it off.Just put it down, and pick it up again when you’re ready to continueworking with it.Storing your HX-20...for a few hours to a few weeksIf you know that you won’t be using your HX-20 for at least a fewhours and perhaps for as long as a few weeks, turn if OFF beforeyou put it away. When you come back to it and turn it on, you’ll findthat the program you were using is still in memory, ready for you touse again!
Just be sure to store your HX-20 in a place with acceptabletemperature and humidity. (Remember-your car in the summer islikely to be much too hot for the HX-20. If you must store an HX-20in your car during hot weather, put it in the trunk, which is likely tobe cooler than the interior of the car itself.)Storing your HX-20...for a few weeks to a few monthsIf you know that you won’t be using your HX-20 for more than afew weeks, you must take certain precautions to ensure that thebatteries won’t drain down. You see, even when you turn the HX-20OFF, it continues to draw a small amount of current from the bat-teries. This current keeps the memory circuits and calendar clockactive.
Although the clock and the memory circuits require only aminiscule amount of power, they will discharge the batteries com-pletely if given enough time. When that happens, the HX-20 willforget all the programs in its memory, and the batteries, once fullydischarged, may no longer be able to accept a full charge.
Therefore, you should charge the batteries for several hoursbefore storing the HX-20 for an extended period of time. It would
63

also be prudent to save on a cassette any programs you have storedin memory. Then store the HX-20 in its original box and packagingmaterials, in a place with acceptable temperature and humidity.
64
Chapter 9
SpecificationsThis chapter provides information of interest to technically-sophisticated users. If you are just learning about computers, ignorethis chapter. Turn instead to the Epson HX-20 BASIC Tutorialand Reference Manual, and learn how to program your HX-20. Fordetailed specifications, see the Epson HX-20 Technical ReferenceManual. All specifications are subject to change without notice.ArchitectureThe HX-20 has two microprocessors for distributed and concurrentI/O processing. The microprocessors (both 630l’s) communicatewith each other through their serial communications ports.
65
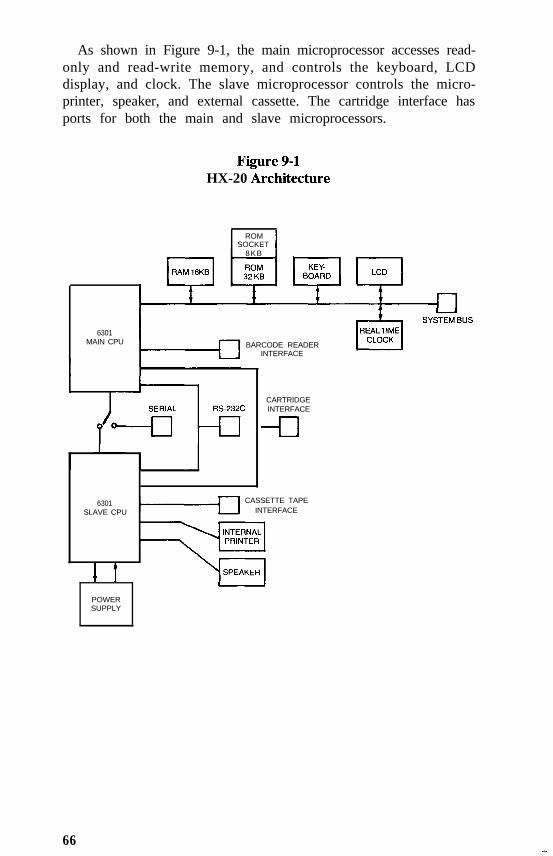
As shown in Figure 9-1, the main microprocessor accesses read-only and read-write memory, and controls the keyboard, LCDdisplay, and clock. The slave microprocessor controls the micro-printer, speaker, and external cassette. The cartridge interface hasports for both the main and slave microprocessors.
Figure 9-1HX-20 Architecture
ROMI ISOCKET8KB
6301MAIN CPU BARCODE READER
INTERFACE
CARTRIDGEINTERFACE
-El
6301SLAVE CPU
CASSETTE TAPEINTERFACE
POWERSUPPLY
66
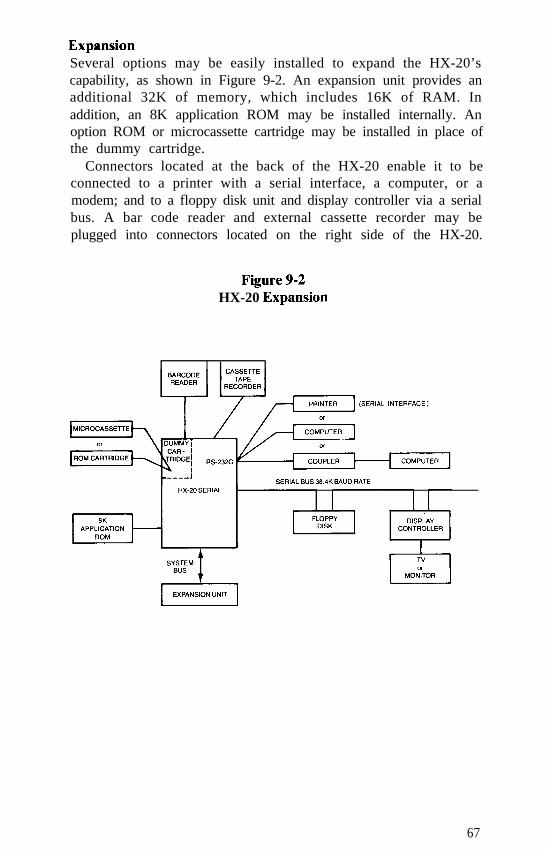
ExpansionSeveral options may be easily installed to expand the HX-20’scapability, as shown in Figure 9-2. An expansion unit provides anadditional 32K of memory, which includes 16K of RAM. Inaddition, an 8K application ROM may be installed internally. Anoption ROM or microcassette cartridge may be installed in place ofthe dummy cartridge.
Connectors located at the back of the HX-20 enable it to beconnected to a printer with a serial interface, a computer, or amodem; and to a floppy disk unit and display controller via a serialbus. A bar code reader and external cassette recorder may beplugged into connectors located on the right side of the HX-20.
Figure 9-2HX-20 Expansion
67
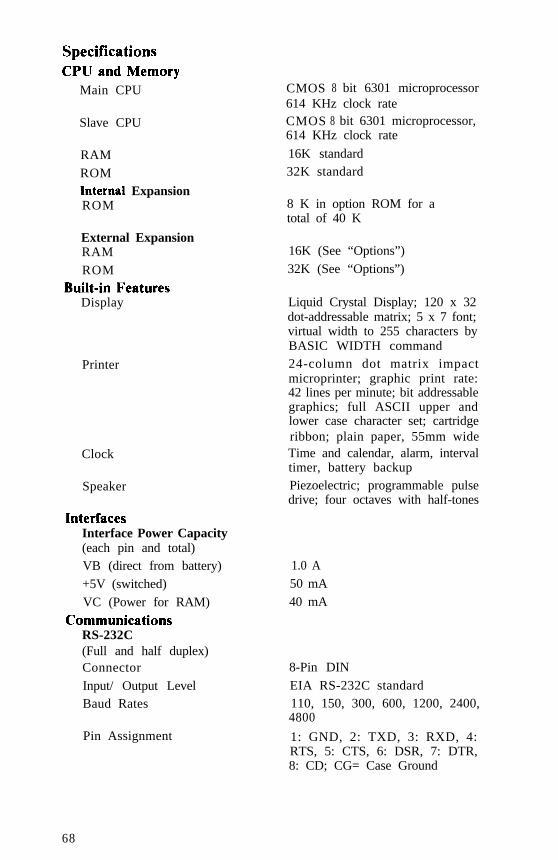
SpecificationsCPU and Memory
Main CPU
Slave CPU
RAM
ROMInternal ExpansionROM
External ExpansionRAM
ROM
Built-in FeaturesDisplay
Printer
Clock
Speaker
InterfacesInterface Power Capacity(each pin and total)VB (direct from battery)
+5V (switched)
VC (Power for RAM)
CommunicationsRS-232C(Full and half duplex)Connector
Input/ Output LevelBaud Rates
Pin Assignment
CMOS 8 bit 6301 microprocessor614 KHz clock rateCMOS 8 bit 6301 microprocessor,614 KHz clock rate
16K standard32K standard
8 K in option ROM for atotal of 40 K
16K (See “Options”)
32K (See “Options”)
Liquid Crystal Display; 120 x 32dot-addressable matrix; 5 x 7 font;virtual width to 255 characters byBASIC WIDTH command24-column dot matrix impactmicroprinter; graphic print rate:42 lines per minute; bit addressablegraphics; full ASCII upper andlower case character set; cartridgeribbon; plain paper, 55mm wideTime and calendar, alarm, intervaltimer, battery backupPiezoelectric; programmable pulsedrive; four octaves with half-tones
1.0 A
50 mA
40 mA
8-Pin DIN
EIA RS-232C standard110, 150, 300, 600, 1200, 2400,4800
1: GND, 2: TXD, 3: RXD, 4:RTS, 5: CTS, 6: DSR, 7: DTR,8: CD; CG= Case Ground
68

Serial(Full and half duplex)
Connector
Input/ Output Level
Baud Rates
Pin Assignment
PeripheralCartridgeConnector
Input/ Output LevelPin Assignment
Cartridge TypeROM CartridgeNot assignedNo cartridgeNot assignedMicrocassette
External CassetteMicrophone
EarphoneRemoteBar Code ReaderConnector
Input LevelSystem BusConnectorAddress Bus
Data Bus
Power SupplyBatteriesType
Capacity
OperationData Integrity
Low Voltage
Recharge
5-Pin DINEIA RS-232C standard
150, 600, 4800, 38400
I: GND, 2: TXD, 3: RXD, 4:O U T . 5 : I N C G = G r o u n d
Special-EpsonTTL
1: SII, 2: SI/01l, 3: S01, 4: SI/02,5: SI/03,6: SI/04,7: VB(Battery),8: MII, 9: M02, 10: M01, II:GND, 12: +5V (Switched)
MI1 SI1 S / 0 10 0 00 0 10 1 00 1 11 * *
(* Doesn’t matter)
Miniature phone jack
Miniature phone jack
Subminiature phone jack
HSJ0861-01-440 (Seidenki)TTL
40-Pin
16 bit8 bit and control lines
Four NiCad batteries, internal,Sub C type1100 mA/ H (Approximately 50hours running BASIC; less de-pending on use of RS-232C port,printer or optional microcassette)
4.5-6.0 V4.0-6.0 V4.5 vFull charge within eight hours attypical room temperature
69
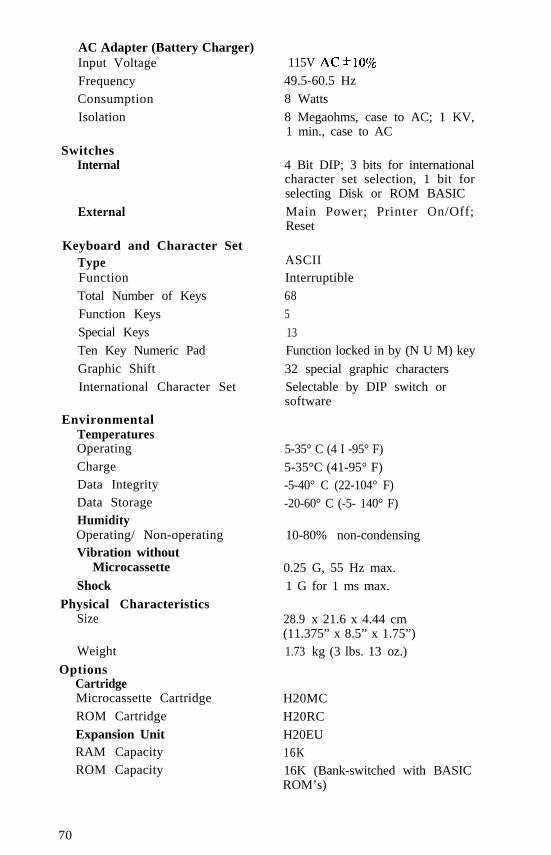
AC Adapter (Battery Charger)Input Voltage
FrequencyConsumption
Isolation
SwitchesInternal
External
Keyboard and Character SetTypeFunction
Total Number of Keys
Function Keys
Special Keys
Ten Key Numeric Pad
Graphic Shift
International Character Set
EnvironmentalTemperaturesOperating
ChargeData IntegrityData StorageHumidityOperating/ Non-operatingVibration without
MicrocassetteShock
Physical CharacteristicsSize
Weight
OptionsCartridgeMicrocassette Cartridge
ROM Cartridge
Expansion UnitRAM CapacityROM Capacity
115V AC-+lO%
49.5-60.5 Hz
8 Watts
8 Megaohms, case to AC; 1 KV,1 min., case to AC
4 Bit DIP; 3 bits for internationalcharacter set selection, 1 bit forselecting Disk or ROM BASIC
Main Power; Printer On/Off;Reset
ASCIIInterruptible
68
5
13Function locked in by (N U M) key
32 special graphic charactersSelectable by DIP switch orsoftware
5-35° C (4 I -95° F)
5-35°C (41-95° F)-5-40° C (22-104° F)
-20-60° C (-5- 140° F)
10-80% non-condensing
0.25 G, 55 Hz max.
1 G for 1 ms max.
28.9 x 21.6 x 4.44 cm(11.375” x 8.5” x 1.75”)1.73 kg (3 lbs. 13 oz.)
H20MC
H20RC
H20EU16K16K (Bank-switched with BASICROM’s)
70
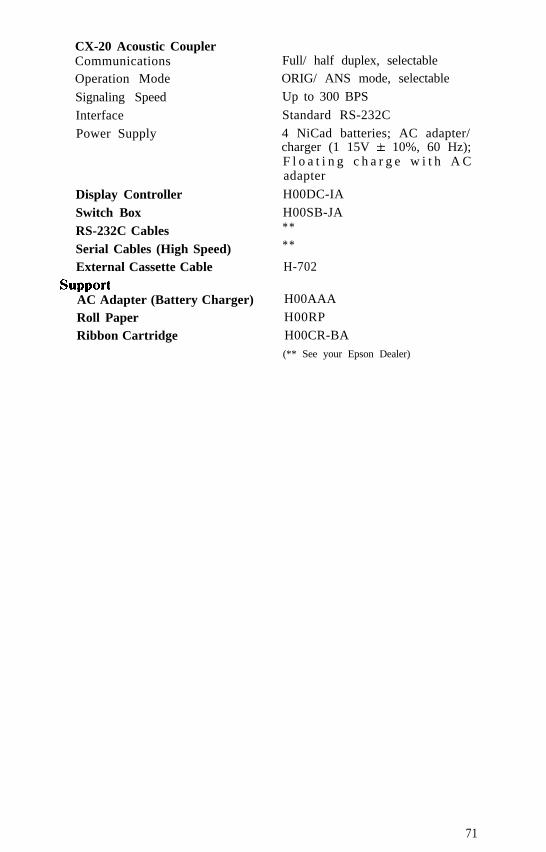
CX-20 Acoustic CouplerCommunicationsOperation Mode
Signaling Speed
Interface
Power Supply
Display ControllerSwitch BoxRS-232C CablesSerial Cables (High Speed)External Cassette Cable
supportAC Adapter (Battery Charger)Roll PaperRibbon Cartridge
Full/ half duplex, selectableORIG/ ANS mode, selectable
Up to 300 BPS
Standard RS-232C
4 NiCad batteries; AC adapter/charger (1 15V + 10%, 60 Hz);F l o a t i n g c h a r g e w i t h A Cadapter
H00DC-IA
H00SB-JA* ** *
H-702
H00AAA
H00RP
H00CR-BA(** See your Epson Dealer)
71