Embed Size (px)
Citation preview
1
NINDS Parkinson’s Disease Biomarkers ProgramData ManagementResource
May 2013
2
Agenda
Overview
ProFoRMS High Level Process Flow
ProFoRMS Demonstration
Reporting
Roles and Privileges
Demo environment
Next Steps
Contacts
Questions
3
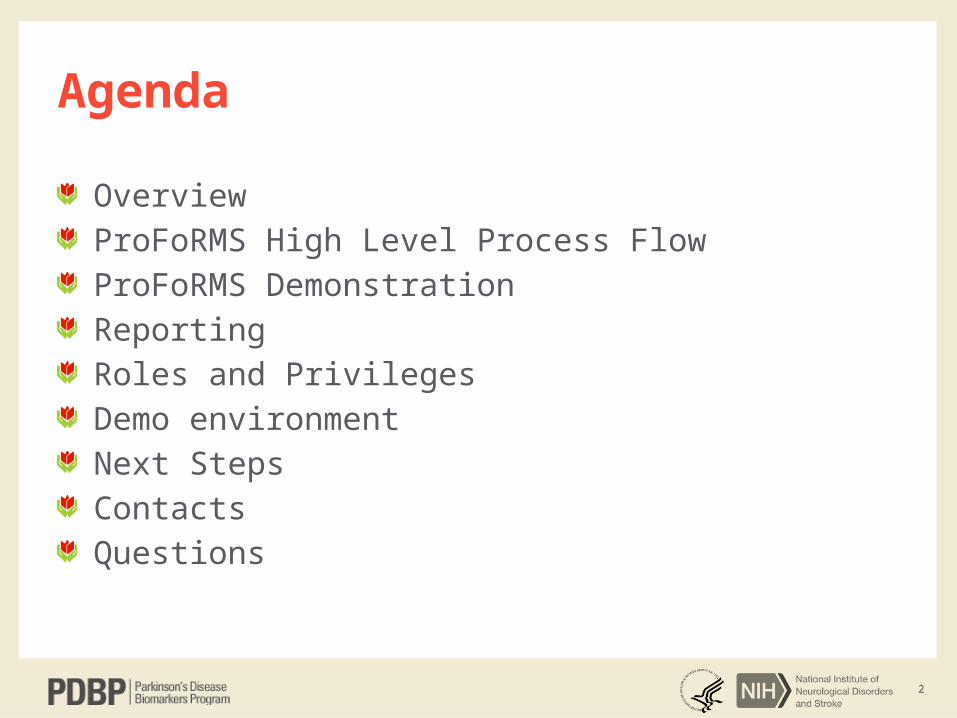
Overview
4
OverviewThe system consists of a collection of modular components that can be used as stand-alone modules or in-conjunction with the other functional modules. The modules consist of the following:
Protocol and Forms Research Management System (ProFoRMS): Manage studies, manage subjects, manage forms, collect data.
Account Management: Manage your user profile and password.
Global Unique Identifier (GUID): Enables data to be associated with a subject without exposing/transferring Personally Identifying Information (PII).
Data Dictionary: Provides common definitions (NINDS common and unique data elements) to enable data to be consistently captured and recorded across PDBP studies.
Data Repository: Long-term repository for PDBP data.

5
ProFoRMS High Level Process Flow
IRB-approved studies created in ProFoRMS by Operations Team
Submission to long-term repository will begin in the summertime
6
ProFoRMS Demonstration
Requesting permission to ProFoRMS
Adding Subjects– Creating GUIDs within ProFoRMS– Validating GUIDs created in the GUID tool
Scheduling Visits
Collecting Data
Reviewing and Editing Data
What to do if you have a problem?
7
ProFoRMS Demonstration
Requesting permission to ProFoRMS
Adding Subjects– Creating GUIDs within ProFoRMS– Validating GUIDs created in the GUID tool
Scheduling Visits
Collecting Data
Reviewing and Editing Data
What to do if you have a problem?
8
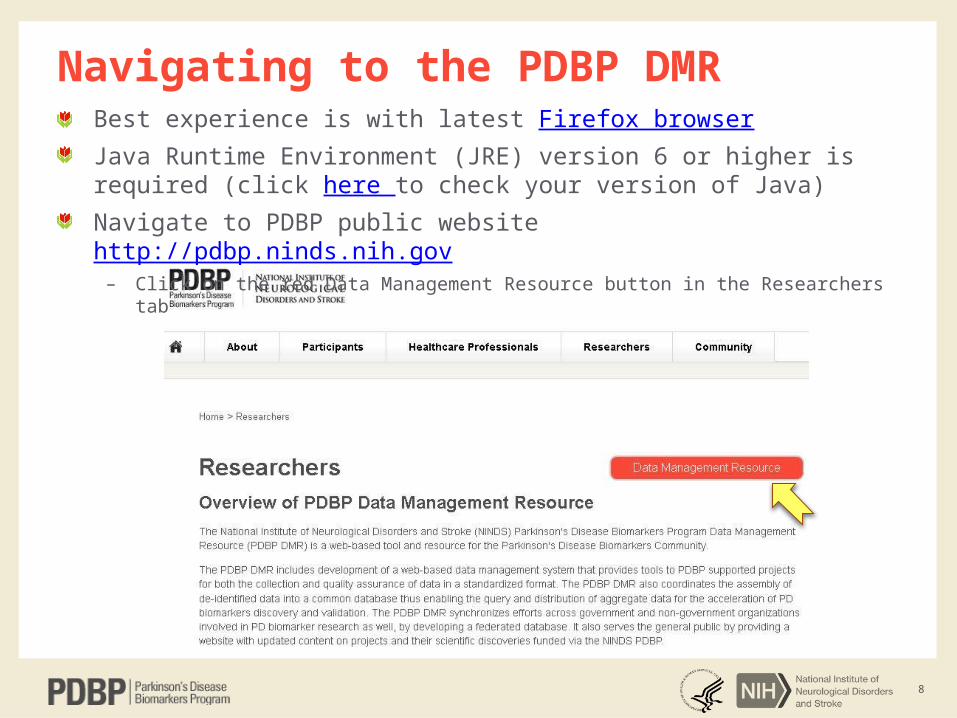
Navigating to the PDBP DMRBest experience is with latest Firefox browser
Java Runtime Environment (JRE) version 6 or higher is required (click here to check your version of Java)
Navigate to PDBP public website http://pdbp.ninds.nih.gov– Click on the red Data Management Resource button in the Researchers tab
9
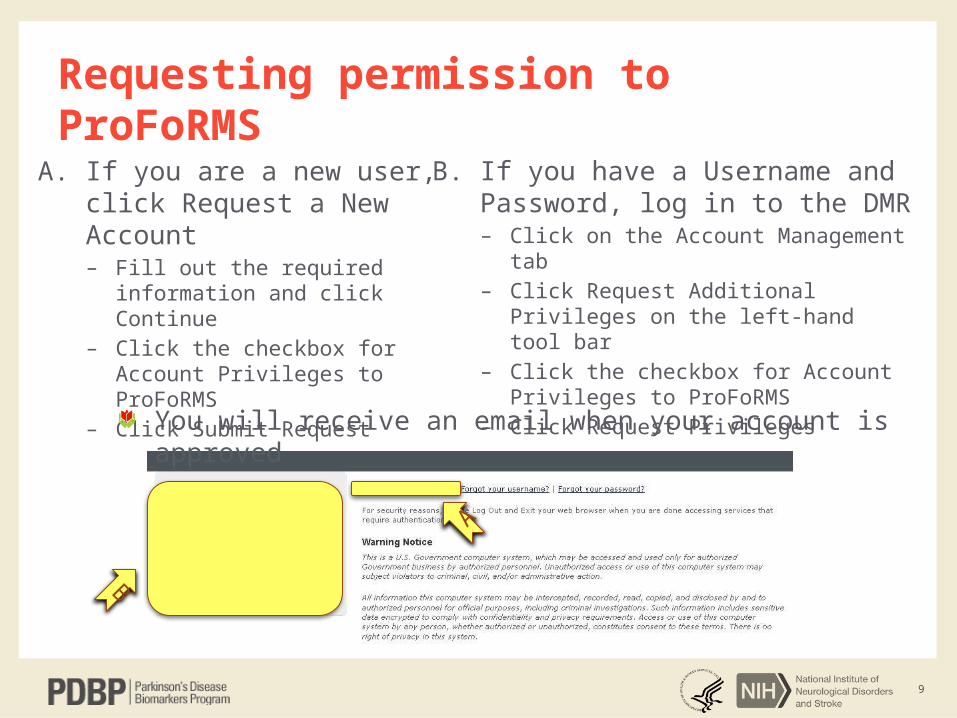
Requesting permission to ProFoRMS
A. If you are a new user, click Request a New Account– Fill out the required information
and click Continue– Click the checkbox for Account
Privileges to ProFoRMS– Click Submit Request
A
B. If you have a Username and Password, log in to the DMR– Click on the Account Management tab– Click Request Additional Privileges on the
left-hand tool bar– Click the checkbox for Account Privileges
to ProFoRMS– Click Request Privileges
You will receive an email when your account is approved
B
10
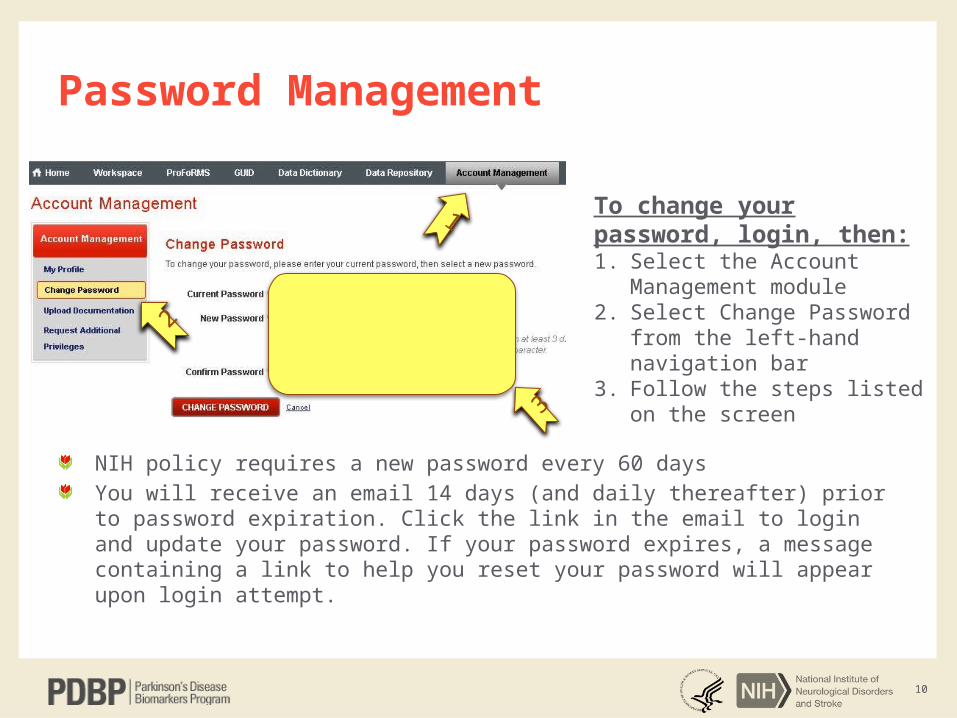
Password Management
To change your password, login, then:1. Select the Account
Management module2. Select Change Password from
the left-hand navigation bar3. Follow the steps listed on the
screen
1
2
NIH policy requires a new password every 60 days
You will receive an email 14 days (and daily thereafter) prior to password expiration. Click the link in the email to login and update your password. If your password expires, a message containing a link to help you reset your password will appear upon login attempt.
3
11
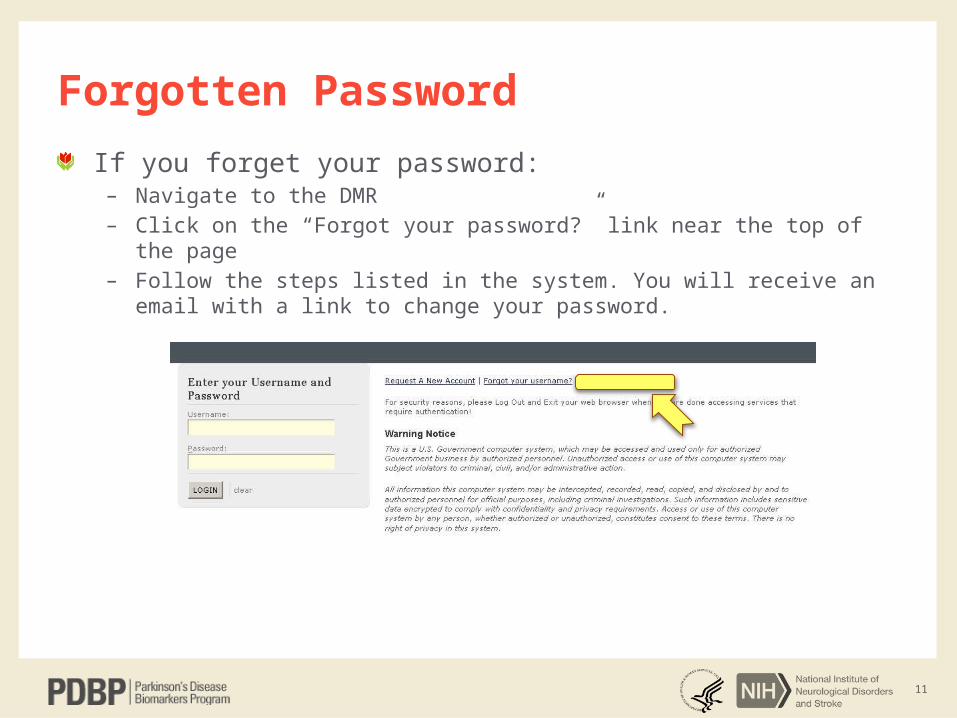
Forgotten Password
If you forget your password:– Navigate to the DMR– Click on the “Forgot your password?” link near the top of the page– Follow the steps listed in the system. You will receive an email with a link to
change your password.
12
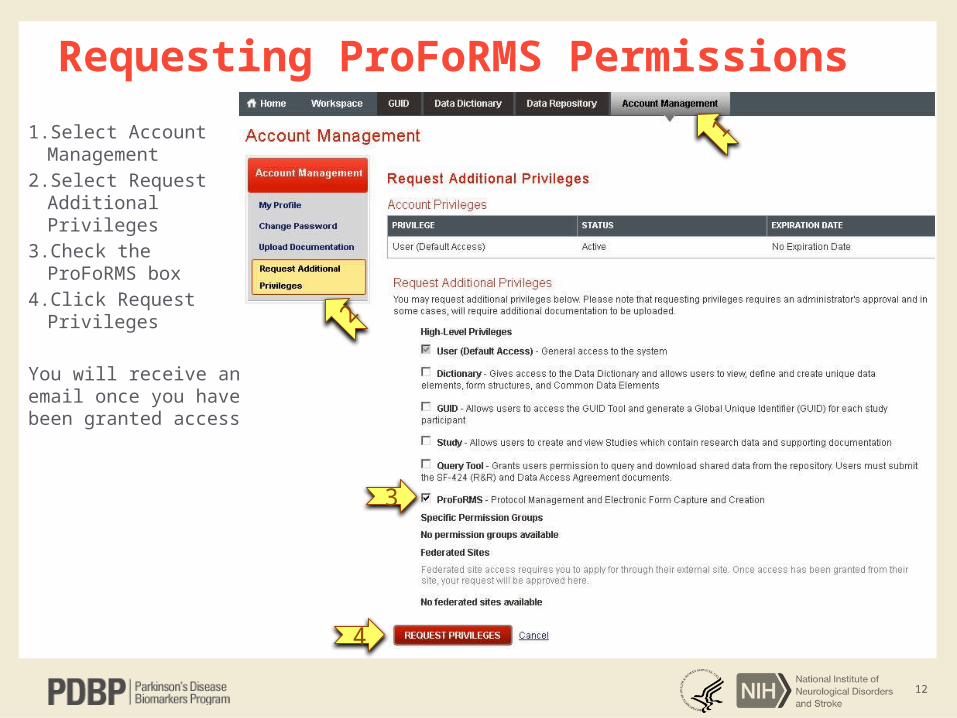
Requesting ProFoRMS Permissions
1. Select Account Management
2. Select Request Additional Privileges
3. Check the ProFoRMS box
4. Click Request Privileges
You will receive an email once you have been granted access
1
2
3
4
13
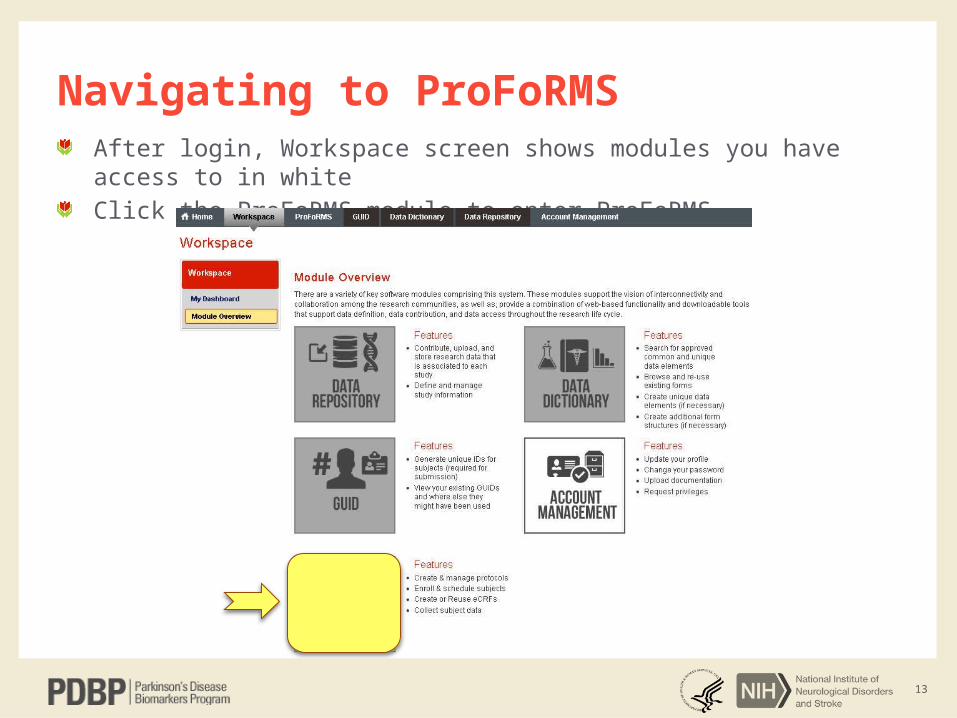
Navigating to ProFoRMSAfter login, Workspace screen shows modules you have access to in white
Click the ProFoRMS module to enter ProFoRMS
14
ProFoRMS Demonstration
Requesting permission to ProFoRMS
Adding Subjects– Creating GUIDs within ProFoRMS– Validating GUIDs created in the GUID tool
Scheduling Visits
Collecting Data
Reviewing and Editing Data
What to do if you have a problem?
15
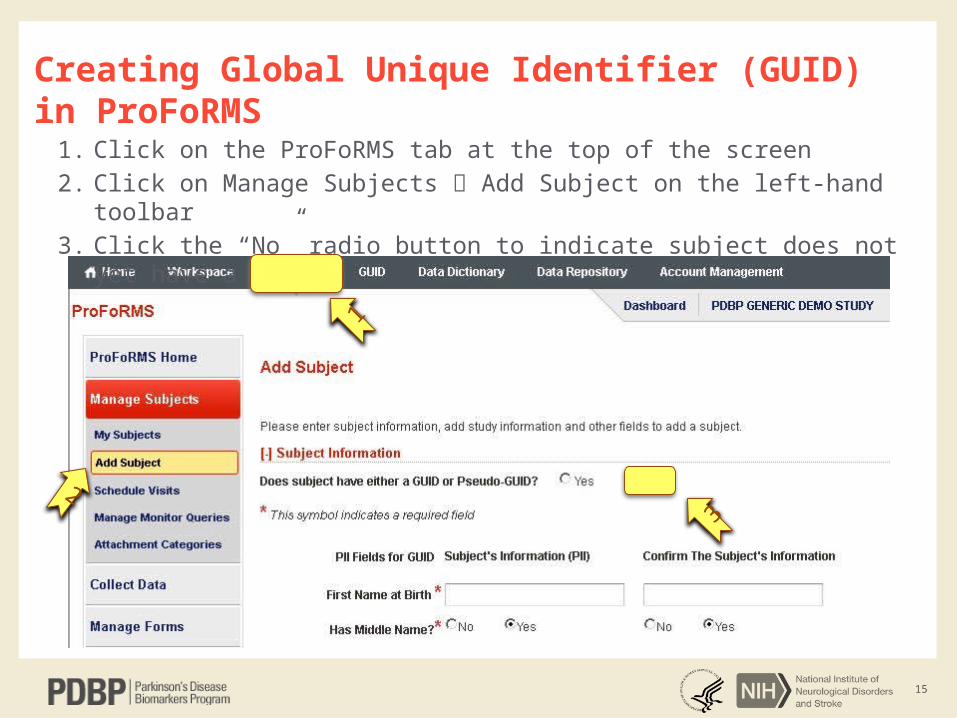
Creating Global Unique Identifier (GUID) in ProFoRMS
1. Click on the ProFoRMS tab at the top of the screen
2. Click on Manage Subjects Add Subject on the left-hand toolbar
3. Click the “No” radio button to indicate subject does not yet have a GUID
1
2
3
16
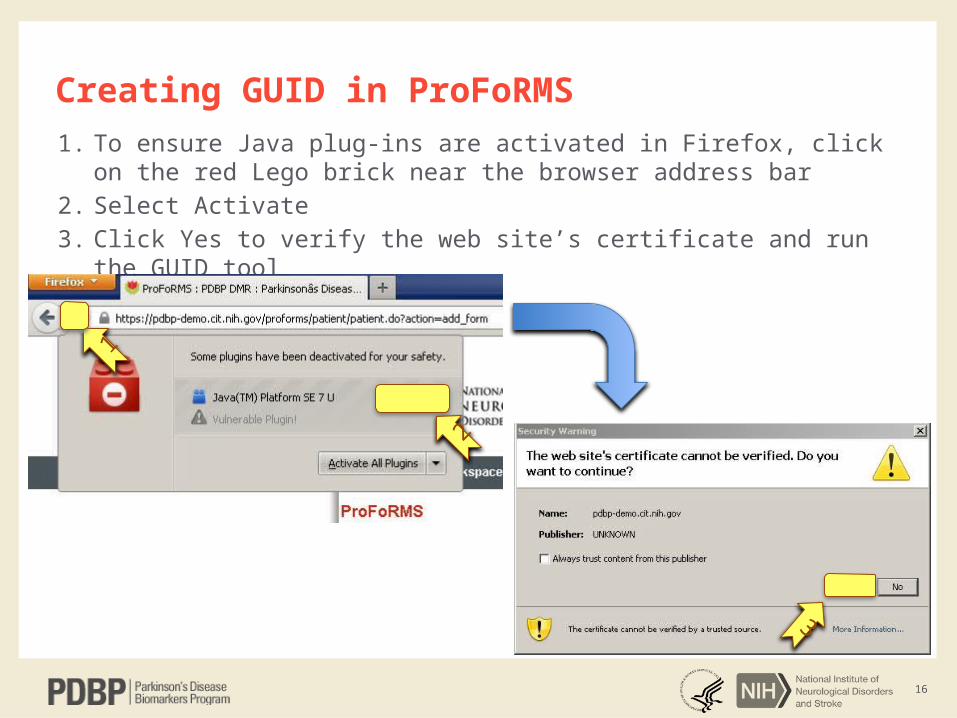
1. To ensure Java plug-ins are activated in Firefox, click on the red Lego brick near the browser address bar
2. Select Activate
3. Click Yes to verify the web site’s certificate and run the GUID tool
2
1Creating GUID in ProFoRMS
3

17
Creating GUID in ProFoRMS
Double-enter subject information into the fields and click Generate GUID
18
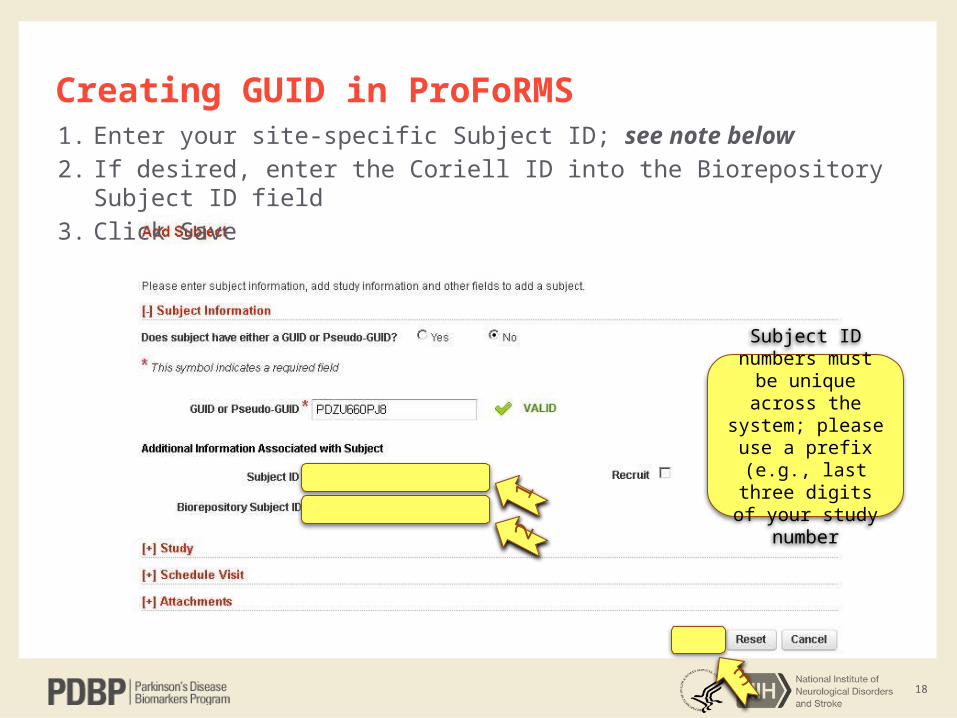
Creating GUID in ProFoRMS1. Enter your site-specific Subject ID; see note below
2. If desired, enter the Coriell ID into the Biorepository Subject ID field
3. Click Save
2
3
1
Subject ID numbers must be unique
across the system; please use a prefix
(e.g., last three digits of your study
number
19
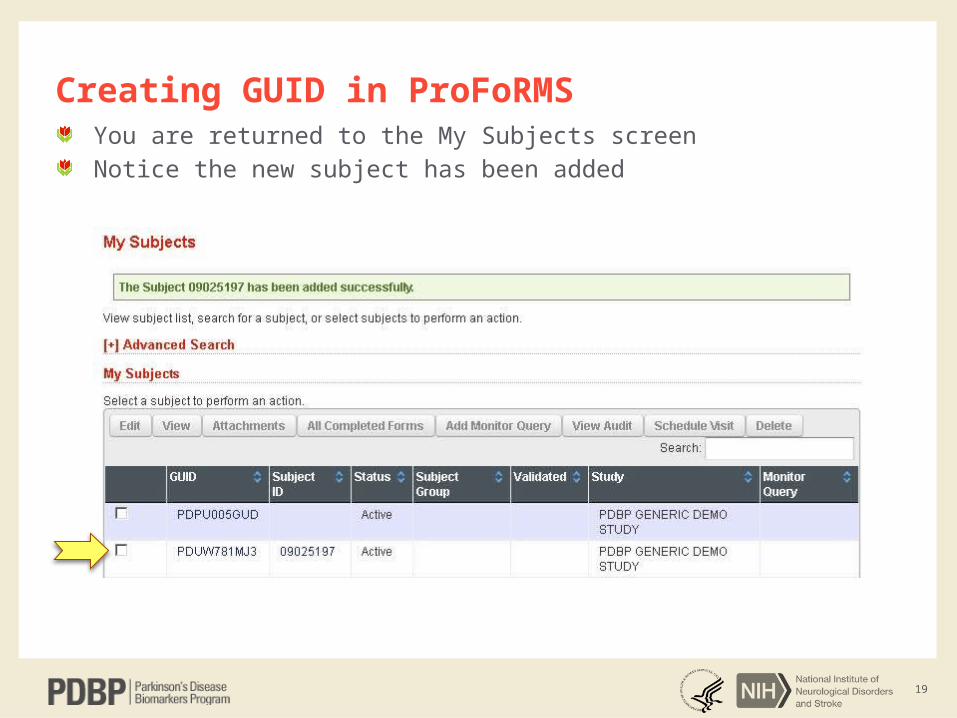
Creating GUID in ProFoRMSYou are returned to the My Subjects screen
Notice the new subject has been added
20
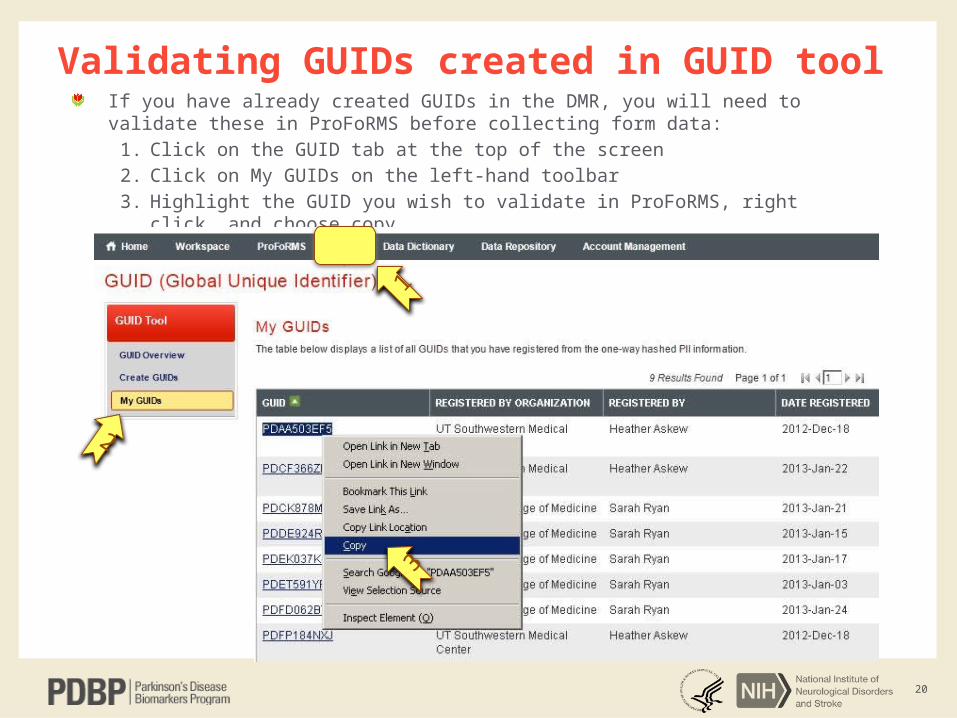
Validating GUIDs created in GUID toolIf you have already created GUIDs in the DMR, you will need to validate these in ProFoRMS before collecting form data:
1. Click on the GUID tab at the top of the screen
2. Click on My GUIDs on the left-hand toolbar
3. Highlight the GUID you wish to validate in ProFoRMS, right click, and choose copy
1
23
21
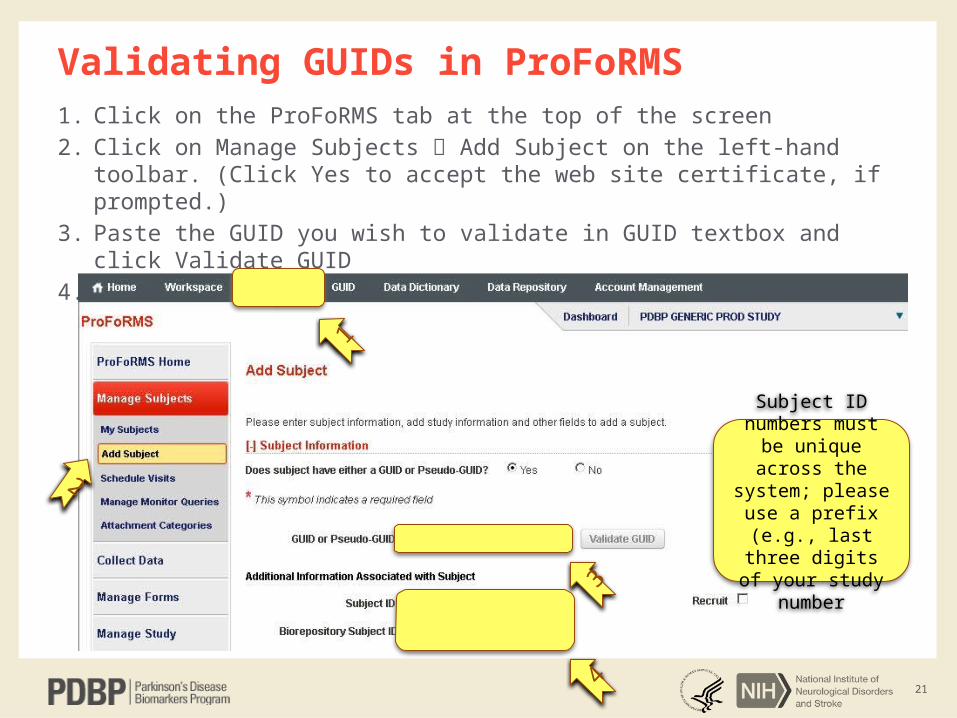
1. Click on the ProFoRMS tab at the top of the screen
2. Click on Manage Subjects Add Subject on the left-hand toolbar. (Click Yes to accept the web site certificate, if prompted.)
3. Paste the GUID you wish to validate in GUID textbox and click Validate GUID
4. Add a Subject and Biorepository Subject IDs, if desired, and click Save
Validating GUIDs in ProFoRMS
1
2
34
Subject ID numbers must be unique
across the system; please use a prefix
(e.g., last three digits of your study
number
22
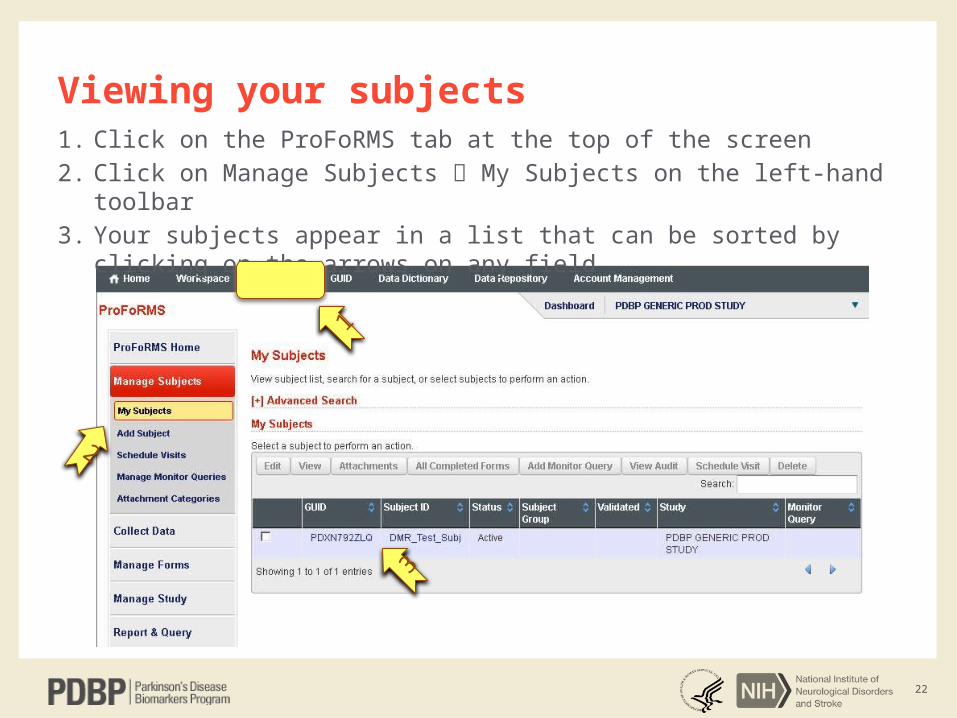
1. Click on the ProFoRMS tab at the top of the screen
2. Click on Manage Subjects My Subjects on the left-hand toolbar
3. Your subjects appear in a list that can be sorted by clicking on the arrows on any field
Viewing your subjects
1
2
3
23
ProFoRMS Demonstration
Requesting permission to ProFoRMS
Adding Subjects– Creating GUIDs within ProFoRMS– Validating GUIDs created in the GUID tool
Scheduling Visits
Collecting Data
Reviewing and Editing Data
What to do if you have a problem?– Set expectations for how long it will take to fix a problem
24
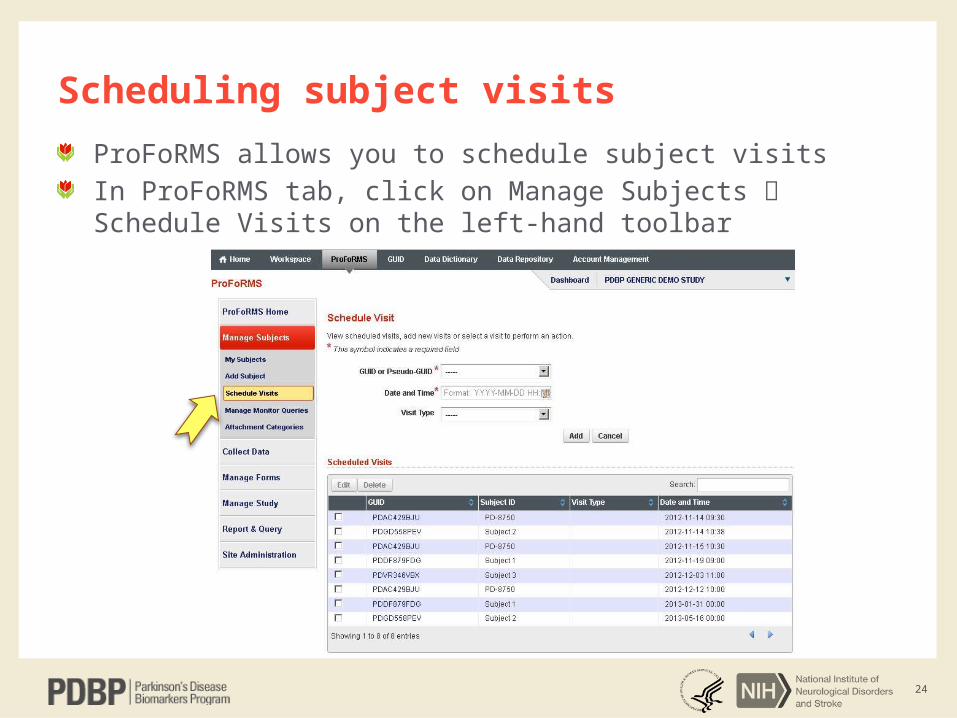
ProFoRMS allows you to schedule subject visits
In ProFoRMS tab, click on Manage Subjects Schedule Visits on the left-hand toolbar
Scheduling subject visits
25
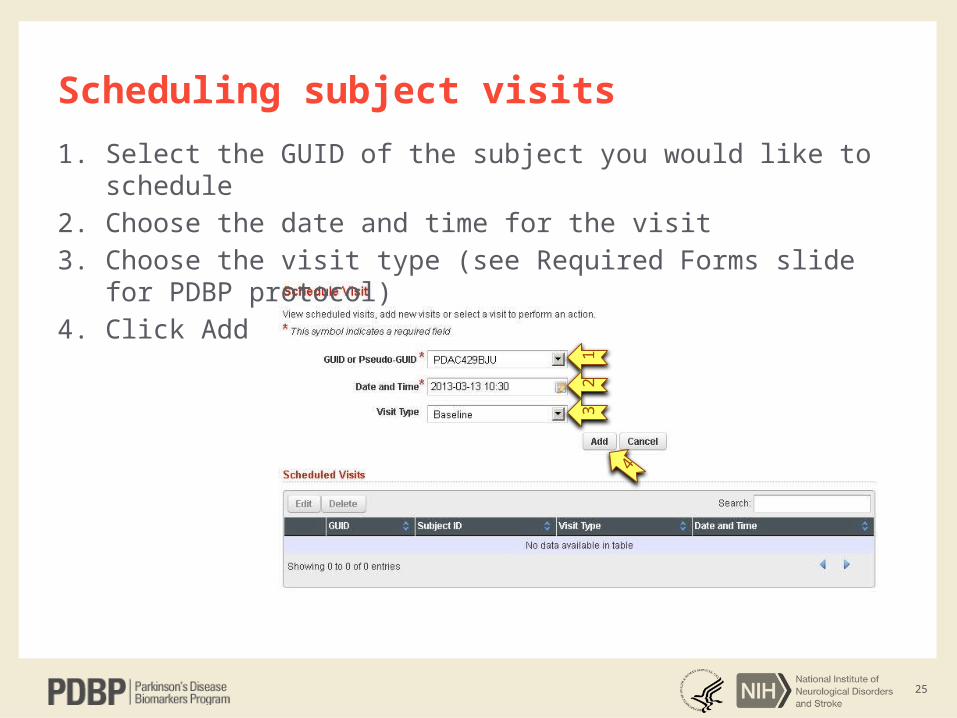
1. Select the GUID of the subject you would like to schedule
2. Choose the date and time for the visit
3. Choose the visit type (see Required Forms slide for PDBP protocol)
4. Click Add
Scheduling subject visits
12
3
4

26
Notice the visit now appears in the scheduled visits window
Continue adding visits using the same process
Click the checkbox next to a visit and click Edit to update as needed
Scheduling subject visits
27
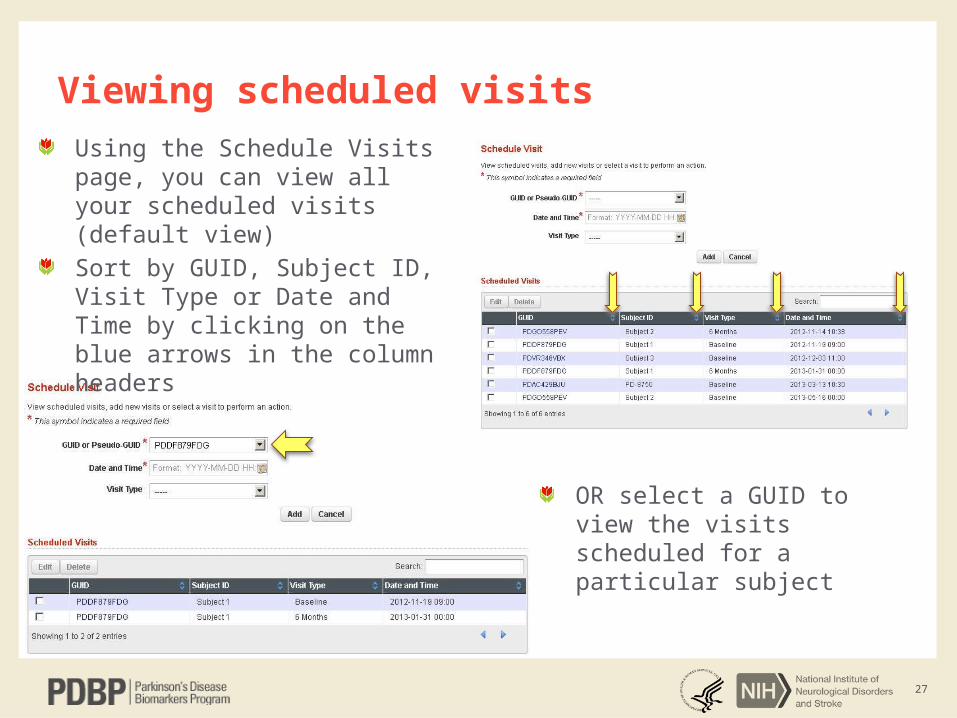
Using the Schedule Visits page, you can view all your scheduled visits (default view)
Sort by GUID, Subject ID, Visit Type or Date and Time by clicking on the blue arrows in the column headers
Viewing scheduled visits
OR select a GUID to view the visits scheduled for a particular subject
28
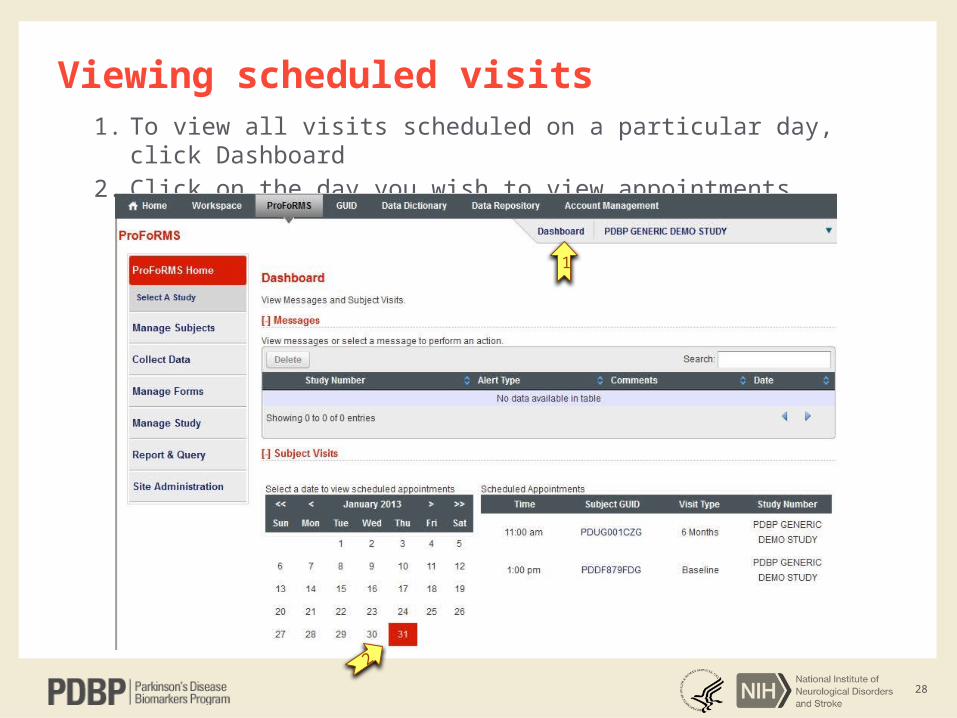
1. To view all visits scheduled on a particular day, click Dashboard
2. Click on the day you wish to view appointments
Viewing scheduled visits
1
2
29
ProFoRMS Demonstration
Requesting permission to ProFoRMS
Adding Subjects– Creating GUIDs within ProFoRMS– Validating GUIDs created in the GUID tool
Scheduling Visits
Collecting Data
Reviewing and Editing Data
What to do if you have a problem?
30
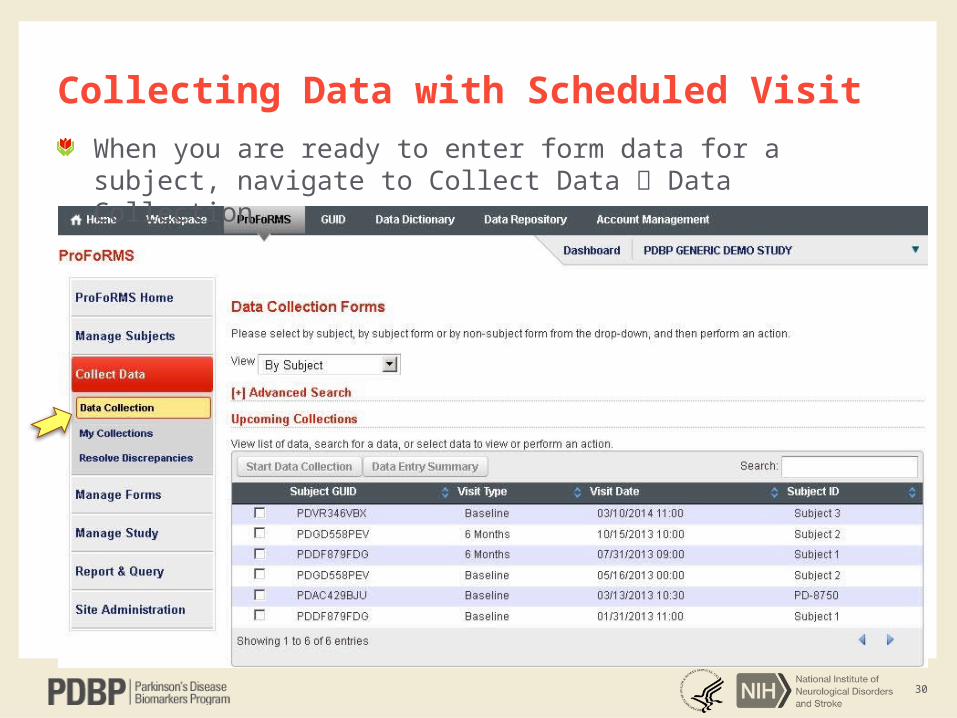
When you are ready to enter form data for a subject, navigate to Collect Data Data Collection
Collecting Data with Scheduled Visit
31
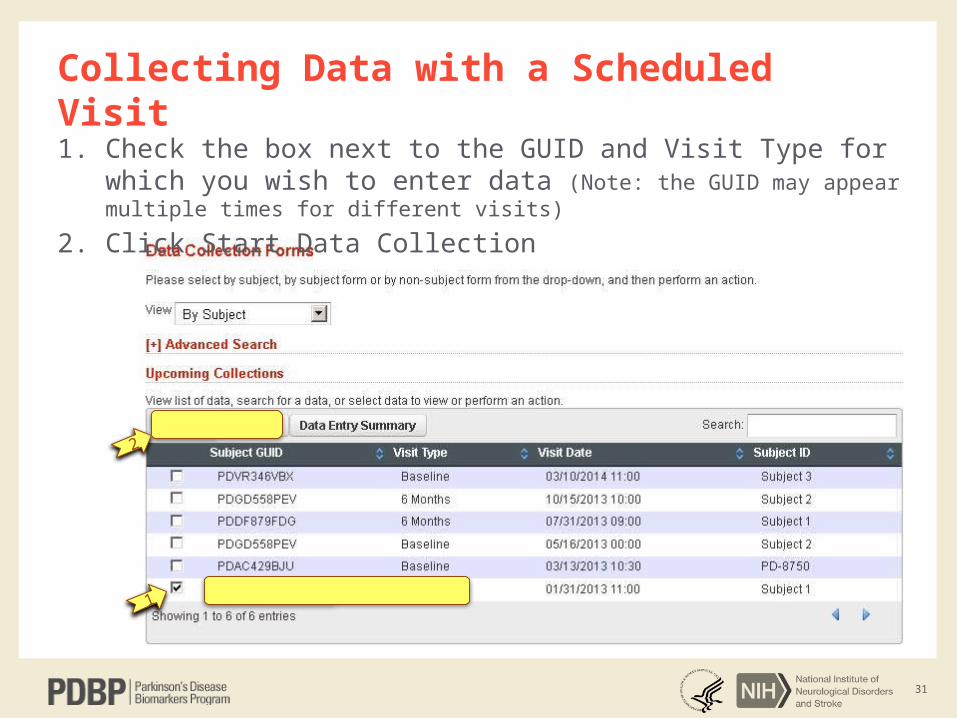
1. Check the box next to the GUID and Visit Type for which you wish to enter data (Note: the GUID may appear multiple times for different visits)
2. Click Start Data Collection
Collecting Data with a Scheduled Visit
1
2
32
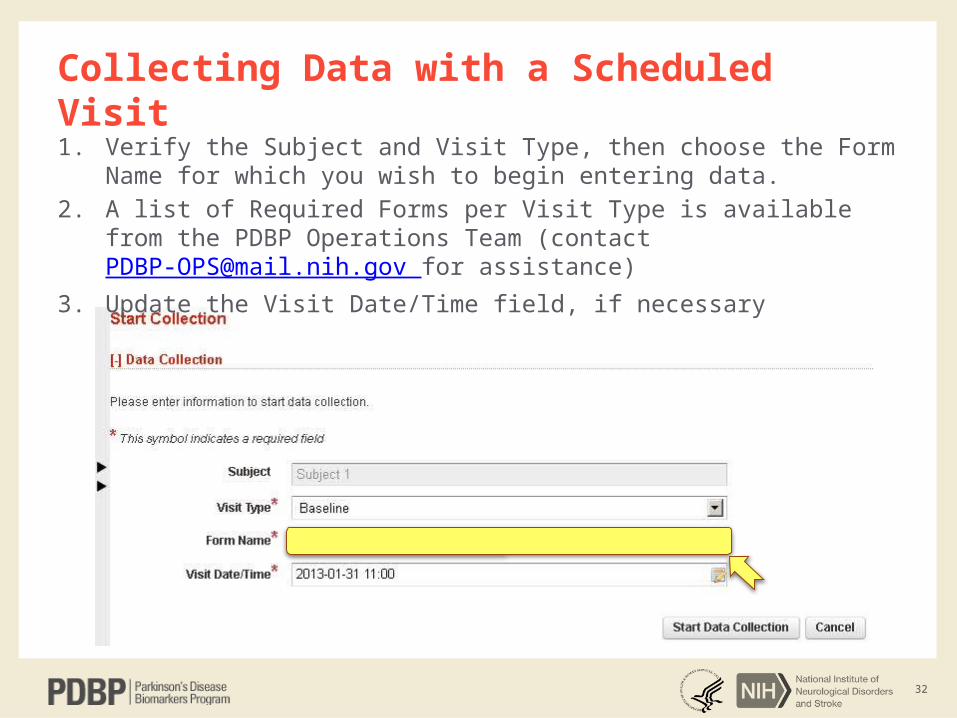
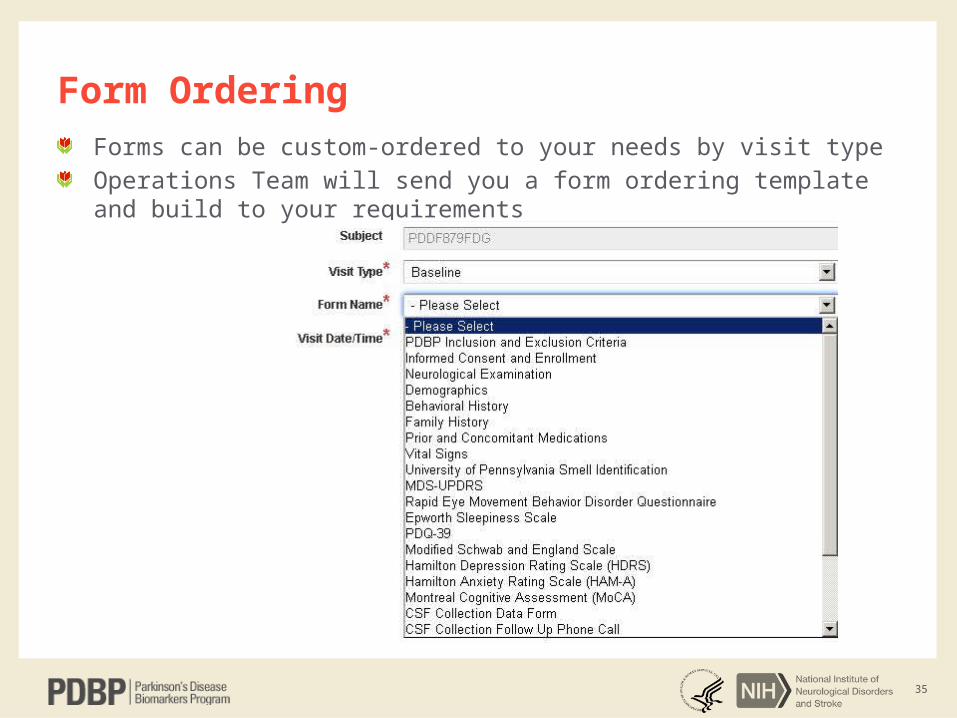
1. Verify the Subject and Visit Type, then choose the Form Name for which you wish to begin entering data.
2. A list of Required Forms per Visit Type is available from the PDBP Operations Team (contact [email protected] for assistance)
3. Update the Visit Date/Time field, if necessary
Collecting Data with a Scheduled Visit
33
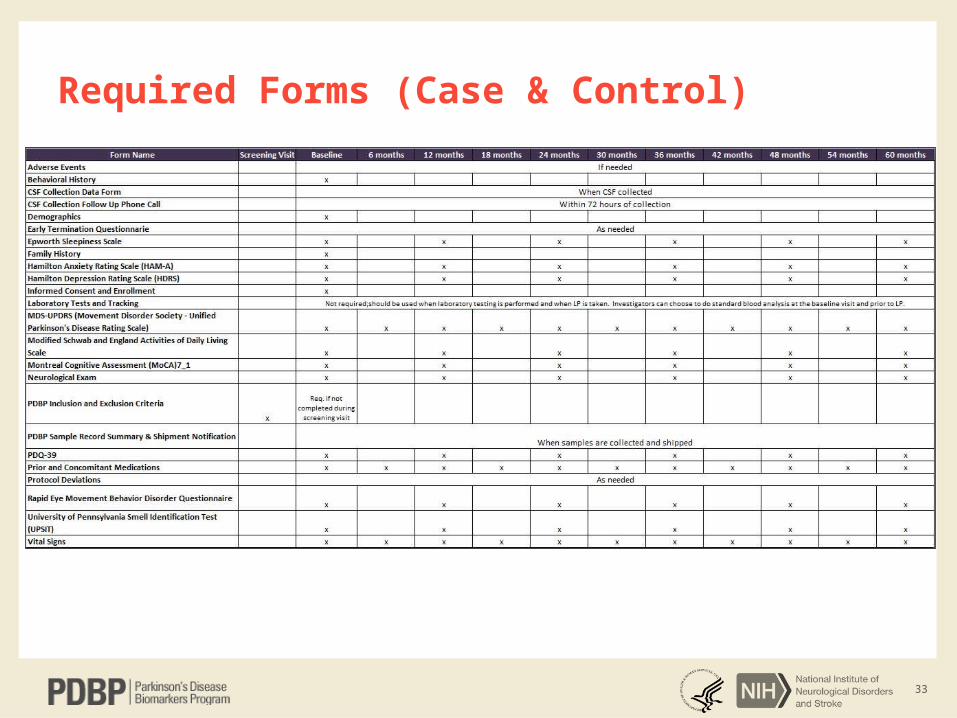
Required Forms (Case & Control)
34
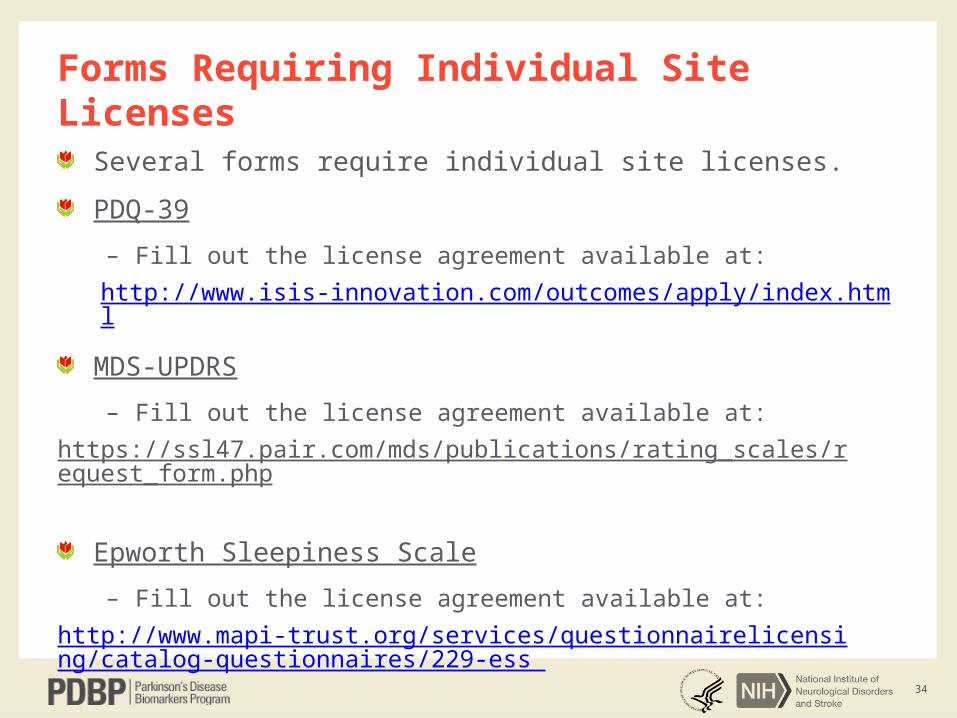
Forms Requiring Individual Site Licenses
Several forms require individual site licenses.
PDQ-39
– Fill out the license agreement available at:
http://www.isis-innovation.com/outcomes/apply/index.html
MDS-UPDRS
– Fill out the license agreement available at:
https://ssl47.pair.com/mds/publications/rating_scales/request_form.php
Epworth Sleepiness Scale
– Fill out the license agreement available at:
http://www.mapi-trust.org/services/questionnairelicensing/catalog-questionnaires/229-ess
35
Form OrderingForms can be custom-ordered to your needs by visit type
Operations Team will send you a form ordering template and build to your requirements
36
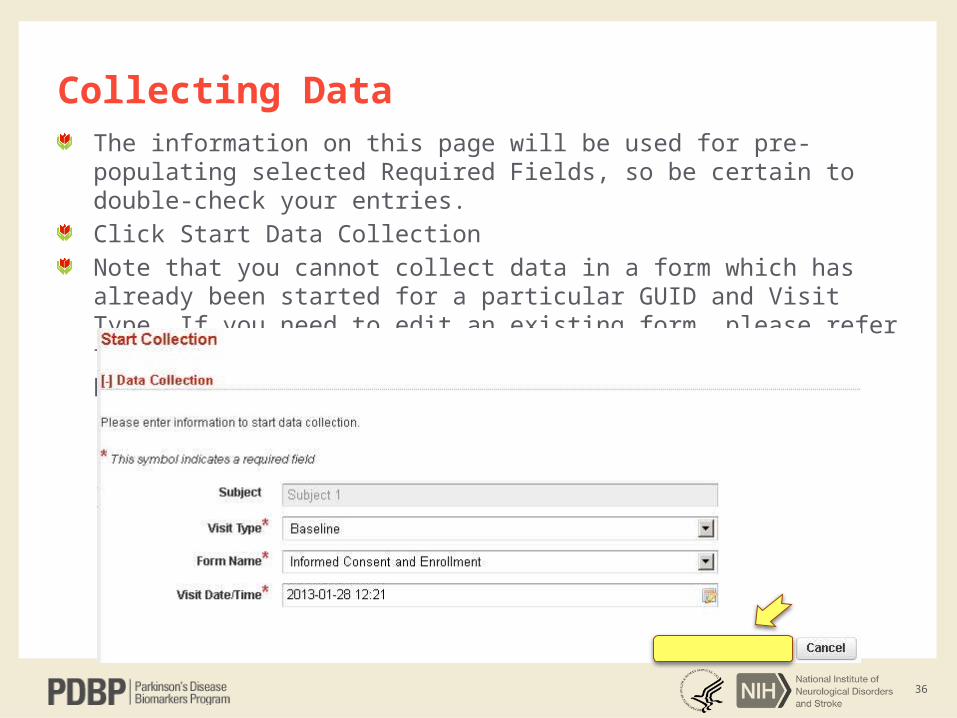
The information on this page will be used for pre-populating selected Required Fields, so be certain to double-check your entries.
Click Start Data Collection
Note that you cannot collect data in a form which has already been started for a particular GUID and Visit Type. If you need to edit an existing form, please refer to the Reviewing and Editing Data section of this presentation
Collecting Data

37
Fields with red asterisks are required– Selected Required Fields will be pre-populated: Name of site, Type of visit, Date
of visit, and GUID will be populated with values from the Start Collection page– Pre-populated fields can be updated, if necessary (e.g. date of visit may not
equal scheduled visit date.
Form will auto-save every 8 minutes
Questions with radio buttons can be reset by double-clicking
Skip logic will grey out certain questions at times
Auto-calculated fields appear in several forms. Answer will appear if you click on them, but it is not necessary to save the form.
Green sections are collapsible. You can expand/hide to read further instructions or view scoring sections.
Validation checks will provide errors at the top of the screen upon Save
We recommend you do not Lock your data until you are ready to submit to the long-term repository; additional instructions and training will be scheduled
None of the forms require double-entry data so you can ignore the references to Entry 1 and Entry 2 that appear in the system
Collecting Data
38
5
1
24
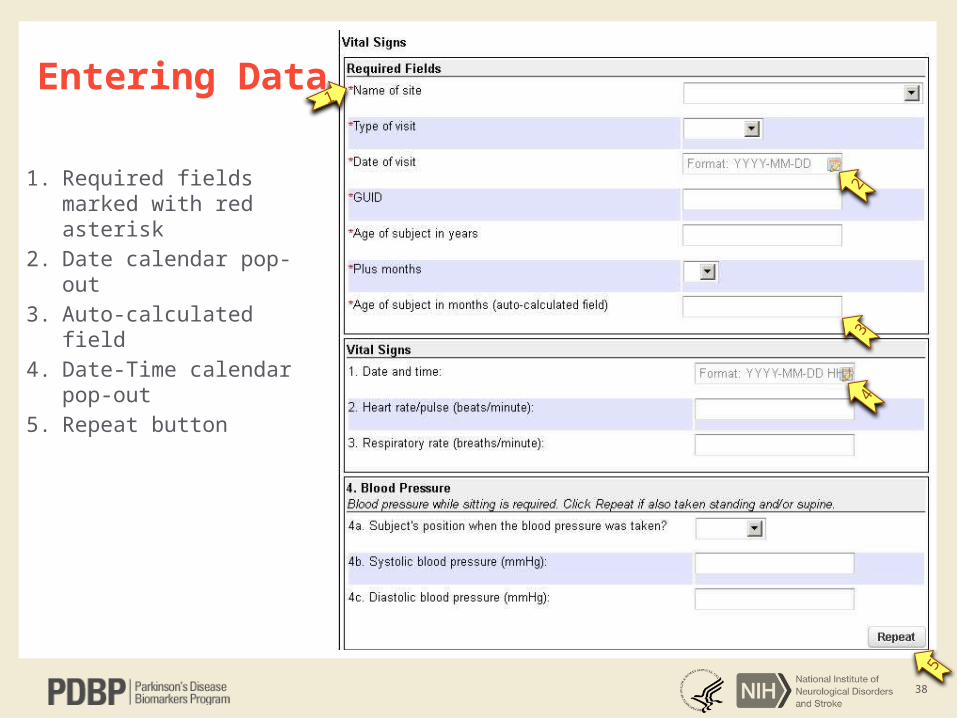
1. Required fields marked with red asterisk
2. Date calendar pop-out
3. Auto-calculated field
4. Date-Time calendar pop-out
5. Repeat button 3
Entering Data
39
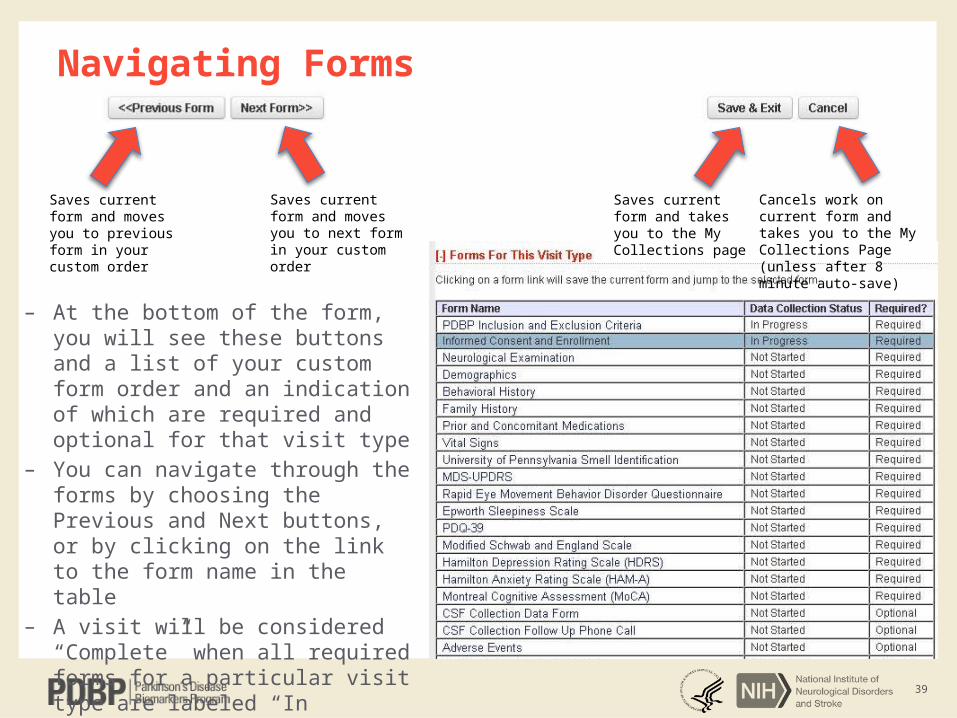
– At the bottom of the form, you will see these buttons and a list of your custom form order and an indication of which are required and optional for that visit type
– You can navigate through the forms by choosing the Previous and Next buttons, or by clicking on the link to the form name in the table
– A visit will be considered “Complete” when all required forms for a particular visit type are labeled “In Progress
Navigating Forms
Saves current form and moves you to previous form in your custom order
Saves current form and moves you to next form in your custom order
Saves current form and takes you to the My Collections page
Cancels work on current form and takes you to the My Collections Page (unless after 8 minute auto-save)
40
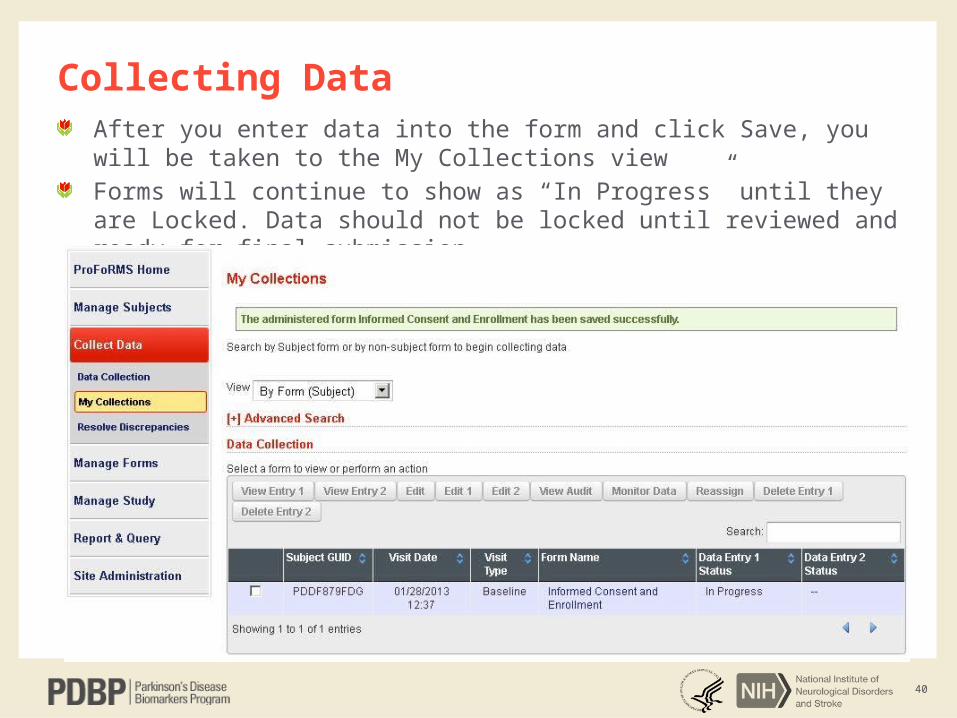
After you enter data into the form and click Save, you will be taken to the My Collections view
Forms will continue to show as “In Progress” until they are Locked. Data should not be locked until reviewed and ready for final submission.
Collecting Data
41
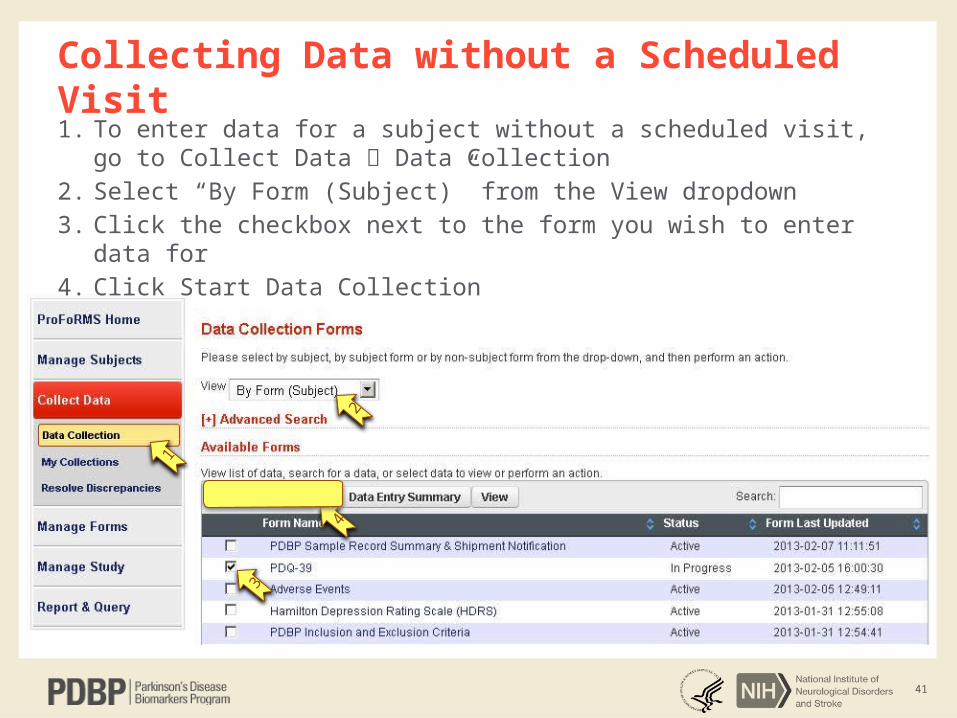
1. To enter data for a subject without a scheduled visit, go to Collect Data Data Collection
2. Select “By Form (Subject)” from the View dropdown
3. Click the checkbox next to the form you wish to enter data for
4. Click Start Data Collection
Collecting Data without a Scheduled Visit
1
2
3
4
42
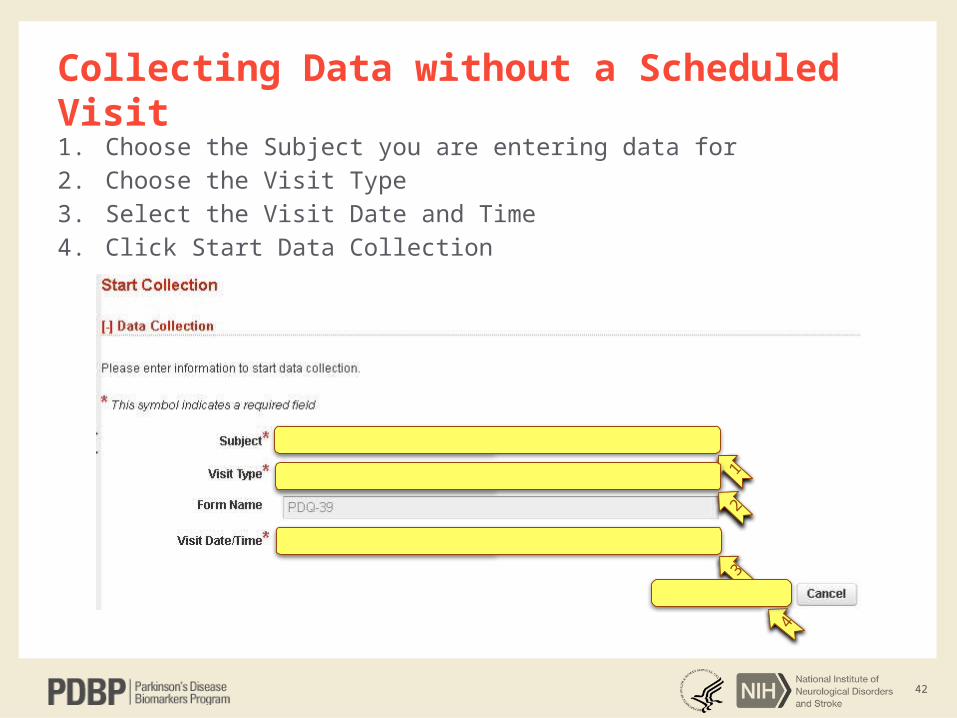
1. Choose the Subject you are entering data for
2. Choose the Visit Type
3. Select the Visit Date and Time
4. Click Start Data Collection
Collecting Data without a Scheduled Visit
12
3
4
43
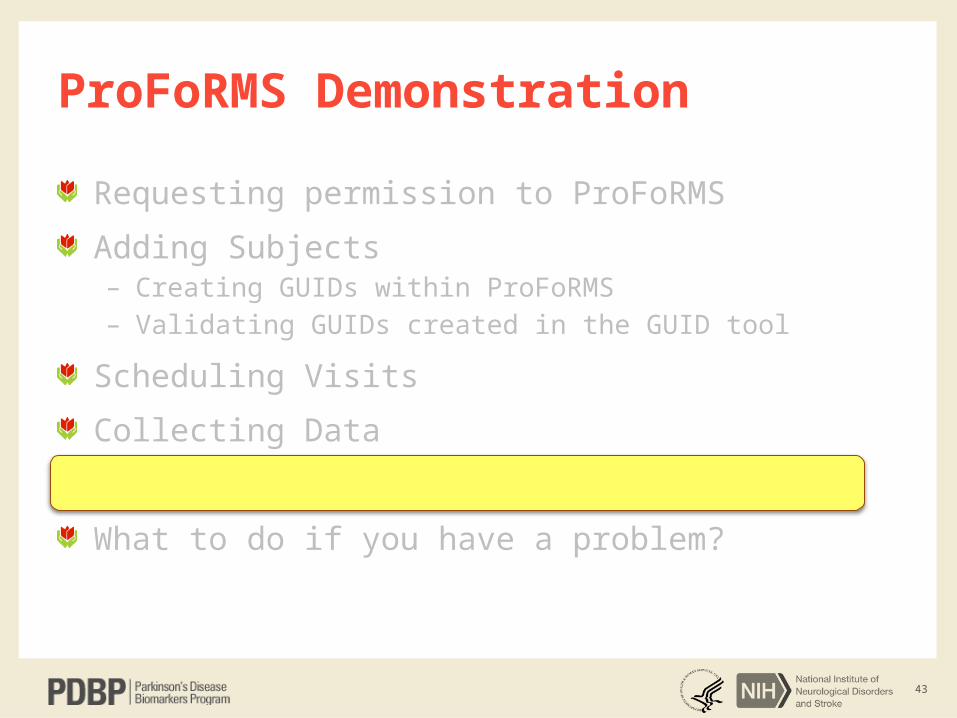
ProFoRMS Demonstration
Requesting permission to ProFoRMS
Adding Subjects– Creating GUIDs within ProFoRMS– Validating GUIDs created in the GUID tool
Scheduling Visits
Collecting Data
Reviewing and Editing Data
What to do if you have a problem?
44
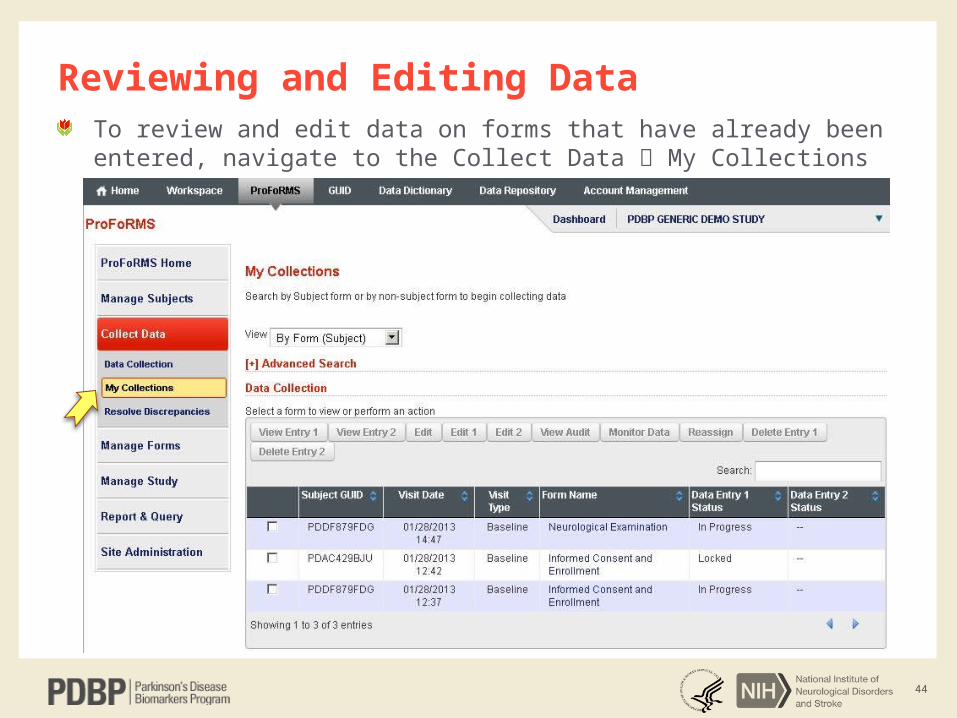
To review and edit data on forms that have already been entered, navigate to the Collect Data My Collections screen
Reviewing and Editing Data
45
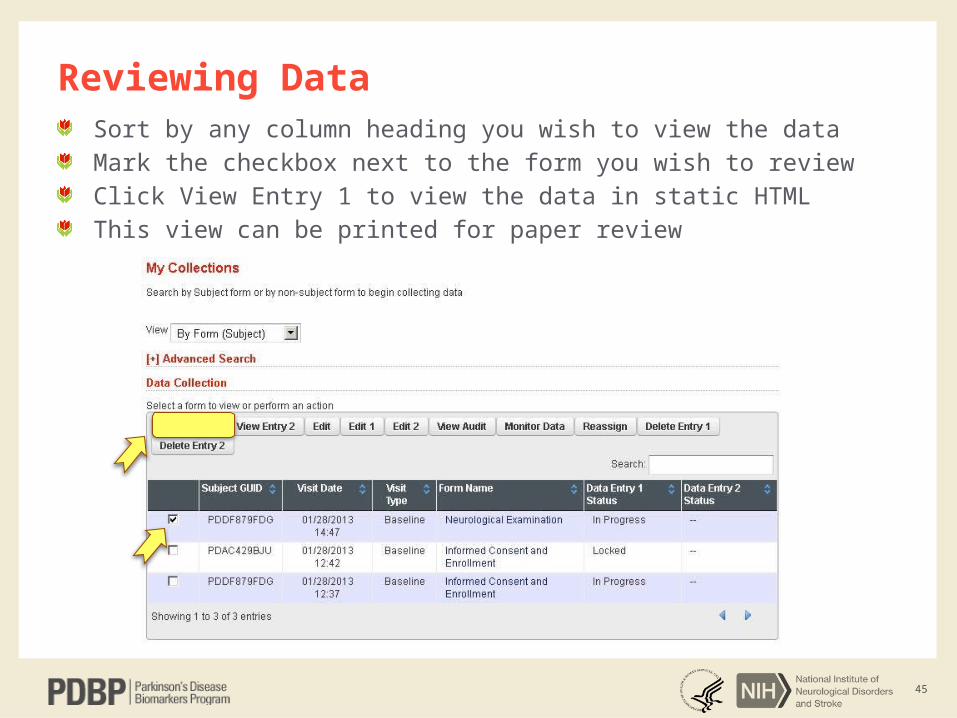
Sort by any column heading you wish to view the data
Mark the checkbox next to the form you wish to review
Click View Entry 1 to view the data in static HTML
This view can be printed for paper review
Reviewing Data

46
From the My Collections page, sort by any column heading you wish
Mark the checkbox next to the form you wish to edit
Click Edit to open the form for editing– Note that the form can only be edited by the person to whom it is assigned
Editing Data
47
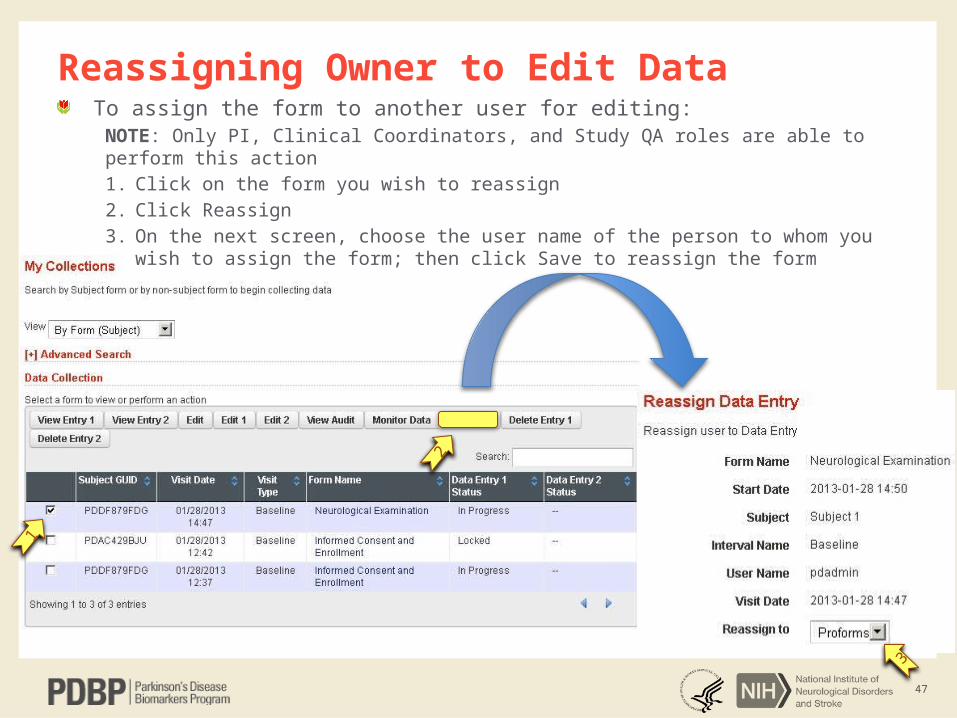
To assign the form to another user for editing:NOTE: Only PI, Clinical Coordinators, and Study QA roles are able to perform this action
1. Click on the form you wish to reassign
2. Click Reassign
3. On the next screen, choose the user name of the person to whom you wish to assign the form; then click Save to reassign the form
Reassigning Owner to Edit Data
2
1
3
48
ProFoRMS Demonstration
Requesting permission to ProFoRMS
Adding Subjects– Creating GUIDs within ProFoRMS– Validating GUIDs created in the GUID tool
Scheduling Visits
Collecting Data
Reviewing and Editing Data
What to do if you have a problem?
49
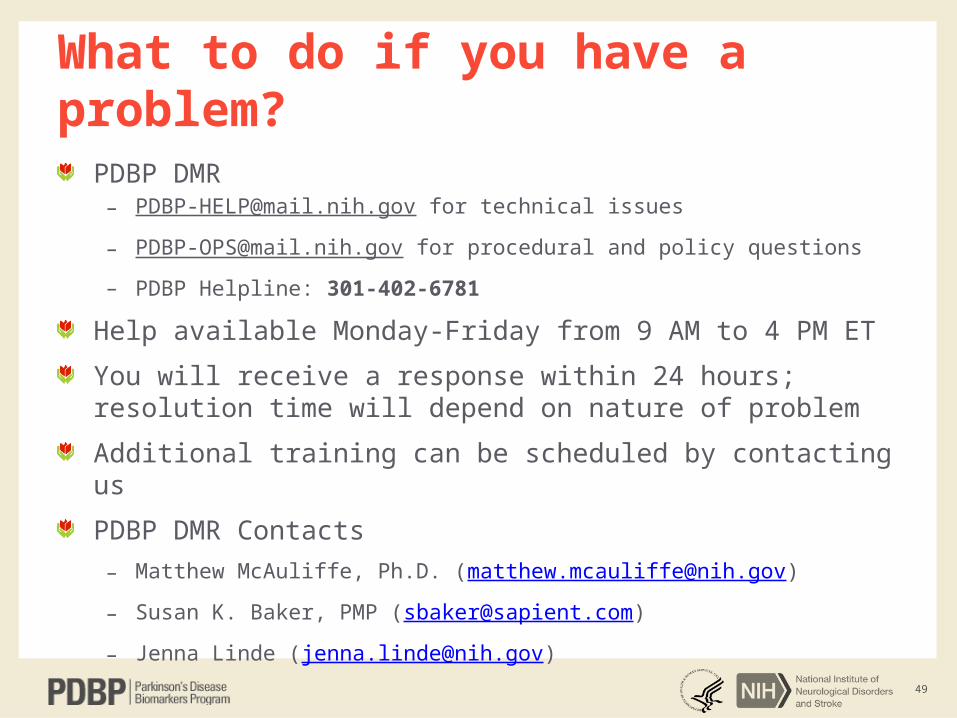
What to do if you have a problem?
PDBP DMR– [email protected] for technical issues
– [email protected] for procedural and policy questions
– PDBP Helpline: 301-402-6781
Help available Monday-Friday from 9 AM to 4 PM ET
You will receive a response within 24 hours; resolution time will depend on nature of problem
Additional training can be scheduled by contacting us
PDBP DMR Contacts
– Matthew McAuliffe, Ph.D. ([email protected])
– Susan K. Baker, PMP ([email protected])
– Jenna Linde ([email protected])

50
ProFoRMS ReportingLimited reporting is now available through ProFoRMS
Reports can be exported in CSV or Excel format
– Study Report: Number of subjects enrolled and Number of forms In progress or Locked
– Completed Visits: Number of completed visits for first four required visit types; completed visit counted when all required forms are complete
– Performance Overview: Number of forms in your study for overall performance tracking (i.e., CSF Collection, Adverse Events, etc.
– Forms Requiring Lock: Not currently in use; shows forms created more than 30 days ago that have not been locked; will be useful once submission to long-term repository is in place
– Resolved Discrepancies: Not currently in use– Documents: List of uploaded documents in your study– Form Status: List of forms in your study– Locked Forms: List of locked forms in your study
51
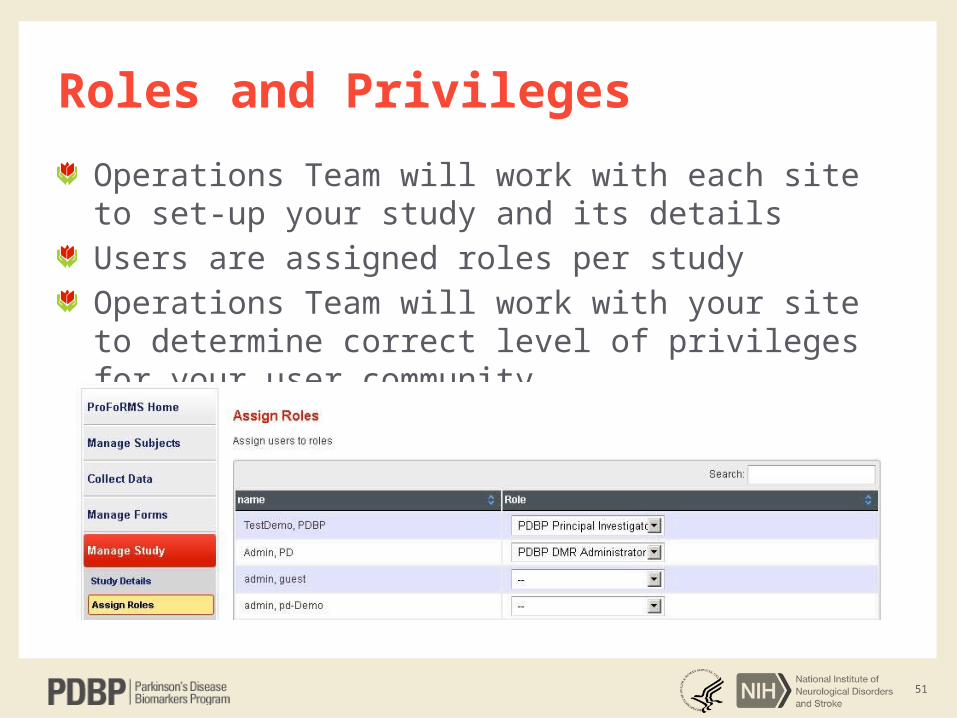
Roles and Privileges
Operations Team will work with each site to set-up your study and its details
Users are assigned roles per study
Operations Team will work with your site to determine correct level of privileges for your user community
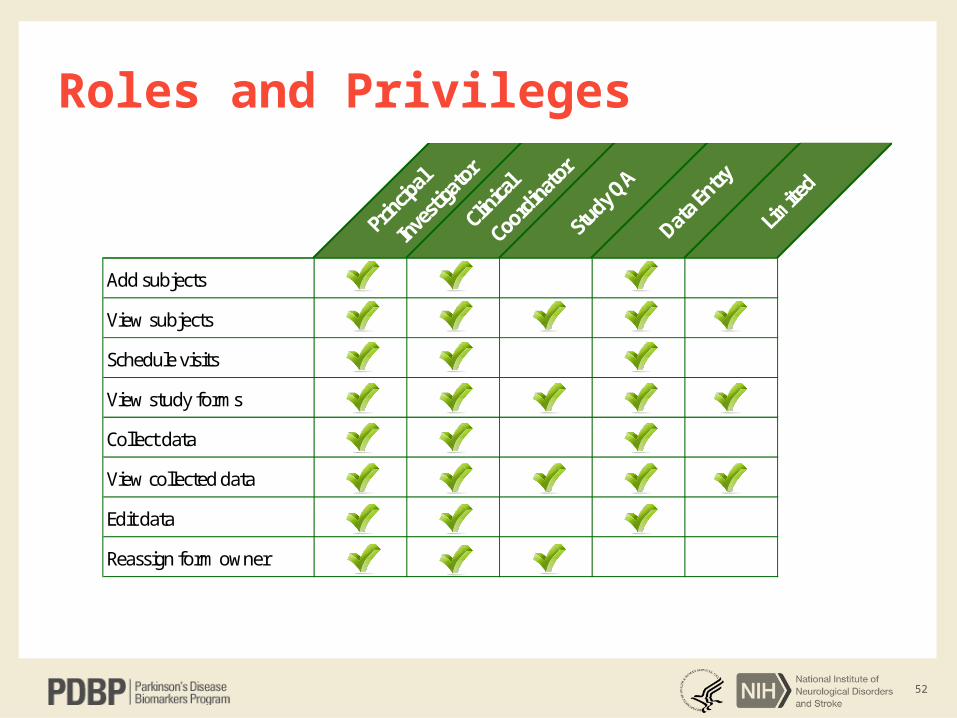
52
Roles and Privileges
Add subjects
View subjects
Schedule visits
View study forms
Collect data
View collected data
Edit data
Reassign form owner
53
Demo Environment
Use demo environment to test out functionality from this presentation:
– Link to demo environment:http://pdbp-demo.cit.nih.gov/
– Username: PDBP_Test_DemoPassword: contact the Operations Team ([email protected])
Please note that data entered into the Demo Environment will be deleted periodically
We recommend you do not bookmark Demo site to reduce risk that you will enter data incorrectly
Environment undergoes regular maintenance and may not be available 24/7
54
Next Steps
Request permission to ProFoRMS
Work with DMR Operations Team to set up access permissions for your site
Access ProFoRMS quickly by bookmarking the following:https://pdbp.ninds.nih.gov/proforms
Process for locking data and submitting to long-term repository will be finalized in the summertime
Additional training sessions will be scheduled to train users on submission and query
Contact us to schedule additional training and one-on-one support
Please send ideas for improving the system to the PDBP Operations Team; enhancements may be scheduled for future releases
55
ContactsPDBP Program Staff
– Katrina Gwinn, M.D. ([email protected])– Margaret Sutherland, Ph.D. ([email protected])– Debra J. Babcock, M.D., Ph.D. ([email protected])– Beth-Anne Sieber, Ph.D. ([email protected])– Ran Zhang, Ph.D. ([email protected])– Coryse St. Hillaire-Clarke, Ph.D. ([email protected])
PDBP DMR Operations Team– [email protected] for technical issues– [email protected] for procedural and policy questions– PDBP Helpline: 301-402-6781– Matthew McAuliffe, Ph.D. ([email protected])– Susan K. Baker, PMP ([email protected]) – Jenna Linde ([email protected])
NINDS Repository– Roderick Corriveau, Ph.D ([email protected])– Matt Self ([email protected])– Chi Tarn, Ph.D. ([email protected])
56
Questions
![NINDS User Manual...Parkinson’s disease [PD], epilepsy, and muscular dystrophy [MD]). Neuro-QoL is comprised of item banks and Neuro-QoL is comprised of item banks and scales that](https://img.pdfslide.net/doc/110x75/5ff604c0959384167265444f/ninds-user-manual-parkinsonas-disease-pd-epilepsy-and-muscular-dystrophy.jpg)