Embed Size (px)
Citation preview

1
Web Technologies
Website Development with Dreamweaver

Website Planning
Before beginning any web development project: A Needs Assessment should be completed. A Story Board should be created. The Layout and Style of the site should be
planned.
IT: Web Technologies – Website Development with Dreamweaver 2
Storyboarding
The Storyboard is a diagram of the website’s structure. Should show all required pages of the site. Should show how each page is related to the
others. Should take into consideration:
Is the structure logical? Can the user find their information quickly? How many links are on each page/
IT: Web Technologies – Website Development with Dreamweaver 3

Sample Storyboard
IT: Web Technologies – Website Development with Dreamweaver 4

Layout & Design
Once the site structure has been determined, the layout and design of the individual pages can be considered.
Layout Considerations: Consistency: Each page should have the same
layout and design. Also includes the pages’ style.
The same design style should be used on each page of the site.
IT: Web Technologies – Website Development with Dreamweaver 5

Layout & Design Navigation: The navigation should be in a
standard position (top or left side) Balance: The page should be balanced. Fonts: The selected font should be easy to read
and generally should be a generic font. Colors: A color scheme should be selected, with
the client. The color scheme should be applied the same on each page.
IT: Web Technologies – Website Development with Dreamweaver 6

Dreamweaver
Web pages are created using HTML, a code for specifying how content should be formatted.
Web pages are interpreted by the web browser.
The web pages can be created using a text editor or a program that can create HTML code.
IT: Web Technologies – Website Development with Dreamweaver 7Copyright © Texas Education Agency, 2011. All rights reserved.

Dreamweaver Work Area
8
CS 5 Layout
A. Document Tabs: Allow you to easily work with, and switch between, multiple documents. B. Menu Bar: Provides access to the most common menu items. C. Workspace Bar: Allows you to select between various workspace layouts. The default is Designer. D. Documents Views: Buttons allowing you to switch between different views. E. Panel Groups: Provides quick access to files, CSS properties, and the site profiles. F. Document Workspace: This is the current document you are working on. G. Property Inspector: Gives quick access to the formatting of content. Is split between HTML and CSS markup.

Dreamweaver Work Area
FTP Toolbar Manages the
uploading and downloading of files.
IT: Web Technologies – Website Development with Dreamweaver 9Copyright © Texas Education Agency, 2011. All rights reserved.

Using Dreamweaver
Creating a New Document To open a blank document in Dreamweaver,
press CTRL+N or click on the File menu at the top left and select New.
IT: Web Technologies – Website Development with Dreamweaver 10Copyright © Texas Education Agency, 2011. All rights reserved.

Using Dreamweaver
IT: Web Technologies – Website Development with Dreamweaver 11Copyright © Texas Education Agency, 2011. All rights reserved.

Using Dreamweaver
IT: Web Technologies – Website Development with Dreamweaver 12
Make sure you are in Design View. The Design button highlighted above should be selected.

Using Dreamweaver
Editing Page Properties Click on the Page Properties button on the
Properties Panel at the bottom of the screen.
IT: Web Technologies – Website Development with Dreamweaver 13

Using Dreamweaver
Editing Page Properties
IT: Web Technologies – Website Development with Dreamweaver 14
From the Page Properties screen you can edit the default text, link, and background properties of the page.
Copyright © Texas Education Agency, 2011. All rights reserved.

Using Dreamweaver
Formatting Text Default text formatting should be defined on the
Page Properties window described in the previous slide.
If you want to format specific sections of text on the page, you should select the text you to format with your mouse.
IT: Web Technologies – Website Development with Dreamweaver 15Copyright © Texas Education Agency, 2011. All rights reserved.

Using Dreamweaver
Formatting Text For basic formatting select the HTML button.
The CSS button will provide additional advanced formatting options through Style Sheets.
We set the selected text to a Heading 1
IT: Web Technologies – Website Development with Dreamweaver 16Copyright © Texas Education Agency, 2011. All rights reserved.

Using Dreamweaver
Formatting Text The text has been formatted to a Heading Level 1
IT: Web Technologies – Website Development with Dreamweaver 17
Using Dreamweaver
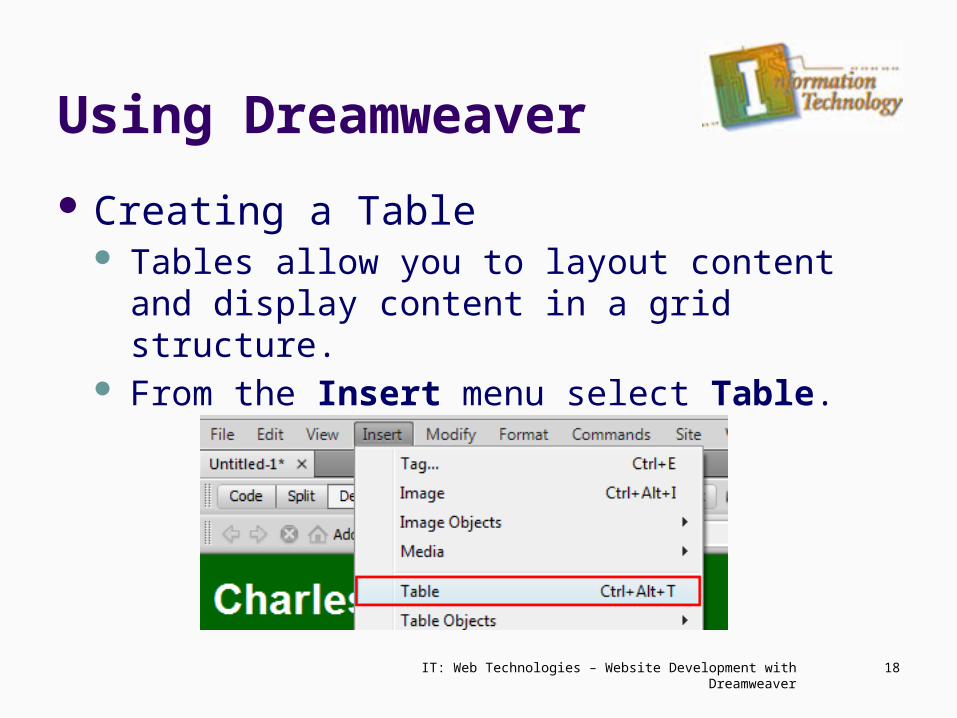
Creating a Table Tables allow you to layout content and display
content in a grid structure. From the Insert menu select Table.
IT: Web Technologies – Website Development with Dreamweaver 18
Using Dreamweaver
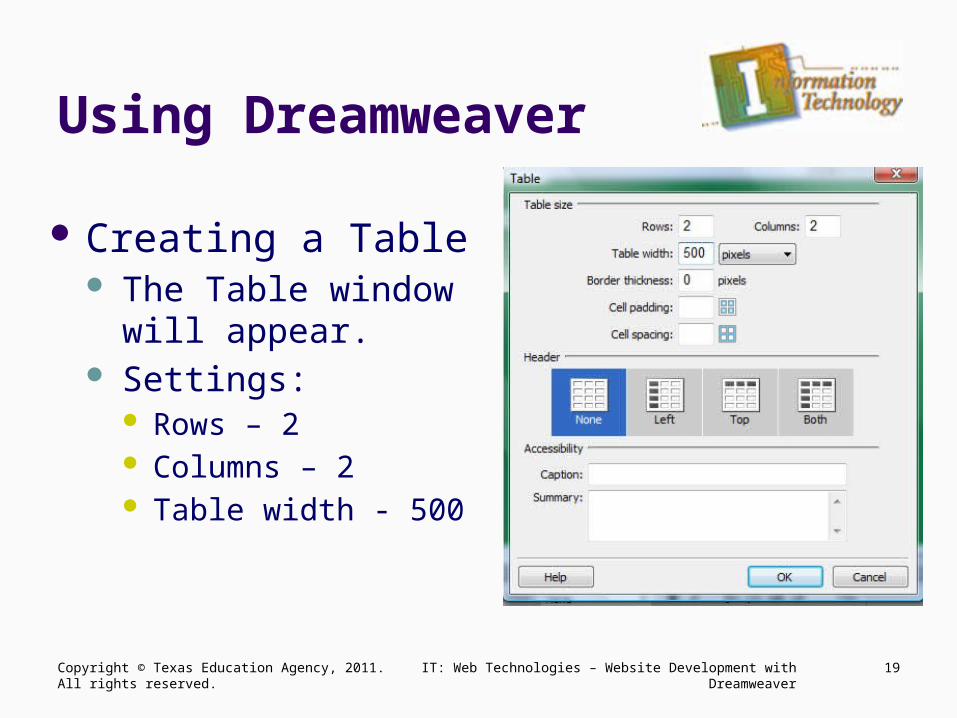
Creating a Table The Table window will
appear. Settings:
Rows – 2 Columns – 2 Table width - 500
IT: Web Technologies – Website Development with Dreamweaver 19Copyright © Texas Education Agency, 2011. All rights reserved.

Using Dreamweaver
Creating Tables The table structure should be displayed below the
heading.
IT: Web Technologies – Website Development with Dreamweaver 20

Using Dreamweaver
IT: Web Technologies – Website Development with Dreamweaver 21Copyright © Texas Education Agency, 2011. All rights reserved.

Using Dreamweaver
Inserting an Image Before the image can be added, the page needs
to be saved. Save the page to your Student Files folder as
dreamweaverPractice.htm
IT: Web Technologies – Website Development with Dreamweaver 22Copyright © Texas Education Agency, 2011. All rights reserved.

Using Dreamweaver
Inserting Images Place your cursor
into the bottom left cell of the table.
IT: Web Technologies – Website Development with Dreamweaver 23Copyright © Texas Education Agency, 2011. All rights reserved.

Using Dreamweaver
Inserting Images From the Insert menu,
select Image. Select the
differenceEngine.jpg from your Student Files folder.
Click Ok.
IT: Web Technologies – Website Development with Dreamweaver 24Copyright © Texas Education Agency, 2011. All rights reserved.

Using Dreamweaver
Inserting Images From the Image Tag Accessibility Attributes
Enter Difference Engine into the Alternate text field. Click Ok
IT: Web Technologies – Website Development with Dreamweaver 25

Using Dreamweaver
Inserting Images The image will be placed
where the cursor was located.
When you click on the image, the Properties Panel will display the properties for the image.
IT: Web Technologies – Website Development with Dreamweaver 26

Using Dreamweaver
Inserting Images Follow the same
procedures to insert the analyticalEngine.jpg image into the bottom right cell.
IT: Web Technologies – Website Development with Dreamweaver 27

Using Dreamweaver
Creating Links The text Charles Babbage Web Site was added
below the table. Select the text your want to make into a link.
IT: Web Technologies – Website Development with Dreamweaver 28

Using Dreamweaver
Creating Links Locate the Insert panel
on the right. Select the Hyperlink
button.
IT: Web Technologies – Website Development with Dreamweaver 29Copyright © Texas Education Agency, 2011. All rights reserved.

Using Dreamweaver Creating Links The Hyperlink window
will appear. Text: The text shown on
the screen. Link: where you want to
go The remaining fields can
be left blank on basic links.
IT: Web Technologies – Website Development with Dreamweaver 30

Using Dreamweaver
Additional Formatting Changing Link Colors
Click the Page Properties button on the bottom of the Properties panel at the bottom of the screen.
IT: Web Technologies – Website Development with Dreamweaver 31

Using Dreamweaver Change Link Colors
Select the Links (CSS) category. Link color and style properties can be modified
here.
IT: Web Technologies – Website Development with Dreamweaver 32

Using Dreamweaver
Aligning Objects The following alignments can be applied to most
objects. Left Right Center Justify (text only)
IT: Web Technologies – Website Development with Dreamweaver 33

Using Dreamweaver
Select the CSS button on the properties panel. The alignment tools are on the right side of the
panel
IT: Web Technologies – Website Development with Dreamweaver 34

Using Dreamweaver
We have selected the title to be centered on the screen.
IT: Web Technologies – Website Development with Dreamweaver 35

Using Dreamweaver
The title should then be centered on the page.
IT: Web Technologies – Website Development with Dreamweaver 36