Embed Size (px)
Citation preview
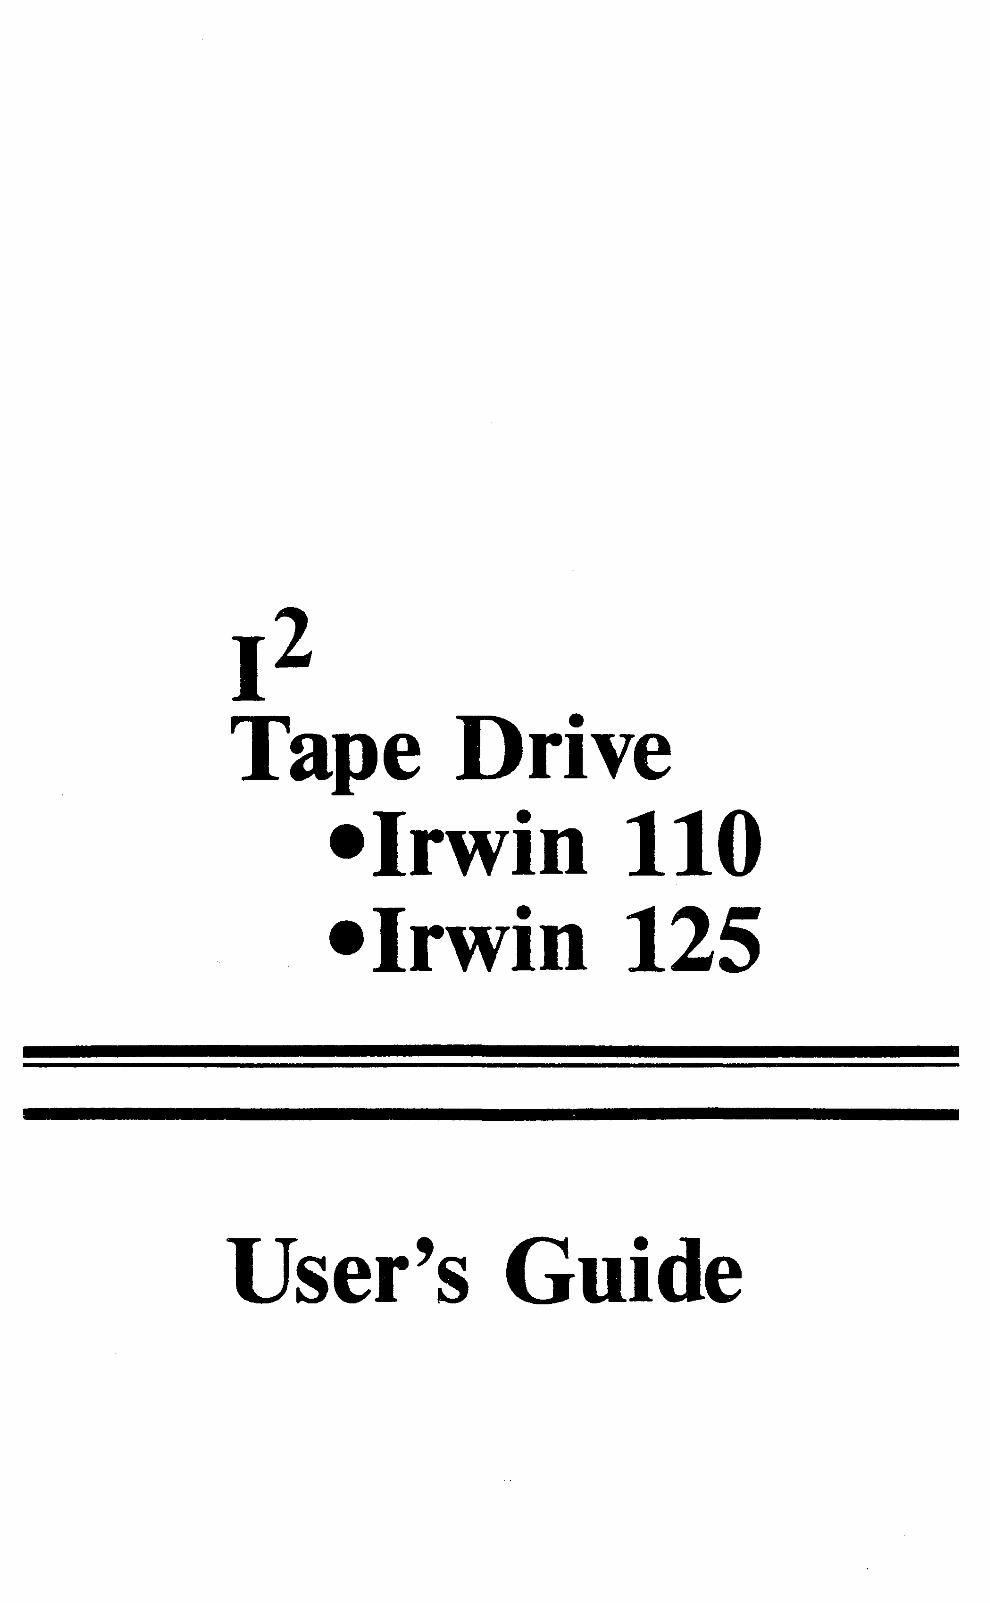
12 Tape Drive
-Irwin 110 -Irwin 125
User's Guide
• 1
TABLE OF CONTENTS
What this Manual Contains. . . . . . . . . . . . . . . . . . . . . . . . . . .. 1
CHAPTER 1 INTRODUCTION Before We Get Started. . . . . . . . . . . . . . . . . . . . . . . . . . . . .. 3
CHAPTER 2 INSTALLATION How to Load and Unload Tape Cartridges. . . . . . . . . . . . .. 5 How to Handle and Care for Tape Cartridges. . . . . . . . . . .. 6 Write Protecting a Cartridge. . . . . . . . . . . . . . . . . . . . . . . .. 6
CHAPTER 3 TAPE CONTROL SOFTWARE
Loading the Tape Control Software . . . . . . . . . . . . . . . . . .. 9 Constructing or Modifying CONFIG.SYS File ........... 11 Description of the Tape Control Programs .............. 12
IMAGE ....................................... 12 FIP . . . . . . . . . . . . . . . . . I • • • • • • • • • • • • • • • • • • • • • • • • • 12 TFORMAT .................................... 12 Using Ba tch Files . . . . . . . . . . . . . . . . . . . . . . . . . . . . . . . . 12
CHAPTER 4 HOW TO PREPARE A NEW TAPE FOR USE
TFORMAT Program ............................... 13 Start Servo Write and Exit ......................... 14 Servo Write and Wait for Completion ................ 15 Servo Write and Then Format Cartridge .............. 15 Format Cartridge Only ........................... 15
Other Selections ................................... 15 Display Cartridge Format Parameters ................ 15 Reverify a Formatted Cartridge ..................... 16 Enter Volume Name ............................. 16
ii Table of Contents
CHAPTER 5 SAVING DISK DATA ON TAPE
How to Save the Contents of the Entire Disk on Tape .... 17 Image Backup to Tape ........................... 18 Image Restore from Tape ......................... 19 End Image ........................ I •••••••••••• 19
How to Save a Group of Files on Tape ................ 19
Using FIP's Menu Mode to Save and Restore Files ....... 20 Backup All Files by Date and Time ................. 20 Backup All Files With a Specified Date .............. 21 Backup All Modified Files ......................... 21 Backup Selected File ............................. 22 Backup Directories .............................. 22 Restore an Entire Save Set ........................ 22 Restore Directories .............................. 22 Restore Selected Files ............................ 22 List Save Sets on Current Cartridge ................. 22 Set Cartridge Status to UNUSED ................... 23 Enter FIP Command Structure .................... 23 Exi t Program ................................... 23
Using FIP's Command Mode to Save Files .............. 23 Sa\Ting Files ............................. , ...... 23
How to Reuse a Tape .............................. 26 Adding New Files ............................... 26 W ri ting Over Existing Files ....................... 27 Renaming the Tape .............................. 27
CHAPTER 6 RESTORING How to Restore the Entire Disk ...................... 31
How to Restore Files or Save Sets ..................... 32 Option 6 - Restore an Entire Save Set .............. 33 Option 7 - Restore Directories .................... 33 Option 8 - Restore Specified Files ................. 33
Using FIP' s Command Mode to Restore Files ........... 34 . Using DOS Buffers to Speed Up Restore Operation ....... 37
__ _0 _, __ •• ' ... ,........... ._<_ .. _ ~ .. ". _
Table of Contents iii
CHAPTER 7 IN CASE OF DIFFICULTIES What to do if Your Tape Won't Restore ............... 39
What to do if a Tape Operation Malfunctions .......... 40
Error Messages ................................... 40 Image Error Messages ............................ 40 TFORMA T Error Messages ........................ 45 FIP Error Messages . . . . . . . . . . . . . . . . . . . . . . . . . . . . . . 46
CHAPTER 8 DRIVE MAINTENANCE Head Cleaning . . . . . . . . . . . . . . . . . . . . . . . . . . . . . . . . . . . 49
CHAPTER 9 WHY AND HOW TO BACKUP DISK FILES
Protecting Your Active Files ......................... 51
How Often? .......... 0 ••••••••••••••••••••••••••• 52
How Many Tapes? ................................ 52
Historical T apes ... . . . . . . . . . . . . . . . . . . . . . . . . . . . . . . . 53
APPENDIX A THEORY OF OPERATION How the System Works ............................. 55
Formatting ..................................... 55 Saving and Restoring ............................. 56 Two Ways to Back Up the Disk .................... 56
APPENDIX B INSTALLATION GUIDELINES
Physical Drive Assignments .......................... 59
Changing the Tape Drive's Device Assignment ........... 59
Termination 0 •• ' ........................ 0 •• Q ••••• • 60
Power Requirements ............................... 61
• IV
APPENDIX C USING BATCH FILES FOR BACKUP OPERATIONS
Batch File Example ................................ 63
SUMMARY OF COMMANDS Image Menu Selections ............................. 65
FIP Menu Selections ............................... 65
FIP Typed Commands ............................. 66
TFORMA T Menu Selections ......................... 67
IND EX . . . . . . . . . . . . . . . . . . . . . . . . . . . . . . . . . . . . . . . . . 69
1
WHAT THIS MANUAL CONTAINS
This manual shows you:
• how to load the software that controls your tape drive,
• how to save and restore disk files, and
• how to care for your tape drive and data cartridges.
To help you use your tape drive as quickly as possible, most of this book is written in a how-to-do-it style. After vou have learned the . . basic steps, you'll be able to use this book for reference. We've summarized the steps for the various operations at the back of this book. After a little practice, you'll be able to back up and restore your files using only the reference section.
If you're new to computers or to the use of fixed disks, we recommend that you read through Chapter 9, "Why and How to Back Up Disk Files", before you begin saving disk files. We believe that if you understand the concept of disk backup, you'll learn the techniques more quickly.
If you're interested in how your tape drive works, there's a nottoo-technical discussion in Appendix A.
If you're looking for something that doesn't appear in the Table of Contents, try the Index at the back of the book.
3
CHAPTERl INTRODUCTION
The Irwin 110 and 125 tape drives are built-in high-speed digital tape drives that copy files from your fixed disk onto magnetic tape cartridges, and restore those files in the event of damage to the originals.
The Irwin 110 stores up to 10 Mb of data on a single cartridge, and the Irwin 125 stores up to 20 Mb. Other than differences in capacity, the drives are identical.
Either system consists of a built-in tape drive and controlling software compatible with your computer's disk operating system (PC-DOS/MS-DOS Version 2.00 or later).
Backup tapes can be made of individual files, groups of files, or the entire fixed disk in a single operation.
BEFORE WE GET STARTED If you have owned your computer for some time, you probably already know how to display disk directories, name and rename files, and transfer files from one directory to another. These are the DOS commands you will use with the tape system.
If your computer is still new and unfamiliar to you, review your DOS manual before installing the tape drive's software.
IMPORTANT NOTE
Your fixed disk must be initialized before you use the tape system. Refer to your DOS manual for instructions.
.. l)
CHAPTER 2 INSTALLATION
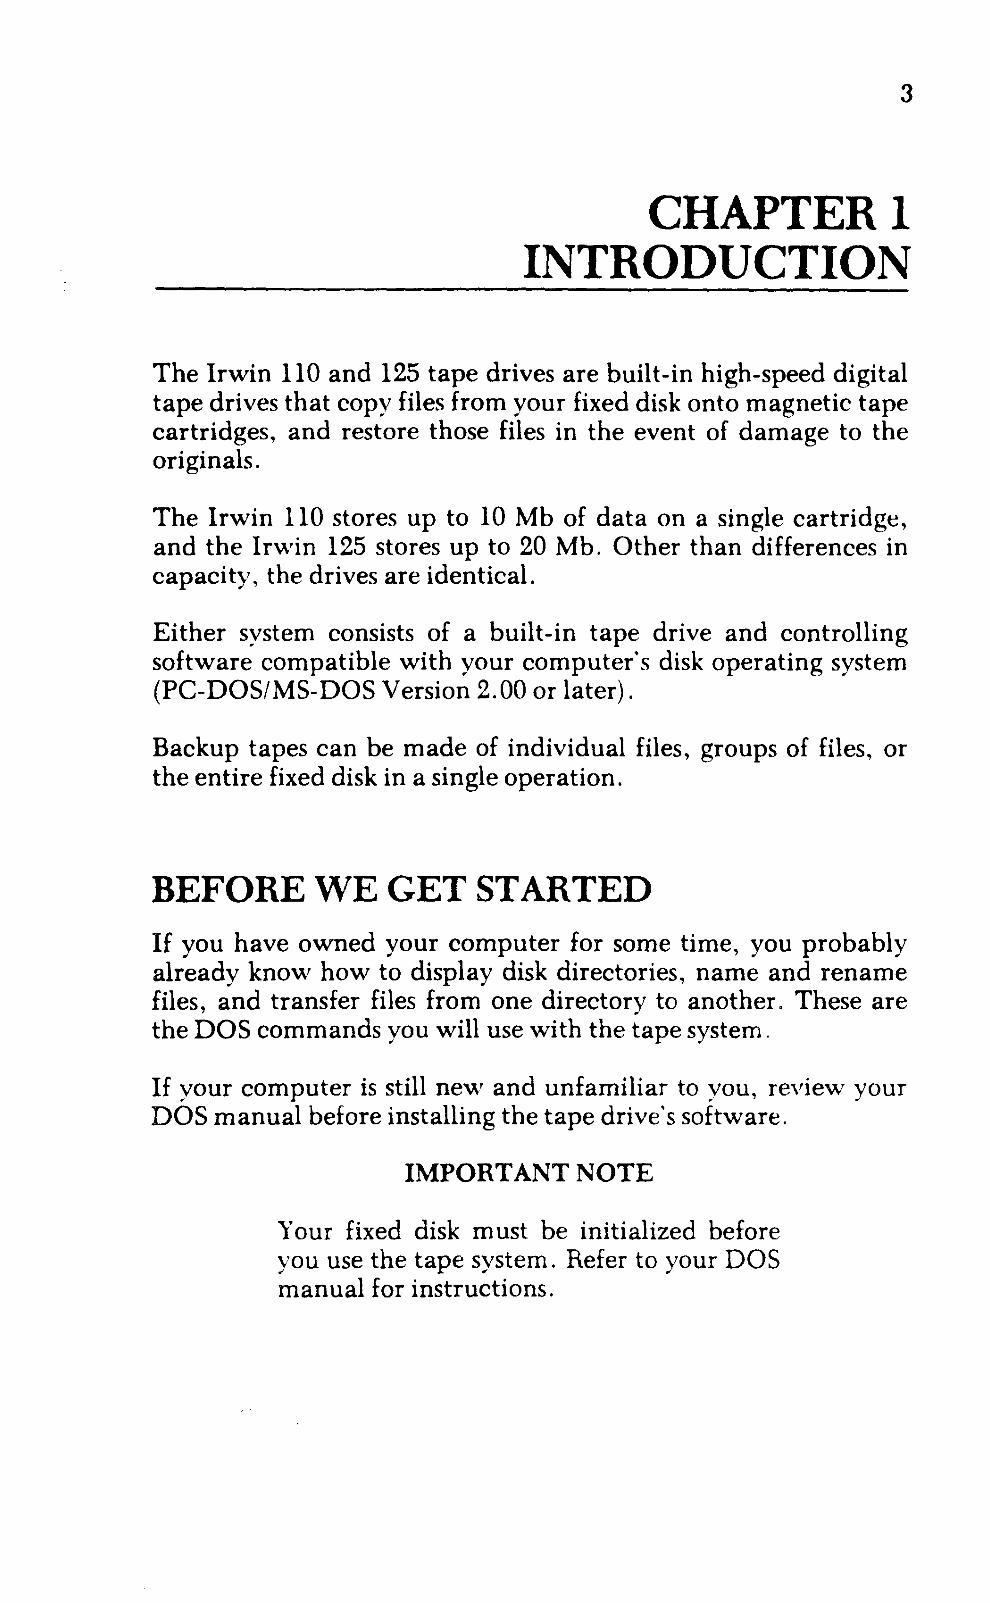
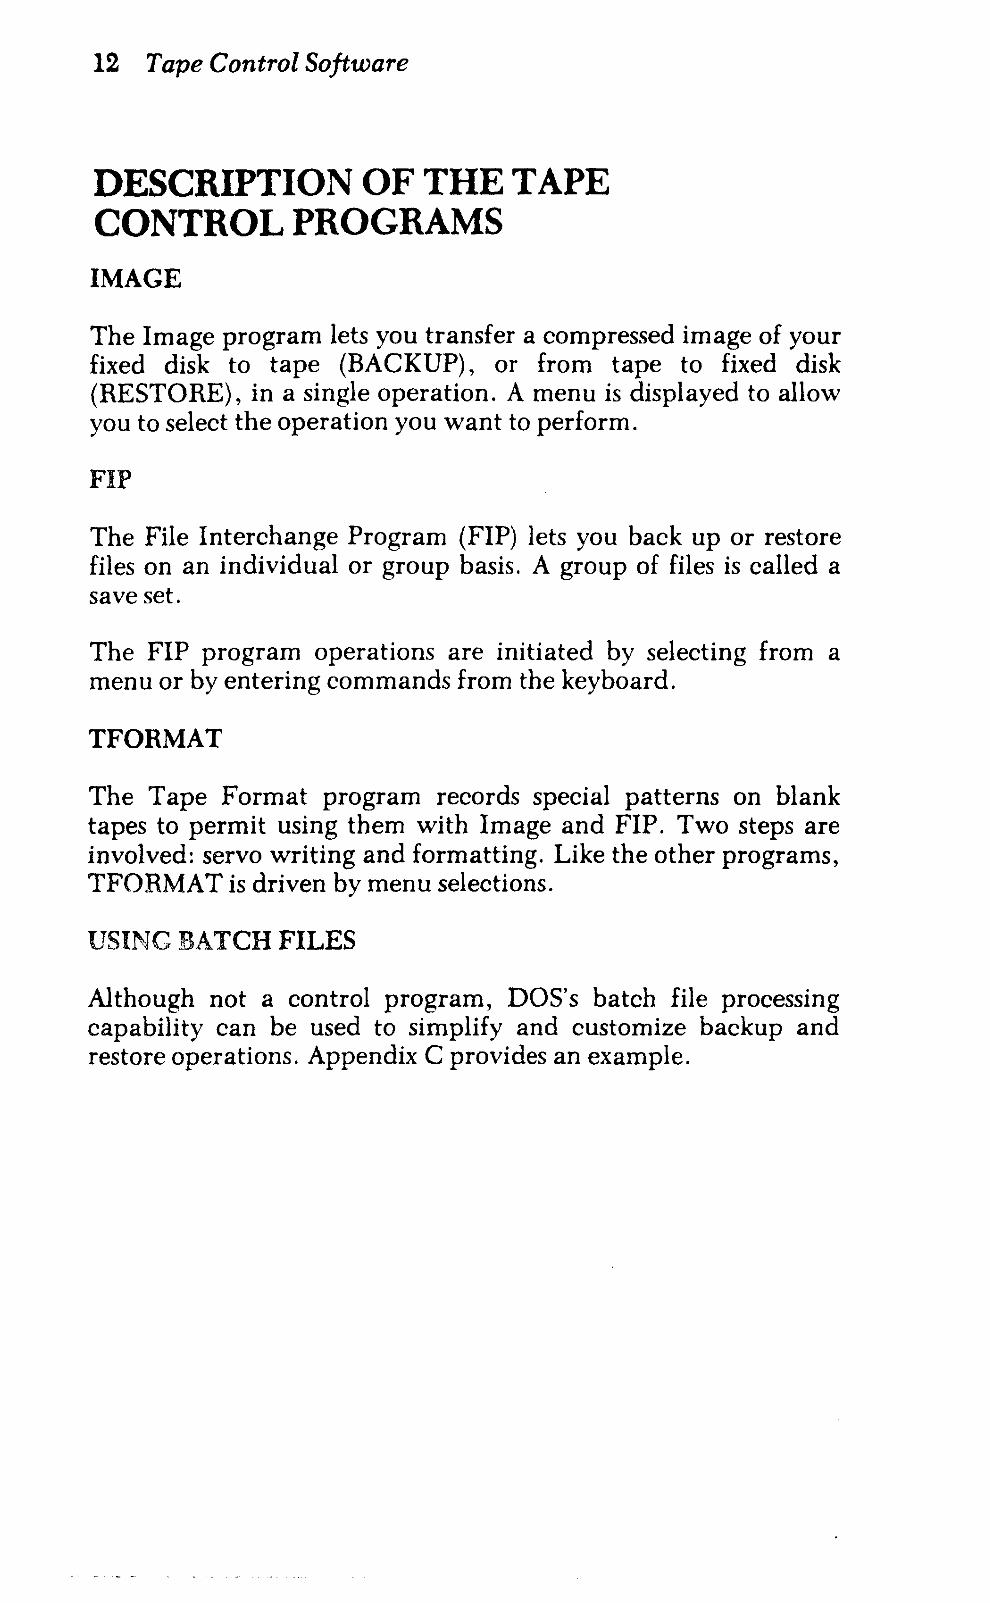
HOW TO LOAD AND UNLOAD TAPE CARTRIDGES To load a cartridge into the drive, simply insert it with the exposed roller edge first, and the metal face down (Figure 2-1). Before inserting the cartridge, check to make sure the paper insert packaged with the cartridge is not stuck to the underside of the cartridge.
You should feel a definite "click" as the cartridge is seated in the drive. If you don't, press the eject bar, withdraw the cartridge, and reinsert it. It should now insert properly.
If the tape drive's power is on, the tape drive automatically positions the tape to its beginning point, lighting the red "busy" light on the front of the drive. Otherwise, the tape will be positioned as soon as you turn the power on.
To remove the cartridge, press the eject bar.
TAPE CARTRIDGE
METAL FACE
ROLLER EDGE
TAPE DRIVE
Figure 2-1. Inserting the Tape Cartridge
6 Installation
HOW TO HANDLE AND CARE FOR TAPE CARTRIDGES
IMPORTANT NOTE
The tape system uses special tape cartridges to store the data contained on your fixed disk. Standard DC-IOO cartridges will not work in the tape drive.
These are the only cartridges that work:
3M DCIOOO Irwin TC 200
The special tape cartridges used in the drive are ruggedly built, but they should be handled with care to preserve the data they contain.
• Never open the cartridge tape's access door or touch the tape itself. One fingerprint can prevent the tape drive from reading data across all tracks.
• Keep the cartridge in its protective box when it is not actually in the tape drive.
• Keep the cartridge away from sources of electromagnetic fields, such as telephones, dictation equipment, mechanical or printing calculators, motors, and bulk tape erasers.
• Keep the cartridge away from heat sources, such as radiators, warm air ducts, registers and lamps.
• Do not lay cartridges on the CRT or the computer's base unit.
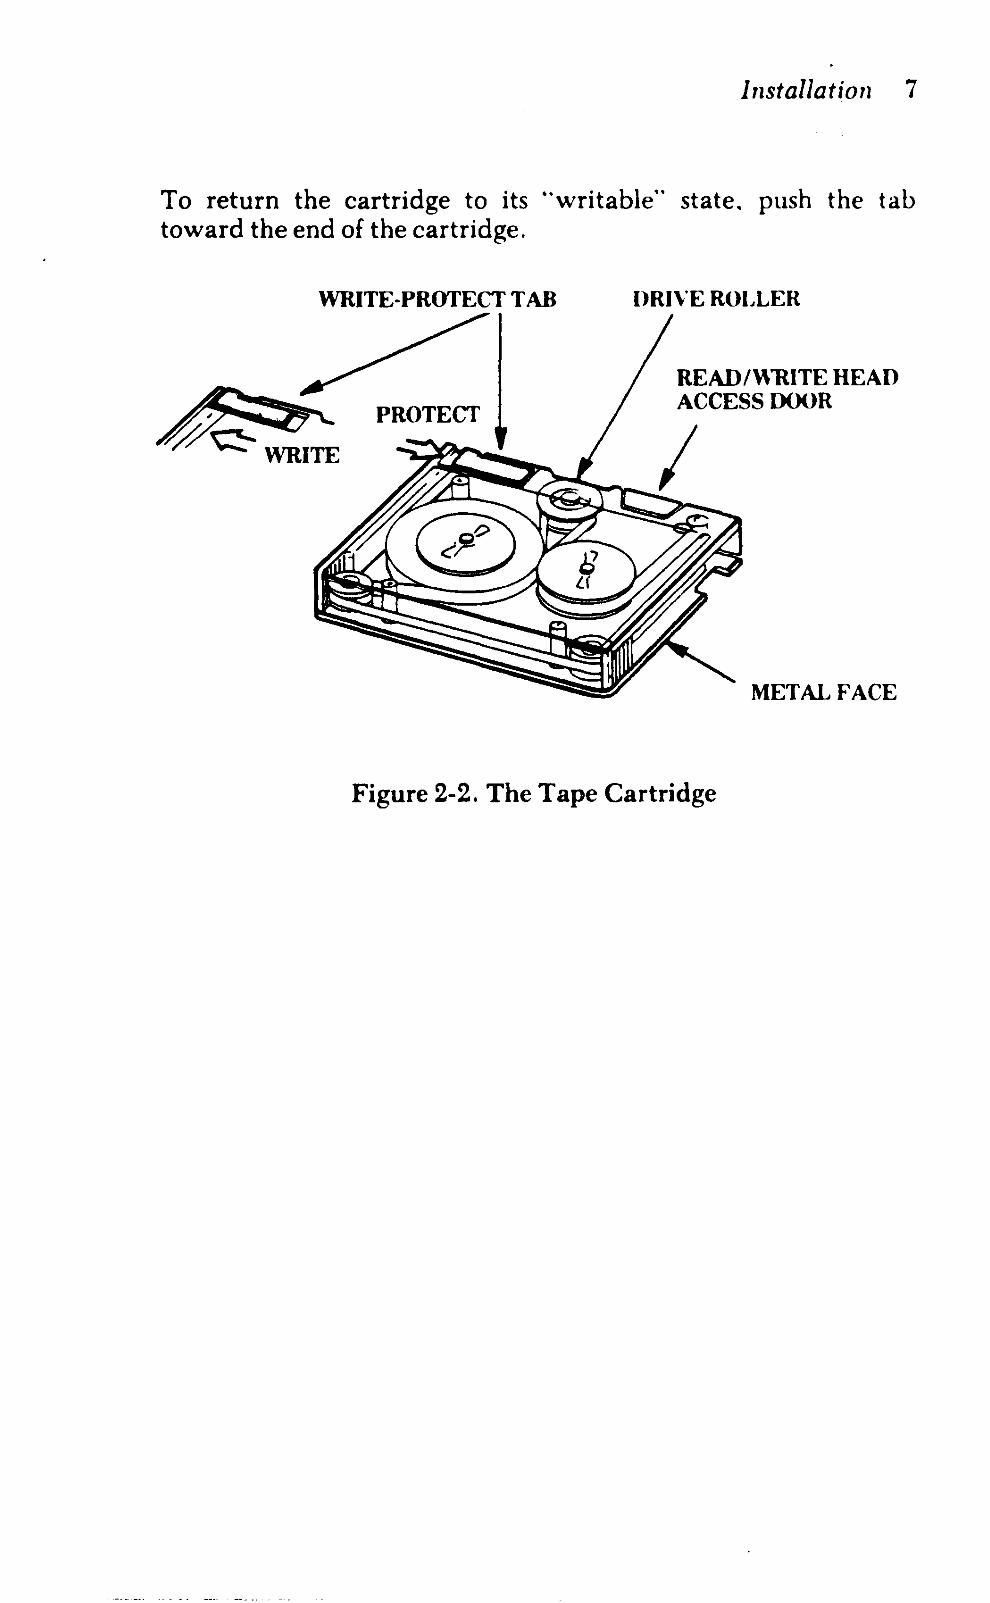
WRrrE-PROTECTING A CARTRIDGE When a tape is full, or when it contains data that you want to protect from accidental erasure, slide the tab marked "RECORD" toward the center (see Figure 2-2). The drive will not attempt to store any data on a tape that is "write-protected" in this way. It will, however, restore files from a write-protected tape to your disk.
Installation 7
To return the cartridge to its "writable" state. push the tab toward the end of the cartridge.
WRITE· PROTECT TAB
PROTECT
()RI\'E ROLLER
READ/WRITE HEAD ACCESS DOOR
METAL FACE
Figure 2-2. The Tape Cartridge
9
CHAPTER 3 TAPE CONTROL SOFTWARE
LOADING THE TAPE CONTROL SOFTWARE The program diskette that came with your tape drive contains the control programs you'll need to back up your fixed disk. The programs run only under MS-DOS/PC-DOS version 2.00 and later versions of these disk operating systems.
The diskette drive in your computer is probably identified as drive A, and the fixed disk as drive C. If not, substitute the correct letters in the steps below.
, 1. Before doing anything else, make a backup copy of the tape
control programs, following the instructions in your DOS manual. Then file your original diskette, and never use it again except to make additional working copies of the programs.
IMPORTANT NOTE
To "enter" any of the command statements shown below or anywhere else in this manual, you must press the Return, Enter, or.-J key as shown in step 2. Your computer will have one of these three keys on its keyboard, and its use at the end of each command statement is implied. Where necessary, the word RETURN is used in this manual to symbolize all three keys.
2. Log into the hard disk drive by typing:
C: [RETURN]
3. Access the root directory by typing:
CD\
10 Tape Control Software
4. Create a directory named BIN. Type:
MD \BIN
5. Transfer the tape control programs to your fixed disk. Type:
COpy A: *.* \BIN
This transfers the tape control programs from the diskette to the BIN directory you created in step 4. Wait until the transfer finishes.
6. Remove the program diskette and store it in a safe place. You should not have to use it again unless the programs you just transferred to fixed disk are damaged somehow.
IMPORTANT NOTE
If you already have an AUTOEXEC.BAT file, skip the following step; just modify your existing file by adding the statements shown in step 8.
7. Create an AUTOEXEC.BAT file. Type:
COPY CON: AUTOEXEC.BAT
8. Enter the following commands into the AUTOEXEC.BAT file:
DATE TIME PATH C:\BIN
After the PATH statement, enter any other commands you "'.'''71l-t;; tiVlke part of the AUTOEXEC.BAT file. For details, see your DOS manual.
IMPORTANT NOTE
Enter the words "DATE" and "TIME", not the actual date and time.
· Tape Control Software 11
You must include DATE and TIME in the batch file, and the operator must enter the correct time and date on startup. The tape control programs use these parameters to identify backup tapes.
9. Press the F6 function key, then press the RETURN key.
The preceding steps create a batch file in the root directory that will be executed automatically each time the computer is turned on. The PATH statement provides an automatic path to the tape control programs from any directory or subdirectory.
CONSTRUCTING OR MODIFYING CONFIG.SYS. FILE You can use the BUFFERS command to cause DOS to create and use up to 99 disk buffers. Unless you tell it to do otherwise, DOS only uses two buffers. You will get significantly better performance from the tape programs and other applications as well if you use more buffers. We suggest using 20 buffers. Each additional buffer increases the resident size of DOS by 528 bytes. (See your DOS manual for details.)
IMPORTANT NOTE
If you already have a CONFIG.SYS file, skip step la, and modify your existing file by adding the statements shown in step 11.
10. Create a CONFIG.SYS file. Type:
COPY CON: CONFIG.SYS.
11. Enter the following commands into the CONFIG.SYS file:
FILES=lO BUFFERS=20
12. Press the F6 function key, then press the RETURN key.
13. Reboot your system.
The tape control programs are now ready to run.
12 Tape Control Software
DESCRIPTION OF THE TAPE CONTROL PROGRAMS IMAGE
The Image program lets you transfer a compressed image of your fixed disk to tape (BACKUP), or from tape to fixed disk (RESTORE), in a single operation. A menu is displayed to allow you to select the operation you want to perform.
FIP
The File Interchange Program (FIP) lets you back up or restore files on an individual or group basis. A group of files is called a save set.
The FIP program operations are initiated by selecting from a menu or by entering commands from the keyboard.
TFORMAT
The Tape Format program records special patterns on blank tapes to permit using them with Image and FIP. Two steps are involved: servo writing and formatting. Like the other programs, TFORMA T is driven by menu selections.
USING BATCH FILES
Although not a control program, DOS's batch file processing capability can be used to simplify and customize backup and restore operations. Appendix C provides an example.
13
CHAPTER 4 HOW TO PREPARE
A NEW TAPE FOR USE
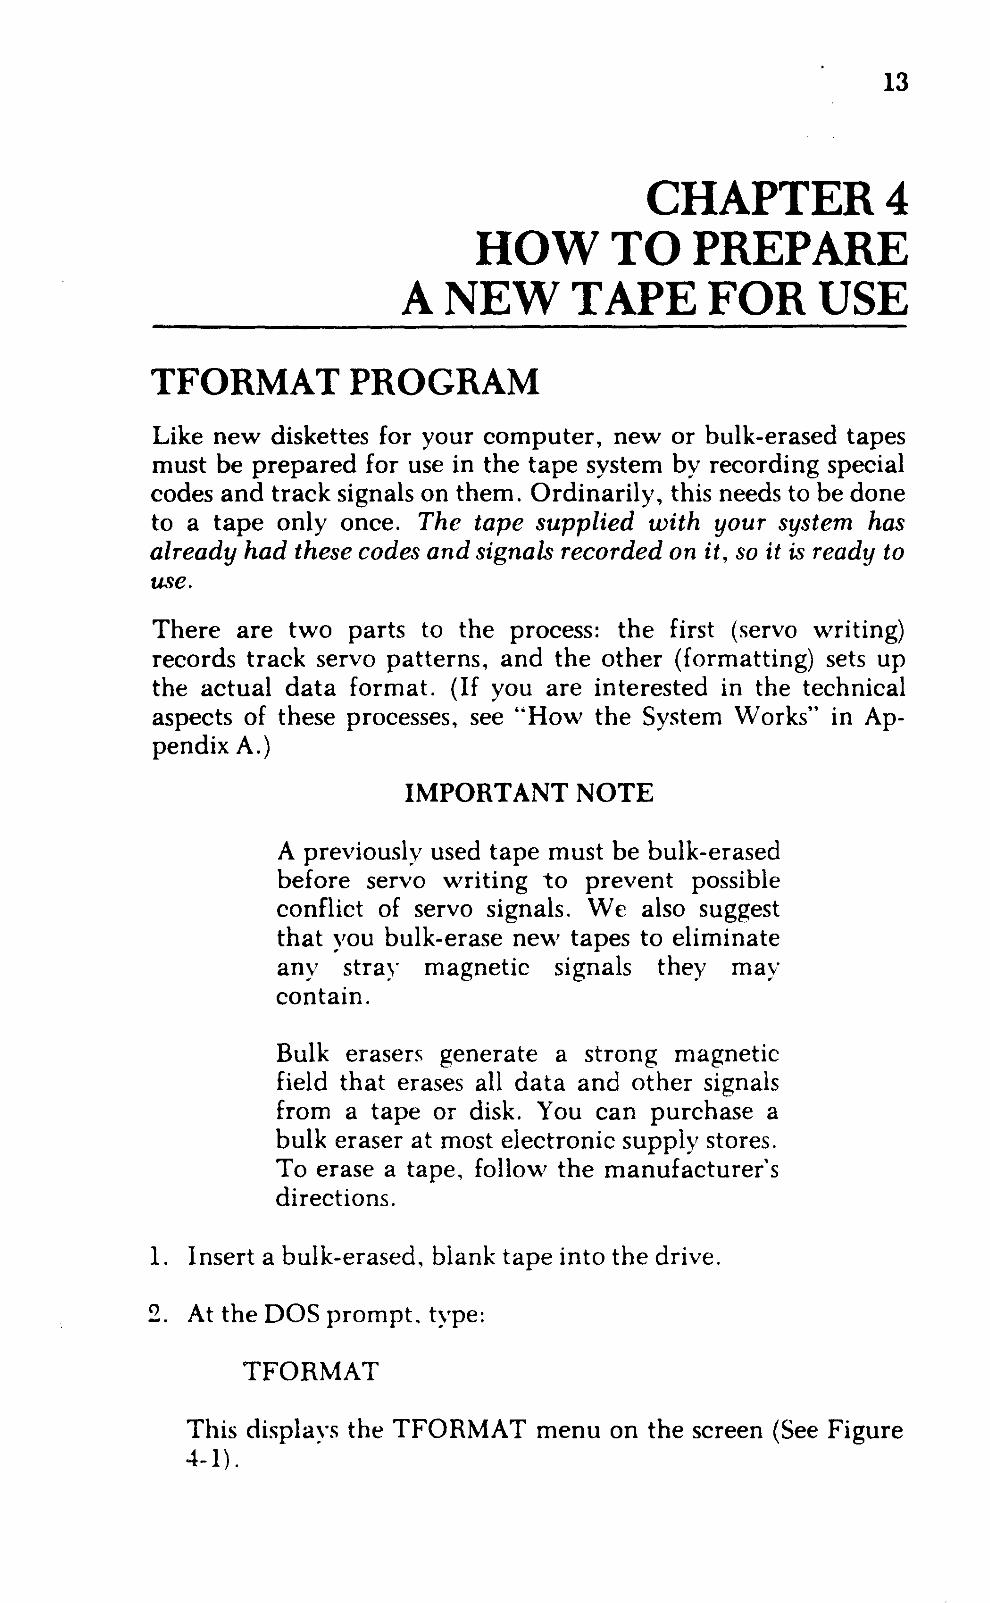
TFORMAT PROGRAM Like new diskettes for your computer, new or bulk-erased tapes must be prepared for use in the tape system by recording special codes and track signals on them. Ordinarily, this needs to be done to a tape only once. The tape supplied with your system has already had these codes and signals recorded on it, so it is ready to use.
There are two parts to the process: the first (servo writing) records track servo patterns, and the other (formatting) sets up the actual data format. (If you are interested in the technical aspects of these processes, see "How the System Works" in Appendix A.)
IMPORTANT NOTE
A previously used tape must be bulk-erased before servo writing to prevent possible conflict of servo signals. We also suggest that you bulk-erase new tapes to eliminate any stray magnetic signals they may contain.
Bulk erasers generate a strong magnetic field that erases all data and other signals from a tape or disk. You can purchase a bulk eraser at most electronic supply stores. To erase a tape, follow the manufacturer's directions.
1. Insert a bulk-erased, blank tape into the drive.
2. At the DOS prompt, type:
TFORMAT
This displays the TFORMAT menu on the screen (See Figure 4-1) .

14 Preparing Tapes
Tape Format Program Release 4 Ie) 1984 1985 Irwin Magnetic Systems
TFORMAT Menu
1 . Start servo write and exit 2. Servo write and wait for completion 3. Servo write and then format cartridge 4. Format cartridge only 5. Display cartridge format parameters 6. Reverify a formatted cartridge 7. Enter volume name 8. Exit program
Enter menu selection (8):
Figure 4-1. TFORMAT Menu
3. Of the operations displayed, select any of the "servo write" operations. Servo writing records a pattern of signals on the tape to guide the read-write head precisely along the data tracks. These are the selections:
Start Servo Write and Exit
This selection starts the servo writing process (which takes about 18 minutes), and returns you to DOS. You can then use your computer for other things while the tape is being servo written. Remember you will also have to jormat the tape r <fo(e you can use it in the system.
If the system has trouble servo writing a tape, the red light on the tape drive will begin flashing. If that happens, bulk-erase the tape and try to servo write it again. If the tape fails again and other tapes successfully complete servo writing, the tape is defective; return it to your dealer. If several tapes fail, see Chapter 7, "In Case of Difficulties."
__ .'~ '-., "' __ ""_~"Jo'_ ••. v'_ • __ " .•••• '_y-_ .
· Preparing Tapes 15
Servo Write and Wait for Completion
If you choose this option, you will not be returned to DOS, but periodic messages will inform you of the progress and completion of servo writing. If difficulties are encountered, error messages will be displayed. Remember that you will also have to format the tape before you can use it in the system.
Servo Write and Then Format Cartridge
This selection both servo writes and formats the tape. While running, status messages are displayed periodically. It takes about 35 minutes to run.
4. If you selected either "Start servo write and exit .. or "Servo write and wait for completion", the tape must still be formatted before it can be used. In that case, select:
Format Cartridge Only
Formatting maps the entire tape for read and write operations. identifying "blocks" of data. This includes a media check to identify and catalog defective blocks so they will not be used for data. The program also records the date of formatting. Running time is about 17 minutes.
As with all magnetic media, data recorded on the cartridge tape degrades a little each time it is read. Since the tape's format information is written once and then read time and time again, it will begin to degrade over time (but usually only after the tape has been used hundreds of times.) If you start to notice an increase in the number of CRC errors or read "retries", reformat the tape.
OTHER SELECTIONS Display Cartridge Format Parameters
This selection allows you to display the title and date of the tape, as well as the number of bad blocks previously identified and cataloged.

16 Preparing Tapes
Reverify a Formatted Cartridge
This selection lets you verify that a used cartridge (or an old but unused cartridge) still works properly. The operation consists of reading each block of the tape to verify that each block is readable. After this verification, it lists the bad blocks not previously cataloged, as well as any blocks that were in the bad block list but can now be read successfully.
Reverify does not erase data files already on the tape, and does not change the bad block list if the cartridge has been used previously. Use this selection when you have trouble restoring files from a tape and it will point you to the source of the problem.
When a cartridge is unused, reverify updates the bad block list for any defective block it detects.
This selection takes about eight minutes to run.
Enter Volume Name
This lets you assign a name to the tape after it has been formatted, or change a name previously assigned. The volume name may be any combination of up to 12 characters, but cannot start with 9. space (i.e., blank).
17
CHAPTER 5 SAVING DISK DATA ON TAPE
If you're new to the use of a fixed disk, read Chapter 9, "Why and How to Back Up Disk Files" before you do the procedures in this chapter.
HOW TO SAVE THE CONTENTS OF THE ENTIRE DISK ON TAPE To save the contents of the entire fixed disk on tape, you must have a tape that is servo written and formatted.
IMPORTANT NOTE
If your fixed disk is partitioned so that DOS only knows about part of the physical disk space, only that part can be backed up with this program.
To get the most efficient use of available disk and tape storage space, you should run the DOS utility program CHKDSK before you back up your disk using Image. This deletes all unnecessary and temporary files from the disk.
1. At the DOS prompt, type:
CHKDSK/F
If no problems are detected, go to step 3. If CHKDSK detects problems it will ask if it should fix them. Answer "Y' to the question, and DOS will create new files of recovered space that was previously lost. The files will have the extension . CHK, and will appear in the root directory.
2. Delete the files with a CHK extension:
DEL \ •. CHK
18 Saving Data
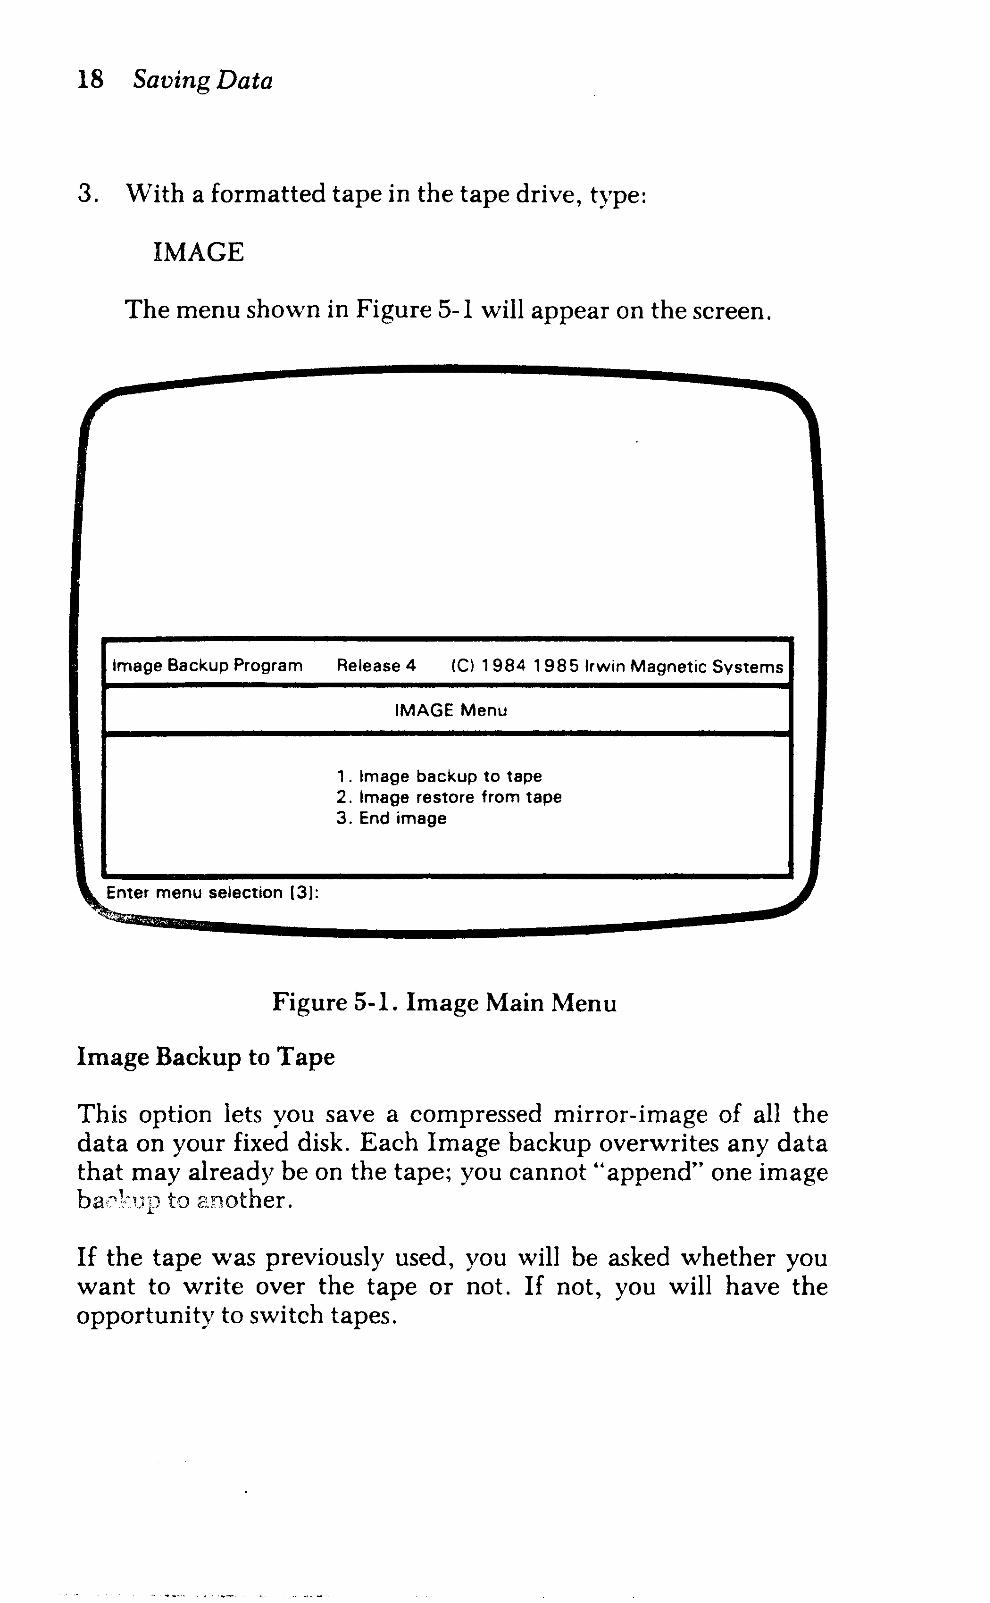
3. With a formatted tape in the tape drive, type:
IMAGE
The menu shown in Figure 5-1 will appear on the screen.
Image Backup Program Release 4 Ie) 1984 1985 Irwin Magnetic Systems
IMAGE Menu
1 . Image backup to tape 2. Image restore from tape 3. End image
Enter menu selection (3):
Figure 5-1. Image Main Men u
Image Backup to Tape
This option lets you save a compressed mirror-image of all the data on your fixed disk. Each Image backup overwrites any data that may already be on the tape; you cannot" append" one image bw..,ln;p to 2!.nother.
If the tape was previously used, you will be asked whether you want to write over the tape or not. If not, you will have the opportunity to switch tapes.
Saving Data 19
It takes up to 16 minutes to save the data on a disk that is filled to capacity, and proportionately less for one that is not full. If your disk contains more data than the tape can hold, you must insert additional cartridges until all the files have been saved. Prompts will be displayed at the proper time. The Image program identifies each tape as it proceeds through the backup. Mark these cartridges to identify their sequence in case it is ever necessary to restore the files.
If you have only one fixed disk drive (DOS C, D, etc.) answer the question about the source disk by pressing RETURN.
The volume name of an Image tape is always the same as the fixed disk's volume name. The time and date of the Image backup is obtained from DOS and saved with the volume name.
An Image back up/ restore operation compresses the data on your disk and makes all of the unused space contiguous, eliminating any problems with fragmented data.
Image Restore from Tape
This option restores the disk files that were saved with "Image backup." (More on this in Chapter 6.)
End Image
CAUTION
Restoring from tape writes over (erases) all files currently on the disk, whether or not • they have copies on the tape.
This option returns you to DOS.
HOW TO SAVE A GROUP OF FILES ON TAPE If you do not want to save all of the files on your fixed disk, you can use the File Interchange Program (FIP) to selectively save up to 250 (Irwin 110) or 500 (Irwin 125) files at a time.
20 Saving Data
FIP procedures can be performed using menus or by entering commands in the command mode. The command mode is identified by a special FIP prompt.
In FIP, files are grouped into what are called "save sets". A file may be any size. You can put as many as 93 (Irwin 110) or 186 (Irwin 125) save sets on a tape, and use an unlimited number of tapes, so there is theoretically no limit to the amount of data you can save using FIP.
Note that you cannot intermix FIP and Image files on the same tape.
IMPORTANT NOTE
The FIP program assumes that your "default drive" is the fixed disk.
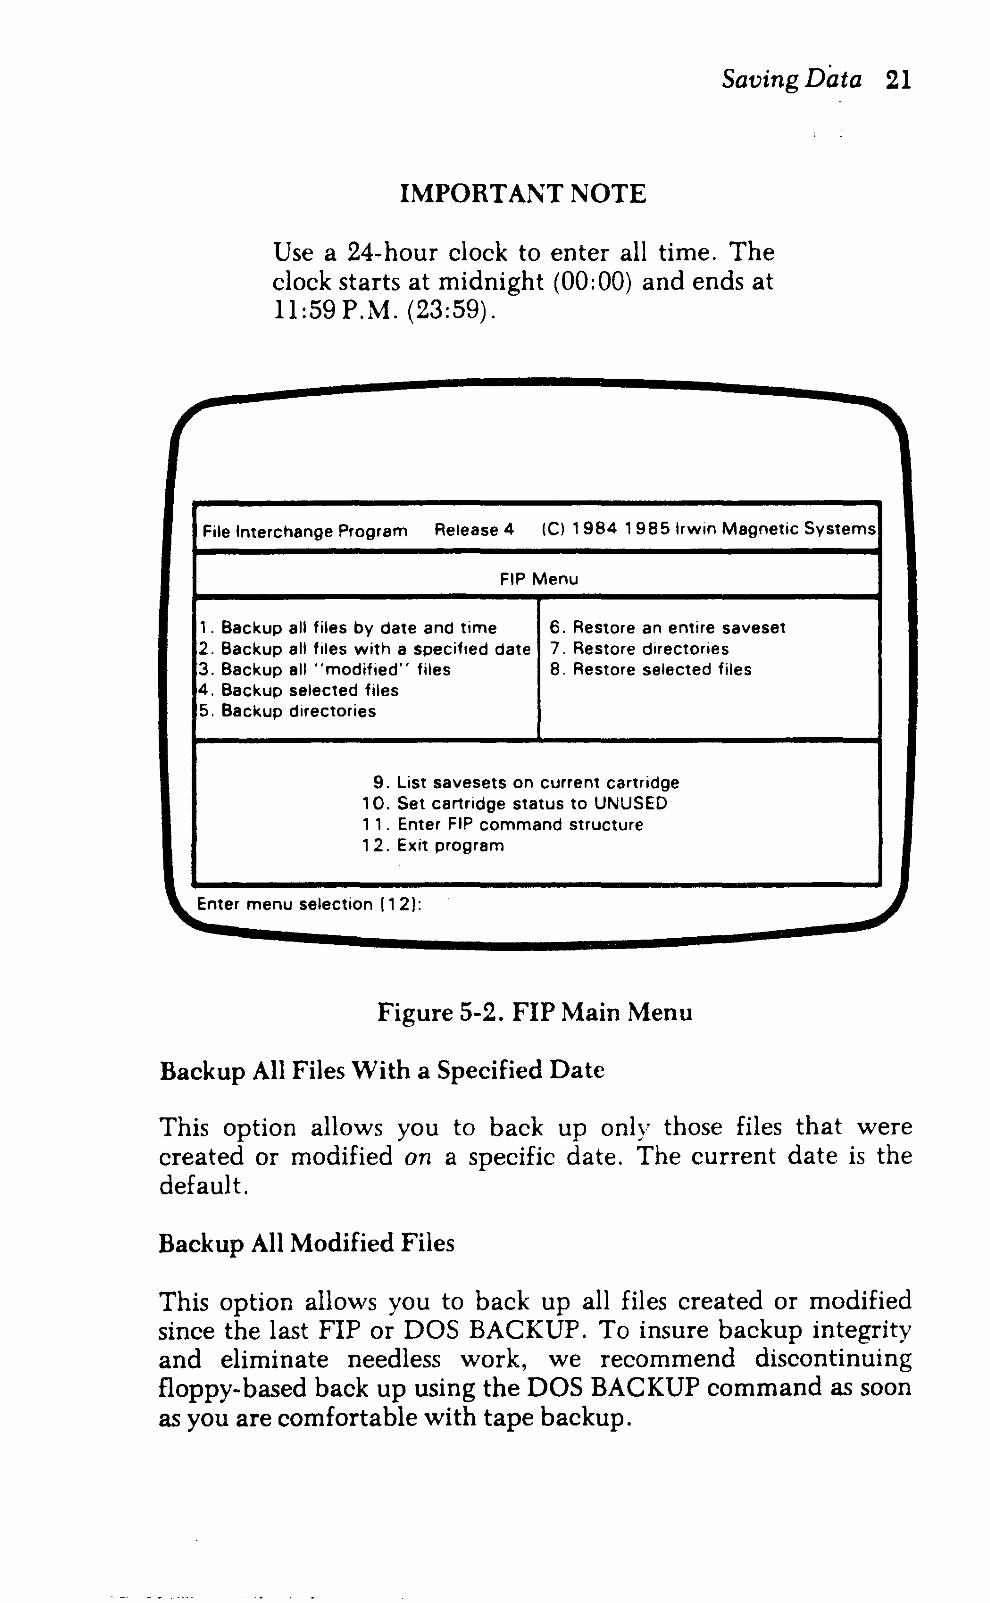
USING FIP's MENU MODE TO SA VE AND RESTORE FILES 1. Insert a tape in the tape drive.
2. At the DOS prompt, type:
FIP
The program reads the tape's master directory (if it is a FIP tape) and the list of bad blocks. When it is finished, it displays the menu shown in Figure 5-2.
3. Select the desired program option by entering the associated number and pressing RETURN. Each option is described in the text that follows.
Backup All Files by Date and Time
i' " .~ "., •....•. ,lllows you to back up all files created on or after a specified date and time. In most systems this also includes files that were modified on or after the specified date. The program displays the current date and allows you to accept it by simply pressing RETURN, or you may enter a different date using the form mm/dd/yy. If you use a date of 111/80, selecting this option saves all of the files on the disk. After you enter the date, FIP displays the default time 00:00 (midnight) that will be used; you can either accept it or enter a different time.
Saving Data 21
IMPORTANT NOTE
Use a 24-hour clock to enter all time. The clock starts at midnight (00:00) and ends at 11:59 P.M. (23:59).
File Interchange Program Release 4 (e) 1984 1985 Irwin Magnetic Systems
FIP Menu
, . Backup all files by date and time 6. Restore an entire saveset 2. Backup all files with a specified date 7. Restore directories 3. Backup all .. modified" files 8. Restore selected files 4. Backup selected files 5. Backup directories
9. List save sets on current cartridge 10. Set cartridge status to UNUSED 1 1 . Enter FIP command structure 1 2. Exit program
Enter menu selection [1 2 J:
Figure 5-2. FIP Main Menu
Backup All Files With a Specified Date
This option allows you to back up only those files that were created or modified on a specific date. The current date is the default.
Backup All Modified Files
This option allows you to back up all files created or modified since the last FIP or DOS BACKUP. To insure backup integrity and eliminate needless work, we recommend discontinuing floppy-based back up using the DOS BACKUP command as soon as you are comfortable with tape backup.
22 Saving Data
Backup Selected File
This option allows you to save a single file or a group of similarlynamed files on tape. The "wildcard" symbols • and? are used to group similarly named files together.
You will be requested to specify the directory, or select the default (current) directory. The save set will assume the name of the file or group of files you specify, including any "wildcard" symbols. So if wildcard characters are used, you will probably want to rename the save set.
Backup Directories
This option lets you save all of the files in any specified disk directory. The name of the current directory is displayed and can be accepted by pressing RETURN, or a different directory name can be chosen. The save set will have the same name as the directory you save.
Note that if the selected directory has more than 250 (Irwin 110) or 500 (Irwin 125) files, FIP will automatically create multiple save sets for the directory.
Restore an Entire Save Set
This option allows you to restore a specified save set from tape. For details, see Chapter 6.
Restore Directories
This option allows you to restore all or some of the directories on a FIP tape. For details, see Chapter 6.
Restore Selected Files
This option allows you to save selected files from a save set, ratherthan the entire save set. For details, see Chapter 6.
List Save Sets on Current Cartridge
This option lists all of the save sets on the tape.
Saving Data 23
Set Cartridge Status to UNUSED
This option "clears" the tape by deleting the directory of save sets. All data on the cartridge is destroyed!
Enter FIP Command Structure
This option switches the FIP program to a command-driven mode of operation. Command mode is signified by the special FIP prompt ».
Exit Program
Returns program control to DOS.
USING FIP's COMMAND MODE TO SAVE FILES Saving Files
FIP's command mode has more built-in flexibility and lets you do more sophisticated backup and restore operations than does the menu mode. Following is a description of how to save individual files or groups of files using the command mode. Restore operations possible in the command mode are described in Chapter 6. Type HELP to get an explanation of the FIP commands, or refer to the Reference Section.
1. Create and name the save set. At the FIP prompt, type:
> > CREATE savesetname
You may use any combination of up to 64 characters to name the save set (i.e., "ACCOUNTING DATA"). Note that spaces cannot be used as part of the name. Use the "_" or "-" character instead.
2. Select the disk files you want to include in the save set:
» SELECT filename1 filename2 filename3
Note that the file names must be separated by spaces.
24 Saving Data
When entering the names of files to be saved, you can use the standard DOS "wild card" characters - the " ... " and the "?" - to make the job easier. For example:
"'.DAT
INVENT??'"
... ... .
selects all files with the extension . D AT.
selects all files beginning with INVENT, with up to two characters before the extension, and any (or no) extension.
selects all files in current directory.
To include files from a different disk directory in the save set, change the current directory like this:
» CD \directoryname\subdirectoryname
Notice that, unlike DOS, the change directory command requires a space before the directory specification. To identify the current directory, use the CD command without parameters:
»CD
If a file selected from the new directory has the same name as one already selected, the second selection will be refused.
To check which files are in the current directory, enter the FIP command:
» DIR
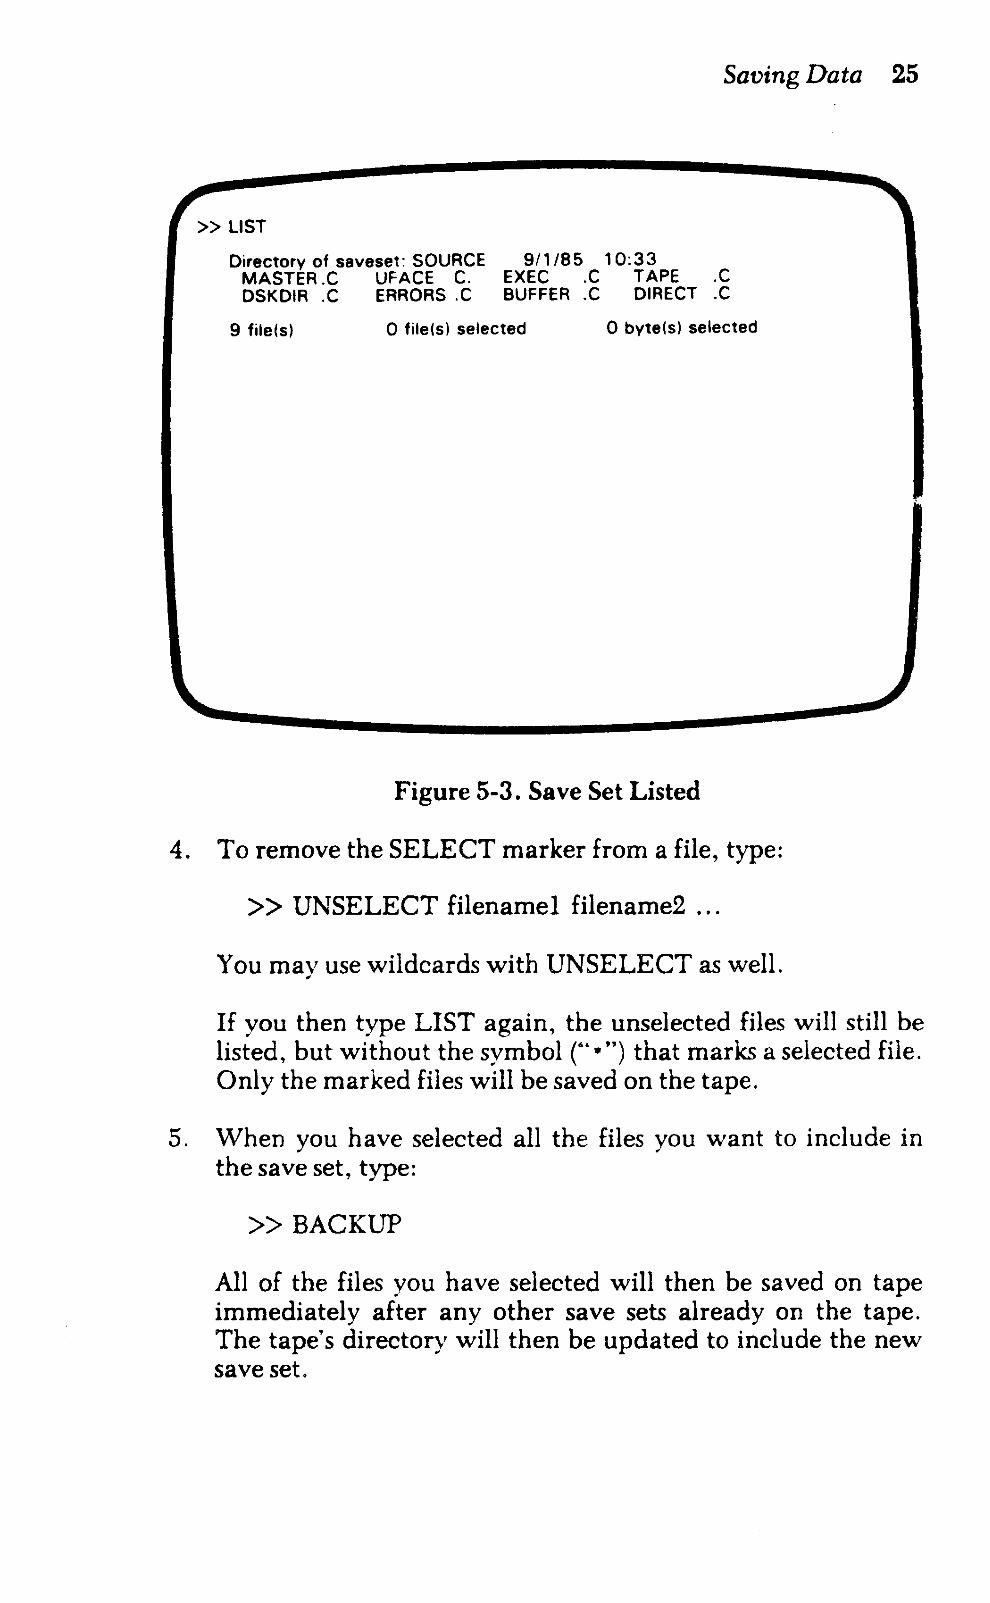
3. After you have entered the names of all the files you want to save, you can verify your selections by typing:
An example of a save set listing is shown in Figure 5-3.
Saving Data 25
» LIST
Directory of saveset: SOURCE 9/1/85 10:33 MASTER.C UFACE C. EXEC .C TAPE .C DSKDIR.C ERRORS.C BUFFER.C DIRECT.C
9 file(s) o file(s) selected o byte(s) selected
Figure 5-3. Save Set Listed
4. To remove the SELECT marker from a file, type:
> > UNSELECT filenamel filename2 ...
You may use wildcards with UNSELECT as well.
If you then type LIST again, the unselected files will still be listed, but without the symbol C'.") that marks a selected file. Only the marked files will be saved on the tape.
5. When you have selected all the files you want to include in the save set, type:
» BACKUP
All of the files you have selected will then be saved on tape immediately after any other save sets already on the tape. The tape's directory will then be updated to include the new save set.
26 Saving Data
6. If you want to create another save set on the same tape, you may do so as soon as the tape drive finishes with the first save set. If you want to use a different tape, wait for the operation to finish, then type:
»END
After FIP displays the command prompt, you can remove the tape from the drive and insert a different tape. If you exchange tapes without the END command, you'll be requested to reinsert the previous tape and enter the END command as soon as you try any operations on the new tape.
7. To return to FIP's main menu, type:
» MENU
To exit the FIP program and return to DOS from command mode, type:
» EXIT
HOW TO REUSE A TAPE Once a tape has been used for saving disk data, it may be used again in any of three ways:
• New save sets can be added after those already saved,
• New save sets can be written over the old save sets. To do this, you must set the tape status to UNUSED. Note that the old save sets are lost, or
• The tape can be reformatted.
First make sure the tape is not write-protected, then insert the cartridge in the drive.
Adding New Files
To add new files to an existing FIP tape, use either menu selections or the command mode to CREATE, SELECT, and BACKUP files. The new save set will be added to the tape. If there is not enough room on the tape for the entire save set, FIP will allow you to reduce the size of the save set by UNSELECTing one or more files.

Saving Data 27
In command mode, you can check the tape for available space. At the FIP prompt, type:
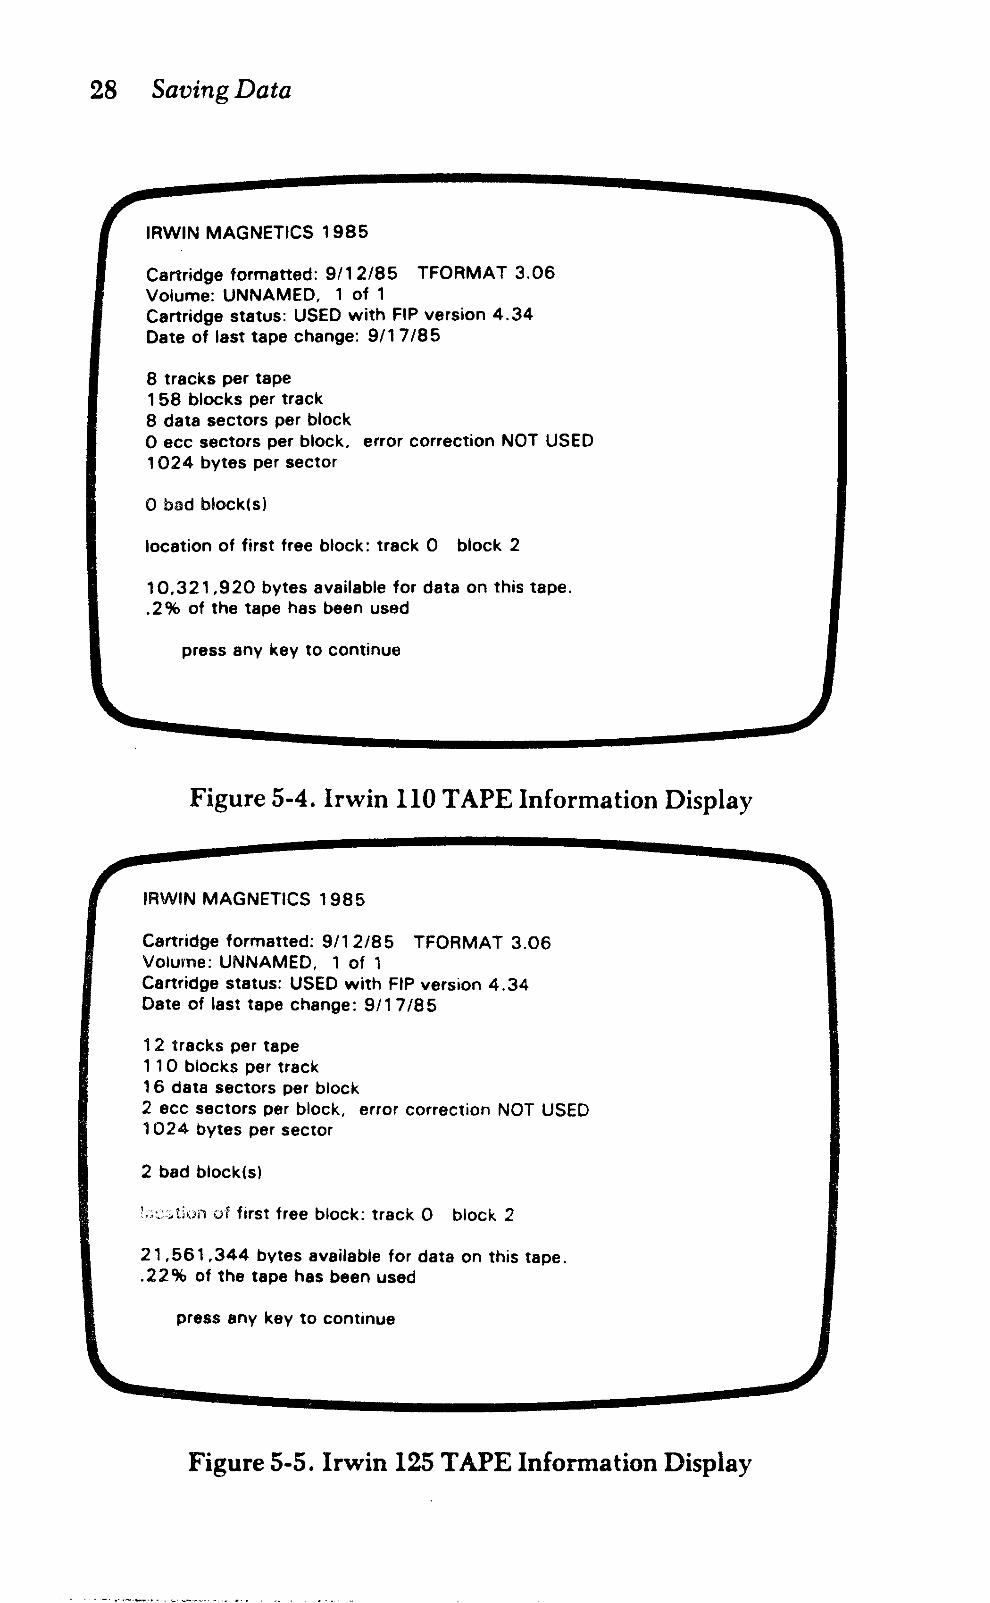
» TAPE
The number of bytes available for storage and other information will be displayed (see Figures 5-4 and 5-5).
WARNING
Any data presently on the tape will be lost when you perform either of the following steps.
Writing over Existing Files
To make sure you have the right tape, run FIP and select menu option "9". This displays the save sets on the tape. Or, in command mode, type:
» SETS
To write over the existing files, select menu option" 10". Or, in command mode, type:
» RESET
This deletes the directory of save sets and allows you to reuse the entire tape. All data on the cartridge i.s destroyed! The table of bad blocks will be retained. Note that, ordinarily, it is not necessary to reformat a used tape.
28 Saving Data
IRWIN MAGNETICS 1985
Cartridge formatted: 9/12/85 TFORMAT 3.06 Volume: UNNAMED, 1 of 1 Cartridge status: USED with FIP version 4.34 Date of last tape change: 9/17/85
8 tracks per tape 1 58 blocks per track 8 data sectors per block o ecc sectors per block, error correction NOT USED 1024 bytes per sector
o bad block(s)
location of first free block: track 0 block 2
10,321,920 bytes available for data on this tape . . 2% of the tape has been used
press any key to continue
Figure 5-4. Irwin 110 TAPE Information Display
IRWIN MAGNETICS 1985
Cartridge formatted: 9/12/85 TFORMAT 3.06 VOlume: UNNAMED, 1 of 1 Cartridge status: USED with FIP version 4.34 Date of last tape change: 9/1 7/85
1 2 tracks per tape 1 1 0 blocks per track 16 data sectors per block 2 ecc sectors per block, error correction NOT USED 1024 bytes per sector
2 bad block(s)
!;\:.;:, ti'.)tI of first tree block: track 0 block 2
21 ,561 ,344 bytes available for data on this tape . . 22% of the tape has been used
press any key to continue
Figure 5-5. Irwin 125 TAPE Information Display
Saving Ddta 29
Renaming the Tape
You can rename the tape with the command:
»VOL
The program will ask you for the new name, which may be any combination of up to 12 characters, but the first character cannot be a space.
IMPORTANT NOTE
If you are resetting or renaming more than one tape, type END before you exchange tapes.
31
CHAPTER 6 RESTORING
HOW TO RESTORE THE ENTIRE DISK If you used Image to save everything on your fixed disk, the data you saved can only be restored from the tape in its entirety; you cannot restore individual files. hemember that an Image restore operation destroys everything that presently exists on your fixed disk.
1. Insert the tape containing your Image files into the drive.
2. At the DOS prompt, type:
IMAGE
The Image menu will appear, as shown in Figure 5-1.
CAUTION
The following operation writes over (erases) all files presently on your fixed disk, whether or not they have copies on the tape.
3. From this menu, select "Image restore from tape."
The operation begins with a check of the tape to make sure it contains an Image backup. If it does not, you must use FIP to restore the files on the tape.
If more than one tape is needed to back up your disk, you'll be prompted to insert additional cartridges at the appropriate time. If you insert a cartridge out of sequence, you'll be asked for the correct cartridge ("'volume").
After restoring your data, a message is displayed reporting a successful transfer, or listing the files that may contain errors. If errors are reported, try again using the same tape. If that doesn't work, use an older backup tape.
32 Restoring Data
The disk volume name is set to the name of the volume restored from tape.
If the DOS that you restored to disk from the Image tape is a different version than the version of DOS executing in your computer's memory, you will get the following message:
"Insert COMMAND. COM disk in default drive and strike any key when ready."
If you see this message, simply reboot the system using the CtrlAlt-Del keys, or turn your computer's power OFF, then ON.
HOW TO RESTORE FILES OR SAVE SETS The FIP program lets you restore individual files or files previously grouped into save sets by one of FIP's "save" options (See Chapter 5).
FIP can be used to restore files in either of two ways; using menu selections or by entering commands. Using menu selections you can restore an entire save set, a complete directory, a group of files, or a single file. In command mode, you can restore an entire save set, several files from the same save set, or a single file.
The FIP program assumes that the DOS "default drive" is the fixed disk.
IMPORTANT NOTE
In the command mode, all files will be restored to the current directory. If this is not acceptable, change to a different directory using the CD command.
1. Insert the tape containing your files into the drive.
2. At the DOS prompt, type:
FIP
The program reads the tape's parameters. When finished, the FIP menu shown in Figure 5-2 is displayed.
Restoring Data 33
3. There are three ways to restore data using FIP; you can restore all of the files in a specified save set, restore all of the files in a specified directory (or all directories), or restore individual files.
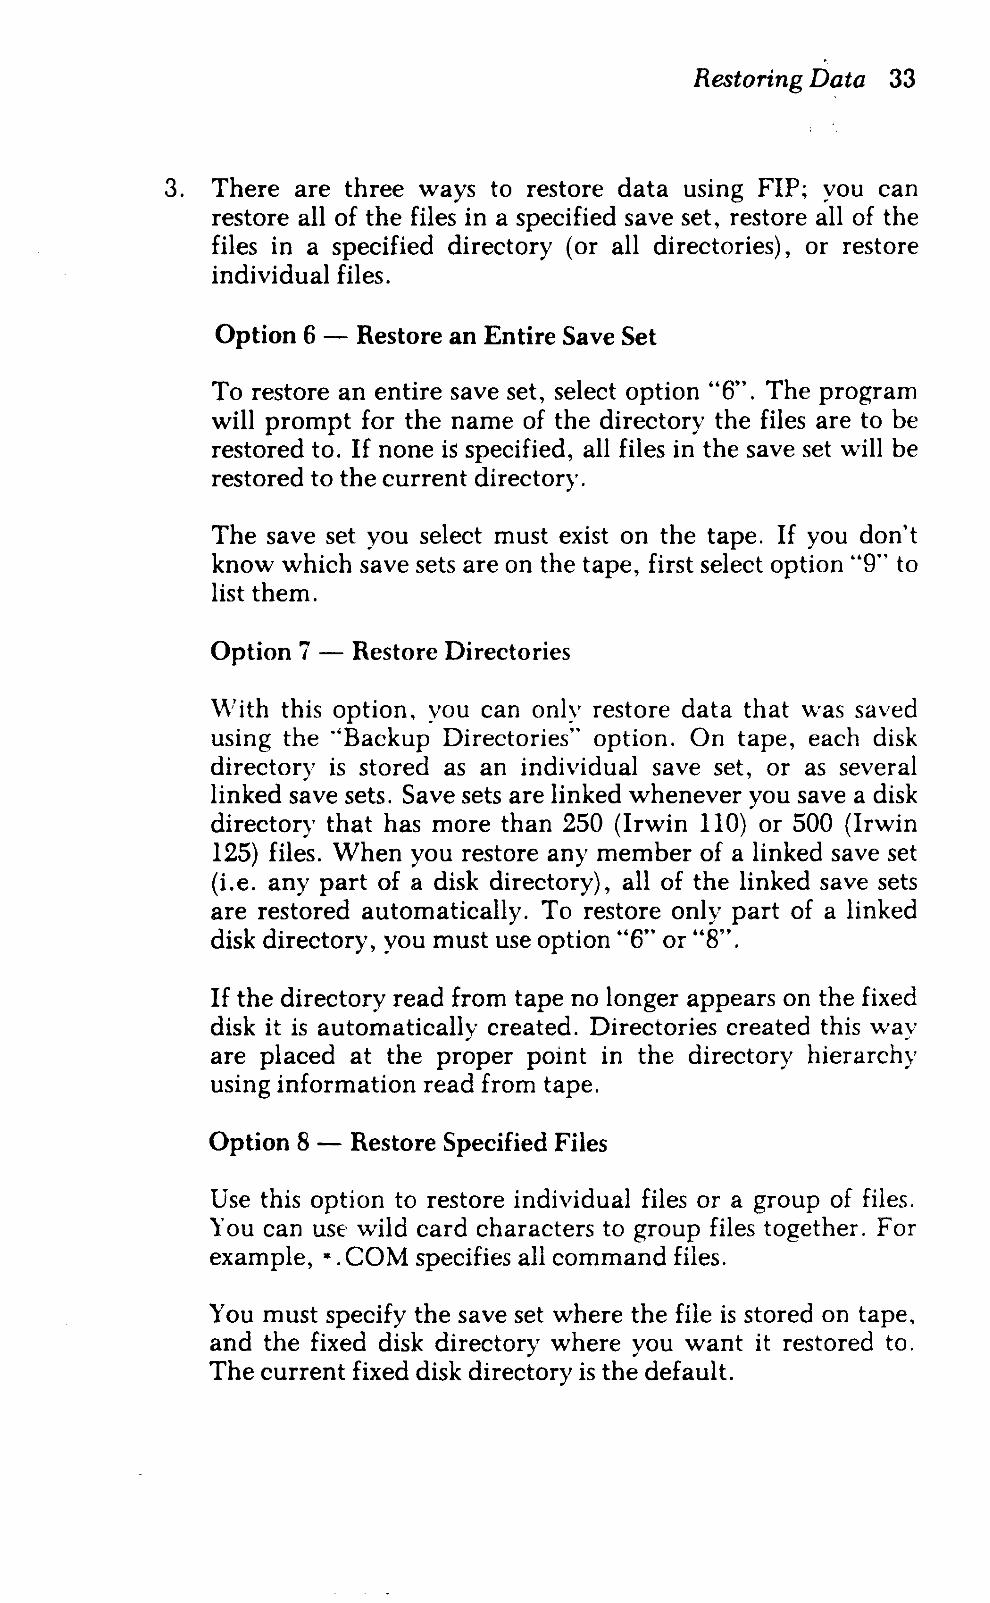
Option 6 - Restore an Entire Save Set
To restore an entire save set, select option "6". The program will prompt for the name of the directory the files are to be restored to. If none is specified, all files in the save set will be restored to the current directory.
The save set you select must exist on the tape. If you don't know which save sets are on the tape, first select option "g" to list them.
Option 7 - Restore Directories
\\lith this option, you can only restore data that was saved using the "Backup Directories" option. On tape, each disk directory is stored as an individual save set, or as several . linked save sets. Save sets are linked whenever you save a disk directory that has more than 250 (Irwin 110) or 500 (Irwin 125) files. When you restore any member of a linked save set (Le. any part of a disk directory), all of the linked save sets are restored automatically. To restore only part of a linked disk directory, you must use option "6" or "8".
If the directory read from tape no longer appears on the fixed disk it is automatically created. Directories created this way are placed at the proper point in the directory hierarchy using information read from tape.
Option 8 - Restore Specified Files
Use this option to restore individual files or a group of files. You can USE' wild card characters to group files together. For example, •. COM specifies all command files.
You must specify the save set where the file is stored on tape, and the fixed disk directory where you want it restored to. The current fixed disk directory is the default.
34 Restoring Data
If these selection do not offer enough flexibility, select option "11" to enter the command mode. Operations possible in the command mode are described in the following text.
USING FIP'S COMMAND MODE TO RESTORE FILES The FIP command mode has more built-in flexibility and lets you do more sophisticated restore operations than are possible using menu selections. Following is a description of how to restore individual files or groups of files using FIP commands.
1. With the FIP menu displayed, select option "11" to enter the command mode. This displays the special FIP prompt
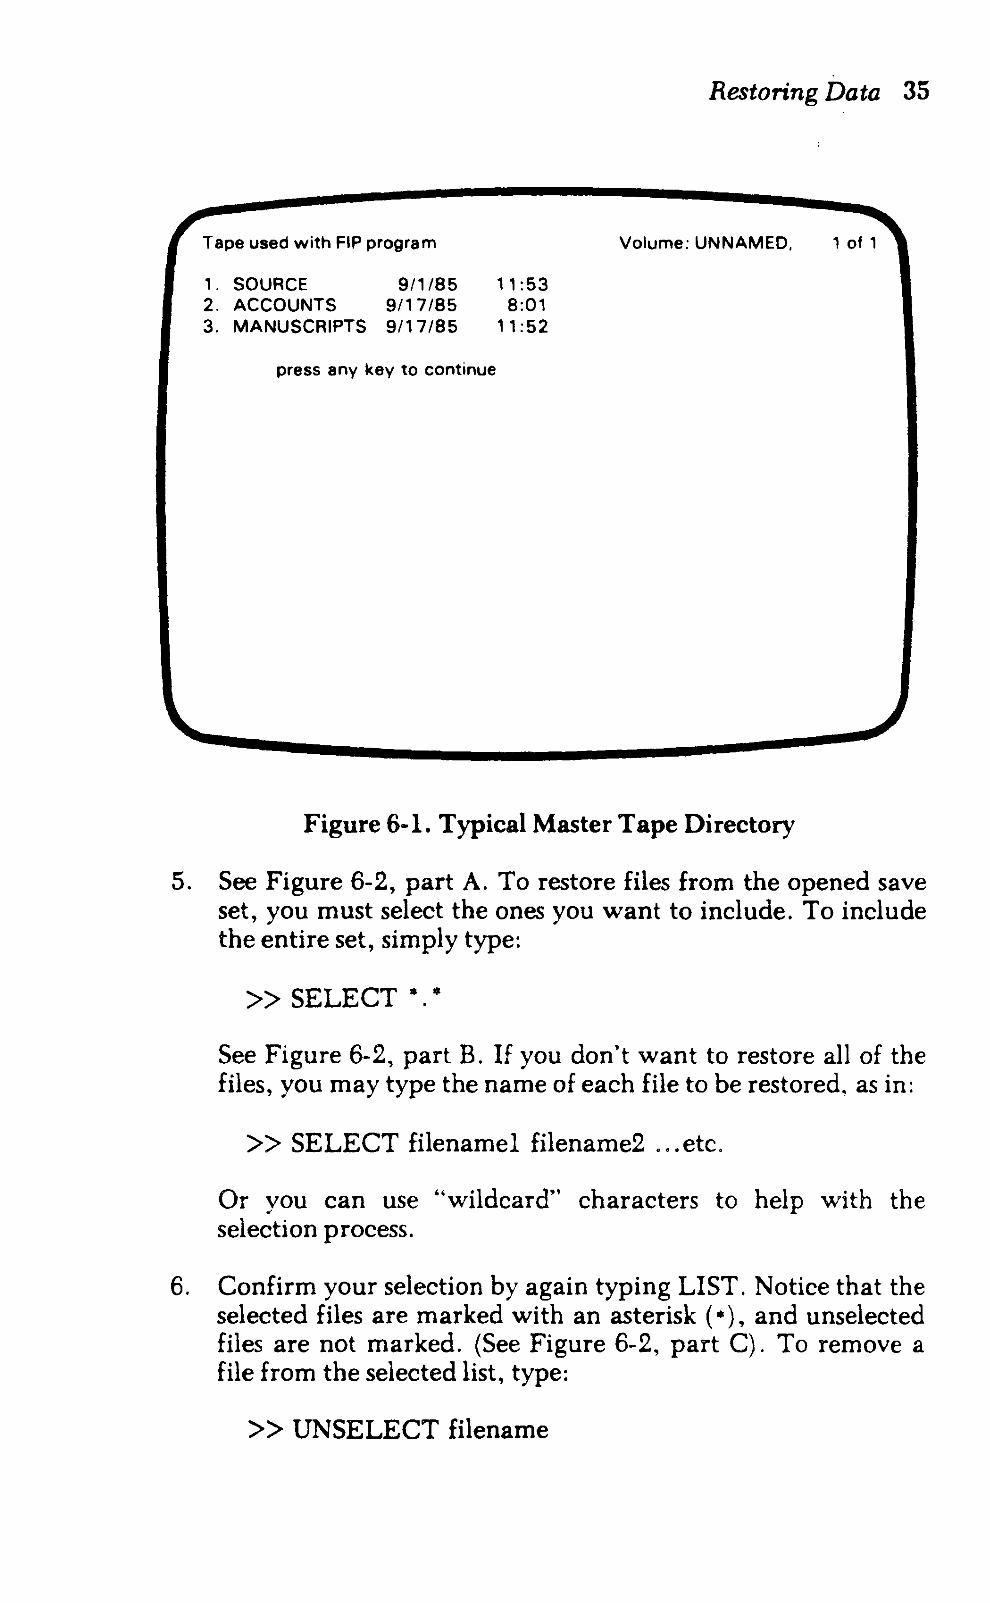
2. To list the save sets that are on the tape, at the FIP prompt type:
» SETS
As shown in Figure 6-1, this lists all of the save sets, and tells when each one was saved on tape.
3. Next, specify the save set you want to restore:
» OPEN savesetnumber
where savesetnumber is the number of one of the save sets listed by the SETS command.
4. You can list the files in the save set by then typing:
» LIST
Restoring Data 35
Tape used with FIP program Volume: UNNAMED, 1 of 1
1. SOURCE 9/1/85 11:53 2. ACCOUNTS 9/17/85 8:01 3. MANUSCRIPTS 9/17/85 11:52
press any key to continue
Figure 6-1. Typical Master Tape Directory
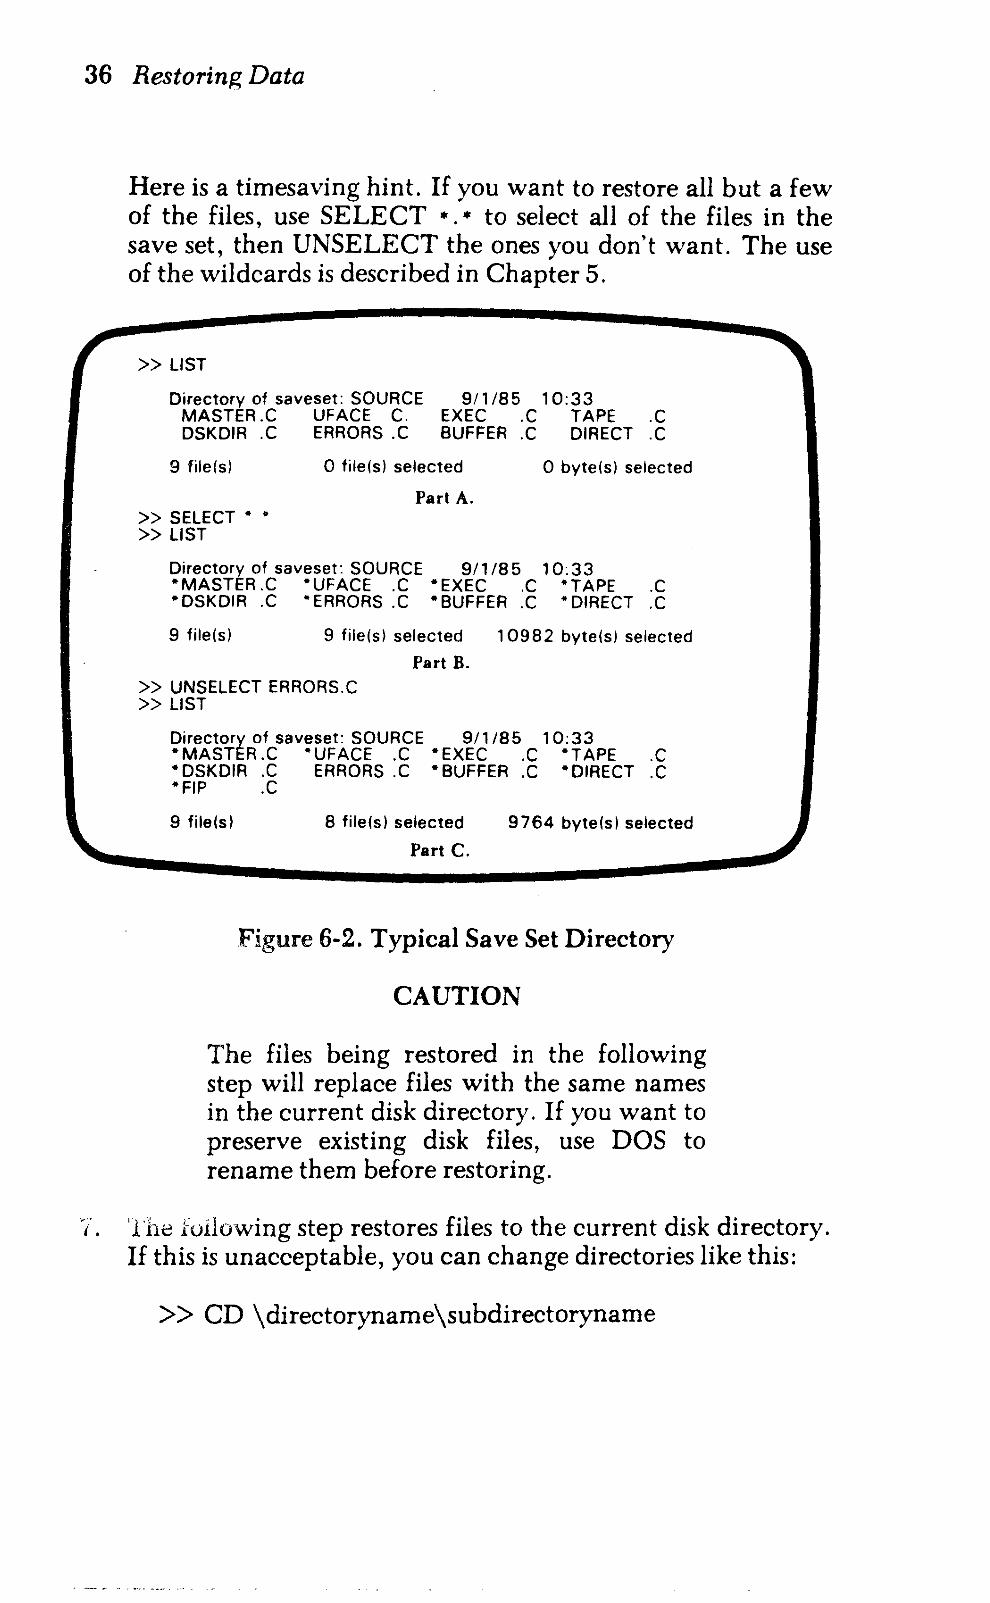
5. See Figure 6-2, part A. To restore files from the opened save set, you must select the ones you want to include. To include the entire set, simply type:
» SELECT .....
See Figure 6-2, part B. If you don't want to restore all of the files, you may type the name of each file to be restored. as in:
» SELECT filenamel filename2 ... etc.
Or you can use "wildcard" characters to help with the selection process.
6. Confirm your selection by again typing LIST. Notice that the selected files are marked with an asterisk ( .. ), and unselected files are not marked. (See Figure 6-2, part C), To remove a file from the selected list, type:
»UNSELECT filename
36 Restoring Data
Here is a timesaving hint. If you want to restore all but a few of the files, use SELECT *. * to select all of the files in the save set, then UNSELECT the ones you don't want. The use of the wildcards is described in Chapter 5.
» LIST
Directory of saveset: SOURCE 9/1/85 10:33 MASTER.C UFACE C. EXEC .C TAPE .C DSKDIR.C ERRORS .C BUFFER.C DIRECT.C
9 file(s)
» SELECT" • » LIST
o file(s) selected
Part A.
o byte(s) selected
Directory of saveset: SOURCE 9/1/85 10:33 "MASTER.C "UFACE .C "EXEC .C "TAPE .C "DSKDIR.C -ERRORS.C "BUFFER.C "DIRECT.C
9 file(s) 9 file(s) selected 10982 byte(s) selected
Part B. » UNSELECT ERRORS.C » LIST
Directory of saveset: SOURCE 9/1/85 10:33 "MASTER.C ·UFACE .C "EXEC .C "TAPE .C • DSKDIR.C ERRORS.C" BUFFER.C "DIRECT .C "FIP .C
9 file(s) 8 file(s) selected
Part C.
9764 byte(s) selected
Figure 6-2. Typical Save Set Directory
CAUTION
The files being restored in the following step will replace files with the same names in the current disk directory. If you want to preserve existing disk files, use DOS to rename them before restoring.
',". 'l'he following step restores files to the current disk directory. If this is unacceptable, you can change directories like this:
» CD \directoryname\subdirectoryname
Restoring Data 37
8. After specifying the proper disk directory and selecting the files you wish to restore, type:
» RESTORE
The selected files are then restored to the current directory. When the restore operation is finished, a message reports a successful transfer, or lists the files that may ccontain errors. After transfer, the save set is closed. You may then open another save set, either to restore it or to examine its directory.
USING DOS BUFFERS TO SPEED UP RESTORE OPERATIONS To minimize the time required to restore files using FIP, change the number of DOS buffers specified in the CONFIG.SYS file according to the following formula:
Number of Buffers = (Number of files X 32) + Average File Size
------------------------------ +5 512
where:
Number of Files = number of files in the save set being restored.
Average File Size = total size of all files being restored divided by the n urn ber of files.
See page 11 or your DOS manual for details.
39
CHAPTER 7 IN CASE OF DIFFICULTIES
WHAT TO DO IF YOUR TAPE WON'T RESTORE If you try to restore data and get a message that the system is unable to accurately restore some part of it, the problem may be temporary. A speck of dust or other contamination may have interfered with reading the tape, and another attempt might prove successful, even though built-in routines make the system try several times after an unsuccessful read.
At the end of a restore operation, those files that could not be read accurately are listed, with a message that they may contain errors.
Things to try:
1. Clean the tape drive's read/write head, then try the restore operation again. (See Chapter 8).
2. 1£ repeated tries do not permit restoring the files, it's likely that the tape has been damaged or contaminated. To check this, use the TFORMAT program to reverify it. Reverify reads the entire tape, and may find bad blocks that were not cataloged previously. If this is the case, you must either make corrections to the disk file with an editor, or restore the defective file from another source, such as an earlier backup tape.
Good backup practice helps prevent losing valuable data by maintaining more than one copy of important files. See Chapter 9 for a discussion of back up philosophy. Always treat your tape cartridges with care, as detailed in "How to Handle and Care for the Tape Cartridges" in Chapter 2.
40 Handling Problems
WHAT TO DO IF A TAPE OPERATION MALFUNCTIONS If a power interruption occurs during a backup or restore operation, simply start over when the power returns. The incomplete files will be replaced by the new copy.
If the drive itself fails during a backup or restore operation, or if you get an unexpected increase in restore failures, try the following steps before you return it to your dealer.
1. Clean the read/write head, then try the operation again. (See Chapter 8). If the problem persists, continue with the following steps.
2. Try a different tape, preferably one that has never been used. Servo write and format the tape, then try both backup and restore operations. If the drive operates normally with a different tape, then the problem is likely to be with the tape you were using.
3. If the drive runs but does not transfer data, the cable connection to the computer may be at fault. Disconnect the cable and work the plug in and out several times. Sometimes a very small amount of corrosion forms on electrical contracts, interferring with the passage of the data signals. Secure the connector and try the operation again.
ERROR MESSAGES In the course of using either Image or FIP, you will receive a number of messages on the display. Most of these simply tell what the system is doing, ask questions for you to answer using the keyboard, or give instructions for you to follow. However, if the system has trouble executing an operation, it may display one or n::Jre n~1:;:;sages that tell you about the problem. Whether you can correct the problem or not, make a note of these messages in case you need to discuss the problem with your dealer.
Image Error Messages
In the list below, only "problem" messages are included. They are in alphabetical order.
Handling Problems 41
BAD BLOCK(S) IN NON-REDIRECTABLE PART OF TAPE
The tape is not usable. Try reformatting the tape. If that doesn't work, the tape is defective and cannot be used with Image or FIP.
BAD SYSTEM SECTOR(S) ON OBJECT DISK
Your fixed disk has bad sectors in the system reserved . area, file allocation table area, or root directory area. This problem is possibly curable by reformatting your disk or by using a different partition.
BLOCK FAILURE ...
If the system is writing to tape (saving files), it will skip over the indicated block, and the block will be added to the bad block list. If it is reading from tape (restoring files), there will be errors in the restored data. Another message will show what file is affected. Restore that file from a different tape.
CANNOT READ BAD BLOCK TABLE CANNOT READ HEADER BLOCK CANNOT READ (WRITE) REDIRECT TABLE
The tape is not usable. Try reformatting the tape to reestablish the defective data. If that doesn't work, the tape is defective and cannot be used with Image or FIP.
DISK ERROR READING (OR WRITING) (MSG)
If the program asks "Retry (YIN) [Y]", you have a chance to correct the problem before pressing RETURN to try again, or press "1''' to cancel the operation. The MSG in parentheses after this message is a DOS error message. See your DOS manual for an explanation. The problem is not in the tape or the tape system; it is in the fixed disk or DOS routine. Consult your dealer if it persists.
42 Handling Problems
FAILED IMAGE COpy
Something went wrong, causing the Image copy to be aborted by the program. This message will always be preceded by a more informative, explanatory message.
DISK DRIVE PARAMETERS ARE SIGNIFICANTLY DIFFERENT
Data on the tape is from a different kind or size of fixed disk and cannot be recorded on your fixed disk. Data should be restored to the original kind of fixed disk, or to roughly the same size partition.
FILE NOT COMPLETELY COPIED: XXXX
XXXX refers to a file name, including a complete path.
This file was could not be copied because of bad sectors on the tape or fixed disk. If XXXX is a directory name, then additional files in that directory are probably lost.
IMAGE FAILURE
This message may accompany other messages that describe the problem more specifically. It indicates that the operation has been cancelled, and probably cannot be performed. If you are attempting a restore operation, try a different backup tape.
INTERNAL ERROR ...
The Image program is faulty. Try copying the program again from the original program diskette. If the Image program still does not work, request a replacement diskette from your dealer. This message is also displayed when there is not enough RAM in your system for the required buffers. The mininum system required is 128K of RAM .
.. -,. - - . - ~ .... - - '. ~
Handling Problems 43
NOT ENOUGH BUFFER SPACE TO CHECK DIRECTORY XXXX
Did not have enough RAM to check the validity of a subdirectory (XXXX) . This directory should be checked. Most likely, nothing will be wrong, but some files may have been shortened.
NOT ENOUGH SPACE FOR QUEUES
There is not enough available memory in your computer for the program to run. The problem is not in the tape or the tape system.
PARTIALLY SUCCESSFUL IMAGE COpy
Some data was lost during the copy because of unreadable or unwritable sectors on the tape or disk. This message is always preceded by messages about specifically affected files. Files not mentioned should be alright.
REDIRECTION TABLE OVERFLOW
The tape has a large number of bad blocks. Try reformatting the tape, or bulk-erase, servo write, and reformat the tape to see if some of the bad blocks can be eliminated. If most of the bad blocks cannot be eliminated by these steps, the tape is defective; discard it and use another.
SOURCE TAPE MAJOR (MINOR) VERSION DOES NOT MATCH PROGRAM VERSION
This means that the tape was written by a version of the Image program that is different from the one currently being used. If the save or restore operation continues to run, ignore the message. If it is cancelled, consul t your dealer.
44 Handling Problems
SOURCE TAPE VOLUME DOES NOT MATCH EXPECTED VOLUME
In a multiple-tape image restore operation, you have inserted the wrong volume number. Eject the cartridge and insert the proper one.
SOURCE TAPE VOLUME TOTAL DOES NOT MATCH PREVIOUS TOTAL
This message indicates that the tape you have inserted is probably from a different backup operation. Check the cartridge.
TAPE IS NOT AN IMAGE TAPE
The tape was not written using the Image program, and cannot be read. If it was written using FIP, use FIP to restore.
T APE ALREADY USED IN THIS BACKUP
The same tape was inserted twice during a multiple tape backup. Make sure that you correctly identify the tape, then insert the proper tape.
VOLUME FAILURE ...
The tape cannot be used as it is. Try reformatting the tape, or bulk-erase, servo write, then reformat the tape. If you still get this message after trying both steps, discard the tape.
XXXXX IS NOT THE SAME AS ORIGINAL SOURCE TAPE NAME YYYYY
The tape is from a different backup operation. Insert the proper tape. (XXXXX and YYYYY are tape volume names.)
Handling Problems 45
WARNING ...
A problem which is rectifiable (in which case retry may be attempted) or only affects a single file.
DD/MM/YY IS NOT THE SAME AS ORIGINAL SOURCE TAPE DATE
The tape is from a different backup operation. Locate and insert the proper tape. This message appears only during a multiple tape restore operation.
TFORMA T Error Messages Any of the following messages can be displayed while you are in the process of servo writing or formatting a data cartridge. When any error occurs, follow these steps to correct the problem:
1. Remove the cartridge, reinsert it, and try again. If in the process of servo writing, the cartridge has to be bulk-erased before retrying the operation. If this doesn't work,
2. Use a different data cartridge. If the operation now works, the initial data cartridge is defective. If this doesn't work,
3. Your tape drive is probably defective. Return it to your dealer for repair.
No message, but light is blinking
At the beginning of servo writing this indicates an edge-of-tape or write mechanism problem; during servo writing it indicates a tape problem.
FORMAT ERROR - one retry
Problem with data transfer, floppy controller, or DMA during format routine.
READ BLOCK ERROR
Problem with data transfer, floppy controller, or DMA during read routine.
46 Handling Problems
RETRY FAILURE (NO ID) - CANNOT VERIFY TRACK. BULK ERASE CARTRIDGE, THEN SERVO \\'RITE
ID read problems during read.
SEEK TRACK ERROR
Problem with floppy controller during seek.
WRITE MAP ERROR
Problem with data transfer, floppy controller, or DMA during write routines.
FIP Error Messages ABNORMAL TAPE CONDITION
Tape run off reel or invalid cartridge. Repair or replace the cartridge.
CANNOT CREATE FILE
Hard disk access error (see DOS error table). Do a CHKDSK before retrying the backup.
CANNOT FIND DATA BLOCK
Tape positioning error. Retry the restore. If it fails again, reformat the tape. Use a prior backup to restore the file(s).
CANNOT FIND FIRST FREE BLOCK
Retry the backup. If it fails again, reformat the tape.
CAN1\IOT FIND SAVE SET DIRECTORY
Retry the restore. If it fails again, reformat the tape.
CANNOT FIND SAVE SET TO VERIFY
Retry the backup. If it fails again, reformat the tape.
Handling Problems 47
CANNOT OPEN FILE
Hard disk access error (see DOS error table). Do a CHKDSK before retrying the backup.
CANNOT READ BAD BLOCK MAP, INSERT ANOTHER CARTRIDGE
Leading block has lost headers or has CRC errors.
CARTRIDGE NOT FORMATTED
Format the cartridge and retry the operation.
DISK FULL
Your fixed disk is full. You must delete some files from disk if you want to continue with the restore operation.
DISK WRITE (READ) ERROR
As stated (see DOS error table). Do a CHKDSK before retrying the restore (backup).
ERROR READING SAVE SET DIRECTORY
Retry the restore. If it fails again, reformat the tape. Use a prior backup to restore the file(s).
ERROR VERIFYING BAD BLOCK MAP
Retry the operation. If it fails again, reformat the tape.
ERROR VERIFYING MASTER DIRECTORY
Retry the operation. If it fails agaIn, reformat the tape.
ERROR WRITING BAD BLOCK MAP
Retry the operation. If it fails again, reformat the tape.

48 Handling Problems
ERROR WRITING MASTER DIRECTORY
Retry the operation. If it fails again, reformat the tape.
FILENAME ALREADY SELECTED
File already selected in current save set.
MASTER DIRECTORY FULL
The maximum number of save sets have been saved on the tape. Reset the tape or use a new one.
MAXIMUM DIRECTORIES/SAVE SET EXCEEDED
Files from too many different directories selected for backup in a single save set. Do backup of current save set and create a new save set for the additional files.
NO MATCH FOR FILENAME
File not found in current directory, upon selecting file for inclusion in a save set for backup.
SA VESET DIRECTORY FULL
Maximum number of files selected for that save set. Backup current save set and create a new save set for the additional files.
SAVE SET IS XX KILOBYTES GREATER THAN TAPE CAPACITY SHRINK SAVE SET OR INSERT NEW CARTRIDGE
49
CHAPTER 8 DRIVE MAINTENANCE
HEAD CLEANING The only maintenance your tape drive should need is to have its read/write head cleaned ever\, six to nine months. Your dealer probably carries one or more brands of head cleaning kits.
Do not use any abrasive to clean the head. Also, do not use cotton-tipped applicators such as Q- Tips® for cleaning; fibers may get caught between parts of the head mounting and find their way between the head and the tape during operation. Only use swabs especially made for cleaning recording heads.
Never apply a lubricant to the drive or head positioning components.
If you have cleaned the read/write head and the drive continues to behave abnormally, consult your dealer.
51
CHAPTER 9 WHY AND HOW TO
BACKUP DISK FILES
There are at least four reasons for using a tape backup system with your fixed disk:
1. To protect active files on a day-to-day basis, so that if something happens to the disk or its files, you won't lose more than a day's work.
2. To store inactive files, such as last year's business records, text files of published documents, or source code for compiled programs.
3. To store infrequently used files when you begin to run short of disk space.
4. To stoie active data files as a historical record (audit trail) of transactions or events.
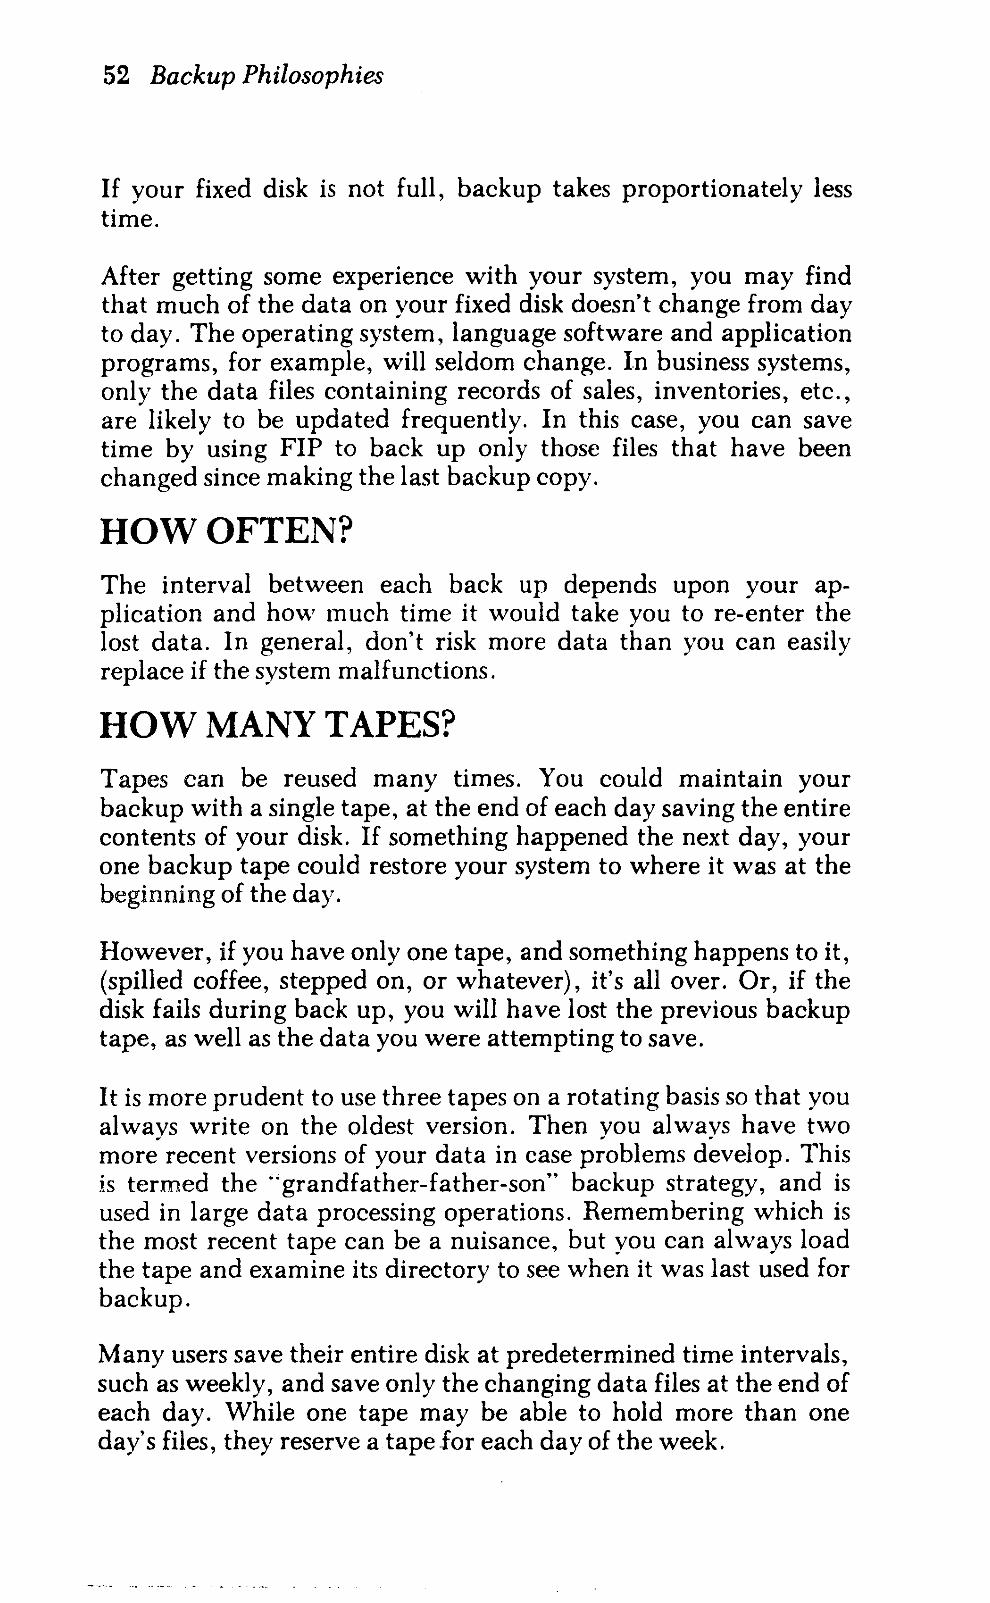
PROTECTING YOUR ACTIVE FILES Most computer owners use backup tape drives to protect their active data files. Since any storage system can lose data, either through a mistake or a failure of the system, it makes good sense to have at least one other copy of the data. Because a fixed disk holds so much data, backing it up with copies on diskettes is time consuming and expensive. High-speed tape is the l()~ical alternative.
The simplest technique for providing a backup tape is to use the Image program to copy the entire fixed disk to tape. It can be started and left to run unattended when you don't need your computer for other tasks. For one full tape of date.. on the 10 Mb product, Image backup takes about 16 minute~. including the time taken to verify the transferred data. In the 20 Mb product, it takes 8 minutes to fill one tape with data, and another 8 minutes to verify the transferred data. In the 20Mb product, the verification phase is optional.
52 Backup Philosophies
If your fixed disk is not full, backup takes proportionately less time.
After getting some experience with your system, you may find that much of the data on your fixed disk doesn't change from day to day. The operating system, language software and application programs, for example, will seldom change. In business systems, only the data files containing records of sales, inventories, etc., are likely to be updated frequently. In this case, you can save time by using FIP to back up only those files that have been changed since making the last backup copy.
HOW OFTEN? The interval between each back up depends upon your application and how much time it would take you to re-enter the lost data. In general, don't risk more data than you can easily replace if the system malfunctions.
HOW MANY TAPES? Tapes can be reused many times. You could maintain your backup with a single tape, at the end of each day saving the entire contents of your disk. If something happened the next day, your one backup tape could restore your system to where it was at the beginning of the day.
However, if you have only one tape, and something happens to it, (spilled coffee, stepped on, or whatever), it's all over. Or, if the disk fails during back up, you will have lost the previous backup tape, as well as the data you were attempting to save.
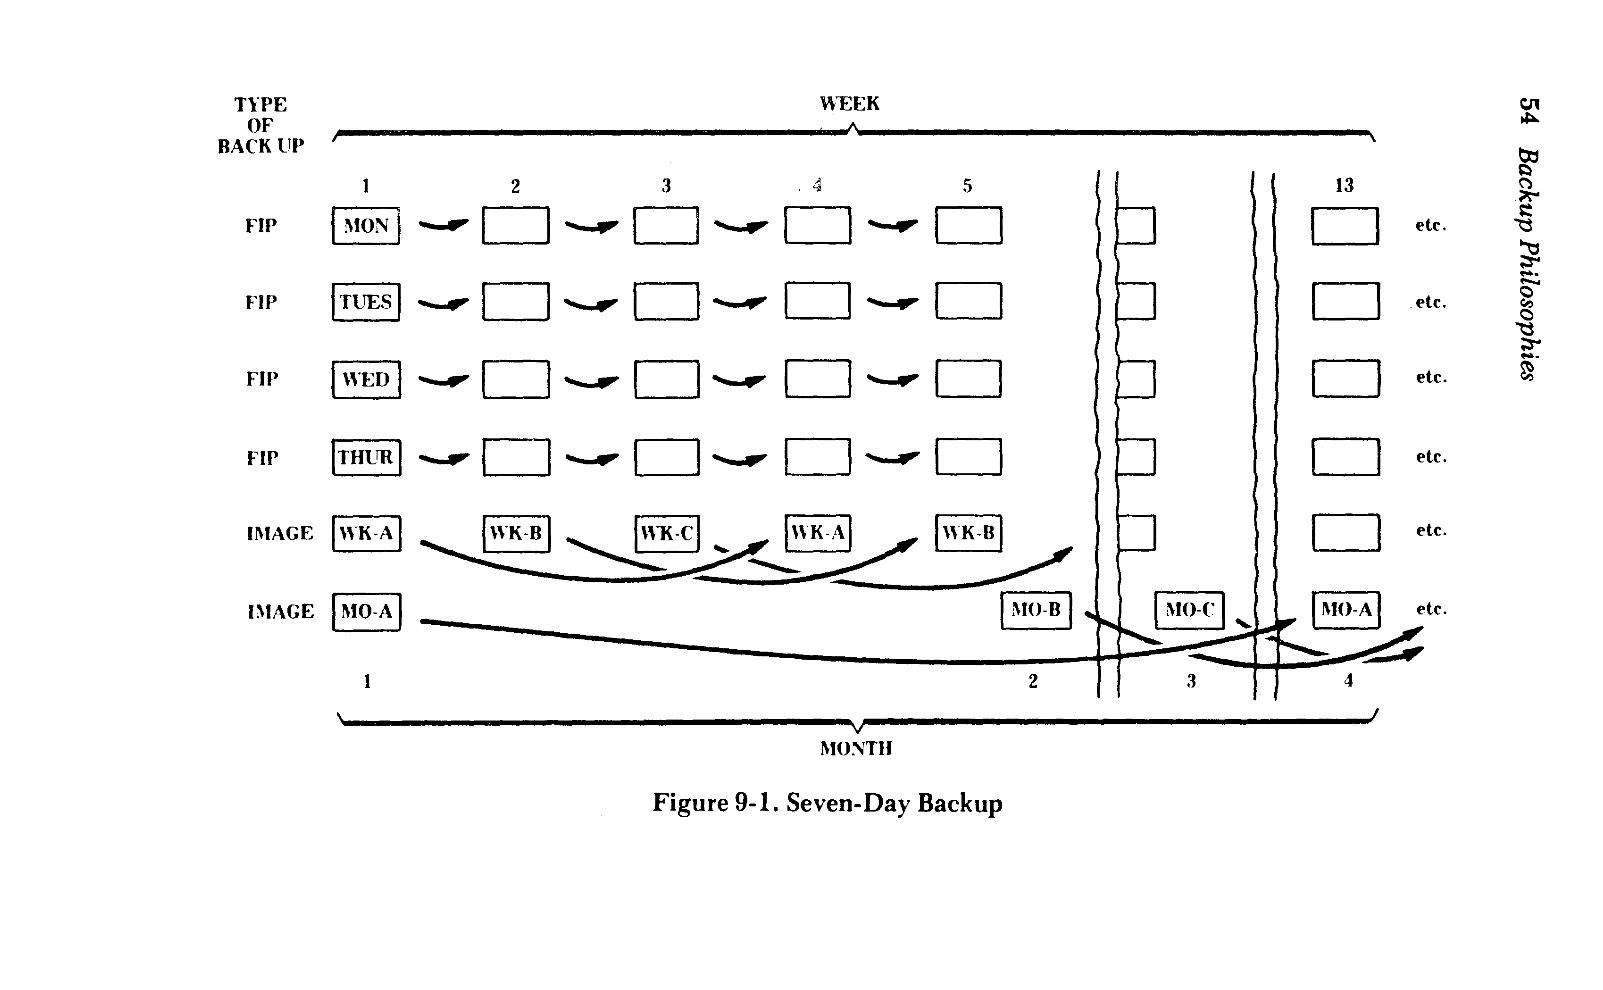
It is more prudent to use three tapes on a rotating basis so that you alwavs write on the oldest version. Then vou alwavs have two . . . more recent versions of your data in case problems develop. This is termed the "grandfather-father-son" backup strategy, and is used in large data processing operations. Remembering which is the most recent tape can be a nuisance, but you can always load the tape and examine its directory to see when it was last used for backup.
Many users save their entire disk at predetermined time intervals, such as weekly, and save only the changing data files at the end of each day. While one tape may be able to hold more than one day's files, they reserve a tape for each day of the week.
Backup Philosophies 53
For example, you could use FIP to back up your active data files at the end of each day except Friday. Each Friday and on the last day of the month, you would do an Image backup, saving everything on the disk. Follow the grandfather-father-son strategy for the Image tapes, rotating tapes each third period. Daily, use the tape you have set aside for that day (Monday tape, Tuesday tape, etc.), writing over what was written there the previous week. Mark the tapes in some way to clearly identify them, such as with different colored labels.
As shown in Figure 9-1, this strategy uses a total of ten tapes, but it provides a very effective backup library. Using such a scheme, you can recover infrequently used files lost months before and just discovered missing.
HISTORICAL TAPES If your application is one in which you want a historical record of the changes to a particular set of files, then you may want to reserve certain tapes for specific files, adding new versions to the tapes at regular intervals. For example, your payroll files could be saved regularly, under different save set names on the same tape:
Save Set Name
PAY_I00184 PAY_110184 PAY_120184 etc.
Contents
PAYROLL SEPTEMBER 1984 PAYROLL OCTOBER 1984 PAYROLL NOVEMBER 1984
TYPE OF
BACK UP
FlP
FIP
FlP
FIP
IMAGE
ntAGE
WEEK ,~ ____________________________________ ~A~ ____________________________________ ~\
1 2 3 . 4 5 13
I !\ION I ... "0 ... .. 0 .... .. 0 ... » 0 0 e
ITUESI ... .. 0 ..... .. 0 .. ., 0 ... .. D 0 e
I WED I ... .. 0 ...... 0 ... .. 0 ... .. 0 0 e
ITlfUR I .... .. O ... 'urO ..... O ... '" D 0 e
IWK.t\ I I WK·B I '- I\~·cl -. !WK.AY 0 ! WK·B I e ........, , .. / .Y-... __ --
I !\IO·A I 1 MO·B I '" ~
I MO·r I " 11\10.A I e ~ " ... ~~ -
1 2 3 4
\~------------------------------------~,.------------------------------------~I - v l\10:\TTlI
Figure 9-1. Seven-Day Backup
til ~
tx:l ~ ~ f'\"" s::
te . ~
~ .... "-
te . e '" e ~ ;:r-....
te . ~
te,
te.
te.

55
APPENDIX A THEORY OF OPERATION
HOW THE SYSTEM WORKS The tape drive uses special digital tape mini-cartridges. With these, you can store 10.3 Mb (Irwin 110) or 21.6 Mb (Irwin 125) of data on ~ single tape. The system compresses disk data as it transfers it to the tape by eliminating unused space that may occur on the disk.
The data is recorded on several data tracks. the first of which starts at the head and goes to the tail. The second track is recorded from the tail to the head, and the third from head to tail, etc.
Formatting
Before it can be used for data backup, a blank tape must have two patterns recorded on it. Each pattern performs an important role during backup and restore operations.
To assure positive and reliable data transfer, "servo paths" are recorded along each data track. These paths keep the head centered on a track during read and write operations.
The servo system permits the drive mechanism itself to be simple yet precise. The head is positioned across the tape by means of a stepper motor turning a spiral cam. Roughly positioned on a track. the head senses the location of each servo path marker and is automatically centered between them by making small adjustments to the stepper motor.
After servo-writing, the tape must be formatted. During this phase. special ·'layout'· data is recorded on the tape. then the tape is read to make sure the data was recorded properly. At the same time, indicators are written at "block" intervals. If a tape block contains a spot that cannot be recorded or read reliably, the block is listed in a "bad block" table at the beginning of the tape. Bad blocks are skipped over during subsequent save and restore operations.
56 Theory oj Operation
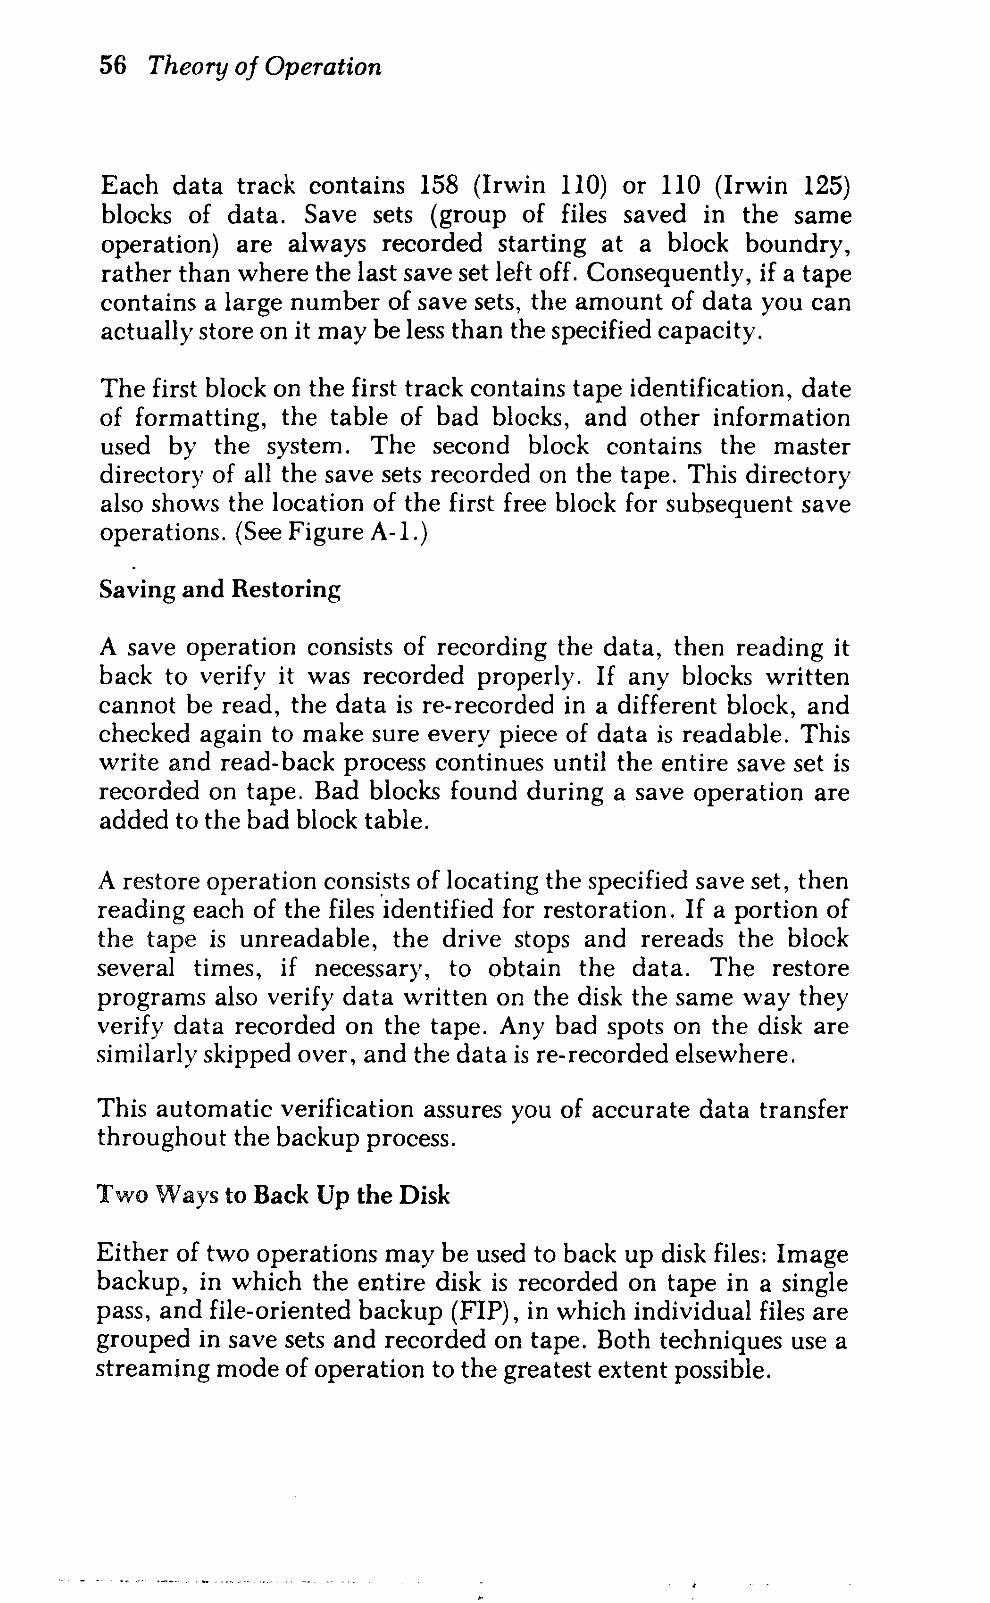
Each data track contains 158 (Irwin 110) or 110 (Irwin 125) blocks of data. Save sets (group of files saved in the same operation) are always recorded starting at a block boundry, rather than where the last save set left off. Consequently, if a tape contains a large number of save sets, the amount of data you can actually store on it may be less than the specified capacity.
The first block on the first track contains tape identification, date of formatting, the table of bad blocks, and other information used by the system. The second block contains the master directory of all the save sets recorded on the tape. This directory also shows the location of the first free block for subsequent save operations. (See Figure A-I.)
Saving and Restoring
A save operation consists of recording the data, then reading it back to verify it was recorded properly. If any blocks written cannot be read, the data is re-recorded in a different block, and checked again to make sure every piece of data is readable. This write and read- back process continues until the entire save set is recorded on tape. Bad blocks found during a save operation are added to the bad block table.
A restore operation consists of locating the specified save set, then reading each of the files 'identified for restoration. If a portion of the tape is unreadable, the drive stops and rereads the block several times, if necessary, to obtain the data. The restore programs also verify data written on the disk the same way they verify data recorded on the tape. Any bad spots on the disk are similarly skipped over, and the data is re-recorded elsewhere.
This automatic verification assures you of accurate data transfer throughout the backup process.
Two Ways to Back Up the Disk
Either of two operations may be used to back up disk files: Image backup, in which the entire disk is recorded on tape in a single pass, and file-oriented backup (FIP) , in which individual files are grouped in save sets and recorded on tape. Both techniques use a streaming mode of operation to the greatest extent possible.
· Theory of Operation 57
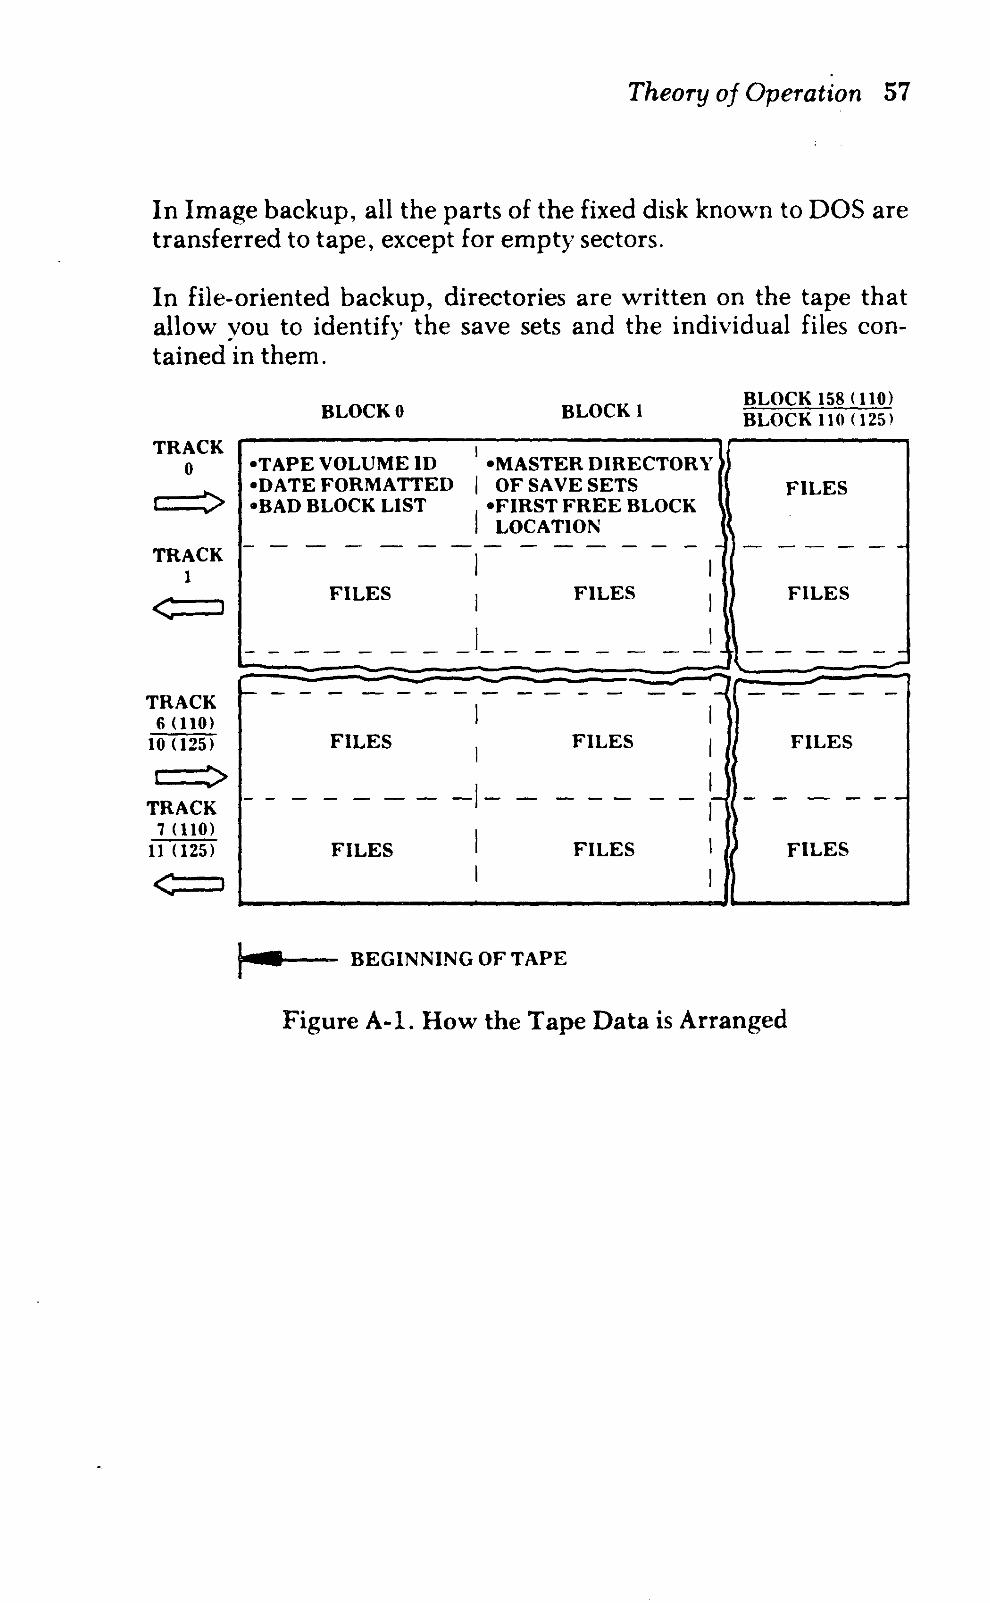
In Image backup, all the parts of the fixed disk known to DOS are transferred to tape, except for empty sectors.
In file-oriented backup, directories are written on the tape that allow you to identify the save sets and the individual files contained in them.
BLOCK 0
TRACK
BLOCK 1 BLOCK 158 (110) BLOCK 110 (125)
o -TAPE VOLUME ID I -MASTER DIRECTORY I OF SAVE SETS '- -DATE FORMATTED
c::::~v -BAD BLOCK LIST I
-FIRST FREE BLOCK LOCATION
FILES
TRACK 1
<
TRACK 6(110)
10 (125)
> TRACK
7 (110) 11 (125)
<
FILES
f-------
FILES
FILES
-1- -I I
• BEGINNING OF TAPE
FILES
FILES
FILES
- - - - - -
FILES
I --- ---- - -----i-----
I I FILES
I - -.- - - - ---I I FILES
I
Figure A-I. How the Tape Data is Arranged
59
APPENDIXB INSTALLATION GUIDELINES
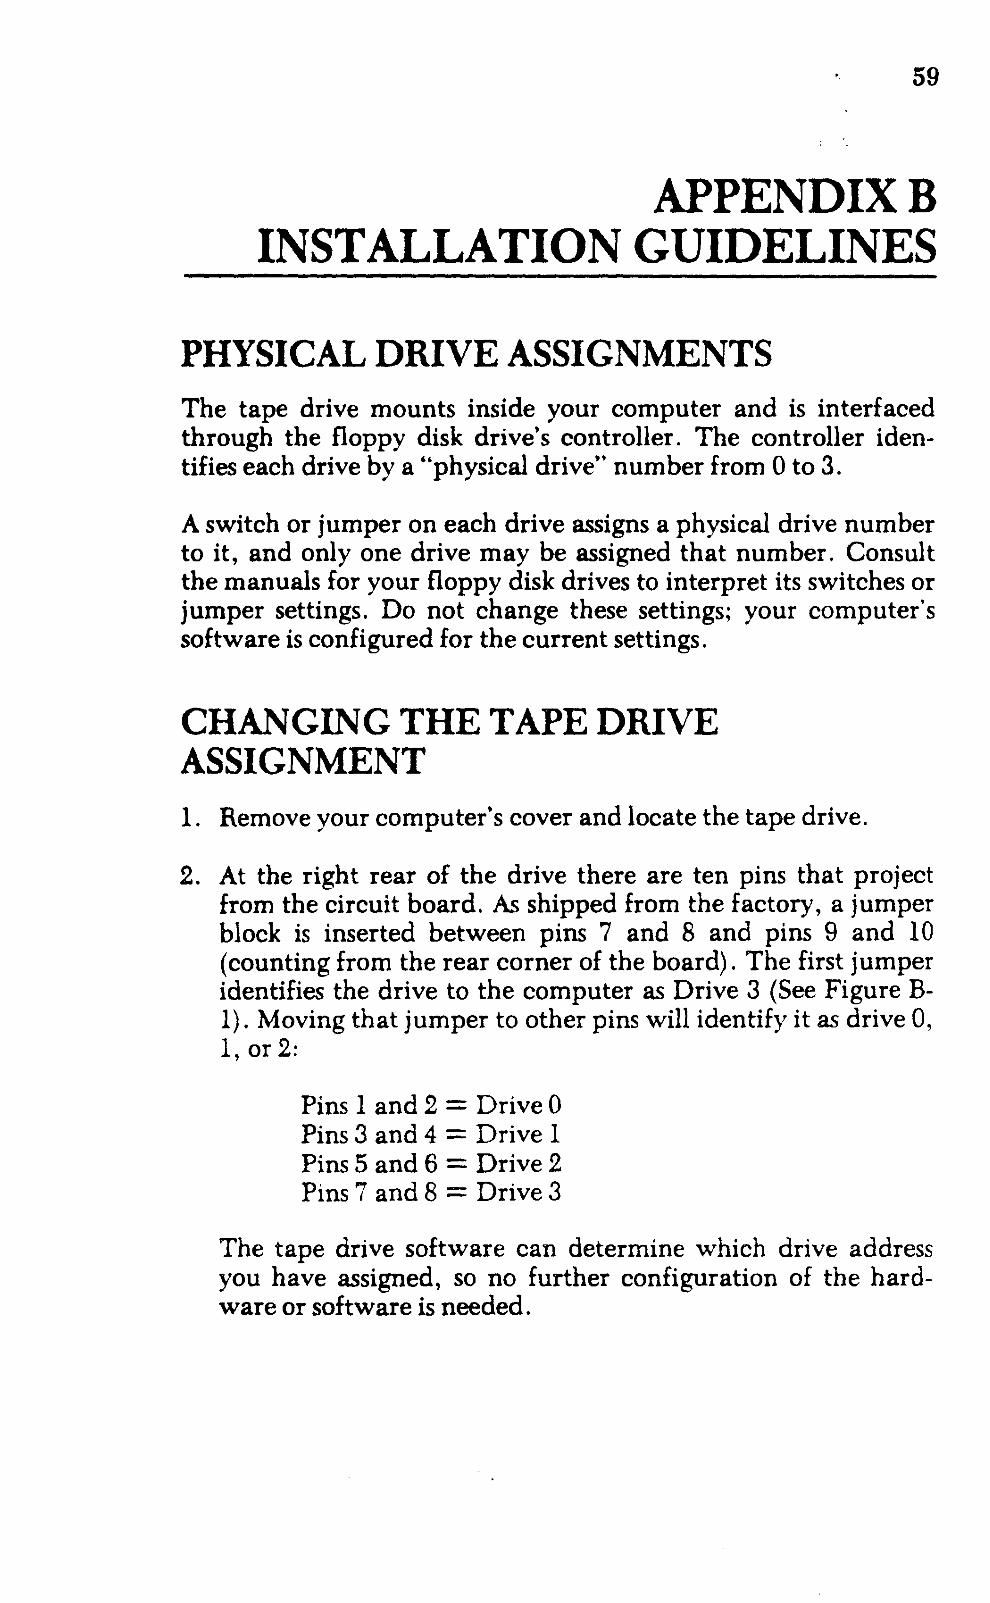
PHYSICAL DRIVE ASSIGNMENTS The tape drive mounts inside your computer and is interfaced through the floppy disk drive's controller. The controller identifies each drive by a "physical drive" number from 0 to 3.
A switch or jumper on each drive assigns a physical drive number to it, and only one drive may be assigned that number. Consult the manuals for your floppy disk drives to interpret its switches or jumper settings. Do not change these settings; your computer's software is configured for the current settings.
CHANGING THE TAPE DRIVE ASSIGNMENT 1. Remove your computer's cover and locate the tape drive.
2. At the right rear of the drive there are ten pins that project from the circuit board. As shipped from the factory, a jumper block is inserted between pins 7 and 8 and pins 9 and 10 (counting from the rear corner of the board). The first jumper identifies the drive to the computer as Drive 3 (See Figure B-1). Moving that jumper to other pins will identify it as drive 0, 1, or 2:
Pins 1 and 2 = Drive 0 Pins 3 and 4 = Drive 1 Pins 5 and 6 = Drive 2 Pins 7 and 8 = Drive 3
The tape drive software can determine which drive address you have assigned, so no further configuration of the hardware or software is needed.
60 Installation Guidelines
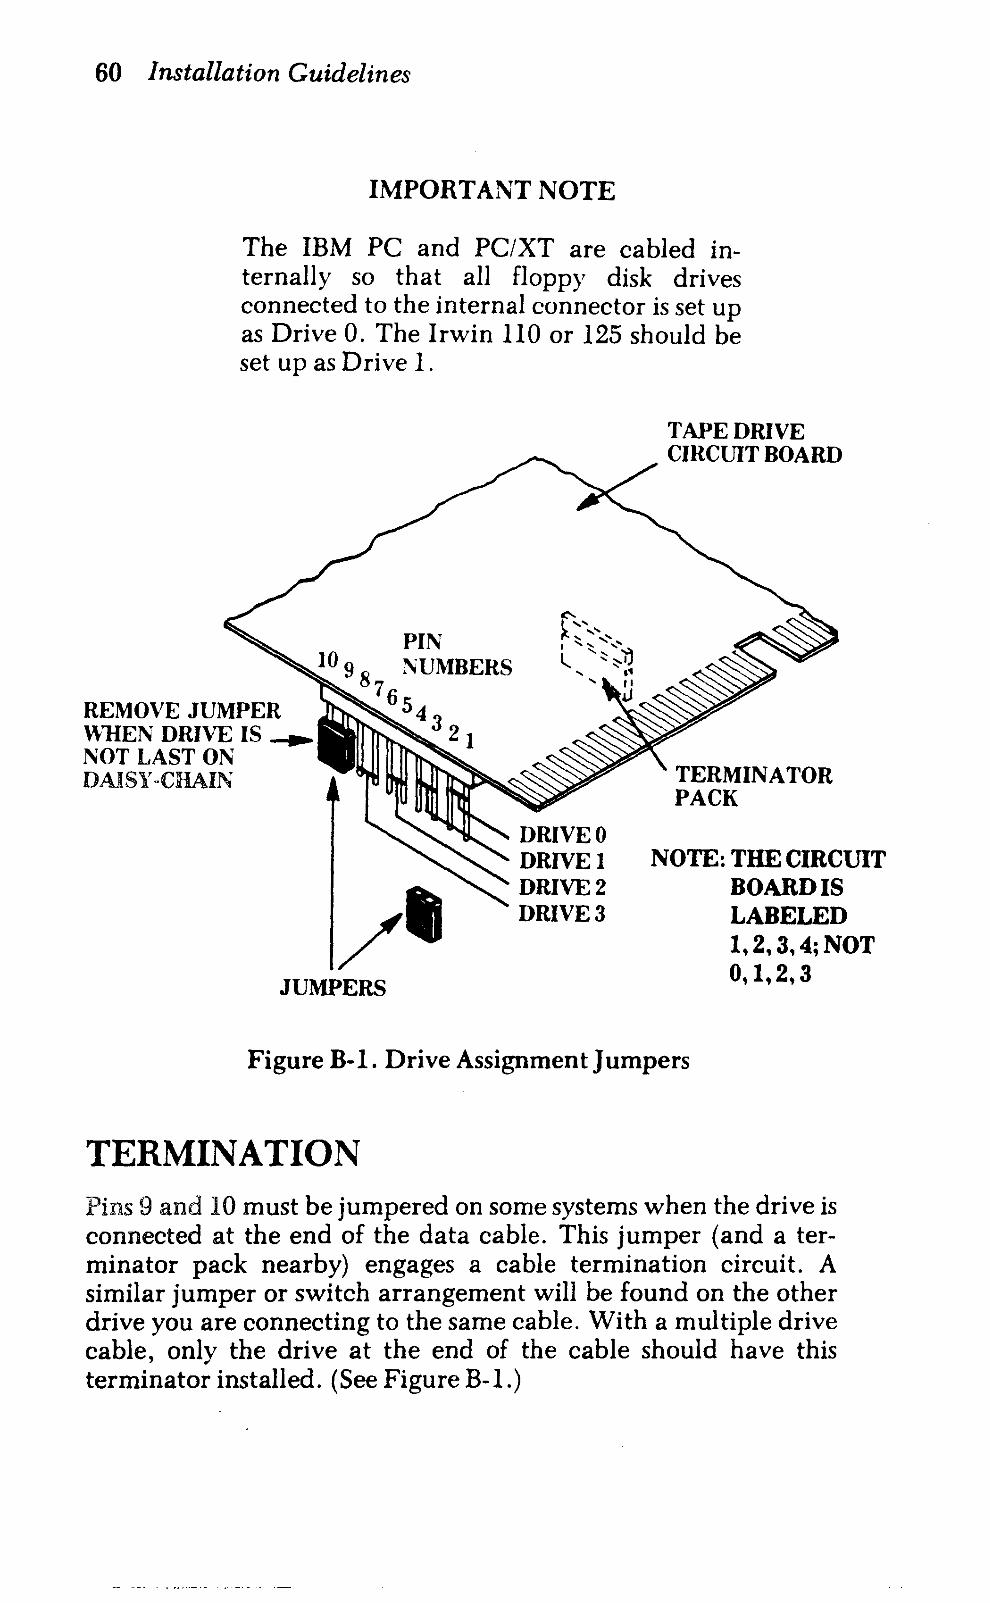
IMPORTANT NOTE
The IBM PC and PC/XT are cabled internally so that all floppy disk drives connected to the internal connector is set up as Drive O. The Irwin 110 or 125 should be set up as Drive 1.
REMOVE JUMPER WHEN DRIVE IS .. NOT LAST ON DAISY -eHAIl';
/ JUMPERS
DRIVE 0 DRIVEl DRIVE 2 DRIVE 3
TAPE DRIVE CIRCUIT BOARD
TERMINATOR PACK
NOTE: THE CIRCUIT BOARD IS LABELED 1,2,3,4; NOT 0,1,2,3
Figure B-l. Drive Assignment Jumpers
TERMINATION Pins 9 and 10 must be jumpered on some systems when the drive is connected at the end of the data cable. This jumper (and a terminator pack nearby) engages a cable termination circuit. A similar jumper or switch arrangement will be found on the other drive you are connecting to the same cable. With a multiple drive cable, only the drive at the end of the cable should have this terminator installed. (See Figure B-1.)
Installation Guidelines 61
If the tape drive is not connected at the end of the data cable, remove the terminator pack and the jumper on pins 9 and 10; store these parts in a safe place in case they are needed again.
If the tape drive is connected at the end of the data cable, do not disturb the terminator pack or the jumper on pins 9 and 10. Instead, remove or disable the termination circuit on the floppy disk drive(s). (See the floppy disk drive's manual for instructions.)
When the jumpers are finally set in position, connect the data cable to the drives, and replace the cover.
POWER REQUIREMENTS The tape drive has the following power requirements:
Voltage (+5%) Current + 12 VDC ................. 1 Ampere (Average)
3.5 Ampere (400 ms surge)
+ 5 VDC .................. 0.5 Ampere
Total Power Dissipation ...... 15.75 watts
63
APPENDIXC USING BATCH FILES FOR
BACKUP OPERATIONS
Batch programs enable even inexperienced users to back up and restore files easily and reliably. With batch files, there is no need to know how the programs operate, since operations are reduced to a simple one-word command entered directly from DOS.
See your DOS manual for more information about batch programming.
To illustrate, a simple example is shown below.
BATCH FILE EXAMPLE To execute this program, at the DOS prompt the operator simply enters:
SAVEIT
The program then erases the existing data on the tape and saves all of the files with a .DAT extension in the /PAYROLL directorv . . The batch program uses two files; one to call FIP (SA VErT .BAT) and the other to provide the responses to FIP that are ordinarily entered using the keyboard (SA VEIT. RSP). The SA VEIT. BA T file may be in the current directory or any directory specified in the DOS path. The SAVEIT.RSP file may be in any directory. as long as the complete path is specified as shown below.
File': SA VEIT . BAT
Command
10 4 Y *.DAT /PAYROLL DatL-Files 12
Comments
Menu selection - "ERASE"/RESET tape. Menu selection - back up selected files Confirms selection Selects all files with .DAT extension Selects the PAYROLL directory Names the save set "Data Files" Menu selection - exit FIP program
64 Using Batch Files
The first two lines of the SA VErT .RSP file permit using the same save set name each time the backup is performed, erasing the previous save set on the tape.
See your DOS Manual for more information about batch programming.
65
SUMMARY OF COMMANDS
Image Menu selections 1. IMAGE BACKUP TO TAPE - Make a backup copy of the
entire disk contents.
2. IMAGE RESTORE FROM TAPE - Copy a tape made \\,Itt1
Image Backup onto the fixed disk. (Replaces everything on the disk.)
3. END IMAGE - Return to DOS
FIP Menu selections 1. Backup all files by date and time. Selects files modified after
a stated date and time and saves them on tape.
2. Backup all files with specific date. Selects files modified or created on a specific date.
3. Backup all "modified" files. Selects all files modified or created since the last FIP or DOS BACKUP.
4. Backup selected files. Saves a single file or a group of similary named files.
5. Backup directories. Saves all the files in a specified directory.
6. Restore an entire save set. Restores a specified save set to a specified directory.
7. Restore directories. Restores a specified directory or directories.
8. Restore selected files. Restores a selected file or group of files from a save set.
9. List save sets on current cartridge. Displays a directory of the tape.
10. Set cartridge status to UNUSED. "Clears" a cartridge so it can be reused.
66 Command Summary
11. Enter FIP command structure. Accesses the FIP commands.
12. Exit program.
FIP Typed commands BACKUP
CD
CD \DirName
CLOSE
CREATE
DIR
END
HELP
LIST
MENU
OPEN
RESET
RESTORE
SELECT
SETS
TAPE
Copy the save set from disk to tape.
Identifies current directory
Changes to another directory
Close one save set to open or create another.
Establish a save set for backup.
List files in current directory
After finishing with one tape, permits loading another.
Display a list of commands and other helpful information about FIP.
List the files in the current save set.
Return to menu from command mode.
Specify a save set from tape master directory.
"Erase" the tape.
Copy the selected files from tape to disk.
Choose disk files for, or from, a save set.
List the save sets on the tape.
Display information, other than contents, about a tape.
Command Summary 67
UNSELECT Deselect files from a save set.
VOL Name a tape.
TFORMAT Menu selections 1. SERVO WRITE AND EXIT - Record servo patterns on tape
while computer is used for something else.
2. SERVO WRITE AND WAIT FOR COMPLETION Record servo patterns without exiting program (status messages are displayed) .
3. SERVO WRITE AND THEN FORMAT CARTRIDGE -Record servo patterns, then immediately record tape format.
4. FORMAT CARTRIDGE ONLY - Format a cartridge that has alreadv been servo written .
•
5. DISPLAY CARTRIDGE FORMAT PARAMETERS -Display tape title, date of formatting, and list the bad blocks.
6. REVERIFY A FORMATTED CARTRIDGE - Read an entire tape to make sure it can be ued, and list any differences from the bad block list that are detected.
7. ENTER VOLUME NAME - Add or change the name of a tape.
8. EXIT PROGRAM - Return to DOS.

69
INDEX -a-
address assignments .................................. 59 AUTOEXEC.BAT file ................................ 10
-b-
backup frequency ................................... 52 backup philosophy ................................ 51,53 backup time ....................................... 51 bad block list ............................... 16,20,28,55 batch files ....................................... 10,63 batch operations .................................... 10 BUFFERS command .............................. 11,37 busy light .............. 0 0 ••••••••• 0 •••• e , • • • • • • • .. •• 5
-c-
CHKDSK operation ................................. 17 cleaning... . . . . . . . . . . . . . . . . . . . . . . . . . . . . .. . . . . . . . . 0 •• 49 commands
BACKUP ................................... 0 •••• 25 CHANGE DIRECTORY ......................... 24,36 CREATE . . . . . . . . . . . . . . . . . . . . . . . . . . . . . . . , . . . . . . " . 23 DIRectory .. 0 •••••••••••••••••• " 0 • D ••••••••••• " •• 24 END ,............ . . . . . . . . . , . . . . . . . . . . . . . . . ..... 26 EXI T . , . . . . . . . . . . . . . . . . . . . . . . . . . . . . . . . , . . . . . . . . I 26 LIST .................. 0 •••••••••• I ............. 24.34 MENU ........... I •••••••••••••• 0 •••••••• I •••••• 26 OPEN ... "., .. I> ...... I .. " •••••• t .......... t t •••••••• 34 RESET .............. " .. D ••••• t •• t • t •••••• I •••••• 27 RESTO RE . . . . . . . . . . . . . . . . . . . . . . . . . . . . . . . . . . . . . . . 37 SELECT ...................................... 23.35 SETS ......... 0 t •••••••••••••• 0 ••• , •••••••••••• 27 ~ 34 TAPE. . . . . . . . . . . . . . . . . . . . . . . . . . . . . , , . I> • • • • • • .. • • • 27 UNSELECT ................................... 25,35 VOL. . . . . . . . . . . . . . . . . . . " . . . . . . . . . . . . . . . . . . " . .. . . .. 29
command summary. . . . . . . . . . . . . . . . . . . . . . . . . . . . . . . . . . 65 CONFI G. SYS file ................................... 11 control programs .................................... 12 copyi ng diskette . . . . . . . . . . . . . . . . . . . . . . . . . . . . . . . . . . . . 10
70 Index
data capacity. data cartridge
capacity care data format date stamp defective erasing handling illustration insertion naming.
•
number required preparation for use removal renaming reusing. timestamp type write protecting
disk compression disk initialization
-d-
Disk Operating System (see DOS) diskette backup diskette drive assignment DOS·CHKDSK operation DOS versions. drive assignment
erasing tapes. error messages
FIP. Image. TFORMAT
error recovery
-e-
.55
.55 6
.57 11,21
39 13,27
6 7 5
29 52 13 5
29 26
.21 6 6
19 3
10 9,59
17 3
.59
13,27
.46 40 45
.39
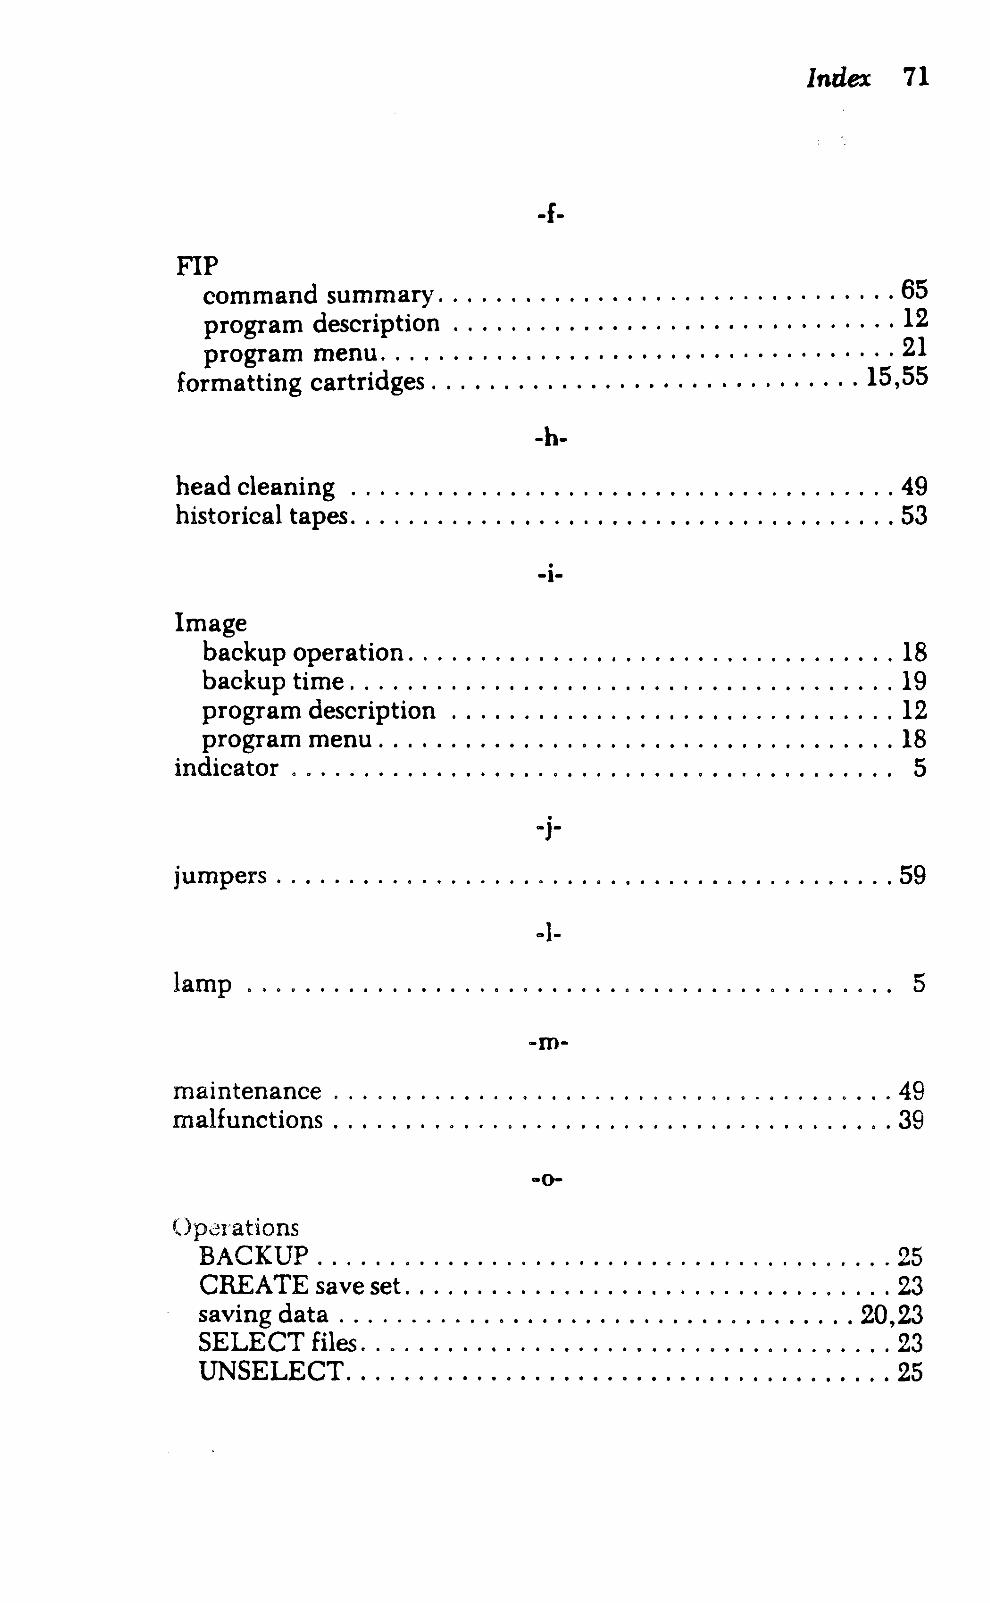
-f-
FIP · . · . . . . .
• • · . • • • • • • · . . . . .
· . • •
. .
Index 71
· . · .
.65
. 12 21
command summary ... program description .. program menu. . . . .
forma tting cartridges. . . . . . . . . . . . . . . . . . . . . . . . ...... 15,55
head cleaning . historical tapes.
Image backup operation. backup time ..... program description program menu. . .
indicator ...... .
. •
. • •
. .
. .
-h-
• . · • . •
• -1-
• •
· . · . · .
• -J-
. • • • • · . • · • •
· . • • · .
· . · .
• · • .
. . · .
· •
• •
49 53
18 19 12 18 5
jumpers • • • • • • 0 • • • • • • • • • • • .. • • • It • • • • • • • • • • • • • • • • • • • • 59
-1-
lamp .. 0 • 0 • • • • • • • • • • • • • • • • • •
maintenance malfunctions
Operations
. . . .
BACKUP ....... . CREATE save set .. .
-m-
· .
-0-
. .
".001".1 •• 1".001 •••
. .
. .
5
49 39
25 23
saving data .................................... 20,23 SELECT files. . . . . . . 23 UNSELECT ..... " ............................... . 25
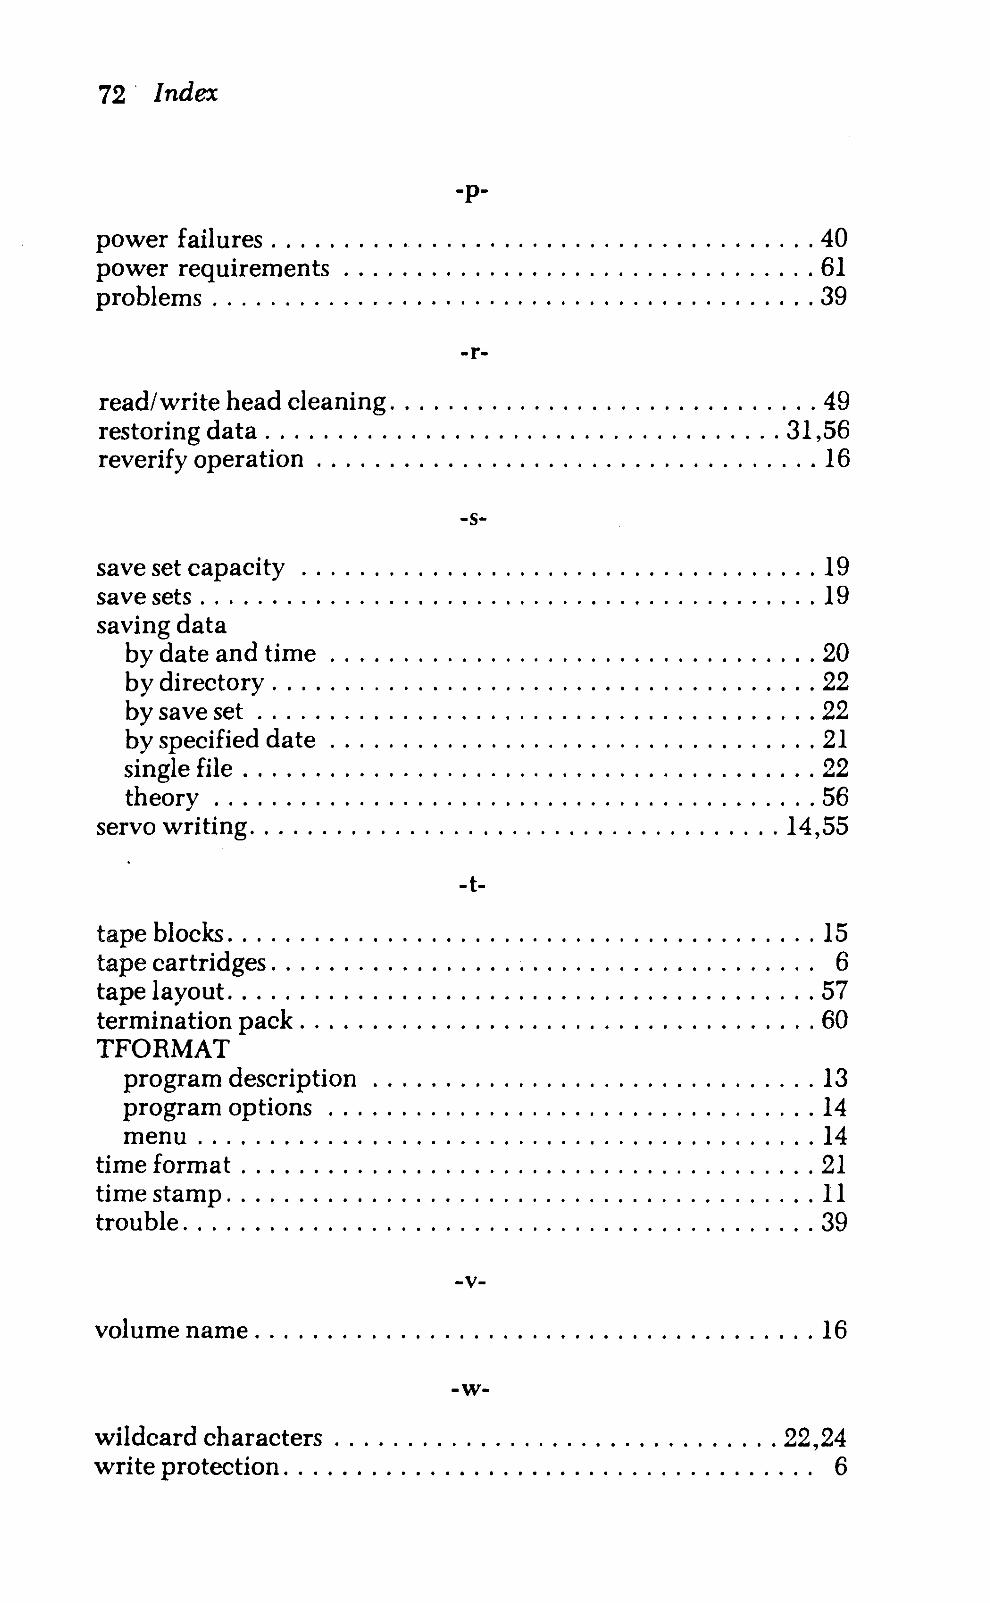
72· Index
-p-
power fail ures . . . . . . . . . . . . . . . . . . . . . . . . . . . . . . . . . . . . . . 40 power req uiremen ts . . . . . . . . . . . . . . . . . . . . . . . . . . . . . . . . . 61 problems .......................................... 39
-r-
read/ write head cleaning .............................. 49 restoring data .................................... 31,56 reverify operation ................................... 16
-s-
savesetcapacity .................................... 19 save sets ........................................... 19 saving data
by date and time .................................. 20 by directory ...................................... 22 by save set ....................................... 22 by specified date . . . . . . . . . . . . . . . . . . . . . . . . . . . . . . . . . . 21 single file . . . . . . . . . . . . . . . . . . . . . . . . . . . . . . . . . . . ..... 22 theory .......................................... 56
servo writing. . . . . . . . . . . . . . . . . . . . . . . . . . . . . . . . . . . . . 14,55
-t-
tape blocks ......................................... 15 tape cartri dges. . . . . . . . . . . . . . . . . . . . . . . . . . . . . . . . . . . . .. 6 tape layout ......................................... 57 terminationpack .................................... 60 TFORMAT
program description ............................... 13 program options .................................. 14 men u . . . . . . . . . . . . . . . . . . . . . . . . . . . , . . . . . . . . . . . . . . . 14
time format ........................................ 21 time stamp ......................................... 11 trou hIe. . . . . . . . . . . . . . . . . . . . . . . . . . . . . . . . . . . . . . . . . ... 39
-v-
vol ume name. . . . . . . . . . . . . . . . . . . . . . . . . . . . . . . . . . . . . .. 16
-w-
wildcard characters ............................... 22,24 wri te protection. . . . . . . . . . . . . . . . . . . . . . . . . . . . . . . . . . . .. 6