Embed Size (px)
Citation preview

AVXMTGHR1D
7” LCD MONITOR
WITH BUILT-IN DVD PLAYER
FOR REAR SEAT ENTERTAINMENT
128-8944B
OPERATION MANUAL / INSTALLATION GUIDE
PUSH

Important NoticeInstallation of headrest products require careful planning and preparation. Be extremely carefulof seats that have airbags built into them. Keep wiring away from any air bag wiring (usuallyidentified by yellow connectors and yellow wire jackets). Damage to air bag wiring can result inpersonal injury to vehicle occupants. If you have any questions regarding wire routing orinstallation in a vehicle, please contactAudiovox Technical Support at 1-800-225-6074.
When connecting power and ground in a mobile video installation, insure that the ACC wire isfused at the point where it is connected to the vehicle ACC wiring. Failure to do so can result indamage to the vehicle if a short circuit develops between the vehicle connection point and themobile video product.
An LCD panel and/or video monitor may be installed in a motor vehicle and visible to the driver ifthe LCD panel or video monitor is used for vehicle information, system control, rear or sideobservation or navigation. If the LCD panel or video monitor is used for television reception,video or DVD play, the LCD panel or video monitor must be installed so that these features willonly function when the vehicle is in “park” or when the vehicle’s parking brake is applied.
An LCD panel or video monitor used for television reception, video or DVD play that operateswhen the vehicle is in gear or when the parking is not applied must be installed to the rear of thedriver’s seat where it will not be visible, directly orindirectly, to be operator of the motor vehicle.
Licensed under one or more of the following patents:Patent NOS. 7,245,274 , 6,899,365 and 6,678,892
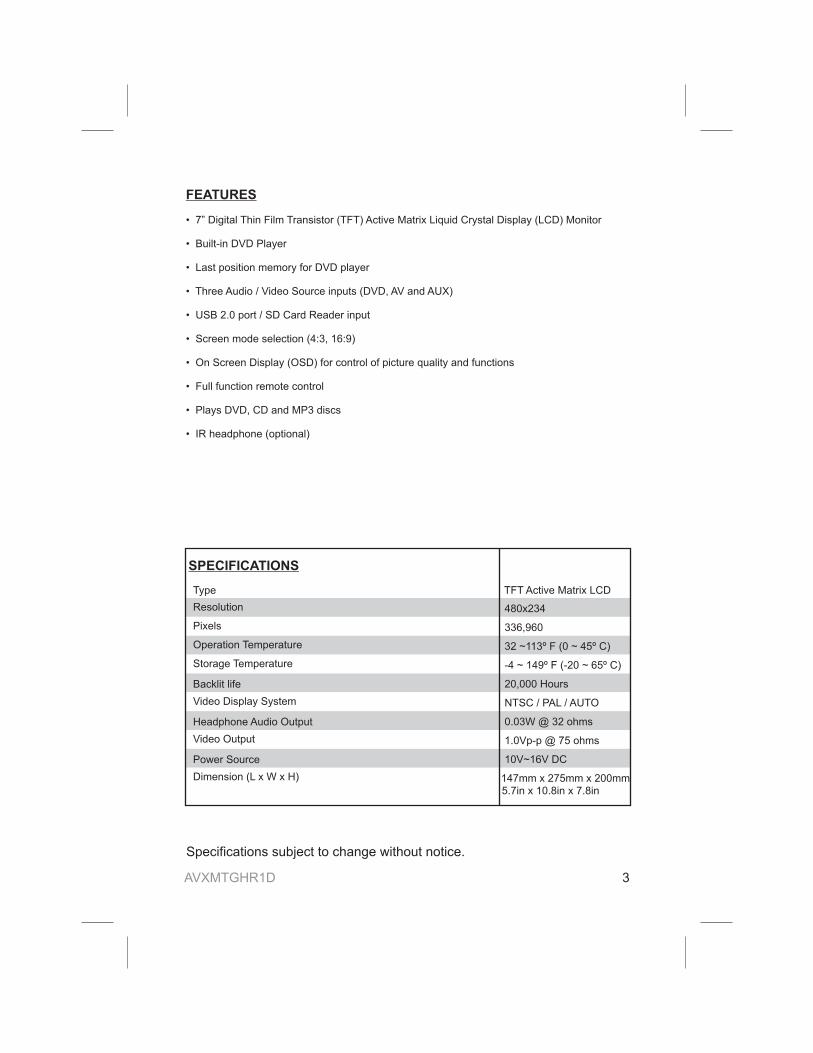
FEATURES
• 7” Digital Thin Film Transistor (TFT) Active Matrix Liquid Crystal Display (LCD) Monitor
• DVD Player
• p m player
• Three i
• USB 2.0 port / SD Card Reader input
• Screen mode selection (4:3, 16:9)
• On Screen Display (OSD) for control of picture quality and functions
• Full function remote control
• s d s
• h
Built-in
Last osition emory for DVD
Audio / Video Source nputs (DVD, AV and AUX)
Play DVD, CD and MP3 isc
IR eadphone (optional)
SPECIFICATIONS
Specifications subject to change without notice.
Resolution
Pixels
Operation Temperature
Storage Temperature
Backlit life
Video Display System
Headphone Audio Output
Video Output
Power Source
Dimension (L x W x H)
480x234
336,960
32 ~113º F (0 ~ 45º C)
-4 ~ 149º F (-20 ~ 65º C)
20,000 Hours
NTSC / PAL / AUTO
0.03W @ 32 ohms
1.0Vp-p @ 75 ohms
10V~16V DC
147mm x 275mm x 200mm
Type TFT Active Matrix LCD
AVXMTGHR1D 3
5.7in x 10.8in x 7.8in
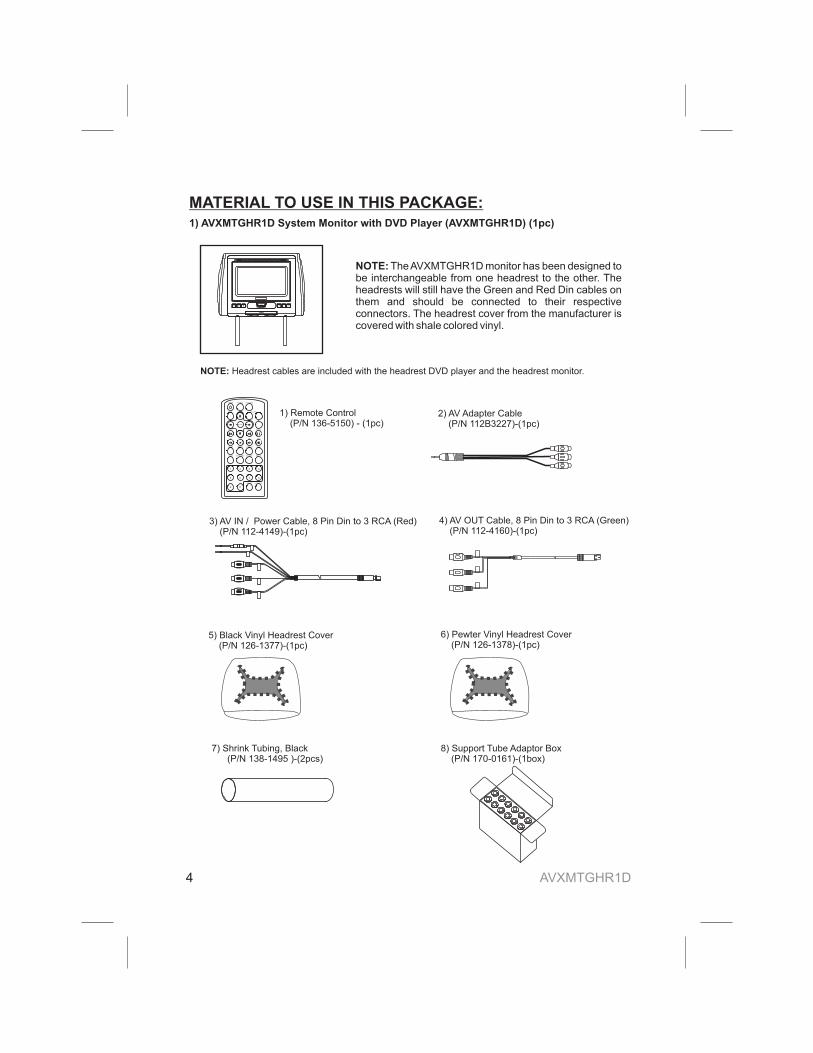
MATERIAL TO USE IN THIS PACKAGE:
NOTE: Headrest cables are included with the headrest DVD player and the headrest monitor.
1) AVXMTGHR1D System Monitor with DVD Player (AVXMTGHR1D) (1pc)
NOTE: TheAVXMTGHR1D monitor has been designed tobe interchangeable from one headrest to the other. Theheadrests will still have the Green and Red Din cables onthem and should be connected to their respectiveconnectors. The headrest cover from the manufacturer iscovered with shale colored vinyl.
1) Remote Control(P/N 136-5150) - (1pc)
3) AV IN / Power Cable, 8 Pin Din to 3 RCA (Red)(P/N 112-4149)-(1pc)
5) Black Vinyl Headrest Cover(P/N 126-1377)-(1pc)
4) AV OUT Cable, 8 Pin Din to 3 RCA (Green)(P/N 112-4160)-(1pc)
2) AV Adapter Cable(P/N )-(1pc)112B3227
6) Pewter Vinyl Headrest Cover(P/N 126-1378)-(1pc)
7)(P/N 138-1495 )-(2pcs)
Shrink Tubing, Black 8)(P/N )-(1box)Support Tube Adaptor Box
170-0161
POWER SOURCE
VOLUME
- +MUTE
ENTER
PIX
PREV NEXT PAUSE
STOPFFPLAYFR
AUDIOSUBTITLEREPEATSETUP
ZOOM
DVD SOURCE
DISC MENU DISPLAY
1 2 3 4
5 6 7 8
9 0
FMM ON/OFF CHANNEL SELECT
SYSTEM MENU
AVXMTGHR1D4
PUSH

HEADREST COVER REPLACEMENT:
1. Using a Philips screwdriver, unscrew the two Philips screws and lift the bottom edgeof the monitor upward.
2. Remove the .velcro tabs securing the headrest cover
3. Replace the headrest cover with the desired color and secure the headrest cover byre-attaching the velcro tabs.
4.Place the monitor cable into the space on the right side of the headrest and lower themonitor into position to align the two Philips screws with the screw holes in the headrest.Close the screen and press the PUSH button to secure the screen.
5.Tighten screws
AVXMTGHR1D 5
NOTE: If desired, replace the headrest cover before installing the headrest in the vehicle.
Unscrew Philips Screws
Remove Velcro Tabs
Push
Tighten Philips Screws

VEHICLE PREPARATION
AVXMTGHR1D6
1) Decide on the system configuration and the options that will be installed.
2) Read the manuals and get familiar with the electrical requirements andconnections.
3) Decide on the mounting locations and methods of mounting the products thatwill be connected to the AVXMTGHR1D.
4) Prepare the vehicle by removing any interior trim necessary to gain access tothe vehicle's wiring as well as all areas where interconnecting wire harnesseswill be located. The mounting method, and the location will vary from vehicle tovehicle, so this manual will only focus for the installation of the AVXMTGHR1DMonitors in the supplied configuration. The best location for the AVXMTGHR1DSystem components is:
a. Monitors: Vehicle specific Headrest The Master Monitor should beinstalled in the passenger position most used.)
5) Locate an accessory power source (+12VDC present when the ignition key is inthe accessory and run positions. 0VDC should be present when the ignition keyis in the OFF position), a constant power source (+12vdc) at all times,regardless of the ignition key and a good ground. Generally, these wires can befound at the ignition switch or fusebox.
Ensure that both the constant and accessory power is fused at thesource. Failure to do so may result in vehicle wiring damage.)
6) Run the wiring harnesses throughout the vehicle as necessary. (Refer to theWiring Diagrams on page 8, as well as the wiring instructions for the individualcomponents and accessory options being installed). Be sure, that all the wiringis protected from sharp edges and is routed in such a manner that it will not bepinched, when it is fully installed. Be sure to leave enough slack in the wiring ateach component to allow sufficient working room. Be sure to leave enough slackin the monitor cables to allow the headrest to move up or down, and seatmovement.
7) Remove all the A/V system components from their packaging and then placethem in the vehicle at their respective locations.
NOTE:
NOTE:

8) Install the headrests:a. Remove vehicle's original headrests.b. insert appropriate support tube adaptors in vehicle post guides. (if needed)c. Hold the headrest above the seat and insert the two cables into the vehiclesupport guides Make sure that the headrest is in the correct position (Displayfacing the rear).d. Route the cables through the seat back and out the bottom of the seat whilepulling the cables to remove the slack. Be sure to leave enough slack in themonitor cables to allow the headrest to move up or down.
9) Connect all the components together (electrically) and verify proper operation ofall the system functions.
AVXMTGHR1D 7
Wireless FM Modulator
The AVXMTGHR1D is equipped with a built-in wireless FM Modulator, that
allows you to listen to the DVD audio signal by tuning your vehicle’s radio to the
selected frequency, ( 87.7MHz, ( 88.1MHz, 88.5MHz,
88.9MHz, 106.7.1MHz, 107.1MHz, 107.5MHz, 107.9MHz.
This feature is accessed by using the FM transmitter buttons on the remote
(FMM ON/OFF, and CHANNEL SELECT).Whenever the FM Modulator is on, broadcast reception on the vehicles radio willbe poor. Switching off will allow normal radio reception.
CH1
NOTE:
CH2 CH3 CH4
CH5 CH6 CH7 CH8
the FM Modulator
In certain areas where there are a large number of FM radio stations (e.g.large cities, urban areas), the reception of the FM signal may not be satisfactory,resulting in static, distorted sound or signal bleed thru from strong local radiostations. This is not a defect in the product, but the result of a stronger local radiostation overpowering the wireless FM transmitter in your headrest monitor.

AVXMTGHR1D WIRING DIAGRAM
Headrest Monitor
GREENRED
AVXMTGHR1D8
PUSH
8 Pin (M) Din Cable Red with RCA Cable(P/N 112-4149)-(1pc)
8 Pin (M) Din Cable Green with RCA Cable(P/N 112-4160)-(1pc)
Video Out Yellow
Audio Out Right Red
Audio Out Left White
12V+VDC
Ground-
Video In Yellow
Audio In Right Red
Audio In Left White

AVXMTGHR1D 9
PUSH
AVXMTGHR1D(FRONT VIEW)
CONTROLS AND INDICATORS DIAGRAM
POWER/SOURCE
SCREEN RELEASE
PULL DOWN
PLAY/PAUSE
STOP
VOLUME /NEXT
SYSTEM MENU
VOLUME PREVIOUS/
IR SENSOR
IR HEADPHONETRANSMITTER LENS
AUX IN SD USB PHONE
AUX IN JACK
USB PORTSD CARD READER
COVER
LCD PANEL
PUSH
DVD DISC
(FRONT VIEW MONITOR OPEN)
(BOTTOM VIEW)
HEADPHONE JACK

AVXMTGHR1D10
REMOTE CONTROL OPERATION
NOTE:
Battery Replacement
The remote control has a battery installed with a pull tab to preventbattery discharge. Remove the pull tab before attempting to use the remote.
1. Remove the battery holder.2. Insert the battery (CR2025) into the battery holder and insert the battery
holder into the remote. Be sure to observe the correct polarity.3. Align the battery holder with the remote control and push until the holder
clicks.
POWER SOURCE
VOLUME
- +MUTE
ENTER
PIX
PREV NEXT PAUSE
STOPFFPLAYFR
AUDIOSUBTITLEREPEATSETUP
ZOOM
DVD SOURCE
DISC MENU DISPLAY
1 2 3 4
5 6 7 8
9 0
FMM ON/OFF CHANNEL SELECT
SYSTEM MENU
1
2
3
4
5
6
7
8
9
10
11
12
13
14
15
16
17
18
19
20
21
22
23
24
25
26
Remote Control Function Description

* Function control is available on the unit and the remote control.
Press this button to turn the unit ON and OFF.
Each time the button is pressed, the audio / video source will change in the
following sequence:
DVD > AV > AUX
The USB device and the SD card can be accessed using the DVD
source button. Refer to Item 26.
Press this button to mute all the audio. Pressing the button again restores the sound
to the previously set level.
Use these buttons to navigate the menu selection on the screen.
Press to return to the previous chapter or track.
1. POWER ( ) Button*
2. SOURCE Button*
NOTE:
MUTE Button
4. CURSOR ( ) Buttons
5. PREVIOUS ( ) Button*
��� �
�
6. FR SCAN BACKWARD ( ) Button
7. PLAY ( ) Button*
8. SETUP Button
,
9. REPEAT Button
�
Press to search in the backward direction. Press repeatedly to change the search speed
from 2, 4, 8, 16 and 32 times the normal speed. Pressing the fifth time returns to normal
speed..
Press to activate the play mode when a disc is loaded in the disc compartment a
USB memory device or a SD card is connected to the unit .
Press the DVD button and SETUP button to display the Setup Menu which allows the
user to change the DVD player options such as OSD Language, Video, Rating etc.
Refer to the settings and adjustment section for more information.
Allows the user to repeat a selected track, folder, title, chapter, or all.
�
,
11AVXMTGHR1D

10. ZOOM Button
11. SYSTEM MENU Button
16.
17. SUBTITLE Button
NOTE:
18. AUDIO Button
NOTE:
Press this button to enlarge or decrease the picture size when playing a DVD disc.
Once Enlarges the picture 2X
Twice Enlarges the picture 3X
3 Times Enlarges the picture 4X
4 Times Reduces the picture 1/2
5 Times Reduces the picture 1/3
6 Times Reduces the picture 1/4
7 Times Picture is returned to original size
Press this button to enter the system menu which contains features and options to
customize the screen display and change the OSD language.
Press to display and select the available subtitle language in DVD mode. Each time he
button the subtitle language changes.
The type and number of subtitle languages vary from disc to disc.
Press to display and select the available AUDIO languages in DVD mode.
Each time you press the button, the language changes.
The audio languages vary from disc to disc.
Press ZOOM button DVD Player performs
12. NUMBER Buttons
13. FMM ON/OFF Button
14. FMM CHANNEL SELECT Button
CH1 CH2 . CH3 CH4 CH5
CH6 CH7 CH8
15. DISC MENU Button
Allows the user to enter numbers 0 to 9 for selection of CD tracks, DVD chapters,
and passwords.
Turns the wireless FM Modulator on or off.
Selects the wireless FM Modulator Frequency:
( 87.7MHz, 88 1MHz, 88.5MHz, 88.9MHz, 106.7MHz,
107.1MHz, 107.5MHz, 107.9MHz.
Press this button to enter the DVD root menu.
DISPLAY
Press to display current disc information while the disc is playing. The information
displayed will be Title Elapsed, Title Remaining, Chapter Elapsed and Chapter
Remaining. Pressing the button will also turn the display off.
t
is pressed Pressing the button will also turn the
subtitles off.
12 AVXMTGHR1D

19. FF SCAN FORWARD ( ) Button*
20. STOP ( ) Button*
21. NEXT ( ) Button*
22. PAUSE ( II ) Button*
23. ENTER Button
24. PIX (Picture Select) Button
25. VOLUME DOWN (-) or UP (+)*
26. DVD Source*
NOTE:
�
�
Press to search in the forward direction. Press repeatedly to change the search speed
from 2, 4, 8, 16 and 32 times the normal speed.
Press to stop playback.
Press to skip to the next chapter or track.
Allows the user to pause the playback. Pressing pause again or pressing the Play
button will resume normal playback.
Used to implement a selected setting or menu option.
Each time this button is pressed, the OSD picture adjustment displays the “Adjustment
bar” for BRIGHTNESS, CONTRAST, COLOR, TINT (For NTSC only). Once the
desired adjustment bar is displayed, use the VOLUME+ and VOLUME– button to
adjust the setting. The display will automatically turn or if no adjustments are made
within 6 seconds is pressed.
Press to select the level of the picture adjustments when the unit is in picture
adjustment mode or to increase or decrease the volume for the wired headphones.
This button is only active when remote control is in the DVD mode. Each time the
button is pressed one of the sources (DVD, USB and SD Card ) will be selected. If a
USB device or SD Card is not plugged in, it will remain on DVD Source.
Press to change source in sequence of DVD > USB > SD Card
The DVD Source button is used to access MP3 and audio CDs when these
discs are in the disc compartment.
�
the un
.
AVXMTGHR1D 13
MENUADJUSTMENT
MENU DISPLAY
The System Menu contains features and options that allow you to customize yoursystem.
1) Press the “ ” button on unit or press the TV button and the SYSTEM MENU
button on the remote control, the menu display below will appear on screen.
2) Use the “+” “-” buttons to change the setting .
3) To select the next menu press the “ ” button or the SYSTEM MENU button on the
remote control.
The first adjustment to appear is the volume adjustment. The volume can be adjusted
from 1 to 32.
The picture can be adjusted under the system menu. The picture adjustments consist
of brightness (BRIGHT), CONTRAST, COLOR, TINT (for NTSC only). The
adjustments range from 1 to 32.
The screen mode select feature allows the user to change the screen format (aspect
ratio from 4:3 or to 16:9).
The IRT can be set to Channel A or Channel B for use with optional wireless
headphones. The IRT function can also be set to off.
SCREEN MODE 16:9
AVXMTGHR1D14
16
BRIGHT 16
CONTRAST 16
COLOR 16
TINT 0
IRT A

The FM Modulator adjustments consist of turning the FM Modulator on or off andselecting the FM Modulator frequency. The wireless FM Modulator Frequenciesthat can be selected are:(CH1 87.7MHz, CH2 88.1MHz, CH3 88.5MHz, CH4 88.9MHz,CH5 106.7MHz, CH6 107.1MHz, CH7 107.5MHz, CH8 107.9MHz.
The OSD Language feature allows the user to select the language for the on-screen display. The user can either select English, Dutch, Spanish,Russian or Chinese for the OSD language.
The RESET function allows all setting options to be reset to factory settings.
French,
The Setup Menu contains features and options that let you customize your DVD
player. For example, you can set a language for the on-screen display or prevent
DVD playback for children.
1. Press the DVD and SETUP buttons on the remote. The Setup Menu appears on
the screen. There are four menu pages which comprise the Setup Menu.
2. To select and set an option, use the cursor buttons ( or ) to move the highlight
to the desired page.
3. After entering the highlighted page, use the cursor buttons ( or ) to highlight
the desired option.
4. Press to open the sub menu that contains the different options available.
Press or to highlight the desired option, and press ENTER to confirm the
selection.
5. Repeat steps 3 and 4 to set the options that reside on the same menu page.
6. To change to another menu page, use the cursor buttons ( or ) then, repeat
steps 2 through 5.
SETTINGS AND ADJUSTMENTS
Using the Setup Menu
� �
� �
�
� �
� �
FMM OFF
OSD LANGUAGE ENGLISH
RESET
15AVXMTGHR1D

AVXMTGHR1D16
GENERAL PAGE
TV Display
Screen Saver
Last Memory
The TV Display feature allows the user to change the screen format (aspect ratio to
4:3 PScan, 4:3 LB, or 16:9 Wide).
1. To select the screen aspect ratio mode use the cursor button or to
highlight TV DISPLAY. Press the cursor button to open the sub menu that
contains the different options available. Press the cursor button or to
highlight the desired option, and press ENTER to confirm the selection. Use the
cursor button to return to the options.
The closed captions feature allows the user to turn the screen saver function on or
off.
1. To select the screen aspect ratio mode use the cursor button or to
highlight CLOSED CAPTIONS. Press cursor button to open the sub menu
that contains the different options available. Press the cursor button or to
highlight the desired option, and press ENTER to confirm the selection. Use the
cursor button to return to the options.
The last memory function allows DVD playback to begin from the point when
playback was last stopped. The last memory feature allows the user to turn the last
memory feature function on or off.
1. To select the screen aspect ratio mode use the cursor button or to
highlight LAST MEMORY. Press the cursor button to open the sub menu
that contains the different options available. Press the cursor button or to
highlight the desired option, and press ENTER to confirm the selection. Use the
cursor button to return to the options.
� �
�
� �
�
� �
�
� �
�
� �
�
� �
�
General Audio
General Setup Page
TV Display
Last Memory
WideOn
On
Goto General Setup Page
ExitPreference
Screen Saver

AUDIO SETUP PAGE
Sound Mode
Bass Boost
Super Bass
Treble Boost
The sound mode feature allows the user to apply preset sound effects to the unit’s
audio output signal. The user may choose from: None ,Rock, Pop, Live, Dance,
Techno, Classic and Soft.
1. To select the sound mode use the cursor button or to highlight SOUND
MODE. Press the cursor button to open the sub menu that contains the
different options available. Press the cursor button or to highlight the
desired option, and press ENTER to confirm the selection. Use the cursor
button to return to the options.
The bass boost feature increases the audio bass response and allows the function
to be turned on or off.
1. To select the bass boost feature use the cursor button or to highlight
BASS BOOST. Press the cursor button to open the sub menu that contains
the different options available. Press the cursor button or to highlight the
desired option, and press ENTER to confirm the selection. Use the cursor
button to return to the options.
The super bass feature increases the audio bass response and allows the function
to be turned on or off.
1. To select the super bass boost feature use the cursor button or to highlight
SUPER BASS. Press the cursor button to open the sub menu that contains
the different options available. Press the cursor button or to highlight the
desired option, and press ENTER to confirm the selection. Use the cursor
button to return to the options.
� �
�
� �
�
� �
�
� �
�
� �
�
� �
�
The treble boost feature increases the audio treble response and allows the function
to be turned on or off.
1. To select the treble boost feature use the cursor button or to highlight
TREBLE BOOST. Press the cursor button to open the sub menu that
contains the different options available. Press the cursor button or to
highlight the desired option, and press ENTER to confirm the selection. Use the
cursor button to return to the options.
� �
�
� �
�
General Audio
Audio Setup Page
Sound Mode
Goto Audio Setup Page
ExitPreference
Bass Boost
Super BassTreble Boost
NoneOff
OffOff
Equalizer
AVXMTGHR1D 17

18 AVXMTGHR1D
PREFERENCE PAGE
TV Type
NOTE:
seven
The Preference page can only be accessed when the disc compartment isempty.
1. To select the TV type use the cursor button or to highlight TV TYPE.
Press the cursor button to open the sub menu that contains the different
options available. Press the cursor button or to highlight the desired
option, and press ENTER to confirm the selection. Use the cursor button to
return to the options.
� �
�
� �
�
This menu page available if there is no disc in the disc tray, the disc tray is open
or the disc in the disc tray is stopped.
There are items in the PREFERENCE PAGE. They are TV TYPE,AUDIO, SUBTITLE, DISC MENU, PARENTAL, PASSWORD, and DEFAULT.
his function matches video output of the unit to the broadcast system of a connected
TV. The unit supports both National Television System Committee (NTSC) and Phase
Alternating Line (PAL) television broadcasting standards.
Options:: Select this mode if the connected TV is a PAL system. The video signalof a NTSC disc will be output in PAL format.: Select this mode if the connected TV is multi-system. The outputformat of video signal will be in accordance with the video signal ofthe disc.
: Select this mode if the connected TV is a NTSC system. The videosignal of a PAL disc will be output in NTSC format.
T
PAL
AUTO
NTSC
General Audio ExitPreference
Preference Page
TV TypeAudioSubtitleDisc MenuParentalPasswordDefault
Goto Preference Page
NTSCEngEngEng

Audio Menu
This item allows a user to select a preferred audio language. This functiononly applies to discs encoded with different audio languages.Options: English, French, Spanish, Chinese, Japanese, Korean, Russian,and Thai.
If the selected language is not available for the currently playing disc,the disc's default setting is applied.
This item allows a user to select a preferred subtitle language. This function only
applies to discs encoded with subtitles.
Options English, French, Spanish, Chinese, Japanese, Korean, Russian,and Thai.
If the selected language is not available for the currently playing disc,the disc's default setting is applied.
This item allows a user to select a preferred disc menu language.
Options English, French, Spanish, Chinese, Japanese, Korean, Russian,and Thai.
If the selected language is not available for the currently playing disc,the disc's default setting is applied.1
NOTE:
:
NOTE:
:
NOTE:
.
1. To select the audio feature use the cursor button or to highlightAUDIO. Press the cursor button to open the sub menu that containsthe different options available. Press the cursor button or tohighlight the desired option, and press ENTER to confirm the selection.Use the cursor button to return to the options.
1. To select the subtitle feature use the cursor button or to highlightSUBTITLE. Press the cursor button to open the sub menu thatcontains the different options available. Press the cursor button orto highlight the desired option, and press ENTER to confirm theselection. Use the cursor button to return to the options.
To select the disc menu feature use the cursor button or to highlightDISC MENU. Press the cursor button to open the sub menu thatcontains the different options available. Press the cursor button orto highlight the desired option, and press ENTER to confirm theselection. Use the cursor button to return to the options.
� �
�
� �
�
� �
�
� �
�
� �
�
� �
�
Subtitle
Disc Menu
AVXMTGHR1D 19

Parental
Password
Default
1 G2 PG3 PG – 13
4 R
5 NC17
6 Adult
To select the parental feature use the cursor button or to highlightPARENTAL. Press the cursor button to open the sub menu thatcontains the different options available. Press the cursor button orto highlight the desired option, and press ENTER to confirm theselection. Use the cursor button to return to the options
To select the password feature use the cursor button or to highlightPASSWORD. Press the cursor button to open the sub menu thatcontains the different options available. Press the cursor button orto highlight the desired option, and press ENTER to confirm theselection.
2. Use the cursor button to return to the options.
To select the default feature use the cursor button or to highlightDEFAULT. Press the cursor button to open the sub menu thatcontains the different options available. Press the cursor button orto highlight the desired option, and press ENTER to confirm theselection. Use the cursor button to return to the options.
� �
�
� �
�
� �
�
� �
�
� �
�
� �
�
This item allows the user to limit the content of movie playback from Kid Safe toAdult. The lower the value, the more strict the control. Movies rated higher thanthe level set for the parental lock can not be viewed without entering the correctpassword.
The rating level can be changed only when the correct password isprovided. This function only works with those discs with parental function
This item allows a user to restore all the default settings except the settings inthe Password Setup Page and the PARENTAL item.
NOTE:.
Options
1
This item allows a user to change the password. The default password is 3308.
1
To change the password:1. Enter the old password in the OLD PASSWORD row.2. Enter the new password in the NEW PASSWORD row.3. Enter the new password again in the CONFIRM PWD row.
You may reset the password if you forget the old password by using thedefault password: 3308. This password is always active even after you haveselected your own password and changed it. To avoid the possibility of othersusing the default password to set the parental level and change the password,record this default password in another area and delete it from this manual.
1
:
.
.
.
NOTE:
20 AVXMTGHR1D

EXIT SETUP PAGE
Exit Setup PageThe exit setup page allows the user to exit the setup menu and return to the DVD
playback.
1. To exit the setup page use the to highlight EXIT and press ENTER to
confirm the selection.
Press the DISPLAY button on the remote control to display the status banner. The
banner includes disc title, chapter, and elapsed time.
Title selection
Press numeric (0-9) buttons to initiate a change of chapter title selection. Then
press ENTER to implement the selection.
The System will detect the insertion of the USB media automatically if no disc is
loaded. The system only auto detects the first media inserted (DVD or USB drive);
the second media source, SD card or CD disc must be manually selected by
pressing the DVD source button on the remote control.
When a disc is inserted, the system will switch to DVD mode immediately
regardless if USB media is currently playing. The DVD source (DVD or USB) can
only be changed while the DVD is not playing. When a USB device is loaded in the
player, the navigation menu appears automatically.
1. Press the cursor button or to move the highlight to the desired folder and
press ENTER to display the contents in the folder.
2. Press the cursor button or to move the highlight to the desired file in the
folder and press ENTER to begin playback of the highlighted file.
�
Playing DVDs
Playing USB
� �
� �
General Audio ExitPreference
Video Setup Page
Exit Setup Menu
AVXMTGHR1D 21

Note: The System supports:
Files: MP3 and JPEG files only.
File systems: FAT16 and FAT32
The system will NOT support:
Files: BMP, M4P, WAV, ASF, H.264, DivX, WMA
File systems: NTFS, ExFAT
The system will always default to the DVD when the system detects a disc in the
DVD player.
When playing an audio CD, the DISPLAY banner appears automatically. The track
number and the elapsed time of the disc are displayed.
Selecting a Track
Selection of a specific track is accomplished by using the numbers keys. Press the
number key corresponding to the desired track and press ENTER and the player
will implement the selection.
Using the REPEAT feature
The default mode for the Repeat feature is OFF. Pressing REPEAT consecutively
changes the repeat options
• TRACK – repeat the track that is playing.
• ALL – repeat the entire disc that is playing.
• REPEAT OFF – repeat is turned off.
MP3 is a format for storing digital audio. An audio CD-quality song can be
compressed into MP3 format with very little loss of quality, while taking up much
less space. CD-R discs that have been encoded in MP3 format can be played on
the DVD player. The DVD player plays the songs in the order they were burned on
to the disc.
Playing Audio CDs
Playing MP3 Discs
AVXMTGHR1D22
Selecting Folders and Songs
When an MP3 disc is loaded in the player, the navigation menu will appear on the
screen automatically.
Press the cursor button, or , to move the highlight to the desired folder and
press the ENTER button to display the songs in the folder.
Press the cursor button, or , to move the highlight to the desired song and
press the ENTER button to begin playback of the highlighted song.
Selecting a Play Mode
You can choose what order the songs will play on a disc temporarily. The default
play mode is FOLDER. Press REPEAT consecutively to choose the desired play
mode. The play mode options are :
• Repeat One Repeat the song that is playing.
• Repeat Folder Repeat the disc that is playing.
• Repeat Off Turn off repeat function.
The System will detect the insertion of the SD Card automatically if no disc is
loaded. The system only auto detects the first media inserted (DVD or the second
media source, USB device ,SD card or CD disc must be manually selected by
pressing the DVD source button on the remote control.
When a disc is inserted, the system will switch to DVD mode immediately
regardless if SD Card media is currently playing. The DVD source can only be
changed while the DVD is not playing. When a SD Card is loaded in the player, the
navigation menu appears automatically.
1. Press the cursor button or to move the highlight to the desired folder and
press ENTER to display the contents in the folder.
2. Press the cursor button or to move the highlight to the desired file in the
folder and press ENTER to begin playback of the highlighted file.
The system will always default to the DVD when the system detects a disc in the
DVD player.
� �
� �
Playing SD Card
� �
� �
AVXMTGHR1D 23

AVXMTGHR1D24
DVD Basics
To get the optimum use out of the DVD Player, please read the following:.
The DVD player is preset to a region code at the factory depending on where the DVD
player is sold.ADVD from a different region cannot be played in this unit and the unit will
display "WRONG REGION”.
DVD Region Code
Region 1- USA, Canada
Region 2- Japan, Europe, South Africa, Middle East, Greenland
Region 3- S. Korea, Taiwan, Hong Kong, Parts of South East Asia
Region 4- Australia, New Zealand, Latin America (including Mexico)
Region 5- Eastern Europe, Russia, India, Africa
Region 6- China

AVXMTGHR1D 25
TROUBLESHOOTING
PROBLEM SOLUTION
IR remote inoperative "
"
Verify that the battery in the remote is fresh.
Verify that the remote sensor eye is not obstructed.
Disc won't play "
"
"
Insert a disc with the label side facing upwards.
Check the type of disc you put into disc tray. This
DVD only plays DVD, audio CD and MP3s.
Both the unit and the disc are coded by region. If the
Play starts, but then stopsimmediately
"
"
The disc is dirty. Clean it.
Condensation has formed. Allow player to dry out.
No sound or distortedsound
"
"
"
Make sure your DVD is connected properly. Make
sure all cables are securely inserted into the
appropriate jacks.
If you are using the 2-channel IR headphones, make
sure you turn on the IR headphone power, make sure
the correct channel (Aor B) is selected.
If the FM Modulator is ON make sure proper
frequency has been selected.
Cannot advance through amovie
" Most discs prohibit advancing through the opening
credits and warning information that appear at the
beginning of movies.
The icon ( ) appears onscreen
" The feature or action cannot be completed at this
time because:
1. The disc’s software restricts it.
2. The disc’s software doesn’t support the feature
(e.g., angles)
3. The feature is not available at the moment.
4.Atitle or chapter number that is out of range has
been requested.
Picture is distorted "
"
The disc might be damaged. Try another disc.
It is normal for some distortion to appear during

AVXMTGHR1D26
Applies to Movies To Go Mobile Video Products
128-6429F
Audiovox Electronics Corporation,150 Marcus Blvd., Hauppauge, New York 11788 1-800-645-4994l
AUDIOVOX ELECTRONICS CORP. (the Company) warrants to the originalretail purchaser of this product that should this product or any part thereof,under normal use and conditions, be proven defective in material or workmanship within 12 months from the date of original purchase, such defect(s) willbe repaired or replaced with reconditioned product (at the Company's option)without charge for parts and repair labor. A game controller, if supplied, issimilarly warranted for ninety (90) days.
To obtain repair or replacement within the terms of this Warranty, the productis to be delivered with proof of warranty coverage (e.g. dated bill of sale),specification of defect(s), transportation prepaid, to the Company at theaddress shown below.This Warranty does not extend to the elimination of externally generated staticor noise, to correction of antenna problems, to costs incurred forinstallation, removal or reinstallation of the product, or to damage to digitalmemory/media devices, gaming devices, discs, speakers, accessories, orvehicle electrical systems.
This Warranty does not apply to any product or part thereof which, in theopinion of the Company, has suffered or been damaged through alteration,improper installation, mishandling, misuse, neglect, accident, or by removalor defacement of the factory serial number/bar code label(s). THE EXTENTOF THE COMPANY'S LIABILITY UNDER THIS WARRANTY IS LIMITED TOTHE REPAIR OR REPLACEMENT PROVIDED ABOVE AND, IN NO EVENT,SHALLTHE COMPANY'S LIABILITY EXCEED THE PURCHASE PRICE PAIDBY PURCHASER FOR THE PRODUCT.
This Warranty is in lieu of all other express warranties or liabilities. ANYIMPLIED WARRANTIES, INCLUDING ANY IMPLIED WARRANTY OFMERCHANTABILITY, SHALL BE LIMITED TO THE DURATION OF THISWRITTEN WARRANTY. ANY ACTION FOR BREACH OF ANY WARRANTYH E R E U N D E R I N C L U D I N G A N Y I M P L I E D WA R R A N T Y O FMERCHANTABILITY MUST BE BROUGHT WITHIN A PERIOD OF 24MONTHS FROM DATE OF ORIGINAL PURCHASE. IN NO CASE SHALLTHE COMPANY BE LIABLE FOR ANY CONSEQUENTIAL OR INCIDENTALDAMAGES FOR BREACH OF THIS OR ANY OTHER WARRANTY. Noperson or representative is authorized to assume for the Company any liabilityother than expressed herein in connection with the sale of this product.

NOTES

© 2011 Audiovox Electronics Corp., Hauppauge, NY 11788 128-8944B


![Commas Until You Cry ! Blah blah blah [pause =, ] blah blah blah [pause =, ] blah blah blah... Blah blah blah [pause =, ] blah blah blah [pause =, ]](https://img.pdfslide.net/doc/110x75/56649f295503460f94c42b3e/commas-until-you-cry-blah-blah-blah-pause-blah-blah-blah-pause-.jpg)