Embed Size (px)
Citation preview
1
13.56Mhz RFID Reader/writer – USB driver installation guide for Windows
Remarks :
Don’t connect the USB reader with the PC when running below auto USB driver setup
[1] insert the USB driver disk to CD-ROM : run the auto setup program from the following path : cd-rom drive :\USB To Virtual Com driver\CP210x_VCP_Win2K_XP_S2K3.exe windows OS support : 2000 , XP , Vista & 2003 server
[2] After driver installation connect the USB reader to the PC’s USB port with a USB cable . Then the PC will find the reader and install the “USB to UART Bridge” driver automatically.
[3] After installation successfully , you will find “CP210xUSB to UART Bridge Controller (Com3)” as
follow message from the control panel/system/hardware/device manager/port(COM & LPT) .
(may be see other COM port #, not the COM3 which is depend on your PC’s hardware configuration)
2
Demo program installation
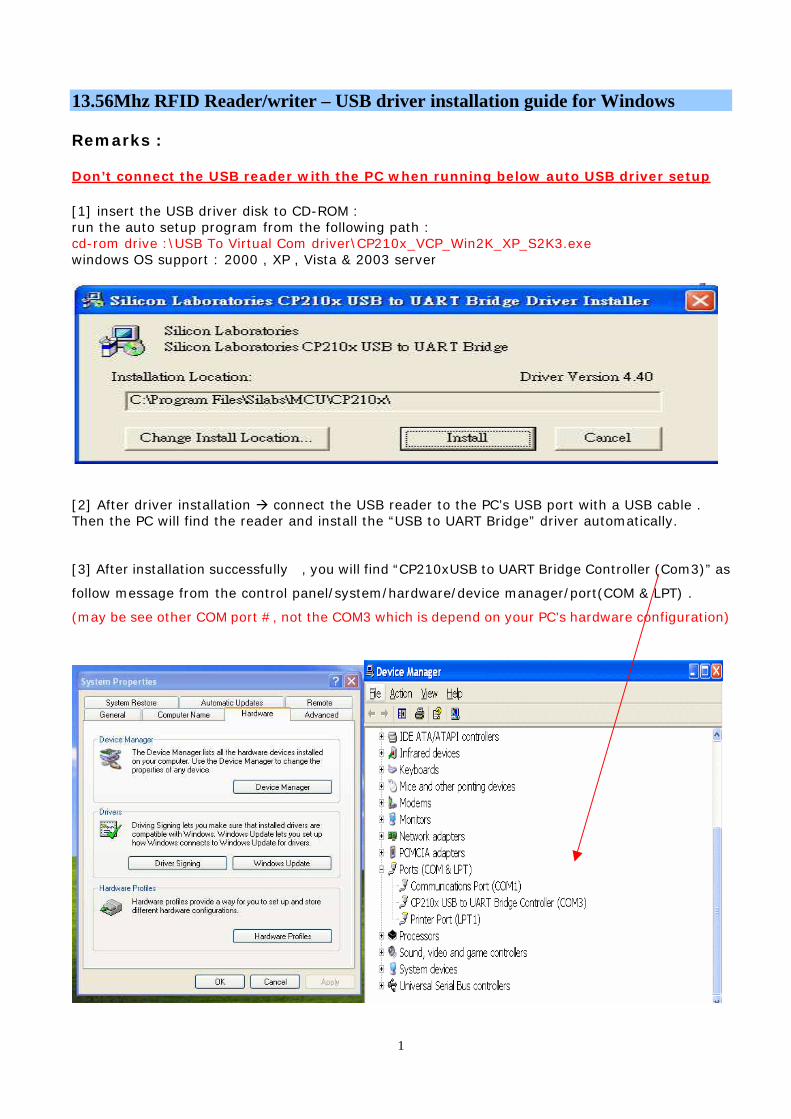
Run the demo program from the following path : VB.Net : cd-rom drive\\demo program & source code\VB_Net\RR3036DemoVB.EN Csharp : cd-rom drive\\demo program & source code\Csharp\RR3036DemoCSharp Delphi : cd-rom drive\\demo program & source code\Delphi\RR3036Demo For model : HF-TP-RW-USB - Demo program (ISO15693)
[1] click on “open com” - will show com port # if the communication is correct.
[2] Select “ISO5693 protocol” from menu and click on “Change to 15693”
How to read single ISO15693 tag [1] place a ISO15693 Tag on the reader [2] click on “Inventory” from Inventory(Single tags) [3] UID will be shown here How to read multiple ISO15693 tag [1] place some ISO15693 Tags on the reader [2] click on “New Inventory” from Inventory(Multiple tags) [3] multiple tag UID will be shown here
3
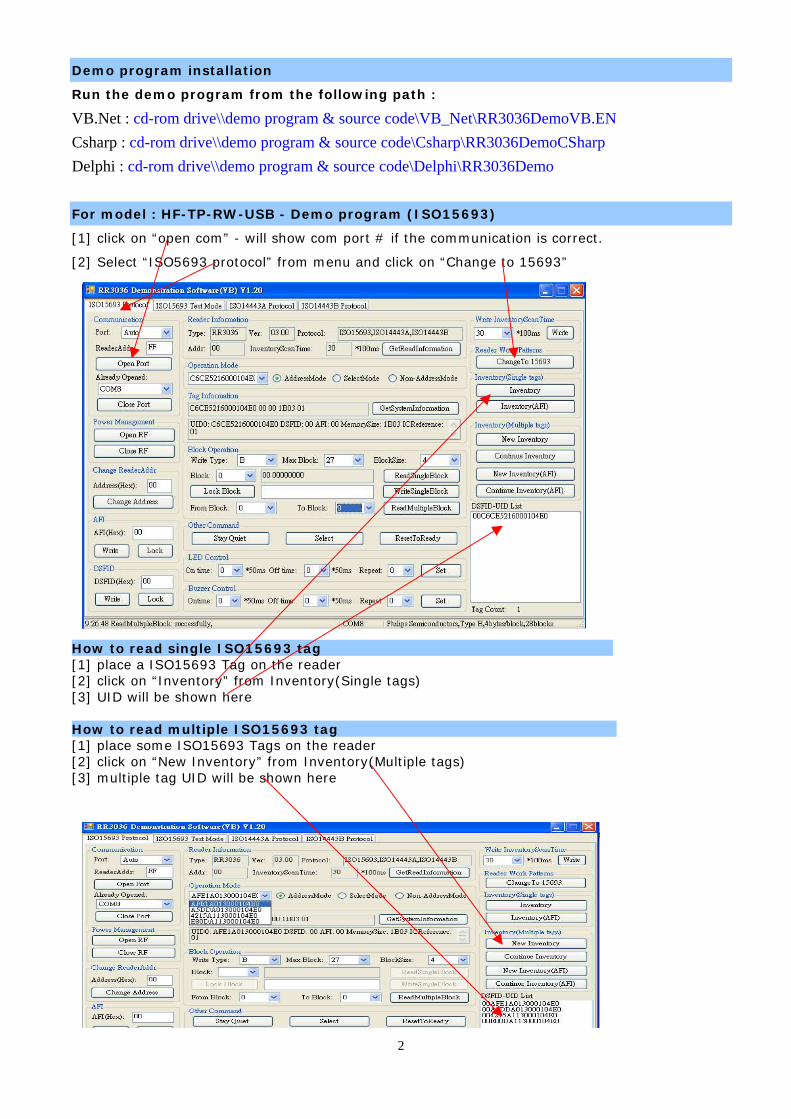
How to read/write ISO15693 tag [1] click on “operation Mode” to select the tag [2] click on GetSystemInformation” to get tag information [3] select the single or multiple block# to read/write from “Block Operation”
Read & write operation for ISO14443A TAG This example is to read/write ISO14443A Mifare S50 Tag Remarks :
How to read ISO15693 tag
For other operation & read/write flow , pls refer to the RR3036 Protocol manual & Mifare Tag’s datasheet in detail
For model : MF1-RW-USB , pls skip the ISO15693 & ISO14443B section description in the RR3036 Protocol manual
ISO15693 Test Mode [1] place some ISO15693 tags on the reader [2] click on “ISO15693 Test Mode” and “open test mode” [3] Multi tags UID will be shown as follow :
[2] click on GetSystemInformation” to get tag information [3] select the single or multiple block# to read
Remarks :
For other operation & read/write flow , pls refer to the RR3036 Protocol manual & ISO15693 Tag’s datasheet in detail

4
For model : HF-TP-RW-USB - Demo program (ISO14443A)
[1] click on “open com” - will show com port # if the communication is correct.
[2] Select ISO14443A from menu
How to read manufacturer block (locate at Block 0 / sector 0) [1] place a MF1 S50 ISO card on the reader [2] click on “change to 14443A” select - sector = “0” and block = “0” [3] click on command : “Request” “Anticoll” “select” “Authkey” “Read” ID will shown on screen as follow :
Read & write operation for ISO14443A TAG This example is to read/write ISO14443A Mifare S50 Tag
Remarks :
For other operation & read/write flow , pls refer to the RR3036 Protocol manual & Mifare ISO14443A Tag’s datasheet in detail

![22.10.2010 SVN Accounts [NPFL094:/] … vojtech.diatka = rw ejemr = rw machacekmatous = rw sedlak = rw masekj = rw](https://img.pdfslide.net/doc/110x75/56649e115503460f94afcb54/22102010httpufalmffcuniczcoursenpfl0941-svn-accounts-npfl094.jpg)