Embed Size (px)
Citation preview
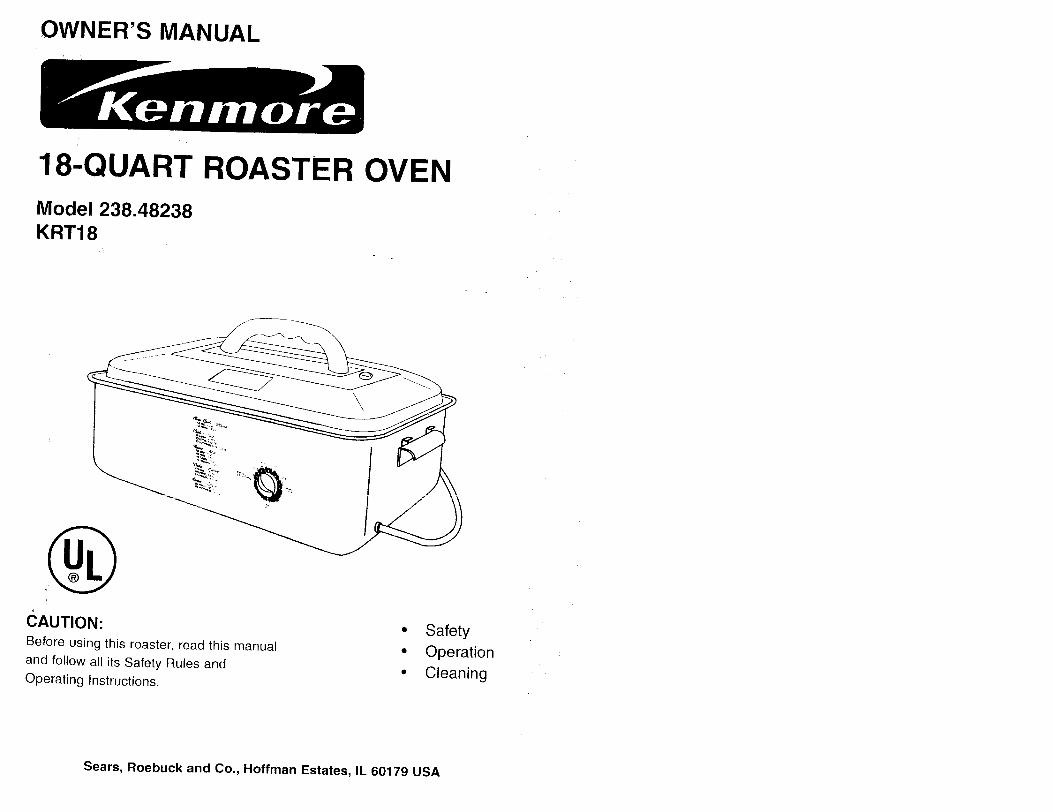
OWNER'S MANUAL
18'QUART ROASTER OVEN
Model 238.48238KRT18
J
CAUTION:
Before using this roaster, read this manual
and follow all its Safety Rules and
Operating Instructions.
• Safety
• Operation
• Cleaning
Sears, Roebuck and Co., Hoffman Estates, IL 60179 USA
FULL ONE YEAR WARRANTY ON KENMORE 18-QUART ROASTER OVENIf this Kenmore 18-Quart Roaster Oven fails due to a defect in material or workmanship
within one year from date of purchase, Sears will replace it free of charge,
WARRANTY SERVICE
To obtain replacement under this warranty, return this Kenmore 18-Quart Roaster Ovento your nearest Sears Store in the United States.
This warranty applies only while this Kenmore 18-Quart Roaster Oven is used in theUnited States.
This warranty gives you specific legal rights, and you may also have other rights whichvary from state to state.
Sears, Roebuck and Co., Dept. 817WA, Hoffman Estates, IL 60179
Customer Service Department 1-800-233-9054
IMPORTANT SAFETY INSTRUCTIONSWhen using electrical appliances, especially when children are present, basic safetypreca_tions should always be followed, including the following:
READ ALL INSTRUCTIONS BEFORE USING.
1. Do not touch hot surfaces. Use handles orknobs.
2. Always plug appliance cord into the wall
outlet, then adjust temperature control tothe desired temperature. To disconnect,
iturn control to OFF position, then removeplug from wal! outlet.
3. Do not immerse the cooking base, cord orp!ug, inwater or other liquid. See instruc-tions for cleaning.
4. This appliance is not for use by children.5. Close supervision is necessary when any
appliance is used near children.6. Unplug from outlet when not in use. Unplug
and allow to cool completely before puttingoh or taking off parts, and before cleaning.
7., Do not operate any damaged appliance. Do
not operate with a damaged cord or plug orafter the appliance malfunctions, or hasbeen dropped or damaged in any manner.Return appliance to the nearest AuthorizedService Center for examination, repair orelectrical or mechanical adjustment.
8. Use attachments only if recommended bythe manufacturer.
9. Do not use outdoors or while standing in adamp area.
10. Do not let cord hang over edge of table orcounter, or touch hot surfaces.
11. Do not place on or near a hot gas or elec-tric burner or in a heated oven.
12. Extreme caution must be used when mov-
ing an appliance containing hot oil or otherhot liquids.
13, Use appliance only as indicatedin theseinstructions.
!4. Do not use metal scouring pads on theexterior surface of the Roaster Oven.
Pieces can break off the pad and touchelectrical parts creating a shock hazard.
15. Always place the Roaster Oven on a non-flammable, non-burnable, heat-resistant sur-
face when cooking. Never place it on car-pet, furniture, or other combustible materi-als. Operate oven in a well-ventilated areaaway from walls and other combustiblematerials.
16.THIS APPLIANCE IS FOR HOUSEHOLDUSE ONLY.
SAVE THESE INSTRUCTIONS
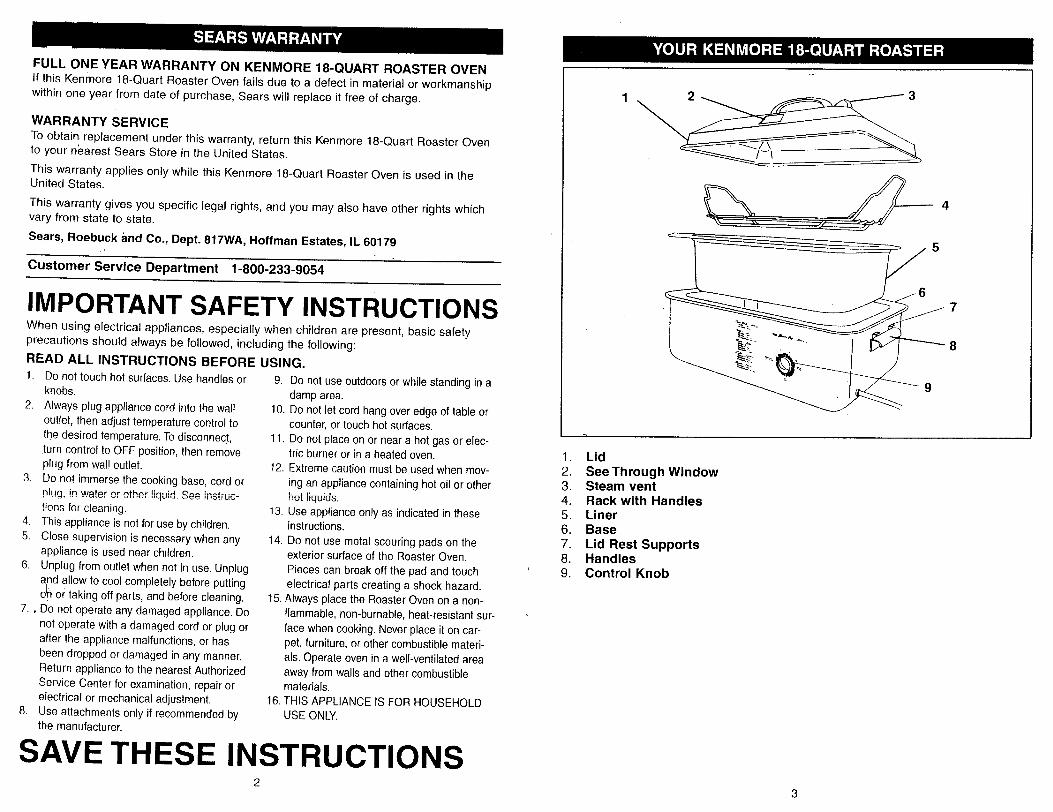
1. Lid2. See Through Window3. Steam vent4. Rack with Handles5. Liner6. Base7. Lid Rest Supports8. Handles9. Control Knob
2 3
This appliance is for HOUSEHOLD USE
ONLY and may be plugged into any 120V
AC electrical outlet. Do not use any othertype of outlet.
CAUTION: A short power supply cord isprovided to reduce the risk of personalinjury resulting from becoming entangledin or tripping over a longer cord. Extensioncords are available from local hardwarestores and may be used if care is exer-cised in their use. If an extension cord isrequired, special Care and caution is nec-
essary. Also the cord must be: (1)marked with an electrical rating of 125 Vand at least 10A., 1250 W., and (2) thecord must be arranged so that it wil! not
drape over the countertop or tabletop
where it can be pulled on by children ortripped over accidentally.POLARIZED PLUG: This appliance has apolarized plug, (one blade is wider thanthe other). As a safety feature to reducethe risk of electrical shock, this plug isintended to fit in a polarized outlet onlyone way. If the plug does not fit fully in theoutlet, reverse the plug. If it still does notfit, contact a qualified electrician. Do not
attempt to defeat this safety feature.
ELECTRIC POWER: If the electric circuit
is overloaded with other appliances, yourappliance may not operate properly. Itshould be operated on a separate electri-_,d, circuit from other appiiances.
BEFORE USING YOUR ROASTER OVEN
1. Carefully unpack your roaster oven andclean, see CLEANING YOUR ROAST-ER OVEN.
2. It is necessary to operate the roaster
empty one time to burn off excess man-
ufacturing oils. Plug into 120 V - 60 Hzoutlet in a well-ventilated area. Place
liner into base and lid on roaster•
3. Turn the control knob !o maximum tem-
perature setting, the indicator light willcome on to let your know the unit isheating. Allow to heat for one hour or
until any odor or smoke disappears.This process is necessary as a part ofth!e initial seasoning of the heating ele-ment.
CAUTION: THE ROASTER WILLBECOME HOT WITH USE.
CAUTION: BASE, LINER AND LID WILLGET VERY WARM DURING USE. IF NEC-
ESSARY TO HANDLE, USE POT HOLD-ERS OR OVEN MITTS.
4. When time is complete, turn controlknob to OFF position and unplug fromoutlet. Allow to cool before moving.
5. Clean the lid, liner and rack, see "CLEANING YOUR ROASTER OVEN.
USING YOUR ROASTER OVEN
Plug into a 120V _ 60Hz outlet. Placeliner into base and place lid on roasteroven.
2. Turn control knob to the desired pre-heat temperature setting and allow topreheat for 20 minutes.
CAUTION: THE ROASTER WILLBECOME HOT WITH USE AND PRO-DUCE STEAM. CAUTION SHOULD BEUSED TO AVOID COVERING STEAMVENT HOLES OR COMING IN CONTACTWITH HOT STEAM FROM STEAM VENTHOLES. NEVER PLACE FOOD ORWATER IN THE BASE.
CAUTION: BASE, LINER AND LID WILLGET VERY WARM DURING USE. IF NEC-
ESSARY TO HANDLE, USE POT HOLD-ERS OR OVEN MITTS.
3. Prepare recipe according to instructionsand carefully add to the preheated linerusing hot pads. Place lid on roasteroven. Do not fill the liner to the brim
with food. Always cook with the liner inposition and lid on the liner. Rememberthat frequent lifting of the lid duringcooking delays total cooking time. Usethe rack with handles for baking. Followrecipes or hints to place soups andfood into liner without the rack.
5,
4. Turn the control knob to the desired
temperature.
Using oven mitts, carefully remove thelid by grasping the handle and lifting thelid away from you. This will allow thesteam to escape and moisture to dripback into food before removing the lidcompletely. The lid may be placed onthe lid rest support for temporary hold-ing during serving or stirring.
6. When cooking time is complete, turncontrol knob to OFF position andunplug from outlet. The cooking times inthe charts are only guides.
7. Allow to cool completely before clean-ing, see CLEANING YOUR ROASTEROVEN
4 5
HINTS
HINTS FOR KEEP WARM
• Used for short periods of time after foodis cooked.
HINTS FOR SLOW COOK
• When slow cooking, remember that liq-uids do not boil away like they do inconventional cooking. Reduce theamount of liquid in any recipe that isnot designed for a roaster oven. Theexceptions to this rule would be rice
and soups. Remember, liquids canalways be added at a later time if nec-essary.
• If a recipe results in too much liquid atthe end of the cooking time, remove thelid and turn the control knob to the
maximum temperature. After about 30-
45 minutes the amount of liquid shouldbe less.
• ItJs not necessary to use the rack when
cooking meats and poultry on slowcook.
• Vegetables such as carrots, potatoes,
turnips, and beets require longer cookingtimes than most meats. Place them onthi_ bottom of the liner and cover themwith liquid.
• If adding fresh milk or yogurt, it shouldbe done the last 2 hours. Evaporatedmilk may be added at the start of cook-ing. If possible, substitute condensed
soups for fresh milk or yogurt.
• Rice and pasta are not recommendedfor long cooking periods. Cook them
separately and then add to the recipet' ,
dunng the last 30 minutes.
• 'For every 30 minutes called for in a
standard recipe, cook for 1-1_/2 hourson slow cook.
HINTS FOR COOK
• Meats will not brown during the cookingprocess. If you desire browning, heat asmall amount of oil in a skillet and
brown meats prior to starting the cook-ing process.
• Whole herbs and spices flavor better inslow cooking than crushed or ground.
• Foods cut into uniform pieces will cookfaster and more evenly than foods leftwhole such as roast or poultry.
HINTS FOR ROAST
• One teaspoon of browning sauce suchas Kitchen Bouquet* may be added to1/4 cup melted butter and brushed ontomeat for additional browning.
• When roasting iess tender cuts ofmeats, use the slow cook setting.
• To enhance browning of poultry, beginthe cooking at 40O°F for the first hourand then reduce the temperature to350°E During the last hour of cooking,carefully drain broth from liner andreturn temperature to 400°E
HINTS FOR BAKE
• To obtain more evenly baked foods,place the rack inside the liner and placebaking pans and casserole dishes ontop of rack during cooking.
• The liner and rack will hold the followingsize pans for baking: most 1 & 2 quartcasserole dishes, _ & 9 inch bakingpans, 9 x 13 inch baking pans, 12 cupmuffin pan, and 8 & 9 inch pie pans.Check pan for fit before filling.
• Cover rack with heavy duty foil and useas a baking sheet.
HINTS FOR STEAM COOK
• Foods cut into uniform pieces will cookfaster and more evenly.
• If you wish your vegetables to be moretender, add more water and turn roasteroven back on for desired time.
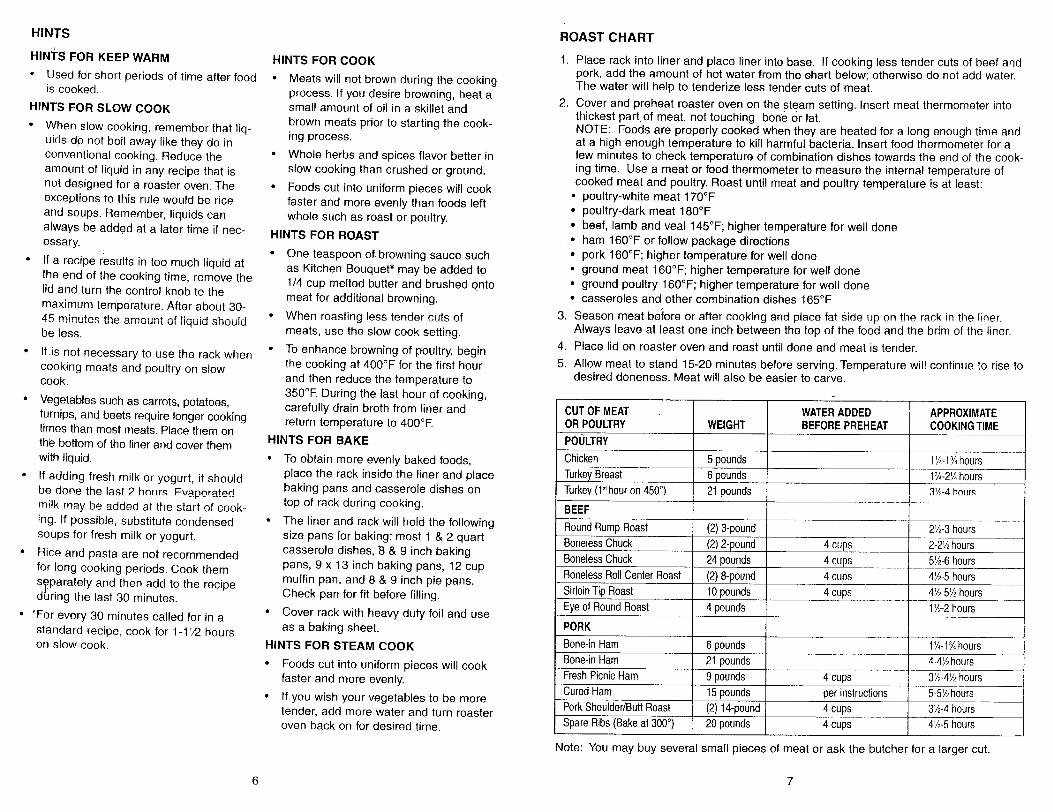
ROAST CHART
1. Place rack into liner and place liner into base. If cooking less tender cuts of beef andpork, add the amount of hot water from the ehart below; otherwise do not add water.The water will help to tenderize less tender cuts of meat.
2. Cover and preheat roaster oven on the steam setting. Insert meat thermometer intothickest part.of meat, not touching bone Or fat.NOTE: Foods are properly cooked when they are heated for a long enough time andat a high enough temperature to kill harmful bacteria. Insert food thermometer for afew minutes to check temperature of combination dishes towards the end of the cook-ing time. Use a meat or food thermometer to measure the internal temperature ofcooked meat and poultry. Roast until meat and poultry temperature is at least:
• poultry-white meat 170°F• poultry-dark meat 180°F
• beef, lamb and veal 145°F; higher temperature for well done• ham 160°F or follow package directions• pork 160°F; higher temperature for well done• ground meat 160°F; higher temperature for well done• ground poultry 160°F; higher temperature for well done• casseroles and other combination dishes 165°F
3. Season meat beiore or after cooking and place tat Side up on the rack in the liner.Always leave at least one inch between the top of the food and the brim of the liner.
4. Place lid on roaster oven and roast until done and meat is tender.
5. Allow meat to stand !5-20 minutes before serving. Temperature will continue to rise todesired doneness. Meat will also be easier to carve.
CUTOFMEATORPOULTRY
POULTRY
Chicken
TurkeyBreast
Turkey(!°'hour on450°)
BEEF
RoundRumpRoastBonelessChuck
BonelessChuck
BonelessRollCenterRoast
SirloinTipRoast
Eyeof RoundRoast
PORK
Bone-inHamBone-inHam
FreshPicnicHam
CuredHam
PorkShoulder/ButtRoast
SpareRibs (Bakeat 3000)
WEIGHT
5 pounds
6 pounds
21pounds
(2) 3-pound
(2) 2-pound
24pounds
(2) 8-pound
10pounds
4 pounds
6 pounds
21pounds
9 pounds15pounds
(2) 14-pound
20pounds
WATERADDEDBEFOREPREHEAT
4 cups
4 cups
4 cups
4 cups
4 cups
perinstructions
4 cups4 cups
APPROXIMATECOOKINGTIME
1¼-1¾hours
1¾-2¼hours
3½-4 hours
2'/2-3hours2-2'/2hours
5½-6hours
4½-5hours
4V2-5'/2hours
1'/2-2hours
1'A-1¾hours
4-4_hhours
3'/2-4'/2hours
5-5'/2hours
3½-4hours4½-5hours
Note: You may buy several small pieces of meat or ask the butcher for a larger cut.
6 7
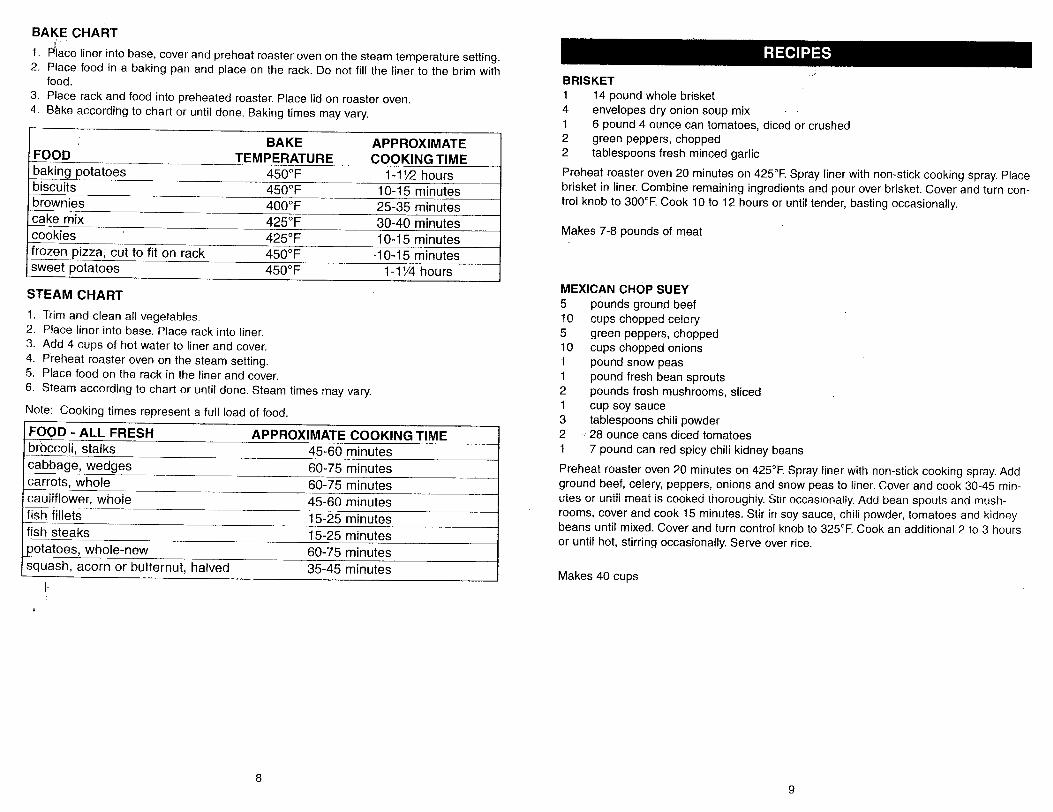
BAKE CHART!'
t. PlaCe liner into base, cover and preheat roaster oven on the steam temperature setting.2. Place food in a baking pan and place on the rack. Do not fill the liner to the brim with
food.
3. Place rack and food into preheated roaster. Place lid on roaster oven.4. B&ke according to chart or until done. Baking times may vary.
BAKE APPROXIMATEFOOD TEMPERATURE COOKING TIMEbaking potatoes 450°F 1-1 '/2 hoursbiscuits 450°F 10-15 minutesbrownies 400°F 25-35 minutes
cake mix 425°F 30-40 minutescookies 425°F 10-15 minutesfrozen pizza; cut to fit on rack 450°F -10-15 minutessweet potatoes 450°F 1-1 '/4 hours
STEAM CHART
i. Trim and clean all vegetables.2. Place liner into base. Place rack into liner.3. Add 4 cups of hot water to liner and cover.4. Preheat roaster oven on the steam setting.5. Place food on the rack in the liner and cover.
6. Steam according to chart or until done. Steam times may vary.
Note: Cooking times represent a full load of food.
FOOD - ALL FRESH APPROXIMATE COOKING TIMEbroccoli, stalks 45-60 minutescabbage, wedges 60-75 minutescarrots, whole 60-75 minutescauliflower, whole 45-60 minutesfish fillets 15-25 minutesfish steaks 15-25 minutes
potatoes, whole-new 60-75 minutesr_ ac-orn-o-r_ternut, halved 35-45 minutes
BRISKET
1 14 pound whole brisket4 envelopes dry onion soup mix • •1 6 pound 4 ounce can tomatoes, diced or crushed2 green peppers, chopped2 tablespoons fresh minced garlic
Preheat roaster oven 20 minutes on 425°F. Spray liner with non-stick cooking spray. Placebrisket in liner. Combine remaining ingredients and pour over brisket. Cover and turn con-trol knob to 300°F. Cook 10 to 12 hours or until tender, basting occasionally.
Makes 7-8 pounds of meat
MEXICAN CHOP SUEY
5 pounds ground beef!0 cups chopped celery5 green peppers, chopped10 cups chopped onions1 pound snow peas1 pound fresh bean sprouts2 pounds fresh mushrooms, sliced
1 cup soy sauce3 tablespoons chili powder2 - 28 ounce cans diced tomatoes
t 7 pound can red spicy chili kidney beans
Preheat roaster oven 20 minutes on 425°E Spray liner with non-stick cooking spray. Addground beef, celery, peppers, onions and snow peas to liner. Cover and cook 30-45 min-utes or until meat is cooked thoroughly. Stir occasionally. Add bean spouts and mush-rooms, cover and cook 15 minutes. Stir in soy sauce, chili powder, tomatoes and kidneybeans until mixed. Cover and turn control knob to 325°F. Cook an additional 2 to 3 hours
or until hot, stirring occasionally. Serve over rice.
Makes 40 cups
8 9
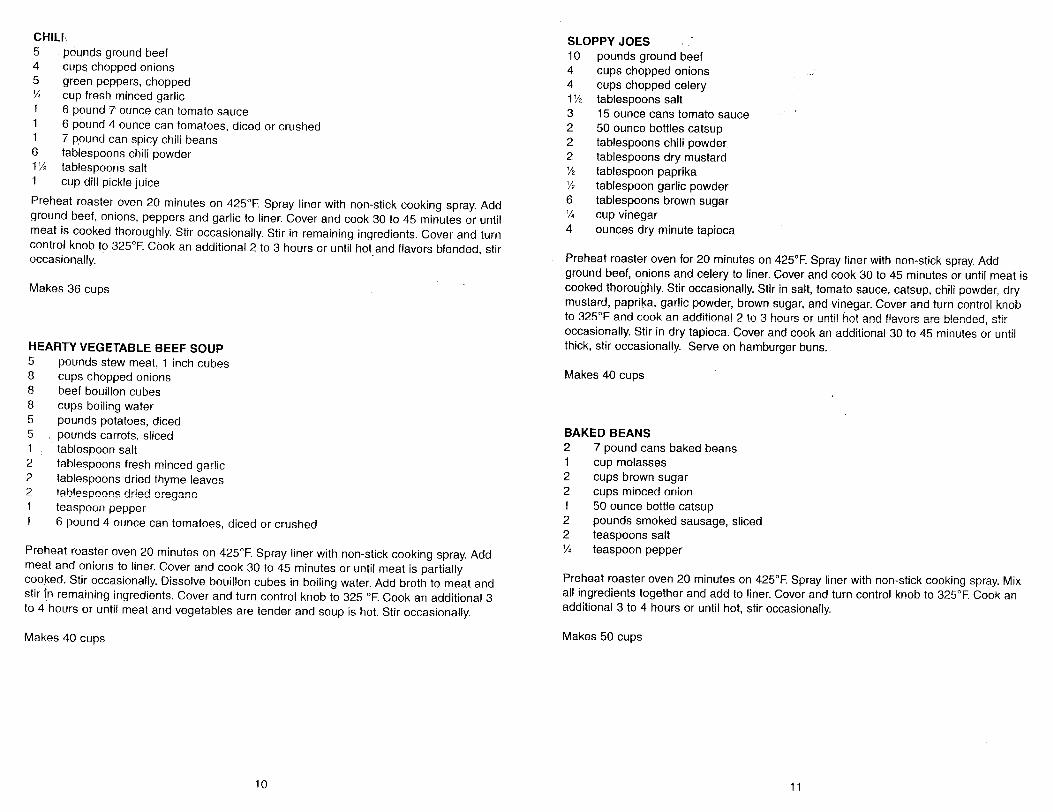
CHILI..
5 p0unds ground beef4 cups chopped onions5 green peppers, chopped'_4 cup fresh minced garlict 6 pound 7 ounce can tomato sauce1 6 pound 4 ounce can tomatoes, diced or crushed1 7 Round can spicy chili beans6 tablespoons chili powder1½ tablespoons salt1 cup dill pickle juice
Preheat roaster oven 20 minutes on 425°E Spray liner with non-stick cooking spray. Addground beef, onions, peppers and garlic to liner. Cover and cook 30 to 45 minutes or until
meat is cooked thoroughly. Stir occasionally. Stir in remaining ingredients. Cover and turncontrol knob to 325°E Cook an additional 2 to 3 hours or until hot and flavors blended, stiroccasionally.
Makes 36 cups
HEARTY VEGETABLE BEEF SOUP58885512221t
pounds stew meat, ! inch cubescups chopped onionsbeef bouillon cubes
cups boiling waterpounds potatoes, dicedpounds carrots, slicedtablespoon salt
tablespoons fresh minced garlictablespoons dried thyme leavestablespoons dried oreganoteaspoon pepper6 pound 4 ounce can tomatoes, diced or crushed
Preheat roaster oven 20 minutes on 425°E Spray liner with non-stick cooking spray. Addmeat and onions to liner. Cover and cook 30 to 45 minutes or until meat is partiallycooked. Stir occasionally. Dissolve bouillon cubes in boiling water. Add broth to meat andstir In remaining ingredients. Cover and turn control knob to 325 °F. Cook an additional 3
to 4 hours or until meat and vegetables are tender and soup is hot. Stir occasionally.
Makes 40 cups
SLOPPY JOES ,.
10 pounds ground beef4 cups chopped onions4 cups chopped celery1½ tablespoons salt3 15 ounce cans tomato sauce " '
2 50 ounce bottles catsup2 tablespoons chili powder.2 tablespoons dry mustard½ tablespoon paprika½ tablespoon garlic powder
6 tablespoons brown sugar¼ cup vinegar
4 ounces dry minute tapioca
Preheat roaster oven for 20 minutes on 425°F. Spray liner with non-stick spray. Addground beef, onions and celery to liner. Cover and cook 30 to 45 minutes or until meat iscooked thoroughly. Stir occasionally. Stir in salt, tomato sauce, catsup, chili powder, drymustard, paprika, garlic powder, brown sugar, and vinegar. Cover and turn control knobto 325°F and cnnk _n additional 2 to 3 hours or until hot and flavors are blended, stiroccasionally. Stir in dry tapioca. Cover and cook an additional 30 to 45 minutes or untilthick, stir occasionally. Serve on hamburger buns.
Makes 40 cups
BAKED BEANS
2 7 pound cans baked beanst cup molasses2 cups brown sugar2 cups minced onion! 50 ounce bottle catsup2 pounds smoked sausage, sliced2 teaspoons salt¼ teaspoon pepper
Preheat roaster oven 20 minutes on 425°E Spray liner with non-stick cooking spray. Mixall ingredients together and add to liner. Cover and turn control knob to 325°E Cook an
additional 3 to 4 hours or until hot, stir occasionally.
Makes 50 cups
10 11

MAINTENANCE
This Roaster Oven requires little mainte-nance. It contains no user-serviceable
parts inside the housing. Do not removethe cover._Contact qualified personnel if theproduct requires servicing.
CLEANINGCAUTION: NEVER IMMERSE THE BASEOR CORD IN WATER OR OTHER LIQUID.
1. Turn control khob to OFF and unplug.Allow to cool completely before cleaning.
2. Wash lid, liner and rack in warm soapywater. Use a non-abrasive cleaning padand cleaner. Rinse and dry thoroughly.
Hever use abrasive cleaners or scouringpads to clean the liner, rack or lid, as theymay damage the surface. If food sticks tothe liner, place liner in base and fill withwater. Cover and turn control knob to350°F for 30 minutes. When time is com-
plete, turn control knob to OFF position,unplug and allow to cool completelybefore cleaning again.
3. Wipe interior and exterior of the basewith a soft, slightly damp cloth or sponge.Never use abrasive cleaners or scouringpads to clean the base, as they maydamage the surface.
4. Allow to dry thoroughly before storing.
Any servicing requiring disassemblyother than the above cleaning must beperformed by an authorized servicecenter.
STORAGE
Unplug and clean unit. Store in original boxor in a clean, dry place. Never store mixerwhile it is plugged in. Never wrap cord
tightly around the appliance. Never placeany stress on cord, especially where thecord enters the unit as this could cause
cord to fray and break.
12
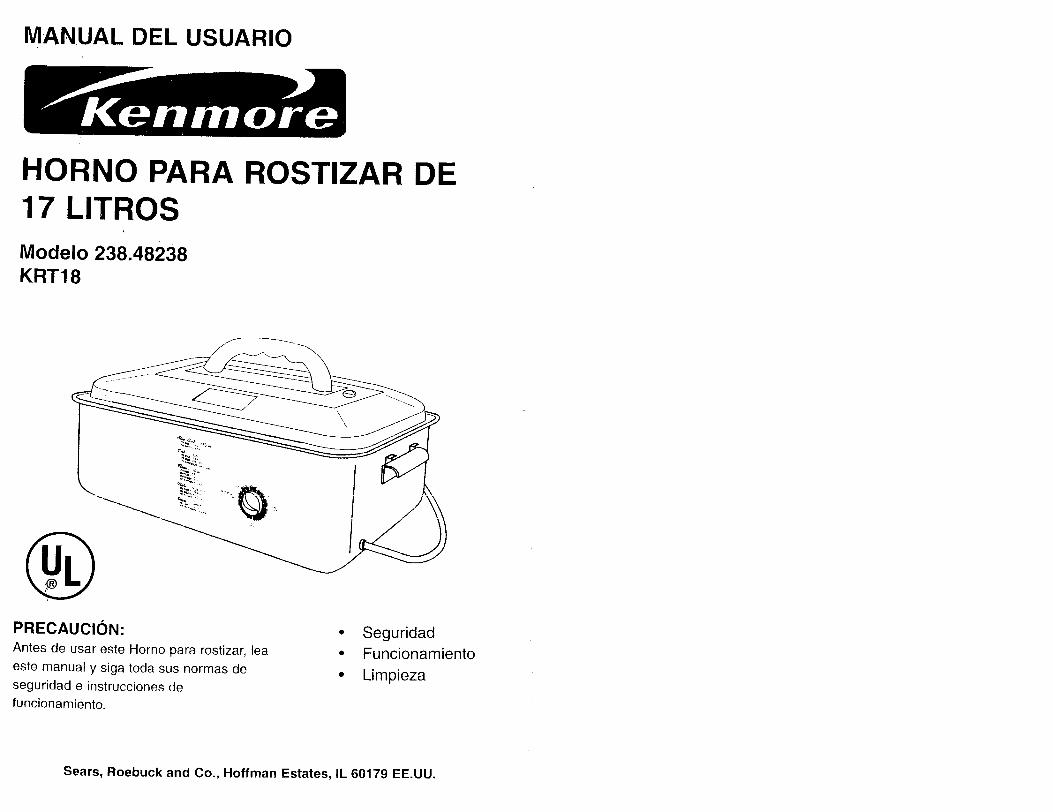
MANUAL DEL USUARIO
HORNO PARA ROSTIZAR DE17 LITROS
Modelo 238.48238KRT18
PRECAUCION:
Antes de usar este Homo para rostizar, lea
este manual y siga toda sus normas deseguridad e instrucciones defuncionamiento.
• Seguridad• Funcionamiento
• Limpieza
Sears, Roebuck and Co., Hoffman Estates, IL 60179 EE.UU.
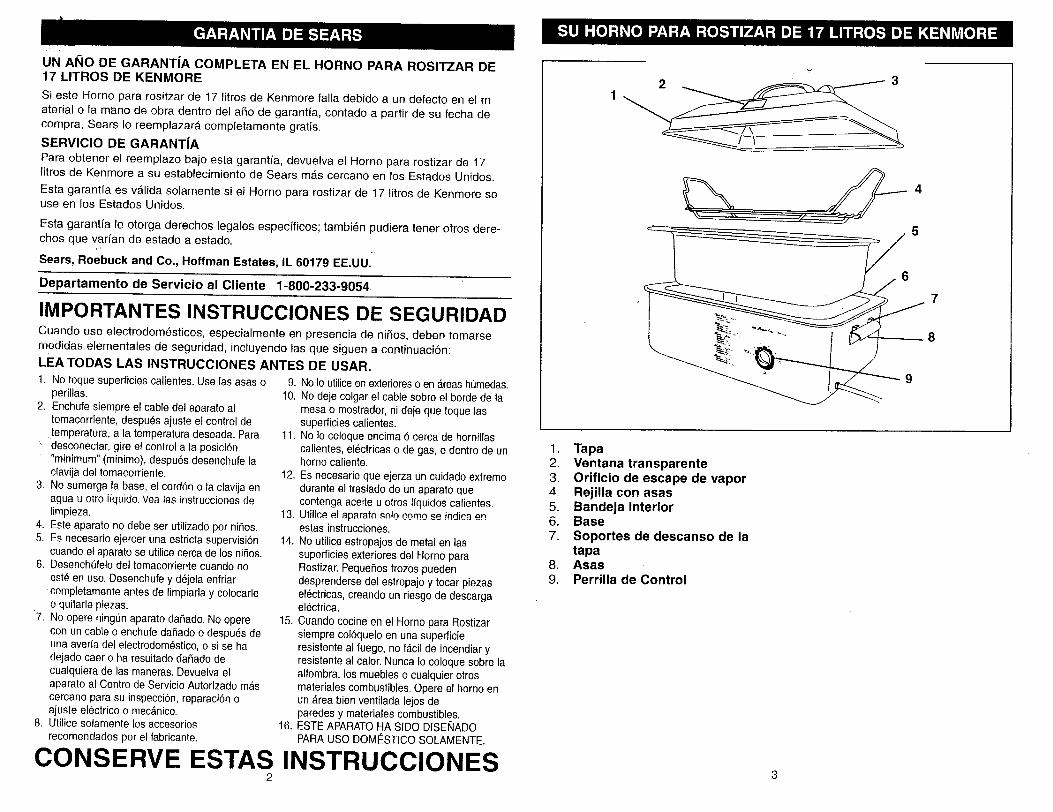
UN AI_IO DE GARANTiA COMPLETA EN EL HORNO PARA ROSITZAR DE17 LITROS DE KENMORE
Si este Homo para rositzar de 17 litros de Kenmore falla debido a un defecto en el rnaterial o la mano de obra dentro de! afio de garantfa, contado a partir de su fecha decompra, Sears Io reemplazar_ completamente gratis.
SERMIClO DE GARANTIA
Para obtener el reemplazo bajo esta garantfa, devuelva el Homo para rostizar de 17litros de Kenmore a su establecimiento de Sears m#,s cercano en los Estados Unidos.
Esta garant(a es vAlida solamente si el Homo para rostizar de 17 litros de Kenrnore seuse en los Estados Unidos.
Esta garantfa Ie otorga derechos legales especfficos; tambi_n pudiera tenet otros dere-chos que varfan de estado a estado.
Sears, Roebuck and Co., Hoffman Estates, IL 60179 EE.UU.
Departamento de Servicio al Cliente 1-800-233-9054
IMPORTANTES INSTRUCCIONES DE SEGURIDADCuando use electrodom_sticos, especialmente en presencia de ni_os, deben tomarsemedidas elernentales de seguridad, incluyendo las que siguen a continuaci6n:LEA TODAS LAS INSTRUCClONES ANTES DE USAR.
1. No toque superficies calientes. Use las asaso 9. No Io utiliceen extedoreso en_,reashumedas.perillas.
2. Enchufe siempre e! cable del aparato altomacorriente, despu_s ajuste et control de
temperatura, a la temperatura deseada. Para' desconectar, gire e! control a la posici6n
"minimum" (minimo), despu_s desenchufe laclavija del tomacorriente.
3. No sumerga la base, el cord6n o la clavija enagua u otro iiquido. Vea ia._ in._trucciones delimpieza.
4. Este aparato no debe ser utilizado por niSos.5. Es necesario ejercer una estricta supervisi6n
cuando el aparato se utilice cerca de los niSos.6. Desencht_felo del tomacorriente cuando no
est6 en uso. Desenchufe y d_jela enfriar',completamente antes de limpiarla y colocarle
o quitarle piezas.'7. No opere ning0n aparato daSado. No opere
con un cable o enchufe daSado o despu_s deuna averfa del electrodom_stico, o si se hadejado caer o ha resultado daRado decualquiera de las maneras. Devuelva elaparato al Centro de Servicio Autorizado rn&scercano para su inspecci6n, reparaci6n oajuste el_ctrico o mec&nico.
8. Utilice solamente los accesorios
recomendados por el fabficante.
CONSERVE
10. No deje colgar el cable sobre el borde de lamesa o mostrador,ni deje que toque lassuperficies calientes.
1!. No Io coloqueencima 6 cerca de hornillascalientes, el_ctricas o de gas, o dentro de unhomo caliente.
12. Es necesario que ejerza un cuidadoextremodurante el traslado de un aparato quecentengaaceite u otros l/quidos calientes.
13. Utilice el aparatoso!o como se indica enestas instrucciones.
14. No utilice estropajosde metal en lassuperficies exterioresdel Horno paraRostizar. PequeSostrozos puedendesprendersedel estropajoy tocar piezasel_ctricas,creando un riesgo de descargael6ctrica.
15. Cuandococine en e! Homo para Rostizarsiempre col6quelo en una superficieresistente al fuego, no f_cit de incendiaryresistente al calor.Nunca Io coloquesobre laalfombra, los muebles o cualquier otrosmateriales combustibles.Opere el homo enun _rea bien ventflada lejos deparedesy materia!es combustibles.
16. ESTE APARATOHA SIDO DISENADOPARA USO DOMESTICO SOLAMENTE.
ESTAS INSTRUCClONES
•%- ,• --,',L-------
'l j7
1. Tapa2. Ventana transparente3. Orificio de escape de vapor4. Rejilla con asas5. Bandeja interior6. Base7. Soportes de descanso de la
tapa8. Asas9. Perrilla de Control
II_,_."]iil_[i_ ID]_!Ll_'_
Este aparato es para USO DOMESTICO
SOLAMENTE. Se puede enchufar a un
tomacorriente de corriente alterna de 120
voltios. No Io use en otro ripe detomacorriente.
PRECAUClON: Se incluye un cableel_ctrico corto para reducir el riesgo delesiones personales, resultantes detropezar o enredarse con un cable el_ctrico
demasiado largo. En caso de que necesiteun cable el_ctrico m_ts largo, puedeconseguir cables de extensi6n en las
ferreterfas de su Iocalidad, y pueden serusados sis e ejercen las precaucionesdebidas. Si se requiere utilizar un cable deextensi6n, es necesario tomar especialcuidado y atenci6n. Adem_.s, el cable
deber__:(1) Estar marcado con un grado
e_eutNuude al menos 125 V, i0 A, 1250W y(2) el cable debe manejarse de tal formaque ...... '.....i lu bu_lyUU sobre la superficie de iamesa o mostrador, donde los nifios puedanjalarlo o alquien pueda tropezar con 51accidentalmente.
CLAVIJA POLARIZADA: Este
electrodom_stico posee una clavijapolarizada (una de sus hojas es m_.sancha que la otra). Como una medida de
seguridad para reducir el riesgo dedescargas el_ctricas. Esta clavija estadesefiada para conectar solamente de una
manera en un tomacerriente polarizado. Sila clavija no conecta completamente en eltomacorriente, invi_rtala. Si aun no conectabien, consulte con un electricista calificado.
No intente alterar esta medida de seguridad.
CORRIENTE ELECTRICA: Si el circuito
el_ctrico estA sobrecargado con otrosaparatos, es posible que el aparato nofuncione correctamente. Este deberfa deser utilizado en un circuito electrico
separado de! resto de los dem#,s aparatos.Este producto es so!amente para usodomestico.
ANTES DE USAR SU HORNO PARA ROSTIZAR
1, Cuidadosamente desempaque el homepara rostizar y Nmpielo, vea COMOLIMPIAR EL HORNO PARAROSTIZAR.
2. Es necesado operar el homo vaufo unasola vez para quemar el exceso deaceites afiadidos de fabrica. Con_ctesea una toma de corriente de 120 V ~ 60
Hz en un Area bien ventilada. Coloquela bandeja interior in la base y la tapa
, en el homo.
3.' Gire la perilla de control al ajuste detemperatura maxima, la luz indicadora
se encendera para indicarle que launidad se est,_ calentado. D_jelocalentar durante una hora o hasta quecualquier olor o humo desaparezca.Este proceso es necesario como partedel periodo inicial del elemento decalentamiento.
PRECAUCION: EL HORNO SE PONDRACALIENTE CON EL USO.
PRECAUCION: LA BASE, LAS ASAS DELA BANDEJA INTERIOR Y LA TAPA SEPONDRAN MUY CALIENTES DURANTE
SU USO. SI ES NECESARIO MANEJARSE,USE AGARRADERAS O GUANTESPARA HORNO.
4. AI completar el tiempo, gire la periUadecontrol a la posici6nde "minimum"(minimo) ydesencht_fe!odel tomacorriente. Permitaque se enfrie antes de moverlo.
5. Limpie la tapa, la bandeja interior y larejilla, vea COMO LIMPIAR EL HORNOPARA ROSTIZAR.
USANDO SU HORNO PARA ROSTIZAR
1. Conecte en un tomacorriente de 120V -
60 Hz. Coloque la bandeja interior en labase y la tapa en el horno.
2. Gire la perilla de control a latemperatura de precalentamientodeseada, deje precalentar por 20minutos.
PRECAUCION: EL HORNO SECALENTARA CON EL USO YPRODUCIRA VAPOR. TENGAPRECAUCION DE NO CUBRIR LOSAGUJEROS DE VENTILACION DEVAPOR O DE ENTRAR EN CONTACTOCON EL VAPOR CALIENTE DE ESTOS.NUNCA PONGA COMIDA O AGUA ENLA BASE.
PRECAUCION: LA BASE, LA BANDEJAINTERIOR Y LA TAPA SE PONDERAN
MUY CALIENTES DURANTE SU USO. SIES NECESARIO MANEJARSE, USEAGARR-ADERAS O GUANTES PARAHORNO.
3° Prepare la receta de acuerdo alasinstrucciones y cuidadosamentep6ngala en la bandeja interiorpre_,alentada utilizando agarraderas.Cologue la tapa sobre el homo. NoIlene la bandeja interior hasta el bordecon comida. Siempre cocine con labandeja interior en posici6n y con latapa en esta. Recuerde que ievantar iatapa con frecuencia durante la cocci6nretrasa el tiempo total de cocci6n. Usela rejilla con asas para hornear. Sigalas recetas o sugerencias para ponersopas y comida dentro de la bandejainterior sin la rejilla.
4,
5.
_-
Gire el botOn de control de temperaturahasta la posici6n deseada.
Usando guantes para hornear,cuidadosamente quite la tapa agarrandoel asa y lavantando la tapa alejada deusted. Esto permitir_ que el vapor seescape y se humedezca goteando denuevo en la comida antes de quitar la
tapa completamente. La tapa puede sercolocada en el soporte de descansopara detenerla temporalmente mientrassirve o menea la comida.
6. Cuando se complete el tiempo decocci6n, gire la perilla de control a laposici6n de "minimum" (minimo) ydesenchufelo del tomacorriente. Los
tiempos de cocci6n en las grAficas sonsolo para guiarse.
7. Deje enfiar completamente antes delimpiar!o, vea COMO L!MP!AR ELHORNO PARA ROSTIZAR.
45
SUGERENCIAS
S_JGERENCIAS PARA MANTENER ELCALOR
• Utilice durante breves periodos de tiempodespues de que los alimentos est_ncocinados.
SUGERENClAS PARA COClNADO LENTO
• Cuando use cocinado lento, recuerde quelos Ifquidos no hierven igual queen elcocinado convencional. Reduzca la
cantidad de !fquido en cualquier recetaque no est_ disefiada para un homo pararostizar. Las excepciones a esta reglasedan el arroz y las sopas. Recuerde, losliquidos siempre pueden afiadirse tiempodespu_s si es necesario.
• Si la receta queda con mucho Ifquido alfinal del tiempo de cocinado, retire la tapay gire la perilla de control a temperaturamd_xima.Despues de aproximadamente30-45 minutes la cantidad de liquido debeser menos.
• No es necesario el use de la reji!lacuando cocine carnes y ayes en cocinadolento.
• Verduras tales come zanahorias, papas,nabos a betabeles requieren tiernpos m#,slargos de cocinado que la mayoria de lascarnes. Col6quelas en el fondo de labandeja interior y c6bralas con liquido.
• Si afiade leche fresca o yogur, tiene quehacerlo en las 2 Qltimas horas. Puede
afiadir leche evaporada al comienzo delcocinado. Si es posible, substituya sopascondensadas per leche fresca o yogur.
• E! arroz y la pasta no son recomendados
para periodos de cocinado prolongados.Cocinelos per separado y despu6s
: afi_dalos a la receta en los t_ltimos 30' minutes.
• Per cada 30 minutes requeridos en unareceta estAndar, cocine durante 1 1/2horas en cocinado lento.
SUGERENCIAS PARA COClNADO
• Las carnes no se doraran durante el
proceso de cocinado. Si desea dorarlas,caliente un poco de aceite en un sart_n ydore las carnes antes de que empiece elproceso de cocinado.
• Las hierbas y especias enteras dan mejorsaber en el cocinado lento que trituradaso molidas.
• Alimentos cortados en pedazos uniformesse cocinaran m_s r_pido y m_.suniformemente que la comida entera talescome came para rostizar o aves.
SUGERENClAS PARA ROSTIZAR
• Una cucharada de salsa para dorarcome la de Kitchen Bouquet e puedeser afiadida a 1/4 de taza de
mantequilla derretida y untada a lacame para un dorado adicional.
• Cuando rostice cortes de camesmenos blandos, use la modalidad decocinado lento.
• Para mejorar el dorado en las aves,comience el cocinado a 400-°F/204-°C
durante la primera hera y despu_sreduzca la temperatura a 350-°F/177-°C.Durante la t_ltima hera de cocinado,cuidadosamente estile el caldo de la
bandeja interior y regrese la temperaturaa 400-°F/204-°C.
SUGERENClAS PARA HORNEAR
• Para obtener comidas horneadas m__suniformemente, coloque la rejilla dentro
de la bandeja interior y co!oque lascharolas para hornear y las cacerolasen la rejilla durante el cocinado.
• La bandeja interior y ia rejilla puedenalojar los siguientes tamafios decacerolas para hornear: la mayoria delas cacerolas de 1 y 2 litros, cazuelaspara hornear de 20 y 22,5 cm,cazuelas para hornear de 22,5 x 32,5
cm y cazuelas para pay de 20 y 22,5cm. Verifique que la cazuela entreantes de Ilenarla.
• Cubra la rejilla con papel de aluminiogrueso y _sela come hoja para hornear.
SUGERENCIAS PARA COCINADO AVAPOR
• Alimentos cortados en pedazosuniformes se cocinar_n m__sr_pido ym__suniformemente.
• Si desea que sus vegetales queden masblandos, agreque m&s agua y vuelva aencender el homo al tiempo deseado.
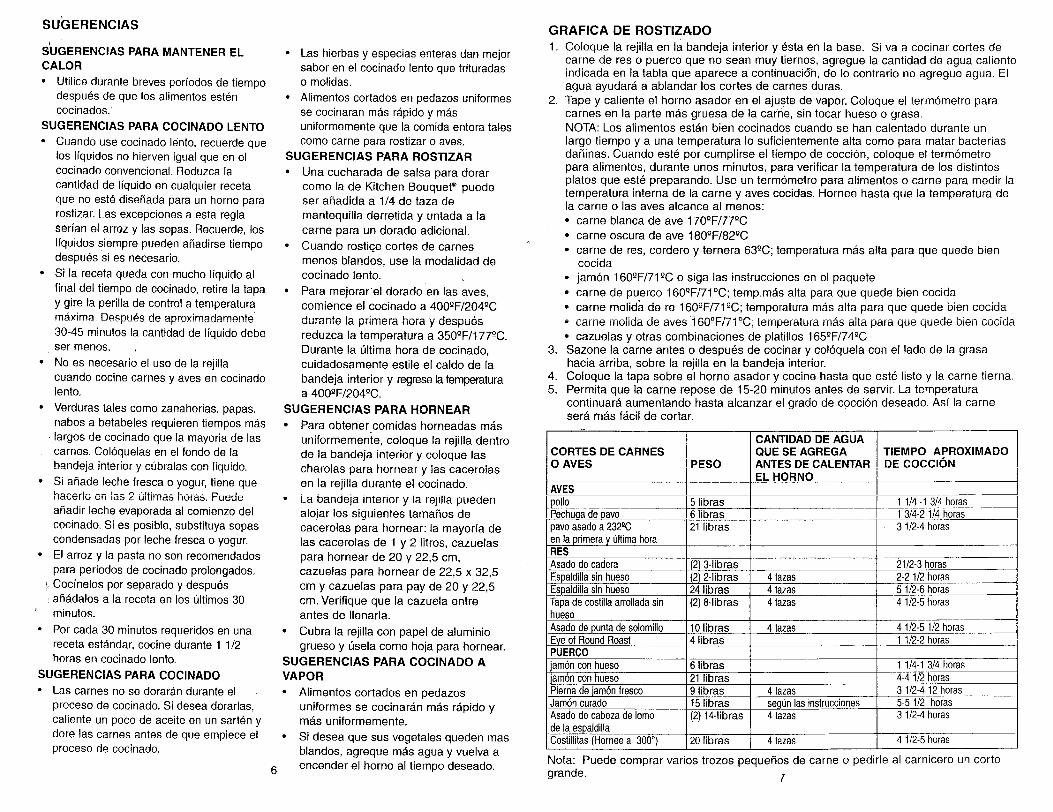
GRAFICA DE ROSTIZADO
1. Coloque la rejilla en la bandeja interior y _sta en la base. Siva a cocinar cortes decame de res o puerco que no sean muy tiernos, agregue la cantidad de agua calienteindicada en la tabla que aparece a continuacio'-n, de Io contrario no agregue agua. Elagua ayudar_, a ablandar los cortes de carries duras.
2. Tape y caliente el homo asador en el ajuste de vapor. Coloque el termOmetro paracarnes en la parte mAs gruesa de la carrie, sin tocar hueso o grasa.NOTA: Los alimentos est__nbien cocinados cuando se han calentado durante unlargo tiempo y a una ternperatura Io suficientemente alta come para matar bacteriasdafiinas. Cuando est_ per cumplirse el tiempo de cocciOn, coloque el term6metropara alimentos, durante unos minutes, para verificar la temperatura de los distintosplates que est_ preparando. Use un termOmetro para alimentos o came para medir latemperatura interna de la came y aves cocidas. Hornee hasta que la temperatura dela carne o las aves alcance al menos:• came blanca de ave 170°-F/77-°C
• came oscura de ave 180°F/82-°C
• came de res, cordero y ternera 63°-C; temperatura mAs alta para que quede biencocida
• jamOn 160-°F/71-°Co siga las instrucciones en el paquete
• came de puerco 160-°F/7!°C; temp.m__s alta para que quede bien cocida• came molida de re 160-°F/71-°C;temperatura mb.s alta para que quede bien cocida
.... I: _ UII_II L;UUIUd• carnemu,,dade aves i60-°F/719C;temperaturam_s altaparaque quede ..........
• cazuelasy otrascombinacionesde platillos165-°F/74_°C3, Sazone lacarneanteso despu@s de cocinary col6quelacon elladode lagrasa
hacia arriba, sobre la rejilla en la bandeja interior.4. Coloque la tapa sobre el homo asador y cocine hasta que est6 listo y la came tierna.5. Permita que la came repose de 15-20 minutes antes de servir. La temperatura
continuarA aumentando hasta alcanzar el grade de cocciOn deseado. Asf la cameser__mAs fAcil de cortar.
CORTES DE CARNESO AVES PESO
AVES
po!loPechuqade Davo_avoasadoa 232°-0
en la primera y t)ltimaheraRESAsado de cadera
Espaldillasin huesoEspaldillasin huesoTapa de costillaarrolladasinhuesoAsado de punta de solomi!loEyeof Round RoastPUERCOamOncon huesoamOncon hueso
Piema de jamOnfrescoJamOncuradoAsado de cabeza de Iomo
de la espaldillaCostillitas(Homee a 300°)
5 !ibras6 libras
21 libras
(2) 3-1ibras(2) 2-1ibras24 libras(2) 8-1ibras
CANTIDAD DE AGUAQUESE AGREGA
!ANTES DE CALENTAREL HORNO
4 tazas4 tazas4 tazas
TIEMPO APROXlMADODE COCCION
! !/4-! 3/4 horas1 3/4-2 1/4 horas3 1/2-4 horas
21/2-3 horas2-2 1/2 horas5 1/2-6 horas4 1/2-5 horas
10libras 4 tazas 41/2-51/2horas4 libras t 1/2-2horas
6 libras 1 1!4-121 libras 4-4 1/29 libras 4 tazas 3 1/2-415 libras
(2) 14-1ibrassegon las instrucciones4 tazas
3/4 horashoras12 horas
5-5 1/2 horas3 1/2-4 horas
20 libras 4 tazas 4 1/2-5 horas
Nora: Puede comprar varies trozos pequefios de came o pedirle al carnicero un cortegrande. 7
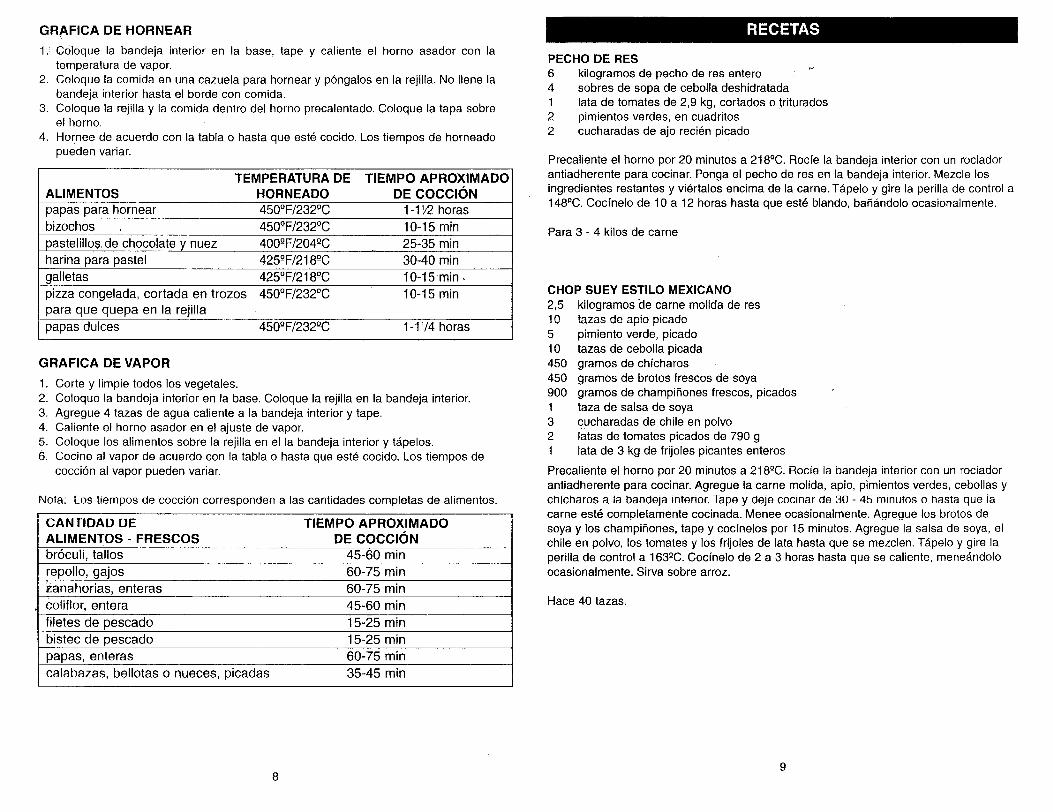
GRAFICA DE HORNEAR
1. Coloque la bandeja interior en la base, tape y caliente el horno asador con latemperatura de vapor•
2. Coloque la comida en una cazuela para hornear y p6ngalos en la rejilla. No Ilene labandeja interior hasta el borde con comida.
3. Coloque la rejilla y la comida dentro del homo precalentado. Coloque la tapa sobreel homo.
4. Hornee de acuerdo con la tabla o hasta que est6 cocido. Los tiempos de horneadopueden variar.
TEMPERATURA DE TIEMPO APROXlMADOALIMENTOS HORNEADO DE COCCIC)N
papas para hornear 450-°F/232°_C 1-11/2horasbizochos 450-°F/232-°C 10-15 min
)astelillos de chocolate y nuez 400-°F/204-°C 25-35 minharina para pastel 425-°F/218-°C 30-40 raingalletas 425-°F/218°-C 10-15 min.pizza congelada, cortada en trozos 450-°F/232°-C 10-15 minpar_ que qu_.pa en !a reji!!apapas dulces 450-°F/232-°C 1-11/4 horas
GRAFICA DE VAPOR
1. Corte y limpie todos los vegetales.2. Coloque la bandeja interior en la base. Coloque la rejilla en la bandeja interior.3. Agregue 4 tazas de agua caliente a la bandeja interior y tape.4, Caliente el homo asador en el ajuste de vapor.5. Coloque los alimentos sobre la rejilla en el la bandeja interior y t_pelos.6. Cocine a! vapor de acuerdo con la tabla o hasta que est6 cocido. Los tiempos de
cocci6n al vapor pueden variar.
Nnla: i on tip.mpn._ alp. _.ncr.i6n ¢.nrrA£pnnrtAn _ I_ cantidades oomp!etas de _limAntn£
CANTIDAD DE TiEMPO APROXlMADOALIMENTOS - FRESCOS DE COCCIONbr6culi, tallos 45-60 rnm
repollo, gajos 60-75 mm_anahorias, enteras 60-75 rnmCotiflor, entera 45-60 mm
filetes de pescado 15-25 mvnbistec de pescado 15-25 mmpapas, enteras 60-75 m=ncalabazas, bellotas o nueces, picadas 35-45 mm
PECHO DE RES
6 kilogramos de pecho de res entero4 sobres de sopa de cebolla deshidratada1 lata de tomates de 2,9 kg, cortados o triturados2 pimientos verdes, en cuadritos2 cucharadas de ajo reci6n picado
Precaliente el homo por 20 minutos a 218°-C. Rocfe la bandeja interior con un rociadorantiadherente para cocinar. Ponga el pecho de res en la bandeja interior. Mezcle losingredientes restantes y vi6rtalos encima de la carne. T__peloy gire la perilla de control a148gC. Cocfnelo de 10 a 12 horas hasta que est6 blando, bafiandolo ocasionalmente.
Para 3 - 4 kilos de came
CHOP SUEY ESTILO MEXlCANO
2,5 kilogramos _e carne molida de resI0 tazas de apio picado5 pimiento verde, picado10 tazas de cebolla picada450 gramos de chfcharos450 gramos de brotos frescos de soya900 gramos de champifiones frescos, picados1 taza de salsa de soya3 cucharadas de chile en polvo2 latas de tomates picados de 790 g1 lata de 3 kg de frijoles picantes enteros
Precaliente el horno por 20 minutos a 2189C. Rocie la bandeja interior con un rociadorantiadherente para cocinar. Agregue la carne molida, apio, pimientos verdes, cebollas yehfeharo._ a ia bandeja interior. Tape y dp.je eocinar de 30 - 4.5 minutos o hasta que iacame est6 completamente cocinada. Menee ocasionalmente. Agregue los brotos desoya y los champifiones, tape y cocinelos por 15 minutos. Agregue la salsa de soya, elchile en polvo, los tomates y los frijoles de lata hasta que se mezclen. TApelo y gire laperilla de control a 163-°C. Cocineto de 2 a 3 horas hasta que se caliente, mene_.ndoloocasionalmente. Sirva sobre arroz.
Hace 40 tazas.
98
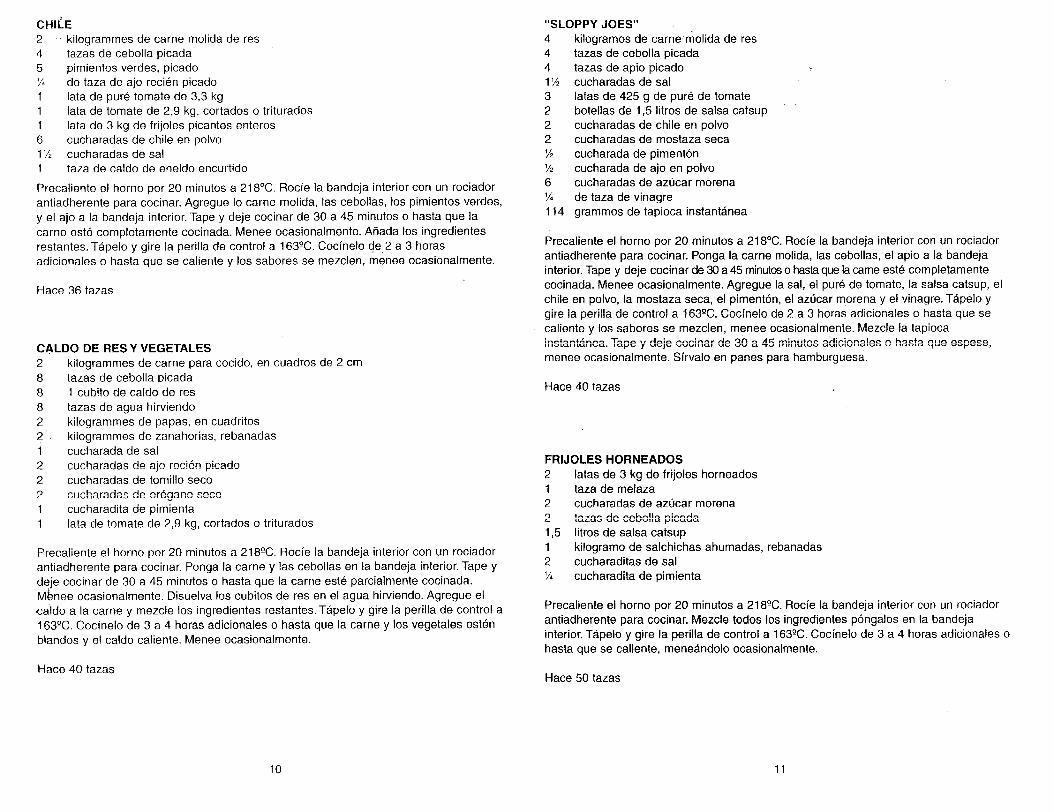
CHILE
2 kilogrammes de came molida de res
4 tazas de cebolla picada5 pimientos verdes, picado'A de taza de ajo reci6n picado1 lata de pur6 tomate de 3,3 kg1 lata de tOmate de 2,9 kg, cortados o triturados1 lata de 3 kg de frijoles picantes enteros6 cucharadas de chile en polvo1'/2 cucharadas de sal1 taza de caldo de eneldo encurtido
Precaliente el homo por 20 minutes a 2189C. Rocfe la bandeja interior con un rociadorantiadherente para cocinar. Agregue Io carne molida, las cebollas, los pimientos verdes,y el ajo a la bandeja interior. Tape y deje cocinar de 30 a 45 minutos o hasta que lacarne est_ completamente cocinada. Menee ocasionalmente. ASada los ingredientesrestantes. T_pelo y gire la perilla de control a 163-°C. Cocinelo de 2 a 3 horasadicionales o hasta que se caliente y los sabores se mezclen, menee ocasionalmente.
Hace 36 tazas
CALDO DE RES Y VEGETALES
2 kilogrammes de carne para cocido, en cuadros de 2 cm8 tazas de cebolla picada8 1 cubito de caldo de res
8 tazas de agua hirviendo2 kilogrammes de papas, en cuadritos2 . kilogrammes de zanahorias, rebanadas1 cucharada de sal
2 cucharadas de ajo reci6n picado2 cucharadas de tomillo seco
2 cucharadas de or6gano seco1 cucharadita de pimienta1 lata de tomate de 2,9 kg, cortados o triturados
Precaliente el homo por 20 minutos a 218-°C. Rocfe la bandeja interior con un rociadorantiadherente para cocinar. Ponga la carney las cebollas en la bandeja interior. Tape y
deje cocinar de 30 a 45 minutes o hasta que la came este parcialmente cocinada.1
Menee ocaslonalmente. Disuelva los cubitos de res en el agua hirviendo. Agregue el
<;aldo a la came y mezcle los ingredientes restantes. TApelo y gire la perilla de control a163°C. Cocinelo de 3 a 4 horas adicionales o hasta que la came y los vegetales est_n
blandos y el caldo caliente. Menee ocasionalmente.
Hace 40 tazas
"SLOPPY JOES"
4 kilogramos de carne molida de res
4 tazas de cebolla picada4 tazas de apio picadoI'A cucharadas de sal
3 latas de 425 g de pure de tomate2 botellas de 1,5 litros de salsa catsup2 cucharadas de chile en polvo2 cucharadas de mostaza seca
'½ cucharada de piment6n1½ cucharada de ajo en polvo6 cucharadas de az0car morena
IA de taza de vinagre114 grammos de tapioca instant&nea
Precaliente el horno por 20 minutos a 218°C. Rocfe la bandeja interior con un rociadorantiadherente para cocinar. Ponga la came molida, las cebollas, el apio a la bandejainterior. Tape y deje cocinar de 30 a 45 minutoso hasta que la came est_ completamentecocinada. Menee ocasionalmente. Agregue la sal, el pur6 de tomate, la salsa catsup, elchile en polvo, la mostaza seca, el piment6n, el az6car morena y e! vinagre. Tapelo y
u,,_ la _,_,,I,_,u_ ,u,_ ,_,.,_,u_.,,,_,vde 2 a 3 ,,u,_,_ ou,,.,u,,o,_o o ,,,_o1,=I.,UIILIUI a t_U_ O_
caliente y los sabores se mezclen, menee ocasionatmente. Mezcle la tapioca
menee ocasionalmente. Sfrvalo en panes para hamburguesa.
Hace 40 tazas
FRIJOLES HORNEADOS
2 latas de 3 kg de frijoles horneados1 taza de melaza2 cucharadas de az_car morena
2 tazas de cebolla picada!,5 litros de salsa catsup1 kilogramo de salchichas ahumadas, rebanadas2 cucharaditas de sal
'/, cucharadita de pimienta
Precaliente el homo pot 20 minutos a 218gC. Rocfe la bandeja interior con un rociadorantiadherente para cocinar. Mezcle todos los ingredientes p6ngalos en la bandejainterior. T_.pelo y gire la perilla de control a 163-°C.Cocfnelo de 3 a 4 heras adicionales ohasta que se caliente, meneAndolo ocasionalmente.
Hace 50 tazas
10 11
MANTENIMIENTO
Este Horno para rostizar requiere muypoco mantenimiento. No levante la
cubierta. P6ngase en contacto conpersonal cualificado si el prodUcto requierealguna reparaci6n.
LIMPIEZAPRECAUCION: NUNCA SUMERJA LABASE O EL CABLE ELECTRICO ENAGUA U OTROS LIQUIDOS.
1. Gire la perilla de control de temperaturaa la posici6n de "minimum" (minimo) ydesenchufe. Deje que se enfrfe
completamente antes de limpiar.
2. Lave la tapa, la bandeja interior y larejilla en agua tibia jabonosa. Use unestropajo y ,Jn !impiador no abrasiv0.Enjuague y seque completmente.Nunca use iimpiadores o estropajosabrasivos para limpiar la bandejainterior, la rejilla o la tapa, podrfandaSar la superficie. Si la comida seadhiere al forro, col6quelo en la base yII@ne!ocon agua. CObralo y gire la perillade control de temperatura a 177_Cdurante 30 minutes. Cuando el tiempo se
complete, gire la perilla de control detemperatura a la posici6n de "minimum"(minimo), desenchufe y deje enfdarcompletamente antes de volverlo a limpiar.
3. Limpie el interior y exterior de la basecon un trapo suave y humedecido o conuna esponja. Nunca use limpiadores oestropajos abrasives para limpiar la
t. base, podrian da_ar la superficie.
4. Deje secar completamente antes de
guardarse.
Cualquier tipo de servicio que requierael desensamblaje del aparato, exceptopor las tareas de Iirnpieza antesmencionadas, deber_ ser practicado porun centro de servicio autorizado.
ALMACENAJE
Desenchufe y limpie la unidad. Guardelo
en su caja original o en lugar limpio y seco.No guarde nunca el mezclador mientrasest_ ann enchufado. No enrolle el cable
fuertemente alrededor del aparato. Noponga ninguna presi6n en el cable,especialmente en el lugar donde entra enla unidad, ya que esto podrfa raer y romperel cable.
12