Embed Size (px)
Citation preview
ASCENT IOM INSTALLATION AND CONFIGURATION
__________________________________________________________________________
Spring 2021 Release 1.2
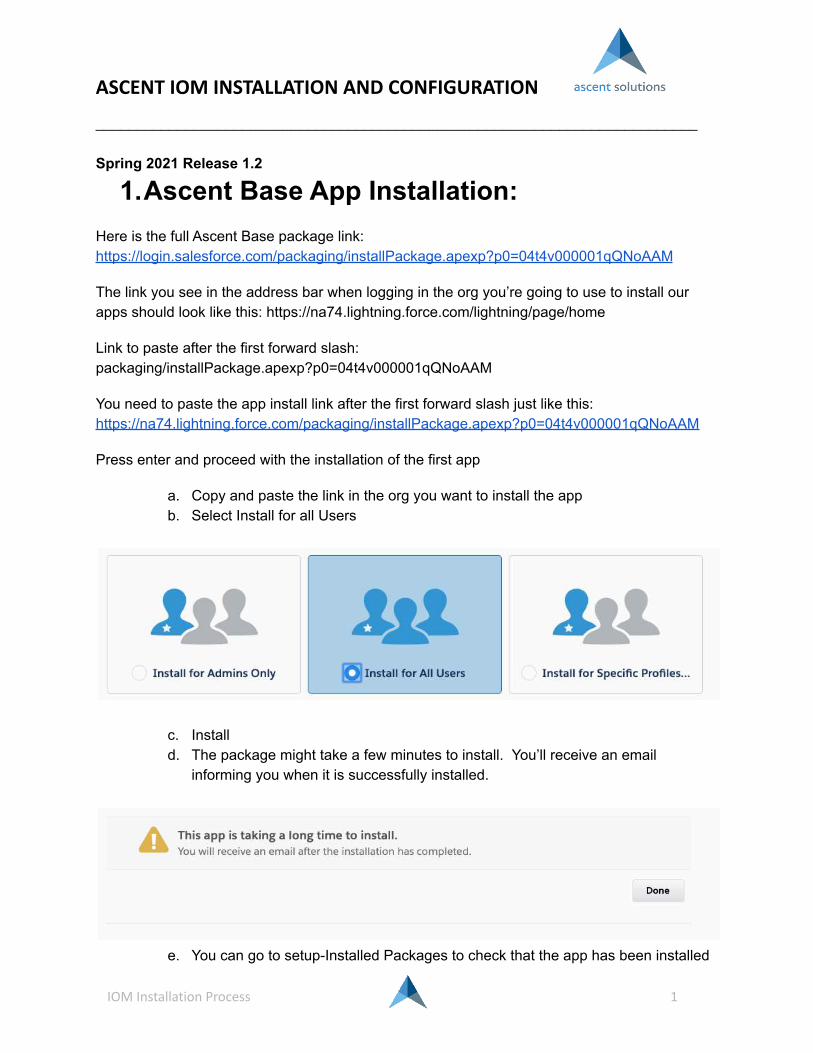
1.Ascent Base App Installation:Here is the full Ascent Base package link:https://login.salesforce.com/packaging/installPackage.apexp?p0=04t4v000001qQNoAAM
The link you see in the address bar when logging in the org you’re going to use to install ourapps should look like this: https://na74.lightning.force.com/lightning/page/home
Link to paste after the first forward slash:packaging/installPackage.apexp?p0=04t4v000001qQNoAAM
You need to paste the app install link after the first forward slash just like this:https://na74.lightning.force.com/packaging/installPackage.apexp?p0=04t4v000001qQNoAAM
Press enter and proceed with the installation of the first app
a. Copy and paste the link in the org you want to install the appb. Select Install for all Users
c. Installd. The package might take a few minutes to install. You’ll receive an email
informing you when it is successfully installed.
e. You can go to setup-Installed Packages to check that the app has been installed
IOM Installation Process 1

2.Ascent Order Management App Installation:Full Link:https://login.salesforce.com/packaging/installPackage.apexp?p0=04t4v000001qQN5AAM
Link to paste after the first forward slash:packaging/installPackage.apexp?p0=04t4v000001qQN5AAM
● Follow the same installation steps described under Ascent Base
3.Ascent Inventory Management AppInstallation:
Full Link:https://login.salesforce.com/packaging/installPackage.apexp?p0=04t4v000001qQNFAA2
Link to paste after the first forward slash:packaging/installPackage.apexp?p0=04t4v000001qQNFAA2
● Follow the same installation steps described under Ascent Base
IOM Installation Guide 2
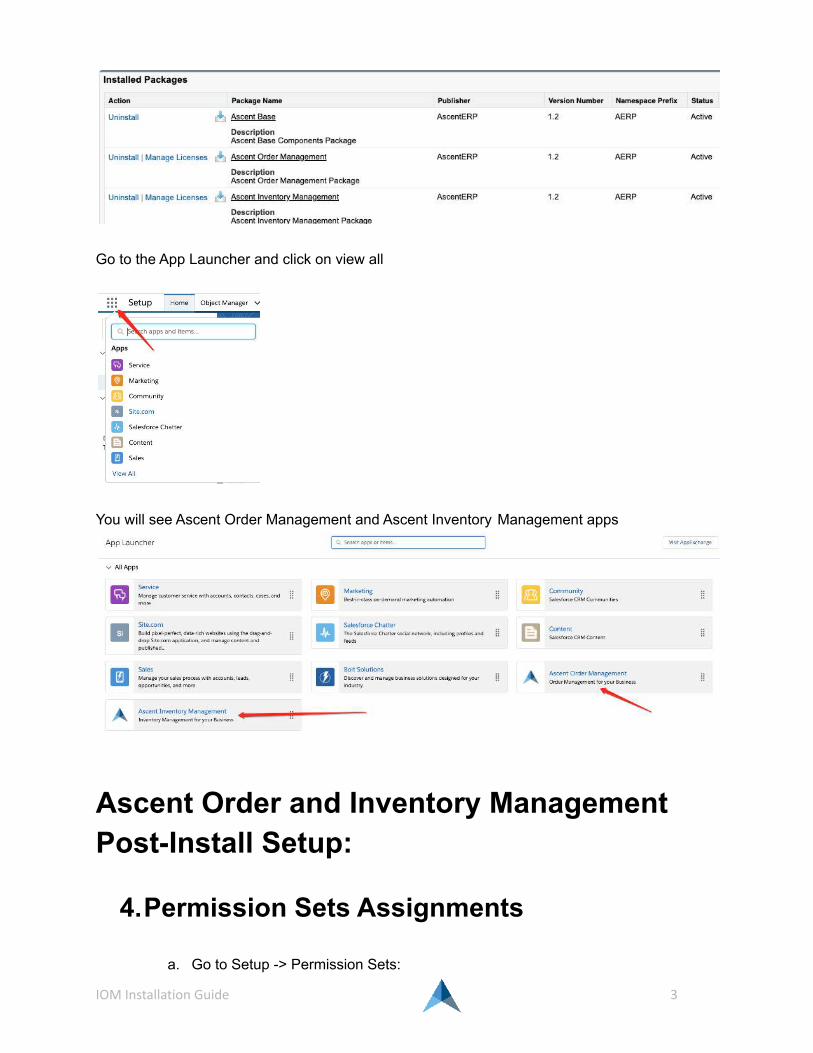
Go to the App Launcher and click on view all
You will see Ascent Order Management and Ascent Inventory Management apps
Ascent Order and Inventory ManagementPost-Install Setup:
4.Permission Sets Assignments
a. Go to Setup -> Permission Sets:
IOM Installation Guide 3
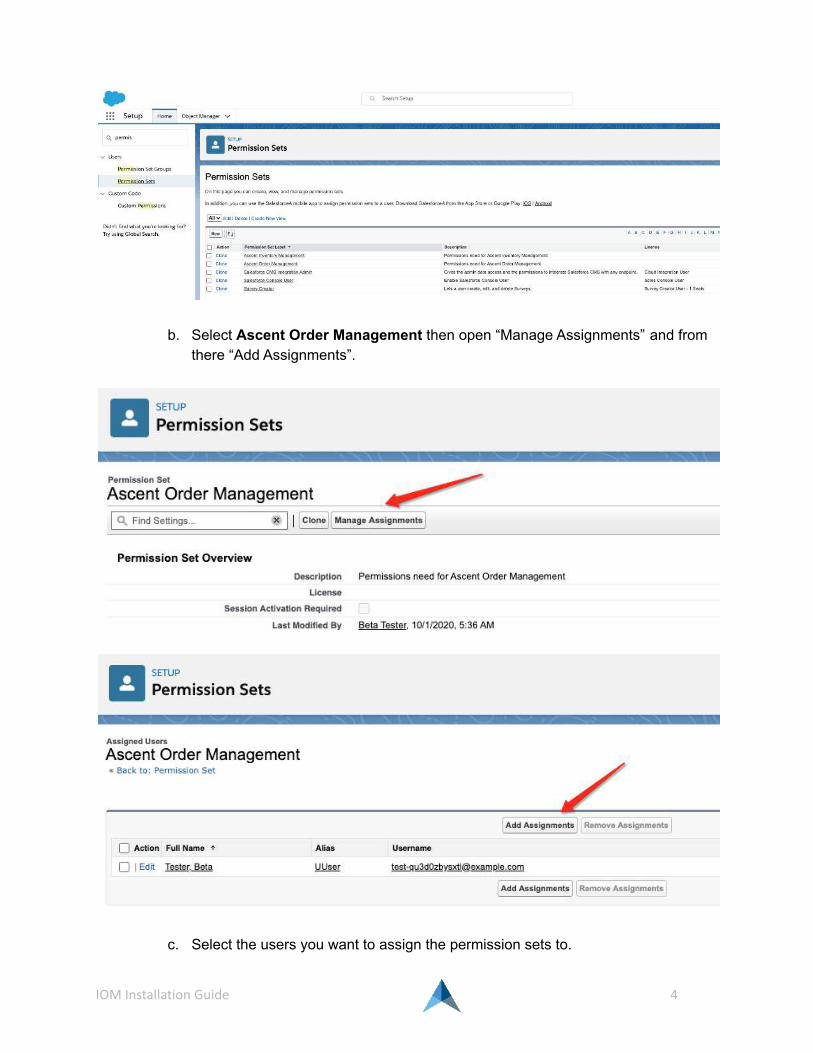
b. Select Ascent Order Management then open “Manage Assignments” and fromthere “Add Assignments”.
c. Select the users you want to assign the permission sets to.
IOM Installation Guide 4
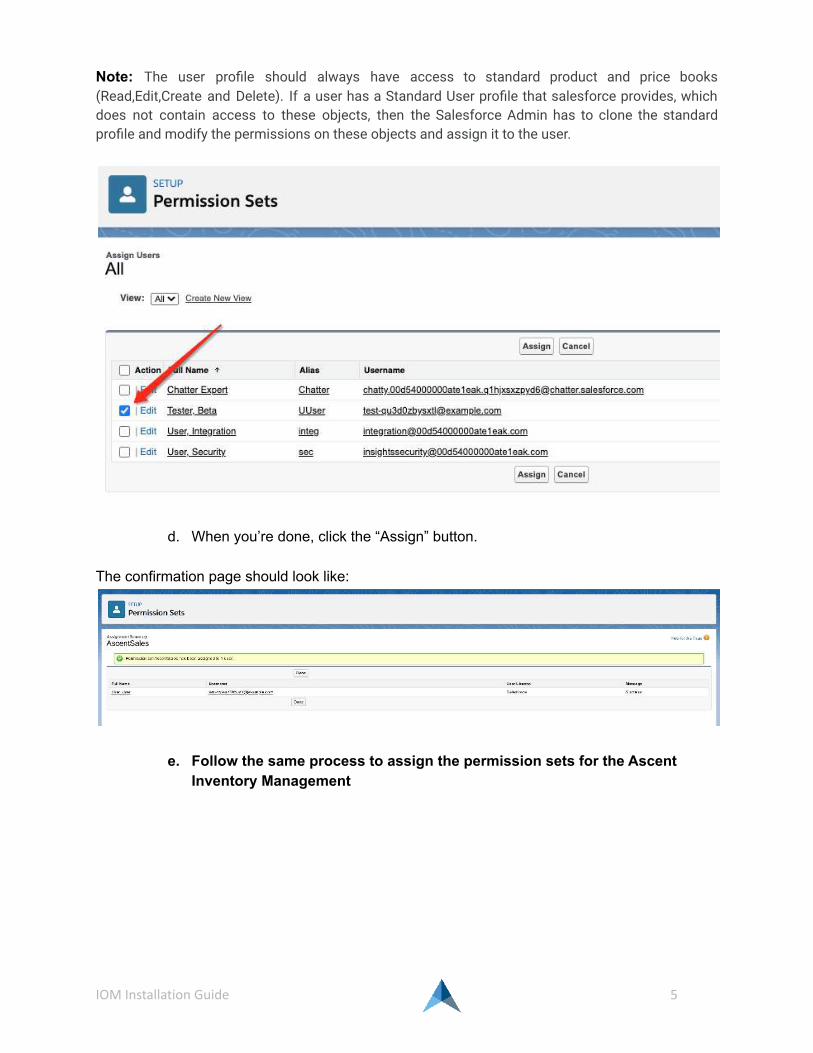
Note: The user profile should always have access to standard product and price books(Read,Edit,Create and Delete). If a user has a Standard User profile that salesforce provides, whichdoes not contain access to these objects, then the Salesforce Admin has to clone the standardprofile and modify the permissions on these objects and assign it to the user.
d. When you’re done, click the “Assign” button.
The confirmation page should look like:
e. Follow the same process to assign the permission sets for the AscentInventory Management
IOM Installation Guide 5

5.Create the IOM Lightning App
a. Go to Setup -> App Manager
b. Click on New Lightning App
c. Add the App Name, Description and upload the Ascent Solutions logo mark, clickNext
IOM Installation Guide 6
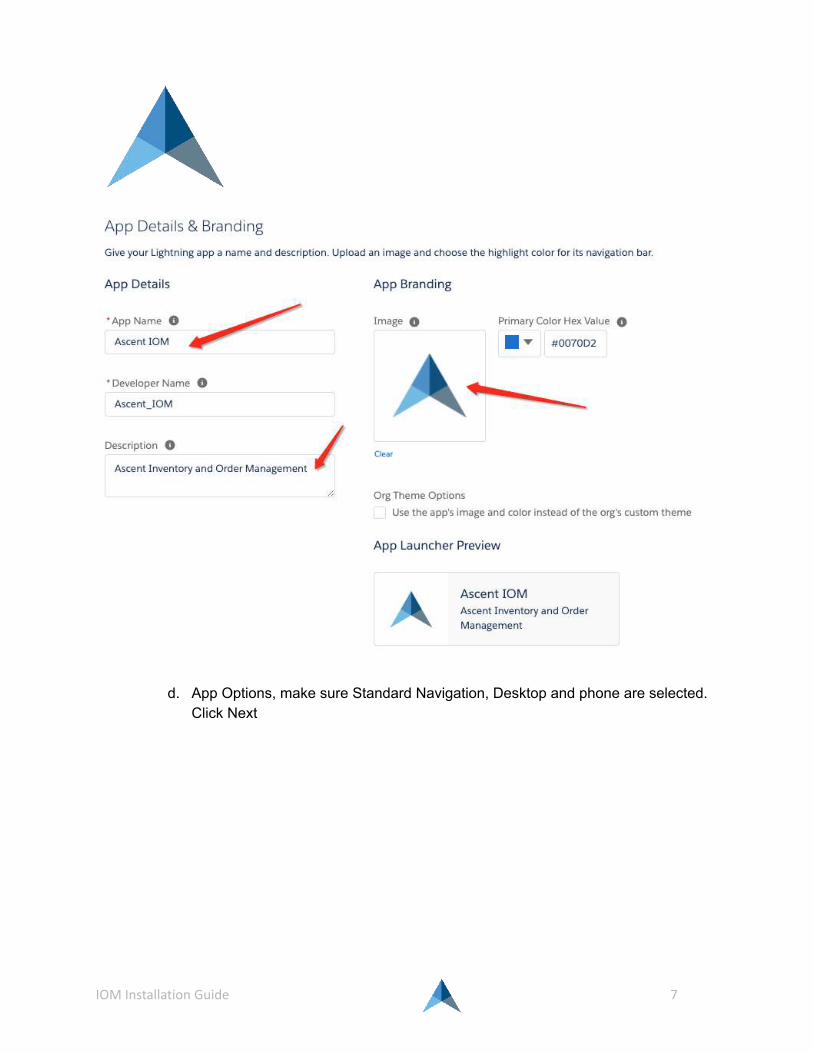
d. App Options, make sure Standard Navigation, Desktop and phone are selected.Click Next
IOM Installation Guide 7
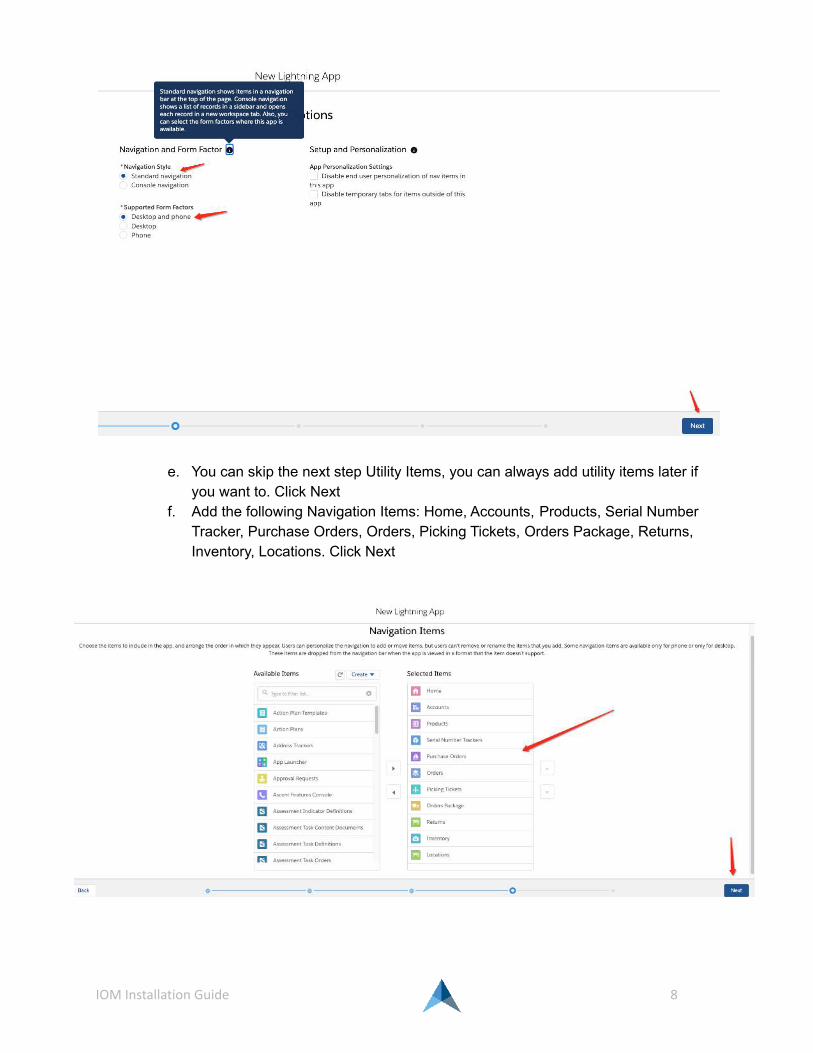
e. You can skip the next step Utility Items, you can always add utility items later ifyou want to. Click Next
f. Add the following Navigation Items: Home, Accounts, Products, Serial NumberTracker, Purchase Orders, Orders, Picking Tickets, Orders Package, Returns,Inventory, Locations. Click Next
IOM Installation Guide 8

g. Select the User Profiles you want to have access to the New Lightning Appcreated. Click Save & Finish
h. Your new Ascent IOM lightning app has been created successfully
5.Objects Page and Compact LayoutsAssignment
a. Go to Setup -> Object Manager and select the object you want to change thelayout assignments
b. Take the Order standard object as an example
IOM Installation Guide 9
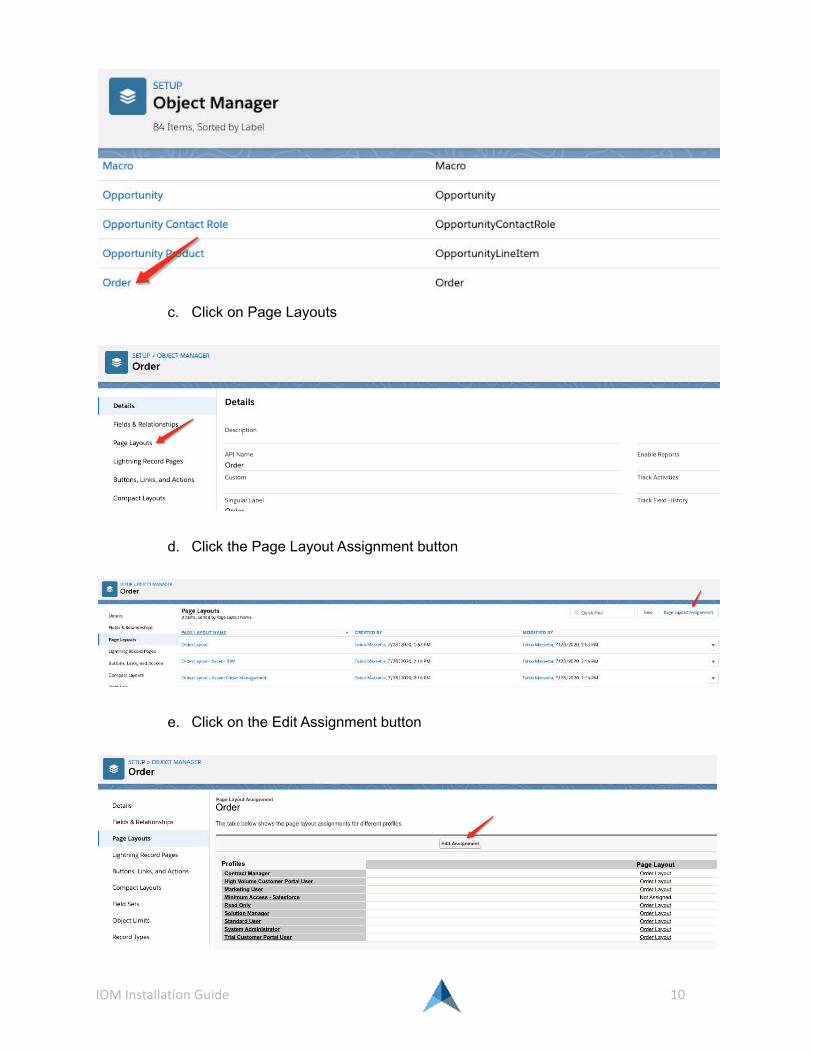
c. Click on Page Layouts
d. Click the Page Layout Assignment button
e. Click on the Edit Assignment button
IOM Installation Guide 10
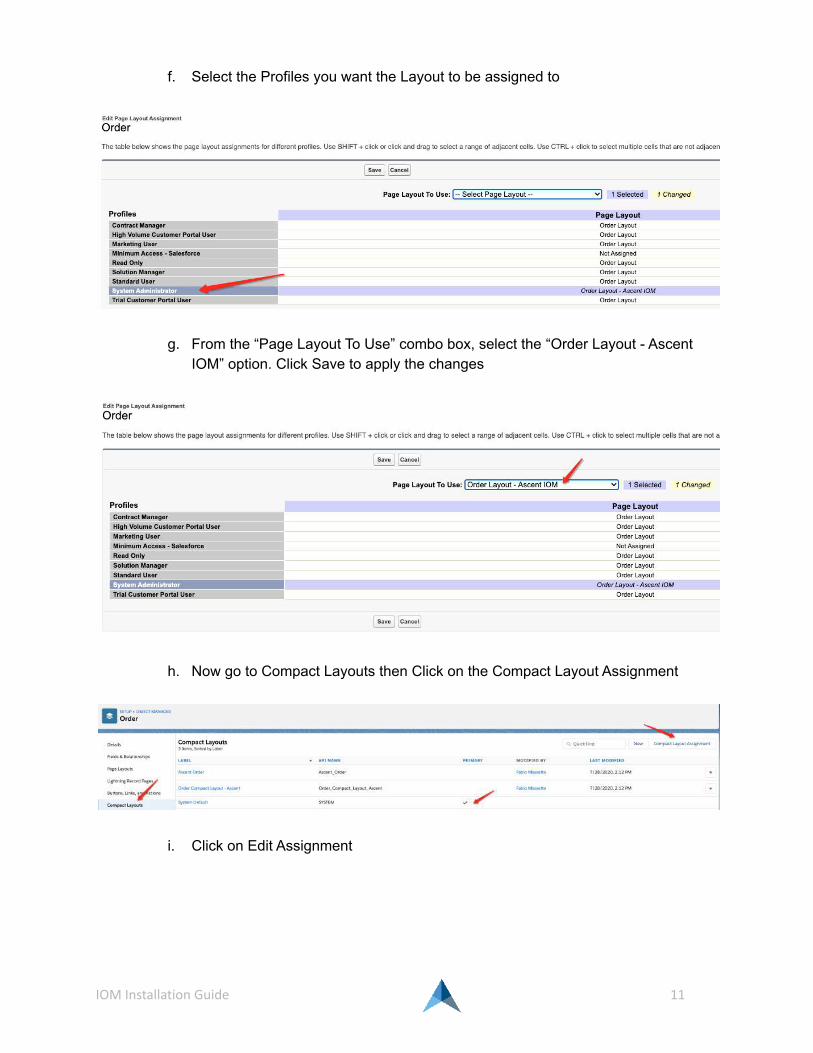
f. Select the Profiles you want the Layout to be assigned to
g. From the “Page Layout To Use” combo box, select the “Order Layout - AscentIOM” option. Click Save to apply the changes
h. Now go to Compact Layouts then Click on the Compact Layout Assignment
i. Click on Edit Assignment
IOM Installation Guide 11
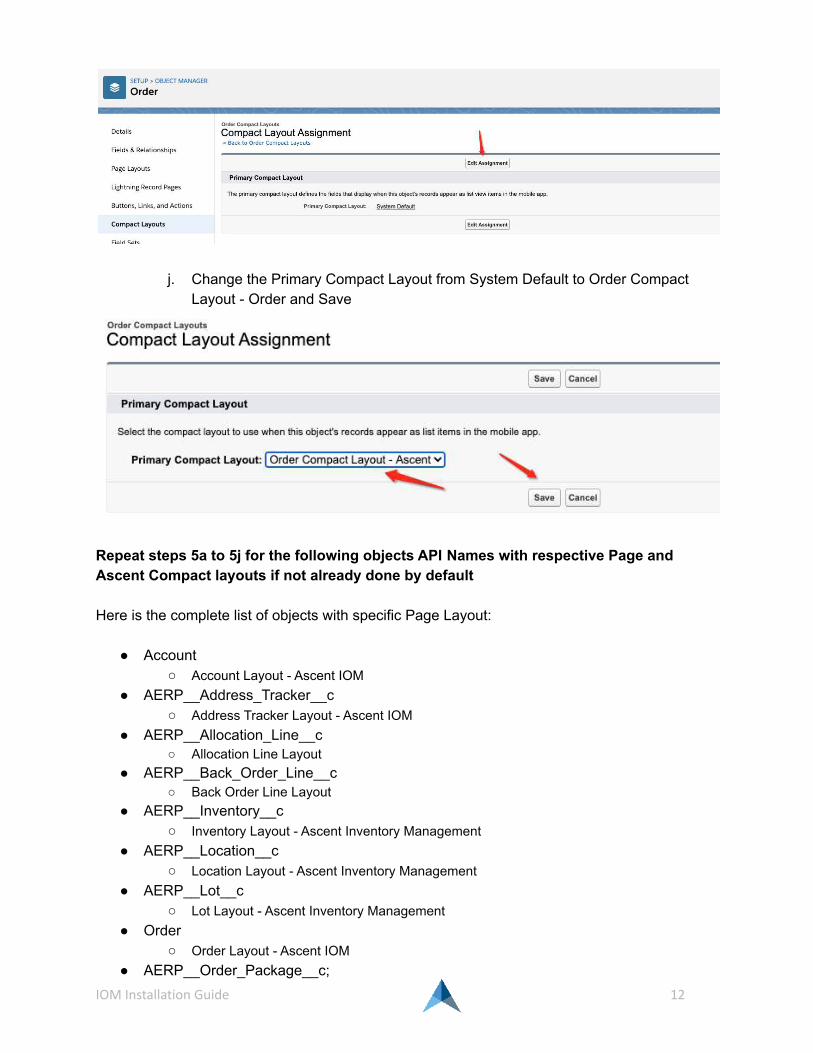
j. Change the Primary Compact Layout from System Default to Order CompactLayout - Order and Save
Repeat steps 5a to 5j for the following objects API Names with respective Page andAscent Compact layouts if not already done by default
Here is the complete list of objects with specific Page Layout:
● Account○ Account Layout - Ascent IOM
● AERP__Address_Tracker__c○ Address Tracker Layout - Ascent IOM
● AERP__Allocation_Line__c○ Allocation Line Layout
● AERP__Back_Order_Line__c○ Back Order Line Layout
● AERP__Inventory__c○ Inventory Layout - Ascent Inventory Management
● AERP__Location__c○ Location Layout - Ascent Inventory Management
● AERP__Lot__c○ Lot Layout - Ascent Inventory Management
● Order○ Order Layout - Ascent IOM
● AERP__Order_Package__c;IOM Installation Guide 12

○ Order Package Layout - Ascent Order Management● AERP__Order_PickingTicket__c
○ Order Picking Ticket Layout - Ascent● OrderItem
○ Order Product Layout - Ascent IOM● AERP__Packed_Order_Line__c
○ Packed Order Line Layout - Ascent Order Management● AERP__Picking_Ticket__c;
○ Pick List Layout - Ascent Order Management● AERP__Picking_Ticket_Line__c
○ Name: Picking Ticket Line Layout - Ascent Order Management● AERP__Price_Book_Entry_UOM__c;
○ Name: Price Book Entry UOM Layout● AERP__Processed_Return_Line__c
○ Processed Returned Line Layout - Ascent● Product2
○ Product Layout - Ascent IOM● AERP__Product_Transaction__c
○ Product Transaction Layout● AERP__Product_UOM__c
○ Product UOM Layout● AERP__Purchase_Order__c
○ Purchase Order Layout - Ascent Inventory Management● AERP__Purchase_Order_Line__c
○ Purchase Order Line Layout - Ascent Inventory Management● AERP__Received_Purchase_Order_Line__c
○ Received Purchase Order Line Layout - Ascent Inventory Management● AERP__Return__c
○ Return Layout - Ascent IOM● AERP__Return_Line__c
○ Return Line Layout - Ascent IOM● AERP__Serial_Number_Tracker__c
○ Serial Number Tracker Layout● AERP__Unit_of_Measure__c
○ Unit of Measure Layout
6.Objects Lightning Record Pages AssignmentSince we’ve created an Ascent IOM solution lightning application, combining Ascent Inventoryand Order Management apps, we need to assign the respective object lightning record pages tothe newly created Ascent IOM Lightning App.
a. Go to Setup -> Lightning App Builder
IOM Installation Guide 13

b. Select the page you want to share. Take the “Account Record Page - AscentInventory Management” page as an example.
Note: Managed Ascent lightning record pages cannot be edited. If the user wants to make anychanges, he can edit the page and save it, a new lightning record page will be created automatically.
c. Select View link next to the name of the page, and click the “Activation…”
d. Select the “APP DEFAULT’ tab on the Activation dialog.
IOM Installation Guide 14

e. Click the button “Assign as App Default”
IOM Installation Guide 15
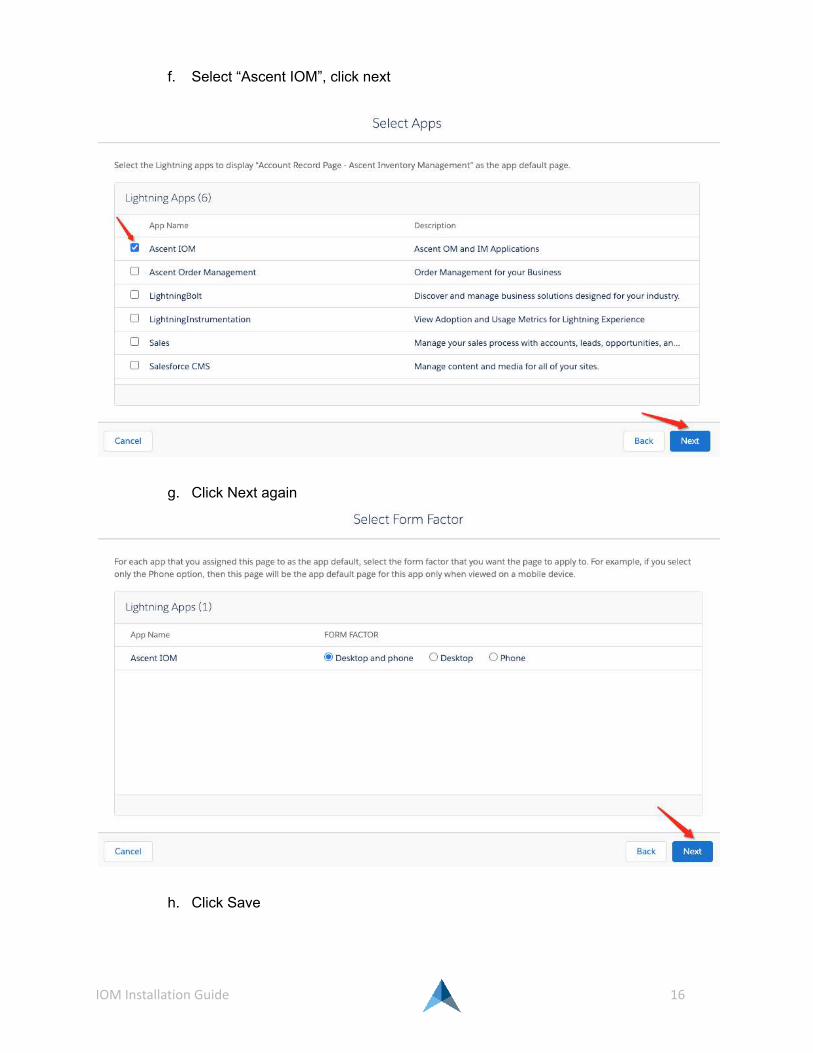
f. Select “Ascent IOM”, click next
g. Click Next again
h. Click Save
IOM Installation Guide 16
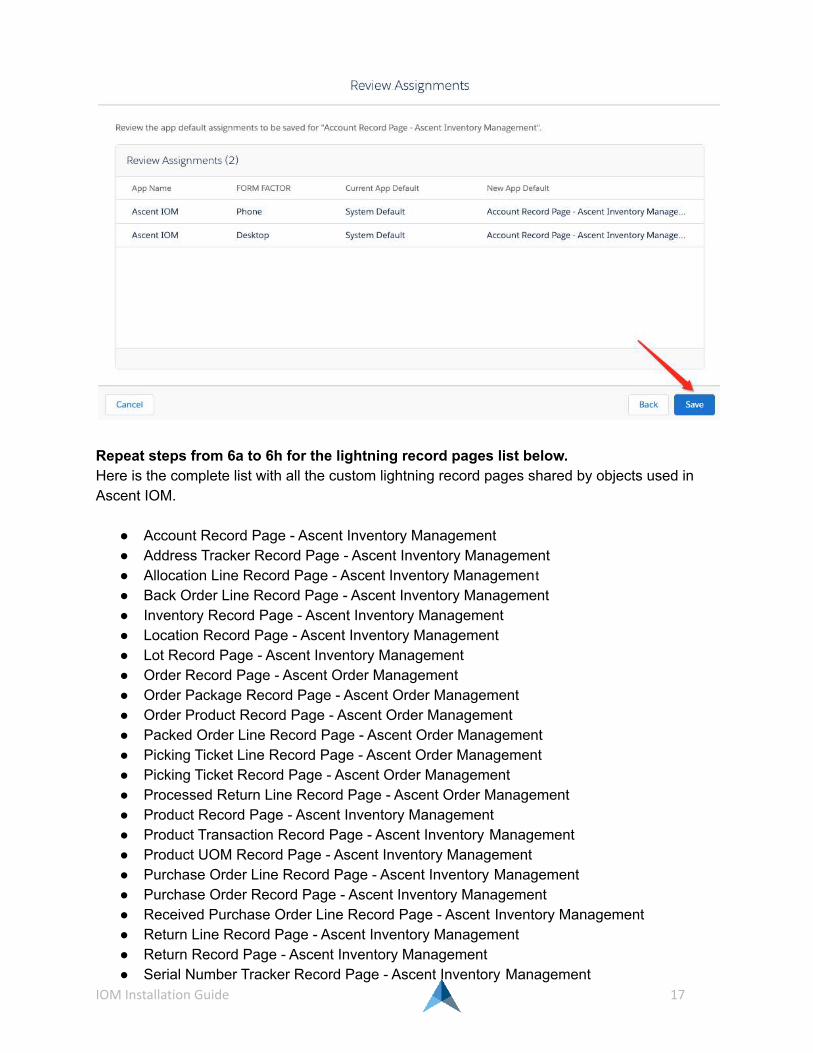
Repeat steps from 6a to 6h for the lightning record pages list below.Here is the complete list with all the custom lightning record pages shared by objects used inAscent IOM.
● Account Record Page - Ascent Inventory Management● Address Tracker Record Page - Ascent Inventory Management● Allocation Line Record Page - Ascent Inventory Management● Back Order Line Record Page - Ascent Inventory Management● Inventory Record Page - Ascent Inventory Management● Location Record Page - Ascent Inventory Management● Lot Record Page - Ascent Inventory Management● Order Record Page - Ascent Order Management● Order Package Record Page - Ascent Order Management● Order Product Record Page - Ascent Order Management● Packed Order Line Record Page - Ascent Order Management● Picking Ticket Line Record Page - Ascent Order Management● Picking Ticket Record Page - Ascent Order Management● Processed Return Line Record Page - Ascent Order Management● Product Record Page - Ascent Inventory Management● Product Transaction Record Page - Ascent Inventory Management● Product UOM Record Page - Ascent Inventory Management● Purchase Order Line Record Page - Ascent Inventory Management● Purchase Order Record Page - Ascent Inventory Management● Received Purchase Order Line Record Page - Ascent Inventory Management● Return Line Record Page - Ascent Inventory Management● Return Record Page - Ascent Inventory Management● Serial Number Tracker Record Page - Ascent Inventory Management
IOM Installation Guide 17
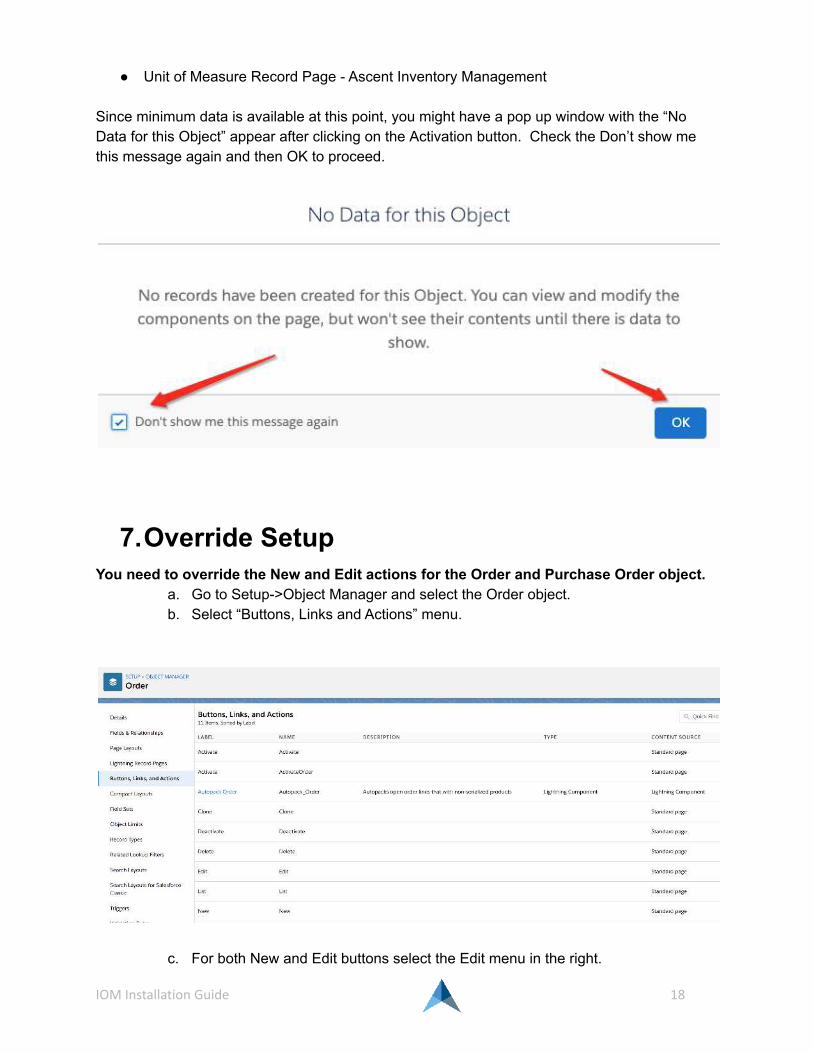
● Unit of Measure Record Page - Ascent Inventory Management
Since minimum data is available at this point, you might have a pop up window with the “NoData for this Object” appear after clicking on the Activation button. Check the Don’t show methis message again and then OK to proceed.
7.Override SetupYou need to override the New and Edit actions for the Order and Purchase Order object.
a. Go to Setup->Object Manager and select the Order object.b. Select “Buttons, Links and Actions” menu.
c. For both New and Edit buttons select the Edit menu in the right.
IOM Installation Guide 18
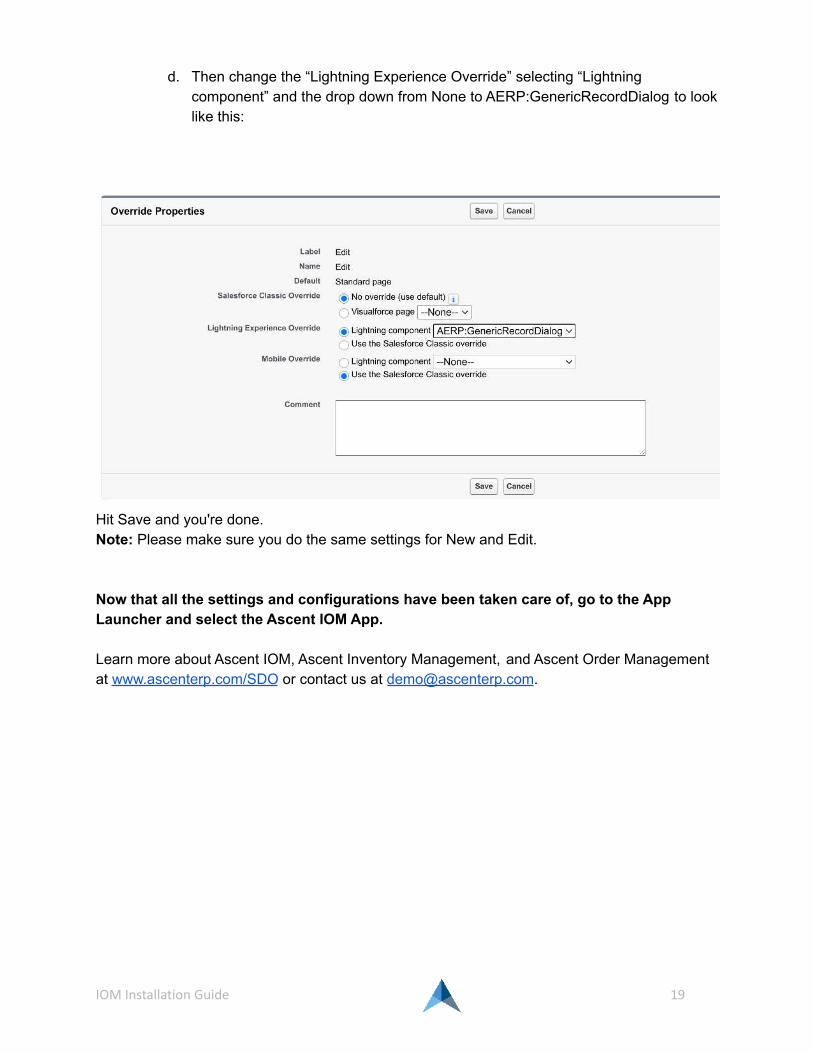
d. Then change the “Lightning Experience Override” selecting “Lightningcomponent” and the drop down from None to AERP:GenericRecordDialog to looklike this:
Hit Save and you're done.Note: Please make sure you do the same settings for New and Edit.
Now that all the settings and configurations have been taken care of, go to the AppLauncher and select the Ascent IOM App.
Learn more about Ascent IOM, Ascent Inventory Management, and Ascent Order Managementat www.ascenterp.com/SDO or contact us at [email protected].
IOM Installation Guide 19