Embed Size (px)
Citation preview

2
Contents
4 INTRODUCTION
4 STUDY GUIDES
5 SELECTING YOUR UKULELE
6 THE PARTS OF YOUR UKULELE
7 HOW TO HOLD YOUR UKULELE
8 THE RIGHT HAND: STRUMMING THE STRINGS
9 USING YOUR LEFT HAND
10 HOW TO TUNE YOUR UKULELE
12 GETTING ACQUAINTED WITH MUSIC
13 READING TAB
14 THE FIRST STRING A
15 Playing with A, B, C
16 PICKING
17 Extra Credit
18 SOUND OFF: HOW TO COUNT TIME
20 REPEAT SIGNS
21 1st String Blues
22 THE SECOND STRING E
23 Jammin’ on Two Strings
25 Hot Cross Buns
27 Blues in C
29 Rockin’ Uke
30 THE THIRD STRING C
31 Jammin’ on Three Strings
33 Largo
35 Jingle Bells
37 Beautiful Brown Eyes
38 INTRODUCING B-FLAT
39 Aura Lee
41 Three-String Boogie
42 TEMPO SIGNS
42 QUARTER REST
43 Three-Tempo Rockin’ Uke
44 INTRODUCING CHORDS
44 THE C7 CHORD
46 THE F CHORD
48 Good Night Ladies
49 KEY SIGNATURES
49 TIES
50 Down in the Valley
53 Ode to Joy
54 THE C CHORD

3
56 INCOMPLETE MEASURES
57 A-Tisket, A-Tasket
59 Tom Dooley
60 EIGHTH NOTES
61 Jammin’ with eighth Notes
62 DOTTED QUARTER NOTES
63 Go Tell Aunt Rhody
64 Cockles and Mussels
66 Clementine
68 THE G7 CHORD
70 Aloha ‘Oe
71 When the Saints Go Marching In
72 THE DOWN-AND-UP STROKE
73 Love Somebody
74 The Streets of Laredo
76 THE FERMATA
77 Michael, Row the Boat Ashore
79 Frankie and Johnny
80 16TH NOTES
80 THE DOTTED 8TH AND 16TH NOTE RHYTHM
81 Blues Strum
82 THE G CHORD
82 THE D7 CHORD
83 Careless Love
86 INTRODUCING F-SHARP
86 D.C. AL FINE
88 Little Brown Jug
89 Bluegrass Strum
90 Gimme That Old-Time Religion
92 CALYPSO STRUM
94 Mary Ann
96 The Sloop John B
100 Over the Rainbow
102 BONUS SECTION
102 PATHWAYS TO BECOMING A PROFESSIONAL
103 Practice
106 How to Prepare for an Audition
107 How to Be the One Everyone Wants in Their Band
108 Rehearsing and Improving the Band
109 How to Get Gigs for the Band
110 The Gig
112 UKULELE CHORD DICTIONARY
120 Ukulele Fingerboard Chart

Introduction
Study GuidesWhat makes this course special are the unique Study Guides that precede the music pages. The Study Guides offer explanations, directions, and additional information to help you easily understand how to play. You also learn a little music theory, a little music history, and about songs and their composers. So much invaluable information is crammed into the Study Guides. They become, in fact, your at-home teacher, assuring you of a quicker, more successful and enjoyable learning experience. You will always progress quicker with a teacher, and even more so using this book.
PickingThe Flat Pick: Flat picks are often used by rock, country, and jazz players to play one or more strings on plucked string instruments such as the ukulele and guitar. Hold the flat pick between the thumb and index finger (see photo on page 8). It’s important not to hold the pick too tightly, as this will cause muscle tension and prevent you from playing with a relaxed feel. You must not hold it too loosely either because this will allow the pick to move around and cause you to play inaccurately or even to drop the pick itself.
The Pick Stroke: Strike the string with a downward motion called a down-pick. Later in the book, you will learn how to up-pick. When playing the 2nd or 3rd string, you can allow the pick to come to rest against the next string. For example, after playing a note on the 2nd string, you can allow the pick to come to rest against the 1st string. However, after playing a note on the 1st string, you must stop the pick using your wrist. The pick should stop a quarter inch or so past the string. In general, it’s a good idea to make the smallest motion you can with the pick while still obtaining a strong, clear tone.
Playing with the Thumb: You may find it more comfortable to not use a pick at all and to play with your thumb. Using the thumb can be very effective when strumming a folk ballad or pop song.
Playing with the Fingernail of the Right Index Finger: This technique is very useful when playing fast folk tunes or country “barn-burners.” Banjo players call this frailing, and the hard-edged sound you get on a ukulele can bring an exciting dimension to your playing. In general, use this technique only when playing chords (see Introducing Chords on page 44).
Extra CrEditThe top exercise on page 17 is “Extra Credit,” which features four beats in every measure. The title refers to getting some extra experience with the notes you have already learned: A, B, and C. But now, you will be changing notes even more quickly, just as you did in the last two measures on page 15. You will also be learning an important new trick that will help keep your hand movements to a minimum.
Start playing “Extra Credit.” When you get to measure 2 of the third line, stop. Above the note B in that measure, there is an instruction above the staff, “Hold B down.” You will not affect the sound of C (3rd finger) by holding B (2nd finger) down. Holding a lower finger down while the next finger plays the following, higher note helps us to play melodies more smoothly. In this case, you’ll play the C and then lift the 3rd finger to return to the note B, which is being held by the 2nd finger.
In the next measure (measure 3 of the third line), raise your 2nd finger off the string to sound the open A on the first beat. On the second beat, play B (2nd finger) and hold the finger down as you play C (3rd finger) on the third beat. On the fourth beat, raise your 2nd and 3rd fingers off B and C to play the open A. In measure 4 of the third line, and going into the fourth line, you will once again hold the 2nd finger down on B as you put your 3rd finger down on C. This is the only new technique in “Extra Credit” so you should be able to play it without problems. Play it several times before moving on.
&
TAB
œ œ œ œ
3 3 3 2
œ œ œ œ
0 0 3 3
œ œ œ œ2 2 2 0
œ œ œ œ2 3 0 0
&
TAB
œ œ œ œ
0 0 0 2
œ œ œ œ3 3 0 0
œ œ œ œ
2 2 2 3
œ œ œ œ0 3 0 0
&
TAB
œ œ œ œ
3 2 0 3
œ œ œ œ
2 3 2 2
HOLD B DOWN
œ œ œ œ0 2 3 0
œ œ œ œ
2 0 2 2
HOLD B DOWN
&
TAB
œ œ œ œ
3 3 3 2
œ œ œ œ0 3 0 0
œ œ œ œ
2 2 2 3
œ œ œ œ0 3 0 0
Extra CrEditMake sure to place your left-hand fingers as close to the fret wires as possible without touching them. When you play the B on the 2nd fret and follow it with the C on the 3rd fret, keep your 2nd finger down. You will only hear the C, but when you go back to the B, it will sound smooth.
&
TAB
œ œ œ œ
3 3 3 2
œ œ œ œ
0 0 3 3
œ œ œ œ2 2 2 0
œ œ œ œ2 3 0 0
&
TAB
œ œ œ œ
0 0 0 2
œ œ œ œ3 3 0 0
œ œ œ œ
2 2 2 3
œ œ œ œ0 3 0 0
&
TAB
œ œ œ œ
3 2 0 3
œ œ œ œ
2 3 2 2
HOLD B DOWN
œ œ œ œ0 2 3 0
œ œ œ œ
2 0 2 2
HOLD B DOWN
&
TAB
œ œ œ œ
3 3 3 2
œ œ œ œ0 3 0 0
œ œ œ œ
2 2 2 3
œ œ œ œ0 3 0 0
&
TAB
œ œ œ œ
3 3 3 2
œ œ œ œ
0 0 3 3
œ œ œ œ2 2 2 0
œ œ œ œ2 3 0 0
&
TAB
œ œ œ œ
0 0 0 2
œ œ œ œ3 3 0 0
œ œ œ œ
2 2 2 3
œ œ œ œ0 3 0 0
&
TAB
œ œ œ œ
3 2 0 3
œ œ œ œ
2 3 2 2
HOLD B DOWN
œ œ œ œ0 2 3 0
œ œ œ œ
2 0 2 2
HOLD B DOWN
&
TAB
œ œ œ œ
3 3 3 2
œ œ œ œ0 3 0 0
œ œ œ œ
2 2 2 3
œ œ œ œ0 3 0 0
&
TAB
œ œ œ œ
3 3 3 2
œ œ œ œ
0 0 3 3
œ œ œ œ2 2 2 0
œ œ œ œ2 3 0 0
&
TAB
œ œ œ œ
0 0 0 2
œ œ œ œ3 3 0 0
œ œ œ œ
2 2 2 3
œ œ œ œ0 3 0 0
&
TAB
œ œ œ œ
3 2 0 3
œ œ œ œ
2 3 2 2
HOLD B DOWN
œ œ œ œ0 2 3 0
œ œ œ œ
2 0 2 2
HOLD B DOWN
&
TAB
œ œ œ œ
3 3 3 2
œ œ œ œ0 3 0 0
œ œ œ œ
2 2 2 3
œ œ œ œ0 3 0 0
Track 4
17
Self-
Teac
hing
Stu
dy G
uide
16
The Study Guide pages will help you learn the material on the lesson pages.
4

The First String AA on the 1st String. Look at the top section of page 15. This section shows you three notes on the fi rst string A. Let’s start with the fi rst diagram on the far left.
Finger Diagram. The words “open string” appear above the diagram, which is just like the chord diagram shown on page 13, and that means the A string is not fi ngered—it is just picked. This string is indicated as a solid line, while the other strings are dashed lines. Pick the solid line, not the dashed lines. The o above the diagram also means “open” (or not fi ngered).
As you hold the ukulele in playing position, the A string is the lowest (closest to the fl oor) and thinnest string on the ukulele though it is the highest in pitch. When ukuleleists refer to the highest string, they mean the highest-sounding string, the A string.
The Staff. Below the fi nger diagram is the fi ve-line music staff. The fi rst symbol you see is the treble clef, also called the G clef (see page 12). Counting up the staff from the bottom line, the note A is located in the 2nd space. Listen to the sound of the open A string by picking it with your right hand (RH).
B on the 1st String. The second diagram is for the note B. It is fi ngered by placing the 2nd (middle) fi nger just slightly behind the 2nd fret and pressing down just fi rmly enough to make a clear tone when you pluck the string. See the fi nger diagram to the right of the photo for the exact location of B on the fi ngerboard. Place your fi nger as close to the fret wire as possible without actually touching it. The music staff below the fi nger diagram shows that by counting up, B is located on the 3rd line. This is the note B played on the A string. Now fi nger B and pick with your RH several times. It should sound slightly higher than A.
C on the 1st String. The diagram and photo on the right is for the note C. It is fi ngered by placing your 3rd fi nger just behind the 3rd fret and pressing down just fi rmly enough to make a clear tone when you pluck the string. Once again, see the fi nger diagram for the exact location. The music staff below the fi nger diagram shows that C is in the 3rd space. This is the note C played on the A string. Now fi nger C, and pick with your RH several times. It should sound higher than B.
Music ExerciseLook down to the fi rst line of music. To the left of the staff, you will see a fi nger diagram of the three notes and fi ngerings you have just learned. It is intended as a quick review.
The staff is divided into small sections called measures, and each measure is separated by bar lines—see page 12.
Begin by playing slowly and evenly. You can keep a steady beat in your head, or you can tap your foot. Each note is a quarter note and will receive one beat or tap of your foot. There are four beats in each measure.
The notes in measures 1 and 2 are all A’s, played on the open A string. The next two measures include all B’s, fi ngered just slightly behind the 1st fret. On the second line of music, measures 5 and 6 are all C’s, fi ngered just behind the 3rd fret. In measure 7, the notes change every two beats—A for two beats, then B for two beats. The last measure begins with two C’s, followed by a fi nal A which is held a little longer, bringing the exercise to a close.
Play this exercise several times, saying the name of each note as you play. It is important to play the notes evenly and steadily. Do not stop between measures or between lines. Start slowly and gradually increase your speed.
Playing with a, B, CThe only new notation in the bottom exercise is the symbol at the very end. A thin line followed by a thick line indicates the end of a piece of music. This exercise includes only three beats in each measure. This will give you practice in changing notes a little more quickly. In the last two measures, you will be changing notes on every beat. That’s quite an accomplishment after playing only one page. When you are comfortable playing this exercise, move on to page 16.
Self-
Teac
hing
Stu
dy G
uide
14

&TAB
w0
&TAB
w2
&TAB
w3
&TAB
w0
&TAB
w1
&TAB
w3
& w
A
OPEN STRING (not fingered)
&w
B
w
&
C
2nd FRET
2
3rd FRET
3
o
The First String A
A
Play slowly and evenly. Use only down-strokes, indicated by ≥ . The symbol ˜ over a note means open string. Do not finger.
&
TAB
œ
≥oo
œ
≥
œ
≥
œ
≥
0 0 0 0
œ œ œ œ
0 0 0 0
etc.
œ œ œ œ
2 2 2 2
2
œ œ œ œ
2 2 2 2
&
TAB
œ œ œ œ
3 3 3 3
3œ œ œ œ
3 3 3 3
œ
o
œ œ œ
0 0 2 2
2œ œ
œ
o
3 3 0
3(HOLD)
&
TAB
œ
≥o
œ
≥
œ
≥
0 0 0
Playing with A, B, C
œ
≥
œ œ
2 2 2
etc.2
œ œ œ
3 3 3
3
œ œ œ
2 2 2
&
TAB
œ œ œ
0 0 0
œ œ œ
2 2 2
œœ œ
3 0 2
œ œ œ
3 2 0
A B
CA B C
A B C
DOUBLE BAR LINE
USED TO SIGNAL THE END OF THE PIECE
B
C
A
FRET 1
FRET 3
FRET 2
(open)
Diag. 1 Diag. 2
2
3
Playing with a, B, C
&
TAB
œ
≥oo
œ
≥
œ
≥
œ
≥
0 0 0 0
œ œ œ œ
0 0 0 0
etc.
œ œ œ œ
2 2 2 2
2
œ œ œ œ
2 2 2 2
&
TAB
œ œ œ œ
3 3 3 3
3œ œ œ œ
3 3 3 3
œ
o
œ œ œ
0 0 2 2
2œ œ
œ
o
3 3 0
3(HOLD)
&
TAB
œ
≥o
œ
≥
œ
≥
0 0 0
Playing with A, B, C
œ
≥
œ œ
2 2 2
etc.2
œ œ œ
3 3 3
3
œ œ œ
2 2 2
&
TAB
œ œ œ
0 0 0
œ œ œ
2 2 2
œœ œ
3 0 2
œ œ œ
3 2 0
A B
CA B C
A B C
DOUBLE BAR LINE
USED TO SIGNAL THE END OF THE PIECE
&
TAB
œ
≥oo
œ
≥
œ
≥
œ
≥
0 0 0 0
œ œ œ œ
0 0 0 0
etc.
œ œ œ œ
2 2 2 2
2
œ œ œ œ
2 2 2 2
&
TAB
œ œ œ œ
3 3 3 3
3œ œ œ œ
3 3 3 3
œ
o
œ œ œ
0 0 2 2
2œ œ
œ
o
3 3 0
3(HOLD)
&
TAB
œ
≥o
œ
≥
œ
≥
0 0 0
Playing with A, B, C
œ
≥
œ œ
2 2 2
etc.2
œ œ œ
3 3 3
3
œ œ œ
2 2 2
&
TAB
œ œ œ
0 0 0
œ œ œ
2 2 2
œœ œ
3 0 2
œ œ œ
3 2 0
A B
CA B C
A B C
DOUBLE BAR LINE
USED TO SIGNAL THE END OF THE PIECE
B
&TAB
w0
&TAB
w2
&TAB
w3
&TAB
w0
&TAB
w1
&TAB
w3
C
&TAB
w0
&TAB
w2
&TAB
w3
&TAB
w0
&TAB
w1
&TAB
w3
Track 2
Track 3
& w
A
OPEN STRING (not fingered)
&w
B
w
&
C
2nd FRET
2
3rd FRET
3
o
15

odE to JoyLike “Largo” (page 33), “Ode to Joy” is a melody from a symphony. This famous melody was composed for the fi nal movement of Ludwig van Beethoven’s monumental Symphony No. 9. Miraculously, Beethoven was completely deaf when he composed it in 1824.
“Ode to Joy” is in time and has a B in the key signature. You can play either the melody or the chords. The melody is fairly easy to play because it only uses the notes F, G, A, B , and C (both high and low). When ascending from B to C on the 1st string (as in the fi rst measure), or from F to G on the 2nd string (as in the third measure), hold your 1st fi nger down on its note while you play the next note with your 3rd fi nger. You should be accustomed to this stretch by now.
As you are looking over the piece, notice that the fi rst, second, and fourth lines start the same but end differently. The second and fourth lines are exactly the same except for the very last note of the fourth line, which is a quarter note and quarter rest instead of a half note. Noticing this kind of similarity makes it much easier to learn a new piece.
This arrangement also uses the F and C7 chords. In measures 8–12, the chords change every two beats, so you will want to make sure you are very comfortable with switching between the two chords.
Have fun playing this classical masterpiece!
As always, use a thorough practice routine.
1. Look over every new piece fi rst to observe all of the important features, especially repeated musical ideas, new notes, and rhythms.
2. Learn to count and clap the rhythms.
3. Practice saying the names of the notes aloud in rhythm as you tap your foot on every beat.
4. Practice saying the fi nger numbers aloud in rhythm as you tap your foot on every beat.
5. Use additive practice. Practice playing slowly, just two measures at a time until they feel easy to play. Then, do the same with the next two measures. When those feel easy to play, play all four measures. Learn two more measures, then play all six. Continue this way through the whole piece.
&
TAB
b4
4
Û Û Û
œ œ œ œ
0 0 1 3
F
Moderato
PLAY:Û Û Û Û
œ œ œ œ
3 1 03
Û Û Û Û
œ œ œ œ
1 1 30
Û Û Û
œ œ ˙
03 3
C7
&
TAB
b
Û Û Û
œ œ œ œ
0 0 1 3
F Û Û Û Û
œ œ œ œ
3 1 03
Û Û Û Û
œ œ œ œ
1 1 30
Û Û
œ œ ˙
3 1 1
C7 F
&
TAB
b
Û Û
œ œ œœ
3 30
1
C7 F Û Û
œœ œ
œ
31 0
1
C7 F Û Û
œœ œ œ
31 0
3
C7 F Û Û Û
œ œ
˙
1 30
C7
&
TAB
b
Û Û Û
œ œ œ œ
0 0 1 3
F Û Û Û Û
œ œ œ œ
3 1 03
Û Û Û Û
œ œ œ œ
1 1 30
Û Û
œ œ œ
Œ
3 1 1
C7 F
Ode to Joy
Hold 1st finger down
Self-
Teac
hing
Stu
dy G
uide
52

odE to Joy
&
TAB
b 44Û Û Û
œ œ œ œ
0 0 1 3
F
Moderato
PLAY:Û Û Û Ûœ œ œ œ
3 1 03
Û Û Û Ûœ œ œ œ
1 1 30
Û Û Ûœ œ ˙
03 3
C7
&
TAB
bÛ Û Û
œ œ œ œ
0 0 1 3
F Û Û Û Ûœ œ œ œ
3 1 03
Û Û Û Ûœ œ œ œ
1 1 30
Û Ûœ œ ˙
3 1 1
C7 F
&
TAB
bÛ Û
œ œ œ œ
3 30
1
C7 F Û Ûœ œ œ œ
31 0
1
C7 F Û Ûœ œ œ œ
31 0
3
C7 F Û Û Ûœ œ ˙
1 30
C7
&
TAB
bÛ Û Û
œ œ œ œ
0 0 1 3
F Û Û Û Ûœ œ œ œ
3 1 03
Û Û Û Ûœ œ œ œ
1 1 30
Û Ûœ œ œ Œ
3 1 1
C7 F
Ode to JoyTheme from Beethoven’s Symphony No. 9
&
TAB
b 44Û Û Û
œ œ œ œ
0 0 1 3
F
Moderato
PLAY:Û Û Û Ûœ œ œ œ
3 1 03
Û Û Û Ûœ œ œ œ
1 1 30
Û Û Ûœ œ ˙
03 3
C7
&
TAB
bÛ Û Û
œ œ œ œ
0 0 1 3
F Û Û Û Ûœ œ œ œ
3 1 03
Û Û Û Ûœ œ œ œ
1 1 30
Û Ûœ œ ˙
3 1 1
C7 F
&
TAB
bÛ Û
œ œ œ œ
3 30
1
C7 F Û Ûœ œ œ œ
31 0
1
C7 F Û Ûœ œ œ œ
31 0
3
C7 F Û Û Ûœ œ ˙
1 30
C7
&
TAB
bÛ Û Û
œ œ œ œ
0 0 1 3
F Û Û Û Ûœ œ œ œ
3 1 03
Û Û Û Ûœ œ œ œ
1 1 30
Û Ûœ œ œ Œ
3 1 1
C7 F
Ode to Joy
&
TAB
b 44Û Û Û
œ œ œ œ
0 0 1 3
F
Moderato
PLAY:Û Û Û Ûœ œ œ œ
3 1 03
Û Û Û Ûœ œ œ œ
1 1 30
Û Û Ûœ œ ˙
03 3
C7
&
TAB
bÛ Û Û
œ œ œ œ
0 0 1 3
F Û Û Û Ûœ œ œ œ
3 1 03
Û Û Û Ûœ œ œ œ
1 1 30
Û Ûœ œ ˙
3 1 1
C7 F
&
TAB
bÛ Û
œ œ œ œ
3 30
1
C7 F Û Ûœ œ œ œ
31 0
1
C7 F Û Ûœ œ œ œ
31 0
3
C7 F Û Û Ûœ œ ˙
1 30
C7
&
TAB
bÛ Û Û
œ œ œ œ
0 0 1 3
F Û Û Û Ûœ œ œ œ
3 1 03
Û Û Û Ûœ œ œ œ
1 1 30
Û Ûœ œ œ Œ
3 1 1
C7 F
Ode to JoyTrack 29Melody & Chords
Track 30Chords Only
53

Introducing F-Sharp2nd FRET
2
&TAB
w2
#
F#
CHORDS USED IN THIS SONG
O O
1 2
D7O
1 2
3
G
3
O O OC
& # 44 œMy
BrightlyPLAY:
Û Û Û
œ œ œ œwife and I live
G Û Û Û
œ œ œ œ œall a - lone in a
C Û Û Ûœ œ œ œ œlit - tle brown hut we
D7
& #Û Û Û
œ œ ˙call our own;
G Û Û Û Û
œ œ œ œshe loves gin, and
Û Û Û
œ œ œ œI love rum, I
C
& #Û Û Û
œ œ œ œtell you what, don’t
D7 Û Û Ûœ œ œ Œwe have fun?
G Û Û Û Ûœ œ ˙
Ha, ha, ha,
Û Û Ûœ œ ˙
you and me,
C
& #Û Û Û
œ œ œ œ œlit - tle brown jug, don’t
D7 Û Û Ûœ œ ˙I love thee?
G Û Û Û Ûœ œ ˙
Ha, ha, ha,
& #Û Û Û
œ œ ˙you and me,
C Û Û Ûœ œ œ œ œlit - tle brown jug, don’t
D7 Û Ûœ œ œI love thee?
G
Little Brown Jug
littlE Brown Jug
& # 44 œMy
BrightlyPLAY:
Û Û Û
œ œ œ œwife and I live
G Û Û Û
œ œ œ œ œall a - lone in a
C Û Û Ûœ œ œ œ œlit - tle brown hut we
D7
& #Û Û Û
œ œ ˙call our own;
G Û Û Û Û
œ œ œ œshe loves gin, and
Û Û Û
œ œ œ œI love rum, I
C
& #Û Û Û
œ œ œ œtell you what, don’t
D7 Û Û Ûœ œ œ Œwe have fun?
G Û Û Û Ûœ œ ˙
Ha, ha, ha,
Û Û Ûœ œ ˙
you and me,
C
& #Û Û Û
œ œ œ œ œlit - tle brown jug, don’t
D7 Û Û Ûœ œ ˙I love thee?
G Û Û Û Ûœ œ ˙
Ha, ha, ha,
& #Û Û Û
œ œ ˙you and me,
C Û Û Ûœ œ œ œ œlit - tle brown jug, don’t
D7 Û Ûœ œ œI love thee?
G
Little Brown Jug
A sharp ≥ raises a note a half step. F≥ is played one fret higher than the note F. When a sharp note appears in a measure, it remains sharp until the end of that measure.
Track 70Vocals & Chords
Track 69
Track 71Chords Only
Track 72Chords Only inBluegrass Strum
88
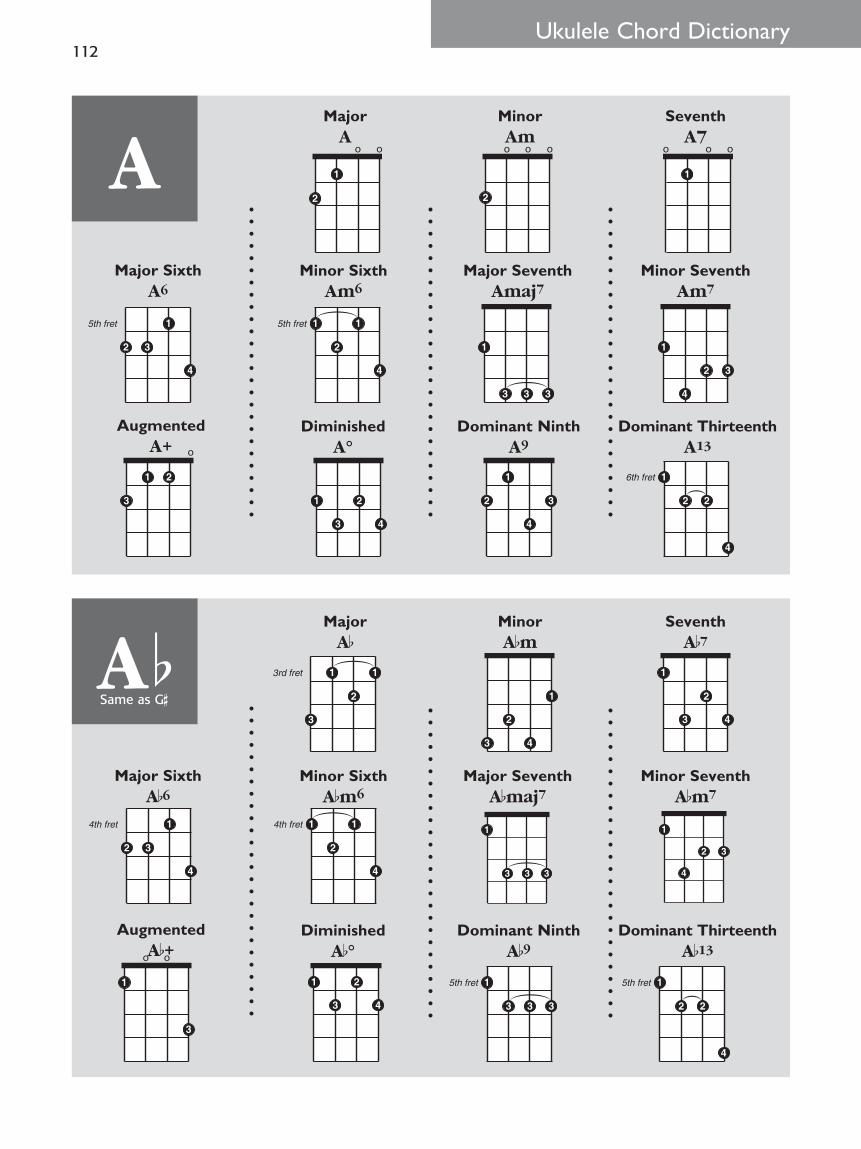
A
MajorAb
MinorAbm
SeventhAb7
Minor SixthAbm6
Major SeventhAbmaj7
Minor SeventhAbm7
DiminishedAb°
Dominant NinthAb9
Dominant ThirteenthAb13
Major SixthAb6
AugmentedAb+
A bA b
Same as G#
A
Ukulele Chord Dictionary Ukulele Chord Dictionary
o o
1
2
o
2
oo o o o
1
11
2
4
5th fret
1
3 3 3
1
2 3
4
2
3 4
1
1
2 3
4
1
22
4
6th fret
1
2 3
4
5th fret
o
21
3
MajorA
SeventhA7
Minor SixthAm6
Major SeventhAmaj7
Minor SeventhAm7
DiminishedA°
Dominant NinthA9
Dominant ThirteenthA13
Major SixthA6
AugmentedA+
2
3 4
1
1
2
3
13rd fret
1
2
3 4
1
2
3 4
11
2
4
4th fret 1
333
1
2 3
4
1
33 3
5th fret 1
22
4
5th fret
1
2 3
4
4th fret
1
3
oo
MinorAm
112