Embed Size (px)
Citation preview


2 Copyright
www.magix.com
Copyright This documentation is protected by law. All rights, especially the right of
duplication, circulation, and translation, are reserved.
No part of this publication may be reproduced in the form of copies,
microfilms or other processes, or transmitted into a language used for
machines, especially data processing machines, without the express written
consent of the publisher.
All copyrights reserved.
All other product names are trademarks of the corresponding manufacturers.
Errors in and changes to the contents as well as program modifications
reserved.
MAGIX and Cleaning Lab are registered trademarks of MAGIX G .
VST is a registered trademark of Steinberg Media Technologies GmbH.
MAGIX Audio Cleaning Lab uses patent-pending technology.
Other mentioned product names may be registered trademarks of the
respective manufacturer.
MAGIX licensing conditions are included in the installation and also at
www.magix.com under EULA
Copyright © MAGIX , 2000-201 . All rights reserved.
Legal notice: Copyrights and laws against exploitation of accomplishments of
artists and publishers shall be observed.

Preface 3
www.magix.com
Preface Congratulations! You now own a high-performance digital audio lab, which is
perfect for cleaning and enhancing the sound of your records, tapes, CD
tracks, MP3 collections or audio files, combining your media in any order, and
burning or exporting everything in optimum quality directly onto CD or DVD.
The volume and sound on each track can be perfectly synced and equalized.
Various audio formats can be combined, simultaneously edited, and burned.
The method is especially easy and clear, since automatic settings, assistants
and step-by-step instructions make sure that the process goes smoothly and
easily. Neither previous experience using the software nor long processing
time are necessary.
The print manual provides an introduction and tutorial that explains all the
most important features with step-by-step instructions.
In addition, an electronic manual is supplied in PDF, which systematically
explains all of the program's components one after the other. You can also
use the program's help file by pressing "F1". If you prefer to discover the many
possibilities of the program by yourself, then use the PDF manual and help file
simply as a reference. An alphabetical index is included for this purpose.
Have fun with MAGIX Audio Cleaning Lab SE.
The MAGIX team.

4 Table of Contents
www.magix.com
Table of Contents
Copyright 2
Preface 3
Support 5
Before you start 7 System requirements 7 Installation 8
Introduction 9 What is MAGIX Audio Cleaning Lab SE? 9 Features 10 Overview of the program interface 12
Tutorial 14 Program start 15 Load and play audio files 16 Cleaning 18 Mastering 20 Object effects 21 Cut out undesired passages 22 Retouch short distortions such as cracks 24 Export 27
If You Still Have Questions 29
More about MAGIX 30 MAGIX Online World 30 magix.info 30 MAGIX Magazine 31

Support 5
www.magix.com
Support Dear MAGIX customer,
Our aim is to provide fast, convenient, solution-focused support at all times.
To this end, we offer a wide range of services:
• Unlimited web support:
As a registered MAGIX customer, you have unlimited access to web
support offered via the convenient MAGIX service portal on
http://support.magix.net, including an intelligent help assistant, high-
quality FAQs, patches and user reports that are constantly updated.
The only requirement for use is product registration on www.magix.com
• The online community, on-the-spot support and a platform for exchange:
MAGIX customers have free and unlimited access to the online
community at www.magix.info, which includes approx. 150,000 members
and offers the opportunity to ask members questions concerning MAGIX
products as well as use the search function to search for specific topics or
answers. In addition to questions & answers, the knowledge pool includes
a glossary, video tutorials and a discussion forum. The multiple experts,
found round-the-clock at www.magix.info guarantee quick answers, which
sometimes come within minutes of a question being posted.
• Additional telephone service:
Besides the large number of free customer service offers, we also offer a
fee-based telephone customer service.
Here you can find a summary of our technical support telephone numbers:
http://support.magix.net/
Mail (Europe): MAGIX Development Support, P.O. Box 20 09 14, 01194
Dresden, Germany
Mail (North America): MAGIX Customer Service, 1105 Terminal Way #302,
Reno, NV 89502, USA

6 Support
www.magix.com
Please have the following information at hand:
• Program version
• Configuration details (operating system, processor, memory, hard drive,
etc.), sound card configuration (type, driver)
• Information regarding other audio software installed
MAGIX Sales Department
You can reach the MAGIX Sales Department workdays for help with the
following questions and problems:
• Orders
• Product consulting (pre-purchase)
• Upgrade requests
• Returns
Europe Monday - Friday, 09:00-16:00 GMT
U.K.: 0203 3189218
Denmark: 699 18149
Sweden: 0852500858
Finland: 09 31581630
Norway: 0210 30665
North America 9 am to 4 pm EST Mon-Fri
Phone: 1-305-722-5810

Before you start 7
www.magix.com
Before you start
System requirements
Operating system: For Microsoft
® Windows
® XP | Vista
® | 7
Computer: • 1 GHz processor or higher
• 512 MB RAM
• 500 MB free hard disk space
• graphics card: resolution 1024 x 768
• 16-bit sound card
• CD-ROM drive
Optional: • Burn CDs/DVDs with CD/DVD±R(W) recorder

8 Before you start
www.magix.com
Installation
Step 1: Insert the program disc into the drive. The installation program starts
up automatically. If the disc doesn't run automatically,
• open Windows Explorer and click the letter of the CD-ROM drive
• or double-click on "Start.exe" to start the installer.
Step 2: To begin the installation of MAGIX Audio Cleaning Lab SE, click on
"Install". The MAGIX Audio Cleaning Lab SE installation program will appear.
Hint: During installation, you will be asked (in case there are multiple users
on your computer) if you would like to set up for the administrator. The
option "Administrator only" restricts use of the program to the specified
administrator. The "All users" option allows all users of the computer to use
the program.
Simply follow the on-screen instructions to complete the installation process,
and then click "Continue". All files are now copied onto the hard drive.
Step 3: Once the installation is complete, confirm the message by pressing
"Finish". Now you can start the program at any time from the Windows
"Start" menu.
Uninstalling the program If you would like to uninstall MAGIX Audio Cleaning Lab SE, you can do so via
the control panel under "Software". Or go to "Programs > MAGIX > MAGIX
Audio Cleaning Lab SE > Service and Support > Uninstall MAGIX Audio
Cleaning Lab SE".

Introduction 9
www.magix.com
Introduction What is MAGIX Audio Cleaning Lab SE?
MAGIX Audio Cleaning Lab SE is a gentle but powerful cleaner for all kinds of
acoustic material including records, tapes, CD tracks, recorded speech, and
MP3s. Digital cleaning features remove everything from light cloudiness to
the worst sound abominations on noise-filled tapes, scratched records, and on
MP3s that have been compressed to death. A fine polish of the sound brings
new life to every song and the burning function encapsulates your sensitive
sound material on audio or data CD, protecting it from any further damage.
Individual tracks, even individual passages within a track can be given their
own effect settings. In addition, the entire sound can be cleaned up, refreshed
and – especially important for compilations – the volume can be balanced.
MAGIX Audio Cleaning Lab SE is fast, easy-to-use and very gentle: Nearly all
effects are calculated in realtime during playback without damaging the
recorded material in the least. The original recordings and songs remain
untouched on the hard drive. You can therefore experiment to your heart's
content without having to worry about causing any lasting damage to your
audio material.

10 Introduction
www.magix.com
Features
Import You can either import existing audio files in many conventional formats into
MAGIX Audio Cleaning Lab SE, or simply use MAGIX Audio Cleaning Lab SE
to record your own music. No matter whether cassette, tape reel, LP, or via
streaming Internet, with only a few clicks, you can digitize your music and edit
it further with MAGIX Audio Cleaning Lab SE.
Cleaning The heart of MAGIX Audio Cleaning Lab SE is its ability to remove unpleasant
noise in music and enrich the overall sound. To do this, there are numerous
professional tools available like the "DeClicker", "DeCrackler", "DeClipper",
"DeNoiser" (including DeRumbler preset), and "DeHisser". You can also add a
number of sound effects to your music. Resampling and timestretching help
adjust the speed and pitch of pieces so that they match, and reverb/echo
adds professional reverb to your music. The possibilities are nearly endless, as
you will see. For more detailed information about the tools, please read
MAGIX Audio Cleaning Lab SE's help file.
Mastering So that your recordings sound optimal, a selection of mastering tools are
available to you once you have cleaned up the audio material. Try them out
yourself to see which settings are the best, or let MAGIX Audio Cleaning Lab
SE do the work for you by searching for the best settings automatically. For
more detailed information about the tools, please read MAGIX Audio
Cleaning Lab SE's help file.
Export Of course, you can also export your recordings. There is a wide range of
formats available which enable you to enjoy your recordings anywhere you
like.

Introduction 11
www.magix.com
Supported formats Import:
Audio: WAV, MP3, WMA, AIF, OGG. FLAC, AAC, M3U, CUE, CD-A
Export:
Export: WAV, MP32, MP3 Surround
2, WMA, OGG, AAC
1, FLAC, MP3/Data
CD/DVD, CD-A
1) Activate AAC encoder (fee-based)
2) only with Windows Media Player 10 or higher

12 Introduction
www.magix.com
Overview of the program interface
Import: Add new audio material here such as audio files from your hard
disk, LPs or tapes via the record function, as well as songs from an audio
CD.
Cleaning: You can remove audio disturbances in the track via the
"Cleaning" screen.
Mastering: Use the "Mastering" screen to optimize the audio material in
the track.
Export: Export audio material as an audio file and burn it directly onto CD
or DVD via the "Export" screen.
Mouse modes: Select a suitable tool here: Arrow (Move mouse mode),
Scissors (Cut mouse mode), "X" (Delete mouse mode), Clock
(Resampling mouse mode), Pen 1 (Draw volume curve mode) or Pen 2
(Draw wave shape).
Menu bar: Here you'll find all functions of MAGIX Audio Cleaning Lab SE.
Overview track: View the complete project. The area which is currently
being edited by the user is highlighted.
Track: Make detailed changes to the audio material here.

Introduction 13
www.magix.com
Object FX: Access the object effects for the selected song in the track
here.
Transport control: Controls playback of the track.
Effects section: Here you can access the individual cleaning and
mastering effects.
Info Box/Analyzer: Switch between information on the currently selected
function and the visualization screen here. The visualization screen
displays the output signal graphically. You can choose between the
following display options: peak meter, oscilloscope, phase correlator,
spectroscope, and spectrogram.
Master volume: Set the total volume of the track here. The limiter
hinders overmodulation, and the auto function enables the volume to be
automatically optimized.

14 Tutorial
www.magix.com
Tutorial In this chapter, we introduce all the most important features of MAGIX Audio
Cleaning Lab SE. You don't need any special experience; just some time for
recordings and hard drive space.
With MAGIX Audio Cleaning Lab SE you can load audio material from a
number of different sources into projects in order to clean it up, edit it, export
it as an audio file/CD or burn it to disc using just some of the special functions
that come in the package.
First of all, you'll need suitable audio material. You can load your records or
tapes, or even, for example, audio files from the Internet as MP3s.
Analog material like records or tapes have to be digitized first so that it can be
processed by the computer. The recording function in MAGIX Audio Cleaning
Lab SE can be used for this purpose. It's used to record analog material via the
computer's sound card.

Tutorial 15
www.magix.com
Program start
After starting the program, a selection dialog including several tasks will
appear.
Choose from:
• Restore vinyl sound: for LPs.
• Clean tape sound: for tapes.
• Optimize voice and audio book recordings: for speech.
• Edit digital files: for MP3 files, web radio recordings and many more.
For all these options you will require relevant material. In the following we
assume that you already possess digitized material which you would like to
free from any bothersome noise.
Note: If you wish to digitize an LP, you should use a USB phono pre-amp in
order to connect your record player to your PC. By doing so, you ensure best
sound quality all the way through. You can find a suitable USB phono pre-
amp in our MAGIX Online Shop at www.magix.com.

16 Tutorial
www.magix.com
Load and play audio files
After choosing a suitable task, MAGIX Audio Cleaning Lab SE will show up
with an empty project window. You are in the "Import" section, which is
recognizable by the lit button below the project window.
The workflow in this section is very easy:
• You can load your audio files, e.g. in MP3 format by clicking the "Audio
files" button.
• You can record LPs or tapes via the "Record" button.
• You can import audio CDs via the "CDs" button.
After import, a waveform display of the audio track appears in the main
window.

Tutorial 17
www.magix.com
The waveform display gives you an idea of the audio track's progression. You
can even detect noises. Crackling for instance creates a clearly visible peak in
the waveform.
Below to the right, you will find the transport controls for playback, stop and
winding. You will be familiar with these functions from other playback
devices.
Use the mouse for quicker navigation: If you click into the waveform display
with the mouse, the playback marker will be moved exactly to this position.
You can start and stop the track by pressing the spacebar of your keyboard.

18 Tutorial
www.magix.com
Cleaning
There are many types of noises. Let's start with the easiest ones: constant
humming or irritating hissing. This kind of noise is usually caused by tape
recorders, record players or microphones and are audible throughout the
complete track. Find out how to get rid of these irritating distortions:
• Switch to the "Cleaning" section.
Most of the elements that are displayed here are identical to the ones in the
"Import" section, but the function area in the lower left hand corner has
changed decisively. Six different functions for removing audio disturbances
are available here, which are adjusted differently depending on your selection
in the start dialog. The modules are "DeClicker", "DeCrackler", "DeClipper",
"DeNoiser", and "DeHisser". If you click on one of these modules, you will find
explanations regarding purpose and workflow of the individual module on the
info monitor located in the bottom right-hand corner.

Tutorial 19
www.magix.com
The slider lets you regulate the
strength of all of the "cleaning" effects
(except for Spectral Cleaning, which
we will deal with later).
If you are not satisfied with the
presets of the start dialog, you can
choose further presets using the
arrow menu.
To get an idea of how the selected
effect affects your audio material, you
can turn it on and off by clicking on
the symbol in the left-hand corner.
Click on the symbol in the bottom
right-hand corner to open a user
interface where you can set all of the
available parameters for the effect.
In a way, this symbol represents the effect's engine hood. The interface
located behind it was designed to simulate professional audio editing devices.
20 Tutorial
www.magix.com
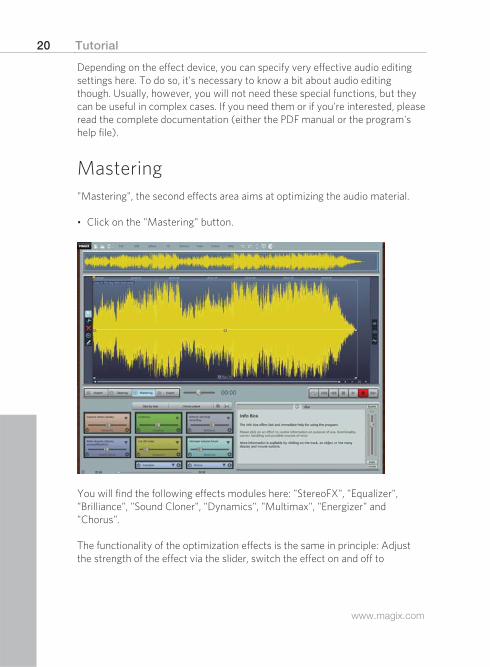
Depending on the effect device, you can specify very effective audio editing
settings here. To do so, it's necessary to know a bit about audio editing
though. Usually, however, you will not need these special functions, but they
can be useful in complex cases. If you need them or if you're interested, please
read the complete documentation (either the PDF manual or the program's
help file).
Mastering
"Mastering", the second effects area aims at optimizing the audio material.
• Click on the "Mastering" button.
You will find the following effects modules here: "StereoFX", "Equalizer",
"Brilliance", "Sound Cloner", "Dynamics", "Multimax", "Energizer" and
"Chorus".
The functionality of the optimization effects is the same in principle: Adjust
the strength of the effect via the slider, switch the effect on and off to

Tutorial 21
www.magix.com
compare the original with the edited audio material and access the actual
operation console by clicking on the symbol in the bottom right-hand corner.
Object effects
If you combine the audio material from various sources, it's normally not
sensible to apply cleaning and mastering effects to all objects in the same
way. Tape recordings typically have other audio disturbances than LP
recordings. Therefore, there are two different ways you can use the effects:
Master effects and object effects.
The master effects are set centrally in the cleaning section. The settings made
here are applied to the entire sound, i.e. for all objects in the master track.
Each object can also have its own individual effect
settings. Click on "Object FX" on the object itself
in the master track.
The "Object FX" screen (object editor) opens in a
new dialog and displays additional effect devices.
These effects can be set separately for every
object in the master track.
The “Object FX” dialog also contains an echo/reverb device for adding
Surround Sound to individual objects, and in addition to the multi-band
compressor (“MultiMax”), a “simple” compressor is also included
(“Dynamics”).

22 Tutorial
www.magix.com
Cut out undesired passages
Now let's take a look at some special kinds of audio disturbances. A typical
example would be the noise of a microphone knocked against something by
mistake or even any kind of crackling, crashing, rustling, which can't be
removed satisfactorily with Spectral Cleaning, because it's too irregular.
These kinds of noises as well as longer undesired passages can be cut out
using the scissors tool in the left-hand corner of the track window.
• Select the scissor mouse mode.
The mouse pointer turns into a pair of scissors. If you
move it across the track, the playback marker moves with
it.
• Play the audio track and search for the section that
you want to cut out.
• Click before and after the section to cut at these
points.
This way, three separate objects are created on the track.
• Switch back to standard mode, select the object in the middle and delete
it by pressing the "Delete" key.

Tutorial 23
www.magix.com
A gap is created in the audio track. The problem is that where the disturbance
used to be there is now absolute silence, which is irritating, too. It's not
enough to simply cut out the audio disturbance, you have to add another
sound into the gap, even if it's only a quiet hissing that is audible throughout
the rest of the material, i.e. the room sound. Therefore, fill the gap with quiet
material that features only hissing, for example.
• Search for a suitable passage in a different section of the audio track that
is roughly as long as the gap. Cut the audio track before and after the
passage.
• Switch back to standard mode and select the passage. Copy it to the
clipboard (Ctrl + C or "Edit > Copy").
• Set the position line to the beginning of the gap and insert the passage
(Ctrl + V or "Edit > Insert").
• Move the bottom right handle on the inserted object to adjust its length to
the gap (It will latch into the cut edges).

24 Tutorial
www.magix.com
That way, the distortion is "patched". All of the cuts can be fine tuned
retroactively using the object handles to avoid crackling at the transitions.
• There are handles at the top left and right hand corners, which allow you
to create fade ins and outs.
• The handle at the top center is for adjusting the volume. If you pull it
downwards, the volume of the object is reduced.
• The handles at the bottom left and right corners adjust the object's
borders. You can fine tune your cuts by extending or contracting the
object.
Retouch short distortions such as cracks
Let's take a look at a quick and elegant way of retouching short distortions
such as cracks and clicks using a pen tool.
Note: You can't undo editing that you did with the "Draw wave shape" tool
(no "Undo" function). After selecting the pen tool, you can decide whether,
for safety purposes, you want to edit in a copy of the file or directly in the
original material.
• Search for a section in the material where you hear crackling and set the
play cursor to that position.

Tutorial 25
www.magix.com
• Zoom into that section so that you can see the details of the waveform
display. You can use the zoom button at the bottom right of the track
window.
• Take a close look. Can you see the crack? Look for a "mountain" that is flat
on top or exceeds its surroundings.

26 Tutorial
www.magix.com
• Select the "Draw wave shape" mode.
The mouse pointer turns into a pen that you can use to draw
directly into the waveform. If you click, the zoom level increases
automatically and you can draw.
It's about trying to turn the flat form a bit more into a peak and
moving it slightly towards the bottom.
This way, for example:

Tutorial 27
www.magix.com
The critical section should then look like this at the end:
If you play back the material now, the cracks have disappeared.
Export
After you have "cleaned up" the material, you can export your material: either
song by song as MP3 or WAV file or all songs of the track as audio CD, DVD,
or data disc.
Switch to the "Export" workspace: Only the functions in the bottom left-hand
corner of the screen are changed.
28 Tutorial
www.magix.com
If you haven't split each song on the track into a separate object, you will
require track markers to specify the beginning of every new piece. With the
help of the track marker assistant, you can control and change all track
beginnings. If you need any help with burning CDs, use the CD assistant.
To save the project click on the floppy disk icon.

If You Still Have Questions 29
www.magix.com
If You Still Have Questions Task wizard The task wizard is your information center for finding out more about MAGIX
Audio Cleaning Lab SE. Divided into various topics, the wizard supports you
during all the most important steps. Open this helpful feature via the "Tasks"
menu.
Info Box (immediate help) MAGIX Audio Cleaning Lab SE includes an Info Box where you can find
important information on the program. By clicking on one of the buttons or
areas of the interface, you can read more.
Program help file The program's help file contains the entire program documentation and other
information. Open the "Help" menu or press "F1" on the keyboard.
Press the "F1" key at any point and the help file will open with the relevant
help topic (context help). The main help page can be accessed via the "Help -
> Contents" menu item.
PDF manual Much like the help feature, the electronic PDF manual contains the entire
program documentation. You can find it under "Start -> Programs -> MAGIX
Audio Cleaning Lab SE" in the "Documentation" subfolder.
Have fun discovering your software!
The MAGIX team

30 More about MAGIX
www.magix.com
More about MAGIX MAGIX Online World
Well-connected: Products and services online from MAGIX
Discover the possibilities offered by the MAGIX Online World. Every MAGIX
product offers a direct and easy-to-use gateway to the world of online
multimedia:
• Present your photos, videos, and
music directly in your Online
Album or in worldwide Internet
communities.
• Find professional templates & content for enhancing your personal
projects.
• Design your own personalized website using professional Flash® design
with photos, videos, music & impressive animations.
• Order brilliant photo prints to be sent directly to your doorstep. It's quick,
easy, and well-priced.
Experience these and many more online services on www.magix.com
magix.info
Help and get help - Directly from within the program, you'll be able to access
magix.info, the new MAGIX Knowledge Database. You'll find answers to all
the most frequently asked questions about MAGIX products and multimedia
in general. Couldn't find an answer to your particular question? No problem –
just ask the question yourself!
You can access magix.info online at http://www.magix.info

More about MAGIX 31
www.magix.com
MAGIX Magazine
The MAGIX Magazine – well-informed & up-to-date:
• Digital trends
• Interesting websites
• Useful information about MAGIX products
You can find the MAGIX Magazine at www.magixmagazine.com.