Embed Size (px)
Citation preview

2000-LB. ATV WINCH
OWNER’S MANUAL
WARNING: Read carefully and understand all
INSTRUCTIONS before operating. Failure to follow the safety rules and other basic safety precautions may result in serious personal injury.
Item #999364

Page of 15 2
Thank you very much for choosing a NORTHERN TOOL + EQUIPMENT CO., INC. Product! For future reference, please complete the owner’s record below: Model: _______________ Purchase Date: _______________ Save the receipt, warranty and these instructions. It is important that you read the entire manual to become familiar with this product before you begin using it. This machine is designed for certain applications only. Northern Tool + Equipment cannot be responsible for issues arising from modification. We strongly recommend this machine is not modified and/or used for any application other than that for which it was designed. If you have any questions relative to a particular application, DO NOT use the machine until you have first contacted Northern Tool + Equipment to determine if it can or should be performed on the product. For technical questions please call 1-800-222-5381.
INTENDED USE This winch is equipped with a permanent magnet motor and is designed for intermittent-duty winching. The winch is not designed to be used in industrial or hoisting applications and the manufacturer does not warrant it to be suitable for such use. Freespool clutch is operated by a pull and turn knob which disengages the gearbox to allow the wire rope to be pulled out without using electric power. A tension plate presses wire rope to reduces backlash and snarling when pulling out the wire rope. Winch allows wide variety of mounting options.
TECHNICAL SPECIFICATIONS Item Description
Max. load 2000 lbs. (906kg) Motor 12V with 0.85 HP Wire rope 5/32" x 49' (4mm x 15m) Gear ratio 153:1
PACKING LIST This carton contains the following items. Please unpack carefully. Read all instructions before beginning.
Description Quantity Winch assembly with wire rope 1 Circuit assembly 1 Hand saver bar 1 Mounting Kit 1 Assembly and operation instructions 1

Page of 15 3
ROLLING LOAD CAPACITY
Slope 10%(6°) 20%(11°) 30%(17°) 100%(45°) Lbs 9804 6920 5154 2570 KG 4446 3138 2337 1165
Rating assume a 10% coefficient of friction. • A 10% slope is a rise of one foot in ten feet. Slope in approximate degrees is shown above. • All loads shown are for single-line operation. Double-line operation with optional pulley block
approximately doubles capacity of winch.
PERFORMANCE Wire Rope Layer Max. Pulling Lbs. Max. Pulling Kg.
1 2000 906 2 1630 740 3 1380 620 4 1190 540 5 1050 470 6 940 420
Load Speed Motor Current Amps
Lbs. Kg. Ft/min M/min 12V 24V 0 0 10.5 3.2 8 NA
500 227 9.2 2.8 30 NA
1000 454 7.5 2.3 60 NA
1500 680 5.9 1.8 90 NA
2000 906 4.2 1.3 118 NA
Based on first layer performance Dimensions:

Page of 15 4
GENERAL SAFETY RULES
WARNING: Read and understand all instructions. Failure to follow all instructions listed below may result in electric shock, fire and/or serious injury.
WARNING: The warnings, cautions, and instructions discussed in this instruction manual cannot cover all possible conditions or situations that could occur. It must be understood by the operator that common sense and caution are factors which cannot be built into this product, but must be supplied by the operator.
SAVE THESE INSTRUCTIONS
WORK AREA • Keep work area clean, free of clutter and well lit. Cluttered and dark work areas can cause
accidents. • Do not use your winch where there is a risk of causing a fire or an explosion; e.g. in the
presence of flammable liquids, gasses, or dust. Electrical components create sparks, which may ignite the dust or fumes.
• Keep children and bystanders away while operating a winch. Distractions can cause you to lose control, so visitors should remain at a safe distance from the work area.
• Be aware of all power lines, electrical circuits, water pipes and other mechanical hazards in your work area, particularly those hazards below the work surface hidden from the operator’s view that may be unintentionally contacted and may cause personal harm or property damage.
• Be alert of your surroundings. Using a winch in confined work areas may put you dangerously close to cutting tools and rotating parts.
•
PERSONAL SAFETY • Stay alert, watch what you are doing and use common sense when operating a winch. Do not
use a winch while you are tired or under the influence of drugs, alcohol or medication. A moment of inattention while operating winches may result in serious personal injury.
• Dress properly. Do not wear loose clothing, dangling objects, or jewelry. Keep your hair, clothing and gloves away from moving parts. Loose clothes, jewelry or long hair can be caught in moving parts. Air vents often cover moving parts and should be avoided.
• Use safety apparel and equipment. Use safety goggles or safety glasses with side shields which comply with current national standards, or when needed, a face shield. Use as dust mask in dusty work conditions. This applies to all persons in the work area. Also use non-skid safety shoes, hardhat, gloves, dust collection systems, and hearing protection when appropriate.
• Do not overreach. Keep proper footing and balance at all times. • Remove adjusting keys or wrenches before connecting to the power supply or turning on the
winch. A wrench or key that is left attached to a rotating part of the winch may result in personal injury.
• Your winch is a very powerful machine. If used unsafely or improperly, there is a possibility that property damage or personal injury could result.

Page of 15 5
WARNING: FOR HEAVY LOADS (TO KEEP THE WINCH FROM STALLING), USE A PULLY BLOCK TO REDUCE THE LOAD ON THE WIRE ROPE.
1. Maximum working load capacity is on the wire rope first layer closest to the drum. DO NOT
OVERLOAD. DO NOT ATTEMPT PROLONGED PULLS AT HEAVY LOADS. Overloads can damage the winch and/or the wire rope and create unsafe operating conditions. FOR LOADS OVER 1000 POUNDS (454KG), WE RECOMMEND THE USE OF THE OPTIONAL PULLEY BLOCK TO DOUBLE LINE THE WIRE ROPE (Figure 2). This reduces the load on the winch and the strain on the wire rope by approximately 50%. Attach hook to load bearing part. THE VEHICLE ENGINE SHOULD BE RUNNING DURING WINCH OPERATION. If considerable winching is performed with the engine off, the battery may be too weak to restart the engine.
2. AFTER READING AND UNDERSTANDING THIS MANUAL, LEARN TO USE YOUR WINCH. After installing the winch, practice using it when the need arises.
3. DO NOT “move” your vehicle to assist the winch in pulling the load. The combination of the winch and vehicle pulling together could overload the wire rope and the winch.
4. ALWAYS STAND CLEAR OF WIRE ROPE, HOOK AND WINCH. IN THE UNLIKELY EVENT OF ANY COMPONENT FAILURE, IT IS BEST TO BE OUT OF HARM’S WAY.
5. INSPECT WIRE ROPE AND EQUIPMENT REQUENTLY. A FRAYED WIRE ROPE WITH BROKEN STANDS SHOULD BE REPLACED IMMEDIATELY. Always replace wire rope with the manufacturer’s identical replacement part (see replacement parts list). Periodically check the winch installation to ensure that all bolts are tight.
6. USE HEAVY LEATHER GLOVES when handling wire rope. DO NOT LET WIRE ROPE SLIDE THROUGH YOUR HANDS EVEN WHEN WEARING GLOVES.
7. NEVER WINCH WITH LESS THAN 5 TURNS OF wire rope AROUND THE WINCH DRUM since the wire rope end fastener will NOT withstand a load.
8. KEEP CLEAR OF WINCH, TAUT WIRE ROPE AND HOOK WHEN OPERATING WINCH. Never put your finger through the hook. If your finger should become trapped in the hook, you could lose your finger. ALWAYS USE THE HANDSAVER BAR when guiding the wire rope in or out (Figure 3).

Page of 15 6
9. NEVER HOOK THE WIRE ROPE BACK ONTO ITSELF because you could damage the
wire rope. Use a nylon sling (Figure 4).
10. It is a good idea to lay a heavy blanket or jacket over the wire rope near the hook end when
pulling heavy loads (Figure 5). If a wire rope failure should occur, the cloth will act as a damper and help prevent the rope from whipping. NOTE: Figs. 5 and 6 are for illustration only; this model winch is for use with ATVs, not trucks or cars.
11. NEVER USE YOUR WINCH FOR LIFTING OR MOVING PEOPLE. 12. Your winch is not designed or intended for overload hoisting operations. 13. AVOID CONTINUOUS PULLS FROM EXTREME ANGLES as this will cause the wire rope to
pile up at one end or the drum. This can jam the wire rope in the winch, causing damage to the rope or the winch.

Page of 15 7
14. NEVER OBSCURE THE WARNING INSTRUCTION LABELS. 15. Always operate winch with unobstructed view of the winching operation. 16. Equipment such as tackle, hooks, pulley blocks, straps, etc. Should be sized to the winching
task and should be periodically inspected for damage that could reduce their strength. 17. NEVER RELEASE FREESPOOL CLUTCH WHEN THERE IS A LOAD ON THE WINCH. 18. STORE THE REMOTE PENDANT ASSEMBLY IN SAFE PLACE when not in use to prevent
use by children or other unauthorized persons. 19. ALWAYS UNPLUG THE REMOTE PENANT AND DISCONNECT WINCH POWER LEADS TO
BATTERY BEFORE WORKING IN OR AROUND THE FAIRLEAD OR WINCH DRUM so that the winch cannot be turned on accidentally.
20. When moving a load, slowly take up the wire rope slack until it becomes taut. Stop, recheck all winching connections. Be sure the hook is properly seated. If a nylon sling is used, check the attachment to the load.
21. When using your winch to move a load, place the vehicle transmission in neutral. Set vehicle parking brake and chock all wheels.
22. DO NOT USE THE WINCH TO HOLD LOADS IN PLACE. Use other means of securing loads such as tie down straps
23. USE ONLY FACTORY-APPROVED SWITCHES, REMOTE CONTROLS AND ACCESSORIES. USE of non-factory approved components may cause injury or property damage and could void your warranty.
24. DO NOT MACHINE OR WELD ANY PART OF THE WINCH. Such alterations may weaken the structural integrity of the winch and could void your warranty.
25. KEEP THE LOAD STEADY AND HAVE CONTROL AT ALL TIMES. Never allow a load to swing or move from side to side.
26. Use caution when pulling or lowering a load up and down a ramp or incline. Keep people, pets and property clear of the path of the load.
WARNING: DO NOT CONNECT WINCH TO A 110V AC HOUSE CURRENT OR 220V POWER SOURCE AS WINCH BURNOUT OR FATAL SHOCK MAY OCCUR
TOOL USE AND CARE

Page of 15 8
• Do not force the winch. Winches do a better and safer job when used in the manner for which they are designed. Plan your work, and use the correct winch for the job.
• Never use a winch with a malfunctioning switch. Any winch that cannot be controlled with the switch is dangerous and must be repaired by an authorized service representative before using.
• Disconnect battery leads from winch and place the switch in the locked or off position before servicing, adjusting, installing accessories or attachments, or storing. Such preventive safety measures reduce the risk of starting the winch accidentally.
• Store idle winches. When winch is not in use, store it in a dry, secure place out of the reach of children. Inspect winch for good working condition prior to storage and before re-use.
• Keep guards in place and in working order. • Never leave winch running unattended.
ASSEMBLY Correct installation of your winch is required for proper operation. Mounting kits are available for most popular vehicles.
Detailed Mounting instructions are provide with each mounting kit.
Read and follow directions carefully to ensure proper winch alignment and trouble free operation.
NOTICE: This winch must be mounted with the wire rope in the underwind direction. Improper mounting could damage your winch and void your warranty.
Step (1) Install mounting plate or structural support for winch. Step (2) Mount the winch to the mounting base plate or the mount that you have designed. Typical mount is to a flat surface capable of handing the load. The M8 ×1.25×35mm mounting bolts supplied are the correct length for use with up to a 1/4" (6.3mm).
CAUTION! Do not substitute any strength grade weaker than ISO grade 8.8. Disconnect the vehicle battery leads.
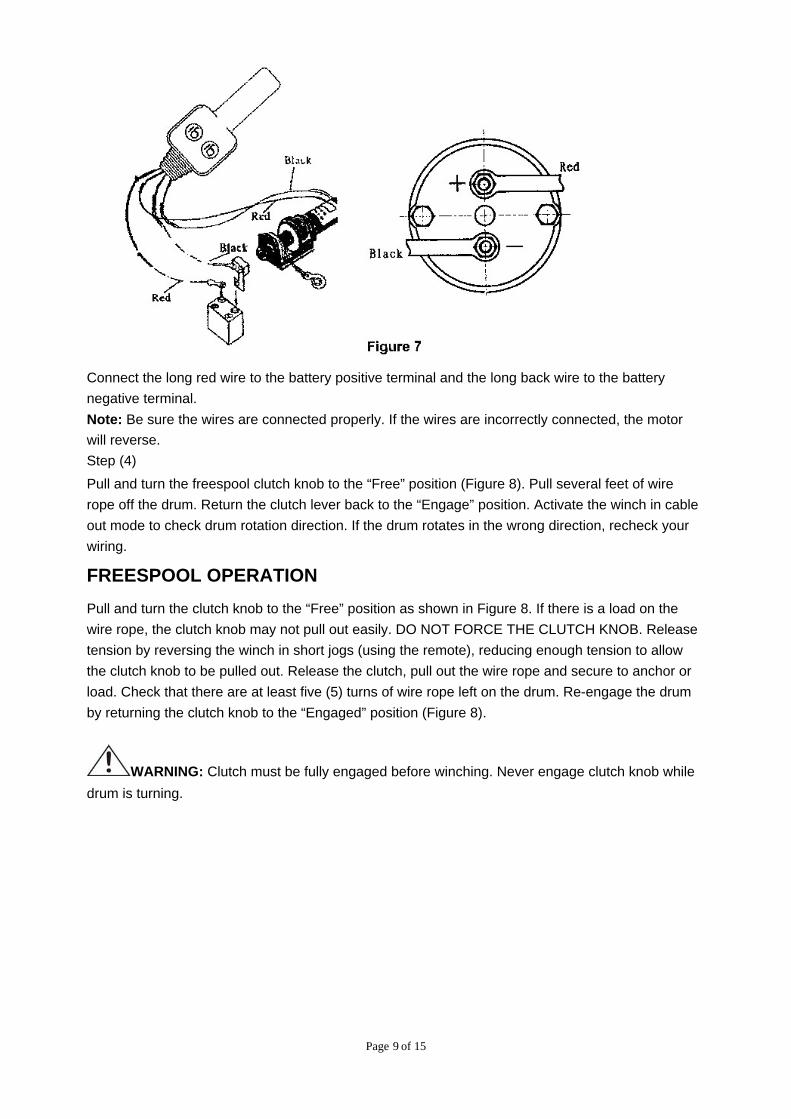
WARNING! Batteries contain gasses which are flammable and explosive. Wear eye protection during installation and remove all metal jewelry. Do not lean over battery while making connections. Step (3) Refer to Figure 7 for winching wiring diagram. Connect the short red wire to the motor positive terminal and the short black wire to the motor negative terminal.
Page of 15 9
Connect the long red wire to the battery positive terminal and the long back wire to the battery negative terminal. Note: Be sure the wires are connected properly. If the wires are incorrectly connected, the motor will reverse. Step (4) Pull and turn the freespool clutch knob to the “Free” position (Figure 8). Pull several feet of wire rope off the drum. Return the clutch lever back to the “Engage” position. Activate the winch in cable out mode to check drum rotation direction. If the drum rotates in the wrong direction, recheck your wiring.
FREESPOOL OPERATION
Pull and turn the clutch knob to the “Free” position as shown in Figure 8. If there is a load on the wire rope, the clutch knob may not pull out easily. DO NOT FORCE THE CLUTCH KNOB. Release tension by reversing the winch in short jogs (using the remote), reducing enough tension to allow the clutch knob to be pulled out. Release the clutch, pull out the wire rope and secure to anchor or load. Check that there are at least five (5) turns of wire rope left on the drum. Re-engage the drum by returning the clutch knob to the “Engaged” position (Figure 8).
WARNING: Clutch must be fully engaged before winching. Never engage clutch knob while drum is turning.

Page of 15 10
EXTENDING THE LIFE OF YOUR WINCH 1. KEEP THE WIRE ROPE TIGHTLY WOUND ON THE DRUM. Do not allow the wire rope to
become loosely wound. A loosely wound spool allows a wire rope under load to work its way down into the layers of wire rope on the drum. When this happens, the wire rope may become wedged within the body of the windings damaging the wire rope. To prevent this problem, keep the wire rope tightly and evenly wound on the drum at all times. A good practice is to rewind the wire rope under tension after each use. One way to do this is to attach the hook to a stationary object at the top of a gradual incline and winch your vehicle up the incline.
2. DO NOT ALLOVE WINCH MOTOR TO OVERHEAT. Remember, the winch is for intermittent use only. During long or heavy pulls, the motor will get hot. At 1600 Ibs. (727kgs) allow motor to cool after 20 seconds of “ON” time. At loads less than 700 Ibs. (318kgs) allow to cool after 2 minutes of “ON” time. KEEP THE ENGINE RUNNING TO RECHARGE THE BATTERY during this break.
3. USE PULLEY BLOCK FOR HEAVY LOADS. To maximize winch and wire rope life, use a pulley block to double-line heavier loads (Figure 2).
4. The pull required to start a load moving is often much greater than the pull required to keep it moving. AVOID FREQUENT STOPS AND STARTS during pull.
5. PREVENT KINKS BEFORE THEY OCCUR (Figure 9).

Page of 15 11
a) This is the start of kink. At this time, the wire rope should be straightened b) The wire rope was pulled and the loop has tightened to a kink. The wire rope is now permanently damaged and must be replaced. c) Kinking causes the wire strands under the greatest tension to break and thus reduces the load capacity of the wire rope. The wire rope must be replaced. REPLACING THE WIRE ROPE Never substitute a heavier or lighter wire rope. Never use rope made to any material other than wire. Always replace damaged wire rope with manufacturer’s identical replacement part (see Replacement Parts List). Pass attaching end of wire rope through the fairlead (if quipped) and attach it to the drum. When inserting the wire rope into the drum, insert it into the correct end of the hole provided (Fig 10). Tighten the set screw securely.
MAINTENANCE
WARNING: Make sure this winch is disconnected from its power source before attempting any maintenance, cleaning, or inspection. • Maintain your winch. It is recommended that the general condition of any winch be examined
before it is used. Keep your winches in good repair by adopting a program of conscientious repair and maintenance in accordance with the recommended procedures found in this manual. If any abnormal vibrations or noise occurs, turn the winch off immediately and have the problem corrected before further use. Have necessary repairs made by qualified service personnel.
• Cleaning. Use only soap and a damp cloth to clean your tools. Many household cleaners are harmful to plastics and other insulation. Never let liquid get inside a tool.

Page of 15 12
• Lubrication: The gearbox and drum bearing are permanently lubricated. If lubrication is necessary after repair or disassembly, only use Shell Alvenia EP2 or similar lubricant.
• Periodically check tightness of mounting bolts and electrical connections. Remove any dirt or corrosion that may have accumulated on the electric connections. Repair should be done by Authorized Repair Centers only. Do not attempt to disassemble the gearbox. Disassembly will void warranty.
TROUBLESHOOTING CHART
If a problem arises, contact your nearest authorized service center.
Symptom Possible Causes Corrective Action
Motor will not operate or runs in one direction only
1. Switch inoperative 2. Broken wires or bad connection 3. Damaged motor
1. Replace switch 2. Check for poor connections3. Replace or repair motor
Motor runs extremely hot
1. Long period of operation 2. Damaged motor
1. Allow to cool 2. Replace or repair motor
Motor runs but with insufficient power or line
speed
1. Weak battery 2. Battery to winch wire too long 3. Poor battery connection 4. Poor ground 5. Damaged motor
1. Recharge or replace battery. Check charging system 2. Keep winch within distance allowed by lead wires 3. Check battery terminals for corrosion. Clean as required 4.Check and clean connections 5. Repair or replace motor
Motor runs but drum doesn’t turn
1. Clutch not engaged
1. Engage clutch
Winch runs backwards
1. Motor wires reversed 2. Switch wires reversed 3. Switch installed incorrectly
1. Rechecking wiring 2. Rechecking wiring 3. Check switch installation
Winch will not hold load 1. Excessive load 1. Reduce load or double line

Page of 15 13
DIAGRAM & PARTS LIST

Page of 15 14
No. Description Quantity 1 Sator 1 2 Stationary Gear Housing Assembly 1 3 T-Series Carrier Assembly 1 4 T-Series Rotator Gear 1 5 Drum Support Plate 1 6 M4×0.7×12ST Panhead Screw 1 7 Drum Support Bushing 1 8 Splined Shaft 1 9 Spring 1 10 Drum Assembly 1 11 M5×0.8×0.8SetScrew 1 12 T-Series Bushing 1 13 Thick Flat Washer 1 14 M5 Hex Flanged Nut 2 15 T-Series Baseplate Assembly 1 16 Tension Plate 1 17 T-Series F/W Knob Assembly 1 18 Rotor 1 19 M6×1×16ST Hex Skt FH Screw 2 20 M5×0.8×12STHex Skt FH Screw 1 21 Hex Head Bolt 1 22 Flat Washer 1 23 Spring Washer 1 24 Hex Head Nut 1 25 Handsaver Bar 1 26 5/32" ×49' Wire Rope and Hook Assembly 1 27 Button 1 28 Switch Cover(up) 1 SPARE PART LIST (CONT.)
29 Switch 1 30 Tapping Screw ST 2.9×16 1 31 Switch Cover (down) 1 32 Tapping Screw ST 2.9×30 1
For replacement parts and technical questions, please call 1-800-222-5381.

Page of 15 15
WARRANTY One-Year Limited Warranty
Northern Tool + Equipment Co., Inc.
2800 Southcross Drive West P.O. Box 1499 Burnsville, MN 55337-0499
Made in China