Embed Size (px)
Citation preview
2004 ENGINE PERFORMANCE
PGM-FI System - TSX
COMPONENT LOCATION INDEX
Fig. 1: Locating PGM-FI System Components (1 Of 3)
2004 Acura TSX
2004 ENGINE PERFORMANCE PGM-FI System - TSX
2004 Acura TSX
2004 ENGINE PERFORMANCE PGM-FI System - TSX
Wednesday, March 12, 2008 2:21:50 AM Page 1 Wednesday, March 12, 2008 2:29:10 AM Page 1
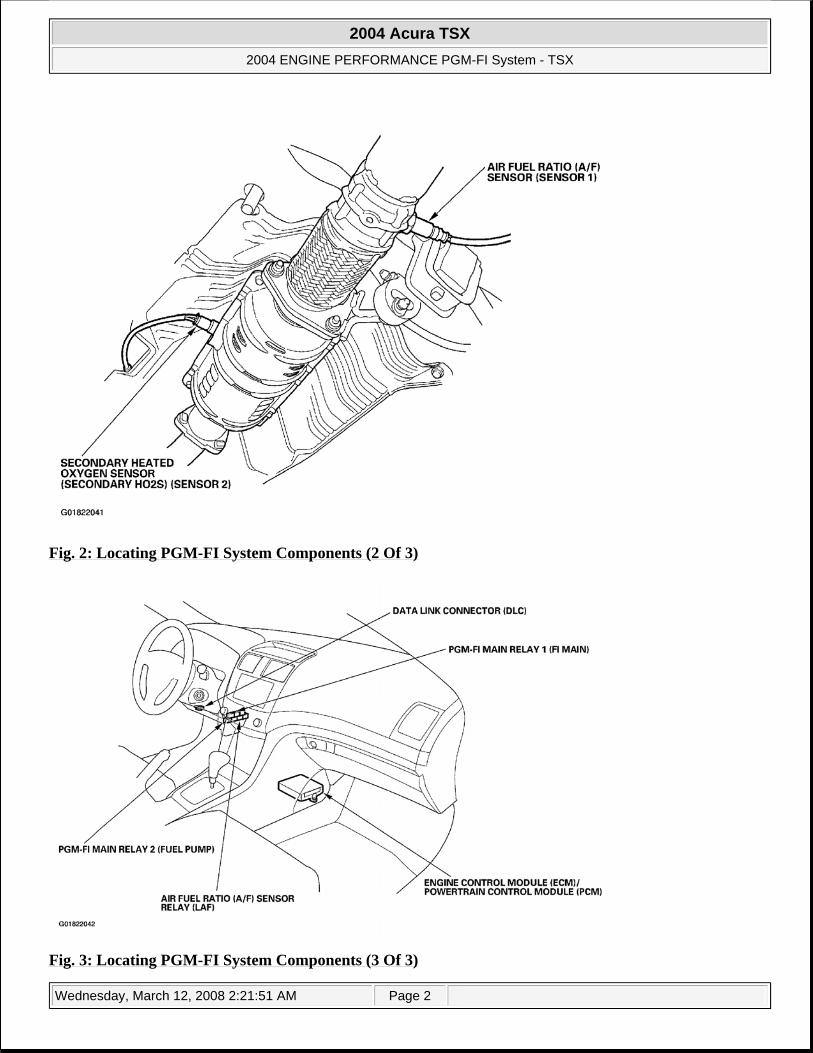
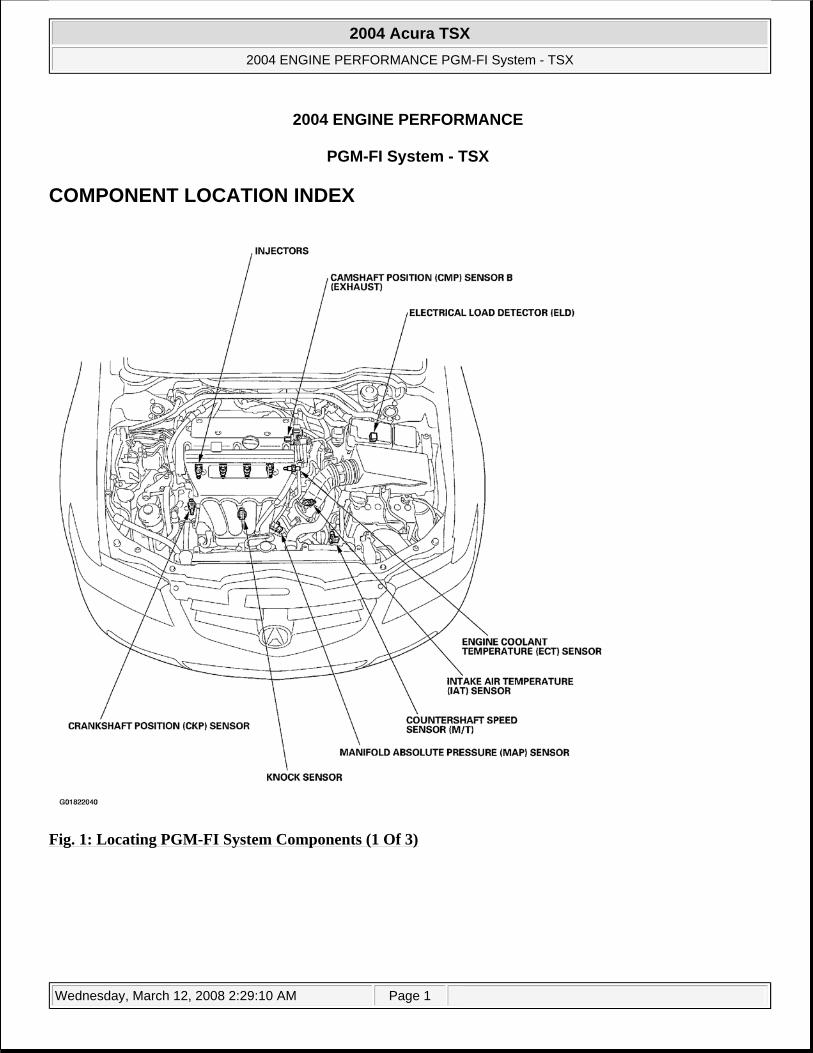
Fig. 2: Locating PGM-FI System Components (2 Of 3)
Fig. 3: Locating PGM-FI System Components (3 Of 3)
2004 Acura TSX
2004 ENGINE PERFORMANCE PGM-FI System - TSX
Wednesday, March 12, 2008 2:21:51 AM Page 2
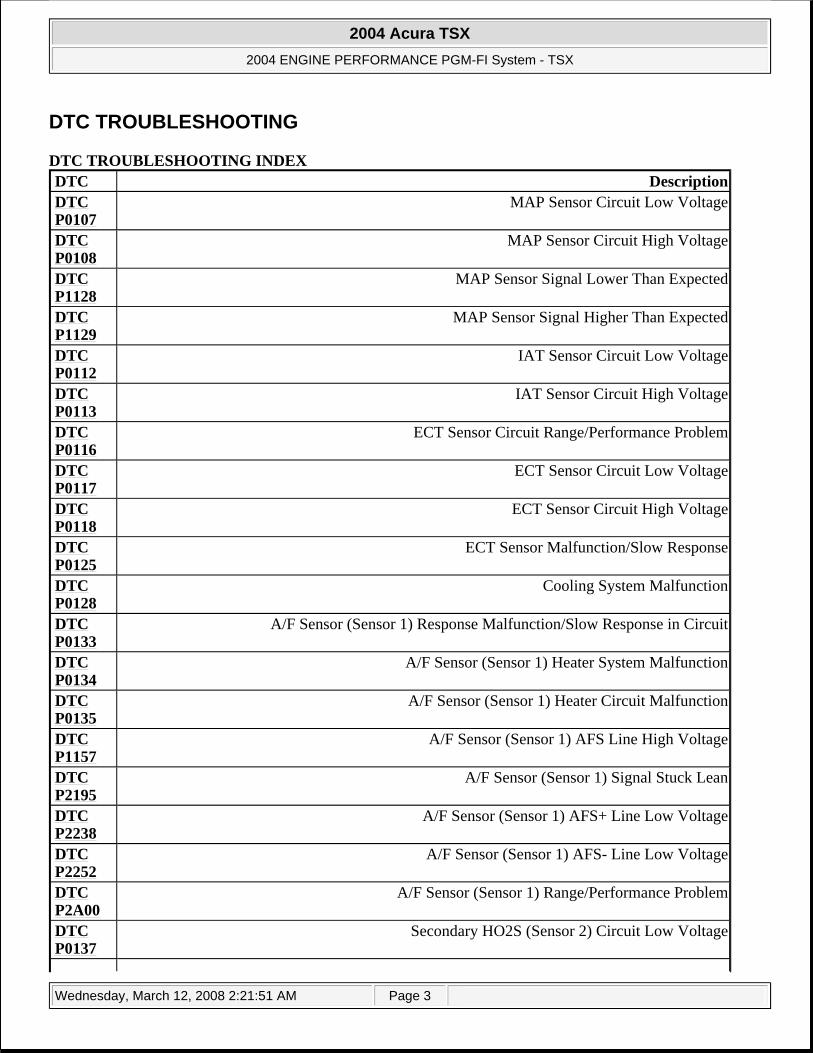
DTC TROUBLESHOOTING
DTC TROUBLESHOOTING INDEX DTC DescriptionDTC P0107
MAP Sensor Circuit Low Voltage
DTC P0108
MAP Sensor Circuit High Voltage
DTC P1128
MAP Sensor Signal Lower Than Expected
DTC P1129
MAP Sensor Signal Higher Than Expected
DTC P0112
IAT Sensor Circuit Low Voltage
DTC P0113
IAT Sensor Circuit High Voltage
DTC P0116
ECT Sensor Circuit Range/Performance Problem
DTC P0117
ECT Sensor Circuit Low Voltage
DTC P0118
ECT Sensor Circuit High Voltage
DTC P0125
ECT Sensor Malfunction/Slow Response
DTC P0128
Cooling System Malfunction
DTC P0133
A/F Sensor (Sensor 1) Response Malfunction/Slow Response in Circuit
DTC P0134
A/F Sensor (Sensor 1) Heater System Malfunction
DTC P0135
A/F Sensor (Sensor 1) Heater Circuit Malfunction
DTC P1157
A/F Sensor (Sensor 1) AFS Line High Voltage
DTC P2195
A/F Sensor (Sensor 1) Signal Stuck Lean
DTC P2238
A/F Sensor (Sensor 1) AFS+ Line Low Voltage
DTC P2252
A/F Sensor (Sensor 1) AFS- Line Low Voltage
DTC P2A00
A/F Sensor (Sensor 1) Range/Performance Problem
DTC P0137
Secondary HO2S (Sensor 2) Circuit Low Voltage
2004 Acura TSX
2004 ENGINE PERFORMANCE PGM-FI System - TSX
Wednesday, March 12, 2008 2:21:51 AM Page 3
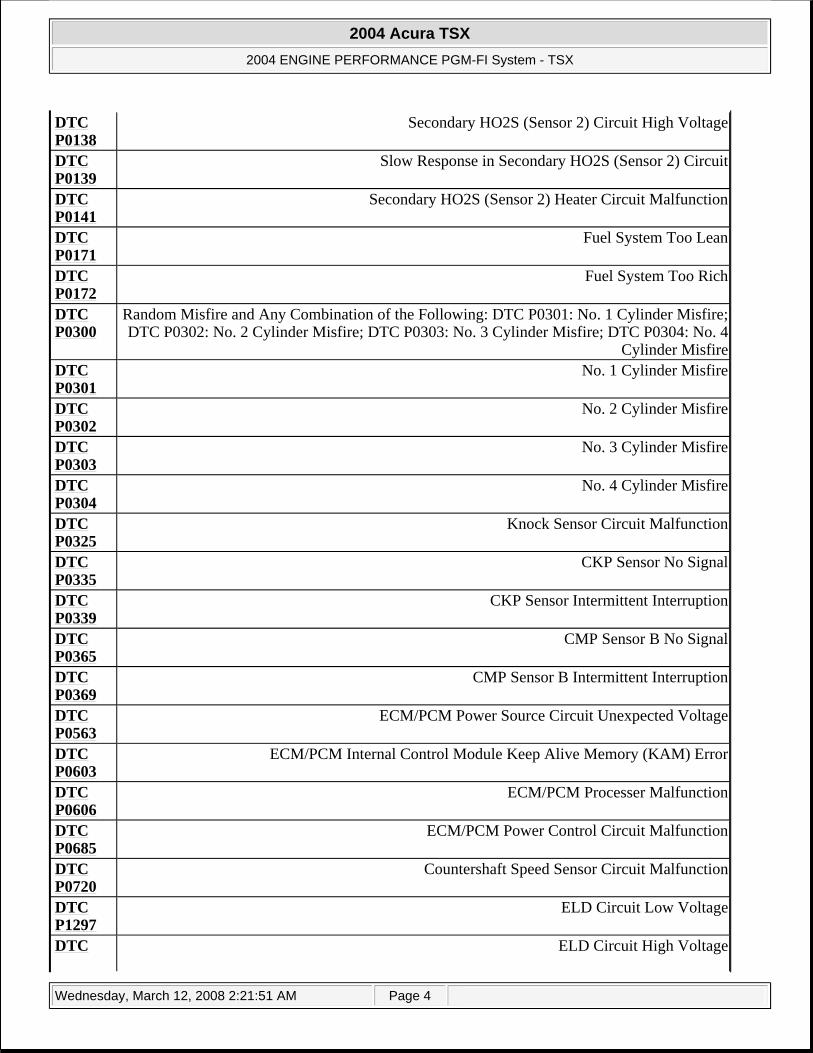
DTC P0138
Secondary HO2S (Sensor 2) Circuit High Voltage
DTC P0139
Slow Response in Secondary HO2S (Sensor 2) Circuit
DTC P0141
Secondary HO2S (Sensor 2) Heater Circuit Malfunction
DTC P0171
Fuel System Too Lean
DTC P0172
Fuel System Too Rich
DTC P0300
Random Misfire and Any Combination of the Following: DTC P0301: No. 1 Cylinder Misfire; DTC P0302: No. 2 Cylinder Misfire; DTC P0303: No. 3 Cylinder Misfire; DTC P0304: No. 4
Cylinder MisfireDTC P0301
No. 1 Cylinder Misfire
DTC P0302
No. 2 Cylinder Misfire
DTC P0303
No. 3 Cylinder Misfire
DTC P0304
No. 4 Cylinder Misfire
DTC P0325
Knock Sensor Circuit Malfunction
DTC P0335
CKP Sensor No Signal
DTC P0339
CKP Sensor Intermittent Interruption
DTC P0365
CMP Sensor B No Signal
DTC P0369
CMP Sensor B Intermittent Interruption
DTC P0563
ECM/PCM Power Source Circuit Unexpected Voltage
DTC P0603
ECM/PCM Internal Control Module Keep Alive Memory (KAM) Error
DTC P0606
ECM/PCM Processer Malfunction
DTC P0685
ECM/PCM Power Control Circuit Malfunction
DTC P0720
Countershaft Speed Sensor Circuit Malfunction
DTC P1297
ELD Circuit Low Voltage
DTC ELD Circuit High Voltage
2004 Acura TSX
2004 ENGINE PERFORMANCE PGM-FI System - TSX
Wednesday, March 12, 2008 2:21:51 AM Page 4

DTC P0107: MAP SENSOR CIRCUIT LOW VOLTAGE
1. Turn the ignition switch ON (II). 2. Check the MAP SENSOR in the DATA LIST with the HDS.
Is about 3 kPa (26 mm Hg, 1.0 in. Hg), or 0.23 V or less indicated? YES: Go to step 3. NO: Intermittent failure, system is OK at this time. Check for poor connections or loose terminals at the MAP sensor and the ECM/PCM.
3. Turn the ignition switch OFF. 4. Disconnect the MAP sensor 3P connector. 5. Turn the ignition switch ON (II). 6. Check the MAP SENSOR in the DATA LIST with the HDS.
Is about 3 kPa (26 mm Hg, 1.0 in. Hg), or 0.23 V or less indicated? YES: Go to step 9 . NO: Go to step 7.
7. Measure voltage between MAP sensor 3P connector terminals No. 1 and No. 3. Is there about 5 V?
YES: Go to step 13 . NO: Go to step 8.
P1298DTC P2227
BARO Sensor Range/Performance Problem
DTC P2228
BARO Sensor Circuit Low Voltage
DTC P2229
BARO Sensor Circuit High Voltage
DTC U0073
FCAN Malfunction (Bus-Off)
DTC U0122
FCAN Malfunction (VSA - ECM/PCM)
DTC U0155
FCAN Malfunction (Gauge Control Module - ECM/PCM)
2004 Acura TSX
2004 ENGINE PERFORMANCE PGM-FI System - TSX
Wednesday, March 12, 2008 2:21:51 AM Page 5
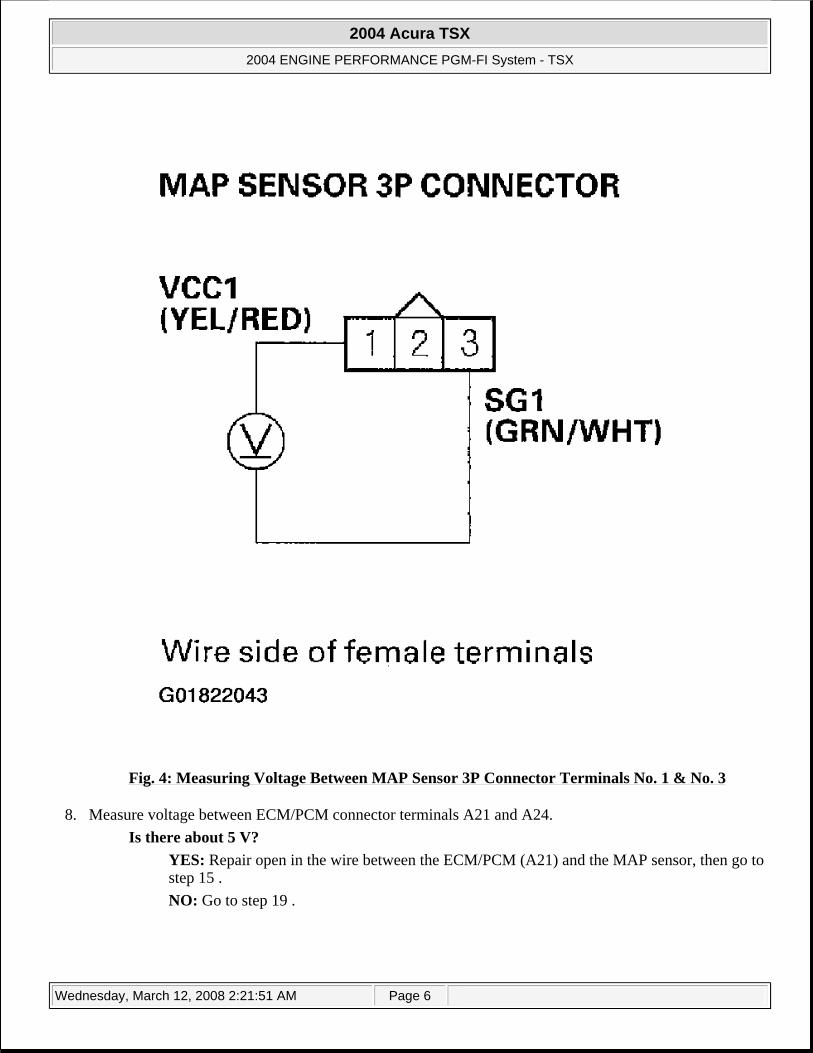
Fig. 4: Measuring Voltage Between MAP Sensor 3P Connector Terminals No. 1 & No. 3
8. Measure voltage between ECM/PCM connector terminals A21 and A24. Is there about 5 V?
YES: Repair open in the wire between the ECM/PCM (A21) and the MAP sensor, then go to step 15 . NO: Go to step 19 .
2004 Acura TSX
2004 ENGINE PERFORMANCE PGM-FI System - TSX
Wednesday, March 12, 2008 2:21:51 AM Page 6
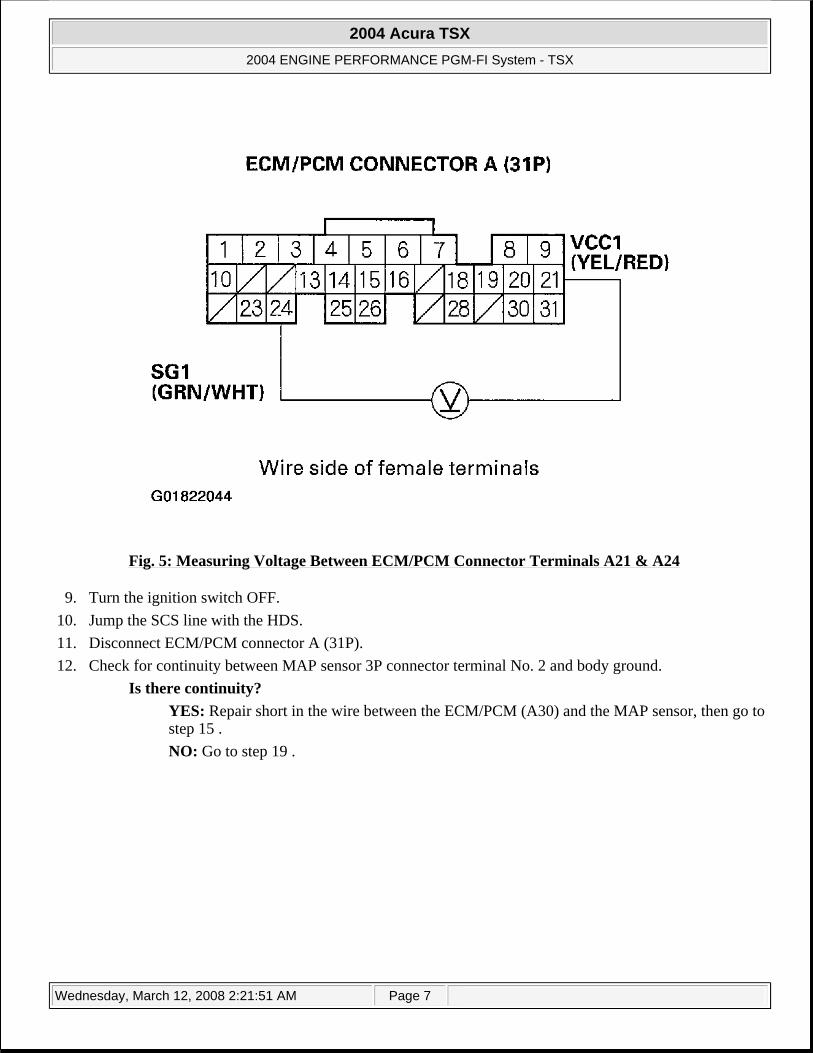
Fig. 5: Measuring Voltage Between ECM/PCM Connector Terminals A21 & A24
9. Turn the ignition switch OFF. 10. Jump the SCS line with the HDS. 11. Disconnect ECM/PCM connector A (31P). 12. Check for continuity between MAP sensor 3P connector terminal No. 2 and body ground.
Is there continuity? YES: Repair short in the wire between the ECM/PCM (A30) and the MAP sensor, then go to step 15 . NO: Go to step 19 .
2004 Acura TSX
2004 ENGINE PERFORMANCE PGM-FI System - TSX
Wednesday, March 12, 2008 2:21:51 AM Page 7
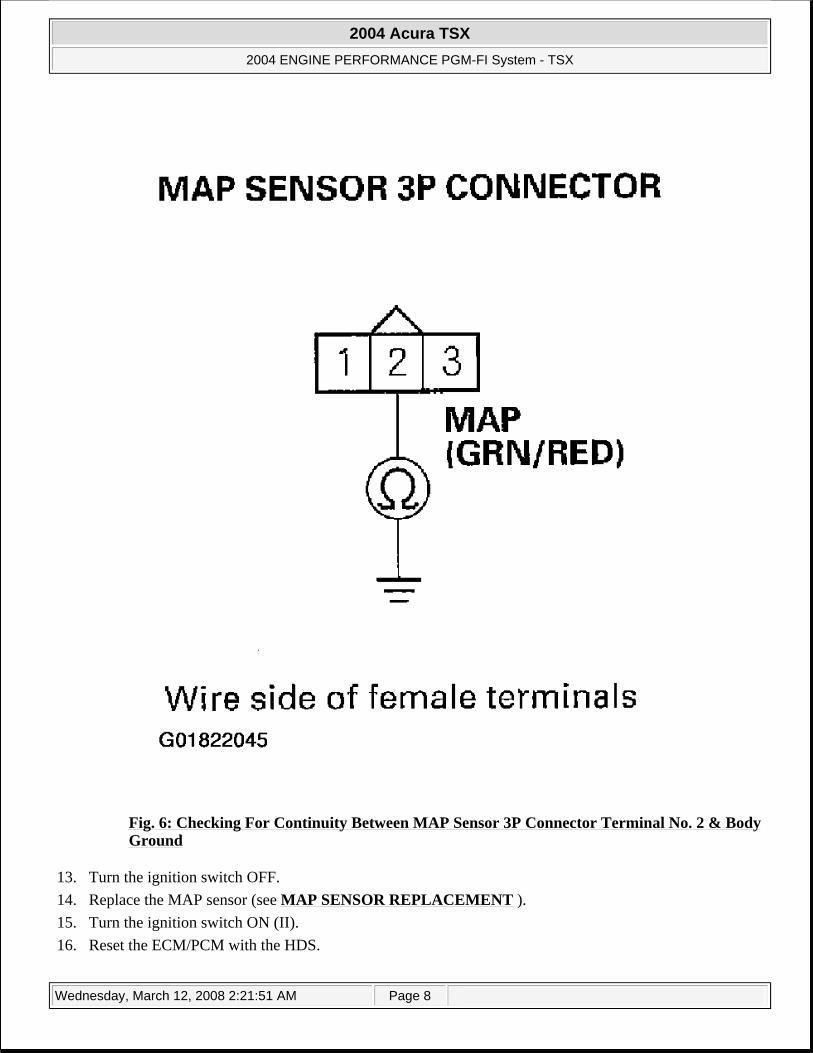
Fig. 6: Checking For Continuity Between MAP Sensor 3P Connector Terminal No. 2 & Body Ground
13. Turn the ignition switch OFF. 14. Replace the MAP sensor (see MAP SENSOR REPLACEMENT ). 15. Turn the ignition switch ON (II). 16. Reset the ECM/PCM with the HDS.
2004 Acura TSX
2004 ENGINE PERFORMANCE PGM-FI System - TSX
Wednesday, March 12, 2008 2:21:51 AM Page 8

17. Do the ECM/PCM idle learn procedure (see ECM/PCM IDLE LEARN PROCEDURE ). 18. Check for Temporary DTCs or DTCs in the DTCs MENU with the HDS.
Are any Temporary DTCs or DTCs indicated? YES: If DTC P0107 is indicated, check for poor connections or loose terminals at the MAP sensor and the ECM/PCM, then go to step 1 . If any other Temporary DTCs or DTCs are indicated, go to the indicated DTC troubleshooting. NO: Troubleshooting is complete.
19. Update the ECM/PCM if it does not have the latest software, or substitute a known-good ECM/PCM (see HOW TO SUBSTITUTE THE ECM/PCM ).
20. Check for Temporary DTCs or DTCs in the DTCs MENU with the HDS. Are any Temporary DTCs or DTCs indicated?
YES: If DTC P0107 is indicated, check for poor connections or loose terminals at the MAP sensor and the ECM/PCM, then go to step 1 . If any other Temporary DTCs or DTCs are indicated, go to the indicated DTC troubleshooting. NO: If the ECM/PCM was updated, troubleshooting is complete. If the ECM/PCM was substituted, replace the original ECM/PCM (see HOW TO REMOVE THE ECM/PCM FOR TESTING ).
DTC P0108: MAP SENSOR CIRCUIT HIGH VOLTAGE
1. Turn the ignition switch ON (II). 2. Check the MAP SENSOR in the DATA LIST with the HDS.
Is about 160 kPa (1,197 mm Hg, 47.1 in. Hg), 4.49 V or more indicated? YES: Go to step 3. NO: Intermittent failure, system is OK at this time. Check for poor connections or loose terminals at the MAP sensor and the ECM/PCM.
3. Turn the ignition switch OFF. 4. Disconnect the MAP sensor 3P connector. 5. Connect MAP sensor 3P connector terminals No. 2 and No. 3 with a jumper wire.
2004 Acura TSX
2004 ENGINE PERFORMANCE PGM-FI System - TSX
Wednesday, March 12, 2008 2:21:51 AM Page 9
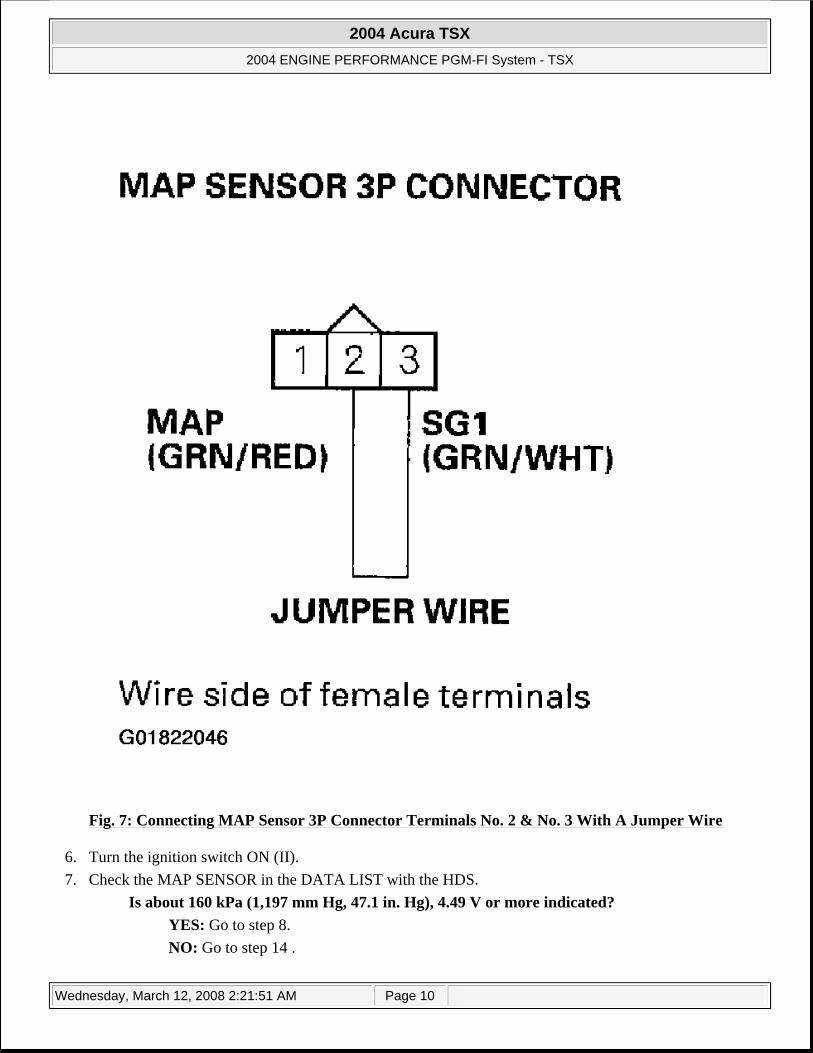
Fig. 7: Connecting MAP Sensor 3P Connector Terminals No. 2 & No. 3 With A Jumper Wire
6. Turn the ignition switch ON (II). 7. Check the MAP SENSOR in the DATA LIST with the HDS.
Is about 160 kPa (1,197 mm Hg, 47.1 in. Hg), 4.49 V or more indicated? YES: Go to step 8. NO: Go to step 14 .
2004 Acura TSX
2004 ENGINE PERFORMANCE PGM-FI System - TSX
Wednesday, March 12, 2008 2:21:51 AM Page 10

8. Remove the jumper wire. 9. Measure voltage between MAP sensor 3P connector terminals No. 1 and No. 3.
Is there about 5 V? YES: Go to step 10. NO: Repair open in the wire between the ECM/PCM (A24) and the MAP sensor, then go to step 16 .
Fig. 8: Measuring Voltage Between MAP Sensor 3P Connector Terminals No. 1 & No. 3
2004 Acura TSX
2004 ENGINE PERFORMANCE PGM-FI System - TSX
Wednesday, March 12, 2008 2:21:51 AM Page 11
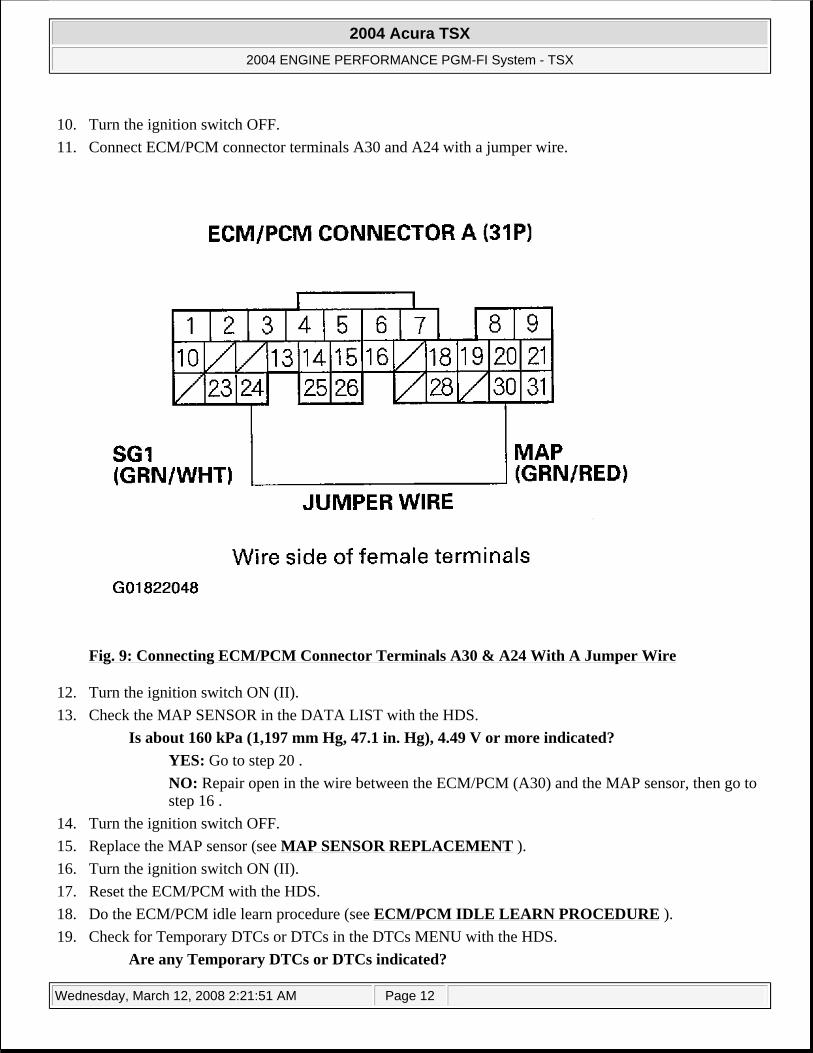
10. Turn the ignition switch OFF. 11. Connect ECM/PCM connector terminals A30 and A24 with a jumper wire.
Fig. 9: Connecting ECM/PCM Connector Terminals A30 & A24 With A Jumper Wire
12. Turn the ignition switch ON (II). 13. Check the MAP SENSOR in the DATA LIST with the HDS.
Is about 160 kPa (1,197 mm Hg, 47.1 in. Hg), 4.49 V or more indicated? YES: Go to step 20 . NO: Repair open in the wire between the ECM/PCM (A30) and the MAP sensor, then go to step 16 .
14. Turn the ignition switch OFF. 15. Replace the MAP sensor (see MAP SENSOR REPLACEMENT ). 16. Turn the ignition switch ON (II). 17. Reset the ECM/PCM with the HDS. 18. Do the ECM/PCM idle learn procedure (see ECM/PCM IDLE LEARN PROCEDURE ). 19. Check for Temporary DTCs or DTCs in the DTCs MENU with the HDS.
Are any Temporary DTCs or DTCs indicated?
2004 Acura TSX
2004 ENGINE PERFORMANCE PGM-FI System - TSX
Wednesday, March 12, 2008 2:21:51 AM Page 12
YES: If DTC P0108 is indicated, check for poor connections or loose terminals at the MAP sensor and the ECM/PCM, then go to step 1 . If any other Temporary DTCs or DTCs are indicated, go to the indicated DTC troubleshooting. NO: Troubleshooting is complete.
20. Update the ECM/PCM if it does not have the latest software, or substitute a known-good ECM/PCM (see HOW TO SUBSTITUTE THE ECM/PCM ).
21. Check for Temporary DTCs or DTCs in the DTCs MENU with the HDS. Are any Temporary DTCs or DTCs indicated?
YES: If DTC P0108 is indicated, check for poor connections or loose terminals at the MAP sensor and the ECM/PCM, then go to step 1 . If any other Temporary DTCs or DTCs are indicated, go to the indicated DTC troubleshooting. NO: If the ECM/PCM was updated, troubleshooting is complete. If the ECM/PCM was substituted, replace the original ECM/PCM (see HOW TO REMOVE THE ECM/PCM FOR TESTING ).
DTC P1128: MAP SENSOR SIGNAL LOWER THAN EXPECTED
1. Turn the ignition switch ON (II). 2. Check the MAP SENSOR in the DATA LIST with the HDS.
Is less than 54.1 kPa (406 mm Hg, 16.0 in. Hg) or 1.61 V held for more than 5 seconds? YES: Go to step 7 . NO: Go to step 3.
3. Clear the DTC with the HDS. 4. Start the engine. Hold the engine speed at 3,000 RPM with no load (in Park or neutral) until the radiator
fan comes on, then let it idle. 5. Test-drive under the following conditions:
Engine coolant temperature more than 158°F (70°C) Engine speed between 1,400 and 6,500 RPM A/T in D position (M/T in 3rd gear) Vehicle speed accelerated from 16 MPH (25 km/h) to 31 MPH (50 km/h) under half throttle
6. Monitor the OBD STATUS for DTC P1128 in the DTCs MENU with the HDS. Does the screen indicate FAILED?
YES: Go to step 7. NO: If the screen indicates PASSED, intermittent failure, system is OK at this time. If the screen indicates NOT COMPLETED, go to step 4 and recheck.
7. Turn the ignition switch OFF. 8. Replace the MAP sensor (see MAP SENSOR REPLACEMENT ). 9. Turn the ignition switch ON (II).
10. Reset the ECM/PCM with the HDS. 11. Do the ECM/PCM idle learn procedure (see ECM/PCM IDLE LEARN PROCEDURE ).
2004 Acura TSX
2004 ENGINE PERFORMANCE PGM-FI System - TSX
Wednesday, March 12, 2008 2:21:51 AM Page 13
12. Start the engine. Hold the engine speed at 3,000 RPM with no load (in Park or neutral) until the radiator fan comes on, then let it idle.
13. Test-drive under the following conditions: Engine coolant temperature more than 158°F (70°C) Engine speed between 1,400 and 6,500 RPM A/T in D position (M/T in 3rd gear) Vehicle speed accelerated from 16 MPH (25 km/h) to 31 MPH (50 km/h) under half throttle
14. Check for Temporary DTCs or DTCs in the DTCs MENU with the HDS. Are any Temporary DTCs or DTCs indicated?
YES: If DTC P1128 is indicated, check for poor connections or loose terminals at the MAP sensor and the ECM/PCM, then go to step 1 . If any other Temporary DTCs or DTCs are indicated, go to the indicated DTC troubleshooting. NO: Go to step 15.
15. Monitor the OBD STATUS for DTC P1128 in the DTCs MENU with the HDS. Does the screen indicate PASSED?
YES: Troubleshooting is complete. NO: If the screen indicates FAILED, check for poor connections or loose terminals at the MAP sensor and the ECM/PCM, then go to step 1 . If the screen indicates NOT COMPLETED, go to step 12 and recheck.
DTC P1129: MAP SENSOR SIGNAL HIGHER THAN EXPECTED
1. Check for vacuum leaks in these parts: PCV valve PCV hose EVAP canister purge valve Throttle body Brake booster hose
Are the parts OK? YES: Go to step 2. NO: Repair or replace leaking parts, then go to step 9 .
2. Start the engine. Hold the engine speed at 3,000 RPM with no load (in Park or neutral) until the radiator fan comes on, then let it idle.
3. Check the MAP SENSOR in the DATA LIST with the HDS. Is more than 36.9 kPa (277 mm Hg, 11.0 in. Hg) or 1.1 V held for more than for 5 seconds?
YES: Go to step 7 . NO: Go to step 4.
4. Clear the DTC with the HDS. 5. Test-drive under the following conditions:
Engine coolant temperature more than 158°F (70°C)
2004 Acura TSX
2004 ENGINE PERFORMANCE PGM-FI System - TSX
Wednesday, March 12, 2008 2:21:51 AM Page 14
Engine speed between 1,400 and 6,500 RPM A/T in D position (M/T in 5th gear) Vehicle speed decelerated from more than 50 MPH (80 km/h) with the throttle fully closed for at least 5 seconds
6. Monitor the OBD STATUS for DTC P1129 in the DTCs MENU with the HDS. Does the screen indicate FAILED?
YES: Go to step 7. NO: If the screen indicates PASSED, intermittent failure, system is OK at this time. If the screen indicates NOT COMPLETED, go to step 5 and recheck.
7. Turn the ignition switch OFF. 8. Replace the MAP sensor (see MAP SENSOR REPLACEMENT ). 9. Turn the ignition switch ON (II).
10. Reset the ECM/PCM with the HDS. 11. Do the ECM/PCM idle learn procedure (see ECM/PCM IDLE LEARN PROCEDURE ). 12. Start the engine. Hold the engine speed at 3,000 RPM with no load (in Park or neutral) until the radiator
fan comes on, then let it idle. 13. Test-drive under the following conditions:
Engine coolant temperature more than 158°F (70°C) Engine speed between 1,400 and 6,500 RPM A/T in D position (M/T in 5th gear) Vehicle speed decelerated from more than 50 MPH (80 km/h) with the throttle fully closed for at least 5 seconds
14. Check for Temporary DTCs or DTC in the DTCs MENU with the HDS. Are any Temporary DTCs or DTCs indicated?
YES: If DTC P1129 is indicated, check for poor connections or loose terminals at the MAP sensor and the ECM/PCM, then go to step 1 . If any other Temporary DTCs or DTCs are indicated, go to the indicated DTC troubleshooting. NO: Go to step 15.
15. Monitor the OBD STATUS for DTC P1129 in the DTCs MENU with the HDS. Does the screen indicate PASSED?
YES: Troubleshooting is complete. NO: If the screen indicates FAILED, check for poor connections or loose terminals at the MAP sensor and the ECM/PCM, then go to step 1 . If the screen indicates NOT COMPLETED, go to step 12 and recheck.
DTC P0112: IAT SENSOR CIRCUIT LOW VOLTAGE
1. Turn the ignition switch ON (II). 2. Check the IAT SENSOR in the DATA LIST with the HDS.
Is about 356°F (180°C) or higher, or 0.08 V or less indicated?
2004 Acura TSX
2004 ENGINE PERFORMANCE PGM-FI System - TSX
Wednesday, March 12, 2008 2:21:51 AM Page 15
YES: Go to step 3. NO: Intermittent failure, system is OK at this time. Check for poor connections or loose terminals at the IAT sensor and the ECM/PCM.
3. Turn the ignition switch OFF. 4. Disconnect the IAT sensor 2P connector. 5. Turn the ignition switch ON (II). 6. Check the IAT SENSOR in the DATA LIST with the HDS.
Is about 356°F (180°C) or higher, or 0.08 V or less indicated? YES: Go to step 7. NO: Go to step 11 .
7. Turn the ignition switch OFF. 8. Jump the SCS line with the HDS. 9. Disconnect ECM/PCM connector B (24P).
10. Check for continuity between IAT sensor 2P connector terminal No. 2 and body ground. Is there continuity?
YES: Repair short in the wire between the IAT sensor and ECM/PCM (B17), then go to step 13 . NO: Go to step 17 .
2004 Acura TSX
2004 ENGINE PERFORMANCE PGM-FI System - TSX
Wednesday, March 12, 2008 2:21:51 AM Page 16
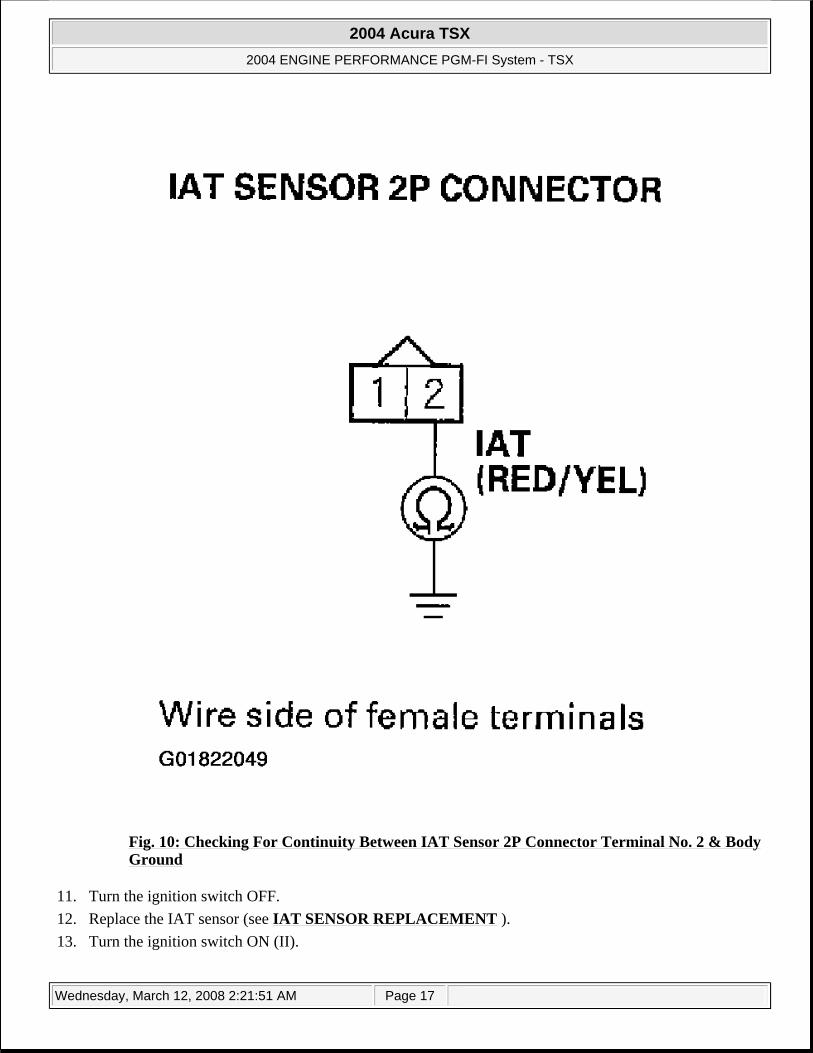
Fig. 10: Checking For Continuity Between IAT Sensor 2P Connector Terminal No. 2 & Body Ground
11. Turn the ignition switch OFF. 12. Replace the IAT sensor (see IAT SENSOR REPLACEMENT ). 13. Turn the ignition switch ON (II).
2004 Acura TSX
2004 ENGINE PERFORMANCE PGM-FI System - TSX
Wednesday, March 12, 2008 2:21:51 AM Page 17
14. Reset the ECM/PCM with the HDS. 15. Do the ECM/PCM idle learn procedure (see ECM/PCM IDLE LEARN PROCEDURE ). 16. Check for Temporary DTCs or DTCs in the DTCs MENU with the HDS.
Are any Temporary DTCs or DTCs indicated? YES: If DTC P0112 is indicated, check for poor connections or loose terminals at the IAT sensor and the ECM/PCM, then go to step 1 . If any other Temporary DTCs or DTCs are indicated, go to the indicated DTC troubleshooting. NO: Troubleshooting is complete.
17. Update the ECM/PCM if it does not have the latest software, or substitute a known-good ECM/PCM (see HOW TO SUBSTITUTE THE ECM/PCM ).
18. Check for Temporary DTCs or DTCs in the DTCs MENU with the HDS. Are any Temporary DTCs or DTCs indicated?
YES: If DTC P0112 is indicated, check for poor connections or loose terminals at the IAT sensor and the ECM/PCM, then go to step 1 . If any other Temporary DTCs or DTCs are indicated, go to the indicated DTC troubleshooting. NO: If the ECM/PCM was updated, troubleshooting is complete. If the ECM/PCM was substituted, replace the original ECM/PCM (see HOW TO REMOVE THE ECM/PCM FOR TESTING ).
DTC P0113: IAT SENSOR CIRCUIT HIGH VOLTAGE
1. Turn the ignition switch ON (II). 2. Check the IAT SENSOR in the DATA LIST with the HDS.
Is about -40°F (-40°C) or less, or 4.90 V or higher indicated? YES: Go to step 3. NO: Intermittent failure, system is OK at this time. Check for poor connections or loose terminals at the IAT sensor and the ECM/PCM.
3. Turn the ignition switch OFF. 4. Disconnect the IAT sensor 2P connector. 5. Connect IAT sensor 2P connector terminals No. 1 and No. 2 with a jumper wire. 6. Turn the ignition switch ON (II). 7. Check the IAT SENSOR in the DATA LIST with the HDS.
Is about -40°F (-40°C) or less, or 4.90 V or higher indicated? YES: Go to step 8. NO: Go to step 13 .
2004 Acura TSX
2004 ENGINE PERFORMANCE PGM-FI System - TSX
Wednesday, March 12, 2008 2:21:51 AM Page 18
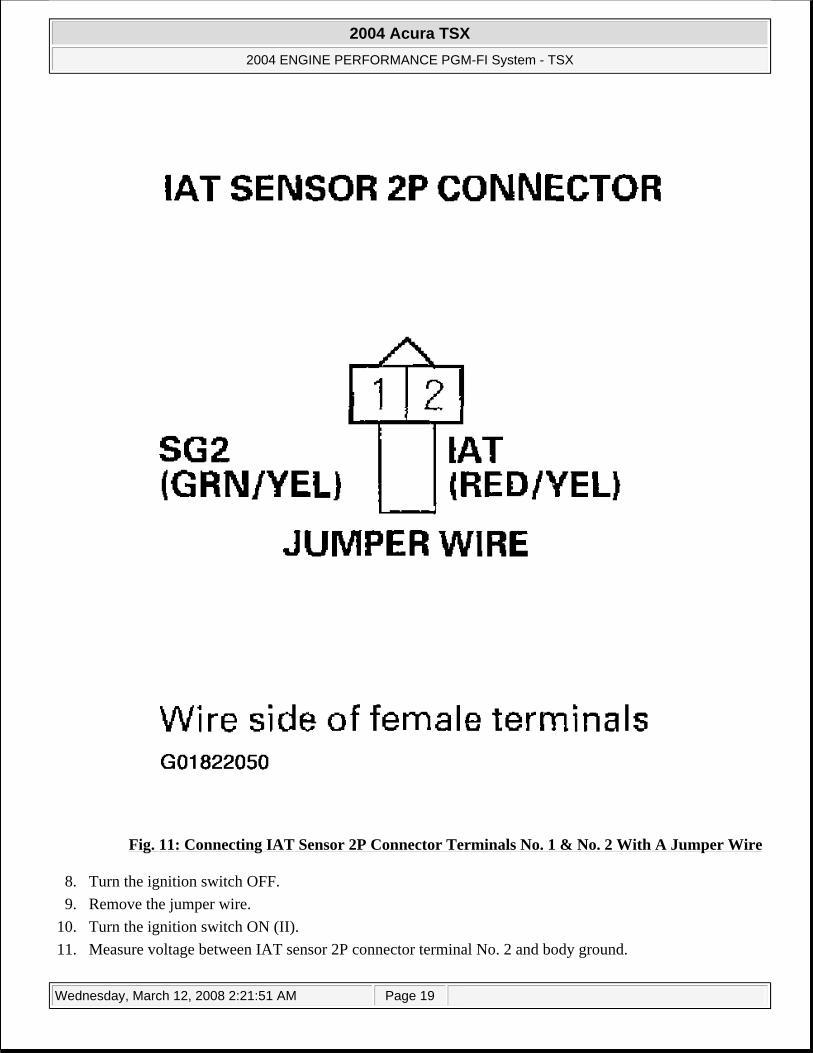
Fig. 11: Connecting IAT Sensor 2P Connector Terminals No. 1 & No. 2 With A Jumper Wire
8. Turn the ignition switch OFF. 9. Remove the jumper wire.
10. Turn the ignition switch ON (II). 11. Measure voltage between IAT sensor 2P connector terminal No. 2 and body ground.
2004 Acura TSX
2004 ENGINE PERFORMANCE PGM-FI System - TSX
Wednesday, March 12, 2008 2:21:51 AM Page 19
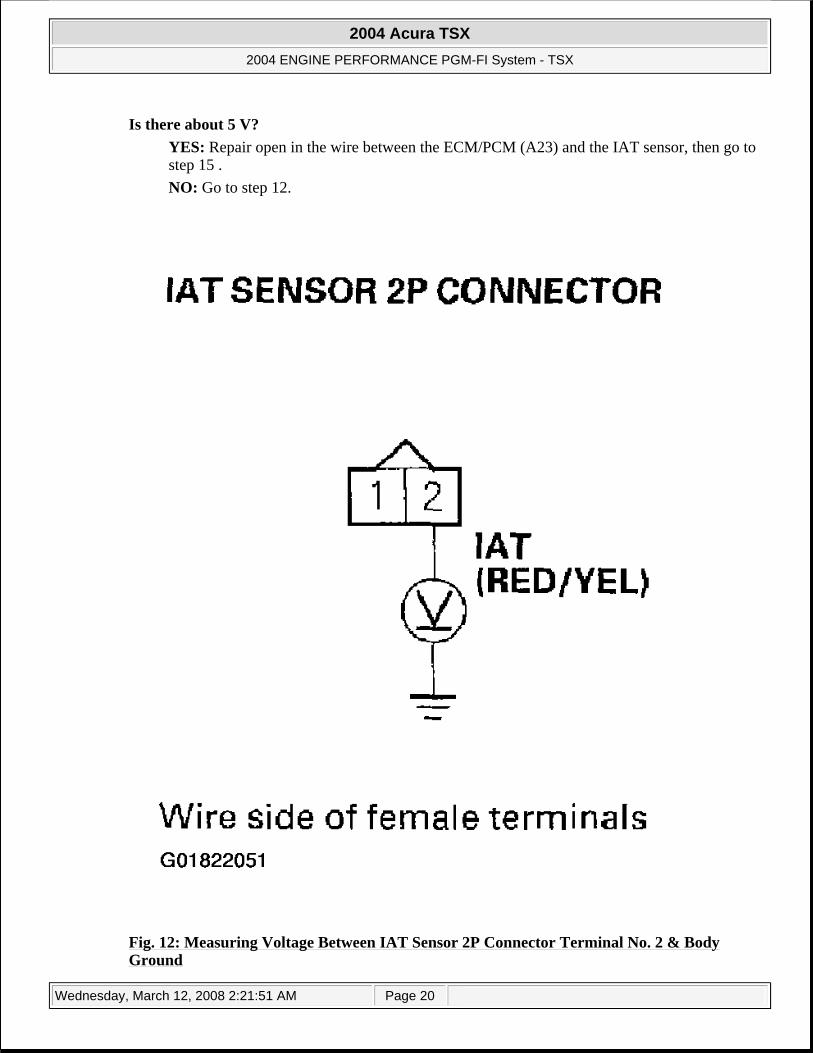
Is there about 5 V? YES: Repair open in the wire between the ECM/PCM (A23) and the IAT sensor, then go to step 15 . NO: Go to step 12.
Fig. 12: Measuring Voltage Between IAT Sensor 2P Connector Terminal No. 2 & Body Ground
2004 Acura TSX
2004 ENGINE PERFORMANCE PGM-FI System - TSX
Wednesday, March 12, 2008 2:21:51 AM Page 20

12. Measure voltage between ECM/PCM connector terminal B17 and body ground. Is there about 5 V?
YES: Repair open in the wire between the ECM/PCM (B17) and the IAT sensor, then go to step 15 . NO: Go to step 19 .
Fig. 13: Measuring Voltage Between ECM/PCM Connector Terminal B17 & Body Ground
2004 Acura TSX
2004 ENGINE PERFORMANCE PGM-FI System - TSX
Wednesday, March 12, 2008 2:21:51 AM Page 21
13. Turn the ignition switch OFF. 14. Replace the IAT sensor (see IAT SENSOR REPLACEMENT ). 15. Turn the ignition switch ON (II). 16. Reset the ECM/PCM with the HDS. 17. Do the ECM/PCM idle learn procedure (see ECM/PCM IDLE LEARN PROCEDURE ). 18. Check for Temporary DTCs or DTCs in the DTCs MENU with the HDS.
Are any Temporary DTCs or DTCs indicated? YES: If DTC P0113 is indicated, check for poor connections or loose terminals at the IAT sensor and the ECM/PCM, then go to step 1 . If any other Temporary DTCs or DTCs are indicated, go to the indicated DTC Troubleshooting. NO: Troubleshooting is complete.
19. Update the ECM/PCM if it does not have the latest software, or substitute a known-good ECM/PCM (see HOW TO SUBSTITUTE THE ECM/PCM ).
20. Check for Temporary DTCs or DTCs in the DTCs MENU with the HDS. Are any Temporary DTCs or DTCs indicated?
YES: If DTC P0113 is indicated, check for poor connections or loose terminals at the IAT sensor and the ECM/PCM, then go to step 1 . If any other Temporary DTCs or DTCs are indicated, go to the indicated DTC troubleshooting. NO: If the ECM/PCM was updated, troubleshooting is complete. If the ECM/PCM was substituted, replace the original ECM/PCM (see HOW TO REMOVE THE ECM/PCM FOR TESTING ).
DTC P0116: ECT SENSOR CIRCUIT RANGE/PERFORMANCE PROBLEM
1. Turn the ignition switch ON (II). 2. Check the ECT SENSOR in the DATA LIST with the HDS.
Is about 176°F (80°C) or higher, or 0.86 V or less indicated? YES: Go to step 3. NO: Go to step 7 .
3. Note the current coolant temperature from step 2. 4. Turn the ignition switch OFF. 5. Let the engine cool for 1 hour. 6. Check the ECT SENSOR in the DATA LIST with the HDS.
Did the ECT change 3.6°F (2°C) or more? YES: Intermittent failure, system is OK at this time. Check the thermostat and the cooling system. NO: Go to step 10 .
7. Note the current coolant temperature. 8. Start the engine. Hold the engine speed at 3,000 RPM with no load (in Park or neutral) until the radiator
fan comes on, then let it idle.
2004 Acura TSX
2004 ENGINE PERFORMANCE PGM-FI System - TSX
Wednesday, March 12, 2008 2:21:51 AM Page 22
9. Check the ECT SENSOR in the DATA LIST with the HDS. Does the ECT change 3.6°F (2°C) or more?
YES: Intermittent failure, system is OK at this time. Check the thermostat and the cooling system. NO: Go to step 10.
10. Turn the ignition switch OFF. 11. Replace the ECT sensor (see ECT SENSOR REPLACEMENT ). 12. Turn the ignition switch ON (II). 13. Reset the ECM/PCM with the HDS. 14. Do the ECM/PCM idle learn procedure (see ECM/PCM IDLE LEARN PROCEDURE ). 15. Allow the engine to cool to between 23°F (-5°C) and 77°F (25°C). 16. Start the engine, and let it idle for 20 minutes. 17. Check for Temporary DTCs or DTCs in the DTCs MENU with the HDS.
Are any Temporary DTCs or DTCs indicated? YES: If DTC P0116 is indicated, check for poor connections or loose terminals at the ECT sensor and the ECM/PCM, then go to step 1 . If any other Temporary DTCs or DTCs are indicated, go to the indicated DTC troubleshooting. NO: Go to step 18.
18. Monitor the OBD STATUS for DTC P0116 in the DTCs MENU with the HDS. Does the screen indicates PASSED?
YES: Troubleshooting is complete. NO: If the screen indicates FAILED, check for poor connections or loose terminals at the ECT sensor and the ECM/PCM, then go to step 1 . If the screen indicates NOT COMPLETED, go to step 15 and recheck.
DTC P0117: ECT SENSOR CIRCUIT LOW VOLTAGE
1. Turn the ignition switch ON (II). 2. Check the ECT SENSOR in the DATA LIST with the HDS.
Is about 356°F (180°C) or higher, or 0.08 V or less indicated? YES: Go to step 3. NO: Intermittent failure, system is OK at this time. Check for poor connections or loose terminals at the ECT sensor and the ECM/PCM.
3. Turn the ignition switch OFF. 4. Disconnect the ECT sensor 2P connector. 5. Turn the ignition switch ON (II). 6. Check the ECT SENSOR in the DATA LIST with the HDS.
Is about 356°F (180°C) or higher, or 0.08 V or less indicated? YES: Go to step 7. NO: Go to step 11 .
2004 Acura TSX
2004 ENGINE PERFORMANCE PGM-FI System - TSX
Wednesday, March 12, 2008 2:21:51 AM Page 23
7. Turn the ignition switch OFF. 8. Jump the SCS line with the HDS. 9. Disconnect ECM/PCM connector B (24P).
10. Check for continuity between ECT sensor 2P connector terminal No. 1 and body ground. Is there continuity?
YES: Repair short in the wire between the ECT sensor and ECM/PCM (B8), then go to step 13 . NO: Go to step 17 .
2004 Acura TSX
2004 ENGINE PERFORMANCE PGM-FI System - TSX
Wednesday, March 12, 2008 2:21:51 AM Page 24
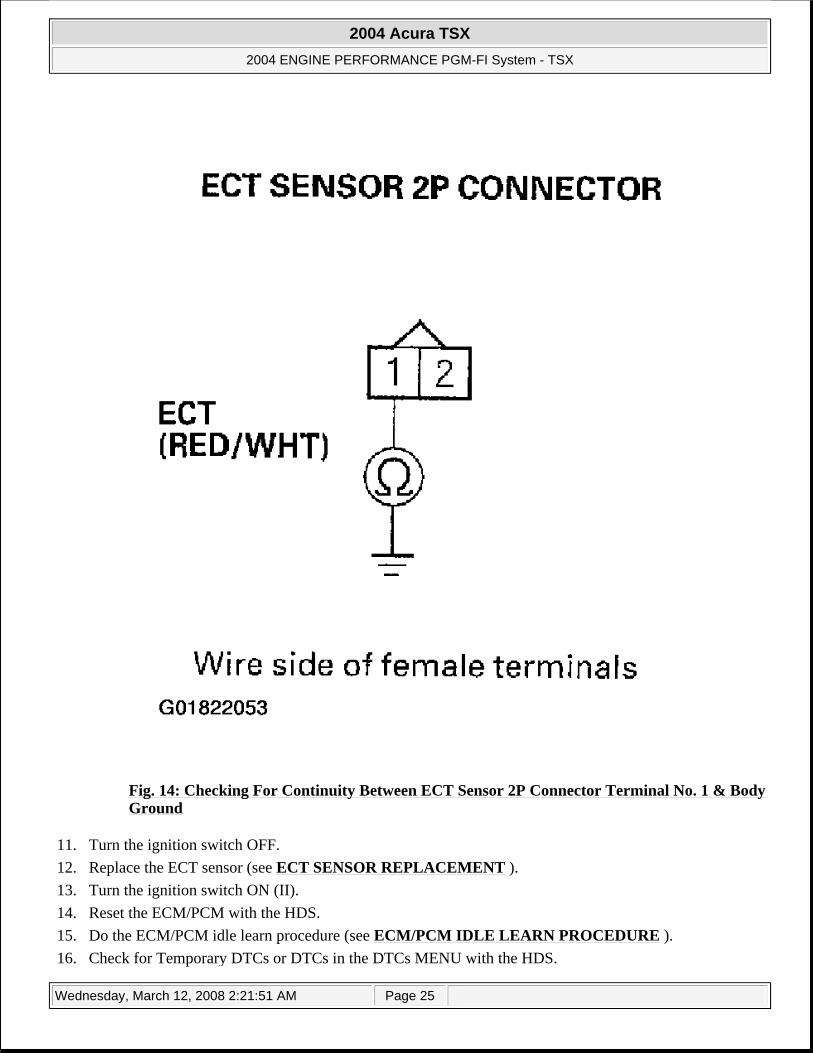
Fig. 14: Checking For Continuity Between ECT Sensor 2P Connector Terminal No. 1 & Body Ground
11. Turn the ignition switch OFF. 12. Replace the ECT sensor (see ECT SENSOR REPLACEMENT ). 13. Turn the ignition switch ON (II). 14. Reset the ECM/PCM with the HDS. 15. Do the ECM/PCM idle learn procedure (see ECM/PCM IDLE LEARN PROCEDURE ). 16. Check for Temporary DTCs or DTCs in the DTCs MENU with the HDS.
2004 Acura TSX
2004 ENGINE PERFORMANCE PGM-FI System - TSX
Wednesday, March 12, 2008 2:21:51 AM Page 25
Are any Temporary DTCs or DTCs indicated? YES: If DTC P0117 is indicated, check for poor connections or loose terminals at the ECT sensor and the ECM/PCM, then go to step 1 . If any other Temporary DTCs or DTCs are indicated, go to the indicated DTC troubleshooting. NO: Troubleshooting is complete.
17. Update the ECM/PCM if it does not have the latest software, or substitute a known-good ECM/PCM (see HOW TO SUBSTITUTE THE ECM/PCM ).
18. Check for Temporary DTCs or DTCs in the DTCs MENU with the HDS. Are any Temporary DTCs or DTCs indicated?
YES: If DTC P0117 is indicated, check for poor connections or loose terminals at the ECT sensor and the ECM/PCM, then go to step 1 . If any other Temporary DTCs or DTCs are indicated, go to the indicated DTC troubleshooting. NO: If the ECM/PCM was updated, troubleshooting is complete. If the ECM/PCM was substituted, replace the original ECM/PCM (see HOW TO REMOVE THE ECM/PCM FOR TESTING ).
DTC P0118: ECT SENSOR CIRCUIT HIGH VOLTAGE
1. Turn the ignition switch ON (II). 2. Check the ECT SENSOR in the DATA LIST with the HDS.
Is about -40°F (-40°C) or less, or 4.90 V or higher indicated? YES: Go to step 3. NO: Intermittent failure, system is OK at this time. Check for poor connections or loose terminals at the ECT sensor and the ECM/PCM.
3. Turn the ignition switch OFF. 4. Disconnect the ECT sensor 2P connector. 5. Connect ECT sensor 2P connector terminals No. 1 and No. 2 with a jumper wire.
2004 Acura TSX
2004 ENGINE PERFORMANCE PGM-FI System - TSX
Wednesday, March 12, 2008 2:21:51 AM Page 26
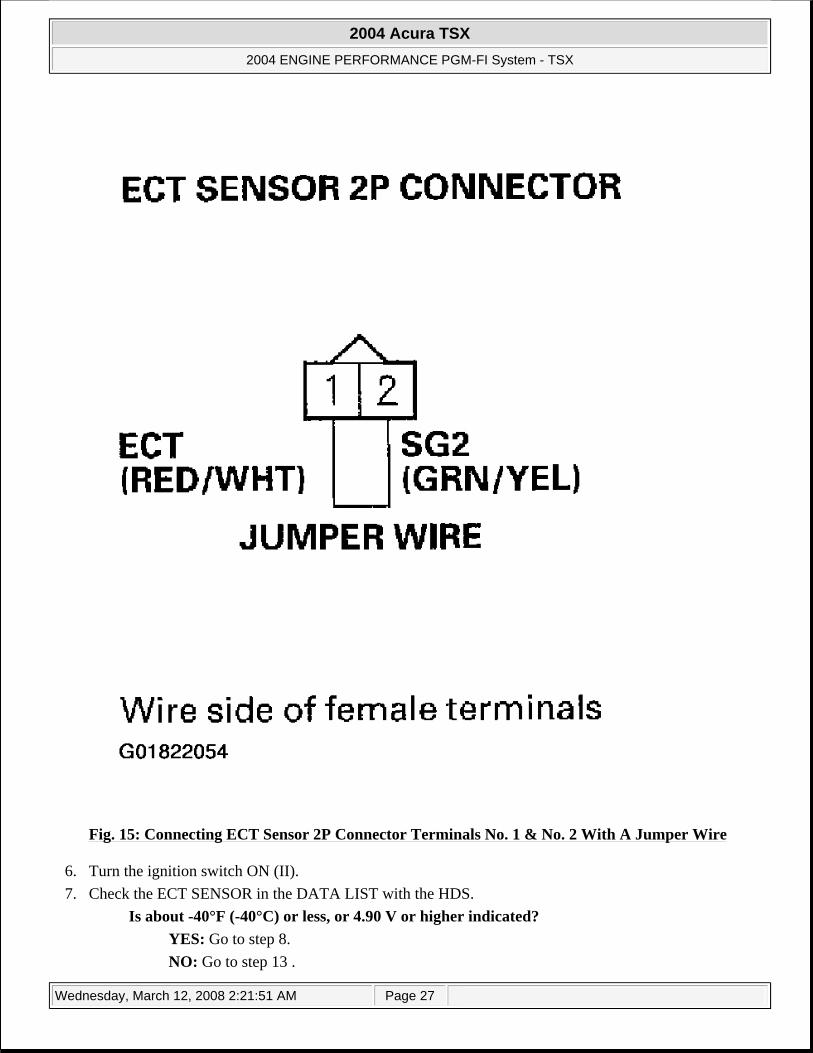
Fig. 15: Connecting ECT Sensor 2P Connector Terminals No. 1 & No. 2 With A Jumper Wire
6. Turn the ignition switch ON (II). 7. Check the ECT SENSOR in the DATA LIST with the HDS.
Is about -40°F (-40°C) or less, or 4.90 V or higher indicated? YES: Go to step 8. NO: Go to step 13 .
2004 Acura TSX
2004 ENGINE PERFORMANCE PGM-FI System - TSX
Wednesday, March 12, 2008 2:21:51 AM Page 27
8. Turn the ignition switch OFF. 9. Remove the jumper wire.
10. Turn the ignition switch ON (II). 11. Measure voltage between ECT sensor 2P connector terminal No. 1 and body ground.
Is there about 5 V? YES: Repair open in the wire between the ECM/PCM (A23) and the ECT sensor, then go to step 15 . NO: Go to step 12.
2004 Acura TSX
2004 ENGINE PERFORMANCE PGM-FI System - TSX
Wednesday, March 12, 2008 2:21:51 AM Page 28
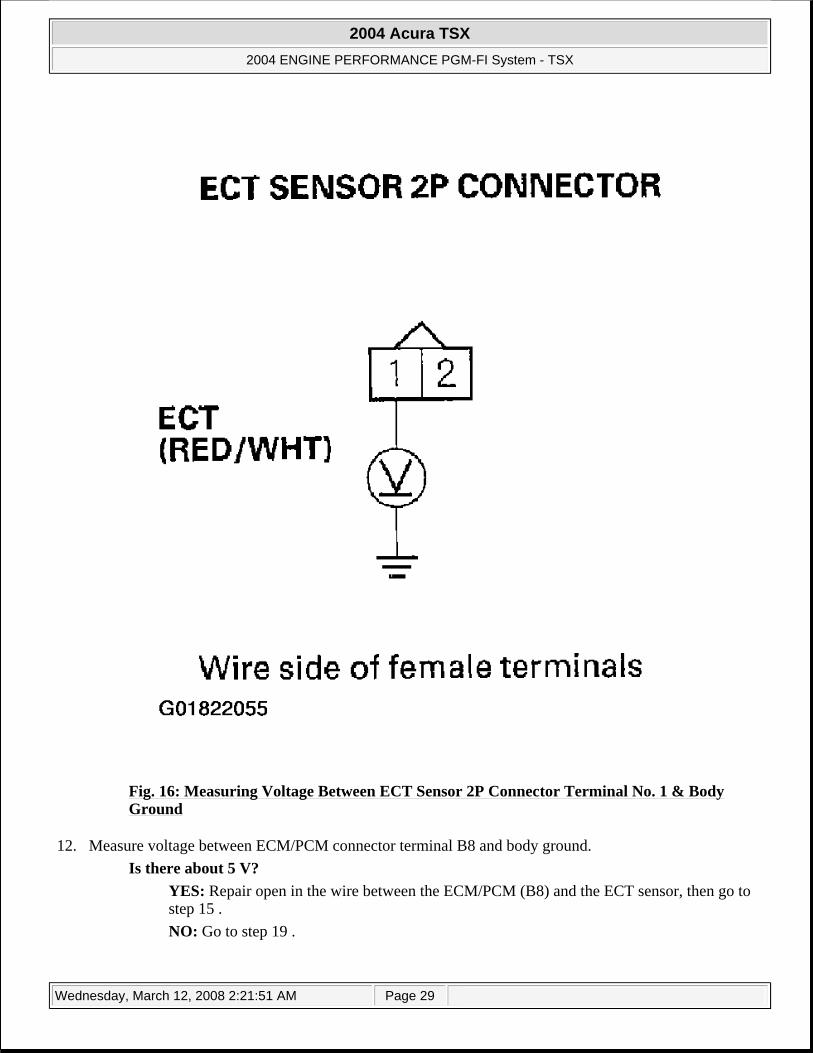
Fig. 16: Measuring Voltage Between ECT Sensor 2P Connector Terminal No. 1 & Body Ground
12. Measure voltage between ECM/PCM connector terminal B8 and body ground. Is there about 5 V?
YES: Repair open in the wire between the ECM/PCM (B8) and the ECT sensor, then go to step 15 . NO: Go to step 19 .
2004 Acura TSX
2004 ENGINE PERFORMANCE PGM-FI System - TSX
Wednesday, March 12, 2008 2:21:51 AM Page 29
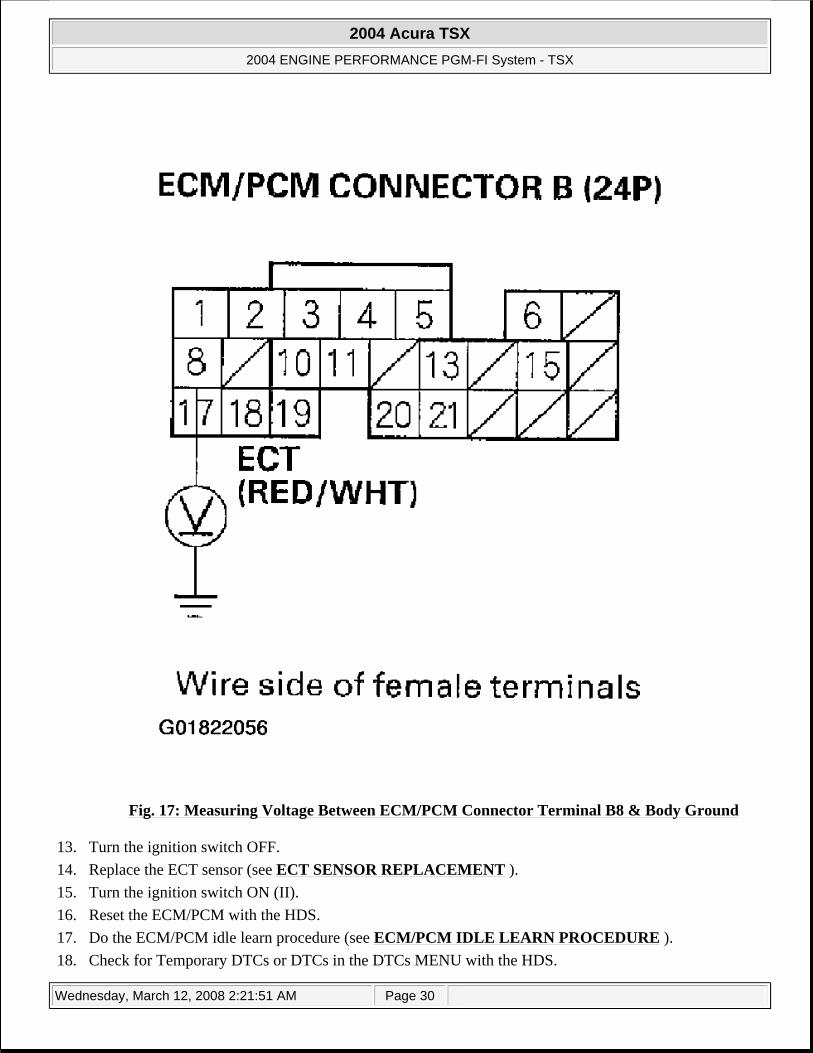
Fig. 17: Measuring Voltage Between ECM/PCM Connector Terminal B8 & Body Ground
13. Turn the ignition switch OFF. 14. Replace the ECT sensor (see ECT SENSOR REPLACEMENT ). 15. Turn the ignition switch ON (II). 16. Reset the ECM/PCM with the HDS. 17. Do the ECM/PCM idle learn procedure (see ECM/PCM IDLE LEARN PROCEDURE ). 18. Check for Temporary DTCs or DTCs in the DTCs MENU with the HDS.
2004 Acura TSX
2004 ENGINE PERFORMANCE PGM-FI System - TSX
Wednesday, March 12, 2008 2:21:51 AM Page 30
Are any Temporary DTCs or DTCs indicated? YES: If DTC P0118 is indicated, check for poor connections or loose terminals at the ECT sensor and the ECM/PCM, then go to step 1 . If any other Temporary DTCs or DTCs are indicated, go to the indicated DTC troubleshooting. NO: Troubleshooting is complete.
19. Update the ECM/PCM if it does not have the latest software, or substitute a known-good ECM/PCM (see HOW TO SUBSTITUTE THE ECM/PCM ).
20. Check for Temporary DTCs or DTCs in the DTCs MENU with the HDS. Are any Temporary DTCs or DTCs indicated?
YES: If DTC P0118 is indicated, check for poor connections or loose terminals at the ECT sensor and the ECM/PCM, then go to step 1 . If any other Temporary DTCs or DTCs are indicated, go to the indicated DTC troubleshooting. NO: If the ECM/PCM was updated, troubleshooting is complete. If the ECM/PCM was substituted, replace the original ECM/PCM (see HOW TO REMOVE THE ECM/PCM FOR TESTING ).
DTC P0125: ECT SENSOR MALFUNCTION/SLOW RESPONSE
1. Start the engine, and let it idle. 2. Check the ECT SENSOR in the DATA LIST with the HDS.
Is about 86°F (30°C) or less, or 2.61 V or higher indicated? YES: Go to step 3. NO: Intermittent failure, system is OK at this time. Check the thermostat and the cooling system.
3. Let the engine idle for 6 minutes. 4. Check the ECT SENSOR in the DATA LIST with the HDS.
Is about 86°F (30°C) or less, or 2.61 V or higher indicated? YES: Go to step 5. NO: Intermittent failure, system is OK at this time. Check the thermostat and the cooling system.
5. Turn the ignition switch OFF. 6. Replace the ECT sensor (see ECT SENSOR REPLACEMENT ). 7. Turn the ignition switch ON (II). 8. Reset the ECM/PCM with the HDS. 9. Do the ECM/PCM idle learn procedure (see ECM/PCM IDLE LEARN PROCEDURE ).
10. Allow the engine to cool between 23°F (-5°C) and 77°F (25°C). 11. Start the engine, and let it idle for 20 minutes. 12. Check for Temporary DTCs or DTCs in the DTCs MENU with the HDS.
Are any Temporary DTCs or DTCs indicated? YES: If DTC P0125 is indicated, check for poor connections or loose terminals at the ECT
2004 Acura TSX
2004 ENGINE PERFORMANCE PGM-FI System - TSX
Wednesday, March 12, 2008 2:21:51 AM Page 31
sensor and the ECM/PCM, then go to step 1 . If any other Temporary DTCs or DTCs are indicated, go to the indicated DTC troubleshooting. NO: Go to step 13.
13. Monitor the OBD STATUS for DTC P0125 in the DTCs MENU with the HDS. Does the screen indicate PASSED?
YES: Troubleshooting is complete. NO: If the screen indicates FAILED, check for poor connections or loose terminals at the ECT sensor and the ECM/PCM, then go to step 1 . If the screen indicates NOT COMPLETED, go to step 10 and recheck.
DTC P0128: COOLING SYSTEM MALFUNCTION
1. Turn the ignition switch ON (II). 2. Clear the DTC with the HDS. 3. Turn the blower switch OFF. 4. Turn the A/C switch OFF. 5. Check the FAN CTRL in the DATA LIST with the HDS.
Is it OFF? YES: Go to step 6. NO: Wait until the FAN CTRL is turned off, then go to step 6.
6. Check the ECT SENSOR in the DATA LIST with the HDS, then check the radiator fan operation. Does the radiator fan keep running when the engine coolant temperature is less than 158°F (70°C)?
YES: Check the radiator fan circuit (see RADIATOR FAN CIRCUIT TROUBLE SHOOTING ), the radiator fan switch circuit (see RADIATOR FAN SWITCH CIRCUIT TROUBLE SHOOTING ), and the radiator fan switch (see RADIATOR FAN SWITCH ). If the circuits and the switch are OK, go to step 21 . NO: Go to step 7.
NOTE: If the DTCs listed below are stored at the same time as DTC P0128, troubleshoot those DTCs first, then recheck for P0128. DTC P0128 can occasionally set when the hood is opened while the engine is running.
P0112, P0113: Intake air temperature (IAT) sensor P0116, P0117, P0118, P0125: Engine coolant temperature (ECT) sensor P0300: Random misfire P0301, P0302, P0303, P0304: No. 1, No. 2, No. 3, or No. 4 cylinder misfire P0335, P0339: Crankshaft position (CKP) sensor P2227, P2228, P2229: Barometric pressure (BARO) sensor P2646, P2647, P2648, P2648: VTEC system P0506, P0507: Idle control system malfunction
2004 Acura TSX
2004 ENGINE PERFORMANCE PGM-FI System - TSX
Wednesday, March 12, 2008 2:21:51 AM Page 32
7. Start the engine. Hold the engine speed at 3,000 RPM with no load (in Park or neutral) until the radiator fan comes on, then let it idle.
8. Turn the ignition switch OFF. 9. Turn the ignition switch ON (II).
10. Do the RADIATOR FAN TEST in the INSPECTION MENU with the HDS for 20 minutes. 11. Check the ECT SENSOR in the DATA LIST with the HDS.
Is about 151°F (66°C) or less, or 1.25 V or more indicated? YES: Intermittent failure, system is OK at this time. NO: Go to step 12.
12. Turn the ignition switch OFF. 13. Cool down the engine until the coolant temperature is between 23°F (-5°C) and 95°F (35°C). 14. Replace the thermostat (see THERMOSTAT REPLACEMENT ). 15. Turn the ignition switch ON (II). 16. Reset the ECM/PCM with the HDS. 17. Do the ECM/PCM idle learn procedure (see ECM/PCM IDLE LEARN PROCEDURE ). 18. Start the engine. Hold the engine speed at 3,000 RPM with no load (in Park or neutral) until the radiator
fan comes on, then let it idle. 19. Check for Temporary DTCs or DTCs in the DTCs MENU with the HDS.
Are any Temporary DTCs or DTCs indicated? YES: If DTC P0128 is indicated, check the cooling system, then go to step 1 . If any other Temporary DTCs or DTCs are indicated, go to the indicated DTC troubleshooting. NO: Go to step 20.
20. Monitor the OBD STATUS for DTC P0128 in the DTCs MENU with the HDS. Does the screen indicate PASSED?
YES: Troubleshooting is complete. NO: If the screen indicates FAILED, check cooling system, then go to step 1 . If the screen indicates NOT COMPLETED, go to step 18 and recheck.
21. Update the ECM/PCM if it does not have the latest software, or substitute a known-good ECM/PCM (see HOW TO SUBSTITUTE THE ECM/PCM ).
22. Cool down the engine until the coolant temperature is between 23°F (-5°C) and 95°F (35°C). 23. Start the engine. Hold the engine speed at 3,000 RPM with no load (in Park or neutral) until the radiator
fan comes on, then let it idle. 24. Check for Temporary DTCs or DTCs in the DTCs MENU with the HDS.
Are any Temporary DTCs or DTCs indicated? YES: If DTC P0128 is indicated, check for poor connections or loose terminals at the ECT sensor and the ECM/PCM, then go to step 1 . If any other Temporary DTCs or DTCs are indicated, go to the indicated DTC troubleshooting. NO: If the ECM/PCM was updated, troubleshooting is complete. If the ECM/PCM was substituted, replace the original ECM/PCM (see HOW TO REMOVE THE ECM/PCM FOR TESTING ).
2004 Acura TSX
2004 ENGINE PERFORMANCE PGM-FI System - TSX
Wednesday, March 12, 2008 2:21:51 AM Page 33

DTC P0133: A/F SENSOR (SENSOR 1) RESPONSE MALFUNCTION/SLOW RESPONSE IN CIRCUIT
1. Turn the ignition switch ON (II). 2. Clear the DTC with the HDS. 3. Start the engine. Hold the engine speed at 3,000 RPM with no load (in Park or neutral) until the radiator
fan comes on, then let it idle. 4. Test-drive under the following conditions:
Engine coolant temperature more than 158°F (70°C) A/T in D position (M/T in 5th gear) Vehicle speed at 30 MPH (48 km/h) or more, and engine speed between 1,000 and 3,000 RPM
5. Check the AF FB AVG in the DATA LIST with the HDS. Is the value between 0.8-1.2?
YES: Go to step 6. NO: Go to step 4 and recheck.
6. Monitor the OBD STATUS for DTC P0133 in the DTCs MENU with the HDS. Does the screen indicate FAILED?
YES: Go to step 7. NO: If the screen indicates PASSED, intermittent failure, system is OK at this time. If the screen indicates EXECUTING, keep driving until a result comes on. If the screen indicates Out of CONDITION, go to step 2 and recheck.
7. Turn the ignition switch OFF. 8. Replace the A/F sensor (Sensor 1) (see A/F SENSOR REPLACEMENT ). 9. Turn the ignition switch ON (II).
10. Reset the ECM/PCM with the HDS. 11. Do the ECM/PCM idle learn procedure (see ECM/PCM IDLE LEARN PROCEDURE ). 12. Start the engine. Hold the engine speed at 3,000 RPM with no load (in Park or neutral) until the radiator
fan comes on, then let it idle. 13. Test-drive under the following conditions:
Engine coolant temperature more than 158°F (70°C) A/T in D position (M/T in 5th gear) Vehicle speed at 30 MPH (48 km/h) or more, and engine speed between 1,000 and 3,000 RPM
14. Check for Temporary DTCs or DTCs in the DTCs MENU with the HDS. Are any Temporary DTCs or DTCs indicated?
YES: If DTC P0133 is indicated, check for poor connections or loose terminals at the A/F sensor (Sensor 1) and the ECM/PCM, then go to step 1 . If any other Temporary DTCs or DTCs are indicated, go to the indicated DTC troubleshooting.
NOTE: If DTC P0139 is stored at the same time as DTC P0133, troubleshoot DTC P0139 first, then recheck for DTC P0133.
2004 Acura TSX
2004 ENGINE PERFORMANCE PGM-FI System - TSX
Wednesday, March 12, 2008 2:21:51 AM Page 34
NO: Go to step 15. 15. Monitor the OBD STATUS for DTC P0133 in the DTCs MENU with the HDS.
Does the screen indicates PASSED? YES: Troubleshooting is complete. NO: If the screen indicates FAILED, check for poor connections or loose terminals at the A/F sensor (Sensor 1) and the ECM/PCM, then go to step 1 . If the screen indicates EXECUTING, keep driving until a result comes on. If the screen indicates Out of CONDITION, go to step 12 and recheck.
DTC P0134: A/F SENSOR (SENSOR 1) HEATER SYSTEM MALFUNCTION
1. Turn the ignition switch ON (II). 2. Clear the DTC with the HDS. 3. Start the engine with no load (in Park or neutral) until the radiator fan comes on, then let it idle. 4. Check for Temporary DTCs or DTCs in the DTCs MENU with the HDS.
Is DTC P0134 indicated? YES: Go to step 5. NO: Intermittent failure, system is OK at this time. Check for poor connections or loose terminals at the A/F sensor (Sensor 1) and the ECM/PCM.
5. Turn the ignition switch OFF. 6. Replace the A/F sensor (Sensor 1) (see A/F SENSOR REPLACEMENT ). 7. Turn the ignition switch ON (II). 8. Reset the ECM/PCM with the HDS. 9. Do the ECM/PCM idle learn procedure (see ECM/PCM IDLE LEARN PROCEDURE ).
10. Check for Temporary DTCs or DTCs in the DTCs MENU with the HDS. Are any Temporary DTCs or DTCs indicated?
YES: If DTC P0134 is indicated, check for poor connections or loose terminals at the A/F sensor (Sensor 1) and the ECM/PCM, then go to step 1 . If any other Temporary DTCs or DTCs are indicated, go to the indicated DTC troubleshooting. NO: Go to step 12.
11. Monitor the OBD STATUS for DTC P0134 in the DTCs MENU with the HDS. Does the screen indicate PASSED?
YES: Troubleshooting is complete. NO: If the screen indicates FAILED, check for poor connections or loose terminals at the A/F sensor (Sensor 1) and the ECM/PCM, then go to step 1 . If the screen indicates NOT COMPLETED, go to step 8 and recheck.
DTC P0135: A/F SENSOR (SENSOR 1) HEATER CIRCUIT MALFUNCTION
NOTE: If DTC P0135 is stored at the same time as DTC P0134, troubleshoot DTC P0135 first, then recheck for DTC P0134.
2004 Acura TSX
2004 ENGINE PERFORMANCE PGM-FI System - TSX
Wednesday, March 12, 2008 2:21:51 AM Page 35
1. Turn the ignition switch ON (II). 2. Clear the DTC with the HDS. 3. Start the engine. Hold the engine speed at 3,000 RPM with no load (in Park or neutral) until the radiator
fan comes on, then let it idle. 4. Check for Temporary DTCs or DTCs in the DTCs MENU with the HDS.
Is DTC P0135 indicated? YES: Go to step 5. NO: Intermittent failure, system is OK at this time. Check for poor connections or loose terminals at the A/F sensor (Sensor 1) and the ECM/PCM.
5. Turn the ignition switch OFF. 6. Check the following fuses:
No. 19 OPTION (40A) fuse in under-hood fuse/relay box. No. 4 A/F SENSOR (15A) fuse in under-dash fuse/relay box. No. 23 IGP (7.5A) fuse in under-dash fuse/relay box.
Are any of the fuses blown? YES: Repair short in the wire between the A/F sensor relay and the fuses, then go to step 23 . NO: Go to step 7.
7. Disconnect the A/F sensor (Sensor 1) 4P connector. 8. Measure resistance between A/F sensor (Sensor 1) 4P connector terminals No. 3 and No. 4.
Is there 2.1-2.9 ohm at room temperature? YES: Go to step 9. NO: Go to step 22 .
2004 Acura TSX
2004 ENGINE PERFORMANCE PGM-FI System - TSX
Wednesday, March 12, 2008 2:21:51 AM Page 36

Fig. 18: Measuring Resistance Between A/F Sensor (Sensor 1) 4P Connector Terminals No. 3 & No. 4
9. Check for continuity between A/F sensor (Sensor 1) 4P connector terminal No. 1 and A/F sensor (Sensor 1) 4P connector terminals No. 3 and No. 4 individually.
Is there continuity? YES: Go to step 22 . NO: Go to step 10.
2004 Acura TSX
2004 ENGINE PERFORMANCE PGM-FI System - TSX
Wednesday, March 12, 2008 2:21:51 AM Page 37
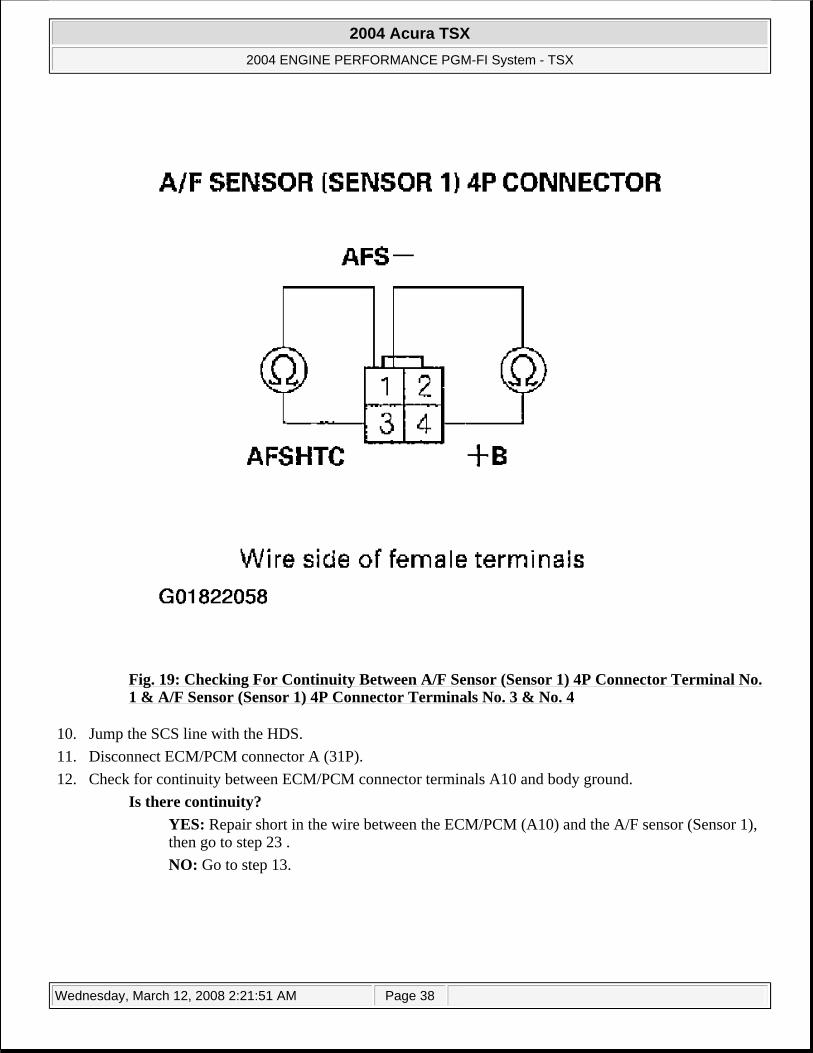
Fig. 19: Checking For Continuity Between A/F Sensor (Sensor 1) 4P Connector Terminal No. 1 & A/F Sensor (Sensor 1) 4P Connector Terminals No. 3 & No. 4
10. Jump the SCS line with the HDS. 11. Disconnect ECM/PCM connector A (31P). 12. Check for continuity between ECM/PCM connector terminals A10 and body ground.
Is there continuity? YES: Repair short in the wire between the ECM/PCM (A10) and the A/F sensor (Sensor 1), then go to step 23 . NO: Go to step 13.
2004 Acura TSX
2004 ENGINE PERFORMANCE PGM-FI System - TSX
Wednesday, March 12, 2008 2:21:51 AM Page 38
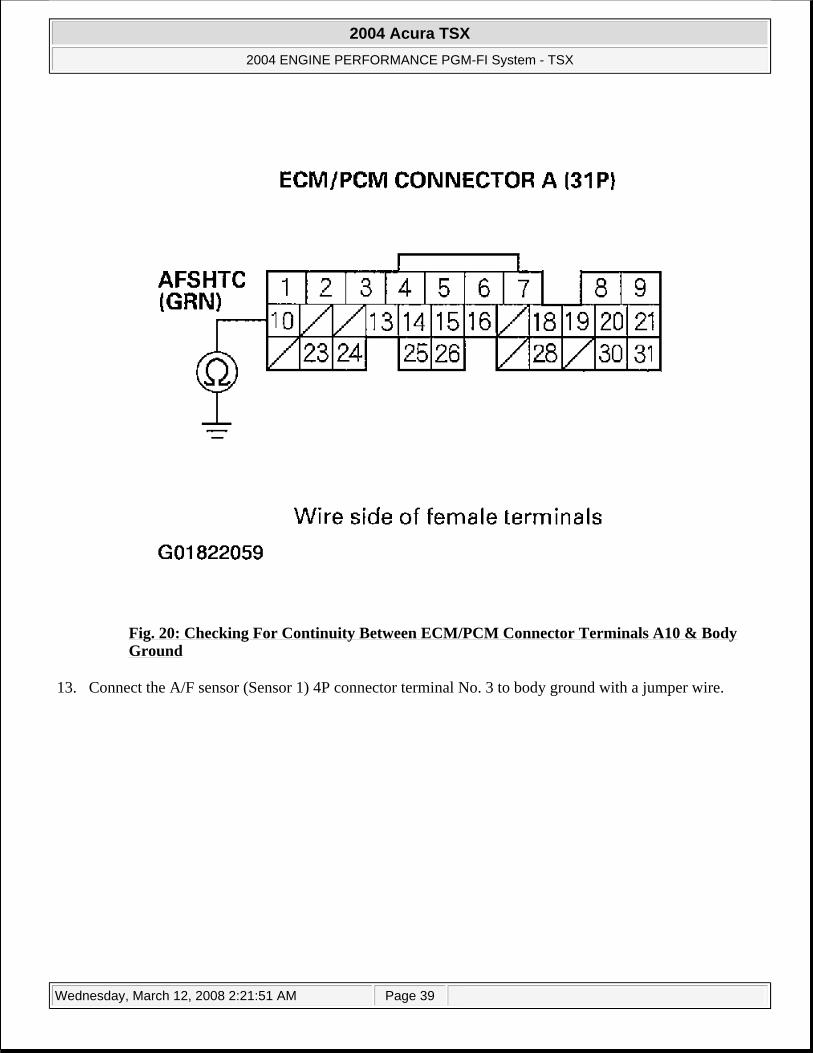
Fig. 20: Checking For Continuity Between ECM/PCM Connector Terminals A10 & Body Ground
13. Connect the A/F sensor (Sensor 1) 4P connector terminal No. 3 to body ground with a jumper wire.
2004 Acura TSX
2004 ENGINE PERFORMANCE PGM-FI System - TSX
Wednesday, March 12, 2008 2:21:51 AM Page 39
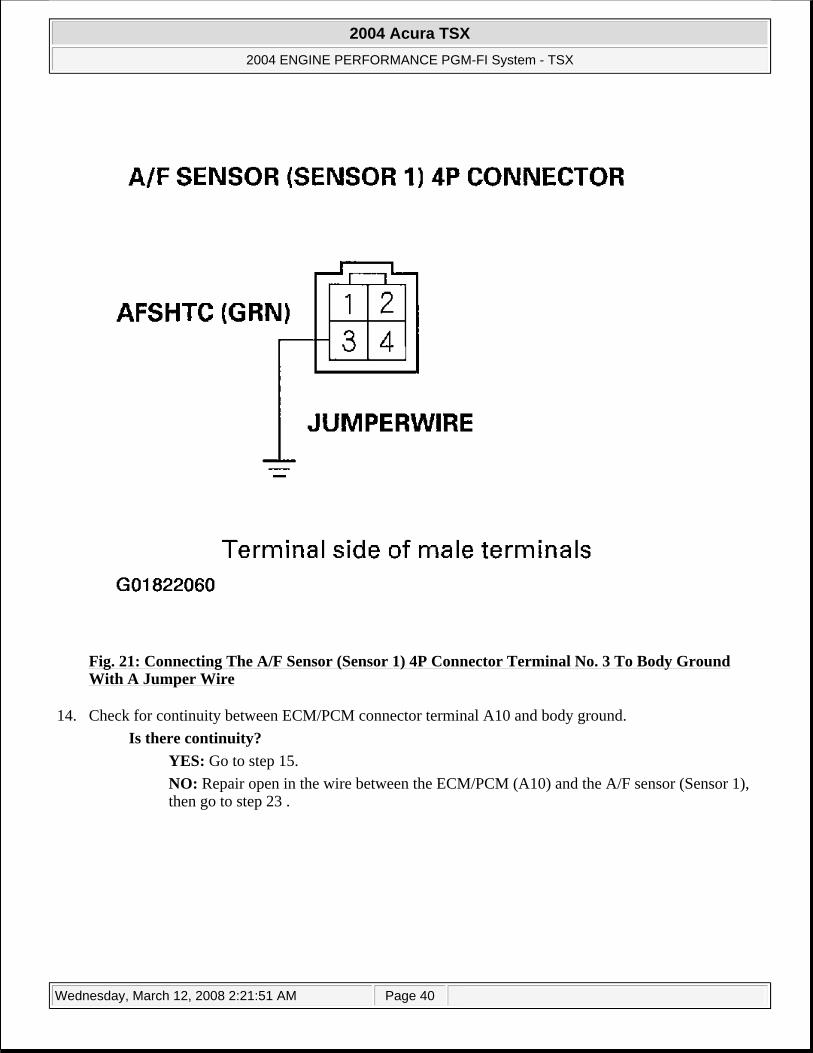
Fig. 21: Connecting The A/F Sensor (Sensor 1) 4P Connector Terminal No. 3 To Body Ground With A Jumper Wire
14. Check for continuity between ECM/PCM connector terminal A10 and body ground. Is there continuity?
YES: Go to step 15. NO: Repair open in the wire between the ECM/PCM (A10) and the A/F sensor (Sensor 1), then go to step 23 .
2004 Acura TSX
2004 ENGINE PERFORMANCE PGM-FI System - TSX
Wednesday, March 12, 2008 2:21:51 AM Page 40
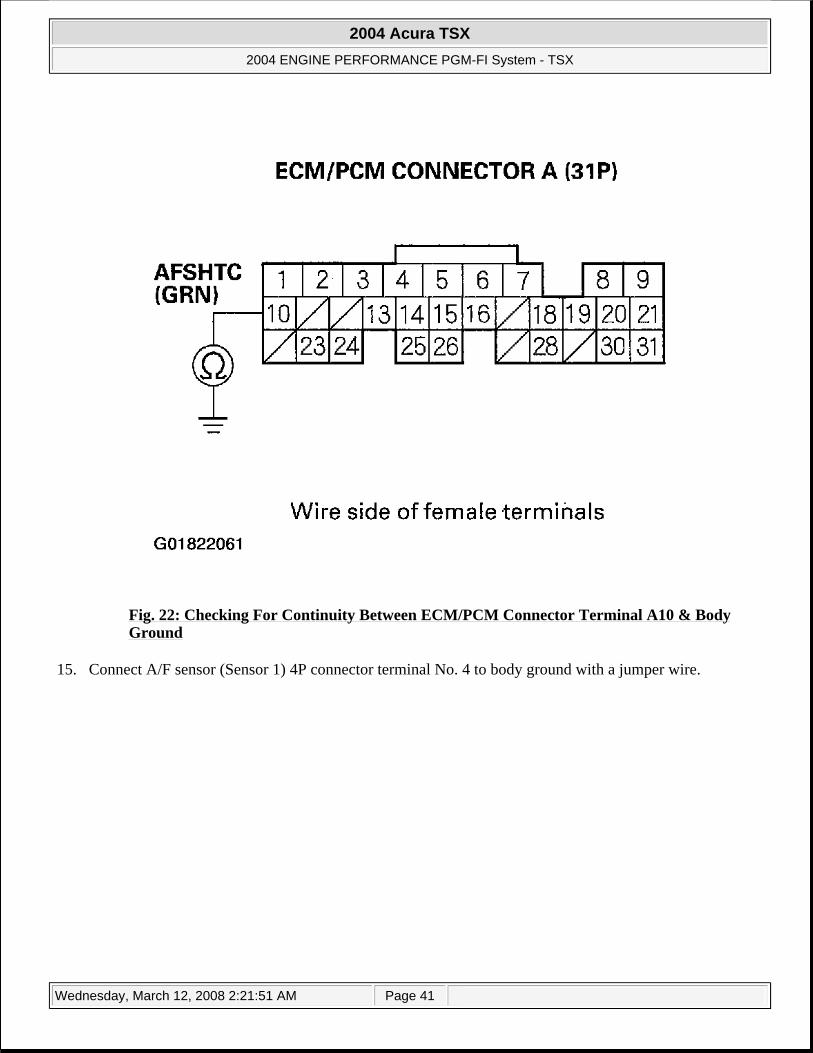
Fig. 22: Checking For Continuity Between ECM/PCM Connector Terminal A10 & Body Ground
15. Connect A/F sensor (Sensor 1) 4P connector terminal No. 4 to body ground with a jumper wire.
2004 Acura TSX
2004 ENGINE PERFORMANCE PGM-FI System - TSX
Wednesday, March 12, 2008 2:21:51 AM Page 41
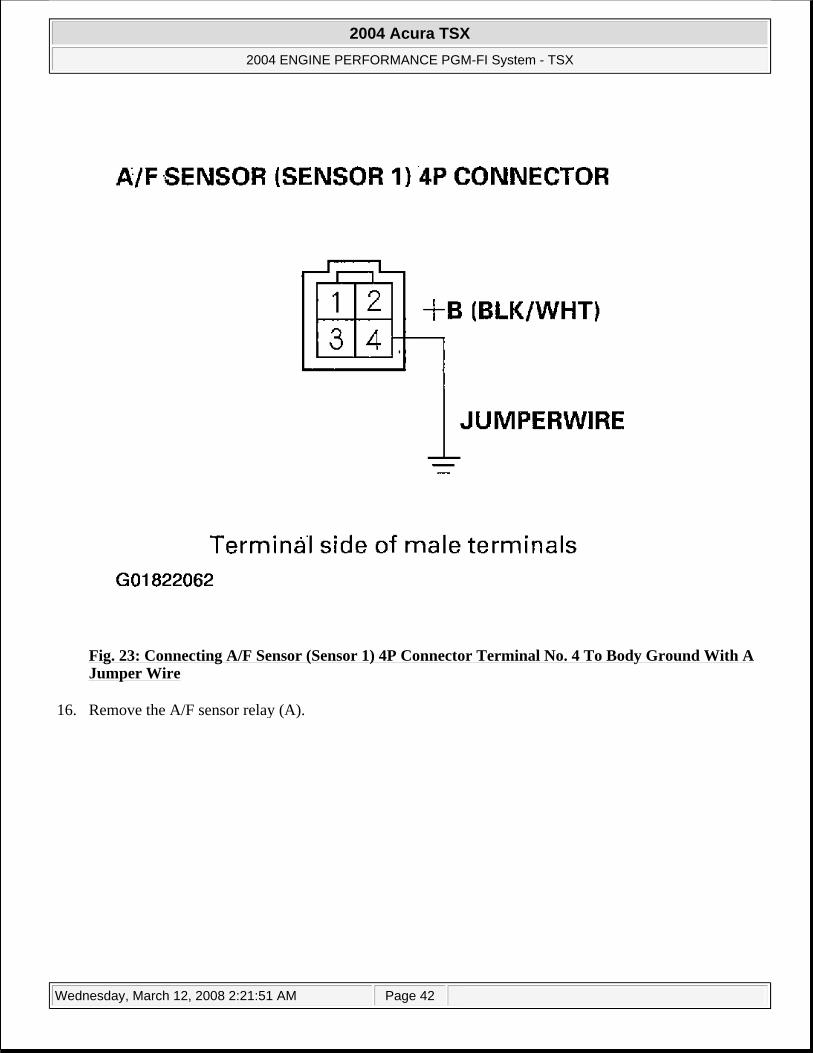
Fig. 23: Connecting A/F Sensor (Sensor 1) 4P Connector Terminal No. 4 To Body Ground With A Jumper Wire
16. Remove the A/F sensor relay (A).
2004 Acura TSX
2004 ENGINE PERFORMANCE PGM-FI System - TSX
Wednesday, March 12, 2008 2:21:51 AM Page 42
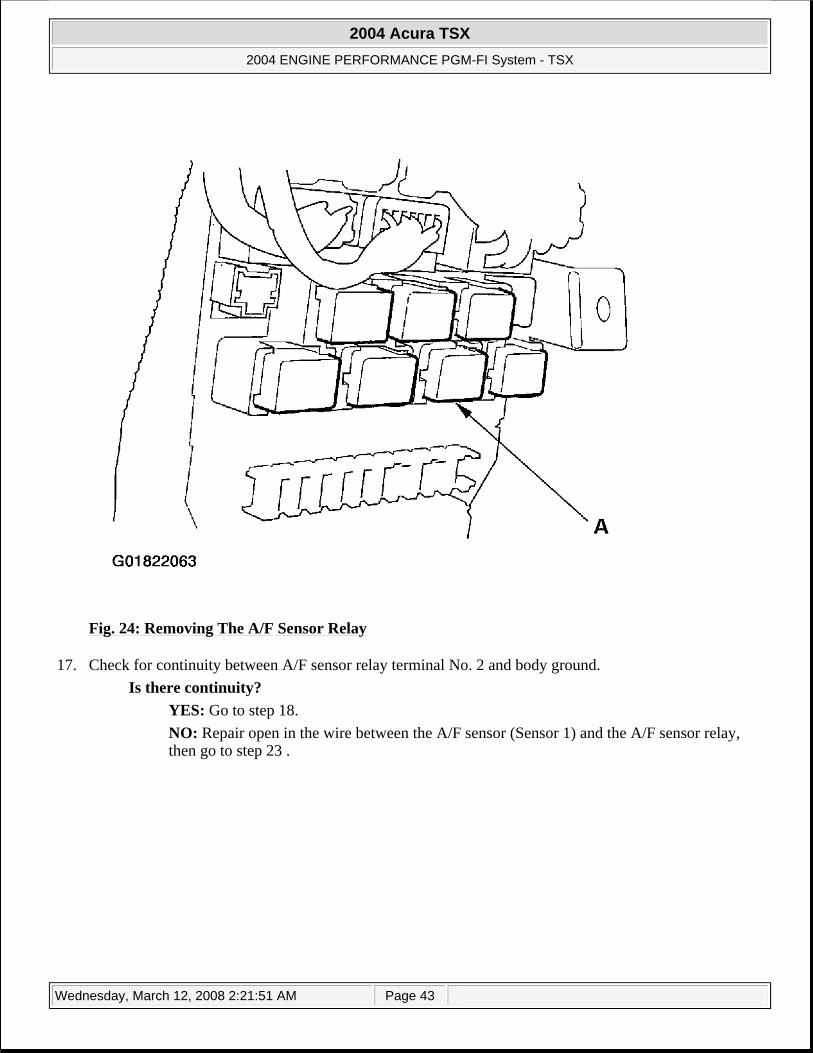
Fig. 24: Removing The A/F Sensor Relay
17. Check for continuity between A/F sensor relay terminal No. 2 and body ground. Is there continuity?
YES: Go to step 18. NO: Repair open in the wire between the A/F sensor (Sensor 1) and the A/F sensor relay, then go to step 23 .
2004 Acura TSX
2004 ENGINE PERFORMANCE PGM-FI System - TSX
Wednesday, March 12, 2008 2:21:51 AM Page 43

Fig. 25: Checking For Continuity Between A/F Sensor Relay Terminal No. 2 & Body Ground
18. Disconnect ECM/PCM connector E (31P). 19. Check for continuity between ECM/PCM connector terminal E8 and the A/F sensor relay terminal No. 4.
Is there continuity? YES: Go to step 20. NO: Repair open in the wire between the ECM/PCM (E8) and the A/F sensor relay, then go to step 22 .
2004 Acura TSX
2004 ENGINE PERFORMANCE PGM-FI System - TSX
Wednesday, March 12, 2008 2:21:51 AM Page 44
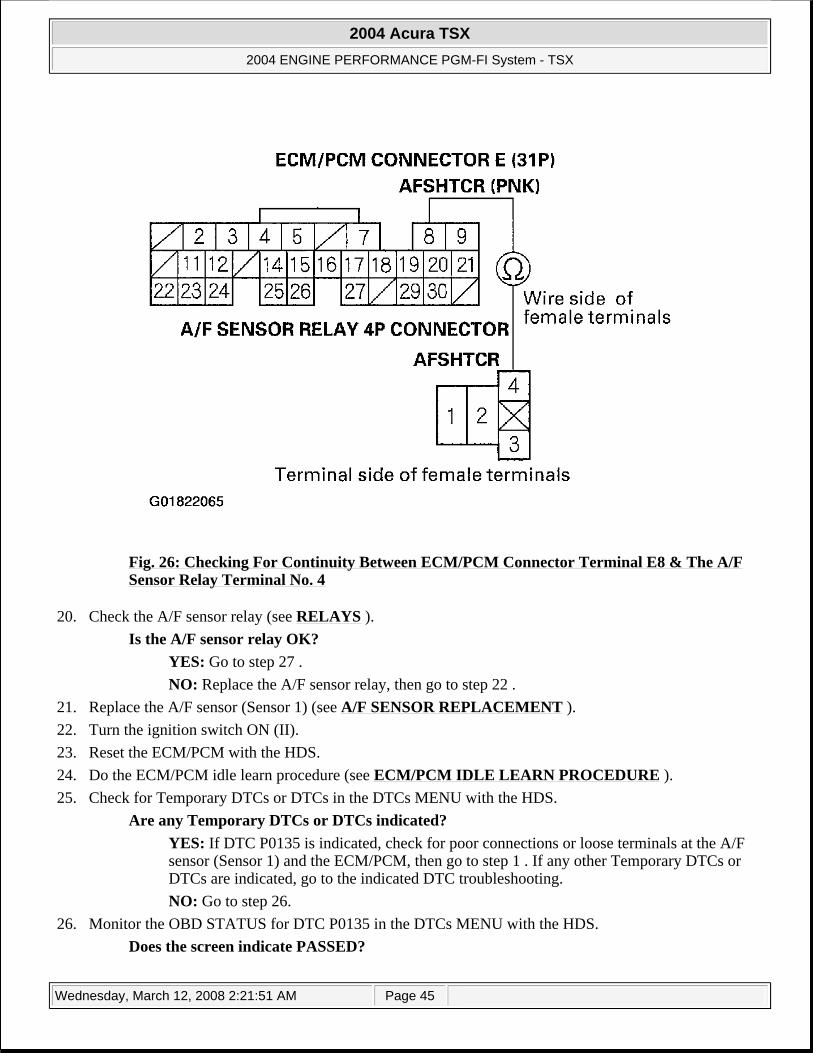
Fig. 26: Checking For Continuity Between ECM/PCM Connector Terminal E8 & The A/F Sensor Relay Terminal No. 4
20. Check the A/F sensor relay (see RELAYS ). Is the A/F sensor relay OK?
YES: Go to step 27 . NO: Replace the A/F sensor relay, then go to step 22 .
21. Replace the A/F sensor (Sensor 1) (see A/F SENSOR REPLACEMENT ). 22. Turn the ignition switch ON (II). 23. Reset the ECM/PCM with the HDS. 24. Do the ECM/PCM idle learn procedure (see ECM/PCM IDLE LEARN PROCEDURE ). 25. Check for Temporary DTCs or DTCs in the DTCs MENU with the HDS.
Are any Temporary DTCs or DTCs indicated? YES: If DTC P0135 is indicated, check for poor connections or loose terminals at the A/F sensor (Sensor 1) and the ECM/PCM, then go to step 1 . If any other Temporary DTCs or DTCs are indicated, go to the indicated DTC troubleshooting. NO: Go to step 26.
26. Monitor the OBD STATUS for DTC P0135 in the DTCs MENU with the HDS. Does the screen indicate PASSED?
2004 Acura TSX
2004 ENGINE PERFORMANCE PGM-FI System - TSX
Wednesday, March 12, 2008 2:21:51 AM Page 45
YES: Troubleshooting is complete. NO: If the screen indicates FAILED, check for poor connections or loose terminals at the A/F sensor (Sensor 1) and the ECM/PCM, then go to step 1 . If the screen indicates NOT COMPLETED, go to step 24 and recheck.
27. Update the ECM/PCM if it does not have the latest software, or substitute a known-good ECM/PCM (see HOW TO SUBSTITUTE THE ECM/PCM ).
28. Check for Temporary DTCs or DTCs in the DTCs MENU with the HDS. Are any Temporary DTCs or DTCs indicated?
YES: If DTC P0135 is indicated, check for poor connections or loose terminals at the A/F sensor (Sensor 1), and the A/F sensor relay and the ECM/PCM, then go to step 1 . If any other Temporary DTCs or DTCs are indicated, go to the indicated DTC troubleshooting. NO: If the ECM/PCM was updated, troubleshooting is complete. If the ECM/PCM was substituted, replace the original ECM/PCM (see HOW TO REMOVE THE ECM/PCM FOR TESTING ).
DTC P1157: A/F SENSOR (SENSOR 1) AFS LINE HIGH VOLTAGE
1. Turn the ignition switch ON (II). 2. Clear the DTC with the HDS. 3. Start the engine. 4. Check for Temporary DTCs or DTCs in the DTCs MENU with the HDS.
Is DTC P1157 indicated? YES: Go to step 5. NO: Intermittent failure, system is OK at this time. Check for poor connections or loose terminals at the A/F sensor (Sensor 1) and the ECM/PCM.
5. Turn the ignition switch OFF. 6. Jump the SCS line with the HDS. 7. Disconnect the A/F sensor (Sensor 1) 4P connector. 8. Disconnect ECM/PCM connector A (31P). 9. Connect A/F sensor (Sensor 1) 4P connector terminals No. 1 and No. 2 with a jumper wire.
2004 Acura TSX
2004 ENGINE PERFORMANCE PGM-FI System - TSX
Wednesday, March 12, 2008 2:21:51 AM Page 46
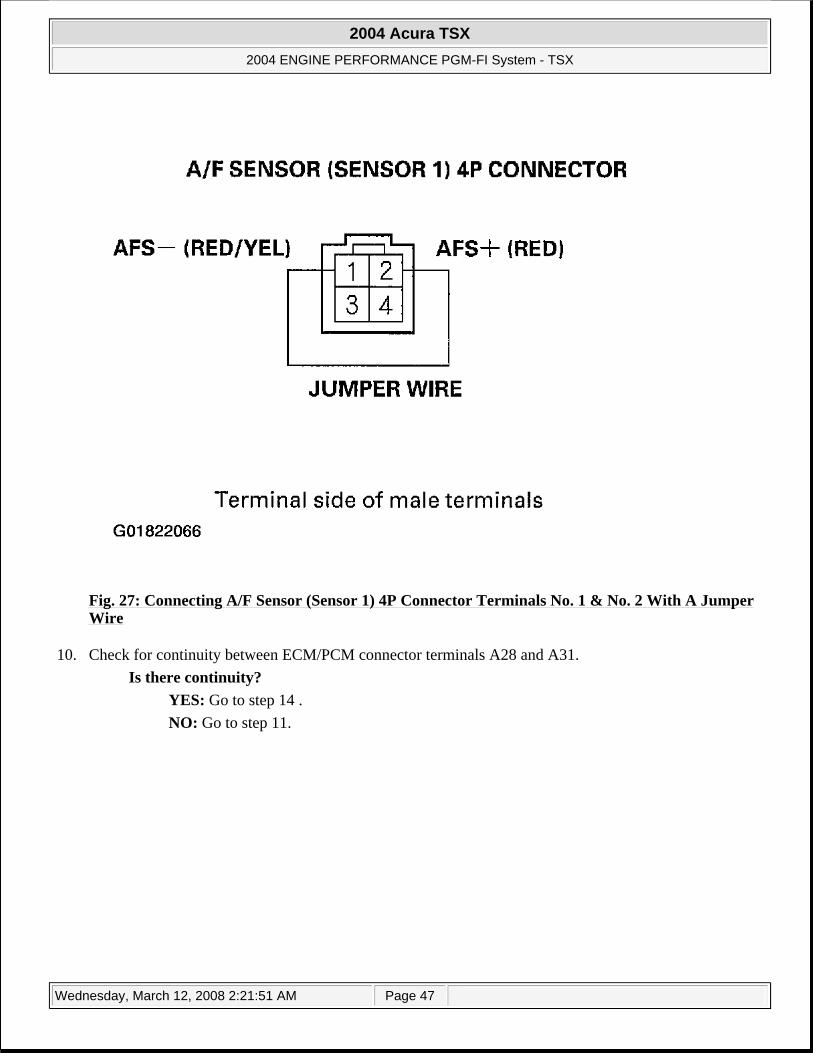
Fig. 27: Connecting A/F Sensor (Sensor 1) 4P Connector Terminals No. 1 & No. 2 With A Jumper Wire
10. Check for continuity between ECM/PCM connector terminals A28 and A31. Is there continuity?
YES: Go to step 14 . NO: Go to step 11.
2004 Acura TSX
2004 ENGINE PERFORMANCE PGM-FI System - TSX
Wednesday, March 12, 2008 2:21:51 AM Page 47
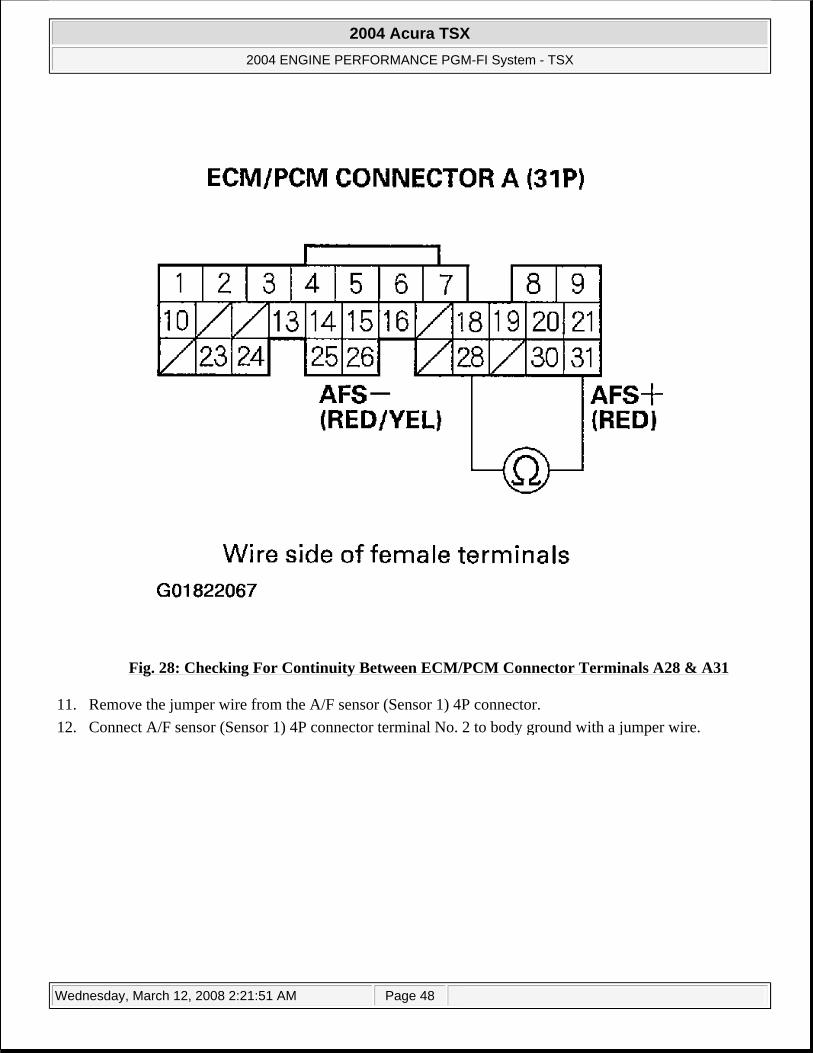
Fig. 28: Checking For Continuity Between ECM/PCM Connector Terminals A28 & A31
11. Remove the jumper wire from the A/F sensor (Sensor 1) 4P connector. 12. Connect A/F sensor (Sensor 1) 4P connector terminal No. 2 to body ground with a jumper wire.
2004 Acura TSX
2004 ENGINE PERFORMANCE PGM-FI System - TSX
Wednesday, March 12, 2008 2:21:51 AM Page 48
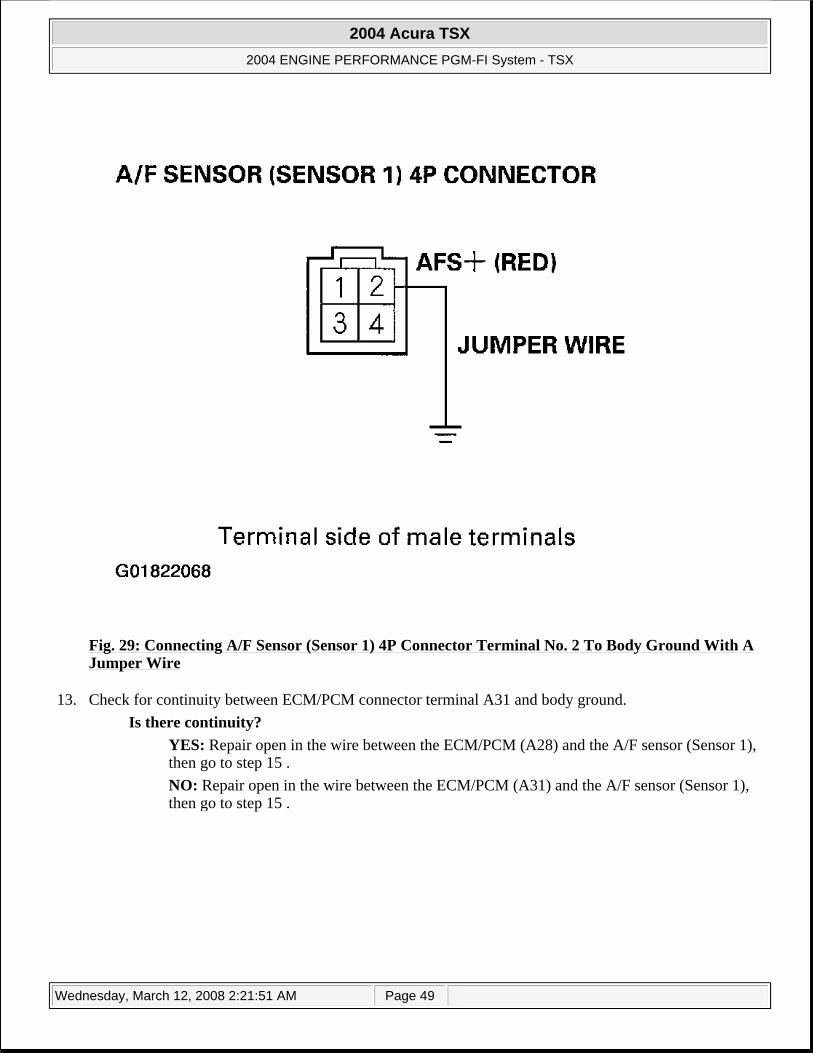
Fig. 29: Connecting A/F Sensor (Sensor 1) 4P Connector Terminal No. 2 To Body Ground With A Jumper Wire
13. Check for continuity between ECM/PCM connector terminal A31 and body ground. Is there continuity?
YES: Repair open in the wire between the ECM/PCM (A28) and the A/F sensor (Sensor 1), then go to step 15 . NO: Repair open in the wire between the ECM/PCM (A31) and the A/F sensor (Sensor 1), then go to step 15 .
2004 Acura TSX
2004 ENGINE PERFORMANCE PGM-FI System - TSX
Wednesday, March 12, 2008 2:21:51 AM Page 49
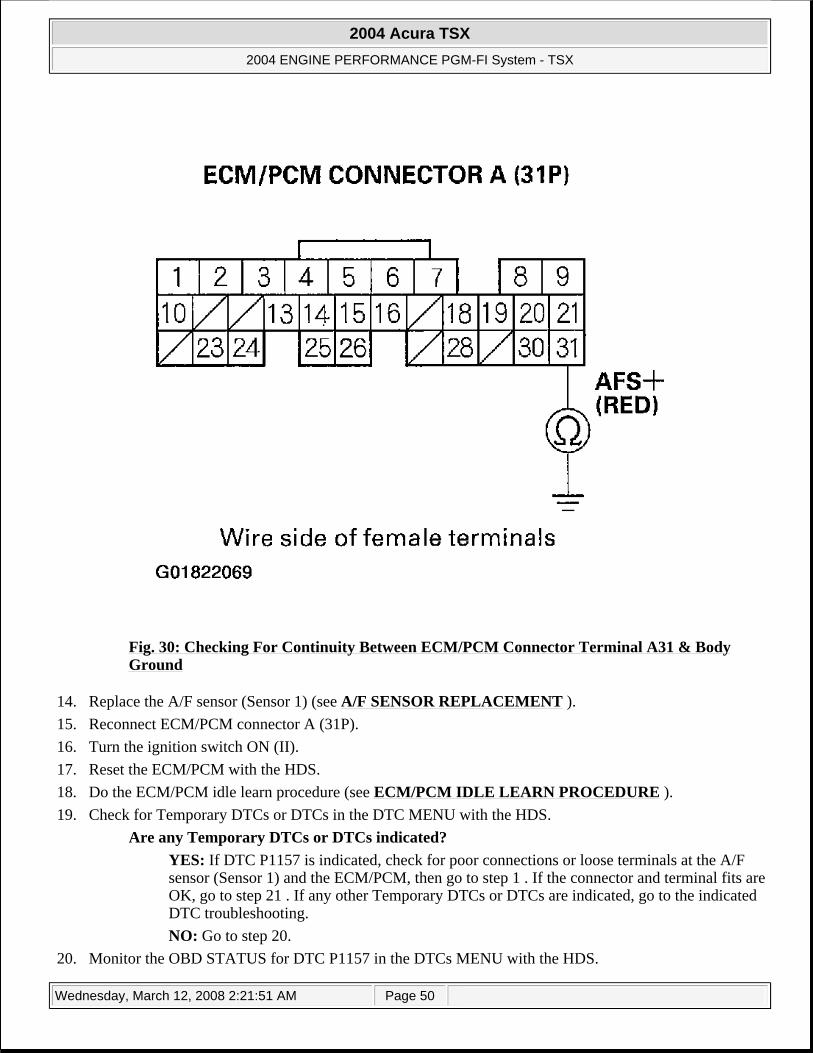
Fig. 30: Checking For Continuity Between ECM/PCM Connector Terminal A31 & Body Ground
14. Replace the A/F sensor (Sensor 1) (see A/F SENSOR REPLACEMENT ). 15. Reconnect ECM/PCM connector A (31P). 16. Turn the ignition switch ON (II). 17. Reset the ECM/PCM with the HDS. 18. Do the ECM/PCM idle learn procedure (see ECM/PCM IDLE LEARN PROCEDURE ). 19. Check for Temporary DTCs or DTCs in the DTC MENU with the HDS.
Are any Temporary DTCs or DTCs indicated? YES: If DTC P1157 is indicated, check for poor connections or loose terminals at the A/F sensor (Sensor 1) and the ECM/PCM, then go to step 1 . If the connector and terminal fits are OK, go to step 21 . If any other Temporary DTCs or DTCs are indicated, go to the indicated DTC troubleshooting. NO: Go to step 20.
20. Monitor the OBD STATUS for DTC P1157 in the DTCs MENU with the HDS.
2004 Acura TSX
2004 ENGINE PERFORMANCE PGM-FI System - TSX
Wednesday, March 12, 2008 2:21:51 AM Page 50
Does the screen indicate PASSED? YES: Troubleshooting is complete. NO: If the screen indicates FAILED, check for poor connections or loose terminals at the A/F sensor (Sensor 1) and the ECM/PCM, then go to step 1 . If the screen indicates NOT COMPLETED, go to step and recheck.
21. Update the ECM/PCM if it does not have the latest software, or substitute a known-good ECM/PCM (see HOW TO SUBSTITUTE THE ECM/PCM ).
22. Check for Temporary DTCs or DTCs in the DTCs MENU with the HDS. Is DTC P1157 indicated?
YES: Go to step 20 and recheck. NO: If the ECM/PCM was updated, troubleshooting is complete. If the ECM/PCM was substituted, replace the original ECM/PCM (see HOW TO REMOVE THE ECM/PCM FOR TESTING ).
DTC P2195: A/F SENSOR (SENSOR 1) SIGNAL STUCK LEAN
1. Inspect the condition of the A/F sensor (Sensor 1). Is it loose in the exhaust pipe?
YES: Go to step 2. NO: Go to step 4 .
2. Turn the ignition switch OFF. 3. Reinstall the A/F sensor (Sensor 1) (see A/F SENSOR REPLACEMENT ). 4. Turn the ignition switch ON (II). 5. Reset the ECM/PCM with the HDS. 6. Do the ECM/PCM idle learn procedure (see ECM/PCM IDLE LEARN PROCEDURE ). 7. Check for Temporary DTCs or DTCs in the DTCs MENU with the HDS.
Are any Temporary DTCs or DTCs indicated? YES: If DTC P2195 is indicated, check for poor connections or loose terminals at the A/F sensor (Sensor 1) and the ECM/PCM, then go to step 1 . If the connection and terminal fits are OK, go to step 8. If any other Temporary DTCs or DTCs are indicated, go to the indicated DTC troubleshooting. NO: Intermittent failure, system is OK at this time. Check for poor connections or loose terminals at the A/F sensor (Sensor 1) and the ECM/PCM.
8. Monitor the OBD STATUS for DTC P2195 in the DTCs MENU with the HDS. Does the screen indicate PASSED?
YES: Troubleshooting is complete. NO: If the screen indicates FAILED, check for poor connections or loose terminals at the A/F sensor (Sensor 1) and the ECM/PCM, then go to step 2 . If the screen indicates NOT COMPLETED, go to step 5 and recheck.
DTC P2238: A/F SENSOR (SENSOR 1) AFS+ LINE LOW VOLTAGE
2004 Acura TSX
2004 ENGINE PERFORMANCE PGM-FI System - TSX
Wednesday, March 12, 2008 2:21:51 AM Page 51

1. Turn the ignition switch ON (II). 2. Clear the DTC with the HDS. 3. Check for Temporary DTCs or DTCs in the DTCs MENU with the HDS.
Is DTC P2238 indicated? YES: Go to step 4. NO: Intermittent failure, system is OK at this time. Check for poor connections or loose terminals at the A/F sensor (Sensor 1) and the ECM/PCM.
4. Turn the ignition switch OFF. 5. Jump the SCS line with the HDS. 6. Disconnect the A/F sensor (Sensor 1) 4P connector. 7. Disconnect ECM/PCM connector A(31P). 8. Check for continuity between ECM/PCM connector terminal A31 and body ground.
Is there continuity? YES: Repair short in the wire between the ECM/PCM (A31) and the A/F sensor (Sensor 1), then go to step 11 . NO: Go to step 9.
2004 Acura TSX
2004 ENGINE PERFORMANCE PGM-FI System - TSX
Wednesday, March 12, 2008 2:21:51 AM Page 52

Fig. 31: Checking For Continuity Between ECM/PCM Connector Terminal A31 And Body Ground
9. Reconnect ECM/PCM connector A (31P). 10. Replace the A/F sensor (Sensor 1) (see A/F SENSOR REPLACEMENT ). 11. Turn the ignition switch ON (II). 12. Reset the ECM/PCM with the HDS. 13. Do the ECM/PCM idle learn procedure (see ECM/PCM IDLE LEARN PROCEDURE ). 14. Check for Temporary DTCs or DTCs in the DTCs MENU with the HDS.
Are any Temporary DTCs or DTCs indicated? YES: If DTC P2238 is indicated, check for poor connections or loose terminals at the A/F sensor (Sensor 1) and the ECM/PCM, then go to step 1 . If the connector and terminal fits are OK, go to step 16 . If any other Temporary DTCs or DTCs are indicated, go to the indicated DTC troubleshooting. NO: Go to step 15.
15. Monitor the OBD STATUS for DTC P2238 in the DTCs MENU with the HDS.
2004 Acura TSX
2004 ENGINE PERFORMANCE PGM-FI System - TSX
Wednesday, March 12, 2008 2:21:51 AM Page 53
Does the screen indicate PASSED? YES: Troubleshooting is complete. NO: If the screen indicates FAILED, check for poor connections or loose terminals at the A/F sensor (Sensor 1) and the ECM/PCM, then go to step 1 . If the screen indicates NOT COMPLETED, go to step 13 and recheck.
16. Update the ECM/PCM if it does not have the latest software, or substitute a known-good ECM/PCM (see HOW TO SUBSTITUTE THE ECM/PCM ).
17. Check for Temporary DTCs or DTCs in the DTCs MENU with the HDS. Is DTC P2238 indicated?
YES: Go to step 15 and recheck. NO: If the ECM/PCM was updated, troubleshooting is complete. If the ECM/PCM was substituted, replace the original ECM/PCM (see HOW TO REMOVE THE ECM/PCM FOR TESTING ).
DTC P2252: A/F SENSOR (SENSOR 1) AFS- LINE LOW VOLTAGE
1. Turn the ignition switch ON (II). 2. Clear the DTC with the HDS. 3. Start the engine. 4. Check for Temporary DTCs or DTCs in the DTCs MENU with the HDS.
Is DTC P2252 indicated? YES: Go to step 5. NO: Intermittent failure, system is OK at this time. Check for poor connections or loose terminals at the A/F sensor (Sensor 1) and the ECM/PCM.
5. Turn the ignition switch OFF. 6. Jump the SCS line with the HDS. 7. Disconnect the A/F sensor (Sensor 1) 4P connector. 8. Disconnect ECM/PCM connector A (31P). 9. Check for continuity between ECM/PCM connector terminal A28 and body ground.
Is there continuity? YES: Repair short in the wire between the ECM/PCM (A28) and the A/F sensor (Sensor 1), then go to step 12 . NO: Go to step 10.
2004 Acura TSX
2004 ENGINE PERFORMANCE PGM-FI System - TSX
Wednesday, March 12, 2008 2:21:52 AM Page 54
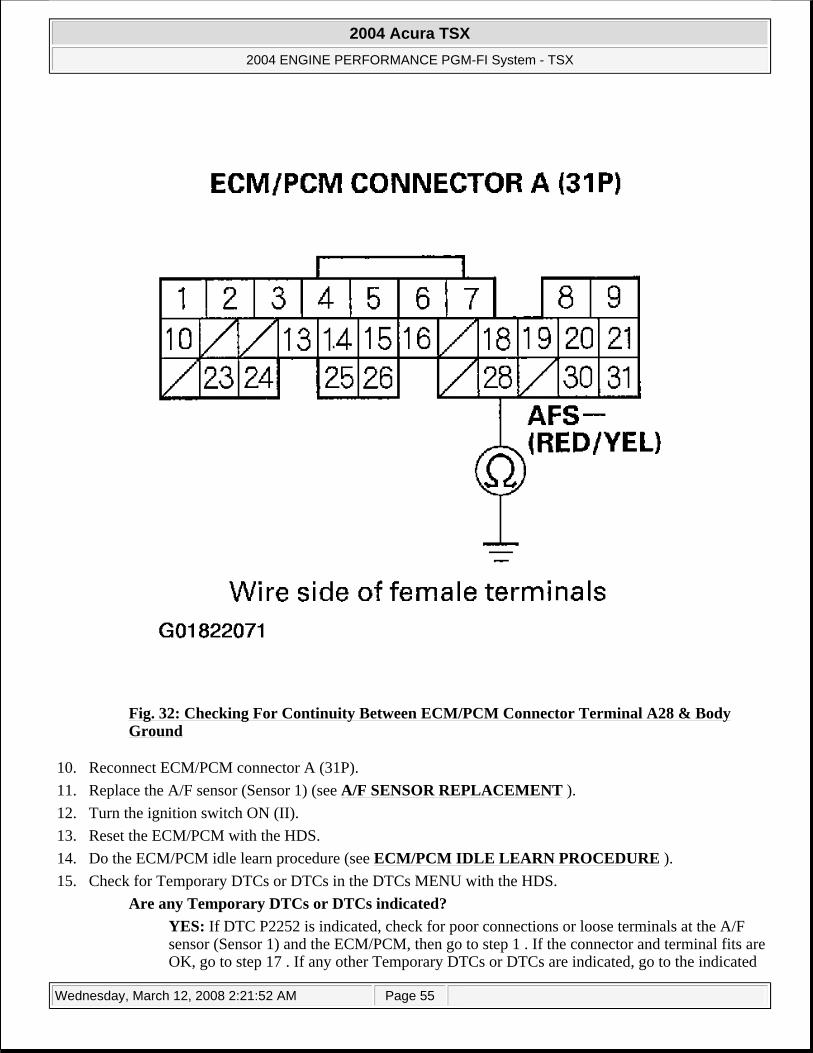
Fig. 32: Checking For Continuity Between ECM/PCM Connector Terminal A28 & Body Ground
10. Reconnect ECM/PCM connector A (31P). 11. Replace the A/F sensor (Sensor 1) (see A/F SENSOR REPLACEMENT ). 12. Turn the ignition switch ON (II). 13. Reset the ECM/PCM with the HDS. 14. Do the ECM/PCM idle learn procedure (see ECM/PCM IDLE LEARN PROCEDURE ). 15. Check for Temporary DTCs or DTCs in the DTCs MENU with the HDS.
Are any Temporary DTCs or DTCs indicated? YES: If DTC P2252 is indicated, check for poor connections or loose terminals at the A/F sensor (Sensor 1) and the ECM/PCM, then go to step 1 . If the connector and terminal fits are OK, go to step 17 . If any other Temporary DTCs or DTCs are indicated, go to the indicated
2004 Acura TSX
2004 ENGINE PERFORMANCE PGM-FI System - TSX
Wednesday, March 12, 2008 2:21:52 AM Page 55
DTC troubleshooting. NO: Go to step 16.
16. Monitor the OBD STATUS for DTC P2252 in the DTCs MENU with the HDS. Does the screen indicate PASSED?
YES: Troubleshooting is complete. NO: If the screen indicates FAILED, check for poor connections or loose terminals at the A/F sensor (Sensor 1) and the ECM/PCM, then go to step 1 . If the screen indicates NOT COMPLETED, go to step 14 and recheck.
17. Update the ECM/PCM if it does not have the latest software, or substitute a known-good ECM/PCM (see HOW TO SUBSTITUTE THE ECM/PCM ).
18. Check for Temporary DTCs or DTCs in the DTCs MENU with the HDS. Is DTC P2252 indicated?
YES: Go to step 16 and recheck. NO: If the ECM/PCM was updated, troubleshooting is complete. If the ECM/PCM was substituted, replace the original ECM/PCM (see HOW TO REMOVE THE ECM/PCM FOR TESTING ).
DTC P2A00: A/F SENSOR (SENSOR 1) RANGE/PERFORMANCE PROBLEM
1. Turn the ignition switch ON (II). 2. Clear the DTC with the HDS. 3. Start the engine. Hold the engine speed at 3,000 RPM with no load (in Park or neutral) until the radiator
fan comes on, then let it idle. 4. Check the AF FB AVG in the DATA LIST with the HDS.
Is the value between 0.8-1.2? YES: Go to step 5. NO: Go to step 2 and recheck.
5. Test-drive under the following conditions: Engine coolant temperature more than 158°F (70°C) A/T in D position (M/T in 3rd gear) Vehicle speed at 26 MPH (41 km/h) or more, and engine speed at 3,250 RPM or less Drive with the throttle fully opened for 5 seconds at an engine speed of 1,600 RPM, then slow down with the throttle completely closed.
6. Monitor the OBD STATUS for DTC P2A00 in the DTCs MENU with the HDS. Does the screen indicate FAILED?
YES: Go to step 7. NO: If the screen indicates PASSED, intermittent failure, system is OK at this time. If the screen indicates EXECUTING, keep driving until a result comes on. If the screen indicates out of CONDITION, go to step 3 and recheck.
7. Turn the ignition switch OFF.
2004 Acura TSX
2004 ENGINE PERFORMANCE PGM-FI System - TSX
Wednesday, March 12, 2008 2:21:52 AM Page 56

8. Replace the A/F sensor (Sensor 1) (see A/F SENSOR REPLACEMENT ). 9. Turn the ignition switch ON (II).
10. Reset the ECM/PCM with the HDS. 11. Do the ECM/PCM idle learn procedure (see ECM/PCM IDLE LEARN PROCEDURE ). 12. Check the AF FB AVG in the DATA LIST with the HDS.
Is the value between 0.8-1.2? YES: Go to step 13. NO: Go to step 11 and recheck.
13. Test-drive under the following conditions: Engine coolant temperature more than 158°F (70°C) A/T in D position (M/T in 3rd gear) Vehicle speed at 26 MPH (41 km/h) or more, and engine speed at 3,250 RPM or less Drive with the throttle fully opened for 5 seconds at an engine speed of 1,600 RPM, then slow down with the throttle completely closed.
14. Check for Temporary DTCs or DTCs in the DTCs MENU with the HDS. Are any Temporary DTCs or DTCs indicated?
YES: If DTC P2A00 is indicated, check for poor connections or loose terminals at the A/F sensor (Sensor 1) and the ECM/PCM, then go to step 1 . If any other Temporary DTCs or DTCs are indicated, go to the indicated DTC troubleshooting. NO: Go to step 15.
15. Monitor the OBD STATUS for DTC P2A00 in the DTCs MENU with the HDS. Does the screen indicate PASSED?
YES: Troubleshooting is complete. NO: If the screen indicates FAILED, check for poor connections or loose terminals at the A/F sensor (Sensor 1) and the ECM/PCM, then go to step 1 . If the screen indicates EXECUTING, keep driving until a result comes on. If the screen indicates Out of CONDITION, go to step 11 and recheck.
DTC P0137: SECONDARY HO2S (SENSOR 2) CIRCUIT LOW VOLTAGE
1. Turn the ignition switch ON (II). 2. Clear the DTC with the HDS. 3. Start the engine. Hold the engine speed at 3,000 RPM with no load (in Park or neutral) until the radiator
fan comes on, then let it idle. 4. Check the HO2S S2 in the DATA LIST with the HDS.
Does the voltage stay at 0.29 V or less? YES: Go to step 5. NO: Go to step 9 .
5. Turn the ignition switch OFF. 6. Disconnect the secondary HO2S (Sensor 2) 4P connector (see SECONDARY HO2S
2004 Acura TSX
2004 ENGINE PERFORMANCE PGM-FI System - TSX
Wednesday, March 12, 2008 2:21:52 AM Page 57
REPLACEMENT ). 7. Turn the ignition switch ON (II). 8. Check the HO2S S2 in the DATA LIST with the HDS.
Does the voltage stay at 0.29 V or less? YES: Go to step 11 . NO: Go to step 15 .
9. Test-drive under the following conditions: Engine coolant temperature more than 158°F (70°C) A/T in D position (M/T in 4th gear) Engine speed at 2,000-3,000 RPM Drive about 10 minutes, then decelerate (with the throttle fully closed) for 5 seconds
10. Monitor the OBD STATUS for DTC P0137 in the DTCs MENU with the HDS. Does the screen indicate FAILED?
YES: Go to step 16 . NO: If the screen indicates PASSED, intermittent failure, system is OK at this time. If the screen indicates EXECUTING, keep driving until a result comes on. If the screen indicates Out of CONDITION, go to step and recheck.
11. Turn the ignition switch OFF. 12. Jump the SCS line with the HDS. 13. Disconnect ECM/PCM connector E (31P). 14. Check for continuity between Secondary HO2S (Sensor 2) 4P connector terminal No. 2 and body ground.
Is there continuity? YES: Repair short in the wire between the ECM/PCM (E20) and the secondary HO2S (Sensor 2), then go to step 17 . NO: Go to step 24 .
2004 Acura TSX
2004 ENGINE PERFORMANCE PGM-FI System - TSX
Wednesday, March 12, 2008 2:21:52 AM Page 58
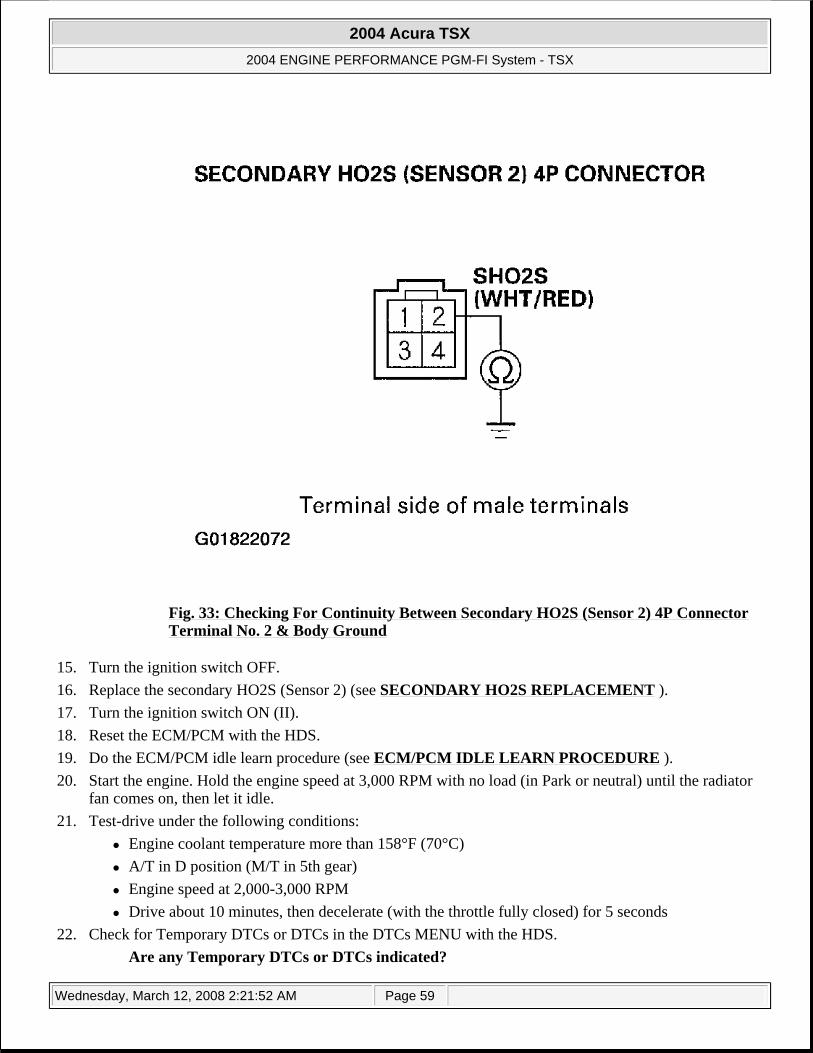
Fig. 33: Checking For Continuity Between Secondary HO2S (Sensor 2) 4P Connector Terminal No. 2 & Body Ground
15. Turn the ignition switch OFF. 16. Replace the secondary HO2S (Sensor 2) (see SECONDARY HO2S REPLACEMENT ). 17. Turn the ignition switch ON (II). 18. Reset the ECM/PCM with the HDS. 19. Do the ECM/PCM idle learn procedure (see ECM/PCM IDLE LEARN PROCEDURE ). 20. Start the engine. Hold the engine speed at 3,000 RPM with no load (in Park or neutral) until the radiator
fan comes on, then let it idle. 21. Test-drive under the following conditions:
Engine coolant temperature more than 158°F (70°C) A/T in D position (M/T in 5th gear) Engine speed at 2,000-3,000 RPM Drive about 10 minutes, then decelerate (with the throttle fully closed) for 5 seconds
22. Check for Temporary DTCs or DTCs in the DTCs MENU with the HDS. Are any Temporary DTCs or DTCs indicated?
2004 Acura TSX
2004 ENGINE PERFORMANCE PGM-FI System - TSX
Wednesday, March 12, 2008 2:21:52 AM Page 59
YES: If DTC P0137 is indicated, check for poor connections or loose terminals at the secondary HO2S (Sensor 2) and the ECM/PCM, then go to step 1 . If any other Temporary DTCs or DTCs are indicated, go to the indicated DTC troubleshooting. NO: Go to step 23.
23. Monitor the OBD STATUS for DTC P0137 in the DTCs MENU with the HDS. Does the screen indicate PASSED?
YES: Troubleshooting is complete. NO: If the screen indicates FAILED, check for poor connections or loose terminals at the secondary HO2S (Sensor 2) and the ECM/PCM, then go to step 1 . If the screen indicates EXECUTING, keep driving until a result comes on. If the screen indicates Out of CONDITION, go to step 20 and recheck.
24. Update the ECM/PCM if it does not have the latest software, or substitute a known-good ECM/PCM (see HOW TO SUBSTITUTE THE ECM/PCM ).
25. Start the engine. Hold the engine speed at 3,000 RPM with no load (in Park or neutral) until the radiator fan comes on, then let it idle.
26. Test-drive under the following conditions: Engine coolant temperature more than 158°F (70°C) A/T in D position (M/T in 5th gear) Engine speed at 2,000-3,000 RPM Drive about 10 minutes, then decelerate (with the throttle fully closed) for 5 seconds
27. Check for Temporary DTCs or DTCs in the DTCs MENU with the HDS. Are any Temporary DTCs or DTCs indicated?
YES: If DTC P0137 is indicated, check for poor connections or loose terminals at the secondary HO2S (Sensor 2) and the ECM/PCM, then go to step 1 . If any other Temporary DTCs or DTCs are indicated, go to the indicated DTC troubleshooting. NO: If the ECM/PCM was updated, troubleshooting is complete. If the ECM/PCM was substituted, replace the original ECM/PCM (see HOW TO REMOVE THE ECM/PCM FOR TESTING ).
DTC P0138: SECONDARY HO2S (SENSOR 2) CIRCUIT HIGH VOLTAGE
1. Turn the ignition switch ON (II). 2. Clear the DTC with the HDS. 3. Start the engine. Hold the engine speed at 3,000 RPM with no load (in Park or neutral) until the radiator
fan comes on, then let it idle. 4. Check the HO2S S2 in the DATA LIST with the HDS.
Does the voltage stay at 0.75 V or higher? YES: Go to step 7 . NO: Go to step 5.
5. Test-drive under the following conditions: Engine coolant temperature more than 158°F (70°C)
2004 Acura TSX
2004 ENGINE PERFORMANCE PGM-FI System - TSX
Wednesday, March 12, 2008 2:21:52 AM Page 60

A/T in D position (M/T in 5th gear) Engine speed at 2,000-3,000 RPM Drive about 10 minutes, then decelerate (with the throttle fully closed) for 5 seconds
6. Monitor the OBD STATUS for DTC P0138 in the DTCs MENU with the HDS. Does the screen indicate FAILED?
YES: Go to step 19 . NO: If the screen indicates PASSED, intermittent failure, system is OK at this time. If the screen indicates EXECUTING, keep driving until a result comes on. If the screen indicates Out of CONDITION, go to step 5 and recheck.
7. Turn the ignition switch OFF. 8. Disconnect the Secondary HO2S (Sensor 2) 4P connector. 9. Connect Secondary HO2S (Sensor 2) 4P connector terminals No. 1 and No. 2 with a jumper wire.
Fig. 34: Connecting Secondary HO2S (Sensor 2) 4P Connector Terminals No. 1 & No. 2 With A Jumper Wire
10. Turn the ignition switch ON (II). 11. Check the HO2S S2 in the DATA LIST with the HDS.
2004 Acura TSX
2004 ENGINE PERFORMANCE PGM-FI System - TSX
Wednesday, March 12, 2008 2:21:52 AM Page 61
Does the voltage stay at 0.75 V or higher? YES: Go to step 12. NO: Go to step 19 .
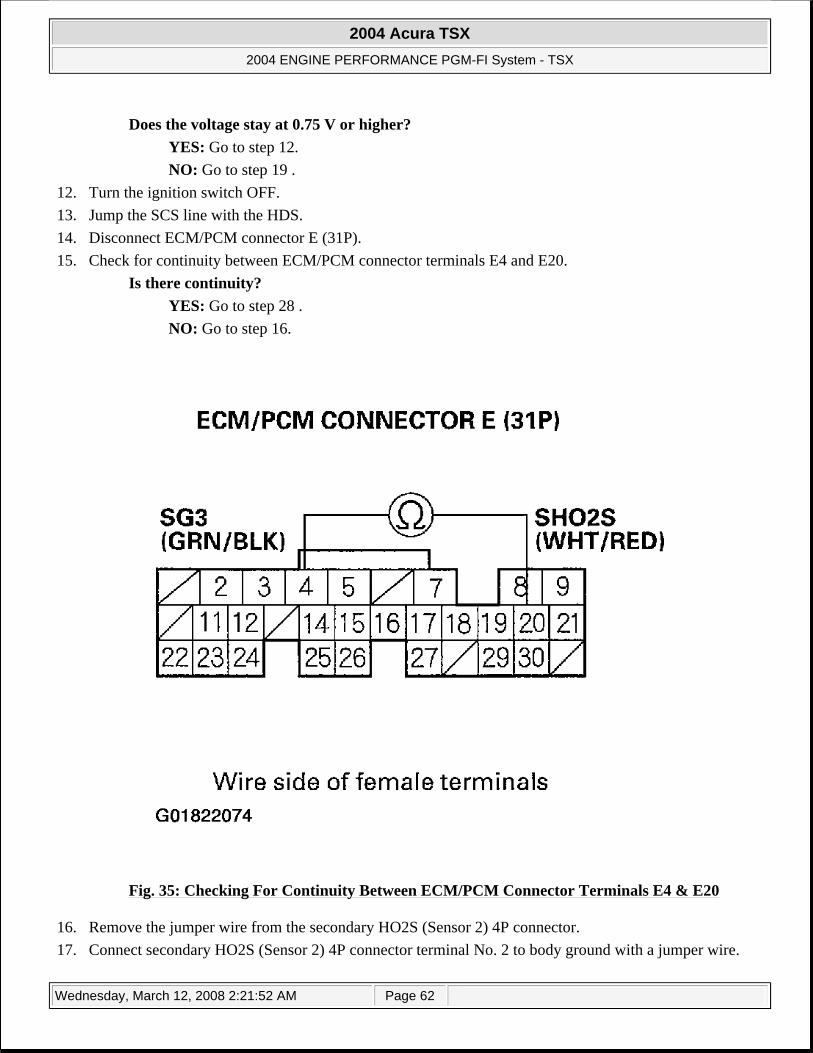
12. Turn the ignition switch OFF. 13. Jump the SCS line with the HDS. 14. Disconnect ECM/PCM connector E (31P). 15. Check for continuity between ECM/PCM connector terminals E4 and E20.
Is there continuity? YES: Go to step 28 . NO: Go to step 16.
Fig. 35: Checking For Continuity Between ECM/PCM Connector Terminals E4 & E20
16. Remove the jumper wire from the secondary HO2S (Sensor 2) 4P connector. 17. Connect secondary HO2S (Sensor 2) 4P connector terminal No. 2 to body ground with a jumper wire.
2004 Acura TSX
2004 ENGINE PERFORMANCE PGM-FI System - TSX
Wednesday, March 12, 2008 2:21:52 AM Page 62
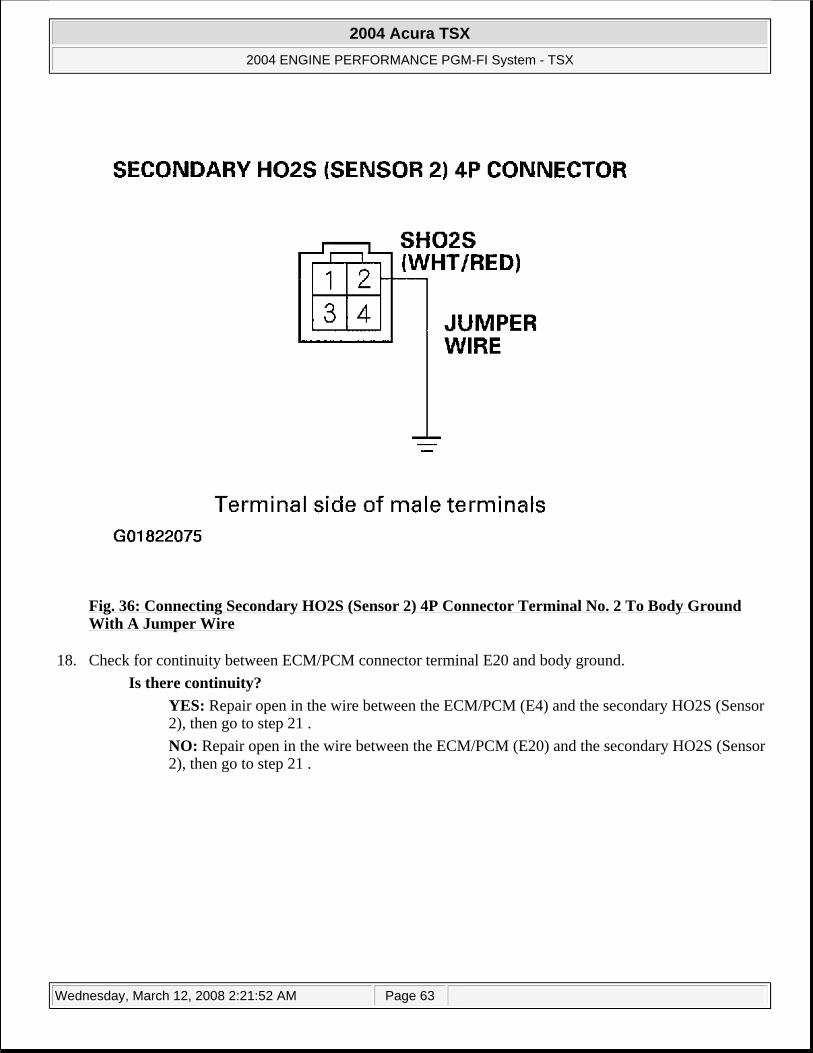
Fig. 36: Connecting Secondary HO2S (Sensor 2) 4P Connector Terminal No. 2 To Body Ground With A Jumper Wire
18. Check for continuity between ECM/PCM connector terminal E20 and body ground. Is there continuity?
YES: Repair open in the wire between the ECM/PCM (E4) and the secondary HO2S (Sensor 2), then go to step 21 . NO: Repair open in the wire between the ECM/PCM (E20) and the secondary HO2S (Sensor 2), then go to step 21 .
2004 Acura TSX
2004 ENGINE PERFORMANCE PGM-FI System - TSX
Wednesday, March 12, 2008 2:21:52 AM Page 63

Fig. 37: Checking For Continuity Between ECM/PCM Connector Terminal E20 & Body Ground
19. Turn the ignition switch OFF. 20. Replace the secondary HO2S (Sensor 2) (see SECONDARY HO2S REPLACEMENT ). 21. Turn the ignition switch ON (II). 22. Reset the ECM/PCM with the HDS. 23. Do the ECM/PCM idle learn procedure (see ECM/PCM IDLE LEARN PROCEDURE ). 24. Start the engine. Hold the engine speed at 3,000 RPM with no load (in Park or neutral) until the radiator
fan comes on, then let it idle. 25. Test-drive under the following conditions:
Engine coolant temperature more than 158°F (70°C) A/T in D position (M/T in 5th gear) Engine speed at 2,000-3,000 RPM Drive about 10 minutes, then decelerate (with the throttle fully closed) for 5 seconds
26. Check for Temporary DTCs or DTCs in the DTCs MENU with the HDS.
2004 Acura TSX
2004 ENGINE PERFORMANCE PGM-FI System - TSX
Wednesday, March 12, 2008 2:21:52 AM Page 64
Are any Temporary DTCs or DTCs indicated? YES: If DTC P0138 is indicated, check for poor connections or loose terminals at the secondary HO2S (Sensor 2) and the ECM/PCM, then go to step 1 . If any other Temporary DTCs or DTCs are indicated, go to the indicated DTC troubleshooting. NO: Go to step 27.
27. Monitor the OBD STATUS for DTC P0138 in the DTCs MENU with the HDS. Does the screen indicate PASSED?
YES: Troubleshooting is complete. NO: If the screen indicates FAILED, check for poor connections or loose terminals at the secondary HO2S (Sensor 2) and the ECM/PCM, then go to step 1 . If the screen indicates EXECUTING, keep driving until a result comes on. If the screen indicates Out of CONDITION, go to step 24 and recheck.
28. Update the ECM/PCM if it does not have the latest software, or substitute a known-good ECM/PCM (see HOW TO SUBSTITUTE THE ECM/PCM ).
29. With engine at operating temperature, (the radiator fans come on) let the engine idle for 10 minutes.
30. Test-drive under the following conditions: Engine coolant temperature more than 158°F (70°C) A/T in D position (M/T in 5th gear) Engine speed at 2,000-3,000 RPM Drive about 10 minutes, then decelerate (with the throttle fully closed) for 5 seconds
31. Check for Temporary DTCs or DTCs in the DTCs MENU with the HDS. Are any Temporary DTCs or DTCs indicated?
YES: If DTC P0138 is indicated, check for poor connections or loose terminals at the secondary HO2S (Sensor 2) and the ECM/PCM, then go to step 1 . If any other Temporary DTCs or DTCs are indicated, go to the indicated DTC troubleshooting. NO: If the ECM/PCM was updated, troubleshooting is complete. If the ECM/PCM was substituted, replace the original ECM/PCM (see HOW TO REMOVE THE ECM/PCM FOR TESTING ).
DTC P0139: SLOW RESPONSE IN SECONDARY HO2S (SENSOR 2) CIRCUIT
1. Turn the ignition switch ON (II). 2. Clear the DTC with the HDS. 3. Start the engine. Hold the engine speed at 3,000 RPM with no load (in Park or neutral) until the radiator
fan comes on, then let it idle. 4. Test-drive under the following conditions:
Engine coolant temperature more than 158°F (70°C) A/T in D position (M/T in 4th gear)
NOTE: The engine must idle for 10 minutes in addition to the idle learn procedure.
2004 Acura TSX
2004 ENGINE PERFORMANCE PGM-FI System - TSX
Wednesday, March 12, 2008 2:21:52 AM Page 65
Engine speed at 2,000-3,000 RPM Drive about 10 minutes, then decelerate (with the throttle fully closed) for 5 seconds
5. Monitor the OBD STATUS for DTC P0139 in the DTCs MENU with the HDS. Does the screen indicate FAILED?
YES: Go to step 6. NO: If the screen indicates PASSED, intermittent failure, system is OK at this time. If the screen indicates EXECUTING, keep driving until a result comes on. If the screen indicates Out of CONDITION, go to step 3 and recheck.
6. Turn the ignition switch OFF. 7. Replace the secondary HO2S (Sensor 2) (see SECONDARY HO2S REPLACEMENT ). 8. Turn the ignition switch ON (II). 9. Reset the ECM/PCM with the HDS.
10. Do the ECM/PCM idle learn procedure (see ECM/PCM IDLE LEARN PROCEDURE ). 11. Start the engine. Hold the engine speed at 3,000 RPM with no load (in Park or neutral) until the radiator
fan comes on, then let it idle. 12. Test-drive under the following conditions:
Engine coolant temperature more than 158°F (70°C) A/T in D position (M/T in 4th gear) Engine speed at 2,000-3,000 RPM Drive about 10 minutes, then decelerate (with the throttle fully closed) for 5 seconds.
13. Check for Temporary DTCs or DTCs in the DTCs MENU with the HDS. Are any Temporary DTCs or DTCs indicated?
YES: If DTC P0139 is indicated, check for poor connections or loose terminals at the secondary HO2S (Sensor 2) and the ECM/PCM, then go to step 1 . If any other Temporary DTCs or DTCs are indicated, go to the indicated DTC troubleshooting. NO: Go to step 14.
14. Monitor the OBD STATUS for DTC P0139 in the DTCs MENU with the HDS. Does the screen indicate PASSED?
YES: Troubleshooting is complete. NO: If the screen indicates FAILED, check for poor connections or loose terminals at the secondary HO2S (Sensor 2) and the ECM/PCM, then go to step 1 . If the screen indicates EXECUTING, keep driving until a result comes on. If the screen indicates Out of CONDITION, go to step 11 and recheck.
DTC P0141: SECONDARY HO2S (SENSOR 2) HEATER CIRCUIT MALFUNCTION
1. Turn the ignition switch ON (II). 2. Clear the DTC with the HDS. 3. Start the engine. 4. Check for Temporary DTCs or DTCs in the DTCs MENU with the HDS.
2004 Acura TSX
2004 ENGINE PERFORMANCE PGM-FI System - TSX
Wednesday, March 12, 2008 2:21:52 AM Page 66

Is DTC P0141 indicated? YES: Go to step 5. NO: Intermittent failure, system is OK at this time. Check for poor connections or loose terminals at the secondary HO2S (Sensor 2) and the ECM/PCM.
5. Check the No. 18 ACG (15A) fuse in the under-dash fuse/relay box. Is the fuse OK?
YES: Go to step 6. NO: Repair short in the wire between the secondary HO2S (Sensor 2) and the No. 4 ACG (10A) fuse, then go to step 24 .
6. Turn the ignition switch OFF. 7. Disconnect the secondary HO2S (Sensor 2) 4P connector (see SECONDARY HO2S
REPLACEMENT ). 8. At the secondary HO2S (Sensor 2), measure resistance between secondary HO2S (Sensor 2) 4P connector
terminals No. 3 and No. 4. Is there 5.0-6.4 ohm at room temperature?
YES: Go to step 9. NO: Go to step 23 .
2004 Acura TSX
2004 ENGINE PERFORMANCE PGM-FI System - TSX
Wednesday, March 12, 2008 2:21:52 AM Page 67
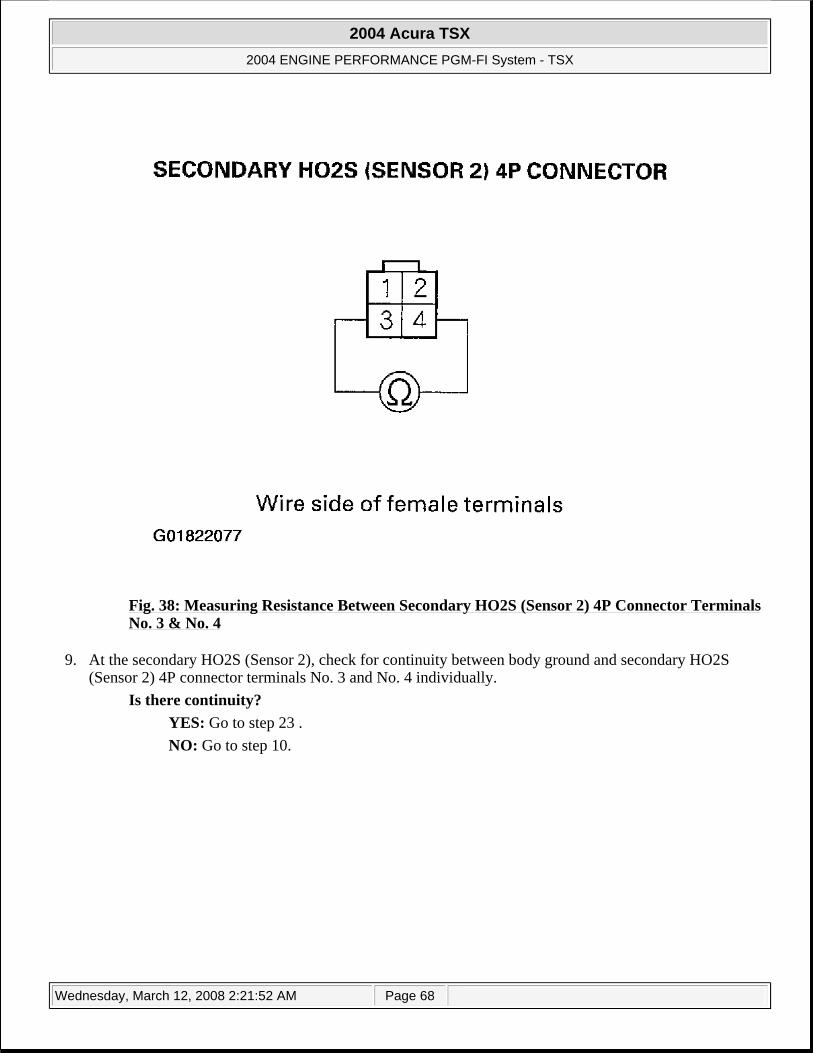
Fig. 38: Measuring Resistance Between Secondary HO2S (Sensor 2) 4P Connector Terminals No. 3 & No. 4
9. At the secondary HO2S (Sensor 2), check for continuity between body ground and secondary HO2S (Sensor 2) 4P connector terminals No. 3 and No. 4 individually.
Is there continuity? YES: Go to step 23 . NO: Go to step 10.
2004 Acura TSX
2004 ENGINE PERFORMANCE PGM-FI System - TSX
Wednesday, March 12, 2008 2:21:52 AM Page 68
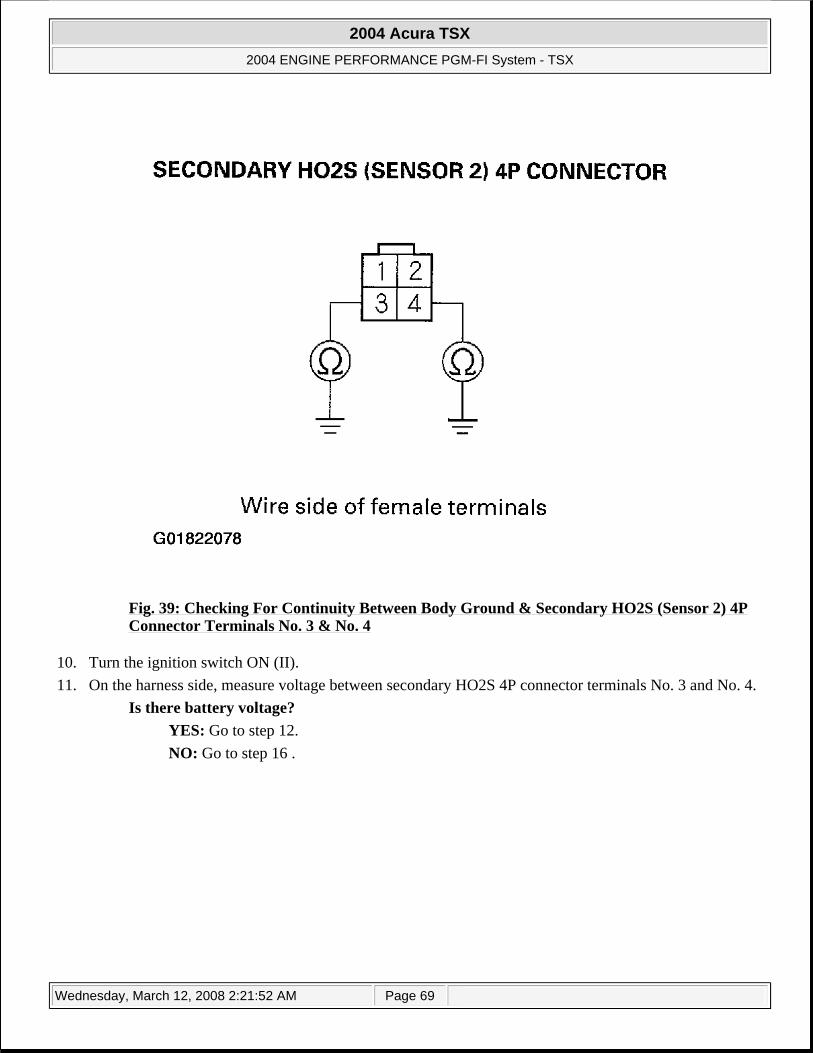
Fig. 39: Checking For Continuity Between Body Ground & Secondary HO2S (Sensor 2) 4P Connector Terminals No. 3 & No. 4
10. Turn the ignition switch ON (II). 11. On the harness side, measure voltage between secondary HO2S 4P connector terminals No. 3 and No. 4.
Is there battery voltage? YES: Go to step 12. NO: Go to step 16 .
2004 Acura TSX
2004 ENGINE PERFORMANCE PGM-FI System - TSX
Wednesday, March 12, 2008 2:21:52 AM Page 69
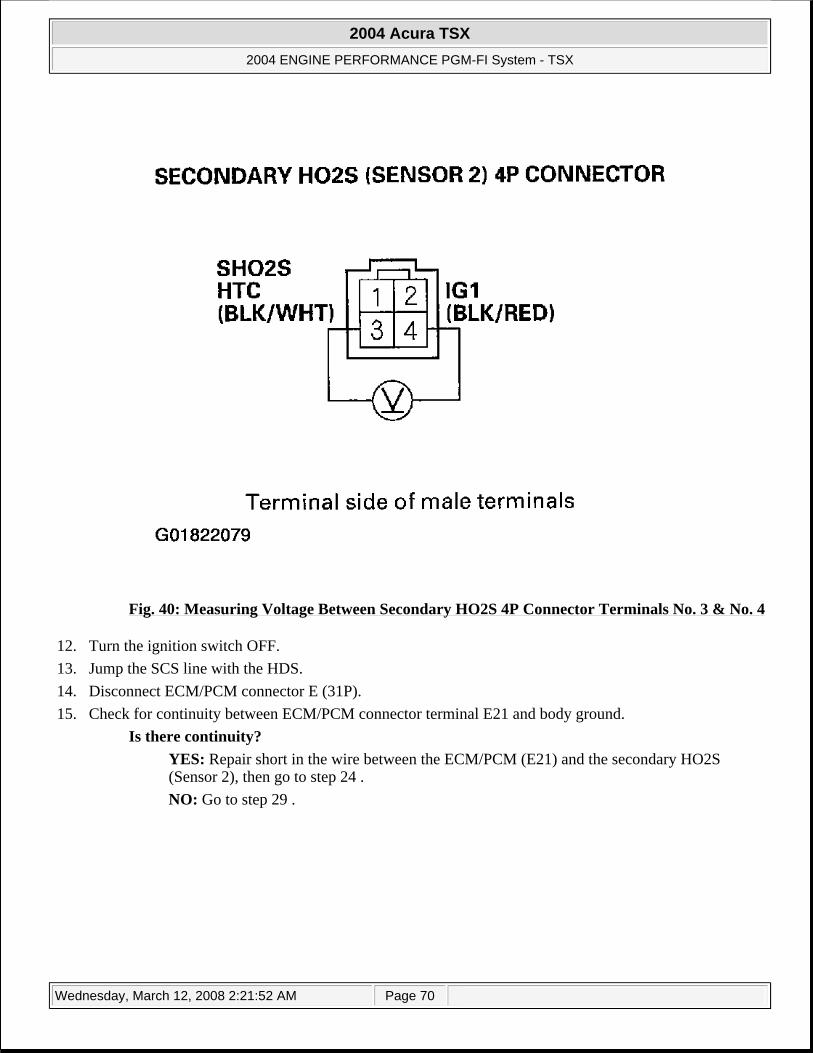
Fig. 40: Measuring Voltage Between Secondary HO2S 4P Connector Terminals No. 3 & No. 4
12. Turn the ignition switch OFF. 13. Jump the SCS line with the HDS. 14. Disconnect ECM/PCM connector E (31P). 15. Check for continuity between ECM/PCM connector terminal E21 and body ground.
Is there continuity? YES: Repair short in the wire between the ECM/PCM (E21) and the secondary HO2S (Sensor 2), then go to step 24 . NO: Go to step 29 .
2004 Acura TSX
2004 ENGINE PERFORMANCE PGM-FI System - TSX
Wednesday, March 12, 2008 2:21:52 AM Page 70
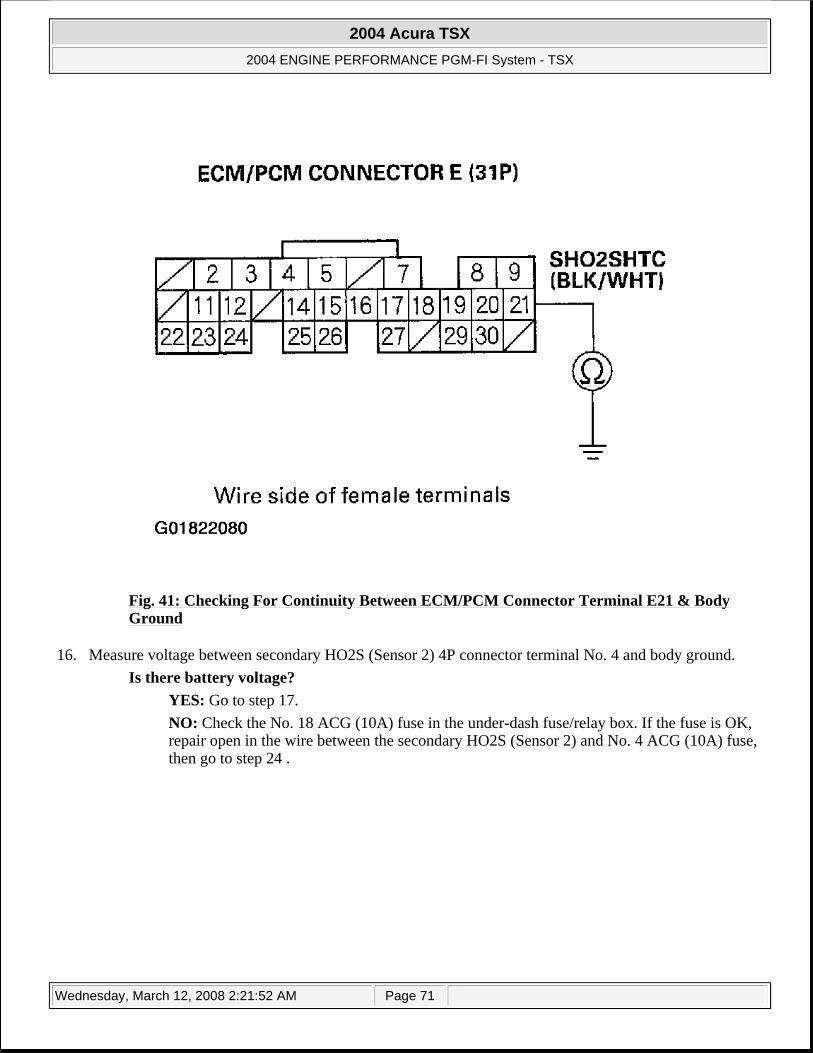
Fig. 41: Checking For Continuity Between ECM/PCM Connector Terminal E21 & Body Ground
16. Measure voltage between secondary HO2S (Sensor 2) 4P connector terminal No. 4 and body ground. Is there battery voltage?
YES: Go to step 17. NO: Check the No. 18 ACG (10A) fuse in the under-dash fuse/relay box. If the fuse is OK, repair open in the wire between the secondary HO2S (Sensor 2) and No. 4 ACG (10A) fuse, then go to step 24 .
2004 Acura TSX
2004 ENGINE PERFORMANCE PGM-FI System - TSX
Wednesday, March 12, 2008 2:21:52 AM Page 71
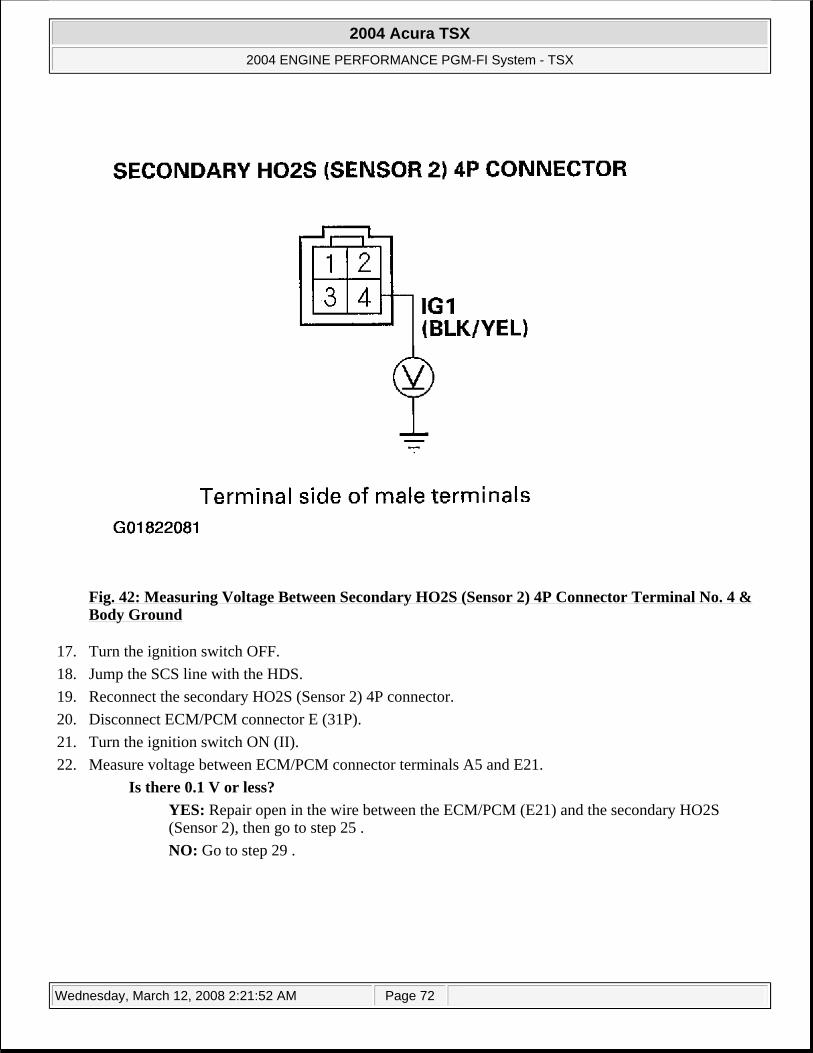
Fig. 42: Measuring Voltage Between Secondary HO2S (Sensor 2) 4P Connector Terminal No. 4 & Body Ground
17. Turn the ignition switch OFF. 18. Jump the SCS line with the HDS. 19. Reconnect the secondary HO2S (Sensor 2) 4P connector. 20. Disconnect ECM/PCM connector E (31P). 21. Turn the ignition switch ON (II). 22. Measure voltage between ECM/PCM connector terminals A5 and E21.
Is there 0.1 V or less? YES: Repair open in the wire between the ECM/PCM (E21) and the secondary HO2S (Sensor 2), then go to step 25 . NO: Go to step 29 .
2004 Acura TSX
2004 ENGINE PERFORMANCE PGM-FI System - TSX
Wednesday, March 12, 2008 2:21:52 AM Page 72
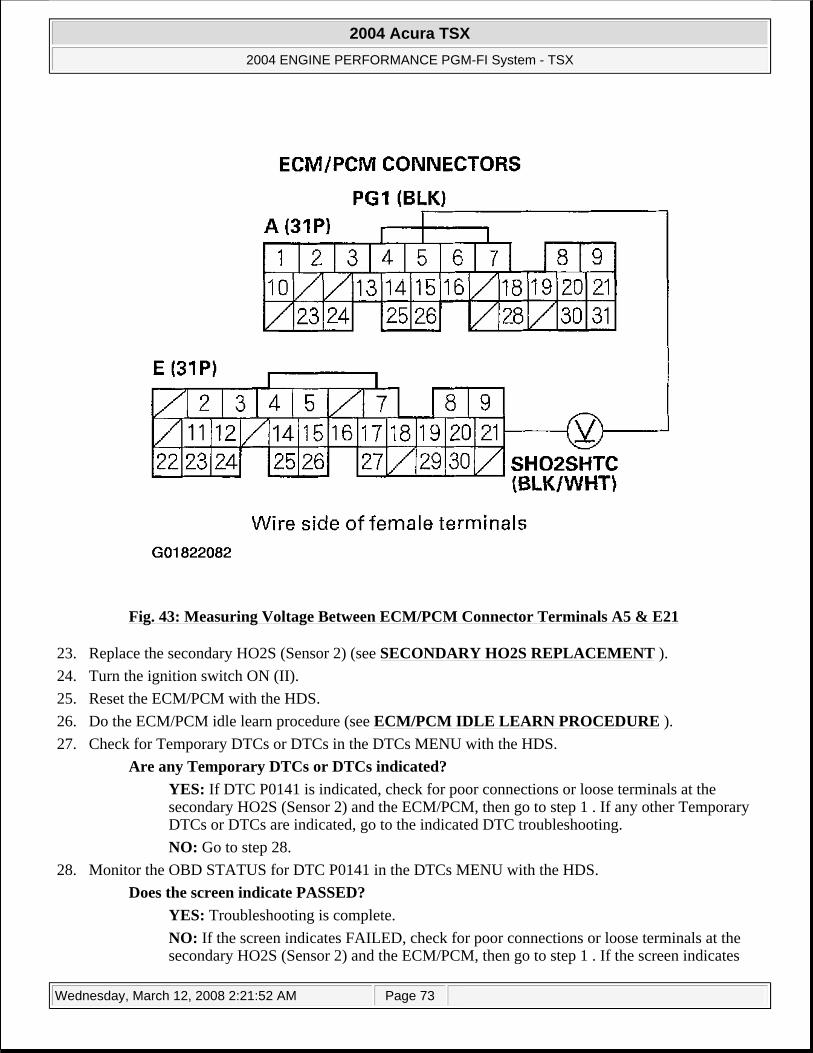
Fig. 43: Measuring Voltage Between ECM/PCM Connector Terminals A5 & E21
23. Replace the secondary HO2S (Sensor 2) (see SECONDARY HO2S REPLACEMENT ). 24. Turn the ignition switch ON (II). 25. Reset the ECM/PCM with the HDS. 26. Do the ECM/PCM idle learn procedure (see ECM/PCM IDLE LEARN PROCEDURE ). 27. Check for Temporary DTCs or DTCs in the DTCs MENU with the HDS.
Are any Temporary DTCs or DTCs indicated? YES: If DTC P0141 is indicated, check for poor connections or loose terminals at the secondary HO2S (Sensor 2) and the ECM/PCM, then go to step 1 . If any other Temporary DTCs or DTCs are indicated, go to the indicated DTC troubleshooting. NO: Go to step 28.
28. Monitor the OBD STATUS for DTC P0141 in the DTCs MENU with the HDS. Does the screen indicate PASSED?
YES: Troubleshooting is complete. NO: If the screen indicates FAILED, check for poor connections or loose terminals at the secondary HO2S (Sensor 2) and the ECM/PCM, then go to step 1 . If the screen indicates
2004 Acura TSX
2004 ENGINE PERFORMANCE PGM-FI System - TSX
Wednesday, March 12, 2008 2:21:52 AM Page 73
NOT COMPLETED, go to step 26 and recheck. 29. Update the ECM/PCM if it does not have the latest software, or substitute a known-good ECM/PCM (see
HOW TO SUBSTITUTE THE ECM/PCM ). 30. Check for Temporary DTCs or DTCs in the DTCs MENU with the HDS.
Are any Temporary DTCs or DTCs indicated? YES: If DTC P0141 is indicated, check for poor connections or loose terminals at the secondary HO2S (Sensor 2) and the ECM/PCM, then go to step 1 . If any other Temporary DTCs or DTCs are indicated, go to the indicated DTC troubleshooting. NO: If the ECM/PCM was updated, troubleshooting is complete. If the ECM/PCM was substituted, replace the original ECM/PCM (see HOW TO REMOVE THE ECM/PCM FOR TESTING ).
DTC P0171: FUEL SYSTEM TOO LEAN; DTC P0172: FUEL SYSTEM TOO RICH
1. Check the fuel pressure (see FUEL PRESSURE TEST ). Is the fuel pressure OK?
YES: Check the engine valve clearances and adjust if necessary. If the valve clearances are OK, replace the injectors (see INJECTOR REPLACEMENT ), then go to step 2. NO: Check the fuel pressure (see FUEL PRESSURE TEST ).
If the pressure is too high, replace the fuel pressure regulator (see FUEL PRESSURE REGULATOR REPLACEMENT ), then go to step 2. If the pressure is too low, check the fuel pump and the fuel feed line, then go to step 2.
2. Turn the ignition switch ON (II). 3. Reset the ECM/PCM with the HDS. 4. Do the ECM/PCM idle learn procedure (see ECM/PCM IDLE LEARN PROCEDURE ). 5. Start the engine. Hold the engine speed at 3,000 RPM with no load (in Park or neutral) until the radiator
fan comes on, then let it idle. 6. Test-drive under the following conditions:
NOTE: If some of the DTCs listed below are stored at the same time as DTC P0171 and/or P0172, troubleshoot those DTCs first, then recheck for P0171 and/or P0172.
P0107, P0108, P1128, P1129: Manifold absolute pressure (MAP) sensor P0133, P1157, P2195, P2238, P2252, P2A00: Air fuel ratio (A/F) sensor (Sensor 1) P0134, P0135: Air fuel ratio (A/F) sensor (Sensor 1) heater P0137, P0138, P0139: Secondary HO2S (Sensor 2) P0141: Secondary HO2S (Sensor 2) heater P2646, P2647, P2648, P2649: VTEC system P2279: Intake air leakage
2004 Acura TSX
2004 ENGINE PERFORMANCE PGM-FI System - TSX
Wednesday, March 12, 2008 2:21:52 AM Page 74
Engine coolant temperature more than 158°F (70°C) Transmission in 5th gear (A/T in D position) Drive at a steady speed between 15-75 MPH (24-120 km/h)
7. Check for Temporary DTCs or DTCs in the DTCs MENU with the HDS. Are any Temporary DTCs or DTCs indicated?
YES: If DTC P0171 or P0172 is indicated, go to step 1 . If any other Temporary DTCs or DTCs are indicated, go to the indicated DTC troubleshooting. NO: Troubleshooting is complete.
DTC P0300: RANDOM MISFIRE AND ANY COMBINATION OF THE FOLLOWING: DTC P0301: NO. 1 CYLINDER MISFIRE; DTC P0302: NO. 2 CYLINDER MISFIRE; DTC P0303: NO. 3 CYLINDER MISFIRE; DTC P0304: NO. 4 CYLINDER MISFIRE
Special Tools Required:
Pressure gauge adaptor 07NAJ-P07010A A/T low pressure gauge w/panel 07406-0070300 A/T pressure hose 07406-0020201 A/T pressure hose, 2,210 mm 07MAJ-PY4011A A/T pressure adaptor 07MAJ-PY40120 Oil pressure hose 07ZAJ-S5A0200
NOTE: DTC P0171 and/or P0172 may take up to 40 minutes of test driving to set. Using the HDS, monitor the long term fuel trim (LT FUEL TRIM) or air fuel feed back AVE (AF FB AVG) for 15 minutes of driving. If the fuel trim/AF AVG stays within 10% of 1.0 (0.0%), there is no problem at this time.
NOTE: If the misfire is frequent enough to trigger detection of increased emissions during 2 consecutive driving cycles, the MIL will come on, and DTC P0300 (and some combination of P0301 through P0304) will be stored. If the misfire is frequent enough to damage the catalyst, the MIL will flash whenever the misfire occurs, and DTC P0300 (and some combination of P0301 through P0304) will be stored. When the misfire stops, the MIL will remain on. Troubleshoot the following DTCs first, if any of them were stored along with the random misfire DTC(s):
P0107, P0108, P1128, P1129: Manifold absolute pressure (MAP) sensor P0171, P0172: Fuel system P0335, P0339: Crankshaft position (CKP) sensor P0365, P0369: Camshaft position (CMP) sensor B
2004 Acura TSX
2004 ENGINE PERFORMANCE PGM-FI System - TSX
Wednesday, March 12, 2008 2:21:52 AM Page 75
1. Note the following freeze data: Engine speed Vehicle speed Throttle position CLV Gear position
2. Clear the DTC with the HDS. 3. Start the engine with no load (in Park or neutral), then let it idle. 4. Monitor the OBD STATUS for DTC P0301, P0302, P0303, or P0304 in the DTCs MENU with the HDS.
Does the screen indicate FAILED? YES: Go to step 9 . NO: If the screen indicates PASSED, go to step 5. If the screen indicates EXECUTING, keep driving until a result comes on. If the screen indicates Out of CONDITION, wait for several minutes, and recheck.
5. Check the CYL 1 MISFIRE, CYL2 MISFIRE, CYL3 MISFIRE, and/or CYL4 MISFIRE in the DATA LIST for 10 minutes with the HDS.
Does CYL1 MISFIRE, CYL2 MISFIRE, CYL3 MISFIRE, and/or CYL4 MISFIRE show misfire counts?
YES: Go to step 9 . NO: Go to step 6.
6. Test-drive the vehicle for several minutes in the range of the recorded freeze data. 7. Monitor the OBD STATUS for DTC P0301, P0302, P0303, or P0304 in the DTCs MENU with the HDS.
Does the screen indicate FAILED? YES: Go to step 9 . NO: If the screen indicates PASSED, go to step 8. If the screen indicates EXECUTING, keep driving until a result comes on. If the screen indicates Out of CONDITION, go to step 6 and recheck.
8. Check the CYL1 MISFIRE, CYL2 MISFIRE, CYL3 MISFIRE, and/or CYL4 MISFIRE in the DATA LIST for 10 minutes with the HDS.
Does CYL1 MISFIRE, CYL2 MISFIRE, CYL3 MISFIRE, and/or CYL4 MISFIRE show misfire counts?
YES: Go to step 9. NO: Intermittent failure, system is OK at this time.
9. Turn the ignition switch OFF. 10. Check the fuel quality.
Is the quality good? YES: Go to step 11.
P0506, P0507: Idle control system
2004 Acura TSX
2004 ENGINE PERFORMANCE PGM-FI System - TSX
Wednesday, March 12, 2008 2:21:52 AM Page 76
NO: Drain the tank and fill it with known-good fuel, then go to step 20 . 11. Inspect the spark plugs (see SPARK PLUG INSPECTION ). If the spark plugs are fouled or worn,
replace them. 12. Test-drive the vehicle for several minutes in the range of the recorded freeze data. 13. Check the CYL1 MISFIRE, CYL2 MISFIRE, CYL3 MISFIRE, and/or CYL4 MISFIRE in the DATA
LIST for 10 minutes with the HDS. Does CYL1 MISFIRE, CYL2 MISFIRE, CYL3 MISFIRE, and/or CYL4 MISFIRE show misfire counts?
YES: Go to step 14. NO: Go to step 20 .
14. Check the fuel pressure (see FUEL PRESSURE TEST ). Is the fuel pressure OK?
YES: Go to step 15. NO:
If the pressure is too high, replace the fuel pressure regulator (see FUEL PRESSURE REGULATOR REPLACEMENT ), then go to step 20 . If the pressure is too low, check the fuel pump, the fuel feed pipe, and the fuel filter. If they are OK, replace the fuel pressure regulator (see FUEL PRESSURE REGULATOR REPLACEMENT ), then go to step 20 .
15. Turn the ignition switch OFF. 16. Remove the VTEC oil pressure switch (A), and install the special tools as shown, then install the VTEC
oil pressure switch (A) in the pressure gauge adapter (B).
NOTE: Install the switch in the reverse order of removal with a new O-ring.
2004 Acura TSX
2004 ENGINE PERFORMANCE PGM-FI System - TSX
Wednesday, March 12, 2008 2:21:52 AM Page 77
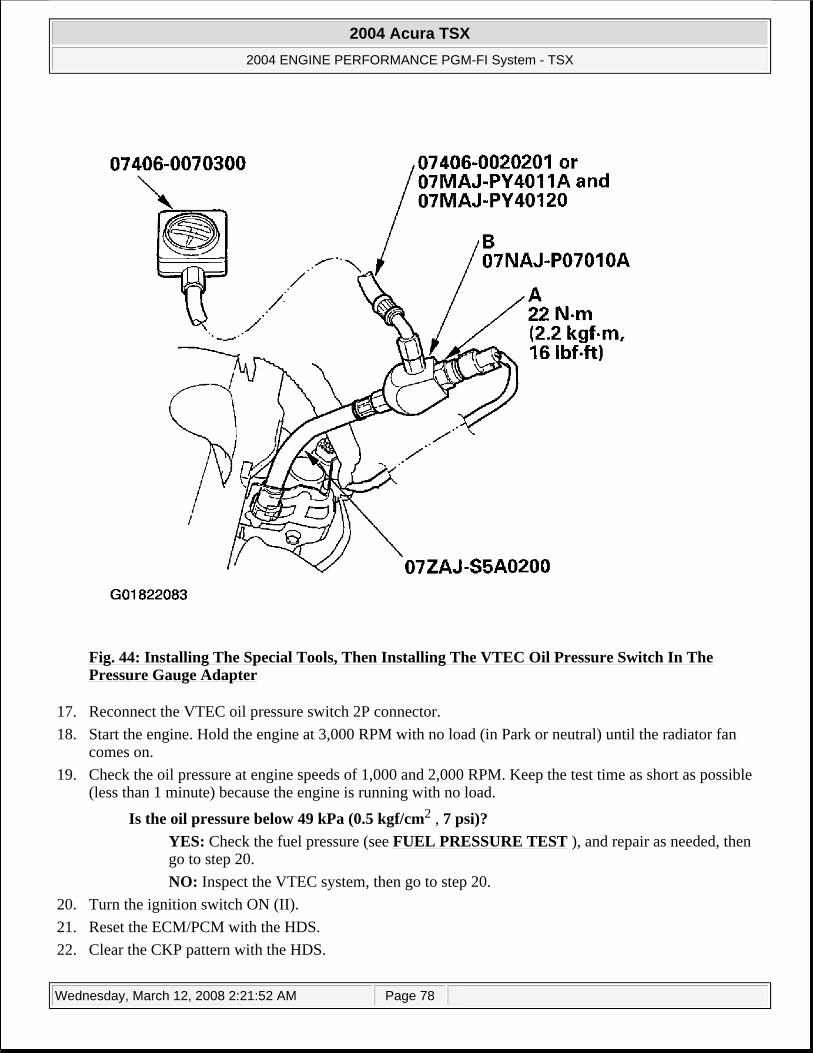
Fig. 44: Installing The Special Tools, Then Installing The VTEC Oil Pressure Switch In The Pressure Gauge Adapter
17. Reconnect the VTEC oil pressure switch 2P connector. 18. Start the engine. Hold the engine at 3,000 RPM with no load (in Park or neutral) until the radiator fan
comes on. 19. Check the oil pressure at engine speeds of 1,000 and 2,000 RPM. Keep the test time as short as possible
(less than 1 minute) because the engine is running with no load.
Is the oil pressure below 49 kPa (0.5 kgf/cm2 , 7 psi)? YES: Check the fuel pressure (see FUEL PRESSURE TEST ), and repair as needed, then go to step 20. NO: Inspect the VTEC system, then go to step 20.
20. Turn the ignition switch ON (II). 21. Reset the ECM/PCM with the HDS. 22. Clear the CKP pattern with the HDS.
2004 Acura TSX
2004 ENGINE PERFORMANCE PGM-FI System - TSX
Wednesday, March 12, 2008 2:21:52 AM Page 78
23. Do the ECM/PCM idle learn procedure (see ECM/PCM IDLE LEARN PROCEDURE ). 24. Do the CKP pattern learn procedure (see CKP PATTERN CLEAR/CKP PATTERN LEARN
PROCEDURE ). 25. Test-drive the vehicle for several minutes in the range of the recorded freeze data. 26. Check for Temporary DTCs or DTCs in the DTCs MENU with the HDS.
Are any Temporary DTCs or DTCs indicated? YES: If DTC P0300, P0301, P0302, P0303, or P0304 are indicated, check for poor connections or loose terminals at the ignition coil, the injector, and the ECM/PCM, then go to troubleshooting DTC P0301, P0302, P0303, or P0304 (see DTC P0301: NO. 1 CYLINDER MISFIRE; DTC P0302: NO. 2 CYLINDER MISFIRE; DTC P0303: NO. 3 CYLINDER MISFIRE; DTC P0304: NO. 4 CYLINDER MISFIRE ). If any other Temporary DTCs or DTCs are indicated, go to the indicated DTC troubleshooting. NO: Go to step 27.
27. Monitor the OBD STATUS for DTC P0301, P0302, P0303, or P0304 in the DTCs MENU with the HDS. Does the screen indicate PASSED?
YES: Troubleshooting is complete. NO: If the screen indicates FAILED, go to step 1 and recheck. If the screen indicates EXECUTING, keep driving until a result comes on. If the screen indicates Out of CONDITION, go to step 25 and recheck.
DTC P0301: NO. 1 CYLINDER MISFIRE; DTC P0302: NO. 2 CYLINDER MISFIRE; DTC P0303: NO. 3 CYLINDER MISFIRE; DTC P0304: NO. 4 CYLINDER MISFIRE
1. Note the following freeze data: Engine speed Vehicle speed Throttle position CLV Gear position
2. Clear the DTC with the HDS. 3. Start the engine with no load (in Park or neutral), then let it idle. 4. Monitor the OBD STATUS for DTC P0301, P0302, P0303, or P0304 in the DTCs MENU with the HDS.
Does the screen indicate FAILED? YES: Go to step 9 . NO: If the screen indicates PASSED, go to step 5. If the screen indicates EXECUTING, keep driving until a result comes on. If the screen indicates Out of CONDITION, wait for several minutes, and recheck.
5. Check the CYL1 MISFIRE, CYL2 MISFIRE, CYL3 MISFIRE, and/or CYL4 MISFIRE in the DATA LIST for 10 minutes with the HDS.
Does CYL1 MISFIRE, CYL2 MISFIRE, CYL3 MISFIRE, and/or CYL4 MISFIRE show misfire counts?
2004 Acura TSX
2004 ENGINE PERFORMANCE PGM-FI System - TSX
Wednesday, March 12, 2008 2:21:52 AM Page 79
YES: Go to step 9 . NO: Go to step 6.
6. Test-drive the vehicle for several minutes in the range of the recorded freeze data. 7. Monitor the OBD STATUS for DTC P0301, P0302, P0303, or P0304 in the DTCs MENU with the HDS.
Does the screen indicate FAILED? YES: Go to step 9 . NO: If the screen indicates PASSED, go to step 8. If the screen indicates EXECUTING, keep driving until a result comes on. If the screen indicates Out of CONDITION, go to step 6 and recheck.
8. Check the CYL1 MISFIRE, CYL2 MISFIRE, CYL3 MISFIRE, and/or CYL4 MISFIRE in the DATA LIST for 10 minutes with the HDS.
Does CYL1 MISFIRE, CYL2 MISFIRE, CYL3 MISFIRE, and/or CYL4 MISFIRE show misfire counts?
YES: Go to step 9. NO: Intermittent failure, system is OK at this time.
9. Turn the ignition switch OFF. 10. Remove the intake manifold cover (see step 3 of REMOVAL ). 11. Start the engine, and listen for a clicking sound at the injector of the problem cylinder.
Does the injector click? YES: Go to step 12. NO: Go to step 43 .
12. Turn the ignition switch OFF. 13. Exchange the ignition coil from the problem cylinder with one from another cylinder. 14. Test-drive the vehicle for several minutes in the range of the recorded freeze data. 15. Check the CYL 1 MISFIRE, CYL 2 MISFIRE, CYL 3 MISFIRE, and/or CYL 4 MISFIRE in the DATA
LIST for 10 minutes with the HDS. Does CYL 1 MISFIRE, CYL 2 MISFIRE, CYL 3 MISFIRE, and/or CYL 4 MISFIRE show misfire counts?
YES: Go to step 16. NO: Intermittent misfire due to poor contact at the ignition coil connector (no misfire at this time). Make sure the coil connections are secure.
16. Determine which cylinder had the misfire. Does the misfire occur in the cylinder where the ignition coil was moved?
YES: Replace the faulty ignition coil (see IGNITION COIL REMOVAL/INSTALLATION ), then go to step 63 . NO: Go to step 17.
17. Turn the ignition switch OFF. 18. Exchange the spark plug from the problem cylinder with one from another cylinder. 19. Test-drive the vehicle for several minutes in the range of the recorded freeze data.
2004 Acura TSX
2004 ENGINE PERFORMANCE PGM-FI System - TSX
Wednesday, March 12, 2008 2:21:52 AM Page 80
20. Check the CYL 1 MISFIRE, CYL 2 MISFIRE, CYL 3 MISFIRE, and/or CYL 4 MISFIRE in the DATA LIST for 10 minutes with the HDS.
Does CYL 1 MISFIRE, CYL 2 MISFIRE, CYL 3 MISFIRE, and/or CYL 4 MISFIRE show misfire counts?
YES: Go to step 21. NO: Intermittent misfire due to spark plug fouling (no misfire at this time).
21. Determine which cylinder had the misfire. Does the misfire occur in the cylinder where the spark plug was moved?
YES: Replace the faulty spark plug, then go to step 63 . NO: Go to step 22.
22. Turn the ignition switch OFF. 23. Exchange the injector from the problem cylinder with one from another cylinder. 24. Start the engine, and let it idle for 2 minutes. 25. Test-drive the vehicle for several minutes in the range of the recorded freeze data. 26. Check the CYL 1 MISFIRE, CYL 2 MISFIRE, CYL 3 MISFIRE, and/or CYL 4 MISFIRE in the DATA
LIST for 10 minutes with the HDS. Does CYL 1 MISFIRE, CYL 2 MISFIRE, CYL 3 MISFIRE, and/or CYL 4 MISFIRE show misfire counts?
YES: Go to step 27. NO: Intermittent misfire due to bad contact in the injector connector (no misfire at this time). Check for poor connections or loose terminals at the injector.
27. Determine which cylinder had the misfire. Does the misfire occur in the cylinder where the injector was moved?
YES: Replace the faulty injector (see INJECTOR REPLACEMENT ), then go to step 63 . NO: Go to step 28.
28. Turn the ignition switch OFF. 29. Disconnect the ignition coil 3P connector from the problem cylinder. 30. Turn the ignition switch ON (II). 31. Measure voltage between ignition coil 3P connector terminal No. 3 and body ground.
Is there battery voltage? YES: Go to step 32. NO: Repair open in the wire between the ignition coil and the No. 1 ignition coil (15A) fuse relay, then go to step 63 .
2004 Acura TSX
2004 ENGINE PERFORMANCE PGM-FI System - TSX
Wednesday, March 12, 2008 2:21:52 AM Page 81
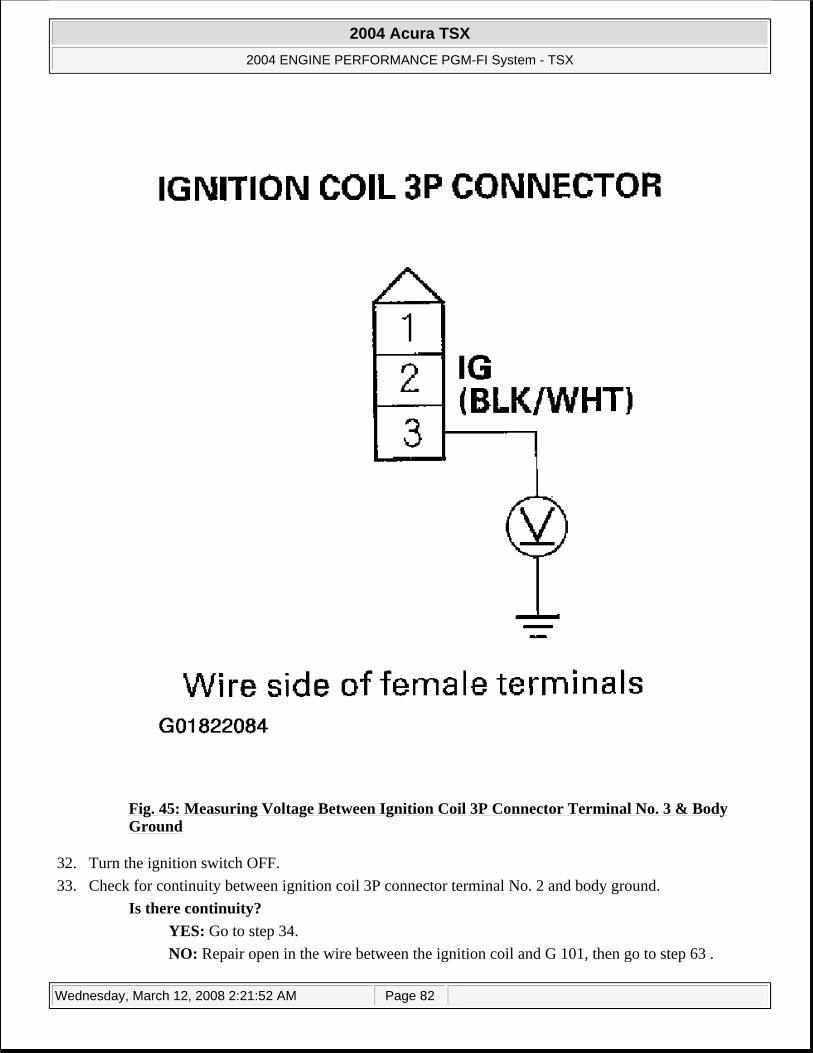
Fig. 45: Measuring Voltage Between Ignition Coil 3P Connector Terminal No. 3 & Body Ground
32. Turn the ignition switch OFF. 33. Check for continuity between ignition coil 3P connector terminal No. 2 and body ground.
Is there continuity? YES: Go to step 34. NO: Repair open in the wire between the ignition coil and G 101, then go to step 63 .
2004 Acura TSX
2004 ENGINE PERFORMANCE PGM-FI System - TSX
Wednesday, March 12, 2008 2:21:52 AM Page 82
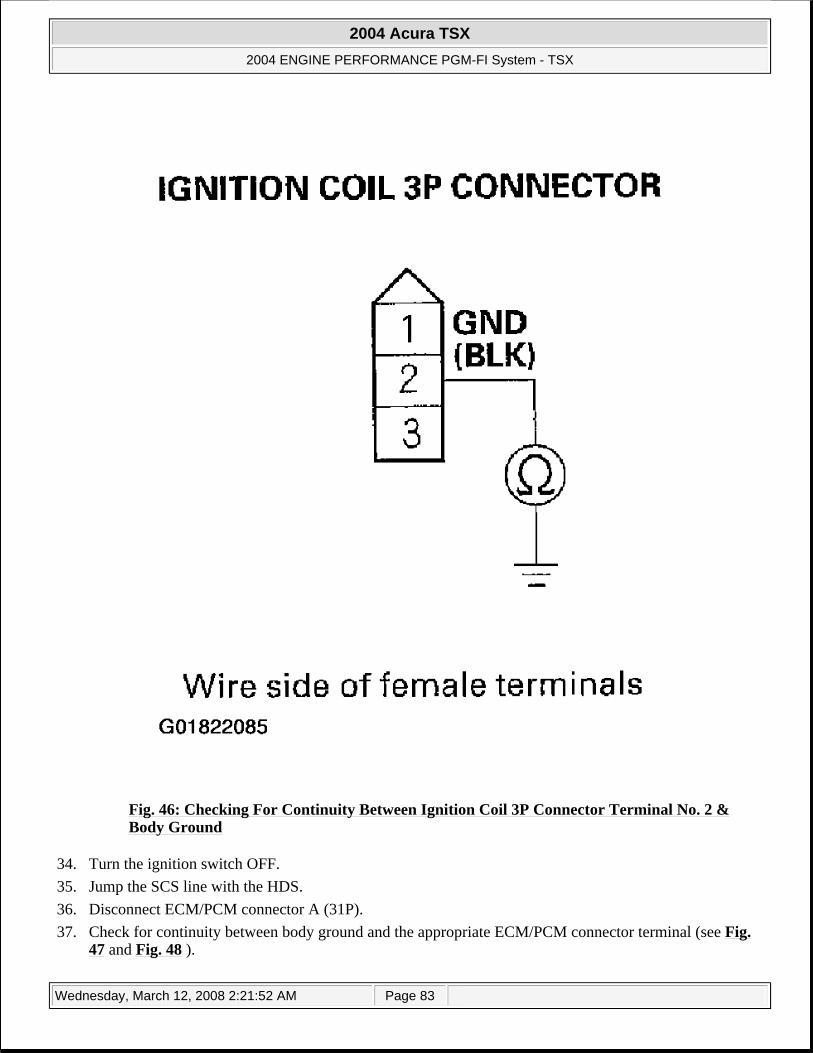
Fig. 46: Checking For Continuity Between Ignition Coil 3P Connector Terminal No. 2 & Body Ground
34. Turn the ignition switch OFF. 35. Jump the SCS line with the HDS. 36. Disconnect ECM/PCM connector A (31P). 37. Check for continuity between body ground and the appropriate ECM/PCM connector terminal (see Fig.
47 and Fig. 48 ).
2004 Acura TSX
2004 ENGINE PERFORMANCE PGM-FI System - TSX
Wednesday, March 12, 2008 2:21:52 AM Page 83

Is there continuity? YES: Repair short in the wire between the ECM/PCM and the ignition coil, then go to step 63 . NO: Go to step 63 .
Fig. 47: Checking For Continuity Between Body Ground & The Appropriate ECM/PCM Connector Terminals
2004 Acura TSX
2004 ENGINE PERFORMANCE PGM-FI System - TSX
Wednesday, March 12, 2008 2:21:52 AM Page 84
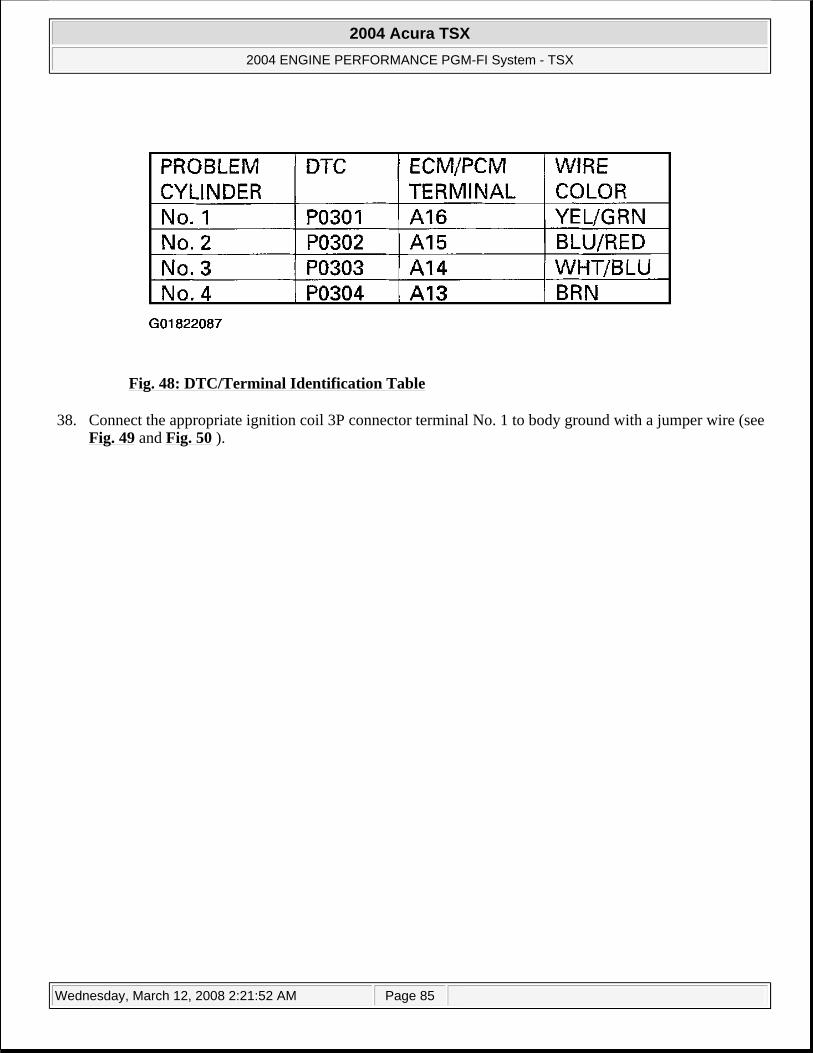
Fig. 48: DTC/Terminal Identification Table
38. Connect the appropriate ignition coil 3P connector terminal No. 1 to body ground with a jumper wire (see Fig. 49 and Fig. 50 ).
2004 Acura TSX
2004 ENGINE PERFORMANCE PGM-FI System - TSX
Wednesday, March 12, 2008 2:21:52 AM Page 85
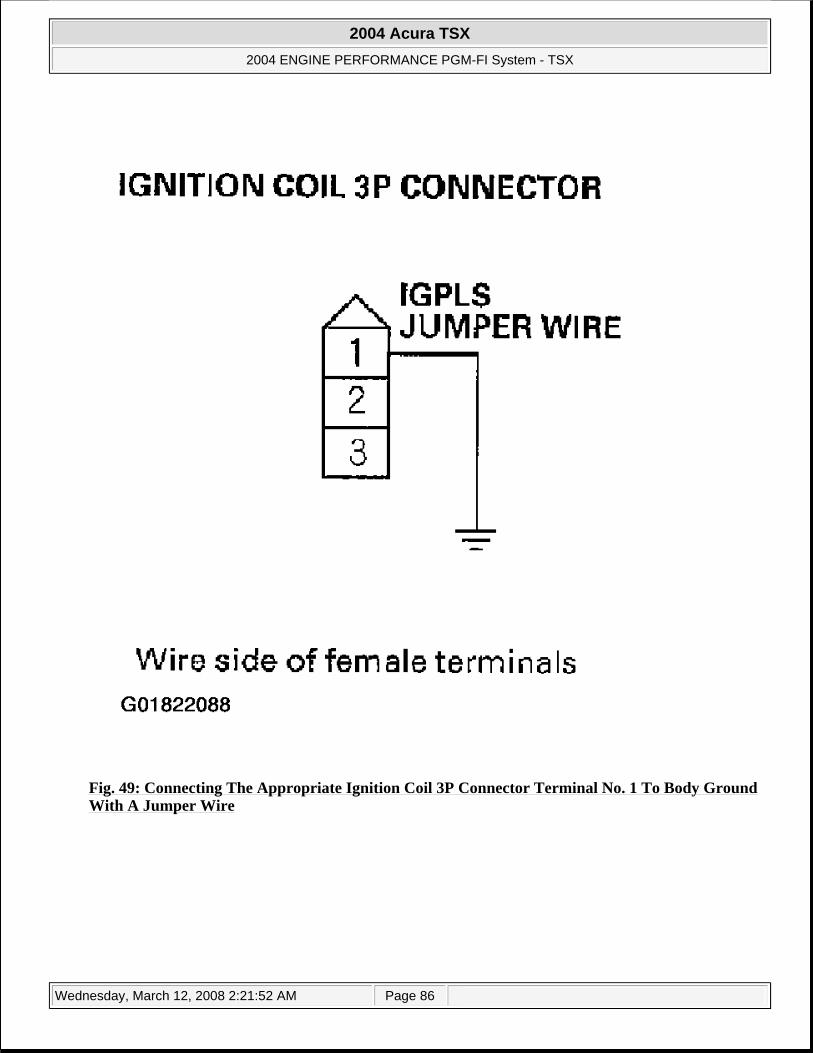
Fig. 49: Connecting The Appropriate Ignition Coil 3P Connector Terminal No. 1 To Body Ground With A Jumper Wire
2004 Acura TSX
2004 ENGINE PERFORMANCE PGM-FI System - TSX
Wednesday, March 12, 2008 2:21:52 AM Page 86
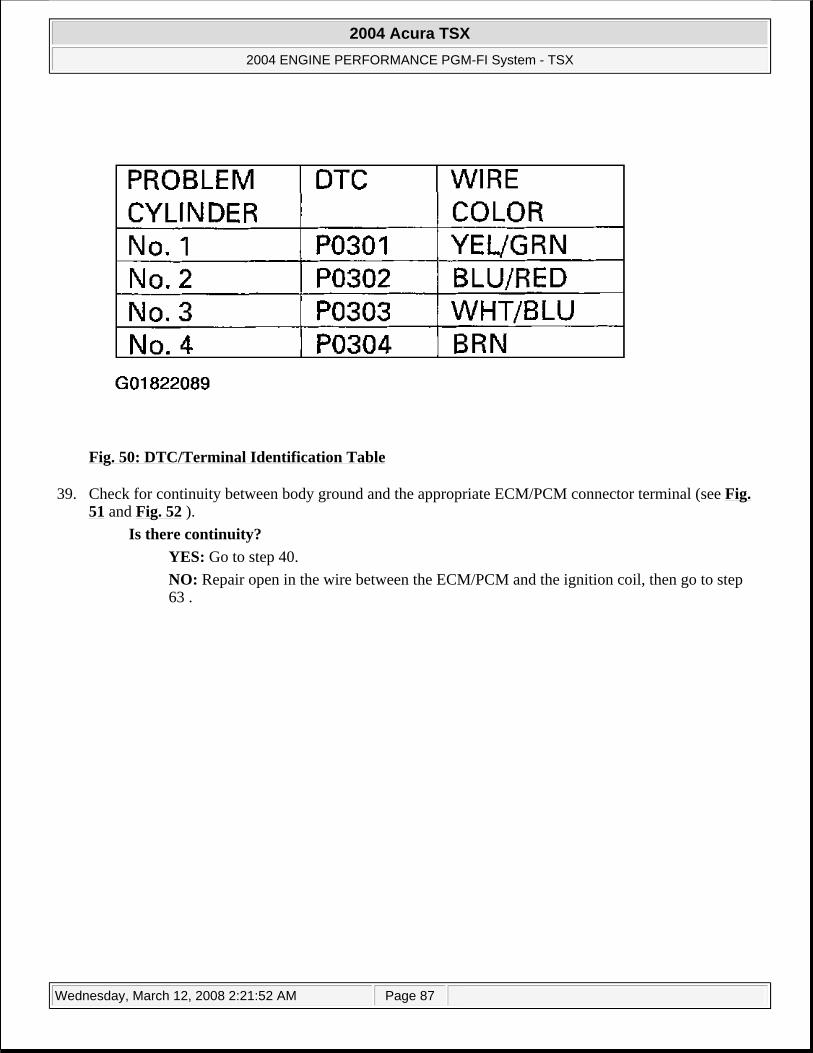
Fig. 50: DTC/Terminal Identification Table
39. Check for continuity between body ground and the appropriate ECM/PCM connector terminal (see Fig. 51 and Fig. 52 ).
Is there continuity? YES: Go to step 40. NO: Repair open in the wire between the ECM/PCM and the ignition coil, then go to step 63 .
2004 Acura TSX
2004 ENGINE PERFORMANCE PGM-FI System - TSX
Wednesday, March 12, 2008 2:21:52 AM Page 87
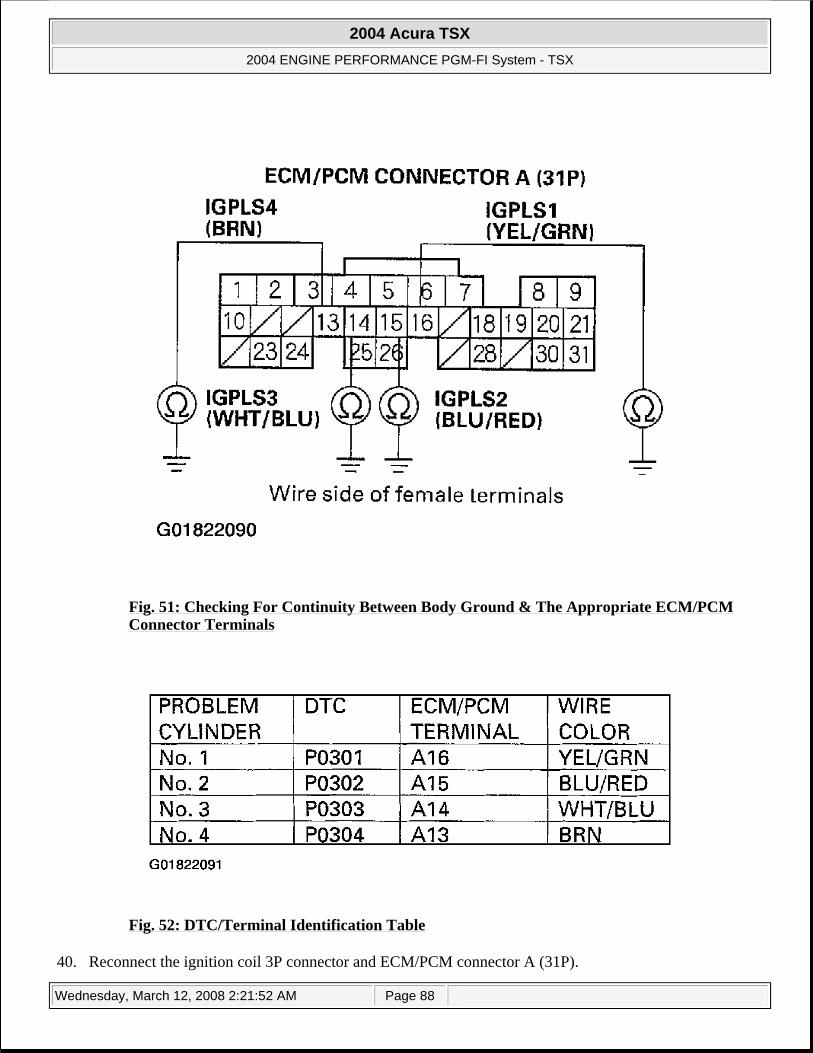
Fig. 51: Checking For Continuity Between Body Ground & The Appropriate ECM/PCM Connector Terminals
Fig. 52: DTC/Terminal Identification Table
40. Reconnect the ignition coil 3P connector and ECM/PCM connector A (31P).
2004 Acura TSX
2004 ENGINE PERFORMANCE PGM-FI System - TSX
Wednesday, March 12, 2008 2:21:52 AM Page 88
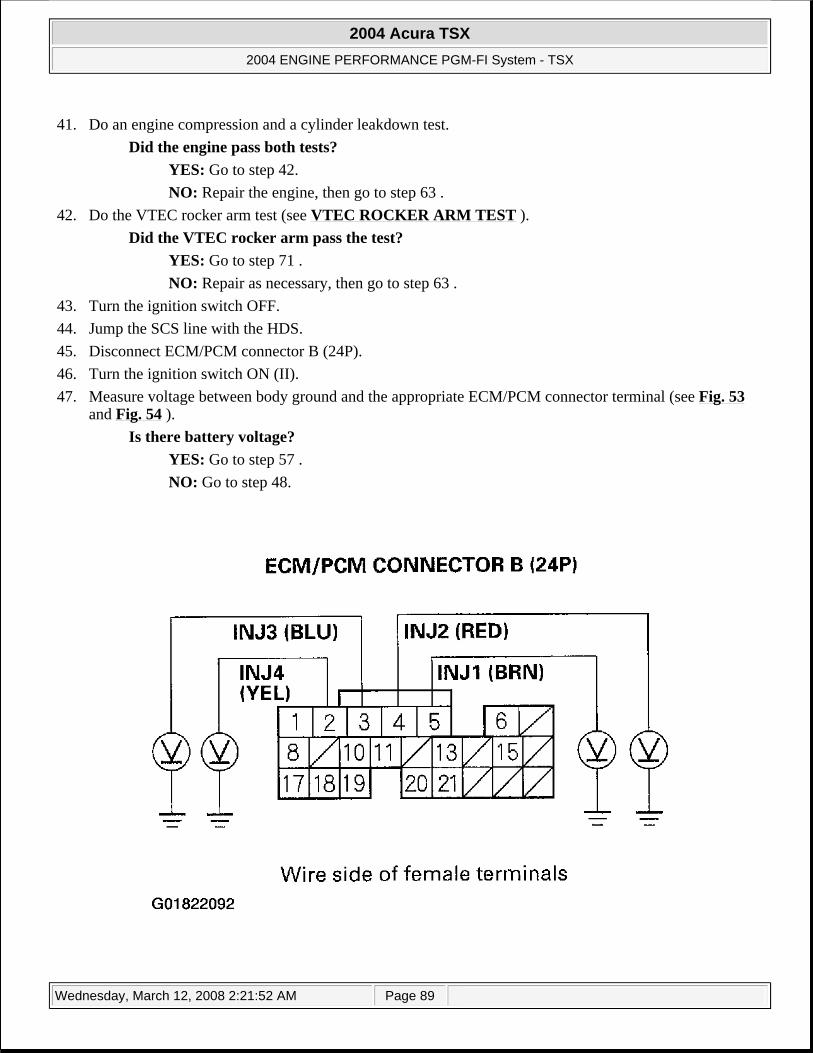
41. Do an engine compression and a cylinder leakdown test. Did the engine pass both tests?
YES: Go to step 42. NO: Repair the engine, then go to step 63 .
42. Do the VTEC rocker arm test (see VTEC ROCKER ARM TEST ). Did the VTEC rocker arm pass the test?
YES: Go to step 71 . NO: Repair as necessary, then go to step 63 .
43. Turn the ignition switch OFF. 44. Jump the SCS line with the HDS. 45. Disconnect ECM/PCM connector B (24P). 46. Turn the ignition switch ON (II). 47. Measure voltage between body ground and the appropriate ECM/PCM connector terminal (see Fig. 53
and Fig. 54 ). Is there battery voltage?
YES: Go to step 57 . NO: Go to step 48.
2004 Acura TSX
2004 ENGINE PERFORMANCE PGM-FI System - TSX
Wednesday, March 12, 2008 2:21:52 AM Page 89
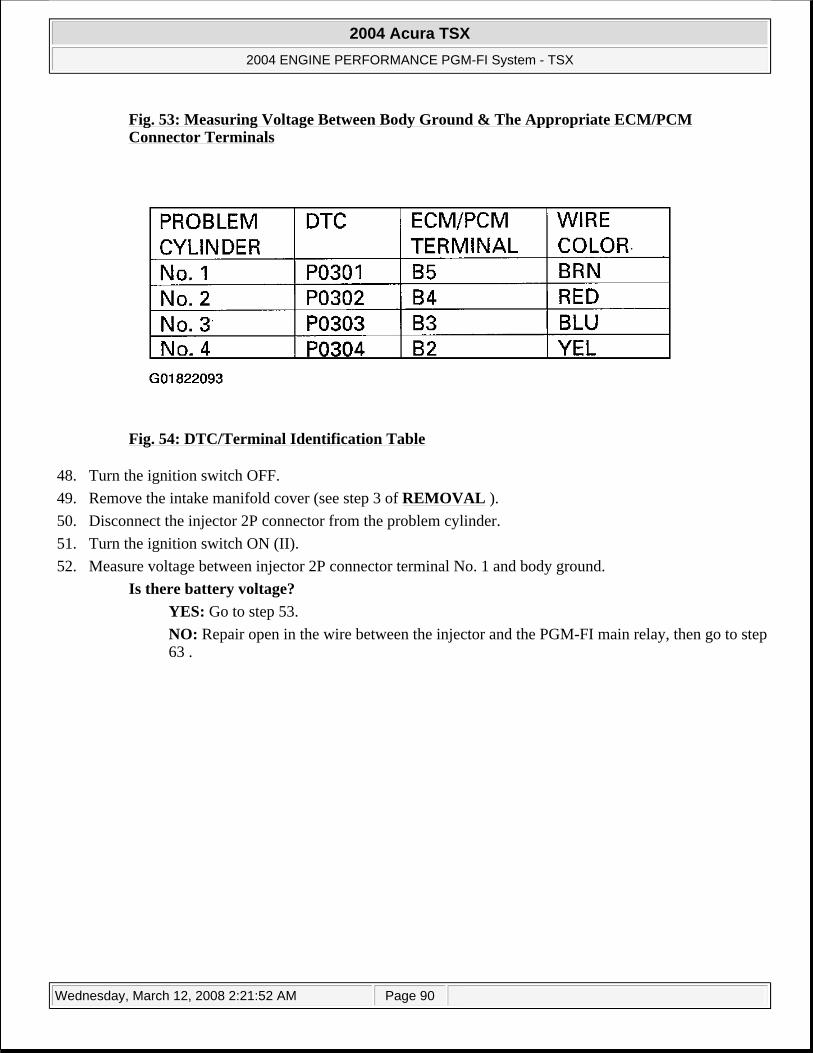
Fig. 53: Measuring Voltage Between Body Ground & The Appropriate ECM/PCM Connector Terminals
Fig. 54: DTC/Terminal Identification Table
48. Turn the ignition switch OFF. 49. Remove the intake manifold cover (see step 3 of REMOVAL ). 50. Disconnect the injector 2P connector from the problem cylinder. 51. Turn the ignition switch ON (II). 52. Measure voltage between injector 2P connector terminal No. 1 and body ground.
Is there battery voltage? YES: Go to step 53. NO: Repair open in the wire between the injector and the PGM-FI main relay, then go to step 63 .
2004 Acura TSX
2004 ENGINE PERFORMANCE PGM-FI System - TSX
Wednesday, March 12, 2008 2:21:52 AM Page 90
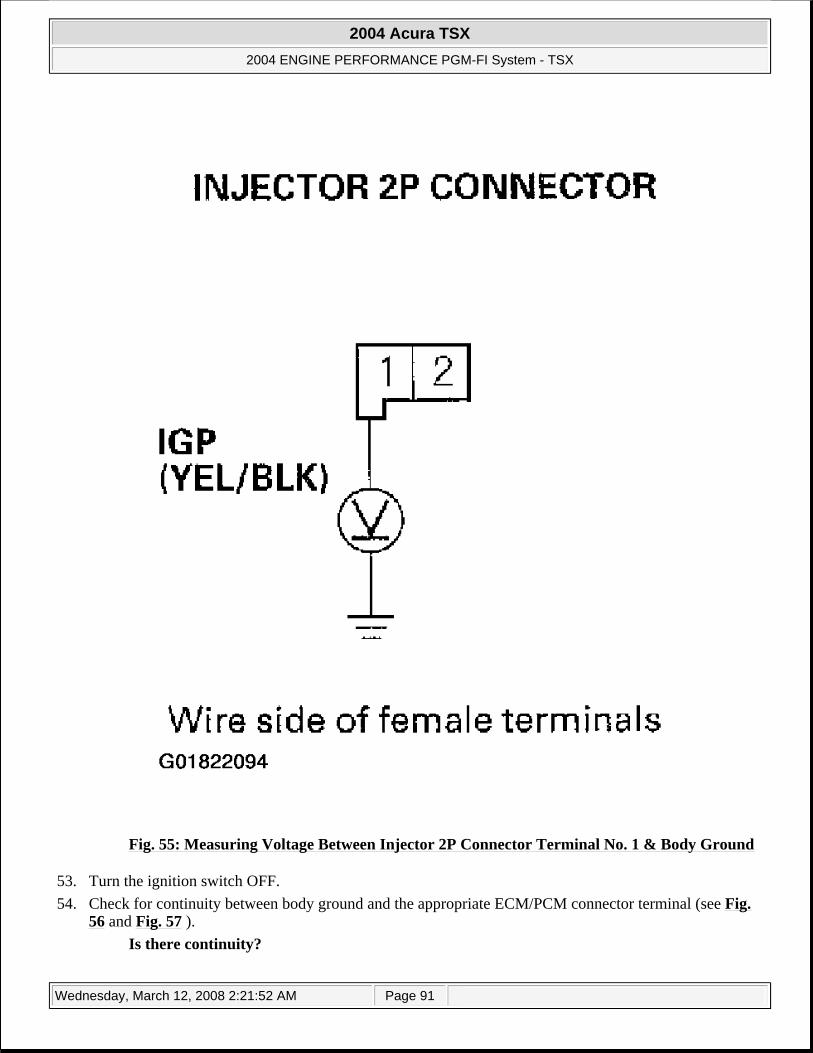
Fig. 55: Measuring Voltage Between Injector 2P Connector Terminal No. 1 & Body Ground
53. Turn the ignition switch OFF. 54. Check for continuity between body ground and the appropriate ECM/PCM connector terminal (see Fig.
56 and Fig. 57 ). Is there continuity?
2004 Acura TSX
2004 ENGINE PERFORMANCE PGM-FI System - TSX
Wednesday, March 12, 2008 2:21:52 AM Page 91
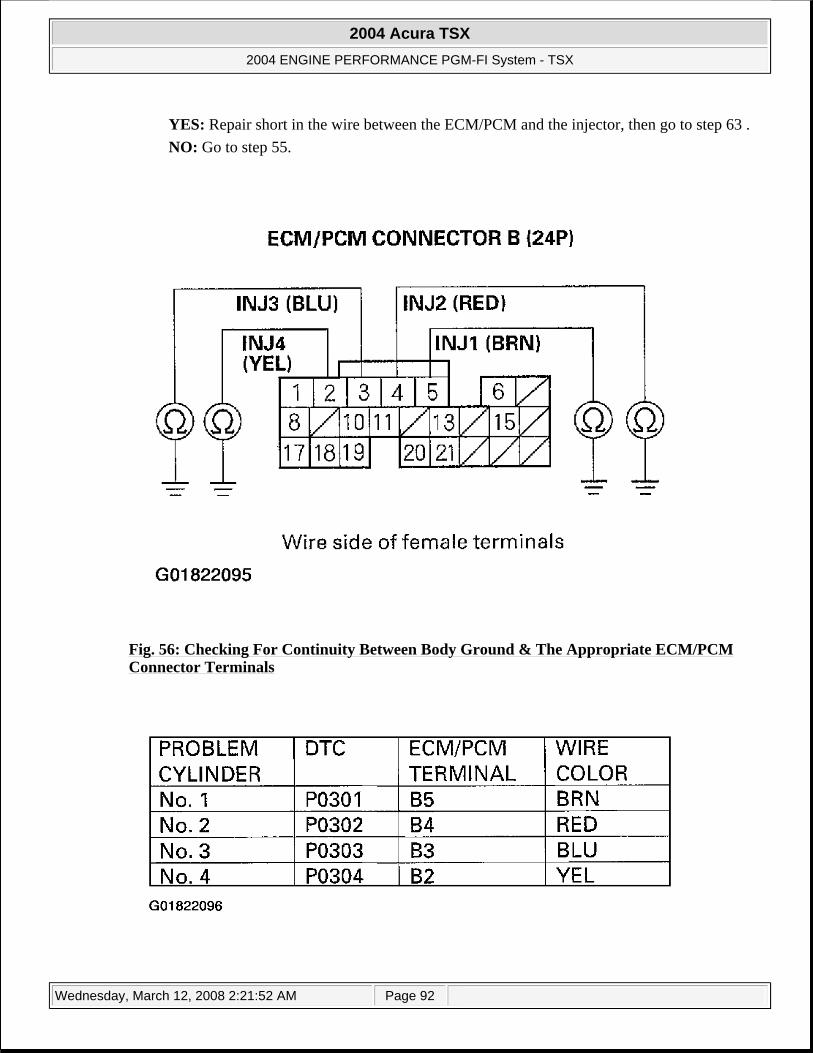
YES: Repair short in the wire between the ECM/PCM and the injector, then go to step 63 . NO: Go to step 55.
Fig. 56: Checking For Continuity Between Body Ground & The Appropriate ECM/PCM Connector Terminals
2004 Acura TSX
2004 ENGINE PERFORMANCE PGM-FI System - TSX
Wednesday, March 12, 2008 2:21:52 AM Page 92
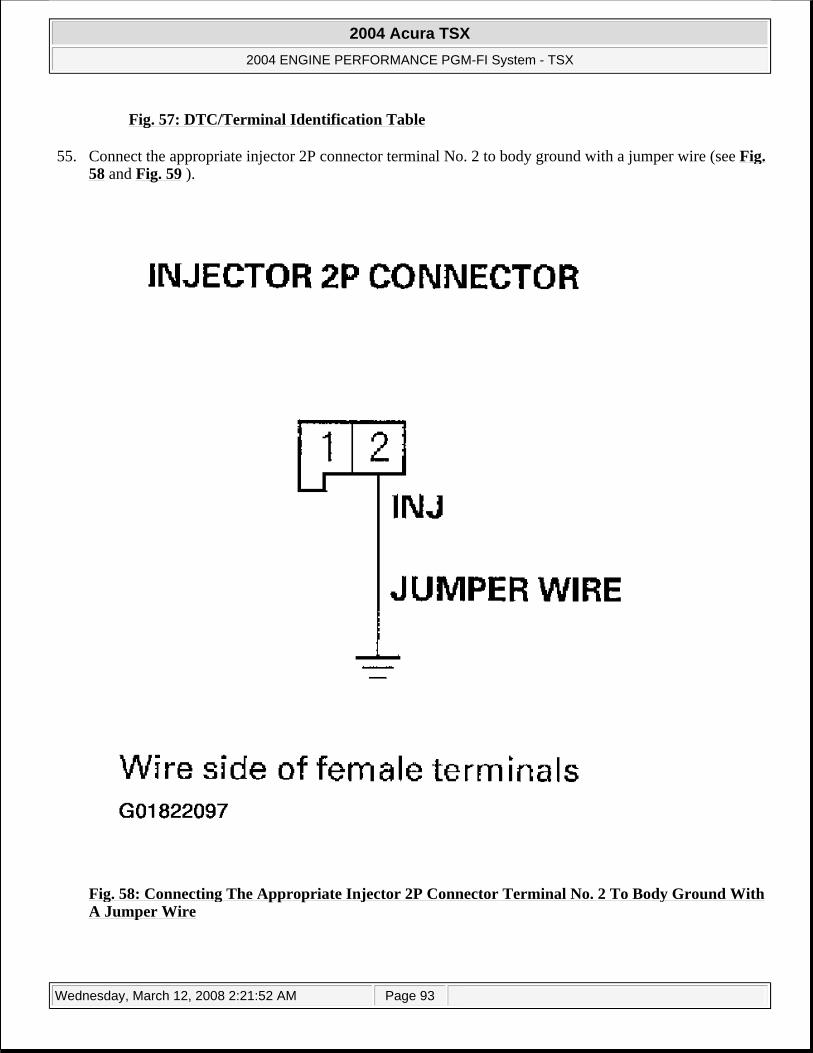
Fig. 57: DTC/Terminal Identification Table
55. Connect the appropriate injector 2P connector terminal No. 2 to body ground with a jumper wire (see Fig. 58 and Fig. 59 ).
Fig. 58: Connecting The Appropriate Injector 2P Connector Terminal No. 2 To Body Ground With A Jumper Wire
2004 Acura TSX
2004 ENGINE PERFORMANCE PGM-FI System - TSX
Wednesday, March 12, 2008 2:21:52 AM Page 93
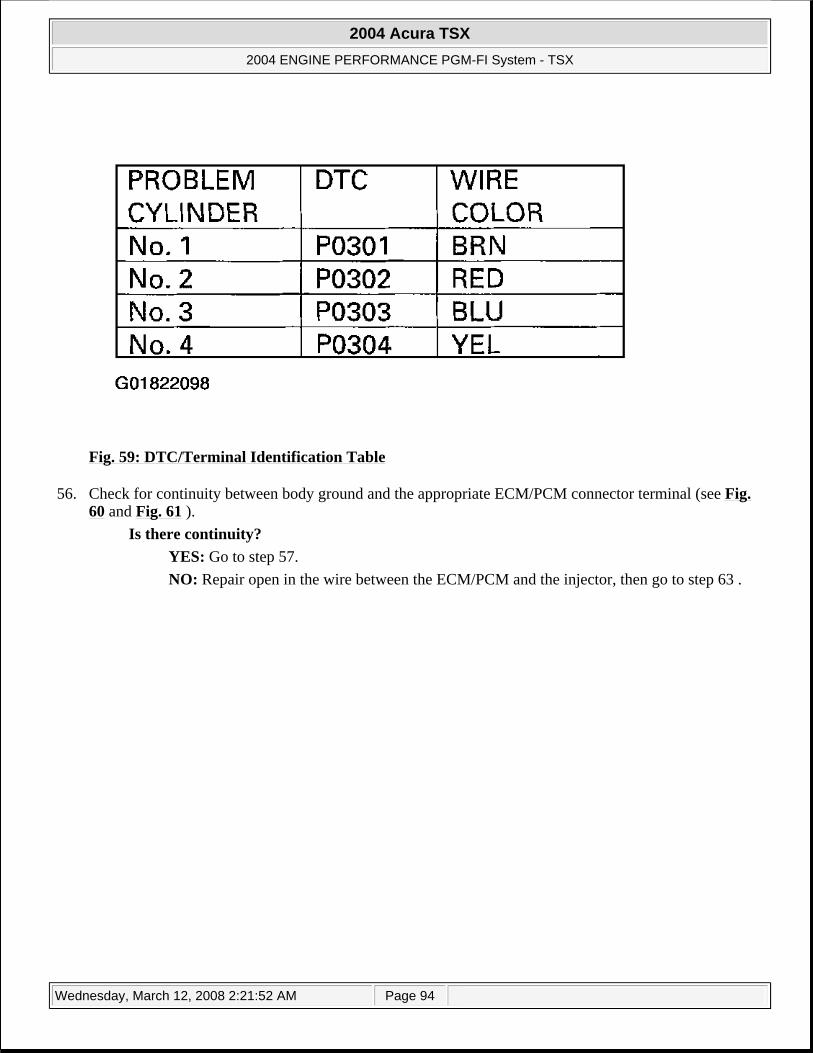
Fig. 59: DTC/Terminal Identification Table
56. Check for continuity between body ground and the appropriate ECM/PCM connector terminal (see Fig. 60 and Fig. 61 ).
Is there continuity? YES: Go to step 57. NO: Repair open in the wire between the ECM/PCM and the injector, then go to step 63 .
2004 Acura TSX
2004 ENGINE PERFORMANCE PGM-FI System - TSX
Wednesday, March 12, 2008 2:21:52 AM Page 94
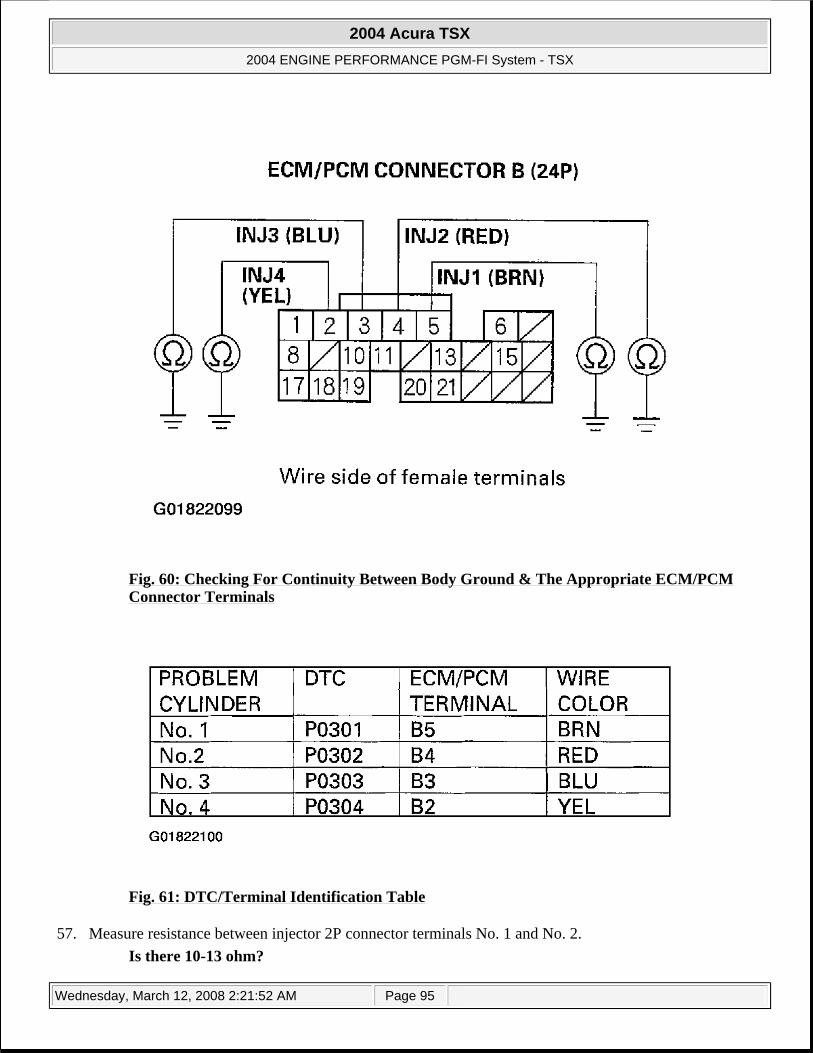
Fig. 60: Checking For Continuity Between Body Ground & The Appropriate ECM/PCM Connector Terminals
Fig. 61: DTC/Terminal Identification Table
57. Measure resistance between injector 2P connector terminals No. 1 and No. 2. Is there 10-13 ohm?
2004 Acura TSX
2004 ENGINE PERFORMANCE PGM-FI System - TSX
Wednesday, March 12, 2008 2:21:52 AM Page 95
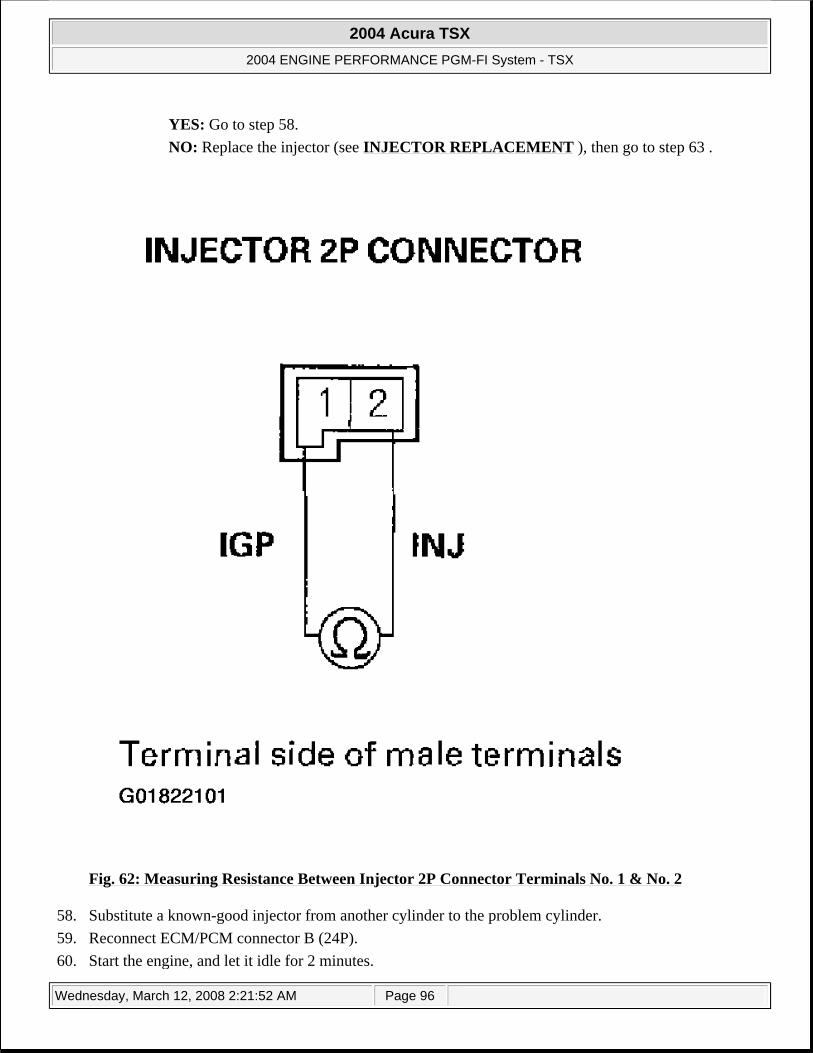
YES: Go to step 58. NO: Replace the injector (see INJECTOR REPLACEMENT ), then go to step 63 .
Fig. 62: Measuring Resistance Between Injector 2P Connector Terminals No. 1 & No. 2
58. Substitute a known-good injector from another cylinder to the problem cylinder. 59. Reconnect ECM/PCM connector B (24P). 60. Start the engine, and let it idle for 2 minutes.
2004 Acura TSX
2004 ENGINE PERFORMANCE PGM-FI System - TSX
Wednesday, March 12, 2008 2:21:52 AM Page 96
61. Test-drive the vehicle for several minutes in the range of the recorded freeze data. 62. Check the CYL1 MISFIRE, CYL2 MISFIRE, CYL3 MISFIRE, and/or CYL4 MISFIRE in the DATA
LIST for 10 minutes with the HDS. Does CYL1 MISFIRE, CYL2 MISFIRE, CYL3 MISFIRE, and/or CYL4 MISFIRE show misfire counts?
YES: Go to step 71 . NO: Replace the original injector (see INJECTOR REPLACEMENT ), then go to step 63.
63. Turn the ignition switch ON (II). 64. Reset the ECM/PCM with the HDS. 65. Clear the CKP pattern with the HDS. 66. Do the ECM/PCM idle learn procedure (see ECM/PCM IDLE LEARN PROCEDURE ). 67. Do the CKP pattern learn procedure (see CKP PATTERN CLEAR/CKP PATTERN LEARN
PROCEDURE ). 68. Test-drive the vehicle for several minutes in the range of the recorded freeze data. 69. Check for Temporary DTCs or DTCs in the DTCs MENU with the HDS.
Are any Temporary DTCs or DTCs indicated? YES: If DTC P0301, P0302, P0303, or P0304 are indicated, check for poor connections or loose terminals at the ignition coil, the injector, and the ECM/PCM, then go to troubleshooting DTC P0300, P0301, P0302, P0303, or P0304 (see DTC P0300: RANDOM MISFIRE AND ANY COMBINATION OF THE FOLLOWING: DTC P0301: NO. 1 CYLINDER MISFIRE; DTC P0302: NO. 2 CYLINDER MISFIRE; DTC P0303: NO. 3 CYLINDER MISFIRE; DTC P0304: NO. 4 CYLINDER MISFIRE ). If any other Temporary DTCs or DTCs are indicated, go to the indicated DTC troubleshooting. NO: Go to step 70.
70. Monitor the OBD STATUS for DTC P0301, P0302, P0303, or P0304 in the DTCs MENU with the HDS. Does the screen indicate PASSED?
YES: Troubleshooting is complete. NO: If the screen indicates FAILED, go to step 1 and recheck. If the screen indicates EXECUTING, keep driving until a result comes on. If the screen indicates Out of CONDITION, go to step 68 and recheck.
71. Update the ECM/PCM if it does not have the latest software, or substitute a known-good ECM/PCM (see HOW TO SUBSTITUTE THE ECM/PCM ).
72. Test-drive the vehicle for several minutes in the range of the recorded freeze data. 73. Check for Temporary DTCs or DTCs in the DTCs MENU with the HDS.
Are any Temporary DTCs or DTCs indicated? YES: If DTC P0301, P0302, P0303, or P0304 are indicated, check for poor connections or loose terminals at the injector, the ignition coil, and the ECM/PCM, then go to step 1 . If any other Temporary DTCs or DTCs are indicated, go to the indicated DTC troubleshooting. NO: If the ECM/PCM was updated, troubleshooting is complete. If the ECM/PCM was substituted, replace the original ECM/PCM (see HOW TO REMOVE THE ECM/PCM FOR TESTING ).
2004 Acura TSX
2004 ENGINE PERFORMANCE PGM-FI System - TSX
Wednesday, March 12, 2008 2:21:52 AM Page 97
DTC P0325: KNOCK SENSOR CIRCUIT MALFUNCTION
1. Turn the ignition switch ON (II). 2. Clear the DTC with the HDS. 3. Start the engine. Hold the engine speed at 3,000 RPM with no load (in Park or neutral) until the radiator
fan comes on, then let it idle. 4. Hold the engine at 3,000-4,000 RPM for at least 60 seconds. 5. Check for Temporary DTCs or DTCs in the DTCs MENU with the HDS.
Is DTC P0325 indicated? YES: Go to step 6. NO: Intermittent failure, system is OK at this time. Check for poor connections or loose terminals at the knock sensor and the ECM/PCM.
6. Turn the ignition switch OFF. 7. Jump the SCS line with the HDS. 8. Disconnect the knock sensor 1P connector. 9. Disconnect ECM/PCM connector A (31P).
10. Check for continuity between ECM/PCM connector terminal A1 and body ground. Is there continuity?
YES: Repair short in the wire between the ECM/PCM (A1) and the knock sensor, then go to step 14 . NO: Go to step 11.
2004 Acura TSX
2004 ENGINE PERFORMANCE PGM-FI System - TSX
Wednesday, March 12, 2008 2:21:52 AM Page 98
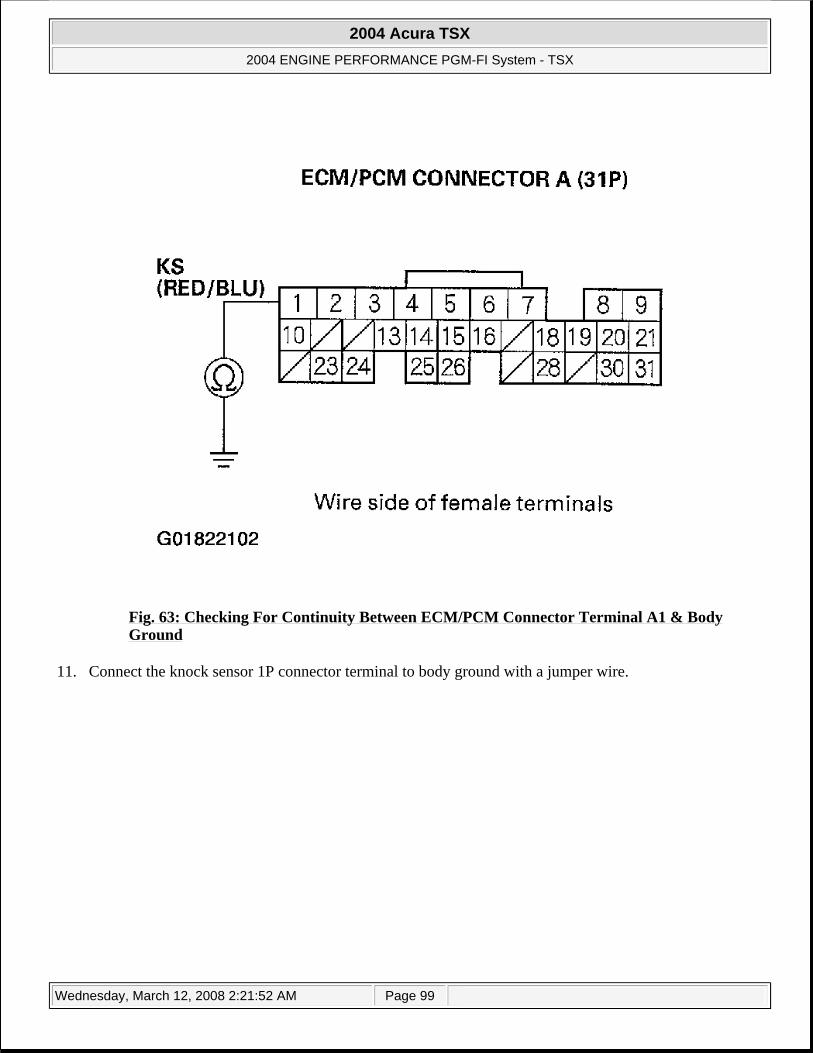
Fig. 63: Checking For Continuity Between ECM/PCM Connector Terminal A1 & Body Ground
11. Connect the knock sensor 1P connector terminal to body ground with a jumper wire.
2004 Acura TSX
2004 ENGINE PERFORMANCE PGM-FI System - TSX
Wednesday, March 12, 2008 2:21:52 AM Page 99
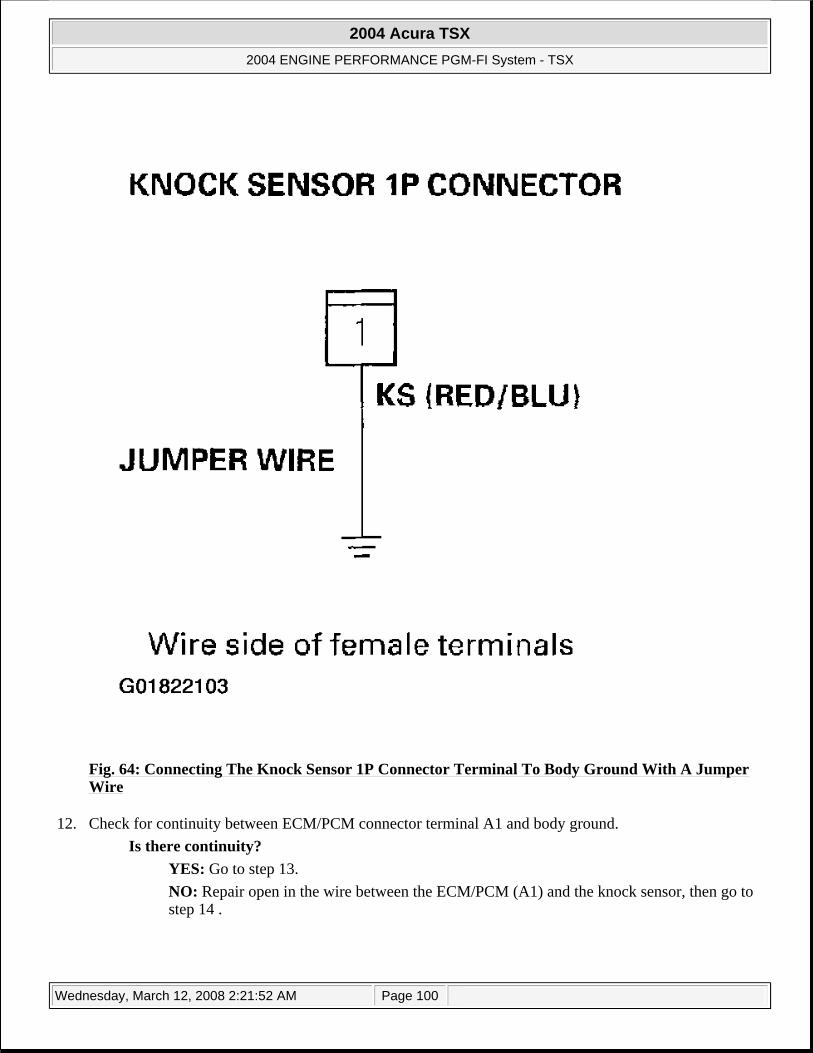
Fig. 64: Connecting The Knock Sensor 1P Connector Terminal To Body Ground With A Jumper Wire
12. Check for continuity between ECM/PCM connector terminal A1 and body ground. Is there continuity?
YES: Go to step 13. NO: Repair open in the wire between the ECM/PCM (A1) and the knock sensor, then go to step 14 .
2004 Acura TSX
2004 ENGINE PERFORMANCE PGM-FI System - TSX
Wednesday, March 12, 2008 2:21:52 AM Page 100
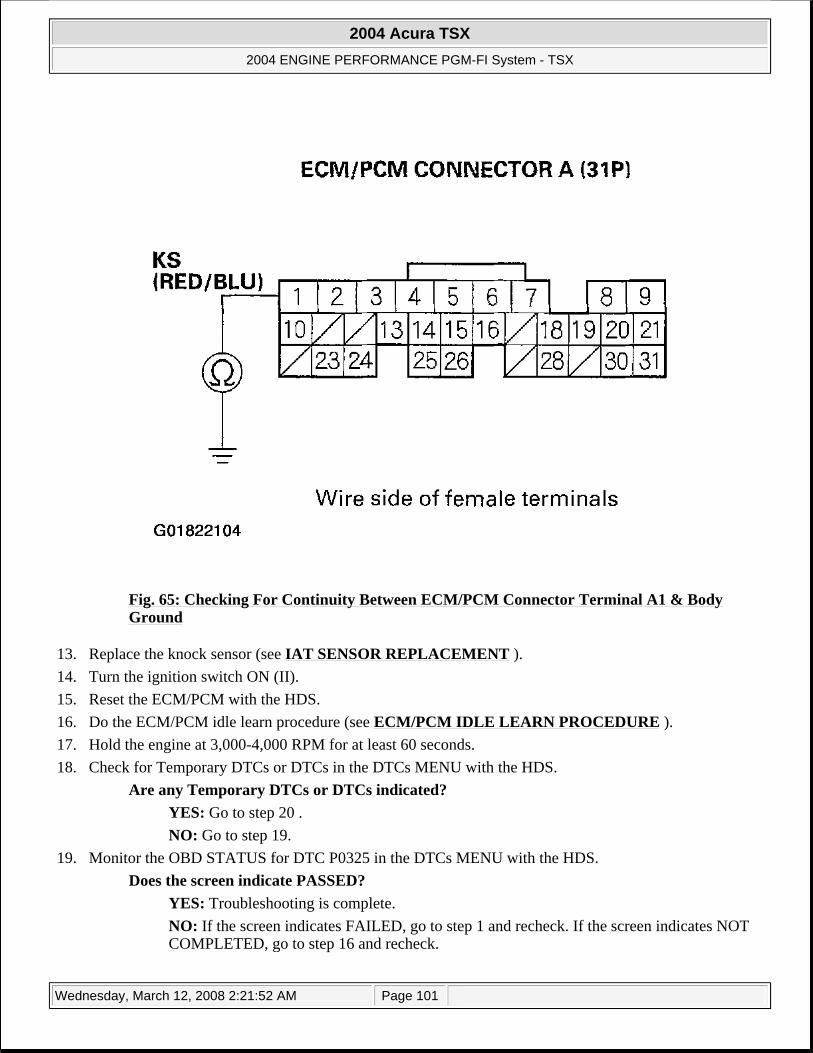
Fig. 65: Checking For Continuity Between ECM/PCM Connector Terminal A1 & Body Ground
13. Replace the knock sensor (see IAT SENSOR REPLACEMENT ). 14. Turn the ignition switch ON (II). 15. Reset the ECM/PCM with the HDS. 16. Do the ECM/PCM idle learn procedure (see ECM/PCM IDLE LEARN PROCEDURE ). 17. Hold the engine at 3,000-4,000 RPM for at least 60 seconds. 18. Check for Temporary DTCs or DTCs in the DTCs MENU with the HDS.
Are any Temporary DTCs or DTCs indicated? YES: Go to step 20 . NO: Go to step 19.
19. Monitor the OBD STATUS for DTC P0325 in the DTCs MENU with the HDS. Does the screen indicate PASSED?
YES: Troubleshooting is complete. NO: If the screen indicates FAILED, go to step 1 and recheck. If the screen indicates NOT COMPLETED, go to step 16 and recheck.
2004 Acura TSX
2004 ENGINE PERFORMANCE PGM-FI System - TSX
Wednesday, March 12, 2008 2:21:52 AM Page 101

20. Update the ECM/PCM if it does not have the latest software, or substitute a known-good ECM/PCM (see HOW TO SUBSTITUTE THE ECM/PCM ).
21. Hold the engine at 3,000-4,000 RPM for at least 60 seconds. 22. Check for Temporary DTCs or DTCs in the DTCs MENU with the HDS.
Are any Temporary DTCs or DTCs indicated? YES: If DTC P0325 is indicated, check for poor connections or loose terminals at the knock sensor and the ECM/PCM, then go to step 1 . If any other Temporary DTCs or DTCs are indicated, go to the indicated DTC troubleshooting. NO: If the ECM/PCM was updated, troubleshooting is complete. If the ECM/PCM was substituted, replace the original ECM/PCM (see HOW TO REMOVE THE ECM/PCM FOR TESTING ).
DTC P0335: CKP SENSOR NO SIGNAL
1. Turn the ignition switch ON (II). 2. Clear the DTC with the HDS. 3. Start the engine. 4. Check for Temporary DTCs or DTCs in the DTCs MENU with the HDS.
Is DTC P0335 indicated? YES: Go to step 5. NO: Intermittent failure, system is OK at this time. Check for poor connections or loose terminals at the CKP sensor and the ECM/PCM.
5. Turn the ignition switch OFF. 6. Disconnect the CKP sensor 3P connector. 7. Turn the ignition switch ON (II). 8. Measure voltage between CKP sensor 3P connector terminal No. 1 and body ground.
Is there battery voltage? YES: Go to step 9. NO: Repair open in the wire between the CKP sensor and PGM-FI main relay 1, then go to step 19 .
2004 Acura TSX
2004 ENGINE PERFORMANCE PGM-FI System - TSX
Wednesday, March 12, 2008 2:21:52 AM Page 102
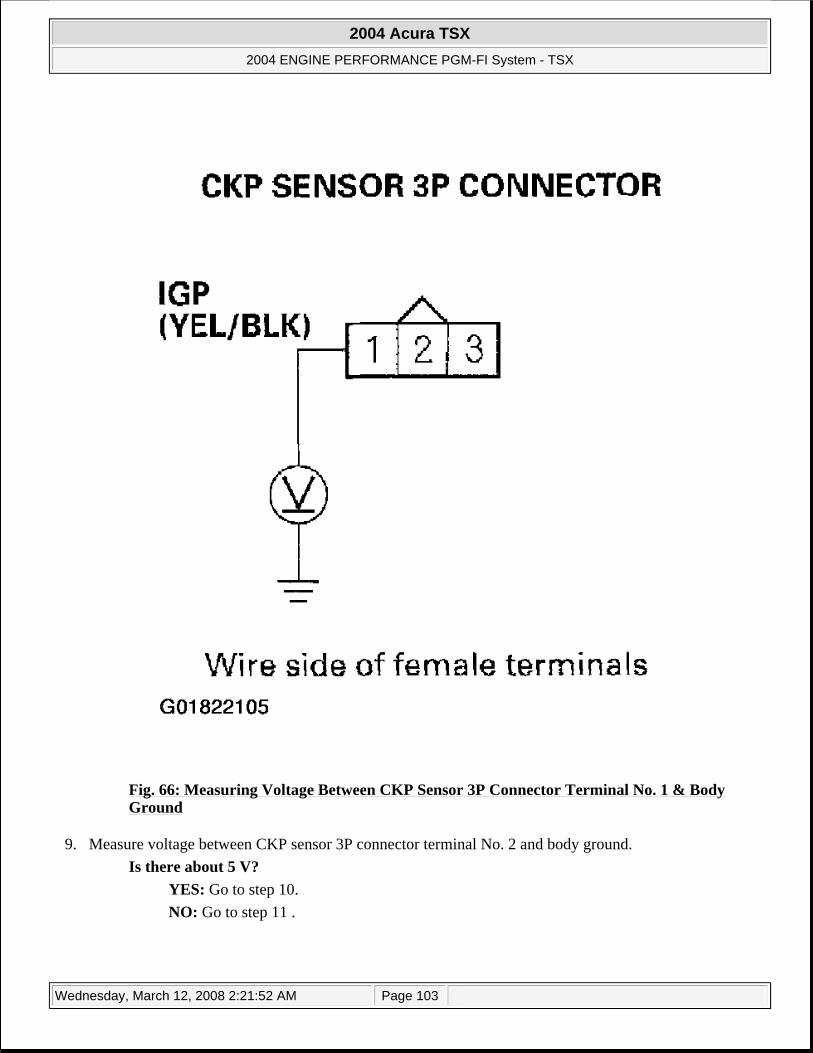
Fig. 66: Measuring Voltage Between CKP Sensor 3P Connector Terminal No. 1 & Body Ground
9. Measure voltage between CKP sensor 3P connector terminal No. 2 and body ground. Is there about 5 V?
YES: Go to step 10. NO: Go to step 11 .
2004 Acura TSX
2004 ENGINE PERFORMANCE PGM-FI System - TSX
Wednesday, March 12, 2008 2:21:52 AM Page 103
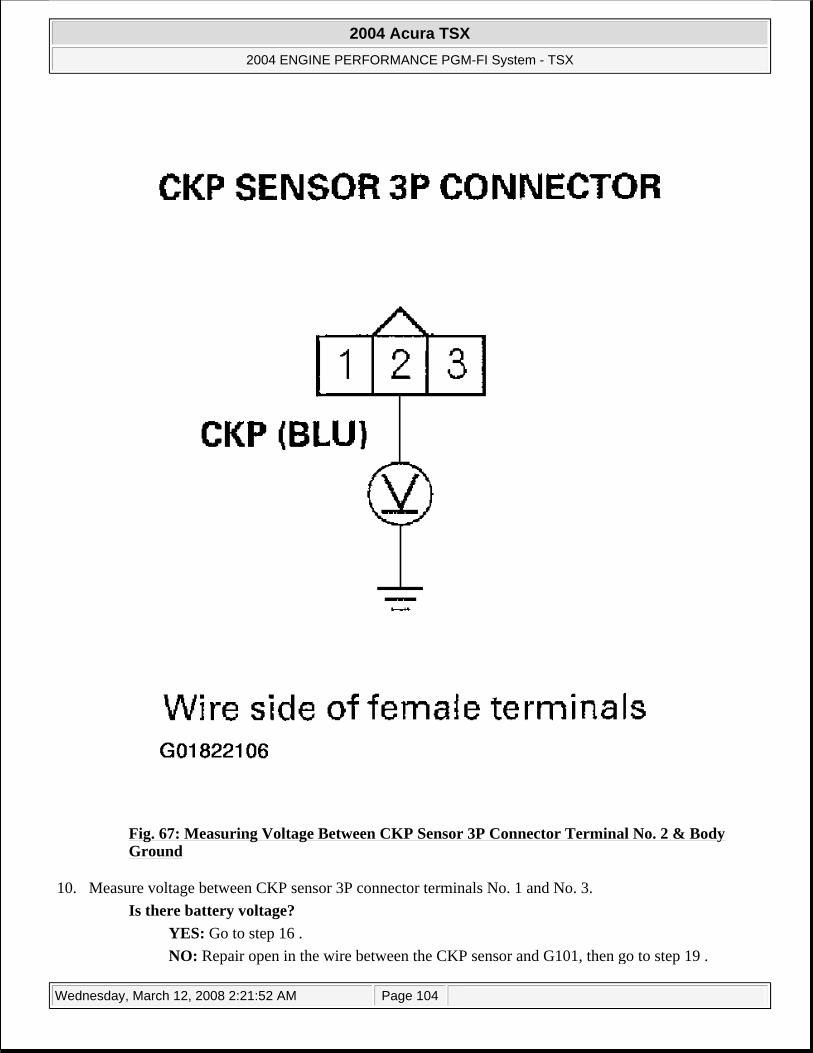
Fig. 67: Measuring Voltage Between CKP Sensor 3P Connector Terminal No. 2 & Body Ground
10. Measure voltage between CKP sensor 3P connector terminals No. 1 and No. 3. Is there battery voltage?
YES: Go to step 16 . NO: Repair open in the wire between the CKP sensor and G101, then go to step 19 .
2004 Acura TSX
2004 ENGINE PERFORMANCE PGM-FI System - TSX
Wednesday, March 12, 2008 2:21:52 AM Page 104
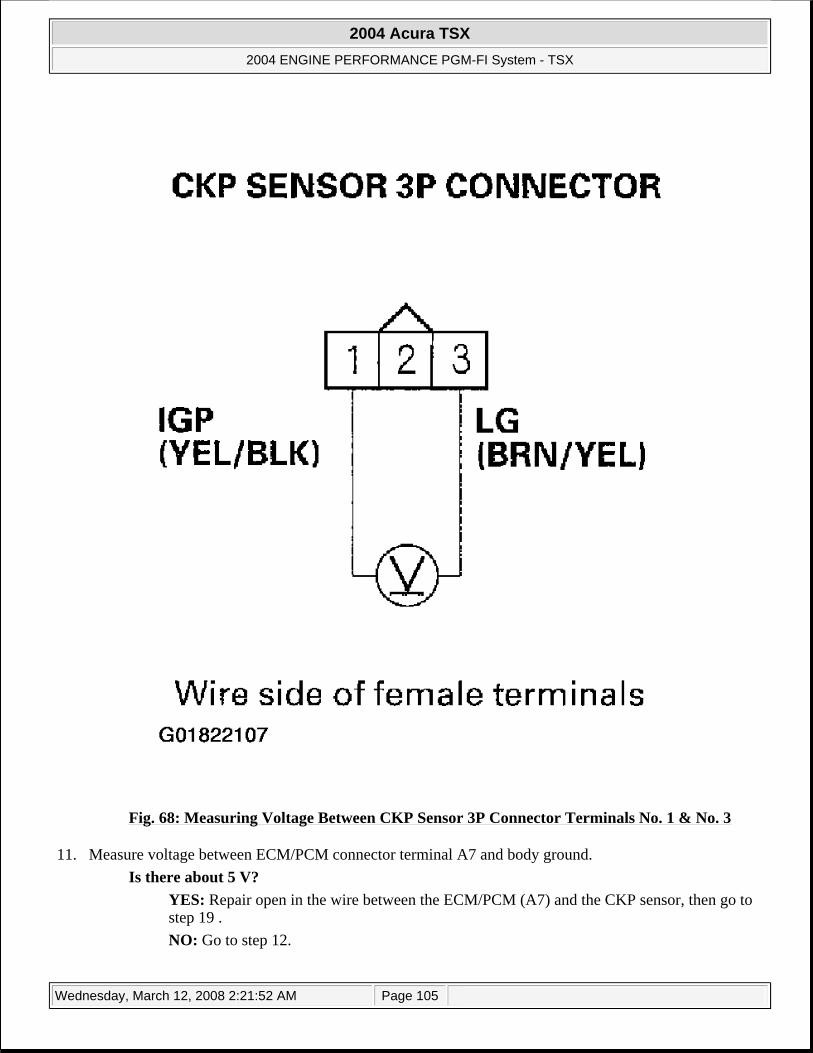
Fig. 68: Measuring Voltage Between CKP Sensor 3P Connector Terminals No. 1 & No. 3
11. Measure voltage between ECM/PCM connector terminal A7 and body ground. Is there about 5 V?
YES: Repair open in the wire between the ECM/PCM (A7) and the CKP sensor, then go to step 19 . NO: Go to step 12.
2004 Acura TSX
2004 ENGINE PERFORMANCE PGM-FI System - TSX
Wednesday, March 12, 2008 2:21:52 AM Page 105
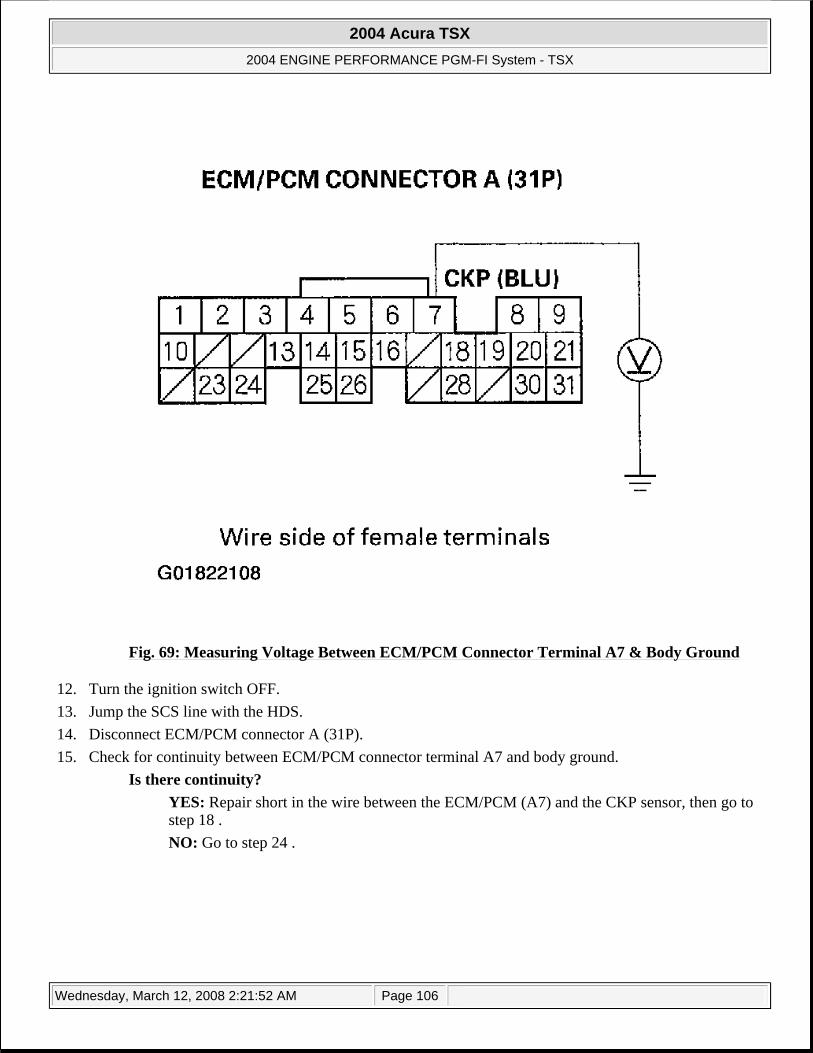
Fig. 69: Measuring Voltage Between ECM/PCM Connector Terminal A7 & Body Ground
12. Turn the ignition switch OFF. 13. Jump the SCS line with the HDS. 14. Disconnect ECM/PCM connector A (31P). 15. Check for continuity between ECM/PCM connector terminal A7 and body ground.
Is there continuity? YES: Repair short in the wire between the ECM/PCM (A7) and the CKP sensor, then go to step 18 . NO: Go to step 24 .
2004 Acura TSX
2004 ENGINE PERFORMANCE PGM-FI System - TSX
Wednesday, March 12, 2008 2:21:52 AM Page 106
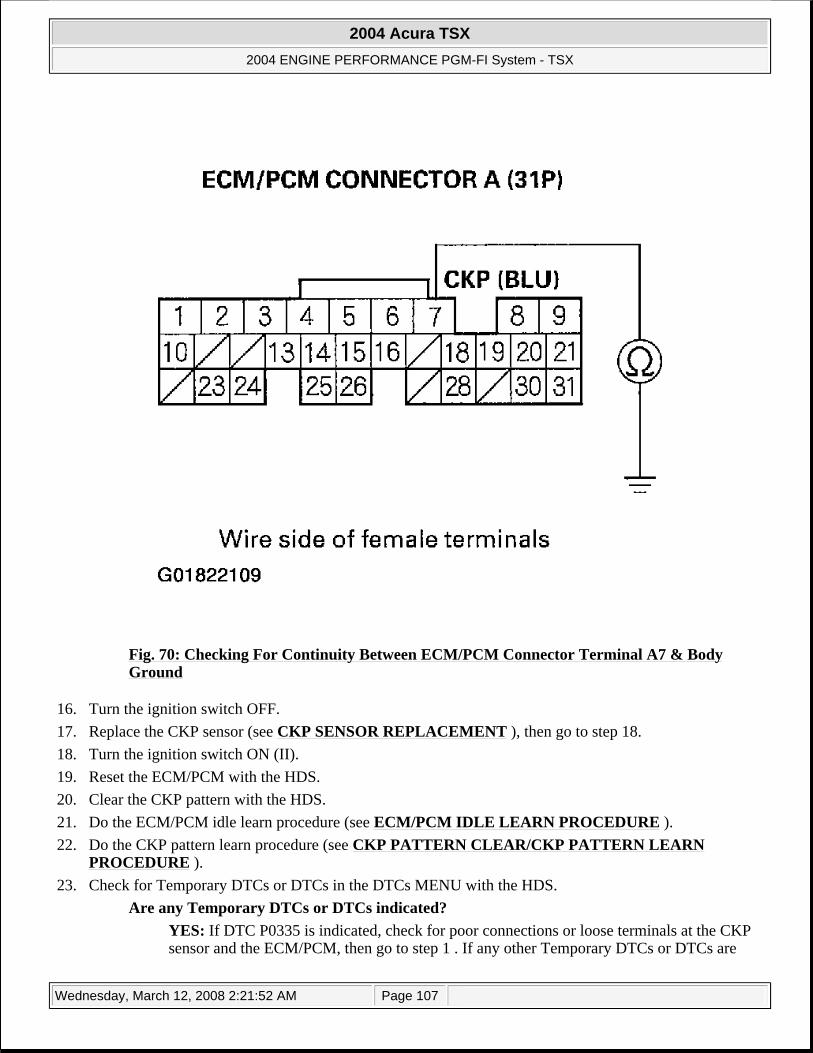
Fig. 70: Checking For Continuity Between ECM/PCM Connector Terminal A7 & Body Ground
16. Turn the ignition switch OFF. 17. Replace the CKP sensor (see CKP SENSOR REPLACEMENT ), then go to step 18. 18. Turn the ignition switch ON (II). 19. Reset the ECM/PCM with the HDS. 20. Clear the CKP pattern with the HDS. 21. Do the ECM/PCM idle learn procedure (see ECM/PCM IDLE LEARN PROCEDURE ). 22. Do the CKP pattern learn procedure (see CKP PATTERN CLEAR/CKP PATTERN LEARN
PROCEDURE ). 23. Check for Temporary DTCs or DTCs in the DTCs MENU with the HDS.
Are any Temporary DTCs or DTCs indicated? YES: If DTC P0335 is indicated, check for poor connections or loose terminals at the CKP sensor and the ECM/PCM, then go to step 1 . If any other Temporary DTCs or DTCs are
2004 Acura TSX
2004 ENGINE PERFORMANCE PGM-FI System - TSX
Wednesday, March 12, 2008 2:21:52 AM Page 107
indicated, go to the indicated DTC troubleshooting. NO: Troubleshooting is complete.
24. Update the ECM/PCM if it does not have the latest software, or substitute a known-good ECM/PCM (see HOW TO SUBSTITUTE THE ECM/PCM ).
25. Check for Temporary DTCs or DTCs in the DTCs MENU with the HDS. Are any Temporary DTCs or DTCs indicated?
YES: If DTC P0335 is indicated, check for poor connections or loose terminals at the CKP sensor and the ECM/PCM, then go to step 1 . If any other Temporary DTCs or DTCs are indicated, go to the indicated DTC troubleshooting. NO: If the ECM/PCM was updated, troubleshooting is complete. If the ECM/PCM was substituted, replace the original ECM/PCM (see HOW TO REMOVE THE ECM/PCM FOR TESTING ).
DTC P0339: CKP SENSOR INTERMITTENT INTERRUPTION
1. Note the following freeze data. Engine speed Vehicle speed
2. Clear the DTC with the HDS. 3. Start the engine, and let it idle for 10 seconds. 4. Check the CKP NOISE COUNT in the DATA LIST with the HDS.
Are 0 counts indicated? YES: Go to step 7 . NO: Go to step 5.
5. Test-drive the vehicle for several minutes in the range of the recorded freeze data. 6. Check the CKP NOISE COUNT in the DATA LIST with the HDS.
Are 0 counts indicated? YES: Go to step 7. NO: Intermittent failure, system is OK at this time. Check for poor connections or loose terminals at the CKP sensor and the ECM/PCM.
7. Check for poor or loose connections and terminals at the following: CKP sensor ECM/PCM Engine ground Body ground
Are the connections and terminals OK? YES: Go to step 8. NO: Repair the connectors or terminals, then go to step 11 .
8. Remove the cam chain case (see CAM CHAIN REMOVAL ), and check for damage on the CKP sensor pulse plate.
2004 Acura TSX
2004 ENGINE PERFORMANCE PGM-FI System - TSX
Wednesday, March 12, 2008 2:21:53 AM Page 108
Is the pulse plate damaged? YES: Replace the CKP sensor pulse plate, then go to step 11 . NO: Go to step 9.
9. Turn the ignition switch OFF. 10. Replace the CKP sensor (see CKP SENSOR REPLACEMENT ). 11. Turn the ignition switch ON (II). 12. Reset the ECM/PCM with the HDS. 13. Clear the CKP pattern with the HDS. 14. Do the ECM/PCM idle learn procedure (see ECM/PCM IDLE LEARN PROCEDURE ). 15. Do the CKP pattern learn procedure (see CKP PATTERN CLEAR/CKP PATTERN LEARN
PROCEDURE ). 16. Start the engine, and let it idle for 10 seconds. 17. Check for Temporary DTCs or DTCs in the DTCs MENU with the HDS.
Are any Temporary DTCs or DTCs indicated? YES: If DTC P0339 is indicated, check for poor connections or loose terminals at the CKP sensor and the ECM/PCM, then go to step 1 . If any other Temporary DTCs or DTCs are indicated, go to the indicated DTC troubleshooting. NO: Troubleshooting is complete.
DTC P0365: CMP SENSOR B NO SIGNAL
1. Turn the ignition switch ON (II). 2. Clear the DTC with the HDS. 3. Start the engine. 4. Check for Temporary DTCs or DTCs in the DTCs MENU with the HDS.
Is DTC P0365 indicated? YES: Go to step 5. NO: Intermittent failure, system is OK at this time. Check for poor connections or loose terminals at CKP sensor B and the ECM/PCM.
5. Turn the ignition switch OFF. 6. Disconnect the CMP sensor B 3P connector. 7. Turn the ignition switch ON (II). 8. Measure voltage between CMP sensor B 3P connector terminal No. 3 and body ground.
Is there battery voltage? YES: Go to step 9. NO: Repair open in the wire between CMP sensor B and PGM-FI main relay 1, then go to step 19 .
2004 Acura TSX
2004 ENGINE PERFORMANCE PGM-FI System - TSX
Wednesday, March 12, 2008 2:21:53 AM Page 109

Fig. 71: Measuring Voltage Between CMP Sensor B 3P Connector Terminal No. 3 & Body Ground
9. Measure voltage between CMP sensor B 3P connector terminal No. 1 and body ground. Is there about 5 V?
YES: Go to step 10. NO: Go to step 11 .
2004 Acura TSX
2004 ENGINE PERFORMANCE PGM-FI System - TSX
Wednesday, March 12, 2008 2:21:53 AM Page 110
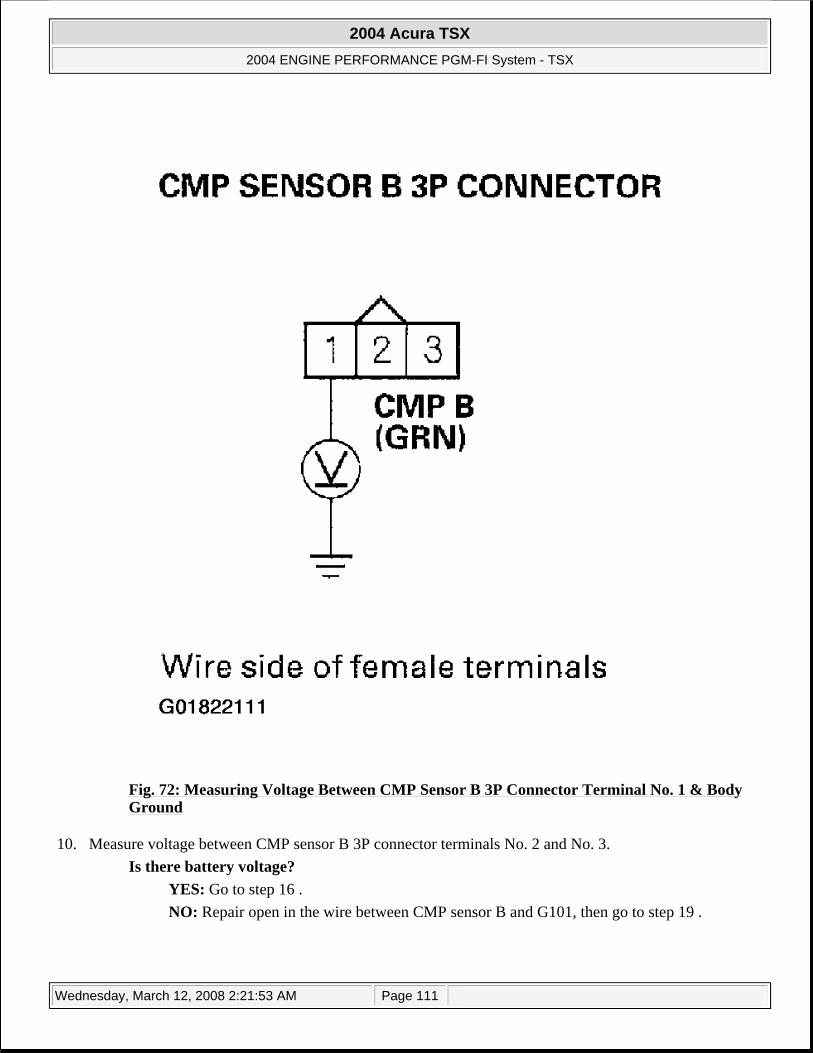
Fig. 72: Measuring Voltage Between CMP Sensor B 3P Connector Terminal No. 1 & Body Ground
10. Measure voltage between CMP sensor B 3P connector terminals No. 2 and No. 3. Is there battery voltage?
YES: Go to step 16 . NO: Repair open in the wire between CMP sensor B and G101, then go to step 19 .
2004 Acura TSX
2004 ENGINE PERFORMANCE PGM-FI System - TSX
Wednesday, March 12, 2008 2:21:53 AM Page 111
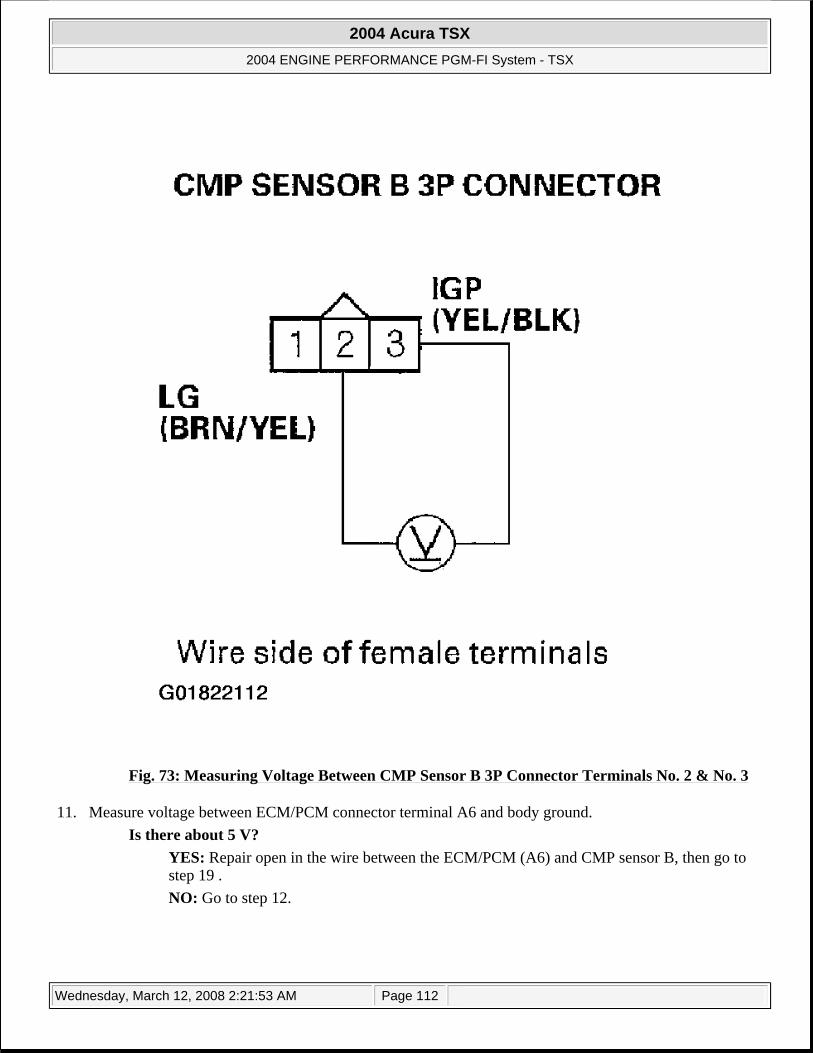
Fig. 73: Measuring Voltage Between CMP Sensor B 3P Connector Terminals No. 2 & No. 3
11. Measure voltage between ECM/PCM connector terminal A6 and body ground. Is there about 5 V?
YES: Repair open in the wire between the ECM/PCM (A6) and CMP sensor B, then go to step 19 . NO: Go to step 12.
2004 Acura TSX
2004 ENGINE PERFORMANCE PGM-FI System - TSX
Wednesday, March 12, 2008 2:21:53 AM Page 112
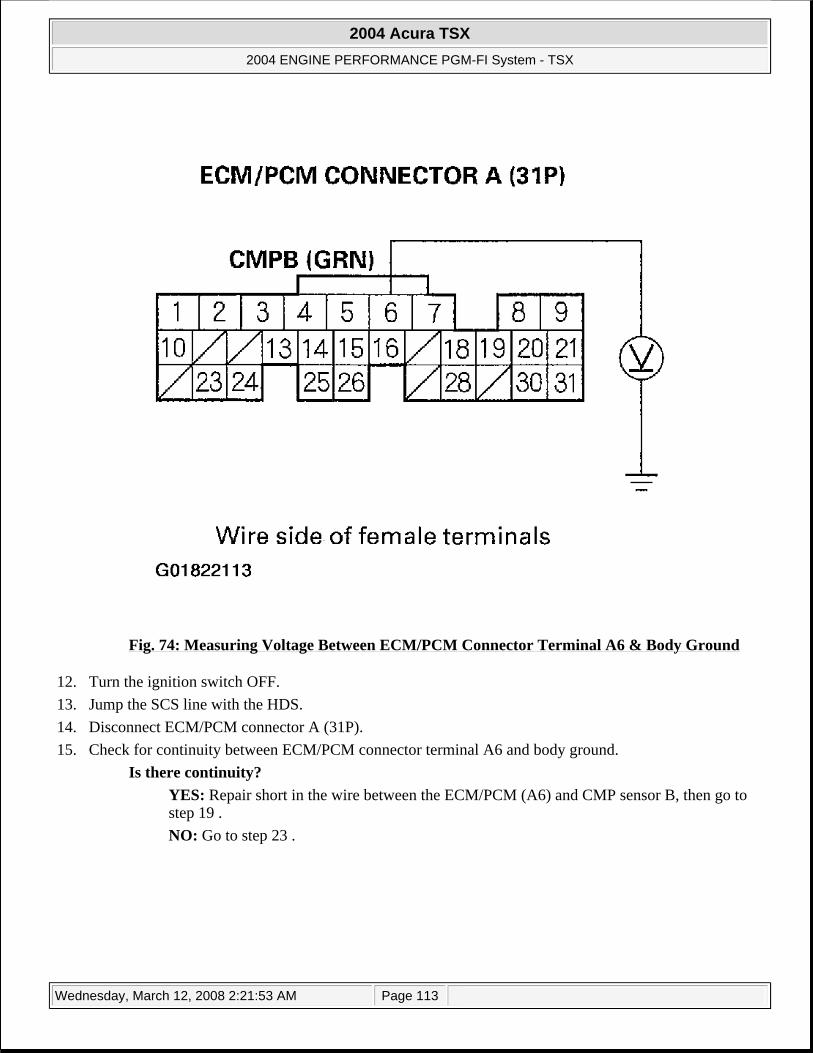
Fig. 74: Measuring Voltage Between ECM/PCM Connector Terminal A6 & Body Ground
12. Turn the ignition switch OFF. 13. Jump the SCS line with the HDS. 14. Disconnect ECM/PCM connector A (31P). 15. Check for continuity between ECM/PCM connector terminal A6 and body ground.
Is there continuity? YES: Repair short in the wire between the ECM/PCM (A6) and CMP sensor B, then go to step 19 . NO: Go to step 23 .
2004 Acura TSX
2004 ENGINE PERFORMANCE PGM-FI System - TSX
Wednesday, March 12, 2008 2:21:53 AM Page 113

Fig. 75: Checking For Continuity Between ECM/PCM Connector Terminal A6 & Body Ground
16. Turn the ignition switch OFF. 17. Replace CMP sensor B (see ECT SENSOR REPLACEMENT ). 18. Turn the ignition switch ON (II). 19. Reset the ECM/PCM with the HDS. 20. Do the ECM/PCM idle learn procedure (see ECM/PCM IDLE LEARN PROCEDURE ). 21. Start the engine. 22. Check for Temporary DTCs or DTCs in the DTCs MENU with the HDS.
Are any Temporary DTCs or DTCs indicated? YES: If DTC P0365 is indicated, check for poor connections or loose terminals at CMP sensor B and the ECM/PCM, then go to step 1 . If any other Temporary DTCs or DTCs are indicated, go to the indicated DTC troubleshooting. NO: Troubleshooting is complete.
23. Update the ECM/PCM if it does not have the latest software, or substitute a known-good ECM/PCM (see
2004 Acura TSX
2004 ENGINE PERFORMANCE PGM-FI System - TSX
Wednesday, March 12, 2008 2:21:53 AM Page 114

HOW TO SUBSTITUTE THE ECM/PCM ). 24. Check for Temporary DTCs or DTCs in the DTCs MENU with the HDS.
Are any Temporary DTCs or DTCs indicated? YES: If DTC P0365 is indicated, check for poor connections or loose terminals at CMP sensor B and the ECM/PCM, then go to step 1 . If any other Temporary DTCs or DTCs are indicated, go to the indicated DTC troubleshooting. NO: If the ECM/PCM was updated, troubleshooting is complete. If the ECM/PCM was substituted, replace the original ECM/PCM (see HOW TO REMOVE THE ECM/PCM FOR TESTING ).
DTC P0369: CMP SENSOR B INTERMITTENT INTERRUPTION
1. Note the following freeze data. Engine speed Vehicle speed
2. Clear the DTC with the HDS. 3. Start the engine, and let it idle for 10 seconds. 4. Check the CMP NOISE B COUNT in the DATA LIST with the HDS.
Are 0 counts indicated? YES: Go to step 7 . NO: Go to step 5.
5. Test-drive the vehicle for several minutes in the range of the recorded freeze data. 6. Check the CMP NOISE B COUNT in the DATA LIST with the HDS.
Are 0 counts indicated? YES: Go to step 7. NO: Intermittent failure, system is OK at this time. Check for poor connections or loose terminals at CMP sensor B and the ECM/PCM.
7. Check for poor or loose connections and terminals at these locations: CMP sensor B ECM/PCM Engine ground Body ground
Are the connections and terminals OK? YES: Go to step 8. NO: Repair the connectors or terminals, then go to step 11 .
8. Check for damage on the CMP sensor B pulse plate (see CMP PULSE PLATE B REPLACEMENT ). Is the pulse plate damaged?
YES: Replace the CMP sensor B pulse plate (see CMP PULSE PLATE B REPLACEMENT ), then go to step 11 . NO: Go to step 9.
2004 Acura TSX
2004 ENGINE PERFORMANCE PGM-FI System - TSX
Wednesday, March 12, 2008 2:21:53 AM Page 115
9. Turn the ignition switch OFF. 10. Replace CMP sensor B (see ECT SENSOR REPLACEMENT ). 11. Turn the ignition switch ON (II). 12. Reset the ECM/PCM with the HDS. 13. Do the ECM/PCM idle learn procedure (see ECM/PCM IDLE LEARN PROCEDURE ). 14. Start the engine, and let it idle for 10 seconds. 15. Check for Temporary DTCs or DTCs in the DTCs MENU with the HDS.
Are any Temporary DTCs or DTCs indicated? YES: If DTC P0369 is indicated, check for poor connections or loose terminals at CMP sensor B and the ECM/PCM, then go to step 1 . If any other Temporary DTCs or DTCs are indicated, go to the indicated DTC troubleshooting. NO: Troubleshooting is complete.
DTC P0563: ECM/PCM POWER SOURCE CIRCUIT UNEXPECTED VOLTAGE
1. Turn the ignition switch ON (II). 2. Clear the DTC with the HDS. 3. Turn the ignition switch OFF. 4. Wait 10 seconds. 5. Turn the ignition switch ON (II). 6. Check for Temporary DTCs or DTCs in the DTCs MENU with the HDS.
Is DTC P0563 indicated? YES: Go to step 7. NO: Intermittent failure, system is OK at this time. Check for poor connections or loose terminals at the No. 8 ECU (ECM/PCM) (15A) fuse in the underhood fuse/relay box, PGM-FI main relay 1, and the ECM/PCM.
7. Turn the ignition switch OFF. 8. Jump the SCS line with the HDS. 9. Disconnect ECM/PCM connector E (31P).
10. Measure voltage between ECM/PCM connector terminal E7 and body ground. Is there battery voltage?
YES: Go to step 13 . NO: Go to step 11.
2004 Acura TSX
2004 ENGINE PERFORMANCE PGM-FI System - TSX
Wednesday, March 12, 2008 2:21:53 AM Page 116
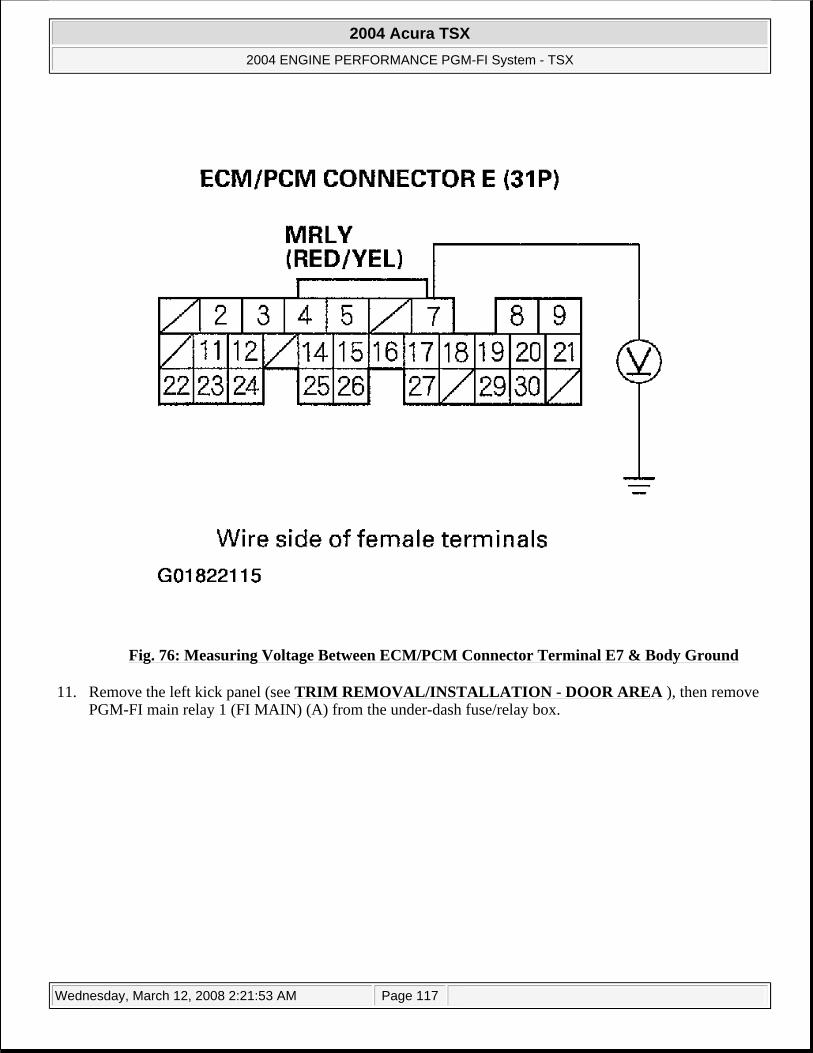
Fig. 76: Measuring Voltage Between ECM/PCM Connector Terminal E7 & Body Ground
11. Remove the left kick panel (see TRIM REMOVAL/INSTALLATION - DOOR AREA ), then remove PGM-FI main relay 1 (FI MAIN) (A) from the under-dash fuse/relay box.
2004 Acura TSX
2004 ENGINE PERFORMANCE PGM-FI System - TSX
Wednesday, March 12, 2008 2:21:53 AM Page 117
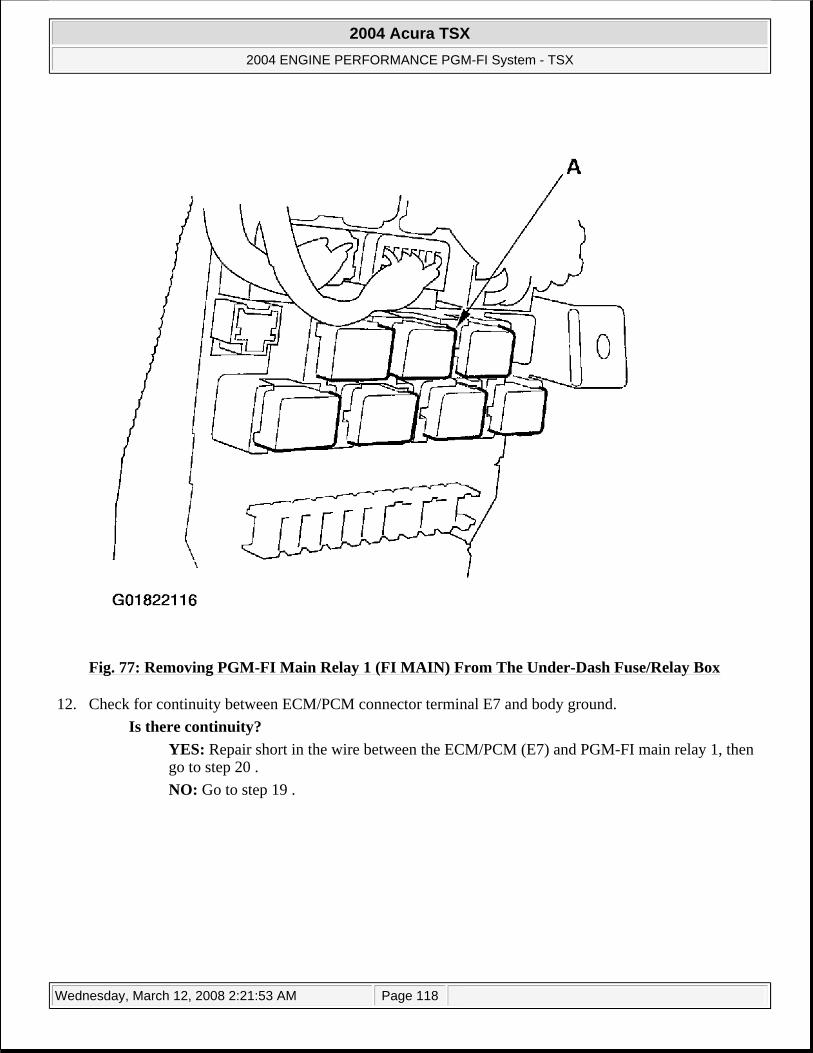
Fig. 77: Removing PGM-FI Main Relay 1 (FI MAIN) From The Under-Dash Fuse/Relay Box
12. Check for continuity between ECM/PCM connector terminal E7 and body ground. Is there continuity?
YES: Repair short in the wire between the ECM/PCM (E7) and PGM-FI main relay 1, then go to step 20 . NO: Go to step 19 .
2004 Acura TSX
2004 ENGINE PERFORMANCE PGM-FI System - TSX
Wednesday, March 12, 2008 2:21:53 AM Page 118
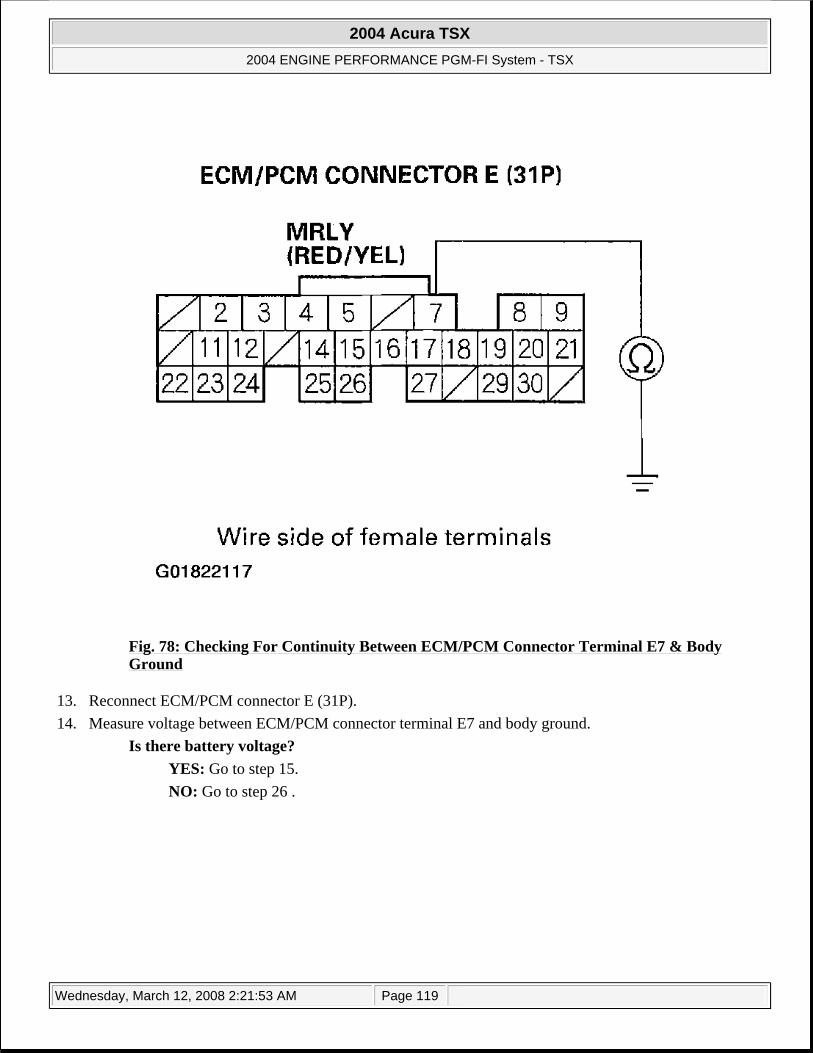
Fig. 78: Checking For Continuity Between ECM/PCM Connector Terminal E7 & Body Ground
13. Reconnect ECM/PCM connector E (31P). 14. Measure voltage between ECM/PCM connector terminal E7 and body ground.
Is there battery voltage? YES: Go to step 15. NO: Go to step 26 .
2004 Acura TSX
2004 ENGINE PERFORMANCE PGM-FI System - TSX
Wednesday, March 12, 2008 2:21:53 AM Page 119
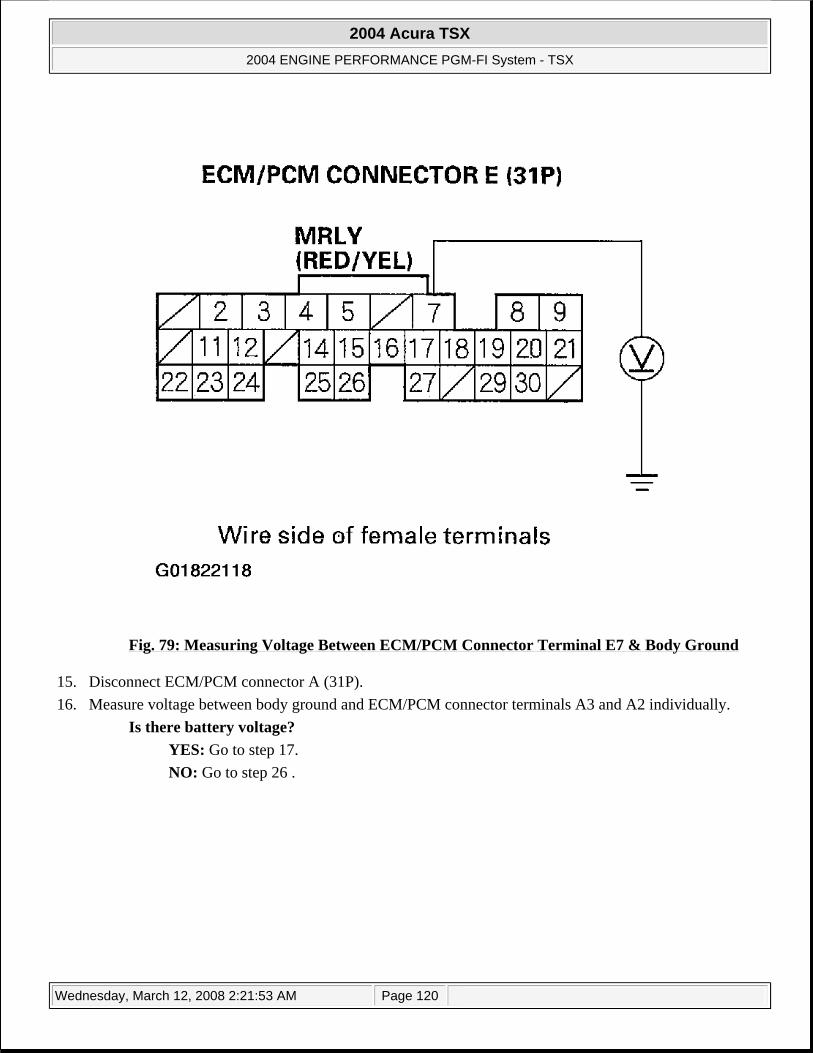
Fig. 79: Measuring Voltage Between ECM/PCM Connector Terminal E7 & Body Ground
15. Disconnect ECM/PCM connector A (31P). 16. Measure voltage between body ground and ECM/PCM connector terminals A3 and A2 individually.
Is there battery voltage? YES: Go to step 17. NO: Go to step 26 .
2004 Acura TSX
2004 ENGINE PERFORMANCE PGM-FI System - TSX
Wednesday, March 12, 2008 2:21:53 AM Page 120

Fig. 80: Measuring Voltage Between Body Ground And ECM/PCM Connector Terminals A3 & A2
17. Remove the left kick panel (see TRIM REMOVAL/INSTALLATION - DOOR AREA ), then remove PGM-FI main relay 1 (FI MAIN) (A) from the under-dash fuse/relay box.
2004 Acura TSX
2004 ENGINE PERFORMANCE PGM-FI System - TSX
Wednesday, March 12, 2008 2:21:53 AM Page 121
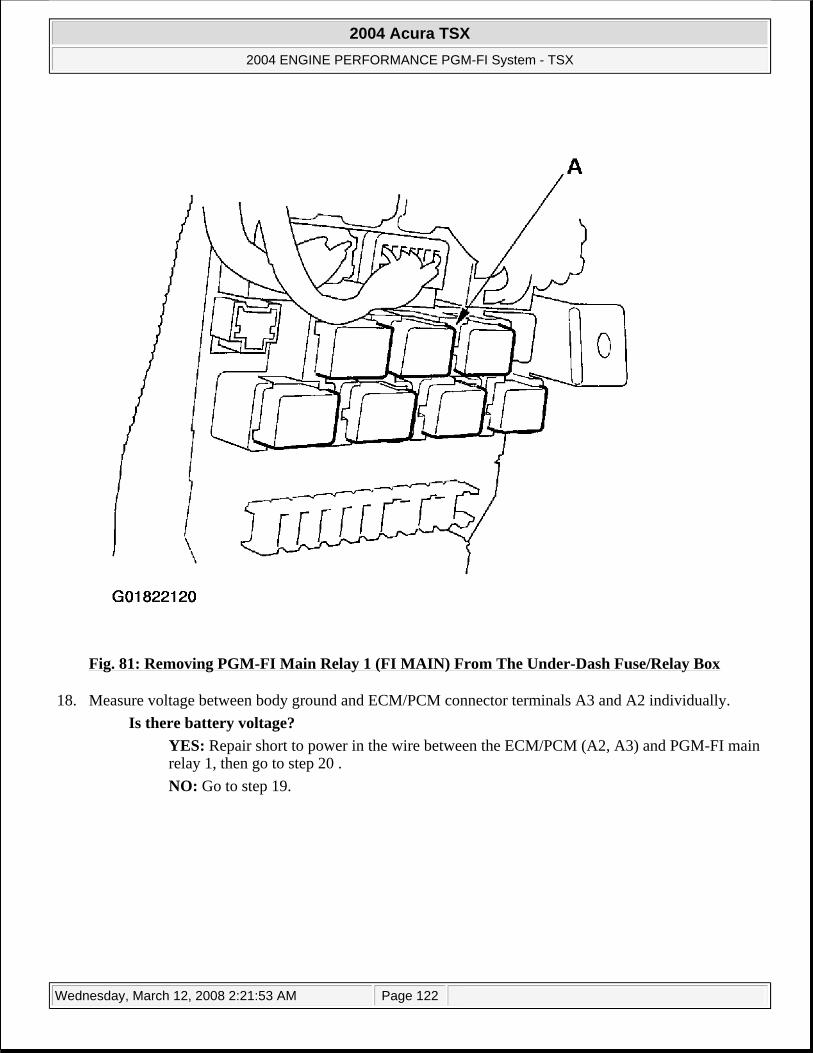
Fig. 81: Removing PGM-FI Main Relay 1 (FI MAIN) From The Under-Dash Fuse/Relay Box
18. Measure voltage between body ground and ECM/PCM connector terminals A3 and A2 individually. Is there battery voltage?
YES: Repair short to power in the wire between the ECM/PCM (A2, A3) and PGM-FI main relay 1, then go to step 20 . NO: Go to step 19.
2004 Acura TSX
2004 ENGINE PERFORMANCE PGM-FI System - TSX
Wednesday, March 12, 2008 2:21:53 AM Page 122
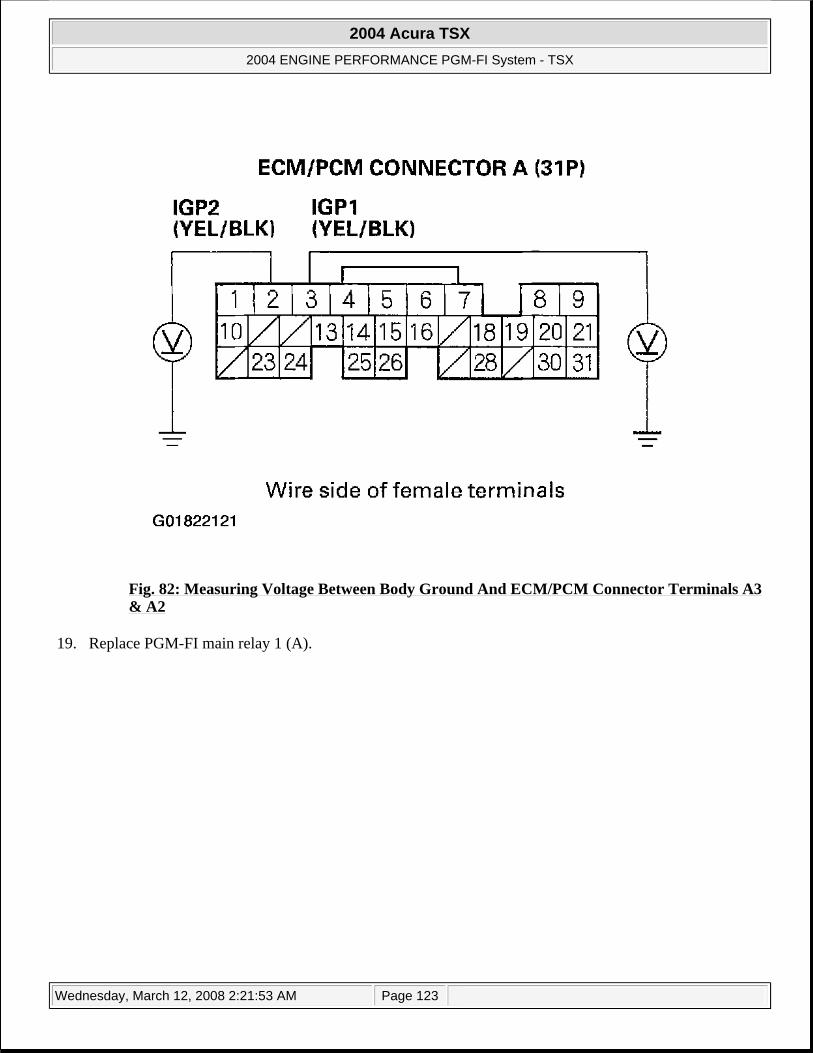
Fig. 82: Measuring Voltage Between Body Ground And ECM/PCM Connector Terminals A3 & A2
19. Replace PGM-FI main relay 1 (A).
2004 Acura TSX
2004 ENGINE PERFORMANCE PGM-FI System - TSX
Wednesday, March 12, 2008 2:21:53 AM Page 123
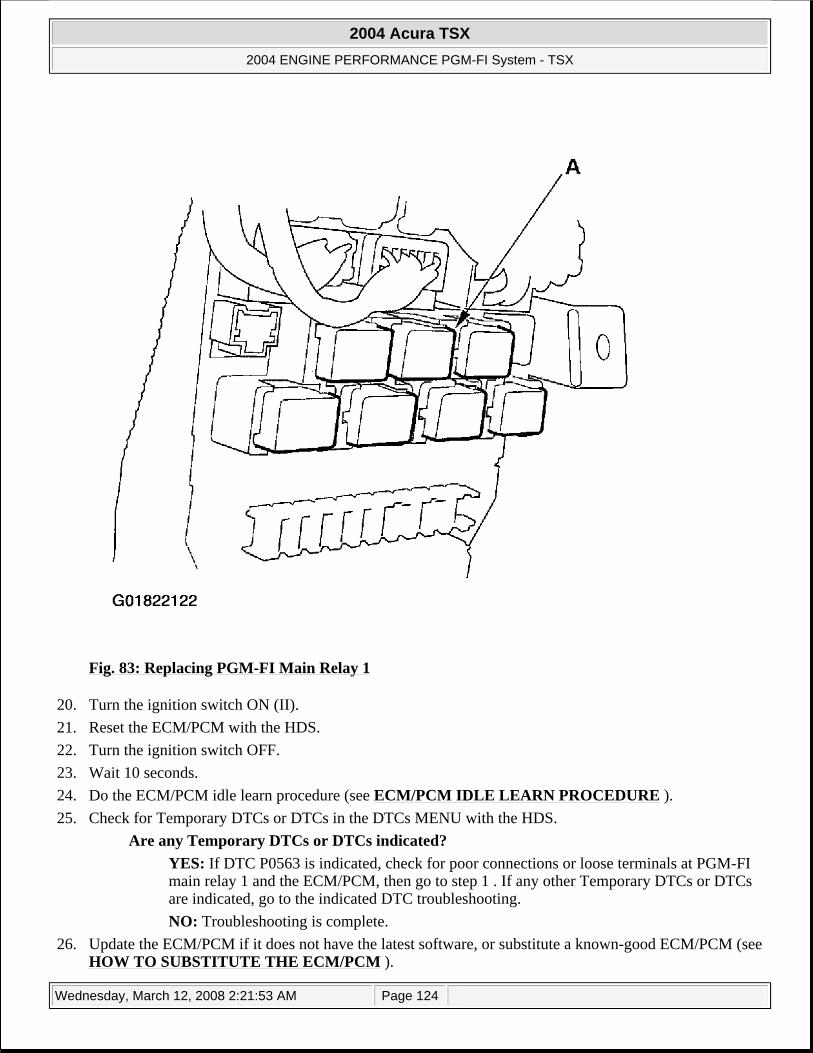
Fig. 83: Replacing PGM-FI Main Relay 1
20. Turn the ignition switch ON (II). 21. Reset the ECM/PCM with the HDS. 22. Turn the ignition switch OFF. 23. Wait 10 seconds. 24. Do the ECM/PCM idle learn procedure (see ECM/PCM IDLE LEARN PROCEDURE ). 25. Check for Temporary DTCs or DTCs in the DTCs MENU with the HDS.
Are any Temporary DTCs or DTCs indicated? YES: If DTC P0563 is indicated, check for poor connections or loose terminals at PGM-FI main relay 1 and the ECM/PCM, then go to step 1 . If any other Temporary DTCs or DTCs are indicated, go to the indicated DTC troubleshooting. NO: Troubleshooting is complete.
26. Update the ECM/PCM if it does not have the latest software, or substitute a known-good ECM/PCM (see HOW TO SUBSTITUTE THE ECM/PCM ).
2004 Acura TSX
2004 ENGINE PERFORMANCE PGM-FI System - TSX
Wednesday, March 12, 2008 2:21:53 AM Page 124
27. Check for Temporary DTCs or DTCs in the DTCs MENU with the HDS. Are any Temporary DTCs or DTCs indicated?
YES: If DTC P0563 is indicated, check for poor connections or loose terminals at PGM-FI main relay 1 and the ECM/PCM, then go to step 1 . If any other Temporary DTCs or DTCs are indicated, go to the indicated DTC troubleshooting. NO: If the ECM/PCM was updated, troubleshooting is complete. If the ECM/PCM was substituted, replace the original ECM/PCM (see HOW TO REMOVE THE ECM/PCM FOR TESTING ).
DTC P0603: ECM/PCM INTERNAL CONTROL MODULE KEEP ALIVE MEMORY (KAM) ERROR
1. Turn the ignition switch ON (II). 2. Clear the DTC with the HDS. 3. Check for Temporary DTCs or DTCs in the DTCs MENU with the HDS.
Are any Temporary DTCs or DTCs indicated? YES: Update the ECM/PCM if it does not have the latest software, or substitute a known-good ECM/PCM, then recheck (see HOW TO SUBSTITUTE THE ECM/PCM ). If the symptom/indication goes away with a known-good ECM/PCM, replace the original ECM/PCM. NO: Intermittent failure, system is OK at this time.
DTC P0606: ECM/PCM PROCESSOR MALFUNCTION
1. Turn the ignition switch ON (II). 2. Clear the DTC with the HDS. 3. Turn the ignition switch OFF. 4. Turn the ignition switch ON (II). 5. Wait 40 seconds. 6. Check for Temporary DTCs or DTCs in the DTCs MENU with the HDS.
Is DTC P0606 indicated? YES: Update the ECM/PCM if it does not have the latest software, or substitute a known-good ECM/PCM, then recheck (see HOW TO SUBSTITUTE THE ECM/PCM ). If the symptom/indication goes away with a known-good ECM/PCM, replace the original ECM/PCM. NO: Intermittent failure, system is OK at this time.
DTC P0685: ECM/PCM POWER CONTROL CIRCUIT MALFUNCTION
1. Turn the ignition switch ON (II). 2. Clear the DTC with the HDS. 3. Check for Temporary DTCs or DTCs in the DTCs MENU with the HDS.
Are any Temporary DTCs or DTCs indicated?
2004 Acura TSX
2004 ENGINE PERFORMANCE PGM-FI System - TSX
Wednesday, March 12, 2008 2:21:53 AM Page 125
YES: Update the ECM/PCM if it does not have the latest software, or substitute a known-good ECM/PCM, then recheck (see HOW TO SUBSTITUTE THE ECM/PCM ). If the symptom/indication goes away with a known-good ECM/PCM, replace the original ECM/PCM. NO: Intermittent failure, system is OK at this time.
DTC P0720: COUNTERSHAFT SPEED SENSOR CIRCUIT MALFUNCTION
1. Start the engine. Hold the engine speed at 3,000 RPM with no load (in neutral) until the radiator fan comes on, then let it idle.
2. Test-drive several miles. 3. Check the C SHAFT SPD in the DATA LIST with the HDS.
Is any vehicle speed indicated? YES: Intermittent failure, system is OK at this time. Check for poor connections or loose terminals at the countershaft speed sensor and the ECM. NO: Go to step 4.
4. Turn the ignition switch OFF. 5. Disconnect the countershaft speed sensor 3P connector. 6. Turn the ignition switch ON (II). 7. Measure voltage between countershaft speed sensor 3P connector terminal No. 1 and body ground.
Is there about 5 V? YES: Go to step 8. NO: Repair open in the wire between the ECM (A21) and the countershaft speed sensor, then go to step 18 .
NOTE: This DTC only occurs on M/T vehicles.
2004 Acura TSX
2004 ENGINE PERFORMANCE PGM-FI System - TSX
Wednesday, March 12, 2008 2:21:53 AM Page 126
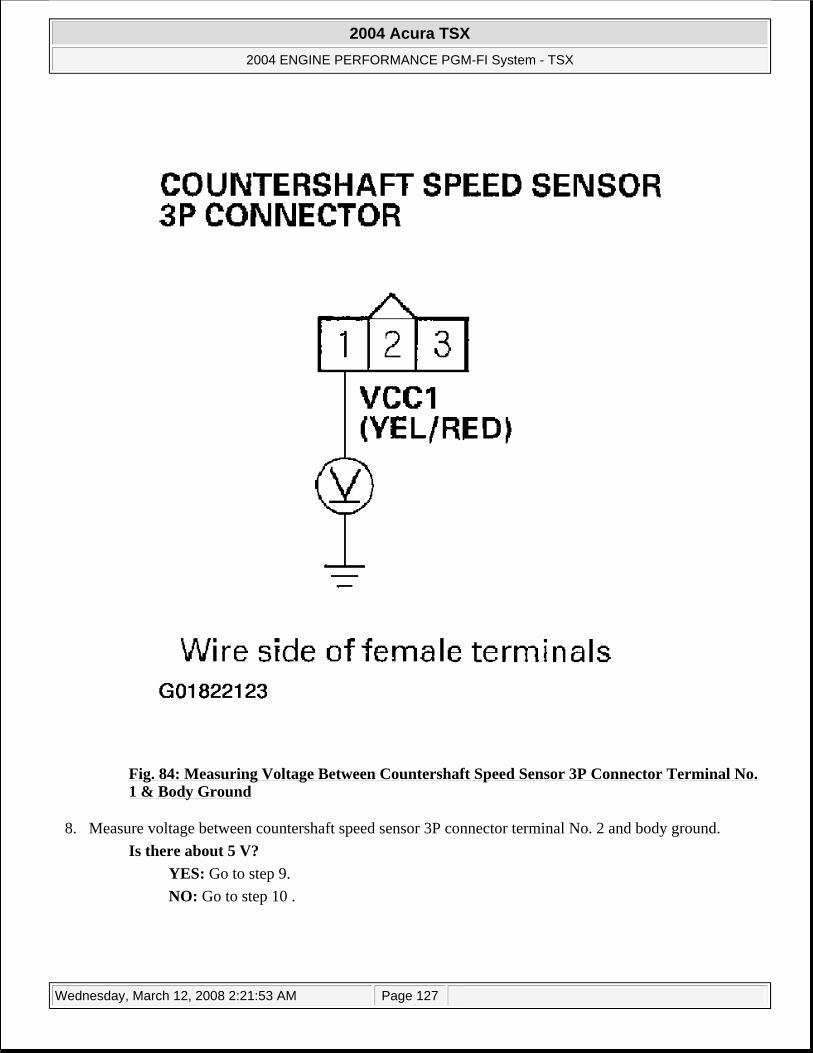
Fig. 84: Measuring Voltage Between Countershaft Speed Sensor 3P Connector Terminal No. 1 & Body Ground
8. Measure voltage between countershaft speed sensor 3P connector terminal No. 2 and body ground. Is there about 5 V?
YES: Go to step 9. NO: Go to step 10 .
2004 Acura TSX
2004 ENGINE PERFORMANCE PGM-FI System - TSX
Wednesday, March 12, 2008 2:21:53 AM Page 127
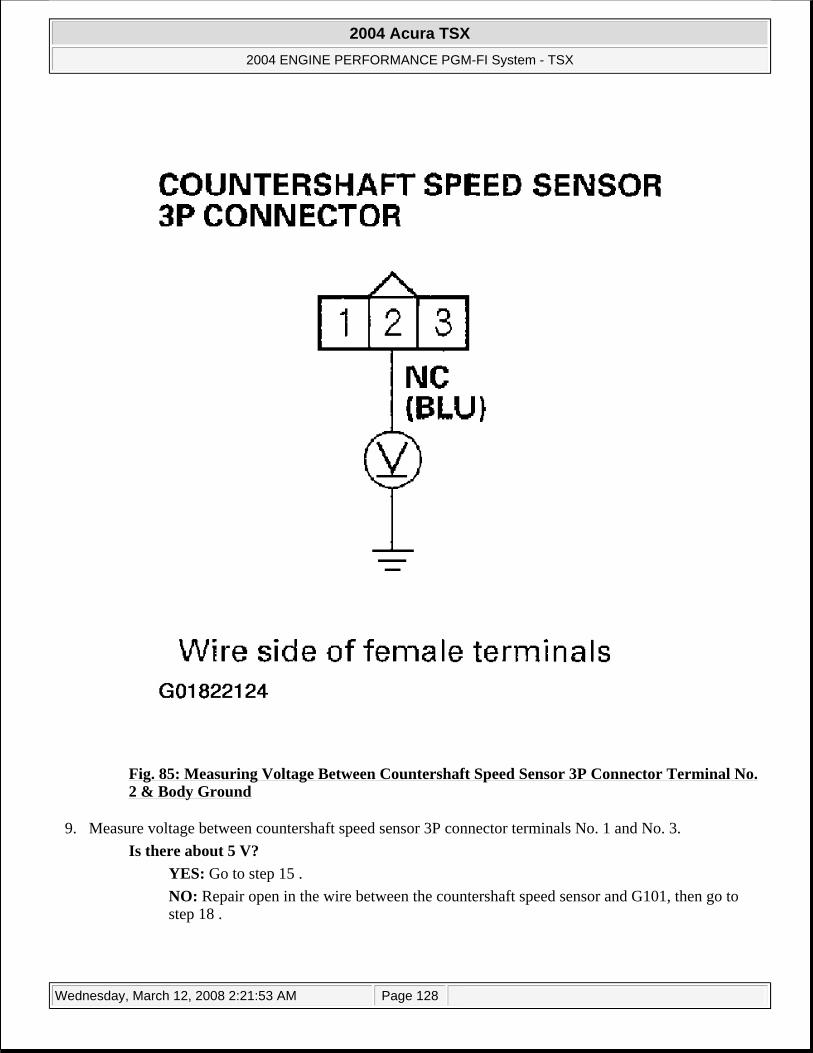
Fig. 85: Measuring Voltage Between Countershaft Speed Sensor 3P Connector Terminal No. 2 & Body Ground
9. Measure voltage between countershaft speed sensor 3P connector terminals No. 1 and No. 3. Is there about 5 V?
YES: Go to step 15 . NO: Repair open in the wire between the countershaft speed sensor and G101, then go to step 18 .
2004 Acura TSX
2004 ENGINE PERFORMANCE PGM-FI System - TSX
Wednesday, March 12, 2008 2:21:53 AM Page 128
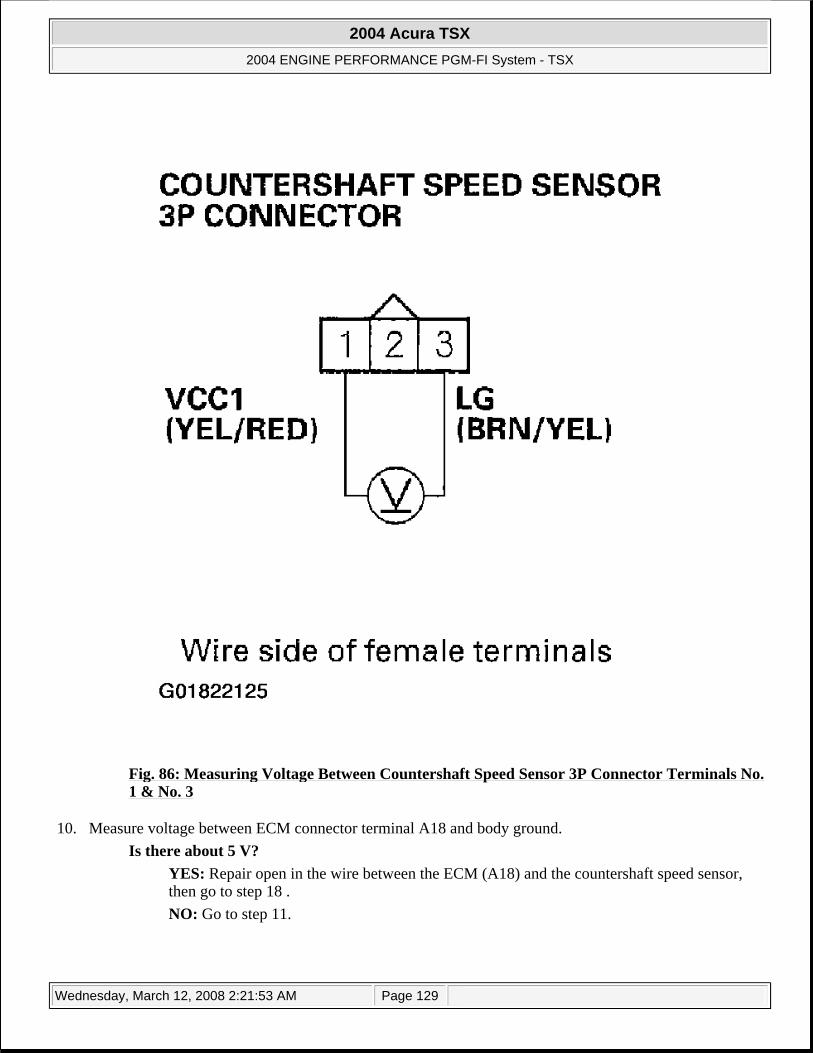
Fig. 86: Measuring Voltage Between Countershaft Speed Sensor 3P Connector Terminals No. 1 & No. 3
10. Measure voltage between ECM connector terminal A18 and body ground. Is there about 5 V?
YES: Repair open in the wire between the ECM (A18) and the countershaft speed sensor, then go to step 18 . NO: Go to step 11.
2004 Acura TSX
2004 ENGINE PERFORMANCE PGM-FI System - TSX
Wednesday, March 12, 2008 2:21:53 AM Page 129
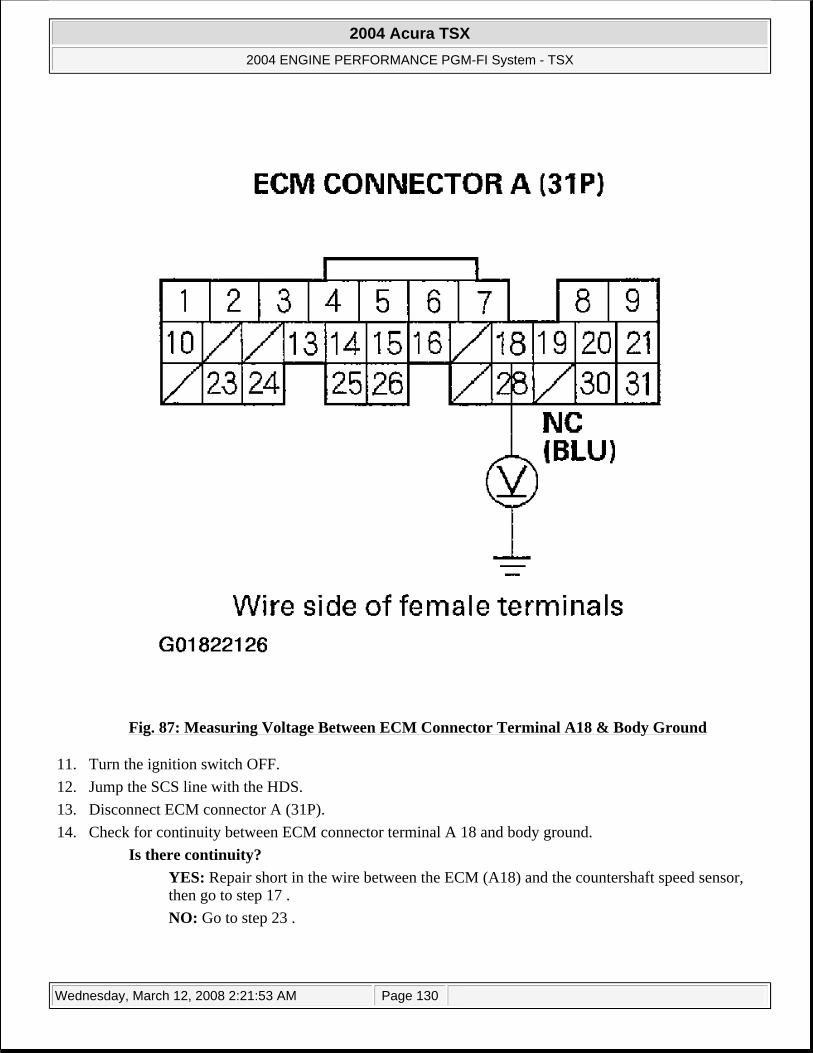
Fig. 87: Measuring Voltage Between ECM Connector Terminal A18 & Body Ground
11. Turn the ignition switch OFF. 12. Jump the SCS line with the HDS. 13. Disconnect ECM connector A (31P). 14. Check for continuity between ECM connector terminal A 18 and body ground.
Is there continuity? YES: Repair short in the wire between the ECM (A18) and the countershaft speed sensor, then go to step 17 . NO: Go to step 23 .
2004 Acura TSX
2004 ENGINE PERFORMANCE PGM-FI System - TSX
Wednesday, March 12, 2008 2:21:53 AM Page 130
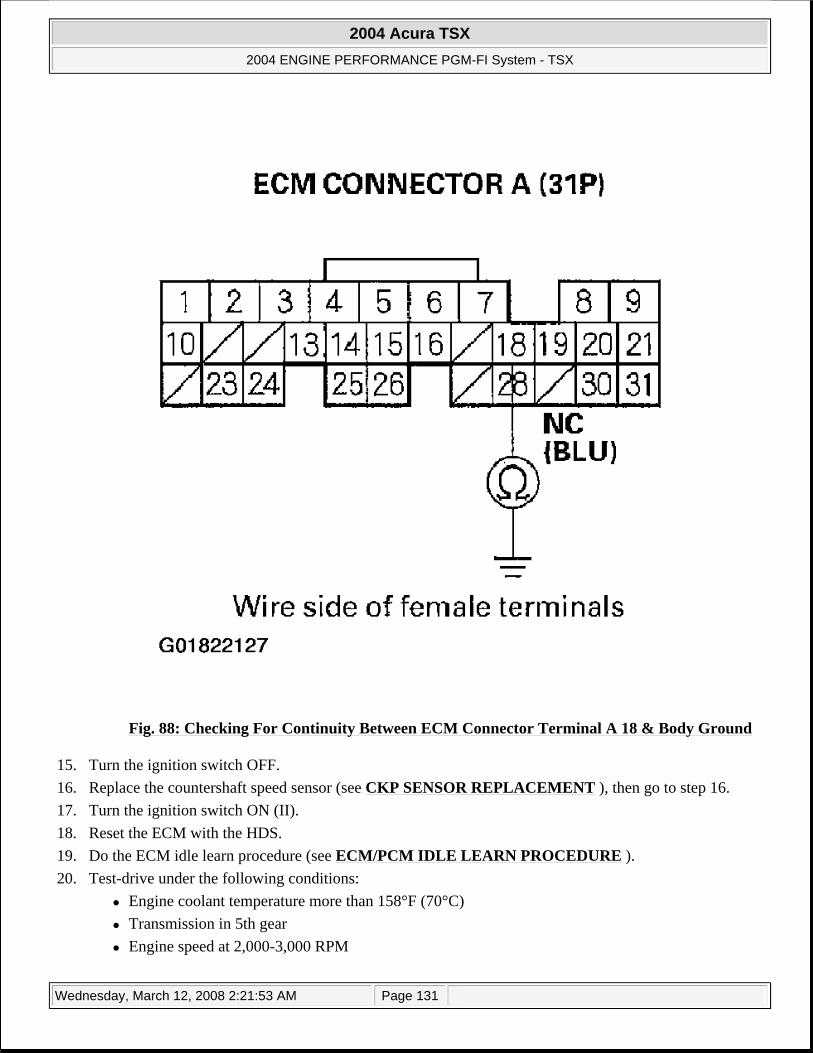
Fig. 88: Checking For Continuity Between ECM Connector Terminal A 18 & Body Ground
15. Turn the ignition switch OFF. 16. Replace the countershaft speed sensor (see CKP SENSOR REPLACEMENT ), then go to step 16. 17. Turn the ignition switch ON (II). 18. Reset the ECM with the HDS. 19. Do the ECM idle learn procedure (see ECM/PCM IDLE LEARN PROCEDURE ). 20. Test-drive under the following conditions:
Engine coolant temperature more than 158°F (70°C) Transmission in 5th gear Engine speed at 2,000-3,000 RPM
2004 Acura TSX
2004 ENGINE PERFORMANCE PGM-FI System - TSX
Wednesday, March 12, 2008 2:21:53 AM Page 131
Drive for several minutes, then decelerate (with the throttle fully closed) for 8 seconds 21. Check for Temporary DTCs or DTCs in the DTCs MENU with the HDS.
Are any Temporary DTCs or DTCs indicated? YES: If DTC P0720 is indicated, check for poor connections or loose terminals at the output shaft speed sensor and the ECM, then go to step 1 . If any other Temporary DTCs or DTCs are indicated, go to the indicated DTC troubleshooting. NO: Go to step 22.
22. Monitor the OBD STATUS for DTC P0720 in the DTCs MENU with the HDS. Does the screen indicate PASSED?
YES: Troubleshooting is complete. NO: If the screen indicates FAILED, go to step 1 and recheck. If the screen indicates NOT COMPLETED, go to step 20 and recheck.
23. Update the ECM if it does not have the latest software, or substitute a known-good ECM (see HOW TO SUBSTITUTE THE ECM/PCM ).
24. Test-drive under the following conditions: Engine coolant temperature more than 158°F (70°C) Transmission in 5th gear Engine speed at 2,000-3,000 RPM Drive for several minutes, then decelerate (with the throttle fully closed) for 8 seconds
25. Check for Temporary DTCs or DTCs in the DTCs MENU with the HDS. Are any Temporary DTCs or DTCs indicated?
YES: If DTC P0720 is indicated, check for poor connections or loose terminals at the countershaft speed sensor and the ECM, then go to step 1 . If any other Temporary DTCs or DTCs are indicated, go to the indicated DTC troubleshooting. NO: If the ECM was updated, troubleshooting is complete. If the ECM was substituted, replace the original ECM (see HOW TO SUBSTITUTE THE ECM/PCM ).
DTC P1297: ELD CIRCUIT LOW VOLTAGE
1. Turn the ignition switch ON (II). 2. Check the ELD in the DATA LIST with the HDS.
Is 72A or more indicated? YES: Go to step 3. NO: Intermittent failure, system is OK at this time. Check for poor connections or loose terminals at the ELD and the ECM/PCM.
3. Turn the ignition switch OFF. 4. Disconnect the ELD 3P connector. 5. Turn the ignition switch ON (II). 6. Check the ELD in the DATA LIST with the HDS.
Is 72A or more indicated?
2004 Acura TSX
2004 ENGINE PERFORMANCE PGM-FI System - TSX
Wednesday, March 12, 2008 2:21:53 AM Page 132
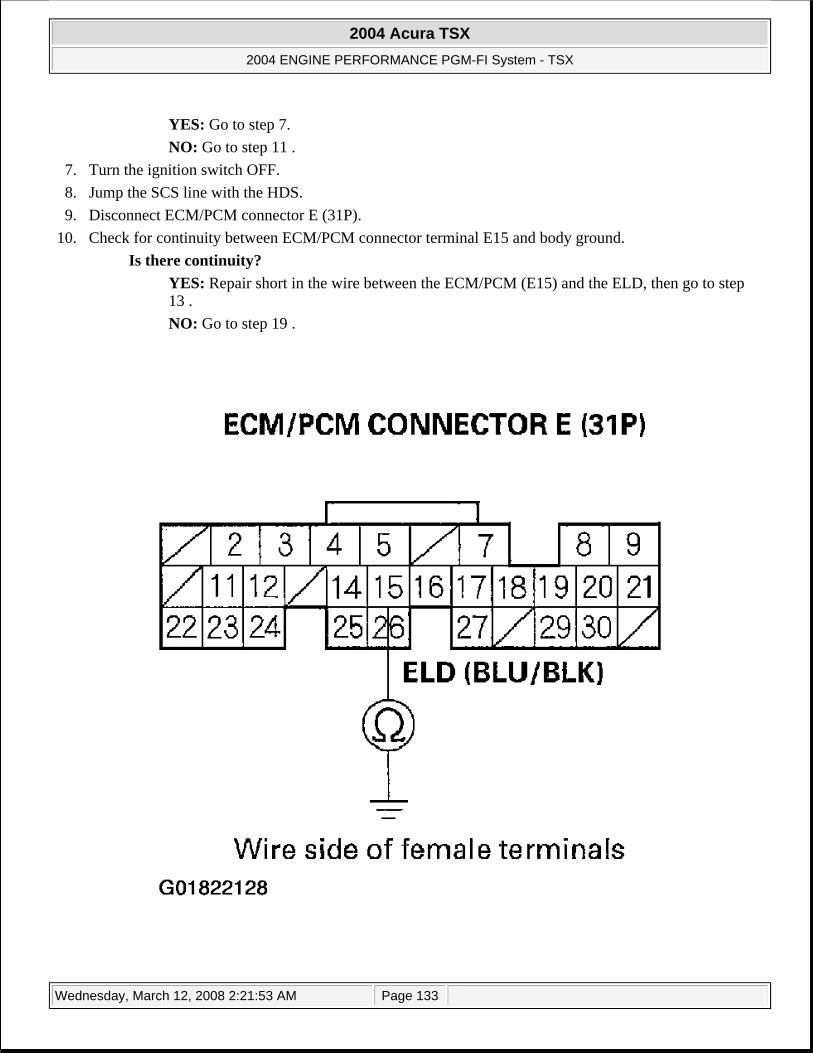
YES: Go to step 7. NO: Go to step 11 .
7. Turn the ignition switch OFF. 8. Jump the SCS line with the HDS. 9. Disconnect ECM/PCM connector E (31P).
10. Check for continuity between ECM/PCM connector terminal E15 and body ground. Is there continuity?
YES: Repair short in the wire between the ECM/PCM (E15) and the ELD, then go to step 13 . NO: Go to step 19 .
2004 Acura TSX
2004 ENGINE PERFORMANCE PGM-FI System - TSX
Wednesday, March 12, 2008 2:21:53 AM Page 133

Fig. 89: Checking For Continuity Between ECM/PCM Connector Terminal E15 & Body Ground
11. Turn the ignition switch OFF. 12. Replace the under-hood fuse/relay box (see REMOVAL AND INSTALLATION ). 13. Turn the ignition switch ON (II). 14. Reset the ECM/PCM with the HDS. 15. Do the ECM/PCM idle learn procedure (see ECM/PCM IDLE LEARN PROCEDURE ). 16. Start the engine. 17. Turn on the headlights. 18. Check for Temporary DTCs or DTCs in the DTCs MENU with the HDS.
Are any Temporary DTCs or DTCs indicated? YES: If DTC P1297 is indicated, check for poor connections or loose terminals at the ELD and the ECM/PCM, then go to step 1 . If any other Temporary DTCs or DTCs are indicated, go to the indicated DTC troubleshooting. NO: Troubleshooting is complete.
19. Update the ECM/PCM if it does not have the latest software, or substitute a known-good ECM/PCM (see HOW TO SUBSTITUTE THE ECM/PCM ).
20. Start the engine. 21. Turn on the headlights. 22. Check for Temporary DTCs or DTCs in the DTCs MENU with the HDS.
Are any Temporary DTCs or DTCs indicated? YES: If DTC P1297 is indicated, check for poor connections or loose terminals at the ELD and the ECM/PCM, then go to step 1 . If any other Temporary DTCs or DTCs are indicated, go to the indicated DTC troubleshooting. NO: If the ECM/PCM was updated, troubleshooting is complete. If the ECM/PCM was substituted, replace the original ECM/PCM (see HOW TO REMOVE THE ECM/PCM FOR TESTING ).
DTC P1298: ELD CIRCUIT HIGH VOLTAGE
1. Start the engine and let it idle. 2. Check the ELD in the DATA LIST with the HDS.
Is 0.2A or less indicated? YES: Go to step 3. NO: Intermittent failure, system is OK at this time. Check for poor connections or loose terminals at the ELD and the ECM/PCM.
3. Turn the ignition switch OFF. 4. Disconnect the ELD 3P connector. 5. Turn the ignition switch ON (II). 6. Measure voltage between ELD 3P connector terminal No. 1 and body ground.
2004 Acura TSX
2004 ENGINE PERFORMANCE PGM-FI System - TSX
Wednesday, March 12, 2008 2:21:53 AM Page 134
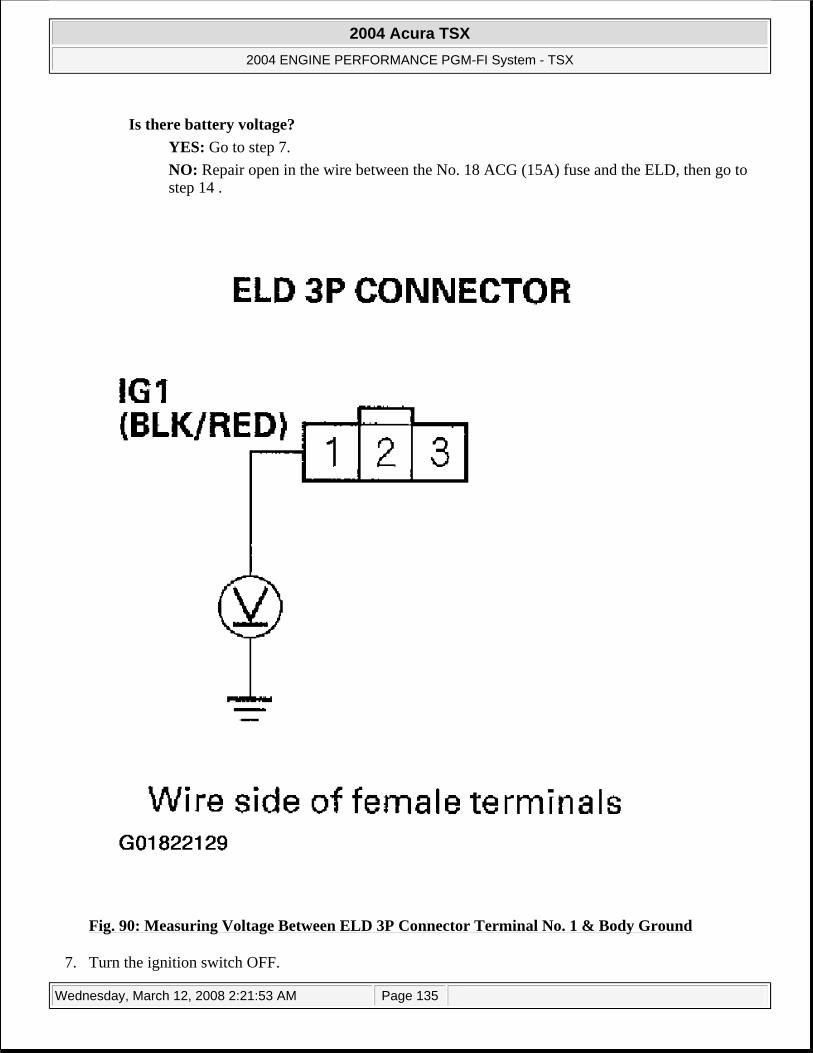
Is there battery voltage? YES: Go to step 7. NO: Repair open in the wire between the No. 18 ACG (15A) fuse and the ELD, then go to step 14 .
Fig. 90: Measuring Voltage Between ELD 3P Connector Terminal No. 1 & Body Ground
7. Turn the ignition switch OFF.
2004 Acura TSX
2004 ENGINE PERFORMANCE PGM-FI System - TSX
Wednesday, March 12, 2008 2:21:53 AM Page 135
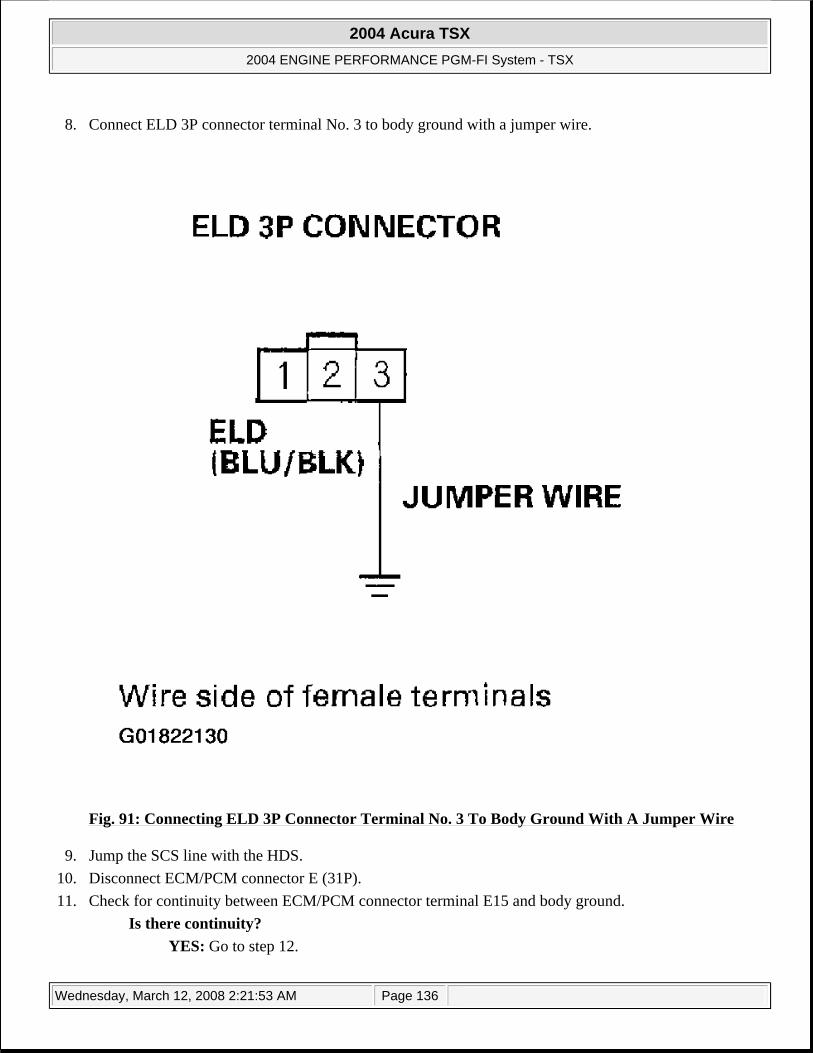
8. Connect ELD 3P connector terminal No. 3 to body ground with a jumper wire.
Fig. 91: Connecting ELD 3P Connector Terminal No. 3 To Body Ground With A Jumper Wire
9. Jump the SCS line with the HDS. 10. Disconnect ECM/PCM connector E (31P). 11. Check for continuity between ECM/PCM connector terminal E15 and body ground.
Is there continuity? YES: Go to step 12.
2004 Acura TSX
2004 ENGINE PERFORMANCE PGM-FI System - TSX
Wednesday, March 12, 2008 2:21:53 AM Page 136
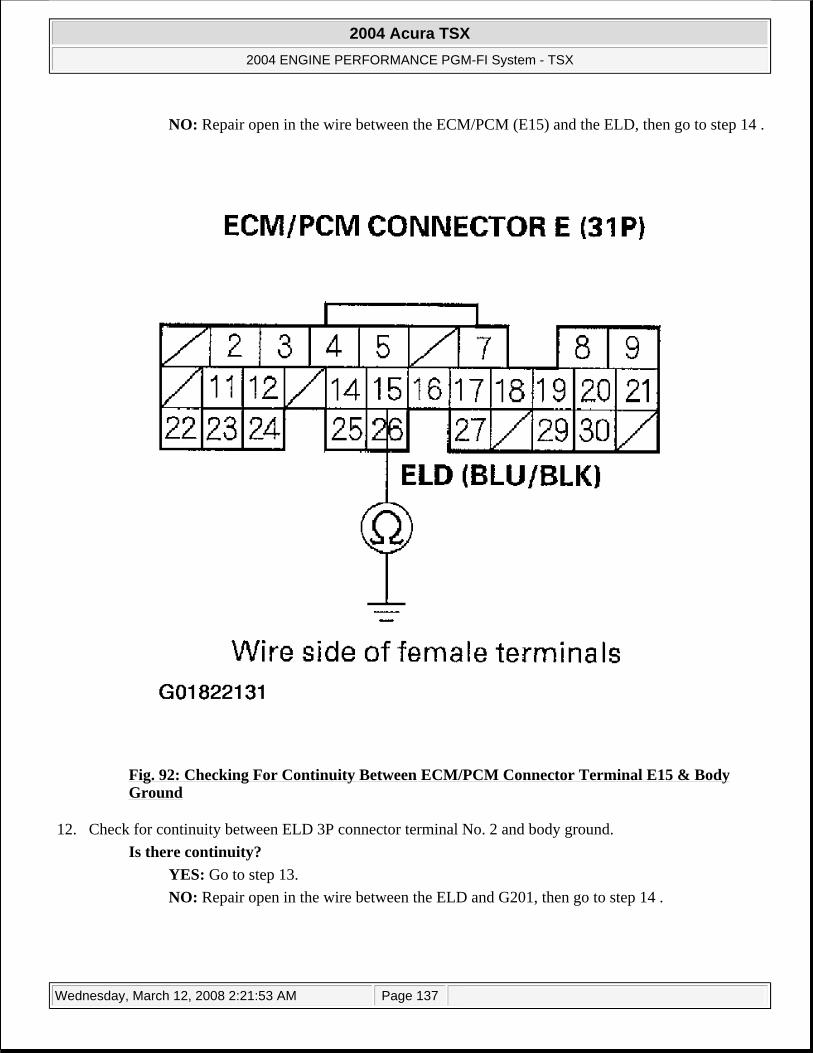
NO: Repair open in the wire between the ECM/PCM (E15) and the ELD, then go to step 14 .
Fig. 92: Checking For Continuity Between ECM/PCM Connector Terminal E15 & Body Ground
12. Check for continuity between ELD 3P connector terminal No. 2 and body ground. Is there continuity?
YES: Go to step 13. NO: Repair open in the wire between the ELD and G201, then go to step 14 .
2004 Acura TSX
2004 ENGINE PERFORMANCE PGM-FI System - TSX
Wednesday, March 12, 2008 2:21:53 AM Page 137
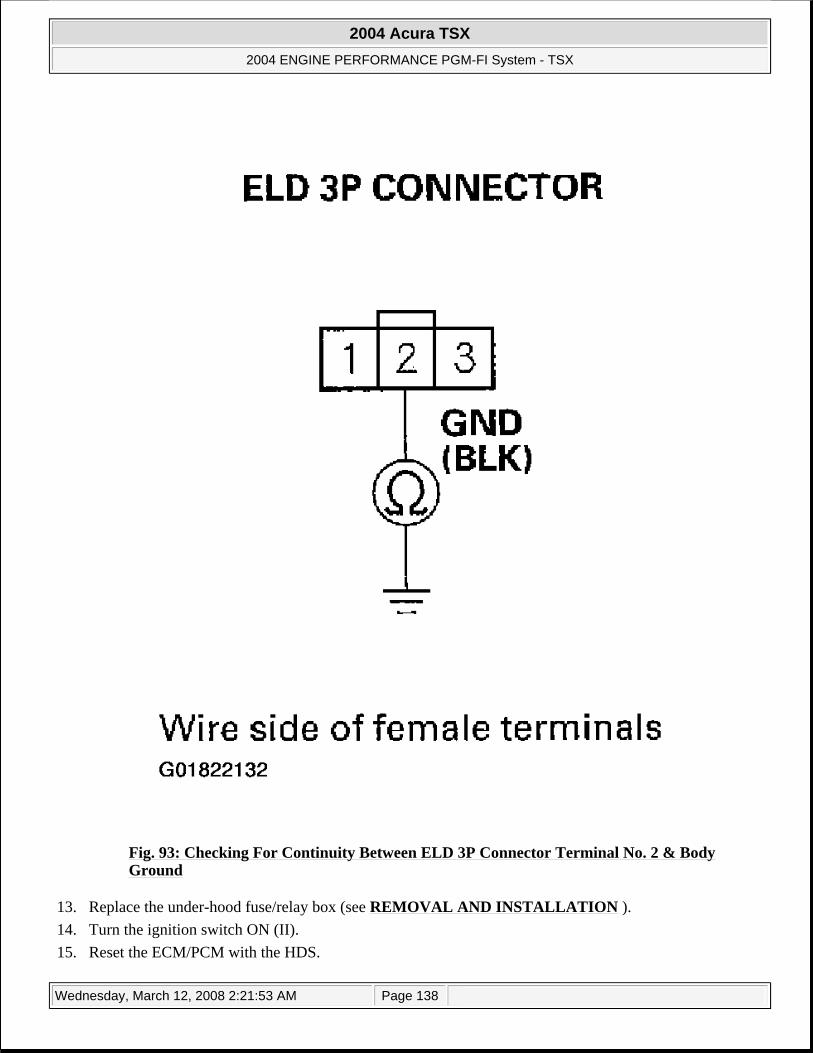
Fig. 93: Checking For Continuity Between ELD 3P Connector Terminal No. 2 & Body Ground
13. Replace the under-hood fuse/relay box (see REMOVAL AND INSTALLATION ). 14. Turn the ignition switch ON (II). 15. Reset the ECM/PCM with the HDS.
2004 Acura TSX
2004 ENGINE PERFORMANCE PGM-FI System - TSX
Wednesday, March 12, 2008 2:21:53 AM Page 138
16. Do the ECM/PCM idle learn procedure (see ECM/PCM IDLE LEARN PROCEDURE ). 17. Check for Temporary DTCs or DTCs in the DTCs MENU with the HDS.
Are any Temporary DTCs or DTCs indicated? YES: Go to step 18. NO: Troubleshooting is complete.
18. Update the ECM/PCM if it does not have the latest software, or substitute a known-good ECM/PCM (see HOW TO SUBSTITUTE THE ECM/PCM ).
19. Check for Temporary DTCs or DTCs in the DTCs MENU with the HDS. Are any Temporary DTCs or DTCs indicated?
YES: If DTC P1298 is indicated, check for poor connections or loose terminals at the ELD and the ECM/PCM, then go to step 1 . If any other Temporary DTCs or DTCs are indicated, go to the indicated DTC troubleshooting. NO: If the ECM/PCM was updated, troubleshooting is complete. If the ECM/PCM was substituted, replace the original ECM/PCM (see HOW TO REMOVE THE ECM/PCM FOR TESTING ).
DTC P2227: BARO SENSOR RANGE/PERFORMANCE PROBLEM
1. Turn the ignition switch ON (II), and wait 2 seconds. 2. Check the BARO SENSOR in the DATA LIST with the HDS.
Is about 101kPa (760 mm Hg, 29.9 in. Hg), or about 2.9 V at sea level indicated? YES: Go to step 3. NO: Update the ECM/PCM if it does not have the latest software, or substitute a known-good ECM/PCM, then recheck (see HOW TO SUBSTITUTE THE ECM/PCM ). If the symptom/indication goes away with a known-good ECM/PCM, replace the original ECM/PCM.
3. Clear the DTC with the HDS. 4. Start the engine. Hold the engine speed at 3,000 RPM with no load (in Park or neutral) until the radiator
fan comes on, then let it idle. 5. Test-drive under the following conditions, then connect the HDS:
Engine coolant temperature more than 158°F (70°C) A/T in D position (M/T in 4th gear) Throttle position between 12 degrees and 20 degrees for 2 seconds
6. Monitor the OBD STATUS for DTC P2227 in the DTCs MENU with the HDS. Does the screen indicate FAILED?
YES: Go to step 7. NO: If the screen indicates PASSED, intermittent failure, system is OK at this time. If the screen indicates NOT COMPLETED, go to step 4 and recheck.
NOTE: If DTC P0107, P0108, P1128 and/or P1129 are stored at the same time as DTC P2227 troubleshoot those DTCs first, then recheck for DTC P2227.
2004 Acura TSX
2004 ENGINE PERFORMANCE PGM-FI System - TSX
Wednesday, March 12, 2008 2:21:53 AM Page 139
7. Update the ECM/PCM if it does not have the latest software, or substitute a known-good ECM/PCM (see HOW TO SUBSTITUTE THE ECM/PCM ).
8. Reset the ECM/PCM with the HDS. 9. Do the ECM/PCM idle learn procedure (see ECM/PCM IDLE LEARN PROCEDURE ).
10. Check for Temporary DTCs or DTCs in the DTCs MENU with the HDS. Are any Temporary DTCs or DTCs indicated?
YES: If DTC P2227 is indicated, check for poor connections or loose terminals at the ECM/PCM then go to step 1 . If any other Temporary DTCs or DTCs are indicated, go to the indicated DTC troubleshooting. NO: If the ECM/PCM was updated, troubleshooting is complete. If the ECM/PCM was substituted, replace the original ECM/PCM (see HOW TO REMOVE THE ECM/PCM FOR TESTING ).
DTC P2228: BARO SENSOR CIRCUIT LOW VOLTAGE
1. Turn the ignition switch ON (II). 2. Check the BARO SENSOR in the DATA LIST with the HDS.
Is about 53 kPa (397 mm Hg, 15.6 in. Hg), 1.58 V, or less indicated? YES: Go to step 3. NO: Intermittent failure, system is OK at this time.
3. Update the ECM/PCM if it does not have the latest software, or substitute a known-good ECM/PCM (see HOW TO SUBSTITUTE THE ECM/PCM ).
4. Check for Temporary DTCs or DTCs in the DTCs MENU with the HDS. Are any Temporary DTCs or DTCs indicated?
YES: If DTC P2228 is indicated, check for poor connections or loose terminals at the ECM/PCM, then go to step 1 . If any other Temporary DTCs or DTCs are indicated, go to the indicated DTC troubleshooting. NO: If the ECM/PCM was updated, troubleshooting is complete. If the ECM/PCM was substituted, replace the original ECM/PCM (see HOW TO REMOVE THE ECM/PCM FOR TESTING ).
DTC P2229: BARO SENSOR CIRCUIT HIGH VOLTAGE
1. Turn the ignition switch ON (II). 2. Check the BARO SENSOR in the DATA LIST with the HDS.
Is about 160 kPa (1200 mm Hg, 47.2 in. Hg), 4.5 V, or higher indicated? YES: Go to step 3. NO: Intermittent failure, system is OK at this time.
3. Update the ECM/PCM if it does not have the latest software, or substitute a known-good ECM/PCM (see HOW TO SUBSTITUTE THE ECM/PCM ).
4. Check for Temporary DTCs or DTCs in the DTCs MENU with the HDS.
2004 Acura TSX
2004 ENGINE PERFORMANCE PGM-FI System - TSX
Wednesday, March 12, 2008 2:21:53 AM Page 140

Are any Temporary DTCs or DTCs indicated? YES: If DTC P2229 is indicated, check for poor connections or loose terminals at the ECM/PCM, then go to step 1 . If any other Temporary DTCs or DTCs are indicated, go to the indicated DTC troubleshooting. NO: If the ECM/PCM was updated, troubleshooting is complete. If the ECM/PCM was substituted, replace the original ECM/PCM (see HOW TO REMOVE THE ECM/PCM FOR TESTING ).
DTC U0073: FCAN MALFUNCTION (BUS-OFF); DTC U0155: FCAN MALFUNCTION (GAUGE CONTROL MODULE - ECM/PCM)
1. Turn the ignition switch ON (II). 2. Clear the DTC with the HDS. 3. Check for Temporary DTCs or DTCs in the DTCs MENU with the HDS.
Is DTC U0073 and/or U0155 indicated? YES: Go to step 4. NO: Intermittent failure, system is OK at this time. Check for poor connections or loose terminals at the gauge control module, VSA control unit, the navigation unit and the ECM/PCM.
4. Check for DTCs in the DTCs MENU in the Body Electrical system with the HDS. Is DTC B1168, B1169 and/or B1178 indicated?
YES: Go to step 5. NO: Perform the gauge control module input test (see GAUGE CONTROL MODULE INPUT TEST ).
5. Turn the ignition switch OFF. 6. Remove the gauge control module (see GAUGE CONTROL MODULE REPLACEMENT ). 7. Disconnect the gauge control module 30P connector. 8. Disconnect the VSA control unit 47P connector. 9. If equipped with the navigation system, disconnect the navigation unit 20P connector.
10. Jump the SCS line with the HDS. 11. Disconnect ECM/PCM connector E (31P). 12. Check for continuity between ECM/PCM connector terminals E11, E24 and body ground individually.
Is there continuity? YES: Repair short in the wire between the gauge control module, VSA control unit, the navigation unit, and the ECM/PCM E11 (E24 - CANL line), then go to step 17 . NO: Go to step 13.
2004 Acura TSX
2004 ENGINE PERFORMANCE PGM-FI System - TSX
Wednesday, March 12, 2008 2:21:53 AM Page 141

Fig. 94: Checking For Continuity Between ECM/PCM Connector Terminals E11, E24 & Body Ground
13. Check for continuity between ECM/PCM connector terminals E11 and E24. Is there continuity?
YES: Repair short in the wire between the ECM/PCM E11 (CANH line) and E24 (CANL line), then go to step 17 . NO: Go to step 14.
2004 Acura TSX
2004 ENGINE PERFORMANCE PGM-FI System - TSX
Wednesday, March 12, 2008 2:21:53 AM Page 142
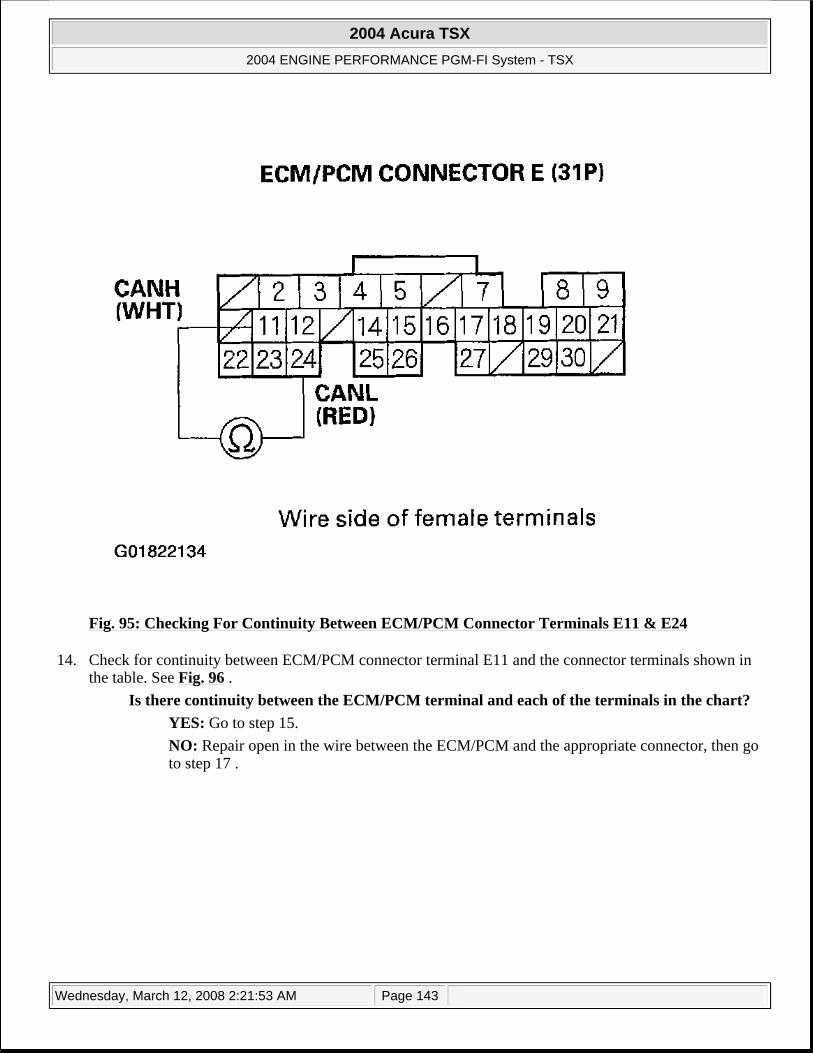
Fig. 95: Checking For Continuity Between ECM/PCM Connector Terminals E11 & E24
14. Check for continuity between ECM/PCM connector terminal E11 and the connector terminals shown in the table. See Fig. 96 .
Is there continuity between the ECM/PCM terminal and each of the terminals in the chart? YES: Go to step 15. NO: Repair open in the wire between the ECM/PCM and the appropriate connector, then go to step 17 .
2004 Acura TSX
2004 ENGINE PERFORMANCE PGM-FI System - TSX
Wednesday, March 12, 2008 2:21:53 AM Page 143
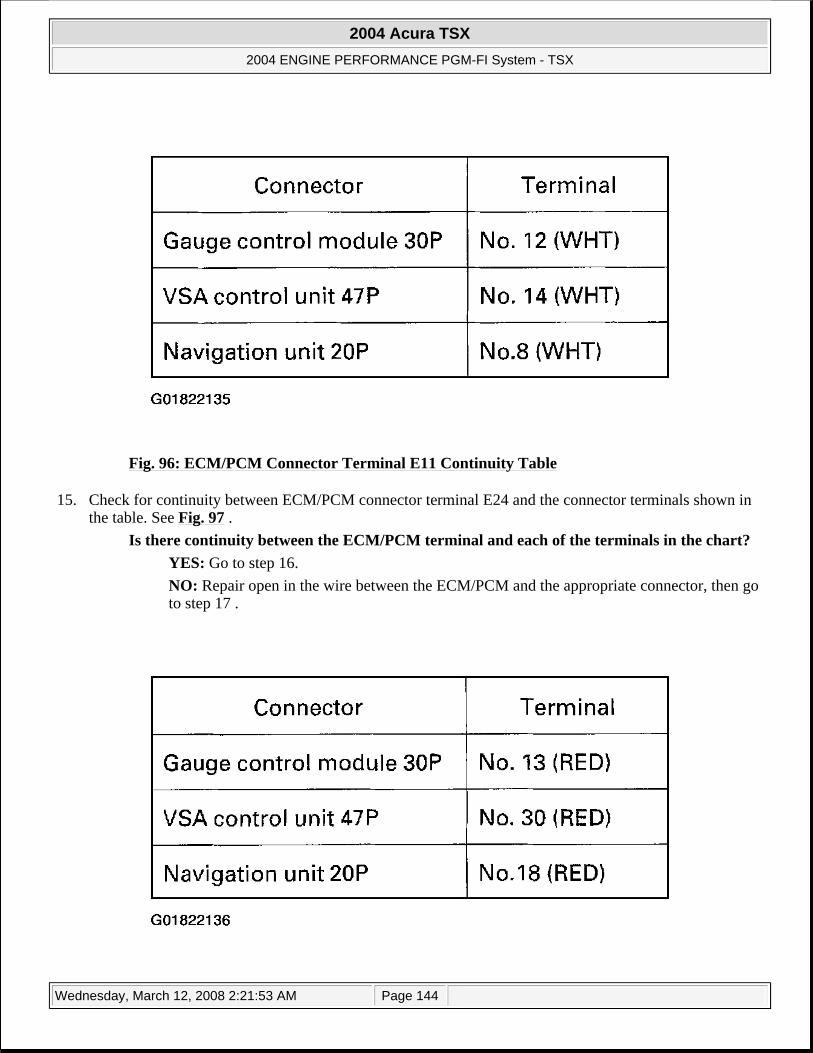
Fig. 96: ECM/PCM Connector Terminal E11 Continuity Table
15. Check for continuity between ECM/PCM connector terminal E24 and the connector terminals shown in the table. See Fig. 97 .
Is there continuity between the ECM/PCM terminal and each of the terminals in the chart? YES: Go to step 16. NO: Repair open in the wire between the ECM/PCM and the appropriate connector, then go to step 17 .
2004 Acura TSX
2004 ENGINE PERFORMANCE PGM-FI System - TSX
Wednesday, March 12, 2008 2:21:53 AM Page 144
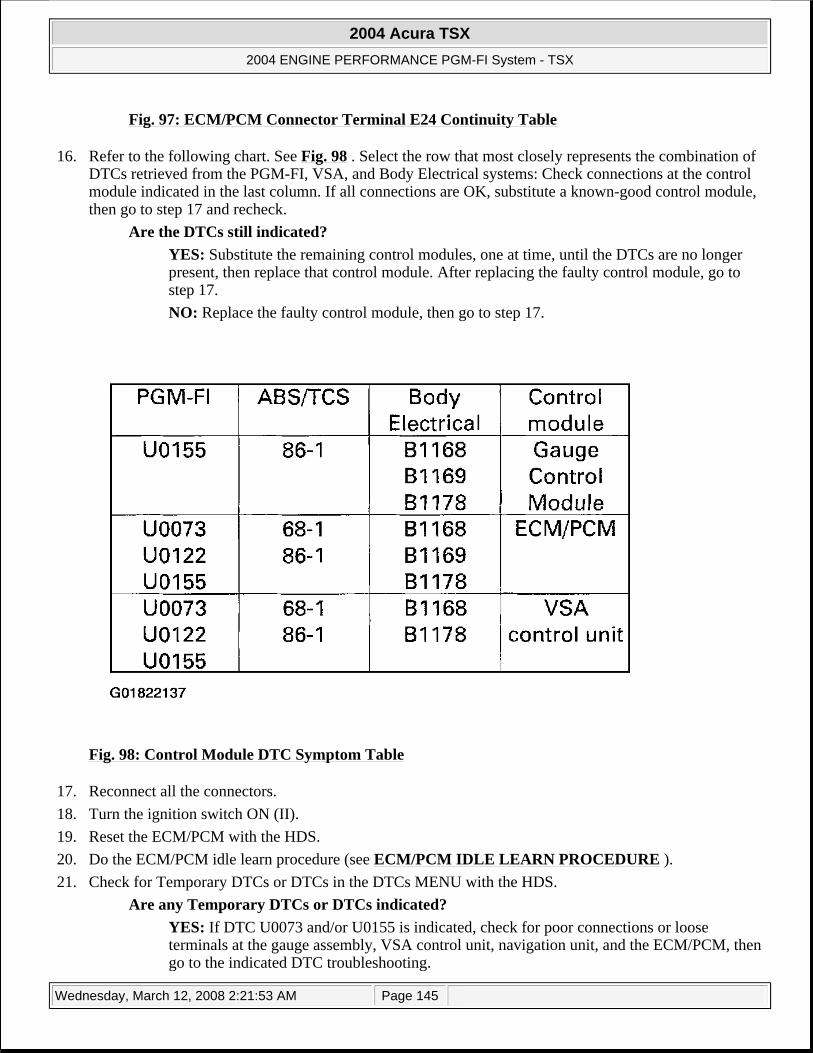
Fig. 97: ECM/PCM Connector Terminal E24 Continuity Table
16. Refer to the following chart. See Fig. 98 . Select the row that most closely represents the combination of DTCs retrieved from the PGM-FI, VSA, and Body Electrical systems: Check connections at the control module indicated in the last column. If all connections are OK, substitute a known-good control module, then go to step 17 and recheck.
Are the DTCs still indicated? YES: Substitute the remaining control modules, one at time, until the DTCs are no longer present, then replace that control module. After replacing the faulty control module, go to step 17. NO: Replace the faulty control module, then go to step 17.
Fig. 98: Control Module DTC Symptom Table
17. Reconnect all the connectors. 18. Turn the ignition switch ON (II). 19. Reset the ECM/PCM with the HDS. 20. Do the ECM/PCM idle learn procedure (see ECM/PCM IDLE LEARN PROCEDURE ). 21. Check for Temporary DTCs or DTCs in the DTCs MENU with the HDS.
Are any Temporary DTCs or DTCs indicated? YES: If DTC U0073 and/or U0155 is indicated, check for poor connections or loose terminals at the gauge assembly, VSA control unit, navigation unit, and the ECM/PCM, then go to the indicated DTC troubleshooting.
2004 Acura TSX
2004 ENGINE PERFORMANCE PGM-FI System - TSX
Wednesday, March 12, 2008 2:21:53 AM Page 145
NO: Troubleshooting is complete.
DTC U0122: FCAN MALFUNCTION (VSA-ECM/PCM)
1. Turn the ignition switch ON (II). 2. Clear the DTC with the HDS. 3. Check for Temporary DTCs or DTCs in the DTCs MENU with the HDS.
Is DTC U0122 indicated? YES: Go to step 4. NO: Intermittent failure, system is OK at this time. Check for poor connections or loose terminals at the gauge assembly, the VSA control unit, and the ECM/PCM.
4. Check for DTCs in the DTCs MENU with the HDS. Is TCS DTC 86 indicated?
YES: Go to step 5. NO: Go to step 9 .
5. Turn the ignition switch OFF. 6. Disconnect the VSA control unit 47P connector. 7. Check for continuity between VSA control unit 47P connector terminals No. 14 and No. 30.
Is there continuity? YES: Go to step 8. NO: Repair open in the wire between the VSA control unit No. 14 (No. 30 - CANL line) and the ECM/PCM E11 (E24 - CANL line), then go to step 14 .
NOTE: If DTC U0073 is stored at the same time as DTC U0122, troubleshoot DTC U0073 first, then recheck for DTC U0122.
2004 Acura TSX
2004 ENGINE PERFORMANCE PGM-FI System - TSX
Wednesday, March 12, 2008 2:21:53 AM Page 146

Fig. 99: Checking For Continuity Between VSA Control Unit 47P Connector Terminals No. 14 & No. 30
8. Check for poor connection at the cabin wire harness/dashboard wire harness 20P connector. Is it OK?
YES: Substitute a known-good VSA control unit, then go to step 14 and recheck. If no DTCs are indicated, replace the original VSA control unit, then go to step 14 . NO: Reconnect the cabin wire harness/dashboard wire harness 20P connector, then go to step 14 .
9. Turn the ignition switch OFF. 10. Disconnect the VSA control unit 47P connector. 11. Turn the ignition switch ON (II). 12. Measure voltage between VSA control unit 47P connector terminal No. 38 and body ground.
Is there battery voltage? YES: Go to step 13. NO: Check the No. 21 IG METER (7.5A) fuse in the under-dash fuse/relay box. If the fuse is OK, repair open in the wire between the No. 21 IG METER (7.5A) fuse and the VSA control unit, then go to step 14 .
2004 Acura TSX
2004 ENGINE PERFORMANCE PGM-FI System - TSX
Wednesday, March 12, 2008 2:21:53 AM Page 147
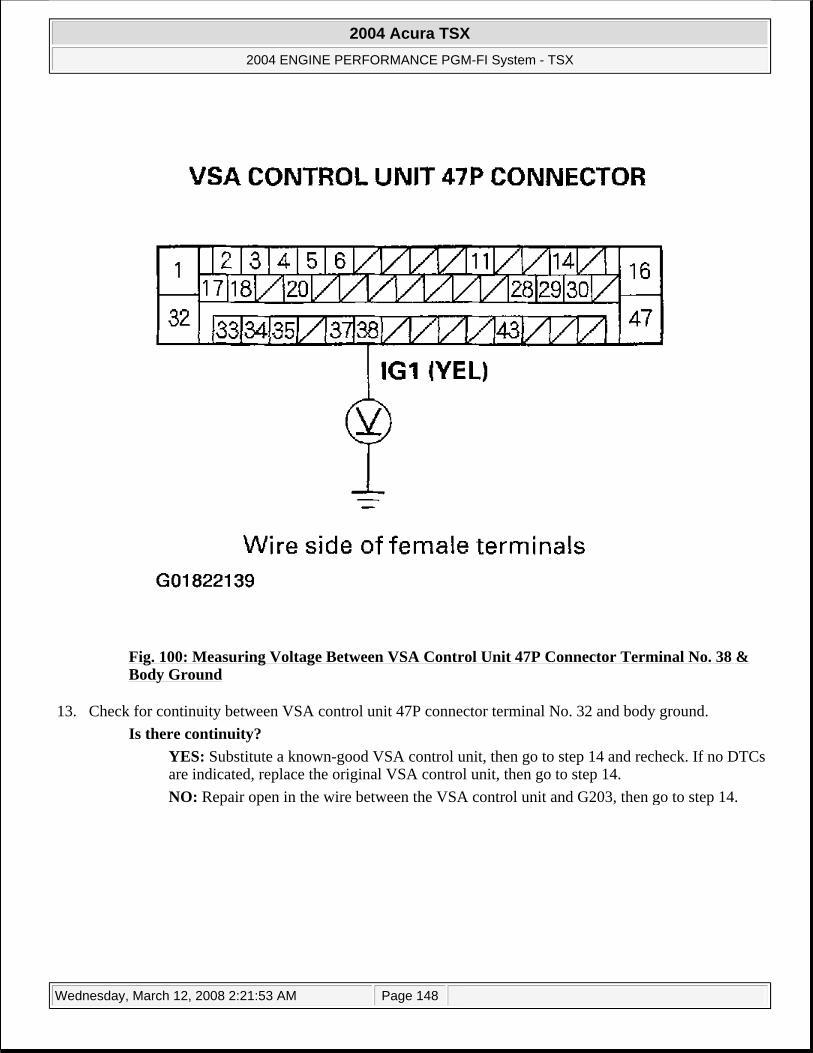
Fig. 100: Measuring Voltage Between VSA Control Unit 47P Connector Terminal No. 38 & Body Ground
13. Check for continuity between VSA control unit 47P connector terminal No. 32 and body ground. Is there continuity?
YES: Substitute a known-good VSA control unit, then go to step 14 and recheck. If no DTCs are indicated, replace the original VSA control unit, then go to step 14. NO: Repair open in the wire between the VSA control unit and G203, then go to step 14.
2004 Acura TSX
2004 ENGINE PERFORMANCE PGM-FI System - TSX
Wednesday, March 12, 2008 2:21:53 AM Page 148
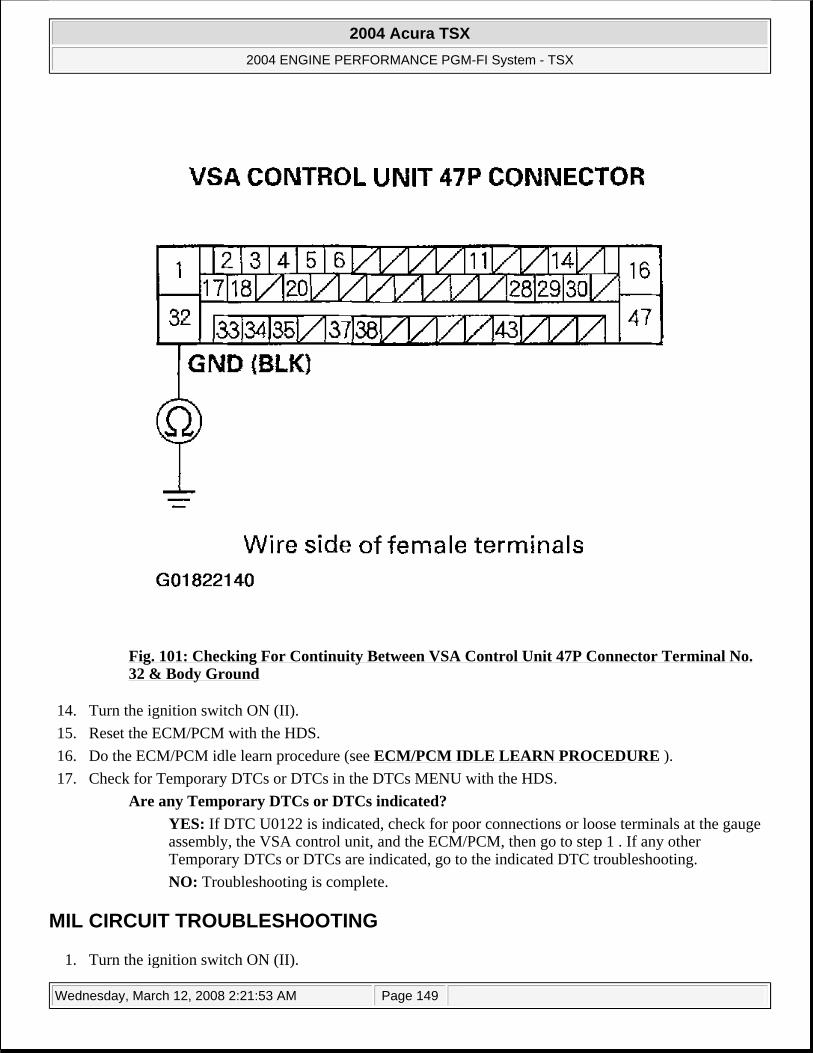
Fig. 101: Checking For Continuity Between VSA Control Unit 47P Connector Terminal No. 32 & Body Ground
14. Turn the ignition switch ON (II). 15. Reset the ECM/PCM with the HDS. 16. Do the ECM/PCM idle learn procedure (see ECM/PCM IDLE LEARN PROCEDURE ). 17. Check for Temporary DTCs or DTCs in the DTCs MENU with the HDS.
Are any Temporary DTCs or DTCs indicated? YES: If DTC U0122 is indicated, check for poor connections or loose terminals at the gauge assembly, the VSA control unit, and the ECM/PCM, then go to step 1 . If any other Temporary DTCs or DTCs are indicated, go to the indicated DTC troubleshooting. NO: Troubleshooting is complete.
MIL CIRCUIT TROUBLESHOOTING
1. Turn the ignition switch ON (II).
2004 Acura TSX
2004 ENGINE PERFORMANCE PGM-FI System - TSX
Wednesday, March 12, 2008 2:21:53 AM Page 149
2. Do the gauge self-diagnostic procedure (see SELF-DIAGNOSTIC PROCEDURE ). Does the MIL indicator flash?
YES: Go to step 3. NO: Substitute a known-good gauge assembly (see GAUGE CONTROL MODULE REPLACEMENT ), and recheck. If the MIL circuit is OK, replace the original gauge assembly.
3. Turn the ignition switch OFF. 4. Turn the ignition switch ON (II), and watch the MIL.
Does the MIL stay off? YES: Go to step 17 . NO: Go to step 5.
5. Turn the ignition switch OFF. 6. Turn the ignition switch ON (II), wait 20 seconds, and watch the MIL.
Does the MIL stay on or flash more than 5 times? YES: Go to step 7. NO: The MIL circuit is OK.
7. Turn the ignition switch OFF. 8. Connect the HDS. (see HOW TO USE THE HDS (HONDA DIAGNOSTIC SYSTEM) ). 9. Turn the ignition switch ON (II), and read the HDS.
Does the HDS communicate with the ECM/PCM? YES: Go to step 10. NO: Go to "DLC Circuit Troubleshooting" (see DLC CIRCUIT TROUBLESHOOTING ). If no problem is found in the DLC troubleshooting, go to step 21 .
10. Check for Temporary DTCs or DTCs in the DTCs MENU with the HDS. Are any Temporary DTCs or DTCs indicated?
YES: Go to the DTC Troubleshooting Index. NO: Go to step 11.
11. Check the MIL in the DATA LIST with the HDS. Is ON indicated?
YES: Go to step 12. NO: Substitute a known-good gauge assembly, and recheck. If the MIL circuit is OK, replace the original gauge assembly.
12. Check the SCS in the DATA LIST with the HDS. Is a short indicated?
YES: Go to step 13. NO: Update the ECM/PCM If it does not have the latest software, or substitute a known-good ECM/PCM, then recheck (see HOW TO SUBSTITUTE THE ECM/PCM ). If the symptom/indication goes away with a known-good ECM/PCM, replace the original
2004 Acura TSX
2004 ENGINE PERFORMANCE PGM-FI System - TSX
Wednesday, March 12, 2008 2:21:53 AM Page 150
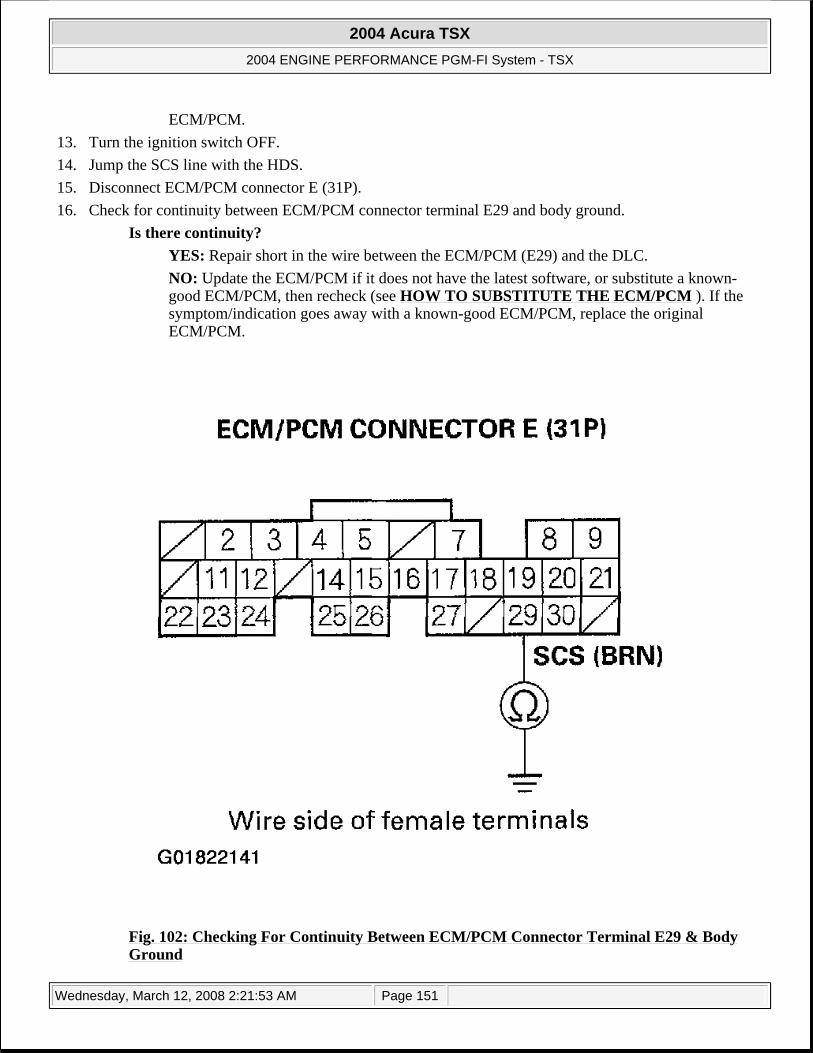
ECM/PCM. 13. Turn the ignition switch OFF. 14. Jump the SCS line with the HDS. 15. Disconnect ECM/PCM connector E (31P). 16. Check for continuity between ECM/PCM connector terminal E29 and body ground.
Is there continuity? YES: Repair short in the wire between the ECM/PCM (E29) and the DLC. NO: Update the ECM/PCM if it does not have the latest software, or substitute a known-good ECM/PCM, then recheck (see HOW TO SUBSTITUTE THE ECM/PCM ). If the symptom/indication goes away with a known-good ECM/PCM, replace the original ECM/PCM.
Fig. 102: Checking For Continuity Between ECM/PCM Connector Terminal E29 & Body Ground
2004 Acura TSX
2004 ENGINE PERFORMANCE PGM-FI System - TSX
Wednesday, March 12, 2008 2:21:53 AM Page 151
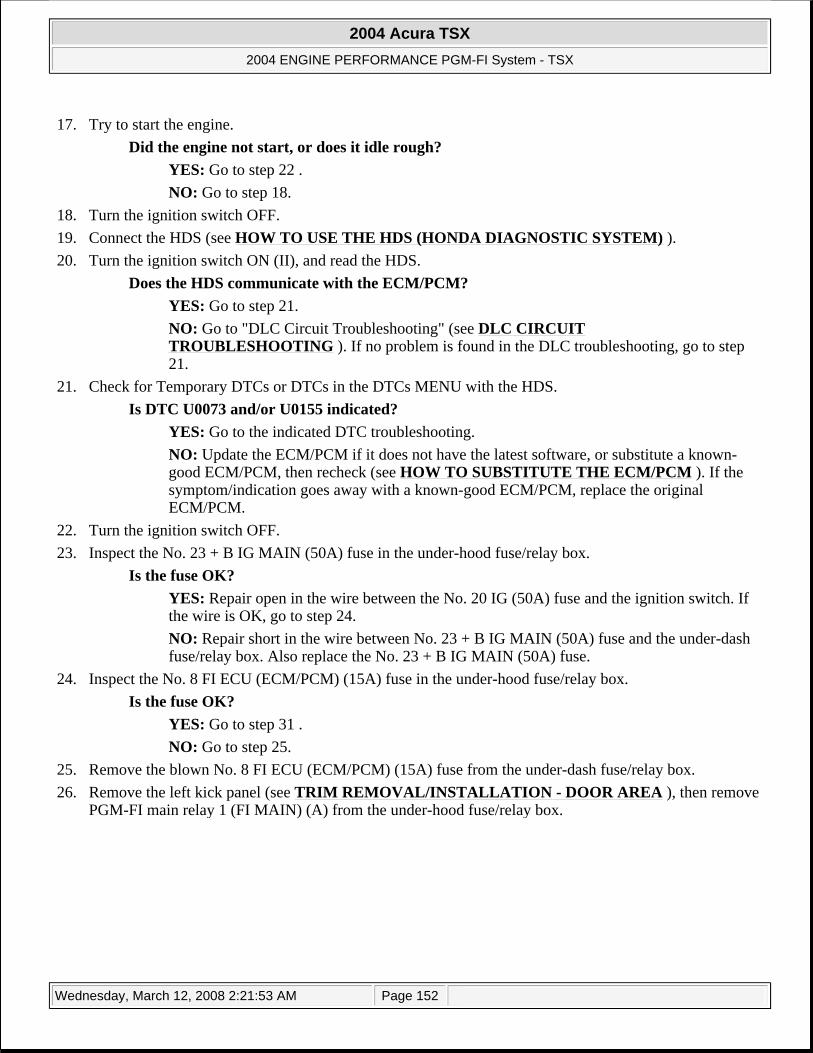
17. Try to start the engine. Did the engine not start, or does it idle rough?
YES: Go to step 22 . NO: Go to step 18.
18. Turn the ignition switch OFF. 19. Connect the HDS (see HOW TO USE THE HDS (HONDA DIAGNOSTIC SYSTEM) ). 20. Turn the ignition switch ON (II), and read the HDS.
Does the HDS communicate with the ECM/PCM? YES: Go to step 21. NO: Go to "DLC Circuit Troubleshooting" (see DLC CIRCUIT TROUBLESHOOTING ). If no problem is found in the DLC troubleshooting, go to step 21.
21. Check for Temporary DTCs or DTCs in the DTCs MENU with the HDS. Is DTC U0073 and/or U0155 indicated?
YES: Go to the indicated DTC troubleshooting. NO: Update the ECM/PCM if it does not have the latest software, or substitute a known-good ECM/PCM, then recheck (see HOW TO SUBSTITUTE THE ECM/PCM ). If the symptom/indication goes away with a known-good ECM/PCM, replace the original ECM/PCM.
22. Turn the ignition switch OFF. 23. Inspect the No. 23 + B IG MAIN (50A) fuse in the under-hood fuse/relay box.
Is the fuse OK? YES: Repair open in the wire between the No. 20 IG (50A) fuse and the ignition switch. If the wire is OK, go to step 24. NO: Repair short in the wire between No. 23 + B IG MAIN (50A) fuse and the under-dash fuse/relay box. Also replace the No. 23 + B IG MAIN (50A) fuse.
24. Inspect the No. 8 FI ECU (ECM/PCM) (15A) fuse in the under-hood fuse/relay box. Is the fuse OK?
YES: Go to step 31 . NO: Go to step 25.
25. Remove the blown No. 8 FI ECU (ECM/PCM) (15A) fuse from the under-dash fuse/relay box. 26. Remove the left kick panel (see TRIM REMOVAL/INSTALLATION - DOOR AREA ), then remove
PGM-FI main relay 1 (FI MAIN) (A) from the under-hood fuse/relay box.
2004 Acura TSX
2004 ENGINE PERFORMANCE PGM-FI System - TSX
Wednesday, March 12, 2008 2:21:53 AM Page 152
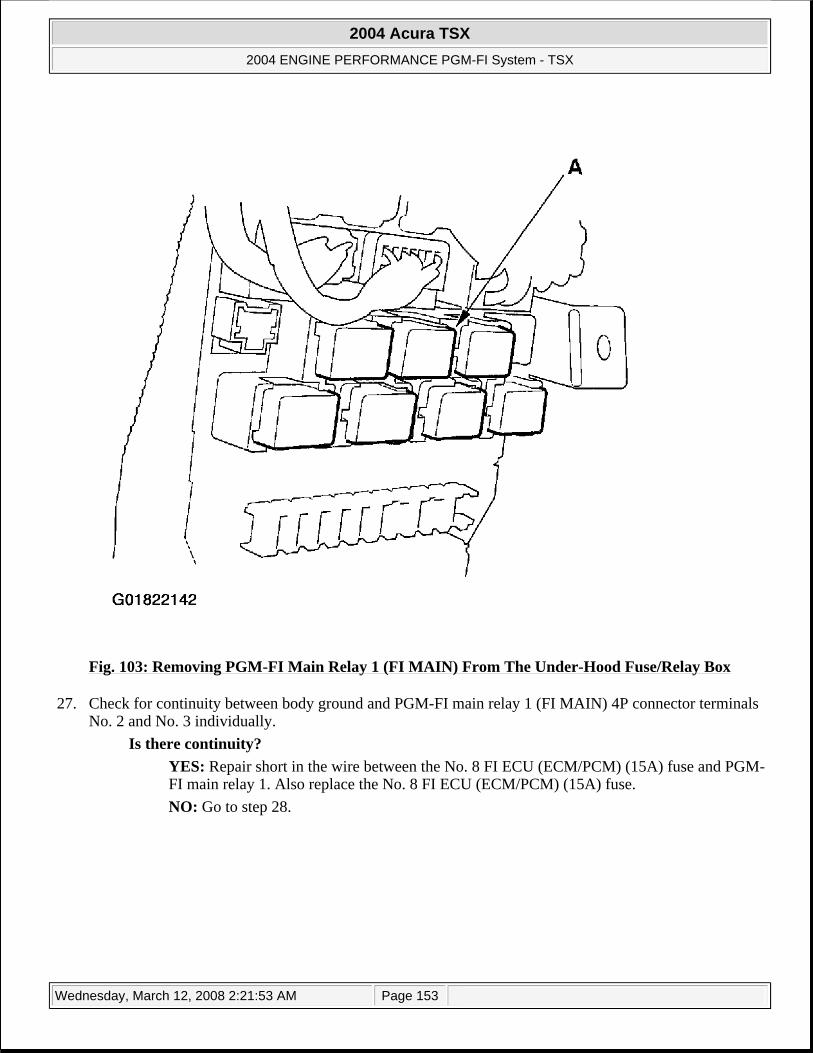
Fig. 103: Removing PGM-FI Main Relay 1 (FI MAIN) From The Under-Hood Fuse/Relay Box
27. Check for continuity between body ground and PGM-FI main relay 1 (FI MAIN) 4P connector terminals No. 2 and No. 3 individually.
Is there continuity? YES: Repair short in the wire between the No. 8 FI ECU (ECM/PCM) (15A) fuse and PGM-FI main relay 1. Also replace the No. 8 FI ECU (ECM/PCM) (15A) fuse. NO: Go to step 28.
2004 Acura TSX
2004 ENGINE PERFORMANCE PGM-FI System - TSX
Wednesday, March 12, 2008 2:21:53 AM Page 153
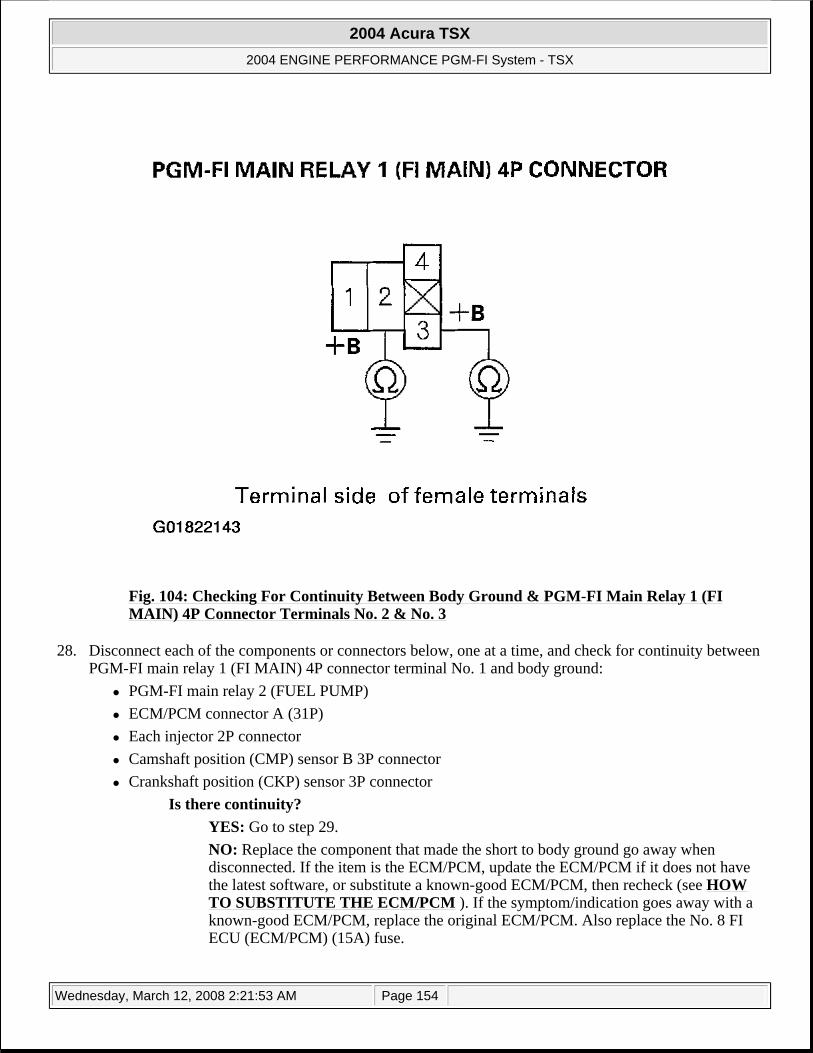
Fig. 104: Checking For Continuity Between Body Ground & PGM-FI Main Relay 1 (FI MAIN) 4P Connector Terminals No. 2 & No. 3
28. Disconnect each of the components or connectors below, one at a time, and check for continuity between PGM-FI main relay 1 (FI MAIN) 4P connector terminal No. 1 and body ground:
PGM-FI main relay 2 (FUEL PUMP) ECM/PCM connector A (31P) Each injector 2P connector Camshaft position (CMP) sensor B 3P connector Crankshaft position (CKP) sensor 3P connector
Is there continuity? YES: Go to step 29. NO: Replace the component that made the short to body ground go away when disconnected. If the item is the ECM/PCM, update the ECM/PCM if it does not have the latest software, or substitute a known-good ECM/PCM, then recheck (see HOW TO SUBSTITUTE THE ECM/PCM ). If the symptom/indication goes away with a known-good ECM/PCM, replace the original ECM/PCM. Also replace the No. 8 FI ECU (ECM/PCM) (15A) fuse.
2004 Acura TSX
2004 ENGINE PERFORMANCE PGM-FI System - TSX
Wednesday, March 12, 2008 2:21:53 AM Page 154
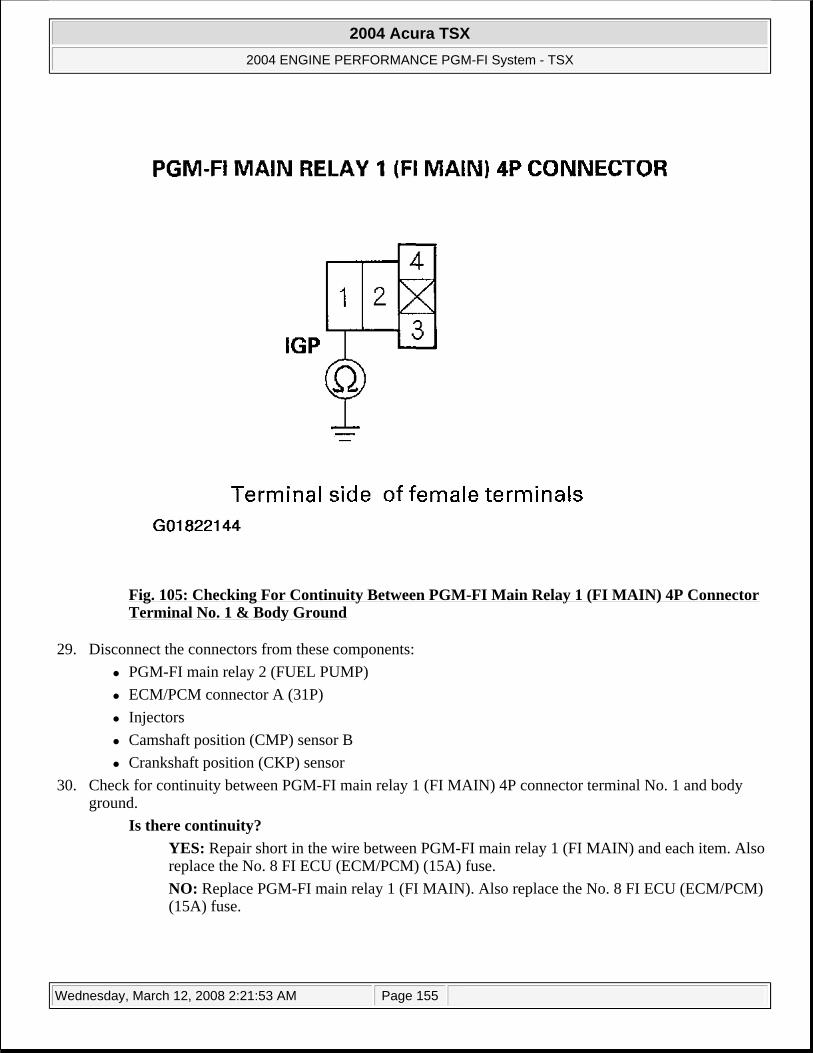
Fig. 105: Checking For Continuity Between PGM-FI Main Relay 1 (FI MAIN) 4P Connector Terminal No. 1 & Body Ground
29. Disconnect the connectors from these components: PGM-FI main relay 2 (FUEL PUMP) ECM/PCM connector A (31P) Injectors Camshaft position (CMP) sensor B Crankshaft position (CKP) sensor
30. Check for continuity between PGM-FI main relay 1 (FI MAIN) 4P connector terminal No. 1 and body ground.
Is there continuity? YES: Repair short in the wire between PGM-FI main relay 1 (FI MAIN) and each item. Also replace the No. 8 FI ECU (ECM/PCM) (15A) fuse. NO: Replace PGM-FI main relay 1 (FI MAIN). Also replace the No. 8 FI ECU (ECM/PCM) (15A) fuse.
2004 Acura TSX
2004 ENGINE PERFORMANCE PGM-FI System - TSX
Wednesday, March 12, 2008 2:21:53 AM Page 155
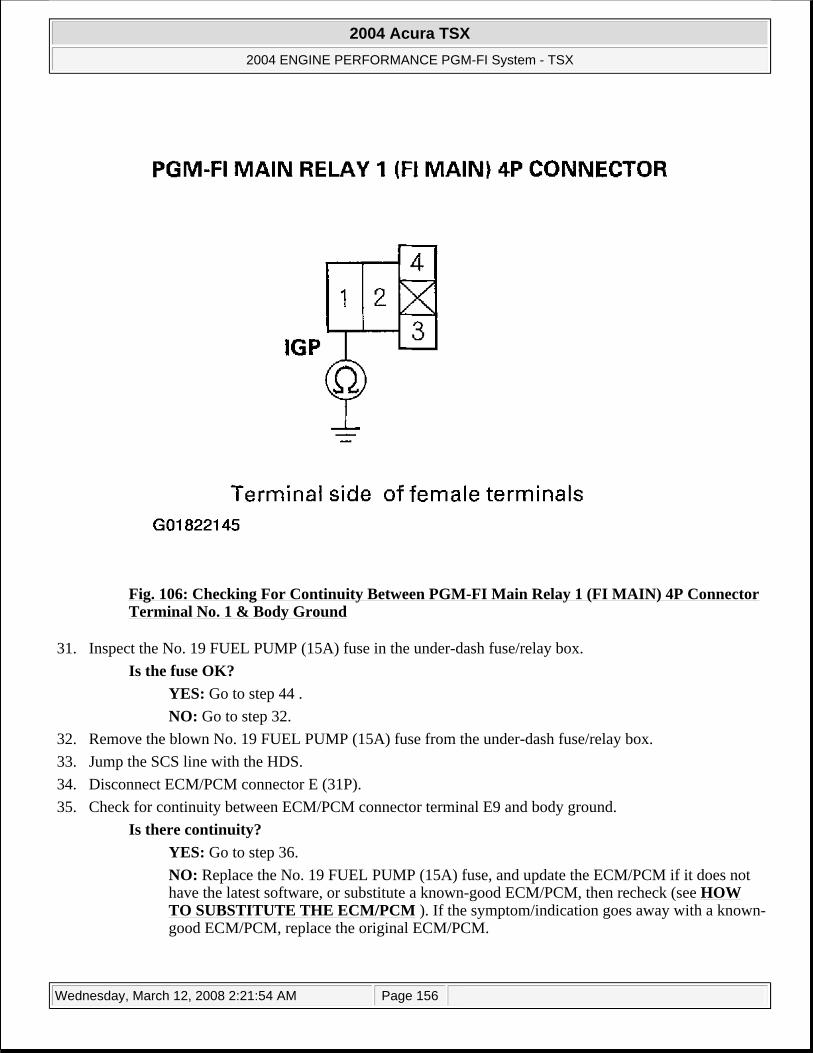
Fig. 106: Checking For Continuity Between PGM-FI Main Relay 1 (FI MAIN) 4P Connector Terminal No. 1 & Body Ground
31. Inspect the No. 19 FUEL PUMP (15A) fuse in the under-dash fuse/relay box. Is the fuse OK?
YES: Go to step 44 . NO: Go to step 32.
32. Remove the blown No. 19 FUEL PUMP (15A) fuse from the under-dash fuse/relay box. 33. Jump the SCS line with the HDS. 34. Disconnect ECM/PCM connector E (31P). 35. Check for continuity between ECM/PCM connector terminal E9 and body ground.
Is there continuity? YES: Go to step 36. NO: Replace the No. 19 FUEL PUMP (15A) fuse, and update the ECM/PCM if it does not have the latest software, or substitute a known-good ECM/PCM, then recheck (see HOW TO SUBSTITUTE THE ECM/PCM ). If the symptom/indication goes away with a known-good ECM/PCM, replace the original ECM/PCM.
2004 Acura TSX
2004 ENGINE PERFORMANCE PGM-FI System - TSX
Wednesday, March 12, 2008 2:21:54 AM Page 156
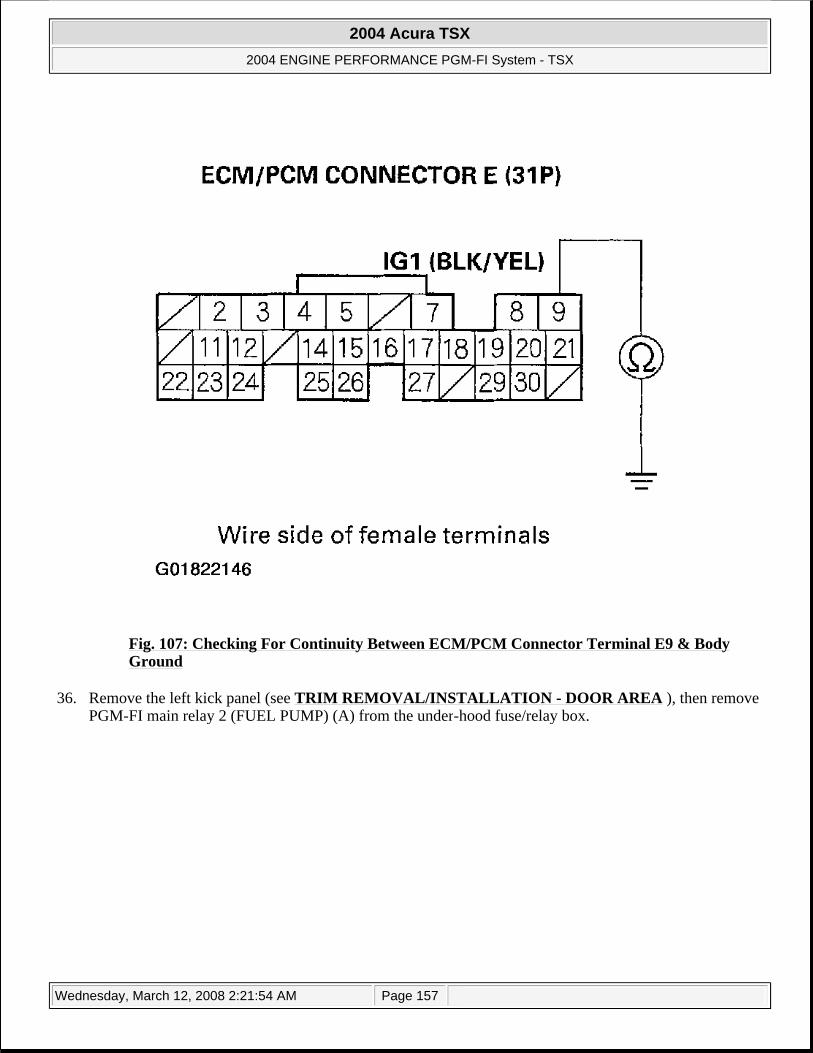
Fig. 107: Checking For Continuity Between ECM/PCM Connector Terminal E9 & Body Ground
36. Remove the left kick panel (see TRIM REMOVAL/INSTALLATION - DOOR AREA ), then remove PGM-FI main relay 2 (FUEL PUMP) (A) from the under-hood fuse/relay box.
2004 Acura TSX
2004 ENGINE PERFORMANCE PGM-FI System - TSX
Wednesday, March 12, 2008 2:21:54 AM Page 157
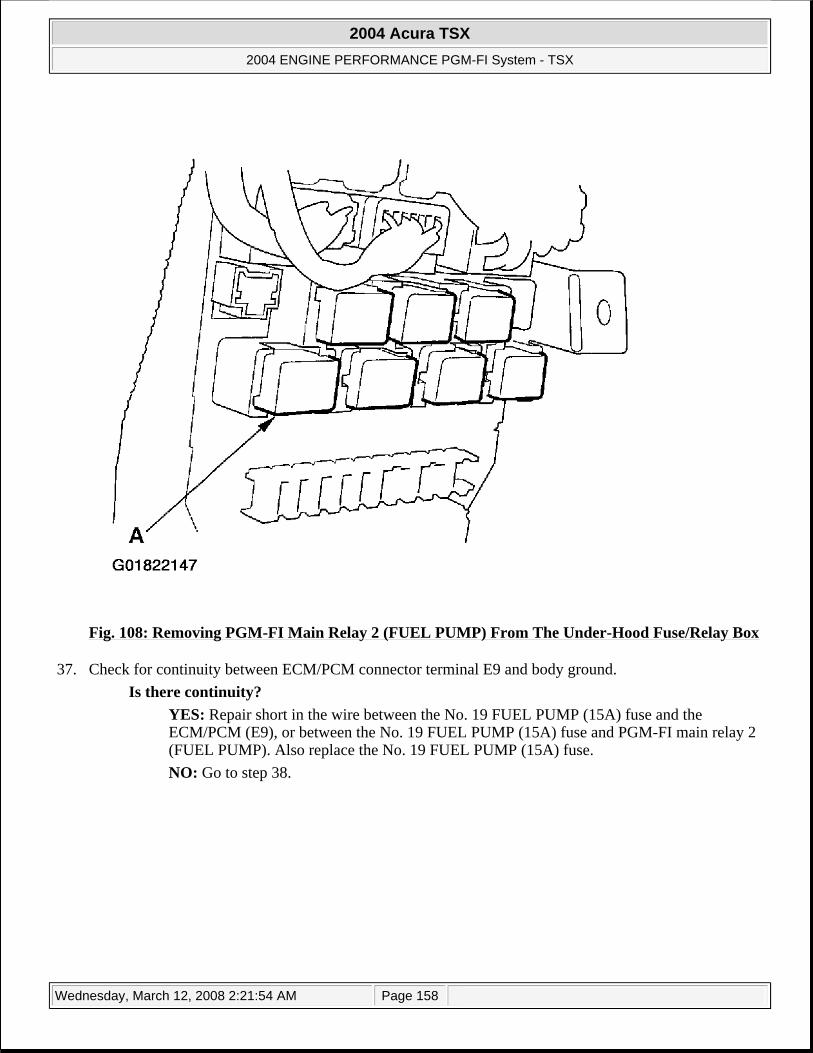
Fig. 108: Removing PGM-FI Main Relay 2 (FUEL PUMP) From The Under-Hood Fuse/Relay Box
37. Check for continuity between ECM/PCM connector terminal E9 and body ground. Is there continuity?
YES: Repair short in the wire between the No. 19 FUEL PUMP (15A) fuse and the ECM/PCM (E9), or between the No. 19 FUEL PUMP (15A) fuse and PGM-FI main relay 2 (FUEL PUMP). Also replace the No. 19 FUEL PUMP (15A) fuse. NO: Go to step 38.
2004 Acura TSX
2004 ENGINE PERFORMANCE PGM-FI System - TSX
Wednesday, March 12, 2008 2:21:54 AM Page 158

Fig. 109: Checking For Continuity Between ECM/PCM Connector Terminal E9 & Body Ground
38. Remove the trunk floor trim panel (see TRIM REMOVAL/INSTALLATION - TRUNK AREA ). 39. Remove the access panel from the floor (see FUEL PUMP/FUEL GAUGE SENDING UNIT
REPLACEMENT ). 40. Disconnect the fuel pump 5P connector. 41. Check for continuity between fuel pump 5P connector terminal No. 5 and body ground.
Is there continuity? YES: Repair short in the wire between the fuel pump and PGM-FI main relay 2 (FUEL PUMP). Also replace the No. 19 FUEL PUMP (15A) fuse. NO: Go to step 42.
2004 Acura TSX
2004 ENGINE PERFORMANCE PGM-FI System - TSX
Wednesday, March 12, 2008 2:21:54 AM Page 159
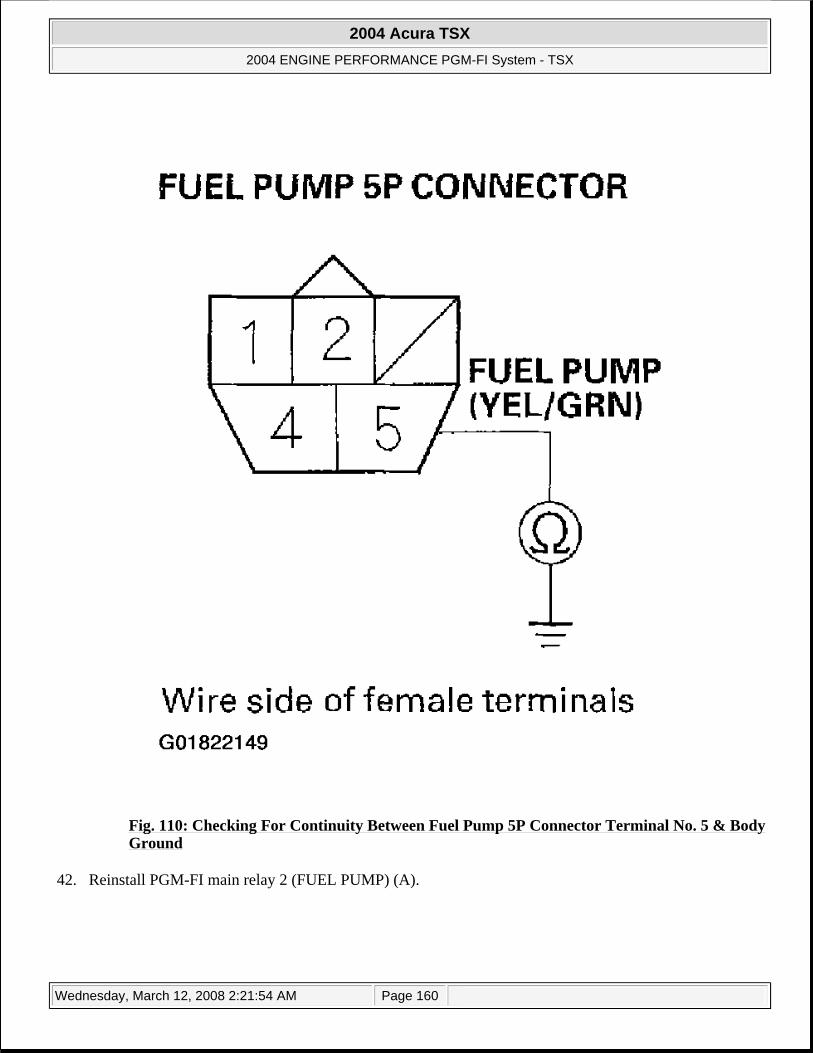
Fig. 110: Checking For Continuity Between Fuel Pump 5P Connector Terminal No. 5 & Body Ground
42. Reinstall PGM-FI main relay 2 (FUEL PUMP) (A).
2004 Acura TSX
2004 ENGINE PERFORMANCE PGM-FI System - TSX
Wednesday, March 12, 2008 2:21:54 AM Page 160
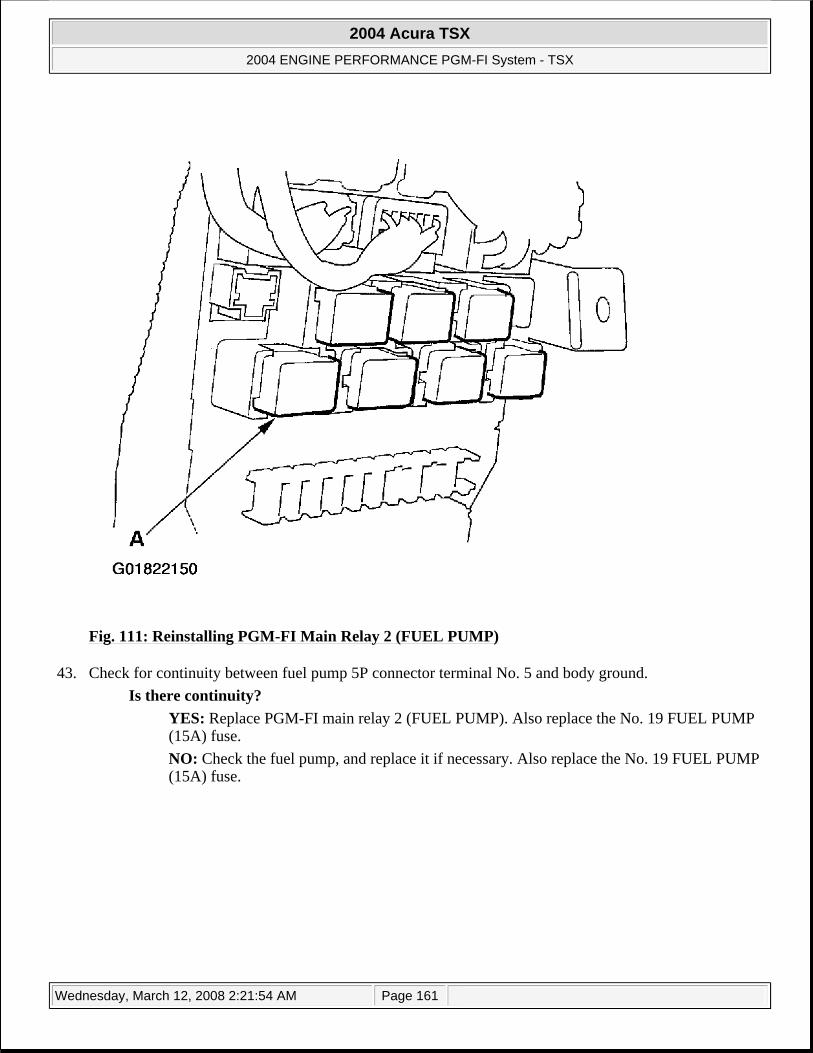
Fig. 111: Reinstalling PGM-FI Main Relay 2 (FUEL PUMP)
43. Check for continuity between fuel pump 5P connector terminal No. 5 and body ground. Is there continuity?
YES: Replace PGM-FI main relay 2 (FUEL PUMP). Also replace the No. 19 FUEL PUMP (15A) fuse. NO: Check the fuel pump, and replace it if necessary. Also replace the No. 19 FUEL PUMP (15A) fuse.
2004 Acura TSX
2004 ENGINE PERFORMANCE PGM-FI System - TSX
Wednesday, March 12, 2008 2:21:54 AM Page 161
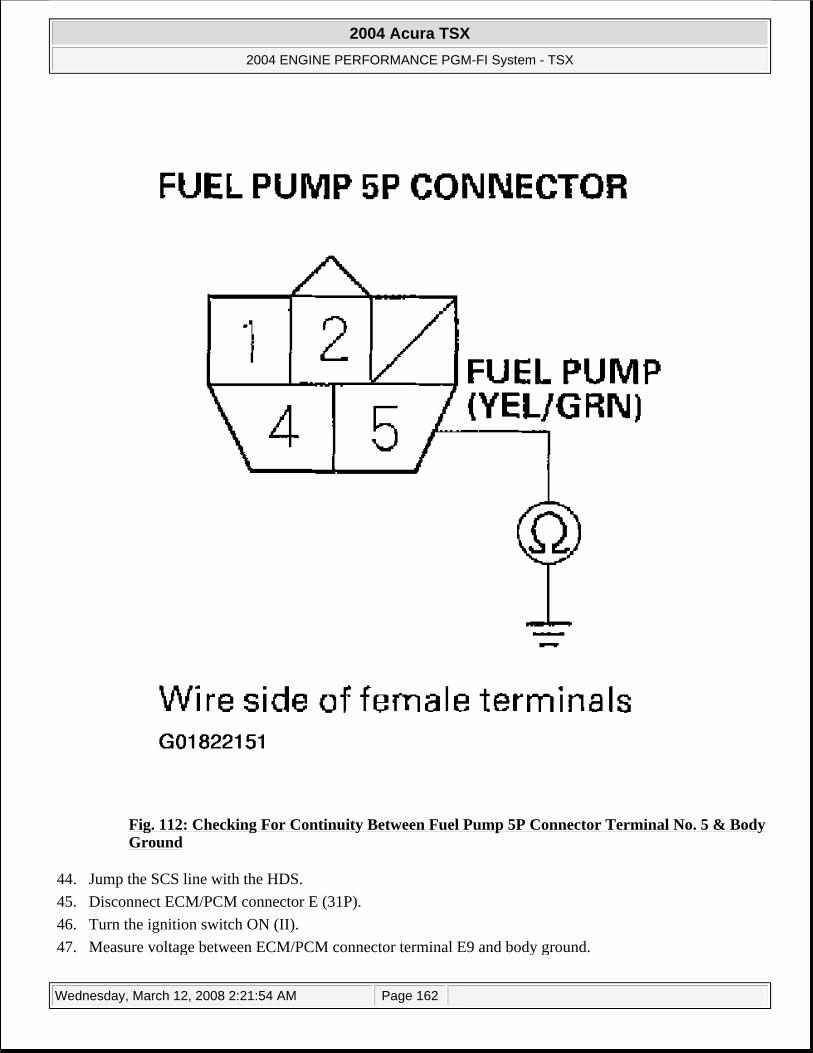
Fig. 112: Checking For Continuity Between Fuel Pump 5P Connector Terminal No. 5 & Body Ground
44. Jump the SCS line with the HDS. 45. Disconnect ECM/PCM connector E (31P). 46. Turn the ignition switch ON (II). 47. Measure voltage between ECM/PCM connector terminal E9 and body ground.
2004 Acura TSX
2004 ENGINE PERFORMANCE PGM-FI System - TSX
Wednesday, March 12, 2008 2:21:54 AM Page 162
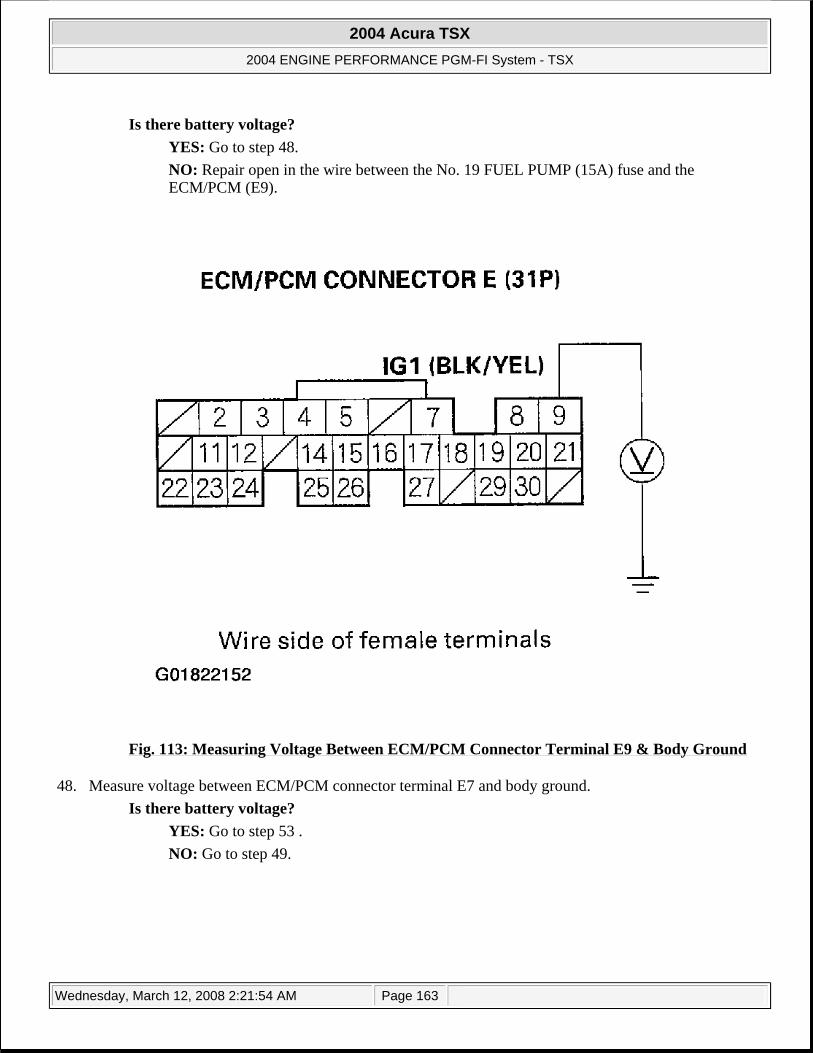
Is there battery voltage? YES: Go to step 48. NO: Repair open in the wire between the No. 19 FUEL PUMP (15A) fuse and the ECM/PCM (E9).
Fig. 113: Measuring Voltage Between ECM/PCM Connector Terminal E9 & Body Ground
48. Measure voltage between ECM/PCM connector terminal E7 and body ground. Is there battery voltage?
YES: Go to step 53 . NO: Go to step 49.
2004 Acura TSX
2004 ENGINE PERFORMANCE PGM-FI System - TSX
Wednesday, March 12, 2008 2:21:54 AM Page 163
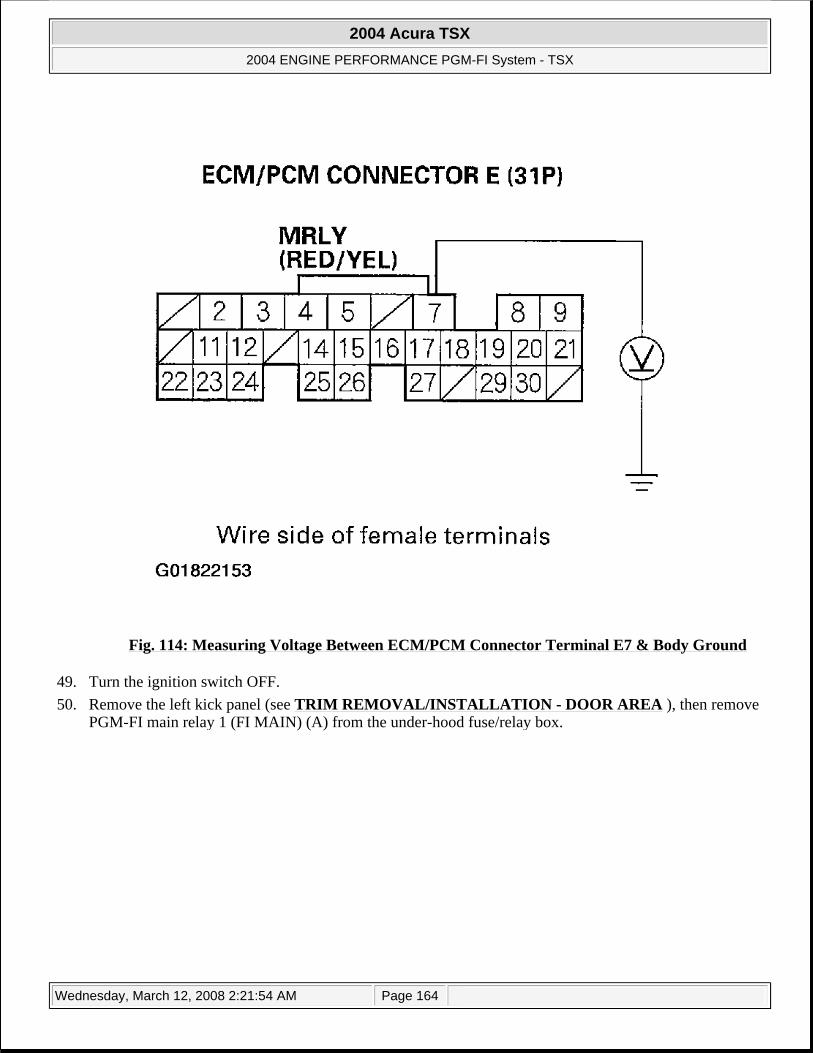
Fig. 114: Measuring Voltage Between ECM/PCM Connector Terminal E7 & Body Ground
49. Turn the ignition switch OFF. 50. Remove the left kick panel (see TRIM REMOVAL/INSTALLATION - DOOR AREA ), then remove
PGM-FI main relay 1 (FI MAIN) (A) from the under-hood fuse/relay box.
2004 Acura TSX
2004 ENGINE PERFORMANCE PGM-FI System - TSX
Wednesday, March 12, 2008 2:21:54 AM Page 164
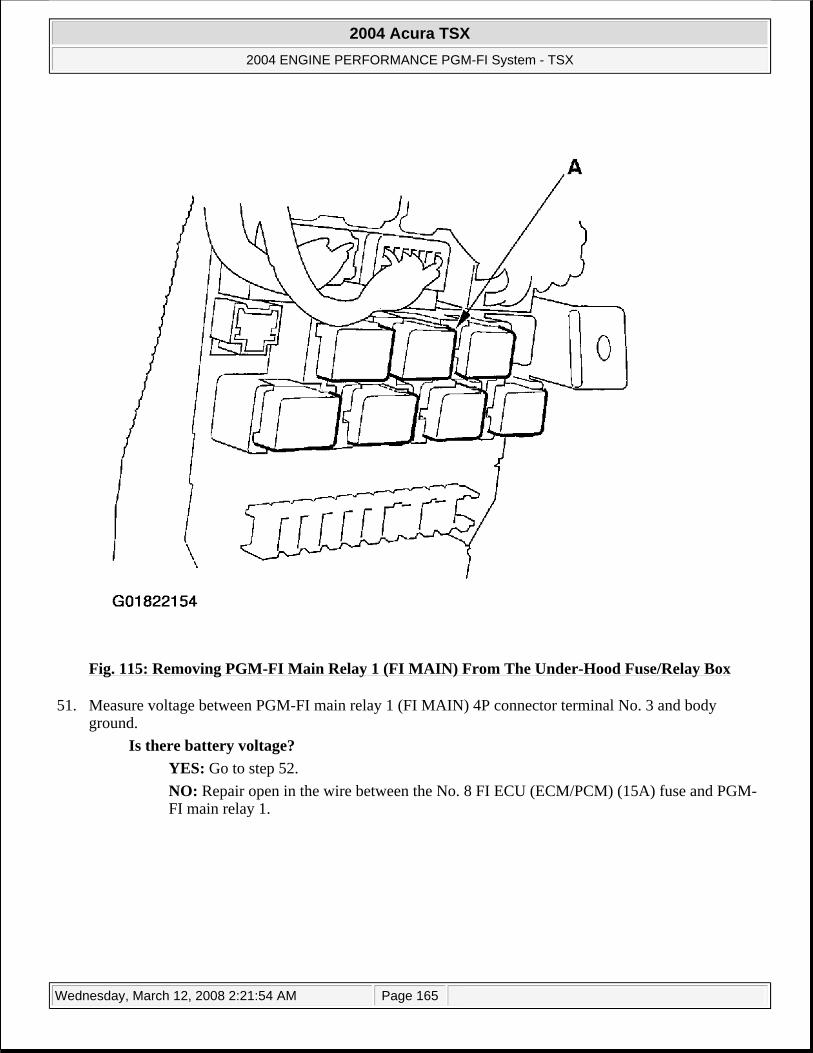
Fig. 115: Removing PGM-FI Main Relay 1 (FI MAIN) From The Under-Hood Fuse/Relay Box
51. Measure voltage between PGM-FI main relay 1 (FI MAIN) 4P connector terminal No. 3 and body ground.
Is there battery voltage? YES: Go to step 52. NO: Repair open in the wire between the No. 8 FI ECU (ECM/PCM) (15A) fuse and PGM-FI main relay 1.
2004 Acura TSX
2004 ENGINE PERFORMANCE PGM-FI System - TSX
Wednesday, March 12, 2008 2:21:54 AM Page 165
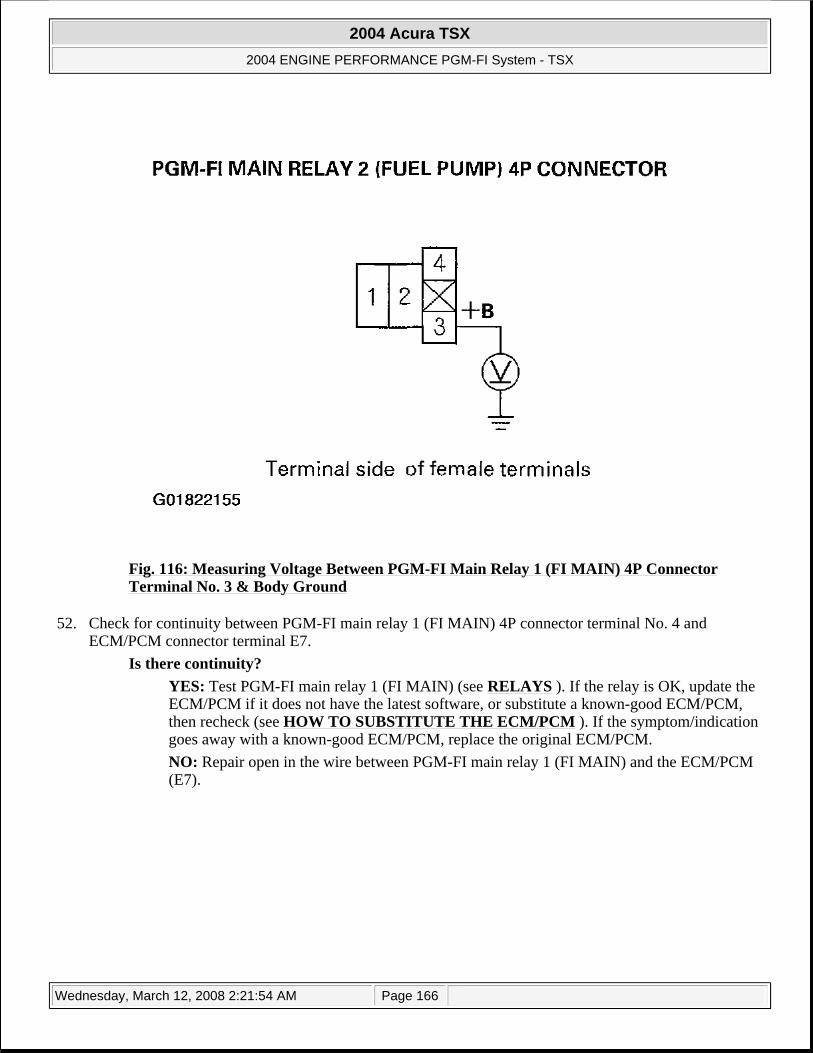
Fig. 116: Measuring Voltage Between PGM-FI Main Relay 1 (FI MAIN) 4P Connector Terminal No. 3 & Body Ground
52. Check for continuity between PGM-FI main relay 1 (FI MAIN) 4P connector terminal No. 4 and ECM/PCM connector terminal E7.
Is there continuity? YES: Test PGM-FI main relay 1 (FI MAIN) (see RELAYS ). If the relay is OK, update the ECM/PCM if it does not have the latest software, or substitute a known-good ECM/PCM, then recheck (see HOW TO SUBSTITUTE THE ECM/PCM ). If the symptom/indication goes away with a known-good ECM/PCM, replace the original ECM/PCM. NO: Repair open in the wire between PGM-FI main relay 1 (FI MAIN) and the ECM/PCM (E7).
2004 Acura TSX
2004 ENGINE PERFORMANCE PGM-FI System - TSX
Wednesday, March 12, 2008 2:21:54 AM Page 166

Fig. 117: Checking For Continuity Between PGM-FI Main Relay 1 (FI MAIN) 4P Connector Terminal No. 4 & ECM/PCM Connector Terminal E7
53. Reconnect ECM/PCM connector E (31P). 54. Turn the ignition switch ON (II). 55. Measure voltage between body ground and ECM/PCM connector terminals A2 and A3 individually.
Is there battery voltage? YES: Go to step 62 . NO: Go to step 56.
2004 Acura TSX
2004 ENGINE PERFORMANCE PGM-FI System - TSX
Wednesday, March 12, 2008 2:21:54 AM Page 167
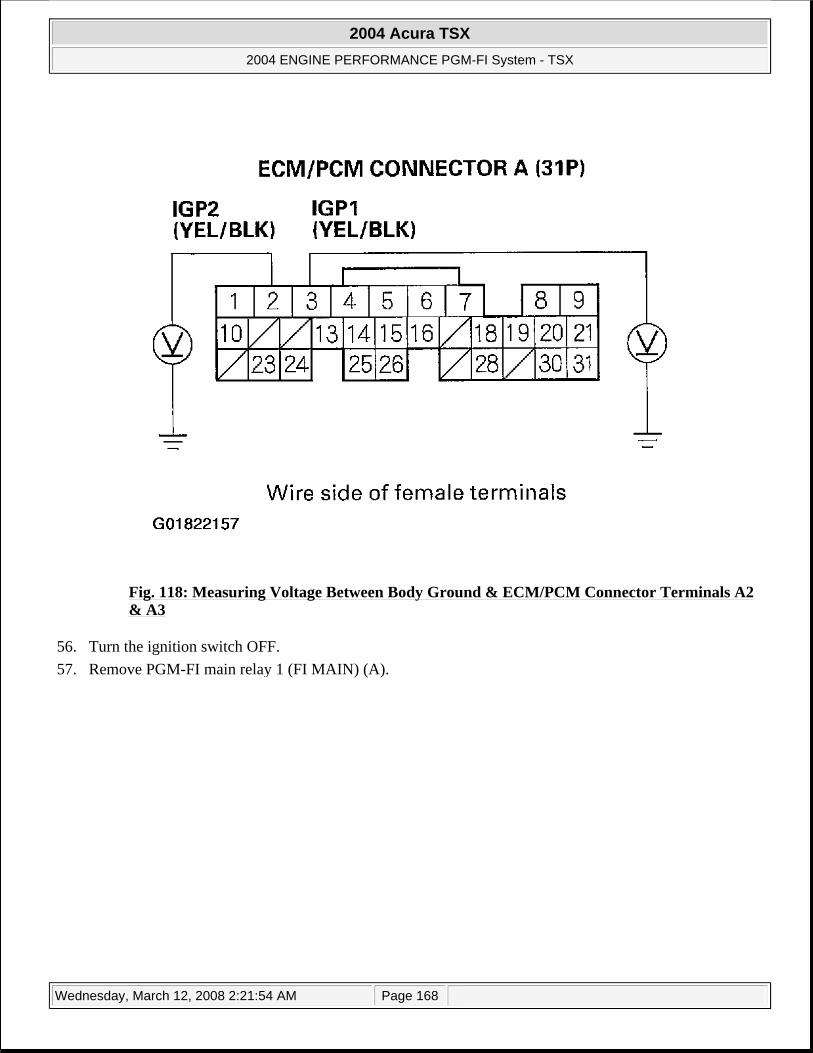
Fig. 118: Measuring Voltage Between Body Ground & ECM/PCM Connector Terminals A2 & A3
56. Turn the ignition switch OFF. 57. Remove PGM-FI main relay 1 (FI MAIN) (A).
2004 Acura TSX
2004 ENGINE PERFORMANCE PGM-FI System - TSX
Wednesday, March 12, 2008 2:21:54 AM Page 168
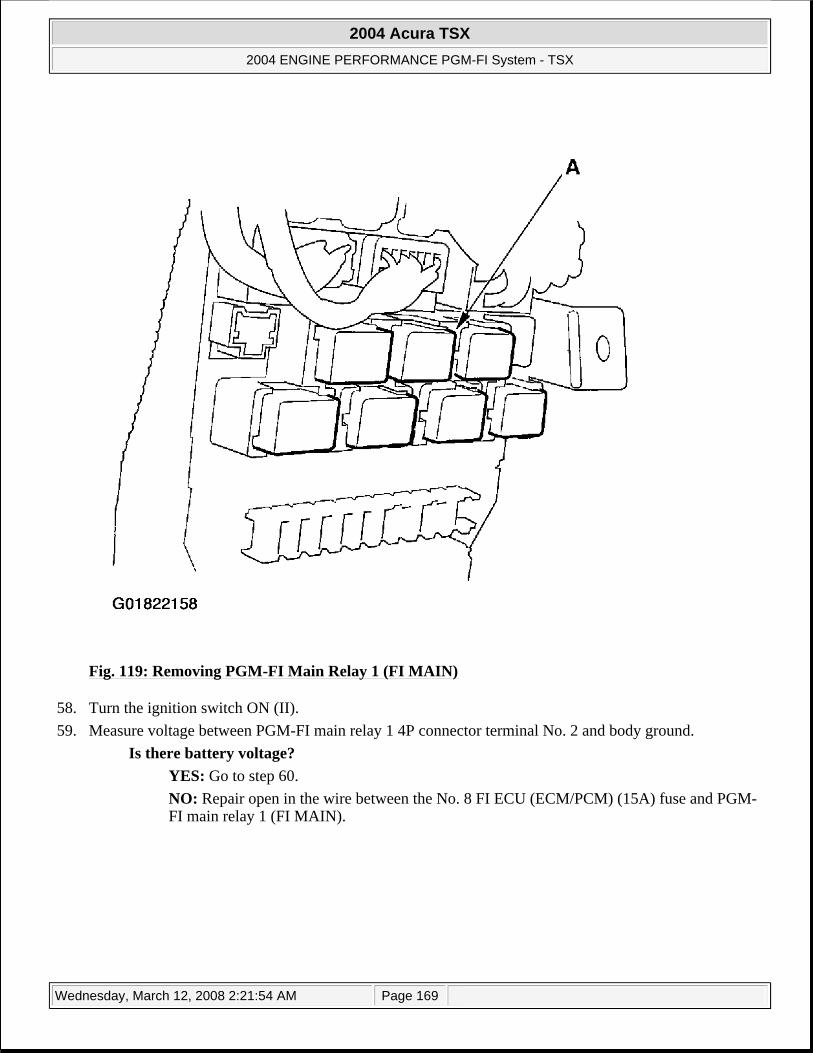
Fig. 119: Removing PGM-FI Main Relay 1 (FI MAIN)
58. Turn the ignition switch ON (II). 59. Measure voltage between PGM-FI main relay 1 4P connector terminal No. 2 and body ground.
Is there battery voltage? YES: Go to step 60. NO: Repair open in the wire between the No. 8 FI ECU (ECM/PCM) (15A) fuse and PGM-FI main relay 1 (FI MAIN).
2004 Acura TSX
2004 ENGINE PERFORMANCE PGM-FI System - TSX
Wednesday, March 12, 2008 2:21:54 AM Page 169

Fig. 120: Measuring Voltage Between PGM-FI Main Relay 1 4P Connector Terminal No. 2 & Body Ground
60. Turn the ignition switch OFF. 61. Check for continuity between PGM-FI main relay 1 (FI MAIN) 4P connector terminal No. 1 and
ECM/PCM connector terminals A2 and A3 individually. Is there continuity?
YES: Replace PGM-FI main relay 1 (FI MAIN). NO: Repair open in the wire between PGM-FI main relay 1 (FI MAIN) and the ECM/PCM (A2, A3).
2004 Acura TSX
2004 ENGINE PERFORMANCE PGM-FI System - TSX
Wednesday, March 12, 2008 2:21:54 AM Page 170
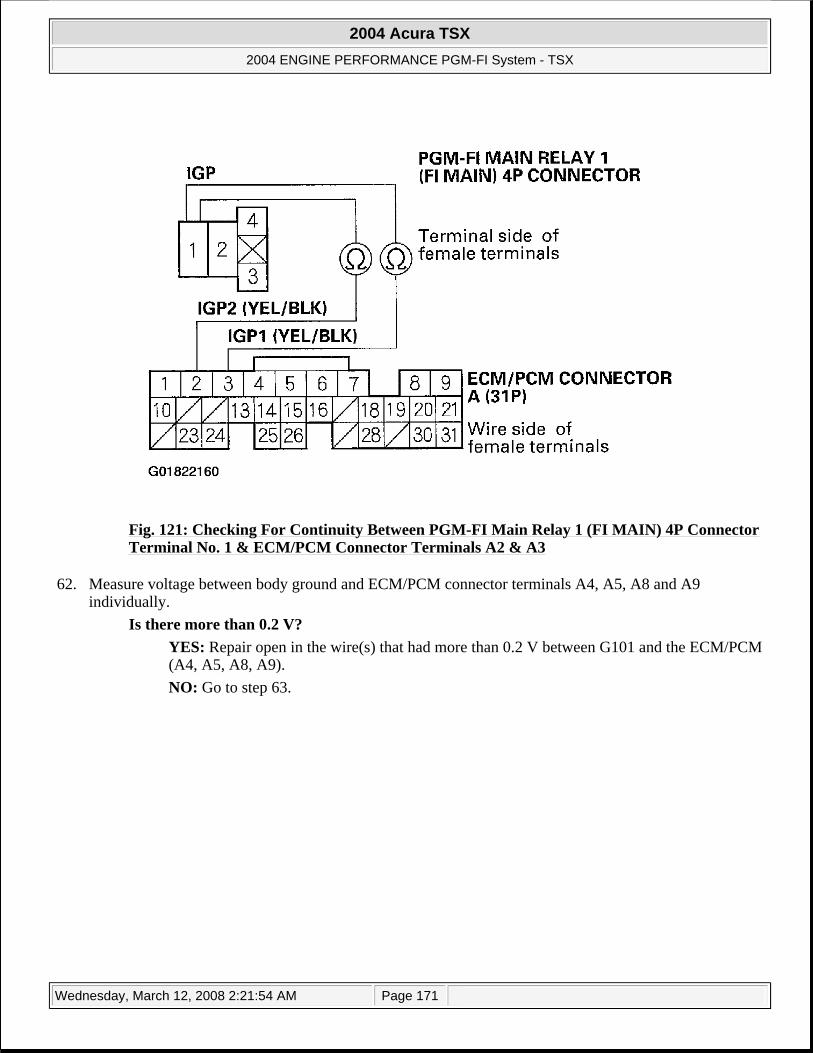
Fig. 121: Checking For Continuity Between PGM-FI Main Relay 1 (FI MAIN) 4P Connector Terminal No. 1 & ECM/PCM Connector Terminals A2 & A3
62. Measure voltage between body ground and ECM/PCM connector terminals A4, A5, A8 and A9 individually.
Is there more than 0.2 V? YES: Repair open in the wire(s) that had more than 0.2 V between G101 and the ECM/PCM (A4, A5, A8, A9). NO: Go to step 63.
2004 Acura TSX
2004 ENGINE PERFORMANCE PGM-FI System - TSX
Wednesday, March 12, 2008 2:21:54 AM Page 171
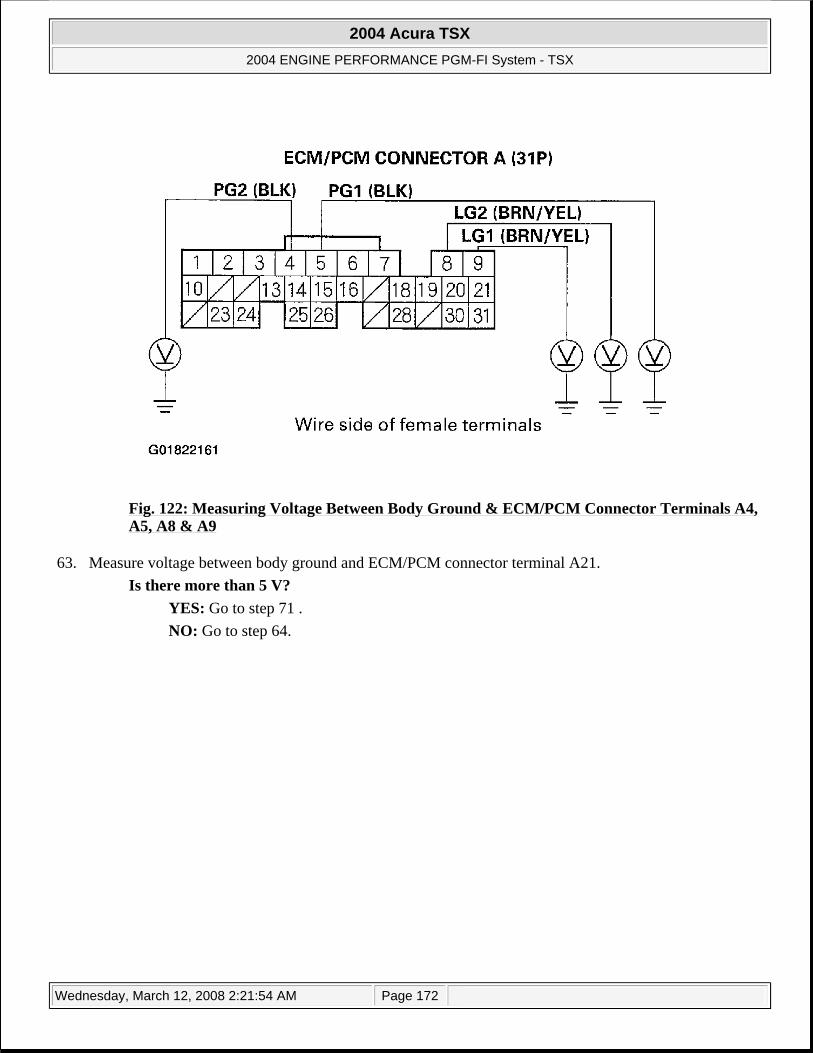
Fig. 122: Measuring Voltage Between Body Ground & ECM/PCM Connector Terminals A4, A5, A8 & A9
63. Measure voltage between body ground and ECM/PCM connector terminal A21. Is there more than 5 V?
YES: Go to step 71 . NO: Go to step 64.
2004 Acura TSX
2004 ENGINE PERFORMANCE PGM-FI System - TSX
Wednesday, March 12, 2008 2:21:54 AM Page 172

Fig. 123: Measuring Voltage Between Body Ground & ECM/PCM Connector Terminal A21
64. Turn the ignition switch OFF. 65. Disconnect the connector from each of these sensors, one at a time, and measure voltage between body
ground and ECM/PCM connector terminal A21 with the ignition switch ON (II): Manifold absolute pressure (MAP) sensor Accelerator pedal position (APP) sensor Mainshaft speed sensor (A/T)
Is there about 5 V? YES: Replace the sensor that restored 5 V when disconnected. NO: Go to step 66.
2004 Acura TSX
2004 ENGINE PERFORMANCE PGM-FI System - TSX
Wednesday, March 12, 2008 2:21:54 AM Page 173
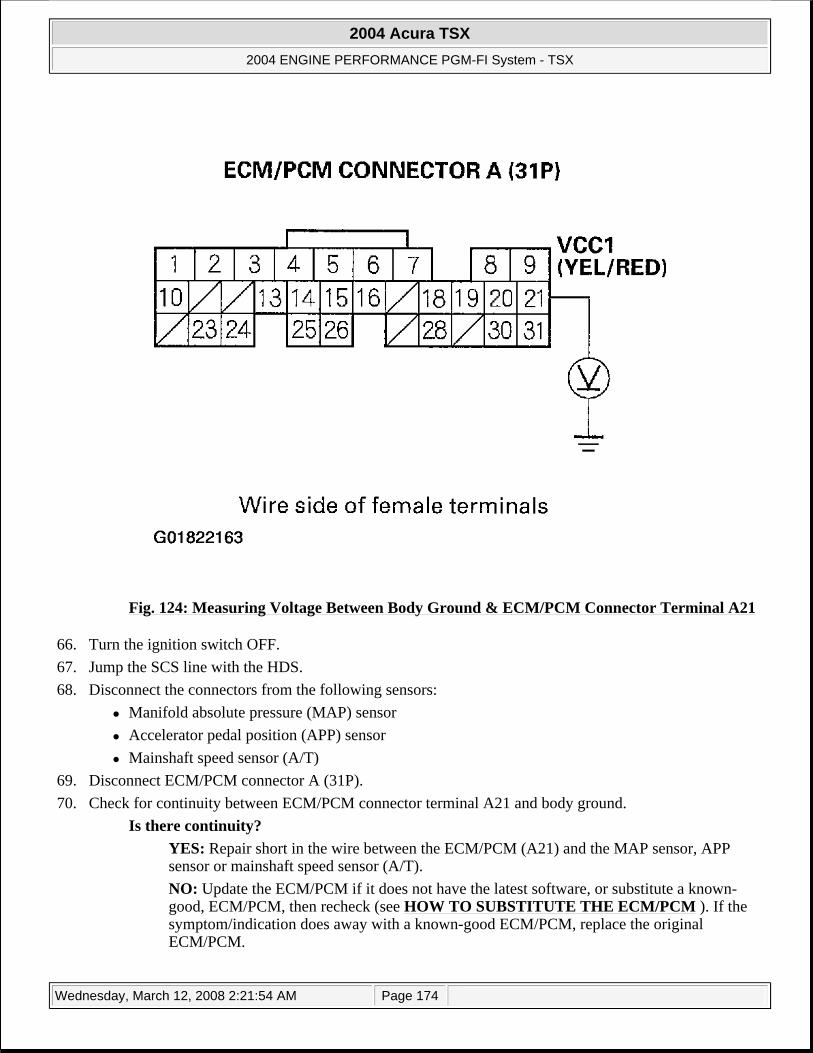
Fig. 124: Measuring Voltage Between Body Ground & ECM/PCM Connector Terminal A21
66. Turn the ignition switch OFF. 67. Jump the SCS line with the HDS. 68. Disconnect the connectors from the following sensors:
Manifold absolute pressure (MAP) sensor Accelerator pedal position (APP) sensor Mainshaft speed sensor (A/T)
69. Disconnect ECM/PCM connector A (31P). 70. Check for continuity between ECM/PCM connector terminal A21 and body ground.
Is there continuity? YES: Repair short in the wire between the ECM/PCM (A21) and the MAP sensor, APP sensor or mainshaft speed sensor (A/T). NO: Update the ECM/PCM if it does not have the latest software, or substitute a known-good, ECM/PCM, then recheck (see HOW TO SUBSTITUTE THE ECM/PCM ). If the symptom/indication does away with a known-good ECM/PCM, replace the original ECM/PCM.
2004 Acura TSX
2004 ENGINE PERFORMANCE PGM-FI System - TSX
Wednesday, March 12, 2008 2:21:54 AM Page 174
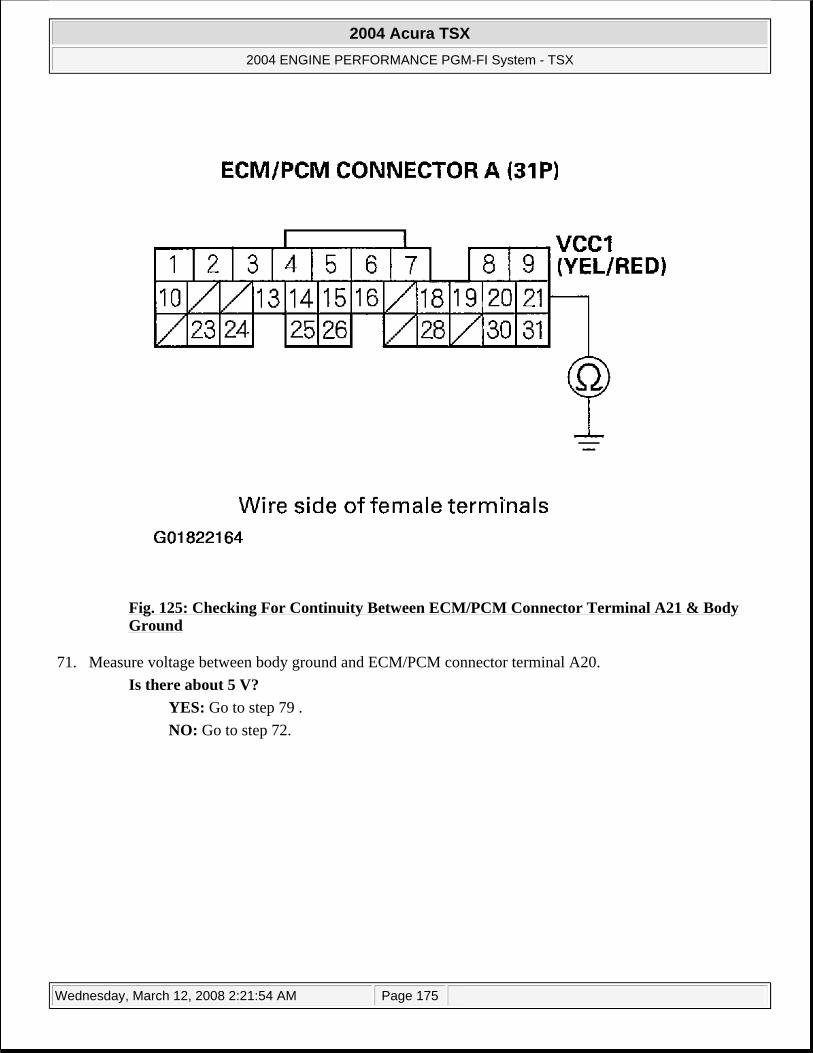
Fig. 125: Checking For Continuity Between ECM/PCM Connector Terminal A21 & Body Ground
71. Measure voltage between body ground and ECM/PCM connector terminal A20. Is there about 5 V?
YES: Go to step 79 . NO: Go to step 72.
2004 Acura TSX
2004 ENGINE PERFORMANCE PGM-FI System - TSX
Wednesday, March 12, 2008 2:21:54 AM Page 175
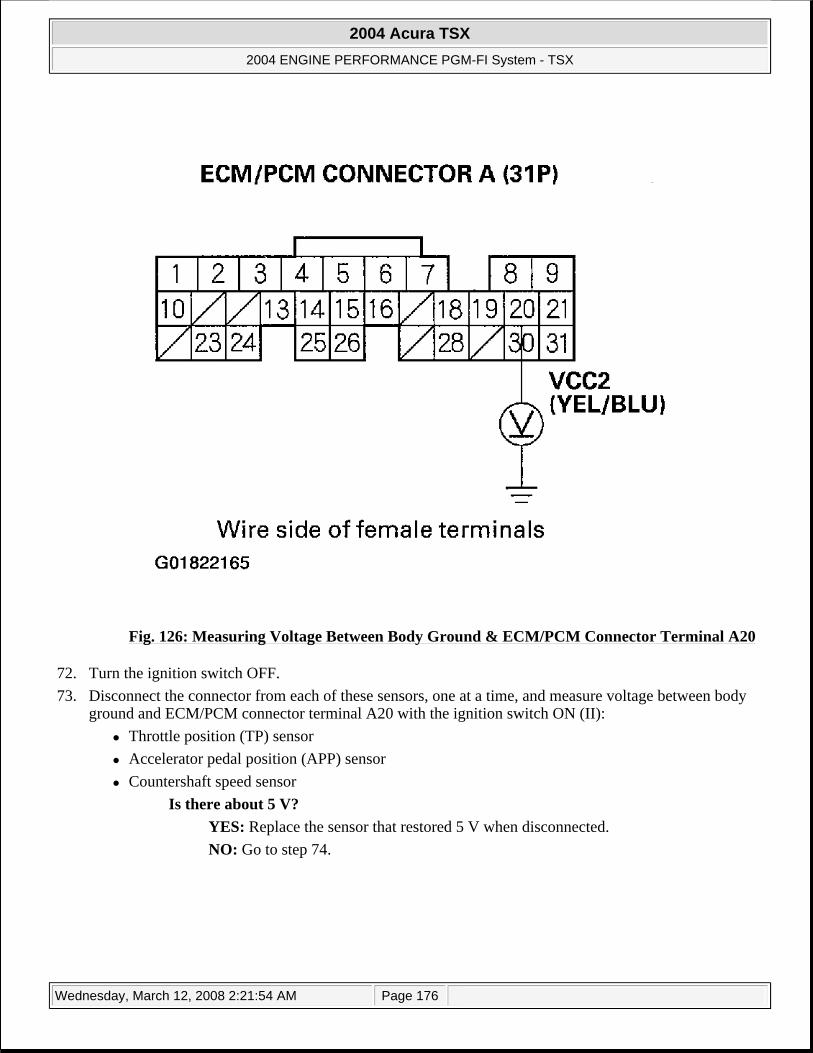
Fig. 126: Measuring Voltage Between Body Ground & ECM/PCM Connector Terminal A20
72. Turn the ignition switch OFF. 73. Disconnect the connector from each of these sensors, one at a time, and measure voltage between body
ground and ECM/PCM connector terminal A20 with the ignition switch ON (II): Throttle position (TP) sensor Accelerator pedal position (APP) sensor Countershaft speed sensor
Is there about 5 V? YES: Replace the sensor that restored 5 V when disconnected. NO: Go to step 74.
2004 Acura TSX
2004 ENGINE PERFORMANCE PGM-FI System - TSX
Wednesday, March 12, 2008 2:21:54 AM Page 176
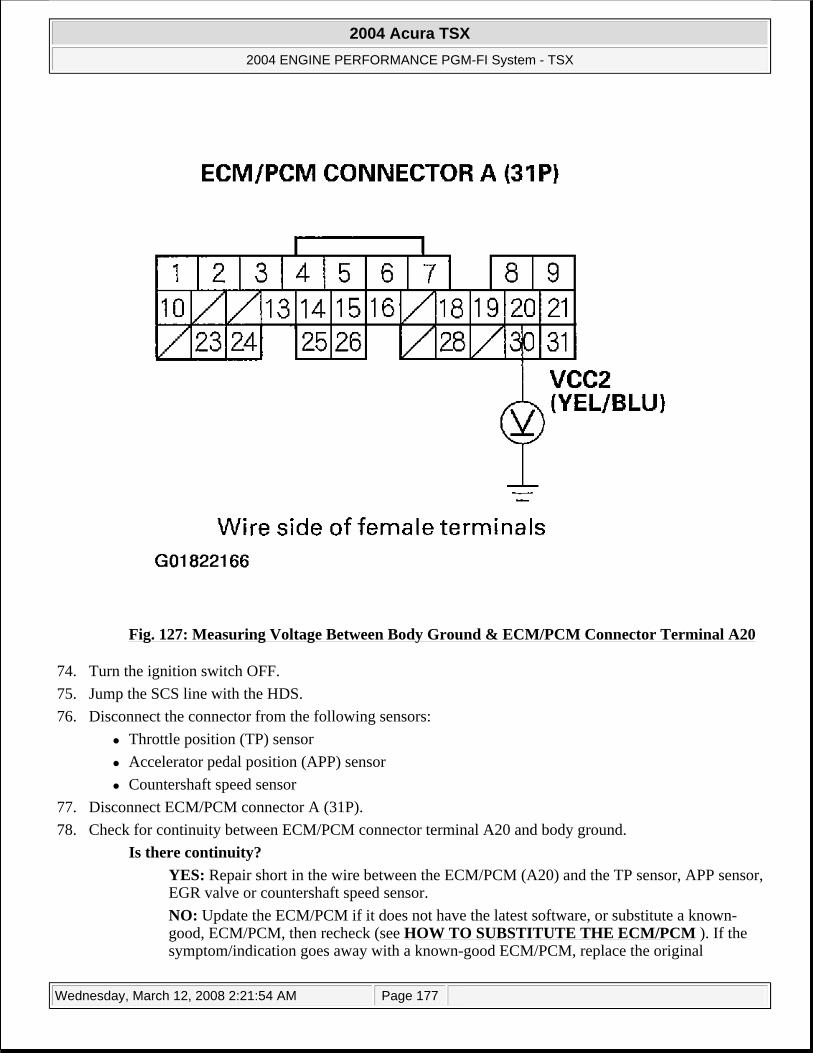
Fig. 127: Measuring Voltage Between Body Ground & ECM/PCM Connector Terminal A20
74. Turn the ignition switch OFF. 75. Jump the SCS line with the HDS. 76. Disconnect the connector from the following sensors:
Throttle position (TP) sensor Accelerator pedal position (APP) sensor Countershaft speed sensor
77. Disconnect ECM/PCM connector A (31P). 78. Check for continuity between ECM/PCM connector terminal A20 and body ground.
Is there continuity? YES: Repair short in the wire between the ECM/PCM (A20) and the TP sensor, APP sensor, EGR valve or countershaft speed sensor. NO: Update the ECM/PCM if it does not have the latest software, or substitute a known-good, ECM/PCM, then recheck (see HOW TO SUBSTITUTE THE ECM/PCM ). If the symptom/indication goes away with a known-good ECM/PCM, replace the original
2004 Acura TSX
2004 ENGINE PERFORMANCE PGM-FI System - TSX
Wednesday, March 12, 2008 2:21:54 AM Page 177

ECM/PCM.
Fig. 128: Checking For Continuity Between ECM/PCM Connector Terminal A20 & Body Ground
79. Measure voltage between body ground and ECM/PCM connector terminal E5. Is there about 5 V?
YES: Update the ECM/PCM if it does not have the latest software, or substitute a known-good, ECM/PCM, then recheck (see HOW TO SUBSTITUTE THE ECM/PCM ). If the symptom/indication goes away with a known-good ECM/PCM, replace the original ECM/PCM. NO: Go to step 80.
2004 Acura TSX
2004 ENGINE PERFORMANCE PGM-FI System - TSX
Wednesday, March 12, 2008 2:21:54 AM Page 178
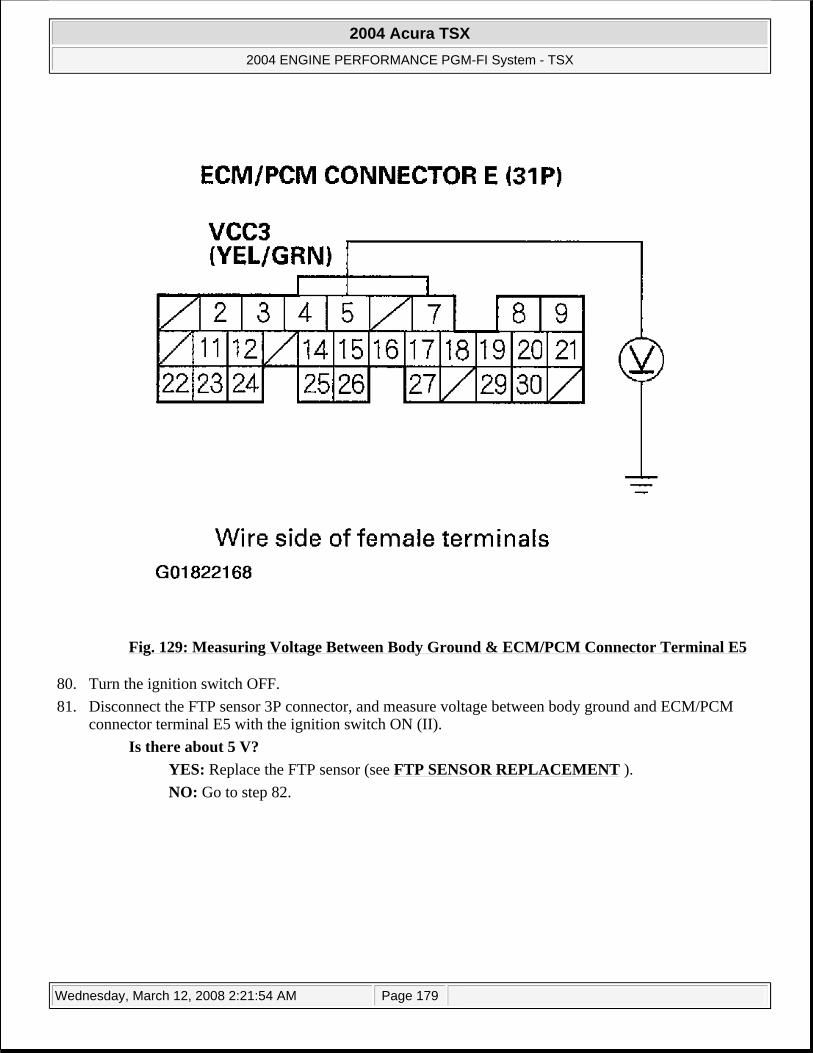
Fig. 129: Measuring Voltage Between Body Ground & ECM/PCM Connector Terminal E5
80. Turn the ignition switch OFF. 81. Disconnect the FTP sensor 3P connector, and measure voltage between body ground and ECM/PCM
connector terminal E5 with the ignition switch ON (II). Is there about 5 V?
YES: Replace the FTP sensor (see FTP SENSOR REPLACEMENT ). NO: Go to step 82.
2004 Acura TSX
2004 ENGINE PERFORMANCE PGM-FI System - TSX
Wednesday, March 12, 2008 2:21:54 AM Page 179
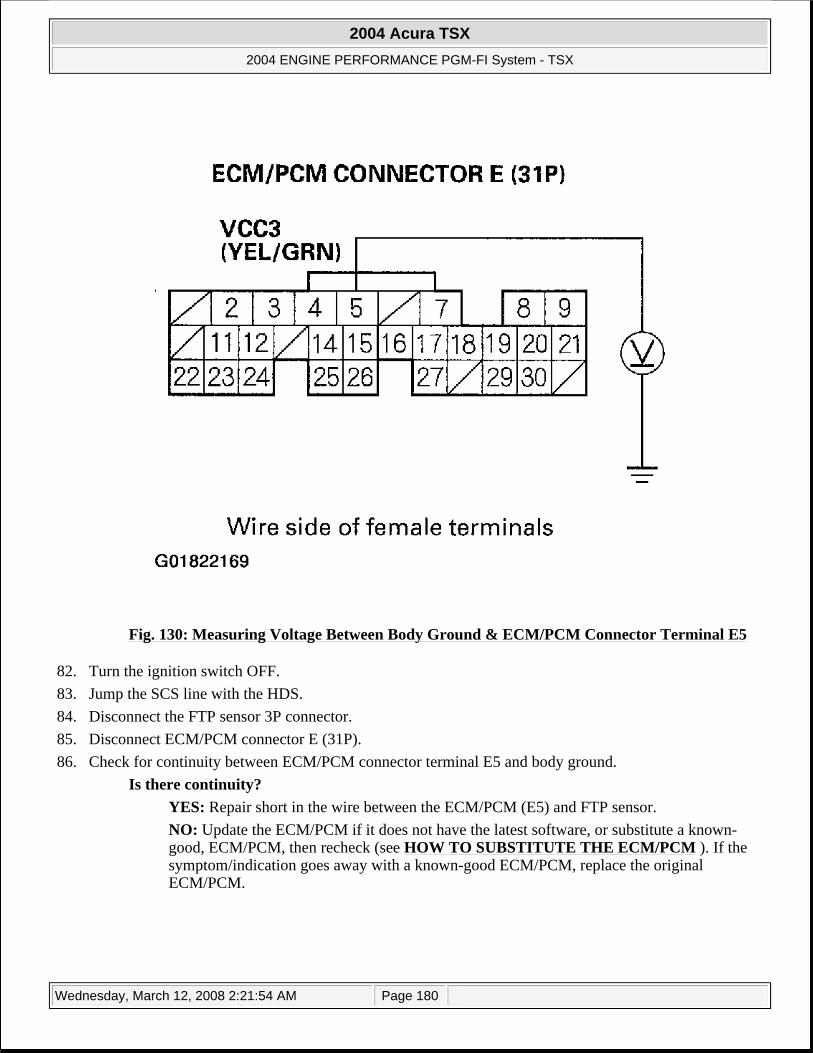
Fig. 130: Measuring Voltage Between Body Ground & ECM/PCM Connector Terminal E5
82. Turn the ignition switch OFF. 83. Jump the SCS line with the HDS. 84. Disconnect the FTP sensor 3P connector. 85. Disconnect ECM/PCM connector E (31P). 86. Check for continuity between ECM/PCM connector terminal E5 and body ground.
Is there continuity? YES: Repair short in the wire between the ECM/PCM (E5) and FTP sensor. NO: Update the ECM/PCM if it does not have the latest software, or substitute a known-good, ECM/PCM, then recheck (see HOW TO SUBSTITUTE THE ECM/PCM ). If the symptom/indication goes away with a known-good ECM/PCM, replace the original ECM/PCM.
2004 Acura TSX
2004 ENGINE PERFORMANCE PGM-FI System - TSX
Wednesday, March 12, 2008 2:21:54 AM Page 180
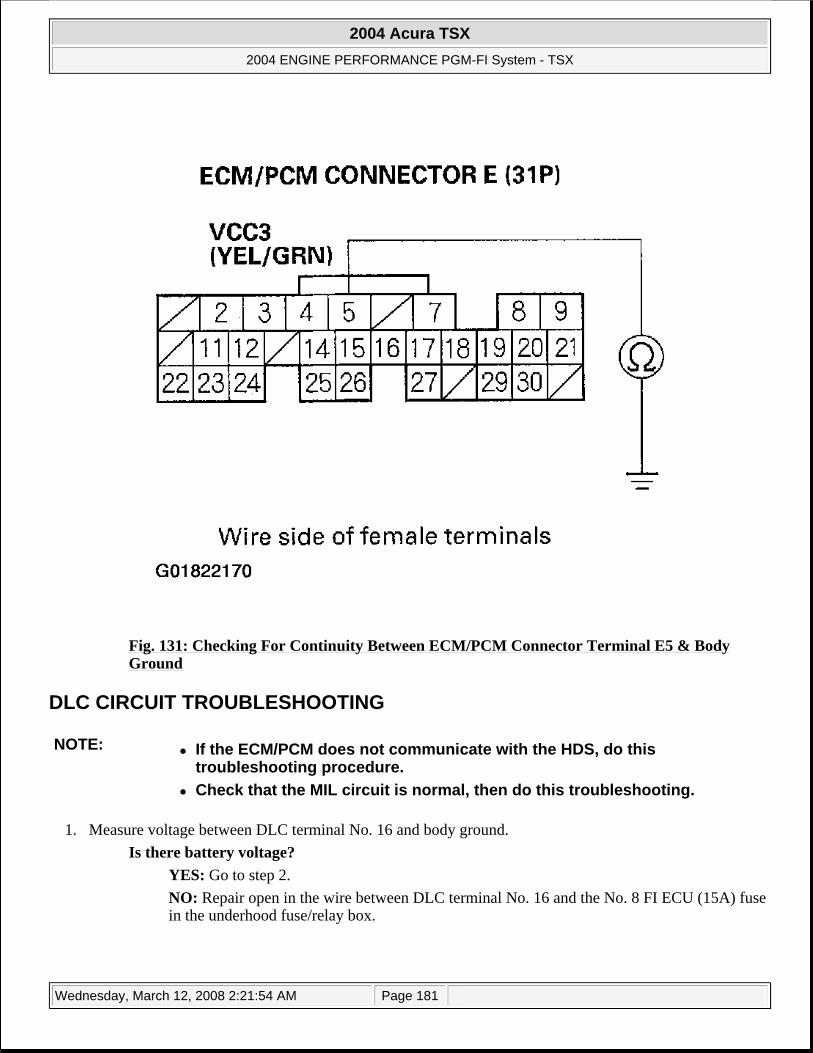
Fig. 131: Checking For Continuity Between ECM/PCM Connector Terminal E5 & Body Ground
DLC CIRCUIT TROUBLESHOOTING
1. Measure voltage between DLC terminal No. 16 and body ground. Is there battery voltage?
YES: Go to step 2. NO: Repair open in the wire between DLC terminal No. 16 and the No. 8 FI ECU (15A) fuse in the underhood fuse/relay box.
NOTE: If the ECM/PCM does not communicate with the HDS, do this troubleshooting procedure. Check that the MIL circuit is normal, then do this troubleshooting.
2004 Acura TSX
2004 ENGINE PERFORMANCE PGM-FI System - TSX
Wednesday, March 12, 2008 2:21:54 AM Page 181
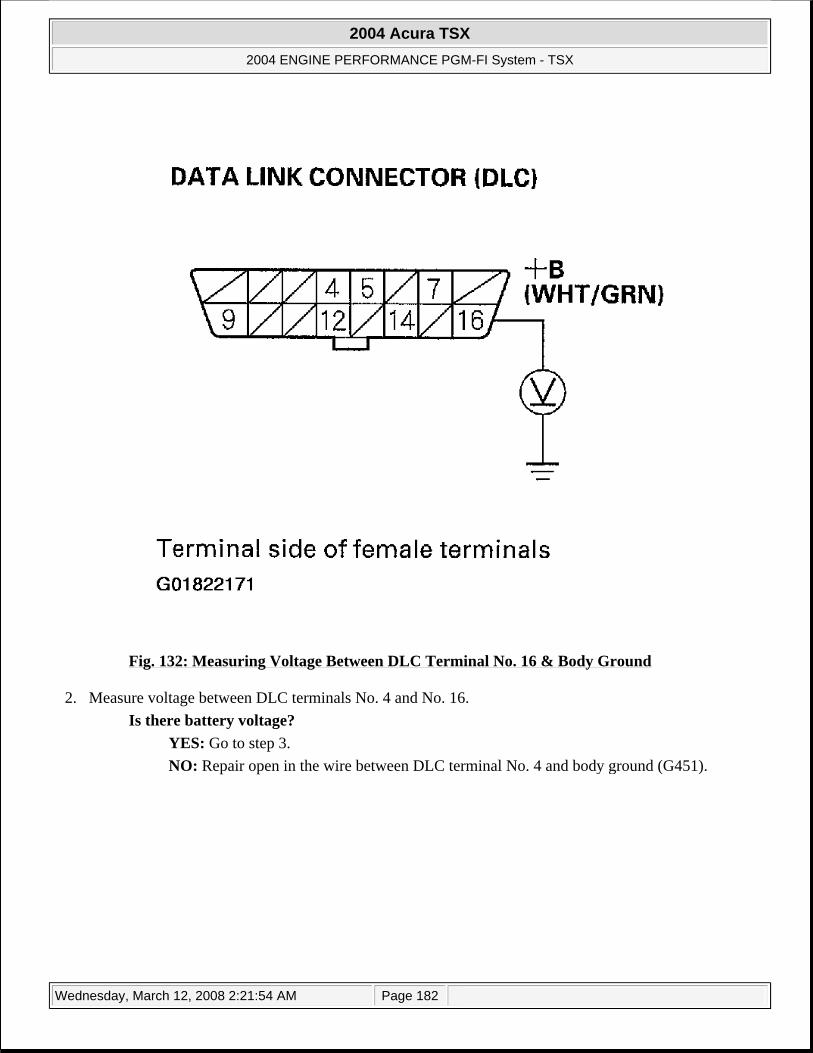
Fig. 132: Measuring Voltage Between DLC Terminal No. 16 & Body Ground
2. Measure voltage between DLC terminals No. 4 and No. 16. Is there battery voltage?
YES: Go to step 3. NO: Repair open in the wire between DLC terminal No. 4 and body ground (G451).
2004 Acura TSX
2004 ENGINE PERFORMANCE PGM-FI System - TSX
Wednesday, March 12, 2008 2:21:54 AM Page 182
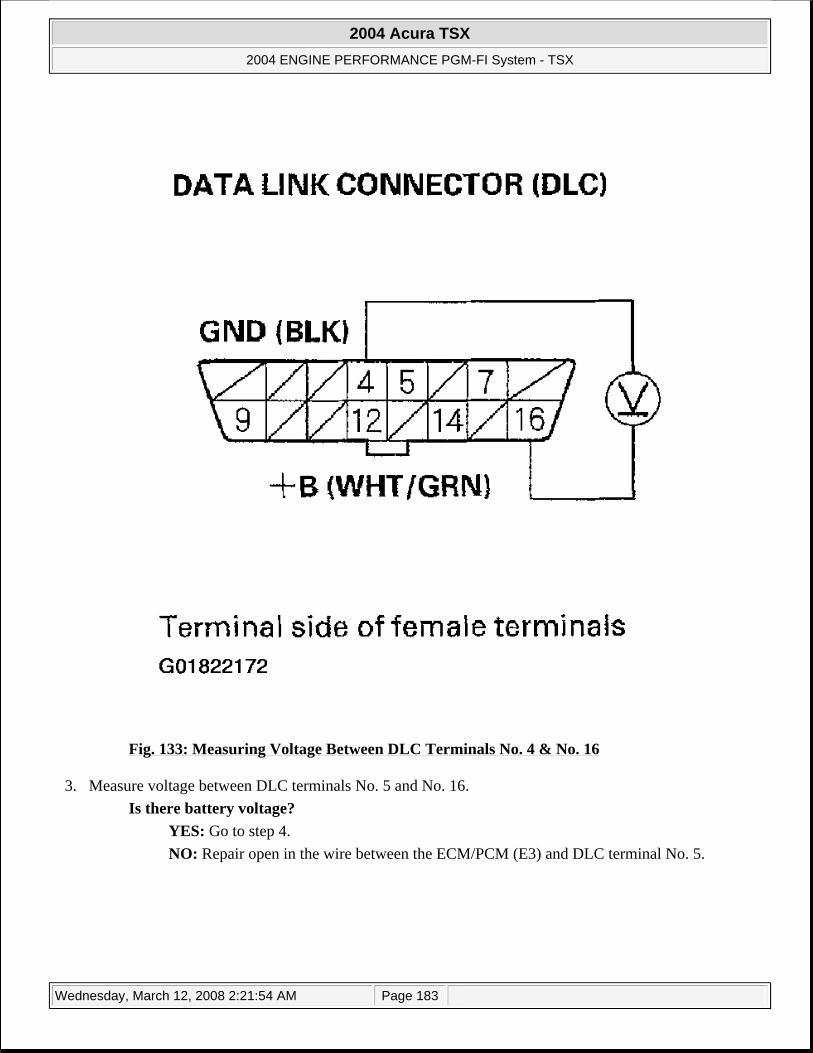
Fig. 133: Measuring Voltage Between DLC Terminals No. 4 & No. 16
3. Measure voltage between DLC terminals No. 5 and No. 16. Is there battery voltage?
YES: Go to step 4. NO: Repair open in the wire between the ECM/PCM (E3) and DLC terminal No. 5.
2004 Acura TSX
2004 ENGINE PERFORMANCE PGM-FI System - TSX
Wednesday, March 12, 2008 2:21:54 AM Page 183
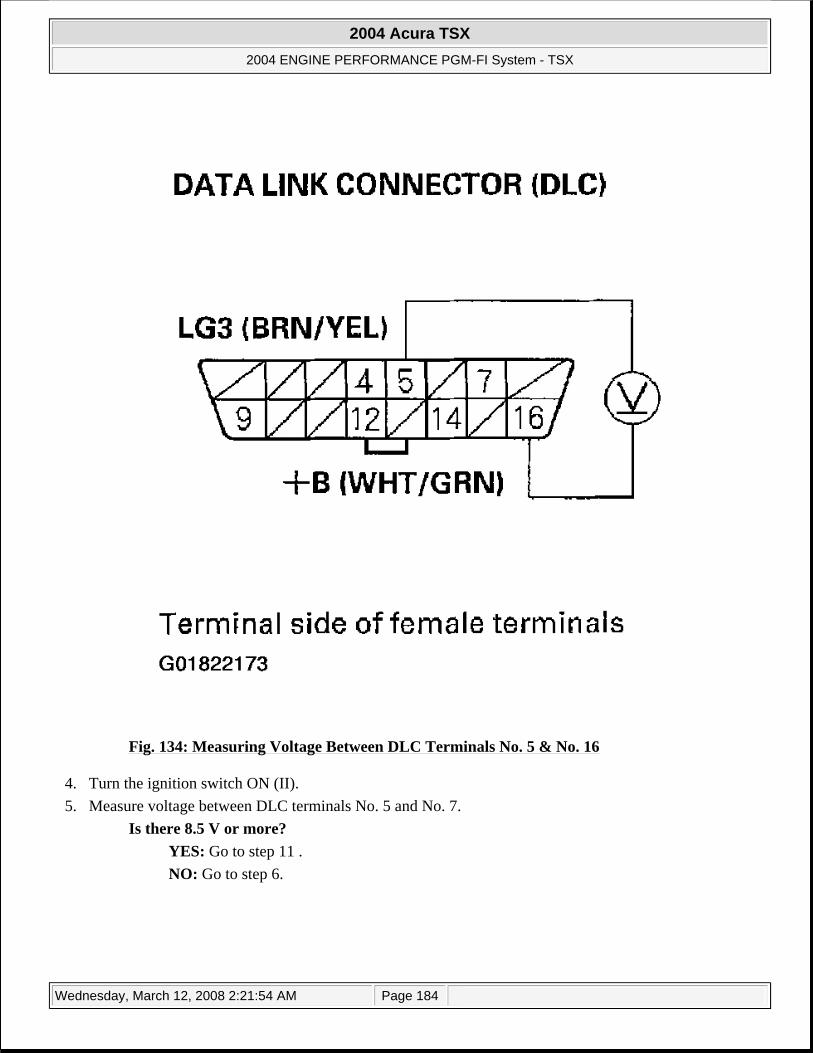
Fig. 134: Measuring Voltage Between DLC Terminals No. 5 & No. 16
4. Turn the ignition switch ON (II). 5. Measure voltage between DLC terminals No. 5 and No. 7.
Is there 8.5 V or more? YES: Go to step 11 . NO: Go to step 6.
2004 Acura TSX
2004 ENGINE PERFORMANCE PGM-FI System - TSX
Wednesday, March 12, 2008 2:21:54 AM Page 184
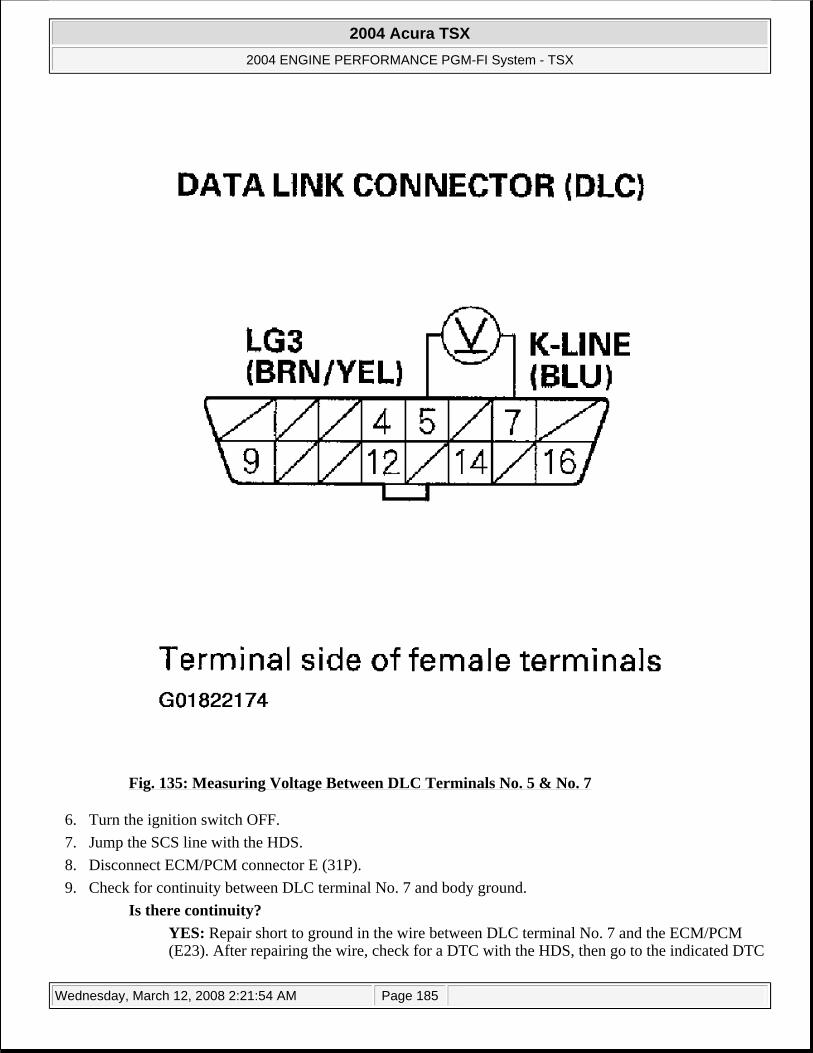
Fig. 135: Measuring Voltage Between DLC Terminals No. 5 & No. 7
6. Turn the ignition switch OFF. 7. Jump the SCS line with the HDS. 8. Disconnect ECM/PCM connector E (31P). 9. Check for continuity between DLC terminal No. 7 and body ground.
Is there continuity? YES: Repair short to ground in the wire between DLC terminal No. 7 and the ECM/PCM (E23). After repairing the wire, check for a DTC with the HDS, then go to the indicated DTC
2004 Acura TSX
2004 ENGINE PERFORMANCE PGM-FI System - TSX
Wednesday, March 12, 2008 2:21:54 AM Page 185
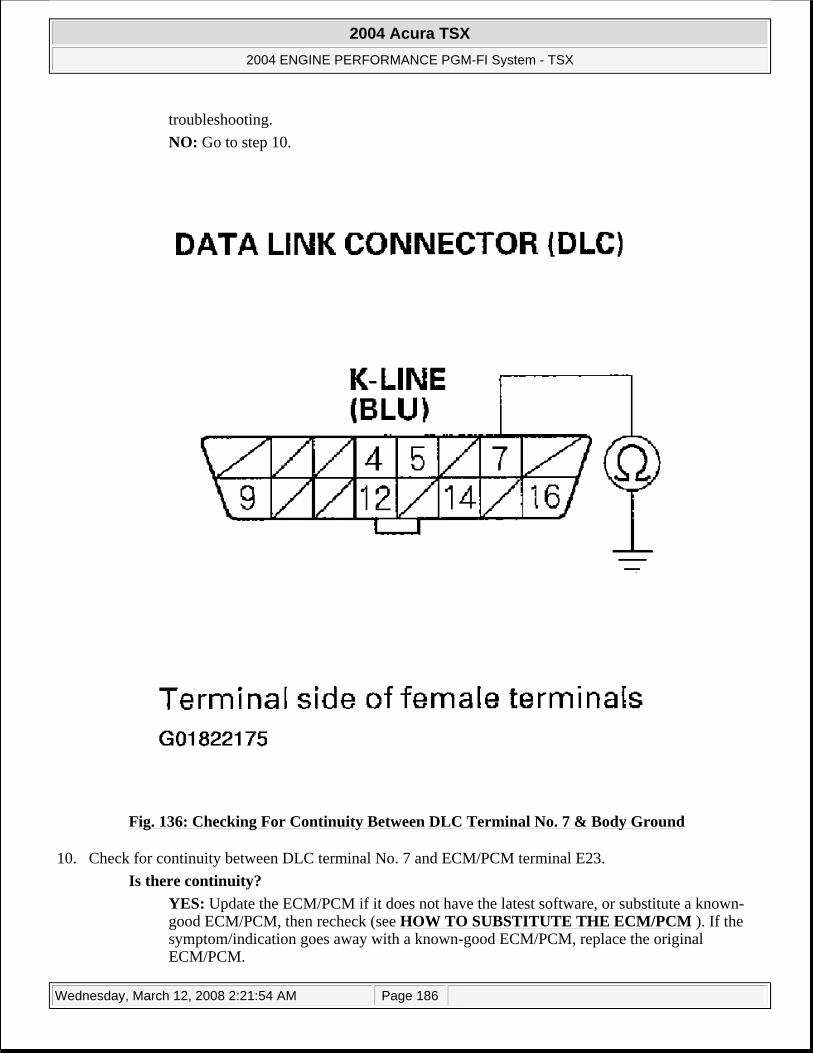
troubleshooting. NO: Go to step 10.
Fig. 136: Checking For Continuity Between DLC Terminal No. 7 & Body Ground
10. Check for continuity between DLC terminal No. 7 and ECM/PCM terminal E23. Is there continuity?
YES: Update the ECM/PCM if it does not have the latest software, or substitute a known-good ECM/PCM, then recheck (see HOW TO SUBSTITUTE THE ECM/PCM ). If the symptom/indication goes away with a known-good ECM/PCM, replace the original ECM/PCM.
2004 Acura TSX
2004 ENGINE PERFORMANCE PGM-FI System - TSX
Wednesday, March 12, 2008 2:21:54 AM Page 186
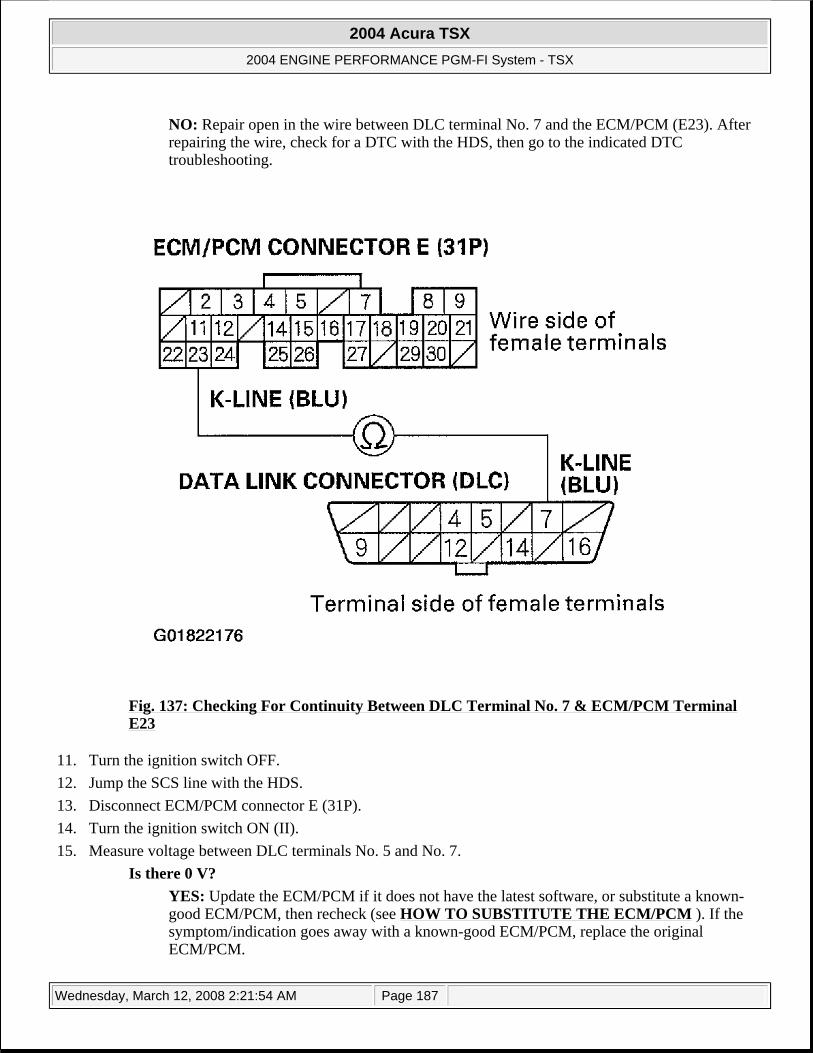
NO: Repair open in the wire between DLC terminal No. 7 and the ECM/PCM (E23). After repairing the wire, check for a DTC with the HDS, then go to the indicated DTC troubleshooting.
Fig. 137: Checking For Continuity Between DLC Terminal No. 7 & ECM/PCM Terminal E23
11. Turn the ignition switch OFF. 12. Jump the SCS line with the HDS. 13. Disconnect ECM/PCM connector E (31P). 14. Turn the ignition switch ON (II). 15. Measure voltage between DLC terminals No. 5 and No. 7.
Is there 0 V? YES: Update the ECM/PCM if it does not have the latest software, or substitute a known-good ECM/PCM, then recheck (see HOW TO SUBSTITUTE THE ECM/PCM ). If the symptom/indication goes away with a known-good ECM/PCM, replace the original ECM/PCM.
2004 Acura TSX
2004 ENGINE PERFORMANCE PGM-FI System - TSX
Wednesday, March 12, 2008 2:21:54 AM Page 187
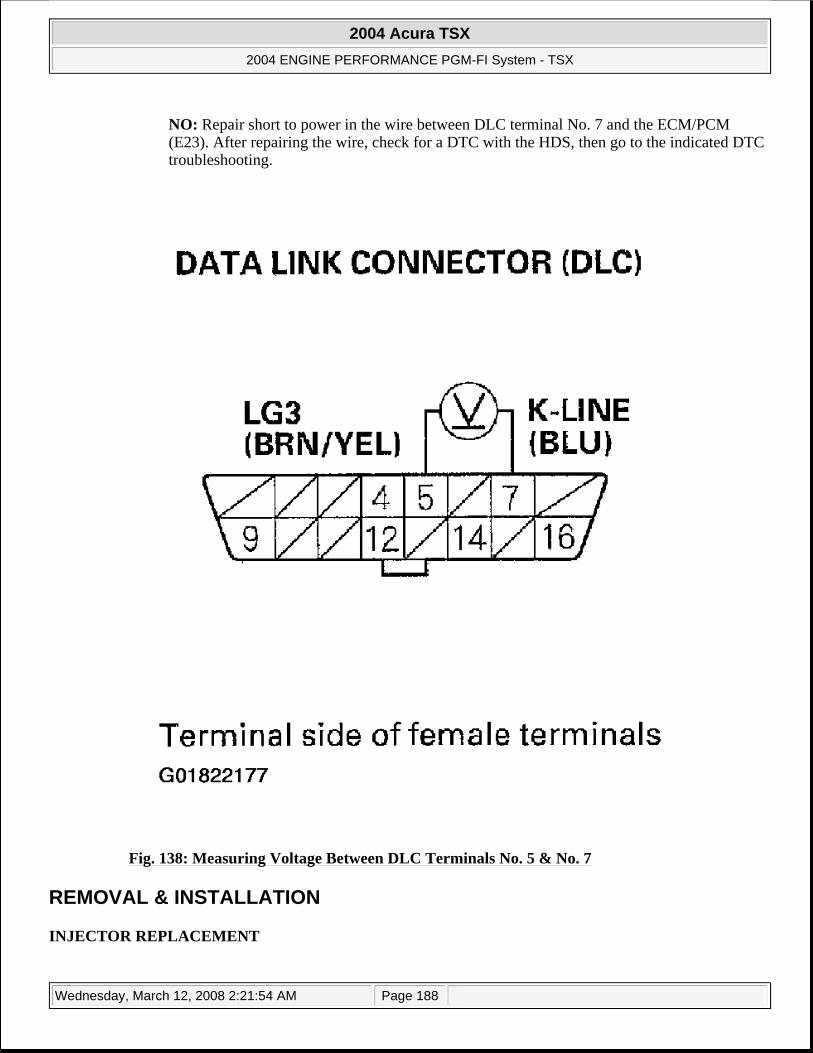
NO: Repair short to power in the wire between DLC terminal No. 7 and the ECM/PCM (E23). After repairing the wire, check for a DTC with the HDS, then go to the indicated DTC troubleshooting.
Fig. 138: Measuring Voltage Between DLC Terminals No. 5 & No. 7
REMOVAL & INSTALLATION
INJECTOR REPLACEMENT
2004 Acura TSX
2004 ENGINE PERFORMANCE PGM-FI System - TSX
Wednesday, March 12, 2008 2:21:54 AM Page 188
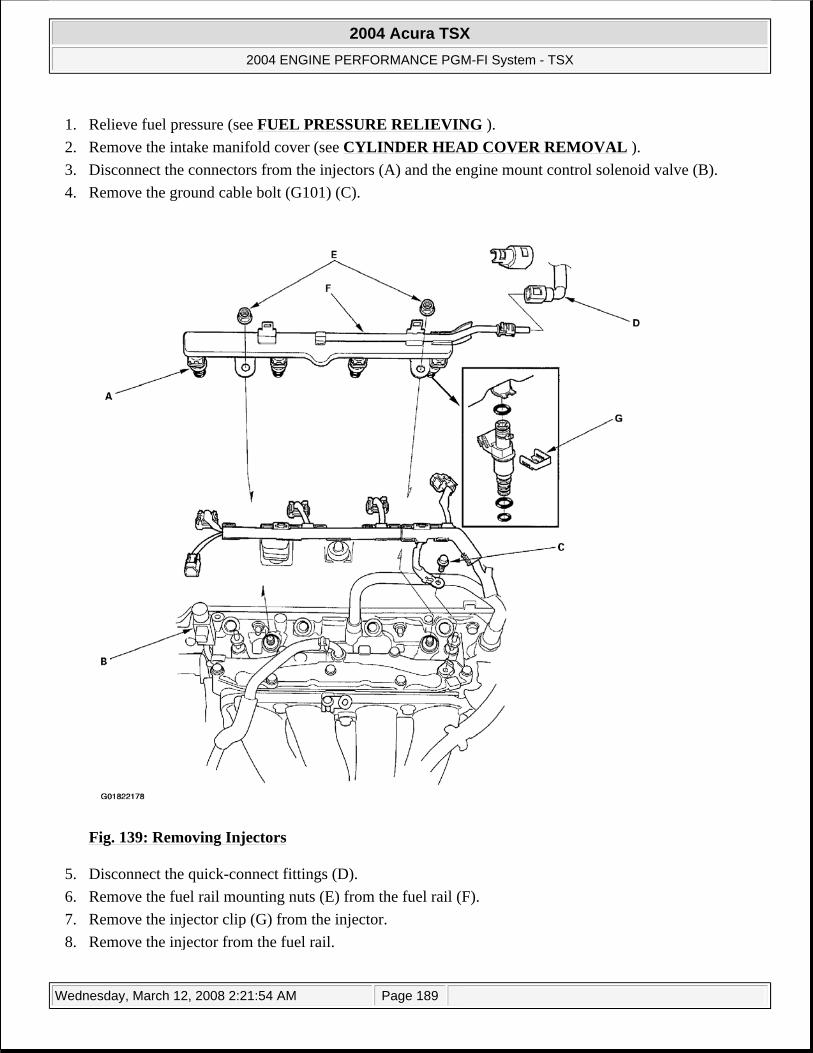
1. Relieve fuel pressure (see FUEL PRESSURE RELIEVING ). 2. Remove the intake manifold cover (see CYLINDER HEAD COVER REMOVAL ). 3. Disconnect the connectors from the injectors (A) and the engine mount control solenoid valve (B). 4. Remove the ground cable bolt (G101) (C).
Fig. 139: Removing Injectors
5. Disconnect the quick-connect fittings (D). 6. Remove the fuel rail mounting nuts (E) from the fuel rail (F). 7. Remove the injector clip (G) from the injector. 8. Remove the injector from the fuel rail.
2004 Acura TSX
2004 ENGINE PERFORMANCE PGM-FI System - TSX
Wednesday, March 12, 2008 2:21:54 AM Page 189
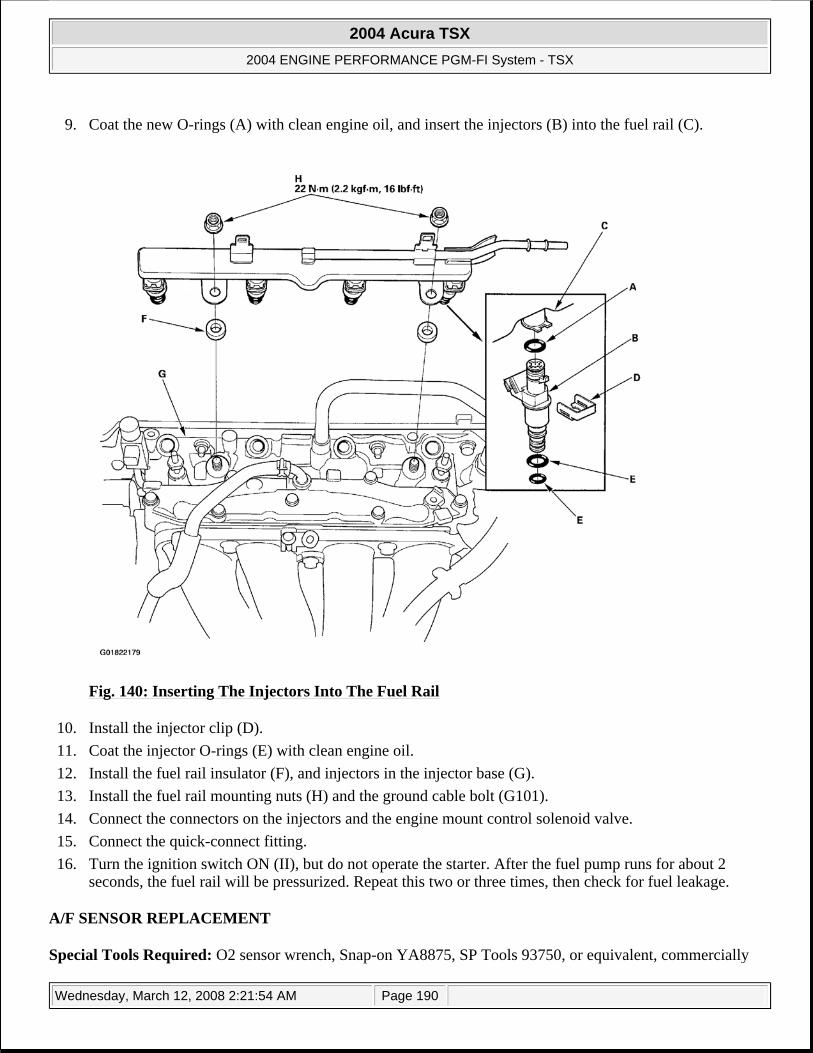
9. Coat the new O-rings (A) with clean engine oil, and insert the injectors (B) into the fuel rail (C).
Fig. 140: Inserting The Injectors Into The Fuel Rail
10. Install the injector clip (D). 11. Coat the injector O-rings (E) with clean engine oil. 12. Install the fuel rail insulator (F), and injectors in the injector base (G). 13. Install the fuel rail mounting nuts (H) and the ground cable bolt (G101). 14. Connect the connectors on the injectors and the engine mount control solenoid valve. 15. Connect the quick-connect fitting. 16. Turn the ignition switch ON (II), but do not operate the starter. After the fuel pump runs for about 2
seconds, the fuel rail will be pressurized. Repeat this two or three times, then check for fuel leakage.
A/F SENSOR REPLACEMENT
Special Tools Required: O2 sensor wrench, Snap-on YA8875, SP Tools 93750, or equivalent, commercially
2004 Acura TSX
2004 ENGINE PERFORMANCE PGM-FI System - TSX
Wednesday, March 12, 2008 2:21:54 AM Page 190

available
1. Disconnect the A/F sensor 4P connector (A), then remove the A/F sensor (B).
Fig. 141: Removing The A/F Sensor
2. Install the A/F sensor in the reverse order of removal.
SECONDARY HO2S REPLACEMENT
Special Tools Required: O2 sensor wrench, Snap-on YA8875, SP Tools 93750, or equivalent, commercially available
2004 Acura TSX
2004 ENGINE PERFORMANCE PGM-FI System - TSX
Wednesday, March 12, 2008 2:21:54 AM Page 191

1. Pull back the carpet from the floor rail under the front edge of the front passenger seat to expose the secondary HO2S 4P connector that is attached to the floor rail.
2. Disconnect the secondary HO2S 4P connector (A), under the passenger's seat.
Fig. 142: Disconnecting The Secondary HO2S 4P Connector
3. Remove the secondary HO2S (A), and the clips (B).
2004 Acura TSX
2004 ENGINE PERFORMANCE PGM-FI System - TSX
Wednesday, March 12, 2008 2:21:54 AM Page 192
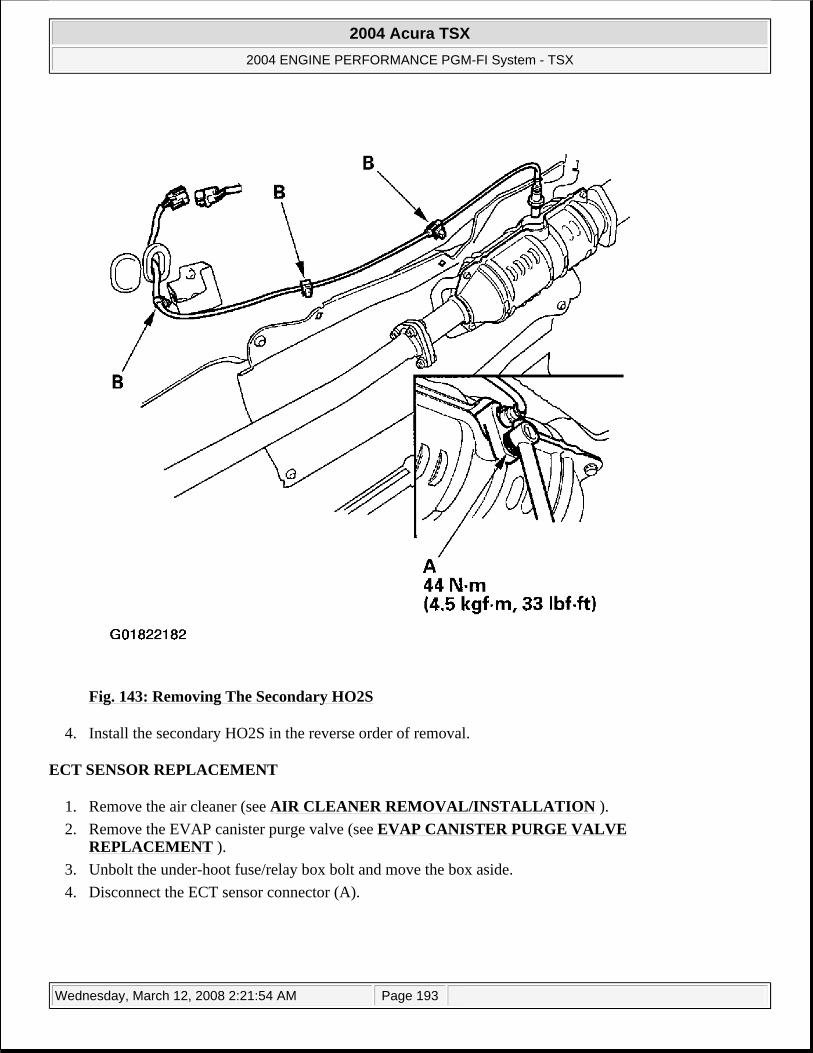
Fig. 143: Removing The Secondary HO2S
4. Install the secondary HO2S in the reverse order of removal.
ECT SENSOR REPLACEMENT
1. Remove the air cleaner (see AIR CLEANER REMOVAL/INSTALLATION ). 2. Remove the EVAP canister purge valve (see EVAP CANISTER PURGE VALVE
REPLACEMENT ). 3. Unbolt the under-hoot fuse/relay box bolt and move the box aside. 4. Disconnect the ECT sensor connector (A).
2004 Acura TSX
2004 ENGINE PERFORMANCE PGM-FI System - TSX
Wednesday, March 12, 2008 2:21:54 AM Page 193
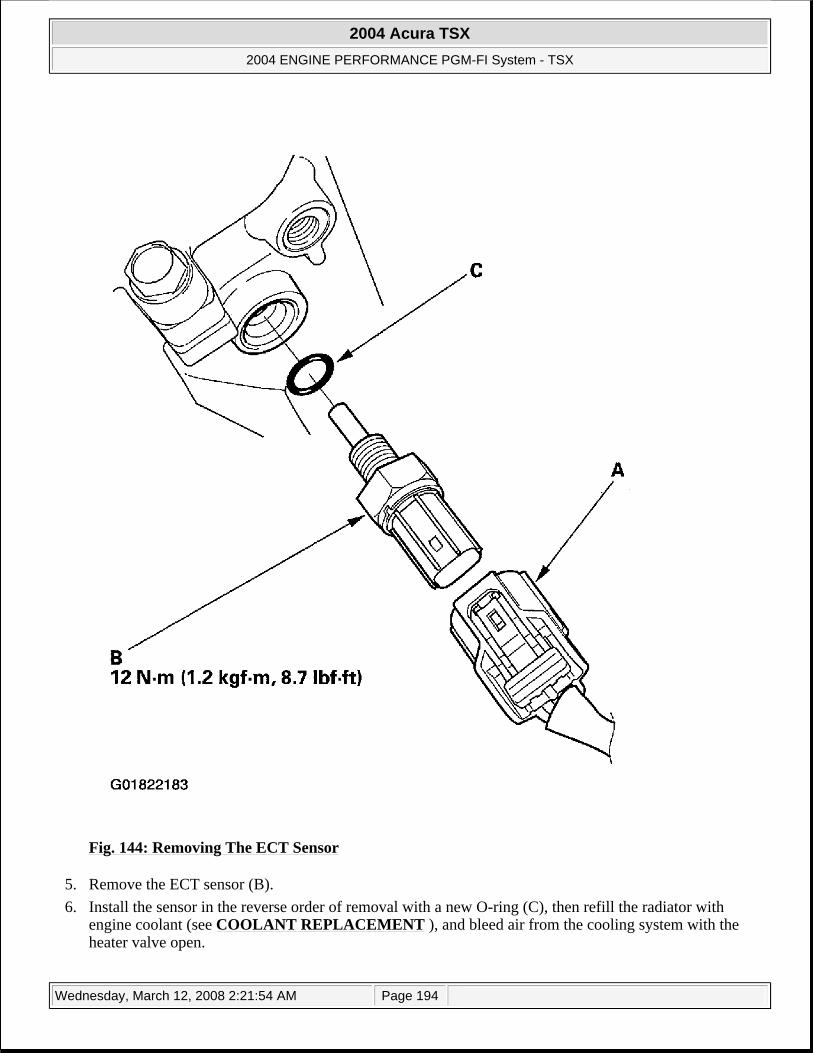
Fig. 144: Removing The ECT Sensor
5. Remove the ECT sensor (B). 6. Install the sensor in the reverse order of removal with a new O-ring (C), then refill the radiator with
engine coolant (see COOLANT REPLACEMENT ), and bleed air from the cooling system with the heater valve open.
2004 Acura TSX
2004 ENGINE PERFORMANCE PGM-FI System - TSX
Wednesday, March 12, 2008 2:21:54 AM Page 194
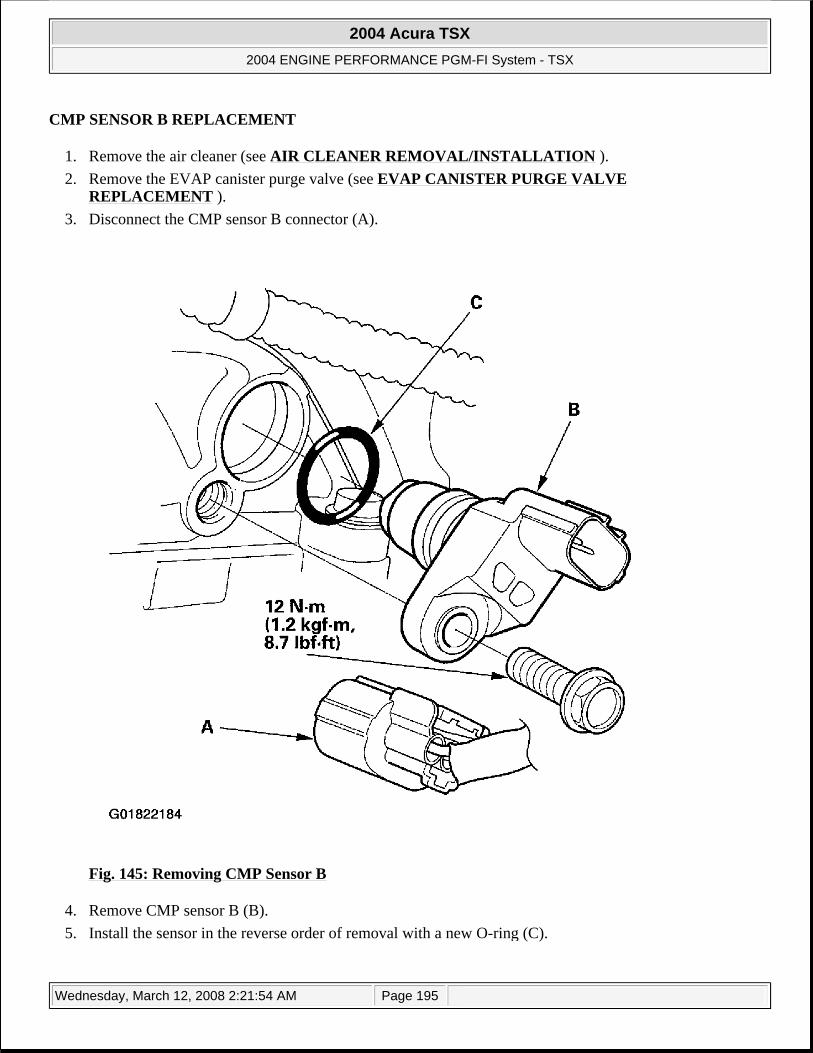
CMP SENSOR B REPLACEMENT
1. Remove the air cleaner (see AIR CLEANER REMOVAL/INSTALLATION ). 2. Remove the EVAP canister purge valve (see EVAP CANISTER PURGE VALVE
REPLACEMENT ). 3. Disconnect the CMP sensor B connector (A).
Fig. 145: Removing CMP Sensor B
4. Remove CMP sensor B (B). 5. Install the sensor in the reverse order of removal with a new O-ring (C).
2004 Acura TSX
2004 ENGINE PERFORMANCE PGM-FI System - TSX
Wednesday, March 12, 2008 2:21:54 AM Page 195
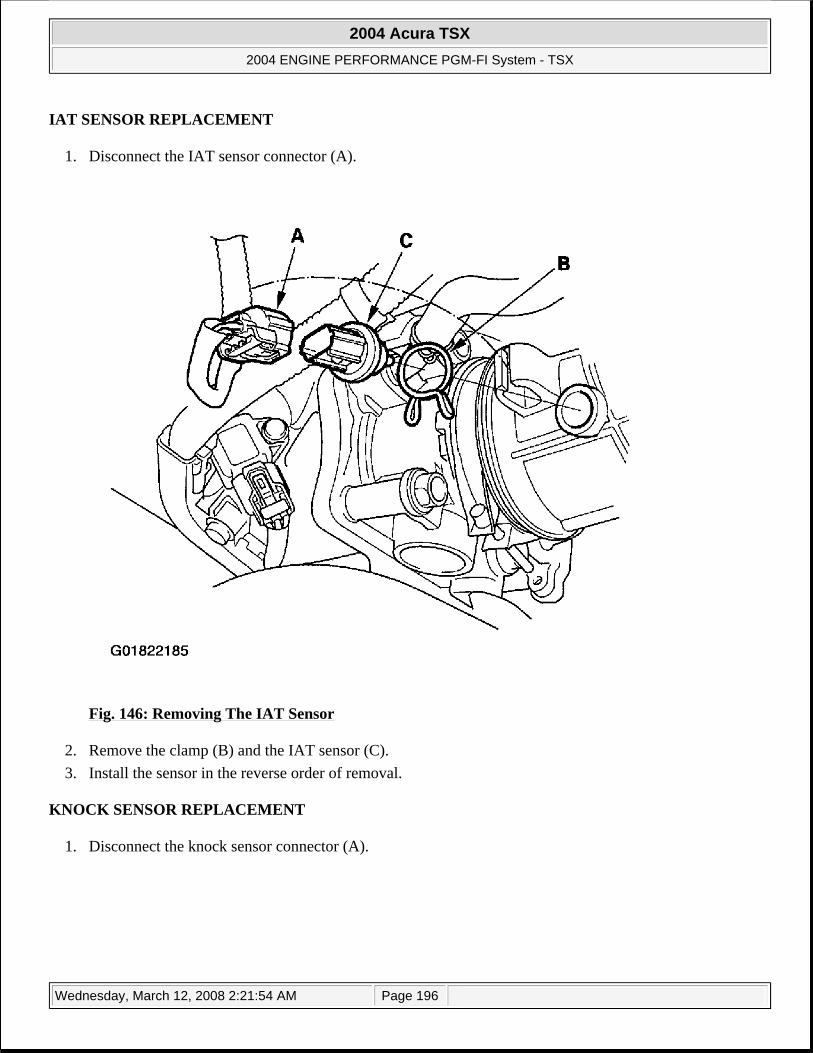
IAT SENSOR REPLACEMENT
1. Disconnect the IAT sensor connector (A).
Fig. 146: Removing The IAT Sensor
2. Remove the clamp (B) and the IAT sensor (C). 3. Install the sensor in the reverse order of removal.
KNOCK SENSOR REPLACEMENT
1. Disconnect the knock sensor connector (A).
2004 Acura TSX
2004 ENGINE PERFORMANCE PGM-FI System - TSX
Wednesday, March 12, 2008 2:21:54 AM Page 196
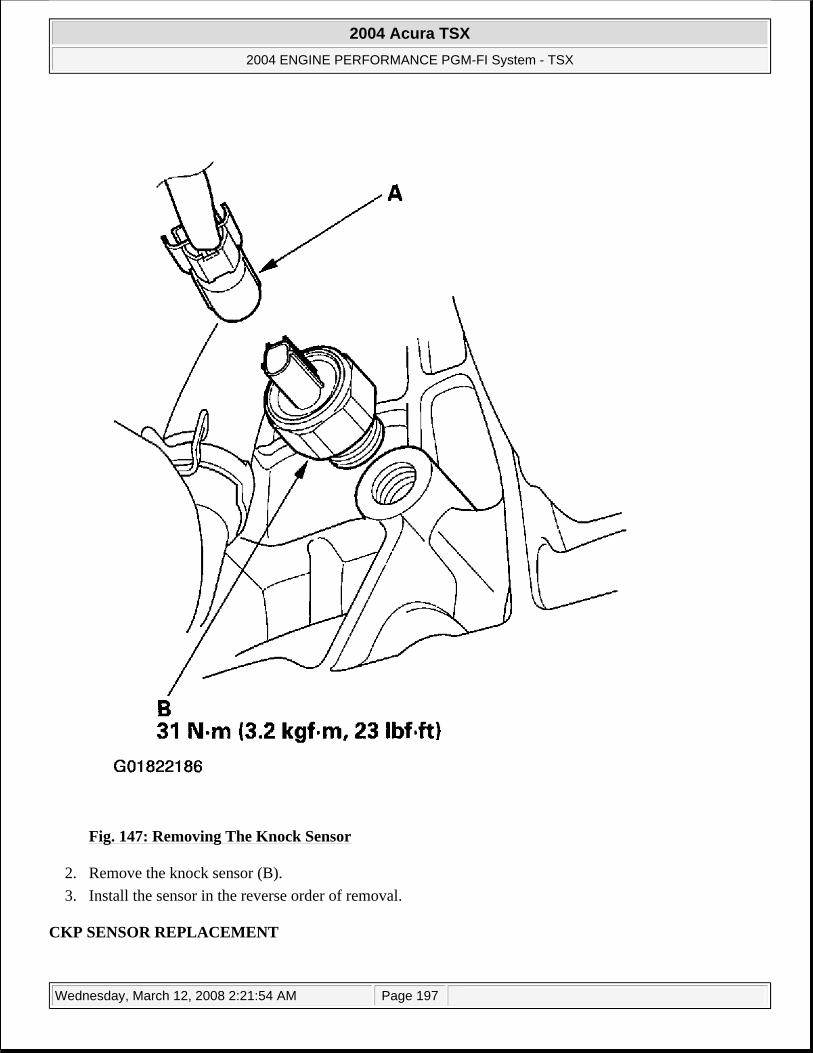
Fig. 147: Removing The Knock Sensor
2. Remove the knock sensor (B). 3. Install the sensor in the reverse order of removal.
CKP SENSOR REPLACEMENT
2004 Acura TSX
2004 ENGINE PERFORMANCE PGM-FI System - TSX
Wednesday, March 12, 2008 2:21:54 AM Page 197
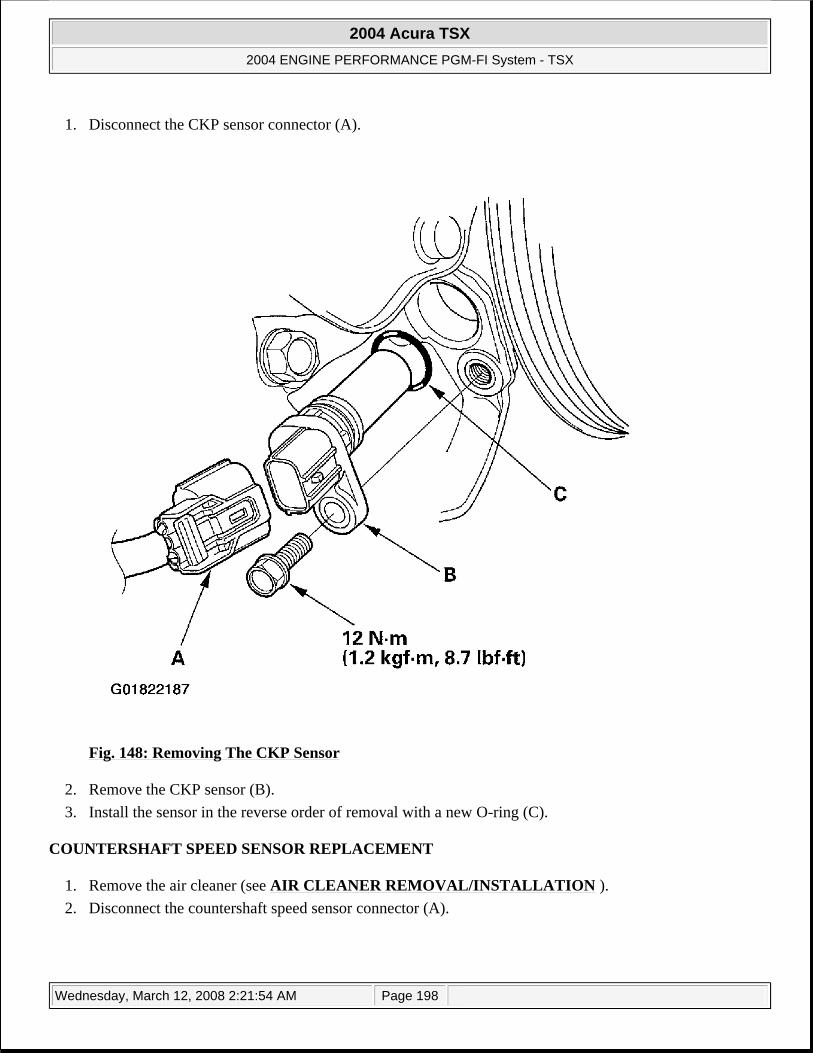
1. Disconnect the CKP sensor connector (A).
Fig. 148: Removing The CKP Sensor
2. Remove the CKP sensor (B). 3. Install the sensor in the reverse order of removal with a new O-ring (C).
COUNTERSHAFT SPEED SENSOR REPLACEMENT
1. Remove the air cleaner (see AIR CLEANER REMOVAL/INSTALLATION ). 2. Disconnect the countershaft speed sensor connector (A).
2004 Acura TSX
2004 ENGINE PERFORMANCE PGM-FI System - TSX
Wednesday, March 12, 2008 2:21:54 AM Page 198
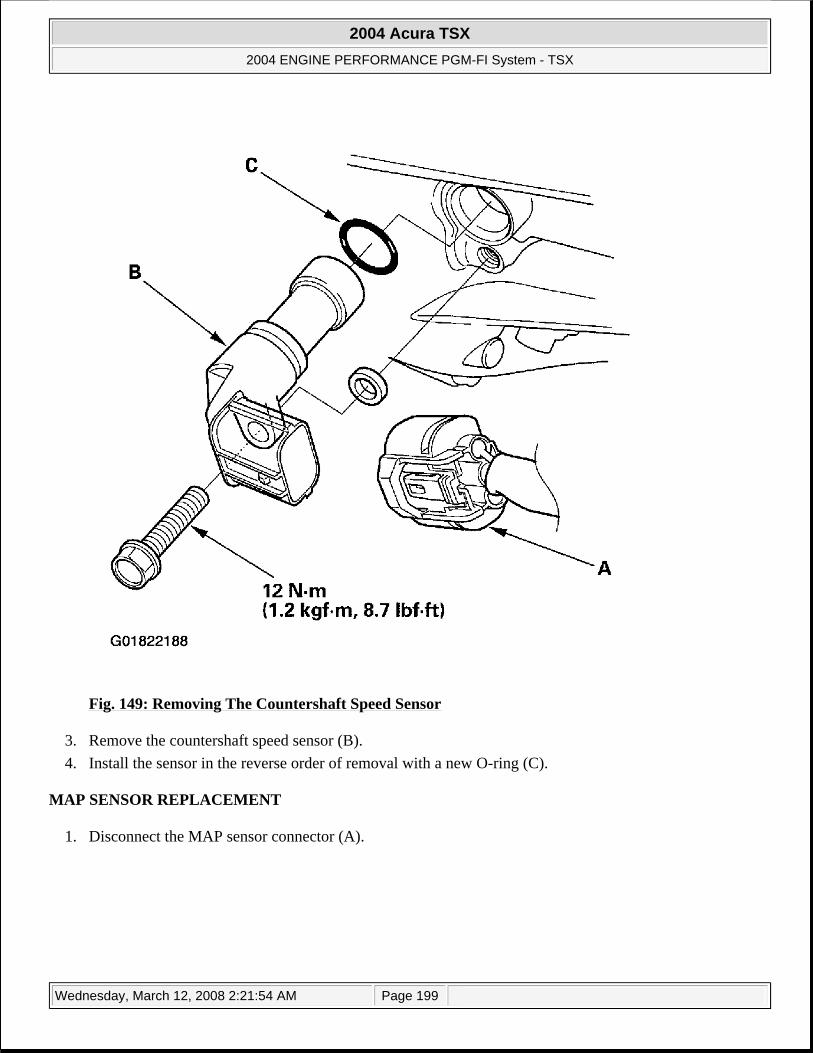
Fig. 149: Removing The Countershaft Speed Sensor
3. Remove the countershaft speed sensor (B). 4. Install the sensor in the reverse order of removal with a new O-ring (C).
MAP SENSOR REPLACEMENT
1. Disconnect the MAP sensor connector (A).
2004 Acura TSX
2004 ENGINE PERFORMANCE PGM-FI System - TSX
Wednesday, March 12, 2008 2:21:54 AM Page 199
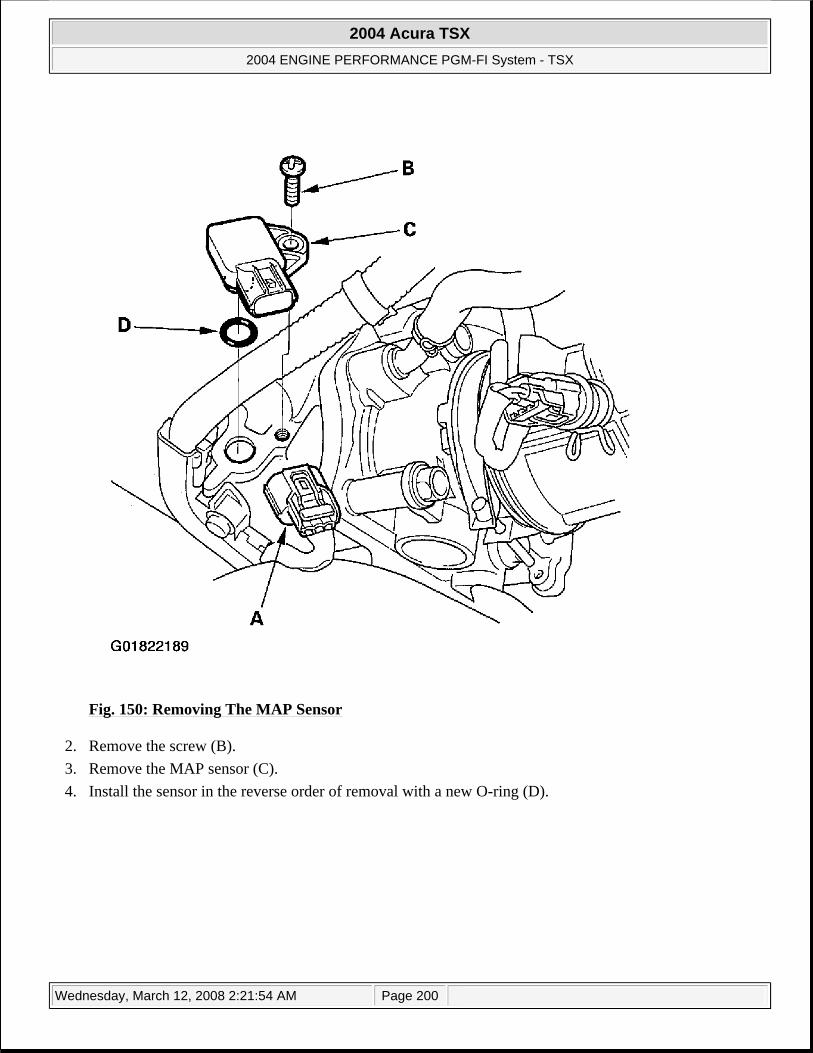
Fig. 150: Removing The MAP Sensor
2. Remove the screw (B). 3. Remove the MAP sensor (C). 4. Install the sensor in the reverse order of removal with a new O-ring (D).
2004 Acura TSX
2004 ENGINE PERFORMANCE PGM-FI System - TSX
Wednesday, March 12, 2008 2:21:54 AM Page 200