Embed Size (px)
Citation preview
1
MCAS_A 31MCAT30
2009Honda GL1800
NAVIGATION SYSTEM
US_MCAS.book Page 1 Tuesday, July 22, 2008 11:26 AM
2
MCAS_A 31MCAT30
Contents
Preface .......................................5Introduction .....................................6A Few Words About Safety ............8System Limitations..........................9
Favorable Reception Areas for GPS Signals.............................9
Unfavorable Reception Areas for GPS Signals...........................10
User Agreement.............................11
Getting Started........................13Getting Started...............................14
System Overview ......................14Operating Controls ....................15Startup .......................................16Display Screens .........................18Map Screen................................19Point Review Screens................23Route Calculate & Edit Route
Screens ..................................24XM NavWeather & XM
NavTraffic Map Screens .......25Main Menu ................................26Let’s Take a Trip .......................29Tips............................................35
Operating Controls ................ 37Right Fairing Panel Controls .........38Left Handlebar Controls ................39Center Display Controls ................40Audio System Controls .................41
Center Display Screens .......... 43Center Display Screens .................44
Types of Navigation System Screens ..................................44
Map Screens ..................................46Map Layouts..............................46Map Screen................................47Next Turn Pop-up......................51Alert Icon...................................51Automatic Re-routing................52Map Scale Zoom .......................53White Arrow Point Locator.......54
Menu Screens ................................56Summary of Main Menu
Functions ...............................61Keyboard Screens..........................64
Operating Keyboards.................65List Screens ...................................67
Point Review Screens....................68Route Calculate & Edit Route
Screens ......................................71Route Calculate Screen .............71Edit Route Screens ....................72
Weather/Traffic Information Screen ........................................76Weather Information Screen .....76Traffic Information Screen........78Traffic/Weather Review
Screen....................................79
Find Destination......................81Find Destination ............................82By Favorite ....................................83
Finding Nearest .........................83Finding by Name.......................86
By Previous Find ...........................88By Point of Interest........................90
Category/Subcategory ...............90Point of Interest – Categories &
Subcategories ........................91Finding Nearest .........................92Finding by Name.......................93
US_MCAS.book Page 2 Tuesday, July 22, 2008 11:26 AM

3
Contents
MCAS_A 31MCAT30
By Address ....................................95By Intersection...............................98By City.........................................101By Exit.........................................102
Finding Nearest Exits ..............102Selecting Exit Road .................103
Favorite Places ......................105Favorite Places.............................106
Storing Favorite Places............107Renaming Favorite Places .......108Deleting Favorite Places..........109
Route......................................111Route............................................112Route to New Destination............114Recalculate Route ........................115Edit Route ....................................116
Adding a Location as a Via .....117Adding a Road as a Via ...........119
Detour ..........................................121
Route to Home ......................123Route to Home.............................124
Calculating a Route Home ......125Checking Your Home
Location...............................125Deleting Your Home
Location...............................126
Weather................................. 127Weather........................................128
Viewing Weather Map ............129Viewing Weather for Other
City ......................................129Viewing Weather Forecast ......130
Traffic.................................... 131Traffic ..........................................132
Viewing Traffic on Full Map ..133Viewing Traffic by Road.........133Viewing Traffic on Current
Route ...................................134Traffic Avoidance....................135
Setup / Info............................ 137Setup / Info ..................................138Setup Screen 1 .............................139
Setup Screen 1 .........................139
Setup Screen 2 .............................143Setup Screen 2 .........................143
Setup System 1 ............................150Setup System 1 ........................150
Setup System 2 ............................152Setup System 2 ........................152
Setup Voice .................................158Info Screens .................................159
GPS Info ..................................159System Info..............................159XM Info...................................159
Technical & Consumer Information ...........................161Glossary.......................................162System Messages.........................164Troubleshooting...........................165System Limitations......................170Database Limitations ...................172Customer Support........................173Index ............................................177
US_MCAS.book Page 3 Tuesday, July 22, 2008 11:26 AM

4
MCAS_A 31MCAT30
US_MCAS.book Page 4 Tuesday, July 22, 2008 11:26 AM
5Preface
MCAS_A 31MCAT30
PrefaceIntroduction.................................................................................6A Few Words About Safety........................................................8System Limitations......................................................................9
Favorable Reception Areas for GPS Signals .......................................9Unfavorable Reception Areas for GPS Signals .................................10
User Agreement.........................................................................11
US_MCAS.book Page 5 Tuesday, July 22, 2008 11:26 AM
6 Preface
MCAS_A 31MCAT30
Introduction
Your Navigation System is a highly-sophisticated yet easy-to-use system with visual and voice guidance that uses satellites and a map database to show you where you are and help guide you to a desired destination.
The Navigation System receives signals from the Global Positioning System (GPS), a network of 24 satellites in orbit around the earth. By receiving signals from several of these satellites, the Navigation System can determine the latitude, longitude, and other positioning information for your motorcycle. In addition, a speed sensor on your motorcycle keeps track of the speed of travel at all times.
GPS is operated by the U.S. Department of Defense. The system is subject to changes that could affect the accuracy and performance of all GPS equipment, including your Navigation System. For example, you may be riding down a highway and your Navi system, relying on GPS data, will tell you you are on the frontage road adjacent to the highway you are actually on. However, you should find your experience with GPS
navigation highly satisfactory.
The Navigation System is easy to use. The locations of many places of business and entertainment are already entered in the system. You can select any of them as a destination by using the control panel on the right fairing. If a desired destination is not in the system’s database, you can still enter it and the system should be able to direct you to it in most cases. You can also save (store) locations in the system as Favorite Places. The system also retains your last 30 finds as Previous Finds so you can easily return to them, and allows you to store a home address to simplify returning home from your destination.
The system provides map coverage for the 50 U.S. states and Canada. The coverage consists of accurately mapped metropolitan and rural areas.
Roads within metropolitan areas, interstate highways, and major roads connecting cities are typically verified.
Verified roads have been driven by the database supplier and information like
the road’s average speed, turn restrictions, or whether it is a one-way street are contained in the Navigation System.
The route calculated by the system may not be the shortest possible because only major roads are mapped in non-detailed areas. You may be aware of secondary roads that shorten the travel distance and time.
While you are riding, the Navigation System provides voice guidance so you do not have to take your eyes off the road. These instructions are provided in advance of the actual riding maneuver so you have time to slow down and prepare for the maneuver.
US_MCAS.book Page 6 Tuesday, July 22, 2008 11:26 AM

7Preface
Introduction
MCAS_A 31MCAT30
How to Use this ManualYou have two options:• Read the entire manual.• Read the Getting Started section to
gain an overview of what the system can do. Then begin learning the controls and screen displays. You can reference the more detailed sections of the manual whenever you need to.
Regardless of your choice, be sure to store this manual on your motorcycle along with your Owner’s Manual for reference.
System Controls Operation While RidingMost of the system controls are automatically disabled while your motorcycle is in motion. Only the Navigation System’s left handlebar controls and audio system controls continue to operate while riding.
Accessory PrecautionsInstalling metallic or metalized accessories near the windscreen can seriously degrade or prevent GPS reception because the GPS antenna is located under the windscreen.
If you plan to install electronic components such as motorcycle location devices, additional amplifiers, or other audio components, ensure that they are not located near the navigation control unit in the travel trunk or near the center display screen. Electronic signals from these devices can cause intermittent disruption of the navigation system.
GPS antenna
US_MCAS.book Page 7 Tuesday, July 22, 2008 11:26 AM

8 Preface
MCAS_A 31MCAT30
A Few Words About Safety
The Navigation System is one of many items on the motorcycle that can distract you. Remember that your primary focus should always be on the road.
To operate the Navigation System, enter information into the system before you begin riding or when your motorcycle is stopped. Then, as you ride, listen to the voice guidance and glance at the screen information when it is safe to do so.
When your motorcycle is moving, only the left handlebar controls and audio system controls for the Navigation System will operate.
Pull off the road if you need more time to study the screen or operate the controls.
The Navigation System is designed to provide route information to help you reach your destination. However, this route guidance may sometimes conflict with road conditions such as street closures, road construction, and detours.
Additionally, the system itself has certain limitations (see page 9). Therefore, you must verify the voice guidance and visual route information provided by the system by carefully observing the roadway, signs, and signals, etc. If you are unsure, proceed with caution. Always use your own good judgment, and obey traffic laws while riding.
WARNING Using the Navigation Systemwhile riding can take yourattention away from the road,causing a crash in which youcould be seriously injured orkilled.
Glance at the navigation screen only when it is safe to do so.
US_MCAS.book Page 8 Tuesday, July 22, 2008 11:26 AM
9Preface
MCAS_A 31MCAT30
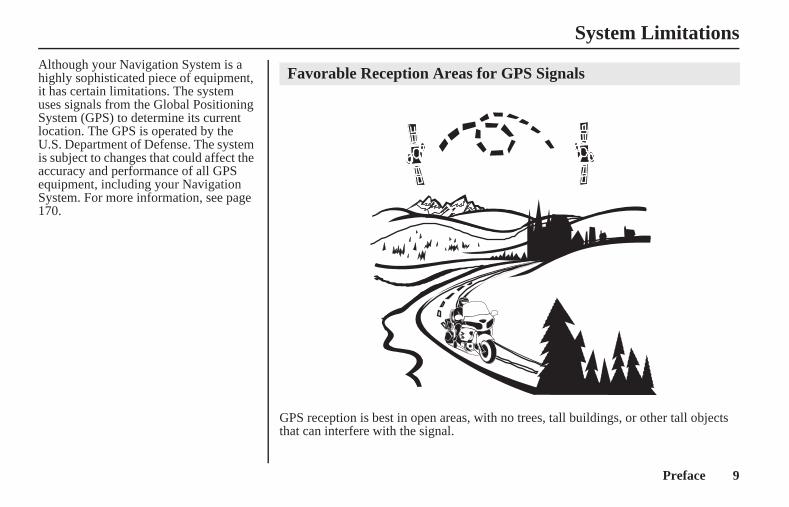
System Limitations
Although your Navigation System is a highly sophisticated piece of equipment, it has certain limitations. The system uses signals from the Global Positioning System (GPS) to determine its current location. The GPS is operated by the U.S. Department of Defense. The system is subject to changes that could affect the accuracy and performance of all GPS equipment, including your Navigation System. For more information, see page 170.
GPS reception is best in open areas, with no trees, tall buildings, or other tall objects that can interfere with the signal.
Favorable Reception Areas for GPS Signals
US_MCAS.book Page 9 Tuesday, July 22, 2008 11:26 AM
10 Preface
System Limitations
MCAS_A 31MCAT30
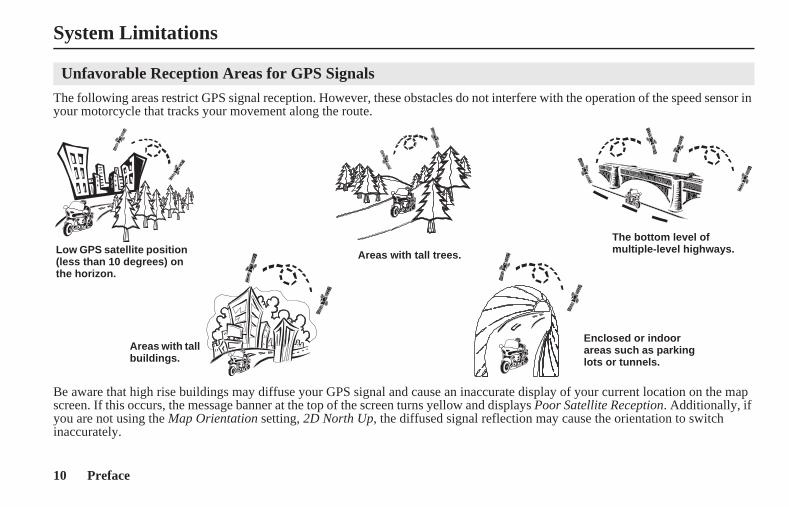
The following areas restrict GPS signal reception. However, these obstacles do not interfere with the operation of the speed sensor in your motorcycle that tracks your movement along the route.
Be aware that high rise buildings may diffuse your GPS signal and cause an inaccurate display of your current location on the map screen. If this occurs, the message banner at the top of the screen turns yellow and displays Poor Satellite Reception. Additionally, if you are not using the Map Orientation setting, 2D North Up, the diffused signal reflection may cause the orientation to switch inaccurately.
Unfavorable Reception Areas for GPS Signals
�
Low GPS satellite position (less than 10 degrees) on the horizon.
Areas with tall buildings.
Areas with tall trees.
The bottom level of multiple-level highways.
Enclosed or indoor areas such as parking lots or tunnels.
US_MCAS.book Page 10 Tuesday, July 22, 2008 11:26 AM

11Preface
MCAS_A 31MCAT30
User Agreement
In using this “Satellite Linked Navigation System” SD (Secure Digital) memory card, which includes HONDA MOTOR CO., LTD. Software, GARMIN LTD. Software, NAVIGATION TECHNOLOGIES CORPORATION database contents and INFO USA CORPORATION database contents (hereinafter referred to as “Licensors”), you are bound by the terms and conditions set forth below. By using your copy of the SD memory card, you have expressed your agreement to the terms and conditions of this Agreement. You should, therefore, make sure that you read and understand the following provisions. If for any reason you do not wish to be bound by the terms of this agreement, please return the SD memory card to your Honda dealer.• The SD memory card may not be
copied, duplicated, or otherwise modified, in whole or in part, without the express written permission of the Licensors.
• The SD memory card may not be transferred or sublicensed to any third party for profit, rent or loan, or licensed for reuse in any manner.
• The SD memory card may not be decompiled, reverse engineered or otherwise disassembled, in whole or in part.
• The SD memory card may not be used in a network or by any other manner of simultaneous use in multiple systems.
• The SD memory card is intended solely for personal use (or internal use where the end-user is a business) by the consumer. The SD memory card is not to be used for commercial purposes.
• The Licensors do not guarantee to the customer that the functions included in the SD memory card meet the specific objectives of the user.
• Licensor shall not be responsible for any damages caused by the use of the SD memory card to the actual user or to any third party.
• The warranty on the SD memory card shall not extend to an exchange or refund due to misspelling, omission of letters, or any other cosmetic discrepancy in the layout of the SD memory card.
• The right to use the SD memory card shall expire either when the user destroys the SD memory card or software, or when any of the terms of this Agreement are violated and the Licensors exercise the option to revoke the license to use the SD memory card or software.
• The terms and conditions hereof apply to all subsequent users and owners as well as to the original purchaser.
US_MCAS.book Page 11 Tuesday, July 22, 2008 11:26 AM

12 Preface
User Agreement
MCAS_A 31MCAT30
The user shall indemnify and save harmless the Licensors, and their officers, employees and agents, from and against any claim, demand or action, irrespective of the nature of the cause of the claim, demand or action, alleging loss, costs, expense, damages or injuries (including injuries resulting in death) arising out of the use or possession of the SD memory card, data, or the Navigation Technologies Corporation database.
Use, duplication, or disclosure of this SD memory card by or on behalf of the United States government is subject to “Restricted Rights” as set forth at FAR 52.227-14, -19 or DFARS 252.227-7013, as applicable. Manufacturers are the Licensors, including HONDA MOTOR CO., LTD., 2-1-1 Minami Aoyama Minato-Ku Tokyo 107-8556 JAPAN., Garmin Ltd., 1200 East 151st Street, Olathe, KS, 66062, Navigation Technologies, 10400 W. Higgins Rd., Rosemont, IL 60018 and INFO USA CORPORATION, 5711 South 86th Circle, Omaha, NE 68127.
US_MCAS.book Page 12 Tuesday, July 22, 2008 11:26 AM

13Getting Started
MCAS_A 31MCAT30
Getting StartedGetting Started ..........................................................................14
System Overview...............................................................................14Operating Controls.............................................................................15Startup ................................................................................................16Display Screens..................................................................................18Map Screen ........................................................................................19Point Review Screens ........................................................................23Route Calculate & Edit Route Screens ..............................................24XM NavWeather & XM NavTraffic Map Screens............................25Main Menu.........................................................................................26Let’s Take a Trip................................................................................29Tips ....................................................................................................35
US_MCAS.book Page 13 Tuesday, July 22, 2008 11:26 AM
14 Getting Started
MCAS_A 31MCAT30
Getting Started
This section is designed to give you a quick overview of your Navigation System before you begin using it on your own. Again, we recommend reading the entire manual, but reading this section will definitely accelerate your learning curve. (Also see Glossary, System Messages, and Troubleshooting on pages 162-169.)
While Not Riding Your MotorcycleWith your motorcycle not in motion, you can use the right fairing panel controls to create and edit a route, obtain information, and setup screen displays.
While Riding Your MotorcycleWhile your motorcycle is in motion after entering your destination in the system, you can use the left handlebar controls, check the map screens, and listen to the voice guidance. The right fairing panel controls become disabled. Even if no route is entered in the system, you will still receive some useful screen and voice guidance information while riding.
System FunctionsThere are three ways to find/designate a location you want to travel to or save as a favorite for future use.• Find Destination menu (see page 81)• Route menu (see page 111)• White Arrow Point Locator feature
(see page 54)After finding your destination, direct the system to:• Create a route to your destination.
(You may only enter one route at a time in the system. You may overwrite an existing route.)
• Edit your route to add vias (stops along the way).
• Reroute your journey to express a preference (speed vs distance) and up to four elements to avoid.
• Include a detour in your current route.
System Overview
US_MCAS.book Page 14 Tuesday, July 22, 2008 11:26 AM
15Getting Started
Getting Started
MCAS_A 31MCAT30
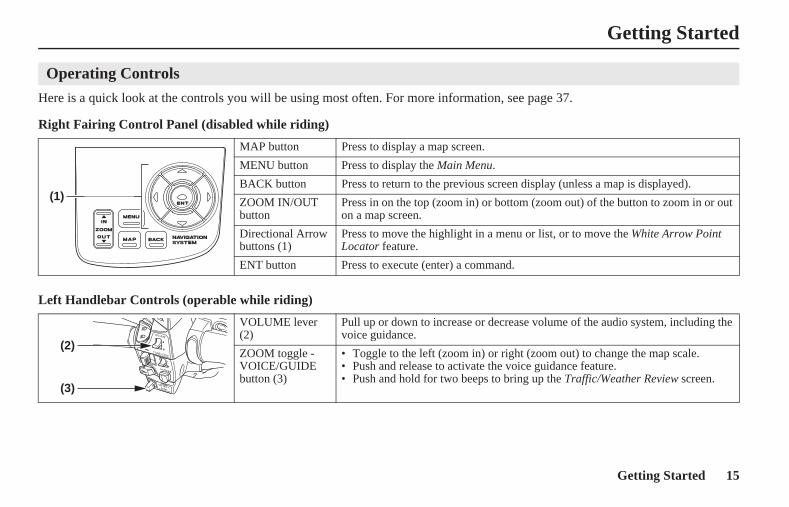
Here is a quick look at the controls you will be using most often. For more information, see page 37.
Right Fairing Control Panel (disabled while riding)
Left Handlebar Controls (operable while riding)
Operating Controls
MAP button Press to display a map screen.
MENU button Press to display the Main Menu.
BACK button Press to return to the previous screen display (unless a map is displayed).
ZOOM IN/OUT button
Press in on the top (zoom in) or bottom (zoom out) of the button to zoom in or out on a map screen.
Directional Arrow buttons (1)
Press to move the highlight in a menu or list, or to move the White Arrow Point Locator feature.
ENT button Press to execute (enter) a command.
VOLUME lever (2)
Pull up or down to increase or decrease volume of the audio system, including the voice guidance.
ZOOM toggle - VOICE/GUIDE button (3)
• Toggle to the left (zoom in) or right (zoom out) to change the map scale.• Push and release to activate the voice guidance feature.• Push and hold for two beeps to bring up the Traffic/Weather Review screen.
(1)
(3)
(2)
US_MCAS.book Page 15 Tuesday, July 22, 2008 11:26 AM

16 Getting Started
Getting Started
MCAS_A 31MCAT30
Turn the ignition switch to ACC to avoid battery drain. The ON position will also activate the system.
After a few seconds, you will see the following screen. (The screen may be different or there may be no screen if you change the default Greeting, or if the Navi system was not selected the last time you turned off the ignition. Press the DISP button under the center display screen or the MAP button on the right fairing panel to enter the Navi system.)
After a few seconds, you will see:
Press the ENT button. (If you do not, the screen will return to the multi-information mode after about 30 seconds. To return to the Navigation System, press the DISP button on the center display or the MAP button on the right fairing panel.)
The Copyrights screen will appear for about one second before a map appears.
Startup
US_MCAS.book Page 16 Thursday, July 31, 2008 11:37 AM
17Getting Started
Getting Started
MCAS_A 31MCAT30
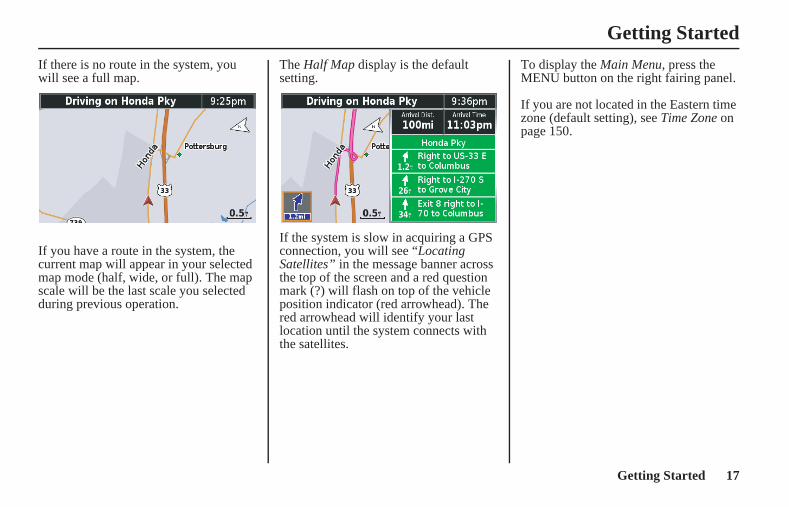
If there is no route in the system, you will see a full map.
If you have a route in the system, the current map will appear in your selected map mode (half, wide, or full). The map scale will be the last scale you selected during previous operation.
The Half Map display is the default setting.
If the system is slow in acquiring a GPS connection, you will see “Locating Satellites” in the message banner across the top of the screen and a red question mark (?) will flash on top of the vehicle position indicator (red arrowhead). The red arrowhead will identify your last location until the system connects with the satellites.
To display the Main Menu, press the MENU button on the right fairing panel.
If you are not located in the Eastern time zone (default setting), see Time Zone on page 150.
US_MCAS.book Page 17 Tuesday, July 22, 2008 11:26 AM
18 Getting Started
Getting Started
MCAS_A 31MCAT30
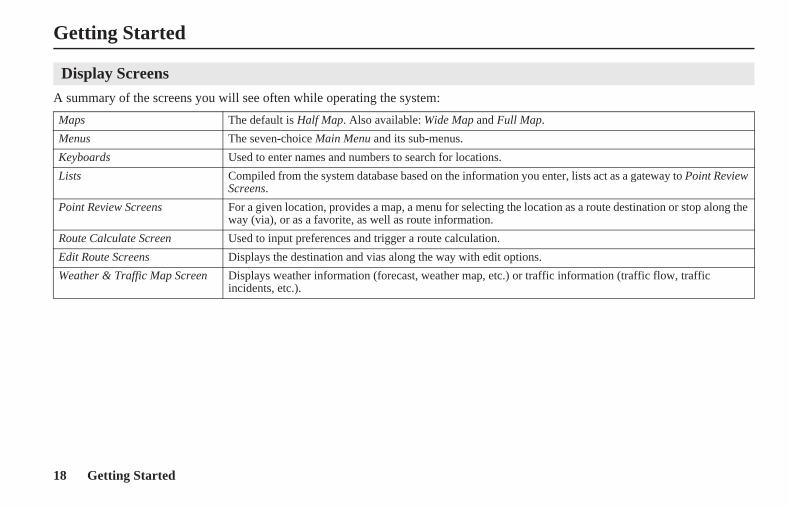
A summary of the screens you will see often while operating the system:
Display Screens
Maps The default is Half Map. Also available: Wide Map and Full Map.
Menus The seven-choice Main Menu and its sub-menus.
Keyboards Used to enter names and numbers to search for locations.
Lists Compiled from the system database based on the information you enter, lists act as a gateway to Point Review Screens.
Point Review Screens For a given location, provides a map, a menu for selecting the location as a route destination or stop along the way (via), or as a favorite, as well as route information.
Route Calculate Screen Used to input preferences and trigger a route calculation.
Edit Route Screens Displays the destination and vias along the way with edit options.
Weather & Traffic Map Screen Displays weather information (forecast, weather map, etc.) or traffic information (traffic flow, traffic incidents, etc.).
US_MCAS.book Page 18 Tuesday, July 22, 2008 11:26 AM

19Getting Started
Getting Started
MCAS_A 31MCAT30
Here is a typical map screen (in the Half Map default setting):
NOTE:• The explanations above are for daytime display. For information about the map background and street colors at night, see page 21.• The POI icons will appear when the map scale is 0.2 mile or smaller.
Map Screen
Road Number
POI Icon
Alert Icon
Orange Flag-Via Stop
Checkered Flag-Destination Detail Display
Current Road
Next Three Maneuvers
Map Scale
Green Circle-Town
Pink Outline-Route
Vehicle Position
Track Log
Map Orientation
Clock
Message Banner
Highway/Road
Map Background
“North Up”
“Heading Up”
US_MCAS.book Page 19 Tuesday, July 22, 2008 11:26 AM

20 Getting Started
Getting Started
MCAS_A 31MCAT30
Map Features
Map Icon
Border Line White around a black line indicates a border line.
Green Circle-Town The green circle with white outline indicates a town. To see the name of town, use the White Arrow Point Locator feature (see page 54).
Map Orientation Indicates either 2D Heading Up, 2D North Up, or 3D Heading Up (see page 140).
Map Scale The length of the scale line represents the distance indicated above the scale. There are 12 selections: from 200 feet to 800 miles.
Pink Outline-Route Indicates your route.
Road Number Indicates a road number. The shape of the sign varies such as oval, shield, etc.
Track Log White dot indicates a track log.
Vehicle Position The red arrowhead indicates your vehicle location and, when moving, which direction your motorcycle is facing.
Checkered Flag- Destination Indicates destination of your route.
Home Icon Indicates your designated Home location, visible for 120 miles or smaller map scale.
POI Icon Indicates a point of interest loaded in the database. See page 143 for a table of all POI icons in the system.
Orange Flag-Via Stop Indicates a stop along the route (via).
US_MCAS.book Page 20 Tuesday, July 22, 2008 11:26 AM
21Getting Started
Getting Started
MCAS_A 31MCAT30
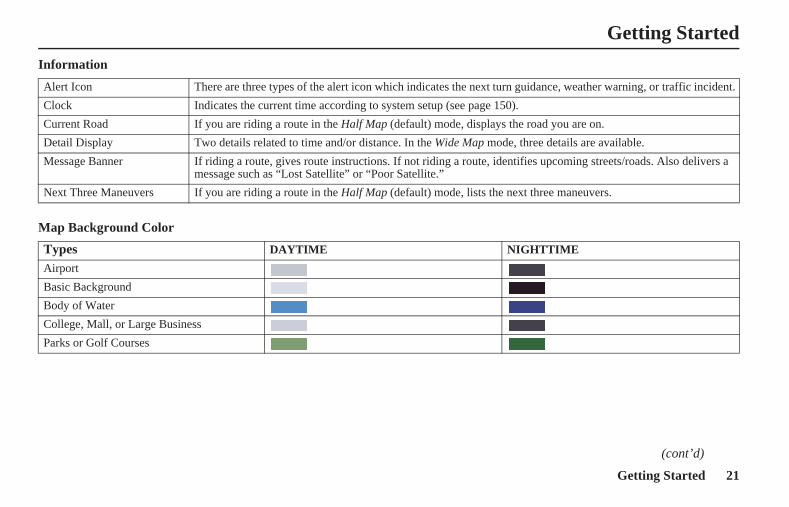
Information
Map Background Color
Alert Icon There are three types of the alert icon which indicates the next turn guidance, weather warning, or traffic incident.
Clock Indicates the current time according to system setup (see page 150).
Current Road If you are riding a route in the Half Map (default) mode, displays the road you are on.
Detail Display Two details related to time and/or distance. In the Wide Map mode, three details are available.
Message Banner If riding a route, gives route instructions. If not riding a route, identifies upcoming streets/roads. Also delivers a message such as “Lost Satellite” or “Poor Satellite.”
Next Three Maneuvers If you are riding a route in the Half Map (default) mode, lists the next three maneuvers.
Types DAYTIME NIGHTTIME
Airport
Basic Background
Body of Water
College, Mall, or Large Business
Parks or Golf Courses
(cont’d)
US_MCAS.book Page 21 Tuesday, July 22, 2008 11:26 AM
22 Getting Started
Getting Started
MCAS_A 31MCAT30
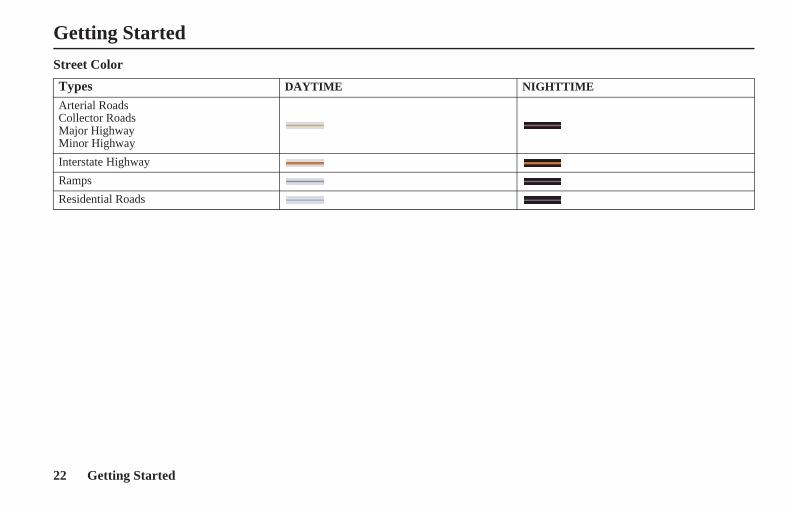
Street Color
Types DAYTIME NIGHTTIME
Arterial RoadsCollector RoadsMajor HighwayMinor Highway
Interstate Highway
Ramps
Residential Roads
US_MCAS.book Page 22 Tuesday, July 22, 2008 11:26 AM
23Getting Started
Getting Started
MCAS_A 31MCAT30
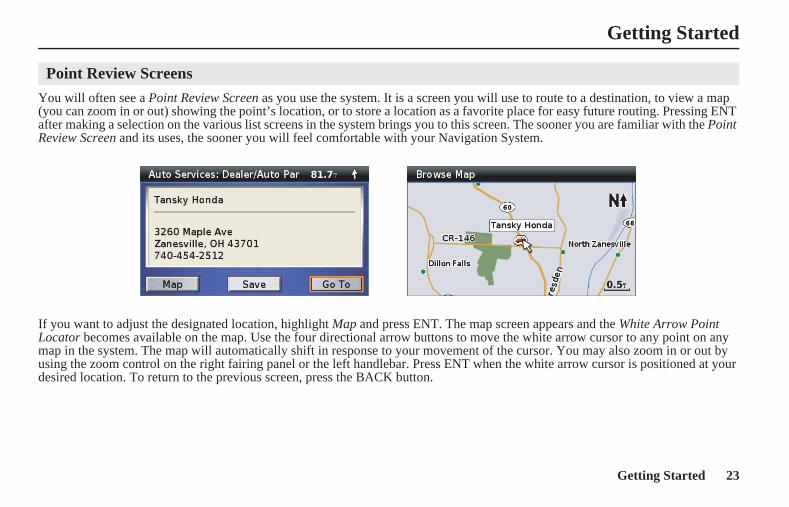
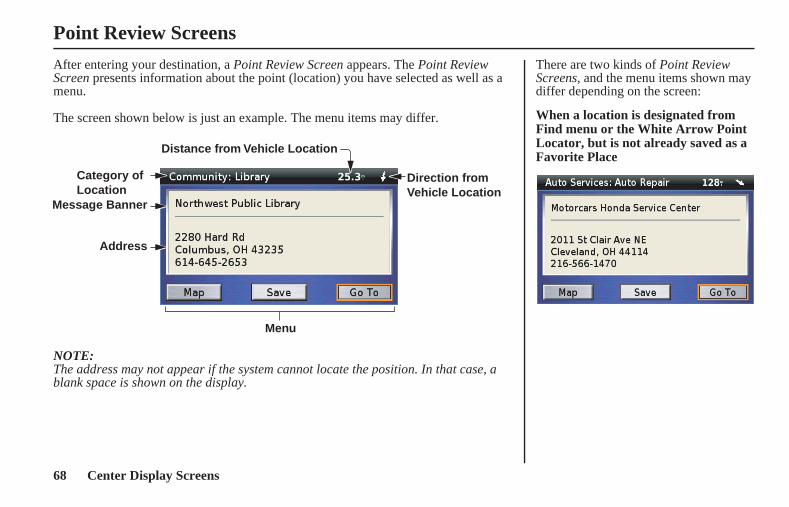
You will often see a Point Review Screen as you use the system. It is a screen you will use to route to a destination, to view a map (you can zoom in or out) showing the point’s location, or to store a location as a favorite place for easy future routing. Pressing ENT after making a selection on the various list screens in the system brings you to this screen. The sooner you are familiar with the Point Review Screen and its uses, the sooner you will feel comfortable with your Navigation System.
If you want to adjust the designated location, highlight Map and press ENT. The map screen appears and the White Arrow Point Locator becomes available on the map. Use the four directional arrow buttons to move the white arrow cursor to any point on any map in the system. The map will automatically shift in response to your movement of the cursor. You may also zoom in or out by using the zoom control on the right fairing panel or the left handlebar. Press ENT when the white arrow cursor is positioned at your desired location. To return to the previous screen, press the BACK button.
Point Review Screens
US_MCAS.book Page 23 Tuesday, July 22, 2008 11:26 AM
24 Getting Started
Getting Started
MCAS_A 31MCAT30
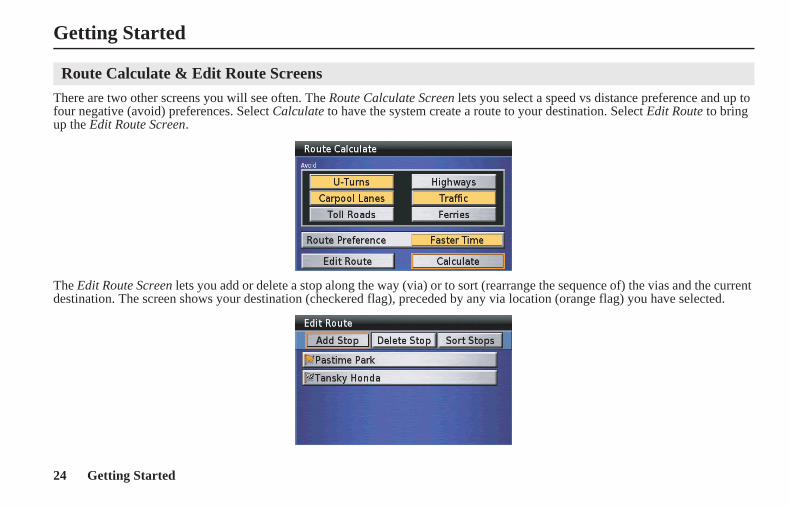
There are two other screens you will see often. The Route Calculate Screen lets you select a speed vs distance preference and up to four negative (avoid) preferences. Select Calculate to have the system create a route to your destination. Select Edit Route to bring up the Edit Route Screen.
The Edit Route Screen lets you add or delete a stop along the way (via) or to sort (rearrange the sequence of) the vias and the current destination. The screen shows your destination (checkered flag), preceded by any via location (orange flag) you have selected.
Route Calculate & Edit Route Screens
US_MCAS.book Page 24 Tuesday, July 22, 2008 11:26 AM
25Getting Started
Getting Started
MCAS_A 31MCAT30
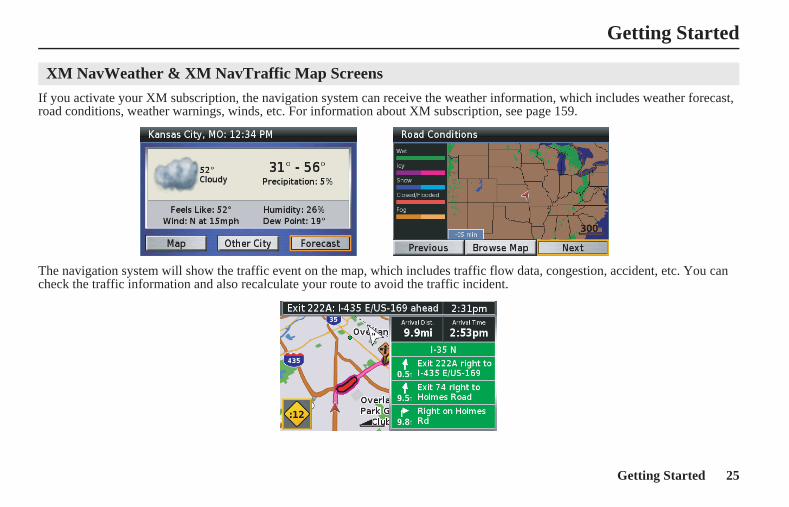
If you activate your XM subscription, the navigation system can receive the weather information, which includes weather forecast, road conditions, weather warnings, winds, etc. For information about XM subscription, see page 159.
The navigation system will show the traffic event on the map, which includes traffic flow data, congestion, accident, etc. You can check the traffic information and also recalculate your route to avoid the traffic incident.
XM NavWeather & XM NavTraffic Map Screens
US_MCAS.book Page 25 Tuesday, July 22, 2008 11:26 AM
26 Getting Started
Getting Started
MCAS_A 31MCAT30
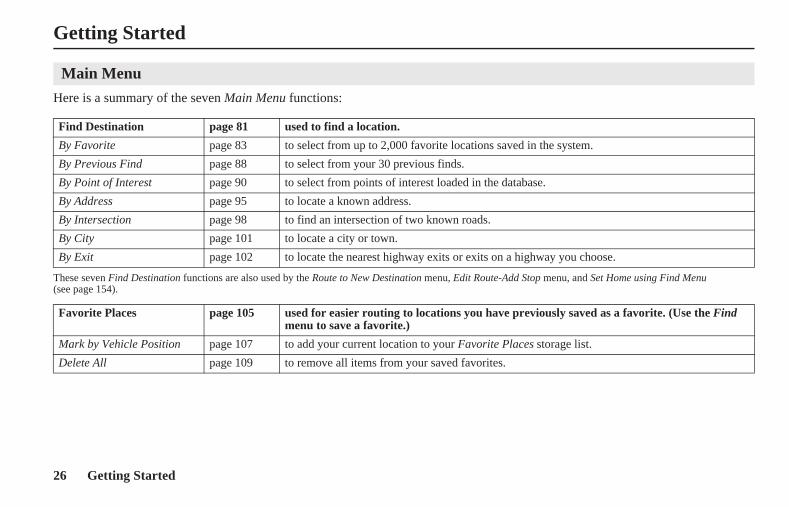
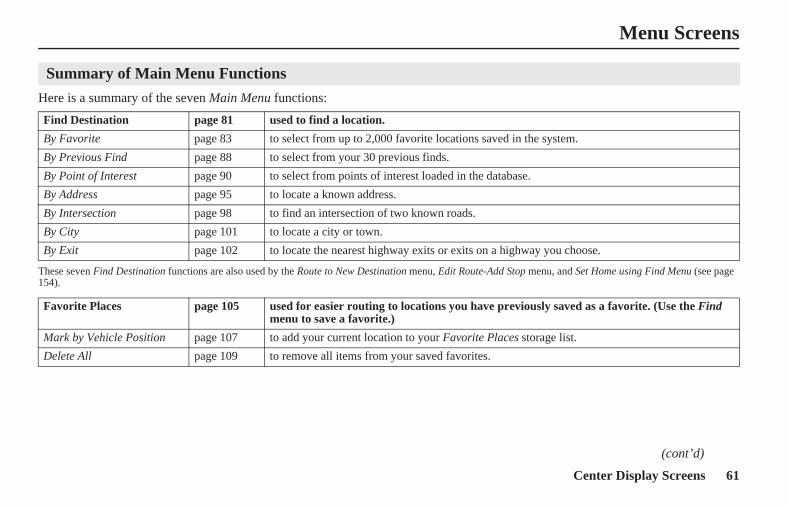
Here is a summary of the seven Main Menu functions:
These seven Find Destination functions are also used by the Route to New Destination menu, Edit Route-Add Stop menu, and Set Home using Find Menu (see page 154).
Main Menu
Find Destination page 81 used to find a location.
By Favorite page 83 to select from up to 2,000 favorite locations saved in the system.
By Previous Find page 88 to select from your 30 previous finds.
By Point of Interest page 90 to select from points of interest loaded in the database.
By Address page 95 to locate a known address.
By Intersection page 98 to find an intersection of two known roads.
By City page 101 to locate a city or town.
By Exit page 102 to locate the nearest highway exits or exits on a highway you choose.
Favorite Places page 105 used for easier routing to locations you have previously saved as a favorite. (Use the Find menu to save a favorite.)
Mark by Vehicle Position page 107 to add your current location to your Favorite Places storage list.
Delete All page 109 to remove all items from your saved favorites.
US_MCAS.book Page 26 Tuesday, July 22, 2008 11:26 AM
27Getting Started
Getting Started
MCAS_A 31MCAT30
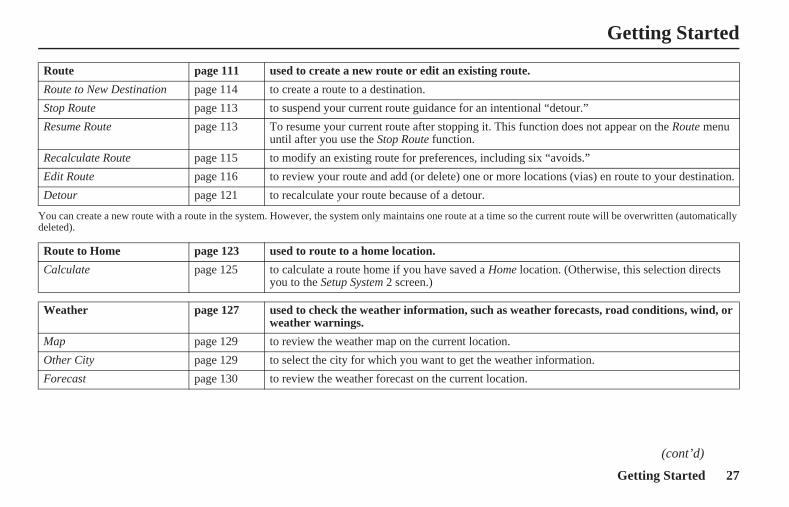
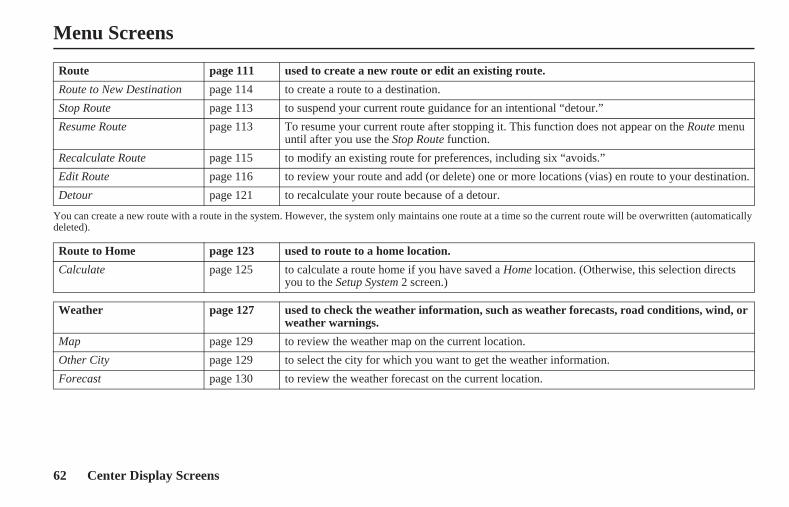
You can create a new route with a route in the system. However, the system only maintains one route at a time so the current route will be overwritten (automatically deleted).
Route page 111 used to create a new route or edit an existing route.
Route to New Destination page 114 to create a route to a destination.
Stop Route page 113 to suspend your current route guidance for an intentional “detour.”
Resume Route page 113 To resume your current route after stopping it. This function does not appear on the Route menu until after you use the Stop Route function.
Recalculate Route page 115 to modify an existing route for preferences, including six “avoids.”
Edit Route page 116 to review your route and add (or delete) one or more locations (vias) en route to your destination.
Detour page 121 to recalculate your route because of a detour.
Route to Home page 123 used to route to a home location.
Calculate page 125 to calculate a route home if you have saved a Home location. (Otherwise, this selection directs you to the Setup System 2 screen.)
Weather page 127 used to check the weather information, such as weather forecasts, road conditions, wind, or weather warnings.
Map page 129 to review the weather map on the current location.
Other City page 129 to select the city for which you want to get the weather information.
Forecast page 130 to review the weather forecast on the current location.
(cont’d)
US_MCAS.book Page 27 Tuesday, July 22, 2008 11:26 AM

28 Getting Started
Getting Started
MCAS_A 31MCAT30
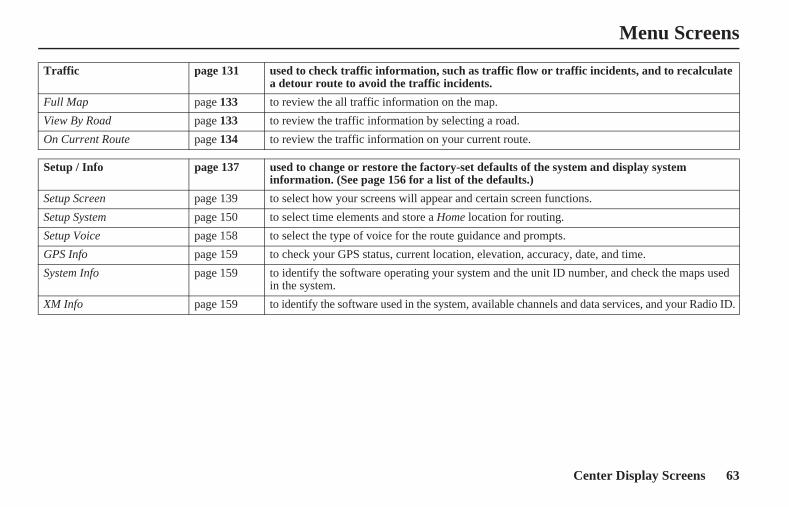
Traffic page 131 used to check traffic information, such as traffic flow or traffic incidents, and to recalculate a detour route to avoid the traffic incidents.
Full Map page 133 to review the all traffic information on the map.
View By Road page 133 to review the traffic information by selecting a road.
On Current Route page 134 to review the traffic information on your current route.
Setup / Info page 137 used to change or restore the factory-set defaults of the system and display system information. (See page 156 for a list of the defaults.)
Setup Screen page 139 to select how your screens will appear and certain screen functions.
Setup System page 150 to select time elements and store a Home location for routing.
Setup Voice page 158 to select the type of voice for the route guidance and prompts.
GPS Info page 159 to check your GPS status, current location, elevation, accuracy, date, and time.
System Info page 159 to identify the software operating your system and the unit ID number, and check the maps used in the system.
XM Info page 159 to identify the software used in the system, available channels and data services, and your Radio ID.
US_MCAS.book Page 28 Tuesday, July 22, 2008 11:26 AM

29Getting Started
Getting Started
MCAS_A 31MCAT30
Let’s imagine your first trip – from your current location to the site of Wyatt Earp’s showdown, the O.K. Corral in Tombstone, Arizona. Let’s avoid all toll roads, but allow U-turns. On the way you want to stop at your favorite Honda dealer. Then, for your return trip, you want to head straight home. Let’s say you live in Marysville, Ohio, just up the road from where they built your Goldwing.
A step-by-step sequence follows. That example, as well as all instructional sequences in the manual, follows an action/reaction structure:• You act – entering instructions and
commands.• The system reacts – displaying a map,
menu, keyboard, list, point review, route calculate, or edit route screen. (And, at times the system’s voice guidance also operates.)
In this manual, you will see an image of what you will view on the display screen.
For your hypothetical trip to Tombstone, you utilize the basic functions of the system.• You find a destination.• You refine the route to your
preference.• You route to it.• You add a stop along the way (via).• You set up quick return routing by
designating your residence as Home.Step-by-step instructions follow.First, press the MENU button on the right fairing panel.
With Find Destination highlighted, press the ENT button.
NOTE:If there are Favorite Places or Previous Finds in the system, the menu will display these options.
Use the down directional arrow button on the right fairing panel to scroll down to highlight By City. Press ENT.
Let’s Take a Trip
(cont’d)
US_MCAS.book Page 29 Tuesday, July 22, 2008 11:26 AM
30 Getting Started
Getting Started
MCAS_A 31MCAT30
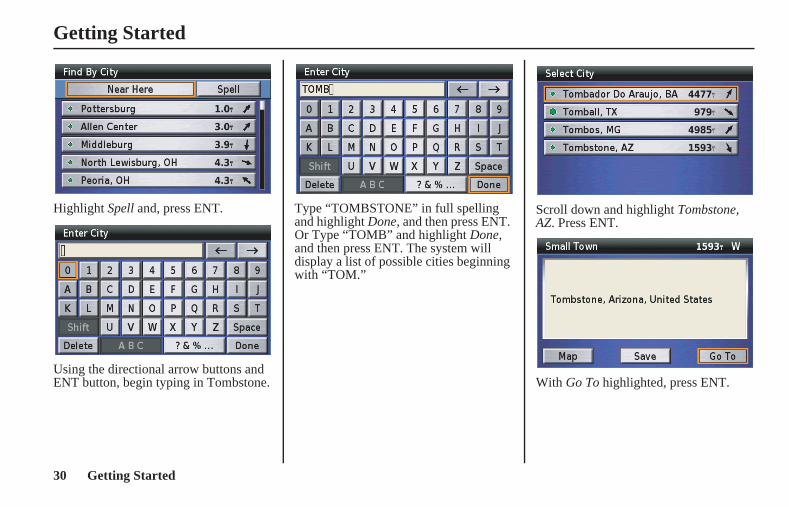
Highlight Spell and, press ENT.
Using the directional arrow buttons and ENT button, begin typing in Tombstone.
Type “TOMBSTONE” in full spelling and highlight Done, and then press ENT. Or Type “TOMB” and highlight Done, and then press ENT. The system will display a list of possible cities beginning with “TOM.”
Scroll down and highlight Tombstone, AZ. Press ENT.
With Go To highlighted, press ENT.
US_MCAS.book Page 30 Tuesday, July 22, 2008 11:26 AM
31Getting Started
Getting Started
MCAS_A 31MCAT30
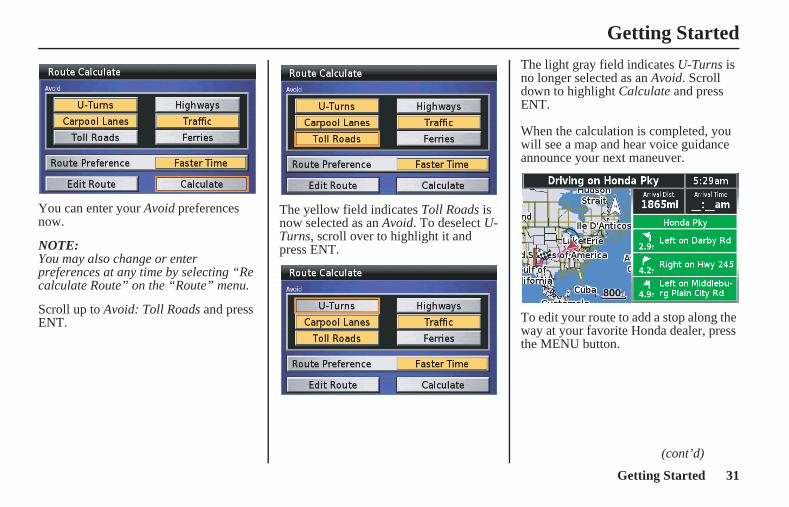
You can enter your Avoid preferences now.
NOTE:You may also change or enter preferences at any time by selecting “Re calculate Route” on the “Route” menu.
Scroll up to Avoid: Toll Roads and press ENT.
The yellow field indicates Toll Roads is now selected as an Avoid. To deselect U-Turns, scroll over to highlight it and press ENT.
The light gray field indicates U-Turns is no longer selected as an Avoid. Scroll down to highlight Calculate and press ENT.
When the calculation is completed, you will see a map and hear voice guidance announce your next maneuver.
To edit your route to add a stop along the way at your favorite Honda dealer, press the MENU button.
(cont’d)
US_MCAS.book Page 31 Tuesday, July 22, 2008 11:26 AM

32 Getting Started
Getting Started
MCAS_A 31MCAT30
Scroll down to Route and press ENT.
Scroll down to Edit Route and press ENT.
With Add Stop highlighted, press ENT.
Scroll down to By Point of Interest. Press ENT.
Highlight Honda Motorcycle Dealer and press ENT.
NOTE:All Honda dealers are listed in the “Auto Services: Dealer/Auto Parts” category of the Point of Interest selection.
Scroll down to your dealer and press ENT.
US_MCAS.book Page 32 Tuesday, July 22, 2008 11:26 AM

33Getting Started
Getting Started
MCAS_A 31MCAT30
With Select highlighted, press ENT.
Press the MAP button.
Highlight Yes and press ENT. The system will recalculate the route to include the via.
Your route is ready to ride. If you want to designate your current location as Home for the return ride, press the MENU button.
Scroll down to Route to Home and press ENT.
Highlight Yes and press ENT.
(cont’d)
US_MCAS.book Page 33 Tuesday, July 22, 2008 11:26 AM

34 Getting Started
Getting Started
MCAS_A 31MCAT30
With Vehicle Position highlighted, press ENT.
With Save Home highlighted, press ENT.
The display returns to the Route Calculate screen. Press the MAP button to return to your main map.
To give yourself the best opportunity to fully grasp the Navigation System, we suggest you continue to read the entire manual. However, if you do not intend to, we suggest you at least check out the following two sections, Operating Controls and Center Display Screens. The next five sections cover the five Main Menu selections. Finally, there is the Technical & Consumer Information section.
US_MCAS.book Page 34 Tuesday, July 22, 2008 11:26 AM

35Getting Started
Getting Started
MCAS_A 31MCAT30
The following tips will help you avoid some confusion as you learn the system:
Tips
A Yellow Field Indicates a Selected Item
Some fields can be switched between yellow (selected) and light gray (not selected). Other fields are permanently yellow, and you highlight and select them to bring up an option screen or to enter information with the keyboard. When choosing between adjacent fields on an option screen, such as Map Layout (Setup Screen 1 screen), use a directional arrow button to move to the field you want to highlight (orange border around the light gray field), then press ENT to select (indicated by the color change to yellow).
Quick Scroll You can quick scroll through many lists. See Scroll Bar on page 44.
Quick Keyboard Maneuvering You can speed up keyboard entry by jumping from the far left to the far right of a row or vice versa – and by jumping from the top keyboard row to the bottom row or vice versa. See page 64.
Understanding the Find Destination Function
Each Find Destination function searches within its designation. By City will find cities. It will not find locations in a specified city. By Point of Interest searches the points pre-loaded in the database.
White Arrow Point Locator This feature can be used to find a location on any map and include it in a route. For more information, see page 54.
Use Category & Subcategory to Simplify Find Destination by Point of Interest
You can narrow your search by selecting the category and sub-category. There are 14 categories. Highlight your desired category and press ENT. The system will display the various sub-categories of your selected category.
Edit Route vs Recalculate Route on the Route menu
• Use Edit Route to bring up an Edit Route Screen to add a stop (via) to your current route.• Use Recalculate Route to bring up a Route Calculate Screen that lets you select your speed vs distance
preference and up to six “avoids.”
Edit Route vs Calculate on the Route Calculate Screen
• Use Calculate to have the system calculate a route to your selected destination.• Use Edit Route to bring up the Edit Route Screen to add a stop (via) to your current route.
(cont’d)
US_MCAS.book Page 35 Tuesday, July 22, 2008 11:26 AM
36 Getting Started
Getting Started
MCAS_A 31MCAT30
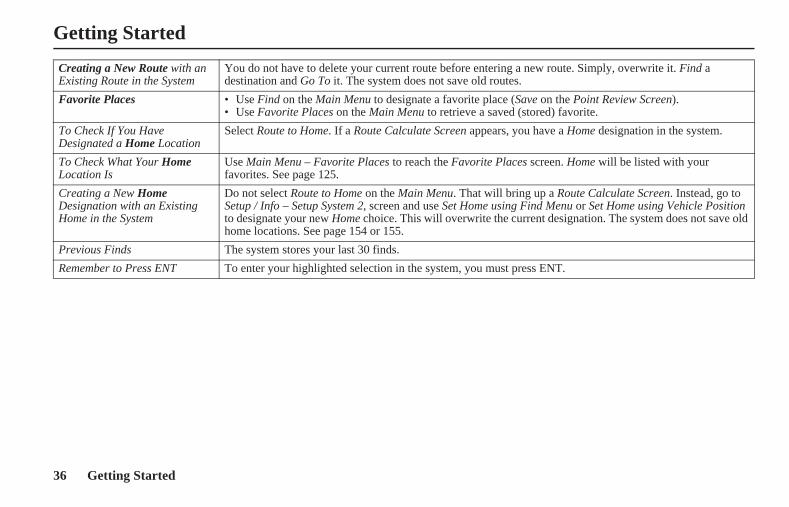
Creating a New Route with an Existing Route in the System
You do not have to delete your current route before entering a new route. Simply, overwrite it. Find a destination and Go To it. The system does not save old routes.
Favorite Places • Use Find on the Main Menu to designate a favorite place (Save on the Point Review Screen).• Use Favorite Places on the Main Menu to retrieve a saved (stored) favorite.
To Check If You Have Designated a Home Location
Select Route to Home. If a Route Calculate Screen appears, you have a Home designation in the system.
To Check What Your Home Location Is
Use Main Menu – Favorite Places to reach the Favorite Places screen. Home will be listed with your favorites. See page 125.
Creating a New Home Designation with an Existing Home in the System
Do not select Route to Home on the Main Menu. That will bring up a Route Calculate Screen. Instead, go to Setup / Info – Setup System 2, screen and use Set Home using Find Menu or Set Home using Vehicle Position to designate your new Home choice. This will overwrite the current designation. The system does not save old home locations. See page 154 or 155.
Previous Finds The system stores your last 30 finds.
Remember to Press ENT To enter your highlighted selection in the system, you must press ENT.
US_MCAS.book Page 36 Tuesday, July 22, 2008 11:26 AM
37Operating Controls
MCAS_A 31MCAT30
Operating ControlsRight Fairing Panel Controls ...................................................38Left Handlebar Controls ..........................................................39Center Display Controls ...........................................................40Audio System Controls .............................................................41
US_MCAS.book Page 37 Tuesday, July 22, 2008 11:26 AM
38 Operating Controls
MCAS_A 31MCAT30
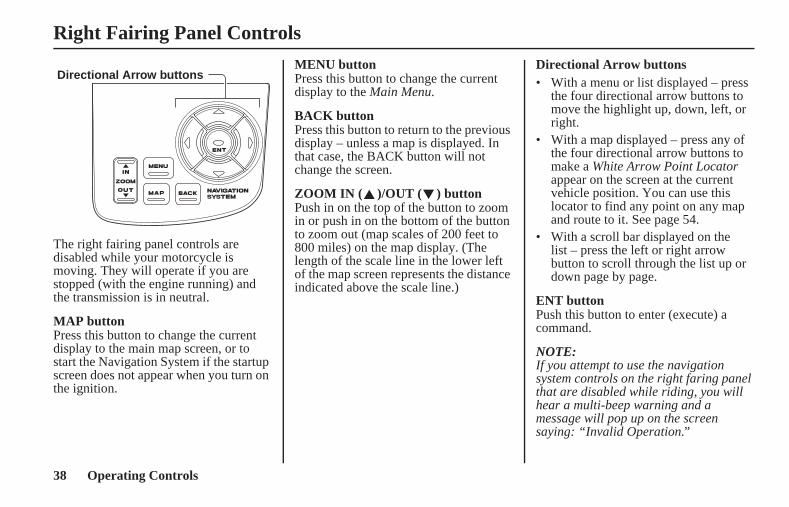
Right Fairing Panel Controls
The right fairing panel controls are disabled while your motorcycle is moving. They will operate if you are stopped (with the engine running) and the transmission is in neutral.
MAP buttonPress this button to change the current display to the main map screen, or to start the Navigation System if the startup screen does not appear when you turn on the ignition.
MENU buttonPress this button to change the current display to the Main Menu.
BACK buttonPress this button to return to the previous display – unless a map is displayed. In that case, the BACK button will not change the screen.
ZOOM IN ( )/OUT ( ) buttonPush in on the top of the button to zoom in or push in on the bottom of the button to zoom out (map scales of 200 feet to 800 miles) on the map display. (The length of the scale line in the lower left of the map screen represents the distance indicated above the scale line.)
Directional Arrow buttons• With a menu or list displayed – press
the four directional arrow buttons to move the highlight up, down, left, or right.
• With a map displayed – press any of the four directional arrow buttons to make a White Arrow Point Locator appear on the screen at the current vehicle position. You can use this locator to find any point on any map and route to it. See page 54.
• With a scroll bar displayed on the list – press the left or right arrow button to scroll through the list up or down page by page.
ENT buttonPush this button to enter (execute) a command.
NOTE:If you attempt to use the navigation system controls on the right faring panel that are disabled while riding, you will hear a multi-beep warning and a message will pop up on the screen saying: “Invalid Operation.”
Directional Arrow buttons
US_MCAS.book Page 38 Tuesday, July 22, 2008 11:26 AM

39Operating Controls
MCAS_A 31MCAT30
Left Handlebar Controls
The left handlebar controls remain operational while your motorcycle is moving. The VOLUME lever duplicates the function of the VOLUME button on the audio system controls. The multi-purpose ZOOM toggle – VOICE/GUIDE button duplicates some of the functions performed with the right panel controls.
VOLUME leverPull the lever up to increase or down to decrease to adjust the volume of the audio system, including the voice guidance. Any volume adjustment you make to the voice guidance will affect the radio and other audio components.
ZOOM IN ( )/OUT ( ) toggleToggle to the left to zoom in or to the right to zoom out anywhere from map scales of 200 feet to 800 miles on the map display. (There are 12 map scale options.)
VOICE/GUIDE button• Push in and release to activate the
voice guidance feature. If you are on a route, you will hear the next maneuver. On the screen, the Next Turn Pop-up window will appear for about five seconds. If you are not on a route, you will hear what direction you are riding in.
• Push in and hold for two beeps to bring up the Traffic/Weather Review screen, which allows you to check the traffic/weather information. Move the ZOOM IN/OUT toggle to the right or left and hold it to switch the review screens. To return to the navigation map screen, push in and hold the button (or press the MAP or DISP button).
VOLUMElever
ZOOM IN/OUTtoggle
VOICE/GUIDEbutton
US_MCAS.book Page 39 Tuesday, July 22, 2008 11:26 AM

40 Operating Controls
MCAS_A 31MCAT30
Center Display Controls
The center screen may display Navigation System information, normal motorcycle functions, or a combination of both. See Center Display Screens on page 43.
While in the Navi mode, the center display buttons may be operated while your motorcycle is moving.
DISP buttonPress this button to toggle between the multi-information display (time, ODO, audio, and trip), a Navi full screen map with the time, and a split screen with the multi-information condensed in a bar below the map. Pressing the DISP button will also terminate the White Arrow Point Locator feature and return the main map display.
INFO buttonPress this button to display the air temperature, headlight aiming and suspension preload.
NOTE:The headlight aiming appears only for the model equipped with the airbag system.
TRIP buttonWhile in the Navi mode, press this button to bring up a split screen (lower portion) display of the odometer and last selected tripmeter (A or B). This display lasts about five seconds. While the screen is still visible, press the button again to toggle between the A and B tripmeters. To reset the tripmeter, push and hold the button with the display in the “TRIP A” or “TRIP B” mode.
DIM button• Push and release to bring up the
dimmer function to change display brightness. The screen lasts for about five seconds. This change applies only to the mode (Day or Night) you are in at the time of adjustment and remains effective until you make another adjustment.
• Push and hold for two beeps to change (toggle) the map screen background color from the current display (daylight: your color selection or night: black) to the alternative. For example, in extremely bright sunshine, you might find the black night background preferable.
US_MCAS.book Page 40 Tuesday, July 22, 2008 11:26 AM

41Operating Controls
MCAS_A 31MCAT30
Audio System Controls
The illustration below is the model equipped with the airbag system.
The illustration below is the model without the airbag system.
Three of the controls on your audio system are used with the Navigation System.
NAVI button• Press to toggle between speaker and
headphones. An icon will display on the screen to indicate your selection.
• Press and hold to shut off the Navi voice guidance, and press to turn it ON.
VOLUME knob/button• Turn the knob to control the volume.• Push the knob/button to control
different components of the audio system. Depending on which components are turned on at the time, consecutive pushes cycle through your control choices. When the Navigation System is on, you may press the VOLUME button to adjust the Navigation voice volume relative to the audio volume, either quieter or louder. Rotate the knob to adjust. See your Owner’s Manual for more information on the audio system.
MODE knob/button• Turn the knob to highlight your
selection.• Press the knob/button to control
various audio modes. Consecutive pushes cycle through your control choices. Beep allows you to turn on or off the audible beep the Navigation System controls make when you press them. See your Owner’s Manual for more information on the audio system.
While in the Navi mode, you may press the audio buttons for a quick look of the non-Navi screen displays (tripmeter, etc.).
NAVI button
VOLUMEknob/button
MODEknob/button
NAVI button
VOLUMEknob/button
MODEknob/button
US_MCAS.book Page 41 Tuesday, July 22, 2008 11:26 AM

42 Operating Controls
MCAS_A 31MCAT30
US_MCAS.book Page 42 Tuesday, July 22, 2008 11:26 AM

43Center Display Screens
MCAS_A 31MCAT30
Center Display ScreensCenter Display Screens.............................................................44
Types of Navigation System Screens ................................................44
Map Screens...............................................................................46Map Layouts ......................................................................................46Map Screen ........................................................................................47Next Turn Pop-up ..............................................................................51Alert Icon ...........................................................................................51Automatic Re-routing ........................................................................52Map Scale Zoom................................................................................53White Arrow Point Locator ...............................................................54
Menu Screens.............................................................................56Summary of Main Menu Functions ...................................................61
Keyboard Screens .....................................................................64Operating Keyboards .........................................................................65
List Screens................................................................................67Point Review Screens ................................................................68Route Calculate & Edit Route Screens ...................................71
Route Calculate Screen ......................................................................71Edit Route Screens.............................................................................72
Weather/Traffic Information Screen ......................................76Weather Information Screen ..............................................................76Traffic Information Screen ................................................................78Traffic/Weather Review Screen.........................................................79
US_MCAS.book Page 43 Tuesday, July 22, 2008 11:26 AM

44 Center Display Screens
MCAS_A 31MCAT30
Center Display Screens
There are three screen formats possible on the center display screen:• Multi-information screen• Navigation System screen• Split screen (Navigation screen with
some multi-information across the bottom, see illustration.)
Screen categories include:• Map Screens (see page 46)• Menu Screens (see page 56)• Keyboard Screens (see page 64)• List Screens (see page 67)• Point Review Screens (see page 68)• Route Calculate & Edit Route Screens
(see page 71)• Weather/Traffic Information Screen
(see page 76)
Scroll Bar
A scroll bar is visible on the right side of some menus and lists when the items exceed the six lines available on a screen display. To advance through the list, use the down directional arrow button to move to the item you want.
NOTE:Throughout this manual you will see some menu screens with more than six items (example: the “Find Destination” menu with seven items). These illustrations are graphic creations to display the complete menu choices available.
Types of Navigation System Screens
US_MCAS.book Page 44 Tuesday, July 22, 2008 11:26 AM
45Center Display Screens
Center Display Screens
MCAS_A 31MCAT30
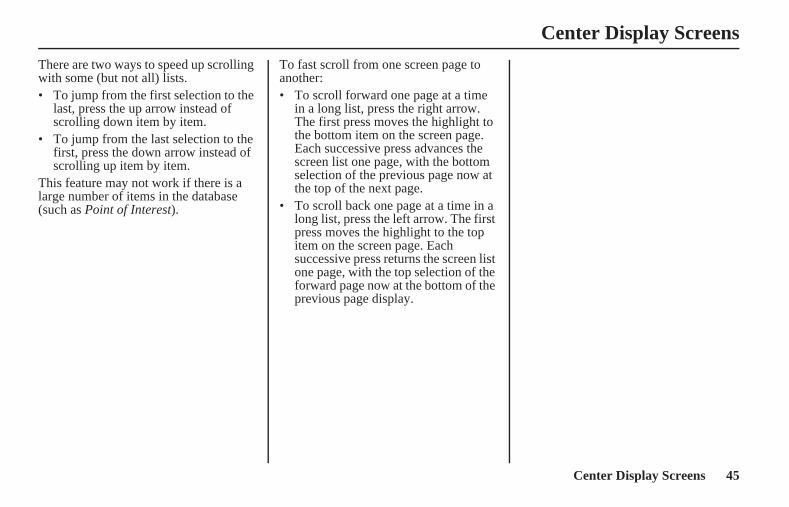
There are two ways to speed up scrolling with some (but not all) lists.• To jump from the first selection to the
last, press the up arrow instead of scrolling down item by item.
• To jump from the last selection to the first, press the down arrow instead of scrolling up item by item.
This feature may not work if there is a large number of items in the database (such as Point of Interest).
To fast scroll from one screen page to another:• To scroll forward one page at a time
in a long list, press the right arrow. The first press moves the highlight to the bottom item on the screen page. Each successive press advances the screen list one page, with the bottom selection of the previous page now at the top of the next page.
• To scroll back one page at a time in a long list, press the left arrow. The first press moves the highlight to the top item on the screen page. Each successive press returns the screen list one page, with the top selection of the forward page now at the bottom of the previous page display.
US_MCAS.book Page 45 Tuesday, July 22, 2008 11:26 AM
46 Center Display Screens
MCAS_A 31MCAT30
Map Screens
There are three choices for map display while riding a route: Full Map, Wide Map, and Half Map. The system default is the Half Map. To change the map layout, see Map Layout on page 139.
Full Map
NOTE:• When no route is entered, the initial
display is “Full Map.”• See “Map Screen” on page 47 for a
complete explanation of features and symbols on the map screens.
Map LayoutsWide Map
Half Map (default)
Message Banner
Detail Display
Message Banner
Current Road
Detail Display
Next ThreeManeuvers
US_MCAS.book Page 46 Tuesday, July 22, 2008 11:26 AM

47Center Display Screens
Map Screens
MCAS_A 31MCAT30
Here is a typical map screen (in the Half Map default setting):
NOTE:• The explanations above are for daytime display. For information about the map background and street colors at night, see page 49.• The POI icons will appear when the map scale is 0.2 mile or smaller.
Map Screen
Road Number
POI Icon
Alert Icon
Orange Flag-Via Stop
Checkered Flag-Destination Detail Display
Current Road
Next Three Maneuvers
Map Scale
Green Circle-Town
Pink Outline-Route
Vehicle Position
Track Log
Map Orientation
Clock
Message Banner
Highway/Road
Map Background
“North Up”
“Heading Up”
US_MCAS.book Page 47 Tuesday, July 22, 2008 11:26 AM

48 Center Display Screens
Map Screens
MCAS_A 31MCAT30
Map Features
Map Icon
Border Line White around a black line indicates a border line.
Green Circle-Town The green circle with white outline indicates a town. To see the name of town, use the White Arrow Point Locator feature (see page 54).
Map Orientation Indicates either 2D Heading Up, 2D North Up, or 3D Heading Up (see page 140).
Map Scale The length of the scale line represents the distance indicated above the scale. There are 12 selections: from 200 feet to 800 miles.
Pink Outline-Route Indicates your route.
Road Number Indicates a road number. The shape of the sign varies such as oval, shield, etc.
Track Log White dot indicates a track log.
Vehicle Position The red arrowhead indicates your vehicle location and, when moving, which direction your motorcycle is facing.
Checkered Flag- Destination Indicates destination of your route.
Home Icon Indicates your designated Home location, visible for 120 miles or smaller map scale.
POI Icon Indicates a point of interest loaded in the database. See page 143 for a table of all POI icons in the system.
Orange Flag-Via Stop Indicates a stop along the route (via).
US_MCAS.book Page 48 Tuesday, July 22, 2008 11:26 AM

49Center Display Screens
Map Screens
MCAS_A 31MCAT30
Information
Map Background Color
Alert Icon There are three types of the alert icon which indicates the next turn guidance, weather warning, or traffic incident.
Clock Indicates the current time according to system setup (see page 150).
Current Road If you are riding a route in the Half Map (default) mode, displays the road you are on.
Detail Display Two details related to time and/or distance. In the Wide Map mode, three details are available.
Message Banner If riding a route, gives route instructions. If not riding a route, identifies upcoming streets/roads. Also delivers a message such as “Lost Satellite” or “Poor Satellite.”
Next Three Maneuvers If you are riding a route in the Half Map (default) mode, lists the next three maneuvers.
Types DAYTIME NIGHTTIME
Airport
Basic Background
Body of Water
College, Mall, or Large Business
Parks or Golf Courses
(cont’d)
US_MCAS.book Page 49 Tuesday, July 22, 2008 11:26 AM
50 Center Display Screens
Map Screens
MCAS_A 31MCAT30
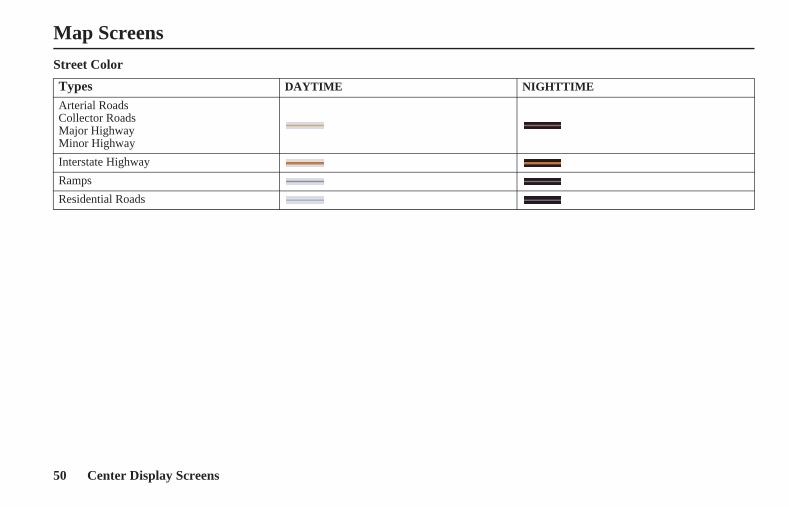
Street Color
Types DAYTIME NIGHTTIME
Arterial RoadsCollector RoadsMajor HighwayMinor Highway
Interstate Highway
Ramps
Residential Roads
US_MCAS.book Page 50 Tuesday, July 22, 2008 11:26 AM
51Center Display Screens
Map Screens
MCAS_A 31MCAT30
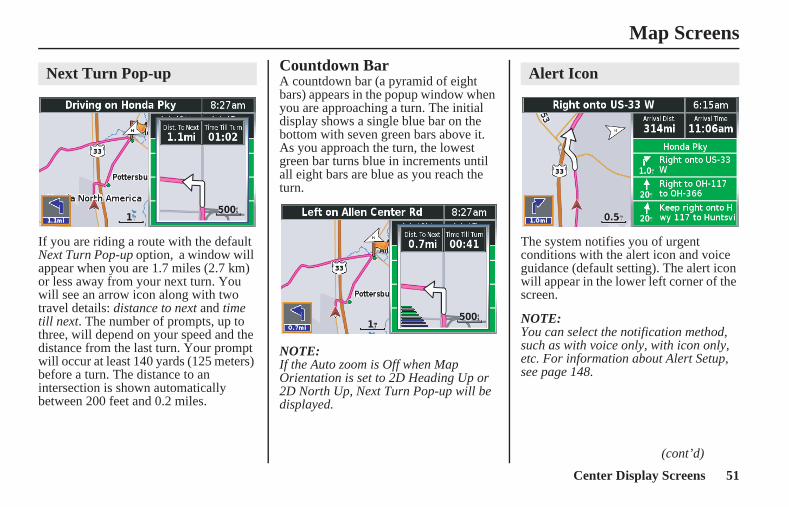
If you are riding a route with the default Next Turn Pop-up option, a window will appear when you are 1.7 miles (2.7 km) or less away from your next turn. You will see an arrow icon along with two travel details: distance to next and time till next. The number of prompts, up to three, will depend on your speed and the distance from the last turn. Your prompt will occur at least 140 yards (125 meters) before a turn. The distance to an intersection is shown automatically between 200 feet and 0.2 miles.
Countdown BarA countdown bar (a pyramid of eight bars) appears in the popup window when you are approaching a turn. The initial display shows a single blue bar on the bottom with seven green bars above it. As you approach the turn, the lowest green bar turns blue in increments until all eight bars are blue as you reach the turn.
NOTE:If the Auto zoom is Off when Map Orientation is set to 2D Heading Up or 2D North Up, Next Turn Pop-up will be displayed.
The system notifies you of urgent conditions with the alert icon and voice guidance (default setting). The alert icon will appear in the lower left corner of the screen.
NOTE:You can select the notification method, such as with voice only, with icon only, etc. For information about Alert Setup, see page 148.
Next Turn Pop-up Alert Icon
(cont’d)
US_MCAS.book Page 51 Tuesday, July 22, 2008 11:26 AM
52 Center Display Screens
Map Screens
MCAS_A 31MCAT30
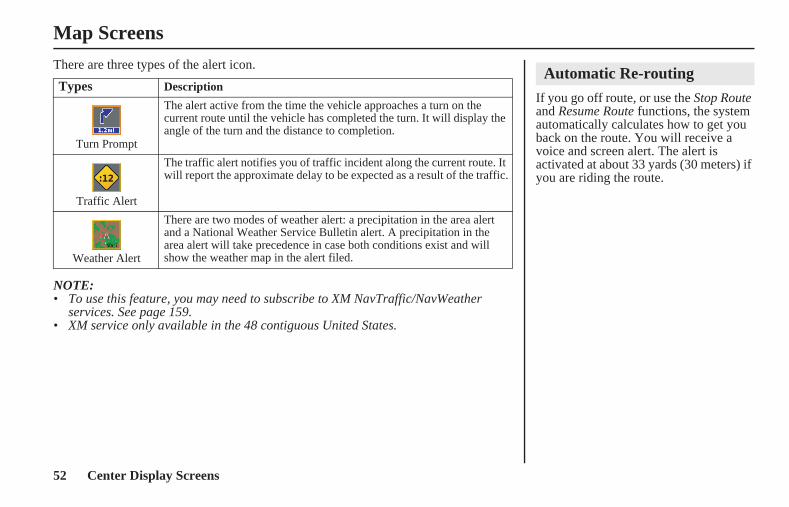
There are three types of the alert icon.
NOTE:• To use this feature, you may need to subscribe to XM NavTraffic/NavWeather
services. See page 159.• XM service only available in the 48 contiguous United States.
Types Description
Turn Prompt
The alert active from the time the vehicle approaches a turn on the current route until the vehicle has completed the turn. It will display the angle of the turn and the distance to completion.
Traffic Alert
The traffic alert notifies you of traffic incident along the current route. It will report the approximate delay to be expected as a result of the traffic.
Weather Alert
There are two modes of weather alert: a precipitation in the area alert and a National Weather Service Bulletin alert. A precipitation in the area alert will take precedence in case both conditions exist and will show the weather map in the alert filed.
If you go off route, or use the Stop Route and Resume Route functions, the system automatically calculates how to get you back on the route. You will receive a voice and screen alert. The alert is activated at about 33 yards (30 meters) if you are riding the route.
Automatic Re-routing
US_MCAS.book Page 52 Tuesday, July 22, 2008 11:26 AM
53Center Display Screens
Map Screens
MCAS_A 31MCAT30
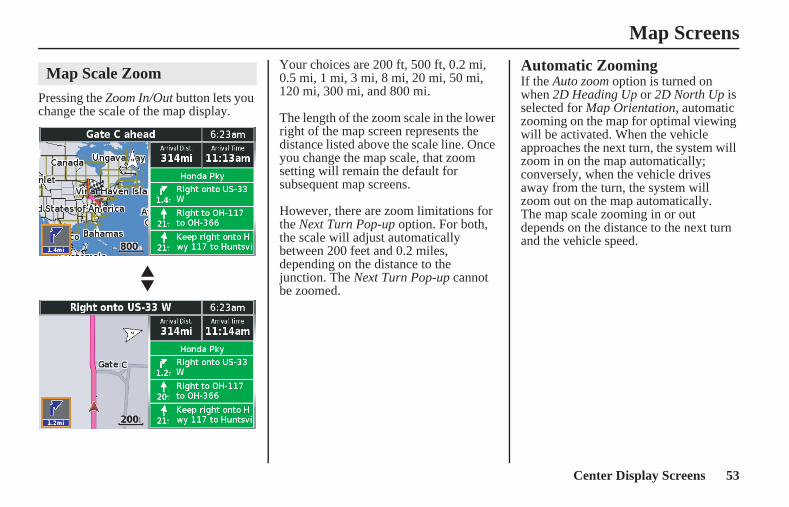
Pressing the Zoom In/Out button lets you change the scale of the map display.
▲▼
Your choices are 200 ft, 500 ft, 0.2 mi, 0.5 mi, 1 mi, 3 mi, 8 mi, 20 mi, 50 mi, 120 mi, 300 mi, and 800 mi.
The length of the zoom scale in the lower right of the map screen represents the distance listed above the scale line. Once you change the map scale, that zoom setting will remain the default for subsequent map screens.
However, there are zoom limitations for the Next Turn Pop-up option. For both, the scale will adjust automatically between 200 feet and 0.2 miles, depending on the distance to the junction. The Next Turn Pop-up cannot be zoomed.
Automatic ZoomingIf the Auto zoom option is turned on when 2D Heading Up or 2D North Up is selected for Map Orientation, automatic zooming on the map for optimal viewing will be activated. When the vehicle approaches the next turn, the system will zoom in on the map automatically; conversely, when the vehicle drives away from the turn, the system will zoom out on the map automatically.The map scale zooming in or out depends on the distance to the next turn and the vehicle speed.
Map Scale Zoom
US_MCAS.book Page 53 Tuesday, July 22, 2008 11:26 AM

54 Center Display Screens
Map Screens
MCAS_A 31MCAT30
In addition to using the Find Destination and Route menus to create a route, you may use a third option – a White Arrow Point Locator that you can move around any main map screen in the system to a new location.
You may use this feature to select a destination, a via, or a Favorite Place.
If you have a map on the screen:
1. Press any of the four directional arrow buttons on the right fairing panel to make the white arrow appear at your current vehicle position.
NOTE:To remove the white arrow and return to the main map display showing your current location, press the MAP button. If you are riding, you may press the DISP button below the center display.
2. Use the four directional arrow buttons to move the white arrow cursor to any point on any map in the system. The map will automatically shift in response to your movement of the cursor.
3. Zoom in or out to find the desired location, using the zoom control on the right fairing panel or the left handlebar.
4. Press ENT to bring up a Point Review Screen for the new location.
NOTE:You can adjust the location or store it as a favorite place. For more information about Point Review Screens, see page 68.
5. With Go To highlighted, press ENT. When you have no route entered, a Route Calculate Screen will appear. Go to step 7.
NOTE:For more information about the Route Calculate Screen, see page 71.
White Arrow Point Locator
US_MCAS.book Page 54 Tuesday, July 22, 2008 11:26 AM
55Center Display Screens
Map Screens
MCAS_A 31MCAT30
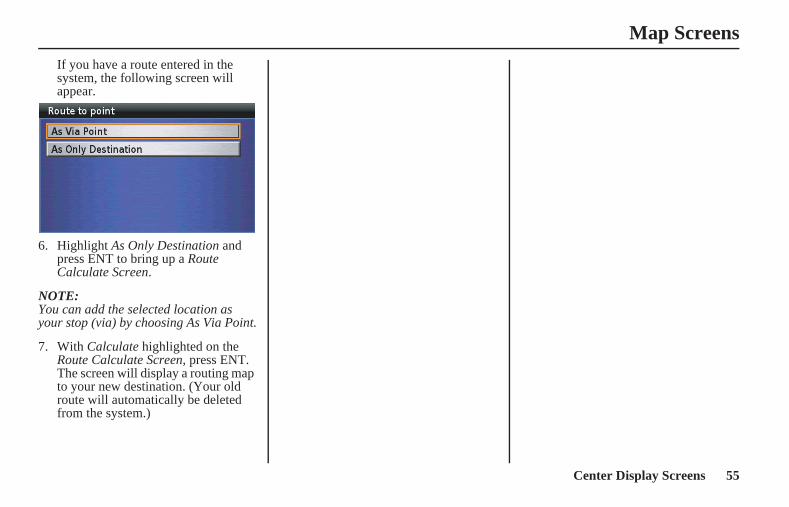
If you have a route entered in the system, the following screen will appear.
6. Highlight As Only Destination and press ENT to bring up a Route Calculate Screen.
NOTE:You can add the selected location as your stop (via) by choosing As Via Point.
7. With Calculate highlighted on the Route Calculate Screen, press ENT. The screen will display a routing map to your new destination. (Your old route will automatically be deleted from the system.)
US_MCAS.book Page 55 Tuesday, July 22, 2008 11:26 AM
56 Center Display Screens
MCAS_A 31MCAT30
Menu Screens
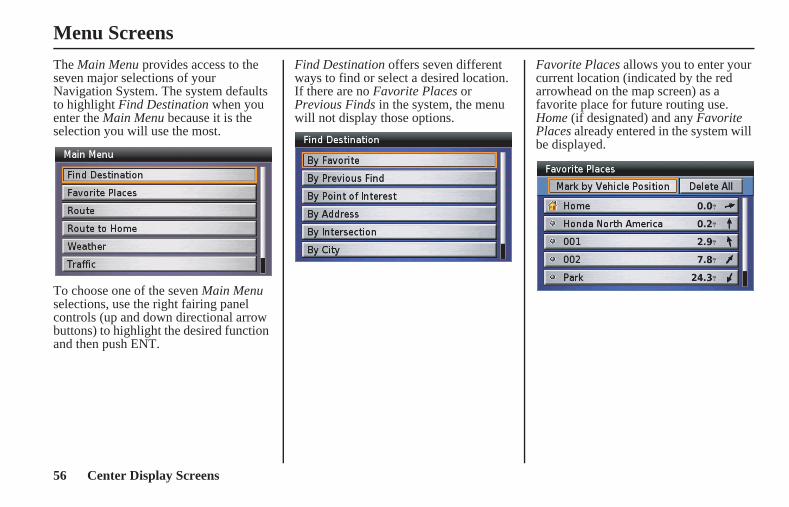
The Main Menu provides access to the seven major selections of your Navigation System. The system defaults to highlight Find Destination when you enter the Main Menu because it is the selection you will use the most.
To choose one of the seven Main Menu selections, use the right fairing panel controls (up and down directional arrow buttons) to highlight the desired function and then push ENT.
Find Destination offers seven different ways to find or select a desired location. If there are no Favorite Places or Previous Finds in the system, the menu will not display those options.
Favorite Places allows you to enter your current location (indicated by the red arrowhead on the map screen) as a favorite place for future routing use. Home (if designated) and any Favorite Places already entered in the system will be displayed.
US_MCAS.book Page 56 Tuesday, July 22, 2008 11:26 AM
57Center Display Screens
Menu Screens
MCAS_A 31MCAT30
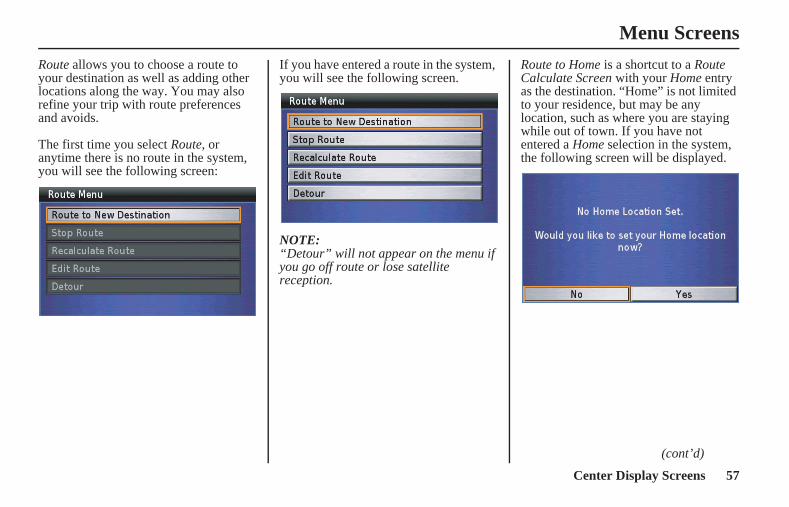
Route allows you to choose a route to your destination as well as adding other locations along the way. You may also refine your trip with route preferences and avoids.
The first time you select Route, or anytime there is no route in the system, you will see the following screen:
If you have entered a route in the system, you will see the following screen.
NOTE:“Detour” will not appear on the menu if you go off route or lose satellite reception.
Route to Home is a shortcut to a Route Calculate Screen with your Home entry as the destination. “Home” is not limited to your residence, but may be any location, such as where you are staying while out of town. If you have not entered a Home selection in the system, the following screen will be displayed.
(cont’d)
US_MCAS.book Page 57 Tuesday, July 22, 2008 11:26 AM
58 Center Display Screens
Menu Screens
MCAS_A 31MCAT30
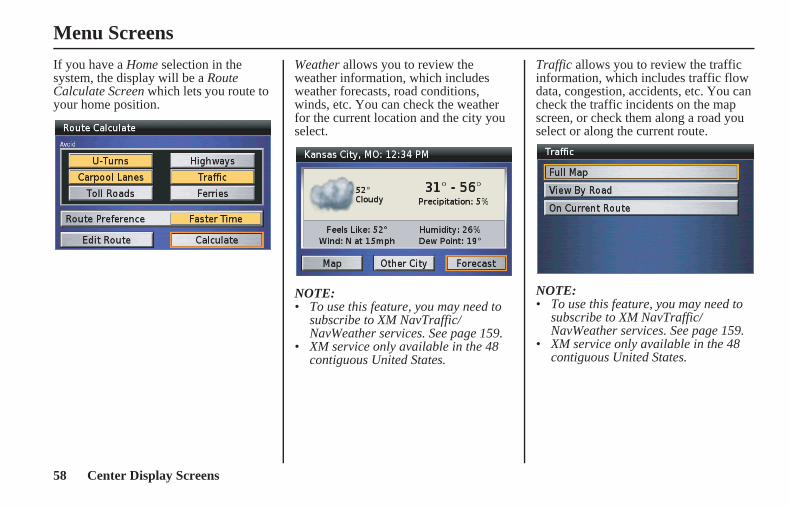
If you have a Home selection in the system, the display will be a Route Calculate Screen which lets you route to your home position.
Weather allows you to review the weather information, which includes weather forecasts, road conditions, winds, etc. You can check the weather for the current location and the city you select.
NOTE:• To use this feature, you may need to
subscribe to XM NavTraffic/NavWeather services. See page 159.
• XM service only available in the 48 contiguous United States.
Traffic allows you to review the traffic information, which includes traffic flow data, congestion, accidents, etc. You can check the traffic incidents on the map screen, or check them along a road you select or along the current route.
NOTE:• To use this feature, you may need to
subscribe to XM NavTraffic/NavWeather services. See page 159.
• XM service only available in the 48 contiguous United States.
US_MCAS.book Page 58 Tuesday, July 22, 2008 11:26 AM

59Center Display Screens
Menu Screens
MCAS_A 31MCAT30
The Setup / Info function lets you set the system and screen displays and guidance voice, and provides system information (three menus).
US_MCAS.book Page 59 Tuesday, July 22, 2008 11:26 AM
60 Center Display Screens
Menu Screens
MCAS_A 31MCAT30
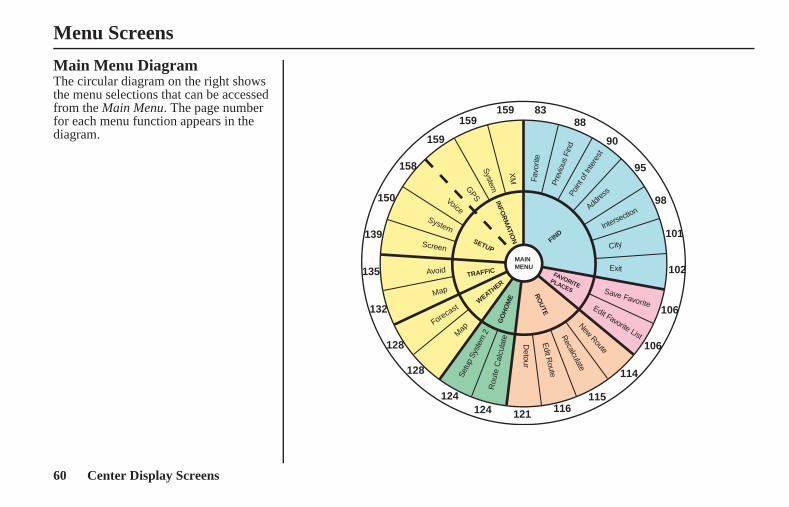
Main Menu DiagramThe circular diagram on the right shows the menu selections that can be accessed from the Main Menu. The page number for each menu function appears in the diagram.
Edit Favorite List
Rou
te C
alcu
late
Setu
p Sy
stem
2
Screen
INFO
RM
ATION
RO
UTE
SETUP
TRAFFIC
WEATHER
FIND
GO
HO
ME
FAVORITEPLACES
MAINMENU
Voice
GPS
System
Map
Map
Avoid
Forecast
XM Fa
vorit
e
Pre
viou
s Fi
ndPo
int o
f Int
eres
t
Addres
s
Intersection
City
Exit
New Route
Recalculate
Edit R
oute
Detour
Save FavoriteS
ystem
124
139
150
158
159
159159 83
88
90
95
98
101
102
114
115116121
106
106
124
135
132
128
128
US_MCAS.book Page 60 Tuesday, July 22, 2008 11:26 AM
61Center Display Screens
Menu Screens
MCAS_A 31MCAT30
Here is a summary of the seven Main Menu functions:
These seven Find Destination functions are also used by the Route to New Destination menu, Edit Route-Add Stop menu, and Set Home using Find Menu (see page 154).
Summary of Main Menu Functions
Find Destination page 81 used to find a location.
By Favorite page 83 to select from up to 2,000 favorite locations saved in the system.
By Previous Find page 88 to select from your 30 previous finds.
By Point of Interest page 90 to select from points of interest loaded in the database.
By Address page 95 to locate a known address.
By Intersection page 98 to find an intersection of two known roads.
By City page 101 to locate a city or town.
By Exit page 102 to locate the nearest highway exits or exits on a highway you choose.
Favorite Places page 105 used for easier routing to locations you have previously saved as a favorite. (Use the Find menu to save a favorite.)
Mark by Vehicle Position page 107 to add your current location to your Favorite Places storage list.
Delete All page 109 to remove all items from your saved favorites.
(cont’d)
US_MCAS.book Page 61 Tuesday, July 22, 2008 11:26 AM
62 Center Display Screens
Menu Screens
MCAS_A 31MCAT30
You can create a new route with a route in the system. However, the system only maintains one route at a time so the current route will be overwritten (automatically deleted).
Route page 111 used to create a new route or edit an existing route.
Route to New Destination page 114 to create a route to a destination.
Stop Route page 113 to suspend your current route guidance for an intentional “detour.”
Resume Route page 113 To resume your current route after stopping it. This function does not appear on the Route menu until after you use the Stop Route function.
Recalculate Route page 115 to modify an existing route for preferences, including six “avoids.”
Edit Route page 116 to review your route and add (or delete) one or more locations (vias) en route to your destination.
Detour page 121 to recalculate your route because of a detour.
Route to Home page 123 used to route to a home location.
Calculate page 125 to calculate a route home if you have saved a Home location. (Otherwise, this selection directs you to the Setup System 2 screen.)
Weather page 127 used to check the weather information, such as weather forecasts, road conditions, wind, or weather warnings.
Map page 129 to review the weather map on the current location.
Other City page 129 to select the city for which you want to get the weather information.
Forecast page 130 to review the weather forecast on the current location.
US_MCAS.book Page 62 Tuesday, July 22, 2008 11:26 AM
63Center Display Screens
Menu Screens
MCAS_A 31MCAT30
Traffic page 131 used to check traffic information, such as traffic flow or traffic incidents, and to recalculate a detour route to avoid the traffic incidents.
Full Map page 133 to review the all traffic information on the map.
View By Road page 133 to review the traffic information by selecting a road.
On Current Route page 134 to review the traffic information on your current route.
Setup / Info page 137 used to change or restore the factory-set defaults of the system and display system information. (See page 156 for a list of the defaults.)
Setup Screen page 139 to select how your screens will appear and certain screen functions.
Setup System page 150 to select time elements and store a Home location for routing.
Setup Voice page 158 to select the type of voice for the route guidance and prompts.
GPS Info page 159 to check your GPS status, current location, elevation, accuracy, date, and time.
System Info page 159 to identify the software operating your system and the unit ID number, and check the maps used in the system.
XM Info page 159 to identify the software used in the system, available channels and data services, and your Radio ID.
US_MCAS.book Page 63 Tuesday, July 22, 2008 11:26 AM
64 Center Display Screens
MCAS_A 31MCAT30
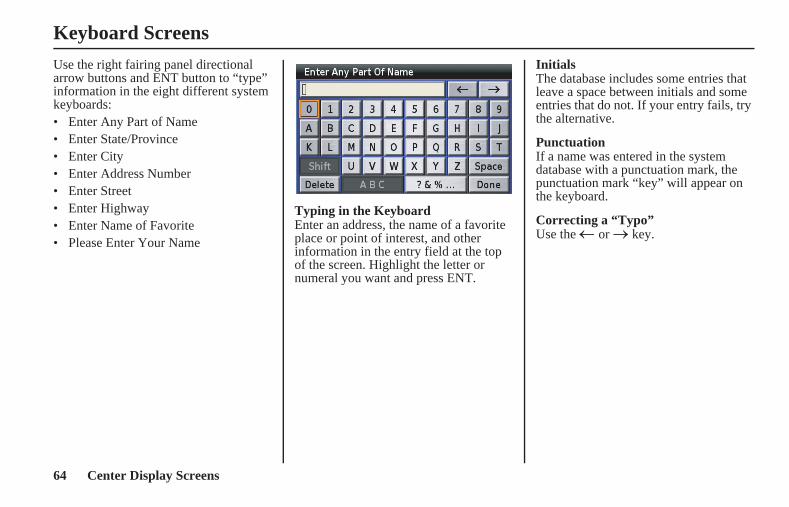
Keyboard Screens
Use the right fairing panel directional arrow buttons and ENT button to “type” information in the eight different system keyboards:• Enter Any Part of Name• Enter State/Province• Enter City• Enter Address Number• Enter Street• Enter Highway• Enter Name of Favorite• Please Enter Your Name
Typing in the KeyboardEnter an address, the name of a favorite place or point of interest, and other information in the entry field at the top of the screen. Highlight the letter or numeral you want and press ENT.
InitialsThe database includes some entries that leave a space between initials and some entries that do not. If your entry fails, try the alternative.
PunctuationIf a name was entered in the system database with a punctuation mark, the punctuation mark “key” will appear on the keyboard.
Correcting a “Typo”Use the ← or → key.
US_MCAS.book Page 64 Tuesday, July 22, 2008 11:26 AM
65Center Display Screens
Keyboard Screens
MCAS_A 31MCAT30
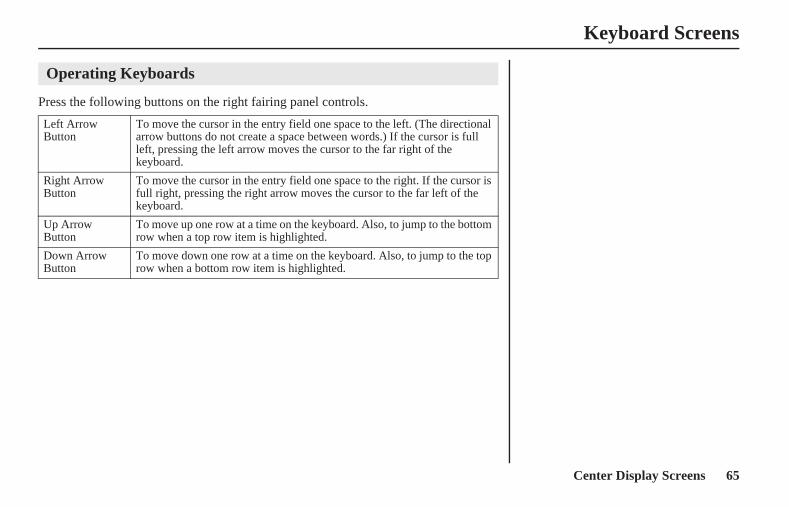
Press the following buttons on the right fairing panel controls.
Operating Keyboards
Left Arrow Button
To move the cursor in the entry field one space to the left. (The directional arrow buttons do not create a space between words.) If the cursor is full left, pressing the left arrow moves the cursor to the far right of the keyboard.
Right Arrow Button
To move the cursor in the entry field one space to the right. If the cursor is full right, pressing the right arrow moves the cursor to the far left of the keyboard.
Up Arrow Button
To move up one row at a time on the keyboard. Also, to jump to the bottom row when a top row item is highlighted.
Down Arrow Button
To move down one row at a time on the keyboard. Also, to jump to the top row when a bottom row item is highlighted.
US_MCAS.book Page 65 Tuesday, July 22, 2008 11:26 AM

66 Center Display Screens
Keyboard Screens
MCAS_A 31MCAT30
Highlight the following items on the screen and press ENT.
Space To enter a space between words or numbers and names. Also, serves as a substitute for punctuation such as periods.
Done To execute what appears in the entry field.
→ To move the highlight in the entry field to the right. Use this feature to enter the “guess” gray word.
← To move the highlight in the entry field to the left. Use this feature to “overwrite” an incorrect entry. All characters typed to the right of the correction will be lost.
Shift To make upper-case or lower-case conversion.
ABC To switch to the keyboard for alphabets or numerals.
? & % ... To switch to the keyboard for symbols.
Delete To delete the character the cursor is positioned on.
US_MCAS.book Page 66 Tuesday, July 22, 2008 11:26 AM
67Center Display Screens
List Screens
MCAS_A 31MCAT30
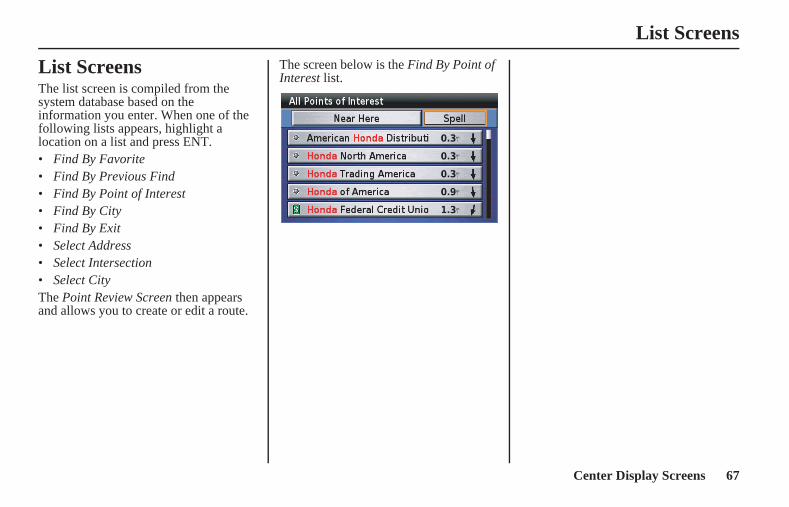
List ScreensThe list screen is compiled from the system database based on the information you enter. When one of the following lists appears, highlight a location on a list and press ENT. • Find By Favorite• Find By Previous Find• Find By Point of Interest• Find By City• Find By Exit• Select Address• Select Intersection• Select CityThe Point Review Screen then appears and allows you to create or edit a route.
The screen below is the Find By Point of Interest list.
US_MCAS.book Page 67 Tuesday, July 22, 2008 11:26 AM
68 Center Display Screens
MCAS_A 31MCAT30
Point Review Screens
After entering your destination, a Point Review Screen appears. The Point Review Screen presents information about the point (location) you have selected as well as a menu.
The screen shown below is just an example. The menu items may differ.
NOTE:The address may not appear if the system cannot locate the position. In that case, a blank space is shown on the display.
Distance from Vehicle Location
Direction from Vehicle Location
Menu
Address
Message Banner
Category of Location
There are two kinds of Point Review Screens, and the menu items shown may differ depending on the screen:
When a location is designated from Find menu or the White Arrow Point Locator, but is not already saved as a Favorite Place
US_MCAS.book Page 68 Tuesday, July 22, 2008 11:26 AM
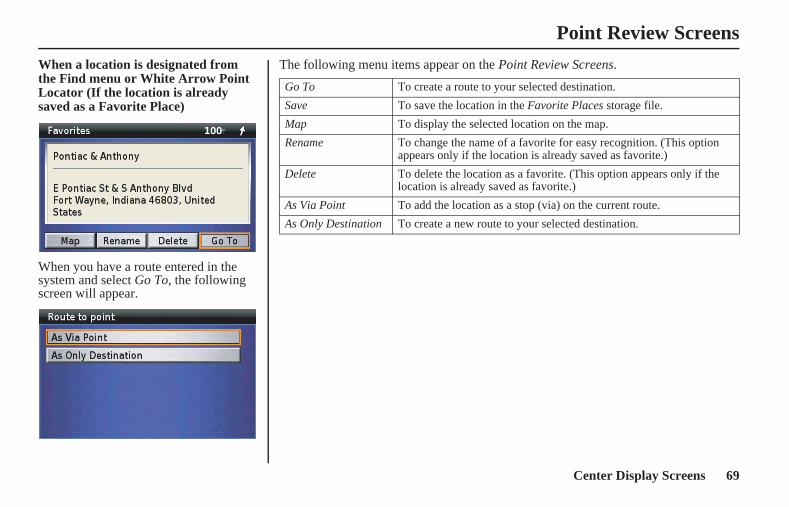
69Center Display Screens
Point Review Screens
MCAS_A 31MCAT30
When a location is designated from the Find menu or White Arrow Point Locator (If the location is already saved as a Favorite Place)
When you have a route entered in the system and select Go To, the following screen will appear.
The following menu items appear on the Point Review Screens.
Go To To create a route to your selected destination.
Save To save the location in the Favorite Places storage file.
Map To display the selected location on the map.
Rename To change the name of a favorite for easy recognition. (This option appears only if the location is already saved as favorite.)
Delete To delete the location as a favorite. (This option appears only if the location is already saved as favorite.)
As Via Point To add the location as a stop (via) on the current route.
As Only Destination To create a new route to your selected destination.
US_MCAS.book Page 69 Tuesday, July 22, 2008 11:26 AM
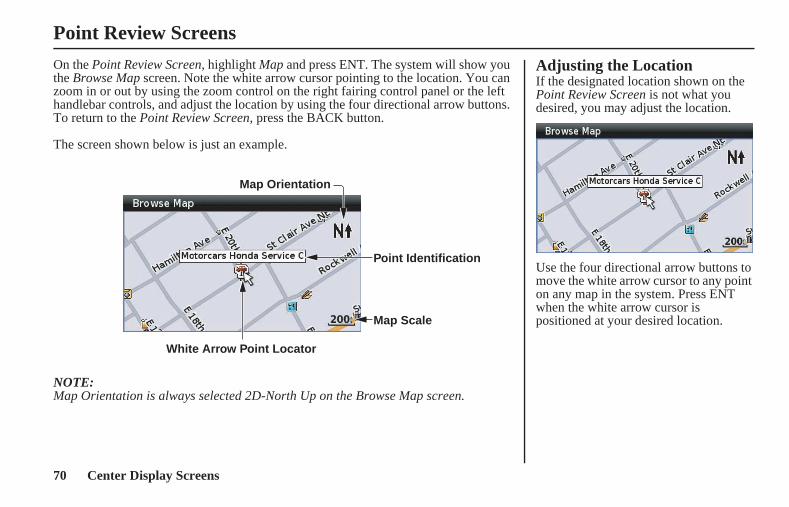
70 Center Display Screens
Point Review Screens
MCAS_A 31MCAT30
On the Point Review Screen, highlight Map and press ENT. The system will show you the Browse Map screen. Note the white arrow cursor pointing to the location. You can zoom in or out by using the zoom control on the right fairing control panel or the left handlebar controls, and adjust the location by using the four directional arrow buttons. To return to the Point Review Screen, press the BACK button.
The screen shown below is just an example.
NOTE:Map Orientation is always selected 2D-North Up on the Browse Map screen.
Map Orientation
Point Identification
White Arrow Point Locator
Map Scale
Adjusting the LocationIf the designated location shown on the Point Review Screen is not what you desired, you may adjust the location.
Use the four directional arrow buttons to move the white arrow cursor to any point on any map in the system. Press ENT when the white arrow cursor is positioned at your desired location.
US_MCAS.book Page 70 Tuesday, July 22, 2008 11:26 AM
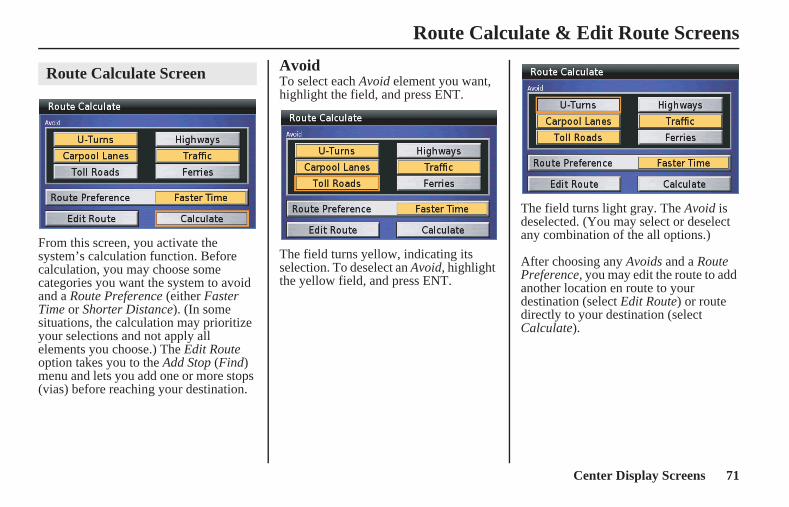
71Center Display Screens
MCAS_A 31MCAT30
Route Calculate & Edit Route Screens
From this screen, you activate the system’s calculation function. Before calculation, you may choose some categories you want the system to avoid and a Route Preference (either Faster Time or Shorter Distance). (In some situations, the calculation may prioritize your selections and not apply all elements you choose.) The Edit Route option takes you to the Add Stop (Find) menu and lets you add one or more stops (vias) before reaching your destination.
AvoidTo select each Avoid element you want, highlight the field, and press ENT.
The field turns yellow, indicating its selection. To deselect an Avoid, highlight the yellow field, and press ENT.
The field turns light gray. The Avoid is deselected. (You may select or deselect any combination of the all options.)
After choosing any Avoids and a Route Preference, you may edit the route to add another location en route to your destination (select Edit Route) or route directly to your destination (select Calculate).
Route Calculate Screen
US_MCAS.book Page 71 Tuesday, July 22, 2008 11:26 AM
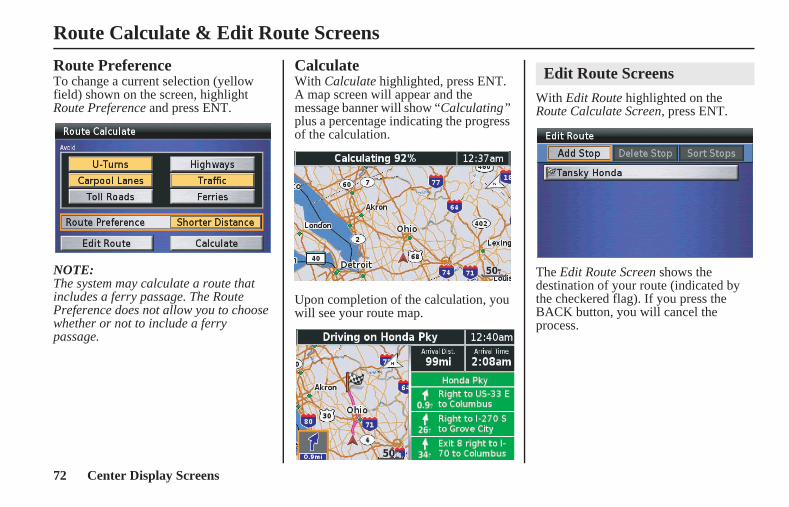
72 Center Display Screens
Route Calculate & Edit Route Screens
MCAS_A 31MCAT30
Route PreferenceTo change a current selection (yellow field) shown on the screen, highlight Route Preference and press ENT.
NOTE:The system may calculate a route that includes a ferry passage. The Route Preference does not allow you to choose whether or not to include a ferry passage.
CalculateWith Calculate highlighted, press ENT. A map screen will appear and the message banner will show “Calculating” plus a percentage indicating the progress of the calculation.
Upon completion of the calculation, you will see your route map.
With Edit Route highlighted on the Route Calculate Screen, press ENT.
The Edit Route Screen shows the destination of your route (indicated by the checkered flag). If you press the BACK button, you will cancel the process.
Edit Route Screens
US_MCAS.book Page 72 Tuesday, July 22, 2008 11:26 AM

73Center Display Screens
Route Calculate & Edit Route Screens
MCAS_A 31MCAT30
To edit the route, highlight Add Stop, and press ENT.
The Add Stop menu offers the seven Find Destination menu selections. Use any of these selections to add a location to your route. Example – using the By Point of Interest option brings up the following screen:
With Search All highlighted and press ENT.
Use the keyboard to type your desired name.
NOTE:For information about the keyboard screen, see page 64.
After typing, highlight Done and press ENT.
With your choice highlighted, press ENT.
With Select highlighted, press ENT.
(cont’d)
US_MCAS.book Page 73 Tuesday, July 22, 2008 11:26 AM
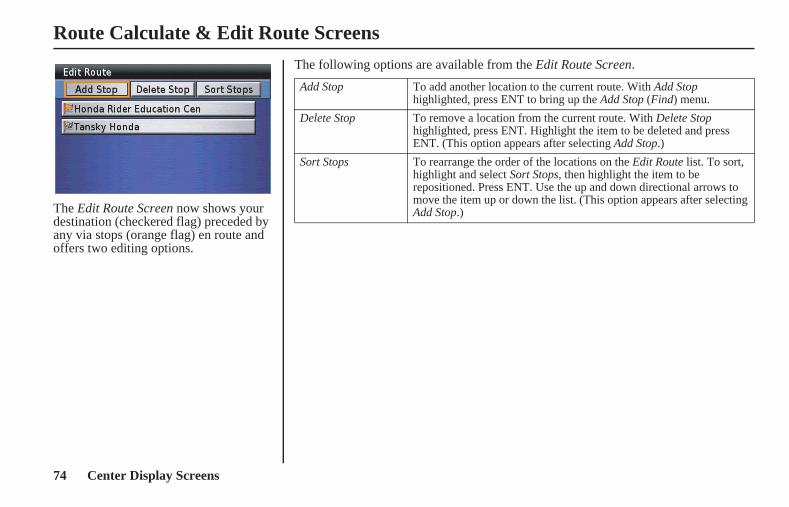
74 Center Display Screens
Route Calculate & Edit Route Screens
MCAS_A 31MCAT30
The Edit Route Screen now shows your destination (checkered flag) preceded by any via stops (orange flag) en route and offers two editing options.
The following options are available from the Edit Route Screen.
Add Stop To add another location to the current route. With Add Stop highlighted, press ENT to bring up the Add Stop (Find) menu.
Delete Stop To remove a location from the current route. With Delete Stop highlighted, press ENT. Highlight the item to be deleted and press ENT. (This option appears after selecting Add Stop.)
Sort Stops To rearrange the order of the locations on the Edit Route list. To sort, highlight and select Sort Stops, then highlight the item to be repositioned. Press ENT. Use the up and down directional arrows to move the item up or down the list. (This option appears after selecting Add Stop.)
US_MCAS.book Page 74 Tuesday, July 22, 2008 11:26 AM

75Center Display Screens
Route Calculate & Edit Route Screens
MCAS_A 31MCAT30
Press the MAP button. The confirmation screen will appear.
Highlight Yes, and press ENT. A map screen will appear and the message banner will show “Calculating” plus a percentage indicating the progress of the calculation.
Upon completion of the calculation, you will see your route map.
US_MCAS.book Page 75 Tuesday, July 22, 2008 11:26 AM
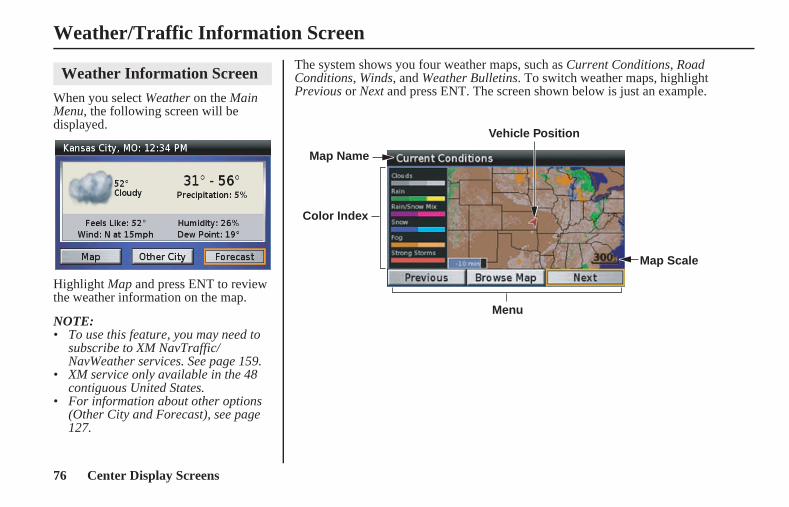
76 Center Display Screens
MCAS_A 31MCAT30
Weather/Traffic Information Screen
When you select Weather on the Main Menu, the following screen will be displayed.
Highlight Map and press ENT to review the weather information on the map.
NOTE:• To use this feature, you may need to
subscribe to XM NavTraffic/NavWeather services. See page 159.
• XM service only available in the 48 contiguous United States.
• For information about other options (Other City and Forecast), see page 127.
Weather Information ScreenThe system shows you four weather maps, such as Current Conditions, Road Conditions, Winds, and Weather Bulletins. To switch weather maps, highlight Previous or Next and press ENT. The screen shown below is just an example.
Vehicle Position
Map Scale
Menu
Color Index
Map Name
US_MCAS.book Page 76 Tuesday, July 22, 2008 11:26 AM

77Center Display Screens
Weather/Traffic Information Screen
MCAS_A 31MCAT30
The following options are available from the weather information screen.
NOTE:• You cannot select a destination on the Browse Map screen for weather information.• You can also see the weather information map on the Traffic/Weather Review
screen. For information about the Traffic/Weather Review screen, see page 79.
Previous to show the previous weather map.
Browse Map to show the full map. You can scroll the map using four directional arrow buttons and zoom in or out on the map screen.
Next to show the next weather map.
If your XM subscription is Basic Weather, the system will display the weather icons instead of graphical “radar” depictions on the Current Conditions map.
US_MCAS.book Page 77 Tuesday, July 22, 2008 11:26 AM

78 Center Display Screens
Weather/Traffic Information Screen
MCAS_A 31MCAT30
The navigation system can display up-to-the minute traffic information when available. The screen shown below is just an example.
NOTE:• To use this feature, you may need to subscribe to XM NavTraffic/NavWeather services. See page 159.• XM service only available in the 48 contiguous United States.
Traffic Information Screen
Message Banner
Alert Icon
Severity and Traffic Flow
Traffic Icon
Map Orientation
Closed
Accident
Incident
High Severity: Traffic is heavily congested or stopped.Medium Severity: Traffic is a little congested.Low Severity: Traffic is still flowing.
Road Condition
Construction
Congestion
Information
US_MCAS.book Page 78 Tuesday, July 22, 2008 11:26 AM

79Center Display Screens
Weather/Traffic Information Screen
MCAS_A 31MCAT30
When you push in and hold the VOICE/GUIDE button on the left handlebar controls, the Traffic/Weather Review screen will be displayed. The Traffic/Weather Review screen can display one of five different screens. Move the ZOOM IN/OUT toggle to the right or left and hold it to switch the review screens. To return to the navigation map screen, push in and hold the VOICE/GUIDE button or press the MAP or DISP button.
NOTE:• To use this feature, you may need to
subscribe to XM NavTraffic/NavWeather services. See page 159.
• XM service only available in the 48 contiguous United States.
Traffic/Weather Review Screen
Return to the first screen.
US_MCAS.book Page 79 Tuesday, July 22, 2008 11:26 AM

80 Center Display Screens
MCAS_A 31MCAT30
US_MCAS.book Page 80 Tuesday, July 22, 2008 11:26 AM

81Find Destination
MCAS_A 31MCAT30
Find DestinationFind Destination ........................................................................82By Favorite.................................................................................83
Finding Nearest..................................................................................83Finding by Name................................................................................86
By Previous Find .......................................................................88By Point of Interest ...................................................................90
Category/Subcategory........................................................................90Point of Interest – Categories & Subcategories .................................91Finding Nearest..................................................................................92Finding by Name................................................................................93
By Address .................................................................................95By Intersection...........................................................................98By City......................................................................................101By Exit......................................................................................102
Finding Nearest Exits.......................................................................102Selecting Exit Road..........................................................................103
US_MCAS.book Page 81 Tuesday, July 22, 2008 11:26 AM

82 Find Destination
MCAS_A 31MCAT30
Find Destination
This section explains the seven methods you may use to find a destination.
On the Main Menu, highlight Find Destination.
Press ENT. The Find Destination menu appears.
The following options are available from the Find Destination menu.
NOTE:If you have no favorites or previous finds in the system, the “By Favorite” or “By Previous Find” choices will be grayed out.
By Favorite To select from up to 2,000 favorite locations you have saved in the system.
By Previous Find To select from your previous 30 finds.
By Point of Interest (POI)
To select from points of interest loaded in the OEM database. (You may not add to the database.)
By Address To route to a known address.
By Intersection To find a location when you do not know the street address, but do know the intersection.
By City To find a known city or town.
By Exit To locate the nearest highway exits or exits on a highway you choose.
US_MCAS.book Page 82 Tuesday, July 22, 2008 11:26 AM
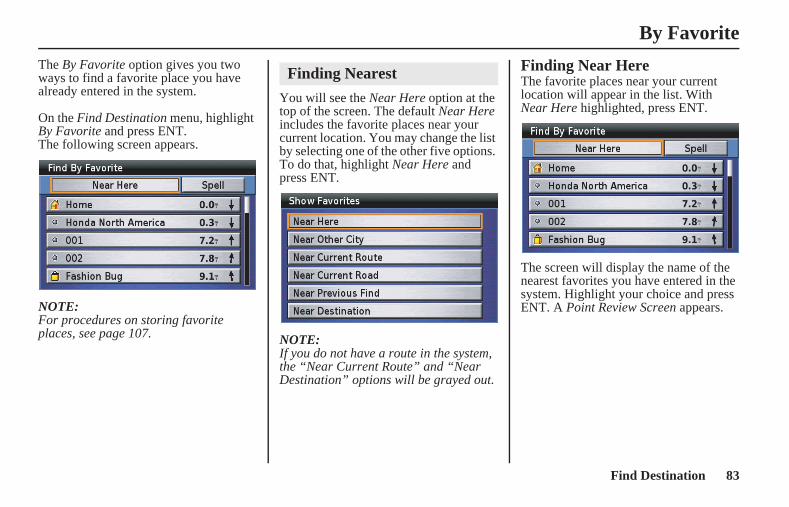
83Find Destination
MCAS_A 31MCAT30
By Favorite
The By Favorite option gives you two ways to find a favorite place you have already entered in the system.
On the Find Destination menu, highlight By Favorite and press ENT. The following screen appears.
NOTE:For procedures on storing favorite places, see page 107.
You will see the Near Here option at the top of the screen. The default Near Here includes the favorite places near your current location. You may change the list by selecting one of the other five options. To do that, highlight Near Here and press ENT.
NOTE:If you do not have a route in the system, the “Near Current Route” and “Near Destination” options will be grayed out.
Finding Near HereThe favorite places near your current location will appear in the list. With Near Here highlighted, press ENT.
The screen will display the name of the nearest favorites you have entered in the system. Highlight your choice and press ENT. A Point Review Screen appears.
Finding Nearest
US_MCAS.book Page 83 Tuesday, July 22, 2008 11:26 AM
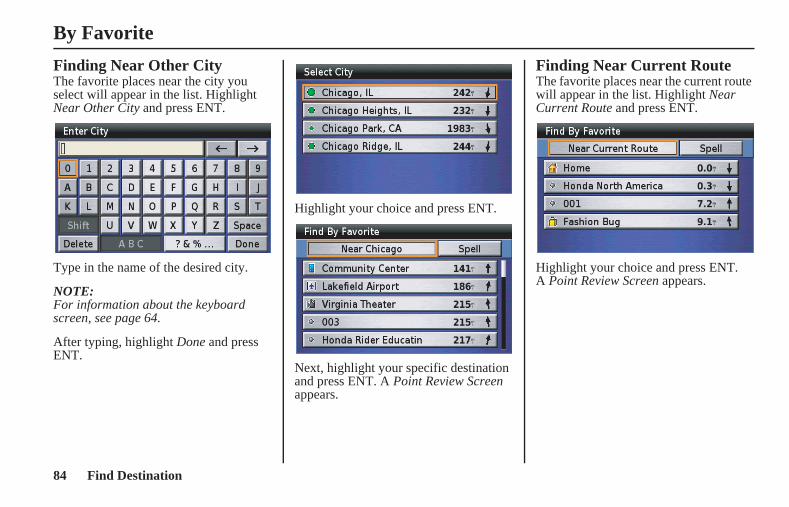
84 Find Destination
By Favorite
MCAS_A 31MCAT30
Finding Near Other CityThe favorite places near the city you select will appear in the list. Highlight Near Other City and press ENT.
Type in the name of the desired city.
NOTE:For information about the keyboard screen, see page 64.
After typing, highlight Done and press ENT.
Highlight your choice and press ENT.
Next, highlight your specific destination and press ENT. A Point Review Screen appears.
Finding Near Current RouteThe favorite places near the current route will appear in the list. Highlight Near Current Route and press ENT.
Highlight your choice and press ENT. A Point Review Screen appears.
US_MCAS.book Page 84 Tuesday, July 22, 2008 11:26 AM

85Find Destination
By Favorite
MCAS_A 31MCAT30
Finding Near Current RoadThe favorite places near the current road will appear in the list. Highlight Near Current Road and press ENT.
Highlight your choice and press ENT. A Point Review Screen appears.
Finding Near Previous FindThe favorite places near the previous find you select will appear in the list. Highlight Near Previous Find and press ENT.
Highlight your choice and press ENT.
Next, highlight your specific destination and press ENT. A Point Review Screen appears.
Finding Near DestinationThe favorite places near the destination will appear in the list. Highlight Near Destination and press ENT.
Highlight your choice and press ENT. A Point Review Screen appears.
(cont’d)
US_MCAS.book Page 85 Tuesday, July 22, 2008 11:26 AM

86 Find Destination
By Favorite
MCAS_A 31MCAT30
NOTE:For more information about the Point Review Screen, see page 68.
With Go To highlighted, press ENT. A Route Calculate Screen appears.
NOTE:For more information about the Route Calculate Screen, see page 71.
With Calculate highlighted, press ENT. The system calculates the route to the destination and starts the voice and route guidance.
This search option allows you to select your favorite place by name. Highlight Spell and press ENT.
Type in the name of the desired favorite.
NOTE:For more information about the keyboard screen, see page 64.
Finding by Name
US_MCAS.book Page 86 Tuesday, July 22, 2008 11:26 AM
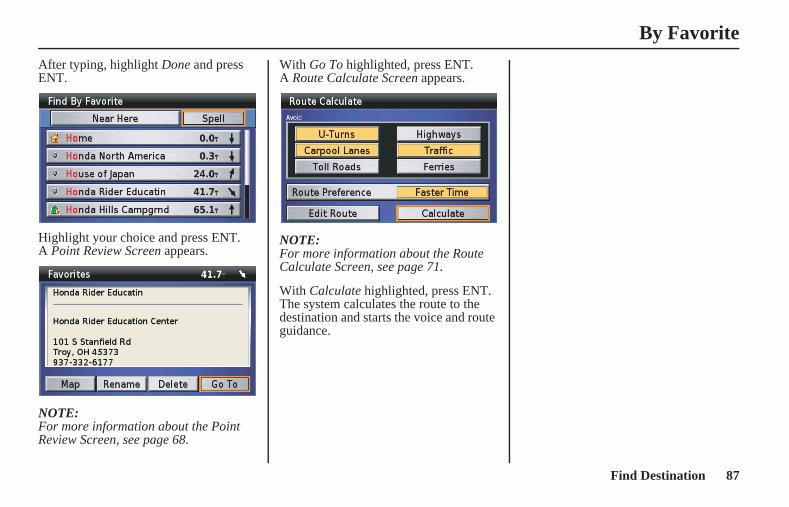
87Find Destination
By Favorite
MCAS_A 31MCAT30
After typing, highlight Done and press ENT.
Highlight your choice and press ENT.A Point Review Screen appears.
NOTE:For more information about the Point Review Screen, see page 68.
With Go To highlighted, press ENT.A Route Calculate Screen appears.
NOTE:For more information about the Route Calculate Screen, see page 71.
With Calculate highlighted, press ENT. The system calculates the route to the destination and starts the voice and route guidance.
US_MCAS.book Page 87 Tuesday, July 22, 2008 11:26 AM

88 Find Destination
MCAS_A 31MCAT30
By Previous Find
The By Previous Find option displays your 30 previous finds (including those that may have been designated as Favorite Places).
On the Find Destination menu, highlight By Previous Find and press ENT.The following screen appears.
You will see the All category at the top of the screen. The default All includes all previous finds. You may reduce the list by selecting one of the other four categories. To do that, highlight All and press ENT.
Highlight your desired category and press ENT.
The screen will show the list for the category you selected. Highlight your choice and press ENT. A Point Review Screen appears.
NOTE:For more information about the Point Review Screen, see page 68.
US_MCAS.book Page 88 Tuesday, July 22, 2008 11:26 AM
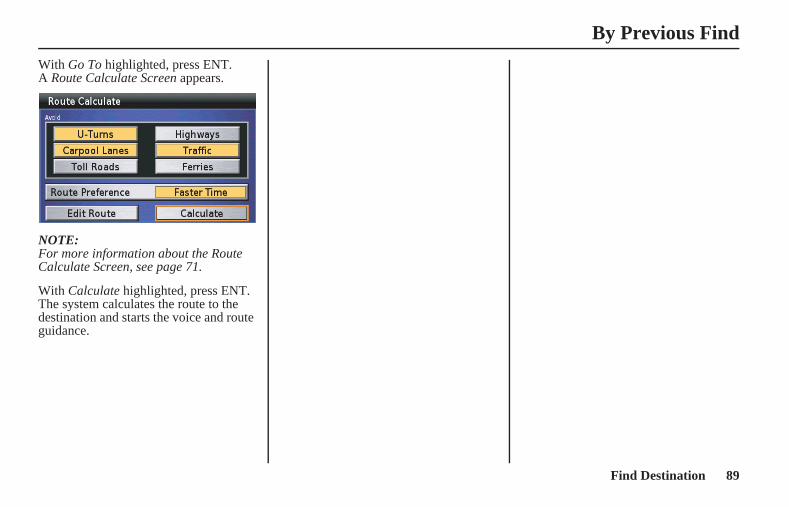
89Find Destination
By Previous Find
MCAS_A 31MCAT30
With Go To highlighted, press ENT.A Route Calculate Screen appears.
NOTE:For more information about the Route Calculate Screen, see page 71.
With Calculate highlighted, press ENT. The system calculates the route to the destination and starts the voice and route guidance.
US_MCAS.book Page 89 Tuesday, July 22, 2008 11:26 AM
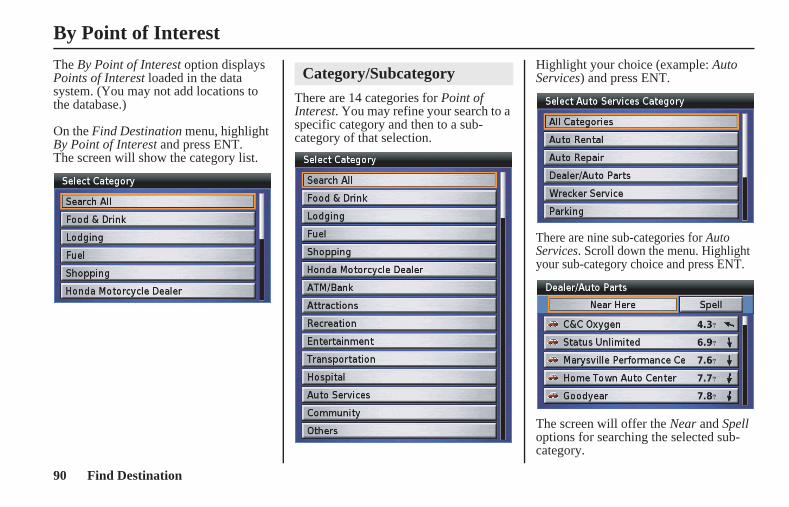
90 Find Destination
MCAS_A 31MCAT30
By Point of Interest
The By Point of Interest option displays Points of Interest loaded in the data system. (You may not add locations to the database.)
On the Find Destination menu, highlight By Point of Interest and press ENT.The screen will show the category list.
There are 14 categories for Point of Interest. You may refine your search to a specific category and then to a sub-category of that selection.
Highlight your choice (example: Auto Services) and press ENT.
There are nine sub-categories for Auto Services. Scroll down the menu. Highlight your sub-category choice and press ENT.
The screen will offer the Near and Spell options for searching the selected sub-category.
Category/Subcategory
US_MCAS.book Page 90 Tuesday, July 22, 2008 11:26 AM
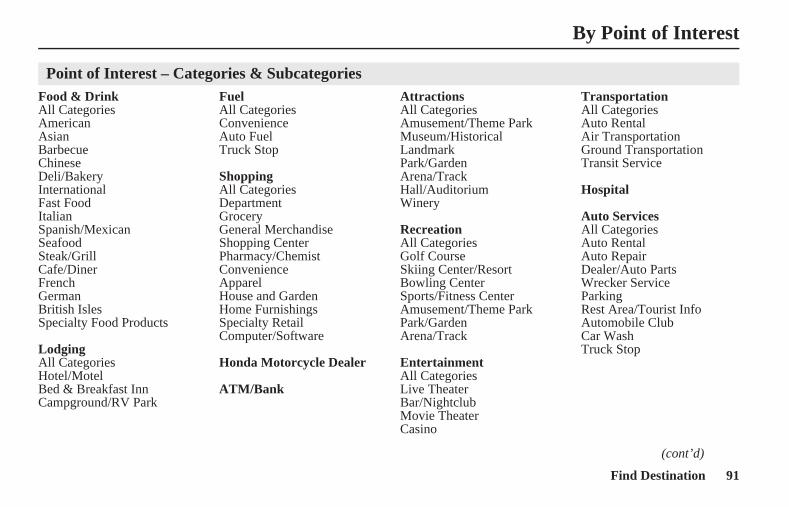
91Find Destination
By Point of Interest
MCAS_A 31MCAT30
Food & DrinkAll CategoriesAmericanAsianBarbecueChineseDeli/BakeryInternationalFast FoodItalianSpanish/MexicanSeafoodSteak/GrillCafe/DinerFrenchGermanBritish IslesSpecialty Food Products
LodgingAll CategoriesHotel/MotelBed & Breakfast InnCampground/RV Park
FuelAll CategoriesConvenienceAuto FuelTruck Stop
ShoppingAll CategoriesDepartmentGroceryGeneral MerchandiseShopping CenterPharmacy/ChemistConvenienceApparelHouse and GardenHome FurnishingsSpecialty RetailComputer/Software
Honda Motorcycle Dealer
ATM/Bank
AttractionsAll CategoriesAmusement/Theme ParkMuseum/HistoricalLandmarkPark/GardenArena/TrackHall/AuditoriumWinery
RecreationAll CategoriesGolf CourseSkiing Center/ResortBowling CenterSports/Fitness CenterAmusement/Theme ParkPark/GardenArena/Track
EntertainmentAll CategoriesLive TheaterBar/NightclubMovie TheaterCasino
TransportationAll CategoriesAuto RentalAir TransportationGround TransportationTransit Service
Hospital
Auto ServicesAll CategoriesAuto RentalAuto RepairDealer/Auto PartsWrecker ServiceParkingRest Area/Tourist InfoAutomobile ClubCar WashTruck Stop
Point of Interest – Categories & Subcategories
(cont’d)
US_MCAS.book Page 91 Tuesday, July 22, 2008 11:26 AM
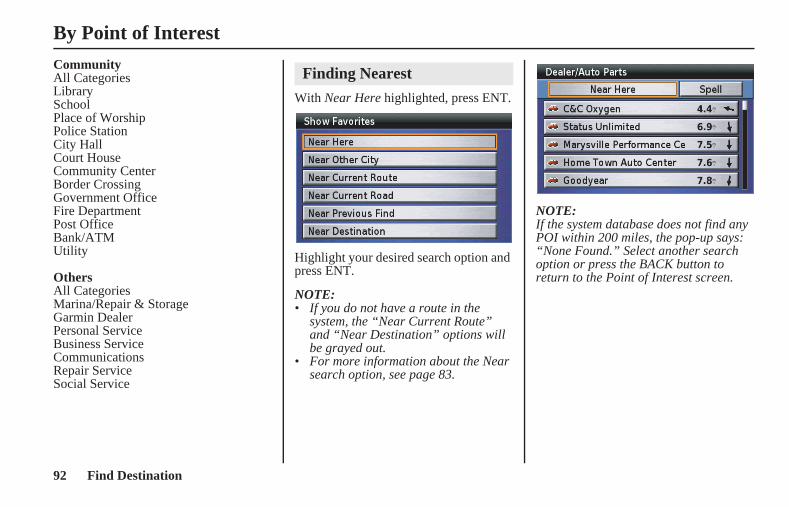
92 Find Destination
By Point of Interest
MCAS_A 31MCAT30
CommunityAll CategoriesLibrarySchoolPlace of WorshipPolice StationCity HallCourt HouseCommunity CenterBorder CrossingGovernment OfficeFire DepartmentPost OfficeBank/ATMUtility
OthersAll CategoriesMarina/Repair & StorageGarmin DealerPersonal ServiceBusiness ServiceCommunicationsRepair ServiceSocial Service
With Near Here highlighted, press ENT.
Highlight your desired search option and press ENT.
NOTE:• If you do not have a route in the
system, the “Near Current Route” and “Near Destination” options will be grayed out.
• For more information about the Near search option, see page 83.
NOTE:If the system database does not find any POI within 200 miles, the pop-up says: “None Found.” Select another search option or press the BACK button to return to the Point of Interest screen.
Finding Nearest
US_MCAS.book Page 92 Tuesday, July 22, 2008 11:26 AM

93Find Destination
By Point of Interest
MCAS_A 31MCAT30
With your choice highlighted, press ENT. A Point Review Screen appears.
NOTE:For more information about the Point Review Screen, see page 68.
With Go To highlighted, press ENT.A Route Calculate Screen appears.
NOTE:For more information about the Route Calculate Screen, see page 71.
With Calculate highlighted, press ENT. The system calculates the route to the destination and starts the voice and route guidance.
With Spell highlighted, press ENT.
Use the keyboard to type the name.
NOTE:For more information about the keyboard screen, see page 64.
After typing, highlight Done and press ENT.
Finding by Name
(cont’d)
US_MCAS.book Page 93 Tuesday, July 22, 2008 11:26 AM

94 Find Destination
By Point of Interest
MCAS_A 31MCAT30
Highlight your choice and press ENT.A Point Review Screen appears.
NOTE:For more information about the Point Review Screen, see page 68.
With Go To highlighted, press ENT.A Route Calculate Screen appears.
NOTE:For more information about the Route Calculate Screen, see page 71.
With Calculate highlighted, press ENT. The system calculates the route to the destination and starts the voice and route guidance.
US_MCAS.book Page 94 Tuesday, July 22, 2008 11:26 AM

95Find Destination
MCAS_A 31MCAT30
By Address
The By Address option lets you put an address into the system so you may route to it.
On the Find Destination menu, highlight By Address and press ENT.The following screen appears.
The system shows your current state, recently selected state. If you use the Select State/Province option, you can search for an address in another state. Highlight your choice and press ENT.
If you choose the Select State/Province option, the keyboard screen will appear. Type the name of state/province. After typing, highlight Done and press ENT. The Select State/Province screen will appear. Highlight your desired state/province and press ENT.
NOTE:For information about the keyboard screen, see page 64.
Highlight Search All Cities and press ENT.
NOTE:The Select City option will narrow your search. If you use this option, you will need to type the city name you want on the keyboard screen.
Use the keyboard to type in the number.
NOTE:For more information about the keyboard screen, see page 64.
After typing, highlight Done and press ENT.
(cont’d)
US_MCAS.book Page 95 Tuesday, July 22, 2008 11:26 AM
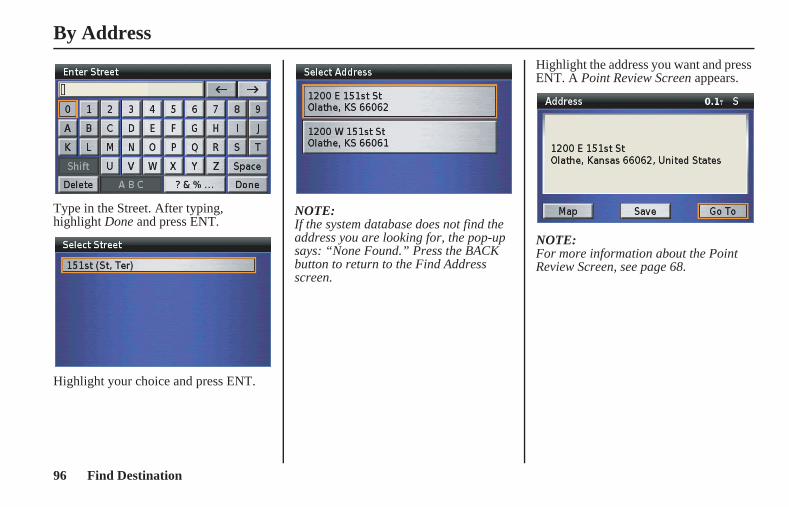
96 Find Destination
By Address
MCAS_A 31MCAT30
Type in the Street. After typing, highlight Done and press ENT.
Highlight your choice and press ENT.
NOTE:If the system database does not find the address you are looking for, the pop-up says: “None Found.” Press the BACK button to return to the Find Address screen.
Highlight the address you want and press ENT. A Point Review Screen appears.
NOTE:For more information about the Point Review Screen, see page 68.
US_MCAS.book Page 96 Tuesday, July 22, 2008 11:26 AM
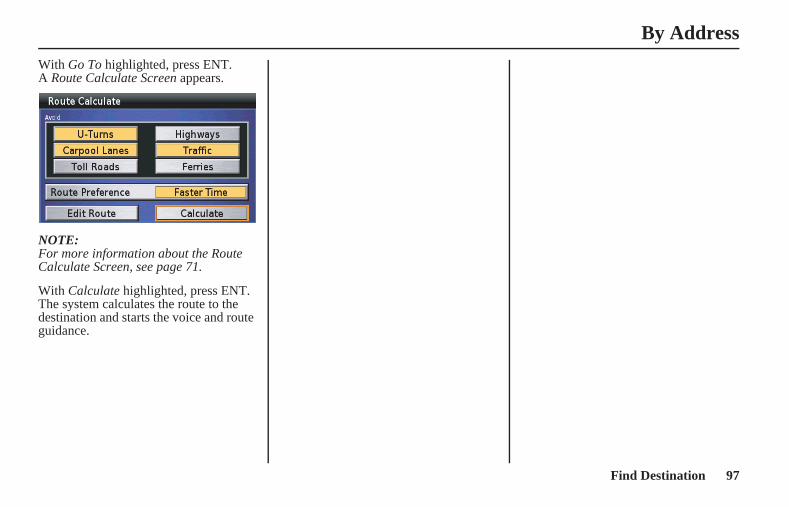
97Find Destination
By Address
MCAS_A 31MCAT30
With Go To highlighted, press ENT.A Route Calculate Screen appears.
NOTE:For more information about the Route Calculate Screen, see page 71.
With Calculate highlighted, press ENT. The system calculates the route to the destination and starts the voice and route guidance.
US_MCAS.book Page 97 Tuesday, July 22, 2008 11:26 AM
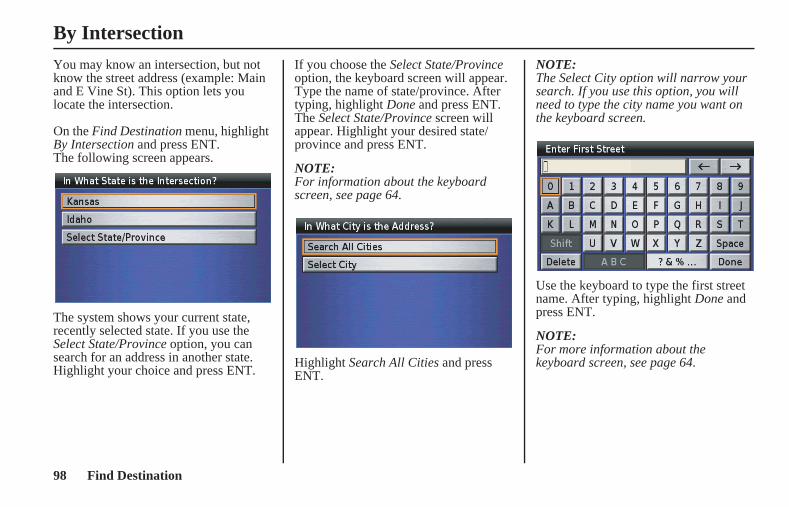
98 Find Destination
MCAS_A 31MCAT30
By Intersection
You may know an intersection, but not know the street address (example: Main and E Vine St). This option lets you locate the intersection.
On the Find Destination menu, highlight By Intersection and press ENT.The following screen appears.
The system shows your current state, recently selected state. If you use the Select State/Province option, you can search for an address in another state. Highlight your choice and press ENT.
If you choose the Select State/Province option, the keyboard screen will appear. Type the name of state/province. After typing, highlight Done and press ENT. The Select State/Province screen will appear. Highlight your desired state/province and press ENT.
NOTE:For information about the keyboard screen, see page 64.
Highlight Search All Cities and press ENT.
NOTE:The Select City option will narrow your search. If you use this option, you will need to type the city name you want on the keyboard screen.
Use the keyboard to type the first street name. After typing, highlight Done and press ENT.
NOTE:For more information about the keyboard screen, see page 64.
US_MCAS.book Page 98 Tuesday, July 22, 2008 11:26 AM

99Find Destination
By Intersection
MCAS_A 31MCAT30
Highlight your choice and press ENT.
Repeat the keyboard process for the Second Street.
With your choice highlighted, press ENT.
NOTE:If the system database does not find the intersection you are looking for, the pop-up says: “None Found.” Press the BACK button to return to the Find Intersection screen.
If you find the intersection you want, highlight it and press ENT. A Point Review Screen appears.
NOTE:For more information about the Point Review Screen, see page 68.
(cont’d)
US_MCAS.book Page 99 Tuesday, July 22, 2008 11:26 AM
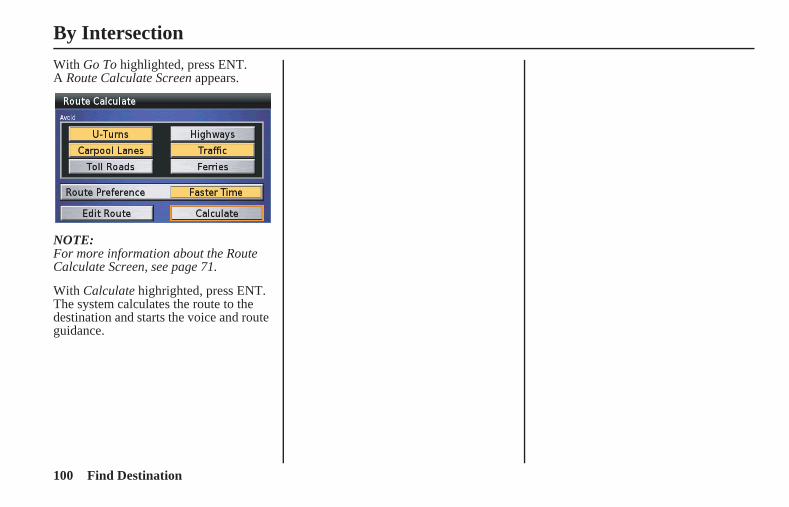
100 Find Destination
By Intersection
MCAS_A 31MCAT30
With Go To highlighted, press ENT.A Route Calculate Screen appears.
NOTE:For more information about the Route Calculate Screen, see page 71.
With Calculate highrighted, press ENT. The system calculates the route to the destination and starts the voice and route guidance.
US_MCAS.book Page 100 Tuesday, July 22, 2008 11:26 AM
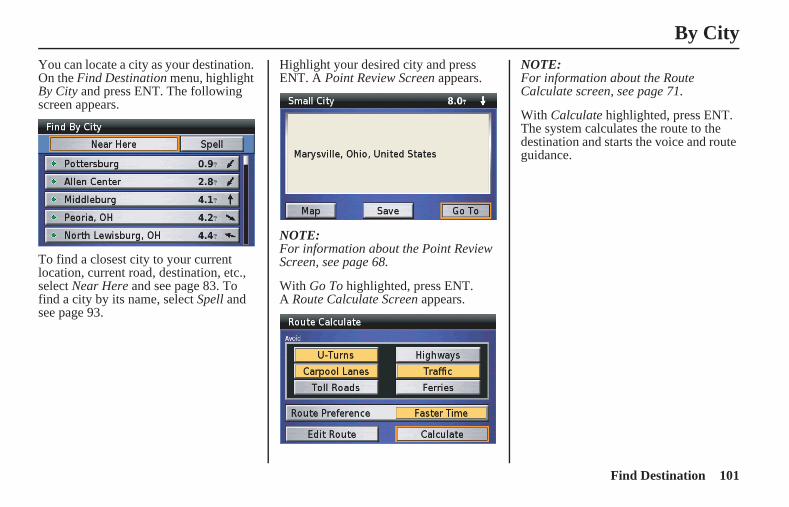
101Find Destination
MCAS_A 31MCAT30
By City
You can locate a city as your destination. On the Find Destination menu, highlight By City and press ENT. The following screen appears.
To find a closest city to your current location, current road, destination, etc., select Near Here and see page 83. To find a city by its name, select Spell and see page 93.
Highlight your desired city and press ENT. A Point Review Screen appears.
NOTE:For information about the Point Review Screen, see page 68.
With Go To highlighted, press ENT.A Route Calculate Screen appears.
NOTE:For information about the Route Calculate screen, see page 71.
With Calculate highlighted, press ENT. The system calculates the route to the destination and starts the voice and route guidance.
US_MCAS.book Page 101 Tuesday, July 22, 2008 11:26 AM
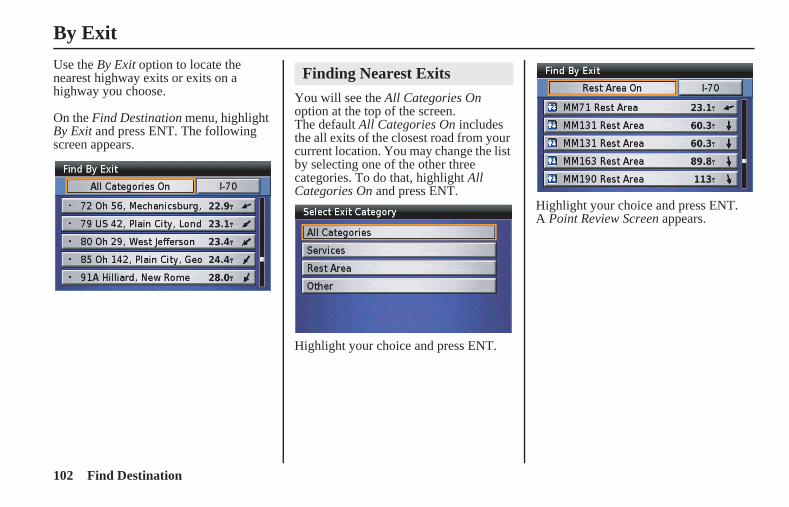
102 Find Destination
MCAS_A 31MCAT30
By Exit
Use the By Exit option to locate the nearest highway exits or exits on a highway you choose.
On the Find Destination menu, highlight By Exit and press ENT. The following screen appears.
You will see the All Categories On option at the top of the screen.The default All Categories On includes the all exits of the closest road from your current location. You may change the list by selecting one of the other three categories. To do that, highlight All Categories On and press ENT.
Highlight your choice and press ENT.
Highlight your choice and press ENT.A Point Review Screen appears.
Finding Nearest Exits
US_MCAS.book Page 102 Tuesday, July 22, 2008 11:26 AM

103Find Destination
By Exit
MCAS_A 31MCAT30
The Point Review Screen shows the exit on its map and offers menu routing choices.
NOTE:For more information about the Point Review Screen, see page 68.
With Go To highlighted, press ENT.A Route Calculate Screen appears.
NOTE:For more information about the Route Calculate Screen, see page 71.
With Calculate highlighted, press ENT. The system calculates the route to the destination and starts the voice and route guidance.
Highlight the exit road box at the upper-right corner of the Find By Exit screen and press ENT.
Use the keyboard to type in the number of the exit road. For example, 88 (for Interstate 88).
NOTE:For more information about the keyboard screen, see page 64.
Selecting Exit Road
(cont’d)
US_MCAS.book Page 103 Tuesday, July 22, 2008 11:26 AM
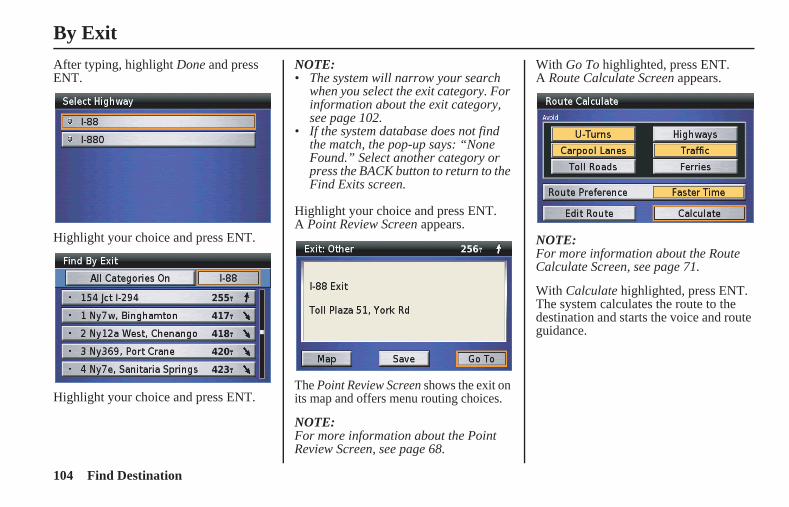
104 Find Destination
By Exit
MCAS_A 31MCAT30
After typing, highlight Done and press ENT.
Highlight your choice and press ENT.
Highlight your choice and press ENT.
NOTE:• The system will narrow your search
when you select the exit category. For information about the exit category, see page 102.
• If the system database does not find the match, the pop-up says: “None Found.” Select another category or press the BACK button to return to the Find Exits screen.
Highlight your choice and press ENT.A Point Review Screen appears.
The Point Review Screen shows the exit on its map and offers menu routing choices.
NOTE:For more information about the Point Review Screen, see page 68.
With Go To highlighted, press ENT.A Route Calculate Screen appears.
NOTE:For more information about the Route Calculate Screen, see page 71.
With Calculate highlighted, press ENT. The system calculates the route to the destination and starts the voice and route guidance.
US_MCAS.book Page 104 Tuesday, July 22, 2008 11:26 AM

105Favorite Places
MCAS_A 31MCAT30
Favorite PlacesFavorite Places.........................................................................106
Storing Favorite Places ....................................................................107Renaming Favorite Places................................................................108Deleting Favorite Places ..................................................................109
US_MCAS.book Page 105 Tuesday, July 22, 2008 11:26 AM
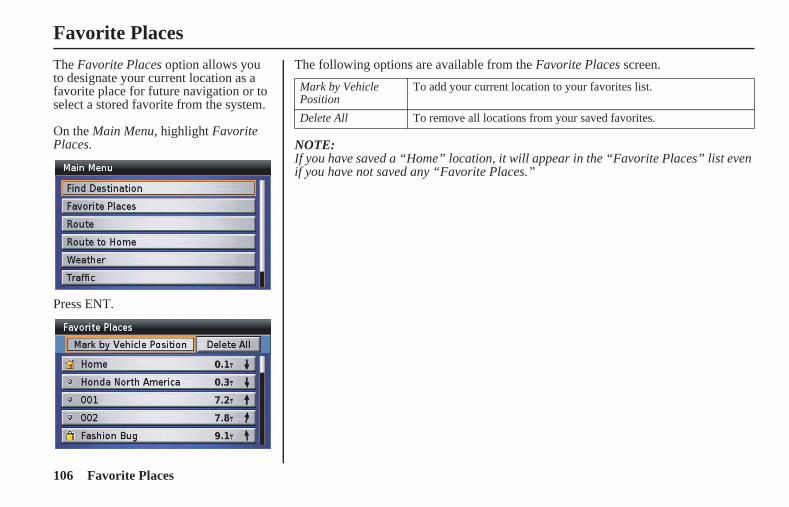
106 Favorite Places
MCAS_A 31MCAT30
Favorite Places
The Favorite Places option allows you to designate your current location as a favorite place for future navigation or to select a stored favorite from the system.
On the Main Menu, highlight Favorite Places.
Press ENT.
The following options are available from the Favorite Places screen.
NOTE:If you have saved a “Home” location, it will appear in the “Favorite Places” list even if you have not saved any “Favorite Places.”
Mark by Vehicle Position
To add your current location to your favorites list.
Delete All To remove all locations from your saved favorites.
US_MCAS.book Page 106 Tuesday, July 22, 2008 11:26 AM
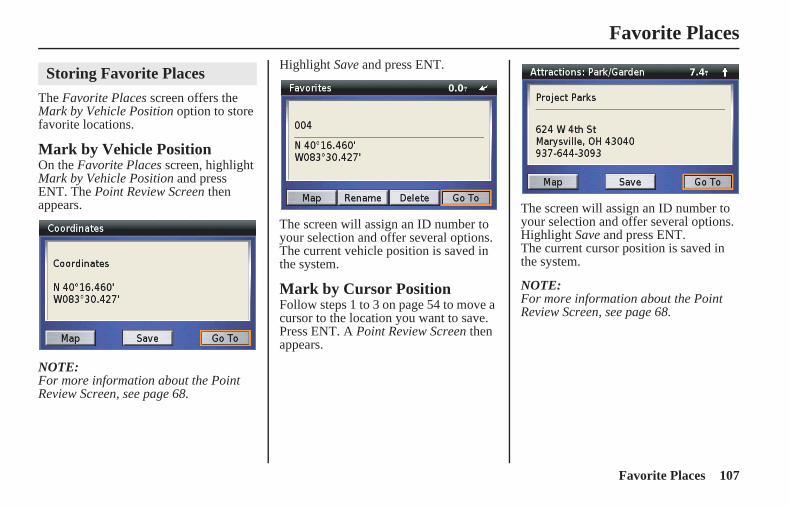
107Favorite Places
Favorite Places
MCAS_A 31MCAT30
The Favorite Places screen offers the Mark by Vehicle Position option to store favorite locations.
Mark by Vehicle PositionOn the Favorite Places screen, highlight Mark by Vehicle Position and press ENT. The Point Review Screen then appears.
NOTE:For more information about the Point Review Screen, see page 68.
Highlight Save and press ENT.
The screen will assign an ID number to your selection and offer several options. The current vehicle position is saved in the system.
Mark by Cursor PositionFollow steps 1 to 3 on page 54 to move a cursor to the location you want to save. Press ENT. A Point Review Screen then appears.
The screen will assign an ID number to your selection and offer several options. Highlight Save and press ENT.The current cursor position is saved in the system.
NOTE:For more information about the Point Review Screen, see page 68.
Storing Favorite Places
US_MCAS.book Page 107 Tuesday, July 22, 2008 11:26 AM
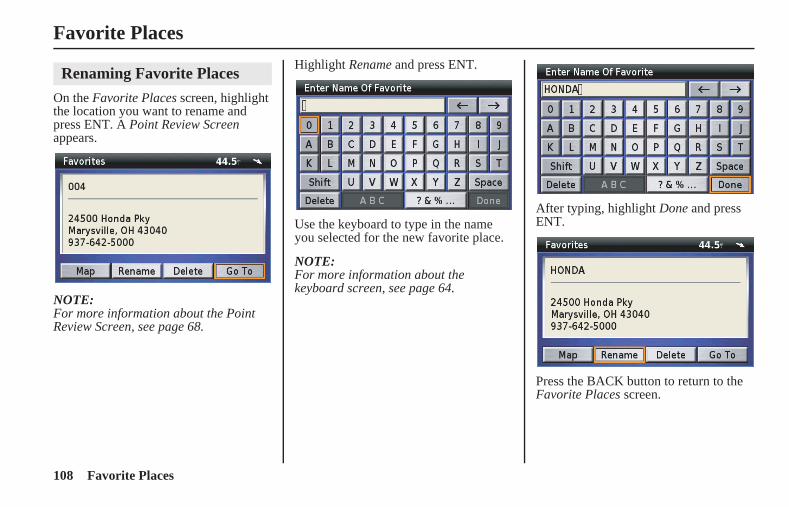
108 Favorite Places
Favorite Places
MCAS_A 31MCAT30
On the Favorite Places screen, highlight the location you want to rename and press ENT. A Point Review Screen appears.
NOTE:For more information about the Point Review Screen, see page 68.
Highlight Rename and press ENT.
Use the keyboard to type in the name you selected for the new favorite place.
NOTE:For more information about the keyboard screen, see page 64.
After typing, highlight Done and press ENT.
Press the BACK button to return to the Favorite Places screen.
Renaming Favorite Places
US_MCAS.book Page 108 Tuesday, July 22, 2008 11:26 AM

109Favorite Places
Favorite Places
MCAS_A 31MCAT30
On the Favorite Places screen, highlight the location you want to delete and press ENT. A Point Review Screen appears.
NOTE:For more information about the Point Review Screen, see page 68.
Highlight Delete and press ENT.
The screen asks you to confirm your selection. Highlight Yes and press ENT.
The display returns to the Favorite Places screen with your selection deleted.
To delete all Favorite Places from the list, highlight Delete All. Press ENT to execute the deletion.
Deleting Favorite Places
US_MCAS.book Page 109 Tuesday, July 22, 2008 11:26 AM

110 Favorite Places
MCAS_A 31MCAT30
US_MCAS.book Page 110 Tuesday, July 22, 2008 11:26 AM
111Route
MCAS_A 31MCAT30
RouteRoute ........................................................................................112Route to New Destination .......................................................114Edit Route ................................................................................116
Adding a Location as a Via..............................................................117Adding a Road as a Via ...................................................................119
Recalculate Route....................................................................115Detour.......................................................................................121
US_MCAS.book Page 111 Tuesday, July 22, 2008 11:26 AM

112 Route
MCAS_A 31MCAT30
Route
To access the Route menu, highlight Route on the Main Menu.
Press ENT. The first time you select the Route option, or any time you do not have a route in the system, you will see the following screen.
Use Route to New Destination to create a route to a destination. Anytime you have a route entered in the system, you will see the following screen.
NOTE:• “Detour” will not appear on the menu
if you go off route or do not have satellite reception.
• If the system calculates a route but does not have satellite reception, the voice guidance will not operate until reception is acquired.
US_MCAS.book Page 112 Tuesday, July 22, 2008 11:26 AM

113Route
Route
MCAS_A 31MCAT30
The following options are available from the Route menu.
Route to New Destination
To create a route to a destination.
Stop Route To suspend your current route for an intentional “detour” so you do not lose your current route or receive off-route messages. You may also use Stop Route if you reach the vicinity of your destination (example: large parking lot) but the route does not terminate. To return to your route, go to the Main Menu, select Route, and then Resume Route.
Resume Route To resume your current route after stopping it. This function does not appear on the Route menu until after you use the Stop Route function.
Recalculate Route To modify an existing route by picking a route preference (either faster time or shorter distance) and entering up to four “avoid” preferences.
Edit Route To review your route and add (or delete) one or more locations en route to your destination.
Detour To recalculate your route because of an unexpected detour of from ½ to 15 miles.
NOTE:The “Route to New Destination” and “Edit Route” selections take you to the seven Find Destination functions. In this “Route” section of the manual, the instructions will refer you to the “Find Destination” step-by-step sequences.
US_MCAS.book Page 113 Tuesday, July 22, 2008 11:26 AM

114 Route
MCAS_A 31MCAT30
Route to New Destination
On the Route menu, highlight Route to New Destination and press ENT.The following screen appears.
The system offers the seven Find Destination menu choices.
See Find Destination on page 81 for information about designating a location. A Point Review Screen will appear.
NOTE:For more information about the Point Review Screen, see page 68.
With Go To highlighted, press ENT.A Route Calculate Screen appears.
NOTE:For more information about the Route Calculate Screen, see page 71.
With Calculate highlighted, press ENT. The system calculates the route to the destination and starts the voice and route guidance.
US_MCAS.book Page 114 Tuesday, July 22, 2008 11:26 AM

115Route
MCAS_A 31MCAT30
Recalculate Route
The Recalculate Route option lets you modify your current route to shorten the time or distance, as well as enter up to four “avoid” preferences.
On the Route menu, highlight Recalculate Route and press ENT.A Route Calculate Screen appears.
NOTE:For more information about the Route Calculate Screen, see page 71.
After entering your preferences, highlight Calculate and press ENT.The system calculates the route to the destination and starts the voice and route guidance.
US_MCAS.book Page 115 Tuesday, July 22, 2008 11:26 AM
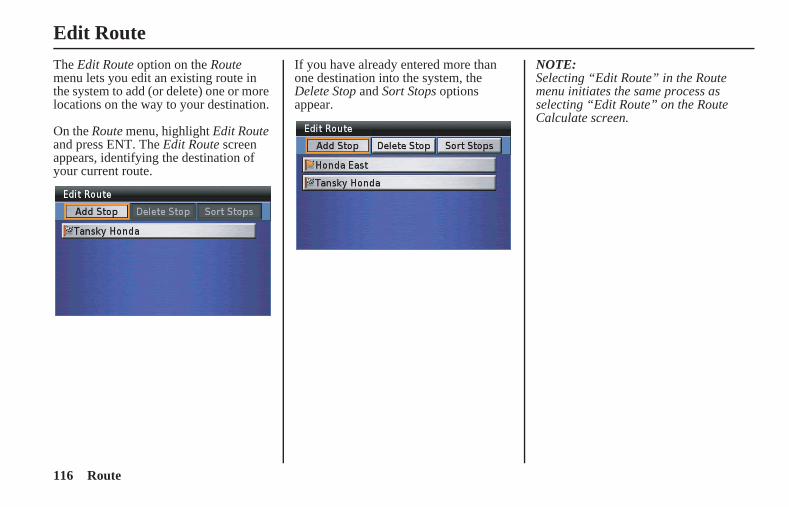
116 Route
MCAS_A 31MCAT30
Edit Route
The Edit Route option on the Route menu lets you edit an existing route in the system to add (or delete) one or more locations on the way to your destination.
On the Route menu, highlight Edit Route and press ENT. The Edit Route screen appears, identifying the destination of your current route.
If you have already entered more than one destination into the system, the Delete Stop and Sort Stops options appear.
NOTE:Selecting “Edit Route” in the Route menu initiates the same process as selecting “Edit Route” on the Route Calculate screen.
US_MCAS.book Page 116 Tuesday, July 22, 2008 11:26 AM

117Route
Edit Route
MCAS_A 31MCAT30
The following options are available from the Edit Route screen.
Add Stop To add another location to the current route. With Add Stop highlighted, press ENT to bring up the Add Stop (Find) menu. See Adding a Location as a Via on this page.
Delete Stop To remove a location from the current route. With Delete Stop highlighted, press ENT. Highlight the item to be deleted and press ENT. (This option appears after selecting Add Stop.)
Sort Stops To rearrange the order of the locations on the Edit Route list. This includes switching a current via with the current destination. To sort, highlight the item to be repositioned. Press ENT. Use the up and down directional arrows to move the item up or down the list. (This option appears after selecting Add Stop.)
On the Edit Route screen, highlight Add Stop and press ENT. The following screen appears.
The Add Route Stop menu offers the seven Find menu selections.
Adding a Location as a Via
(cont’d)
US_MCAS.book Page 117 Tuesday, July 22, 2008 11:26 AM
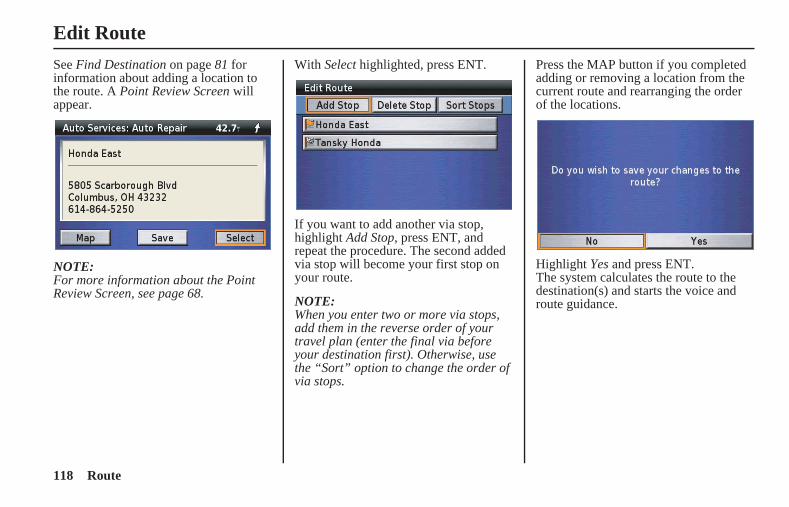
118 Route
Edit Route
MCAS_A 31MCAT30
See Find Destination on page 81 for information about adding a location to the route. A Point Review Screen will appear.
NOTE:For more information about the Point Review Screen, see page 68.
With Select highlighted, press ENT.
If you want to add another via stop, highlight Add Stop, press ENT, and repeat the procedure. The second added via stop will become your first stop on your route.
NOTE:When you enter two or more via stops, add them in the reverse order of your travel plan (enter the final via before your destination first). Otherwise, use the “Sort” option to change the order of via stops.
Press the MAP button if you completed adding or removing a location from the current route and rearranging the order of the locations.
Highlight Yes and press ENT.The system calculates the route to the destination(s) and starts the voice and route guidance.
US_MCAS.book Page 118 Tuesday, July 22, 2008 11:26 AM
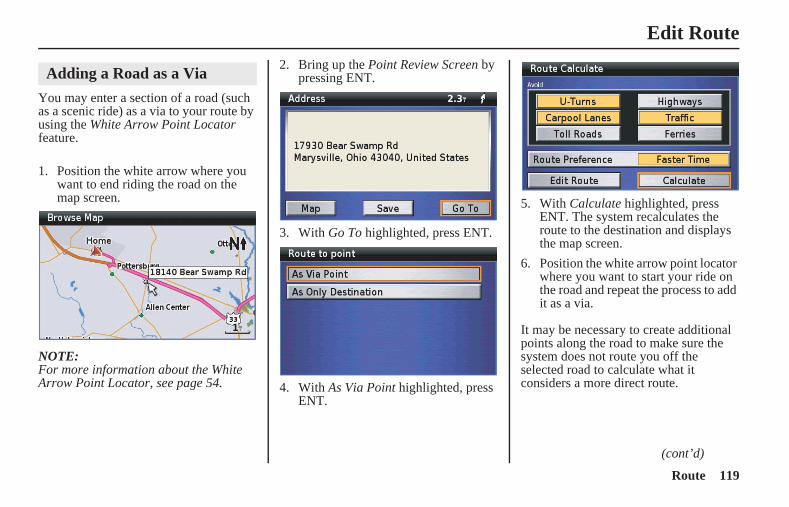
119Route
Edit Route
MCAS_A 31MCAT30
You may enter a section of a road (such as a scenic ride) as a via to your route by using the White Arrow Point Locator feature.
1. Position the white arrow where you want to end riding the road on the map screen.
NOTE:For more information about the White Arrow Point Locator, see page 54.
2. Bring up the Point Review Screen by pressing ENT.
3. With Go To highlighted, press ENT.
4. With As Via Point highlighted, press ENT.
5. With Calculate highlighted, press ENT. The system recalculates the route to the destination and displays the map screen.
6. Position the white arrow point locator where you want to start your ride on the road and repeat the process to add it as a via.
It may be necessary to create additional points along the road to make sure the system does not route you off the selected road to calculate what it considers a more direct route.
Adding a Road as a Via
(cont’d)
US_MCAS.book Page 119 Tuesday, July 22, 2008 11:26 AM
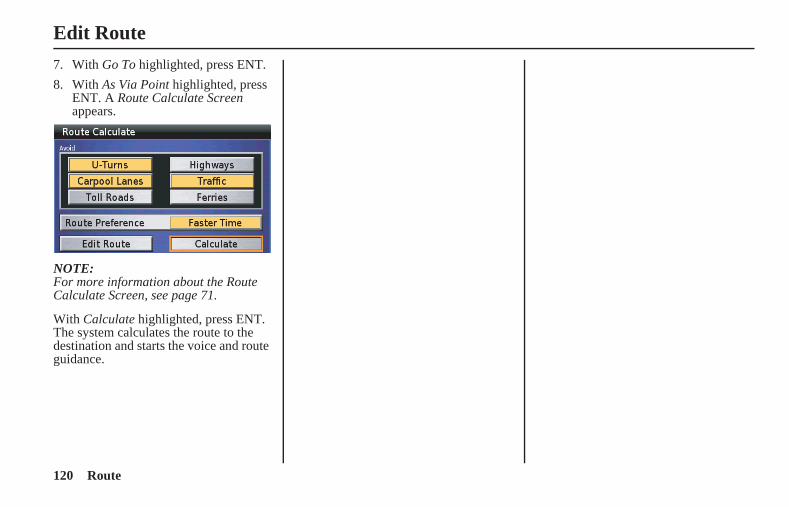
120 Route
Edit Route
MCAS_A 31MCAT30
7. With Go To highlighted, press ENT.
8. With As Via Point highlighted, press ENT. A Route Calculate Screen appears.
NOTE:For more information about the Route Calculate Screen, see page 71.
With Calculate highlighted, press ENT. The system calculates the route to the destination and starts the voice and route guidance.
US_MCAS.book Page 120 Tuesday, July 22, 2008 11:26 AM
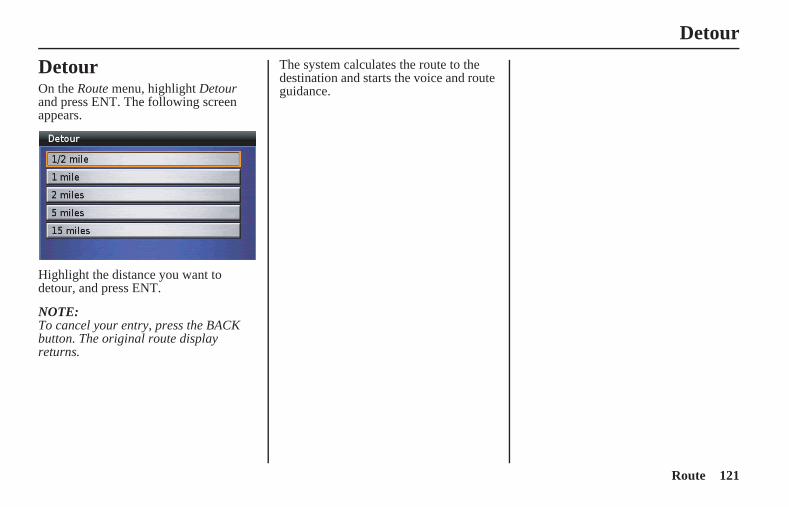
121Route
Detour
MCAS_A 31MCAT30
DetourOn the Route menu, highlight Detour and press ENT. The following screen appears.
Highlight the distance you want to detour, and press ENT.
NOTE:To cancel your entry, press the BACK button. The original route display returns.
The system calculates the route to the destination and starts the voice and route guidance.
US_MCAS.book Page 121 Tuesday, July 22, 2008 11:26 AM

122 Route
MCAS_A 31MCAT30
US_MCAS.book Page 122 Tuesday, July 22, 2008 11:26 AM

123Route to Home
MCAS_A 31MCAT30
Route to HomeRoute to Home.........................................................................124
Calculating a Route Home...............................................................125Checking Your Home Location .......................................................125Deleting Your Home Location.........................................................126
US_MCAS.book Page 123 Tuesday, July 22, 2008 11:26 AM

124 Route to Home
MCAS_A 31MCAT30
Route to Home
Once you store a Home location using Set Home using Find Menu (see page 154) or Set Home using Vehicle Position (see page 155), Route to Home offers a quick method to route there.
On the Main Menu, highlight Route to Home.
Press ENT.
If you have previously entered a Home location, a Route Calculate Screen appears.
If there is no Home in the system, you will be directed to Setup System 2 screen.
For storing a Home location, see Set Home using Find Menu on page 154 or Set Home using Vehicle Position on page 155.
NOTE:Once you save a “Home” location, the map screen will display a “Home” icon for 120 miles or smaller map scale.
US_MCAS.book Page 124 Tuesday, July 22, 2008 11:26 AM
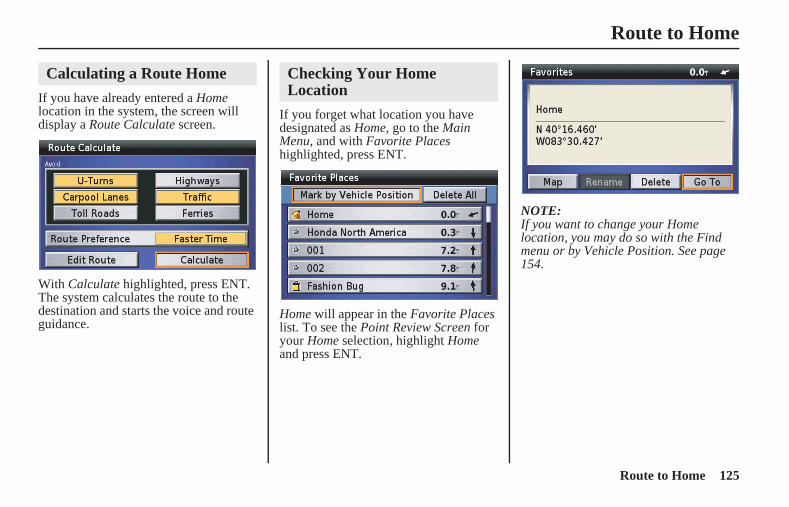
125Route to Home
Route to Home
MCAS_A 31MCAT30
If you have already entered a Home location in the system, the screen will display a Route Calculate screen.
With Calculate highlighted, press ENT. The system calculates the route to the destination and starts the voice and route guidance.
If you forget what location you have designated as Home, go to the Main Menu, and with Favorite Places highlighted, press ENT.
Home will appear in the Favorite Places list. To see the Point Review Screen for your Home selection, highlight Home and press ENT.
NOTE:If you want to change your Home location, you may do so with the Find menu or by Vehicle Position. See page 154.
Calculating a Route Home Checking Your Home Location
US_MCAS.book Page 125 Tuesday, July 22, 2008 11:26 AM
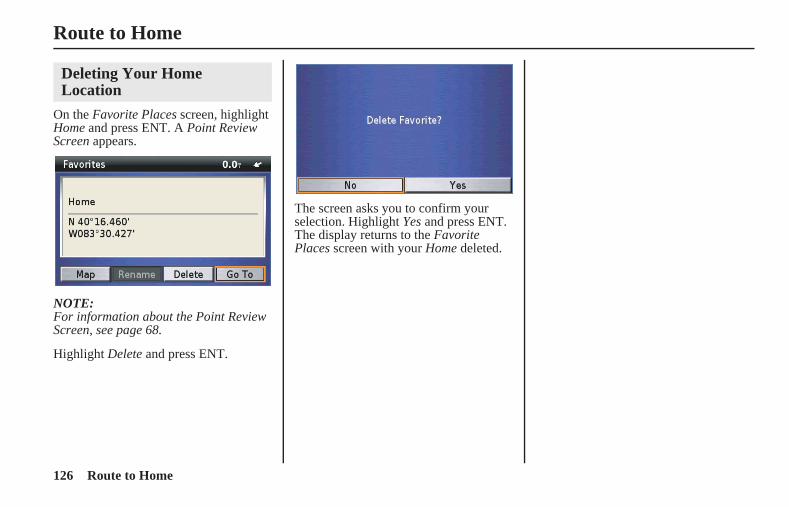
126 Route to Home
Route to Home
MCAS_A 31MCAT30
On the Favorite Places screen, highlight Home and press ENT. A Point Review Screen appears.
NOTE:For information about the Point Review Screen, see page 68.
Highlight Delete and press ENT.
The screen asks you to confirm your selection. Highlight Yes and press ENT. The display returns to the Favorite Places screen with your Home deleted.
Deleting Your Home Location
US_MCAS.book Page 126 Tuesday, July 22, 2008 11:26 AM

127Weather
MCAS_A 31MCAT30
WeatherWeather....................................................................................128
Viewing Weather Map.....................................................................129Viewing Weather for Other City......................................................129Viewing Weather Forecast...............................................................130
US_MCAS.book Page 127 Tuesday, July 22, 2008 11:26 AM
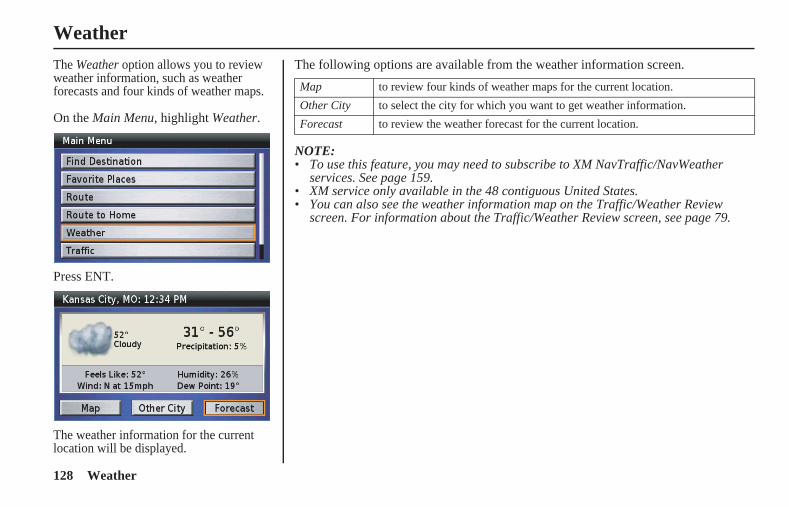
128 Weather
MCAS_A 31MCAT30
Weather
The Weather option allows you to review weather information, such as weather forecasts and four kinds of weather maps.
On the Main Menu, highlight Weather.
Press ENT.
The weather information for the current location will be displayed.
The following options are available from the weather information screen.
NOTE:• To use this feature, you may need to subscribe to XM NavTraffic/NavWeather
services. See page 159.• XM service only available in the 48 contiguous United States.• You can also see the weather information map on the Traffic/Weather Review
screen. For information about the Traffic/Weather Review screen, see page 79.
Map to review four kinds of weather maps for the current location.
Other City to select the city for which you want to get weather information.
Forecast to review the weather forecast for the current location.
US_MCAS.book Page 128 Tuesday, July 22, 2008 11:26 AM
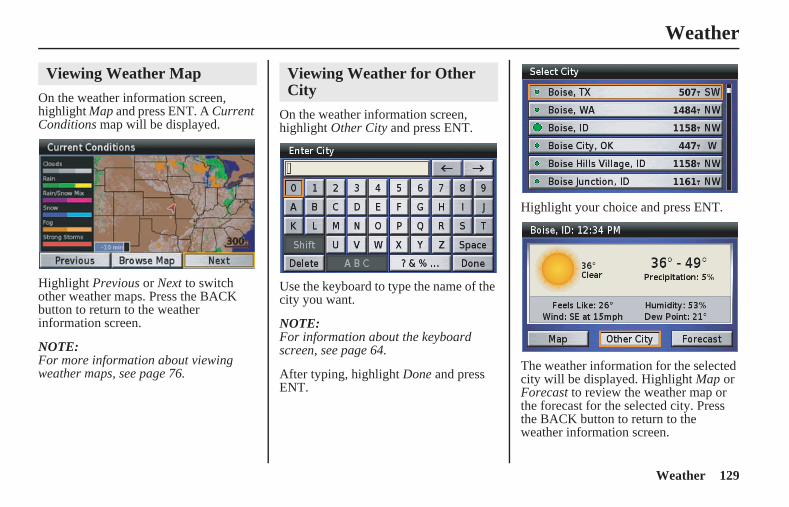
129Weather
Weather
MCAS_A 31MCAT30
On the weather information screen, highlight Map and press ENT. A Current Conditions map will be displayed.
Highlight Previous or Next to switch other weather maps. Press the BACK button to return to the weather information screen.
NOTE:For more information about viewing weather maps, see page 76.
On the weather information screen, highlight Other City and press ENT.
Use the keyboard to type the name of the city you want.
NOTE:For information about the keyboard screen, see page 64.
After typing, highlight Done and press ENT.
Highlight your choice and press ENT.
The weather information for the selected city will be displayed. Highlight Map or Forecast to review the weather map or the forecast for the selected city. Press the BACK button to return to the weather information screen.
Viewing Weather Map Viewing Weather for Other City
US_MCAS.book Page 129 Tuesday, July 22, 2008 11:26 AM
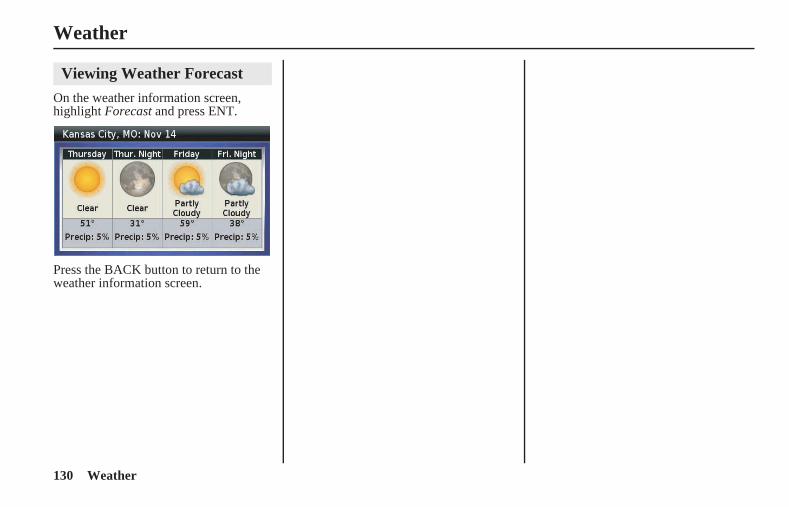
130 Weather
Weather
MCAS_A 31MCAT30
On the weather information screen, highlight Forecast and press ENT.
Press the BACK button to return to the weather information screen.
Viewing Weather Forecast
US_MCAS.book Page 130 Tuesday, July 22, 2008 11:26 AM
131Traffic
MCAS_A 31MCAT30
TrafficTraffic.......................................................................................132
Viewing Traffic on Full Map...........................................................133Viewing Traffic by Road .................................................................133Viewing Traffic on Current Route...................................................134Traffic Avoidance ............................................................................135
US_MCAS.book Page 131 Tuesday, July 22, 2008 11:26 AM
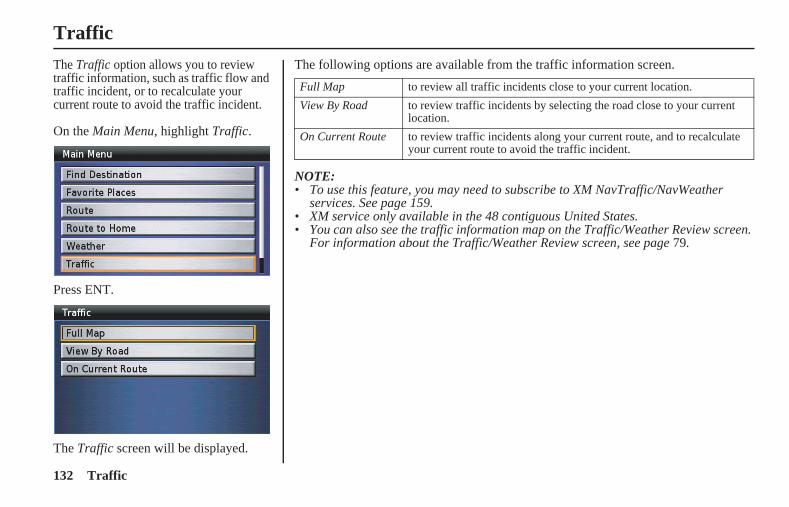
132 Traffic
MCAS_A 31MCAT30
Traffic
The Traffic option allows you to review traffic information, such as traffic flow and traffic incident, or to recalculate your current route to avoid the traffic incident.
On the Main Menu, highlight Traffic.
Press ENT.
The Traffic screen will be displayed.
The following options are available from the traffic information screen.
NOTE:• To use this feature, you may need to subscribe to XM NavTraffic/NavWeather
services. See page 159.• XM service only available in the 48 contiguous United States.• You can also see the traffic information map on the Traffic/Weather Review screen.
For information about the Traffic/Weather Review screen, see page 79.
Full Map to review all traffic incidents close to your current location.
View By Road to review traffic incidents by selecting the road close to your current location.
On Current Route to review traffic incidents along your current route, and to recalculate your current route to avoid the traffic incident.
US_MCAS.book Page 132 Tuesday, July 22, 2008 11:26 AM
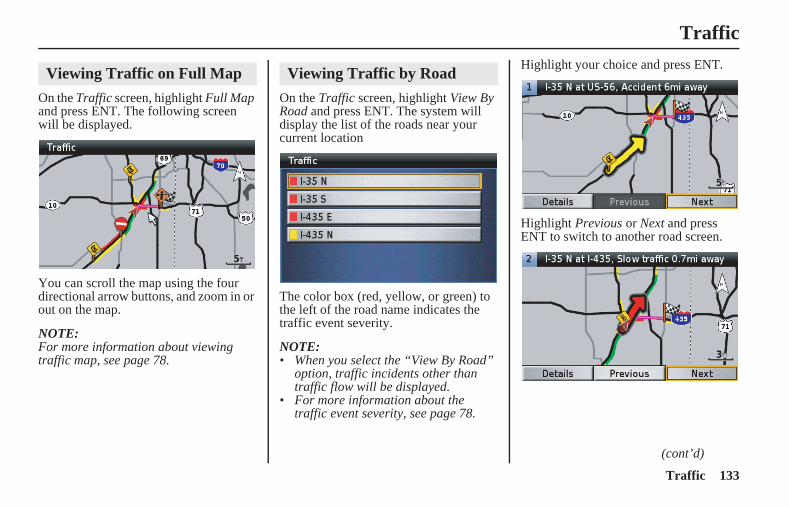
133Traffic
Traffic
MCAS_A 31MCAT30
On the Traffic screen, highlight Full Map and press ENT. The following screen will be displayed.
You can scroll the map using the four directional arrow buttons, and zoom in or out on the map.
NOTE:For more information about viewing traffic map, see page 78.
On the Traffic screen, highlight View By Road and press ENT. The system will display the list of the roads near your current location
The color box (red, yellow, or green) to the left of the road name indicates the traffic event severity.
NOTE:• When you select the “View By Road”
option, traffic incidents other than traffic flow will be displayed.
• For more information about the traffic event severity, see page 78.
Highlight your choice and press ENT.
Highlight Previous or Next and press ENT to switch to another road screen.
Viewing Traffic on Full Map Viewing Traffic by Road
(cont’d)
US_MCAS.book Page 133 Tuesday, July 22, 2008 11:26 AM

134 Traffic
Traffic
MCAS_A 31MCAT30
Highlight Details and press ENT to review the detailed information for the selected road.
Press the BACK button to return to the previous screen.
On the Traffic screen, highlight On Current Route and press ENT.
To avoid all traffic incidents on your current route, highlight Avoid All and press ENT. The system will recalculate your current route.
When you select View All, the following screen will be displayed.
Highlight Previous or Next and press ENT to view traffic incidents. To avoid a traffic incident, hightlight Avoid and press ENT. The system will recalculate your route avoiding the selected traffic incident.
Viewing Traffic on Current Route
US_MCAS.book Page 134 Tuesday, July 22, 2008 11:26 AM

135Traffic
Traffic
MCAS_A 31MCAT30
Automatic Traffic AvoidanceThe system periodically tries to find the best route available, taking in factors such as traffic speed, road speed, road closures and other traffic congestion. When updated traffic information is received and it affects the current route, the system will find a better route and avoid the traffic congestion.
Manual Traffic AvoidanceIf you select On Current Route when a traffic incident is on your route, you can avoid traffic incidents manually. See Viewing Traffic on Current Route on page 134.
Traffic Avoidance
US_MCAS.book Page 135 Tuesday, July 22, 2008 11:26 AM

136 Traffic
MCAS_A 31MCAT30
US_MCAS.book Page 136 Tuesday, July 22, 2008 11:26 AM
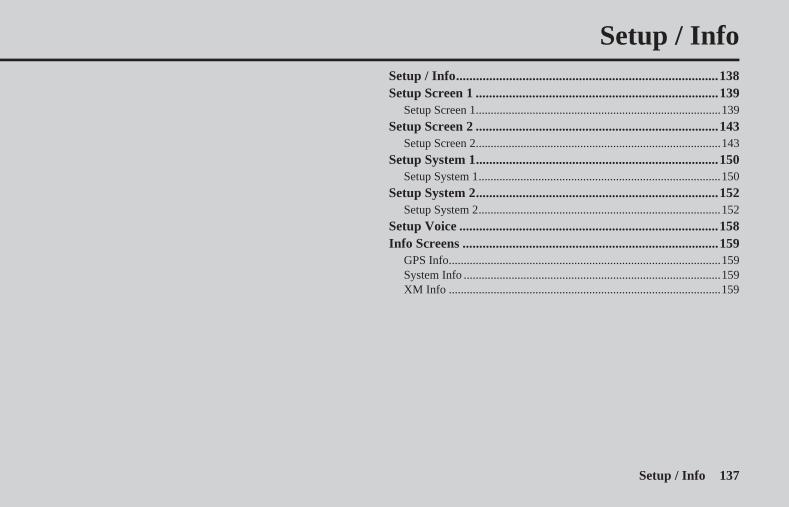
137Setup / Info
MCAS_A 31MCAT30
Setup / InfoSetup / Info...............................................................................138Setup Screen 1 .........................................................................139
Setup Screen 1..................................................................................139
Setup Screen 2 .........................................................................143Setup Screen 2..................................................................................143
Setup System 1.........................................................................150Setup System 1.................................................................................150
Setup System 2.........................................................................152Setup System 2.................................................................................152
Setup Voice ..............................................................................158Info Screens .............................................................................159
GPS Info...........................................................................................159System Info ......................................................................................159XM Info ...........................................................................................159
US_MCAS.book Page 137 Tuesday, July 22, 2008 11:26 AM
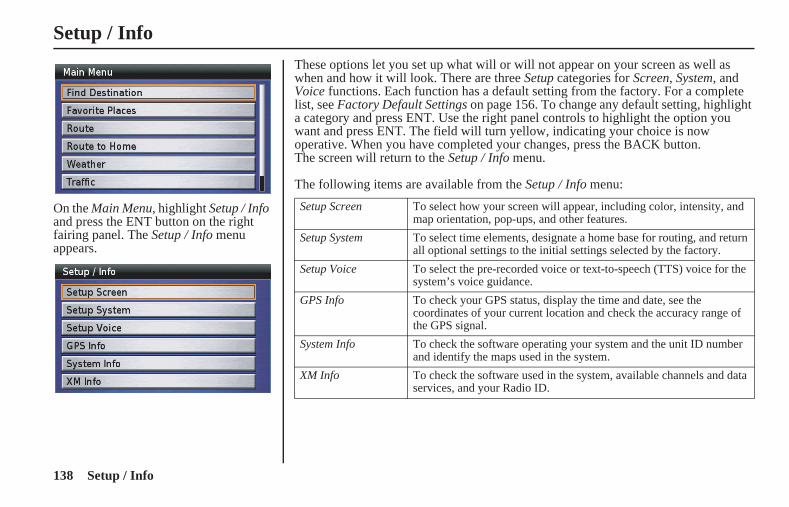
138 Setup / Info
MCAS_A 31MCAT30
Setup / Info
On the Main Menu, highlight Setup / Info and press the ENT button on the right fairing panel. The Setup / Info menu appears.
These options let you set up what will or will not appear on your screen as well as when and how it will look. There are three Setup categories for Screen, System, and Voice functions. Each function has a default setting from the factory. For a complete list, see Factory Default Settings on page 156. To change any default setting, highlight a category and press ENT. Use the right panel controls to highlight the option you want and press ENT. The field will turn yellow, indicating your choice is now operative. When you have completed your changes, press the BACK button.The screen will return to the Setup / Info menu.
The following items are available from the Setup / Info menu:
Setup Screen To select how your screen will appear, including color, intensity, and map orientation, pop-ups, and other features.
Setup System To select time elements, designate a home base for routing, and return all optional settings to the initial settings selected by the factory.
Setup Voice To select the pre-recorded voice or text-to-speech (TTS) voice for the system’s voice guidance.
GPS Info To check your GPS status, display the time and date, see the coordinates of your current location and check the accuracy range of the GPS signal.
System Info To check the software operating your system and the unit ID number and identify the maps used in the system.
XM Info To check the software used in the system, available channels and data services, and your Radio ID.
US_MCAS.book Page 138 Tuesday, July 22, 2008 11:26 AM
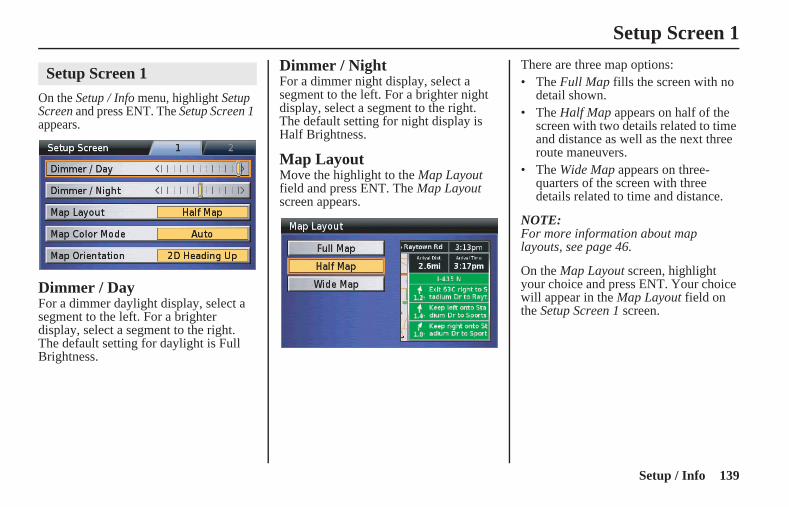
139Setup / Info
MCAS_A 31MCAT30
Setup Screen 1
On the Setup / Info menu, highlight Setup Screen and press ENT. The Setup Screen 1 appears.
Dimmer / DayFor a dimmer daylight display, select a segment to the left. For a brighter display, select a segment to the right. The default setting for daylight is Full Brightness.
Dimmer / NightFor a dimmer night display, select a segment to the left. For a brighter night display, select a segment to the right. The default setting for night display is Half Brightness.
Map LayoutMove the highlight to the Map Layout field and press ENT. The Map Layout screen appears.
There are three map options:• The Full Map fills the screen with no
detail shown.• The Half Map appears on half of the
screen with two details related to time and distance as well as the next three route maneuvers.
• The Wide Map appears on three-quarters of the screen with three details related to time and distance.
NOTE:For more information about map layouts, see page 46.
On the Map Layout screen, highlight your choice and press ENT. Your choice will appear in the Map Layout field on the Setup Screen 1 screen.
Setup Screen 1
US_MCAS.book Page 139 Tuesday, July 22, 2008 11:26 AM
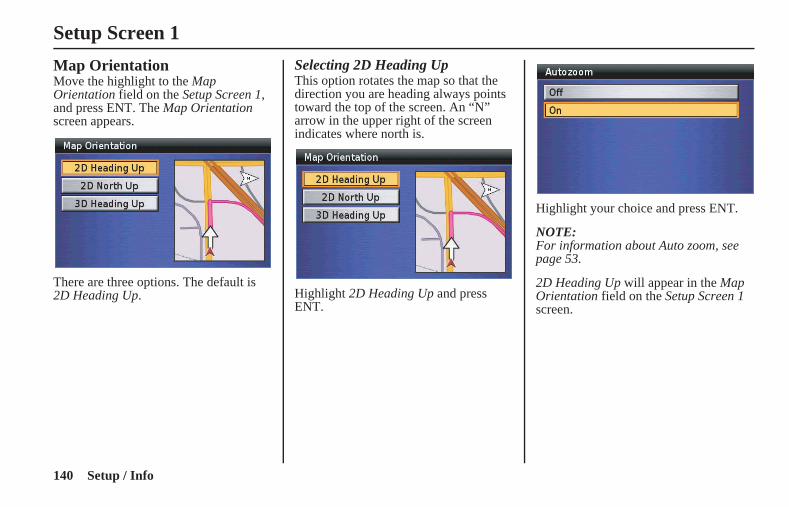
140 Setup / Info
Setup Screen 1
MCAS_A 31MCAT30
Map OrientationMove the highlight to the Map Orientation field on the Setup Screen 1, and press ENT. The Map Orientation screen appears.
There are three options. The default is 2D Heading Up.
Selecting 2D Heading UpThis option rotates the map so that the direction you are heading always points toward the top of the screen. An “N” arrow in the upper right of the screen indicates where north is.
Highlight 2D Heading Up and press ENT.
Highlight your choice and press ENT.
NOTE:For information about Auto zoom, see page 53.
2D Heading Up will appear in the Map Orientation field on the Setup Screen 1 screen.
US_MCAS.book Page 140 Tuesday, July 22, 2008 11:26 AM
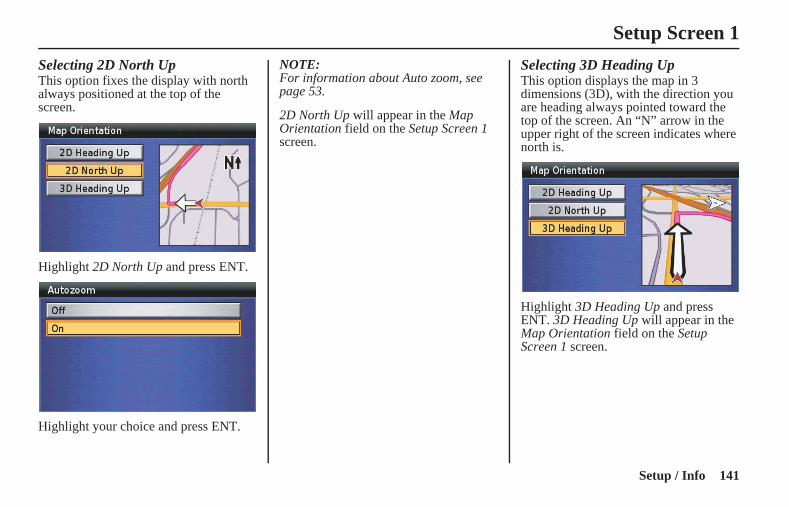
141Setup / Info
Setup Screen 1
MCAS_A 31MCAT30
Selecting 2D North UpThis option fixes the display with north always positioned at the top of the screen.
Highlight 2D North Up and press ENT.
Highlight your choice and press ENT.
NOTE:For information about Auto zoom, see page 53.
2D North Up will appear in the Map Orientation field on the Setup Screen 1 screen.
Selecting 3D Heading UpThis option displays the map in 3 dimensions (3D), with the direction you are heading always pointed toward the top of the screen. An “N” arrow in the upper right of the screen indicates where north is.
Highlight 3D Heading Up and press ENT. 3D Heading Up will appear in the Map Orientation field on the Setup Screen 1 screen.
US_MCAS.book Page 141 Tuesday, July 22, 2008 11:26 AM
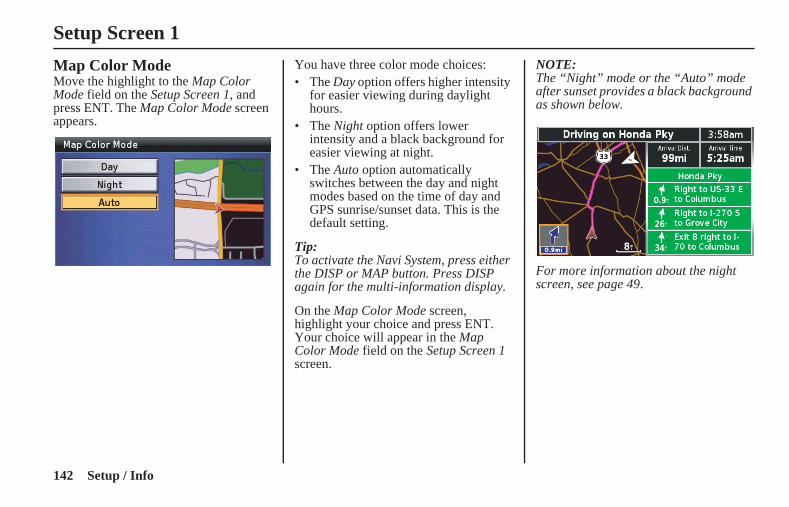
142 Setup / Info
Setup Screen 1
MCAS_A 31MCAT30
Map Color ModeMove the highlight to the Map Color Mode field on the Setup Screen 1, and press ENT. The Map Color Mode screen appears.
You have three color mode choices:• The Day option offers higher intensity
for easier viewing during daylight hours.
• The Night option offers lower intensity and a black background for easier viewing at night.
• The Auto option automatically switches between the day and night modes based on the time of day and GPS sunrise/sunset data. This is the default setting.
Tip:To activate the Navi System, press either the DISP or MAP button. Press DISP again for the multi-information display.
On the Map Color Mode screen, highlight your choice and press ENT. Your choice will appear in the Map Color Mode field on the Setup Screen 1 screen.
NOTE:The “Night” mode or the “Auto” mode after sunset provides a black background as shown below.
For more information about the night screen, see page 49.
US_MCAS.book Page 142 Tuesday, July 22, 2008 11:26 AM

143Setup / Info
MCAS_A 31MCAT30
Setup Screen 2
To move to screen 2, highlight the 2 tab at the top of the Setup Screen 1, and press ENT. The Setup Screen 2 appears.
POI DisplayThe default is Off. If the option is On, POI (point of interest) icons will appear when the map scale is 0.2 mile or smaller.
NOTE:The POI icon of the location you stored as Favorite will be displayed on the 120 miles or smaller map scale.
There are two other icons that are not part of the POI Icon option. They appear whether the option is on or off.
Honda motorcycle dealer (wing) icons remain visible until you zoom
out past the 8 miles map scale.
The Home icon appears if you have designated a Home location (for
120 miles or smaller map scale).
Turning on POI Icons on the MapIf you want to show POI icons on the map, highlight POI Display on the Setup Screen 2 screen and press ENT.
Highlight Display and press ENT to turn on POI Display.
Setup Screen 2
(cont’d)
US_MCAS.book Page 143 Tuesday, July 22, 2008 11:26 AM
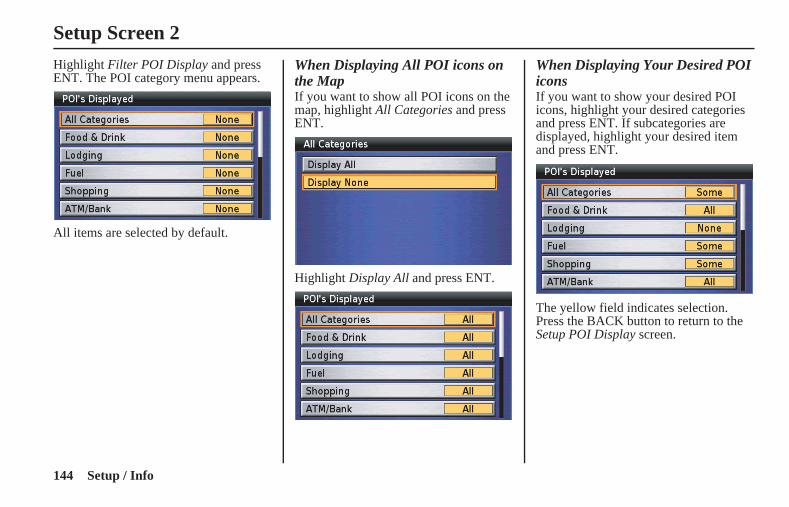
144 Setup / Info
Setup Screen 2
MCAS_A 31MCAT30
Highlight Filter POI Display and press ENT. The POI category menu appears.
All items are selected by default.
When Displaying All POI icons on the MapIf you want to show all POI icons on the map, highlight All Categories and press ENT.
Highlight Display All and press ENT.
When Displaying Your Desired POI iconsIf you want to show your desired POI icons, highlight your desired categories and press ENT. If subcategories are displayed, highlight your desired item and press ENT.
The yellow field indicates selection. Press the BACK button to return to the Setup POI Display screen.
US_MCAS.book Page 144 Tuesday, July 22, 2008 11:26 AM
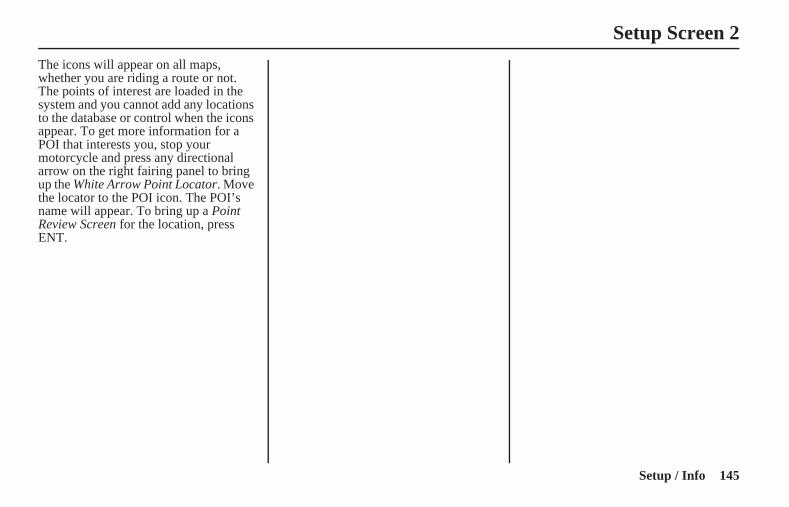
145Setup / Info
Setup Screen 2
MCAS_A 31MCAT30
The icons will appear on all maps, whether you are riding a route or not. The points of interest are loaded in the system and you cannot add any locations to the database or control when the icons appear. To get more information for a POI that interests you, stop your motorcycle and press any directional arrow on the right fairing panel to bring up the White Arrow Point Locator. Move the locator to the POI icon. The POI’s name will appear. To bring up a Point Review Screen for the location, press ENT.
US_MCAS.book Page 145 Tuesday, July 22, 2008 11:26 AM

146 Setup / Info
Setup Screen 2
MCAS_A 31MCAT30
POI (Point of Interest) Icons
Food & DrinkAmerican, Barbecue, Spanish/Mexican, French, etc.
Asian, Chinese
Deli/Bakery, Café/Diner
Fast Food
Italian
Seafood
Steak/Grill
LodgingHotel/Motel, Bed & Breakfast Inn
Campground/RV Park
Fuel
Convenience
Auto Fuel
Truck Stop
ShoppingDepartment, General Merchandise, Apparel
Grocery, Shopping Center
Pharmacy/Chemist
Convenience
Honda Motorcycle Dealer
Honda Motorcycle Dealer
ATM/Bank
ATM/Bank
Attraction
Amusement/Theme Park
Museum/Historical, Hall/ Auditorium
Landmark
Park/Garden
Arena/Track
Winery
Recreation
Golf Course
Skiing Center/Resort
Bowling Center
Sports/Fitness Center
Amusement/Theme Park
Park/Garden
Arena/Track
Entertainment
Live Theater
Bar/Nightclub
Movie Theater
Casino
Transportation
Auto Rental
Air Transportation
Ground Transportation
Hospital
Hospital
US_MCAS.book Page 146 Tuesday, July 22, 2008 11:26 AM
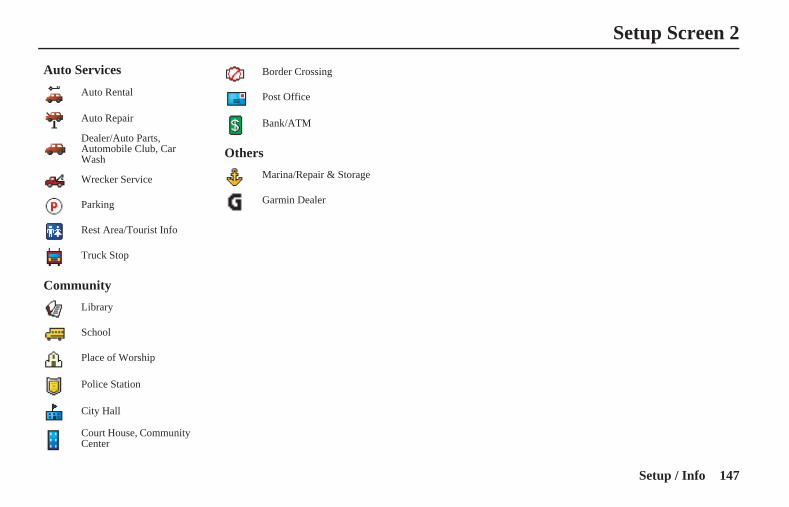
147Setup / Info
Setup Screen 2
MCAS_A 31MCAT30
Auto Services
Auto Rental
Auto Repair
Dealer/Auto Parts, Automobile Club, Car Wash
Wrecker Service
Parking
Rest Area/Tourist Info
Truck Stop
Community
Library
School
Place of Worship
Police Station
City Hall
Court House, Community Center
Border Crossing
Post Office
Bank/ATM
Others
Marina/Repair & Storage
Garmin Dealer
US_MCAS.book Page 147 Tuesday, July 22, 2008 11:26 AM
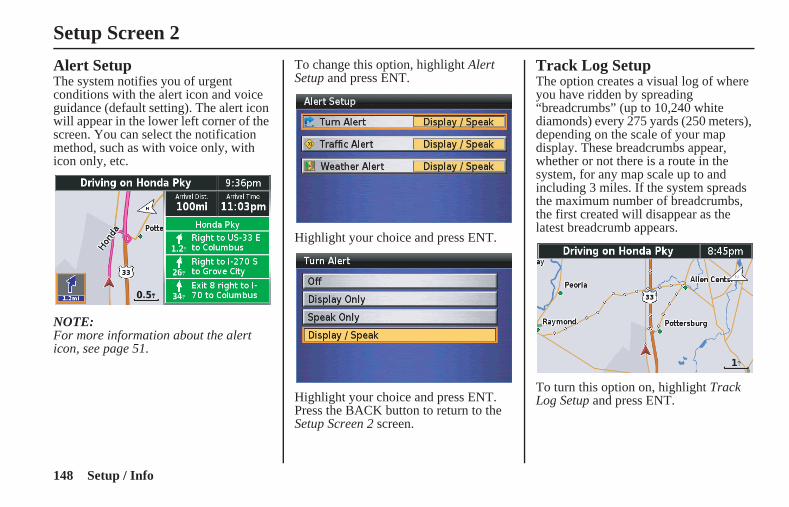
148 Setup / Info
Setup Screen 2
MCAS_A 31MCAT30
Alert SetupThe system notifies you of urgent conditions with the alert icon and voice guidance (default setting). The alert icon will appear in the lower left corner of the screen. You can select the notification method, such as with voice only, with icon only, etc.
NOTE:For more information about the alert icon, see page 51.
To change this option, highlight Alert Setup and press ENT.
Highlight your choice and press ENT.
Highlight your choice and press ENT. Press the BACK button to return to the Setup Screen 2 screen.
Track Log SetupThe option creates a visual log of where you have ridden by spreading “breadcrumbs” (up to 10,240 white diamonds) every 275 yards (250 meters), depending on the scale of your map display. These breadcrumbs appear, whether or not there is a route in the system, for any map scale up to and including 3 miles. If the system spreads the maximum number of breadcrumbs, the first created will disappear as the latest breadcrumb appears.
To turn this option on, highlight Track Log Setup and press ENT.
US_MCAS.book Page 148 Tuesday, July 22, 2008 11:26 AM
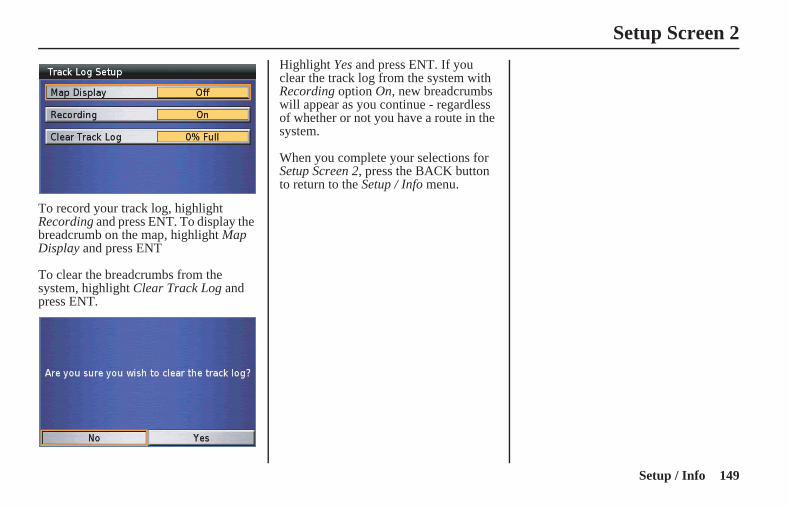
149Setup / Info
Setup Screen 2
MCAS_A 31MCAT30
To record your track log, highlight Recording and press ENT. To display the breadcrumb on the map, highlight Map Display and press ENT
To clear the breadcrumbs from the system, highlight Clear Track Log and press ENT.
Highlight Yes and press ENT. If you clear the track log from the system with Recording option On, new breadcrumbs will appear as you continue - regardless of whether or not you have a route in the system.
When you complete your selections for Setup Screen 2, press the BACK button to return to the Setup / Info menu.
US_MCAS.book Page 149 Tuesday, July 22, 2008 11:26 AM
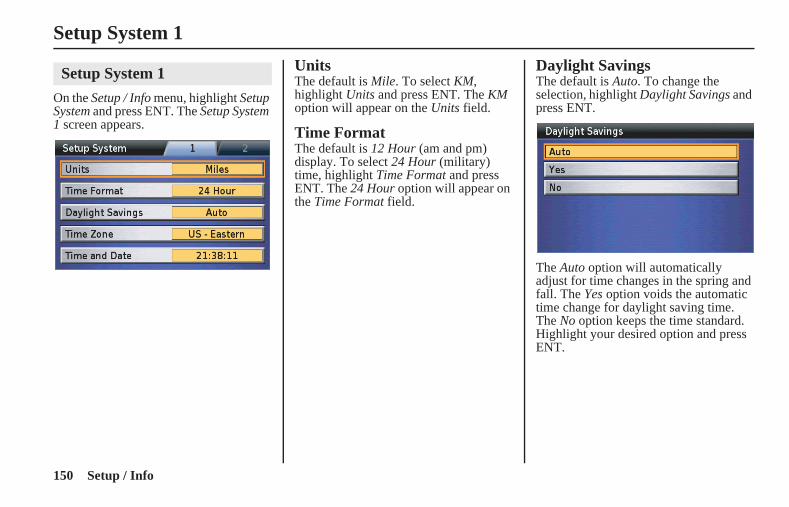
150 Setup / Info
MCAS_A 31MCAT30
Setup System 1
On the Setup / Info menu, highlight Setup System and press ENT. The Setup System 1 screen appears.
UnitsThe default is Mile. To select KM, highlight Units and press ENT. The KM option will appear on the Units field.
Time FormatThe default is 12 Hour (am and pm) display. To select 24 Hour (military) time, highlight Time Format and press ENT. The 24 Hour option will appear on the Time Format field.
Daylight SavingsThe default is Auto. To change the selection, highlight Daylight Savings and press ENT.
The Auto option will automatically adjust for time changes in the spring and fall. The Yes option voids the automatic time change for daylight saving time. The No option keeps the time standard. Highlight your desired option and press ENT.
Setup System 1
US_MCAS.book Page 150 Tuesday, July 22, 2008 11:26 AM
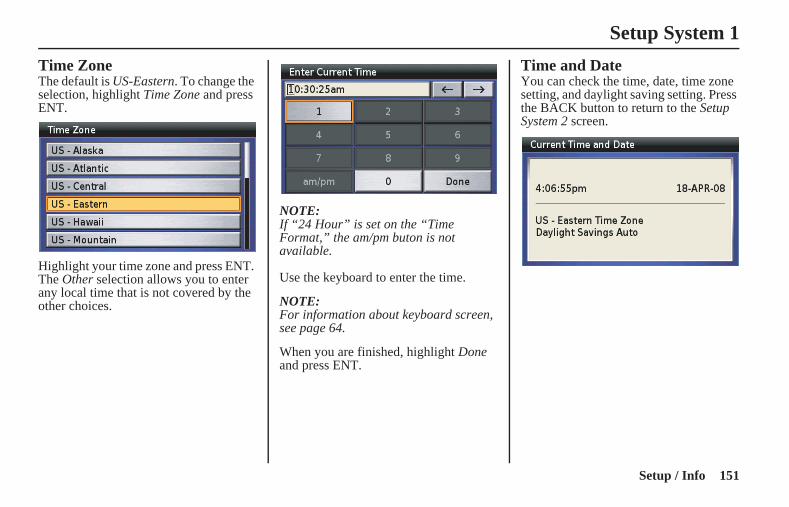
151Setup / Info
Setup System 1
MCAS_A 31MCAT30
Time ZoneThe default is US-Eastern. To change the selection, highlight Time Zone and press ENT.
Highlight your time zone and press ENT. The Other selection allows you to enter any local time that is not covered by the other choices.
NOTE:If “24 Hour” is set on the “Time Format,” the am/pm buton is not available.
Use the keyboard to enter the time.
NOTE:For information about keyboard screen, see page 64.
When you are finished, highlight Done and press ENT.
Time and DateYou can check the time, date, time zone setting, and daylight saving setting. Press the BACK button to return to the Setup System 2 screen.
US_MCAS.book Page 151 Tuesday, July 22, 2008 11:26 AM

152 Setup / Info
MCAS_A 31MCAT30
Setup System 2
To move to screen 2, highlight the 2 tab at the top of the Setup System 1 screen, and press ENT. The Setup System 2 screen appears.
GreatingYou can select the greeting screen that appears when you turn the ignition on. Highlight Greeting and press ENT.
Selecting Standard GreetingThe default for the opening/ending greeting is the Standard greeting, which shows the Goldwing logo and then fades out. The same logo appears as the closing greeting.
Highlight Standard and Press ENT.
Your choice will appear in the Greeting field on the Setup System 2 screen. To return to the Setup / Info menu, press the BACK button.
Setup System 2
US_MCAS.book Page 152 Tuesday, July 22, 2008 11:26 AM
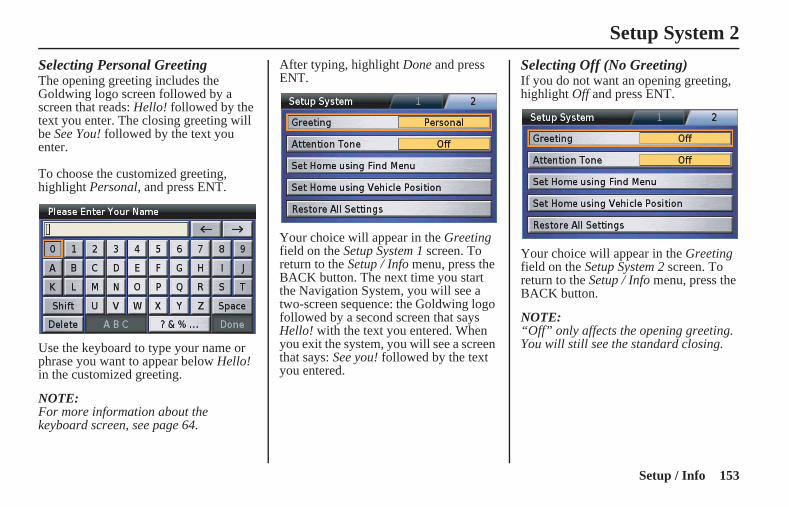
153Setup / Info
Setup System 2
MCAS_A 31MCAT30
Selecting Personal GreetingThe opening greeting includes the Goldwing logo screen followed by a screen that reads: Hello! followed by the text you enter. The closing greeting will be See You! followed by the text you enter.
To choose the customized greeting, highlight Personal, and press ENT.
Use the keyboard to type your name or phrase you want to appear below Hello! in the customized greeting.
NOTE:For more information about the keyboard screen, see page 64.
After typing, highlight Done and press ENT.
Your choice will appear in the Greeting field on the Setup System 1 screen. To return to the Setup / Info menu, press the BACK button. The next time you start the Navigation System, you will see a two-screen sequence: the Goldwing logo followed by a second screen that says Hello! with the text you entered. When you exit the system, you will see a screen that says: See you! followed by the text you entered.
Selecting Off (No Greeting)If you do not want an opening greeting, highlight Off and press ENT.
Your choice will appear in the Greeting field on the Setup System 2 screen. To return to the Setup / Info menu, press the BACK button.
NOTE:“Off” only affects the opening greeting. You will still see the standard closing.
US_MCAS.book Page 153 Tuesday, July 22, 2008 11:26 AM
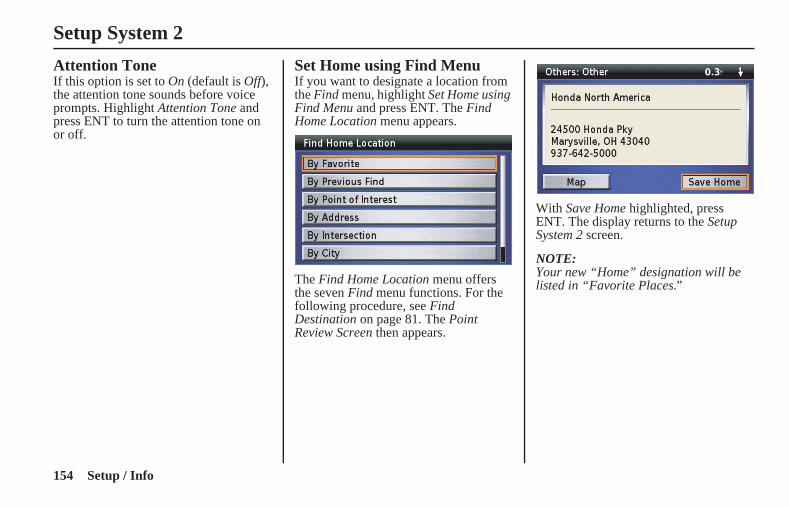
154 Setup / Info
Setup System 2
MCAS_A 31MCAT30
Attention ToneIf this option is set to On (default is Off), the attention tone sounds before voice prompts. Highlight Attention Tone and press ENT to turn the attention tone on or off.
Set Home using Find MenuIf you want to designate a location from the Find menu, highlight Set Home using Find Menu and press ENT. The Find Home Location menu appears.
The Find Home Location menu offers the seven Find menu functions. For the following procedure, see Find Destination on page 81. The Point Review Screen then appears.
With Save Home highlighted, press ENT. The display returns to the Setup System 2 screen.
NOTE:Your new “Home” designation will be listed in “Favorite Places.”
US_MCAS.book Page 154 Tuesday, July 22, 2008 11:26 AM
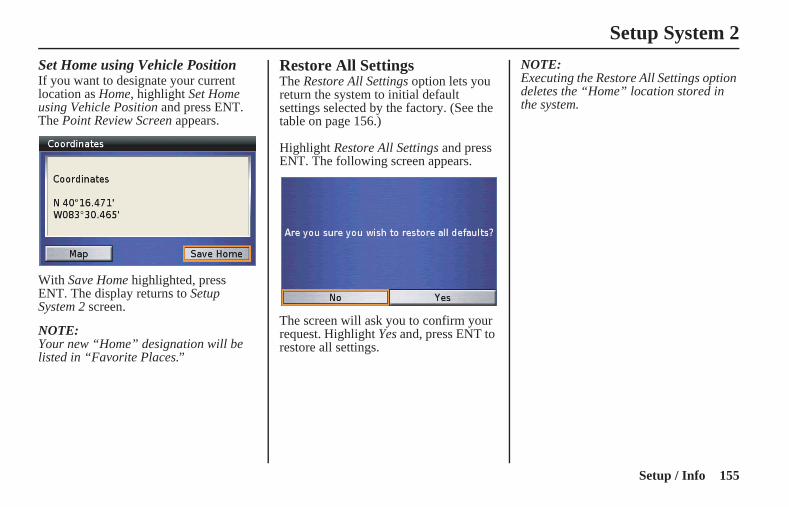
155Setup / Info
Setup System 2
MCAS_A 31MCAT30
Set Home using Vehicle PositionIf you want to designate your current location as Home, highlight Set Home using Vehicle Position and press ENT. The Point Review Screen appears.
With Save Home highlighted, press ENT. The display returns to Setup System 2 screen.
NOTE:Your new “Home” designation will be listed in “Favorite Places.”
Restore All SettingsThe Restore All Settings option lets you return the system to initial default settings selected by the factory. (See the table on page 156.)
Highlight Restore All Settings and press ENT. The following screen appears.
The screen will ask you to confirm your request. Highlight Yes and, press ENT to restore all settings.
NOTE:Executing the Restore All Settings option deletes the “Home” location stored in the system.
US_MCAS.book Page 155 Tuesday, July 22, 2008 11:26 AM
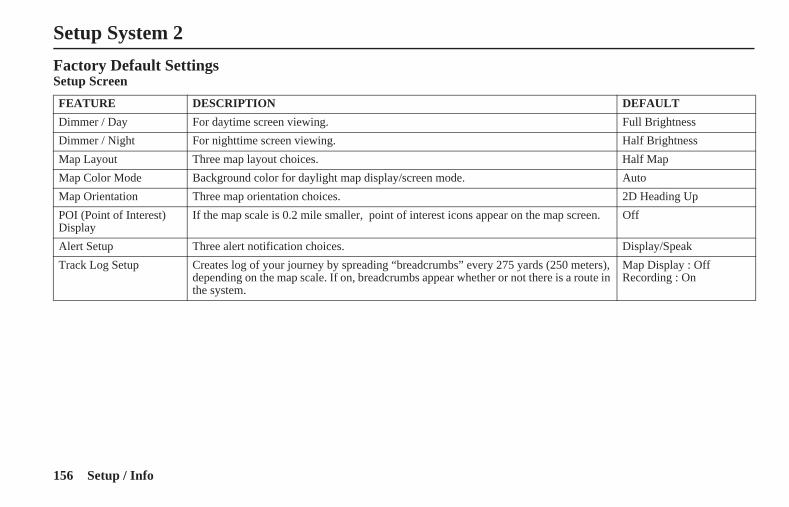
156 Setup / Info
Setup System 2
MCAS_A 31MCAT30
Factory Default SettingsSetup Screen
FEATURE DESCRIPTION DEFAULT
Dimmer / Day For daytime screen viewing. Full Brightness
Dimmer / Night For nighttime screen viewing. Half Brightness
Map Layout Three map layout choices. Half Map
Map Color Mode Background color for daylight map display/screen mode. Auto
Map Orientation Three map orientation choices. 2D Heading Up
POI (Point of Interest) Display
If the map scale is 0.2 mile smaller, point of interest icons appear on the map screen. Off
Alert Setup Three alert notification choices. Display/Speak
Track Log Setup Creates log of your journey by spreading “breadcrumbs” every 275 yards (250 meters), depending on the map scale. If on, breadcrumbs appear whether or not there is a route in the system.
Map Display : OffRecording : On
US_MCAS.book Page 156 Tuesday, July 22, 2008 11:26 AM
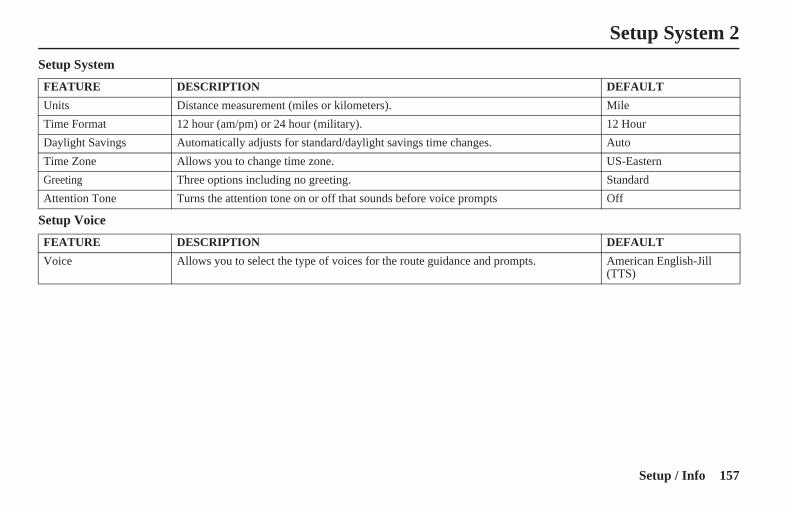
157Setup / Info
Setup System 2
MCAS_A 31MCAT30
Setup System
Setup Voice
FEATURE DESCRIPTION DEFAULT
Units Distance measurement (miles or kilometers). Mile
Time Format 12 hour (am/pm) or 24 hour (military). 12 Hour
Daylight Savings Automatically adjusts for standard/daylight savings time changes. Auto
Time Zone Allows you to change time zone. US-Eastern
Greeting Three options including no greeting. Standard
Attention Tone Turns the attention tone on or off that sounds before voice prompts Off
FEATURE DESCRIPTION DEFAULT
Voice Allows you to select the type of voices for the route guidance and prompts. American English-Jill (TTS)
US_MCAS.book Page 157 Tuesday, July 22, 2008 11:26 AM
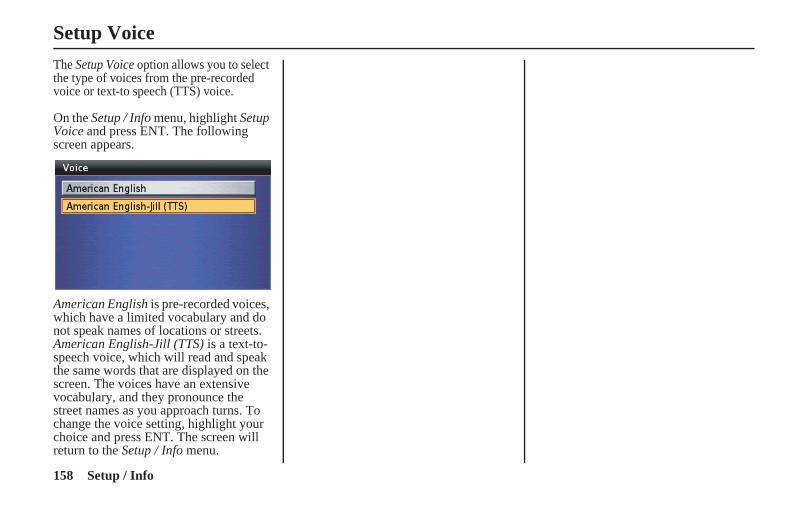
158 Setup / Info
MCAS_A 31MCAT30
Setup Voice
The Setup Voice option allows you to select the type of voices from the pre-recorded voice or text-to speech (TTS) voice.
On the Setup / Info menu, highlight Setup Voice and press ENT. The following screen appears.
American English is pre-recorded voices, which have a limited vocabulary and do not speak names of locations or streets. American English-Jill (TTS) is a text-to-speech voice, which will read and speak the same words that are displayed on the screen. The voices have an extensive vocabulary, and they pronounce the street names as you approach turns. To change the voice setting, highlight your choice and press ENT. The screen will return to the Setup / Info menu.
US_MCAS.book Page 158 Tuesday, July 22, 2008 11:26 AM
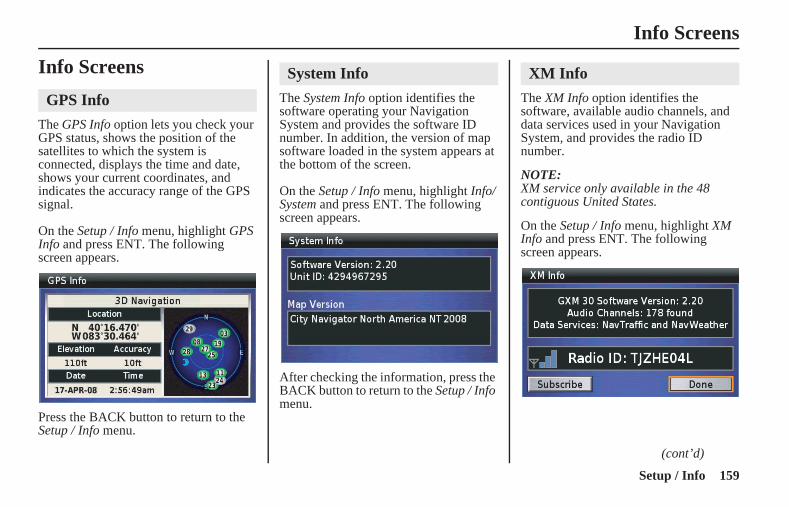
159Setup / Info
Info Screens
MCAS_A 31MCAT30
Info Screens
The GPS Info option lets you check your GPS status, shows the position of the satellites to which the system is connected, displays the time and date, shows your current coordinates, and indicates the accuracy range of the GPS signal.
On the Setup / Info menu, highlight GPS Info and press ENT. The following screen appears.
Press the BACK button to return to the Setup / Info menu.
The System Info option identifies the software operating your Navigation System and provides the software ID number. In addition, the version of map software loaded in the system appears at the bottom of the screen.
On the Setup / Info menu, highlight Info/System and press ENT. The following screen appears.
After checking the information, press the BACK button to return to the Setup / Info menu.
The XM Info option identifies the software, available audio channels, and data services used in your Navigation System, and provides the radio ID number.
NOTE:XM service only available in the 48 contiguous United States.
On the Setup / Info menu, highlight XM Info and press ENT. The following screen appears.
GPS Info
System Info XM Info
(cont’d)
US_MCAS.book Page 159 Thursday, July 31, 2008 4:01 PM
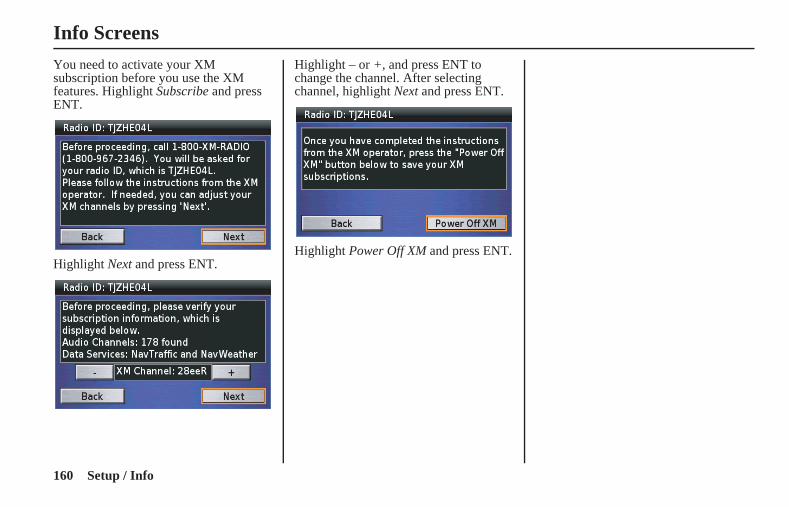
160 Setup / Info
Info Screens
MCAS_A 31MCAT30
You need to activate your XM subscription before you use the XM features. Highlight Subscribe and press ENT.
Highlight Next and press ENT.
Highlight – or +, and press ENT to change the channel. After selecting channel, highlight Next and press ENT.
Highlight Power Off XM and press ENT.
US_MCAS.book Page 160 Tuesday, July 22, 2008 11:26 AM

161Technical & Consumer Information
MCAS_A 31MCAT30
Technical & Consumer InformationGlossary....................................................................................162System Messages .....................................................................164Troubleshooting ......................................................................165System Limitations..................................................................170Database Limitations ..............................................................172Customer Support...................................................................173
US_MCAS.book Page 161 Tuesday, July 22, 2008 11:26 AM
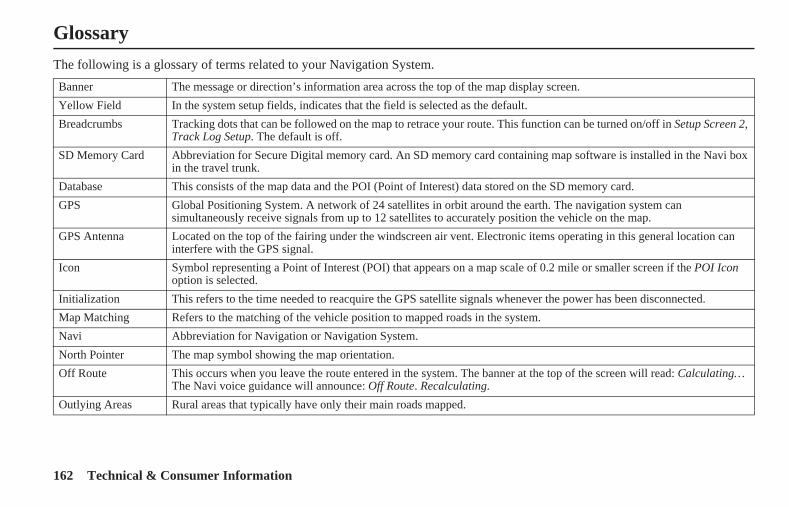
162 Technical & Consumer Information
MCAS_A 31MCAT30
Glossary
The following is a glossary of terms related to your Navigation System.
Banner The message or direction’s information area across the top of the map display screen.
Yellow Field In the system setup fields, indicates that the field is selected as the default.
Breadcrumbs Tracking dots that can be followed on the map to retrace your route. This function can be turned on/off in Setup Screen 2, Track Log Setup. The default is off.
SD Memory Card Abbreviation for Secure Digital memory card. An SD memory card containing map software is installed in the Navi box in the travel trunk.
Database This consists of the map data and the POI (Point of Interest) data stored on the SD memory card.
GPS Global Positioning System. A network of 24 satellites in orbit around the earth. The navigation system can simultaneously receive signals from up to 12 satellites to accurately position the vehicle on the map.
GPS Antenna Located on the top of the fairing under the windscreen air vent. Electronic items operating in this general location can interfere with the GPS signal.
Icon Symbol representing a Point of Interest (POI) that appears on a map scale of 0.2 mile or smaller screen if the POI Icon option is selected.
Initialization This refers to the time needed to reacquire the GPS satellite signals whenever the power has been disconnected.
Map Matching Refers to the matching of the vehicle position to mapped roads in the system.
Navi Abbreviation for Navigation or Navigation System.
North Pointer The map symbol showing the map orientation.
Off Route This occurs when you leave the route entered in the system. The banner at the top of the screen will read: Calculating… The Navi voice guidance will announce: Off Route. Recalculating.
Outlying Areas Rural areas that typically have only their main roads mapped.
US_MCAS.book Page 162 Tuesday, July 22, 2008 11:26 AM
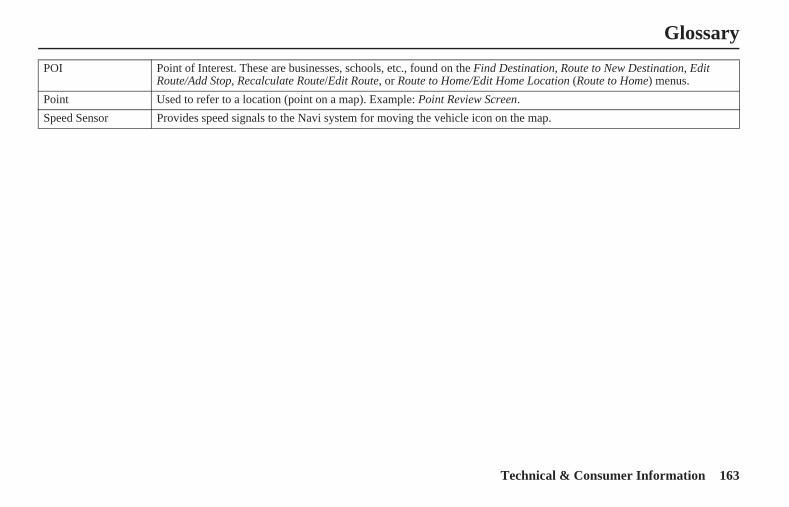
163Technical & Consumer Information
Glossary
MCAS_A 31MCAT30
POI Point of Interest. These are businesses, schools, etc., found on the Find Destination, Route to New Destination, Edit Route/Add Stop, Recalculate Route/Edit Route, or Route to Home/Edit Home Location (Route to Home) menus.
Point Used to refer to a location (point on a map). Example: Point Review Screen.
Speed Sensor Provides speed signals to the Navi system for moving the vehicle icon on the map.
US_MCAS.book Page 163 Tuesday, July 22, 2008 11:26 AM
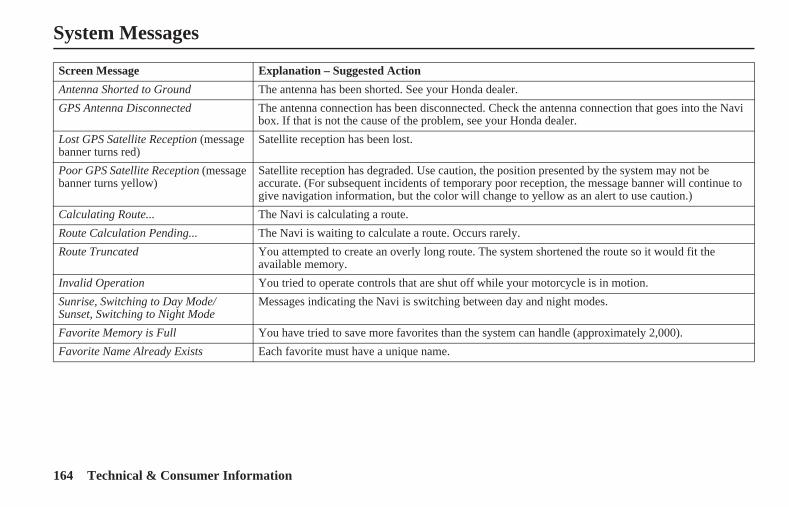
164 Technical & Consumer Information
MCAS_A 31MCAT30
System Messages
Screen Message Explanation – Suggested Action
Antenna Shorted to Ground The antenna has been shorted. See your Honda dealer.
GPS Antenna Disconnected The antenna connection has been disconnected. Check the antenna connection that goes into the Navi box. If that is not the cause of the problem, see your Honda dealer.
Lost GPS Satellite Reception (message banner turns red)
Satellite reception has been lost.
Poor GPS Satellite Reception (message banner turns yellow)
Satellite reception has degraded. Use caution, the position presented by the system may not be accurate. (For subsequent incidents of temporary poor reception, the message banner will continue to give navigation information, but the color will change to yellow as an alert to use caution.)
Calculating Route... The Navi is calculating a route.
Route Calculation Pending... The Navi is waiting to calculate a route. Occurs rarely.
Route Truncated You attempted to create an overly long route. The system shortened the route so it would fit the available memory.
Invalid Operation You tried to operate controls that are shut off while your motorcycle is in motion.
Sunrise, Switching to Day Mode/ Sunset, Switching to Night Mode
Messages indicating the Navi is switching between day and night modes.
Favorite Memory is Full You have tried to save more favorites than the system can handle (approximately 2,000).
Favorite Name Already Exists Each favorite must have a unique name.
US_MCAS.book Page 164 Tuesday, July 22, 2008 11:26 AM

165Technical & Consumer Information
Troubleshooting
MCAS_A 31MCAT30
TroubleshootingHardware
Voice Guidance
Screen
PROBLEM EXPLANATION
The Vehicle Position icon does not move on the map screen while I'm riding my motorcycle.
The map will not display if the speed sensor is not working. See your Honda dealer.
PROBLEM EXPLANATION
I did not hear the voice guidance when I expected to hear it. The Navigation System voice guidance operates whether the audio system is on or off. However, the volume of the voice guidance depends on the setting of the VOLUME knob on the audio system controls. If the knob is turned fully off, you will not hear the voice guidance. Also, since the Navi voice can be routed through the speakers or the headphones, check that you are listening to the sound source you selected.
PROBLEM EXPLANATION
While I ride, my screen shows “white dots” on it. What do they mean? These are called “breadcrumbs.” They appear if the Track Log Setup option is on. (The default is off.) See page 148.
What is the sequence of messages I will see if the system has not been initialized recently?
Searching for Satellites. Locating Satellites. Acquiring Satellites. GPS Ready.
(cont’d)
US_MCAS.book Page 165 Tuesday, July 22, 2008 11:26 AM

166 Technical & Consumer Information
Troubleshooting
MCAS_A 31MCAT30
Software
The distance appears like “_ _ . _.” Satellite reception has been lost.
Arrival Time appears like “_ _:_ _” am/pm. The system estimates it will take more than 24 hours to get to the destination.
After using the White Arrow Point Locator, I resumed riding, but the map display is frozen.
If you resume riding after using this feature without removing it from the screen, the screen will continue to display the last map screen until you terminate the point locator feature by pressing the DISP button. We suggest you press the MAP button before you resume riding. Either action will return your main map display.
I get inconsistent results when I type in initials searching for a location. The database includes some entries that leave spaces between initials and some entries that do not. If your entry fails, try the alternative.
When I approached the Canadian border, the map showed a border crossing POI icon, but this did not happen when I approached Mexico.
The system does not include border crossing icons for Mexico.
PROBLEM EXPLANATION
I found some errors in the database. How do I report them? Minor errors are bound to occur in a database this big. If you encounter major errors, you can report them per the instructions on page 173.
I want to buy a new SD memory card. How do I purchase one? See Map Software & Navigation System Software Upgrades on page 173.
How can I determine the software version in my Navigation System? Select System Info from the Setup / Info menu.
When is my city going to become part of a fully verified detailed coverage area?
The mapping database supplier is constantly verifying new and existing areas that currently show on the map as unverified. Alaska and Hawaii are covered.
PROBLEM EXPLANATION
US_MCAS.book Page 166 Tuesday, July 22, 2008 11:26 AM

167Technical & Consumer Information
Troubleshooting
MCAS_A 31MCAT30
Features
Will the Navigation System work outside North America? It will work in Hawaii, Alaska, and Canada as well as the continental U.S., but XM feature will not work in Hawaii and Alaska.
Why is the street I am on not on the map? It has been here for a year. The mapping database is constantly undergoing revision. See page 173 to learn how to obtain the latest detailed coverage information.
PROBLEM EXPLANATION
My state does not observe daylight savings time. How do I turn off this feature?
The setting switches automatically by default, but you can change it. See Setup System 1 screen, Daylight Savings on page 150.
Can I turn the Navigation System off with the ignition on? No. You cannot turn the Navigation System off with the ignition on.
PROBLEM EXPLANATION
(cont’d)
US_MCAS.book Page 167 Tuesday, July 22, 2008 11:26 AM
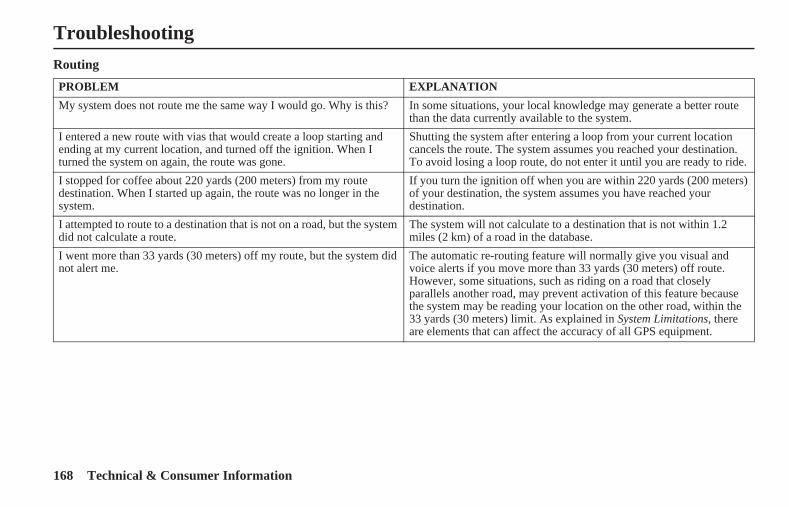
168 Technical & Consumer Information
Troubleshooting
MCAS_A 31MCAT30
Routing
PROBLEM EXPLANATION
My system does not route me the same way I would go. Why is this? In some situations, your local knowledge may generate a better route than the data currently available to the system.
I entered a new route with vias that would create a loop starting and ending at my current location, and turned off the ignition. When I turned the system on again, the route was gone.
Shutting the system after entering a loop from your current location cancels the route. The system assumes you reached your destination. To avoid losing a loop route, do not enter it until you are ready to ride.
I stopped for coffee about 220 yards (200 meters) from my route destination. When I started up again, the route was no longer in the system.
If you turn the ignition off when you are within 220 yards (200 meters) of your destination, the system assumes you have reached your destination.
I attempted to route to a destination that is not on a road, but the system did not calculate a route.
The system will not calculate to a destination that is not within 1.2 miles (2 km) of a road in the database.
I went more than 33 yards (30 meters) off my route, but the system did not alert me.
The automatic re-routing feature will normally give you visual and voice alerts if you move more than 33 yards (30 meters) off route. However, some situations, such as riding on a road that closely parallels another road, may prevent activation of this feature because the system may be reading your location on the other road, within the 33 yards (30 meters) limit. As explained in System Limitations, there are elements that can affect the accuracy of all GPS equipment.
US_MCAS.book Page 168 Tuesday, July 22, 2008 11:26 AM
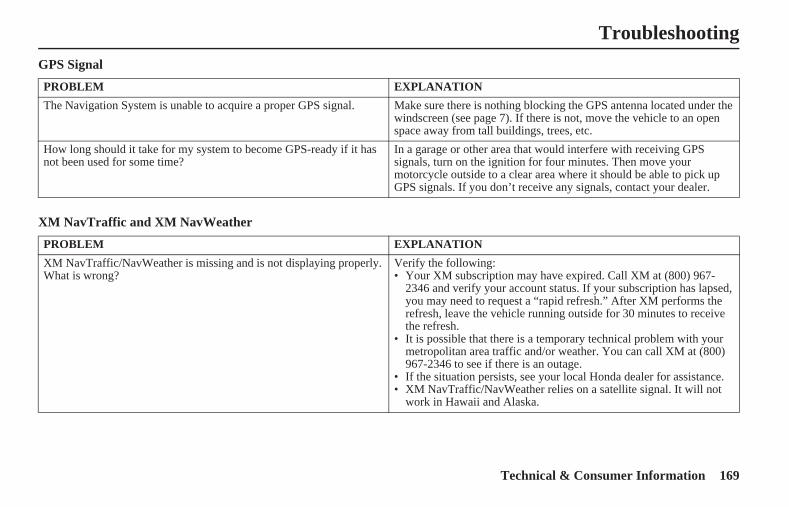
169Technical & Consumer Information
MCAS_A 31MCAT30
Troubleshooting
GPS Signal
XM NavTraffic and XM NavWeather
PROBLEM EXPLANATION
The Navigation System is unable to acquire a proper GPS signal. Make sure there is nothing blocking the GPS antenna located under the windscreen (see page 7). If there is not, move the vehicle to an open space away from tall buildings, trees, etc.
How long should it take for my system to become GPS-ready if it has not been used for some time?
In a garage or other area that would interfere with receiving GPS signals, turn on the ignition for four minutes. Then move your motorcycle outside to a clear area where it should be able to pick up GPS signals. If you don’t receive any signals, contact your dealer.
PROBLEM EXPLANATION
XM NavTraffic/NavWeather is missing and is not displaying properly. What is wrong?
Verify the following:• Your XM subscription may have expired. Call XM at (800) 967-
2346 and verify your account status. If your subscription has lapsed, you may need to request a “rapid refresh.” After XM performs the refresh, leave the vehicle running outside for 30 minutes to receive the refresh.
• It is possible that there is a temporary technical problem with your metropolitan area traffic and/or weather. You can call XM at (800) 967-2346 to see if there is an outage.
• If the situation persists, see your local Honda dealer for assistance.• XM NavTraffic/NavWeather relies on a satellite signal. It will not
work in Hawaii and Alaska.
US_MCAS.book Page 169 Tuesday, July 22, 2008 11:26 AM

170 Technical & Consumer Information
MCAS_A 31MCAT30
System Limitations
Although your Navigation System is a highly sophisticated piece of equipment, you may find it has certain limitations. The system uses signals from the Global Positioning System (GPS) to determine its current location. The GPS is operated by the U.S. Department of Defense. The system is subject to changes that could affect the accuracy and performance of all GPS equipment, including your Navigation System.
Although the system will direct you to your desired destination, it may not always do it by what you consider to be the most direct route.
The points of interest listings are not as complete in outlying areas as they are in metropolitan areas. For example, only limited numbers of gas stations, restaurants, supermarkets, banks, etc., are included. In outlying areas, you may not find listings for places you know exist, and the facilities listed may not be the closest. This is also true for police, agencies and hospitals. Always check with local information sources if you need law enforcement or hospital services.
On rare occasions, you may find that the system “reboots.” This is indicated by the display returning to the logo screen. A reboot can be caused by a number of things, including excessive heat or shock. It does not necessarily indicate a problem that requires service. After the system completes the reboot, it should allow you to complete whatever functions you were performing before the reboot.
Honda has made every effort to verify that the system’s database was accurate at the time it was created. However, businesses do close or move to new locations, and new businesses start in the old locations. For this reason, you may occasionally find inaccurate information when you select and drive to a point of interest. The number of these inaccuracies will increase as time goes on. However, database updates are available annually. See Map Software & Navigation System Software Upgrades on page 173.
US_MCAS.book Page 170 Tuesday, July 22, 2008 11:26 AM
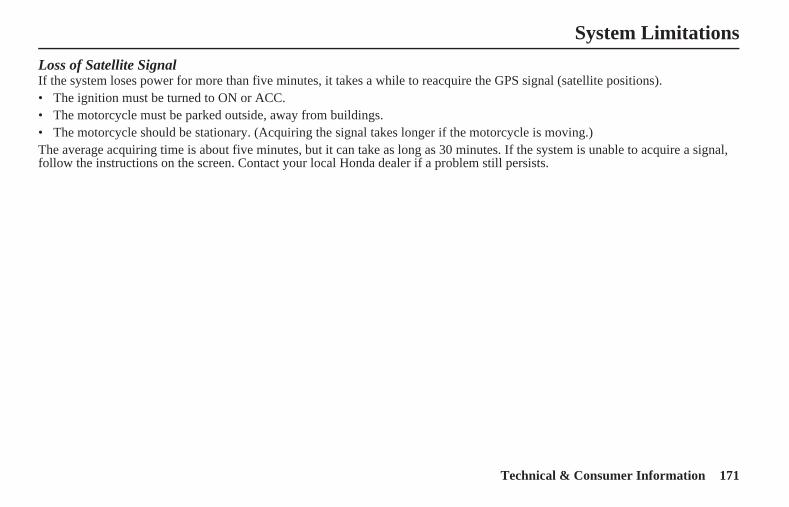
171Technical & Consumer Information
System Limitations
MCAS_A 31MCAT30
Loss of Satellite SignalIf the system loses power for more than five minutes, it takes a while to reacquire the GPS signal (satellite positions).• The ignition must be turned to ON or ACC.• The motorcycle must be parked outside, away from buildings.• The motorcycle should be stationary. (Acquiring the signal takes longer if the motorcycle is moving.)The average acquiring time is about five minutes, but it can take as long as 30 minutes. If the system is unable to acquire a signal, follow the instructions on the screen. Contact your local Honda dealer if a problem still persists.
US_MCAS.book Page 171 Tuesday, July 22, 2008 11:26 AM

172 Technical & Consumer Information
MCAS_A 31MCAT30
Database Limitations
The navigation system’s digitized map database reflects the most complete and accurate data available at the time of production. Accordingly, your copy may contain inaccurate or incomplete data or information due to the passage of time, road construction, changing conditions, or other causes.
In addition, this database does not include, analyze, process, consider, or reflect any of the following categories of information:• Population density• Neighborhood quality or safety• Availability or proximity of law enforcement• Construction work, zones, or hazards• Legal restrictions (such as vehicular type, weight, load, height, and speed restrictions)• Road slope or grade• Bridge height, width, weight, or other limits• Traffic facilities safety• Pavement characteristics or conditions• Special eventsWe assume no liability for any incident that may result from an error in the program or from changed conditions not noted above.
US_MCAS.book Page 172 Tuesday, July 22, 2008 11:26 AM
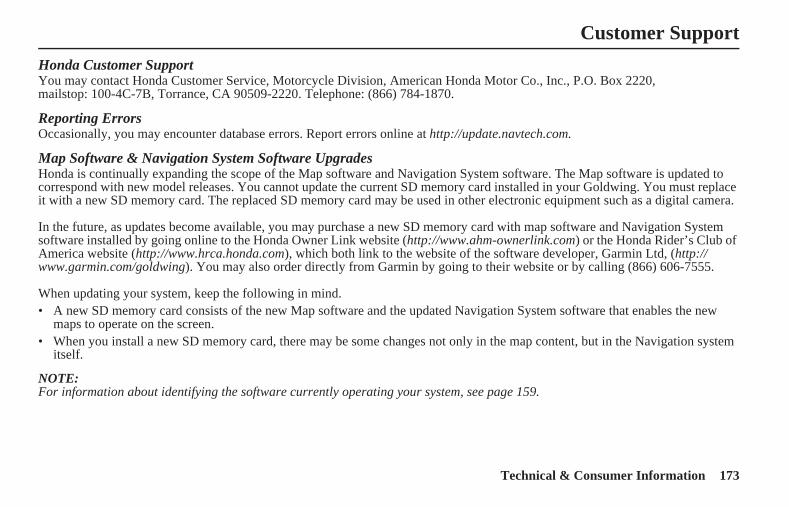
173Technical & Consumer Information
MCAS_A 31MCAT30
Customer Support
Honda Customer SupportYou may contact Honda Customer Service, Motorcycle Division, American Honda Motor Co., Inc., P.O. Box 2220, mailstop: 100-4C-7B, Torrance, CA 90509-2220. Telephone: (866) 784-1870.
Reporting ErrorsOccasionally, you may encounter database errors. Report errors online at http://update.navtech.com.
Map Software & Navigation System Software UpgradesHonda is continually expanding the scope of the Map software and Navigation System software. The Map software is updated to correspond with new model releases. You cannot update the current SD memory card installed in your Goldwing. You must replace it with a new SD memory card. The replaced SD memory card may be used in other electronic equipment such as a digital camera.
In the future, as updates become available, you may purchase a new SD memory card with map software and Navigation System software installed by going online to the Honda Owner Link website (http://www.ahm-ownerlink.com) or the Honda Rider’s Club of America website (http://www.hrca.honda.com), which both link to the website of the software developer, Garmin Ltd, (http://www.garmin.com/goldwing). You may also order directly from Garmin by going to their website or by calling (866) 606-7555.
When updating your system, keep the following in mind.• A new SD memory card consists of the new Map software and the updated Navigation System software that enables the new
maps to operate on the screen.• When you install a new SD memory card, there may be some changes not only in the map content, but in the Navigation system
itself.
NOTE:For information about identifying the software currently operating your system, see page 159.
US_MCAS.book Page 173 Tuesday, July 22, 2008 11:26 AM
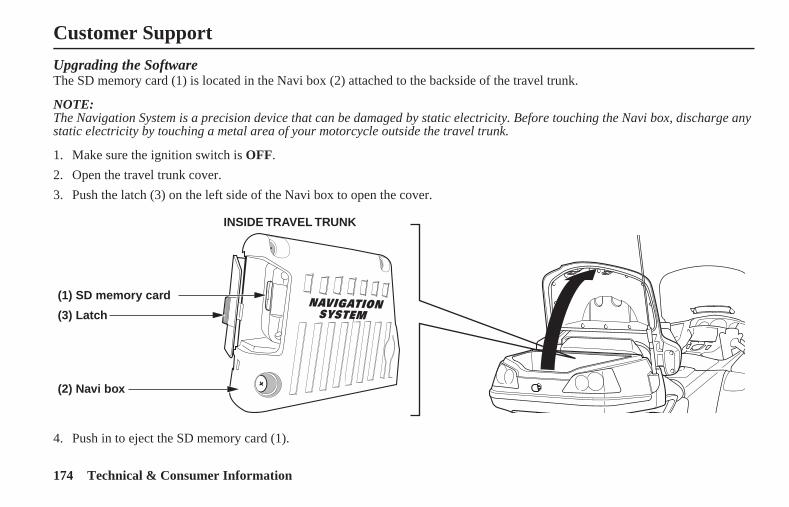
174 Technical & Consumer Information
Customer Support
MCAS_A 31MCAT30
Upgrading the SoftwareThe SD memory card (1) is located in the Navi box (2) attached to the backside of the travel trunk.
NOTE:The Navigation System is a precision device that can be damaged by static electricity. Before touching the Navi box, discharge any static electricity by touching a metal area of your motorcycle outside the travel trunk.
1. Make sure the ignition switch is OFF.
2. Open the travel trunk cover.
3. Push the latch (3) on the left side of the Navi box to open the cover.
4. Push in to eject the SD memory card (1).
(1) SD memory card
(3) Latch
(2) Navi box
INSIDE TRAVEL TRUNK
US_MCAS.book Page 174 Tuesday, July 22, 2008 11:26 AM
175Technical & Consumer Information
Customer Support
MCAS_A 31MCAT30
5. Insert the new SD memory card and push in until it clicks.
6. Turn the ignition switch to ACC. It automatically starts updating. The initial Navigation System screen (sunrise beyond the Earth) will appear, followed by the Copyrights screen. This means the update is completed.
7. Close the Navi box cover and push the latch to the right until it clicks. Check that the cover is securely closed.
8. Close the travel trunk cover.
9. To check the update was successful, go to the Setup / Info menu and select System Info. Check that the screen identifies the new update.
10. Turn the ignition switch to OFF.
US_MCAS.book Page 175 Tuesday, July 22, 2008 11:26 AM

176 Technical & Consumer Information
MCAS_A 31MCAT30
US_MCAS.book Page 176 Tuesday, July 22, 2008 11:26 AM
177
MCAS_A 31MCAT30
Index
A
address,find destination by...................95
alert icon ....................................51audio system controls ..................41
B
button,BACK ....................................38DIM .......................................40DIRECTIONAL ARROW .......38DISP ......................................40ENT .......................................38MAP ......................................38MENU ...................................38NAVI .....................................41VOICE/GUIDE.......................39ZOOM IN/OUT ......................38
button/knob,MODE ...................................41VOLUME...............................41
C
center display controls ................ 40changing SD memory card ........ 174city,
find distination by ................. 101controls,
audio system........................... 41center display ......................... 40left handlebar.......................... 39right fairing panel ................... 38
customer support ...................... 173
D
database limitations .................. 172detour ...................................... 121
E
edit route screen ......................... 72errors,
reporting .............................. 173exit,
find distination by ................. 102
F
favorite places...........................105favorite places,
find distination by ...................83find destination,
by address...............................95by city ..................................101by exit ..................................102by favorite ..............................83by intersection.........................98by point of interest ..................90by previous find ......................88menu ......................................82
full map......................................46
G
getting started .............................14glossary ....................................162GPS info menu .........................159
H
half map .....................................46
US_MCAS.book Page 177 Tuesday, July 22, 2008 11:26 AM

178
Index
MCAS_A 31MCAT30
I
intersection,find destination by ...................98
K
keyboard screens .........................64
L
left handlebar controls .................39lever, volume ..............................39limitations,
database ................................172system ..................................170
list screens ..................................67
M
main menu ............................26, 56maneuver list ..............................51map,
full .........................................46half.........................................46scale zoom ..............................53
screen layouts ......................... 46memory card,
accessing .............................. 174menu,
detour................................... 121favorite places....................... 106find destination ....................... 82GPS info .............................. 159main....................................... 26recalculate ............................ 115route .................................... 111route to home................ 124, 128route to new destination......... 114screens ................................... 56setup / info ........................... 138setup screen .......................... 139setup system ......................... 150setup voice ........................... 158system info ........................... 159traffic ................................... 132weather ................................ 128XM info ............................... 159
message banner .......................... 46messages,
system .................................. 164
N
next turn pop-up ..........................51
O
operating controls........................37operating keyboards ....................65
P
point of interest,find destination by ...................90
point review screens ....................68previous find,
find destination by ...................88
R
recalculate ................................115re-routing, automatic ...................52resume......................................113right fairing panel controls ...........38route to home ............123, 127, 131route to new destination menu ....114
US_MCAS.book Page 178 Tuesday, July 22, 2008 11:26 AM
179
Index
MCAS_A 31MCAT30
route,calculate screen .......................71edit.......................................116menu ............................111, 112new destination .....................114
S
screen,center display ..........................43edit route ................................72info ......................................159keyboard.................................64list..........................................67map ........................................46menu ......................................56point review ............................68route calculate.........................71traffic .....................................78traffic/weather review..............79weather...................................76
scroll bar ....................................44settings,
factory default.......................156setup / info menu ......................138setup screen menu .....................139
setup system menu.................... 150setup voice menu ...................... 158startup........................................ 16stop ......................................... 113support, customer ..................... 173system info menu ..................... 159system,
limitations ............................ 170messages .............................. 164startup.................................... 16
T
tips, getting started...................... 35toggle, zoom .............................. 39traffic,
avoiding incidents................. 135review screen.......................... 79screen .................................... 78viewing by road .................... 133viewing current route ............ 134viewing full map................... 133
trip, let’s take a........................... 29troubleshooting......................... 165
V
volume lever...............................39
W
weather,review screen ..........................79screen .....................................76viewing forecast ....................130viewing map .........................129viewing other city..................129
white arrow point locator .............54wide map....................................46
X
XM info menu ..........................159XM subscription .......................159
Z
zoom, map scale..........................53
US_MCAS.book Page 179 Tuesday, July 22, 2008 11:26 AM

180
MCAS_A 31MCAT30
US_MCAS.book Page 180 Tuesday, July 22, 2008 11:26 AM

181
MCAS_A 31MCAT30
US_MCAS.book Page 181 Tuesday, July 22, 2008 11:26 AM

182
MCAS_A 31MCAT30
US_MCAS.book Page 182 Tuesday, July 22, 2008 11:26 AM

183
MCAS_A 31MCAT30
US_MCAS.book Page 183 Tuesday, July 22, 2008 11:26 AM

184
MCAS_A 31MCAT30
US_MCAS.book Page 184 Tuesday, July 22, 2008 11:26 AM