Embed Size (px)
Citation preview
Black plate (1,1)Chevrolet Corvette Owner Manual - 2011
2011 Chevrolet Corvette Owner Manual M
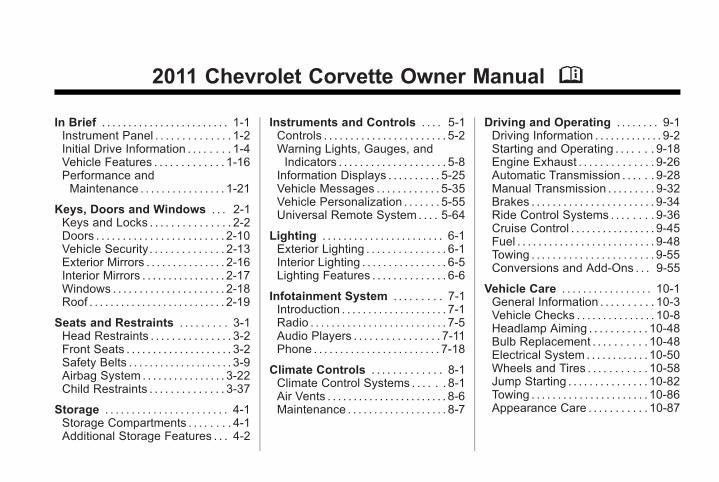
In Brief . . . . . . . . . . . . . . . . . . . . . . . . 1-1Instrument Panel . . . . . . . . . . . . . . 1-2Initial Drive Information . . . . . . . . 1-4Vehicle Features . . . . . . . . . . . . . 1-16Performance andMaintenance . . . . . . . . . . . . . . . . 1-21
Keys, Doors and Windows . . . 2-1Keys and Locks . . . . . . . . . . . . . . . 2-2Doors . . . . . . . . . . . . . . . . . . . . . . . . 2-10Vehicle Security. . . . . . . . . . . . . . 2-13Exterior Mirrors . . . . . . . . . . . . . . . 2-16Interior Mirrors . . . . . . . . . . . . . . . . 2-17Windows . . . . . . . . . . . . . . . . . . . . . 2-18Roof . . . . . . . . . . . . . . . . . . . . . . . . . . 2-19
Seats and Restraints . . . . . . . . . 3-1Head Restraints . . . . . . . . . . . . . . . 3-2Front Seats . . . . . . . . . . . . . . . . . . . . 3-2Safety Belts . . . . . . . . . . . . . . . . . . . . 3-9Airbag System . . . . . . . . . . . . . . . . 3-22Child Restraints . . . . . . . . . . . . . . 3-37
Storage . . . . . . . . . . . . . . . . . . . . . . . 4-1Storage Compartments . . . . . . . . 4-1Additional Storage Features . . . 4-2
Instruments and Controls . . . . 5-1Controls . . . . . . . . . . . . . . . . . . . . . . . 5-2Warning Lights, Gauges, andIndicators . . . . . . . . . . . . . . . . . . . . 5-8
Information Displays . . . . . . . . . . 5-25Vehicle Messages . . . . . . . . . . . . 5-35Vehicle Personalization . . . . . . . 5-55Universal Remote System . . . . 5-64
Lighting . . . . . . . . . . . . . . . . . . . . . . . 6-1Exterior Lighting . . . . . . . . . . . . . . . 6-1Interior Lighting . . . . . . . . . . . . . . . . 6-5Lighting Features . . . . . . . . . . . . . . 6-6
Infotainment System . . . . . . . . . 7-1Introduction . . . . . . . . . . . . . . . . . . . . 7-1Radio . . . . . . . . . . . . . . . . . . . . . . . . . . 7-5Audio Players . . . . . . . . . . . . . . . . 7-11Phone . . . . . . . . . . . . . . . . . . . . . . . . 7-18
Climate Controls . . . . . . . . . . . . . 8-1Climate Control Systems . . . . . . 8-1Air Vents . . . . . . . . . . . . . . . . . . . . . . . 8-6Maintenance . . . . . . . . . . . . . . . . . . . 8-7
Driving and Operating . . . . . . . . 9-1Driving Information . . . . . . . . . . . . . 9-2Starting and Operating . . . . . . . 9-18Engine Exhaust . . . . . . . . . . . . . . 9-26Automatic Transmission . . . . . . 9-28Manual Transmission . . . . . . . . . 9-32Brakes . . . . . . . . . . . . . . . . . . . . . . . 9-34Ride Control Systems . . . . . . . . 9-36Cruise Control . . . . . . . . . . . . . . . . 9-45Fuel . . . . . . . . . . . . . . . . . . . . . . . . . . 9-48Towing . . . . . . . . . . . . . . . . . . . . . . . 9-55Conversions and Add-Ons . . . 9-55
Vehicle Care . . . . . . . . . . . . . . . . . 10-1General Information . . . . . . . . . . 10-3Vehicle Checks . . . . . . . . . . . . . . . 10-8Headlamp Aiming . . . . . . . . . . . 10-48Bulb Replacement . . . . . . . . . . 10-48Electrical System . . . . . . . . . . . . 10-50Wheels and Tires . . . . . . . . . . . 10-58Jump Starting . . . . . . . . . . . . . . . 10-82Towing . . . . . . . . . . . . . . . . . . . . . . 10-86Appearance Care . . . . . . . . . . . 10-87
Black plate (2,1)Chevrolet Corvette Owner Manual - 2011
2011 Chevrolet Corvette Owner Manual M
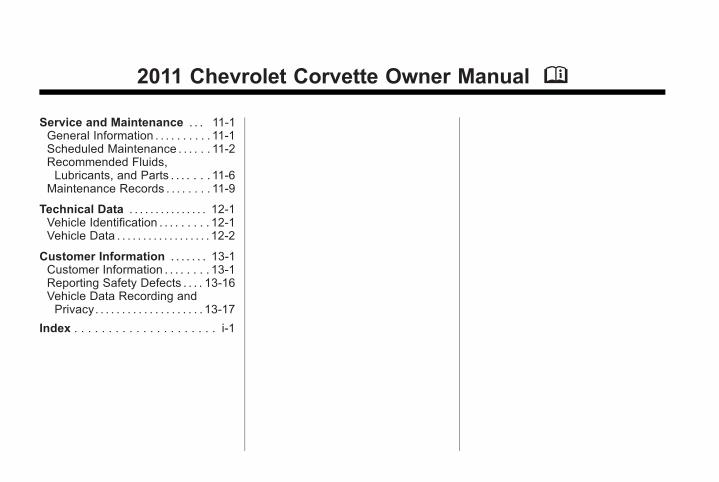
Service and Maintenance . . . 11-1General Information . . . . . . . . . . 11-1Scheduled Maintenance . . . . . . 11-2Recommended Fluids,Lubricants, and Parts . . . . . . . 11-6
Maintenance Records . . . . . . . . 11-9
Technical Data . . . . . . . . . . . . . . . 12-1Vehicle Identification . . . . . . . . . 12-1Vehicle Data . . . . . . . . . . . . . . . . . . 12-2
Customer Information . . . . . . . 13-1Customer Information . . . . . . . . 13-1Reporting Safety Defects . . . . 13-16Vehicle Data Recording andPrivacy. . . . . . . . . . . . . . . . . . . . 13-17
Index . . . . . . . . . . . . . . . . . . . . . i-1
Black plate (3,1)Chevrolet Corvette Owner Manual - 2011
Introduction iii
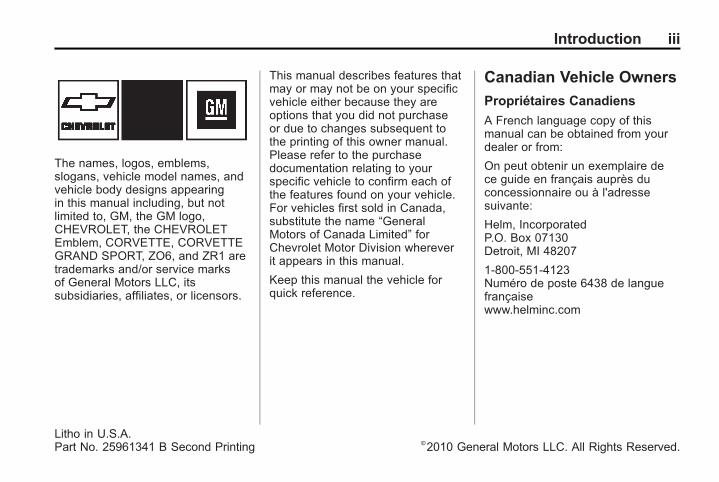
The names, logos, emblems,slogans, vehicle model names, andvehicle body designs appearingin this manual including, but notlimited to, GM, the GM logo,CHEVROLET, the CHEVROLETEmblem, CORVETTE, CORVETTEGRAND SPORT, ZO6, and ZR1 aretrademarks and/or service marksof General Motors LLC, itssubsidiaries, affiliates, or licensors.
This manual describes features thatmay or may not be on your specificvehicle either because they areoptions that you did not purchaseor due to changes subsequent tothe printing of this owner manual.Please refer to the purchasedocumentation relating to yourspecific vehicle to confirm each ofthe features found on your vehicle.For vehicles first sold in Canada,substitute the name “GeneralMotors of Canada Limited” forChevrolet Motor Division whereverit appears in this manual.
Keep this manual the vehicle forquick reference.
Canadian Vehicle Owners
Propriétaires Canadiens
A French language copy of thismanual can be obtained from yourdealer or from:
On peut obtenir un exemplaire dece guide en français auprès duconcessionnaire ou à l'adressesuivante:
Helm, IncorporatedP.O. Box 07130Detroit, MI 48207
1-800-551-4123Numéro de poste 6438 de languefrançaisewww.helminc.com
Litho in U.S.A.Part No. 25961341 B Second Printing ©2010 General Motors LLC. All Rights Reserved.
Black plate (4,1)Chevrolet Corvette Owner Manual - 2011
iv Introduction
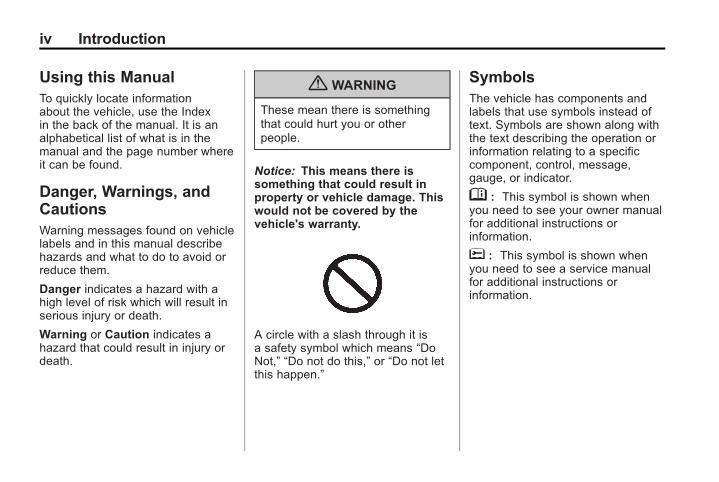
Using this ManualTo quickly locate informationabout the vehicle, use the Indexin the back of the manual. It is analphabetical list of what is in themanual and the page number whereit can be found.
Danger, Warnings, andCautionsWarning messages found on vehiclelabels and in this manual describehazards and what to do to avoid orreduce them.
Danger indicates a hazard with ahigh level of risk which will result inserious injury or death.
Warning or Caution indicates ahazard that could result in injury ordeath.
{ WARNING
These mean there is somethingthat could hurt you or otherpeople.
Notice: This means there issomething that could result inproperty or vehicle damage. Thiswould not be covered by thevehicle's warranty.
A circle with a slash through it isa safety symbol which means “DoNot,” “Do not do this,” or “Do not letthis happen.”
SymbolsThe vehicle has components andlabels that use symbols instead oftext. Symbols are shown along withthe text describing the operation orinformation relating to a specificcomponent, control, message,gauge, or indicator.
M : This symbol is shown whenyou need to see your owner manualfor additional instructions orinformation.
* : This symbol is shown whenyou need to see a service manualfor additional instructions orinformation.
Black plate (5,1)Chevrolet Corvette Owner Manual - 2011
Introduction v
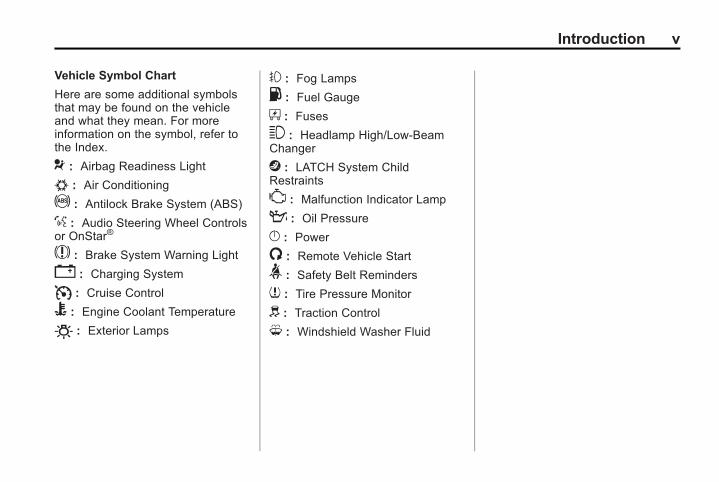
Vehicle Symbol Chart
Here are some additional symbolsthat may be found on the vehicleand what they mean. For moreinformation on the symbol, refer tothe Index.
9 : Airbag Readiness Light
# : Air Conditioning
! : Antilock Brake System (ABS)
% : Audio Steering Wheel Controlsor OnStar®
$ : Brake System Warning Light
" : Charging System
I : Cruise Control
B : Engine Coolant Temperature
O : Exterior Lamps
# : Fog Lamps
. : Fuel Gauge
+ : Fuses
3 : Headlamp High/Low-BeamChanger
j : LATCH System ChildRestraints
* : Malfunction Indicator Lamp
: : Oil Pressure
} : Power
/ : Remote Vehicle Start
> : Safety Belt Reminders
7 : Tire Pressure Monitor
d : Traction Control
M : Windshield Washer Fluid

Black plate (6,1)Chevrolet Corvette Owner Manual - 2011
vi Introduction
2 NOTES
Black plate (1,1)Chevrolet Corvette Owner Manual - 2011
In Brief 1-1
In Brief
Instrument PanelInstrument Panel . . . . . . . . . . . . . . 1-2
Initial Drive InformationInitial Drive Information . . . . . . . . 1-4Remote Keyless Entry (RKE)System . . . . . . . . . . . . . . . . . . . . . . 1-4
Door Locks . . . . . . . . . . . . . . . . . . . 1-5Trunk Release . . . . . . . . . . . . . . . . 1-6Windows . . . . . . . . . . . . . . . . . . . . . . 1-6Seat Adjustment . . . . . . . . . . . . . . 1-6Memory Features . . . . . . . . . . . . . 1-8Safety Belts . . . . . . . . . . . . . . . . . . 1-10Sensing System forPassenger Airbag . . . . . . . . . . 1-10
Mirror Adjustment . . . . . . . . . . . . 1-11Steering WheelAdjustment . . . . . . . . . . . . . . . . . 1-11
Interior Lighting . . . . . . . . . . . . . . 1-12Exterior Lighting . . . . . . . . . . . . . 1-13Windshield Wiper/Washer . . . . 1-13Climate Controls . . . . . . . . . . . . . 1-14Transmission . . . . . . . . . . . . . . . . 1-15
Vehicle FeaturesRadio(s) . . . . . . . . . . . . . . . . . . . . . 1-16Satellite Radio . . . . . . . . . . . . . . . 1-17Portable Audio Devices . . . . . . 1-17Bluetooth® . . . . . . . . . . . . . . . . . . . 1-18Steering Wheel Controls . . . . . 1-18Cruise Control . . . . . . . . . . . . . . . 1-19Navigation System . . . . . . . . . . . 1-19Driver InformationCenter (DIC) . . . . . . . . . . . . . . . 1-19
Power Outlets . . . . . . . . . . . . . . . 1-20Roof Panel . . . . . . . . . . . . . . . . . . 1-20Convertible . . . . . . . . . . . . . . . . . . 1-21
Performance and MaintenanceTraction ControlSystem (TCS) . . . . . . . . . . . . . . 1-21
Towing . . . . . . . . . . . . . . . . . . . . . . . 1-21Tire Pressure Monitor . . . . . . . . 1-22ZO6, Z16, and ZR1Features . . . . . . . . . . . . . . . . . . . 1-22
Engine Oil Life System . . . . . . 1-23Driving for Better FuelEconomy . . . . . . . . . . . . . . . . . . . 1-23
Battery . . . . . . . . . . . . . . . . . . . . . . . 1-24Roadside AssistanceProgram . . . . . . . . . . . . . . . . . . . . 1-24
OnStar® . . . . . . . . . . . . . . . . . . . . . 1-25
Black plate (2,1)Chevrolet Corvette Owner Manual - 2011
1-2 In Brief
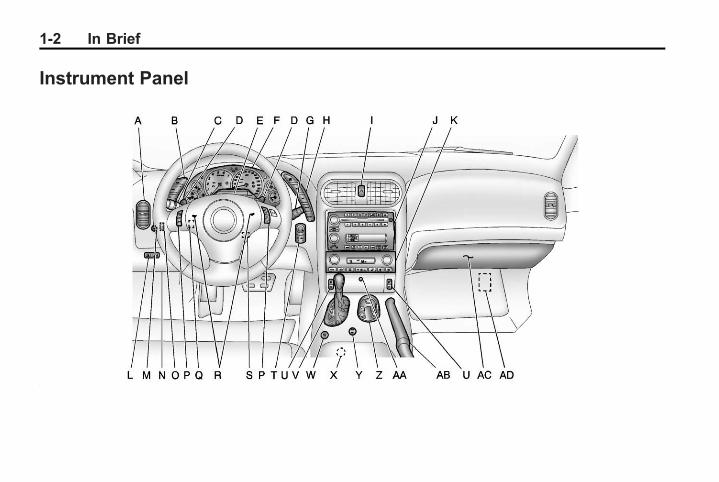
Instrument Panel
Black plate (3,1)Chevrolet Corvette Owner Manual - 2011
In Brief 1-3
A. Air Vents on page 8‑6.
B. Head‐Up Display Controls(If Equipped). See Head-UpDisplay (HUD) on page 5‑31.
C. Turn and Lane‐Change Lever.See Turn and Lane-ChangeSignals (Auto Signal) onpage 6‑4.Cruise Control on page 9‑45.Fog Lamps on page 6‑5.Exterior Lamp Controls onpage 6‑1.
D. Manual Shift Paddles(If Equipped). See AutomaticTransmission on page 9‑28.
E. Driver Information Center (DIC)on page 5‑25.
F. Instrument Cluster on page 5‑9.
G. Windshield Wiper/Washer onpage 5‑4.
H. Driver Information Center (DIC)Buttons. See Driver InformationCenter (DIC) on page 5‑25.
I. Hazard Warning Flashers onpage 6‑4.
J. Infotainment on page 7‑1.
K. Dual Automatic Climate ControlSystem on page 8‑1.
L. Fuel Door Release Button. SeeFilling the Tank on page 9‑52.
Hatch/Trunk Release Button.See “Hatch/Trunk Lid Release”under Hatch on page 2‑10.
M. Instrument Panel IlluminationControl on page 6‑5.
N. Data Link Connector (DLC)(Out of View). See MalfunctionIndicator Lamp on page 5‑18.
O. Power Folding Top Switch(If Equipped). See ConvertibleTop on page 2‑23.
P. Bluetooth Controls(If Equipped). See Bluetooth onpage 7‑18.Steering Wheel Controls onpage 5‑3 (If Equipped).
Q. Steering Wheel Adjustment onpage 5‑2.
R. Horn on page 5‑4.
S. Telescopic Steering ColumnControl (If Equipped). SeeSteering Wheel Adjustment onpage 5‑2.
T. Ignition Positions on page 9‑20.
U. Heated Front Seats on page 3‑8(If Equipped).
V. Shift Lever (Automatic Shown).See Automatic Transmission onpage 9‑28 or ManualTransmission on page 9‑32.
W. Active Handling System onpage 9‑37.
X. Power Outlets on page 5‑6.
Y. Selective Ride Control onpage 9‑43 (If Equipped).
Z. Cupholders on page 4‑1.
AA. Ashtrays on page 5‑8.
Cigarette Lighter on page 5‑7.
AB. Parking Brake on page 9‑35.
AC.Glove Box on page 4‑1.
AD. Instrument Panel Fuse Block onpage 10‑55.
Black plate (4,1)Chevrolet Corvette Owner Manual - 2011
1-4 In Brief
Initial DriveInformationThis section provides a briefoverview about some of theimportant features that may or maynot be on your specific vehicle.
For more detailed information, referto each of the features which can befound later in this owner manual.
Remote Keyless Entry(RKE) SystemThe RKE transmitter is used to lockand unlock the doors from up to30 m (100 ft) away from the vehicle.
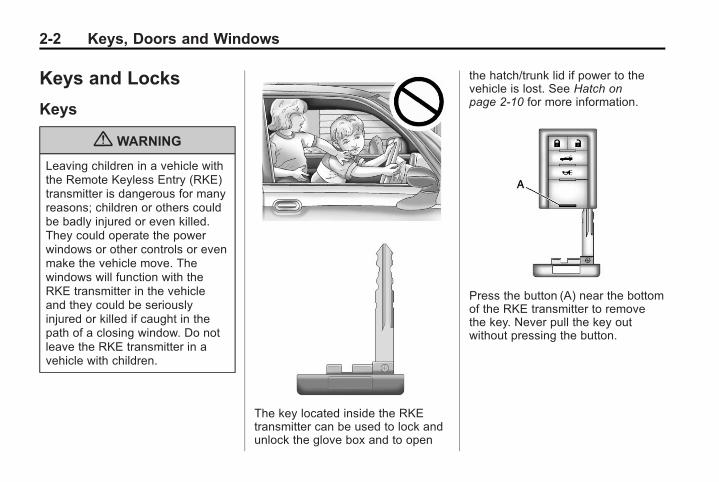
Press the button (A) to remove thekey. The key can be used to lockand unlock the glove box and toopen the hatch/trunk lid if power tothe vehicle is lost. See Hatch onpage 2‑10 for more information.
K : Press to unlock the driver door.Press again within five seconds tounlock both doors.
Q : Press to lock all doors.
} : Press and hold forapproximately one second to openthe hatch/trunk.
L : Press to sound the horn.Press any other button on the RKEtransmitter to stop it.
See Keys on page 2‑2 and RemoteKeyless Entry (RKE) SystemOperation on page 2‑3.
Black plate (5,1)Chevrolet Corvette Owner Manual - 2011
In Brief 1-5
Door Locks
From the outside, press Q or Kon the keyless access transmitter.
When you have the transmitter withyou, you may also unlock and openthe door by squeezing the doorhandle sensor (A).
From the inside, use the power doorlock switch (B), located at the top ofthe door panel, near both windows.
K : Press to unlock the doors.
Q : Press to lock the doors.
To open a door from the inside afterit is locked, press the button (C) infront of the door handle and pushthe door open.
See Power Door Locks on page 2‑9.
Loss of Vehicle ElectricalPower
If the vehicle has lost battery power,the driver door can be openedmanually.
Inside the Vehicle
Pull the door release handle locatedon the floor next to the seat.

Black plate (6,1)Chevrolet Corvette Owner Manual - 2011
1-6 In Brief
Trunk Release
Opening and Closing theHatch/Trunk
There are three ways to open thehatch/trunk:. Touch the button located above
the license plate. The keylessaccess transmitter must bewithin three feet of the button.
. PressV located to the left ofthe steering wheel.
. Press} on the keylessaccess transmitter.
For more information, see Hatch onpage 2‑10.
Windows
The power window switches arelocated on each door.
Pull up or press down on the frontof the switch to raise or lower thewindow.
For more information, see PowerWindows on page 2‑18.
Seat Adjustment
Manual Seats
To adjust a manual seat:
1. Lift the bar under the front of theseat cushion to unlock the seat.
2. Slide the seat to the desiredposition and release the bar.
3. Try to move the seat back andforth to make sure it is locked inplace.
See Seat Adjustment on page 3‑2for more information.
Black plate (7,1)Chevrolet Corvette Owner Manual - 2011
In Brief 1-7
Power Seats
To adjust a power seat, if equipped:. Move the seat forward or
rearward by sliding the controlforward or rearward.
. Raise or lower the front or rearpart of the seat cushion bymoving the front or rear of thecontrol up or down.
See Power Seat Adjustment onpage 3‑3 for more information.
Power Lumbar and SideBolsters
A. Lumbar Support Control
B. Side Bolster Support Control
To adjust the support, if equipped:. Move control (A) forward or
rearward to adjust lumbarsupport.
. Move control (B) up or down toadjust the side bolsters.
See Lumbar Adjustment onpage 3‑6 for more information.
Reclining Seatbacks
To recline a manual seatback:
1. Lift the lever on the outboardside of the seat.
2. Move the seatback to thedesired position, and thenrelease the lever to lock theseatback in place.
3. Push and pull on the seatback tomake sure it is locked.
See Reclining Seatbacks onpage 3‑6 for more information.
Black plate (8,1)Chevrolet Corvette Owner Manual - 2011
1-8 In Brief
Heated Seats
If available, the buttons are on thecenter console. The ignition must beon for this feature to work.
L : Press to turn on the heatedseat at the high setting.
Press again to switch to the lowsetting.
9 : Press to turn the system off.
See Heated Front Seats onpage 3‑8 for more information.
Memory Features
On vehicles with the memoryfeature, the controls on the driverdoor are used to program and recallmemory settings for the driver seat,outside mirrors, and the telescopicsteering column.
Storing Memory Positions
To save into memory:
1. Adjust the driver seat, bothoutside mirrors, and thetelescopic steering column.
2. Press and hold “1” untiltwo beeps sound.
3. Repeat for a second driverposition using “2.”
To recall:. On vehicles with an automatic
transmission, press and release“1” or “2.”
If the vehicle is in P (Park), asingle beep sounds and thememory position is recalled aftera brief delay.
If the vehicle is not in P (Park),three beeps sound and thememory position is not recalled.

Black plate (9,1)Chevrolet Corvette Owner Manual - 2011
In Brief 1-9
. On vehicles with a manualtransmission, when the vehicleis on, the parking brake must beset to recall a memory position.Press and release “1” or “2.”
A single beep sounds and thememory position is recalled aftera brief delay.
If the vehicle is on and theparking brake is not set,three beeps sound and thememory position is not recalled.
See “Memory Seat, Mirrors, andSteering Wheel” under Power SeatAdjustment on page 3‑3 for moreinformation.
Easy Exit Driver Seat
This feature can move the seatrearward and the telescopic steeringcolumn out of the way to allow extraroom to exit the vehicle.
B : Press to save and recall theeasy exit seat position.
To save into memory:
1. Recall the desired drivingposition by pressing “1.”
2. Adjust the seat and thetelescopic steering column tothe desired exit position.
3. Press and hold B untiltwo beeps sound.
4. Repeat for a second driverposition using “2.”
To recall, press and release B.The vehicle must be in P (Park) foran automatic transmission or theparking brake must be set for amanual transmission. A single beepsounds. The seat and telescopicsteering column will move to theposition previously stored for theidentified driver.
See “Memory Seat, Mirrors, andSteering Wheel” under Power SeatAdjustment on page 3‑3 for moreinformation.
Black plate (10,1)Chevrolet Corvette Owner Manual - 2011
1-10 In Brief
Safety Belts
Refer to the following sections forimportant information on how to usesafety belts properly.. Safety Belts on page 3‑9.. How to Wear Safety Belts
Properly on page 3‑13.. Lap-Shoulder Belt on page 3‑18.
. Lower Anchors and Tethers forChildren (LATCH System)(Coupe and Convertible ModelsOnly) on page 3‑43 or LowerAnchors and Tethers forChildren (LATCH System)(ZO6 and ZR1 Models Only) onpage 3‑44.
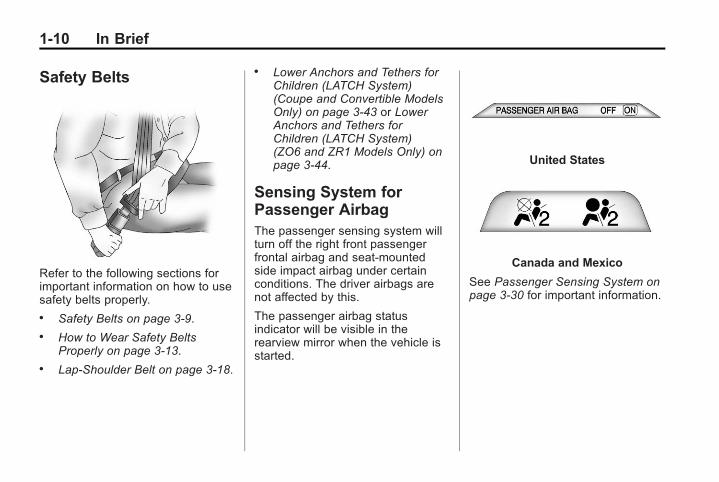
Sensing System forPassenger AirbagThe passenger sensing system willturn off the right front passengerfrontal airbag and seat‐mountedside impact airbag under certainconditions. The driver airbags arenot affected by this.
The passenger airbag statusindicator will be visible in therearview mirror when the vehicle isstarted.
United States
Canada and Mexico
See Passenger Sensing System onpage 3‑30 for important information.
Black plate (11,1)Chevrolet Corvette Owner Manual - 2011
In Brief 1-11
Mirror Adjustment
Exterior Mirrors
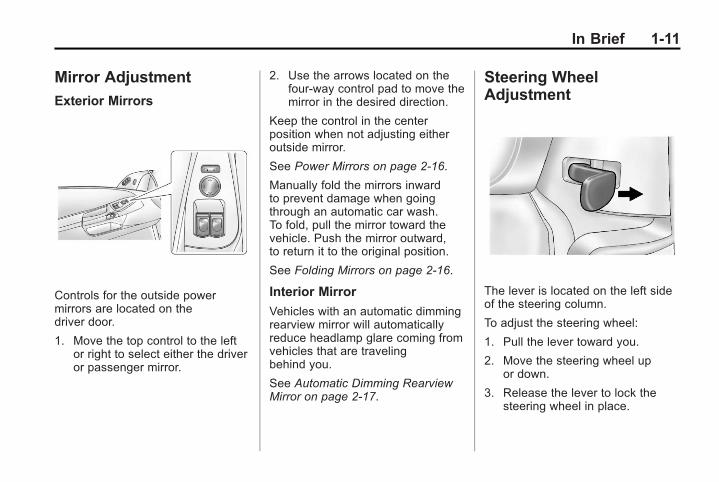
Controls for the outside powermirrors are located on thedriver door.
1. Move the top control to the leftor right to select either the driveror passenger mirror.
2. Use the arrows located on thefour-way control pad to move themirror in the desired direction.
Keep the control in the centerposition when not adjusting eitheroutside mirror.
See Power Mirrors on page 2‑16.
Manually fold the mirrors inwardto prevent damage when goingthrough an automatic car wash.To fold, pull the mirror toward thevehicle. Push the mirror outward,to return it to the original position.
See Folding Mirrors on page 2‑16.
Interior Mirror
Vehicles with an automatic dimmingrearview mirror will automaticallyreduce headlamp glare coming fromvehicles that are travelingbehind you.
See Automatic Dimming RearviewMirror on page 2‑17.
Steering WheelAdjustment
The lever is located on the left sideof the steering column.
To adjust the steering wheel:
1. Pull the lever toward you.
2. Move the steering wheel upor down.
3. Release the lever to lock thesteering wheel in place.
Black plate (12,1)Chevrolet Corvette Owner Manual - 2011
1-12 In Brief
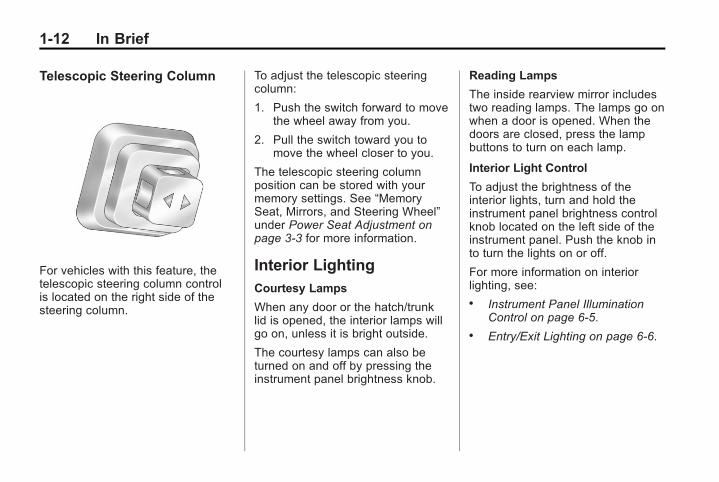
Telescopic Steering Column
For vehicles with this feature, thetelescopic steering column controlis located on the right side of thesteering column.
To adjust the telescopic steeringcolumn:
1. Push the switch forward to movethe wheel away from you.
2. Pull the switch toward you tomove the wheel closer to you.
The telescopic steering columnposition can be stored with yourmemory settings. See “MemorySeat, Mirrors, and Steering Wheel”under Power Seat Adjustment onpage 3‑3 for more information.
Interior LightingCourtesy Lamps
When any door or the hatch/trunklid is opened, the interior lamps willgo on, unless it is bright outside.
The courtesy lamps can also beturned on and off by pressing theinstrument panel brightness knob.
Reading Lamps
The inside rearview mirror includestwo reading lamps. The lamps go onwhen a door is opened. When thedoors are closed, press the lampbuttons to turn on each lamp.
Interior Light Control
To adjust the brightness of theinterior lights, turn and hold theinstrument panel brightness controlknob located on the left side of theinstrument panel. Push the knob into turn the lights on or off.
For more information on interiorlighting, see:. Instrument Panel Illumination
Control on page 6‑5.. Entry/Exit Lighting on page 6‑6.
Black plate (13,1)Chevrolet Corvette Owner Manual - 2011
In Brief 1-13
Exterior Lighting
Exterior Lamps
The exterior lamp control is locatedto the left of the steering wheel, onthe multifunction lever.
O : Turn the band with thissymbol on it to operate the exteriorlamps.
O : Turns off all lamps.
AUTO: Sets the exterior lampsto automatic mode. AUTO modeturns the exterior lamps on and offdepending on how much light isavailable outside the vehicle.
; : Turns on the parking lampstogether with the sidemarker lamps,taillamps, license plate lamps, andinstrument panel lights.
5 : Turns on the headlampstogether with the parking lamps,sidemarker lamps, taillamps, licenseplate lamps, and instrument panellights.
Turn and Lane-Change Signal
The turn signal lever has twoupward and downward positions tosignal a lane change or a turn.. For a lane change, raise or
lower the lever. The signalautomatically flashes threetimes.
. For a turn, raise or lower thelever all of the way up or down.The turn signal will stop flashingwhen the turn is completed.
For more information, see:. Exterior Lamp Controls on
page 6‑1.. Turn and Lane-Change Signals
(Auto Signal) on page 6‑4.
Windshield Wiper/Washer
The windshield wiper lever islocated on the right side of thesteering column.
1 : Use for fast wipes.
6 : Use for slow wipes.
& : Use to set a delay betweenwipes.
x : Use for a delayed wipingcycle. Turn the intermittent adjustband down for a longer delay or upfor a shorter delay.
Black plate (14,1)Chevrolet Corvette Owner Manual - 2011
1-14 In Brief
9 : Use to turn off the windshieldwipers.
8 : Use for a for a single wipingcycle. For more wipes, hold theband longer.
Windshield Washer: Press thebutton at the end of the lever untilthe washers begin.
See Windshield Wiper/Washer onpage 5‑4.
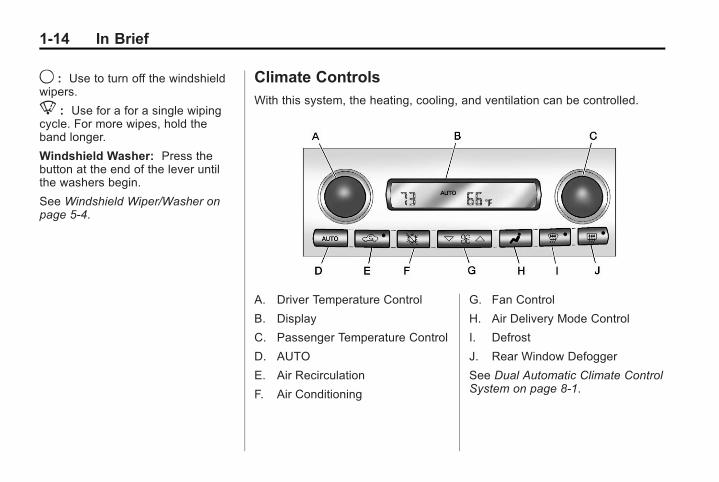
Climate ControlsWith this system, the heating, cooling, and ventilation can be controlled.
A. Driver Temperature Control
B. Display
C. Passenger Temperature Control
D. AUTO
E. Air Recirculation
F. Air Conditioning
G. Fan Control
H. Air Delivery Mode Control
I. Defrost
J. Rear Window Defogger
See Dual Automatic Climate ControlSystem on page 8‑1.
Black plate (15,1)Chevrolet Corvette Owner Manual - 2011
In Brief 1-15
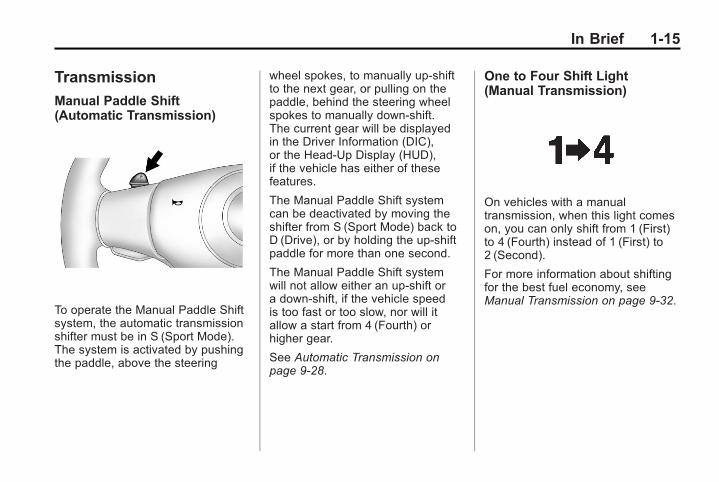
Transmission
Manual Paddle Shift(Automatic Transmission)
To operate the Manual Paddle Shiftsystem, the automatic transmissionshifter must be in S (Sport Mode).The system is activated by pushingthe paddle, above the steering
wheel spokes, to manually up-shiftto the next gear, or pulling on thepaddle, behind the steering wheelspokes to manually down-shift.The current gear will be displayedin the Driver Information (DIC),or the Head-Up Display (HUD),if the vehicle has either of thesefeatures.
The Manual Paddle Shift systemcan be deactivated by moving theshifter from S (Sport Mode) back toD (Drive), or by holding the up‐shiftpaddle for more than one second.
The Manual Paddle Shift systemwill not allow either an up-shift ora down-shift, if the vehicle speedis too fast or too slow, nor will itallow a start from 4 (Fourth) orhigher gear.
See Automatic Transmission onpage 9‑28.
One to Four Shift Light(Manual Transmission)
On vehicles with a manualtransmission, when this light comeson, you can only shift from 1 (First)to 4 (Fourth) instead of 1 (First) to2 (Second).
For more information about shiftingfor the best fuel economy, seeManual Transmission on page 9‑32.
Black plate (16,1)Chevrolet Corvette Owner Manual - 2011
1-16 In Brief
Vehicle Features
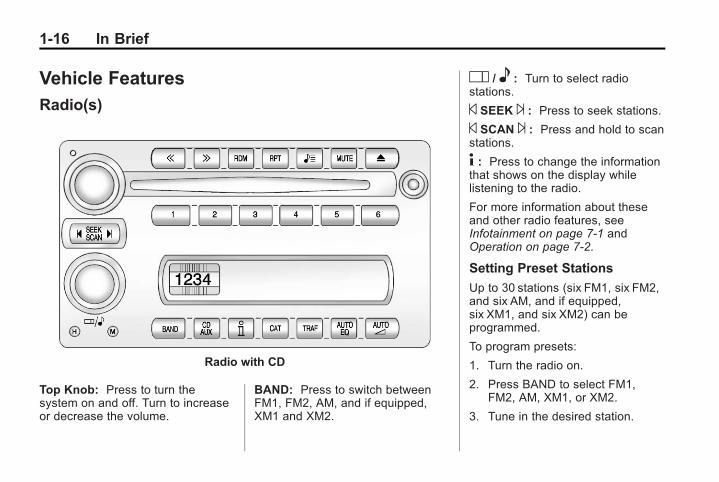
Radio(s)
Radio with CD
Top Knob: Press to turn thesystem on and off. Turn to increaseor decrease the volume.
BAND: Press to switch betweenFM1, FM2, AM, and if equipped,XM1 and XM2.
O / e : Turn to select radiostations.
© SEEK ¨ : Press to seek stations.
© SCAN ¨ : Press and hold to scanstations.
4 : Press to change the informationthat shows on the display whilelistening to the radio.
For more information about theseand other radio features, seeInfotainment on page 7‑1 andOperation on page 7‑2.
Setting Preset Stations
Up to 30 stations (six FM1, six FM2,and six AM, and if equipped,six XM1, and six XM2) can beprogrammed.
To program presets:
1. Turn the radio on.
2. Press BAND to select FM1,FM2, AM, XM1, or XM2.
3. Tune in the desired station.
Black plate (17,1)Chevrolet Corvette Owner Manual - 2011
In Brief 1-17
4. Press AUTO EQ to select theequalization.
5. Press and hold one of the sixnumbered pushbuttons until theradio beeps once.
6. Repeat the steps for eachpushbutton.
See Operation on page 7‑2.
Setting the Clock
To set the clock:
1. Press and hold H until thecorrect hour displays.
2. Press and hold M until thecorrect minute displays.
See Clock on page 5‑6.
Satellite RadioXM is a satellite radio servicebased in the 48 contiguous UnitedStates and 10 Canadian provinces.XM satellite radio has a widevariety of programming andcommercial-free music, coast tocoast, and in digital-quality sound.
A fee is required to receive theXM service.
For more information, refer to:. www.xmradio.com or call
1-800-929-2100 (U.S.). www.xmradio.ca or call
1-877-438-9677 (Canada)
See Satellite Radio on page 7‑8.
Portable Audio DevicesThis vehicle may have an auxiliaryinput jack, located on the audiofaceplate. External devices such asiPod®, MP3 players, etc. can beconnected to the auxiliary input jackusing a 3.5 mm (1/8 in) input jackcable.
See “Using the Auxiliary Input Jack”under Auxiliary Devices onpage 7‑17.
Black plate (18,1)Chevrolet Corvette Owner Manual - 2011
1-18 In Brief
Bluetooth®
For vehicles with a Bluetoothsystem, it allows users with aBluetooth‐enabled cell phone tomake and receive hands-free callsusing the vehicle’s audio systemand controls.
The Bluetooth‐enabled cell phonemust be paired with the Bluetoothsystem before it can be used in thevehicle. Not all phones will supportall functions. For more information,visit www.gm.com/bluetooth.
For more information, see Bluetoothon page 7‑18.
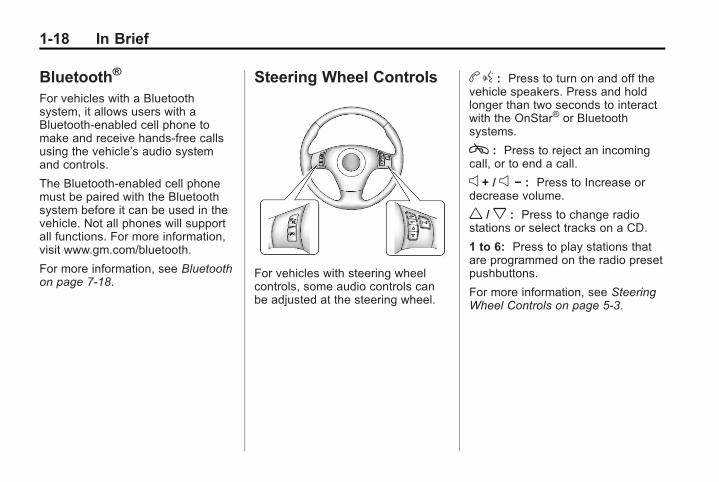
Steering Wheel Controls
For vehicles with steering wheelcontrols, some audio controls canbe adjusted at the steering wheel.
b g : Press to turn on and off thevehicle speakers. Press and holdlonger than two seconds to interactwith the OnStar® or Bluetoothsystems.
c : Press to reject an incomingcall, or to end a call.
e + / e − : Press to Increase ordecrease volume.
w /x : Press to change radiostations or select tracks on a CD.
1 to 6: Press to play stations thatare programmed on the radio presetpushbuttons.
For more information, see SteeringWheel Controls on page 5‑3.
Black plate (19,1)Chevrolet Corvette Owner Manual - 2011
In Brief 1-19
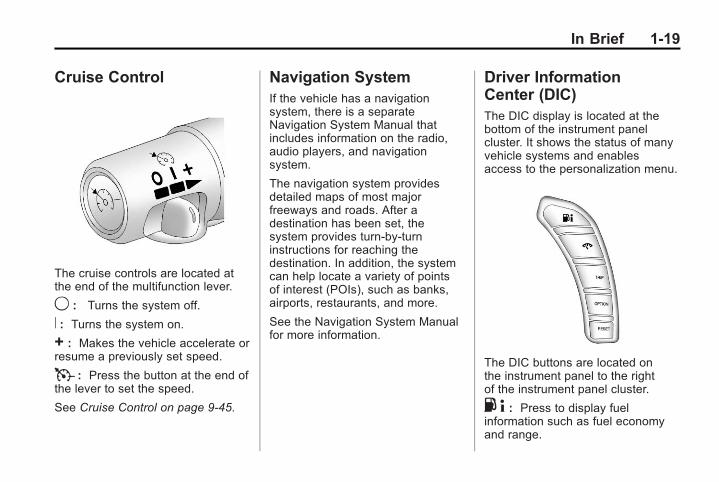
Cruise Control
The cruise controls are located atthe end of the multifunction lever.
9 : Turns the system off.
R : Turns the system on.
+ : Makes the vehicle accelerate orresume a previously set speed.
T : Press the button at the end ofthe lever to set the speed.
See Cruise Control on page 9‑45.
Navigation SystemIf the vehicle has a navigationsystem, there is a separateNavigation System Manual thatincludes information on the radio,audio players, and navigationsystem.
The navigation system providesdetailed maps of most majorfreeways and roads. After adestination has been set, thesystem provides turn-by-turninstructions for reaching thedestination. In addition, the systemcan help locate a variety of pointsof interest (POIs), such as banks,airports, restaurants, and more.
See the Navigation System Manualfor more information.
Driver InformationCenter (DIC)The DIC display is located at thebottom of the instrument panelcluster. It shows the status of manyvehicle systems and enablesaccess to the personalization menu.
The DIC buttons are located onthe instrument panel to the rightof the instrument panel cluster.
. 4 : Press to display fuelinformation such as fuel economyand range.
Black plate (20,1)Chevrolet Corvette Owner Manual - 2011
1-20 In Brief
2 : Press to display gaugeinformation like oil pressure andtemperature, coolant temperature,automatic transmission fluidtemperature (if equipped), batteryvoltage, and front/rear tirepressures.
TRIP: Press to display your totaland trip distance driven, the elapsedtime function, your average speed,and the engine oil life.
OPTION: Press to choose personaloptions that are available on yourvehicle, depending on the optionsyour vehicle is equipped with, suchas door locks, easy entry seats, andlanguage.
RESET: Press, along with the otherbuttons, to reset system functions,select personal options, and turn offor acknowledge messages onthe DIC.
For more information, see DriverInformation Center (DIC) onpage 5‑25.
Vehicle Personalization
Some vehicle features can beprogrammed by using the DICbuttons located to the right of theinstrument panel cluster. Thefeatures that can be programmedinclude:. Units. Memory Features. Lighting Features. Lock and Unlock Feedback. Door Lock and Unlock Settings. Language. Personalization Name
See Vehicle Personalization onpage 5‑55.
Power OutletsThe accessory power outlet can beused to plug in electrical equipment,such as a cell phone or MP3 player.
The accessory power outlet islocated inside the center consolestorage compartment, on theforward left side.
Remove the cover to access andreplace when not in use.
See Power Outlets on page 5‑6.
Roof PanelOn vehicles with a removableroof panel, there are three releaselatches. Two are located on the frontof the roof panel and the other islocated on the back of the roofpanel. See “Removing the RoofPanel” under Roof Panel onpage 2‑19.
Black plate (21,1)Chevrolet Corvette Owner Manual - 2011
In Brief 1-21
Until you are sure you can removethe roof panel by yourself, havesomeone help you. Once removed,the roof panel should always bestored properly in the rear storagecompartment.
For more information:. See “Storing the Roof Panel”
under Roof Panel on page 2‑19.. See “Installing the Roof Panel”
under Roof Panel on page 2‑19.
ConvertibleIf equipped, the convertible top canbe lowered and stowed under thetonneau cover behind the rear seat.For step-by-step instructions, seeConvertible Top on page 2‑23.
Performance andMaintenance
Traction ControlSystem (TCS)The traction control system limitswheel spin. The system turns onautomatically every time the vehicleis started.. To turn off traction control,
press and release d on the
console. d illuminates andthe appropriate DIC messagedisplays. See Ride ControlSystem Messages on page 5‑44.
. Press and release the buttonagain to turn on traction control.
See Traction Control System (TCS)on page 9‑36.
The vehicle has an ActiveHandling System that helpsmaintain directional control of thevehicle in difficult driving conditions.See Active Handling System onpage 9‑37.
The vehicle may have CompetitiveDriving Mode (except ZR1),Performance TractionManagement (ZR1), and LaunchControl systems designed to allowincreased performance whileaccelerating and cornering. SeeCompetitive Driving Mode onpage 9‑39.
TowingThe vehicle was neither designednor intended to be towed with any ofits wheels on the ground.
See Towing the Vehicle onpage 10‑86 and RecreationalVehicle Towing on page 10‑86.
Black plate (22,1)Chevrolet Corvette Owner Manual - 2011
1-22 In Brief
Tire Pressure MonitorThis vehicle may have a TirePressure Monitor System (TPMS).
The TPMS warning light alerts youto a significant loss in pressure ofone of the vehicle's tires. If thewarning light comes on, stop assoon as possible and inflate thetires to the recommended pressureshown on the Tire and LoadingInformation label. See Vehicle LoadLimits on page 9‑14. The warninglight will remain on until the tirepressure is corrected.
During cooler conditions, the low tirepressure warning light may appearwhen the vehicle is first started andthen turn off. This may be an early
indicator that the tire pressures aregetting low and the tires need to beinflated to the proper pressure.
The TPMS does not replace normalmonthly tire maintenance. It is thedriver’s responsibility to maintaincorrect tire pressures.
See Tire Pressure Monitor Systemon page 10‑68.
ZO6, Z16, and ZR1FeaturesChecking Engine Oil
ZO6, ZR1, and manual transmissionZ16 (Grand Sport) coupe modelshave a high performance dry sumplubrication system. This systemoperates differently than a standardengine lubrication system. SeeEngine Oil on page 10‑15.
You should check the oil levelonly after the engine has beenthoroughly warmed up and thenshut off for at least five minutes.This ensures that the oil levelreading obtained will be accurate.
Jump Starting the Battery
The battery of ZO6, ZR1, andmanual transmission Z16 (GrandSport) coupe models is in the rearof the vehicle. You do not need toaccess the battery for jump starting.There are remote positive (+) andnegative (−) terminals under thehood for this purpose. See Batteryon page 10‑43 and Jump Startingon page 10‑82.
Brake Noise
Under certain weather or operatingconditions, occasional brake noisemight be heard with the vehicle'sperformance braking system. Thisbrake system is designed forsuperior fade resistance andconsistent operation using highperformance brake pads. Brakenoise is normal and does not affectsystem performance. See Brakingon page 9‑3.
Black plate (23,1)Chevrolet Corvette Owner Manual - 2011
In Brief 1-23
Car Wash Guidelines
Automatic car washes are notrecommended for this vehicle.Some car washes cause damage tothe vehicle, the wheels, and theconvertible top, if the vehicle is soequipped.
If you drive the vehicle through anautomatic car wash that does nothave enough clearance for theundercarriage and/or wide rear tiresand wheels, you could damage thevehicle. Verify with the manager ofthe car wash that the vehicle will fitbefore entering the car wash or usea touchless car wash. See “WashingYour Vehicle” under Exterior Careon page 10‑87.
Engine Oil Life SystemThe engine oil life system calculatesengine oil life based on vehicle useand displays a DIC message whenit is necessary to change the engineoil and filter. The oil life systemshould be reset to 100% onlyfollowing an oil change.
Resetting the Oil Life System
1. Press the TRIP button so theOIL LIFE percentage isdisplayed.
2. Press RESET and hold fortwo seconds. OIL LIFEREMAINING 100% will appear.
See Engine Oil Life System onpage 10‑22.
Driving for Better FuelEconomyDriving habits can affect fuelmileage. Here are some driving tipsto get the best fuel economypossible.. Avoid fast starts and accelerate
smoothly.. Brake gradually and avoid
abrupt stops.. Avoid idling the engine for long
periods of time.. When road and weather
conditions are appropriate, usecruise control, if equipped.
. Always follow posted speedlimits or drive more slowly whenconditions require.
. Keep vehicle tires properlyinflated.
. Combine several trips into asingle trip.

Black plate (24,1)Chevrolet Corvette Owner Manual - 2011
1-24 In Brief
. Replace the vehicle's tires withthe same TPC Spec numbermolded into the tire's sidewallnear the size.
. Follow recommended scheduledmaintenance.
Premium Fuel
This vehicle's engine was designedto use premium unleaded gasoline.See Recommended Fuel onpage 9‑49.
BatteryThis vehicle has a maintenance freebattery. See Battery on page 10‑43and Jump Starting on page 10‑82.
For ZO6, ZR1, and manualtransmission Z16 (Grand Sport)coupe models the battery is locatedin the rear hatch/trunk area. Accessto the battery is not necessary tojump start the vehicle. There arepositive (+) and negative (−)terminals in the enginecompartment.
Roadside AssistanceProgramU.S.: 1-800-243-8872
TTY Users (U.S.): 1-888-889-2438
Canada: 1-800-268-6800
Mexico: 01-800-466-0800
As the owner of a new Chevrolet,you are automatically enrolled in theRoadside Assistance program.
See Roadside Assistance Program(U.S. and Canada) on page 13‑8 orRoadside Assistance Program(Mexico) on page 13‑10 for moreinformation.
Roadside Assistance and OnStar(U.S. and Canada)
If you have an active OnStarsubscription, press theQ buttonand the current GPS location will besent to an OnStar advisor who willassess your problem, contactRoadside Assistance, and relayyour exact location to get the helpyou need.
Online Owner Center (U.S. andCanada)
The Online Owner Center is acomplimentary service that includesonline service reminders, vehiclemaintenance tips, online ownermanual, special privileges,and more.
Sign up today at:www.chevyownercenter.com(U.S.) or www.gm.ca (Canada).
Black plate (25,1)Chevrolet Corvette Owner Manual - 2011
In Brief 1-25
OnStar®
OnStar uses several innovativetechnologies and live Advisors toprovide a wide range of safety,security, navigation, diagnostics,and calling services.
Automatic Crash Response
In a crash, built‐in sensors canautomatically alert an OnStarAdvisor who is immediatelyconnected to the vehicle to see ifyou need help.
How OnStar Service Works
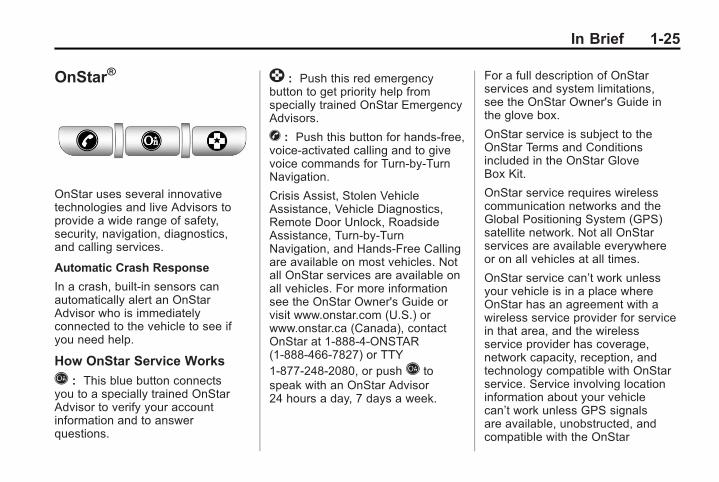
Q : This blue button connectsyou to a specially trained OnStarAdvisor to verify your accountinformation and to answerquestions.
] : Push this red emergencybutton to get priority help fromspecially trained OnStar EmergencyAdvisors.
X : Push this button for hands‐free,voice‐activated calling and to givevoice commands for Turn‐by‐TurnNavigation.
Crisis Assist, Stolen VehicleAssistance, Vehicle Diagnostics,Remote Door Unlock, RoadsideAssistance, Turn‐by‐TurnNavigation, and Hands‐Free Callingare available on most vehicles. Notall OnStar services are available onall vehicles. For more informationsee the OnStar Owner's Guide orvisit www.onstar.com (U.S.) orwww.onstar.ca (Canada), contactOnStar at 1-888-4-ONSTAR(1‐888‐466‐7827) or TTY1‐877‐248‐2080, or pushQ tospeak with an OnStar Advisor24 hours a day, 7 days a week.
For a full description of OnStarservices and system limitations,see the OnStar Owner's Guide inthe glove box.
OnStar service is subject to theOnStar Terms and Conditionsincluded in the OnStar GloveBox Kit.
OnStar service requires wirelesscommunication networks and theGlobal Positioning System (GPS)satellite network. Not all OnStarservices are available everywhereor on all vehicles at all times.
OnStar service can’t work unlessyour vehicle is in a place whereOnStar has an agreement with awireless service provider for servicein that area, and the wirelessservice provider has coverage,network capacity, reception, andtechnology compatible with OnStarservice. Service involving locationinformation about your vehiclecan’t work unless GPS signalsare available, unobstructed, andcompatible with the OnStar
Black plate (26,1)Chevrolet Corvette Owner Manual - 2011
1-26 In Brief
hardware. The vehicle has to havea working electrical system andadequate battery power for theOnStar equipment to operate.OnStar service may not work if theOnStar equipment isn’t properlyinstalled or you haven’t maintainedit and your vehicle is in goodworking order and in compliancewith all government regulations.If you try to add, connect, or modifyany equipment or software in yourvehicle, OnStar service may notwork. Other problems OnStar can’tcontrol may prevent service to you,such as hills, tall buildings, tunnels,weather, electrical system designand architecture of your vehicle,damage to important parts of yourvehicle in a crash, or wireless phonenetwork congestion or jamming.
See Radio Frequency Statement onpage 13‑19 for informationregarding Part 15 of the FederalCommunications Commission (FCC)rules and Industry CanadaStandards RSS-210/220/310.
OnStar Steering WheelControls
This vehicle may have a b g /cx Talk/Mute button that can beused to interact with OnStarHands-Free Calling. See SteeringWheel Controls on page 5‑3 formore information.
On some vehicles, the mute buttoncan be used to dial numbers intovoice mail systems, or to dial phoneextensions. See the OnStar Owner'sGuide for more information.
Your Responsibility
Increase the volume of the radio ifthe OnStar Advisor cannot beheard.
If the light next to the OnStarbuttons is red, the system may notbe functioning properly. PushQand request a vehicle diagnosticcheck. If the light appears clear(no light is appearing), your OnStarsubscription has expired and allservices have been deactivated.PushQ to confirm that the OnStarequipment is active.
OnStar®
If the vehicle is equipped with anactive OnStar system, that systemmay also record data in crash ornear crash-like situations. TheOnStar Terms and Conditionsprovides information on datacollection and use and is availablein the OnStar Glove Box Kit, atwww.onstar.com (U.S.) orwww.onstar.ca (Canada), or bypushingQ and speaking to anAdvisor.
Black plate (1,1)Chevrolet Corvette Owner Manual - 2011
Keys, Doors and Windows 2-1
Keys, Doors andWindows
Keys and LocksKeys . . . . . . . . . . . . . . . . . . . . . . . . . . 2-2Remote Keyless Entry (RKE)System . . . . . . . . . . . . . . . . . . . . . . 2-3
Remote Keyless Entry (RKE)System Operation . . . . . . . . . . . 2-3
Door Locks . . . . . . . . . . . . . . . . . . . 2-8Power Door Locks . . . . . . . . . . . . 2-9Automatic Door Locks . . . . . . . 2-10Lockout Protection . . . . . . . . . . . 2-10
DoorsHatch . . . . . . . . . . . . . . . . . . . . . . . . 2-10
Vehicle SecurityVehicle Security . . . . . . . . . . . . . . 2-13Anti-Theft Alarm System . . . . . 2-13Immobilizer . . . . . . . . . . . . . . . . . . 2-14Immobilizer Operation . . . . . . . 2-14
Exterior MirrorsConvex Mirrors . . . . . . . . . . . . . . 2-16Power Mirrors . . . . . . . . . . . . . . . . 2-16Folding Mirrors . . . . . . . . . . . . . . . 2-16Heated Mirrors . . . . . . . . . . . . . . . 2-17Automatic Dimming Mirror . . . 2-17
Interior MirrorsAutomatic Dimming RearviewMirror . . . . . . . . . . . . . . . . . . . . . . . 2-17
WindowsWindows . . . . . . . . . . . . . . . . . . . . . 2-18Power Windows . . . . . . . . . . . . . 2-18Sun Visors . . . . . . . . . . . . . . . . . . . 2-19
RoofRoof Panel . . . . . . . . . . . . . . . . . . 2-19Convertible Top . . . . . . . . . . . . . . 2-23
Black plate (2,1)Chevrolet Corvette Owner Manual - 2011
2-2 Keys, Doors and Windows
Keys and Locks
Keys
{ WARNING
Leaving children in a vehicle withthe Remote Keyless Entry (RKE)transmitter is dangerous for manyreasons; children or others couldbe badly injured or even killed.They could operate the powerwindows or other controls or evenmake the vehicle move. Thewindows will function with theRKE transmitter in the vehicleand they could be seriouslyinjured or killed if caught in thepath of a closing window. Do notleave the RKE transmitter in avehicle with children.
The key located inside the RKEtransmitter can be used to lock andunlock the glove box and to open
the hatch/trunk lid if power to thevehicle is lost. See Hatch onpage 2‑10 for more information.
Press the button (A) near the bottomof the RKE transmitter to removethe key. Never pull the key outwithout pressing the button.
Black plate (3,1)Chevrolet Corvette Owner Manual - 2011
Keys, Doors and Windows 2-3
This vehicle has a keyless accesssystem with pushbutton start. SeeIgnition Positions on page 9‑20 forinformation on starting the vehicle.
Notice: If you ever lose yourtransmitter(s) and/or key, it couldbe difficult to get into yourvehicle. You may even have todamage your vehicle to get in. Besure you have a spare transmitterand/or key.
If you are locked out of the vehicle,contact Roadside Assistance. SeeRoadside Assistance Program (U.S.and Canada) on page 13‑8 orRoadside Assistance Program(Mexico) on page 13‑10.
Remote Keyless Entry(RKE) SystemSee Radio Frequency Statement onpage 13‑19 for informationregarding Part 15 of the FederalCommunications Commission (FCC)rules and Industry CanadaStandards RSS-210/220/310.
If there is a decrease in the RKEoperating range:. Check the distance. The
transmitter may be too far fromthe vehicle.
. Check the location. Othervehicles or objects may beblocking the signal.
. Check the transmitter's battery.See “Battery Replacement” laterin this section.
. If the transmitter is still notworking correctly, see yourdealer or a qualified technicianfor service.
Remote Keyless Entry(RKE) System OperationThe Remote Keyless Entry (RKE)transmitter functions work up to30 m (100 ft) away from the vehicle.
Keyless Unlocking
Press the door handle sensorto unlock and open the doors ifthe RKE transmitter is within range.See Door Locks on page 2‑8and “Passive Door Unlock”under Vehicle Personalization onpage 5‑55 for additional information.
Black plate (4,1)Chevrolet Corvette Owner Manual - 2011
2-4 Keys, Doors and Windows
Keyless Locking
The doors lock after severalseconds if all doors are closed andat least one RKE transmitter hasbeen removed from the interior ofthe vehicle. To customize whetherthe doors automatically lock whenexiting the vehicle, see “PassiveDoor Locking” under VehiclePersonalization on page 5‑55 foradditional information.
Keyless Trunk Opening
Press the hatch/trunk releasebutton located on the rear of thehatch/trunk lid above the licenseplate to open the trunk if the RKEtransmitter is within range. SeeHatch on page 2‑10 for additionalinformation.
There are other conditions thatcan affect the performance of thetransmitter. See Remote KeylessEntry (RKE) System on page 2‑3.
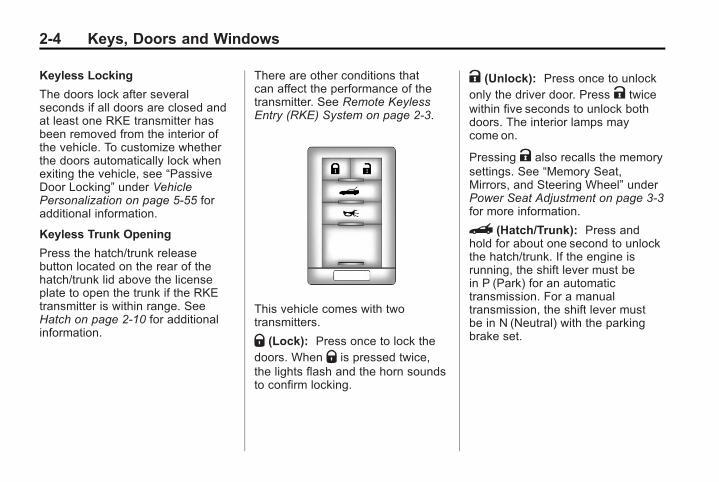
This vehicle comes with twotransmitters.
Q (Lock): Press once to lock thedoors. When Q is pressed twice,the lights flash and the horn soundsto confirm locking.
K (Unlock): Press once to unlockonly the driver door. Press K twicewithin five seconds to unlock bothdoors. The interior lamps maycome on.
Pressing K also recalls the memorysettings. See “Memory Seat,Mirrors, and Steering Wheel” underPower Seat Adjustment on page 3‑3for more information.
} (Hatch/Trunk): Press andhold for about one second to unlockthe hatch/trunk. If the engine isrunning, the shift lever must bein P (Park) for an automatictransmission. For a manualtransmission, the shift lever mustbe in N (Neutral) with the parkingbrake set.
Black plate (5,1)Chevrolet Corvette Owner Manual - 2011
Keys, Doors and Windows 2-5
L (Panic): Press to sound thehorn. Press any other button onthe RKE transmitter to stop it.
The vehicle comes withtwo transmitters. Each transmitterwill have a number on top of it,“1” or “2.” These numberscorrespond to the driver of thevehicle. For example, the memoryseat position for driver 1 will berecalled when using the transmitterlabeled “1,” if enabled through theDIC. See “Memory Seat, Mirrors,and Steering Wheel” under PowerSeat Adjustment on page 3‑3 andVehicle Personalization onpage 5‑55 for more information.
Programming Transmittersto the Vehicle
Only RKE transmittersprogrammed to this vehicle willwork. If a transmitter is lost orstolen, a replacement can bepurchased and programmedthrough your dealer. The vehicle
can be reprogrammed so that lostor stolen transmitters no longerwork. Each vehicle can have up tofour transmitters programmed to it.
Programming with a RecognizedTransmitter
A new transmitter can beprogrammed to the vehicle whenthere is one recognized transmitter.For vehicles sold in Canada, tworecognized transmitters are requiredto program a new transmitter.
1. The vehicle must be off.
2. Both the recognized and newtransmitters must be with you.
3. Insert the vehicle key into thekey cylinder located above thelicense plate.
4. Open the hatch/trunk.
5. Turn the key five times withinfive seconds.
6. The DIC displays READY FORFOB #2, 3 or 4.
7. Place the new transmitter inthe glove box transmitter pocketwith the buttons facing thepassenger side.
8. A beep sounds whenprogramming is complete.The DIC displays READY FOR#3 or 4, or MAXIMUM NUMBEROF FOBS LEARNED.
Black plate (6,1)Chevrolet Corvette Owner Manual - 2011
2-6 Keys, Doors and Windows
9. To program additionaltransmitters, repeat Step 7.Press Acc. on the ignition switchif programming is complete.
10. Press K on each newlyprogrammed transmitter tocomplete the process.
Programming without aRecognized Transmitter
This procedure requires three10-minute cycles to complete theprogramming process. UnitedStates owners are permitted toprogram a new transmitter totheir vehicle when a recognizedtransmitter is not available. TheCanadian immobilizer standardrequires that Canadian owners seetheir dealer for programming newtransmitters when two recognizedtransmitters are not available.
1. The vehicle must be off.
2. Place the new transmitter inthe glove box transmitter pocketwith the buttons facing thepassenger side.
3. Insert the vehicle key into thekey cylinder located above thelicense plate.
4. Open the hatch/trunk.
5. Turn the key five times withinfive seconds.
6. The DIC message displaysOFF-ACCESSORY TO LEARN.
7. Press Acc. on the ignitionswitch.
8. The DIC reads WAIT10 MINUTES and counts downto zero.
9. The DIC displaysOFF-ACCESSORY TO LEARNagain.
10. Press Acc. on the ignitionswitch.
11. Steps 8, 9, and 10 will berepeated two more times.
12. A beep sounds and the DICreads READY FOR FOB #1. Allpreviously known transmitterprogramming has been erased.
13. A beep sounds onceprogramming in complete.The DIC displays READYFOR FOB #2.
Black plate (7,1)Chevrolet Corvette Owner Manual - 2011
Keys, Doors and Windows 2-7
To program additionaltransmitters, take transmitter 1out of the transmitter pocketand place transmitter 2 in thepocket. Up to four transmitterscan be programmed. The DICthen displays MAXIMUMNUMBER OF FOBS LEARNEDand exits theprogramming mode.
Press Acc. on the ignitionswitch to complete the process.
14. Press Acc. on the ignitionswitch if programming iscomplete.
15. Press K on each newlyprogrammed transmitter tocomplete the process.
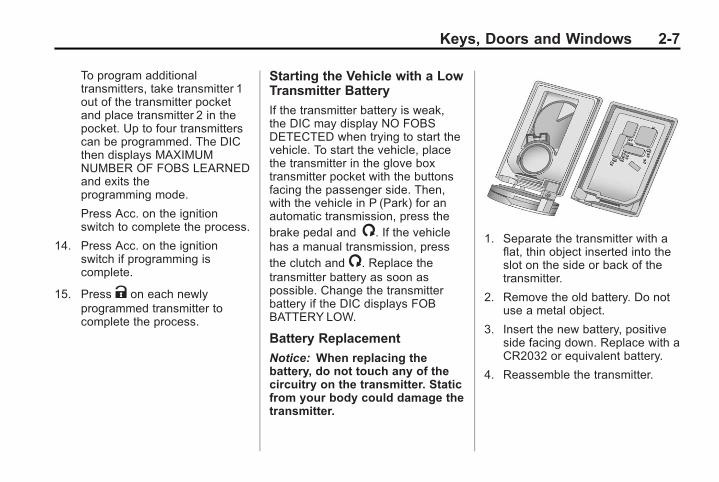
Starting the Vehicle with a LowTransmitter Battery
If the transmitter battery is weak,the DIC may display NO FOBSDETECTED when trying to start thevehicle. To start the vehicle, placethe transmitter in the glove boxtransmitter pocket with the buttonsfacing the passenger side. Then,with the vehicle in P (Park) for anautomatic transmission, press thebrake pedal and /. If the vehiclehas a manual transmission, pressthe clutch and/. Replace thetransmitter battery as soon aspossible. Change the transmitterbattery if the DIC displays FOBBATTERY LOW.
Battery Replacement
Notice: When replacing thebattery, do not touch any of thecircuitry on the transmitter. Staticfrom your body could damage thetransmitter.
1. Separate the transmitter with aflat, thin object inserted into theslot on the side or back of thetransmitter.
2. Remove the old battery. Do notuse a metal object.
3. Insert the new battery, positiveside facing down. Replace with aCR2032 or equivalent battery.
4. Reassemble the transmitter.
Black plate (8,1)Chevrolet Corvette Owner Manual - 2011
2-8 Keys, Doors and Windows
Door Locks
{ WARNING
Unlocked doors can bedangerous.
. Passengers — especiallychildren — can easily openthe doors and fall out of amoving vehicle. When a dooris locked it will not open. Youincrease the chance of beingthrown out of the vehicle in acrash if the doors are notlocked. So, wear safety beltsproperly and lock the doorswhenever you drive.
(Continued)
WARNING (Continued)
. Young children who get intounlocked vehicles may beunable to get out. A child canbe overcome by extreme heatand can suffer permanentinjuries or even death fromheat stroke. Always lock yourvehicle whenever youleave it.
. Outsiders can easily enterthrough an unlocked doorwhen you slow down or stopyour vehicle. Locking yourdoors can help prevent thisfrom happening.
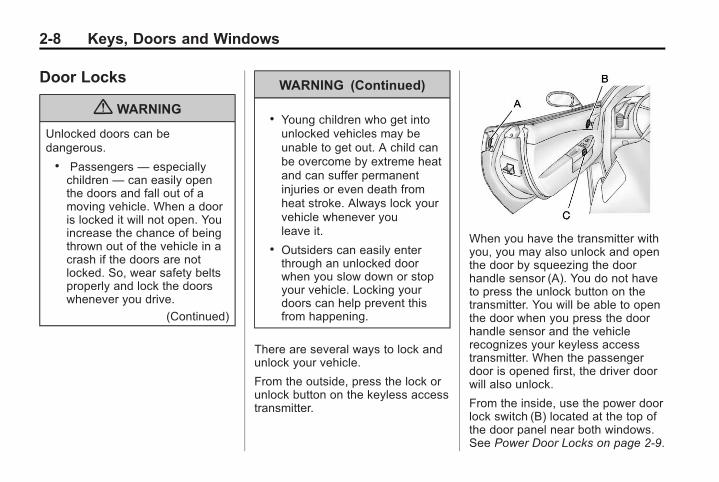
There are several ways to lock andunlock your vehicle.
From the outside, press the lock orunlock button on the keyless accesstransmitter.
When you have the transmitter withyou, you may also unlock and openthe door by squeezing the doorhandle sensor (A). You do not haveto press the unlock button on thetransmitter. You will be able to openthe door when you press the doorhandle sensor and the vehiclerecognizes your keyless accesstransmitter. When the passengerdoor is opened first, the driver doorwill also unlock.
From the inside, use the power doorlock switch (B) located at the top ofthe door panel near both windows.See Power Door Locks on page 2‑9.
Black plate (9,1)Chevrolet Corvette Owner Manual - 2011
Keys, Doors and Windows 2-9
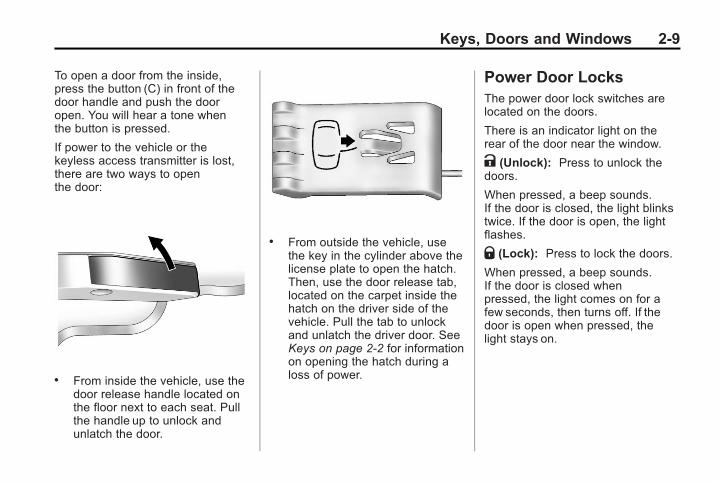
To open a door from the inside,press the button (C) in front of thedoor handle and push the dooropen. You will hear a tone whenthe button is pressed.
If power to the vehicle or thekeyless access transmitter is lost,there are two ways to openthe door:
. From inside the vehicle, use thedoor release handle located onthe floor next to each seat. Pullthe handle up to unlock andunlatch the door.
. From outside the vehicle, usethe key in the cylinder above thelicense plate to open the hatch.Then, use the door release tab,located on the carpet inside thehatch on the driver side of thevehicle. Pull the tab to unlockand unlatch the driver door. SeeKeys on page 2‑2 for informationon opening the hatch during aloss of power.
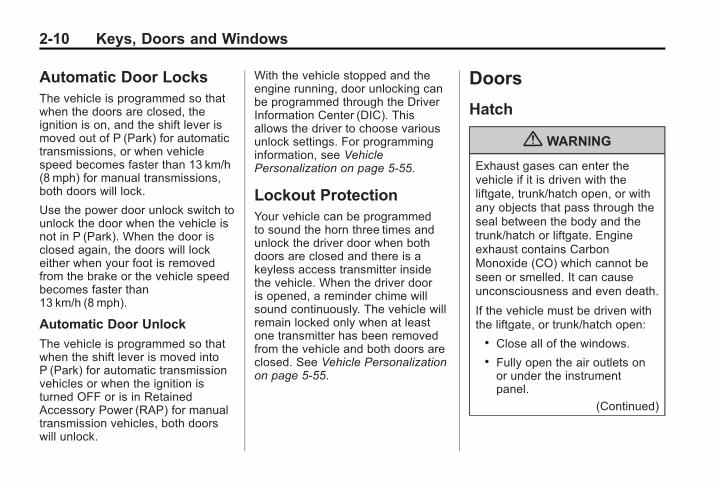
Power Door LocksThe power door lock switches arelocated on the doors.
There is an indicator light on therear of the door near the window.
K (Unlock): Press to unlock thedoors.
When pressed, a beep sounds.If the door is closed, the light blinkstwice. If the door is open, the lightflashes.
Q (Lock): Press to lock the doors.
When pressed, a beep sounds.If the door is closed whenpressed, the light comes on for afew seconds, then turns off. If thedoor is open when pressed, thelight stays on.
Black plate (10,1)Chevrolet Corvette Owner Manual - 2011
2-10 Keys, Doors and Windows
Automatic Door LocksThe vehicle is programmed so thatwhen the doors are closed, theignition is on, and the shift lever ismoved out of P (Park) for automatictransmissions, or when vehiclespeed becomes faster than 13 km/h(8 mph) for manual transmissions,both doors will lock.
Use the power door unlock switch tounlock the door when the vehicle isnot in P (Park). When the door isclosed again, the doors will lockeither when your foot is removedfrom the brake or the vehicle speedbecomes faster than13 km/h (8 mph).
Automatic Door Unlock
The vehicle is programmed so thatwhen the shift lever is moved intoP (Park) for automatic transmissionvehicles or when the ignition isturned OFF or is in RetainedAccessory Power (RAP) for manualtransmission vehicles, both doorswill unlock.
With the vehicle stopped and theengine running, door unlocking canbe programmed through the DriverInformation Center (DIC). Thisallows the driver to choose variousunlock settings. For programminginformation, see VehiclePersonalization on page 5‑55.
Lockout ProtectionYour vehicle can be programmedto sound the horn three times andunlock the driver door when bothdoors are closed and there is akeyless access transmitter insidethe vehicle. When the driver dooris opened, a reminder chime willsound continuously. The vehicle willremain locked only when at leastone transmitter has been removedfrom the vehicle and both doors areclosed. See Vehicle Personalizationon page 5‑55.
Doors
Hatch
{ WARNING
Exhaust gases can enter thevehicle if it is driven with theliftgate, trunk/hatch open, or withany objects that pass through theseal between the body and thetrunk/hatch or liftgate. Engineexhaust contains CarbonMonoxide (CO) which cannot beseen or smelled. It can causeunconsciousness and even death.
If the vehicle must be driven withthe liftgate, or trunk/hatch open:
. Close all of the windows.
. Fully open the air outlets onor under the instrumentpanel.
(Continued)
Black plate (11,1)Chevrolet Corvette Owner Manual - 2011
Keys, Doors and Windows 2-11
WARNING (Continued)
. Adjust the Climate Controlsystem to a setting thatbrings in only outside air andset the fan speed to thehighest setting. See ClimateControl System in the Index.
. If the vehicle is equipped witha power liftgate, disable thepower liftgate function.
For more information aboutcarbon monoxide, see EngineExhaust on page 9‑26.
Notice: Closing the hatch/trunklid forcefully or from the sidescan cause damage to the glass,the defogger or the weatherstripping. Be sure objects will fitin the hatch/trunk area beforeclosing the hatch/trunk lid. Whenclosing the hatch/trunk lid, gentlypull down from the center.
Notice: Do not store heavy orsharp objects in the rear storagecompartments located in thehatch/trunk area. The objectscould damage the underbody.
Hatch/Trunk Lid Release
There are several ways to releasethe hatch/trunk lid. If your vehiclehas an automatic transmission, theshift lever must be in P (Park). Formanual transmission vehicles, theparking brake must be set when theignition is started for the hatch/trunkrelease to operate. The parkingbrake does not need to be set whenthe ignition is off for the hatch/trunkrelease to operate. See ParkingBrake on page 9‑35.
V (Hatch/Trunk) : Press thisbutton, located on the instrumentpanel to the left of the steeringwheel. The theft-deterrent alarmsystem must not be armed.
} (Hatch/Trunk) : Press thisbutton on the keyless accesstransmitter. See Remote KeylessEntry (RKE) System on page 2‑3.
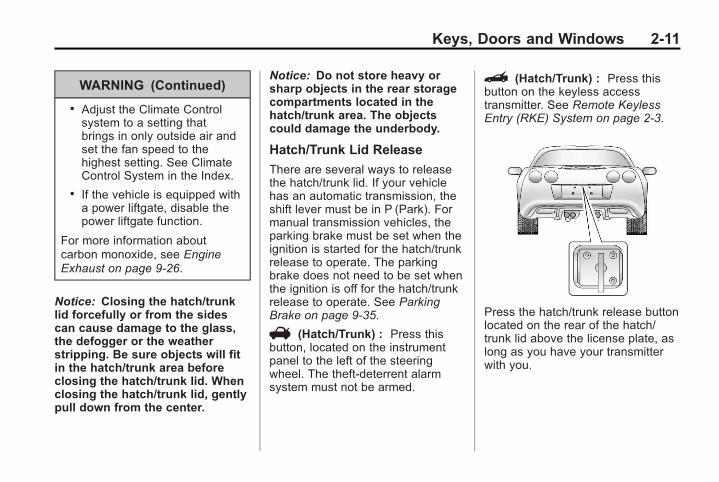
Press the hatch/trunk release buttonlocated on the rear of the hatch/trunk lid above the license plate, aslong as you have your transmitterwith you.
Black plate (12,1)Chevrolet Corvette Owner Manual - 2011
2-12 Keys, Doors and Windows
If your vehicle has lost batterypower, open the hatch/trunk usingthe vehicle key. See Keys onpage 2‑2 for more information.The key lock cylinder is located onthe rear of the hatch/trunk lid abovethe license plate. Turn the vehiclekey clockwise in the lock.
Closing the Rear Compartment(Except Convertible)
To close the rear compartmentlid of your coupe, pull down on therear edge of the lid. Lower it untilthe power pull down latch featureactivates; it will close the rest ofthe way and latch automatically.
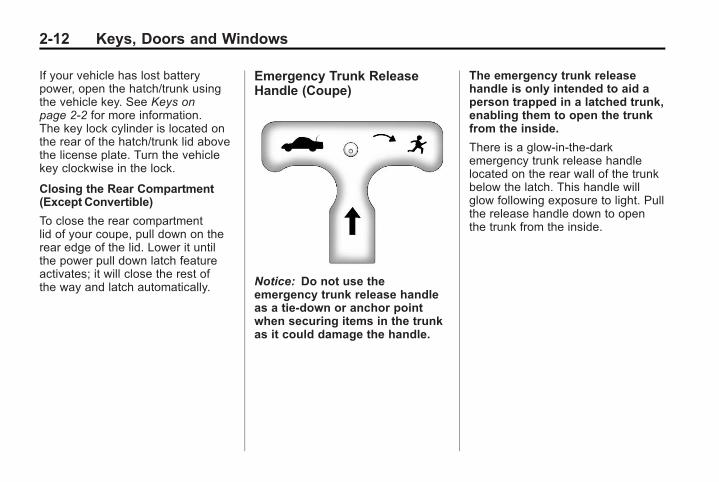
Emergency Trunk ReleaseHandle (Coupe)
Notice: Do not use theemergency trunk release handleas a tie-down or anchor pointwhen securing items in the trunkas it could damage the handle.
The emergency trunk releasehandle is only intended to aid aperson trapped in a latched trunk,enabling them to open the trunkfrom the inside.
There is a glow-in-the-darkemergency trunk release handlelocated on the rear wall of the trunkbelow the latch. This handle willglow following exposure to light. Pullthe release handle down to openthe trunk from the inside.
Black plate (13,1)Chevrolet Corvette Owner Manual - 2011
Keys, Doors and Windows 2-13
Vehicle SecurityThis vehicle has theft-deterrentfeatures; however, they do not makeit impossible to steal.
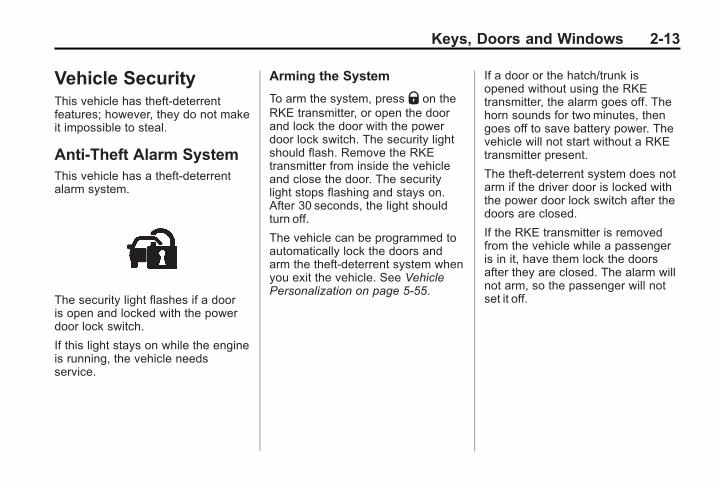
Anti-Theft Alarm SystemThis vehicle has a theft-deterrentalarm system.
The security light flashes if a dooris open and locked with the powerdoor lock switch.
If this light stays on while the engineis running, the vehicle needsservice.
Arming the System
To arm the system, press Q on theRKE transmitter, or open the doorand lock the door with the powerdoor lock switch. The security lightshould flash. Remove the RKEtransmitter from inside the vehicleand close the door. The securitylight stops flashing and stays on.After 30 seconds, the light shouldturn off.
The vehicle can be programmed toautomatically lock the doors andarm the theft-deterrent system whenyou exit the vehicle. See VehiclePersonalization on page 5‑55.
If a door or the hatch/trunk isopened without using the RKEtransmitter, the alarm goes off. Thehorn sounds for two minutes, thengoes off to save battery power. Thevehicle will not start without a RKEtransmitter present.
The theft-deterrent system does notarm if the driver door is locked withthe power door lock switch after thedoors are closed.
If the RKE transmitter is removedfrom the vehicle while a passengeris in it, have them lock the doorsafter they are closed. The alarm willnot arm, so the passenger will notset it off.
Black plate (14,1)Chevrolet Corvette Owner Manual - 2011
2-14 Keys, Doors and Windows
Testing the Alarm
To test the system use the followingprocedure.
1. Make sure the trunk lid/hatch islatched.
2. Lower the window on thedriver door.
3. Manually arm the system.
4. Close the doors and wait30 seconds.
5. Reach through the open windowand manually pull the releaselever on the floor.
6. Press the unlock button on thetransmitter to turn off the alarm.
If the alarm does not sound, checkto see if the horn works. The hornfuse may be blown. See Fuses andCircuit Breakers on page 10‑51.If the horn works, but the alarmdoes not go off, see your dealer.
Disarming the System
Press the unlock button on the RKEtransmitter or squeeze the doorhandle sensor while the transmitteris near the vehicle to unlock a door.Unlocking a door any other way setsoff the alarm. If the alarm sounds,press the unlock button on the RKEtransmitter to disarm it.
Do not leave the key or devicethat disarms or deactivates thetheft-deterrent system in the vehicle.
ImmobilizerSee Radio Frequency Statement onpage 13‑19 for informationregarding Part 15 of the FederalCommunications Commission (FCC)rules and Industry CanadaStandards RSS-210/220/310.
Immobilizer OperationThe vehicle has a passivetheft-deterrent system.
The system is automatically armedwhen the ignition is turned off.
The immobilization system isdisarmed when the ignition is turnedto OFF/ACCESSORY or START anda valid transmitter is found in thevehicle.
You do not have to manually arm ordisarm the system.
Black plate (15,1)Chevrolet Corvette Owner Manual - 2011
Keys, Doors and Windows 2-15
The security light comes on ifthere is a problem with arming ordisarming the theft-deterrentsystem.
The system has one or more RKEtransmitters that are matched toan immobilizer control unit in thevehicle. Only a correctly matchedRKE transmitter starts the vehicle.The vehicle may not start if the RKEtransmitter is damaged.
If the engine does not start and thesecurity light comes on, there maybe a problem with the immobilizersystem. Press the START buttonagain.
If the vehicle does not start andthe RKE transmitter appears to beundamaged, try another RKEtransmitter. Or, place the transmitterin the transmitter pocket. See “NOFOBS DETECTED” under Key andLock Messages on page 5‑42 foradditional information. Check thefuse. See Fuses and CircuitBreakers on page 10‑51. If theengine still does not start with theother transmitter, the vehicle needsservice. If the engine does start, thefirst transmitter may be faulty. Seeyour dealer or have a new RKEtransmitter programmed to thevehicle.
The immobilizer system canlearn new or replacement RKEtransmitters. Up to four RKEtransmitters can be programmed forthe vehicle. To program additionaltransmitters, see “Matchingtransmitter(s) to Your Vehicle” underRemote Keyless Entry (RKE)System Operation on page 2‑3.
Do not leave the key or devicethat disarms or deactivates thetheft-deterrent system in the vehicle.
Black plate (16,1)Chevrolet Corvette Owner Manual - 2011
2-16 Keys, Doors and Windows
Exterior Mirrors
Convex Mirrors
{ WARNING
A convex mirror can make things,like other vehicles, look fartheraway than they really are. If youcut too sharply into the right lane,you could hit a vehicle on theright. Check the inside mirror orglance over your shoulder beforechanging lanes.
The passenger side mirror is convexshaped. A convex mirror's surface iscurved so more can be seen fromthe driver seat.
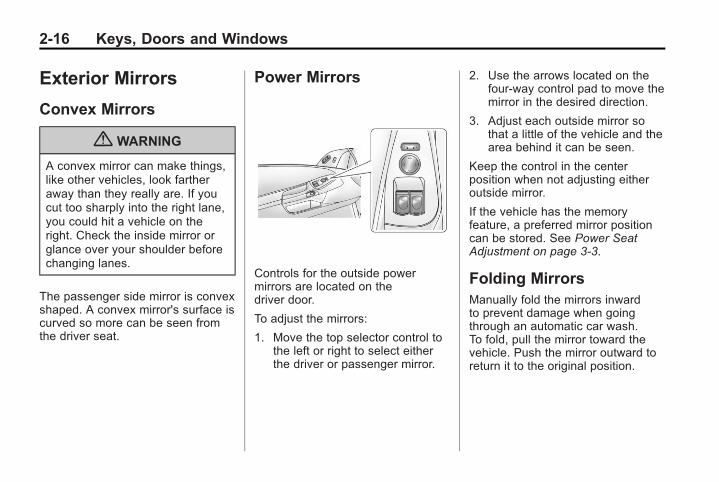
Power Mirrors
Controls for the outside powermirrors are located on thedriver door.
To adjust the mirrors:
1. Move the top selector control tothe left or right to select eitherthe driver or passenger mirror.
2. Use the arrows located on thefour-way control pad to move themirror in the desired direction.
3. Adjust each outside mirror sothat a little of the vehicle and thearea behind it can be seen.
Keep the control in the centerposition when not adjusting eitheroutside mirror.
If the vehicle has the memoryfeature, a preferred mirror positioncan be stored. See Power SeatAdjustment on page 3‑3.
Folding MirrorsManually fold the mirrors inwardto prevent damage when goingthrough an automatic car wash.To fold, pull the mirror toward thevehicle. Push the mirror outward toreturn it to the original position.

Black plate (17,1)Chevrolet Corvette Owner Manual - 2011
Keys, Doors and Windows 2-17
Heated MirrorsFor vehicles with heated mirrors:
< (Rear Window Defogger):Press to heat the mirrors.
See “Rear Window Defogger” underDual Automatic Climate ControlSystem on page 8‑1 for moreinformation.
Automatic DimmingMirrorIf the vehicle has this feature, thedriver side outside mirror adjusts forthe glare of headlamps behind you.This feature is controlled by the onand off setting on the insiderearview mirror.
Interior Mirrors
Automatic DimmingRearview MirrorVehicles with an automatic dimminginside rearview mirror, compassdisplay, and/or map lamps, andOnStar® will automatically changeto reduce glare from headlampsbehind you. A time delay featureprevents rapid changing from theday to night positions while drivingunder lights and through traffic.
If the vehicle has OnStar®, thereare three control buttons locatedat the bottom of the mirror. See theOnStar® owner's guide for moreinformation on the services OnStar®
provides.
P (On/Off): The automaticdimming feature is activatedwhen the vehicle is started.Press and hold this button for upto six seconds to turn this featureon or off.
T (Indicator Light): This light turnson when the automatic dimmingfeature is active.
Map Lamps
If the mirror has map lamps, theyare located at the bottom of themirror. To manually turn the lampson or off, press the button next toeach lamp.
Cleaning the Mirror
Do not spray glass cleaner directlyon the mirror. Use a soft toweldampened with water.
Black plate (18,1)Chevrolet Corvette Owner Manual - 2011
2-18 Keys, Doors and Windows
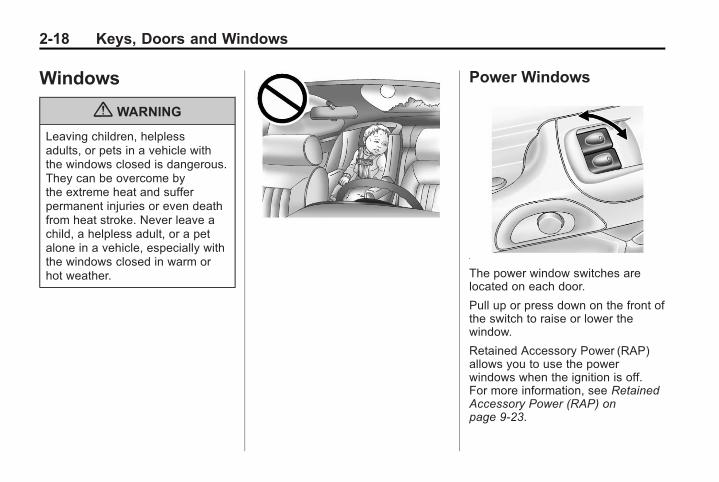
Windows
{ WARNING
Leaving children, helplessadults, or pets in a vehicle withthe windows closed is dangerous.They can be overcome bythe extreme heat and sufferpermanent injuries or even deathfrom heat stroke. Never leave achild, a helpless adult, or a petalone in a vehicle, especially withthe windows closed in warm orhot weather.
Power Windows
The power window switches arelocated on each door.
Pull up or press down on the front ofthe switch to raise or lower thewindow.
Retained Accessory Power (RAP)allows you to use the powerwindows when the ignition is off.For more information, see RetainedAccessory Power (RAP) onpage 9‑23.

Black plate (19,1)Chevrolet Corvette Owner Manual - 2011
Keys, Doors and Windows 2-19
Express-Down Window
Press the front of the switch tothe second position to activatethe express-down feature. To stopthe window as it is lowering, pressthe switch again.
Window Indexing
This feature automatically lowersthe window a small amount whenthe door is opened. When the dooris closed, the window will raise toits full up position. If either windowdoes not index properly, it couldbe due to loss of power. Beforereturning to your dealer for service,perform the power window initializeprocedure.
Power Window Initialize
After a power reconnect such asbattery replacement, the windowindex‐up feature will not functionuntil the system is initialized.
Once power is restored:
1. Close the door.
2. Raise the window and hold theswitch up for three seconds afterthe window is closed.
3. Release the switch, thenhold the switch up again forthree seconds and release.
Sun VisorsPull the visor toward you, or moveit to the side to help reduce glare.
To use the lighted mirror, lift thecover.
Roof
Roof PanelOn vehicles with a removable roofpanel, follow the procedures whenremoving or installing it.
Removing the Roof Panel
{ WARNING
Do not try to remove a roof panelwhile the vehicle is moving.Trying to remove the roof panelwhile the vehicle is moving couldcause an accident. The panelcould fall into the vehicle andcause you to lose control, or itcould fly off and strike anothervehicle. You or others could beinjured. Remove the roof panelonly when the vehicle is parked.
Until you are sure you can removethe panel alone, have someonehelp you.
Black plate (20,1)Chevrolet Corvette Owner Manual - 2011
2-20 Keys, Doors and Windows
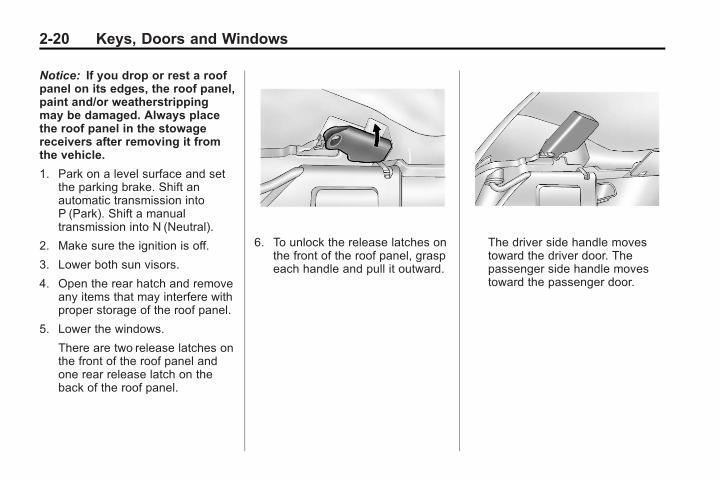
Notice: If you drop or rest a roofpanel on its edges, the roof panel,paint and/or weatherstrippingmay be damaged. Always placethe roof panel in the stowagereceivers after removing it fromthe vehicle.
1. Park on a level surface and setthe parking brake. Shift anautomatic transmission intoP (Park). Shift a manualtransmission into N (Neutral).
2. Make sure the ignition is off.
3. Lower both sun visors.
4. Open the rear hatch and removeany items that may interfere withproper storage of the roof panel.
5. Lower the windows.
There are two release latches onthe front of the roof panel andone rear release latch on theback of the roof panel.
6. To unlock the release latches onthe front of the roof panel, graspeach handle and pull it outward.
The driver side handle movestoward the driver door. Thepassenger side handle movestoward the passenger door.
Black plate (21,1)Chevrolet Corvette Owner Manual - 2011
Keys, Doors and Windows 2-21
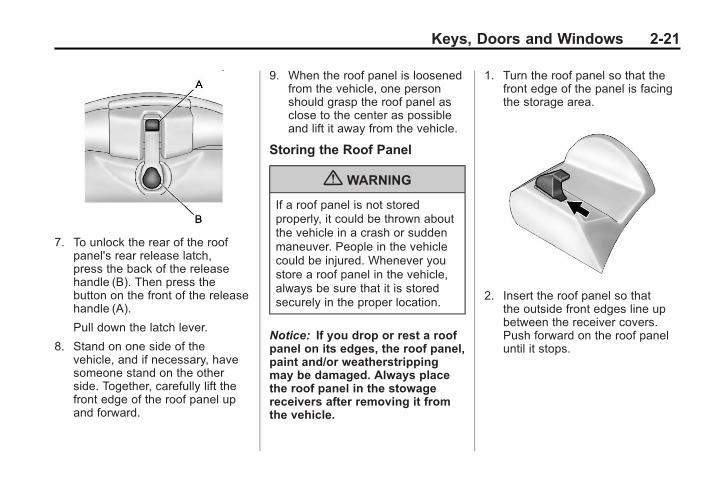
7. To unlock the rear of the roofpanel's rear release latch,press the back of the releasehandle (B). Then press thebutton on the front of the releasehandle (A).
Pull down the latch lever.
8. Stand on one side of thevehicle, and if necessary, havesomeone stand on the otherside. Together, carefully lift thefront edge of the roof panel upand forward.
9. When the roof panel is loosenedfrom the vehicle, one personshould grasp the roof panel asclose to the center as possibleand lift it away from the vehicle.
Storing the Roof Panel
{ WARNING
If a roof panel is not storedproperly, it could be thrown aboutthe vehicle in a crash or suddenmaneuver. People in the vehiclecould be injured. Whenever youstore a roof panel in the vehicle,always be sure that it is storedsecurely in the proper location.
Notice: If you drop or rest a roofpanel on its edges, the roof panel,paint and/or weatherstrippingmay be damaged. Always placethe roof panel in the stowagereceivers after removing it fromthe vehicle.
1. Turn the roof panel so that thefront edge of the panel is facingthe storage area.
2. Insert the roof panel so thatthe outside front edges line upbetween the receiver covers.Push forward on the roof paneluntil it stops.
Black plate (22,1)Chevrolet Corvette Owner Manual - 2011
2-22 Keys, Doors and Windows
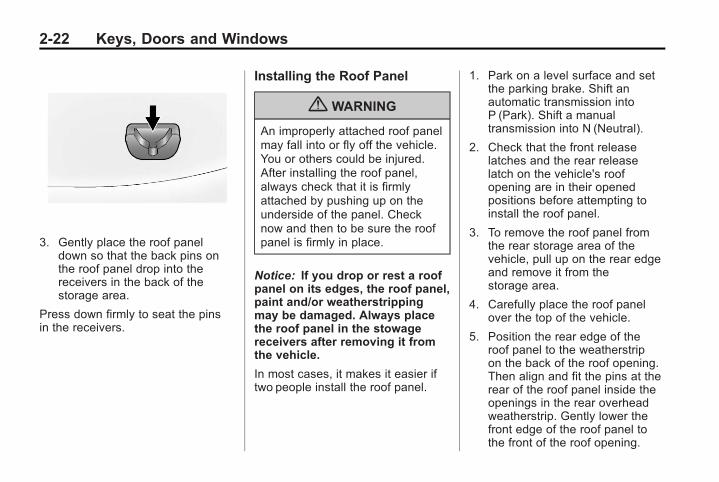
3. Gently place the roof paneldown so that the back pins onthe roof panel drop into thereceivers in the back of thestorage area.
Press down firmly to seat the pinsin the receivers.
Installing the Roof Panel
{ WARNING
An improperly attached roof panelmay fall into or fly off the vehicle.You or others could be injured.After installing the roof panel,always check that it is firmlyattached by pushing up on theunderside of the panel. Checknow and then to be sure the roofpanel is firmly in place.
Notice: If you drop or rest a roofpanel on its edges, the roof panel,paint and/or weatherstrippingmay be damaged. Always placethe roof panel in the stowagereceivers after removing it fromthe vehicle.
In most cases, it makes it easier iftwo people install the roof panel.
1. Park on a level surface and setthe parking brake. Shift anautomatic transmission intoP (Park). Shift a manualtransmission into N (Neutral).
2. Check that the front releaselatches and the rear releaselatch on the vehicle's roofopening are in their openedpositions before attempting toinstall the roof panel.
3. To remove the roof panel fromthe rear storage area of thevehicle, pull up on the rear edgeand remove it from thestorage area.
4. Carefully place the roof panelover the top of the vehicle.
5. Position the rear edge of theroof panel to the weatherstripon the back of the roof opening.Then align and fit the pins at therear of the roof panel inside theopenings in the rear overheadweatherstrip. Gently lower thefront edge of the roof panel tothe front of the roof opening.

Black plate (23,1)Chevrolet Corvette Owner Manual - 2011
Keys, Doors and Windows 2-23
6. Turn the front release handlesinward so that they latch to theclosed position.
7. Push up on the handle of therear roof release handle to latchits hook in the closed position.
8. Push and pull the roof panel upand down and side to side toensure the roof panel is securelyinstalled.
Removable Roof Panel
Notice: If you use a glasstreatment and/or conditioner thatcontains ethyl sulfate on the roofpanel, you could damage thepanel. The repairs would not becovered by your warranty. Onlyuse a GM-approved glass cleaneron the roof panel.
Special care is necessary whencleaning, removing, and/or storingthe roof panel.. Flush with water to remove dust
and dirt, then dry the panel.. Clean a transparent roof panel
with GMGlass Cleaner. Leavethe cleaner on the panel forone minute, then wipe the panelwith a soft, lint-free cloth. Do notuse glass cleaner on a paintedroof panel.
. Do not use abrasive cleaningmaterials on either type of panel.
If water drops are frequently allowedto dry on the roof panel, impuritiesin the water will adhere to the top.These impurities may etch or marthe finish. When the panel gets wet,dry it off.
Convertible Top
Manual Operation
For care and cleaning of theconvertible top, see “Cleaning theConvertible Top” in this section.High pressure car washes maycause water to enter the vehicle.
If the vehicle has this feature, thefollowing procedures explain theproper operation of the manualconvertible top.
Black plate (24,1)Chevrolet Corvette Owner Manual - 2011
2-24 Keys, Doors and Windows
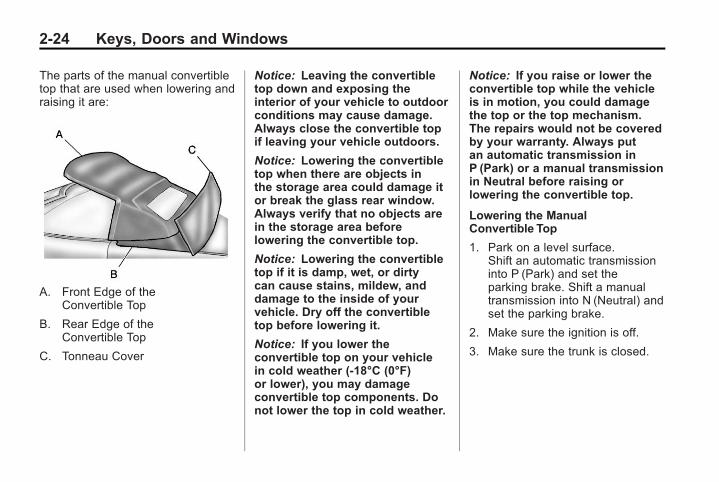
The parts of the manual convertibletop that are used when lowering andraising it are:
A. Front Edge of theConvertible Top
B. Rear Edge of theConvertible Top
C. Tonneau Cover
Notice: Leaving the convertibletop down and exposing theinterior of your vehicle to outdoorconditions may cause damage.Always close the convertible topif leaving your vehicle outdoors.
Notice: Lowering the convertibletop when there are objects inthe storage area could damage itor break the glass rear window.Always verify that no objects arein the storage area beforelowering the convertible top.
Notice: Lowering the convertibletop if it is damp, wet, or dirtycan cause stains, mildew, anddamage to the inside of yourvehicle. Dry off the convertibletop before lowering it.
Notice: If you lower theconvertible top on your vehiclein cold weather (-18°C (0°F)or lower), you may damageconvertible top components. Donot lower the top in cold weather.
Notice: If you raise or lower theconvertible top while the vehicleis in motion, you could damagethe top or the top mechanism.The repairs would not be coveredby your warranty. Always putan automatic transmission inP (Park) or a manual transmissionin Neutral before raising orlowering the convertible top.
Lowering the ManualConvertible Top
1. Park on a level surface.Shift an automatic transmissioninto P (Park) and set theparking brake. Shift a manualtransmission into N (Neutral) andset the parking brake.
2. Make sure the ignition is off.
3. Make sure the trunk is closed.
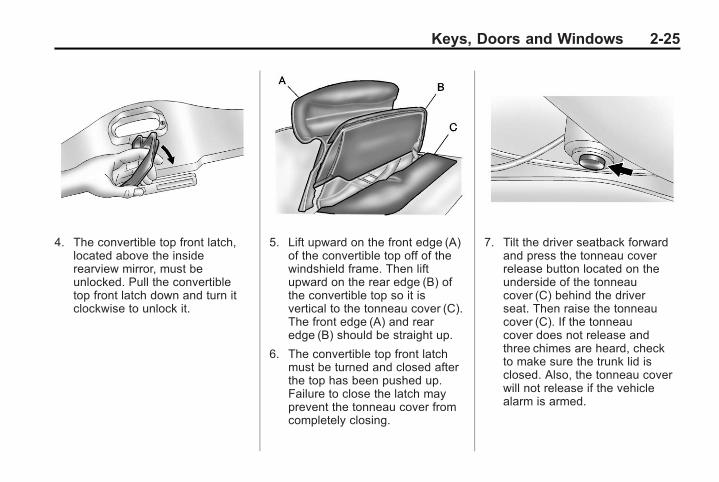
Black plate (25,1)Chevrolet Corvette Owner Manual - 2011
Keys, Doors and Windows 2-25
4. The convertible top front latch,located above the insiderearview mirror, must beunlocked. Pull the convertibletop front latch down and turn itclockwise to unlock it.
5. Lift upward on the front edge (A)of the convertible top off of thewindshield frame. Then liftupward on the rear edge (B) ofthe convertible top so it isvertical to the tonneau cover (C).The front edge (A) and rearedge (B) should be straight up.
6. The convertible top front latchmust be turned and closed afterthe top has been pushed up.Failure to close the latch mayprevent the tonneau cover fromcompletely closing.
7. Tilt the driver seatback forwardand press the tonneau coverrelease button located on theunderside of the tonneaucover (C) behind the driverseat. Then raise the tonneaucover (C). If the tonneaucover does not release andthree chimes are heard, checkto make sure the trunk lid isclosed. Also, the tonneau coverwill not release if the vehiclealarm is armed.

Black plate (26,1)Chevrolet Corvette Owner Manual - 2011
2-26 Keys, Doors and Windows
After pressing the releasebutton, the driver and passengerdoor glass should retract to thefull-down position.
If the vehicle has lost batterypower, the tonneau cover (C)can still be opened using themanual release cable.
The tonneau cover emergencymanual release cable is locatedunderneath the carpeting behindthe passenger seat headrestraint, on the undersideforward edge of the tonneaucover. To access the cable,lift and pull back the carpeting.Also, see Hatch on page 2‑10for information on theemergency trunk release handle.
Notice: If you lower theconvertible top into the storagecompartment and the rear edgeof the top is not in the full-downposition, you could damage thetop. Always verify that the rearedge of the convertible top is inthe full-down position beforelowering the top into the storagecompartment.
8. Pull the cable to release thetonneau cover.
9. Push forward on the frontedge (A) of the convertible topto allow the rear edge (B) of theconvertible top to be moved toits full-down position.
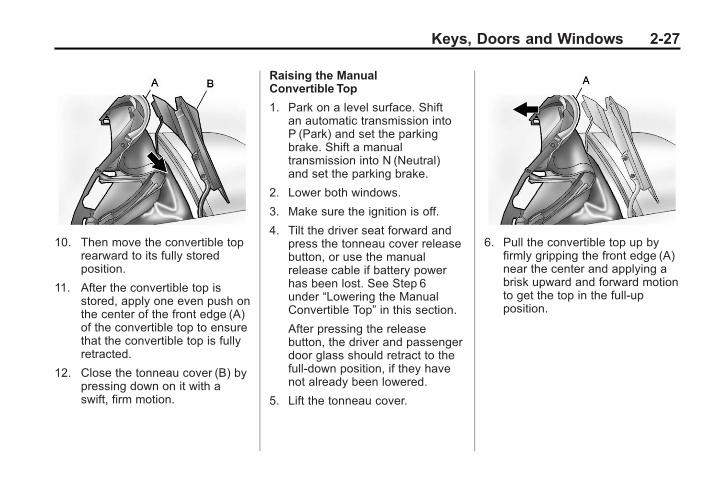
Black plate (27,1)Chevrolet Corvette Owner Manual - 2011
Keys, Doors and Windows 2-27
10. Then move the convertible toprearward to its fully storedposition.
11. After the convertible top isstored, apply one even push onthe center of the front edge (A)of the convertible top to ensurethat the convertible top is fullyretracted.
12. Close the tonneau cover (B) bypressing down on it with aswift, firm motion.
Raising the ManualConvertible Top
1. Park on a level surface. Shiftan automatic transmission intoP (Park) and set the parkingbrake. Shift a manualtransmission into N (Neutral)and set the parking brake.
2. Lower both windows.
3. Make sure the ignition is off.
4. Tilt the driver seat forward andpress the tonneau cover releasebutton, or use the manualrelease cable if battery powerhas been lost. See Step 6under “Lowering the ManualConvertible Top” in this section.
After pressing the releasebutton, the driver and passengerdoor glass should retract to thefull-down position, if they havenot already been lowered.
5. Lift the tonneau cover.
6. Pull the convertible top up byfirmly gripping the front edge (A)near the center and applying abrisk upward and forward motionto get the top in the full-upposition.
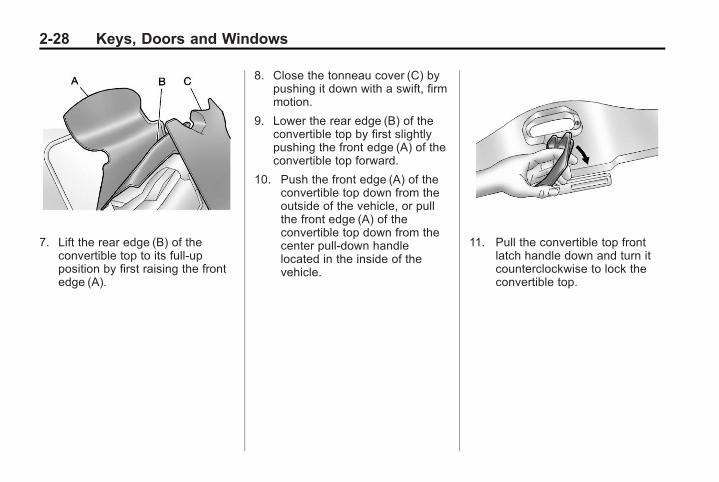
Black plate (28,1)Chevrolet Corvette Owner Manual - 2011
2-28 Keys, Doors and Windows
7. Lift the rear edge (B) of theconvertible top to its full-upposition by first raising the frontedge (A).
8. Close the tonneau cover (C) bypushing it down with a swift, firmmotion.
9. Lower the rear edge (B) of theconvertible top by first slightlypushing the front edge (A) of theconvertible top forward.
10. Push the front edge (A) of theconvertible top down from theoutside of the vehicle, or pullthe front edge (A) of theconvertible top down from thecenter pull-down handlelocated in the inside of thevehicle.
11. Pull the convertible top frontlatch handle down and turn itcounterclockwise to lock theconvertible top.

Black plate (29,1)Chevrolet Corvette Owner Manual - 2011
Keys, Doors and Windows 2-29
Power Operation
For care and cleaning of theconvertible top see “Cleaning theConvertible Top” in this section.High pressure car washes maycause water to enter the vehicle.
To operate the convertible top usethe following steps.
Notice: Leaving the convertibletop down and exposing theinterior of your vehicle to outdoorconditions may cause damage.Always close the convertible topif leaving your vehicle outdoors.
Notice: Lowering the convertibletop when there are objects in thestorage area could damage it orbreak the glass rear window.Always verify that no objectsare in the storage area beforelowering the convertible top.
Notice: Lowering the convertibletop if it is damp, wet, or dirtycan cause stains, mildew, anddamage to the inside of yourvehicle. Dry off the convertibletop before lowering it.
Notice: If you lower theconvertible top on your vehiclein cold weather (-18°C (0°F)or lower), you may damageconvertible top components.Do not lower the top in coldweather.
Notice: If you raise or lower theconvertible top while the vehicleis in motion, you could damagethe top or the top mechanism.The repairs would not be coveredby your warranty. Always putan automatic transmission inP (Park) or a manual transmissionin Neutral before raising orlowering the convertible top.
Lowering the PowerConvertible Top
1. Park on a level surface. Startthe engine. Shift an automatictransmission into P (Park) andset the parking brake. Shift amanual transmission intoN (Neutral), and set the parkingbrake.
2. Make sure the trunk is closed,the rear trunk partition in the rearstorage area is in the fastenedupright position, and no objectsare forward of the divider. See“Rear Trunk Partition” underRear Storage on page 4‑1.
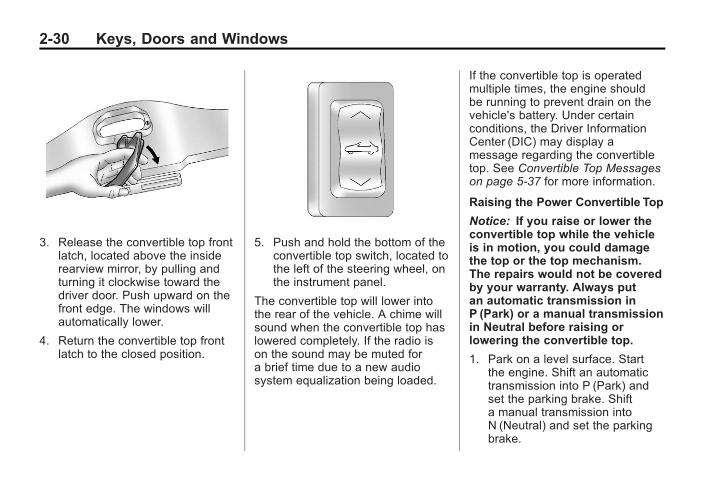
Black plate (30,1)Chevrolet Corvette Owner Manual - 2011
2-30 Keys, Doors and Windows
3. Release the convertible top frontlatch, located above the insiderearview mirror, by pulling andturning it clockwise toward thedriver door. Push upward on thefront edge. The windows willautomatically lower.
4. Return the convertible top frontlatch to the closed position.
5. Push and hold the bottom of theconvertible top switch, located tothe left of the steering wheel, onthe instrument panel.
The convertible top will lower intothe rear of the vehicle. A chime willsound when the convertible top haslowered completely. If the radio ison the sound may be muted fora brief time due to a new audiosystem equalization being loaded.
If the convertible top is operatedmultiple times, the engine shouldbe running to prevent drain on thevehicle's battery. Under certainconditions, the Driver InformationCenter (DIC) may display amessage regarding the convertibletop. See Convertible Top Messageson page 5‑37 for more information.
Raising the Power Convertible Top
Notice: If you raise or lower theconvertible top while the vehicleis in motion, you could damagethe top or the top mechanism.The repairs would not be coveredby your warranty. Always putan automatic transmission inP (Park) or a manual transmissionin Neutral before raising orlowering the convertible top.
1. Park on a level surface. Startthe engine. Shift an automatictransmission into P (Park) andset the parking brake. Shifta manual transmission intoN (Neutral) and set the parkingbrake.
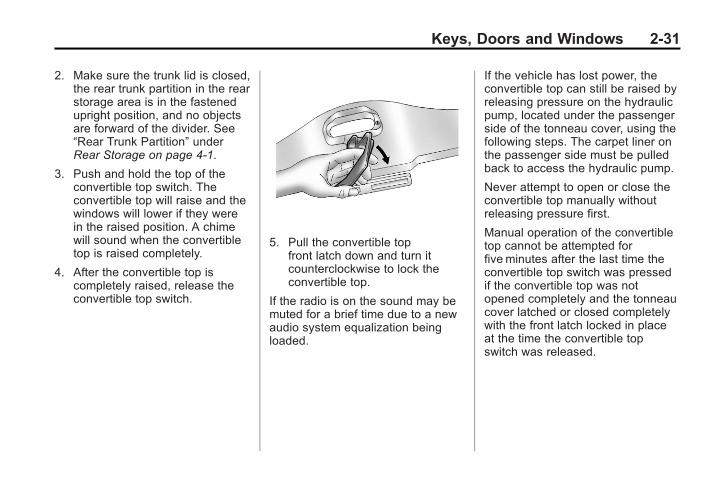
Black plate (31,1)Chevrolet Corvette Owner Manual - 2011
Keys, Doors and Windows 2-31
2. Make sure the trunk lid is closed,the rear trunk partition in the rearstorage area is in the fastenedupright position, and no objectsare forward of the divider. See“Rear Trunk Partition” underRear Storage on page 4‑1.
3. Push and hold the top of theconvertible top switch. Theconvertible top will raise and thewindows will lower if they werein the raised position. A chimewill sound when the convertibletop is raised completely.
4. After the convertible top iscompletely raised, release theconvertible top switch.
5. Pull the convertible topfront latch down and turn itcounterclockwise to lock theconvertible top.
If the radio is on the sound may bemuted for a brief time due to a newaudio system equalization beingloaded.
If the vehicle has lost power, theconvertible top can still be raised byreleasing pressure on the hydraulicpump, located under the passengerside of the tonneau cover, using thefollowing steps. The carpet liner onthe passenger side must be pulledback to access the hydraulic pump.
Never attempt to open or close theconvertible top manually withoutreleasing pressure first.
Manual operation of the convertibletop cannot be attempted forfive minutes after the last time theconvertible top switch was pressedif the convertible top was notopened completely and the tonneaucover latched or closed completelywith the front latch locked in placeat the time the convertible topswitch was released.
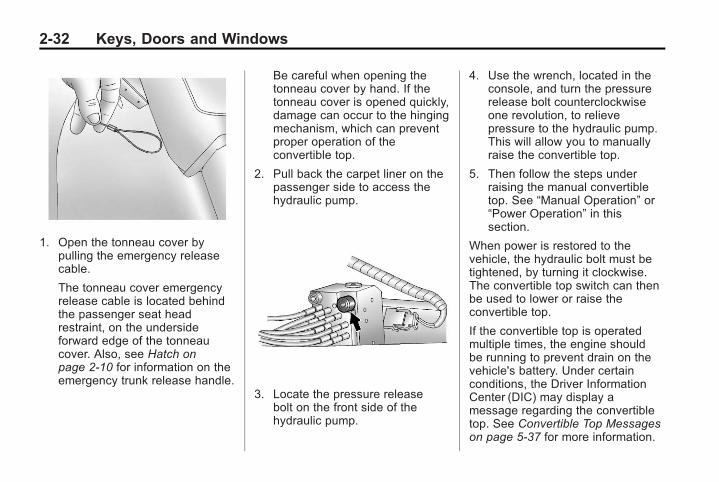
Black plate (32,1)Chevrolet Corvette Owner Manual - 2011
2-32 Keys, Doors and Windows
1. Open the tonneau cover bypulling the emergency releasecable.
The tonneau cover emergencyrelease cable is located behindthe passenger seat headrestraint, on the undersideforward edge of the tonneaucover. Also, see Hatch onpage 2‑10 for information on theemergency trunk release handle.
Be careful when opening thetonneau cover by hand. If thetonneau cover is opened quickly,damage can occur to the hingingmechanism, which can preventproper operation of theconvertible top.
2. Pull back the carpet liner on thepassenger side to access thehydraulic pump.
3. Locate the pressure releasebolt on the front side of thehydraulic pump.
4. Use the wrench, located in theconsole, and turn the pressurerelease bolt counterclockwiseone revolution, to relievepressure to the hydraulic pump.This will allow you to manuallyraise the convertible top.
5. Then follow the steps underraising the manual convertibletop. See “Manual Operation” or“Power Operation” in thissection.
When power is restored to thevehicle, the hydraulic bolt must betightened, by turning it clockwise.The convertible top switch can thenbe used to lower or raise theconvertible top.
If the convertible top is operatedmultiple times, the engine shouldbe running to prevent drain on thevehicle's battery. Under certainconditions, the Driver InformationCenter (DIC) may display amessage regarding the convertibletop. See Convertible Top Messageson page 5‑37 for more information.
Black plate (33,1)Chevrolet Corvette Owner Manual - 2011
Keys, Doors and Windows 2-33
If the battery has beendisconnected, the power windowsmust be initialized for the power topto operate. See Power Windows onpage 2‑18 for more information.
Cleaning the Convertible Top
The convertible top should becleaned often. However, highpressure car washes may causewater to enter the vehicle.
When hand washing the convertibletop, do it in partial shade. Use amild soap, lukewarm water, and asoft sponge. A chamois or cloth mayleave lint on the top, and a brushcan chafe the threads in the topfabric. Do not use detergents, harshcleaners, solvents, or bleachingagents.
Wet the entire vehicle and wash thetop evenly to avoid spots or rings.Let the soap remain on the fabricfor a fewminutes. When the top isreally dirty, use a mild foam-typecleaner. Thoroughly rinse the entirevehicle, then let the top dry in directsunlight.
To protect the convertible top:. After washing the vehicle,
make sure the convertible top iscompletely dry before lowering it.
. Do not get any cleaner on thevehicle's painted finish; it couldleave streaks.
. If go through an automatic carwash, ask the manager if theequipment could damage theconvertible top.
Black plate (34,1)Chevrolet Corvette Owner Manual - 2011
2-34 Keys, Doors and Windows
2 NOTES
Black plate (1,1)Chevrolet Corvette Owner Manual - 2011
Seats and Restraints 3-1
Seats andRestraints
Head RestraintsHead Restraints . . . . . . . . . . . . . . . 3-2
Front SeatsSeat Adjustment . . . . . . . . . . . . . . 3-2Power Seat Adjustment . . . . . . . 3-3Lumbar Adjustment . . . . . . . . . . . 3-6Reclining Seatbacks . . . . . . . . . . 3-6Seatback Latches . . . . . . . . . . . . . 3-8Heated Front Seats . . . . . . . . . . . 3-8
Safety BeltsSafety Belts . . . . . . . . . . . . . . . . . . . 3-9How to Wear Safety BeltsProperly . . . . . . . . . . . . . . . . . . . . 3-13
Lap-Shoulder Belt . . . . . . . . . . . 3-18Safety Belt Use DuringPregnancy . . . . . . . . . . . . . . . . . . 3-20
Safety Belt Extender . . . . . . . . . 3-21
Safety System Check . . . . . . . . 3-21Safety Belt Care . . . . . . . . . . . . . 3-21Replacing Safety Belt SystemParts After a Crash . . . . . . . . . 3-22
Airbag SystemAirbag System . . . . . . . . . . . . . . . 3-22Where Are the Airbags? . . . . . 3-24When Should an AirbagInflate? . . . . . . . . . . . . . . . . . . . . . 3-26
What Makes an AirbagInflate? . . . . . . . . . . . . . . . . . . . . . 3-27
How Does an AirbagRestrain? . . . . . . . . . . . . . . . . . . . 3-28
What Will You See After anAirbag Inflates? . . . . . . . . . . . . 3-28
Passenger SensingSystem . . . . . . . . . . . . . . . . . . . . . 3-30
Servicing the Airbag-EquippedVehicle . . . . . . . . . . . . . . . . . . . . . 3-34
Adding Equipment to theAirbag-Equipped Vehicle . . . 3-35
Airbag System Check . . . . . . . . 3-36Replacing Airbag SystemParts After a Crash . . . . . . . . . 3-36
Child RestraintsOlder Children . . . . . . . . . . . . . . . 3-37Infants and YoungChildren . . . . . . . . . . . . . . . . . . . . 3-39
Child Restraint Systems . . . . . 3-41Lower Anchors and Tethersfor Children (LATCH System)(Coupe and ConvertibleModels Only) . . . . . . . . . . . . . . . 3-43
Lower Anchors and Tethersfor Children (LATCH System)(ZO6 and ZR1Models Only) . . . . . . . . . . . . . . . 3-44
Replacing LATCH SystemParts After a Crash . . . . . . . . . 3-48
Securing Child Restraints . . . . 3-48
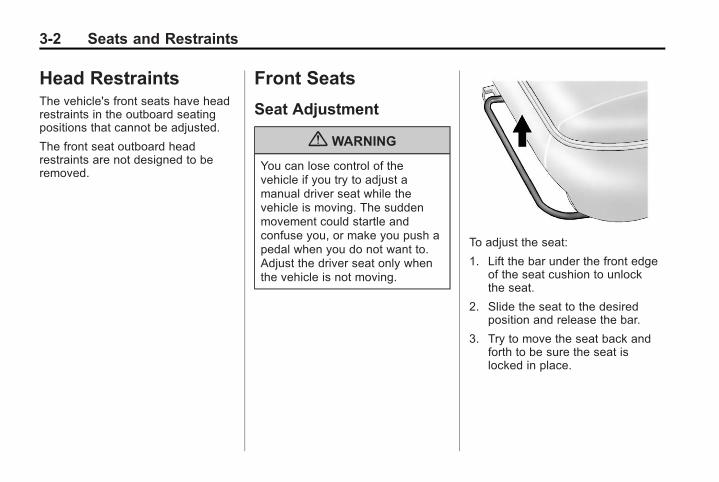
Black plate (2,1)Chevrolet Corvette Owner Manual - 2011
3-2 Seats and Restraints
Head RestraintsThe vehicle's front seats have headrestraints in the outboard seatingpositions that cannot be adjusted.
The front seat outboard headrestraints are not designed to beremoved.
Front Seats
Seat Adjustment
{ WARNING
You can lose control of thevehicle if you try to adjust amanual driver seat while thevehicle is moving. The suddenmovement could startle andconfuse you, or make you push apedal when you do not want to.Adjust the driver seat only whenthe vehicle is not moving.
To adjust the seat:
1. Lift the bar under the front edgeof the seat cushion to unlockthe seat.
2. Slide the seat to the desiredposition and release the bar.
3. Try to move the seat back andforth to be sure the seat islocked in place.
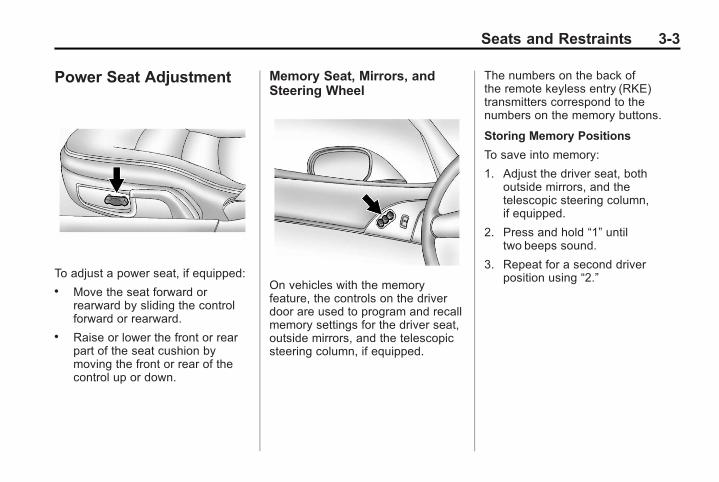
Black plate (3,1)Chevrolet Corvette Owner Manual - 2011
Seats and Restraints 3-3
Power Seat Adjustment
To adjust a power seat, if equipped:. Move the seat forward or
rearward by sliding the controlforward or rearward.
. Raise or lower the front or rearpart of the seat cushion bymoving the front or rear of thecontrol up or down.
Memory Seat, Mirrors, andSteering Wheel
On vehicles with the memoryfeature, the controls on the driverdoor are used to program and recallmemory settings for the driver seat,outside mirrors, and the telescopicsteering column, if equipped.
The numbers on the back ofthe remote keyless entry (RKE)transmitters correspond to thenumbers on the memory buttons.
Storing Memory Positions
To save into memory:
1. Adjust the driver seat, bothoutside mirrors, and thetelescopic steering column,if equipped.
2. Press and hold “1” untiltwo beeps sound.
3. Repeat for a second driverposition using “2.”

Black plate (4,1)Chevrolet Corvette Owner Manual - 2011
3-4 Seats and Restraints
To recall a memory position:. On vehicles with an automatic
transmission, press and release“1” or “2.”
If the vehicle is in P (Park), asingle beep sounds and thememory position is recalledafter a brief delay.
If the vehicle is not in P (Park),three beeps sound and thememory position is not recalled.
. On vehicles with a manualtransmission, when the vehicleis on, the parking brake must beset to recall a memory position.Press and release “1” or “2.”
A single beep sounds and thememory position is recalledafter a brief delay.
If the vehicle is on and theparking brake is not set,three beeps sound and thememory position is not recalled.
Memory Remote Recall (AutomaticTransmission)
This feature can recall the driverseat, outside mirrors, and telescopicsteering column, if equipped, tostored positions when entering thevehicle.
To activate, enter the vehicle andstart the engine. The driver seat,outside mirrors, and telescopicsteering column will move to thememory position associated withthe transmitter used to unlock thevehicle.
This feature is turned on or off usingthe vehicle personalization menu.See “Auto Memory Recall” underVehicle Personalization onpage 5‑55 for more information.
To stop recall movement, press oneof the power seat controls, powermirror or memory buttons, or thetelescopic steering column switch.
If something has blocked thedriver seat while recalling amemory position, the recall maystop. Remove the obstruction; thenpress and hold the appropriatemanual control for the memory itemthat is not recalling for two seconds.Try recalling the memory positionagain by pressing the appropriatememory button. If the memoryposition is still not recalling, seeyour dealer for service.
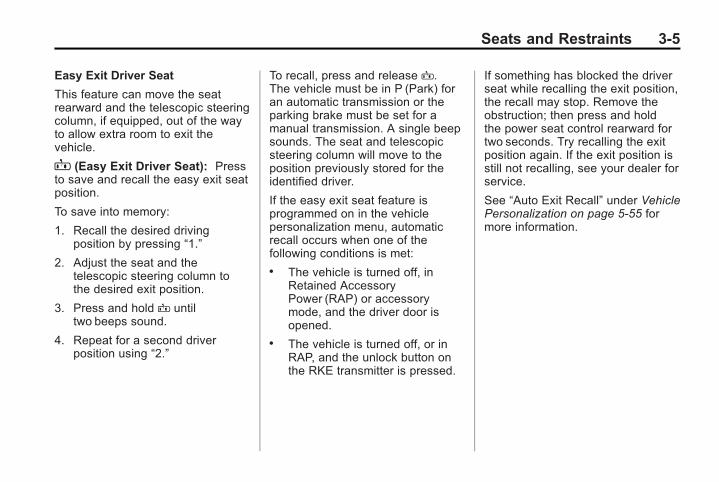
Black plate (5,1)Chevrolet Corvette Owner Manual - 2011
Seats and Restraints 3-5
Easy Exit Driver Seat
This feature can move the seatrearward and the telescopic steeringcolumn, if equipped, out of the wayto allow extra room to exit thevehicle.
B (Easy Exit Driver Seat): Pressto save and recall the easy exit seatposition.
To save into memory:
1. Recall the desired drivingposition by pressing “1.”
2. Adjust the seat and thetelescopic steering column tothe desired exit position.
3. Press and hold B untiltwo beeps sound.
4. Repeat for a second driverposition using “2.”
To recall, press and release B.The vehicle must be in P (Park) foran automatic transmission or theparking brake must be set for amanual transmission. A single beepsounds. The seat and telescopicsteering column will move to theposition previously stored for theidentified driver.
If the easy exit seat feature isprogrammed on in the vehiclepersonalization menu, automaticrecall occurs when one of thefollowing conditions is met:. The vehicle is turned off, in
Retained AccessoryPower (RAP) or accessorymode, and the driver door isopened.
. The vehicle is turned off, or inRAP, and the unlock button onthe RKE transmitter is pressed.
If something has blocked the driverseat while recalling the exit position,the recall may stop. Remove theobstruction; then press and holdthe power seat control rearward fortwo seconds. Try recalling the exitposition again. If the exit position isstill not recalling, see your dealer forservice.
See “Auto Exit Recall” under VehiclePersonalization on page 5‑55 formore information.

Black plate (6,1)Chevrolet Corvette Owner Manual - 2011
3-6 Seats and Restraints
Lumbar Adjustment
Power Lumbar and SideBolsters
A. Lumbar Support Control
B. Side Bolster Support Control
To adjust the support, if equipped:. Move control (A) forward or
rearward to adjust lumbarsupport.
. Move control (B) up or down toadjust the side bolsters.
Reclining Seatbacks
{ WARNING
You can lose control of thevehicle if you try to adjust amanual driver seat while thevehicle is moving. The suddenmovement could startle andconfuse you, or make you pusha pedal when you do not want to.Adjust the driver seat only whenthe vehicle is not moving.
{ WARNING
If either seatback is not locked,it could move forward in a suddenstop or crash. That could causeinjury to the person sitting there.Always push and pull on theseatbacks to be sure they arelocked.
To recline the seatback:
1. Lift the lever.
2. Move the seatback to thedesired position, and thenrelease the lever to lock theseatback in place.
3. Push and pull on the seatbackto make sure it is locked.
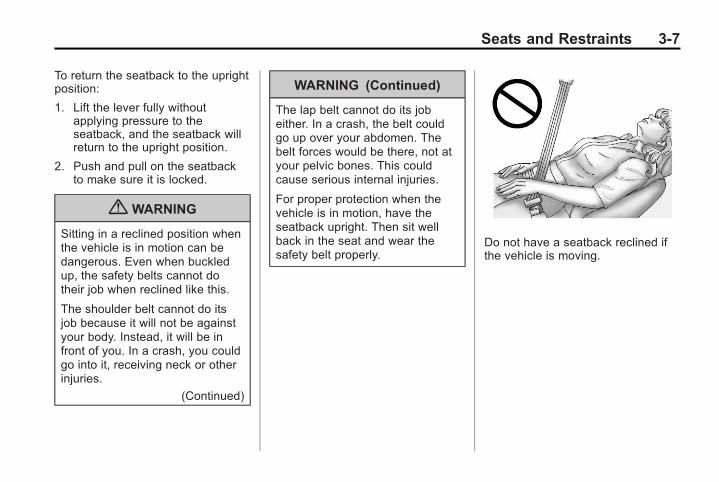
Black plate (7,1)Chevrolet Corvette Owner Manual - 2011
Seats and Restraints 3-7
To return the seatback to the uprightposition:
1. Lift the lever fully withoutapplying pressure to theseatback, and the seatback willreturn to the upright position.
2. Push and pull on the seatbackto make sure it is locked.
{ WARNING
Sitting in a reclined position whenthe vehicle is in motion can bedangerous. Even when buckledup, the safety belts cannot dotheir job when reclined like this.
The shoulder belt cannot do itsjob because it will not be againstyour body. Instead, it will be infront of you. In a crash, you couldgo into it, receiving neck or otherinjuries.
(Continued)
WARNING (Continued)
The lap belt cannot do its jobeither. In a crash, the belt couldgo up over your abdomen. Thebelt forces would be there, not atyour pelvic bones. This couldcause serious internal injuries.
For proper protection when thevehicle is in motion, have theseatback upright. Then sit wellback in the seat and wear thesafety belt properly.
Do not have a seatback reclined ifthe vehicle is moving.
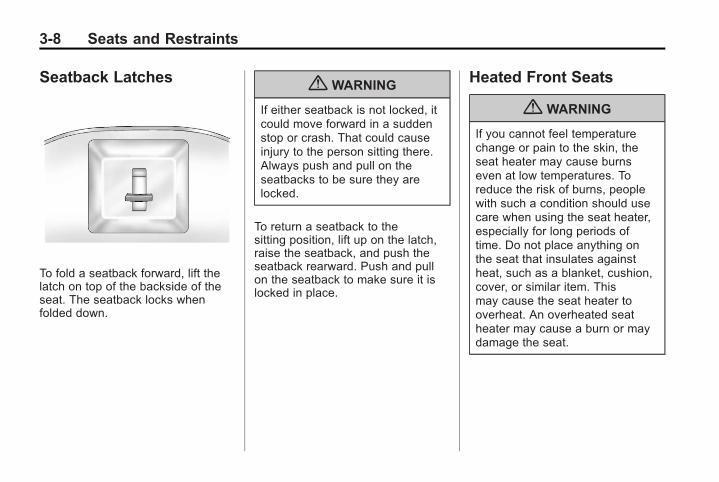
Black plate (8,1)Chevrolet Corvette Owner Manual - 2011
3-8 Seats and Restraints
Seatback Latches
To fold a seatback forward, lift thelatch on top of the backside of theseat. The seatback locks whenfolded down.
{ WARNING
If either seatback is not locked, itcould move forward in a suddenstop or crash. That could causeinjury to the person sitting there.Always push and pull on theseatbacks to be sure they arelocked.
To return a seatback to thesitting position, lift up on the latch,raise the seatback, and push theseatback rearward. Push and pullon the seatback to make sure it islocked in place.
Heated Front Seats
{ WARNING
If you cannot feel temperaturechange or pain to the skin, theseat heater may cause burnseven at low temperatures. Toreduce the risk of burns, peoplewith such a condition should usecare when using the seat heater,especially for long periods oftime. Do not place anything onthe seat that insulates againstheat, such as a blanket, cushion,cover, or similar item. Thismay cause the seat heater tooverheat. An overheated seatheater may cause a burn or maydamage the seat.
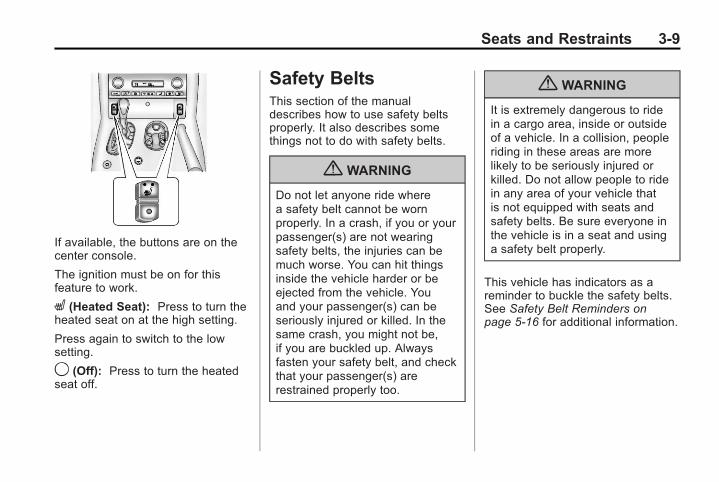
Black plate (9,1)Chevrolet Corvette Owner Manual - 2011
Seats and Restraints 3-9
If available, the buttons are on thecenter console.
The ignition must be on for thisfeature to work.
L (Heated Seat): Press to turn theheated seat on at the high setting.
Press again to switch to the lowsetting.
9 (Off): Press to turn the heatedseat off.
Safety BeltsThis section of the manualdescribes how to use safety beltsproperly. It also describes somethings not to do with safety belts.
{ WARNING
Do not let anyone ride wherea safety belt cannot be wornproperly. In a crash, if you or yourpassenger(s) are not wearingsafety belts, the injuries can bemuch worse. You can hit thingsinside the vehicle harder or beejected from the vehicle. Youand your passenger(s) can beseriously injured or killed. In thesame crash, you might not be,if you are buckled up. Alwaysfasten your safety belt, and checkthat your passenger(s) arerestrained properly too.
{ WARNING
It is extremely dangerous to ridein a cargo area, inside or outsideof a vehicle. In a collision, peopleriding in these areas are morelikely to be seriously injured orkilled. Do not allow people to ridein any area of your vehicle thatis not equipped with seats andsafety belts. Be sure everyone inthe vehicle is in a seat and usinga safety belt properly.
This vehicle has indicators as areminder to buckle the safety belts.See Safety Belt Reminders onpage 5‑16 for additional information.
Black plate (10,1)Chevrolet Corvette Owner Manual - 2011
3-10 Seats and Restraints
In most states and in all Canadianprovinces, the law requires wearingsafety belts. Here is why:
You never know if you will be in acrash. If you do have a crash, youdo not know if it will be aserious one.
A few crashes are mild, and somecrashes can be so serious that evenbuckled up, a person would notsurvive. But most crashes are inbetween. In many of them, peoplewho buckle up can survive andsometimes walk away. Withoutsafety belts they could have beenbadly hurt or killed.
After more than 40 years of safetybelts in vehicles, the facts are clear.In most crashes buckling up doesmatter ... a lot!
Why Safety Belts Work
When you ride in or on anything,you go as fast as it goes.
Take the simplest vehicle. Supposeit is just a seat on wheels.
Put someone on it.
Black plate (11,1)Chevrolet Corvette Owner Manual - 2011
Seats and Restraints 3-11
Get it up to speed. Then stop thevehicle. The rider does not stop.
The person keeps going untilstopped by something. In a realvehicle, it could be the windshield...
or the instrument panel...
Black plate (12,1)Chevrolet Corvette Owner Manual - 2011
3-12 Seats and Restraints
or the safety belts!
With safety belts, you slow downas the vehicle does. You get moretime to stop. You stop over moredistance, and your strongest bonestake the forces. That is why safetybelts make such good sense.
Questions and Answers AboutSafety Belts
Q: Will I be trapped in the vehicleafter a crash if I am wearing asafety belt?
A: You could be — whether you arewearing a safety belt or not. Butyour chance of being consciousduring and after an accident, soyou can unbuckle and get out, ismuch greater if you are belted.And you can unbuckle a safetybelt, even if you areupside down.
Q: If my vehicle has airbags, whyshould I have to wear safetybelts?
A: Airbags are supplementalsystems only; so they work withsafety belts — not instead ofthem. Whether or not an airbagis provided, all occupants stillhave to buckle up to get themost protection. That is truenot only in frontal collisions,but especially in side and othercollisions.
Q: If I am a good driver, and Inever drive far from home,why should I wear safetybelts?
A: You may be an excellent driver,but if you are in a crash — evenone that is not your fault — youand your passenger(s) can behurt. Being a good driver doesnot protect you from thingsbeyond your control, such asbad drivers.
Most accidents occur within40 km (25mi) of home. Andthe greatest number of seriousinjuries and deaths occurat speeds of less than65 km/h (40 mph).
Safety belts are for everyone.
Black plate (13,1)Chevrolet Corvette Owner Manual - 2011
Seats and Restraints 3-13
How to Wear Safety BeltsProperlyThis section is only for people ofadult size.
Be aware that there are specialthings to know about safety beltsand children. And there are differentrules for smaller children andinfants. If a child will be riding inthe vehicle, see Older Children onpage 3‑37 or Infants and YoungChildren on page 3‑39. Follow thoserules for everyone's protection.
It is very important for all occupantsto buckle up. Statistics show thatunbelted people are hurt more oftenin crashes than those who arewearing safety belts.
Occupants who are not buckled upcan be thrown out of the vehicle in acrash. And they can strike others inthe vehicle who are wearing safetybelts.
First, before you or yourpassenger(s) wear a safety belt,there is important information youshould know.
Sit up straight and always keepyour feet on the floor in front of you.The lap part of the belt should beworn low and snug on the hips, justtouching the thighs. In a crash, this
applies force to the strong pelvicbones and you would be less likelyto slide under the lap belt. If you slidunder it, the belt would apply forceon your abdomen. This could causeserious or even fatal injuries. Theshoulder belt should go over theshoulder and across the chest.These parts of the body are bestable to take belt restraining forces.
The shoulder belt locks if there is asudden stop or crash.
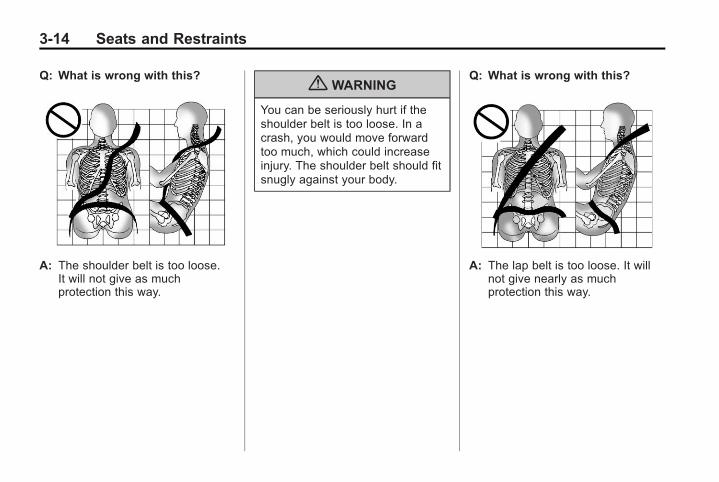
Black plate (14,1)Chevrolet Corvette Owner Manual - 2011
3-14 Seats and Restraints
Q: What is wrong with this?
A: The shoulder belt is too loose.It will not give as muchprotection this way.
{ WARNING
You can be seriously hurt if theshoulder belt is too loose. In acrash, you would move forwardtoo much, which could increaseinjury. The shoulder belt should fitsnugly against your body.
Q: What is wrong with this?
A: The lap belt is too loose. It willnot give nearly as muchprotection this way.
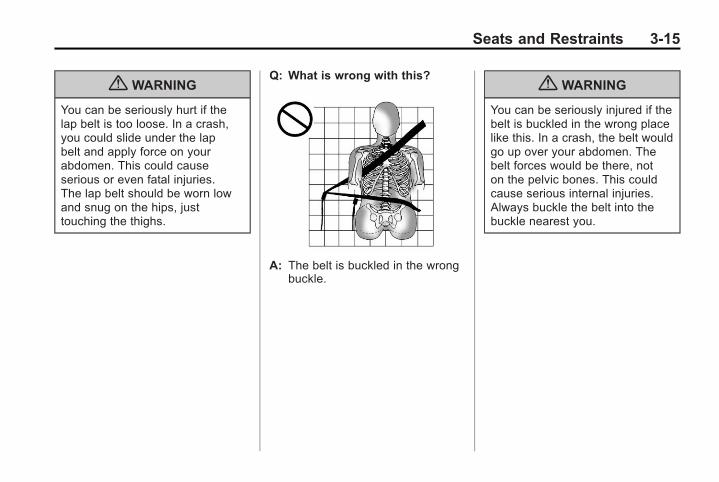
Black plate (15,1)Chevrolet Corvette Owner Manual - 2011
Seats and Restraints 3-15
{ WARNING
You can be seriously hurt if thelap belt is too loose. In a crash,you could slide under the lapbelt and apply force on yourabdomen. This could causeserious or even fatal injuries.The lap belt should be worn lowand snug on the hips, justtouching the thighs.
Q: What is wrong with this?
A: The belt is buckled in the wrongbuckle.
{ WARNING
You can be seriously injured if thebelt is buckled in the wrong placelike this. In a crash, the belt wouldgo up over your abdomen. Thebelt forces would be there, noton the pelvic bones. This couldcause serious internal injuries.Always buckle the belt into thebuckle nearest you.
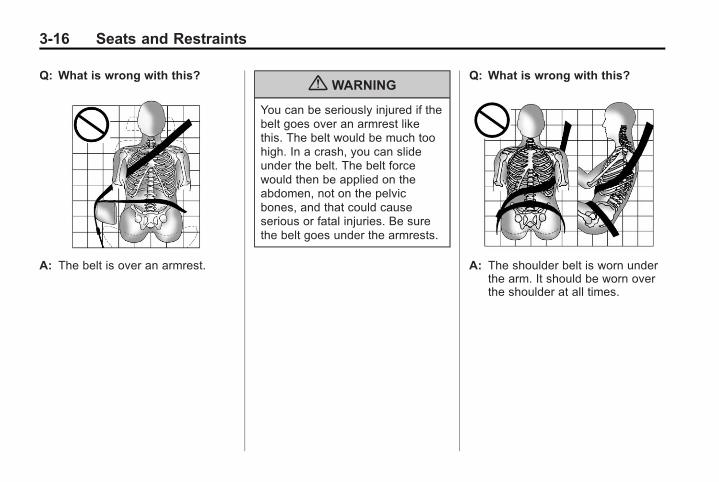
Black plate (16,1)Chevrolet Corvette Owner Manual - 2011
3-16 Seats and Restraints
Q: What is wrong with this?
A: The belt is over an armrest.
{ WARNING
You can be seriously injured if thebelt goes over an armrest likethis. The belt would be much toohigh. In a crash, you can slideunder the belt. The belt forcewould then be applied on theabdomen, not on the pelvicbones, and that could causeserious or fatal injuries. Be surethe belt goes under the armrests.
Q: What is wrong with this?
A: The shoulder belt is worn underthe arm. It should be worn overthe shoulder at all times.
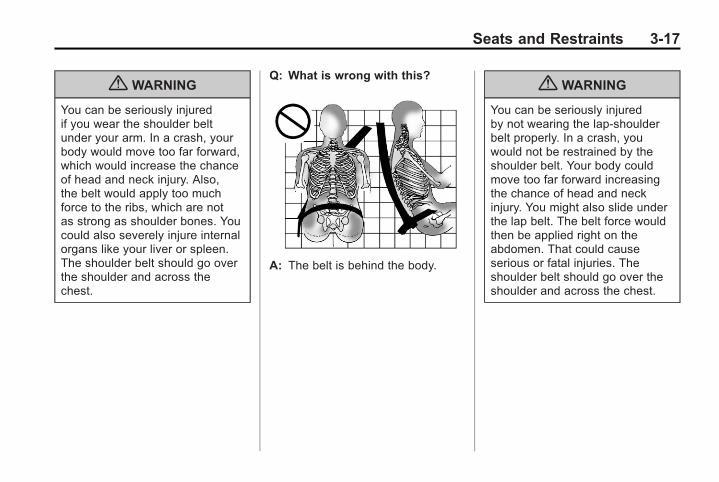
Black plate (17,1)Chevrolet Corvette Owner Manual - 2011
Seats and Restraints 3-17
{ WARNING
You can be seriously injuredif you wear the shoulder beltunder your arm. In a crash, yourbody would move too far forward,which would increase the chanceof head and neck injury. Also,the belt would apply too muchforce to the ribs, which are notas strong as shoulder bones. Youcould also severely injure internalorgans like your liver or spleen.The shoulder belt should go overthe shoulder and across thechest.
Q: What is wrong with this?
A: The belt is behind the body.
{ WARNING
You can be seriously injuredby not wearing the lap-shoulderbelt properly. In a crash, youwould not be restrained by theshoulder belt. Your body couldmove too far forward increasingthe chance of head and neckinjury. You might also slide underthe lap belt. The belt force wouldthen be applied right on theabdomen. That could causeserious or fatal injuries. Theshoulder belt should go over theshoulder and across the chest.
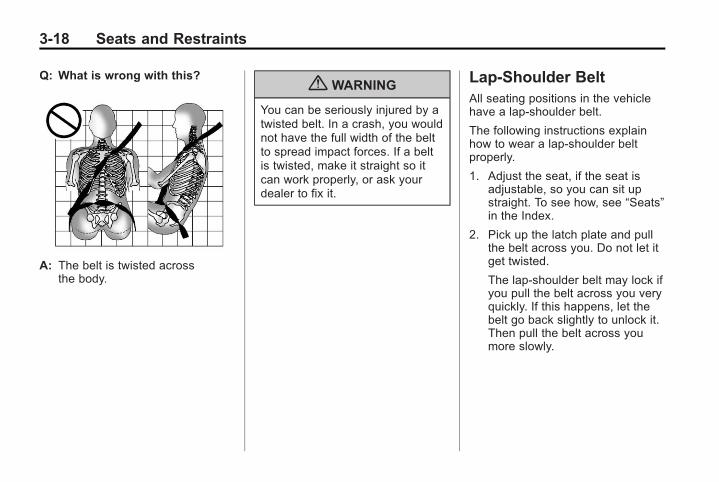
Black plate (18,1)Chevrolet Corvette Owner Manual - 2011
3-18 Seats and Restraints
Q: What is wrong with this?
A: The belt is twisted acrossthe body.
{ WARNING
You can be seriously injured by atwisted belt. In a crash, you wouldnot have the full width of the beltto spread impact forces. If a beltis twisted, make it straight so itcan work properly, or ask yourdealer to fix it.
Lap-Shoulder BeltAll seating positions in the vehiclehave a lap-shoulder belt.
The following instructions explainhow to wear a lap-shoulder beltproperly.
1. Adjust the seat, if the seat isadjustable, so you can sit upstraight. To see how, see “Seats”in the Index.
2. Pick up the latch plate and pullthe belt across you. Do not let itget twisted.
The lap-shoulder belt may lock ifyou pull the belt across you veryquickly. If this happens, let thebelt go back slightly to unlock it.Then pull the belt across youmore slowly.
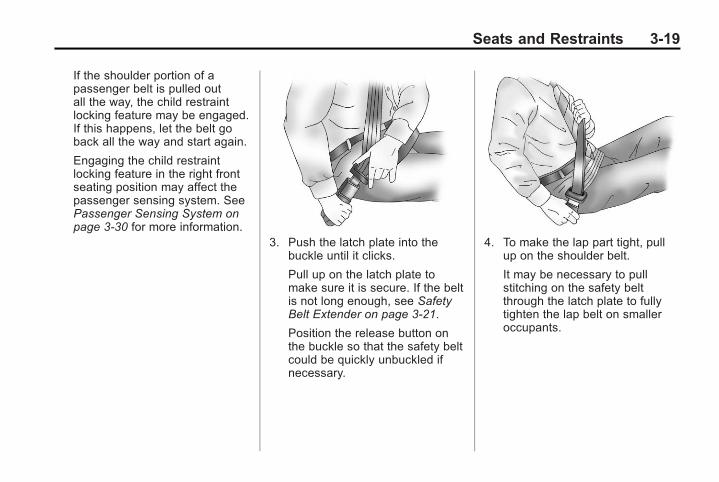
Black plate (19,1)Chevrolet Corvette Owner Manual - 2011
Seats and Restraints 3-19
If the shoulder portion of apassenger belt is pulled outall the way, the child restraintlocking feature may be engaged.If this happens, let the belt goback all the way and start again.
Engaging the child restraintlocking feature in the right frontseating position may affect thepassenger sensing system. SeePassenger Sensing System onpage 3‑30 for more information.
3. Push the latch plate into thebuckle until it clicks.
Pull up on the latch plate tomake sure it is secure. If the beltis not long enough, see SafetyBelt Extender on page 3‑21.
Position the release button onthe buckle so that the safety beltcould be quickly unbuckled ifnecessary.
4. To make the lap part tight, pullup on the shoulder belt.
It may be necessary to pullstitching on the safety beltthrough the latch plate to fullytighten the lap belt on smalleroccupants.
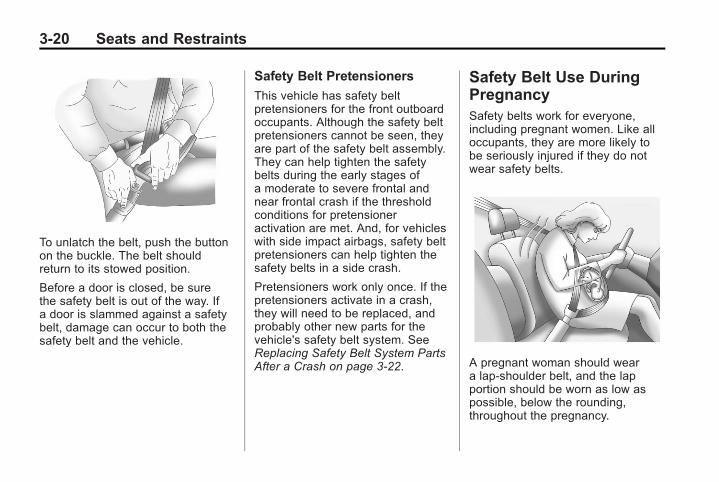
Black plate (20,1)Chevrolet Corvette Owner Manual - 2011
3-20 Seats and Restraints
To unlatch the belt, push the buttonon the buckle. The belt shouldreturn to its stowed position.
Before a door is closed, be surethe safety belt is out of the way. Ifa door is slammed against a safetybelt, damage can occur to both thesafety belt and the vehicle.
Safety Belt Pretensioners
This vehicle has safety beltpretensioners for the front outboardoccupants. Although the safety beltpretensioners cannot be seen, theyare part of the safety belt assembly.They can help tighten the safetybelts during the early stages ofa moderate to severe frontal andnear frontal crash if the thresholdconditions for pretensioneractivation are met. And, for vehicleswith side impact airbags, safety beltpretensioners can help tighten thesafety belts in a side crash.
Pretensioners work only once. If thepretensioners activate in a crash,they will need to be replaced, andprobably other new parts for thevehicle's safety belt system. SeeReplacing Safety Belt System PartsAfter a Crash on page 3‑22.
Safety Belt Use DuringPregnancySafety belts work for everyone,including pregnant women. Like alloccupants, they are more likely tobe seriously injured if they do notwear safety belts.
A pregnant woman should weara lap-shoulder belt, and the lapportion should be worn as low aspossible, below the rounding,throughout the pregnancy.
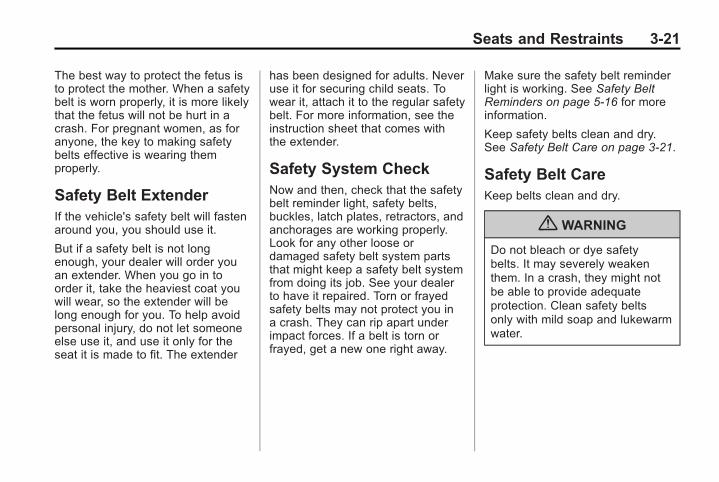
Black plate (21,1)Chevrolet Corvette Owner Manual - 2011
Seats and Restraints 3-21
The best way to protect the fetus isto protect the mother. When a safetybelt is worn properly, it is more likelythat the fetus will not be hurt in acrash. For pregnant women, as foranyone, the key to making safetybelts effective is wearing themproperly.
Safety Belt ExtenderIf the vehicle's safety belt will fastenaround you, you should use it.
But if a safety belt is not longenough, your dealer will order youan extender. When you go in toorder it, take the heaviest coat youwill wear, so the extender will belong enough for you. To help avoidpersonal injury, do not let someoneelse use it, and use it only for theseat it is made to fit. The extender
has been designed for adults. Neveruse it for securing child seats. Towear it, attach it to the regular safetybelt. For more information, see theinstruction sheet that comes withthe extender.
Safety System CheckNow and then, check that the safetybelt reminder light, safety belts,buckles, latch plates, retractors, andanchorages are working properly.Look for any other loose ordamaged safety belt system partsthat might keep a safety belt systemfrom doing its job. See your dealerto have it repaired. Torn or frayedsafety belts may not protect you ina crash. They can rip apart underimpact forces. If a belt is torn orfrayed, get a new one right away.
Make sure the safety belt reminderlight is working. See Safety BeltReminders on page 5‑16 for moreinformation.
Keep safety belts clean and dry.See Safety Belt Care on page 3‑21.
Safety Belt CareKeep belts clean and dry.
{ WARNING
Do not bleach or dye safetybelts. It may severely weakenthem. In a crash, they might notbe able to provide adequateprotection. Clean safety beltsonly with mild soap and lukewarmwater.
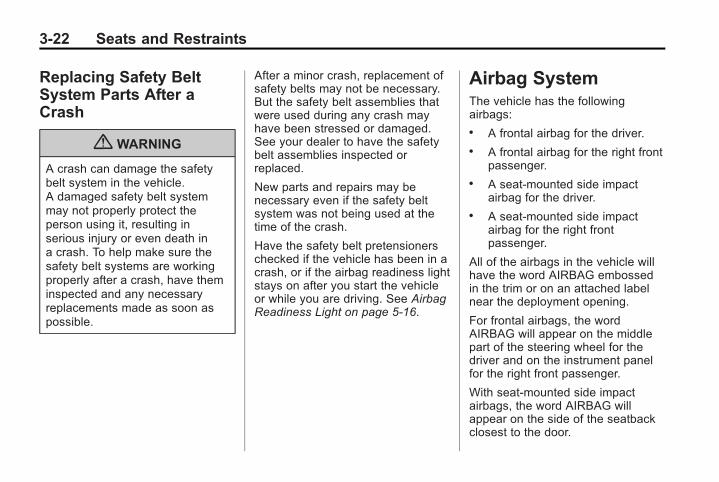
Black plate (22,1)Chevrolet Corvette Owner Manual - 2011
3-22 Seats and Restraints
Replacing Safety BeltSystem Parts After aCrash
{ WARNING
A crash can damage the safetybelt system in the vehicle.A damaged safety belt systemmay not properly protect theperson using it, resulting inserious injury or even death ina crash. To help make sure thesafety belt systems are workingproperly after a crash, have theminspected and any necessaryreplacements made as soon aspossible.
After a minor crash, replacement ofsafety belts may not be necessary.But the safety belt assemblies thatwere used during any crash mayhave been stressed or damaged.See your dealer to have the safetybelt assemblies inspected orreplaced.
New parts and repairs may benecessary even if the safety beltsystem was not being used at thetime of the crash.
Have the safety belt pretensionerschecked if the vehicle has been in acrash, or if the airbag readiness lightstays on after you start the vehicleor while you are driving. See AirbagReadiness Light on page 5‑16.
Airbag SystemThe vehicle has the followingairbags:. A frontal airbag for the driver.. A frontal airbag for the right front
passenger.. A seat-mounted side impact
airbag for the driver.. A seat-mounted side impact
airbag for the right frontpassenger.
All of the airbags in the vehicle willhave the word AIRBAG embossedin the trim or on an attached labelnear the deployment opening.
For frontal airbags, the wordAIRBAG will appear on the middlepart of the steering wheel for thedriver and on the instrument panelfor the right front passenger.
With seat-mounted side impactairbags, the word AIRBAG willappear on the side of the seatbackclosest to the door.
Black plate (23,1)Chevrolet Corvette Owner Manual - 2011
Seats and Restraints 3-23
Airbags are designed to supplementthe protection provided by safetybelts. Even though today's airbagsare also designed to help reducethe risk of injury from the force of aninflating bag, all airbags must inflatevery quickly to do their job.
Here are the most important thingsto know about the airbag system:
{ WARNING
You can be severely injured orkilled in a crash if you are notwearing your safety belt— evenif you have airbags. Airbags aredesigned to work with safetybelts, but do not replace them.Also, airbags are not designed todeploy in every crash. In somecrashes safety belts are your onlyrestraint. See When Should anAirbag Inflate? on page 3‑26.
(Continued)
WARNING (Continued)
Wearing your safety belt during acrash helps reduce your chanceof hitting things inside the vehicleor being ejected from it. Airbagsare “supplemental restraints” tothe safety belts. Everyone in yourvehicle should wear a safety beltproperly—whether or not there isan airbag for that person.
{ WARNING
Airbags inflate with great force,faster than the blink of an eye.Anyone who is up against, orvery close to, any airbag when itinflates can be seriously injuredor killed. Do not sit unnecessarily
(Continued)
WARNING (Continued)
close to the airbag, as you wouldbe if you were sitting on the edgeof your seat or leaning forward.Safety belts help keep you inposition before and during acrash. Always wear your safetybelt, even with airbags. The drivershould sit as far back as possiblewhile still maintaining control ofthe vehicle.
Occupants should not lean onor sleep against the door or sidewindows in seating positions withseat-mounted airbags.
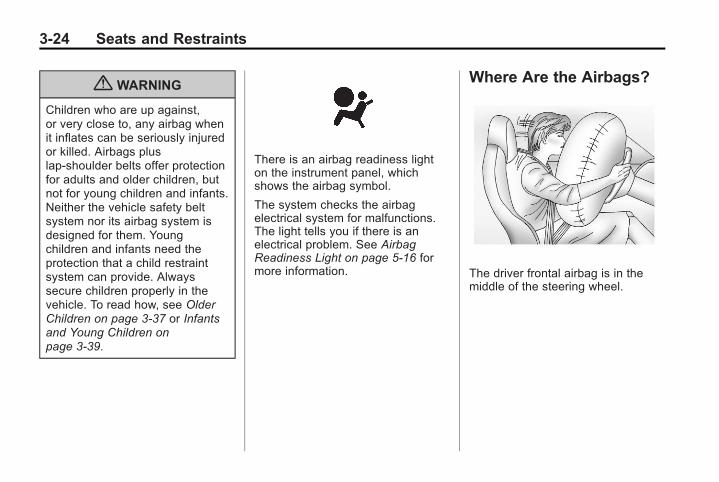
Black plate (24,1)Chevrolet Corvette Owner Manual - 2011
3-24 Seats and Restraints
{ WARNING
Children who are up against,or very close to, any airbag whenit inflates can be seriously injuredor killed. Airbags pluslap-shoulder belts offer protectionfor adults and older children, butnot for young children and infants.Neither the vehicle safety beltsystem nor its airbag system isdesigned for them. Youngchildren and infants need theprotection that a child restraintsystem can provide. Alwayssecure children properly in thevehicle. To read how, see OlderChildren on page 3‑37 or Infantsand Young Children onpage 3‑39.
There is an airbag readiness lighton the instrument panel, whichshows the airbag symbol.
The system checks the airbagelectrical system for malfunctions.The light tells you if there is anelectrical problem. See AirbagReadiness Light on page 5‑16 formore information.
Where Are the Airbags?
The driver frontal airbag is in themiddle of the steering wheel.
Black plate (25,1)Chevrolet Corvette Owner Manual - 2011
Seats and Restraints 3-25
The right front passenger frontalairbag is in the instrument panel onthe passenger side.
Driver Side Shown, PassengerSide Similar
The seat-mounted side impactairbags for the driver and right frontpassenger are in the side of theseatbacks closest to the door.
{ WARNING
If something is between anoccupant and an airbag, theairbag might not inflate properlyor it might force the object intothat person causing severe injuryor even death. The path of aninflating airbag must be keptclear. Do not put anythingbetween an occupant and anairbag, and do not attach or putanything on the steering wheelhub or on or near any otherairbag covering.
Do not use seat accessoriesthat block the inflation path of aseat-mounted side impact airbag.

Black plate (26,1)Chevrolet Corvette Owner Manual - 2011
3-26 Seats and Restraints
When Should an AirbagInflate?Frontal airbags are designed toinflate in moderate to severe frontalor near-frontal crashes to helpreduce the potential for severeinjuries mainly to the driver's or rightfront passenger's head and chest.However, they are only designedto inflate if the impact exceedsa predetermined deploymentthreshold. Deployment thresholdsare used to predict how severe acrash is likely to be in time for theairbags to inflate and help restrainthe occupants.
Whether the frontal airbags willor should deploy is not based onhow fast your vehicle is traveling.It depends largely on what you hit,the direction of the impact, and howquickly your vehicle slows down.
Frontal airbags may inflate atdifferent crash speeds. Forexample:. If the vehicle hits a stationary
object, the airbags could inflateat a different crash speed than ifthe vehicle hits a moving object.
. If the vehicle hits an object thatdeforms, the airbags couldinflate at a different crash speedthan if the vehicle hits an objectthat does not deform.
. If the vehicle hits a narrow object(like a pole), the airbags couldinflate at a different crash speedthan if the vehicle hits a wideobject (like a wall).
. If the vehicle goes into an objectat an angle, the airbags couldinflate at a different crash speedthan if the vehicle goes straightinto the object.
Thresholds can also vary withspecific vehicle design.
Frontal airbags are not intended toinflate during vehicle rollovers, rearimpacts, or in many side impacts.
In addition, your vehicle hasdual-stage frontal airbags.Dual-stage airbags adjust therestraint according to crash severity.Your vehicle has electronic frontalsensors, which help the sensingsystem distinguish between amoderate frontal impact and a moresevere frontal impact. For moderatefrontal impacts, dual-stage airbagsinflate at a level less than fulldeployment. For more severe frontalimpacts, full deployment occurs.
Black plate (27,1)Chevrolet Corvette Owner Manual - 2011
Seats and Restraints 3-27
Your vehicle may have one or twoseat position sensors, dependingon what model you have. Theseat position sensor(s) enablethe sensing system to monitorthe position of the driver seat(all models except ZO6 and ZR1)and the right front passenger seat(all models). Seat position sensor(s)provide information that is used todetermine if the airbags shoulddeploy at a reduced level or at fulldeployment.
Your vehicle may or may not haveseat-mounted side impact airbags.See Airbag System on page 3‑22.Seat-mounted side impact airbagsare intended to inflate in moderateto severe side crashes.
Seat-mounted side impact airbagswill inflate if the crash severity isabove the system's designedthreshold level. The threshold levelcan vary with specific vehicledesign.
Seat-mounted side impact airbagsare not intended to inflate in frontalimpacts, near-frontal impacts,rollovers, or rear impacts.A seat-mounted side impact airbagis intended to deploy on the side ofthe vehicle that is struck.
In any particular crash, no onecan say whether an airbag shouldhave inflated simply because of thedamage to a vehicle or becauseof what the repair costs were. Forseat-mounted side impact airbags,deployment is determined by thelocation and severity of the sideimpact.
What Makes an AirbagInflate?In a deployment event, the sensingsystem sends an electrical signaltriggering a release of gas from theinflator. Gas from the inflator fills theairbag causing the bag to break outof the cover and deploy. The inflator,the airbag, and related hardware areall part of the airbag module.
Frontal airbag modules are locatedinside the steering wheel andinstrument panel. For vehicles withseat-mounted side impact airbags,there are airbag modules in the sideof the front seatbacks closest tothe door.
Black plate (28,1)Chevrolet Corvette Owner Manual - 2011
3-28 Seats and Restraints
How Does an AirbagRestrain?In moderate to severe frontal ornear frontal collisions, even beltedoccupants can contact the steeringwheel or the instrument panel. Inmoderate to severe side collisions,even belted occupants can contactthe inside of the vehicle.
Airbags supplement the protectionprovided by safety belts. Frontalairbags distribute the force ofthe impact more evenly over theoccupant's upper body, stoppingthe occupant more gradually.Seat-mounted side impact airbagsdistribute the force of the impactmore evenly over the occupant'supper body.
But airbags would not help inmany types of collisions, primarilybecause the occupant's motion isnot toward those airbags. See WhenShould an Airbag Inflate? onpage 3‑26 for more information.
Airbags should never be regardedas anything more than a supplementto safety belts.
What Will You See Afteran Airbag Inflates?After the frontal and seat-mountedside impact airbags inflate, theyquickly deflate, so quickly that somepeople may not even realize theairbags inflated. Some componentsof the airbag module may be hot forseveral minutes. For location of theairbag modules, see What Makesan Airbag Inflate? on page 3‑27.
The parts of the airbag that comeinto contact with you may be warm,but not too hot to touch. There maybe some smoke and dust comingfrom the vents in the deflatedairbags. Airbag inflation does notprevent the driver from seeing outof the windshield or being able tosteer the vehicle, nor does it preventpeople from leaving the vehicle.
{ WARNING
When an airbag inflates, theremay be dust in the air. This dustcould cause breathing problemsfor people with a history ofasthma or other breathing trouble.To avoid this, everyone in thevehicle should get out as soonas it is safe to do so. If you havebreathing problems but cannotget out of the vehicle after anairbag inflates, then get fresh airby opening a window or a door.If you experience breathingproblems following an airbagdeployment, you should seekmedical attention.
The vehicle has a feature that mayautomatically unlock the doors, turnthe interior lamps on, turn on thehazard warning flashers, and shutoff the fuel system after the airbagsinflate. You can lock the doors, turn
Black plate (29,1)Chevrolet Corvette Owner Manual - 2011
Seats and Restraints 3-29
the interior lamps off, and turn thehazard warning flashers off by usingthe controls for those features.
{ WARNING
A crash severe enough to inflatethe airbags may have alsodamaged important functionsin the vehicle, such as the fuelsystem, brake and steeringsystems, etc. Even if the vehicleappears to be drivable after amoderate crash, there may beconcealed damage that couldmake it difficult to safely operatethe vehicle.
Use caution if you should attemptto restart the engine after a crashhas occurred.
In many crashes severe enoughto inflate the airbag, windshieldsare broken by vehicle deformation.Additional windshield breakage mayalso occur from the right frontpassenger airbag.. Airbags are designed to inflate
only once. After an airbaginflates, you will need somenew parts for the airbag system.If you do not get them, theairbag system will not be thereto help protect you in anothercrash. A new system will includeairbag modules and possiblyother parts. The service manualfor your vehicle covers the needto replace other parts.
. The vehicle has a crash sensingand diagnostic module whichrecords information after acrash. See Vehicle DataRecording and Privacy onpage 13‑17 and Event DataRecorders on page 13‑17.
. Let only qualified technicianswork on the airbag system.Improper service can mean thatthe airbag system will not workproperly. See your dealer forservice.

Black plate (30,1)Chevrolet Corvette Owner Manual - 2011
3-30 Seats and Restraints
Passenger SensingSystemThe vehicle has a passengersensing system for the right frontpassenger position. The passengerairbag status indicator will be visiblein the rearview mirror when thevehicle is started.
United States
Canada and Mexico
The words ON and OFF, or thesymbol for on and off, will be visibleduring the system check. When thesystem check is complete, either the
word ON or OFF, or the symbolfor on or off, will be visible. SeePassenger Airbag Status Indicatoron page 5‑17.
The passenger sensing system willturn off the right front passengerfrontal airbag and seat-mountedside impact airbag under certainconditions. The driver airbags arenot affected by the passengersensing system.
The passenger sensing systemworks with sensors that are part ofthe right front passenger seat. Thesensors are designed to detect thepresence of a properly-seatedoccupant and determine if the rightfront passenger frontal airbag andseat-mounted side impact airbagshould be enabled (may inflate)or not.
According to accident statistics,children are safer when properlysecured in a rear seat in the correctchild restraint for their weight andsize. We recommend that
rear-facing child restraints not betransported in the vehicle, even ifthe airbags are off.
A label on the sun visor says,“Never put a rear-facing child seatin the front.” This is because the riskto the rear-facing child is so great,if the airbag deploys.
{ WARNING
A child in a rear-facing childrestraint can be seriouslyinjured or killed if the right frontpassenger airbag inflates. Thisis because the back of therear-facing child restraint wouldbe very close to the inflatingairbag. A child in a forward-facingchild restraint can be seriouslyinjured or killed if the right frontpassenger airbag inflates and thepassenger seat is in a forwardposition.
(Continued)
Black plate (31,1)Chevrolet Corvette Owner Manual - 2011
Seats and Restraints 3-31
WARNING (Continued)
Even if the passenger sensingsystem has turned off the rightfront passenger frontal airbagand seat-mounted side impactairbag (if equipped), no system isfail-safe. No one can guaranteethat an airbag will not deployunder some unusualcircumstance, even thoughthe airbag(s) are off.
Secure rear-facing child restraintsin a rear seat, even if theairbag(s) are off. If you secure aforward-facing child restraint inthe right front seat, always movethe front passenger seat as farback as it will go. It is better tosecure the child restraint in arear seat.
The passenger sensing system isdesigned to turn off the right frontpassenger frontal airbag andseat-mounted side impact airbag if:. The right front passenger seat is
unoccupied.. The system determines that an
infant is present in a rear-facinginfant seat.
. The system determines that asmall child is present in a childrestraint.
. The system determines that asmall child is present in abooster seat.
. A right front passenger takeshis/her weight off of the seat fora period of time.
. The right front passenger seatis occupied by a smaller person,such as a child who hasoutgrown child restraints.
. Or, if there is a critical problemwith the airbag system or thepassenger sensing system.
When the passenger sensingsystem has turned off the rightfront passenger frontal airbag andseat-mounted side impact airbag,the off indicator will light and stay litto remind you that the airbag(s) areoff. See Passenger Airbag StatusIndicator on page 5‑17.
The passenger sensing systemis designed to turn on (may inflate)the right front passenger frontalairbag and seat-mounted sideimpact airbag anytime the systemsenses that a person of adult sizeis sitting properly in the right frontpassenger seat.
When the passenger sensingsystem has allowed the airbag(s) tobe enabled, the on indicator will lightand stay lit to remind you that theairbag or airbags are active.
Black plate (32,1)Chevrolet Corvette Owner Manual - 2011
3-32 Seats and Restraints
For some children who haveoutgrown child restraints and forvery small adults, the passengersensing system may or may not turnoff the right front passenger frontalairbag and seat-mounted sideimpact airbag, depending uponthe person's seating posture andbody build. Everyone in the vehiclewho has outgrown child restraintsshould wear a safety beltproperly—whether or not thereis an airbag for that person.
{ WARNING
If the airbag readiness light evercomes on and stays on, it meansthat something may be wrongwith the airbag system. To helpavoid injury to yourself or others,have the vehicle serviced rightaway. See Airbag ReadinessLight on page 5‑16 for moreinformation, including importantsafety information.
If the On Indicator is Lit for aChild Restraint
If a child restraint has been installedand the on indicator is lit:
1. Turn the vehicle off.
2. Remove the child restraint fromthe vehicle.
3. Remove any additional itemsfrom the seat such as blankets,cushions, seat covers, seatheaters, or seat massagers.
4. Reinstall the child restraintfollowing the directionsprovided by the child restraintmanufacturer and refer toSecuring Child Restraints onpage 3‑48.
5. If, after reinstalling the childrestraint and restarting thevehicle, the on indicator is stilllit, turn the vehicle off. Thenslightly recline the vehicleseatback and adjust the seatcushion, if adjustable, to makesure that the vehicle seatback isnot pushing the child restraintinto the seat cushion.
6. Restart the vehicle.
If the on indicator is still lit, donot install a child restraint in thisvehicle and check with yourdealer.
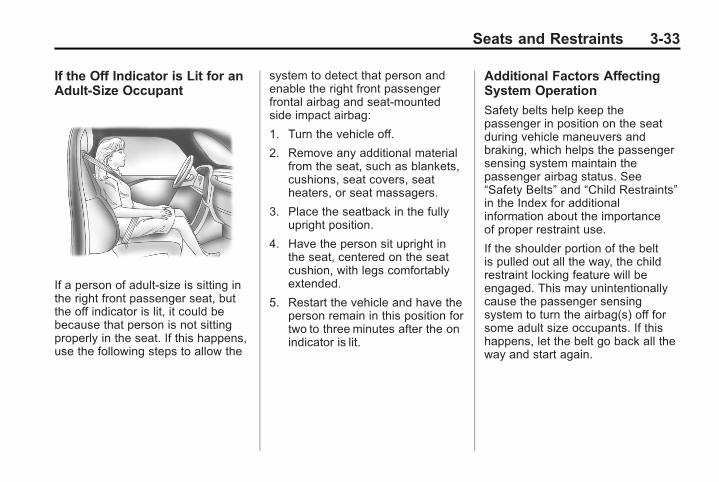
Black plate (33,1)Chevrolet Corvette Owner Manual - 2011
Seats and Restraints 3-33
If the Off Indicator is Lit for anAdult-Size Occupant
If a person of adult-size is sitting inthe right front passenger seat, butthe off indicator is lit, it could bebecause that person is not sittingproperly in the seat. If this happens,use the following steps to allow the
system to detect that person andenable the right front passengerfrontal airbag and seat-mountedside impact airbag:
1. Turn the vehicle off.
2. Remove any additional materialfrom the seat, such as blankets,cushions, seat covers, seatheaters, or seat massagers.
3. Place the seatback in the fullyupright position.
4. Have the person sit upright inthe seat, centered on the seatcushion, with legs comfortablyextended.
5. Restart the vehicle and have theperson remain in this position fortwo to three minutes after the onindicator is lit.
Additional Factors AffectingSystem Operation
Safety belts help keep thepassenger in position on the seatduring vehicle maneuvers andbraking, which helps the passengersensing system maintain thepassenger airbag status. See“Safety Belts” and “Child Restraints”in the Index for additionalinformation about the importanceof proper restraint use.
If the shoulder portion of the beltis pulled out all the way, the childrestraint locking feature will beengaged. This may unintentionallycause the passenger sensingsystem to turn the airbag(s) off forsome adult size occupants. If thishappens, let the belt go back all theway and start again.
Black plate (34,1)Chevrolet Corvette Owner Manual - 2011
3-34 Seats and Restraints
A thick layer of additional material,such as a blanket or cushion,or aftermarket equipment suchas seat covers, seat heaters, andseat massagers can affect howwell the passenger sensing systemoperates. We recommend thatyou not use seat covers or otheraftermarket equipment except whenapproved by GM for your specificvehicle. See Adding Equipment tothe Airbag-Equipped Vehicle onpage 3‑35 for more informationabout modifications that can affecthow the system operates.
{ WARNING
Stowing of articles under thepassenger seat or between thepassenger seat cushion andseatback may interfere with theproper operation of the passengersensing system.
Servicing theAirbag-Equipped VehicleAirbags affect how the vehicleshould be serviced. There are partsof the airbag system in severalplaces around the vehicle. Yourdealer and the service manual haveinformation about servicing thevehicle and the airbag system. Topurchase a service manual, seeService Publications OrderingInformation on page 13‑15.
{ WARNING
For up to 10 seconds after theignition is turned off and thebattery is disconnected, an airbagcan still inflate during improperservice. You can be injured if youare close to an airbag when itinflates. Avoid yellow connectors.They are probably part of theairbag system. Be sure to followproper service procedures, andmake sure the person performingwork for you is qualified to do so.

Black plate (35,1)Chevrolet Corvette Owner Manual - 2011
Seats and Restraints 3-35
Adding Equipment to theAirbag-Equipped VehicleQ: Is there anything I might add
to or change about the vehiclethat could keep the airbagsfrom working properly?
A: Yes. If you add things thatchange the vehicle's frame,bumper system, height, front endor side sheet metal, they maykeep the airbag system fromworking properly. Changing ormoving any parts of the frontseats, safety belts, the airbagsensing and diagnostic module,steering wheel, instrumentpanel, the inside rear mirror,front sensors, or airbag wiringcan affect the operation of theairbag system.
In addition, the vehicle hasa passenger sensing systemfor the right front passengerposition, which includes sensorsthat are part of the passenger
seat. The passenger sensingsystem may not operate properlyif the original seat trim isreplaced with non-GM covers,upholstery or trim, or withGM covers, upholstery or trimdesigned for a different vehicle.Any object, such as anaftermarket seat heater or acomfort enhancing pad ordevice, installed under or ontop of the seat fabric, could alsointerfere with the operation ofthe passenger sensing system.This could either prevent properdeployment of the passengerairbag(s) or prevent thepassenger sensing systemfrom properly turning off thepassenger airbag(s). SeePassenger Sensing System onpage 3‑30.
If you have any questionsabout this, you should contactCustomer Assistance before youmodify your vehicle. The phonenumbers and addresses for
Customer Assistance are inStep Two of the CustomerSatisfaction Procedure inthis manual. See CustomerSatisfaction Procedure (U.S. andCanada) on page 13‑1 orCustomer SatisfactionProcedure (Mexico) onpage 13‑3.
Q: Because I have a disability,I have to get my vehiclemodified. How can I find outwhether this will affect myairbag system?
A: If you have questions, callCustomer Assistance. Thephone numbers and addressesfor Customer Assistance arein Step Two of the CustomerSatisfaction Procedure in thismanual. See CustomerSatisfaction Procedure (U.S. andCanada) on page 13‑1 orCustomer SatisfactionProcedure (Mexico) onpage 13‑3.
Black plate (36,1)Chevrolet Corvette Owner Manual - 2011
3-36 Seats and Restraints
Your dealer and the service manualhave information about the locationof the airbag sensors, sensing anddiagnostic module and airbagwiring.
Airbag System CheckThe airbag system does not needregularly scheduled maintenance orreplacement. Make sure the airbagreadiness light is working. SeeAirbag Readiness Light onpage 5‑16 for more information.
Notice: If an airbag coveringis damaged, opened, or broken,the airbag may not work properly.Do not open or break the airbagcoverings. If there are anyopened or broken airbag covers,have the airbag covering and/orairbag module replaced. For thelocation of the airbag modules,see What Makes an AirbagInflate? on page 3‑27. See yourdealer for service.
Replacing Airbag SystemParts After a Crash
{ WARNING
A crash can damage theairbag systems in the vehicle.A damaged airbag systemmay not work properly andmay not protect you and yourpassenger(s) in a crash, resultingin serious injury or even death.To help make sure the airbagsystems are working properlyafter a crash, have theminspected and any necessaryreplacements made as soon aspossible.
If an airbag inflates, you will need toreplace airbag system parts. Seeyour dealer for service.
If the airbag readiness light stays onafter the vehicle is started or comeson when you are driving, the airbagsystem may not work properly.Have the vehicle serviced rightaway. See Airbag Readiness Lighton page 5‑16 for more information.
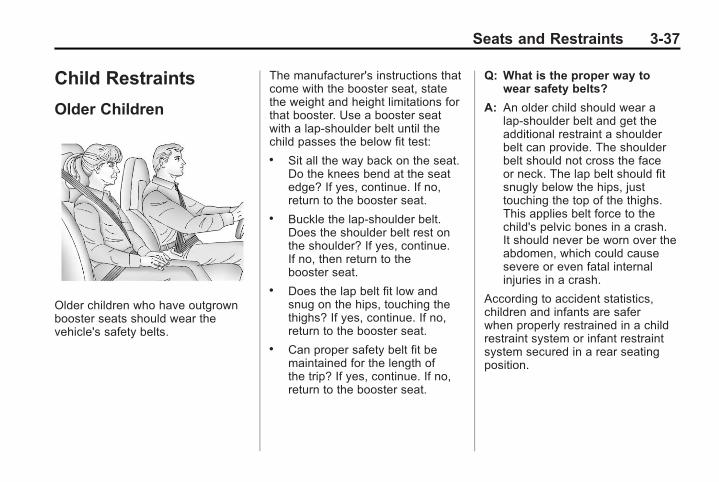
Black plate (37,1)Chevrolet Corvette Owner Manual - 2011
Seats and Restraints 3-37
Child Restraints
Older Children
Older children who have outgrownbooster seats should wear thevehicle's safety belts.
The manufacturer's instructions thatcome with the booster seat, statethe weight and height limitations forthat booster. Use a booster seatwith a lap-shoulder belt until thechild passes the below fit test:. Sit all the way back on the seat.
Do the knees bend at the seatedge? If yes, continue. If no,return to the booster seat.
. Buckle the lap-shoulder belt.Does the shoulder belt rest onthe shoulder? If yes, continue.If no, then return to thebooster seat.
. Does the lap belt fit low andsnug on the hips, touching thethighs? If yes, continue. If no,return to the booster seat.
. Can proper safety belt fit bemaintained for the length ofthe trip? If yes, continue. If no,return to the booster seat.
Q: What is the proper way towear safety belts?
A: An older child should wear alap-shoulder belt and get theadditional restraint a shoulderbelt can provide. The shoulderbelt should not cross the faceor neck. The lap belt should fitsnugly below the hips, justtouching the top of the thighs.This applies belt force to thechild's pelvic bones in a crash.It should never be worn over theabdomen, which could causesevere or even fatal internalinjuries in a crash.
According to accident statistics,children and infants are saferwhen properly restrained in a childrestraint system or infant restraintsystem secured in a rear seatingposition.
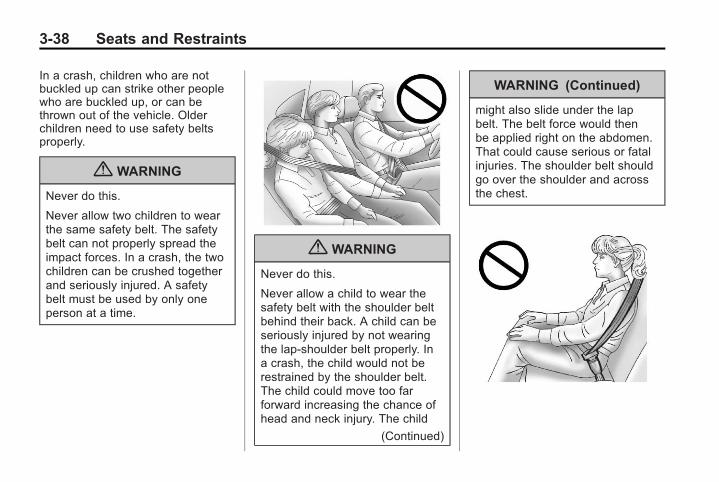
Black plate (38,1)Chevrolet Corvette Owner Manual - 2011
3-38 Seats and Restraints
In a crash, children who are notbuckled up can strike other peoplewho are buckled up, or can bethrown out of the vehicle. Olderchildren need to use safety beltsproperly.
{ WARNING
Never do this.
Never allow two children to wearthe same safety belt. The safetybelt can not properly spread theimpact forces. In a crash, the twochildren can be crushed togetherand seriously injured. A safetybelt must be used by only oneperson at a time.
{ WARNING
Never do this.
Never allow a child to wear thesafety belt with the shoulder beltbehind their back. A child can beseriously injured by not wearingthe lap-shoulder belt properly. Ina crash, the child would not berestrained by the shoulder belt.The child could move too farforward increasing the chance ofhead and neck injury. The child
(Continued)
WARNING (Continued)
might also slide under the lapbelt. The belt force would thenbe applied right on the abdomen.That could cause serious or fatalinjuries. The shoulder belt shouldgo over the shoulder and acrossthe chest.
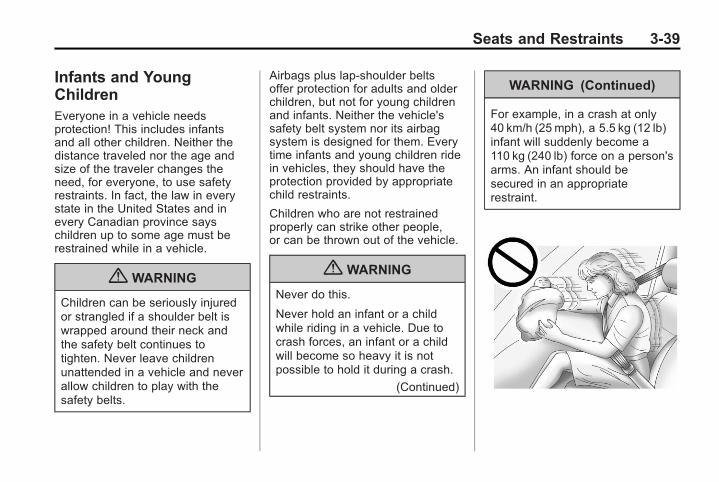
Black plate (39,1)Chevrolet Corvette Owner Manual - 2011
Seats and Restraints 3-39
Infants and YoungChildrenEveryone in a vehicle needsprotection! This includes infantsand all other children. Neither thedistance traveled nor the age andsize of the traveler changes theneed, for everyone, to use safetyrestraints. In fact, the law in everystate in the United States and inevery Canadian province sayschildren up to some age must berestrained while in a vehicle.
{ WARNING
Children can be seriously injuredor strangled if a shoulder belt iswrapped around their neck andthe safety belt continues totighten. Never leave childrenunattended in a vehicle and neverallow children to play with thesafety belts.
Airbags plus lap‐shoulder beltsoffer protection for adults and olderchildren, but not for young childrenand infants. Neither the vehicle'ssafety belt system nor its airbagsystem is designed for them. Everytime infants and young children ridein vehicles, they should have theprotection provided by appropriatechild restraints.
Children who are not restrainedproperly can strike other people,or can be thrown out of the vehicle.
{ WARNING
Never do this.
Never hold an infant or a childwhile riding in a vehicle. Due tocrash forces, an infant or a childwill become so heavy it is notpossible to hold it during a crash.
(Continued)
WARNING (Continued)
For example, in a crash at only40 km/h (25 mph), a 5.5 kg (12 lb)infant will suddenly become a110 kg (240 lb) force on a person'sarms. An infant should besecured in an appropriaterestraint.
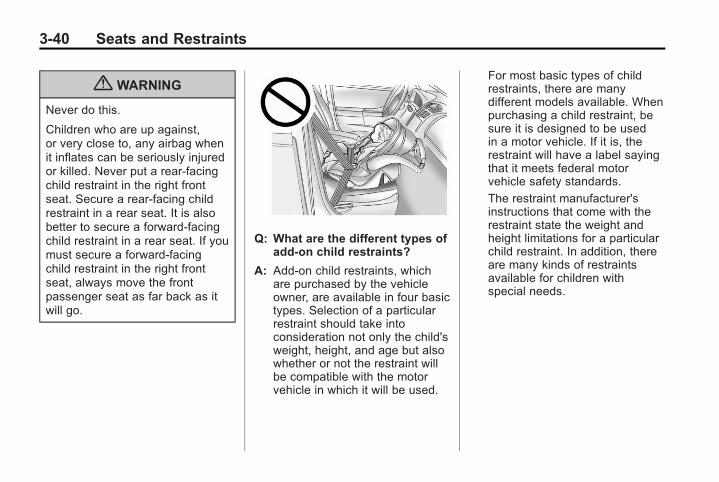
Black plate (40,1)Chevrolet Corvette Owner Manual - 2011
3-40 Seats and Restraints
{ WARNING
Never do this.
Children who are up against,or very close to, any airbag whenit inflates can be seriously injuredor killed. Never put a rear-facingchild restraint in the right frontseat. Secure a rear-facing childrestraint in a rear seat. It is alsobetter to secure a forward-facingchild restraint in a rear seat. If youmust secure a forward-facingchild restraint in the right frontseat, always move the frontpassenger seat as far back as itwill go.
Q: What are the different types ofadd-on child restraints?
A: Add-on child restraints, whichare purchased by the vehicleowner, are available in four basictypes. Selection of a particularrestraint should take intoconsideration not only the child'sweight, height, and age but alsowhether or not the restraint willbe compatible with the motorvehicle in which it will be used.
For most basic types of childrestraints, there are manydifferent models available. Whenpurchasing a child restraint, besure it is designed to be usedin a motor vehicle. If it is, therestraint will have a label sayingthat it meets federal motorvehicle safety standards.
The restraint manufacturer'sinstructions that come with therestraint state the weight andheight limitations for a particularchild restraint. In addition, thereare many kinds of restraintsavailable for children withspecial needs.
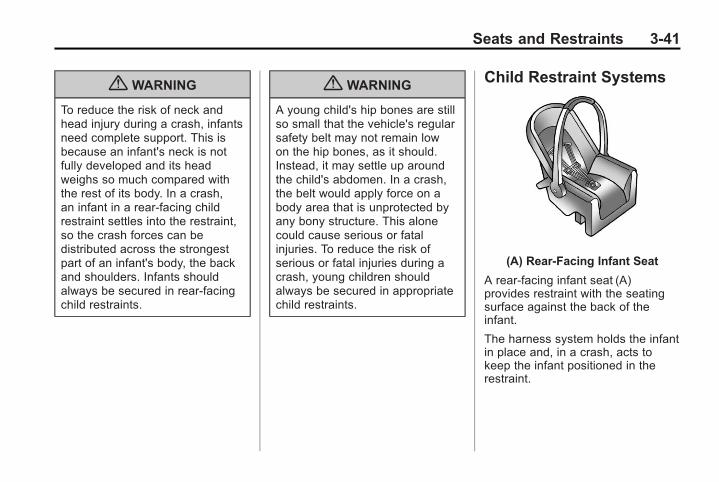
Black plate (41,1)Chevrolet Corvette Owner Manual - 2011
Seats and Restraints 3-41
{ WARNING
To reduce the risk of neck andhead injury during a crash, infantsneed complete support. This isbecause an infant's neck is notfully developed and its headweighs so much compared withthe rest of its body. In a crash,an infant in a rear-facing childrestraint settles into the restraint,so the crash forces can bedistributed across the strongestpart of an infant's body, the backand shoulders. Infants shouldalways be secured in rear-facingchild restraints.
{ WARNING
A young child's hip bones are stillso small that the vehicle's regularsafety belt may not remain lowon the hip bones, as it should.Instead, it may settle up aroundthe child's abdomen. In a crash,the belt would apply force on abody area that is unprotected byany bony structure. This alonecould cause serious or fatalinjuries. To reduce the risk ofserious or fatal injuries during acrash, young children shouldalways be secured in appropriatechild restraints.
Child Restraint Systems
(A) Rear‐Facing Infant Seat
A rear-facing infant seat (A)provides restraint with the seatingsurface against the back of theinfant.
The harness system holds the infantin place and, in a crash, acts tokeep the infant positioned in therestraint.
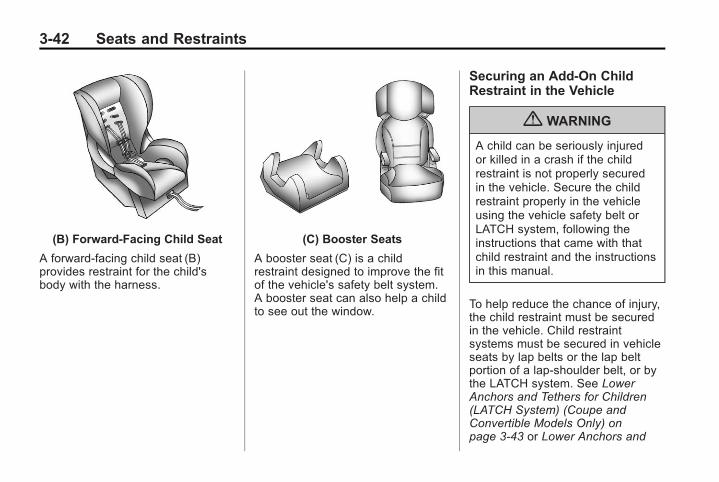
Black plate (42,1)Chevrolet Corvette Owner Manual - 2011
3-42 Seats and Restraints
(B) Forward-Facing Child Seat
A forward-facing child seat (B)provides restraint for the child'sbody with the harness.
(C) Booster Seats
A booster seat (C) is a childrestraint designed to improve the fitof the vehicle's safety belt system.A booster seat can also help a childto see out the window.
Securing an Add-On ChildRestraint in the Vehicle
{ WARNING
A child can be seriously injuredor killed in a crash if the childrestraint is not properly securedin the vehicle. Secure the childrestraint properly in the vehicleusing the vehicle safety belt orLATCH system, following theinstructions that came with thatchild restraint and the instructionsin this manual.
To help reduce the chance of injury,the child restraint must be securedin the vehicle. Child restraintsystems must be secured in vehicleseats by lap belts or the lap beltportion of a lap-shoulder belt, or bythe LATCH system. See LowerAnchors and Tethers for Children(LATCH System) (Coupe andConvertible Models Only) onpage 3‑43 or Lower Anchors and
Black plate (43,1)Chevrolet Corvette Owner Manual - 2011
Seats and Restraints 3-43
Tethers for Children (LATCHSystem) (ZO6 and ZR1 ModelsOnly) on page 3‑44 for moreinformation. Children can beendangered in a crash if the childrestraint is not properly secured inthe vehicle.
When securing an add-on childrestraint, refer to the instructionsthat come with the restraint whichmay be on the restraint itself or in abooklet, or both, and to this manual.The child restraint instructions areimportant, so if they are notavailable, obtain a replacementcopy from the manufacturer.
Keep in mind that an unsecuredchild restraint can move around in acollision or sudden stop and injurepeople in the vehicle. Be sure toproperly secure any child restraint inthe vehicle — even when no child isin it.
In some areas of the United Statesand Canada, Certified ChildPassenger Safety Technicians(CPSTs) are available to inspectand demonstrate how to correctlyuse and install child restraints. Inthe U.S., refer to the NationalHighway Traffic SafetyAdministration (NHTSA) websiteto locate the nearest child safetyseat inspection station. For CPSTavailability in Canada, check withTransport Canada or the ProvincialMinistry of Transportation office.
Securing the Child Within theChild Restraint
{ WARNING
A child can be seriously injuredor killed in a crash if the childis not properly secured in thechild restraint. Secure the childproperly following the instructionsthat came with that child restraint.
Lower Anchors andTethers for Children(LATCH System) (Coupeand ConvertibleModels Only)Some child restraints have a LATCHsystem. As part of the LATCHsystem, your child restraint mayhave lower attachments and/or atop tether. The LATCH system canhelp hold the child restraint in placeduring driving or in a crash. Somevehicles have lower and/or toptether anchors designed to securea child restraint with lowerattachments and/or a top tether.
Some child restraints with a toptether are designed to be usedwhether the top tether is anchoredor not. Other child restraints requirethat the top tether be anchored.A national or local law may requirethat the top tether be anchored.
Black plate (44,1)Chevrolet Corvette Owner Manual - 2011
3-44 Seats and Restraints
In Canada, the law requires thatforward-facing child restraints havea top tether, and that the tether beattached.
Your vehicle does not have loweranchors or top tether anchors tosecure a child restraint with theLATCH system. If a national orlocal law requires that your toptether be anchored, do not use achild restraint in this vehiclebecause a top tether cannot beproperly anchored. You must usethe safety belts to secure your childrestraint in this vehicle, unless anational or local law requires thatthe top tether be anchored. Refer tothe child restraint instructions andinstructions in this manual forsecuring a child restraint using thevehicle's safety belts. See SecuringChild Restraints on page 3‑48.
Lower Anchors andTethers for Children(LATCH System)(ZO6 and ZR1Models Only)Some child restraints have a LATCHsystem. As part of the LATCHsystem, your child restraint mayhave lower attachments and/or atop tether. The LATCH system canhelp hold the child restraint in placeduring driving or in a crash. Somevehicles have lower and/or toptether anchors designed to securea child restraint with lowerattachments and/or a top tether.
Your vehicle does not have loweranchors to accommodate lowerattachments. Your vehicle doeshave a top tether anchor. If your
child restraint has a top tether,make sure your child restraint isproperly installed using the toptether anchor and the vehicle'ssafety belt. A child restraint mustnever be installed using only thetop tether and anchor. Refer toyour child restraint instructions andsee Securing Child Restraints onpage 3‑48 for instructions onsecuring your child restraint usingthe vehicle's safety belts.
In order to use the top tetheranchors in your vehicle, youneed a child restraint equippedwith a top tether. The child restraintmanufacturer will provide you withinstructions on how to use the childrestraint and its top tether. Thefollowing explains how to attach achild restraint with the top tether inyour vehicle.
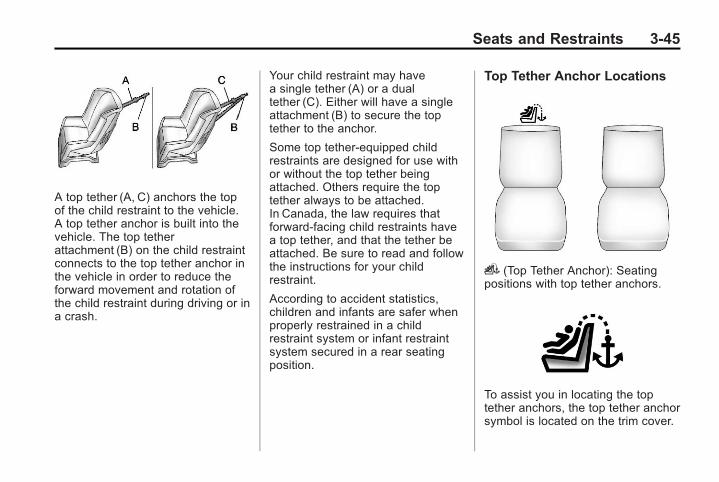
Black plate (45,1)Chevrolet Corvette Owner Manual - 2011
Seats and Restraints 3-45
A top tether (A, C) anchors the topof the child restraint to the vehicle.A top tether anchor is built into thevehicle. The top tetherattachment (B) on the child restraintconnects to the top tether anchor inthe vehicle in order to reduce theforward movement and rotation ofthe child restraint during driving or ina crash.
Your child restraint may havea single tether (A) or a dualtether (C). Either will have a singleattachment (B) to secure the toptether to the anchor.
Some top tether-equipped childrestraints are designed for use withor without the top tether beingattached. Others require the toptether always to be attached.In Canada, the law requires thatforward-facing child restraints havea top tether, and that the tether beattached. Be sure to read and followthe instructions for your childrestraint.
According to accident statistics,children and infants are safer whenproperly restrained in a childrestraint system or infant restraintsystem secured in a rear seatingposition.
Top Tether Anchor Locations
i (Top Tether Anchor): Seatingpositions with top tether anchors.
To assist you in locating the toptether anchors, the top tether anchorsymbol is located on the trim cover.
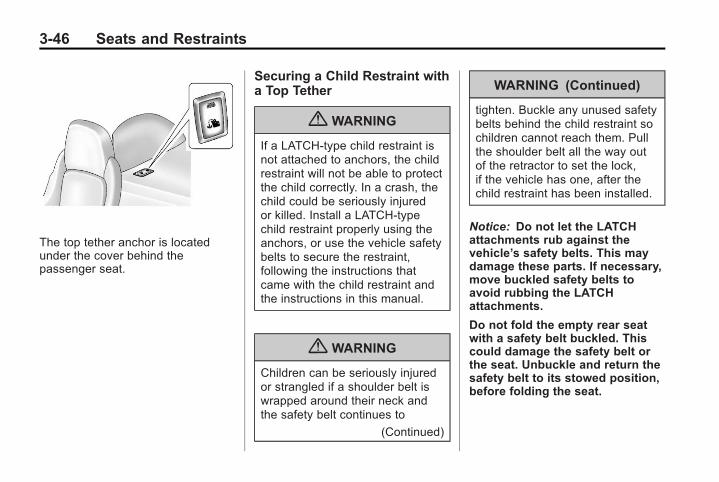
Black plate (46,1)Chevrolet Corvette Owner Manual - 2011
3-46 Seats and Restraints
The top tether anchor is locatedunder the cover behind thepassenger seat.
Securing a Child Restraint witha Top Tether
{ WARNING
If a LATCH-type child restraint isnot attached to anchors, the childrestraint will not be able to protectthe child correctly. In a crash, thechild could be seriously injuredor killed. Install a LATCH-typechild restraint properly using theanchors, or use the vehicle safetybelts to secure the restraint,following the instructions thatcame with the child restraint andthe instructions in this manual.
{ WARNING
Children can be seriously injuredor strangled if a shoulder belt iswrapped around their neck andthe safety belt continues to
(Continued)
WARNING (Continued)
tighten. Buckle any unused safetybelts behind the child restraint sochildren cannot reach them. Pullthe shoulder belt all the way outof the retractor to set the lock,if the vehicle has one, after thechild restraint has been installed.
Notice: Do not let the LATCHattachments rub against thevehicle’s safety belts. This maydamage these parts. If necessary,move buckled safety belts toavoid rubbing the LATCHattachments.
Do not fold the empty rear seatwith a safety belt buckled. Thiscould damage the safety belt orthe seat. Unbuckle and return thesafety belt to its stowed position,before folding the seat.
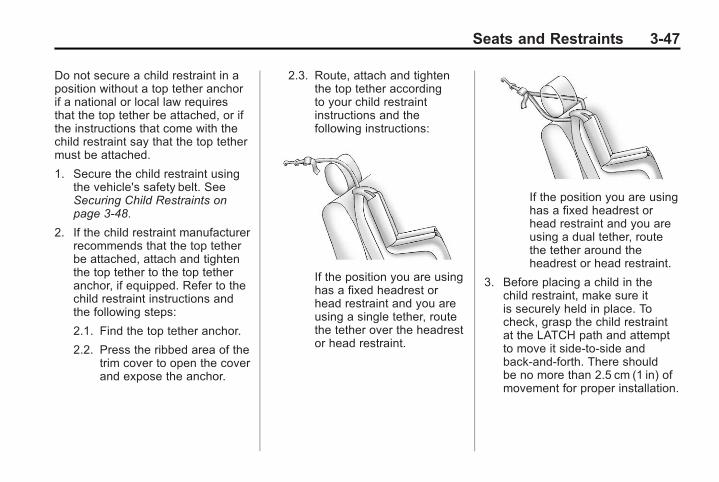
Black plate (47,1)Chevrolet Corvette Owner Manual - 2011
Seats and Restraints 3-47
Do not secure a child restraint in aposition without a top tether anchorif a national or local law requiresthat the top tether be attached, or ifthe instructions that come with thechild restraint say that the top tethermust be attached.
1. Secure the child restraint usingthe vehicle's safety belt. SeeSecuring Child Restraints onpage 3‑48.
2. If the child restraint manufacturerrecommends that the top tetherbe attached, attach and tightenthe top tether to the top tetheranchor, if equipped. Refer to thechild restraint instructions andthe following steps:
2.1. Find the top tether anchor.
2.2. Press the ribbed area of thetrim cover to open the coverand expose the anchor.
2.3. Route, attach and tightenthe top tether accordingto your child restraintinstructions and thefollowing instructions:
If the position you are usinghas a fixed headrest orhead restraint and you areusing a single tether, routethe tether over the headrestor head restraint.
If the position you are usinghas a fixed headrest orhead restraint and you areusing a dual tether, routethe tether around theheadrest or head restraint.
3. Before placing a child in thechild restraint, make sure itis securely held in place. Tocheck, grasp the child restraintat the LATCH path and attemptto move it side‐to‐side andback‐and‐forth. There shouldbe no more than 2.5 cm (1 in) ofmovement for proper installation.
Black plate (48,1)Chevrolet Corvette Owner Manual - 2011
3-48 Seats and Restraints
Replacing LATCH SystemParts After a Crash
{ WARNING
A crash can damage theLATCH system in the vehicle.A damaged LATCH system maynot properly secure the childrestraint, resulting in seriousinjury or even death in a crash.To help make sure the LATCHsystem is working properly aftera crash, see your dealer to havethe system inspected and anynecessary replacements madeas soon as possible.
If the vehicle has the LATCH systemand it was being used during acrash, new LATCH system partsmay be needed.
New parts and repairs may benecessary even if the LATCHsystem was not being used at thetime of the crash.
Securing Child RestraintsThis vehicle has airbags. Inaddition, the vehicle has apassenger sensing system whichis designed to turn off the rightfront passenger frontal airbagand seat-mounted side impactairbag (if equipped) under certainconditions. See Passenger SensingSystem on page 3‑30 andPassenger Airbag Status Indicatoron page 5‑17 for more information,including important safetyinformation.
A label on the sun visor says,“Never put a rear-facing child seatin the front.” This is because the riskto the rear-facing child is so great,if the airbag deploys.
{ WARNING
A child in a rear-facingchild restraint can be seriouslyinjured or killed if the rightfront passenger airbag inflates.This is because the back of therear-facing child restraint wouldbe very close to the inflatingairbag. A child in a forward-facingchild restraint can be seriouslyinjured or killed if the right frontpassenger airbag inflates and thepassenger seat is in a forwardposition.
Even if the passenger sensingsystem has turned off the rightfront passenger frontal airbag,no system is fail-safe. No onecan guarantee that an airbag willnot deploy under some unusualcircumstance, even though it isturned off.
(Continued)
Black plate (49,1)Chevrolet Corvette Owner Manual - 2011
Seats and Restraints 3-49
WARNING (Continued)
Secure rear-facing childrestraints in a rear seat, even ifthe airbag is off. If you secure aforward-facing child restraint inthe right front seat, always movethe front passenger seat as farback as it will go. It is better tosecure the child restraint in arear seat.
See Passenger Sensing Systemon page 3‑30 for additionalinformation.
Rear-facing child restraints shouldnot be installed in the vehicle, evenif the airbag(s) are off.
If the child restraint has the LATCHsystem, see Lower Anchors andTethers for Children (LATCHSystem) (Coupe and ConvertibleModels Only) on page 3‑43 orLower Anchors and Tethers forChildren (LATCH System) (ZO6 andZR1 Models Only) on page 3‑44 for
how and where to install the childrestraint using LATCH. If a childrestraint is secured using a safetybelt and it uses a top tether, seeLower Anchors and Tethers forChildren (LATCH System) (Coupeand Convertible Models Only) onpage 3‑43 or Lower Anchors andTethers for Children (LATCHSystem) (ZO6 and ZR1 ModelsOnly) on page 3‑44 for top tetheranchor locations.
Do not secure a child seat in aposition without a top tether anchorif a national or local law requiresthat the top tether be anchored, orif the instructions that come withthe child restraint say that the topstrap must be anchored.
In Canada, the law requires thatforward-facing child restraints havea top tether, and that the tether beattached.
You will be using the lap-shoulderbelt to secure the child restraint inthis position. Follow the instructionsthat came with the child restraint.
1. Move the seat as far back asit will go before securing theforward-facing child restraint.
When the passenger sensingsystem has turned off the rightfront passenger frontal airbagand seat-mounted side impactairbag (if equipped), the offindicator on the passengerairbag status indicator shouldlight and stay lit when you startthe vehicle. See PassengerAirbag Status Indicator onpage 5‑17.
2. Put the child restraint onthe seat.
3. Pick up the latch plate, and runthe lap and shoulder portions ofthe vehicle’s safety belt throughor around the restraint. The childrestraint instructions will showyou how.
Black plate (50,1)Chevrolet Corvette Owner Manual - 2011
3-50 Seats and Restraints
4. Push the latch plate into thebuckle until it clicks.
Position the release button onthe buckle so that the safety beltcould be quickly unbuckled ifnecessary.
5. Pull the shoulder belt all the wayout of the retractor to set thelock. When the retractor lock isset, the belt can be tightened butnot pulled out of the retractor.
6. To tighten the belt, push downon the child restraint, pull theshoulder portion of the belt totighten the lap portion of the belt,and feed the shoulder belt backinto the retractor. When installinga forward-facing child restraint,it may be helpful to use yourknee to push down on the childrestraint as you tighten the belt.
Try to pull the belt out of theretractor to make sure theretractor is locked. If theretractor is not locked, repeatSteps 5 and 6.
Black plate (51,1)Chevrolet Corvette Owner Manual - 2011
Seats and Restraints 3-51
7. If the child restraint has a toptether, follow the child restraintmanufacturer's instructionsregarding the use of the toptether. See Lower Anchors andTethers for Children (LATCHSystem) (Coupe and ConvertibleModels Only) on page 3‑43 orLower Anchors and Tethers forChildren (LATCH System)(ZO6 and ZR1 Models Only) onpage 3‑44 for more information.
8. Before placing a child in thechild restraint, make sure itis securely held in place. Tocheck, grasp the child restraintat the safety belt path andattempt to move it side‐to‐sideand back‐and‐forth. When thechild restraint is properlyinstalled, there should be nomore than 2.5 cm (1 in) ofmovement.
If the airbag or airbags are off, theoff indicator in the passenger airbagstatus indicator will come on andstay on when the vehicle is started.
If a child restraint has beeninstalled and the on indicator is lit,see “If the On Indicator is Lit for aChild Restraint ” under PassengerSensing System on page 3‑30 formore information.
To remove the child restraint,unbuckle the vehicle safety belt andlet it return to the stowed position.If the top tether is attached to a toptether anchor, disconnect it.
Black plate (52,1)Chevrolet Corvette Owner Manual - 2011
3-52 Seats and Restraints
2 NOTES

Black plate (1,1)Chevrolet Corvette Owner Manual - 2011
Storage 4-1
Storage
Storage CompartmentsGlove Box . . . . . . . . . . . . . . . . . . . . 4-1Cupholders . . . . . . . . . . . . . . . . . . . 4-1Rear Storage . . . . . . . . . . . . . . . . . 4-1Center Console Storage . . . . . . 4-2
Additional Storage FeaturesCargo Cover . . . . . . . . . . . . . . . . . . 4-2Convenience Net . . . . . . . . . . . . . 4-3
StorageCompartments
Glove BoxOpen the glove box by lifting up onthe lever. Use the key to lock andunlock the lighted glove box.
CupholdersTwo cupholders are located onthe center console next to the shiftlever. Slide the handle from the leftto the right side to access the lid.
Rear StorageTwo rear storage compartments arelocated in the floor of the rear hatch/trunk area.
Convertible Shown, CoupeSimilar
To access a storage compartment,pull up to open the cover. Thecovers cannot be removed.
For ZO6 and ZR1, and Grand SportCoupe with a manual transmission,the right rear compartment storesthe battery and cannot be used forstorage.
Notice: Do not store heavy orsharp objects in the rear storagecompartments located in thehatch/trunk area. The objectscould damage the underbody.
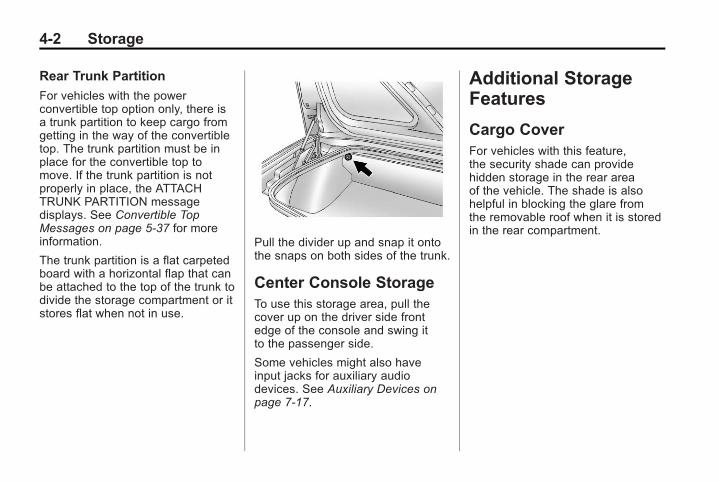
Black plate (2,1)Chevrolet Corvette Owner Manual - 2011
4-2 Storage
Rear Trunk Partition
For vehicles with the powerconvertible top option only, there isa trunk partition to keep cargo fromgetting in the way of the convertibletop. The trunk partition must be inplace for the convertible top tomove. If the trunk partition is notproperly in place, the ATTACHTRUNK PARTITION messagedisplays. See Convertible TopMessages on page 5‑37 for moreinformation.
The trunk partition is a flat carpetedboard with a horizontal flap that canbe attached to the top of the trunk todivide the storage compartment or itstores flat when not in use.
Pull the divider up and snap it ontothe snaps on both sides of the trunk.
Center Console StorageTo use this storage area, pull thecover up on the driver side frontedge of the console and swing itto the passenger side.
Some vehicles might also haveinput jacks for auxiliary audiodevices. See Auxiliary Devices onpage 7‑17.
Additional StorageFeatures
Cargo CoverFor vehicles with this feature,the security shade can providehidden storage in the rear areaof the vehicle. The shade is alsohelpful in blocking the glare fromthe removable roof when it is storedin the rear compartment.
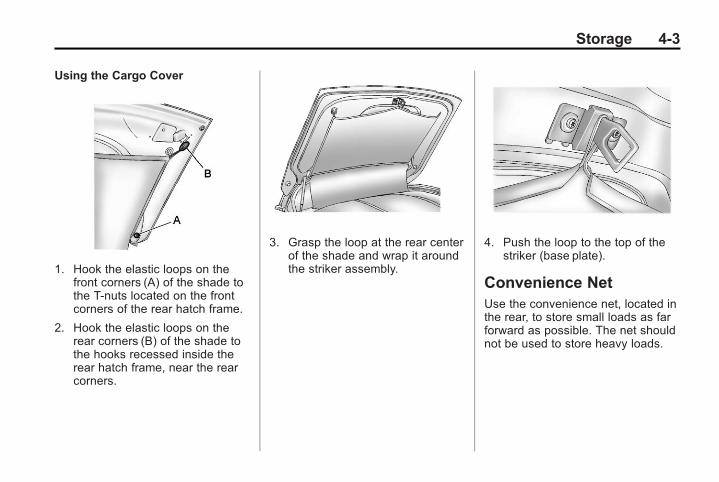
Black plate (3,1)Chevrolet Corvette Owner Manual - 2011
Storage 4-3
Using the Cargo Cover
1. Hook the elastic loops on thefront corners (A) of the shade tothe T-nuts located on the frontcorners of the rear hatch frame.
2. Hook the elastic loops on therear corners (B) of the shade tothe hooks recessed inside therear hatch frame, near the rearcorners.
3. Grasp the loop at the rear centerof the shade and wrap it aroundthe striker assembly.
4. Push the loop to the top of thestriker (base plate).
Convenience NetUse the convenience net, located inthe rear, to store small loads as farforward as possible. The net shouldnot be used to store heavy loads.

Black plate (4,1)Chevrolet Corvette Owner Manual - 2011
4-4 Storage
2 NOTES
Black plate (1,1)Chevrolet Corvette Owner Manual - 2011
Instruments and Controls 5-1
Instruments andControls
ControlsSteering Wheel Adjustment . . . 5-2Steering Wheel Controls . . . . . . 5-3Horn . . . . . . . . . . . . . . . . . . . . . . . . . . 5-4Windshield Wiper/Washer . . . . . 5-4Compass . . . . . . . . . . . . . . . . . . . . . 5-5Clock . . . . . . . . . . . . . . . . . . . . . . . . . 5-6Power Outlets . . . . . . . . . . . . . . . . . 5-6Cigarette Lighter . . . . . . . . . . . . . . 5-7Ashtrays . . . . . . . . . . . . . . . . . . . . . . 5-8
Warning Lights, Gauges, andIndicatorsWarning Lights, Gauges, andIndicators . . . . . . . . . . . . . . . . . . . . 5-8
Instrument Cluster . . . . . . . . . . . . 5-9Speedometer . . . . . . . . . . . . . . . . 5-11Odometer . . . . . . . . . . . . . . . . . . . . 5-11Tachometer . . . . . . . . . . . . . . . . . . 5-11Fuel Gauge . . . . . . . . . . . . . . . . . . 5-11
Boost Gauge (ZR1) . . . . . . . . . . 5-12Engine Oil PressureGauge . . . . . . . . . . . . . . . . . . . . . . 5-13
Engine Coolant TemperatureGauge . . . . . . . . . . . . . . . . . . . . . . 5-15
Voltmeter Gauge . . . . . . . . . . . . . 5-15Safety Belt Reminders . . . . . . . 5-16Airbag Readiness Light . . . . . . 5-16Passenger Airbag StatusIndicator . . . . . . . . . . . . . . . . . . . . 5-17
MalfunctionIndicator Lamp . . . . . . . . . . . . . 5-18
Brake System WarningLight . . . . . . . . . . . . . . . . . . . . . . . 5-21
Antilock Brake System (ABS)Warning Light . . . . . . . . . . . . . . 5-22
One-to-Four Shift Light(Manual Transmission) . . . . . 5-22
Active Handling SystemLight . . . . . . . . . . . . . . . . . . . . . . . 5-23
Traction Control System(TCS) Warning Light . . . . . . . 5-23
Tire Pressure Light . . . . . . . . . . 5-24Security Light . . . . . . . . . . . . . . . . 5-24High-Beam On Light . . . . . . . . . 5-25Front Fog Lamp Light . . . . . . . . 5-25Lamps On Reminder . . . . . . . . . 5-25
Information DisplaysDriver InformationCenter (DIC) . . . . . . . . . . . . . . . 5-25
Head-Up Display (HUD) . . . . . 5-31
Vehicle MessagesVehicle Messages . . . . . . . . . . . 5-35Battery Voltage and ChargingMessages . . . . . . . . . . . . . . . . . . 5-35
Brake System Messages . . . . 5-36Convertible Top Messages . . . 5-37Cruise Control Messages . . . . 5-38Door Ajar Messages . . . . . . . . . 5-39Engine Cooling SystemMessages . . . . . . . . . . . . . . . . . . 5-39
Engine Oil Messages . . . . . . . . 5-40Engine Power Messages . . . . 5-41Fuel System Messages . . . . . . 5-41Key and Lock Messages . . . . . 5-42Lamp Messages . . . . . . . . . . . . . 5-44Ride Control SystemMessages . . . . . . . . . . . . . . . . . . 5-44
Safety Belt Messages . . . . . . . 5-49Anti-Theft Alarm SystemMessages . . . . . . . . . . . . . . . . . . 5-50
Service Vehicle Messages . . . 5-50
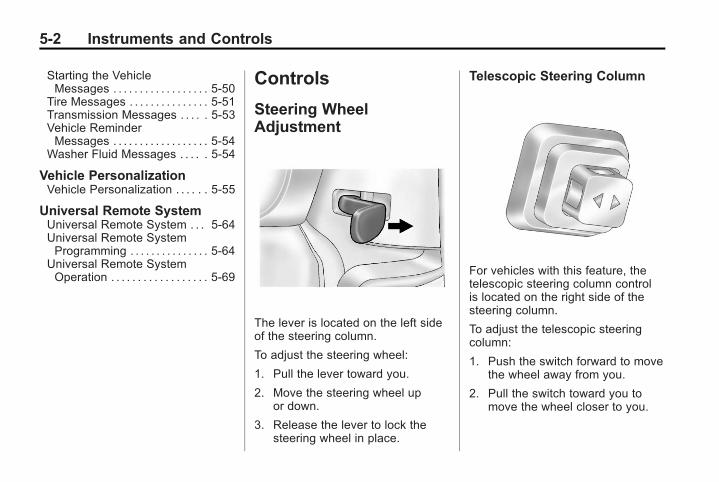
Black plate (2,1)Chevrolet Corvette Owner Manual - 2011
5-2 Instruments and Controls
Starting the VehicleMessages . . . . . . . . . . . . . . . . . . 5-50
Tire Messages . . . . . . . . . . . . . . . 5-51Transmission Messages . . . . . 5-53Vehicle ReminderMessages . . . . . . . . . . . . . . . . . . 5-54
Washer Fluid Messages . . . . . 5-54
Vehicle PersonalizationVehicle Personalization . . . . . . 5-55
Universal Remote SystemUniversal Remote System . . . 5-64Universal Remote SystemProgramming . . . . . . . . . . . . . . . 5-64
Universal Remote SystemOperation . . . . . . . . . . . . . . . . . . 5-69
Controls
Steering WheelAdjustment
The lever is located on the left sideof the steering column.
To adjust the steering wheel:
1. Pull the lever toward you.
2. Move the steering wheel upor down.
3. Release the lever to lock thesteering wheel in place.
Telescopic Steering Column
For vehicles with this feature, thetelescopic steering column controlis located on the right side of thesteering column.
To adjust the telescopic steeringcolumn:
1. Push the switch forward to movethe wheel away from you.
2. Pull the switch toward you tomove the wheel closer to you.
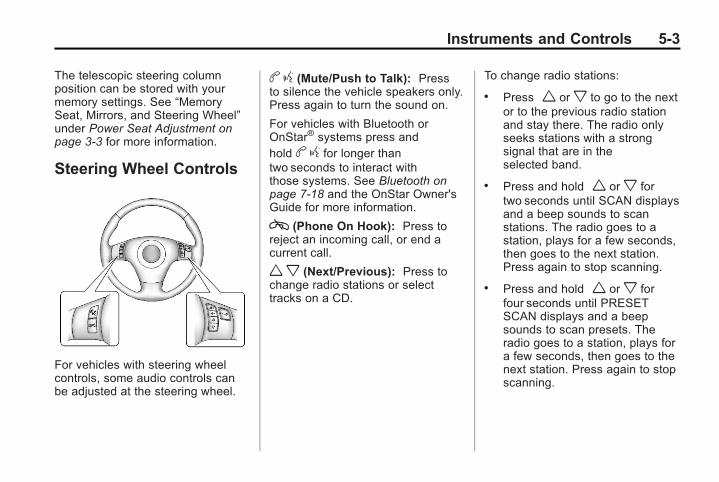
Black plate (3,1)Chevrolet Corvette Owner Manual - 2011
Instruments and Controls 5-3
The telescopic steering columnposition can be stored with yourmemory settings. See “MemorySeat, Mirrors, and Steering Wheel”under Power Seat Adjustment onpage 3‑3 for more information.
Steering Wheel Controls
For vehicles with steering wheelcontrols, some audio controls canbe adjusted at the steering wheel.
b g (Mute/Push to Talk): Pressto silence the vehicle speakers only.Press again to turn the sound on.
For vehicles with Bluetooth orOnStar® systems press andhold b g for longer thantwo seconds to interact withthose systems. See Bluetooth onpage 7‑18 and the OnStar Owner'sGuide for more information.
c (Phone On Hook): Press toreject an incoming call, or end acurrent call.
wx (Next/Previous): Press tochange radio stations or selecttracks on a CD.
To change radio stations:
. Press w orx to go to the nextor to the previous radio stationand stay there. The radio onlyseeks stations with a strongsignal that are in theselected band.
. Press and hold w orx fortwo seconds until SCAN displaysand a beep sounds to scanstations. The radio goes to astation, plays for a few seconds,then goes to the next station.Press again to stop scanning.
. Press and hold w orx forfour seconds until PRESETSCAN displays and a beepsounds to scan presets. Theradio goes to a station, plays fora few seconds, then goes to thenext station. Press again to stopscanning.
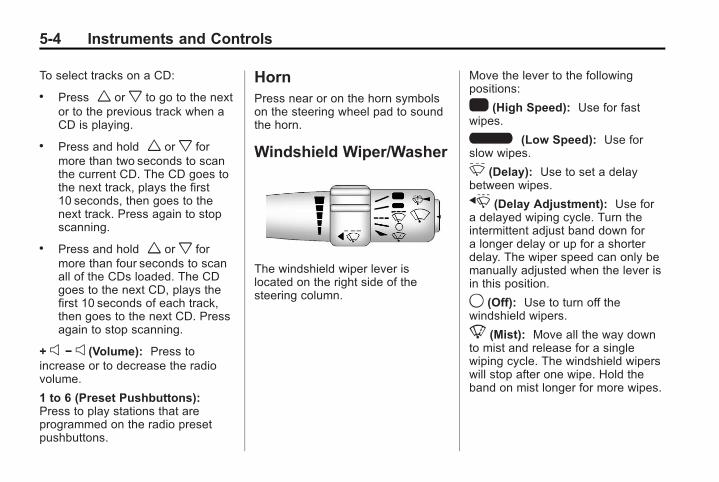
Black plate (4,1)Chevrolet Corvette Owner Manual - 2011
5-4 Instruments and Controls
To select tracks on a CD:
. Press w orx to go to the nextor to the previous track when aCD is playing.
. Press and hold w orx formore than two seconds to scanthe current CD. The CD goes tothe next track, plays the first10 seconds, then goes to thenext track. Press again to stopscanning.
. Press and hold w orx formore than four seconds to scanall of the CDs loaded. The CDgoes to the next CD, plays thefirst 10 seconds of each track,then goes to the next CD. Pressagain to stop scanning.
+ e − e (Volume): Press toincrease or to decrease the radiovolume.
1 to 6 (Preset Pushbuttons):Press to play stations that areprogrammed on the radio presetpushbuttons.
HornPress near or on the horn symbolson the steering wheel pad to soundthe horn.
Windshield Wiper/Washer
The windshield wiper lever islocated on the right side of thesteering column.
Move the lever to the followingpositions:
1 (High Speed): Use for fastwipes.
6 (Low Speed): Use forslow wipes.
& (Delay): Use to set a delaybetween wipes.
x (Delay Adjustment): Use fora delayed wiping cycle. Turn theintermittent adjust band down fora longer delay or up for a shorterdelay. The wiper speed can only bemanually adjusted when the lever isin this position.
9 (Off): Use to turn off thewindshield wipers.
8 (Mist): Move all the way downto mist and release for a singlewiping cycle. The windshield wiperswill stop after one wipe. Hold theband on mist longer for more wipes.
Black plate (5,1)Chevrolet Corvette Owner Manual - 2011
Instruments and Controls 5-5
Heavy snow or ice can overloadthe wipers. If this occurs, a circuitbreaker will stop the wipers until themotor cools. Clear all ice and snowfrom the wiper blades before usingthem. If frozen to the windshield,carefully loosen them or thaw them.Damaged wiper blades should bereplaced. See Wiper BladeReplacement on page 10‑46.
Windshield Washer
The lever on the right side ofthe steering column also controlsthe windshield washer. There isa button at the end of the lever.To spray washer fluid on thewindshield, press the button andhold it. The washer will spray untilyou release the button. The wiperswill continue to clear the window forabout six seconds after the button isreleased and then stop or return toyour preset speed.
{ WARNING
In freezing weather, do not usethe washer until the windshield iswarmed. Otherwise the washerfluid can form ice on thewindshield, blocking your vision.
If the fluid in the windshield washerfluid reservoir is low, the messageCHECK WASHER FLUID willappear on the Driver InformationCenter (DIC) display. It will take15 seconds after the bottle is refilledfor this message to turn off. Forinformation on the correct washerfluid to use, see Washer Fluid onpage 10‑37 and RecommendedFluids and Lubricants on page 11‑6.
Compass
Compass Operation
With the compass feature on,each time the vehicle is started, thecompass will take a few secondsto adjust and display the currentcompass heading. For example,NE is displayed for north-east.
Compass Calibration
PressP once to turn the compassdisplay on or off.
If after several seconds the displaydoes not show a compass heading,there may be a strong magneticfield interfering with the compass.Interference can be caused by amagnetic antenna mount, note padholder, or similar object. If theletter C or CAL appears in thecompass window, the compassneeds calibration.
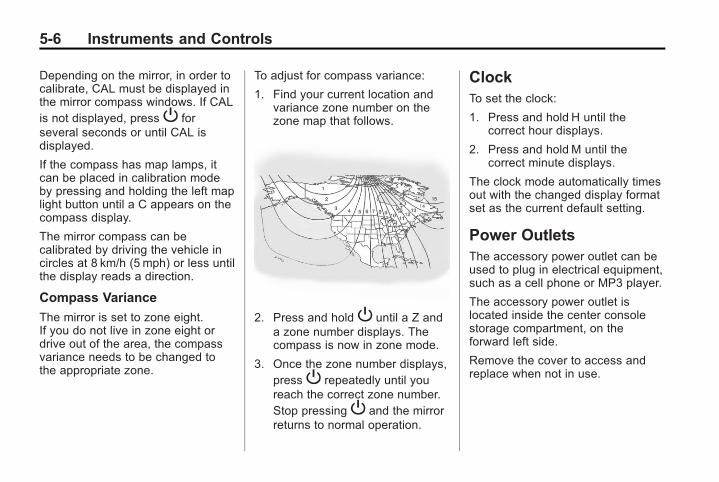
Black plate (6,1)Chevrolet Corvette Owner Manual - 2011
5-6 Instruments and Controls
Depending on the mirror, in order tocalibrate, CAL must be displayed inthe mirror compass windows. If CALis not displayed, pressP forseveral seconds or until CAL isdisplayed.
If the compass has map lamps, itcan be placed in calibration modeby pressing and holding the left maplight button until a C appears on thecompass display.
The mirror compass can becalibrated by driving the vehicle incircles at 8 km/h (5 mph) or less untilthe display reads a direction.
Compass Variance
The mirror is set to zone eight.If you do not live in zone eight ordrive out of the area, the compassvariance needs to be changed tothe appropriate zone.
To adjust for compass variance:
1. Find your current location andvariance zone number on thezone map that follows.
2. Press and holdP until a Z anda zone number displays. Thecompass is now in zone mode.
3. Once the zone number displays,pressP repeatedly until youreach the correct zone number.Stop pressingP and the mirrorreturns to normal operation.
ClockTo set the clock:
1. Press and hold H until thecorrect hour displays.
2. Press and hold M until thecorrect minute displays.
The clock mode automatically timesout with the changed display formatset as the current default setting.
Power OutletsThe accessory power outlet can beused to plug in electrical equipment,such as a cell phone or MP3 player.
The accessory power outlet islocated inside the center consolestorage compartment, on theforward left side.
Remove the cover to access andreplace when not in use.
Black plate (7,1)Chevrolet Corvette Owner Manual - 2011
Instruments and Controls 5-7
{ WARNING
Power is always supplied to theoutlets. Do not leave electricalequipment plugged in when thevehicle is not in use because thevehicle could catch fire and causeinjury or death.
Notice: Leaving electricalequipment plugged in for anextended period of time whilethe vehicle is off will drain thebattery. Always unplug electricalequipment when not in use anddo not plug in equipment thatexceeds the maximum 20 ampererating.
Certain electrical accessoriesmay not be compatible with theaccessory power outlet and couldoverload vehicle or adapter fuses.If a problem is experienced, seeyour dealer.
When adding electrical equipment,be sure to follow the properinstallation instructions includedwith the equipment. See Add-OnElectrical Equipment on page 9‑55.
It is recommended that a qualifiedtechnician or dealer be seen forthe proper installation of yourequipment.
Notice: Hanging heavyequipment from the power outletcan cause damage not coveredby the vehicle warranty. Thepower outlets are designed foraccessory power plugs only, suchas cell phone charge cords.
Cigarette LighterTo use the cigarette lighter, push itin all the way and let go. When it isready, it will pop back out by itself.
Notice: Holding a cigarette lighterin while it is heating does not letthe lighter back away from theheating element when it is hot.Damage from overheating canoccur to the lighter or heatingelement, or a fuse could beblown. Do not hold a cigarettelighter in while it is heating.
Black plate (8,1)Chevrolet Corvette Owner Manual - 2011
5-8 Instruments and Controls
AshtraysThe ashtray and cigarette lighter arelocated on the instrument panel, infront of the shift lever. To use theashtray, press on the indentation atthe top of the door.
Notice: If papers, pins, or otherflammable items are put in theashtray, hot cigarettes or othersmoking materials could ignitethem and possibly damage thevehicle. Never put flammableitems in the ashtray.
Loose objects, such as paper clips,can lodge behind and beneath theashtray lid and prevent movementof the lid. You should avoid puttingsmall, loose objects near theashtray.
Warning Lights,Gauges, andIndicatorsWarning lights and gauges cansignal that something is wrongbefore it becomes serious enoughto cause an expensive repair orreplacement. Paying attention tothe warning lights and gauges couldprevent injury.
Warning lights come on when therecould be a problem with a vehiclefunction. Some warning lights comeon briefly when the engine is startedto indicate they are working.
Gauges can indicate when therecould be a problem with a vehiclefunction. Often gauges and warninglights work together to indicate aproblem with the vehicle.
When one of the warning lightscomes on and stays on whiledriving, or when one of the gaugesshows there may be a problem,check the section that explains whatto do. Follow this manual's advice.Waiting to do repairs can be costlyand even dangerous.

Black plate (9,1)Chevrolet Corvette Owner Manual - 2011
Instruments and Controls 5-9
Instrument Cluster
English Coupe and Convertible Shown, Metric Similar
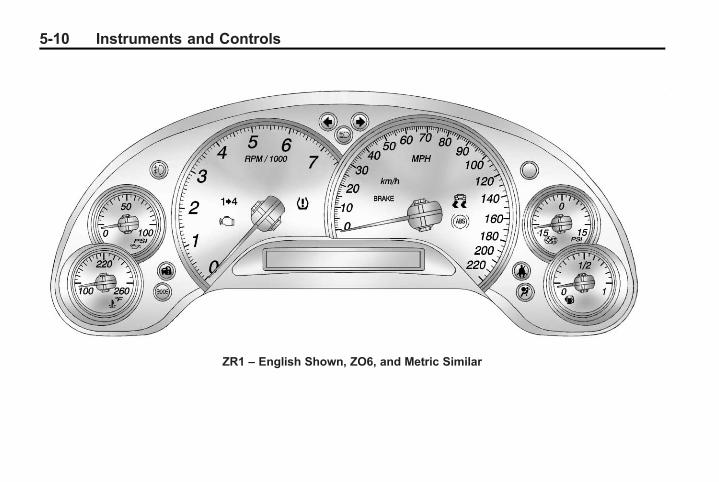
Black plate (10,1)Chevrolet Corvette Owner Manual - 2011
5-10 Instruments and Controls
ZR1 – English Shown, ZO6, and Metric Similar

Black plate (11,1)Chevrolet Corvette Owner Manual - 2011
Instruments and Controls 5-11
SpeedometerThe speedometer shows the speedin either kilometers per hour (km/h)or miles per hour (mph). For moreinformation see “Personal Options”under Vehicle Personalization onpage 5‑55.
OdometerTo read the odometer with theignition off, turn on the parkinglamps.
If the vehicle needs a new odometerinstalled, the mileage total of thenew odometer will be set to theoriginal kilometers (miles) of the oldodometer. See your dealer if theodometer must be replaced in thevehicle.
TachometerThe tachometer displays the enginespeed in thousands of revolutionsper minute (rpm).
Notice: Fuel shuts off at about6500 rpm for the base model,7000 rpm for the ZO6 model, and6600 rpm for the ZR1 model. If thevehicle continues to be driven atthe fuel shut off rpm, the enginecould be damaged. Be sure tooperate the vehicle below thefuel shut off rpm or reduce thevehicle's rpm quickly when thefuel shuts off.
Fuel Gauge
The fuel gauge shows how muchfuel the vehicle has left while theengine is on.
An arrow on the fuel gaugeindicates the side of the vehiclethe fuel door is on.
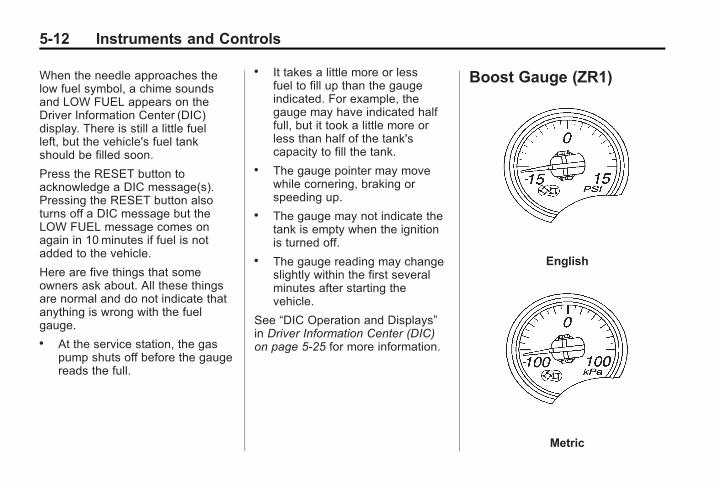
Black plate (12,1)Chevrolet Corvette Owner Manual - 2011
5-12 Instruments and Controls
When the needle approaches thelow fuel symbol, a chime soundsand LOW FUEL appears on theDriver Information Center (DIC)display. There is still a little fuelleft, but the vehicle's fuel tankshould be filled soon.
Press the RESET button toacknowledge a DIC message(s).Pressing the RESET button alsoturns off a DIC message but theLOW FUEL message comes onagain in 10 minutes if fuel is notadded to the vehicle.
Here are five things that someowners ask about. All these thingsare normal and do not indicate thatanything is wrong with the fuelgauge.. At the service station, the gas
pump shuts off before the gaugereads the full.
. It takes a little more or lessfuel to fill up than the gaugeindicated. For example, thegauge may have indicated halffull, but it took a little more orless than half of the tank'scapacity to fill the tank.
. The gauge pointer may movewhile cornering, braking orspeeding up.
. The gauge may not indicate thetank is empty when the ignitionis turned off.
. The gauge reading may changeslightly within the first severalminutes after starting thevehicle.
See “DIC Operation and Displays”in Driver Information Center (DIC)on page 5‑25 for more information.
Boost Gauge (ZR1)
English
Metric

Black plate (13,1)Chevrolet Corvette Owner Manual - 2011
Instruments and Controls 5-13
For vehicles that have this gauge, itis located near the instrument panelcluster.
This gauge indicates vacuum duringlight to moderate throttle and boostunder heavier throttle.
It displays the air pressure level inthe intake manifold before it entersthe engine's combustion chamber.
The gauge is automatically centeredat zero every time the engine isstarted. Actual vacuum or boostis displayed from this zero point.Changes in ambient pressure,such as driving in mountains andchanging weather, will slightlychange the zero reading.
Engine Oil PressureGauge
English
Metric
English— ZO6 and ZR1 Models
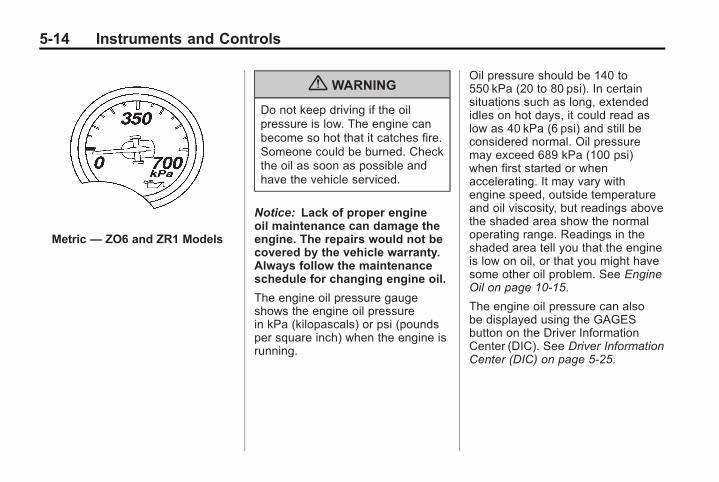
Black plate (14,1)Chevrolet Corvette Owner Manual - 2011
5-14 Instruments and Controls
Metric — ZO6 and ZR1 Models
{ WARNING
Do not keep driving if the oilpressure is low. The engine canbecome so hot that it catches fire.Someone could be burned. Checkthe oil as soon as possible andhave the vehicle serviced.
Notice: Lack of proper engineoil maintenance can damage theengine. The repairs would not becovered by the vehicle warranty.Always follow the maintenanceschedule for changing engine oil.
The engine oil pressure gaugeshows the engine oil pressurein kPa (kilopascals) or psi (poundsper square inch) when the engine isrunning.
Oil pressure should be 140 to550 kPa (20 to 80 psi). In certainsituations such as long, extendedidles on hot days, it could read aslow as 40 kPa (6 psi) and still beconsidered normal. Oil pressuremay exceed 689 kPa (100 psi)when first started or whenaccelerating. It may vary withengine speed, outside temperatureand oil viscosity, but readings abovethe shaded area show the normaloperating range. Readings in theshaded area tell you that the engineis low on oil, or that you might havesome other oil problem. See EngineOil on page 10‑15.
The engine oil pressure can alsobe displayed using the GAGESbutton on the Driver InformationCenter (DIC). See Driver InformationCenter (DIC) on page 5‑25.
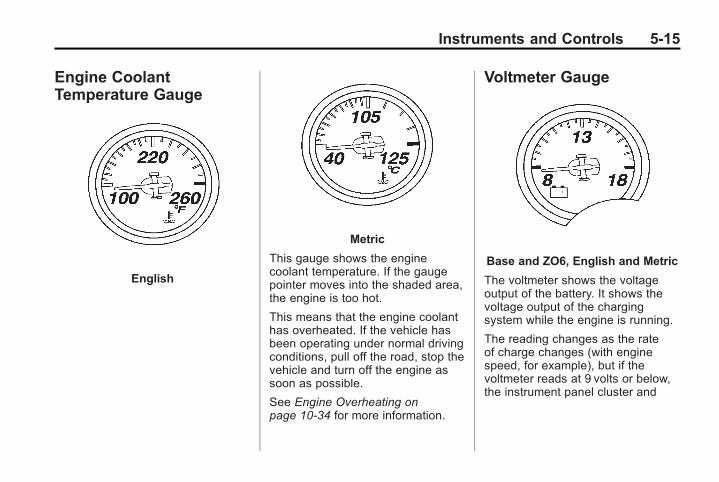
Black plate (15,1)Chevrolet Corvette Owner Manual - 2011
Instruments and Controls 5-15
Engine CoolantTemperature Gauge
English
Metric
This gauge shows the enginecoolant temperature. If the gaugepointer moves into the shaded area,the engine is too hot.
This means that the engine coolanthas overheated. If the vehicle hasbeen operating under normal drivingconditions, pull off the road, stop thevehicle and turn off the engine assoon as possible.
See Engine Overheating onpage 10‑34 for more information.
Voltmeter Gauge
Base and ZO6, English and Metric
The voltmeter shows the voltageoutput of the battery. It shows thevoltage output of the chargingsystem while the engine is running.
The reading changes as the rateof charge changes (with enginespeed, for example), but if thevoltmeter reads at 9 volts or below,the instrument panel cluster and
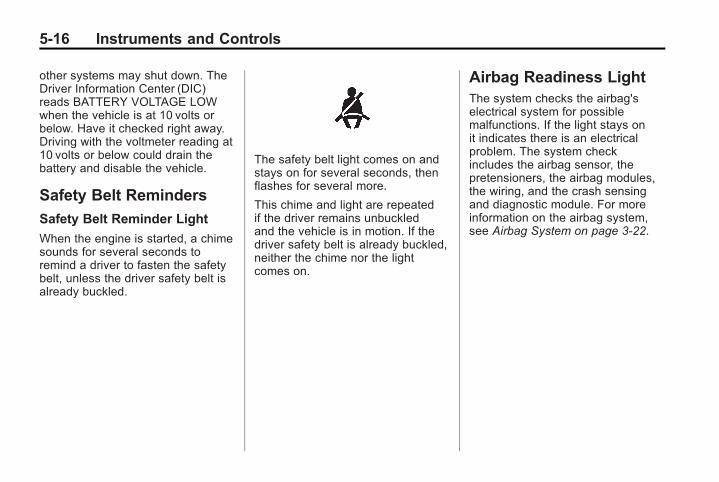
Black plate (16,1)Chevrolet Corvette Owner Manual - 2011
5-16 Instruments and Controls
other systems may shut down. TheDriver Information Center (DIC)reads BATTERY VOLTAGE LOWwhen the vehicle is at 10 volts orbelow. Have it checked right away.Driving with the voltmeter reading at10 volts or below could drain thebattery and disable the vehicle.
Safety Belt Reminders
Safety Belt Reminder Light
When the engine is started, a chimesounds for several seconds toremind a driver to fasten the safetybelt, unless the driver safety belt isalready buckled.
The safety belt light comes on andstays on for several seconds, thenflashes for several more.
This chime and light are repeatedif the driver remains unbuckledand the vehicle is in motion. If thedriver safety belt is already buckled,neither the chime nor the lightcomes on.
Airbag Readiness LightThe system checks the airbag'selectrical system for possiblemalfunctions. If the light stays onit indicates there is an electricalproblem. The system checkincludes the airbag sensor, thepretensioners, the airbag modules,the wiring, and the crash sensingand diagnostic module. For moreinformation on the airbag system,see Airbag System on page 3‑22.
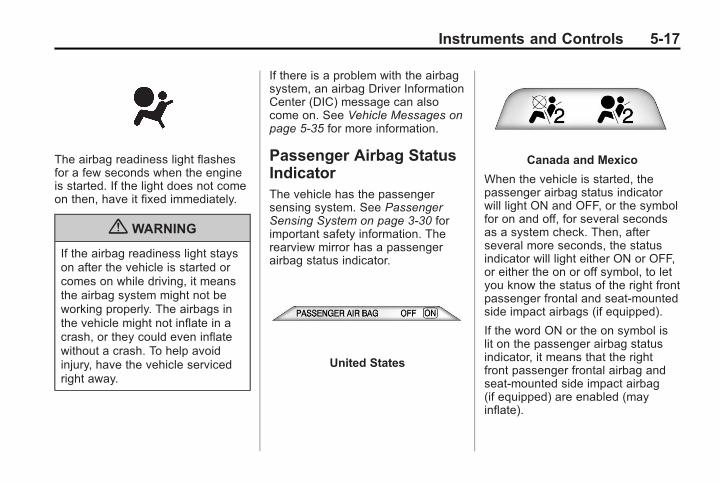
Black plate (17,1)Chevrolet Corvette Owner Manual - 2011
Instruments and Controls 5-17
The airbag readiness light flashesfor a few seconds when the engineis started. If the light does not comeon then, have it fixed immediately.
{ WARNING
If the airbag readiness light stayson after the vehicle is started orcomes on while driving, it meansthe airbag system might not beworking properly. The airbags inthe vehicle might not inflate in acrash, or they could even inflatewithout a crash. To help avoidinjury, have the vehicle servicedright away.
If there is a problem with the airbagsystem, an airbag Driver InformationCenter (DIC) message can alsocome on. See Vehicle Messages onpage 5‑35 for more information.
Passenger Airbag StatusIndicatorThe vehicle has the passengersensing system. See PassengerSensing System on page 3‑30 forimportant safety information. Therearview mirror has a passengerairbag status indicator.
United States
Canada and Mexico
When the vehicle is started, thepassenger airbag status indicatorwill light ON and OFF, or the symbolfor on and off, for several secondsas a system check. Then, afterseveral more seconds, the statusindicator will light either ON or OFF,or either the on or off symbol, to letyou know the status of the right frontpassenger frontal and seat-mountedside impact airbags (if equipped).
If the word ON or the on symbol islit on the passenger airbag statusindicator, it means that the rightfront passenger frontal airbag andseat-mounted side impact airbag(if equipped) are enabled (mayinflate).
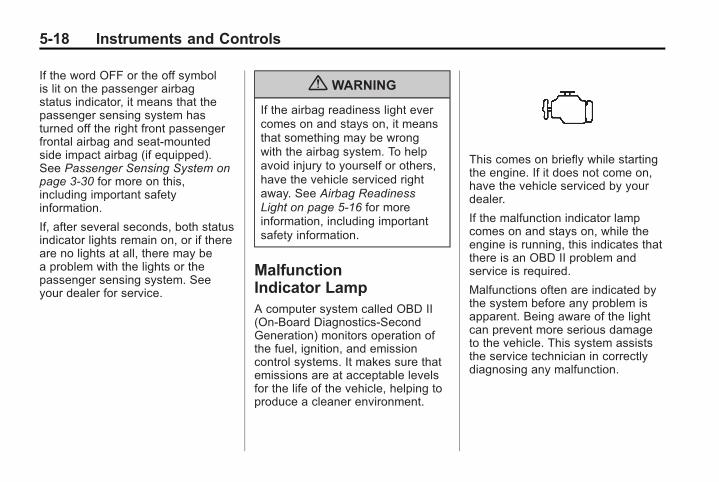
Black plate (18,1)Chevrolet Corvette Owner Manual - 2011
5-18 Instruments and Controls
If the word OFF or the off symbolis lit on the passenger airbagstatus indicator, it means that thepassenger sensing system hasturned off the right front passengerfrontal airbag and seat-mountedside impact airbag (if equipped).See Passenger Sensing System onpage 3‑30 for more on this,including important safetyinformation.
If, after several seconds, both statusindicator lights remain on, or if thereare no lights at all, there may bea problem with the lights or thepassenger sensing system. Seeyour dealer for service.
{ WARNING
If the airbag readiness light evercomes on and stays on, it meansthat something may be wrongwith the airbag system. To helpavoid injury to yourself or others,have the vehicle serviced rightaway. See Airbag ReadinessLight on page 5‑16 for moreinformation, including importantsafety information.
MalfunctionIndicator LampA computer system called OBD II(On-Board Diagnostics-SecondGeneration) monitors operation ofthe fuel, ignition, and emissioncontrol systems. It makes sure thatemissions are at acceptable levelsfor the life of the vehicle, helping toproduce a cleaner environment.
This comes on briefly while startingthe engine. If it does not come on,have the vehicle serviced by yourdealer.
If the malfunction indicator lampcomes on and stays on, while theengine is running, this indicates thatthere is an OBD II problem andservice is required.
Malfunctions often are indicated bythe system before any problem isapparent. Being aware of the lightcan prevent more serious damageto the vehicle. This system assiststhe service technician in correctlydiagnosing any malfunction.
Black plate (19,1)Chevrolet Corvette Owner Manual - 2011
Instruments and Controls 5-19
Notice: If the vehicle iscontinually driven with this lighton, after a while, the emissioncontrols might not work as well,the vehicle fuel economy mightnot be as good, and the enginemight not run as smoothly. Thiscould lead to costly repairs thatmight not be covered by thevehicle warranty.
Notice: Modifications made to theengine, transmission, exhaust,intake, or fuel system of thevehicle or the replacement ofthe original tires with otherthan those of the same TirePerformance Criteria (TPC) canaffect the vehicle's emissioncontrols and can cause this lightto come on. Modifications tothese systems could lead tocostly repairs not covered bythe vehicle warranty. This couldalso result in a failure to pass arequired Emission Inspection/Maintenance test. SeeAccessories and Modifications onpage 10‑4.
This light comes on during amalfunction in one of two ways:
Light Flashing: A misfire conditionhas been detected. A misfireincreases vehicle emissions andcould damage the emission controlsystem on the vehicle. Diagnosisand service might be required.
The following can prevent moreserious damage to the vehicle:. Reduce vehicle speed.. Avoid hard accelerations.. Avoid steep uphill grades.
If the light continues to flash, whenit is safe to do so, stop the vehicle.Find a safe place to park thevehicle. Turn off the vehicle, waitat least 10 seconds, and restart theengine. If the light is still flashing,follow the previous steps and seeyour dealer for service as soon aspossible.
Light On Steady: An emissioncontrol system malfunction hasbeen detected on the vehicle.Diagnosis and service might berequired.
the following may correct anemission system malfunction:. Make sure the fuel cap is fully
installed. See Filling the Tank onpage 9‑52. The diagnosticsystem can determine if thefuel cap has been left off orimproperly installed. A loose ormissing fuel cap allows fuel toevaporate into the atmosphere.A few driving trips with the capproperly installed should turn thelight off.
. Make sure the electrical systemis not wet. The system couldbe wet if the vehicle was driventhrough a deep puddle of water.The condition is usuallycorrected when the electricalsystem dries out. A few drivingtrips should turn the light off.
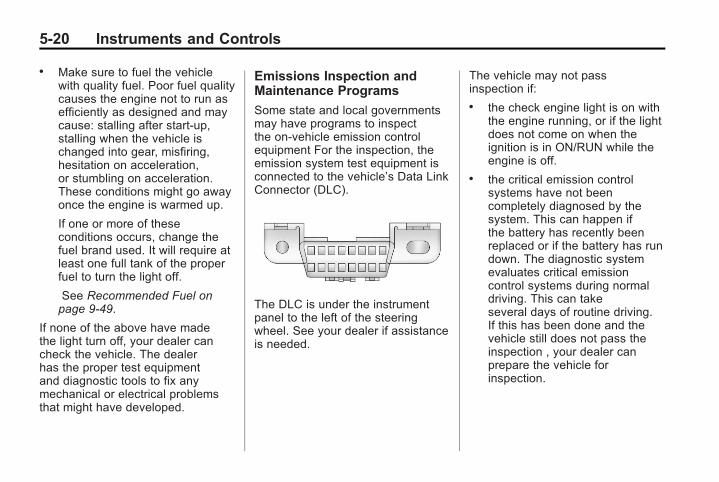
Black plate (20,1)Chevrolet Corvette Owner Manual - 2011
5-20 Instruments and Controls
. Make sure to fuel the vehiclewith quality fuel. Poor fuel qualitycauses the engine not to run asefficiently as designed and maycause: stalling after start-up,stalling when the vehicle ischanged into gear, misfiring,hesitation on acceleration,or stumbling on acceleration.These conditions might go awayonce the engine is warmed up.
If one or more of theseconditions occurs, change thefuel brand used. It will require atleast one full tank of the properfuel to turn the light off.
See Recommended Fuel onpage 9‑49.
If none of the above have madethe light turn off, your dealer cancheck the vehicle. The dealerhas the proper test equipmentand diagnostic tools to fix anymechanical or electrical problemsthat might have developed.
Emissions Inspection andMaintenance Programs
Some state and local governmentsmay have programs to inspectthe on-vehicle emission controlequipment For the inspection, theemission system test equipment isconnected to the vehicle’s Data LinkConnector (DLC).
The DLC is under the instrumentpanel to the left of the steeringwheel. See your dealer if assistanceis needed.
The vehicle may not passinspection if:. the check engine light is on with
the engine running, or if the lightdoes not come on when theignition is in ON/RUN while theengine is off.
. the critical emission controlsystems have not beencompletely diagnosed by thesystem. This can happen ifthe battery has recently beenreplaced or if the battery has rundown. The diagnostic systemevaluates critical emissioncontrol systems during normaldriving. This can takeseveral days of routine driving.If this has been done and thevehicle still does not pass theinspection , your dealer canprepare the vehicle forinspection.
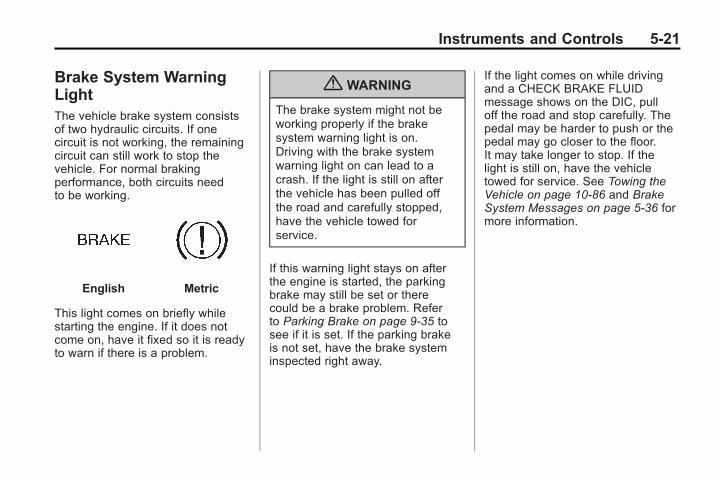
Black plate (21,1)Chevrolet Corvette Owner Manual - 2011
Instruments and Controls 5-21
Brake System WarningLightThe vehicle brake system consistsof two hydraulic circuits. If onecircuit is not working, the remainingcircuit can still work to stop thevehicle. For normal brakingperformance, both circuits needto be working.
English Metric
This light comes on briefly whilestarting the engine. If it does notcome on, have it fixed so it is readyto warn if there is a problem.
{ WARNING
The brake system might not beworking properly if the brakesystem warning light is on.Driving with the brake systemwarning light on can lead to acrash. If the light is still on afterthe vehicle has been pulled offthe road and carefully stopped,have the vehicle towed forservice.
If this warning light stays on afterthe engine is started, the parkingbrake may still be set or therecould be a brake problem. Referto Parking Brake on page 9‑35 tosee if it is set. If the parking brakeis not set, have the brake systeminspected right away.
If the light comes on while drivingand a CHECK BRAKE FLUIDmessage shows on the DIC, pulloff the road and stop carefully. Thepedal may be harder to push or thepedal may go closer to the floor.It may take longer to stop. If thelight is still on, have the vehicletowed for service. See Towing theVehicle on page 10‑86 and BrakeSystem Messages on page 5‑36 formore information.
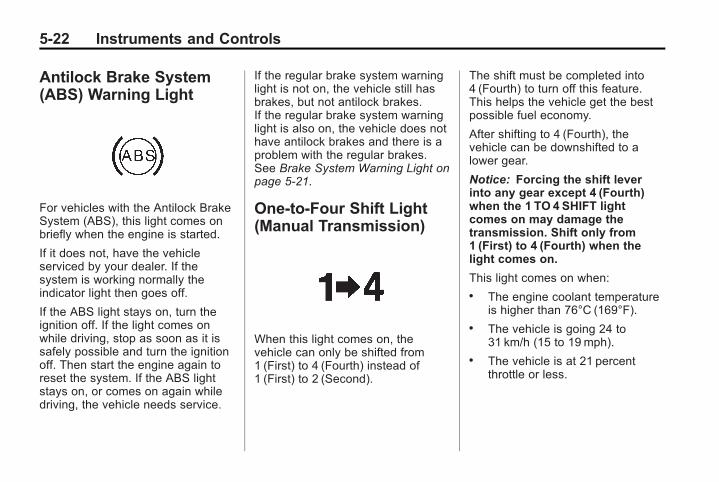
Black plate (22,1)Chevrolet Corvette Owner Manual - 2011
5-22 Instruments and Controls
Antilock Brake System(ABS) Warning Light
For vehicles with the Antilock BrakeSystem (ABS), this light comes onbriefly when the engine is started.
If it does not, have the vehicleserviced by your dealer. If thesystem is working normally theindicator light then goes off.
If the ABS light stays on, turn theignition off. If the light comes onwhile driving, stop as soon as it issafely possible and turn the ignitionoff. Then start the engine again toreset the system. If the ABS lightstays on, or comes on again whiledriving, the vehicle needs service.
If the regular brake system warninglight is not on, the vehicle still hasbrakes, but not antilock brakes.If the regular brake system warninglight is also on, the vehicle does nothave antilock brakes and there is aproblem with the regular brakes.See Brake System Warning Light onpage 5‑21.
One-to-Four Shift Light(Manual Transmission)
When this light comes on, thevehicle can only be shifted from1 (First) to 4 (Fourth) instead of1 (First) to 2 (Second).
The shift must be completed into4 (Fourth) to turn off this feature.This helps the vehicle get the bestpossible fuel economy.
After shifting to 4 (Fourth), thevehicle can be downshifted to alower gear.
Notice: Forcing the shift leverinto any gear except 4 (Fourth)when the 1 TO 4 SHIFT lightcomes on may damage thetransmission. Shift only from1 (First) to 4 (Fourth) when thelight comes on.
This light comes on when:. The engine coolant temperature
is higher than 76°C (169°F).. The vehicle is going 24 to
31 km/h (15 to 19 mph).. The vehicle is at 21 percent
throttle or less.
Black plate (23,1)Chevrolet Corvette Owner Manual - 2011
Instruments and Controls 5-23
Active Handling SystemLight
The Active Handling System lightcomes on briefly as the engine isstarted. If the light does not, havethe vehicle serviced by your dealer.If the system is working normally thelight goes off.
If the light stays on or comes onwhile driving, a chime sounds anda SERVICE ACTIVE HANDLINGSYSTEM message appears on theDIC and the vehicle need service.
This light also comes on while thevehicle is in the CompetitiveDriving Mode.
For the ZR1 this light comes onwhen Performance Traction mode isactivated, along with DIC messagesfor the five traction modes.
When the Active Handling Systemis turned off, the light comes on, achime sounds, and the TRACTIONSYSTEM AND ACTIVE HANDLING– OFF message displays in the DIC.The Traction Control System is offand the Active Handling Systemdoes not assist with controlling thevehicle.
When the Active Handling Systemis turned back on, the light turnsoff, a chime sounds, and theTRACTION SYSTEM AND ACTIVEHANDLING – ON message displaysin the DIC.
See Ride Control System Messageson page 5‑44 for more information.
Traction Control System(TCS) Warning Light
The Traction Control System (TCS)warning light comes on briefly whenthe engine is started.
If the light does not, have thevehicle serviced by your dealer.If the system is working normallythe light then goes off.
If the light stays on, or comes onwhile driving and a SERVICETRACTION SYSTEM messagedisplays in the Driver InformationCenter (DIC), the vehicle needsservice.
Black plate (24,1)Chevrolet Corvette Owner Manual - 2011
5-24 Instruments and Controls
When the TCS is turned off, thislight comes on and a TRACTIONSYSTEM OFF message displayson the DIC. When this light is on,the TCS system does not limitwheel spin.
When the TCS is turned back on,this light turns off and a TRACTIONSYSTEM ON message displays onthe DIC
This light also comes on while thevehicle is in the CompetitiveDriving Mode.
See Traction Control System (TCS)on page 9‑36 and Ride ControlSystem Messages on page 5‑44 formore information.
See Active Handling System onpage 9‑37 for more information onCompetitive Driving Mode andPerformance Traction Mode.
Tire Pressure Light
For vehicles with the Tire PressureMonitor System (TPMS), this lightcomes on briefly when the engineis started. It provides informationabout tire pressures and the TPMS.
When the Light is On Steady
This indicates that one or moreof the tires are significantlyunderinflated.
A tire pressure message canaccompany the light. See TireMessages on page 5‑51 for moreinformation. Stop as soon aspossible, and inflate the tires tothe pressure value shown on theTire and Loading Information label.See Tire Pressure on page 10‑66for more information.
When the Light Flashes First andThen is On Steady
This indicates that there may be aproblem with the TPMS. The lightflashes for about a minute andstays on steady for the remainderof the ignition cycle. This sequencerepeats with every ignition cycle.See Tire Pressure MonitorOperation on page 10‑69 for moreinformation.
Security Light
For information regarding this lightand the vehicle's security system,see Anti-Theft Alarm System onpage 2‑13.
Black plate (25,1)Chevrolet Corvette Owner Manual - 2011
Instruments and Controls 5-25
High-Beam On Light
This light comes on when thehigh-beam headlamps are in use.
See Headlamp High/Low-BeamChanger on page 6‑2 for moreinformation.
Front Fog Lamp Light
The fog lamp lights come on whenthe fog lamps are in use.
The lights go out when the foglamps are turned off. See FogLamps on page 6‑5 for moreinformation.
Lamps On Reminder
This light comes on whenever theparking lamps are on.
See Exterior Lamps Off Reminderon page 6‑2 for more information.
Information Displays
Driver InformationCenter (DIC)The Driver Information Center (DIC)display is located on the instrumentpanel cluster and shows driverpersonalization features andwarning/status messages.
The DIC comes on when the ignitionis turned on. After displayingCORVETTE BY CHEVROLET, theDIC shows the information that waslast displayed before the enginewas turned off.
If a problem is detected, a warningmessage appears on the DICdisplay. See Vehicle Messages onpage 5‑35 for more information.
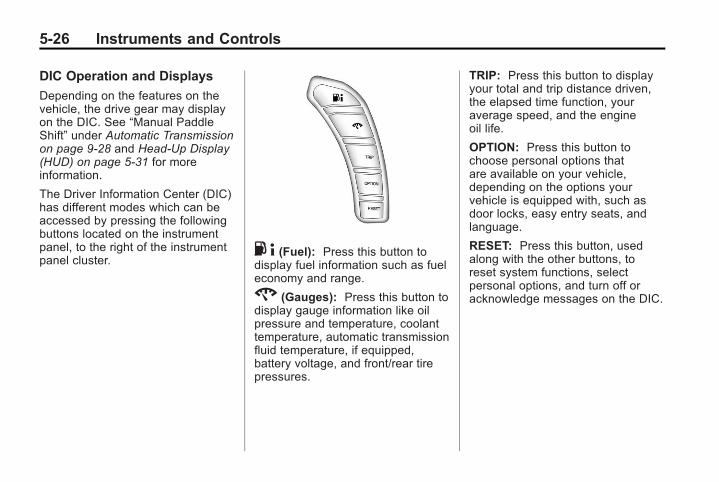
Black plate (26,1)Chevrolet Corvette Owner Manual - 2011
5-26 Instruments and Controls
DIC Operation and Displays
Depending on the features on thevehicle, the drive gear may displayon the DIC. See “Manual PaddleShift” under Automatic Transmissionon page 9‑28 and Head-Up Display(HUD) on page 5‑31 for moreinformation.
The Driver Information Center (DIC)has different modes which can beaccessed by pressing the followingbuttons located on the instrumentpanel, to the right of the instrumentpanel cluster.
. 4 (Fuel): Press this button todisplay fuel information such as fueleconomy and range.
2 (Gauges): Press this button todisplay gauge information like oilpressure and temperature, coolanttemperature, automatic transmissionfluid temperature, if equipped,battery voltage, and front/rear tirepressures.
TRIP: Press this button to displayyour total and trip distance driven,the elapsed time function, youraverage speed, and the engineoil life.
OPTION: Press this button tochoose personal options thatare available on your vehicle,depending on the options yourvehicle is equipped with, such asdoor locks, easy entry seats, andlanguage.
RESET: Press this button, usedalong with the other buttons, toreset system functions, selectpersonal options, and turn off oracknowledge messages on the DIC.
Black plate (27,1)Chevrolet Corvette Owner Manual - 2011
Instruments and Controls 5-27
Fuel Button
The fuel button displays averagefuel economy and instantaneousfuel economy, calculated for yourspecific driving conditions, andrange information.
Average Fuel Economy: Theaverage fuel economy is viewed asa long-term approximation of youroverall driving conditions. Youshould reset the average fueleconomy display every time yourefuel. If you press the RESETbutton in this mode while you aredriving, the system will reset thisdisplay and begin figuring fueleconomy from that point in time.
Press the fuel button to displayaverage fuel economy, such as:. AVERAGE FUEL ECONOMY
11.7 L/100 km or. AVERAGE FUEL ECONOMY
20.1 MPG
Instantaneous Fuel Economy:Instantaneous fuel economy reflectsonly the fuel economy that thevehicle has right now and willchange frequently as drivingconditions change. Unlike averagefuel economy, this menu itemcannot be reset.
Press the fuel button again todisplay instantaneous fuel economy,such as:. INSTANT FUEL ECONOMY
11.7 L/100 km or. INSTANT FUEL ECONOMY
20.1 MPG
Fuel Range: The range calculatesthe remaining distance you candrive without refueling. It is basedon fuel economy and the fuelremaining in the tank.
Press the fuel button again todisplay the range, such as:. RANGE 48 km or. RANGE 30MI
If the LOW FUEL warning isdisplayed or if RANGE is less than64 km (40 miles), the display willread RANGE LOW.
The fuel economy data used todetermine fuel range is an averageof recent driving conditions. As yourdriving conditions change, this datais gradually updated automatically.
If the vehicle has been idling fora long time, the range displayedon the DIC could be abnormallylow. The vehicle must be driven8 to 16 km (5 to 10 miles) to getan accurate reading.
Black plate (28,1)Chevrolet Corvette Owner Manual - 2011
5-28 Instruments and Controls
Gauges Button
The gauges button displaysoil pressure, oil temperature,coolant temperature, transmissionfluid temperature for automatictransmission vehicles only, batteryvoltage, and tire pressureinformation.
Oil Pressure: This display showsthe oil pressure.
Press the gauges button to displaythe oil pressure, such as:. OIL PRESSURE 276 kPa or. OIL PRESSURE 40 PSI
Oil Temperature: This displayshows the oil temperature.
Press the gauges button again todisplay the oil temperature, such as:. OIL TEMPERATURE 112°C or. OIL TEMPERATURE 234°F
If the oil temperature is low,the display will show OILTEMPERATURE LOW. If the oiltemperature is high, the display willshow OIL TEMPERATURE HIGH.
Coolant Temperature: This displayshows the engine coolanttemperature.
Press the gauges button again todisplay the coolant temperature,such as:. COOLANT
TEMPERATURE 51°C or. COOLANT
TEMPERATURE 123°F
If the coolant temperature is low,the display will show COOLANTTEMPERATURE LOW. If thecoolant temperature is high, thedisplay will show COOLANTTEMPERATURE HIGH.
Transmission FluidTemperature: If you have anautomatic transmission vehicle,this display shows the automatictransmission fluid temperature.
Press the gauges button again todisplay the automatic transmissionfluid temperature, such as:. TRANS FLUID TEMP 51°C or. TRANS FLUID TEMP 123°F
If the transmission fluid temperatureis low, the display will showTRANS FLUID TEMP LOW. If thetransmission fluid temperature ishigh, the display will show TRANSFLUID TEMP HIGH.

Black plate (29,1)Chevrolet Corvette Owner Manual - 2011
Instruments and Controls 5-29
Battery Voltage: This displayshows the current battery voltage.
Press the gauges button again todisplay the battery voltage, such as:. BATTERY VOLTAGE
13.5 VOLTS
Tire Pressure: This display showsthe tire pressure for each tire.
Press the gauges button again todisplay the tire pressure for the fronttires, such as:. FRONT TIRE PRESSURES
L 234 kPa R 228 kPa or. FRONT TIRE PRESSURES
L 34 PSI R 33 PSI
Press the gauges button again todisplay the tire pressure for the reartires, such as:. REAR TIRE PRESSURES
L 234 kPa R 228 kPa or. REAR TIRE PRESSURES
L 34 PSI R 33 PSI
TRIP Button
The TRIP button displays theodometer, trip distance, elapsedtime, average speed, and oil liferemaining information.
Odometer: The odometer showshow far your vehicle has beendriven in either kilometers or miles.Press the TRIP button to displayodometer readings, such as:. ODOMETER 20008 km or. ODOMETER 12345MI
You can also display the odometerby turning on the parking lamps.
Trip Odometers: There are two tripodometers. Press the TRIP buttonto display TRIP ODOMETERAreadings and press the button againto display TRIP ODOMETERBreadings, such as:. TRIP ODOMETER A 209.9 km or. TRIP ODOMETER A 130.5 MI. TRIP ODOMETER B 483.5 km or. TRIP ODOMETER B 300.5 MI
Both of the trip odometers canbe used simultaneously. The tripodometers can be reset by pressingthe RESET button on the DIC.
There is also a miles since lastignition feature that displays thenumber of kilometers (miles) drivensince you last started the vehicle.Press and hold the RESET buttonfor three seconds, then release it.The kilometers (miles) since the lastignition cycle will be set into the tripodometer.
Elapsed Timer: Press theTRIP button until ELAPSEDTIMER is displayed, such asELAPSED TIMER .00.
When the ignition is in on, the DICcan be used as a stopwatch. Thedisplay can show hours, minutes,and seconds. The elapsed timeindicator will record up to 23 hours,59 minutes, and 59 seconds, thenit will reset to zero and continuecounting. The display appears asELAPSED TIMER .00 in the elapsedtime function.
Black plate (30,1)Chevrolet Corvette Owner Manual - 2011
5-30 Instruments and Controls
You can start or stop the elapsedtime by pressing the RESET button.To reset the elapsed time to zero,press the RESET button forthree seconds while the timer isdisplayed.
Pressing and holding the RESETbutton for at least 10 seconds willreset the timer display to the timesince last ignition cycle.
Average Speed: Press the TRIPbutton until the average speed isdisplayed, such as:. AVERAGE SPEED 100 km/h or. AVERAGE SPEED 62MPH
Press and hold the RESET button toreset to 0.0 km/h (mph).
Engine Oil Life: Press the TRIPbutton until the engine oil life isdisplayed, such as OIL LIFEREMAINING 89%.
This is an estimate of the engineoil's remaining useful life. It willshow 100% when the system isreset after an oil change. It will alertyou to change the oil on a scheduleconsistent with your drivingconditions.
When the remaining oil life is low,the system will alert you with themessage CHANGE ENGINE OIL.
Remember, you must reset theengine oil life system yourselfafter each oil change. It will notreset itself. To reset the system,see Engine Oil Life System onpage 10‑22. Be careful not toreset the engine oil life systemaccidentally at any time other thanwhen the oil has just been changed.It cannot be reset accurately untilthe next oil change.
See Scheduled Maintenance onpage 11‑2 and Engine Oil onpage 10‑15 for more information.
OPTION Button
The OPTION button allows youto access the PERSONALOPTIONS menu and customizethe personalization settings on yourvehicle. See Vehicle Personalizationon page 5‑55 for more information.
RESET Button
The RESET button, used alongwith other buttons, will resetsystem functions and turn off oracknowledge messages on the DIC.
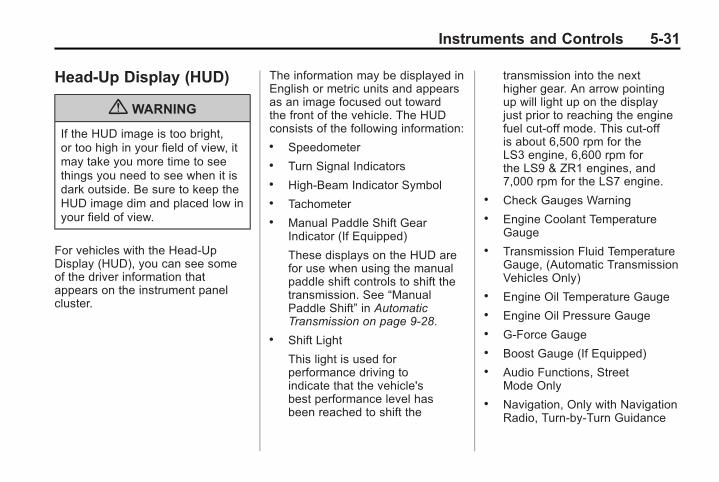
Black plate (31,1)Chevrolet Corvette Owner Manual - 2011
Instruments and Controls 5-31
Head-Up Display (HUD)
{ WARNING
If the HUD image is too bright,or too high in your field of view, itmay take you more time to seethings you need to see when it isdark outside. Be sure to keep theHUD image dim and placed low inyour field of view.
For vehicles with the Head-UpDisplay (HUD), you can see someof the driver information thatappears on the instrument panelcluster.
The information may be displayed inEnglish or metric units and appearsas an image focused out towardthe front of the vehicle. The HUDconsists of the following information:. Speedometer. Turn Signal Indicators. High-Beam Indicator Symbol. Tachometer. Manual Paddle Shift Gear
Indicator (If Equipped)
These displays on the HUD arefor use when using the manualpaddle shift controls to shift thetransmission. See “ManualPaddle Shift” in AutomaticTransmission on page 9‑28.
. Shift Light
This light is used forperformance driving toindicate that the vehicle'sbest performance level hasbeen reached to shift the
transmission into the nexthigher gear. An arrow pointingup will light up on the displayjust prior to reaching the enginefuel cut-off mode. This cut-offis about 6,500 rpm for theLS3 engine, 6,600 rpm forthe LS9 & ZR1 engines, and7,000 rpm for the LS7 engine.
. Check Gauges Warning
. Engine Coolant TemperatureGauge
. Transmission Fluid TemperatureGauge, (Automatic TransmissionVehicles Only)
. Engine Oil Temperature Gauge
. Engine Oil Pressure Gauge
. G-Force Gauge
. Boost Gauge (If Equipped)
. Audio Functions, StreetMode Only
. Navigation, Only with NavigationRadio, Turn-by-Turn Guidance
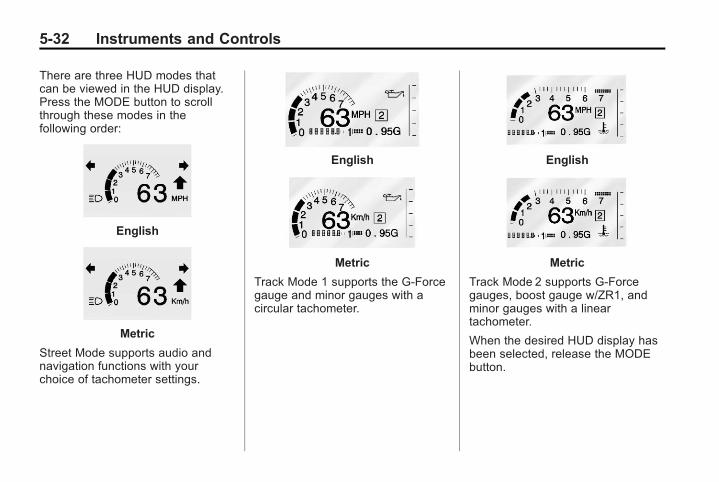
Black plate (32,1)Chevrolet Corvette Owner Manual - 2011
5-32 Instruments and Controls
There are three HUD modes thatcan be viewed in the HUD display.Press the MODE button to scrollthrough these modes in thefollowing order:
English
Metric
Street Mode supports audio andnavigation functions with yourchoice of tachometer settings.
English
Metric
Track Mode 1 supports the G-Forcegauge and minor gauges with acircular tachometer.
English
Metric
Track Mode 2 supports G-Forcegauges, boost gauge w/ZR1, andminor gauges with a lineartachometer.
When the desired HUD display hasbeen selected, release the MODEbutton.
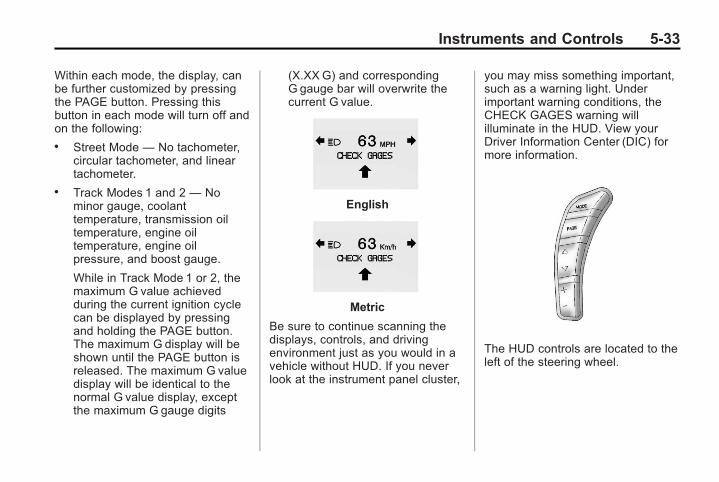
Black plate (33,1)Chevrolet Corvette Owner Manual - 2011
Instruments and Controls 5-33
Within each mode, the display, canbe further customized by pressingthe PAGE button. Pressing thisbutton in each mode will turn off andon the following:. Street Mode — No tachometer,
circular tachometer, and lineartachometer.
. Track Modes 1 and 2 — Nominor gauge, coolanttemperature, transmission oiltemperature, engine oiltemperature, engine oilpressure, and boost gauge.
While in Track Mode 1 or 2, themaximum G value achievedduring the current ignition cyclecan be displayed by pressingand holding the PAGE button.The maximum G display will beshown until the PAGE button isreleased. The maximum G valuedisplay will be identical to thenormal G value display, exceptthe maximum G gauge digits
(X.XXG) and correspondingG gauge bar will overwrite thecurrent G value.
English
Metric
Be sure to continue scanning thedisplays, controls, and drivingenvironment just as you would in avehicle without HUD. If you neverlook at the instrument panel cluster,
you may miss something important,such as a warning light. Underimportant warning conditions, theCHECK GAGES warning willilluminate in the HUD. View yourDriver Information Center (DIC) formore information.
The HUD controls are located to theleft of the steering wheel.
Black plate (34,1)Chevrolet Corvette Owner Manual - 2011
5-34 Instruments and Controls
To adjust the HUD so it can be seenproperly, do the following:
1. Start the engine and press theHUD dimmer control all the wayup by pressing the (+) button.
The brightness of the HUDimage is determined by the lightconditions in the direction thevehicle is facing and where youhave the HUD dimmer controlset. If you are facing a darkobject or a heavily shaded area,the HUD may anticipate that youare entering a dark area andmay begin to dim.
It is possible for sunlight toenter the HUD making it difficultto see the image. The displaywill return to normal when thesunlight is no longer enteringthe HUD.
2. Adjust the seat to a comfortabledriving position. If your seatposition changes, the HUD mayneed to be re-adjusted.
3. Press the up or down arrowsto center the HUD image inyour view.
The HUD image can only beadjusted up and down, not sideto side.
4. Press the dimmer controldownward until the HUD imageis no brighter than necessary.
To turn HUD off, press and hold the(–) button until the HUD displayturns off.
If the sun comes out or it becomescloudy, the HUD brightness mayneed to be adjusted again usingthe dimmer control. Polarizedsunglasses could make the HUDimage harder to see.
The HUD information can bedisplayed in one of six languagesincluding English, Spanish, French,German, Italian, or Japanese. Thespeedometer can be displayed ineither English or metric units.
To change the language and unitselections, see “Entering thePersonal Options Menu” underVehicle Personalization onpage 5‑55.
Clean the inside of the windshieldas needed to remove any dirt or filmthat reduces the sharpness or clarityof the HUD image.
To clean the HUD, spray householdglass cleaner on a soft, clean cloth.Wipe the HUD lens gently, then dryit. Do not spray cleaner directly onthe lens because the cleaner couldleak into the unit.
Black plate (35,1)Chevrolet Corvette Owner Manual - 2011
Instruments and Controls 5-35
If the ignition is on and the HUDimage cannot be seen, check tosee if:. Something is covering the
HUD unit.. The HUD dimmer control is
adjusted properly.. The HUD image is adjusted
to the proper height.. Ambient light is low, in the
direction the vehicle is facing.. A fuse is blown. See Fuses and
Circuit Breakers on page 10‑51.
Keep in mind that the windshield ispart of the HUD system. SeeWindshield Replacement onpage 10‑47.
Vehicle MessagesMessages displayed on the DICindicate the status of the vehicleor some action may be neededto correct a condition. Multiplemessages may appear one afteranother.
The messages that do notrequire immediate action can beacknowledged and cleared bypressing the RESET button.
The messages that requireimmediate action cannot be cleareduntil that action is performed. Allmessages should be taken seriouslyand clearing the messages does notcorrect the problem.
Battery Voltage andCharging Messages
BATTERY SAVER ACTIVE
This message displays when thevehicle has detected that the batteryvoltage is dropping beyond areasonable point. The battery saversystem starts reducing certainfeatures of the vehicle that you maybe able to notice. At the point thatfeatures are disabled, this messageis displayed. It means that thevehicle is trying to save the chargein the battery. Turn off unnecessaryaccessories to allow the battery torecharge.
BATTERY VOLTAGE HIGH
See Voltmeter Gauge on page 5‑15.
BATTERY VOLTAGE LOW
See Voltmeter Gauge on page 5‑15.
Black plate (36,1)Chevrolet Corvette Owner Manual - 2011
5-36 Instruments and Controls
SERVICE CHARGING SYSTEM
If this message displays while youare driving, there may be a problemwith the electrical charging system.It could mean that there is a looseor broken drive belt or that there isanother electrical problem. Have thevehicle checked right away by yourdealer. Driving while this message ison could drain the battery.
If you must drive a short distancewith the message on, be certain toturn off the vehicle's accessories,such as the radio and airconditioner.
Multiple chimes sound when thismessage is displayed.
To acknowledge the message, pressthe RESET button. The messagereappears every 10 minutes untilthis condition changes.
Brake System Messages
ABS (Antilock Brake System)ACTIVE
This message displays when theAntilock Brake System (ABS) isadjusting brake pressure to helpavoid a braking skid.
Slippery road conditions may existif this message is displayed, soadjust your driving accordingly.The message stays on for a fewseconds after the system stopsadjusting brake pressure. SeeAntilock Brake System (ABS) onpage 9‑34 for more information.
CHANGE BRAKE PADS
On vehicles with electronic brakepad wear sensors, this message willbe displayed when the pads areworn. See your dealer for service.
CHECK BRAKE FLUID
This message displays, a soundwill be heard, and the brake systemwarning light on the instrumentpanel cluster turns on if the ignitionis on to inform the driver that thebrake fluid level is low. See BrakeSystem Warning Light onpage 5‑21. Have the brake systemserviced by your dealer as soon aspossible. See Brakes onpage 10‑38.
SERVICE ANTILOCK BRAKES
If this message displays whileyou are driving, stop as soon aspossible and turn the ignition off.Then start the engine again to resetthe system. If the message stayson, or comes back on again whileyou are driving, the vehicle is inneed of service. See your dealer.If the antilock brake system (ABS)warning light is on and the regularbrake system warning light is not
Black plate (37,1)Chevrolet Corvette Owner Manual - 2011
Instruments and Controls 5-37
on, you still have brakes, but donot have ABS. If the regular brakesystem warning light is also on, youdo not have ABS and there is aproblem with the brakes. SeeAntilock Brake System (ABS)Warning Light on page 5‑22 andBrake System Warning Light onpage 5‑21.
If this message is displayed, theTraction Control System (TCS)and the Active Handling Systemwill also be disabled. The DIC willscroll three messages: SERVICEANTILOCK BRAKES, SERVICETRACTION SYSTEM, andSERVICE ACTIVE HANDLING, andthe instrument panel cluster lightswill come on along with a sound.When the service message isdisplayed, the computer controlledsystems will not assist the driver.Have the system repaired by yourdealer as soon as possible. Adjustyour driving accordingly.
To acknowledge these messages,press the RESET button.
Convertible TopMessages
ATTACH TRUNK PARTITION
If the vehicle has a powerconvertible top, this messagedisplays and a sound will be heardif the trunk partition is not in place.Open the hatch/trunk and makesure the trunk partition is secureand no objects are on the trunkpartition. See Rear Storage onpage 4‑1 for more information.
CLOSE TRUNK TO MOVE TOP
This message displays and asound will be heard if the trunk isopen while you are trying to operatethe convertible top. Make sure thetrunk is closed before operating theconvertible top. See Convertible Topon page 2‑23.
SET PARK BRAKE TOMOVE TOP
If the vehicle has a manualtransmission, this message displaysand a sound will be heard if youtry to operate the power convertibletop without first setting the parkingbrake. Set the parking brakebefore trying to operate the powerconvertible top. See Convertible Topon page 2‑23 for more information.
SHIFT TO PARK OR SET PARKBRAKE FOR TOP
If the vehicle has an automatictransmission, this message displaysand a sound will be heard if you tryto operate the power convertible topwithout first shifting into P (Park) orsetting the parking brake. Eithershift the vehicle into P (Park) or setthe parking brake before trying tooperate the power convertible top.See Convertible Top on page 2‑23for more information.
Black plate (38,1)Chevrolet Corvette Owner Manual - 2011
5-38 Instruments and Controls
TOO COLD TO MOVE TOP
This message displays and asound will be heard when thepower convertible top button ispressed and the power convertibletop pump motor temperature isbelow −20°C (−4°F). Wait for thepower convertible top pump motorto warm up before using the powerconvertible top.
TOP MOTOR OVERTEMPERATURE
This message displays and asound will be heard when thepower convertible top button ispressed and the power convertibletop pump motor temperature is over105°C (221°F). Wait for the powerconvertible top pump motor to cooldown before using the powerconvertible top.
TOP NOT SECURE
This message displays and asound will be heard when thepower convertible top button isreleased before the top open orclose operation is complete or if thetop is closed without the headerlatch engaged. Press and hold theconvertible top button to fully openor close the top, and make sure thatthe header latch is engaged afterthe top is closed.
UNLATCH HEADER TOMOVE TOP
This message displays and asound will be heard if you try tolower the convertible top withoutfirst unlocking the top. Movethe latch handle to unlock theconvertible top. See Convertible Topon page 2‑23.
Cruise Control Messages
CRUISE DISENGAGED
This message displays briefly whenyou disengage the cruise controlsystem by stepping on the brake onan automatic transmission vehicle orthe clutch on a manual transmissionvehicle, or by turning off the cruisecontrol switch. See Cruise Controlon page 9‑45 for more information.
CRUISE SET TO XXXMPH(XXX km/h)
See Cruise Control on page 9‑45.
Black plate (39,1)Chevrolet Corvette Owner Manual - 2011
Instruments and Controls 5-39
Door Ajar Messages
DRIVER DOOR AJAR
This message displays if the driverdoor is not closed properly. Makesure that the door is closedcompletely.
HATCH AJAR (Coupe)
This message displays when thehatch is not closed completely.Make sure that the hatch is closedcompletely. See Hatch on page 2‑10for more information.
PASSENGER DOOR AJAR
This message displays if thepassenger door is not closedproperly. Make sure that the dooris closed completely.
TONNEAU AJAR (Convertible)
This message displays whenthe convertible top is not closedcompletely. Make sure that thetop is closed completely. SeeConvertible Top on page 2‑23 formore information.
TRUNK AJAR (Convertible)
This message displays when thetrunk is not closed completely.Make sure that the trunk is closedcompletely. See Hatch on page 2‑10for more information.
Engine Cooling SystemMessages
CHECK COOLANT LEVEL
This message displays when theengine coolant level is low. Havethe cooling system serviced by yourdealer as soon as possible. SeeEngine Coolant on page 10‑29.
COOLANT OVERTEMPERATURE
This message displays and a soundwill be heard if the engine coolantexceeds 124°C (255°F). If you havebeen operating the vehicle undernormal driving conditions, pull offthe road, stop the vehicle, and turnoff the engine as soon as possible.
You can monitor the coolanttemperature with the gaugesbutton on the DIC or the enginecoolant temperature gauge onthe instrument panel cluster. SeeEngine Overheating on page 10‑34,Driver Information Center (DIC) onpage 5‑25, and Engine CoolantTemperature Gauge on page 5‑15.
To acknowledge the message, pressthe RESET button. The messageand sound will come back on untilthis condition changes. If you donot press the RESET button, themessage remains on until thecondition changes.
Black plate (40,1)Chevrolet Corvette Owner Manual - 2011
5-40 Instruments and Controls
ENGINE OVERHEATED –STOP ENGINE
This message displays and asound will be heard when theengine has overheated. Stop andturn the engine off immediately toavoid severe engine damage. SeeEngine Overheating on page 10‑34.
ENGINE PROTECTIONREDUCE ENGINE RPM
This message displays if the engineoil temperature exceeds 160°C(320°F). Check the engine coolanttemperature and engine oil level.If the engine is too hot, see EngineOverheating on page 10‑34. Thevehicle may need service, so seeyour dealer.
You can monitor the oil temperaturewith the gauges button on the DIC.See Driver Information Center (DIC)on page 5‑25.
Multiple chimes sound whenthis message is displayed. Thismessage remains displayed andactive until the issue is resolved.
HOT ENGINE AIRCONDITIONING OFF
This message displays whenthe engine coolant becomeshotter than the normal operatingtemperature. To avoid added strainon a hot engine, the air conditioningcompressor is automatically turnedoff. When the coolant temperaturereturns to normal, the A/C operationautomatically resumes. You cancontinue to drive the vehicle. If thismessage continues to appear, havethe system repaired by your dealeras soon as possible to avoidcompressor damage.
Engine Oil Messages
CHANGE ENGINE OIL
This message displays when thelife of the engine oil has expired.See Scheduled Maintenance onpage 11‑2. After an oil change, theengine oil life system must be reset.
See “Engine Oil Life” under DriverInformation Center (DIC) onpage 5‑25. Also, see Engine Oil onpage 10‑15 and Engine Oil LifeSystem on page 10‑22 for moreinformation.
CHECK OIL LEVEL
On some vehicles, this messagedisplays and two chimes sound ifthe oil level in the vehicle is low.Once the vehicle senses a changein the engine oil level, the lightremains off.
If this message appears afterstarting the engine, the engine oillevel may be too low. You may needto add oil. See Engine Overheatingon page 10‑34.
To acknowledge the message, pressthe RESET button. The messagereappears every 10 minutes untilthis condition changes.
Black plate (41,1)Chevrolet Corvette Owner Manual - 2011
Instruments and Controls 5-41
LOW OIL PRESSURE
This message displays if low oilpressure levels occur. If thismessage appears while the engineis running, stop the engine and donot operate it until the cause of lowoil pressure is corrected. Severedamage to the engine can result.A sound will be heard when thismessage is displayed. See EngineOil on page 10‑15.
Engine Power Messages
ENGINE DRAG CONTROLACTIVE
This message displays whenengine drag control is active.When driving in a lower gear inrainy, snowy, or icy conditions andthen letting up on the acceleratoror downshifting, the rear wheelsmay begin to slip and this messagedisplays. This message stays on fora few seconds following the enginedrag control event.
REDUCED ENGINE POWER
If this message displays and thecheck engine light comes on, anoticeable reduction in the vehicle'sperformance may occur. If theREDUCED ENGINE POWERmessage is displayed, but thereis no reduction in performance,proceed to your destination. Theperformance may be reduced thenext time the vehicle is driven.
The vehicle may be driven at areduced speed while the REDUCEDENGINE POWER message isdisplayed, but acceleration andspeed may be reduced. Anytimethe check engine light stays on,the vehicle should be taken toyour dealer as soon as possiblefor diagnosis and repair. SeeMalfunction Indicator Lamp onpage 5‑18 for more information.
Multiple chimes sound when thismessage is displayed.
To acknowledge the message, pressthe RESET button. The messagereappears every five minutes untilthis condition changes.
If the REDUCED ENGINEPOWER message is displayed incombination with the COOLANTOVER TEMPERATURE message,see Engine Overheating onpage 10‑34.
Fuel System Messages
CHECK GAS CAP
This message displays if the fuelcap has not been fully tightened.Check the fuel cap to make surethat it is on properly. Oncetightened, it takes at least oneovernight park to reset or clear thismessage. If both the CHECK GASCAP message and the malfunctionindicator lamp in the instrumentpanel cluster are on, you may needto see your dealer for service. SeeMalfunction Indicator Lamp onpage 5‑18 for more information.

Black plate (42,1)Chevrolet Corvette Owner Manual - 2011
5-42 Instruments and Controls
LOW FUEL
This message displays when thefuel tank is less than 10 percentfull and the display is turned off.A sound will be heard when thismessage is displayed. Refill the fueltank as soon as possible. See FuelGauge on page 5‑11.
SERVICE FUEL SYSTEM
This message displays if thePowertrain Control Module (PCM)has detected a problem withinthe fuel system. Have the vehicleserviced by your dealer. Thismessage also displays when thecluster is not getting fuel informationfrom the PCM.
Key and Lock Messages
FOB AUTOLEARN WAITXXMINUTES
See “Matching Transmitter(s) toYour Vehicle” under RemoteKeyless Entry (RKE) SystemOperation on page 2‑3.
FOB BATTERY LOW
See “Battery Replacement” underRemote Keyless Entry (RKE)System Operation on page 2‑3.
KNOWN FOB
See “Matching Transmitter(s) toYour Vehicle” under RemoteKeyless Entry (RKE) SystemOperation on page 2‑3.
MAXIMUM NUMBER OF FOBSLEARNED
See “Matching Transmitter(s) toYour Vehicle” under RemoteKeyless Entry (RKE) SystemOperation on page 2‑3.
NO FOBS DETECTED
This message displays if thevehicle does not detect thepresence of a Remote KeylessEntry (RKE) transmitter when youhave attempted to start the vehicleor a vehicle door has just closed.The following conditions may causethis message to appear.. Driver-added equipment plugged
into the accessory power outleton the center console is causinginterference. Examples of thesedevices are cell phones and cellphone chargers, two-way radios,power inverters, or similar items.Try moving the RKE transmitteraway from these devices whenstarting the vehicle. In addition,PDA devices and remote garageand gate openers may alsogenerate ElectromagneticInterference (EMI) that mayinterfere with the RKEtransmitter. Do not carry theRKE transmitter in the samepocket or bag as these devices.
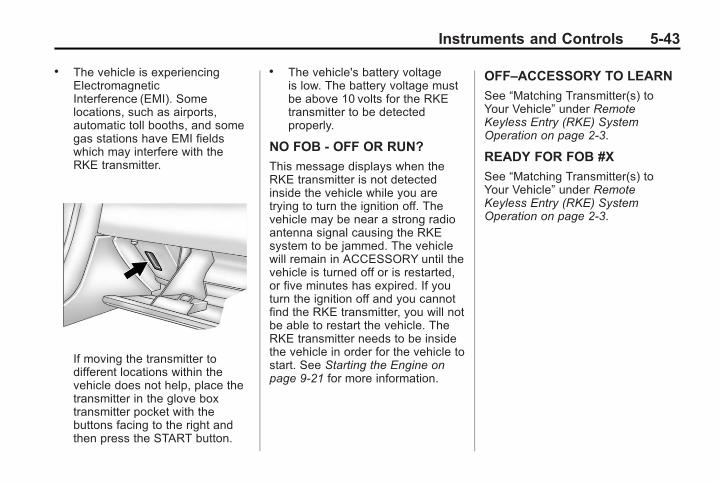
Black plate (43,1)Chevrolet Corvette Owner Manual - 2011
Instruments and Controls 5-43
. The vehicle is experiencingElectromagneticInterference (EMI). Somelocations, such as airports,automatic toll booths, and somegas stations have EMI fieldswhich may interfere with theRKE transmitter.
If moving the transmitter todifferent locations within thevehicle does not help, place thetransmitter in the glove boxtransmitter pocket with thebuttons facing to the right andthen press the START button.
. The vehicle's battery voltageis low. The battery voltage mustbe above 10 volts for the RKEtransmitter to be detectedproperly.
NO FOB - OFF OR RUN?
This message displays when theRKE transmitter is not detectedinside the vehicle while you aretrying to turn the ignition off. Thevehicle may be near a strong radioantenna signal causing the RKEsystem to be jammed. The vehiclewill remain in ACCESSORY until thevehicle is turned off or is restarted,or five minutes has expired. If youturn the ignition off and you cannotfind the RKE transmitter, you will notbe able to restart the vehicle. TheRKE transmitter needs to be insidethe vehicle in order for the vehicle tostart. See Starting the Engine onpage 9‑21 for more information.
OFF–ACCESSORY TO LEARN
See “Matching Transmitter(s) toYour Vehicle” under RemoteKeyless Entry (RKE) SystemOperation on page 2‑3.
READY FOR FOB #X
See “Matching Transmitter(s) toYour Vehicle” under RemoteKeyless Entry (RKE) SystemOperation on page 2‑3.
Black plate (44,1)Chevrolet Corvette Owner Manual - 2011
5-44 Instruments and Controls
Lamp Messages
HEADLAMPS SUGGESTED
This message displays if it is darkenough outside and the headlampsand the Twilight Sentinel® controlsare off. This message informs thedriver that turning on the exteriorlamps is recommended. It hasbecome dark enough outside torequire the headlamps and/or otherexterior lamps.
TURN SIGNAL ON
This message displays and asound will be heard if a turn signalis left on for 1.2 km (three-quartersof a mile). Move the turn signal/multifunction lever to the offposition.
To acknowledge this message,press the RESET button.
Ride Control SystemMessages
ACTIVE HANDLING
This message displays whenthe Active Handling System isoperating. The Active HandlingSystem is a computer controlledsystem that assists the driver incontrolling the vehicle in difficultdriving conditions. You may feel orhear the system working and seethe ACTIVE HANDLING messagedisplayed in the DIC. This messagestays on for a few seconds followingthe active handling event. Thisis normal when the system isoperating. See Active HandlingSystem on page 9‑37 and Brakingon page 9‑3.
ACTIVE HANDLING READY
This message displays whenthe functional check of the ActiveHandling System has beencompleted. See Active HandlingSystem on page 9‑37 for moreinformation.
COMPETITIVE DRIVING MODE
This message displays and asound will be heard when theCompetitive Driving mode isselected. The instrument panelcluster light will be on when theCompetitive Driving mode isselected. If your vehicle is equippedwith a manual transmission, LaunchControl is available when this modeis selected. The Traction ControlSystem (TCS) will not be operatingwhile in the Competitive Drivingmode. Adjust your drivingaccordingly. This system is availableon all models except ZR1. SeeCompetitive Driving Mode onpage 9‑39, including the “LaunchControl” information.
Black plate (45,1)Chevrolet Corvette Owner Manual - 2011
Instruments and Controls 5-45
MAXIMUM SPEED 129 km/h(80MPH)
This message displays when amalfunction is present in theSelective Ride Control system. Thevehicle speed will be limited to avalue determined by the vehiclewhen the shock absorber systemhas failed and the shocks are intheir full soft mode. Have the vehicleserviced by your dealer as soon aspossible.
To acknowledge the message, pressthe RESET button. The messagereappears every 10 minutes untilthis condition changes.
PERF TRAC 1 – WET ACTIVEHANDLING ON
This message displays and a soundwill be heard when this PerformanceTraction Management mode isselected. The instrument panelcluster light will also be on whenthis mode is selected. LaunchControl is available when thismode is selected. In this modethe Traction Control and ActiveHandling System are availablebut intended for use on wet racetrack conditions. Adjust yourdriving accordingly. This systemis available only on ZR1 models.See “Performance TractionManagement” and “Launch Control”under Competitive Driving Mode onpage 9‑39 for more informationabout the use of this mode.
PERF TRAC 2 – DRY ACTIVEHANDLING ON
This message displays and a soundwill be heard when this PerformanceTraction Management mode isselected. The instrument panelcluster light will also be on whenthis mode is selected. LaunchControl is available when thismode is selected. In this modethe Traction Control and ActiveHandling System are availablebut intended for use on dry racetrack conditions. Adjust yourdriving accordingly. This systemis available only on ZR1 models.See “Performance TractionManagement” and “Launch Control”under Competitive Driving Mode onpage 9‑39 for more informationabout the use of this mode.

Black plate (46,1)Chevrolet Corvette Owner Manual - 2011
5-46 Instruments and Controls
PERF TRAC 3 – SPORTACTIVE HANDLING ON
This message displays and a soundwill be heard when this PerformanceTraction Management mode isselected. The instrument panelcluster light will also be on whenthis mode is selected. LaunchControl is available when thismode is selected. In this modethe Traction Control and ActiveHandling System are availablebut intended for use on dry racetrack conditions. Adjust yourdriving accordingly. This systemis available only on ZR1 models.See “Performance TractionManagement” and “Launch Control”under Competitive Driving Mode onpage 9‑39 for more informationabout the use of this mode.
PERF TRAC 4 – SPORTACTIVE HANDLING OFF
This message displays and a soundwill be heard when this PerformanceTraction Management mode isselected. The instrument panelcluster light will also be on whenthis mode is selected. LaunchControl is available when this modeis selected. In this mode theTraction Control is available butintended for use on dry race trackconditions. The Active HandlingSystem is disabled when this modeis selected. This mode will requiremore driver skill than modes 1-3.Adjust your driving accordingly.This system is available only onZR1 models. See “PerformanceTraction Management” and “LaunchControl” under Competitive DrivingMode on page 9‑39 for moreinformation about the use ofthis mode.
PERF TRAC 5 – RACE ACTIVEHANDLING OFF
This message displays and a soundwill be heard when this PerformanceTraction Management mode isselected. The instrument panelcluster light will also be on whenthis mode is selected. LaunchControl is available when this modeis selected. In this mode theTraction Control is available butintended for use on dry race trackconditions. The Active HandlingSystem is disabled when this modeis selected. This mode will requiremore driver skill than modes 1-4.Adjust your driving accordingly.This system is available only onZR1 models. See “PerformanceTraction Management” and “LaunchControl” under Competitive DrivingMode on page 9‑39 for moreinformation about the use ofthis mode.
Black plate (47,1)Chevrolet Corvette Owner Manual - 2011
Instruments and Controls 5-47
SERVICE ACTIVE HANDLINGSYSTEM
This message displays if there is aproblem with the Active HandlingSystem and the vehicle needsservice. The active handling systemlight on the instrument panel clusteralso turns on and a sound will beheard. See your dealer. When thismessage is displayed, the system isnot working. Adjust your drivingaccordingly. See Active HandlingSystem on page 9‑37 for moreinformation.
SERVICE RIDE CONTROL
This message displays when theSelective Ride Control systemhas detected a malfunction andthe system must be serviced.See your dealer. If a fault ispresent in the Selective RideControl system which causesthe shocks to be in their full softcondition, the messages SERVICERIDE CONTROL, SHOCKSINOPERATIVE, and MAXIMUMSPEED 129 km/h (80 MPH) willdisplay together. See Selective RideControl on page 9‑43 for moreinformation.
SERVICE TRACTION SYSTEM
If this message displays when youare driving, there is a problem withthe Traction Control System (TCS)and the vehicle is in need ofservice. See your dealer. When thismessage is displayed, the systemwill not limit wheel spin. Adjust yourdriving accordingly.
The traction control system (TCS)warning light on the instrumentpanel cluster will also turn on anda sound will be heard.
When this message is displayed,the computer controlled systems willnot assist the driver in controllingthe vehicle. Have the systemrepaired by your dealer as soon aspossible. Adjust your drivingaccordingly. See Traction ControlSystem (TCS) on page 9‑36 formore information.
To acknowledge the message, pressthe RESET button.
Black plate (48,1)Chevrolet Corvette Owner Manual - 2011
5-48 Instruments and Controls
SHOCKS INOPERATIVE
This message displays when amalfunction is present in theSelective Ride Control systemwhich is causing the shocks to bein their full soft mode. This is awarning to the driver that the vehiclehandling may be affected. Have thevehicle serviced by your dealer assoon as possible.
To acknowledge the message, pressthe RESET button . The messagereappears every 10 minutes untilthis condition changes.
TRACTION SYSTEM ACTIVE
This message displays when theTraction Control System (TCS) islimiting wheel spin. Slippery roadconditions may exist if this messageis displayed, so adjust your drivingaccordingly. The message stays onfor a few seconds after the TCSstops limiting wheel spin. SeeTraction Control System (TCS) onpage 9‑36 for more information.
TRACTION SYSTEM ANDACTIVE HANDLING – OFF
This message displays, theinstrument panel cluster light turnson, and a sound will be heard whenthe Traction Control System (TCS)and Active Handling System areturned off by pressing the ActiveHandling System button on theconsole for five seconds. TheAntilock Brake System (ABS)remains on with the TCS and ActiveHandling System off. Adjust yourdriving accordingly. See TractionControl System (TCS) on page 9‑36and Active Handling System onpage 9‑37 for more information.
To acknowledge this message,press the RESET button.
TRACTION SYSTEM ANDACTIVE HANDLING – ON
If the Traction Control System (TCS)and Active Handling System are off,this message displays briefly, theinstrument panel cluster light turnsoff, and a sound will be heard whenthe TCS and Active HandlingSystem are turned on by brieflypressing the Active HandlingSystem button on the console. SeeTraction Control System (TCS) onpage 9‑36 and Active HandlingSystem on page 9‑37 for moreinformation.

Black plate (49,1)Chevrolet Corvette Owner Manual - 2011
Instruments and Controls 5-49
TRACTION SYSTEM – OFF
This message displays and stayson, a sound will be heard, andthe traction control system (TCS)warning light on the instrumentpanel cluster turns on when theTCS is turned off by pressing theActive Handling System button onthe console. See Traction ControlSystem (TCS) Warning Light onpage 5‑23 and Traction ControlSystem (TCS) on page 9‑36 formore information.
To acknowledge the message, pressthe RESET button.
TRACTION SYSTEM – ON
This message displays and a soundwill be heard when the TractionControl System (TCS) is turned onby pressing the Active HandlingSystem button on the console. Thismessage automatically clears fromthe DIC display on its own. SeeTraction Control System (TCS) onpage 9‑36 for more information.
Safety Belt Messages
BUCKLE PASSENGER
This message reminds you tobuckle the passenger's safety belt.
This message displays and asound will be heard when theignition is on, the driver's safetybelt is buckled, the passenger'ssafety belt is unbuckled with thepassenger airbag enabled, and thevehicle is in motion. You shouldhave the passenger buckle theirsafety belt.
The reminder will be repeated ifthe ignition is on, the vehicle is inmotion, the driver is buckled, thepassenger is still unbuckled, and thepassenger airbag is enabled. If thepassenger's safety belt is alreadybuckled, this message will notcome on.
BUCKLE SEATBELT
This message reminds you tobuckle the driver's safety belt.
This message displays and a soundwill be heard when the ignition is on,the driver's safety belt is unbuckled,and the vehicle is in motion. Youshould buckle your safety belt.
If the driver remains unbuckledwhen the ignition is on and thevehicle is in motion, the reminderwill be repeated. If the driver'ssafety belt is already buckled, thismessage will not come on.
This message is an additionalreminder to the safety belt reminderlight in the instrument panel cluster.See Safety Belt Reminders onpage 5‑16 for more information.
Black plate (50,1)Chevrolet Corvette Owner Manual - 2011
5-50 Instruments and Controls
Anti-Theft Alarm SystemMessages
INTRUSION SENSOR OFF
This message may display when theanti-theft alarm has been disarmed.
INTRUSION SENSOR ON
This message may display when theanti-theft alarm has been armed.
Service Vehicle Messages
SERVICE AIR CONDITIONING
This message displays when theelectronic sensors that controlthe air conditioning and heatingsystems are no longer working.Have the climate control systemserviced by your dealer if younotice a drop in heating and airconditioning efficiency.
SERVICE ELECTRICALSYSTEM
This message displays if anelectrical problem has occurredwithin the Powertrain ControlModule (PCM). Have the vehicleserviced by your dealer.
SERVICE VEHICLE SOON
This message displays and a soundwill be heard when there may be anelectrical or another system problemwith the vehicle. Have your vehiclechecked by your dealer if thismessage keeps appearing.
Starting the VehicleMessages
PRESS BRAKE TO STARTENGINE (AutomaticTransmission Only)
This message displays if you tryto start the engine by pressing thekeyless ignition start button withouthaving the brake pressed. Thebrake needs to be pressed whenstarting the engine. See IgnitionPositions on page 9‑20 for moreinformation.
Black plate (51,1)Chevrolet Corvette Owner Manual - 2011
Instruments and Controls 5-51
Tire Messages
HIGH TIRE PRESSURE
This message may be displayedwhen one or more of the tires isoverinflated. This message alsodisplays LEFT FRONT, RIGHTFRONT, LEFT REAR, or RIGHTREAR to indicate which tire isaffected. You can receive more thanone tire pressure message at atime. To read other messages thatmay have been sent at the sametime, press the RESET button . If atire pressure message appears onthe DIC, stop as soon as you can.Have the tire pressures checkedand set to those shown on the Tireand Loading Information label. SeeRun-Flat Tires on page 10‑59,Vehicle Load Limits on page 9‑14,Tire Pressure on page 10‑66, andTire Pressure Monitor System onpage 10‑68. The DIC also showsthe tire pressure values. See DriverInformation Center (DIC) onpage 5‑25.
To acknowledge the message,press the RESET button.A message reappears every10 minutes until the condition iscorrected.
LOW TIRE PRESSURE or TIRELOW ADD AIR TO TIRE
{ WARNING
When the LOW TIREPRESSURE or TIRE FLATmessage is displayed on theDriver Information Center, yourvehicle's handling capabilitieswill be reduced during severemaneuvers. The active handlingsystem will be affected. SeeActive Handling System onpage 9‑37. If you drive too fast,you could lose control of yourvehicle. You or others could beinjured. Do not drive over 90 km/h(55 mph) when the LOW TIREPRESSURE or TIRE FLAT
(Continued)
WARNING (Continued)
message is displayed. Drivecautiously and check your tirepressures as soon as you can.
This message displays when one ormore of the tires is underinflated.This message also displays LEFTFRONT, RIGHT FRONT, LEFTREAR, or RIGHT REAR to indicatewhich tire is affected. Multiplechimes sound and the tire pressurelight on the instrument panel clusterturns on when this message isdisplayed. See Tire Pressure Lighton page 5‑24. You can receive morethan one tire pressure message at atime. To read other messages thatmay have been sent at the sametime, press the RESET button. If atire pressure message appears onthe DIC, stop as soon as you can.
Black plate (52,1)Chevrolet Corvette Owner Manual - 2011
5-52 Instruments and Controls
Have the tire pressures checkedand set to those shown on the Tireand Loading Information label. SeeRun-Flat Tires on page 10‑59,Vehicle Load Limits on page 9‑14,Tire Pressure on page 10‑66, andTire Pressure Monitor System onpage 10‑68. The DIC also showsthe tire pressure values. See DriverInformation Center (DIC) onpage 5‑25.
To acknowledge the message,press the RESET button.A message reappears every10 minutes until the condition iscorrected.
SERVICE TIRE MONITOR
This message displays if a parton the Tire Pressure MonitorSystem (TPMS) is not workingproperly. The tire pressure lightalso flashes and then remains onduring the same ignition cycle. SeeTire Pressure Light on page 5‑24.Several conditions may cause thismessage to appear. See TirePressure Monitor Operation on
page 10‑69 for more information.If the warning comes on and stayson, there may be a problem with theTPMS. See your dealer.
TIRE FLAT
{ WARNING
When the LOW TIREPRESSURE or TIRE FLATmessage is displayed on theDriver Information Center, yourvehicle's handling capabilitieswill be reduced during severemaneuvers. If you drive too fast,you could lose control of yourvehicle. You or others could beinjured. Do not drive over 55 mph(90 km/h) when the LOW TIREPRESSURE or TIRE FLATmessage is displayed. Drivecautiously and check your tirepressures as soon as you can.
This message displays whenone or more of the tires is flat.This message also displays LEFTFRONT, RIGHT FRONT, LEFTREAR, or RIGHT REAR to indicatewhich tire is affected. Multiplechimes sound and the tire pressurelight on the instrument panel clustercomes on when this message isdisplayed. See Tire Pressure Lighton page 5‑24.
This message is followed bythe MAXIMUM SPEED 90 km/h(55 MPH) message, and then bythe REDUCED HANDLINGmessage. The Active HandlingSystem will intervene more quicklywhen a flat tire has been detected.Adjust your driving accordingly.
Black plate (53,1)Chevrolet Corvette Owner Manual - 2011
Instruments and Controls 5-53
You can receive more than one tirepressure message at a time. Toread other messages that may havebeen sent at the same time, pressthe RESET button. If a tire pressuremessage appears on the DIC, stopas soon as you can. Have the tirepressures checked and set to thoseshown on the Tire and LoadingInformation label. See Run-FlatTires on page 10‑59, Vehicle LoadLimits on page 9‑14, Tire Pressureon page 10‑66, and Tire PressureMonitor System on page 10‑68. TheDIC also shows the tire pressurevalues. See Driver InformationCenter (DIC) on page 5‑25.
To acknowledge the message,press the RESET button.A message reappears every10 minutes until the condition iscorrected.
Transmission Messages
SERVICE TRANSMISSION
This message displays when thereis a problem with the transmission.See your dealer for service.
SHIFT TO PARK
If the vehicle has an automatictransmission, this message displaysif the vehicle is not in P (Park) whenthe engine is being turned off. Thevehicle will be in ACCESSORY.Once the shift lever is moved toP (Park), the vehicle will turn off.
The vehicle will remain inACCESSORY, without the 20 minutetime-out period, until the shift leveris moved to P (Park) or until thedriver presses the pushbutton torestart the vehicle. See IgnitionPositions on page 9‑20 for moreinformation.
TRANSMISSION HOT IDLEENGINE
This message displays and fourchimes sound if the transmissionfluid temperature rises above132°C (270°F) or rises rapidly.The transmission may shift gears orapply the torque converter clutch toreduce the fluid temperature. Drivingaggressively or driving on long hillscan cause the transmission fluidtemperature to be higher thannormal. If this message appears,you may continue to drive at aslower speed. Monitor thetransmission fluid temperatureand allow it to cool to at least110°C (230°F). The transmissionfluid temperature can be monitoredwith the gauges button on the DIC.See “DIC Operation and Displays”under Driver Information Center(DIC) on page 5‑25 and AutomaticTransmission Fluid on page 10‑23.Also check the engine coolanttemperature. If it is also hot, seeEngine Overheating on page 10‑34.
Black plate (54,1)Chevrolet Corvette Owner Manual - 2011
5-54 Instruments and Controls
If this message is displayed duringnormal vehicle operation on flatroads, the vehicle may needservice. See your dealer for aninspection.
If driving in a performance orcompetitive manner, the use of(S) Sport Automatic Mode or(S) Sport Manual Paddle Shiftgear selection is recommended.See Automatic Transmission onpage 9‑28 for more information.
To acknowledge the message, pressthe RESET button. The messagereappears every 10 minutes untilthis condition changes. If you donot press the RESET button, themessage remains on the displayuntil the condition changes.
UPSHIFT NOW
See Manual Transmission onpage 9‑32.
Vehicle ReminderMessages
ACCESSORY MODE ON
This message displays when thevehicle is in accessory mode.
ICE POSSIBLE
This message displays whenthe outside air temperature iscold enough to create icy roadconditions. Adjust your drivingaccordingly.
OPTIONS UNAVAILABLE
This message displays for a fewseconds if a RKE transmitter that isnot labeled 1 or 2 is used and youtry to personalize the features onthe vehicle by pressing the OPTIONbutton. The personalization systemwill not recognize the transmitterand the DIC will not display thecurrent driver number or the menusused to set personalizations. Thepersonalization features will then be
set to the default states. SeeVehicle Personalization onpage 5‑55 for more information.
SET PARK BRAKE FOR SEATRECALL
If the vehicle has a manualtransmission, this message displaysif you try to recall the memorypositions when the ignition is onand the parking brake is not set.If the vehicle is on, you must setthe parking brake in order for thememory positions to recall. See“Memory Seat, Mirrors and SteeringWheel” under Power SeatAdjustment on page 3‑3 for moreinformation.
Washer Fluid Messages
CHECK WASHER FLUID
See Washer Fluid on page 10‑37.
Black plate (55,1)Chevrolet Corvette Owner Manual - 2011
Instruments and Controls 5-55
VehiclePersonalizationMany features on your vehiclecan be personalized. This meansthat the operation of these featurescan be set to operate differentlydepending on who is driving thevehicle. See “Personal Options”later in this section for the featuresthat you can personalize.
The personalization settings forother features are automaticallyupdated and saved as the driveradjusts them. These include thefollowing settings and presets:. The radio presets, tone, volume,
fade, balance, equalization (EQ)settings, and source (radioor CD).
. The last climate control setting.
. The Head-Up Display (HUD)position and dimming level,if your vehicle has this feature.
. The instrument panel clusterdimming level and last selectedDIC display.
Separate personalization settingsare saved for two different drivers.One of the Remote Keyless Entry(RKE) transmitters is assigned todriver 1. The other is assigned todriver 2. The backs of the RKEtransmitters are labelled 1 or 2 tocorrespond to each driver.
The current driver's preferences arerecalled when one of the followingoccurs:. The lock or unlock button on the
RKE transmitter, labelled 1 or 2,is pressed.
. The appropriate memorybutton, 1 or 2, located on thedriver door is pressed. See“Memory Seat, Mirrors, andSteering Wheel” under PowerSeat Adjustment on page 3‑3 formore information.
. A valid RKE transmitter isdetected upon opening thedriver door.
If more than one valid RKEtransmitter is detected uponopening the driver door, the driverpreferences for the lowest drivernumber will be recalled.
If an RKE transmitter that isnot labelled 1 or 2 is used, thepersonalization system will notrecognize the transmitter. The DriverInformation Center (DIC) will notdisplay a current driver numberand the features that are normallyprogrammed through the DIC will beset to the default states. Also, if theOPTION button is pressed, the DICdoes not display the menus used toset personalizations, but insteaddisplays OPTIONS UNAVAILABLEfor a few seconds.
Black plate (56,1)Chevrolet Corvette Owner Manual - 2011
5-56 Instruments and Controls
Entering the PersonalOptions Menu
To enter the personal options menu,use the following steps:
1. If you have an automatictransmission vehicle, turn thevehicle on with the shift leverin P (Park).
If you have a manualtransmission vehicle, turn thevehicle on with the parkingbrake set.
To avoid excessive drain on thebattery, it is recommended thatthe headlamps are turned off.
2. Press the OPTION button andyou will enter the PERSONALOPTIONS menu.
The DIC will display the currentdriver number (1 or 2) for a fewseconds and then will displayinstructions on which buttonsto use for setting thepersonalizations. The RESETbutton is used to select a settingfor a particular feature. TheOPTION button is used to moveto the next feature.
3. Press the OPTION buttonwhile the instruction screen isdisplayed to enter the firstpersonalization menu item.
4. Once you have cycled throughall of the personal options,pressing the OPTION buttona final time exits the personaloptions menu. In addition, ifno button is pressed within45 seconds, the DIC will exitthe personal options menu.
Personal Options
The following options are availablefor programming:
Display Units: This option allowsyou to choose the measurementunits.
Press the OPTION button untilDISPLAY UNITS appears on thedisplay, then press the RESETbutton to scroll through the followingmodes:. ENGLISH (default). METRIC
If you choose ENGLISH, allinformation will be displayed inEnglish units.
If you choose METRIC, allinformation will be displayed inmetric units.
When the mode you want isselected, press the OPTION buttonto set your choice and advance tothe next personal option.
Black plate (57,1)Chevrolet Corvette Owner Manual - 2011
Instruments and Controls 5-57
Auto Memory Recall (AutomaticTransmission only): If yourautomatic transmission vehicle hasthe memory package, you may havethis option. This option allows thedriver seat, the telescopic steeringcolumn, if your vehicle has thisfeature, and the outside rearviewmirrors to automatically move to thecurrent driver's set position whenthe engine starts.
Press the OPTION button untilAUTO MEMORY RECALL appearson the display, then press theRESET button to scroll through thefollowing modes:. YES. NO (default)
If you choose YES, the driver seat,the outside rearview mirrors and thetelescopic steering column, if yourvehicle has this feature, positionsare recalled when you turn theignition on.
If you choose NO, this option willturn off.
When the mode you want isselected, press the OPTION buttonto set your choice and advance tothe next personal option.
Auto Exit Recall: If your vehiclehas the memory package, you mayhave this option. This option allowsthe driver seat and telescopicsteering column, if your vehicle hasthis feature, to automatically moveto the current driver's exit positionwhen one of the following occurs:. The vehicle is turned off or in
Retained Accessory Power(RAP) or accessory mode andthe driver door is opened.
. The vehicle is turned off or inRAP and the unlock button onthe RKE transmitter is pressed.
In order for the Auto Exit Recallfeature to work on an automatictransmission vehicle, the vehiclemust be in P (Park). On a manualtransmission vehicle, the parkingbrake must be set.
Press the OPTION button untilAUTO EXIT RECALL appears onthe display, then press the RESETbutton to scroll through the followingmodes:. YES. NO (default)
If you choose YES, when you turnthe ignition off and open the driverdoor or press the unlock button onthe RKE transmitter, the seat andthe telescopic steering wheel, if yourvehicle has this feature, will returnto their stored exit positions for aneasy exit or an easy entrance whenreturning to the vehicle.
The seat and steering wheel willonly return to the stored drivingposition if you press the appropriatememory button or activate the AutoMemory Recall feature.
If you choose NO, this option willturn off.
Black plate (58,1)Chevrolet Corvette Owner Manual - 2011
5-58 Instruments and Controls
When the mode you want isselected, press the OPTION buttonto set your choice and advance tothe next personal option.
Approach Lights: This optionbriefly turns on the parking lamps,the high-beam headlamps, and theback-up lamps during low lightperiods when the RKE transmitteris used to unlock the vehicle.
Press the OPTION button untilAPPROACH LIGHTS appears onthe display, then press the RESETbutton to scroll through the followingmodes:. OFF. ON (default)
If you choose OFF, this option willturn off.
If you choose ON, the parkinglamps, the high-beam headlamps,and the back-up lamps will comeon for 20 seconds during low lightperiods when all of the followingoccur:. You press the unlock button on
the RKE transmitter.. Both of the doors are closed.. The vehicle is off or in RAP.
The lamps remain on for 20 secondsor until a door is opened, the lockbutton on the RKE transmitter ispressed, or the vehicle is no longeroff or in RAP.
See Remote Keyless Entry (RKE)System on page 2‑3 for moreinformation.
When the mode you want isselected, press the OPTION buttonto set your choice and advance tothe next personal option.
Twilight Delay: This optionallows you to set the amount of timeyou want the parking lamps andhigh-beam headlamps to remain onafter you exit the vehicle. This willoccur when the vehicle is off or inRAP and the headlamps are on dueto the automatic headlamp system.The parking lamps and high-beamheadlamps will remain on until thedriver selected time expires, theexterior lamp control is activated,or the vehicle is no longer off orin RAP.
Black plate (59,1)Chevrolet Corvette Owner Manual - 2011
Instruments and Controls 5-59
Press the OPTION button untilTWILIGHT DELAY appears on thedisplay, then press the RESETbutton to scroll through the followingmodes:. OFF. 15 S. 30 S (default). 90 S
If you choose OFF, this option willturn off.
If you choose 15 S, the twilightdelay time will be set to 15 seconds.
If you choose 30 S, the twilightdelay time will be set to 30 seconds.
If you choose 90 S, the twilightdelay time will be set to 90 seconds.
When the mode you want isselected, press the OPTION buttonto set your choice and advance tothe next personal option.
Flash at Unlock: This optionactivates the front and rear turnsignals for two short flashes whenthe unlock or hatch/trunk button onthe RKE transmitter is pressed. Thiswill only occur when the vehicleis off.
Press the OPTION button untilFLASH AT UNLOCK appears onthe display, then press the RESETbutton to scroll through the followingmodes:. YES (default). NO
If you choose YES, the front andrear turn signals will flash twicewhen you press the unlock button orthe hatch/trunk button on the RKEtransmitter.
If you choose NO, this option willturn off.
When the mode you want isselected, press the OPTION buttonto set your choice and advance tothe next personal option.
Flash at Lock: This optionactivates the front and rear turnsignals for one long flash when thelock button on the RKE transmitteris pressed. This will only occurwhen the vehicle is off. If the lockbutton on the RKE transmitter ispressed again within five seconds,the horn will sound regardless ofwhich setting you have selected.
Press the OPTION button untilFLASH AT LOCK appears on thedisplay, then press the RESETbutton to scroll through the followingmodes:. YES (default). NO
If you choose YES, the front andrear turn signals will flash oncewhen you press the lock button onthe RKE transmitter.
If you choose NO, this option willturn off.
Black plate (60,1)Chevrolet Corvette Owner Manual - 2011
5-60 Instruments and Controls
When the mode you want isselected, press the OPTION buttonto set your choice and advance tothe next personal option.
FOB Reminder: This optionsounds the horn three times whenthe driver door is closed and there isa RKE transmitter inside the interiorof the vehicle. This will only occurwhen the vehicle is off.
Press the OPTION button until FOBREMINDER appears on the display,then press the RESET button toscroll through the following modes:. YES. NO (default)
If you choose YES, the horn willsound three times when a RKEtransmitter is inside of the vehiclewhile the ignition is turned offand the driver door is closed.
If you choose NO, this option willturn off.
When the mode you want isselected, press the OPTION buttonto set your choice and advance tothe next personal option.
Passive Door Locking: Thisoption allows you to select whetherthe doors automatically lock duringnormal vehicle exit. When theignition is turned off and all doorsbecome closed, the vehicle willdetermine how many RKEtransmitters remain in the vehicleinterior. If at least one RKEtransmitter has been removed fromthe interior of the vehicle, the doorswill lock after a short delay.
For example, if there are two RKEtransmitters in the vehicle and oneis removed, the other will be lockedin. The RKE transmitter locked inthe vehicle can still be used to startthe vehicle or unlock the doors,if needed. A person approaching theoutside of the locked vehicle without
an authorized RKE transmitter,however, will not be able to openthe door, even with a transmitter inthe vehicle.
You may temporarily disable thepassive door locking feature bypressing the door unlock switch forthree seconds on an open door.Passive door locking will thenremain disabled until a door lockswitch is pressed or until the powermode transitions from the offpower mode.
Press the OPTION button untilPASSIVE DOOR LOCKING appearson the display, then press theRESET button to scroll through thefollowing modes:. OFF (default). SILENT. HORN
If you choose OFF, this option willturn off.
Black plate (61,1)Chevrolet Corvette Owner Manual - 2011
Instruments and Controls 5-61
If you choose SILENT, the doors willautomatically lock a short time afteryou remove a RKE transmitter fromthe interior of the vehicle and closeboth doors.
If you choose HORN, the doors willautomatically lock and the horn willsound a short time after you removea RKE transmitter from the interiorof the vehicle and close both doors.
If you are parking in a quiet areaand do not want the horn to soundwhen the doors lock, press the lockbutton on the RKE transmitterimmediately after removing it fromthe interior and closing the doors.This will lock the doors and cancelthe passive locking for this ignitioncycle.
When the mode you want isselected, press the OPTION buttonto set your choice and advance tothe next personal option.
Passive Door Unlock: This optionallows you to select which doorswill automatically unlock when youapproach and open the driver doorwith the RKE transmitter. See DoorLocks on page 2‑8 for moreinformation.
Press the OPTION button untilPASSIVE DOOR UNLOCK appearson the display, then press theRESET button to scroll through thefollowing modes:. DRIVER. BOTH (default)
If you choose DRIVER, only thedriver door will automatically unlockwhen you approach and open thedriver door with the RKE transmitter.
If you choose BOTH, both doors willautomatically unlock when youapproach and open the driver doorwith the RKE transmitter.
Auto Unlock: This option allowsyou to select whether the driverdoor, both doors, or neither doorautomatically unlocks when the shiftlever is moved into P (Park) forautomatic transmission vehicles orwhen the ignition is turned off or isin RAP for manual transmissionvehicles.
Press the OPTION button untilAUTO UNLOCK appears on thedisplay, then press the RESETbutton to scroll through the followingmodes:. OFF. DRIVER. BOTH (default)
If you choose OFF, this option willturn off.
Black plate (62,1)Chevrolet Corvette Owner Manual - 2011
5-62 Instruments and Controls
If you choose DRIVER, onautomatic transmission vehicles, thedriver door will automatically unlockwhen the shift lever is moved intoP (Park). On manual transmissionvehicles, the driver door willautomatically unlock when theignition is turned off or is in RAP.
If you choose BOTH, on automatictransmission vehicles, both doorswill automatically unlock when theshift lever is moved into P (Park).On manual transmission vehicles,both doors will automatically unlockwhen the ignition is turned off or isin RAP.
When the mode you want isselected, press the OPTION buttonto set your choice and advance tothe next personal option.
Language: This option allows youto select the language the DIC, theHead-Up Display (HUD), if yourvehicle has this feature, and theradio uses to display messages.Each language mode will bedisplayed in its own language.
For example, English will bedisplayed as ENGLISH, Spanish asESPANOL, etc. If your vehicle hasthe navigation system, you will nothave the Japanese language mode.
Press the OPTION button untilLANGUAGE appears on the display,then press the RESET button toscroll through the following modes:. ENGLISH (default). DEUTSCH (German). FRANCAIS (French). ITALIANO (Italian). ESPANOL (Spanish)
If you choose a language thatyou do not understand, press theOPTION and RESET buttons forfive seconds. The DIC will begindisplaying all of the variouslanguages one by one for as longas the buttons are pressed. Whenthe desired language is displayed,release the buttons and the DIC willset to this language.
When the mode you want isselected, press the OPTION buttonto set your choice and advance tothe next personal option.
Personalize Name: This optionallows you to type in a name orgreeting that will appear on the DICdisplay whenever the correspondingRKE transmitter (1 or 2) is used orone of the memory buttons (1 or 2)located on the driver door ispressed.
Press the OPTION button untilPERSONALIZE NAME appears onthe display, then press the RESETbutton to scroll through the followingmodes:. YES. NO (default)
If you choose YES, you can type ina name that will appear on the DICdisplay.
Black plate (63,1)Chevrolet Corvette Owner Manual - 2011
Instruments and Controls 5-63
To program a name, use thefollowing procedure:
1. Enter the PERSONAL OPTIONSmenu and select the drivernumber (1 or 2) that you wouldlike to program by following theinstructions listed previouslyunder “Entering the PersonalOptions Menu”.
2. Press the OPTION button untilthe PERSONALIZE NAMEoption appears on the display.
3. Select YES underPERSONALIZE NAME bypressing the RESET button.
4. Press the OPTION button anda cursor will display whereyou can insert a letter.
5. Press the OPTION buttonagain until the letter you wantis displayed. To scroll throughthe letters faster and withouta beeping noise, keep theOPTIONS button depressed.
There are alpha/numericcharacters and a blank spaceavailable.
6. Press the RESET button toselect the letter of your choiceand proceed on to the nextspace to the right.
If you make a mistake and wouldlike to clear or replace a letter,perform the following steps:
6.1. Press the RESET button toreach the letter you wouldlike to change.
6.2. Press the OPTION buttonto scroll through the letterchoices.
6.3. Press the RESET buttonto select the letter andproceed on to the nextspace to the right.
7. Repeat Steps 5 and 6 until thename or greeting you want iscomplete. After the name or
greeting is complete, keeppressing the RESET button untilthe display turns blank andexits out of this option. You canprogram up to 20 characters.
If you choose NO, this option willturn off.
If a customized name or greetingis not programmed, the DIC displaywill show Driver 1 or Driver 2to correspond with either thenumber on the back of the RKEtransmitter (1 or 2) being used or tothe memory button (1 or 2) that ispressed.
PERSONALIZE NAME is thelast option available to program inthe PERSONAL OPTIONS menu.Pressing the OPTION button afterthis setting will exit you from thePERSONAL OPTIONS menu.The last item you were in prior toentering PERSONAL OPTIONS willthen display on the DIC.
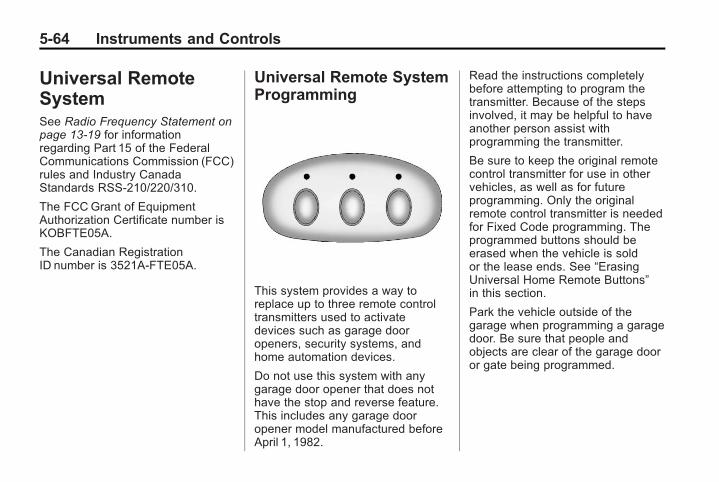
Black plate (64,1)Chevrolet Corvette Owner Manual - 2011
5-64 Instruments and Controls
Universal RemoteSystemSee Radio Frequency Statement onpage 13‑19 for informationregarding Part 15 of the FederalCommunications Commission (FCC)rules and Industry CanadaStandards RSS-210/220/310.
The FCCGrant of EquipmentAuthorization Certificate number isKOBFTE05A.
The Canadian RegistrationID number is 3521A-FTE05A.
Universal Remote SystemProgramming
This system provides a way toreplace up to three remote controltransmitters used to activatedevices such as garage dooropeners, security systems, andhome automation devices.
Do not use this system with anygarage door opener that does nothave the stop and reverse feature.This includes any garage dooropener model manufactured beforeApril 1, 1982.
Read the instructions completelybefore attempting to program thetransmitter. Because of the stepsinvolved, it may be helpful to haveanother person assist withprogramming the transmitter.
Be sure to keep the original remotecontrol transmitter for use in othervehicles, as well as for futureprogramming. Only the originalremote control transmitter is neededfor Fixed Code programming. Theprogrammed buttons should beerased when the vehicle is soldor the lease ends. See “ErasingUniversal Home Remote Buttons”in this section.
Park the vehicle outside of thegarage when programming a garagedoor. Be sure that people andobjects are clear of the garage dooror gate being programmed.
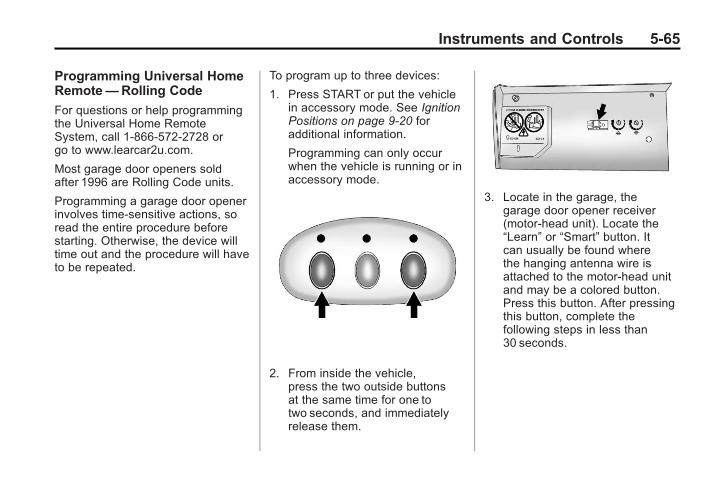
Black plate (65,1)Chevrolet Corvette Owner Manual - 2011
Instruments and Controls 5-65
Programming Universal HomeRemote—Rolling Code
For questions or help programmingthe Universal Home RemoteSystem, call 1-866-572-2728 orgo to www.learcar2u.com.
Most garage door openers soldafter 1996 are Rolling Code units.
Programming a garage door openerinvolves time-sensitive actions, soread the entire procedure beforestarting. Otherwise, the device willtime out and the procedure will haveto be repeated.
To program up to three devices:
1. Press START or put the vehiclein accessory mode. See IgnitionPositions on page 9‑20 foradditional information.
Programming can only occurwhen the vehicle is running or inaccessory mode.
2. From inside the vehicle,press the two outside buttonsat the same time for one totwo seconds, and immediatelyrelease them.
3. Locate in the garage, thegarage door opener receiver(motor-head unit). Locate the“Learn” or “Smart” button. Itcan usually be found wherethe hanging antenna wire isattached to the motor-head unitand may be a colored button.Press this button. After pressingthis button, complete thefollowing steps in less than30 seconds.
Black plate (66,1)Chevrolet Corvette Owner Manual - 2011
5-66 Instruments and Controls
4. Immediately return to thevehicle. Press and hold theUniversal Home Remote buttonthat will be used to control thegarage door until the garagedoor moves. The indicator light,above the selected button,should slowly blink. This buttonmay need to be held for up to20 seconds.
5. Immediately, within one second,release the button when thegarage door moves. Theindicator light blinks rapidly untilprogramming is complete.
6. Press and release the samebutton again. The garage doorshould move, confirming thatprogramming is successful andcomplete.
To program another Rolling Codedevice such as an additional garagedoor opener, a security device,or home automation device, repeatSteps 1 through 6, choosing adifferent function button in Step 4than what was used for the garagedoor opener.
If these instructions do not work, thegarage door opener is probably aFixed Code unit. Follow theprogramming instructions that followfor a Fixed Code garage dooropener.
Programming Universal HomeRemote— Fixed Code
For questions or help programmingthe Universal Home RemoteSystem, call 1-866-572-2728 orgo to www.learcar2u.com.
Most garage door openers soldbefore 1996 are Fixed Code units.
Programming a garage door openerinvolves time-sensitive actions, soread the entire procedure beforestarting. Otherwise, the device willtime out and the procedure will haveto be repeated.
To program up to three devices:
1. Press START or put the vehiclein accessory mode. See IgnitionPositions on page 9‑20 foradditional information.
Programming can only occurwhen the vehicle is running or inaccessory mode.
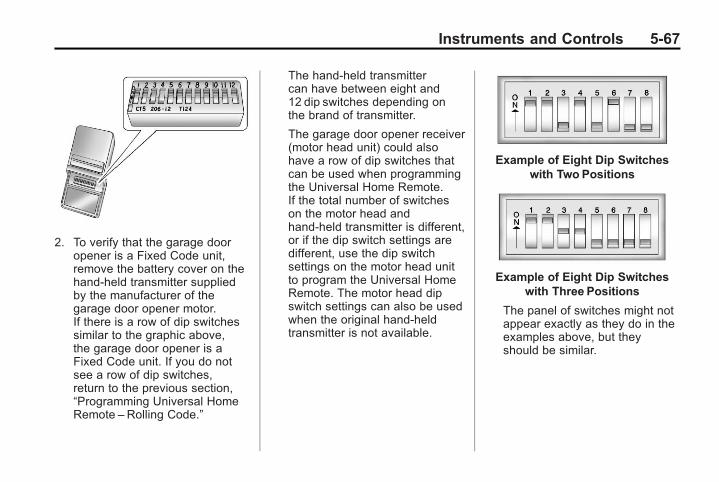
Black plate (67,1)Chevrolet Corvette Owner Manual - 2011
Instruments and Controls 5-67
2. To verify that the garage dooropener is a Fixed Code unit,remove the battery cover on thehand-held transmitter suppliedby the manufacturer of thegarage door opener motor.If there is a row of dip switchessimilar to the graphic above,the garage door opener is aFixed Code unit. If you do notsee a row of dip switches,return to the previous section,“Programming Universal HomeRemote –Rolling Code.”
The hand-held transmittercan have between eight and12 dip switches depending onthe brand of transmitter.
The garage door opener receiver(motor head unit) could alsohave a row of dip switches thatcan be used when programmingthe Universal Home Remote.If the total number of switcheson the motor head andhand-held transmitter is different,or if the dip switch settings aredifferent, use the dip switchsettings on the motor head unitto program the Universal HomeRemote. The motor head dipswitch settings can also be usedwhen the original hand-heldtransmitter is not available.
Example of Eight Dip Switcheswith Two Positions
Example of Eight Dip Switcheswith Three Positions
The panel of switches might notappear exactly as they do in theexamples above, but theyshould be similar.
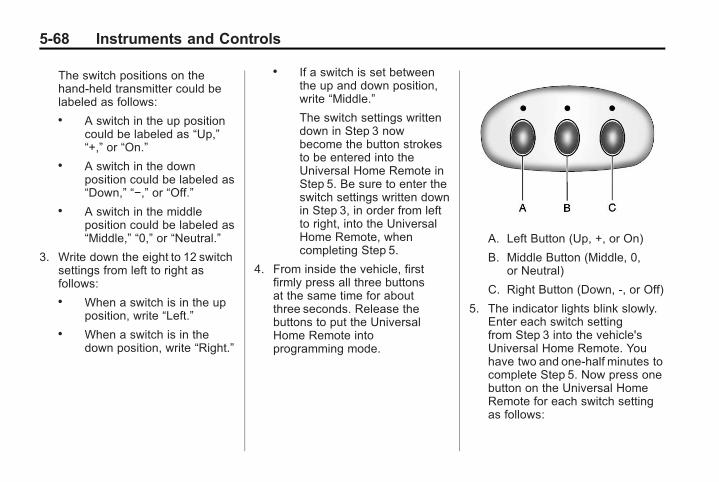
Black plate (68,1)Chevrolet Corvette Owner Manual - 2011
5-68 Instruments and Controls
The switch positions on thehand-held transmitter could belabeled as follows:. A switch in the up position
could be labeled as “Up,”“+,” or “On.”
. A switch in the downposition could be labeled as“Down,” “−,” or “Off.”
. A switch in the middleposition could be labeled as“Middle,” “0,” or “Neutral.”
3. Write down the eight to 12 switchsettings from left to right asfollows:. When a switch is in the up
position, write “Left.”. When a switch is in the
down position, write “Right.”
. If a switch is set betweenthe up and down position,write “Middle.”
The switch settings writtendown in Step 3 nowbecome the button strokesto be entered into theUniversal Home Remote inStep 5. Be sure to enter theswitch settings written downin Step 3, in order from leftto right, into the UniversalHome Remote, whencompleting Step 5.
4. From inside the vehicle, firstfirmly press all three buttonsat the same time for aboutthree seconds. Release thebuttons to put the UniversalHome Remote intoprogramming mode.
A. Left Button (Up, +, or On)
B. Middle Button (Middle, 0,or Neutral)
C. Right Button (Down, -, or Off)
5. The indicator lights blink slowly.Enter each switch settingfrom Step 3 into the vehicle'sUniversal Home Remote. Youhave two and one-half minutes tocomplete Step 5. Now press onebutton on the Universal HomeRemote for each switch settingas follows:
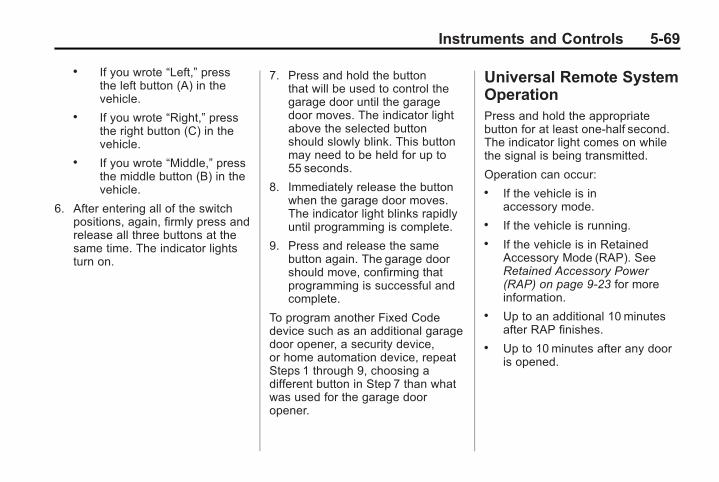
Black plate (69,1)Chevrolet Corvette Owner Manual - 2011
Instruments and Controls 5-69
. If you wrote “Left,” pressthe left button (A) in thevehicle.
. If you wrote “Right,” pressthe right button (C) in thevehicle.
. If you wrote “Middle,” pressthe middle button (B) in thevehicle.
6. After entering all of the switchpositions, again, firmly press andrelease all three buttons at thesame time. The indicator lightsturn on.
7. Press and hold the buttonthat will be used to control thegarage door until the garagedoor moves. The indicator lightabove the selected buttonshould slowly blink. This buttonmay need to be held for up to55 seconds.
8. Immediately release the buttonwhen the garage door moves.The indicator light blinks rapidlyuntil programming is complete.
9. Press and release the samebutton again. The garage doorshould move, confirming thatprogramming is successful andcomplete.
To program another Fixed Codedevice such as an additional garagedoor opener, a security device,or home automation device, repeatSteps 1 through 9, choosing adifferent button in Step 7 than whatwas used for the garage dooropener.
Universal Remote SystemOperationPress and hold the appropriatebutton for at least one-half second.The indicator light comes on whilethe signal is being transmitted.
Operation can occur:. If the vehicle is in
accessory mode.. If the vehicle is running.. If the vehicle is in Retained
Accessory Mode (RAP). SeeRetained Accessory Power(RAP) on page 9‑23 for moreinformation.
. Up to an additional 10 minutesafter RAP finishes.
. Up to 10 minutes after any dooris opened.
Black plate (70,1)Chevrolet Corvette Owner Manual - 2011
5-70 Instruments and Controls
Reprogramming UniversalHome Remote Buttons
Any of the three buttons can bereprogrammed by repeating theinstructions.
Erasing Universal HomeRemote Buttons
The programmed buttons should beerased when the vehicle is sold orthe lease ends.
To erase either Rolling Code orFixed Code on the Universal HomeRemote device:
1. Press and hold the two outsidebuttons at the same time forapproximately 20 seconds, untilthe indicator lights, locateddirectly above the buttons, beginto blink rapidly.
2. Once the indicator lights begin toblink, release both buttons. Thecodes from all buttons areerased.
For help or information on theUniversal Home Remote System,call the customer assistance phonenumber under Customer AssistanceOffices (U.S. and Canada) onpage 13‑5 or Customer AssistanceOffices (Mexico) on page 13‑5.
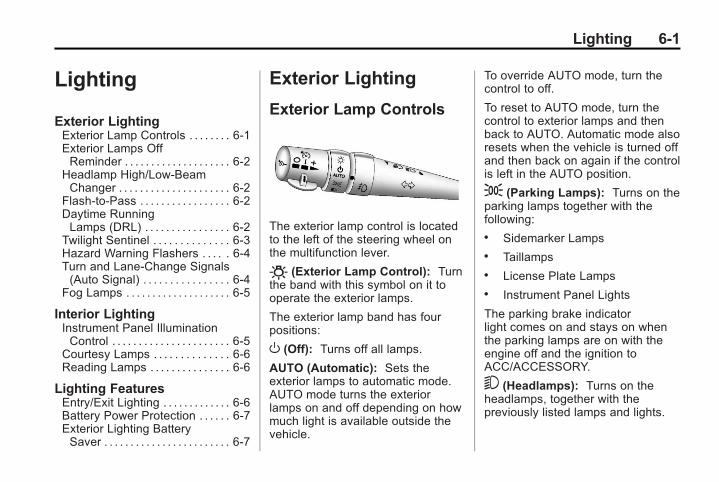
Black plate (1,1)Chevrolet Corvette Owner Manual - 2011
Lighting 6-1
Lighting
Exterior LightingExterior Lamp Controls . . . . . . . . 6-1Exterior Lamps OffReminder . . . . . . . . . . . . . . . . . . . . 6-2
Headlamp High/Low-BeamChanger . . . . . . . . . . . . . . . . . . . . . 6-2
Flash-to-Pass . . . . . . . . . . . . . . . . . 6-2Daytime RunningLamps (DRL) . . . . . . . . . . . . . . . . 6-2
Twilight Sentinel . . . . . . . . . . . . . . 6-3Hazard Warning Flashers . . . . . 6-4Turn and Lane-Change Signals(Auto Signal) . . . . . . . . . . . . . . . . 6-4
Fog Lamps . . . . . . . . . . . . . . . . . . . . 6-5
Interior LightingInstrument Panel IlluminationControl . . . . . . . . . . . . . . . . . . . . . . 6-5
Courtesy Lamps . . . . . . . . . . . . . . 6-6Reading Lamps . . . . . . . . . . . . . . . 6-6
Lighting FeaturesEntry/Exit Lighting . . . . . . . . . . . . . 6-6Battery Power Protection . . . . . . 6-7Exterior Lighting BatterySaver . . . . . . . . . . . . . . . . . . . . . . . . 6-7
Exterior Lighting
Exterior Lamp Controls
The exterior lamp control is locatedto the left of the steering wheel onthe multifunction lever.
O (Exterior Lamp Control): Turnthe band with this symbol on it tooperate the exterior lamps.
The exterior lamp band has fourpositions:
O (Off): Turns off all lamps.
AUTO (Automatic): Sets theexterior lamps to automatic mode.AUTO mode turns the exteriorlamps on and off depending on howmuch light is available outside thevehicle.
To override AUTO mode, turn thecontrol to off.
To reset to AUTO mode, turn thecontrol to exterior lamps and thenback to AUTO. Automatic mode alsoresets when the vehicle is turned offand then back on again if the controlis left in the AUTO position.
; (Parking Lamps): Turns on theparking lamps together with thefollowing:. Sidemarker Lamps. Taillamps. License Plate Lamps. Instrument Panel Lights
The parking brake indicatorlight comes on and stays on whenthe parking lamps are on with theengine off and the ignition toACC/ACCESSORY.
5 (Headlamps): Turns on theheadlamps, together with thepreviously listed lamps and lights.
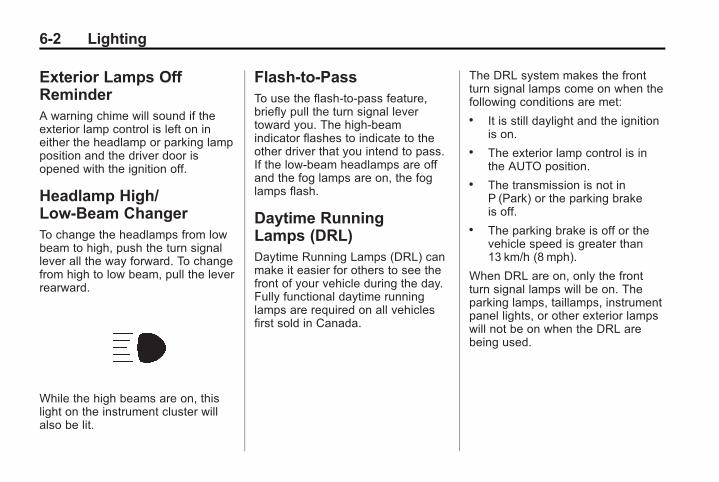
Black plate (2,1)Chevrolet Corvette Owner Manual - 2011
6-2 Lighting
Exterior Lamps OffReminderA warning chime will sound if theexterior lamp control is left on ineither the headlamp or parking lampposition and the driver door isopened with the ignition off.
Headlamp High/Low-Beam ChangerTo change the headlamps from lowbeam to high, push the turn signallever all the way forward. To changefrom high to low beam, pull the leverrearward.
While the high beams are on, thislight on the instrument cluster willalso be lit.
Flash-to-PassTo use the flash-to-pass feature,briefly pull the turn signal levertoward you. The high-beamindicator flashes to indicate to theother driver that you intend to pass.If the low-beam headlamps are offand the fog lamps are on, the foglamps flash.
Daytime RunningLamps (DRL)Daytime Running Lamps (DRL) canmake it easier for others to see thefront of your vehicle during the day.Fully functional daytime runninglamps are required on all vehiclesfirst sold in Canada.
The DRL system makes the frontturn signal lamps come on when thefollowing conditions are met:. It is still daylight and the ignition
is on.. The exterior lamp control is in
the AUTO position.. The transmission is not in
P (Park) or the parking brakeis off.
. The parking brake is off or thevehicle speed is greater than13 km/h (8 mph).
When DRL are on, only the frontturn signal lamps will be on. Theparking lamps, taillamps, instrumentpanel lights, or other exterior lampswill not be on when the DRL arebeing used.

Black plate (3,1)Chevrolet Corvette Owner Manual - 2011
Lighting 6-3
When it is dark enough outside, thefront turn signal lamps turn off andthe normal low-beam headlampsturn on.
When it is bright enough outside,the regular lamps go off, and thefront turn signal lamps will take over.If the vehicle is started in a darkgarage, the automatic headlampsystem comes on immediately.Once the vehicle leaves the garage,it takes approximately one minutefor the automatic headlamp systemto change to DRL if it is lightoutside. During that delay, theinstrument panel cluster may notbe as bright as usual. Make surethe instrument panel brightnessknob is in the full bright position.See Instrument Panel IlluminationControl on page 6‑5 for moreinformation.
If it is dark enough outside andthe exterior lamp control is off, aHEADLAMPS SUGGESTEDmessage will display on the DriverInformation Center (DIC). See LampMessages on page 5‑44.
Turning the exterior lamp controlto off a second time, or turning onthe headlamps will remove theHEADLAMPS SUGGESTEDmessage in the DIC. If the parkinglamps or the fog lamps were turnedon instead, the HEADLAMPSSUGGESTED message willcontinue to be displayed.
The regular headlamp systemshould be turned on when needed.
To turn off the DRL, turn the exteriorlamp control to the off position orshift into P (Park). The DRL will stayoff until the control is toggled againor the vehicle is shifted out ofP (Park).
This procedure applies only tovehicles first sold in the UnitedStates.
Twilight SentinelTwilight Sentinel® is an automaticheadlamp system. When activated,this feature turns your headlampsand parking lamps on and off bysensing how dark it is outside.
Be sure not to cover the light sensoron the top of the instrument panel.
AUTO: Activates the system.
If the band is already in the AUTOposition when you start your vehicle,Twilight Sentinel is automaticallyenabled.
If it is dark outside, your vehicleheadlamps and parking lamps willturn on automatically.
Once it is bright enough outside, theheadlamps and parking lamps willautomatically turn back off.
Twilight Sentinel may also turn onwhen you drive through a dimlylit area.
Once you leave the dimly lit area, itmay take about one minute beforethe Twilight Sentinel turns off.
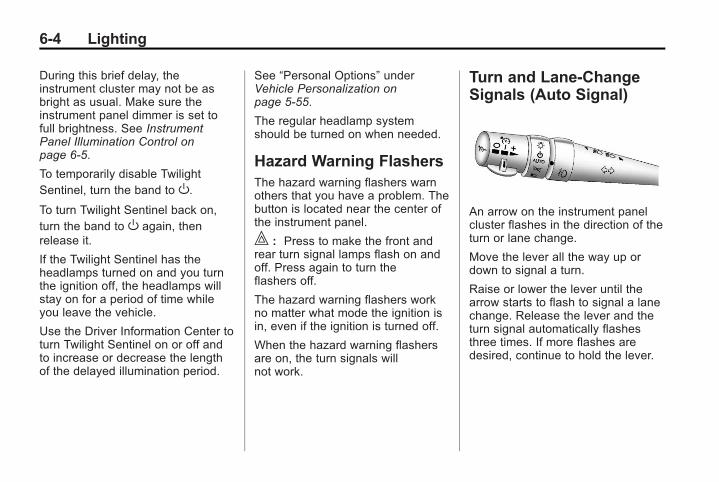
Black plate (4,1)Chevrolet Corvette Owner Manual - 2011
6-4 Lighting
During this brief delay, theinstrument cluster may not be asbright as usual. Make sure theinstrument panel dimmer is set tofull brightness. See InstrumentPanel Illumination Control onpage 6‑5.
To temporarily disable TwilightSentinel, turn the band to O.To turn Twilight Sentinel back on,turn the band to O again, thenrelease it.
If the Twilight Sentinel has theheadlamps turned on and you turnthe ignition off, the headlamps willstay on for a period of time whileyou leave the vehicle.
Use the Driver Information Center toturn Twilight Sentinel on or off andto increase or decrease the lengthof the delayed illumination period.
See “Personal Options” underVehicle Personalization onpage 5‑55.
The regular headlamp systemshould be turned on when needed.
Hazard Warning FlashersThe hazard warning flashers warnothers that you have a problem. Thebutton is located near the center ofthe instrument panel.
| : Press to make the front andrear turn signal lamps flash on andoff. Press again to turn theflashers off.
The hazard warning flashers workno matter what mode the ignition isin, even if the ignition is turned off.
When the hazard warning flashersare on, the turn signals willnot work.
Turn and Lane-ChangeSignals (Auto Signal)
An arrow on the instrument panelcluster flashes in the direction of theturn or lane change.
Move the lever all the way up ordown to signal a turn.
Raise or lower the lever until thearrow starts to flash to signal a lanechange. Release the lever and theturn signal automatically flashesthree times. If more flashes aredesired, continue to hold the lever.
Black plate (5,1)Chevrolet Corvette Owner Manual - 2011
Lighting 6-5
The lever returns to its startingposition when it is released.
If after signaling a turn or lanechange the arrows flash rapidly ordo not come on, a signal bulb maybe burned out.
Have the bulbs replaced. If the bulbis not burned out, check the fuse.See Fuses and Circuit Breakers onpage 10‑51.
Turn Signal on Chime
A chime sounds if the turn signalhas been on for more than 1.2 km(0.75 miles) of driving.
If you need to leave the turnsignal on for more than 1.2 km(0.75 miles), turn off the signal andthen turn it back on.
Fog LampsUse fog lamps for better vision infoggy or misty conditions.
The fog lamps control is located onthe multifunction lever next to theexterior lamp control.
# (Fog Lamps): Turning the bandto this position will turn the foglamps on.
When you turn the fog lamps on,the fog lamp light will appear on theinstrument panel cluster to indicatethat the fog lamps and the parkinglamps are on.
If you turn the high-beamheadlamps on, the fog lamps willturn off. They will turn on againwhen you switch to low-beamheadlamps.
The ignition must be on for the foglamps to operate.
Some localities have laws thatrequire the headlamps to be onalong with the fog lamps.
Interior Lighting
Instrument PanelIllumination Control
The knob for this feature is locatedon the left side of the instrumentpanel.
Push the knob in to turn on theinterior lights.

Black plate (6,1)Chevrolet Corvette Owner Manual - 2011
6-6 Lighting
Turn and hold the knobclockwise to brighten the lightsor counterclockwise to dim them.During the day, this knob will adjustthe instrument panel brightness andat night will adjust all interiorlighting.
Be sure not to have this knobturned all the way down with thelamps on during the day. The DriverInformation Center (DIC) may not bevisible.
Courtesy LampsWhen any door or the hatch/trunklid is opened, the interior lamps willgo on unless it is bright outside.
You can also turn the courtesylamps on and off by pressing theinstrument panel brightness knob.
Reading LampsThe inside rearview mirror includestwo reading lamps. The lamps willgo on when a door is opened. Whenthe doors are closed, press eachlamp switch to turn them onindividually.
Lighting Features
Entry/Exit LightingWith entry lighting, the interiorlamps will come on when enteringthe vehicle. To illuminate your exit,the interior lamps come on for about20 seconds when the engine isturned off .
To turn the entry and exit lighting off,quickly turn the courtesy lamps onand off by pressing the instrumentpanel brightness knob.
Black plate (7,1)Chevrolet Corvette Owner Manual - 2011
Lighting 6-7
Battery Power ProtectionThis vehicle has a feature to helpprevent the battery from beingdrained in case any of the followinglamps are left on: the underhoodlamp, if your vehicle has thisfeature, vanity mirror lamps, cargolamps, reading lamps, console,or glove box lamps. If any of theselamps are left on, they willautomatically time-out after about10 minutes. To reset it, all of theabove lamps must be turned off orthe ignition key on.
Exterior Lighting BatterySaverIf the manual parking lamps orheadlamps have been left on, theexterior lamps will turn off as soonas the ignition is turned off orRetained Accessory Power (RAP) isactive. This protects againstdraining the battery in case youhave accidentally left the headlampsor parking lamps on. The batterysaver does not work if theheadlamps are turned on after theignition switch is turned to off.
If you need to leave the lamps on,use the exterior lamp control to turnthe lamps back on.

Black plate (8,1)Chevrolet Corvette Owner Manual - 2011
6-8 Lighting
2 NOTES
Black plate (1,1)Chevrolet Corvette Owner Manual - 2011
Infotainment System 7-1
InfotainmentSystem
IntroductionInfotainment . . . . . . . . . . . . . . . . . . . 7-1Theft-Deterrent Feature . . . . . . . 7-2Operation . . . . . . . . . . . . . . . . . . . . . 7-2
RadioAM-FM Radio . . . . . . . . . . . . . . . . . 7-5Satellite Radio . . . . . . . . . . . . . . . . 7-8Radio Reception . . . . . . . . . . . . . 7-10Diversity Antenna System . . . . 7-11Satellite Radio Antenna . . . . . . 7-11
Audio PlayersCD Player . . . . . . . . . . . . . . . . . . . . 7-11Auxiliary Devices . . . . . . . . . . . . 7-17
PhoneBluetooth . . . . . . . . . . . . . . . . . . . . 7-18
Introduction
InfotainmentDetermine which radio the vehiclehas and read the following pages tobecome familiar with its features.
{ WARNING
Taking your eyes off the roadfor extended periods couldcause a crash resulting in injuryor death to you or others. Donot give extended attention toentertainment tasks while driving.
This system provides access tomany audio and non‐audio listings.
To minimize taking your eyes off theroad while driving, do the followingwhile the vehicle is parked:. Become familiar with the
operation and controls of theaudio system.
. Set up the tone, speakeradjustments, and preset radiostations.
For more information, see DefensiveDriving on page 9‑2.
Notice: Contact your dealerbefore adding any equipment.
Adding audio or communicationequipment could interfere withthe operation of the engine, radio,or other systems, and coulddamage them. Follow federalrules covering mobile radio andtelephone equipment.
The vehicle has RetainedAccessory Power (RAP). With RAP,the audio system can be playedeven after the ignition is turned off.
Black plate (2,1)Chevrolet Corvette Owner Manual - 2011
7-2 Infotainment System
See Retained Accessory Power(RAP) on page 9‑23 for moreinformation.
Navigation/Radio System
For vehicles with a navigation radiosystem, see the separate NavigationSystem Manual.
Theft-Deterrent FeatureTheftLock® is designed todiscourage theft of the vehicle'sradio by learning a portion of theVehicle Identification Number (VIN).The radio does not operate andLOCKED displays if the radio isstolen or moved to a differentvehicle.
When the when the ignition is inthe off position, a blinking red lighton the upper left side of the radioindicates that TheftLock® is armed.
Operation
Single CD Radio Shown, Six-Disc CD Radio Similar
The vehicle has one of these radiosas its audio system.
An indicator light on the upper leftside of the radio flashes when theignition is off, to indicate the theft
deterrent feature is set. For moreinformation, see Theft-DeterrentFeature on page 7‑2.
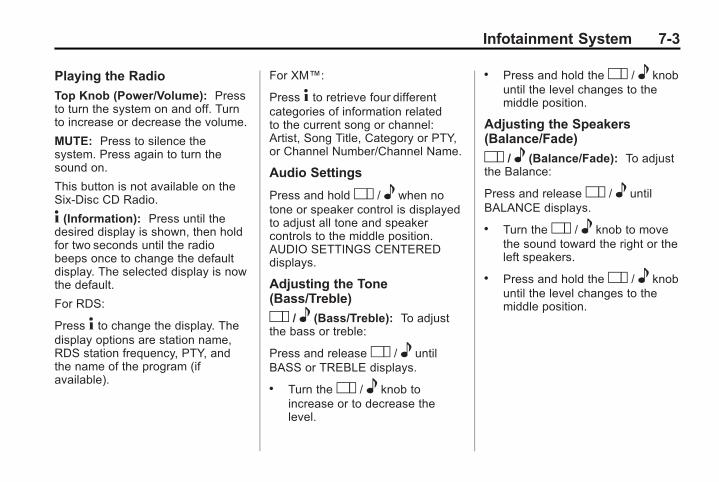
Black plate (3,1)Chevrolet Corvette Owner Manual - 2011
Infotainment System 7-3
Playing the Radio
Top Knob (Power/Volume): Pressto turn the system on and off. Turnto increase or decrease the volume.
MUTE: Press to silence thesystem. Press again to turn thesound on.
This button is not available on theSix-Disc CD Radio.
4 (Information): Press until thedesired display is shown, then holdfor two seconds until the radiobeeps once to change the defaultdisplay. The selected display is nowthe default.
For RDS:
Press 4 to change the display. Thedisplay options are station name,RDS station frequency, PTY, andthe name of the program (ifavailable).
For XM™:
Press 4 to retrieve four differentcategories of information relatedto the current song or channel:Artist, Song Title, Category or PTY,or Channel Number/Channel Name.
Audio Settings
Press and holdO / e when notone or speaker control is displayedto adjust all tone and speakercontrols to the middle position.AUDIO SETTINGS CENTEREDdisplays.
Adjusting the Tone(Bass/Treble)
O / e (Bass/Treble): To adjustthe bass or treble:
Press and releaseO / e untilBASS or TREBLE displays.
. Turn theO / e knob toincrease or to decrease thelevel.
. Press and hold theO / e knobuntil the level changes to themiddle position.
Adjusting the Speakers(Balance/Fade)
O / e (Balance/Fade): To adjustthe Balance:
Press and releaseO / e untilBALANCE displays.
. Turn theO / e knob to movethe sound toward the right or theleft speakers.
. Press and hold theO / e knobuntil the level changes to themiddle position.
Black plate (4,1)Chevrolet Corvette Owner Manual - 2011
7-4 Infotainment System
To adjust the Fade:
Press and releaseO / e untilFADE displays
. Turn theO / e knob to movethe sound toward the front or therear speakers.
. Press and hold theO / e knobuntil the level changes to themiddle position.
AUTO EQ (AutomaticEqualization): The radio savesseparate AUTO EQ settings foreach preset and source.
For vehicles without the Bose soundsystem:. Press AUTO EQ to select
equalization settings designedfor CLASSICAL, POP, ROCK,JAZZ, TALK, and COUNTRY.
. Selecting CUSTOM or changingbass or treble, returns the EQ tothe manual bass and treblesettings.
For vehicles with the Bose soundsystem:. Press AUTO EQ to select
equalization settings from EQ1through EQ6.
. Selecting CUSTOM or changingbass or treble, returns the EQ tothe manual bass and treblesettings.
AUTOn (Automatic Volume):Automatic volume automaticallyadjusts the audio system to makeup for road and wind noise, byincreasing the volume as vehiclespeed increases.
For vehicles without the Bose soundsystem:
1. Set the volume at the desiredlevel.
2. Press AUTOn to selectAUTO VOLUME MIN (minimum),AUTO VOLUME MED (medium),
or AUTO VOLUME MAX(maximum). Each highersetting provides more volumecompensation at faster vehiclespeeds.
3. Press AUTOn until AUTOVOLUME OFF displays to turnautomatic volume off.
For vehicles with the Bose soundsystem:
Vehicles with the Bose soundsystem include Bose AudioPilot®
noise compensation technology.AudioPilot continuously adjuststhe audio system equalization tocompensate for background noise.This feature is most effective atlower radio volume settings wherebackground noise can affect howwell the audio is heard. At highervolume settings, there may be littleor no adjustments by AudioPilot. Foradditional information on AudioPilot,visit bose.com/audiopilot.

Black plate (5,1)Chevrolet Corvette Owner Manual - 2011
Infotainment System 7-5
To use AudioPilot:
1. Set the volume at the desiredlevel.
2. Press AUTOn until AUTOVOLUME ON displays.
3. Press AUTOn until AUTOVOLUME OFF displays to turnoff AudioPilot.
Radio Messages
CAL ERR (Calibration Error):Displays if the radio is no longerconfigured properly for the vehicle.The vehicle must be returned toyour dealer for service.
LOC (Locked): Displays when theTheftLock system has locked up.The vehicle must be returned toyour dealer for service.
If any error occurs repeatedly orcannot be corrected, contact yourdealer.
Radio
AM-FM Radio
Radio Data System (RDS)
RDS features are available for useonly on FM stations that broadcastRDS information. The station nameor call letters display while the radiois tuned to an RDS station.
This system relies upon receivingspecific information from thesestations and works only when theinformation is available. In rarecases, a radio station can broadcastincorrect information that causes theradio features to work improperly.If this happens, contact the radiostation.
With RDS, the radio can:. Seek to stations broadcasting
the selected type ofprogramming.
. Receive announcementsconcerning local and nationalemergencies.
. Display messages from radiostations.
. Seek to stations with trafficannouncements.
. Provide the time of day.
. Provide a program type (PTY)for current programming.
. Provide the name of the programbeing broadcast.
Black plate (6,1)Chevrolet Corvette Owner Manual - 2011
7-6 Infotainment System
RDS Messages
ALERT!: Alert warns of local ornational emergencies. When analert announcement comes on thecurrent radio station, ALERT!displays. The announcement isheard, even if the volume is lowor a CD is playing. If a CD isplaying, play stops during theannouncement. Alertannouncements cannot beturned off.
ALERT! is not affected by tests ofthe emergency broadcast system.This feature is not supported by allRDS stations.
4 (Information): If the currentstation has a message, INFOdisplays. Press 4 to see themessage. The message can displaythe artist, song title, call in phonenumbers, etc.
If the entire message is notdisplayed, parts of the messageappears every three seconds. Toscroll through the message, pressand release 4. A new group ofwords displays after every pressof the button. Once the completemessage has displayed, INFOdisappears from the display untilanother new message is received.The last message can be displayedby pressing this button. The lastmessage is displayed until a newmessage is received or the radio istuned to a different station.
NO INFO displays when a messageis not available from a station.
TRAF (Traffic): TA (traffic) displayswhen the station broadcasts trafficannouncements.
Press TRAF and the radio seeksto a station that broadcasts trafficannouncements. When a station isfound, the radio stops seeking andTA displays. NO TRAFFIC INFOdisplays if a station that broadcaststraffic announcements cannot befound.
Press TRAF to turn off the trafficannouncements if TA is on thedisplay.
The radio plays the trafficannouncement even if the volumeis low. The radio interrupts the playof a CD if the last tuned stationbroadcasts traffic announcements.
This function does not apply to XMSatellite Radio Service.
Black plate (7,1)Chevrolet Corvette Owner Manual - 2011
Infotainment System 7-7
Finding a Station
BAND: Press to switch betweenFM1, FM2, AM, XM1, or XM2.
O /e (Tune): Turn to select radiostations.
© SEEK ¨ : Press to go to theprevious or to the next station andstay there.
The radio only stops at stations witha strong signal.
© SCAN ¨ : Press and hold © or ¨for two seconds until FREQUENCYSCAN displays. The radio goes toa station, plays for a few seconds,then goes on to the next station.Press © or ¨ again to stop scanning.
To scan preset stations:
Press and hold © or ¨ forfour seconds until PRESET SCANdisplays. The radio goes to thenext preset station, plays for a fewseconds, then goes to the nextpreset station. Press © or ¨ againor press one of the pushbuttons tostop scanning presets.
The radio only scans stations witha strong signal.
1–6 (Preset Pushbuttons):Press to play stations that areprogrammed to the radio presetpushbuttons.
Storing Radio Stations
Drivers are encouraged to storeradio station while the vehicle isparked. See Defensive Driving onpage 9‑2. Tune to stored radiostations using the presets, favoritesbutton, and steering wheel controls,if the vehicle has this feature.
Up to 30 stations (six FM1, six FM2,and six AM, six XM1 and six XM2),and equalization settings for eachstation can be programmed on thesix numbered pushbuttons.
To set presets:
1. Tune to a radio station.
2. Press AUTO EQ to select theequalization.
3. Press and hold one of the sixnumbered pushbuttons until theradio beeps once.
4. Repeat the steps for eachpushbutton.
Black plate (8,1)Chevrolet Corvette Owner Manual - 2011
7-8 Infotainment System
Satellite Radio
XM™ Satellite Radio Service
XM is a satellite radio service basedin the 48 contiguous United Statesand 10 Canadian provinces. XMSatellite Radio has a wide variety ofprogramming and commercial-freemusic, coast to coast, and indigital-quality sound. A service feeis required to receive the XMservice. If XM Service needs to bereactivated, the radio will display"No Subscription Please Renew" onchannel XM1. For more information,contact XM at www.xmradio.com or1-800-929-2100 in the U.S., andwww.xmradio.ca or1-877-438-9677 in Canada.
Finding an XM Channel
BAND: Press to switch betweenFM1, FM2, AM, XM1, or XM2.
O /e (Tune): Turn to manuallyselect an XM channel.
t SEEKu : Press to go to theprevious or to the next XM channel.
t SCANu : Press and hold t oru for two seconds untilFREQUENCY SCAN displays. Theradio goes to a channel, plays fora few seconds, then goes on to thenext station. Press t oru againto stop scanning.
To scan preset stations:
Press and hold t oru forfour seconds until PRESET SCANdisplays. The radio goes to thenext preset station, plays for a fewseconds, then goes to the nextpreset station. Press t oru againor press one of the pushbuttons tostop scanning presets.
1–6 (Preset Pushbuttons):Press to play channels that areprogrammed to the radio presetpushbuttons.
Finding a Category (CAT)Station
To select an XM station by category:
1. Press the CAT button. The lastselected category displays.
2. Turn theO / e knob to selecta category.
3. Press t oru to go to acategory's station. SEEKINGCATEGORY displays.
4. To go to another station withinthat category, press the CATbutton to display the category,then press t oru to go toanother station.
If the radio cannot find the desiredcategory, NONE displays and theradio returns to the last stationtuned.
Black plate (9,1)Chevrolet Corvette Owner Manual - 2011
Infotainment System 7-9
SCAN: To scan the stations withina category:
1. Press CAT. The last selectedcategory displays.
2. Turn theO / e knob to selecta category.
3. Press and hold t oru until abeep sounds and SCANCATEGORY displays. The radiobegins scanning the stations inthe category.
4. Press t oru to stop scanning.
Storing XM Channels
Drivers are encouraged to storeXM channels while the vehicle isparked. See Defensive Driving onpage 9‑2. Tune to stored radiostations using the presets, favoritesbutton, and steering wheel controls,if the vehicle has this feature.
Up to 30 stations (six FM1, six FM2,and six AM, six XM1 and six XM2),and equalization settings for eachstation can be programmed on thesix numbered pushbuttons.
To set presets:
1. Tune to a channel.
2. Press AUTO EQ to select theequalization.
3. Press and hold one of the sixnumbered pushbuttons untilthe radio beeps once.
4. Repeat the steps for eachpushbutton.
XM Radio Messages
XL (Explicit LanguageChannels): These channels, or anyothers, can be blocked by calling1-800-929-2100 in the U.S. and1-877-438-9677 in Canada.
Updating: The encryption code inthe receiver is being updated, andno action is required. This processshould take no longer than30 seconds.
No Signal: The system isfunctioning correctly, but the vehicleis in a location that is blocking theXM signal. When the vehicle ismoved into an open area, the signalshould return.
Loading XM: The audio system isacquiring and processing audio andtext data. No action is needed. Thismessage should disappear shortly.
CH Off Air: This channel is notcurrently in service. Tune in toanother channel.
Black plate (10,1)Chevrolet Corvette Owner Manual - 2011
7-10 Infotainment System
CH Unauth: This channel isblocked or cannot be received withyour XM Subscription package.
CH Unavail: This previouslyassigned channel is no longerassigned. Tune to another station.If this station was one of thepresets, choose another stationfor that preset button.
No Info: No artist, song title,category, or text information isavailable at this time on thischannel. The system is workingproperly.
No Subscription Please Renew:XM subscription needs to bereactivated. Contact XM atwww.xmradio.com or call1-800-929-2100 in the U.S.and www.xmradio.ca or call1-877-438-9677 in Canada.
Not Found: There are no channelsavailable for the selected category.The system is working properly.
XM Locked: The XM receiver inthe vehicle may have previouslybeen in another vehicle. For securitypurposes, XM receivers cannot beswapped between vehicles. If thismessage is received after havingthe vehicle serviced, check withyour dealer.
Radio ID: If tuned to channel 0, thismessage will alternate with the XMRadio eight‐digit radio ID label. Thislabel is needed to activate theservice.
Unknown: If this message isreceived when tuned to channel 0,there may be a receiver fault.Consult with your dealer.
Chk XMRcvr: If this message doesnot clear within a short period oftime, the receiver may have a fault.Consult with your dealer.
Radio ReceptionFrequency interference and staticcan occur during normal radioreception if items such as cell phonechargers, vehicle convenienceaccessories, and external electronicdevices are plugged into theaccessory power outlet. If there isinterference or static, unplug theitem from the accessory poweroutlet.
AM
The range for most AM stationsis greater than for FM, especiallyat night. The longer range cancause station frequencies tointerfere with each other. For betterradio reception, most AM radiostations boost the power levelsduring the day, and then reducethese levels during the night. Staticcan also occur when things likestorms and power lines interferewith radio reception. When thishappens, try reducing the treble onthe radio.
Black plate (11,1)Chevrolet Corvette Owner Manual - 2011
Infotainment System 7-11
FM Stereo
FM signals only reach about16 to 65 km (10 to 40 mi). Althoughthe radio has a built-in electroniccircuit that automatically works toreduce interference, some staticcan occur, especially around tallbuildings or hills, causing the soundto fade in and out.
XM™ Satellite Radio Service
XM Satellite Radio Service givesdigital radio reception from coast tocoast in the 48 contiguous UnitedStates, and in Canada. Just aswith FM, tall buildings or hills caninterfere with satellite radio signals,causing the sound to fade in andout. In addition, traveling or standingunder heavy foliage, bridges,garages, or tunnels may cause lossof the XM signal for a period of time.
Cellular Phone Usage
Cellular phone usage may causeinterference with the vehicle's radio.
This interference may occur whenmaking or receiving phone calls,charging the phone's battery,or simply having the phone on. Thisinterference causes an increasedlevel of static while listening to theradio. If static is received whilelistening to the radio, unplug thecellular phone and turn it off.
Diversity Antenna SystemThe AM-FM antenna is a hiddenself‐tuning system. It optimizes theAM and FM signals relative to thevehicle's position and radio stationsource. No maintenance oradjustments are needed.
Satellite Radio AntennaFor vehicles with XM Satellite RadioService, the antenna is located onthe roof or on the trunk lid of thevehicle. Keep the antenna clear ofobstructions for clear radioreception.
Audio Players
CD Player
Care of the CD Player
Do not add labels to a CD; it couldget caught in the CD player. Use amarking pen to write on the top ofthe CD if a description is needed.
Do not use CD lens cleaners, theycould damage the CD player.
Notice: If a label is added to aCD, more than one CD is insertedinto the slot at a time, or anattempt is made to play scratchedor damaged CDs, the CD playercould be damaged. While usingthe CD player, use only CDs ingood condition without any label,load one CD at a time, and keepthe CD player and the loading slotfree of foreign materials, liquids,and debris.
If an error displays, see “CDMessages” later in this section.
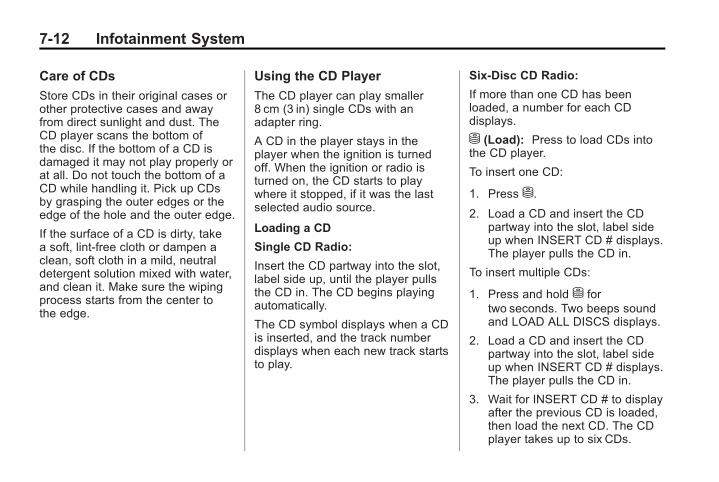
Black plate (12,1)Chevrolet Corvette Owner Manual - 2011
7-12 Infotainment System
Care of CDs
Store CDs in their original cases orother protective cases and awayfrom direct sunlight and dust. TheCD player scans the bottom ofthe disc. If the bottom of a CD isdamaged it may not play properly orat all. Do not touch the bottom of aCD while handling it. Pick up CDsby grasping the outer edges or theedge of the hole and the outer edge.
If the surface of a CD is dirty, takea soft, lint‐free cloth or dampen aclean, soft cloth in a mild, neutraldetergent solution mixed with water,and clean it. Make sure the wipingprocess starts from the center tothe edge.
Using the CD Player
The CD player can play smaller8 cm (3 in) single CDs with anadapter ring.
A CD in the player stays in theplayer when the ignition is turnedoff. When the ignition or radio isturned on, the CD starts to playwhere it stopped, if it was the lastselected audio source.
Loading a CD
Single CD Radio:
Insert the CD partway into the slot,label side up, until the player pullsthe CD in. The CD begins playingautomatically.
The CD symbol displays when a CDis inserted, and the track numberdisplays when each new track startsto play.
Six-Disc CD Radio:
If more than one CD has beenloaded, a number for each CDdisplays.
M (Load): Press to load CDs intothe CD player.
To insert one CD:
1. Press M.
2. Load a CD and insert the CDpartway into the slot, label sideup when INSERT CD # displays.The player pulls the CD in.
To insert multiple CDs:
1. Press and hold M fortwo seconds. Two beeps soundand LOAD ALL DISCS displays.
2. Load a CD and insert the CDpartway into the slot, label sideup when INSERT CD # displays.The player pulls the CD in.
3. Wait for INSERT CD # to displayafter the previous CD is loaded,then load the next CD. The CDplayer takes up to six CDs.
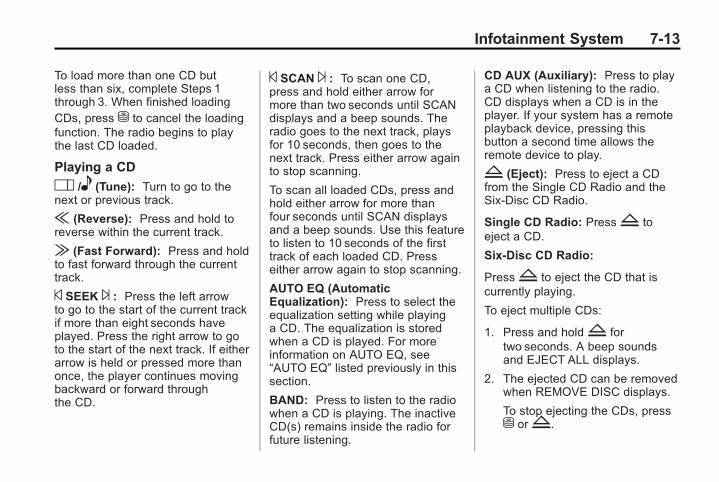
Black plate (13,1)Chevrolet Corvette Owner Manual - 2011
Infotainment System 7-13
To load more than one CD butless than six, complete Steps 1through 3. When finished loadingCDs, press M to cancel the loadingfunction. The radio begins to playthe last CD loaded.
Playing a CD
O /e (Tune): Turn to go to thenext or previous track.
{ (Reverse): Press and hold toreverse within the current track.
| (Fast Forward): Press and holdto fast forward through the currenttrack.
© SEEK ¨ : Press the left arrowto go to the start of the current trackif more than eight seconds haveplayed. Press the right arrow to goto the start of the next track. If eitherarrow is held or pressed more thanonce, the player continues movingbackward or forward throughthe CD.
© SCAN ¨ : To scan one CD,press and hold either arrow formore than two seconds until SCANdisplays and a beep sounds. Theradio goes to the next track, playsfor 10 seconds, then goes to thenext track. Press either arrow againto stop scanning.
To scan all loaded CDs, press andhold either arrow for more thanfour seconds until SCAN displaysand a beep sounds. Use this featureto listen to 10 seconds of the firsttrack of each loaded CD. Presseither arrow again to stop scanning.
AUTO EQ (AutomaticEqualization): Press to select theequalization setting while playinga CD. The equalization is storedwhen a CD is played. For moreinformation on AUTO EQ, see“AUTO EQ” listed previously in thissection.
BAND: Press to listen to the radiowhen a CD is playing. The inactiveCD(s) remains inside the radio forfuture listening.
CD AUX (Auxiliary): Press to playa CD when listening to the radio.CD displays when a CD is in theplayer. If your system has a remoteplayback device, pressing thisbutton a second time allows theremote device to play.
Z (Eject): Press to eject a CDfrom the Single CD Radio and theSix‐Disc CD Radio.
Single CD Radio: PressZ toeject a CD.
Six-Disc CD Radio:
PressZ to eject the CD that iscurrently playing.
To eject multiple CDs:
1. Press and holdZ fortwo seconds. A beep soundsand EJECT ALL displays.
2. The ejected CD can be removedwhen REMOVE DISC displays.
To stop ejecting the CDs, pressM orZ.
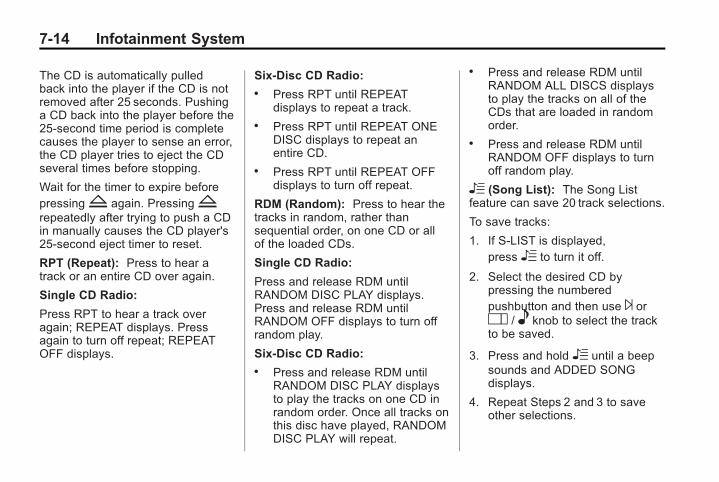
Black plate (14,1)Chevrolet Corvette Owner Manual - 2011
7-14 Infotainment System
The CD is automatically pulledback into the player if the CD is notremoved after 25 seconds. Pushinga CD back into the player before the25‐second time period is completecauses the player to sense an error,the CD player tries to eject the CDseveral times before stopping.
Wait for the timer to expire beforepressingZ again. PressingZrepeatedly after trying to push a CDin manually causes the CD player's25-second eject timer to reset.
RPT (Repeat): Press to hear atrack or an entire CD over again.
Single CD Radio:
Press RPT to hear a track overagain; REPEAT displays. Pressagain to turn off repeat; REPEATOFF displays.
Six-Disc CD Radio:. Press RPT until REPEAT
displays to repeat a track.. Press RPT until REPEAT ONE
DISC displays to repeat anentire CD.
. Press RPT until REPEAT OFFdisplays to turn off repeat.
RDM (Random): Press to hear thetracks in random, rather thansequential order, on one CD or allof the loaded CDs.
Single CD Radio:
Press and release RDM untilRANDOM DISC PLAY displays.Press and release RDM untilRANDOM OFF displays to turn offrandom play.
Six-Disc CD Radio:. Press and release RDM until
RANDOM DISC PLAY displaysto play the tracks on one CD inrandom order. Once all tracks onthis disc have played, RANDOMDISC PLAY will repeat.
. Press and release RDM untilRANDOM ALL DISCS displaysto play the tracks on all of theCDs that are loaded in randomorder.
. Press and release RDM untilRANDOM OFF displays to turnoff random play.
R (Song List): The Song Listfeature can save 20 track selections.
To save tracks:
1. If S-LIST is displayed,pressR to turn it off.
2. Select the desired CD bypressing the numberedpushbutton and then use ¨ orO / e knob to select the trackto be saved.
3. Press and holdR until a beepsounds and ADDED SONGdisplays.
4. Repeat Steps 2 and 3 to saveother selections.
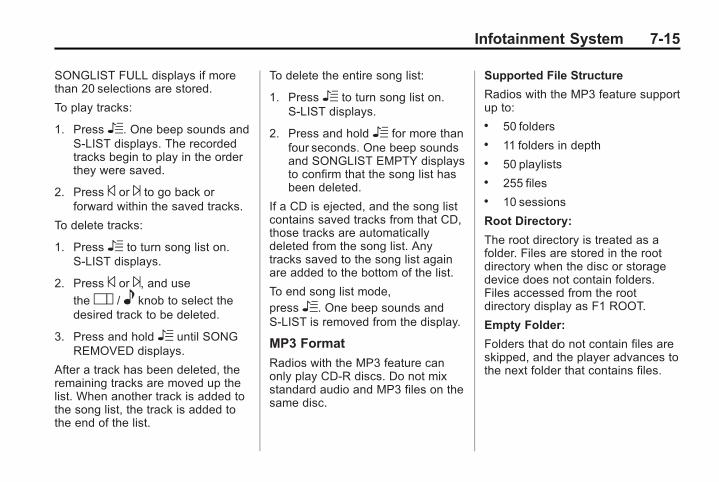
Black plate (15,1)Chevrolet Corvette Owner Manual - 2011
Infotainment System 7-15
SONGLIST FULL displays if morethan 20 selections are stored.
To play tracks:
1. PressR. One beep sounds andS-LIST displays. The recordedtracks begin to play in the orderthey were saved.
2. Press © or ¨ to go back orforward within the saved tracks.
To delete tracks:
1. PressR to turn song list on.S-LIST displays.
2. Press © or ¨, and use
theO / e knob to select thedesired track to be deleted.
3. Press and holdR until SONGREMOVED displays.
After a track has been deleted, theremaining tracks are moved up thelist. When another track is added tothe song list, the track is added tothe end of the list.
To delete the entire song list:
1. PressR to turn song list on.S-LIST displays.
2. Press and holdR for more thanfour seconds. One beep soundsand SONGLIST EMPTY displaysto confirm that the song list hasbeen deleted.
If a CD is ejected, and the song listcontains saved tracks from that CD,those tracks are automaticallydeleted from the song list. Anytracks saved to the song list againare added to the bottom of the list.
To end song list mode,pressR. One beep sounds andS-LIST is removed from the display.
MP3 Format
Radios with the MP3 feature canonly play CD-R discs. Do not mixstandard audio and MP3 files on thesame disc.
Supported File Structure
Radios with the MP3 feature supportup to:. 50 folders. 11 folders in depth. 50 playlists. 255 files. 10 sessions
Root Directory:
The root directory is treated as afolder. Files are stored in the rootdirectory when the disc or storagedevice does not contain folders.Files accessed from the rootdirectory display as F1 ROOT.
Empty Folder:
Folders that do not contain files areskipped, and the player advances tothe next folder that contains files.
Black plate (16,1)Chevrolet Corvette Owner Manual - 2011
7-16 Infotainment System
Supported Bit Rates
The following bit rates aresupported: 32 kbps, 40 kbps,56 kbps, 64 kbps, 80 kbps, 96 kbps,112 kbps, 128 kbps, 160 kbps,192 kbps, 224 kbps, 256 kbps, and320 kbps or a variable bit rate.
File Naming
ID3v1 and ID3v2 tags aresupported. The track namecontained in the ID3 tag is shownon the display. The display onlyshows up to 32 characters for trackand file names.
If the track name is not contained inthe ID3 tag, the display shows thefile name without the file extension.
Playlists
Playlists that do not have a .m3uor .wpl extension may not work.
Preprogrammed playlists created byWinAmp™, MusicMatch™, or RealJukebox™ software are supportedand cannot be edited using theradio.
Playing an MP3
Insert a CD partway into the slot,label side up. The player pulls it in,and READING displays. The CDshould begin playing and the CDsymbol displays.
If the ignition or radio is turned offwith a CD-R in the player, it staysin the player. When the ignition orradio is turned on, the CD-R startsto play where it stopped, if it wasthe last selected audio source.
As each new track starts to play,the track number displays.
Order of Play
Tracks are played sequentially inthe following order:
1. Playlists.
2. Files contained in the rootdirectory.
3. Files contained in folders.
O /e (Tune): Turn to go to thenext or previous track.
{ (Previous Folder): Press togo to the first track in the previousfolder. Press and hold to reversethrough the current track.
| (Next Folder): Press to go tothe first track in the next folder.Press and hold to fast forward thecurrent track.
RDM (Random): Press to hearthe tracks in random, rather thansequential order, on one CD, onefolder, or all of the loaded CDs.
Press and release RDM until:. RANDOM DISC PLAY displays
to play the tracks on the CD inrandom order.
. RANDOM FOLDER displays toplay the tracks in the folder inrandom order.
. RANDOM ALL DISCS displaysto play the tracks on all of theCDs that are loaded in randomorder.
. RANDOM OFF displays to turnoff random play.
Black plate (17,1)Chevrolet Corvette Owner Manual - 2011
Infotainment System 7-17
RPT (Repeat): Press to hear atrack, CD, or folder over again.
Press and release RPT until:. REPEAT displays to repeat a
track.. REPEAT ONE DISC displays to
repeat a CD.. REPEAT FOLDER displays to
repeat a folder.. REPEAT OFF displays to turn off
repeated play.
© SEEK ¨ : Press © to go to thestart of the current track, if morethan eight seconds have played.Press ¨ to go to the next track.
Press © or ¨ more than once tocontinue moving backward orforward through the CD.
4 (Information): Press to displaythe artist name and album containedin the ID3 tag.
BAND: Press to listen to the radiowhen a CD is playing. The inactiveCD remains inside the radio forfuture listening.
CD AUX (Auxiliary): Press to playa CD when listening to the radio.The CD symbol displays when a CDis loaded.
Auxiliary Devices
Using the Auxiliary Input Jack
The radio system has an auxiliaryinput jack located on the right sideof the faceplate. This is not an audiooutput; do not plug the headphoneset into the front auxiliary input jack.An external audio device can beconnected to the auxiliary input jackfor use as another source for audiolistening.
Drivers are encouraged to set upany auxiliary device while thevehicle is in P (Park). See DefensiveDriving on page 9‑2.
Connect a 3.5 mm (1/8 in) cable tothe radio’s front auxiliary input jackto use a portable audio player. Theradio displays AUX INPUT DEVICEwhen a device is connected andbegins playing audio from thatdevice.
Top Knob (Power/Volume): Turnto increase or decrease the volumeof the portable player. Additionalvolume adjustments can be madefrom the portable device.
BAND: Press to listen to the radiowhile a portable audio device isplaying. The portable audio devicecontinues playing.
CD/AUX (CD/Auxiliary): Press toplay a CD while a portable audiodevice is playing. Press again andthe system begins playing audiofrom the connected portable audioplayer. If a portable audio player isconnected, AUX INPUT DEVICEdisplays. If a portable audio playeris not connected, AUX INPUTDEVICE does not display.
Black plate (18,1)Chevrolet Corvette Owner Manual - 2011
7-18 Infotainment System
Phone
BluetoothFor vehicles equipped withBluetooth‐capability, the systemcan interact with many cell phones,allowing:. Placement and receipt of calls
in a hands-free mode.. Sharing of the cell phone’s
address book or contact listwith the vehicle.
To minimize driver distraction,before driving, and with the vehicleparked:. Become familiar with the
features of the cell phone.Organize the phone book andcontact lists clearly and deleteduplicate or rarely used entries.If possible, program speed dialor other shortcuts.
. Review the controls andoperation of the infotainmentsystem.
. Pair cell phone(s) to the vehicle.The system may not work withall cell phones. See “Pairing aPhone” in this section for moreinformation.
. If the cell phone has voicedialing capability, learn to usethat feature to access theaddress book or contact list.See “Voice Pass-Thru” in thissection for more information.
. See “Storing and Deleting PhoneNumbers” in this section formore information.
{ WARNING
When using a cell phone, itcan be distracting to look toolong or too often at the screen ofthe phone or the infotainment(navigation) system. Taking youreyes off the road too long ortoo often could cause a crashresulting in injury or death. Focusyour attention on driving.
Vehicles with a Bluetooth systemcan use a Bluetooth‐capable cellphone with a Hands‐Free Profile tomake and receive phone calls. Thesystem can be used while the key isin ON/RUN or ACC/ACCESSORYposition. The range of the Bluetoothsystem can be up to 9.1 m (30 ft).Not all phones support all functions,and not all phones are guaranteedto work with the in-vehicle Bluetoothsystem. See www.gm.com/bluetoothfor more information on compatiblephones.
Voice Recognition
The Bluetooth system uses voicerecognition to interpret voicecommands to dial phone numbersand name tags.
For additional information say “Help”while you are in a voicerecognition menu.
Black plate (19,1)Chevrolet Corvette Owner Manual - 2011
Infotainment System 7-19
Noise: Keep interior noise levelsto a minimum. The system may notrecognize voice commands if thereis too much background noise.
When to Speak: A short tonesounds after the system respondsindicating when it is waiting for avoice command. Wait until the toneand then speak.
How to Speak: Speak clearly ina calm and natural voice.
Audio System
When using the in‐vehicle Bluetoothsystem, sound comes through thevehicle's front audio systemspeakers and overrides the audiosystem. Use the audio systemvolume knob, during a call, tochange the volume level. Theadjusted volume level remains inmemory for later calls. To preventmissed calls, a minimum volumelevel is used if the volume is turneddown too low.
Bluetooth Controls
Use the buttons located on thesteering wheel to operate thein‐vehicle Bluetooth system. SeeSteering Wheel Controls onpage 5‑3 for more information.
b g (Push To Talk): Press toanswer incoming calls, to confirmsystem information, and to startspeech recognition.
c (Phone On Hook): Press toend a call, reject a call, or cancelan operation.
Pairing
A Bluetooth cell phone must bepaired to the Bluetooth system andthen connected to the vehicle beforeit can be used. See your cell phonemanufacturer's user guide forBluetooth functions before pairingthe cell phone. If a Bluetooth phoneis not connected, calls will be madeusing OnStar® Hands‐Free Calling,if available. Refer to the OnStarowner's guide for more information.
Pairing Information. Up to five cell phones can be
paired to the Bluetooth system.. The pairing process is disabled
when the vehicle is moving.. Pairing only needs to be
completed once, unless thepairing information on the cellphone changes or the cell phoneis deleted from the system.
. Only one paired cell phone canbe connected to the Bluetoothsystem at a time.
. If multiple paired cell phonesare within range of the system,the system connects to the firstavailable paired cell phone in theorder that they were first pairedto the system. To link to adifferent paired phone, see“Connecting to a DifferentPhone” later in this section.
Black plate (20,1)Chevrolet Corvette Owner Manual - 2011
7-20 Infotainment System
Pairing a Phone
1. Press and hold b g fortwo seconds.
2. Say “Bluetooth.”
3. Say “Pair.” The system respondswith instructions and a four‐digitPersonal Identification Number(PIN). The PIN is used in Step 5.
4. Start the pairing process on thecell phone that you want to pair.For help with this process, seeyour cell phone manufacturersuser guide.
5. Locate the device named “YourVehicle” in the list on the cellphone. Follow the instructionson the cell phone to enter thePIN that was provided in Step 3.
After the PIN is successfullyentered, the system prompts youto provide a name for the pairedcell phone. This name will beused to indicate which phonesare paired and connected to thevehicle, see “Listing All Pairedand Connected Phones” later inthis section for more information.
6. Repeat Steps 1 through 5 to pairadditional phones.
Listing All Paired and ConnectedPhones
The system can list all cell phonespaired to it. If a paired cell phone isalso connected to the vehicle, thesystem responds with “is connected”after that phone name.
1. Press and hold b g fortwo seconds.
2. Say “Bluetooth.”
3. Say “List.”
Deleting a Paired Phone
If the phone name you want todelete is unknown, see “Listing AllPaired and Connected Phones.”
1. Press and hold b g fortwo seconds.
2. Say “Bluetooth.”
3. Say “Delete.” The system asksfor which phone to delete.
4. Say the name of the phone youwant to delete.
Connecting to a Different Phone
To connect to a different cell phone,the Bluetooth system looks for thenext available cell phone in theorder in which all the available cellphones were paired. Dependingon which cell phone you want toconnect to, you may have to usethis command several times.
1. Press and hold b g fortwo seconds.
2. Say “Bluetooth.”
Black plate (21,1)Chevrolet Corvette Owner Manual - 2011
Infotainment System 7-21
3. Say “Change phone.”. If another cell phone is
found, the response will be“<Phone name> is nowconnected.”
. If another cell phone is notfound, the original phoneremains connected.
Storing and Deleting PhoneNumbers
The system can store up to30 phone numbers as name tagsin the Hands‐Free Directory that isshared between the Bluetooth andOnStar systems.
The following commands are useddelete and store phone numbers.
Store: This command will storea phone number, or a group ofnumbers as a name tag.
Digit Store: This command allowsa phone number to be stored as aname tag by entering the digits oneat a time.
Delete: This command is used todelete individual name tags.
Delete All Name Tags: Thiscommand deletes all storedname tags in the Hands‐FreeCalling Directory and the OnStarTurn‐by‐Turn Destinations Directory.
Using the “Store” Command
1. Press and hold b g fortwo seconds.
2. Say “Store.”
3. Say the phone number or groupof numbers you want to store allat once with no pauses, thenfollow the directions given by thesystem to save a name tag forthis number.
Using the “Digit Store” Command
If an unwanted number isrecognized by the system, say“Clear” at any time to clear the lastnumber.
To hear all of the numbersrecognized by the system, say“Verify” at any time.
1. Press and hold b g fortwo seconds.
2. Say “Digit Store.”
3. Say each digit, one at a time,that you want to store. Aftereach digit is entered, the systemrepeats back the digit it heardfollowed by a tone. After thelast digit has been entered, say“Store”, and then follow thedirections given by the systemto save a name tag for thisnumber.
Black plate (22,1)Chevrolet Corvette Owner Manual - 2011
7-22 Infotainment System
Using the “Delete” Command
1. Press and hold b g fortwo seconds.
2. Say “Delete.”
3. Say the name tag you want todelete.
Using the “Delete All Name Tags”Command
This command deletes all storedname tags in the Hands‐FreeCalling Directory and the OnStarTurn‐by‐Turn Destinations Directory.
To delete all name tags:
1. Press and hold b g fortwo seconds.
2. Say “Delete all name tags.”
Listing Stored Numbers
The list command will list all thestored numbers and name tags.
Using the “List” Command
1. Press and hold b g fortwo seconds.
2. Say “Directory.”
3. Say “Hands‐Free Calling.”
4. Say “List.”
Making a Call
Calls can be made using thefollowing commands.
Dial or Call: The dial orcall command can be usedinterchangeably to dial a phonenumber or a stored name tag.
Digit Dial: This command allowsa phone number to be dialed byentering the digits one at a time.
Re‐dial: This command is used todial the last number used on the cellphone.
Using the “Dial” or “Call”Command
1. Press and hold b g fortwo seconds.
2. Say “Dial” or “Call.”
3. Say the entire number withoutpausing or say the name tag.
Once connected, the person calledwill be heard through the audiospeakers.
Using the “Digit Dial” Command
The digit dial command allows aphone number to be dialed byentering the digits one at a time.After each digit is entered, thesystem repeats back the digit itheard followed by a tone.
If an unwanted number isrecognized by the system, say“Clear” at any time to clear thelast number.
Black plate (23,1)Chevrolet Corvette Owner Manual - 2011
Infotainment System 7-23
To hear all of the numbersrecognized by the system, say“Verify” at any time.
1. Press and hold b g fortwo seconds.
2. Say “Digit Dial.”
3. Say each digit, one at a time,that you want to dial. After eachdigit is entered, the systemrepeats back the digit it heardfollowed by a tone. After the lastdigit has been entered,say “Dial.”
Once connected, the person calledwill be heard through the audiospeakers.
Using the “Re‐dial” Command
1. Press and hold b g fortwo seconds.
2. After the tone, say “Re‐dial.”
Once connected, the person calledwill be heard through the audiospeakers.
Receiving a Call
When an incoming call is received,the audio system mutes and a ringtone is heard in the vehicle.
. Press b g to answer the call.
. Pressi to ignore a call.
Call Waiting
Call waiting must be supported onthe cell phone and enabled by thewireless service carrier.
. Press b g to answer anincoming call when another callis active. The original call isplaced on hold.
. Press b g again to return to theoriginal call.
. To ignore the incoming call, noaction is required.
. Pressi to disconnect thecurrent call and switch to the callon hold.
Three‐Way Calling
Three‐way calling must besupported on the cell phone andenabled by the wireless servicecarrier.
1. While on a call, press b g.2. Say “Three‐way call.”
3. Use the dial or call command todial the number of the third partyto be called.
4. Once the call is connected,press b g to link all the callerstogether.
Ending a Call
Pressi to end a call.
Black plate (24,1)Chevrolet Corvette Owner Manual - 2011
7-24 Infotainment System
Muting a Call
During a call, all sounds from insidethe vehicle can be muted so that theperson on the other end of the callcannot hear them.
To mute a call, press b g and thensay “Mute Call.”
To cancel mute, press b g andthen say “Un‐mute Call.”
Transferring a Call
Audio can be transferred betweenthe Bluetooth system and the cellphone.
The cell phone must be pairedand connected with the Bluetoothsystem before a call can betransferred. The connection processcan take up to two minutes after theignition is turned to ON/RUN.
To Transfer Audio from theBluetooth System to a Cell Phone
During a call with the audio in thevehicle:
1. Press b g.2. Say “Transfer Call.”
To Transfer Audio to the BluetoothSystem from a Cell Phone
During a call with the audio on thecell phone, press b g. The audiotransfers to the vehicle. If the audiodoes not transfer to the vehicle, usethe audio transfer feature on thecell phone. See your cell phonemanufacturer's user guide for moreinformation.
Voice Pass-Thru
Voice pass‐thru allows access tothe voice recognition commands onthe cell phone. See your cell phonemanufacturer's user guide to see ifthe cell phone supports this feature.
To access contacts stored in the cellphone:
1. Press and hold b g fortwo seconds.
2. Say “Bluetooth.” The systemresponds “Bluetooth ready”,followed by a tone.
3. Say “Voice.” The systemresponds “OK, accessing<phone name>.”
The cell phone's normal promptmessages will go through itscycle according to the phone'soperating instructions.
Black plate (25,1)Chevrolet Corvette Owner Manual - 2011
Infotainment System 7-25
Dual Tone Multi-Frequency(DTMF) Tones
The Bluetooth system can sendnumbers and the numbers storedas name tags during a call. Youcan use this feature when callinga menu‐driven phone system.Account numbers can also bestored for use.
Sending a Number or Name TagDuring a Call
1. Press b g. The systemresponds “Ready”, followed bya tone.
2. Say “Dial.”
3. Say the number or name tagto send.
Clearing the System
Unless information is deleted outof the in‐vehicle Bluetooth system,it will be retained indefinitely. Thisincludes all saved name tags inthe phone book and phone pairinginformation. For information on howto delete this information, see theprevious sections on “Deleting aPaired Phone” and “Storing andDeleting Phone Numbers.”
Other Information
The Bluetooth® word mark andlogos are owned by the Bluetooth®
SIG, Inc. and any use of such marksby General Motors is under license.Other trademarks and trade namesare those of their respective owners.
See Radio Frequency Statement onpage 13‑19 for FCC information.
Black plate (26,1)Chevrolet Corvette Owner Manual - 2011
7-26 Infotainment System
2 NOTES
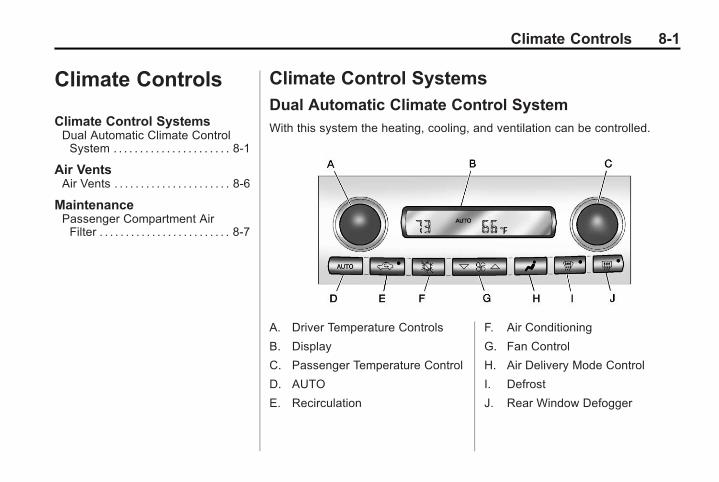
Black plate (1,1)Chevrolet Corvette Owner Manual - 2011
Climate Controls 8-1
Climate Controls
Climate Control SystemsDual Automatic Climate ControlSystem . . . . . . . . . . . . . . . . . . . . . . 8-1
Air VentsAir Vents . . . . . . . . . . . . . . . . . . . . . . 8-6
MaintenancePassenger Compartment AirFilter . . . . . . . . . . . . . . . . . . . . . . . . . 8-7
Climate Control Systems
Dual Automatic Climate Control SystemWith this system the heating, cooling, and ventilation can be controlled.
A. Driver Temperature Controls
B. Display
C. Passenger Temperature Control
D. AUTO
E. Recirculation
F. Air Conditioning
G. Fan Control
H. Air Delivery Mode Control
I. Defrost
J. Rear Window Defogger
Black plate (2,1)Chevrolet Corvette Owner Manual - 2011
8-2 Climate Controls
When the vehicle is first started,the display shows the driver'stemperature setting, the outsidetemperature, the fan speed, and theair delivery, for about 10 seconds.
The outside temperature is shownin the center of the display. Thedigital display will show the readingsin Fahrenheit or Celsius. See“Personal Options” under VehiclePersonalization on page 5‑55 forinformation on changing yourdisplay.
Automatic Operation
AUTO (Automatic): Press theAUTO button to place the entiresystem in the automatic mode.When automatic operation is active,the system automatically controlsthe inside temperature, the airdelivery mode, and the fan speed.
After a 10 second display of thecurrent settings, the word AUTO,the driver's temperature setting andthe outside temperature will beshown. The system operates toreach the set temperature as quicklyas possible. The AUTO controlsystem works best with the windowsup and the removable roof installedor the convertible top up.
1. Press the AUTO button.
2. Adjust the temperature to acomfortable setting between16°C (60°F) and 32°C (90°F).Choosing the coldest or warmesttemperature setting will notcause the system to heat or coolany faster. A setting of 23°C(73°F) is suggested.
In cold weather, the system willstart at reduced fan speeds toavoid blowing cold air into your
vehicle until warmer air isavailable. The system starts outblowing air at the floor but maychange modes automatically asthe vehicle warms up to maintainthe chosen temperature setting.The length of time needed forwarm up depends on the outsidetemperature and the length oftime that has elapsed since thevehicle was last driven.
3. Wait for the system to regulate.This may take from 10 to30 minutes. Then adjust thetemperature, if necessary.
Do not cover the solar sensorlocated in the center of theinstrument panel, near thewindshield. For more informationon the solar sensor, see “Sensors”later in this section.
Black plate (3,1)Chevrolet Corvette Owner Manual - 2011
Climate Controls 8-3
Manual Operation
Driver Power/Temperature: Pressthe driver temperature knob to turnthe climate control system off. Thisis the only setting that completelyshuts off the fan. The digital displayshows only the outside temperature.The driver and the passenger settemperature and the air intake modecan still be adjusted when theclimate control is off.
Passenger Power/Temperature:Press the passenger temperatureknob to turn the passenger's climatecontrol system on or off. Turn theknob to increase or decrease thetemperature for the passenger. If thepassenger's climate control systemis off, the driver's temperature knobwill control the temperature for theentire vehicle.
x9w (Fan): Press to increaseor decrease the fan speed. The fanspeed setting will appear in thedisplay.
Pressing the arrows will deleteAUTO from the digital display. Thefan graphics with the fan speed barswill be shown. The AUTO buttonmust be pressed to return to theautomatic fan control.
If the airflow seems low when thefan speed is at the highest setting,the passenger compartment air filtermay need to be replaced. For moreinformation, see PassengerCompartment Air Filter on page 8‑7.
N (Air Delivery Mode Control):Press this button to manually lock inthe current air delivery setting andto stop the automatic mode control.PressingN deletes AUTO from thedigital display and the modegraphics will be shown. To changethe setting, pressN again. TheAUTO button must be pressed toreturn to the automatic modeselection.
To change the current mode, selectone of the following:
H (Vent): Air is directed to theinstrument panel outlets, with someair directed to the floor outlets.
% (Bi-Level): Air is dividedbetween the instrument panel andfloor outlets.
6 (Floor): Air is directed to thefloor outlets, with some air directedto the windshield and side windowdefogger outlets.
- (Floor/Defog): This mode clearsthe windows of fog or moisture. Airis directed to the windshield and thefloor outlets, with a small amountto the side window outlets. In thismode, the system automaticallyturns off the recirculation and runsthe air conditioning compressorunless the outside temperature is ator below freezing. The recirculationmode cannot be selected while inthe defog mode.
Black plate (4,1)Chevrolet Corvette Owner Manual - 2011
8-4 Climate Controls
1 (Defrost): This mode clears thewindows of fog or frost more quickly.Air is directed to the windshield, witha small amount directed to the sidewindow outlets. The indicator lightcomes on and the digital display willshow the defrost mode symbol andfan speed when the front defrostmode is being used. In this mode,the system automatically turns offthe recirculation and runs the airconditioning compressor, unless theoutside temperature is at or belowfreezing. Recirculation cannot beselected while in the defrost mode.Pressing1 again will return thesystem to the last operating mode.
For severe ice conditions, turn thedriver's temperature knob to 32°C(90°F) while in defrost mode.
Do not drive the vehicle until all thewindows are clear.
^ (Air Conditioning Off):Press to turn the air conditioningcompressor off. Press AUTO toreturn to automatic operation.When in AUTO, the air conditioningcompressor comes on automatically,as needed.
Air conditioning does not operateat temperatures below about 2°C to4°C (35°F to 40°F). In temperaturesabove 4°C (40°F), the airconditioning cannot be turned offin defrost and defog, as it helps toremove moisture from the vehicle.It also helps to keep the windowsclear.
You may notice a slight change inengine performance when the airconditioning compressor shuts offand turns on again. This is normal.The system is designed to makeadjustments to help with fueleconomy while still maintaining theselected temperature.
On hot days, open the windows tolet hot inside air escape; then closethem. This helps to reduce the timeit takes for the vehicle to cool down.It also helps the system to operatemore efficiently.
For quick cool down on hotdays press the AUTO button andadjust the temperature to a cool,comfortable setting. To achievemaximum cool down, do thefollowing:
1. SelectH mode.
2. Press?.
3. Select the a/c on.
4. Select the coolest temperature.
5. Select the highest fan speed.
Black plate (5,1)Chevrolet Corvette Owner Manual - 2011
Climate Controls 8-5
Using these settings together forlong periods of time may cause theair inside of your vehicle to becometoo dry. To prevent this fromhappening, after the air in thevehicle has cooled, turn therecirculation mode off.
The air conditioning systemremoves moisture from the air, soa small amount of water might dripunder the vehicle while idling orafter turning off the engine. This isnormal.
? (Recirculation): Press to turnthe recirculation mode on or off. Anindicator light comes on to showthat recirculation is on. This modeprevents outside air from enteringyour vehicle. It can be used toprevent outside air and odors fromentering your vehicle and to helpcool the air inside your vehicle morequickly. Recirculation mode is notavailable in defrost or defog mode.
Sensors
The solar sensor on the vehiclemonitors the solar heat and usesthe information to maintain theselected temperature whenoperating in AUTO mode byautomatically adjusting thetemperature, fan speed, and airdelivery system. The system mayalso supply cooler air to the sideof the vehicle facing the sun. Therecirculation mode will also beactivated, as necessary. Do notcover the solar sensor located onthe top of the instrument panel nearthe windshield or the system willnot work properly.
There is also a sensor locatedbehind the front bumper. Thissensor reads the outside airtemperature and helps to maintainthe temperature inside the vehicle.Any cover on the front of the vehiclecould give a false reading in thetemperature.
If the outside temperature goes up,the displayed temperature will notchange until:. The vehicle's speed is above
19 km/h (12 mph) forfive minutes.
. The vehicle's speed is above52 km/h (32 mph) for two andone‐half minutes.
These delays prevent falsereadings. If the temperature goesdown, the outside temperaturewill be shown when you start thevehicle. If it has been turned offfor less than three hours, thetemperature will be recalled fromthe previous vehicle operation.
There is also an inside temperaturesensor located to the left of theignition switch. The automaticclimate control system uses thissensor to receive information, so ifyou block or cover it, the system willnot function properly.
Black plate (6,1)Chevrolet Corvette Owner Manual - 2011
8-6 Climate Controls
Rear Window Defogger
The rear window defogger uses awarming grid to remove fog or frostfrom the rear window.
The rear window defogger onlyworks when the engine is running.
= (Rear Window Defogger):Press to turn the rear windowdefogger on or off. Be sure to clearas much snow from the rear windowas possible. An indicator lightcomes on to show that the rearwindow defogger is on.
The rear window defogger turns offabout 10 minutes after the buttonis pressed when traveling less than48 km/h (30 mph). If turned onagain, the defogger only runs forabout five minutes before turningoff. The defogger can also be turnedoff by turning off the engine.
The vehicle has heated outsiderearview mirrors. The mirrors willheat to help clear fog or frost fromthe surface of the mirrors when therear window defogger button ispressed.
For vehicles with a powerconvertible top, the rear windowdefogger and heated mirrors areautomatically disabled when thepower convertible top is movingor down.
Notice: Do not use anythingsharp on the inside of the rearwindow. If you do, you couldcut or damage the warming grid,and the repairs would not becovered by the vehicle warranty.Do not attach a temporary vehiclelicense, tape, a decal, or anythingsimilar to the defogger grid.
Air VentsUse the tab located on the airoutlets to change the direction ofthe airflow.
Operation Tips. Clear away any ice, snow,
or leaves from the air inlets atthe base of the windshield thatmay block the flow of air intoyour vehicle.
. Use of non-GM approved hooddeflectors may adversely affectthe performance of the system.
. Keep the area around the baseof the instrument panel consoleand air path under the seatsclear of objects to help circulatethe air inside of your vehiclemore effectively.
Black plate (7,1)Chevrolet Corvette Owner Manual - 2011
Climate Controls 8-7
Maintenance
Passenger CompartmentAir FilterThe passenger compartment airfilter removes certain particles fromthe air including pollen and dustparticles. Reductions in airflow,which may occur more often industy areas, indicate that the filtermay need to be replaced. SeeMaintenance Replacement Parts onpage 11‑8.
Notice: Driving without apassenger compartment air filterin place can cause water andsmall particles, like paper andleaves, to be pulled into yourclimate control system which maycause damage to it. Make sureyou always replace the old filterwith a new one.
The passenger compartment airfilter is located on the passengerside of the engine compartmentnear the battery. See EngineCompartment Overview onpage 10‑10.
To check or replace the air filter:
1. Remove the cover retainerclips (A) from the passengercompartment air filter cover.
2. Remove the cover.
3. Remove the filter and install thenew air filter.
4. Replace the filter cover.
5. Attach the retainer clips.
Black plate (8,1)Chevrolet Corvette Owner Manual - 2011
8-8 Climate Controls
2 NOTES

Black plate (1,1)Chevrolet Corvette Owner Manual - 2011
Driving and Operating 9-1
Driving andOperating
Driving InformationDefensive Driving . . . . . . . . . . . . . 9-2Drunk Driving . . . . . . . . . . . . . . . . . 9-2Control of a Vehicle . . . . . . . . . . . 9-3Braking . . . . . . . . . . . . . . . . . . . . . . . 9-3Steering . . . . . . . . . . . . . . . . . . . . . . . 9-4Off-Road Recovery . . . . . . . . . . . . 9-5Loss of Control . . . . . . . . . . . . . . . . 9-6Racing or Other CompetitiveDriving . . . . . . . . . . . . . . . . . . . . . . . 9-7
Driving on Wet Roads . . . . . . . . . 9-9Highway Hypnosis . . . . . . . . . . . 9-10Hill and Mountain Roads . . . . . 9-10Winter Driving . . . . . . . . . . . . . . . . 9-11If the Vehicle is Stuck . . . . . . . . 9-13Vehicle Load Limits . . . . . . . . . . 9-14
Starting and OperatingNew Vehicle Break-In . . . . . . . . 9-18Front Air Dam . . . . . . . . . . . . . . . 9-19Ignition Positions . . . . . . . . . . . . 9-20Starting the Engine . . . . . . . . . . 9-21Retained AccessoryPower (RAP) . . . . . . . . . . . . . . . 9-23
Shifting Into Park (AutomaticTransmission) . . . . . . . . . . . . . . 9-24
Shifting Out of Park . . . . . . . . . . 9-25Parking (ManualTransmission) . . . . . . . . . . . . . . 9-26
Parking Over ThingsThat Burn . . . . . . . . . . . . . . . . . . 9-26
Engine ExhaustEngine Exhaust . . . . . . . . . . . . . . 9-26Running the Vehicle WhileParked . . . . . . . . . . . . . . . . . . . . . 9-27
Automatic TransmissionAutomatic Transmission . . . . . 9-28Manual Mode . . . . . . . . . . . . . . . . 9-29
Manual TransmissionManual Transmission . . . . . . . . 9-32
BrakesAntilock BrakeSystem (ABS) . . . . . . . . . . . . . . 9-34
Parking Brake . . . . . . . . . . . . . . . 9-35Brake Assist . . . . . . . . . . . . . . . . . 9-36
Ride Control SystemsTraction ControlSystem (TCS) . . . . . . . . . . . . . . 9-36
Active Handling System . . . . . 9-37
Competitive Driving Mode . . . 9-39Limited-Slip Rear Axle . . . . . . . 9-43Selective Ride Control . . . . . . . 9-43
Cruise ControlCruise Control . . . . . . . . . . . . . . . 9-45
FuelFuel . . . . . . . . . . . . . . . . . . . . . . . . . 9-48Recommended Fuel . . . . . . . . . 9-49Gasoline Specifications (U.S.and Canada Only) . . . . . . . . . . 9-49
California FuelRequirements . . . . . . . . . . . . . . 9-50
Fuels in Foreign Countries . . . 9-50Fuel Additives . . . . . . . . . . . . . . . 9-50Filling the Tank . . . . . . . . . . . . . . 9-52Filling a Portable FuelContainer . . . . . . . . . . . . . . . . . . . 9-54
TowingGeneral TowingInformation . . . . . . . . . . . . . . . . . 9-55
Conversions and Add-OnsAdd-On ElectricalEquipment . . . . . . . . . . . . . . . . . 9-55
Black plate (2,1)Chevrolet Corvette Owner Manual - 2011
9-2 Driving and Operating
Driving Information
Defensive DrivingDefensive driving means “alwaysexpect the unexpected.” The firststep in driving defensively is to wearthe safety belt. See Safety Belts onpage 3‑9.
{ WARNING
Assume that other road users(pedestrians, bicyclists, and otherdrivers) are going to be carelessand make mistakes. Anticipatewhat they might do and be ready.In addition:
. Allow enough followingdistance between you andthe driver in front of you.
. Focus on the task of driving.
(Continued)
WARNING (Continued)
Driver distraction can causecollisions resulting in injury orpossible death. These simpledefensive driving techniquescould save your life.
Drunk Driving
{ WARNING
Drinking and then driving isvery dangerous. Your reflexes,perceptions, attentiveness, andjudgment can be affected by evena small amount of alcohol. Youcan have a serious — or evenfatal — collision if you drive afterdrinking.
Do not drink and drive or ride witha driver who has been drinking.Ride home in a cab; or if you arewith a group, designate a driverwho will not drink.
Death and injury associated withdrinking and driving is a globaltragedy.
Alcohol affects four things thatanyone needs to drive a vehicle:judgment, muscular coordination,vision, and attentiveness.
Police records show thatalmost 40 percent of all motorvehicle-related deaths involvealcohol. In most cases, thesedeaths are the result of someonewho was drinking and driving.In recent years, more than17,000 annual motor vehicle-relateddeaths have been associated withthe use of alcohol, with about250,000 people injured.
Black plate (3,1)Chevrolet Corvette Owner Manual - 2011
Driving and Operating 9-3
For persons under 21, it is againstthe law in every U.S. state to drinkalcohol. There are good medical,psychological, and developmentalreasons for these laws.
The obvious way to eliminate theleading highway safety problem isfor people never to drink alcoholand then drive.
Medical research shows thatalcohol in a person's systemcan make crash injuries worse,especially injuries to the brain,spinal cord, or heart. This meansthat when anyone who has beendrinking — driver or passenger — isin a crash, that person's chance ofbeing killed or permanently disabledis higher than if the person had notbeen drinking.
Control of a VehicleThe following three systemshelp to control the vehicle whiledriving — brakes, steering, andaccelerator. At times, as whendriving on snow or ice, it is easy toask more of those control systemsthan the tires and road can provide.Meaning, you can lose control ofthe vehicle. See Traction ControlSystem (TCS) on page 9‑36 andActive Handling System onpage 9‑37.
Adding non‐dealer accessories canaffect vehicle performance. SeeAccessories and Modifications onpage 10‑4.
BrakingSee Brake System Warning Light onpage 5‑21.
Braking action involves perceptiontime and reaction time. Deciding topush the brake pedal is perceptiontime. Actually doing it isreaction time.
Average reaction time is aboutthree‐fourths of a second. Butthat is only an average. It might beless with one driver and as long astwo or three seconds or more withanother. Age, physical condition,alertness, coordination, andeyesight all play a part. So doalcohol, drugs, and frustration.But even in three‐fourths of asecond, a vehicle moving at100 km/h (60 mph) travels20 m (66 feet). That could be a lotof distance in an emergency, sokeeping enough space betweenthe vehicle and others is important.
And, of course, actual stoppingdistances vary greatly with thesurface of the road, whether it ispavement or gravel; the conditionof the road, whether it is wet, dry,or icy; tire tread; the condition of thebrakes; the weight of the vehicle;and the amount of brake forceapplied.
Black plate (4,1)Chevrolet Corvette Owner Manual - 2011
9-4 Driving and Operating
Avoid needless heavy braking.Some people drive in spurts, heavyacceleration followed by heavybraking, rather than keeping pacewith traffic. This is a mistake. Thebrakes might not have time to coolbetween hard stops. The brakes willwear out much faster with a lot ofheavy braking. Keeping pace withthe traffic and allowing realisticfollowing distances eliminates a lotof unnecessary braking. That meansbetter braking and longer brake life.
If the engine ever stops whilethe vehicle is being driven, brakenormally but do not pump thebrakes. If the brakes are pumped,the pedal could get harder to pushdown. If the engine stops, there willstill be some power brake assist butit will be used when the brake isapplied. Once the power assist isused up, it can take longer to stopand the brake pedal will be harderto push.
Under certain weather or operatingconditions, occasional brakesqueak, squeal, or other noisemight be heard with the vehicle'sperformance braking system.This brake system is designedfor superior fade resistance andconsistent operation using highperformance brake pads. Brakenoise and brake dust are normaland do not affect systemperformance.
Adding non‐dealer accessories canaffect vehicle performance. SeeAccessories and Modifications onpage 10‑4.
Steering
Power Steering
If power steering assist is lostbecause the engine stops or thesystem is not functioning, thevehicle can be steered but it willtake more effort.
Magnetic Speed VariableAssist Steering System
This system continuously adjuststhe effort felt when steering at allvehicle speeds. It provides easewhen parking, yet a firm, solid feelat highway speeds.
Steering Tips
It is important to take curves at areasonable speed.
Traction in a curve depends on thecondition of the tires and the roadsurface, the angle at which thecurve is banked, and vehicle speed.While in a curve, speed is the onefactor that can be controlled.
If there is a need to reduce speed,do it before entering the curve, whilethe front wheels are straight.
Try to adjust the speed so you candrive through the curve. Maintain areasonable, steady speed. Wait toaccelerate until out of the curve, andthen accelerate gently into thestraightaway.
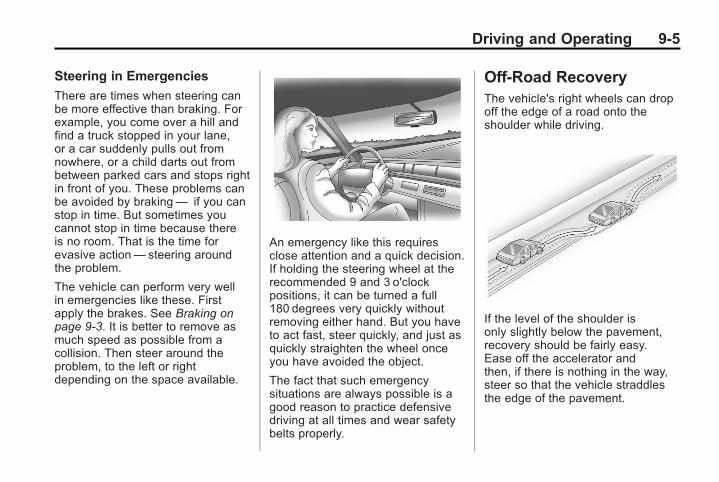
Black plate (5,1)Chevrolet Corvette Owner Manual - 2011
Driving and Operating 9-5
Steering in Emergencies
There are times when steering canbe more effective than braking. Forexample, you come over a hill andfind a truck stopped in your lane,or a car suddenly pulls out fromnowhere, or a child darts out frombetween parked cars and stops rightin front of you. These problems canbe avoided by braking— if you canstop in time. But sometimes youcannot stop in time because thereis no room. That is the time forevasive action— steering aroundthe problem.
The vehicle can perform very wellin emergencies like these. Firstapply the brakes. See Braking onpage 9‑3. It is better to remove asmuch speed as possible from acollision. Then steer around theproblem, to the left or rightdepending on the space available.
An emergency like this requiresclose attention and a quick decision.If holding the steering wheel at therecommended 9 and 3 o'clockpositions, it can be turned a full180 degrees very quickly withoutremoving either hand. But you haveto act fast, steer quickly, and just asquickly straighten the wheel onceyou have avoided the object.
The fact that such emergencysituations are always possible is agood reason to practice defensivedriving at all times and wear safetybelts properly.
Off-Road RecoveryThe vehicle's right wheels can dropoff the edge of a road onto theshoulder while driving.
If the level of the shoulder isonly slightly below the pavement,recovery should be fairly easy.Ease off the accelerator andthen, if there is nothing in the way,steer so that the vehicle straddlesthe edge of the pavement.
Black plate (6,1)Chevrolet Corvette Owner Manual - 2011
9-6 Driving and Operating
Turn the steering wheel 8 to 13 cm(3 to 5 in), about one-eighth turn,until the right front tire contactsthe pavement edge. Then turn thesteering wheel to go straight downthe roadway.
Loss of ControlLet us review what driving expertssay about what happens when thethree control systems— brakes,steering, and acceleration— do nothave enough friction where the tiresmeet the road to do what the driverhas asked.
In any emergency, do not give up.Keep trying to steer and constantlyseek an escape route or area ofless danger.
Skidding
In a skid, a driver can lose controlof the vehicle. Defensive driversavoid most skids by takingreasonable care suited to existingconditions, and by not overdrivingthose conditions. But skids arealways possible.
The three types of skids correspondto the vehicle's three controlsystems. In the braking skid,the wheels are not rolling. In thesteering or cornering skid, too muchspeed or steering in a curve causestires to slip and lose cornering force.And in the acceleration skid, toomuch throttle causes the drivingwheels to spin.
If the vehicle starts to slide, easeyour foot off the accelerator pedaland quickly steer the way youwant the vehicle to go. If you startsteering quickly enough, the vehiclemay straighten out. Always be readyfor a second skid if it occurs.
Of course, traction is reduced whenwater, snow, ice, gravel, or othermaterial is on the road. For safety,slow down and adjust your drivingto these conditions. It is importantto slow down on slippery surfacesbecause stopping distance is longerand vehicle control more limited.
While driving on a surface withreduced traction, try to avoidsudden steering, acceleration,or braking, including reducingvehicle speed by shifting to a lowergear. Any sudden changes couldcause the tires to slide. You mightnot realize the surface is slipperyuntil the vehicle is skidding. Learn torecognize warning clues— such asenough water, ice, or packed snowon the road to make a mirroredsurface— and slow down when youhave any doubt.
Remember: Antilock brakes helpavoid only the braking skid.
Black plate (7,1)Chevrolet Corvette Owner Manual - 2011
Driving and Operating 9-7
Racing or OtherCompetitive DrivingRacing or competitive driving mayaffect the vehicle warranty. See thewarranty book before using thevehicle for racing or othercompetitive driving.
Notice: If you use the vehiclefor racing or other competitivedriving, the engine may use moreoil than it would with normal use.Low oil levels can damage theengine. For information on howto add oil, see Engine Oil onpage 10‑15.
ZO6, ZR1, and Grand Sport Only:Be sure to check the oil leveloften during racing or othercompetitive driving and keep thelevel at or near the upper markthat shows the proper operatingrange on the engine oil dipstick.
Except ZO6, ZR1, and GrandSport: Be sure to check the oillevel often during racing or othercompetitive driving and keep thelevel at or near 1 L (1 qt) abovethe upper mark that shows theproper operating range on theengine oil dipstick. After thecompetitive driving, removeexcess oil so that the level onthe dipstick is not above theupper mark that shows theproper operating range.
ZO6, ZR1, and Grand Sport Only:For racing or competitive driving,it is recommended that the brakefluid be replaced with a highperformance brake fluid that hasa dry boiling point greater than279°C (534°F). After conversion tothe high performance brake fluid,follow the brake fluid servicerecommendations outlined by thefluid manufacturer. Do not usesilicone or DOT‐5 brake fluids.
ZO6, ZR1, and Grand Sport Only:For racing or competitive driving, itis recommended that the loading ofthe vehicle be limited to the driveronly, with no other cargo, and thattires be inflated to 180 kPa (26 psi)for a maximum speed of 230 km/h(143 mph).
If the vehicle is a ZO6, ZR1,or Grand Sport model, it hasgreaseable outer ends on both ofthe rear toe‐links. Under normaluse, lubrication should be performedas described in the maintenanceschedule. See ScheduledMaintenance on page 11‑2 andRecommended Fluids andLubricants on page 11‑6. If usingthe vehicle for racing, lubricationshould be performed at the end ofeach racing day. See your dealerfor lubrication and make sure anyneeded repairs are made at once.Proper procedures for performingthese services can be found inthe service manual. See ServicePublications Ordering Informationon page 13‑15.
Black plate (8,1)Chevrolet Corvette Owner Manual - 2011
9-8 Driving and Operating
If the vehicle is used for racing orother competitive driving, the rearaxle fluid temperatures may behigher than would occur in normaldriving. We recommend that therear axle fluid be drained andrefilled with new fluid after every24 hours of racing or competitivedriving. See Recommended Fluidsand Lubricants on page 11‑6 forwhat fluid to use.
ZR1 Brake Burnish Procedure
Notice: These procedures arespecific to the ZR1 with ceramicbrake rotors. These proceduresshould not be run on otherCorvette models as damage mayresult.
Notice: The new vehicle break‐inperiod should be completedbefore performing the brakeburnish procedure or damagemay occur to the powertrain/engine. See New Vehicle Break-Inon page 9‑18.
When performed as instructed,these procedures will not damagethe brakes. During the burnishingprocedure, the brake pads willsmoke and produce an odor. Thebraking force and pedal travel mayincrease. After the procedure iscomplete, the brake pads mayappear white at the rotor contact.
Street High Performance BrakeBurnishing Procedure
Run this procedure in a safemanner and in compliance with alllocal and state ordinances/lawsregarding motor vehicle operation.Run this procedure only on drypavement.
1. From a stop, accelerate asrapidly as possible withoutactivating traction control to aspeed of 97 kph (60 mph).
2. Use enough pedal force tocompletely stop the vehicle infour to five seconds. If ABSactivates, braking is too hard.
3. Repeat Steps 1 and 2,five times. This should takeabout 10 minutes.
4. After completing the 50 stops,cool the brakes by driving for8 km (5 mi) at 97 kph (60 mph).
As with all high performance brakesystems, some amount of brakesqueal is normal.
Racing/Track Brake BurnishProcedure
To prepare the ZR1 brake systemfor track events and racing, theStreet High Performance BrakeBurnish as described previouslyshould be completed.
In addition to completing the StreetHigh Performance Brake BurnishingProcedure, the following procedureneeds to be completed to make theZR1 brake system ready for trackevents and racing.
This procedure should only be runon a track and only on drypavement.
Black plate (9,1)Chevrolet Corvette Owner Manual - 2011
Driving and Operating 9-9
Notice: Brake pedal fade willoccur during this track burnishprocedure and can cause brakepedal travel and force to increase.This could extend stoppingdistance until the brakes are fullyburnished.
1. Drive a normal first lap and nottoo aggressive.
2. Laps 2 and 3 should begradually driven faster and moreaggressive, while allowing forreduced brake output andincreased stopping distancedue to brake fade.
3. Lap 4 as near to full speed,while allowing for reduced brakeoutput and increased stoppingdistance due to brake fade.
4. Laps 5 and 6 should be cooldown laps
5. Lap 7 should be normal drivingor an easy out lap.
Driving on Wet RoadsRain and wet roads can reducevehicle traction and affect yourability to stop and accelerate.Always drive slower in these typesof driving conditions and avoiddriving through large puddles anddeep‐standing or flowing water.
{ WARNING
Wet brakes can cause crashes.They might not work as well ina quick stop and could causepulling to one side. You couldlose control of the vehicle.
After driving through a largepuddle of water or a car/vehiclewash, lightly apply the brakepedal until the brakes worknormally.
(Continued)
WARNING (Continued)
Flowing or rushing water createsstrong forces. Driving throughflowing water could cause thevehicle to be carried away. If thishappens, you and other vehicleoccupants could drown. Do notignore police warnings and bevery cautious about trying to drivethrough flowing water.
Hydroplaning
Hydroplaning is dangerous. Watercan build up under the vehicle'stires so they actually ride on thewater. This can happen if the roadis wet enough and you are goingfast enough. When the vehicle ishydroplaning, it has little or nocontact with the road.
There is no hard and fast rule abouthydroplaning. The best advice is toslow down when the road is wet.
Black plate (10,1)Chevrolet Corvette Owner Manual - 2011
9-10 Driving and Operating
Other Rainy Weather Tips
Besides slowing down, other wetweather driving tips include:. Allow extra following distance.. Pass with caution.. Keep windshield wiping
equipment in good shape.. Keep the windshield washer fluid
reservoir filled.. Have good tires with proper
tread depth. See Tires onpage 10‑58.
. Turn off cruise control.
Highway HypnosisAlways be alert and pay attentionto your surroundings while driving.If you become tired or sleepy, finda safe place to park the vehicleand rest.
Other driving tips include:. Keep the vehicle well ventilated.. Keep interior temperature cool.. Keep your eyes moving — scan
the road ahead and to the sides.. Check the rearview mirror and
vehicle instruments often.
Hill and Mountain RoadsDriving on steep hills or throughmountains is different than drivingon flat or rolling terrain. Tips fordriving in these conditions include:. Keep the vehicle serviced and
in good shape.. Check all fluid levels and brakes,
tires, cooling system, andtransmission.
. Shift to a lower gear when goingdown steep or long hills.
{ WARNING
If you do not shift down, thebrakes could get so hot that theywould not work well. You wouldthen have poor braking or evennone going down a hill. You couldcrash. Shift down to let the engineassist the brakes on a steepdownhill slope.
{ WARNING
Coasting downhill in N (Neutral)or with the ignition off isdangerous. The brakes will haveto do all the work of slowing downand they could get so hot thatthey would not work well. Youwould then have poor braking oreven none going down a hill. Youcould crash. Always have theengine running and the vehiclein gear when going downhill.
Black plate (11,1)Chevrolet Corvette Owner Manual - 2011
Driving and Operating 9-11
. Stay in your own lane. Do notswing wide or cut across thecenter of the road. Drive atspeeds that let you stay in yourown lane.
. Top of hills: Bealert — something could be inyour lane (stalled car, accident).
. Pay attention to special roadsigns (falling rocks area, windingroads, long grades, passing orno-passing zones) and takeappropriate action.
Winter Driving
Driving on Snow or Ice
Drive carefully when there is snowor ice between the tires and theroad, creating less traction or grip.Wet ice can occur at about 0°C(32°F) when freezing rain begins tofall, resulting in even less traction.Avoid driving on wet ice or infreezing rain until roads can betreated with salt or sand.
Drive with caution, whatever thecondition. Accelerate gently sotraction is not lost. Accelerating tooquickly causes the wheels to spinand makes the surface under thetires slick, so there is even lesstraction.
Try not to break the fragile traction.If you accelerate too fast, the drivewheels will spin and polish thesurface under the tires even more.
The Antilock Brake System (ABS)on page 9‑34 improves vehiclestability during hard stops onslippery roads, but apply the brakessooner than when on dry pavement.
Allow greater following distanceon any slippery road and watchfor slippery spots. Icy patches canoccur on otherwise clear roads inshaded areas. The surface of acurve or an overpass can remainicy when the surrounding roadsare clear. Avoid sudden steeringmaneuvers and braking whileon ice.
Turn off cruise control on slipperysurfaces.
Black plate (12,1)Chevrolet Corvette Owner Manual - 2011
9-12 Driving and Operating
Blizzard Conditions
Being stuck in snow can be aserious situation. Stay with thevehicle unless there is help nearby.If possible, use the RoadsideAssistance Program (U.S. andCanada) on page 13‑8 or RoadsideAssistance Program (Mexico) onpage 13‑10. To get help and keepeveryone in the vehicle safe:. Turn on the hazard warning
flashers.. Tie a red cloth to an outside
mirror.
{ WARNING
Snow can trap engine exhaustunder the vehicle. This maycause exhaust gases to getinside. Engine exhaust containsCarbon Monoxide (CO) whichcannot be seen or smelled. It cancause unconsciousness and evendeath.
(Continued)
WARNING (Continued)
If the vehicle is stuck in the snow:. Clear away snow from aroundthe base of your vehicle,especially any that is blockingthe exhaust pipe.
. Check again from time totime to be sure snow doesnot collect there.
. Open a window about 5 cm(2 in) on the side of thevehicle that is away from thewind to bring in fresh air.
. Fully open the air outletson or under the instrumentpanel.
(Continued)
WARNING (Continued)
. Adjust the climate controlsystem to a setting thatcirculates the air inside thevehicle and set the fan speedto the highest setting. SeeClimate Control System inthe Index.
For more information aboutcarbon monoxide, see EngineExhaust on page 9‑26.
Snow can trap exhaust gasesunder your vehicle. This cancause deadly CO (CarbonMonoxide) gas to get inside.CO could overcome you and killyou. You cannot see it or smellit, so you might not know it is inyour vehicle. Clear away snowfrom around the base of yourvehicle, especially any that isblocking the exhaust.
Black plate (13,1)Chevrolet Corvette Owner Manual - 2011
Driving and Operating 9-13
Run the engine for short periodsonly as needed to keep warm, butbe careful.
To save fuel, run the engine for onlyshort periods as needed to warmthe vehicle and then shut the engineoff and close the window most ofthe way to save heat. Repeat thisuntil help arrives but only when youfeel really uncomfortable from thecold. Moving about to keep warmalso helps.
If it takes some time for help toarrive, now and then when you runthe engine, push the acceleratorpedal slightly so the engine runsfaster than the idle speed. Thiskeeps the battery charged to restartthe vehicle and to signal for helpwith the headlamps. Do this as littleas possible to save fuel.
If the Vehicle is StuckSlowly and cautiously spin thewheels to free the vehicle whenstuck in sand, mud, ice, or snow.
If stuck too severely for the tractionsystem to free the vehicle, turn thetraction system off and use therocking method.
{ WARNING
If the vehicle's tires spin at highspeed, they can explode, and youor others could be injured. Thevehicle can overheat, causing anengine compartment fire or otherdamage. Spin the wheels as littleas possible and avoid goingabove 55 km/h (35 mph).
For information about using tirechains on the vehicle, see TireChains on page 10‑80.
Rocking the Vehicle to Getit Out
Turn the steering wheel left andright to clear the area around thefront wheels. Turn off any tractionsystem. Shift back and forthbetween R (Reverse) and a forwardgear, or with a manual transmission,between 1 (First) or 2 (Second) andR (Reverse), spinning the wheels aslittle as possible. To preventtransmission wear, wait until thewheels stop spinning before shiftinggears. Release the acceleratorpedal while shifting, and presslightly on the accelerator pedalwhen the transmission is in gear.Slowly spinning the wheels in theforward and reverse directionscauses a rocking motion that couldfree the vehicle. If that does not getthe vehicle out after a few tries, itmight need to be towed out. If thevehicle does need to be towed out,see Towing the Vehicle onpage 10‑86.
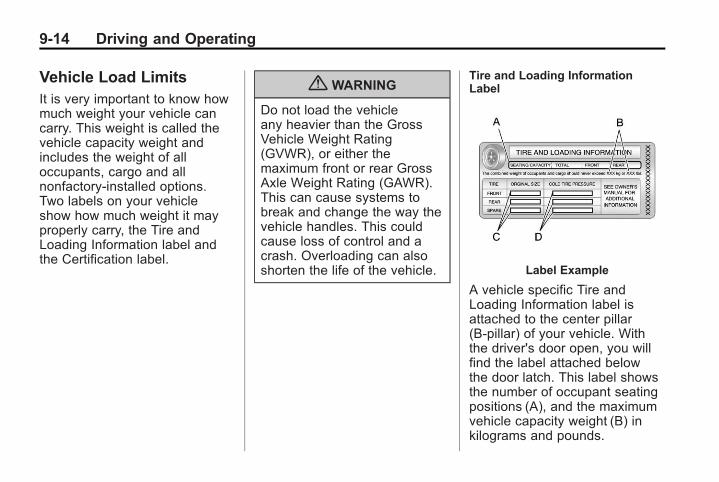
Black plate (14,1)Chevrolet Corvette Owner Manual - 2011
9-14 Driving and Operating
Vehicle Load LimitsIt is very important to know howmuch weight your vehicle cancarry. This weight is called thevehicle capacity weight andincludes the weight of alloccupants, cargo and allnonfactory‐installed options.Two labels on your vehicleshow how much weight it mayproperly carry, the Tire andLoading Information label andthe Certification label.
{ WARNING
Do not load the vehicleany heavier than the GrossVehicle Weight Rating(GVWR), or either themaximum front or rear GrossAxle Weight Rating (GAWR).This can cause systems tobreak and change the way thevehicle handles. This couldcause loss of control and acrash. Overloading can alsoshorten the life of the vehicle.
Tire and Loading InformationLabel
Label Example
A vehicle specific Tire andLoading Information label isattached to the center pillar(B-pillar) of your vehicle. Withthe driver's door open, you willfind the label attached belowthe door latch. This label showsthe number of occupant seatingpositions (A), and the maximumvehicle capacity weight (B) inkilograms and pounds.

Black plate (15,1)Chevrolet Corvette Owner Manual - 2011
Driving and Operating 9-15
The Tire and LoadingInformation label also shows thesize of the original equipmenttires (C) and the recommendedcold tire inflation pressures (D).For more information on tiresand inflation see Tires onpage 10‑58 and Tire Pressureon page 10‑66.
There is also important loadinginformation on the vehicleCertification label. It tells youthe Gross Vehicle WeightRating (GVWR) and the GrossAxle Weight Rating (GAWR) forthe front and rear axle. See“Certification Label” later in thissection.
Steps for Determining CorrectLoad Limit
1. Locate the statement“The combined weight ofoccupants and cargo shouldnever exceed XXX kg orXXX lbs” on your vehicle'splacard.
2. Determine the combinedweight of the driver andpassengers that will be ridingin your vehicle.
3. Subtract the combinedweight of the driver andpassengers from XXX kg orXXX lbs.
4. The resulting figure equalsthe available amount of cargoand luggage load capacity.For example, if the “XXX”amount equals 1400 lbs andthere will be five 150 lbpassengers in your vehicle,
the amount of available cargoand luggage load capacityis 650 lbs (1400 − 750(5 x 150) = 650 lbs).
5. Determine the combinedweight of luggage and cargobeing loaded on the vehicle.That weight may not safelyexceed the available cargoand luggage load capacitycalculated in Step 4.
6. If your vehicle will be towinga trailer, the load from yourtrailer will be transferred toyour vehicle. Consult thismanual to determine how thisreduces the available cargoand luggage load capacity ofyour vehicle.
Your vehicle is neitherdesigned nor intended to towa trailer.
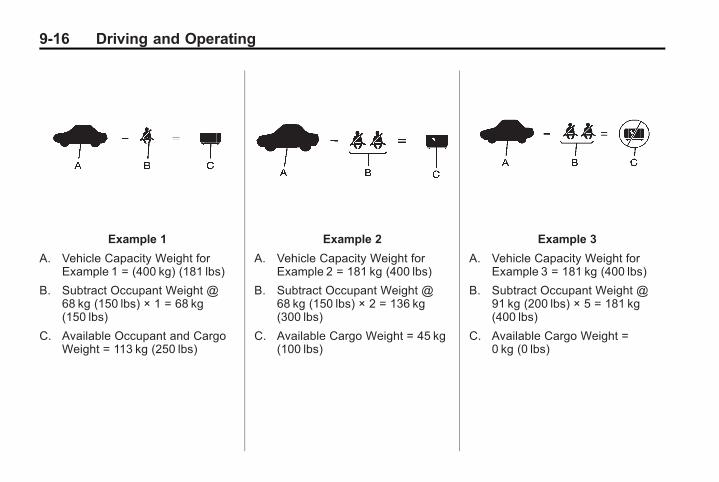
Black plate (16,1)Chevrolet Corvette Owner Manual - 2011
9-16 Driving and Operating
Example 1
A. Vehicle Capacity Weight forExample 1 = (400 kg) (181 lbs)
B. Subtract Occupant Weight @68 kg (150 lbs) × 1 = 68 kg(150 lbs)
C. Available Occupant and CargoWeight = 113 kg (250 lbs)
Example 2
A. Vehicle Capacity Weight forExample 2 = 181 kg (400 lbs)
B. Subtract Occupant Weight @68 kg (150 lbs) × 2 = 136 kg(300 lbs)
C. Available Cargo Weight = 45 kg(100 lbs)
Example 3
A. Vehicle Capacity Weight forExample 3 = 181 kg (400 lbs)
B. Subtract Occupant Weight @91 kg (200 lbs) × 5 = 181 kg(400 lbs)
C. Available Cargo Weight =0 kg (0 lbs)
Black plate (17,1)Chevrolet Corvette Owner Manual - 2011
Driving and Operating 9-17
Refer to your vehicle's Tire andLoading Information label forspecific information about yourvehicle's capacity weight andseating positions. The combinedweight of the driver, passengersand cargo should never exceedyour vehicle's capacity weight.
Certification Label
A vehicle specific Certificationlabel is attached to the rearedge of the driver's door. It tellsyou the gross weight capacity of
your vehicle, called the GrossVehicle Weight Rating (GVWR).The GVWR includes the weightof the vehicle, all occupants,fuel and cargo. Never exceedthe GVWR for your vehicle,or the Gross Axle WeightRating (GAWR) for either thefront or rear axle.
Do not load your vehiclewith more weight than it wasdesigned to carry. See “Stepsfor Determining Correct LoadLimit” earlier in this section.
{ WARNING
Do not load the vehicleany heavier than the GrossVehicle Weight Rating(GVWR), or either the
(Continued)
WARNING (Continued)
maximum front or rear GrossAxle Weight Rating (GAWR).This can cause systems tobreak and change the way thevehicle handles. This couldcause loss of control and acrash. Overloading can alsoshorten the life of the vehicle.
Notice : Overloading thevehicle may cause damage.Repairs would not be coveredby the vehicle warranty. Donot overload the vehicle.
Black plate (18,1)Chevrolet Corvette Owner Manual - 2011
9-18 Driving and Operating
If you put things inside yourvehicle — like suitcases,tools, packages or anythingelse — they will go as fast asthe vehicle goes. If you have tostop or turn quickly, or if there isa crash, they will keep going.
{ WARNING
Things you put inside yourvehicle can strike and injurepeople in a sudden stop orturn, or in a crash.
. Put things in the rear areaof your vehicle. Try tospread the weight evenly.
(Continued)
WARNING (Continued)
. Never stack heavierthings, like suitcases,inside the vehicle so thatsome of them are abovethe tops of the seats.
. Do not leave anunsecured child restraintin your vehicle.
. When you carry somethinginside the vehicle, secureit whenever you can.
Starting andOperating
New Vehicle Break-InFollow these recommendedguidelines during the first 2 414 km(1,500 miles) of driving this vehicle.Parts have a break-in period andperformance will be better in thelong run.
For the first 322 km (200 miles):. To break in new tires, drive at
moderate speeds and avoid hardcornering for the first 322 km(200 miles).
. New brake linings also need abreak- in period. Avoid makinghard stops during the first322 km (200miles). This isrecommended every timebrake linings are replaced.
Black plate (19,1)Chevrolet Corvette Owner Manual - 2011
Driving and Operating 9-19
For the first 80 km (500 miles):. Avoid full throttle starts and
abrupt stops.. Do not exceed 4,000 rpm.. Avoid driving at any one
constant speed, fast or slow,including the use of cruisecontrol.
. Avoid downshifting to brakeor slow the vehicle when theengine speed will exceed4000 rpm.
. Do not let the engine labor.Never lug the engine in highgear at low speeds. With amanual transmission, shift tothe next lower gear. This ruleapplies at all times, not justduring the break-in period.
For the first 2 414 km (1,500 miles):. Do not participate in track
events, sport driving schools,or similar activities during thefirst 2 414 km (1,500miles).
. Check engine oil with everyrefueling and add if necessary.Oil and fuel consumption may behigher than normal during thefirst 2 414 km (1,500miles).
Front Air DamThe vehicle is equipped with a frontair dam which has minimal groundclearance.
Vehicles with the ZR1 package,or ZO6 vehicles with RPO ULZ, alsocome with a splitter made fromcarbon fiber.
{ WARNING
ZR1s, and ZO6s with RPO ULZ,contain parts made from carbonfiber.
When damaged, the exposededges can be very sharp.A person could be injured bythese sharp edges. Use cautionwhen washing the vehicle,coming in contact with,or removing damaged carbonfiber parts. See your dealer forreplacement.
Under normal operation, thesecomponents will occasionallycontact some road surfaces (speedbumps, driveway ramps, etc.). Thiscan be heard inside the vehicle asa scraping noise. This is normal anddoes not indicate a problem.
Use care when approaching bumpsor objects on road surfaces andavoid them when possible.
Black plate (20,1)Chevrolet Corvette Owner Manual - 2011
9-20 Driving and Operating
Ignition Positions
The vehicle has an electronickeyless ignition with a push-buttonstart.
In order to shift out of P (Park),the vehicle must be running or inAcc. mode and the regular brakepedal must be applied.
/ (START): Press this buttonwhile your foot is on the brake foran automatic transmission, or whilepressing in the clutch for a manualtransmission, to start the engine.If the vehicle is in OFF or RetainedAccessory Power (RAP) mode, theRemote Keyless Entry (RKE)transmitter must be inside thevehicle to start the engine.
9 Acc. (STOPPING THE ENGINE/OFF/ACCESSORY): When thevehicle is stopped with the engineon, press the button once to turn theengine off.
Do not turn the engine off when thevehicle is moving. This will cause aloss of power assist in the brakeand steering systems and disablethe airbags.
In an emergency, if the vehicle mustbe shut off while driving:
1. Brake using a firm and steadypressure. Do not pump thebrakes repeatedly. This maydeplete power assist, requiringincreased brake pedal force.
2. Shift the vehicle to neutral. Thiscan be done while the vehicle ismoving. After shifting to neutral,firmly apply the brakes and steerthe vehicle to a safe location.
3. Come to a complete stop. Shiftto P (Park) with an automatictransmission, or Neutral with amanual transmission. Turn theignition to OFF.
4. Set the parking brake. SeeParking Brake on page 9‑35
Black plate (21,1)Chevrolet Corvette Owner Manual - 2011
Driving and Operating 9-21
{ WARNING
Turning off the vehicle whilemoving may cause loss of powerassist in the brake and steeringsystems and disable the airbags.While driving, only shut thevehicle off in an emergency.
5. If the vehicle must be shut offwhile driving, turn the ignition toACC/ACCESSORY.
When the engine is on or thevehicle is in accessory powermode, it is recommended that amanual transmission be placedin R (Reverse). An automatictransmission must be placed inP (Park). Then press the Acc.button to turn the engine off andplace the vehicle in RAP. SeeRetained Accessory Power (RAP)on page 9‑23 for more information.
If an automatic vehicle is notcorrectly placed in P (Park) a SHIFTTO PARK message will display onthe Driver Information Center (DIC).
For more information, seeTransmission Messages onpage 5‑53.
When the engine is off, press thisbutton to place the vehicle inaccessory mode. ACCESSORYMODEON will display on the DriverInformation Center (DIC). This modeallows you to use things like theradio and the power windows whilethe engine is off. Use accessorymode if you must have the vehiclein motion while the engine is off, forexample, if the vehicle is beingpushed or towed.
After being in accessory mode forabout 10 minutes, the vehicle willautomatically enter RAP or OFF,depending on if the doors areopened or closed.
Starting the EngineMove the shift lever to P (Park)or N (Neutral) for an automatictransmission. For a manualtransmission the vehicle can bestarted in Neutral or any othergear as long as the clutch pedal ispressed. To restart a vehicle with amanual transmission when you arealready moving, use the Neutralposition only. To restart a vehiclewith an automatic transmissionwhen you are already moving, useN (Neutral).
Notice: Do not try to shift toP (Park) if the vehicle is moving.If you do, you could damage thetransmission. Shift to P (Park)only when the vehicle is stopped.
The RKE transmitter must be insidethe vehicle for the ignition to work.
Black plate (22,1)Chevrolet Corvette Owner Manual - 2011
9-22 Driving and Operating
Cell phone chargers can interferewith the operation of the KeylessAccess System. Battery chargersshould not be plugged in whenstarting or turning off the engine.
To start the vehicle, do the following:
1. For vehicles with an automatictransmission, with your foot onthe brake pedal, press theSTART button located on theinstrument panel. For vehicleswith a manual transmission, youmust also press in the clutchpedal while pressing the STARTbutton.
If there is not an RKE transmitterin the vehicle or if there issomething causing interferencewith it, the DIC will displayNO FOBS DETECTED. See Keyand Lock Messages onpage 5‑42 for more information.
2. When the engine beginscranking, let go of the button andthe engine cranks automaticallyuntil it starts. If the battery in theRKE transmitter is weak, theDIC displays FOB BATTERYLOW. You can still drive thevehicle.
See “Battery Replacement”under Remote Keyless Entry(RKE) System Operation onpage 2‑3 for more information.If the fob battery is dead, youneed to insert the fob into thefob slot to enable enginestarting. See “NO FOBSDETECTED” under Key andLock Messages on page 5‑42.
3. Do not race the engineimmediately after starting it.Operate the engine andtransmission gently until theoil warms up and lubricatesall moving parts.
4. If the engine does not start andno DIC message is displayed,wait 15 seconds before tryingagain to let the cranking motorcool down.
If the engine does not start after5-10 seconds, especially in verycold weather (below −18°Cor 0°F), it could be flooded withtoo much gasoline. Try pushingthe accelerator pedal all the wayto the floor while cranking for upto 15 seconds maximum. Wait atleast 15 seconds between eachtry, to allow the cranking motorto cool down. When the enginestarts, let go of the accelerator.If the vehicle starts briefly butthen stops again, repeat thesesteps. This clears the extragasoline from the engine.
Black plate (23,1)Chevrolet Corvette Owner Manual - 2011
Driving and Operating 9-23
Notice: Cranking the engine forlong periods of time, by pressingthe START button immediatelyafter cranking has ended, canoverheat and damage thecranking motor, and drain thebattery. Wait at least 15 secondsbetween each try, to allow thecranking motor to cool down.
The vehicle has aComputer-Controlled CrankingSystem. This feature assists instarting the engine and protectscomponents. Once cranking hasbeen initiated, the engine continuescranking for a few seconds or untilthe vehicle starts. If the engine doesnot start, cranking automaticallystops after 15 seconds to preventcranking motor damage. To preventgear damage, this system alsoprevents cranking if the engine isalready running.
Notice: The engine is designedto work with the electronics inthe vehicle. If electrical partsor accessories are added, youcould change the way the engineoperates. Before adding electricalequipment, check with yourdealer. If you do not, the enginemight not perform properly. Anyresulting damage would not becovered by the vehicle warranty.
Stopping the Engine
If the vehicle has an automatictransmission, move the shift leverto P (Park) and press and hold theAcc. (Off/Accessory) button, locatedon the instrument panel, until theengine shuts off. If the shift leveris not in P (Park), the engine shutsoff and the vehicle goes into theaccessory mode. The DIC displaysSHIFT TO PARK. Once the shifter ismoved to P (Park), the vehicle turnsoff. If the vehicle has a manualtransmission, it is recommendedthat you move the shift lever to
R (Reverse) and set the parkingbrake after you turn off the engineby pressing and holding the Acc.(Off/Accessory) button.
If the RKE transmitter is notdetected inside the vehicle when itis turned to off, the DIC displaysNO FOB –OFF OR RUN?.
See Key and Lock Messages onpage 5‑42 for more information.
Retained AccessoryPower (RAP)These vehicle accessories can beused for up to 10 minutes after theengine is turned off:. Audio System. Power Windows
These features continue to workup to 10 minutes after the engineis turned off or until either door isopened. If a door is opened, thepower windows and audio systemwill shut off.
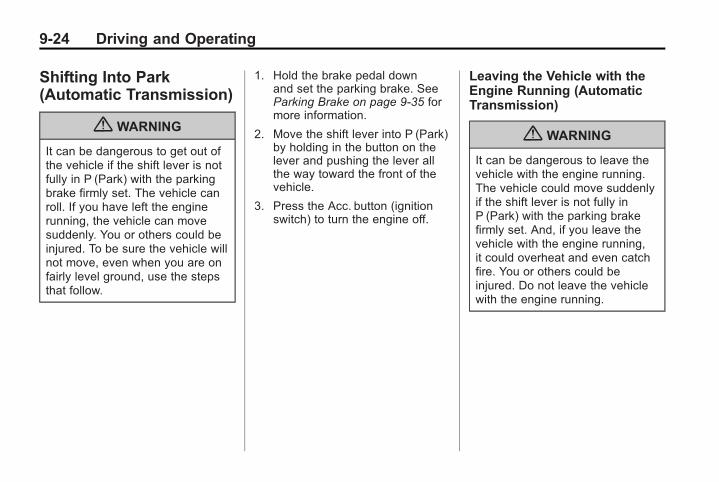
Black plate (24,1)Chevrolet Corvette Owner Manual - 2011
9-24 Driving and Operating
Shifting Into Park(Automatic Transmission)
{ WARNING
It can be dangerous to get out ofthe vehicle if the shift lever is notfully in P (Park) with the parkingbrake firmly set. The vehicle canroll. If you have left the enginerunning, the vehicle can movesuddenly. You or others could beinjured. To be sure the vehicle willnot move, even when you are onfairly level ground, use the stepsthat follow.
1. Hold the brake pedal downand set the parking brake. SeeParking Brake on page 9‑35 formore information.
2. Move the shift lever into P (Park)by holding in the button on thelever and pushing the lever allthe way toward the front of thevehicle.
3. Press the Acc. button (ignitionswitch) to turn the engine off.
Leaving the Vehicle with theEngine Running (AutomaticTransmission)
{ WARNING
It can be dangerous to leave thevehicle with the engine running.The vehicle could move suddenlyif the shift lever is not fully inP (Park) with the parking brakefirmly set. And, if you leave thevehicle with the engine running,it could overheat and even catchfire. You or others could beinjured. Do not leave the vehiclewith the engine running.
Black plate (25,1)Chevrolet Corvette Owner Manual - 2011
Driving and Operating 9-25
If you have to leave the vehiclewith the engine running, be surethe vehicle is in P (Park) and theparking brake is firmly set beforeyou leave it. After you have movedthe shift lever into P (Park), holddown the regular brake pedal. See ifyou can move the shift lever awayfrom P (Park) without first pushingthe button on the lever. If you can, itmeans that the shift lever was notfully locked into P (Park).
Torque Lock (AutomaticTransmission)
If you are parking on a hill and youdo not shift the transmission intoP (Park) properly, the weight of thevehicle may put too much force onthe parking pawl in thetransmission. You may find it difficultto pull the shift lever out of P (Park).This is called “torque lock.”To prevent torque lock, set theparking brake and then shift intoP (Park) properly before you leavethe driver seat. To find out how, see“Shifting Into P (Park)” previously inthis section.
When you are ready to drive, movethe shift lever out of P (Park) beforeyou release the parking brake.
If torque lock does occur, you mayneed to have another vehicle pushyours a little uphill to take some ofthe pressure from the transmissionparking pawl, so you can pull theshift lever out of P (Park).
Shifting Out of ParkShift lock release prevents shiftingout of P (Park) unless the vehicle isrunning or in accessory mode andthe brake pedal is applied.
The shift lock release is alwaysfunctional except in the case of anuncharged or low voltage (less than9‐volt) battery. See Jump Startingon page 10‑82 for more information.
Black plate (26,1)Chevrolet Corvette Owner Manual - 2011
9-26 Driving and Operating
To shift out of P (Park) use thefollowing:
1. Apply the brake pedal.
2. Release the parking brake. SeeParking Brake on page 9‑35.
3. Press the shift lever button.
4. Move the shift lever to thedesired position.
If you still are unable to shift outof P (Park):
1. Fully release the shift leverbutton.
2. While holding down the brakepedal, press the shift leverbutton again.
3. Move the shift lever to thedesired position.
If you still cannot move the shiftlever from P (Park), consult yourdealer or a professional towingservice.
Parking (ManualTransmission)Before you get out of the vehicle,move the shift lever into R (Reverse)and firmly apply the parking brake.Once the shift lever has beenplaced into R (Reverse) with theclutch pedal pressed in, you canturn the ignition off and release theclutch.
Parking Over ThingsThat Burn
{ WARNING
Things that can burn could touchhot exhaust parts under thevehicle and ignite. Do not parkover papers, leaves, dry grass,or other things that can burn.
Engine Exhaust
{ WARNING
Engine exhaust contains carbonmonoxide (CO) which cannot beseen or smelled. Exposure to COcan cause unconsciousness andeven death.
Exhaust may enter the vehicle if:. The vehicle idles in areaswith poor ventilation (parkinggarages, tunnels, deep snowthat may block underbodyairflow or tail pipes).
. The exhaust smells orsounds strange or different.
. The exhaust system leaksdue to corrosion or damage.
. The vehicle exhaust systemhas been modified, damagedor improperly repaired.
(Continued)
Black plate (27,1)Chevrolet Corvette Owner Manual - 2011
Driving and Operating 9-27
WARNING (Continued)
. There are holes or openingsin the vehicle body fromdamage or after marketmodifications that are notcompletely sealed.
If unusual fumes are detected orif it is suspected that exhaust iscoming into the vehicle:
. Drive it only with the windowscompletely down.
. Have the vehicle repairedimmediately.
Never park the vehicle with theengine running in an enclosedarea such as a garage or abuilding that has no fresh airventilation.
Running the VehicleWhile ParkedIt is better not to park with theengine running. But if you ever haveto, here are some things to know.
{ WARNING
Idling a vehicle in an enclosedarea with poor ventilation isdangerous. Engine exhaust mayenter the vehicle. Engine exhaustcontains carbon monoxide (CO)which cannot be seen or smelled.It can cause unconsciousnessand even death. Never run theengine in an enclosed area thathas no fresh air ventilation. Formore information, see EngineExhaust on page 9‑26.
{ WARNING
It can be dangerous to get outof the vehicle if the automatictransmission shift lever is not fullyin P (Park) with the parking brakefirmly set. The vehicle can roll.Do not leave the vehicle whenthe engine is running unless youhave to. If you have left theengine running, the vehicle canmove suddenly. You or otherscould be injured. To be sure thevehicle will not move, even whenyou are on fairly level ground,always set the parking brake andmove the shift lever to P (Park).
Follow the proper steps to be surethe vehicle will not move. SeeShifting Into Park (AutomaticTransmission) on page 9‑24.
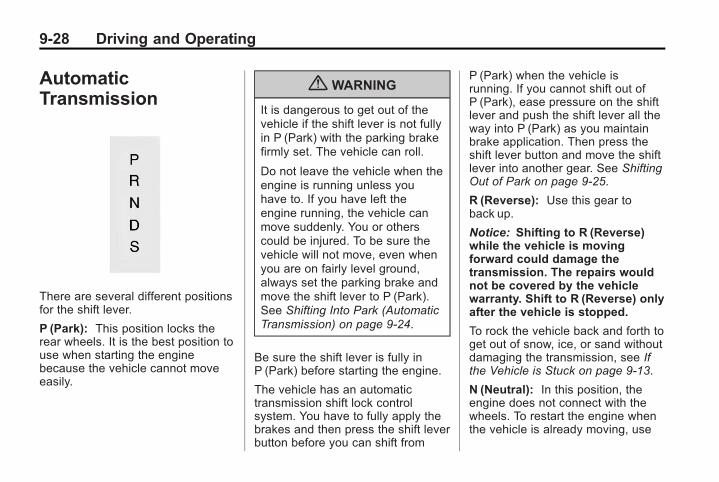
Black plate (28,1)Chevrolet Corvette Owner Manual - 2011
9-28 Driving and Operating
AutomaticTransmission
There are several different positionsfor the shift lever.
P (Park): This position locks therear wheels. It is the best position touse when starting the enginebecause the vehicle cannot moveeasily.
{ WARNING
It is dangerous to get out of thevehicle if the shift lever is not fullyin P (Park) with the parking brakefirmly set. The vehicle can roll.
Do not leave the vehicle when theengine is running unless youhave to. If you have left theengine running, the vehicle canmove suddenly. You or otherscould be injured. To be sure thevehicle will not move, even whenyou are on fairly level ground,always set the parking brake andmove the shift lever to P (Park).See Shifting Into Park (AutomaticTransmission) on page 9‑24.
Be sure the shift lever is fully inP (Park) before starting the engine.
The vehicle has an automatictransmission shift lock controlsystem. You have to fully apply thebrakes and then press the shift leverbutton before you can shift from
P (Park) when the vehicle isrunning. If you cannot shift out ofP (Park), ease pressure on the shiftlever and push the shift lever all theway into P (Park) as you maintainbrake application. Then press theshift lever button and move the shiftlever into another gear. See ShiftingOut of Park on page 9‑25.
R (Reverse): Use this gear toback up.
Notice: Shifting to R (Reverse)while the vehicle is movingforward could damage thetransmission. The repairs wouldnot be covered by the vehiclewarranty. Shift to R (Reverse) onlyafter the vehicle is stopped.
To rock the vehicle back and forth toget out of snow, ice, or sand withoutdamaging the transmission, see Ifthe Vehicle is Stuck on page 9‑13.
N (Neutral): In this position, theengine does not connect with thewheels. To restart the engine whenthe vehicle is already moving, use
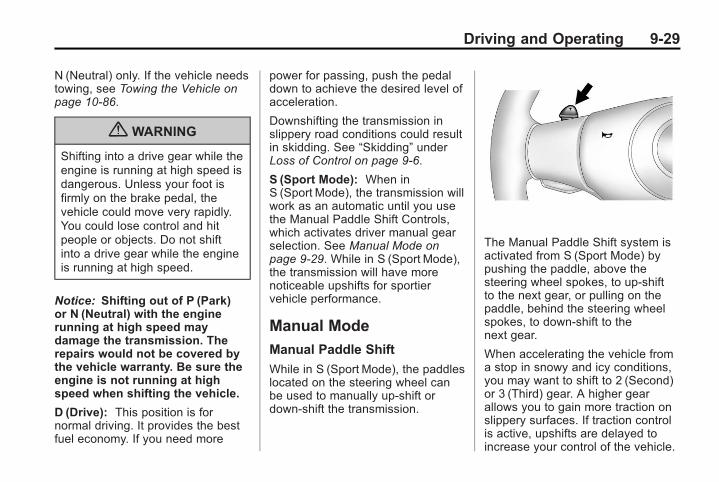
Black plate (29,1)Chevrolet Corvette Owner Manual - 2011
Driving and Operating 9-29
N (Neutral) only. If the vehicle needstowing, see Towing the Vehicle onpage 10‑86.
{ WARNING
Shifting into a drive gear while theengine is running at high speed isdangerous. Unless your foot isfirmly on the brake pedal, thevehicle could move very rapidly.You could lose control and hitpeople or objects. Do not shiftinto a drive gear while the engineis running at high speed.
Notice: Shifting out of P (Park)or N (Neutral) with the enginerunning at high speed maydamage the transmission. Therepairs would not be covered bythe vehicle warranty. Be sure theengine is not running at highspeed when shifting the vehicle.
D (Drive): This position is fornormal driving. It provides the bestfuel economy. If you need more
power for passing, push the pedaldown to achieve the desired level ofacceleration.
Downshifting the transmission inslippery road conditions could resultin skidding. See “Skidding” underLoss of Control on page 9‑6.
S (Sport Mode): When inS (Sport Mode), the transmission willwork as an automatic until you usethe Manual Paddle Shift Controls,which activates driver manual gearselection. See Manual Mode onpage 9‑29. While in S (Sport Mode),the transmission will have morenoticeable upshifts for sportiervehicle performance.
Manual Mode
Manual Paddle Shift
While in S (Sport Mode), the paddleslocated on the steering wheel canbe used to manually up-shift ordown-shift the transmission.
The Manual Paddle Shift system isactivated from S (Sport Mode) bypushing the paddle, above thesteering wheel spokes, to up-shiftto the next gear, or pulling on thepaddle, behind the steering wheelspokes, to down-shift to thenext gear.
When accelerating the vehicle froma stop in snowy and icy conditions,you may want to shift to 2 (Second)or 3 (Third) gear. A higher gearallows you to gain more traction onslippery surfaces. If traction controlis active, upshifts are delayed toincrease your control of the vehicle.
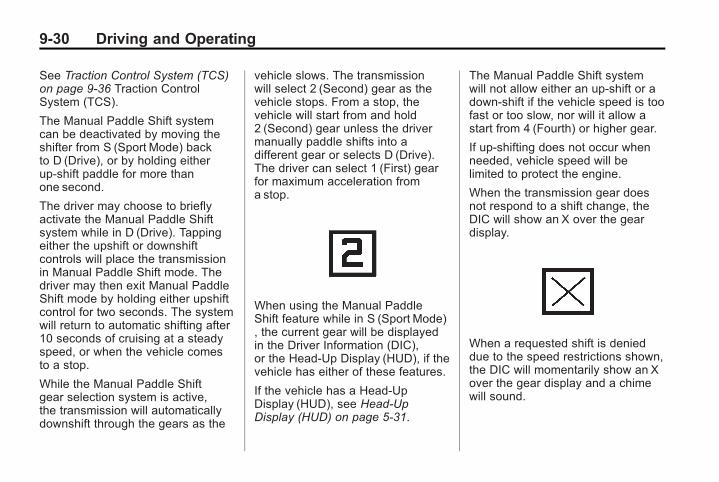
Black plate (30,1)Chevrolet Corvette Owner Manual - 2011
9-30 Driving and Operating
See Traction Control System (TCS)on page 9‑36 Traction ControlSystem (TCS).
The Manual Paddle Shift systemcan be deactivated by moving theshifter from S (Sport Mode) backto D (Drive), or by holding eitherup‐shift paddle for more thanone second.
The driver may choose to brieflyactivate the Manual Paddle Shiftsystem while in D (Drive). Tappingeither the upshift or downshiftcontrols will place the transmissionin Manual Paddle Shift mode. Thedriver may then exit Manual PaddleShift mode by holding either upshiftcontrol for two seconds. The systemwill return to automatic shifting after10 seconds of cruising at a steadyspeed, or when the vehicle comesto a stop.
While the Manual Paddle Shiftgear selection system is active,the transmission will automaticallydownshift through the gears as the
vehicle slows. The transmissionwill select 2 (Second) gear as thevehicle stops. From a stop, thevehicle will start from and hold2 (Second) gear unless the drivermanually paddle shifts into adifferent gear or selects D (Drive).The driver can select 1 (First) gearfor maximum acceleration froma stop.
When using the Manual PaddleShift feature while in S (Sport Mode), the current gear will be displayedin the Driver Information (DIC),or the Head-Up Display (HUD), if thevehicle has either of these features.
If the vehicle has a Head-UpDisplay (HUD), see Head-UpDisplay (HUD) on page 5‑31.
The Manual Paddle Shift systemwill not allow either an up-shift or adown-shift if the vehicle speed is toofast or too slow, nor will it allow astart from 4 (Fourth) or higher gear.
If up-shifting does not occur whenneeded, vehicle speed will belimited to protect the engine.
When the transmission gear doesnot respond to a shift change, theDIC will show an X over the geardisplay.
When a requested shift is denieddue to the speed restrictions shown,the DIC will momentarily show an Xover the gear display and a chimewill sound.
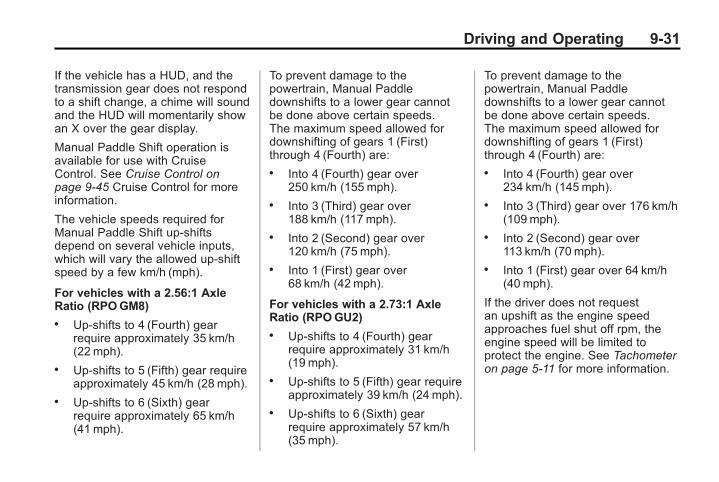
Black plate (31,1)Chevrolet Corvette Owner Manual - 2011
Driving and Operating 9-31
If the vehicle has a HUD, and thetransmission gear does not respondto a shift change, a chime will soundand the HUD will momentarily showan X over the gear display.
Manual Paddle Shift operation isavailable for use with CruiseControl. See Cruise Control onpage 9‑45 Cruise Control for moreinformation.
The vehicle speeds required forManual Paddle Shift up-shiftsdepend on several vehicle inputs,which will vary the allowed up-shiftspeed by a few km/h (mph).
For vehicles with a 2.56:1 AxleRatio (RPOGM8). Up-shifts to 4 (Fourth) gear
require approximately 35 km/h(22 mph).
. Up-shifts to 5 (Fifth) gear requireapproximately 45 km/h (28 mph).
. Up-shifts to 6 (Sixth) gearrequire approximately 65 km/h(41 mph).
To prevent damage to thepowertrain, Manual Paddledownshifts to a lower gear cannotbe done above certain speeds.The maximum speed allowed fordownshifting of gears 1 (First)through 4 (Fourth) are:. Into 4 (Fourth) gear over
250 km/h (155 mph).. Into 3 (Third) gear over
188 km/h (117 mph).. Into 2 (Second) gear over
120 km/h (75 mph).. Into 1 (First) gear over
68 km/h (42 mph).
For vehicles with a 2.73:1 AxleRatio (RPOGU2). Up-shifts to 4 (Fourth) gear
require approximately 31 km/h(19 mph).
. Up-shifts to 5 (Fifth) gear requireapproximately 39 km/h (24 mph).
. Up-shifts to 6 (Sixth) gearrequire approximately 57 km/h(35 mph).
To prevent damage to thepowertrain, Manual Paddledownshifts to a lower gear cannotbe done above certain speeds.The maximum speed allowed fordownshifting of gears 1 (First)through 4 (Fourth) are:. Into 4 (Fourth) gear over
234 km/h (145 mph).. Into 3 (Third) gear over 176 km/h
(109 mph).. Into 2 (Second) gear over
113 km/h (70 mph).. Into 1 (First) gear over 64 km/h
(40 mph).
If the driver does not requestan upshift as the engine speedapproaches fuel shut off rpm, theengine speed will be limited toprotect the engine. See Tachometeron page 5‑11 for more information.
Black plate (32,1)Chevrolet Corvette Owner Manual - 2011
9-32 Driving and Operating
Manual Transmission
This is the shift pattern for thesix-speed manual transmission.
Here is how to operate thetransmission:
1 (First): Press the clutch pedaland shift into 1 (First). Then slowlylet up on the clutch pedal as youpress the accelerator pedal.
You can shift into 1 (First) whenyou are going less than 64 km/h(40 mph). If you come to a completestop and it is hard to shift into1 (First), put the shift lever in Neutraland let up on the clutch. Press theclutch pedal back down. Then shiftinto 1 (First).
2 (Second): Press the clutch pedalas you let up on the acceleratorpedal and shift into 2 (Second).Then, slowly let up on the clutchpedal as you press the acceleratorpedal.
3 (Third), 4 (Fourth), 5 (Fifth)and 6 (Sixth): Shift into 3 (Third),4 (Fourth), 5 (Fifth) and 6 (Sixth) thesame way you do for 2 (Second).Slowly let up on the clutch pedal asyou press the accelerator pedal.
To stop, let up on the acceleratorpedal and press the brake pedal.Just before the vehicle stops, pressthe clutch pedal and the brakepedal, and shift to Neutral.
Neutral: Use this position whenyou start or idle the engine. Theshift lever is in Neutral when it iscentered in the shift pattern, not inany gear.
R (Reverse): To back up, pressdown the clutch pedal and shift intoR (Reverse). Just apply pressureto get the lever past 5 (Fifth) and6 (Sixth) into R (Reverse). Let upon the clutch pedal slowly whilepressing the accelerator pedal.
The six-speed manual transmissionhas a feature that allows youto safely shift into R (Reverse)while the vehicle is rolling at lessthan 5 km/h (3 mph). You will belocked out if you try to shift intoR (Reverse) while the vehicle ismoving faster than 5 km/h (3 mph).
Black plate (33,1)Chevrolet Corvette Owner Manual - 2011
Driving and Operating 9-33
Shift Speeds(Manual Transmission)
{ WARNING
If you skip a gear when youdownshift, you could lose controlof the vehicle. You could injureyourself or others. Do not shiftdown more than one gear at atime when you downshift.
This chart shows when to shift to the next higher gear for the best fueleconomy.
Manual Transmission RecommendedShift Speeds in km/h (mph)
EngineAcceleration Shift Speed
1 to 2 2 to 3 3 to 4 4 to 5 5 to 6
All Engines 24 (15) 40 (25) 64 (40) 72 (45) 80 (50)
If the engine speed drops below900 rpm, or if the engine is notrunning smoothly, you shoulddownshift to the next lower gear.You may have to downshift twoor more gears to keep the enginerunning smoothly or for goodengine performance.
Notice: When shifting gears, donot move the shift lever aroundunnecessarily. This may damagethe transmission. Shift directlyinto the next gear.
One to Four Shift Light(Manual Transmission)
When this light comes on, you canonly shift from 1 (First) to 4 (Fourth)instead of 1 (First) to 2 (Second).
See One-to-Four Shift Light (ManualTransmission) on page 5‑22 formore information.
Black plate (34,1)Chevrolet Corvette Owner Manual - 2011
9-34 Driving and Operating
Downshifting(Manual Transmission)
Do not downshift into the gearshown below at a speed greaterthan shown in the table:
1 (First) 80 km/h (50 mph)
2 (Second) 119 km/h (74 mph)
3 (Third)163 km/h(101 mph)
4 (Fourth)209 km/h(130 mph)
Notice: If you skip more than onegear when you downshift, or ifyou race the engine when yourelease the clutch pedal whiledownshifting, you could damagethe engine, clutch, driveshaft orthe transmission. Do not skipgears or race the engine whendownshifting.
The six-speed transmission has aspring that centers the shift levernear 3 (Third) and 4 (Fourth). Thisspring helps you know which gearyou are in when you are shifting. Becareful when shifting from 1 (First)to 2 (Second) or downshifting from6 (Sixth) to 5 (Fifth). The spring willtry to pull the shift lever toward4 (Fourth) and 3 (Third). Make sureyou move the lever into 2 (Second)or 5 (Fifth). If you let the shift levermove in the direction of the pulling,you may end up shifting from1 (First) to 4 (Fourth) or from6 (Sixth) to 3 (Third).
If the driver does not upshift as theengine speed approaches fuel shutoff RPM, the engine speed will belimited to protect the engine. SeeTachometer on page 5‑11 for moreinformation.
Brakes
Antilock BrakeSystem (ABS)This vehicle has the AntilockBrake System (ABS), an advancedelectronic braking system that helpsprevent a braking skid.
When the engine is started and thevehicle begins to drive away, ABSchecks itself. A momentary motor orclicking noise might be heard whilethis test is going on, and it mighteven be noticed that the brakepedal moves a little. This is normal.
If there is a problem with ABS, thiswarning light stays on. See AntilockBrake System (ABS) Warning Lighton page 5‑22.

Black plate (35,1)Chevrolet Corvette Owner Manual - 2011
Driving and Operating 9-35
If driving safely on a wet roadand it becomes necessary to slamon the brakes and continue brakingto avoid a sudden obstacle, acomputer senses that the wheelsare slowing down. If one of thewheels is about to stop rolling, thecomputer will separately work thebrakes at each wheel.
ABS can change the brake pressureto each wheel, as required, fasterthan any driver could. This can helpthe driver steer around the obstaclewhile braking hard.
As the brakes are applied, thecomputer keeps receiving updateson wheel speed and controlsbraking pressure accordingly.
Remember: ABS does not changethe time needed to get a foot up tothe brake pedal or always decrease
stopping distance. If you get tooclose to the vehicle in front of you,there will not be enough time toapply the brakes if that vehiclesuddenly slows or stops. Alwaysleave enough room up ahead tostop, even with ABS.
Using ABS
Do not pump the brakes. Just holdthe brake pedal down firmly and letABS work. You might hear the ABSpump or motor operating and feelthe brake pedal pulsate, but this isnormal.
Braking in Emergencies
ABS allows the driver to steer andbrake at the same time. In manyemergencies, steering can helpmore than even the very bestbraking.
Parking BrakeThe parking brake lever is locatedto the right of the center console.
To set the parking brake, hold thebrake pedal down. Pull the parkingbrake lever up. If the ignition is on,the brake system warning light willcome on.
To release the parking brake, holdthe brake pedal down. Then pushthe release button in as you movethe parking brake lever all theway down.
Notice: Driving with the parkingbrake on can overheat the brakesystem and cause prematurewear or damage to brake systemparts. Make sure that the parkingbrake is fully released and thebrake warning light is off beforedriving.
Black plate (36,1)Chevrolet Corvette Owner Manual - 2011
9-36 Driving and Operating
Brake AssistThis vehicle has a brake assistfeature designed to assist the driverin stopping or decreasing vehiclespeed in emergency drivingconditions. This feature uses thestability system hydraulic brakecontrol module to supplement thepower brake system underconditions where the driver hasquickly and forcefully applied thebrake pedal in an attempt to quicklystop or slow down the vehicle. Thestability system hydraulic brakecontrol module increases brakepressure at each corner of thevehicle until the ABS activates.Minor brake pedal pulsation orpedal movement during this timeis normal and the driver shouldcontinue to apply the brake pedalas the driving situation dictates.The brake assist feature willautomatically disengage when thebrake pedal is released or brakepedal pressure is quicklydecreased.
Ride Control Systems
Traction ControlSystem (TCS)The vehicle has a Traction ControlSystem (TCS) that limits wheel spin.This is especially useful in slipperyroad conditions. The systemoperates only if it senses that therear wheels are spinning too muchor are beginning to lose traction.When this happens, the systemworks the rear brakes and reducesengine power (by closing the throttleand managing engine spark) to limitwheel spin.
The TRACTION SYSTEM ACTIVEmessage displays on the DriverInformation Center (DIC) when TCSis limiting wheel spin. See RideControl System Messages onpage 5‑44. The system may beheard or felt while it is working, butthis is normal.
If cruise control is being used whenTCS begins to limit wheel spin, thecruise control will automaticallydisengage. Cruise control may bereengaged when road conditionsallow. See Cruise Control onpage 9‑45.
The SERVICE TRACTION SYSTEMmessage and the TCS warning lightwill come on if there is a problemwith TCS. See Ride Control SystemMessages on page 5‑44.
When this light and the SERVICETRACTION SYSTEM message areon, the system will not limit wheelspin. Adjust your drivingaccordingly.
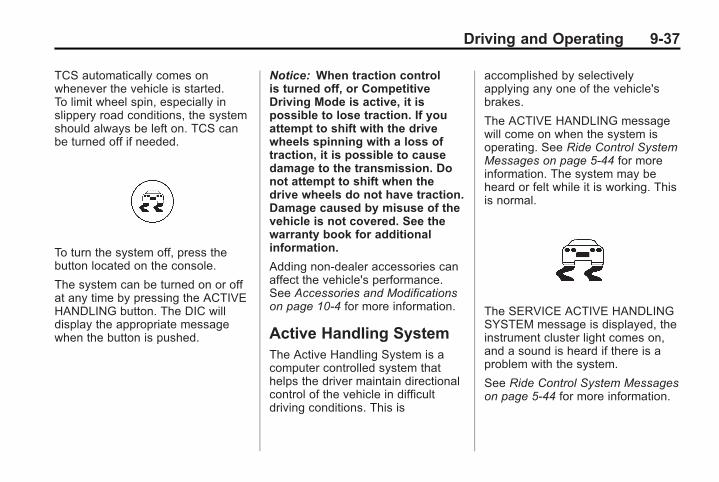
Black plate (37,1)Chevrolet Corvette Owner Manual - 2011
Driving and Operating 9-37
TCS automatically comes onwhenever the vehicle is started.To limit wheel spin, especially inslippery road conditions, the systemshould always be left on. TCS canbe turned off if needed.
To turn the system off, press thebutton located on the console.
The system can be turned on or offat any time by pressing the ACTIVEHANDLING button. The DIC willdisplay the appropriate messagewhen the button is pushed.
Notice: When traction controlis turned off, or CompetitiveDriving Mode is active, it ispossible to lose traction. If youattempt to shift with the drivewheels spinning with a loss oftraction, it is possible to causedamage to the transmission. Donot attempt to shift when thedrive wheels do not have traction.Damage caused by misuse of thevehicle is not covered. See thewarranty book for additionalinformation.
Adding non‐dealer accessories canaffect the vehicle's performance.See Accessories and Modificationson page 10‑4 for more information.
Active Handling SystemThe Active Handling System is acomputer controlled system thathelps the driver maintain directionalcontrol of the vehicle in difficultdriving conditions. This is
accomplished by selectivelyapplying any one of the vehicle'sbrakes.
The ACTIVE HANDLING messagewill come on when the system isoperating. See Ride Control SystemMessages on page 5‑44 for moreinformation. The system may beheard or felt while it is working. Thisis normal.
The SERVICE ACTIVE HANDLINGSYSTEM message is displayed, theinstrument cluster light comes on,and a sound is heard if there is aproblem with the system.
See Ride Control System Messageson page 5‑44 for more information.
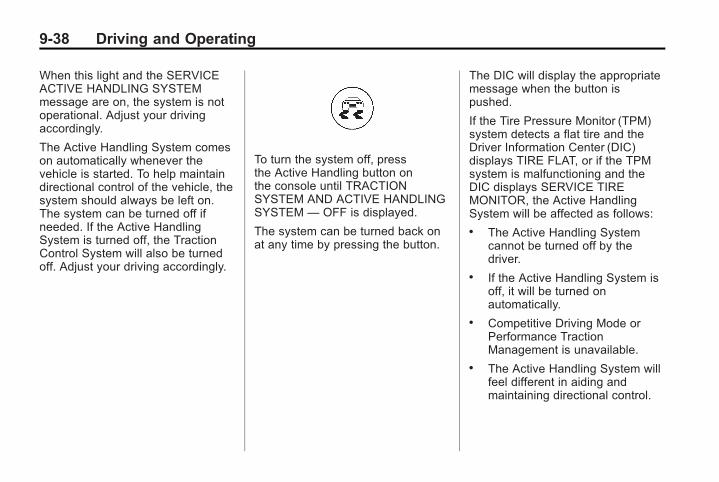
Black plate (38,1)Chevrolet Corvette Owner Manual - 2011
9-38 Driving and Operating
When this light and the SERVICEACTIVE HANDLING SYSTEMmessage are on, the system is notoperational. Adjust your drivingaccordingly.
The Active Handling System comeson automatically whenever thevehicle is started. To help maintaindirectional control of the vehicle, thesystem should always be left on.The system can be turned off ifneeded. If the Active HandlingSystem is turned off, the TractionControl System will also be turnedoff. Adjust your driving accordingly.
To turn the system off, pressthe Active Handling button onthe console until TRACTIONSYSTEM AND ACTIVE HANDLINGSYSTEM — OFF is displayed.
The system can be turned back onat any time by pressing the button.
The DIC will display the appropriatemessage when the button ispushed.
If the Tire Pressure Monitor (TPM)system detects a flat tire and theDriver Information Center (DIC)displays TIRE FLAT, or if the TPMsystem is malfunctioning and theDIC displays SERVICE TIREMONITOR, the Active HandlingSystem will be affected as follows:. The Active Handling System
cannot be turned off by thedriver.
. If the Active Handling System isoff, it will be turned onautomatically.
. Competitive Driving Mode orPerformance TractionManagement is unavailable.
. The Active Handling System willfeel different in aiding andmaintaining directional control.
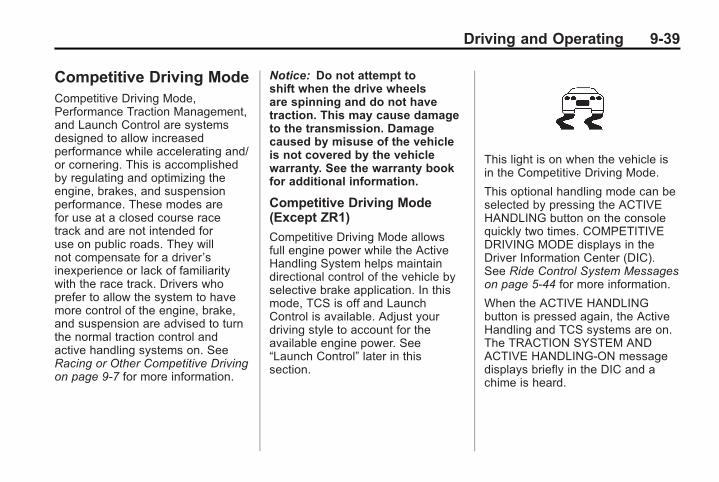
Black plate (39,1)Chevrolet Corvette Owner Manual - 2011
Driving and Operating 9-39
Competitive Driving ModeCompetitive Driving Mode,Performance Traction Management,and Launch Control are systemsdesigned to allow increasedperformance while accelerating and/or cornering. This is accomplishedby regulating and optimizing theengine, brakes, and suspensionperformance. These modes arefor use at a closed course racetrack and are not intended foruse on public roads. They willnot compensate for a driver’sinexperience or lack of familiaritywith the race track. Drivers whoprefer to allow the system to havemore control of the engine, brake,and suspension are advised to turnthe normal traction control andactive handling systems on. SeeRacing or Other Competitive Drivingon page 9‑7 for more information.
Notice: Do not attempt toshift when the drive wheelsare spinning and do not havetraction. This may cause damageto the transmission. Damagecaused by misuse of the vehicleis not covered by the vehiclewarranty. See the warranty bookfor additional information.
Competitive Driving Mode(Except ZR1)
Competitive Driving Mode allowsfull engine power while the ActiveHandling System helps maintaindirectional control of the vehicle byselective brake application. In thismode, TCS is off and LaunchControl is available. Adjust yourdriving style to account for theavailable engine power. See“Launch Control” later in thissection.
This light is on when the vehicle isin the Competitive Driving Mode.
This optional handling mode can beselected by pressing the ACTIVEHANDLING button on the consolequickly two times. COMPETITIVEDRIVING MODE displays in theDriver Information Center (DIC).See Ride Control System Messageson page 5‑44 for more information.
When the ACTIVE HANDLINGbutton is pressed again, the ActiveHandling and TCS systems are on.The TRACTION SYSTEM ANDACTIVE HANDLING-ON messagedisplays briefly in the DIC and achime is heard.
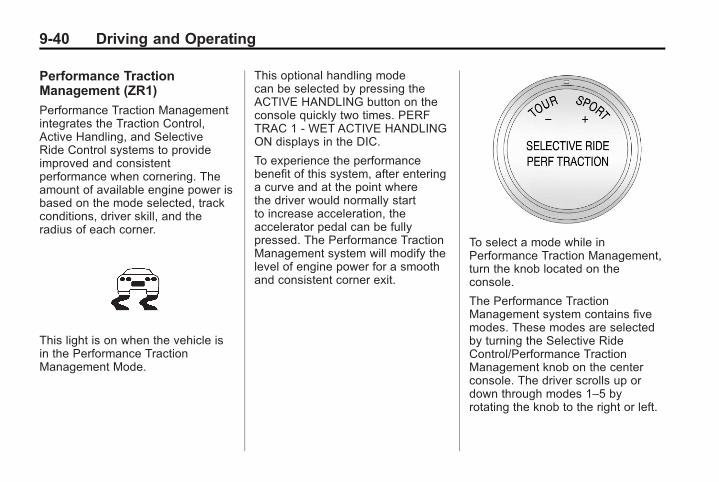
Black plate (40,1)Chevrolet Corvette Owner Manual - 2011
9-40 Driving and Operating
Performance TractionManagement (ZR1)
Performance Traction Managementintegrates the Traction Control,Active Handling, and SelectiveRide Control systems to provideimproved and consistentperformance when cornering. Theamount of available engine power isbased on the mode selected, trackconditions, driver skill, and theradius of each corner.
This light is on when the vehicle isin the Performance TractionManagement Mode.
This optional handling modecan be selected by pressing theACTIVE HANDLING button on theconsole quickly two times. PERFTRAC 1 - WET ACTIVE HANDLINGON displays in the DIC.
To experience the performancebenefit of this system, after enteringa curve and at the point wherethe driver would normally startto increase acceleration, theaccelerator pedal can be fullypressed. The Performance TractionManagement system will modify thelevel of engine power for a smoothand consistent corner exit.
To select a mode while inPerformance Traction Management,turn the knob located on theconsole.
The Performance TractionManagement system contains fivemodes. These modes are selectedby turning the Selective RideControl/Performance TractionManagement knob on the centerconsole. The driver scrolls up ordown through modes 1–5 byrotating the knob to the right or left.
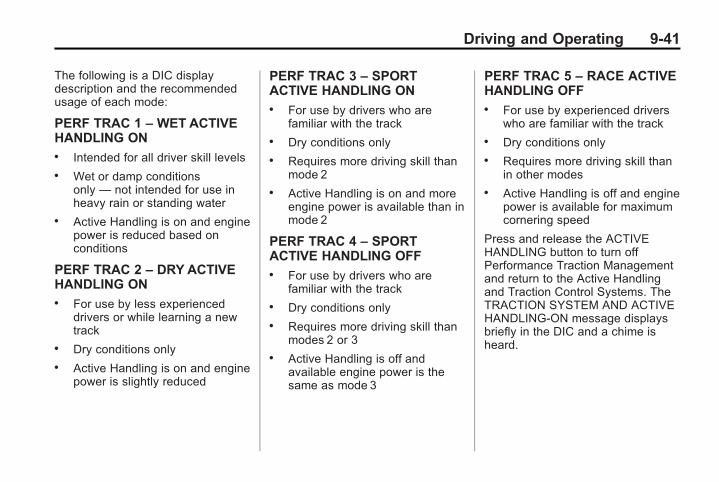
Black plate (41,1)Chevrolet Corvette Owner Manual - 2011
Driving and Operating 9-41
The following is a DIC displaydescription and the recommendedusage of each mode:
PERF TRAC 1 – WET ACTIVEHANDLING ON. Intended for all driver skill levels. Wet or damp conditions
only — not intended for use inheavy rain or standing water
. Active Handling is on and enginepower is reduced based onconditions
PERF TRAC 2 – DRY ACTIVEHANDLING ON. For use by less experienced
drivers or while learning a newtrack
. Dry conditions only
. Active Handling is on and enginepower is slightly reduced
PERF TRAC 3 – SPORTACTIVE HANDLING ON. For use by drivers who are
familiar with the track. Dry conditions only. Requires more driving skill than
mode 2. Active Handling is on and more
engine power is available than inmode 2
PERF TRAC 4 – SPORTACTIVE HANDLING OFF. For use by drivers who are
familiar with the track. Dry conditions only. Requires more driving skill than
modes 2 or 3. Active Handling is off and
available engine power is thesame as mode 3
PERF TRAC 5 – RACE ACTIVEHANDLING OFF. For use by experienced drivers
who are familiar with the track. Dry conditions only. Requires more driving skill than
in other modes. Active Handling is off and engine
power is available for maximumcornering speed
Press and release the ACTIVEHANDLING button to turn offPerformance Traction Managementand return to the Active Handlingand Traction Control Systems. TheTRACTION SYSTEM AND ACTIVEHANDLING-ON message displaysbriefly in the DIC and a chime isheard.
Black plate (42,1)Chevrolet Corvette Owner Manual - 2011
9-42 Driving and Operating
Launch Control
A Launch Control feature isavailable, within Competitive DrivingMode (except ZR1) or PerformanceTraction Management (ZR1), onvehicles with a manual transmissionto allow the driver to achieve highlevels of vehicle acceleration ina straight line. Launch Control isa form of traction control thatmanages tire spin while launchingthe vehicle. This feature is intendedfor use during closed course raceevents where consistent zero tosixty and quarter mile times aredesirable.
Launch Control is only availablewhen the following criteria are met:. Competitive Driving Mode is
selected (except ZR1) or anyof the Performance TractionManagement modes areselected (ZR1). The TCS lightcomes on the instrument paneland the appropriate DICmessage displays.
. The vehicle is not moving.
. The steering wheel is pointingstraight.
. The clutch is pressed and thevehicle is in first gear.
. The accelerator pedal is rapidlyapplied to wide open throttle.
The Launch Control feature willinitially limit engine speed as thedriver rapidly applies the acceleratorpedal to wide open throttle.
A smooth, quick release of theclutch, while maintaining the fullypressed accelerator pedal, willmanage wheel slip. Completeshifts as described in ManualTransmission on page 9‑32.
After the vehicle is launched, thesystem continues in CompetitiveMode (except ZR1) or PerformanceTraction Management (ZR1).
Competitive Driving Mode,Performance Traction Management,and Launch Control are systemsdesigned for a closed course racetrack and not intended for use onpublic roads. The systems are notintended to compensate for lack ofdriver experience or familiarity withthe race track.
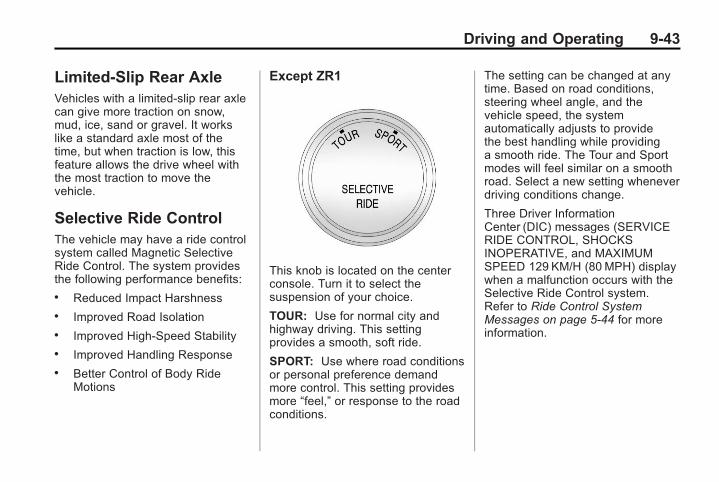
Black plate (43,1)Chevrolet Corvette Owner Manual - 2011
Driving and Operating 9-43
Limited-Slip Rear AxleVehicles with a limited-slip rear axlecan give more traction on snow,mud, ice, sand or gravel. It workslike a standard axle most of thetime, but when traction is low, thisfeature allows the drive wheel withthe most traction to move thevehicle.
Selective Ride ControlThe vehicle may have a ride controlsystem called Magnetic SelectiveRide Control. The system providesthe following performance benefits:. Reduced Impact Harshness. Improved Road Isolation. Improved High-Speed Stability. Improved Handling Response. Better Control of Body Ride
Motions
Except ZR1
This knob is located on the centerconsole. Turn it to select thesuspension of your choice.
TOUR: Use for normal city andhighway driving. This settingprovides a smooth, soft ride.
SPORT: Use where road conditionsor personal preference demandmore control. This setting providesmore “feel,” or response to the roadconditions.
The setting can be changed at anytime. Based on road conditions,steering wheel angle, and thevehicle speed, the systemautomatically adjusts to providethe best handling while providinga smooth ride. The Tour and Sportmodes will feel similar on a smoothroad. Select a new setting wheneverdriving conditions change.
Three Driver InformationCenter (DIC) messages (SERVICERIDE CONTROL, SHOCKSINOPERATIVE, and MAXIMUMSPEED 129 KM/H (80 MPH) displaywhen a malfunction occurs with theSelective Ride Control system.Refer to Ride Control SystemMessages on page 5‑44 for moreinformation.
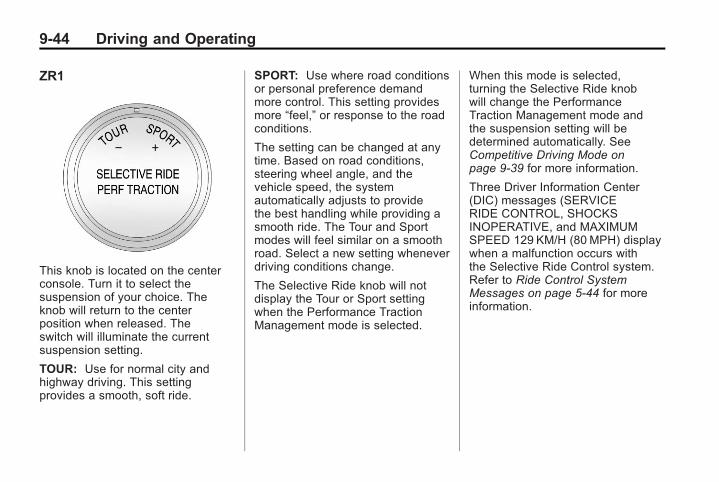
Black plate (44,1)Chevrolet Corvette Owner Manual - 2011
9-44 Driving and Operating
ZR1
This knob is located on the centerconsole. Turn it to select thesuspension of your choice. Theknob will return to the centerposition when released. Theswitch will illuminate the currentsuspension setting.
TOUR: Use for normal city andhighway driving. This settingprovides a smooth, soft ride.
SPORT: Use where road conditionsor personal preference demandmore control. This setting providesmore “feel,” or response to the roadconditions.
The setting can be changed at anytime. Based on road conditions,steering wheel angle, and thevehicle speed, the systemautomatically adjusts to providethe best handling while providing asmooth ride. The Tour and Sportmodes will feel similar on a smoothroad. Select a new setting wheneverdriving conditions change.
The Selective Ride knob will notdisplay the Tour or Sport settingwhen the Performance TractionManagement mode is selected.
When this mode is selected,turning the Selective Ride knobwill change the PerformanceTraction Management mode andthe suspension setting will bedetermined automatically. SeeCompetitive Driving Mode onpage 9‑39 for more information.
Three Driver Information Center(DIC) messages (SERVICERIDE CONTROL, SHOCKSINOPERATIVE, and MAXIMUMSPEED 129 KM/H (80 MPH) displaywhen a malfunction occurs withthe Selective Ride Control system.Refer to Ride Control SystemMessages on page 5‑44 for moreinformation.
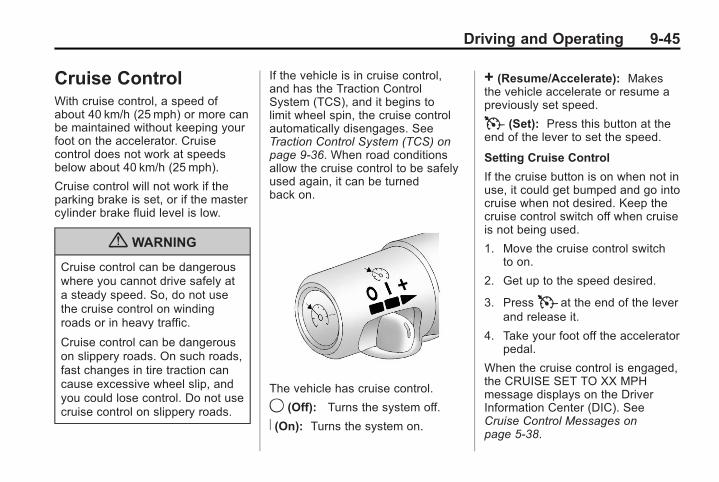
Black plate (45,1)Chevrolet Corvette Owner Manual - 2011
Driving and Operating 9-45
Cruise ControlWith cruise control, a speed ofabout 40 km/h (25 mph) or more canbe maintained without keeping yourfoot on the accelerator. Cruisecontrol does not work at speedsbelow about 40 km/h (25 mph).
Cruise control will not work if theparking brake is set, or if the mastercylinder brake fluid level is low.
{ WARNING
Cruise control can be dangerouswhere you cannot drive safely ata steady speed. So, do not usethe cruise control on windingroads or in heavy traffic.
Cruise control can be dangerouson slippery roads. On such roads,fast changes in tire traction cancause excessive wheel slip, andyou could lose control. Do not usecruise control on slippery roads.
If the vehicle is in cruise control,and has the Traction ControlSystem (TCS), and it begins tolimit wheel spin, the cruise controlautomatically disengages. SeeTraction Control System (TCS) onpage 9‑36. When road conditionsallow the cruise control to be safelyused again, it can be turnedback on.
The vehicle has cruise control.
9 (Off): Turns the system off.
R (On): Turns the system on.
+ (Resume/Accelerate): Makesthe vehicle accelerate or resume apreviously set speed.
T (Set): Press this button at theend of the lever to set the speed.
Setting Cruise Control
If the cruise button is on when not inuse, it could get bumped and go intocruise when not desired. Keep thecruise control switch off when cruiseis not being used.
1. Move the cruise control switchto on.
2. Get up to the speed desired.
3. PressT at the end of the leverand release it.
4. Take your foot off the acceleratorpedal.
When the cruise control is engaged,the CRUISE SET TO XX MPHmessage displays on the DriverInformation Center (DIC). SeeCruise Control Messages onpage 5‑38.
Black plate (46,1)Chevrolet Corvette Owner Manual - 2011
9-46 Driving and Operating
Resuming a Set Speed
If the cruise control is set at adesired speed and then the brakesare applied, the cruise control isdisengaged without erasing the setspeed from memory.
Once the vehicle speed reachesabout 40 km/h (25 mph) or more,move the cruise control switchbriefly from R to S. The vehiclereturns to the previous set speedand stays there.
If the switch is held at resume/accelerate, the vehicle keeps goingfaster until the switch is released orthe brake is applied. Do not hold theswitch at resume/accelerate, unlessyou want the vehicle to go faster.
Increasing Speed While UsingCruise Control
If the cruise control system isalready activated,. Use the accelerator pedal to get
to the higher speed. PressJ atthe end of the lever, then releasethe button and the acceleratorpedal. If the accelerator pedal isheld longer than 60 seconds,cruise control will turn off.
. Move the cruise switch from R toS. Hold it there until desiredspeed is reached, and thenrelease the switch.
. To increase the vehicle speed insmall amounts, move the switchbriefly to S. Each time this isdone, the vehicle goes about1.6 km/h (1 mph) faster.
Reducing Speed While UsingCruise Control
If the cruise control system isalready activated,. Press and hold the set button
until the lower speed desired isreached, then release it.
. To slow down in small amounts,briefly pressJ. Each time thisis done, the vehicle goes about1.6 km/h (1 mph) slower.
Passing Another Vehicle WhileUsing Cruise Control
Use the accelerator pedal toincrease the vehicle speed. Whenyou take your foot off the pedal,the vehicle will slow down to theprevious set cruise speed.
Black plate (47,1)Chevrolet Corvette Owner Manual - 2011
Driving and Operating 9-47
Using Cruise Control on Hills
How well the cruise control workson hills depends upon the vehiclespeed, load, and the steepnessof the hills. When going up steephills, you might want to step onthe accelerator pedal to maintainthe vehicle speed. When goingdownhill, you might have to brakeor shift to a lower gear to keep thevehicle's speed down. When thebrakes are applied the cruise controlis disengaged.
Cruise Control in Sport andManual Paddle Shift GearSelection
When the vehicle is in S (Sport)and the manual paddle shift controlsare not being used, cruise controloperates in the same manner asD (Drive).
When the vehicle is in S (Sport) andthe manual paddle shift controls arebeing used, cruise control operatesas follows:. If cruise control is active and a
gear is selected with the manualpaddle shift controls, the vehiclespeed is maintained in thedriver selected gear and willnot automatically up-shift ordown-shift the transmissionwhile the driver’s gear selectionis active.
. If driving in hilly terrain, cruisecontrol may not be able tomaintain vehicle speed if anup-shift or down-shift is notselected by the driver. Whiledriving on hilly terrain and cruisecontrol is active with a manualpaddle shift gear selection, thedriver must select the propergear for the terrain or selectD (Drive) on the gear rangeselector for full automatictransmission operation.
Black plate (48,1)Chevrolet Corvette Owner Manual - 2011
9-48 Driving and Operating
Ending Cruise Control. To disengage cruise control,
step lightly on the brake pedal.If the vehicle has a manualtransmission, lightly tap theclutch to end the cruise controlsession.
. To turn off the cruise controlsystem, move the cruise controlswitch to9.
When cruise control is disengaged,the CRUISE DISENGAGEDmessage displays on the DriverInformation Center (DIC). SeeCruise Control Messages onpage 5‑38.
Erasing Speed Memory
The cruise control set speed iserased from memory by movingthe switch to9 or if the ignitionis turned off.
FuelUse of the recommended fuel isan important part of the propermaintenance of this vehicle. To helpkeep the engine clean and maintainoptimum vehicle performance, werecommend the use of gasolineadvertised as TOP TIER DetergentGasoline.
Look for the TOP TIER label on thefuel pump to ensure gasoline meetsenhanced detergency standardsdeveloped by auto companies. Alist of marketers providing TOPTIER Detergent Gasoline can befound at www.toptiergas.com.
The eighth digit of the VehicleIdentification Number (VIN) showsthe code letter or number thatidentifies the vehicle's engine.The VIN is at the top left of theinstrument panel. See VehicleIdentification Number (VIN) onpage 12‑1.
Black plate (49,1)Chevrolet Corvette Owner Manual - 2011
Driving and Operating 9-49
Recommended FuelIf the vehicle has the 6.2L V8 engine(VIN Code W), use premiumunleaded gasoline with a postedoctane rating of 91 or higher. Youcan also use regular unleadedgasoline rated at 87 octane orhigher, but the vehicle's accelerationcould be slightly reduced, and aslight audible knocking noise,commonly referred to as sparkknock, might be heard. If the octaneis less than 87, a heavy knockingnoise might be heard when driving.If this occurs, use a gasoline ratedat 87 octane or higher as soon aspossible. Otherwise, you coulddamage the engine. If heavyknocking is heard when usinggasoline rated at 87 octane orhigher, the engine needs service.
If the vehicle has the 6.2L V8 engine(VIN Code T) or the 7.0L V8 engine(VIN Code E), use premiumunleaded gasoline with a postedoctane rating of 91 or higher. Forbest performance, use premiumunleaded gasoline with a postedoctane rating of 93. In anemergency, you can use regularunleaded gasoline with an octanerating of 87 or higher. If 87 octanefuel is used, do not perform anyaggressive driving maneuvers suchas wide open throttle applications.You might also hear audible sparkknock during acceleration. Refill thetank with premium fuel as soon aspossible to avoid damaging theengine. If heavy knocking is heardwhen using gasoline rated at91 octane or higher, the engineneeds service.
Gasoline Specifications(U.S. and Canada Only)At a minimum, gasoline should meetASTM specification D 4814 in theUnited States or CAN/CGSB‐3.5 or3.511 in Canada. Some gasolinescontain an octane-enhancingadditive calledmethylcyclopentadienyl manganesetricarbonyl (MMT). We recommendagainst the use of gasolinescontaining MMT. See Fuel Additiveson page 9‑50 for additionalinformation.
Black plate (50,1)Chevrolet Corvette Owner Manual - 2011
9-50 Driving and Operating
California FuelRequirementsIf the vehicle is certified to meetCalifornia Emissions Standards, it isdesigned to operate on fuels thatmeet California specifications. Seethe underhood emission controllabel. If this fuel is not available instates adopting California EmissionsStandards, the vehicle will operatesatisfactorily on fuels meetingfederal specifications, but emissioncontrol system performance mightbe affected. The malfunctionindicator lamp could turn on and thevehicle might fail a smog‐check test.See Malfunction Indicator Lamp onpage 5‑18. If this occurs, return toyour authorized dealer for diagnosis.If it is determined that the conditionis caused by the type of fuel used,repairs might not be covered by thevehicle warranty.
Fuels in ForeignCountriesNever use leaded gasoline or anyother fuel not recommended in theprevious text on fuel. Costly repairscaused by use of improper fuelwould not be covered by the vehiclewarranty.
To check the fuel availability, askan auto club, or contact a major oilcompany that does business in thecountry where you will be driving.
Fuel AdditivesTo provide cleaner air, all gasolinesin the United States are nowrequired to contain additives thathelp prevent engine and fuel systemdeposits from forming, allowing theemission control system to workproperly. In most cases, nothingshould have to be added to the fuel.However, some gasolines containonly the minimum amount ofadditive required to meet U.S.Environmental Protection Agencyregulations. To help keep fuelinjectors and intake valves cleanand avoid problems due to dirtyinjectors or valves, look for gasolinethat is advertised as TOP TIERDetergent Gasoline. Look for theTOP TIER label on the fuel pump toensure gasoline meets enhanceddetergency standards developedby the auto companies. A list ofmarketers providing TOP TIERDetergent Gasoline can be foundat www.toptiergas.com.
Black plate (51,1)Chevrolet Corvette Owner Manual - 2011
Driving and Operating 9-51
For customers who do not use TOPTIER Detergent Gasoline regularly,one bottle of GM Fuel SystemTreatment PLUS, added to the fueltank at every engine oil change,can help clean deposits from fuelinjectors and intake valves. GM FuelSystem Treatment PLUS is the onlygasoline additive recommended byGeneral Motors. It is available atyour dealer.
Gasolines containing oxygenates,such as ethers and ethanol, andreformulated gasolines might beavailable in your area. Werecommend that you use thesegasolines, if they comply with thespecifications described earlier.
However, E85 (85% ethanol) andother fuels containing more than10% ethanol must not be used invehicles that were not designed forthose fuels.
Notice: This vehicle was notdesigned for fuel that containsmethanol. Do not use fuelcontaining methanol. It cancorrode metal parts in the fuelsystem and also damage plasticand rubber parts. That damagewould not be covered under thevehicle warranty.
Some gasolines that arenot reformulated for low emissionscan contain an octane-enhancingadditive calledmethylcyclopentadienyl manganesetricarbonyl (MMT); ask the attendantwhere you buy gasoline whether thefuel contains MMT. We recommendagainst the use of such gasolines.Fuels containing MMT can reducespark plug life and affect emissioncontrol system performance. Themalfunction indicator lamp mightturn on. If this occurs, return to yourdealer for service.

Black plate (52,1)Chevrolet Corvette Owner Manual - 2011
9-52 Driving and Operating
Filling the Tank
{ WARNING
Fuel vapor burns violently and afuel fire can cause bad injuries.To help avoid injuries to you andothers, read and follow all theinstructions on the fuel pumpisland. Turn off the engine whenrefueling. Do not smoke near fuelor when refueling the vehicle. Donot use cellular phones. Keepsparks, flames, and smokingmaterials away from fuel. Do notleave the fuel pump unattendedwhen refueling the vehicle. This isagainst the law in some places.Do not re-enter the vehicle whilepumping fuel. Keep children awayfrom the fuel pump; never letchildren pump fuel.
The tethered fuel cap is locatedbehind a hinged fuel door on thedriver side of the vehicle.
The fuel door release button islocated on the instrument panel tothe left of the steering wheel. Pushthe button to release the fuel door.
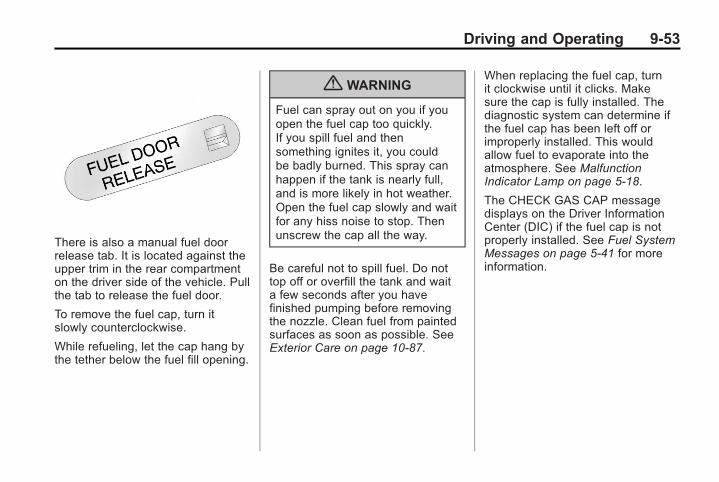
Black plate (53,1)Chevrolet Corvette Owner Manual - 2011
Driving and Operating 9-53
There is also a manual fuel doorrelease tab. It is located against theupper trim in the rear compartmenton the driver side of the vehicle. Pullthe tab to release the fuel door.
To remove the fuel cap, turn itslowly counterclockwise.
While refueling, let the cap hang bythe tether below the fuel fill opening.
{ WARNING
Fuel can spray out on you if youopen the fuel cap too quickly.If you spill fuel and thensomething ignites it, you couldbe badly burned. This spray canhappen if the tank is nearly full,and is more likely in hot weather.Open the fuel cap slowly and waitfor any hiss noise to stop. Thenunscrew the cap all the way.
Be careful not to spill fuel. Do nottop off or overfill the tank and waita few seconds after you havefinished pumping before removingthe nozzle. Clean fuel from paintedsurfaces as soon as possible. SeeExterior Care on page 10‑87.
When replacing the fuel cap, turnit clockwise until it clicks. Makesure the cap is fully installed. Thediagnostic system can determine ifthe fuel cap has been left off orimproperly installed. This wouldallow fuel to evaporate into theatmosphere. See MalfunctionIndicator Lamp on page 5‑18.
The CHECK GAS CAP messagedisplays on the Driver InformationCenter (DIC) if the fuel cap is notproperly installed. See Fuel SystemMessages on page 5‑41 for moreinformation.
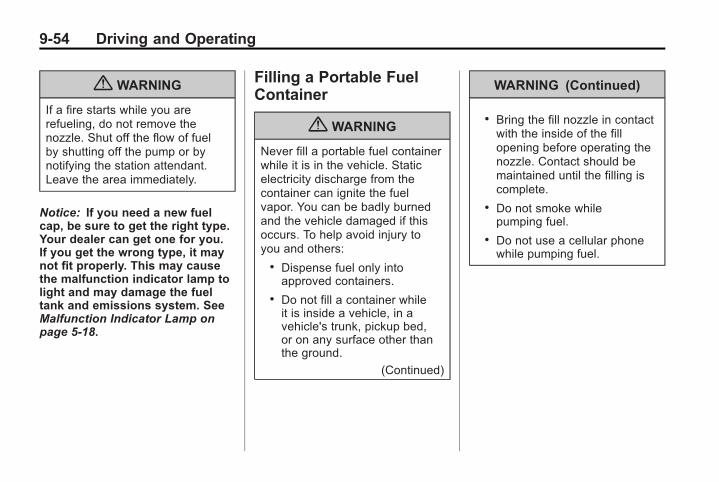
Black plate (54,1)Chevrolet Corvette Owner Manual - 2011
9-54 Driving and Operating
{ WARNING
If a fire starts while you arerefueling, do not remove thenozzle. Shut off the flow of fuelby shutting off the pump or bynotifying the station attendant.Leave the area immediately.
Notice: If you need a new fuelcap, be sure to get the right type.Your dealer can get one for you.If you get the wrong type, it maynot fit properly. This may causethe malfunction indicator lamp tolight and may damage the fueltank and emissions system. SeeMalfunction Indicator Lamp onpage 5‑18.
Filling a Portable FuelContainer
{ WARNING
Never fill a portable fuel containerwhile it is in the vehicle. Staticelectricity discharge from thecontainer can ignite the fuelvapor. You can be badly burnedand the vehicle damaged if thisoccurs. To help avoid injury toyou and others:
. Dispense fuel only intoapproved containers.
. Do not fill a container whileit is inside a vehicle, in avehicle's trunk, pickup bed,or on any surface other thanthe ground.
(Continued)
WARNING (Continued)
. Bring the fill nozzle in contactwith the inside of the fillopening before operating thenozzle. Contact should bemaintained until the filling iscomplete.
. Do not smoke whilepumping fuel.
. Do not use a cellular phonewhile pumping fuel.

Black plate (55,1)Chevrolet Corvette Owner Manual - 2011
Driving and Operating 9-55
Towing
General TowingInformationThe vehicle is neither designed norintended to tow a trailer.
Conversions andAdd-Ons
Add-On ElectricalEquipmentNotice: Do not add anythingelectrical to the vehicle unlessyou check with your dealer first.Some electrical equipment candamage the vehicle and thedamage would not be covered bythe vehicle's warranty. Someadd-on electrical equipment cankeep other components fromworking as they should.
Add-on equipment can drain thevehicle's 12‐volt battery, even ifthe vehicle is not operating.
The vehicle has an airbag system.Before attempting to add anythingelectrical to the vehicle, seeServicing the Airbag-EquippedVehicle on page 3‑34 and AddingEquipment to the Airbag-EquippedVehicle on page 3‑35.

Black plate (56,1)Chevrolet Corvette Owner Manual - 2011
9-56 Driving and Operating
2 NOTES
Black plate (1,1)Chevrolet Corvette Owner Manual - 2011
Vehicle Care 10-1
Vehicle Care
General InformationGeneral Information . . . . . . . . . . 10-3California Proposition65 Warning . . . . . . . . . . . . . . . . . 10-3
California PerchlorateMaterials Requirements . . . . 10-3
Accessories andModifications . . . . . . . . . . . . . . . 10-4
Lifting the Vehicle . . . . . . . . . . . . 10-5
Vehicle ChecksDoing Your OwnService Work . . . . . . . . . . . . . . . 10-8
Hood . . . . . . . . . . . . . . . . . . . . . . . . 10-9Engine CompartmentOverview . . . . . . . . . . . . . . . . . . 10-10
Engine Oil . . . . . . . . . . . . . . . . . . 10-15Engine Oil Life System . . . . . 10-22
Automatic TransmissionFluid . . . . . . . . . . . . . . . . . . . . . . 10-23
Manual TransmissionFluid . . . . . . . . . . . . . . . . . . . . . . 10-23
Hydraulic Clutch . . . . . . . . . . . . 10-24Engine Air Cleaner/Filter . . . . 10-24Cooling System (Engine) . . . 10-28Cooling System(Intercooler) . . . . . . . . . . . . . . . 10-29
Engine Coolant . . . . . . . . . . . . . 10-29Engine Overheating . . . . . . . . 10-34Overheated EngineProtectionOperating Mode . . . . . . . . . . . 10-35
Power Steering Fluid . . . . . . . 10-36Washer Fluid . . . . . . . . . . . . . . . 10-37Brakes . . . . . . . . . . . . . . . . . . . . . 10-38Brake Fluid . . . . . . . . . . . . . . . . . 10-41Battery . . . . . . . . . . . . . . . . . . . . . 10-43Rear Axle . . . . . . . . . . . . . . . . . . 10-44Starter Switch Check . . . . . . . 10-44Automatic Transmission ShiftLock Control FunctionCheck . . . . . . . . . . . . . . . . . . . . . 10-45
Park Brake and P (Park)Mechanism Check . . . . . . . . 10-45
Wiper BladeReplacement . . . . . . . . . . . . . . 10-46
Windshield Replacement . . . 10-47
Headlamp AimingHeadlamp Aiming . . . . . . . . . . 10-48
Bulb ReplacementBulb Replacement . . . . . . . . . . 10-48Halogen Bulbs . . . . . . . . . . . . . . 10-48High Intensity Discharge(HID) Lighting . . . . . . . . . . . . . 10-48
Headlamps, Front TurnSignal and ParkingLamps . . . . . . . . . . . . . . . . . . . . 10-49
Taillamps, Turn Signal, andStoplamps . . . . . . . . . . . . . . . . 10-50
Replacement Bulbs . . . . . . . . . 10-50
Black plate (2,1)Chevrolet Corvette Owner Manual - 2011
10-2 Vehicle Care
Electrical SystemElectrical SystemOverload . . . . . . . . . . . . . . . . . . 10-50
Fuses and CircuitBreakers . . . . . . . . . . . . . . . . . . 10-51
Engine Compartment FuseBlock . . . . . . . . . . . . . . . . . . . . . 10-52
Instrument Panel FuseBlock . . . . . . . . . . . . . . . . . . . . . 10-55
Wheels and TiresTires . . . . . . . . . . . . . . . . . . . . . . . . 10-58Winter Tires . . . . . . . . . . . . . . . . 10-59Run-Flat Tires . . . . . . . . . . . . . . 10-59Low-Profile Tires . . . . . . . . . . . 10-60Tire Sidewall Labeling . . . . . . 10-61Tire Designations . . . . . . . . . . . 10-62Tire Terminology andDefinitions . . . . . . . . . . . . . . . . 10-63
Tire Pressure . . . . . . . . . . . . . . . 10-66Tire Pressure for High-SpeedOperation . . . . . . . . . . . . . . . . . 10-67
Tire Pressure MonitorSystem . . . . . . . . . . . . . . . . . . . 10-68
Tire Pressure MonitorOperation . . . . . . . . . . . . . . . . . 10-69
Tire Inspection . . . . . . . . . . . . . . 10-72Tire Rotation . . . . . . . . . . . . . . . 10-72When It Is Time for NewTires . . . . . . . . . . . . . . . . . . . . . . 10-72
Buying New Tires . . . . . . . . . . . 10-73Different Size Tires andWheels . . . . . . . . . . . . . . . . . . . 10-75
Uniform Tire QualityGrading . . . . . . . . . . . . . . . . . . . 10-76
Wheel Alignment and TireBalance . . . . . . . . . . . . . . . . . . . 10-77
Wheel Replacement . . . . . . . . 10-78Tire Chains . . . . . . . . . . . . . . . . . 10-80If a Tire Goes Flat . . . . . . . . . . 10-80
Jump StartingJump Starting . . . . . . . . . . . . . . 10-82
TowingTowing the Vehicle . . . . . . . . . 10-86Recreational VehicleTowing . . . . . . . . . . . . . . . . . . . . 10-86
Appearance CareExterior Care . . . . . . . . . . . . . . . 10-87Interior Care . . . . . . . . . . . . . . . . 10-90Floor Mats . . . . . . . . . . . . . . . . . . 10-95
Black plate (3,1)Chevrolet Corvette Owner Manual - 2011
Vehicle Care 10-3
General InformationFor service and parts needs,visit your dealer. You will receivegenuine GM parts and GM-trainedand supported service people.
Genuine GM parts have one ofthese marks:
California Proposition65 WarningMost motor vehicles, including thisone, contain and/or emit chemicalsknown to the State of California tocause cancer and birth defects orother reproductive harm. Engineexhaust, many parts and systems,many fluids, and some componentwear by-products contain and/oremit these chemicals.
California PerchlorateMaterials RequirementsCertain types of automotiveapplications, such as airbaginitiators, seat belt pretensioners,and lithium batteries contained inRemote Keyless Entry transmitters,may contain perchlorate materials.Special handling may be necessary.For additional information, seewww.dtsc.ca.gov/hazardouswaste/perchlorate.
Black plate (4,1)Chevrolet Corvette Owner Manual - 2011
10-4 Vehicle Care
Accessories andModificationsAdding non‐dealer accessoriesto the vehicle can affect vehicleperformance and safety, includingsuch things as airbags, braking,stability, ride and handling,emissions systems, aerodynamics,durability, and electronic systemslike antilock brakes, traction control,and stability control. Some of theseaccessories could even causemalfunction or damage not coveredby the vehicle warranty.
Damage to vehicle componentsresulting from the installation or useof non‐GM certified parts, includingcontrol module modifications, is notcovered under the terms of thevehicle warranty and may affectremaining warranty coverage foraffected parts.
GM Accessories are designed tocomplement and function with othersystems on the vehicle. Your GMdealer can accessorize the vehicleusing genuine GM Accessories.
When you go to your GM dealerand ask for GM Accessories, youwill know that GM-trained andsupported service technicians willperform the work using genuine GMAccessories.
Also, see Adding Equipment to theAirbag-Equipped Vehicle onpage 3‑35.
Black plate (5,1)Chevrolet Corvette Owner Manual - 2011
Vehicle Care 10-5
Lifting the Vehicle
{ WARNING
Lifting a vehicle can cause aninjury. The vehicle can slip off thejack and roll over you or otherpeople. You and they could bebadly injured. Find a level placeto lift your vehicle. To helpprevent the vehicle from moving:
1. Set the parking brakefirmly.
2. Put an automatictransmission shift lever inP (Park), or shift a manualtransmission to 1 (First) orR (Reverse).
3. Turn off the engine.
To be even more certain thevehicle won't move, put blocks infront of and behind the wheels.
{ WARNING
Getting under a vehicle when itis jacked up is dangerous. If thevehicle slips off the jack, youcould be badly injured or killed.Never get under a vehicle whenit is supported only by a jack.
{ WARNING
Raising the vehicle with thejack improperly positioned candamage the vehicle or the vehiclemay fall and cause you or othersinjury.
If you ever use a jack to lift yourvehicle, follow the instructions thatcame with the jack, and be sure touse the correct lifting points to avoiddamaging your vehicle.
Notice: Lifting your vehicleimproperly can damage yourvehicle and result in costlyrepairs not covered by yourwarranty. To lift your vehicleproperly, follow the advice inthis part.
To help prevent vehicle damage:. Be sure to place a block orpad between the jack and thevehicle.
. Make sure the jack you areusing spans at least twocrossmember ribs.
. Lift only in the areas shownin the following pictures.
For additional information, seeyour dealer and the ChevroletCorvette service manual.
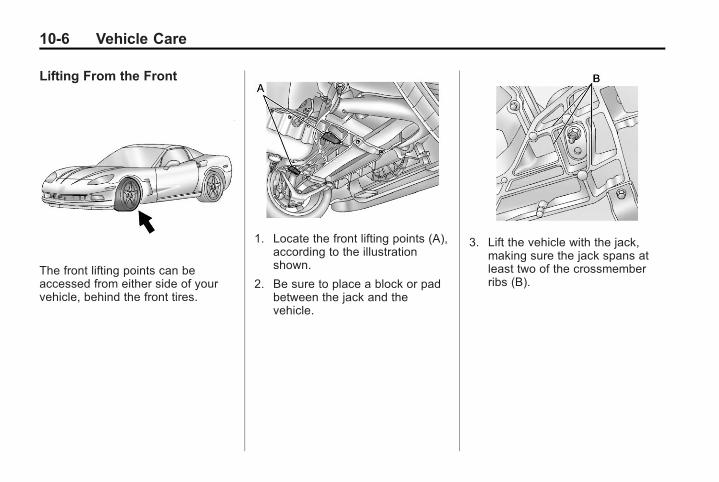
Black plate (6,1)Chevrolet Corvette Owner Manual - 2011
10-6 Vehicle Care
Lifting From the Front
The front lifting points can beaccessed from either side of yourvehicle, behind the front tires.
1. Locate the front lifting points (A),according to the illustrationshown.
2. Be sure to place a block or padbetween the jack and thevehicle.
3. Lift the vehicle with the jack,making sure the jack spans atleast two of the crossmemberribs (B).
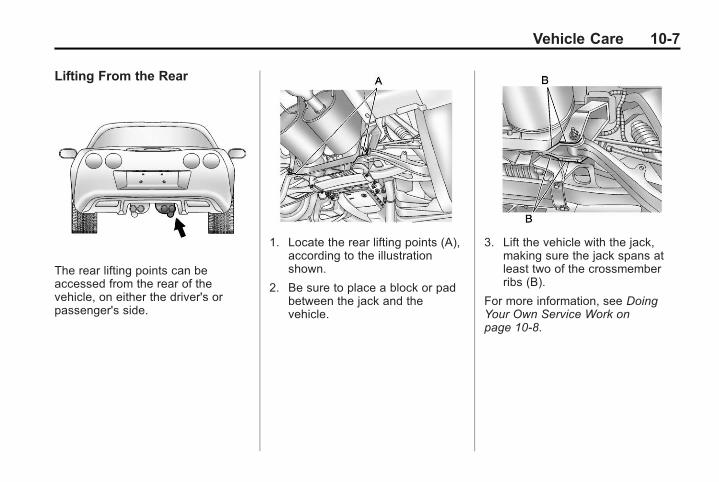
Black plate (7,1)Chevrolet Corvette Owner Manual - 2011
Vehicle Care 10-7
Lifting From the Rear
The rear lifting points can beaccessed from the rear of thevehicle, on either the driver's orpassenger's side.
1. Locate the rear lifting points (A),according to the illustrationshown.
2. Be sure to place a block or padbetween the jack and thevehicle.
3. Lift the vehicle with the jack,making sure the jack spans atleast two of the crossmemberribs (B).
For more information, see DoingYour Own Service Work onpage 10‑8.
Black plate (8,1)Chevrolet Corvette Owner Manual - 2011
10-8 Vehicle Care
Vehicle Checks
Doing Your OwnService Work
{ WARNING
You can be injured and thevehicle could be damaged if youtry to do service work on a vehiclewithout knowing enough about it.
. Be sure you have sufficientknowledge, experience, theproper replacement parts,and tools before attemptingany vehiclemaintenance task.
(Continued)
WARNING (Continued)
. Be sure to use the propernuts, bolts, and otherfasteners. Metric and Englishfasteners can be easilyconfused. If the wrongfasteners are used, parts canlater break or fall off. Youcould be hurt.
If doing some of your own servicework, use the proper servicemanual. It tells you much moreabout how to service the vehiclethan this manual can. To order theproper service manual, see ServicePublications Ordering Informationon page 13‑15.
This vehicle has an airbag system.Before attempting to do your ownservice work, see Servicing theAirbag-Equipped Vehicle onpage 3‑34.
Keep a record with all parts receiptsand list the mileage and the date ofany service work performed. SeeMaintenance Records on page 11‑9.
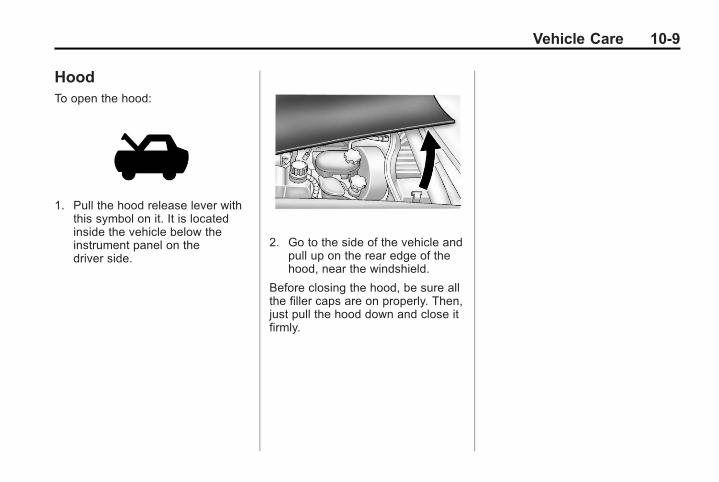
Black plate (9,1)Chevrolet Corvette Owner Manual - 2011
Vehicle Care 10-9
HoodTo open the hood:
1. Pull the hood release lever withthis symbol on it. It is locatedinside the vehicle below theinstrument panel on thedriver side.
2. Go to the side of the vehicle andpull up on the rear edge of thehood, near the windshield.
Before closing the hood, be sure allthe filler caps are on properly. Then,just pull the hood down and close itfirmly.
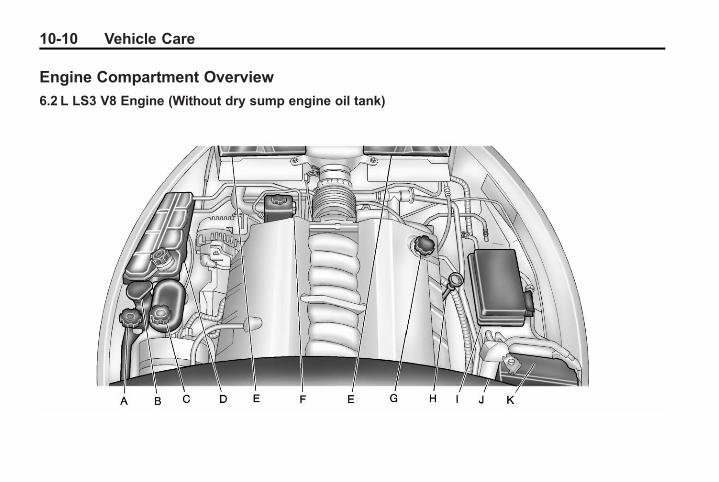
Black plate (10,1)Chevrolet Corvette Owner Manual - 2011
10-10 Vehicle Care
Engine Compartment Overview
6.2 L LS3 V8 Engine (Without dry sump engine oil tank)
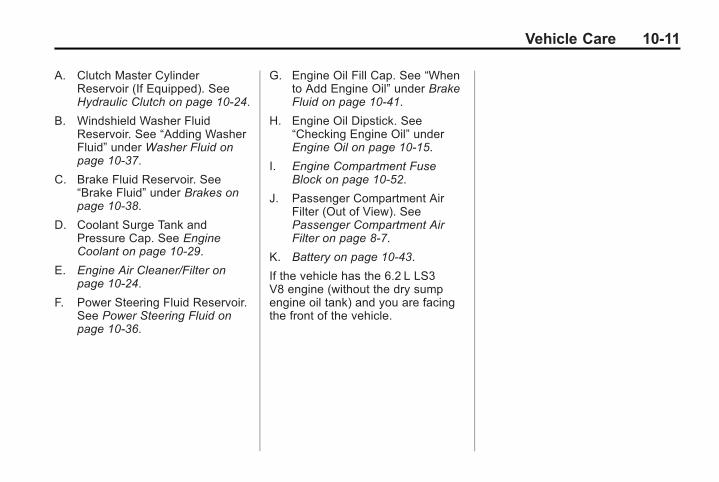
Black plate (11,1)Chevrolet Corvette Owner Manual - 2011
Vehicle Care 10-11
A. Clutch Master CylinderReservoir (If Equipped). SeeHydraulic Clutch on page 10‑24.
B. Windshield Washer FluidReservoir. See “Adding WasherFluid” under Washer Fluid onpage 10‑37.
C. Brake Fluid Reservoir. See“Brake Fluid” under Brakes onpage 10‑38.
D. Coolant Surge Tank andPressure Cap. See EngineCoolant on page 10‑29.
E. Engine Air Cleaner/Filter onpage 10‑24.
F. Power Steering Fluid Reservoir.See Power Steering Fluid onpage 10‑36.
G. Engine Oil Fill Cap. See “Whento Add Engine Oil” under BrakeFluid on page 10‑41.
H. Engine Oil Dipstick. See“Checking Engine Oil” underEngine Oil on page 10‑15.
I. Engine Compartment FuseBlock on page 10‑52.
J. Passenger Compartment AirFilter (Out of View). SeePassenger Compartment AirFilter on page 8‑7.
K. Battery on page 10‑43.
If the vehicle has the 6.2 L LS3V8 engine (without the dry sumpengine oil tank) and you are facingthe front of the vehicle.
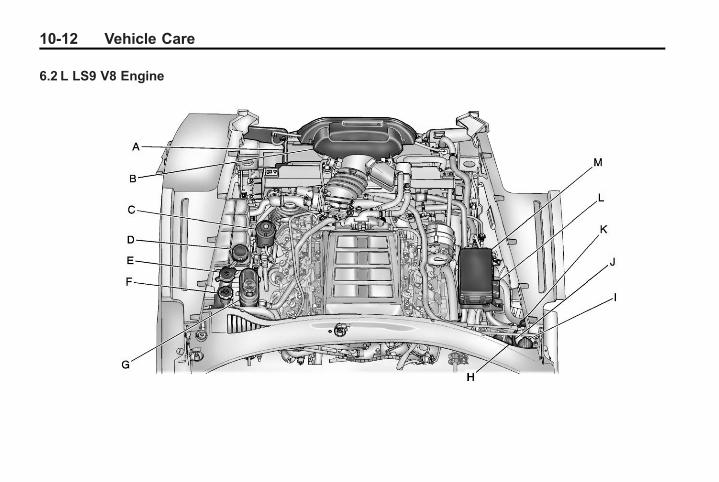
Black plate (12,1)Chevrolet Corvette Owner Manual - 2011
10-12 Vehicle Care
6.2 L LS9 V8 Engine
Black plate (13,1)Chevrolet Corvette Owner Manual - 2011
Vehicle Care 10-13
A. Intercooler. See Cooling System(Engine) on page 10‑28 orCooling System (Intercooler) onpage 10‑29.
B. Engine Air Cleaner/Filter onpage 10‑24.
C. Power Steering Fluid Reservoirand Cap. See Power SteeringFluid on page 10‑36.
D. Coolant Surge Tank andPressure Cap. See EngineCoolant on page 10‑29.
E. Windshield Washer FluidReservoir. See “Adding WasherFluid” under Washer Fluid onpage 10‑37.
F. Clutch Master CylinderReservoir (If Equipped). SeeHydraulic Clutch on page 10‑24.
G. Brake Fluid Reservoir. See“Brake Fluid” under Brakes onpage 10‑38.
H. Passenger Compartment AirFilter (Out of View). SeePassenger Compartment AirFilter on page 8‑7.
I. Engine Oil Fill Cap. See “Whento Add Engine Oil” underEngine Oil on page 10‑15.
J. Dry Sump Engine Oil Tank. See“Changing Engine Oil and Filter”Brake Fluid on page 10‑41.
K. Engine Oil Dipstick. See“Checking Engine Oil” underEngine Oil on page 10‑15.
L. Remote Positive (+) Terminal(Out of View). See JumpStarting on page 10‑82.
M. Engine Compartment FuseBlock on page 10‑52.
If the vehicle has the 6.2 L LS9Supercharged V8 engine and youare facing the front of the vehicle.
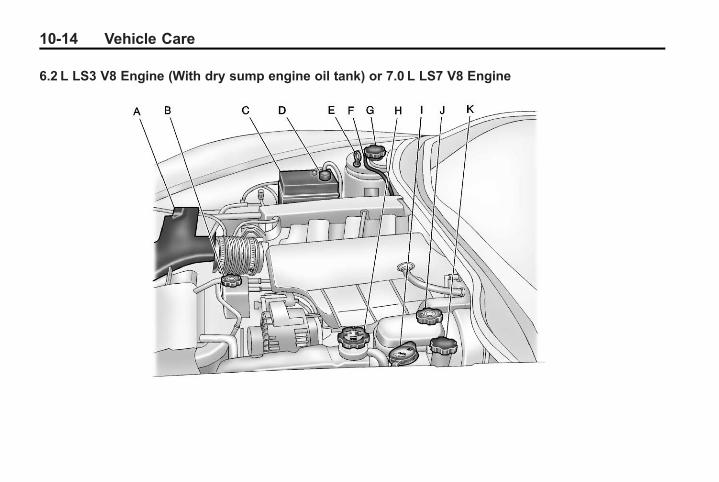
Black plate (14,1)Chevrolet Corvette Owner Manual - 2011
10-14 Vehicle Care
6.2 L LS3 V8 Engine (With dry sump engine oil tank) or 7.0 L LS7 V8 Engine
Black plate (15,1)Chevrolet Corvette Owner Manual - 2011
Vehicle Care 10-15
A. Engine Air Cleaner/Filter onpage 10‑24.
B. Power Steering Fluid Reservoir.See Power Steering Fluid onpage 10‑36.
C. Engine Compartment FuseBlock on page 10‑52.
D. Remote Positive (+) Terminal(Out of View). See JumpStarting on page 10‑82.
E. Engine Oil Dipstick. See“Checking Engine Oil” underEngine Oil on page 10‑15.
F. Dry Sump Engine Oil Tank. See“Changing Engine Oil and Filter”under Engine Oil onpage 10‑15.
G. Engine Oil Fill Cap. See “Whento Add Engine Oil” underEngine Oil on page 10‑15.
H. Coolant Surge Tank andPressure Cap. See EngineCoolant on page 10‑29.
I. Windshield Washer FluidReservoir. See “Adding WasherFluid” under Washer Fluid onpage 10‑37.
J. Brake Fluid Reservoir. See“Brake Fluid” under Brake Fluidon page 10‑41.
K. Clutch Master CylinderReservoir. See Hydraulic Clutchon page 10‑24.
If the vehicle has the 6.2 L LS3V8 engine with the manualtransmission (with the dry sumpengine oil tank) or the 7.0 L LS7V8 engine and you are facing thedriver side of the vehicle.
Engine OilTo ensure proper engineperformance and long life, carefulattention must be paid to engineoil. Following these simple, butimportant steps will help protectyour investment:. Always use engine oil approved
to the proper specification and ofthe proper viscosity grade. See“Selecting the Right Engine Oil”in this section.
. Check the engine oil levelregularly and maintain theproper oil level. See “CheckingEngine Oil” and “When to AddEngine Oil” in this section.
. Change the engine oil at theappropriate time. See Engine OilLife System on page 10‑22.
. Always dispose of engine oilproperly. See “What to Do withUsed Oil” in this section.
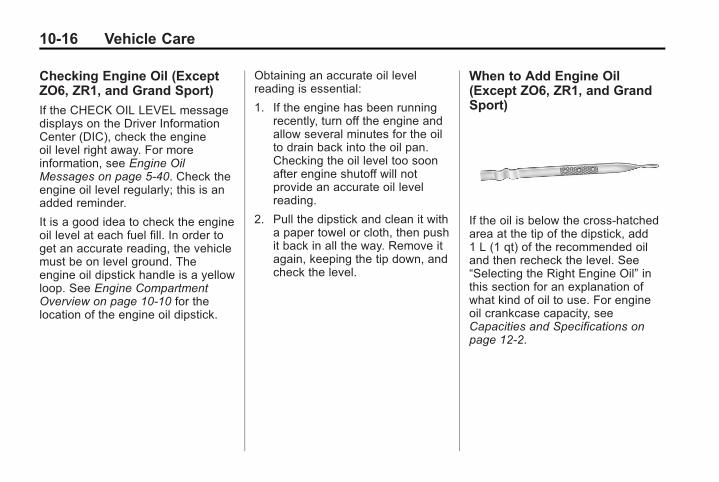
Black plate (16,1)Chevrolet Corvette Owner Manual - 2011
10-16 Vehicle Care
Checking Engine Oil (ExceptZO6, ZR1, and Grand Sport)
If the CHECK OIL LEVEL messagedisplays on the Driver InformationCenter (DIC), check the engineoil level right away. For moreinformation, see Engine OilMessages on page 5‑40. Check theengine oil level regularly; this is anadded reminder.
It is a good idea to check the engineoil level at each fuel fill. In order toget an accurate reading, the vehiclemust be on level ground. Theengine oil dipstick handle is a yellowloop. See Engine CompartmentOverview on page 10‑10 for thelocation of the engine oil dipstick.
Obtaining an accurate oil levelreading is essential:
1. If the engine has been runningrecently, turn off the engine andallow several minutes for the oilto drain back into the oil pan.Checking the oil level too soonafter engine shutoff will notprovide an accurate oil levelreading.
2. Pull the dipstick and clean it witha paper towel or cloth, then pushit back in all the way. Remove itagain, keeping the tip down, andcheck the level.
When to Add Engine Oil(Except ZO6, ZR1, and GrandSport)
If the oil is below the cross-hatchedarea at the tip of the dipstick, add1 L (1 qt) of the recommended oiland then recheck the level. See“Selecting the Right Engine Oil” inthis section for an explanation ofwhat kind of oil to use. For engineoil crankcase capacity, seeCapacities and Specifications onpage 12‑2.

Black plate (17,1)Chevrolet Corvette Owner Manual - 2011
Vehicle Care 10-17
See Racing or Other CompetitiveDriving on page 9‑7 for additionalinformation on engine oil.
Notice: Do not add too muchoil. Oil levels above or belowthe acceptable operating rangeshown on the dipstick are harmfulto the engine. If you find thatyou have an oil level above theoperating range, i.e., the enginehas so much oil that the oil levelgets above the cross-hatchedarea that shows the properoperating range, the engine couldbe damaged. You should drainout the excess oil or limit drivingof the vehicle and seek a serviceprofessional to remove theexcess amount of oil.
See Engine Compartment Overviewon page 10‑10 for the location ofthe engine oil fill cap.
Add enough oil to put the levelsomewhere in the proper operatingrange . Push the dipstick all the wayback in when through.
Checking Engine Oil (ZO6,ZR1, and Grand Sport)
A. Engine Oil Dipstick
B. Engine Oil Fill Cap
It is a good idea to check the engineoil level at each fuel fill. In order toget an accurate reading, the vehiclemust be on level ground.
The engine oil dipstick handle is ayellow loop. The dipstick is locatedon the dry sump engine oil tank.See Engine Compartment Overviewon page 10‑10 for the location of thedry sump engine oil tank.
These vehicles have aracetrack‐ready dry sumpengine lubrication system. Thishigh‐performance system operatesdifferently than a standard enginelubrication system and requires aspecial procedure when checkingthe engine oil level. Follow thisprocedure closely when checkingthe engine oil level.
The engine oil level must bechecked when the engine is warm.Cold oil level in the dry sump tankmay not indicate the actual amountof oil in the system. With thissystem, engine oil is contained inan external tank, separate from theengine. Under normal operatingconditions, the oil pan under theengine does not store any oil. If thevehicle has been parked for anextended period without the enginebeing started, some oil will seepback into the oil pan, reducing theamount of oil held in the dry sumptank and there could be no engineoil at all showing on the dipstick.
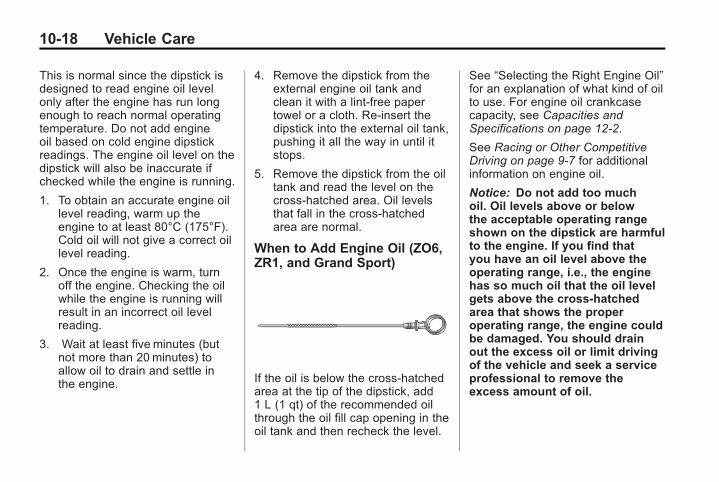
Black plate (18,1)Chevrolet Corvette Owner Manual - 2011
10-18 Vehicle Care
This is normal since the dipstick isdesigned to read engine oil levelonly after the engine has run longenough to reach normal operatingtemperature. Do not add engineoil based on cold engine dipstickreadings. The engine oil level on thedipstick will also be inaccurate ifchecked while the engine is running.
1. To obtain an accurate engine oillevel reading, warm up theengine to at least 80°C (175°F).Cold oil will not give a correct oillevel reading.
2. Once the engine is warm, turnoff the engine. Checking the oilwhile the engine is running willresult in an incorrect oil levelreading.
3. Wait at least five minutes (butnot more than 20 minutes) toallow oil to drain and settle inthe engine.
4. Remove the dipstick from theexternal engine oil tank andclean it with a lint‐free papertowel or a cloth. Re‐insert thedipstick into the external oil tank,pushing it all the way in until itstops.
5. Remove the dipstick from the oiltank and read the level on thecross‐hatched area. Oil levelsthat fall in the cross‐hatchedarea are normal.
When to Add Engine Oil (ZO6,ZR1, and Grand Sport)
If the oil is below the cross-hatchedarea at the tip of the dipstick, add1 L (1 qt) of the recommended oilthrough the oil fill cap opening in theoil tank and then recheck the level.
See “Selecting the Right Engine Oil”for an explanation of what kind of oilto use. For engine oil crankcasecapacity, see Capacities andSpecifications on page 12‑2.
See Racing or Other CompetitiveDriving on page 9‑7 for additionalinformation on engine oil.
Notice: Do not add too muchoil. Oil levels above or belowthe acceptable operating rangeshown on the dipstick are harmfulto the engine. If you find thatyou have an oil level above theoperating range, i.e., the enginehas so much oil that the oil levelgets above the cross-hatchedarea that shows the properoperating range, the engine couldbe damaged. You should drainout the excess oil or limit drivingof the vehicle and seek a serviceprofessional to remove theexcess amount of oil.
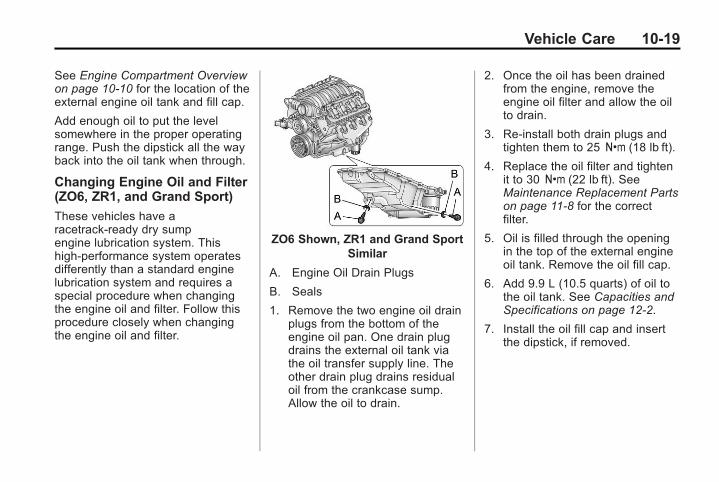
Black plate (19,1)Chevrolet Corvette Owner Manual - 2011
Vehicle Care 10-19
See Engine Compartment Overviewon page 10‑10 for the location of theexternal engine oil tank and fill cap.
Add enough oil to put the levelsomewhere in the proper operatingrange. Push the dipstick all the wayback into the oil tank when through.
Changing Engine Oil and Filter(ZO6, ZR1, and Grand Sport)
These vehicles have aracetrack‐ready dry sumpengine lubrication system. Thishigh‐performance system operatesdifferently than a standard enginelubrication system and requires aspecial procedure when changingthe engine oil and filter. Follow thisprocedure closely when changingthe engine oil and filter.
ZO6 Shown, ZR1 and Grand SportSimilar
A. Engine Oil Drain Plugs
B. Seals
1. Remove the two engine oil drainplugs from the bottom of theengine oil pan. One drain plugdrains the external oil tank viathe oil transfer supply line. Theother drain plug drains residualoil from the crankcase sump.Allow the oil to drain.
2. Once the oil has been drainedfrom the engine, remove theengine oil filter and allow the oilto drain.
3. Re‐install both drain plugs andtighten them to 25 Y (18 lb ft).
4. Replace the oil filter and tightenit to 30 Y (22 lb ft). SeeMaintenance Replacement Partson page 11‑8 for the correctfilter.
5. Oil is filled through the openingin the top of the external engineoil tank. Remove the oil fill cap.
6. Add 9.9 L (10.5 quarts) of oil tothe oil tank. See Capacities andSpecifications on page 12‑2.
7. Install the oil fill cap and insertthe dipstick, if removed.
Black plate (20,1)Chevrolet Corvette Owner Manual - 2011
10-20 Vehicle Care
8. Start the engine and let it run atidle for at least 15 seconds. Thiswill circulate the fresh engine oilthrough the lubrication system.
9. Shut off the engine and checkthe oil level as described under“Checking Engine Oil (ZO6,ZR1, and Grand Sport).”
Selecting the Right Engine Oil
Selecting the right engine oildepends on both the proper oilspecification and viscosity grade:
Specification
Use and ask for engine oils withthe dexos™ certification mark. Oilsmeeting the requirements of thevehicle should have the dexoscertification mark on the container.This certification mark indicates thatthe oil has been approved to thedexos specification.
This vehicle was filled at the factorywith dexos‐approved engine oil.
Notice: Use only engine oilthat is approved to the dexosspecification or an equivalentengine oil of the appropriateviscosity grade. Engine oilsapproved to the dexosspecification will show the dexossymbol on the container. Failureto use the recommended engineoil or equivalent can result inengine damage not coveredby the vehicle warranty. If youare unsure whether the oilis approved to the dexosspecification, ask your serviceprovider.
It is recommended to use Mobil 1®
engine oils that meet therequirements of the dexosspecification.
Use of Substitute Engine Oils ifdexos is unavailable: In the eventthat dexos‐approved engine oil isnot available at an oil change orfor maintaining proper oil level,you may use substitute engine oildisplaying the API Starburst symboland of SAE 5W-30 viscosity grade.Use of oils that do not meet thedexos specification, however, mayresult in reduced performance undercertain circumstances.
Viscosity Grade
SAE 5W-30 is the best viscositygrade for the vehicle. Do notuse other viscosity oils such asSAE 10W‐30, 10W‐40, or 20W-50.
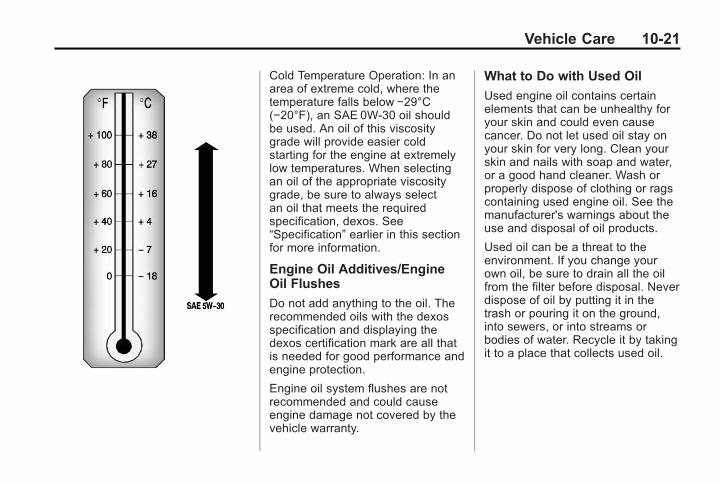
Black plate (21,1)Chevrolet Corvette Owner Manual - 2011
Vehicle Care 10-21
Cold Temperature Operation: In anarea of extreme cold, where thetemperature falls below −29°C(−20°F), an SAE 0W-30 oil shouldbe used. An oil of this viscositygrade will provide easier coldstarting for the engine at extremelylow temperatures. When selectingan oil of the appropriate viscositygrade, be sure to always selectan oil that meets the requiredspecification, dexos. See“Specification” earlier in this sectionfor more information.
Engine Oil Additives/EngineOil Flushes
Do not add anything to the oil. Therecommended oils with the dexosspecification and displaying thedexos certification mark are all thatis needed for good performance andengine protection.
Engine oil system flushes are notrecommended and could causeengine damage not covered by thevehicle warranty.
What to Do with Used Oil
Used engine oil contains certainelements that can be unhealthy foryour skin and could even causecancer. Do not let used oil stay onyour skin for very long. Clean yourskin and nails with soap and water,or a good hand cleaner. Wash orproperly dispose of clothing or ragscontaining used engine oil. See themanufacturer's warnings about theuse and disposal of oil products.
Used oil can be a threat to theenvironment. If you change yourown oil, be sure to drain all the oilfrom the filter before disposal. Neverdispose of oil by putting it in thetrash or pouring it on the ground,into sewers, or into streams orbodies of water. Recycle it by takingit to a place that collects used oil.
Black plate (22,1)Chevrolet Corvette Owner Manual - 2011
10-22 Vehicle Care
Engine Oil Life System
When to Change Engine Oil
This vehicle has a computer thatindicates when to change theengine oil and filter. This is basedon engine revolutions and enginetemperature, and not on mileage.Based on driving conditions, themileage at which an oil change isindicated can vary considerably. Forthe oil life system to work properly,the system must be reset every timethe oil is changed.
ZO6, ZR1, and Grand Sport modelshave a racetrack‐ready dry sumpengine lubrication system. Thishigh‐performance system operatesdifferently than a standard enginelubrication system and requires aspecial procedure when changingthe engine oil and filter. See EngineOil on page 10‑15.
When the system has calculatedthat oil life has been diminished,it indicates that an oil change isnecessary. A CHANGE ENGINEOIL message comes on. Changethe oil as soon as possible withinthe next 1 000 km (600mi). It ispossible that, if driving under thebest conditions, the oil life systemmight indicate that an oil changeis not necessary for up to a year.The engine oil and filter must bechanged at least once a year and,at this time, the system must bereset. Your dealer has trainedservice people who will perform thiswork and reset the system. It is alsoimportant to check the oil regularlyover the course of an oil draininterval and keep it at the properlevel.
If the system is ever resetaccidentally, the oil must bechanged at 5 000 km (3,000 mi)since the last oil change.Remember to reset the oil lifesystem whenever the oil is changed.
How to Reset the Engine OilLife System
Reset the system whenever theengine oil is changed so that thesystem can calculate the nextengine oil change. To reset thesystem:
1. Press the TRIP button sothe OIL LIFE percentage isdisplayed.
2. Press RESET and hold fortwo seconds. OIL LIFEREMAINING 100% will appear.
If the CHANGE ENGINE OILmessage comes back on when thevehicle is started, the engine oil lifesystem has not reset. Repeat theprocedure.
Black plate (23,1)Chevrolet Corvette Owner Manual - 2011
Vehicle Care 10-23
Automatic TransmissionFluid
How to Check AutomaticTransmission Fluid
It is not necessary to checkthe transmission fluid level.A transmission fluid leak is theonly reason for fluid loss. If aleak occurs, take the vehicle tothe dealer service departmentand have it repaired as soon aspossible.
The vehicle is not equipped witha transmission fluid level dipstick.There is a special procedure forchecking and changing thetransmission fluid. Because thisprocedure is difficult, this shouldbe done at the dealer servicedepartment. Contact the dealer for
additional information or theprocedure can be found in theservice manual. To purchase aservice manual, see ServicePublications Ordering Informationon page 13‑15.
Notice: Use of the incorrectautomatic transmission fluidmay damage the vehicle, and thedamages may not be covered bythe vehicle warranty. Always usethe automatic transmission fluidlisted in Recommended Fluidsand Lubricants on page 11‑6.
Change the fluid and filter at theintervals listed in ScheduledMaintenance on page 11‑2, andbe sure to use the fluid listed inRecommended Fluids andLubricants on page 11‑6.
Manual TransmissionFluidIt is not necessary to check themanual transmission fluid level.A transmission fluid leak is theonly reason for fluid loss. If a leakoccurs, take the vehicle to thedealer service department andhave it repaired as soon aspossible. See Recommended Fluidsand Lubricants on page 11‑6 forthe proper fluid to use.
Black plate (24,1)Chevrolet Corvette Owner Manual - 2011
10-24 Vehicle Care
Hydraulic ClutchIt is not necessary to regularlycheck clutch fluid unless yoususpect there is a leak in thesystem. Adding fluid will not correcta leak. A fluid loss in this systemcould indicate a problem. Have thesystem inspected and repaired.
When to Check and Whatto Use
The hydraulic clutch fluid reservoircap has this symbol on it. SeeEngine Compartment Overview onpage 10‑10 for reservoir location.
Refer to the MaintenanceSchedule for the proper fluid to use.See Recommended Fluids andLubricants on page 11‑6. The fluidrequires changing every two years.See Scheduled Maintenance onpage 11‑2.
How to Check and Add Fluid
Visually check the clutch fluidreservoir to make sure the fluid levelis at the MIN (minimum) line on theside of the reservoir. The hydraulicclutch fluid system should be closedand sealed.
Do not remove the cap to checkthe fluid level or to top‐off the fluidlevel. Remove the cap only whennecessary to add the proper fluiduntil the level reaches the MIN line.
Engine Air Cleaner/FilterSee Engine Compartment Overviewon page 10‑10 for the location of theengine air cleaner/filter.
Notice: If you spray water intothe engine air cleaner/filter intakeand water enters the engine aircleaner/filter housing, you coulddamage your vehicle's engine.The repairs would not be coveredby your warranty. Do not spraywater into the engine air cleaner/filter intake and/or housing.
If cleaning the vehicle with the hoodopen, take care not to spray waterdirectly near the filter opening ofthe air cleaner, as shown in theillustration, as this could damagethe vehicle's engine.
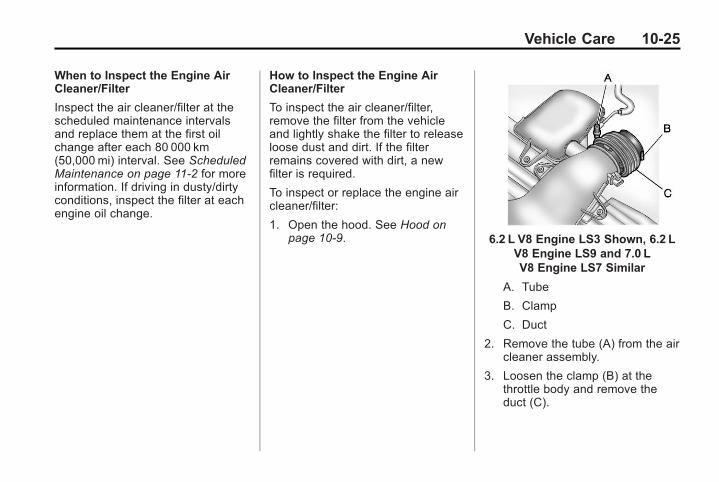
Black plate (25,1)Chevrolet Corvette Owner Manual - 2011
Vehicle Care 10-25
When to Inspect the Engine AirCleaner/Filter
Inspect the air cleaner/filter at thescheduled maintenance intervalsand replace them at the first oilchange after each 80 000 km(50,000 mi) interval. See ScheduledMaintenance on page 11‑2 for moreinformation. If driving in dusty/dirtyconditions, inspect the filter at eachengine oil change.
How to Inspect the Engine AirCleaner/Filter
To inspect the air cleaner/filter,remove the filter from the vehicleand lightly shake the filter to releaseloose dust and dirt. If the filterremains covered with dirt, a newfilter is required.
To inspect or replace the engine aircleaner/filter:
1. Open the hood. See Hood onpage 10‑9. 6.2 L V8 Engine LS3 Shown, 6.2 L
V8 Engine LS9 and 7.0 LV8 Engine LS7 Similar
A. Tube
B. Clamp
C. Duct
2. Remove the tube (A) from the aircleaner assembly.
3. Loosen the clamp (B) at thethrottle body and remove theduct (C).
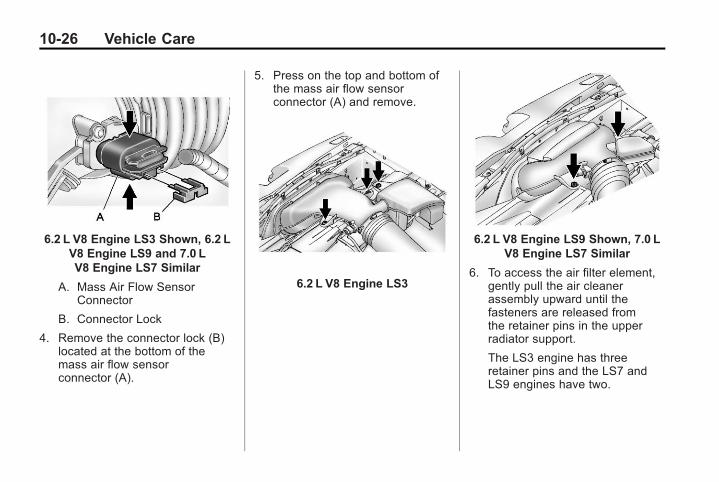
Black plate (26,1)Chevrolet Corvette Owner Manual - 2011
10-26 Vehicle Care
6.2 L V8 Engine LS3 Shown, 6.2 LV8 Engine LS9 and 7.0 LV8 Engine LS7 Similar
A. Mass Air Flow SensorConnector
B. Connector Lock
4. Remove the connector lock (B)located at the bottom of themass air flow sensorconnector (A).
5. Press on the top and bottom ofthe mass air flow sensorconnector (A) and remove.
6.2 L V8 Engine LS3
6.2 L V8 Engine LS9 Shown, 7.0 LV8 Engine LS7 Similar
6. To access the air filter element,gently pull the air cleanerassembly upward until thefasteners are released fromthe retainer pins in the upperradiator support.
The LS3 engine has threeretainer pins and the LS7 andLS9 engines have two.
Black plate (27,1)Chevrolet Corvette Owner Manual - 2011
Vehicle Care 10-27
6.2 L V8 Engine LS3 Shown, 6.2 LV8 Engine LS9 and 7.0 LV8 Engine LS7 Similar
A. Screw
B. Filter Cover
C. Filter
7. To remove the filter from theLS3 and LS7 engines, removethe six screws (A) securing thefilter cover (B) then pull away togain access to the air filter (C).
To remove the filter assemblyfrom the LS9 engine, remove thesix screws securing the filtercover. The filter cover and the airfilter are one piece.
8. Inspect or replace the filter orfilter cover assembly. SeeMaintenance Replacement Partson page 11‑8.
9. Reverse Steps 2 through 7 toreplace the air cleaner/filtercover.
{ WARNING
Operating the engine with the aircleaner/filter off can cause youor others to be burned. The aircleaner not only cleans the air; ithelps to stop flames if the enginebackfires. Use caution whenworking on the engine and do notdrive with the air cleaner/filter off.
Notice: If the air cleaner/filter isoff, dirt can easily get into theengine, which could damage it.Always have the air cleaner/filterin place when you are driving.
Black plate (28,1)Chevrolet Corvette Owner Manual - 2011
10-28 Vehicle Care
Cooling System (Engine)The cooling system allows theengine to maintain the correctworking temperature.
7.0L Engine shown, 6.2L Enginesimilar
A. Electric Engine Cooling Fan
B. Coolant Surge Tank withPressure Cap
{ WARNING
An electric engine cooling fanunder the hood can start up evenwhen the engine is not runningand can cause injury. Keephands, clothing, and tools awayfrom any underhood electric fan.
{ WARNING
Heater and radiator hoses, andother engine parts, can be veryhot. Do not touch them. If you do,you can be burned.
(Continued)
WARNING (Continued)
Do not run the engine if there isa leak. If you run the engine, itcould lose all coolant. That couldcause an engine fire, and youcould be burned. Get any leakfixed before you drive the vehicle.
Notice: Using coolant other thanDEX-COOL® can cause prematureengine, heater core, or radiatorcorrosion. In addition, the enginecoolant could require changingsooner, at 50 000 km (30,000mi)or 24months, whichever occursfirst. Any repairs would not becovered by the vehicle warranty.Always use DEX-COOL(silicate-free) coolant in thevehicle.
Black plate (29,1)Chevrolet Corvette Owner Manual - 2011
Vehicle Care 10-29
Cooling System(Intercooler)The 6.2L LS9 superchargedV8 engine has an intercoolercooling system. See EngineCompartment Overview onpage 10‑10 for location of theintercooler.
The intercooler cooling system hasa special procedure for drainingand adding coolant. Because thisprocedure is difficult, see the dealerfor service if the intercooler is lowon coolant. The procedure can alsobe found in the service manual. Topurchase a service manual, seeService Publications OrderingInformation on page 13‑15.
Checking Coolant
1. Verify that the engine andintercooler are no longer hot.
2. Place a cloth to absorb possiblecoolant loss under the driver'sside bleeder valve (A).
3. Loosen, but do not completelyunscrew the bleeder valve tocheck for coolant in the system.
4. Tighten the bleeder valve if thereis coolant flowing out of thebleeder valve.
5. If there is no coolant flowing outof the bleeder valve, there couldbe a leak in the system. Tightenthe bleeder valve and contactthe dealer for service.
Engine CoolantThe cooling system in the vehicleis filled with DEX-COOL® enginecoolant. This coolant is designed toremain in the vehicle for 5 years or240 000 km (150,000mi), whicheveroccurs first.
The following explains the coolingsystem and how to check and addcoolant when it is low. If there is aproblem with engine overheating,see Engine Overheating onpage 10‑34.
Black plate (30,1)Chevrolet Corvette Owner Manual - 2011
10-30 Vehicle Care
What to Use
{ WARNING
Adding only plain water or someother liquid to the cooling systemcan be dangerous. Plain waterand other liquids, can boil beforethe proper coolant mixture will.The vehicle's coolant warningsystem is set for the propercoolant mixture. With plain wateror the wrong mixture, the enginecould get too hot but you wouldnot get the overheat warning. Theengine could catch fire and you orothers could be burned. Use a50/50 mixture of clean, drinkablewater and DEX-COOL coolant.
Use a 50/50 mixture of clean,drinkable water and DEX-COOLcoolant. If using this mixture,nothing else needs to be added.This mixture:. Gives freezing protection down
to −37°C (−34°F), outsidetemperature.
. Gives boiling protection up to129°C (265°F), enginetemperature.
. Protects against rust andcorrosion.
. Will not damage aluminum parts.
. Helps keep the proper enginetemperature.
Notice: If an improper coolantmixture is used, the engine couldoverheat and be badly damaged.The repair cost would not becovered by the vehicle warranty.Too much water in the mixturecan freeze and crack the engine,radiator, heater core, and otherparts.
Notice: If extra inhibitorsand/or additives are used inthe vehicle cooling system, thevehicle could be damaged. Useonly the proper mixture of theengine coolant listed in thismanual for the cooling system.See Recommended Fluids andLubricants on page 11‑6 for moreinformation.
Never dispose of engine coolantby putting it in the trash, pouringit on the ground, or into sewers,streams, or bodies of water.Have the coolant changed by anauthorized service center, familiarwith legal requirements regardingused coolant disposal. This will helpprotect the environment and yourhealth.
Black plate (31,1)Chevrolet Corvette Owner Manual - 2011
Vehicle Care 10-31
Checking Coolant
The vehicle must be on a levelsurface when checking the coolantlevel.
Check to see if coolant is visible inthe coolant surge tank. If the coolantinside the coolant surge tank isboiling, do not do anything else untilit cools down. If coolant is visiblebut the coolant level is not at orabove the FULL COLD mark, add a50/50 mixture of clean, drinkablewater and DEX-COOL coolant at thecoolant recovery tank, but be surethe cooling system is cool beforethis is done. See Engine Coolant onpage 10‑29 for more information.
The engine coolant surge tank islocated toward the rear of theengine compartment on the driverside of the vehicle. See EngineCompartment Overview onpage 10‑10 for more information onlocation.
When the engine is cold, the coolantlevel should be at the FULL COLDmark on the coolant surge tank.
When the engine is hot, the levelcould be higher than the FULLCOLD line. If the coolant is belowthe FULL COLD line when theengine is hot, there could be a leakin the cooling system.
If the coolant is low, add the coolantor take the vehicle to a dealer forservice.
Black plate (32,1)Chevrolet Corvette Owner Manual - 2011
10-32 Vehicle Care
How to Add Coolant to theCoolant Surge Tank
{ WARNING
You can be burned if you spillcoolant on hot engine parts.Coolant contains ethylene glycoland it will burn if the engine partsare hot enough. Do not spillcoolant on a hot engine.
{ WARNING
Steam and scalding liquids from ahot cooling system can blow outand burn you badly. They areunder pressure, and if you turn
(Continued)
WARNING (Continued)
the coolant surge tank pressurecap— even a little— they cancome out at high speed. Neverturn the cap when the coolingsystem, including the coolantsurge tank pressure cap, is hot.Wait for the cooling system andcoolant surge tank pressure capto cool if you ever have to turnthe pressure cap.
If coolant is needed, add the properDEX-COOL coolant mixture directlyto the surge tank, but be sure thecooling system is cool before thisis done.
1. When the cooling system,including the coolant surge tankpressure cap and upper radiatorhose, is no longer hot, removethe pressure cap.
Turn the pressure cap slowlycounterclockwise aboutone-quarter turn and then stop.
If a hiss is heard, wait for that tostop. A hiss means there is stillsome pressure left.
2. Keep turning the pressure capslowly, and remove it.
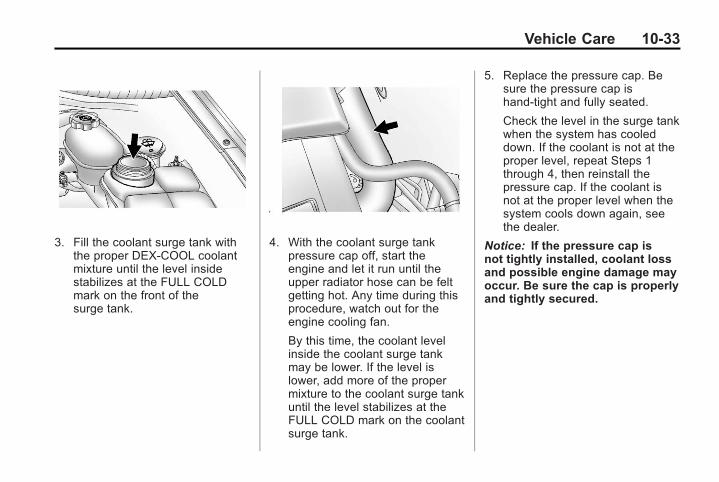
Black plate (33,1)Chevrolet Corvette Owner Manual - 2011
Vehicle Care 10-33
3. Fill the coolant surge tank withthe proper DEX-COOL coolantmixture until the level insidestabilizes at the FULL COLDmark on the front of thesurge tank.
4. With the coolant surge tankpressure cap off, start theengine and let it run until theupper radiator hose can be feltgetting hot. Any time during thisprocedure, watch out for theengine cooling fan.
By this time, the coolant levelinside the coolant surge tankmay be lower. If the level islower, add more of the propermixture to the coolant surge tankuntil the level stabilizes at theFULL COLD mark on the coolantsurge tank.
5. Replace the pressure cap. Besure the pressure cap ishand-tight and fully seated.
Check the level in the surge tankwhen the system has cooleddown. If the coolant is not at theproper level, repeat Steps 1through 4, then reinstall thepressure cap. If the coolant isnot at the proper level when thesystem cools down again, seethe dealer.
Notice: If the pressure cap isnot tightly installed, coolant lossand possible engine damage mayoccur. Be sure the cap is properlyand tightly secured.
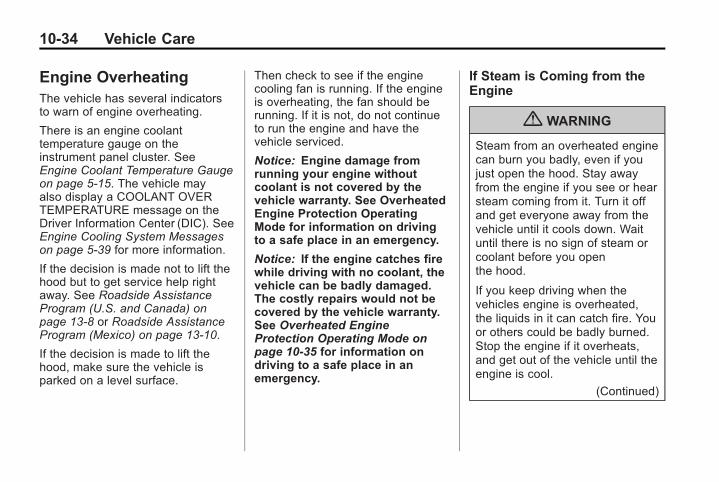
Black plate (34,1)Chevrolet Corvette Owner Manual - 2011
10-34 Vehicle Care
Engine OverheatingThe vehicle has several indicatorsto warn of engine overheating.
There is an engine coolanttemperature gauge on theinstrument panel cluster. SeeEngine Coolant Temperature Gaugeon page 5‑15. The vehicle mayalso display a COOLANT OVERTEMPERATURE message on theDriver Information Center (DIC). SeeEngine Cooling System Messageson page 5‑39 for more information.
If the decision is made not to lift thehood but to get service help rightaway. See Roadside AssistanceProgram (U.S. and Canada) onpage 13‑8 or Roadside AssistanceProgram (Mexico) on page 13‑10.
If the decision is made to lift thehood, make sure the vehicle isparked on a level surface.
Then check to see if the enginecooling fan is running. If the engineis overheating, the fan should berunning. If it is not, do not continueto run the engine and have thevehicle serviced.
Notice: Engine damage fromrunning your engine withoutcoolant is not covered by thevehicle warranty. See OverheatedEngine Protection OperatingMode for information on drivingto a safe place in an emergency.
Notice: If the engine catches firewhile driving with no coolant, thevehicle can be badly damaged.The costly repairs would not becovered by the vehicle warranty.See Overheated EngineProtection Operating Mode onpage 10‑35 for information ondriving to a safe place in anemergency.
If Steam is Coming from theEngine
{ WARNING
Steam from an overheated enginecan burn you badly, even if youjust open the hood. Stay awayfrom the engine if you see or hearsteam coming from it. Turn it offand get everyone away from thevehicle until it cools down. Waituntil there is no sign of steam orcoolant before you openthe hood.
If you keep driving when thevehicles engine is overheated,the liquids in it can catch fire. Youor others could be badly burned.Stop the engine if it overheats,and get out of the vehicle until theengine is cool.
(Continued)
Black plate (35,1)Chevrolet Corvette Owner Manual - 2011
Vehicle Care 10-35
WARNING (Continued)
See Overheated EngineProtection Operating Mode onpage 10‑35 for information ondriving to a safe place in anemergency.
If No Steam is Coming fromthe Engine
If an engine overheat warning isdisplayed but no steam can be seenor heard, the problem may not betoo serious. Sometimes the enginecan get a little too hot when thevehicle:. Climbs a long hill on a hot day. Stops after high-speed driving. Idles for long periods in traffic
If the overheat warning is displayedwith no sign of steam:
1. Turn the air conditioning off.
2. Turn the heater on to the highesttemperature and to the highestfan speed. Open the windows asnecessary.
3. If in a traffic jam, shift toN (Neutral) while stopped. If it issafe to do so, pull off the road,shift to P (Park) or N (Neutral)and let the engine idle.
If the temperature overheat gauge isno longer in the overheat zone or anoverheat warning no longerdisplays, the vehicle can be driven.Continue to drive the vehicle slowlyfor about 10 minutes. Keep a safevehicle distance from the vehicle infront. If the warning does not comeback on, continue to drive normally.
If the warning continues, pull over,stop, and park the vehicleright away.
If there is no sign of steam, idlethe engine for three minutes whileparked. If the warning is stilldisplayed, turn off the engine until itcools down. Also, see “OverheatedEngine Protection Operating Mode”next in this section.
Overheated EngineProtectionOperating ModeThis emergency operating modelets the vehicle be driven to asafe place, up to 80 km (50 mi),in an emergency situation. If anoverheated engine condition existsand the messages COOLANTOVER TEMPERATURE andREDUCED ENGINE POWER aredisplayed, along with the checkengine light, an overheat protectionmode which alternates firing groupsof cylinders helps prevent enginedamage. In this mode, there is asignificant loss in power and engineperformance.

Black plate (36,1)Chevrolet Corvette Owner Manual - 2011
10-36 Vehicle Care
Driving extended distances in theoverheat protection mode should beavoided.
Notice: After driving in theoverheated engine protectionoperating mode, to avoid enginedamage, allow the engine to coolbefore attempting any repair.The engine oil will be severelydegraded. Repair the cause ofcoolant loss, change the oil andreset the oil life system. SeeEngine Oil on page 10‑15.
Power Steering Fluid
See Engine Compartment Overviewon page 10‑10 for reservoir location.
When to Check Power SteeringFluid
It is not necessary to regularlycheck power steering fluid unlessthere is a leak suspected in thesystem or an unusual noise isheard. A fluid loss in this systemcould indicate a problem. Have thesystem inspected and repaired.
How to Check Power SteeringFluid
To check the power steering fluid:
1. Turn the ignition off and let theengine compartment cool down.
2. Wipe the cap and the top of thereservoir clean.
3. Unscrew the cap and wipe thedipstick with a clean rag.
4. Replace the cap and completelytighten it.
5. Remove the cap again and lookat the fluid level on the dipstick.There are markings on bothsides of the dipstick.
The level should be at the FULLCOLD mark. If necessary, add onlyenough fluid to bring the level up tothe mark.
When the engine compartmentis hot, the level should be at theHOT mark. When the enginecompartment is cool, the levelshould be at the FULL COLD mark.
Black plate (37,1)Chevrolet Corvette Owner Manual - 2011
Vehicle Care 10-37
What to Use
To determine what kind of fluid touse, see Recommended Fluids andLubricants on page 11‑6. Alwaysuse the proper fluid.
Notice: Use of the incorrect fluidmay damage the vehicle and thedamages may not be covered bythe vehicle's warranty. Alwaysuse the correct fluid listed inRecommended Fluids andLubricants on page 11‑6.
Washer Fluid
What to Use
When the vehicle needs windshieldwasher fluid, be sure to read themanufacturer's instructions beforeuse. If the vehicle will be operatingin an area where the temperaturemay fall below freezing, use a fluidthat has sufficient protection againstfreezing.
Adding Washer Fluid
Open the cap with the washersymbol on it. Add washer fluiduntil the tank is full. See EngineCompartment Overview onpage 10‑10 for reservoir location.
Notice:. When using concentratedwasher fluid, follow themanufacturer's instructionsfor adding water.
. Do not mix water withready-to-use washer fluid.Water can cause the solutionto freeze and damage thewasher fluid tank and otherparts of the washer system.Also, water does not clean aswell as washer fluid.
. Fill the washer fluid tank onlythree-quarters full when it isvery cold. This allows forfluid expansion if freezingoccurs, which could damagethe tank if it iscompletely full.
. Do not use engine coolant(antifreeze) in the windshieldwasher. It can damage thewindshield washer systemand paint.
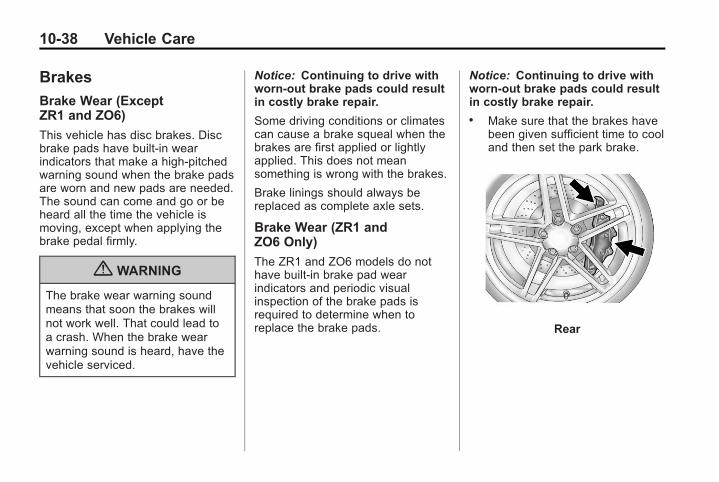
Black plate (38,1)Chevrolet Corvette Owner Manual - 2011
10-38 Vehicle Care
Brakes
Brake Wear (ExceptZR1 and ZO6)
This vehicle has disc brakes. Discbrake pads have built-in wearindicators that make a high-pitchedwarning sound when the brake padsare worn and new pads are needed.The sound can come and go or beheard all the time the vehicle ismoving, except when applying thebrake pedal firmly.
{ WARNING
The brake wear warning soundmeans that soon the brakes willnot work well. That could lead toa crash. When the brake wearwarning sound is heard, have thevehicle serviced.
Notice: Continuing to drive withworn-out brake pads could resultin costly brake repair.
Some driving conditions or climatescan cause a brake squeal when thebrakes are first applied or lightlyapplied. This does not meansomething is wrong with the brakes.
Brake linings should always bereplaced as complete axle sets.
Brake Wear (ZR1 andZO6 Only)
The ZR1 and ZO6 models do nothave built-in brake pad wearindicators and periodic visualinspection of the brake pads isrequired to determine when toreplace the brake pads.
Notice: Continuing to drive withworn-out brake pads could resultin costly brake repair.. Make sure that the brakes have
been given sufficient time to cooland then set the park brake.
Rear
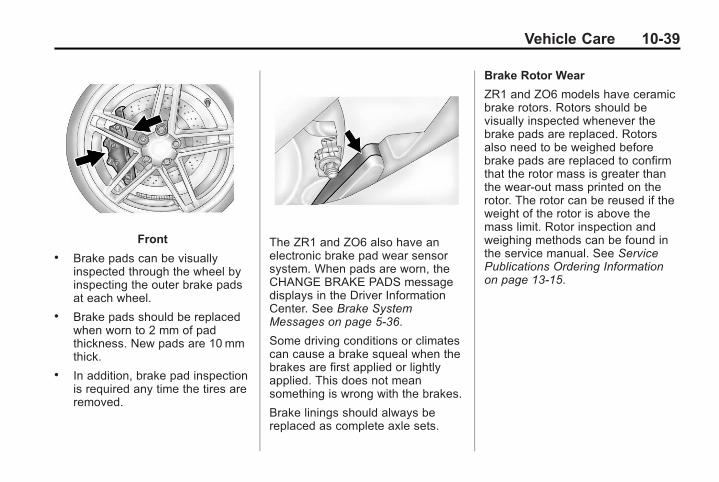
Black plate (39,1)Chevrolet Corvette Owner Manual - 2011
Vehicle Care 10-39
Front. Brake pads can be visually
inspected through the wheel byinspecting the outer brake padsat each wheel.
. Brake pads should be replacedwhen worn to 2 mm of padthickness. New pads are 10 mmthick.
. In addition, brake pad inspectionis required any time the tires areremoved.
The ZR1 and ZO6 also have anelectronic brake pad wear sensorsystem. When pads are worn, theCHANGE BRAKE PADS messagedisplays in the Driver InformationCenter. See Brake SystemMessages on page 5‑36.
Some driving conditions or climatescan cause a brake squeal when thebrakes are first applied or lightlyapplied. This does not meansomething is wrong with the brakes.
Brake linings should always bereplaced as complete axle sets.
Brake Rotor Wear
ZR1 and ZO6 models have ceramicbrake rotors. Rotors should bevisually inspected whenever thebrake pads are replaced. Rotorsalso need to be weighed beforebrake pads are replaced to confirmthat the rotor mass is greater thanthe wear‐out mass printed on therotor. The rotor can be reused if theweight of the rotor is above themass limit. Rotor inspection andweighing methods can be found inthe service manual. See ServicePublications Ordering Informationon page 13‑15.
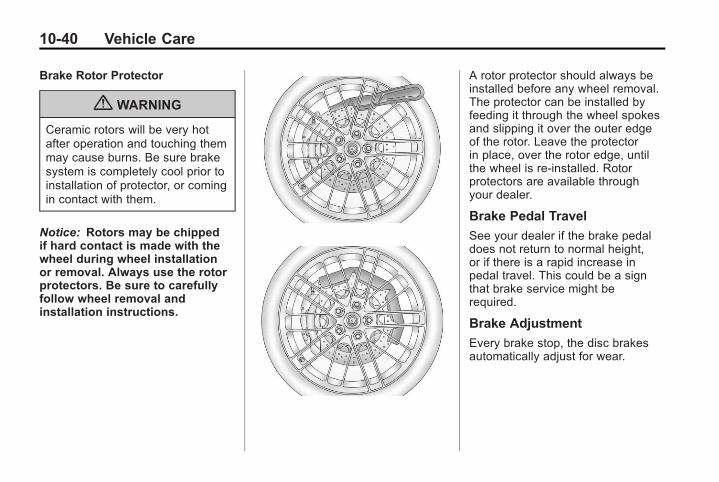
Black plate (40,1)Chevrolet Corvette Owner Manual - 2011
10-40 Vehicle Care
Brake Rotor Protector
{ WARNING
Ceramic rotors will be very hotafter operation and touching themmay cause burns. Be sure brakesystem is completely cool prior toinstallation of protector, or comingin contact with them.
Notice: Rotors may be chippedif hard contact is made with thewheel during wheel installationor removal. Always use the rotorprotectors. Be sure to carefullyfollow wheel removal andinstallation instructions.
A rotor protector should always beinstalled before any wheel removal.The protector can be installed byfeeding it through the wheel spokesand slipping it over the outer edgeof the rotor. Leave the protectorin place, over the rotor edge, untilthe wheel is re‐installed. Rotorprotectors are available throughyour dealer.
Brake Pedal Travel
See your dealer if the brake pedaldoes not return to normal height,or if there is a rapid increase inpedal travel. This could be a signthat brake service might berequired.
Brake Adjustment
Every brake stop, the disc brakesautomatically adjust for wear.
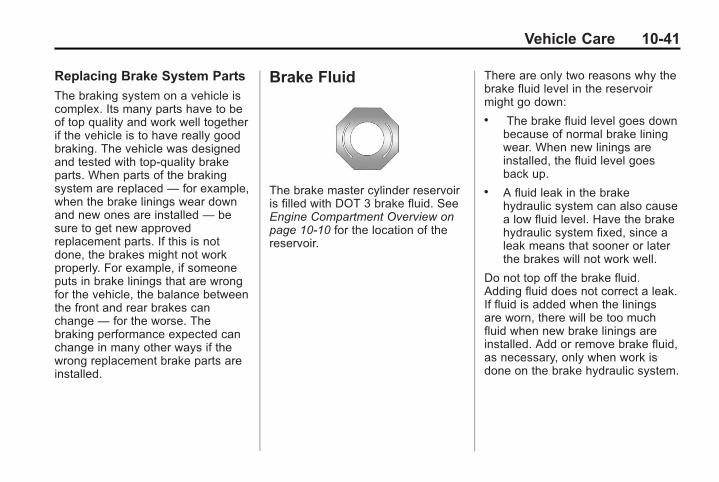
Black plate (41,1)Chevrolet Corvette Owner Manual - 2011
Vehicle Care 10-41
Replacing Brake System Parts
The braking system on a vehicle iscomplex. Its many parts have to beof top quality and work well togetherif the vehicle is to have really goodbraking. The vehicle was designedand tested with top-quality brakeparts. When parts of the brakingsystem are replaced — for example,when the brake linings wear downand new ones are installed — besure to get new approvedreplacement parts. If this is notdone, the brakes might not workproperly. For example, if someoneputs in brake linings that are wrongfor the vehicle, the balance betweenthe front and rear brakes canchange — for the worse. Thebraking performance expected canchange in many other ways if thewrong replacement brake parts areinstalled.
Brake Fluid
The brake master cylinder reservoiris filled with DOT 3 brake fluid. SeeEngine Compartment Overview onpage 10‑10 for the location of thereservoir.
There are only two reasons why thebrake fluid level in the reservoirmight go down:. The brake fluid level goes down
because of normal brake liningwear. When new linings areinstalled, the fluid level goesback up.
. A fluid leak in the brakehydraulic system can also causea low fluid level. Have the brakehydraulic system fixed, since aleak means that sooner or laterthe brakes will not work well.
Do not top off the brake fluid.Adding fluid does not correct a leak.If fluid is added when the liningsare worn, there will be too muchfluid when new brake linings areinstalled. Add or remove brake fluid,as necessary, only when work isdone on the brake hydraulic system.
Black plate (42,1)Chevrolet Corvette Owner Manual - 2011
10-42 Vehicle Care
{ WARNING
If too much brake fluid is added, itcan spill on the engine and burn,if the engine is hot enough. Youor others could be burned, andthe vehicle could be damaged.Add brake fluid only when workis done on the brake hydraulicsystem. See “Checking BrakeFluid” in this section.
Refer to the Maintenance Scheduleto determine when to check thebrake fluid. See ScheduledMaintenance on page 11‑2.
Checking Brake Fluid
Check brake fluid by looking at thebrake fluid reservoir. See EngineCompartment Overview onpage 10‑10.
The fluid level should be abovethe MIN mark on the reservoir. If itis not, have the brake hydraulicsystem checked to see if there isa leak.
After work is done on the brakehydraulic system, make sure thelevel is between the MIN and MAXmarks.
What to Add
Use only new DOT 3 brake fluidfrom a sealed container. SeeRecommended Fluids andLubricants on page 11‑6.
Always clean the brake fluidreservoir cap and the area aroundthe cap before removing it. Thishelps keep dirt from entering thereservoir.
{ WARNING
With the wrong kind of fluid inthe brake hydraulic system, thebrakes might not work well. Thiscould cause a crash. Always usethe proper brake fluid.
Black plate (43,1)Chevrolet Corvette Owner Manual - 2011
Vehicle Care 10-43
Notice:. Using the wrong fluidcan badly damage brakehydraulic system parts. Forexample, just a few dropsof mineral-based oil, suchas engine oil, in the brakehydraulic system candamage brake hydraulicsystem parts so badly thatthey will have to be replaced.Do not let someone put inthe wrong kind of fluid.
. If brake fluid is spilled on thevehicle's painted surfaces,the paint finish can bedamaged. Be careful notto spill brake fluid on thevehicle. If you do, wash itoff immediately.
BatteryRefer to the replacement number onthe original battery label when anew battery is needed.
For battery replacement, see yourdealer or the service manual. Topurchase a service manual, seeService Publications OrderingInformation on page 13‑15.
{ DANGER
Battery posts, terminals, andrelated accessories contain leadand lead compounds, chemicalsknown to the State of California tocause cancer and reproductiveharm. Wash hands after handling.
Vehicle Storage
{ WARNING
Batteries have acid that can burnyou and gas that can explode.You can be badly hurt if you arenot careful. See Jump Starting onpage 10‑82 for tips on workingaround a battery withoutgetting hurt.
Some vehicles have a batterycharger package. Follow theinstructions provided with thebattery charger package to keepthe battery charged when thevehicle is not in use. For vehicleswithout a battery charger, see thefollowing information.
Infrequent Usage: Remove theblack, negative (−) cable from thebattery to keep the battery fromrunning down.
See “Power Window Initialization” inPower Windows on page 2‑18.
Extended Storage: Remove theblack, negative (−) cable from thebattery or use a battery tricklecharger.
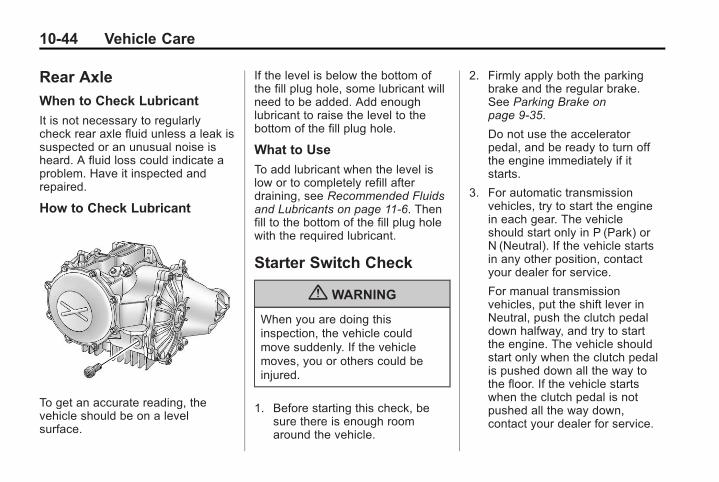
Black plate (44,1)Chevrolet Corvette Owner Manual - 2011
10-44 Vehicle Care
Rear Axle
When to Check Lubricant
It is not necessary to regularlycheck rear axle fluid unless a leak issuspected or an unusual noise isheard. A fluid loss could indicate aproblem. Have it inspected andrepaired.
How to Check Lubricant
To get an accurate reading, thevehicle should be on a levelsurface.
If the level is below the bottom ofthe fill plug hole, some lubricant willneed to be added. Add enoughlubricant to raise the level to thebottom of the fill plug hole.
What to Use
To add lubricant when the level islow or to completely refill afterdraining, see Recommended Fluidsand Lubricants on page 11‑6. Thenfill to the bottom of the fill plug holewith the required lubricant.
Starter Switch Check
{ WARNING
When you are doing thisinspection, the vehicle couldmove suddenly. If the vehiclemoves, you or others could beinjured.
1. Before starting this check, besure there is enough roomaround the vehicle.
2. Firmly apply both the parkingbrake and the regular brake.See Parking Brake onpage 9‑35.
Do not use the acceleratorpedal, and be ready to turn offthe engine immediately if itstarts.
3. For automatic transmissionvehicles, try to start the enginein each gear. The vehicleshould start only in P (Park) orN (Neutral). If the vehicle startsin any other position, contactyour dealer for service.
For manual transmissionvehicles, put the shift lever inNeutral, push the clutch pedaldown halfway, and try to startthe engine. The vehicle shouldstart only when the clutch pedalis pushed down all the way tothe floor. If the vehicle startswhen the clutch pedal is notpushed all the way down,contact your dealer for service.
Black plate (45,1)Chevrolet Corvette Owner Manual - 2011
Vehicle Care 10-45
Automatic TransmissionShift Lock ControlFunction Check
{ WARNING
When you are doing thisinspection, the vehicle couldmove suddenly. If the vehiclemoves, you or others could beinjured.
1. Before starting this check, besure there is enough roomaround the vehicle. It should beparked on a level surface.
2. Firmly apply the parking brake.See Parking Brake onpage 9‑35.
Be ready to apply the regularbrake immediately if the vehiclebegins to move.
3. With the engine off, turn theignition on, but do not start theengine. Without applying theregular brake, try to move theshift lever out of P (Park) withnormal effort. If the shift levermoves out of P (Park), contactyour dealer for service.
Park Brake and P (Park)Mechanism Check
{ WARNING
When you are doing this check,the vehicle could begin to move.You or others could be injuredand property could be damaged.Make sure there is room in frontof the vehicle in case it begins toroll. Be ready to apply the regularbrake at once should the vehiclebegin to move.
Park on a fairly steep hill, with thevehicle facing downhill. Keepingyour foot on the regular brake, setthe parking brake.. To check the parking brake's
holding ability: With the enginerunning and the transmission inN (Neutral), slowly remove footpressure from the regular brakepedal. Do this until the vehicle isheld by the parking brake only.
. To check the P (Park)mechanism's holding ability:With the engine running, shiftto P (Park). Then release theparking brake followed by theregular brake.
Contact your dealer if service isrequired.
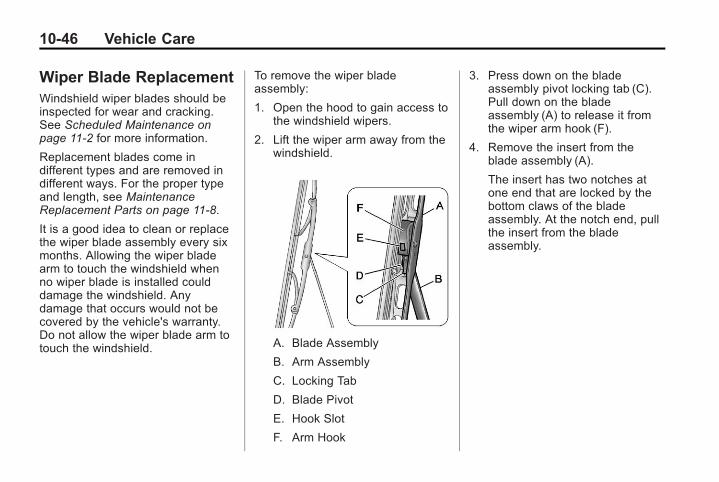
Black plate (46,1)Chevrolet Corvette Owner Manual - 2011
10-46 Vehicle Care
Wiper Blade ReplacementWindshield wiper blades should beinspected for wear and cracking.See Scheduled Maintenance onpage 11‑2 for more information.
Replacement blades come indifferent types and are removed indifferent ways. For the proper typeand length, see MaintenanceReplacement Parts on page 11‑8.
It is a good idea to clean or replacethe wiper blade assembly every sixmonths. Allowing the wiper bladearm to touch the windshield whenno wiper blade is installed coulddamage the windshield. Anydamage that occurs would not becovered by the vehicle's warranty.Do not allow the wiper blade arm totouch the windshield.
To remove the wiper bladeassembly:
1. Open the hood to gain access tothe windshield wipers.
2. Lift the wiper arm away from thewindshield.
A. Blade Assembly
B. Arm Assembly
C. Locking Tab
D. Blade Pivot
E. Hook Slot
F. Arm Hook
3. Press down on the bladeassembly pivot locking tab (C).Pull down on the bladeassembly (A) to release it fromthe wiper arm hook (F).
4. Remove the insert from theblade assembly (A).
The insert has two notches atone end that are locked by thebottom claws of the bladeassembly. At the notch end, pullthe insert from the bladeassembly.
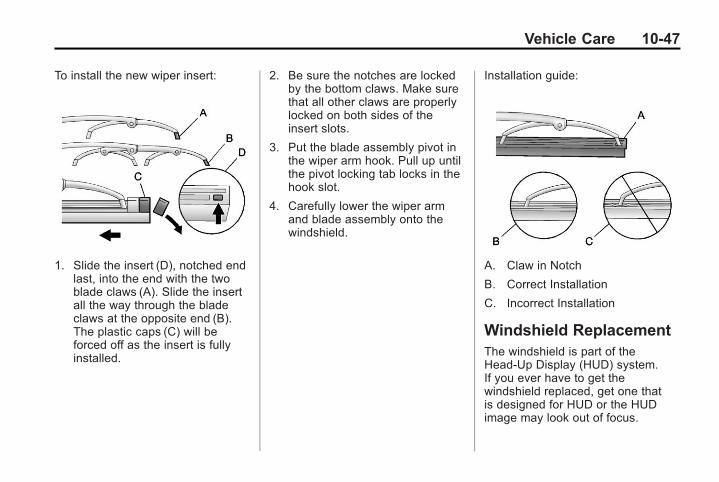
Black plate (47,1)Chevrolet Corvette Owner Manual - 2011
Vehicle Care 10-47
To install the new wiper insert:
1. Slide the insert (D), notched endlast, into the end with the twoblade claws (A). Slide the insertall the way through the bladeclaws at the opposite end (B).The plastic caps (C) will beforced off as the insert is fullyinstalled.
2. Be sure the notches are lockedby the bottom claws. Make surethat all other claws are properlylocked on both sides of theinsert slots.
3. Put the blade assembly pivot inthe wiper arm hook. Pull up untilthe pivot locking tab locks in thehook slot.
4. Carefully lower the wiper armand blade assembly onto thewindshield.
Installation guide:
A. Claw in Notch
B. Correct Installation
C. Incorrect Installation
Windshield ReplacementThe windshield is part of theHead-Up Display (HUD) system.If you ever have to get thewindshield replaced, get one thatis designed for HUD or the HUDimage may look out of focus.
Black plate (48,1)Chevrolet Corvette Owner Manual - 2011
10-48 Vehicle Care
Headlamp AimingHeadlamp aim has been preset atthe factory and should need nofurther adjustment.
However, if the vehicle is damagedin a crash, the headlamp aim maybe affected. Aim adjustment to thelow-beam headlamps may benecessary if oncoming drivers flashtheir high-beam headlamps at you(for vertical aim).
If the headlamps need to bere-aimed, it is recommended thatthe vehicle be taken to the dealerfor service.
Bulb ReplacementFor the proper type of replacementbulbs, see Replacement Bulbs onpage 10‑50.
For any bulb‐changing procedurenot listed in this section, contactyour dealer.
Halogen Bulbs
{ WARNING
Halogen bulbs have pressurizedgas inside and can burst if youdrop or scratch the bulb. You orothers could be injured. Be sureto read and follow the instructionson the bulb package.
High Intensity Discharge(HID) Lighting
{ WARNING
The low beam high intensitydischarge lighting systemoperates at a very high voltage.If you try to service any of thesystem components, you could beseriously injured. Have yourdealer or a qualified technicianservice them.
The vehicle may have HIDheadlamps. After an HID headlampbulb has been replaced, you maynotice that the beam is a slightlydifferent shade than it was originally.This is normal.
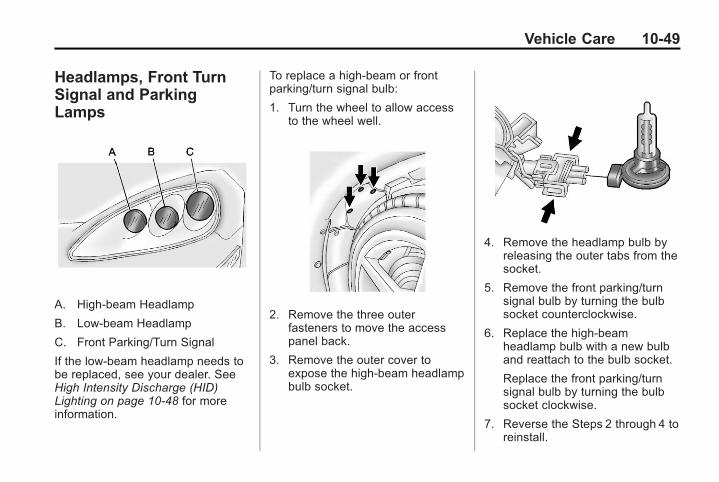
Black plate (49,1)Chevrolet Corvette Owner Manual - 2011
Vehicle Care 10-49
Headlamps, Front TurnSignal and ParkingLamps
A. High-beam Headlamp
B. Low-beam Headlamp
C. Front Parking/Turn Signal
If the low-beam headlamp needs tobe replaced, see your dealer. SeeHigh Intensity Discharge (HID)Lighting on page 10‑48 for moreinformation.
To replace a high-beam or frontparking/turn signal bulb:
1. Turn the wheel to allow accessto the wheel well.
2. Remove the three outerfasteners to move the accesspanel back.
3. Remove the outer cover toexpose the high-beam headlampbulb socket.
4. Remove the headlamp bulb byreleasing the outer tabs from thesocket.
5. Remove the front parking/turnsignal bulb by turning the bulbsocket counterclockwise.
6. Replace the high-beamheadlamp bulb with a new bulband reattach to the bulb socket.
Replace the front parking/turnsignal bulb by turning the bulbsocket clockwise.
7. Reverse the Steps 2 through 4 toreinstall.
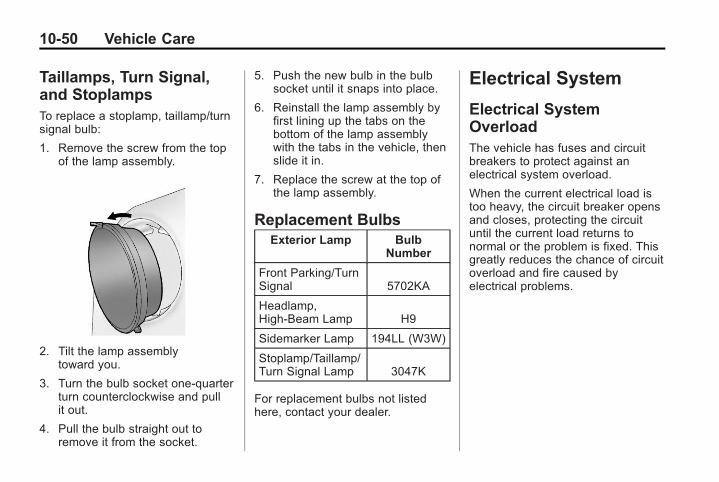
Black plate (50,1)Chevrolet Corvette Owner Manual - 2011
10-50 Vehicle Care
Taillamps, Turn Signal,and StoplampsTo replace a stoplamp, taillamp/turnsignal bulb:
1. Remove the screw from the topof the lamp assembly.
2. Tilt the lamp assemblytoward you.
3. Turn the bulb socket one-quarterturn counterclockwise and pullit out.
4. Pull the bulb straight out toremove it from the socket.
5. Push the new bulb in the bulbsocket until it snaps into place.
6. Reinstall the lamp assembly byfirst lining up the tabs on thebottom of the lamp assemblywith the tabs in the vehicle, thenslide it in.
7. Replace the screw at the top ofthe lamp assembly.
Replacement BulbsExterior Lamp Bulb
Number
Front Parking/TurnSignal 5702KA
Headlamp,High‐Beam Lamp H9
Sidemarker Lamp 194LL (W3W)
Stoplamp/Taillamp/Turn Signal Lamp 3047K
For replacement bulbs not listedhere, contact your dealer.
Electrical System
Electrical SystemOverloadThe vehicle has fuses and circuitbreakers to protect against anelectrical system overload.
When the current electrical load istoo heavy, the circuit breaker opensand closes, protecting the circuituntil the current load returns tonormal or the problem is fixed. Thisgreatly reduces the chance of circuitoverload and fire caused byelectrical problems.
Black plate (51,1)Chevrolet Corvette Owner Manual - 2011
Vehicle Care 10-51
Fuses and circuit breakers protectthe following in the vehicle:. Headlamp Wiring. Windshield Wiper Motor. Power Windows and Other
Power Accessories
Replace a bad fuse with a new oneof the identical size and rating.
If there is a problem on the roadand a fuse needs to be replaced,the same amperage fuse can beborrowed. Choose some feature ofthe vehicle that is not needed to useand replace it as soon as possible.
Headlamp Wiring
An electrical overload may causethe lamps to go on and off, or insome cases to remain off. Have theheadlamp wiring checked right awayif the lamps go on and off orremain off.
Windshield Wipers
If the wiper motor overheats due toheavy snow or ice, the windshieldwipers will stop until the motor coolsand will then restart.
Although the circuit is protectedfrom electrical overload, overloaddue to heavy snow or ice maycause wiper linkage damage.Always clear ice and heavy snowfrom the windshield before usingthe windshield wipers.
If the overload is caused by anelectrical problem and not snow orice, be sure to get it fixed.
Fuses and CircuitBreakersThe wiring circuits in the vehicle areprotected from short circuits by acombination of J-Case fuses,mini-fuses and circuit breakers. Thisgreatly reduces the chance of firescaused by electrical problems.
Look at the silver-colored bandinside the fuse. If the band is brokenor melted, replace the fuse. Be sureyou replace a bad fuse with a newone of the identical size and rating.
If you ever have a problem on theroad and do not have a spare fuse,you can borrow one that has thesame amperage. Just pick somefeature of the vehicle that you canget along without — like the radio orcigarette lighter — and use its fuse,if it is the correct amperage.Replace it as soon as you can.
Vehicles with the ZR1 package havean intercooler relay located on thefan shroud. See your dealer.
Vehicles with the ZR1 package alsohave a fuel system mini-fuse. It islocated near the battery in thebattery storage compartment in therear of the vehicle.
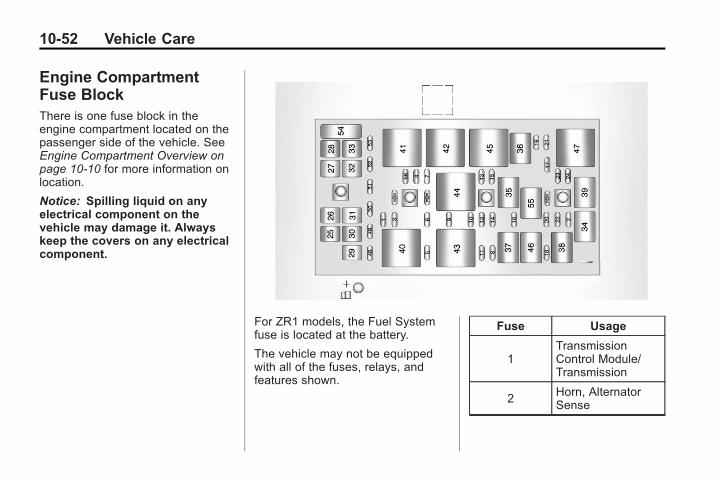
Black plate (52,1)Chevrolet Corvette Owner Manual - 2011
10-52 Vehicle Care
Engine CompartmentFuse BlockThere is one fuse block in theengine compartment located on thepassenger side of the vehicle. SeeEngine Compartment Overview onpage 10‑10 for more information onlocation.
Notice: Spilling liquid on anyelectrical component on thevehicle may damage it. Alwayskeep the covers on any electricalcomponent.
For ZR1 models, the Fuel Systemfuse is located at the battery.
The vehicle may not be equippedwith all of the fuses, relays, andfeatures shown.
Fuse Usage
1TransmissionControl Module/Transmission
2Horn, AlternatorSense
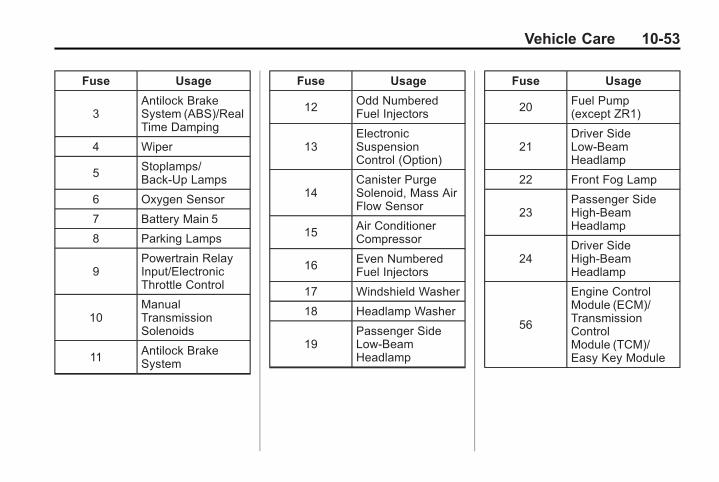
Black plate (53,1)Chevrolet Corvette Owner Manual - 2011
Vehicle Care 10-53
Fuse Usage
3Antilock BrakeSystem (ABS)/RealTime Damping
4 Wiper
5Stoplamps/Back-Up Lamps
6 Oxygen Sensor
7 Battery Main 5
8 Parking Lamps
9Powertrain RelayInput/ElectronicThrottle Control
10ManualTransmissionSolenoids
11Antilock BrakeSystem
Fuse Usage
12 Odd NumberedFuel Injectors
13ElectronicSuspensionControl (Option)
14Canister PurgeSolenoid, Mass AirFlow Sensor
15Air ConditionerCompressor
16Even NumberedFuel Injectors
17 Windshield Washer
18 Headlamp Washer
19Passenger SideLow-BeamHeadlamp
Fuse Usage
20 Fuel Pump(except ZR1)
21Driver SideLow-BeamHeadlamp
22 Front Fog Lamp
23Passenger SideHigh-BeamHeadlamp
24Driver SideHigh-BeamHeadlamp
56
Engine ControlModule (ECM)/TransmissionControlModule (TCM)/Easy Key Module
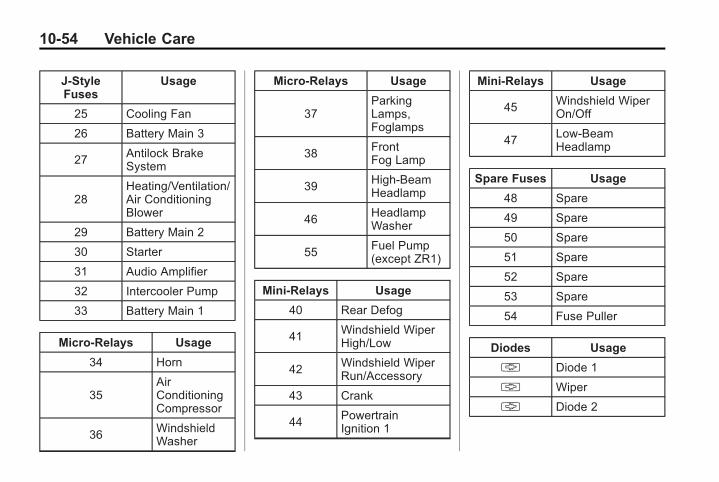
Black plate (54,1)Chevrolet Corvette Owner Manual - 2011
10-54 Vehicle Care
J-StyleFuses
Usage
25 Cooling Fan
26 Battery Main 3
27Antilock BrakeSystem
28Heating/Ventilation/Air ConditioningBlower
29 Battery Main 2
30 Starter
31 Audio Amplifier
32 Intercooler Pump
33 Battery Main 1
Micro-Relays Usage
34 Horn
35AirConditioningCompressor
36WindshieldWasher
Micro-Relays Usage
37ParkingLamps,Foglamps
38FrontFog Lamp
39High-BeamHeadlamp
46HeadlampWasher
55Fuel Pump(except ZR1)
Mini-Relays Usage
40 Rear Defog
41Windshield WiperHigh/Low
42Windshield WiperRun/Accessory
43 Crank
44PowertrainIgnition 1
Mini-Relays Usage
45 Windshield WiperOn/Off
47Low-BeamHeadlamp
Spare Fuses Usage
48 Spare
49 Spare
50 Spare
51 Spare
52 Spare
53 Spare
54 Fuse Puller
Diodes Usage
§ Diode 1
§ Wiper
§ Diode 2
Black plate (55,1)Chevrolet Corvette Owner Manual - 2011
Vehicle Care 10-55
Instrument Panel FuseBlockThe instrument panel fuse block islocated on the passenger side of thevehicle, under the instrument paneland under the toe-board.
Remove the carpet and toe-boardcovering to access the fuse block bypulling at the top of each corner ofthe panel. Open the fuse blockcover to access the fuses.
You can remove fuses using thefuse puller.
The vehicle may not be equippedwith all of the fuses, relays, andfeatures shown.
Fuses Usage
BCK/UP LAMP
Back‐up Lamps
BLANK Not Used
BLANK Not Used
Fuses Usage
BTSI SOL/STRWHL LCK
BrakeTransmission ShiftInterlock, SteeringWheelColumn Lock
CLSTR/HUDCluster, Heads‐UpDisplay
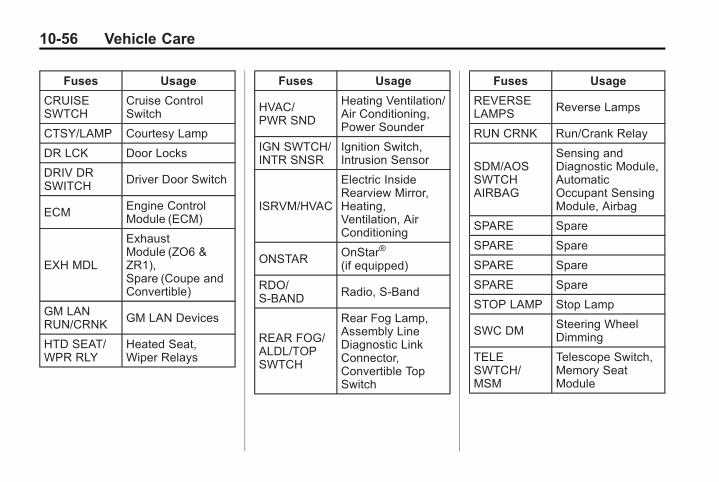
Black plate (56,1)Chevrolet Corvette Owner Manual - 2011
10-56 Vehicle Care
Fuses Usage
CRUISESWTCH
Cruise ControlSwitch
CTSY/LAMP Courtesy Lamp
DR LCK Door Locks
DRIV DRSWITCH
Driver Door Switch
ECMEngine ControlModule (ECM)
EXH MDL
ExhaustModule (ZO6 &ZR1),Spare (Coupe andConvertible)
GM LANRUN/CRNK
GM LAN Devices
HTD SEAT/WPR RLY
Heated Seat,Wiper Relays
Fuses Usage
HVAC/PWR SND
Heating Ventilation/Air Conditioning,Power Sounder
IGN SWTCH/INTR SNSR
Ignition Switch,Intrusion Sensor
ISRVM/HVAC
Electric InsideRearview Mirror,Heating,Ventilation, AirConditioning
ONSTAROnStar®
(if equipped)
RDO/S‐BAND
Radio, S‐Band
REAR FOG/ALDL/TOPSWTCH
Rear Fog Lamp,Assembly LineDiagnostic LinkConnector,Convertible TopSwitch
Fuses Usage
REVERSELAMPS
Reverse Lamps
RUN CRNK Run/Crank Relay
SDM/AOSSWTCHAIRBAG
Sensing andDiagnostic Module,AutomaticOccupant SensingModule, Airbag
SPARE Spare
SPARE Spare
SPARE Spare
SPARE Spare
STOP LAMP Stop Lamp
SWC DMSteering WheelDimming
TELESWTCH/MSM
Telescope Switch,Memory SeatModule
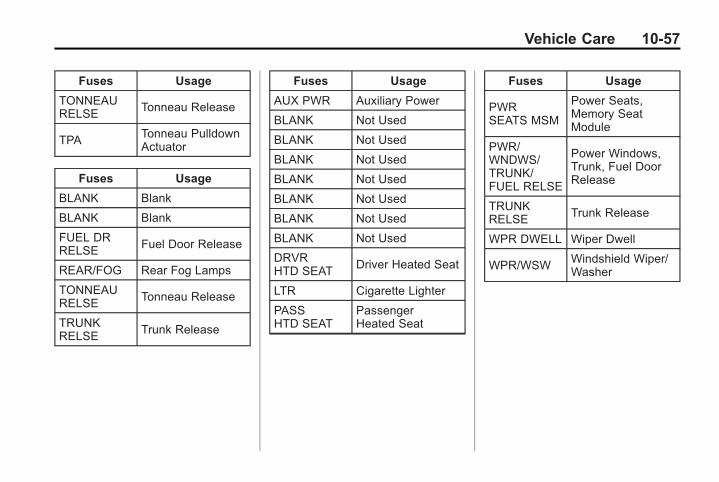
Black plate (57,1)Chevrolet Corvette Owner Manual - 2011
Vehicle Care 10-57
Fuses Usage
TONNEAURELSE
Tonneau Release
TPATonneau PulldownActuator
Fuses Usage
BLANK Blank
BLANK Blank
FUEL DRRELSE Fuel Door Release
REAR/FOG Rear Fog Lamps
TONNEAURELSE
Tonneau Release
TRUNKRELSE
Trunk Release
Fuses Usage
AUX PWR Auxiliary Power
BLANK Not Used
BLANK Not Used
BLANK Not Used
BLANK Not Used
BLANK Not Used
BLANK Not Used
BLANK Not Used
DRVRHTD SEAT
Driver Heated Seat
LTR Cigarette Lighter
PASSHTD SEAT
PassengerHeated Seat
Fuses Usage
PWRSEATS MSM
Power Seats,Memory SeatModule
PWR/WNDWS/TRUNK/FUEL RELSE
Power Windows,Trunk, Fuel DoorRelease
TRUNKRELSE Trunk Release
WPR DWELL Wiper Dwell
WPR/WSWWindshield Wiper/Washer
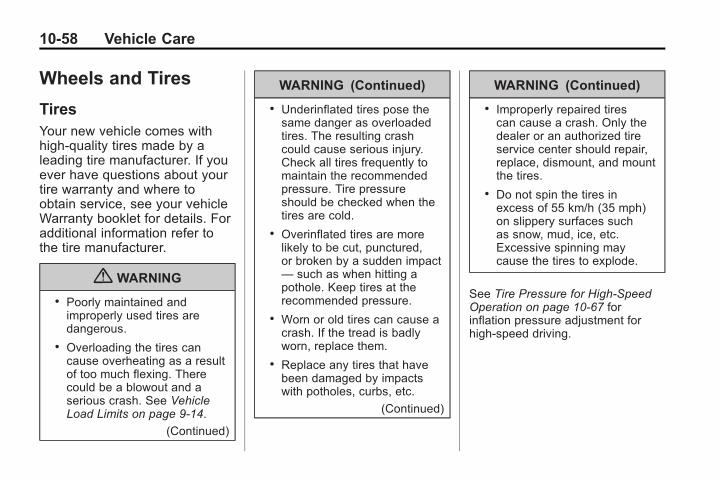
Black plate (58,1)Chevrolet Corvette Owner Manual - 2011
10-58 Vehicle Care
Wheels and Tires
TiresYour new vehicle comes withhigh-quality tires made by aleading tire manufacturer. If youever have questions about yourtire warranty and where toobtain service, see your vehicleWarranty booklet for details. Foradditional information refer tothe tire manufacturer.
{ WARNING
. Poorly maintained andimproperly used tires aredangerous.
. Overloading the tires cancause overheating as a resultof too much flexing. Therecould be a blowout and aserious crash. See VehicleLoad Limits on page 9‑14.
(Continued)
WARNING (Continued)
. Underinflated tires pose thesame danger as overloadedtires. The resulting crashcould cause serious injury.Check all tires frequently tomaintain the recommendedpressure. Tire pressureshould be checked when thetires are cold.
. Overinflated tires are morelikely to be cut, punctured,or broken by a sudden impact— such as when hitting apothole. Keep tires at therecommended pressure.
. Worn or old tires can cause acrash. If the tread is badlyworn, replace them.
. Replace any tires that havebeen damaged by impactswith potholes, curbs, etc.
(Continued)
WARNING (Continued)
. Improperly repaired tirescan cause a crash. Only thedealer or an authorized tireservice center should repair,replace, dismount, and mountthe tires.
. Do not spin the tires inexcess of 55 km/h (35 mph)on slippery surfaces suchas snow, mud, ice, etc.Excessive spinning maycause the tires to explode.
See Tire Pressure for High-SpeedOperation on page 10‑67 forinflation pressure adjustment forhigh-speed driving.
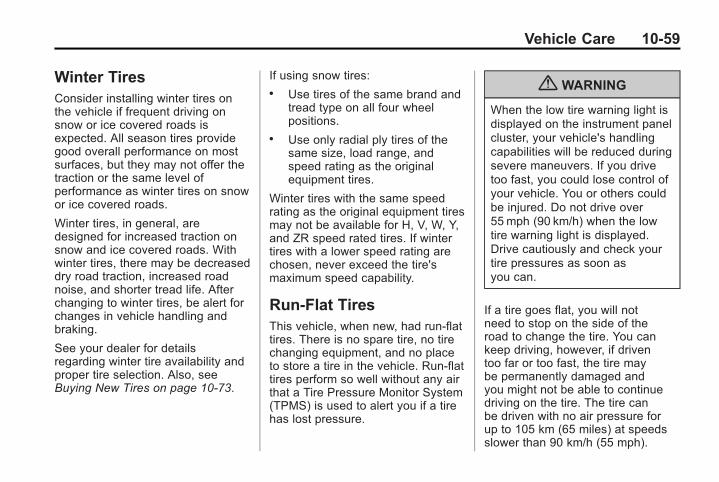
Black plate (59,1)Chevrolet Corvette Owner Manual - 2011
Vehicle Care 10-59
Winter TiresConsider installing winter tires onthe vehicle if frequent driving onsnow or ice covered roads isexpected. All season tires providegood overall performance on mostsurfaces, but they may not offer thetraction or the same level ofperformance as winter tires on snowor ice covered roads.
Winter tires, in general, aredesigned for increased traction onsnow and ice covered roads. Withwinter tires, there may be decreaseddry road traction, increased roadnoise, and shorter tread life. Afterchanging to winter tires, be alert forchanges in vehicle handling andbraking.
See your dealer for detailsregarding winter tire availability andproper tire selection. Also, seeBuying New Tires on page 10‑73.
If using snow tires:. Use tires of the same brand and
tread type on all four wheelpositions.
. Use only radial ply tires of thesame size, load range, andspeed rating as the originalequipment tires.
Winter tires with the same speedrating as the original equipment tiresmay not be available for H, V, W, Y,and ZR speed rated tires. If wintertires with a lower speed rating arechosen, never exceed the tire'smaximum speed capability.
Run-Flat TiresThis vehicle, when new, had run-flattires. There is no spare tire, no tirechanging equipment, and no placeto store a tire in the vehicle. Run-flattires perform so well without any airthat a Tire Pressure Monitor System(TPMS) is used to alert you if a tirehas lost pressure.
{ WARNING
When the low tire warning light isdisplayed on the instrument panelcluster, your vehicle's handlingcapabilities will be reduced duringsevere maneuvers. If you drivetoo fast, you could lose control ofyour vehicle. You or others couldbe injured. Do not drive over55 mph (90 km/h) when the lowtire warning light is displayed.Drive cautiously and check yourtire pressures as soon asyou can.
If a tire goes flat, you will notneed to stop on the side of theroad to change the tire. You cankeep driving, however, if driventoo far or too fast, the tire maybe permanently damaged andyou might not be able to continuedriving on the tire. The tire canbe driven with no air pressure forup to 105 km (65 miles) at speedsslower than 90 km/h (55 mph).
Black plate (60,1)Chevrolet Corvette Owner Manual - 2011
10-60 Vehicle Care
The shorter the distance you driveand the slower the speed, thegreater the chance that the tire willnot have to be replaced. As soonas possible, contact the nearestauthorized GM or run-flat servicingfacility for inspection and repair orreplacement. When a tire is filledwith air, it provides a cushionbetween the road and the wheel.Because you will not have thiscushion when driving on a deflatedrun-flat tire, try to avoid potholesand other road hazards that coulddamage the tire and/or wheelbeyond repair. When a tire has beendamaged, or if you have driven anydistance on a run-flat tire, checkwith an authorized run-flat tireservice center to determine whetherthe tire can be repaired or should bereplaced. To maintain your vehicle'srun-flat feature, all replacement tiresmust be run-flat tires.
To locate the nearest GM or run-flatservicing facility, call RoadsideAssistance. For phone numbersand Roadside Service details seeRoadside Assistance Program (U.S.and Canada) on page 13‑8 orRoadside Assistance Program(Mexico) on page 13‑10.
The valve stems on your run-flattires have sensors that are part ofthe Tire Pressure Monitor System(TPMS). See Tire Pressure MonitorSystem on page 10‑68. Thesesensors contain batteries which aredesigned to last for 10 years undernormal driving conditions. See yourdealer if you ever need to have awheel replaced, or if the sensorsever need replacement.
Notice: Using liquid sealantscan damage the tire valves andtire pressure monitor sensors inthe vehicle's run-flat tires. Thisdamage would not be coveredby warranty. Do not use liquidsealants in the vehicle's run-flattires.
Low-Profile Tires
Low‐Profile Performance Tire
The original equipment tires onyour vehicle are classified aslow‐profile performance tires.These tires are designed forvery responsive driving on wetor dry pavement. You may alsonotice more road noise withlow‐profile tires and that theytend to wear faster.
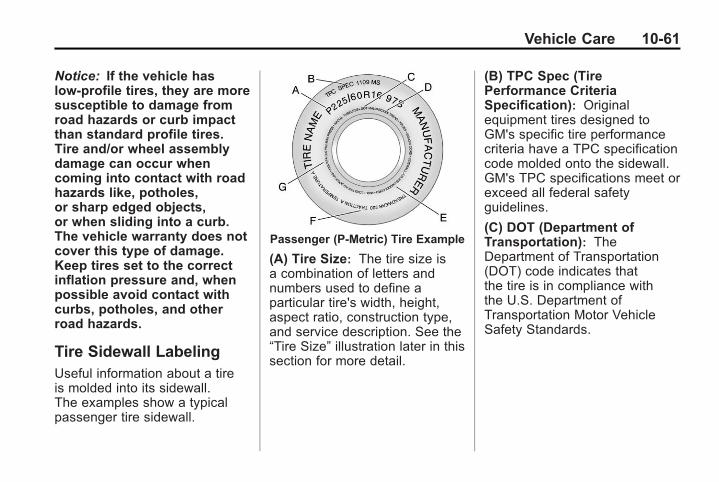
Black plate (61,1)Chevrolet Corvette Owner Manual - 2011
Vehicle Care 10-61
Notice: If the vehicle haslow‐profile tires, they are moresusceptible to damage fromroad hazards or curb impactthan standard profile tires.Tire and/or wheel assemblydamage can occur whencoming into contact with roadhazards like, potholes,or sharp edged objects,or when sliding into a curb.The vehicle warranty does notcover this type of damage.Keep tires set to the correctinflation pressure and, whenpossible avoid contact withcurbs, potholes, and otherroad hazards.
Tire Sidewall LabelingUseful information about a tireis molded into its sidewall.The examples show a typicalpassenger tire sidewall.
Passenger (P‐Metric) Tire Example
(A) Tire Size: The tire size isa combination of letters andnumbers used to define aparticular tire's width, height,aspect ratio, construction type,and service description. See the“Tire Size” illustration later in thissection for more detail.
(B) TPC Spec (TirePerformance CriteriaSpecification): Originalequipment tires designed toGM's specific tire performancecriteria have a TPC specificationcode molded onto the sidewall.GM's TPC specifications meet orexceed all federal safetyguidelines.
(C) DOT (Department ofTransportation): TheDepartment of Transportation(DOT) code indicates thatthe tire is in compliance withthe U.S. Department ofTransportation Motor VehicleSafety Standards.
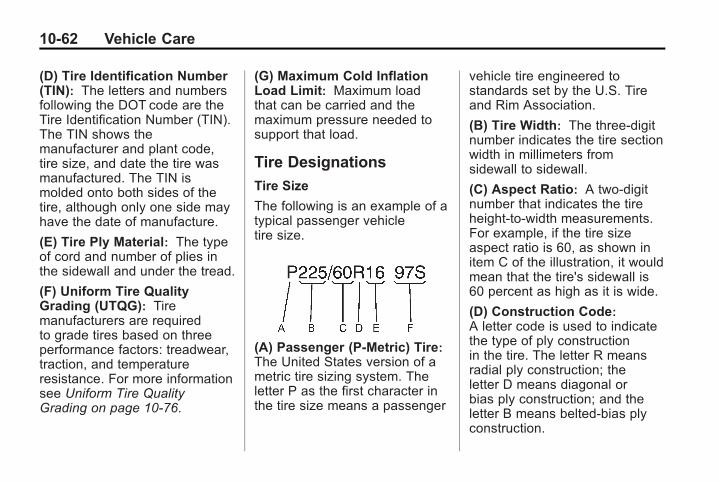
Black plate (62,1)Chevrolet Corvette Owner Manual - 2011
10-62 Vehicle Care
(D) Tire Identification Number(TIN): The letters and numbersfollowing the DOT code are theTire Identification Number (TIN).The TIN shows themanufacturer and plant code,tire size, and date the tire wasmanufactured. The TIN ismolded onto both sides of thetire, although only one side mayhave the date of manufacture.
(E) Tire Ply Material: The typeof cord and number of plies inthe sidewall and under the tread.
(F) Uniform Tire QualityGrading (UTQG): Tiremanufacturers are requiredto grade tires based on threeperformance factors: treadwear,traction, and temperatureresistance. For more informationsee Uniform Tire QualityGrading on page 10‑76.
(G) Maximum Cold InflationLoad Limit: Maximum loadthat can be carried and themaximum pressure needed tosupport that load.
Tire Designations
Tire Size
The following is an example of atypical passenger vehicletire size.
(A) Passenger (P‐Metric) Tire:The United States version of ametric tire sizing system. Theletter P as the first character inthe tire size means a passenger
vehicle tire engineered tostandards set by the U.S. Tireand Rim Association.
(B) Tire Width: The three‐digitnumber indicates the tire sectionwidth in millimeters fromsidewall to sidewall.
(C) Aspect Ratio: A two‐digitnumber that indicates the tireheight‐to‐width measurements.For example, if the tire sizeaspect ratio is 60, as shown initem C of the illustration, it wouldmean that the tire's sidewall is60 percent as high as it is wide.
(D) Construction Code:A letter code is used to indicatethe type of ply constructionin the tire. The letter R meansradial ply construction; theletter D means diagonal orbias ply construction; and theletter B means belted‐bias plyconstruction.
Black plate (63,1)Chevrolet Corvette Owner Manual - 2011
Vehicle Care 10-63
(E) Rim Diameter: Diameter ofthe wheel in inches.
(F) Service Description: Thesecharacters represent the loadindex and speed rating of thetire. The load index representsthe load carrying capacity a tireis certified to carry. The speedrating is the maximum speed atire is certified to carry a load.
Tire Terminology andDefinitionsAir Pressure: The amountof air inside the tire pressingoutward on each square inchof the tire. Air pressure isexpressed in psi (pounds persquare inch) or kPa (kilopascal).
Accessory Weight: Thecombined weight of optionalaccessories. Some examplesof optional accessories are,automatic transmission, powersteering, power brakes, powerwindows, power seats, and airconditioning.
Aspect Ratio: The relationshipof a tire's height to its width.
Belt: A rubber coated layer ofcords that is located betweenthe plies and the tread. Cordsmay be made from steel or otherreinforcing materials.
Bead: The tire bead containssteel wires wrapped by steelcords that hold the tire ontothe rim.
Bias Ply Tire: A pneumatictire in which the plies are laidat alternate angles less than90 degrees to the centerline ofthe tread.
Cold Tire Pressure: Theamount of air pressure in a tire,measured in kPa (kilopascal)or psi (pounds per square inch)before a tire has built up heatfrom driving. See Tire Pressureon page 10‑66.
Curb Weight: The weight of amotor vehicle with standard andoptional equipment including themaximum capacity of fuel, oil,and coolant, but withoutpassengers and cargo.
Black plate (64,1)Chevrolet Corvette Owner Manual - 2011
10-64 Vehicle Care
DOT Markings: A code moldedinto the sidewall of a tiresignifying that the tire is incompliance with the U.S.Department of Transportation(DOT) Motor Vehicle SafetyStandards. The DOT codeincludes the Tire IdentificationNumber (TIN), an alphanumericdesignator which can alsoidentify the tire manufacturer,production plant, brand, anddate of production.
GVWR: Gross Vehicle WeightRating. See Vehicle Load Limitson page 9‑14.
GAWR FRT: Gross Axle WeightRating for the front axle. SeeVehicle Load Limits onpage 9‑14.
GAWR RR: Gross Axle WeightRating for the rear axle. SeeVehicle Load Limits onpage 9‑14.
Intended Outboard Sidewall:The side of an asymmetrical tire,that must always face outwardwhen mounted on a vehicle.
Kilopascal (kPa): The metricunit for air pressure.
Light Truck (LT‐Metric) Tire: Atire used on light duty trucks andsome multipurpose passengervehicles.
Load Index: An assignednumber ranging from 1 to 279that corresponds to the loadcarrying capacity of a tire.
Maximum Inflation Pressure:The maximum air pressure towhich a cold tire can be inflated.The maximum air pressure ismolded onto the sidewall.
Maximum Load Rating:The load rating for a tire at themaximum permissible inflationpressure for that tire.
Maximum Loaded VehicleWeight: The sum of curbweight, accessory weight,vehicle capacity weight, andproduction options weight.
Normal Occupant Weight: Thenumber of occupants a vehicleis designed to seat multiplied by68 kg (150 lbs). See VehicleLoad Limits on page 9‑14.
Occupant Distribution:Designated seating positions.
Outward Facing Sidewall:The side of an asymmetrical tirethat has a particular side thatfaces outward when mountedon a vehicle. The side of thetire that contains a whitewall,bears white lettering, or bearsmanufacturer, brand, and/ormodel name molding that ishigher or deeper than the samemoldings on the other sidewallof the tire.
Black plate (65,1)Chevrolet Corvette Owner Manual - 2011
Vehicle Care 10-65
Passenger (P-Metric) Tire:A tire used on passenger carsand some light duty trucks andmultipurpose vehicles.
Recommended InflationPressure: Vehiclemanufacturer's recommendedtire inflation pressure as shownon the tire placard. See TirePressure on page 10‑66 andVehicle Load Limits onpage 9‑14.
Radial Ply Tire: A pneumatictire in which the ply cords thatextend to the beads are laid at90 degrees to the centerline ofthe tread.
Rim: A metal support for a tireand upon which the tire beadsare seated.
Sidewall: The portion of a tirebetween the tread and the bead.
Speed Rating: Analphanumeric code assignedto a tire indicating the maximumspeed at which a tire canoperate.
Traction: The friction betweenthe tire and the road surface.The amount of grip provided.
Tread: The portion of a tirethat comes into contact withthe road.
Treadwear Indicators: Narrowbands, sometimes called wearbars, that show across the treadof a tire when only 1.6 mm(1/16 in) of tread remains. SeeWhen It Is Time for New Tireson page 10‑72.
UTQGS (Uniform Tire QualityGrading Standards):A tire information systemthat provides consumers withratings for a tire's traction,temperature, and treadwear.Ratings are determined bytire manufacturers usinggovernment testing procedures.The ratings are molded into thesidewall of the tire. See UniformTire Quality Grading onpage 10‑76.
Vehicle Capacity Weight:The number of designatedseating positions multiplied by68 kg (150 lbs) plus the ratedcargo load. See Vehicle LoadLimits on page 9‑14.
Black plate (66,1)Chevrolet Corvette Owner Manual - 2011
10-66 Vehicle Care
Vehicle Maximum Load on theTire: Load on an individual tiredue to curb weight, accessoryweight, occupant weight, andcargo weight.
Vehicle Placard: A labelpermanently attached to avehicle showing the vehiclecapacity weight and theoriginal equipment tire sizeand recommended inflationpressure. See “Tire and LoadingInformation Label” under VehicleLoad Limits on page 9‑14.
Tire PressureTires need the correct amountof air pressure to operateeffectively.
Notice: Neither tireunderinflation noroverinflation is good.Underinflated tires, or tiresthat do not have enough air,can result in:. Tire overloading andover-heating which couldlead to a blowout.
. Premature orirregular wear.
. Poor handling.
. Reduced fuel economy.
Overinflated tires, or tires thathave too much air, canresult in:. Unusual wear.. Poor handling.. Rough ride.. Needless damage fromroad hazards.
The Tire and LoadingInformation Label on thevehicle indicates the originalequipment tires and the correctcold tire inflation pressures. Therecommended pressure is theminimum air pressure needed tosupport the vehicle's maximumload carrying capacity.
For additional informationregarding how much weightthe vehicle can carry, and anexample of the Tire and LoadingInformation label, see VehicleLoad Limits on page 9‑14. Howthe vehicle is loaded affectsvehicle handling and ridecomfort. Never load the vehiclewith more weight than it wasdesigned to carry.
When to Check
Check the tires once a monthor more.

Black plate (67,1)Chevrolet Corvette Owner Manual - 2011
Vehicle Care 10-67
How to Check
Use a good quality pocket-typegauge to check the tirepressure. Proper tire inflationcannot be determined bylooking at the tire. Check the tireinflation pressure when the tiresare cold, meaning the vehiclehas not been driven for at leastthree hours or no more than1.6 km (1 mi).
Remove the valve cap from thetire valve stem. Press the tiregauge firmly onto the valve toget the pressure measurement.If the cold tire inflation pressurematches the recommendedpressure on the Tire andLoading Information Label, nofurther adjustment is necessary.
If the inflation pressure is low,add air until the recommendedpressure is reached. If theinflation pressure in high, presson the metal stem in the centerof the tire valve to release air.Re‐check the tire pressure withthe tire gauge.
Return the valve caps on thevalve stems to keep out dirt andmoisture and prevent leaks.
Tire Pressure forHigh-Speed Operation
{ WARNING
Driving at high speeds, 160 km/h(100mph) or higher, puts anadditional strain on tires.Sustained high-speed drivingcauses excessive heat build upand can cause sudden tire failure.
(Continued)
WARNING (Continued)
You could have a crash and youor others could be killed. Somehigh-speed rated tires requireinflation pressure adjustment forhigh speed operation. Whenspeed limits and road conditionsare such that a vehicle can bedriven at high speeds, make surethe tires are rated for high speedoperation, in excellent condition,and set to the correct cold tireinflation pressure for thevehicle load.
If you will be driving your vehicle atspeeds of 175 mph (282 km/h) orhigher, where it is legal, set the coldinflation pressure to the maximuminflation pressure shown on thetire sidewall, or 38 psi (265 kPa),whichever is lower. See theexample following. When you end
Black plate (68,1)Chevrolet Corvette Owner Manual - 2011
10-68 Vehicle Care
this high-speed driving, return thetires to the cold inflation pressureshown on the Tire and LoadingInformation label. See Vehicle LoadLimits on page 9‑14.
Example:
You will find the maximum loadand inflation pressure molded onthe tire's sidewall, in small letters,near the rim flange. It will readsomething like this: Maximum load690 kg (1521 lbs) 300 kPa (44 psi)Max. Press.
For this example, you would set theinflation pressure for high‐speeddriving at 38 psi (265 kPa).
Racing or other competitive drivingmay affect the warranty coverageof your vehicle. See your warrantybooklet for more information.
Tire Pressure MonitorSystemThe Tire Pressure Monitor System(TPMS) uses radio and sensortechnology to check tire pressurelevels. The TPMS sensors monitorthe air pressure in your tires andtransmit tire pressure readings to areceiver located in the vehicle.
Each tire, including the spare(if provided), should be checkedmonthly when cold and inflated tothe inflation pressure recommendedby the vehicle manufacturer on thevehicle placard or tire inflationpressure label. (If your vehicle hastires of a different size than the sizeindicated on the vehicle placard ortire inflation pressure label, youshould determine the proper tireinflation pressure for those tires.)
As an added safety feature, yourvehicle has been equipped with atire pressure monitoring system(TPMS) that illuminates a low tirepressure telltale when one ormore of your tires is significantlyunder‐inflated.
Accordingly, when the low tirepressure telltale illuminates, youshould stop and check your tires assoon as possible, and inflate themto the proper pressure. Driving ona significantly under‐inflated tirecauses the tire to overheat and canlead to tire failure. Under‐inflationalso reduces fuel efficiency andtire tread life, and may affect thevehicle's handling and stoppingability.
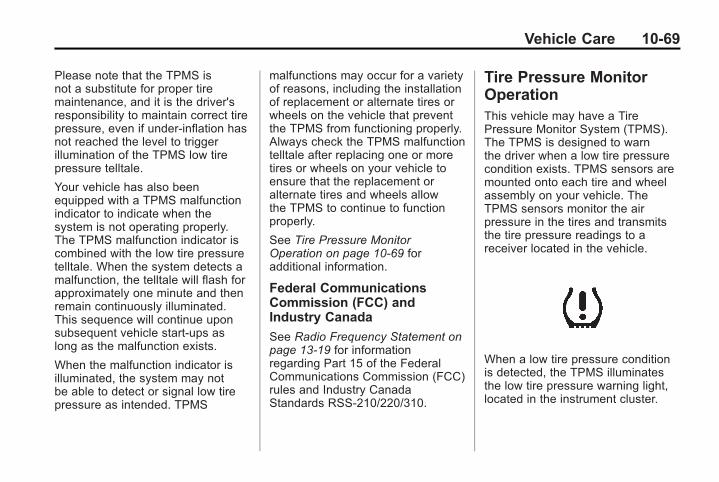
Black plate (69,1)Chevrolet Corvette Owner Manual - 2011
Vehicle Care 10-69
Please note that the TPMS isnot a substitute for proper tiremaintenance, and it is the driver'sresponsibility to maintain correct tirepressure, even if under‐inflation hasnot reached the level to triggerillumination of the TPMS low tirepressure telltale.
Your vehicle has also beenequipped with a TPMS malfunctionindicator to indicate when thesystem is not operating properly.The TPMS malfunction indicator iscombined with the low tire pressuretelltale. When the system detects amalfunction, the telltale will flash forapproximately one minute and thenremain continuously illuminated.This sequence will continue uponsubsequent vehicle start‐ups aslong as the malfunction exists.
When the malfunction indicator isilluminated, the system may notbe able to detect or signal low tirepressure as intended. TPMS
malfunctions may occur for a varietyof reasons, including the installationof replacement or alternate tires orwheels on the vehicle that preventthe TPMS from functioning properly.Always check the TPMS malfunctiontelltale after replacing one or moretires or wheels on your vehicle toensure that the replacement oralternate tires and wheels allowthe TPMS to continue to functionproperly.
See Tire Pressure MonitorOperation on page 10‑69 foradditional information.
Federal CommunicationsCommission (FCC) andIndustry Canada
See Radio Frequency Statement onpage 13‑19 for informationregarding Part 15 of the FederalCommunications Commission (FCC)rules and Industry CanadaStandards RSS-210/220/310.
Tire Pressure MonitorOperationThis vehicle may have a TirePressure Monitor System (TPMS).The TPMS is designed to warnthe driver when a low tire pressurecondition exists. TPMS sensors aremounted onto each tire and wheelassembly on your vehicle. TheTPMS sensors monitor the airpressure in the tires and transmitsthe tire pressure readings to areceiver located in the vehicle.
When a low tire pressure conditionis detected, the TPMS illuminatesthe low tire pressure warning light,located in the instrument cluster.
Black plate (70,1)Chevrolet Corvette Owner Manual - 2011
10-70 Vehicle Care
If the warning light comes on,stop as soon as possible and inflatethe tires to the recommendedpressure shown on the tire loadinginformation label. See Vehicle LoadLimits on page 9‑14.
A message to check the pressure ina specific tire displays in the DriverInformation Center (DIC). The lowtire pressure warning light and theDIC warning message appear ateach ignition cycle until the tiresare inflated to the correct inflationpressure. Using the DIC, tirepressure levels can be viewed. Foradditional information and detailsabout the DIC operation anddisplays see Driver InformationCenter (DIC) on page 5‑25 and TireMessages on page 5‑51.
The low tire pressure warning lightmay come on in cool weather whenthe vehicle is first started, and thenturn off as the vehicle is driven. Thiscould be an early indicator that theair pressure is getting low andneeds to be inflated to the properpressure.
A Tire and Loading Informationlabel shows the size of the originalequipment tires and the correctinflation pressure for the tires whenthey are cold. See Vehicle LoadLimits on page 9‑14, for an exampleof the Tire and Loading Informationlabel and its location. Also see TirePressure on page 10‑66 foradditional information.
The TPMS can warn about a lowtire pressure condition but it doesnot replace normal tiremaintenance. See Tire Inspectionon page 10‑72, Tire Rotation onpage 10‑72, When It Is Time forNew Tires on page 10‑72, and Tireson page 10‑58.
Notice: Tire sealant materials arenot all the same. A non-approvedtire sealant could damage theTPMS sensors. TPMS sensordamage caused by using anincorrect tire sealant is notcovered by the vehiclewarranty. Always use onlythe GM-approved tire sealantavailable through your dealer orincluded in the vehicle.
Black plate (71,1)Chevrolet Corvette Owner Manual - 2011
Vehicle Care 10-71
TPMS Malfunction Light andMessage
The TPMS will not function properlyif one or more of the TPMS sensorsare missing or inoperable. Whenthe system detects a malfunction,the low tire warning light flashesfor about one minute and then stayson for the remainder of the ignitioncycle. A DIC warning message alsodisplays. The malfunction light andDIC warning message come on ateach ignition cycle until the problemis corrected. Some of the conditionsthat can cause these to comeon are:. The TPMS sensor matching
process was not done or notcompleted successfully. Themalfunction light and the DICmessage should go off aftersuccessfully completing thesensor matching process.
. One or more TPMS sensors aremissing or damaged. Themalfunction light and the DICmessage should go off when theTPMS sensors are installed andthe sensor matching process isperformed successfully. Seeyour dealer for service.
. Replacement tires or wheels donot match the original equipmenttires or wheels. Tires and wheelsother than those recommendedcould prevent the TPMS fromfunctioning properly. See BuyingNew Tires on page 10‑73.
. Operating electronic devices orbeing near facilities using radiowave frequencies similar to theTPMS could cause the TPMSsensors to malfunction.
If the TPMS is not functioningproperly, it cannot detect or signal alow tire condition. See your dealerfor service if the TPMS malfunctionlight and DIC message come onand stays on.
TPMS Sensor MatchingProcess
Each TPMS sensor has a uniqueidentification code. The identificationcode needs to be matched to a newtire/wheel position after replacingone or more of the TPMS sensors.The malfunction light and the DICmessage should go off at the nextignition cycle. The sensors arematched to the tire/wheel positions,using a TPMS relearn tool, in thefollowing order: driver side front tire,passenger side front tire, passengerside rear tire, and driver side rear.See your dealer for service.
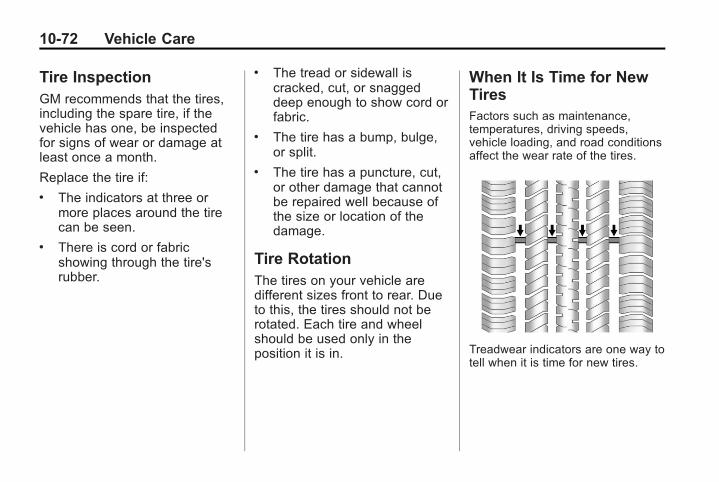
Black plate (72,1)Chevrolet Corvette Owner Manual - 2011
10-72 Vehicle Care
Tire InspectionGM recommends that the tires,including the spare tire, if thevehicle has one, be inspectedfor signs of wear or damage atleast once a month.
Replace the tire if:. The indicators at three or
more places around the tirecan be seen.
. There is cord or fabricshowing through the tire'srubber.
. The tread or sidewall iscracked, cut, or snaggeddeep enough to show cord orfabric.
. The tire has a bump, bulge,or split.
. The tire has a puncture, cut,or other damage that cannotbe repaired well because ofthe size or location of thedamage.
Tire RotationThe tires on your vehicle aredifferent sizes front to rear. Dueto this, the tires should not berotated. Each tire and wheelshould be used only in theposition it is in.
When It Is Time for NewTiresFactors such as maintenance,temperatures, driving speeds,vehicle loading, and road conditionsaffect the wear rate of the tires.
Treadwear indicators are one way totell when it is time for new tires.
Black plate (73,1)Chevrolet Corvette Owner Manual - 2011
Vehicle Care 10-73
Treadwear indicators appear whenthe tires have only 1.6 mm (1/16 in)or less of tread remaining. See TireInspection on page 10‑72 and TireRotation on page 10‑72 for moreinformation.
The rubber in tires ages over time.This also applies for the spare tire,if the vehicle has one, even if it isnever used. Multiple conditionsincluding temperatures, loadingconditions, and inflation pressuremaintenance affect how fast agingtakes place. Tires will typically needto be replaced due to wear beforethey may need to be replaced dueto age. Consult the tiremanufacturer for more informationon when tires should be replaced.
Vehicle Storage
Tires age when stored normallymounted on a parked vehicle. Parka vehicle that will be stored for atleast a month in a cool, dry, cleanarea away from direct sunlight toslow aging. This area should befree of grease, gasoline, or othersubstances that can deterioraterubber.
Parking for an extended period cancause flat spots on the tires thatmay result in vibrations whiledriving. When storing a vehicle forat least a month, remove the tires orraise the vehicle to reduce theweight from the tires.
Buying New TiresGM has developed and matchedspecific tires for your vehicle. Theoriginal equipment tires installed onyour vehicle, when it was new, weredesigned to meet General MotorsTire Performance CriteriaSpecification (TPC Spec) systemrating. If you need replacementtires, GM strongly recommends thatyou get tires with the same TPCSpec rating. This way, your vehiclewill continue to have tires that aredesigned to give the sameperformance and vehicle safety,during normal use, as the originaltires.
Black plate (74,1)Chevrolet Corvette Owner Manual - 2011
10-74 Vehicle Care
GM's exclusive TPC Specsystem considers over a dozencritical specifications that impactthe overall performance of yourvehicle, including brake systemperformance, ride and handling,traction control, and tire pressuremonitoring performance. GM's TPCSpec number is molded onto thetire's sidewall near the tire size.If the tires have an all‐season treaddesign, the TPC Spec number willbe followed by an MS for mud andsnow. See Tire Sidewall Labeling onpage 10‑61, for additionalinformation.
GM recommends replacing tires insets of four. This is because uniformtread depth on all tires will helpkeep your vehicle performing mostlike it did when the tires were new.Replacing less than a full set of tirescan affect the braking and handlingperformance of your vehicle. SeeTire Inspection on page 10‑72 andTire Rotation on page 10‑72.
{ WARNING
Tires could explode duringimproper service. Attempting tomount or dismount a tire couldcause injury or death. Only yourdealer or authorized tire servicecenter should mount or dismountthe tires.
Winter tires with the same speedrating as your original equipmenttires may not be available for H, V,W, Y and ZR speed rated tires.If you choose snow tires with alower speed rating, never exceedthe tire's maximum speed capability.
{ WARNING
Mixing tires could cause you tolose control while driving. If youmix tires of different sizes (otherthan those originally installed onyour vehicle), brands, or types(radial and bias-belted tires), thevehicle may not handle properly,and you could have a crash.Using tires of different sizes(other than those originallyinstalled on your vehicle), brandsor types, may also cause damageto your vehicle. Be sure to usethe correct size, brand, and typetires on all four wheels.

Black plate (75,1)Chevrolet Corvette Owner Manual - 2011
Vehicle Care 10-75
{ WARNING
Using bias-ply tires on thevehicle may cause the wheelrim flanges to develop cracksafter many miles of driving.A tire and/or wheel could failsuddenly and cause a crash.Use only radial-ply tires withthe wheels on the vehicle.
If you must replace your vehicle'stires with those that do not havea TPC Spec number, make surethey are the same size, load range,speed rating, and construction type(radial and bias‐belted tires) as yourvehicle's original tires.
Vehicles that have a tire pressuremonitoring system could give aninaccurate low‐pressure warningif non‐TPC Spec rated tires areinstalled on it. Non‐TPC Specrated tires may give a low‐pressurewarning that is higher or lower than
the proper warning level you wouldget with TPC Spec rated tires. SeeTire Pressure Monitor Operation onpage 10‑69.
Your vehicle's original equipmenttires are listed on the Tire andLoading Information label. SeeVehicle Load Limits on page 9‑14,for more information about the Tireand Loading Information label andits location on your vehicle.
Different Size Tires andWheelsIf wheels or tires are installed thatare a different size than the originalequipment wheels and tires, vehicleperformance, including its braking,ride and handling characteristics,stability, and resistance to rollovermay be affected. If the vehicle haselectronic systems such as antilockbrakes, rollover airbags, tractioncontrol, and electronic stabilitycontrol, the performance of thesesystems can also be affected.
{ WARNING
If different sized wheels are used,there may not be an acceptablelevel of performance and safetyif tires not recommended forthose wheels are selected. Thisincreases the chance of a crashand serious injury. Only use GMspecific wheel and tire systemsdeveloped for the vehicle, andhave them properly installed bya GM certified technician.
See Buying New Tires onpage 10‑73 and Accessories andModifications on page 10‑4 foradditional information.
Black plate (76,1)Chevrolet Corvette Owner Manual - 2011
10-76 Vehicle Care
Uniform Tire QualityGradingQuality grades can be foundwhere applicable on the tiresidewall between tread shoulderand maximum section width. Forexample:
Treadwear 200 Traction AATemperature A
The following information relatesto the system developed by theUnited States National HighwayTraffic Safety Administration(NHTSA), which grades tiresby treadwear, traction, andtemperature performance. Thisapplies only to vehicles sold inthe United States. The gradesare molded on the sidewalls ofmost passenger car tires. TheUniform Tire Quality Grading
(UTQG) system does not applyto deep tread, winter-type snowtires, space-saver, or temporaryuse spare tires, tires withnominal rim diameters of10 to 12 inches (25 to 30 cm),or to some limited-productiontires.
While the tires available onGeneral Motors passenger carsand light trucks may vary withrespect to these grades, theymust also conform to federalsafety requirements andadditional General Motors TirePerformance Criteria (TPC)standards.
All Passenger Car Tires MustConform to Federal SafetyRequirements In Addition ToThese Grades.
Treadwear
The treadwear grade is acomparative rating basedon the wear rate of the tirewhen tested under controlledconditions on a specifiedgovernment test course.For example, a tire graded150 would wear one and ahalf (1½) times as well on thegovernment course as a tiregraded 100. The relativeperformance of tires dependsupon the actual conditions oftheir use, however, and maydepart significantly from thenorm due to variations indriving habits, service practicesand differences in roadcharacteristics and climate.
Black plate (77,1)Chevrolet Corvette Owner Manual - 2011
Vehicle Care 10-77
Traction – AA, A, B, C
The traction grades, fromhighest to lowest, are AA, A, B,and C. Those grades representthe tire's ability to stop on wetpavement as measured undercontrolled conditions onspecified government testsurfaces of asphalt andconcrete. A tire marked C mayhave poor traction performance.Warning: The traction gradeassigned to this tire is based onstraight-ahead braking tractiontests, and does not includeacceleration, cornering,hydroplaning, or peak tractioncharacteristics.
Temperature – A, B, C
The temperature gradesare A (the highest), B, and C,representing the tire's resistanceto the generation of heat and itsability to dissipate heat when
tested under controlledconditions on a specified indoorlaboratory test wheel. Sustainedhigh temperature can cause thematerial of the tire to degenerateand reduce tire life, andexcessive temperature can leadto sudden tire failure. The gradeC corresponds to a level ofperformance which allpassenger car tires must meetunder the Federal Motor SafetyStandard No. 109. Grades B andA represent higher levels ofperformance on the laboratorytest wheel than the minimumrequired by law. Warning: Thetemperature grade for this tireis established for a tire that isproperly inflated and notoverloaded. Excessive speed,underinflation, or excessiveloading, either separately or incombination, can cause heatbuildup and possible tire failure.
Wheel Alignment and TireBalanceThe tires and wheels were alignedand balanced at the factory toprovide the longest tire life and bestoverall performance. Adjustments towheel alignment and tire balancingwill not be necessary on a regularbasis. However, check thealignment if there is unusual tirewear or if the vehicle is pulling toone side or the other. If the vehiclevibrates when driving on a smoothroad, the tires and wheels mightneed to be rebalanced. See yourdealer for proper diagnosis.
Black plate (78,1)Chevrolet Corvette Owner Manual - 2011
10-78 Vehicle Care
Wheel ReplacementReplace any wheel that is bent,cracked, or badly rusted orcorroded. If wheel nuts keep comingloose, the wheel, wheel bolts, andwheel nuts should be replaced.If the wheel leaks air, replace it(except some aluminum wheels,which can sometimes be repaired).See your dealer if any of theseconditions exist.
Your dealer will know the kind ofwheel you need.
Each new wheel should havethe same load-carrying capacity,diameter, width, offset, and bemounted the same way as the oneit replaces.
If you need to replace any of yourwheels, wheel bolts or wheel nuts,replace them only with new GMoriginal equipment parts. This way,you will be sure to have the rightwheel, wheel bolts, and wheel nutsfor your vehicle.
{ WARNING
Using the wrong replacementwheels, wheel bolts, or wheelnuts can be dangerous. It couldaffect the braking and handlingof the vehicle. Tires can lose air,and cause loss of control, causinga crash. Always use the correctwheel, wheel bolts, and wheelnuts for replacement.
{ WARNING
Replacing a wheel with a usedone is dangerous. How it hasbeen used or how far it has beendriven may be unknown. It couldfail suddenly and cause a crash.When replacing wheels, use anew GM original equipmentwheel.
Notice: The wrong wheel canalso cause problems withbearing life, brake cooling,speedometer or odometercalibration, headlamp aim,bumper height, vehicle groundclearance, and tire clearance tothe body and chassis.
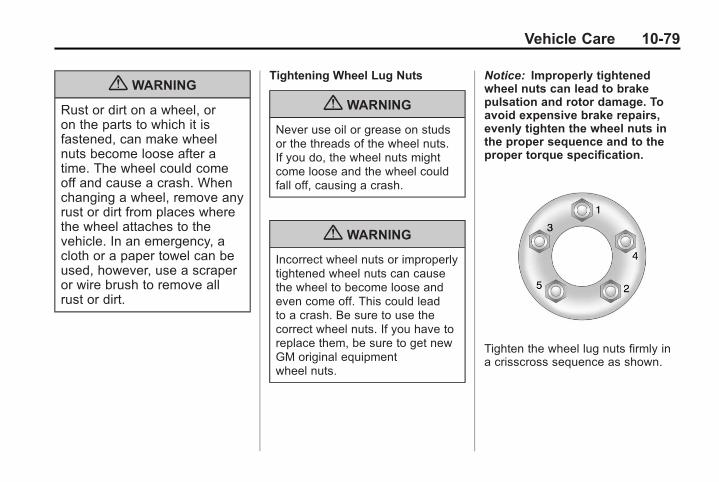
Black plate (79,1)Chevrolet Corvette Owner Manual - 2011
Vehicle Care 10-79
{ WARNING
Rust or dirt on a wheel, oron the parts to which it isfastened, can make wheelnuts become loose after atime. The wheel could comeoff and cause a crash. Whenchanging a wheel, remove anyrust or dirt from places wherethe wheel attaches to thevehicle. In an emergency, acloth or a paper towel can beused, however, use a scraperor wire brush to remove allrust or dirt.
Tightening Wheel Lug Nuts
{ WARNING
Never use oil or grease on studsor the threads of the wheel nuts.If you do, the wheel nuts mightcome loose and the wheel couldfall off, causing a crash.
{ WARNING
Incorrect wheel nuts or improperlytightened wheel nuts can causethe wheel to become loose andeven come off. This could leadto a crash. Be sure to use thecorrect wheel nuts. If you have toreplace them, be sure to get newGM original equipmentwheel nuts.
Notice: Improperly tightenedwheel nuts can lead to brakepulsation and rotor damage. Toavoid expensive brake repairs,evenly tighten the wheel nuts inthe proper sequence and to theproper torque specification.
Tighten the wheel lug nuts firmly ina crisscross sequence as shown.

Black plate (80,1)Chevrolet Corvette Owner Manual - 2011
10-80 Vehicle Care
Tire Chains
{ WARNING
Do not use tire chains. There isnot enough clearance. Tire chainsused on a vehicle without theproper amount of clearance cancause damage to the brakes,suspension, or other vehicleparts. The area damaged by thetire chains could cause you tolose control of the vehicle andyou or others may be injured ina crash. Use another type oftraction device only if its
(Continued)
WARNING (Continued)
manufacturer recommends it foruse on the vehicle and tire sizecombination and road conditions.Follow that manufacturer'sinstructions. To help avoiddamage to the vehicle, driveslowly, re‐adjust or remove thedevice if it is contacting thevehicle, and do not spin thewheels. If you do find tractiondevices that will fit, install themon the rear tires.
If a Tire Goes FlatIt is unusual for a tire to blow outwhile you are driving, especially ifyou maintain the tires properly. Ifair goes out of a tire, it is muchmore likely to leak out slowly. SeeTires on page 10‑58 for additionalinformation. But if you should everhave a blowout, here are a few tipsabout what to expect and whatto do:
If a front tire fails, the flat tirecreates a drag that pulls the vehicletoward that side. Take your foot offthe accelerator pedal and grip thesteering wheel firmly. Steer tomaintain lane position, and thengently brake to a stop, well off theroad, if possible.
Black plate (81,1)Chevrolet Corvette Owner Manual - 2011
Vehicle Care 10-81
A rear blowout, particularly on acurve, acts much like a skid andmay require the same correctionyou would use in a skid. In any rearblowout remove your foot from theaccelerator pedal. Get the vehicleunder control by steering the wayyou want the vehicle to go. It maybe very bumpy and noisy, but youcan still steer. Gently brake to astop, well off the road, if possible.
The vehicle has no spare tire, notire changing equipment, and noplace to store a tire.
The vehicle, when new, had run-flattires. This type of tire can operateeffectively with no air pressure, soyou will not need to stop on theside of the road to change a flat tire.You can just keep on driving. Theshorter the distance you drive andthe slower the speed, the greaterthe chance that the run-flat tire willnot have to be replaced. Run-flattires perform so well without any airthat a Tire Pressure Monitor System(TPMS) is used to alert you if a tirehas lost pressure. See Run-FlatTires on page 10‑59 and TirePressure Monitor System onpage 10‑68.
{ WARNING
Special tools and proceduresare required to service a run-flattire. If these special tools andprocedures are not used you orothers could be injured and thevehicle could be damaged.Always be sure the proper toolsand procedures, as described inthe service manual, are used.
To order a service manual, seeService Publications OrderingInformation on page 13‑15.
Black plate (82,1)Chevrolet Corvette Owner Manual - 2011
10-82 Vehicle Care
Jump StartingFor more information about thevehicle battery, see Battery onpage 10‑43.
If your battery has run down, youmay want to use another vehicleand some jumper cables to startyour vehicle. Be sure to use thefollowing steps to do it safely.
{ WARNING
Batteries can hurt you. They canbe dangerous because:
. They contain acid that canburn you.
. They contain gas that canexplode or ignite.
. They contain enoughelectricity to burn you.
If you do not follow these stepsexactly, some or all of thesethings can hurt you.
Notice: If you try to start yourvehicle by pushing or pulling it,you could damage your vehicle.Do not push or pull your vehicleto start it; instead, use the jumpstarting procedure in this manualto start your vehicle when thebattery has run down.
1. Check the other vehicle. It musthave a 12-volt battery with anegative ground system.
Notice: Only use a vehicle thathas a 12-volt system with anegative ground for jumpstarting. If the other vehicle doesnot have a 12-volt system with anegative ground, both vehiclescan be damaged.
2. Get the vehicles close enoughso the jumper cables can reach,but be sure the vehicles are nottouching each other. If theyare, it could cause a groundconnection you do not want. Youwould not be able to start your
vehicle, and the bad groundingcould damage the electricalsystems.
To avoid the possibility of thevehicles rolling, set the parkingbrake firmly on both vehiclesinvolved in the jump startprocedure. Put an automatictransmission in P (Park) or amanual transmission in Neutralbefore setting the parkingbrakes.
Notice: If the radio or otheraccessories are left on during thejump starting procedure, theycould be damaged. The repairswould not be covered by thewarranty. Always turn off theradio and other accessories whenjump starting the vehicle.
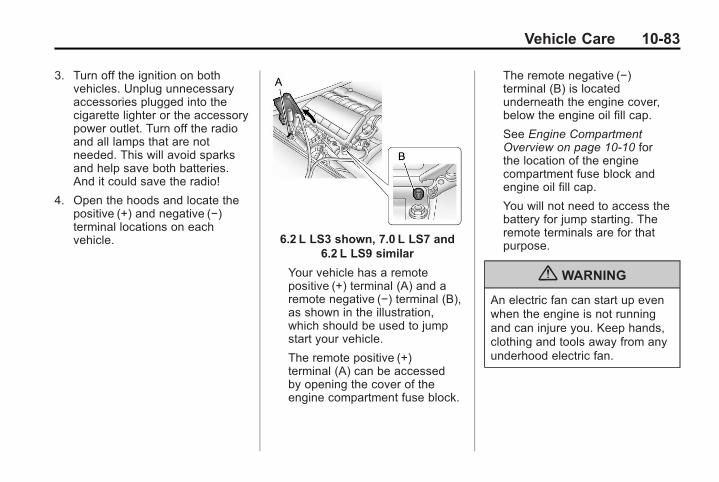
Black plate (83,1)Chevrolet Corvette Owner Manual - 2011
Vehicle Care 10-83
3. Turn off the ignition on bothvehicles. Unplug unnecessaryaccessories plugged into thecigarette lighter or the accessorypower outlet. Turn off the radioand all lamps that are notneeded. This will avoid sparksand help save both batteries.And it could save the radio!
4. Open the hoods and locate thepositive (+) and negative (−)terminal locations on eachvehicle. 6.2 L LS3 shown, 7.0 L LS7 and
6.2 L LS9 similar
Your vehicle has a remotepositive (+) terminal (A) and aremote negative (−) terminal (B),as shown in the illustration,which should be used to jumpstart your vehicle.
The remote positive (+)terminal (A) can be accessedby opening the cover of theengine compartment fuse block.
The remote negative (−)terminal (B) is locatedunderneath the engine cover,below the engine oil fill cap.
See Engine CompartmentOverview on page 10‑10 forthe location of the enginecompartment fuse block andengine oil fill cap.
You will not need to access thebattery for jump starting. Theremote terminals are for thatpurpose.
{ WARNING
An electric fan can start up evenwhen the engine is not runningand can injure you. Keep hands,clothing and tools away from anyunderhood electric fan.
Black plate (84,1)Chevrolet Corvette Owner Manual - 2011
10-84 Vehicle Care
{ WARNING
Using an open flame near abattery can cause battery gas toexplode. People have been hurtdoing this, and some have beenblinded. Use a flashlight if youneed more light.
Be sure the battery has enoughwater. You do not need to addwater to the battery installed inyour new vehicle. But if a batteryhas filler caps, be sure the rightamount of fluid is there. If it is low,add water to take care of thatfirst. If you do not, explosive gascould be present.
Battery fluid contains acid thatcan burn you. Do not get it onyou. If you accidentally get it inyour eyes or on your skin, flushthe place with water and getmedical help immediately.
{ WARNING
Fans or other moving engineparts can injure you badly. Keepyour hands away from movingparts once the engine is running.
5. Check that the jumper cables donot have loose or missinginsulation. If they do, you couldget a shock. The vehicles couldbe damaged too.
Before you connect the cables,here are some basic things youshould know. Positive (+) will goto positive (+) or to a remotepositive (+) terminal if the vehiclehas one. Negative (−) will go to aheavy, unpainted metal enginepart or to a remote negative (−)terminal if the vehicle has one.
Do not connect positive (+) tonegative (−) or you will get ashort that would damage thebattery and maybe other parts
too. And do not connect thenegative (−) cable to thenegative (−) terminal on the deadbattery because this can causesparks.
6. Connect the red positive (+)cable to the positive (+) terminalof the dead battery. Use aremote positive (+) terminal ifthe vehicle has one.
7. Do not let the other end touchmetal. Connect it to thepositive (+) terminal of thegood battery. Use a remotepositive (+) terminal if the vehiclehas one.
8. Now connect the blacknegative (−) cable to thenegative (−) terminal of thegood battery. Use a remotenegative (−) terminal if thevehicle has one.
Do not let the other end touchanything until the next step. Theother end of the negative (−)cable does not go to the dead
Black plate (85,1)Chevrolet Corvette Owner Manual - 2011
Vehicle Care 10-85
battery. It goes to a heavy,unpainted metal engine part orto a remote negative (−) terminalon the vehicle with the deadbattery.
9. Connect the other end of thenegative (−) cable at least 45 cm(18 inches) away from the deadbattery, but not near engineparts that move. The electricalconnection is just as good there,and the chance of sparks gettingback to the battery is much less.
Your vehicle has a remotenegative (−) terminal for thispurpose.
10. Now start the vehicle with thegood battery and run theengine for a while.
11. Try to start the vehicle thathad the dead battery. If it willnot start after a few tries, itprobably needs service.
Notice: If the jumper cables areconnected or removed in thewrong order, electrical shortingmay occur and damage thevehicle. The repairs would not becovered by the vehicle warranty.Always connect and remove thejumper cables in the correctorder, making sure that thecables do not touch each otheror other metal.
Jumper Cable Removal
A. Heavy, Unpainted Metal EnginePart or Remote Negative (−)Terminal
B. Good Battery or RemotePositive (+) and Negative (−)Terminals
C. Dead Battery or RemotePositive (+) Terminal
Black plate (86,1)Chevrolet Corvette Owner Manual - 2011
10-86 Vehicle Care
To disconnect the jumper cablesfrom both vehicles, do the following:
1. Disconnect the blacknegative (−) cable from thevehicle that had the deadbattery.
2. Disconnect the blacknegative (−) cable from thevehicle with the good battery.
3. Disconnect the red positive (+)cable from the vehicle with thegood battery.
4. Disconnect the red positive (+)cable from the other vehicle.
5. Return the engine fuse blockcover to its original position.
6. You may also need to initializethe power windows. See “PowerWindow Initialize” under PowerWindows on page 2‑18 for moreinformation.
Towing
Towing the VehicleNotice: To avoid damage,the disabled vehicle should betowed with all four wheels offthe ground. Care must be takenwith vehicles that have lowground clearance and/or specialequipment. Always flatbed on acar carrier.
Consult your dealer or aprofessional towing service if thedisabled vehicle must be towed.See Roadside Assistance Program(U.S. and Canada) on page 13‑8 orRoadside Assistance Program(Mexico) on page 13‑10.
Recreational VehicleTowingNotice: Dolly towing or dinghytowing the vehicle may causedamage because of reducedground clearance. Always putthe vehicle on a flatbed truck ortrailer.
The vehicle was neither designednor intended to be towed with anyof its wheels on the ground. If thevehicle must be towed, see Towingthe Vehicle on page 10‑86.
Black plate (87,1)Chevrolet Corvette Owner Manual - 2011
Vehicle Care 10-87
Appearance Care
Exterior CareSilicone grease on weatherstrips willmake them last longer, seal better,and not stick or squeak. Applysilicone grease with a clean cloth.During very cold, damp weatherfrequent application may berequired. See Recommended Fluidsand Lubricants on page 11‑6.
Washing the Vehicle
The best way to preserve thevehicle's finish is to keep it clean bywashing it often.
Notice: Certain cleaners containchemicals that can damage theemblems or nameplates on thevehicle. Check the cleaningproduct label. If it states that itshould not be used on plasticparts, do not use it on the vehicleor damage may occur and itwould not be covered by thewarranty.
Do not wash the vehicle in directsunlight. Use a car washing soap.Do not use cleaning agents that arepetroleum based or that containacid or abrasives, as they candamage the paint, metal or plasticon the vehicle. Approved cleaningproducts can be obtained from yourdealer. Follow all manufacturers'directions regarding correct productusage, necessary safetyprecautions and appropriatedisposal of any vehicle careproduct.
Rinse the vehicle well, beforewashing and after to remove allcleaning agents completely. If theyare allowed to dry on the surface,they could stain.
Dry the finish with a soft, cleanchamois or an all-cotton towel toavoid surface scratches and waterspotting.
Notice: If you drive the vehiclethrough an automatic car washthat does not have enoughclearance for the wide rear tiresand wheels, you could damagethe vehicle. Verify with themanager of the car wash that thevehicle will fit before entering thecar wash or use a touchlesscar wash.
High pressure car washes maycause water to enter the vehicle.Avoid using high pressure washescloser than 30 cm (12 in) to thesurface of the vehicle. Use of powerwashers exceeding 8 274 kPa(1,200 psi) can result in damage orremoval of paint and decals.
Cleaning Exterior Lamps/Lenses
Use only lukewarm or cold water,a soft cloth and a car washing soapto clean exterior lamps and lenses.Follow instructions under “Washingthe Vehicle”.
Black plate (88,1)Chevrolet Corvette Owner Manual - 2011
10-88 Vehicle Care
Finish Care
Occasional waxing or mild polishingof the vehicle by hand may benecessary to remove residue fromthe paint finish. Approved cleaningproducts can be obtained from yourdealer.
If the vehicle has a basecoat/clearcoat paint finish, the clearcoatgives more depth and gloss tothe colored basecoat. Alwaysuse waxes and polishes that arenon-abrasive and made for abasecoat/clearcoat paint finish.
Notice: Machine compoundingor aggressive polishing on abasecoat/clearcoat paint finishmay damage it. Use onlynon-abrasive waxes and polishesthat are made for a basecoat/clearcoat paint finish on thevehicle.
Foreign materials such as calciumchloride and other salts, ice meltingagents, road oil and tar, tree sap,bird droppings, chemicals fromindustrial chimneys, etc., candamage the vehicle's finish if theyremain on painted surfaces. Washthe vehicle as soon as possible.If necessary, use non-abrasivecleaners that are marked safe forpainted surfaces to remove foreignmatter.
Exterior painted surfaces aresubject to aging, weather andchemical fallout that can take theirtoll over a period of years. To helpkeep the paint finish looking new,keep the vehicle garaged orcovered whenever possible.
Protecting Exterior Bright MetalParts
Bright metal parts should becleaned regularly to keep theirluster. Washing with water is all thatis usually needed. However, chromepolish may be used on chrome orstainless steel trim, if necessary.
Use special care with aluminumtrim. To avoid damaging protectivetrim, never use auto or chromepolish, steam or caustic soap toclean aluminum. A coating of wax,rubbed to high polish, isrecommended for all bright metalparts.
ZR1 Carbon Fiber Panels
Carbon fiber panels can be washedand waxed like any other panels.
Use a clear or black pigmented waxon the inner hood carbon fiberpanel.
Black plate (89,1)Chevrolet Corvette Owner Manual - 2011
Vehicle Care 10-89
ZR1 Hood Window
The hood window on the ZR1 canbe cleaned in the same manner asthe headlamp lenses. See “CleaningExterior Lamps/Lenses” for moreinformation.
Windshield and Wiper Blades
Clean the outside of the windshieldwith glass cleaner.
Clean the rubber blades usinga lint free cloth or paper towelsoaked with windshield washerfluid or a mild detergent. Washthe windshield thoroughly whencleaning the blades. Bugs, roadgrime, sap and a buildup of vehiclewash/wax treatments may causewiper streaking. Replace the wiperblades if they are worn or damaged.
Wipers can be damaged by:. Extreme dusty conditions. Sand and salt. Heat and sun. Snow and ice, without proper
removal
Tires
To clean the tires, use a stiff brushwith tire cleaner.
Notice: Using petroleum-basedtire dressing products on thevehicle may damage the paintfinish and/or tires. When applyinga tire dressing, always wipe offany overspray from all paintedsurfaces on the vehicle.
Finish Damage
Any stone chips, fractures or deepscratches in the finish should berepaired right away. Bare metal willcorrode quickly and may developinto major repair expense.
Minor chips and scratches can berepaired with touch-up materialsavailable from your dealer. Largerareas of finish damage can becorrected in your dealer's body andpaint shop.
Chemicals used for ice and snowremoval and dust control can collecton the underbody. If these are notremoved, corrosion and rust candevelop on the underbody partssuch as fuel lines, frame, floor pan,and exhaust system even thoughthey have corrosion protection.
At least every spring, flush thesematerials from the underbody withplain water. Clean any areas where
Black plate (90,1)Chevrolet Corvette Owner Manual - 2011
10-90 Vehicle Care
mud and debris can collect. Dirtpacked in close areas of theframe should be loosened beforebeing flushed. Your dealer or anunderbody car washing systemcan do this.
Underbody Maintenance
Chemicals used for ice and snowremoval and dust control can collecton the underbody. If these are notremoved, corrosion and rust candevelop on the underbody partssuch as fuel lines, frame, floor pan,and exhaust system even thoughthey have corrosion protection.
At least every spring, flush thesematerials from the underbodywith plain water. Clean any areaswhere mud and debris can collect.Dirt packed in close areas of theframe should be loosened beforebeing flushed. Your dealer or anunderbody car washing systemcan do this.
Fiberglass Springs (CompositeSprings)
Notice: If you use acidic orcorrosive cleaning products,engine degreasers or aluminumcleaning agents on fiberglasssprings, you may damage thesprings. The repairs would not becovered by your warranty. Useonly approved cleaners whencleaning your vehicle's fiberglasssprings.
Chemical Paint Spotting
Some weather and atmosphericconditions can create a chemicalfallout. Airborne pollutants can fallupon and attack painted surfaces onthe vehicle. This damage can taketwo forms: blotchy, ring-shapeddiscolorations, and small, irregulardark spots etched into the paintsurface.
Although no defect in the paint jobcauses this, we will repair, at nocharge to the owner, the surfacesof new vehicles damaged by thisfallout condition within 12 monthsor 20 000 km (12,000miles) ofpurchase, whichever occurs first.
Interior CareThe interior will continue to look itsbest if it is cleaned often. Althoughnot always visible, dust and dirt canaccumulate on the upholstery. Dirtcan damage carpet, fabric, leather,and plastic surfaces. Regularvacuuming is recommended toremove particles from theupholstery. It is important to keepthe upholstery from becoming andremaining heavily soiled. Soilsshould be removed as quickly aspossible. The interior mayexperience extremes of heat thatcould cause stains to set rapidly.
Black plate (91,1)Chevrolet Corvette Owner Manual - 2011
Vehicle Care 10-91
Lighter colored interiors may requiremore frequent cleaning. Use carebecause newspapers and garmentsthat transfer color to homefurnishings may also transfer colorto the interior.
When cleaning the interior, onlyuse cleaners specifically designedfor the surfaces being cleaned.Permanent damage may resultfrom using cleaners on surfacesfor which they were not intended.Use glass cleaner only on glass.Remove any accidental over-sprayfrom other surfaces immediately. Toprevent over-spray, apply cleanerdirectly to the cleaning cloth.
Notice: Using abrasive cleanerswhen cleaning glass surfaceson the vehicle, could scratch theglass and/or cause damage tothe rear window defogger. Whencleaning the glass on the vehicle,use only a soft cloth and glasscleaner.
Many cleaners contain solvents thatmay become concentrated in thebreathing space. Before usingcleaners, read and adhere to allsafety instructions on the label.While cleaning the interior, maintainadequate ventilation by opening thedoors and windows.
Dust may be removed from smallbuttons and knobs using a smallbrush with soft bristles.
Products that remove odors fromthe upholstery and clean the glasscan be obtained from your dealer.
Do not clean the vehicle using:. A knife or any other sharp object
to remove a soil from any interiorsurface.
. A stiff brush. It can causedamage to the interior surfaces.
. Heavy pressure or aggressiverubbing with a cleaning cloth.Use of heavy pressure candamage the interior and doesnot improve the effectiveness ofsoil removal.
. Laundry detergents ordishwashing soaps withdegreasers can leave residuethat streaks and attracts dirt. Forliquid cleaners, about 20 dropsper gallon (3.78 L) of water is agood guide. Use only mild,neutral-pH soaps.
. Too much cleaner that saturatesthe upholstery.
. Cleaners that contain solventscan damage the interior.
Black plate (92,1)Chevrolet Corvette Owner Manual - 2011
10-92 Vehicle Care
Fabric/Carpet
Use a vacuum cleaner with asoft brush attachment frequentlyto remove dust and loose dirt.A canister vacuum with a beater barin the nozzle may only be used onfloor carpet and carpeted floor mats.For any soil, always try to remove itfirst with plain water or club soda.Before cleaning, gently remove asmuch of the soil as possible usingone of the following techniques:. For liquids: gently blot the
remaining soil with a papertowel. Allow the soil to absorbinto the paper towel until nomore can be removed.
. For solid dry soils: remove asmuch as possible and thenvacuum.
To clean:
1. Saturate a lint-free, clean whitecloth with water or club soda.
2. Wring the cloth to removeexcess moisture.
3. Start on the outside edge of thesoil and gently rub toward thecenter. Continue cleaning, usinga clean area of the cloth eachtime it becomes soiled.
4. Continue to gently rub the soiledarea until the cleaning clothremains clean.
5. If the soil is not completelyremoved, use a mild soapsolution and repeat the cleaningprocess that was used with plainwater.
If any of the soil remains, acommercial fabric cleaner or spotlifter may be necessary. When acommercial upholstery cleaner orspot lifter is to be used, test a smallhidden area for colorfastness first.If the locally cleaned area gives anyimpression that a ring formation mayresult, clean the entire surface.
After the cleaning process has beencompleted, a paper towel can beused to blot excess moisture fromthe fabric or carpet.

Black plate (93,1)Chevrolet Corvette Owner Manual - 2011
Vehicle Care 10-93
Coated Moldings
These moldings are around thehatch opening in the rear area.. When lightly soiled, wipe with a
sponge or soft lint-free clothdampened with water.
. When heavily soiled, use warmsoapy water.
Leather
Leather, and lighter colored leatherin particular, will need more frequentcleaning to prevent the buildup ofdust, dirt, and colors transferredfrom other items so that these donot become permanent stains.
To remove dust, a soft clothdampened with water can be used.If a more thorough cleaning isnecessary, a soft cloth dampenedwith a mild soap solution can beused. Your dealer has a GMapproved leather cleaner availablethat provides superior cleaningperformance when used regularlyon finished automotive leathers.Allow the leather to dry naturally. Donot use heat, steam, spot lifters orspot removers, or shoe polish onleather. Many commercial leathercleaners and coatings that aresold to preserve and protect leathermay permanently change the
appearance and feel of the leatherand are not recommended. Do notuse silicone or wax-based products,or those containing organic solventsto clean the interior because theycan alter the appearance byincreasing the gloss in anon-uniform manner.
Instrument Panel, Vinyl andother Plastic Surfaces
A soft cloth dampened withwater may be used to removedust. If a more thorough cleaningis necessary, a clean soft clothdampened with a mild soap solutioncan be used to gently remove dustand dirt. Never use spot lifters orremovers on plastic surfaces. Many
Black plate (94,1)Chevrolet Corvette Owner Manual - 2011
10-94 Vehicle Care
commercial cleaners and coatingsthat are sold to preserve and protectsoft plastic surfaces maypermanently change theappearance and feel of the interiorand are not recommended. Do notuse silicone or wax-based products,or those containing organic solventsto clean the interior because theycan alter the appearance byincreasing the gloss in anon-uniform manner.
Some commercial products mayincrease gloss on the instrumentpanel. The increase in gloss maycause annoying reflections in thewindshield and even make it difficultto see through the windshield undercertain conditions.
Notice: Air fresheners containsolvents that may cause damageto plastics and painted surfaces.Follow the manufacturer’sinstructions when using airfresheners in the vehicle. If airfreshener comes in contact withpaint or a plastic surface, blotimmediately with a soft cloth.Damage caused by using airfresheners would not be coveredby the vehicle warranty.
Cargo Cover andConvenience Net
Wash with warm water and milddetergent, rinse with cold water andtumble dry on low. Do not usechlorine bleach.
Care of Safety Belts
Keep belts clean and dry.
{ WARNING
Do not bleach or dye safetybelts. It may severely weakenthem. In a crash, they might notbe able to provide adequateprotection. Clean safety beltsonly with mild soap and lukewarmwater.
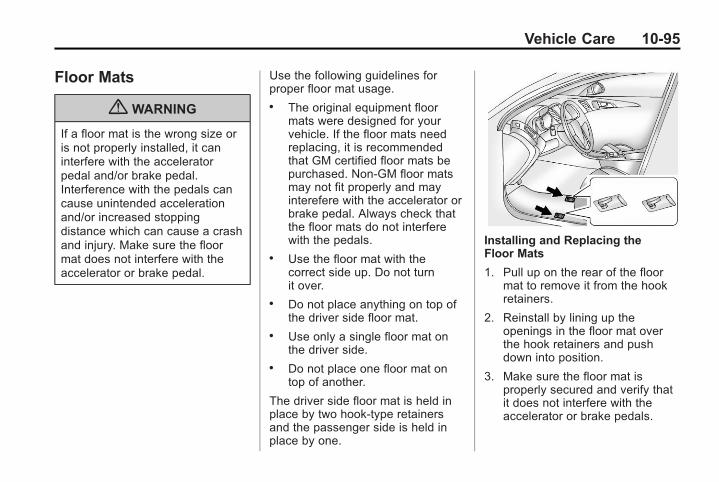
Black plate (95,1)Chevrolet Corvette Owner Manual - 2011
Vehicle Care 10-95
Floor Mats
{ WARNING
If a floor mat is the wrong size oris not properly installed, it caninterfere with the acceleratorpedal and/or brake pedal.Interference with the pedals cancause unintended accelerationand/or increased stoppingdistance which can cause a crashand injury. Make sure the floormat does not interfere with theaccelerator or brake pedal.
Use the following guidelines forproper floor mat usage.. The original equipment floor
mats were designed for yourvehicle. If the floor mats needreplacing, it is recommendedthat GM certified floor mats bepurchased. Non-GM floor matsmay not fit properly and mayinterefere with the accelerator orbrake pedal. Always check thatthe floor mats do not interferewith the pedals.
. Use the floor mat with thecorrect side up. Do not turnit over.
. Do not place anything on top ofthe driver side floor mat.
. Use only a single floor mat onthe driver side.
. Do not place one floor mat ontop of another.
The driver side floor mat is held inplace by two hook-type retainersand the passenger side is held inplace by one.
Installing and Replacing theFloor Mats
1. Pull up on the rear of the floormat to remove it from the hookretainers.
2. Reinstall by lining up theopenings in the floor mat overthe hook retainers and pushdown into position.
3. Make sure the floor mat isproperly secured and verify thatit does not interfere with theaccelerator or brake pedals.
Black plate (96,1)Chevrolet Corvette Owner Manual - 2011
10-96 Vehicle Care
2 NOTES
Black plate (1,1)Chevrolet Corvette Owner Manual - 2011
Service and Maintenance 11-1
Service andMaintenance
General InformationGeneral Information . . . . . . . . . . 11-1
Scheduled MaintenanceScheduled Maintenance . . . . . 11-2
Recommended Fluids,Lubricants, and PartsRecommended Fluids andLubricants . . . . . . . . . . . . . . . . . . 11-6
Maintenance ReplacementParts . . . . . . . . . . . . . . . . . . . . . . . 11-8
Maintenance RecordsMaintenance Records . . . . . . . . 11-9
General InformationNotice: Maintenance intervals,checks, inspections,recommended fluids, andlubricants are necessary to keepthis vehicle in good workingcondition. Damage caused byfailure to follow scheduledmaintenance might not becovered by the vehicle warranty.
As the vehicle owner, you areresponsible for the scheduledmaintenance in this section. Werecommend having your dealerperform these services. Propervehicle maintenance helps tokeep the vehicle in good workingcondition, improves fuel economy,and reduces vehicle emissions forbetter air quality.
Because of all the different wayspeople use vehicles, maintenanceneeds vary. The vehicle might needmore frequent checks and services.Please read the information underScheduled Maintenance. To keepthe vehicle in good condition, seeyour dealer.
The maintenance schedule is forvehicles that:. Carry passengers and cargo
within recommended limits onthe Tire and Loading Informationlabel. See Vehicle Load Limitson page 9‑14.
. Are driven on reasonable roadsurfaces within legal drivinglimits.
. Use the recommended fuel. SeeRecommended Fuel onpage 9‑49.
Black plate (2,1)Chevrolet Corvette Owner Manual - 2011
11-2 Service and Maintenance
{ WARNING
Performing maintenance work canbe dangerous. Some jobs cancause serious injury. Performmaintenance work only if youhave the required know-how andthe proper tools and equipment.If in doubt, see your dealer tohave a qualified technician do thework. See Doing Your OwnService Work on page 10‑8.
At your dealer, you can becertain that you will receive thehighest level of service available.Your dealer has specially trainedservice technicians, uses genuinereplacement parts, as well as,up‐to‐date tools and equipmentto ensure fast and accuratediagnostics.
The proper replacement parts,fluids, and lubricants to use arelisted in Recommended Fluids andLubricants on page 11‑6 andMaintenance Replacement Parts onpage 11‑8. We recommend the useof genuine parts from your dealer.
ScheduledMaintenanceWhen the Change Engine OilMessage Displays
Change engine oil and filter. SeeEngine Oil on page 10‑15. AnEmission Control Service.
When the CHANGE OIL SOONmessage displays, service isrequired for the vehicle as soonas possible, within the next1 000 km/600 miles. If drivingunder the best conditions, theengine oil life system might notindicate the need for vehicle servicefor more than a year. The engine oiland filter must be changed at leastonce a year and the oil life systemmust be reset. Your dealer has
Black plate (3,1)Chevrolet Corvette Owner Manual - 2011
Service and Maintenance 11-3
trained service technicians who willperform this work and reset thesystem. If the engine oil life systemis reset accidentally, service thevehicle within 5 000 km/3,000 milessince the last service. Reset the oillife system whenever the oil ischanged. See Engine Oil LifeSystem on page 10‑22.
Every Engine Oil Change. Change engine oil and filter.
Reset oil life system. SeeEngine Oil on page 10‑15 andEngine Oil Life System onpage 10‑22. An EmissionControl Service.
. Engine coolant level check. SeeEngine Coolant on page 10‑29.
. Engine cooling systeminspection. Visual inspectionof hoses, pipes, fittings, andclamps and replacement,if needed.
. Windshield washer fluid levelcheck. See Washer Fluid onpage 10‑37.
. Windshield wiper bladeinspection for wear, cracking,or contamination and windshieldand wiper blade cleaning,if contaminated. See ExteriorCare on page 10‑87. Wornor damaged wiper bladereplacement. See Wiper BladeReplacement on page 10‑46.
. Tire inflation pressures check.See Tire Pressure onpage 10‑66.
. Tire wear inspection. See TireInspection on page 10‑72.
. Fluids visual leak check (orevery 12 months, whicheveroccurs first). A leak in anysystem must be repaired andthe fluid level checked.
. Engine air cleaner filterinspection. See Engine AirCleaner/Filter on page 10‑24.
. Brake system inspection (orevery 12 months, whicheveroccurs first).
. Steering and suspensioninspection. Visual inspectionfor damaged, loose, or missingparts or signs of wear.
. Body hinges and latches,key lock cylinders, anyfolding seat hardware, andrear compartment, hood, andconsole door hinges and latcheslubrication. See RecommendedFluids and Lubricants onpage 11‑6. More frequentlubrication may be requiredwhen the vehicle is exposed to acorrosive environment. Applyingsilicone grease on weatherstripswith a clean cloth makes themlast longer, seal better, and notstick or squeak.
. Restraint system componentcheck. See Safety SystemCheck on page 3‑21.
Black plate (4,1)Chevrolet Corvette Owner Manual - 2011
11-4 Service and Maintenance
. Fuel system inspection fordamage or leaks.
. Exhaust system and nearby heatshields inspection for loose ordamaged components.
Additional Required Services
At Each Fuel Stop. Engine oil level check. See
Engine Oil on page 10‑15.. Engine coolant level check. See
Engine Coolant on page 10‑29.. Windshield washer fluid level
check. See Washer Fluid onpage 10‑37.
Once a Month. Tire inflation check. See Tire
Pressure on page 10‑66.. Tire wear inspection. See Tire
Inspection on page 10‑72 andTire Rotation on page 10‑72.
Once a Year. See Starter Switch Check on
page 10‑44.. See Automatic Transmission
Shift Lock Control FunctionCheck on page 10‑45.
. See Park Brake and P (Park)Mechanism Check onpage 10‑45.
. Accelerator pedal check fordamage, high effort, or binding.Replace if needed.
. Underbody flushing service.
. Hood/Decklid/Liftgate/LiftglassSupport Gas Strut Service:Visually inspect gas strut,if equipped, for signs of wear,cracks, or other damage. Checkthe hold open ability of the gasstrut. Contact your dealer ifservice is required.
Once Every Two Years. Clutch hydraulic system drain,
flush, and refill. Service at aregular service interval everytwo years. This service canbe complex; have your dealerperform this service. SeeHydraulic Clutch on page 10‑24.
First Engine Oil Change AfterEvery 40 000 km/25,000Miles. Passenger compartment air
filter replacement (or every24 months, whichever occursfirst). More frequent replacementmay be needed if you drive inareas with heavy traffic, areaswith poor air quality, or areaswith high dust levels.Replacement may also beneeded if you notice reducedair flow, windows fogging up,or odors. Your dealer can helpyou determine when it is theright time to replace the filter.
Black plate (5,1)Chevrolet Corvette Owner Manual - 2011
Service and Maintenance 11-5
. ZR1 Only: Engine air cleanerfilter replacement. See EngineAir Cleaner/Filter on page 10‑24.
First Engine Oil Change AfterEvery 80 000 km/50,000Miles. Engine air cleaner filter
replacement. See Engine AirCleaner/Filter on page 10‑24.
. Automatic transmission fluidchange (severe service) forvehicles mainly driven in heavycity traffic in hot weather, inhilly or mountainous terrain,when frequently towing atrailer, or used for taxi, police,or delivery service. SeeAutomatic Transmission Fluid onpage 10‑23.
. Evaporative control systeminspection. Check all fuel andvapor lines and hoses for properhook‐up, routing, and condition.
Check that the purge valve,if the vehicle has one, worksproperly. Replace as needed. AnEmission Control Service. TheU.S. Environmental ProtectionAgency or the California AirResources Board hasdetermined that the failure toperform this maintenance itemwill not nullify the emissionwarranty or limit recall liabilityprior to the completion of thevehicle's useful life. We,however, urge that allrecommended maintenanceservices be performed at theindicated intervals and themaintenance be recorded.
First Engine Oil Change AfterEvery 160 000 km/100,000Miles. Automatic transmission fluid
change (normal service). SeeAutomatic Transmission Fluid onpage 10‑23.
. Spark plug replacement andspark plug wires inspection. AnEmission Control Service.
First Engine Oil Change AfterEvery 240 000 km/150,000Miles. Engine cooling system drain,
flush, and refill (or every fiveyears, whichever occurs first).See Engine Coolant onpage 10‑29. An EmissionControl Service.
. ZR1 Only: Intercooler systemdrain, flush, and refill (or everyfive years, whichever occursfirst). See Engine Coolant onpage 10‑29.
. Engine drive belts inspectionfor fraying, excessive cracks,or obvious damage (or every10 years, whichever occursfirst). Replace, if needed.
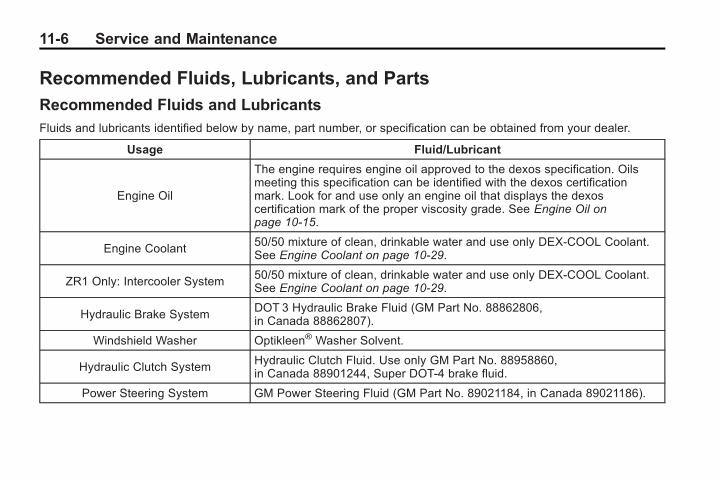
Black plate (6,1)Chevrolet Corvette Owner Manual - 2011
11-6 Service and Maintenance
Recommended Fluids, Lubricants, and Parts
Recommended Fluids and LubricantsFluids and lubricants identified below by name, part number, or specification can be obtained from your dealer.
Usage Fluid/Lubricant
Engine Oil
The engine requires engine oil approved to the dexos specification. Oilsmeeting this specification can be identified with the dexos certificationmark. Look for and use only an engine oil that displays the dexoscertification mark of the proper viscosity grade. See Engine Oil onpage 10‑15.
Engine Coolant50/50 mixture of clean, drinkable water and use only DEX-COOL Coolant.See Engine Coolant on page 10‑29.
ZR1 Only: Intercooler System 50/50 mixture of clean, drinkable water and use only DEX-COOL Coolant.See Engine Coolant on page 10‑29.
Hydraulic Brake SystemDOT 3 Hydraulic Brake Fluid (GM Part No. 88862806,in Canada 88862807).
Windshield Washer Optikleen® Washer Solvent.
Hydraulic Clutch SystemHydraulic Clutch Fluid. Use only GM Part No. 88958860,in Canada 88901244, Super DOT-4 brake fluid.
Power Steering System GM Power Steering Fluid (GM Part No. 89021184, in Canada 89021186).
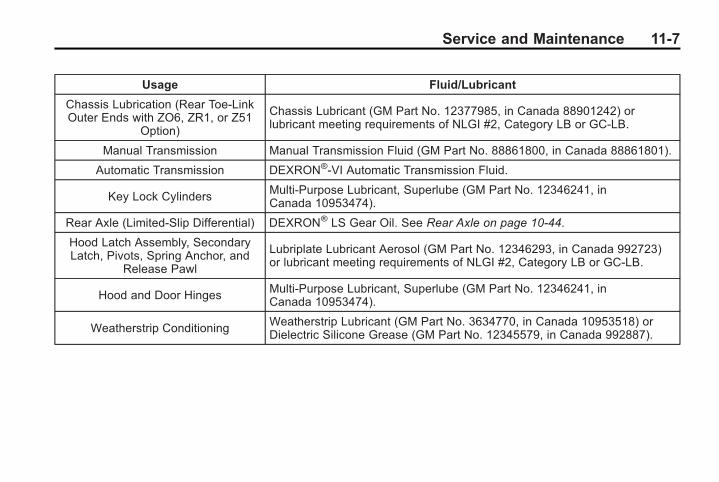
Black plate (7,1)Chevrolet Corvette Owner Manual - 2011
Service and Maintenance 11-7
Usage Fluid/Lubricant
Chassis Lubrication (Rear Toe‐LinkOuter Ends with ZO6, ZR1, or Z51
Option)
Chassis Lubricant (GM Part No. 12377985, in Canada 88901242) orlubricant meeting requirements of NLGI #2, Category LB or GC-LB.
Manual Transmission Manual Transmission Fluid (GM Part No. 88861800, in Canada 88861801).
Automatic Transmission DEXRON®-VI Automatic Transmission Fluid.
Key Lock CylindersMulti-Purpose Lubricant, Superlube (GM Part No. 12346241, inCanada 10953474).
Rear Axle (Limited-Slip Differential) DEXRON® LS Gear Oil. See Rear Axle on page 10‑44.
Hood Latch Assembly, SecondaryLatch, Pivots, Spring Anchor, and
Release Pawl
Lubriplate Lubricant Aerosol (GM Part No. 12346293, in Canada 992723)or lubricant meeting requirements of NLGI #2, Category LB or GC-LB.
Hood and Door Hinges Multi-Purpose Lubricant, Superlube (GM Part No. 12346241, inCanada 10953474).
Weatherstrip ConditioningWeatherstrip Lubricant (GM Part No. 3634770, in Canada 10953518) orDielectric Silicone Grease (GM Part No. 12345579, in Canada 992887).
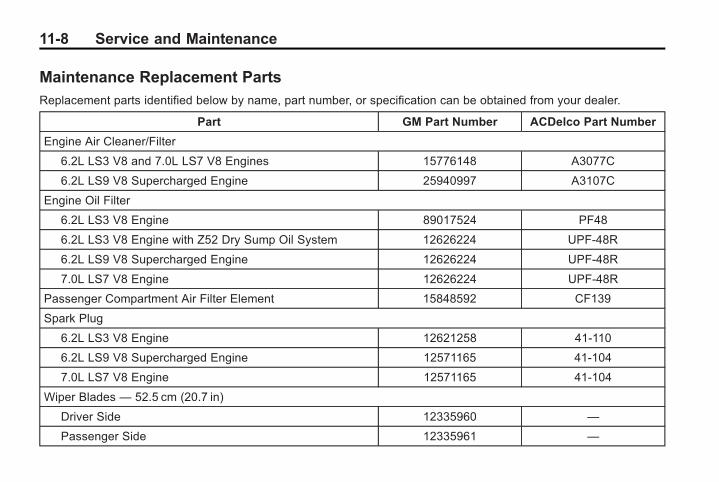
Black plate (8,1)Chevrolet Corvette Owner Manual - 2011
11-8 Service and Maintenance
Maintenance Replacement PartsReplacement parts identified below by name, part number, or specification can be obtained from your dealer.
Part GM Part Number ACDelco Part Number
Engine Air Cleaner/Filter
6.2L LS3 V8 and 7.0L LS7 V8 Engines 15776148 A3077C
6.2L LS9 V8 Supercharged Engine 25940997 A3107C
Engine Oil Filter
6.2L LS3 V8 Engine 89017524 PF48
6.2L LS3 V8 Engine with Z52 Dry Sump Oil System 12626224 UPF-48R
6.2L LS9 V8 Supercharged Engine 12626224 UPF-48R
7.0L LS7 V8 Engine 12626224 UPF-48R
Passenger Compartment Air Filter Element 15848592 CF139
Spark Plug
6.2L LS3 V8 Engine 12621258 41-110
6.2L LS9 V8 Supercharged Engine 12571165 41-104
7.0L LS7 V8 Engine 12571165 41-104
Wiper Blades — 52.5 cm (20.7 in)
Driver Side 12335960 —
Passenger Side 12335961 —
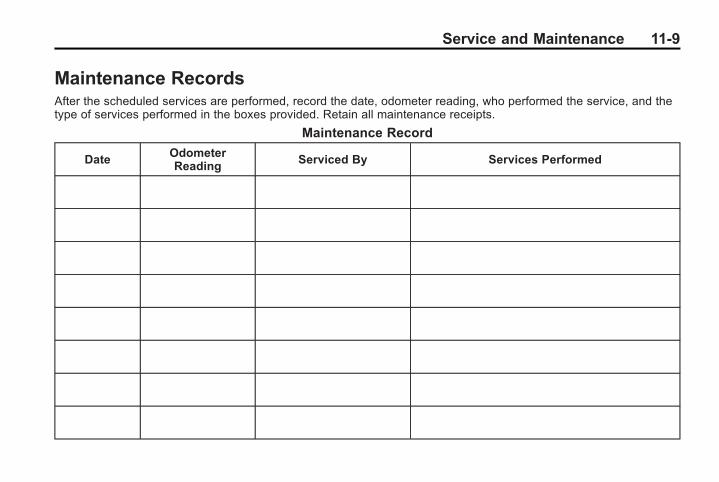
Black plate (9,1)Chevrolet Corvette Owner Manual - 2011
Service and Maintenance 11-9
Maintenance RecordsAfter the scheduled services are performed, record the date, odometer reading, who performed the service, and thetype of services performed in the boxes provided. Retain all maintenance receipts.
Maintenance Record
DateOdometerReading
Serviced By Services Performed
Black plate (10,1)Chevrolet Corvette Owner Manual - 2011
11-10 Service and Maintenance
Maintenance Record (cont.)
Date OdometerReading
Serviced By Services Performed
Black plate (11,1)Chevrolet Corvette Owner Manual - 2011
Service and Maintenance 11-11
Maintenance Record (cont.)
Date OdometerReading
Serviced By Services Performed
Black plate (12,1)Chevrolet Corvette Owner Manual - 2011
11-12 Service and Maintenance
Maintenance Record (cont.)
Date OdometerReading
Serviced By Services Performed
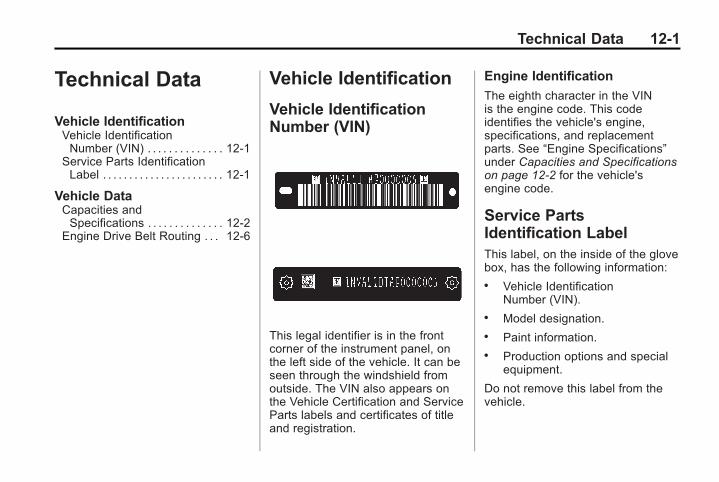
Black plate (1,1)Chevrolet Corvette Owner Manual - 2011
Technical Data 12-1
Technical Data
Vehicle IdentificationVehicle IdentificationNumber (VIN) . . . . . . . . . . . . . . 12-1
Service Parts IdentificationLabel . . . . . . . . . . . . . . . . . . . . . . . 12-1
Vehicle DataCapacities andSpecifications . . . . . . . . . . . . . . 12-2
Engine Drive Belt Routing . . . 12-6
Vehicle Identification
Vehicle IdentificationNumber (VIN)
This legal identifier is in the frontcorner of the instrument panel, onthe left side of the vehicle. It can beseen through the windshield fromoutside. The VIN also appears onthe Vehicle Certification and ServiceParts labels and certificates of titleand registration.
Engine Identification
The eighth character in the VINis the engine code. This codeidentifies the vehicle's engine,specifications, and replacementparts. See “Engine Specifications”under Capacities and Specificationson page 12‑2 for the vehicle'sengine code.
Service PartsIdentification LabelThis label, on the inside of the glovebox, has the following information:. Vehicle Identification
Number (VIN).. Model designation.. Paint information.. Production options and special
equipment.
Do not remove this label from thevehicle.
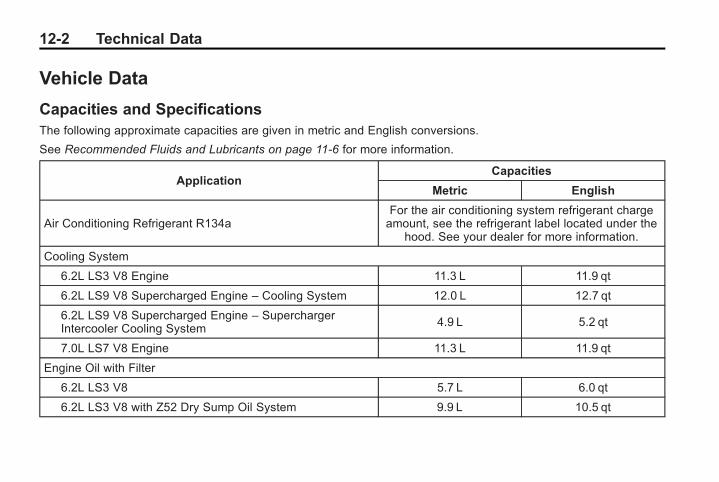
Black plate (2,1)Chevrolet Corvette Owner Manual - 2011
12-2 Technical Data
Vehicle Data
Capacities and SpecificationsThe following approximate capacities are given in metric and English conversions.
See Recommended Fluids and Lubricants on page 11‑6 for more information.
ApplicationCapacities
Metric English
Air Conditioning Refrigerant R134aFor the air conditioning system refrigerant chargeamount, see the refrigerant label located under the
hood. See your dealer for more information.
Cooling System
6.2L LS3 V8 Engine 11.3 L 11.9 qt
6.2L LS9 V8 Supercharged Engine – Cooling System 12.0 L 12.7 qt
6.2L LS9 V8 Supercharged Engine – SuperchargerIntercooler Cooling System 4.9 L 5.2 qt
7.0L LS7 V8 Engine 11.3 L 11.9 qt
Engine Oil with Filter
6.2L LS3 V8 5.7 L 6.0 qt
6.2L LS3 V8 with Z52 Dry Sump Oil System 9.9 L 10.5 qt
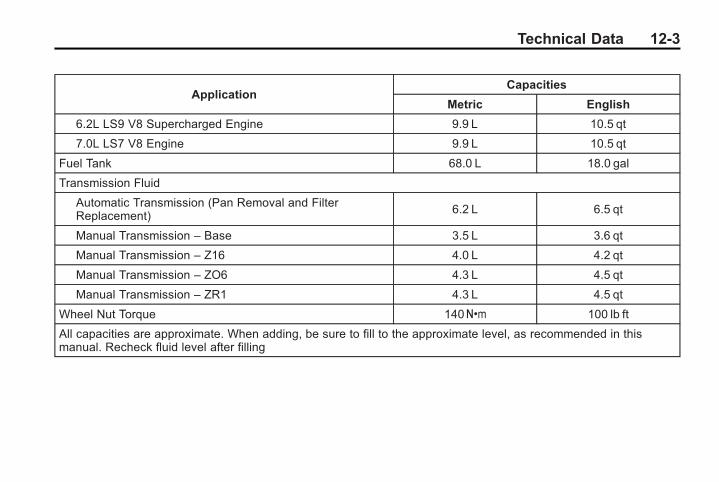
Black plate (3,1)Chevrolet Corvette Owner Manual - 2011
Technical Data 12-3
ApplicationCapacities
Metric English
6.2L LS9 V8 Supercharged Engine 9.9 L 10.5 qt
7.0L LS7 V8 Engine 9.9 L 10.5 qt
Fuel Tank 68.0 L 18.0 gal
Transmission Fluid
Automatic Transmission (Pan Removal and FilterReplacement)
6.2 L 6.5 qt
Manual Transmission – Base 3.5 L 3.6 qt
Manual Transmission – Z16 4.0 L 4.2 qt
Manual Transmission – ZO6 4.3 L 4.5 qt
Manual Transmission – ZR1 4.3 L 4.5 qt
Wheel Nut Torque 140Y 100 lb ft
All capacities are approximate. When adding, be sure to fill to the approximate level, as recommended in thismanual. Recheck fluid level after filling
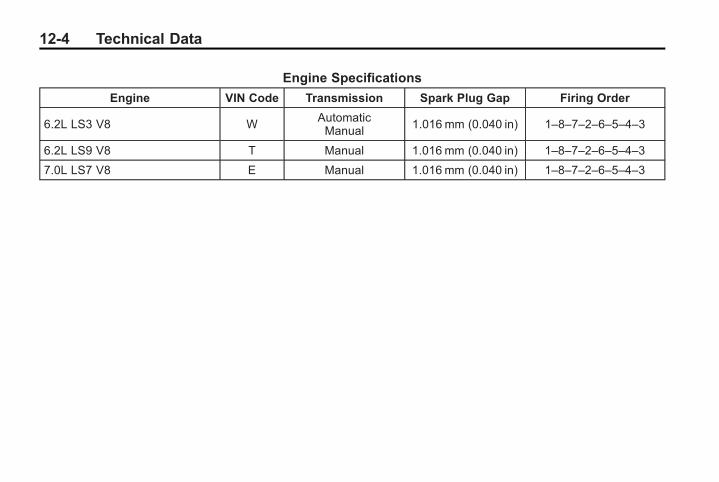
Black plate (4,1)Chevrolet Corvette Owner Manual - 2011
12-4 Technical Data
Engine Specifications
Engine VIN Code Transmission Spark Plug Gap Firing Order
6.2L LS3 V8 WAutomaticManual
1.016 mm (0.040 in) 1–8–7–2–6–5–4–3
6.2L LS9 V8 T Manual 1.016 mm (0.040 in) 1–8–7–2–6–5–4–3
7.0L LS7 V8 E Manual 1.016 mm (0.040 in) 1–8–7–2–6–5–4–3
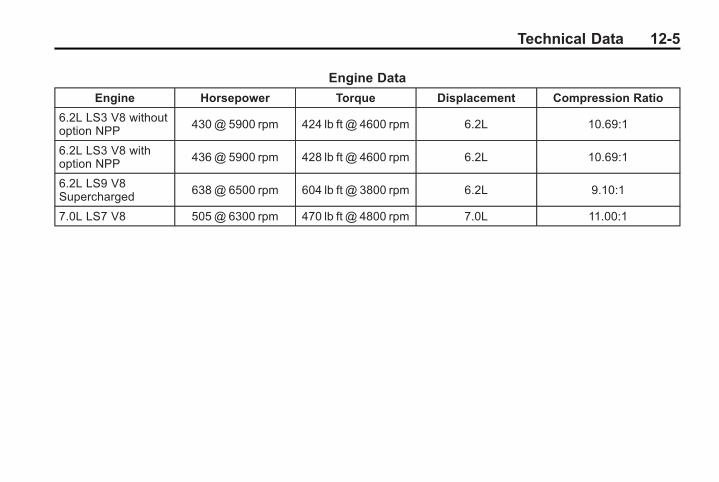
Black plate (5,1)Chevrolet Corvette Owner Manual - 2011
Technical Data 12-5
Engine Data
Engine Horsepower Torque Displacement Compression Ratio
6.2L LS3 V8 withoutoption NPP
430@ 5900 rpm 424 lb ft @ 4600 rpm 6.2L 10.69:1
6.2L LS3 V8 withoption NPP 436@ 5900 rpm 428 lb ft @ 4600 rpm 6.2L 10.69:1
6.2L LS9 V8Supercharged
638@ 6500 rpm 604 lb ft @ 3800 rpm 6.2L 9.10:1
7.0L LS7 V8 505@ 6300 rpm 470 lb ft @ 4800 rpm 7.0L 11.00:1
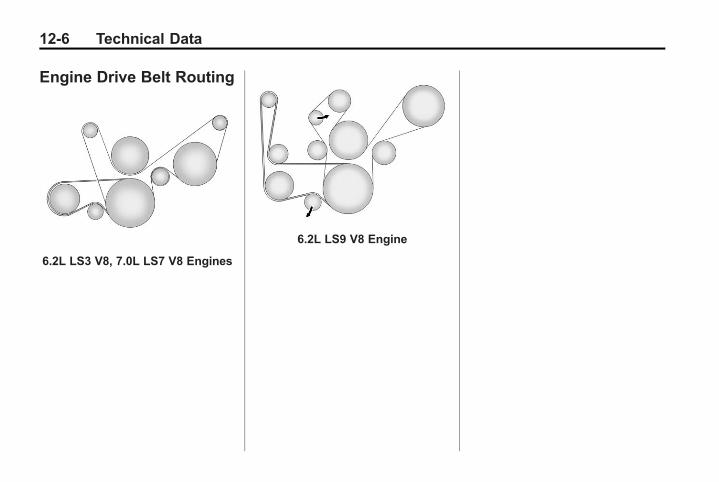
Black plate (6,1)Chevrolet Corvette Owner Manual - 2011
12-6 Technical Data
Engine Drive Belt Routing
6.2L LS3 V8, 7.0L LS7 V8 Engines
6.2L LS9 V8 Engine
Black plate (1,1)Chevrolet Corvette Owner Manual - 2011
Customer Information 13-1
CustomerInformation
Customer InformationCustomer SatisfactionProcedure (U.S. andCanada) . . . . . . . . . . . . . . . . . . . . 13-1
Customer SatisfactionProcedure (Mexico) . . . . . . . . 13-3
Customer Assistance Offices(U.S. and Canada) . . . . . . . . . 13-5
Customer Assistance Offices(Mexico) . . . . . . . . . . . . . . . . . . . . 13-5
Customer Assistance for TextTelephone (TTY) Users (U.S.and Canada) . . . . . . . . . . . . . . . 13-6
Online Owner Center . . . . . . . . 13-6GM Mobility ReimbursementProgram (U.S. andCanada) . . . . . . . . . . . . . . . . . . . . 13-7
Roadside Assistance Program(U.S. and Canada) . . . . . . . . . 13-8
Roadside AssistanceProgram (Mexico) . . . . . . . . . 13-10
Scheduling ServiceAppointments (U.S. andCanada) . . . . . . . . . . . . . . . . . . 13-10
Courtesy TransportationProgram (U.S. andCanada) . . . . . . . . . . . . . . . . . . . 13-11
Collision Damage Repair(U.S. and Canada) . . . . . . . . 13-12
Service PublicationsOrdering Information . . . . . . 13-15
Reporting Safety DefectsReporting Safety Defects tothe United StatesGovernment . . . . . . . . . . . . . . . 13-16
Reporting Safety Defects tothe CanadianGovernment . . . . . . . . . . . . . . . 13-16
Reporting Safety Defects toGeneral Motors . . . . . . . . . . . 13-17
Vehicle Data Recording andPrivacyVehicle Data Recording andPrivacy . . . . . . . . . . . . . . . . . . . . 13-17
Event Data Recorders . . . . . . 13-17OnStar® . . . . . . . . . . . . . . . . . . . . 13-18Navigation System . . . . . . . . . 13-18Radio FrequencyIdentification (RFID) . . . . . . . 13-19
Radio FrequencyStatement . . . . . . . . . . . . . . . . . 13-19
Customer Information
Customer SatisfactionProcedure (U.S. andCanada)Your satisfaction and goodwill areimportant to your dealer and toChevrolet. Normally, any concernswith the sales transaction or theoperation of the vehicle will beresolved by the dealer's sales orservice departments. Sometimes,however, despite the best intentionsof all concerned, misunderstandingscan occur. If your concern has notbeen resolved to your satisfaction,the following steps should be taken:
STEP ONE: Discuss your concernwith a member of dealershipmanagement. Normally, concernscan be quickly resolved at that level.If the matter has already beenreviewed with the sales, service,or parts manager, contact the ownerof the dealership or the generalmanager.
Black plate (2,1)Chevrolet Corvette Owner Manual - 2011
13-2 Customer Information
STEP TWO: If after contacting amember of dealership management,it appears your concern cannot beresolved by the dealership withoutfurther help, in the U.S., call theChevrolet Customer AssistanceCenter at 1-800-222-1020. InCanada, call General Motors ofCanada Customer CommunicationCentre at 1-800-263-3777 (English),or 1-800-263-7854 (French).
We encourage you to call thetoll-free number in order to give yourinquiry prompt attention. Have thefollowing information available togive the Customer Assistancerepresentative:. Vehicle Identification
Number (VIN). This is availablefrom the vehicle registration ortitle, or the plate at the top leftof the instrument panel andvisible through the windshield.
. Dealership name and location.
. Vehicle delivery date andpresent mileage.
When contacting Chevrolet,remember that your concern willlikely be resolved at a dealer'sfacility. That is why we suggestfollowing Step One first.
STEP THREE — U.S. Owners:Both General Motors and yourdealer are committed to makingsure you are completely satisfiedwith your new vehicle. However,if you continue to remain unsatisfiedafter following the procedureoutlined in Steps One and Two, youcan file with the Better BusinessBureau (BBB) Auto Line® Programto enforce your rights.
The BBB Auto Line Program is anout-of-court program administeredby the Council of Better BusinessBureaus to settle automotivedisputes regarding vehicle repairsor the interpretation of the NewVehicle Limited Warranty. Althoughyou may be required to resort to thisinformal dispute resolution programprior to filing a court action, use ofthe program is free of charge and
your case will generally be heardwithin 40 days. If you do not agreewith the decision given in your case,you may reject it and proceed withany other venue for relief availableto you.
You may contact the BBB AutoLine Program using the toll-freetelephone number or write them atthe following address:
BBB Auto Line ProgramCouncil of Better Business Bureaus,Inc.4200 Wilson BoulevardSuite 800Arlington, VA 22203-1838
Telephone: 1-800-955-5100www.dr.bbb.org/goauto
This program is available in all50 states and the District ofColumbia. Eligibility is limited byvehicle age, mileage, and otherfactors. General Motors reservesthe right to change eligibilitylimitations and/or discontinue itsparticipation in this program.
Black plate (3,1)Chevrolet Corvette Owner Manual - 2011
Customer Information 13-3
STEP THREE — CanadianOwners: In the event that youdo not feel your concerns havebeen addressed after followingthe procedure outlined in StepsOne and Two, General Motors ofCanada Limited wants you to beaware of its participation in ano-charge Mediation/ArbitrationProgram. General Motors of CanadaLimited has committed to bindingarbitration of owner disputesinvolving factory-related vehicleservice claims. The programprovides for the review of the factsinvolved by an impartial third partyarbiter, and may include an informalhearing before the arbiter. Theprogram is designed so that theentire dispute settlement process,from the time you file your complaintto the final decision, should becompleted in about 70 days. Webelieve our impartial program offersadvantages over courts in mostjurisdictions because it is informal,quick, and free of charge.
For further information concerningeligibility in the Canadian MotorVehicle Arbitration Plan (CAMVAP),call toll-free 1-800-207-0685, or callthe General Motors CustomerCommunication Centre,1-800-263-3777 (English),1-800-263-7854 (French),or write to:
The Mediation/Arbitration Programc/o Customer CommunicationCentreGeneral Motors of Canada LimitedMail Code: CA1-163-0051908 Colonel Sam DriveOshawa, Ontario L1H 8P7
Your inquiry should be accompaniedby the Vehicle IdentificationNumber (VIN).
Customer SatisfactionProcedure (Mexico)
Did you get the Warranty ExtensionPlan? This plan is recommended byGeneral Motors to supplement thewarranty included with the newvehicle purchase.
See your dealer for details.
Black plate (4,1)Chevrolet Corvette Owner Manual - 2011
13-4 Customer Information
Customer AssistanceProcedure
Owner satisfaction and goodwill arevery important to your dealer andGeneral Motors.
Normally, any problem with thetransaction, sale, or usage of thevehicle must be handled by yourdealer sales or service departments.However, we recognize thatdespite the good intentions of allparties involved, sometimes amisunderstanding may occur.
If you have a problem that has notbeen satisfactorily handled throughthe normal means, we suggest thefollowing steps:
STEP ONE
Explain your case to the dealerservice agent, service manager,dealer sales agent, or salesmanager, depending on your case.
Make sure that they have allnecessary information. They areinterested in your continualsatisfaction.
STEP TWO
If you are not satisfied, pleasecontact the general manager or thedealership owner to ask for theirhelp. If they are not able to resolveyour case, ask them to contact theright people at General Motors forsupport, if needed.
STEP THREE
If your case is not resolved in areasonable amount of time by yourdealer, please call the GeneralMotors Customer AssistanceCenter (CAC) and provide thefollowing information:. Name. Address. Phone number. Model year. Brand. Vehicle Identification
Number (VIN). Mileage. Delivery date. Description of the problem. Dealership name. Dealership address
Black plate (5,1)Chevrolet Corvette Owner Manual - 2011
Customer Information 13-5
See Customer Assistance Offices(U.S. and Canada) on page 13‑5 orCustomer Assistance Offices(Mexico) on page 13‑5 for moreinformation.
Customer AssistanceOffices (U.S. and Canada)Chevrolet encourages customersto call the toll-free number forassistance. However, if a customerwishes to write or e-mail Chevrolet,the letter should be addressed to:
United States
Chevrolet Motor DivisionChevrolet CustomerAssistance CenterP.O. Box 33170Detroit, MI 48232-5170www.Chevrolet.com
1-800-222-10201-800-833-2438 (For TextTelephone Devices (TTYs))Roadside Assistance:1-800-243-8872
From Puerto Rico:
1-800-496-9992 (English)1-800-496-9993 (Spanish)
From U.S. Virgin Islands:
1-800-496-9994
Canada
General Motors of Canada LimitedCustomer Communication Centre,Mail Code: CA1-163-0051908 Colonel Sam DriveOshawa, Ontario L1H 8P7www.gm.ca
1-800-263-3777 (English)1-800-263-7854 (French)1-800-263-3830 (For TextTelephone devices (TTYs))Roadside Assistance:1-800-268-6800
Overseas
Please contact the local GeneralMotors Business Unit.
Mexico, Central America, andCaribbean Islands/Countries(Except Puerto Rico andU.S. Virgin Islands)
General Motors de Mexico,S. de R.L. de C.V.Customer Assistance CenterAv. Ejercito Nacional #843Col. GranadaC.P. 11520, Mexico, D.F.
01-800-466-0800Long Distance: 011-52-53 29 0800
Customer AssistanceOffices (Mexico)To contact the Customer AssistanceCenter (CAC), use the phonenumbers listed in this section.Customer assistance is availableMonday through Friday, 08:00 to20:00 hours, and Saturdays from08:00 to 15:00 hours.
All e-mail inquiries to the CustomerAssistance Center (CAC) should besent to: [email protected].
Black plate (6,1)Chevrolet Corvette Owner Manual - 2011
13-6 Customer Information
Mexico
From Mexico City
5329-0811
From Other Mexico Locations
01-800-466-0811
United States and Canada
1-866-466-8190
Costa Rica
00-800-052-1005
Guatemala
1-800-999-5252
Panama
00-800-052-0001
Dominican Republic
1-888-751-5301
El Salvador
800-6273
Honduras
800-0122-6101
Customer Assistance forText Telephone (TTY)Users (U.S. and Canada)To assist customers who are deaf,hard of hearing, or speech-impairedand who use Text Telephones(TTYs), Chevrolet has TTYequipment available at its CustomerAssistance Center. Any TTY userin the U.S. can communicate withChevrolet by dialing:1-800-833-2438. TTY users inCanada can dial 1-800-263-3830.
Online Owner Center
Chevrolet Owner Center (U.S.)www.chevyownercenter.com
Information and servicescustomized for your specificvehicle — all in one convenientplace.. Digital owner manual, warranty
information, and more.. Storage for online service and
maintenance records.. Chevrolet dealer locator for
service nationwide.. Exclusive privileges and offers.. Recall notices for your specific
vehicle.. OnStar and GM Cardmember
Services Earnings summaries.
Black plate (7,1)Chevrolet Corvette Owner Manual - 2011
Customer Information 13-7
Other Helpful Links
Chevrolet — www.chevrolet.com
Chevrolet Merchandise —www.chevymall.com
Help Center — www.chevrolet.com/pages/mds/helpcenter/faq.do. FAQ. Contact Us
My GM Canada www.gm.ca
My GM Canada is apassword-protected section ofwww.gm.ca where you can saveinformation on GM vehicles, getpersonalized offers, and use handytools and forms with greater ease.
Here are a few of the valuable toolsand services you will haveaccess to:. My Showroom: Find and save
information on vehicles andcurrent offers in your area.
. My Dealers: Save details suchas address and phone numberfor each of your preferred GMdealers.
. My Driveway: Access quick linksto parts and service estimates,check trade-in values,or schedule a serviceappointment by adding thevehicles you own to yourdriveway profile.
. My Preferences: Manage yourprofile and use tools and formswith greater ease.
To sign up, visit the My GM.casection within www.gm.ca.
GM MobilityReimbursement Program(U.S. and Canada)
This program is available toqualified applicants for costreimbursement of eligibleaftermarket adaptive equipmentrequired for the vehicle, such ashand controls or a wheelchair/scooter lift for the vehicle.
For more information on the limitedoffer, visit www.gmmobility.com orcall the GM Mobility AssistanceCenter at 1-800-323-9935. TextTelephone (TTY) users, call1-800-833-9935.
Black plate (8,1)Chevrolet Corvette Owner Manual - 2011
13-8 Customer Information
General Motors of Canada alsohas a Mobility Program. Call1-800-GM-DRIVE (463-7483) fordetails. TTY users call1-800-263-3830.
Roadside AssistanceProgram (U.S. andCanada)For U.S.‐purchased vehicles,call 1‐800‐243‐8872; (TextTelephone (TTY): 1‐888‐889‐2438).
For Canadian‐purchased vehicles,call 1-800-268-6800.
Service is available 24 hours a day,365 days a year.
Calling for Assistance
When calling Roadside Assistance,have the following informationready:. Your name, home address, and
home telephone number.. Telephone number of your
location.. Location of the vehicle.. Model, year, color, and license
plate number of the vehicle.. Odometer reading, Vehicle
Identification Number (VIN), anddelivery date of the vehicle.
. Description of the problem.
Coverage
Services are provided up to 5 years/160 000 km (100,000mi), whichevercomes first.
In the U.S., anyone driving thevehicle is covered. In Canada, aperson driving the vehicle withoutpermission from the owner is notcovered.
Roadside Assistance is not a part ofthe New Vehicle Limited Warranty.Chevrolet and General Motors ofCanada Limited reserve the right tomake any changes or discontinuethe Roadside Assistance program atany time without notification.
Chevrolet and General Motors ofCanada Limited reserve the rightto limit services or payment to anowner or driver if they decide theclaims are made too often, or thesame type of claim is made manytimes.
Black plate (9,1)Chevrolet Corvette Owner Manual - 2011
Customer Information 13-9
Services Provided. Emergency Fuel Delivery:
Delivery of enough fuel for thevehicle to get to the nearestservice station.
. Lock‐Out Service: Service tounlock the vehicle if you arelocked out. A remote unlock maybe available if you have OnStar.For security reasons, the drivermust present identificationbefore this service is given.
. Emergency Tow From a PublicRoad or Highway: Tow to thenearest Chevrolet dealer forwarranty service, or if the vehiclewas in a crash and cannot bedriven. Assistance is also givenwhen the vehicle is stuck in thesand, mud, or snow.
. Flat Tire Change: Service tochange a flat tire with the sparetire. The spare tire, if equipped,must be in good condition andproperly inflated. It is the owner'sresponsibility for the repair orreplacement of the tire if it is notcovered by the warranty.
. Battery Jump Start: Service tojump start a dead battery.
Services Not Included inRoadside Assistance. Impound towing caused by
violation of any laws.. Legal fines.. Mounting, dismounting,
or changing of snow tires,chains, or other traction devices.
. Towing or services for vehiclesdriven on a non-public road orhighway.
Services Specific to CanadianPurchased Vehicles. Fuel Delivery: Reimbursement
is approximately $5 Canadian.Diesel fuel delivery may berestricted. Propane and otherfuels are not provided throughthis service.
. Lock-Out Service: Vehicleregistration is required.
. Trip Routing Service: Detailedmaps of North America areprovided when requested eitherwith the most direct route or themost scenic route. There is alimit of six requests per year.Additional travel information isalso available. Allow threeweeks for delivery.
Black plate (10,1)Chevrolet Corvette Owner Manual - 2011
13-10 Customer Information
. Trip Interruption Benefitsand Assistance: Must beover 250 kilometers fromwhere your trip was startedto qualify. General Motors ofCanada Limited requirespre-authorization, originaldetailed receipts, and a copyof the repair orders. Onceauthorization has been received,the Roadside Assistance advisorwill help to make arrangementsand explain how to receivepayment.
. Alternative Service:If assistance cannot beprovided right away, theRoadside Assistance advisormay give permission to get localemergency road service. Youwill receive payment, up to $100,after sending the original receiptto Roadside Assistance.Mechanical failures may becovered, however any cost forparts and labor for repairs notcovered by the warranty are theowner responsibility.
Roadside AssistanceProgram (Mexico)Roadside Assistance is available24 hours a day, 365 days ofthe year.
For detailed information aboutRoadside Assistance, please seethe brochure provided with yournew vehicle or visit our website at:www.chevrolet.com.mx. Navigatethe site and click on “Asistencia enel Camino.” E-mail correspondenceshould be sent to:[email protected].
To contact Roadside Assistance byphone, use the following numbers:
Mexico
01-800-466-0800
United States
1-866-466-8901
Canada
1-800-268-6800
Scheduling ServiceAppointments (U.S. andCanada)When the vehicle requires warrantyservice, contact the dealer andrequest an appointment. Byscheduling a service appointmentand advising the service consultantof your transportation needs, thedealer can help minimize yourinconvenience.
If the vehicle cannot be scheduledinto the service departmentimmediately, keep driving it untilit can be scheduled for service,unless, of course, the problem issafety related. If it is, please call thedealership, let them know this, andask for instructions.
If the dealer requests you to bringthe vehicle for service, you areurged to do so as early in the workday as possible to allow for thesame day-repair.
Black plate (11,1)Chevrolet Corvette Owner Manual - 2011
Customer Information 13-11
Courtesy TransportationProgram (U.S. andCanada)To enhance your ownershipexperience, we and our participatingdealers are proud to offer CourtesyTransportation, a customer supportprogram for vehicles with theBumper-to-Bumper (Base WarrantyCoverage period in Canada),extended powertrain, and/orhybrid‐specific warranties in boththe U.S. and Canada.
Several Courtesy Transportationoptions are available to assist inreducing inconvenience whenwarranty repairs are required.
Courtesy Transportation is not apart of the New Vehicle LimitedWarranty. A separate bookletentitled “Warranty and OwnerAssistance Information” furnishedwith each new vehicle providesdetailed warranty coverageinformation.
Transportation Options
Warranty service can generallybe completed while you wait.However, if you are unable towait, GM helps to minimizeinconvenience by providing severaltransportation options. Dependingon the circumstances, the dealercan offer one of the following:
Shuttle Service
Shuttle service is the preferredmeans of offering CourtesyTransportation. Dealers may provideshuttle service to get you to yourdestination with minimal interruptionof your daily schedule. This includesone‐way or round‐trip shuttle servicewithin reasonable time and distanceparameters of the dealer's area.
Public Transportation or FuelReimbursement
If the vehicle requires overnightwarranty repairs, and publictransportation is used instead ofthe dealer's shuttle service, theexpense must be supported byoriginal receipts and can onlybe up to the maximum amountallowed by GM for shuttle service.In addition, for U.S. customers,should you arrange transportationthrough a friend or relative, limitedreimbursement for reasonablefuel expenses may be available.Claim amounts should reflectactual costs and be supported byoriginal receipts. See the dealer forinformation regarding the allowanceamounts for reimbursement of fuelor other transportation costs.
Black plate (12,1)Chevrolet Corvette Owner Manual - 2011
13-12 Customer Information
Courtesy Rental Vehicle
The dealer may arrange to provideyou with a courtesy rental vehicleor reimburse you for a rental vehiclethat you obtain if the vehicle is keptfor an overnight warranty repair.Rental reimbursement will be limitedand must be supported by originalreceipts. This requires that you signand complete a rental agreementand meet state/provincial, local, andrental vehicle provider requirements.Requirements vary and may includeminimum age requirements,insurance coverage, credit card,etc. You are responsible for fuelusage charges and may also beresponsible for taxes, levies, usagefees, excessive mileage, or rentalusage beyond the completion of therepair.
It may not be possible to provide alike vehicle as a courtesy rental.
Additional ProgramInformation
All program options, such asshuttle service, may not be availableat every dealer. Please contactthe dealer for specific informationabout availability. All CourtesyTransportation arrangements will beadministered by appropriate dealerpersonnel.
General Motors reserves theright to unilaterally modify,change, or discontinue CourtesyTransportation at any time andto resolve all questions of claimeligibility pursuant to the terms andconditions described herein at itssole discretion.
Collision Damage Repair(U.S. and Canada)If the vehicle is involved in acollision and it is damaged, havethe damage repaired by a qualifiedtechnician using the properequipment and quality replacementparts. Poorly performed collisionrepairs diminish the vehicle resalevalue, and safety performance canbe compromised in subsequentcollisions.
Collision Parts
Genuine GM Collision parts arenew parts made with the samematerials and construction methodsas the parts with which the vehiclewas originally built. Genuine GMCollision parts are the best choice toensure that the vehicle's designedappearance, durability, and safetyare preserved. The use of GenuineGM parts can help maintain the GMNew Vehicle Limited Warranty.
Black plate (13,1)Chevrolet Corvette Owner Manual - 2011
Customer Information 13-13
Recycled original equipment partsmay also be used for repair. Theseparts are typically removed fromvehicles that were total losses inprior crashes. In most cases, theparts being recycled are fromundamaged sections of the vehicle.A recycled original equipment GMpart may be an acceptable choiceto maintain the vehicle's originallydesigned appearance and safetyperformance; however, the history ofthese parts is not known. Such partsare not covered by the GM NewVehicle Limited Warranty, and anyrelated failures are not covered bythat warranty.
Aftermarket collision parts arealso available. These are made bycompanies other than GM and maynot have been tested for the vehicle.As a result, these parts may fitpoorly, exhibit premature durability/corrosion problems, and may notperform properly in subsequent
collisions. Aftermarket parts are notcovered by the GM New VehicleLimited Warranty, and any vehiclefailure related to such parts is notcovered by that warranty.
Repair Facility
GM also recommends that youchoose a collision repair facility thatmeets your needs before you everneed collision repairs. The dealermay have a collision repair centerwith GM-trained technicians andstate‐of‐the‐art equipment, or beable to recommend a collisionrepair center that has GM-trainedtechnicians and comparableequipment.
Insuring The Vehicle
Protect your investment in the GMvehicle with comprehensive andcollision insurance coverage. Thereare significant differences in thequality of coverage afforded byvarious insurance policy terms.
Many insurance policies providereduced protection to the GMvehicle by limiting compensationfor damage repairs by usingaftermarket collision parts. Someinsurance companies will notspecify aftermarket collision parts.When purchasing insurance, werecommend that you ensure that thevehicle will be repaired with GMoriginal equipment collision parts.If such insurance coverage isnot available from your currentinsurance carrier, consider switchingto another insurance carrier.
If the vehicle is leased, the leasingcompany may require you to haveinsurance that ensures repairs withGenuine GM Original EquipmentManufacturer (OEM) parts orGenuine Manufacturer replacementparts. Read the lease carefully, asyou may be charged at the end ofthe lease for poor quality repairs.

Black plate (14,1)Chevrolet Corvette Owner Manual - 2011
13-14 Customer Information
If a Crash Occurs
If there has been an injury, callemergency services for help. Do notleave the scene of a crash until allmatters have been taken care of.Move the vehicle only if its positionputs you in danger, or you areinstructed to move it by a policeofficer.
Give only the necessary informationto police and other parties involvedin the crash.
For emergency towing seeRoadside Assistance Program (U.S.and Canada) on page 13‑8 orRoadside Assistance Program(Mexico) on page 13‑10.
Gather the following information:. Driver name, address, and
telephone number.. Driver license number.. Owner name, address, and
telephone number.. Vehicle license plate number.. Vehicle make, model, and
model year.. Vehicle Identification
Number (VIN).. Insurance company and policy
number.. General description of the
damage to the other vehicle.
Choose a reputable repair facilitythat uses quality replacement parts.See “Collision Parts” earlier in thissection.
If the airbag has inflated, see WhatWill You See After an AirbagInflates? on page 3‑28.
Managing the Vehicle DamageRepair Process
In the event that the vehicle requiresdamage repairs, GM recommendsthat you take an active role in itsrepair. If you have a pre-determinedrepair facility of choice, take thevehicle there, or have it towedthere. Specify to the facility that anyrequired replacement collision partsbe original equipment parts, eithernew Genuine GM parts or recycledoriginal GM parts. Remember,recycled parts will not be coveredby the GM vehicle warranty.
Insurance pays the bill for the repair,but you must live with the repair.Depending on your policy limits,your insurance company mayinitially value the repair usingaftermarket parts. Discuss this withthe repair professional, and insist onGenuine GM parts. Remember,if the vehicle is leased, you maybe obligated to have the vehiclerepaired with Genuine GM parts,even if your insurance coveragedoes not pay the full cost.
Black plate (15,1)Chevrolet Corvette Owner Manual - 2011
Customer Information 13-15
If another party's insurancecompany is paying for the repairs,you are not obligated to accept arepair valuation based on thatinsurance company's collision policyrepair limits, as you have nocontractual limits with that company.In such cases, you can have controlof the repair and parts choices aslong as the cost stays withinreasonable limits.
Service PublicationsOrdering Information
Service Manuals
Service Manuals have the diagnosisand repair information on theengines, transmission, axle,suspension, brakes, electrical,steering, body, etc.
Service Bulletins
Service Bulletins give additionaltechnical service informationneeded to knowledgeably serviceGeneral Motors cars and trucks.
Each bulletin contains instructionsto assist in the diagnosis andservice of the vehicle.
Owner Information
Owner publications are writtenspecifically for owners and intendedto provide basic operationalinformation about the vehicle. TheOwner Manual includes theMaintenance Schedule for allmodels.
In-Portfolio: Includes a Portfolio,Owner Manual, and WarrantyBooklet.
RETAIL SELL PRICE:$35.00 (U.S.) plus handling andshipping fees.
Without Portfolio: OwnerManual only.
RETAIL SELL PRICE:$25.00 (U.S.) plus handling andshipping fees.
Current and Past Models
Technical Service Bulletins andManuals are available for currentand past model GM vehicles.
ORDER TOLL FREE:1-800-551-4123 Monday - Friday8:00 AM - 6:00 PM Eastern Time
For Credit Card Orders Only(VISA-MasterCard-Discover), visitHelm, Inc. at: www.helminc.com.
Or write to:
Helm, IncorporatedP.O. Box 07130Detroit, MI 48207
Prices are subject to changewithout notice and without incurringobligation. Allow ample time fordelivery.
All listed prices are quoted in U.S.funds. Make checks payable inU.S. funds.

Black plate (16,1)Chevrolet Corvette Owner Manual - 2011
13-16 Customer Information
Reporting SafetyDefects
Reporting Safety Defectsto the United StatesGovernmentIf you believe that your vehiclehas a defect which could causea crash or could cause injury ordeath, you should immediatelyinform the National HighwayTraffic Safety Administration(NHTSA) in addition to notifyingGeneral Motors.
If NHTSA receives similarcomplaints, it may open aninvestigation, and if it finds thata safety defect exists in a groupof vehicles, it may order a recalland remedy campaign.
However, NHTSA cannotbecome involved in individualproblems between you, yourdealer, or General Motors.
To contact NHTSA, you maycall the Vehicle Safety Hotlinetoll-free at 1-888-327-4236(TTY: 1-800-424-9153); go tohttp://www.safercar.gov; orwrite to:
Administrator, NHTSA1200 New Jersey Avenue, S.E.Washington, D.C. 20590
You can also obtain otherinformation about motorvehicle safety fromhttp://www.safercar.gov.
Reporting Safety Defectsto the CanadianGovernmentIf you live in Canada, and youbelieve that the vehicle has a safetydefect, notify Transport Canadaimmediately, and notify GeneralMotors of Canada Limited. Callthem at 1-800-333-0510 or write to:
Transport CanadaRoad Safety Branch2780 Sheffield RoadOttawa, Ontario K1B 3V9
Black plate (17,1)Chevrolet Corvette Owner Manual - 2011
Customer Information 13-17
Reporting Safety Defectsto General MotorsIn addition to notifying NHTSA (orTransport Canada) in a situation likethis, notify General Motors.
Call 1-800-222-1020, or write:
Chevrolet Motor DivisionChevrolet CustomerAssistance CenterP.O. Box 33170Detroit, MI 48232-5170
In Canada, call 1-800-263-3777(English) or 1-800-263-7854(French), or write:
General Motors of Canada LimitedCustomer Communication Centre,Mail Code: CA1-163-0051908 Colonel Sam DriveOshawa, Ontario L1H 8P7
Vehicle DataRecording andPrivacyThis GM vehicle has a number ofsophisticated computers that recordinformation about the vehicle’sperformance and how it is driven.For example, the vehicle usescomputer modules to monitor andcontrol engine and transmissionperformance, to monitor theconditions for airbag deploymentand deploy airbags in a crash, and,if so equipped, to provide antilockbraking to help the driver control thevehicle. These modules may storedata to help the dealer technicianservice the vehicle. Some modulesmay also store data about how youoperate the vehicle, such as rate offuel consumption or average speed.These modules may also retain theowner’s personal preferences, suchas radio pre-sets, seat positions,and temperature settings.
Event Data RecordersThis vehicle has an Event DataRecorder (EDR). The main purposeof an EDR is to record, in certaincrash or near crash-like situations,such as an airbag deployment orhitting a road obstacle, data thatwill assist in understanding how avehicle's systems performed. TheEDR is designed to record datarelated to vehicle dynamics andsafety systems for a short period oftime, typically 30 seconds or less.The EDR in this vehicle is designedto record such data as:. How various systems in the
vehicle were operating.. Whether or not the driver and
passenger safety belts werebuckled/fastened.
. How far, if at all, the driver waspressing the accelerator and/orbrake pedal.
. How fast the vehicle wastraveling.
Black plate (18,1)Chevrolet Corvette Owner Manual - 2011
13-18 Customer Information
This data can help provide a betterunderstanding of the circumstancesin which crashes and injuries occur.
Important: EDR data is recordedby the vehicle only if a non-trivialcrash situation occurs; no data isrecorded by the EDR under normaldriving conditions and no personaldata (e.g., name, gender, age,and crash location) is recorded.However, other parties, such aslaw enforcement, could combinethe EDR data with the type ofpersonally identifying data routinelyacquired during a crashinvestigation.
To read data recorded by an EDR,special equipment is required, andaccess to the vehicle or the EDR isneeded. In addition to the vehiclemanufacturer, other parties, such aslaw enforcement, that have thespecial equipment, can read theinformation if they have access tothe vehicle or the EDR.
GM will not access this data orshare it with others except: with theconsent of the vehicle owner or,if the vehicle is leased, with theconsent of the lessee; in responseto an official request by police orsimilar government office; as part ofGM's defense of litigation throughthe discovery process; or, asrequired by law. Data that GMcollects or receives may also beused for GM research needs ormay be made available to others forresearch purposes, where a need isshown and the data is not tied to aspecific vehicle or vehicle owner.
OnStar®
If the vehicle is equipped with anactive OnStar system, that systemmay also record data in crash ornear crash‐like situations. TheOnStar Terms and Conditionsprovides information on datacollection and use and is availablein the OnStar glove box kit, atwww.onstar.com (U.S.) orwww.onstar.ca (Canada), orby pressing theQ button andspeaking to an advisor.
Navigation SystemIf the vehicle has a navigationsystem, use of the system mayresult in the storage of destinations,addresses, telephone numbers, andother trip information. Refer to thenavigation system operating manualfor information on stored data andfor deletion instructions.
Black plate (19,1)Chevrolet Corvette Owner Manual - 2011
Customer Information 13-19
Radio FrequencyIdentification (RFID)RFID technology is used in somevehicles for functions such as tirepressure monitoring and ignitionsystem security, as well as inconnection with conveniencessuch as key fobs for remote doorlocking/unlocking and starting, andin-vehicle transmitters for garagedoor openers. RFID technology inGM vehicles does not use or recordpersonal information or link with anyother GM system containingpersonal information.
Radio FrequencyStatementThis vehicle has systems thatoperate on a radio frequency thatcomply with Part 15 of the FederalCommunications Commission (FCC)rules and with Industry CanadaStandards RSS‐210/220/310.
Operation is subject to the followingtwo conditions:
1. The device may not causeinterference.
2. The device must accept anyinterference received, includinginterference that may causeundesired operation of thedevice.
Changes or modifications to anyof these systems by other than anauthorized service facility could voidauthorization to use this equipment.
Black plate (20,1)Chevrolet Corvette Owner Manual - 2011
13-20 Customer Information
2 NOTES
Black plate (1,1)Chevrolet Corvette Owner Manual - 2011
INDEX i-1
AAccessories andModifications . . . . . . . . . . . . . . . . . 10-4
Accessory Power . . . . . . . . . . . . . . 9-23Active Handling System . . . . . . . 9-37Light . . . . . . . . . . . . . . . . . . . . . . . . . .5-23
Add-On ElectricalEquipment . . . . . . . . . . . . . . . . . . . 9-55
AdjustmentsLumbar, Front Seats . . . . . . . . . . . 3-6
Air Cleaner/Filter, Engine . . . . . 10-24Air Dam, Front . . . . . . . . . . . . . . . . . 9-19Air Filter, PassengerCompartment . . . . . . . . . . . . . . . . . 8-7
Air Vents . . . . . . . . . . . . . . . . . . . . . . . 8-6Airbag SystemCheck . . . . . . . . . . . . . . . . . . . . . . . .3-36How Does an AirbagRestrain? . . . . . . . . . . . . . . . . . . .3-28
Passenger SensingSystem . . . . . . . . . . . . . . . . . . . . . .3-30
What Makes an AirbagInflate? . . . . . . . . . . . . . . . . . . . . . .3-27
Airbag System (cont.)What Will You See Afteran Airbag Inflates? . . . . . . . . . .3-28
When Should an AirbagInflate? . . . . . . . . . . . . . . . . . . . . . .3-26
Where Are the Airbags? . . . . . .3-24AirbagsAdding Equipment to theVehicle . . . . . . . . . . . . . . . . . . . . . .3-35
Passenger Status Indicator . . .5-17Readiness Light . . . . . . . . . . . . . .5-16Servicing Airbag-EquippedVehicles . . . . . . . . . . . . . . . . . . . . .3-34
System Check . . . . . . . . . . . . . . . .3-22Alarm SystemAnti-Theft . . . . . . . . . . . . . . . . . . . . .2-13
AM-FM Radio . . . . . . . . . . . . . . . . . . . 7-5AntennaSatellite Radio . . . . . . . . . . . . . . . . 7-11
Anti-TheftAlarm System . . . . . . . . . . . . . . . .2-13Alarm System Messages . . . . .5-50
Antilock BrakeSystem (ABS) . . . . . . . . . . . . . . . . 9-34Warning Light . . . . . . . . . . . . . . . . .5-22
Appearance CareExterior . . . . . . . . . . . . . . . . . . . . . 10-87Interior . . . . . . . . . . . . . . . . . . . . . . 10-90
Ashtrays . . . . . . . . . . . . . . . . . . . . . . . . 5-8Assistance Program,Roadside . . . . . . . . . . . . . . 13-8, 13-10
Audio Players . . . . . . . . . . . . . . . . . 7-11CD . . . . . . . . . . . . . . . . . . . . . . . . . . . 7-11
Audio SystemDiversity Antenna System . . . . 7-11Radio Reception . . . . . . . . . . . . . .7-10Theft-Deterrent Feature . . . . . . . . 7-2
AutomaticDimming Mirrors . . . . . . . . . . . . . .2-17Door Locks . . . . . . . . . . . . . . . . . . .2-10
Automatic Transmission . . . . . . . 9-28Fluid . . . . . . . . . . . . . . . . . . . . . . . . 10-23Manual Mode . . . . . . . . . . . . . . . . .9-29Shift Lock ControlFunction Check . . . . . . . . . . . 10-45
Auxiliary Devices . . . . . . . . . . . . . . 7-17Axle, Rear . . . . . . . . . . . . . . . . . . . . 10-44
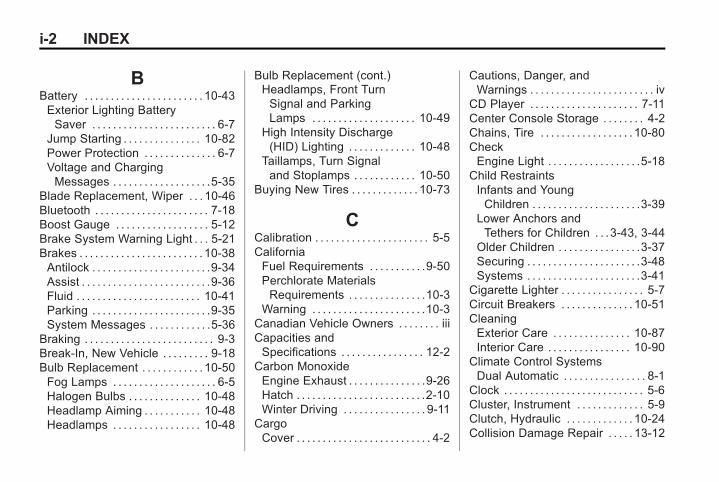
Black plate (2,1)Chevrolet Corvette Owner Manual - 2011
i-2 INDEX
BBattery . . . . . . . . . . . . . . . . . . . . . . . 10-43Exterior Lighting BatterySaver . . . . . . . . . . . . . . . . . . . . . . . . 6-7
Jump Starting . . . . . . . . . . . . . . . 10-82Power Protection . . . . . . . . . . . . . . 6-7Voltage and ChargingMessages . . . . . . . . . . . . . . . . . . .5-35
Blade Replacement, Wiper . . . 10-46Bluetooth . . . . . . . . . . . . . . . . . . . . . . 7-18Boost Gauge . . . . . . . . . . . . . . . . . . 5-12Brake System Warning Light . . . 5-21Brakes . . . . . . . . . . . . . . . . . . . . . . . . 10-38Antilock . . . . . . . . . . . . . . . . . . . . . . .9-34Assist . . . . . . . . . . . . . . . . . . . . . . . . .9-36Fluid . . . . . . . . . . . . . . . . . . . . . . . . 10-41Parking . . . . . . . . . . . . . . . . . . . . . . .9-35System Messages . . . . . . . . . . . .5-36
Braking . . . . . . . . . . . . . . . . . . . . . . . . . 9-3Break-In, New Vehicle . . . . . . . . . 9-18Bulb Replacement . . . . . . . . . . . . 10-50Fog Lamps . . . . . . . . . . . . . . . . . . . . 6-5Halogen Bulbs . . . . . . . . . . . . . . 10-48Headlamp Aiming . . . . . . . . . . . 10-48Headlamps . . . . . . . . . . . . . . . . . 10-48
Bulb Replacement (cont.)Headlamps, Front TurnSignal and ParkingLamps . . . . . . . . . . . . . . . . . . . . 10-49
High Intensity Discharge(HID) Lighting . . . . . . . . . . . . . 10-48
Taillamps, Turn Signaland Stoplamps . . . . . . . . . . . . 10-50
Buying New Tires . . . . . . . . . . . . . 10-73
CCalibration . . . . . . . . . . . . . . . . . . . . . . 5-5CaliforniaFuel Requirements . . . . . . . . . . .9-50Perchlorate MaterialsRequirements . . . . . . . . . . . . . . .10-3
Warning . . . . . . . . . . . . . . . . . . . . . .10-3Canadian Vehicle Owners . . . . . . . . iiiCapacities andSpecifications . . . . . . . . . . . . . . . . 12-2
Carbon MonoxideEngine Exhaust . . . . . . . . . . . . . . .9-26Hatch . . . . . . . . . . . . . . . . . . . . . . . . .2-10Winter Driving . . . . . . . . . . . . . . . . 9-11
CargoCover . . . . . . . . . . . . . . . . . . . . . . . . . . 4-2
Cautions, Danger, andWarnings . . . . . . . . . . . . . . . . . . . . . . . . iv
CD Player . . . . . . . . . . . . . . . . . . . . . 7-11Center Console Storage . . . . . . . . 4-2Chains, Tire . . . . . . . . . . . . . . . . . . 10-80CheckEngine Light . . . . . . . . . . . . . . . . . .5-18
Child RestraintsInfants and YoungChildren . . . . . . . . . . . . . . . . . . . . .3-39
Lower Anchors andTethers for Children . . .3-43, 3-44
Older Children . . . . . . . . . . . . . . . .3-37Securing . . . . . . . . . . . . . . . . . . . . . .3-48Systems . . . . . . . . . . . . . . . . . . . . . .3-41
Cigarette Lighter . . . . . . . . . . . . . . . . 5-7Circuit Breakers . . . . . . . . . . . . . . 10-51CleaningExterior Care . . . . . . . . . . . . . . . 10-87Interior Care . . . . . . . . . . . . . . . . 10-90
Climate Control SystemsDual Automatic . . . . . . . . . . . . . . . . 8-1
Clock . . . . . . . . . . . . . . . . . . . . . . . . . . . 5-6Cluster, Instrument . . . . . . . . . . . . . 5-9Clutch, Hydraulic . . . . . . . . . . . . . 10-24Collision Damage Repair . . . . . 13-12
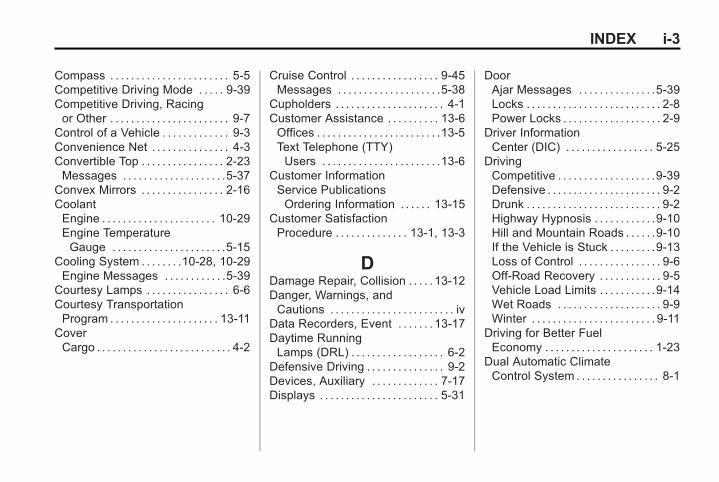
Black plate (3,1)Chevrolet Corvette Owner Manual - 2011
INDEX i-3
Compass . . . . . . . . . . . . . . . . . . . . . . . 5-5Competitive Driving Mode . . . . . 9-39Competitive Driving, Racingor Other . . . . . . . . . . . . . . . . . . . . . . . 9-7
Control of a Vehicle . . . . . . . . . . . . . 9-3Convenience Net . . . . . . . . . . . . . . . 4-3Convertible Top . . . . . . . . . . . . . . . . 2-23Messages . . . . . . . . . . . . . . . . . . . .5-37
Convex Mirrors . . . . . . . . . . . . . . . . 2-16CoolantEngine . . . . . . . . . . . . . . . . . . . . . . 10-29Engine TemperatureGauge . . . . . . . . . . . . . . . . . . . . . .5-15
Cooling System . . . . . . . .10-28, 10-29Engine Messages . . . . . . . . . . . .5-39
Courtesy Lamps . . . . . . . . . . . . . . . . 6-6Courtesy TransportationProgram . . . . . . . . . . . . . . . . . . . . . 13-11
CoverCargo . . . . . . . . . . . . . . . . . . . . . . . . . . 4-2
Cruise Control . . . . . . . . . . . . . . . . . 9-45Messages . . . . . . . . . . . . . . . . . . . .5-38
Cupholders . . . . . . . . . . . . . . . . . . . . . 4-1Customer Assistance . . . . . . . . . . 13-6Offices . . . . . . . . . . . . . . . . . . . . . . . .13-5Text Telephone (TTY)Users . . . . . . . . . . . . . . . . . . . . . . .13-6
Customer InformationService PublicationsOrdering Information . . . . . . 13-15
Customer SatisfactionProcedure . . . . . . . . . . . . . . 13-1, 13-3
DDamage Repair, Collision . . . . . 13-12Danger, Warnings, andCautions . . . . . . . . . . . . . . . . . . . . . . . . iv
Data Recorders, Event . . . . . . . 13-17Daytime RunningLamps (DRL) . . . . . . . . . . . . . . . . . . 6-2
Defensive Driving . . . . . . . . . . . . . . . 9-2Devices, Auxiliary . . . . . . . . . . . . . 7-17Displays . . . . . . . . . . . . . . . . . . . . . . . 5-31
DoorAjar Messages . . . . . . . . . . . . . . .5-39Locks . . . . . . . . . . . . . . . . . . . . . . . . . . 2-8Power Locks . . . . . . . . . . . . . . . . . . . 2-9
Driver InformationCenter (DIC) . . . . . . . . . . . . . . . . . 5-25
DrivingCompetitive . . . . . . . . . . . . . . . . . . .9-39Defensive . . . . . . . . . . . . . . . . . . . . . . 9-2Drunk . . . . . . . . . . . . . . . . . . . . . . . . . . 9-2Highway Hypnosis . . . . . . . . . . . .9-10Hill and Mountain Roads . . . . . .9-10If the Vehicle is Stuck . . . . . . . . .9-13Loss of Control . . . . . . . . . . . . . . . . 9-6Off-Road Recovery . . . . . . . . . . . . 9-5Vehicle Load Limits . . . . . . . . . . .9-14Wet Roads . . . . . . . . . . . . . . . . . . . . 9-9Winter . . . . . . . . . . . . . . . . . . . . . . . . 9-11
Driving for Better FuelEconomy . . . . . . . . . . . . . . . . . . . . . 1-23
Dual Automatic ClimateControl System . . . . . . . . . . . . . . . . 8-1
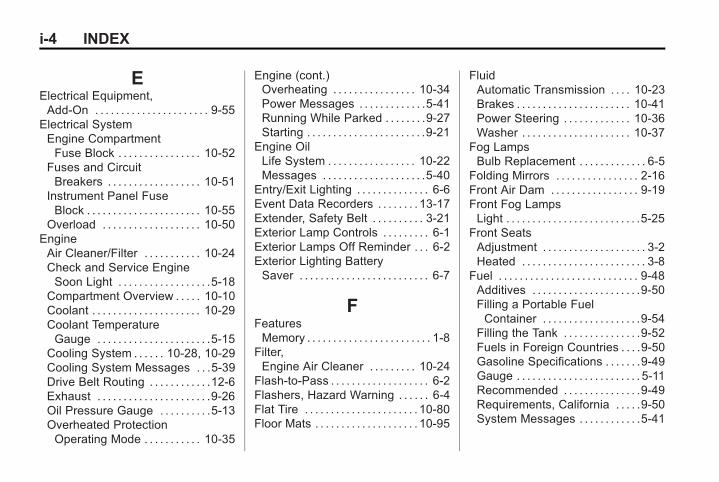
Black plate (4,1)Chevrolet Corvette Owner Manual - 2011
i-4 INDEX
EElectrical Equipment,Add-On . . . . . . . . . . . . . . . . . . . . . . 9-55
Electrical SystemEngine CompartmentFuse Block . . . . . . . . . . . . . . . . 10-52
Fuses and CircuitBreakers . . . . . . . . . . . . . . . . . . 10-51
Instrument Panel FuseBlock . . . . . . . . . . . . . . . . . . . . . . 10-55
Overload . . . . . . . . . . . . . . . . . . . 10-50EngineAir Cleaner/Filter . . . . . . . . . . . 10-24Check and Service EngineSoon Light . . . . . . . . . . . . . . . . . .5-18
Compartment Overview . . . . . 10-10Coolant . . . . . . . . . . . . . . . . . . . . . 10-29Coolant TemperatureGauge . . . . . . . . . . . . . . . . . . . . . .5-15
Cooling System . . . . . . 10-28, 10-29Cooling System Messages . . .5-39Drive Belt Routing . . . . . . . . . . . .12-6Exhaust . . . . . . . . . . . . . . . . . . . . . .9-26Oil Pressure Gauge . . . . . . . . . .5-13Overheated ProtectionOperating Mode . . . . . . . . . . . 10-35
Engine (cont.)Overheating . . . . . . . . . . . . . . . . 10-34Power Messages . . . . . . . . . . . . .5-41Running While Parked . . . . . . . .9-27Starting . . . . . . . . . . . . . . . . . . . . . . .9-21
Engine OilLife System . . . . . . . . . . . . . . . . . 10-22Messages . . . . . . . . . . . . . . . . . . . .5-40
Entry/Exit Lighting . . . . . . . . . . . . . . 6-6Event Data Recorders . . . . . . . . 13-17Extender, Safety Belt . . . . . . . . . . 3-21Exterior Lamp Controls . . . . . . . . . 6-1Exterior Lamps Off Reminder . . . 6-2Exterior Lighting BatterySaver . . . . . . . . . . . . . . . . . . . . . . . . . 6-7
FFeaturesMemory . . . . . . . . . . . . . . . . . . . . . . . . 1-8
Filter,Engine Air Cleaner . . . . . . . . . 10-24
Flash-to-Pass . . . . . . . . . . . . . . . . . . . 6-2Flashers, Hazard Warning . . . . . . 6-4Flat Tire . . . . . . . . . . . . . . . . . . . . . . 10-80Floor Mats . . . . . . . . . . . . . . . . . . . . 10-95
FluidAutomatic Transmission . . . . 10-23Brakes . . . . . . . . . . . . . . . . . . . . . . 10-41Power Steering . . . . . . . . . . . . . 10-36Washer . . . . . . . . . . . . . . . . . . . . . 10-37
Fog LampsBulb Replacement . . . . . . . . . . . . . 6-5
Folding Mirrors . . . . . . . . . . . . . . . . 2-16Front Air Dam . . . . . . . . . . . . . . . . . 9-19Front Fog LampsLight . . . . . . . . . . . . . . . . . . . . . . . . . .5-25
Front SeatsAdjustment . . . . . . . . . . . . . . . . . . . . 3-2Heated . . . . . . . . . . . . . . . . . . . . . . . . 3-8
Fuel . . . . . . . . . . . . . . . . . . . . . . . . . . . 9-48Additives . . . . . . . . . . . . . . . . . . . . .9-50Filling a Portable FuelContainer . . . . . . . . . . . . . . . . . . .9-54
Filling the Tank . . . . . . . . . . . . . . .9-52Fuels in Foreign Countries . . . .9-50Gasoline Specifications . . . . . . .9-49Gauge . . . . . . . . . . . . . . . . . . . . . . . . 5-11Recommended . . . . . . . . . . . . . . .9-49Requirements, California . . . . .9-50System Messages . . . . . . . . . . . .5-41
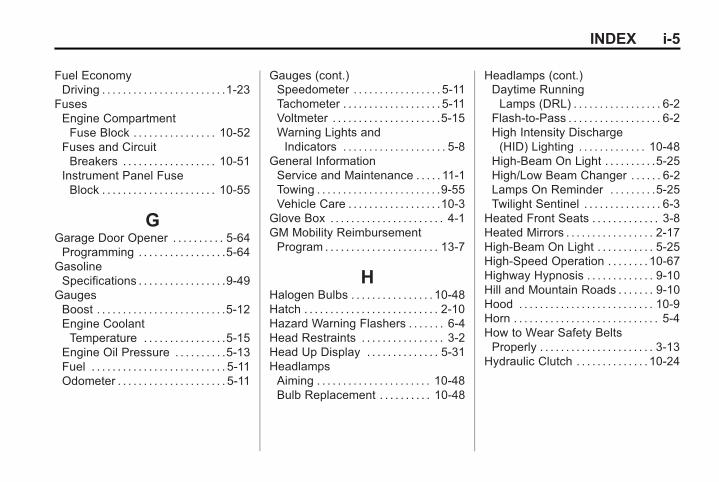
Black plate (5,1)Chevrolet Corvette Owner Manual - 2011
INDEX i-5
Fuel EconomyDriving . . . . . . . . . . . . . . . . . . . . . . . .1-23
FusesEngine CompartmentFuse Block . . . . . . . . . . . . . . . . 10-52
Fuses and CircuitBreakers . . . . . . . . . . . . . . . . . . 10-51
Instrument Panel FuseBlock . . . . . . . . . . . . . . . . . . . . . . 10-55
GGarage Door Opener . . . . . . . . . . 5-64Programming . . . . . . . . . . . . . . . . .5-64
GasolineSpecifications . . . . . . . . . . . . . . . . .9-49
GaugesBoost . . . . . . . . . . . . . . . . . . . . . . . . .5-12Engine CoolantTemperature . . . . . . . . . . . . . . . .5-15
Engine Oil Pressure . . . . . . . . . .5-13Fuel . . . . . . . . . . . . . . . . . . . . . . . . . . 5-11Odometer . . . . . . . . . . . . . . . . . . . . . 5-11
Gauges (cont.)Speedometer . . . . . . . . . . . . . . . . . 5-11Tachometer . . . . . . . . . . . . . . . . . . . 5-11Voltmeter . . . . . . . . . . . . . . . . . . . . .5-15Warning Lights andIndicators . . . . . . . . . . . . . . . . . . . . 5-8
General InformationService and Maintenance . . . . . 11-1Towing . . . . . . . . . . . . . . . . . . . . . . . .9-55Vehicle Care . . . . . . . . . . . . . . . . . .10-3
Glove Box . . . . . . . . . . . . . . . . . . . . . . 4-1GM Mobility ReimbursementProgram . . . . . . . . . . . . . . . . . . . . . . 13-7
HHalogen Bulbs . . . . . . . . . . . . . . . . 10-48Hatch . . . . . . . . . . . . . . . . . . . . . . . . . . 2-10Hazard Warning Flashers . . . . . . . 6-4Head Restraints . . . . . . . . . . . . . . . . 3-2Head Up Display . . . . . . . . . . . . . . 5-31HeadlampsAiming . . . . . . . . . . . . . . . . . . . . . . 10-48Bulb Replacement . . . . . . . . . . 10-48
Headlamps (cont.)Daytime RunningLamps (DRL) . . . . . . . . . . . . . . . . . 6-2
Flash-to-Pass . . . . . . . . . . . . . . . . . . 6-2High Intensity Discharge(HID) Lighting . . . . . . . . . . . . . 10-48
High-Beam On Light . . . . . . . . . .5-25High/Low Beam Changer . . . . . . 6-2Lamps On Reminder . . . . . . . . .5-25Twilight Sentinel . . . . . . . . . . . . . . . 6-3
Heated Front Seats . . . . . . . . . . . . . 3-8Heated Mirrors . . . . . . . . . . . . . . . . . 2-17High-Beam On Light . . . . . . . . . . . 5-25High-Speed Operation . . . . . . . . 10-67Highway Hypnosis . . . . . . . . . . . . . 9-10Hill and Mountain Roads . . . . . . . 9-10Hood . . . . . . . . . . . . . . . . . . . . . . . . . . 10-9Horn . . . . . . . . . . . . . . . . . . . . . . . . . . . . 5-4How to Wear Safety BeltsProperly . . . . . . . . . . . . . . . . . . . . . . 3-13
Hydraulic Clutch . . . . . . . . . . . . . . 10-24
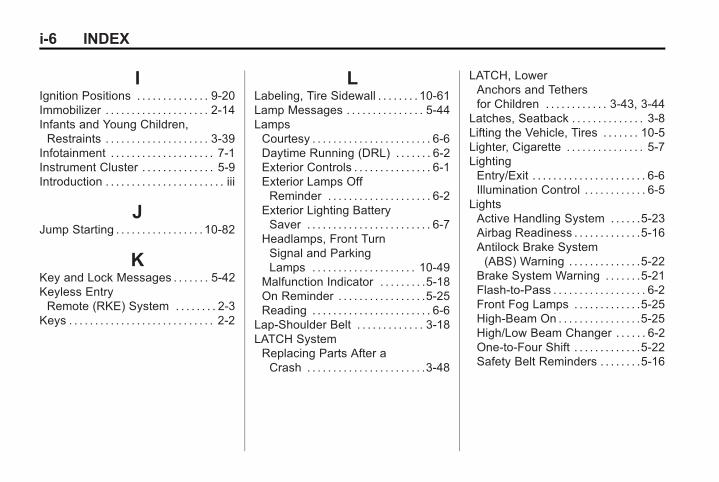
Black plate (6,1)Chevrolet Corvette Owner Manual - 2011
i-6 INDEX
IIgnition Positions . . . . . . . . . . . . . . 9-20Immobilizer . . . . . . . . . . . . . . . . . . . . 2-14Infants and Young Children,Restraints . . . . . . . . . . . . . . . . . . . . 3-39
Infotainment . . . . . . . . . . . . . . . . . . . . 7-1Instrument Cluster . . . . . . . . . . . . . . 5-9Introduction . . . . . . . . . . . . . . . . . . . . . . . iii
JJump Starting . . . . . . . . . . . . . . . . . 10-82
KKey and Lock Messages . . . . . . . 5-42Keyless EntryRemote (RKE) System . . . . . . . . 2-3
Keys . . . . . . . . . . . . . . . . . . . . . . . . . . . . 2-2
LLabeling, Tire Sidewall . . . . . . . . 10-61Lamp Messages . . . . . . . . . . . . . . . 5-44LampsCourtesy . . . . . . . . . . . . . . . . . . . . . . . 6-6Daytime Running (DRL) . . . . . . . 6-2Exterior Controls . . . . . . . . . . . . . . . 6-1Exterior Lamps OffReminder . . . . . . . . . . . . . . . . . . . . 6-2
Exterior Lighting BatterySaver . . . . . . . . . . . . . . . . . . . . . . . . 6-7
Headlamps, Front TurnSignal and ParkingLamps . . . . . . . . . . . . . . . . . . . . 10-49
Malfunction Indicator . . . . . . . . .5-18On Reminder . . . . . . . . . . . . . . . . .5-25Reading . . . . . . . . . . . . . . . . . . . . . . . 6-6
Lap-Shoulder Belt . . . . . . . . . . . . . 3-18LATCH SystemReplacing Parts After aCrash . . . . . . . . . . . . . . . . . . . . . . .3-48
LATCH, LowerAnchors and Tethersfor Children . . . . . . . . . . . . 3-43, 3-44
Latches, Seatback . . . . . . . . . . . . . . 3-8Lifting the Vehicle, Tires . . . . . . . 10-5Lighter, Cigarette . . . . . . . . . . . . . . . 5-7LightingEntry/Exit . . . . . . . . . . . . . . . . . . . . . . 6-6Illumination Control . . . . . . . . . . . . 6-5
LightsActive Handling System . . . . . .5-23Airbag Readiness . . . . . . . . . . . . .5-16Antilock Brake System(ABS) Warning . . . . . . . . . . . . . .5-22
Brake System Warning . . . . . . .5-21Flash-to-Pass . . . . . . . . . . . . . . . . . . 6-2Front Fog Lamps . . . . . . . . . . . . .5-25High-Beam On . . . . . . . . . . . . . . . .5-25High/Low Beam Changer . . . . . . 6-2One-to-Four Shift . . . . . . . . . . . . .5-22Safety Belt Reminders . . . . . . . .5-16

Black plate (7,1)Chevrolet Corvette Owner Manual - 2011
INDEX i-7
Lights (cont.)Security . . . . . . . . . . . . . . . . . . . . . .5-24Tire Pressure . . . . . . . . . . . . . . . . .5-24Traction Control System(TCS) Warning . . . . . . . . . . . . . .5-23
Limited-Slip Rear Axle . . . . . . . . . 9-43LocksAutomatic Door . . . . . . . . . . . . . . .2-10Door . . . . . . . . . . . . . . . . . . . . . . . . . . . 2-8Lockout Protection . . . . . . . . . . . .2-10Power Door . . . . . . . . . . . . . . . . . . . . 2-9
Loss of Control . . . . . . . . . . . . . . . . . 9-6Low-Profile Tires . . . . . . . . . . . . . . 10-60Lower Anchors andTethers for Children(LATCH System) . . . . . . . 3-43, 3-44
Lumbar Adjustment . . . . . . . . . . . . . 3-6Front Seats . . . . . . . . . . . . . . . . . . . . 3-6
MMaintenanceRecords . . . . . . . . . . . . . . . . . . . . . . 11-9
Maintenance ScheduleRecommended Fluids andLubricants . . . . . . . . . . . . . . . . . . . 11-6
Scheduled Maintenance . . . . . . 11-2Malfunction Indicator Lamp . . . . 5-18Manual Mode . . . . . . . . . . . . . . . . . . 9-29Manual Transmission . . . . . . . . . . 9-32Fluid . . . . . . . . . . . . . . . . . . . . . . . . 10-23
Memory Features . . . . . . . . . . . . . . . 1-8MessagesAnti-Theft Alarm System . . . . . .5-50Battery Voltage andCharging . . . . . . . . . . . . . . . . . . . .5-35
Brake System . . . . . . . . . . . . . . . .5-36Convertible Top . . . . . . . . . . . . . . .5-37
Messages (cont.)Door Ajar . . . . . . . . . . . . . . . . . . . . .5-39Engine Cooling System . . . . . . .5-39Engine Oil . . . . . . . . . . . . . . . . . . . .5-40Engine Power . . . . . . . . . . . . . . . .5-41Fuel System . . . . . . . . . . . . . . . . . .5-41Key and Lock . . . . . . . . . . . . . . . . .5-42Lamp . . . . . . . . . . . . . . . . . . . . . . . . .5-44Ride Control System . . . . . . . . . .5-44Safety Belt . . . . . . . . . . . . . . . . . . . .5-49Service Vehicle . . . . . . . . . . . . . . .5-50Starting the Vehicle . . . . . . . . . . .5-50Tire . . . . . . . . . . . . . . . . . . . . . . . . . . .5-51Transmission . . . . . . . . . . . . . . . . .5-53Vehicle . . . . . . . . . . . . . . . . . . . . . . .5-35Vehicle Reminder . . . . . . . . . . . . .5-54Washer Fluid . . . . . . . . . . . . . . . . .5-54
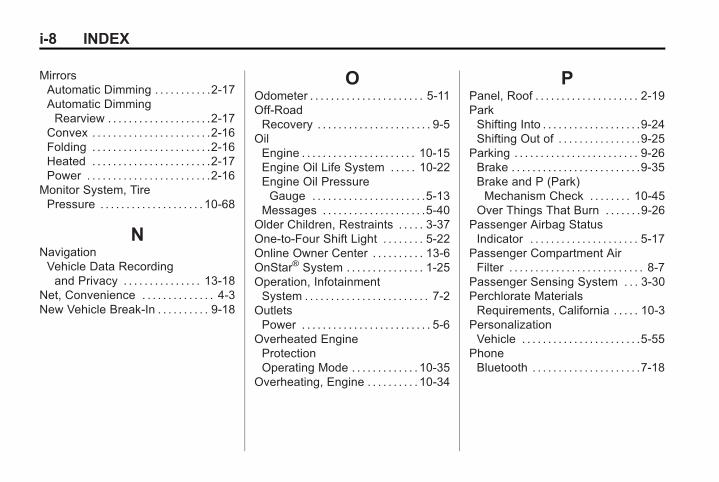
Black plate (8,1)Chevrolet Corvette Owner Manual - 2011
i-8 INDEX
MirrorsAutomatic Dimming . . . . . . . . . . .2-17Automatic DimmingRearview . . . . . . . . . . . . . . . . . . . .2-17
Convex . . . . . . . . . . . . . . . . . . . . . . .2-16Folding . . . . . . . . . . . . . . . . . . . . . . .2-16Heated . . . . . . . . . . . . . . . . . . . . . . .2-17Power . . . . . . . . . . . . . . . . . . . . . . . .2-16
Monitor System, TirePressure . . . . . . . . . . . . . . . . . . . . 10-68
NNavigationVehicle Data Recordingand Privacy . . . . . . . . . . . . . . . 13-18
Net, Convenience . . . . . . . . . . . . . . 4-3New Vehicle Break-In . . . . . . . . . . 9-18
OOdometer . . . . . . . . . . . . . . . . . . . . . . 5-11Off-RoadRecovery . . . . . . . . . . . . . . . . . . . . . . 9-5
OilEngine . . . . . . . . . . . . . . . . . . . . . . 10-15Engine Oil Life System . . . . . 10-22Engine Oil PressureGauge . . . . . . . . . . . . . . . . . . . . . .5-13
Messages . . . . . . . . . . . . . . . . . . . .5-40Older Children, Restraints . . . . . 3-37One-to-Four Shift Light . . . . . . . . 5-22Online Owner Center . . . . . . . . . . 13-6OnStar® System . . . . . . . . . . . . . . . 1-25Operation, InfotainmentSystem . . . . . . . . . . . . . . . . . . . . . . . . 7-2
OutletsPower . . . . . . . . . . . . . . . . . . . . . . . . . 5-6
Overheated EngineProtectionOperating Mode . . . . . . . . . . . . . 10-35
Overheating, Engine . . . . . . . . . . 10-34
PPanel, Roof . . . . . . . . . . . . . . . . . . . . 2-19ParkShifting Into . . . . . . . . . . . . . . . . . . .9-24Shifting Out of . . . . . . . . . . . . . . . .9-25
Parking . . . . . . . . . . . . . . . . . . . . . . . . 9-26Brake . . . . . . . . . . . . . . . . . . . . . . . . .9-35Brake and P (Park)Mechanism Check . . . . . . . . 10-45
Over Things That Burn . . . . . . .9-26Passenger Airbag StatusIndicator . . . . . . . . . . . . . . . . . . . . . 5-17
Passenger Compartment AirFilter . . . . . . . . . . . . . . . . . . . . . . . . . . 8-7
Passenger Sensing System . . . 3-30Perchlorate MaterialsRequirements, California . . . . . 10-3
PersonalizationVehicle . . . . . . . . . . . . . . . . . . . . . . .5-55
PhoneBluetooth . . . . . . . . . . . . . . . . . . . . .7-18

Black plate (9,1)Chevrolet Corvette Owner Manual - 2011
INDEX i-9
PowerDoor Locks . . . . . . . . . . . . . . . . . . . . 2-9Mirrors . . . . . . . . . . . . . . . . . . . . . . . .2-16Outlets . . . . . . . . . . . . . . . . . . . . . . . . 5-6Protection, Battery . . . . . . . . . . . . . 6-7Retained Accessory (RAP) . . .9-23Seat Adjustment . . . . . . . . . . . . . . . 3-3Steering Fluid . . . . . . . . . . . . . . . 10-36Windows . . . . . . . . . . . . . . . . . . . . .2-18
Pregnancy, Using SafetyBelts . . . . . . . . . . . . . . . . . . . . . . . . . 3-20
PrivacyRadio FrequencyIdentification (RFID) . . . . . . . 13-19
ProgramCourtesy Transportation . . . . .13-11
Proposition 65 Warning,California . . . . . . . . . . . . . . . . . . . . . 10-3
RRacing or Other CompetitiveDriving . . . . . . . . . . . . . . . . . . . . . . . . 9-7
Radio FrequencyIdentification (RFID) . . . . . . . . 13-19Statement . . . . . . . . . . . . . . . . . . 13-19
RadiosAM-FM Radio . . . . . . . . . . . . . . . . . . 7-5Reception . . . . . . . . . . . . . . . . . . . .7-10Satellite . . . . . . . . . . . . . . . . . . . . . . . . 7-8
Reading Lamps . . . . . . . . . . . . . . . . . 6-6Rear Axle . . . . . . . . . . . . . . . . . . . . . 10-44Limited-Slip . . . . . . . . . . . . . . . . . . .9-43
Rear Storage . . . . . . . . . . . . . . . . . . . 4-1Rearview MirrorsAutomatic Dimming . . . . . . . . . . .2-17
Reclining Seatbacks . . . . . . . . . . . . 3-6Recommended Fluids andLubricants . . . . . . . . . . . . . . . . . . . . 11-6
Recommended Fuel . . . . . . . . . . . 9-49RecordsMaintenance . . . . . . . . . . . . . . . . . . 11-9
Recreational VehicleTowing . . . . . . . . . . . . . . . . . . . . . . 10-86
Reimbursement Program,GM Mobility . . . . . . . . . . . . . . . . . . 13-7
Remote Keyless Entry (RKE)System . . . . . . . . . . . . . . . . . . . . . . . . 2-3
Replacement Bulbs . . . . . . . . . . . 10-50Replacement PartsAirbags . . . . . . . . . . . . . . . . . . . . . . .3-36Maintenance . . . . . . . . . . . . . . . . . . 11-8
Replacing Airbag System . . . . . . 3-36Replacing LATCH SystemParts After a Crash . . . . . . . . . . . 3-48
Replacing Safety BeltSystem Parts After aCrash . . . . . . . . . . . . . . . . . . . . . . . . 3-22
Reporting Safety DefectsCanadian Government . . . . . . 13-16General Motors . . . . . . . . . . . . . 13-17U.S. Government . . . . . . . . . . . 13-16
Retained AccessoryPower (RAP) . . . . . . . . . . . . . . . . . 9-23
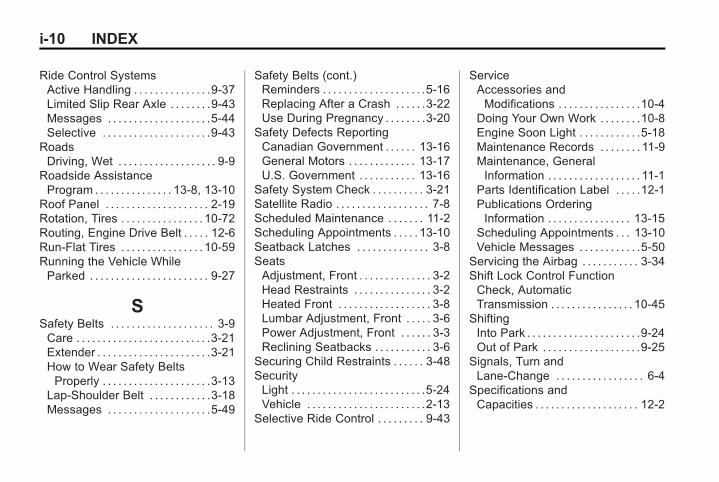
Black plate (10,1)Chevrolet Corvette Owner Manual - 2011
i-10 INDEX
Ride Control SystemsActive Handling . . . . . . . . . . . . . . .9-37Limited Slip Rear Axle . . . . . . . .9-43Messages . . . . . . . . . . . . . . . . . . . .5-44Selective . . . . . . . . . . . . . . . . . . . . .9-43
RoadsDriving, Wet . . . . . . . . . . . . . . . . . . . 9-9
Roadside AssistanceProgram . . . . . . . . . . . . . . . 13-8, 13-10
Roof Panel . . . . . . . . . . . . . . . . . . . . 2-19Rotation, Tires . . . . . . . . . . . . . . . . 10-72Routing, Engine Drive Belt . . . . . 12-6Run-Flat Tires . . . . . . . . . . . . . . . . 10-59Running the Vehicle WhileParked . . . . . . . . . . . . . . . . . . . . . . . 9-27
SSafety Belts . . . . . . . . . . . . . . . . . . . . 3-9Care . . . . . . . . . . . . . . . . . . . . . . . . . .3-21Extender . . . . . . . . . . . . . . . . . . . . . .3-21How to Wear Safety BeltsProperly . . . . . . . . . . . . . . . . . . . . .3-13
Lap-Shoulder Belt . . . . . . . . . . . .3-18Messages . . . . . . . . . . . . . . . . . . . .5-49
Safety Belts (cont.)Reminders . . . . . . . . . . . . . . . . . . . .5-16Replacing After a Crash . . . . . .3-22Use During Pregnancy . . . . . . . .3-20
Safety Defects ReportingCanadian Government . . . . . . 13-16General Motors . . . . . . . . . . . . . 13-17U.S. Government . . . . . . . . . . . 13-16
Safety System Check . . . . . . . . . . 3-21Satellite Radio . . . . . . . . . . . . . . . . . . 7-8Scheduled Maintenance . . . . . . . 11-2Scheduling Appointments . . . . . 13-10Seatback Latches . . . . . . . . . . . . . . 3-8SeatsAdjustment, Front . . . . . . . . . . . . . . 3-2Head Restraints . . . . . . . . . . . . . . . 3-2Heated Front . . . . . . . . . . . . . . . . . . 3-8Lumbar Adjustment, Front . . . . . 3-6Power Adjustment, Front . . . . . . 3-3Reclining Seatbacks . . . . . . . . . . . 3-6
Securing Child Restraints . . . . . . 3-48SecurityLight . . . . . . . . . . . . . . . . . . . . . . . . . .5-24Vehicle . . . . . . . . . . . . . . . . . . . . . . .2-13
Selective Ride Control . . . . . . . . . 9-43
ServiceAccessories andModifications . . . . . . . . . . . . . . . .10-4
Doing Your Own Work . . . . . . . .10-8Engine Soon Light . . . . . . . . . . . .5-18Maintenance Records . . . . . . . . 11-9Maintenance, GeneralInformation . . . . . . . . . . . . . . . . . . 11-1
Parts Identification Label . . . . .12-1Publications OrderingInformation . . . . . . . . . . . . . . . . 13-15
Scheduling Appointments . . . 13-10Vehicle Messages . . . . . . . . . . . .5-50
Servicing the Airbag . . . . . . . . . . . 3-34Shift Lock Control FunctionCheck, AutomaticTransmission . . . . . . . . . . . . . . . . 10-45
ShiftingInto Park . . . . . . . . . . . . . . . . . . . . . .9-24Out of Park . . . . . . . . . . . . . . . . . . .9-25
Signals, Turn andLane-Change . . . . . . . . . . . . . . . . . 6-4
Specifications andCapacities . . . . . . . . . . . . . . . . . . . . 12-2
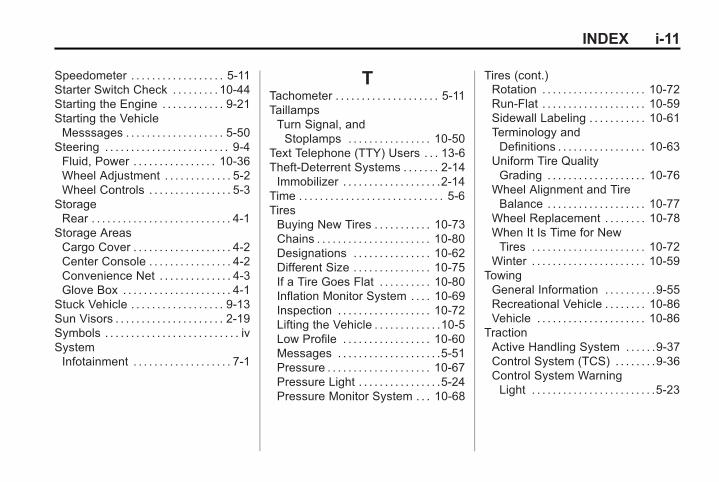
Black plate (11,1)Chevrolet Corvette Owner Manual - 2011
INDEX i-11
Speedometer . . . . . . . . . . . . . . . . . . 5-11Starter Switch Check . . . . . . . . . 10-44Starting the Engine . . . . . . . . . . . . 9-21Starting the VehicleMesssages . . . . . . . . . . . . . . . . . . . 5-50
Steering . . . . . . . . . . . . . . . . . . . . . . . . 9-4Fluid, Power . . . . . . . . . . . . . . . . 10-36Wheel Adjustment . . . . . . . . . . . . . 5-2Wheel Controls . . . . . . . . . . . . . . . . 5-3
StorageRear . . . . . . . . . . . . . . . . . . . . . . . . . . . 4-1
Storage AreasCargo Cover . . . . . . . . . . . . . . . . . . . 4-2Center Console . . . . . . . . . . . . . . . . 4-2Convenience Net . . . . . . . . . . . . . . 4-3Glove Box . . . . . . . . . . . . . . . . . . . . . 4-1
Stuck Vehicle . . . . . . . . . . . . . . . . . . 9-13Sun Visors . . . . . . . . . . . . . . . . . . . . . 2-19Symbols . . . . . . . . . . . . . . . . . . . . . . . . . . ivSystemInfotainment . . . . . . . . . . . . . . . . . . . 7-1
TTachometer . . . . . . . . . . . . . . . . . . . . 5-11TaillampsTurn Signal, andStoplamps . . . . . . . . . . . . . . . . 10-50
Text Telephone (TTY) Users . . . 13-6Theft-Deterrent Systems . . . . . . . 2-14Immobilizer . . . . . . . . . . . . . . . . . . .2-14
Time . . . . . . . . . . . . . . . . . . . . . . . . . . . . 5-6TiresBuying New Tires . . . . . . . . . . . 10-73Chains . . . . . . . . . . . . . . . . . . . . . . 10-80Designations . . . . . . . . . . . . . . . 10-62Different Size . . . . . . . . . . . . . . . 10-75If a Tire Goes Flat . . . . . . . . . . 10-80Inflation Monitor System . . . . 10-69Inspection . . . . . . . . . . . . . . . . . . 10-72Lifting the Vehicle . . . . . . . . . . . . .10-5Low Profile . . . . . . . . . . . . . . . . . 10-60Messages . . . . . . . . . . . . . . . . . . . .5-51Pressure . . . . . . . . . . . . . . . . . . . . 10-67Pressure Light . . . . . . . . . . . . . . . .5-24Pressure Monitor System . . . 10-68
Tires (cont.)Rotation . . . . . . . . . . . . . . . . . . . . 10-72Run-Flat . . . . . . . . . . . . . . . . . . . . 10-59Sidewall Labeling . . . . . . . . . . . 10-61Terminology andDefinitions . . . . . . . . . . . . . . . . . 10-63
Uniform Tire QualityGrading . . . . . . . . . . . . . . . . . . . 10-76
Wheel Alignment and TireBalance . . . . . . . . . . . . . . . . . . . 10-77
Wheel Replacement . . . . . . . . 10-78When It Is Time for NewTires . . . . . . . . . . . . . . . . . . . . . . 10-72
Winter . . . . . . . . . . . . . . . . . . . . . . 10-59TowingGeneral Information . . . . . . . . . .9-55Recreational Vehicle . . . . . . . . 10-86Vehicle . . . . . . . . . . . . . . . . . . . . . 10-86
TractionActive Handling System . . . . . .9-37Control System (TCS) . . . . . . . .9-36Control System WarningLight . . . . . . . . . . . . . . . . . . . . . . . .5-23
Black plate (12,1)Chevrolet Corvette Owner Manual - 2011
i-12 INDEX
Traction (cont.)Limited-Slip Rear Axle . . . . . . . .9-43Selective Ride Control . . . . . . . .9-43
TransmissionAutomatic . . . . . . . . . . . . . . . . . . . . .9-28Fluid, Automatic . . . . . . . . . . . . 10-23Fluid, Manual . . . . . . . . . . . . . . . 10-23Messages . . . . . . . . . . . . . . . . . . . .5-53One-to-Four Shift Light . . . . . . .5-22
Transportation Program,Courtesy . . . . . . . . . . . . . . . . . . . . 13-11
Turn and Lane-ChangeSignals . . . . . . . . . . . . . . . . . . . . . . . . 6-4
Twilight Sentinel . . . . . . . . . . . . . . . . 6-3
UUniform Tire QualityGrading . . . . . . . . . . . . . . . . . . . . . 10-76
Universal Remote System . . . . . 5-64Operation . . . . . . . . . . . . . . . . . . . . .5-69Programming . . . . . . . . . . . . . . . . .5-64
Using this Manual . . . . . . . . . . . . . . . . iv
VVehicleCanadian Owners . . . . . . . . . . . . . . . iiiControl . . . . . . . . . . . . . . . . . . . . . . . . 9-3IdentificationNumber (VIN) . . . . . . . . . . . . . . .12-1
Load Limits . . . . . . . . . . . . . . . . . . .9-14Messages . . . . . . . . . . . . . . . . . . . .5-35Personalization . . . . . . . . . . . . . . .5-55Reminder Messages . . . . . . . . . .5-54Security . . . . . . . . . . . . . . . . . . . . . .2-13Towing . . . . . . . . . . . . . . . . . . . . . . 10-86
Vehicle CareTire Pressure . . . . . . . . . . . . . . . 10-66
Vehicle IdentificationService Parts IdentificationLabel . . . . . . . . . . . . . . . . . . . . . . . .12-1
Ventilation, Air . . . . . . . . . . . . . . . . . . 8-6Visors . . . . . . . . . . . . . . . . . . . . . . . . . 2-19Voltmeter Gauge . . . . . . . . . . . . . . 5-15
WWarningBrake System Light . . . . . . . . . . .5-21
Warning Lights, Gauges, andIndicators . . . . . . . . . . . . . . . . . . . . . 5-8
Warnings . . . . . . . . . . . . . . . . . . . . . . . . . ivCautions and Danger . . . . . . . . . . . .ivHazard Flashers . . . . . . . . . . . . . . . 6-4
Washer Fluid . . . . . . . . . . . . . . . . . 10-37Washer Fluid Messages . . . . . . . 5-54WheelsAlignment and TireBalance . . . . . . . . . . . . . . . . . . . 10-77
Different Size . . . . . . . . . . . . . . . 10-75Replacement . . . . . . . . . . . . . . . 10-78
When It Is Time for NewTires . . . . . . . . . . . . . . . . . . . . . . . . 10-72
Windows . . . . . . . . . . . . . . . . . . . . . . 2-18Power . . . . . . . . . . . . . . . . . . . . . . . .2-18
WindshieldReplacement . . . . . . . . . . . . . . . 10-47Wiper/Washer . . . . . . . . . . . . . . . . . 5-4
Winter Driving . . . . . . . . . . . . . . . . . 9-11Winter Tires . . . . . . . . . . . . . . . . . . 10-59Wiper Blade Replacement . . . . 10-46