Embed Size (px)
Citation preview
Owner’s Manual
2013 Rev 1.1.13
4150 East Paris Ave. Kentwood, MI 49512 www.emeraldspa.com 800.766.7727

2
���������������
INTRODUCTION ………………...…………………………………………………………… 3 IMPORTANT SAFETY INSTRUCTIONS …………………..………………………..…………. 4
• General ………..……………...………………………………………………………. 4 • Electrical ………………………………………………………………………………. 5
SPA LOCATION ……………………………………………………………………………… 6
• Outdoor Considerations ……………………………………...………………………….. 6 • Indoor Considerations …………………………………………….…………………….. 6 • Indoor or Outdoor Considerations …………………………………………………….…… 6
INSTALLATION INSTRUCTIONS ………………………………………...………………….. 7 • General Procedures ……………………………………………………….……………. 7 • 240V Systems ………………………………………………………………..………. 7-8 • GFCI Load Center Wiring ………………………………………………………………... 9
FEATURES ……………………..……………………..……………………………………. 10
• Electronics ………………………………………….………………………………… 10 • In-Spa Features …………………………………………………………………….. 11-13
STARTING AND USING YOUR SPA ……………………….……………………………….. 14
• Filling Your Spa ……………………………………..……………………..………….. 14
SPA WATER CARE ………..…………………………………………………………..…… 14 • Filter Cartridge Removal / Replacement ……………………….………………...………...14 • Chemical Safety Tips ……………………..…………...…………………………..….. 15 • Spa Frog In-Line System …………………………..………………………………… 15-16 • Ozone Generator ……………………………………...…………………………..….. 17 • Draining the Water ……………………………………………………………………. 17
MAINTAINING YOUR SPA …………………………………….…………………….……… 18
• Cleaning the Spa Shell ……………………………………………….....……………… 18 • Relamping the Underwater Light ……………………………………………………....… 18 • Winterizing Your Spa ………………………………………………………………..…. 18 • The Spa Cabinet ……………………………………………………...……………….. 18
SPA CONTROLS ………………………………………...…………………………………. 19 • Spa Side Control for Chateau …………………………………………………………… 19 • Spa Side Control for Estate and Manor ………………………………………………… 20-21 • Spa Side Control Troubleshooting / Error Codes …..…………………………..………….. 22
TROUBLESHOOTING ………………………..…………………………………..………… 23 SPA WARRANTY INFORMATION ………………………………………..……………… 24-25

3
Congratulations on your purchase of the finest spa on the market today. Emerald Spa Corporation welcomes you to the Emerald Spa life-style! We are confident that this purchase will fulfill all your comfort, therapy, and relaxation needs. With proper care, your spa will provide many years of comfort and pleasure. Please take the time to read all of the instructions before you install your Emerald Spa. This Owner’s Manual will help you understand all the features of your spa and ensure that you get the most from your investment. Remember, your beautiful new spa is a powerful appliance! You owe it to yourself, your family, and your friends, to make sure that the spa is installed correctly and safely. This manual explains safety precautions, installation instructions, operating directions, and maintenance procedures. If you have questions after reading this manual, please call Emerald Spa at 1.800.766.7727. Read and understand all safety, installation, operating instructions, and all warnings and cautions before adding water or attaching electrical power.
�� �������
Emerald Spa Purchase Information
Spa Model:
Power Pack Model:
Serial #:
Date of Purchase:

4
1. READ AND FOLLOW ALL INSTRUCTIONS 2. DANGER - Risk of Accidental Drowning. Extreme caution must be exercised to prevent unauthorized access by children. To
avoid accidents, ensure that children cannot use this spa unless they are supervised at all times. 3. DANGER - Risk of Injury. The suction fittings in this spa are sized to match the specific water flow created by the pump.
Should the need arise to replace the suction fittings or the pump, be sure that the flow rates are compatible. Never operate the spa if the suction fittings are broken or missing. Never replace a suction fitting with one rated less than the flow rate marked on the original fitting.
4. DANGER - Risk of Electric Shock. Install at least 5 feet (1.52 m) from all metal surfaces. As an alternative, a spa may be installed within 5 feet of metal surfaces if each metal surface is permanently connected by a minimum No. 8 AWG (8.4 mm2) solid copper conductor to the wire connector on the terminal box that is provided for this purpose.
5. DANGER - Risk of Electric Shock. Do not permit any electric appliance, such as a light, telephone, radio, or television, within 5 feet (1.52 m) of a spa.
6. WARNING – To reduce the risk of injury, the water in the spa should never exceed 104°F (40°C). Water temperatures between 100°F (38°C) and 104°F (40°C) are considered safe for a healthy adult for a 10-to-15 minute time period. Lower water temperatures are recommend for extended use (exceeding 10-15 minutes) and for younger adults/children.
7. WARNING – To reduce the risk of injury, do not permit children to use this product unless they are closely supervised at all times.
8. A wire connector is provided on this unit to connect a minimum No. 8 AWG (8.4mm2) solid copper conductor between this unit and any metal equipment, metal enclosures of electrical equipment, metal water pipe, or conduit within 5 feet (1.52 m) of the unit.
9. Excessive water temperatures have a high potential for causing fetal damage during pregnancy. Pregnant women should limit spa water temperatures to 100°F (38°C) and only use the spa under the direction of a licensed physician.
10. The use of alcohol, drugs, or medication before or during spa use may lead to unconsciousness with the possibility of drowning.
11. Persons taking medication should consult a licensed physician before entering the spa. 12. Persons suffering from obesity or with a medical history of heart disease, low or high blood pressure, circulatory system
problems, or diabetes should consult a licensed physician before entering the spa. 13. CAUSES, SYMPTOMS AND EFFECTS OF HYPERTHERMIA - Hyperthermia occurs when the internal temperature of the
body reaches a level several degrees above the normal body temperature of 98.6° F. The symptoms of hyperthermia include an increase in the internal temperature of the body, dizziness, lethargy, drowsiness, and fainting. The effects of hyperthermia include (1) failure to perceive heat, (2) failure to recognize the need to exit spa, (3) unawareness of impending hazard, (4) fetal damage in pregnant women, (5) physical inability to exit the spa, (6) unconsciousness resulting in the danger of drowning.
14. The use of alcohol, drugs, or medication can greatly increase the risk of fatal hyperthermia. 15. During winter months where the temperature is consistently below freezing, check your spa periodically to ensure that it is
operating correctly and that the power to the spa has not been interrupted as to protect the water lines from freezing. 16. Do not use your spa alone. 17. People with infectious diseases should not use the spa. 18. To avoid injury, use care when entering or exiting the spa. 19. Do not use the spa immediately following strenuous exercise. 20. Maintain proper water chemistry in accordance to manufacturers’ instruction.
���� �������������� ������
General
When installing and using the electrical equipment, basic safety precautions should always be followed, including the following:

5
1. Read & follow all safety instructions. 2. A green colored terminal or a terminal marked G, GR, Ground, Grounding, or the international symbol is located inside the
supply terminal box or compartment. To reduce the risk of electric shock, this terminal must be connected to the grounding means provided in the electric supply panel with a continuous copper wire equivalent in size to the circuit conductors supplying this equipment.
3. The equipment must be provided with a ground fault circuit interrupter located in the disconnect switch, as installed by a licensed electrician.
4. The electrical service panel should be equipped with a 50-amp switch. 5. The electrical supply for the spa must include a suitably rated switch or circuit breaker to open all ungrounded supply
conductors, to comply with section 422-30 of the National Electrical Code, ANSI/NFPA 70-2002. The disconnecting means must be readily accessible to the spa occupant, but must not be within 5 feet (1.52 m) of the spa.
6. All field-installed metal components such as rails, ladders, drains or other similar hardware within 3 meters of the spa shall be bonded to the equipment grounding bus with copper wire conductors not smaller than No. 6 AWG.
7. For units intended for use other than single family dwellings, a clearly labeled emergency switch shall be provided as part of the installation. The switch shall be readily accessible to the occupants and shall be installed at least 5 feet (1.52 m) away, adjacent to, and within sight of, the unit.
8. WARNING: Improper electrical connections or conductor sizing may cause the equipment module to operate improperly, create the potential for an electrical hazard, and may void the warranty.
9. CAUTION: Use only approved pressure-type wire splicing lugs or connectors suitable for the size and type of wiring used. If your spa is equipped with audio components, the following instructions also apply: 1. CAUTION - Risk of Electric Shock. Do not leave component access panel open. 2. CAUTION - Risk of Electric Shock. Replace components only with identical components. 3. CAUTION - Do not operate the audio components while inside the spa. 4. WARNING - Prevent Electrocution. Do not connect any auxiliary components (for example cable, additional speakers,
headphones, additional audio/video components, etc.) to the system. 5. These units are not provided with an outdoor antennae; when provided, it should be installed in accordance with Article 810
of the National Electrical Code, ANSI/NFPA 70. 6. Do not service this product yourself as opening or removing covers may expose you to dangerous voltage or other risk of
injury. Refer all servicing to qualified service personnel. 7. If the power supply connections or power supply cord(s) are damaged; if water is entering the audio equipment compartment
area; if the protective shields or barriers are showing signs of deterioration; or if there are signs of other potential damage to the unit, turn off the unit at the disconnect switch and refer servicing to qualified service personnel.
8. This unit should be subjected to periodic routine maintenance (for example, once every 3 months) to make sure that the unit is operating properly.
9. Replace damaged cord immediately. 10. Do not bury electrical cables or cords.
���� �������������� ������
Electrical

6
• Walls, ceiling, flooring, and/or hardwood must be able to withstand high humidity. Just like in your bathroom, an exhaust fan would be a good idea.
• Spa Chemicals in the air may corrode certain metals in your home. • A self-draining floor is a great way to ease any worries about spilled water. • Spas must be accessible at all times to permit servicing if needed. Cost associated with the removal of walls, pulling a spa
out of an enclosed area, etc. are not the responsibility of the manufacturer. All costs associated with these types of items will be the sole responsibility of the homeowner.
• Remember that you'll need extra space to store the cover when it is removed. When using our handy cover-lift device, you should allow for an extra 16" of clearance behind the spa.
• The spa must be placed on a solid, flat, and level surface that does not move or shake. • You should consult with a builder or engineer to determine if your floor will support the spa weight. Remember, you must
allow for the spa, water, and people in your total weight calculations. • Be sure your spa is secure from access by young children. We offer a locking spa cover, but we also suggest keeping the
spa room locked and off limits to children.
• Place your spa on a solid, flat, and level surface. We recommend a 4" thick reinforced concrete pad as the best surface. Dirt, sand, concrete pavers, paver stones, etc. are not acceptable surfaces for your spa and these surfaces will void all warranty claims.
• Keep in mind natural elements such as wind, sun, falling leaves, etc. Also consider lighting, visibility from the house, and accessibility.
• We recommend that you locate your spa in a locked fenced-in area to prevent access to the spa by children. • It is a good idea to have a contractor review your proposed site to see that there are no support problems. There are often
local ordinances that need to be met for spa use.
• When installing the spa, provide for adequate drainage to prevent water from entering the equipment module area. • When installing the spa, enable access to the equipment compartment. • Never locate light switches or other electrical components within reach from inside your spa. The equipment module must
remain protected by the skirting of the spa. Wherever you locate your spa, you will need to have access to water in order to fill it. Also, you will need to be able to drain your spa periodically. Since your spa water will likely have chemicals in it, you won't want to drain your spa on the lawn or into a garden. Be sure you can reach a garden hose from the spa to where you plan to drain the water. Never let water get on the equipment module that is located in the door opening of your spa.
�����������
Outdoor Considerations
Your spa has been conveniently designed for use in either an indoor or outdoor setting. While selecting an appropriate location for your spa, there are important things to consider.
Indoor Considerations
Indoor or Outdoor Considerations
MINIMUM 16 INCHES
4 INCH THICK CONCRETE PAD
RECOMMENDED SUPPORT

7
This section covers the installation of your spa. All electrical steps must be performed by a licensed electrician. The spa must be connected to a proper power supply and meet all National Electrical Code (N.E.C.) and local code requirements. The connection must include the conductors necessary for operation and bonding, as required by N.E.C. 1. Remove the spa from its shipping container and retain all safety, operation, and warranty information. 2. Position the spa on a flat, level surface such as concrete, or a wood deck which provides adequate drainage. 3. Position the spa at least 5 feet from all metal surfaces unless each metal surface is permanently connected to a
bonding wire, as indicated in step 4. 4. The spa may be installed within 5 feet of metal surfaces as follows:
• Installation must be in accordance with Article 680-(40-44) of the National Electrical Code, ANSI/NFPA 70-2002.
• Each metal surface must be permanently connected to a bonding wire which is attached to a pressure wire connector provided for that purpose.
• The pressure wire connector is located on the equipment system control enclosure. • The bonding wire must be at least No. 8 AWG (8.4 mm²) solid copper wire, in accordance with article 680-
43E. • The bonding wire must be attached to the pressure wire connector and all metal equipment, metal
enclosures of electrical equipment, metal water pipe, or conduit within 5 feet of the spa.
1. Install a 50-amp, switch in the electrical service panel. 2. The electrical supply for the spa must include a GFCI to shut off the power supply (to comply with section 422-
30 of the National Electrical Code, ANSI/NFPA 70-2002). This disconnecting means must be readily accessible to the spa occupant, however it must not be within 5 feet of the spa (see diagram).
�������������� ������
General Procedures
240V Systems
GFCI At least 5 feet
Service Panel

8
3. Pull four copper current carrying conductors (one each: black, red, white, green). Use either No. 6 AWG 60° C, No. 8 AWG
75° C, or No. 8 AWG 90° C wire, if spa is 50 feet or less away from its power supply.
NOTE: The ground must be equal to or larger than the largest power conductor.
4. Reposition the spa at its final location and route the flexible conduit. 5. Using a 1” conduit connector at the end of the flexible conduit, route wires through an entrance hole cut by your electrician in
the control enclosure, and attach the conduit connector to the control enclosure. 6. Attach power wires to the terminal block. See 240V wiring diagram inside the control enclosure cover.
Attach the wires as follows and shown in graphic below. 7. Complete the conductor connections at the power supply panel. 8. Do not turn power on until instructed to do so in the “Starting and Using Your Spa” section.
240V Systems [continued]
GROUND
LINE 2
NEUTRAL
LINE 1
9
TO HOT TUB SYSTEM BOX
FROM HOUSE BREAKER BOX
GR
OU
ND
RE
D (H
OT)
WH
ITE
(NE
UTR
AL)
BLA
CK
(HO
T)
WHITE
WHITE
RED (HOT)
GFCI LOAD CENTER
GREEN OR BARE COPPER
BLACK
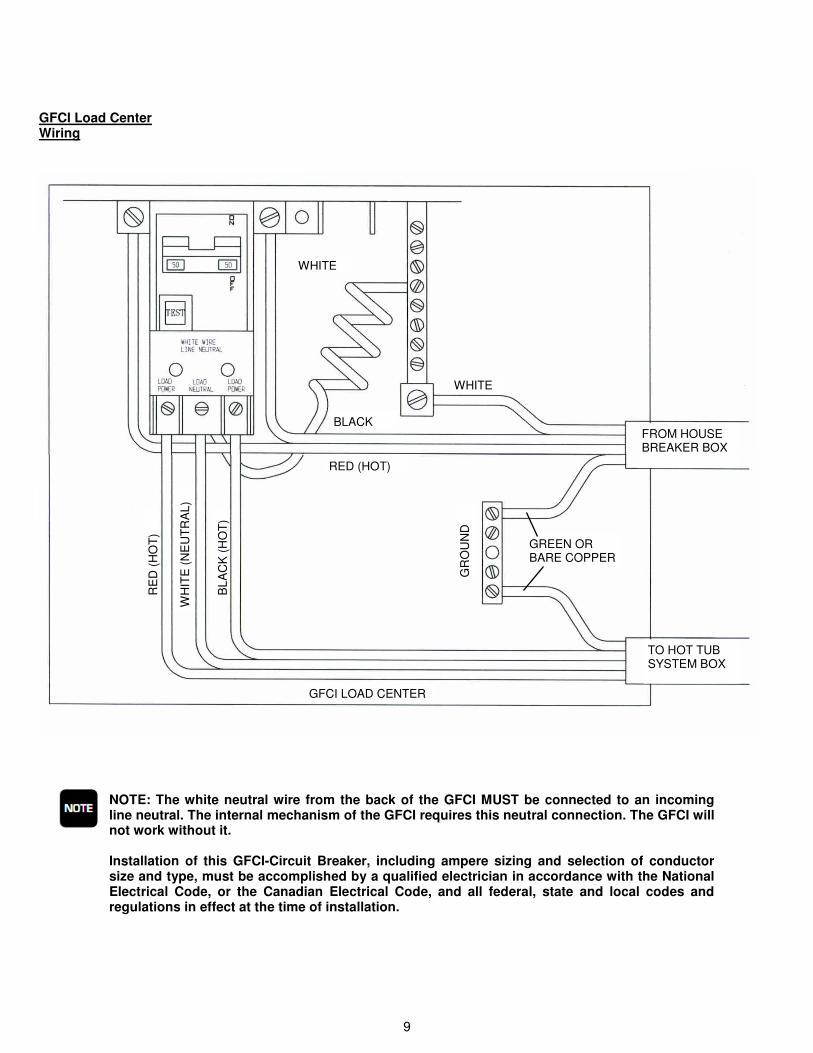
GFCI Load Center Wiring
NOTE: The white neutral wire from the back of the GFCI MUST be connected to an incoming line neutral. The internal mechanism of the GFCI requires this neutral connection. The GFCI will not work without it. Installation of this GFCI-Circuit Breaker, including ampere sizing and selection of conductor size and type, must be accomplished by a qualified electrician in accordance with the National Electrical Code, or the Canadian Electrical Code, and all federal, state and local codes and regulations in effect at the time of installation.

10
The electronic features of each spa series are summarized in the following chart:
����� ���
Electronics
Water Pump(s) (1) 3 HP / 2 Speed (1) 3 HP / 2 Speed (1) 2 HP / 2 Speed (2) 3 HP / 2 Speed
Power Pack IN.XE 3-Output IN.XE 5-Output IN.XE 5-Output
Heater 4.0KW 4.0KW 4.0KW
Light Yes Yes Yes
Control Panel Digital Digital Digital
Ozonator (optional) 120V Ready Ready Ready
Voltage Requirement 240V 240V 240V
Temperature Adjustment Keypad Keypad Keypad
Automatic Time Outs Yes Yes Yes
Preset Filter Cycles Yes Yes Yes
Programmable Filter Cycles: Topside Yes Yes Yes
Sensor Failure Detection Yes Yes Yes
Flow Error Detection Yes Yes Yes
Smart Winter Mode Yes Yes Yes
High Limit Protection Yes Yes Yes
Heater/Status Indicator Yes Yes Yes
Night Vision Backlight Yes Yes Yes
Continuous Digital Water Temperature Display Yes Yes Yes
Digital Time Display No Yes Yes
Digital Operational Status Display Yes Yes Yes
Digital Diagnostic Display Yes Yes Yes
Automatic Filtration Yes Yes Yes
Automatic Water Pump Purge Yes Yes Yes
CHATEAU ESTATE MANOR

11
In-Spa Features
Your spa may be equipped with a variety of therapy jets, controls, and fixtures. Refer to the following charts and identify those features installed on your spa.
NOTE: Take care not to turn the jet face beyond the natural stopping point. If this does occur it may prevent the jet from functioning properly.
Mini Jets* (available in 1-1/2” size only)
A forceful, steady stream of water / air is delivered from these jets when the pump is on high or low speed.
Directional Jets* (available in 2”, 3” & 5” sizes)
Pulsator Jets* (available in 3” & 5” sizes)
MIN. MAX.
MIN. MAX.
Twin Spin Jets* (available in 5” size only)
MIN. MAX.
Directional jets deliver therapy exactly where it’s needed. The jet’s nozzle can be positioned for pinpoint pressure on a sore muscle or specific area of the body.
Our Pulsator jets provide two rotating streams of jetted massage therapy for ultimate comfort. Simply turn the outer ring of the jet to adjust the water flow.
The Twin Spin jet has an unique water flow pattern due to its dual rotating jet nozzles. Turn the outer ring to also moderate the water flowing through the jet.
Whirlpool Jets* (available in 5” size only)
A standard feature on all Manor spas, the Whirlpool jet delivers a high degree of water through its large nozzle opening. Jet action is further enhanced when air is mixed into the stream of the water.
Jet face appearance may be subject to change at any time. * Stainless steel jet option available.
MIN. MAX.

12
In-Spa Features [continued]
MoodStream Jets
A standard feature on all Manor series spas, the moodstream jets are located above the waterline. Utilizing the valve installed above the jet, you can control the intensity of the water stream. The gentle sound of cascading water enhances relaxation and your enjoyment of each spa experience.
Individual Neck Jet Control
Installed on all Manor series spas (optional on Estate series) is a separate valve controlling the intensity of the water pressure for the neck jets. Pressure is controlled by turning the face of the jet and/or by the use of this control valve.
Cup Holders Located along the top edge of the spa are areas to set a cup or soda can. These cup holders are strictly for your convenience when you seek refreshments during use of your spa.
Towel Warmer Option
Optional on Manor & Estate spas is a special compartment built into the cabinet. Simply place your towel or robe in the compartment and the vented heat from the interior of the spa will keep it warm. DANGER: Do NOT use for chemical storage!
LED Lighting Option
Optional LED lighting sets just the right mood. Choose your favorite color, or let multiple colors calmly illuminate the water.
Air Control Valves
The air intake valves are located in various locations along the top coping of the spa. Turn to increase or decrease the amount of air mixed with the water flow. More air adds to the massage effect.

13
In-Spa Features [continued]
Audio System Option
The manufacturer’s instruction manual for Emerald Spa’s Audio System is in the warranty bag located next to the power pack inside the spa cabinet. Consult this manual for important user instructions and proper operation of the system.
Telescoping Weir Skim Filter
The weir skimmer is found on all Emerald Spa models. Its purpose is to skim the water surface. Always keep the water level at least 2” above the opening of the skimmer or damage to the system may result.
Suction Grate The suction grate is the intake opening for the water circulating system. This grate protects you from the powerful suction created by the pump (s) that power your spa.
WARNING: Never block or remove the suction grate. Do not use spa if suction grate is removed!
The Aquasound Audio System consists of two marine grade outdoor speakers mounted in the coping at the corners of the spa, a panel mounted waterproof enclosure capable of playing music from several portable media players including the Apple iPod™, or from the built-in FM tuner. Also included with the Aquasound Audio System is a RF remote which has up to a 30ft range. Please consult the stereo owner’s manual for a list of supported iPod™ devices, and for instructions on the proper operation of the system.
14
��� ��������������� �����
Filling Your Spa Once the electric power has been connected, check the following while the power is OFF: 1. Be sure all fittings to the support system are tight. Hand tighten only! 2. Be sure the drain valve is closed. 3. Your spa is equipped with 2 or 4 push/pull valves. There is one located before the suction side of the
pump and one located adjacent to the discharge side of your heater. If you have a secondary pump, there will be two valves for this pump as well. Pull the push/pull valves OUT so they are open.
4. Using a garden hose, fill with water to 2-4" above the skim filter. Always fill your spa with hard (not softened) water. Do not overfill. After the spa is filled, remove the garden hose.
5. Check the equipment module area for water leaks. If there is water dripping, it is probably a loose connection at the equipment module. You should re-check the tightness of the fittings and placement of the "O"-rings. If you cannot locate the source of the water leak, contact your authorized service dealer.
6. Check that the filter is positioned in the skim/filter system. 7. Activate the power to your spa. Refer to the Control Panel Instruction sheet included with this manual.
Your spa is equipped with what we believe is the finest filtering device available. We call it the Skim / Filter system, and it is one of the few skimmers available which actually skims the water surface. You'll notice a distinct whirlpool being drawn into the system, and floating debris of all sizes will literally "fall" into the unit and be trapped by the filter. It is important that you keep your filter clean, and it is suggested that you check the filter at least once per month and replace it when it becomes loaded with dirt or debris.
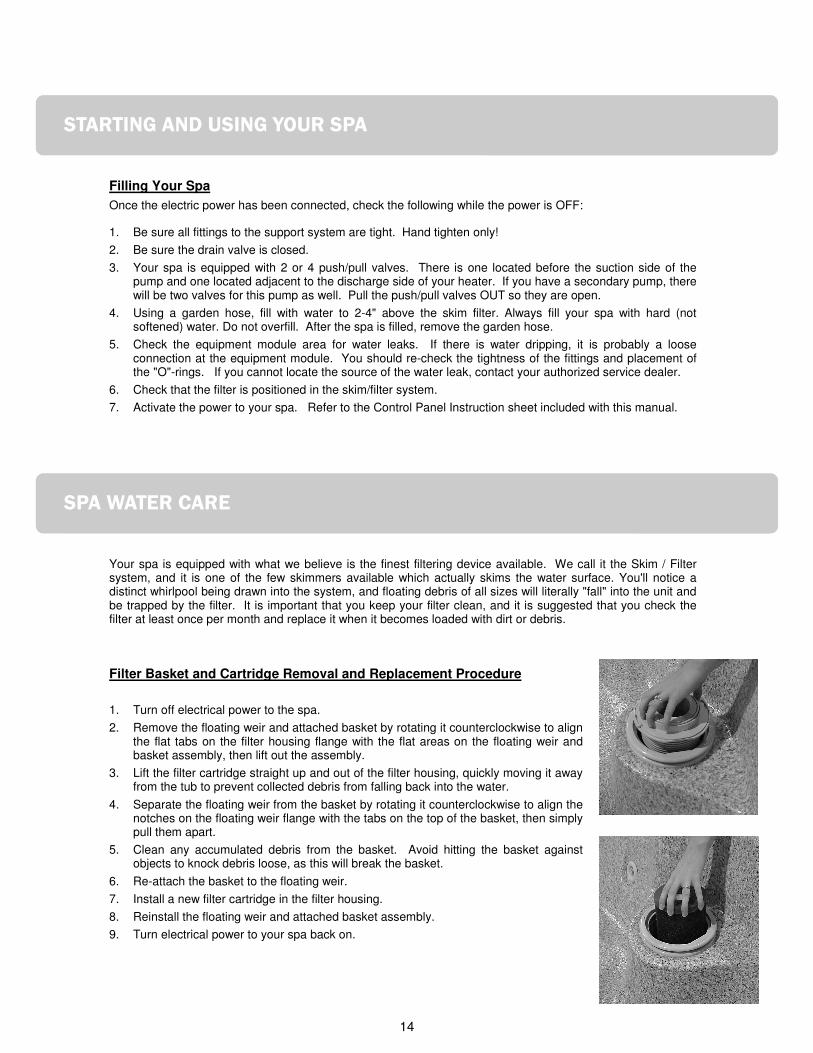
Filter Basket and Cartridge Removal and Replacement Procedure 1. Turn off electrical power to the spa. 2. Remove the floating weir and attached basket by rotating it counterclockwise to align
the flat tabs on the filter housing flange with the flat areas on the floating weir and basket assembly, then lift out the assembly.
3. Lift the filter cartridge straight up and out of the filter housing, quickly moving it away from the tub to prevent collected debris from falling back into the water.
4. Separate the floating weir from the basket by rotating it counterclockwise to align the notches on the floating weir flange with the tabs on the top of the basket, then simply pull them apart.
5. Clean any accumulated debris from the basket. Avoid hitting the basket against objects to knock debris loose, as this will break the basket.
6. Re-attach the basket to the floating weir. 7. Install a new filter cartridge in the filter housing. 8. Reinstall the floating weir and attached basket assembly. 9. Turn electrical power to your spa back on.
�������� �� ��
15
Chemical Safety Tips
• Never mix different types of chemicals or contaminate them in any way. • Do not exceed recommended dosages. • After superchlorinating/brominating, wait until the disinfectant level is down 3-5 parts per million (ppm) before
using the spa. • Keep chemicals out of reach of children and pets. • Keep containers closed when not in use. • Do not use contents of unlabeled containers. • Never add water to chemicals. If called for by the instructions, add chemicals to water. • Dispose of empty containers as instructed on the label. • Never handle chemicals with your bare hands. • Store chemicals in a cool, dry, clean place (not under spa). • Remove cover when superchlorinating/brominating. Wait at least one hour (with circulating system or low-spa
speed pump on) before replacing the cover. Doing so will prolong life of cover.
NOTE: Check and maintain your water chemistry at least twice a week for proper levels.
Spa Frog In-Line System
Your spa came with the most advanced, revolutionary sanitation system available today. When using the unique SPA FROG Mineral Cartridge with the exclusive SPA FROG Bromine Cartridge, you’ll enjoy your spa more with less work and less bromine.
Less Work Because: • Minerals continuously work to control bacteria for up to four full months. • Cartridges last longer to eliminate daily maintenance. • Cartridges are pre-filled for no measuring or mess. • Simply adjust to your setting and relax for weeks. Less Bromine Because: • With minerals in the water, bromine use is cut by up to 50%. * • Bromine last longer: 2-4 weeks on a 350 gallon spa with average use. • With minerals and low levels of bromine, the water feels softer. • The system reduces odors and leaves the water crystal clear. • SPA FROG has the only minerals that work with bromine. *Compared to the ANSI/NSPI recommended minimums for bromine in a spa.
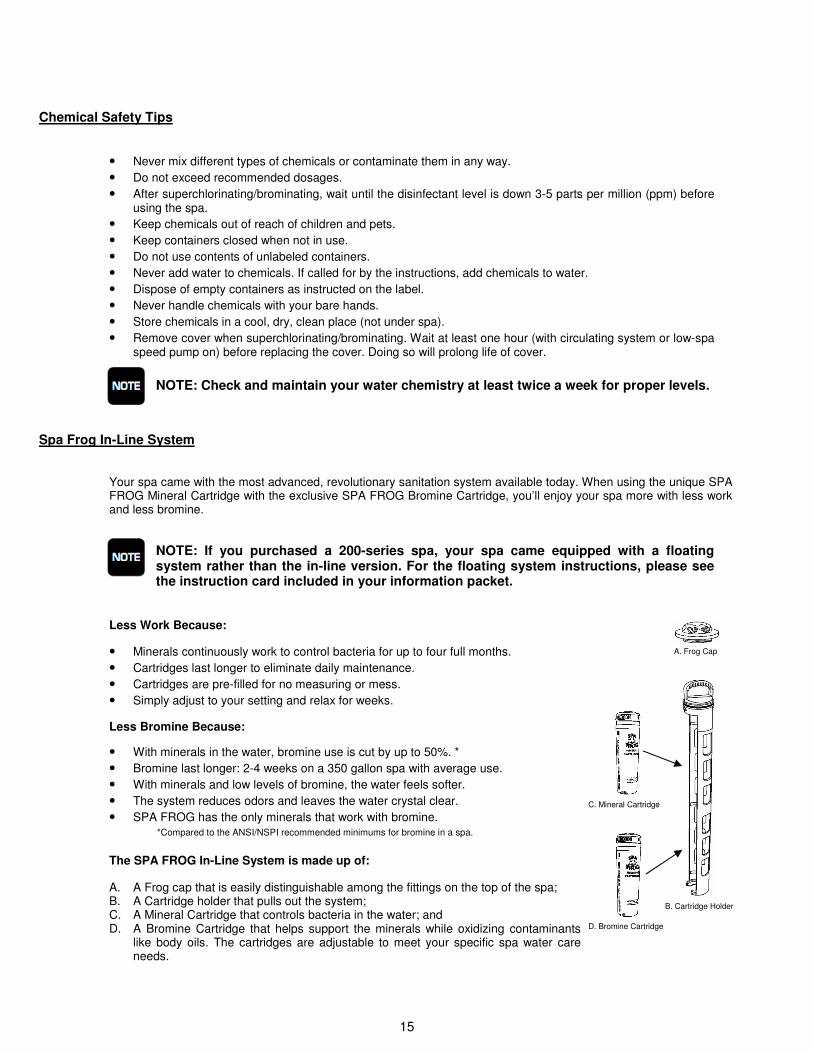
The SPA FROG In-Line System is made up of: A. A Frog cap that is easily distinguishable among the fittings on the top of the spa; B. A Cartridge holder that pulls out the system; C. A Mineral Cartridge that controls bacteria in the water; and D. A Bromine Cartridge that helps support the minerals while oxidizing contaminants
like body oils. The cartridges are adjustable to meet your specific spa water care needs.
C. Mineral Cartridge
D. Bromine Cartridge
A. Frog Cap
B. Cartridge Holder
NOTE: If you purchased a 200-series spa, your spa came equipped with a floating system rather than the in-line version. For the floating system instructions, please see the instruction card included in your information packet.
16
Spa Frog In-Line System [continued]
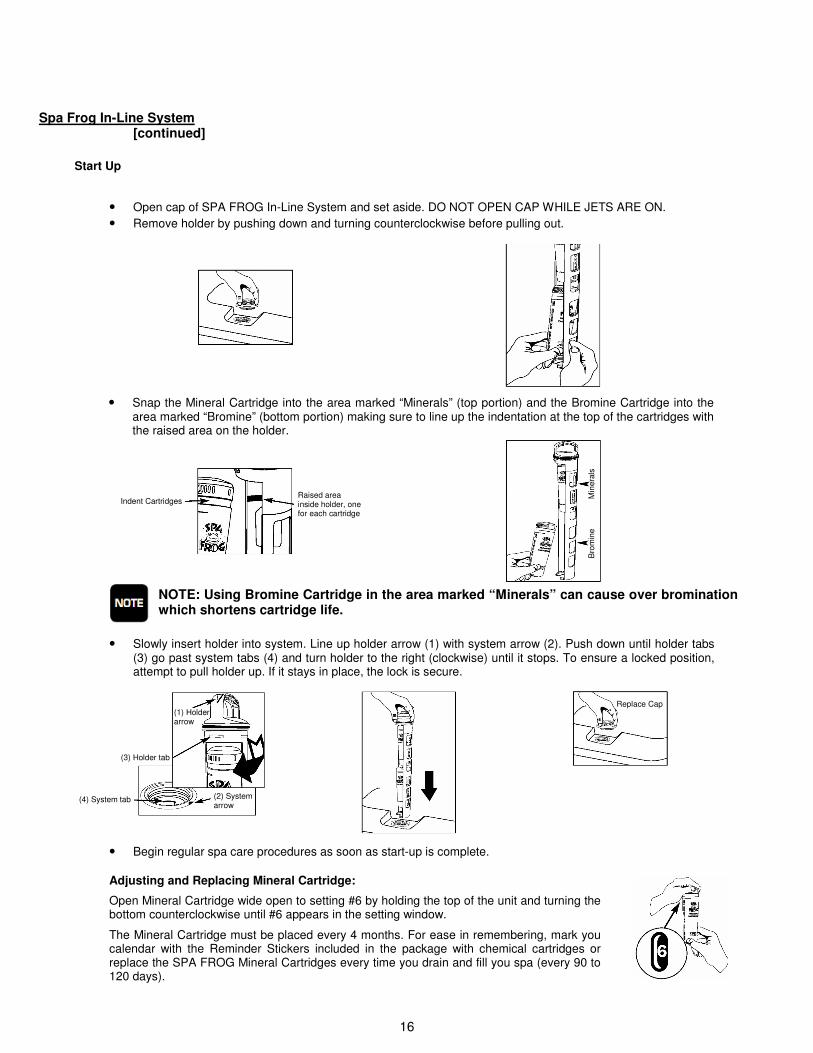
• Open cap of SPA FROG In-Line System and set aside. DO NOT OPEN CAP WHILE JETS ARE ON. • Remove holder by pushing down and turning counterclockwise before pulling out.
• Snap the Mineral Cartridge into the area marked “Minerals” (top portion) and the Bromine Cartridge into the area marked “Bromine” (bottom portion) making sure to line up the indentation at the top of the cartridges with the raised area on the holder.
Start Up
NOTE: Using Bromine Cartridge in the area marked “Minerals” can cause over bromination which shortens cartridge life.
Indent Cartridges Raised area inside holder, one for each cartridge
Min
eral
s B
rom
ine
• Slowly insert holder into system. Line up holder arrow (1) with system arrow (2). Push down until holder tabs (3) go past system tabs (4) and turn holder to the right (clockwise) until it stops. To ensure a locked position, attempt to pull holder up. If it stays in place, the lock is secure.
Replace Cap (1) Holder arrow
(3) Holder tab
(4) System tab (2) System arrow
• Begin regular spa care procedures as soon as start-up is complete.
Adjusting and Replacing Mineral Cartridge: Open Mineral Cartridge wide open to setting #6 by holding the top of the unit and turning the bottom counterclockwise until #6 appears in the setting window. The Mineral Cartridge must be placed every 4 months. For ease in remembering, mark you calendar with the Reminder Stickers included in the package with chemical cartridges or replace the SPA FROG Mineral Cartridges every time you drain and fill you spa (every 90 to 120 days).

17
Ozone Generator [optional]
An Ozone generator will supplement disinfectants and provide the following benefits: • Kills bacteria and viruses • Destroys matter which might discolor water • Does not affect the pH level of the water • Has no “chemical” smell • Automatic and requires little or no maintenance • REDUCES the need for disinfectants. Does NOT eliminate the need. Refer to you ozone generators owner’s manual for information on service and maintenance.
Drain the Water
CAUTION: Do not allow the pump to run without water. Running the pump without water will cause pump damage and void the warranty.
2. Rotate the spout assembly counterclockwise until spout stops.
1. Locate spa drain feature at base of spa. Pull the spout out (approximately 2”) leaving the exterior end cap on.
3. After rotating the spout, pull the spout out further until it stops. Rotate drain cap counterclockwise and remove it.
4. Attach a garden hose to drain threads and then push the drain spout back in about half-way to allow water to begin draining from the spa.
Under normal usage, you should change the water in your spa every 3-4 months. Before doing so be sure to turn off all power to the spa, then follow these easy steps to drain the spa:
Once the tub is drained, replace the drain cap, rotate the spout clockwise until it stops and push it back into the recess. The remaining water in the spa can be scooped or siphoned out and you are now ready to clean the acrylic surface.
NOTE: Chemically treated water may damage plants. Place the garden hose in a safe discharge area. NOTE: Some water will be left in the bottom of the spa and in your plumbing lines. This small amount of water can be mixed with fresh water without consequence. If 100% draining is required, a small submersible pump or a wet/dry shop vacuum should be used. Always call your dealer for assistance.

18
Cleaning the Spa Shell
Use a nonabrasive household cleaner to clean all spa shell surfaces and fixtures. Do not use scouring cleansers or solvents; damage to the acrylic finish will result. Your Emerald Spa is manufactured using continuous-cast cross-linked acrylic sheet. This material provides a strong chemical-resistant high gloss surface that is hard, nonporous, and impermeable to water. Given proper care, the polished, lustrous surface of the sheet will retain its appearance for many years. To clean your spa, be sure to use a soft absorbent cloth with any of the commercially available nonabrasive foam or liquid agents in general cleaning concentrations. Always rinse thoroughly with clean water and a soft chamois or moist cellulose sponge. Cleaning agents containing strong abrasives such as scouring powders or strong solvents such as gasoline, acetone, or denatured alcohol should not be used to clean the acrylic surface of your spa. Fine scratches may be minimized by the use of a mild automobile cleaner-polish. The cleaner-polish has a fine abrasive action, and its wax content tends to fill small scratches to make them less visible.
NOTE: Do not use scouring cleansers or solvents; damage to the acrylic finish will result. NOTE: Do not use strong solvents such as gasoline, acetone, or denatured alcohol; damage to the acrylic finish will result.
Relamping the Underwater Light
The underwater light should be relamped from the under side of the spa as follows: 1. Disconnect the power to the spa.
2. Remove cabinet panel directly behind the light fixture.
3. Remove the old bulb and replace with a new bulb.
Winterizing Your Spa
Please see your local dealer for assistance on winterization.
The Spa Cabinet
Durabilt™ Synthetic Cabinet Your Durabilt Synthetic Cabinet is made completely of a synthetic material. To clean, take a dampened rag with mild dish soap and wash the outside panels.
NOTE: Damage caused by improper winterization will NOT be covered under warranty.
������������ �����
19
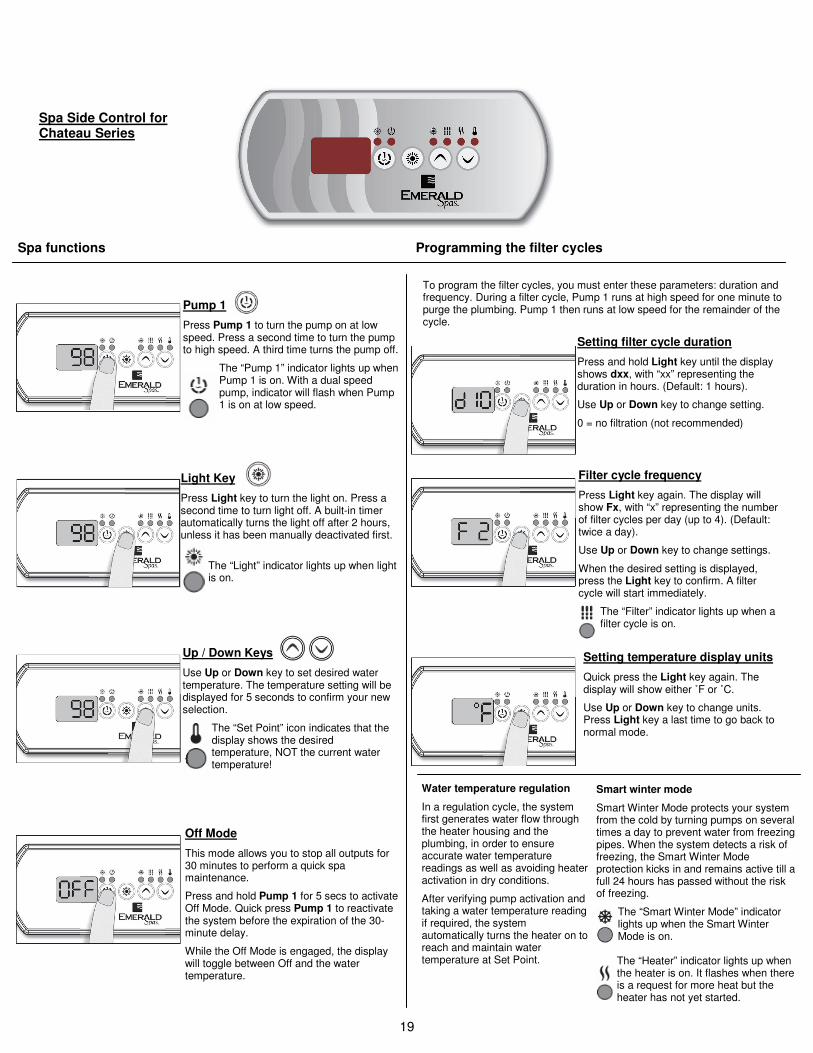
Pump 1 Press Pump 1 to turn the pump on at low speed. Press a second time to turn the pump to high speed. A third time turns the pump off.
The “Pump 1” indicator lights up when Pump 1 is on. With a dual speed pump, indicator will flash when Pump 1 is on at low speed.
Light Key Press Light key to turn the light on. Press a second time to turn light off. A built-in timer automatically turns the light off after 2 hours, unless it has been manually deactivated first.
The “Light” indicator lights up when light is on.
Up / Down Keys Use Up or Down key to set desired water temperature. The temperature setting will be displayed for 5 seconds to confirm your new selection.
The “Set Point” icon indicates that the display shows the desired temperature, NOT the current water temperature!
Off Mode This mode allows you to stop all outputs for 30 minutes to perform a quick spa maintenance. Press and hold Pump 1 for 5 secs to activate Off Mode. Quick press Pump 1 to reactivate the system before the expiration of the 30-minute delay. While the Off Mode is engaged, the display will toggle between Off and the water temperature.
Setting temperature display units Quick press the Light key again. The display will show either ˚F or ˚C. Use Up or Down key to change units. Press Light key a last time to go back to normal mode.
Setting filter cycle duration Press and hold Light key until the display shows dxx, with “xx” representing the duration in hours. (Default: 1 hours). Use Up or Down key to change setting. 0 = no filtration (not recommended)
Filter cycle frequency Press Light key again. The display will show Fx, with “x” representing the number of filter cycles per day (up to 4). (Default: twice a day). Use Up or Down key to change settings. When the desired setting is displayed, press the Light key to confirm. A filter cycle will start immediately.
The “Filter” indicator lights up when a filter cycle is on.
Spa functions Programming the filter cycles
To program the filter cycles, you must enter these parameters: duration and frequency. During a filter cycle, Pump 1 runs at high speed for one minute to purge the plumbing. Pump 1 then runs at low speed for the remainder of the cycle.
Water temperature regulation In a regulation cycle, the system first generates water flow through the heater housing and the plumbing, in order to ensure accurate water temperature readings as well as avoiding heater activation in dry conditions. After verifying pump activation and taking a water temperature reading if required, the system automatically turns the heater on to reach and maintain water temperature at Set Point.
Smart winter mode Smart Winter Mode protects your system from the cold by turning pumps on several times a day to prevent water from freezing pipes. When the system detects a risk of freezing, the Smart Winter Mode protection kicks in and remains active till a full 24 hours has passed without the risk of freezing.
The “Smart Winter Mode” indicator lights up when the Smart Winter Mode is on. The “Heater” indicator lights up when the heater is on. It flashes when there is a request for more heat but the heater has not yet started.
Spa Side Control for Chateau Series

20
Spa Side Control for Estate and Manor Series
Description
Main Functions
Standby Mode Use Standby key to pause all pumps for 30 minutes*. You can exit Standby mode at any time by pressing again on the Standby key.
In order to warn the user, the spa light will flash for a few seconds before the exit of Standby mode and restart the pumps. The “Stby” message is also displayed during Standby mode. * Pump will stay turned on if there is a request for more heat.
Pump 1 key Press Pump 1 key to turn Pump 1 on at low speed. Press a second time to turn pump at high speed. Press a third time to turn pump off. A built-in time automatically turns pump off after 20 minutes, unless pump has been manually deactivated first.
+/- keys Use (+) or (-) key to set desired water temperature. The temperature setting will be displayed for 5 seconds to confirm your new selection. The “Set Point” icon indicates that the display shows the desired temperature, NOT the current water temperature!
Pump Icons
AM/PM (°F / °C)
Set point Icon
Service Icon
Smart Winter Mode Icon
Time, Temperature & Message Digits
“Light” Key Light Icon
“OK” Key “Plus” Key “Program” Key
“Pump” Keys “Left” Key
“Minus” Key “Standby” Key
“Right” Key
Program Icon
Filtering Icon Heating Icon
Pump 2 key Press Pump 2 key to turn Pump 2 on at high speed. Press a second time to turn pump off. A built-in timer automatically turns pump off after 20 minutes, unless pump has been manually deactivated first.
Light key Press Light key to turn light on. Press a second time to turn light off.
A built-in timer automatically turns light off after 2 hours, unless it has been manually deactivated first.
Icon Description
Light Icon: The “Light” icon lights up when the light is on.
Pump Icons: The “Pump” indicator numbers light up and their icons become animated when pumps are on.
Smart Winter Mode Icon: The “SWM” icon automatically turns on when freeze protection is active. It flashes while system purges the spa plumbing.
Filter Cycle Icon: The “Filter Cycle” icon lights up when filter cycle is on. It flashes when filtering is suspended.
Heater Icon: The “Heater” icon lights up when the heater is on.
Program Icon: The “Program” icon lights up when Programming.
Set Point Icon: The “Set Point” icon automatically turns on when set point setting menu is activated. (SP message on display). It flashes when: 1- there is a call for heat and heater has not started yet, 2- heater has just turned off and element is cooling down or 3- if system is performing a check flow.
Service Icon: A problem has been detected. DO NOT ENTER THE WATER! Spa service is required.
21
Spa Side Control for Estate and Manor Series
[continued]
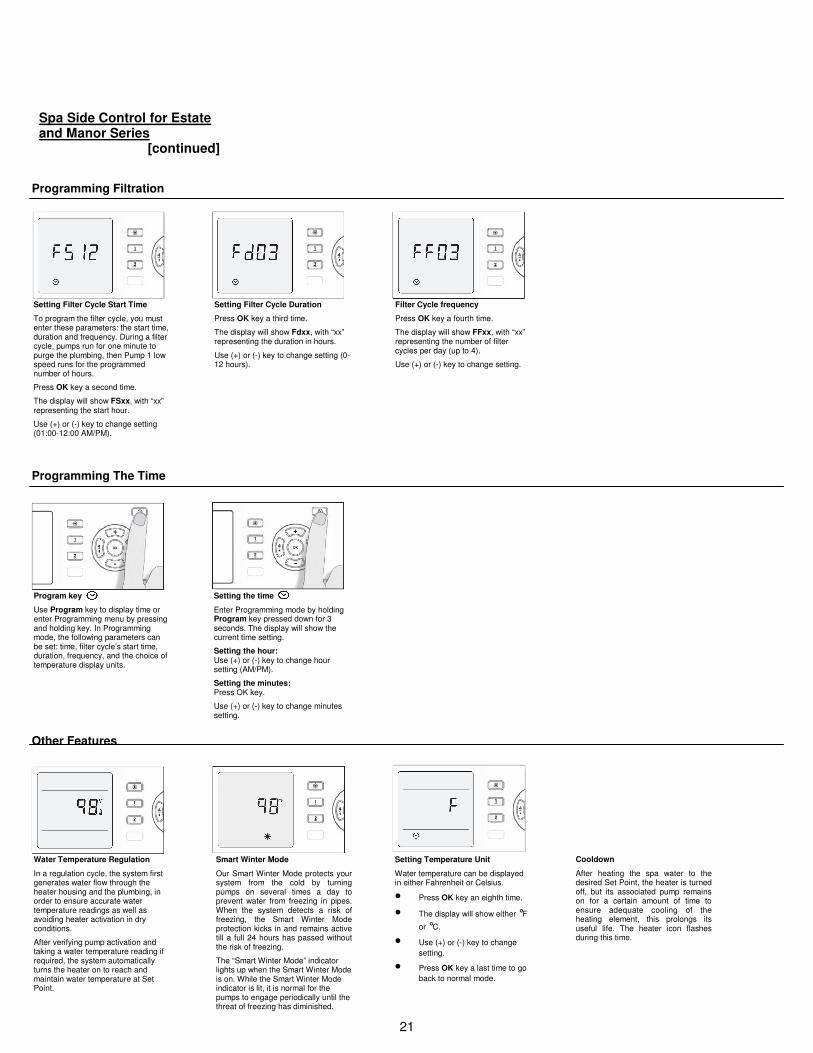
Programming Filtration
Program key Use Program key to display time or enter Programming menu by pressing and holding key. In Programming mode, the following parameters can be set: time, filter cycle’s start time, duration, frequency, and the choice of temperature display units.
Setting the time Enter Programming mode by holding Program key pressed down for 3 seconds. The display will show the current time setting. Setting the hour: Use (+) or (-) key to change hour setting (AM/PM). Setting the minutes: Press OK key. Use (+) or (-) key to change minutes setting.
Setting Filter Cycle Start Time To program the filter cycle, you must enter these parameters: the start time, duration and frequency. During a filter cycle, pumps run for one minute to purge the plumbing, then Pump 1 low speed runs for the programmed number of hours. Press OK key a second time. The display will show FSxx, with “xx” representing the start hour. Use (+) or (-) key to change setting (01:00-12:00 AM/PM).
Setting Filter Cycle Duration Press OK key a third time. The display will show Fdxx, with “xx” representing the duration in hours. Use (+) or (-) key to change setting (0-12 hours).
Filter Cycle frequency Press OK key a fourth time. The display will show FFxx, with “xx” representing the number of filter cycles per day (up to 4). Use (+) or (-) key to change setting.
Water Temperature Regulation In a regulation cycle, the system first generates water flow through the heater housing and the plumbing, in order to ensure accurate water temperature readings as well as avoiding heater activation in dry conditions. After verifying pump activation and taking a water temperature reading if required, the system automatically turns the heater on to reach and maintain water temperature at Set Point.
Smart Winter Mode Our Smart Winter Mode protects your system from the cold by turning pumps on several times a day to prevent water from freezing in pipes. When the system detects a risk of freezing, the Smart Winter Mode protection kicks in and remains active till a full 24 hours has passed without the risk of freezing. The “Smart Winter Mode” indicator lights up when the Smart Winter Mode is on. While the Smart Winter Mode indicator is lit, it is normal for the pumps to engage periodically until the threat of freezing has diminished.
Setting Temperature Unit Water temperature can be displayed in either Fahrenheit or Celsius.
• Press OK key an eighth time.
• The display will show either °F
or °C.
• Use (+) or (-) key to change setting.
• Press OK key a last time to go back to normal mode.
Other Features
Programming The Time
Cooldown After heating the spa water to the desired Set Point, the heater is turned off, but its associated pump remains on for a certain amount of time to ensure adequate cooling of the heating element, this prolongs its useful life. The heater icon flashes during this time.

22
TROUBLE SHOOTING / SPA SIDE CONTROL ERROR CODES
MESSAGE
MEANING
An internal hardware error has been detected in the in.xe.
The system has shut the heater down because the temperature at the heater has reached 119°F (48°C). Temperature inside the spa cabinet is too high, causing the internal temperature in the in.xe to increase above normal limits. The system does not detect any water flow while the primary pump is running. A problem is detected with the temperature probe.
The water temperature in the spa has reached 108°F (42°C).
No low level configuration software has been installed into the system.
ACTION REQUIRED
Contact your dealer or service provider.
Do not enter the water! Remove the spa cover and allow the water to cool down, then shut the power off and power your spa up again to reset the system. Open spa cabinet panels and wait until error clears. Check and open water valves. Check for water level. Clean filter. If the problem persists, call your dealer or service supplier. Contact your dealer or service supplier. Do not enter the water! Remove the spa cover and allow the water to cool down to a lower temperature. Call your dealer or service supplier if problem persists. Contact your dealer or service supplier.
Warning! Shock Hazard! No User Serviceable Parts. Do not attempt service of this control system. Contact your dealer or service organization for assistance. Follow all owner’s manual power connection instructions. Installation must be performed by a licensed electrician and all grounding connec-tions must be properly installed.
Periodically throughout each day, your spa will turn on (run) to circulate the water and check the water temperature -- this happens in addition to your set filtration cycle. If heat is needed, the spa will continue to run until the set temperature is reached. This cycle will continue to repeat itself throughout the day.

23
� �������������
• Equipment Module Will Not Operate
• Make sure the spa control is plugged into the control system of the equipment module.
• Check the main circuit breaker panel. If the GFCI or circuit breaker has tripped, reset the breaker.
• If the circuit breaker trips repeatedly, contact your dealer.
• Turn the circuit breaker, or switch, supplying power to the equipment module OFF then ON.
• If breaker continues to trip, check with your electrician to be sure the proper amperage breaker was installed.
• Pump Will Run But There Is No Water Flow
• Make sure all valves are in the open position.
• Make sure the filter is clean.
• Make sure the suction intake covers are free of debris.
• Make sure the water level of the spa is at least 2/3 of the way up the skimmer.
• Check to make sure all adjustable flow-type jets are turned open.
• Pump Runs And There Is Water Flow But No Heat
• Press the temperature set button to increase temperature. Do NOT expect to feel hot water coming from the jets.
• Make sure all valves are open to allow full water flow through the system. Limited water flow will NOT build enough pressure to allow the heater to come on.
• Clean the filter to assure maximum water flow.
• Pulsating Or Minimal Water Flow In High Speed Mode
• Be sure jets are turned open
• Make sure all valves are open.
• Make sure the filter element is clean.
• Make sure the suction intake covers are free of debris.
• Ozone Bubbles Are Not Coming Out Of Ozone Jet
• Make sure the lever of the Diverter Valve (if equipped) is not in the center position.
• Pump Vibrates Excessively
• Check for loose screws on equipment module face and bolts attaching equipment module to frame.
• Make sure spa is not touching or rubbing against anything such as a deck rail, house, etc.
• Air may be trapped in pump housing. Turn pump off. Slightly loosen the pump unions. With a towel
covering the area (water will splash) turn the pump on for 3-5 seconds to bleed air out of pump hous-
ing. Turn pump off and tighten the unions. Repeat if necessary. • Make sure that the spa has been installed on a properly supported surface.

24
������ ������� ������
Emerald Spa Corporation, manufacturer of Emerald Spas (“Emerald”) extends this Limited Warranty solely to the original consumer purchaser of any Emerald Spa manufactured in the U.S.A. or Canada after January 1, 2013.
LIFETIME STRUCTURAL WARRANTY Emerald warrants (parts and labor) the spa shell against water loss due to defects in the spa shell for the “Lifetime” of the spa shell. For purposes hereof, a spa shell’s “Lifetime” shall begin on the date of manufacture and shall terminate on the earlier to occur of (i) the discontinuation of the product line by Emerald, or (ii) ten (10) years from the date of purchase, or (iii) eleven (11) years from the date of manufacture. This warranty is subject to the limitations and disclaimers herein.
FIVE-YEAR SURFACE WARRANTY Emerald warrants (parts and labor) the spa surface against cracks caused by defective materials or workmanship for a period not to exceed the lesser of five (5) years from the date of purchase or six (6) years from the date of manufacture. Excluded from this warranty are the cosmetic damages, surface blistering or conditions arising from abuse, misuse, normal wear or acts of God. This warranty is subject to the limitations and disclaimers herein.
THREE-YEAR COMPONENT WARRANTY Emerald warrants (parts and labor) the mechanical equipment, plumbing, fittings, and controls against defects in workmanship for a period not to exceed the lesser of three (3) years from the date of purchase or four (4) years from the date of manufacture. Damage caused in whole or in part by improper electrical hook-up or wiring, or by any other cause listed as an exclusion to the warranties herein, voids the warranty. Travel, trip, or mileage costs are not covered under this warranty and service and travel charges may be assessed to the purchaser by the dealer.
EXTENT OF WARRANTY/DISCLAIMERS These warranties extend only to the original "consumer" purchaser of the spa as that term is defined in the Magnuson-Moss Warranty Act, 15 USC Section 101, as amended. These warranties terminate upon: (1) transfer of ownership of the spa; (2) rental of the spa; (3) rental of the premises where the spa is located; or (4) commercial or public use of the spa. Warranty coverage shall not extend for any reason beyond the stated periods. The warranties as set forth and limited herein are the sole and exclusive warranties made by Emerald and Emerald hereby expressly disclaims any other warranties, express or implied. EMERALD HEREBY EXPRESSLY DISCLAIMS THE IMPLIED WARRANTIES OF NON-INFRINGEMENT, MERCHANTABILITY AND FITNESS FOR A PARTICULAR PURPOSE. EMERALD’S LIABILITY WITH RESPECT TO ITS PRODUCTS SHALL NOT EXCEED THE OBLIGATION TO REPAIR OR REPLACE DEFECTIVE PRODUCT AS EXPRESSLY SET FORTH ABOVE IRRESPECTIVE OF THE THEORY UPON WHICH ANY CLAIM MIGHT BE BASED INCLUDING BREACH OF CONTRACT, WARRANTY, NEGLIGENCE, OR STRICT LIABILITY. UNDER NO CIRCUMSTANCES SHALL EMERALD BE LIABLE FOR SPECIAL, INCIDENTAL, OR CONSEQUENTIAL DAMAGES.
WARRANTY PROCEDURES In the event of any malfunction or defect covered by any of these warranties, contact the authorized dealer from whom you purchased your spa. All service work must be performed by an authorized dealer or an authorized agent of Emerald. In the event there is not an authorized dealer or repair firm in your area, the spa can be returned pre-paid freight (you pay) to Emerald for evaluation and, if necessary, repair of the defect. Emerald will then ship the spa back to you pre-paid (Emerald pays) upon completion of the repair. In the event the spa needs to be returned to Emerald for repair, contact Emerald in advance at: 4150 East Paris Avenue, Kentwood, Michigan, 49512, phone number: (800) 766.7727, for packaging and shipping instructions. In addition, Emerald reserves the right to inspect or designate a person to inspect any part that is claimed to be defective and covered by this warranty. For any warranty service of components, Emerald reserves the right to choose at its option repair of the problem or a replacement of the defective component. You are responsible to provide adequate access to the spa, equipment, and plumbing. Emerald, its dealers or agents will not perform service on spas where conditions are unclean, unsafe or potentially unhealthy due to abuse, neglect, or improper maintenance. With regard to spa surface warranty repairs, cracks will be repaired so as to prevent damage to or leakage from the spa shell. No warranty is made that the color or texture of the repair will match the original surface. Emerald reserves the right to substitute a part or component of equivalent value, either new or reconditioned, and any such repair or replacement shall assume as its warranty only the remaining portion of the warranty on the original product. Travel, trip, and mileage costs are not covered under these warranties and these charges may be assessed to you. Emerald dealers shall have the right to add additional surcharges for their services which are not covered by these warranties. Any party making a claim hereunder must establish by dated sales slip, invoice or installation receipt the date of original purchase and the fact that claimant is the original purchaser and that the spa is at the original installation location. Transportation costs incurred to and from Emerald for replacement spa, spa shell, plumbing, power pack or any part related to the spa are the responsibility of the purchaser. All costs for the removal and re-installation of the spa, spa shell or power pack are the responsibility of the purchaser.
25
Spa Warranty Information [continued]
ACTS INVALIDATING WARRANTIES These warranties shall be null and void if the spa has been subject to alteration, misuse or abuse (or is used in manner that is not consistent with the product specifications or for which it is not designed) or if any repairs to the spa are attempted by anyone other than an authorized representative of Emerald. Alteration shall include but is not limited to any component or plumbing change, electrical conversion, or the addition of any non-approved sanitation or water purification device or heating system, which contributes to a component or unit failure, or unsafe operation of the system. CORROSION OR DEGRADATION TO THE SPA SHELL, SURFACE, FITTINGS, STAINLESS ACCENTS, ELECTRONICS, PUMP AND ALL OTHER COMPONENTS THAT ARE CAUSED BY IMPROPER USE OF CHEMICALS AND/OR WATER TREATMENT ARE NOT COVERED UNDER THESE WARRANTIES. Damages caused by the following are not covered under these warranties: transportation or installation by third parties; operation of the spa at water temperatures outside the range of 50 degrees F. to 104 degrees F.; dirty, clogged or calcified filter cartridges; a defective support system (a solid, flat, level surface is required); harsh chemicals which are not recommended by the plastic manufacturer which come into contact with the spa surface; allowing undissolved spa sanitizing chemicals to come into contact with the spa surface; improper water chemistry maintenance; allowing the spa to remain uncovered in direct sunlight; freezing conditions; moving or relocating the spa; failure of an inadequate pad, platform, deck or other support structure; improper electrical hook-up or wiring; and acts of God or third parties or other damages caused to the spa which are outside the control of Emerald.
LIMITATIONS OF LIABILITY/EXCLUSIONS THESE WARRANTIES DO NOT APPLY TO PARTS WHICH ARE NOT MANUFACTURED BY EMERALD AND SHALL NOT APPLY TO ANY ITEMS INSTALLED IN OR ATTACHED TO THE SPA AFTER THE DATE OF MANUFACTURE OR TO OPTIONAL PARTS OR SYSTEMS WHICH ARE PURCHASED FOR INCLUSION ON OR IN THE SPA. EMERALD SHALL HAVE NO RESPONSIBILITY TO AID IN THE ENFORCEMENT OF ANY WARRANTIES AGAINST MANUFACTURERS OF SUCH ITEMS, PARTS, SYSTEMS OR OPTIONS. Optional Parts include, without limitation, ozone generator, all audio systems, and LED lighting. Emerald shall not be liable for loss of use of the spa or other incidental or consequential costs, expenses or damages, which include but are not limited to, water and/or sewage costs, water damage to surrounding areas, rooms or furnishings, the removal of or reinstallation of a wall, deck or other fixture, water leakage, costs of shipping or packaging, applicable taxes, or the payment of any costs or expenses of disassembly, removal, or reinstallation of the spa or any part. Pump shaft seal parts are warranted 2 years (unless otherwise excluded as described above) from initial start up of spa and labor is not included on such parts notwithstanding anything above to the contrary. The stainless steel escutcheon on the stainless steel jet option, fuses, light bulbs, spa pillows, spa cover, cover accessories and o-rings are not covered under these warranties. Under no circumstances shall Emerald or its representatives be held liable for injury to any person or damage to any property, however arising, even if caused by Emerald or its representatives’ negligence. Some states do not allow limitation on how long an implied warranty lasts, and some states do not allow the exclusion or limitation of incidental or consequential damages, so these limitations or exclusions may not apply to you. These warranties give you specific legal rights, and you may also have other rights, which vary from state to state. No distributor, salesperson, dealer, retailer, or other representative of Emerald other than its President has the authority to alter or change these warranties, which changes must be in writing signed by such President. The warranties herein shall be in lieu of, and not in addition to, any other rights and remedies which might be otherwise available to purchaser.
������ ������� �������������������


![Safety Relay Module User's Manual - MITSUBISHI ELECTRIC …dl.mitsubishielectric.com/dl/fa/document/manual/plc/sh... · 2016-12-19 · A - 3 [Installation Precautions] [Wiring Precautions]](https://img.pdfslide.net/doc/110x75/5e8a074a03ac1b2a630583ae/safety-relay-module-users-manual-mitsubishi-electric-dl-2016-12-19-a-3-installation.jpg)