Embed Size (px)
Citation preview

2016-2017 Polaris Axys
Sidekick Installation Instructions
Boondocker Axys SideKick
Revised 12/16/2016 Page 2 of 11 www.boondockers.com……………….....BoonDocker……….………………....877-522-7805
1. Remove hood and side panels. 2. Remove fasteners and slide console back.
3. Remove belt and driven clutch. 4. Remove clutch cover/ oil-tank and let rest in place as shown.
5. Remove screw, push pins, and factory ducting. 6. Unplug ECU and remove upper air-box assembly.
Boondocker Axys SideKick
Revised 12/16/2016 Page 3 of 11 www.boondockers.com……………….....BoonDocker……….………………....877-522-7805
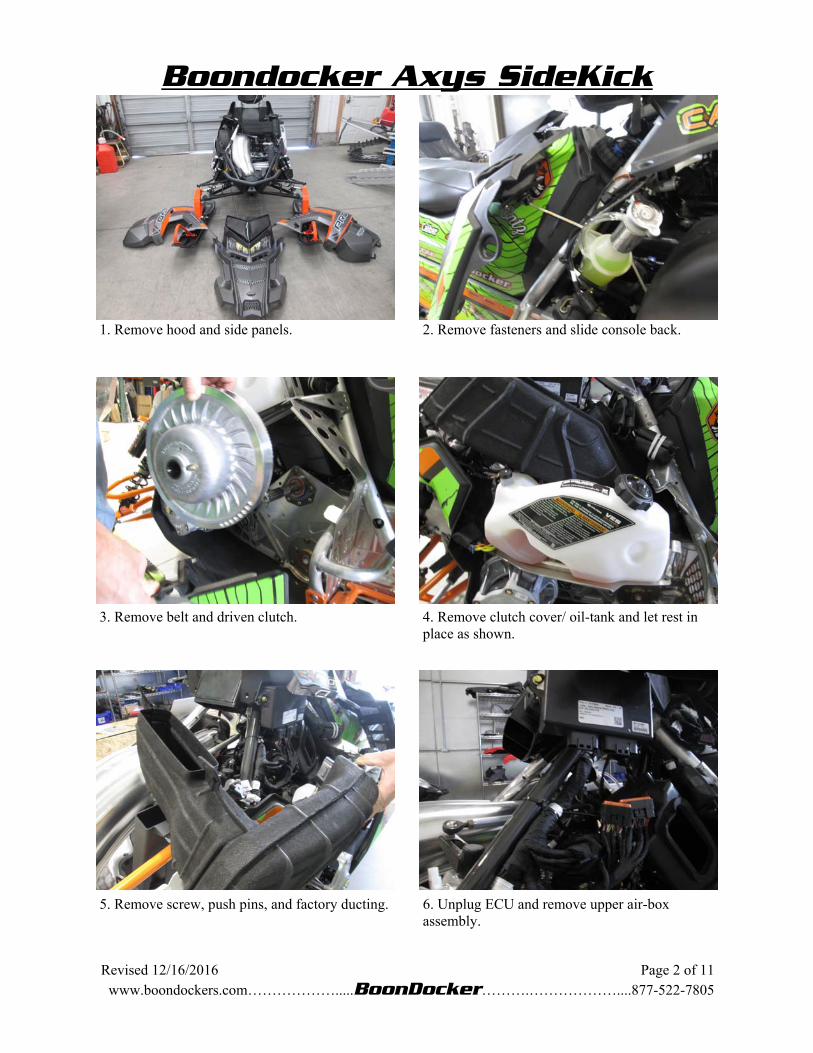
7. Un-Bolt coils, and TBAP sensor from air-box.
8. Remove wiring from air-box, loosen clamps, and remove air-box.
9. Remove muffler.
10. Remove exhaust snow deflector and muffler grommet.
11. Drill rivets and remove right foot kick-panel. Keep panel intact for future use
12. Hang rear of sled and remove 2 rear suspen-sion cross shaft bolts.

Boondocker Axys SideKick
Revised 12/16/2016 Page 4 of 11 www.boondockers.com……………….....BoonDocker……….………………....877-522-7805
13. Remove front cross shaft bolt, and 4 belt drive case nuts.
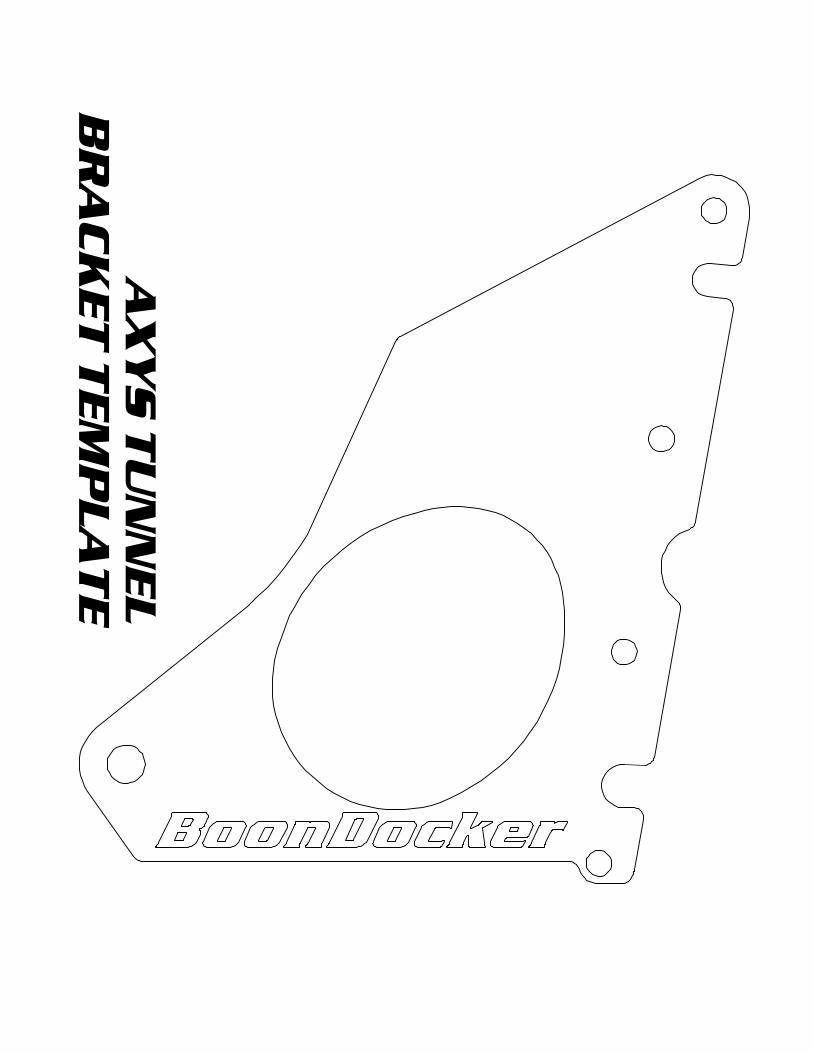
14. Cut out template and mark exhaust outlet on tunnel.
15. drill 2 1/8” hole in bottom left corner. Use a saw to finish cutting outlined hole. MAKE SURE TRACK IS CLEAR WHEN CUTTING HOLE TO PREVENT DAMAGE.
16. Install exhaust outlet tunnel support and 2 spring tabs both facing up.
17. Reinstall rear suspension bolts.
18. Rivet muffler block off plate in.
Boondocker Axys SideKick
Revised 12/16/2016 Page 5 of 11 www.boondockers.com……………….....BoonDocker……….………………....877-522-7805
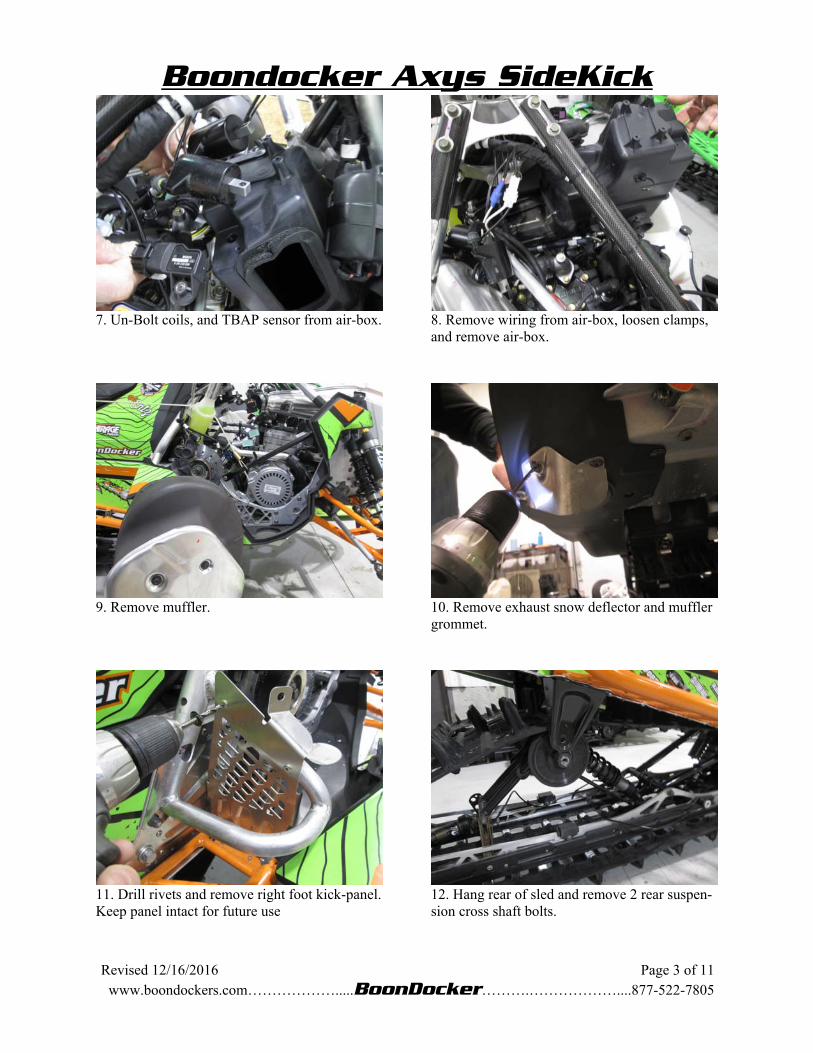
19. Unplug the stock oil line as pictured. Re-move stock clamp and save for re-use in step 26 for installation of turbo oil feed line
20. Cut the upper oil hose, install T and connect previously unplugged hose as pictured.
21. Install stock muffler rubber mounts on to turbo bracket. Remove and re-use screws to mount solenoid on turbo bracket as shown (electrical connection facing toward turbo).
22. Connect oil feed hose to turbo.
23. Mount solenoid to turbo bracket and install turbo assembly in place of stock muffler.
24. Route water lines and oil line through chassis and secure with a zip-tie.
Boondocker Axys SideKick
Revised 12/16/2016 Page 6 of 11 www.boondockers.com……………….....BoonDocker……….………………....877-522-7805
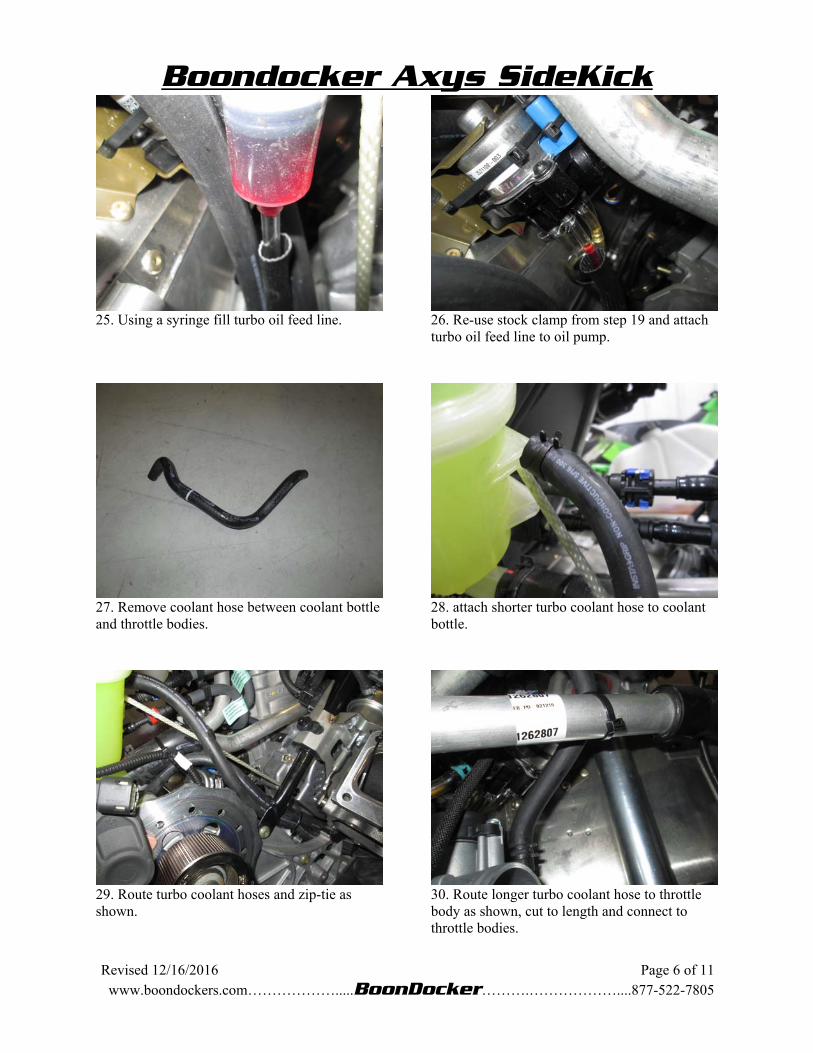
25. Using a syringe fill turbo oil feed line.
26. Re-use stock clamp from step 19 and attach turbo oil feed line to oil pump.
27. Remove coolant hose between coolant bottle and throttle bodies.
28. attach shorter turbo coolant hose to coolant bottle.
29. Route turbo coolant hoses and zip-tie as shown.
30. Route longer turbo coolant hose to throttle body as shown, cut to length and connect to throttle bodies.
Boondocker Axys SideKick
Revised 12/16/2016 Page 7 of 11 www.boondockers.com……………….....BoonDocker……….………………....877-522-7805
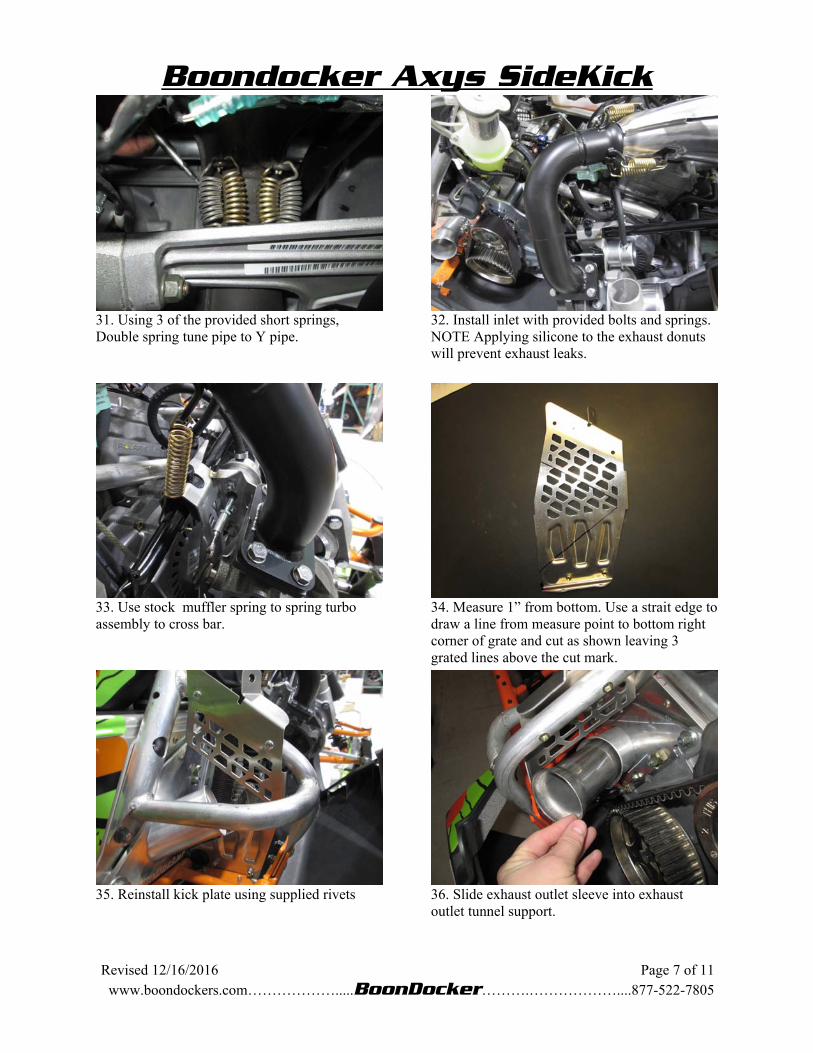
31. Using 3 of the provided short springs, Double spring tune pipe to Y pipe.
32. Install inlet with provided bolts and springs. NOTE Applying silicone to the exhaust donuts will prevent exhaust leaks.
33. Use stock muffler spring to spring turbo assembly to cross bar.
34. Measure 1” from bottom. Use a strait edge to draw a line from measure point to bottom right corner of grate and cut as shown leaving 3 grated lines above the cut mark.
35. Reinstall kick plate using supplied rivets
36. Slide exhaust outlet sleeve into exhaust outlet tunnel support.
Boondocker Axys SideKick
Revised 12/16/2016 Page 8 of 11 www.boondockers.com……………….....BoonDocker……….………………....877-522-7805
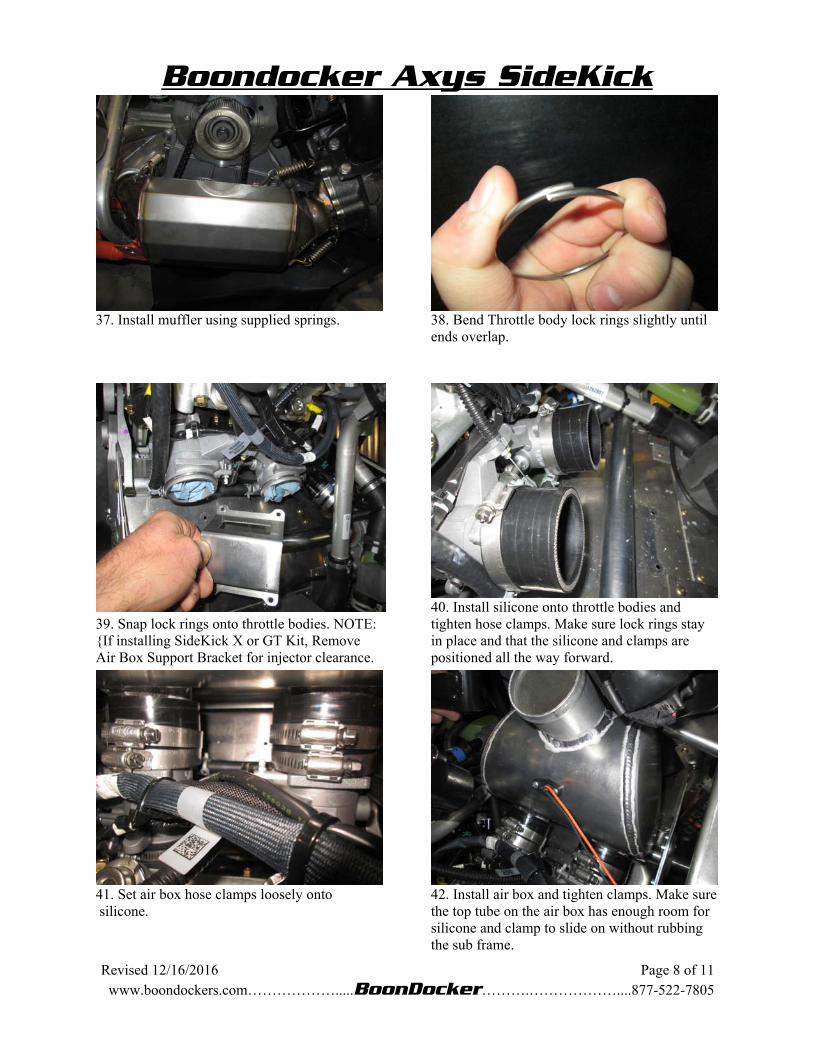
37. Install muffler using supplied springs.
38. Bend Throttle body lock rings slightly until ends overlap.
39. Snap lock rings onto throttle bodies. NOTE: {If installing SideKick X or GT Kit, Remove Air Box Support Bracket for injector clearance.
40. Install silicone onto throttle bodies and tighten hose clamps. Make sure lock rings stay in place and that the silicone and clamps are positioned all the way forward.
41. Set air box hose clamps loosely onto silicone.
42. Install air box and tighten clamps. Make sure the top tube on the air box has enough room for silicone and clamp to slide on without rubbing the sub frame.
Boondocker Axys SideKick
Revised 12/16/2016 Page 9 of 11 www.boondockers.com……………….....BoonDocker……….………………....877-522-7805
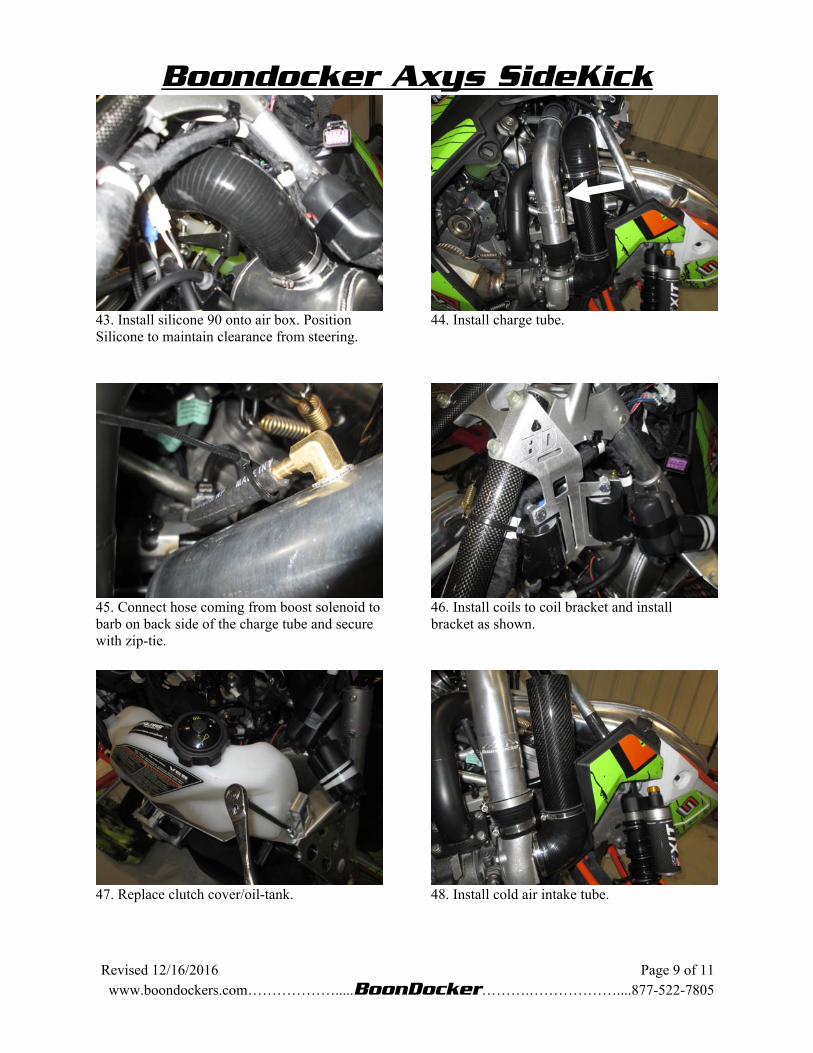
43. Install silicone 90 onto air box. Position Silicone to maintain clearance from steering.
44. Install charge tube.
45. Connect hose coming from boost solenoid to barb on back side of the charge tube and secure with zip-tie.
46. Install coils to coil bracket and install bracket as shown.
47. Replace clutch cover/oil-tank. 48. Install cold air intake tube.
Boondocker Axys SideKick
Revised 12/16/2016 Page 10 of 11 www.boondockers.com……………….....BoonDocker……….………………....877-522-7805
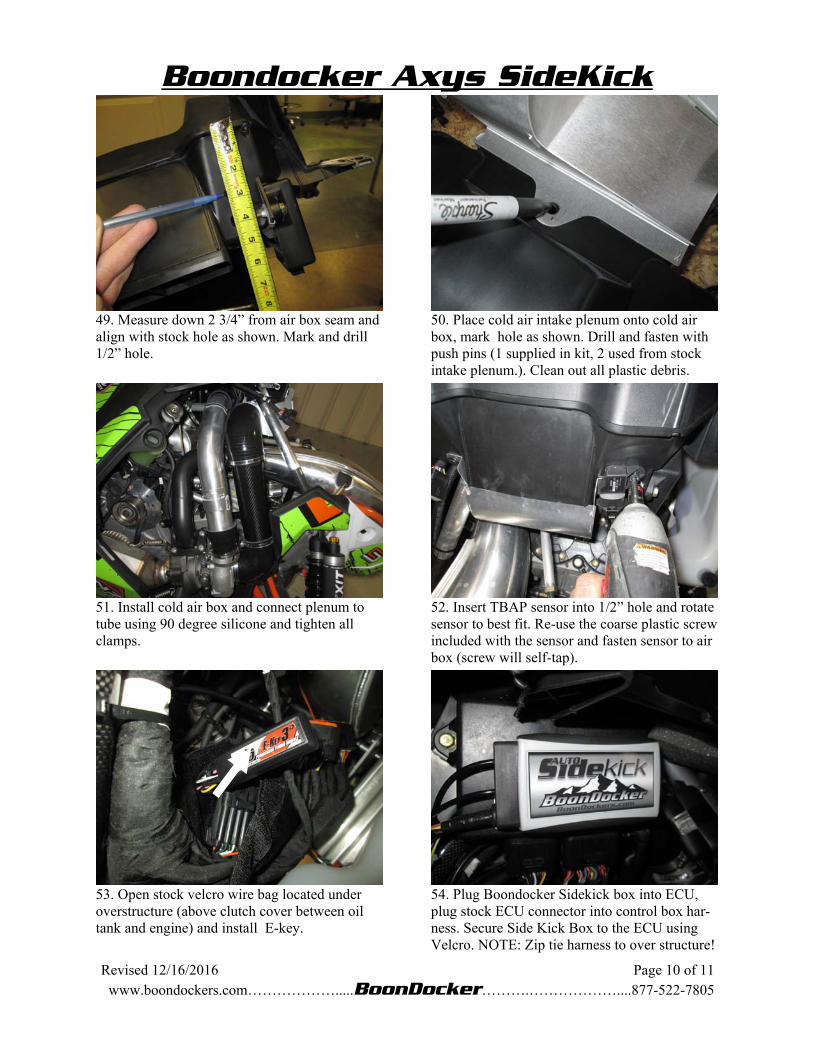
49. Measure down 2 3/4” from air box seam and align with stock hole as shown. Mark and drill 1/2” hole.
50. Place cold air intake plenum onto cold air box, mark hole as shown. Drill and fasten with push pins (1 supplied in kit, 2 used from stock intake plenum.). Clean out all plastic debris.
51. Install cold air box and connect plenum to tube using 90 degree silicone and tighten all clamps.
53. Open stock velcro wire bag located under overstructure (above clutch cover between oil tank and engine) and install E-key.
54. Plug Boondocker Sidekick box into ECU, plug stock ECU connector into control box har-ness. Secure Side Kick Box to the ECU using Velcro. NOTE: Zip tie harness to over structure!
52. Insert TBAP sensor into 1/2” hole and rotate sensor to best fit. Re-use the coarse plastic screw included with the sensor and fasten sensor to air box (screw will self-tap).

Boondocker Axys SideKick
Revised 12/16/2016 Page 11 of 11 www.boondockers.com……………….....BoonDocker……….………………....877-522-7805
55. Connect Boondocker Sidekick box to air box temp sensor.
56. Connect Boondocker Sidekick box boost hose to air box fitting.
58. Replace drive clutch spring and cam arms using supplied clutch items. Supplied compo-nents are used to achieve an optimal RPM range between 8400 to 8600.
57. NOTE: Check all wire routing zip tie wiring where needed to secure and prevent rubbing or moving parts interference...

THIS PAGELEFT BLANK
AX
YS
TU
NN
EL
BR
AC
KE
T T
EM
PL
AT
E