Embed Size (px)
Citation preview

2018 Science Demonstrations
The following science demonstrations were prepared and presented by the teacher candidates in the University of Northern Colorado’s SCED 441/541 (Methods in Teaching Secondary School Science) in Fall 2018, instructor Dr. Rob Reinsvold. Most of the demonstrations were presented at the 2018 Colorado Science Conference as “30 Demos in 50 Minutes”. This continued the tradition started by Dr. Courtney Willis over a decade ago. Although each demonstration was tested by the teacher candidates, you are encouraged to test it yourself before using it for instruction. Often a slight change in materials can affect the success of the demo. Also, even though some safety considerations are mentioned, please use additional caution with any of the demos, especially if students will be using the demos.
You are free to use these demos if you like.

Excitation of Molecules
Margrett Davis-Chemistry Senior BIG SCIENTIFIC IDEA SUPPORTED BY THIS DEMO The release or absorption of energy from a chemical system depends upon the changes in total bond energy. MATERIALS: 2 bottles of sparkling water with lids or caps. (Or two bottles of clear soda) 2-6 drops of food coloring PROCEDURE:
1. Open the lid of the first bottle of clear carbonated beverage. 2. Add 1-3 drops of food coloring. 3. Quickly close the lid and vigorously shake the contents. 4. Show your audience that the food coloring has been uniformly dispersed. 5. Reopen the lid of the first bottle. 6. Repeat steps 1-5 EXCEPT at step 3, gently tilt the bottle back and forth until the food coloring has dispersed.
TIPS: The bottles of carbonated beverages should be full and as undisturbed as possible before the demonstration. The liquid from the first bottle may not spew out of the container after adding the food coloring because opening the lid before shaking allows for a release of pressure. If this is the case, ask a member of the audience near you to make observations about the sounds produced by each of the bottles. Or omit the addition of food coloring from your demonstration. EXPLANATION: Carbonated beverages contain bubbles of carbon dioxide. When shaken, the carbon dioxide molecules are excited due to an increase in kinetic energy inside of the container. As a result, the pressure inside of the container is increased so when the cap is opened, in order to equilibrate with the pressure outside of the system (the bottle), gas quickly escapes, pushing liquid out with it. When the bottle is gently tilted, less energy is added to the system, so the pressure is not as dramatically increased. This demonstration would work well as part of a unit about gas molecules or the effects of adding energy to a system. With the food coloring it also works well as a safety demonstration for how to properly mix solutions in a chemistry lab and why this is important.

Penetration of Radioactive Particles
Margrett Davis-Chemistry Senior BIG SCIENTIFIC IDEA SUPPORTED BY THIS DEMO Radioactive particles vary in size and energy which allows them to pass through more materials if they are smaller and higher energy. MATERIALS: A coffee straw A regular straw A toilet paper or paper towel tube Three cylindrical or spherical objects such as toothpicks and dowels (pipe cleaners fit well in drinking straws!) One which is small enough to fit through the tube and the regular straw One which is small enough to fit through the tube but not the regular straw One which is too large to fit through the tube or the straw Alternatively, use varying needle sizes (such as a crocheting needle and various sewing needles) and textiles which the different needles can get through and one that they can’t. PROCEDURE:
1. Hold up the round or spherical objects one at a time and explain that each object represents different radioactive particles. Explain that these are not to scale-the actual particles decrease by orders of magnitude from each other. The largest represents an alpha particle which is the nucleus of a Helium atom. The next largest represents a beta particle which is an electron. The smallest represents a gamma particle which is a photon.
2. Hold up the cardboard tube. Inform/remind your audience that for the most part, atoms are empty space and different materials pack atoms more tightly than others. Explain that the tube represents a gap which radioactive particles could get through in paper. Show each of the items passing through/not passing through.
3. Repeat step two with the regular straw. Explain that this represents a gap in aluminum or wood. 4. Repeat step two with the coffee straw. Explain that this represents a gap in thick plates or lead or iron. Mention
that in real life, some gamma radiation still gets past this barrier, because a secondary factor to the penetration of radiation is the energy of the particle, but for the most part, this is a highly effective barrier.
ALTERNATIVE PROCEDURE: This demonstration also works if you puncture various textiles with various needles. Read the initial procedure and replace the tubes with textiles and the cylindrical or spherical objects with needles. TIPS: If you are doing the first procedure: It may be useful to cut the straws and the cardboard roll to visibly create a hole rather than a tunnel for the objects to pass through. EXPLANATION: A more detailed explanation is in the procedure because it is important to make explicit during the demonstration but this demonstration is an analogous model for how size of radioactive particles and density of materials affects the ability of materials to block radioactive particles.
SAFETY: If the procedure is done with needles through textiles, be sure careful not to poke yourself with the needles.

Chirality
Margrett Davis-Chemistry Senior BIG SCIENTIFIC IDEA SUPPORTED BY THIS DEMO The 3-dimensional orientation of the atomic bonds within a chiral molecule can affect the properties of a molecule as much the relative positions of atoms in isomers. MATERIALS: 2 personal whiteboards or large pieces of paper Markers appropriate to the surface you are writing on Caraway seeds or rye bread Spearmint leaves or spearmint gum SETUP: It is at least probably useful to draw the molecule excluding the alkene branch which makes the molecule chiral, and draw the chiral branch as you are discussing the concept of chirality. Make sure your seeds or bread and your leaves and gum are open so that audience members can make scent-based observations. PROCEDURE:
1. Show your audience drawings of carvone molecules which you label R and S. Point out the chiral centers of each and make sure your audience understands that the dashed line represents the bond going into the flat surface and the bold line represents the bond coming out of the flat surface.
2. Ask for a volunteer from the audience who is not allergic to spearmint or caraway. (Mention that your volunteer will NOT be eating anything.) Have your volunteer explain the taste of caraway and spearmint as they remember and have the volunteer smell the samples and report their observations.
3. Explain that both spearmint and caraway get their flavors and scents from carvone. Caraway contains the S enantiomer and Spearmint contains the R enantiomer.
4. (Optional: Industrially, R carvone is used as an insect repellent and S carvone is used to prevent potatoes from sprouting prematurely. Biologically, the fact that we can smell the difference between the carvone enantiomers but not all other enantiomers indicates that our olfactory receptors contain chiral groups)
5. Make it explicit that the purpose of this demonstration is to point out that the chirality of a molecule has measurable and significant effects on the behavior of a molecule.
TIPS: If you are using this demonstration to introduce the concept of chirality, a really simple but effective way to define chirality before the demonstration is to show that your hands are chiral-that is, they are mirror images of one another. Overlay your hands with both palms towards your audience to show that they are not the same, and then flip one hand towards yourself and overlay them again, showing that one perfectly covers the other. EXPLANATION: Chirality is the concept that some molecules have atomic bonds that can occupy two different orientations in three-dimensional space. This produces molecules which are mirror images of each other but cannot perfectly overlay each other. The mirror images are called enantiomers. Enantiomers can have very different properties from one another even though the atoms are bonded in the same locations on the molecule and there are the same number of total atoms. Some molecules have more than one chiral center. Carvone only has one but this difference in bond orientation has easily observable effects on the scents of substances which contain large quantities of either enantiomer.

Growth of the Areas of Circles
Margrett Davis-Chemistry Senior BIG SCIENTIFIC IDEA SUPPORTED BY THIS DEMO As the radius of a circle linearly increases, its area increases exponentially. MATERIALS: Cardboard cutout of a circle with a 10” diameter Cardboard cutout of a circle with an 8” diameter Cardboard or paper cutouts of 40 red circles with 1” diameters (Should leave you with a few extra ‘pepperonis’ in case any get lost or destroyed) Masking tape SETUP: The pepperonis should be placed on the outer ring of the 10” pizza before the start of the demonstration. PROCEDURE:
1. Explain that the two larger circles represent a medium and large pizza. Do not show the side of the large pizza with the pepperonis yet
2. Overlay the “medium pizza” over the large pizza so that the medium pizza is approximately in the middle of the large pizza. Ask your audience to guess, if each pizza was cut into eighths, how much more pizza they think they get out of the large pizza in terms of number of medium pizza sized slices.
3. Turn over the large pizza so that the ring of pepperonis is facing the audience and overlay the medium pizza again. Ask them if their number has changed or stayed the same.
4. Discuss the formulas to measure circles with your audience as you peel off the pepperoni rings and re-place them onto the medium pizza so that they are touching but not overlapping, essentially making a pie chart. Show your audience that approximately 1/3 of the medium pizza has been covered. Finish your discussion of the formulas to measure circles by pointing out that area increases by the square of the radius and asking the audience what fraction of the area of a 16” pizza an 8” pizza would cover. (Answer: ¼)
EXPLANATION: The area of a circle is represented mathematically as Pi times the square of the radius. It can be difficult to conceptualize that this is a mathematical way to say that as the radius of a circle linearly increases, the area of a circle increases exponentially. This demonstration illustrates this concept visually. Mathematically, a circle with a radius of 5” has an area which is 1.56 times the size of the area of a circle with a radius of 4”. Put another way, the medium pizza is approximately 2/3 of the size of the large pizza so 1/3 of the medium pizza can be covered by the excess pizza between the large and medium) DIAGRAM
The “pizzas” before and after the ring of “pepperonis” are moved from the large pizza to the medium pizza.

Fermentation Lab
Luke Engelbert - Biology Senior BIG SCIENTIFIC IDEA SUPPORTED BY THIS DEMO Life requires sufficient energy and matter inputs in order to thrive. MATERIALS: Zip-lock bag or test tube (alternative procedure) Test tube rack (alternative procedure) Dry active yeast Sugar Warm water Cup of water Balloon (alternative procedure) SETUP: Have zip-lock bag with yeast and sugar already mixed. Have cup of water set up next to it. Have pre-made lab kit set up showing end result. PROCEDURE:
1. Open zip-lock. 2. Add 4 tablespoons of yeast to zip-lock bag. 3. Add 2 tablespoons of sugar to yeast in zip-lock bag. 4. Add .5 cup of water to yeast sugar mixture in zip-lock bag. 5. Remove air from bag and close 6. Let bag with mixture sit for 15 min. 7. Observe bags growth.
EXPLANATION: During ATP production for organisms that undergo a process called fermentation, a by-product of is CO2 gas. With this lab it can be observed that the yeast is alive and creating ATP by the growth level of gas in the bag. SAFETY: Mixing chemicals together with an organism in a bag. Releasing air from bag could result in spilled solution.

Convection Currents
Luke Engelbert - Biology Senior BIG SCIENTIFIC IDEA SUPPORTED BY THIS DEMO Convection currents in the of magma in the Earth’s mantle drive tectonic plate movement. MATERIALS: Hot plate Large clear bowl Ice cube tray Red food dye Blue food dye Water SETUP: Water poured into bowl. Ice cubes already made and standing by. Bowl placed on hot place. Hot plate turned on to high temperature. PROCEDURE:
1. Pour water into ice cube tray. 2. Dye water blue with blue food coloring. 3. Place ice cube tray in freezer to freeze. 4. After water is frozen pull out of freezer. 5. Place large clear bowl onto hot plate. 6. Pour water into large clear bowl. Let water calm. 7. Drop 2 drips of red food coloring into bowl. 8. Turn on hot plate. 9. Let water heat up. 10. Once red food coloring begins to rise place small piece of blue ice into bowl
EXPLANATION: As liquids heat up they become less dense and travel upward towards their surface where it cools. While this is happening, the cooler, denser liquid at the surface falls to the bottom of the container only to be reheated and circulate back upward. SAFETY: Hot plate gets very hot and can burn user. Hot water can boil and burn user.

ATP Snake
Luke Engelbert - Biology Senior BIG SCIENTIFIC IDEA SUPPORTED BY THIS DEMO Life requires the use of energy to create more energy. MATERIALS: Snake in a Can SETUP:
Snake in a can on the outside of the can. Have the can’s lid off. PROCEDURE:
1. Begin procedure with snake outside of can. 2. Compress snake into can 3. Seal snake into can with lid 4. Release snake away from people
EXPLANATION: In order for life to create ATP, life must use energy in the process of making ADP into ATP. During the process of glycolysis, a cell uses 2 ATP to brake glucose down into pyruvate but ends up creating 4 more ATP molecules. Since pushing a snake in to a can causes a loss in energy this shows the initial step of the use of ATP but when the snake is released it explodes out with energy showing that energy came out of the system. SAFETY: Snake in a can is a projectile. Must not be aimed at others

Fire Trail
Luke Engelbert - Biology Senior BIG SCIENTIFIC IDEA SUPPORTED BY THIS DEMO During combustion reactions, smoke forms from incomplete combustion and when in the right conditions can reignite. MATERIALS: Candle Lighter Bottle lid SETUP:
Have candle standing up. Lighter and lid lying next to it. PROCEDURE:
1. Light candle using lighter. Put lighter out. 2. Let candle burn. 3. Light lighter. 4. Using bottle cap, put out flame by lowing cap over flame. 5. Lift cap straight up when removing 6. Put lighter flame into smoke trail. 7. Light smoke trail. 8. Put lighter out 9. Blow out candle
EXPLANATION: While the wick is still smoldering, there is still wax on it that has not full burned. Its then lifted out with the smoke and reignited by the lighters flame. The flame then burns down the smoke trail till it reaches the wick and reignites it. SAFETY: Fire hazard
Boyle’s Lung
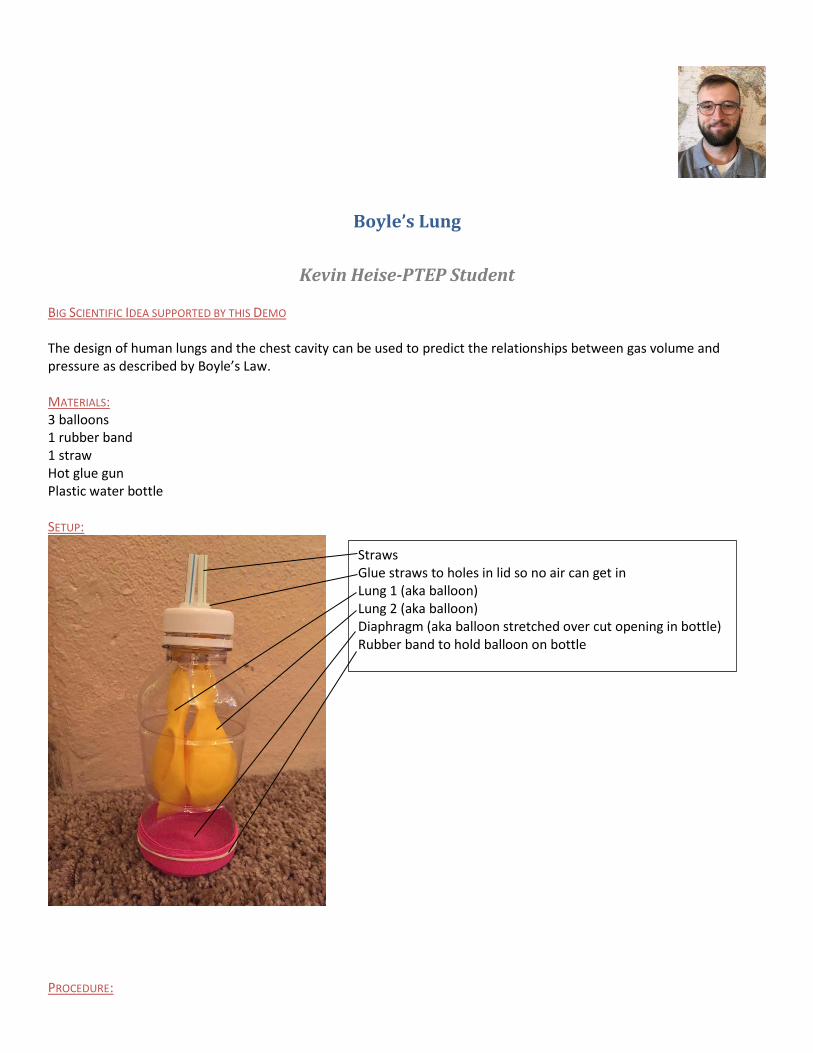
Kevin Heise-PTEP Student BIG SCIENTIFIC IDEA SUPPORTED BY THIS DEMO The design of human lungs and the chest cavity can be used to predict the relationships between gas volume and pressure as described by Boyle’s Law. MATERIALS: 3 balloons 1 rubber band 1 straw Hot glue gun Plastic water bottle SETUP:
PROCEDURE:
Straws Glue straws to holes in lid so no air can get in Lung 1 (aka balloon) Lung 2 (aka balloon) Diaphragm (aka balloon stretched over cut opening in bottle) Rubber band to hold balloon on bottle

1. Hold the bottle in one hand 2. Pinch the center of the pink balloon (diaphragm) with the other hand 3. Pull down on the pink balloon (aka contracting the diaphragm) 4. Push up on the pink balloon (aka relaxing the diaphragm)
TIPS:
Exaggerate the diaphragm movement to better display air movement into and out of the lungs. EXPLANATION:
This demo displays how organisms obtain matter (oxygen) from the environment from breathing. Breathing can best be explained by the interaction between volume and pressure of a gas as described by Boyle’s Law.
By contracting the diaphragm, the volume of the chest cavity increases and the pressure inside the cavity decreases.
This allows air from the external environment to enter into the lungs since the pressure from the outside environment is greater than what is inside the chest cavity. As the lungs expand and fill with air, oxygen binds to the hemoglobin in RBC that travel through alveolar capillary beds. As the diaphragm relaxes, the volume of the chest cavity decreases which increases the pressure of the cavity. This causes air to move out of the lungs, to the outside environment which now has a similar pressure to the inside of the chest cavity. Additionally, the elastic recoil of the lungs helps exhale air out of the lungs. SAFETY:
none

Spindle Kick
Kevin Heise-PTEP Student BIG SCIENTIFIC IDEA SUPPORTED BY THIS DEMO
Investigating system interactions gives us an indication of how information flows and delivers negative and/or positive feedback to stabilize a system. Analyzing these relationships can reveal the function of a tissue based on its structure. MATERIALS:
Reflex hammer (also called neuro hammer) SETUP:
Sit upright where the femur is supported by a chair or table. Allow the distal aspect of the leg to hang off the chair or table and relax the quadriceps and hamstrings. PROCEDURE:
Gently strike the patellar tendon with the reflex hammer directly distal to the patella such that the quadriceps tendon will quickly lengthen. The reflex arc caused by the muscle spindle response will cause the quadriceps muscles to contract and extend the knee. TIPS:
Practice beforehand to make sure the correct place on the patellar tendon is struck. EXPLANATION: Muscle spindles are sensitive to stretch and rate of stretch. Specifically, they insert into the connective tissue within the muscle and run parallel with the muscle fibers. The number of spindles in a particular muscle varies depending upon the level of control needed for the area. Consequently, the concentration of the muscle spindles in the hands is much greater than the thigh. When rapid stretch occurs, an impulse is sent to the CNS. The CNS then activates the motor neurons of the muscle and causes it to contract (this is most prominent in the extensor muscles of the extremities). As shown in the diagram below, when a reflex hammer strikes the patellar tendon, it causes a quick stretch of the musculotendinous unit of the quadriceps. In response, the quadriceps fires and the knee extends. To an extent, the more sudden the tap of the hammer, the more significant the reflexive contraction. A more practical example is seen in maintaining posture, as when a student begins to doze off in class. As the head starts to nod forward, a sudden stretch is placed on the neck extensors, which activates the muscle spindles and ultimately results in a sudden jerk back to an extended position. Furthermore, the stretch reflex provided by the muscle spindle may be utilized to facilitate a greater response, as in the case of a quick, short squat before attempting a jump. The quick stretch placed upon the muscle in the squat enables the same muscles to generate more force in the subsequent jump off the floor.

SAFETY:
Do not do this on someone who has patellar tendinitis, osgood schlatter knee, frequent patellar dislocations, or a recently replaced knee joint.
References
Floyd, R. T. (2015) Manual of structural kinesiology (19th ed.). New York: NY. McGraw Hill Education

Wounded Apple
Kevin Heise-PTEP Student BIG SCIENTIFIC IDEA SUPPORTED BY THIS DEMO Body systems differ when in a state of health and disease. Additionally, there are complex set of interactions which determine how an organism responds to disease. For example, a primary wound injury may lead to a secondary injury as a result of the physiological process that occurs in response to the primary wound. SETUP:
MATERIALS: Water Syringe Band-Aids Sterile Pad Gauze Athletic Training Tape Neosporin Non-latex gloves Cutting Board Apple (could use 1-10 apples) Pen Nail Knife (scalpel) Cheese grater

PROCEDURE:
Make the following wounds in an apple by using the following (may be fun to make up some story for each wound)
Abrasion-Cheese grater
Laceration-Pen
Incision-knife (scalpel)
Puncture-nail
Avulsion-knife (scalpel)
Once the wounds are made, allow the students to irrigate the wound with the syringe, and clean the area with a sterile pad. Then, they can apply Neosporin, and create a way to cover the wound by using a bandage of some sort (gauze and athletic tape or band-aid). TIPS:
You can do 1 wound per apple, or all wounds in 1 apple. You can vary the apples used by the class size you have. Since this does include sharp objects, it may be best for the teacher to tell a story and make the wound types. Then, have the students take the apple, sterilize the wound, and bandage it. EXPLANATION:
Primary injuries are mainly unpreventable apart from altering behaviors beforehand. Thus, the damage to the tissue is directly due to the trauma during the initial moments of injury. Secondary injury results from any damage, injury, or death that occurs as a result of the physiological process that occurs in response to primary damage. This happens as a result of the healing process due to the interplay between the internal and external environment. Thus, external dressing acts as a middle ground between internal and external environment and allows the healing process to take place. This is a good “engage” activity as an introduction to the functions of the circulatory system. The main idea to stress here is the cascade of events and interactions which determines how organism response to disease (or in this case, wounds).
SAFETY:
This demo requires the use of sharp objects. Students must be aware of the rules for using sharp objects to ensure no one is harmed.

Orange Circles
Kevin Heise-PTEP Student BIG SCIENTIFIC IDEA SUPPORTED BY THIS DEMO Similar properties between the surface area of a sphere and a circle can be represented through similar equations. MATERIALS: 8.5” x 14” paper Orange (could also use mandarin orange) SETUP:
First, have the students trace the orange on the paper 6 times. It should look like this:
Next, have students discuss all they should know about circles. Lead them to define the equation for the area of a
circle as a= πr2 Finally, have the students predict how many circles will be filled up with the orange peel.
PROCEDURE: Have students peel the orange and fill up the circles they made on the paper. It should look something like this:
Finally, have students come up with a mathematical way to represent this. Through the use of guided questioning,
they should decide that the surface area of the sphere (in this case, the orange) = 4 πr2 TIPS:
Possibly have students make small pieces with the peel to have them fit it more like puzzle pieces on the paper. EXPLANATION:
This is illustrating how 3D and 2D shapes share similar properties that can be expressed through similar equations.
SAFETY: If student is allergic to citrus fruit, this lab is not safe for them.

Insulated Balloon
Andrew Mattivi - Biology Senior BIG SCIENTIFIC IDEA SUPPORTED BY THIS DEMO Different objects have different specific heats, which is the amount of energy a substance must absorb to raise its temperature by 1 degree. When a substance is heated, it expands, this is called thermal expansion. MATERIALS: 2 balloons Lighter Access to a sink for water SETUP:
Inflate one balloon with air. Inflate a second balloon after first filling it with water until it will not hold any more. PROCEDURE:
Hold the balloon only inflated with air in your hands. Light the lighter, and hold the lighter to the bottom of the balloon. After a very short time, the balloon will pop. Now repeat the same procedure but with the balloon filled with a small amount of water. Make sure to hold the flame right below the part of the balloon where the water has pooled, this time, the balloon will not pop, and will not pop for a very long time. TIPS:
Make sure the flame is directly below the pool of water in the second balloon. If the flame is not, the balloon WILL pop, and drench everything below it. EXPLANATION:
As the rubber of the first balloon is heated, it expands, and becomes weaker and cannot hold the pressure on the inside of the balloon. Water has a very high specific heat, and absorbs the thermal energy from the lighter without causing the rubber in the second balloon to weaken or expand, allowing it to withstand much more exposure to the heat for extended periods of time.
SAFETY:
Make sure no students are conducting the experiment, the flame could burn students if held improperly.

World’s Simplest Train
Andrew Mattivi- Biology Senior BIG SCIENTIFIC IDEA SUPPORTED BY THIS DEMO Electrical current can induce a magnetic field. Like magnetic forces repel each other MATERIALS: Copper wire Dowel Rod AA Battery Two 5/8” Magnets SETUP:
Wrap the copper wire in a coil around the dowel rod until the desired length is achieved. PROCEDURE:
Place the magnets on the battery. Place the battery inside the coil of copper wire. Once all of the battery is in the wire coil, the magnetic contact with the copper will produce an electrical current, which, in turn will produce a magnetic field. This magnetic field will repel the batteries, and push the battery through the track on its own. TIPS:
This may require some re-adjustment of orientation of the magnets if it will not propel the battery through the track at first. EXPLANATION:
Induced current will produce a magnetic field according to the right hand rule. This magnetic field will repel like magnetic forces, pushing the battery through the track.
SAFETY:
No real safety concerns on this demo.

Invincible Balloon
Andrew Mattivi - Biology Senior BIG SCIENTIFIC IDEA SUPPORTED BY THIS DEMO Polymers are long chains of molecules. Each polymer has its own unique properties. Pressure varies in a system, and different parts of a system feel more stress than others. If Polymers are supported, they will retain their shape MATERIALS: 2 Balloons 2 Wooden Food Skewers Vegetable Oil Clear Tape SETUP:
Draw small dots with sharpie, around 2cm each all over the surface of the balloon before inflation. Place clear tape on both sides of one of the balloons. Place 2-3 drops of vegetable oil on the skewers and coat the outside of the skewer. PROCEDURE:
Show students that both balloons are uninflated, have them take note of the size of the dots on each balloon. Inflate balloons to about 2/3 full. Tie knot at bottom of balloon. Have students take note of the size of the dots after inflation. Ask students what they think will occur if you poke the balloon with a wooden food skewer. Poke the balloon near the bottom (by the knot) and run the skewer through the top of the balloon. Now try and do the same but on the side of the balloon (it will pop). Do this same procedure again, but this time with the taped balloon. This time for the second poking, run the skewer through the tape on both sides, this should support the balloon enough not to pop. Ask students why they think the second one didn’t pop on the side. TIPS: Don’t tell students about the tape until after they have guessed how the second balloon did not pop. EXPLANATION:
The pressure inside the balloon is mainly supported by the sides of the balloon. The bottom and top have an excess of rubber polymer, which is not under much stress. The lubricated skewer slides right through both sides of the balloon, since the pressure is not enough to tear the balloon on these areas. The side is much more stressed, and a slight tear causes the balloon to pop. The tape on the second balloon supports the polymer enough that even on the sides, it retains its shape, and does not pop.
SAFETY:
Possible to get splinters from lubricating the skewers.

Fun with Alloys
Andrew Mattivi - Biology Senior BIG SCIENTIFIC IDEA SUPPORTED BY THIS DEMO The combination of two metals forms an alloy. These alloys can have different properties than either of the starting metals, or a combination of them both. MATERIALS: Aluminum Can Sand Paper Gallium Knife SETUP:
Puncture the side of the can with a sharp object a few times. Drain the liquid from the can. PROCEDURE:
Scratch the surface of the top of the aluminum can with the sandpaper. Make sure to cover the whole surface you wish to change. After the can is scratched, heat the gallium by holding it in your hands, or by using a hot plate. Just enough to melt the gallium is all that is needed. After the gallium is liquid, pour it on to the top of the can. Let it sit for about 3 hours. The newly formed alloy should be quite malleable, and you should be able to tear the aluminum can apart with very little force. TIPS: Have one can pre-prepped, so you can show both the procedure and the outcome without having to wait 3 hours. EXPLANATION:
When metals combine, they form alloys, these alloys can have different properties than the original metals, and in the case of aluminum and gallium, the new alloy is quite malleable, and easily comes apart without much force. SAFETY:
Gallium should NOT be exposed to water, the reaction that occurs produces gasses that should not be inhaled and is also incredibly exothermic and could possibly burn skin.

Wave Freeze Ray
Andrew Roth - Physics Senior BIG SCIENTIFIC IDEA SUPPORTED BY THIS DEMO Standing waves appear to not move in space because of the unique properties of their constructive and destructive interference. MATERIALS: Speaker with exposed diaphragm Glue Small metal bar 2-3 m of bright string with loops tied on both ends 2 C-clamps Signal generator Pulley 50 g Mass hanger 100 g mass Variable frequency strobe light SETUP:
1. Attach small bar to the center of the speaker diaphragm with glue 2. Tie string to small bar, gluing down if necessary 3. Clamp speaker to one end of the table, and pulley apparatus to the other end 4. Run other end of string over the pulley, hanging the mass hanger off of the loose end such that the whole string
is held taut 5. Hook the signal generator up to the speaker
PROCEDURE:
1. Model, using the wave on a string, how we can almost see an individual wave by creating a standing wave, noting that “two waves” still appear to exist
2. Turn off the lights and turn on the strobe light 3. Dial the frequency of the strobe light until it matches that of the wave, which should cause the wave to look still

TIPS: -Some smartphones can download a frequency generator app, which can be used to run the speaker if a signal generator is unavailable -The speaker frequency should generally be set at less than 50 Hz -Most handheld strobe lights have short charged times—make sure to keep the strobe plugged in when not in use -A good rule of thumb is t set the strobe light at a frequency about 200x that of the speaker frequency EXPLANATION: The wave looks frozen in mid-air! The strobe light projects light onto the string at the exact same point during its journey every time. Since standing waves interfere very predictably, “taking a picture” of the string at the exact same point over and over returns the exact same result every time. This “same point” refers to the frequency of the wave, which needs to match the frequency of the strobe light (or be an integer divisor of it). SAFETY: Use of a strobe light may be detrimental to observers with epilepsy or sensitivity to bright flashes of light; warn students ahead of time and/or try to use a higher frequency strobe.
Wah-Wah Machine
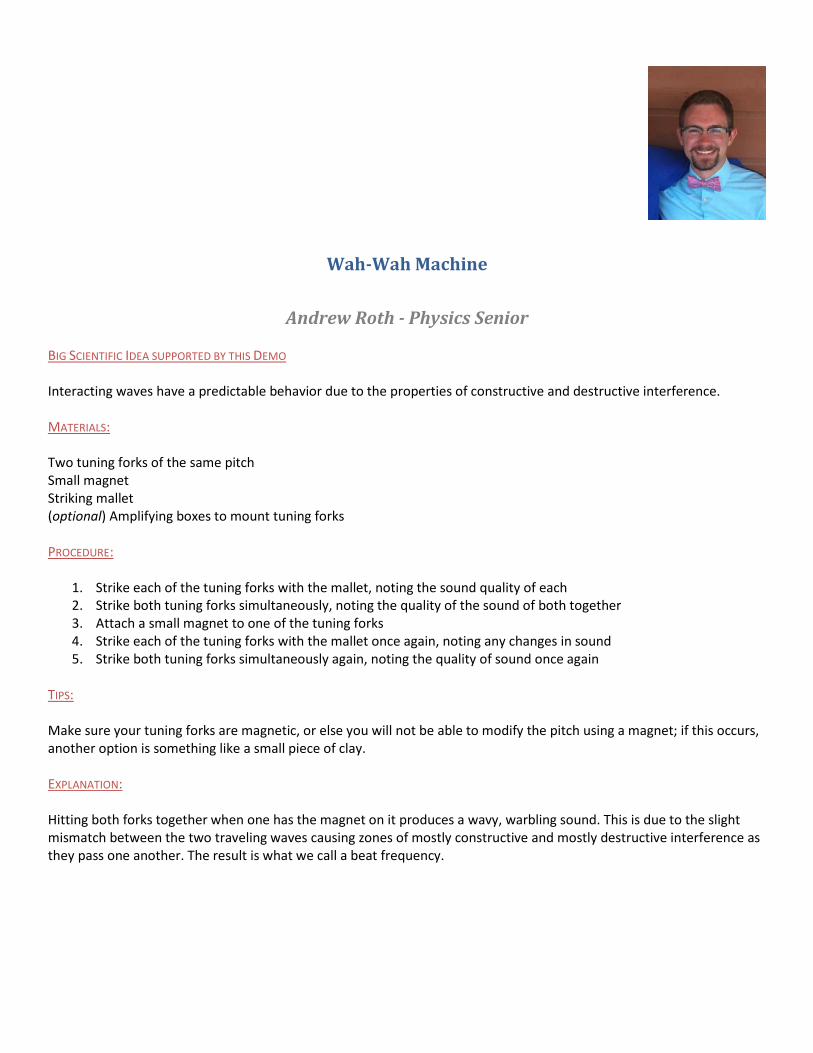
Andrew Roth - Physics Senior BIG SCIENTIFIC IDEA SUPPORTED BY THIS DEMO Interacting waves have a predictable behavior due to the properties of constructive and destructive interference. MATERIALS: Two tuning forks of the same pitch Small magnet Striking mallet (optional) Amplifying boxes to mount tuning forks PROCEDURE:
1. Strike each of the tuning forks with the mallet, noting the sound quality of each 2. Strike both tuning forks simultaneously, noting the quality of the sound of both together 3. Attach a small magnet to one of the tuning forks 4. Strike each of the tuning forks with the mallet once again, noting any changes in sound 5. Strike both tuning forks simultaneously again, noting the quality of sound once again
TIPS: Make sure your tuning forks are magnetic, or else you will not be able to modify the pitch using a magnet; if this occurs, another option is something like a small piece of clay. EXPLANATION: Hitting both forks together when one has the magnet on it produces a wavy, warbling sound. This is due to the slight mismatch between the two traveling waves causing zones of mostly constructive and mostly destructive interference as they pass one another. The result is what we call a beat frequency.

Angle of Gravity
Andrew Roth - Physics Senior BIG SCIENTIFIC IDEA SUPPORTED BY THIS DEMO Free-body diagrams visually represent the net force on an object. MATERIALS: Styrofoam poster board String Pin Fishing weight, bolt, or other small, heavy object Tape Protractor Markers SETUP:
1. Cut a 6” slit in one large piece of poster board. 2. Tape the two large pieces of poster board together at one end, such that they create a hinge. The slit-board
should be on top, and the board should be taped on the side with the slit. 3. Build a box out of more poster board and attach to the top (slit) plate such that it lies flush with the side edge. 4. Tie the weight to the string and pin the string to the center of the box so that it can hang freely as a plumb line. 5. Attach a cutout “coordinate system” to the box, parallel and perpendicular to the top board. 6. Cut out two 6” quarter circles and label with angle measures every 10 degrees 7. Attach one “protractor” to the bottom board through the slit, such that it measures the angle of the top board.
Attach the other to the bottom half of the box, such that it measures the angle of the gravity plumb line.
PROCEDURE:
1. Briefly explain how to place a coordinate system (i.e. “When we put an object on a ramp, it’s generally a good idea to place our coordinate system for our free-body diagram so that it’s perpendicular to the surface”)
2. Slowly lift the ramp up, letting the plumb line rotate freely as the ramp rises 3. Have students record the angle of the ramp and the angle of the plumb line at several positions

TIPS: Make the plumb line clearly visible against the background of the protractor—this can be accomplished with thick or colored string. EXPLANATION: The angle between the weight vector and the perpendicular is always the exact same as the angle of incline of the ramp the object rests on. This is due to the geometry of the situation, and can also be proved mathematically.

Bowling Ball Vectors
Andrew Roth - Physics Senior BIG SCIENTIFIC IDEA SUPPORTED BY THIS DEMO The net force on an object in a given direction is the sum of the same-directional component of all forces on that object. MATERIALS: Bowling ball with attached I-bolt 10 ft rope (recommended ½ in. thickness) Small loop of rope Helmet (Optional) Vector cutouts PROCEDURE:
1. Thread the small loop of rope through I-bolt and tie off 2. Have a student volunteer (while wearing a helmet!) lift the bowling ball by the rope as high as possible 3. Measure the final height of the ball 4. Replace the small loop of rope with the 10 ft. rope 5. Have two more student volunteers try to lift the bowling ball while only holding the ends of the rope 6. Measure the final height of the ball and compare to the first scenario 7. Have all volunteers comment on the effort expended during the demo (i.e. “How hard was it to lift the ball?”)
EXPLANATION: Since an object’s motion in one direction is only influenced by forces in that direction (in this case, upwards), forces not directly in line with the direction of motion will have a lesser effect. The second scenario will likely have a lessened final height because, although two people provide force, most of that force is in the sideways direction and thus not contributing to lifting the bowling ball at all! SAFETY: The student lifting the bowling ball alone should wear head protection, as they will likely be able to lift the bowling ball above their head.

Glow Sticks and Dish Soap Reactions
Erin Sporl - Biology Senior BIG SCIENTIFIC IDEA SUPPORTED BY THIS DEMO You can use this to a comparison of a star’s life cycle. Adding the two chemicals are the birth of a star and adding the dish soap to make it brighter simulates the star growing and getting brighter. When you keep the soap, it simulates the star dying out and losing its light and becoming a dwarf. MATERIALS: Glow sticks Dish soap Glass jar for hydrogen peroxide (color) Glass Jar for diphenyl oxalate compound (activator) Stirring rod SETUP:
Cut open the glow sticks and separate the two liquids into two separate containers. One liquid will be in the plastic tube (the activator) and the other liquid will be in a glass tube (the color). PROCEDURE:
1. Crack one glow stick as a control to compare brightness levels to. 2. Pour the activator into the cup with the color. 3. Watch it glow for a few seconds, get an idea of how bright it is. 4. Add a small amount of dish soap, enough to make it brighter. 5. Keep adding soap until it the brightness decreases.
TIPS: Make sure to use enough glow sticks. Amazon sells a box of 300 for $20. EXPLANATION:
The glow sticks have two chemicals in them, in the plastic casing there’s a diphenyl oxalate compound (the activator), in the glass vial there’s hydrogen peroxide (the color). When the two mix it makes a glowing reaction, and when a weak base is added (dish soap) the reaction occurs faster and produces a brighter light. However when you keep adding it, the energy in the system is converted into CO2.
SAFETY:
Make sure not to cut yourself while breaking open the glass vials. The chemicals in glow sticks can be a mild irritant, wearing gloves to avoid it is advised. The chemicals will eat through plastic cups, make sure to use glass jars.

Underwater Sandcastles
Erin Sporl - Biology Senior BIG SCIENTIFIC IDEA SUPPORTED BY THIS DEMO Substances that are hydrophobic will not mix with water, and any object that they are coating will keep the object completely dry even when dunked in water and taken out of water. MATERIALS: Scotchgard Craft sand Water Container big enough to hold the sand and water SETUP:
Spray the sand with Scotchgard, mix it around on a baking sheet, repeat about 3 times. PROCEDURE:
1. Fill the container with water. 2. Take a handful of sand and slowly pour it in and allow the sand to build up any shape. 3. Grab the sand from the bottom and bring it up to air to show that it’s still sand. 4. You can even do this where you put the sand inside of a mold and put that underwater, and pull the mold out
leaving a shape. TIPS:
Colored sand will show best, and it will also allow people to see the barrier the Scotchgard makes between the sand and the water. EXPLANATION:
Things that are hydrophobic will not mix with water, and anything that they coat will be kept dry when underwater. This can be related to cell membranes and the phospholipid bilayer to show what it means to be a hydrophobic tail.
SAFETY:
None

Turning Water into Wine
Erin Sporl - Biology Senior BIG SCIENTIFIC IDEA SUPPORTED BY THIS DEMO When a liquid that is denser are on top of a less dense liquid, the less dense liquid will eventually move on top of the denser liquid. MATERIALS: Plastic wine glasses Red wine Water Clear vinyl big enough to cover the glass SETUP:
Fill one wine glass with water and the other with red wine, make sure to fill it all the way to the brim. PROCEDURE:
1. Put the plastic sheet over the glass of water. 2. Flip the water glass onto the wine glass while holding the plastic sheet. 3. Move the plastic sheet enough to allow mixing. 4. Leave to sit for about 10 minutes or until the wine is in the top glass and the water is in the bottom glass.
TIPS: Be sure to fill the glass all the way to the brim or it won’t work as well.
EXPLANATION:
The water is denser than the wine, because of that when the water starts on the top it will settle to the bottom. Same for the wine, it’s less dense than water and since it’s started on the bottom it will move to the top.
SAFETY:
None
Diagram

Rubber Chicken Bones
Erin Sporl - Biology Senior BIG SCIENTIFIC IDEA SUPPORTED BY THIS DEMO Acids dissolve parts of things leaving them intact, but structurally weak. MATERIALS: Vinegar Chicken bones (leg bones work best) Container SETUP:
Let chicken bones soak in vinegar for 3 days. PROCEDURE:
1. Have one chicken bone for reference of how hard a chicken bone is normally. 2. Try and bend it, even bend it until it snaps if you want. 3. Pull the prepared bone out of the vinegar bath and bend it to show that it’s become “rubberized”.
TIPS:
Normal white vinegar is the best to use. EXPLANATION:
A mild acid will strip away at the hard calcium of bones and leave them structurally intact, but they will be more flexible than before. The calcium in the bone is what’s keeping the bone hard.
SAFETY:
Vinegar can irritate eyes.

Semi-permeable membrane
Allison Teichman - Biology Senior BIG SCIENTIFIC IDEA SUPPORTED BY THIS DEMO Organisms use matter and energy to live and grow. Changes of energy and matter in a system can be described in terms of energy and matter flows into, out of, and within that system.
Specialized cells in multi-cellular organisms perform specialized functions. MATERIALS: Dirt Uncooked pasta (beads) (anything that cannot fit through the holes in your strainer) Strainer Bowl PROCEDURE:
Mix dirt and uncooked pasta together Pour mixture over a strainer Shake over a bowl until pasta and dirt are separated
EXPLANATION:
The strainer acts as a membrane that small un-charged molecules can diffuse through. The dirt represents the small uncharged particles that can readily diffuse through a membrane and the uncooked noodles represent the larger molecules that cannot diffuse through a membrane on their own.

Erosion and Soil
Allison Teichman - Biology Senior BIG SCIENTIFIC IDEA SUPPORTED BY THIS DEMO Water movement causes weathering and erosion, changing landscape features. The properties of the earth’s surface can change the effect that water has on changing landscape features MATERIALS: 3 Two-liter bottles cut in half vertically with bottle neck still attached String Hole punch 3 water bottles cut in half horizontally Soil Dead leaves Grass whose roots have grown through soil Pitcher of water Box with black paper to place bottles on SETUP:
Hole punch two holes into each of the cut in half water bottles, near the top and on opposite sides from each other. Tie a single string through each hole on the water bottle. Fill one two-liter half way with just soil and place the water bottle on a string over the neck of the two-liter. Fill the second two-liter half way with soil and place a layer of dry dead leaves on top, place water bottle on the neck. Place the grass into the third two-liter and water bottle on the neck. PROCEDURE:
Once the two-liters are all set up, slowly pour water all over the soils one at a time until water starts pouring out of the two-liter neck into the water bottle bucket. TIPS:
Make sure that the cut in half water bottles are large enough to hold all the water that you are pouring into the soil system. EXPLANATION:
As you pour water into the system that only has soil in it, the water runoff that you end up with will be carrying lots of soil with it, because there is nothing holding that soil where it is, so the water is able to move the soil freely. The system with leaves on top of the soil will result in less soil leaving with the water runoff because the leaves act as a protective barrio and prevent the soil from moving as much. The two-liter where the grass is grown into the soil will have almost no soil leaving the system, because the roots of the grass hold all of the soil in place. Showing that the differences in soil systems will change how water erodes an area.

Diagram

Tinsel Balloons
Allison Teichman - Biology Senior BIG SCIENTIFIC IDEA SUPPORTED BY THIS DEMO When two objects interact, each one exerts a force on the other that can cause energy to be transferred to and from the object. MATERIALS: Balloon Tinsel PROCEDURE:
Rub the balloon on your hair, wool or anything fuzzy to build a negative charge Drop a piece of tinsel on the balloon It sticks
EXPLANATION: When you rub the balloon in your hair you give the balloon a negative static charge. When you drop the tinsel onto the balloon, it has with a neutral charge, but once it touches the balloon, the negative charges in the tinsel will move as far away from the balloon as possible leaving the positive charge closer to the balloon. Opposites attract and the tinsel will stick to the balloon. SAFETY: Be aware of small static shocks.

Vanilla Balloons
Allison Teichman - Biology Senior BIG SCIENTIFIC IDEA SUPPORTED BY THIS DEMO Organisms use matter and energy to live and grow. Changes of energy and matter in a system can be described in terms of energy and matter flows into, out of, and within that system. Specialized cells in multi-cellular organisms perform specialized functions. MATERIALS: Balloon Vanilla extract PROCEDURE:
Place balloon over the opening of the bottle of vanilla extract Carefully pour some vanilla into the balloon. Remove the balloon from the vanilla bottle Blow up the balloon Tie the balloon off Shake the vanilla around the balloon Smell the outside of the balloon
EXPLANATION: The scent molecules of vanilla are small enough that they can fit through the membrane of the balloon. SAFETY: Be aware of latex allergies when picking out balloons.

The Boomerang Hula-hoop Analysis Peter Woodley
Peter Woodley – Biology Post Bac – Pre-service Teacher BIG SCIENTIFIC IDEA SUPPORTED BY THIS DEMO The behavior of an object is the result of the forces applied to it, as well as any other subsequent interactions. MATERIALS: Hula-hoop(s) SETUP: The presenter practices the maneuver in an open space to achieve consistency. PROCEDURE: The hula-hoop should be tossed forward with back spin. It should hit the ground sliding in the opposite direction of the spin until it catches and roles right back to the instructor. TIPS: The hula-hoop maneuver should be practiced. EXPLANATION: Rolling resistance is the resistance to rolling that occurs when a round object, such as a ball, wheel, or cylinder rolls on a surface. It is caused primarily by deformation of the object, deformation of the surface, or both. Kinetic friction refers to the frictional force of a moving object. If a force is being applied on a stationary object, friction is considered a static force until movement occurs. Friction is a force that occurs between two or more surfaces of objects that is typically in the direction opposite to the force being applied on an object. It can be calculated by multiplying the coefficient of friction by the normal force, which takes into account gravity and any other forces perpendicular to the surfaces in contact. The static coefficient of friction is used when the object is stationary and is usually larger than the kinetic coefficient of friction, which is used during movement. SAFETY: This demonstration is fairly safe. The risks involved are centered around spatial awareness. We don’t want to hit anyone or knock anything over. Again, independent practice outside is a great way to start.

Peter Woodley
Genetic Diversity Fluctuations in Populations
Peter Woodley – Biology Post Bac – Pre-service Teacher BIG SCIENTIFIC IDEA SUPPORTED BY THIS DEMO A genetic bottleneck occurs when the genetic diversity of a species is reduced due to a random catastrophe. Genetic drift is also a loss of genetic diversity but is due to improved fitness. The founder effect leads to less diversity due to isolation from the larger population. All of these reductions in genetic diversity leave the existing populations with less genetic potential to survive in an ecosystem that is in flux. MATERIALS: Four Clear Beakers Water Oil Stirring utensil Tray for spills Food coloring SETUP: The water with food coloring (for contrast) and oil are placed into two beakers at a one to one ratio. The other two beakers will remain empty. PROCEDURE: Half of the liquid is slowly poured into an empty beaker, which leads to a different ratio of oil and water in the new container (Genetic drift due to fitness). Then, follow the same procedure again but instead stir the water and oil carefully and vigorously immediately prior to half of the contents into the other empty beaker. This should lead to the same ratio of water and oil as the original container (Genetic Bottleneck due to catastrophe). TIPS: The goal is to show how fitness is selective and bottlenecks due to catastrophe are not. This means that the water and oil should be settled as it is poured first beaker. The second beaker should be mixed vigorously to achieve a homogenous condition as it is poured. EXPLANATION: Genetic diversity can be impacted by a variation in fitness due to traits that are favorable to survival. The oil in the first beaker represents the segment of the population that showed greater fitness. The mixing of the liquids represents a catastrophic event that randomly reduced the genetic diversity that is similar to the original. *This can also include various sediments that would represent even more genetic diversity in the populations.

SAFETY: This demonstration is safe but potentially messy. The tray is used to isolate the mess and there should be rags on hand to deal with messes.

Peter Woodley
Two Takes on Magnetic Braking
Peter Woodley – Biology Post Bac – Pre-service Teacher BIG SCIENTIFIC IDEA SUPPORTED BY THIS DEMO When an EMF is generated by a change in magnetic flux (the conductor passing by the magnet) according to Faraday’s Law, the polarity of the induced EMF is such that it produces a current whose electromagnetic field opposes the change that created it. Demonstrations 1) Magnet falling through a copper tube 2) Aluminum ruler falling between magnets MATERIALS: 1 & 2) Neodymium magnets (strong magnets) (the more the better for the ruler) 1) Copper tube and aluminum ruler (non-ferromagnetic conductors) 1) PVC tube of the same interior diameter 2) Two pieces of thin yet rigid wood or plastic and spacers (wooden shims and wooden skewers) 2) Two rubber bands SETUP: 1) The copper tube is ready to go. 2) The spacers should be only slightly bigger than the thickness of the ruler (the goal is to provide a space with close proximity and minimal contact with the ruler). PROCEDURE: 1) Drop the magnet down the tube. 2) Drop the ruler down in between the magnets 1 &2) Use some sort of padding to stop ruler or magnet from hitting the floor and damaging something. TIPS:
I recommend using materials that you have. I tried to use the cheapest materials that were available for the ruler part. The copper tube costs what a copper tube costs ($7) and the plastic tube ($2). The magnets were purchased for a few bucks at the “Little Shop of Physics”, which is another good cause like this one. The benefits of the ruler part of the demo is realized when the student feels the resistance. The tube should bring the acceleration of the magnet to zero due to the law of conservation of energy.

EXPLANATION:
Lenz's law of electromagnetic induction states that, when an emf is induced according to Faraday's law, the polarity (direction) of that induced emf is such that it opposes the cause of its production.
The law of conservation of energy is why acceleration, in ideal conditions, will reach zero. Essentially, we can’t create more energy out than the amount we put in.
SAFETY:
There should be consideration for where the magnet and ruler strike the floor, as they could cause damage to the floor and/or the magnet/ruler. The ruler is soft aluminum with a lot of pounds per square inch and the magnet is very hard and brittle. Always be careful with metal poles because of potential for electrocution and broken windows. These magnets are very strong and can pinch you, slam together and break, ruin electronic devices and cards, so be very careful when using, moving, or storing them.

Peter Woodley
The Air is Where Most of the Mass of a Producer Come From
Peter Woodley – Biology Post Bac – Pre-service Teacher BIG SCIENTIFIC IDEA SUPPORTED BY THIS DEMO The carbon dioxide in the air is incorporated into the structure of a plant in the form of carbon. Carbon makes up ~96% of the dry mass of a producer. MATERIALS: Two balloons A balance SETUP: Place the balance on a table so that it can be seen as balanced with nothing on it. Have both balloons uninflated. PROCEDURE: Put both uninflated balloons on a scale to show that they weigh the same amount. Then inflate one of the balloons and place it on the scale with the other one still uninflated. This should cause the balance to fall on the side of the inflated balloon. TIPS: The balance needs to be sensitive enough to register the weight of the air inside the balloon. Balloons pop, so back up balloons should be on hand. EXPLANATION: Photosynthesis uses carbon dioxide to make a fibrous carbohydrate called cellulose. Cellulose is found in the cell walls of plants and provides the rigidity that allows plants to be sturdy enough to stand upright. Plant cells and animal cells, except for bones and cartilage, is like bricks and water balloons, respectively. SAFETY: This demonstration is safe, but babies should not be given balloons.
Ideal Cell Size
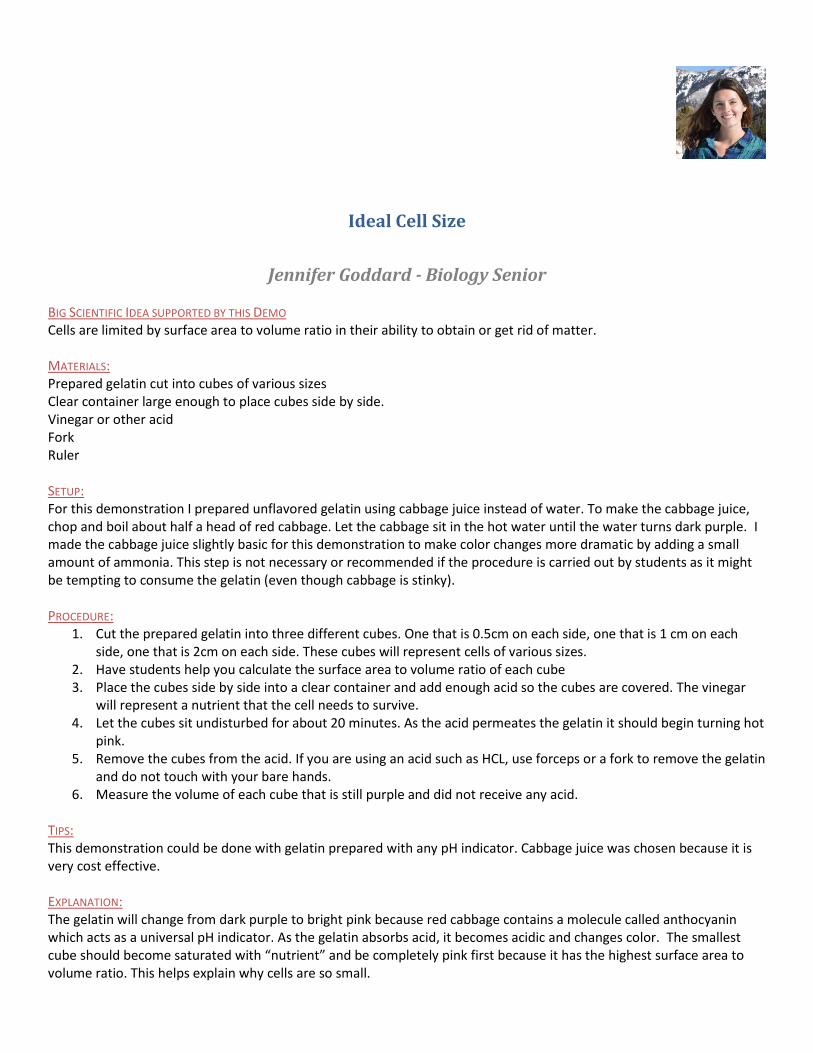
Jennifer Goddard - Biology Senior BIG SCIENTIFIC IDEA SUPPORTED BY THIS DEMO Cells are limited by surface area to volume ratio in their ability to obtain or get rid of matter. MATERIALS: Prepared gelatin cut into cubes of various sizes Clear container large enough to place cubes side by side. Vinegar or other acid Fork Ruler SETUP: For this demonstration I prepared unflavored gelatin using cabbage juice instead of water. To make the cabbage juice, chop and boil about half a head of red cabbage. Let the cabbage sit in the hot water until the water turns dark purple. I made the cabbage juice slightly basic for this demonstration to make color changes more dramatic by adding a small amount of ammonia. This step is not necessary or recommended if the procedure is carried out by students as it might be tempting to consume the gelatin (even though cabbage is stinky). PROCEDURE:
1. Cut the prepared gelatin into three different cubes. One that is 0.5cm on each side, one that is 1 cm on each side, one that is 2cm on each side. These cubes will represent cells of various sizes.
2. Have students help you calculate the surface area to volume ratio of each cube 3. Place the cubes side by side into a clear container and add enough acid so the cubes are covered. The vinegar
will represent a nutrient that the cell needs to survive. 4. Let the cubes sit undisturbed for about 20 minutes. As the acid permeates the gelatin it should begin turning hot
pink. 5. Remove the cubes from the acid. If you are using an acid such as HCL, use forceps or a fork to remove the gelatin
and do not touch with your bare hands. 6. Measure the volume of each cube that is still purple and did not receive any acid.
TIPS: This demonstration could be done with gelatin prepared with any pH indicator. Cabbage juice was chosen because it is very cost effective. EXPLANATION: The gelatin will change from dark purple to bright pink because red cabbage contains a molecule called anthocyanin which acts as a universal pH indicator. As the gelatin absorbs acid, it becomes acidic and changes color. The smallest cube should become saturated with “nutrient” and be completely pink first because it has the highest surface area to volume ratio. This helps explain why cells are so small.

SAFETY: The gelatin used in this experiment should not be consumed. Caution should be exercised when using the acid and removing the gelatin from the acid.

GERMS!
Jennifer Goddard - Biology Senior BIG SCIENTIFIC IDEA SUPPORTED BY THIS DEMO Germs, or viral and bacterial infections can be easily transmitted from person to person via physical contact. MATERIALS: Luminous powder (mine is called art glow and was found on amazon) A UV light source PROCEDURE: For this demo, a luminous powder is used to represent germs, or a specific viral infection such as the flu. Place some of the powder on your own hands in advance. As opportunities arise, make contact with students though high fives or shaking of hands to spread the powder. To make the germs visible, turn off the lights and use the UV light on the classes hands to check for infection, or spreading of the powder to others. EXPLANATION: As physical contact is made, powder from the teacher is transferred to students who then transfer powder to peers. This exponential increase in glowing, infected individuals demonstrates how rapidly harmful viruses and bacteria can be spread. Major outbreaks can be initiated by one sick individual.
SAFETY: Participants should wash their hands after the demo. Although the powder is non-toxic, it should not be inhaled.

Hydrophobic and hydrophilic Interactions
Jennifer Goddard - Biology Senior BIG SCIENTIFIC IDEA SUPPORTED BY THIS DEMO Because water is polar, molecules that contain mostly nonpolar bonds are hydrophobic and will not mix with water. Water can dissolve many polar molecules. Hydrophobic and hydrophilic interactions are the basis for cell membrane structure as cell membranes are composed of phospholipids that contain hydrophobic and hydrophilic components. MATERIALS: Large clear container full of water Vegetable oil Liquid food coloring Toothpick Dish soap Small container that can be sealed or easily covered with your thumb, such as Tupperware or an empty plastic bottle. PROCEDURE: 1. Fill your container with water. 2. Pour vegetable oil into the small container. The amount will vary depending on the scale of the demonstration, you want enough to almost cover the surface of your water. 3. Drop about 10-15 drops of food coloring into the oil. Cover and shake the mixture so that the food coloring is separated and suspended in the oil. 4. Gently pour the mixture into the water, be careful to not pour so much in that the mixture interacts with the sides of the containers as this can prematurely start the reaction. The oil should form micelles and rest on top of the water with the oil still suspended. 5.Dip a toothpick into dish soap and then place the toothpick into the middle of the oil. TIPS: Plastic containers work best for holding water as the oil is not attracted to glass, however glass still works. EXPLANATION: Food coloring does not mix with oil as it is a polar, hydrophilic substance and oil is hydrophobic. The oil floats on top of the water because it is both hydrophobic and less dense than water. Micelles form due to hydrophobic interactions that limit contact with water. The food coloring remains suspended in the oil as it is a similar density and form micelles within the oil that minimize contact with the nonpolar oil. The addition of soap disrupts these micelles and hydrophobic/hydrophilic interactions because soap is both polar and nonpolar. SAFETY: There are no safety concerns associated with this demonstration.

Human Piano
Jennifer Goddard - Biology Senior BIG SCIENTIFIC IDEA SUPPORTED BY THIS DEMO Circuits must be both closed and grounded. The human body is capable of conducting electricity. MATERIALS: Makey Makey kit Six volunteers A computer of laptop Speaker SETUP: Make sure your computer is connected to the speaker and to the internet. PROCEDURE:
1. Go to https://apps.makeymakey.com/piano/ 2. Connect the Makey Makey board to your computer 3. Use alligator clips to connect wires to the board. 4. Have each volunteer hold the end of one wire connected to the board 5. Play the human piano by touching each person (shoulder or hive five free hand
EXPLANATION: This system can be used to replace a keyboard with any items that can conduct electricity by creating open and closed circuits. SAFETY: There are no safety concerns associated with this demonstration.
Acceleration of Gravity to Rotational Energy
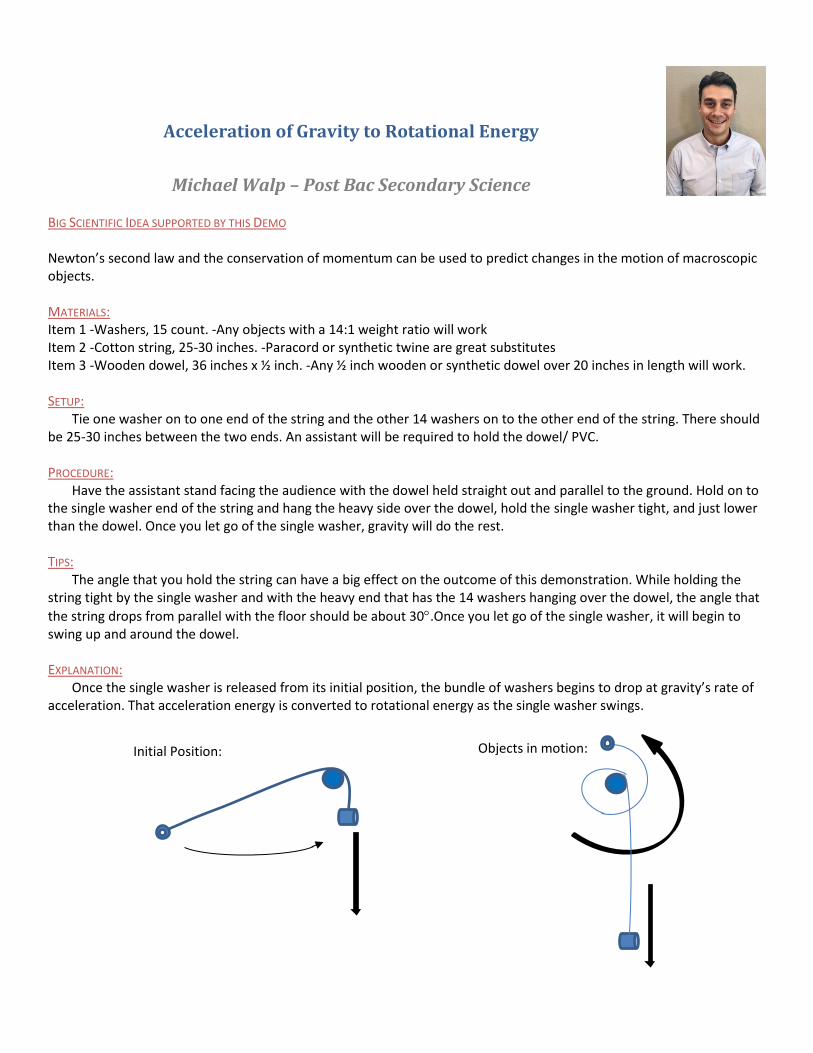
Michael Walp – Post Bac Secondary Science BIG SCIENTIFIC IDEA SUPPORTED BY THIS DEMO Newton’s second law and the conservation of momentum can be used to predict changes in the motion of macroscopic objects. MATERIALS: Item 1 -Washers, 15 count. -Any objects with a 14:1 weight ratio will work Item 2 -Cotton string, 25-30 inches. -Paracord or synthetic twine are great substitutes Item 3 -Wooden dowel, 36 inches x ½ inch. -Any ½ inch wooden or synthetic dowel over 20 inches in length will work. SETUP:
Tie one washer on to one end of the string and the other 14 washers on to the other end of the string. There should be 25-30 inches between the two ends. An assistant will be required to hold the dowel/ PVC. PROCEDURE:
Have the assistant stand facing the audience with the dowel held straight out and parallel to the ground. Hold on to the single washer end of the string and hang the heavy side over the dowel, hold the single washer tight, and just lower than the dowel. Once you let go of the single washer, gravity will do the rest. TIPS:
The angle that you hold the string can have a big effect on the outcome of this demonstration. While holding the string tight by the single washer and with the heavy end that has the 14 washers hanging over the dowel, the angle that
the string drops from parallel with the floor should be about 30.Once you let go of the single washer, it will begin to swing up and around the dowel.
EXPLANATION:
Once the single washer is released from its initial position, the bundle of washers begins to drop at gravity’s rate of acceleration. That acceleration energy is converted to rotational energy as the single washer swings.
Initial Position: Objects in motion:

Density and Buoyancy of Soda Cans
Michael Walp – Post Bac Secondary Science BIG SCIENTIFIC IDEA SUPPORTED BY THIS DEMO The density of a regular Pepsi id significantly greater than that of a Diet Pepsi, enough that it will sink in fresh water compared to the Diet Pepsi which will float. MATERIALS:
Large clear basin.
1 can of Pepsi, 1 can of Diet Pepsi (Coke and Diet Coke will work just as well.)
(1) 26-ounce container of salt. SETUP:
Fill a clear basin with water so that there is plenty of room for a soda can to sink below the water level.
PROCEDURE: First the Pepsi can is added to the water, it sinks. Then the Diet Pepsi can is added to the basin, it floats. Remove
both and add 26 ounces of salt. Put both cans back in the basin, they both will float. EXPLANATION:
The sugars (salts) in the regular Pepsi make it heavier than water and the lack of those sugars in the diet Pepsi make it lighter that water (buoyant). The density of the water in the basin is increased once salt is added and now both cans are less dense than the water and will float (have buoyancy.)
Only the diet will float in fresh water Both will float in salt water

Football Doppler Effect
Michael Walp – Post Bac Secondary Science BIG SCIENTIFIC IDEA SUPPORTED BY THIS DEMO Wave Properties: The wavelength and frequency of a wave are related to one another by the speed of travel of the wave, which depends on the type of wave and the medium through which it is passing. MATERIALS: 1 sonic football. -A foam football with a substitute noise making device implanted in the foam and taped over would work. PROCEDURE: Get two people comfortable passing and catching the football, and throw it around so each member of the audience can experience the sound passing by them. TIPS: This will not work in a small room. EXPLANATION:
As the source of the moving sound waves approach the listener, the wavelength condenses and the pitch increases. As the sources of the sound waves passes by and move away from the listener, the wavelength elongates and the pitch decreases. SAFETY:
Be careful not to hit anyone in the face.

Light Wave Energy
Michael Walp – Post Bac Secondary Science BIG SCIENTIFIC IDEA SUPPORTED BY THIS DEMO Waves have characteristic properties and behaviors. MATERIALS: (CALIBRI 11 FONT IN ALL CAPS, UNDERLINED AND RED)
1 Red laser pointer.
1 Green laser pointer.
1 Violet laser pointer
3 Glow in the dark masks. -Glow in the dark plastic works best (i.e. not painted solids) SETUP:
Turn out the lights. Preferable to have no windows. Set up the glow in the dark masks where the audience can see each. PROCEDURE:
One at a time, shine each laser on the mask in a swirling motion. Start with the red laser, then the green laser, and end with the violet laser. TIPS:
Make sure the phosphorescent masks/stars have not been exposed to light. They need to be as dark as possible. EXPLANATION:
The wavelength of each laser is different. The red laser appears brightest and is the easiest to see, but has the longest wavelength and lowest energy, thus it does not light up the mask. The green laser, also easy to see, has a slightly shorter wavelength and slightly higher energy, but still does not light up the phosphorescent plastic. The Violet laser, which is the most difficult to see, has the shortest wavelength of the three and the highest energy. For this reason the violet laser will have the greatest effect on lighting up the mask.
SAFETY:
Keep lasers away from eyes!!!