Embed Size (px)
Citation preview
26-0003 Version 12 Page 1
Bidders List
User’s Manual
Quick Quote Buyer User Guide
August 2014
Version 12
26-0003
Copyright © 2001, 2014, CGI Technologies and Solutions, Incorporated. All rights reserved. These materials contain the intellectual property of CGI Technologies and Solutions, Inc. and are therefore proprietary and confidential.
These materials also contain information that is the intellectual property of Ariba, Inc. and therefore proprietary and confidential. These materials can be
copied and distributed to authorized COVA users for the exclusive use of participation in eVA. Any other copying and distribution of these materials is strictly prohibited.

QUICK QUOTE BUYER USER GUIDE
TABLE OF CONTENTS
26-0003 Version 12 Page i
TABLE OF CONTENTS LIST OF FIGURES .................................................................................. V
LIST OF TABLES ................................................................................. XII
1. GETTING STARTED ................................................................. 1
USING THIS GUIDE ............................................................................... 2
HYPERLINKS .......................................................................................................... 2
TYPOGRAPHICAL CONVENTIONS ................................................................................... 2
LOGGING ON ......................................................................................... 4
MY WORK.............................................................................................. 5
ACTION PANE ........................................................................................................ 6
NAVIGATING THE MY WORK PANES ............................................................................... 7
IN PROCESS PANE ................................................................................................... 8
ISSUED PANE......................................................................................................... 8
CLOSED-EVALUATING PANE ...................................................................................... 10
PAST PANE ......................................................................................................... 11
REQUEST STATUS SUMMARY ..................................................................................... 12
REQUEST BY BUYSENSEORG LIST ............................................................................... 13
2. CREATE A REQUEST .............................................................. 15
HEADER INFORMATION ...................................................................... 15
SET-ASIDE ......................................................................................................... 17
REQUEST TITLE AND CATEGORY ................................................................................. 17
CLOSE DATE AND CLOSE TIME .................................................................................. 17
FUTURE PUBLISH DATE ........................................................................................... 17
BID VALID (DAYS) ................................................................................................ 18
SERVICE AREA ..................................................................................................... 18
AWARD METHOD ................................................................................................... 18
COMMENTS ......................................................................................................... 19
SPECIAL TERMS AND CONDITIONS .............................................................................. 19
ATTACHMENTS ..................................................................................................... 19
ITEM MANAGEMENT ............................................................................ 25
ITEM ................................................................................................................. 26
LOT NUMBER ....................................................................................................... 27
ITEM NUMBER ...................................................................................................... 28
ITEM DESCRIPTION ................................................................................................ 28
VENDOR PART NUM ............................................................................................... 28
BRAND NAME....................................................................................................... 28
QUANTITY .......................................................................................................... 28
UNIT OF MEASURE ................................................................................................. 28
NIGP CODE ........................................................................................................ 28
NEED BY DATE ..................................................................................................... 29
SHIP TO ............................................................................................................ 29
QUICK QUOTE BUYER USER GUIDE
TABLE OF CONTENTS
Page ii 26-0003 Version 12
COMMENTS ......................................................................................................... 29
SPECIAL TERMS AND CONDITIONS .............................................................................. 30
ATTACHMENTS ..................................................................................................... 30
ADD NIGP CODES ................................................................................ 33
VENDOR LIST ...................................................................................... 35
ADD AD HOC VENDORS .......................................................................................... 38
REMOVING VENDORS ............................................................................................. 40
VENDOR NOTIFICATION ..................................................................... 41
PRINTING THE VENDOR NOTIFICATION LIST ................................................................... 42
REQUEST REVIEW ............................................................................... 43
QUICK QUOTE COMPLETE.................................................................... 47
HELP FOR VENDORS ............................................................................................... 48
ADDING A VENDOR TO AN ISSUED OR SUBMITTED REQUEST ............. 50
3. MANAGING YOUR QUICK QUOTE REQUESTS ......................... 53
SEARCHING FOR A QUICK QUOTE REQUEST ........................................ 53
EDITING A QUICK QUOTE REQUEST .................................................... 54
COPYING A QUICK QUOTE REQUEST ................................................... 55
AMENDING A QUICK QUOTE REQUEST ................................................ 59
AMENDMENT WORKFLOW ......................................................................................... 64
REVIEWING REQUEST HISTORY .................................................................................. 64
CANCELING AND REISSUING A QUICK QUOTE REQUEST ..................... 67
CANCELING OR DELETING A QUICK QUOTE REQUEST ......................... 71
4. APPROVING QUICK QUOTE REQUESTS .................................. 73
REVIEWING REQUESTS ....................................................................... 73
APPROVING REQUESTS ....................................................................... 75
DENYING REQUESTS ........................................................................... 76
5. VENDOR RESPONSES ............................................................ 79
RESPONDING MULTIPLE TIMES .......................................................... 79
CHANGING THE RESPONSE ................................................................. 80
RESPONDING TO AN AMENDED REQUEST ........................................... 81
ENTERING PAPER RESPONSES ............................................................ 81
6. EVALUATING THE REQUEST .................................................. 91
VIEWING RESPONSES BEFORE A REQUEST CLOSES ............................ 91
DOWNLOADING RESPONSES ..................................................................................... 95
EVALUATING AND AWARDING RESPONSES ........................................ 95
AWARD METHODS AND EVALUATING YOUR REQUEST ......................................................... 97
EVALUATION REVIEW ....................................................................... 100
QUICK QUOTE BUYER USER GUIDE
TABLE OF CONTENTS
26-0003 Version 12 Page iii
LINE ITEM EVALUATION REVIEW............................................................................... 101
LOT EVALUATION REVIEW ...................................................................................... 102
GRAND TOTAL EVALUATION REVIEW .......................................................................... 103
NO AWARD ALL EVALUATION REVIEW ........................................................................ 104
ERRORS AND WARNINGS ....................................................................................... 105
NO AWARD AND REISSUE A QUICK QUOTE REQUEST ........................ 106
ADDING COMMENTS ......................................................................... 110
PUBLISHING THE BID TABULATION ................................................. 118
7. FINALIZING THE AWARD .................................................... 121
AWARD COMPLETION ....................................................................... 121
REQUISITION GENERATED IN EMALL SCREEN ................................................................ 121
EMALL REQUISITION CREATION ............................................................................... 121
SUBMITTING THE EMALL REQUISITION ............................................ 124
CHANGING THE REQUEST TO AWARDED STATUS .............................. 124
RE-AWARDING A REQUEST ............................................................... 127
8. EVALUATION HISTORY ....................................................... 129
BID TABULATION SUMMARY SCREEN ................................................ 129
EVALUATE REQUEST SCREEN ............................................................ 132
RESPONSE AND EVALUATION REVIEW SCREEN ................................ 137
9. REVERSE AUCTIONS ........................................................... 139
BEFORE YOU BEGIN .......................................................................... 139
CREATE A REVERSE AUCTION ........................................................... 139
COPY A QUICK QUOTE REQUEST ....................................................... 140
ADD VENDOR TO AN ISSUED REVERSE AUCTION .............................. 141
CANCEL AND REISSUE A REVERSE AUCTION ..................................... 141
CANCEL OR DELETE A REVERSE AUCTION REQUEST .......................... 141
MONITOR AND EVALUATE A REVERSE AUCTION ............................... 141
PAPER RESPONSES ........................................................................... 143
EVALUATING REVERSE AUCTION RESPONSES .................................. 143
AWARDING A REVERSE AUCTION REQUEST ...................................... 143
NO AWARD AND REISSUE A REVERSE AUCTION ............................... 143
APPENDIX A BUYER NOTIFICATIONS ....................................... 145
APPROVAL REQUIRED NOTIFICATION .............................................. 145
REQUEST APPROVED NOTIFICATION ................................................ 145
REQUEST DENIED NOTIFICATION ..................................................... 146
APPENDIX B VENDOR NOTIFICATIONS .................................... 147
QUICK QUOTE REQUEST NOTIFICATION ........................................... 147

QUICK QUOTE BUYER USER GUIDE
TABLE OF CONTENTS
Page iv 26-0003 Version 12
REVERSE AUCTION NOTIFICATION ................................................... 148
AMENDED QUICK QUOTE NOTIFICATION (NEW RESPONSES NOT REQUIRED) ....................................................................................... 149
AMENDED QUICK QUOTE NOTIFICATION (NEW RESPONSES REQUIRED) ......................................................................................................... 151
ELECTRONIC RESPONSE RECEIVED NOTIFICATION .......................... 152
PAPER RESPONSE ENTERED NOTIFICATION ..................................... 153
CANCELED REQUEST NOTIFICATION ................................................ 154
BID TABULATION PUBLISHED NOTIFICATION .................................. 155

QUICK QUOTE BUYER USER GUIDE
LIST OF FIGURES
26-0003 Version 12 Page v
LIST OF FIGURES
Figure 1: eVA Home Page and Buyer Login Field ......................................................................... 4
Figure 2: Quick Quote Link on the Knowledge Center Screen ........................................................ 5
Figure 3: MY WORK Screen ........................................................................................................ 5
Figure 4: The MY WORK Action Pane ............................................................................................ 6
Figure 5: Sortable Headings ..................................................................................................... 7
Figure 6: The Action Buttons .................................................................................................... 7
Figure 7: IN PROCESS Pane ......................................................................................................... 8
Figure 8: ISSUED Pane ............................................................................................................... 9
Figure 9: CLOSED-EVALUATING Pane .............................................................................................10
Figure 10: PAST Pane ..............................................................................................................11
Figure 11: BSO LIST Screen .....................................................................................................13
Figure 12: Request HEADER Screen ...........................................................................................15
Figure 13: Future Publish Date Fields........................................................................................18
Figure 14: Adding Attachments to the Request Header ...............................................................20
Figure 15: ATTACHMENTS Screen ................................................................................................20
Figure 16: CHOOSE FILE Screen .................................................................................................21
Figure 17: Attaching the Selected File .......................................................................................22
Figure 18: Marking the Attachments Proprietary and Confidential .................................................23
Figure 19: Completed Request Header ......................................................................................24
Figure 20: ITEM MANAGEMENT Screen ..........................................................................................25
Figure 21: ITEM Screen ...........................................................................................................26
Figure 22: NIGP Code Selection ...............................................................................................29
Figure 23: NIGP Code Field .....................................................................................................29
Figure 24: Completed ITEM Screen ............................................................................................31
Figure 25: ITEM MANAGEMENT Screen Showing Item Lines .............................................................32
Figure 26: Adding Additional NIGP Codes ..................................................................................33
QUICK QUOTE BUYER USER GUIDE
LIST OF FIGURES
Page vi 26-0003 Version 12
Figure 27: NIGP Code Selection ...............................................................................................34
Figure 28: Add NIGP Codes Pane Showing Maximum Commodities ...............................................35
Figure 29: VENDOR LIST Screen .................................................................................................37
Figure 30: Adding an Ad Hoc Vendor ........................................................................................38
Figure 31: AD HOC VENDOR Page................................................................................................39
Figure 32: Finalizing the Vendor List .........................................................................................40
Figure 33: VENDOR NOTIFICATION Screen ......................................................................................41
Figure 34: REQUEST REVIEW Screen ............................................................................................43
Figure 35: Request Review—Approval Required? ........................................................................44
Figure 36: Request Review—Available Approvers List .................................................................44
Figure 37: Printing the REQUEST REVIEW Screen ...........................................................................46
Figure 38: Navigating to Previous Sections of the Request ..........................................................47
Figure 39: QUICK QUOTE COMPLETE Screen—Approval Required ......................................................47
Figure 40: QUICK QUOTE COMPLETE Screen—No Approval Required ..................................................48
Figure 41: Sample Vendor Notification ......................................................................................49
Figure 42: Locating the Request in the ISSUED Pane.....................................................................50
Figure 43: Navigating to the Vendor List ...................................................................................50
Figure 44: Creating a New Ad Hoc Vendor .................................................................................51
Figure 45: QUICK QUOTE COMPLETE Screen ...................................................................................52
Figure 46: Search Field in the Action Pane ...................................................................................53
Figure 47: Search Results .......................................................................................................54
Figure 48: Edit Button on the REQUEST REVIEW Screen .................................................................54
Figure 49: Edit Confirmation Box .............................................................................................55
Figure 50: HEADER Screen Showing Request in composing Status .................................................55
Figure 51: Choosing the Copy Command in the Actions Drop-down Menu ........................................56
Figure 52: REQUEST COPY Screen Showing Attachments ...............................................................56
Figure 53: REQUEST COPY Screen for User with Reverse Auction Access ..........................................57
Figure 54: REQUEST COPY Screen—Attachments ..........................................................................57

QUICK QUOTE BUYER USER GUIDE
LIST OF FIGURES
26-0003 Version 12 Page vii
Figure 55: Header Screen for the Copied Request ......................................................................58
Figure 56: ITEM MANAGEMENT Screen for a Copied Request ............................................................59
Figure 57: Actions Menu Showing Amend ..................................................................................60
Figure 58: Amend Confirmation Screen .....................................................................................60
Figure 59: ITEM MANAGEMENT Screen Showing Updated Quick Quote ID ..........................................61
Figure 60: Material Change Prompt on Submit ...........................................................................63
Figure 61: Material Change Warning Message ............................................................................64
Figure 62: Request History Screen, Item Links Collapsed ............................................................65
Figure 63: Request History Screen, Item Links Expanded ............................................................65
Figure 64: VIEW COMMENTS Screen .............................................................................................66
Figure 65: Actions Menu showing Reissue (Cancel) .....................................................................67
Figure 66: CANCEL AND REISSUE CONFIRMATION Screen .....................................................................68
Figure 67: Header Screen for a Reissued Request ......................................................................69
Figure 68: Header Screen Showing Changes Made for the Reissue ...............................................70
Figure 69: Actions Menu Showing Cancel/Delete ........................................................................71
Figure 70: REQUEST DELETE Screen ............................................................................................72
Figure 71: MY WORK Screen Showing Canceled Request ..............................................................72
Figure 72: Action Pane for a User Designated as an Approver ......................................................73
Figure 73: Approvals Actions Menu ...........................................................................................73
Figure 74: REQUEST REVIEW Screen for Approvals ........................................................................74
Figure 75: Navigation Options .................................................................................................75
Figure 76: Approval Confirmation Box—Approve ........................................................................75
Figure 77: Approve Action Confirmed .......................................................................................76
Figure 78: Approval Confirmation Box—Deny ............................................................................76
Figure 79: Deny Action Confirmed ............................................................................................77
Figure 80: PAST APPROVALS Pane ................................................................................................77
Figure 81: Evaluation Screen Showing Multiple Responses from the Same Vendor ..........................79
Figure 82: Evaluation Screen Showing Vendor’s Initial Response ..................................................80
QUICK QUOTE BUYER USER GUIDE
LIST OF FIGURES
Page viii 26-0003 Version 12
Figure 83: Evaluation Screen Showing Vendor’s Updated Response ..............................................80
Figure 84: Actions Menu Showing Paper Response .....................................................................81
Figure 85: Paper Response Screen ...........................................................................................82
Figure 86: Request Version Selection Box .................................................................................82
Figure 87: Vendor Selection Screen ..........................................................................................83
Figure 88: Searching for a Vendor ............................................................................................84
Figure 89: Response Header Screen for Paper Response .............................................................85
Figure 90: Response Item Screen for Paper Response ................................................................86
Figure 91: Indicating No Bid for a Line Item ..............................................................................87
Figure 92: Response Summary for Paper Response ....................................................................88
Figure 93: RESPONSE COMPLETED Screen .....................................................................................89
Figure 94: Actions Menu Showing Evaluate ...............................................................................91
Figure 95: EVALUATION REQUEST Screen ......................................................................................92
Figure 96: Line Item Evaluation ...............................................................................................93
Figure 97: RESPONSE SUMMARY Screen ........................................................................................94
Figure 98: Excel Spreadsheet Containing Downloaded Responses ................................................95
Figure 99: Actions Menu Showing Evaluate ...............................................................................95
Figure 100: EVALUATE REQUEST Screen .......................................................................................96
Figure 101: LINE ITEM EVALUATION Screen ....................................................................................98
Figure 102: LOT EVALUATION Screen ...........................................................................................99
Figure 103: GRAND TOTAL EVALUATION Screen ............................................................................. 100
Figure 104: Line Item Evaluation Review Screen ...................................................................... 101
Figure 105: Lot Evaluation Review Screen ............................................................................... 102
Figure 106: Grand Total Evaluation Review Screen ................................................................... 103
Figure 107: No Award All Evaluation Review Screen ................................................................. 104
Figure 108: REQUISITION GENERATED IN EMALL Confirmation Screen ................................................ 105
Figure 109: Evaluation Review No Award Warning Message ....................................................... 105
Figure 111: Actions Menu Showing No Award/Reissue .............................................................. 106

QUICK QUOTE BUYER USER GUIDE
LIST OF FIGURES
26-0003 Version 12 Page ix
Figure 112: EVALUATE REQUEST Screen—No Award/Reissue ......................................................... 107
Figure 113: Line Item Evaluation—No Award/Reissue ............................................................... 107
Figure 114: Lot Evaluation—No Award/Reissue ........................................................................ 108
Figure 115: Grand Total Evaluation—No Award/Reissue ............................................................ 108
Figure 116: NO AWARD/REISSUE Confirmation Screen ................................................................. 109
Figure 117: EVALUATE REQUEST Screen—Add Comment ............................................................... 110
Figure 118: ADD COMMENTS Pane.............................................................................................. 111
Figure 119: COMMENTS Pane Showing Evaluation Comment ........................................................ 112
Figure 120: COMMENTS Pane Showing Denied Comment ............................................................. 112
Figure 121: Publishing a Comment ......................................................................................... 113
Figure 122: Withdrawing a Comment ..................................................................................... 113
Figure 123: Copying a Comment ............................................................................................ 114
Figure 124: ADD COMMENTS Pane Showing Copied Comment ........................................................ 115
Figure 125: COMMENTS Pane Showing Internal Comment ............................................................ 116
Figure 126: Filtering Comments ............................................................................................. 116
Figure 127: Removing Comments Filter .................................................................................. 117
Figure 128: Publishing the Bid Tabulation................................................................................ 118
Figure 129: Bid Tab Confirmation Screen ................................................................................ 118
Figure 130: EVALUATE REQUEST Screen Showing bids opened Status ............................................. 119
Figure 131: Unpublished Confirmation Screen ......................................................................... 119
Figure 132: REQUISITION GENERATED IN EMALL Screen ................................................................... 121
Figure 133: Ariba Requisition for a Quick Quote Award ............................................................. 122
Figure 134: Ariba Requisition Details ...................................................................................... 123
Figure 135: Ariba Requisition Showing Approval Flow Tab and Submit Button ...................................... 124
Figure 136: Setting the Status to awarded .............................................................................. 125
Figure 137: Request Status Change Confirmation Screen .......................................................... 125
Figure 138: Evaluate Request Screen Showing awarded Status .................................................. 126
Figure 139: Request Status Change Confirmation Screen .......................................................... 126
QUICK QUOTE BUYER USER GUIDE
LIST OF FIGURES
Page x 26-0003 Version 12
Figure 140: Actions Menu Showing View Bid Tab ...................................................................... 129
Figure 141: BID TABULATION SUMMARY Screen ............................................................................. 130
Figure 142: AWARD SUMMARY Screen ........................................................................................ 131
Figure 143: Actions Menu Showing Evaluate on CLOSED-EVALUATING Pane ...................................... 132
Figure 144: Evaluate Request—Evaluation History .................................................................... 132
Figure 145: AWARD SUMMARY Screen ........................................................................................ 134
Figure 146: Actions Menu Showing View Evaluation in PAST Pane................................................ 135
Figure 147: EVALUATE REQUEST Screen—PAST Pane ..................................................................... 136
Figure 148: Actions Menu Showing View Responses ................................................................. 137
Figure 149: RESPONSE AND EVALUATION REVIEW Screen .................................................................. 137
Figure 150: AWARD SUMMARY Screen ........................................................................................ 138
Figure 151: Creating a Reverse Auction .................................................................................. 139
Figure 152: Copying a Request to Create a Reverse Auction ...................................................... 140
Figure 153: Error Message for Too Many Items ........................................................................ 140
Figure 154: Actions Menu Showing Reverse Auction Monitoring ................................................. 141
Figure 155: REVERSE AUCTION MONITORING Screen ....................................................................... 142
Figure 156: Approval Required Notification .............................................................................. 145
Figure 157: Request Approved Notification .............................................................................. 145
Figure 158: Request Denied Notification ................................................................................. 146
Figure 159: Quick Quote Request Notification .......................................................................... 147
Figure 160: Reverse Auction Notification ................................................................................. 148
Figure 161: Amended Quick Quote Notification (New Responses Not Required) ............................ 149
Figure 162: Amended Quick Quote Notification (New Responses Not Required) Sent to Responding
Vendors ............................................................................................................................... 150
Figure 163: Amended Quick Quote Notification (New Responses Required) ................................. 151
Figure 164: Electronic Response Received Notification .............................................................. 152
Figure 165: Paper Response Entered Notification ..................................................................... 153
Figure 166: Canceled Request Notification............................................................................... 154
QUICK QUOTE BUYER USER GUIDE
LIST OF FIGURES
26-0003 Version 12 Page xi
Figure 167: Bid Tab Published Notification ............................................................................... 155
QUICK QUOTE BUYER USER GUIDE
LIST OF TABLES
26-0003 Version 12 Page xii
LIST OF TABLES
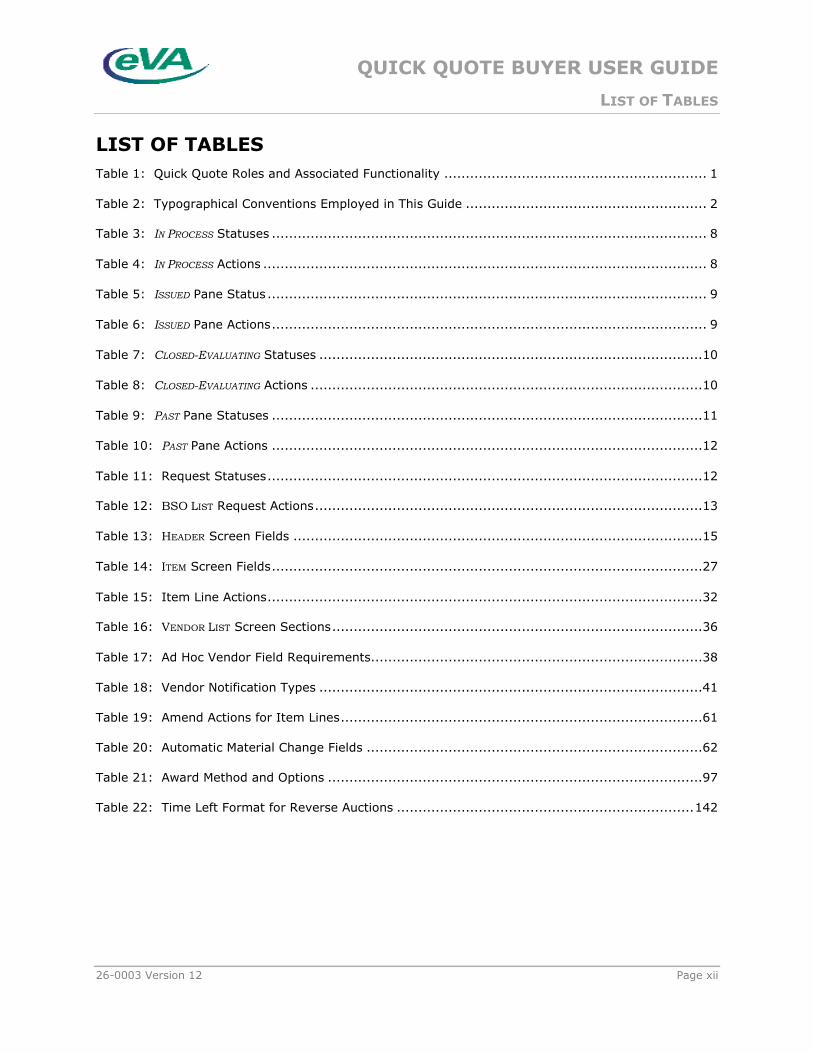
Table 1: Quick Quote Roles and Associated Functionality ............................................................. 1
Table 2: Typographical Conventions Employed in This Guide ........................................................ 2
Table 3: IN PROCESS Statuses ..................................................................................................... 8
Table 4: IN PROCESS Actions ....................................................................................................... 8
Table 5: ISSUED Pane Status ...................................................................................................... 9
Table 6: ISSUED Pane Actions ..................................................................................................... 9
Table 7: CLOSED-EVALUATING Statuses .........................................................................................10
Table 8: CLOSED-EVALUATING Actions ...........................................................................................10
Table 9: PAST Pane Statuses ....................................................................................................11
Table 10: PAST Pane Actions ....................................................................................................12
Table 11: Request Statuses .....................................................................................................12
Table 12: BSO LIST Request Actions ..........................................................................................13
Table 13: HEADER Screen Fields ...............................................................................................15
Table 14: ITEM Screen Fields ....................................................................................................27
Table 15: Item Line Actions .....................................................................................................32
Table 16: VENDOR LIST Screen Sections ......................................................................................36
Table 17: Ad Hoc Vendor Field Requirements.............................................................................38
Table 18: Vendor Notification Types .........................................................................................41
Table 19: Amend Actions for Item Lines ....................................................................................61
Table 20: Automatic Material Change Fields ..............................................................................62
Table 21: Award Method and Options .......................................................................................97
Table 22: Time Left Format for Reverse Auctions ..................................................................... 142
QUICK QUOTE BUYER USER GUIDE
CREATE A REQUEST
26-0003 Version 12 Page 1
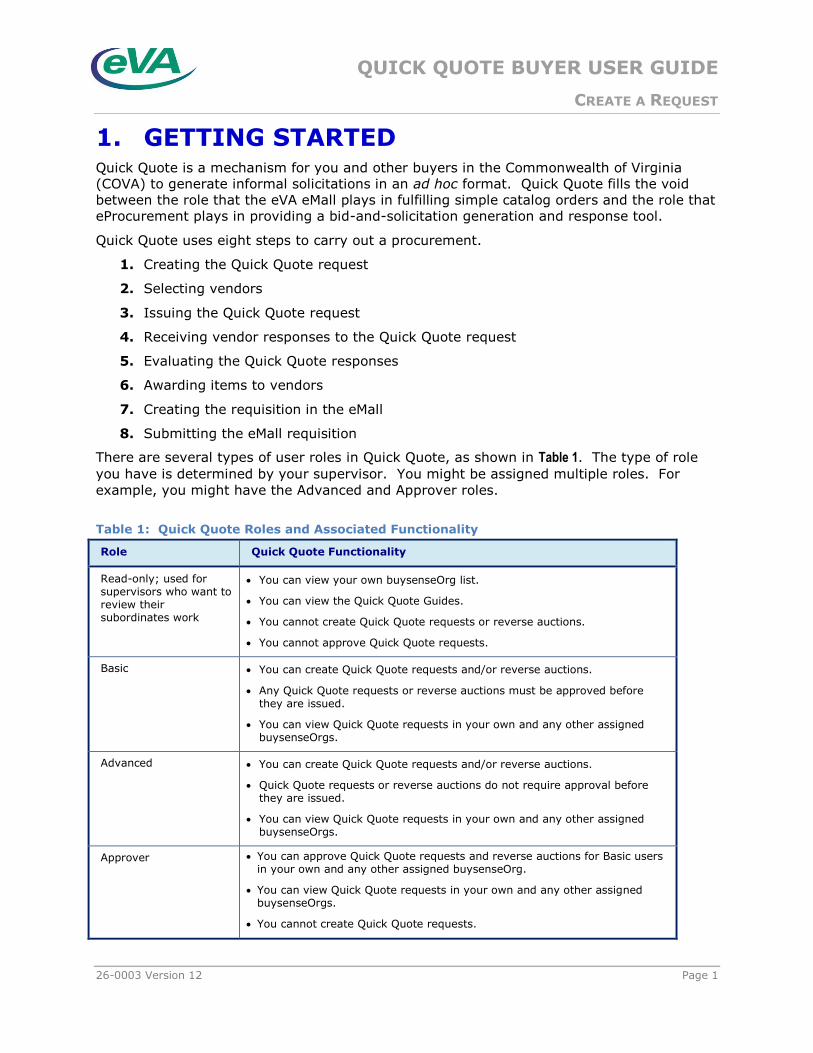
1. GETTING STARTED Quick Quote is a mechanism for you and other buyers in the Commonwealth of Virginia
(COVA) to generate informal solicitations in an ad hoc format. Quick Quote fills the void
between the role that the eVA eMall plays in fulfilling simple catalog orders and the role that
eProcurement plays in providing a bid-and-solicitation generation and response tool.
Quick Quote uses eight steps to carry out a procurement.
1. Creating the Quick Quote request
2. Selecting vendors
3. Issuing the Quick Quote request
4. Receiving vendor responses to the Quick Quote request
5. Evaluating the Quick Quote responses
6. Awarding items to vendors
7. Creating the requisition in the eMall
8. Submitting the eMall requisition
There are several types of user roles in Quick Quote, as shown in Table 1. The type of role
you have is determined by your supervisor. You might be assigned multiple roles. For
example, you might have the Advanced and Approver roles.
Table 1: Quick Quote Roles and Associated Functionality
Role Quick Quote Functionality
Read-only; used for supervisors who want to review their subordinates work
You can view your own buysenseOrg list.
You can view the Quick Quote Guides.
You cannot create Quick Quote requests or reverse auctions.
You cannot approve Quick Quote requests.
Basic You can create Quick Quote requests and/or reverse auctions.
Any Quick Quote requests or reverse auctions must be approved before they are issued.
You can view Quick Quote requests in your own and any other assigned buysenseOrgs.
Advanced You can create Quick Quote requests and/or reverse auctions.
Quick Quote requests or reverse auctions do not require approval before they are issued.
You can view Quick Quote requests in your own and any other assigned buysenseOrgs.
Approver You can approve Quick Quote requests and reverse auctions for Basic users in your own and any other assigned buysenseOrg.
You can view Quick Quote requests in your own and any other assigned buysenseOrgs.
You cannot create Quick Quote requests.
QUICK QUOTE BUYER USER GUIDE
CREATE A REQUEST
Page 2 26-0003 Version 12
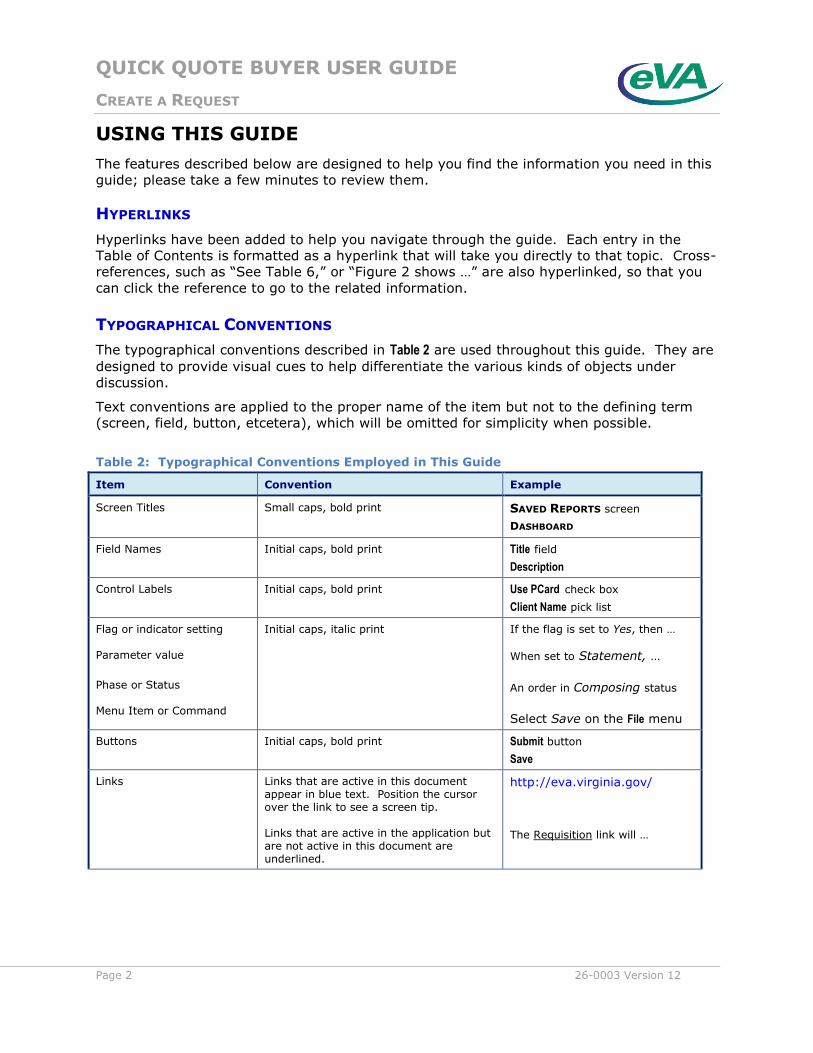
USING THIS GUIDE
The features described below are designed to help you find the information you need in this
guide; please take a few minutes to review them.
HYPERLINKS
Hyperlinks have been added to help you navigate through the guide. Each entry in the
Table of Contents is formatted as a hyperlink that will take you directly to that topic. Cross-
references, such as “See Table 6,” or “Figure 2 shows …” are also hyperlinked, so that you
can click the reference to go to the related information.
TYPOGRAPHICAL CONVENTIONS
The typographical conventions described in Table 2 are used throughout this guide. They are
designed to provide visual cues to help differentiate the various kinds of objects under
discussion.
Text conventions are applied to the proper name of the item but not to the defining term
(screen, field, button, etcetera), which will be omitted for simplicity when possible.
Table 2: Typographical Conventions Employed in This Guide
Item Convention Example
Screen Titles Small caps, bold print SAVED REPORTS screen
DASHBOARD
Field Names Initial caps, bold print Title field
Description
Control Labels Initial caps, bold print Use PCard check box
Client Name pick list
Flag or indicator setting Parameter value
Phase or Status Menu Item or Command
Initial caps, italic print If the flag is set to Yes, then …
When set to Statement, …
An order in Composing status
Select Save on the File menu
Buttons Initial caps, bold print Submit button
Save
Links Links that are active in this document appear in blue text. Position the cursor over the link to see a screen tip. Links that are active in the application but are not active in this document are underlined.
http://eva.virginia.gov/ The Requisition link will …
QUICK QUOTE BUYER USER GUIDE
CREATE A REQUEST
26-0003 Version 12 Page 3
Item Convention Example
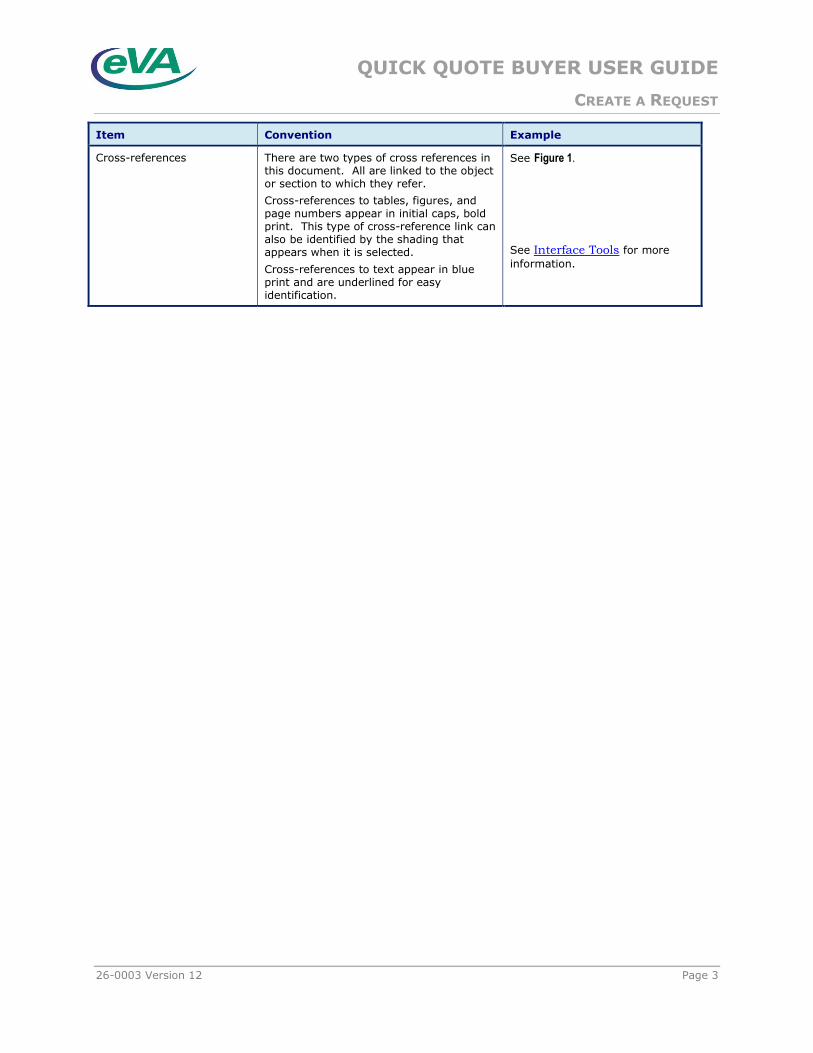
Cross-references There are two types of cross references in this document. All are linked to the object or section to which they refer.
Cross-references to tables, figures, and page numbers appear in initial caps, bold print. This type of cross-reference link can also be identified by the shading that appears when it is selected.
Cross-references to text appear in blue print and are underlined for easy identification.
See Figure 1.
See Interface Tools for more
information.

QUICK QUOTE BUYER USER GUIDE
CREATE A REQUEST
Page 4 26-0003 Version 12
LOGGING ON
To access Quick Quote:
Open your Web browser, type the URL http://eva.virginia.gov into the address line, and press Enter.
Enter your User ID (Username) and password. Click the Buyer Login button (Figure 1).
Figure 1: eVA Home Page and Buyer Login Field
QUICK QUOTE BUYER USER GUIDE
CREATE A REQUEST
26-0003 Version 12 Page 5
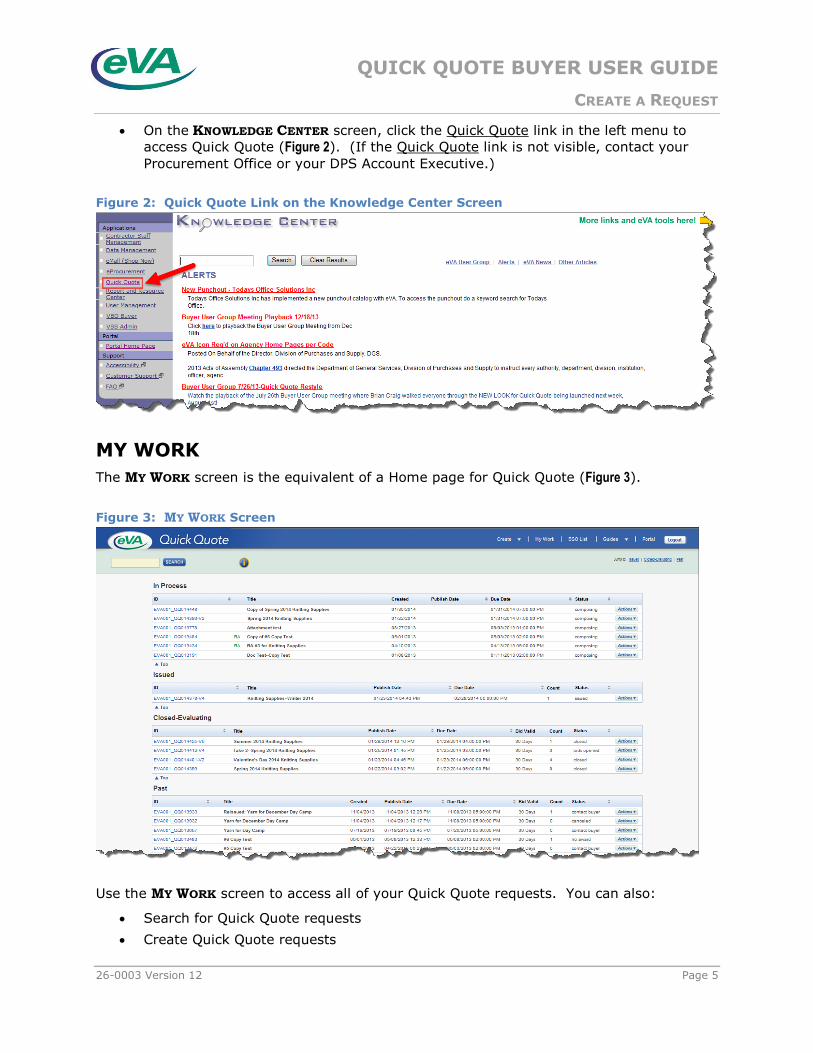
On the KNOWLEDGE CENTER screen, click the Quick Quote link in the left menu to
access Quick Quote (Figure 2). (If the Quick Quote link is not visible, contact your
Procurement Office or your DPS Account Executive.)
Figure 2: Quick Quote Link on the Knowledge Center Screen
MY WORK
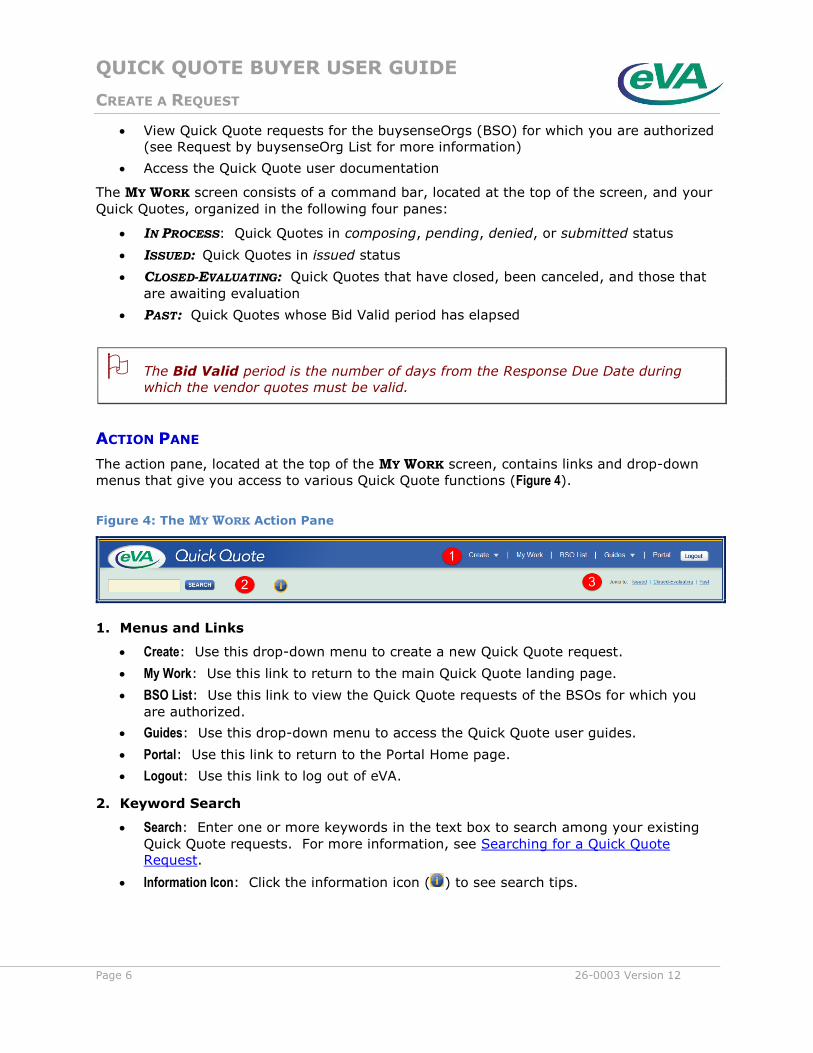
The MY WORK screen is the equivalent of a Home page for Quick Quote (Figure 3).
Figure 3: MY WORK Screen
Use the MY WORK screen to access all of your Quick Quote requests. You can also:
Search for Quick Quote requests
Create Quick Quote requests
QUICK QUOTE BUYER USER GUIDE
CREATE A REQUEST
Page 6 26-0003 Version 12
View Quick Quote requests for the buysenseOrgs (BSO) for which you are authorized
(see Request by buysenseOrg List for more information)
Access the Quick Quote user documentation
The MY WORK screen consists of a command bar, located at the top of the screen, and your
Quick Quotes, organized in the following four panes:
IN PROCESS: Quick Quotes in composing, pending, denied, or submitted status
ISSUED: Quick Quotes in issued status
CLOSED-EVALUATING: Quick Quotes that have closed, been canceled, and those that
are awaiting evaluation
PAST: Quick Quotes whose Bid Valid period has elapsed
The Bid Valid period is the number of days from the Response Due Date during
which the vendor quotes must be valid.
ACTION PANE
The action pane, located at the top of the MY WORK screen, contains links and drop-down
menus that give you access to various Quick Quote functions (Figure 4).
Figure 4: The MY WORK Action Pane
1. Menus and Links
Create: Use this drop-down menu to create a new Quick Quote request.
My Work: Use this link to return to the main Quick Quote landing page.
BSO List: Use this link to view the Quick Quote requests of the BSOs for which you
are authorized.
Guides: Use this drop-down menu to access the Quick Quote user guides.
Portal: Use this link to return to the Portal Home page.
Logout: Use this link to log out of eVA.
2. Keyword Search
Search: Enter one or more keywords in the text box to search among your existing
Quick Quote requests. For more information, see Searching for a Quick Quote
Request.
Information Icon: Click the information icon ( ) to see search tips.
QUICK QUOTE BUYER USER GUIDE
CREATE A REQUEST
26-0003 Version 12 Page 7
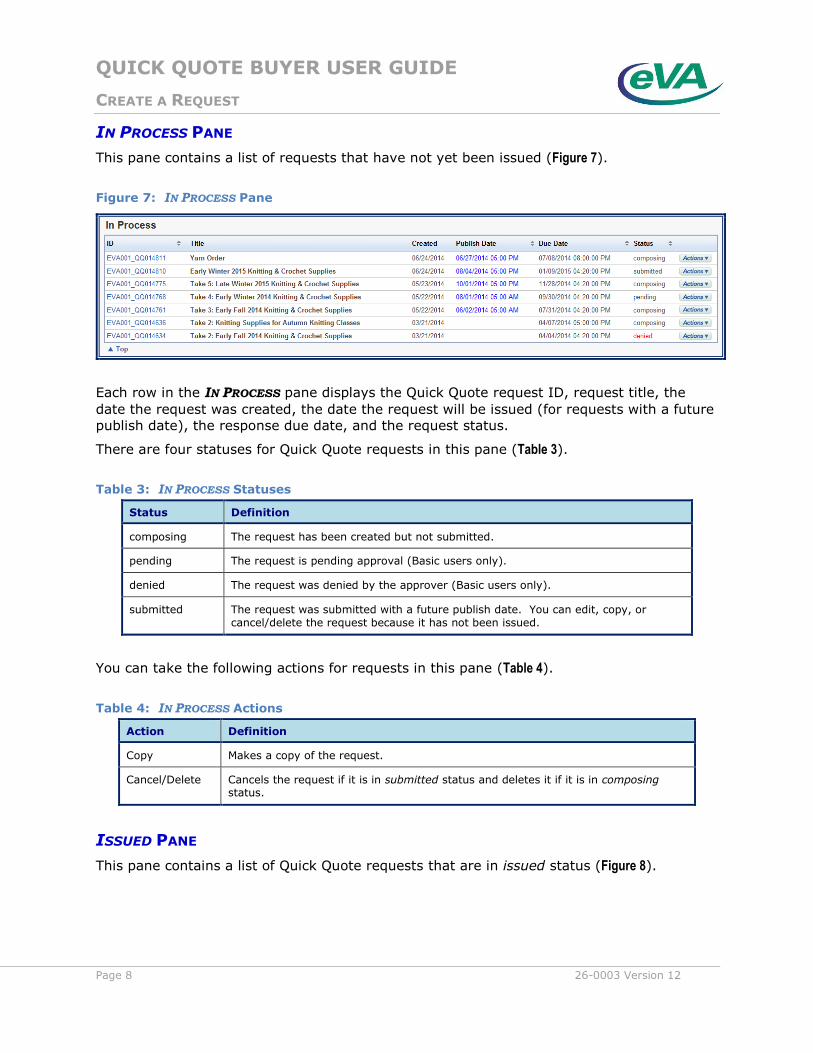
3. Jump Links
Issued: Use this link to go directly to a list of Quick Quote requests that are in issued
status.
Closed-Evaluating: Use this link to go directly to a list of Quick Quote requests that are
in closed status or are being evaluated.
Past: Use this link to go directly to a list of Quick Quote requests that are in the Past
pane.
NAVIGATING THE My Work PANES
Request lists shown in the MY WORK screen panes are displayed in Request ID order, from
newest to oldest. If there are more than 10 requests, click the More… button (located at the
bottom right of each pane) to list additional requests.
Click a sortable column heading (ID, Publish Date, Due Date, or Status) to change the sort order
(Figure 5). The current sort order is indicated by an up or down arrow to the right of the
column heading. Select the same column to reverse the sort (ascending to descending).
Figure 5: Sortable Headings
An Actions button is located to the right of each Quick Quote request (Figure 6). Click the
button to see the possible actions for the corresponding Quick Quote request. The actions
available vary depending on the status of the request.
Figure 6: The Action Buttons
QUICK QUOTE BUYER USER GUIDE
CREATE A REQUEST
Page 8 26-0003 Version 12
IN PROCESS PANE
This pane contains a list of requests that have not yet been issued (Figure 7).
Figure 7: IN PROCESS Pane
Each row in the IN PROCESS pane displays the Quick Quote request ID, request title, the
date the request was created, the date the request will be issued (for requests with a future
publish date), the response due date, and the request status.
There are four statuses for Quick Quote requests in this pane (Table 3).
Table 3: IN PROCESS Statuses
Status Definition
composing The request has been created but not submitted.
pending The request is pending approval (Basic users only).
denied The request was denied by the approver (Basic users only).
submitted The request was submitted with a future publish date. You can edit, copy, or
cancel/delete the request because it has not been issued.
You can take the following actions for requests in this pane (Table 4).
Table 4: IN PROCESS Actions
Action Definition
Copy Makes a copy of the request.
Cancel/Delete Cancels the request if it is in submitted status and deletes it if it is in composing status.
ISSUED PANE
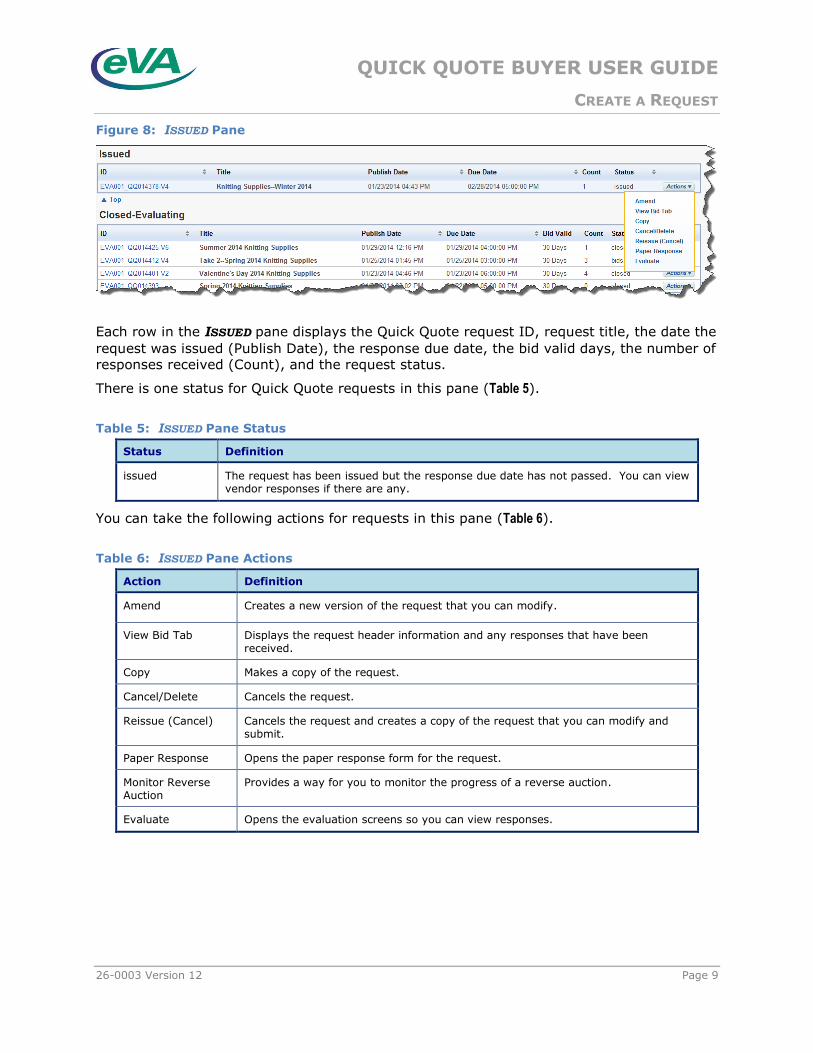
This pane contains a list of Quick Quote requests that are in issued status (Figure 8).
QUICK QUOTE BUYER USER GUIDE
CREATE A REQUEST
26-0003 Version 12 Page 9
Figure 8: ISSUED Pane
Each row in the ISSUED pane displays the Quick Quote request ID, request title, the date the
request was issued (Publish Date), the response due date, the bid valid days, the number of
responses received (Count), and the request status.
There is one status for Quick Quote requests in this pane (Table 5).
Table 5: ISSUED Pane Status
Status Definition
issued The request has been issued but the response due date has not passed. You can view vendor responses if there are any.
You can take the following actions for requests in this pane (Table 6).
Table 6: ISSUED Pane Actions
Action Definition
Amend Creates a new version of the request that you can modify.
View Bid Tab Displays the request header information and any responses that have been
received.
Copy Makes a copy of the request.
Cancel/Delete Cancels the request.
Reissue (Cancel) Cancels the request and creates a copy of the request that you can modify and submit.
Paper Response Opens the paper response form for the request.
Monitor Reverse Auction
Provides a way for you to monitor the progress of a reverse auction.
Evaluate Opens the evaluation screens so you can view responses.
QUICK QUOTE BUYER USER GUIDE
CREATE A REQUEST
Page 10 26-0003 Version 12
CLOSED-EVALUATING PANE
This pane contains a list of Quick Quote requests that have passed their due dates (Figure 9).
Figure 9: CLOSED-EVALUATING Pane
Each row in the CLOSED-EVALUATING pane displays the Quick Quote request ID, request title,
the date the request was issued (Publish Date), the response due date, the bid valid days,
the number of responses received (Count), and the request status.
There are five statuses for requests in the CLOSED-EVALUATING pane (Table 7).
Table 7: CLOSED-EVALUATING Statuses
Status Definition
closed The response due date for the request has passed. You can evaluate responses if
there are any, and then create a vendor award.
canceled An issued request that was canceled.
bids opened The request is in closed status and you selected the Publish Bid Tabulation check box
so that vendors can view all responses. You can evaluate responses if there are any, and then create a vendor award;
Or
You have evaluated and created a vendor award for at least one line item on the request.
awarded You have selected the Set Status to Awarded check box on the Evaluation to manually
update the request status to awarded status. You can continue to evaluate responses, create awards, and publish bid tabulation information.
no award You have set all lines to no award, or set all previously awarded lines to no award without awarding any lines.
You can take the following actions for requests in this pane (Table 8).
Table 8: CLOSED-EVALUATING Actions
Action Definition
Copy Makes a copy of the request.
Reissue (Cancel) Cancels the request and creates a copy that you can modify and submit. This action is allowed for requests in canceled status that have not been reissued.
Paper Response Opens the paper response form for the request. This action is allowed for
QUICK QUOTE BUYER USER GUIDE
CREATE A REQUEST
26-0003 Version 12 Page 11
Action Definition
requests in closed, bids opened or canceled status.
View Bid Tab Displays the request header information and any responses that have been received.
No Award/Reissue No awards the request and creates a copy that you can modify and submit.
Evaluate Opens the evaluation screens so that you can make award decisions for the request.
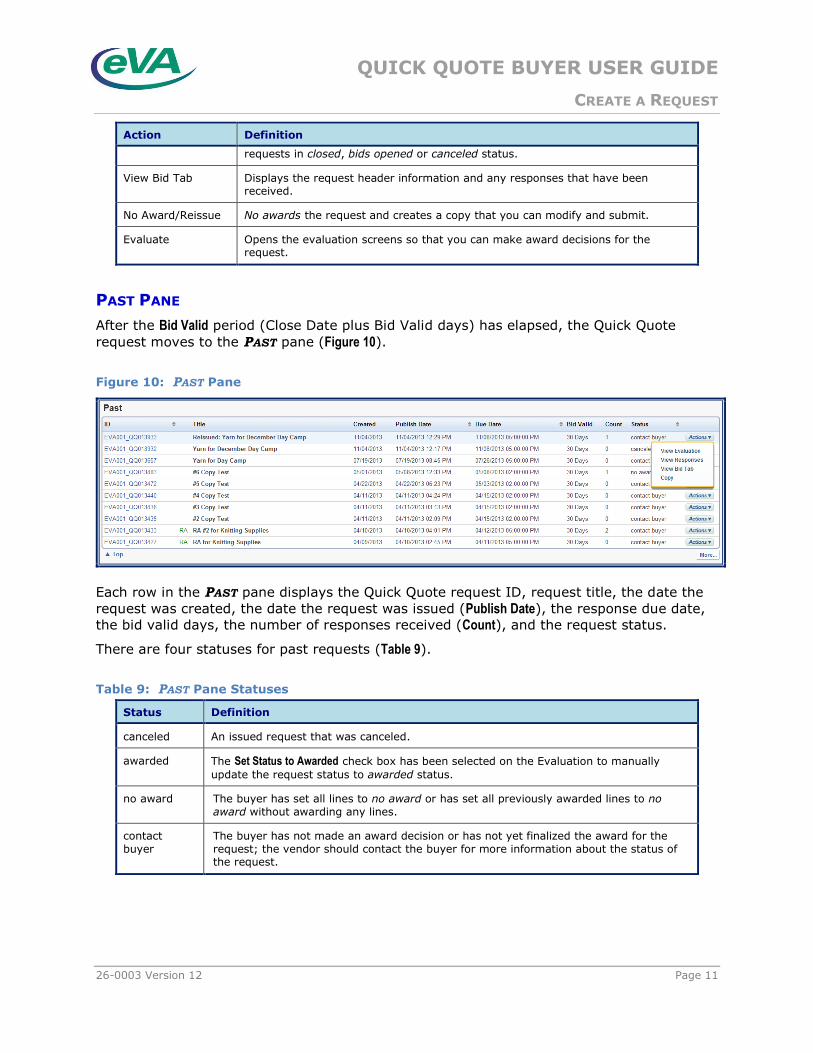
PAST PANE
After the Bid Valid period (Close Date plus Bid Valid days) has elapsed, the Quick Quote
request moves to the PAST pane (Figure 10).
Figure 10: PAST Pane
Each row in the PAST pane displays the Quick Quote request ID, request title, the date the
request was created, the date the request was issued (Publish Date), the response due date,
the bid valid days, the number of responses received (Count), and the request status.
There are four statuses for past requests (Table 9).
Table 9: PAST Pane Statuses
Status Definition
canceled An issued request that was canceled.
awarded The Set Status to Awarded check box has been selected on the Evaluation to manually
update the request status to awarded status.
no award The buyer has set all lines to no award or has set all previously awarded lines to no
award without awarding any lines.
contact
buyer
The buyer has not made an award decision or has not yet finalized the award for the
request; the vendor should contact the buyer for more information about the status of the request.
QUICK QUOTE BUYER USER GUIDE
CREATE A REQUEST
Page 12 26-0003 Version 12
You can take the following actions for requests in this pane (Table 10).
Table 10: PAST Pane Actions
Action Definition
View Evaluation Opens the evaluation screens in read-only mode.
View Responses Opens the Response and Evaluation Review screen so you can view the
vendor responses.
View Bid Tab Displays the request header information and any responses that have been received.
Copy Makes a copy of the request.
REQUEST STATUS SUMMARY
Table 11 lists all Quick Quote Request statuses and illustrates how the request status changes
as the request moves through its life cycle.
Table 11: Request Statuses
Before Bid Valid Days Expire
After Bid Valid Days Expire
Select Manual Award Indicator
Clear Manual Award Indicator
composing N/A N/A N/A
pending N/A N/A N/A
denied N/A N/A N/A
submitted N/A N/A N/A
issued N/A N/A N/A
closed contact buyer awarded contact buyer
bids opened
(by either publishing the bid tab or submitting an award on the request)
contact buyer awarded contact buyer
awarded
(manually awarded request)
awarded N/A
contact buyer
awarded
(This status is for requests in awarded status before June 24, 2009.)
awarded N/A
N/A
no award no award awarded contact buyer
canceled canceled N/A N/A
QUICK QUOTE BUYER USER GUIDE
CREATE A REQUEST
26-0003 Version 12 Page 13
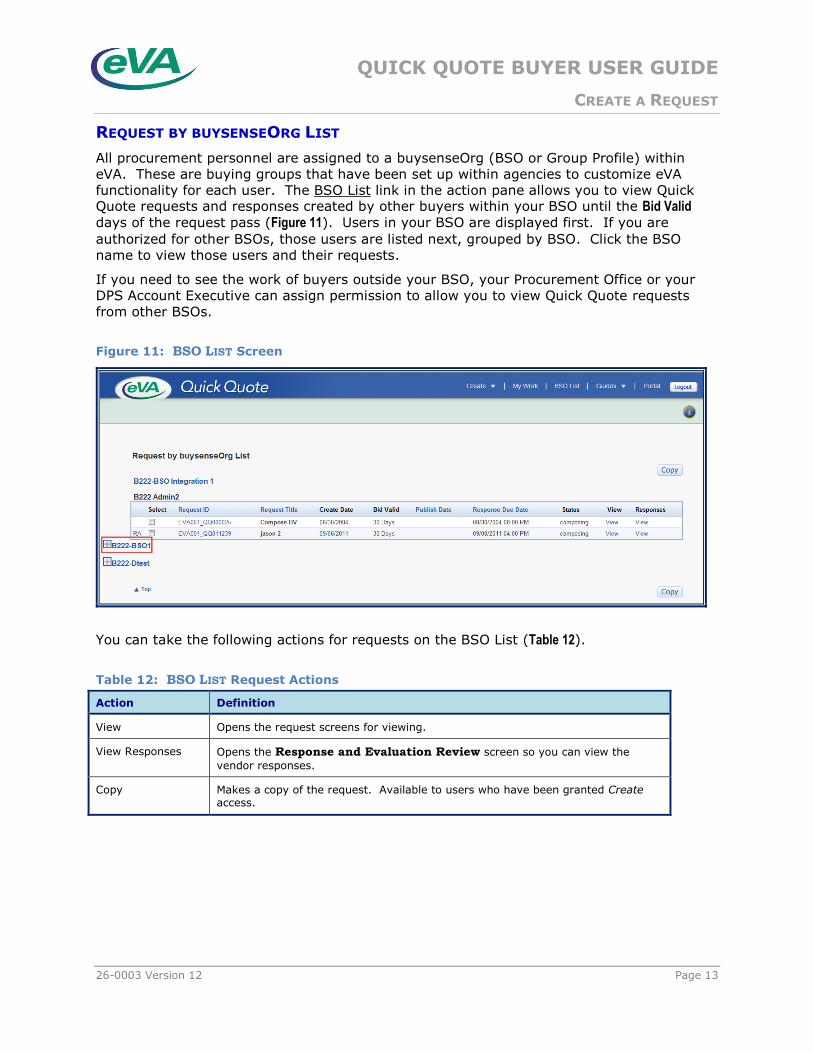
REQUEST BY BUYSENSEORG LIST
All procurement personnel are assigned to a buysenseOrg (BSO or Group Profile) within
eVA. These are buying groups that have been set up within agencies to customize eVA
functionality for each user. The BSO List link in the action pane allows you to view Quick Quote requests and responses created by other buyers within your BSO until the Bid Valid
days of the request pass (Figure 11). Users in your BSO are displayed first. If you are
authorized for other BSOs, those users are listed next, grouped by BSO. Click the BSO
name to view those users and their requests.
If you need to see the work of buyers outside your BSO, your Procurement Office or your
DPS Account Executive can assign permission to allow you to view Quick Quote requests
from other BSOs.
Figure 11: BSO LIST Screen
You can take the following actions for requests on the BSO List (Table 12).
Table 12: BSO LIST Request Actions
Action Definition
View Opens the request screens for viewing.
View Responses Opens the Response and Evaluation Review screen so you can view the
vendor responses.
Copy Makes a copy of the request. Available to users who have been granted Create access.

QUICK QUOTE BUYER USER GUIDE
CREATE A REQUEST
26-0003 Version 12 Page 15
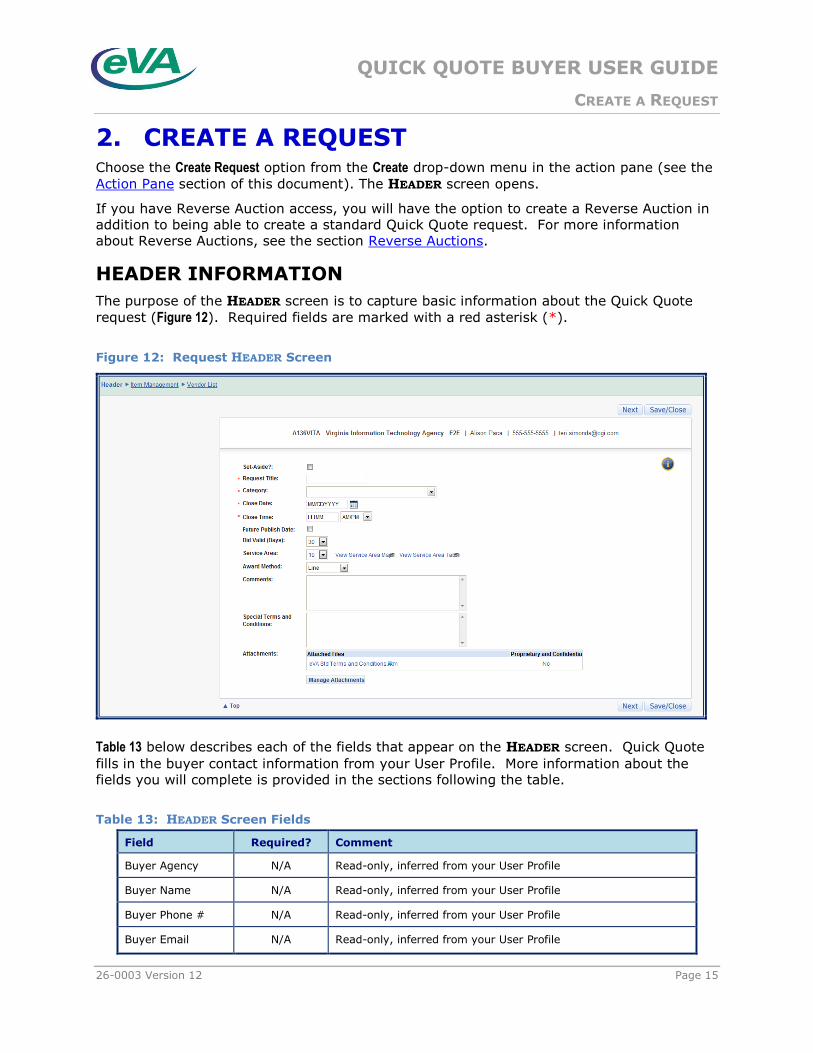
2. CREATE A REQUEST Choose the Create Request option from the Create drop-down menu in the action pane (see the
Action Pane section of this document). The HEADER screen opens.
If you have Reverse Auction access, you will have the option to create a Reverse Auction in
addition to being able to create a standard Quick Quote request. For more information
about Reverse Auctions, see the section Reverse Auctions.
HEADER INFORMATION
The purpose of the HEADER screen is to capture basic information about the Quick Quote
request (Figure 12). Required fields are marked with a red asterisk (*).
Figure 12: Request HEADER Screen
Table 13 below describes each of the fields that appear on the HEADER screen. Quick Quote
fills in the buyer contact information from your User Profile. More information about the
fields you will complete is provided in the sections following the table.
Table 13: HEADER Screen Fields
Field Required? Comment
Buyer Agency N/A Read-only, inferred from your User Profile
Buyer Name N/A Read-only, inferred from your User Profile
Buyer Phone # N/A Read-only, inferred from your User Profile
Buyer Email N/A Read-only, inferred from your User Profile

QUICK QUOTE BUYER USER GUIDE
CREATE A REQUEST
Page 16 26-0003 Version 12
Field Required? Comment
Set-Aside? No Check box
Checked = Yes; a drop-down menu listing the available SWaM values is displayed.
Unchecked = No
Request Title* Yes Text box
Provides a description of the procurement (for example, “Knitting Supplies for Summer Camp 2014”)
Accepts up to 255 characters
Category* Yes Drop-down list
Close Date* Yes Text box
Acceptable format: mm/dd/yyyy
Calendar icon also available
Close Time* Yes Text box
Acceptable formats:
o hh:mm
o h:mm
o h
o hh
Future Publish Date
No Check box
Checked = Yes
Unchecked = No
Publish Date No Conditional field; appears only if Future Publish Date check box is
selected
Acceptable format: mm/dd/yyyy
Calendar icon also available
Publish Time No Conditional field; appears only if Future Publish Date check box is
selected
Acceptable formats:
o hh:mm
o h:mm
o h
o hh
Bid Valid (Days) No Drop-down list
Valid selections: 30-day increments up to 360 days.
Defaults to 30
Service Area No Drop-down list
Defaults to 10—Statewide
Select multiple service areas: press and hold Ctrl key while
making selections
Award Method No Drop-down list
Defaults to Line
Comments No Text box
Holds up to 255 characters
Special Terms and Conditions
No Text box
Holds up to 255 characters

QUICK QUOTE BUYER USER GUIDE
CREATE A REQUEST
26-0003 Version 12 Page 17
Field Required? Comment
Attachments No Always includes eVA Standard Terms and Conditions
Maximum file size of 30 megabytes
Special characters not allowed in file names; letters and numbers only
Maximum of 50 characters, including the file type or extension
No limit to number of attachments
SET-ASIDE
Select the Set-Aside? check box to designate a Quick Quote request as a Set-Aside for
vendors with certain SWaM designations. Select the appropriate SWaM designation from
the drop-down menu.
REQUEST TITLE AND CATEGORY
Enter the Request Title. The title describes the procurement and is seen by vendors and the
public. The title should be descriptive enough so you can easily find the procurement on the MY WORK screen.
Select a Category from the drop-down menu. Select the value that best represents the
category of goods or services you are requesting.
CLOSE DATE AND CLOSE TIME
Enter the Close Date and the Close Time. Vendors must respond with their quotes by the Close
Date (also called Due Date on the IN PROCESS list).
Quick Quote requires the Close Date and Time to be at least one hour from the current
time. When you are ready to send the request to vendors, Quick Quote will also verify that
there is at least one hour between the Issue Date and Time, and the Close Date and Time.
Also note that if the Close Date is fewer than three days from the Issue Date, Quick Quote
will issue a warning message.
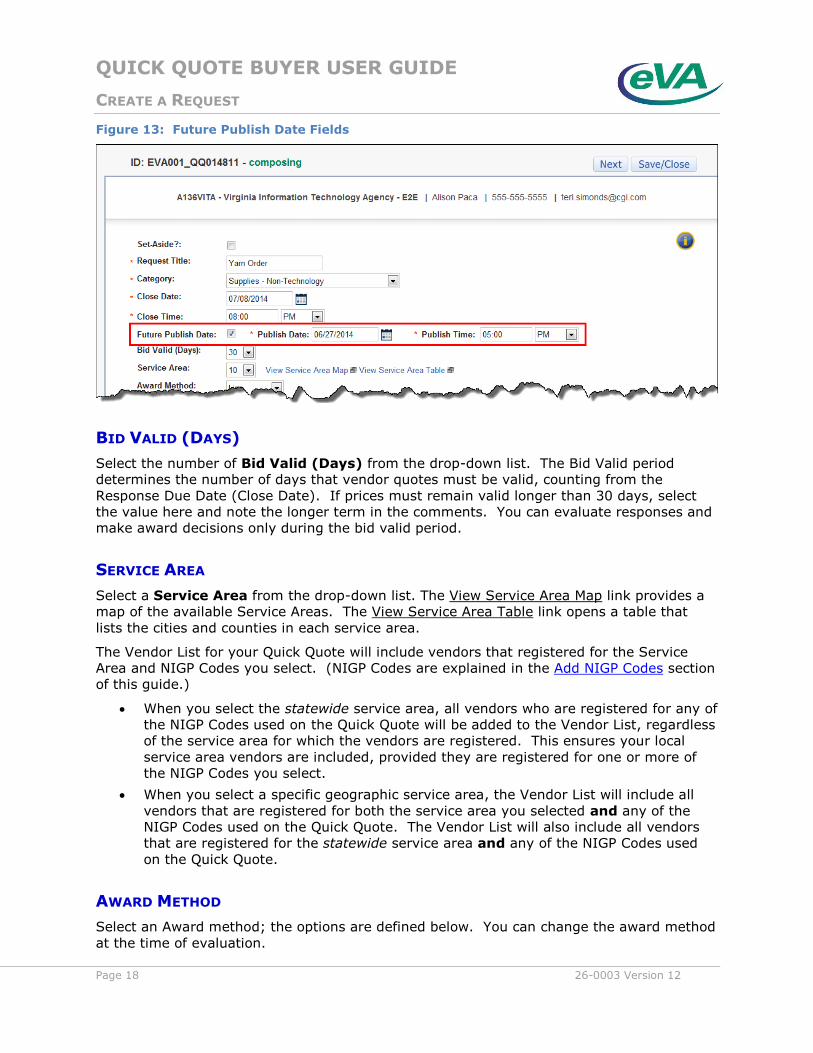
FUTURE PUBLISH DATE
If you want Quick Quote to issue your request at some time in the future, click the Future Publish Date check box to activate the Publish Date and Publish Time fields (Figure 13). Enter
the date and time on which you want the Quick Quote Request to be issued.
Quick Quote Requests that have a Future Publish Date remain in submitted status until the
designated date and time. You can make changes to requests that are in submitted status.
QUICK QUOTE BUYER USER GUIDE
CREATE A REQUEST
Page 18 26-0003 Version 12
Figure 13: Future Publish Date Fields
BID VALID (DAYS)
Select the number of Bid Valid (Days) from the drop-down list. The Bid Valid period
determines the number of days that vendor quotes must be valid, counting from the
Response Due Date (Close Date). If prices must remain valid longer than 30 days, select
the value here and note the longer term in the comments. You can evaluate responses and
make award decisions only during the bid valid period.
SERVICE AREA
Select a Service Area from the drop-down list. The View Service Area Map link provides a
map of the available Service Areas. The View Service Area Table link opens a table that
lists the cities and counties in each service area.
The Vendor List for your Quick Quote will include vendors that registered for the Service
Area and NIGP Codes you select. (NIGP Codes are explained in the Add NIGP Codes section
of this guide.)
When you select the statewide service area, all vendors who are registered for any of
the NIGP Codes used on the Quick Quote will be added to the Vendor List, regardless
of the service area for which the vendors are registered. This ensures your local
service area vendors are included, provided they are registered for one or more of
the NIGP Codes you select.
When you select a specific geographic service area, the Vendor List will include all
vendors that are registered for both the service area you selected and any of the
NIGP Codes used on the Quick Quote. The Vendor List will also include all vendors
that are registered for the statewide service area and any of the NIGP Codes used
on the Quick Quote.
AWARD METHOD
Select an Award method; the options are defined below. You can change the award method
at the time of evaluation.
QUICK QUOTE BUYER USER GUIDE
CREATE A REQUEST
26-0003 Version 12 Page 19
Line: Each line item can be awarded to a different vendor.
Lot: A lot is made up of a group of items that are identified by a common lot
number. All of the items in a lot are awarded to a single vendor.
Grand Total: All items are awarded to a single vendor.
Quick Quote informs vendors of the award method so they can submit responses
accordingly.
COMMENTS
You can enter any other information in the Comments field. Be aware that your comments
are displayed to every user and supplier who views the Quick Quote request header. (Note:
Comments are not transferred to the AWARDS screen or the eMall when the order is
created.)
You can create one or more attachments if you need to include comments that exceed the space limit of the Comments field.
SPECIAL TERMS AND CONDITIONS
The Special Terms and Conditions field is available to note important terms and conditions.
Information entered in this field is displayed to every user and supplier who views the Quick Quote request header. (Note: This information is not transferred to the AWARDS screen or
the eMall when the order is created.)
You can create one or more attachments to add terms and conditions that exceed the space limits of the Special Terms and Conditions field.
ATTACHMENTS
The eVA Std Terms and Conditions document is automatically attached to every Quick
Quote request header. This document contains information about general terms and
conditions that pertain to all Quick Quote procurement transactions.
If your entity has general terms and conditions that are different from the eVA Std Terms
and Conditions, contact your DPS Account Executive
You can include attachments of any file type. To add an attachment, click the Manage Attachments button (Figure 14).

QUICK QUOTE BUYER USER GUIDE
CREATE A REQUEST
Page 20 26-0003 Version 12
Figure 14: Adding Attachments to the Request Header
Click Browse… to open the CHOOSE FILE window (Figure 15).
Figure 15: ATTACHMENTS Screen
QUICK QUOTE BUYER USER GUIDE
CREATE A REQUEST
26-0003 Version 12 Page 21
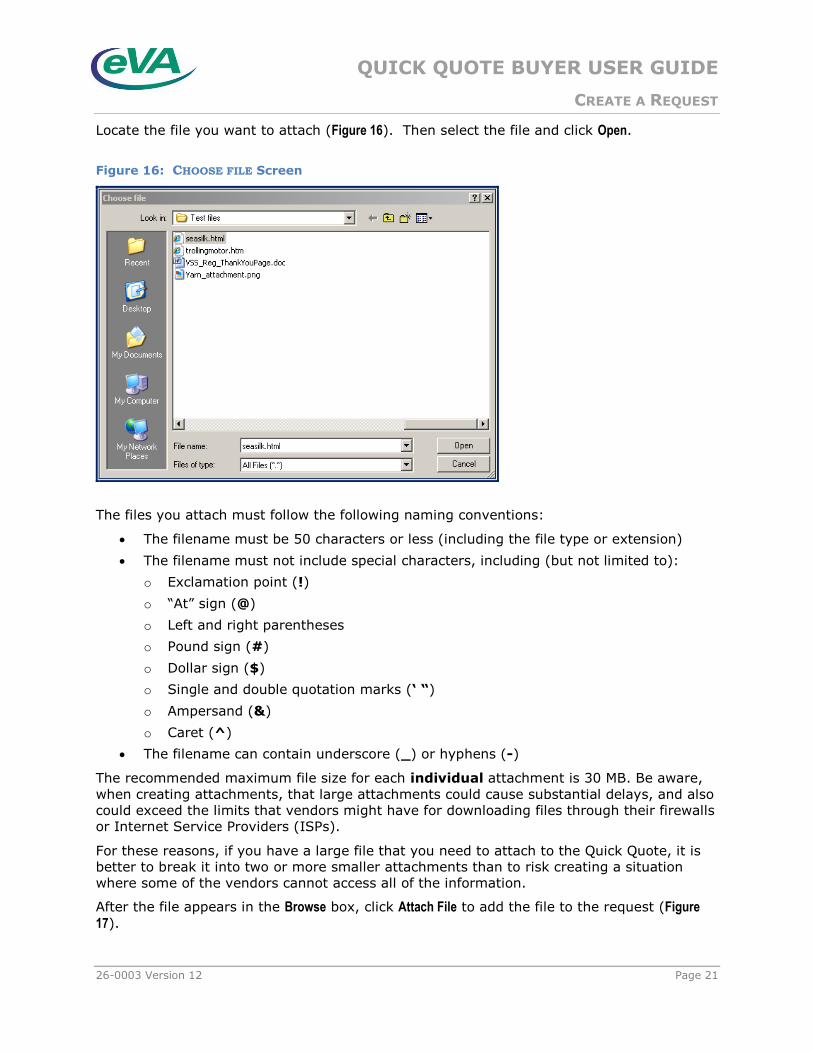
Locate the file you want to attach (Figure 16). Then select the file and click Open.
Figure 16: CHOOSE FILE Screen
The files you attach must follow the following naming conventions:
The filename must be 50 characters or less (including the file type or extension)
The filename must not include special characters, including (but not limited to):
o Exclamation point (!)
o “At” sign (@)
o Left and right parentheses
o Pound sign (#)
o Dollar sign ($)
o Single and double quotation marks (‘ “)
o Ampersand (&)
o Caret (^)
The filename can contain underscore (_) or hyphens (-)
The recommended maximum file size for each individual attachment is 30 MB. Be aware,
when creating attachments, that large attachments could cause substantial delays, and also
could exceed the limits that vendors might have for downloading files through their firewalls
or Internet Service Providers (ISPs).
For these reasons, if you have a large file that you need to attach to the Quick Quote, it is
better to break it into two or more smaller attachments than to risk creating a situation
where some of the vendors cannot access all of the information.
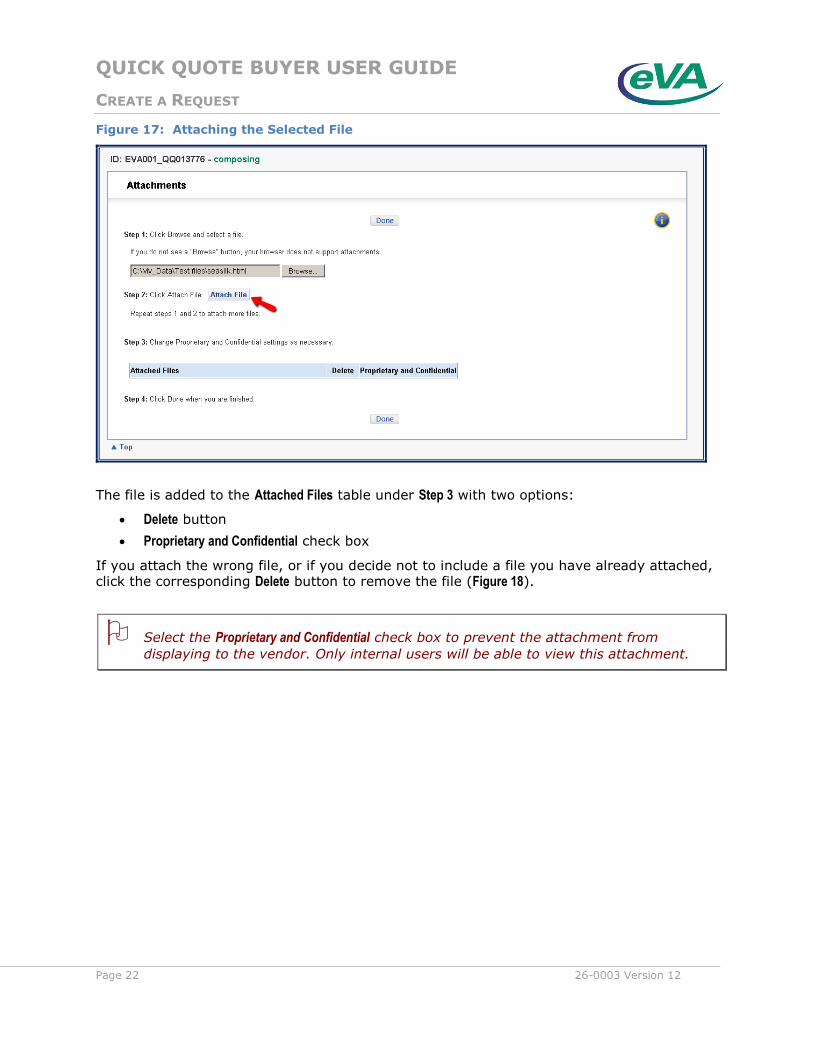
After the file appears in the Browse box, click Attach File to add the file to the request (Figure 17).
QUICK QUOTE BUYER USER GUIDE
CREATE A REQUEST
Page 22 26-0003 Version 12
Figure 17: Attaching the Selected File
The file is added to the Attached Files table under Step 3 with two options:
Delete button
Proprietary and Confidential check box
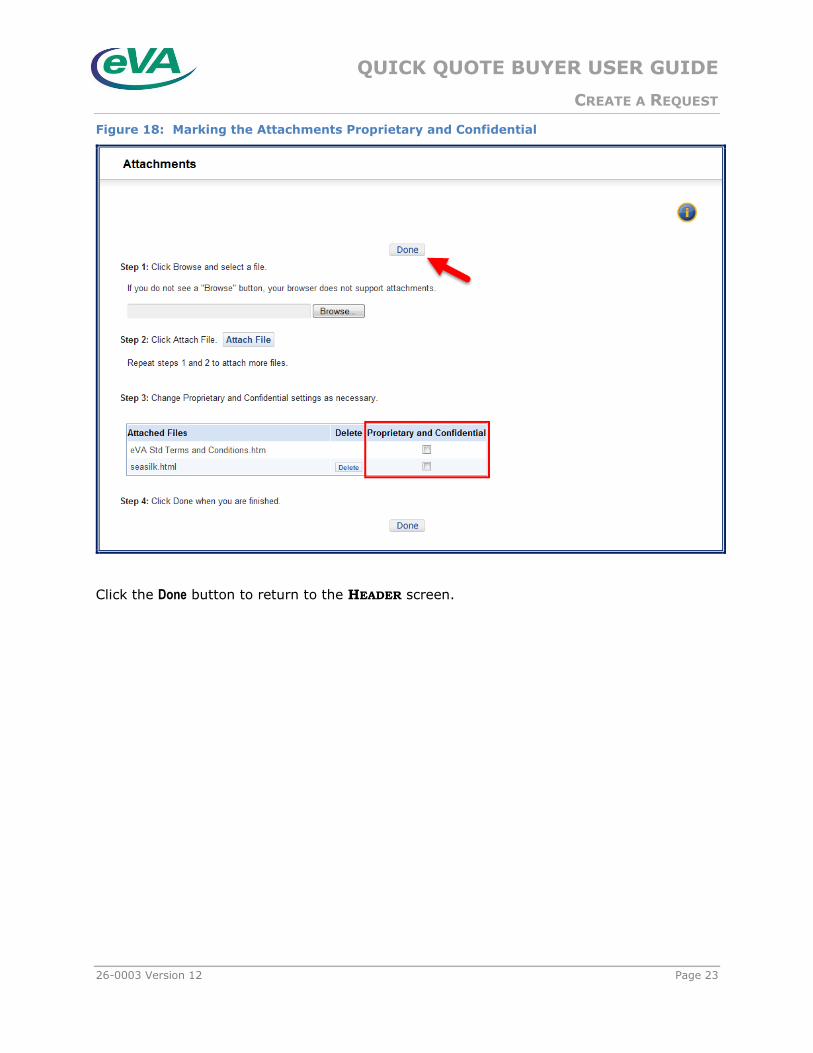
If you attach the wrong file, or if you decide not to include a file you have already attached, click the corresponding Delete button to remove the file (Figure 18).
Select the Proprietary and Confidential check box to prevent the attachment from
displaying to the vendor. Only internal users will be able to view this attachment.
QUICK QUOTE BUYER USER GUIDE
CREATE A REQUEST
26-0003 Version 12 Page 23
Figure 18: Marking the Attachments Proprietary and Confidential
Click the Done button to return to the HEADER screen.

QUICK QUOTE BUYER USER GUIDE
CREATE A REQUEST
Page 24 26-0003 Version 12
Figure 19: Completed Request Header
Click Next to access the ITEM MANAGEMENT screen.
Click Save/Close to save the request and return to the MY WORK screen. Your request will be
saved in composing status; you will be able to find it in the IN PROCESS pane on the MY
WORK screen.
Quick Quote automatically saves your request when you add attachments, and when using the Next and Previous buttons.
QUICK QUOTE BUYER USER GUIDE
CREATE A REQUEST
26-0003 Version 12 Page 25
ITEM MANAGEMENT
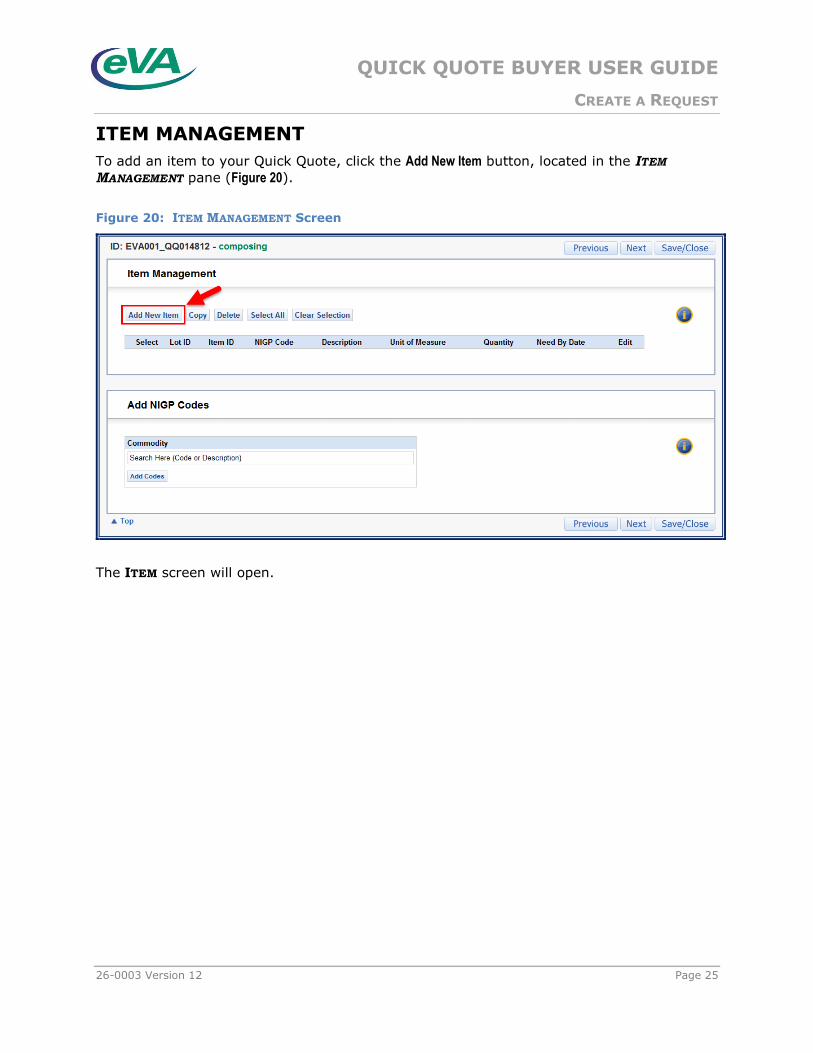
To add an item to your Quick Quote, click the Add New Item button, located in the ITEM
MANAGEMENT pane (Figure 20).
Figure 20: ITEM MANAGEMENT Screen
The ITEM screen will open.
QUICK QUOTE BUYER USER GUIDE
CREATE A REQUEST
Page 26 26-0003 Version 12
ITEM
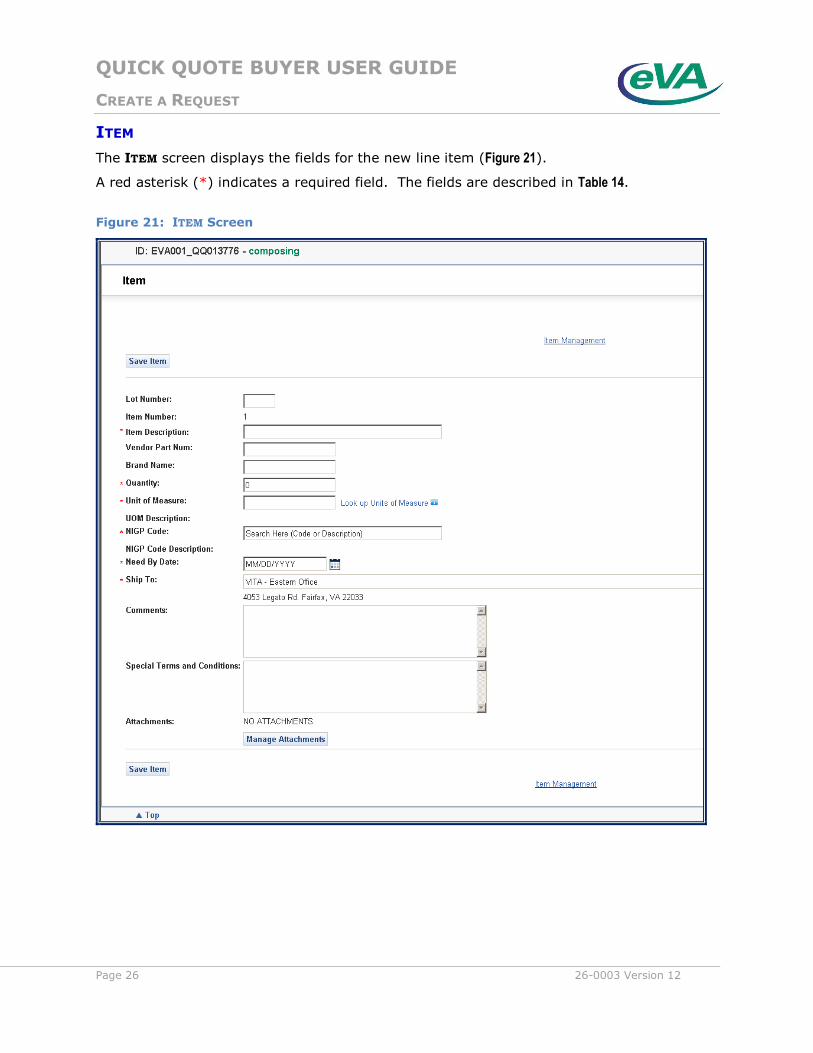
The ITEM screen displays the fields for the new line item (Figure 21).
A red asterisk (*) indicates a required field. The fields are described in Table 14.
Figure 21: ITEM Screen
QUICK QUOTE BUYER USER GUIDE
CREATE A REQUEST
26-0003 Version 12 Page 27
Table 14: ITEM Screen Fields
Field Required? Comment
Lot Number No Text field
Enter a lot number if your award method is Lot.
If you do not enter a lot number, Quick Quote will assign all items to Lot 0 (zero)
Item Number No Read-only
Quick Quote-generated sequential number
Item Description* Yes Text box
Holds up to 255 characters
Vendor Part Num No Text field
The vendor-assigned part number for the item
Brand Name No Text field
Quantity* Yes Text field
Whole numbers only
Use of decimals or fractions generates error message
Unit of Measure* Yes Text field
Click Look up Units of Measure to view list of valid
abbreviations
Invalid abbreviations generate an error message
UOM Description No Read-only.
Quick Quote displays the description based on Unit of
Measure entered.
NIGP Code* Yes Drop-down list
Search for more … opens a searchable pick list
Need By Date* Yes Acceptable format: mm/dd/yyyy
Calendar icon are also available
Ship To* Yes Pre-populates with the default address for your Agency.
Comments No Text box
Holds up to 255 characters
Special Terms and
Conditions
No Text box
Holds up to 255 characters
Attachments No Maximum file size of 30 megabytes
Special characters are not allowed in file names; use letters and numbers only
No limit to the number of attachments
LOT NUMBER
This field is only to be used if you chose Lot as the award method on the HEADER screen. If
you do not enter a Lot Number, the system will assign all items to Lot 0 (zero).
QUICK QUOTE BUYER USER GUIDE
CREATE A REQUEST
Page 28 26-0003 Version 12
ITEM NUMBER
This field contains a Quick Quote-generated, sequential number.
ITEM DESCRIPTION
Enter a description of the item, up to 255 characters. This field is required.
If you need additional space, create an attachment and make a note in the Item Description
field that additional detail is in the Attachments section.
VENDOR PART NUM
Enter the part number of the item, as listed by the vendor.
BRAND NAME
Enter the brand name of the item.
QUANTITY
Enter a numeric quantity for the item, using whole numbers only. Quick Quote will generate
an error message if the data entered is invalid.
UNIT OF MEASURE
Enter a valid abbreviation in the Unit of Measure (UOM) text box. Quick Quote will populate the
UOM Description for the Unit of Measure you entered. If the abbreviation is not on the
standard list, Quick Quote will generate an error message.
Click the Look up Units of Measure link to see a list of valid units of measure and descriptions.
(Use the browser’s Search or Find function to help you identify the right unit of measure.)
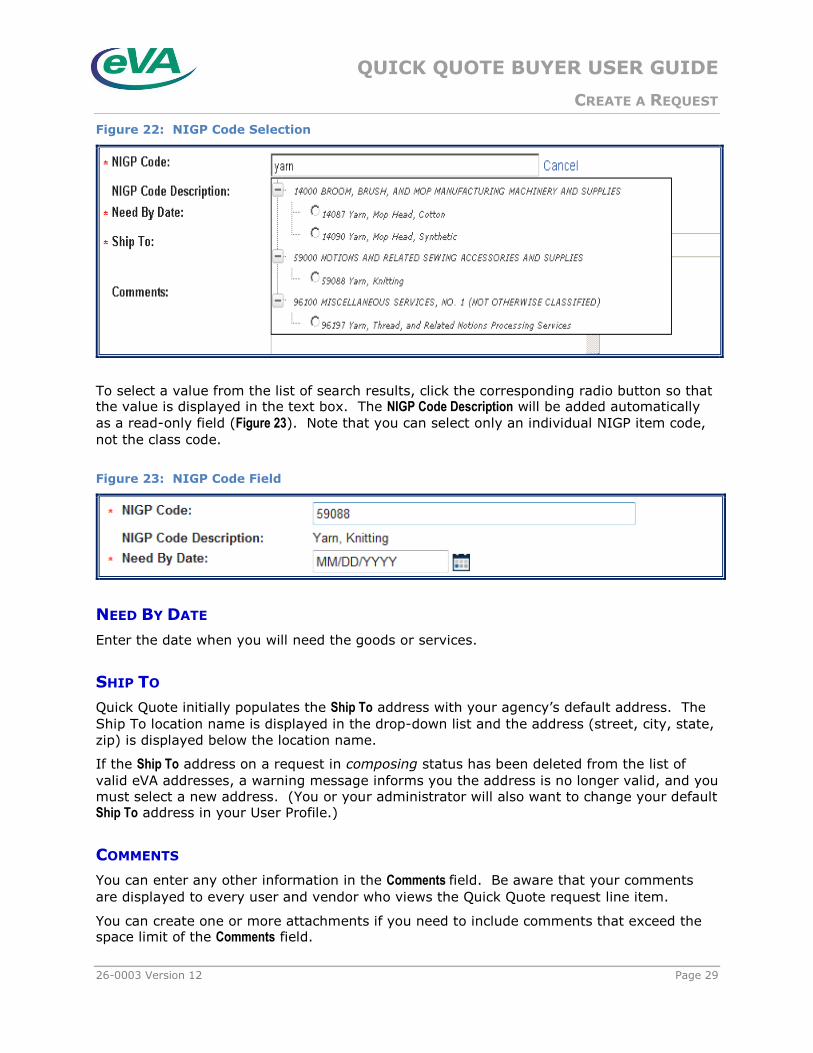
NIGP CODE
NIGP codes are the standardized commodity codes for goods or services that vendors have
registered to provide.
Start typing a description or commodity code number in the NIGP Code field (Figure 22). A
search is triggered after two characters have been entered in this field. The 20 closest
matches to the commodity code or description will be displayed below the field.
To narrow the list of commodity codes that are displayed, type additional information in the NIGP Code field. As more characters are entered, the search results are refined. You can
collapse the item code list by clicking the minus (-) sign next to the class code; click the
plus (+) sign to expand it again.
QUICK QUOTE BUYER USER GUIDE
CREATE A REQUEST
26-0003 Version 12 Page 29
Figure 22: NIGP Code Selection
To select a value from the list of search results, click the corresponding radio button so that the value is displayed in the text box. The NIGP Code Description will be added automatically
as a read-only field (Figure 23). Note that you can select only an individual NIGP item code,
not the class code.
Figure 23: NIGP Code Field
NEED BY DATE
Enter the date when you will need the goods or services.
SHIP TO
Quick Quote initially populates the Ship To address with your agency’s default address. The
Ship To location name is displayed in the drop-down list and the address (street, city, state,
zip) is displayed below the location name.
If the Ship To address on a request in composing status has been deleted from the list of
valid eVA addresses, a warning message informs you the address is no longer valid, and you
must select a new address. (You or your administrator will also want to change your default Ship To address in your User Profile.)
COMMENTS
You can enter any other information in the Comments field. Be aware that your comments
are displayed to every user and vendor who views the Quick Quote request line item.
You can create one or more attachments if you need to include comments that exceed the space limit of the Comments field.
QUICK QUOTE BUYER USER GUIDE
CREATE A REQUEST
Page 30 26-0003 Version 12
SPECIAL TERMS AND CONDITIONS
Use the Special Terms and Conditions field to give information to vendors that is specific to this
line item, such as special packaging requirements. Information entered in this field is
displayed to every user and supplier who views the Quick Quote request line item.
You can create one or more attachments for this line item to add terms and conditions that exceed the space limits of the Special Terms and Conditions field.
ATTACHMENTS
You can include attachments of any file type on each item. Click Manage Attachments to
provide an expanded description, comments, special terms and conditions, or any other
information you need to provide the vendor.
Be aware that large attachments could cause substantial delays and might exceed the limits
that vendors might have for downloading files through their firewalls or ISPs.
QUICK QUOTE BUYER USER GUIDE
CREATE A REQUEST
26-0003 Version 12 Page 31
After you have completed all of the required information, click the Save Item button (Figure 24).
Figure 24: Completed ITEM Screen
After the item is saved, a new REQUEST ITEM screen appears with a 2 in the Item Number field.
Enter all of the information necessary to add another item to the request. Be sure to click the Save Item button for each request item you create. When you have finished adding
items, click the Item Management link. New items will be displayed in the list on the
ITEM MANAGEMENT screen (Figure 25).
QUICK QUOTE BUYER USER GUIDE
CREATE A REQUEST
Page 32 26-0003 Version 12
Figure 25: ITEM MANAGEMENT Screen Showing Item Lines
If you need to edit an item, click the Edit link next to the item and repeat the steps outlined
above.
Table 15 lists the actions that are available for request item lines within Item Management.
Table 15: Item Line Actions
Action What It Does
Add New Item Opens a new Request Item screen; enter the request item information
for the new item.
Copy Allows you to copy one or more items that you selected to create new
item lines. Make any changes necessary to the new items using the Edit link.
Delete Deletes one or more items that you selected.
Edit Click this link to change item line information.
Select All Selects the Select checkboxes for all item lines.
Clear Selection Removes the check from all Select checkboxes.
QUICK QUOTE BUYER USER GUIDE
CREATE A REQUEST
26-0003 Version 12 Page 33
ADD NIGP CODES
Entering additional NIGP CODES is an optional step that allows you to assign multiple NIGP
Codes to your Quick Quote request (Figure 26). This means that more vendors will be
notified of the request, which in turn can mean an increase in both the quantity and quality
of responses.
This approach can be especially helpful in situations where a vendor has not registered for
all of the commodities for which they provide goods and services.
Figure 26: Adding Additional NIGP Codes
Begin as you did for the NIGP Code field, earlier: Start typing a description or commodity
code number in the Commodity field (Figure 27). Possible matches will be displayed, as before,
with two differences.
As shown below, the commodities will have check boxes beside them instead of radio
buttons. This allows you to make more than one selection.
The class code will also have a check box, allowing you to select all values shown in
the class with one click, provided that the number of added codes remains below the
maximum number allowed. If you select the class code, be sure to review the
selected child commodities to ensure that they are relevant to the request.
QUICK QUOTE BUYER USER GUIDE
CREATE A REQUEST
Page 34 26-0003 Version 12
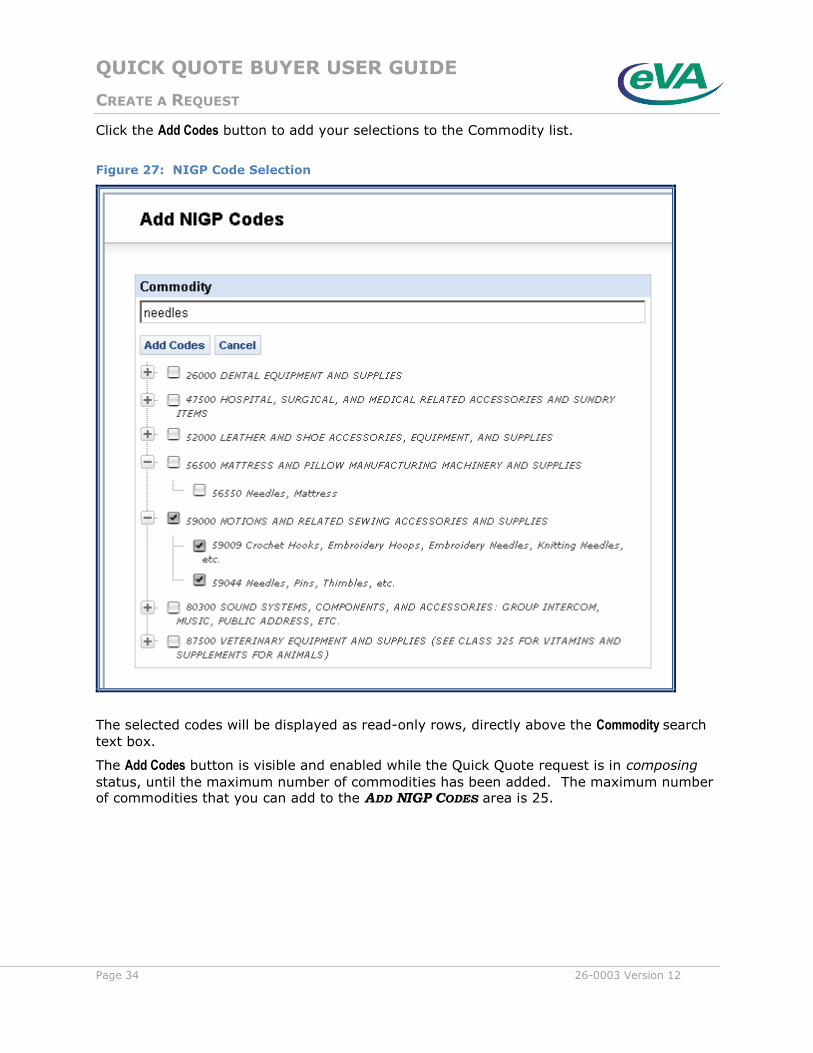
Click the Add Codes button to add your selections to the Commodity list.
Figure 27: NIGP Code Selection
The selected codes will be displayed as read-only rows, directly above the Commodity search
text box.
The Add Codes button is visible and enabled while the Quick Quote request is in composing
status, until the maximum number of commodities has been added. The maximum number of commodities that you can add to the ADD NIGP CODES area is 25.
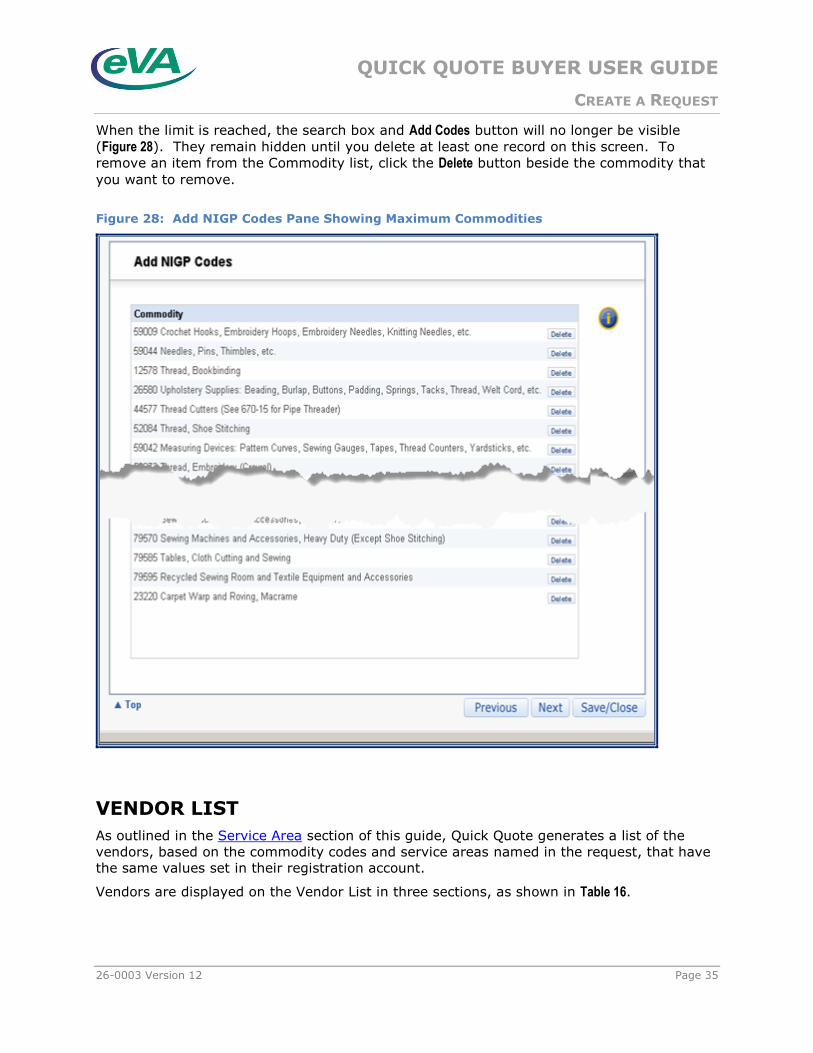
QUICK QUOTE BUYER USER GUIDE
CREATE A REQUEST
26-0003 Version 12 Page 35
When the limit is reached, the search box and Add Codes button will no longer be visible
(Figure 28). They remain hidden until you delete at least one record on this screen. To
remove an item from the Commodity list, click the Delete button beside the commodity that
you want to remove.
Figure 28: Add NIGP Codes Pane Showing Maximum Commodities
VENDOR LIST
As outlined in the Service Area section of this guide, Quick Quote generates a list of the
vendors, based on the commodity codes and service areas named in the request, that have
the same values set in their registration account.
Vendors are displayed on the Vendor List in three sections, as shown in Table 16.
QUICK QUOTE BUYER USER GUIDE
CREATE A REQUEST
Page 36 26-0003 Version 12
Table 16: VENDOR LIST Screen Sections
Section Description Add or Delete
Notifications Required
Vendors that have selected “Send bid notices” are always notified of bidding opportunities for their registered commodity codes.
You cannot deselect vendors that chose to receive notifications.
Notifications Optional
Vendors that have selected “No bid notices” at registration.
You can deselect vendors that chose notifications optional at registration.
Ad Hoc Vendors Vendors that you add to the Vendor List. You can add Ad Hoc Vendors manually.
It is important for vendors to understand the value of registering in eVA with all
applicable NIGP Codes and Service Area information.
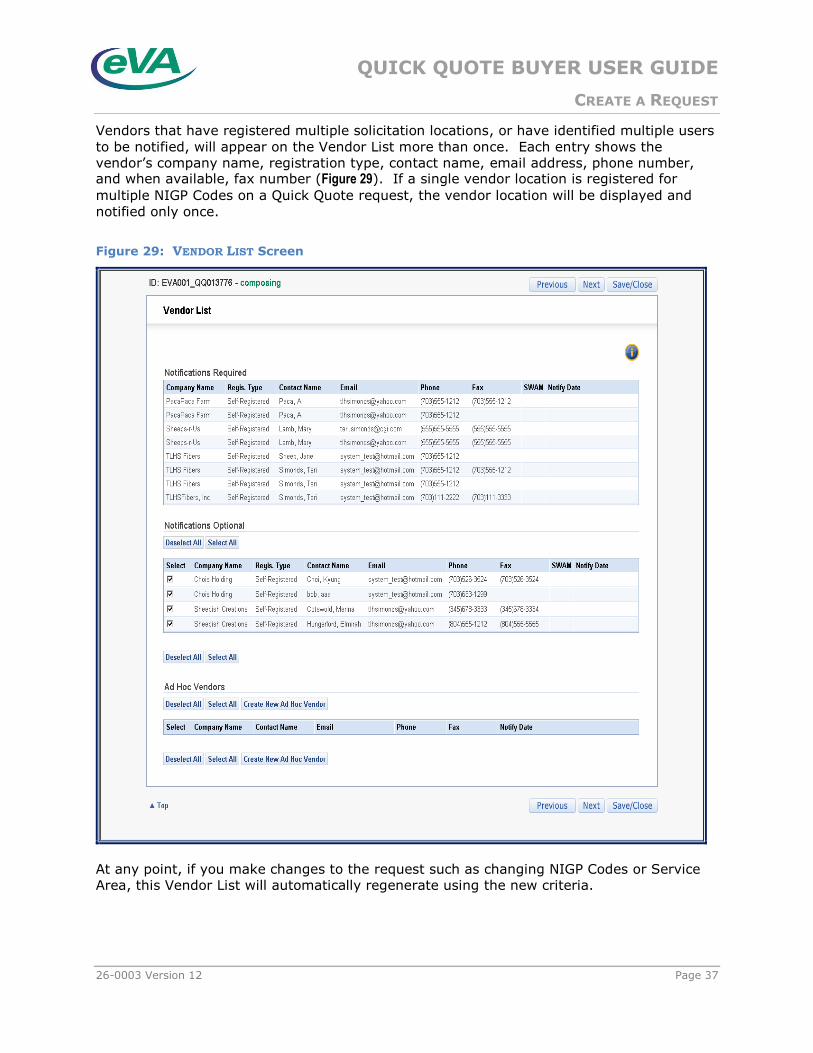
QUICK QUOTE BUYER USER GUIDE
CREATE A REQUEST
26-0003 Version 12 Page 37
Vendors that have registered multiple solicitation locations, or have identified multiple users
to be notified, will appear on the Vendor List more than once. Each entry shows the
vendor’s company name, registration type, contact name, email address, phone number, and when available, fax number (Figure 29). If a single vendor location is registered for
multiple NIGP Codes on a Quick Quote request, the vendor location will be displayed and
notified only once.
Figure 29: VENDOR LIST Screen
At any point, if you make changes to the request such as changing NIGP Codes or Service
Area, this Vendor List will automatically regenerate using the new criteria.
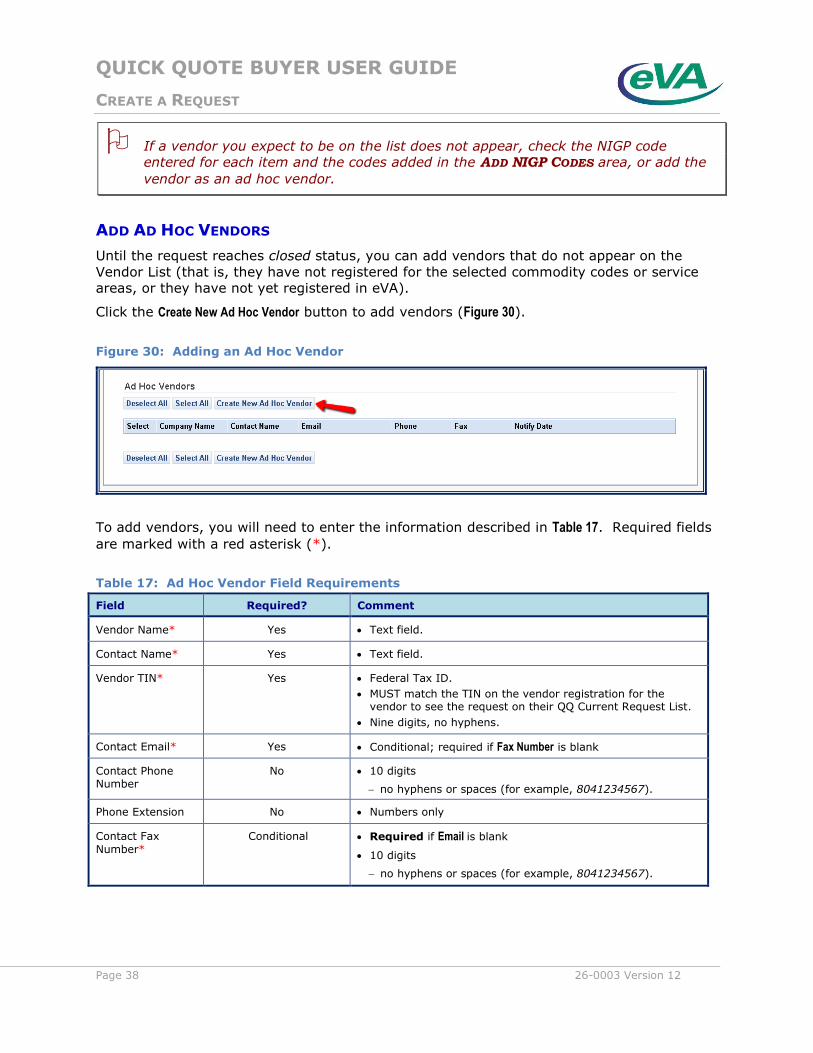
QUICK QUOTE BUYER USER GUIDE
CREATE A REQUEST
Page 38 26-0003 Version 12
If a vendor you expect to be on the list does not appear, check the NIGP code
entered for each item and the codes added in the ADD NIGP CODES area, or add the
vendor as an ad hoc vendor.
ADD AD HOC VENDORS
Until the request reaches closed status, you can add vendors that do not appear on the
Vendor List (that is, they have not registered for the selected commodity codes or service
areas, or they have not yet registered in eVA).
Click the Create New Ad Hoc Vendor button to add vendors (Figure 30).
Figure 30: Adding an Ad Hoc Vendor
To add vendors, you will need to enter the information described in Table 17. Required fields
are marked with a red asterisk (*).
Table 17: Ad Hoc Vendor Field Requirements
Field Required? Comment
Vendor Name* Yes Text field.
Contact Name* Yes Text field.
Vendor TIN* Yes Federal Tax ID.
MUST match the TIN on the vendor registration for the vendor to see the request on their QQ Current Request List.
Nine digits, no hyphens.
Contact Email* Yes Conditional; required if Fax Number is blank
Contact Phone Number
No 10 digits
no hyphens or spaces (for example, 8041234567).
Phone Extension No Numbers only
Contact Fax
Number*
Conditional Required if Email is blank
10 digits
no hyphens or spaces (for example, 8041234567).
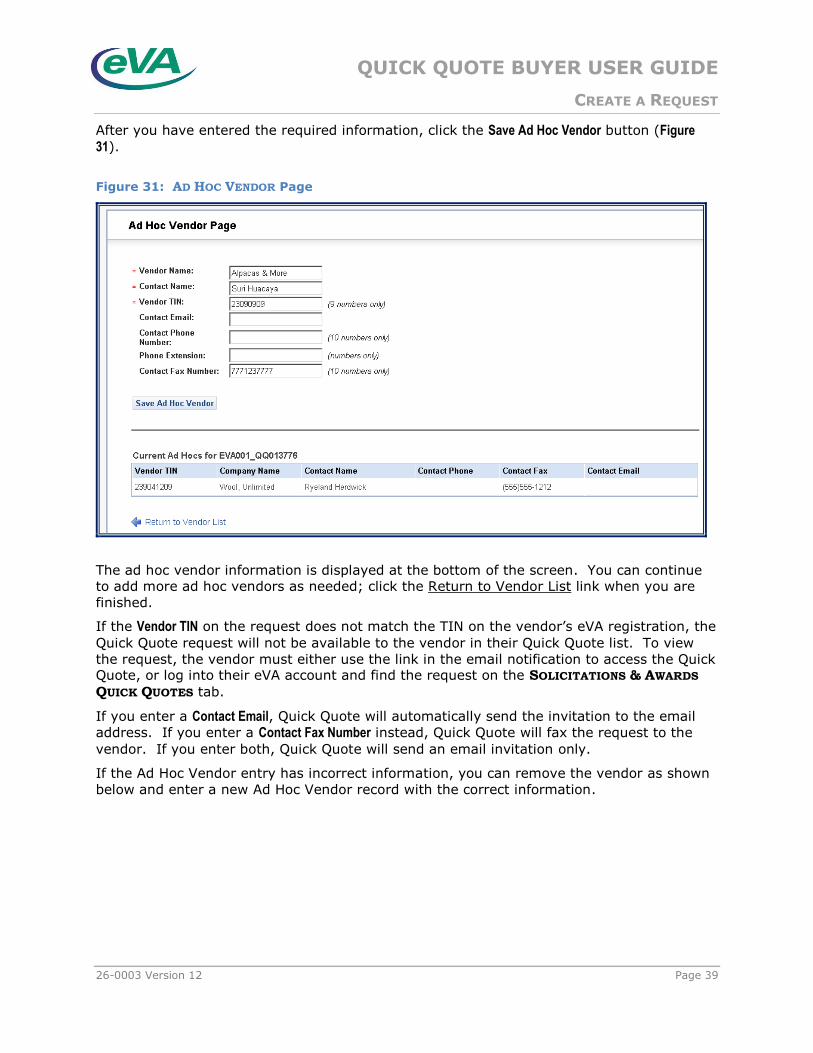
QUICK QUOTE BUYER USER GUIDE
CREATE A REQUEST
26-0003 Version 12 Page 39
After you have entered the required information, click the Save Ad Hoc Vendor button (Figure 31).
Figure 31: AD HOC VENDOR Page
The ad hoc vendor information is displayed at the bottom of the screen. You can continue
to add more ad hoc vendors as needed; click the Return to Vendor List link when you are
finished.
If the Vendor TIN on the request does not match the TIN on the vendor’s eVA registration, the
Quick Quote request will not be available to the vendor in their Quick Quote list. To view
the request, the vendor must either use the link in the email notification to access the Quick Quote, or log into their eVA account and find the request on the SOLICITATIONS & AWARDS
QUICK QUOTES tab.
If you enter a Contact Email, Quick Quote will automatically send the invitation to the email
address. If you enter a Contact Fax Number instead, Quick Quote will fax the request to the
vendor. If you enter both, Quick Quote will send an email invitation only.
If the Ad Hoc Vendor entry has incorrect information, you can remove the vendor as shown
below and enter a new Ad Hoc Vendor record with the correct information.
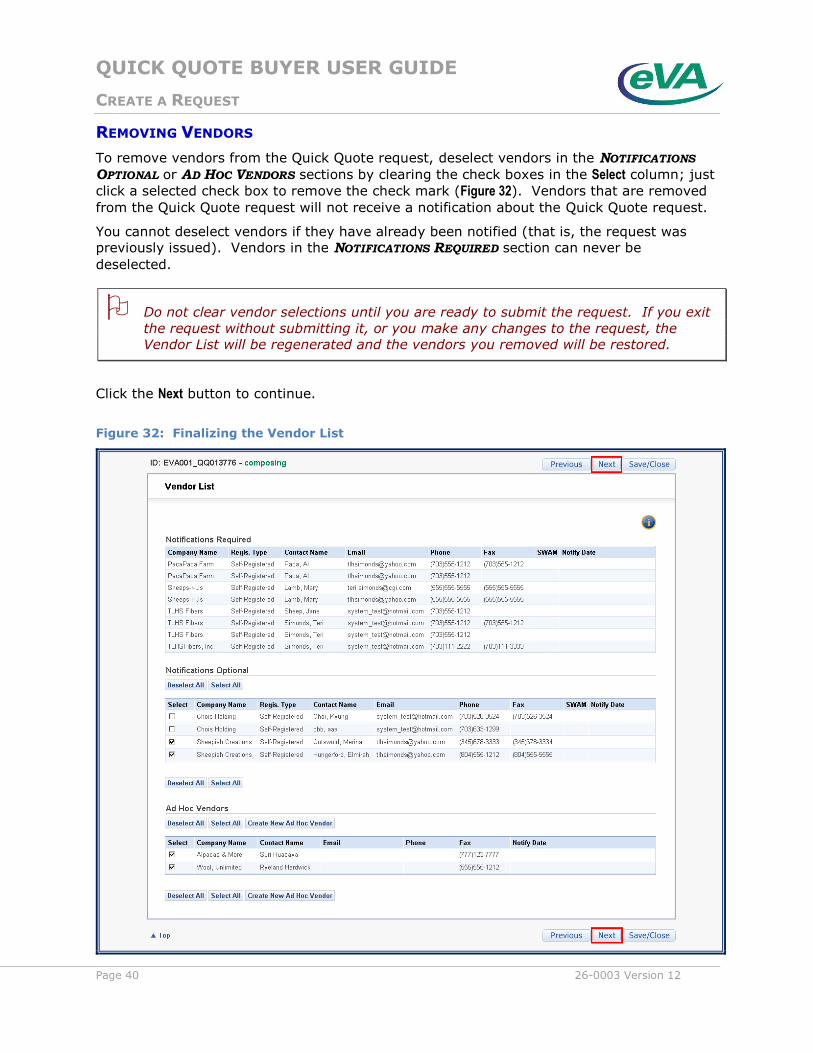
QUICK QUOTE BUYER USER GUIDE
CREATE A REQUEST
Page 40 26-0003 Version 12
REMOVING VENDORS
To remove vendors from the Quick Quote request, deselect vendors in the NOTIFICATIONS
OPTIONAL or AD HOC VENDORS sections by clearing the check boxes in the Select column; just
click a selected check box to remove the check mark (Figure 32). Vendors that are removed
from the Quick Quote request will not receive a notification about the Quick Quote request.
You cannot deselect vendors if they have already been notified (that is, the request was
previously issued). Vendors in the NOTIFICATIONS REQUIRED section can never be
deselected.
Do not clear vendor selections until you are ready to submit the request. If you exit
the request without submitting it, or you make any changes to the request, the
Vendor List will be regenerated and the vendors you removed will be restored.
Click the Next button to continue.
Figure 32: Finalizing the Vendor List

QUICK QUOTE BUYER USER GUIDE
CREATE A REQUEST
26-0003 Version 12 Page 41
VENDOR NOTIFICATION
The VENDOR NOTIFICATION screen lists all vendors to be notified of the Quick Quote request,
separated into three groups (Table 18 and Figure 33).
Table 18: Vendor Notification Types
Section Comment
Notified by Email Quick Quote sends an email to the vendor’s registered solicitation email address. For
Ad Hoc vendors, Quick Quote uses the Contact Email entered on the Quick Quote Vendor
List.
Notified by Fax Quick Quote sends a fax to the vendor’s registered solicitation fax number. For Ad Hoc
vendors, Quick Quote uses the Contact Fax entered on the Quick Quote Vendor List.
Notified by Buyer The vendor has set its preferred method of notification to US Mail. You must notify the vendor manually. Remember to include attachments.
To prevent duplicate notifications to vendors, the notification list filters by unique
email address or fax number, based on the method of notification set by the
vendor.
Figure 33: VENDOR NOTIFICATION Screen
QUICK QUOTE BUYER USER GUIDE
CREATE A REQUEST
Page 42 26-0003 Version 12
PRINTING THE VENDOR NOTIFICATION LIST
The Vendor List is always stored with the online version of the Quick Quote request.
However, if you want to keep a hard-copy record of the vendors that were notified, you can print the VENDOR NOTIFICATION screen using your browser’s Print function. You can also use
the hard copy as a helpful reminder to notify vendors in the NOTIFIED BY BUYER section.
(You can return to this screen later.)
After you print this screen, click Next to go to the REQUEST REVIEW screen.
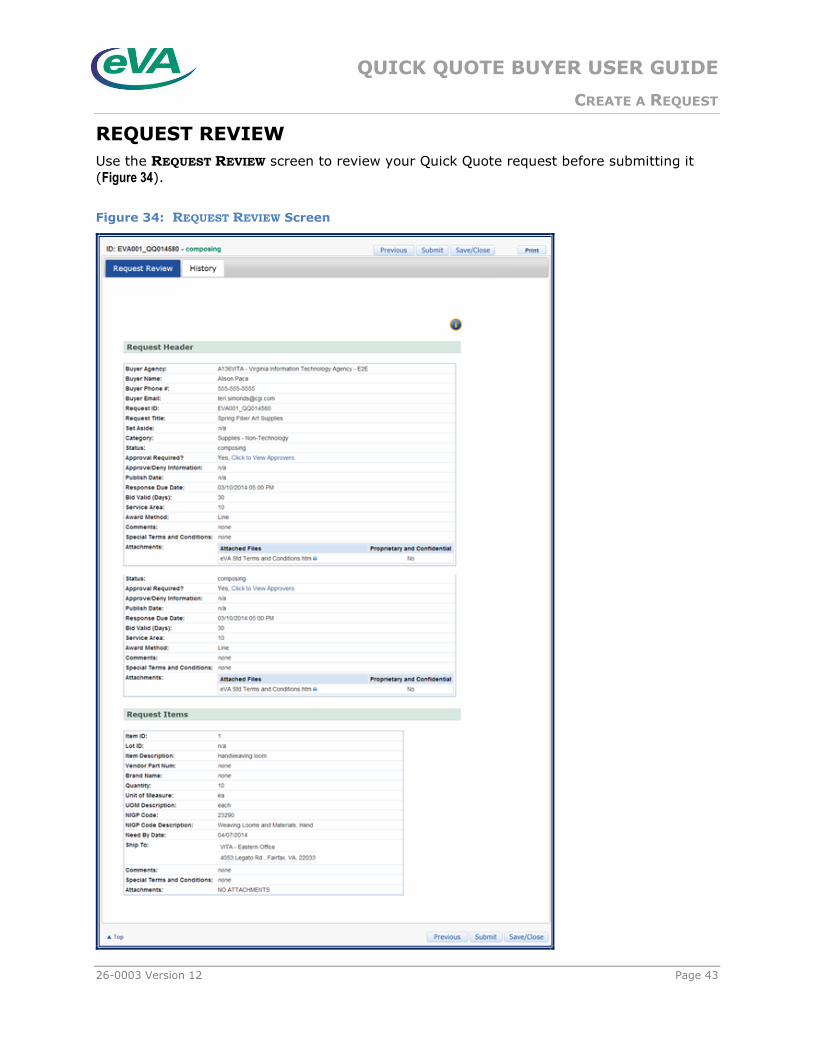
QUICK QUOTE BUYER USER GUIDE
CREATE A REQUEST
26-0003 Version 12 Page 43
REQUEST REVIEW
Use the REQUEST REVIEW screen to review your Quick Quote request before submitting it
(Figure 34).
Figure 34: REQUEST REVIEW Screen
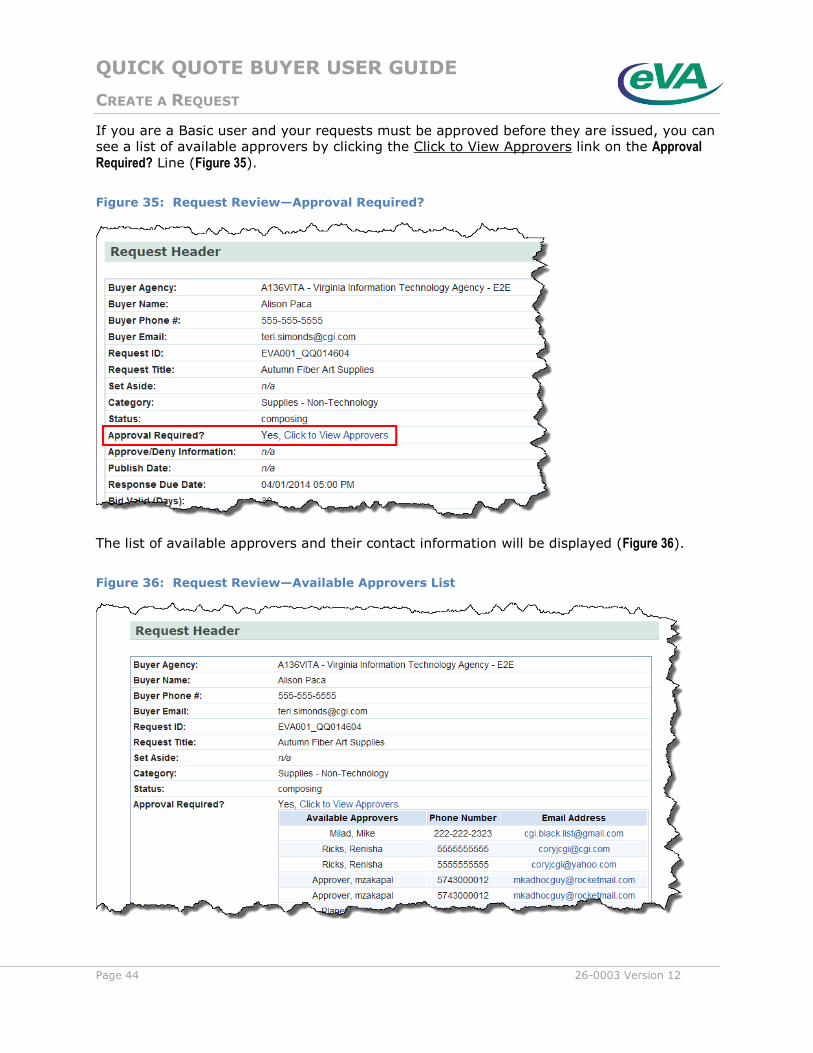
QUICK QUOTE BUYER USER GUIDE
CREATE A REQUEST
Page 44 26-0003 Version 12
If you are a Basic user and your requests must be approved before they are issued, you can see a list of available approvers by clicking the Click to View Approvers link on the Approval Required? Line (Figure 35).
Figure 35: Request Review—Approval Required?
The list of available approvers and their contact information will be displayed (Figure 36).
Figure 36: Request Review—Available Approvers List
QUICK QUOTE BUYER USER GUIDE
CREATE A REQUEST
26-0003 Version 12 Page 45
Click the link again to hide the list.
You can also print the Quick Quote request by clicking the Print button. This screen provides
the details for each item, so you can deliver a printed version of the request (along with any attachments) to the vendors in the NOTIFIED BY BUYER section on the VENDOR NOTIFICATION
screen.
To print attachments, select the link for each attachment on the REQUEST REVIEW screen to
open and print them (Figure 37).
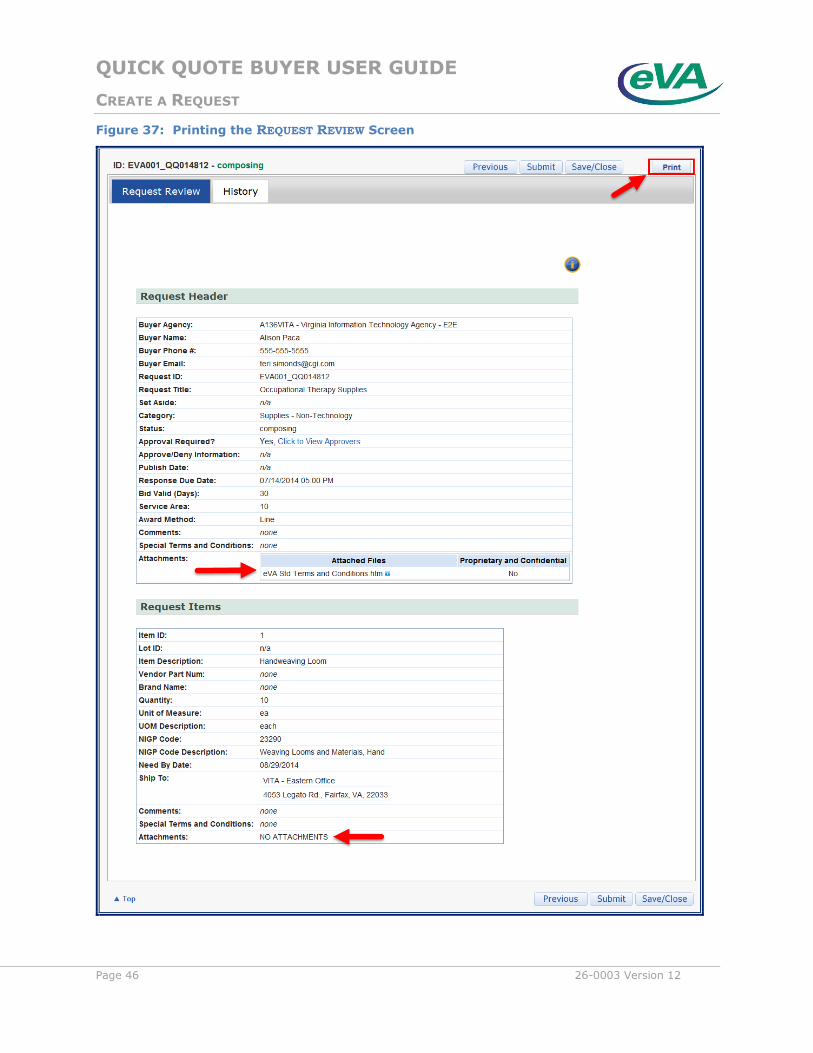
QUICK QUOTE BUYER USER GUIDE
CREATE A REQUEST
Page 46 26-0003 Version 12
Figure 37: Printing the REQUEST REVIEW Screen
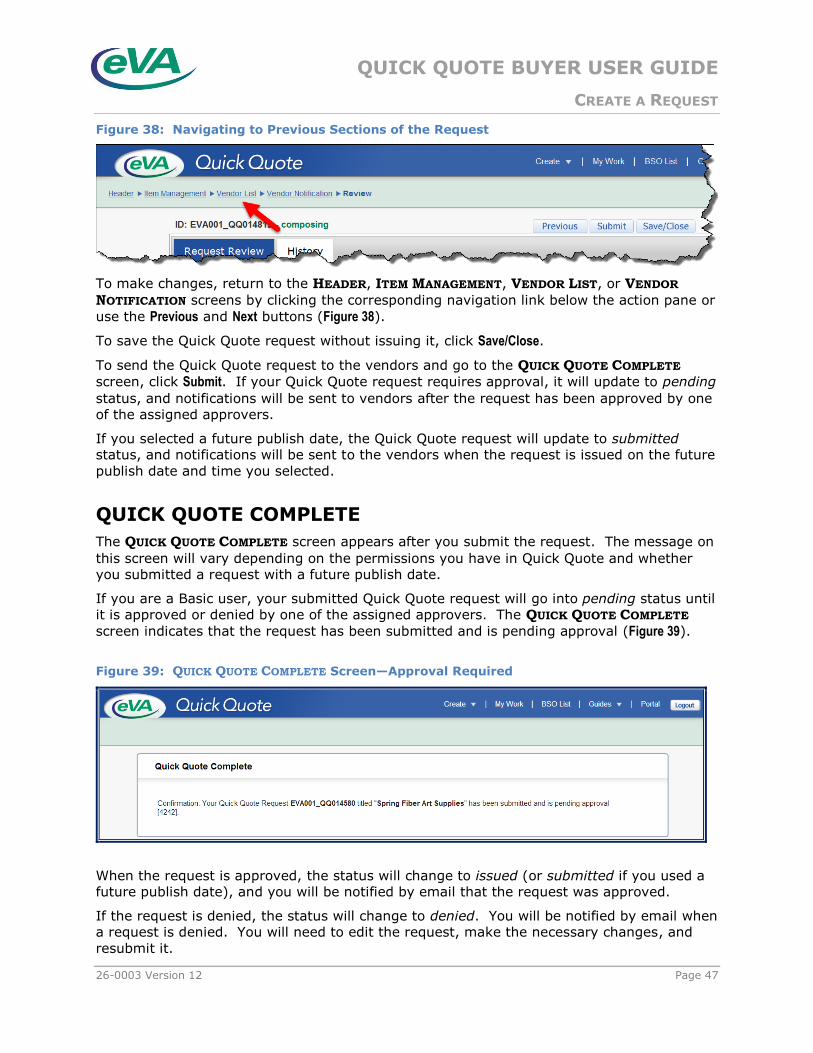
QUICK QUOTE BUYER USER GUIDE
CREATE A REQUEST
26-0003 Version 12 Page 47
Figure 38: Navigating to Previous Sections of the Request
To make changes, return to the HEADER, ITEM MANAGEMENT, VENDOR LIST, or VENDOR
NOTIFICATION screens by clicking the corresponding navigation link below the action pane or
use the Previous and Next buttons (Figure 38).
To save the Quick Quote request without issuing it, click Save/Close.
To send the Quick Quote request to the vendors and go to the QUICK QUOTE COMPLETE
screen, click Submit. If your Quick Quote request requires approval, it will update to pending
status, and notifications will be sent to vendors after the request has been approved by one
of the assigned approvers.
If you selected a future publish date, the Quick Quote request will update to submitted
status, and notifications will be sent to the vendors when the request is issued on the future
publish date and time you selected.
QUICK QUOTE COMPLETE
The QUICK QUOTE COMPLETE screen appears after you submit the request. The message on
this screen will vary depending on the permissions you have in Quick Quote and whether
you submitted a request with a future publish date.
If you are a Basic user, your submitted Quick Quote request will go into pending status until
it is approved or denied by one of the assigned approvers. The QUICK QUOTE COMPLETE
screen indicates that the request has been submitted and is pending approval (Figure 39).
Figure 39: QUICK QUOTE COMPLETE Screen—Approval Required
When the request is approved, the status will change to issued (or submitted if you used a
future publish date), and you will be notified by email that the request was approved.
If the request is denied, the status will change to denied. You will be notified by email when
a request is denied. You will need to edit the request, make the necessary changes, and
resubmit it.
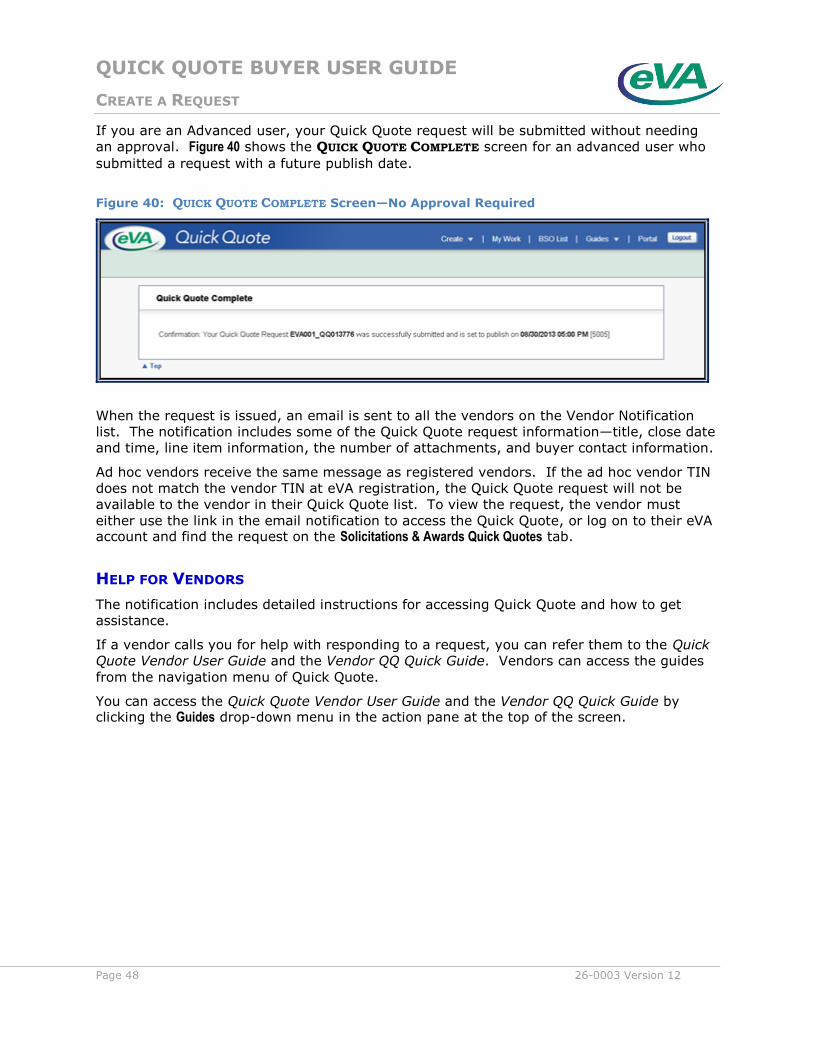
QUICK QUOTE BUYER USER GUIDE
CREATE A REQUEST
Page 48 26-0003 Version 12
If you are an Advanced user, your Quick Quote request will be submitted without needing
an approval. Figure 40 shows the QUICK QUOTE COMPLETE screen for an advanced user who
submitted a request with a future publish date.
Figure 40: QUICK QUOTE COMPLETE Screen—No Approval Required
When the request is issued, an email is sent to all the vendors on the Vendor Notification
list. The notification includes some of the Quick Quote request information—title, close date
and time, line item information, the number of attachments, and buyer contact information.
Ad hoc vendors receive the same message as registered vendors. If the ad hoc vendor TIN
does not match the vendor TIN at eVA registration, the Quick Quote request will not be
available to the vendor in their Quick Quote list. To view the request, the vendor must
either use the link in the email notification to access the Quick Quote, or log on to their eVA account and find the request on the Solicitations & Awards Quick Quotes tab.
HELP FOR VENDORS
The notification includes detailed instructions for accessing Quick Quote and how to get
assistance.
If a vendor calls you for help with responding to a request, you can refer them to the Quick
Quote Vendor User Guide and the Vendor QQ Quick Guide. Vendors can access the guides
from the navigation menu of Quick Quote.
You can access the Quick Quote Vendor User Guide and the Vendor QQ Quick Guide by clicking the Guides drop-down menu in the action pane at the top of the screen.
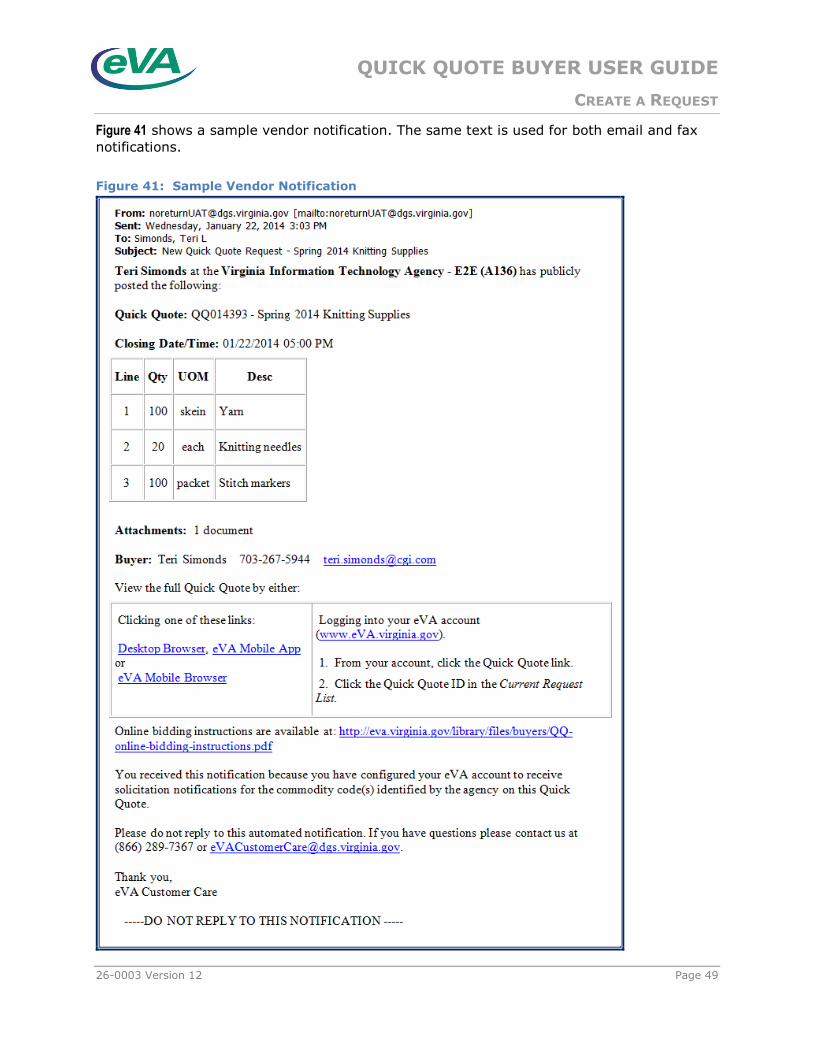
QUICK QUOTE BUYER USER GUIDE
CREATE A REQUEST
26-0003 Version 12 Page 49
Figure 41 shows a sample vendor notification. The same text is used for both email and fax
notifications.
Figure 41: Sample Vendor Notification
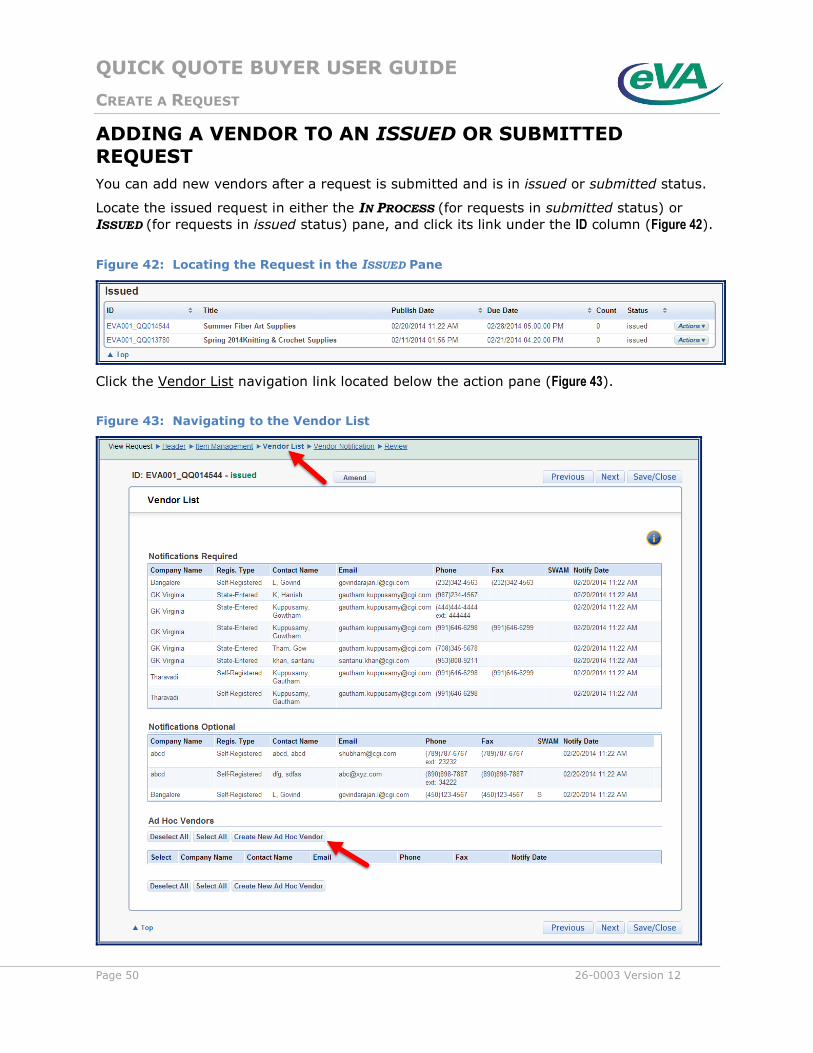
QUICK QUOTE BUYER USER GUIDE
CREATE A REQUEST
Page 50 26-0003 Version 12
ADDING A VENDOR TO AN ISSUED OR SUBMITTED REQUEST
You can add new vendors after a request is submitted and is in issued or submitted status.
Locate the issued request in either the IN PROCESS (for requests in submitted status) or
ISSUED (for requests in issued status) pane, and click its link under the ID column (Figure 42).
Figure 42: Locating the Request in the ISSUED Pane
Click the Vendor List navigation link located below the action pane (Figure 43).
Figure 43: Navigating to the Vendor List

QUICK QUOTE BUYER USER GUIDE
CREATE A REQUEST
26-0003 Version 12 Page 51
At the bottom of the VENDOR LIST screen, click Create New Ad Hoc Vendor. Follow the
instructions in the section Add Ad Hoc Vendors in this guide to add a vendor. Be sure to
submit the request again on the REQUEST REVIEW screen so the new vendor will be notified
of the request.
Figure 44: Creating a New Ad Hoc Vendor
The Notify Date column on the VENDOR LIST screen indicates when vendors were notified of
the Quick Quote request. The Notify Date for newly added Ad Hoc Vendors will be blank until
the Quick Quote is submitted and sent to the newly added vendor (Figure 44).

QUICK QUOTE BUYER USER GUIDE
CREATE A REQUEST
Page 52 26-0003 Version 12
After you submit the request, you will receive a confirmation on the QUICK QUOTE COMPLETE
screen that the vendor has been notified (Figure 45).
Figure 45: QUICK QUOTE COMPLETE Screen
You cannot add additional vendors after the request has closed.
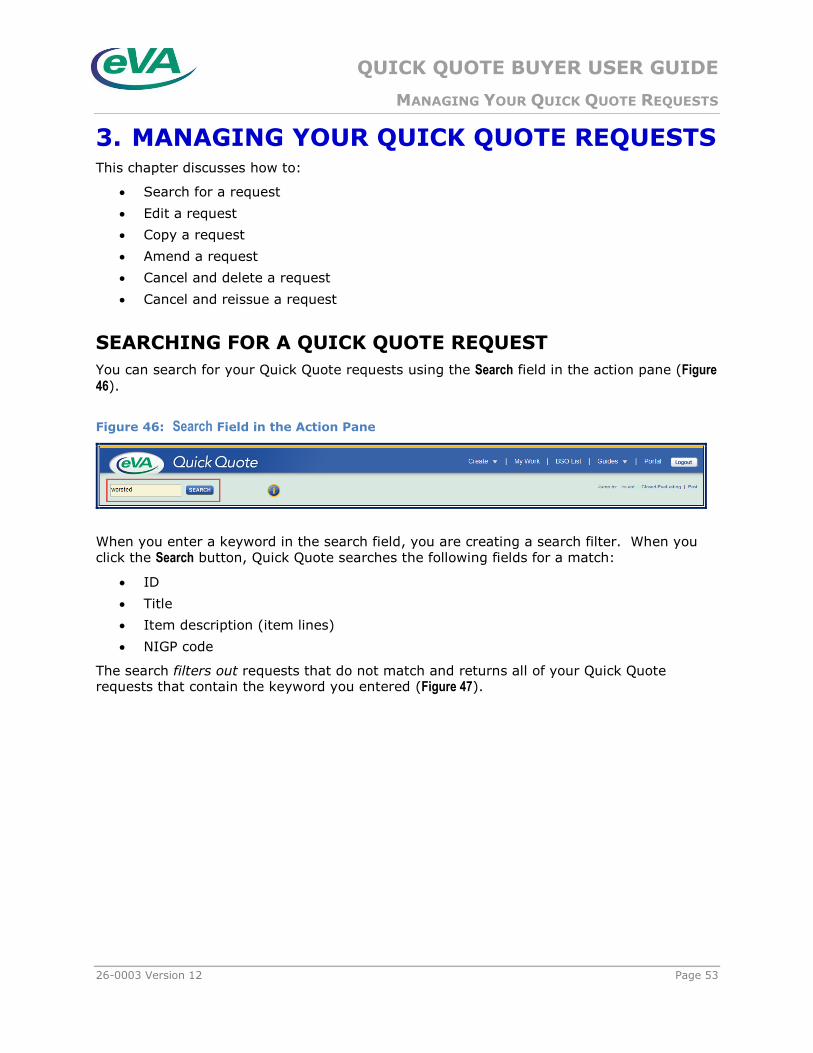
QUICK QUOTE BUYER USER GUIDE
MANAGING YOUR QUICK QUOTE REQUESTS
26-0003 Version 12 Page 53
3. MANAGING YOUR QUICK QUOTE REQUESTS This chapter discusses how to:
Search for a request
Edit a request
Copy a request
Amend a request
Cancel and delete a request
Cancel and reissue a request
SEARCHING FOR A QUICK QUOTE REQUEST
You can search for your Quick Quote requests using the Search field in the action pane (Figure 46).
Figure 46: Search Field in the Action Pane
When you enter a keyword in the search field, you are creating a search filter. When you click the Search button, Quick Quote searches the following fields for a match:
ID
Title
Item description (item lines)
NIGP code
The search filters out requests that do not match and returns all of your Quick Quote requests that contain the keyword you entered (Figure 47).
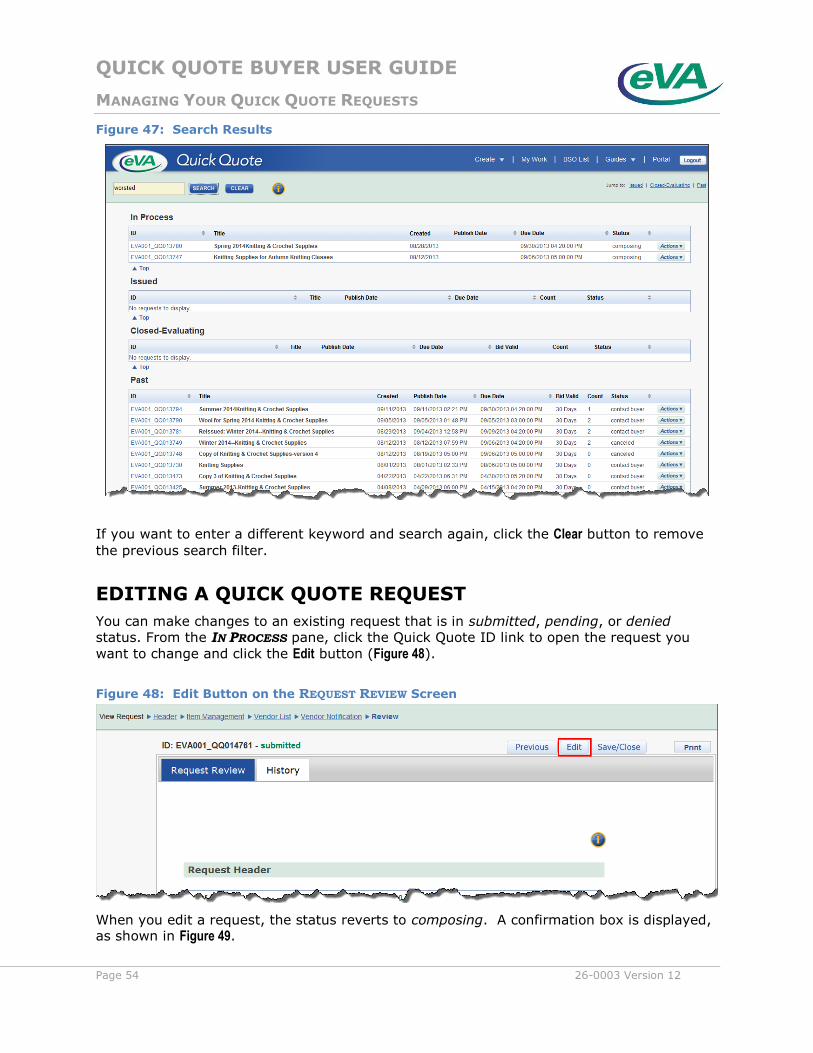
QUICK QUOTE BUYER USER GUIDE
MANAGING YOUR QUICK QUOTE REQUESTS
Page 54 26-0003 Version 12
Figure 47: Search Results
If you want to enter a different keyword and search again, click the Clear button to remove
the previous search filter.
EDITING A QUICK QUOTE REQUEST
You can make changes to an existing request that is in submitted, pending, or denied
status. From the IN PROCESS pane, click the Quick Quote ID link to open the request you
want to change and click the Edit button (Figure 48).
Figure 48: Edit Button on the REQUEST REVIEW Screen
When you edit a request, the status reverts to composing. A confirmation box is displayed, as shown in Figure 49.

QUICK QUOTE BUYER USER GUIDE
MANAGING YOUR QUICK QUOTE REQUESTS
26-0003 Version 12 Page 55
Figure 49: Edit Confirmation Box
Click OK to continue.
Figure 50: HEADER Screen Showing Request in composing Status
Make the necessary changes; when you are finished, click Submit from the REVIEW screen to
submit the request. Click Save/Close to save the request without issuing it.
To change a Quick Quote request that is in issued status, you must create an amendment.
Follow the instructions in the section Amending a Quick Quote Request to create an
amendment.
COPYING A QUICK QUOTE REQUEST
You can copy an existing request as a shortcut to creating a new Quick Quote request.
Follow these steps to find an existing request that contains the information you need to
copy.
1. Use the Search functionality to find a request that is similar to the request you want to
create.
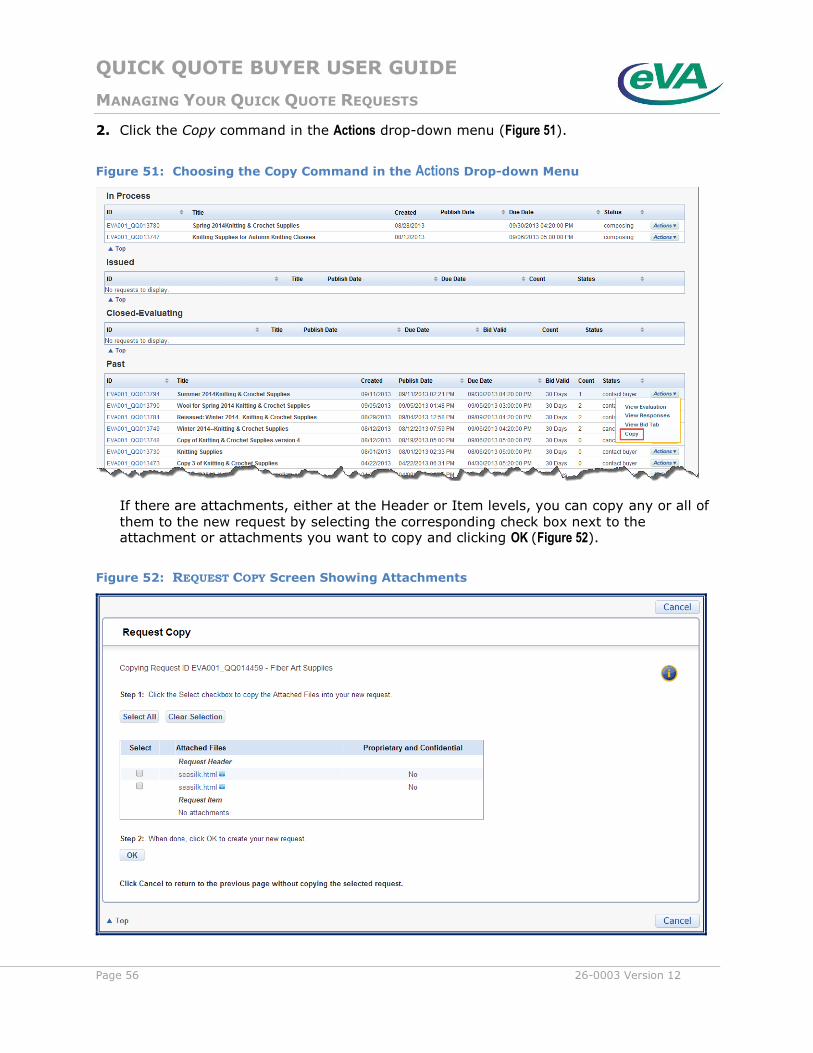
QUICK QUOTE BUYER USER GUIDE
MANAGING YOUR QUICK QUOTE REQUESTS
Page 56 26-0003 Version 12
2. Click the Copy command in the Actions drop-down menu (Figure 51).
Figure 51: Choosing the Copy Command in the Actions Drop-down Menu
If there are attachments, either at the Header or Item levels, you can copy any or all of
them to the new request by selecting the corresponding check box next to the attachment or attachments you want to copy and clicking OK (Figure 52).
Figure 52: REQUEST COPY Screen Showing Attachments
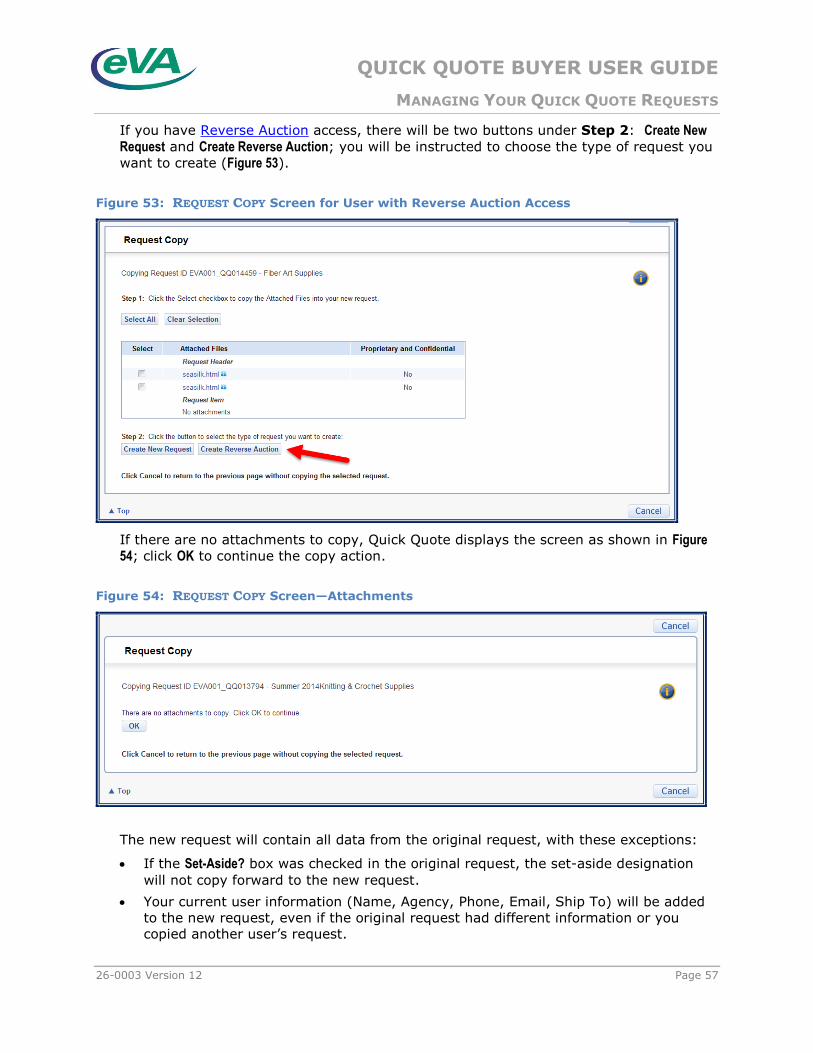
QUICK QUOTE BUYER USER GUIDE
MANAGING YOUR QUICK QUOTE REQUESTS
26-0003 Version 12 Page 57
If you have Reverse Auction access, there will be two buttons under Step 2: Create New Request and Create Reverse Auction; you will be instructed to choose the type of request you
want to create (Figure 53).
Figure 53: REQUEST COPY Screen for User with Reverse Auction Access
If there are no attachments to copy, Quick Quote displays the screen as shown in Figure 54; click OK to continue the copy action.
Figure 54: REQUEST COPY Screen—Attachments
The new request will contain all data from the original request, with these exceptions:
If the Set-Aside? box was checked in the original request, the set-aside designation
will not copy forward to the new request.
Your current user information (Name, Agency, Phone, Email, Ship To) will be added
to the new request, even if the original request had different information or you
copied another user’s request.
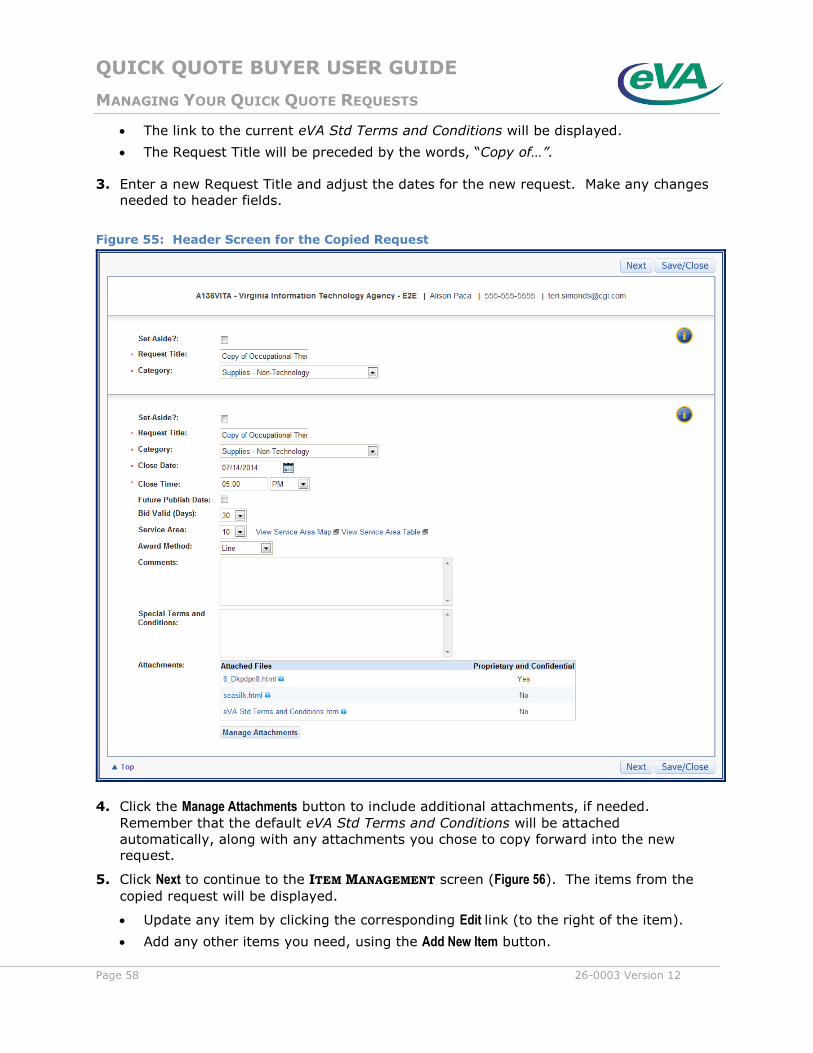
QUICK QUOTE BUYER USER GUIDE
MANAGING YOUR QUICK QUOTE REQUESTS
Page 58 26-0003 Version 12
The link to the current eVA Std Terms and Conditions will be displayed.
The Request Title will be preceded by the words, “Copy of…”.
3. Enter a new Request Title and adjust the dates for the new request. Make any changes
needed to header fields.
Figure 55: Header Screen for the Copied Request
4. Click the Manage Attachments button to include additional attachments, if needed.
Remember that the default eVA Std Terms and Conditions will be attached
automatically, along with any attachments you chose to copy forward into the new
request.
5. Click Next to continue to the ITEM MANAGEMENT screen (Figure 56). The items from the
copied request will be displayed.
Update any item by clicking the corresponding Edit link (to the right of the item).
Add any other items you need, using the Add New Item button.
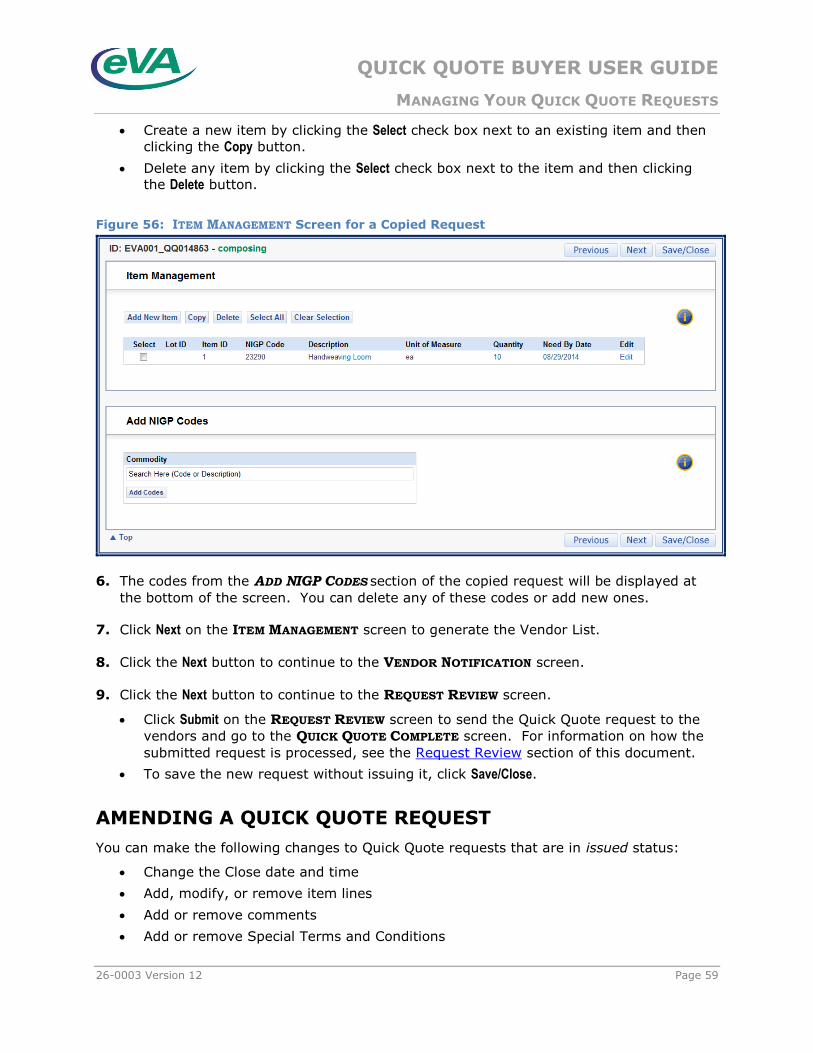
QUICK QUOTE BUYER USER GUIDE
MANAGING YOUR QUICK QUOTE REQUESTS
26-0003 Version 12 Page 59
Create a new item by clicking the Select check box next to an existing item and then
clicking the Copy button.
Delete any item by clicking the Select check box next to the item and then clicking
the Delete button.
Figure 56: ITEM MANAGEMENT Screen for a Copied Request
6. The codes from the ADD NIGP CODES section of the copied request will be displayed at
the bottom of the screen. You can delete any of these codes or add new ones.
7. Click Next on the ITEM MANAGEMENT screen to generate the Vendor List.
8. Click the Next button to continue to the VENDOR NOTIFICATION screen.
9. Click the Next button to continue to the REQUEST REVIEW screen.
Click Submit on the REQUEST REVIEW screen to send the Quick Quote request to the
vendors and go to the QUICK QUOTE COMPLETE screen. For information on how the
submitted request is processed, see the Request Review section of this document.
To save the new request without issuing it, click Save/Close.
AMENDING A QUICK QUOTE REQUEST
You can make the following changes to Quick Quote requests that are in issued status:
Change the Close date and time
Add, modify, or remove item lines
Add or remove comments
Add or remove Special Terms and Conditions

QUICK QUOTE BUYER USER GUIDE
MANAGING YOUR QUICK QUOTE REQUESTS
Page 60 26-0003 Version 12
Add or remove attachments
To create an amendment to a request, follow the steps outlined below.
1. From the ISSUED pane, click Amend in the Actions drop-down menu for the request you
want to modify.
Figure 57: Actions Menu Showing Amend
2. Click OK to create the amendment.
Figure 58: Amend Confirmation Screen
3. A new version of the Quick Quote request will be created. All request information from
the prior version, including the set-aside designation, attachments, active and removed
or canceled lines, and ad hoc vendors, will be copied into the new request version. Note
that the previous version will stay in issued status until the amendment is issued.
4. Make any changes needed to the request header. Use the Manage Attachments button to
add or delete attachments, as needed.
5. Click Next to continue to the ITEM MANAGEMENT screen. The request item lines from the
prior version will be displayed. A new version of the Quick Quote request is
automatically saved in composing status, and the request ID is displayed with the
amendment version number. Each subsequent amendment will increment the version
number (for example: V3, V4).
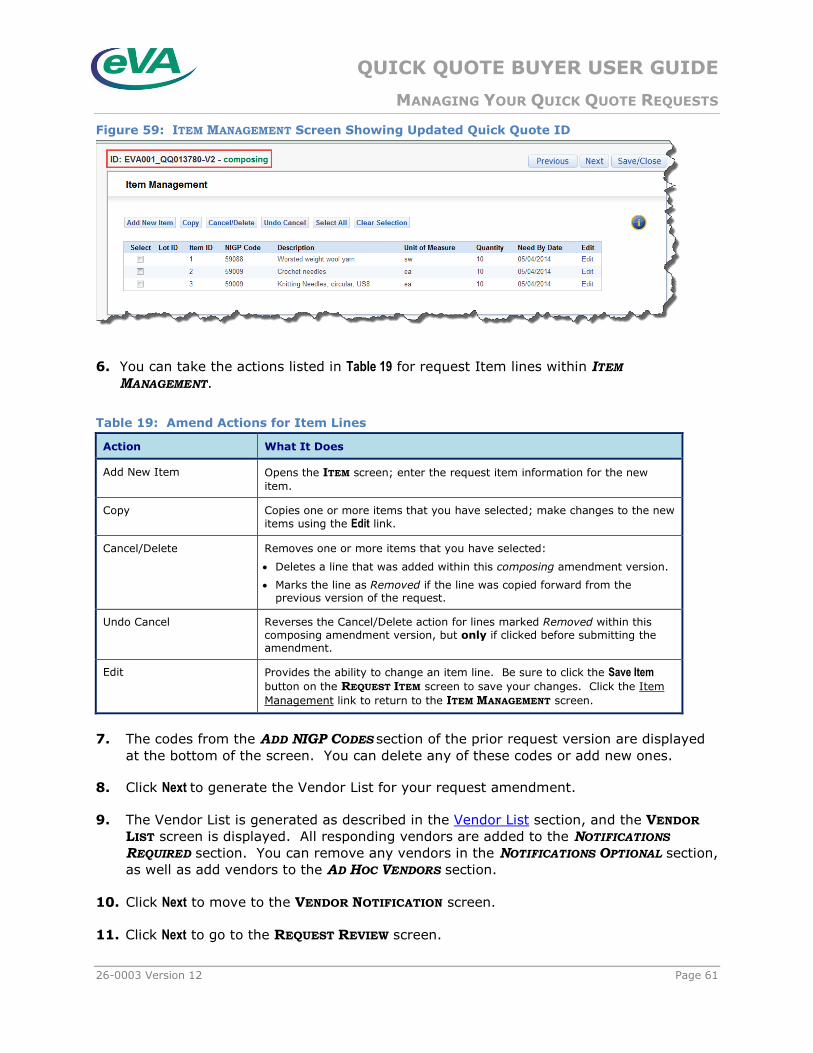
QUICK QUOTE BUYER USER GUIDE
MANAGING YOUR QUICK QUOTE REQUESTS
26-0003 Version 12 Page 61
Figure 59: ITEM MANAGEMENT Screen Showing Updated Quick Quote ID
6. You can take the actions listed in Table 19 for request Item lines within ITEM
MANAGEMENT.
Table 19: Amend Actions for Item Lines
Action What It Does
Add New Item Opens the ITEM screen; enter the request item information for the new
item.
Copy Copies one or more items that you have selected; make changes to the new
items using the Edit link.
Cancel/Delete Removes one or more items that you have selected:
Deletes a line that was added within this composing amendment version.
Marks the line as Removed if the line was copied forward from the previous version of the request.
Undo Cancel Reverses the Cancel/Delete action for lines marked Removed within this
composing amendment version, but only if clicked before submitting the amendment.
Edit Provides the ability to change an item line. Be sure to click the Save Item
button on the REQUEST ITEM screen to save your changes. Click the Item
Management link to return to the ITEM MANAGEMENT screen.
7. The codes from the ADD NIGP CODES section of the prior request version are displayed
at the bottom of the screen. You can delete any of these codes or add new ones.
8. Click Next to generate the Vendor List for your request amendment.
9. The Vendor List is generated as described in the Vendor List section, and the VENDOR
LIST screen is displayed. All responding vendors are added to the NOTIFICATIONS
REQUIRED section. You can remove any vendors in the NOTIFICATIONS OPTIONAL section,
as well as add vendors to the AD HOC VENDORS section.
10. Click Next to move to the VENDOR NOTIFICATION screen.
11. Click Next to go to the REQUEST REVIEW screen.
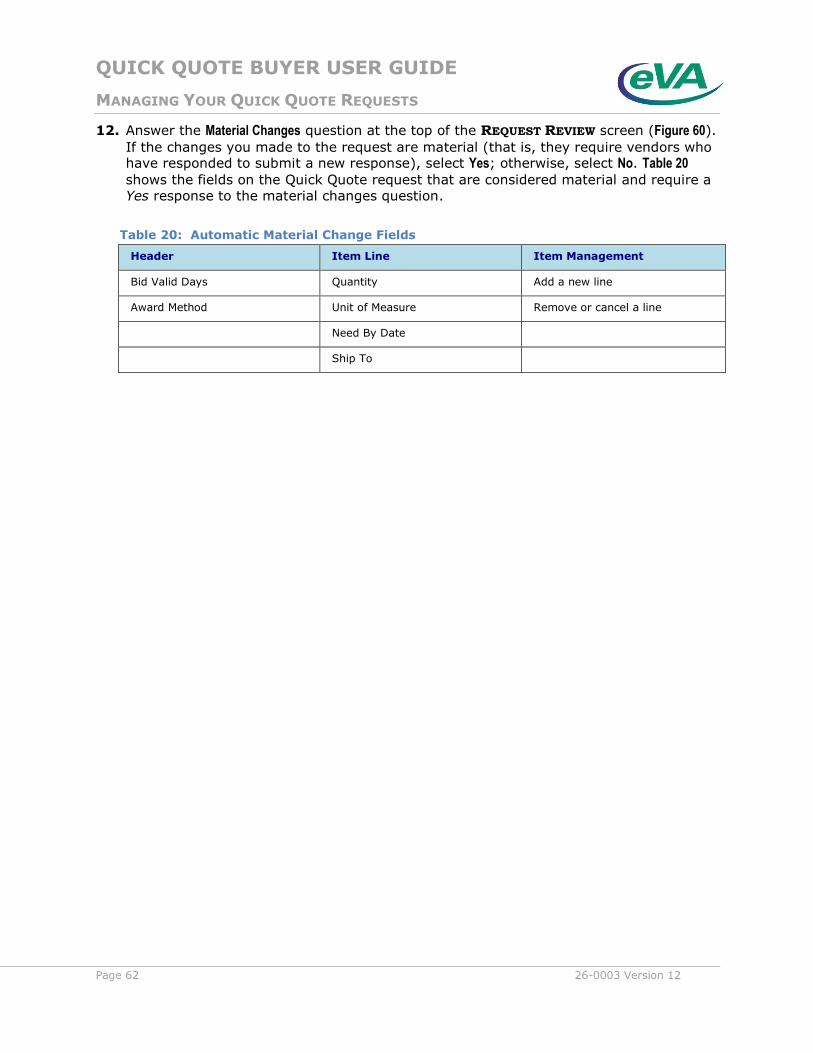
QUICK QUOTE BUYER USER GUIDE
MANAGING YOUR QUICK QUOTE REQUESTS
Page 62 26-0003 Version 12
12. Answer the Material Changes question at the top of the REQUEST REVIEW screen (Figure 60).
If the changes you made to the request are material (that is, they require vendors who have responded to submit a new response), select Yes; otherwise, select No. Table 20
shows the fields on the Quick Quote request that are considered material and require a
Yes response to the material changes question.
Table 20: Automatic Material Change Fields
Header Item Line Item Management
Bid Valid Days Quantity Add a new line
Award Method Unit of Measure Remove or cancel a line
Need By Date
Ship To

QUICK QUOTE BUYER USER GUIDE
MANAGING YOUR QUICK QUOTE REQUESTS
26-0003 Version 12 Page 63
Figure 60: Material Change Prompt on Submit
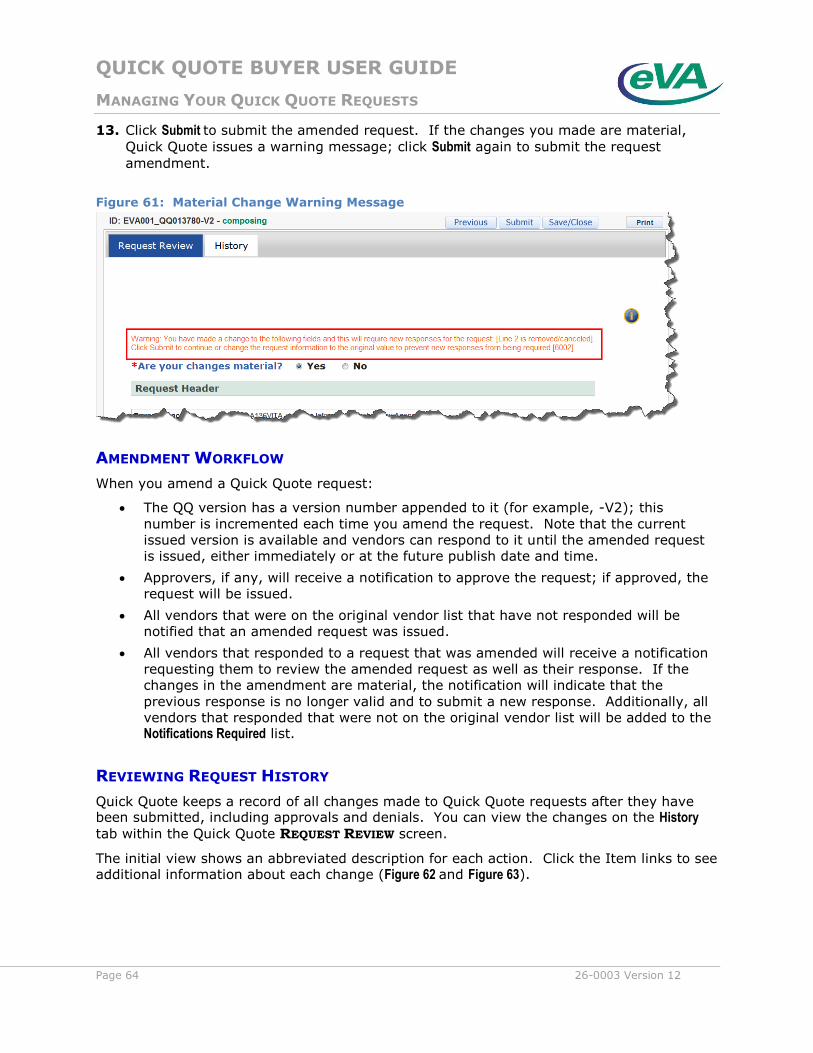
QUICK QUOTE BUYER USER GUIDE
MANAGING YOUR QUICK QUOTE REQUESTS
Page 64 26-0003 Version 12
13. Click Submit to submit the amended request. If the changes you made are material,
Quick Quote issues a warning message; click Submit again to submit the request
amendment.
Figure 61: Material Change Warning Message
AMENDMENT WORKFLOW
When you amend a Quick Quote request:
The QQ version has a version number appended to it (for example, -V2); this
number is incremented each time you amend the request. Note that the current
issued version is available and vendors can respond to it until the amended request
is issued, either immediately or at the future publish date and time.
Approvers, if any, will receive a notification to approve the request; if approved, the
request will be issued.
All vendors that were on the original vendor list that have not responded will be
notified that an amended request was issued.
All vendors that responded to a request that was amended will receive a notification
requesting them to review the amended request as well as their response. If the
changes in the amendment are material, the notification will indicate that the
previous response is no longer valid and to submit a new response. Additionally, all
vendors that responded that were not on the original vendor list will be added to the Notifications Required list.
REVIEWING REQUEST HISTORY
Quick Quote keeps a record of all changes made to Quick Quote requests after they have been submitted, including approvals and denials. You can view the changes on the History tab within the Quick Quote REQUEST REVIEW screen.
The initial view shows an abbreviated description for each action. Click the Item links to see additional information about each change (Figure 62 and Figure 63).
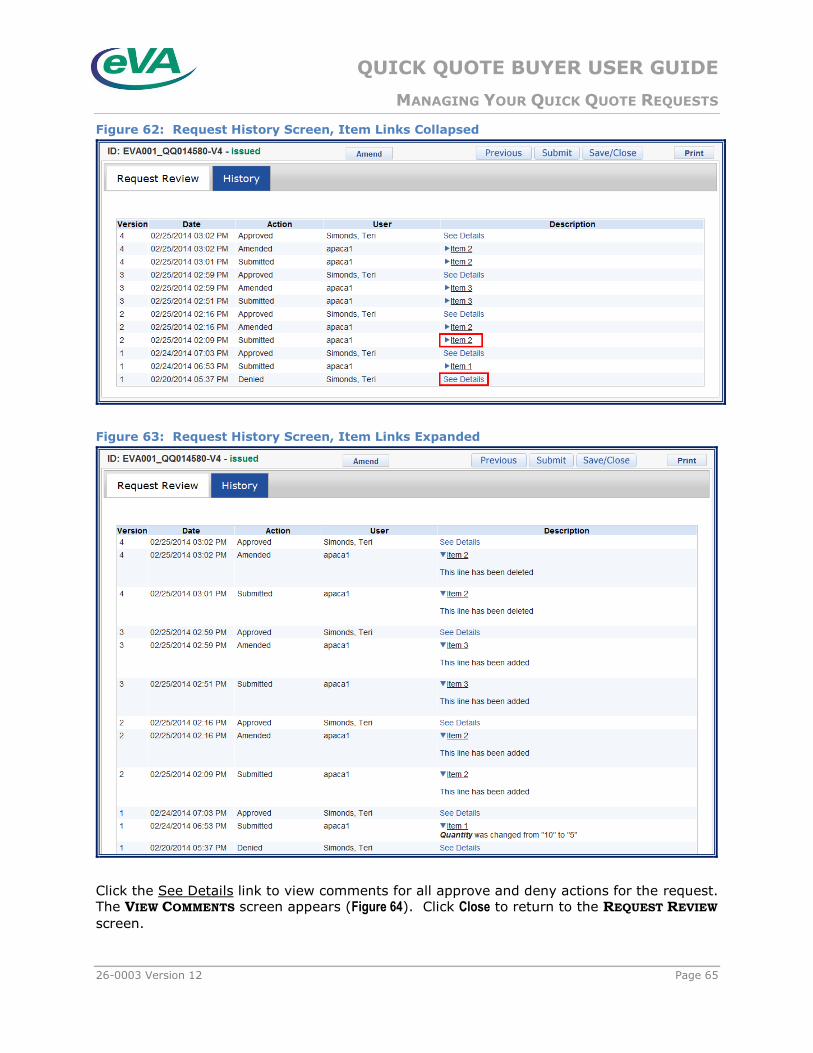
QUICK QUOTE BUYER USER GUIDE
MANAGING YOUR QUICK QUOTE REQUESTS
26-0003 Version 12 Page 65
Figure 62: Request History Screen, Item Links Collapsed
Figure 63: Request History Screen, Item Links Expanded
Click the See Details link to view comments for all approve and deny actions for the request. The VIEW COMMENTS screen appears (Figure 64). Click Close to return to the REQUEST REVIEW
screen.
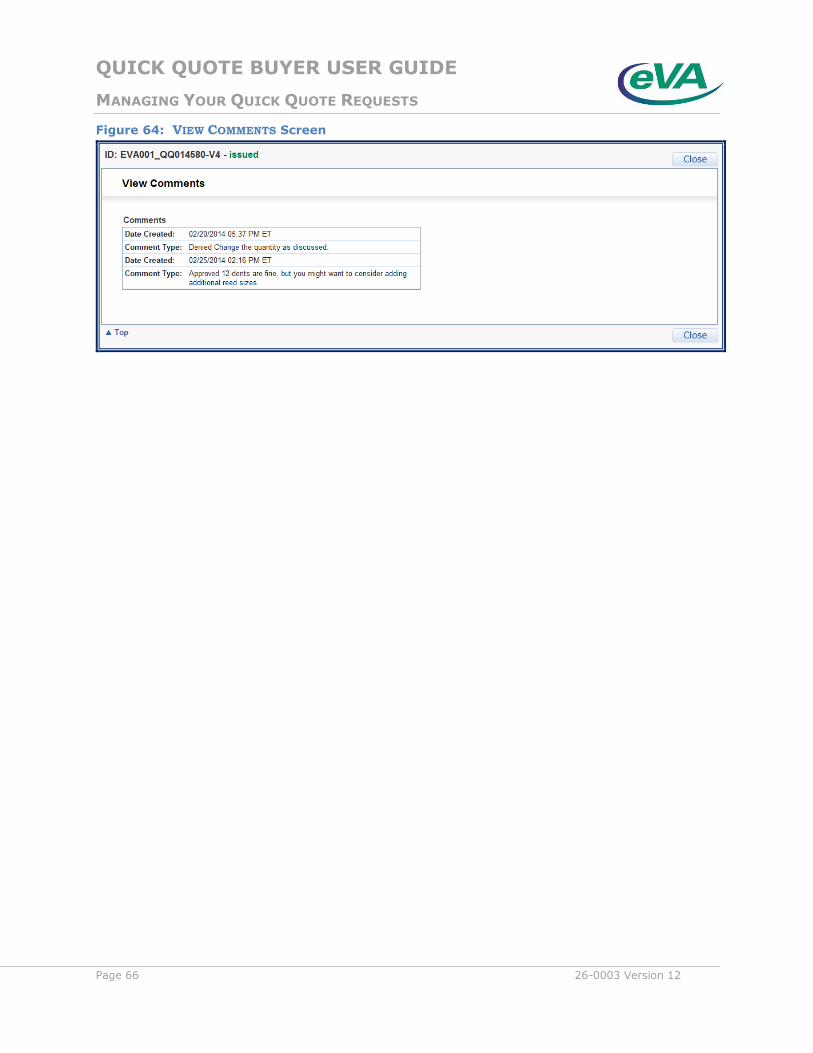
QUICK QUOTE BUYER USER GUIDE
MANAGING YOUR QUICK QUOTE REQUESTS
Page 66 26-0003 Version 12
Figure 64: VIEW COMMENTS Screen
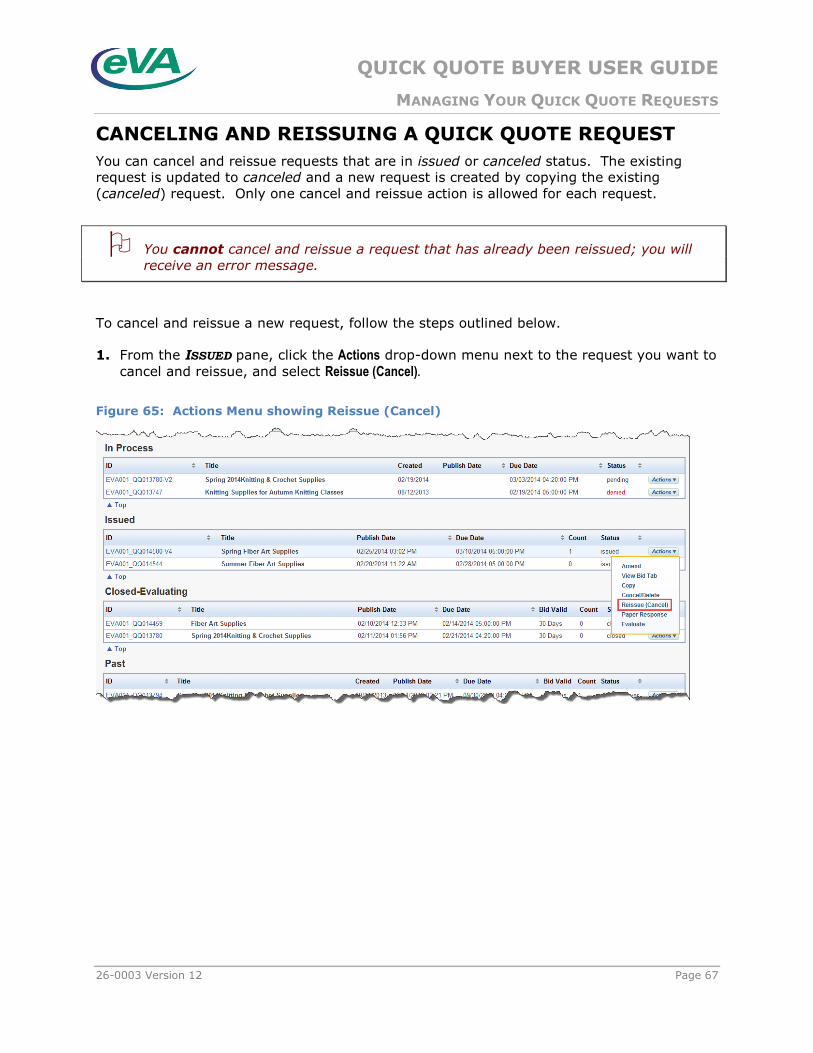
QUICK QUOTE BUYER USER GUIDE
MANAGING YOUR QUICK QUOTE REQUESTS
26-0003 Version 12 Page 67
CANCELING AND REISSUING A QUICK QUOTE REQUEST
You can cancel and reissue requests that are in issued or canceled status. The existing
request is updated to canceled and a new request is created by copying the existing
(canceled) request. Only one cancel and reissue action is allowed for each request.
You cannot cancel and reissue a request that has already been reissued; you will
receive an error message.
To cancel and reissue a new request, follow the steps outlined below.
1. From the ISSUED pane, click the Actions drop-down menu next to the request you want to
cancel and reissue, and select Reissue (Cancel).
Figure 65: Actions Menu showing Reissue (Cancel)
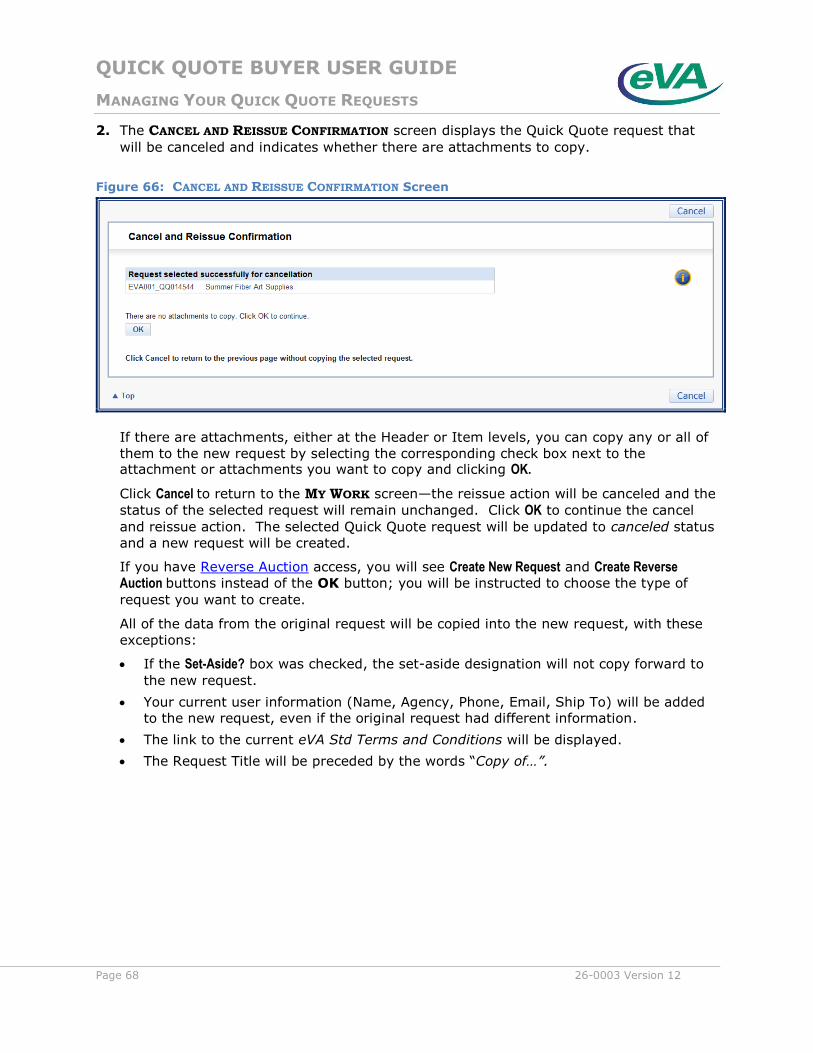
QUICK QUOTE BUYER USER GUIDE
MANAGING YOUR QUICK QUOTE REQUESTS
Page 68 26-0003 Version 12
2. The CANCEL AND REISSUE CONFIRMATION screen displays the Quick Quote request that
will be canceled and indicates whether there are attachments to copy.
Figure 66: CANCEL AND REISSUE CONFIRMATION Screen
If there are attachments, either at the Header or Item levels, you can copy any or all of
them to the new request by selecting the corresponding check box next to the attachment or attachments you want to copy and clicking OK.
Click Cancel to return to the MY WORK screen—the reissue action will be canceled and the
status of the selected request will remain unchanged. Click OK to continue the cancel
and reissue action. The selected Quick Quote request will be updated to canceled status
and a new request will be created.
If you have Reverse Auction access, you will see Create New Request and Create Reverse Auction buttons instead of the OK button; you will be instructed to choose the type of
request you want to create.
All of the data from the original request will be copied into the new request, with these
exceptions:
If the Set-Aside? box was checked, the set-aside designation will not copy forward to
the new request.
Your current user information (Name, Agency, Phone, Email, Ship To) will be added
to the new request, even if the original request had different information.
The link to the current eVA Std Terms and Conditions will be displayed.
The Request Title will be preceded by the words “Copy of…”.
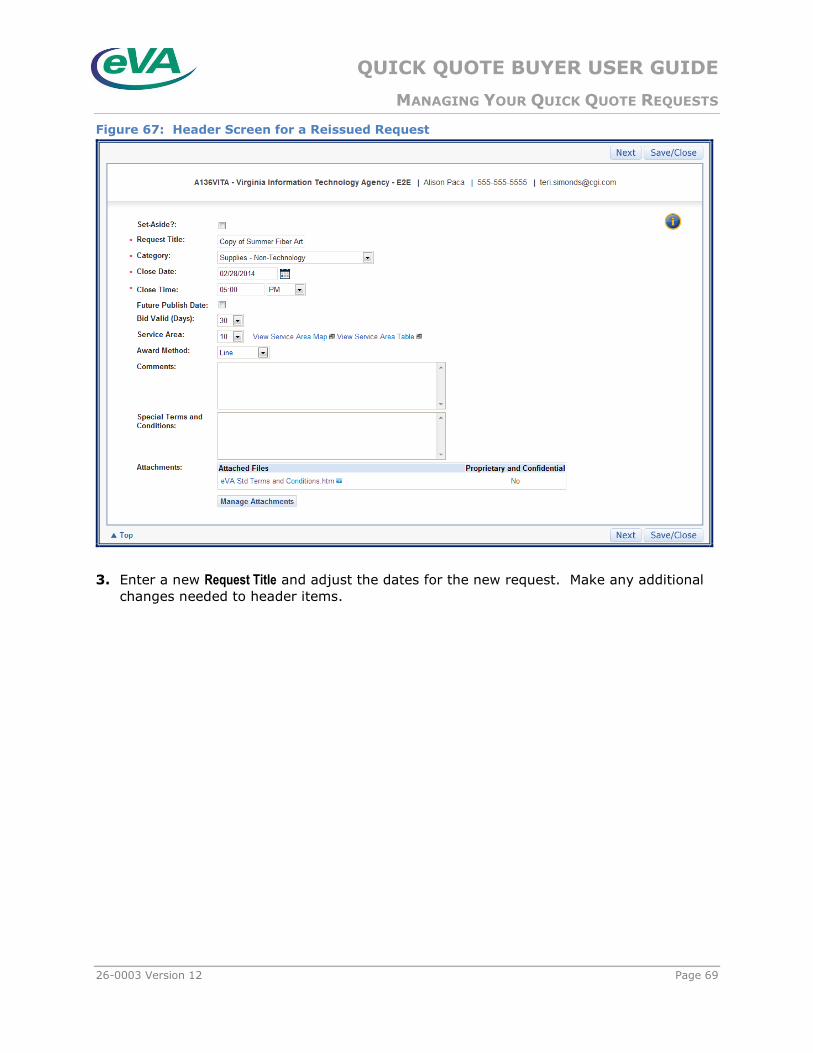
QUICK QUOTE BUYER USER GUIDE
MANAGING YOUR QUICK QUOTE REQUESTS
26-0003 Version 12 Page 69
Figure 67: Header Screen for a Reissued Request
3. Enter a new Request Title and adjust the dates for the new request. Make any additional
changes needed to header items.
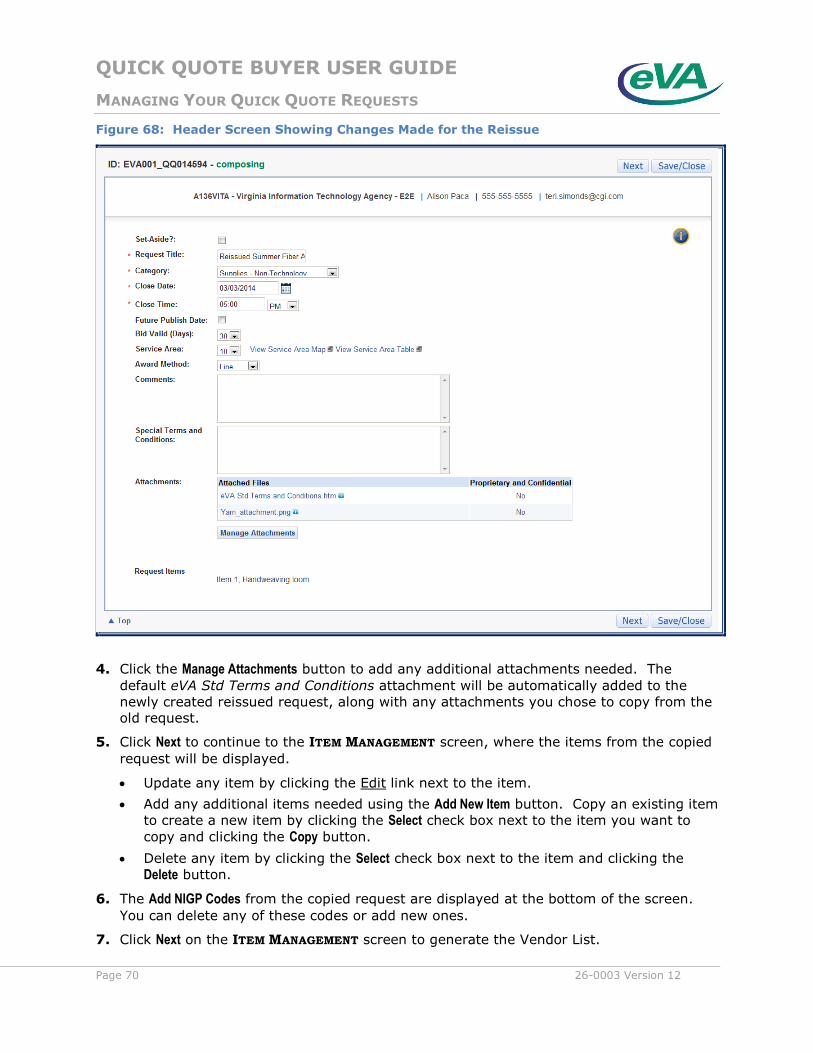
QUICK QUOTE BUYER USER GUIDE
MANAGING YOUR QUICK QUOTE REQUESTS
Page 70 26-0003 Version 12
Figure 68: Header Screen Showing Changes Made for the Reissue
4. Click the Manage Attachments button to add any additional attachments needed. The
default eVA Std Terms and Conditions attachment will be automatically added to the
newly created reissued request, along with any attachments you chose to copy from the
old request.
5. Click Next to continue to the ITEM MANAGEMENT screen, where the items from the copied
request will be displayed.
Update any item by clicking the Edit link next to the item.
Add any additional items needed using the Add New Item button. Copy an existing item
to create a new item by clicking the Select check box next to the item you want to
copy and clicking the Copy button.
Delete any item by clicking the Select check box next to the item and clicking the
Delete button.
6. The Add NIGP Codes from the copied request are displayed at the bottom of the screen.
You can delete any of these codes or add new ones.
7. Click Next on the ITEM MANAGEMENT screen to generate the Vendor List.

QUICK QUOTE BUYER USER GUIDE
MANAGING YOUR QUICK QUOTE REQUESTS
26-0003 Version 12 Page 71
8. Click Next to continue to the VENDOR NOTIFICATION screen.
9. Click the Next button to continue to the REQUEST REVIEW screen.
Click Submit on the REQUEST REVIEW screen. The Quick Quote request will be sent to
the vendors and the QUICK QUOTE COMPLETE screen will be displayed. For
information on how the submitted request is processed, see the Request Review
section of this document.
To save the new request without issuing it, click Save/Close.
CANCELING OR DELETING A QUICK QUOTE REQUEST
You can delete requests that have not been issued (that is, requests that are in composing,
pending, denied, or submitted status). Vendors will never see deleted requests because
they were never issued.
You can cancel requests that have been issued but have not closed. When vendors view the
request, they will see that it is in canceled status.
To cancel or delete requests, go to the IN PROCESS or ISSUED panes. Click the Actions drop-
down menu next to the request you want to cancel or delete, and select Cancel/Delete (Figure 69).
Figure 69: Actions Menu Showing Cancel/Delete
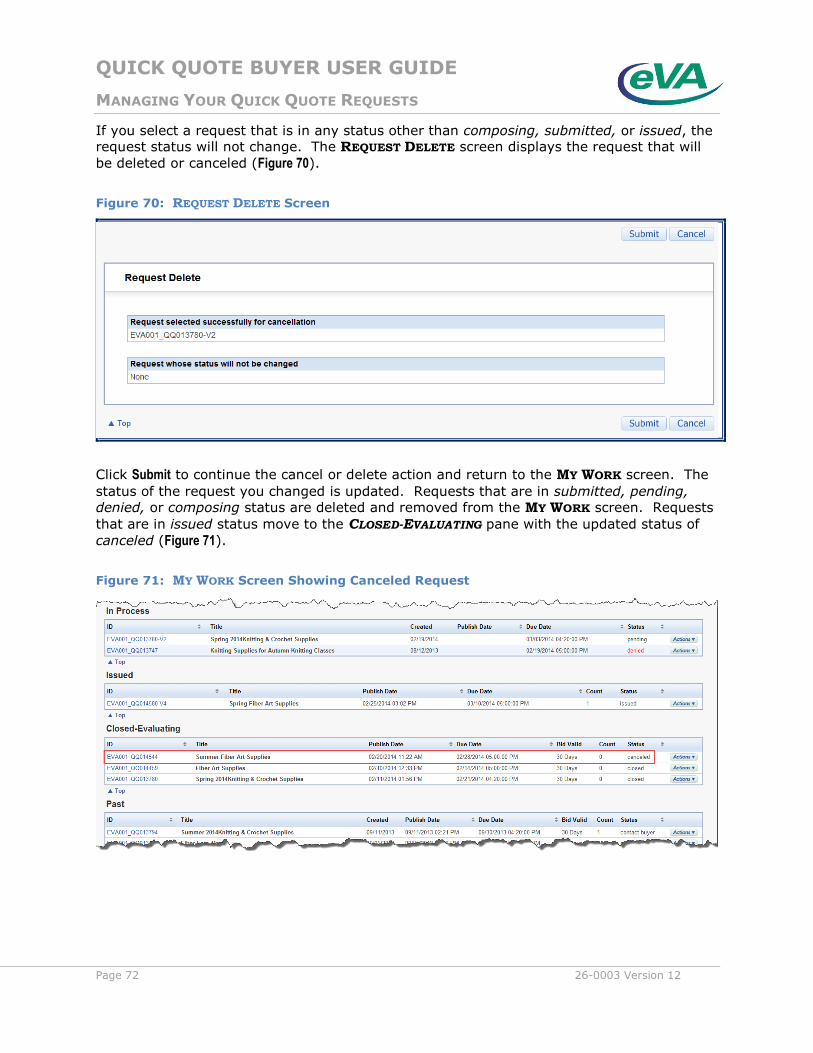
QUICK QUOTE BUYER USER GUIDE
MANAGING YOUR QUICK QUOTE REQUESTS
Page 72 26-0003 Version 12
If you select a request that is in any status other than composing, submitted, or issued, the
request status will not change. The REQUEST DELETE screen displays the request that will
be deleted or canceled (Figure 70).
Figure 70: REQUEST DELETE Screen
Click Submit to continue the cancel or delete action and return to the MY WORK screen. The
status of the request you changed is updated. Requests that are in submitted, pending,
denied, or composing status are deleted and removed from the MY WORK screen. Requests
that are in issued status move to the CLOSED-EVALUATING pane with the updated status of
canceled (Figure 71).
Figure 71: MY WORK Screen Showing Canceled Request
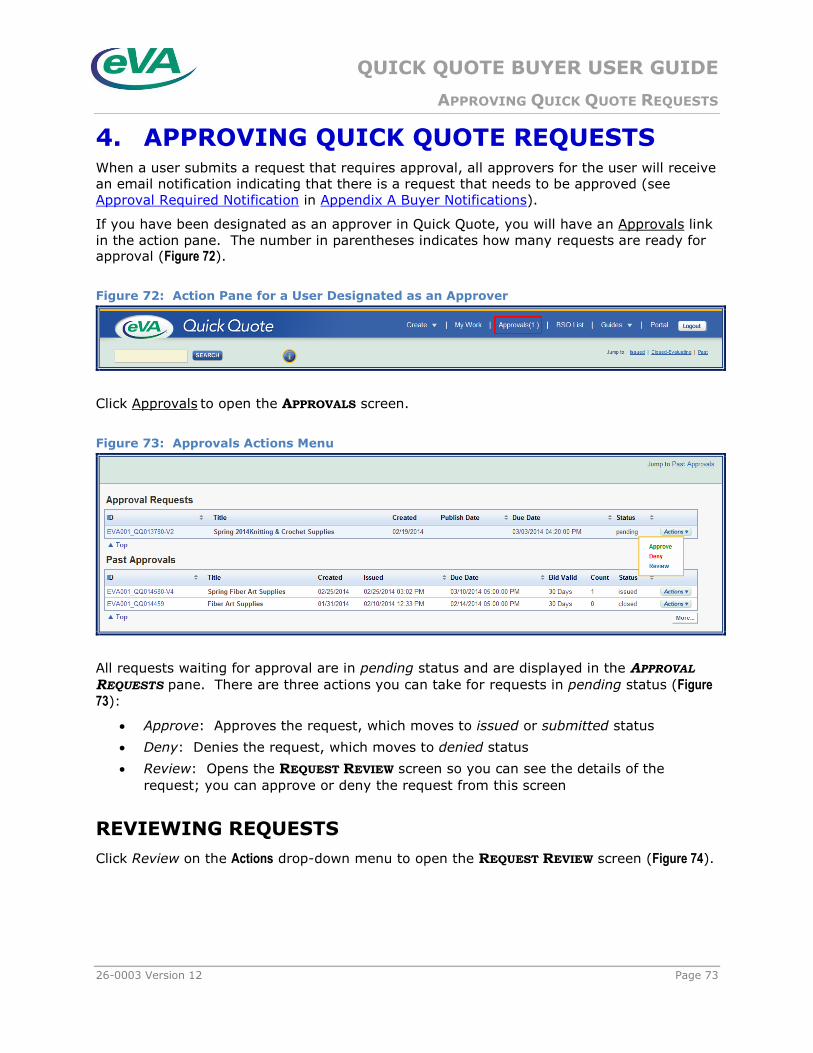
QUICK QUOTE BUYER USER GUIDE
APPROVING QUICK QUOTE REQUESTS
26-0003 Version 12 Page 73
4. APPROVING QUICK QUOTE REQUESTS When a user submits a request that requires approval, all approvers for the user will receive
an email notification indicating that there is a request that needs to be approved (see
Approval Required Notification in Appendix A Buyer Notifications).
If you have been designated as an approver in Quick Quote, you will have an Approvals link
in the action pane. The number in parentheses indicates how many requests are ready for approval (Figure 72).
Figure 72: Action Pane for a User Designated as an Approver
Click Approvals to open the APPROVALS screen.
Figure 73: Approvals Actions Menu
All requests waiting for approval are in pending status and are displayed in the APPROVAL
REQUESTS pane. There are three actions you can take for requests in pending status (Figure
73):
Approve: Approves the request, which moves to issued or submitted status
Deny: Denies the request, which moves to denied status
Review: Opens the REQUEST REVIEW screen so you can see the details of the
request; you can approve or deny the request from this screen
REVIEWING REQUESTS
Click Review on the Actions drop-down menu to open the REQUEST REVIEW screen (Figure 74).
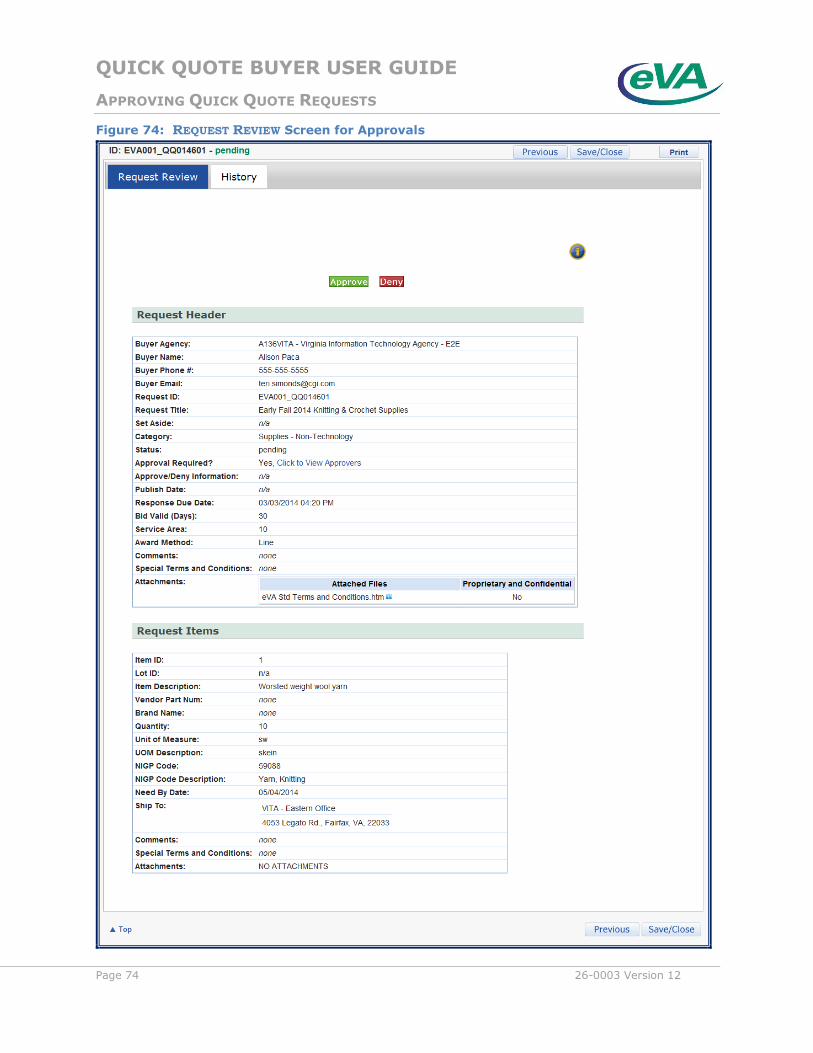
QUICK QUOTE BUYER USER GUIDE
APPROVING QUICK QUOTE REQUESTS
Page 74 26-0003 Version 12
Figure 74: REQUEST REVIEW Screen for Approvals
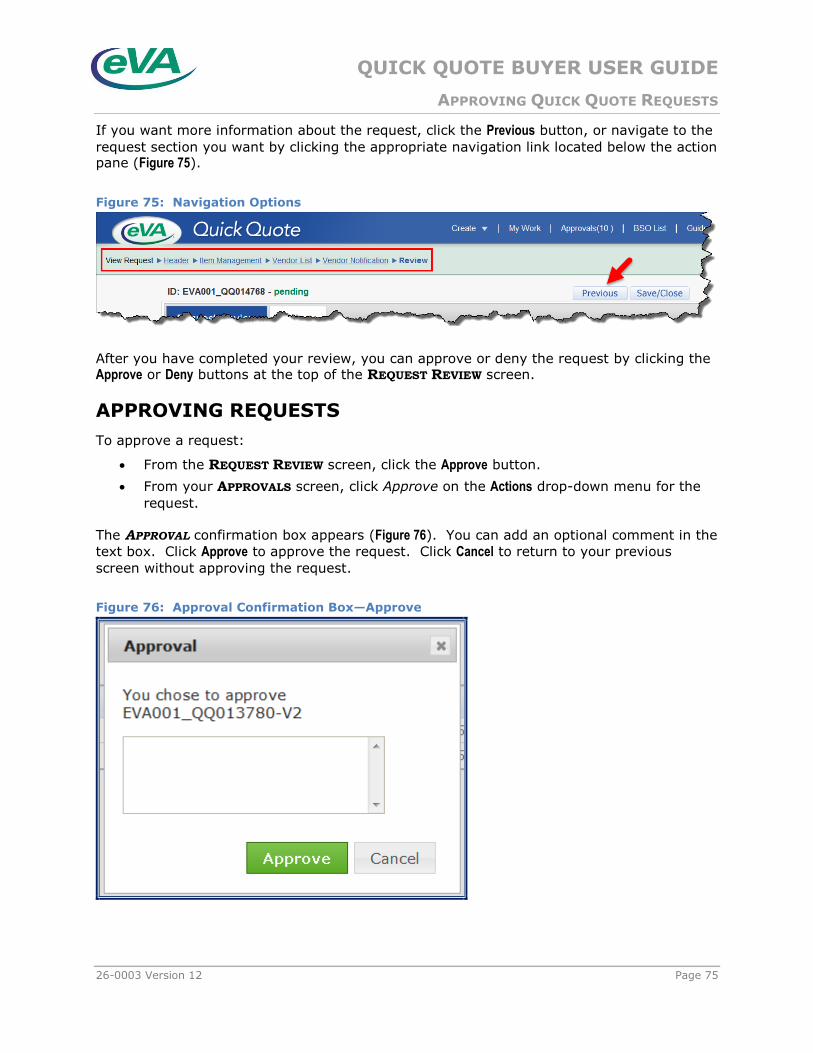
QUICK QUOTE BUYER USER GUIDE
APPROVING QUICK QUOTE REQUESTS
26-0003 Version 12 Page 75
If you want more information about the request, click the Previous button, or navigate to the
request section you want by clicking the appropriate navigation link located below the action pane (Figure 75).
Figure 75: Navigation Options
After you have completed your review, you can approve or deny the request by clicking the Approve or Deny buttons at the top of the REQUEST REVIEW screen.
APPROVING REQUESTS
To approve a request:
From the REQUEST REVIEW screen, click the Approve button.
From your APPROVALS screen, click Approve on the Actions drop-down menu for the
request.
The APPROVAL confirmation box appears (Figure 76). You can add an optional comment in the
text box. Click Approve to approve the request. Click Cancel to return to your previous
screen without approving the request.
Figure 76: Approval Confirmation Box—Approve
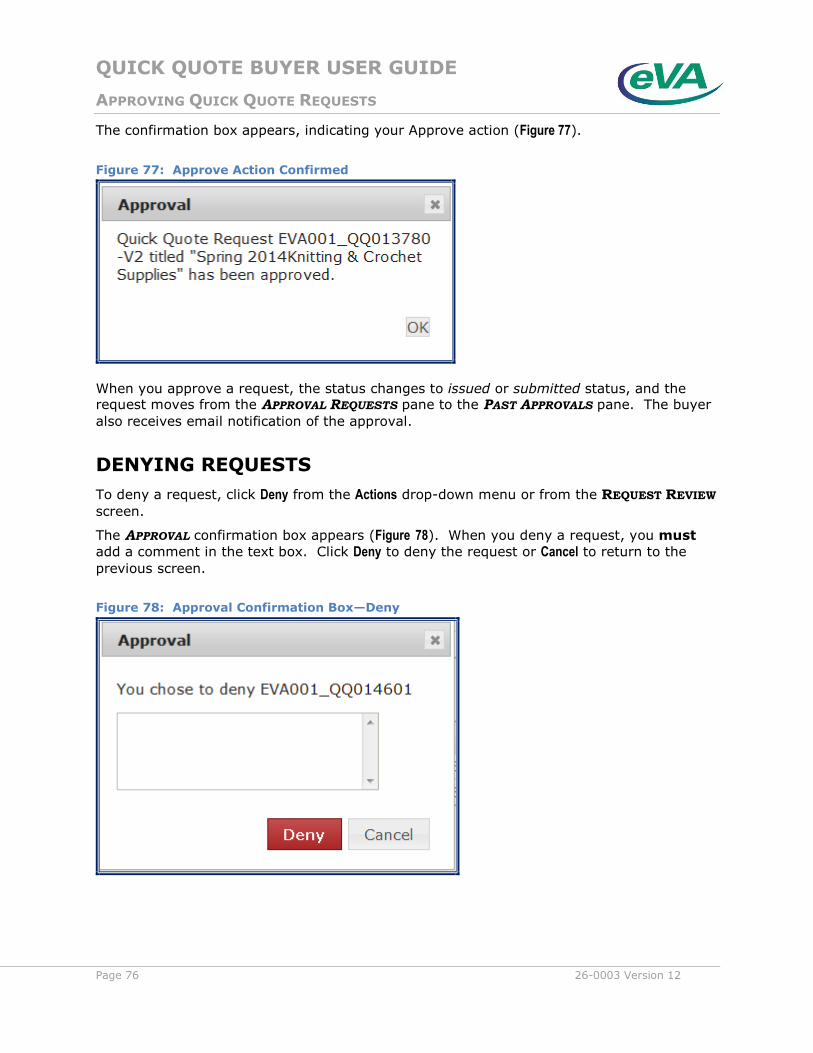
QUICK QUOTE BUYER USER GUIDE
APPROVING QUICK QUOTE REQUESTS
Page 76 26-0003 Version 12
The confirmation box appears, indicating your Approve action (Figure 77).
Figure 77: Approve Action Confirmed
When you approve a request, the status changes to issued or submitted status, and the request moves from the APPROVAL REQUESTS pane to the PAST APPROVALS pane. The buyer
also receives email notification of the approval.
DENYING REQUESTS
To deny a request, click Deny from the Actions drop-down menu or from the REQUEST REVIEW
screen.
The APPROVAL confirmation box appears (Figure 78). When you deny a request, you must
add a comment in the text box. Click Deny to deny the request or Cancel to return to the
previous screen.
Figure 78: Approval Confirmation Box—Deny
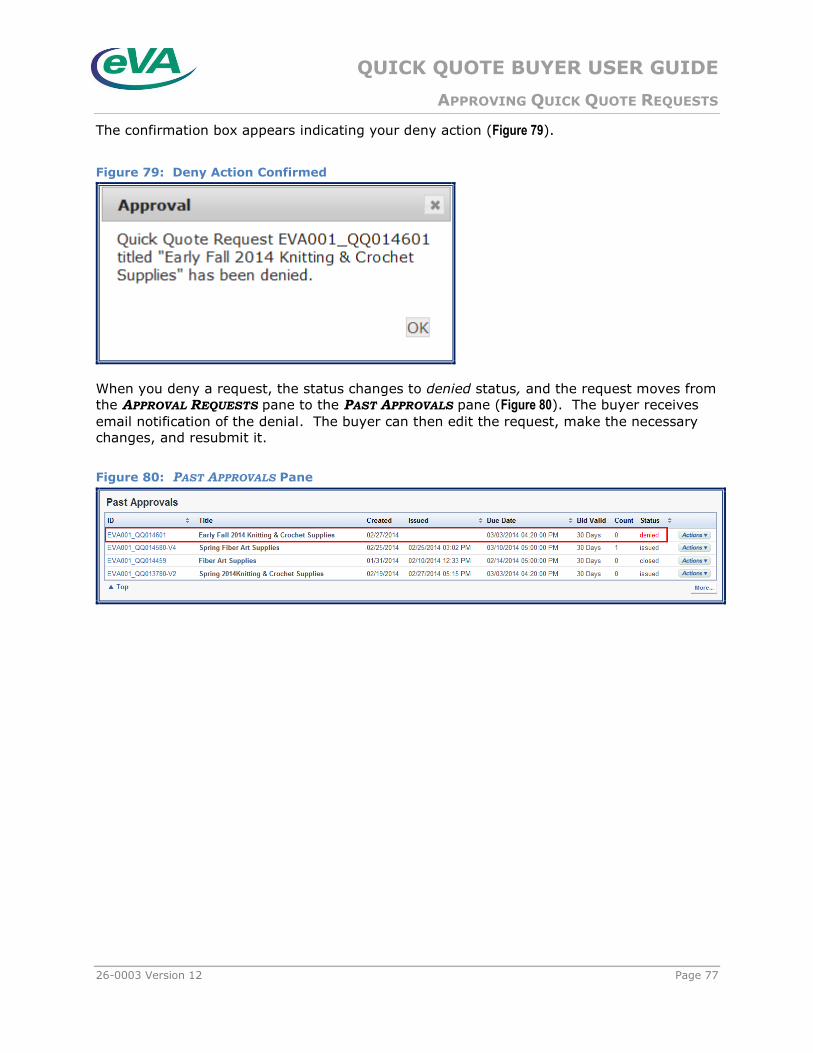
QUICK QUOTE BUYER USER GUIDE
APPROVING QUICK QUOTE REQUESTS
26-0003 Version 12 Page 77
The confirmation box appears indicating your deny action (Figure 79).
Figure 79: Deny Action Confirmed
When you deny a request, the status changes to denied status, and the request moves from
the APPROVAL REQUESTS pane to the PAST APPROVALS pane (Figure 80). The buyer receives
email notification of the denial. The buyer can then edit the request, make the necessary
changes, and resubmit it.
Figure 80: PAST APPROVALS Pane

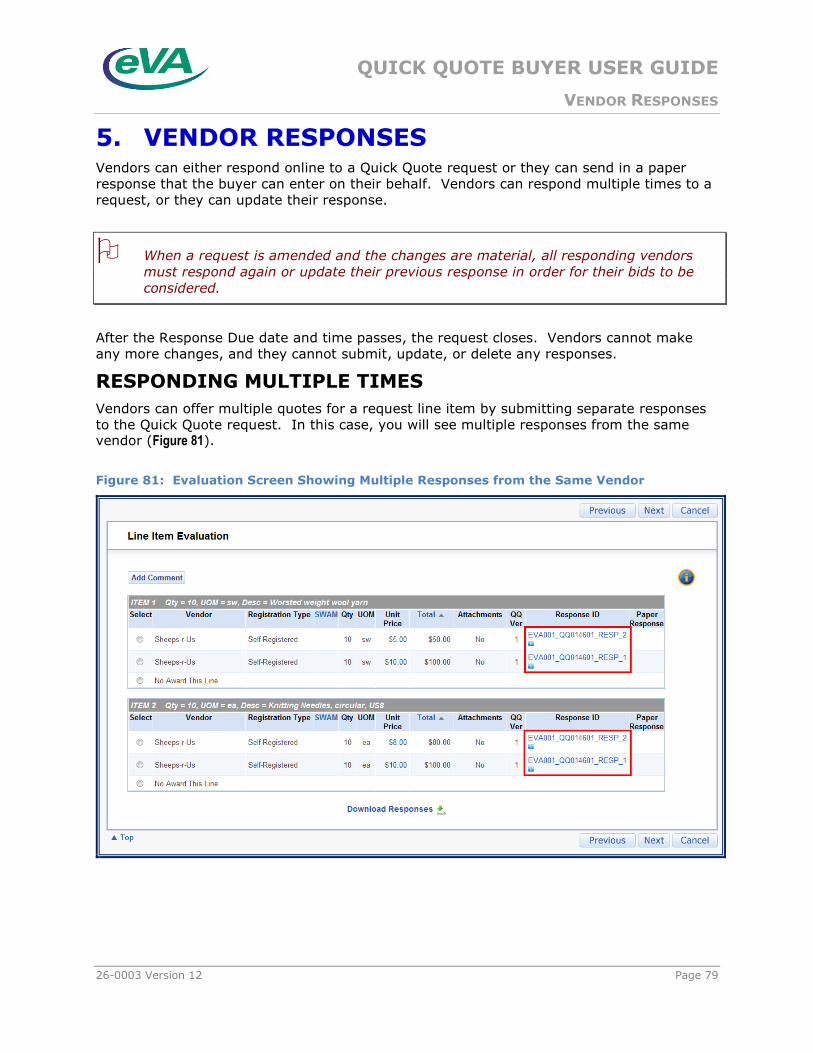
QUICK QUOTE BUYER USER GUIDE
VENDOR RESPONSES
26-0003 Version 12 Page 79
5. VENDOR RESPONSES Vendors can either respond online to a Quick Quote request or they can send in a paper
response that the buyer can enter on their behalf. Vendors can respond multiple times to a
request, or they can update their response.
When a request is amended and the changes are material, all responding vendors
must respond again or update their previous response in order for their bids to be
considered.
After the Response Due date and time passes, the request closes. Vendors cannot make
any more changes, and they cannot submit, update, or delete any responses.
RESPONDING MULTIPLE TIMES
Vendors can offer multiple quotes for a request line item by submitting separate responses
to the Quick Quote request. In this case, you will see multiple responses from the same vendor (Figure 81).
Figure 81: Evaluation Screen Showing Multiple Responses from the Same Vendor

QUICK QUOTE BUYER USER GUIDE
VENDOR RESPONSES
Page 80 26-0003 Version 12
CHANGING THE RESPONSE
Vendors can update their responses as often as they want until the request closes. They can
view their submitted responses and update their responses to make changes to any fields
for any line. They can also delete active submitted responses.
Figure 82 shows the vendor’s first response to a request.
Figure 82: Evaluation Screen Showing Vendor’s Initial Response
In Figure 83, the vendor has updated the first response. Note that the response ID ends with
V2, indicating that it is the second version of the vendor’s original response.
Figure 83: Evaluation Screen Showing Vendor’s Updated Response
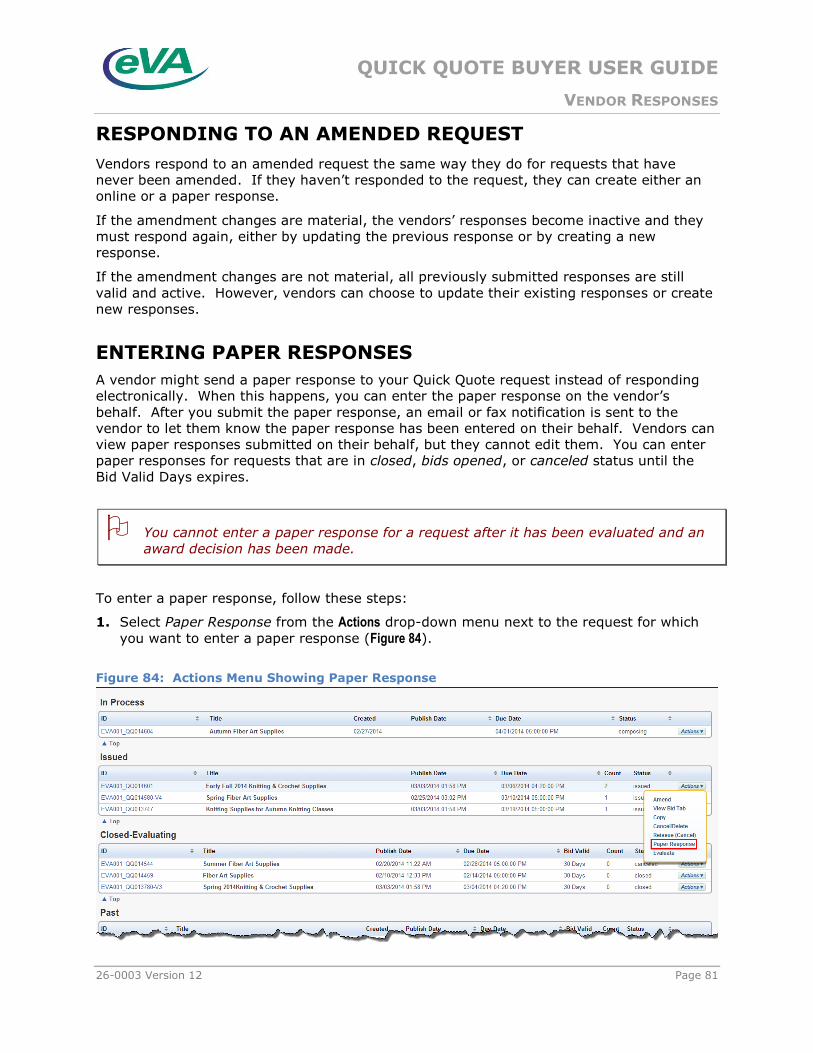
QUICK QUOTE BUYER USER GUIDE
VENDOR RESPONSES
26-0003 Version 12 Page 81
RESPONDING TO AN AMENDED REQUEST
Vendors respond to an amended request the same way they do for requests that have
never been amended. If they haven’t responded to the request, they can create either an
online or a paper response.
If the amendment changes are material, the vendors’ responses become inactive and they
must respond again, either by updating the previous response or by creating a new
response.
If the amendment changes are not material, all previously submitted responses are still
valid and active. However, vendors can choose to update their existing responses or create
new responses.
ENTERING PAPER RESPONSES
A vendor might send a paper response to your Quick Quote request instead of responding
electronically. When this happens, you can enter the paper response on the vendor’s
behalf. After you submit the paper response, an email or fax notification is sent to the
vendor to let them know the paper response has been entered on their behalf. Vendors can
view paper responses submitted on their behalf, but they cannot edit them. You can enter
paper responses for requests that are in closed, bids opened, or canceled status until the
Bid Valid Days expires.
You cannot enter a paper response for a request after it has been evaluated and an
award decision has been made.
To enter a paper response, follow these steps:
1. Select Paper Response from the Actions drop-down menu next to the request for which
you want to enter a paper response (Figure 84).
Figure 84: Actions Menu Showing Paper Response

QUICK QUOTE BUYER USER GUIDE
VENDOR RESPONSES
Page 82 26-0003 Version 12
2. Click the Create New Response button on the PAPER RESPONSE FOR QUICK QUOTE # screen
(Figure 85).
Figure 85: Paper Response Screen
If the request has been amended, you must choose the request version against which the response is to be submitted (Figure 86).
Figure 86: Request Version Selection Box
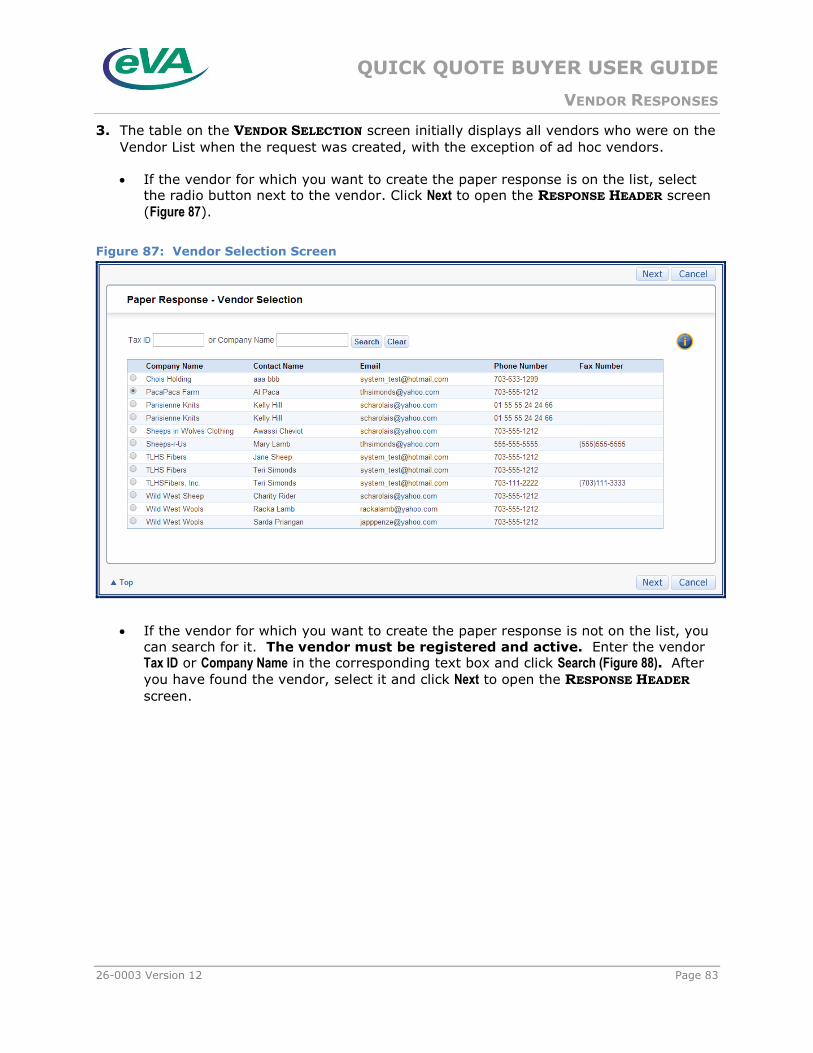
QUICK QUOTE BUYER USER GUIDE
VENDOR RESPONSES
26-0003 Version 12 Page 83
3. The table on the VENDOR SELECTION screen initially displays all vendors who were on the
Vendor List when the request was created, with the exception of ad hoc vendors.
If the vendor for which you want to create the paper response is on the list, select the radio button next to the vendor. Click Next to open the RESPONSE HEADER screen
(Figure 87).
Figure 87: Vendor Selection Screen
If the vendor for which you want to create the paper response is not on the list, you
can search for it. The vendor must be registered and active. Enter the vendor Tax ID or Company Name in the corresponding text box and click Search (Figure 88). After
you have found the vendor, select it and click Next to open the RESPONSE HEADER
screen.
QUICK QUOTE BUYER USER GUIDE
VENDOR RESPONSES
Page 84 26-0003 Version 12
Figure 88: Searching for a Vendor
If you select the wrong vendor, click the Clear button to remove it.
If the vendor is not on the initial list, and you cannot find it during your search, you
cannot enter a paper response at that time. Contact the vendor and have the
vendor register in eVA.
4. The RESPONSE HEADER screen will be displayed (Figure 89). The vendor information will
be populated automatically, and you will be listed as the preparer of the paper response.
Enter the date on which you received the paper response in the Response Received Date/Time fields. (Note: The date/time cannot be later than the response due date,
nor before the request publish date.) Enter a Response Title and any comments. Use
the Manage Attachments button to add any attachments.

QUICK QUOTE BUYER USER GUIDE
VENDOR RESPONSES
26-0003 Version 12 Page 85
Figure 89: Response Header Screen for Paper Response
QUICK QUOTE BUYER USER GUIDE
VENDOR RESPONSES
Page 86 26-0003 Version 12
5. Click Next. The first RESPONSE ITEM screen will be displayed with information pre-
populated from the Item information entered in the Quick Quote request. Enter the Unit Price for the line item and edit any other information (Figure 90).
Figure 90: Response Item Screen for Paper Response
QUICK QUOTE BUYER USER GUIDE
VENDOR RESPONSES
26-0003 Version 12 Page 87
6. If the vendor did not respond to a particular line item, select No Bid from the Do you wish
to respond to Item #? drop-down list (Figure 91). Click Next to go to the next RESPONSE ITEM
screen. Continue entering the vendor’s response Item information and clicking Next until
you have placed a bid for each item.
Figure 91: Indicating No Bid for a Line Item
QUICK QUOTE BUYER USER GUIDE
VENDOR RESPONSES
Page 88 26-0003 Version 12
7. After you enter the vendor response for all items, click Summary to go the RESPONSE
SUMMARY screen, where you can review the response information (Figure 92). Note that
No bid items do not appear on the RESPONSE SUMMARY screen. When your review is
complete, click Submit to submit the paper response.
Figure 92: Response Summary for Paper Response
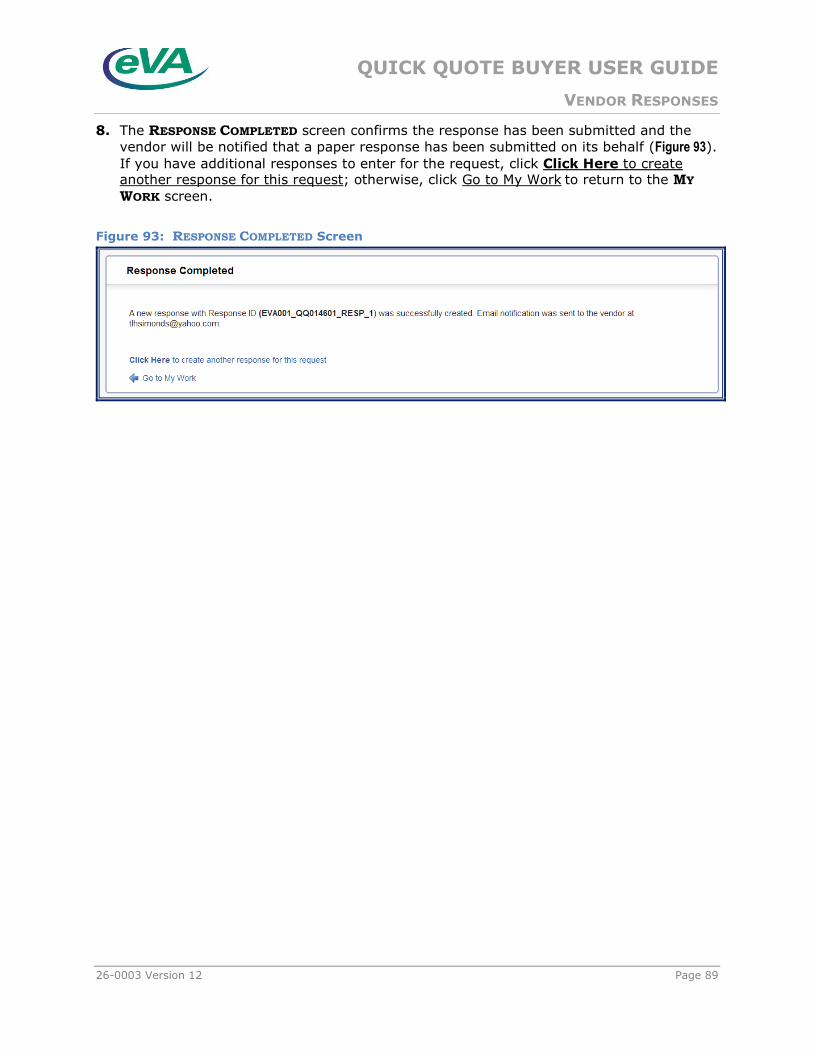
QUICK QUOTE BUYER USER GUIDE
VENDOR RESPONSES
26-0003 Version 12 Page 89
8. The RESPONSE COMPLETED screen confirms the response has been submitted and the
vendor will be notified that a paper response has been submitted on its behalf (Figure 93).
If you have additional responses to enter for the request, click Click Here to create another response for this request; otherwise, click Go to My Work to return to the MY
WORK screen.
Figure 93: RESPONSE COMPLETED Screen

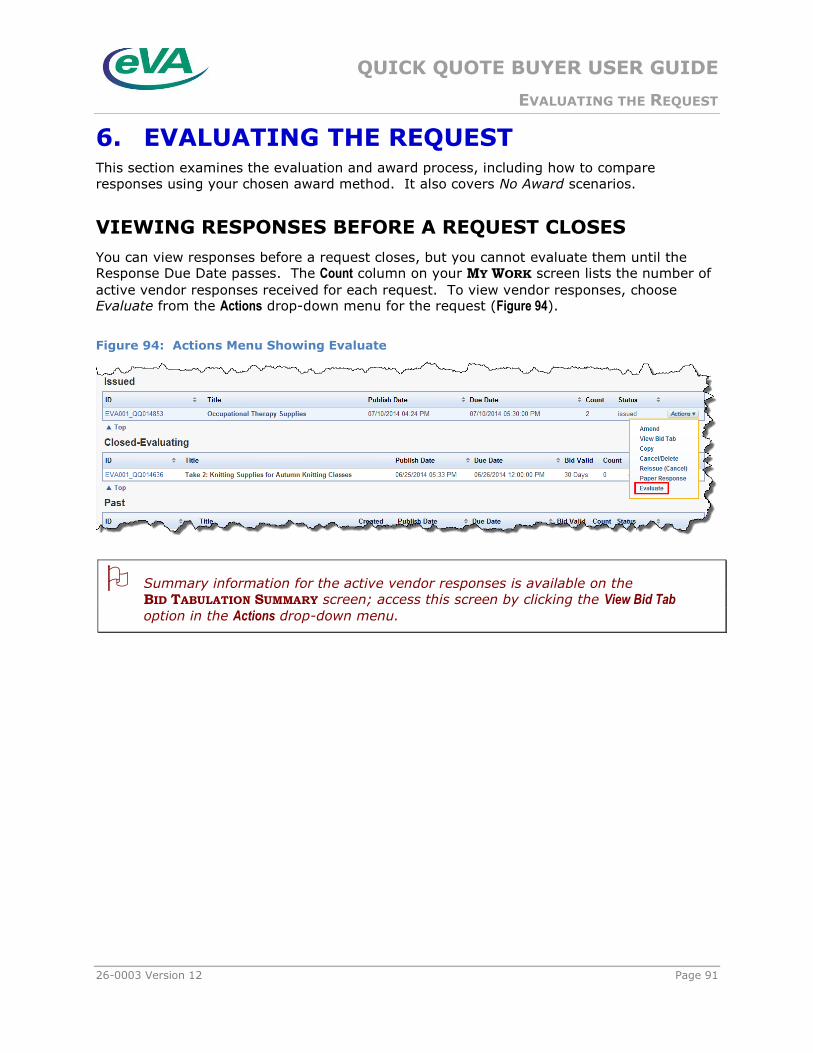
QUICK QUOTE BUYER USER GUIDE
EVALUATING THE REQUEST
26-0003 Version 12 Page 91
6. EVALUATING THE REQUEST This section examines the evaluation and award process, including how to compare
responses using your chosen award method. It also covers No Award scenarios.
VIEWING RESPONSES BEFORE A REQUEST CLOSES
You can view responses before a request closes, but you cannot evaluate them until the Response Due Date passes. The Count column on your MY WORK screen lists the number of
active vendor responses received for each request. To view vendor responses, choose Evaluate from the Actions drop-down menu for the request (Figure 94).
Figure 94: Actions Menu Showing Evaluate
Summary information for the active vendor responses is available on the
BID TABULATION SUMMARY screen; access this screen by clicking the View Bid Tab
option in the Actions drop-down menu.
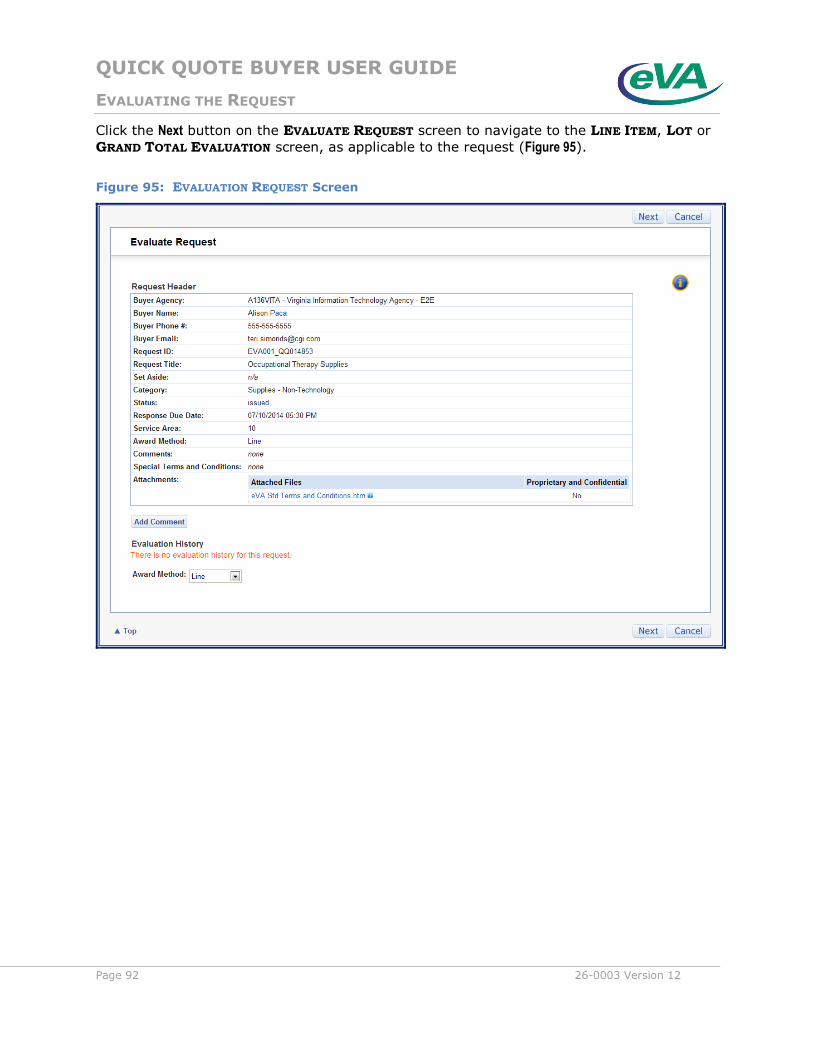
QUICK QUOTE BUYER USER GUIDE
EVALUATING THE REQUEST
Page 92 26-0003 Version 12
Click the Next button on the EVALUATE REQUEST screen to navigate to the LINE ITEM, LOT or
GRAND TOTAL EVALUATION screen, as applicable to the request (Figure 95).
Figure 95: EVALUATION REQUEST Screen

QUICK QUOTE BUYER USER GUIDE
EVALUATING THE REQUEST
26-0003 Version 12 Page 93
This screen displays all active vendor responses that have been received for the request. The Attachments column indicates whether the vendor response includes attachments (Figure 96).
Figure 96: Line Item Evaluation
Click the links in the Response ID column to view the Response Summary for each vendor’s
response. Click the Close button on the RESPONSE SUMMARY screen to close the summary
and return to the evaluation (Figure 97).
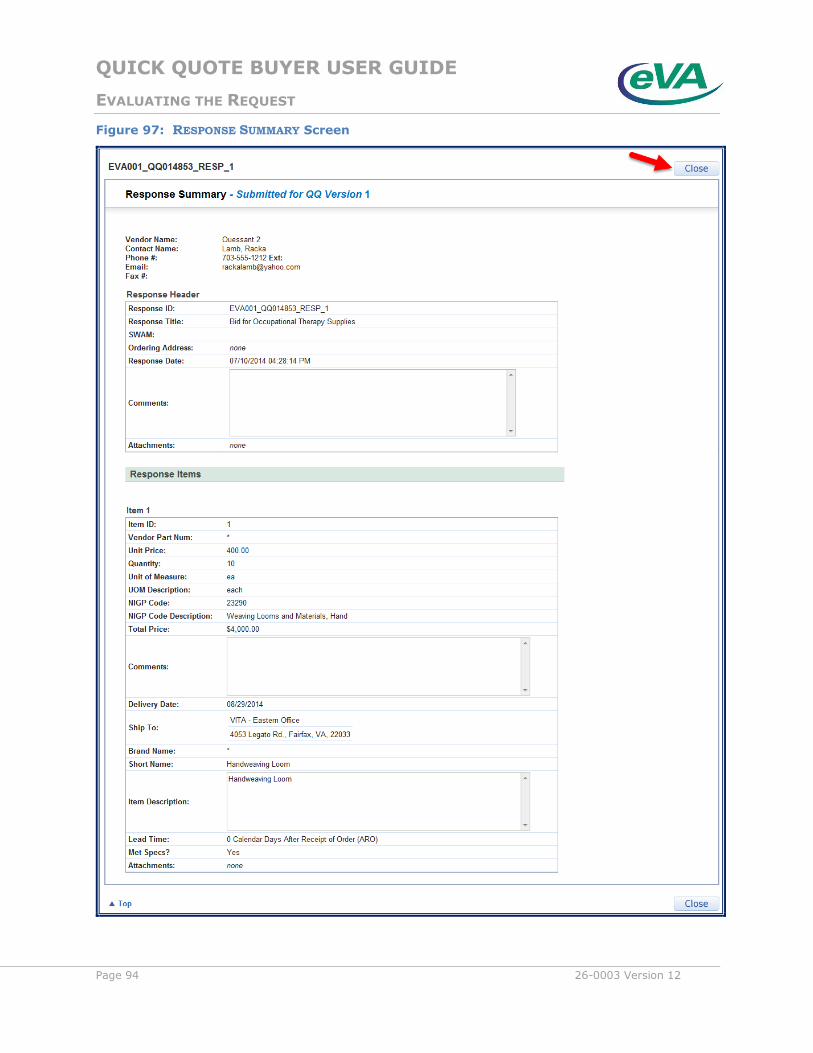
QUICK QUOTE BUYER USER GUIDE
EVALUATING THE REQUEST
Page 94 26-0003 Version 12
Figure 97: RESPONSE SUMMARY Screen
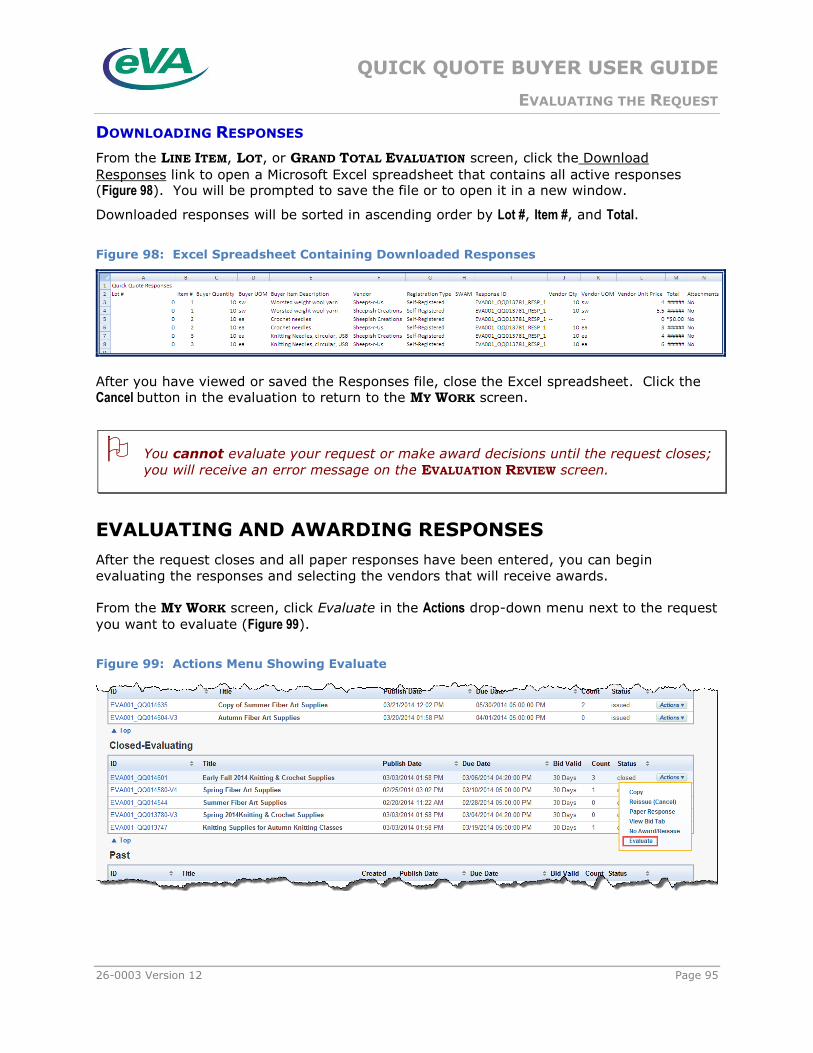
QUICK QUOTE BUYER USER GUIDE
EVALUATING THE REQUEST
26-0003 Version 12 Page 95
DOWNLOADING RESPONSES
From the LINE ITEM, LOT, or GRAND TOTAL EVALUATION screen, click the Download
Responses link to open a Microsoft Excel spreadsheet that contains all active responses (Figure 98). You will be prompted to save the file or to open it in a new window.
Downloaded responses will be sorted in ascending order by Lot #, Item #, and Total.
Figure 98: Excel Spreadsheet Containing Downloaded Responses
After you have viewed or saved the Responses file, close the Excel spreadsheet. Click the Cancel button in the evaluation to return to the MY WORK screen.
You cannot evaluate your request or make award decisions until the request closes;
you will receive an error message on the EVALUATION REVIEW screen.
EVALUATING AND AWARDING RESPONSES
After the request closes and all paper responses have been entered, you can begin
evaluating the responses and selecting the vendors that will receive awards.
From the MY WORK screen, click Evaluate in the Actions drop-down menu next to the request
you want to evaluate (Figure 99).
Figure 99: Actions Menu Showing Evaluate
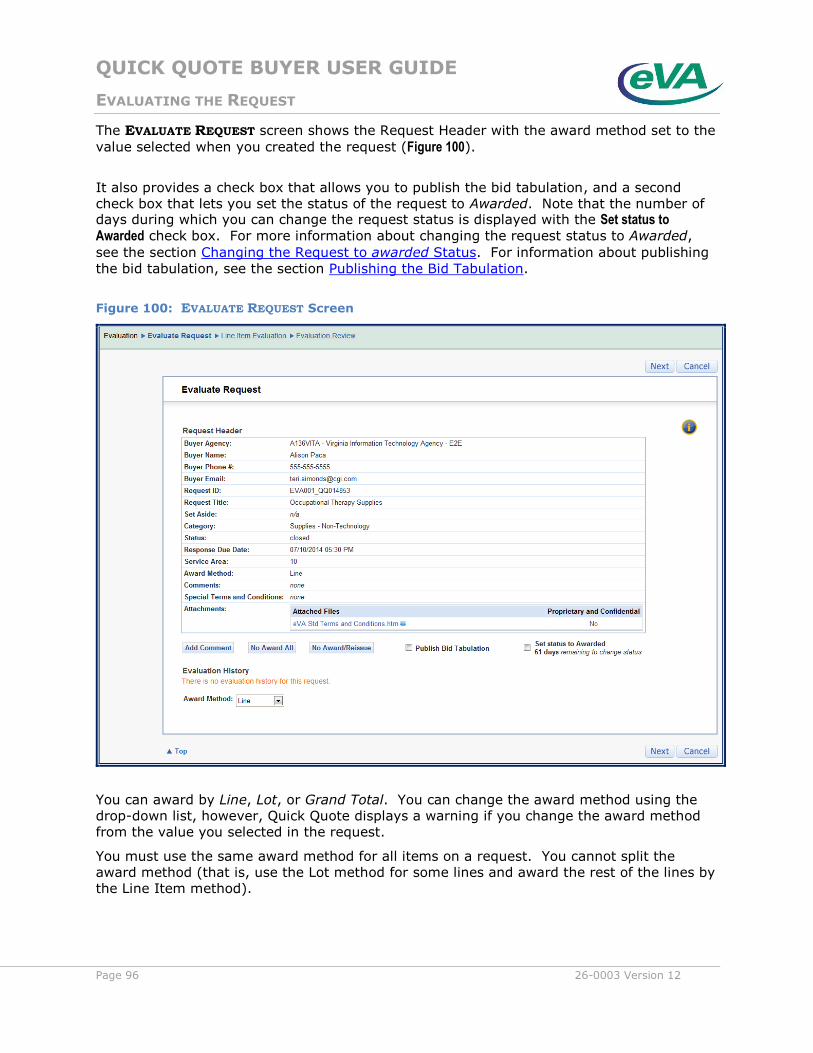
QUICK QUOTE BUYER USER GUIDE
EVALUATING THE REQUEST
Page 96 26-0003 Version 12
The EVALUATE REQUEST screen shows the Request Header with the award method set to the
value selected when you created the request (Figure 100).
It also provides a check box that allows you to publish the bid tabulation, and a second
check box that lets you set the status of the request to Awarded. Note that the number of days during which you can change the request status is displayed with the Set status to Awarded check box. For more information about changing the request status to Awarded,
see the section Changing the Request to awarded Status. For information about publishing
the bid tabulation, see the section Publishing the Bid Tabulation.
Figure 100: EVALUATE REQUEST Screen
You can award by Line, Lot, or Grand Total. You can change the award method using the
drop-down list, however, Quick Quote displays a warning if you change the award method
from the value you selected in the request.
You must use the same award method for all items on a request. You cannot split the
award method (that is, use the Lot method for some lines and award the rest of the lines by
the Line Item method).
QUICK QUOTE BUYER USER GUIDE
EVALUATING THE REQUEST
26-0003 Version 12 Page 97
You can make award decisions until the Bid Valid Days expire.
AWARD METHODS AND EVALUATING YOUR REQUEST
The LINE ITEM, LOT, and GRAND TOTAL EVALUATION screens allow you to compare prices
using the selected award method. You can manipulate the appearance of the data displayed
on these screens, to some extent, for more convenient viewing. For example:
Responses are initially sorted in descending order by Total. Click the Total column
heading to view the responses in ascending order; click the column heading again to
revert to descending order.
To sort responses by SWAM type, click the SWAM column heading.
The Attachments column indicates whether the vendor response includes attachments—Yes if
there are any header or line attachments and No if there are no attachments in the
response.
To view the details of a response, click the corresponding link in the Response ID column to
open the Response Summary. To view response attachments, use the Attached Files link in
the Response Summary. Click Close in the Response Summary to close the response
information.
Table 21 lists the options available to you when evaluating a request that has multiple lines or
lots.
Table 21: Award Method and Options
Award Method
Vendor Award
No Award No Decision
Line Item Individual lines can be awarded to different vendors.
Individual lines can be set to No Award This Line.
Individual lines can be left undecided.
Lot Individual lots can be awarded to a different vendor (all line items in the lot are awarded to one vendor).
Individual lots can be set to No Award This Lot (all line items in the lot are set to No Award).
Individual lots can be left undecided.
Grand Total
All line items are awarded to one vendor.
All line items are set to No Award.
All line items are left undecided.
Request Status
Updates to bids opened when at least one line is awarded to a vendor.
Updates to no award when all lines are set to no award.
Remains in closed status during the bid valid period when all lines have no decision.
Exception: When the bid tab is
published, the status will update to bids opened.
Line Item Evaluation
The Line Item Evaluation method groups responses by Line Item. Each section shows an
item number with the quantity, unit of measure, and description from the request. Beneath
that information, there is one row for each vendor that entered a bid on the line item.
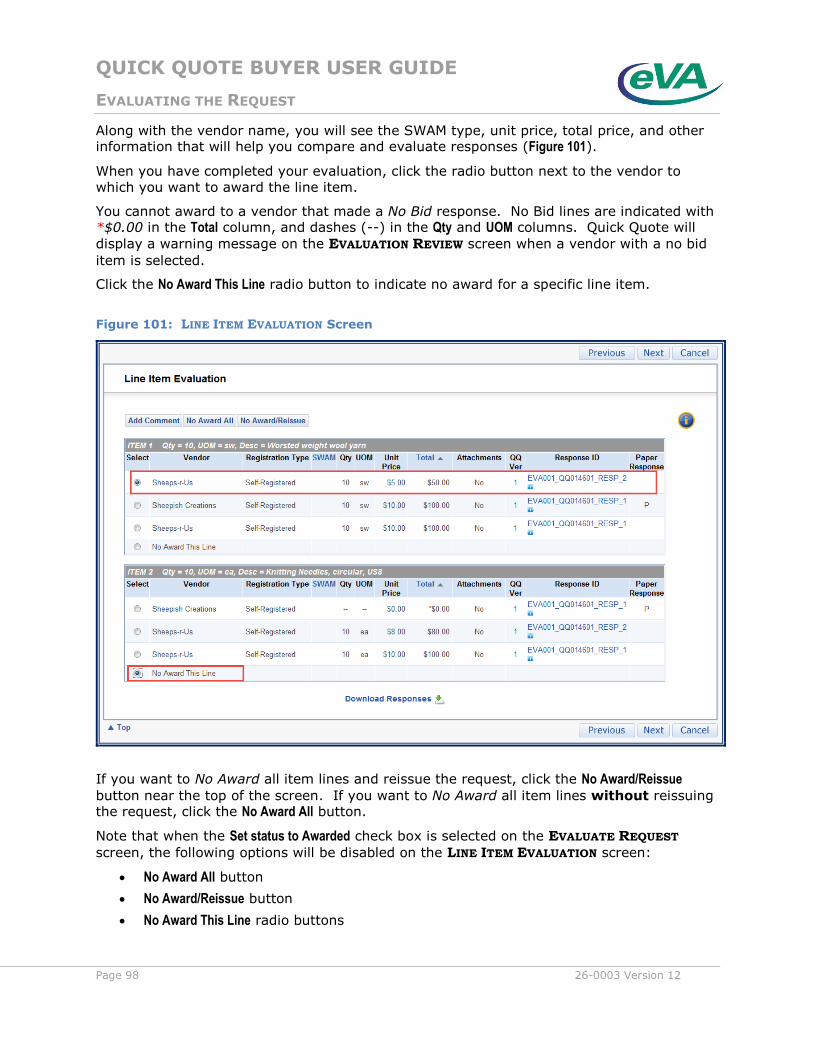
QUICK QUOTE BUYER USER GUIDE
EVALUATING THE REQUEST
Page 98 26-0003 Version 12
Along with the vendor name, you will see the SWAM type, unit price, total price, and other information that will help you compare and evaluate responses (Figure 101).
When you have completed your evaluation, click the radio button next to the vendor to
which you want to award the line item.
You cannot award to a vendor that made a No Bid response. No Bid lines are indicated with *$0.00 in the Total column, and dashes (--) in the Qty and UOM columns. Quick Quote will
display a warning message on the EVALUATION REVIEW screen when a vendor with a no bid
item is selected.
Click the No Award This Line radio button to indicate no award for a specific line item.
Figure 101: LINE ITEM EVALUATION Screen
If you want to No Award all item lines and reissue the request, click the No Award/Reissue
button near the top of the screen. If you want to No Award all item lines without reissuing the request, click the No Award All button.
Note that when the Set status to Awarded check box is selected on the EVALUATE REQUEST
screen, the following options will be disabled on the LINE ITEM EVALUATION screen:
No Award All button
No Award/Reissue button
No Award This Line radio buttons
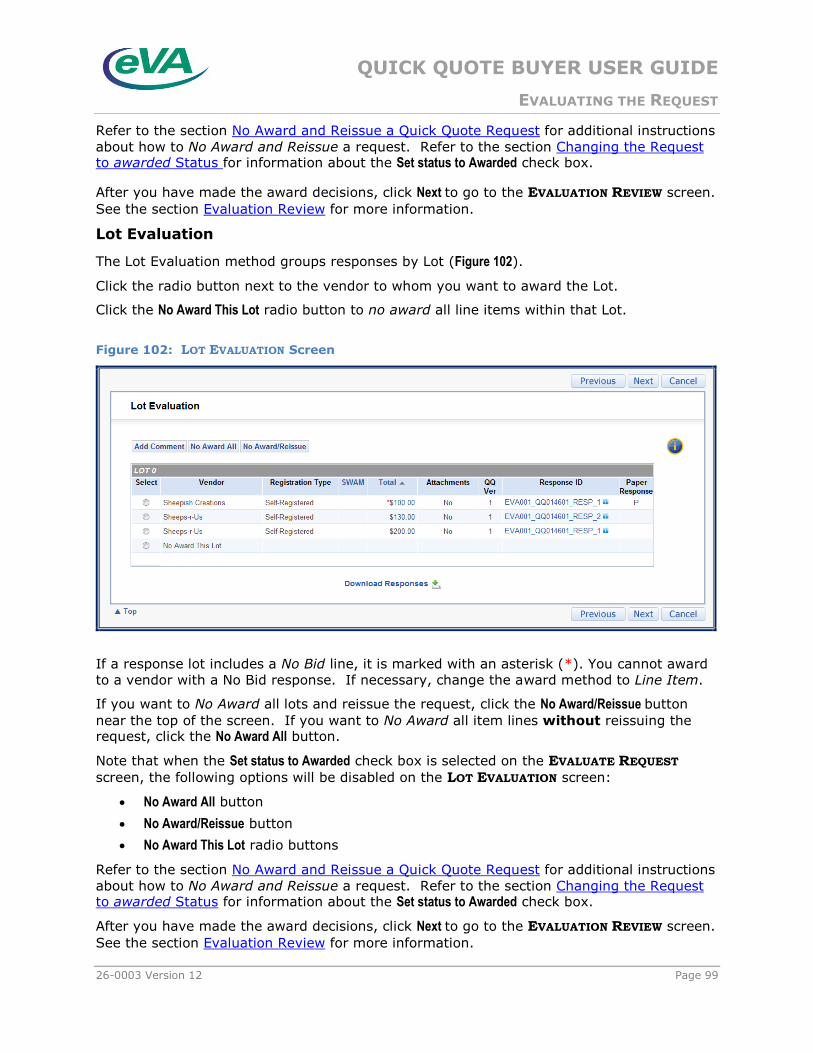
QUICK QUOTE BUYER USER GUIDE
EVALUATING THE REQUEST
26-0003 Version 12 Page 99
Refer to the section No Award and Reissue a Quick Quote Request for additional instructions
about how to No Award and Reissue a request. Refer to the section Changing the Request to awarded Status for information about the Set status to Awarded check box.
After you have made the award decisions, click Next to go to the EVALUATION REVIEW screen.
See the section Evaluation Review for more information.
Lot Evaluation
The Lot Evaluation method groups responses by Lot (Figure 102).
Click the radio button next to the vendor to whom you want to award the Lot.
Click the No Award This Lot radio button to no award all line items within that Lot.
Figure 102: LOT EVALUATION Screen
If a response lot includes a No Bid line, it is marked with an asterisk (*). You cannot award
to a vendor with a No Bid response. If necessary, change the award method to Line Item.
If you want to No Award all lots and reissue the request, click the No Award/Reissue button
near the top of the screen. If you want to No Award all item lines without reissuing the request, click the No Award All button.
Note that when the Set status to Awarded check box is selected on the EVALUATE REQUEST
screen, the following options will be disabled on the LOT EVALUATION screen:
No Award All button
No Award/Reissue button
No Award This Lot radio buttons
Refer to the section No Award and Reissue a Quick Quote Request for additional instructions
about how to No Award and Reissue a request. Refer to the section Changing the Request to awarded Status for information about the Set status to Awarded check box.
After you have made the award decisions, click Next to go to the EVALUATION REVIEW screen.
See the section Evaluation Review for more information.
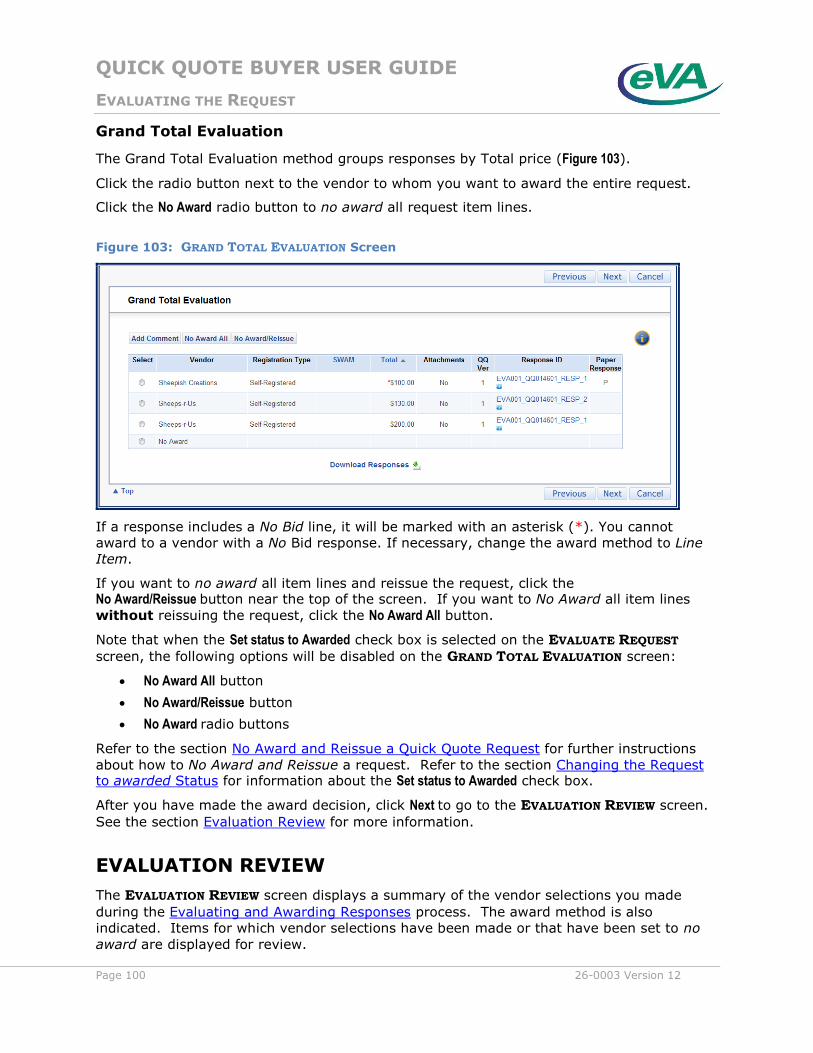
QUICK QUOTE BUYER USER GUIDE
EVALUATING THE REQUEST
Page 100 26-0003 Version 12
Grand Total Evaluation
The Grand Total Evaluation method groups responses by Total price (Figure 103).
Click the radio button next to the vendor to whom you want to award the entire request.
Click the No Award radio button to no award all request item lines.
Figure 103: GRAND TOTAL EVALUATION Screen
If a response includes a No Bid line, it will be marked with an asterisk (*). You cannot
award to a vendor with a No Bid response. If necessary, change the award method to Line
Item.
If you want to no award all item lines and reissue the request, click the No Award/Reissue button near the top of the screen. If you want to No Award all item lines
without reissuing the request, click the No Award All button.
Note that when the Set status to Awarded check box is selected on the EVALUATE REQUEST
screen, the following options will be disabled on the GRAND TOTAL EVALUATION screen:
No Award All button
No Award/Reissue button
No Award radio buttons
Refer to the section No Award and Reissue a Quick Quote Request for further instructions
about how to No Award and Reissue a request. Refer to the section Changing the Request to awarded Status for information about the Set status to Awarded check box.
After you have made the award decision, click Next to go to the EVALUATION REVIEW screen.
See the section Evaluation Review for more information.
EVALUATION REVIEW
The EVALUATION REVIEW screen displays a summary of the vendor selections you made
during the Evaluating and Awarding Responses process. The award method is also
indicated. Items for which vendor selections have been made or that have been set to no
award are displayed for review.
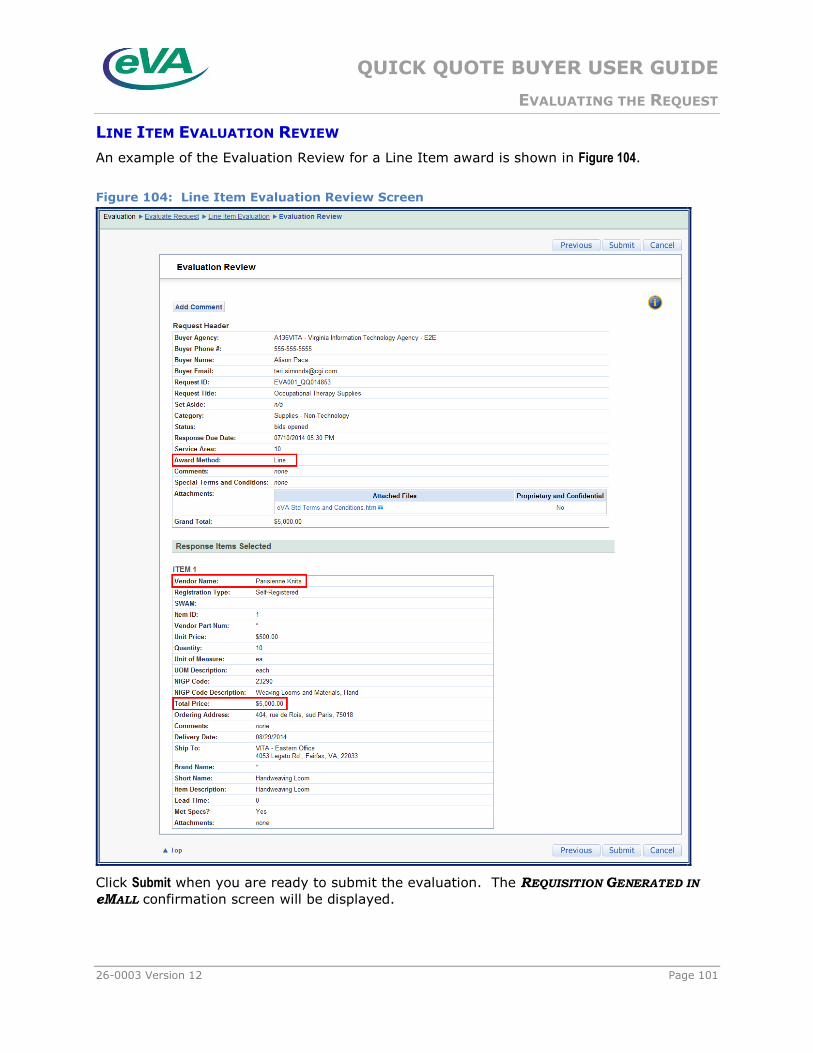
QUICK QUOTE BUYER USER GUIDE
EVALUATING THE REQUEST
26-0003 Version 12 Page 101
LINE ITEM EVALUATION REVIEW
An example of the Evaluation Review for a Line Item award is shown in Figure 104.
Figure 104: Line Item Evaluation Review Screen
Click Submit when you are ready to submit the evaluation. The REQUISITION GENERATED IN
eMALL confirmation screen will be displayed.
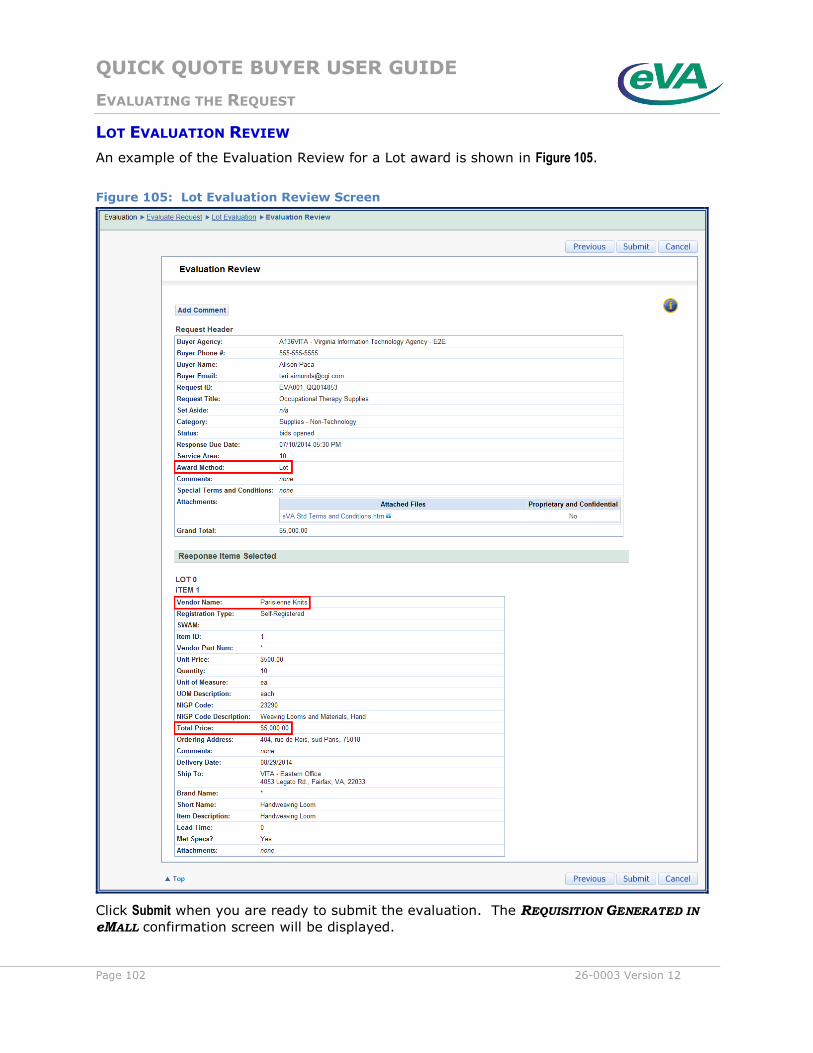
QUICK QUOTE BUYER USER GUIDE
EVALUATING THE REQUEST
Page 102 26-0003 Version 12
LOT EVALUATION REVIEW
An example of the Evaluation Review for a Lot award is shown in Figure 105.
Figure 105: Lot Evaluation Review Screen
Click Submit when you are ready to submit the evaluation. The REQUISITION GENERATED IN
eMALL confirmation screen will be displayed.
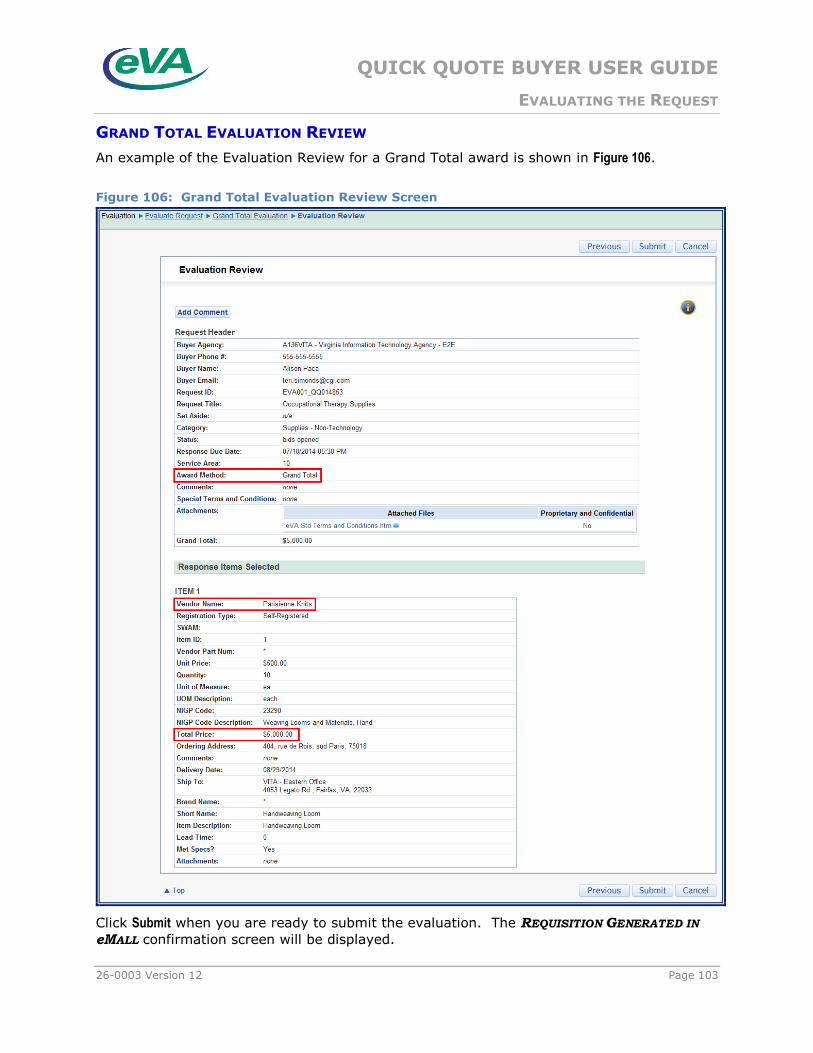
QUICK QUOTE BUYER USER GUIDE
EVALUATING THE REQUEST
26-0003 Version 12 Page 103
GRAND TOTAL EVALUATION REVIEW
An example of the Evaluation Review for a Grand Total award is shown in Figure 106.
Figure 106: Grand Total Evaluation Review Screen
Click Submit when you are ready to submit the evaluation. The REQUISITION GENERATED IN
eMALL confirmation screen will be displayed.
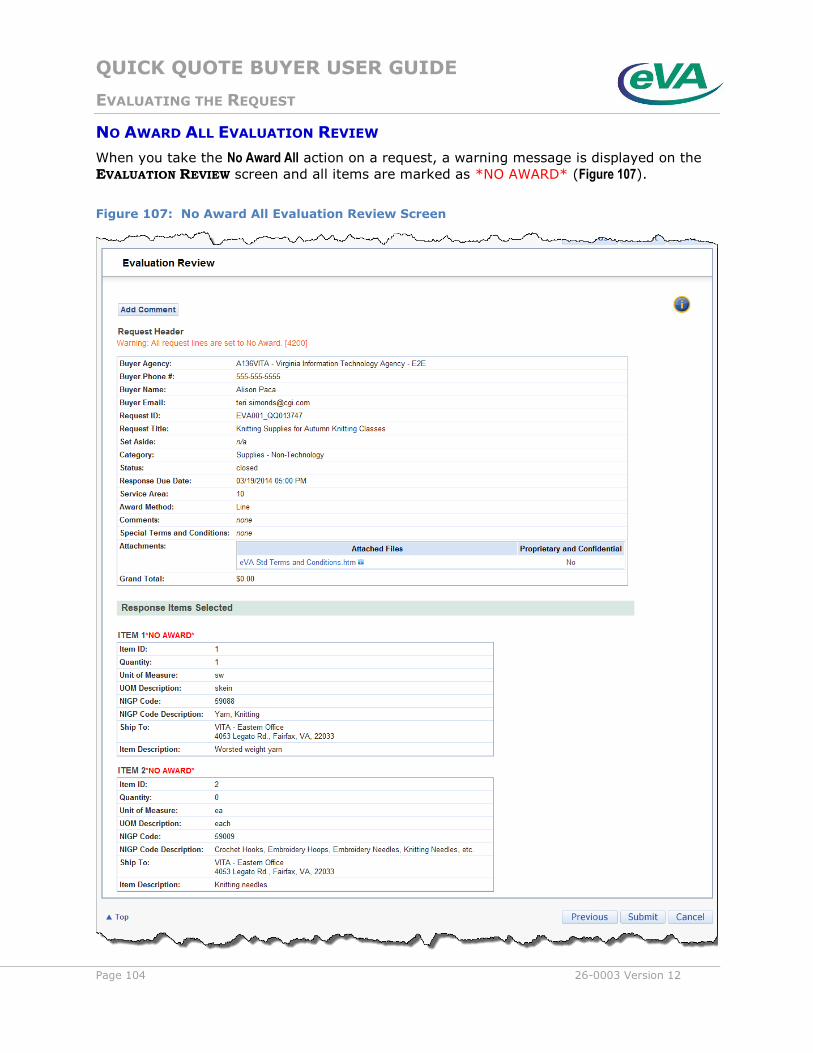
QUICK QUOTE BUYER USER GUIDE
EVALUATING THE REQUEST
Page 104 26-0003 Version 12
NO AWARD ALL EVALUATION REVIEW
When you take the No Award All action on a request, a warning message is displayed on the
EVALUATION REVIEW screen and all items are marked as *NO AWARD* (Figure 107).
Figure 107: No Award All Evaluation Review Screen
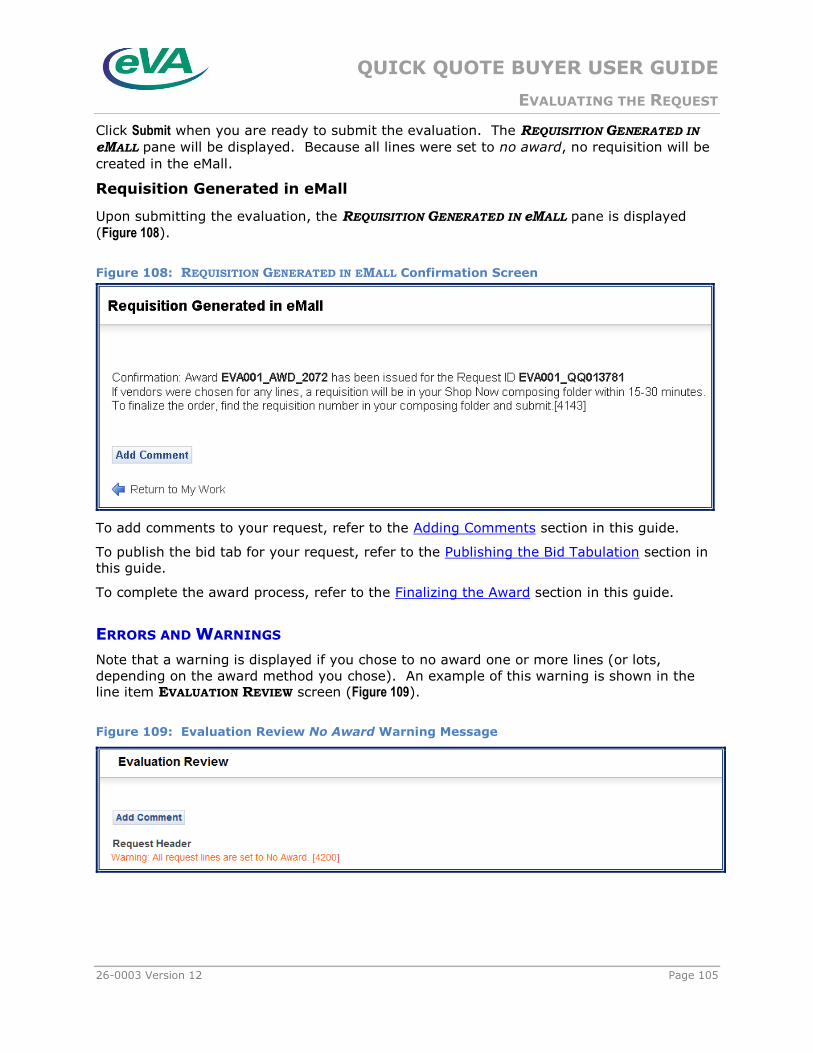
QUICK QUOTE BUYER USER GUIDE
EVALUATING THE REQUEST
26-0003 Version 12 Page 105
Click Submit when you are ready to submit the evaluation. The REQUISITION GENERATED IN
eMALL pane will be displayed. Because all lines were set to no award, no requisition will be
created in the eMall.
Requisition Generated in eMall
Upon submitting the evaluation, the REQUISITION GENERATED IN eMALL pane is displayed
(Figure 108).
Figure 108: REQUISITION GENERATED IN EMALL Confirmation Screen
To add comments to your request, refer to the Adding Comments section in this guide.
To publish the bid tab for your request, refer to the Publishing the Bid Tabulation section in
this guide.
To complete the award process, refer to the Finalizing the Award section in this guide.
ERRORS AND WARNINGS
Note that a warning is displayed if you chose to no award one or more lines (or lots,
depending on the award method you chose). An example of this warning is shown in the line item EVALUATION REVIEW screen (Figure 109).
Figure 109: Evaluation Review No Award Warning Message
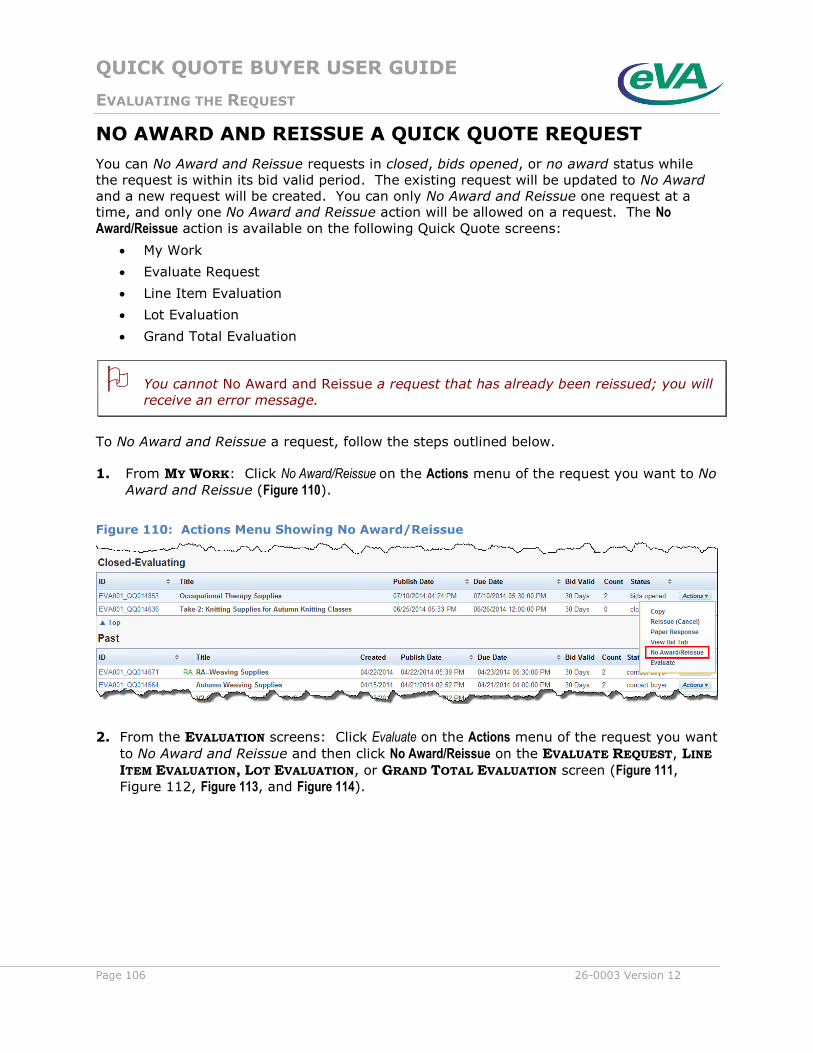
QUICK QUOTE BUYER USER GUIDE
EVALUATING THE REQUEST
Page 106 26-0003 Version 12
NO AWARD AND REISSUE A QUICK QUOTE REQUEST
You can No Award and Reissue requests in closed, bids opened, or no award status while
the request is within its bid valid period. The existing request will be updated to No Award
and a new request will be created. You can only No Award and Reissue one request at a time, and only one No Award and Reissue action will be allowed on a request. The No Award/Reissue action is available on the following Quick Quote screens:
My Work
Evaluate Request
Line Item Evaluation
Lot Evaluation
Grand Total Evaluation
You cannot No Award and Reissue a request that has already been reissued; you will
receive an error message.
To No Award and Reissue a request, follow the steps outlined below.
1. From MY WORK: Click No Award/Reissue on the Actions menu of the request you want to No
Award and Reissue (Figure 110).
Figure 110: Actions Menu Showing No Award/Reissue
2. From the EVALUATION screens: Click Evaluate on the Actions menu of the request you want
to No Award and Reissue and then click No Award/Reissue on the EVALUATE REQUEST, LINE
ITEM EVALUATION, LOT EVALUATION, or GRAND TOTAL EVALUATION screen (Figure 111, Figure 112, Figure 113, and Figure 114).
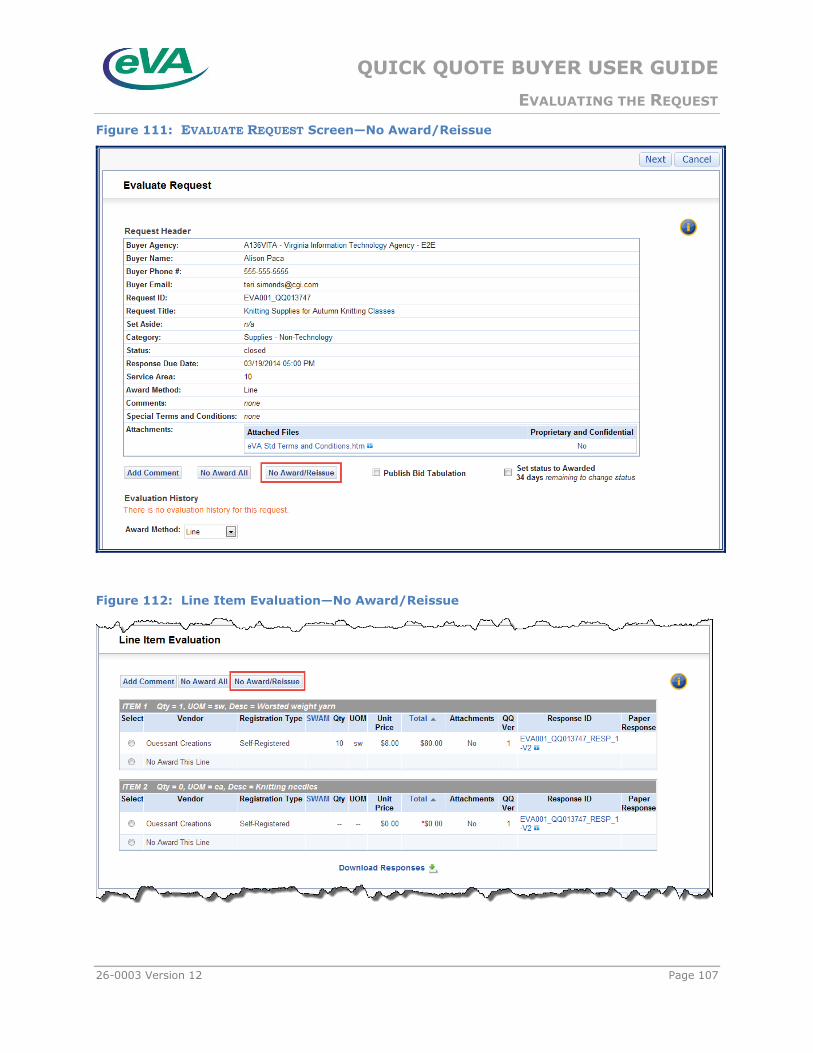
QUICK QUOTE BUYER USER GUIDE
EVALUATING THE REQUEST
26-0003 Version 12 Page 107
Figure 111: EVALUATE REQUEST Screen—No Award/Reissue
Figure 112: Line Item Evaluation—No Award/Reissue
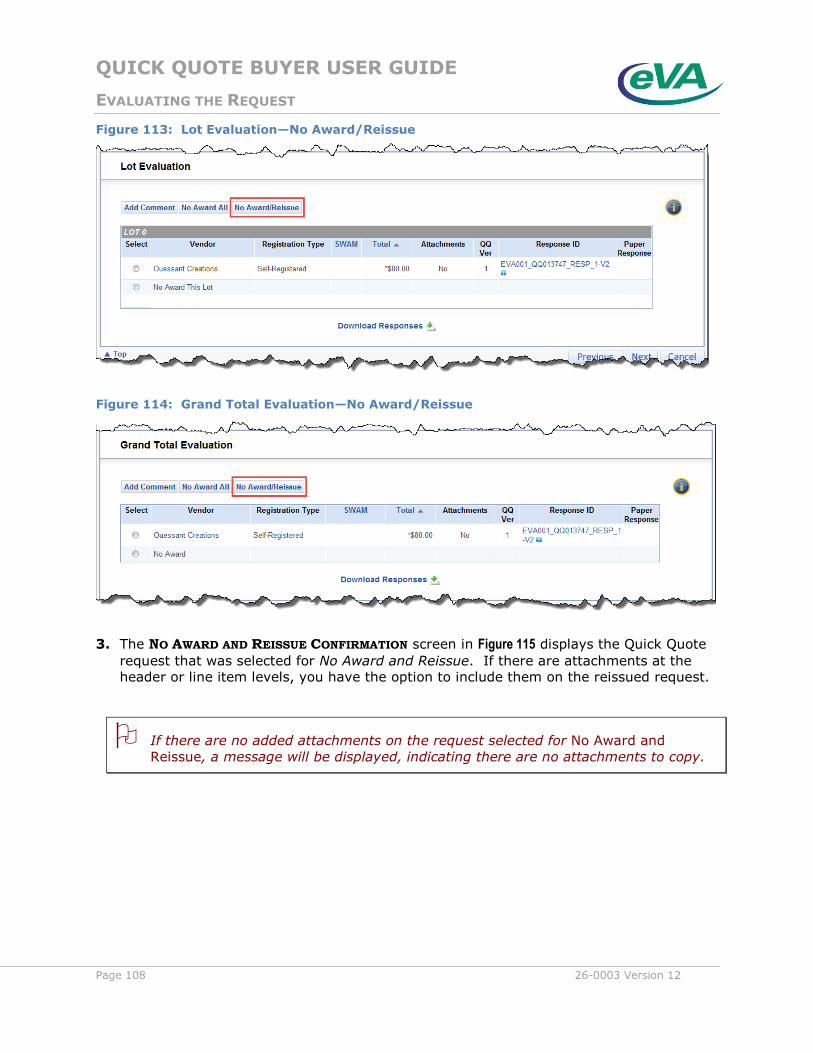
QUICK QUOTE BUYER USER GUIDE
EVALUATING THE REQUEST
Page 108 26-0003 Version 12
Figure 113: Lot Evaluation—No Award/Reissue
Figure 114: Grand Total Evaluation—No Award/Reissue
3. The NO AWARD AND REISSUE CONFIRMATION screen in Figure 115 displays the Quick Quote
request that was selected for No Award and Reissue. If there are attachments at the
header or line item levels, you have the option to include them on the reissued request.
If there are no added attachments on the request selected for No Award and
Reissue, a message will be displayed, indicating there are no attachments to copy.

QUICK QUOTE BUYER USER GUIDE
EVALUATING THE REQUEST
26-0003 Version 12 Page 109
Figure 115: NO AWARD/REISSUE Confirmation Screen
4. Click OK to continue the No Award and Reissue action and create a reissued request. Click Cancel to return to your MY WORK screen; the No Award and Reissue action will be
canceled, and the status of the request will remain unchanged.
The new request will contain all data copied from the original request, with the following
differences:
If the Set-Aside? box was selected, that selection will not copy forward to the new
request
Your current user information (Name, Agency, Phone, Email, Ship To) will be added
to the new request, even if the original request had different information
The link to the current eVA Std Terms and Conditions will be displayed
The Request Title is preceded by the words “Copy of…”
5. Make any changes necessary to the Request Header and the request items. When you
have finished making changes, submit the reissued request or save/close it to submit
later.
Comments will be added to the reissued request, and to the record of the existing
No Award request, to document the reissue action.
To add comments to your request, refer to the Adding Comments section in this guide.
To publish the bid tab for the no awarded request, refer to the Publishing the Bid Tabulation
section in this guide.
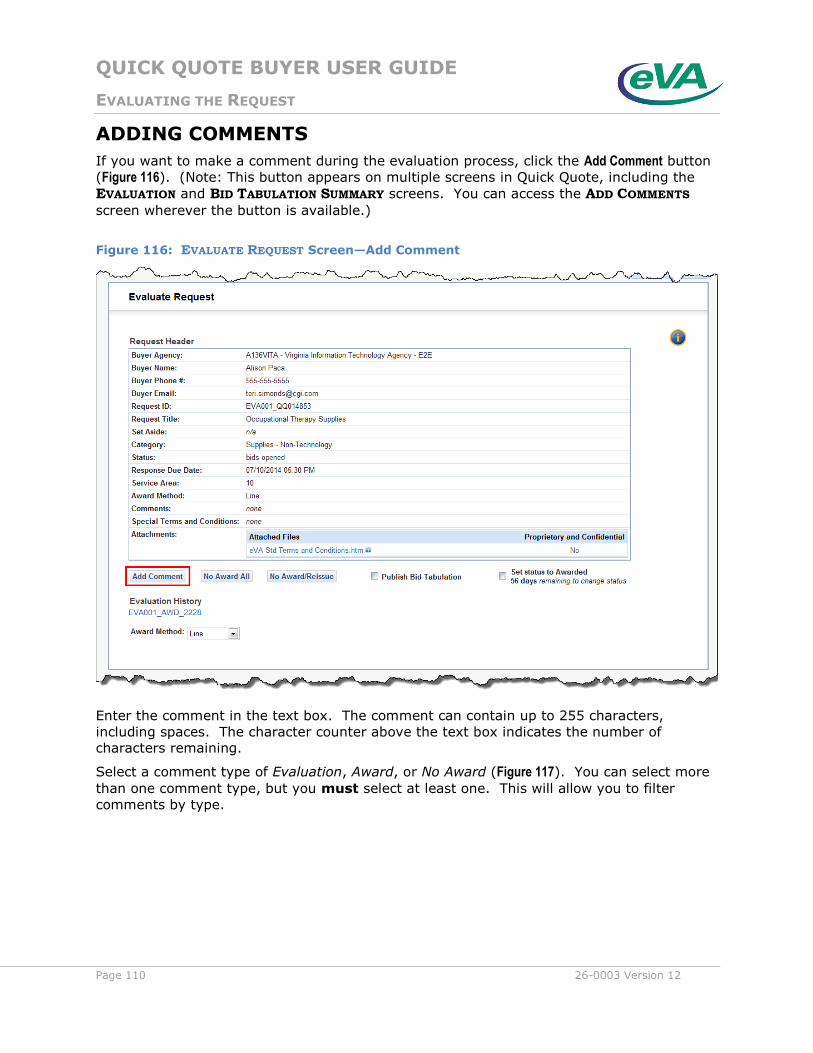
QUICK QUOTE BUYER USER GUIDE
EVALUATING THE REQUEST
Page 110 26-0003 Version 12
ADDING COMMENTS
If you want to make a comment during the evaluation process, click the Add Comment button
(Figure 116). (Note: This button appears on multiple screens in Quick Quote, including the
EVALUATION and BID TABULATION SUMMARY screens. You can access the ADD COMMENTS
screen wherever the button is available.)
Figure 116: EVALUATE REQUEST Screen—Add Comment
Enter the comment in the text box. The comment can contain up to 255 characters,
including spaces. The character counter above the text box indicates the number of
characters remaining.
Select a comment type of Evaluation, Award, or No Award (Figure 117). You can select more
than one comment type, but you must select at least one. This will allow you to filter
comments by type.
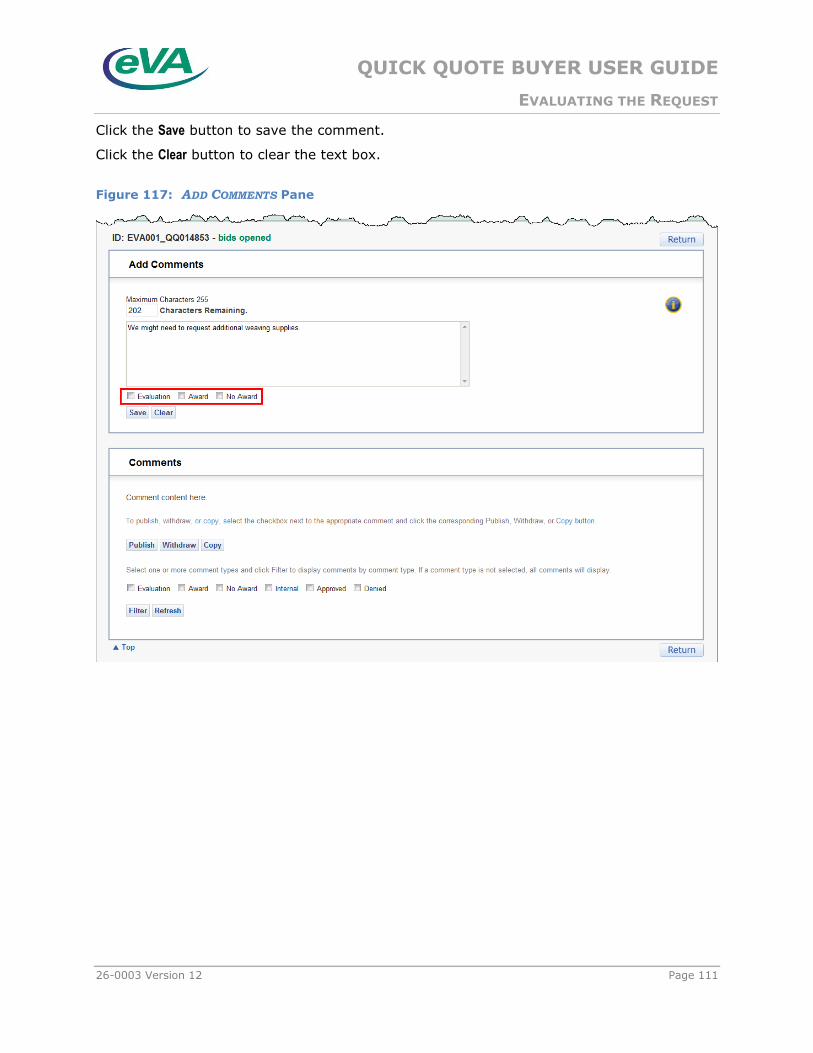
QUICK QUOTE BUYER USER GUIDE
EVALUATING THE REQUEST
26-0003 Version 12 Page 111
Click the Save button to save the comment.
Click the Clear button to clear the text box.
Figure 117: ADD COMMENTS Pane
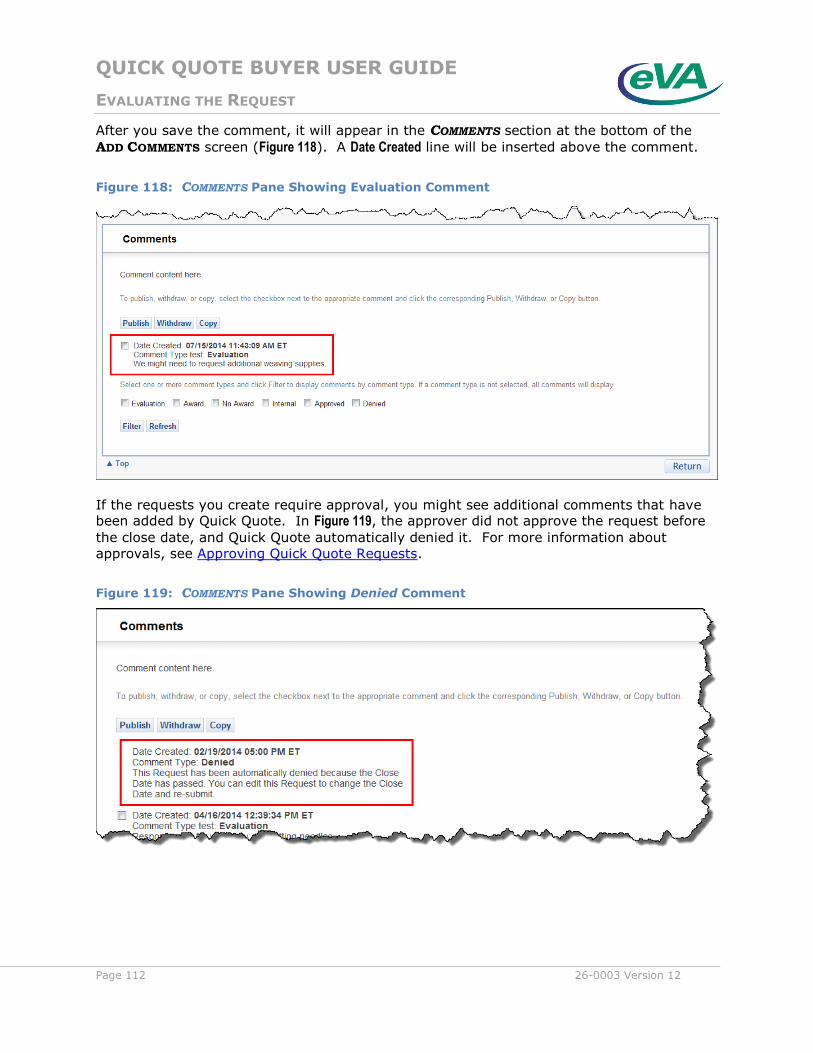
QUICK QUOTE BUYER USER GUIDE
EVALUATING THE REQUEST
Page 112 26-0003 Version 12
After you save the comment, it will appear in the COMMENTS section at the bottom of the
ADD COMMENTS screen (Figure 118). A Date Created line will be inserted above the comment.
Figure 118: COMMENTS Pane Showing Evaluation Comment
If the requests you create require approval, you might see additional comments that have been added by Quick Quote. In Figure 119, the approver did not approve the request before
the close date, and Quick Quote automatically denied it. For more information about
approvals, see Approving Quick Quote Requests.
Figure 119: COMMENTS Pane Showing Denied Comment

QUICK QUOTE BUYER USER GUIDE
EVALUATING THE REQUEST
26-0003 Version 12 Page 113
If you want vendors to see the comment, select the check box next to the comment and click Publish (Figure 120). A Date Published line will be inserted to indicate when you published
the comment.
Figure 120: Publishing a Comment
You can withdraw a comment after it is published by selecting the comment and clicking Withdraw (Figure 121). A Date Withdrawn line will be added to the comment to indicate when you
withdrew the comment. Vendors will no longer see that comment.
Figure 121: Withdrawing a Comment
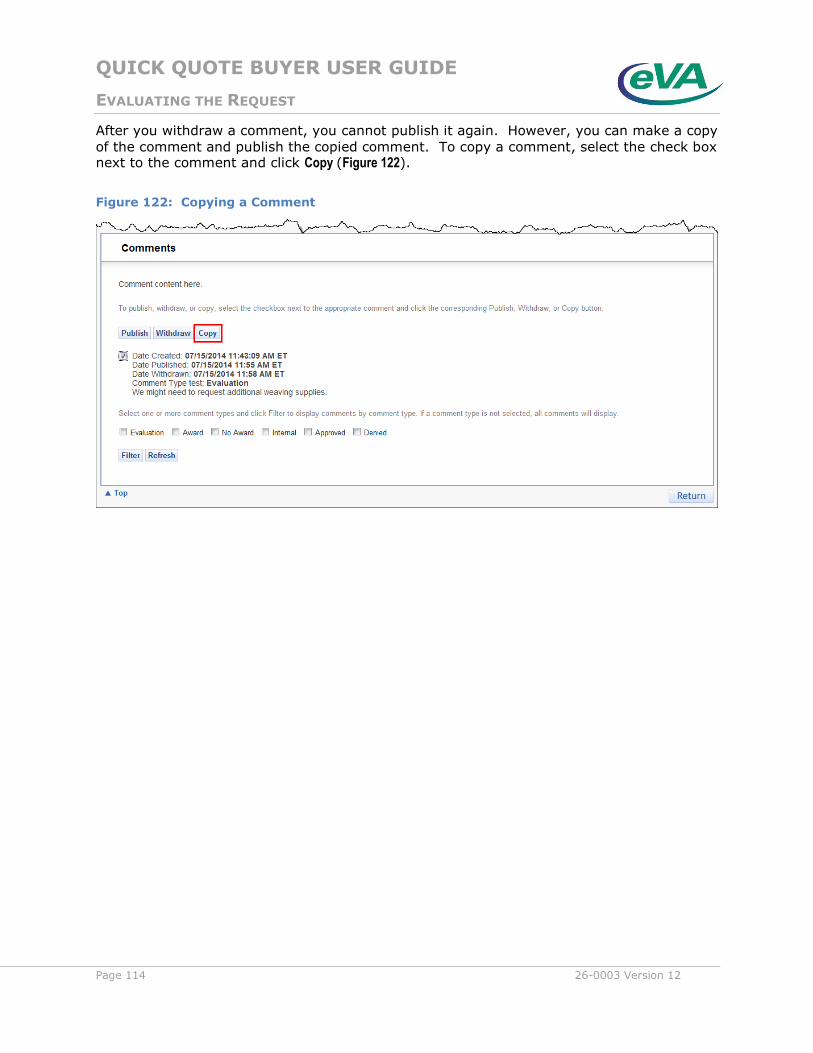
QUICK QUOTE BUYER USER GUIDE
EVALUATING THE REQUEST
Page 114 26-0003 Version 12
After you withdraw a comment, you cannot publish it again. However, you can make a copy
of the comment and publish the copied comment. To copy a comment, select the check box next to the comment and click Copy (Figure 122).
Figure 122: Copying a Comment
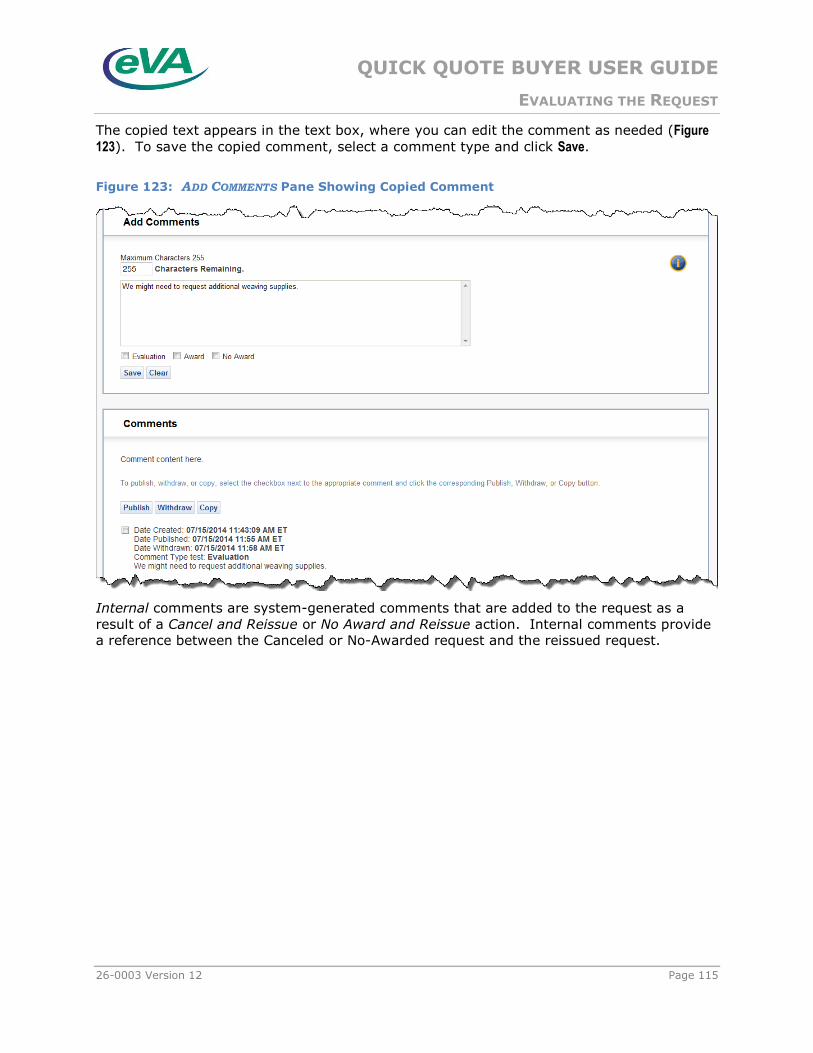
QUICK QUOTE BUYER USER GUIDE
EVALUATING THE REQUEST
26-0003 Version 12 Page 115
The copied text appears in the text box, where you can edit the comment as needed (Figure 123). To save the copied comment, select a comment type and click Save.
Figure 123: ADD COMMENTS Pane Showing Copied Comment
Internal comments are system-generated comments that are added to the request as a
result of a Cancel and Reissue or No Award and Reissue action. Internal comments provide
a reference between the Canceled or No-Awarded request and the reissued request.
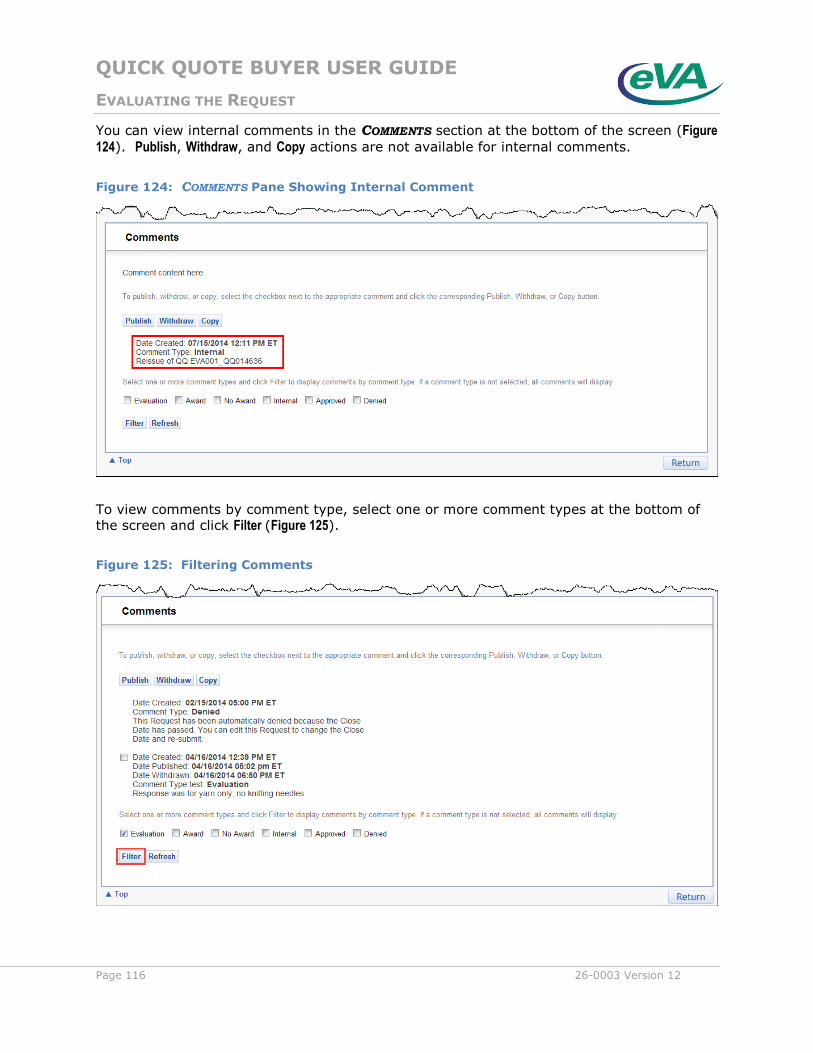
QUICK QUOTE BUYER USER GUIDE
EVALUATING THE REQUEST
Page 116 26-0003 Version 12
You can view internal comments in the COMMENTS section at the bottom of the screen (Figure 124). Publish, Withdraw, and Copy actions are not available for internal comments.
Figure 124: COMMENTS Pane Showing Internal Comment
To view comments by comment type, select one or more comment types at the bottom of the screen and click Filter (Figure 125).
Figure 125: Filtering Comments
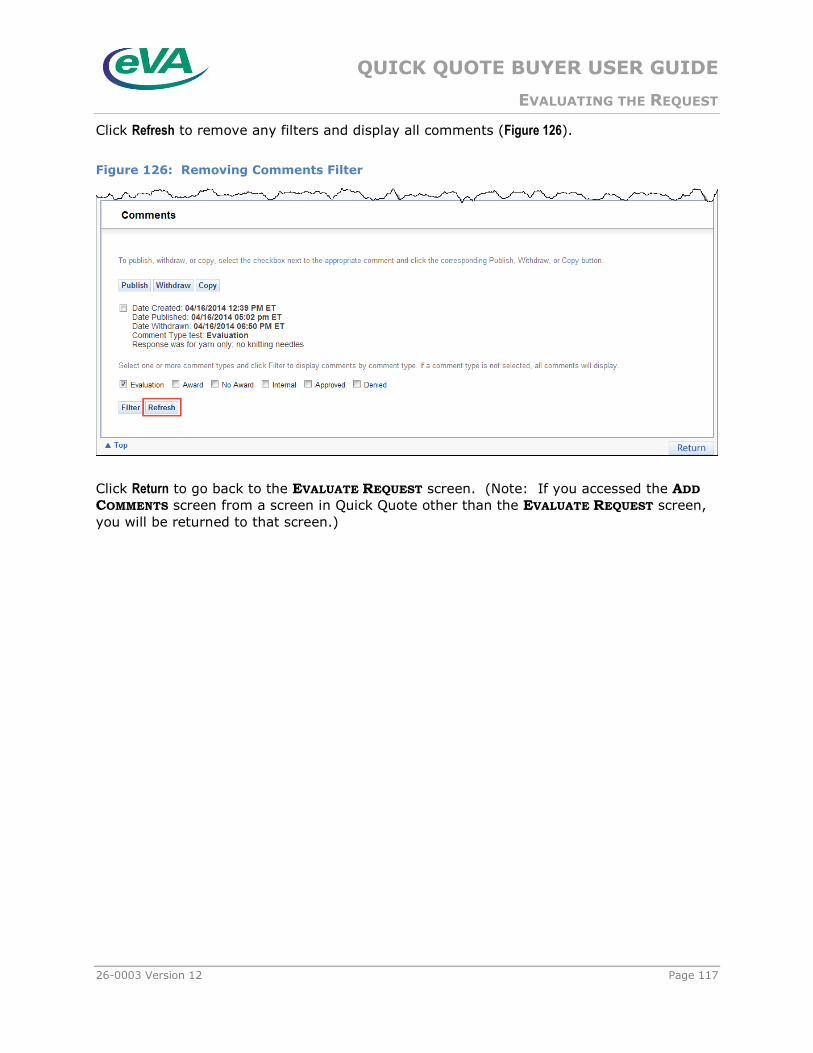
QUICK QUOTE BUYER USER GUIDE
EVALUATING THE REQUEST
26-0003 Version 12 Page 117
Click Refresh to remove any filters and display all comments (Figure 126).
Figure 126: Removing Comments Filter
Click Return to go back to the EVALUATE REQUEST screen. (Note: If you accessed the ADD
COMMENTS screen from a screen in Quick Quote other than the EVALUATE REQUEST screen,
you will be returned to that screen.)

QUICK QUOTE BUYER USER GUIDE
EVALUATING THE REQUEST
Page 118 26-0003 Version 12
PUBLISHING THE BID TABULATION
The vendor bid information can be published until the Bid Valid Days of the request passes. If you want to publish the vendor bid information, select the Publish Bid Tabulation check box
(Figure 127). (Note: This check box is available on the EVALUATE REQUEST and the BID
TABULATION SUMMARY screens.)
Figure 127: Publishing the Bid Tabulation
The CONFIRMATION screen is displayed (Figure 128). Click OK to publish the Bid Tabulation
and return to the EVALUATE REQUEST screen. Click Cancel to return to the previous screen
without publishing the Bid Tabulation.
Figure 128: Bid Tab Confirmation Screen

QUICK QUOTE BUYER USER GUIDE
EVALUATING THE REQUEST
26-0003 Version 12 Page 119
Be aware that vendors will receive an email or fax notification each time you publish
the Bid Tabulation.
After the Bid Tabulation is published, the status of the request changes from closed to bids opened (Figure 129). If the request status is no award or awarded at the time the bid tab is
published, the request status will not change.
Figure 129: EVALUATE REQUEST Screen Showing bids opened Status
To unpublish the Bid Tabulation, clear the Publish Bid Tabulation check box. The CONFIRMATION
screen will be displayed (Figure 130). Click OK to unpublish the Bid Tabulation; the status will
change from bids opened to closed.
Figure 130: Unpublished Confirmation Screen
QUICK QUOTE BUYER USER GUIDE
EVALUATING THE REQUEST
Page 120 26-0003 Version 12
To continue evaluating your request, click Next on the EVALUATE REQUEST screen. Refer to
the section Evaluating and Awarding Responses for information about evaluating your
request.
Click the Cancel button in the evaluation to return to the MY WORK screen.
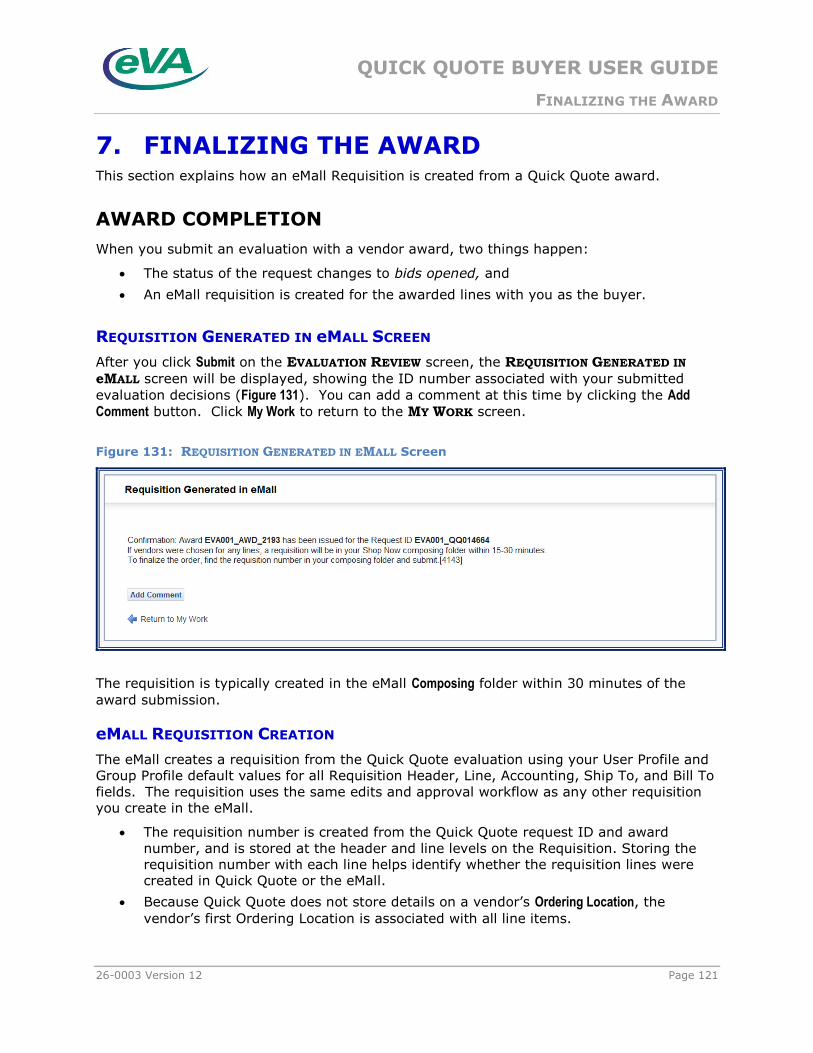
QUICK QUOTE BUYER USER GUIDE
FINALIZING THE AWARD
26-0003 Version 12 Page 121
7. FINALIZING THE AWARD This section explains how an eMall Requisition is created from a Quick Quote award.
AWARD COMPLETION
When you submit an evaluation with a vendor award, two things happen:
The status of the request changes to bids opened, and
An eMall requisition is created for the awarded lines with you as the buyer.
REQUISITION GENERATED IN eMALL SCREEN
After you click Submit on the EVALUATION REVIEW screen, the REQUISITION GENERATED IN
eMALL screen will be displayed, showing the ID number associated with your submitted
evaluation decisions (Figure 131). You can add a comment at this time by clicking the Add Comment button. Click My Work to return to the MY WORK screen.
Figure 131: REQUISITION GENERATED IN EMALL Screen
The requisition is typically created in the eMall Composing folder within 30 minutes of the
award submission.
eMALL REQUISITION CREATION
The eMall creates a requisition from the Quick Quote evaluation using your User Profile and
Group Profile default values for all Requisition Header, Line, Accounting, Ship To, and Bill To
fields. The requisition uses the same edits and approval workflow as any other requisition
you create in the eMall.
The requisition number is created from the Quick Quote request ID and award
number, and is stored at the header and line levels on the Requisition. Storing the
requisition number with each line helps identify whether the requisition lines were
created in Quick Quote or the eMall.
Because Quick Quote does not store details on a vendor’s Ordering Location, the
vendor’s first Ordering Location is associated with all line items.
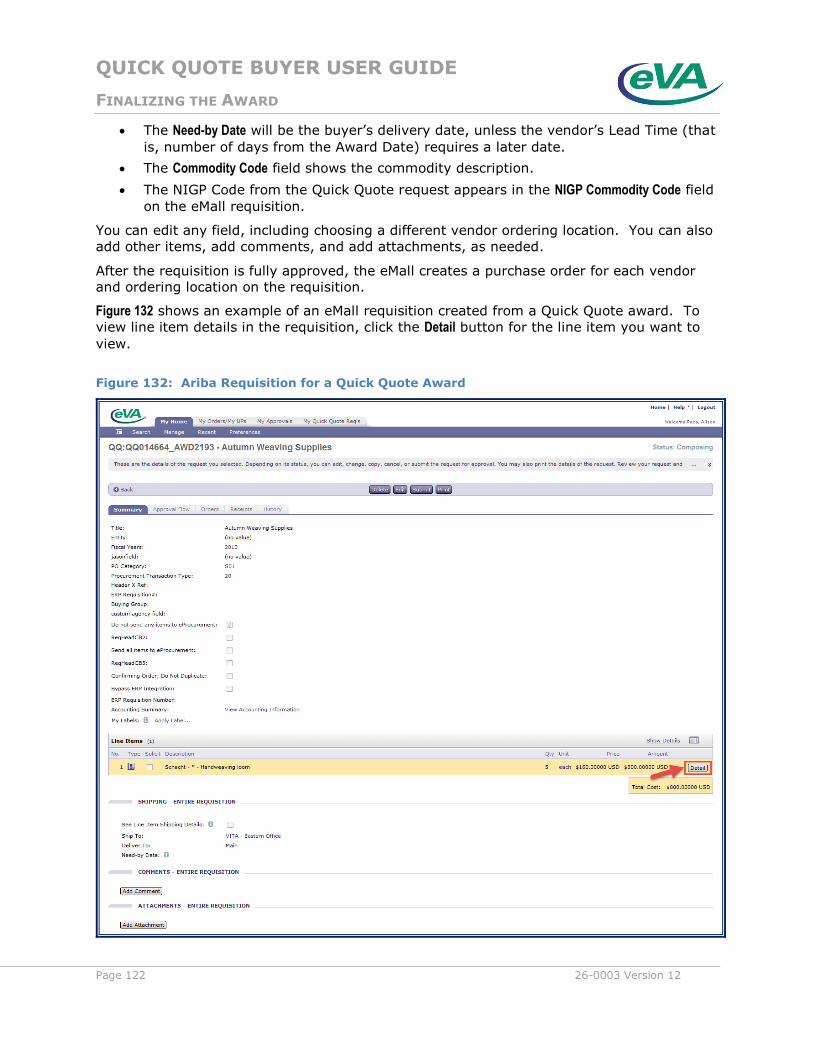
QUICK QUOTE BUYER USER GUIDE
FINALIZING THE AWARD
Page 122 26-0003 Version 12
The Need-by Date will be the buyer’s delivery date, unless the vendor’s Lead Time (that
is, number of days from the Award Date) requires a later date.
The Commodity Code field shows the commodity description.
The NIGP Code from the Quick Quote request appears in the NIGP Commodity Code field
on the eMall requisition.
You can edit any field, including choosing a different vendor ordering location. You can also
add other items, add comments, and add attachments, as needed.
After the requisition is fully approved, the eMall creates a purchase order for each vendor
and ordering location on the requisition.
Figure 132 shows an example of an eMall requisition created from a Quick Quote award. To
view line item details in the requisition, click the Detail button for the line item you want to
view.
Figure 132: Ariba Requisition for a Quick Quote Award
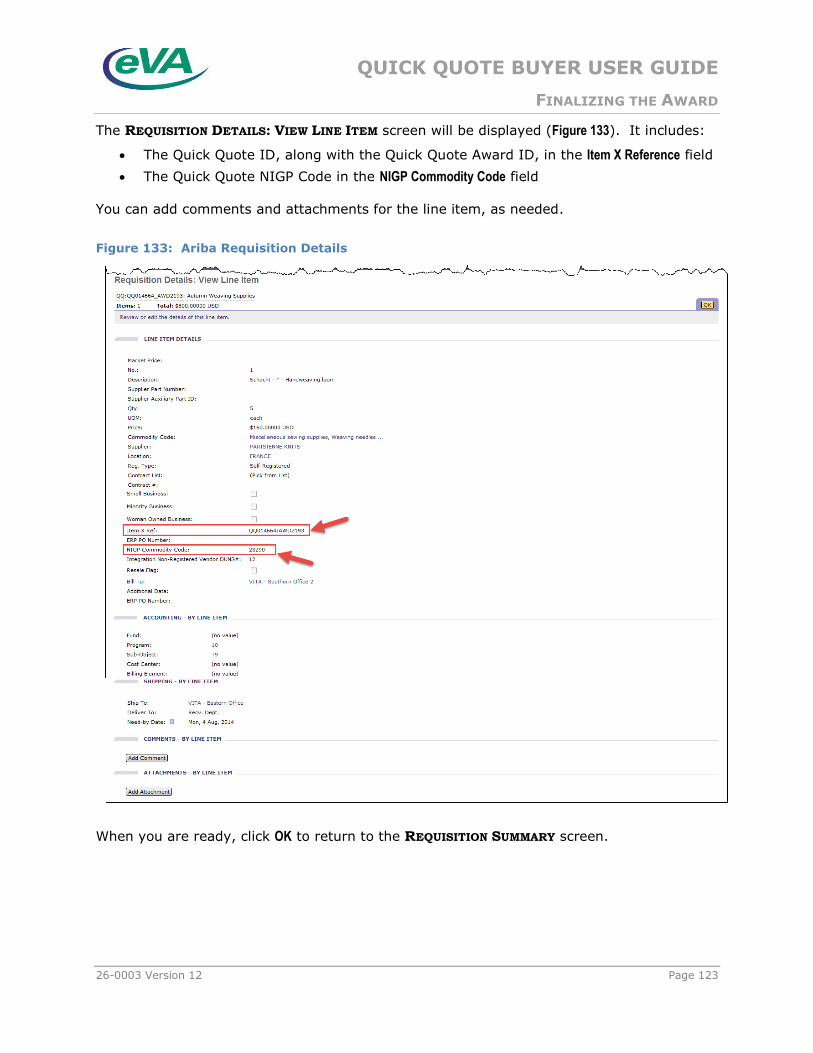
QUICK QUOTE BUYER USER GUIDE
FINALIZING THE AWARD
26-0003 Version 12 Page 123
The REQUISITION DETAILS: VIEW LINE ITEM screen will be displayed (Figure 133). It includes:
The Quick Quote ID, along with the Quick Quote Award ID, in the Item X Reference field
The Quick Quote NIGP Code in the NIGP Commodity Code field
You can add comments and attachments for the line item, as needed.
Figure 133: Ariba Requisition Details
When you are ready, click OK to return to the REQUISITION SUMMARY screen.

QUICK QUOTE BUYER USER GUIDE
FINALIZING THE AWARD
Page 124 26-0003 Version 12
SUBMITTING THE EMALL REQUISITION
After you have reviewed the requisition details, click Submit to create an order to be sent to
the vendor (Figure 134). Note that the requisition might need to be approved before the
order is generated. Click the Approval Flow tab to view the approval information.
Figure 134: Ariba Requisition Showing Approval Flow Tab and Submit Button
CHANGING THE REQUEST TO AWARDED STATUS
The status of your Quick Quote remains bids opened after the order for your award is
generated in the eMall; it will update to contact buyer after the bid valid period expires.
You must manually update the request status to awarded in Quick Quote.
From the MY WORK screen, click Evaluate in the Actions drop-down menu next to the request
you want to update. On the EVALUATE REQUEST screen, select the Set status to Awarded
checkbox (Figure 135).
You can manually update the status to awarded for up to 30 days past the expiration
of the bid valid days. The number of days left to make the update displays next to the Set status to Awarded checkbox.

QUICK QUOTE BUYER USER GUIDE
FINALIZING THE AWARD
26-0003 Version 12 Page 125
Figure 135: Setting the Status to awarded
The CONFIRMATION screen displays (Figure 136). Click OK to update the request status to
awarded. Click Cancel to return to the EVALUATE REQUEST screen without changing the
request status.
Figure 136: Request Status Change Confirmation Screen
As shown below, you will be returned to the EVALUATE REQUEST screen, and the status of
the request will be awarded (Figure 137).

QUICK QUOTE BUYER USER GUIDE
FINALIZING THE AWARD
Page 126 26-0003 Version 12
Figure 137: Evaluate Request Screen Showing awarded Status
To reverse the manual awarded status, click the Set status to Awarded check box to clear it.
The CONFIRMATION screen will be displayed (Figure 138). Click OK to reverse the manual
awarded status. Click Cancel to return to the EVALUATE REQUEST screen without changing
the request status.
Figure 138: Request Status Change Confirmation Screen
You will be returned to the EVALUATE REQUEST screen and the Set status to Awarded check box
will have been cleared. The request status is updated to the appropriate pre-awarded
status. If the request returns to closed or bids opened status, you can create paper
responses.

QUICK QUOTE BUYER USER GUIDE
FINALIZING THE AWARD
26-0003 Version 12 Page 127
RE-AWARDING A REQUEST
If a situation arises, such as a vendor failing to perform, you can re-evaluate the Quick
Quote request. You can re-evaluate a request as many times as needed until the Bid Valid Days of the request passes. At that time, the request moves from the CLOSED-EVALUATING
pane to the PAST pane.


QUICK QUOTE BUYER USER GUIDE
EVALUATION HISTORY
26-0003 Version 12 Page 129
8. EVALUATION HISTORY Quick Quote keeps a record of the evaluation history for each request. You can view the
evaluation history of a request in three places:
The BID TABULATION SUMMARY screen
The EVALUATE REQUEST screen
The RESPONSE AND EVALUATION REVIEW screen (PAST requests only)
BID TABULATION SUMMARY SCREEN
You can view the evaluation history on the BID TABULATION SUMMARY screen from the
CLOSED-EVALUATING and PAST panes. To view the Bid Tab, click View Bid Tab in the Actions menu (Figure 139) for any request that is in one of the following statuses:
closed (CLOSED-EVALUATING)
bids opened (CLOSED-EVALUATING)
awarded (CLOSED-EVALUATING and PAST)
no award (CLOSED-EVALUATING and PAST)
contact buyer (PAST)
Figure 139: Actions Menu Showing View Bid Tab
The BID TABULATION SUMMARY screen is also available for requests in issued status to
allow you to view summary information for the active vendor responses for your
Quick Quote.
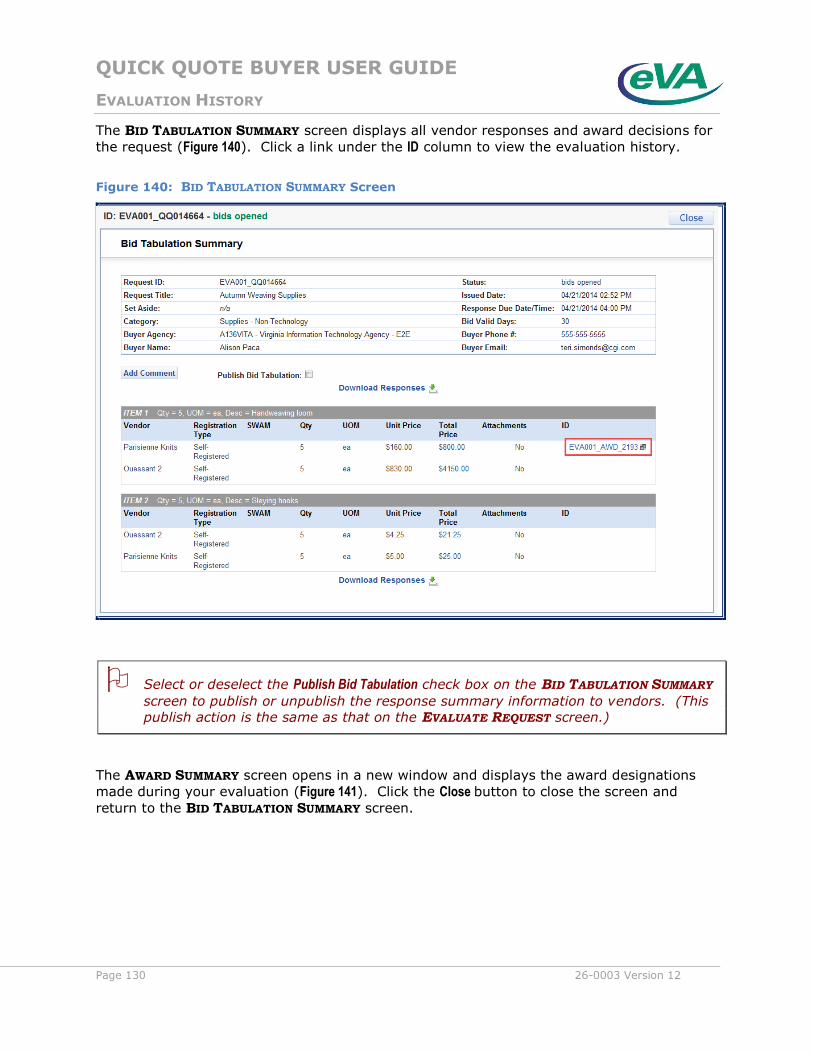
QUICK QUOTE BUYER USER GUIDE
EVALUATION HISTORY
Page 130 26-0003 Version 12
The BID TABULATION SUMMARY screen displays all vendor responses and award decisions for
the request (Figure 140). Click a link under the ID column to view the evaluation history.
Figure 140: BID TABULATION SUMMARY Screen
Select or deselect the Publish Bid Tabulation check box on the BID TABULATION SUMMARY
screen to publish or unpublish the response summary information to vendors. (This
publish action is the same as that on the EVALUATE REQUEST screen.)
The AWARD SUMMARY screen opens in a new window and displays the award designations
made during your evaluation (Figure 141). Click the Close button to close the screen and
return to the BID TABULATION SUMMARY screen.

QUICK QUOTE BUYER USER GUIDE
EVALUATION HISTORY
26-0003 Version 12 Page 131
Figure 141: AWARD SUMMARY Screen
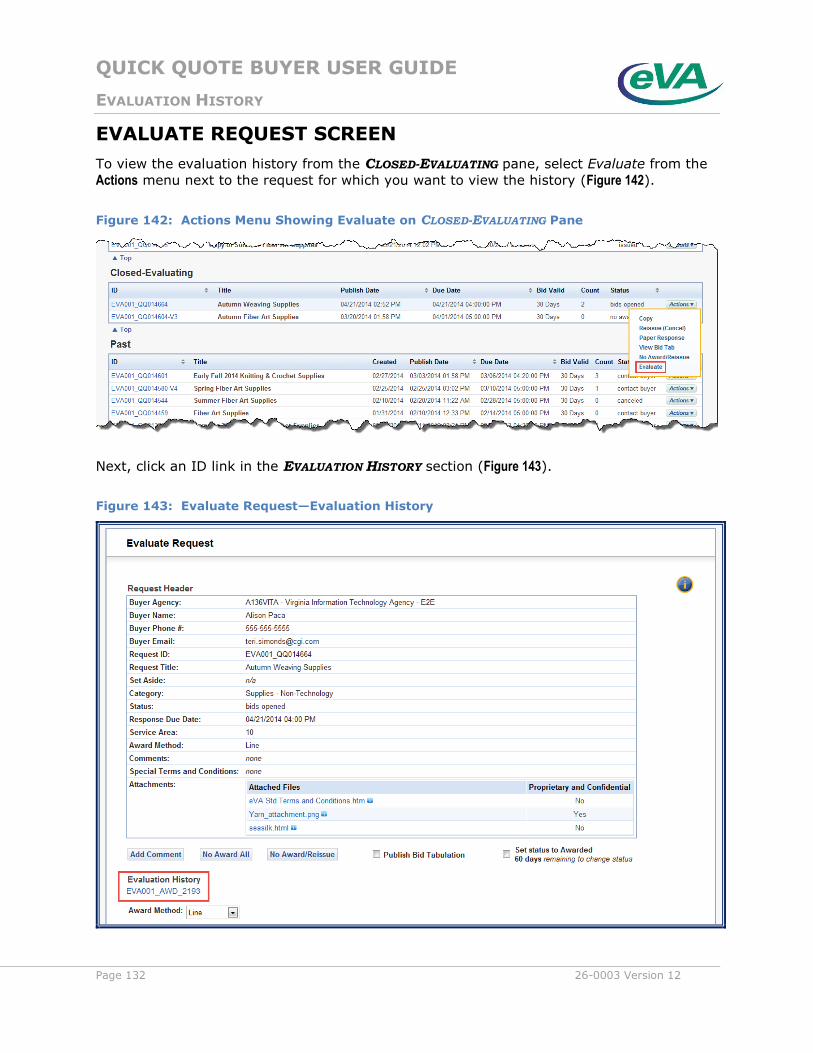
QUICK QUOTE BUYER USER GUIDE
EVALUATION HISTORY
Page 132 26-0003 Version 12
EVALUATE REQUEST SCREEN
To view the evaluation history from the CLOSED-EVALUATING pane, select Evaluate from the
Actions menu next to the request for which you want to view the history (Figure 142).
Figure 142: Actions Menu Showing Evaluate on CLOSED-EVALUATING Pane
Next, click an ID link in the EVALUATION HISTORY section (Figure 143).
Figure 143: Evaluate Request—Evaluation History
QUICK QUOTE BUYER USER GUIDE
EVALUATION HISTORY
26-0003 Version 12 Page 133
The AWARD SUMMARY screen opens in a new window and displays the award designations
made during your evaluation (Figure 144). Click the Close button to close the screen and
return to the EVALUATE REQUEST screen.

QUICK QUOTE BUYER USER GUIDE
EVALUATION HISTORY
Page 134 26-0003 Version 12
Figure 144: AWARD SUMMARY Screen
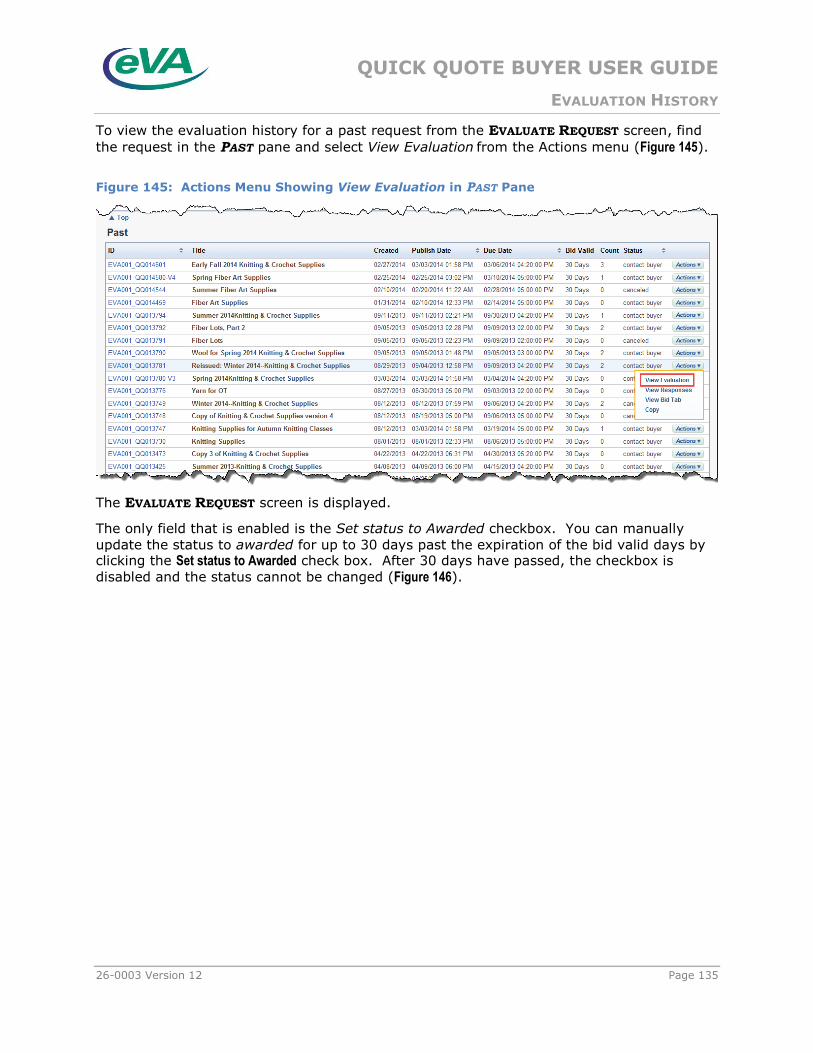
QUICK QUOTE BUYER USER GUIDE
EVALUATION HISTORY
26-0003 Version 12 Page 135
To view the evaluation history for a past request from the EVALUATE REQUEST screen, find
the request in the PAST pane and select View Evaluation from the Actions menu (Figure 145).
Figure 145: Actions Menu Showing View Evaluation in PAST Pane
The EVALUATE REQUEST screen is displayed.
The only field that is enabled is the Set status to Awarded checkbox. You can manually
update the status to awarded for up to 30 days past the expiration of the bid valid days by clicking the Set status to Awarded check box. After 30 days have passed, the checkbox is
disabled and the status cannot be changed (Figure 146).

QUICK QUOTE BUYER USER GUIDE
EVALUATION HISTORY
Page 136 26-0003 Version 12
Figure 146: EVALUATE REQUEST Screen—PAST Pane
Click an award ID link in the EVALUATION HISTORY section to see the award summary. Click
the Close button to close the AWARD SUMMARY screen and return to the EVALUATE REQUEST
screen.
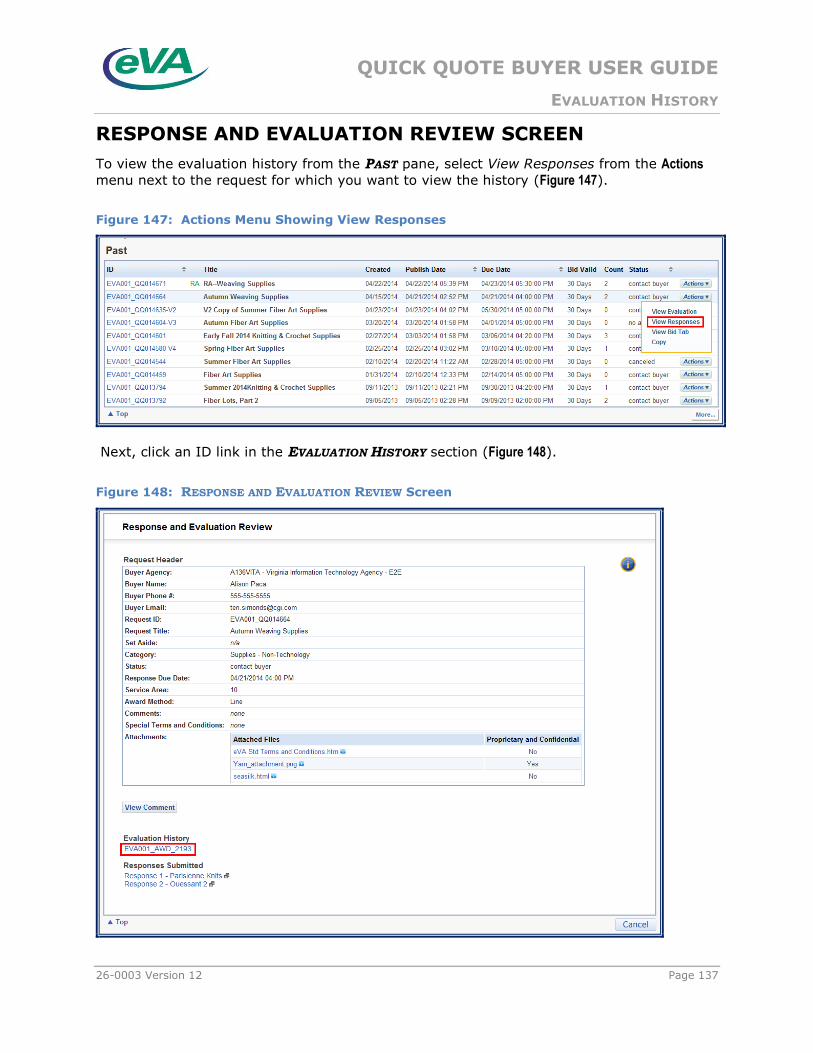
QUICK QUOTE BUYER USER GUIDE
EVALUATION HISTORY
26-0003 Version 12 Page 137
RESPONSE AND EVALUATION REVIEW SCREEN
To view the evaluation history from the PAST pane, select View Responses from the Actions menu next to the request for which you want to view the history (Figure 147).
Figure 147: Actions Menu Showing View Responses
Next, click an ID link in the EVALUATION HISTORY section (Figure 148).
Figure 148: RESPONSE AND EVALUATION REVIEW Screen

QUICK QUOTE BUYER USER GUIDE
EVALUATION HISTORY
Page 138 26-0003 Version 12
The AWARD SUMMARY screen opens in a new window and displays the award designations
made during your evaluation (Figure 149). Click the Close button to close the screen and
return to the RESPONSE AND EVALUATION REVIEW screen.
Figure 149: AWARD SUMMARY Screen
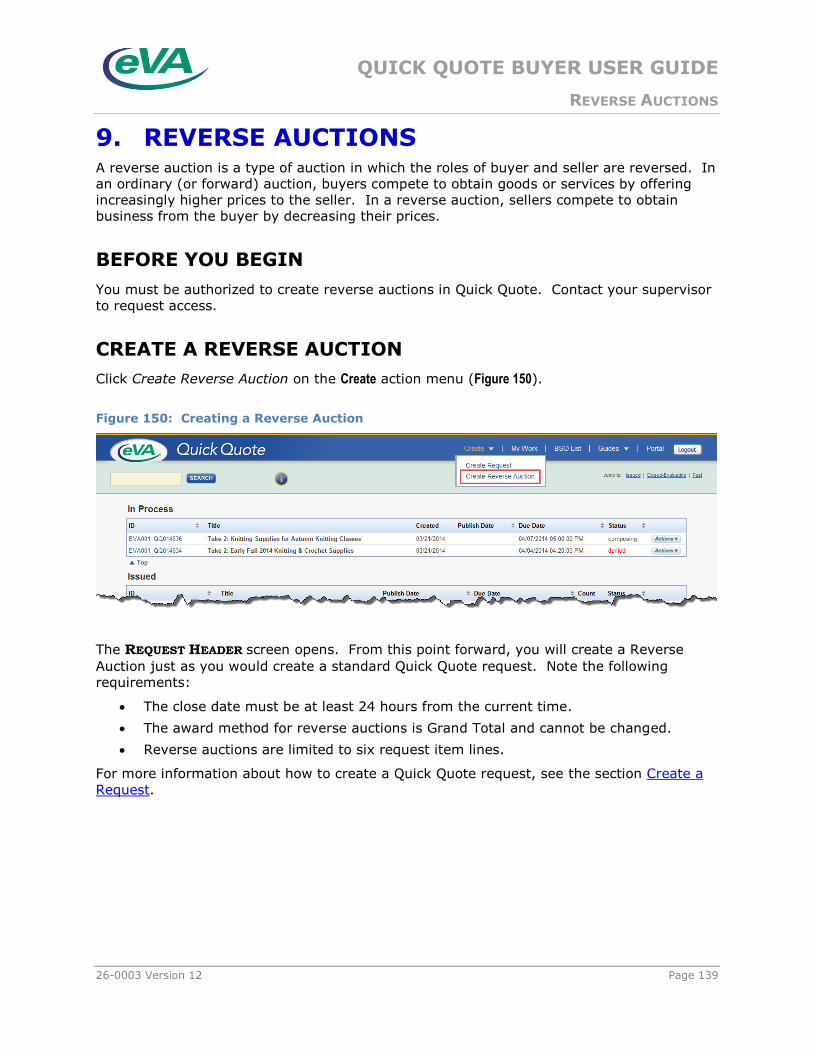
QUICK QUOTE BUYER USER GUIDE
REVERSE AUCTIONS
26-0003 Version 12 Page 139
9. REVERSE AUCTIONS A reverse auction is a type of auction in which the roles of buyer and seller are reversed. In
an ordinary (or forward) auction, buyers compete to obtain goods or services by offering
increasingly higher prices to the seller. In a reverse auction, sellers compete to obtain
business from the buyer by decreasing their prices.
BEFORE YOU BEGIN
You must be authorized to create reverse auctions in Quick Quote. Contact your supervisor
to request access.
CREATE A REVERSE AUCTION
Click Create Reverse Auction on the Create action menu (Figure 150).
Figure 150: Creating a Reverse Auction
The REQUEST HEADER screen opens. From this point forward, you will create a Reverse
Auction just as you would create a standard Quick Quote request. Note the following
requirements:
The close date must be at least 24 hours from the current time.
The award method for reverse auctions is Grand Total and cannot be changed.
Reverse auctions are limited to six request item lines.
For more information about how to create a Quick Quote request, see the section Create a
Request.
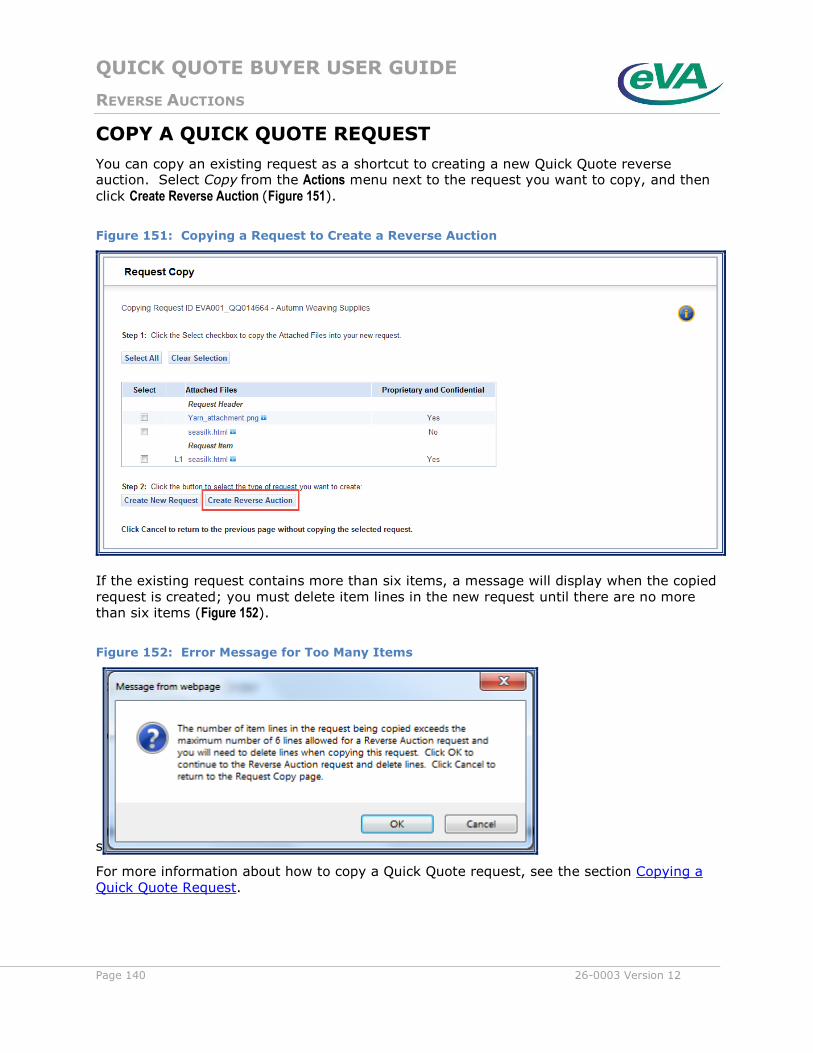
QUICK QUOTE BUYER USER GUIDE
REVERSE AUCTIONS
Page 140 26-0003 Version 12
COPY A QUICK QUOTE REQUEST
You can copy an existing request as a shortcut to creating a new Quick Quote reverse auction. Select Copy from the Actions menu next to the request you want to copy, and then
click Create Reverse Auction (Figure 151).
Figure 151: Copying a Request to Create a Reverse Auction
If the existing request contains more than six items, a message will display when the copied
request is created; you must delete item lines in the new request until there are no more than six items (Figure 152).
Figure 152: Error Message for Too Many Items
s
For more information about how to copy a Quick Quote request, see the section Copying a
Quick Quote Request.
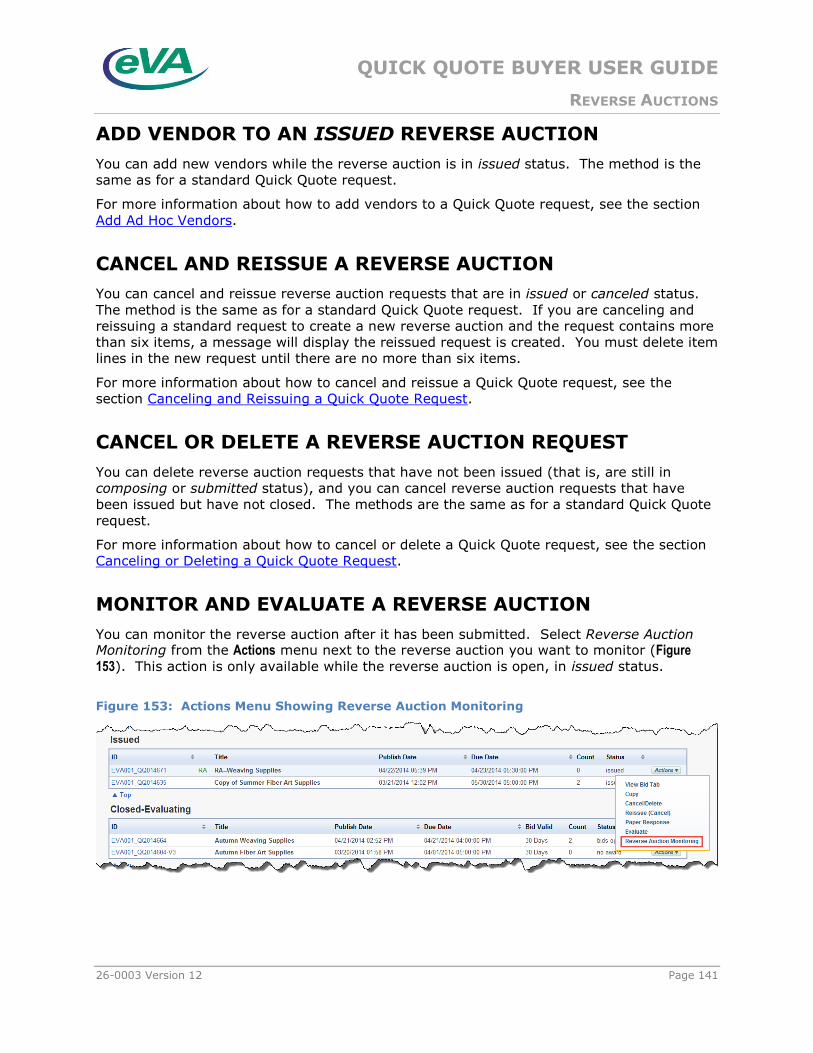
QUICK QUOTE BUYER USER GUIDE
REVERSE AUCTIONS
26-0003 Version 12 Page 141
ADD VENDOR TO AN ISSUED REVERSE AUCTION
You can add new vendors while the reverse auction is in issued status. The method is the
same as for a standard Quick Quote request.
For more information about how to add vendors to a Quick Quote request, see the section
Add Ad Hoc Vendors.
CANCEL AND REISSUE A REVERSE AUCTION
You can cancel and reissue reverse auction requests that are in issued or canceled status.
The method is the same as for a standard Quick Quote request. If you are canceling and
reissuing a standard request to create a new reverse auction and the request contains more
than six items, a message will display the reissued request is created. You must delete item
lines in the new request until there are no more than six items.
For more information about how to cancel and reissue a Quick Quote request, see the
section Canceling and Reissuing a Quick Quote Request.
CANCEL OR DELETE A REVERSE AUCTION REQUEST
You can delete reverse auction requests that have not been issued (that is, are still in
composing or submitted status), and you can cancel reverse auction requests that have
been issued but have not closed. The methods are the same as for a standard Quick Quote
request.
For more information about how to cancel or delete a Quick Quote request, see the section
Canceling or Deleting a Quick Quote Request.
MONITOR AND EVALUATE A REVERSE AUCTION
You can monitor the reverse auction after it has been submitted. Select Reverse Auction Monitoring from the Actions menu next to the reverse auction you want to monitor (Figure 153). This action is only available while the reverse auction is open, in issued status.
Figure 153: Actions Menu Showing Reverse Auction Monitoring
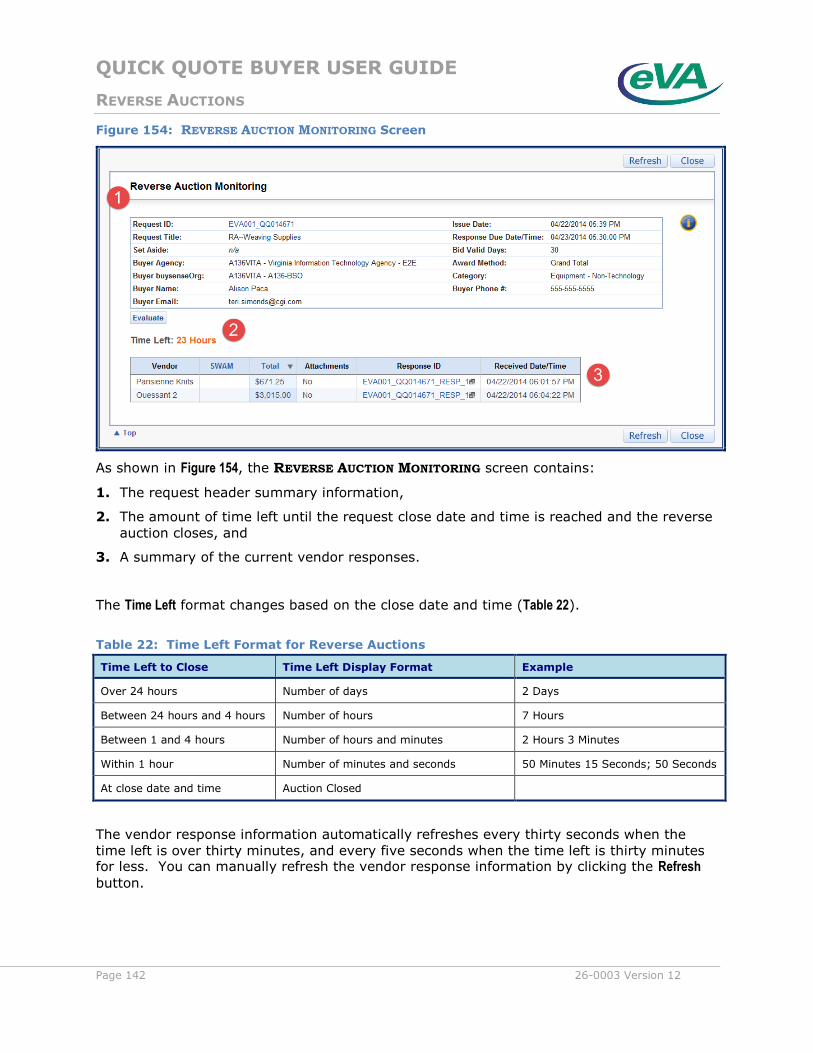
QUICK QUOTE BUYER USER GUIDE
REVERSE AUCTIONS
Page 142 26-0003 Version 12
Figure 154: REVERSE AUCTION MONITORING Screen
As shown in Figure 154, the REVERSE AUCTION MONITORING screen contains:
1. The request header summary information,
2. The amount of time left until the request close date and time is reached and the reverse
auction closes, and
3. A summary of the current vendor responses.
The Time Left format changes based on the close date and time (Table 22).
Table 22: Time Left Format for Reverse Auctions
Time Left to Close Time Left Display Format Example
Over 24 hours Number of days 2 Days
Between 24 hours and 4 hours Number of hours 7 Hours
Between 1 and 4 hours Number of hours and minutes 2 Hours 3 Minutes
Within 1 hour Number of minutes and seconds 50 Minutes 15 Seconds; 50 Seconds
At close date and time Auction Closed
The vendor response information automatically refreshes every thirty seconds when the
time left is over thirty minutes, and every five seconds when the time left is thirty minutes for less. You can manually refresh the vendor response information by clicking the Refresh
button.
QUICK QUOTE BUYER USER GUIDE
REVERSE AUCTIONS
26-0003 Version 12 Page 143
PAPER RESPONSES
Paper responses are not available for Reverse Auction requests.
EVALUATING REVERSE AUCTION RESPONSES
You can evaluate responses to the Reverse Auction requests by clicking Evaluate on the Actions menu or the Evaluate button on the REVERSE AUCTION MONITORING screen. The
evaluation process is the same as for standard Quick Quote requests, except that the award
method for Reverse Auctions is set to Grand Total and cannot be changed.
Note that Grand Total and Total Price values are rounded to two digits after the decimal on the
GRAND TOTAL EVALUATION screen.
For information about how to evaluate responses, see the section Evaluating and Awarding
Responses.
AWARDING A REVERSE AUCTION REQUEST
The award process for a reverse auction is the same as for standard Quick Quote requests.
Note that the Award Method is restricted to Grand Total and cannot be changed.
When the reverse auction is awarded, the Total Price value is rounded to two digits after the
decimal, and this price is included in the award that is sent to the eMall.
For information about how to award a Quick Quote request, see the section
Finalizing the Award.
NO AWARD AND REISSUE A REVERSE AUCTION
You can No Award and Reissue reverse auction requests that are in closed, bids opened or
no award status. The method is the same as for a standard Quick Quote request.
For more information about how to No Award and Reissue a Quick Quote request, see the
section No Award and Reissue a Quick Quote Request.

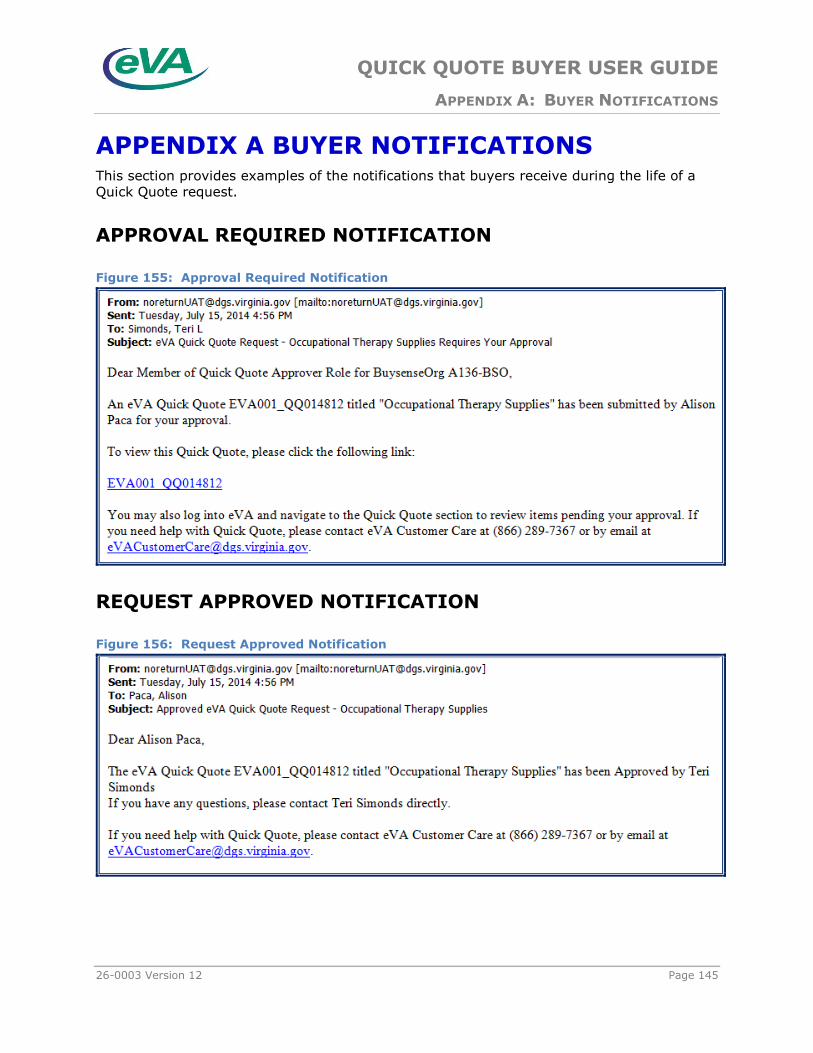
QUICK QUOTE BUYER USER GUIDE
APPENDIX A: BUYER NOTIFICATIONS
26-0003 Version 12 Page 145
APPENDIX A BUYER NOTIFICATIONS This section provides examples of the notifications that buyers receive during the life of a
Quick Quote request.
APPROVAL REQUIRED NOTIFICATION
Figure 155: Approval Required Notification
REQUEST APPROVED NOTIFICATION
Figure 156: Request Approved Notification
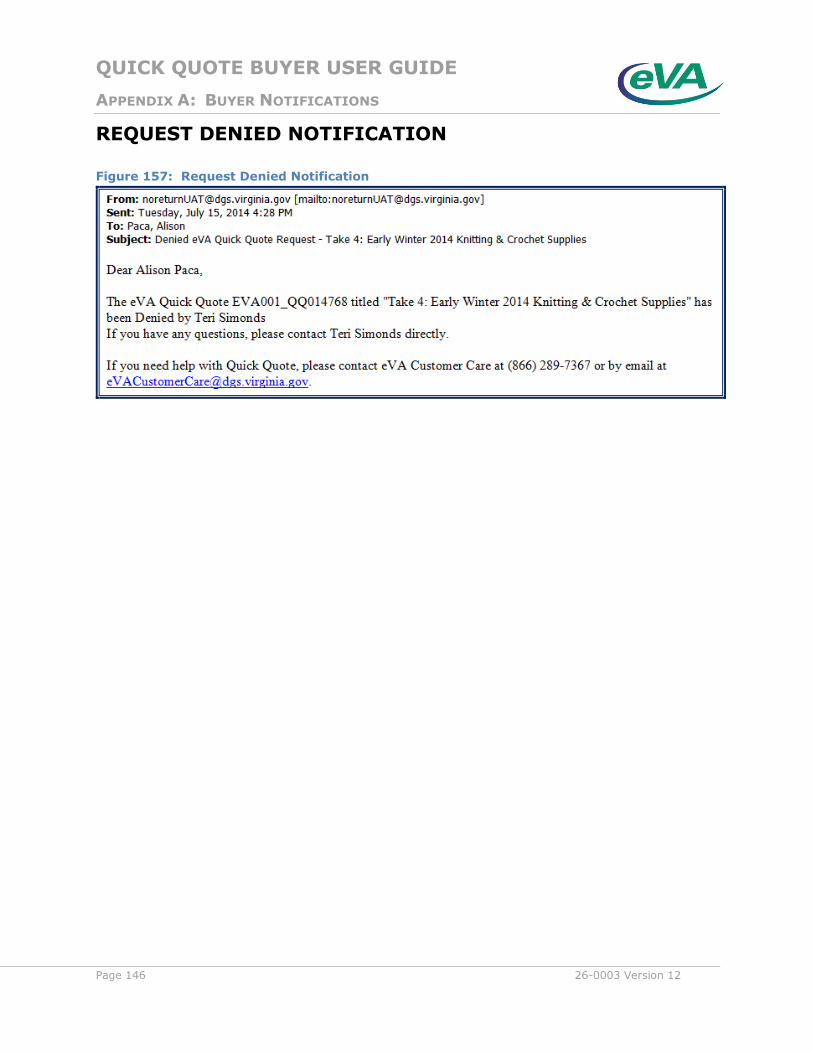
QUICK QUOTE BUYER USER GUIDE
APPENDIX A: BUYER NOTIFICATIONS
Page 146 26-0003 Version 12
REQUEST DENIED NOTIFICATION
Figure 157: Request Denied Notification

QUICK QUOTE BUYER USER GUIDE
APPENDIX B: VENDOR NOTIFICATIONS
26-0003 Version 12 Page 147
APPENDIX B VENDOR NOTIFICATIONS This section provides examples of the notifications that vendors receive during the life of a
Quick Quote request.
QUICK QUOTE REQUEST NOTIFICATION
Figure 158: Quick Quote Request Notification
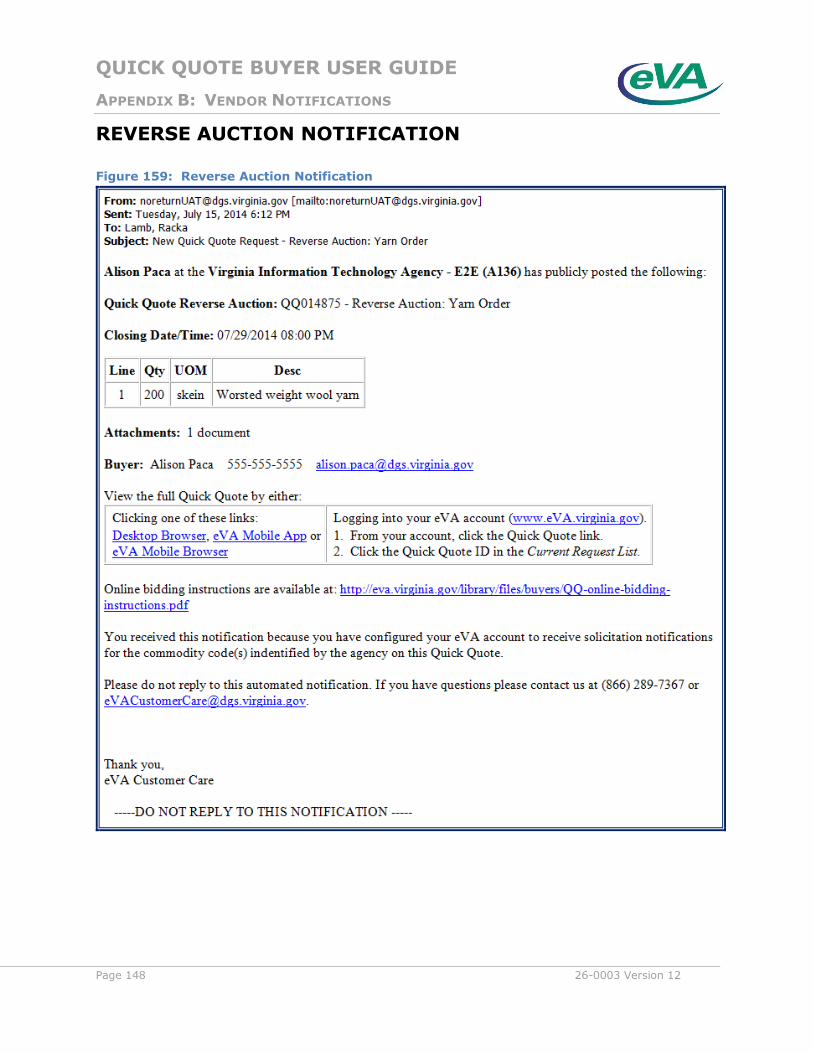
QUICK QUOTE BUYER USER GUIDE
APPENDIX B: VENDOR NOTIFICATIONS
Page 148 26-0003 Version 12
REVERSE AUCTION NOTIFICATION
Figure 159: Reverse Auction Notification
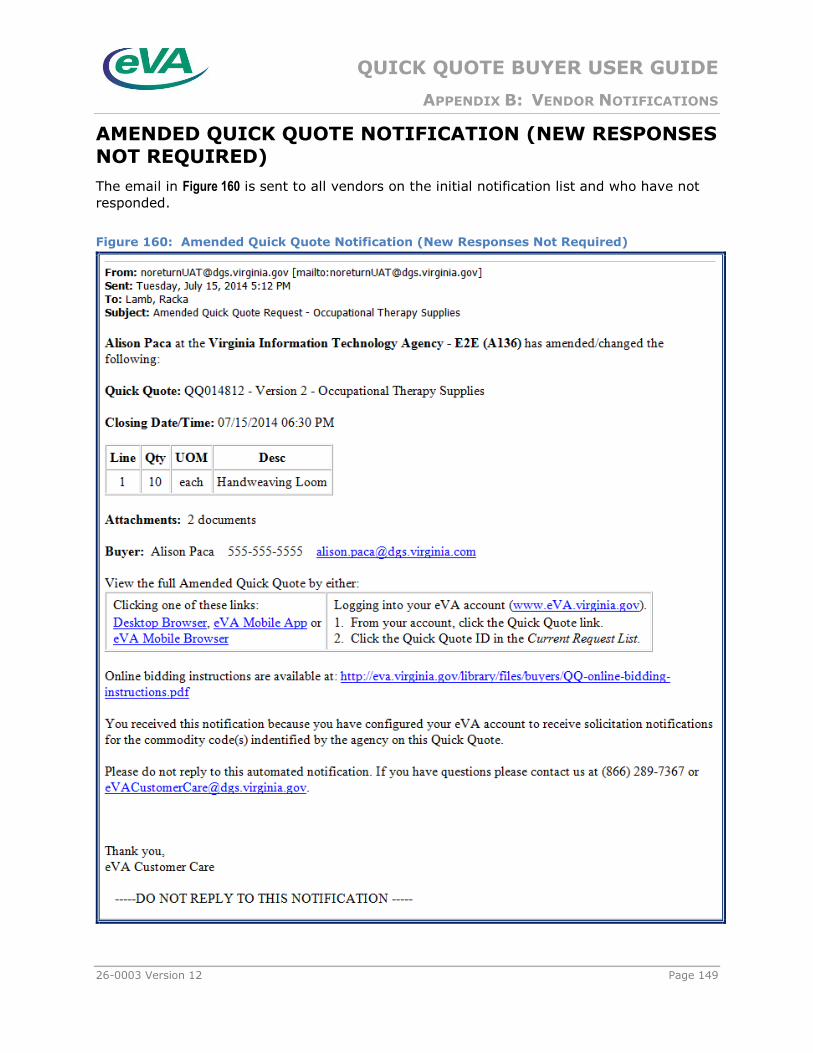
QUICK QUOTE BUYER USER GUIDE
APPENDIX B: VENDOR NOTIFICATIONS
26-0003 Version 12 Page 149
AMENDED QUICK QUOTE NOTIFICATION (NEW RESPONSES NOT REQUIRED)
The email in Figure 160 is sent to all vendors on the initial notification list and who have not
responded.
Figure 160: Amended Quick Quote Notification (New Responses Not Required)
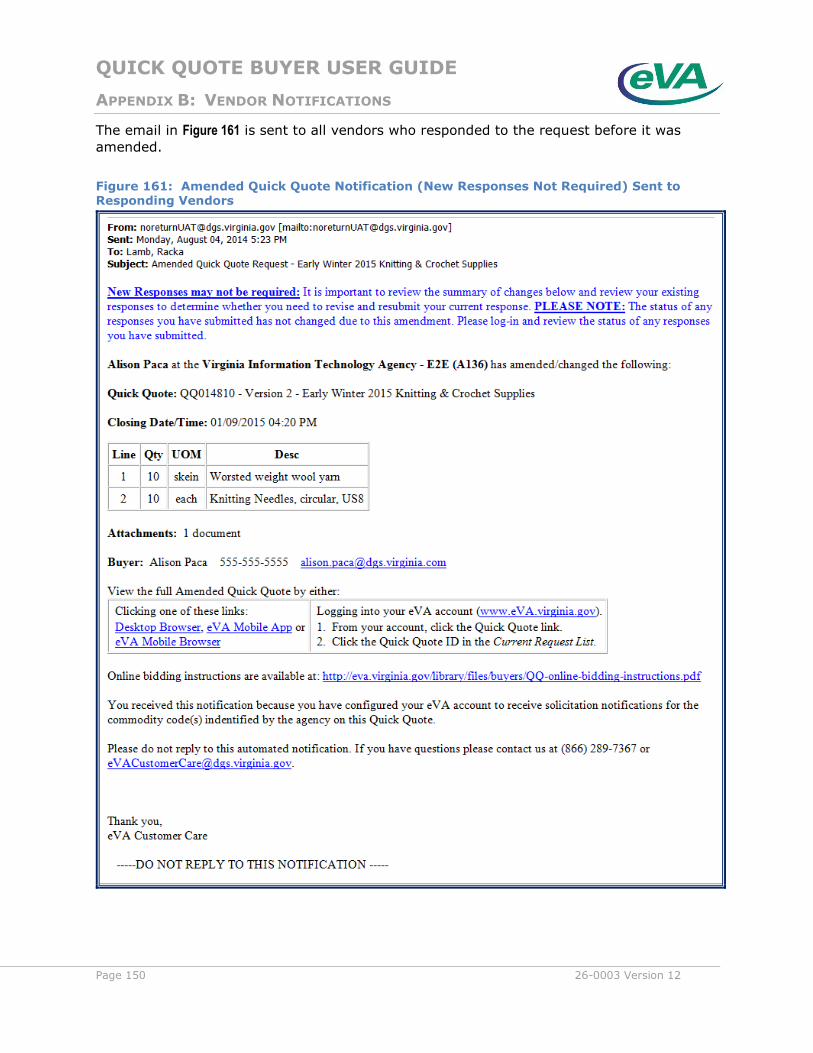
QUICK QUOTE BUYER USER GUIDE
APPENDIX B: VENDOR NOTIFICATIONS
Page 150 26-0003 Version 12
The email in Figure 161 is sent to all vendors who responded to the request before it was
amended.
Figure 161: Amended Quick Quote Notification (New Responses Not Required) Sent to Responding Vendors
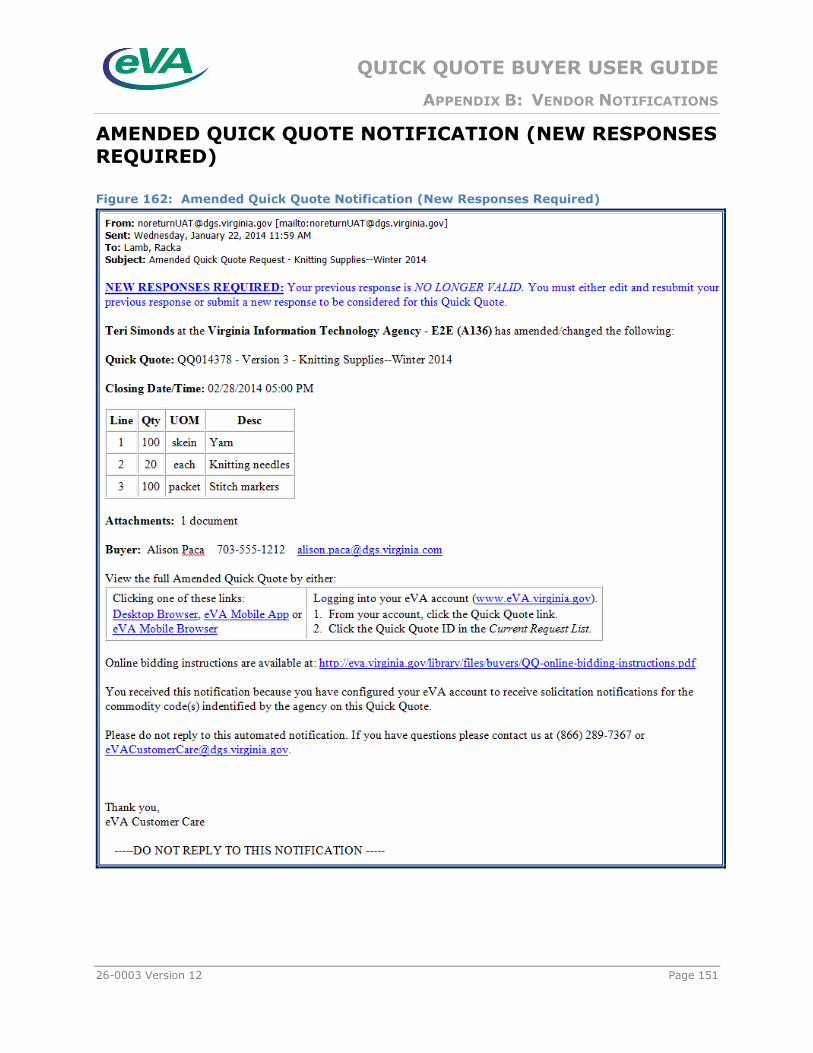
QUICK QUOTE BUYER USER GUIDE
APPENDIX B: VENDOR NOTIFICATIONS
26-0003 Version 12 Page 151
AMENDED QUICK QUOTE NOTIFICATION (NEW RESPONSES REQUIRED)
Figure 162: Amended Quick Quote Notification (New Responses Required)

QUICK QUOTE BUYER USER GUIDE
APPENDIX B: VENDOR NOTIFICATIONS
Page 152 26-0003 Version 12
ELECTRONIC RESPONSE RECEIVED NOTIFICATION
Figure 163: Electronic Response Received Notification
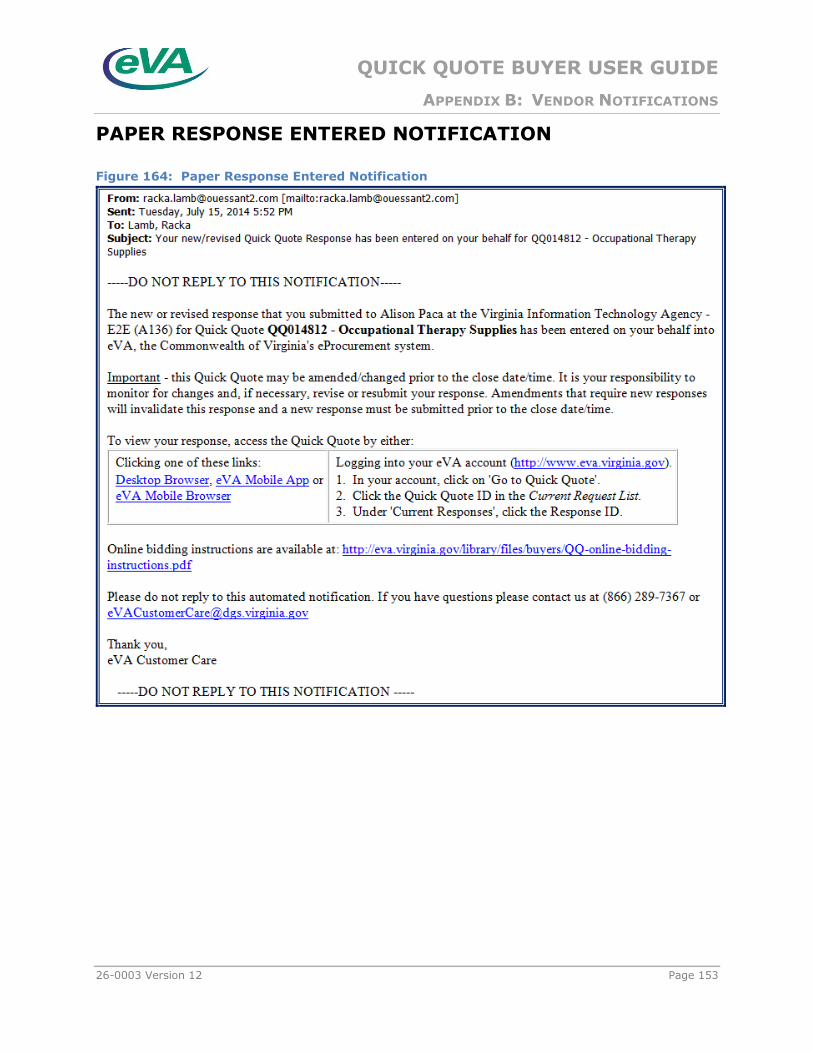
QUICK QUOTE BUYER USER GUIDE
APPENDIX B: VENDOR NOTIFICATIONS
26-0003 Version 12 Page 153
PAPER RESPONSE ENTERED NOTIFICATION
Figure 164: Paper Response Entered Notification

QUICK QUOTE BUYER USER GUIDE
APPENDIX B: VENDOR NOTIFICATIONS
Page 154 26-0003 Version 12
CANCELED REQUEST NOTIFICATION
Figure 165: Canceled Request Notification
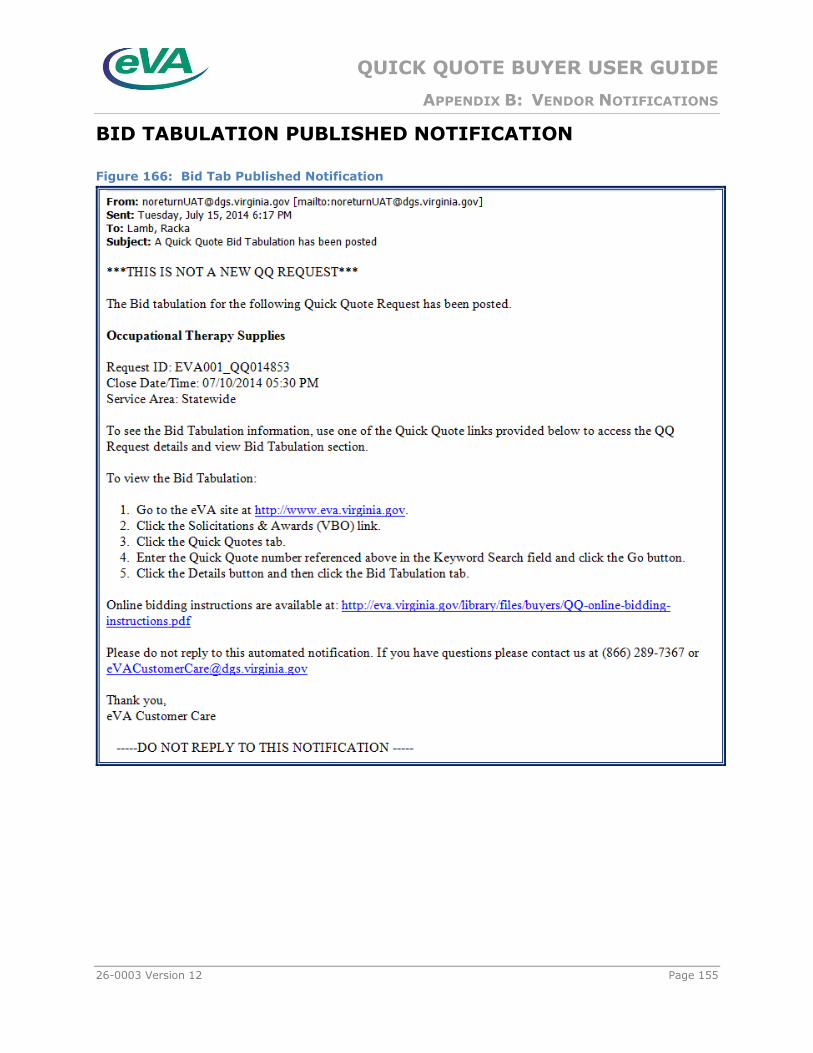
QUICK QUOTE BUYER USER GUIDE
APPENDIX B: VENDOR NOTIFICATIONS
26-0003 Version 12 Page 155
BID TABULATION PUBLISHED NOTIFICATION
Figure 166: Bid Tab Published Notification