Embed Size (px)
DESCRIPTION
nuxeo
Citation preview
1. Document Management - User Guide . . . . . . . . . . . . . . . . . . . . . . . . . . . . . . . . . . . . . . . . . . . . . . . . . . . . . . . . 21.1 Document Management concepts . . . . . . . . . . . . . . . . . . . . . . . . . . . . . . . . . . . . . . . . . . . . . . . . . . . . . . 21.2 Browsing content in Document Management . . . . . . . . . . . . . . . . . . . . . . . . . . . . . . . . . . . . . . . . . . . . . . 5
1.2.1 Accessing content . . . . . . . . . . . . . . . . . . . . . . . . . . . . . . . . . . . . . . . . . . . . . . . . . . . . . . . . . . . . . . 51.2.2 Changing content presentation . . . . . . . . . . . . . . . . . . . . . . . . . . . . . . . . . . . . . . . . . . . . . . . . . . . . 71.2.3 Searching Nuxeo DM . . . . . . . . . . . . . . . . . . . . . . . . . . . . . . . . . . . . . . . . . . . . . . . . . . . . . . . . . . . 111.2.4 User home . . . . . . . . . . . . . . . . . . . . . . . . . . . . . . . . . . . . . . . . . . . . . . . . . . . . . . . . . . . . . . . . . . . 191.2.5 Using Nuxeo gadgets from other applications . . . . . . . . . . . . . . . . . . . . . . . . . . . . . . . . . . . . . . . . 20
1.3 Working in workspaces . . . . . . . . . . . . . . . . . . . . . . . . . . . . . . . . . . . . . . . . . . . . . . . . . . . . . . . . . . . . . . . 211.3.1 Working with workspaces . . . . . . . . . . . . . . . . . . . . . . . . . . . . . . . . . . . . . . . . . . . . . . . . . . . . . . . . 21
1.3.1.1 Creating a workspace . . . . . . . . . . . . . . . . . . . . . . . . . . . . . . . . . . . . . . . . . . . . . . . . . . . . . . 221.3.1.2 Editing a workspace . . . . . . . . . . . . . . . . . . . . . . . . . . . . . . . . . . . . . . . . . . . . . . . . . . . . . . . 231.3.1.3 Deleting a workspace . . . . . . . . . . . . . . . . . . . . . . . . . . . . . . . . . . . . . . . . . . . . . . . . . . . . . . 241.3.1.4 Managing a workspace . . . . . . . . . . . . . . . . . . . . . . . . . . . . . . . . . . . . . . . . . . . . . . . . . . . . . 24
1.3.1.4.1 Managing deleted documents . . . . . . . . . . . . . . . . . . . . . . . . . . . . . . . . . . . . . . . . . . . 241.3.1.4.2 Setting publication targets . . . . . . . . . . . . . . . . . . . . . . . . . . . . . . . . . . . . . . . . . . . . . . 251.3.1.4.3 Applying a preset look to a space . . . . . . . . . . . . . . . . . . . . . . . . . . . . . . . . . . . . . . . . 261.3.1.4.4 Changing the presentation of document lists . . . . . . . . . . . . . . . . . . . . . . . . . . . . . . . 271.3.1.4.5 Defining the authorized document types . . . . . . . . . . . . . . . . . . . . . . . . . . . . . . . . . . . 291.3.1.4.6 Local search configurations . . . . . . . . . . . . . . . . . . . . . . . . . . . . . . . . . . . . . . . . . . . . . 30
1.3.2 Working with documents . . . . . . . . . . . . . . . . . . . . . . . . . . . . . . . . . . . . . . . . . . . . . . . . . . . . . . . . . 321.3.2.1 Creating content . . . . . . . . . . . . . . . . . . . . . . . . . . . . . . . . . . . . . . . . . . . . . . . . . . . . . . . . . . 321.3.2.2 Editing content . . . . . . . . . . . . . . . . . . . . . . . . . . . . . . . . . . . . . . . . . . . . . . . . . . . . . . . . . . . 341.3.2.3 Deleting content . . . . . . . . . . . . . . . . . . . . . . . . . . . . . . . . . . . . . . . . . . . . . . . . . . . . . . . . . . 36
1.3.3 Notes . . . . . . . . . . . . . . . . . . . . . . . . . . . . . . . . . . . . . . . . . . . . . . . . . . . . . . . . . . . . . . . . . . . . . . . . 371.3.4 Files . . . . . . . . . . . . . . . . . . . . . . . . . . . . . . . . . . . . . . . . . . . . . . . . . . . . . . . . . . . . . . . . . . . . . . . . 391.3.5 Folders . . . . . . . . . . . . . . . . . . . . . . . . . . . . . . . . . . . . . . . . . . . . . . . . . . . . . . . . . . . . . . . . . . . . . . 401.3.6 Working using drag and drop . . . . . . . . . . . . . . . . . . . . . . . . . . . . . . . . . . . . . . . . . . . . . . . . . . . . . 42
1.3.6.1 Installing Drag and Drop extensions . . . . . . . . . . . . . . . . . . . . . . . . . . . . . . . . . . . . . . . . . . . 421.3.6.2 Importing content using Drag and Drop . . . . . . . . . . . . . . . . . . . . . . . . . . . . . . . . . . . . . . . . 42
1.3.7 Desktop & Office Suites Integration . . . . . . . . . . . . . . . . . . . . . . . . . . . . . . . . . . . . . . . . . . . . . . . . 451.3.7.1 Working with Live Edit . . . . . . . . . . . . . . . . . . . . . . . . . . . . . . . . . . . . . . . . . . . . . . . . . . . . . . 45
1.3.7.1.1 Installing Live Edit . . . . . . . . . . . . . . . . . . . . . . . . . . . . . . . . . . . . . . . . . . . . . . . . . . . . 471.3.7.1.2 Live Edit compatibility table . . . . . . . . . . . . . . . . . . . . . . . . . . . . . . . . . . . . . . . . . . . . . 521.3.7.1.3 Manage your own file type with LiveEdit . . . . . . . . . . . . . . . . . . . . . . . . . . . . . . . . . . . 55
1.3.7.2 Working with WebDAV and WSS . . . . . . . . . . . . . . . . . . . . . . . . . . . . . . . . . . . . . . . . . . . . . 551.3.8 Relations . . . . . . . . . . . . . . . . . . . . . . . . . . . . . . . . . . . . . . . . . . . . . . . . . . . . . . . . . . . . . . . . . . . . . 581.3.9 Comments . . . . . . . . . . . . . . . . . . . . . . . . . . . . . . . . . . . . . . . . . . . . . . . . . . . . . . . . . . . . . . . . . . . . 591.3.10 Annotations . . . . . . . . . . . . . . . . . . . . . . . . . . . . . . . . . . . . . . . . . . . . . . . . . . . . . . . . . . . . . . . . . . 611.3.11 Tags . . . . . . . . . . . . . . . . . . . . . . . . . . . . . . . . . . . . . . . . . . . . . . . . . . . . . . . . . . . . . . . . . . . . . . . 621.3.12 Document's history . . . . . . . . . . . . . . . . . . . . . . . . . . . . . . . . . . . . . . . . . . . . . . . . . . . . . . . . . . . . 641.3.13 Alerts . . . . . . . . . . . . . . . . . . . . . . . . . . . . . . . . . . . . . . . . . . . . . . . . . . . . . . . . . . . . . . . . . . . . . . . 65
1.3.13.1 Sending an email . . . . . . . . . . . . . . . . . . . . . . . . . . . . . . . . . . . . . . . . . . . . . . . . . . . . . . . . 651.3.13.2 Setting automatic notifications . . . . . . . . . . . . . . . . . . . . . . . . . . . . . . . . . . . . . . . . . . . . . . 67
1.3.14 Workflows . . . . . . . . . . . . . . . . . . . . . . . . . . . . . . . . . . . . . . . . . . . . . . . . . . . . . . . . . . . . . . . . . . . 701.3.14.1 Starting a workflow . . . . . . . . . . . . . . . . . . . . . . . . . . . . . . . . . . . . . . . . . . . . . . . . . . . . . . . 701.3.14.2 Managing the workflow participants . . . . . . . . . . . . . . . . . . . . . . . . . . . . . . . . . . . . . . . . . . 711.3.14.3 Participating to a workflow . . . . . . . . . . . . . . . . . . . . . . . . . . . . . . . . . . . . . . . . . . . . . . . . . 741.3.14.4 Abandoning a workflow . . . . . . . . . . . . . . . . . . . . . . . . . . . . . . . . . . . . . . . . . . . . . . . . . . . . 76
1.3.15 Forums . . . . . . . . . . . . . . . . . . . . . . . . . . . . . . . . . . . . . . . . . . . . . . . . . . . . . . . . . . . . . . . . . . . . . 771.3.15.1 Managing topics . . . . . . . . . . . . . . . . . . . . . . . . . . . . . . . . . . . . . . . . . . . . . . . . . . . . . . . . . 781.3.15.2 Participating to a topic . . . . . . . . . . . . . . . . . . . . . . . . . . . . . . . . . . . . . . . . . . . . . . . . . . . . . 80
1.3.16 Pictures . . . . . . . . . . . . . . . . . . . . . . . . . . . . . . . . . . . . . . . . . . . . . . . . . . . . . . . . . . . . . . . . . . . . . 821.3.17 Websites and blogs . . . . . . . . . . . . . . . . . . . . . . . . . . . . . . . . . . . . . . . . . . . . . . . . . . . . . . . . . . . . 84
1.3.17.1 Blogs . . . . . . . . . . . . . . . . . . . . . . . . . . . . . . . . . . . . . . . . . . . . . . . . . . . . . . . . . . . . . . . . . . 851.3.17.2 Websites . . . . . . . . . . . . . . . . . . . . . . . . . . . . . . . . . . . . . . . . . . . . . . . . . . . . . . . . . . . . . . . 87
1.3.18 Email folders . . . . . . . . . . . . . . . . . . . . . . . . . . . . . . . . . . . . . . . . . . . . . . . . . . . . . . . . . . . . . . . . . 891.3.19 Using Workspace Templates . . . . . . . . . . . . . . . . . . . . . . . . . . . . . . . . . . . . . . . . . . . . . . . . . . . . 911.3.20 Exporting documents . . . . . . . . . . . . . . . . . . . . . . . . . . . . . . . . . . . . . . . . . . . . . . . . . . . . . . . . . . 92
1.4 Working in sections . . . . . . . . . . . . . . . . . . . . . . . . . . . . . . . . . . . . . . . . . . . . . . . . . . . . . . . . . . . . . . . . . . 971.4.1 Publishing documents . . . . . . . . . . . . . . . . . . . . . . . . . . . . . . . . . . . . . . . . . . . . . . . . . . . . . . . . . . . 97
1.5 Managing Nuxeo DM . . . . . . . . . . . . . . . . . . . . . . . . . . . . . . . . . . . . . . . . . . . . . . . . . . . . . . . . . . . . . . . . 1011.5.1 Managing access rights . . . . . . . . . . . . . . . . . . . . . . . . . . . . . . . . . . . . . . . . . . . . . . . . . . . . . . . . . 1011.5.2 Managing groups . . . . . . . . . . . . . . . . . . . . . . . . . . . . . . . . . . . . . . . . . . . . . . . . . . . . . . . . . . . . . . 1061.5.3 Managing users . . . . . . . . . . . . . . . . . . . . . . . . . . . . . . . . . . . . . . . . . . . . . . . . . . . . . . . . . . . . . . . 1081.5.4 Managing vocabularies . . . . . . . . . . . . . . . . . . . . . . . . . . . . . . . . . . . . . . . . . . . . . . . . . . . . . . . . . . 1121.5.5 Managing dashboards . . . . . . . . . . . . . . . . . . . . . . . . . . . . . . . . . . . . . . . . . . . . . . . . . . . . . . . . . . 1151.5.6 Managing authentication with other applications . . . . . . . . . . . . . . . . . . . . . . . . . . . . . . . . . . . . . . 117
Nuxeo Document Management 5.5 Documentation Center
Copyright © 2010-2012 Nuxeo. All Rights Reserved.
Document Management - User GuideNuxeo Document Management is the document management module of the Nuxeo Platform. It provides organizationswith the features they need to enable their teams to work more efficiently either on a project-basis or on longer termbusiness processes.
This user guide provides information and step-by-step instructions to help you use the Document Management moduleof the Nuxeo Platform. Collaborative work takes place in , where you can create documents, share and editworkspacesthem. When documents are ready for distribution, you can publish them in , which are the spaces devoted tosectionscontent distribution.
For administrators, the integrated Admin Center provides tools to manage, monitor and extend the application withplugins and customizations.
You can come and discuss Nuxeo DM with other users on our .discussion forum
Download
.Download this documentation in PDF
Document Management 5.5 User Guide
Document Management conceptsBrowsing content in Document Management
Accessing contentChanging content presentationSearching Nuxeo DMUser homeUsing Nuxeo gadgets from other applications
Working in workspacesWorking with workspacesWorking with documentsNotesFilesFoldersWorking using drag and dropDesktop & Office Suites IntegrationRelationsCommentsAnnotationsTagsDocument's historyAlertsWorkflowsForumsPicturesWebsites and blogsEmail foldersUsing Workspace TemplatesExporting documents
Working in sectionsPublishing documents
Managing Nuxeo DMManaging access rightsManaging groupsManaging usersManaging vocabulariesManaging dashboardsManaging authentication with other applications
Document Management conceptsNuxeo DM is the Nuxeo Platform document management module. It distinguishes collaborative work and contentdistribution.
Nuxeo Document Management 5.5 Documentation Center
Copyright © 2010-2012 Nuxeo. All Rights Reserved.
The general concept is this: documents are created, edited, possibly approved in workspaces. When finished, they arepublished in sections. When obsolete, they're unpublished from sections. Actions users can perform on documents aredetermined by access rights given by spaces managers. To encourage collaborative work and information sharing,Nuxeo DM proposes several collaborative services, such as forums, blogs and websites.
On this page
Available spacesAccess rightsGroups of users
Available spaces
Tabs are available on top the of the page, that give access to different environments.
The tab is where the user can find all the information that concern him: his dashboard to get a quickHomeaccess to documents, and that he can customize with internal and external gadgets, the summary of hisnotification subscriptions, see his profile, etc.The tab is the main tab. This is where the majority of user's activity within the DMDocument Managementmodule will occur since it's where users can work on documents and browse your application domains,workspace, sections, etc.
Administrators have two extra tabs:
The tab, from which they can .Admin Center manage the applicationThe tab,which provides access to Nuxeo Connect and , the online customization andStudio Nuxeo Studioconfiguration environment.
Collaborative work takes place in , where users can and . are designedworkspaces create edit documents Workspacesto make capture, sharing and editing of documents easier using desktop integration features, , . Incomments annotationsthe mean time, , , and enable you to build a coherent anddocuments history and versioning relations workflows alertscontrolled documents structure.
To help users create the workspaces in which they work, you can create workspaces and prepare thetemplatesstructure that will be applied to workspaces used in .template-based workspaces
When documents are finished and ready, they are published in . Traditionally opened to a wider audience thansectionsworkspaces, sections are dedicated to content distribution and communication and are designed for contentconsultation. That is why you won't be able to change documents (edit or move them) in sections : documents publishedin sections are frozen versions of workspace documents. is controlled using a workflow, that requiresPublishingpublishing requests to be so documents can be seen in sections.approved
Sections, workspaces and templates are grouped in domains. A domain can be considered as a mini-application inNuxeo or a root in the application. Typically you can use domains to open the application to two or more very differentpopulations of users. For instance, you can have an "intranet" domain and an "extranet" domain. Domains are can betotally independent or not, depending on the access rights you set on each domain.
Access rights
Access to documents and the actions allowed are determined by access rights. Some users will then be allowed to onlyread documents, when others will be able to edit documents or to manage spaces and documents.
The available access rights are:
Right Actions in workspaces Actions in sections
Read Consult content Comment documents Annotate documents Tag documents
Consult content Comment documents Annotate documents Tag documents + Can ask for publishing actions
Version Manage the archived versions of adocument (view, restore, delete) + Read actions
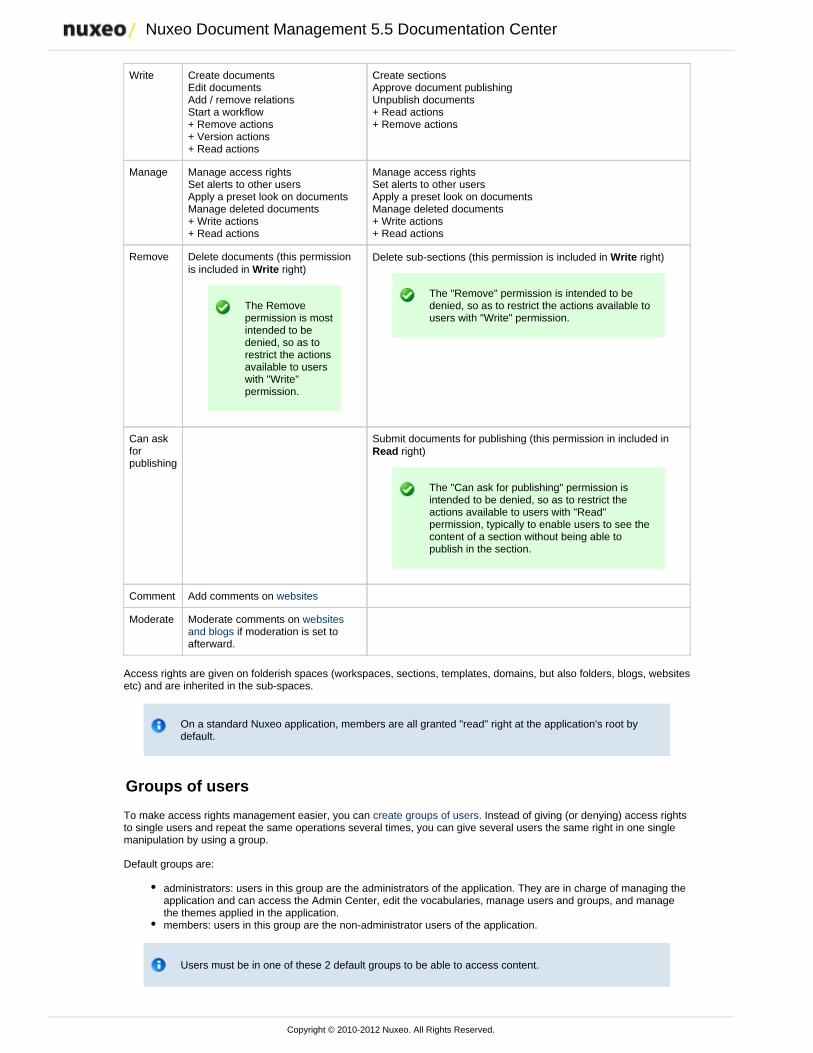
Nuxeo Document Management 5.5 Documentation Center
Copyright © 2010-2012 Nuxeo. All Rights Reserved.
Write Create documents Edit documents Add / remove relations Start a workflow + Remove actions + Version actions + Read actions
Create sections Approve document publishing Unpublish documents + Read actions + Remove actions
Manage Manage access rights Set alerts to other users Apply a preset look on documents Manage deleted documents + Write actions + Read actions
Manage access rights Set alerts to other users Apply a preset look on documents Manage deleted documents + Write actions + Read actions
Remove Delete documents (this permissionis included in right) Write
The Removepermission is mostintended to bedenied, so as torestrict the actionsavailable to userswith "Write"permission.
Delete sub-sections (this permission is included in right)Write
The "Remove" permission is intended to bedenied, so as to restrict the actions available tousers with "Write" permission.
Can askforpublishing
Submit documents for publishing (this permission in included in right) Read
The "Can ask for publishing" permission isintended to be denied, so as to restrict theactions available to users with "Read"permission, typically to enable users to see thecontent of a section without being able topublish in the section.
Comment Add comments on websites
Moderate Moderate comments on websites if moderation is set toand blogs
afterward.
Access rights are given on folderish spaces (workspaces, sections, templates, domains, but also folders, blogs, websitesetc) and are inherited in the sub-spaces.
On a standard Nuxeo application, members are all granted "read" right at the application's root bydefault.
Groups of users
To make access rights management easier, you can . Instead of giving (or denying) access rightscreate groups of usersto single users and repeat the same operations several times, you can give several users the same right in one singlemanipulation by using a group.
Default groups are:
administrators: users in this group are the administrators of the application. They are in charge of managing theapplication and can access the Admin Center, edit the vocabularies, manage users and groups, and managethe themes applied in the application.members: users in this group are the non-administrator users of the application.
Users must be in one of these 2 default groups to be able to access content.
Nuxeo Document Management 5.5 Documentation Center
Copyright © 2010-2012 Nuxeo. All Rights Reserved.
You can as many groups as needed.create
Related pages
Page: Document Management concepts
Page: Managing a workspace
Page: Working in sections
Page: Managing users
Page: Managing access rights
Page: Managing groups
Page: Editing a workspace
Page: Creating a workspace
Page: Deleting a workspace
Browsing content in Document ManagementTo help you find accurate documents, the Document Management module features several different ways to accessdocuments:
The different navigation trees, the tag cloud, or the dashboard enable you to browse content according to.different axis
You can also use the .simple, faceted or advanced search
For each of the available means to access documents, you can .customize the informations displayed
Accessing content
There are different ways to access content in Nuxeo DM. You can either use one of the navigation trees available, thetag cloud or your dashboard.
On this page
Navigation treesNavigation through folders
Virtual navigationTag CloudDashboard
Navigation trees
Several navigation trees are available so that you can access your documents either by going through folders (physicalnavigation) or using virtual navigation.
Navigation through folders
The default navigation tree displayed on the left hand side of the pages is the folders navigation tree. It displays all thedomain structure from the root. It enables you to easily access any space in the application structure.
Nuxeo Document Management 5.5 Documentation Center
Copyright © 2010-2012 Nuxeo. All Rights Reserved.
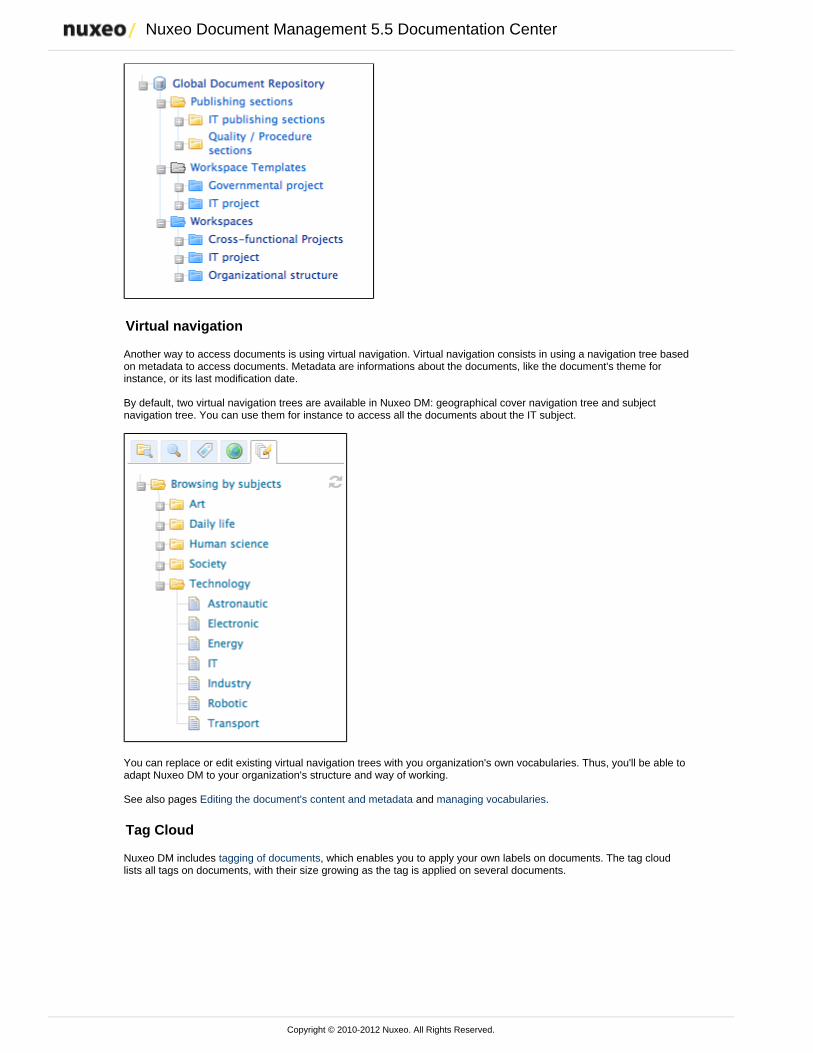
Virtual navigation
Another way to access documents is using virtual navigation. Virtual navigation consists in using a navigation tree basedon metadata to access documents. Metadata are informations about the documents, like the document's theme forinstance, or its last modification date.
By default, two virtual navigation trees are available in Nuxeo DM: geographical cover navigation tree and subjectnavigation tree. You can use them for instance to access all the documents about the IT subject.
You can replace or edit existing virtual navigation trees with you organization's own vocabularies. Thus, you'll be able toadapt Nuxeo DM to your organization's structure and way of working.
See also pages and .Editing the document's content and metadata managing vocabularies
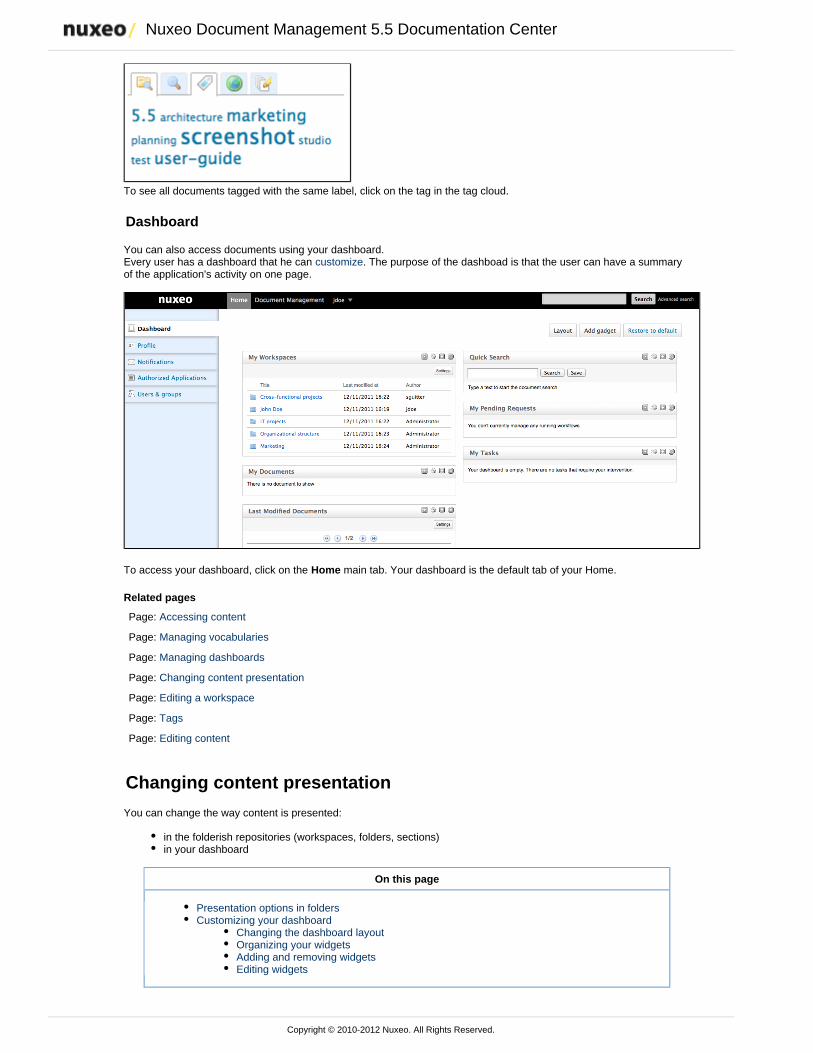
Tag Cloud
Nuxeo DM includes , which enables you to apply your own labels on documents. The tag cloudtagging of documentslists all tags on documents, with their size growing as the tag is applied on several documents.
Nuxeo Document Management 5.5 Documentation Center
Copyright © 2010-2012 Nuxeo. All Rights Reserved.
To see all documents tagged with the same label, click on the tag in the tag cloud.
Dashboard
You can also access documents using your dashboard.Every user has a dashboard that he can . The purpose of the dashboad is that the user can have a summarycustomizeof the application's activity on one page.
To access your dashboard, click on the main tab. Your dashboard is the default tab of your Home.Home
Related pages
Page: Accessing content
Page: Managing vocabularies
Page: Managing dashboards
Page: Changing content presentation
Page: Editing a workspace
Page: Tags
Page: Editing content
Changing content presentation
You can change the way content is presented:
in the folderish repositories (workspaces, folders, sections)in your dashboard
On this page
Presentation options in foldersCustomizing your dashboard
Changing the dashboard layoutOrganizing your widgetsAdding and removing widgetsEditing widgets
Nuxeo Document Management 5.5 Documentation Center
Copyright © 2010-2012 Nuxeo. All Rights Reserved.
Presentation options in folders
Different views of the content lists are available in workspaces, folders and sections:
list view (default view):
icons view:
compact view:
To change presentation: Click on one of the icons displayed on the top right corner of tab:Content
list view icon:
icon view icon:
compact view icon:
Customizing your dashboard
When you customize your dashboard, you can change the layout of the page, but you can also add, remove and edit thewidgets displayed.
Nuxeo Document Management 5.5 Documentation Center
Copyright © 2010-2012 Nuxeo. All Rights Reserved.
1.
2.
3.
1.
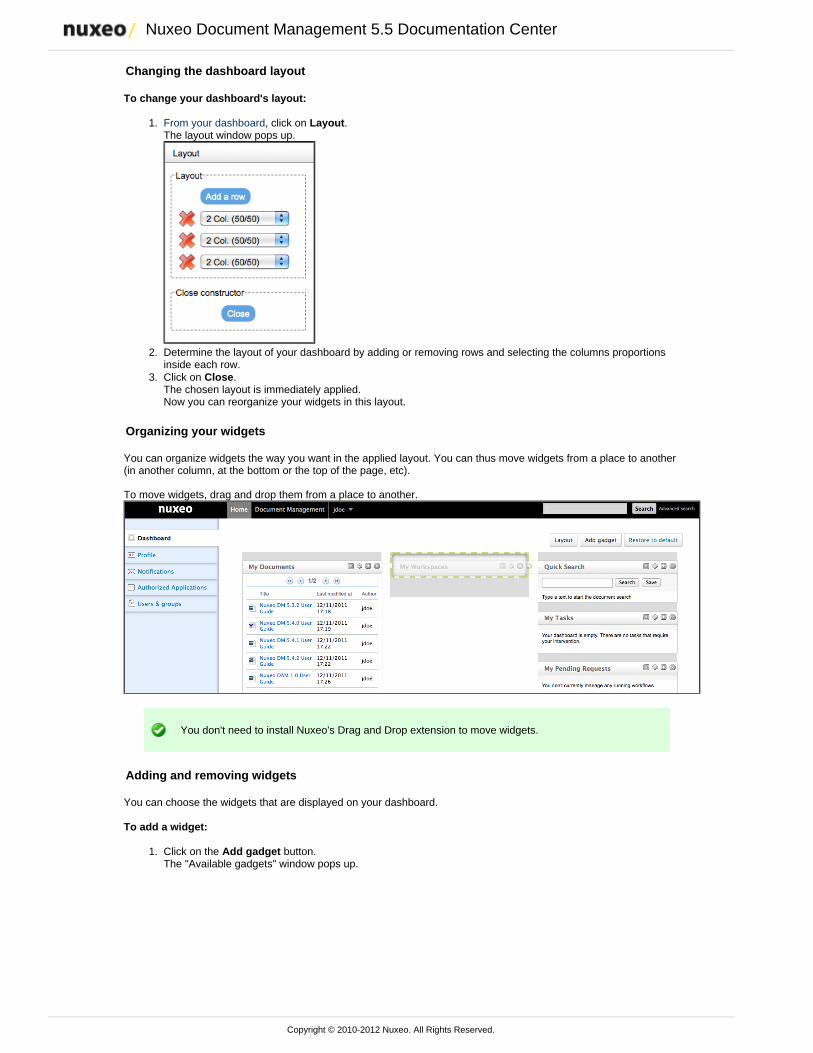
Changing the dashboard layout
To change your dashboard's layout:
From your dashboard, click on .LayoutThe layout window pops up.
Determine the layout of your dashboard by adding or removing rows and selecting the columns proportionsinside each row.Click on .CloseThe chosen layout is immediately applied.Now you can reorganize your widgets in this layout.
Organizing your widgets
You can organize widgets the way you want in the applied layout. You can thus move widgets from a place to another(in another column, at the bottom or the top of the page, etc).
To move widgets, drag and drop them from a place to another.
You don't need to install Nuxeo's Drag and Drop extension to move widgets.
Adding and removing widgets
You can choose the widgets that are displayed on your dashboard.
To add a widget:
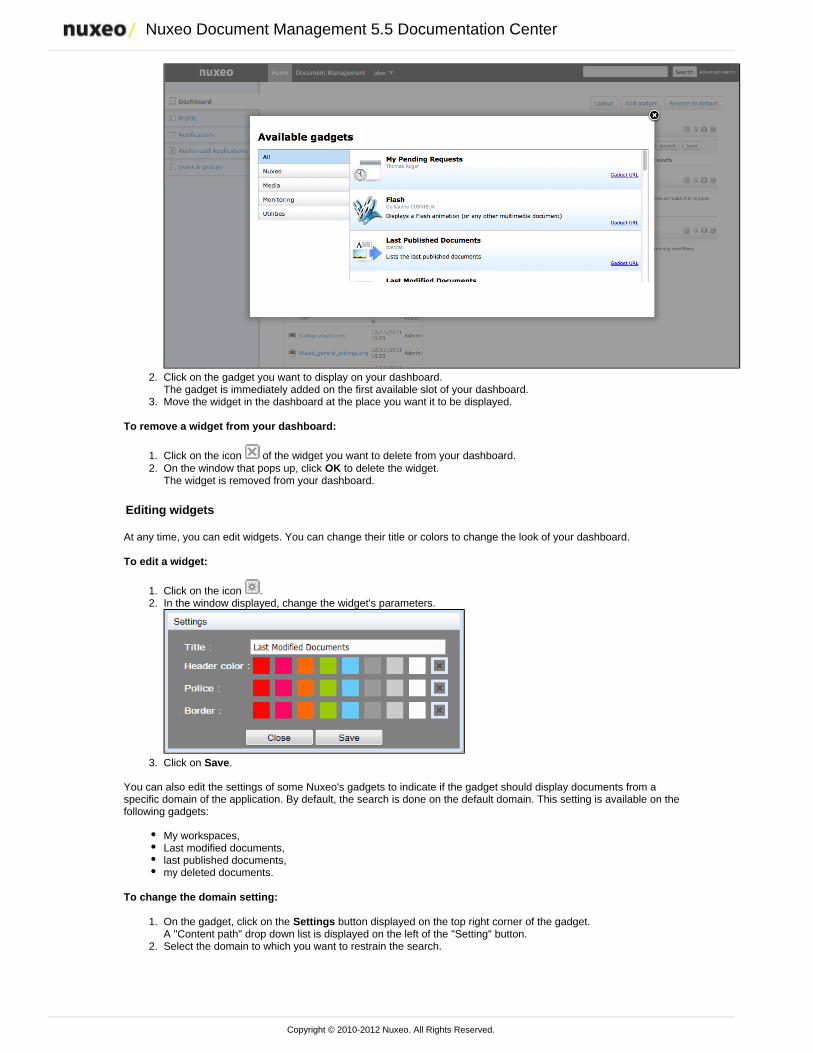
Click on the button.Add gadgetThe "Available gadgets" window pops up.
Nuxeo Document Management 5.5 Documentation Center
Copyright © 2010-2012 Nuxeo. All Rights Reserved.
1.
2.
3.
1. 2.
1. 2.
3.
1.
2.
Click on the gadget you want to display on your dashboard.The gadget is immediately added on the first available slot of your dashboard.Move the widget in the dashboard at the place you want it to be displayed.
To remove a widget from your dashboard:
Click on the icon of the widget you want to delete from your dashboard.On the window that pops up, click to delete the widget.OKThe widget is removed from your dashboard.
Editing widgets
At any time, you can edit widgets. You can change their title or colors to change the look of your dashboard.
To edit a widget:
Click on the icon .In the window displayed, change the widget's parameters.
Click on .Save
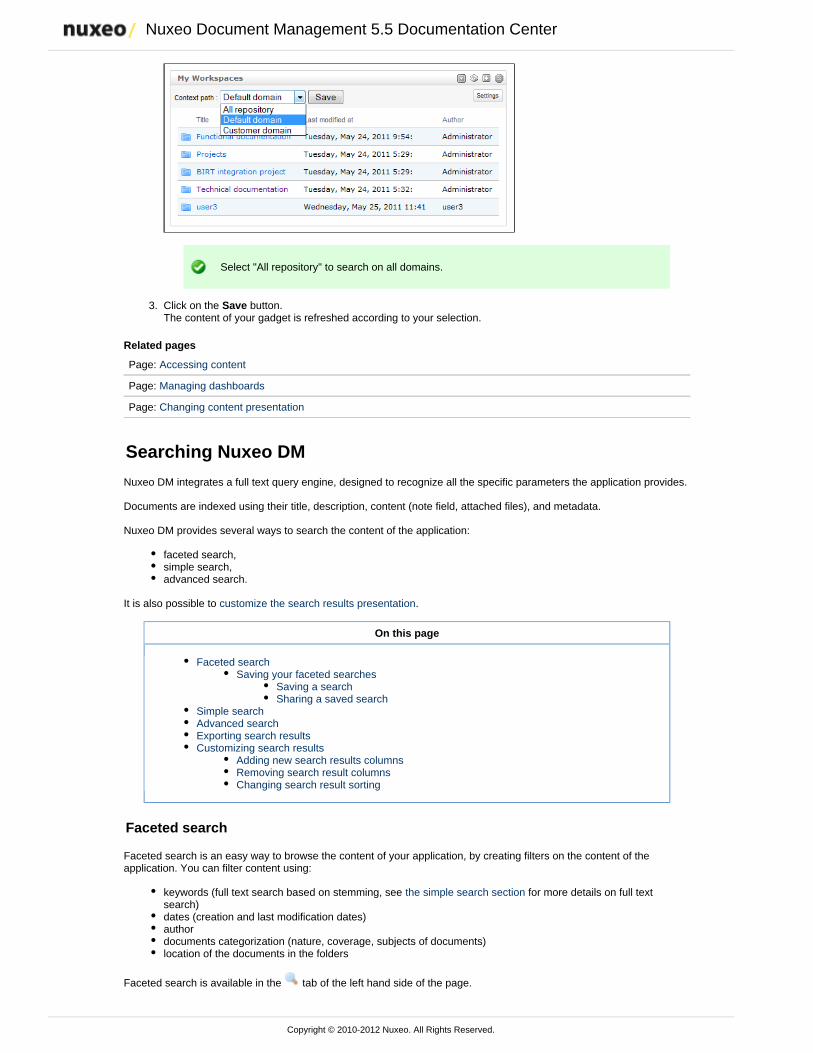
You can also edit the settings of some Nuxeo's gadgets to indicate if the gadget should display documents from aspecific domain of the application. By default, the search is done on the default domain. This setting is available on thefollowing gadgets:
My workspaces,Last modified documents,last published documents,my deleted documents.
To change the domain setting:
On the gadget, click on the button displayed on the top right corner of the gadget.SettingsA "Content path" drop down list is displayed on the left of the "Setting" button.Select the domain to which you want to restrain the search.
Nuxeo Document Management 5.5 Documentation Center
Copyright © 2010-2012 Nuxeo. All Rights Reserved.
2.
3.
Select "All repository" to search on all domains.
Click on the button.SaveThe content of your gadget is refreshed according to your selection.
Related pages
Page: Accessing content
Page: Managing dashboards
Page: Changing content presentation
Searching Nuxeo DM
Nuxeo DM integrates a full text query engine, designed to recognize all the specific parameters the application provides.
Documents are indexed using their title, description, content (note field, attached files), and metadata.
Nuxeo DM provides several ways to search the content of the application:
faceted search,simple search,advanced search.
It is also possible to .customize the search results presentation
On this page
Faceted searchSaving your faceted searches
Saving a searchSharing a saved search
Simple searchAdvanced searchExporting search resultsCustomizing search results
Adding new search results columnsRemoving search result columnsChanging search result sorting
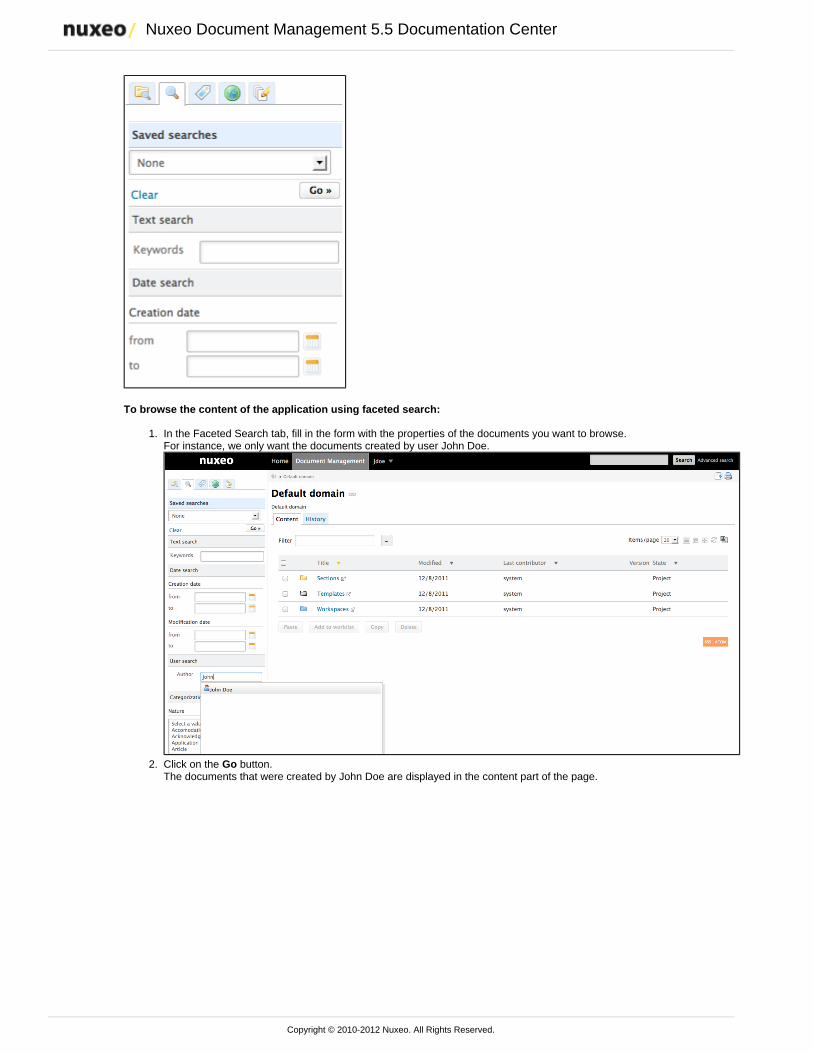
Faceted search
Faceted search is an easy way to browse the content of your application, by creating filters on the content of theapplication. You can filter content using:
keywords (full text search based on stemming, see for more details on full textthe simple search sectionsearch)dates (creation and last modification dates)authordocuments categorization (nature, coverage, subjects of documents)location of the documents in the folders
Faceted search is available in the tab of the left hand side of the page.
Nuxeo Document Management 5.5 Documentation Center
Copyright © 2010-2012 Nuxeo. All Rights Reserved.
1.
2.
To browse the content of the application using faceted search:
In the Faceted Search tab, fill in the form with the properties of the documents you want to browse.For instance, we only want the documents created by user John Doe.
Click on the button.GoThe documents that were created by John Doe are displayed in the content part of the page.
Nuxeo Document Management 5.5 Documentation Center
Copyright © 2010-2012 Nuxeo. All Rights Reserved.
2.
3.
4.
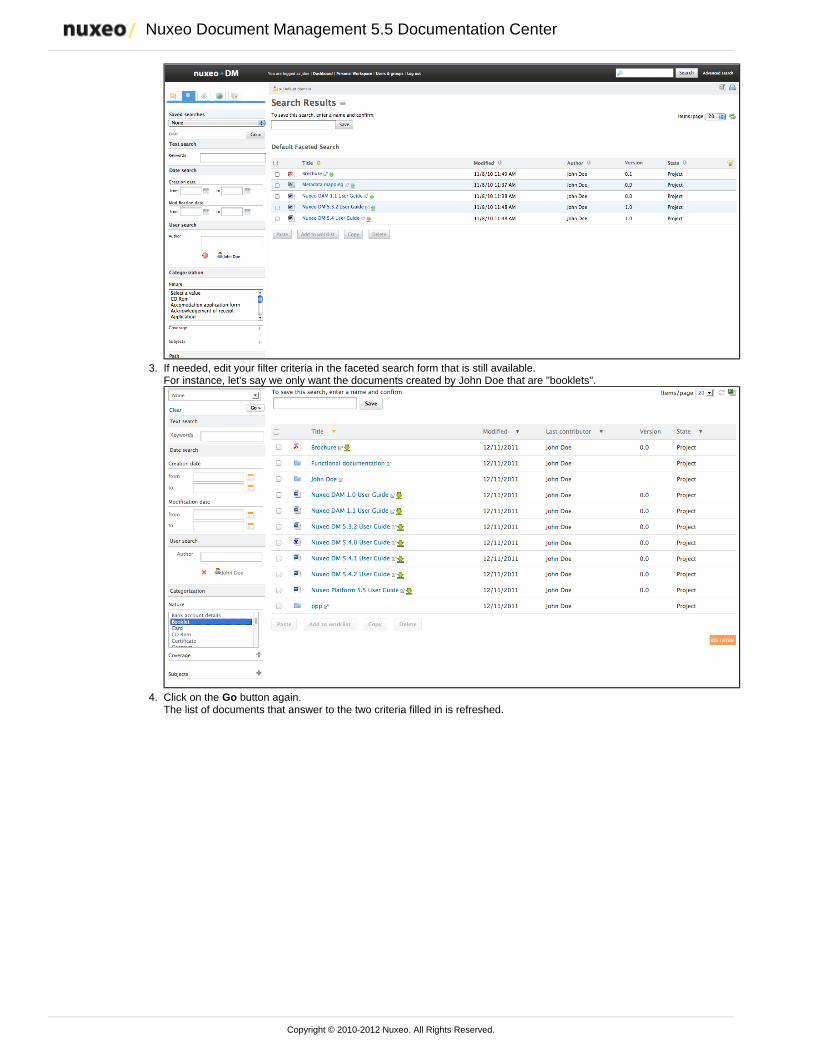
If needed, edit your filter criteria in the faceted search form that is still available.For instance, let's say we only want the documents created by John Doe that are "booklets".
Click on the button again.GoThe list of documents that answer to the two criteria filled in is refreshed.
Nuxeo Document Management 5.5 Documentation Center
Copyright © 2010-2012 Nuxeo. All Rights Reserved.
4.
1. 2.
3.
Saving your faceted searches
With faceted search comes the possibility to save your searches, so you can reuse them at anytime. You can also sharethese saved searched to make them available for other users.
Only faceted searches can be saved.
Saving a search
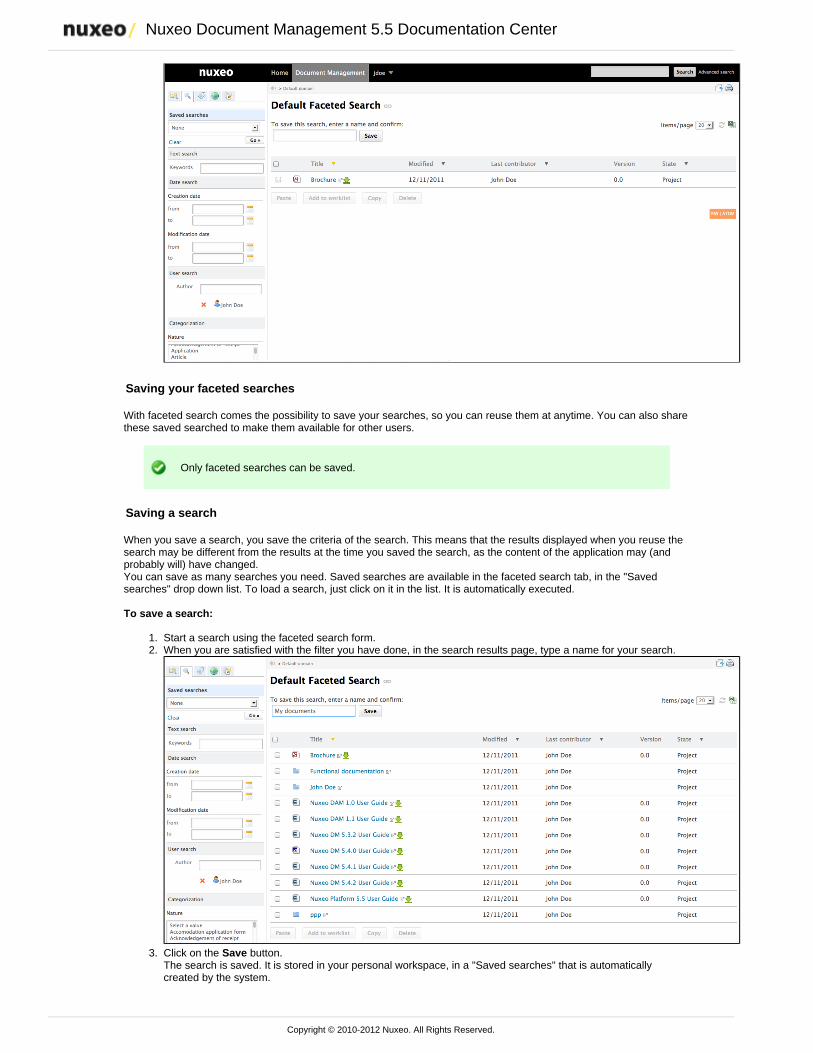
When you save a search, you save the criteria of the search. This means that the results displayed when you reuse thesearch may be different from the results at the time you saved the search, as the content of the application may (andprobably will) have changed. You can save as many searches you need. Saved searches are available in the faceted search tab, in the "Savedsearches" drop down list. To load a search, just click on it in the list. It is automatically executed.
To save a search:
Start a search using the faceted search form.When you are satisfied with the filter you have done, in the search results page, type a name for your search.
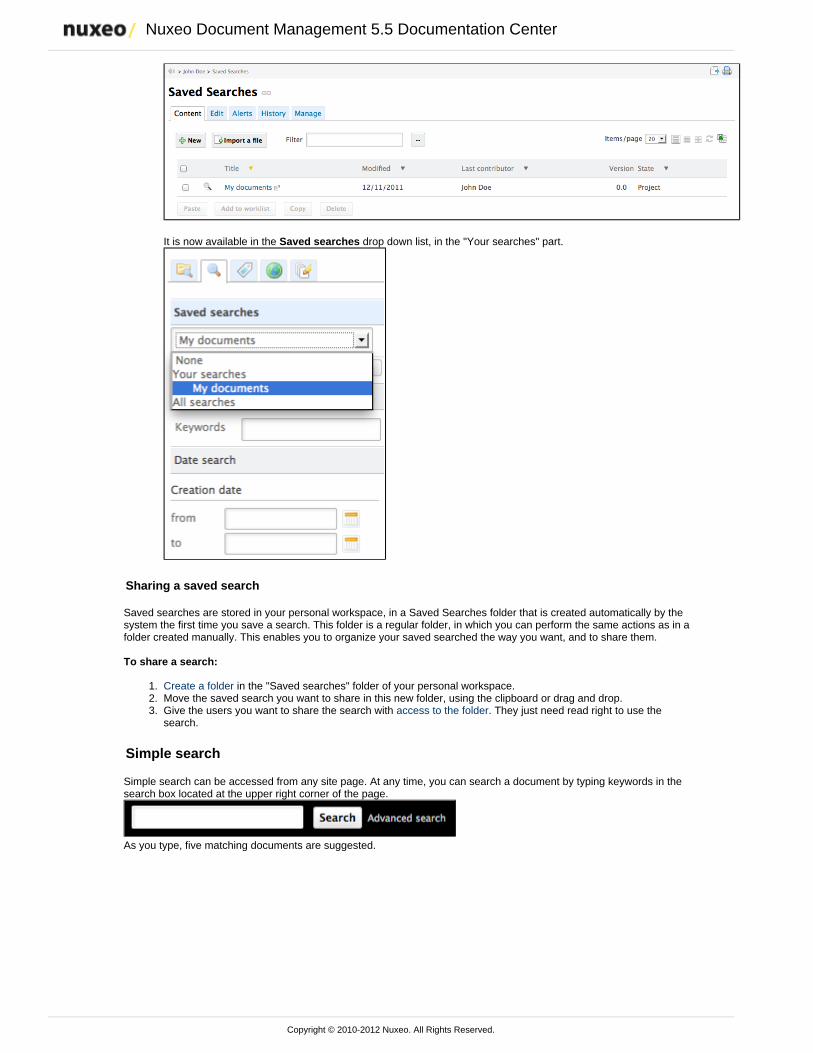
Click on the button.SaveThe search is saved. It is stored in your personal workspace, in a "Saved searches" that is automaticallycreated by the system.
Nuxeo Document Management 5.5 Documentation Center
Copyright © 2010-2012 Nuxeo. All Rights Reserved.
3.
1. 2. 3.
It is now available in the drop down list, in the "Your searches" part.Saved searches
Sharing a saved search
Saved searches are stored in your personal workspace, in a Saved Searches folder that is created automatically by thesystem the first time you save a search. This folder is a regular folder, in which you can perform the same actions as in afolder created manually. This enables you to organize your saved searched the way you want, and to share them.
To share a search:
Create a folder in the "Saved searches" folder of your personal workspace.Move the saved search you want to share in this new folder, using the clipboard or drag and drop.Give the users you want to share the search with . They just need read right to use theaccess to the foldersearch.
Simple search
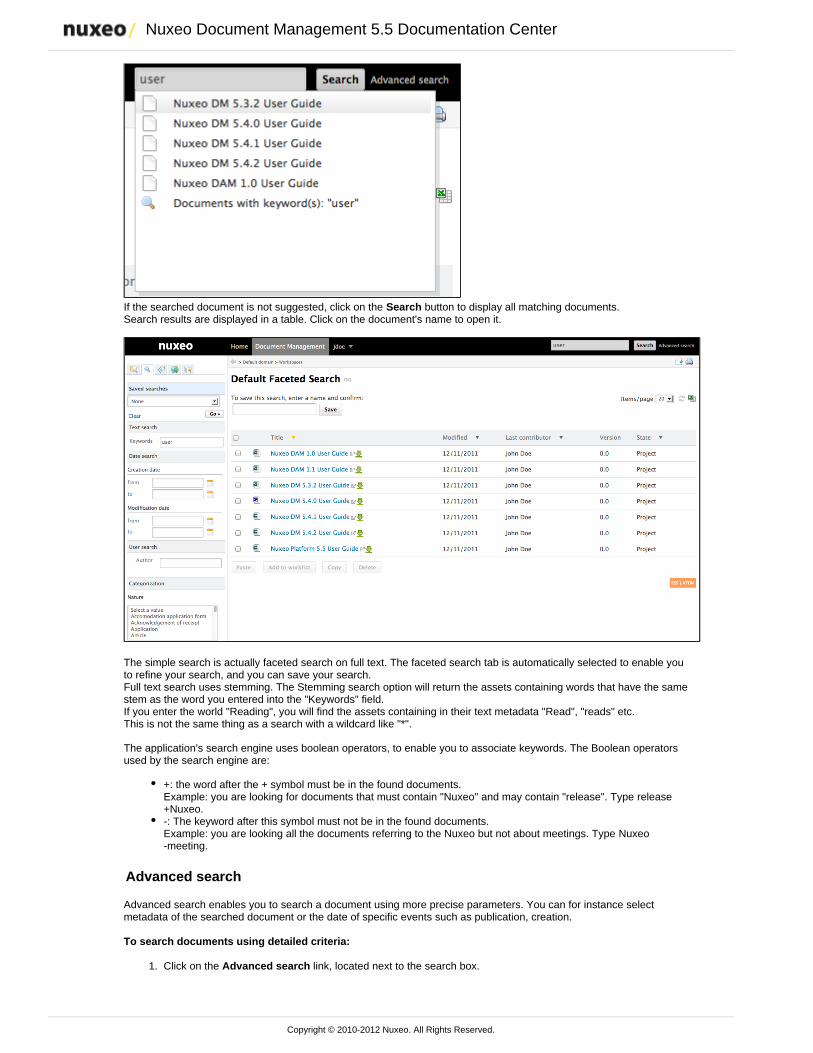
Simple search can be accessed from any site page. At any time, you can search a document by typing keywords in thesearch box located at the upper right corner of the page.
As you type, five matching documents are suggested.
Nuxeo Document Management 5.5 Documentation Center
Copyright © 2010-2012 Nuxeo. All Rights Reserved.
1.
If the searched document is not suggested, click on the button to display all matching documents. SearchSearch results are displayed in a table. Click on the document's name to open it.
The simple search is actually faceted search on full text. The faceted search tab is automatically selected to enable youto refine your search, and you can save your search.Full text search uses stemming. The Stemming search option will return the assets containing words that have the samestem as the word you entered into the "Keywords" field.If you enter the world "Reading", you will find the assets containing in their text metadata "Read", "reads" etc.This is not the same thing as a search with a wildcard like "*".
The application's search engine uses boolean operators, to enable you to associate keywords. The Boolean operatorsused by the search engine are:
+: the word after the + symbol must be in the found documents.Example: you are looking for documents that must contain "Nuxeo" and may contain "release". Type release
.+Nuxeo-: The keyword after this symbol must not be in the found documents.Example: you are looking all the documents referring to the Nuxeo but not about meetings. Type Nuxeo
.-meeting
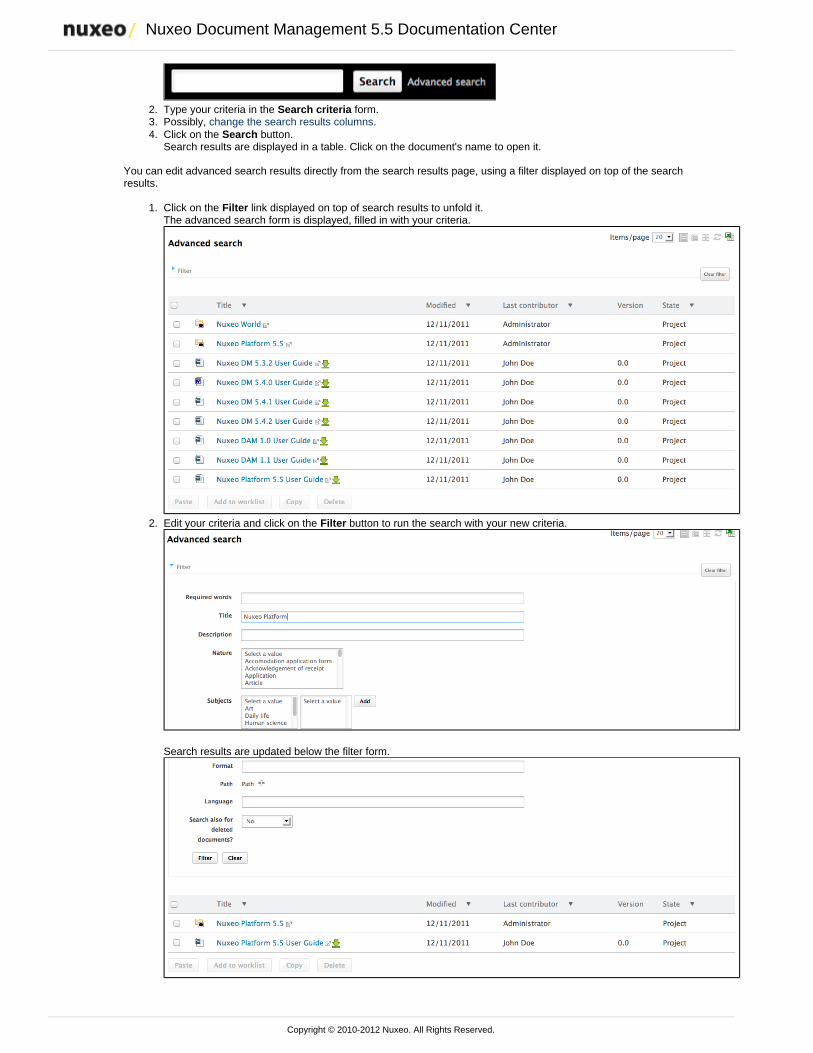
Advanced search
Advanced search enables you to search a document using more precise parameters. You can for instance selectmetadata of the searched document or the date of specific events such as publication, creation.
To search documents using detailed criteria:
Click on the link, located next to the search box.Advanced search
Nuxeo Document Management 5.5 Documentation Center
Copyright © 2010-2012 Nuxeo. All Rights Reserved.
1.
2. 3. 4.
1.
2.
Type your criteria in the form.Search criteriaPossibly, .change the search results columnsClick on the button.SearchSearch results are displayed in a table. Click on the document's name to open it.
You can edit advanced search results directly from the search results page, using a filter displayed on top of the searchresults.
Click on the link displayed on top of search results to unfold it.FilterThe advanced search form is displayed, filled in with your criteria.
Edit your criteria and click on the button to run the search with your new criteria.Filter
Search results are updated below the filter form.
Nuxeo Document Management 5.5 Documentation Center
Copyright © 2010-2012 Nuxeo. All Rights Reserved.
1.
2.
3.
1.
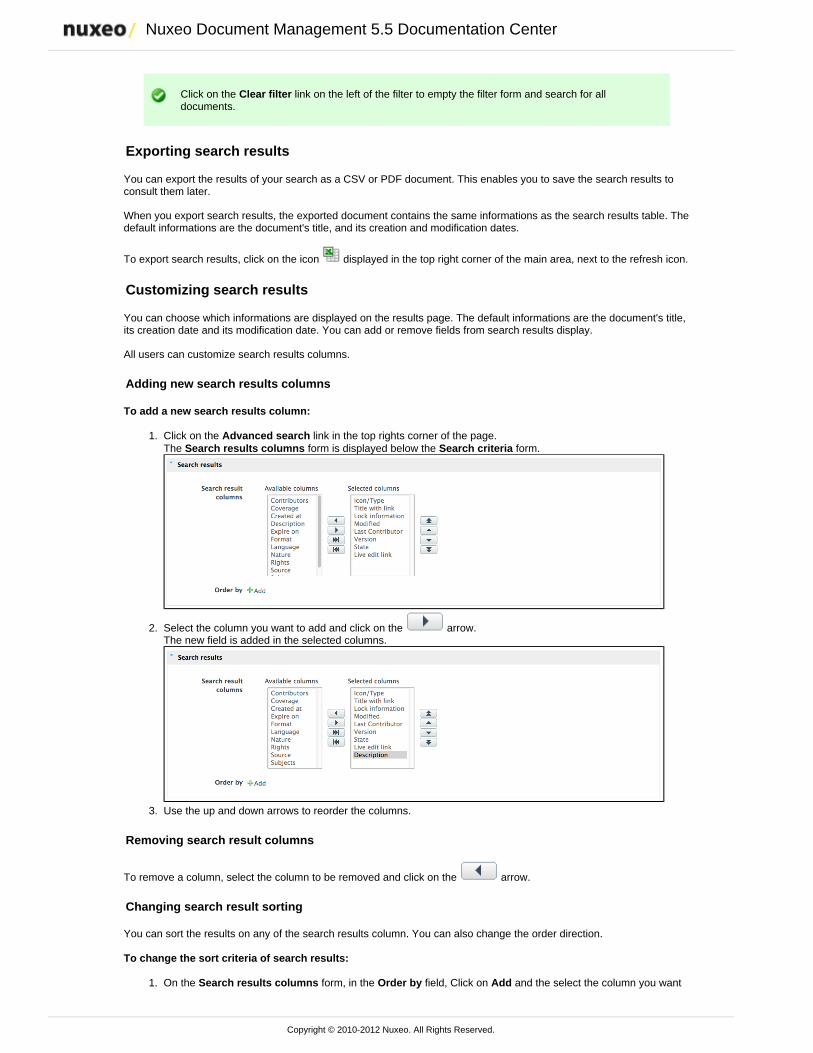
Click on the link on the left of the filter to empty the filter form and search for allClear filterdocuments.
Exporting search results
You can export the results of your search as a CSV or PDF document. This enables you to save the search results toconsult them later.
When you export search results, the exported document contains the same informations as the search results table. Thedefault informations are the document's title, and its creation and modification dates.
To export search results, click on the icon displayed in the top right corner of the main area, next to the refresh icon.
Customizing search results
You can choose which informations are displayed on the results page. The default informations are the document's title,its creation date and its modification date. You can add or remove fields from search results display.
All users can customize search results columns.
Adding new search results columns
To add a new search results column:
Click on the link in the top rights corner of the page.Advanced searchThe form is displayed below the form.Search results columns Search criteria
Select the column you want to add and click on the arrow.The new field is added in the selected columns.
Use the up and down arrows to reorder the columns.
Removing search result columns
To remove a column, select the column to be removed and click on the arrow.
Changing search result sorting
You can sort the results on any of the search results column. You can also change the order direction.
To change the sort criteria of search results:
On the form, in the field, Click on and the select the column you wantSearch results columns Order by Add
Nuxeo Document Management 5.5 Documentation Center
Copyright © 2010-2012 Nuxeo. All Rights Reserved.
1.
2. to use to sort the search results.In the field, select if you want to order search results in an increasing or decreasing order.Order direction
Related pages
Page: Searching Nuxeo DM
Page: Local search configurations
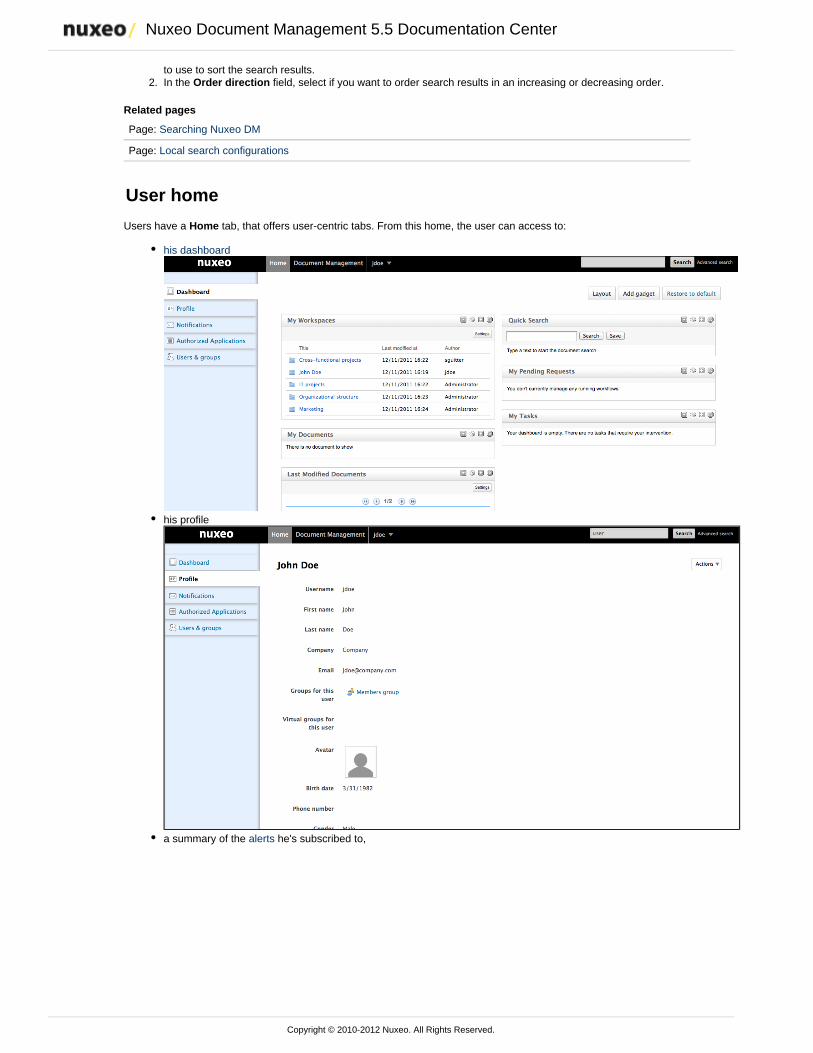
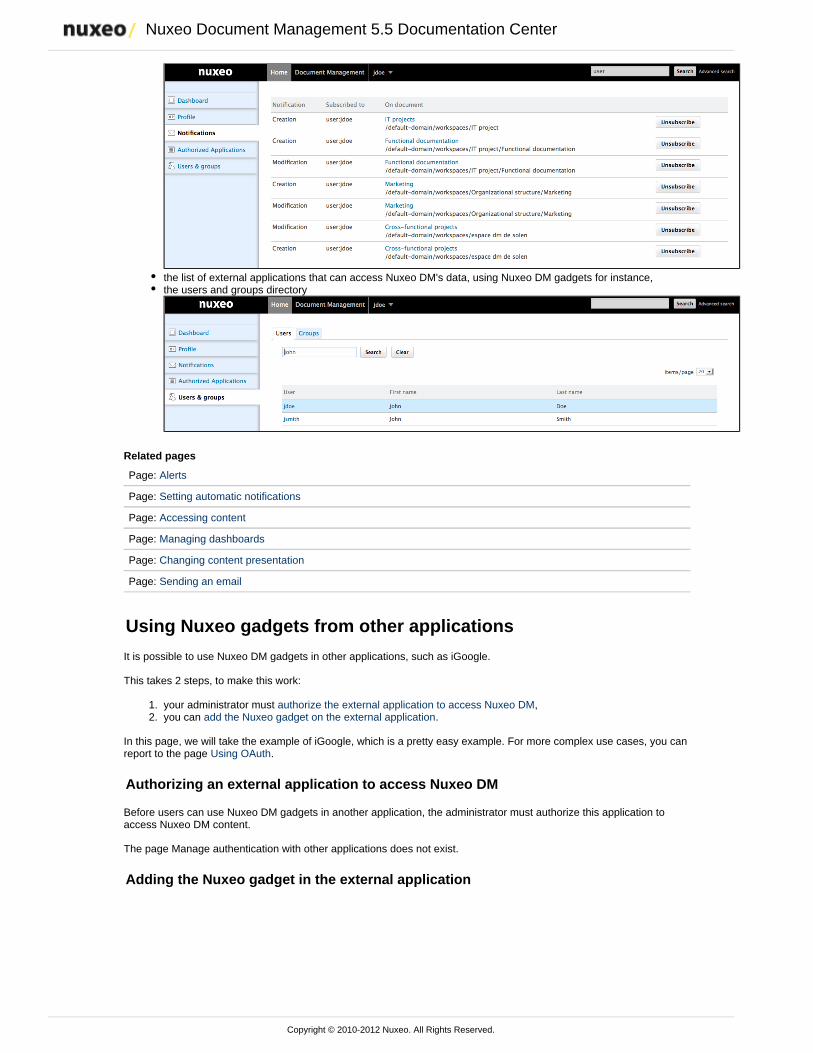
User home
Users have a tab, that offers user-centric tabs. From this home, the user can access to:Home
his dashboard
his profile
a summary of the he's subscribed to,alerts
Nuxeo Document Management 5.5 Documentation Center
Copyright © 2010-2012 Nuxeo. All Rights Reserved.
1. 2.
the list of external applications that can access Nuxeo DM's data, using Nuxeo DM gadgets for instance,the users and groups directory
Related pages
Page: Alerts
Page: Setting automatic notifications
Page: Accessing content
Page: Managing dashboards
Page: Changing content presentation
Page: Sending an email
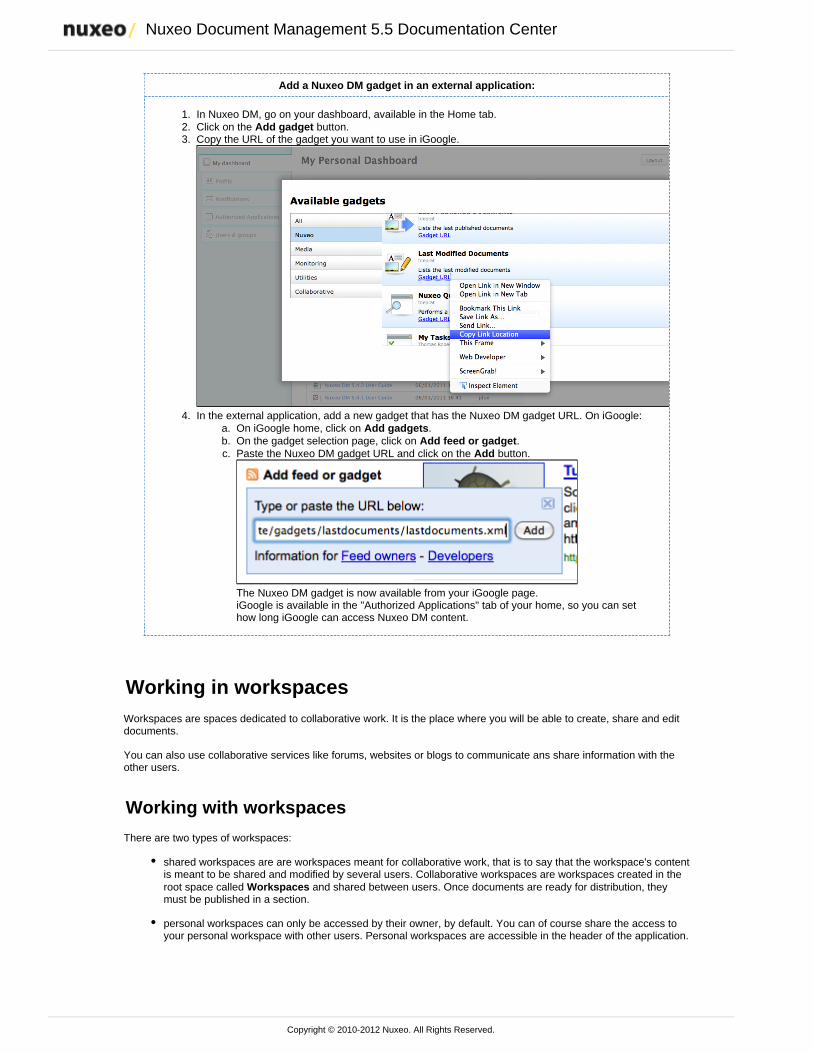
Using Nuxeo gadgets from other applications
It is possible to use Nuxeo DM gadgets in other applications, such as iGoogle.
This takes 2 steps, to make this work:
your administrator must ,authorize the external application to access Nuxeo DMyou can .add the Nuxeo gadget on the external application
In this page, we will take the example of iGoogle, which is a pretty easy example. For more complex use cases, you canreport to the page .Using OAuth
Authorizing an external application to access Nuxeo DM
Before users can use Nuxeo DM gadgets in another application, the administrator must authorize this application toaccess Nuxeo DM content.
The page Manage authentication with other applications does not exist.
Adding the Nuxeo gadget in the external application
Nuxeo Document Management 5.5 Documentation Center
Copyright © 2010-2012 Nuxeo. All Rights Reserved.
1. 2. 3.
4. a. b. c.
Add a Nuxeo DM gadget in an external application:
In Nuxeo DM, go on your dashboard, available in the Home tab.Click on the button.Add gadgetCopy the URL of the gadget you want to use in iGoogle.
In the external application, add a new gadget that has the Nuxeo DM gadget URL. On iGoogle:On iGoogle home, click on .Add gadgetsOn the gadget selection page, click on .Add feed or gadgetPaste the Nuxeo DM gadget URL and click on the button.Add
The Nuxeo DM gadget is now available from your iGoogle page.iGoogle is available in the "Authorized Applications" tab of your home, so you can sethow long iGoogle can access Nuxeo DM content.
Working in workspacesWorkspaces are spaces dedicated to collaborative work. It is the place where you will be able to create, share and editdocuments.
You can also use collaborative services like forums, websites or blogs to communicate ans share information with theother users.
Working with workspaces
There are two types of workspaces:
shared workspaces are are workspaces meant for collaborative work, that is to say that the workspace's contentis meant to be shared and modified by several users. Collaborative workspaces are workspaces created in theroot space called and shared between users. Once documents are ready for distribution, theyWorkspacesmust be published in a section.
personal workspaces can only be accessed by their owner, by default. You can of course share the access toyour personal workspace with other users. Personal workspaces are accessible in the header of the application.

Nuxeo Document Management 5.5 Documentation Center
Copyright © 2010-2012 Nuxeo. All Rights Reserved.
1. 2. 3. 4.
1. 2. 3.
4.
Content creation and edition, as well as management, works the same way in personal workspaces asin collaborative workspaces.
By default, no workspace is available at workspaces root. Thus, you can create the structure you need for your project,edit it if needed. You can also for users to be able to collaborate in the workspaces.set the appropriate access right
Workspaces management also includes setting for users to be informed when content is created or edited inalertsworkspaces and handling content deletion.
Creating a workspace
Workspaces are created in the Workspaces rootspace, either at the root of Workspaces or in subworkspaces. Bydefault, no workspace is available in Nuxeo DM so that you can create the structure needed for your project. You cancreate as many workspaces and subworkspaces as you need.
Workspaces can be created from scratch or from a template.
Creating a workspace from scratch
To create a new workspace, you need to have at least 'Write' rights in the parent folder.
To create a workspace:
Click on the button ( if you are the root of workspaces).New Document New WorkspaceOn the Available document types window, click on .WorkspaceGive the workspace a title and possibly a description.Click on button.CreateThe workspace's tab is displayed.Content
Creating a workspace from a template
Templates are predefined workspaces that you can use to make building your workspace structure easier.
When you create a workspace from a template, the newly created workspace automatically have the same content anddescription as its template. Access rights however are not inherited from the template but from the parent workspace.
To create a workspace from a template:
Click on the button ( if you are the root of workspaces).New Document New WorkspaceOn the Available document types window, click on .WorkspaceGive the workspace a title, possibly a description and select the template to create the workspace from in thedrop down list.Click on button.CreateThe workspace's tab is displayed.Content
Related pages
Page: Creating a workspace
Page: Editing a workspace
Page: Deleting a workspace
Page: Managing a workspace
Page: Document Management concepts
Want to customize workspaces?
Page: Add a News content view on workspaces (Nuxeo Studio)
Nuxeo Document Management 5.5 Documentation Center
Copyright © 2010-2012 Nuxeo. All Rights Reserved.
1. 2.
3. 4.
Page: Override existing document types (Nuxeo Studio)
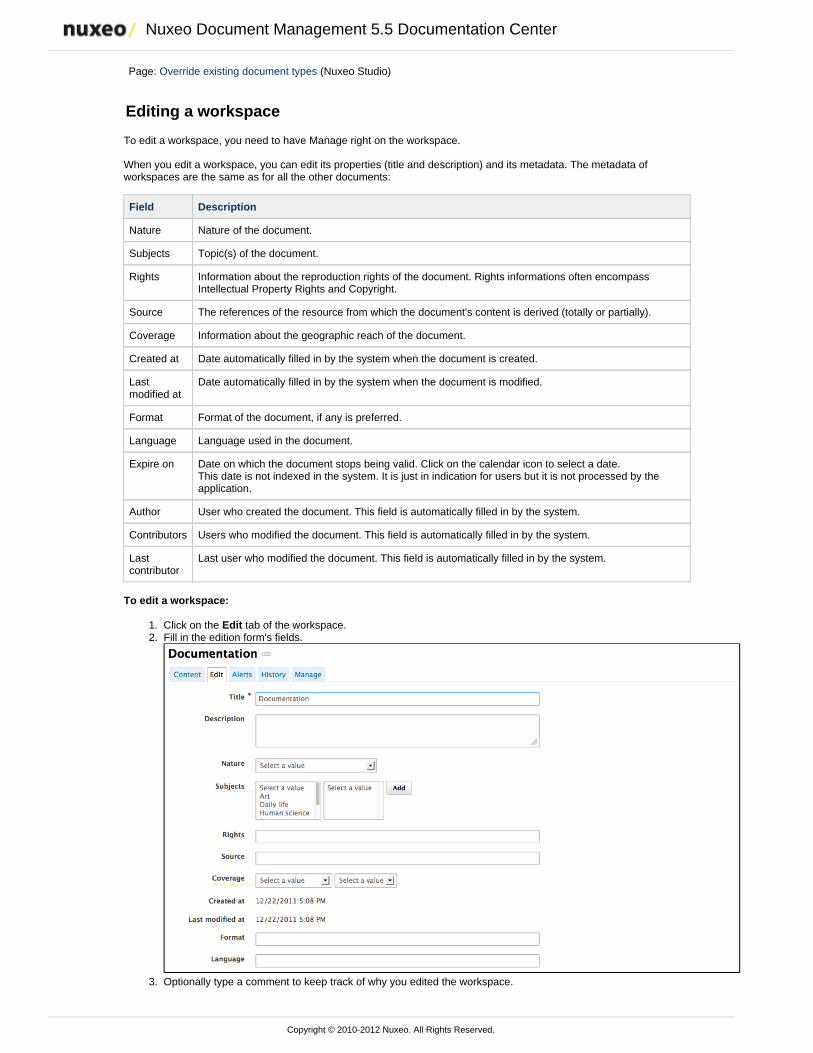
Editing a workspace
To edit a workspace, you need to have Manage right on the workspace.
When you edit a workspace, you can edit its properties (title and description) and its metadata. The metadata ofworkspaces are the same as for all the other documents:
Field Description
Nature Nature of the document.
Subjects Topic(s) of the document.
Rights Information about the reproduction rights of the document. Rights informations often encompassIntellectual Property Rights and Copyright.
Source The references of the resource from which the document's content is derived (totally or partially).
Coverage Information about the geographic reach of the document.
Created at Date automatically filled in by the system when the document is created.
Lastmodified at
Date automatically filled in by the system when the document is modified.
Format Format of the document, if any is preferred.
Language Language used in the document.
Expire on Date on which the document stops being valid. Click on the calendar icon to select a date. This date is not indexed in the system. It is just in indication for users but it is not processed by theapplication.
Author User who created the document. This field is automatically filled in by the system.
Contributors Users who modified the document. This field is automatically filled in by the system.
Lastcontributor
Last user who modified the document. This field is automatically filled in by the system.
To edit a workspace:
Click on the tab of the workspace.EditFill in the edition form's fields.
Optionally type a comment to keep track of why you edited the workspace.
Nuxeo Document Management 5.5 Documentation Center
Copyright © 2010-2012 Nuxeo. All Rights Reserved.
4.
1. 2. 3.
1.
Click on the button.SaveModifications are saved and the fact that you edited the workspace is tracked in tab.History
Related pages;
Page: Creating a workspace
Page: Editing a workspace
Page: Deleting a workspace
Page: Accessing content
Page: Editing content
Page: Managing vocabularies
Page: Managing a workspace
Page: Document Management concepts
Deleting a workspace
Only users with writing or management rights in the parent workspace can delete a workspace.
When you delete a workspace, you also delete its content. This action moves the workspace into the parent's trash, fromwhich users with management rights can or .revert deletion delete it permanently
To delete a workspace:
In the tab of the parent workspace, check the box corresponding to the workspace to delete.ContentClick on the button.DeleteIn the window that pops up, click on the button.OKThe parent workspace's tab is displayed: the deleted workspace is not displayed anymore.Content
Related pages
Page: Managing deleted documents
Page: Deleting a workspace
Page: Deleting content
Managing a workspace
Users with management rights can parameter the workspace.
All management actions are available in the tab of the workspace.ManagementThis is the place where you can:
set access rights on the workspace to define who can read the content, edit it or delegate management of theworkspaceset for other users so they get automatically informed of the content evolutionalertsmanage deleted documents in the workspace ,Trashchange the look of the workspace by ,choosing a preset themedefine the sections in which users will be able to publish from the document (called ).publication targets
Managing deleted documents
When they are deleted by users with writing rights, documents are moved into the tab of the parent folderTrash(domain, workspace, folder, etc). They are not erased from the application. Users with management rights can stillrestore them or delete them permanently.
Restoring documents
Only users with management rights can restore documents.
When they are deleted by users with writing rights, documents are moved into the tab of workspaces or folders.TrashThey are not erased from the application and can still be restored, i.e. moved back into the tab of theContentworkspace.
To restore a document:
Nuxeo Document Management 5.5 Documentation Center
Copyright © 2010-2012 Nuxeo. All Rights Reserved.
1.
2. 3. 4.
1.
2. 3.
1.
2.
3.
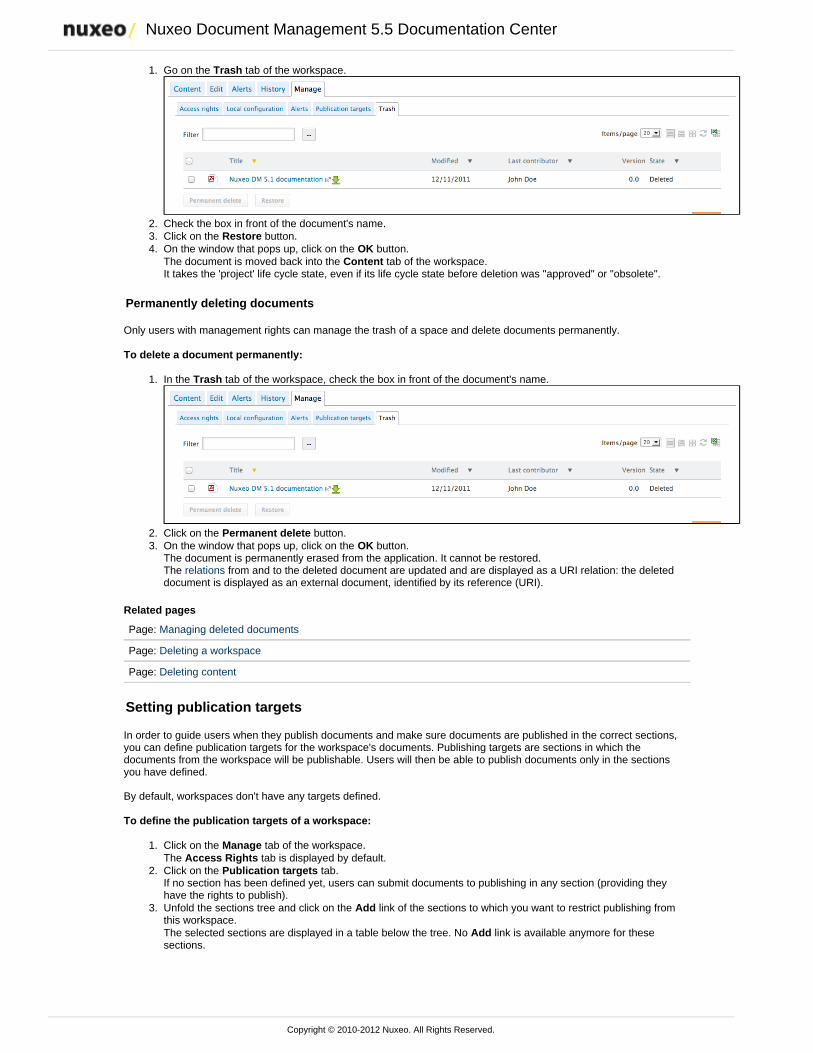
Go on the tab of the workspace.Trash
Check the box in front of the document's name.Click on the button.RestoreOn the window that pops up, click on the button.OKThe document is moved back into the tab of the workspace. ContentIt takes the 'project' life cycle state, even if its life cycle state before deletion was "approved" or "obsolete".
Permanently deleting documents
Only users with management rights can manage the trash of a space and delete documents permanently.
To delete a document permanently:
In the tab of the workspace, check the box in front of the document's name.Trash
Click on the button.Permanent deleteOn the window that pops up, click on the button.OKThe document is permanently erased from the application. It cannot be restored.The from and to the deleted document are updated and are displayed as a URI relation: the deletedrelationsdocument is displayed as an external document, identified by its reference (URI).
Related pages
Page: Managing deleted documents
Page: Deleting a workspace
Page: Deleting content
Setting publication targets
In order to guide users when they publish documents and make sure documents are published in the correct sections,you can define publication targets for the workspace's documents. Publishing targets are sections in which thedocuments from the workspace will be publishable. Users will then be able to publish documents only in the sectionsyou have defined.
By default, workspaces don't have any targets defined.
To define the publication targets of a workspace:
Click on the tab of the workspace.ManageThe tab is displayed by default.Access RightsClick on the tab.Publication targetsIf no section has been defined yet, users can submit documents to publishing in any section (providing theyhave the rights to publish).Unfold the sections tree and click on the link of the sections to which you want to restrict publishing fromAddthis workspace.The selected sections are displayed in a table below the tree. No link is available anymore for theseAddsections.

Nuxeo Document Management 5.5 Documentation Center
Copyright © 2010-2012 Nuxeo. All Rights Reserved.
3.
4.
When they click on the tab of documents to publish a document, users are still displayed all thePublishsections they have "Read" right on, but the link is now available for the selected sections only.Publish here
Click on the icon to remove a section from the workspace's targets.
Related pages
Page: Publishing documents
Page: Setting publication targets
Applying a preset look to a space
Local administrators, ie users with Manage right in the space, can easily apply a preset theme to a workspace, templateor section. You can apply a theme to spaces only. For instance, you can change the theme of sections, so that they lookdifferent from workspaces, but you cannot change the look of a document.
Two themes, also called flavors, are available by default: the Nuxeo theme and the Rainbow theme. Flavors are sets ofcolors that determine the look of the space. If you configured other flavors in Nuxeo Studio, they are available here aswell.
The new space's theme is not applied to the sub-spaces, but it is applied to the documents it contains.
When you choose to apply a theme to a workspace, for instance, you can refine what is displayed on the page byapplying a perspective on the theme. A perspective is a fragment visualization mask that determines that some parts ofthe page, like the clipboard and worklist, are not displayed to the user if specified conditions are met. The defaultapplication has only one perspective.

Nuxeo Document Management 5.5 Documentation Center
Copyright © 2010-2012 Nuxeo. All Rights Reserved.
1. 2.
3. 4.
To change the theme of a workspace:
Click on tab of the space.ManageClick on the tab and, if needed, click on the link of the "ThemeLocal configuration EnableConfiguration" section.
Select the flavour you want to apply.Click on the button.SaveThe page is displayed with the selected look.
Related topics in other spaces
Page: Brand your Application (Nuxeo Studio)
Changing the presentation of document lists
From the "Local configuration" sub-tab of the "Manage" tab, you can set preferences on what content can be created inthe current space, how the lists of content should be presented, customized search features...
Nuxeo DM uses different presentations for the lists of documents: they can have different layouts, display specificinformations on the documents, have a different default number of documents on a page, enable some features on thedocuments, etc. These predefined presentations of lists of documents are called "Content views".Here are some examples of content views used in Nuxeo DM:
Document content (used for workspaces and sections for instance):
trash content view:
Nuxeo Document Management 5.5 Documentation Center
Copyright © 2010-2012 Nuxeo. All Rights Reserved.
1. 2. 3.
4. 5. 6.
7.
1. 2.
3.
4.
Last modified documents:
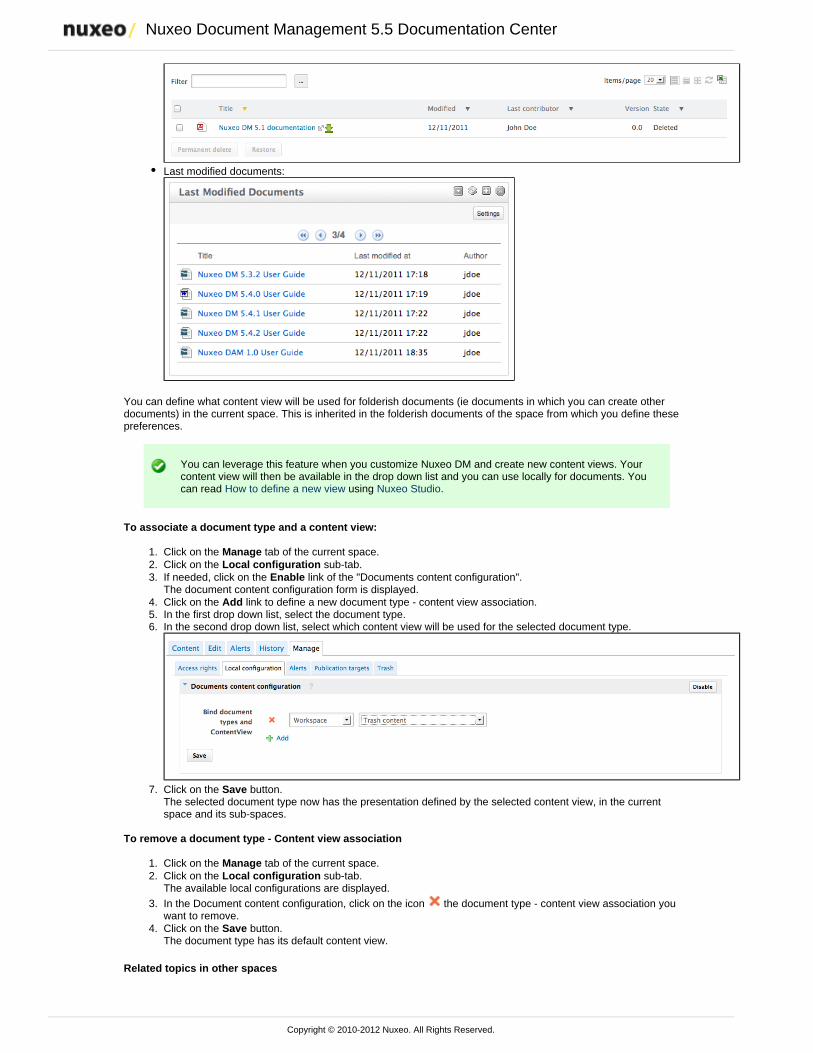
You can define what content view will be used for folderish documents (ie documents in which you can create otherdocuments) in the current space. This is inherited in the folderish documents of the space from which you define thesepreferences.
You can leverage this feature when you customize Nuxeo DM and create new content views. Yourcontent view will then be available in the drop down list and you can use locally for documents. Youcan read using .How to define a new view Nuxeo Studio
To associate a document type and a content view:
Click on the tab of the current space.ManageClick on the sub-tab.Local configurationIf needed, click on the link of the "Documents content configuration".EnableThe document content configuration form is displayed.Click on the link to define a new document type - content view association.AddIn the first drop down list, select the document type.In the second drop down list, select which content view will be used for the selected document type.
Click on the button.SaveThe selected document type now has the presentation defined by the selected content view, in the currentspace and its sub-spaces.
To remove a document type - Content view association
Click on the tab of the current space.ManageClick on the sub-tab.Local configurationThe available local configurations are displayed.
In the Document content configuration, click on the icon the document type - content view association youwant to remove.Click on the button.SaveThe document type has its default content view.
Related topics in other spaces
Nuxeo Document Management 5.5 Documentation Center
Copyright © 2010-2012 Nuxeo. All Rights Reserved.
1. 2.
3.
4.
5.
Page: Configure a domain specific advanced search (Nuxeo Studio)
Page: Define a new content view (Nuxeo Studio)
Page: Customize tabs - withdraw built-in tabs - add content view tabs (Nuxeo Studio)
Defining the authorized document types
The local configuration enables users to define set some document types preferences at the workspace or section level,from Nuxeo DM's interface. These preferences are inherited in the sub-spaces and all folderish documents (folders,ordered folders, websites, etc).
On this page
Defining what document types can be createdDenying the possibility to create documentsSelecting the default document type
Defining what document types can be created
Users with Manage right in a space can define what document types can be created in the current space by restrictingthe list of allowed document types proposed by default.
To define what document types can be created in a space:
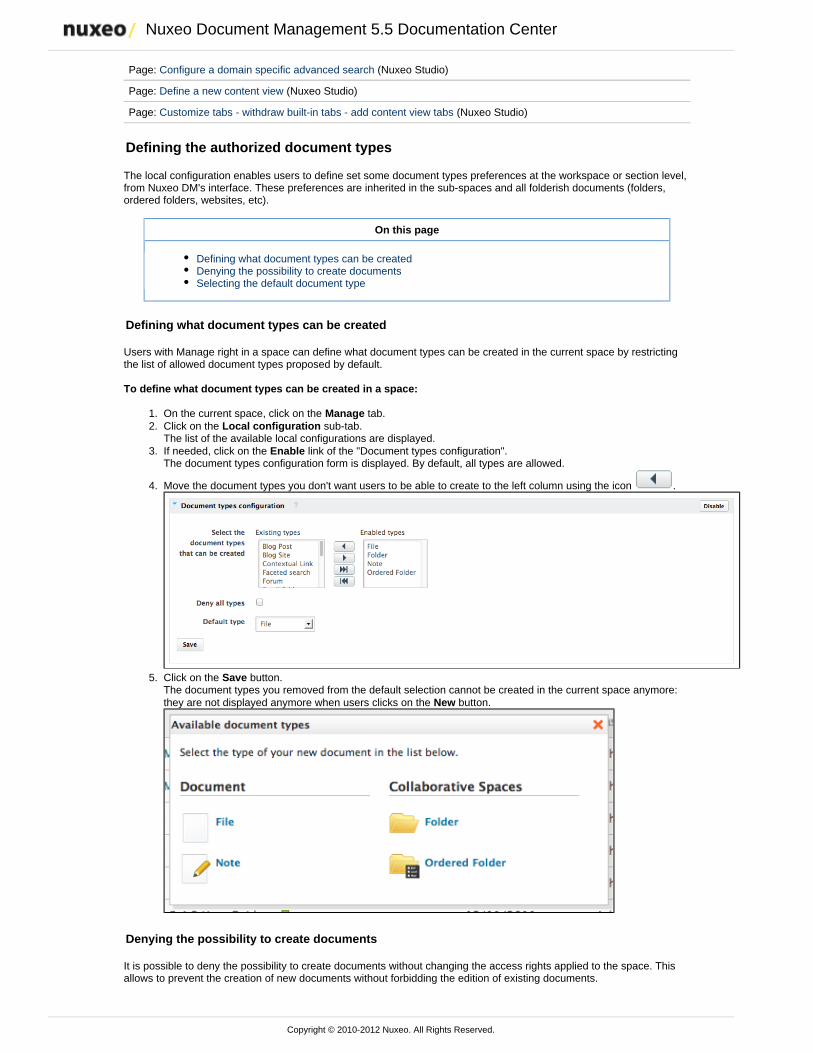
On the current space, click on the tab.ManageClick on the sub-tab.Local configurationThe list of the available local configurations are displayed.If needed, click on the link of the "Document types configuration".EnableThe document types configuration form is displayed. By default, all types are allowed.
Move the document types you don't want users to be able to create to the left column using the icon .
Click on the button.SaveThe document types you removed from the default selection cannot be created in the current space anymore:they are not displayed anymore when users clicks on the button.New
Denying the possibility to create documents
It is possible to deny the possibility to create documents without changing the access rights applied to the space. Thisallows to prevent the creation of new documents without forbidding the edition of existing documents.
Nuxeo Document Management 5.5 Documentation Center
Copyright © 2010-2012 Nuxeo. All Rights Reserved.
1. 2.
3.
4. 5.
1. 2.
3.
4. 5.
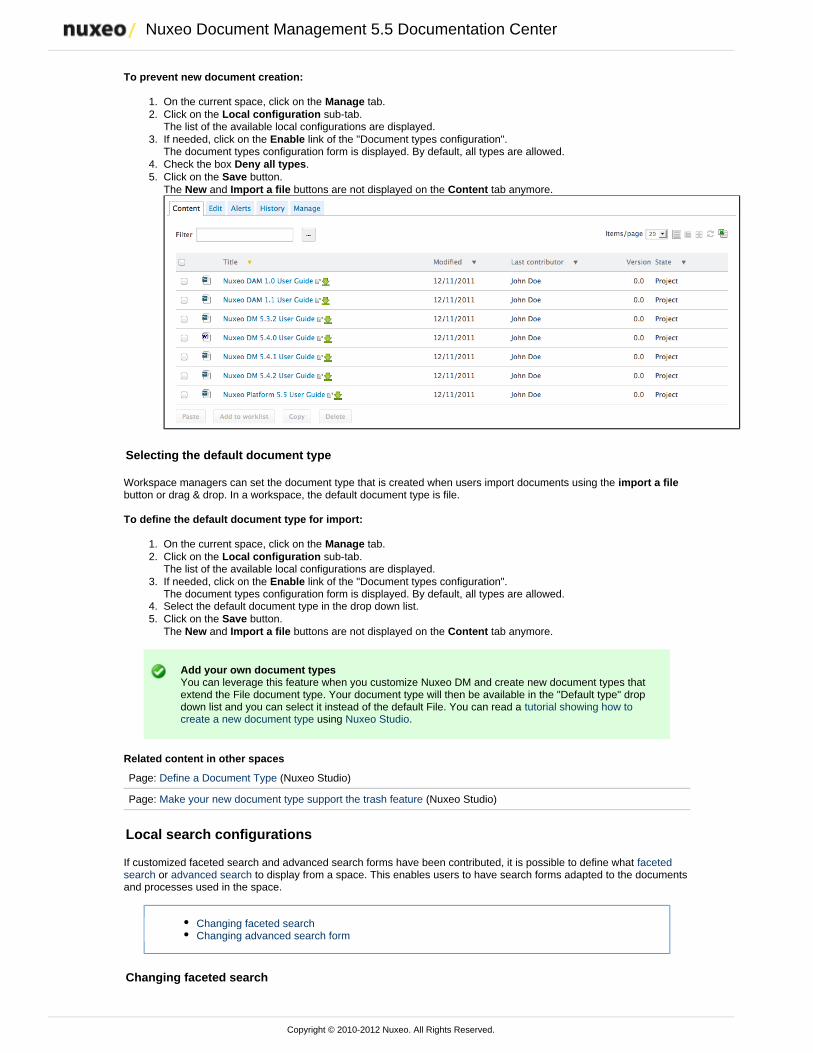
To prevent new document creation:
On the current space, click on the tab.ManageClick on the sub-tab.Local configurationThe list of the available local configurations are displayed.If needed, click on the link of the "Document types configuration".EnableThe document types configuration form is displayed. By default, all types are allowed.Check the box .Deny all typesClick on the button.SaveThe and buttons are not displayed on the tab anymore.New Import a file Content
Selecting the default document type
Workspace managers can set the document type that is created when users import documents using the import a filebutton or drag & drop. In a workspace, the default document type is file.
To define the default document type for import:
On the current space, click on the tab.ManageClick on the sub-tab.Local configurationThe list of the available local configurations are displayed.If needed, click on the link of the "Document types configuration".EnableThe document types configuration form is displayed. By default, all types are allowed.Select the default document type in the drop down list.Click on the button.SaveThe and buttons are not displayed on the tab anymore.New Import a file Content
Add your own document typesYou can leverage this feature when you customize Nuxeo DM and create new document types thatextend the File document type. Your document type will then be available in the "Default type" dropdown list and you can select it instead of the default File. You can read a tutorial showing how to
using .create a new document type Nuxeo Studio
Related content in other spaces
Page: Define a Document Type (Nuxeo Studio)
Page: Make your new document type support the trash feature (Nuxeo Studio)
Local search configurations
If customized faceted search and advanced search forms have been contributed, it is possible to define what faceted or to display from a space. This enables users to have search forms adapted to the documentssearch advanced search
and processes used in the space.
Changing faceted searchChanging advanced search form
Changing faceted search
Nuxeo Document Management 5.5 Documentation Center
Copyright © 2010-2012 Nuxeo. All Rights Reserved.
1. 2. 3.
4.
5.
1. 2. 3.
4.
It is possible to enable several faceted searches on a space. This allows users to have several forms and possiblypredefined searches that they can edit.
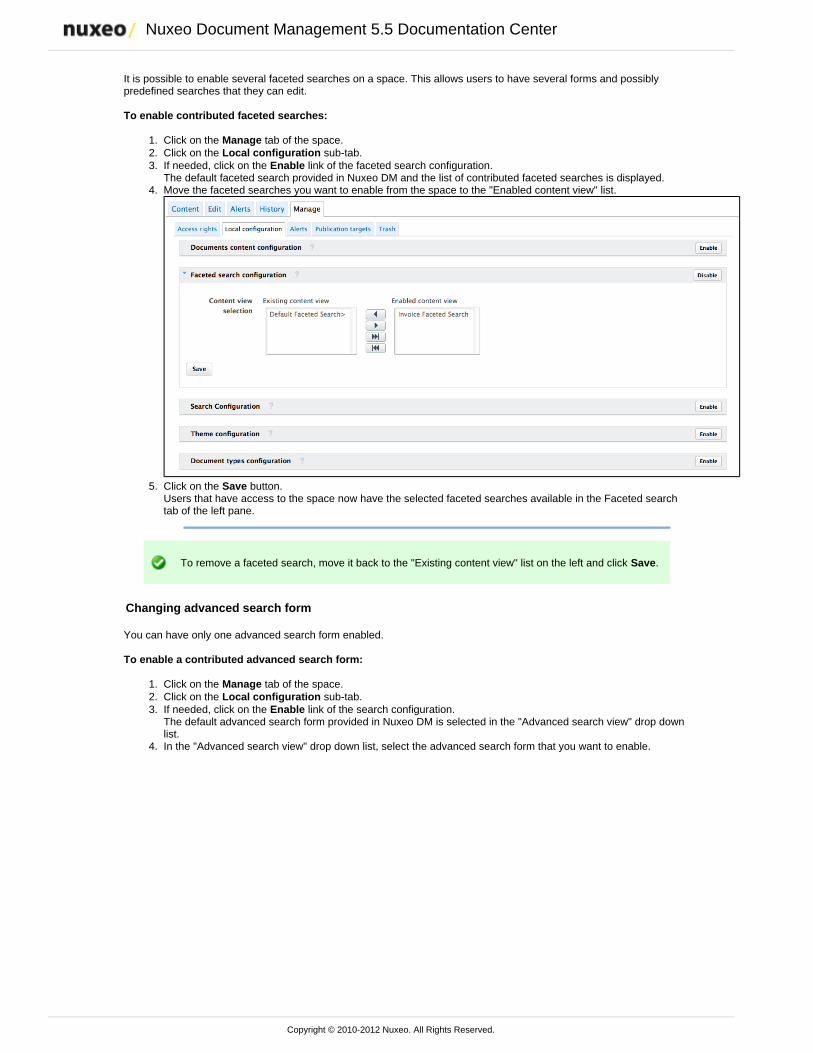
To enable contributed faceted searches:
Click on the tab of the space.ManageClick on the sub-tab.Local configurationIf needed, click on the link of the faceted search configuration.EnableThe default faceted search provided in Nuxeo DM and the list of contributed faceted searches is displayed.Move the faceted searches you want to enable from the space to the "Enabled content view" list.
Click on the button.SaveUsers that have access to the space now have the selected faceted searches available in the Faceted searchtab of the left pane.
To remove a faceted search, move it back to the "Existing content view" list on the left and click .Save
Changing advanced search form
You can have only one advanced search form enabled.
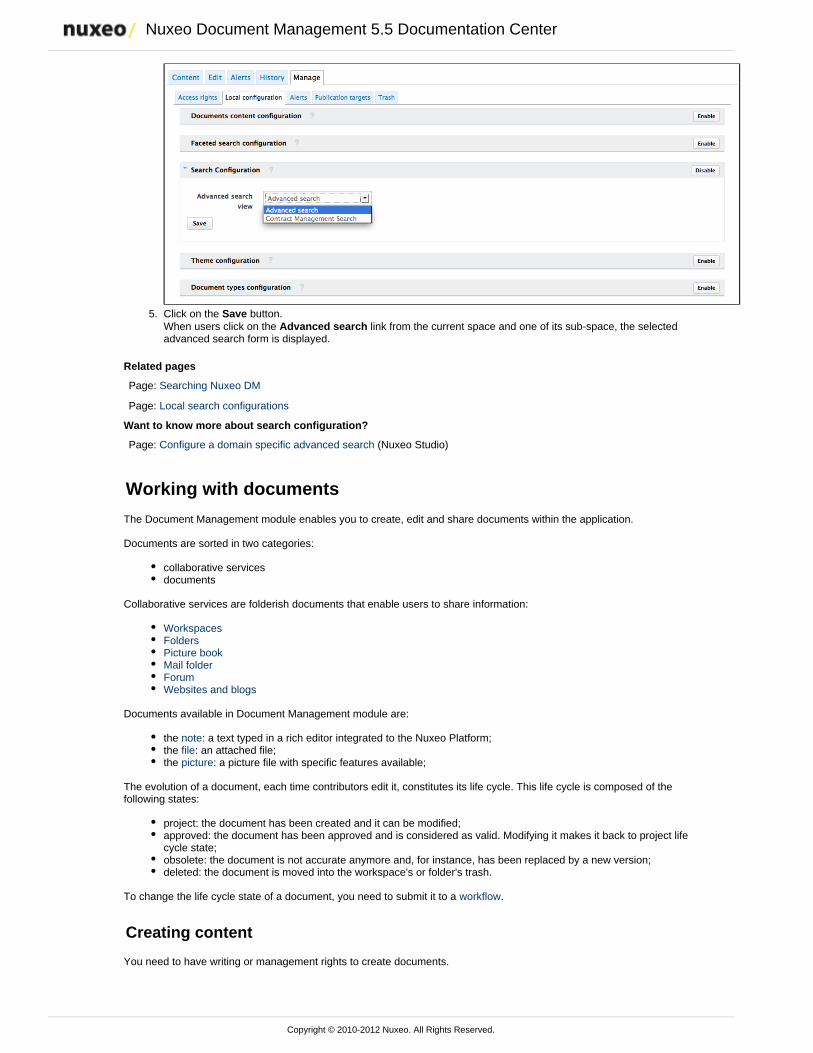
To enable a contributed advanced search form:
Click on the tab of the space.ManageClick on the sub-tab.Local configurationIf needed, click on the link of the search configuration.EnableThe default advanced search form provided in Nuxeo DM is selected in the "Advanced search view" drop downlist.In the "Advanced search view" drop down list, select the advanced search form that you want to enable.
Nuxeo Document Management 5.5 Documentation Center
Copyright © 2010-2012 Nuxeo. All Rights Reserved.
4.
5. Click on the button.SaveWhen users click on the link from the current space and one of its sub-space, the selectedAdvanced searchadvanced search form is displayed.
Related pages
Page: Searching Nuxeo DM
Page: Local search configurations
Want to know more about search configuration?
Page: Configure a domain specific advanced search (Nuxeo Studio)
Working with documents
The Document Management module enables you to create, edit and share documents within the application.
Documents are sorted in two categories:
collaborative servicesdocuments
Collaborative services are folderish documents that enable users to share information:
WorkspacesFoldersPicture bookMail folderForumWebsites and blogs
Documents available in Document Management module are:
the : a text typed in a rich editor integrated to the Nuxeo Platform;notethe : an attached file;filethe : a picture file with specific features available;picture
The evolution of a document, each time contributors edit it, constitutes its life cycle. This life cycle is composed of thefollowing states:
project: the document has been created and it can be modified;approved: the document has been approved and is considered as valid. Modifying it makes it back to project lifecycle state;obsolete: the document is not accurate anymore and, for instance, has been replaced by a new version;deleted: the document is moved into the workspace's or folder's trash.
To change the life cycle state of a document, you need to submit it to a .workflow
Creating content
You need to have writing or management rights to create documents.
Nuxeo Document Management 5.5 Documentation Center
Copyright © 2010-2012 Nuxeo. All Rights Reserved.
1. 2.
3. 4.
1. 2.
3.
Documents can be created in workspaces, templates and folders only. There are several ways to create documents inNuxeo DM. You can:
create all content types from the “Content” tab of the workspace and filing the appropriate form (see below),use drag and drop from your desktop, to ,import one or several documentscreate documents directly from MS Office or OpenOffice, using Nuxeo LiveEdit extensions.
On this page
Creating a document using the New document buttonCreating a document using the Import a file button
Creating a document using the New document button
Creating a document using the button enables you to select the type of document you want to createNew documentamong all Nuxeo DM's document types.
To create a document using the New document button:
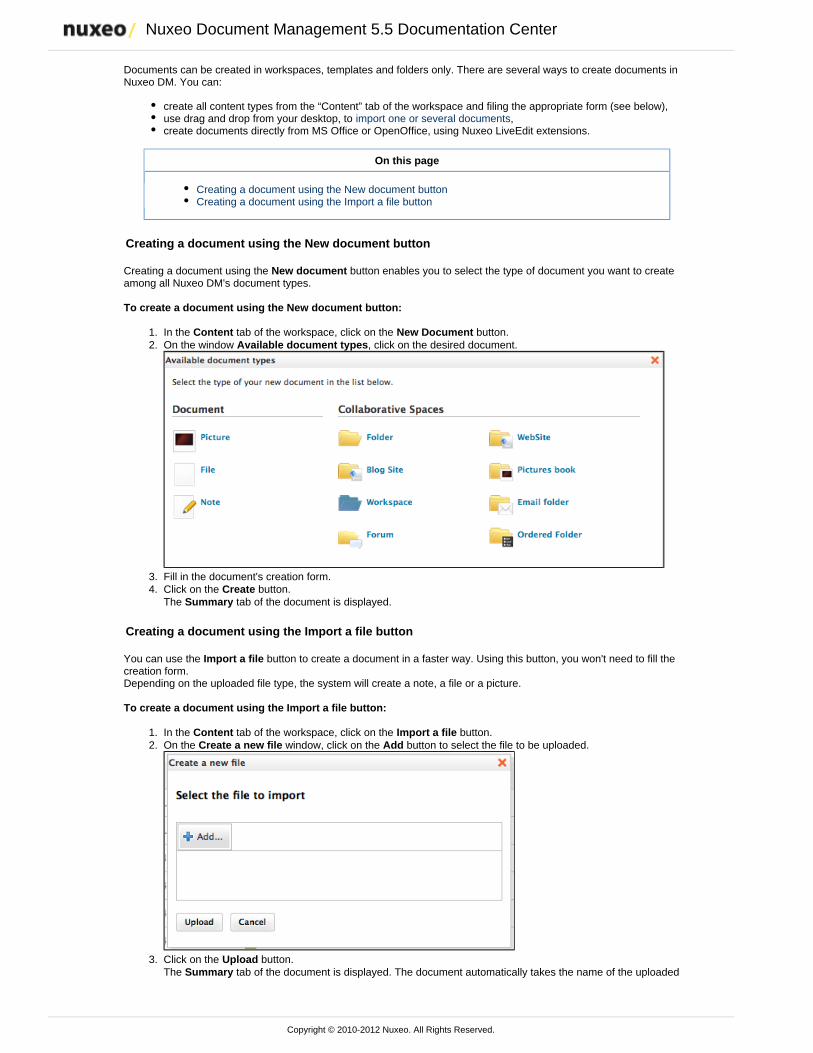
In the tab of the workspace, click on the button.Content New DocumentOn the window , click on the desired document.Available document types
Fill in the document's creation form.Click on the button.CreateThe tab of the document is displayed.Summary
Creating a document using the Import a file button
You can use the button to create a document in a faster way. Using this button, you won't need to fill theImport a filecreation form.Depending on the uploaded file type, the system will create a note, a file or a picture.
To create a document using the Import a file button:
In the tab of the workspace, click on the button.Content Import a fileOn the window, click on the button to select the file to be uploaded.Create a new file Add
Click on the button.UploadThe tab of the document is displayed. The document automatically takes the name of the uploadedSummary
Nuxeo Document Management 5.5 Documentation Center
Copyright © 2010-2012 Nuxeo. All Rights Reserved.
3.
file as its title. The document has no description. You need to to fill in this field.modify the document
Related pages
Page: Working using drag and drop
Page: Working with Live Edit
Page: Installing Live Edit
Page: Working with WebDAV and WSS
Page: Importing content using Drag and Drop
Page: Installing Drag and Drop extensions
Page: Live Edit compatibility table
Page: Manage your own file type with LiveEdit
Editing content
Documents can be edited by users with writing rights in a folder.
Documents can be edited in workspaces only. If you want to modify a published document, you need to edit it in theworkspace and republish it.
Document modification means:
editing or changing the attached file of a document,fileediting the text of a ,noteor simply editing the title, description or any metadata of the document.
On this page
Versioning overviewMetadata overviewEditing a document
Versioning overview
Every time you modify a document, you can define if the changes should be saved in a new version of the document.
Every document holds a version number, which is a piece of information about the evolution of the document. A versionnumber (V.v) is composed of a major version number (V) and a minor version number (v). When a document is created,its version number is 0.0. Minor version increment are used for secondary changes. Major version increment is usuallyreserved to significant modifications.
When you edit a document and save your modifications, you have several options regarding the versioning of yourdocument. Let's say that your current document version is 0.1.
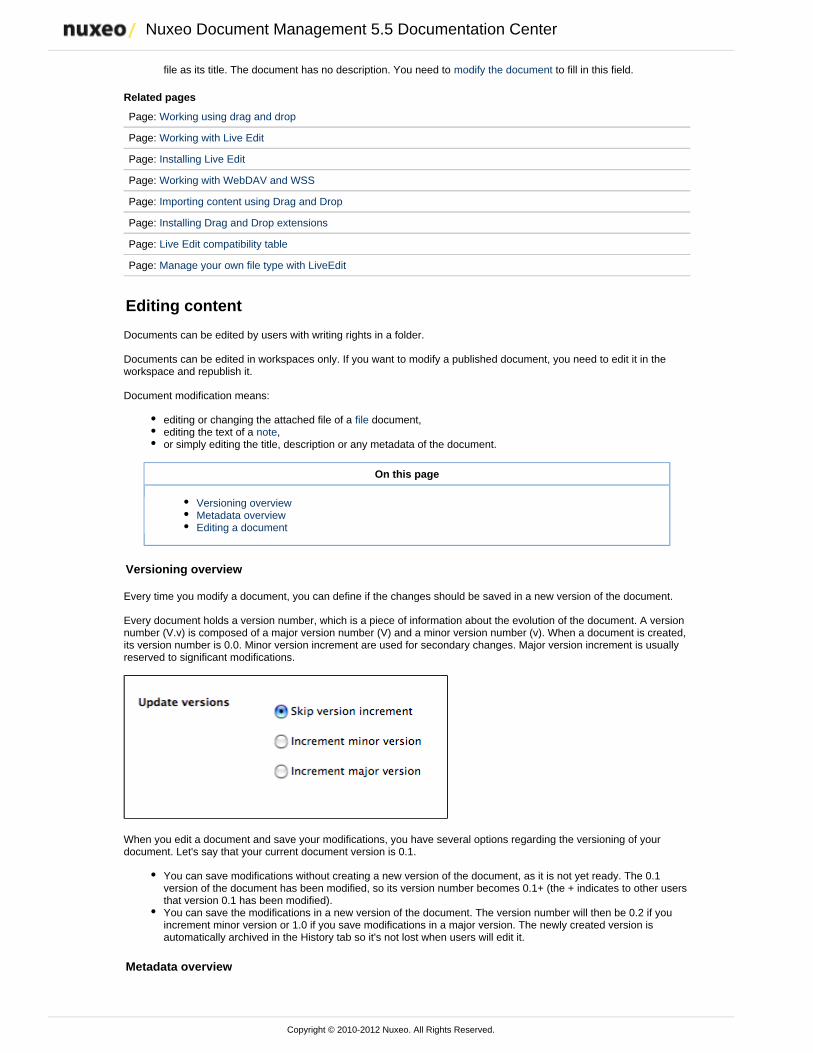
You can save modifications without creating a new version of the document, as it is not yet ready. The 0.1version of the document has been modified, so its version number becomes 0.1+ (the + indicates to other usersthat version 0.1 has been modified).You can save the modifications in a new version of the document. The version number will then be 0.2 if youincrement minor version or 1.0 if you save modifications in a major version. The newly created version isautomatically archived in the History tab so it's not lost when users will edit it.
Metadata overview
Nuxeo Document Management 5.5 Documentation Center
Copyright © 2010-2012 Nuxeo. All Rights Reserved.
1.
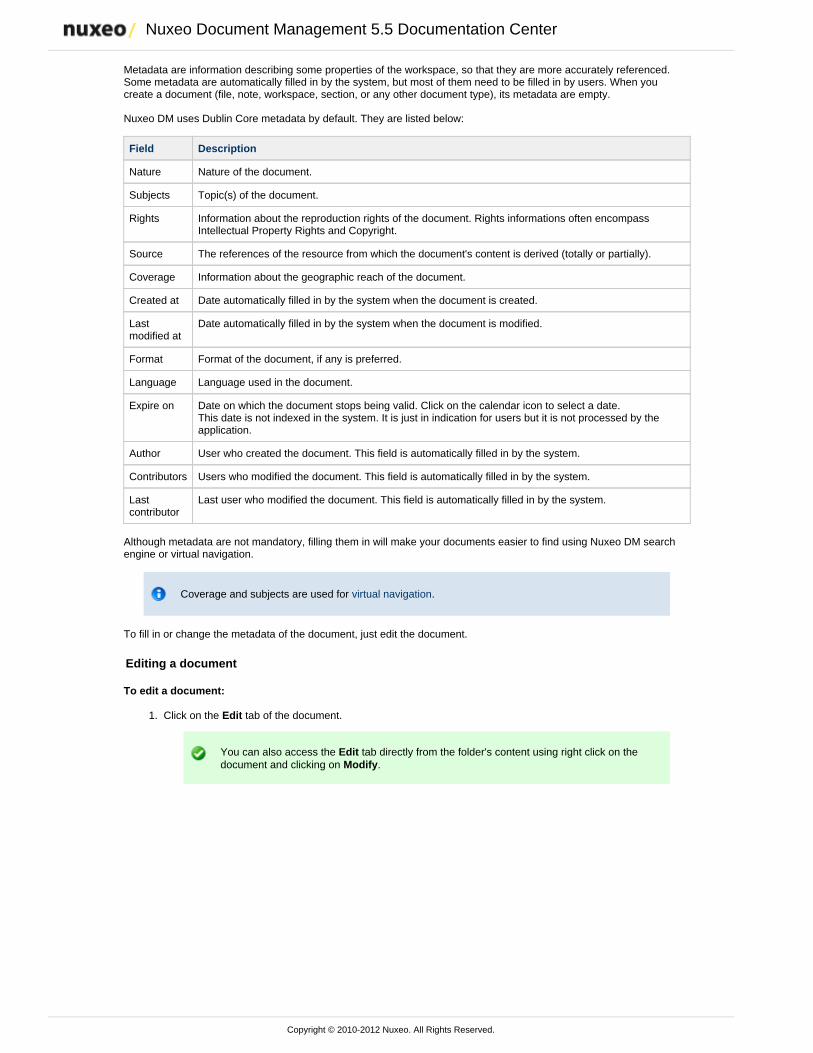
Metadata are information describing some properties of the workspace, so that they are more accurately referenced.Some metadata are automatically filled in by the system, but most of them need to be filled in by users. When youcreate a document (file, note, workspace, section, or any other document type), its metadata are empty.
Nuxeo DM uses Dublin Core metadata by default. They are listed below:
Field Description
Nature Nature of the document.
Subjects Topic(s) of the document.
Rights Information about the reproduction rights of the document. Rights informations often encompassIntellectual Property Rights and Copyright.
Source The references of the resource from which the document's content is derived (totally or partially).
Coverage Information about the geographic reach of the document.
Created at Date automatically filled in by the system when the document is created.
Lastmodified at
Date automatically filled in by the system when the document is modified.
Format Format of the document, if any is preferred.
Language Language used in the document.
Expire on Date on which the document stops being valid. Click on the calendar icon to select a date. This date is not indexed in the system. It is just in indication for users but it is not processed by theapplication.
Author User who created the document. This field is automatically filled in by the system.
Contributors Users who modified the document. This field is automatically filled in by the system.
Lastcontributor
Last user who modified the document. This field is automatically filled in by the system.
Although metadata are not mandatory, filling them in will make your documents easier to find using Nuxeo DM searchengine or virtual navigation.
Coverage and subjects are used for .virtual navigation
To fill in or change the metadata of the document, just edit the document.
Editing a document
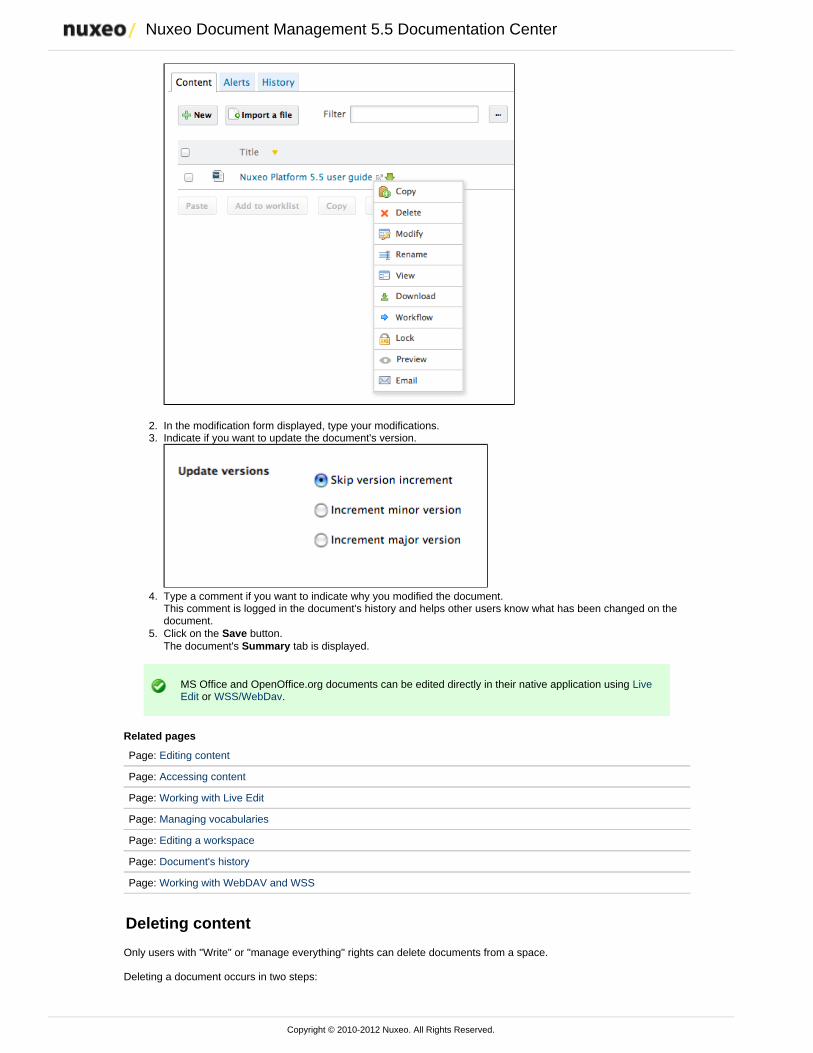
To edit a document:
Click on the tab of the document.Edit
You can also access the tab directly from the folder's content using right click on theEditdocument and clicking on .Modify
Nuxeo Document Management 5.5 Documentation Center
Copyright © 2010-2012 Nuxeo. All Rights Reserved.
1.
2. 3.
4.
5.
In the modification form displayed, type your modifications.Indicate if you want to update the document's version.
Type a comment if you want to indicate why you modified the document.This comment is logged in the document's history and helps other users know what has been changed on thedocument.Click on the button.SaveThe document's tab is displayed.Summary
MS Office and OpenOffice.org documents can be edited directly in their native application using Live or .Edit WSS/WebDav
Related pages
Page: Editing content
Page: Accessing content
Page: Working with Live Edit
Page: Managing vocabularies
Page: Editing a workspace
Page: Document's history
Page: Working with WebDAV and WSS
Deleting content
Only users with "Write" or "manage everything" rights can delete documents from a space.
Deleting a document occurs in two steps:
Nuxeo Document Management 5.5 Documentation Center
Copyright © 2010-2012 Nuxeo. All Rights Reserved.
1. 2.
1. 2. 3.
A user moves a document to trash.The manager of the space .deletes the document permanently
The trash tab is displayed to users with management rights.
There are two ways to move a document into the tab:Trash
Deleting it from the workspace content table,submitting the document to an , with the destination lifecycle state 'deleted'.workflow
If you are sure that the document is to be deleted, you can delete it from the workspace's content table. However, if youwant the deletion to be approved before, you need to submit it to a and specify that the destination life cycle isworkflow'deleted'. When the workflow is ended and the deletion approved, the document is automatically moved into the Trashtab of the document.
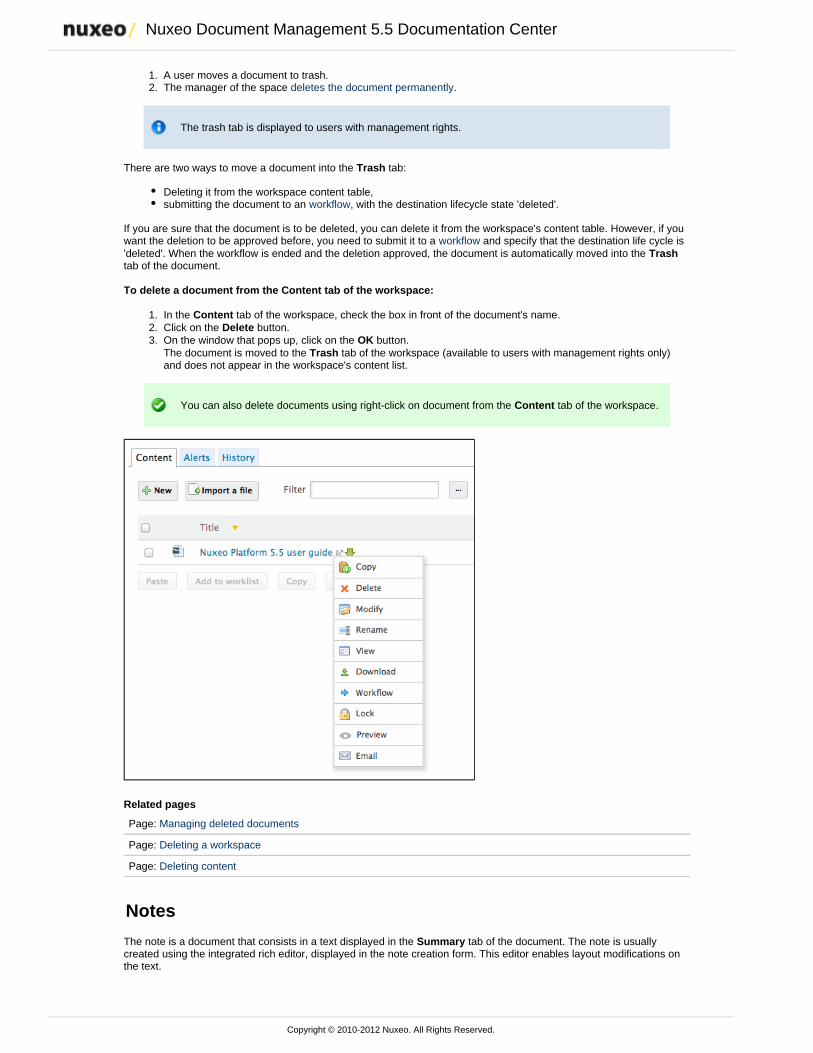
To delete a document from the Content tab of the workspace:
In the tab of the workspace, check the box in front of the document's name.ContentClick on the button.DeleteOn the window that pops up, click on the button.OKThe document is moved to the tab of the workspace (available to users with management rights only)Trashand does not appear in the workspace's content list.
You can also delete documents using right-click on document from the tab of the workspace.Content
Related pages
Page: Managing deleted documents
Page: Deleting a workspace
Page: Deleting content
Notes
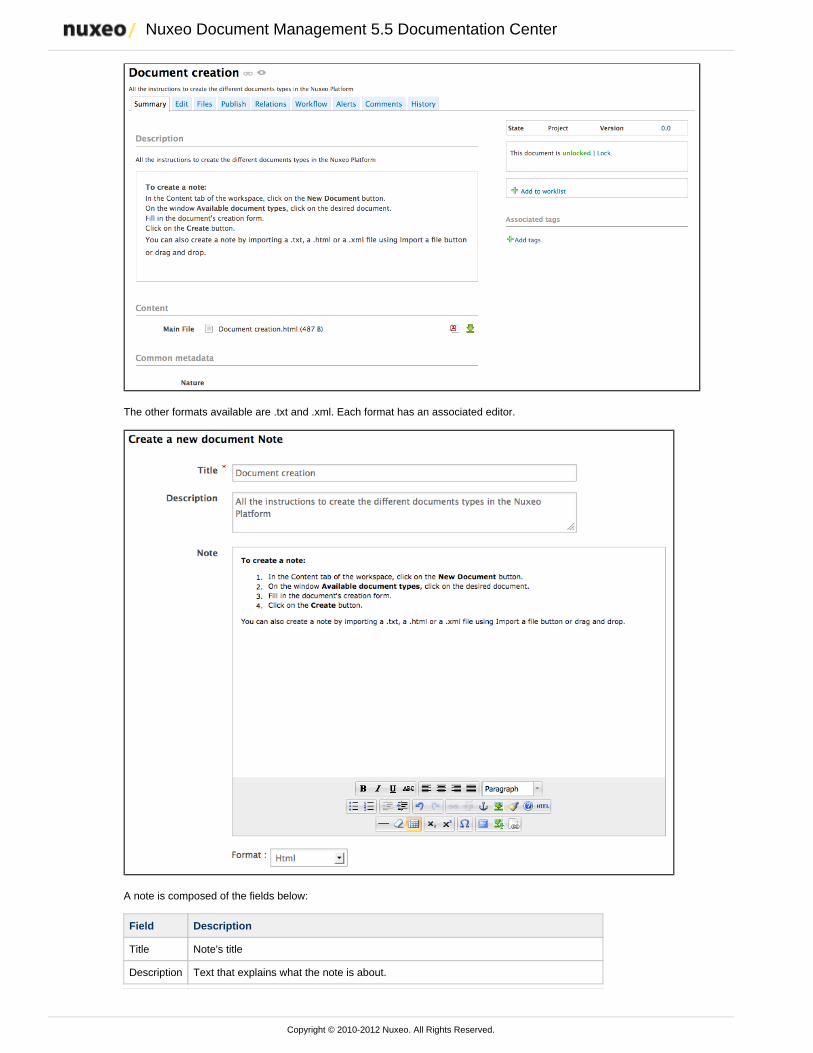
The note is a document that consists in a text displayed in the tab of the document. The note is usuallySummarycreated using the integrated rich editor, displayed in the note creation form. This editor enables layout modifications onthe text.
Nuxeo Document Management 5.5 Documentation Center
Copyright © 2010-2012 Nuxeo. All Rights Reserved.
The other formats available are .txt and .xml. Each format has an associated editor.
A note is composed of the fields below:
Field Description
Title Note's title
Description Text that explains what the note is about.
Nuxeo Document Management 5.5 Documentation Center
Copyright © 2010-2012 Nuxeo. All Rights Reserved.
1. 2.
3. 4.
Content Text of the note created using a rich text editor.
Format Format of the automatically created file used to export notes from the Nuxeo Platform.
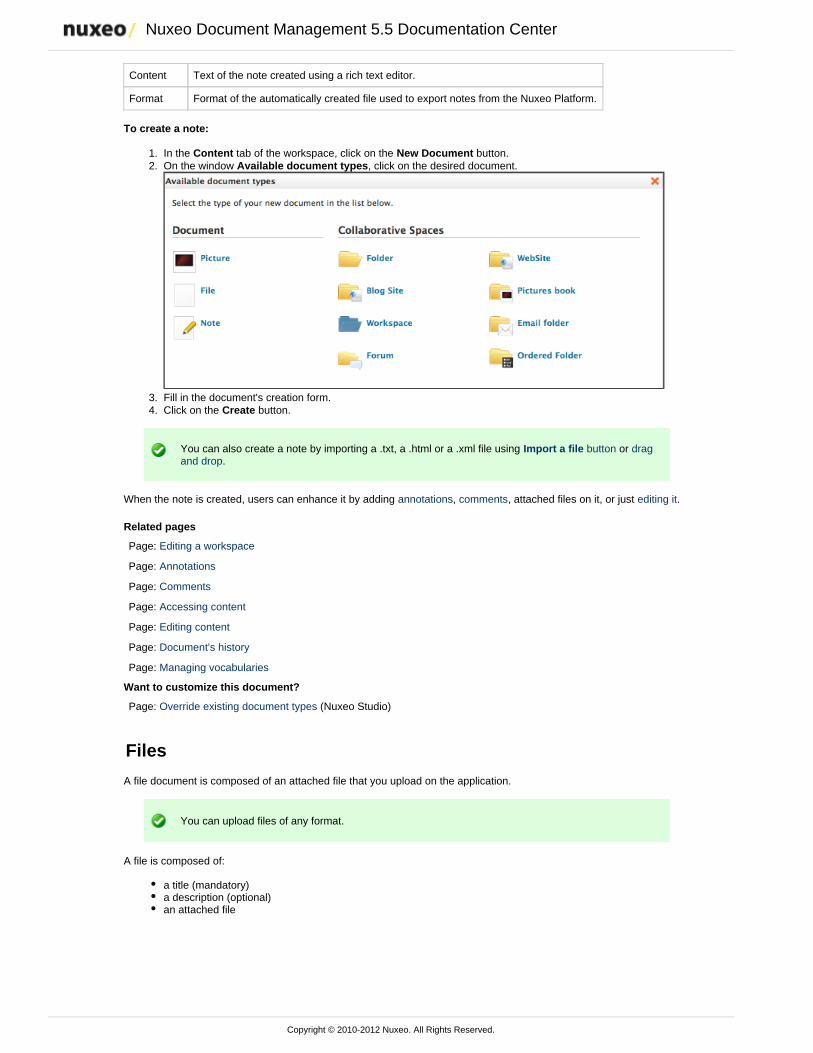
To create a note:
In the tab of the workspace, click on the button.Content New DocumentOn the window , click on the desired document.Available document types
Fill in the document's creation form.Click on the button.Create
You can also create a note by importing a .txt, a .html or a .xml file using or buttonImport a file drag.and drop
When the note is created, users can enhance it by adding , , attached files on it, or just .annotations comments editing it
Related pages
Page: Editing a workspace
Page: Annotations
Page: Comments
Page: Accessing content
Page: Editing content
Page: Document's history
Page: Managing vocabularies
Want to customize this document?
Page: Override existing document types (Nuxeo Studio)
Files
A file document is composed of an attached file that you upload on the application.
You can upload files of any format.
A file is composed of:
a title (mandatory)a description (optional)an attached file
Nuxeo Document Management 5.5 Documentation Center
Copyright © 2010-2012 Nuxeo. All Rights Reserved.
1. 2.
3. 4.
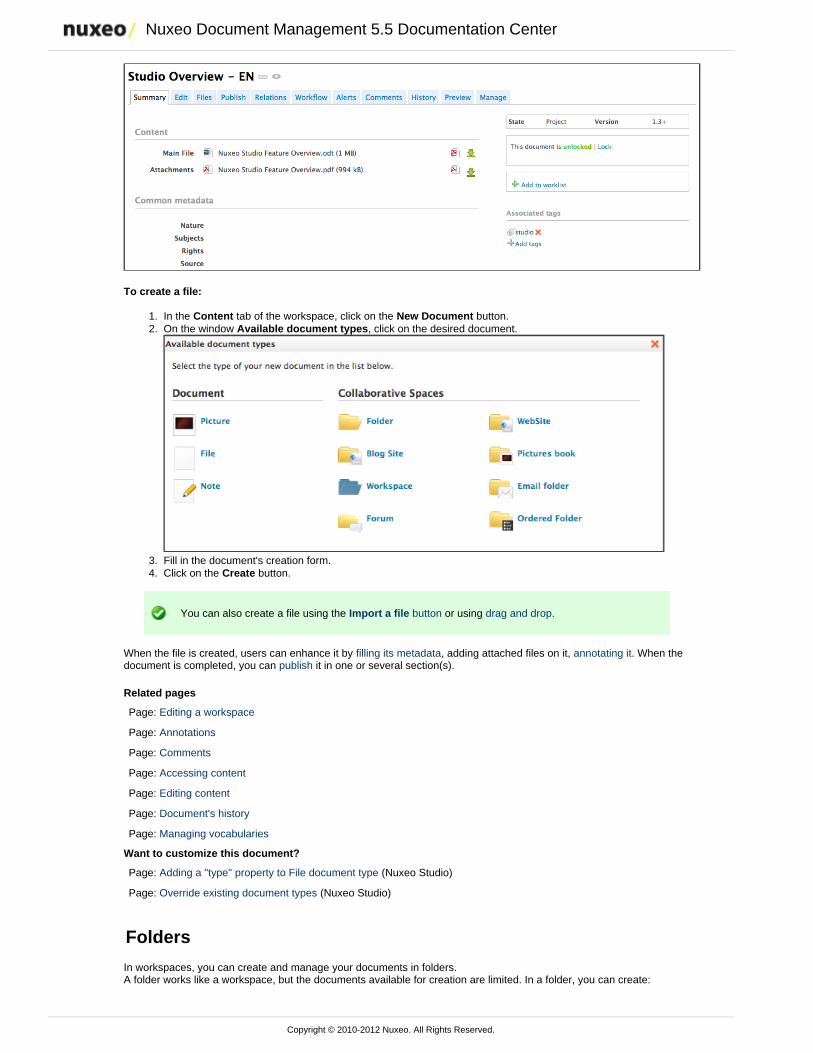
To create a file:
In the tab of the workspace, click on the button.Content New DocumentOn the window , click on the desired document.Available document types
Fill in the document's creation form.Click on the button.Create
You can also create a file using the or using . buttonImport a file drag and drop
When the file is created, users can enhance it by , adding attached files on it, . When thefilling its metadata annotating itdocument is completed, you can it in one or several section(s).publish
Related pages
Page: Editing a workspace
Page: Annotations
Page: Comments
Page: Accessing content
Page: Editing content
Page: Document's history
Page: Managing vocabularies
Want to customize this document?
Page: Adding a "type" property to File document type (Nuxeo Studio)
Page: Override existing document types (Nuxeo Studio)
Folders
In workspaces, you can create and manage your documents in folders.A folder works like a workspace, but the documents available for creation are limited. In a folder, you can create:
Nuxeo Document Management 5.5 Documentation Center
Copyright © 2010-2012 Nuxeo. All Rights Reserved.
1.
2. 3.
notesfilessub-folders.
There are two types of folders:
regular foldersordered folders.
The difference between the two folder types is the way content is sorted.
In a regular folder, documents are sorted on the title by default. You can change the sort criterion by clicking onthe content table columns title. You can thus sort them on their state, author, etc.In an ordered folder, you can change the order of documents manually. So, the orders in which documents arelisted in the folder doesn't depend on one of its properties (version, author, etc). When a document is created, itis added at the end of the list.
Regular folders
Regulars folders, called "Folders", have the same behavior as workspaces. In a folder, you can:
create documents and do all the actions available on them (edit, approve, manage relations, etc)manage access rights,subscribe to and manage alerts,manage the folder's trash.
Like in a workspace, you can use drag & drop to create content in a folder.
Ordered folders
Ordered folders are folders in which you can change the content's order.
An ordered folder has the same presentation as a regular folder, but it has some additional buttons below the contenttable:
Move upMove downMove to topMove to bottom
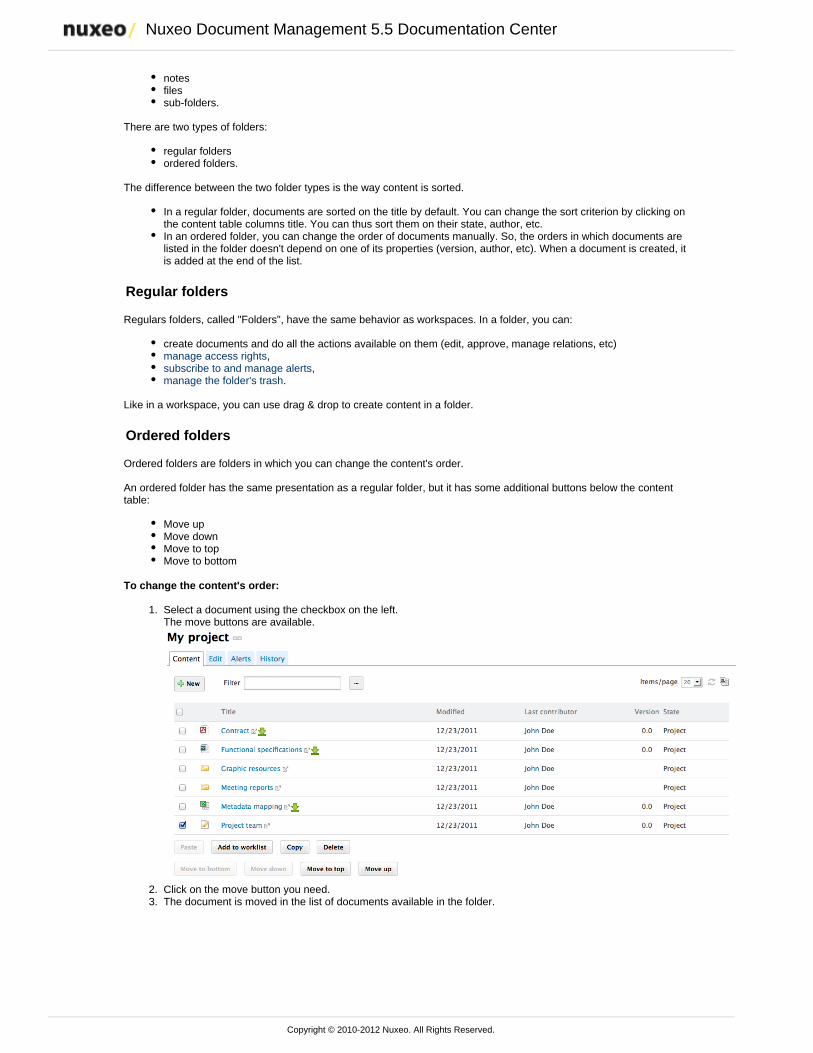
To change the content's order:
Select a document using the checkbox on the left.The move buttons are available.
Click on the move button you need.The document is moved in the list of documents available in the folder.
Nuxeo Document Management 5.5 Documentation Center
Copyright © 2010-2012 Nuxeo. All Rights Reserved.
3.
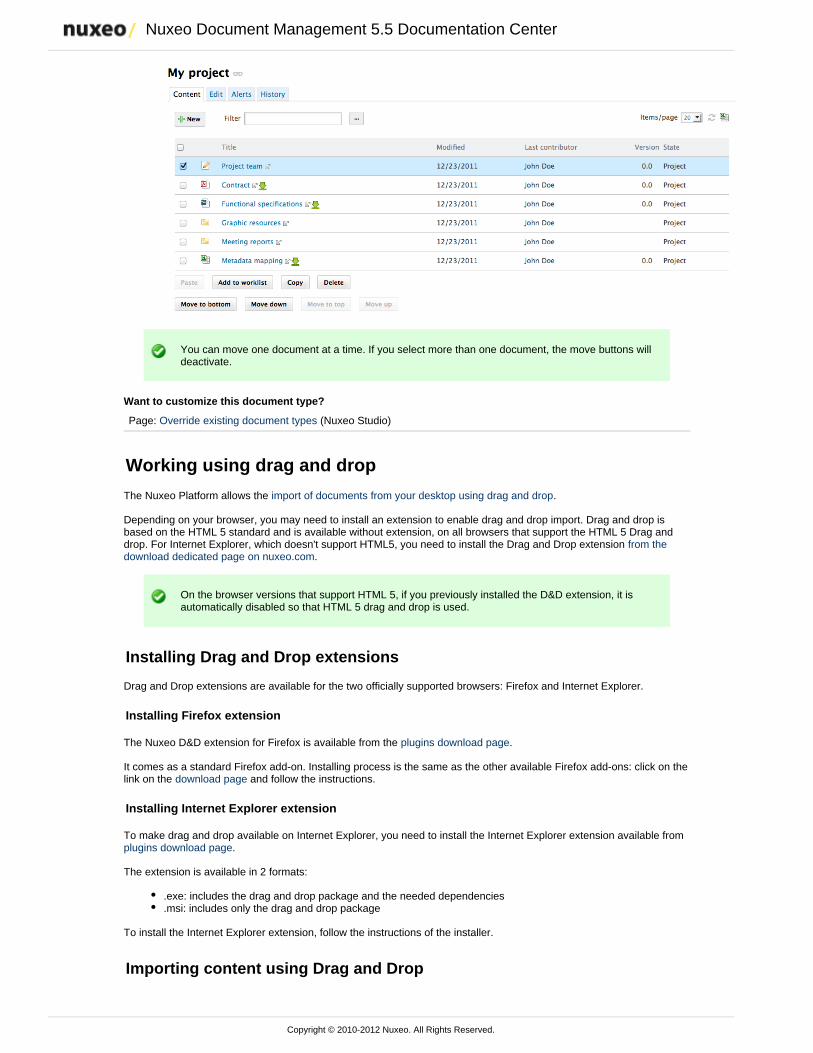
You can move one document at a time. If you select more than one document, the move buttons willdeactivate.
Want to customize this document type?
Page: Override existing document types (Nuxeo Studio)
Working using drag and drop
The Nuxeo Platform allows the .import of documents from your desktop using drag and drop
Depending on your browser, you may need to install an extension to enable drag and drop import. Drag and drop isbased on the HTML 5 standard and is available without extension, on all browsers that support the HTML 5 Drag anddrop. For Internet Explorer, which doesn't support HTML5, you need to install the Drag and Drop extension from the
.download dedicated page on nuxeo.com
On the browser versions that support HTML 5, if you previously installed the D&D extension, it isautomatically disabled so that HTML 5 drag and drop is used.
Installing Drag and Drop extensions
Drag and Drop extensions are available for the two officially supported browsers: Firefox and Internet Explorer.
Installing Firefox extension
The Nuxeo D&D extension for Firefox is available from the .plugins download page
It comes as a standard Firefox add-on. Installing process is the same as the other available Firefox add-ons: click on thelink on the and follow the instructions.download page
Installing Internet Explorer extension
To make drag and drop available on Internet Explorer, you need to install the Internet Explorer extension available from .plugins download page
The extension is available in 2 formats:
.exe: includes the drag and drop package and the needed dependencies
.msi: includes only the drag and drop package
To install the Internet Explorer extension, follow the instructions of the installer.
Importing content using Drag and Drop
Nuxeo Document Management 5.5 Documentation Center
Copyright © 2010-2012 Nuxeo. All Rights Reserved.
You can use Drag and Drop to easily import content into Nuxeo or just to create one document at a time. Two types ofimport are available:
quick import, that enables to quickly create documents in workspace;import with metadata, that enables to fill in metadata of the document(s) before they are created in theworkspace.
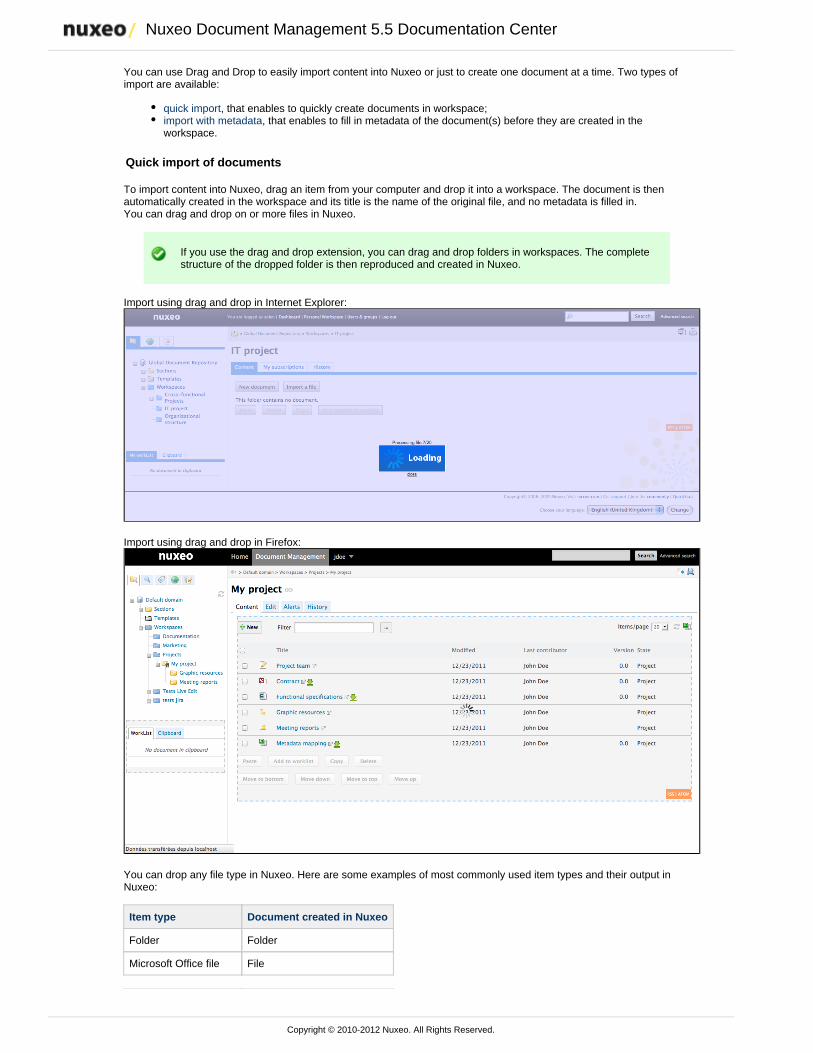
Quick import of documents
To import content into Nuxeo, drag an item from your computer and drop it into a workspace. The document is thenautomatically created in the workspace and its title is the name of the original file, and no metadata is filled in.You can drag and drop on or more files in Nuxeo.
If you use the drag and drop extension, you can drag and drop folders in workspaces. The completestructure of the dropped folder is then reproduced and created in Nuxeo.
Import using drag and drop in Internet Explorer:
Import using drag and drop in Firefox:
You can drop any file type in Nuxeo. Here are some examples of most commonly used item types and their output inNuxeo:
Item type Document created in Nuxeo
Folder Folder
Microsoft Office file File
Nuxeo Document Management 5.5 Documentation Center
Copyright © 2010-2012 Nuxeo. All Rights Reserved.
1.
2.
3.
4.
5.
6.
OpenOffice.file File
.txt file Note
Picture (.jpg, .png, etc) Picture
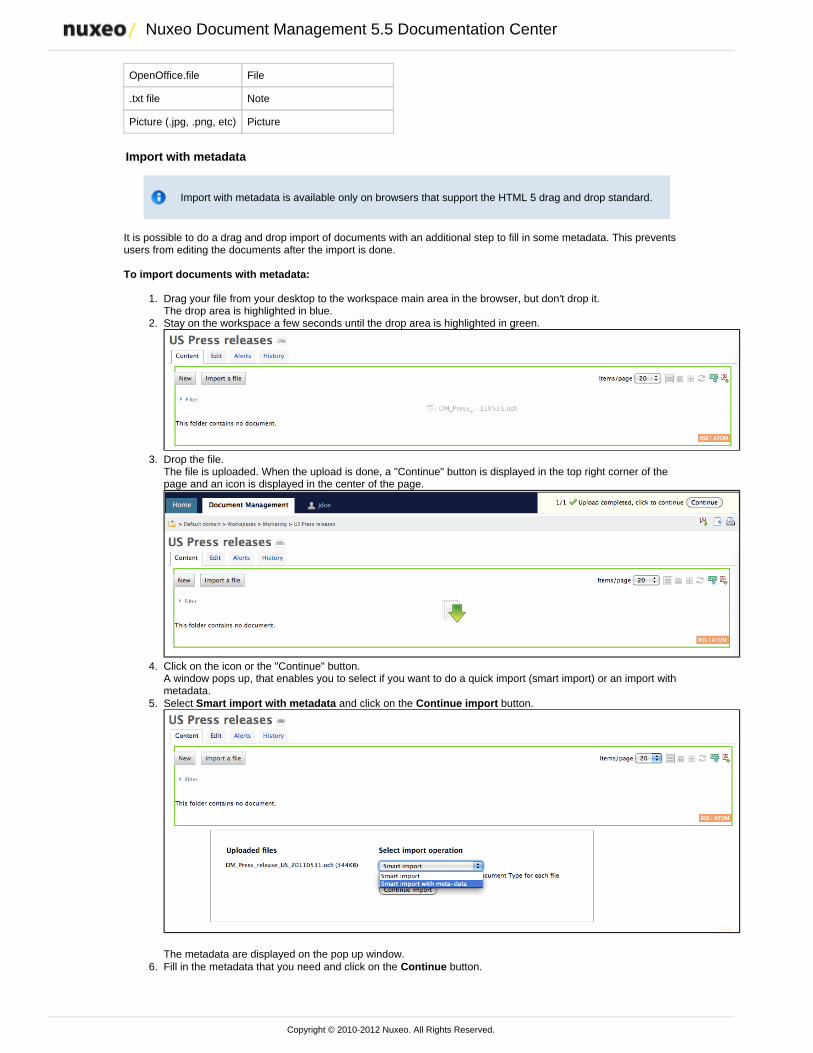
Import with metadata
Import with metadata is available only on browsers that support the HTML 5 drag and drop standard.
It is possible to do a drag and drop import of documents with an additional step to fill in some metadata. This preventsusers from editing the documents after the import is done.
To import documents with metadata:
Drag your file from your desktop to the workspace main area in the browser, but don't drop it.The drop area is highlighted in blue.Stay on the workspace a few seconds until the drop area is highlighted in green.
Drop the file.The file is uploaded. When the upload is done, a "Continue" button is displayed in the top right corner of thepage and an icon is displayed in the center of the page.
Click on the icon or the "Continue" button.A window pops up, that enables you to select if you want to do a quick import (smart import) or an import withmetadata.Select and click on the button.Smart import with metadata Continue import
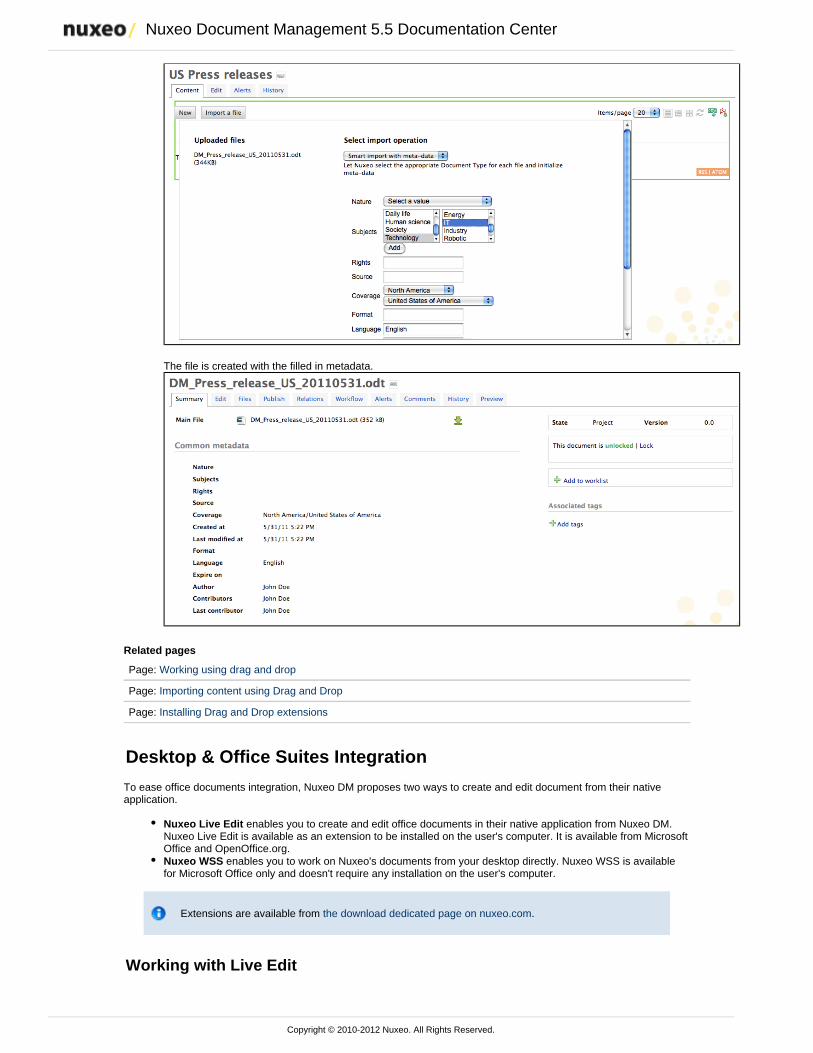
The metadata are displayed on the pop up window.Fill in the metadata that you need and click on the button.Continue
Nuxeo Document Management 5.5 Documentation Center
Copyright © 2010-2012 Nuxeo. All Rights Reserved.
6.
The file is created with the filled in metadata.
Related pages
Page: Working using drag and drop
Page: Importing content using Drag and Drop
Page: Installing Drag and Drop extensions
Desktop & Office Suites Integration
To ease office documents integration, Nuxeo DM proposes two ways to create and edit document from their nativeapplication.
Nuxeo Live Edit enables you to create and edit office documents in their native application from Nuxeo DM.Nuxeo Live Edit is available as an extension to be installed on the user's computer. It is available from MicrosoftOffice and OpenOffice.org.Nuxeo WSS enables you to work on Nuxeo's documents from your desktop directly. Nuxeo WSS is availablefor Microsoft Office only and doesn't require any installation on the user's computer.
Extensions are available from .the download dedicated page on nuxeo.com
Working with Live Edit
Nuxeo Document Management 5.5 Documentation Center
Copyright © 2010-2012 Nuxeo. All Rights Reserved.
1. 2. 3. 4.
5. 6.
1.
2. 3.
Nuxeo Live Edit is a Nuxeo DM extension that enables users to open and edit Microsoft Office and OpenOffice.orgdocuments in their native application from Nuxeo. This extension prevents you from the painful process of downloading -editing - uploading office documents in the application.
Live Edit comes as an extension that needs to be installed on the user's computer. It can be downloaded from the.download dedicated page on nuxeo.com
Live Edit is available for:
MS Office,OpenOffice.org.
Nuxeo Live Edit targets Microsoft Office 2007/2010, OpenOffice.org 3.3 and LibreOffice 3.4.4. It is known to work withInternet Explorer 7+ and Firefox 3.6+.
Live Edit can be used on Windows and Linux environments.
Live Edit allows you to:
create documents in MS Office and OpenOffice.org,edit documents in MS Office and OpenOffice.org.
On this page
Before you startCreating office documentsEditing documents
Before you start
Before you start using Live Edit to create and edit documents:
you may want to take a look at the ,Live Edit compatibility tableplease check your certificate is validated if your Nuxeo DM uses HTTPS. If your certificate is not validated, LiveEdit won't work.under Linux, ensure to have Java support installed when using LibreOffice. Ubuntu package is libreoffice-java-commonfor Internet Explorer 9 users, change your browser mode to at least "IE9 Compat view", in the developer toolbar(F12).
Creating office documents
To create office documents directly into Nuxeo DM:
Click on one of the MS Office or OpenOffice.org icon displayed below the search box.The application corresponding to the icon you clicked on opens.Type the content of your document.Save your modifications in Nuxeo DM:
By closing the application.By cliking in the Add-Ins menu of the application.Save in NuxeoA window opens.Save in Nuxeo
Give the document a title and a description, and select where to save the document in Nuxeo DM.Click on button.OKThe document is automatically saved in Nuxeo DM.
Editing documents
Documents that can be edited with Live Edit are indicated by the icon in the tab of the parent folder and in the Content tab of the document.Summary
When you edit a document online using Live Edit, the document is automatically locked in Nuxeo DM. It is automaticallyunlocked when you close the file from Microsoft Office or OpenOffice.org.
To edit office documents from Nuxeo DM:
Click on the online edition icon of the document.The document opens in the appropriate application.Modify the file.When done, close the editing application.
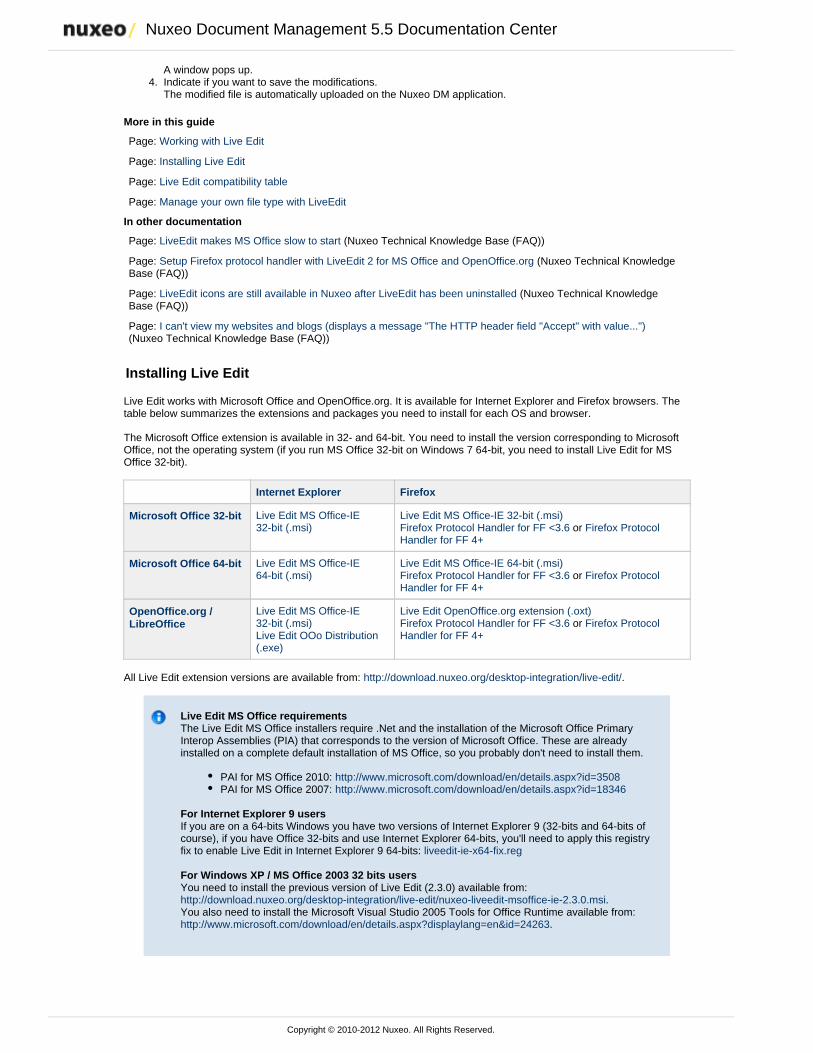
Nuxeo Document Management 5.5 Documentation Center
Copyright © 2010-2012 Nuxeo. All Rights Reserved.
3.
4. A window pops up.Indicate if you want to save the modifications.The modified file is automatically uploaded on the Nuxeo DM application.
More in this guide
Page: Working with Live Edit
Page: Installing Live Edit
Page: Live Edit compatibility table
Page: Manage your own file type with LiveEdit
In other documentation
Page: LiveEdit makes MS Office slow to start (Nuxeo Technical Knowledge Base (FAQ))
Page: Setup Firefox protocol handler with LiveEdit 2 for MS Office and OpenOffice.org (Nuxeo Technical KnowledgeBase (FAQ))
Page: LiveEdit icons are still available in Nuxeo after LiveEdit has been uninstalled (Nuxeo Technical KnowledgeBase (FAQ))
Page: I can't view my websites and blogs (displays a message "The HTTP header field "Accept" with value...")(Nuxeo Technical Knowledge Base (FAQ))
Installing Live Edit
Live Edit works with Microsoft Office and OpenOffice.org. It is available for Internet Explorer and Firefox browsers. Thetable below summarizes the extensions and packages you need to install for each OS and browser.
The Microsoft Office extension is available in 32- and 64-bit. You need to install the version corresponding to MicrosoftOffice, not the operating system (if you run MS Office 32-bit on Windows 7 64-bit, you need to install Live Edit for MSOffice 32-bit).
Internet Explorer Firefox
Microsoft Office 32-bit Live Edit MS Office-IE32-bit (.msi)
Live Edit MS Office-IE 32-bit (.msi) or Firefox Protocol Handler for FF <3.6 Firefox Protocol
Handler for FF 4+
Microsoft Office 64-bit Live Edit MS Office-IE64-bit (.msi)
Live Edit MS Office-IE 64-bit (.msi) or Firefox Protocol Handler for FF <3.6 Firefox Protocol
Handler for FF 4+
OpenOffice.org /LibreOffice
Live Edit MS Office-IE32-bit (.msi)Live Edit OOo Distribution(.exe)
Live Edit OpenOffice.org extension (.oxt) or Firefox Protocol Handler for FF <3.6 Firefox Protocol
Handler for FF 4+
All Live Edit extension versions are available from: .http://download.nuxeo.org/desktop-integration/live-edit/
Live Edit MS Office requirementsThe Live Edit MS Office installers require .Net and the installation of the Microsoft Office PrimaryInterop Assemblies (PIA) that corresponds to the version of Microsoft Office. These are alreadyinstalled on a complete default installation of MS Office, so you probably don't need to install them.
PAI for MS Office 2010: http://www.microsoft.com/download/en/details.aspx?id=3508PAI for MS Office 2007: http://www.microsoft.com/download/en/details.aspx?id=18346
For Internet Explorer 9 usersIf you are on a 64-bits Windows you have two versions of Internet Explorer 9 (32-bits and 64-bits ofcourse), if you have Office 32-bits and use Internet Explorer 64-bits, you'll need to apply this registryfix to enable Live Edit in Internet Explorer 9 64-bits: liveedit-ie-x64-fix.reg
For Windows XP / MS Office 2003 32 bits usersYou need to install the previous version of Live Edit (2.3.0) available from:
.http://download.nuxeo.org/desktop-integration/live-edit/nuxeo-liveedit-msoffice-ie-2.3.0.msiYou also need to install the available from: Microsoft Visual Studio 2005 Tools for Office Runtime
.http://www.microsoft.com/download/en/details.aspx?displaylang=en&id=24263
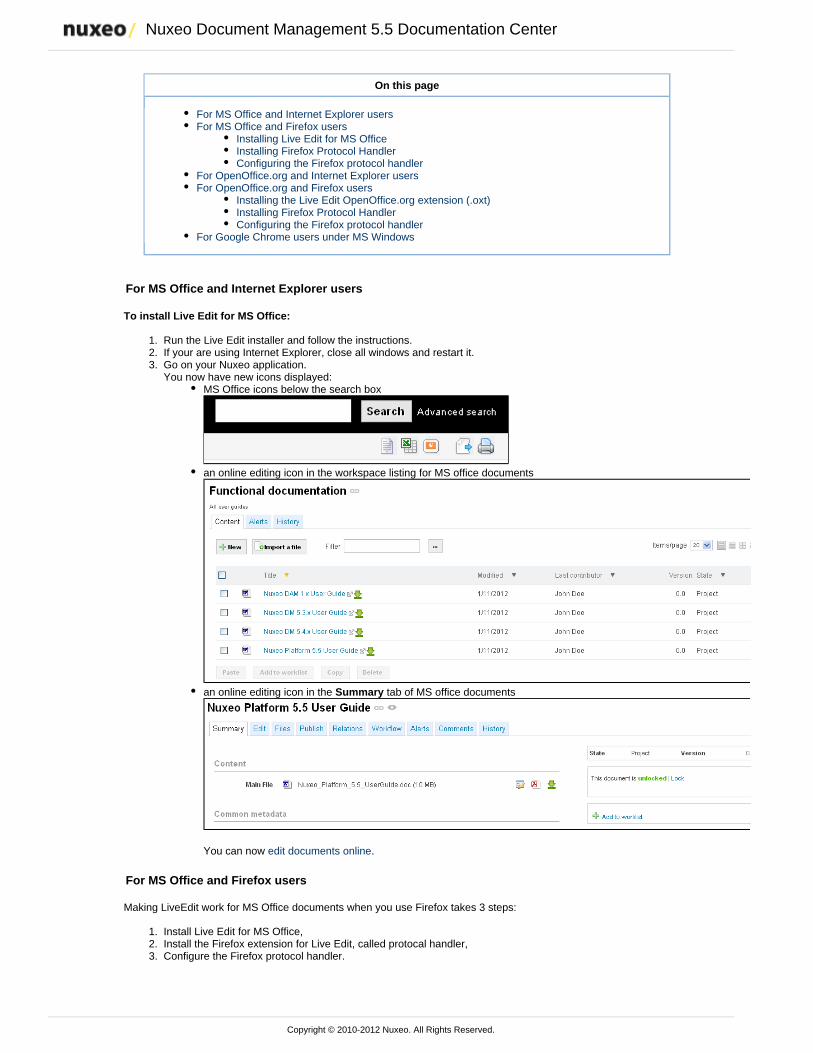
Nuxeo Document Management 5.5 Documentation Center
Copyright © 2010-2012 Nuxeo. All Rights Reserved.
1. 2. 3.
1. 2. 3.
On this page
For MS Office and Internet Explorer usersFor MS Office and Firefox users
Installing Live Edit for MS OfficeInstalling Firefox Protocol HandlerConfiguring the Firefox protocol handler
For OpenOffice.org and Internet Explorer usersFor OpenOffice.org and Firefox users
Installing the Live Edit OpenOffice.org extension (.oxt)Installing Firefox Protocol HandlerConfiguring the Firefox protocol handler
For Google Chrome users under MS Windows
For MS Office and Internet Explorer users
To install Live Edit for MS Office:
Run the Live Edit installer and follow the instructions.If your are using Internet Explorer, close all windows and restart it.Go on your Nuxeo application.You now have new icons displayed:
MS Office icons below the search box
an online editing icon in the workspace listing for MS office documents
an online editing icon in the tab of MS office documentsSummary
You can now .edit documents online
For MS Office and Firefox users
Making LiveEdit work for MS Office documents when you use Firefox takes 3 steps:
Install Live Edit for MS Office,Install the Firefox extension for Live Edit, called protocal handler,Configure the Firefox protocol handler.
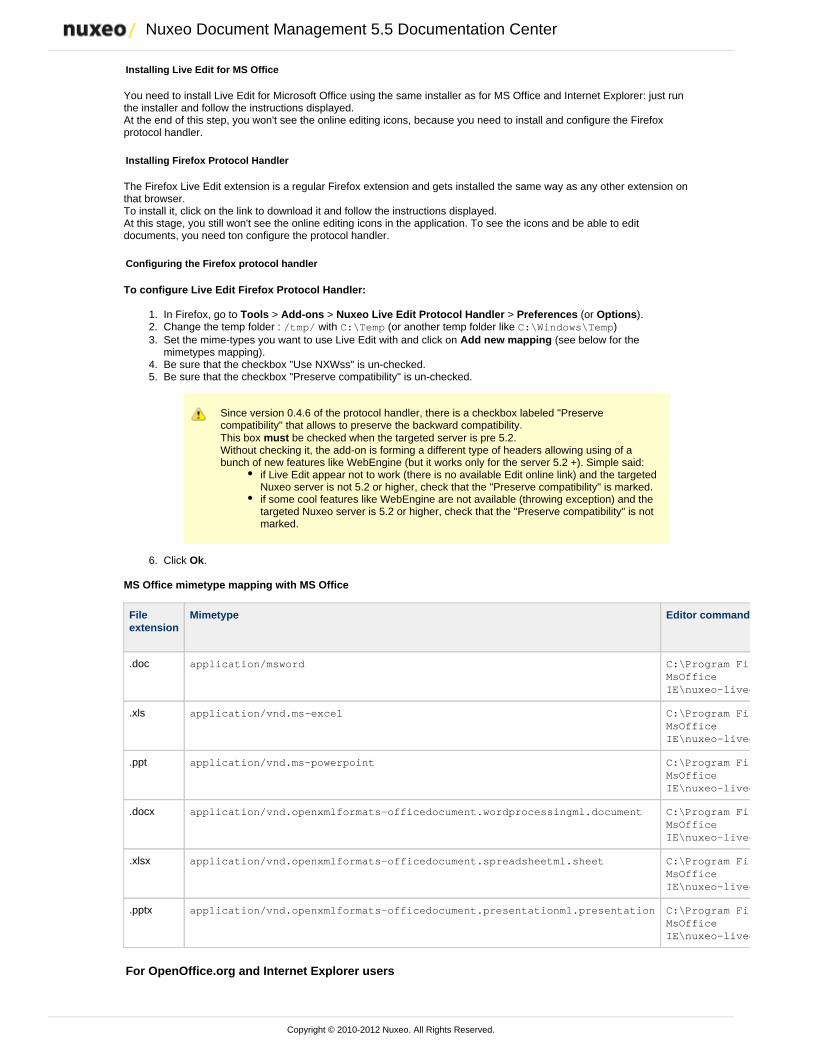
Nuxeo Document Management 5.5 Documentation Center
Copyright © 2010-2012 Nuxeo. All Rights Reserved.
1. 2. 3.
4. 5.
6.
Installing Live Edit for MS Office
You need to install Live Edit for Microsoft Office using the same installer as for MS Office and Internet Explorer: just runthe installer and follow the instructions displayed.At the end of this step, you won't see the online editing icons, because you need to install and configure the Firefoxprotocol handler.
Installing Firefox Protocol Handler
The Firefox Live Edit extension is a regular Firefox extension and gets installed the same way as any other extension onthat browser.To install it, click on the link to download it and follow the instructions displayed.At this stage, you still won't see the online editing icons in the application. To see the icons and be able to editdocuments, you need ton configure the protocol handler.
Configuring the Firefox protocol handler
To configure Live Edit Firefox Protocol Handler:
In Firefox, go to > > > (or ).Tools Add-ons Nuxeo Live Edit Protocol Handler Preferences OptionsChange the temp folder : with (or another temp folder like )/tmp/ C:\Temp C:\Windows\TempSet the mime-types you want to use Live Edit with and click on (see below for theAdd new mappingmimetypes mapping).Be sure that the checkbox "Use NXWss" is un-checked.Be sure that the checkbox "Preserve compatibility" is un-checked.
Since version 0.4.6 of the protocol handler, there is a checkbox labeled "Preservecompatibility" that allows to preserve the backward compatibility.This box be checked when the targeted server is pre 5.2.mustWithout checking it, the add-on is forming a different type of headers allowing using of abunch of new features like WebEngine (but it works only for the server 5.2 +). Simple said:
if Live Edit appear not to work (there is no available Edit online link) and the targetedNuxeo server is not 5.2 or higher, check that the "Preserve compatibility" is marked.if some cool features like WebEngine are not available (throwing exception) and thetargeted Nuxeo server is 5.2 or higher, check that the "Preserve compatibility" is notmarked.
Click .Ok
MS Office mimetype mapping with MS Office
Fileextension
Mimetype Editor command
.doc application/msword C:\Program Files\Nuxeo\Nuxeo Live EditMsOfficeIE\nuxeo-liveedit-msoffice-launcher.exe
.xls application/vnd.ms-excel C:\Program Files\Nuxeo\Nuxeo Live EditMsOfficeIE\nuxeo-liveedit-msoffice-launcher.exe
.ppt application/vnd.ms-powerpoint C:\Program Files\Nuxeo\Nuxeo Live EditMsOfficeIE\nuxeo-liveedit-msoffice-launcher.exe
.docx application/vnd.openxmlformats-officedocument.wordprocessingml.document C:\Program Files\Nuxeo\Nuxeo Live EditMsOfficeIE\nuxeo-liveedit-msoffice-launcher.exe
.xlsx application/vnd.openxmlformats-officedocument.spreadsheetml.sheet C:\Program Files\Nuxeo\Nuxeo Live EditMsOfficeIE\nuxeo-liveedit-msoffice-launcher.exe
.pptx application/vnd.openxmlformats-officedocument.presentationml.presentation C:\Program Files\Nuxeo\Nuxeo Live EditMsOfficeIE\nuxeo-liveedit-msoffice-launcher.exe
For OpenOffice.org and Internet Explorer users
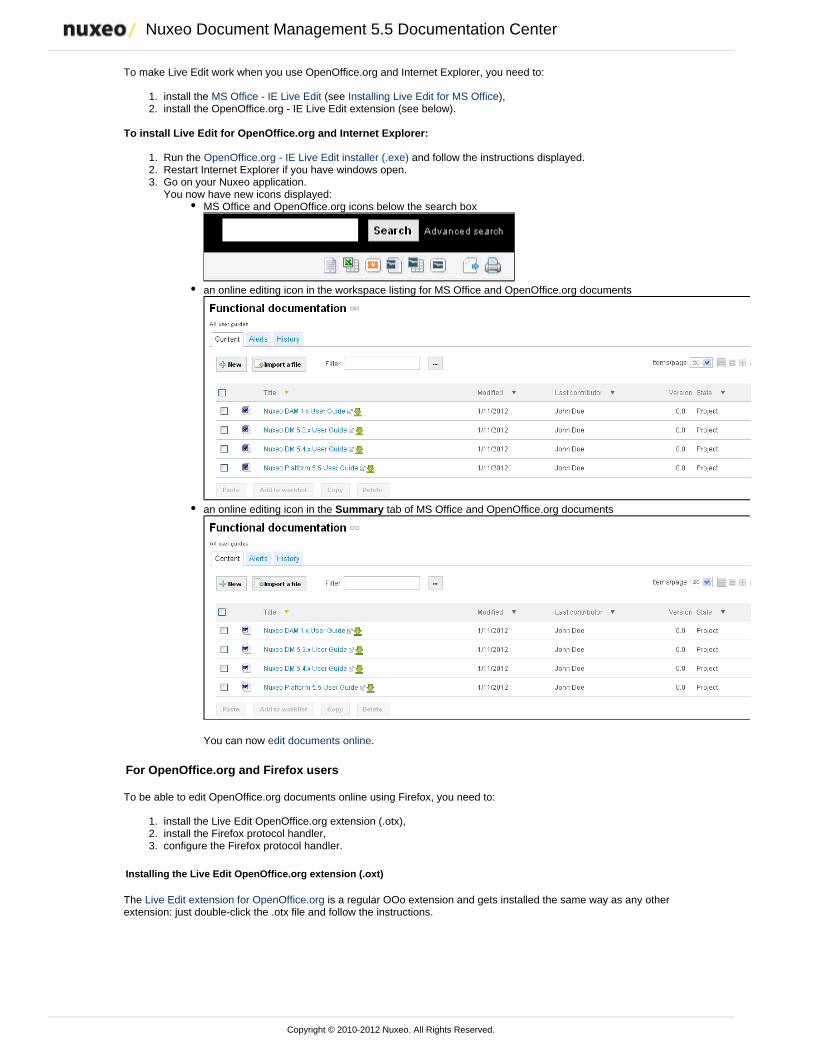
Nuxeo Document Management 5.5 Documentation Center
Copyright © 2010-2012 Nuxeo. All Rights Reserved.
1. 2.
1. 2. 3.
1. 2. 3.
To make Live Edit work when you use OpenOffice.org and Internet Explorer, you need to:
install the (see ),MS Office - IE Live Edit Installing Live Edit for MS Officeinstall the OpenOffice.org - IE Live Edit extension (see below).
To install Live Edit for OpenOffice.org and Internet Explorer:
Run the and follow the instructions displayed.OpenOffice.org - IE Live Edit installer (.exe)Restart Internet Explorer if you have windows open.Go on your Nuxeo application.You now have new icons displayed:
MS Office and OpenOffice.org icons below the search box
an online editing icon in the workspace listing for MS Office and OpenOffice.org documents
an online editing icon in the tab of MS Office and OpenOffice.org documentsSummary
You can now .edit documents online
For OpenOffice.org and Firefox users
To be able to edit OpenOffice.org documents online using Firefox, you need to:
install the Live Edit OpenOffice.org extension (.otx),install the Firefox protocol handler,configure the Firefox protocol handler.
Installing the Live Edit OpenOffice.org extension (.oxt)
The is a regular OOo extension and gets installed the same way as any otherLive Edit extension for OpenOffice.orgextension: just double-click the .otx file and follow the instructions.
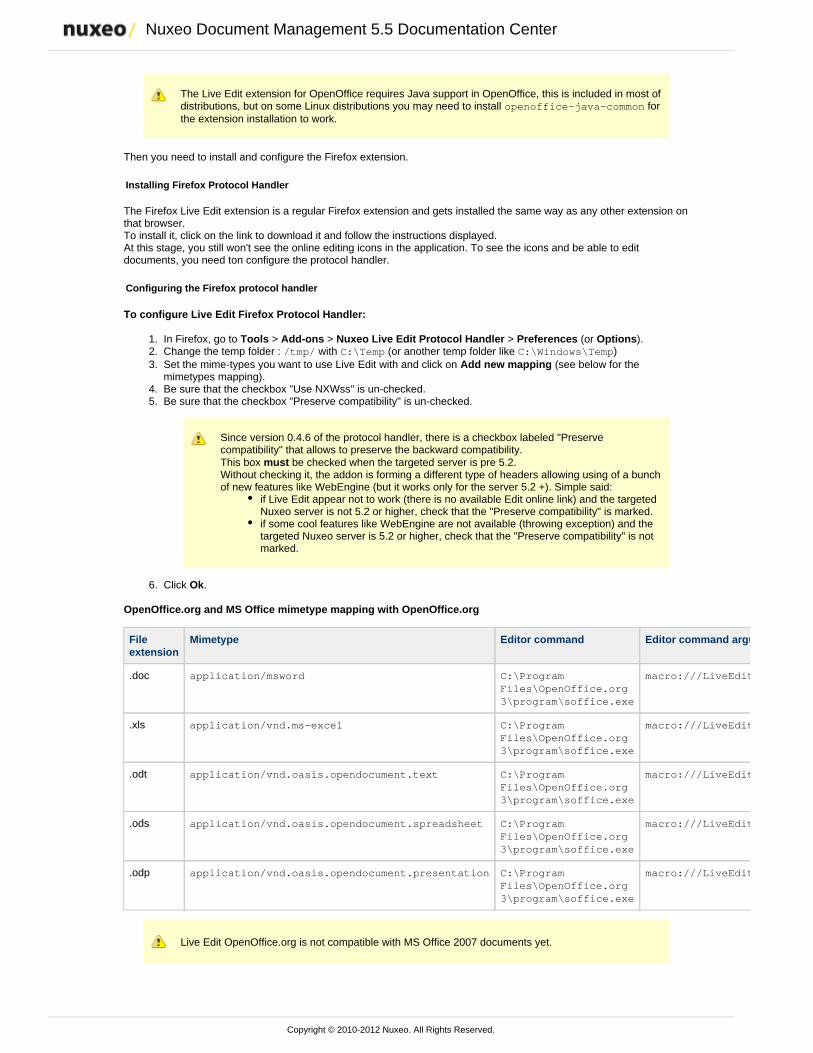
Nuxeo Document Management 5.5 Documentation Center
Copyright © 2010-2012 Nuxeo. All Rights Reserved.
1. 2. 3.
4. 5.
6.
The Live Edit extension for OpenOffice requires Java support in OpenOffice, this is included in most ofdistributions, but on some Linux distributions you may need to install foropenoffice-java-commonthe extension installation to work.
Then you need to install and configure the Firefox extension.
Installing Firefox Protocol Handler
The Firefox Live Edit extension is a regular Firefox extension and gets installed the same way as any other extension onthat browser.To install it, click on the link to download it and follow the instructions displayed.At this stage, you still won't see the online editing icons in the application. To see the icons and be able to editdocuments, you need ton configure the protocol handler.
Configuring the Firefox protocol handler
To configure Live Edit Firefox Protocol Handler:
In Firefox, go to > > > (or ).Tools Add-ons Nuxeo Live Edit Protocol Handler Preferences OptionsChange the temp folder : with (or another temp folder like )/tmp/ C:\Temp C:\Windows\TempSet the mime-types you want to use Live Edit with and click on (see below for theAdd new mappingmimetypes mapping).Be sure that the checkbox "Use NXWss" is un-checked.Be sure that the checkbox "Preserve compatibility" is un-checked.
Since version 0.4.6 of the protocol handler, there is a checkbox labeled "Preservecompatibility" that allows to preserve the backward compatibility.This box be checked when the targeted server is pre 5.2.mustWithout checking it, the addon is forming a different type of headers allowing using of a bunchof new features like WebEngine (but it works only for the server 5.2 +). Simple said:
if Live Edit appear not to work (there is no available Edit online link) and the targetedNuxeo server is not 5.2 or higher, check that the "Preserve compatibility" is marked.if some cool features like WebEngine are not available (throwing exception) and thetargeted Nuxeo server is 5.2 or higher, check that the "Preserve compatibility" is notmarked.
Click .Ok
OpenOffice.org and MS Office mimetype mapping with OpenOffice.org
Fileextension
Mimetype Editor command Editor command arguments
.doc application/msword C:\ProgramFiles\OpenOffice.org3\program\soffice.exe
macro:///LiveEditOOo.launcher.load(%s)
.xls application/vnd.ms-excel C:\ProgramFiles\OpenOffice.org3\program\soffice.exe
macro:///LiveEditOOo.launcher.load(%s)
.odt application/vnd.oasis.opendocument.text C:\ProgramFiles\OpenOffice.org3\program\soffice.exe
macro:///LiveEditOOo.launcher.load(%s)
.ods application/vnd.oasis.opendocument.spreadsheet C:\ProgramFiles\OpenOffice.org3\program\soffice.exe
macro:///LiveEditOOo.launcher.load(%s)
.odp application/vnd.oasis.opendocument.presentation C:\ProgramFiles\OpenOffice.org3\program\soffice.exe
macro:///LiveEditOOo.launcher.load(%s)
Live Edit OpenOffice.org is not compatible with MS Office 2007 documents yet.
Nuxeo Document Management 5.5 Documentation Center
Copyright © 2010-2012 Nuxeo. All Rights Reserved.
1. 2.
3.
1. 2.
3.
For Google Chrome users under MS Windows
For Windows users, Chrome will use Windows registry where NuxeoLiveEdit protocol is declared (LiveEdit for MS IEmust be installed). However some steps are needed to configure your computer and the server.
On your machine, you need to force Chrome to handle protocol:nxedit
Close Google Chrome because at shutdown it dumps its properties in the file we'll modify.Edit the file located under:Local State
XP: C:\Documents and Settings\<USERNAME>\Local Settings\Application Data\Google\Chrome\UserData;Vista/7: C:\Users\<USERNAME>\AppData\Local\Google\Chrome\User Data.
Add the protocol under the section, as such:nxedit protocol_handler
"protocol_handler": { "excluded_schemes": { ... "nxedit": false, ... }
If the section doesn't exist, find a mailto link and follow it, it should initialize this section.protocol_handler
Server side, because we don't have yet a mechanism to detect that LiveEdit is configured, you have to set a property toallow LiveEdit on each document type. As a consequence, you'll have to pay attention when clicking on LiveEdit links.
Edit .$NUXEO_HOME/templates/common/config/nuxeo.propertiesChange the value for the property from to org.nuxeo.ecm.platform.liveedit.config client server(uncomment the line if needed).Restart the Nuxeo server.
More in this guide
Page: Working with Live Edit
Page: Installing Live Edit
Page: Live Edit compatibility table
Page: Manage your own file type with LiveEdit
In other documentation
Page: LiveEdit makes MS Office slow to start (Nuxeo Technical Knowledge Base (FAQ))
Page: Setup Firefox protocol handler with LiveEdit 2 for MS Office and OpenOffice.org (Nuxeo Technical KnowledgeBase (FAQ))
Page: LiveEdit icons are still available in Nuxeo after LiveEdit has been uninstalled (Nuxeo Technical KnowledgeBase (FAQ))
Page: I can't view my websites and blogs (displays a message "The HTTP header field "Accept" with value...")(Nuxeo Technical Knowledge Base (FAQ))
Live Edit compatibility table
The table below states the compatibility of Live Edit plugins with different versions of browsers and office software, forNuxeo DM 5.4+.
Tested versions of Live Edit are:
Live Edit MS Office-IE (.msi): 2.2.1Live Edit OpenOffice Distribution (.exe): 2.2.1FireFox Protocol Handler: 0.4.11More information on the plugin / environment correspondence on the .Live Edit Installation page
On this page
Windows XP environmentWindows 7 64b environmentWindows 7 32b environmentInternet Explorer 9 compatibility
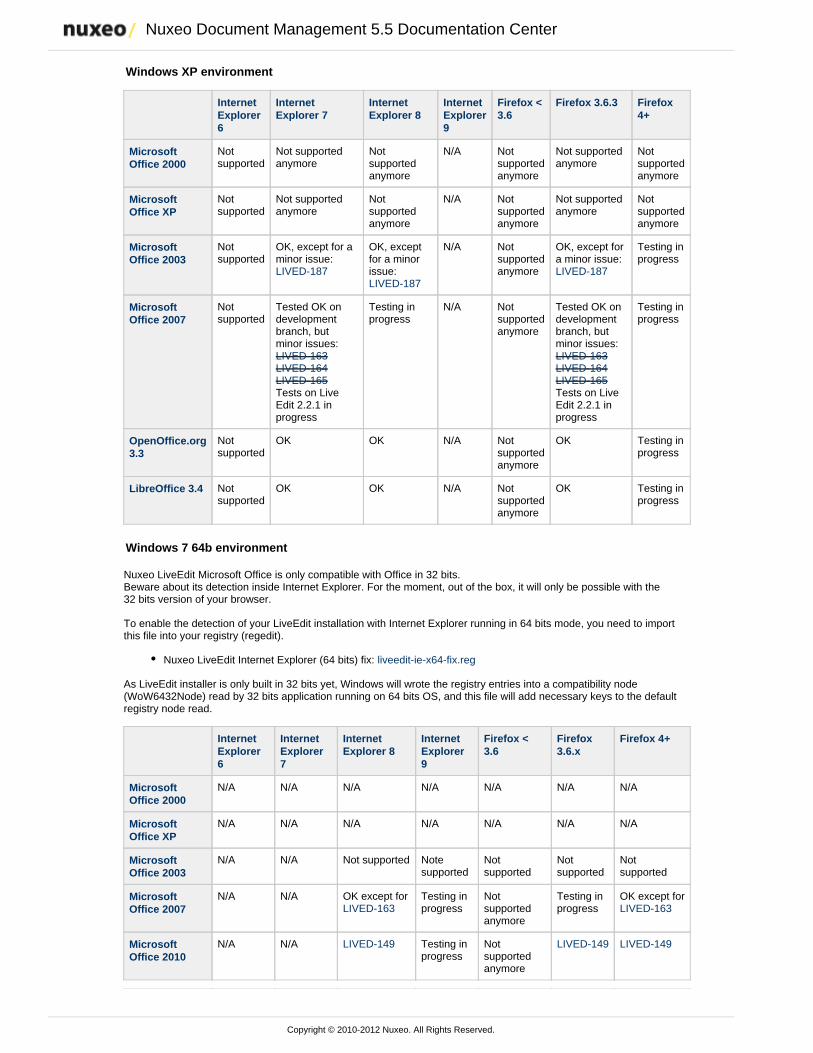
Nuxeo Document Management 5.5 Documentation Center
Copyright © 2010-2012 Nuxeo. All Rights Reserved.
Windows XP environment
InternetExplorer6
InternetExplorer 7
InternetExplorer 8
InternetExplorer9
Firefox <3.6
Firefox 3.6.3 Firefox4+
MicrosoftOffice 2000
Notsupported
Not supportedanymore
Notsupportedanymore
N/A Notsupportedanymore
Not supportedanymore
Notsupportedanymore
MicrosoftOffice XP
Notsupported
Not supportedanymore
Notsupportedanymore
N/A Notsupportedanymore
Not supportedanymore
Notsupportedanymore
MicrosoftOffice 2003
Notsupported
OK, except for aminor issue: LIVED-187
OK, exceptfor a minorissue: LIVED-187
N/A Notsupportedanymore
OK, except fora minor issue: LIVED-187
Testing inprogress
MicrosoftOffice 2007
Notsupported
Tested OK ondevelopmentbranch, butminor issues:
LIVED-163 LIVED-164 LIVED-165
Tests on LiveEdit 2.2.1 inprogress
Testing inprogress
N/A Notsupportedanymore
Tested OK ondevelopmentbranch, butminor issues:
LIVED-163 LIVED-164 LIVED-165
Tests on LiveEdit 2.2.1 inprogress
Testing inprogress
OpenOffice.org3.3
Notsupported
OK OK N/A Notsupportedanymore
OK Testing inprogress
LibreOffice 3.4 Notsupported
OK OK N/A Notsupportedanymore
OK Testing inprogress
Windows 7 64b environment
Nuxeo LiveEdit Microsoft Office is only compatible with Office in 32 bits.Beware about its detection inside Internet Explorer. For the moment, out of the box, it will only be possible with the32 bits version of your browser.
To enable the detection of your LiveEdit installation with Internet Explorer running in 64 bits mode, you need to importthis file into your registry (regedit).
Nuxeo LiveEdit Internet Explorer (64 bits) fix: liveedit-ie-x64-fix.reg
As LiveEdit installer is only built in 32 bits yet, Windows will wrote the registry entries into a compatibility node(WoW6432Node) read by 32 bits application running on 64 bits OS, and this file will add necessary keys to the defaultregistry node read.
InternetExplorer6
InternetExplorer7
InternetExplorer 8
InternetExplorer9
Firefox <3.6
Firefox3.6.x
Firefox 4+
MicrosoftOffice 2000
N/A N/A N/A N/A N/A N/A N/A
MicrosoftOffice XP
N/A N/A N/A N/A N/A N/A N/A
MicrosoftOffice 2003
N/A N/A Not supported Notesupported
Notsupported
Notsupported
Notsupported
MicrosoftOffice 2007
N/A N/A OK except forLIVED-163
Testing inprogress
Notsupportedanymore
Testing inprogress
OK except forLIVED-163
MicrosoftOffice 2010
N/A N/A LIVED-149 Testing inprogress
Notsupportedanymore
LIVED-149 LIVED-149
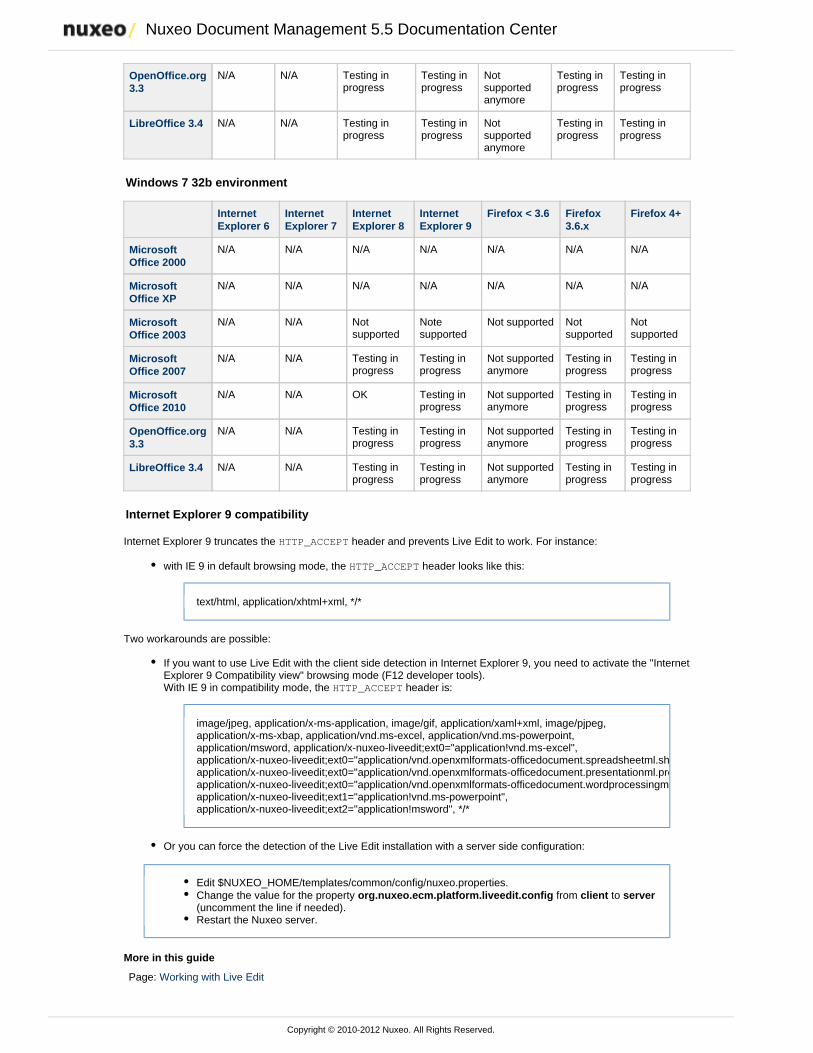
Nuxeo Document Management 5.5 Documentation Center
Copyright © 2010-2012 Nuxeo. All Rights Reserved.
OpenOffice.org3.3
N/A N/A Testing inprogress
Testing inprogress
Notsupportedanymore
Testing inprogress
Testing inprogress
LibreOffice 3.4 N/A N/A Testing inprogress
Testing inprogress
Notsupportedanymore
Testing inprogress
Testing inprogress
Windows 7 32b environment
InternetExplorer 6
InternetExplorer 7
InternetExplorer 8
InternetExplorer 9
Firefox < 3.6 Firefox3.6.x
Firefox 4+
MicrosoftOffice 2000
N/A N/A N/A N/A N/A N/A N/A
MicrosoftOffice XP
N/A N/A N/A N/A N/A N/A N/A
MicrosoftOffice 2003
N/A N/A Notsupported
Notesupported
Not supported Notsupported
Notsupported
MicrosoftOffice 2007
N/A N/A Testing inprogress
Testing inprogress
Not supportedanymore
Testing inprogress
Testing inprogress
MicrosoftOffice 2010
N/A N/A OK Testing inprogress
Not supportedanymore
Testing inprogress
Testing inprogress
OpenOffice.org3.3
N/A N/A Testing inprogress
Testing inprogress
Not supportedanymore
Testing inprogress
Testing inprogress
LibreOffice 3.4 N/A N/A Testing inprogress
Testing inprogress
Not supportedanymore
Testing inprogress
Testing inprogress
Internet Explorer 9 compatibility
Internet Explorer 9 truncates the header and prevents Live Edit to work. For instance:HTTP_ACCEPT
with IE 9 in default browsing mode, the header looks like this:HTTP_ACCEPT
text/html, application/xhtml+xml, */*
Two workarounds are possible:
If you want to use Live Edit with the client side detection in Internet Explorer 9, you need to activate the "InternetExplorer 9 Compatibility view" browsing mode (F12 developer tools).With IE 9 in compatibility mode, the header is:HTTP_ACCEPT
image/jpeg, application/x-ms-application, image/gif, application/xaml+xml, image/pjpeg,application/x-ms-xbap, application/vnd.ms-excel, application/vnd.ms-powerpoint,application/msword, application/x-nuxeo-liveedit;ext0="application!vnd.ms-excel",application/x-nuxeo-liveedit;ext0="application/vnd.openxmlformats-officedocument.spreadsheetml.sheet",application/x-nuxeo-liveedit;ext0="application/vnd.openxmlformats-officedocument.presentationml.presentation",application/x-nuxeo-liveedit;ext0="application/vnd.openxmlformats-officedocument.wordprocessingml.document",application/x-nuxeo-liveedit;ext1="application!vnd.ms-powerpoint",application/x-nuxeo-liveedit;ext2="application!msword", */*
Or you can force the detection of the Live Edit installation with a server side configuration:
Edit $NUXEO_HOME/templates/common/config/nuxeo.properties.Change the value for the property from to org.nuxeo.ecm.platform.liveedit.config client server(uncomment the line if needed).Restart the Nuxeo server.
More in this guide
Page: Working with Live Edit
Nuxeo Document Management 5.5 Documentation Center
Copyright © 2010-2012 Nuxeo. All Rights Reserved.
Page: Installing Live Edit
Page: Live Edit compatibility table
Page: Manage your own file type with LiveEdit
In other documentation
Page: LiveEdit makes MS Office slow to start (Nuxeo Technical Knowledge Base (FAQ))
Page: Setup Firefox protocol handler with LiveEdit 2 for MS Office and OpenOffice.org (Nuxeo Technical KnowledgeBase (FAQ))
Page: LiveEdit icons are still available in Nuxeo after LiveEdit has been uninstalled (Nuxeo Technical KnowledgeBase (FAQ))
Page: I can't view my websites and blogs (displays a message "The HTTP header field "Accept" with value...")(Nuxeo Technical Knowledge Base (FAQ))
Manage your own file type with LiveEdit
How to enhance Live Edit to take care of your own file type
By default, we recognize default office files (doc, docx, xls, xlsx, odt, ...) for both Microsoft Office and OpenOffice.org.But sometimes, you could be interested in managing other file types with Live Edit, and launching their associatededitors.
With Internet Explorer
Recognized extensions are managed in the Windows Registry. They are simple string values, stored in HKEY_LOCAL_MACHINE\SOFTWARE\Wow6432Node\Microsoft\Windows\CurrentVersion\Internet
and using this model:Settings\Accepted Documents
In a .reg file, a new handled extension should looks like:"liveedit_msoffice12_word_template"="application/x-nuxeo-liveedit;ext7=\"vnd.ms-word.template.macroEnabled.12\"".
The key is a unique name, and in this example, it is "liveedit_msoffice12_word_template".The value is built like a MIME-TYPE: application/x-nuxeo-liveedit;extX=" ". In this example, the valueFILE_MIME_TYPEis: "application/x-nuxeo-liveedit;ext7="vnd.ms-word.template.macroEnabled.12".
With Internet Explorer, Live Edit will open the associated program and save the edited file into Nuxeowhen the program ended.
Do not forget to restart your browser after making changes.
See the attached file to enable all Microsoft Office extensions.
With Firefox
In the extension preferences form, you can directly add the editor / MIME-TYPE mapping. By doing this, it will beenough to enable a new extension.
With Firefox, you just receive a file descriptor with the file URL and authentication information. Youalso need to add a script to download the file, start the editor and upload it when finished.
Working with WebDAV and WSS
Nuxeo enables you to create and edit MS Office documents stored in Nuxeo directly from your OS desktop, withouthaving to go on your Nuxeo application in your browser. This is possible thanks to the support of the WebDAV (
) and Windows SharePoint Service (WSS) protocols.Web-based Distributed Authoring and Versioning
For both protocols, you don't need to install an extension or configure Nuxeo. You just need to add Nuxeo as a networkdrive. You will then be able to do the following actions on Nuxeo MS Office documents, from your OS desktop directly:
create documents and folders,edit documents,move documents and folders.
Nuxeo Document Management 5.5 Documentation Center
Copyright © 2010-2012 Nuxeo. All Rights Reserved.
1. 2.
3.
4. 5. 6.
1. 2. 3. 4.
(read below for more...)
On this page
Adding Nuxeo as an external driveAdding a new network place from Windows XPMapping a network drive from Windows 7 ExplorerConnecting to Nuxeo from Mac OS FinderConnecting to Nuxeo from Linux
Browsing Nuxeo from your OSEditing documentsCreating content in Nuxeo
Adding Nuxeo as an external drive
Depending on your OS, the steps to follow so Nuxeo is seen by the OS as an external drive are different depending onyour OS.
The first time you do the mapping, make sure that you have already logged in to the web interfaceonce. This is required to setup the Windows authentication protocol.
Adding a new network place from Windows XP
From the Windows Explorer, open .My Network PlacesClick on .Add a network placeThe opens.Add Network Place WizardWhen asked for the Internet or network address, type the address of your Nuxeo application, for instance"http://localhost:8080/nuxeo/".When prompted, type your username and password.Give the application a name. This is the name that will be displayed in the network places.Finish the steps.The network place is created. You can now browse the content of your Nuxeo application in the WindowsExplorer, from the network places.If you checked the box, the workspaces of the application areOpen this network place when I click Finishdisplayed in the explorer.
Mapping a network drive from Windows 7 Explorer
Open the Windows Explorer.Click .Map network driveChoose a Drive letter.In , type the address of your Nuxeo application adding the suffix, for instanceFolder site/dav/"http://localhost:8080/nuxeo/site/dav/".Make sur is selected. Connect using different credentials

Nuxeo Document Management 5.5 Documentation Center
Copyright © 2010-2012 Nuxeo. All Rights Reserved.
4.
5.
6.
1. 2.
3.
Click on .FinishA connect window opens.Type your login and your password and click on the button.OK
Connecting to Nuxeo from Mac OS Finder
From the Finder open the popupConnect to ServerType the address of your Nuxeo application adding the suffix, for instancesite/dav/"http://localhost:8080/nuxeo/site/dav/".A connect window opens.Type your login and your password and click on the button.OK
Connecting to Nuxeo from Linux
The plugin comes with a default configuration which supports only a few clients. On Linux, it supports:
cadaver, which enables you to browse the content of the Nuxeo application in command line like you would dowith a FTP server;davfs, which enables your to mount Nuxeo and see it as a file system directory.
It is possible to .configure the application to work with other WebDAV clients
Browsing Nuxeo from your OS
After you added the Nuxeo application as an external drive, you can browse the content of Nuxeo from your OS. Youcan see:
workspaces,folders,templates,files,notes,pictures.
Editing documents
You can edit office documents available in your Nuxeo workspaces and folders from your OS, like any other localdocuments.The document is automatically locked in Nuxeo. When you save your modifications, they are saved in Nuxeo directly.When done, closing the document will unlock the document in Nuxeo.
Creating content in Nuxeo
You can create folders and documents in Nuxeo from your desktop.To create documents in a Nuxeo folder or workspace, you can:
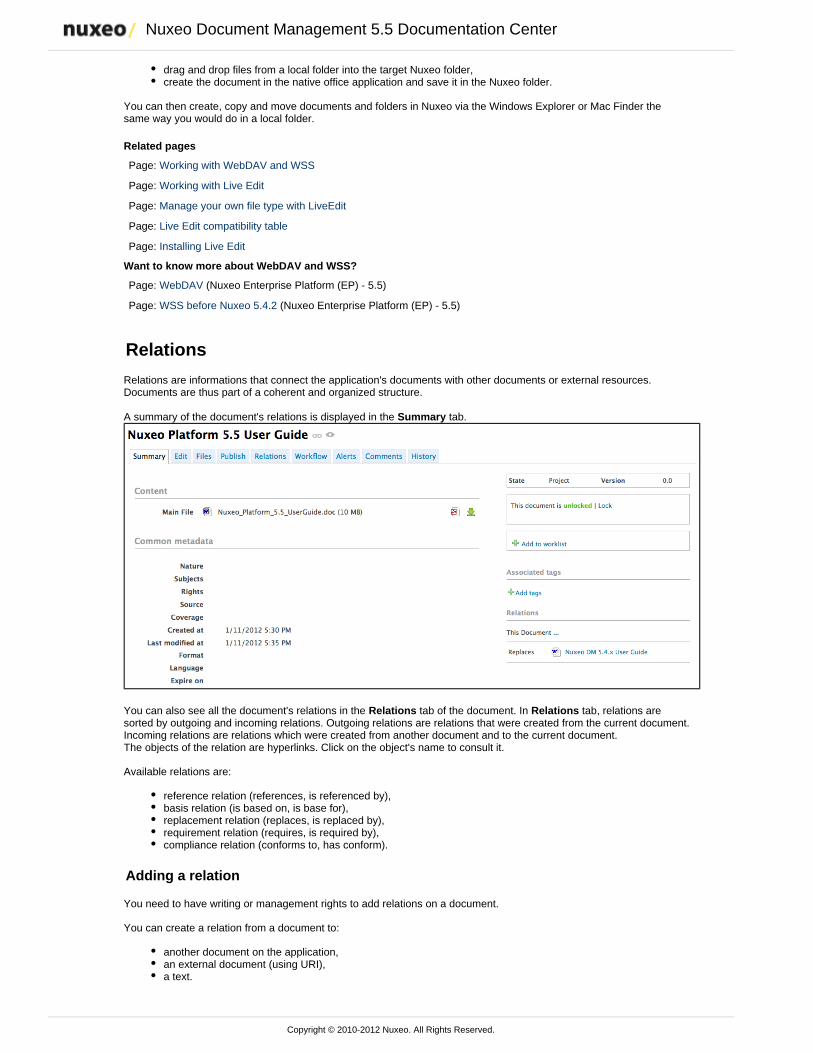
Nuxeo Document Management 5.5 Documentation Center
Copyright © 2010-2012 Nuxeo. All Rights Reserved.
drag and drop files from a local folder into the target Nuxeo folder,create the document in the native office application and save it in the Nuxeo folder.
You can then create, copy and move documents and folders in Nuxeo via the Windows Explorer or Mac Finder thesame way you would do in a local folder.
Related pages
Page: Working with WebDAV and WSS
Page: Working with Live Edit
Page: Manage your own file type with LiveEdit
Page: Live Edit compatibility table
Page: Installing Live Edit
Want to know more about WebDAV and WSS?
Page: WebDAV (Nuxeo Enterprise Platform (EP) - 5.5)
Page: WSS before Nuxeo 5.4.2 (Nuxeo Enterprise Platform (EP) - 5.5)
Relations
Relations are informations that connect the application's documents with other documents or external resources.Documents are thus part of a coherent and organized structure.
A summary of the document's relations is displayed in the tab. Summary
You can also see all the document's relations in the tab of the document. In tab, relations areRelations Relationssorted by outgoing and incoming relations. Outgoing relations are relations that were created from the current document.Incoming relations are relations which were created from another document and to the current document.The objects of the relation are hyperlinks. Click on the object's name to consult it.
Available relations are:
reference relation (references, is referenced by),basis relation (is based on, is base for),replacement relation (replaces, is replaced by),requirement relation (requires, is required by),compliance relation (conforms to, has conform).
Adding a relation
You need to have writing or management rights to add relations on a document.
You can create a relation from a document to:
another document on the application,an external document (using URI),a text.
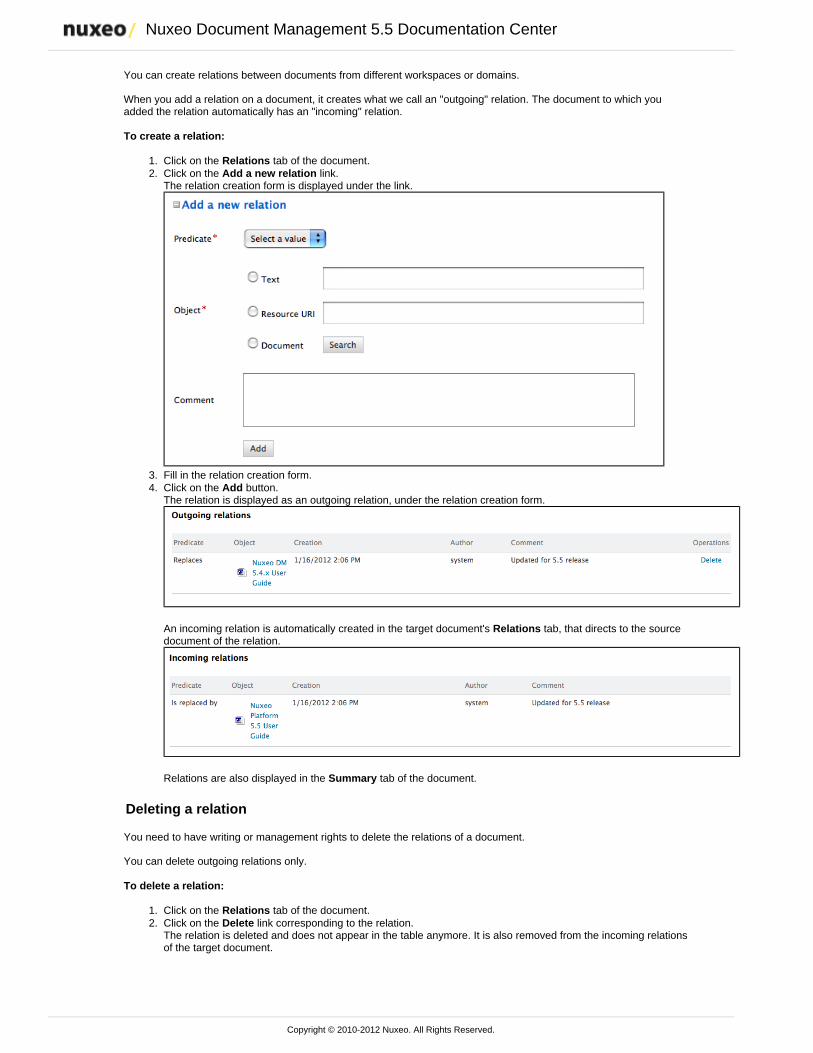
Nuxeo Document Management 5.5 Documentation Center
Copyright © 2010-2012 Nuxeo. All Rights Reserved.
1. 2.
3. 4.
1. 2.
You can create relations between documents from different workspaces or domains.
When you add a relation on a document, it creates what we call an "outgoing" relation. The document to which youadded the relation automatically has an "incoming" relation.
To create a relation:
Click on the tab of the document.RelationsClick on the link.Add a new relationThe relation creation form is displayed under the link.
Fill in the relation creation form.Click on the button.AddThe relation is displayed as an outgoing relation, under the relation creation form.
An incoming relation is automatically created in the target document's tab, that directs to the sourceRelationsdocument of the relation.
Relations are also displayed in the tab of the document.Summary
Deleting a relation
You need to have writing or management rights to delete the relations of a document.
You can delete outgoing relations only.
To delete a relation:
Click on the tab of the document.RelationsClick on the link corresponding to the relation.DeleteThe relation is deleted and does not appear in the table anymore. It is also removed from the incoming relationsof the target document.
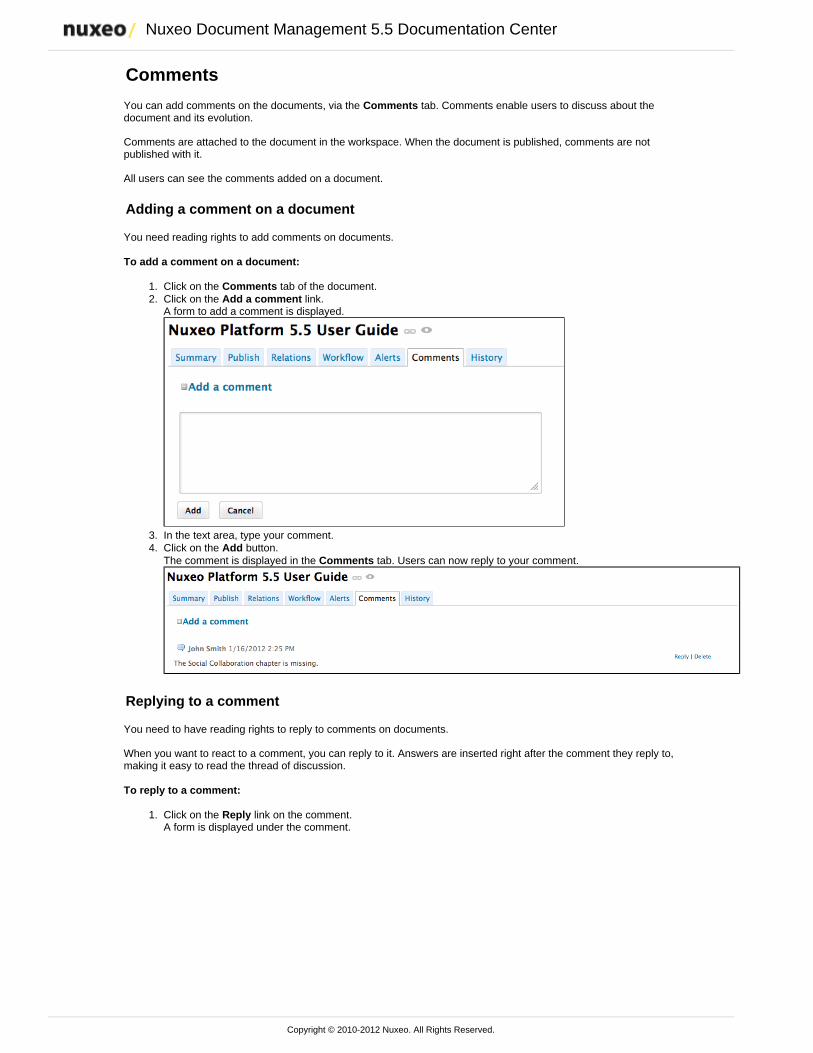
Nuxeo Document Management 5.5 Documentation Center
Copyright © 2010-2012 Nuxeo. All Rights Reserved.
1. 2.
3. 4.
1.
Comments
You can add comments on the documents, via the tab. Comments enable users to discuss about theCommentsdocument and its evolution.
Comments are attached to the document in the workspace. When the document is published, comments are notpublished with it.
All users can see the comments added on a document.
Adding a comment on a document
You need reading rights to add comments on documents.
To add a comment on a document:
Click on the tab of the document.CommentsClick on the link.Add a commentA form to add a comment is displayed.
In the text area, type your comment.Click on the button.AddThe comment is displayed in the tab. Users can now reply to your comment.Comments
Replying to a comment
You need to have reading rights to reply to comments on documents.
When you want to react to a comment, you can reply to it. Answers are inserted right after the comment they reply to,making it easy to read the thread of discussion.
To reply to a comment:
Click on the link on the comment.ReplyA form is displayed under the comment.
Nuxeo Document Management 5.5 Documentation Center
Copyright © 2010-2012 Nuxeo. All Rights Reserved.
1.
2. 3.
1. 2.
1.
2.
3.
Type your comment in the text area.Click on the button.AddThe answer is inserted after the comment it replies to.
Deleting comments
Only the author of the comment and users with management rights can delete the comments of a document.
Deleting a comment is a permanent action. You cannot restore deleted comments.
To delete a comment:
Click on the tab of the document.CommentsClick on the link displayed in the top right corner of the comment.Delete
The comment is immediately erased.
Annotations
Annotations are post-its or comments placed on the preview of documents.You can annotate documents as soon as you can access them, ie when you have at least "Read" right.
To annotate a document:
Click on the icon of the document.The document's preview is displayed in a pop up window.Draw a frame on the preview.An input pop up appears.Type your comment.
Nuxeo Document Management 5.5 Documentation Center
Copyright © 2010-2012 Nuxeo. All Rights Reserved.
3.
4. Click on .SubmitThe annotation is saved.You can see your annotation when the mouse is over the zone you selected, and, in the margin, the list ofannotations, and for each, the author, date and time of annotation and the text.
Tags
Tags are labels that you can add on documents to help you describe them.Unlike subjects in the metadata of the document, you don't have to choose tags in a closed list. You are free to apply thelabels that describe the document best. However, tags are proposed as you type them, to enable you to use the sametags as the other users and have a consistent tagging of documents.
You can add as many tags on documents as you want.
Nuxeo Document Management 5.5 Documentation Center
Copyright © 2010-2012 Nuxeo. All Rights Reserved.
1. 2.
3.
You can then use the tag cloud to find all documents that have the same tags.
Tagging documents
Users can add a tag on a document as soon as they can access the document, ie as soon as they have reading rights.
Documents can be tagged in workspaces and in sections. When a document is published, the tags applied in theworkspaces are not published with the document. You can have tags in the workspace that are more collaborative workoriented than in the section.
To tag a document:
Go on the tab of the document.SummaryClick on the link.Add tagsA text area is displayed below the link.Type a label.
Tags already used are proposed from 3 letters typed.
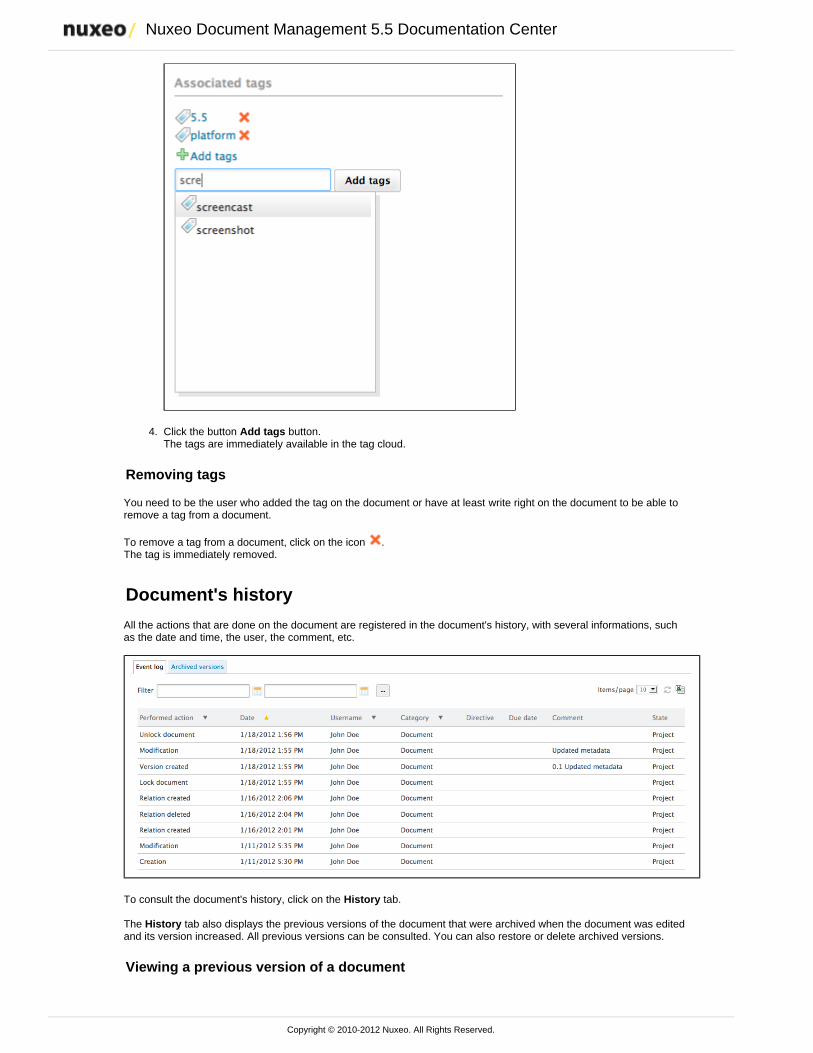
Nuxeo Document Management 5.5 Documentation Center
Copyright © 2010-2012 Nuxeo. All Rights Reserved.
3.
4. Click the button button.Add tagsThe tags are immediately available in the tag cloud.
Removing tags
You need to be the user who added the tag on the document or have at least right on the document to be able towriteremove a tag from a document.
To remove a tag from a document, click on the icon .The tag is immediately removed.
Document's history
All the actions that are done on the document are registered in the document's history, with several informations, suchas the date and time, the user, the comment, etc.
To consult the document's history, click on the tab.History
The tab also displays the previous versions of the document that were archived when the document was editedHistoryand its version increased. All previous versions can be consulted. You can also restore or delete archived versions.
Viewing a previous version of a document
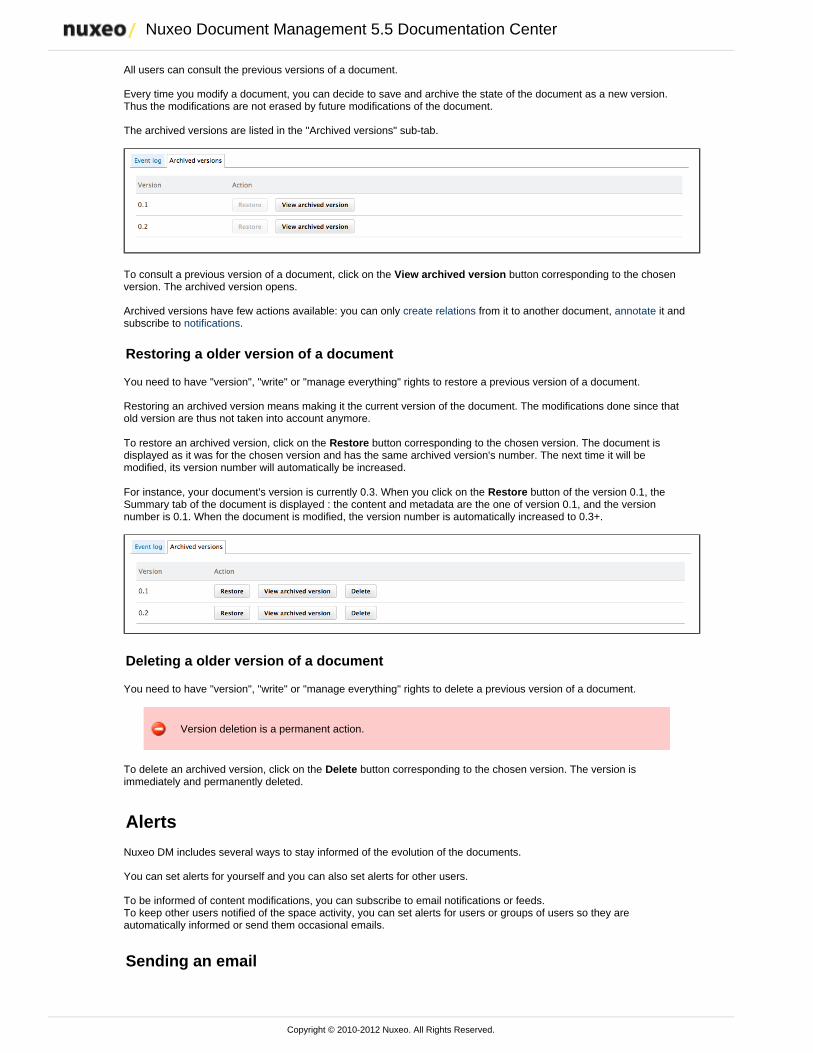
Nuxeo Document Management 5.5 Documentation Center
Copyright © 2010-2012 Nuxeo. All Rights Reserved.
All users can consult the previous versions of a document.
Every time you modify a document, you can decide to save and archive the state of the document as a new version.Thus the modifications are not erased by future modifications of the document.
The archived versions are listed in the "Archived versions" sub-tab.
To consult a previous version of a document, click on the button corresponding to the chosenView archived versionversion. The archived version opens.
Archived versions have few actions available: you can only from it to another document, it andcreate relations annotatesubscribe to .notifications
Restoring a older version of a document
You need to have "version", "write" or "manage everything" rights to restore a previous version of a document.
Restoring an archived version means making it the current version of the document. The modifications done since thatold version are thus not taken into account anymore.
To restore an archived version, click on the button corresponding to the chosen version. The document isRestoredisplayed as it was for the chosen version and has the same archived version's number. The next time it will bemodified, its version number will automatically be increased.
For instance, your document's version is currently 0.3. When you click on the button of the version 0.1, theRestoreSummary tab of the document is displayed : the content and metadata are the one of version 0.1, and the versionnumber is 0.1. When the document is modified, the version number is automatically increased to 0.3+.
Deleting a older version of a document
You need to have "version", "write" or "manage everything" rights to delete a previous version of a document.
Version deletion is a permanent action.
To delete an archived version, click on the button corresponding to the chosen version. The version isDeleteimmediately and permanently deleted.
Alerts
Nuxeo DM includes several ways to stay informed of the evolution of the documents.
You can set alerts for yourself and you can also set alerts for other users.
To be informed of content modifications, you can subscribe to email notifications or feeds.To keep other users notified of the space activity, you can set alerts for users or groups of users so they areautomatically informed or send them occasional emails.
Sending an email
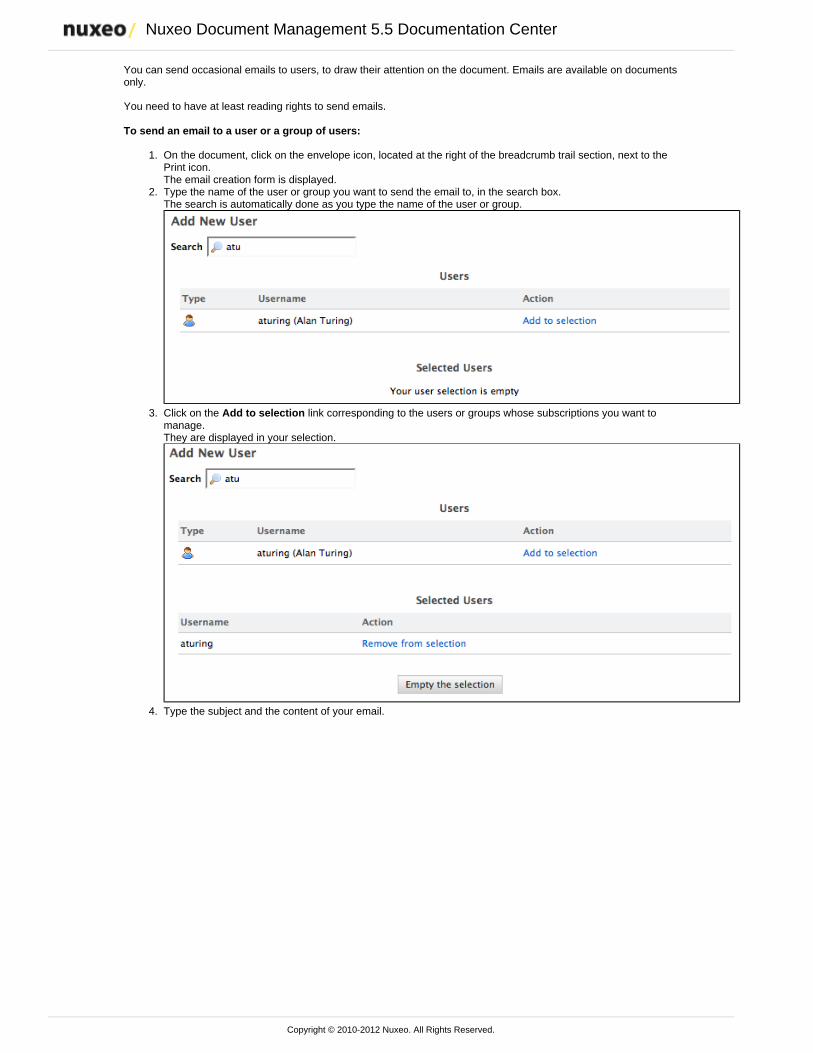
Nuxeo Document Management 5.5 Documentation Center
Copyright © 2010-2012 Nuxeo. All Rights Reserved.
1.
2.
3.
4.
You can send occasional emails to users, to draw their attention on the document. Emails are available on documentsonly.
You need to have at least reading rights to send emails.
To send an email to a user or a group of users:
On the document, click on the envelope icon, located at the right of the breadcrumb trail section, next to thePrint icon.The email creation form is displayed.Type the name of the user or group you want to send the email to, in the search box.The search is automatically done as you type the name of the user or group.
Click on the link corresponding to the users or groups whose subscriptions you want toAdd to selectionmanage.They are displayed in your selection.
Type the subject and the content of your email.
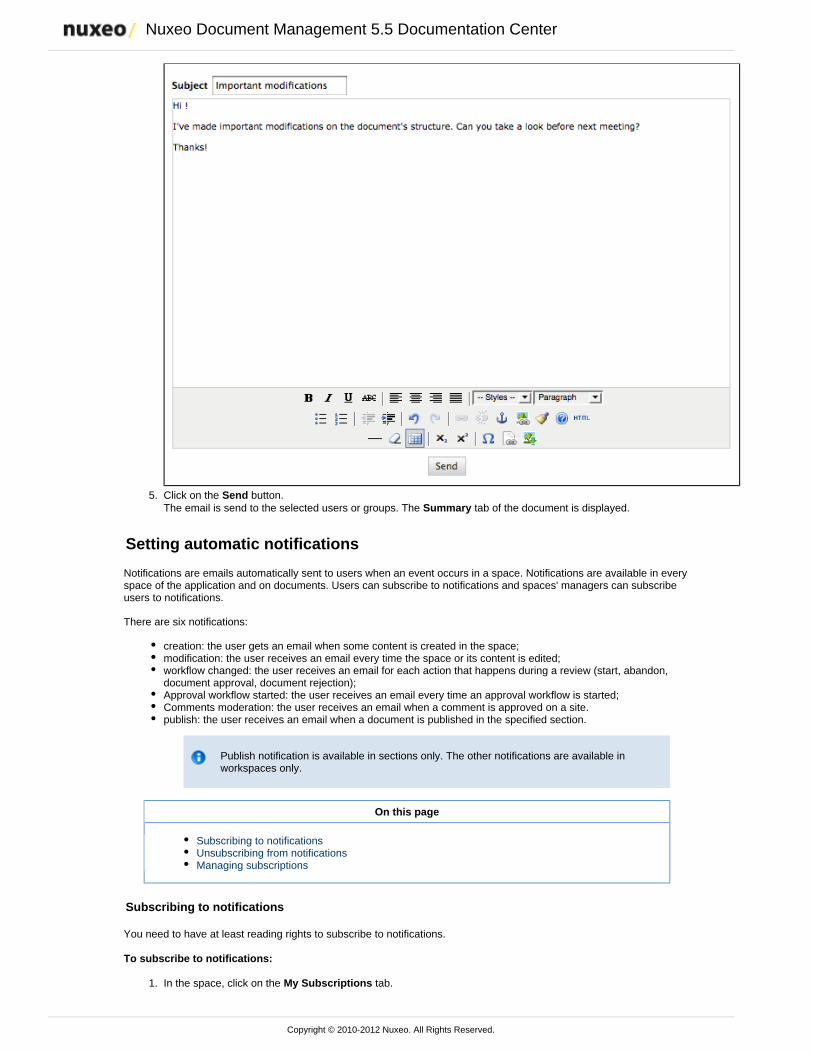
Nuxeo Document Management 5.5 Documentation Center
Copyright © 2010-2012 Nuxeo. All Rights Reserved.
4.
5.
1.
Click on the button.SendThe email is send to the selected users or groups. The tab of the document is displayed.Summary
Setting automatic notifications
Notifications are emails automatically sent to users when an event occurs in a space. Notifications are available in everyspace of the application and on documents. Users can subscribe to notifications and spaces' managers can subscribeusers to notifications.
There are six notifications:
creation: the user gets an email when some content is created in the space;modification: the user receives an email every time the space or its content is edited;workflow changed: the user receives an email for each action that happens during a review (start, abandon,document approval, document rejection);Approval workflow started: the user receives an email every time an approval workflow is started;Comments moderation: the user receives an email when a comment is approved on a site.publish: the user receives an email when a document is published in the specified section.
Publish notification is available in sections only. The other notifications are available inworkspaces only.
On this page
Subscribing to notificationsUnsubscribing from notificationsManaging subscriptions
Subscribing to notifications
You need to have at least reading rights to subscribe to notifications.
To subscribe to notifications:
In the space, click on the tab.My Subscriptions
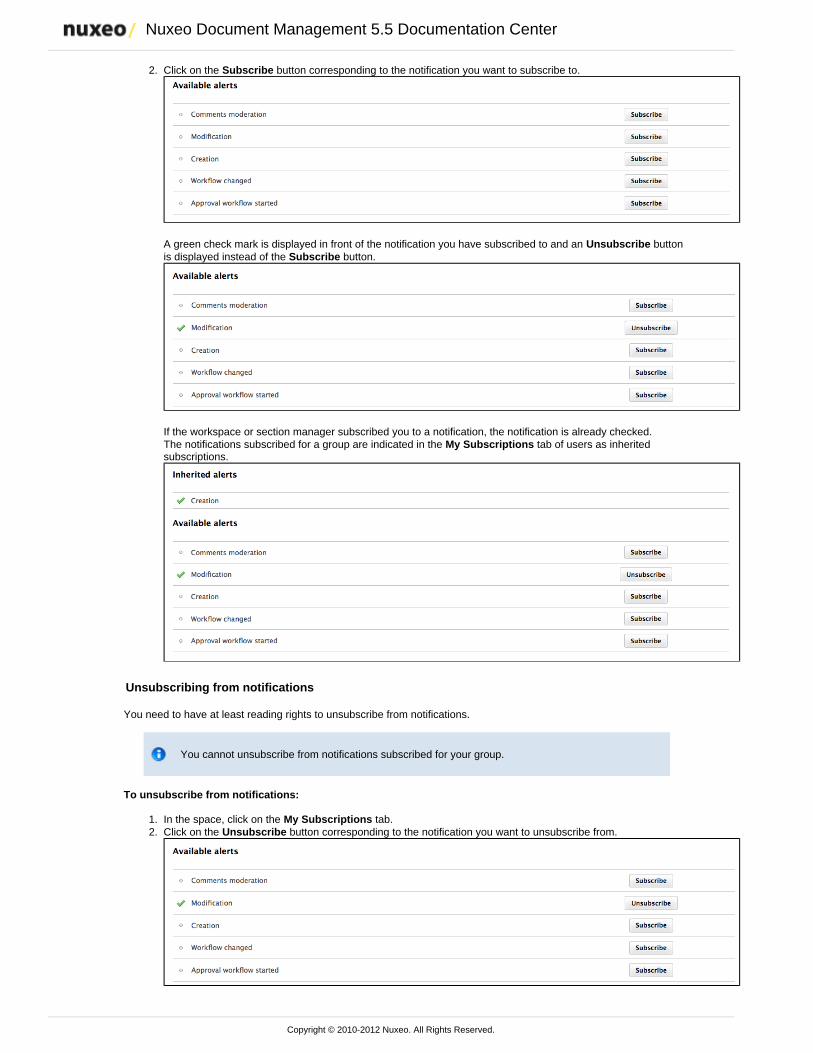
Nuxeo Document Management 5.5 Documentation Center
Copyright © 2010-2012 Nuxeo. All Rights Reserved.
2.
1. 2.
Click on the button corresponding to the notification you want to subscribe to.Subscribe
A green check mark is displayed in front of the notification you have subscribed to and an buttonUnsubscribeis displayed instead of the button.Subscribe
If the workspace or section manager subscribed you to a notification, the notification is already checked.The notifications subscribed for a group are indicated in the tab of users as inheritedMy Subscriptionssubscriptions.
Unsubscribing from notifications
You need to have at least reading rights to unsubscribe from notifications.
You cannot unsubscribe from notifications subscribed for your group.
To unsubscribe from notifications:
In the space, click on the tab.My SubscriptionsClick on the button corresponding to the notification you want to unsubscribe from.Unsubscribe
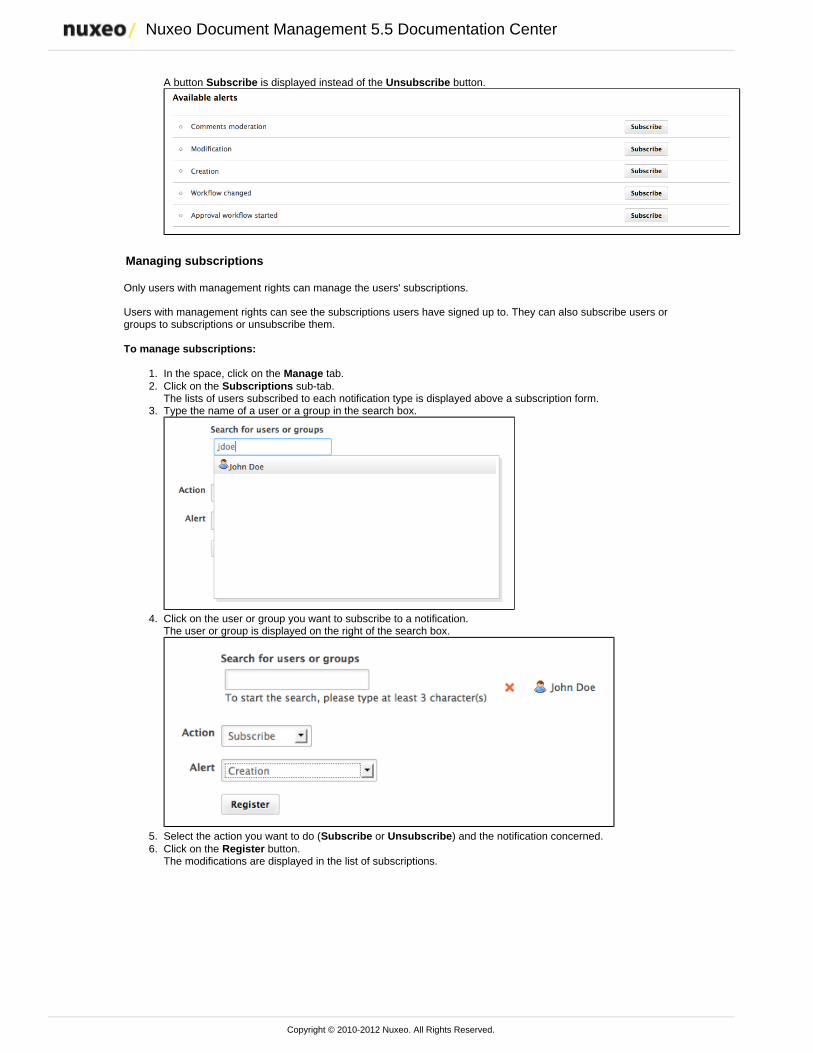
Nuxeo Document Management 5.5 Documentation Center
Copyright © 2010-2012 Nuxeo. All Rights Reserved.
2.
1. 2.
3.
4.
5. 6.
A button is displayed instead of the button.Subscribe Unsubscribe
Managing subscriptions
Only users with management rights can manage the users' subscriptions.
Users with management rights can see the subscriptions users have signed up to. They can also subscribe users orgroups to subscriptions or unsubscribe them.
To manage subscriptions:
In the space, click on the tab.ManageClick on the sub-tab.SubscriptionsThe lists of users subscribed to each notification type is displayed above a subscription form.Type the name of a user or a group in the search box.
Click on the user or group you want to subscribe to a notification.The user or group is displayed on the right of the search box.
Select the action you want to do ( or ) and the notification concerned.Subscribe UnsubscribeClick on the button.RegisterThe modifications are displayed in the list of subscriptions.
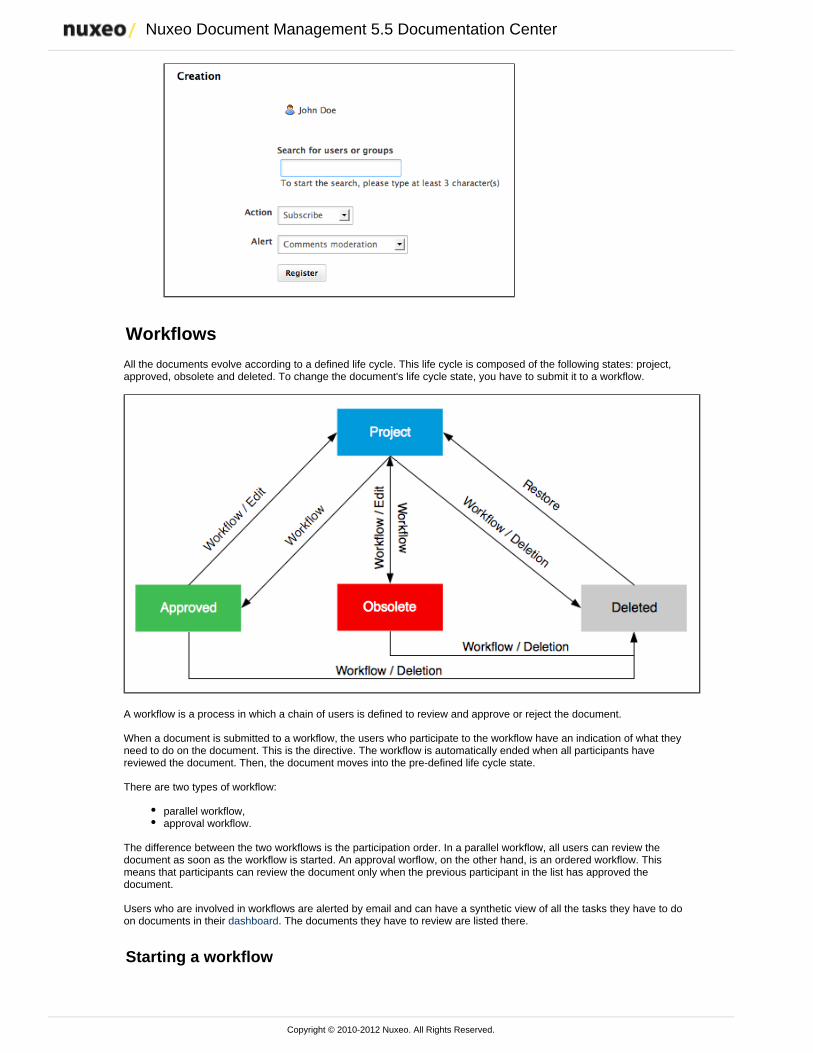
Nuxeo Document Management 5.5 Documentation Center
Copyright © 2010-2012 Nuxeo. All Rights Reserved.
6.
Workflows
All the documents evolve according to a defined life cycle. This life cycle is composed of the following states: project,approved, obsolete and deleted. To change the document's life cycle state, you have to submit it to a workflow.
A workflow is a process in which a chain of users is defined to review and approve or reject the document.
When a document is submitted to a workflow, the users who participate to the workflow have an indication of what theyneed to do on the document. This is the directive. The workflow is automatically ended when all participants havereviewed the document. Then, the document moves into the pre-defined life cycle state.
There are two types of workflow:
parallel workflow,approval workflow.
The difference between the two workflows is the participation order. In a parallel workflow, all users can review thedocument as soon as the workflow is started. An approval worflow, on the other hand, is an ordered workflow. Thismeans that participants can review the document only when the previous participant in the list has approved thedocument.
Users who are involved in workflows are alerted by email and can have a synthetic view of all the tasks they have to doon documents in their . The documents they have to review are listed there.dashboard
Starting a workflow

Nuxeo Document Management 5.5 Documentation Center
Copyright © 2010-2012 Nuxeo. All Rights Reserved.
1. 2.
3. 4.
5.
You need to have writing or management rights to start a workflow.
The process to start a workflow is the same for both workflows.
To start a workflow:
Click on the tab of the document.WorkflowFill in the form : select the type of workflow you want to start and the output life cycle state.Start a workflow
Selecting the "Approved" output life cycle state makes the document life cycle change to"Approved" and increments the document's version. You need to select if you want toincrement the minor version or major version.
Click on the button.StartAdd users on the workflow.
You are not automatically declared as a participant of the workflow. If you want to participateto the workflow, you need to add yourself as a participant.
Click on the button to let participants approve or reject the document.Start the workflow
Managing the workflow participants
When you prepare a workflow, you determine which users will review the document.
Given the workflow type and your participation to the workflow, you can add new participants, change their order ofparticipation, or remove them. To make recurrent participants management easier, you can also use reviewers lists.
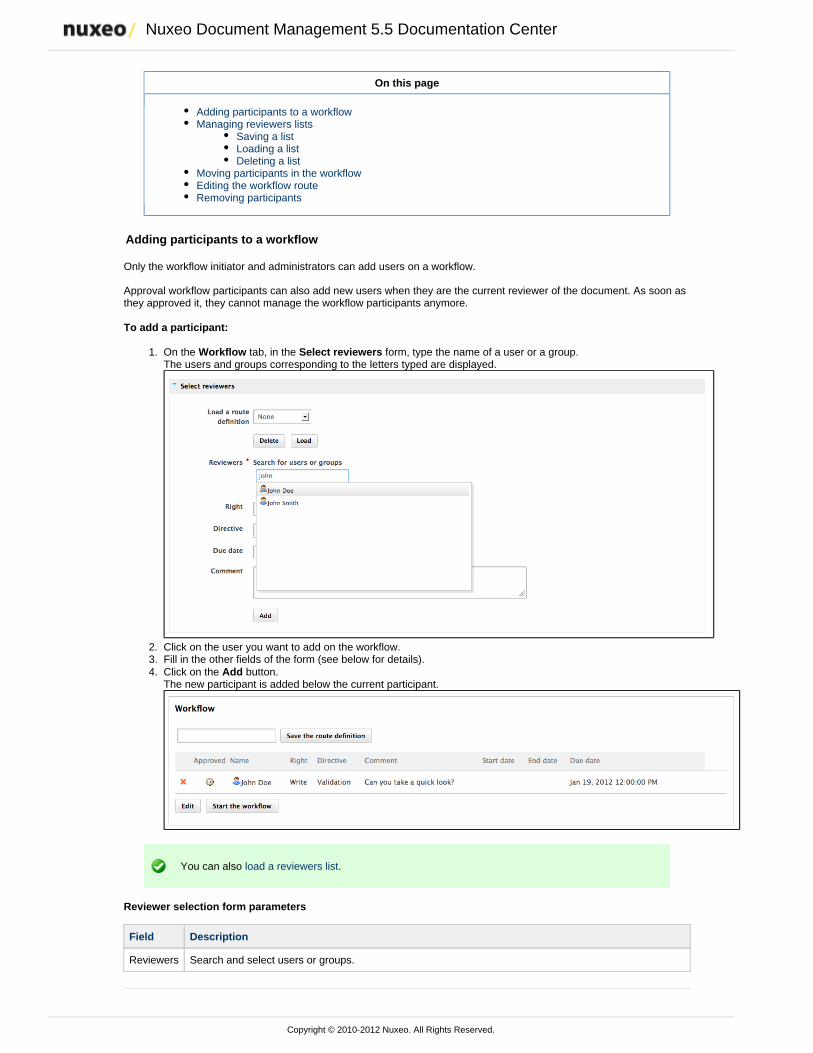
Nuxeo Document Management 5.5 Documentation Center
Copyright © 2010-2012 Nuxeo. All Rights Reserved.
1.
2. 3. 4.
On this page
Adding participants to a workflowManaging reviewers lists
Saving a listLoading a listDeleting a list
Moving participants in the workflowEditing the workflow routeRemoving participants
Adding participants to a workflow
Only the workflow initiator and administrators can add users on a workflow.
Approval workflow participants can also add new users when they are the current reviewer of the document. As soon asthey approved it, they cannot manage the workflow participants anymore.
To add a participant:
On the tab, in the form, type the name of a user or a group.Workflow Select reviewersThe users and groups corresponding to the letters typed are displayed.
Click on the user you want to add on the workflow.Fill in the other fields of the form (see below for details).Click on the button.AddThe new participant is added below the current participant.
You can also .load a reviewers list
Reviewer selection form parameters
Field Description
Reviewers Search and select users or groups.
Nuxeo Document Management 5.5 Documentation Center
Copyright © 2010-2012 Nuxeo. All Rights Reserved.
1. 2.
3.
1.
2.
1.
Right This field enables you to grant reviewers with access rights on the document for the time of the workflow.
Directive Select in the list what you expect from the reviewer.
Due date Select the maximum date at which you expect the user to have completed his task on the workflow.When the due date is reached or passed, the task is displayed in red in the reviewer's dashboard.
Comment Type a comment to give more details to the reviewer about what you expect from him during theworkflow, for instance if you want him to pay attention to a specific part of the document.
Managing reviewers lists
You can save the lists of workflow participants, to reuse them later on the same type of workflow. Indeed, documentsoften go through the same chains for review or approval.
Workflow participants lists are saved by user and by workflow type. This means that users can only see the lists theysaved, not the list other users saved. And that a list can only be used on the same workflow type as the workflow it wassaved from.
Saving a list
Any user can save a workflow participants list.
To save a list of participants:
Go on the tab of the document.WorkflowIn the section, type a name for the list.Workflow
Click on the button.Save the listThe list is saved and is now available in the form.Select reviewers
Loading a list
You can load a list of participants at any time, as long as you have the right to add reviewers on the workflow. You canalso combine the use of a list and the manual management of participants (move, add, remove).
To load a list:
Select it in the drop down list in the form.Load a list of reviewers select reviewers
Click on the button.Load
Deleting a list
You can delete the lists of reviewers you have saved from a workflow.
To delete a participants list:
Select it in the drop down list in the form.Load a list of reviewers select reviewers
Nuxeo Document Management 5.5 Documentation Center
Copyright © 2010-2012 Nuxeo. All Rights Reserved.
1.
2.
1.
2. 3.
1. 2.
Click on the button.Delete
Moving participants in the workflow
Users who can add participants to a workflow can also change their order on the workflow. Use the and arrows tomove users up and down in the workflow.
Editing the workflow route
The workflow initiator can edit the workflow route, to edit the due dates and other parameters for instance, especiallywhen the route is based on a participants list.
To edit a participants list:
Under the workflow route, click on the button.EditThe route is displayed in edit mode.
Change the parameters you want.Click on the button.SaveThe route is updated with your new parameters.
Removing participants
Users who can add participants to a workflow can also remove them from the workflow.
To remove a user from the workflow's participants:
Click the icon to remove from the workflow.Confirm removal on the window that pops up.Users is immediately removed from the participants of the workflow.
Nuxeo Document Management 5.5 Documentation Center
Copyright © 2010-2012 Nuxeo. All Rights Reserved.
Participating to a workflow
Once the workflow has been started, users added on the workflow's roadmap can review the document and approve orreject it.
The workflow initiator can approve or reject the document in behalf of all the workflow's participants.
On this page
Approving a documentRejecting a documentEnding the workflow
Approving a document
In a parallel workflow, participants can approve the document as soon as the workflow is started.In an approval workflow, participants can approve the document when it's their turn, after the previous participant on theworkflow has approved it.
To approve the document during the workflow:Click on the link displayed on the workflow's roadmap next to your name. ApproveA green tick on the roadmap indicates that you approved the document. If you are in an approval workflow, the next participant can now review the document and approve or reject it.
Rejecting a document
Nuxeo Document Management 5.5 Documentation Center
Copyright © 2010-2012 Nuxeo. All Rights Reserved.
1. 2.
1. 2.
In a parallel workflow, participants can review the document and reject it as soon as the workflow is started.In an approval workflow, participants can reject the document when it's their turn, after the previous participant on theworkflow has approved it.
To reject the document during the workflow:
Type a comment to indicate why you reject the document (mandatory).Click on the link displayed on the workflow's roadmap next to your name.RejectA red tick on the roadmap indicates that you rejected the document. If you are in an approval workflow, the previous user on the roadmap is automatically inserted after you on theroadmap to check the document. His directive is "Verification after reject".
Ending the workflow
The workflow will automatically ends when the last reviewer approves or rejects the document.
In a parallel workflow:
If all participants have approved the document, its lifecycle state changes into the one chosen when before theworkflow was started.If a user has rejected the document, the workflow ends but its lifecycle state doesn't change.
In an approval workflow, all users must approve the document. The document will then automatically get into the targetlifecycle state.
Abandoning a workflow
Only the workflow initiator and administrators can abandon a workflow.
Abandoning a workflow means canceling it. When you abandon a workflow, the life cycle state of the document does notchange. The modifications made on the document during the workflow are kept.
The abandon process is the same for the two types of workflows.
To abandon a workflow:
Click on the tab of the document.WorkflowIn the section of the page, type a comment in the field.Abandon workflow Comment
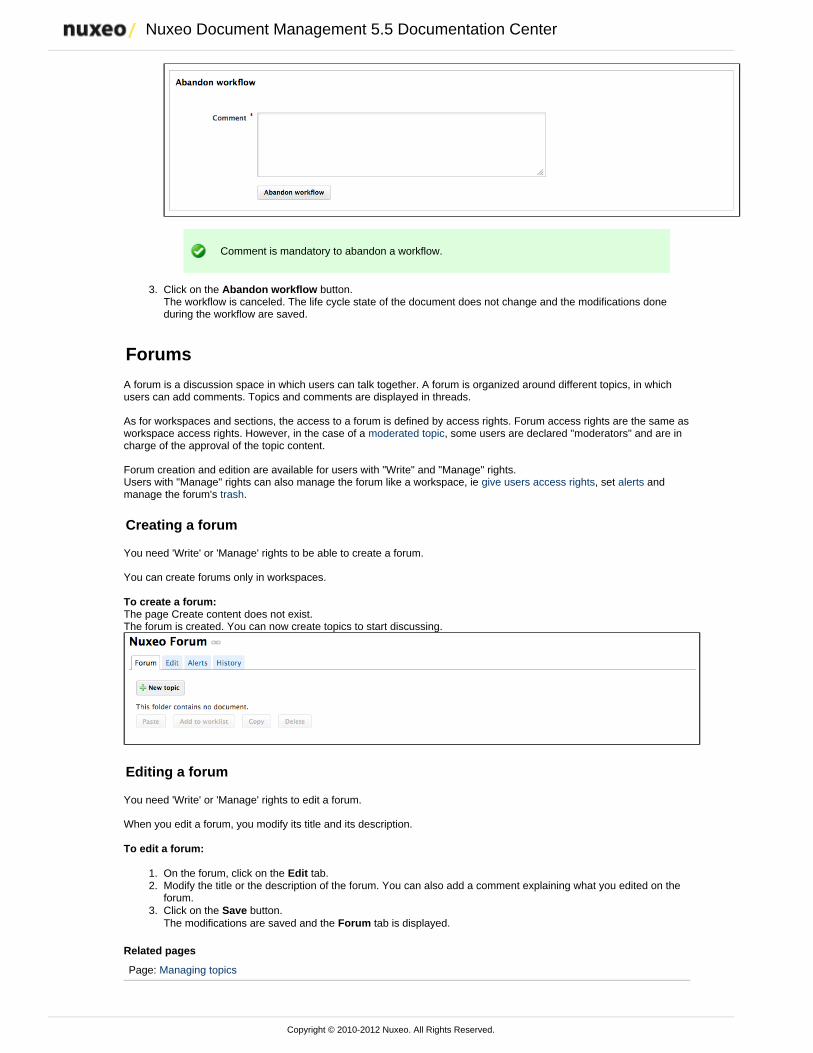
Nuxeo Document Management 5.5 Documentation Center
Copyright © 2010-2012 Nuxeo. All Rights Reserved.
2.
3.
1. 2.
3.
Comment is mandatory to abandon a workflow.
Click on the button.Abandon workflowThe workflow is canceled. The life cycle state of the document does not change and the modifications doneduring the workflow are saved.
Forums
A forum is a discussion space in which users can talk together. A forum is organized around different topics, in whichusers can add comments. Topics and comments are displayed in threads.
As for workspaces and sections, the access to a forum is defined by access rights. Forum access rights are the same asworkspace access rights. However, in the case of a , some users are declared "moderators" and are inmoderated topiccharge of the approval of the topic content.
Forum creation and edition are available for users with "Write" and "Manage" rights.Users with "Manage" rights can also manage the forum like a workspace, ie , set andgive users access rights alertsmanage the forum's .trash
Creating a forum
You need 'Write' or 'Manage' rights to be able to create a forum.
You can create forums only in workspaces.
To create a forum:The page Create content does not exist.The forum is created. You can now create topics to start discussing.
Editing a forum
You need 'Write' or 'Manage' rights to edit a forum.
When you edit a forum, you modify its title and its description.
To edit a forum:
On the forum, click on the tab.EditModify the title or the description of the forum. You can also add a comment explaining what you edited on theforum.Click on the button.SaveThe modifications are saved and the tab is displayed.Forum
Related pages
Page: Managing topics
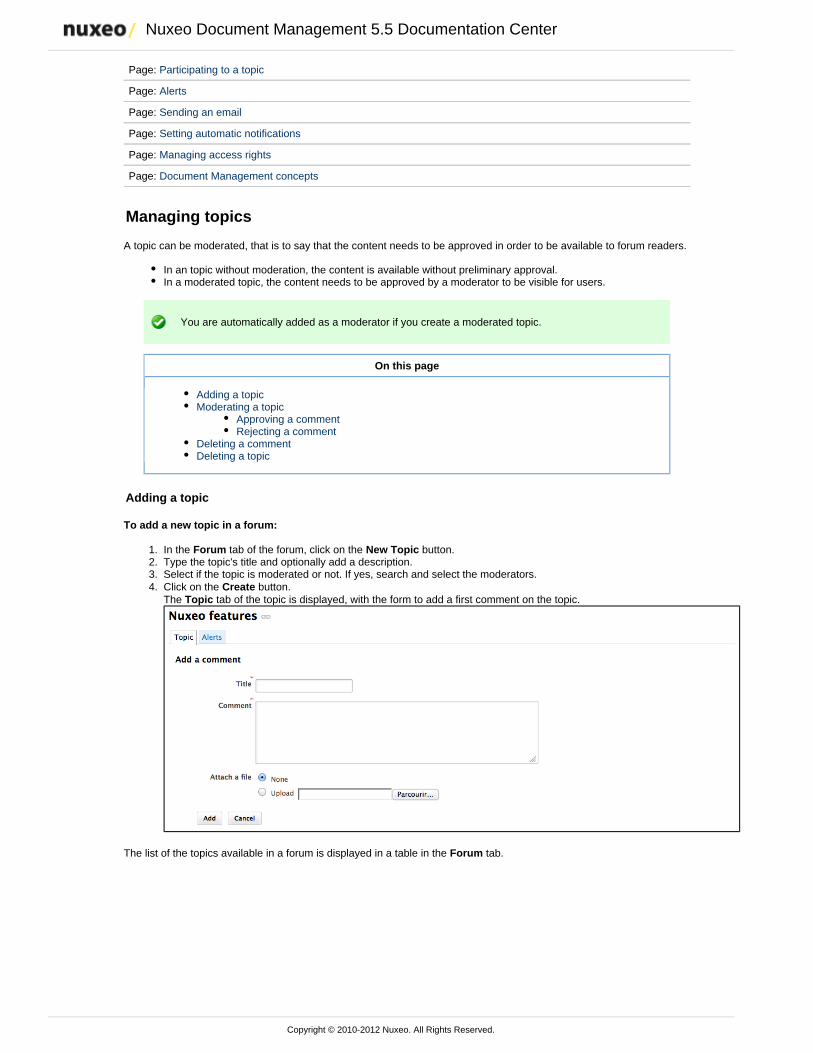
Nuxeo Document Management 5.5 Documentation Center
Copyright © 2010-2012 Nuxeo. All Rights Reserved.
1. 2. 3. 4.
Page: Participating to a topic
Page: Alerts
Page: Sending an email
Page: Setting automatic notifications
Page: Managing access rights
Page: Document Management concepts
Managing topics
A topic can be moderated, that is to say that the content needs to be approved in order to be available to forum readers.
In an topic without moderation, the content is available without preliminary approval.In a moderated topic, the content needs to be approved by a moderator to be visible for users.
You are automatically added as a moderator if you create a moderated topic.
On this page
Adding a topicModerating a topic
Approving a commentRejecting a comment
Deleting a commentDeleting a topic
Adding a topic
To add a new topic in a forum:
In the tab of the forum, click on the button.Forum New TopicType the topic's title and optionally add a description.Select if the topic is moderated or not. If yes, search and select the moderators.Click on the button.CreateThe tab of the topic is displayed, with the form to add a first comment on the topic.Topic
The list of the topics available in a forum is displayed in a table in the tab.Forum
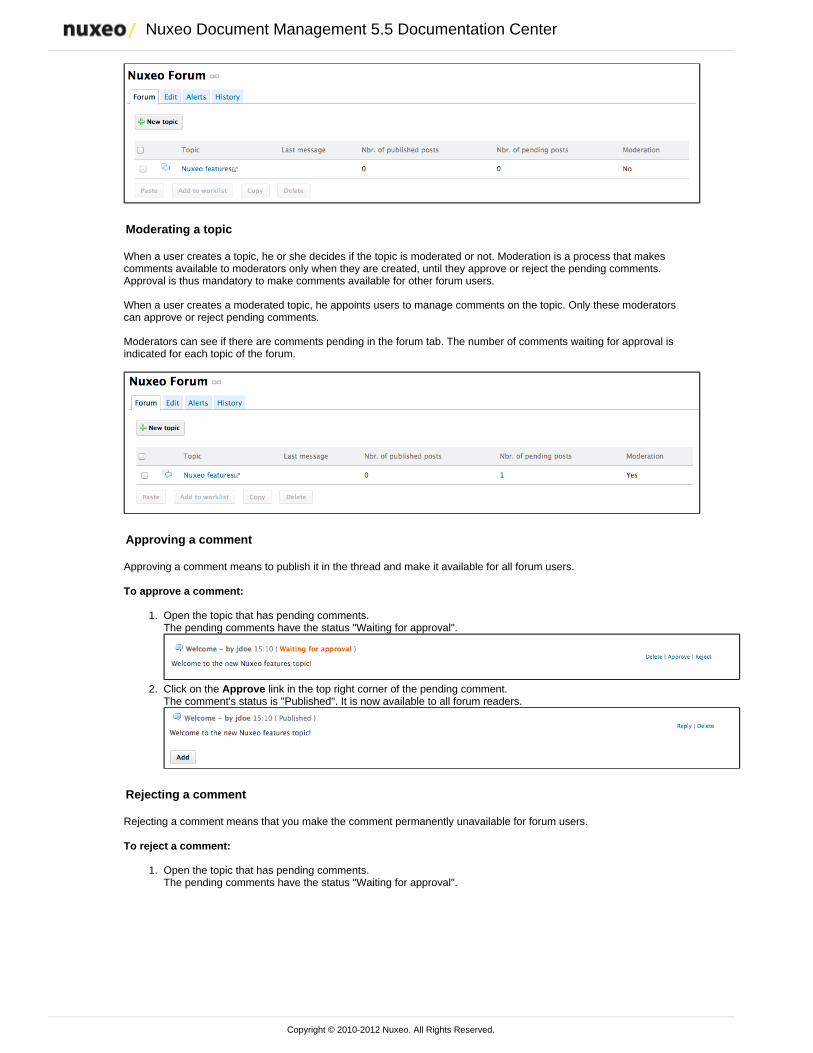
Nuxeo Document Management 5.5 Documentation Center
Copyright © 2010-2012 Nuxeo. All Rights Reserved.
1.
2.
1.
Moderating a topic
When a user creates a topic, he or she decides if the topic is moderated or not. Moderation is a process that makescomments available to moderators only when they are created, until they approve or reject the pending comments.Approval is thus mandatory to make comments available for other forum users.
When a user creates a moderated topic, he appoints users to manage comments on the topic. Only these moderatorscan approve or reject pending comments.
Moderators can see if there are comments pending in the forum tab. The number of comments waiting for approval isindicated for each topic of the forum.
Approving a comment
Approving a comment means to publish it in the thread and make it available for all forum users.
To approve a comment:
Open the topic that has pending comments.The pending comments have the status "Waiting for approval".
Click on the link in the top right corner of the pending comment.ApproveThe comment's status is "Published". It is now available to all forum readers.
Rejecting a comment
Rejecting a comment means that you make the comment permanently unavailable for forum users.
To reject a comment:
Open the topic that has pending comments.The pending comments have the status "Waiting for approval".
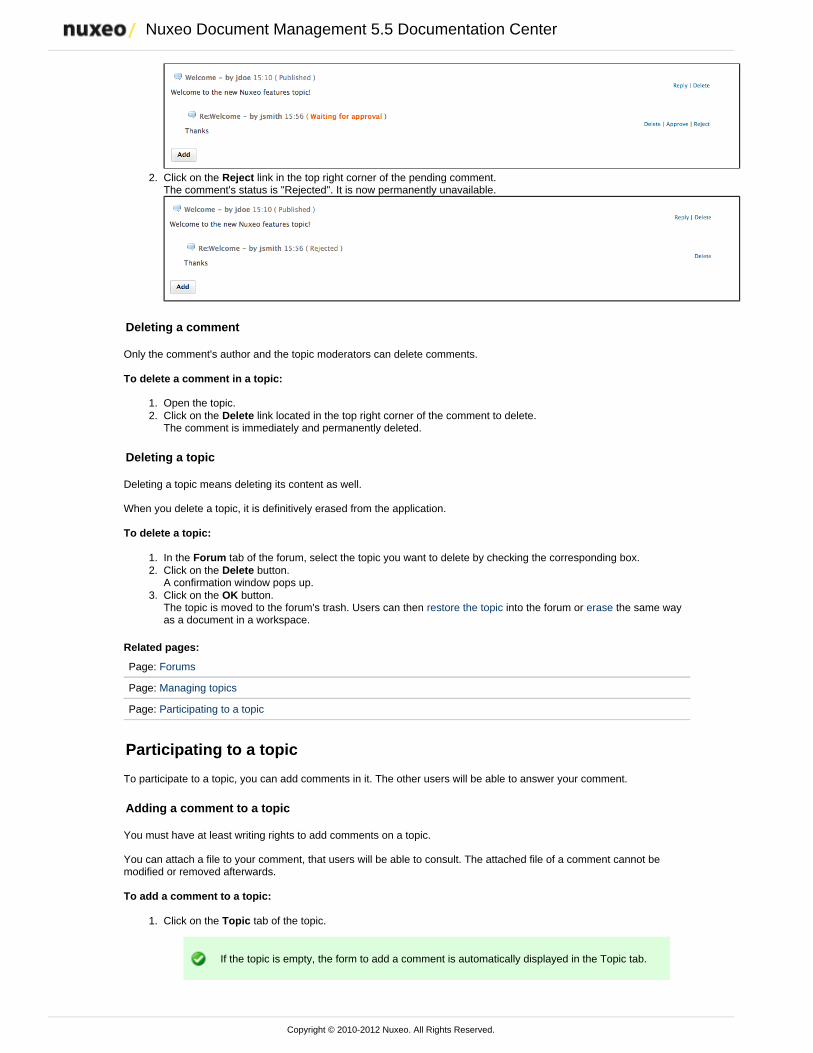
Nuxeo Document Management 5.5 Documentation Center
Copyright © 2010-2012 Nuxeo. All Rights Reserved.
1.
2.
1. 2.
1. 2.
3.
1.
Click on the link in the top right corner of the pending comment.RejectThe comment's status is "Rejected". It is now permanently unavailable.
Deleting a comment
Only the comment's author and the topic moderators can delete comments.
To delete a comment in a topic:
Open the topic.Click on the link located in the top right corner of the comment to delete.DeleteThe comment is immediately and permanently deleted.
Deleting a topic
Deleting a topic means deleting its content as well.
When you delete a topic, it is definitively erased from the application.
To delete a topic:
In the tab of the forum, select the topic you want to delete by checking the corresponding box.ForumClick on the button.DeleteA confirmation window pops up.Click on the button.OKThe topic is moved to the forum's trash. Users can then into the forum or the same wayrestore the topic eraseas a document in a workspace.
Related pages:
Page: Forums
Page: Managing topics
Page: Participating to a topic
Participating to a topic
To participate to a topic, you can add comments in it. The other users will be able to answer your comment.
Adding a comment to a topic
You must have at least writing rights to add comments on a topic.
You can attach a file to your comment, that users will be able to consult. The attached file of a comment cannot bemodified or removed afterwards.
To add a comment to a topic:
Click on the tab of the topic.Topic
If the topic is empty, the form to add a comment is automatically displayed in the Topic tab.
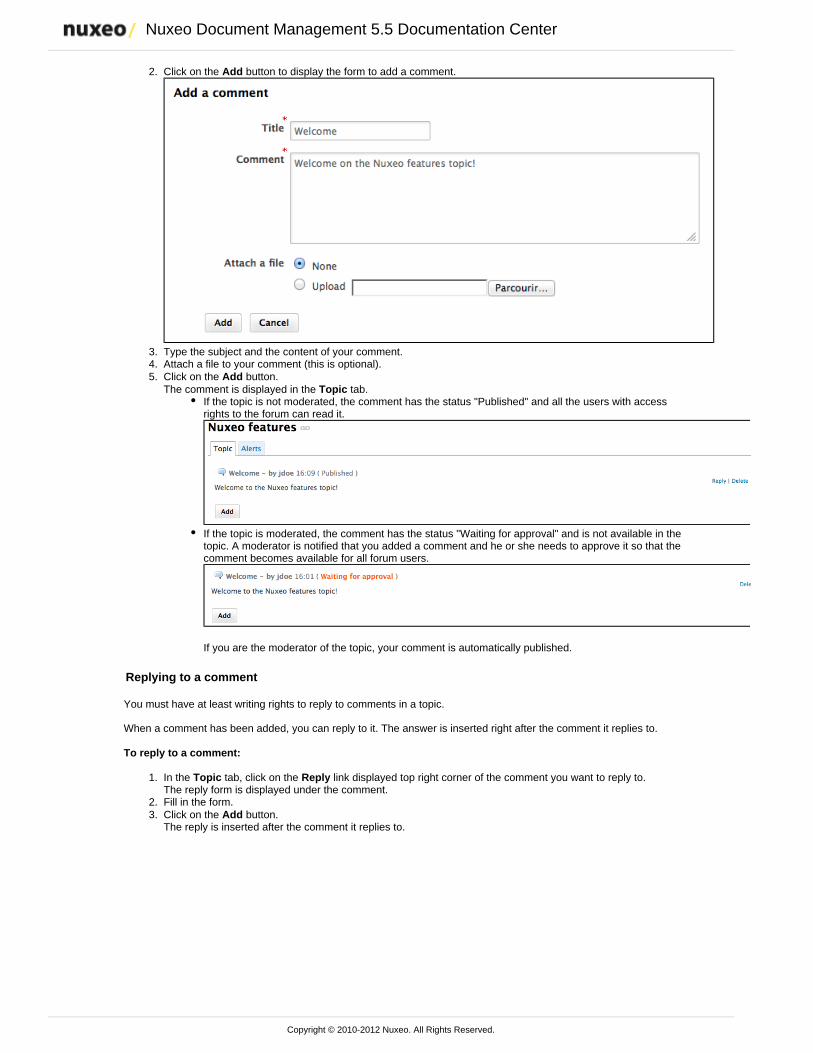
Nuxeo Document Management 5.5 Documentation Center
Copyright © 2010-2012 Nuxeo. All Rights Reserved.
2.
3. 4. 5.
1.
2. 3.
Click on the button to display the form to add a comment.Add
Type the subject and the content of your comment.Attach a file to your comment (this is optional).Click on the button.AddThe comment is displayed in the tab.Topic
If the topic is not moderated, the comment has the status "Published" and all the users with accessrights to the forum can read it.
If the topic is moderated, the comment has the status "Waiting for approval" and is not available in thetopic. A moderator is notified that you added a comment and he or she needs to approve it so that thecomment becomes available for all forum users.
If you are the moderator of the topic, your comment is automatically published.
Replying to a comment
You must have at least writing rights to reply to comments in a topic.
When a comment has been added, you can reply to it. The answer is inserted right after the comment it replies to.
To reply to a comment:
In the tab, click on the link displayed top right corner of the comment you want to reply to.Topic ReplyThe reply form is displayed under the comment.Fill in the form.Click on the button.AddThe reply is inserted after the comment it replies to.
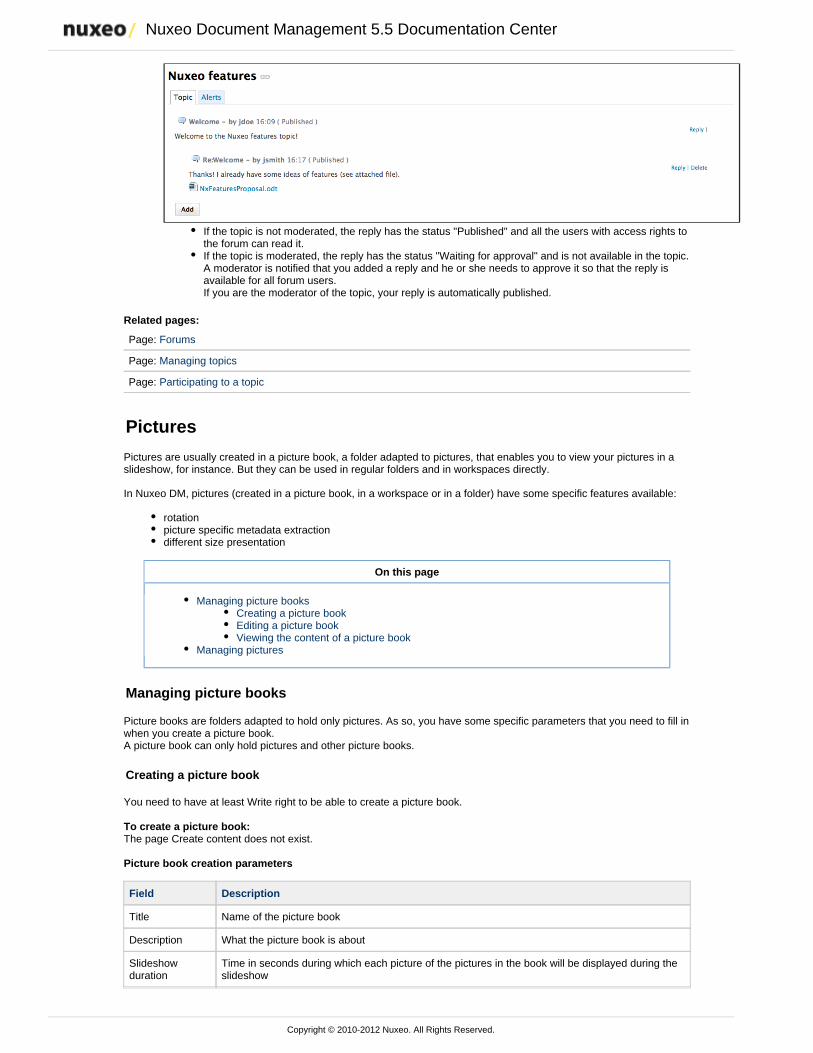
Nuxeo Document Management 5.5 Documentation Center
Copyright © 2010-2012 Nuxeo. All Rights Reserved.
3.
If the topic is not moderated, the reply has the status "Published" and all the users with access rights tothe forum can read it.If the topic is moderated, the reply has the status "Waiting for approval" and is not available in the topic.A moderator is notified that you added a reply and he or she needs to approve it so that the reply isavailable for all forum users.If you are the moderator of the topic, your reply is automatically published.
Related pages:
Page: Forums
Page: Managing topics
Page: Participating to a topic
Pictures
Pictures are usually created in a picture book, a folder adapted to pictures, that enables you to view your pictures in aslideshow, for instance. But they can be used in regular folders and in workspaces directly.
In Nuxeo DM, pictures (created in a picture book, in a workspace or in a folder) have some specific features available:
rotationpicture specific metadata extractiondifferent size presentation
On this page
Managing picture booksCreating a picture bookEditing a picture bookViewing the content of a picture book
Managing pictures
Managing picture books
Picture books are folders adapted to hold only pictures. As so, you have some specific parameters that you need to fill inwhen you create a picture book.A picture book can only hold pictures and other picture books.
Creating a picture book
You need to have at least Write right to be able to create a picture book.
To create a picture book:The page Create content does not exist.
Picture book creation parameters
Field Description
Title Name of the picture book
Description What the picture book is about
Slideshowduration
Time in seconds during which each picture of the pictures in the book will be displayed during theslideshow
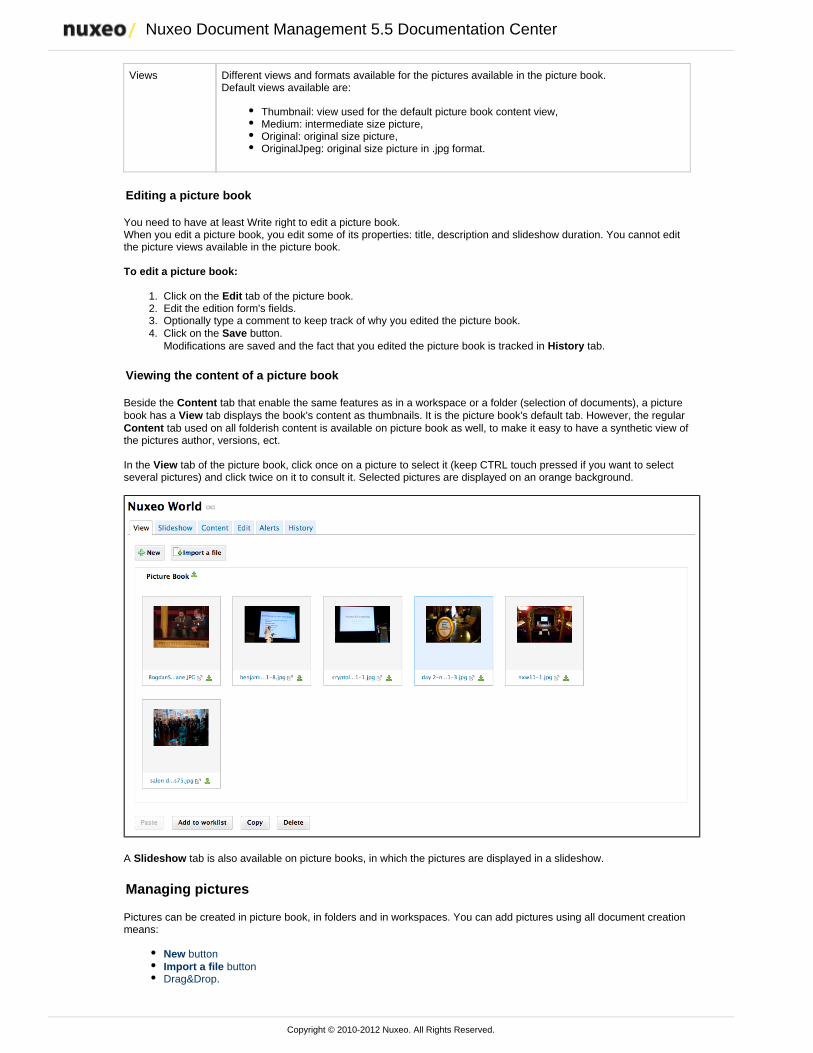
Nuxeo Document Management 5.5 Documentation Center
Copyright © 2010-2012 Nuxeo. All Rights Reserved.
1. 2. 3. 4.
Views Different views and formats available for the pictures available in the picture book.Default views available are:
Thumbnail: view used for the default picture book content view,Medium: intermediate size picture,Original: original size picture,OriginalJpeg: original size picture in .jpg format.
Editing a picture book
You need to have at least Write right to edit a picture book.When you edit a picture book, you edit some of its properties: title, description and slideshow duration. You cannot editthe picture views available in the picture book.
To edit a picture book:
Click on the tab of the picture book.EditEdit the edition form's fields.Optionally type a comment to keep track of why you edited the picture book.Click on the button.SaveModifications are saved and the fact that you edited the picture book is tracked in tab.History
Viewing the content of a picture book
Beside the tab that enable the same features as in a workspace or a folder (selection of documents), a pictureContentbook has a tab displays the book's content as thumbnails. It is the picture book's default tab. However, the regular View
tab used on all folderish content is available on picture book as well, to make it easy to have a synthetic view ofContentthe pictures author, versions, ect.
In the tab of the picture book, click once on a picture to select it (keep CTRL touch pressed if you want to selectViewseveral pictures) and click twice on it to consult it. Selected pictures are displayed on an orange background.
A tab is also available on picture books, in which the pictures are displayed in a slideshow.Slideshow
Managing pictures
Pictures can be created in picture book, in folders and in workspaces. You can add pictures using all document creationmeans:
buttonNew buttonImport a file
Drag&Drop.
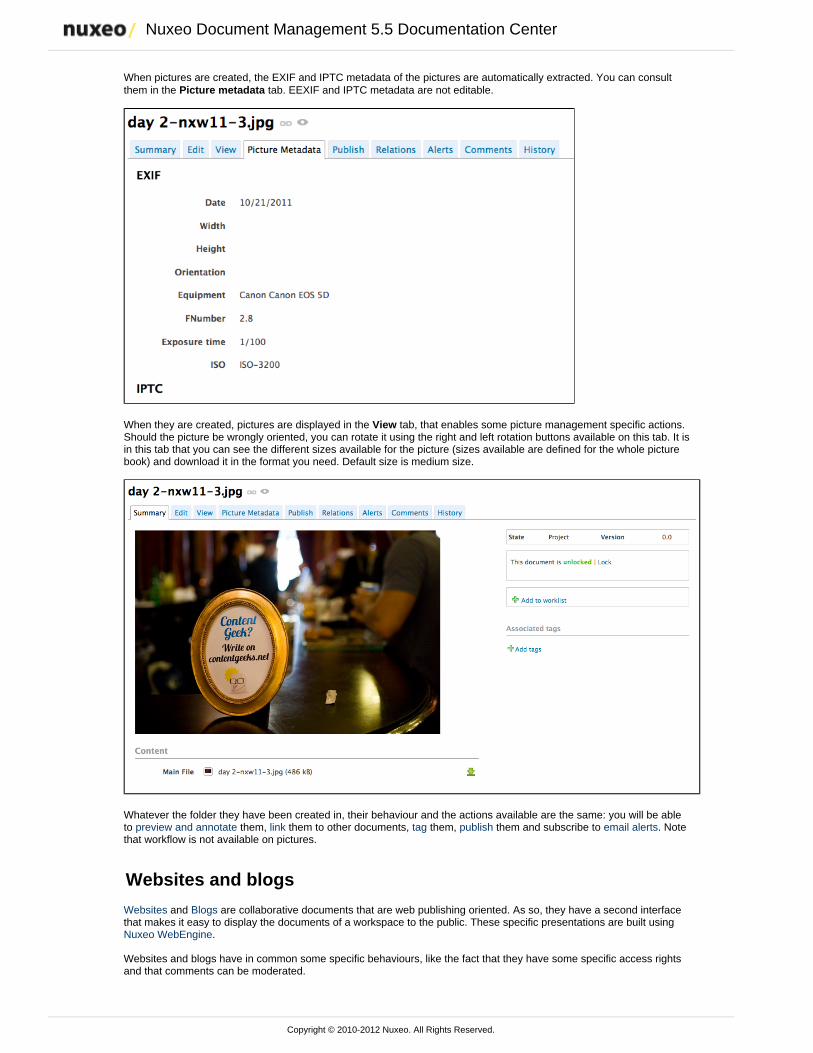
Nuxeo Document Management 5.5 Documentation Center
Copyright © 2010-2012 Nuxeo. All Rights Reserved.
When pictures are created, the EXIF and IPTC metadata of the pictures are automatically extracted. You can consultthem in the tab. EEXIF and IPTC metadata are not editable.Picture metadata
When they are created, pictures are displayed in the tab, that enables some picture management specific actions.ViewShould the picture be wrongly oriented, you can rotate it using the right and left rotation buttons available on this tab. It isin this tab that you can see the different sizes available for the picture (sizes available are defined for the whole picturebook) and download it in the format you need. Default size is medium size.
Whatever the folder they have been created in, their behaviour and the actions available are the same: you will be ableto them, them to other documents, them, them and subscribe to . Notepreview and annotate link tag publish email alertsthat workflow is not available on pictures.
Websites and blogs
Websites and are collaborative documents that are web publishing oriented. As so, they have a second interfaceBlogsthat makes it easy to display the documents of a workspace to the public. These specific presentations are built using
.Nuxeo WebEngine
Websites and blogs have in common some specific behaviours, like the fact that they have some specific access rightsand that comments can be moderated.
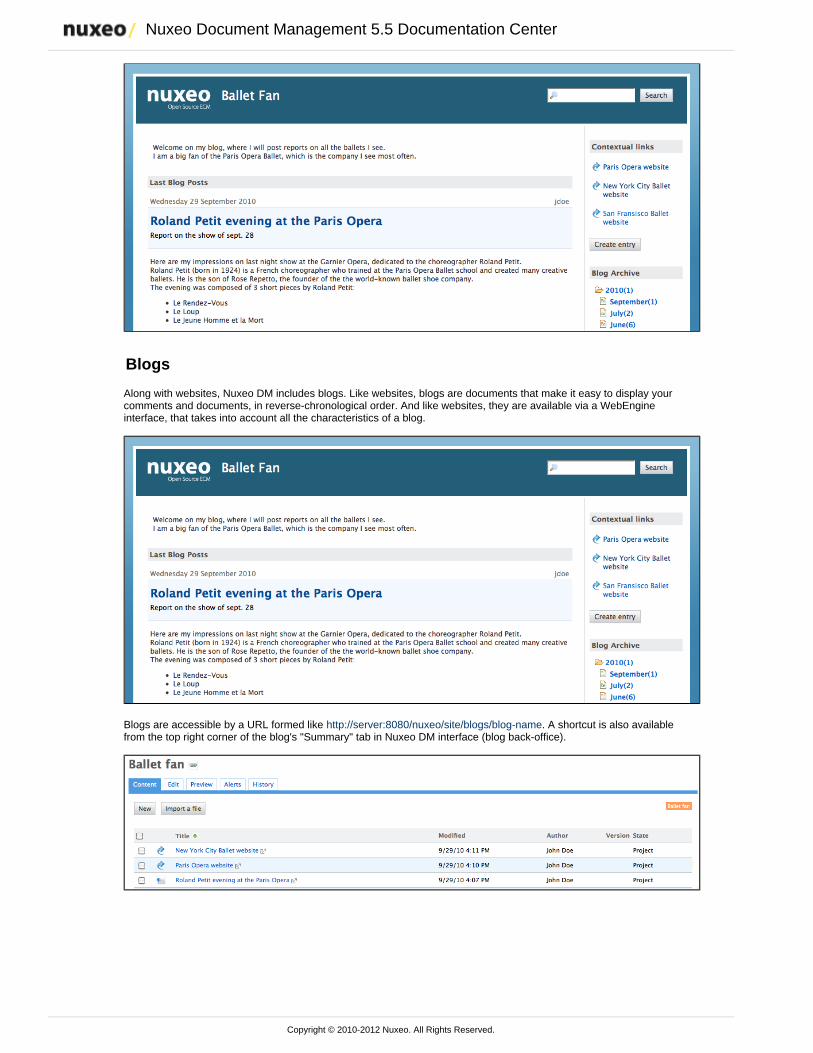
Nuxeo Document Management 5.5 Documentation Center
Copyright © 2010-2012 Nuxeo. All Rights Reserved.
Blogs
Along with websites, Nuxeo DM includes blogs. Like websites, blogs are documents that make it easy to display yourcomments and documents, in reverse-chronological order. And like websites, they are available via a WebEngineinterface, that takes into account all the characteristics of a blog.
Blogs are accessible by a URL formed like . A shortcut is also availablehttp://server:8080/nuxeo/site/blogs/blog-namefrom the top right corner of the blog's "Summary" tab in Nuxeo DM interface (blog back-office).

Nuxeo Document Management 5.5 Documentation Center
Copyright © 2010-2012 Nuxeo. All Rights Reserved.
1. 2.
3.
1.
2.
On this page
Creating a blogAdding content to your blog
Adding a blog postAdding a contextual link
Creating a blog
Blogs can be created in workspaces only. You just need to have "Write" right to be able to create a new blog.
To create a blog:The page Create content does not exist.
Blog parameters
Field Description
Blog name Type the name of your blog. This name will be displayed on top of all blog's pages.
Baseline Type a brief description or catchphrase for your blog. This baseline will be displayed on allpages below the blog's name.
Email Type the webmaster's email address. This address will be used for the contact link.
Logo Default logo is Nuxeo's. You can upload the logo of your choice to replace Nuxeo's logo withone adapted to your blog's subject.
Welcome text Type a text that will be displayed on the home page of your blog.
WelcomeAnimation/Image
You can add a SWF animation or a picture on your blog's home page.
Captcha Check the box your you want users to type letters or digits from a distorted image displayed onforms, to secure content creation on your blog.
Moderation Type Select if comments posted on your blog should be should be approved to become visible byusers (beforehand moderation) or if they are published immediately (afterwards moderation).
Adding content to your blog
In a blog, you can create blog posts and contextual links.
Adding a blog post
Blog posts are all created at the root of the blog. They are then automatically sorted by creation date in the left menu ofthe blog.
You need "Write" permission to be able to create blog posts. You can create them from the blog's back-office (DM'sinterface) or from the blog's interface.
To create a blog post:
From the blog's homepage, click on the button .Create entryFill in the creation form:
Title: type the name of your post.Description: type a text describing what the post is about.Content: type the content of your post in the editor.
Click on the button SaveThe post is immediately created and displayed. It is also displayed in the last blog posts.
Adding a contextual link
Contextual links are links displayed on the blog's home page.They can be added from the blog's back-office only.
To add a contextual link:
On the tab of the blog from the back-office interface, click on the button.Content New
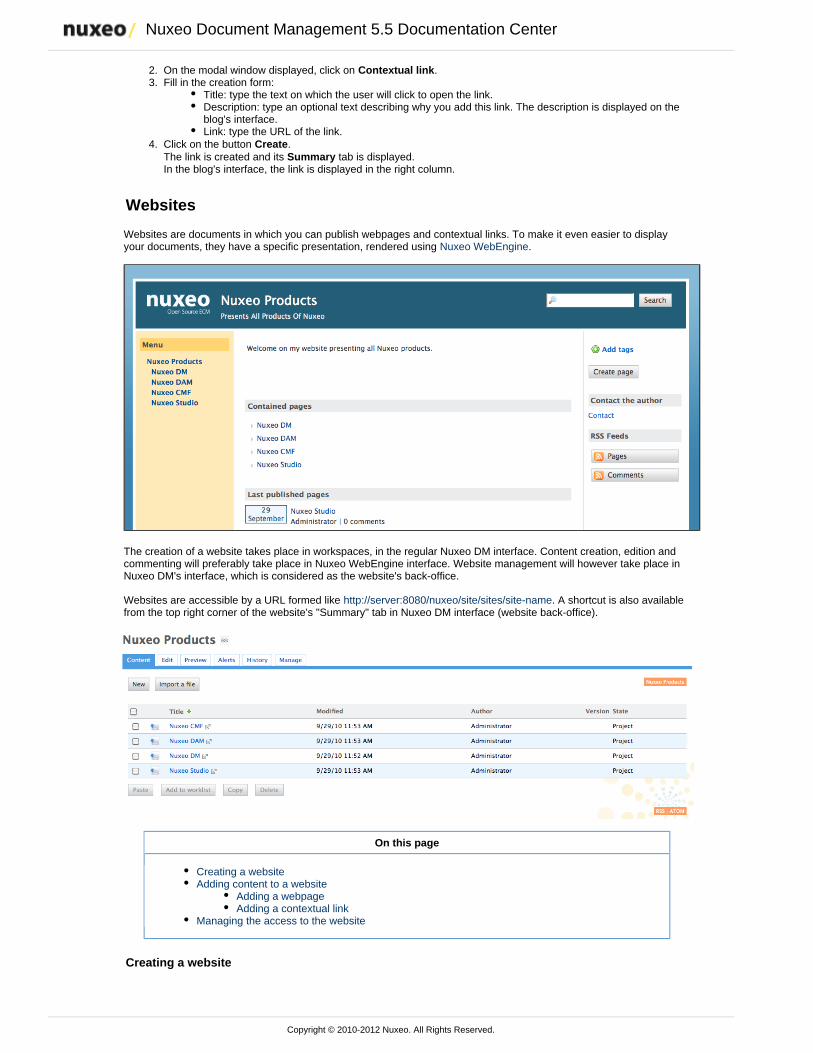
Nuxeo Document Management 5.5 Documentation Center
Copyright © 2010-2012 Nuxeo. All Rights Reserved.
2. 3.
4.
On the modal window displayed, click on .Contextual linkFill in the creation form:
Title: type the text on which the user will click to open the link.Description: type an optional text describing why you add this link. The description is displayed on theblog's interface.Link: type the URL of the link.
Click on the button .CreateThe link is created and its tab is displayed.SummaryIn the blog's interface, the link is displayed in the right column.
Websites
Websites are documents in which you can publish webpages and contextual links. To make it even easier to displayyour documents, they have a specific presentation, rendered using .Nuxeo WebEngine
The creation of a website takes place in workspaces, in the regular Nuxeo DM interface. Content creation, edition andcommenting will preferably take place in Nuxeo WebEngine interface. Website management will however take place inNuxeo DM's interface, which is considered as the website's back-office.
Websites are accessible by a URL formed like . A shortcut is also availablehttp://server:8080/nuxeo/site/sites/site-namefrom the top right corner of the website's "Summary" tab in Nuxeo DM interface (website back-office).
On this page
Creating a websiteAdding content to a website
Adding a webpageAdding a contextual link
Managing the access to the website
Creating a website
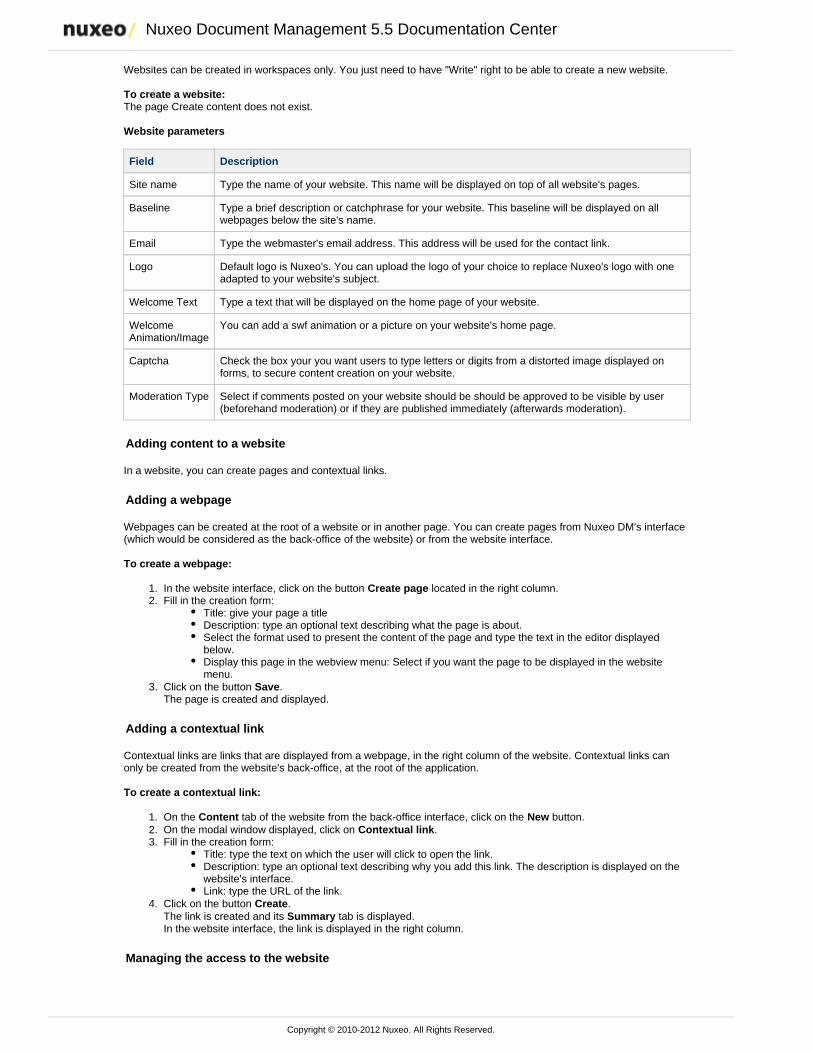
Nuxeo Document Management 5.5 Documentation Center
Copyright © 2010-2012 Nuxeo. All Rights Reserved.
1. 2.
3.
1. 2. 3.
4.
Websites can be created in workspaces only. You just need to have "Write" right to be able to create a new website.
To create a website:The page Create content does not exist.
Website parameters
Field Description
Site name Type the name of your website. This name will be displayed on top of all website's pages.
Baseline Type a brief description or catchphrase for your website. This baseline will be displayed on allwebpages below the site's name.
Email Type the webmaster's email address. This address will be used for the contact link.
Logo Default logo is Nuxeo's. You can upload the logo of your choice to replace Nuxeo's logo with oneadapted to your website's subject.
Welcome Text Type a text that will be displayed on the home page of your website.
WelcomeAnimation/Image
You can add a swf animation or a picture on your website's home page.
Captcha Check the box your you want users to type letters or digits from a distorted image displayed onforms, to secure content creation on your website.
Moderation Type Select if comments posted on your website should be should be approved to be visible by user(beforehand moderation) or if they are published immediately (afterwards moderation).
Adding content to a website
In a website, you can create pages and contextual links.
Adding a webpage
Webpages can be created at the root of a website or in another page. You can create pages from Nuxeo DM's interface(which would be considered as the back-office of the website) or from the website interface.
To create a webpage:
In the website interface, click on the button located in the right column.Create pageFill in the creation form:
Title: give your page a titleDescription: type an optional text describing what the page is about.Select the format used to present the content of the page and type the text in the editor displayedbelow.Display this page in the webview menu: Select if you want the page to be displayed in the websitemenu.
Click on the button .SaveThe page is created and displayed.
Adding a contextual link
Contextual links are links that are displayed from a webpage, in the right column of the website. Contextual links canonly be created from the website's back-office, at the root of the application.
To create a contextual link:
On the tab of the website from the back-office interface, click on the button.Content NewOn the modal window displayed, click on .Contextual linkFill in the creation form:
Title: type the text on which the user will click to open the link.Description: type an optional text describing why you add this link. The description is displayed on thewebsite's interface.Link: type the URL of the link.
Click on the button .CreateThe link is created and its tab is displayed.SummaryIn the website interface, the link is displayed in the right column.
Managing the access to the website
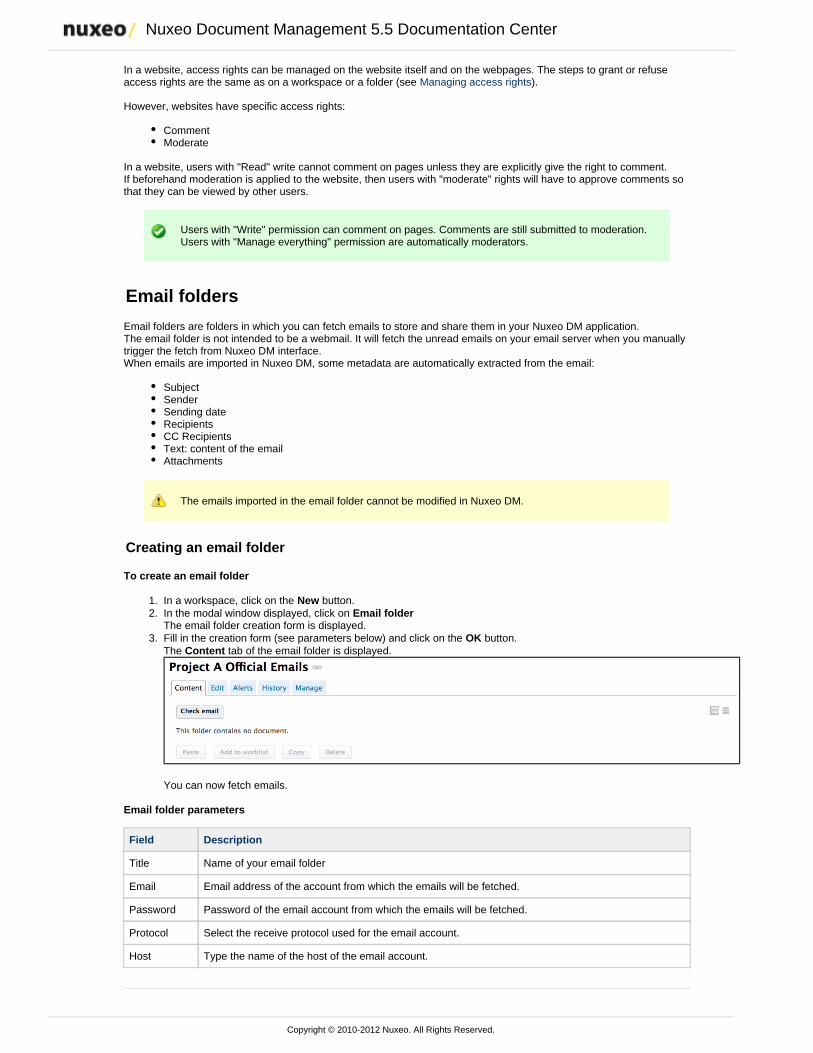
Nuxeo Document Management 5.5 Documentation Center
Copyright © 2010-2012 Nuxeo. All Rights Reserved.
1. 2.
3.
In a website, access rights can be managed on the website itself and on the webpages. The steps to grant or refuseaccess rights are the same as on a workspace or a folder (see ).Managing access rights
However, websites have specific access rights:
CommentModerate
In a website, users with "Read" write cannot comment on pages unless they are explicitly give the right to comment.If beforehand moderation is applied to the website, then users with "moderate" rights will have to approve comments sothat they can be viewed by other users.
Users with "Write" permission can comment on pages. Comments are still submitted to moderation.Users with "Manage everything" permission are automatically moderators.
Email folders
Email folders are folders in which you can fetch emails to store and share them in your Nuxeo DM application. The email folder is not intended to be a webmail. It will fetch the unread emails on your email server when you manuallytrigger the fetch from Nuxeo DM interface. When emails are imported in Nuxeo DM, some metadata are automatically extracted from the email:
SubjectSenderSending dateRecipientsCC RecipientsText: content of the emailAttachments
The emails imported in the email folder cannot be modified in Nuxeo DM.
Creating an email folder
To create an email folder
In a workspace, click on the button.NewIn the modal window displayed, click on Email folderThe email folder creation form is displayed.Fill in the creation form (see parameters below) and click on the button.OKThe tab of the email folder is displayed.Content
You can now fetch emails.
Email folder parameters
Field Description
Title Name of your email folder
Email Email address of the account from which the emails will be fetched.
Password Password of the email account from which the emails will be fetched.
Protocol Select the receive protocol used for the email account.
Host Type the name of the host of the email account.
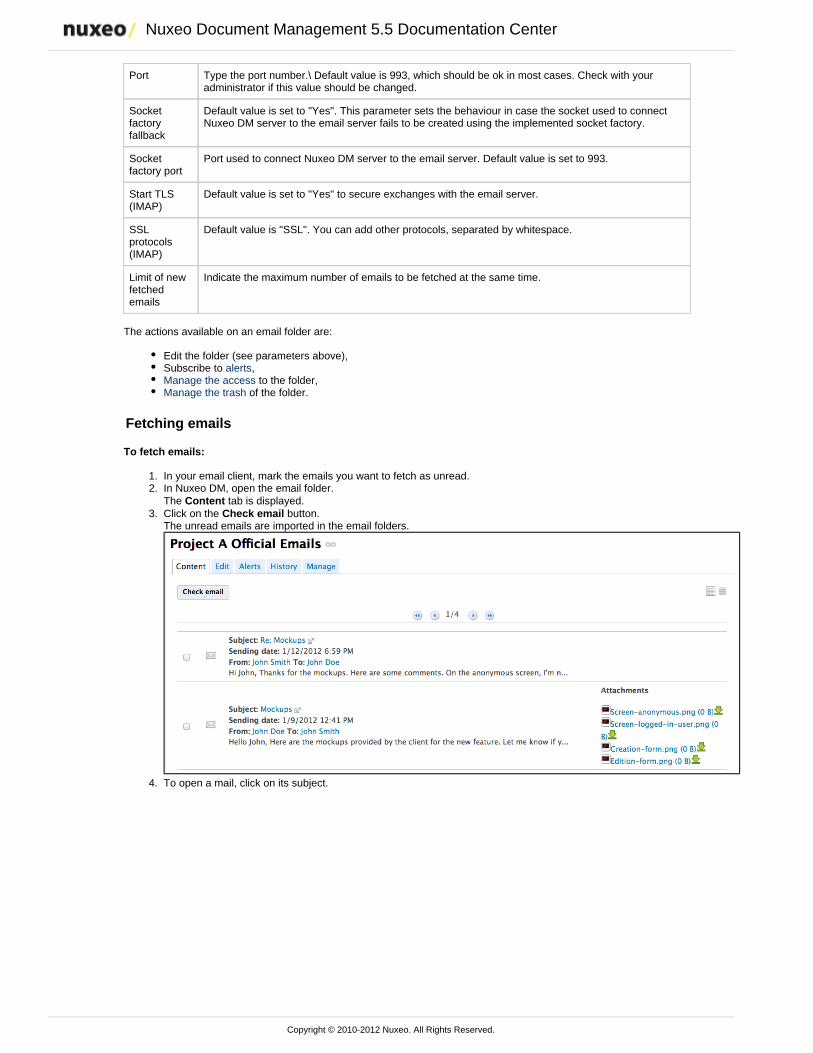
Nuxeo Document Management 5.5 Documentation Center
Copyright © 2010-2012 Nuxeo. All Rights Reserved.
1. 2.
3.
4.
Port Type the port number.\ Default value is 993, which should be ok in most cases. Check with youradministrator if this value should be changed.
Socketfactoryfallback
Default value is set to "Yes". This parameter sets the behaviour in case the socket used to connectNuxeo DM server to the email server fails to be created using the implemented socket factory.
Socketfactory port
Port used to connect Nuxeo DM server to the email server. Default value is set to 993.
Start TLS(IMAP)
Default value is set to "Yes" to secure exchanges with the email server.
SSLprotocols(IMAP)
Default value is "SSL". You can add other protocols, separated by whitespace.
Limit of newfetchedemails
Indicate the maximum number of emails to be fetched at the same time.
The actions available on an email folder are:
Edit the folder (see parameters above),Subscribe to ,alertsManage the access to the folder,Manage the trash of the folder.
Fetching emails
To fetch emails:
In your email client, mark the emails you want to fetch as unread.In Nuxeo DM, open the email folder.The tab is displayed.ContentClick on the button.Check emailThe unread emails are imported in the email folders.
To open a mail, click on its subject.
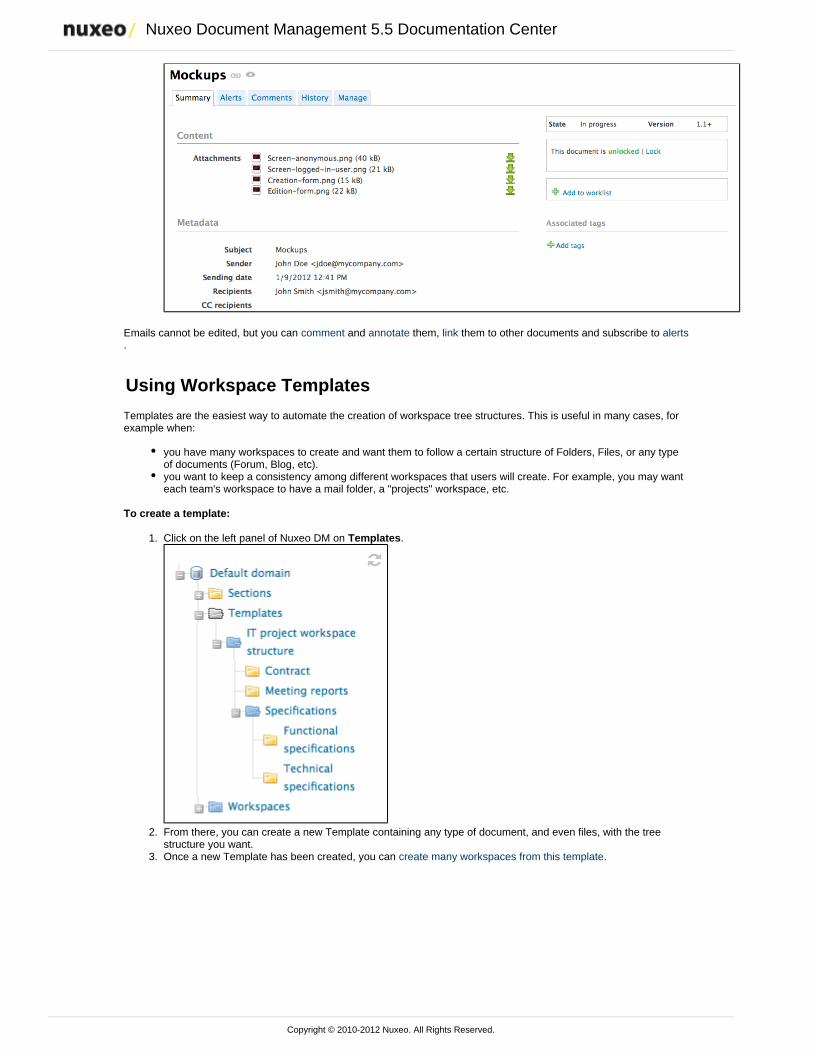
Nuxeo Document Management 5.5 Documentation Center
Copyright © 2010-2012 Nuxeo. All Rights Reserved.
4.
1.
2.
3.
Emails cannot be edited, but you can and them, them to other documents and subscribe to comment annotate link alerts.
Using Workspace Templates
Templates are the easiest way to automate the creation of workspace tree structures. This is useful in many cases, forexample when:
you have many workspaces to create and want them to follow a certain structure of Folders, Files, or any typeof documents (Forum, Blog, etc).you want to keep a consistency among different workspaces that users will create. For example, you may wanteach team's workspace to have a mail folder, a "projects" workspace, etc.
To create a template:
Click on the left panel of Nuxeo DM on .Templates
From there, you can create a new Template containing any type of document, and even files, with the treestructure you want.Once a new Template has been created, you can .create many workspaces from this template

Nuxeo Document Management 5.5 Documentation Center
Copyright © 2010-2012 Nuxeo. All Rights Reserved.
1. 2.
Templates and User Rights Management
When you set access rights on the 1st-level workspace of a template - heremySampleStructure-, it will be inherited in the new workspaces. For example, a user who isnot allowed to read "mySampleStructure" will not be able to see it when creating a workspace.
When you set access rights on the content of a workspace in a template, it won't be inheritedin the new workspaces. For example, a user who can't read a folder like "SampleFolder" in aworkspace but have reading access on the 1st-level workspace, will be allowed to see"SampleFolder"In a few words, don't try to manage workspaces' access rights with Templates (this can bedone other ways, like using configuration tool).Studio
Exporting documents
Users can export documents on their computer. It is possible to export:
one document at a time,a selection of documents,an entire workspace, folder, section.
There are several types of export:
the enables users to get a zipped folder with the documents' main attachment (.pdf, .doc files);zip exportthe is a low level export that enables users to either get the XML definition of the document or getXML exporta folder for each exported document that contains:
a document.xml file holding the document's metadata and various information such as the appliedaccess rights,a .blob file that holds the binary content of the document. This blob is referenced in the document.xmlfile;
the enables users to have a view of the main information on the document;PDF exportthe enables users to save the table that displays the content of a workspace or content.Excel export
Export is available from:
the worklist
the Export options page, available by clicking the icon below the search box.
On this page
Exporting attachmentsExporting a document's attachmentsExporting the attachments of a document selectionExporting the content of a workspace
Exporting the list of documents a folderLow-level exports
XML export of a single documentXML export of a document selectionXML export of a folder
Exporting attachments
Users can easily export the attachments of a document or of a selection of documents, i.e. their main file and theadditional attachments added from the tab of the documents.Files
Exporting a document's attachments
When you are on a document and you want to get its attached files, you can export them in a zipped folder.
To export the attachments of a document:
From the document, click on the icon to see the export options.Click on .ZIP Binary Export
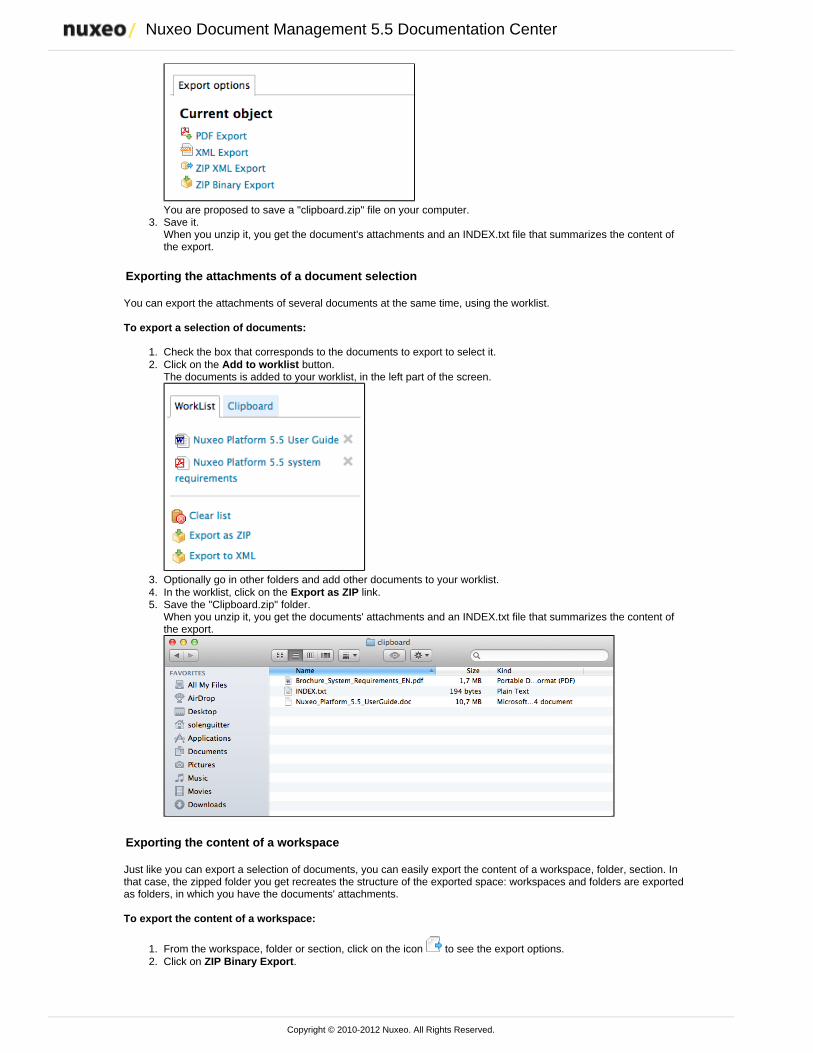
Nuxeo Document Management 5.5 Documentation Center
Copyright © 2010-2012 Nuxeo. All Rights Reserved.
2.
3.
1. 2.
3. 4. 5.
1. 2.
You are proposed to save a "clipboard.zip" file on your computer.Save it.When you unzip it, you get the document's attachments and an INDEX.txt file that summarizes the content ofthe export.
Exporting the attachments of a document selection
You can export the attachments of several documents at the same time, using the worklist.
To export a selection of documents:
Check the box that corresponds to the documents to export to select it.Click on the button.Add to worklistThe documents is added to your worklist, in the left part of the screen.
Optionally go in other folders and add other documents to your worklist.In the worklist, click on the link.Export as ZIPSave the "Clipboard.zip" folder.When you unzip it, you get the documents' attachments and an INDEX.txt file that summarizes the content ofthe export.
Exporting the content of a workspace
Just like you can export a selection of documents, you can easily export the content of a workspace, folder, section. Inthat case, the zipped folder you get recreates the structure of the exported space: workspaces and folders are exportedas folders, in which you have the documents' attachments.
To export the content of a workspace:
From the workspace, folder or section, click on the icon to see the export options.Click on .ZIP Binary Export
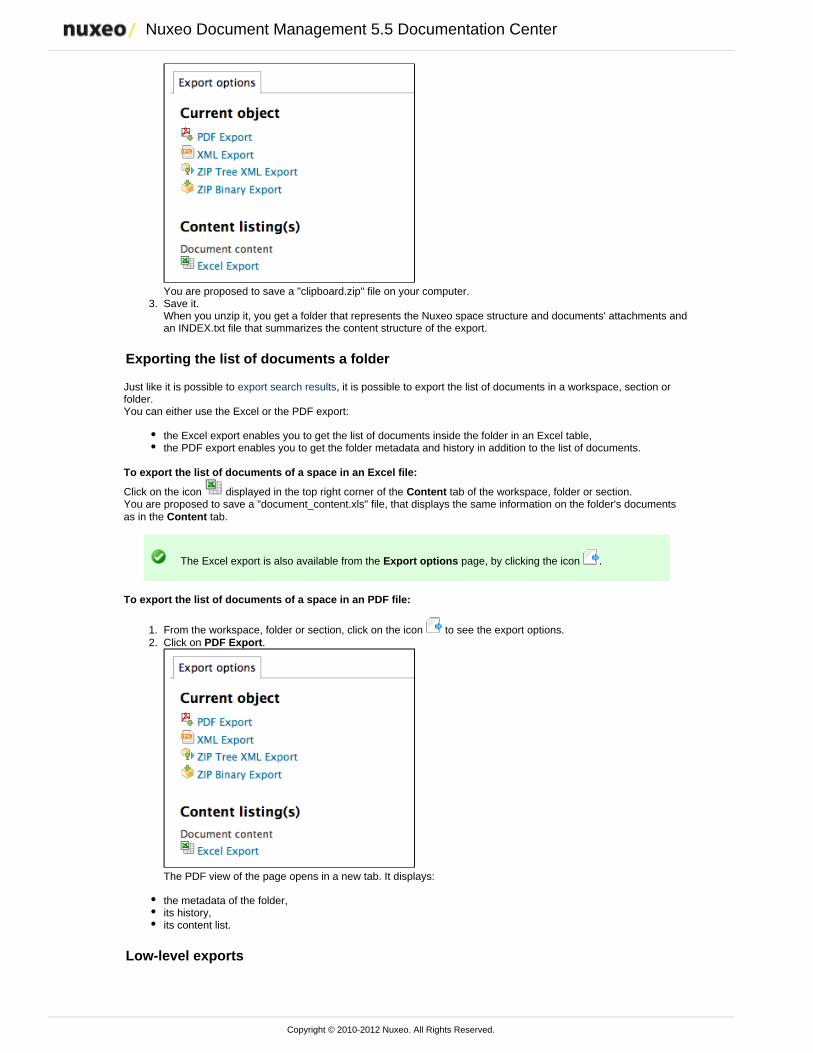
Nuxeo Document Management 5.5 Documentation Center
Copyright © 2010-2012 Nuxeo. All Rights Reserved.
2.
3.
1. 2.
You are proposed to save a "clipboard.zip" file on your computer.Save it.When you unzip it, you get a folder that represents the Nuxeo space structure and documents' attachments andan INDEX.txt file that summarizes the content structure of the export.
Exporting the list of documents a folder
Just like it is possible to , it is possible to export the list of documents in a workspace, section orexport search resultsfolder.You can either use the Excel or the PDF export:
the Excel export enables you to get the list of documents inside the folder in an Excel table,the PDF export enables you to get the folder metadata and history in addition to the list of documents.
To export the list of documents of a space in an Excel file:
Click on the icon displayed in the top right corner of the tab of the workspace, folder or section.ContentYou are proposed to save a "document_content.xls" file, that displays the same information on the folder's documentsas in the tab.Content
The Excel export is also available from the page, by clicking the icon .Export options
To export the list of documents of a space in an PDF file:
From the workspace, folder or section, click on the icon to see the export options.Click on .PDF Export
The PDF view of the page opens in a new tab. It displays:
the metadata of the folder,its history,its content list.
Low-level exports

Nuxeo Document Management 5.5 Documentation Center
Copyright © 2010-2012 Nuxeo. All Rights Reserved.
1. 2.
3.
1. 2.
XML export is a low level that enables users to get a set of information on documents in an XML file. This export type isuseful for debugging, and as such, is mainly intended to administrators. You can export:
a single document,a selection of documents,the structure of a folder.
XML export of a single document
The XML export of a document enables users to get a folder for the exported document that contains:
a document.xml file holding the document's various information (the applied access rights, the document'smetadata, its path),a .blob file that holds the binary content of the document. This blob is referenced in the document.xml file.
To get the XML export of a document:
From the document, click on the icon to see the export options.Click on .ZIP XML Export
You are proposed to save a "export.zip" file on your computer.
If you're only interested in the XML file of the document, click on . The XML fileXML Exportshould open in a new tab or window (depending on your browser's preferences).
Save the "export.zip" file.When you unzip it, you get a folder named from the document, that contains a document.xml file and .blob foreach attachment of the document.
XML export of a document selection
It is possible to do an XML export of several documents in a single export, using the Worklist.
To export a selection of documents:
Check the box that corresponds to the documents to export to select it.Click on the button.Add to worklistThe documents is added to your worklist, in the left part of the screen.
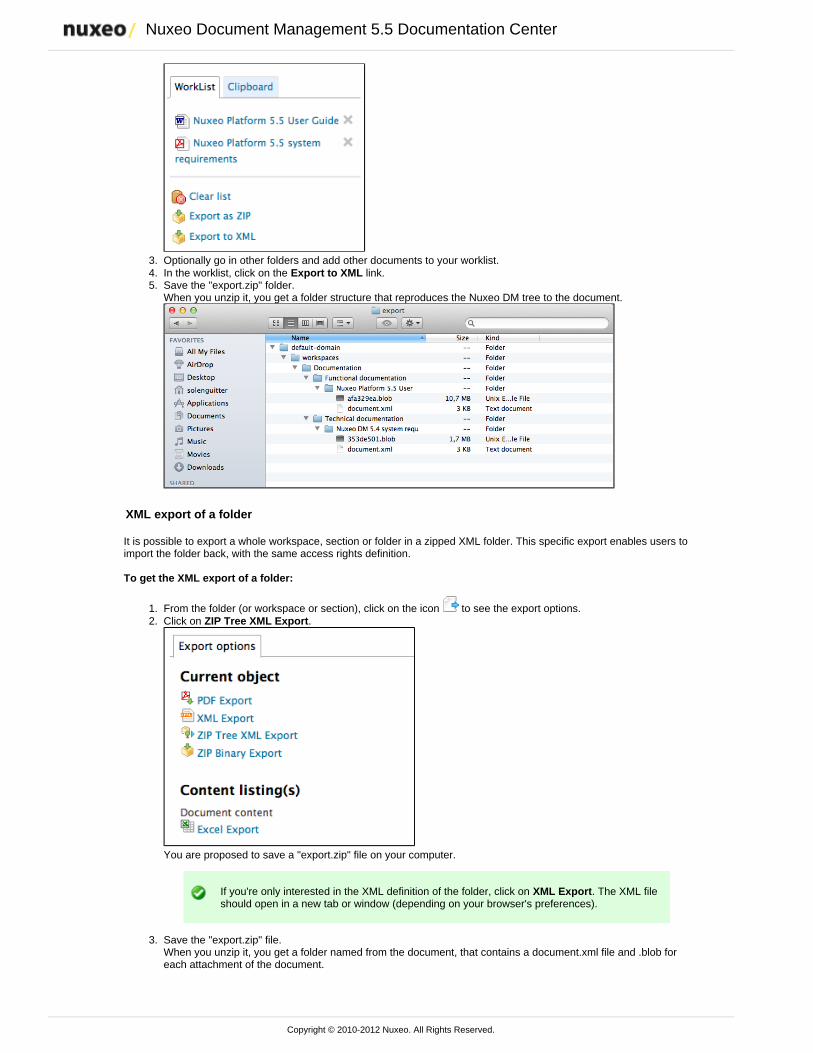
Nuxeo Document Management 5.5 Documentation Center
Copyright © 2010-2012 Nuxeo. All Rights Reserved.
2.
3. 4. 5.
1. 2.
3.
Optionally go in other folders and add other documents to your worklist.In the worklist, click on the link.Export to XMLSave the "export.zip" folder.When you unzip it, you get a folder structure that reproduces the Nuxeo DM tree to the document.
XML export of a folder
It is possible to export a whole workspace, section or folder in a zipped XML folder. This specific export enables users toimport the folder back, with the same access rights definition.
To get the XML export of a folder:
From the folder (or workspace or section), click on the icon to see the export options.Click on .ZIP Tree XML Export
You are proposed to save a "export.zip" file on your computer.
If you're only interested in the XML definition of the folder, click on . The XML fileXML Exportshould open in a new tab or window (depending on your browser's preferences).
Save the "export.zip" file.When you unzip it, you get a folder named from the document, that contains a document.xml file and .blob foreach attachment of the document.
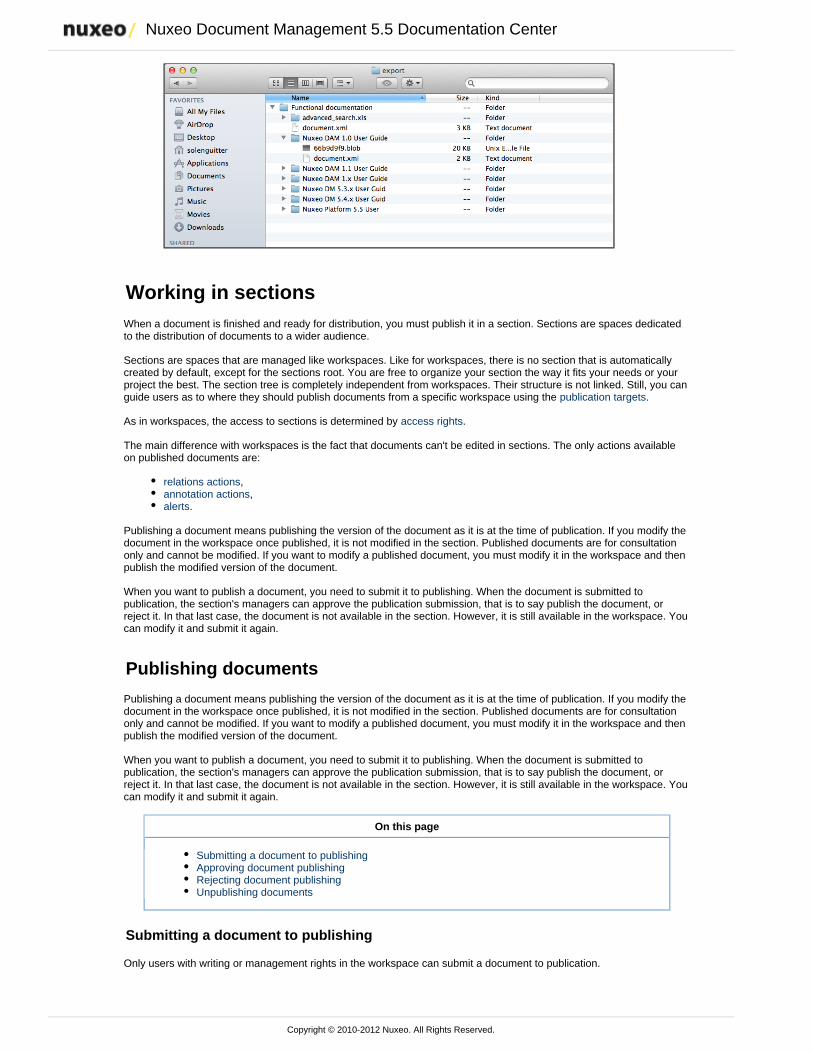
Nuxeo Document Management 5.5 Documentation Center
Copyright © 2010-2012 Nuxeo. All Rights Reserved.
3.
Working in sectionsWhen a document is finished and ready for distribution, you must publish it in a section. Sections are spaces dedicatedto the distribution of documents to a wider audience.
Sections are spaces that are managed like workspaces. Like for workspaces, there is no section that is automaticallycreated by default, except for the sections root. You are free to organize your section the way it fits your needs or yourproject the best. The section tree is completely independent from workspaces. Their structure is not linked. Still, you canguide users as to where they should publish documents from a specific workspace using the .publication targets
As in workspaces, the access to sections is determined by .access rights
The main difference with workspaces is the fact that documents can't be edited in sections. The only actions availableon published documents are:
relations actions,annotation actions,alerts.
Publishing a document means publishing the version of the document as it is at the time of publication. If you modify thedocument in the workspace once published, it is not modified in the section. Published documents are for consultationonly and cannot be modified. If you want to modify a published document, you must modify it in the workspace and thenpublish the modified version of the document.
When you want to publish a document, you need to submit it to publishing. When the document is submitted topublication, the section's managers can approve the publication submission, that is to say publish the document, orreject it. In that last case, the document is not available in the section. However, it is still available in the workspace. Youcan modify it and submit it again.
Publishing documents
Publishing a document means publishing the version of the document as it is at the time of publication. If you modify thedocument in the workspace once published, it is not modified in the section. Published documents are for consultationonly and cannot be modified. If you want to modify a published document, you must modify it in the workspace and thenpublish the modified version of the document.
When you want to publish a document, you need to submit it to publishing. When the document is submitted topublication, the section's managers can approve the publication submission, that is to say publish the document, orreject it. In that last case, the document is not available in the section. However, it is still available in the workspace. Youcan modify it and submit it again.
On this page
Submitting a document to publishingApproving document publishingRejecting document publishingUnpublishing documents
Submitting a document to publishing
Only users with writing or management rights in the workspace can submit a document to publication.
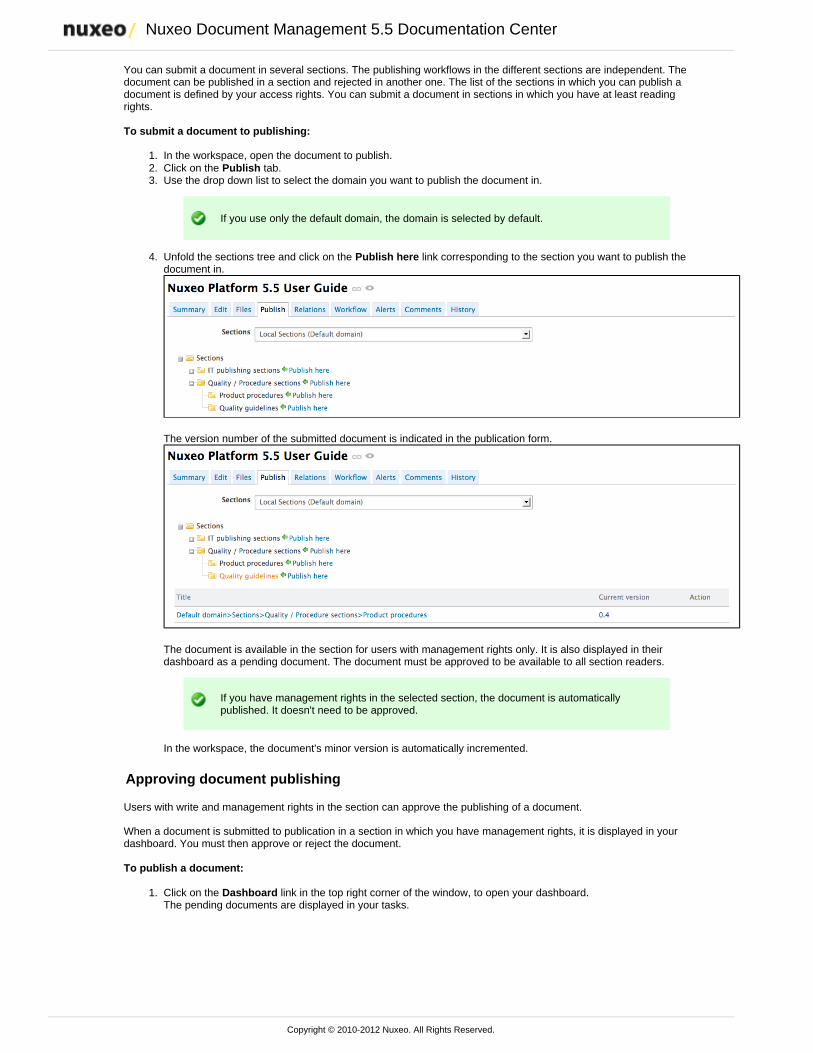
Nuxeo Document Management 5.5 Documentation Center
Copyright © 2010-2012 Nuxeo. All Rights Reserved.
1. 2. 3.
4.
1.
You can submit a document in several sections. The publishing workflows in the different sections are independent. Thedocument can be published in a section and rejected in another one. The list of the sections in which you can publish adocument is defined by your access rights. You can submit a document in sections in which you have at least readingrights.
To submit a document to publishing:
In the workspace, open the document to publish.Click on the tab.PublishUse the drop down list to select the domain you want to publish the document in.
If you use only the default domain, the domain is selected by default.
Unfold the sections tree and click on the link corresponding to the section you want to publish thePublish heredocument in.
The version number of the submitted document is indicated in the publication form.
The document is available in the section for users with management rights only. It is also displayed in theirdashboard as a pending document. The document must be approved to be available to all section readers.
If you have management rights in the selected section, the document is automaticallypublished. It doesn't need to be approved.
In the workspace, the document's minor version is automatically incremented.
Approving document publishing
Users with write and management rights in the section can approve the publishing of a document.
When a document is submitted to publication in a section in which you have management rights, it is displayed in yourdashboard. You must then approve or reject the document.
To publish a document:
Click on the link in the top right corner of the window, to open your dashboard.DashboardThe pending documents are displayed in your tasks.
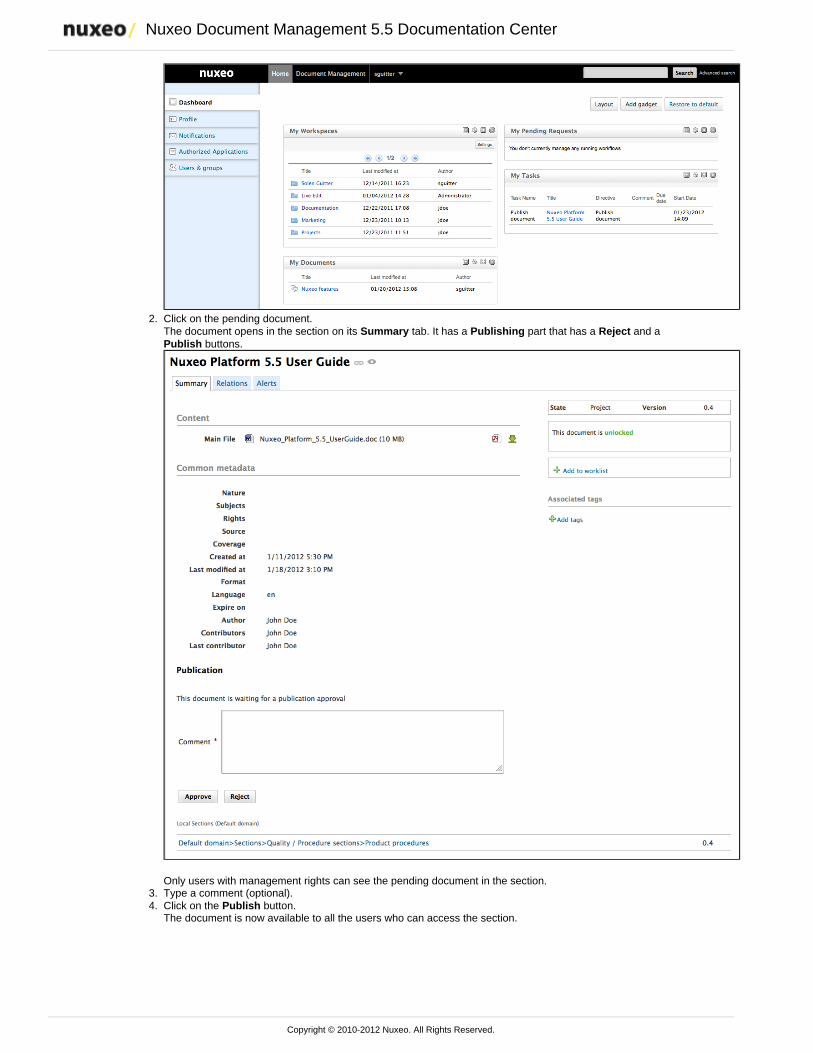
Nuxeo Document Management 5.5 Documentation Center
Copyright © 2010-2012 Nuxeo. All Rights Reserved.
1.
2.
3. 4.
Click on the pending document.The document opens in the section on its tab. It has a part that has a and a Summary Publishing Reject
buttons.Publish
Only users with management rights can see the pending document in the section.Type a comment (optional).Click on the button.PublishThe document is now available to all the users who can access the section.
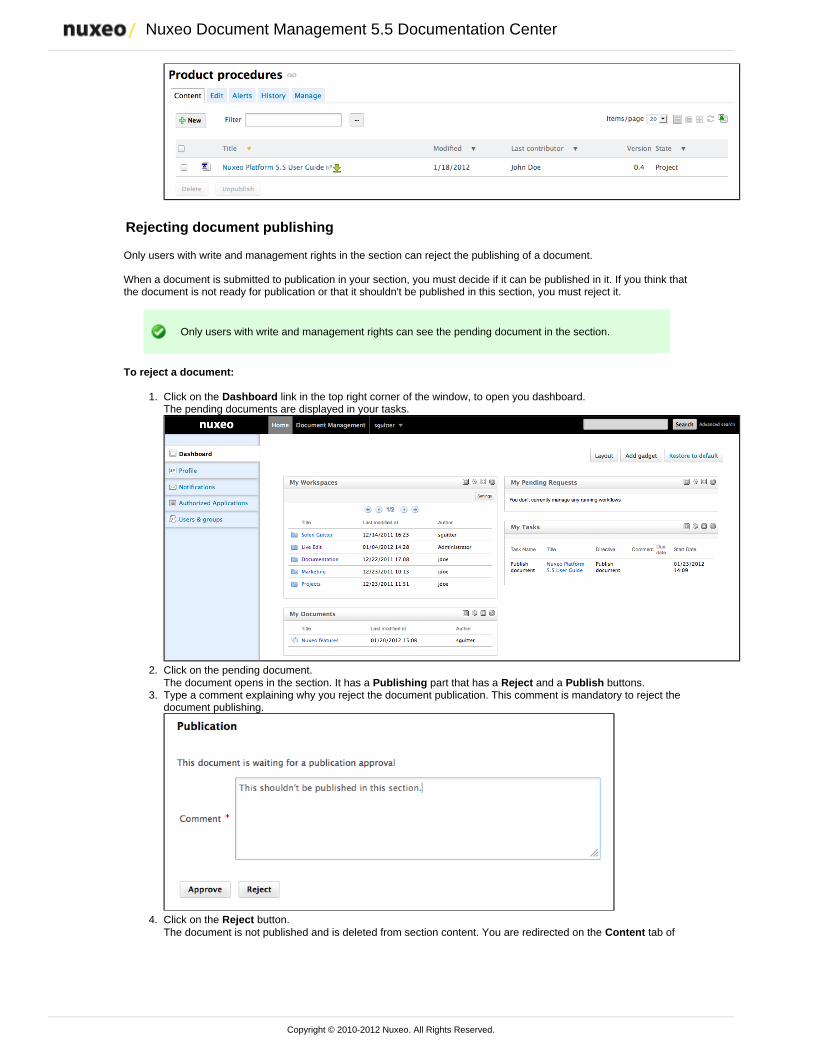
Nuxeo Document Management 5.5 Documentation Center
Copyright © 2010-2012 Nuxeo. All Rights Reserved.
4.
1.
2.
3.
4.
Rejecting document publishing
Only users with write and management rights in the section can reject the publishing of a document.
When a document is submitted to publication in your section, you must decide if it can be published in it. If you think thatthe document is not ready for publication or that it shouldn't be published in this section, you must reject it.
Only users with write and management rights can see the pending document in the section.
To reject a document:
Click on the link in the top right corner of the window, to open you dashboard.DashboardThe pending documents are displayed in your tasks.
Click on the pending document.The document opens in the section. It has a part that has a and a buttons.Publishing Reject PublishType a comment explaining why you reject the document publication. This comment is mandatory to reject thedocument publishing.
Click on the button.RejectThe document is not published and is deleted from section content. You are redirected on the tab ofContent
Nuxeo Document Management 5.5 Documentation Center
Copyright © 2010-2012 Nuxeo. All Rights Reserved.
4.
1.
2.
the section.In the workspace, the fact that publishing was rejected is logged in the History of the document.
Unpublishing documents
Only users with writing or management rights can unpublish a document from a section.
When a document is obsolete or inaccurate, it shouldn't be available in sections anymore. You have to unpublish it sosection readers do not have access to the document.
Unpublishing a document deletes the document from the section, but it does not delete the workspace document.
To unpublish a document from a section:
In the tab of the section, check the box in front of the document's name.Content
Click on the button.UnpublishThe document is unpublished and does not appear in the section. The original document in the workspace isnot deleted.
Related pages
Page: Publishing documents
Page: Setting publication targets
Managing Nuxeo DMAdministrators can configure some elements directly from Nuxeo DM's user interface.
As an administrator, you are in charge of managing in . You can create news users and groups, edit theirusers groupsproperties, or even delete users or groups.You can can also , i.e. the labels displayed in drop down lists.manage vocabularies
At a space level, space managers are in charge of .managing access rights
Managing access rights
Only users with management rights can manage the access rights of a space.
Nuxeo Document Management 5.5 Documentation Center
Copyright © 2010-2012 Nuxeo. All Rights Reserved.
1. 2. 3.
Managing access rights means granting or denying access rights in a space. The access rights management screen isavailable as a sub-tab in the tab of the space.Manage
The access rights management sub-tab is accessible composed of three parts:
the part displays rights that were granted or denied in a parent space;Inherited rightsthe part displays the rights that were granted or denied in the current space;Local rightsthe form to grant or deny access rights in the current space.
On this page
Rights prioritizationGranting access rightsDenying access rightsRemoving a user from local rightsBlocking rights inheritance
Rights prioritization
The access rights available are:
Right Actions in workspaces Actions in sections
Read Consult content Comment documents Annotate documents Tag documents
Consult content Comment documents Annotate documents Tag documents + Can ask for publishing actions
Version Manage the archived versions of adocument (view, restore, delete) + Read actions
Write Create documents Edit documents Add / remove relations Start a workflow + Remove actions + Version actions + Read actions
Create sections Approve document publishing Unpublish documents + Read actions + Remove actions
Nuxeo Document Management 5.5 Documentation Center
Copyright © 2010-2012 Nuxeo. All Rights Reserved.
1.
2.
Manage Manage access rights Set alerts to other users Apply a preset look on documents Manage deleted documents + Write actions + Read actions
Manage access rights Set alerts to other users Apply a preset look on documents Manage deleted documents + Write actions + Read actions
Remove Delete documents (this permissionis included in right) Write
The Removepermission is mostintended to bedenied, so as torestrict the actionsavailable to userswith "Write"permission.
Delete sub-sections (this permission is included in right)Write
The "Remove" permission is intended to bedenied, so as to restrict the actions available tousers with "Write" permission.
Can askforpublishing
Submit documents for publishing (this permission in included in right) Read
The "Can ask for publishing" permission isintended to be denied, so as to restrict theactions available to users with "Read"permission, typically to enable users to see thecontent of a section without being able topublish in the section.
Comment Add comments on websites
Moderate Moderate comments on websites if moderation is set toand blogs
afterward.
As you can see, some rights include more permissions than others, and sometimes include other rights. That's the casefor "Write", that includes "Remove".Beside the fact that some rights are stronger than others, you should be aware, when you set up rights on a space, thatsome rights have priority over others:
local rights have priority over inherited rights,granted rights have priority over denied rights.The fact that the rights are given or denied to a single user or a group doesn't have any influence.
Granting access rights
To grant access rights:
Click on the tab of the space.ManageThe sub-tab is displayed.Access RightsIn the form, type the username of the user you want to grant rights to.To give access rights to a group, type the group's name.
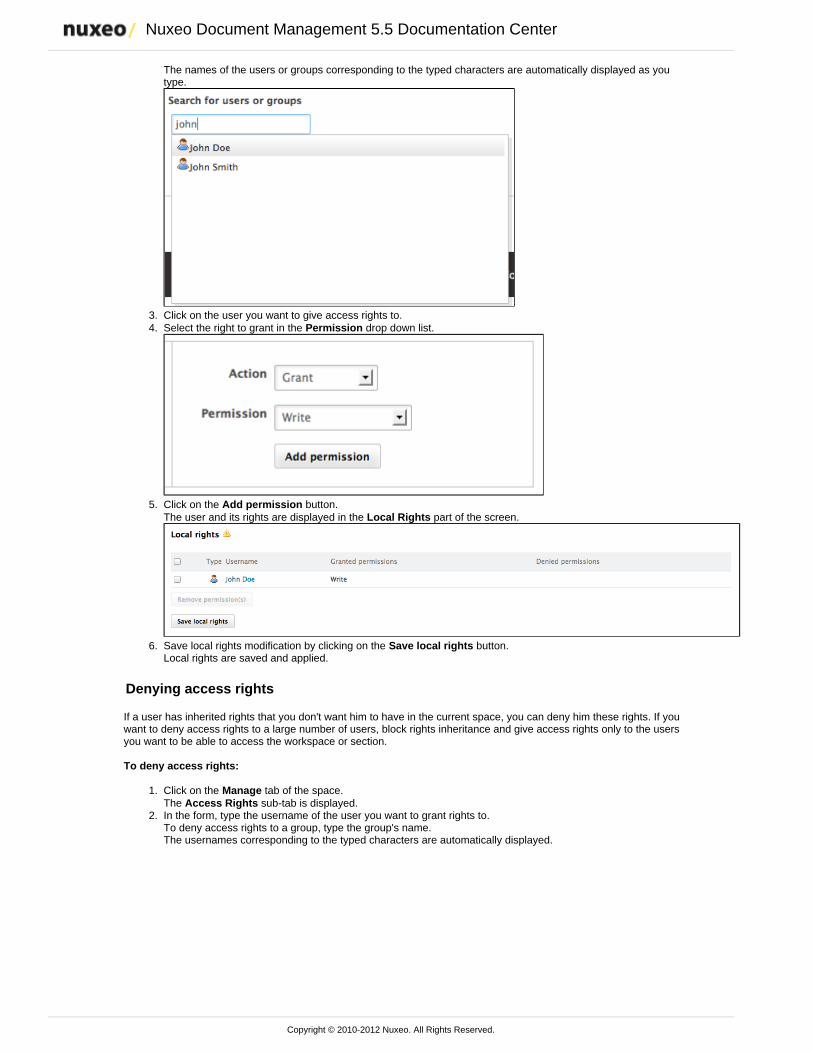
Nuxeo Document Management 5.5 Documentation Center
Copyright © 2010-2012 Nuxeo. All Rights Reserved.
2.
3. 4.
5.
6.
1.
2.
The names of the users or groups corresponding to the typed characters are automatically displayed as youtype.
Click on the user you want to give access rights to.Select the right to grant in the drop down list.Permission
Click on the button.Add permissionThe user and its rights are displayed in the part of the screen.Local Rights
Save local rights modification by clicking on the button.Save local rightsLocal rights are saved and applied.
Denying access rights
If a user has inherited rights that you don't want him to have in the current space, you can deny him these rights. If youwant to deny access rights to a large number of users, block rights inheritance and give access rights only to the usersyou want to be able to access the workspace or section.
To deny access rights:
Click on the tab of the space.ManageThe sub-tab is displayed.Access RightsIn the form, type the username of the user you want to grant rights to.To deny access rights to a group, type the group's name.The usernames corresponding to the typed characters are automatically displayed.
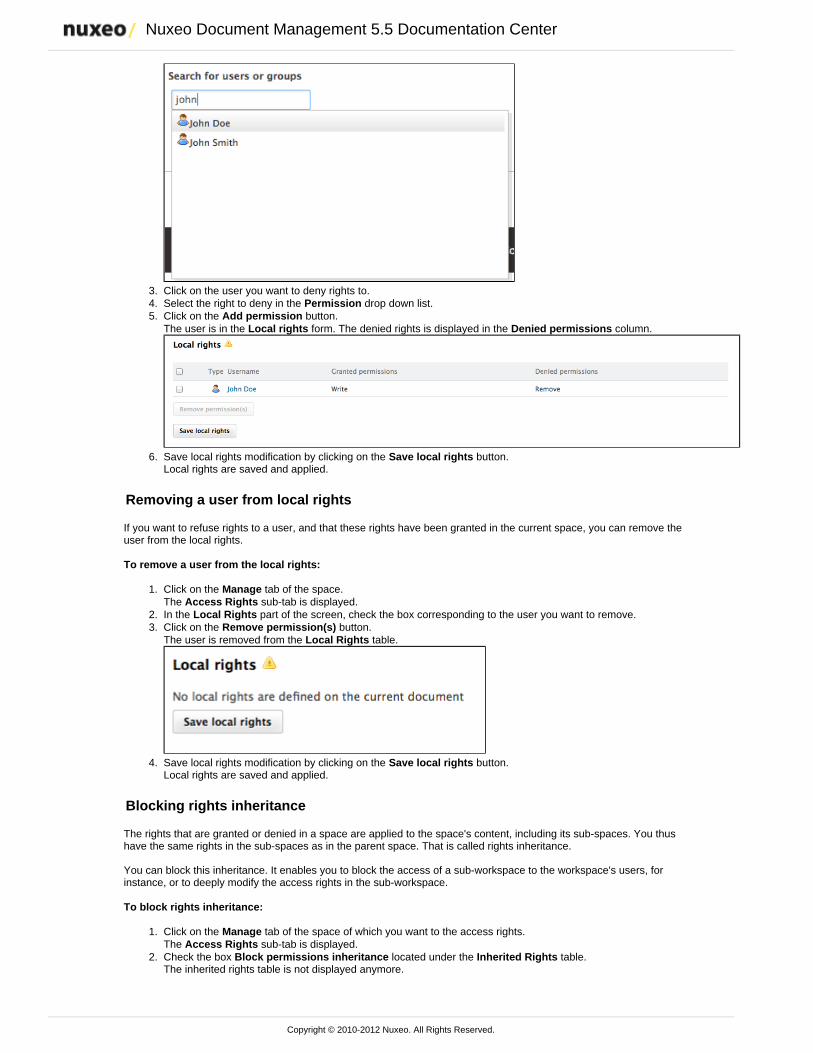
Nuxeo Document Management 5.5 Documentation Center
Copyright © 2010-2012 Nuxeo. All Rights Reserved.
2.
3. 4. 5.
6.
1.
2. 3.
4.
1.
2.
Click on the user you want to deny rights to.Select the right to deny in the drop down list.PermissionClick on the button.Add permissionThe user is in the form. The denied rights is displayed in the column.Local rights Denied permissions
Save local rights modification by clicking on the button.Save local rightsLocal rights are saved and applied.
Removing a user from local rights
If you want to refuse rights to a user, and that these rights have been granted in the current space, you can remove theuser from the local rights.
To remove a user from the local rights:
Click on the tab of the space.ManageThe sub-tab is displayed.Access RightsIn the part of the screen, check the box corresponding to the user you want to remove.Local RightsClick on the button.Remove permission(s)The user is removed from the table.Local Rights
Save local rights modification by clicking on the button.Save local rightsLocal rights are saved and applied.
Blocking rights inheritance
The rights that are granted or denied in a space are applied to the space's content, including its sub-spaces. You thushave the same rights in the sub-spaces as in the parent space. That is called rights inheritance.
You can block this inheritance. It enables you to block the access of a sub-workspace to the workspace's users, forinstance, or to deeply modify the access rights in the sub-workspace.
To block rights inheritance:
Click on the tab of the space of which you want to the access rights.ManageThe sub-tab is displayed.Access RightsCheck the box located under the table.Block permissions inheritance Inherited RightsThe inherited rights table is not displayed anymore.
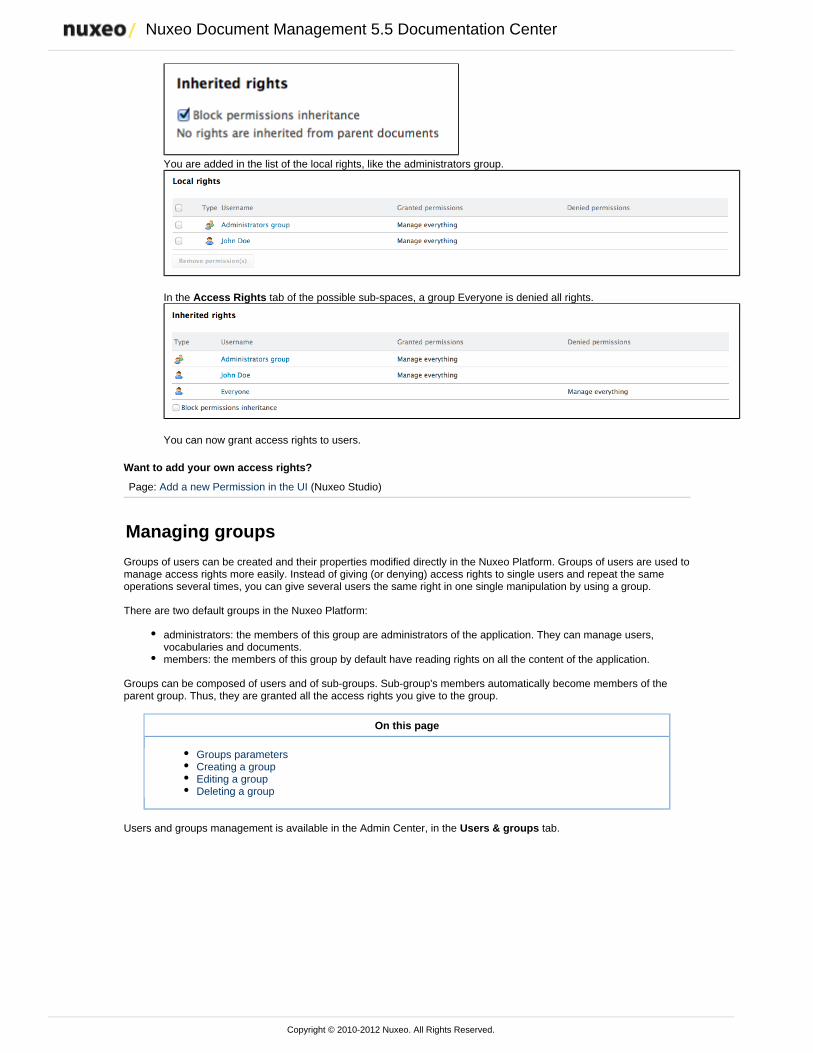
Nuxeo Document Management 5.5 Documentation Center
Copyright © 2010-2012 Nuxeo. All Rights Reserved.
2.
You are added in the list of the local rights, like the administrators group.
In the tab of the possible sub-spaces, a group Everyone is denied all rights.Access Rights
You can now grant access rights to users.
Want to add your own access rights?
Page: Add a new Permission in the UI (Nuxeo Studio)
Managing groups
Groups of users can be created and their properties modified directly in the Nuxeo Platform. Groups of users are used tomanage access rights more easily. Instead of giving (or denying) access rights to single users and repeat the sameoperations several times, you can give several users the same right in one single manipulation by using a group.
There are two default groups in the Nuxeo Platform:
administrators: the members of this group are administrators of the application. They can manage users,vocabularies and documents.members: the members of this group by default have reading rights on all the content of the application.
Groups can be composed of users and of sub-groups. Sub-group's members automatically become members of theparent group. Thus, they are granted all the access rights you give to the group.
On this page
Groups parametersCreating a groupEditing a groupDeleting a group
Users and groups management is available in the Admin Center, in the tab.Users & groups
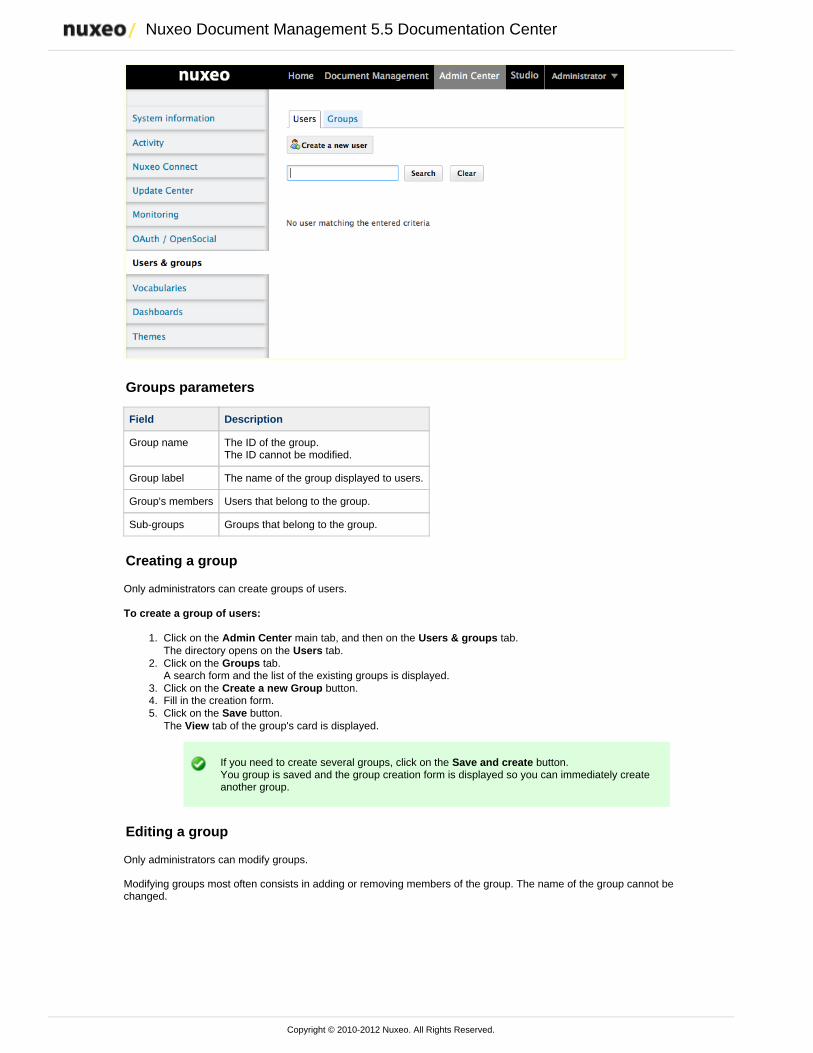
Nuxeo Document Management 5.5 Documentation Center
Copyright © 2010-2012 Nuxeo. All Rights Reserved.
1.
2.
3. 4. 5.
Groups parameters
Field Description
Group name The ID of the group.The ID cannot be modified.
Group label The name of the group displayed to users.
Group's members Users that belong to the group.
Sub-groups Groups that belong to the group.
Creating a group
Only administrators can create groups of users.
To create a group of users:
Click on the main tab, and then on the tab.Admin Center Users & groupsThe directory opens on the tab.UsersClick on the tab.GroupsA search form and the list of the existing groups is displayed.Click on the button.Create a new GroupFill in the creation form.Click on the button.SaveThe tab of the group's card is displayed.View
If you need to create several groups, click on the button.Save and createYou group is saved and the group creation form is displayed so you can immediately createanother group.
Editing a group
Only administrators can modify groups.
Modifying groups most often consists in adding or removing members of the group. The name of the group cannot bechanged.
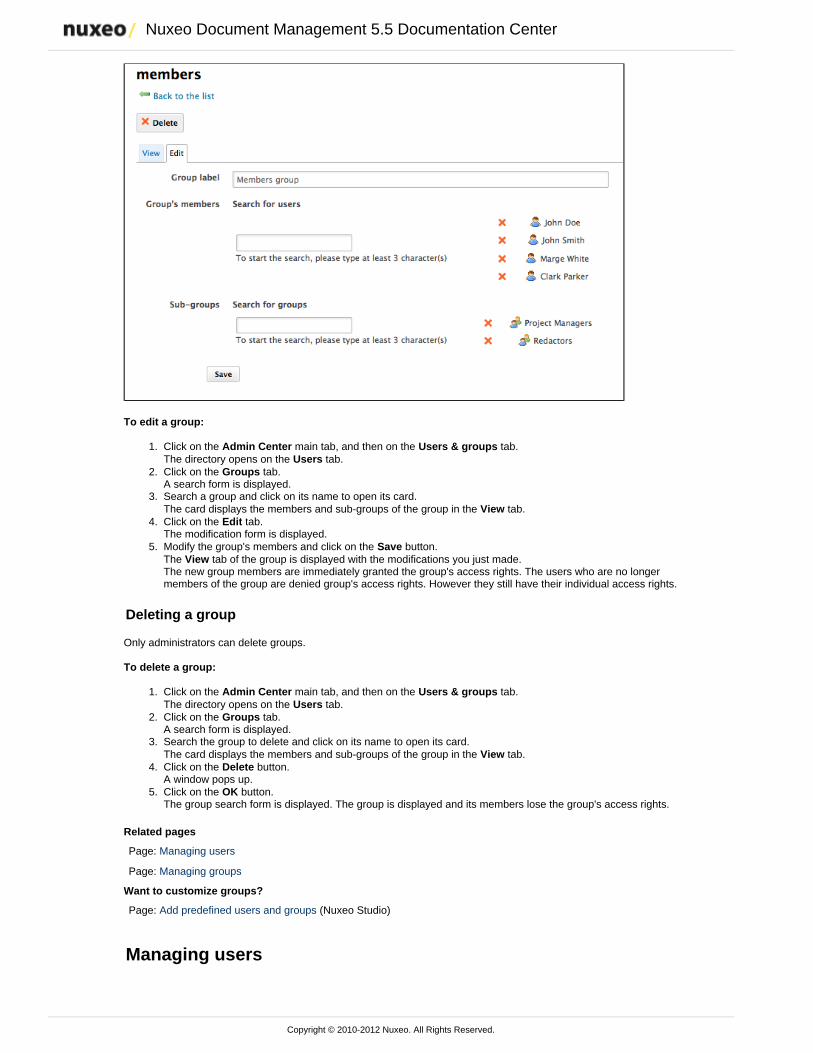
Nuxeo Document Management 5.5 Documentation Center
Copyright © 2010-2012 Nuxeo. All Rights Reserved.
1.
2.
3.
4.
5.
1.
2.
3.
4.
5.
To edit a group:
Click on the main tab, and then on the tab.Admin Center Users & groupsThe directory opens on the tab.UsersClick on the tab.GroupsA search form is displayed.Search a group and click on its name to open its card.The card displays the members and sub-groups of the group in the tab.ViewClick on the tab.EditThe modification form is displayed.Modify the group's members and click on the button.SaveThe tab of the group is displayed with the modifications you just made.ViewThe new group members are immediately granted the group's access rights. The users who are no longermembers of the group are denied group's access rights. However they still have their individual access rights.
Deleting a group
Only administrators can delete groups.
To delete a group:
Click on the main tab, and then on the tab.Admin Center Users & groupsThe directory opens on the tab.UsersClick on the tab.GroupsA search form is displayed.Search the group to delete and click on its name to open its card.The card displays the members and sub-groups of the group in the tab.ViewClick on the button.DeleteA window pops up.Click on the button.OKThe group search form is displayed. The group is displayed and its members lose the group's access rights.
Related pages
Page: Managing users
Page: Managing groups
Want to customize groups?
Page: Add predefined users and groups (Nuxeo Studio)
Managing users
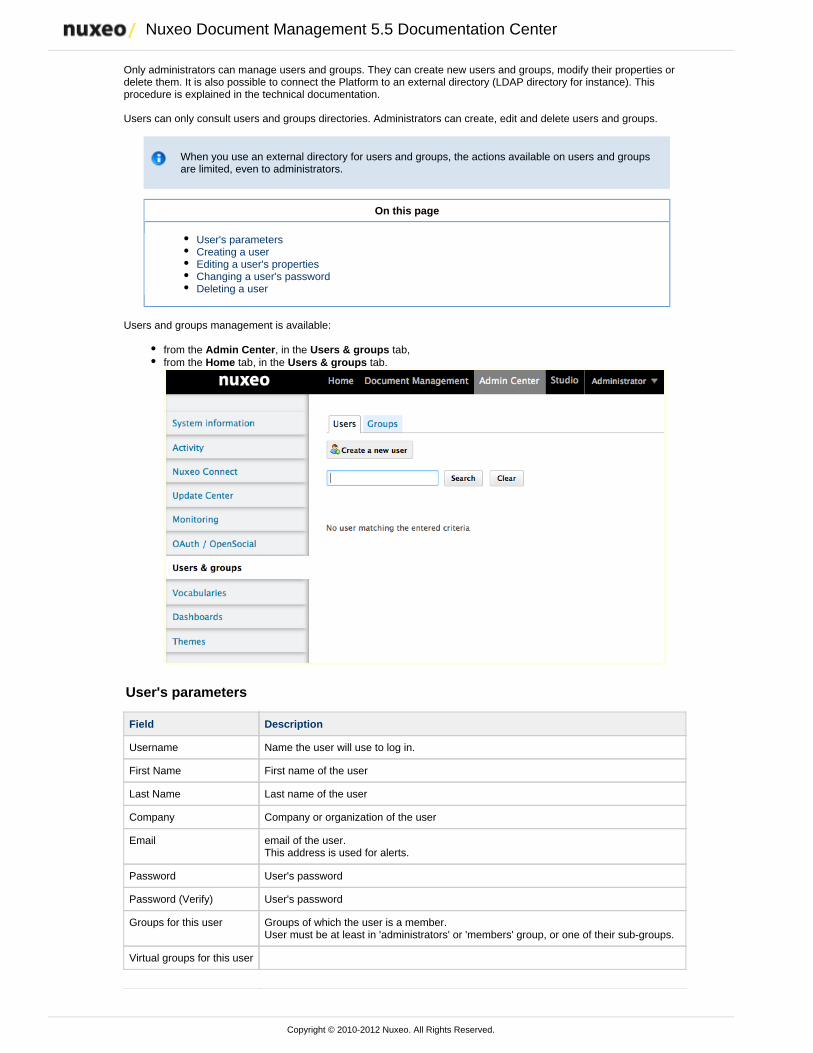
Nuxeo Document Management 5.5 Documentation Center
Copyright © 2010-2012 Nuxeo. All Rights Reserved.
Only administrators can manage users and groups. They can create new users and groups, modify their properties ordelete them. It is also possible to connect the Platform to an external directory (LDAP directory for instance). Thisprocedure is explained in the technical documentation.
Users can only consult users and groups directories. Administrators can create, edit and delete users and groups.
When you use an external directory for users and groups, the actions available on users and groupsare limited, even to administrators.
On this page
User's parametersCreating a userEditing a user's propertiesChanging a user's passwordDeleting a user
Users and groups management is available:
from the , in the tab,Admin Center Users & groupsfrom the tab, in the tab.Home Users & groups
User's parameters
Field Description
Username Name the user will use to log in.
First Name First name of the user
Last Name Last name of the user
Company Company or organization of the user
Email email of the user. This address is used for alerts.
Password User's password
Password (Verify) User's password
Groups for this user Groups of which the user is a member.User must be at least in 'administrators' or 'members' group, or one of their sub-groups.
Virtual groups for this user
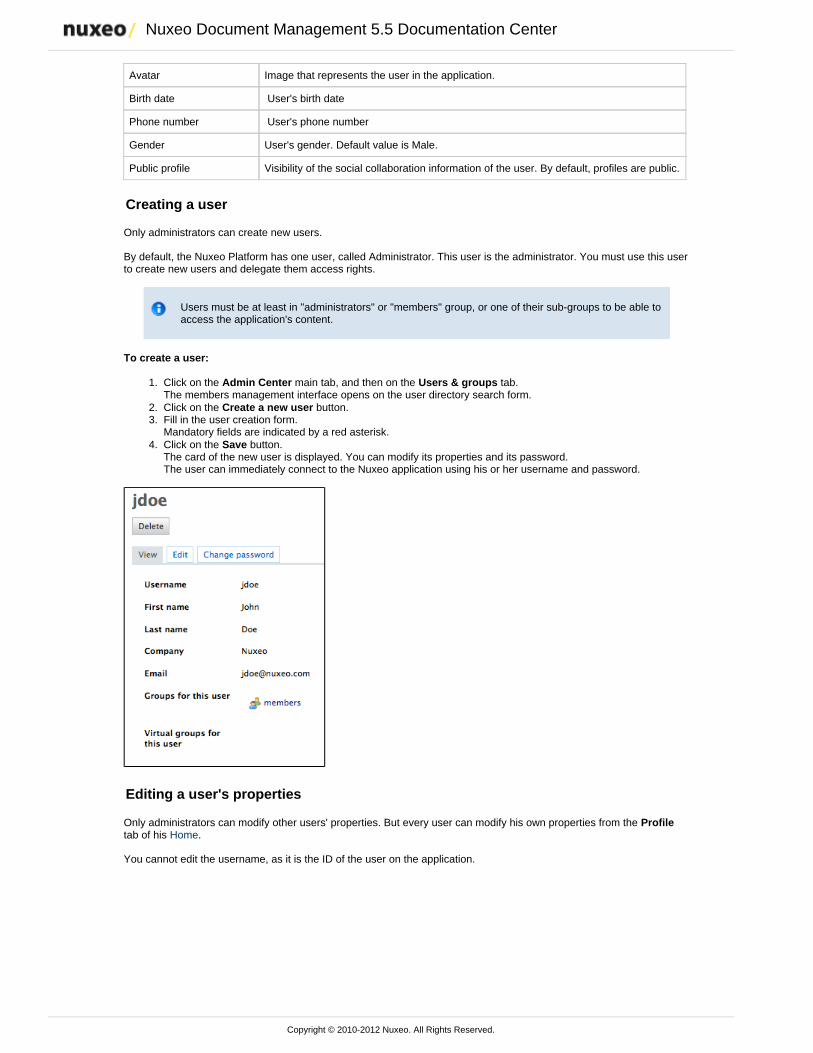
Nuxeo Document Management 5.5 Documentation Center
Copyright © 2010-2012 Nuxeo. All Rights Reserved.
1.
2. 3.
4.
Avatar Image that represents the user in the application.
Birth date User's birth date
Phone number User's phone number
Gender User's gender. Default value is Male.
Public profile Visibility of the social collaboration information of the user. By default, profiles are public.
Creating a user
Only administrators can create new users.
By default, the Nuxeo Platform has one user, called Administrator. This user is the administrator. You must use this userto create new users and delegate them access rights.
Users must be at least in "administrators" or "members" group, or one of their sub-groups to be able toaccess the application's content.
To create a user:
Click on the main tab, and then on the tab.Admin Center Users & groupsThe members management interface opens on the user directory search form.Click on the button.Create a new userFill in the user creation form.Mandatory fields are indicated by a red asterisk.Click on the button.SaveThe card of the new user is displayed. You can modify its properties and its password.The user can immediately connect to the Nuxeo application using his or her username and password.
Editing a user's properties
Only administrators can modify other users' properties. But every user can modify his own properties from the Profiletab of his .Home
You cannot edit the username, as it is the ID of the user on the application.
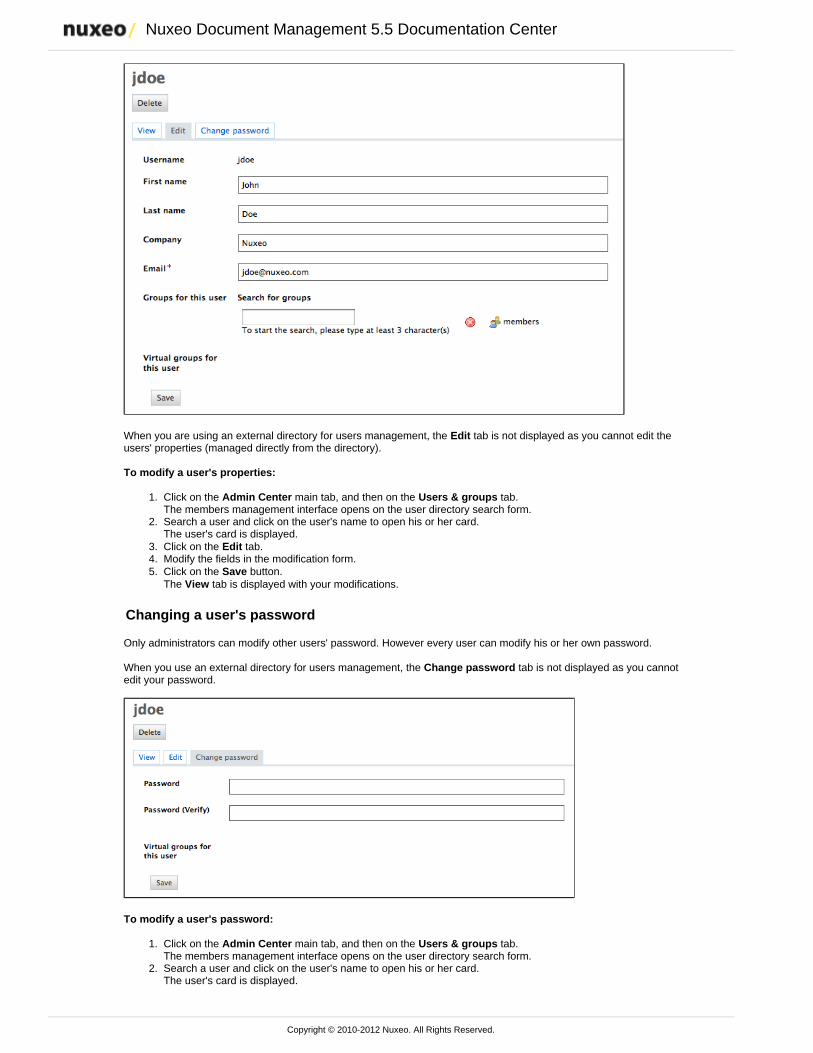
Nuxeo Document Management 5.5 Documentation Center
Copyright © 2010-2012 Nuxeo. All Rights Reserved.
1.
2.
3. 4. 5.
1.
2.
3.
When you are using an external directory for users management, the tab is not displayed as you cannot edit theEditusers' properties (managed directly from the directory).
To modify a user's properties:
Click on the main tab, and then on the tab.Admin Center Users & groupsThe members management interface opens on the user directory search form.Search a user and click on the user's name to open his or her card.The user's card is displayed.Click on the tab.EditModify the fields in the modification form.Click on the button.SaveThe tab is displayed with your modifications.View
Changing a user's password
Only administrators can modify other users' password. However every user can modify his or her own password.
When you use an external directory for users management, the tab is not displayed as you cannotChange passwordedit your password.
To modify a user's password:
Click on the main tab, and then on the tab.Admin Center Users & groupsThe members management interface opens on the user directory search form.Search a user and click on the user's name to open his or her card.The user's card is displayed.

Nuxeo Document Management 5.5 Documentation Center
Copyright © 2010-2012 Nuxeo. All Rights Reserved.
3. 4. 5.
1.
2.
3.
4.
Click on the tab.Change passwordType the new password and confirm it.Click on the button.SaveThe tab is displayed. The user must use his or her new password the next time he or she logs in.View
Deleting a user
Only administrators can delete users.
Deleting a user is a permanent action.
To delete a user:
Click on the main tab, and then on the tab.Admin Center Users & groupsThe members management interface opens on the user directory search form.Search a user and click on the user's name to open his or her card.The user's card is displayed.Click on the button.DeleteA window pops up.Click on the button.OKThe user is deleted. He or she cannot log in to the Nuxeo application.
Related pages
Page: Managing users
Page: Managing groups
Want to customize users?
Page: Add predefined users and groups (Nuxeo Studio)
Managing vocabularies
Only administrators can consult and manage vocabularies.
Vocabularies are the lists of labels used in the application, for instance in drop down lists. A vocabulary is composed ofseveral entries, that are the options in the drop down lists. Some vocabularies are hierarchical, i.e. they have severallevels. For instance, the metadata uses a two level vocabulary. First level is . Second level is Subjects Topic Subtopicand each entry is linked to a entry.Topic
Functional administrators can only modify or delete vocabularies. They cannot create a new vocabulary from the userinterface.
On this page
Consulting vocabulariesVocabulary entries parametersEditing vocabularies
Adding a new vocabulary entryEditing a vocabulary entryDeleting a vocabulary entry
Consulting vocabularies
All vocabularies editable from the user interface are listed in the vocabularies management interface.
Depending on the version of Nuxeo DM you use, you won't access the vocabularies the same way
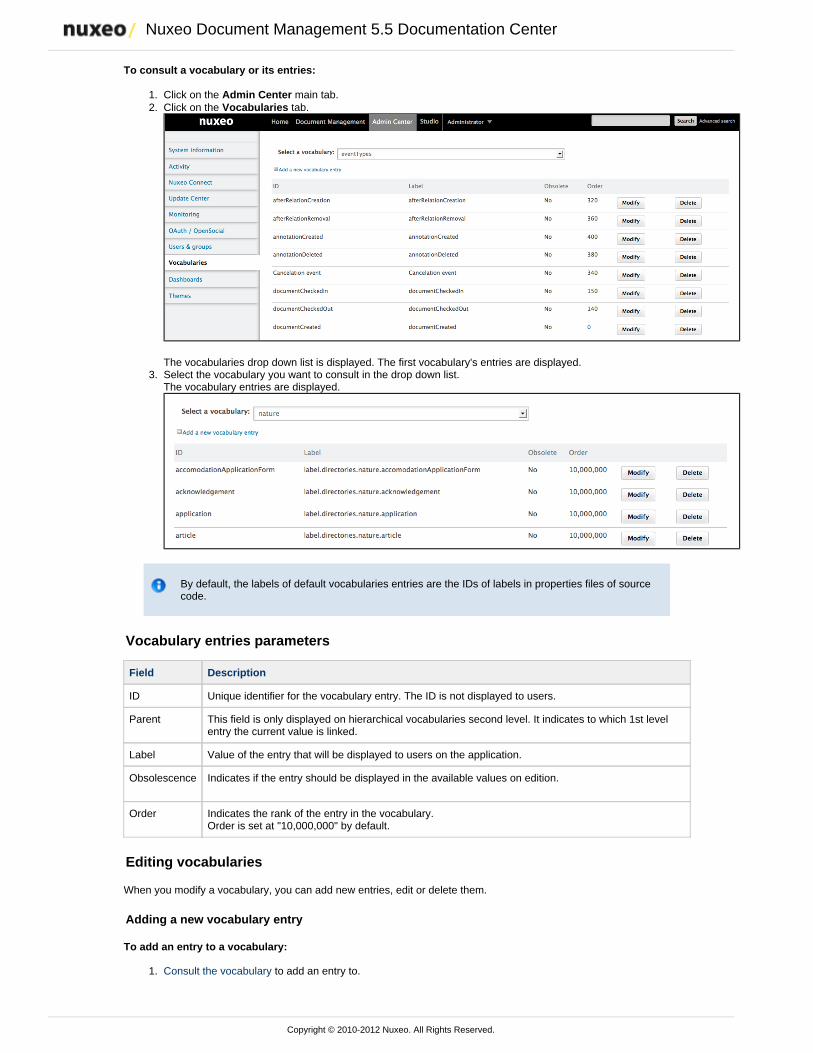
Nuxeo Document Management 5.5 Documentation Center
Copyright © 2010-2012 Nuxeo. All Rights Reserved.
1. 2.
3.
1.
2.
To consult a vocabulary or its entries:
Click on the main tab.Admin CenterClick on the tab.Vocabularies
The vocabularies drop down list is displayed. The first vocabulary's entries are displayed.Select the vocabulary you want to consult in the drop down list.The vocabulary entries are displayed.
By default, the labels of default vocabularies entries are the IDs of labels in properties files of sourcecode.
Vocabulary entries parameters
Field Description
ID Unique identifier for the vocabulary entry. The ID is not displayed to users.
Parent This field is only displayed on hierarchical vocabularies second level. It indicates to which 1st levelentry the current value is linked.
Label Value of the entry that will be displayed to users on the application.
Obsolescence Indicates if the entry should be displayed in the available values on edition.
Order Indicates the rank of the entry in the vocabulary. Order is set at "10,000,000" by default.
Editing vocabularies
When you modify a vocabulary, you can add new entries, edit or delete them.
Adding a new vocabulary entry
To add an entry to a vocabulary:
Consult the vocabulary to add an entry to.
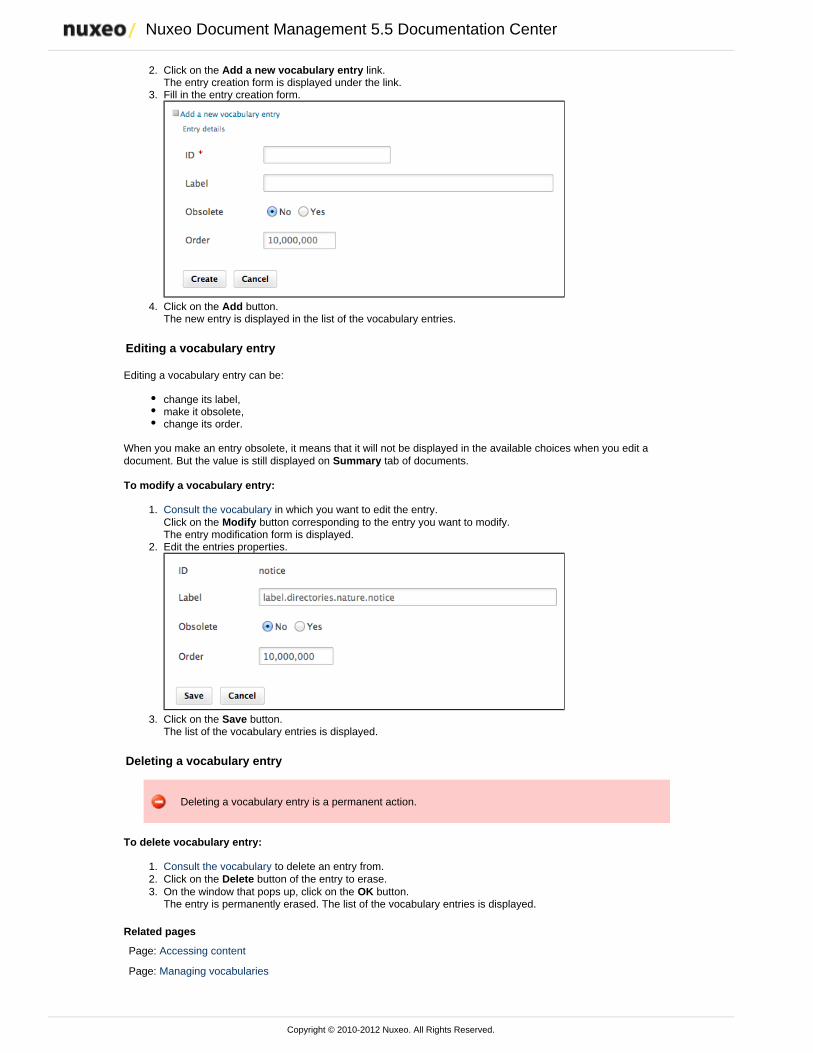
Nuxeo Document Management 5.5 Documentation Center
Copyright © 2010-2012 Nuxeo. All Rights Reserved.
2.
3.
4.
1.
2.
3.
1. 2. 3.
Click on the link.Add a new vocabulary entryThe entry creation form is displayed under the link.Fill in the entry creation form.
Click on the button.AddThe new entry is displayed in the list of the vocabulary entries.
Editing a vocabulary entry
Editing a vocabulary entry can be:
change its label,make it obsolete,change its order.
When you make an entry obsolete, it means that it will not be displayed in the available choices when you edit adocument. But the value is still displayed on tab of documents.Summary
To modify a vocabulary entry:
Consult the vocabulary in which you want to edit the entry.Click on the button corresponding to the entry you want to modify.ModifyThe entry modification form is displayed.Edit the entries properties.
Click on the button.SaveThe list of the vocabulary entries is displayed.
Deleting a vocabulary entry
Deleting a vocabulary entry is a permanent action.
To delete vocabulary entry:
Consult the vocabulary to delete an entry from.Click on the button of the entry to erase.DeleteOn the window that pops up, click on the button.OKThe entry is permanently erased. The list of the vocabulary entries is displayed.
Related pages
Page: Accessing content
Page: Managing vocabularies
Nuxeo Document Management 5.5 Documentation Center
Copyright © 2010-2012 Nuxeo. All Rights Reserved.
1. 2. 3. 4.
5.
6. 7.
Page: Editing a workspace
Page: Editing content
Want to know more about vocabularies configuration?
Page: Add a new vocabulary (Nuxeo Studio)
Managing dashboards
The administrators of a Nuxeo DM application can set up the dashboards that will be displayed to users. On a defaultNuxeo DM instance, administrators can:
define the default user dashboard, which is the dashboard displayed to authenticated users by default andwhich they can ;customizeadd external gadgets that users will be able to display on their dashboard by .customizing it
When , administrators can define the anonymousanonymous access to Nuxeo DM is enableddashboard, which is the dashboard displayed to users that are not logged in. The configuration of theanonymous dashboard works exactly .like the default user dashboard
On this page
Defining the default user dashboardManaging external gadgets
Adding external gadgetsModifying an external gagdetDeleting an external gadget
Defining the default user dashboard
The user default dashboard is used to generate the user's dashboard the first time the user logs in, and when the userclicks on the "Restore default" button on his dashboard.
Nuxeo DM includes a dashboard that is proposed as the default user dashboard. You can edit this default userdashboard to make it adapted to your organization and users. Editing the default user dashboard works the same wayusers can edit their dashboard. You can:
change the dashboard layout,add or remove gadgets,edit widgets.
Managing external gadgets
As an administrator, you can add and manage gadgets from other applications or websites so that they are available forusers when they click on the "Add gadget" button.
Adding external gadgets
To add an external gadget:
On the website which provides the external gadget, copy the gadget's URL.Log in to Nuxeo DM.In the Admin Center, click on the tab.DashboardsClick on the tabs.External gadgetsThe link is displayed.AddIf you already added some external gadgets, the list of configured gadgets is displayed.Click on the linkAddThe form to add a gadget is displayed.Fill in the form (see below for gadget parameters).Click on the button.CreateThe new gadget and its properties is displayed in a table.
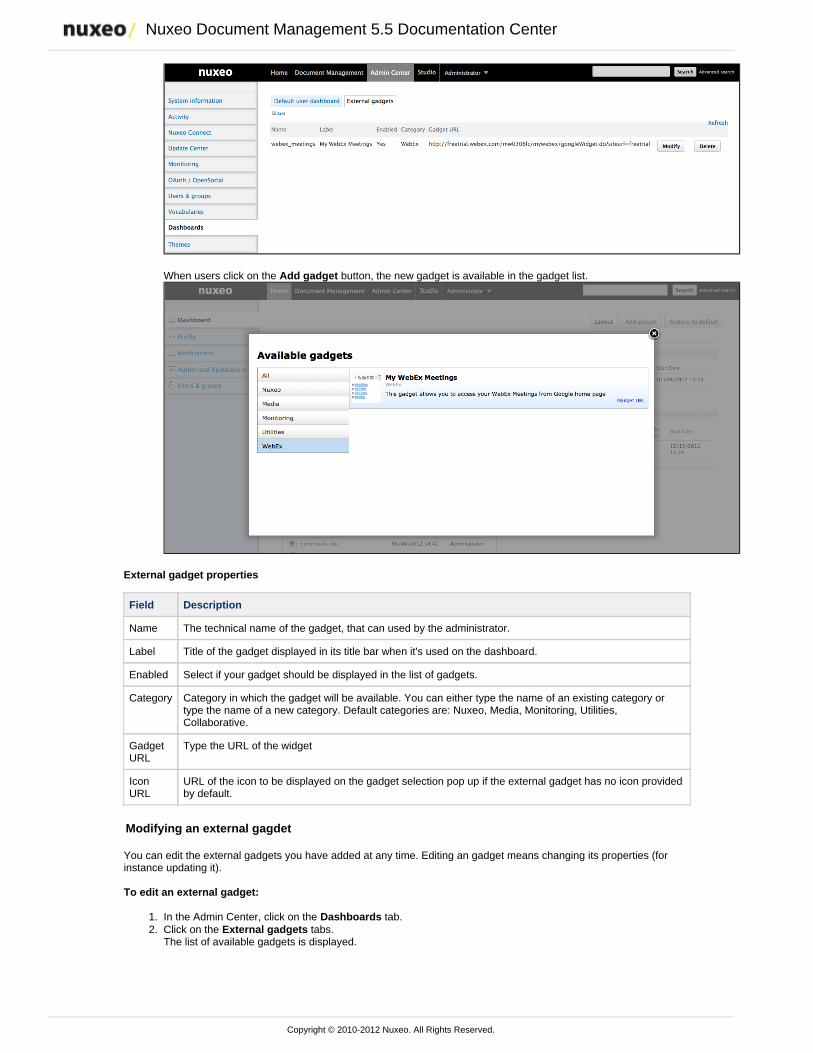
Nuxeo Document Management 5.5 Documentation Center
Copyright © 2010-2012 Nuxeo. All Rights Reserved.
7.
1. 2.
When users click on the button, the new gadget is available in the gadget list.Add gadget
External gadget properties
Field Description
Name The technical name of the gadget, that can used by the administrator.
Label Title of the gadget displayed in its title bar when it's used on the dashboard.
Enabled Select if your gadget should be displayed in the list of gadgets.
Category Category in which the gadget will be available. You can either type the name of an existing category ortype the name of a new category. Default categories are: Nuxeo, Media, Monitoring, Utilities,Collaborative.
GadgetURL
Type the URL of the widget
IconURL
URL of the icon to be displayed on the gadget selection pop up if the external gadget has no icon providedby default.
Modifying an external gagdet
You can edit the external gadgets you have added at any time. Editing an gadget means changing its properties (forinstance updating it).
To edit an external gadget:
In the Admin Center, click on the tab.DashboardsClick on the tabs.External gadgetsThe list of available gadgets is displayed.
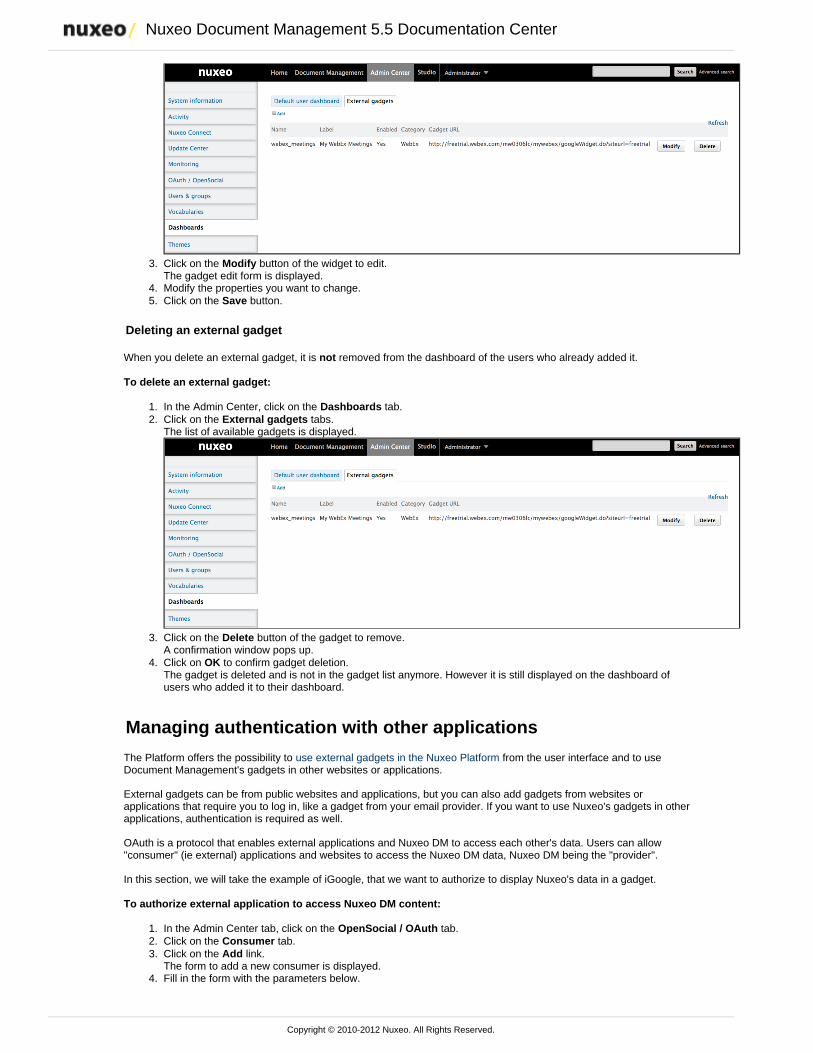
Nuxeo Document Management 5.5 Documentation Center
Copyright © 2010-2012 Nuxeo. All Rights Reserved.
2.
3.
4. 5.
1. 2.
3.
4.
1. 2. 3.
4.
5.
Click on the button of the widget to edit.ModifyThe gadget edit form is displayed.Modify the properties you want to change.Click on the button.Save
Deleting an external gadget
When you delete an external gadget, it is removed from the dashboard of the users who already added it.not
To delete an external gadget:
In the Admin Center, click on the tab.DashboardsClick on the tabs.External gadgetsThe list of available gadgets is displayed.
Click on the button of the gadget to remove.DeleteA confirmation window pops up.Click on to confirm gadget deletion.OKThe gadget is deleted and is not in the gadget list anymore. However it is still displayed on the dashboard ofusers who added it to their dashboard.
Managing authentication with other applications
The Platform offers the possibility to from the user interface and to useuse external gadgets in the Nuxeo PlatformDocument Management's gadgets in other websites or applications.
External gadgets can be from public websites and applications, but you can also add gadgets from websites orapplications that require you to log in, like a gadget from your email provider. If you want to use Nuxeo's gadgets in otherapplications, authentication is required as well.
OAuth is a protocol that enables external applications and Nuxeo DM to access each other's data. Users can allow"consumer" (ie external) applications and websites to access the Nuxeo DM data, Nuxeo DM being the "provider".
In this section, we will take the example of iGoogle, that we want to authorize to display Nuxeo's data in a gadget.
To authorize external application to access Nuxeo DM content:
In the Admin Center tab, click on the tab.OpenSocial / OAuthClick on the tab.ConsumerClick on the link.AddThe form to add a new consumer is displayed.Fill in the form with the parameters below.
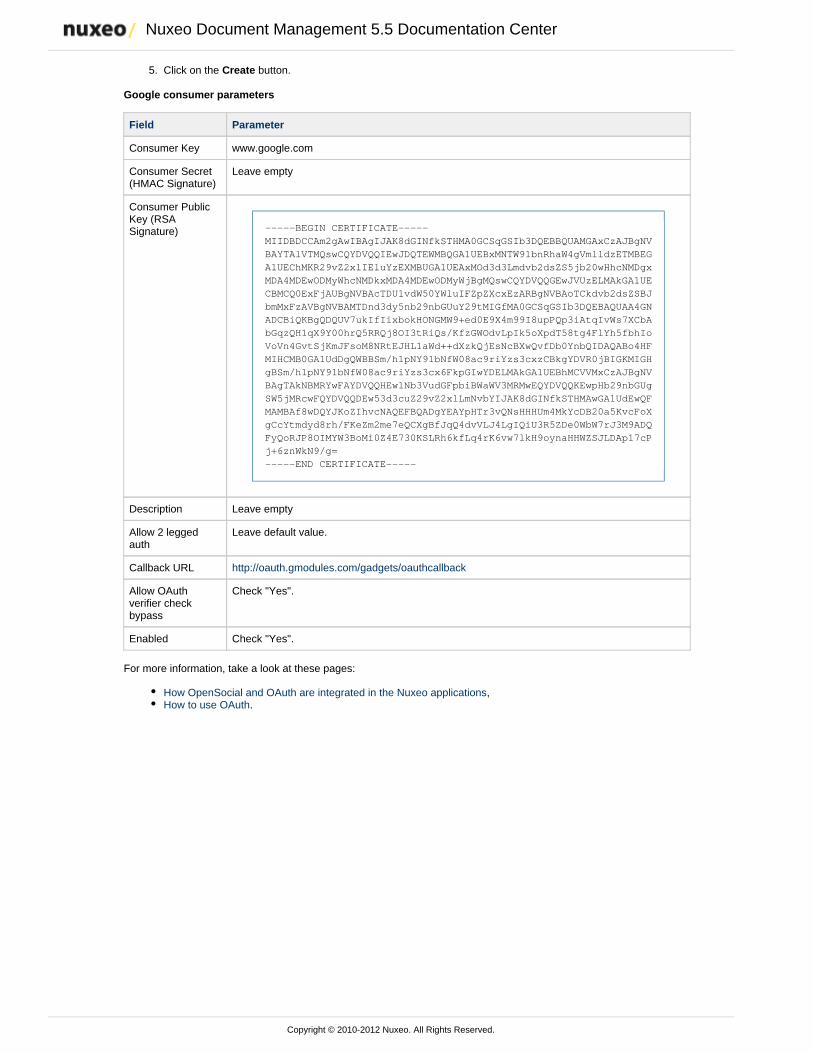
Nuxeo Document Management 5.5 Documentation Center
Copyright © 2010-2012 Nuxeo. All Rights Reserved.
5. Click on the button.Create
Google consumer parameters
Field Parameter
Consumer Key www.google.com
Consumer Secret(HMAC Signature)
Leave empty
Consumer PublicKey (RSASignature) -----BEGIN CERTIFICATE-----
MIIDBDCCAm2gAwIBAgIJAK8dGINfkSTHMA0GCSqGSIb3DQEBBQUAMGAxCzAJBgNVBAYTAlVTMQswCQYDVQQIEwJDQTEWMBQGA1UEBxMNTW91bnRhaW4gVmlldzETMBEGA1UEChMKR29vZ2xlIEluYzEXMBUGA1UEAxMOd3d3Lmdvb2dsZS5jb20wHhcNMDgxMDA4MDEwODMyWhcNMDkxMDA4MDEwODMyWjBgMQswCQYDVQQGEwJVUzELMAkGA1UECBMCQ0ExFjAUBgNVBAcTDU1vdW50YWluIFZpZXcxEzARBgNVBAoTCkdvb2dsZSBJbmMxFzAVBgNVBAMTDnd3dy5nb29nbGUuY29tMIGfMA0GCSqGSIb3DQEBAQUAA4GNADCBiQKBgQDQUV7ukIfIixbokHONGMW9+ed0E9X4m99I8upPQp3iAtqIvWs7XCbAbGqzQH1qX9Y00hrQ5RRQj8OI3tRiQs/KfzGWOdvLpIk5oXpdT58tg4FlYh5fbhIoVoVn4GvtSjKmJFsoM8NRtEJHL1aWd++dXzkQjEsNcBXwQvfDb0YnbQIDAQABo4HFMIHCMB0GA1UdDgQWBBSm/h1pNY91bNfW08ac9riYzs3cxzCBkgYDVR0jBIGKMIGHgBSm/h1pNY91bNfW08ac9riYzs3cx6FkpGIwYDELMAkGA1UEBhMCVVMxCzAJBgNVBAgTAkNBMRYwFAYDVQQHEw1Nb3VudGFpbiBWaWV3MRMwEQYDVQQKEwpHb29nbGUgSW5jMRcwFQYDVQQDEw53d3cuZ29vZ2xlLmNvbYIJAK8dGINfkSTHMAwGA1UdEwQFMAMBAf8wDQYJKoZIhvcNAQEFBQADgYEAYpHTr3vQNsHHHUm4MkYcDB20a5KvcFoXgCcYtmdyd8rh/FKeZm2me7eQCXgBfJqQ4dvVLJ4LgIQiU3R5ZDe0WbW7rJ3M9ADQFyQoRJP8OIMYW3BoMi0Z4E730KSLRh6kfLq4rK6vw7lkH9oynaHHWZSJLDAp17cPj+6znWkN9/g=-----END CERTIFICATE-----
Description Leave empty
Allow 2 leggedauth
Leave default value.
Callback URL http://oauth.gmodules.com/gadgets/oauthcallback
Allow OAuthverifier checkbypass
Check "Yes".
Enabled Check "Yes".
For more information, take a look at these pages:
How OpenSocial and OAuth are integrated in the Nuxeo applications,How to use OAuth.


![[Nuxeo World 2013] Workshop - Build your data model and UI with Nuxeo](https://img.pdfslide.net/doc/110x75/54b539134a7959232a8b468b/nuxeo-world-2013-workshop-build-your-data-model-and-ui-with-nuxeo.jpg)


![[Nuxeo World 2013] OPENING KEYNOTE - ERIC BARROCA, NUXEO CEO](https://img.pdfslide.net/doc/110x75/54b539224a79594f358b4679/nuxeo-world-2013-opening-keynote-eric-barroca-nuxeo-ceo.jpg)

![[Nuxeo World 2013] Construire un portail pour Nuxeo (in French)](https://img.pdfslide.net/doc/110x75/558680d4d8b42a45278b4720/nuxeo-world-2013-construire-un-portail-pour-nuxeo-in-french.jpg)