Embed Size (px)
Citation preview
F.MAINTENANCE OF OPEN CNC (BOOT-UP AND IPL) APPENDIX B-63945EN/02
- 748 -
F MAINTENANCE OF OPEN CNC (BOOT-UP AND IPL)
F.1 OVERVIEW.............................................................................749
F.2 CHANGING START SEQUENCES .......................................751
F.3 EXPLANATION OF SCREENS .............................................752
F.4 OTHER SCREENS ..................................................................758
B-63945EN/02 APPENDIX F.MAINTENANCE OF OPEN CNC (BOOT-UP AND IPL)
- 749 -
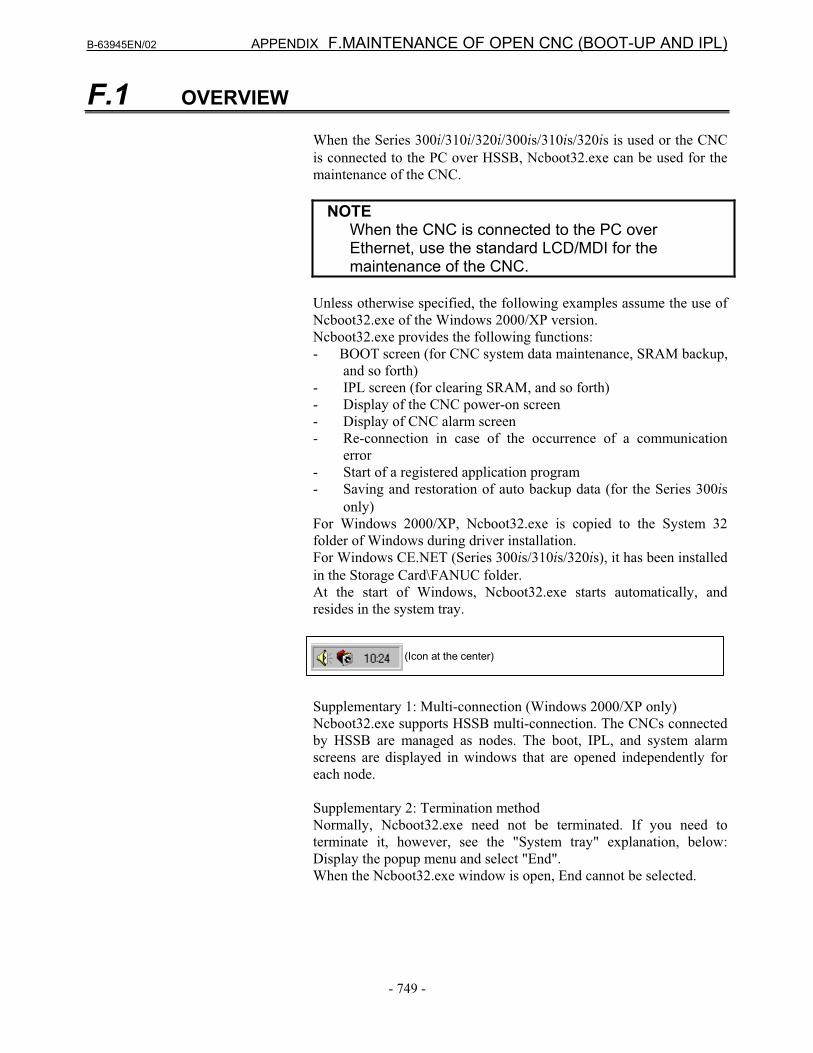
F.1 OVERVIEW
When the Series 300i/310i/320i/300is/310is/320is is used or the CNC
is connected to the PC over HSSB, Ncboot32.exe can be used for the
maintenance of the CNC.
NOTE When the CNC is connected to the PC over
Ethernet, use the standard LCD/MDI for the maintenance of the CNC.
Unless otherwise specified, the following examples assume the use of
Ncboot32.exe of the Windows 2000/XP version.
Ncboot32.exe provides the following functions:
- BOOT screen (for CNC system data maintenance, SRAM backup,
and so forth)
- IPL screen (for clearing SRAM, and so forth)
- Display of the CNC power-on screen
- Display of CNC alarm screen
- Re-connection in case of the occurrence of a communication
error
- Start of a registered application program
- Saving and restoration of auto backup data (for the Series 300is
only)
For Windows 2000/XP, Ncboot32.exe is copied to the System 32
folder of Windows during driver installation.
For Windows CE.NET (Series 300is/310is/320is), it has been installed
in the Storage Card\FANUC folder.
At the start of Windows, Ncboot32.exe starts automatically, and
resides in the system tray.
(Icon at the center)
Supplementary 1: Multi-connection (Windows 2000/XP only)
Ncboot32.exe supports HSSB multi-connection. The CNCs connected
by HSSB are managed as nodes. The boot, IPL, and system alarm
screens are displayed in windows that are opened independently for
each node.
Supplementary 2: Termination method
Normally, Ncboot32.exe need not be terminated. If you need to
terminate it, however, see the "System tray" explanation, below:
Display the popup menu and select "End".
When the Ncboot32.exe window is open, End cannot be selected.
F.MAINTENANCE OF OPEN CNC (BOOT-UP AND IPL) APPENDIX B-63945EN/02
- 750 -
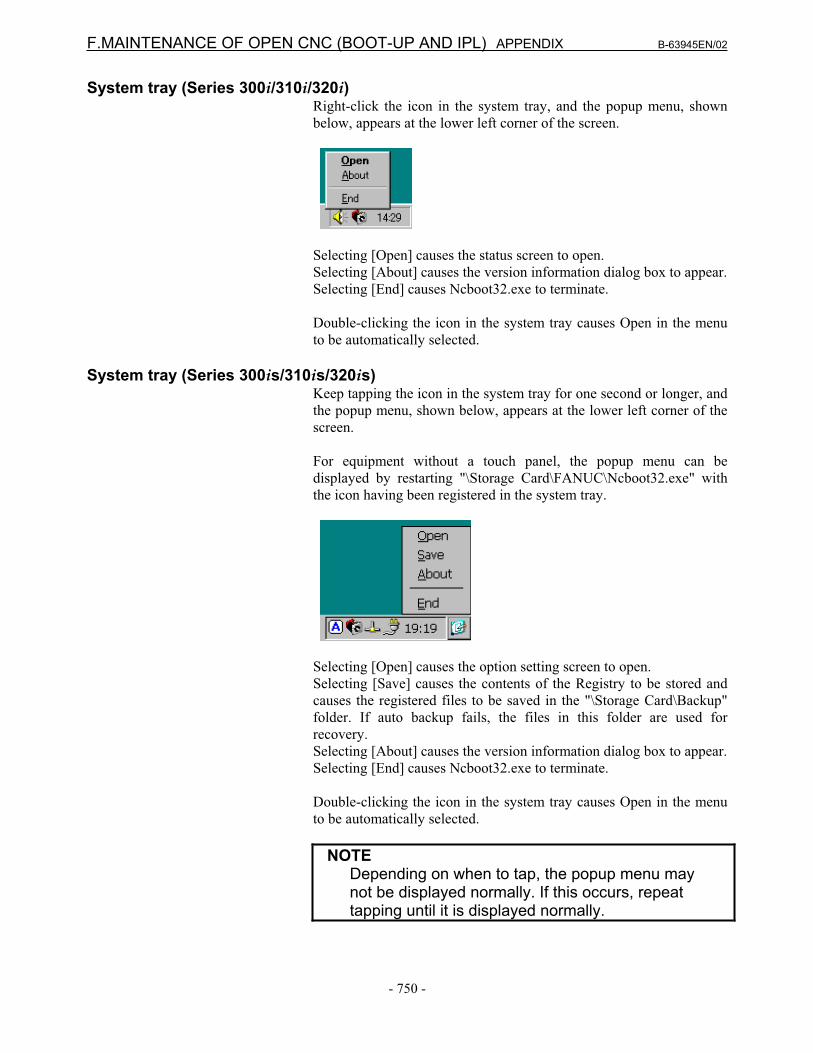
System tray (Series 300i/310i/320i)Right-click the icon in the system tray, and the popup menu, shown
below, appears at the lower left corner of the screen.
Selecting [Open] causes the status screen to open.
Selecting [About] causes the version information dialog box to appear.
Selecting [End] causes Ncboot32.exe to terminate.
Double-clicking the icon in the system tray causes Open in the menu
to be automatically selected.
System tray (Series 300is/310is/320is)Keep tapping the icon in the system tray for one second or longer, and
the popup menu, shown below, appears at the lower left corner of the
screen.
For equipment without a touch panel, the popup menu can be
displayed by restarting "\Storage Card\FANUC\Ncboot32.exe" with
the icon having been registered in the system tray.
Selecting [Open] causes the option setting screen to open.
Selecting [Save] causes the contents of the Registry to be stored and
causes the registered files to be saved in the "\Storage Card\Backup"
folder. If auto backup fails, the files in this folder are used for
recovery.
Selecting [About] causes the version information dialog box to appear.
Selecting [End] causes Ncboot32.exe to terminate.
Double-clicking the icon in the system tray causes Open in the menu
to be automatically selected.
NOTE Depending on when to tap, the popup menu may
not be displayed normally. If this occurs, repeat tapping until it is displayed normally.
B-63945EN/02 APPENDIX F.MAINTENANCE OF OPEN CNC (BOOT-UP AND IPL)
- 751 -
F.2 CHANGING START SEQUENCES
By pressing the MDI keys 6 and 7 and turning the power ON or by
setting the rotary switch provided on the main board of the CNC main
unit (for the LCD-mounted type Series 300is) to the F position, you
can perform maintenance work using the BOOT and IPL screens.
During normal operation
1. The CNC starts without waiting for communication to be
established.
2. After communication is established, the PC performs
initialization described below.
3. Start FOCAS2.
4. Start a registered application program.
5. Perform monitoring for communication errors and CNC system
alarms.
During maintenance
1. Wait until communication with the CNC is established.
2. Display the boot screen.
3. Display the IPL screen.
4. Display the CNC power-on screen.
5. Start FOCAS2.
6. Start a registered application program.
7. Perform monitoring for communication errors and CNC system
alarms.
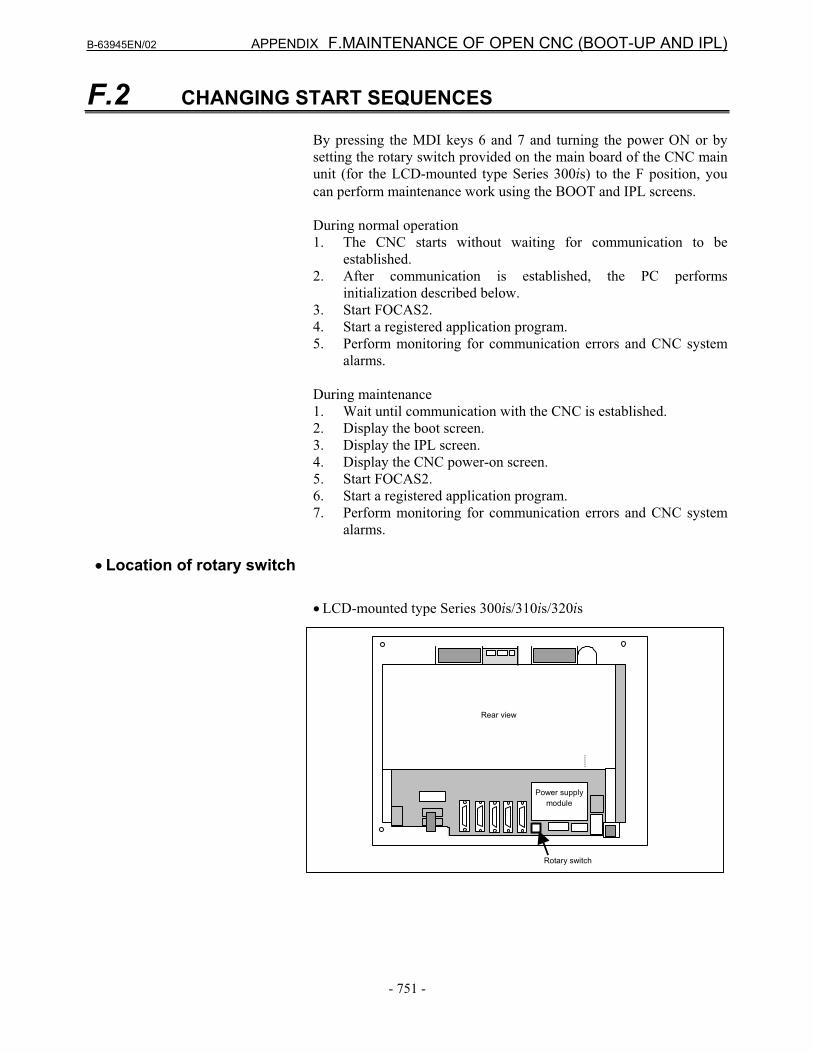
Location of rotary switch
LCD-mounted type Series 300is/310is/320is
Rear view
Power supply
module
Rotary switch
F.MAINTENANCE OF OPEN CNC (BOOT-UP AND IPL) APPENDIX B-63945EN/02
- 752 -
F.3 EXPLANATION OF SCREENS
NOTE To open each screen of Ncboot32.exe, you are
recommended to use either the mouse or touch panel.
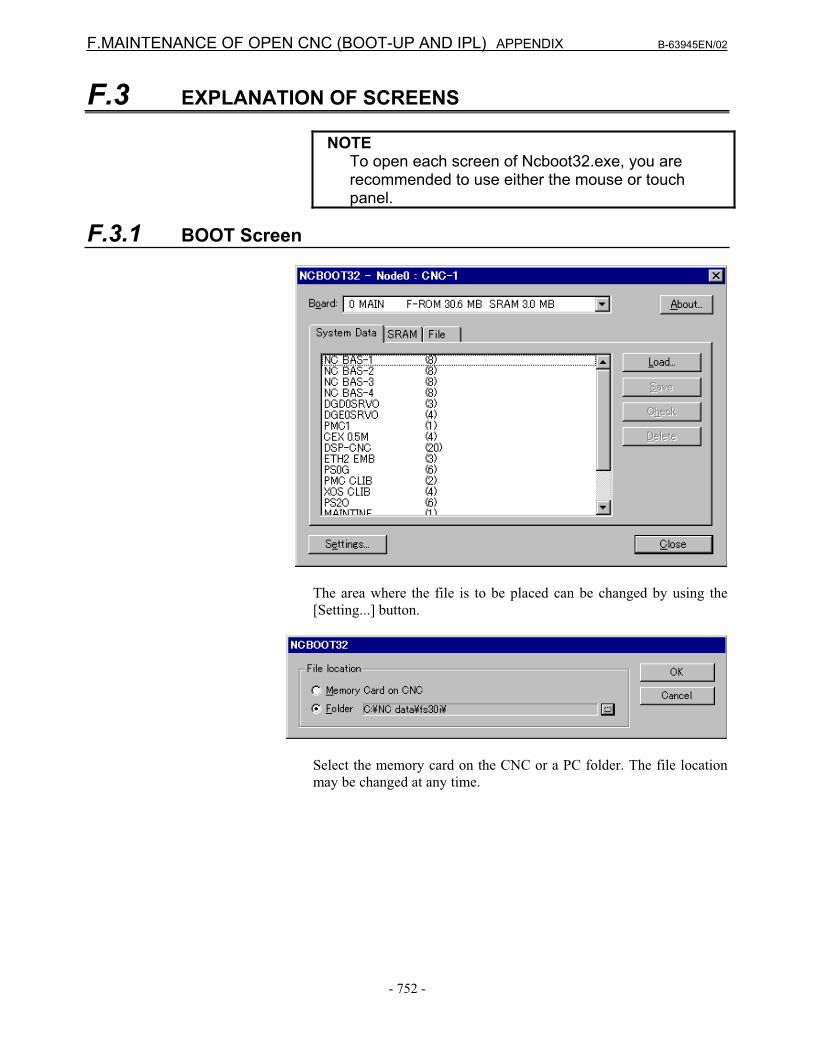
F.3.1 BOOT Screen
The area where the file is to be placed can be changed by using the
[Setting...] button.
Select the memory card on the CNC or a PC folder. The file location
may be changed at any time.
B-63945EN/02 APPENDIX F.MAINTENANCE OF OPEN CNC (BOOT-UP AND IPL)
- 753 -
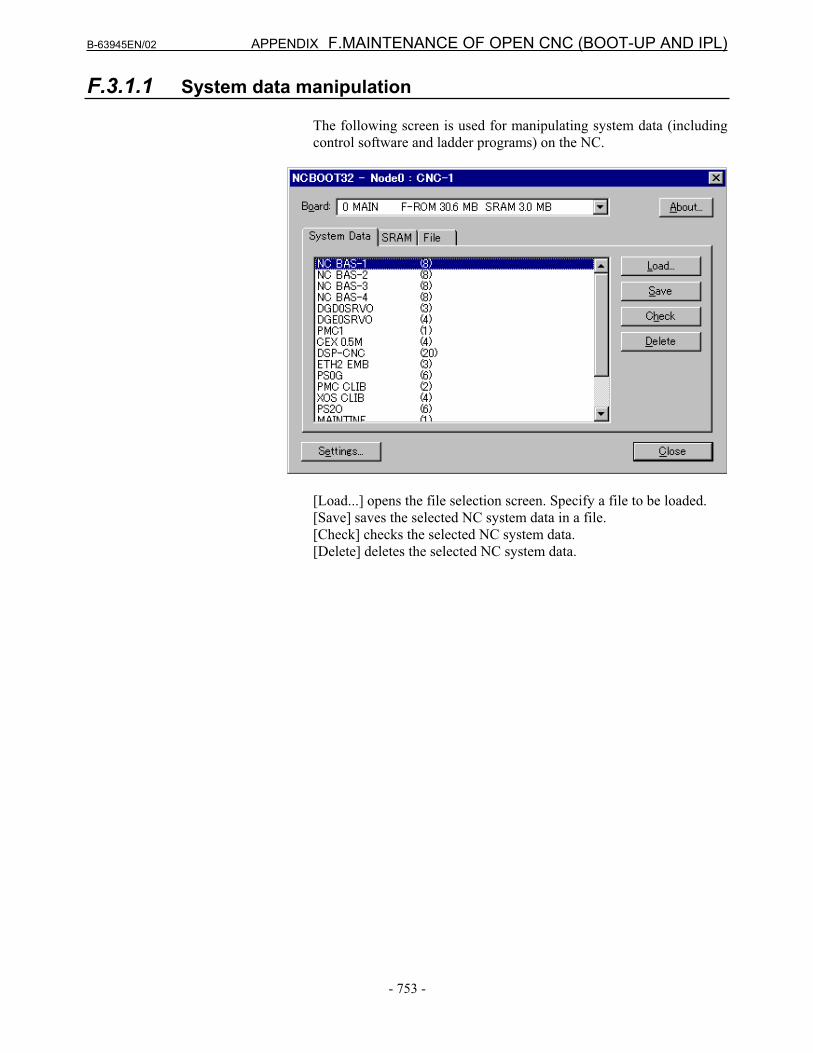
F.3.1.1 System data manipulation
The following screen is used for manipulating system data (including
control software and ladder programs) on the NC.
[Load...] opens the file selection screen. Specify a file to be loaded.
[Save] saves the selected NC system data in a file.
[Check] checks the selected NC system data.
[Delete] deletes the selected NC system data.
F.MAINTENANCE OF OPEN CNC (BOOT-UP AND IPL) APPENDIX B-63945EN/02
- 754 -
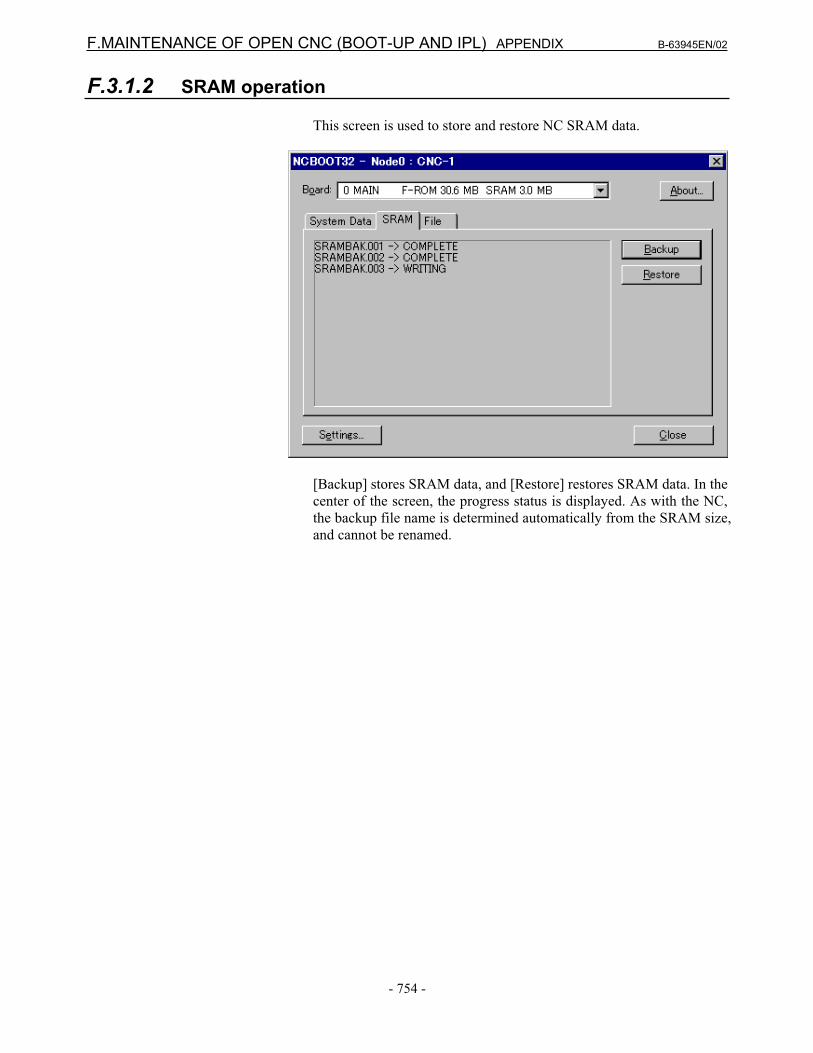
F.3.1.2 SRAM operation
This screen is used to store and restore NC SRAM data.
[Backup] stores SRAM data, and [Restore] restores SRAM data. In the
center of the screen, the progress status is displayed. As with the NC,
the backup file name is determined automatically from the SRAM size,
and cannot be renamed.
B-63945EN/02 APPENDIX F.MAINTENANCE OF OPEN CNC (BOOT-UP AND IPL)
- 755 -
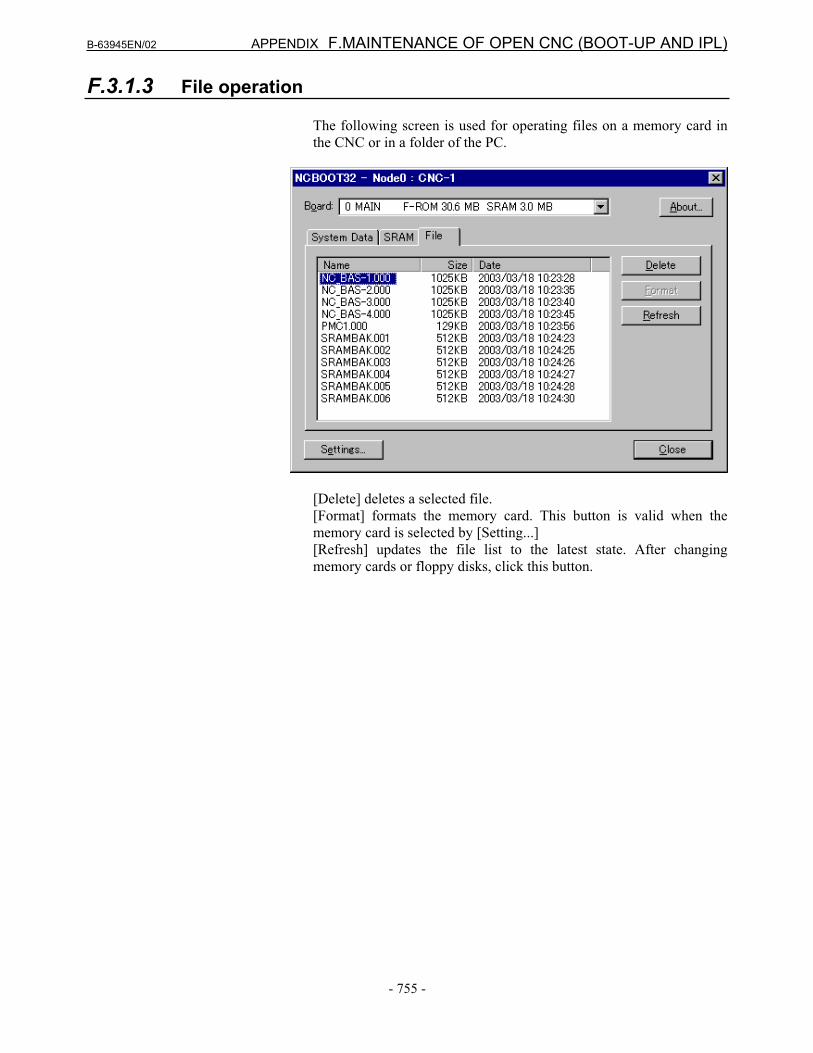
F.3.1.3 File operation
The following screen is used for operating files on a memory card in
the CNC or in a folder of the PC.
[Delete] deletes a selected file.
[Format] formats the memory card. This button is valid when the
memory card is selected by [Setting...]
[Refresh] updates the file list to the latest state. After changing
memory cards or floppy disks, click this button.
F.MAINTENANCE OF OPEN CNC (BOOT-UP AND IPL) APPENDIX B-63945EN/02
- 756 -
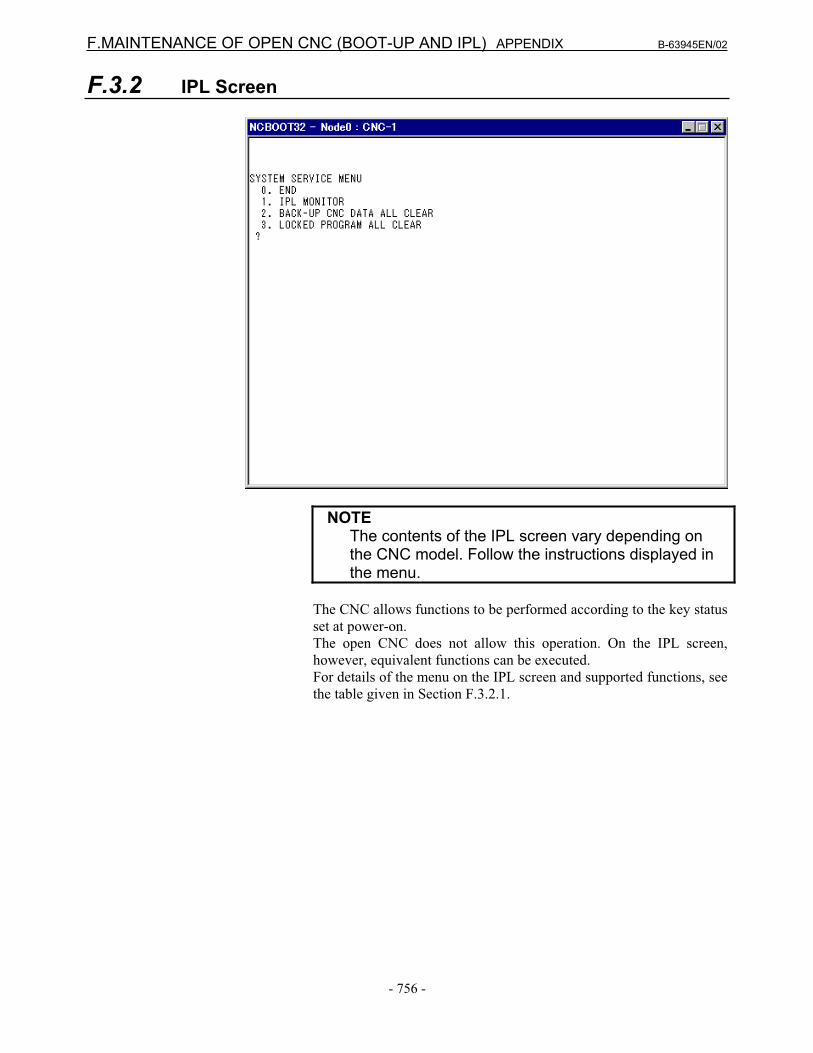
F.3.2 IPL Screen
NOTE The contents of the IPL screen vary depending on
the CNC model. Follow the instructions displayed in the menu.
The CNC allows functions to be performed according to the key status
set at power-on.
The open CNC does not allow this operation. On the IPL screen,
however, equivalent functions can be executed.
For details of the menu on the IPL screen and supported functions, see
the table given in Section F.3.2.1.

B-63945EN/02 APPENDIX F.MAINTENANCE OF OPEN CNC (BOOT-UP AND IPL)
- 757 -
F.3.2.1 Functions on the IPL screen
Title on IPL screen
Corresponding MDI key operation
at power-on
(Operation with a standard CNC)
0. EXIT
1. IPL MONITOR <-> + <.>
2. BACK-UP CNC DATA ALL CLEAR <DELETE> + <RESET>
3. LOCKED PROGRAM ALL CLEAR <M> + <0>

F.MAINTENANCE OF OPEN CNC (BOOT-UP AND IPL) APPENDIX B-63945EN/02
- 758 -
F.4 OTHER SCREENS
F.4.1 CNC Alarm Screen
This screen appears when a system alarm is issued in the CNC. (The
above screen is an example. The displayed information varies
depending on the system alarm issued in the CNC.)
B-63945EN/02 APPENDIX F.MAINTENANCE OF OPEN CNC (BOOT-UP AND IPL)
- 759 -
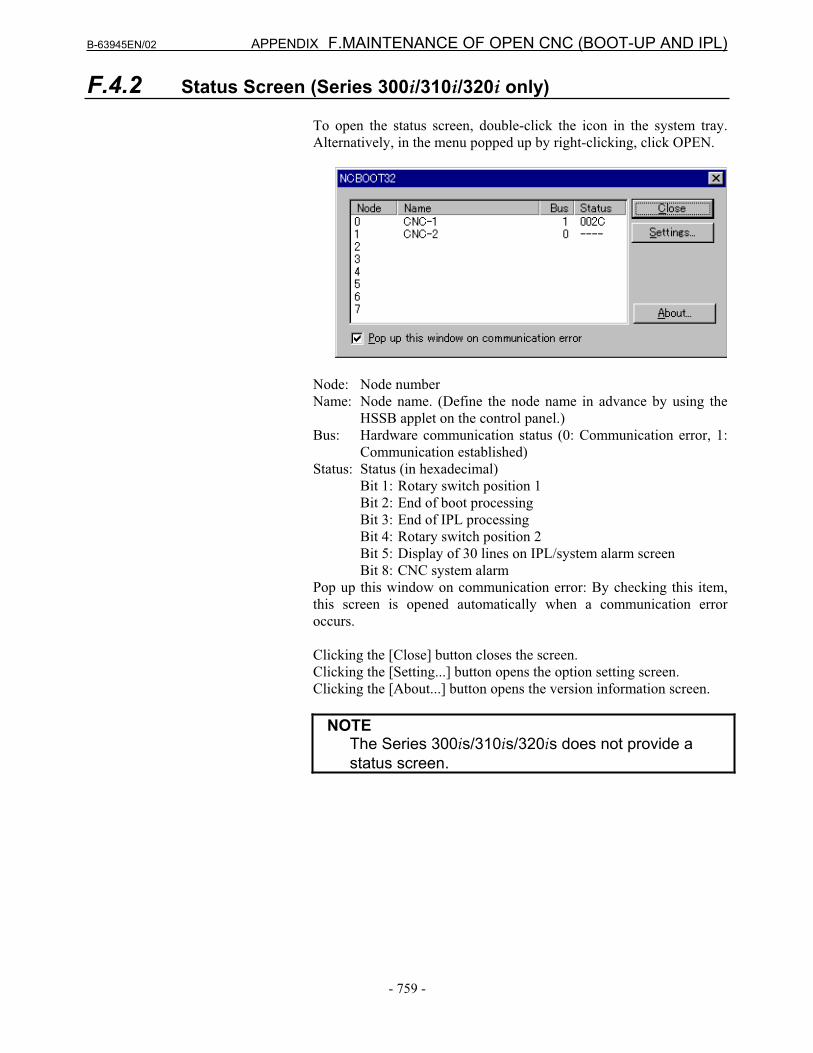
F.4.2 Status Screen (Series 300i/310i/320i only)
To open the status screen, double-click the icon in the system tray.
Alternatively, in the menu popped up by right-clicking, click OPEN.
Node: Node number
Name: Node name. (Define the node name in advance by using the
HSSB applet on the control panel.)
Bus: Hardware communication status (0: Communication error, 1:
Communication established)
Status: Status (in hexadecimal)
Bit 1: Rotary switch position 1
Bit 2: End of boot processing
Bit 3: End of IPL processing
Bit 4: Rotary switch position 2
Bit 5: Display of 30 lines on IPL/system alarm screen
Bit 8: CNC system alarm
Pop up this window on communication error: By checking this item,
this screen is opened automatically when a communication error
occurs.
Clicking the [Close] button closes the screen.
Clicking the [Setting...] button opens the option setting screen.
Clicking the [About...] button opens the version information screen.
NOTE The Series 300is/310is/320is does not provide a
status screen.
F.MAINTENANCE OF OPEN CNC (BOOT-UP AND IPL) APPENDIX B-63945EN/02
- 760 -
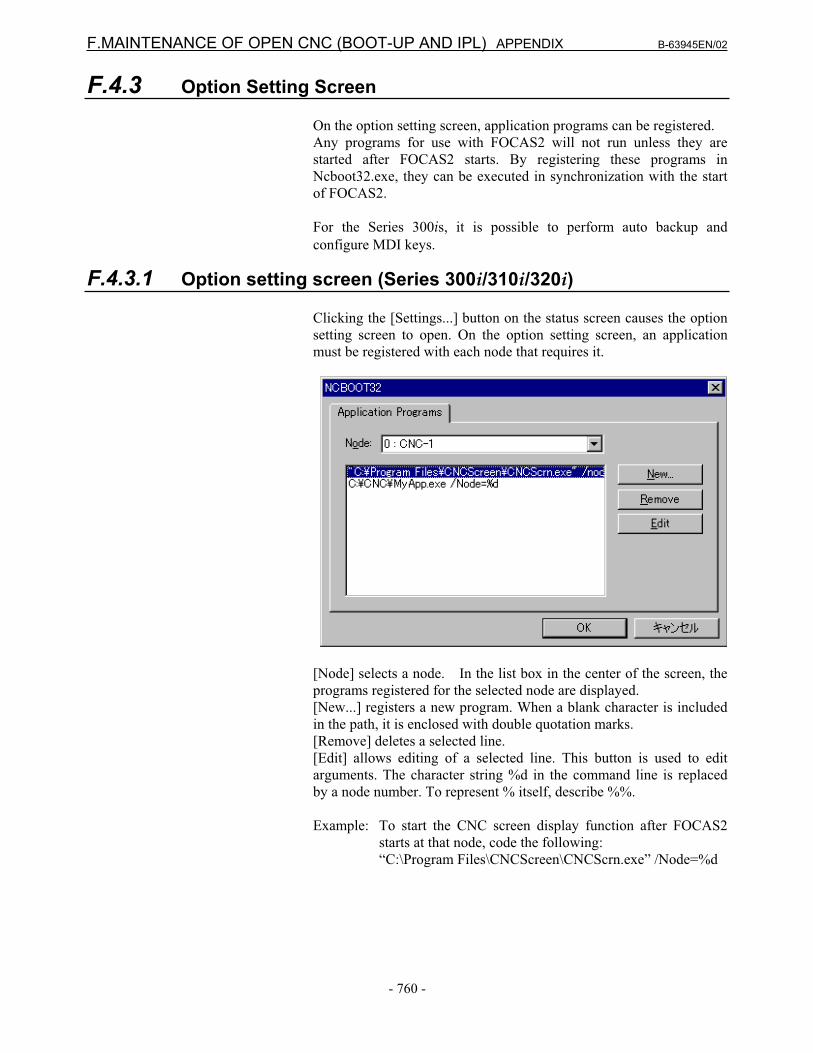
F.4.3 Option Setting Screen
On the option setting screen, application programs can be registered.
Any programs for use with FOCAS2 will not run unless they are
started after FOCAS2 starts. By registering these programs in
Ncboot32.exe, they can be executed in synchronization with the start
of FOCAS2.
For the Series 300is, it is possible to perform auto backup and
configure MDI keys.
F.4.3.1 Option setting screen (Series 300i/310i/320i)
Clicking the [Settings...] button on the status screen causes the option
setting screen to open. On the option setting screen, an application
must be registered with each node that requires it.
[Node] selects a node. In the list box in the center of the screen, the
programs registered for the selected node are displayed.
[New...] registers a new program. When a blank character is included
in the path, it is enclosed with double quotation marks.
[Remove] deletes a selected line.
[Edit] allows editing of a selected line. This button is used to edit
arguments. The character string %d in the command line is replaced
by a node number. To represent % itself, describe %%.
Example: To start the CNC screen display function after FOCAS2
starts at that node, code the following:
“C:\Program Files\CNCScreen\CNCScrn.exe” /Node=%d
B-63945EN/02 APPENDIX F.MAINTENANCE OF OPEN CNC (BOOT-UP AND IPL)
- 761 -
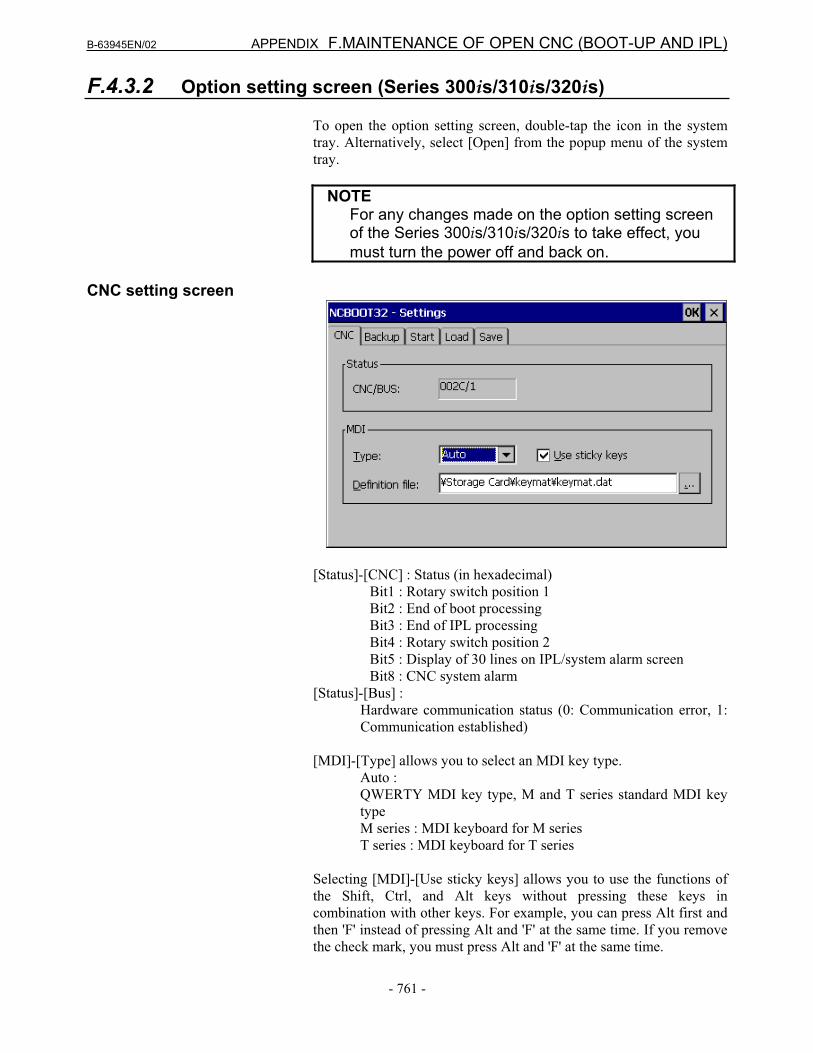
F.4.3.2 Option setting screen (Series 300is/310is/320is)
To open the option setting screen, double-tap the icon in the system
tray. Alternatively, select [Open] from the popup menu of the system
tray.
NOTE For any changes made on the option setting screen
of the Series 300is/310is/320is to take effect, you
must turn the power off and back on.
CNC setting screen
[Status]-[CNC] : Status (in hexadecimal)
Bit1 : Rotary switch position 1
Bit2 : End of boot processing
Bit3 : End of IPL processing
Bit4 : Rotary switch position 2
Bit5 : Display of 30 lines on IPL/system alarm screen
Bit8 : CNC system alarm
[Status]-[Bus] :
Hardware communication status (0: Communication error, 1:
Communication established)
[MDI]-[Type] allows you to select an MDI key type.
Auto :
QWERTY MDI key type, M and T series standard MDI key
type
M series : MDI keyboard for M series
T series : MDI keyboard for T series
Selecting [MDI]-[Use sticky keys] allows you to use the functions of
the Shift, Ctrl, and Alt keys without pressing these keys in
combination with other keys. For example, you can press Alt first and
then 'F' instead of pressing Alt and 'F' at the same time. If you remove
the check mark, you must press Alt and 'F' at the same time.

F.MAINTENANCE OF OPEN CNC (BOOT-UP AND IPL) APPENDIX B-63945EN/02
- 762 -
[MDI]-[Definition file] allows you to specify a customized MDI key
definition file.
Device setting screen
Place a check mark next to [Allow CNC to use Windows devices] to
make the devices on Windows (Ethernet, serial, and PCMCIA
devices) usable by the CNC.
Place a check mark next to [Watch fan motors for display unit] to
check the operation of the display unit of the stand-alone type CNC; if
an error is detected, an error message is displayed.
Backup setting screen
Place a check mark next to [Enable battery backup unit] to
automatically save the contents of the Registry and files when the
power is turned off. A dedicated battery is used to supply power
during a saving operation after the power is turned off.
Place a check mark next to [Backup Windows registry] to
automatically save the contents of the Registry when the power is
turned off.
B-63945EN/02 APPENDIX F.MAINTENANCE OF OPEN CNC (BOOT-UP AND IPL)
- 763 -
NOTE Usually, the contents of the Registry are not
changed and, therefore, no problems will arise if they are not automatically saved. You are recommended to remove the check mark next to Auto saving of Registry just in case.
[Battery life span] allows you to set the number of days after which a
message prompting you to save manually is to be displayed during
long-period operation.
[Battery alarm] indicates the state of the battery dedicated for backup
(in hexadecimal notation).
0000 : Normal
0001 : The previous auto saving not completed
Other : Battery hardware error value
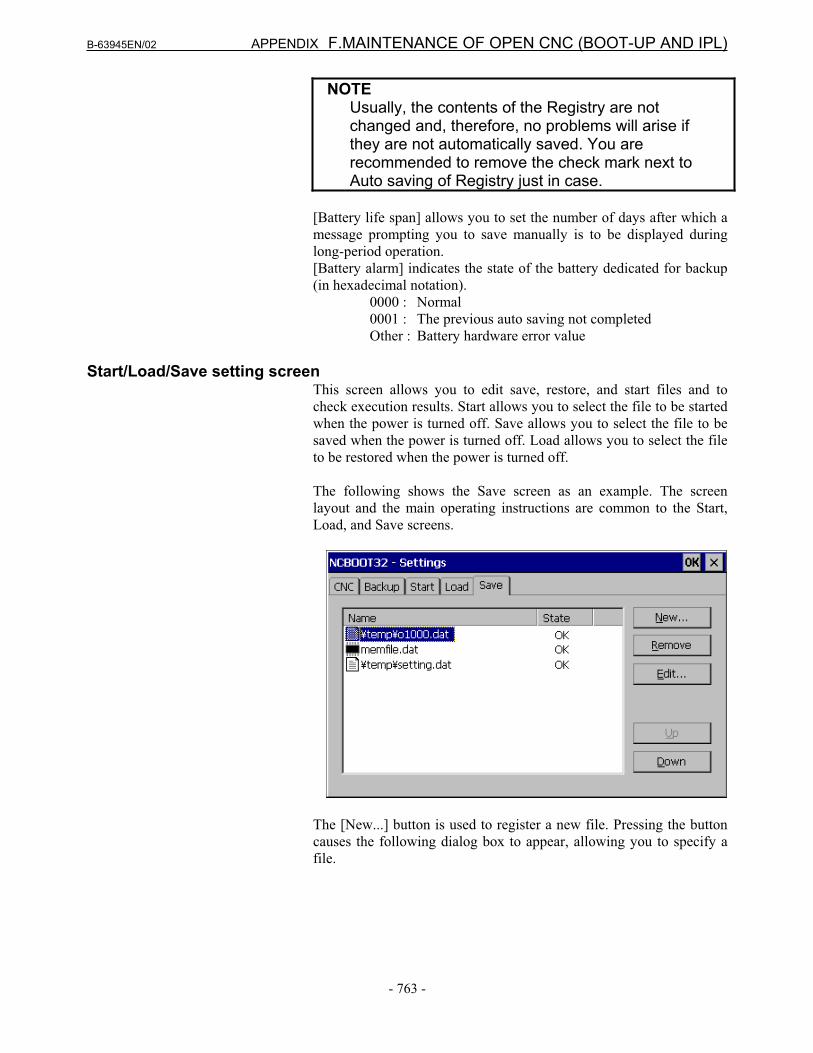
Start/Load/Save setting screen This screen allows you to edit save, restore, and start files and to
check execution results. Start allows you to select the file to be started
when the power is turned off. Save allows you to select the file to be
saved when the power is turned off. Load allows you to select the file
to be restored when the power is turned off.
The following shows the Save screen as an example. The screen
layout and the main operating instructions are common to the Start,
Load, and Save screens.
The [New...] button is used to register a new file. Pressing the button
causes the following dialog box to appear, allowing you to specify a
file.

F.MAINTENANCE OF OPEN CNC (BOOT-UP AND IPL) APPENDIX B-63945EN/02
- 764 -
- Start screen
In the [File name] field, specify a full path name of the
file to be executed.
In the [Parameter] field, specify the program argument.
- Load/Save screen
[Type] is used to specify whether the file is on the Disk
(object store) or it is a memory mapped file.
In the [File name] field, specify the full path name if the
file is on the Disk; specify the name of the file mapping
object if it is a memory mapped file.
NOTE The name of a file mapping object is used
as a temporary file for use during saving and restoration. You must, therefore, specify a string characters effective as a file name.
In the [Memory size] field, specify the size of the
memory mapped file. For a file on the Disk, you need not
specify the size because it is calculated from the actual
file name.
The [Remove] button allows you to cancel the registration of the
selected line.
The [Edit...] button allows you to change the changes made with the
[New...] button.
The [Up] button is used to move a selected line up in the registration
sequence.
The [Down] button is used to move a selected line down in the
registration sequencer.
![1 $SU VW (G +LWDFKL +HDOWKFDUH %XVLQHVV 8QLW 1 X ñ 1 … · 2020. 5. 26. · 1 1 1 1 1 x 1 1 , x _ y ] 1 1 1 1 1 1 ¢ 1 1 1 1 1 1 1 1 1 1 1 1 1 1 1 1 1 1 1 1 1 1 1 1 1 1 1 1 1 1](https://img.pdfslide.net/doc/110x75/5fbfc0fcc822f24c4706936b/1-su-vw-g-lwdfkl-hdowkfduh-xvlqhvv-8qlw-1-x-1-2020-5-26-1-1-1-1-1-x.jpg)


![1 ¢ Ù 1 £¢ 1 £ £¢ 1 - Narodowy Bank Polski · 1 à 1 1 1 1 \ 1 1 1 1 ¢ 1 1 £ 1 £ £¢ 1 ¢ 1 ¢ Ù 1 à 1 1 1 ¢ à 1 1 £ ï 1 1. £¿ï° 1 ¢ 1 £ 1 1 1 1 ] 1 1 1 1 ¢](https://img.pdfslide.net/doc/110x75/5fc6757af26c7e63a70a621e/1-1-1-1-narodowy-bank-polski-1-1-1-1-1-1-1-1-1-1-1.jpg)


![[XLS] · Web view1 1 1 2 3 1 1 2 2 1 1 1 1 1 1 2 1 1 1 1 1 1 2 1 1 1 1 2 2 3 5 1 1 1 1 34 1 1 1 1 1 1 1 1 1 1 240 2 1 1 1 1 1 2 1 3 1 1 2 1 2 5 1 1 1 1 8 1 1 2 1 1 1 1 2 2 1 1 1 1](https://img.pdfslide.net/doc/110x75/5ad1d2817f8b9a05208bfb6d/xls-view1-1-1-2-3-1-1-2-2-1-1-1-1-1-1-2-1-1-1-1-1-1-2-1-1-1-1-2-2-3-5-1-1-1-1.jpg)
![1 1 1 1 1 1 1 ¢ 1 1 1 - pdfs.semanticscholar.org€¦ · 1 1 1 [ v . ] v 1 1 ¢ 1 1 1 1 ý y þ ï 1 1 1 ð 1 1 1 1 1 x](https://img.pdfslide.net/doc/110x75/5f7bc722cb31ab243d422a20/1-1-1-1-1-1-1-1-1-1-pdfs-1-1-1-v-v-1-1-1-1-1-1-y-1-1-1-.jpg)


![1 1 1 1 1 1 1 ¢ 1 , ¢ 1 1 1 , 1 1 1 1 ¡ 1 1 1 1 · 1 1 1 1 1 ] ð 1 1 w ï 1 x v w ^ 1 1 x w [ ^ \ w _ [ 1. 1 1 1 1 1 1 1 1 1 1 1 1 1 1 1 1 1 1 1 1 1 1 1 1 1 1 1 ð 1 ] û w ü](https://img.pdfslide.net/doc/110x75/5f40ff1754b8c6159c151d05/1-1-1-1-1-1-1-1-1-1-1-1-1-1-1-1-1-1-1-1-1-1-1-1-1-1-w-1-x-v.jpg)