Embed Size (px)
Citation preview

3256-1 v1.00 © CCI Learning Solutions Inc. 31
Microsoft® Office Specialist 2013 Series
Microsoft®
PowerPoint 2013 Certification Guide
Lesson 2: Working with Slides Lesson Objectives In this lesson, you will examine the features you can use to create, organize, format, and manage slides. Upon successful completion of this lesson, you should be able to: use and apply themes format slide backgrounds apply slide layouts or create a new slide layout apply styles to slides modify existing layout masters use guides and gridlines add, format, resize, reposition, and delete
placeholders apply modified layout to existing slides
insert new slides, duplicate slides, hide and show slides, or delete slides
insert slides from an existing presentation merge multiple presentations insert slides from an outline add footers, slide numbers, and a date organize or rearrange slides use the Slide Sorter
and other views use sections
Using Themes You can quickly create or modify an existing presentation to give it a professional modern look by applying a theme. A theme is a set of unified design elements, such as backgrounds, effects, colors, fonts, and graphics, which provides a consistent look for all slides in a presentation. Themes also influence objects such as images, charts, and tables. Fo
r Eva
luatio
n Only
Lesson 2 Working with Slides
32 3256-1 v1.00 © CCI Learning Solutions Inc.
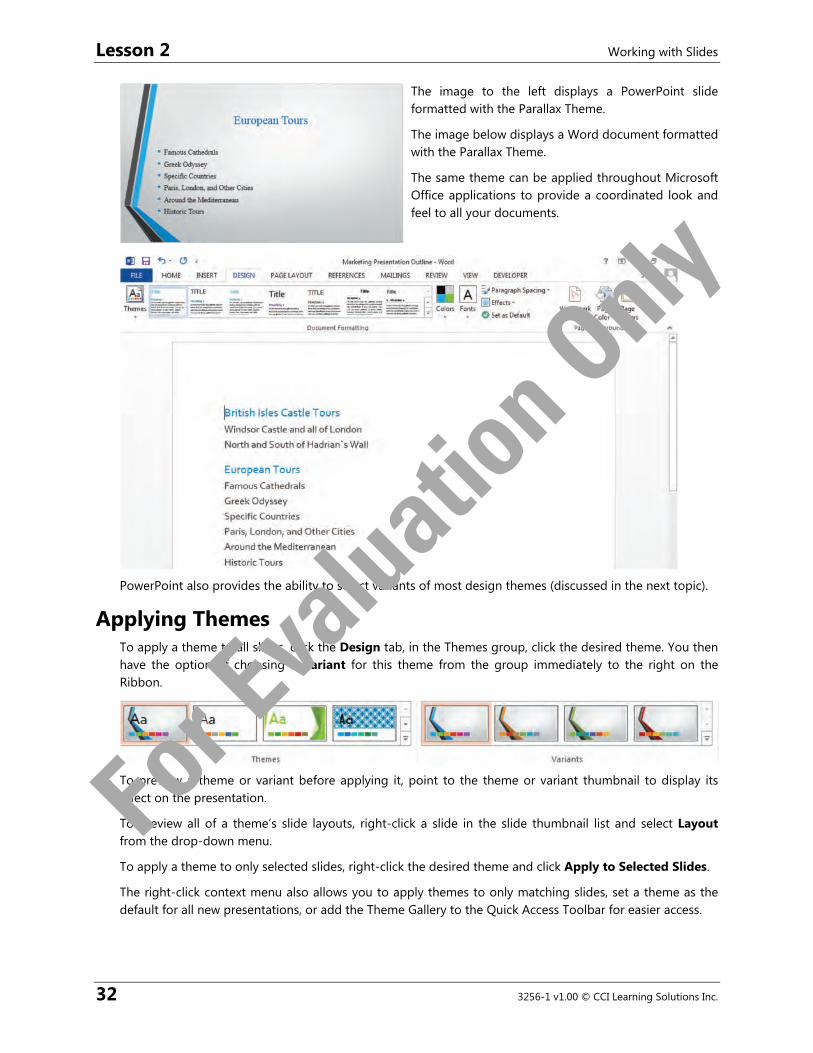
The image to the left displays a PowerPoint slide formatted with the Parallax Theme.
The image below displays a Word document formatted with the Parallax Theme.
The same theme can be applied throughout Microsoft Office applications to provide a coordinated look and feel to all your documents.
PowerPoint also provides the ability to select variants of most design themes (discussed in the next topic).
Applying Themes To apply a theme to all slides, click the Design tab, in the Themes group, click the desired theme. You then have the option of choosing a Variant for this theme from the group immediately to the right on the Ribbon.
To preview a theme or variant before applying it, point to the theme or variant thumbnail to display its effect on the presentation.
To preview all of a theme’s slide layouts, right-click a slide in the slide thumbnail list and select Layout from the drop-down menu.
To apply a theme to only selected slides, right-click the desired theme and click Apply to Selected Slides.
The right-click context menu also allows you to apply themes to only matching slides, set a theme as the default for all new presentations, or add the Theme Gallery to the Quick Access Toolbar for easier access.
For E
valua
tion O
nly

Working with Slides Lesson 2
3256-1 v1.00 © CCI Learning Solutions Inc. 33
Modifying Themes Objective 1.2
You can customize individual aspects of a theme, such as the colors and fonts, while still retaining the other design elements. You can also create your own theme that you can reuse on other presentations.
To change only the theme colors, on the Design tab, in the Variants group, click the More arrow and click Colors. PowerPoint displays a list of preselected color palettes. Point the mouse at the color palettes to preview the effect on the presentation.
To change only the theme fonts, on the Design tab, in the Variants group, click the More arrow, and click Fonts. PowerPoint displays a list of preselected font groups. Point the mouse at the font groups to preview the effect on the presentation.
To change only the theme effects, on the Design tab, in the Variants group, click the More arrow, and click Effects. PowerPoint displays a list of preprogrammed effects. Effects influence the graphical look of your presentation, such as graphic fills, lines, bevels, and shadows.
To change the theme background style, on the Design tab, in the Variants group, click the More arrow, click Background Styles. PowerPoint displays a list of preselected background styles. Point the mouse at the color palettes to preview the effect on the presentation.
To save changes to a theme and give it a unique name, on the Design tab, in the Themes group, click the More arrow and click Save Current Theme. PowerPoint saves themes with the thmx extension. The saved theme will appear in the Theme Gallery and also on the Custom tab of the New presentation screen.
For E
valua
tion O
nly

Lesson 2 Working with Slides
34 3256-1 v1.00 © CCI Learning Solutions Inc.
Formatting Slide Backgrounds Objective 1.2, 2.1
One of the design elements included in a theme is the slide background—the area of the slide behind the headings, text, and other content you add. You can format the slide background with colors, patterns, textures, and pictures using the Format Background task pane.
To format the background, click the Design tab, in the Customize group, click Format Background. This opens the Format Background task pane.
Learn the Skill In this exercise, you will learn how to apply a theme to an entire presentation, apply a theme to selected slides, and customize theme variants.
1 Open the Tours by Tolano presentation and save it as Tours by Tolano – Student.
2 Click the Design tab, in the Themes group, point your mouse over some of the themes.
Live Preview causes the text style and background images in the presentation to change.
To view more themes, use the arrow and More buttons on the right of the themes library.
3 Click the Parallax theme to apply it to the entire presentation.
4 In the Variants group, click the fourth variant.
5 In the Variants group, click the More button, click Fonts, and then click Customize Fonts.
6 In the Create New Theme Fonts dialog box, click Cooper Black for the Heading font and Georgia for the Body font.
7 In the Name field, delete the text and type: Tolano, and then click Save.
Notice that PowerPoint changes the heading and body text.
8 In the Variants group, click the More button, select Colors, and click Customize Colors.
9 In the Create New Theme Colors dialog box for Accent 1, select Red, Accent 1, Darker 50%. Fo
r Eva
luatio
n Only

Working with Slides Lesson 2
3256-1 v1.00 © CCI Learning Solutions Inc. 35
10 In the Name field, delete the text, type: Tolano and click Save.
Notice that the red line becomes darker.
11 In the Variants group, click the More button and select Background Styles.
12 From the library of background styles displayed, select Style 4 (black).
13 Scroll through the presentation and view the results.
14 On the Design tab, in the Customize group, click Format Background.
The Format Background task pane opens.
15 Select Pattern fill.
A gallery of patterns using the theme colors appears.
16 Click on several patterns to see how they will look when applied.
17 Click Solid fill.
18 Click the Color arrow and then select Black.
19 Click Apply to All to apply your changes and then click the Close button to exit the task pane.
In the next steps, you will apply a theme to selected slides only.
20 Click the View tab, and click Slide Sorter.
21 Click slide 2 to select it.
Notice a border surrounds the selected slide to indicate it has been selected.
22 Press and hold down the key while clicking slide 4.
Notice the selection border surrounds slides 2 and 4.
Note: To select multiple slides that are non-contiguous (not connected to each other), hold down the key as you click each slide. An outline appears around each slide to indicate it has been selected. To select multiple slides that appear one after another (contiguous), click the first slide and then hold down the key as you click the last slide in the group. All slides between the first and last slide are selected.
23 Repeat the +click process until every even numbered slide has been selected (slides 6, 8, 10, and 12).
For E
valua
tion O
nly

Lesson 2 Working with Slides
36 3256-1 v1.00 © CCI Learning Solutions Inc.
Verify that a selection border surrounds every other slide.
24 Click the Design tab, and click the More button to open the Themes gallery.
25 Right-click the Mesh theme and then click Apply to Selected Slides.
The Mesh theme has been applied to only the selected slides.
26 In the Variants group, click the More button and select Fonts.
Notice the Custom Theme Font style is listed first and the Custom Font Theme name displays Tolano.
27 Click Cooper Black.
28 In the Variants group, click the More button and select Background Styles.
29 From the library of background styles displayed, select Style 4 (black).
30 Click the View tab, and then click Normal to return to Normal view.
31 Scroll through the presentation and view the results.
32 Save the presentation and leave it open for a later exercise.
Understanding Slide Layouts You can use slide layouts to define the structure, positioning, and formatting for all of the content that appears on a slide.
Slide layouts contain placeholders that position and hold content such as text, tables, videos, and pictures. When you add content to a placeholder, PowerPoint automatically formats it to the settings associated with that placeholder.
Each PowerPoint theme includes one slide master and a set of related slide layouts. Theme settings determine the available slide layouts and automatic settings for the placeholders within slide layouts.
You can use the slide layouts associated with the theme you’ve chosen or change the slide layouts to suit your needs.
Applying Slide Layouts Objective 1.2, 2.1
When you create a blank presentation, the first slide automatically displays with the Title Slide layout, following the general rules of having a title page for the presentation. By default, when you create a new slide using the New Slide command, the slide layout applied is the Title and Content layout. This follows the next standard for a new presentation to allow you to enter points about the presentation, usually an agenda that outlines what the presentation will cover. As you click New Slide again, another Title and Content slide layout appears for the next slide. If this is not the slide layout you want to use, you can change it to another slide layout.
Note: Selecting a different layout may affect the design of the slide. If you have text in a title or text placeholder, and the new layout you select does not contain a placeholder, that placeholder will be converted to a text box. Selecting another layout will not convert the text box into a placeholder.
Fo
r Eva
luatio
n Only

Working with Slides Lesson 2
3256-1 v1.00 © CCI Learning Solutions Inc. 37
To change the layout of an existing slide to one of the preset slide layouts, use one of the following methods:
• Select the slide and, on the Home tab, in the Slides group, click Layout and then click a slide layout; or
• right-click a slide in the Slide pane, click Layout, and click a slide layout.
For E
valua
tion O
nly

Lesson 2 Working with Slides
38 3256-1 v1.00 © CCI Learning Solutions Inc.
To insert a new slide using a specific slide layout, on the Home tab, in the Slides group, click the arrow for New Slide and choose a slide layout.
Formatting Placeholders After choosing a slide layout, you may want to format the content placeholder to better suit your presentation. By changing the formatting of the whole placeholder, not just the text within it, you can add visual appeal or draw attention to a specific area on your slide.
PowerPoint provides a variety of ways to format placeholders. For example, you can add an outline, fill, or shadow; change the thickness or color of the lines that define the shape of a placeholder; and add three-dimensional effects to a placeholder. When filling a placeholder with color or changing line color, try to pick colors that complement your presentation’s color scheme.
Before you can change a placeholder, you need to select it. Click anywhere on the border or outline of a placeholder to select and change the entire placeholder with the next action, such as bolding all the text, or adding a background color. The outline will then display small square boxes around the perimeter indicating the placeholder is selected; these square boxes are called handles and you can click these to resize the placeholder.
If you apply a color to the outline of a placeholder, when the placeholder is selected, the top and left sides of the placeholder have a thicker outline than the bottom or right sides:
For E
valua
tion O
nly

Working with Slides Lesson 2
3256-1 v1.00 © CCI Learning Solutions Inc. 39
Applying Styles to Placeholders Objective 2.1
The most effective way to format placeholders and text is to use the Quick Styles gallery. Quick Styles change how a theme’s colors, fonts, and effects are combined. When you format your placeholder using the Quick Style gallery options, your content will be well matched to your overall document theme.
Quick Styles are combinations of fill, border, and effect formatting options; PowerPoint displays thumbnails of them in various Quick Style galleries. Quick Styles offer an efficient way to apply professional, consistent styles to your presentation content.
To apply a Quick Style to a placeholder, on the Home tab, in the Drawing group, click Quick Styles.
You can then point to any of the Quick Styles in the gallery to see a live preview of how the Quick Style will affect your slide, if you select it.
While a Quick Style bundles several design elements together, you can also change the fill, outline, and other aspects of a placeholder independently.
Changing the Outline of a Placeholder To change the outline of a placeholder on a slide, use one of the following methods:
• Click the Home tab, in the Drawing group, click Shape Outline; or
• under Drawing Tools, on the Format tab, in the Shape Styles group, click Shape Outline; or
• under Drawing Tools, on the Format tab, in the Shape Styles group, click the dialog box launcher to open the Format Shape task pane, select the Fill & Line icon in Shape Options and then in the Line section, select the line options desired.
Hint: The Quick Styles available to you depend on the theme you select.
For E
valua
tion O
nly

Lesson 2 Working with Slides
40 3256-1 v1.00 © CCI Learning Solutions Inc.
Changing the Fill of a Placeholder Fill refers to the background of the selected placeholder; you can set the fill to be a color, a gradient, a texture, or a picture. To change the fill of a placeholder on a slide, use one of the following methods:
• Click the Home tab, in the Drawing group, click Shape Fill; or
• under Drawing Tools, on the Format tab, in the Shape Styles group, click Shape Fill; or
• under Drawing Tools, on the Format tab, in the Shape Styles group, click the dialog box launcher to open the Format Shape task pane, select the Fill & Line icon in Shape Options and, in the Fill section, select the fill options desired.
Applying an Effect to a Placeholder An effect will change the appearance of the placeholder such as using shadows, glows, or a 3D style. To apply an effect to a placeholder on a slide, use one of the following methods:
• Click the Home tab, in the Drawing group, click Shape Effects; or
• under Drawing Tools, on the Format tab, in the Shape Styles group, click Shape Effects; or
• under Drawing Tools, on the Format tab, in the Shape Styles group, click the dialog box launcher; then select the Effects icon in Shape Options and select one of the effects options.
Learn the Skill In this exercise, you will change the slide layout of an existing slide, apply Quick Styles to a placeholder, change the outline and fill of a placeholder, and apply other effects in the current presentation.
1 If necessary, open the Tours by Tolano – Student presentation.
2 Select slide 2 – Agenda.
3 Click the Home tab, and in the Slides group, click Layout.
4 Select the Two Content slide layout.
Notice the slide layout changes to display two content placeholders. You can add new content by clicking the appropriate icon in the placeholder, but you will leave it empty for now.
5 With slide 2 selected, click on the border of the Agenda list placeholder to select the placeholder.
Handles surround the placeholder to indicate it has been selected.
6 On the Home tab, in the Drawing group, click Quick Styles and select Moderate Effect – Black, Dark 1.
7 Select slide 3 – Bicycle Tours.
For E
valua
tion O
nly
Working with Slides Lesson 2
3256-1 v1.00 © CCI Learning Solutions Inc. 41
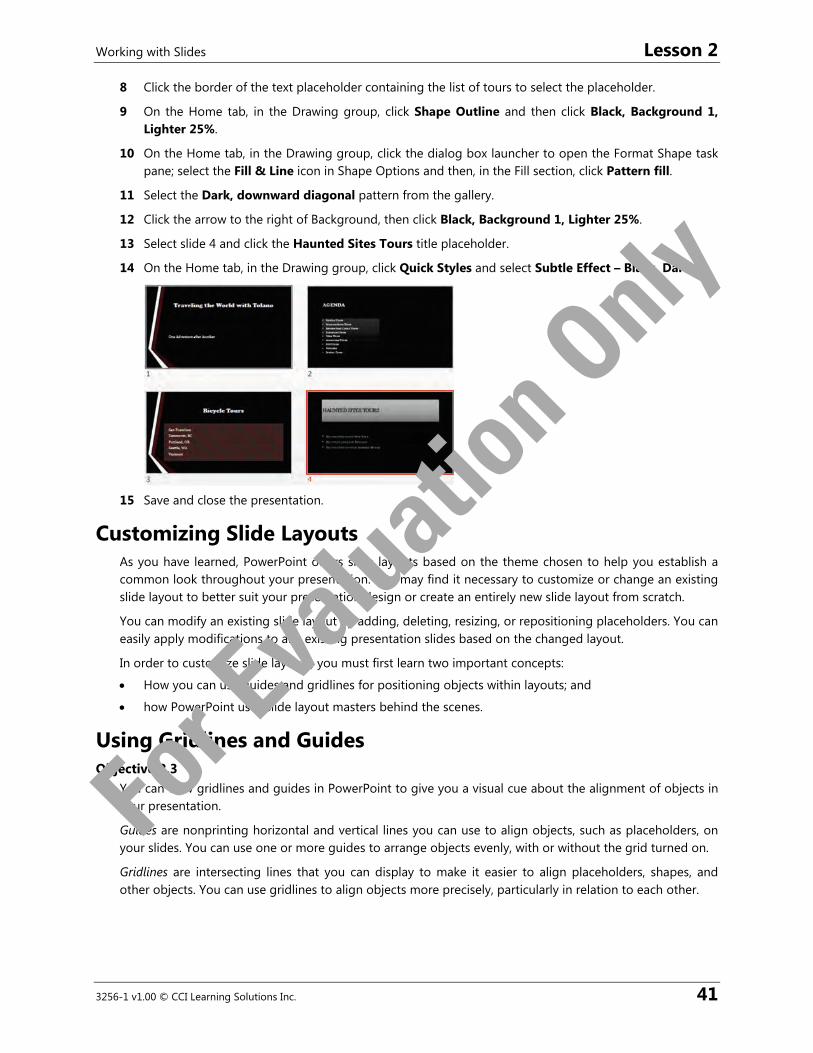
8 Click the border of the text placeholder containing the list of tours to select the placeholder.
9 On the Home tab, in the Drawing group, click Shape Outline and then click Black, Background 1, Lighter 25%.
10 On the Home tab, in the Drawing group, click the dialog box launcher to open the Format Shape task pane; select the Fill & Line icon in Shape Options and then, in the Fill section, click Pattern fill.
11 Select the Dark, downward diagonal pattern from the gallery.
12 Click the arrow to the right of Background, then click Black, Background 1, Lighter 25%.
13 Select slide 4 and click the Haunted Sites Tours title placeholder.
14 On the Home tab, in the Drawing group, click Quick Styles and select Subtle Effect – Black, Dark 1.
15 Save and close the presentation.
Customizing Slide Layouts As you have learned, PowerPoint offers slide layouts based on the theme chosen to help you establish a common look throughout your presentation. You may find it necessary to customize or change an existing slide layout to better suit your presentation design or create an entirely new slide layout from scratch.
You can modify an existing slide layout by adding, deleting, resizing, or repositioning placeholders. You can easily apply modifications to any existing presentation slides based on the changed layout.
In order to customize slide layouts, you must first learn two important concepts:
• How you can use guides and gridlines for positioning objects within layouts; and
• how PowerPoint uses slide layout masters behind the scenes.
Using Gridlines and Guides Objective 2.3
You can view gridlines and guides in PowerPoint to give you a visual cue about the alignment of objects in your presentation.
Guides are nonprinting horizontal and vertical lines you can use to align objects, such as placeholders, on your slides. You can use one or more guides to arrange objects evenly, with or without the grid turned on.
Gridlines are intersecting lines that you can display to make it easier to align placeholders, shapes, and other objects. You can use gridlines to align objects more precisely, particularly in relation to each other.
For E
valua
tion O
nly

Lesson 2 Working with Slides
42 3256-1 v1.00 © CCI Learning Solutions Inc.
You can show or hide both guides and gridlines, and you can add or delete guides. You can adjust guides by dragging them to a new location. As you drag the guide, a measurement appears, indicating where on the vertical or horizontal ruler you are moving the guide. You can choose from a range of preset measurements to set the spacing between gridlines. Guides and gridlines are not visible when you deliver your presentation to your audience and they are not printed.
A feature called Smart Guides, are dashed lines that automatically appear when you center an object between other objects, or when you space objects evenly on a slide. Smart Guides help you align objects as you move them around the slide. You can use Smart Guides to align objects and to ensure consistent spacing between objects.
To turn guides or gridlines on or off, use one of the following methods:
• Right-click outside the slide objects, and click Grid and Guides to open the Grid and Guides dialog box. Within the dialog box, activate or deactivate the options and then click OK; or
• Right-click outside the slide objects, and point
to Grid and Guides to display the drop-down menu to select the appropriate option; or
• click the View tab, and in the Show group, click Gridlines or Guides; or
• press + for guides or press + for gridlines.
Using the mouse to move shapes to a particular position on a slide can be difficult, as the shape will snap to the grid. To stop your shapes snapping to the grid, clear the Snap objects to grid check box within the Grid and Guides dialog box, or press when you are dragging a shape so that it moves freely. You can press arrow keys to move objects on a slide or press +arrow keys to move objects by small increments, also known as nudging.
Understanding Slide Masters Objective 1.2
Every PowerPoint presentation contains a slide master with related slide layout masters, formats, and theme information that is used to establish a common look throughout the presentation.
The Slide Master enables you to set up the global structure of your presentation. When you make changes to the Slide Master, PowerPoint applies them to many or all the slides in your presentation. You work with the Slide Master when you want to customize slide layouts related to the master or to apply global settings to your presentation, such as text formats, bullet styles, and master graphics. You can use masters to format aspects such as logo, title, and footer placement.
For E
valua
tion O
nly
Working with Slides Lesson 2
3256-1 v1.00 © CCI Learning Solutions Inc. 43
Using slide masters to apply global settings, such as font style and logo placement, can save you an enormous amount of time. When you make a change in the slide master, all slides that follow that master will contain those changes.
If you make changes to the master or slide layout masters in an existing presentation, you will need to reapply the changed layouts to the existing slides in Normal view to see the changes.
PowerPoint provides three types of masters: the Slide Master controls the slides and title slide in your presentation; the Notes Master controls the global aspects of notes; and the Handout Master controls the handouts. This section focuses on using the Slide Master.
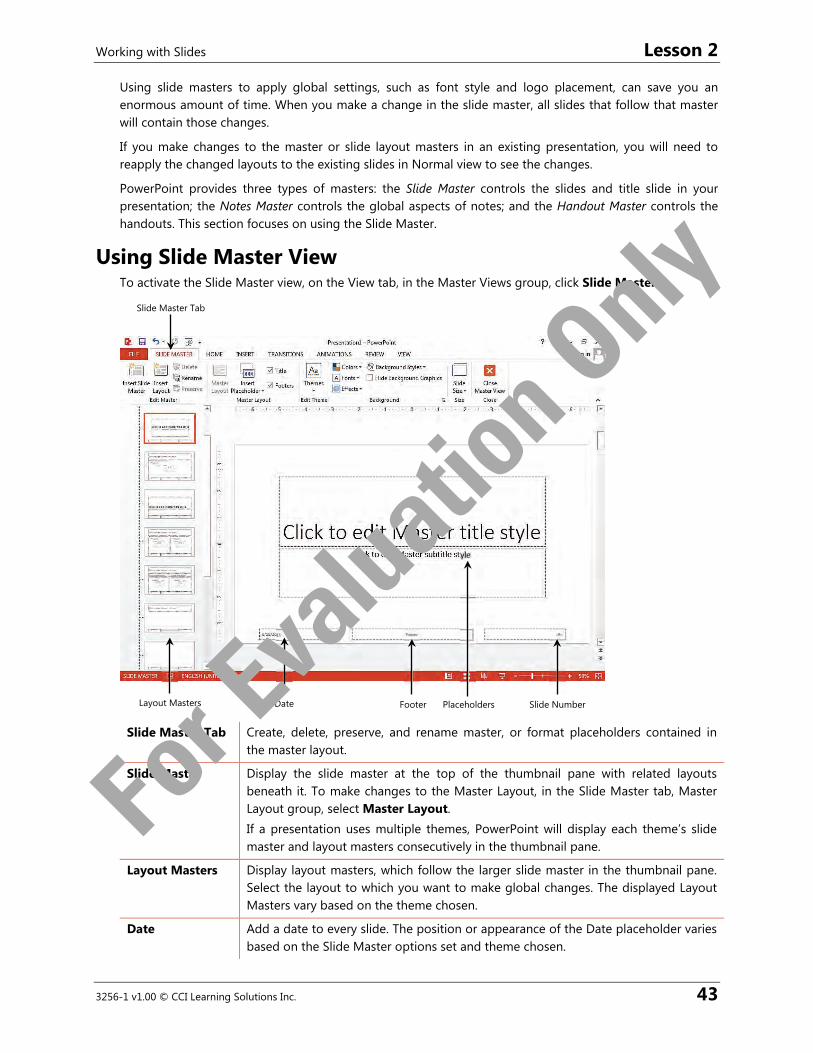
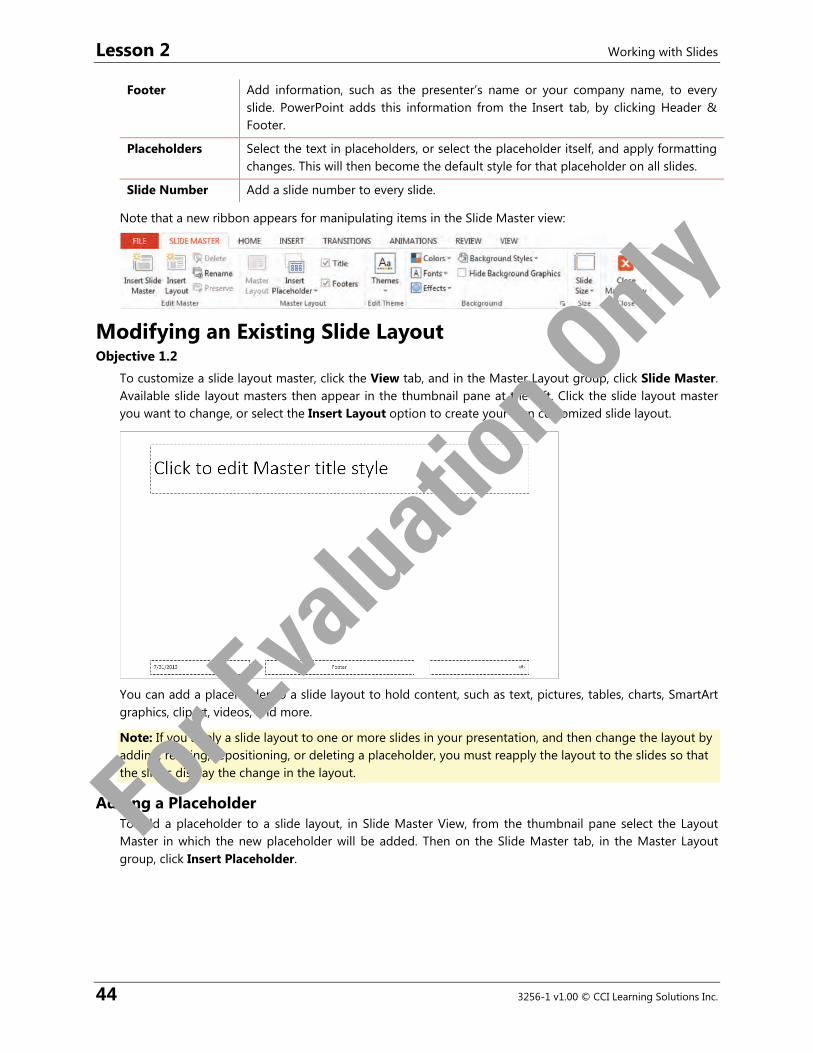
Using Slide Master View To activate the Slide Master view, on the View tab, in the Master Views group, click Slide Master.
Slide Master Tab Create, delete, preserve, and rename master, or format placeholders contained in the master layout.
Slide Master Display the slide master at the top of the thumbnail pane with related layouts beneath it. To make changes to the Master Layout, in the Slide Master tab, Master Layout group, select Master Layout. If a presentation uses multiple themes, PowerPoint will display each theme’s slide master and layout masters consecutively in the thumbnail pane.
Layout Masters Display layout masters, which follow the larger slide master in the thumbnail pane. Select the layout to which you want to make global changes. The displayed Layout Masters vary based on the theme chosen.
Date Add a date to every slide. The position or appearance of the Date placeholder varies based on the Slide Master options set and theme chosen.
Slide Master Tab
Footer Slide Number Placeholders Layout Masters Date
For E
valua
tion O
nly
Lesson 2 Working with Slides
44 3256-1 v1.00 © CCI Learning Solutions Inc.
Footer Add information, such as the presenter’s name or your company name, to every slide. PowerPoint adds this information from the Insert tab, by clicking Header & Footer.
Placeholders Select the text in placeholders, or select the placeholder itself, and apply formatting changes. This will then become the default style for that placeholder on all slides.
Slide Number Add a slide number to every slide.
Note that a new ribbon appears for manipulating items in the Slide Master view:
Modifying an Existing Slide Layout Objective 1.2
To customize a slide layout master, click the View tab, and in the Master Layout group, click Slide Master. Available slide layout masters then appear in the thumbnail pane at the left. Click the slide layout master you want to change, or select the Insert Layout option to create your own customized slide layout.
You can add a placeholder to a slide layout to hold content, such as text, pictures, tables, charts, SmartArt graphics, clipart, videos, and more.
Note: If you apply a slide layout to one or more slides in your presentation, and then change the layout by adding, resizing, repositioning, or deleting a placeholder, you must reapply the layout to the slides so that the slides display the change in the layout.
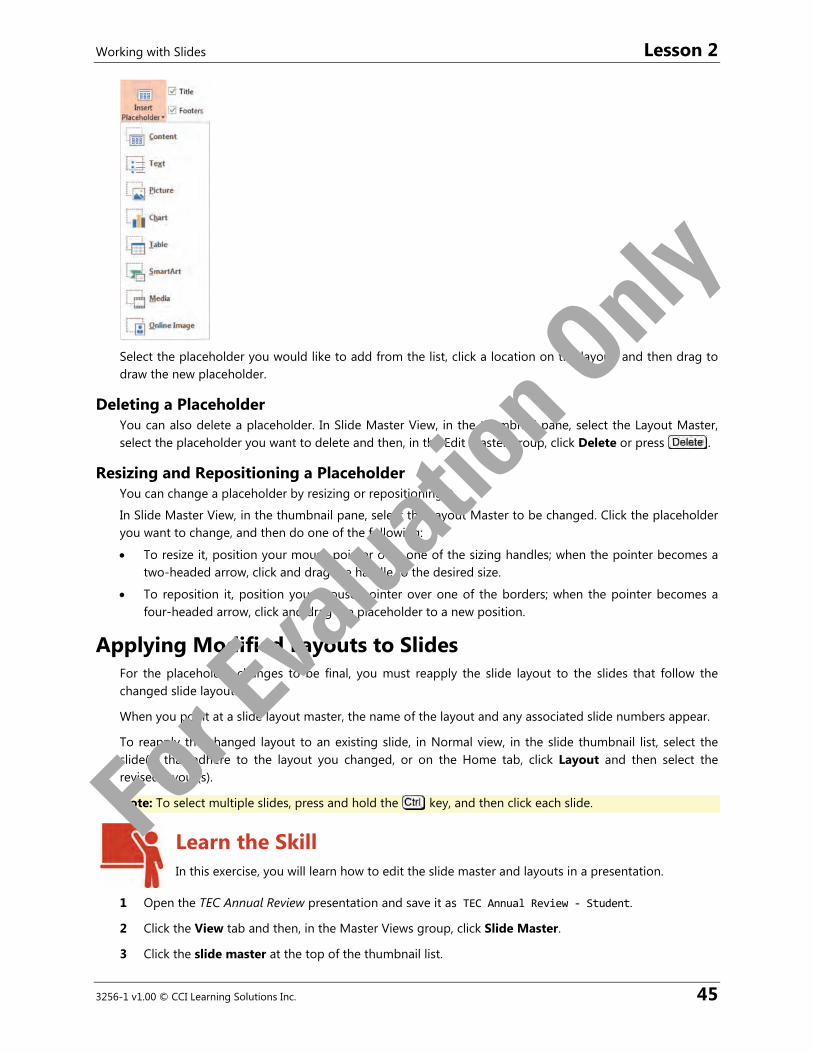
Adding a Placeholder To add a placeholder to a slide layout, in Slide Master View, from the thumbnail pane select the Layout Master in which the new placeholder will be added. Then on the Slide Master tab, in the Master Layout group, click Insert Placeholder.
For E
valua
tion O
nly
Working with Slides Lesson 2
3256-1 v1.00 © CCI Learning Solutions Inc. 45
Select the placeholder you would like to add from the list, click a location on the layout, and then drag to draw the new placeholder.
Deleting a Placeholder You can also delete a placeholder. In Slide Master View, in the thumbnail pane, select the Layout Master, select the placeholder you want to delete and then, in the Edit Master group, click Delete or press .
Resizing and Repositioning a Placeholder You can change a placeholder by resizing or repositioning it.
In Slide Master View, in the thumbnail pane, select the Layout Master to be changed. Click the placeholder you want to change, and then do one of the following:
• To resize it, position your mouse pointer over one of the sizing handles; when the pointer becomes a two-headed arrow, click and drag the handle to the desired size.
• To reposition it, position your mouse pointer over one of the borders; when the pointer becomes a four-headed arrow, click and drag the placeholder to a new position.
Applying Modified Layouts to Slides For the placeholder changes to be final, you must reapply the slide layout to the slides that follow the changed slide layout.
When you point at a slide layout master, the name of the layout and any associated slide numbers appear.
To reapply the changed layout to an existing slide, in Normal view, in the slide thumbnail list, select the slide(s) that adhere to the layout you changed, or on the Home tab, click Layout and then select the revised layout(s).
Note: To select multiple slides, press and hold the key, and then click each slide.
Learn the Skill In this exercise, you will learn how to edit the slide master and layouts in a presentation.
1 Open the TEC Annual Review presentation and save it as TEC Annual Review - Student.
2 Click the View tab and then, in the Master Views group, click Slide Master.
3 Click the slide master at the top of the thumbnail list.
For E
valua
tion O
nly

Lesson 2 Working with Slides
46 3256-1 v1.00 © CCI Learning Solutions Inc.
4 Click the View tab, in the Show group, click Guides to display the guides on the screen.
5 Drag the horizontal guide down to position it at 3.00, and then drag the vertical guide to the right to 4.50.
6 Click the Insert tab, click Pictures. Browse to the folder containing the student data files and then
double-click the Tolano Environmental Consulting Logo file to insert it.
7 Drag the picture until the right side aligns with the vertical guide and the bottom aligns with the horizontal guide, to position it at the bottom right corner of the slide master.
8 Click the Title and Content layout master from the thumbnail list to select it.
9 In the layout, click the title placeholder, click the Home tab and then, in the Font group, change the font to Century Gothic or another font of your choosing.
10 Click the Slide Master tab and then, in the Background group, click Background Styles, and choose Style 5.
11 Click the View tab, in the Show group, click the box to display Gridlines.
12 Click the Slide Master tab, in the Edit Master group, click Insert Layout.
A thumbnail layout appears in the thumbnail list. The new layout contains placeholders and content based on the Slide Master.
13 In the Master Layout group, click Insert Placeholder.
14 Select the Text placeholder from the list.
15 Drag to draw the text placeholder from the first gridline beneath the left corner of the title placeholder to the right; ending at the vertical gridline to the left of the Tolano Environmental Consulting logo image. Fo
r Eva
luatio
n Only

Working with Slides Lesson 2
3256-1 v1.00 © CCI Learning Solutions Inc. 47
16 Click the Home tab, in the Drawing group, click Quick Styles, and then click Subtle Effect-Black, Dark
1.
17 Click the Slide Master tab, in the Edit Master group, click Delete to delete the new layout.
18 On the Slide Master tab, click Close Master View to return to Normal view.
19 Looking at the slides in the slide thumbnail list, notice that each slide now has the Tolano Environmental Consulting logo in the bottom right corner.
20 Click slide 3 and notice that the title placeholder font and slide background have changed to match the Title and Content layout master.
21 Click the View tab, in the Show group, click Gridlines and Guides to turn them off.
22 Save and close the presentation.
Managing Slides PowerPoint makes it easy to add, delete, and duplicate slides in a presentation. You can reuse slides from an existing presentation and insert an outline from a text document, such as Microsoft Word.
Inserting New Slides You can insert as many slides into a presentation as you require, and you can insert a slide in any location in the presentation, not just at the end.
For E
valua
tion O
nly

Lesson 2 Working with Slides
48 3256-1 v1.00 © CCI Learning Solutions Inc.
To insert a new slide with the default Title and Content slide layout, use one of the following methods:
• On the Home tab, in the Slides group, click New Slide; or
• press + ; or
• right-click a slide in the slide thumbnail list and click New Slide; or
• from the last placeholder on a slide, press + .
To insert a slide using a different slide layout, on the Home tab, in the Slides group, click the New Slide arrow and choose a slide layout that suits the content for that slide.
Duplicating Slides Objective 2.1
You can insert new slides that are duplicates of existing slides. By doing so, you can save time you would otherwise spend adding text and objects, and formatting a new slide. You might want to use this option when the slide contains more points than you should show on one slide; instead of rekeying the points on another slide, you can duplicate the slide and then delete the repetitive points from each slide appropriately. Another example could be when you need only to change the picture using the same size or position settings.
To duplicate slides, select the slide (or slides) and then use one of the following methods:
• On the Home tab, in the Slides group, click the New Slide arrow and then click Duplicate Selected Slides; or
• right-click the slide in the slide thumbnail list and click Duplicate Slide; or
• click the slide in the slide thumbnail list and press + .
Hiding and Showing Slides Objective 2.1
Different audiences, available delivery time, and need for detail may require modifications to your presentations, such as shortening the length of play time. You can hide or display slides as needed to customize the length of your presentations.
Hidden slides remain in the presentation file but are not shown when you run the presentation in Slide Show view. Slides marked as hidden can be retrieved and displayed when you need them.
You use the Hide Slide option to hide slides and to show previously hidden slides.
The hidden slide icon appears with the slide number inside, next to the slide you have hidden.
To hide a slide:
• In the slide thumbnail list, select the slide (or slides) you wish to hide, right-click the slide and then click Hide Slide; or
• on the Slide Show tab, in the Set Up group, click Hide Slide.
For E
valua
tion O
nly

Working with Slides Lesson 2
3256-1 v1.00 © CCI Learning Solutions Inc. 49
To show a hidden slide:
• In the slide thumbnail list, select the slide (or slides) you wish to show, right-click the slide, and then click Hide Slide; or
• on the Slide Show tab, in the Set Up group, click Hide Slide; or
• in Slide Show view, right-click the current slide, click See All Slides, and then click the slide that you want to show.
Inserting Slides from Existing Presentations Objective 5.1
You can incorporate slides from other presentations that include information similar to what you want for the current presentation, or you can merge multiple presentations. This saves time because you do not have to recreate slides; it also ensures consistency between presentations.
To reuse slides from an existing presentation, on the Home tab, in the Slides group, click the New Slide arrow and click Reuse Slides.
In the Insert slide from: option, click Browse. You can then choose to insert and reuse slides from individual presentations (Browse File) or from a Microsoft SharePoint Slide Library (Browse Slide Library).
When you open an individual presentation, the slides from that presentation appear in a list in the task pane. You can then click a slide to insert it immediately into your current presentation.
To merge all slides in the presentation, right-click a slide then click Insert All Slides.
If you want the slide you are adding to maintain the formatting of the original presentation, select Keep source formatting at the bottom of the Reuse Slides pane before you insert the slide.
If you want to apply the theme from the source presentation to the presentation you are working on, right-click a slide and choose either Apply Theme to All Slides or Apply Theme to Selected Slides.
For E
valua
tion O
nly

Lesson 2 Working with Slides
50 3256-1 v1.00 © CCI Learning Solutions Inc.
Inserting Slides from an Outline Objective 1.1
If you have a Word document or similar text file with an outline of your presentation, you can use that outline to create slides. This feature works best when the document is correctly formatted. Document content formatted with Heading 1 styles become slide titles. Content formatted with subheading styles (Heading 2 or Heading 3) become bulleted lists in the slides subtitle placeholder.
On the Home tab, click the New Slide arrow and click Slides from Outline to browse and select a document containing an outline of a presentation.
Deleting Slides Objective 2.1
As you build your presentation, you may decide you do not want a particular slide, such as if it is no longer required or it is incorrect. In this case, you can simply delete that slide.
To delete a slide, select the slide and then use one of the following methods:
• Click the slide in the slide thumbnail list and press ; or
• right-click the slide in the slide thumbnail list and click Delete Slide.
Learn the Skill In this exercise, you will practice inserting, duplicating, and deleting slides, and changing slide layouts.
1 Press + to create a new blank presentation.
2 Click the Home tab and, in the Slides group, click the New Slide icon.
PowerPoint inserts a new slide after the first one using the default Title and Content layout. Since the first slide is a Title slide you can use to introduce the whole presentation, a second slide that uses the Title and Content layout allows you to list topics to be covered in the rest of the presentation.
3 On the Home tab, in the Slides group, click the New Slide arrow and then click Two Content.
PowerPoint creates a third slide after the second, using the same theme but with the layout you selected. All new slides you create in this presentation will continue to use the selected theme (though you may change the theme).
For E
valua
tion O
nly

Working with Slides Lesson 2
3256-1 v1.00 © CCI Learning Solutions Inc. 51
4 In the slide thumbnail list, with slide 3 selected (as shown above), press + to duplicate this
slide.
You now have two slides that are exactly the same.
Suppose you now decide you want this new slide to have the Title and Content layout.
5 With slide 4 selected, on the Home tab, in the Slides group, click Layout.
6 Click Title and Content.
The slide layout has now changed.
You have a slide in the Project Status Report presentation you would like to reuse in this new presentation.
7 On the Home tab, in the Slides group, click the arrow for New Slide and select Reuse Slides to display the Reuse Slides task pane.
8 Click Browse, then click Browse File. In the Browse dialog box, navigate to the student data files, click the Project Status Report file, and then click Open.
The slides from the Project Status Report presentation appear in the Reuse Slides task pane. For E
valua
tion O
nly

Lesson 2 Working with Slides
52 3256-1 v1.00 © CCI Learning Solutions Inc.
9 Click the fourth slide in the list, titled Issues and Resolution.
PowerPoint immediately inserts the content of this slide into your presentation.
Suppose you have a Word document containing an outline of more content for this presentation.
10 On the Home tab, in the Slides group, click the arrow for New Slide and select Slides from Outline.
11 In the Insert Outline dialog box, browse to the location where the student data files are stored and select the Corporate Profile Word document and then click Insert.
Notice that several new slides are added to your presentation, one for every main heading in the Word document.
Suppose you no longer need slide 5 with the content from the Project Status Report presentation.
12 Click slide 5 in the slide thumbnail list and press to remove it.
If you do not wish to include the slides created from the outline in your presentation, you can delete them all at once. To do so easily, we will first switch to Slide Sorter view.
13 Click the View tab, click Slide Sorter to switch to Slide Sorter view, and then close the Reuse Slides pane.
14 On the View tab, in the Zoom group, click Zoom, click 66%, and then click OK to change the magnification so all slides appear on the screen.
15 Click slide 5 and then, while holding the key, click slide 9 to select all the slides from 5 to 9. Then press , to remove all of them at once.
16 On the Quick Access Toolbar, click Save.
17 If necessary, navigate to the student data files location and, in the File name field, type: Draft Template for Review – Student and then click Save. Leave the presentation open.
For E
valua
tion O
nly
Working with Slides Lesson 2
3256-1 v1.00 © CCI Learning Solutions Inc. 53
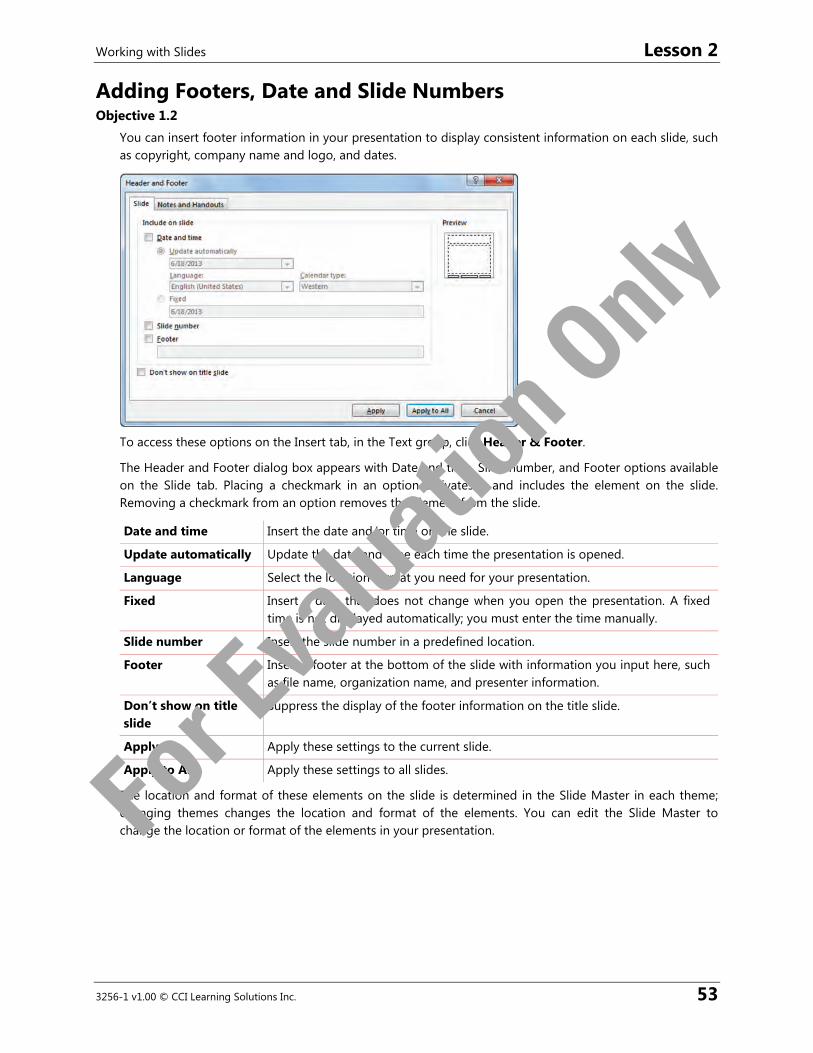
Adding Footers, Date and Slide Numbers Objective 1.2
You can insert footer information in your presentation to display consistent information on each slide, such as copyright, company name and logo, and dates.
To access these options on the Insert tab, in the Text group, click Header & Footer.
The Header and Footer dialog box appears with Date and time, Slide number, and Footer options available on the Slide tab. Placing a checkmark in an option activates it and includes the element on the slide. Removing a checkmark from an option removes the element from the slide.
Date and time Insert the date and/or time on the slide.
Update automatically Update the date and time each time the presentation is opened.
Language Select the location format you need for your presentation.
Fixed Insert a date that does not change when you open the presentation. A fixed time is not displayed automatically; you must enter the time manually.
Slide number Insert the slide number in a predefined location.
Footer Insert a footer at the bottom of the slide with information you input here, such as file name, organization name, and presenter information.
Don’t show on title slide
Suppress the display of the footer information on the title slide.
Apply Apply these settings to the current slide.
Apply to All Apply these settings to all slides.
The location and format of these elements on the slide is determined in the Slide Master in each theme; changing themes changes the location and format of the elements. You can edit the Slide Master to change the location or format of the elements in your presentation. Fo
r Eva
luatio
n Only

Lesson 2 Working with Slides
54 3256-1 v1.00 © CCI Learning Solutions Inc.
The Notes and Handouts tab in the Header and Footer dialog box contains the option to include a page header; the Slide number option changes to Page number.
Controlling Slide Numbers Objective 1.2
Slide numbers are useful when organizing your presentation, referencing slides during a presentation, and also when printing handouts or slides. You can turn numbering on and off for slides and handouts. You can choose to turn slide numbers on or off for one slide or the entire presentation. Also, you can prevent the number from displaying on the title slide.
Slide numbers update automatically when you add, delete, or rearrange slides.
Activating the Slide Number option within the Header and Footer dialog box displays a slide number on the slide, beginning with the number 1. If you need to adjust the start number, you can do so in the Slide Size dialog box. Click the Design tab, click Slide Size, click Custom Slide Size, and then click Number slides from.
To turn on slide numbering, click the Insert tab, in the Text group, click Header & Footer or Insert Slide Number. Then in the Header and Footer dialog box, ensure you have selected Slide number and click Apply to apply to the current slide, or Apply to All to apply to all slides. Fo
r Eva
luatio
n Only
Working with Slides Lesson 2
3256-1 v1.00 © CCI Learning Solutions Inc. 55
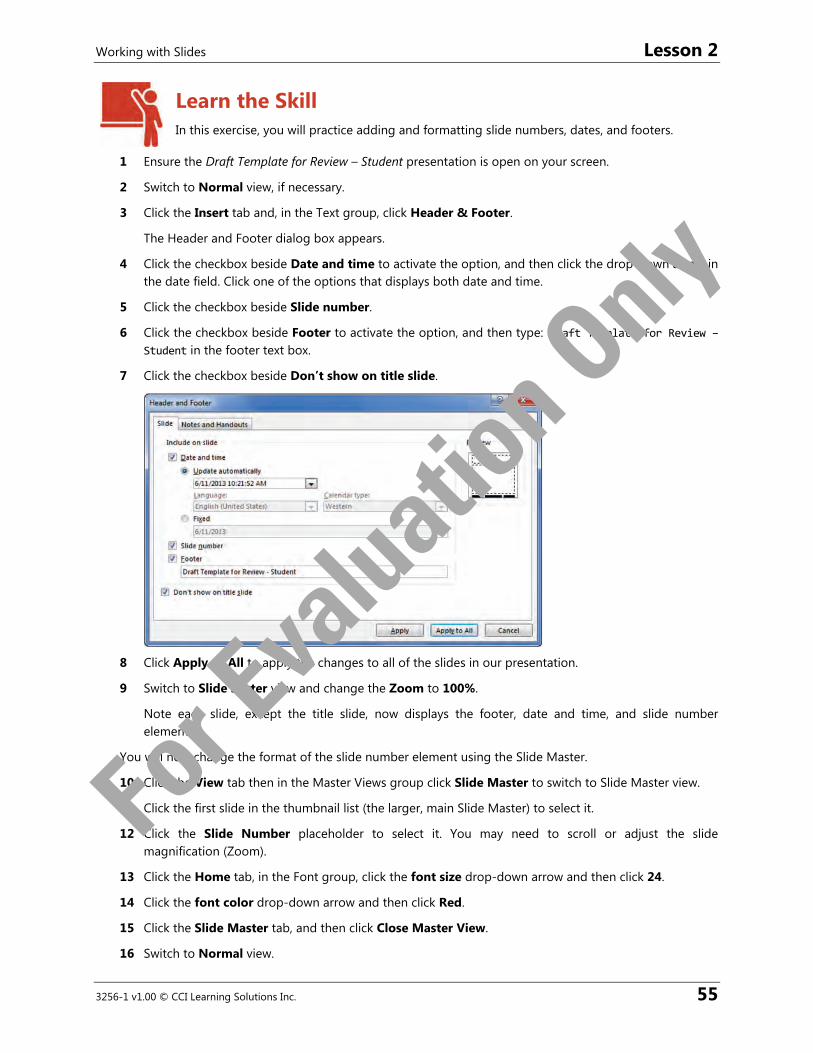
Learn the Skill In this exercise, you will practice adding and formatting slide numbers, dates, and footers.
1 Ensure the Draft Template for Review – Student presentation is open on your screen.
2 Switch to Normal view, if necessary.
3 Click the Insert tab and, in the Text group, click Header & Footer.
The Header and Footer dialog box appears.
4 Click the checkbox beside Date and time to activate the option, and then click the drop-down arrow in the date field. Click one of the options that displays both date and time.
5 Click the checkbox beside Slide number.
6 Click the checkbox beside Footer to activate the option, and then type: Draft Template for Review – Student in the footer text box.
7 Click the checkbox beside Don’t show on title slide.
8 Click Apply to All to apply the changes to all of the slides in our presentation.
9 Switch to Slide Sorter view and change the Zoom to 100%.
Note each slide, except the title slide, now displays the footer, date and time, and slide number elements.
You will now change the format of the slide number element using the Slide Master.
10 Click the View tab then in the Master Views group click Slide Master to switch to Slide Master view.
11 Click the first slide in the thumbnail list (the larger, main Slide Master) to select it.
12 Click the Slide Number placeholder to select it. You may need to scroll or adjust the slide magnification (Zoom).
13 Click the Home tab, in the Font group, click the font size drop-down arrow and then click 24.
14 Click the font color drop-down arrow and then click Red.
15 Click the Slide Master tab, and then click Close Master View.
16 Switch to Normal view.
For E
valua
tion O
nly
Lesson 2 Working with Slides
56 3256-1 v1.00 © CCI Learning Solutions Inc.
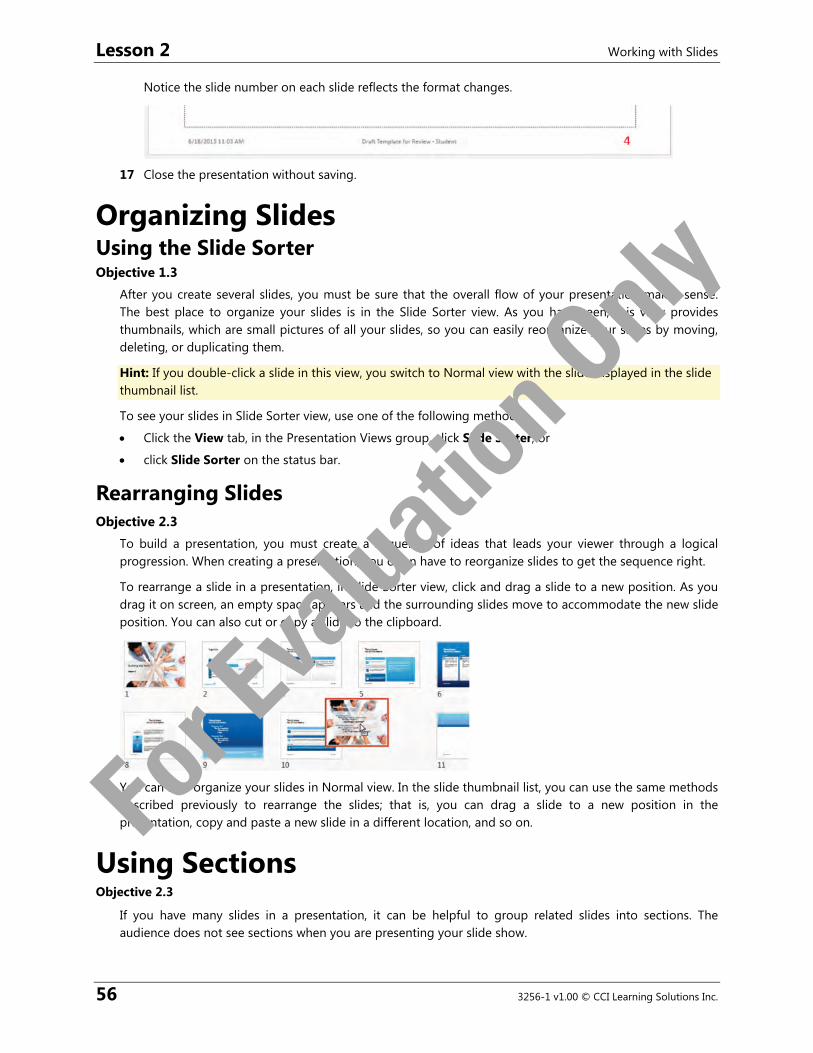
Notice the slide number on each slide reflects the format changes.
17 Close the presentation without saving.
Organizing Slides Using the Slide Sorter Objective 1.3
After you create several slides, you must be sure that the overall flow of your presentation makes sense. The best place to organize your slides is in the Slide Sorter view. As you have seen, this view provides thumbnails, which are small pictures of all your slides, so you can easily reorganize your slides by moving, deleting, or duplicating them.
Hint: If you double-click a slide in this view, you switch to Normal view with the slide displayed in the slide thumbnail list.
To see your slides in Slide Sorter view, use one of the following methods:
• Click the View tab, in the Presentation Views group, click Slide Sorter; or
• click Slide Sorter on the status bar.
Rearranging Slides Objective 2.3
To build a presentation, you must create a sequence of ideas that leads your viewer through a logical progression. When creating a presentation, you often have to reorganize slides to get the sequence right.
To rearrange a slide in a presentation, in Slide Sorter view, click and drag a slide to a new position. As you drag it on screen, an empty space appears and the surrounding slides move to accommodate the new slide position. You can also cut or copy a slide to the clipboard.
You can also organize your slides in Normal view. In the slide thumbnail list, you can use the same methods described previously to rearrange the slides; that is, you can drag a slide to a new position in the presentation, copy and paste a new slide in a different location, and so on.
Using Sections Objective 2.3
If you have many slides in a presentation, it can be helpful to group related slides into sections. The audience does not see sections when you are presenting your slide show.
For E
valua
tion O
nly

Working with Slides Lesson 2
3256-1 v1.00 © CCI Learning Solutions Inc. 57
You can collapse sections of slides, hiding some slides from view, so you can focus only on the slides you are currently working on, or allow different people to work on different parts of the same presentation. You can format, arrange, or delete slides as a group.
Learn the Skill In this exercise, you will practice duplicating and rearranging slides and working with sections.
1 Open the Teamwork Seminar 2 presentation and save it as Teamwork Seminar 2 - Student.
2 Switch to Slide Sorter view.
Depending on the size of your screen and the zoom factor, you will see all or most of the slides in this presentation at once. You can use the zoom slider to show more or fewer slides on screen.
3 Click slide 3 and then drag and drop it between slides 6 and 7.
Moving this slide to this location provides a title page for a new section of the presentation.
4 Click slide 11 and drag it to be placed after slide 16.
You can also reorganize slides in the slide thumbnail list in Normal View.
5 On the status bar, click Normal to return to this view.
6 In the slide thumbnail list, scroll until you can see slide 2 and click to select it; press + to create a duplicate of the Agenda slide.
7 In the slide thumbnail list, drag the duplicate of the Agenda slide until it is between slides 22 and 23.
For E
valua
tion O
nly

Lesson 2 Working with Slides
58 3256-1 v1.00 © CCI Learning Solutions Inc.
8 On the status bar, click Slide Sorter to return to this view.
9 Select slide 6. On the Home tab, in the Slides group, click the Section arrow and then click Add Section.
An Untitled Section heading appears between slides 5 and 6.
10 Select slide 22 and, on the Home tab, click Section and then Add Section again.
The presentation is now divided into three sections, representing a beginning, middle, and end.
11 Click the Default Section header. On the Home tab, in the Slides group, click Section and then click
Rename Section. Change the name of this section to Beginning and click Rename.
12 Right-click the middle Untitled Section header and click Rename Section. Change the name of this section to Middle and click Rename.
13 Right-click the last Untitled Section header and click Move Section Up.
For E
valua
tion O
nly

Working with Slides Lesson 2
3256-1 v1.00 © CCI Learning Solutions Inc. 59
The section now appears before the Middle section.
14 Right-click the Untitled Section header and click Move Section Down.
The section returns to its original position.
15 Right-click the Beginning header and click Collapse All.
The sections collapse and the screen now shows only the section headers and number of slides within each section.
16 Double-click Beginning to expand it.
The section expands and all of the slides in the section are selected.
17 Double-click Middle to expand it as well.
18 Right-click the Untitled Section header and click Remove Section.
The section header label is removed. The slides remain and are now included in the middle section.
19 Right-click slide 22 and click Add Section to restore the section.
20 Click the Untitled Section header to select all of the slides in the section.
21 Click the Design tab, and in the Customize group, click Format Background.
The Format Background task pane opens.
22 Select Solid fill in the Fill section, click the Color arrow, and click a color of your choice.
All slides in the section automatically reflect the background format change.
Note: Clicking Apply to All in the Format Background task pane applies the background format change to all slides in the presentation, not just the selected slides.
23 Right-click the Untitled Section header and click Remove Section & Slides.
The section and all of the slides are deleted.
24 On the Quick Access Toolbar, click the Undo arrow twice to restore the section and slides and remove the background change.
25 Press + to save the presentation.
26 Press + to close the presentation.
For E
valua
tion O
nly

Lesson 2 Working with Slides
60 3256-1 v1.00 © CCI Learning Solutions Inc.
Lesson Summary In this lesson, you examined the features you can use to set up an outline and add, modify, or format text in a presentation. You should now be able to:
use and apply themes
format slide backgrounds
apply slide layouts or create a new slide layout
apply styles to slides
modify existing layout masters
use guides and gridlines
add, format, resize, reposition, and delete placeholders
apply modified layout to existing slides
insert new slides, duplicate slides, hide and show slides, or delete slides
insert slides from an existing presentation
merge multiple presentations
insert slides from an outline
add footers, slide numbers, and a date
organize or rearrange slides use the Slide Sorter and other views
use sections
Review Questions 1. Why is it beneficial to use a theme when creating your presentation?
2. Which individual aspects of a theme can be customized?
3. How do you change a theme font to one of its preselected font groups?
4. What is the purpose of slide layouts?
5. What determines the type and format of available presentation slide layouts?
6. What is the quickest way to apply a combination of fill, border, and effect formatting to placeholders?
7. How do you position a guide at a precise measurement location?
8. How do you incorporate an individual slide from a file containing an existing presentation into your presentation?
9. How do you rearrange slides in the slide thumbnail list?
10. What is the purpose of sections?
For E
valua
tion O
nly