Embed Size (px)
Citation preview

360 Essentials: A Beginner's Guide to Immersive Video Storytelling


360 Essentials: A Beginner's Guide to Immersive Video
Storytelling
JOSHUA CAMERON, GARY GOULD, AND ADRIAN MA
ADAM CHEN AND STEPHANIE LUI
RYERSON UNIVERSITY LIBRARY
TORONTO

360 Essentials: A Beginner's Guide to Immersive Video Storytelling by Adrian Ma is licensed under a Creative Commons Attribution 4.0 International License, except where otherwise noted.
Embedded video content is licensed under the license of the content on the original site. Inclusion of this video content is allowed under the terms of use of YouTube. YouTube still images have been used under the Copyright Act exception of Fair Dealing for the purpose of education.
This book was produced with Pressbooks (https://pressbooks.com) and rendered with Prince.
Prologue: Introduction
There are so many potential applications for 360 video and VR, including for journalism and documentary content, exciting marketing content, engaging educational experiences or just to simply capture the world around you.
Have you ever found yourself looking at an amazing photograph that truly takes your breath away and wished you could just step inside for a moment? Or have you ever been watching an interesting video but wanted to know what was on the other side of the lens?
We definitely have. And by we, we mean the team that have put together this handbook you’re reading right now. Collectively, we are Dr. Gary Gould (PhD in Film and Television), journalism professor Adrian Ma, designer and researcher Joshua Cameron, and project assistants Adam Chen and Stephanie Liu. Hi! Nice to meet you.
We are multimedia instructors, researchers and content producers based at Ryerson University in Toronto. We couldn’t help but notice that interest in 360 video and virtual reality has really skyrocketed in recent years and some amazing content is being created. We have been exploring and experimenting with 360-degree video, photography and spatial audio recording, and figuring out how these elements can be used to create incredible, immersive experiences. From capturing special events that give you the best seat in the house to producing virtual reality documentaries that make you feel like you’re actually there, creating 360 video and virtual reality (VR) content can be an exciting and uniquely engaging form of storytelling.
There are so many potential applications for 360 video and VR, including for journalism and documentary content, exciting
Prologue: Introduction | 1
marketing content, engaging educational experiences or just to simply capture the world around you. And thanks to rapid innovations in technology, creating this stuff is easier and cheaper than you may think.
Our objective with this resource is to walk you through the essential steps in creating compelling and engaging 360 video experiences. While some prior experience with photography or videography can help, the technology available now gives anybody the ability to produce this type of amazing content. By the time you work your way through this book’s chapters and exercises, you will be able to:
• Set up, operate and shoot high quality pictures and video with a 360 video camera;
• Turn your 360 videos into basic virtual reality content; • Understand some of the ethical challenges associated with
immersive content; • Develop stronger stories and narrative 360 content.
We thank you for your interest in 360 video. Are you ready to get started? Let’s go.
Sincerely, The Team
2 | 360 Essentials: A Beginner's Guide to Immersive Video Storytelling

1. Chapter 1: What is 360 Video?
In this chapter, we’ll touch upon the history and evolution of immersive360 visual experiences, look at how modern 360 video works andhighlight some technical terms and concepts that are important toknow as you move into shooting and producing immersive content.
Chapter 1: What is 360 Video? | 3
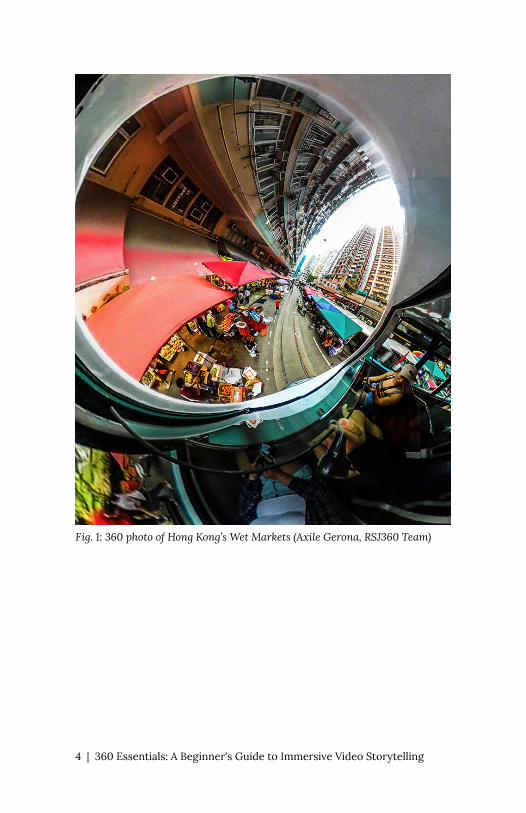
Fig. 1: 360 photo of Hong Kong’s Wet Markets (Axile Gerona, RSJ360 Team)
4 | 360 Essentials: A Beginner's Guide to Immersive Video Storytelling
What is 360 Video?
SOME HISTORY, KEY TERMS AND CONCEPTS
Before we dive into the how-to aspects of creating cool 360 videos,we should spend a little time getting familiar with this technologyso that we’re all on the same page. There are several key terms andconcepts specific to the realm of 360 content that we need toacquaint ourselves with, as well as important bits of history andcontext that will help us better understand the capabilities andopportunities of this emerging content form.
Essentially, 360-degree photos or videos are visuals in which theview in every direction is captured and presented simultaneously. You may think this is a recent innovation, but actually, people have beentrying to capture and reproduce immersive 360 experiences forcenturies.
During the days of the Roman Empire, painters would adorn theinteriors of buildings and villas from floor to ceiling to depict scenesof natural landscapes, court life, cities or dramatizations of historicalor mythological events, creating something of a 360 visual experience(fig. 1).
The concept of the panorama(essentially taking an ultra-widehorizontal perspective allowing you to see as much of the subject aspossible) is as old as art itself, with many examples from many culturesover hundreds of years, like this example (fig. 2) from China’s SongDynasty.
It would seem that people have always enjoyed images that makethem feel part of the scene and artists have likewise consistentlydeveloped new techniques and presentation methods to helpstrengthen that feeling of immersion. During the late-18th century,painters and visual artists in Europe were especially developing
Chapter 1: What is 360 Video? | 5
intriguing new ways of showcasing their work, particularly for theirpanorama art.
While the concept of presenting ultra-wide scenes wasn’t new,English painter Robert Barker is largely credited for coining the term “panorama” inspired by the Greek words for “all” (pan) and “view”(horama) in 1792. Barker famously introduced the term when hedeveloped a more interactive presentation experience to showcasehis panoramic paintings of cities. He would wrap his work aroundgiant cylindrical displays, allowing people to walk around and see anunbroken horizontal view of the scene. These “cycloramas”, as theywere called, lead to a deeper sense of immersion and the effect ofpeople feeling like they were almost walking through the scene itself.
This concept caught on and soon other artists began innovatingpanoramic exhibits. Travelling shows and purpose-built panoramatheatres became wildly popular throughout the 19th century. Thesebuildings popped up over Europe and North America, including onethat was built in Toronto, Canada in 1887.
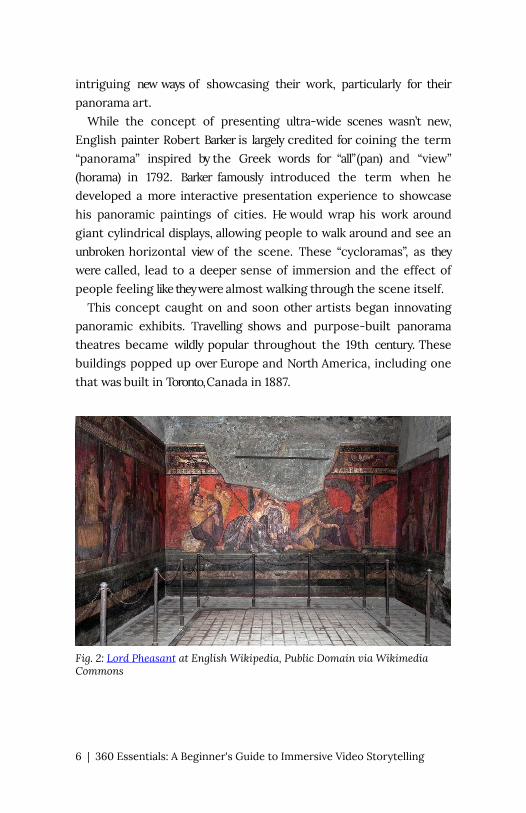
Fig. 2: Lord Pheasant at English Wikipedia, Public Domain via Wikimedia Commons
6 | 360 Essentials: A Beginner's Guide to Immersive Video Storytelling
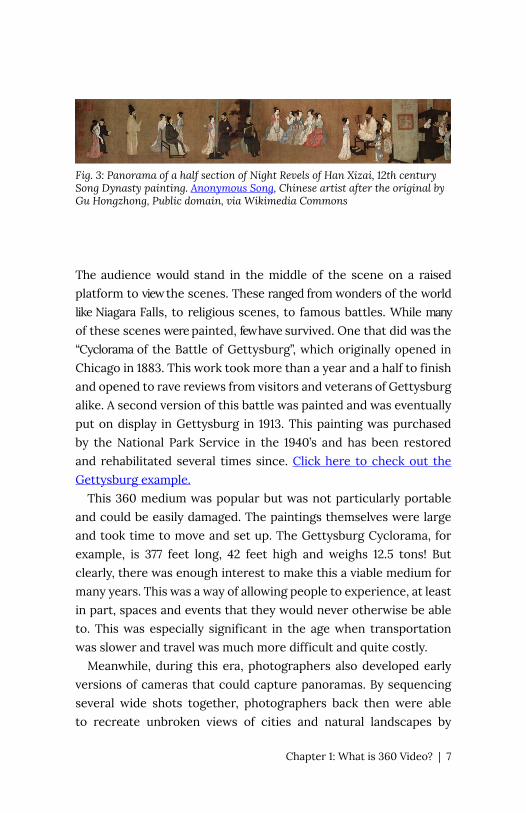
Fig. 3: Panorama of a half section of Night Revels of Han Xizai, 12th century Song Dynasty painting. Anonymous Song, Chinese artist after the original by Gu Hongzhong, Public domain, via Wikimedia Commons
The audience would stand in the middle of the scene on a raisedplatform to view the scenes. These ranged from wonders of the worldlike Niagara Falls, to religious scenes, to famous battles. While manyof these scenes were painted, few have survived. One that did was the“Cyclorama of the Battle of Gettysburg”, which originally opened in Chicago in 1883. This work took more than a year and a half to finish and opened to rave reviews from visitors and veterans of Gettysburg alike. A second version of this battle was painted and was eventually put on display in Gettysburg in 1913. This painting was purchased by the National Park Service in the 1940’s and has been restored and rehabilitated several times since. Click here to check out the Gettysburg example.
This 360 medium was popular but was not particularly portable and could be easily damaged. The paintings themselves were large and took time to move and set up. The Gettysburg Cyclorama, for example, is 377 feet long, 42 feet high and weighs 12.5 tons! But clearly, there was enough interest to make this a viable medium for many years. This was a way of allowing people to experience, at least in part, spaces and events that they would never otherwise be able to. This was especially significant in the age when transportation was slower and travel was much more difficult and quite costly.
Meanwhile, during this era, photographers also developed early versions of cameras that could capture panoramas. By sequencing several wide shots together, photographers back then were able to recreate unbroken views of cities and natural landscapes by
Chapter 1: What is 360 Video? | 7
pressing the images onto silver-coated copper plates called daguerreotypes. Indeed, the U.S. Library of Congress has a really incredible collection of early panorama photography you should check out here.
Another popular and unique way of showcasing photography in a more immersive way was the spectacularly-named Kaiserpanorama. Patented in 1890 by scientist August Fuhrmann (no idea why he didn’t call it the Fuhrmanorama… way catchier, right?), this fascinating circular mini-theatre comprised a number of wooden viewing stations that rotated through a series of illuminated glass slide images (fig. 4).
These glass slide images were designed using the stereoscopic effect. Essentially two images of the same subject are taken, but at slightly different angles for the left and right eyes. Because the images are ever so slightly incongruous with one another, when the eyes see the images together through the Kaiserpanorama, the brain interprets them as one image but with a sense of depth, at least much more so than a standard image. This stereoscopic technique is the basis for many of the “3D” experiences you’re likely familiar with in the modern era, from 3D comic books to those red toy View-Masters to old superhero films that charged you an extra $10 to rent 3D glasses. The concept of the stereoscopic effect is also important to know if when it comes to shooting, editing and viewing your own 360-3D videos. More on this later.
8 | 360 Essentials: A Beginner's Guide to Immersive Video Storytelling
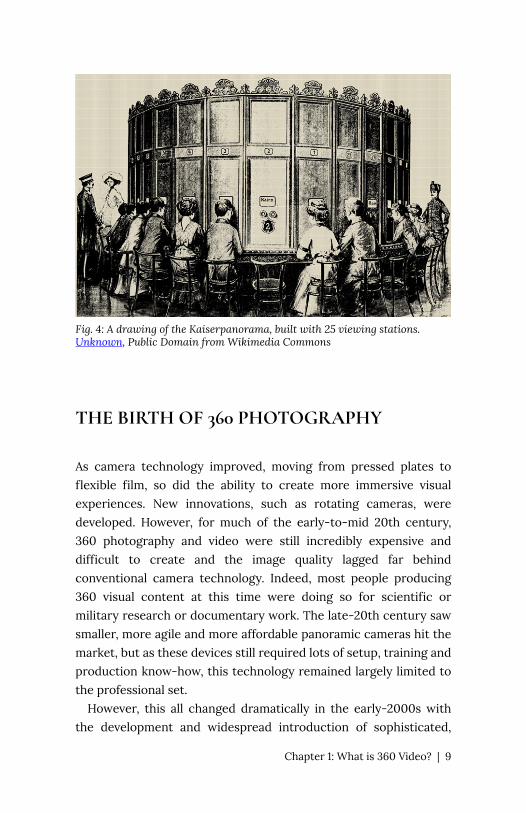
Fig. 4: A drawing of the Kaiserpanorama, built with 25 viewing stations. Unknown, Public Domain from Wikimedia Commons
THE BIRTH OF 360 PHOTOGRAPHY
As camera technology improved, moving from pressed plates to flexible film, so did the ability to create more immersive visual experiences. New innovations, such as rotating cameras, were developed. However, for much of the early-to-mid 20th century, 360 photography and video were still incredibly expensive and difficult to create and the image quality lagged far behind conventional camera technology. Indeed, most people producing 360 visual content at this time were doing so for scientific or military research or documentary work. The late-20th century saw smaller, more agile and more affordable panoramic cameras hit the market, but as these devices still required lots of setup, training and production know-how, this technology remained largely limited to the professional set.
However, this all changed dramatically in the early-2000s with the development and widespread introduction of sophisticated,
Chapter 1: What is 360 Video? | 9
powerful (yet relatively affordable) digital cameras and smartphones.
THE DIGITAL 360 ERA
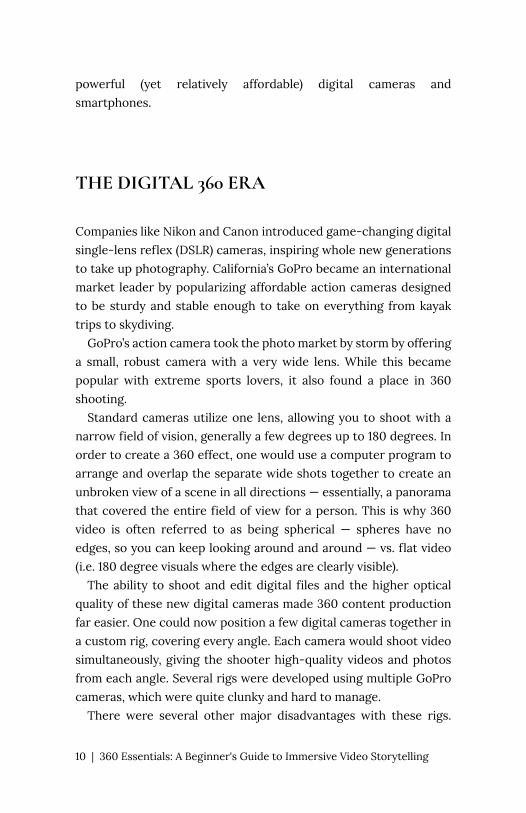
Companies like Nikon and Canon introduced game-changing digital single-lens reflex (DSLR) cameras, inspiring whole new generations to take up photography. California’s GoPro became an international market leader by popularizing affordable action cameras designed to be sturdy and stable enough to take on everything from kayak trips to skydiving.
GoPro’s action camera took the photo market by storm by offering a small, robust camera with a very wide lens. While this became popular with extreme sports lovers, it also found a place in 360 shooting.
Standard cameras utilize one lens, allowing you to shoot with a narrow field of vision, generally a few degrees up to 180 degrees. In order to create a 360 effect, one would use a computer program to arrange and overlap the separate wide shots together to create an unbroken view of a scene in all directions — essentially, a panorama that covered the entire field of view for a person. This is why 360 video is often referred to as being spherical — spheres have no edges, so you can keep looking around and around — vs. flat video (i.e. 180 degree visuals where the edges are clearly visible).
The ability to shoot and edit digital files and the higher optical quality of these new digital cameras made 360 content production far easier. One could now position a few digital cameras together in a custom rig, covering every angle. Each camera would shoot video simultaneously, giving the shooter high-quality videos and photos from each angle. Several rigs were developed using multiple GoPro cameras, which were quite clunky and hard to manage.
There were several other major disadvantages with these rigs.
10 | 360 Essentials: A Beginner's Guide to Immersive Video Storytelling
One was the cost. At about $500 per GoPro camera the price quickly escalated (and don’t forget the SD cards needed as well!). The other issue was that if one of the cameras stopped working (battery issues for example), then there would be a piece of the 360 scene missing.
The other disadvantage with these rigs was that they required tremendous computing power (and time!) to sequence all the footage together. Clearly this was not technology aimed at main street.
There were other attempts to create 360 photos. One involved placing a single GoPro camera on a motorized tilt pan head which would automatically rotate and take the photos needed to create a 360 photo. It would then stitch the photos together using software. The issue with this set up was that if there were people in the scene they had to stand completely still (sort of a throw back to the early days of photography!). Again, this was not a technology that would work for most people and was only photos, not video.
However, over the past decade, we’ve seen some exponential advances in 360 shooting technology that has reduced the need to construct such elaborate rigs. For one, high-definition video would become a standard (if not minimal) feature on every type of digital camera, including the ones built-in to ever-improving smartphones. Now, it’s easy and cost-effective to find 360 cameras that can shoot 4K resolution video, with 6K and 8K cameras trending down in price as well. There are 360 cameras that are capable of shooting 11K video, but these tend to still cost upwards of $20,000 and are ideal for professional filmmakers.
Major strides have also been made to create cameras and programs that make sequencing the footage far easier than before. The act of sequencing separate shots together to produce this 360 effect is called stitching, which is an important term to remember. The stitch line is where the edges of the visuals come together. An excellent stitching job will help the 360 “illusion” appear smooth and seamless. However, it can be challenging to achieve this seamlessness as objects on or near the stitchlines easily distort or blur or differences in lighting can become more apparent.
Chapter 1: What is 360 Video? | 11
Now, it’s easy and cost-effective to find 360 cameras that can shoot 4K resolution video, with 6K and 8K cameras are trending down in price as well.
AN EVOLVING STITCH-UATION
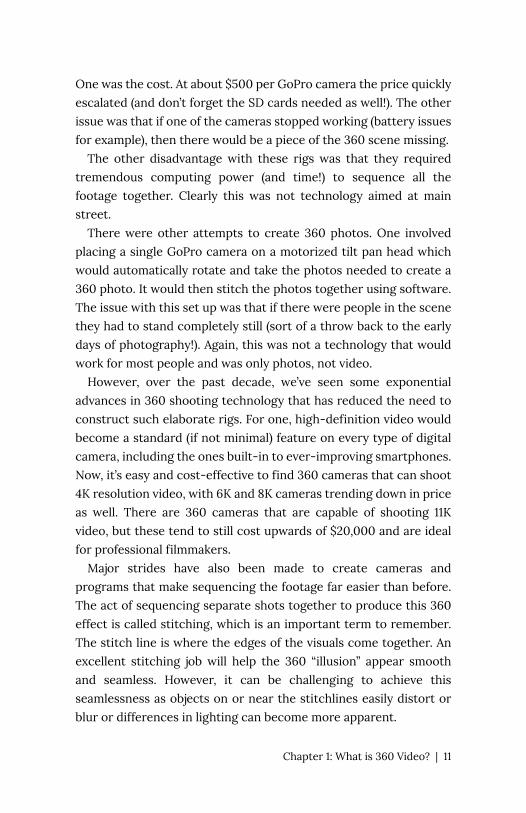
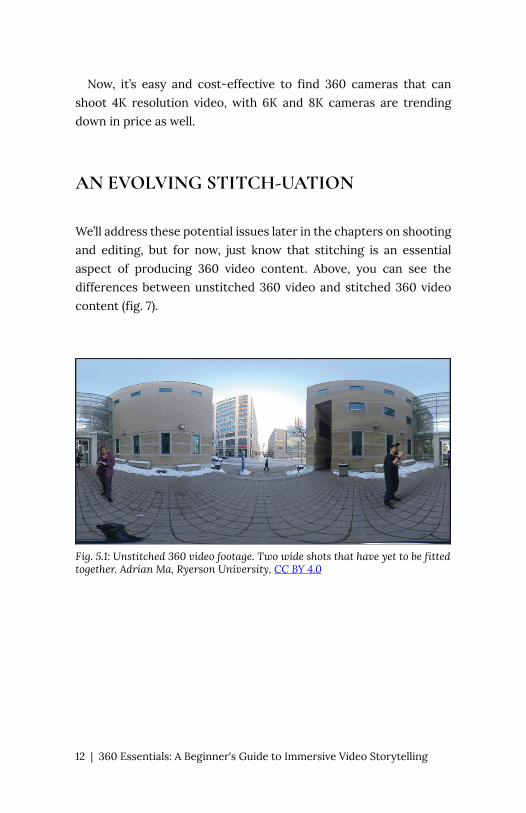
We’ll address these potential issues later in the chapters on shooting and editing, but for now, just know that stitching is an essential aspect of producing 360 video content. Above, you can see the differences between unstitched 360 video and stitched 360 video content (fig. 7).
Fig. 5.1: Unstitched 360 video footage. Two wide shots that have yet to be fitted together. Adrian Ma, Ryerson University, CC BY 4.0
12 | 360 Essentials: A Beginner's Guide to Immersive Video Storytelling
Fig. 5.2: The visual clears up once the wide shots have been stitched together. Adrian Ma, Ryerson University, CC BY 4.0
As we mentioned before, the primary method for shooting high quality 360 video several years ago was to rig up multiple cameras and then stitch the footage together using computer software, often a third-party program. Even with a high-end computer and powerful software, this is a labour intensive and time-consuming method of producing 360 content. However, one of the most critical developments for the widespread adoption of 360 video has been the manufacturing of affordable, user-friendly and visually powerful digital cameras designed specifically to capture 360 content.
In recent years, numerous companies — from well-established brands like Samsung and GoPro to upstarts like Insta360 — have brought to market myriad 360 camera options for shooters of all kinds, whether you’re a hobbyist who just wants to share some interesting vacation videos on social media or a professional filmmaker creating cutting-edge cinematic virtual reality experiences. In general these days, 360 cameras feature multiple lenses on one camera body. At the minimum, there is a front and rear lens, each capturing a 180 degree field of view on either side.
When you bring them together, that gives you a 360 degree field
Chapter 1: What is 360 Video? | 13
of view. Some of the more advanced cinematic 360 cameras have several lenses on the camera body, which provides the ability to capture video at much higher resolutions.
The trend to make 360-specific cameras has also led to the creation of auto-stitching features or “no stitch” workflows to help you save time and energy from having to do it all manually. Our guidebook is an introduction to 360 video storytelling and, as such, our focus is on the use of the more user-friendly and affordable 360 cameras, most of which come with native stitching software or have designed their production workflow to minimize (or remove) stitching altogether. So we will not be delving into the technical aspects of manually stitching 360 content, although there are many effective programs one could use to do so (see our Resources chapter).
Instead, for this guidebook, we advise you to start with a 360 camera and to follow the directions of your particular 360 camera to prepare your video files accordingly (And see our Gear Guide in Chapter 2 to figure out which camera is right for you!).
YOUR OWN PERSONAL IMMERSIVE THEATRE
As important as the innovations of 360 cameras have been, of equal importance has been tremendous advancements in how we view 360 content. A few decades ago, 360 video was a highly specialized type of content that was only accessible to the public as theatre experiences. Probably the most famous person to explore 360 cinema was Walt Disney. Disney put a lot of effort to make people feel like they were part of the story and the interactive attractions at Disneyland (and subsequent parks that opened after his death) are great examples of this. He was however, first and foremost a filmmaker, and in 1955 he installed “Circarama” (later to be called
14 | 360 Essentials: A Beginner's Guide to Immersive Video Storytelling
Circlevision) in his theme park. In the early days, this technology used eleven 16mm projectors but this would eventually change to nine 35mm projectors. Disney’s first film that used this technology was “America the Beautiful” and it would later be used at Epcot’s Canada Pavilion with the film “O Canada!”.
Both the cyclorama paintings and the Circlevision technologies offered audiences a panorama experience but not a true 360 experience. One theatre that offers a true 360 experience is Space 360 which opened in Gwangju, South Korea. This is a spherical theatre built by the Lucerium National Science Museum and Korea Hydro and Power. Up to 45 people at a time stand on a glass bridge and are surrounded by projected images.
The problem with all theatre based 360 experiences, whether it is a 360 painting or a film, is the special building required. Also, the actual viewing experience is hindered by audience size. If you are with a large group of people then your field of view can be limited by others who block the screen/painting. In the case of Disney’s use of 360 film projection, the screens were elevated above the audience who were then required to stand to watch the film. The view in the Space 360 theatre is again limited by people around you and the bridge which is not completely transparent. There are also two exits on either end of the bridge which cut in to the experience.
THE DIFFERENCES BETWEEN 360, 3D-360 AND VR VIDEO
Nowadays, we can watch 360 video content easily on your desktop computer or your smartphone. But for a much more immersive experience, we can also use a headset or head-mounted device (HMD). These wearable goggles can help block out environmental distractions to help immerse the user entirely in the 360 content, allowing one to better experience this sensation of presence. They
Chapter 1: What is 360 Video? | 15
also often have control features, either built-in the headset itself or in the form of hand controllers or an phone-based app, which grant the viewer more control or interact with the content.
Headsets are available in a variety of forms. The most basic headsets, like Google’s famous Cardboard model, are designed to work with your smartphones, as dozens of video player apps and streaming platforms (including YouTube, Vimeo) offer different levels of 360 and stereoscopic playback. Other headsets, such as the Oculus and HTC Vive series, offer more power, higher build quality and native playback support. Although every model of headset has different strengths and weaknesses, they all share one common flaw — it’s really hard to look cool while wearing them.
However, headsets are essential for experiencing what has proven to be the next tier of immersive video — 360-3D and virtual reality.
Whether you’ve used a 360 camera before, there is a good chance you have watched some 360 video or virtual reality content before, perhaps on YouTube or Facebook. It’s important to understand that 360 video, 3D video and virtual reality (VR) are distinctive in their own rights.
These terms are often used interchangeably by those working in news media and advertising (and often to the annoyance of those who specialize in virtual reality), but they’re not technically the same thing. Let’s break it down real quick.
“360”
Quite simply, a piece of 360 content allows people to choose where in the photo or video they want to look by using a mouse, trackpad or by moving their phone to control the viewing angle — this example, when uploaded or embedded on a platform that supports 360 content, would only show you a small section at a time, and you could drag your cursor left or right to see more.
16 | 360 Essentials: A Beginner's Guide to Immersive Video Storytelling
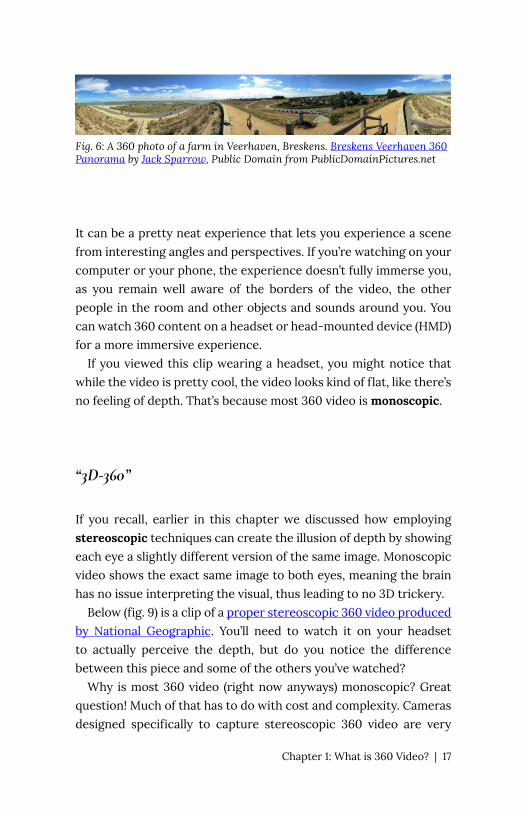
Fig. 6: A 360 photo of a farm in Veerhaven, Breskens. Breskens Veerhaven 360 Panorama by Jack Sparrow, Public Domain from PublicDomainPictures.net
It can be a pretty neat experience that lets you experience a scene from interesting angles and perspectives. If you’re watching on your computer or your phone, the experience doesn’t fully immerse you, as you remain well aware of the borders of the video, the other people in the room and other objects and sounds around you. You can watch 360 content on a headset or head-mounted device (HMD) for a more immersive experience.
If you viewed this clip wearing a headset, you might notice that while the video is pretty cool, the video looks kind of flat, like there’s no feeling of depth. That’s because most 360 video is monoscopic.
“3D-360”
If you recall, earlier in this chapter we discussed how employing stereoscopic techniques can create the illusion of depth by showing each eye a slightly different version of the same image. Monoscopic video shows the exact same image to both eyes, meaning the brain has no issue interpreting the visual, thus leading to no 3D trickery.
Below (fig. 9) is a clip of a proper stereoscopic 360 video produced by National Geographic. You’ll need to watch it on your headset to actually perceive the depth, but do you notice the difference between this piece and some of the others you’ve watched?
Why is most 360 video (right now anyways) monoscopic? Great question! Much of that has to do with cost and complexity. Cameras designed specifically to capture stereoscopic 360 video are very
Chapter 1: What is 360 Video? | 17
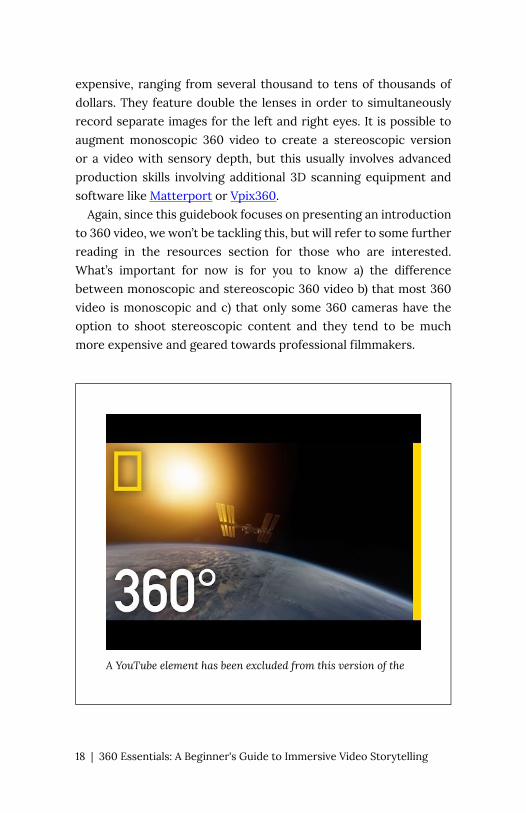
expensive, ranging from several thousand to tens of thousands of dollars. They feature double the lenses in order to simultaneously record separate images for the left and right eyes. It is possible to augment monoscopic 360 video to create a stereoscopic version or a video with sensory depth, but this usually involves advanced production skills involving additional 3D scanning equipment and software like Matterport or Vpix360.
Again, since this guidebook focuses on presenting an introduction to 360 video, we won’t be tackling this, but will refer to some further reading in the resources section for those who are interested. What’s important for now is for you to know a) the difference between monoscopic and stereoscopic 360 video b) that most 360 video is monoscopic and c) that only some 360 cameras have the option to shoot stereoscopic content and they tend to be much more expensive and geared towards professional filmmakers.
A YouTube element has been excluded from this version of the
18 | 360 Essentials: A Beginner's Guide to Immersive Video Storytelling
text. You can view it online here:
https://pressbooks.library.ryerson.ca/360essentials/?p=5
Fig. 7: 3D VR filmed in space by National Geographic
WHAT IS VR VIDEO?
“Virtual Reality”
OK, so is any of this 360 stuff we’ve been watching “virtual reality?” Yes and no. It turns out that virtual reality has been maddeningly difficult to define.
The Tow Center at the Columbia Graduate School of Journalism, for one, defines virtual reality as “an immersive media experience that replicates either a real or imagined environment and allows users to interact with this world in ways that feel as if they are there.” Other definitions emphasize that true VR involves a three-dimensional experience where one has full freedom of movement and the ability to manipulate aspects of the environment.
While the term “virtual reality” remains loosely defined and open to interpretation, most researchers and content creators would agree that a fundamental aspect of VR is the idea of presence, the sensation of actually feeling like you’re physically part of the scene, but through the connection of technology. When VR is done well, it can actually trick your brain and body into believing you’re about to swing through a canyon in Utah (fig. 10).
Try watching the tightrope video again with a headset. Did your stomach drop a little? Did the brightness of the sun remind you of a summer day? Those sensations are something VR content
Chapter 1: What is 360 Video? | 19
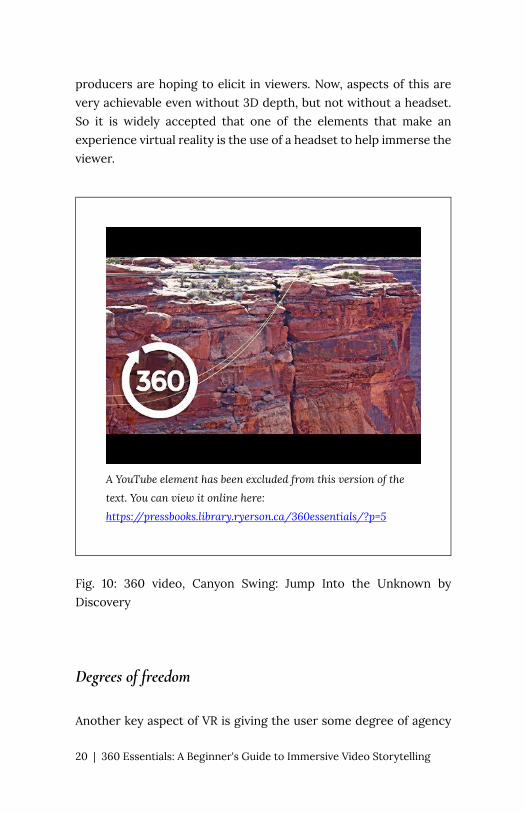
producers are hoping to elicit in viewers. Now, aspects of this are very achievable even without 3D depth, but not without a headset. So it is widely accepted that one of the elements that make an experience virtual reality is the use of a headset to help immerse the viewer.
A YouTube element has been excluded from this version of the
text. You can view it online here:
https://pressbooks.library.ryerson.ca/360essentials/?p=5
Fig. 10: 360 video, Canyon Swing: Jump Into the Unknown by Discovery
Degrees of freedom
Another key aspect of VR is giving the user some degree of agency
20 | 360 Essentials: A Beginner's Guide to Immersive Video Storytelling
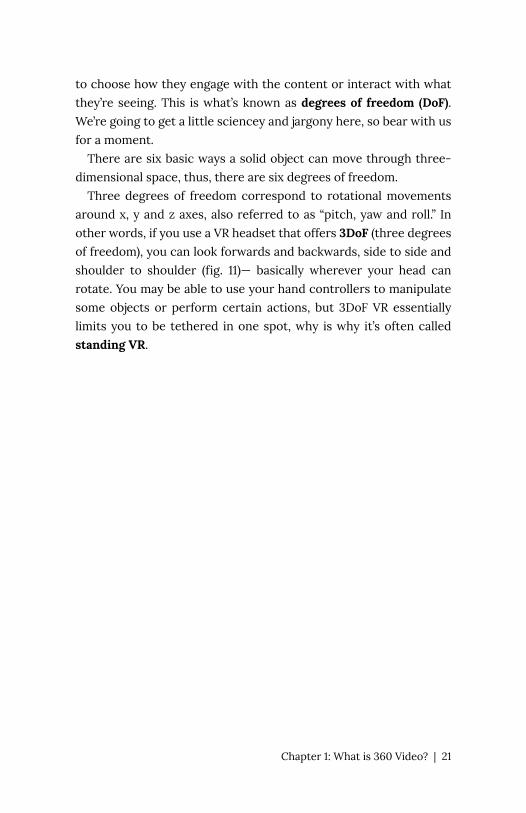
to choose how they engage with the content or interact with what they’re seeing. This is what’s known as degrees of freedom (DoF). We’re going to get a little sciencey and jargony here, so bear with us for a moment.
There are six basic ways a solid object can move through three-dimensional space, thus, there are six degrees of freedom.
Three degrees of freedom correspond to rotational movements around x, y and z axes, also referred to as “pitch, yaw and roll.” In other words, if you use a VR headset that offers 3DoF (three degrees of freedom), you can look forwards and backwards, side to side and shoulder to shoulder (fig. 11)— basically wherever your head can rotate. You may be able to use your hand controllers to manipulate some objects or perform certain actions, but 3DoF VR essentially limits you to be tethered in one spot, why is why it’s often called standing VR.
Chapter 1: What is 360 Video? | 21
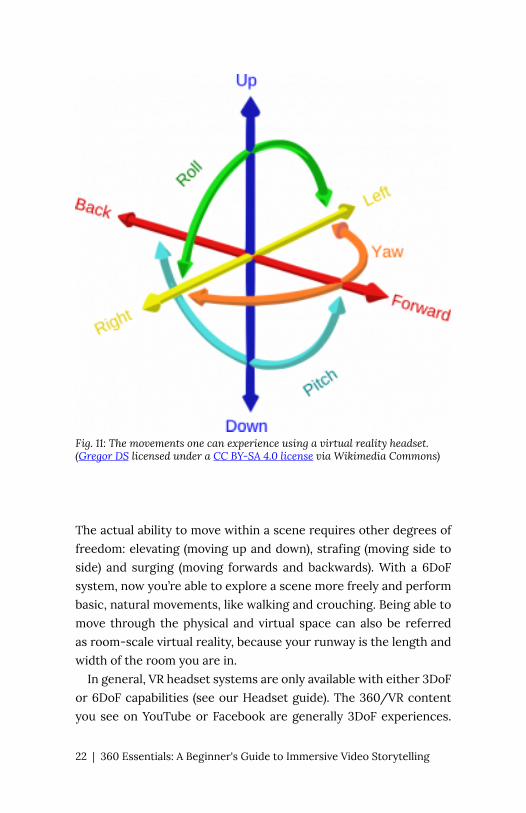
Fig. 11: The movements one can experience using a virtual reality headset. (Gregor DS licensed under a CC BY-SA 4.0 license via Wikimedia Commons)
The actual ability to move within a scene requires other degrees of freedom: elevating (moving up and down), strafing (moving side to side) and surging (moving forwards and backwards). With a 6DoF system, now you’re able to explore a scene more freely and perform basic, natural movements, like walking and crouching. Being able to move through the physical and virtual space can also be referred as room-scale virtual reality, because your runway is the length and width of the room you are in.
In general, VR headset systems are only available with either 3DoF or 6DoF capabilities (see our Headset guide). The 360/VR content you see on YouTube or Facebook are generally 3DoF experiences.
22 | 360 Essentials: A Beginner's Guide to Immersive Video Storytelling
On the most basic level, this would mean giving people the ability to look wherever they wanted to, like with 360 video. More premium types of VR headsets like the Oculus or HTC Vive brands, have superior movement tracking technology, allowing them to enjoy 6DoF games and video content.
As this is an introductory guidebook, our primary focus is on producing 3DoF video content, as specialized software and gaming programs like Unity and Unreal are often required to create environments that actually utilize 6DoF (Learn more about this in Chapter X – The Future of 360) and most 360 cameras aimed for consumer users on the market are not advanced to support the depth mapping and 3D video needed for this.
TL;DR
We hope this chapter has provided some history and context into the evolution of 360 video. Of course, the real fun is in shooting, editing and showing off amazing 360 experiences (we’re about to get to that, we swear!), but it is important to understand some of the key terms and concepts that underpin this medium. As a props for making it to the end of the chapter, we’ll make things easy and break everything down for you.
• History has shown that people have a real fascination and desire to experience art, photography and video in immersive ways.
• 360 photography and video technology have been evolving for centuries, becoming substantially more affordable and user-friendly.
• Modern 360 video is created by sequencing multiple shots together (i.e. two 180 degree shots = one 360 degree shot) — this is known as stitching.
• The seam at which two shots are sequenced together is known
Chapter 1: What is 360 Video? | 23
as the stitch line. • 360 video, 3D-360 video and virtual reality are not the same
things and many people take issue with using these terms interchangeably! Quick recap:
◦ 360 video is content that allows the user to watch from an angle of their choice.
◦ 3D-360 video is shot with stereoscopic video techniques, giving a sense of depth to the scene. This is more advanced 360 work and most 360 content you’ll see right now is monoscopic.
◦ Virtual reality is an immersive, interactive experience in a simulated or captured environment. The immersive aspect is critical to be true VR, requiring the use of a headset.
• A key aspect of virtual reality is giving the viewer some freedom of movement. These are referred to as degrees of freedom (DoF):
◦ 3DoF refers to three degrees of freedom (ability to move your head around while experiencing content).
◦ 6DoF refers to six degrees of freedom (ability to move your head and body position while experiencing content).
• Really effective 360 or VR content tries to generate the concept of presence for users, the sensation or feeling that you’re really there in the scene. The feeling of presence allows us to engage with the virtual environment in a way that feels natural and realistic.
24 | 360 Essentials: A Beginner's Guide to Immersive Video Storytelling
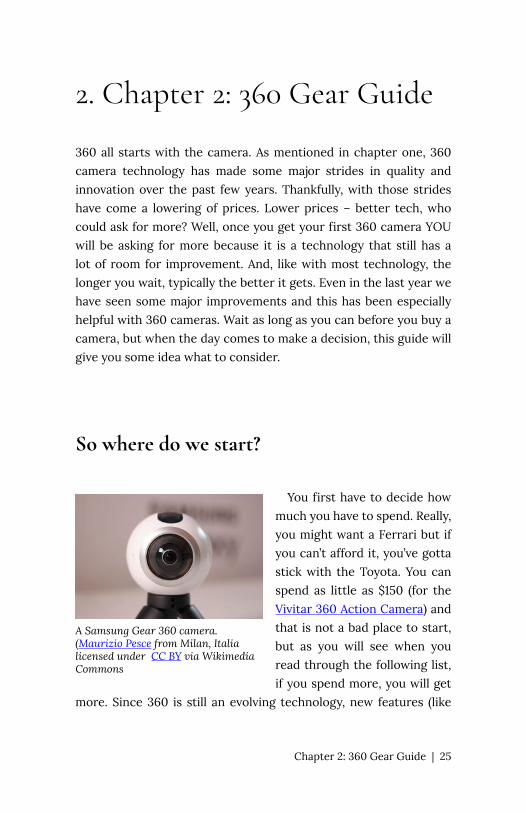
A Samsung Gear 360 camera. (Maurizio Pesce from Milan, Italia licensed under CC BY via Wikimedia Commons
2. Chapter 2: 360 Gear Guide
360 all starts with the camera. As mentioned in chapter one, 360 camera technology has made some major strides in quality and innovation over the past few years. Thankfully, with those strides have come a lowering of prices. Lower prices – better tech, who could ask for more? Well, once you get your first 360 camera YOU will be asking for more because it is a technology that still has a lot of room for improvement. And, like with most technology, the longer you wait, typically the better it gets. Even in the last year we have seen some major improvements and this has been especially helpful with 360 cameras. Wait as long as you can before you buy a camera, but when the day comes to make a decision, this guide will give you some idea what to consider.
So where do we start?
You first have to decide how much you have to spend. Really, you might want a Ferrari but if you can’t afford it, you’ve gotta stick with the Toyota. You can spend as little as $150 (for the Vivitar 360 Action Camera) and that is not a bad place to start, but as you will see when you read through the following list, if you spend more, you will get
more. Since 360 is still an evolving technology, new features (like
Chapter 2: 360 Gear Guide | 25
better stabilization for example), can make a huge difference to the viewing experience.
For the purpose of this guide, all the cameras recommended are under $1,000 in Canadian currency as of the time this guide was written (expect the prices to trickle up as time goes on unless you’re able to find a great sale). Shop around before you buy and in some cases you might find it cheaper to buy it in the U.S. or Asia. Be sure to do some online sleuthing to make you get the best price. Also, you will find that often when a new model of a 360 camera comes out, the older model price drops dramatically. An excellent example of that is the GoPro Fusion, which costed nearly $1,000 when it was released, and now sells for half as much. This is because the newer GoPro Max 360 camera is both improved and cheaper, with a sticker price of around $700 at the time of its release.
As we mentioned before, the focus of this guide will be the smaller, dual lens 360 cameras that we consider the most practical for the journalists and people on the go (and for people on a budget!). Larger, professional cameras like the KanDao Obsidian R (which currently retails for nearly $6,000), the Insta360 Pro (currently retailing for just under $5,000), or even the smaller KanDao Obsidian Go (which currently sells for about $3,000), are excellent cameras but are expensive and require a lot of computing power to edit the footage. The Vuze+ VR is cheaper at nearly $1,000, but it has eight lenses and is not a camera that fits easily in your pocket.
There are certainly advantages to the cameras with more lenses but, again, this guide is going to focus on smaller portable units. There is an old photographer’s saying that “the best camera is the one you have with you.” With small, pocket sized 360 cameras, you are much more likely to have it with you and actually use it. Also, with every release of new 360 cameras, these smaller cameras are getting better and better.
The purpose of this guide is to not recommend any one camera, but to highlight features that we consider important to have on any camera you choose. These are presented in no particular order:
26 | 360 Essentials: A Beginner's Guide to Immersive Video Storytelling
RESOLUTION
As you will learn elsewhere in this guide, close-ups do not generally work well in 360. This is more of a wide angle medium where people can look around and view everything. When you are looking at 360 footage, especially through VR headsets, the ideal is for people to feel they are really there. And this is why resolution is VERY important. More resolution means more detail in the footage, which is what you want. You want the viewer to be able to read signs in the distance, or see people’s facial expressions, or other interesting details in your scene.
What exactly is resolution?
A visual device, whether it is a monitor, a phone or a television, all display a certain quality of picture. For digital images, size is measured in pixels. A pixel is the smallest element in the image. If you look really close at a screen you can usually see pixels as they appear as dots. These dots contain the colour information (aka sub pixels) which are red, green and blue (RGB).
A digital display, like a television, a computer monitor, or a smartphone, can display a certain number of pixels, or dots. They are measured both horizontally and vertically. Standard High Definition televisions, for example, are typically 1920 x 1080. This means there are 1920 pixels wide, and 1080 pixels high. It is helpful to understand that if a TV says it has 1920 x 1080 pixels, then the actual size of the TV (whether it is a 32 inch or a 65 inch) does not matter – it still only has that many pixels which is why smaller televisions traditionally looked better because there were the same number of pixels but in a smaller area. That is why 4K TVs, which
Chapter 2: 360 Gear Guide | 27
have a pixel count of 3840 x 2160, will look better because there are more pixels.
Ok, so what on Earth does this have to do with 360? Well, as previously mentioned, if 3840 x 2160 (4K) is the number of pixels that a camera shoots, then that is all the pixels it shoots. But with 360 video, the camera takes those pixels and spreads them around 360 degrees. So, it does not mean that you are seeing 4K video when you are looking in one direction – you are maybe seeing 1000 pixels in each direction. This is why the higher the pixel count the better because it spreads them around the image, which is important because you have a larger viewing area. More pixels equals more resolution which is critical with 360.
Here’s a tip: sometimes a manufacturer will come out with an update for a camera that will improve the quality and look of the image on the camera you already own. This means you should keep your eyes out for updates that might add extra features and improvements to your camera. This is especially true of new cameras that are released. Typically there will be a firmware update for that camera at some point.
A few things related to resolution of the camera:
1. Overheating. The higher resolution puts a great demand on the electronics of the camera which means the camera will get hotter. Some cameras, like with the Samsung Gear VR 360 (2017), will shut off if they overheat which can be more than an inconvenience.
2. A higher resolution means a much larger file which means you need to have a computer that can handle that file.
3. Larger files means your SD card will be filled faster which means you will need a larger SD card.
4. More resolution puts a greater strain on the battery which means it drains faster. Some cameras, like the 360 Penguin Action camera for example, even offer resolution that cannot be accessed when using just a battery – you have to plug in the camera.
28 | 360 Essentials: A Beginner's Guide to Immersive Video Storytelling

FRAMES PER SECOND
This is as good a time as any to discuss frames per second. This is something you have to consider when you are setting up the camera to shoot, but you need to know about it in advance so you can purchase the correct camera.
FPS or frames per second is exactly what it sounds like – how many different images or “frames” will be shown per second. If you think of the old style film cameras, they were just a bunch of frames of images that ran through a projector at a certain speed. Film typically runs at 24 frames per second and this trained audiences to recognize what is considered a “cinematic look.” When the analog television system was standardized in North America in 1954, the frame rate was 29.97 (rounded up to 30fps). This standard was called the NTSC standard after the technical group that created it (the National Television System Committee). As a side note, different analog systems (PAL and SECAM) were used elsewhere in the world which used a 25 frame per second rate. The higher frame rate of television (more frames per second) is why video looks more “fluid” than film (which has a “choppier” feel). This is sometimes called “The Soap Opera Effect.” This look works well for 360 since it looks more like real life and less like the film look of 24fps (although again, it depends on what you are shooting).
Older camera technology allowed you to only use one frame rate but digital technology changed all of that. Changing the frame rate on your camera will change the look and visual feel of your shots. For most purposes, 30 fps is quite appropriate. Anything higher, say 60fps, is used to create slow-motion effects or when recording action such as a sporting event.
When considering your frame rate (how many fps), you need to consider how much motion there will be in your video. Shooting
Chapter 2: 360 Gear Guide | 29
movement at 24 or 30 frames per second, if the movement is fast enough, could mean that there is some motion blur if you try to do a slow motion effect on this footage when you are editing. Both of these frame rates do provide a fairly natural look to your shots even if there is normal movement in the shot, like people walking around in the frame. To be clear, there is nothing wrong with either 24fps or 30fps as they have been used at the professional level for years and continue to dominate the market. So more frames per seconds is not necessarily better.
Shooting more frames per second, like 60 or 120 fps, and then watching the footage at normal speed might look unnatural – almost like a staccato effect. However, freezing or doing a super slow motion effect with this footage will look great. Think of a hockey game where the player is taking a shot at the net. More frames per second means that when you slow the footage down you will be able to see sharp images of the puck as it flies towards the net. If you slow down the same footage if it was shot with 24 or 30fps, the puck would be blurred.
When buying a camera you will see different options offered. You might see camera specs like 5.7K @30fps, 4K@60fps etc. This means that the camera cannot offer a high frame rate at the highest resolution. We recommend that you always choose the highest frame rate your camera offers and only use a higher frame rate if you want to do slow motion with it.
CONCLUSION: Simply put, buy the best resolution you can afford. 4K is fine, but as you will see in the camera list at the end of this chapter, there are some very inexpensive cameras that shoot 5.3K+ which you should consider, but we would not recommend buying anything lower than 5.3K.
So let’s now talk about our next consideration when buying a camera – the battery.
30 | 360 Essentials: A Beginner's Guide to Immersive Video Storytelling

BATTERY POWER
Anybody who uses portable electronics knows the importance of consistent battery power. Go into any coffee shop or library and see how many people have devices plugged in and charging. Even malls have gotten into the act and offer free charging stations. Power is important.
Why does 360 video draw so much power?
Part of the issue is that as cameras get smaller and more portable, there is less space for a battery, which means manufacturers use a smaller size battery. Also, in order to effectively use just two lenses to capture the 360 image, manufacturers try to make the camera as thin as possible. Again, this leaves less room for a battery.
Another issue is that 360 cameras offer some kind of Bluetooth or wireless connection to a smartphone, which again draws more power. While all cameras have basic controls on the cameras, many cameras, like the Ricoh Theta V, require a smartphone (with an app of course!) to control most of the camera functions.
Good 360 footage is 4K resolution or higher which is very hard on your battery. We are actually recommending people to shoot 5.3K or higher which draws even more power. The KanDao Qoocam 8K even offers 8K recording capabilities but comes at a cost as it only records 40 minutes (and the battery is not interchangeable although you can plug the camera into a portable USB power source).
Finally, remember that there are actually two cameras inside a 360 camera and both are drawing power. This means there are two different sensors that need to be powered and the electronics to run them. So that is why you need to carefully look at the battery situation for the camera you are looking at.
Chapter 2: 360 Gear Guide | 31
Solutions:
The best solution is to buy a camera that allows you to change the batteries. Unfortunately, not all cameras have interchangeable batteries (like many smartphones these days) and this can be a problem. With perhaps maybe up to an hour of battery life (but probably half that), you must have an alternative power source. The easiest solution is to buy a camera that allows for you to change the battery, and then buy a second battery.
A note on batteries: you can buy after-market batteries for many cameras and these are usually cheaper. Usually though, these batteries do not last as long as the ones from the camera manufacturer. You should also keep the batteries warm as batteries in cold temperature lose power. When you are shooting in cold weather, the nice thing about most 360 cameras is that they get warm when you are shooting so the battery temperature is usually then at an ideal level.
If you purchase a camera that does not allow you to interchange the battery, then consider an external battery power supply that will allow you to charge up the camera.
You might also make sure that the camera will keep working if you plug it in to AC power (wall plug) especially if you want to use the camera to live stream long events.
Recommendation – buy a 360 camera that allows you to change the battery. Also, remember to keep the batteries warm (if you are shooting in a cold environment) so they don’t lose charge.
STABILIZATION
Watch a 360 video for any length of time and you will appreciate the importance of a rock steady image. Too much movement can actually make the viewer physically sick and of course they will
32 | 360 Essentials: A Beginner's Guide to Immersive Video Storytelling
then stop watching your video. Keeping a shot stable usually means using a stand of some kind is recommended and the type you get is important.
A traditional tripod (with three legs) will not work well with 360 shooting because the legs will be in the shot. Also, as you will read elsewhere about the importance of shooting eye level to a subject. This means you need a stand that goes high enough that it is “eye level” but is a single stand mount so that it is not very noticeable in the shot. As a side note, even the clamp used to mount the camera on to the stand can get in the 360 shot and should be avoided. This is a problem with stands that use a GoPro type clamp mount because it sticks out just enough to get in the shot.
A monopod with feet is what you are going to look for instead. Manfrotto sells a well-made stand (the VR PIXI EVO) designed for 360 cameras. It extends to about 4.6 feet which is a little low so just be aware of that. There are other stands for sale of course, but you want to make sure it goes to a decent height and that it is a solid construction and not prone to swaying in the wind.
The selfie stick is another necessity. You cannot just hold the 360 camera up like you might other video cameras because it will mean you will have a huge hand in the shot. This is where the monopod and the selfie stick shine. The selfie stick can also be used to put the camera in some interesting places. Placed correctly, the selfie stick can appear invisible in the video, which can help the sense of immersion. The proprietary selfie sticks sold by the camera’s maker are ones that should be strongly considered. Some selfie sticks can double as a monopod and come with feet that fold out or attach to the bottom of the stand so you can step out of the shot and get some steady images.
You may be familiar with gimbals. In recent years the gimbal has found popularity because they provide a rock steady shot even when the camera is moving. Many have HD cameras built in or are designed for a DSLR or smartphone, but remember 360 is a very different kind of shooting because you don’t want anything to obstruct the wider lens. A few companies even produced gimbals
Chapter 2: 360 Gear Guide | 33
for 360 – like Moza’s Guru 360 or the Glide Gear CYL100. Stabilization is a critical part of 360 as noted, but with the improvements in built-in camera stabilization, external gimbals are not needed or recommended. If you have an older 360 camera with poor/no stabilization, either just use the camera on a static stand or spend the money on a new camera (which may actually be cheaper than the price of a gimbal).
Now, having said all of that (and talk about burying the lead!), make sure that the camera you buy has great stabilization. You will need this for any movement you might want in the shot. Say you want to do a 360 video of a theme park ride or something where the camera is moving. Without adequate stabilization, your video could make people sick. Rock steady is the goal and good stabilization will get you there. You will see electronic stabilization, which is fine but usually does not work on every shooting format the camera offers, and a built in optical stabilization (some kind of a six or eight axis gyro) is preferable.
MEMORY
Some 360 cameras, such as the Ricoh Theta V and the Theta Z1, only offer built-in memory with no way to expand that. Again, think long and hard before you buy a camera with fixed memory. The Theta cameras come with only 19 gigs worth of memory, which is not a lot when you are travelling. If you plan to purchase a camera with fixed memory, keep that in mind when you are shooting and perhaps bring a laptop along to download the material to. Again, that’s not ideal and most 360 cameras now have a microSD card slot. We recommend only getting a camera that is built with some kind of removable memory card. Some 360 cameras, like the Kandao Qoocam 8K offer both built-in memory (an impressive 64 gigs) and a micro SD card slot – talk about having the best of both worlds!
34 | 360 Essentials: A Beginner's Guide to Immersive Video Storytelling
For those of you who might say you will just delete the clips you don’t want, this is a dangerous way of thinking in the field. One slip of the finger and you might delete footage you didn’t mean to. Also, this takes up valuable time and battery power to do. It is far better to shoot when you are shooting and then only delete files after you have backed them up securely.
Another consideration with memory is to make sure you get memory that is fast enough to handle 360 footage especially if you are shooting 4K and above. This format shoots very large files and you need a card fast enough to hand the transfer. Not all SD cards are created equal. We recommend a U3 rated SDXC card. You also need to be aware that every electronic device that uses a digital media card like the microSD card has a maximum allowable size.
Our Recommendation: buy a camera that allows you to change the microSD card.
OTHER CONSIDERATIONS:
?Frames Per Second In the next chapter we will discuss more about frames per second
but if you are shooting high speed sports or action you will want to look at cameras that offer more frames per second (FPS) such as 60, 100 or 120 fps.
?Waterproof or not? There are numerous waterproof cameras available and these tend
to be marketed as action cameras which is great if you are going to use the camera for extreme sports. Some of these are also shock resistant. While you might be looking for a waterproof or shock resistant camera, you should remember that having a camera with these features may prove to be useful. Have you ever dropped your phone? There is a reason that smartphone cases are popular and
Chapter 2: 360 Gear Guide | 35
shooting with a 360 camera will often put it in a place where it could be dropped, knocked over, or where it could get wet so having the extra protection these cameras offer is helpful.
One note about shooting underwater: For a camera like the GoPro Fusion, although you could shoot underwater with it without a housing, this is not advised because the water will create distortions. You will need a special housing for the lens to get proper stitching. The Nikon Keymission 360 recognizes this, and provides lens protectors. GoPro also now provides lens protector covers in their latest 360 waterproof camera (The Max). One side benefit from these lens protectors, is that they do exactly what they are supposed to – they protect your lens. As with any camera, a scratch on a lens pretty much means the camera is done. With a regular DSLR camera you can put a UV filter over the lens to protect it, so it is nice to have some kind of protection for the lens of a 360 camera.
Here is a list of some waterproof cameras:
GoPro Max ($700) – 5.6K with live streaming capabilities. The newest waterproof camera from GoPro and it is an improved version of the Fusion. Waterproof to five metres and comes with a protective lens, 18 megapixel photos and six microphones for spherical sound.
GoPro Fusion ($320) – Waterproof to 10 metres, 5.2K video, GPS, excellent stabilization, RAW photos, 18 megapixel photos. Since this is a discontinued camera it is available at a deep discount. It is an excellent choice for the price.
Garmin VIRB 360 ($970) – Waterproof to 10 metres, 5.7K video (@30fps), GPS, stabilization, speedometer overlay, 15 megapixel photographs (5640 x 2816), live stream (4K@30fps – Apple Only), MicroSD up to 128GB. The battery will last about one hour.
360Fly 4K ($175) – Waterproof to 10 metres, 4K, GPS, Single Lens Nikon Keymission 360 ($220) – Waterproof to 30 metres (with
36 | 360 Essentials: A Beginner's Guide to Immersive Video Storytelling

the included underwater lens protector), taking whopping 23.9 megapixel photographs.
?Stitching Software Something that is often overlooked when purchasing a camera,
is the stitching software that comes with the camera. Different camera manufacturers offer different proprietary software and some of it is clearly better than others. The free stitching software is nice because it means you just have to import the footage from the camera and it will stitch the footage for you. More on stitching elsewhere in this guide but it is something you need to be aware of when buying a camera. Stitching software has improved a lot and now some cameras can stitch in camera.
While a camera might be a solid piece of technology, you might look into the propriety stitching software that comes with the camera. This is also something that is constantly changing as manufacturers continue to update their software and cameras.
?Photo taking Capability While the focus of this guide is 360 video storytelling, all 360
cameras can also shoot photos and different cameras have different photo taking capabilities. If this is important t0 you, pick a camera with a decent sensor (12 or more megapixels for photos is very good) and one that shoots RAW photos. RAW is an uncompressed file and offers much higher quality images.
?Audio Recorder and external microphones Since most cameras record poor sound of people talking from a
distance, an external audio recording device like a Zoom H1n (which sells for $160 on Amazon) or even a smart phone is helpful. A few cameras (like the KanDao Qoocam 8K) have mic inputs and with those cameras you can plug in a wireless or shotgun mic. This of course is a challenge because it will most likely be in the shot somewhere. Ricoh is one manufacturer that sells a 3D microphone (TA-1) specifically for their camera which plugs into the bottom of
Chapter 2: 360 Gear Guide | 37

the camera and it retails for less than $300 CAD. Having this 360 spatial audio is a huge plus to your 360 production.
Ok. So, you better understand what to look for, but are there some suggestions that we might give you? So here are some…
CAMERAS TO CONSIDER
As with most things in life there are different levels of products that will appeal to different people. This list is by no means definitive, but it gives you a solid idea of what is out there.
THE TOP TIER – For Professional Cinematographers
At this level, not only is the cost larger, but so are the cameras. They have more lenses which improves the overall look because this creates a lot of overlapped images for stitching. As mentioned, the early days of 360 involved a bunch of GoPros mounted together. The technology has moved this idea – multiple cameras using multiple SD cards – to the next level by incorporating all of the camera lenses and SD cards into a single entity. We are not going to focus on these but they are mentioned as the best 360 has to offer at any price!
Cameras at this level include:
Tier 1 – Cinematic quality 360 for professional filmmakers while still being compact and portable
Insta360 Titan ($20,000) — The price and the name says it all. Top
38 | 360 Essentials: A Beginner's Guide to Immersive Video Storytelling
of the heap with an incredible 11K video recording capability, 10 Bit colour and a 9-axis stabilization gyro. Also shoots in 10K 3D.
Insta360 Pro 2 ($6,700) – 8K 3D and offers long-range live monitoring.
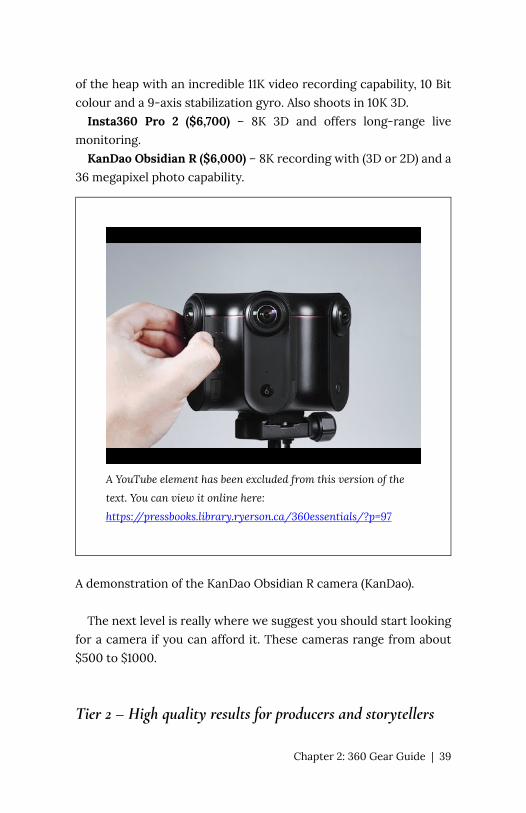
KanDao Obsidian R ($6,000) – 8K recording with (3D or 2D) and a 36 megapixel photo capability.
A YouTube element has been excluded from this version of the
text. You can view it online here:
https://pressbooks.library.ryerson.ca/360essentials/?p=97
A demonstration of the KanDao Obsidian R camera (KanDao). The next level is really where we suggest you should start looking
for a camera if you can afford it. These cameras range from about $500 to $1000.
Tier 2 – High quality results for producers and storytellers
Chapter 2: 360 Gear Guide | 39
(Cameras below $1,000)
KanDao Qoocam 8K ($800) — This is a big step forward in small, portable 360 cameras as it offers 8K resolution. Though smaller than other KanDaos on the market, this camera is the largest two lens 360 camera on the market (about double the size of the new GoPro Max) and is also heavier than most cameras. Also offers 10 bit video (which offers one billion colours vs 16.7 million colours for 8-bit video) and a larger than most sensor (1/1.7” vs 1/2.3” which is about 50% larger). This camera uses H.264 or H.265, which offers an astounding 200mbps bit rate. Also allows for editing on your phone. Excellent slow motion with one of the highest frame rates (120 fps). Offers RAW mode for photos and has a good size touchscreen (2.4”) which makes navigating the menu much easier and allows you to see (in 360) what the camera is seeing. This means you no longer need a smart phone to view your footage.
Something else that is huge is that it has a mic input. It is actually one of the few cameras to have this feature. Also offers built-in memory (a respectable 64 gigs worth of internal memory) and a micro SD card slot for upto 256 GB. There are so many great features in this camera including excellent six axis stabilization. If there is one weakness it is the non-removable battery, which will give you about 40 minutes of heavy shooting. However you can shoot with this camera while charging so you can connect it to a USB power supply and keep going. This camera also comes with optional replaceable lens covers to protect the lens. There is also an optional waterproof housing for this camera.
This camera looks promising and Kandao has an excellent track record with 360 cameras, but there are still some questions, mostly about the stitching capabilities. There is an excellent comparison of this camera to the Insta360 One X and the GoPro Max cameras here. Surprisingly, the footage looks very close to the 8K Kandao and in some cases performs better.
GoPro Max ($799) — Offers 5.6K with live streaming capabilities. This recent waterproof camera from GoPro and is an improved
40 | 360 Essentials: A Beginner's Guide to Immersive Video Storytelling
version of the popular Fusion model. This camera is waterproof up to five metres and comes gives you 18 megapixel photos and six microphones for on-board spherical audio recording, which is a big bonus.
Insta360 One X ($500) — This is a solid performer right in the middle of the pack on price and a personal favourite of our production staff. It offers a gorgeous 5.7K resolution with 18 megapixel photo capabilities. It has excellent stabilization (six axis gyro), and the ability to edit on your smartphone. What is especially impressive about this camera is its ability to handle tough shooting situations like backlighting or areas with lots of shadows. It does a nice job overall with colour saturation as well as it provides an HDR option. If you get this camera, we recommend you also buy the Insta360 invisible selfie stick along with it. A waterproof housing is also available for this camera (up to 5M).
A YouTube element has been excluded from this version of the
text. You can view it online here:
https://pressbooks.library.ryerson.ca/360essentials/?p=97
Chapter 2: 360 Gear Guide | 41
The Insta360 One X is one of the most popular consumer-facing 360 cameras on the market (Insta360)
Tier 3 – Cameras Below $500
YI 360 VR ($150) — The YI 360 VR is an excellent camera, especially considering how the company has dramatically dropped its price tag in recent months. It offers 5.7K resolution (unreal for the price, really), very good stabilization and in camera stitching. It also has a removable battery, microSD card slot and a very functional built in menu. While this camera is not as slender as other cameras (appears quite boxy), this is very functional as it stands vertically quite comfortably.
Samsung Gear 360 ($200) — Agile and versatile, the well-known Gear 360 doesn’t pack a lot of shooting punch (maxing out at 4K resolution), but it is a tremendously user-friendly camera and a solid choice for hobbyists just getting into 360 content. Allows expandable memory and offers time lapse shooting and straightforward live streaming to Facebook or YouTube. If your primary interest is having an affordable camera to take 360 pictures and video clips of your vacation for social media, this pocket-sized device is ideal.
GoPro Fusion ($380) — Waterproof to 10M, 5.2K video, GPS, excellent stabilization, RAW photos, 18 megapixel photos. Since this is a discontinued camera it is available at a deep discount. It is an excellent choice for the price.
42 | 360 Essentials: A Beginner's Guide to Immersive Video Storytelling
A YouTube element has been excluded from this version of the
text. You can view it online here:
https://pressbooks.library.ryerson.ca/360essentials/?p=97
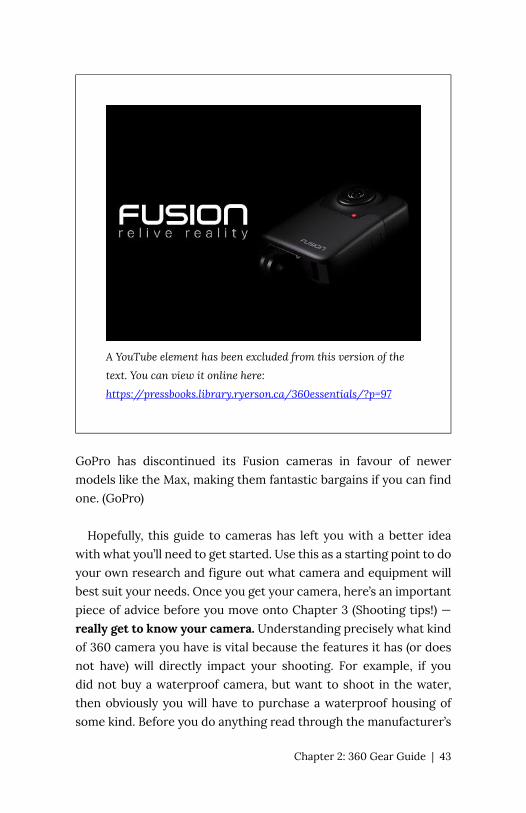
GoPro has discontinued its Fusion cameras in favour of newer models like the Max, making them fantastic bargains if you can find one. (GoPro)
Hopefully, this guide to cameras has left you with a better idea
with what you’ll need to get started. Use this as a starting point to do your own research and figure out what camera and equipment will best suit your needs. Once you get your camera, here’s an important piece of advice before you move onto Chapter 3 (Shooting tips!) — really get to know your camera. Understanding precisely what kind of 360 camera you have is vital because the features it has (or does not have) will directly impact your shooting. For example, if you did not buy a waterproof camera, but want to shoot in the water, then obviously you will have to purchase a waterproof housing of some kind. Before you do anything read through the manufacturer’s
Chapter 2: 360 Gear Guide | 43
instructions for your specific camera or watch online videos about your camera’s features. As with any piece of equipment you are using, getting comfortable with how it works can be the difference between footage that is tremendous and footage that is trash.
TL;DR:
1. With 360 video, higher resolution matters in terms of getting the best picture quality and viewing experience possible. Get the highest shooting resolution you can afford. Your camera should, at minimum, give you the ability to shoot 4K, although we highly suggest going for a camera that can do 5K+ if you’re able to afford it
2. The most important accessory you can have with a 360 camera is some kind of selfie stick or monopod that is designed to be used with these kinds of cameras. These will help stabilize your camera when shooting (incredibly important for 360) but will be thin enough to disappear or look subtle in your footage
3. These cameras drain batteries like crazy, so it’s always a good idea to purchase spare camera batteries and always have them charged up and ready to swap in
4. These cameras differ greatly in terms of how much on-board memory they contain. High resolution video will fill up the memory quickly, so ideally, look for a camera that allows you to add additional SD card memory.
44 | 360 Essentials: A Beginner's Guide to Immersive Video Storytelling
3. Chapter 3: A Guide to Shooting in 360
So you’ve got your camera and you’re ready to roll. In this chapter, we present our handy dandy field guide on how to prep your equipment, different types of 360 shots you can try and how to capture quality video no matter how fancy your gear is.
Setting your camera up for success
Making sure you’re on point with your camera setup is absolutely vital because if you get this wrong, you may record at the wrong frame rate or resolution and possibly spoil your whole shoot. Again, this goes back to understanding what features your camera has and then knowing how to access them. It also helps to have everything you need gathered together, organized and checked to make sure they’re in good working order. Use a gear checklist (like the one we’ve provided below) before a major shoot:
GEAR CHECKLIST:
◻ 360 camera ◻ Extra camera batteries OR an external USB power bank ◻ A fast transfer/high speed microSD card (we recommend a U3
rated SDXC card). An extra one is highly recommended ◻ Monopod/Selfie stick – This/these are an absolute necessity.
Chapter 3: A Guide to Shooting in360 | 45
Holding a camera without a selfie stick will mean you will have a giant hand in the bottom of the screen. The monopod (get one with feet!) allows you to set up the camera and then leave it alone to record the scene ◻ All necessary charging cables. ◻ Lens cover or soft case (scratched lenses will destroy your
camera!) ◻ Any kind of waterproof case or sport housing you may need ◻ Smartphone with 360 camera app – Make sure you have the
app not only downloaded, but check all of this before you leave your home. Also, do all of this the night before so you can make sure it all works. Then you can fully charge your camera. ◻ Lens cleaning kit – A regular camera lens cleaning kit will do. OK, everything checked off? Before you go on your shoot, it’s a
good idea to run through your camera settings to make sure you’ll get what you want.
1. Insert the battery and turn on the camera power. Does it show as fully charged?
2. In the menu, select the recording format that you want. We recommend you choose the highest quality possible. The minimum you want to select is 4K. If your camera has 5K capability (or higher), then we suggest using that setting. Check the frame rate as well. We suggest shooting at the highest frame rate available, with 30 frames per second (FPS) being the top option for many consumer-level 360 cameras. If you’re shooting some slow motion or time lapse footage, 25 FPS will suffice.
3. Also, check the menu for any other recording anomalies. Some cameras may have a default record time before entering sleep mode (the Ricoh Theta V, for example shuts off after five minutes of recording on its default setting). This can be a disaster if you are using the camera to record a wedding, only
46 | 360 Essentials: A Beginner's Guide to Immersive Video Storytelling
to later find out it stopped (and did not automatically restart) midway through the vows! If there is a default time limit, be sure to change this.
4. Insert and format the microSD card. Once you have done this, do a short test record and play it back to make sure it recorded properly.
5. Clean the lens with your lens cleaning kit. If it has a lens cleaning fluid, never put the liquid directly on the lens. Spray or squirt the liquid onto the lens cleaning cloth first. Dirt on a 360 lens is bad news when shooting. A scratch it even worse news so make sure you are careful. While we are on the topic of scratches – NEVER LAY YOUR 360 CAMERA down on an unprotected lens. This is an easy way to scratch your lens. Some of the newer cameras (Kandao Qoocam 8K, GoPro Max) now come with inexpensive (and replaceable) lens covers. These should be used at all times and not just when shooting underwater. Protect your lens!
6. Put your camera in a soft, protective case as you head out!
FUNDAMENTAL SHOT TYPES
The cool thing about 360 video is that, thanks to technological innovations and a growing legion of daring filmmakers, new shooting techniques are being experimented with all the time. But at this point, it’s prudent to master a few basic types of 360 shots before moving onto more advanced ideas.
As we’ve mentioned before, unlike other forms of video storytelling where there are numerous types of shots, including medium-shots, close-ups and extreme close-ups, most kinds of shots in 360 video are variations of wide shots. Having said that, there are some consistent types of shots that form the basis of 360 visual storytelling. They may be basic, but they are very effective.
Chapter 3: A Guide to Shooting in 360 | 47
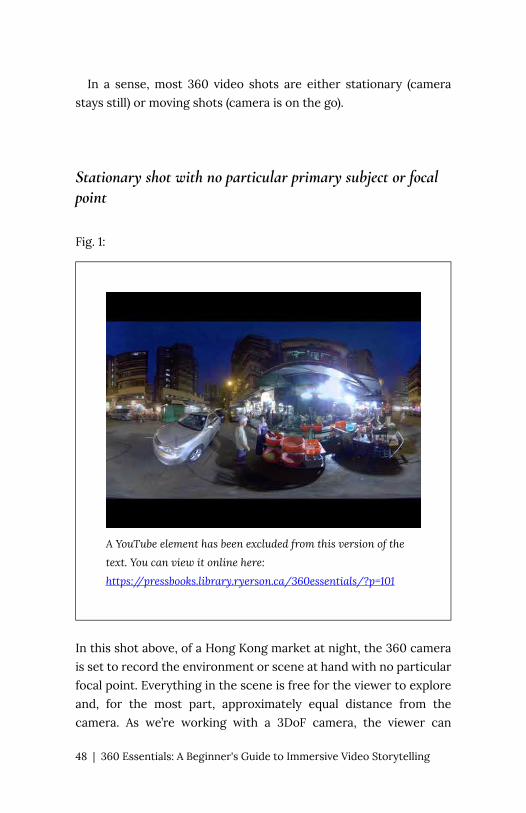
In a sense, most 360 video shots are either stationary (camera stays still) or moving shots (camera is on the go).
Stationary shot with no particular primary subject or focal point
Fig. 1:
A YouTube element has been excluded from this version of the
text. You can view it online here:
https://pressbooks.library.ryerson.ca/360essentials/?p=101
In this shot above, of a Hong Kong market at night, the 360 camera is set to record the environment or scene at hand with no particular focal point. Everything in the scene is free for the viewer to explore and, for the most part, approximately equal distance from the camera. As we’re working with a 3DoF camera, the viewer can
48 | 360 Essentials: A Beginner's Guide to Immersive Video Storytelling

choose where to look in the video, but remains stationary while the action unfolds around them.
Stationary shot with a primary subject or focal point
Fig. 2:
A YouTube element has been excluded from this version of the
text. You can view it online here:
https://pressbooks.library.ryerson.ca/360essentials/?p=101
In this wide shot, the camera is also planted to remain stationary, except this time, there is a primary subject or focal point that the filmmakers want you to see. The viewer is still free to explore other parts of the scene, however, it is clear from the camera position that the statute of Bruce Lee in Hong Kong’s Tsim Sha Tsui harbourfront is meant to draw your attention. When you’re shooting a stationary
Chapter 3: A Guide to Shooting in 360 | 49
shot with a particular focal point in mind, remember these key tips: a) be sure that the subject is at least two feet away from the lens to avoid blurring or distortion b) the subject is not caught in the camera’s blind spot and in danger of being in the stitch line and c) make sure the camera is dead level (or as much as reasonably possible).
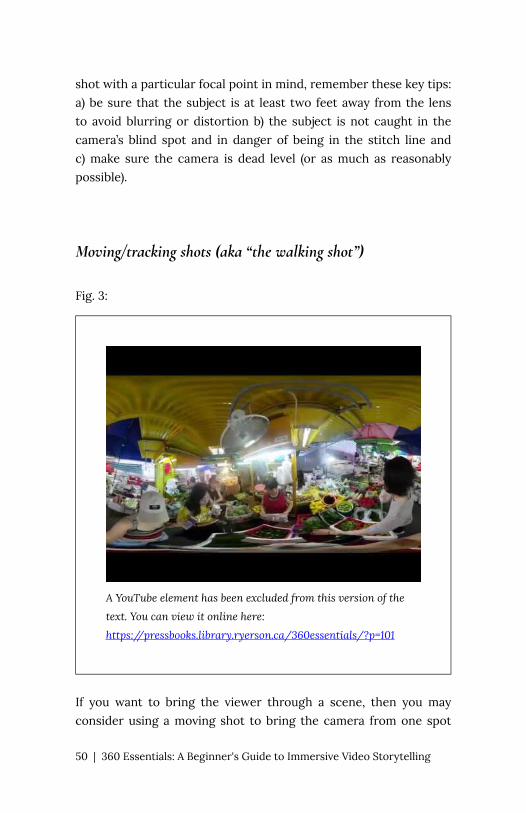
Moving/tracking shots (aka “the walking shot”)
Fig. 3:
A YouTube element has been excluded from this version of the
text. You can view it online here:
https://pressbooks.library.ryerson.ca/360essentials/?p=101
If you want to bring the viewer through a scene, then you may consider using a moving shot to bring the camera from one spot
50 | 360 Essentials: A Beginner's Guide to Immersive Video Storytelling

to another. In order to create this type of shot, you will most likely have to hold the camera with a selfie stick (unless you have access to a drone or some kind of professional dolly). And unless you have a 360 camera that’s large enough to hide under its blind spot, you will more than likely end up being in the shot itself. That’s not necessarily an issue, as many 360 content creators end up being “hosts” in their videos, perhaps leading their viewers through tours of places or if a reporter acts as a guide. If you’re going to be in the shot, just act natural and try to become part of the environment as much as possible. There are many different ways one could hold and position the camera while walking, including straight overhead (so the camera operator appears at the bottom of the video) or in front of the body a few feet (so the camera operator appears when you look behind). Some filmmakers have also mounted 360 cameras onto helmets to try to create a first-person perspective feel, although those can be tough to shoot. Feel free to try different variations and compare the results. Whatever you do, when you tackle a moving or walking shot, we would advise you to:
• Keep your movements consistent and minimal • Don’t pan, tilt or rotate the camera – this can be disorientating
for people, especially those watching with headsets • If you’re going to move, do it one direction, smoothly and
slowly. If your movement involves a sudden change in direction, it helps if that change feels natural and somewhat expected (i.e. following the curve in a road or moving from a staircase to a hallway)
• If your camera has built-in stabilization, make sure it’s active • If you’re moving shot is following a primary subject, remember
to keep the camera at least two or three feet away for visual clarity
There are some cool variations of the walking shot you can do that changes the perspective for the viewer.
One variation is what we’ll call the “follow shot.” Instead of holding
Chapter 3: A Guide to Shooting in 360 | 51
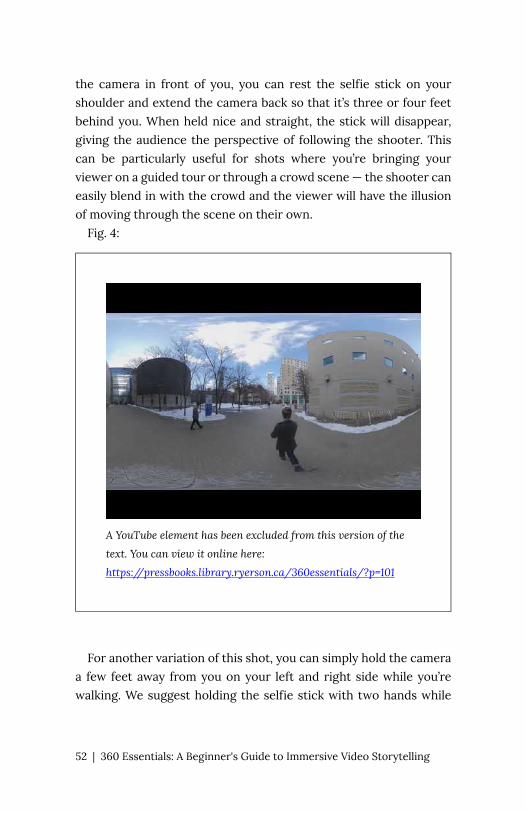
the camera in front of you, you can rest the selfie stick on your shoulder and extend the camera back so that it’s three or four feet behind you. When held nice and straight, the stick will disappear, giving the audience the perspective of following the shooter. This can be particularly useful for shots where you’re bringing your viewer on a guided tour or through a crowd scene — the shooter can easily blend in with the crowd and the viewer will have the illusion of moving through the scene on their own.
Fig. 4:
A YouTube element has been excluded from this version of the
text. You can view it online here:
https://pressbooks.library.ryerson.ca/360essentials/?p=101
For another variation of this shot, you can simply hold the camera
a few feet away from you on your left and right side while you’re walking. We suggest holding the selfie stick with two hands while
52 | 360 Essentials: A Beginner's Guide to Immersive Video Storytelling
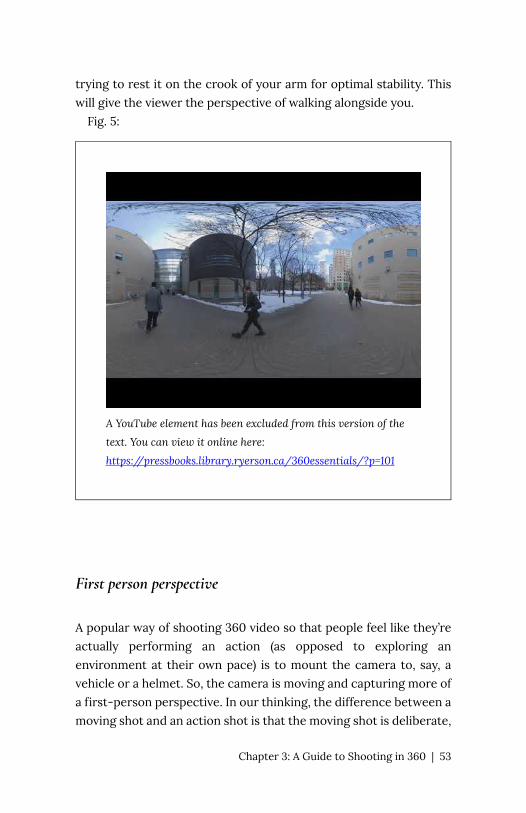
trying to rest it on the crook of your arm for optimal stability. This will give the viewer the perspective of walking alongside you.
Fig. 5:
A YouTube element has been excluded from this version of the
text. You can view it online here:
https://pressbooks.library.ryerson.ca/360essentials/?p=101
First person perspective
A popular way of shooting 360 video so that people feel like they’re actually performing an action (as opposed to exploring an environment at their own pace) is to mount the camera to, say, a vehicle or a helmet. So, the camera is moving and capturing more of a first-person perspective. In our thinking, the difference between a moving shot and an action shot is that the moving shot is deliberate,
Chapter 3: A Guide to Shooting in 360 | 53
planned movement. With the action shot, the movement is more spontaneous, harder to predict and more about creating the illusion that you’re doing the action itself. Think of 360/VR videos of skydiving or riding roller coasters. Once again, for anything involving movement, stabilization is the name of the game, so having a camera (hopefully with excellent built-in stabilization) securely mounted will be of utmost priority.
Timelapse
One feature most 360 cameras now have is the built-in ability to create time lapse shots, as a timelapse can be pretty difficult and time-consuming to create manually. This feature works with both stationary and moving shots. Be sure the camera is placed in a secure area that will show something of interest in all fields of view over a span of time — for example, try an interesting sunrise or a crowded place, rather than a small room with constant artificial light. Unless, perhaps, there’s something really interesting happening in that room.
Fig. 6: William Briscoe Photography’s YouTube channel has several incredible timelapse 360 videos that put the full majesty of the northern lights on display.
54 | 360 Essentials: A Beginner's Guide to Immersive Video Storytelling
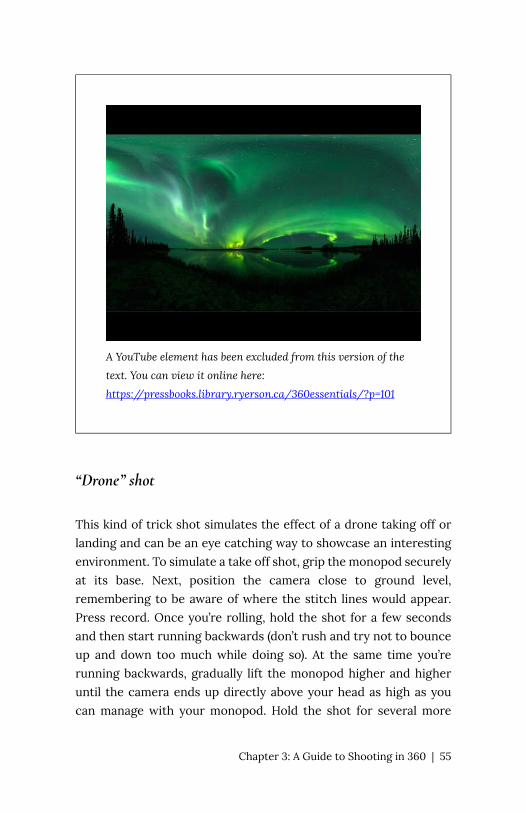
A YouTube element has been excluded from this version of the
text. You can view it online here:
https://pressbooks.library.ryerson.ca/360essentials/?p=101
“Drone” shot
This kind of trick shot simulates the effect of a drone taking off or landing and can be an eye catching way to showcase an interesting environment. To simulate a take off shot, grip the monopod securely at its base. Next, position the camera close to ground level, remembering to be aware of where the stitch lines would appear. Press record. Once you’re rolling, hold the shot for a few seconds and then start running backwards (don’t rush and try not to bounce up and down too much while doing so). At the same time you’re running backwards, gradually lift the monopod higher and higher until the camera ends up directly above your head as high as you can manage with your monopod. Hold the shot for several more
Chapter 3: A Guide to Shooting in 360 | 55
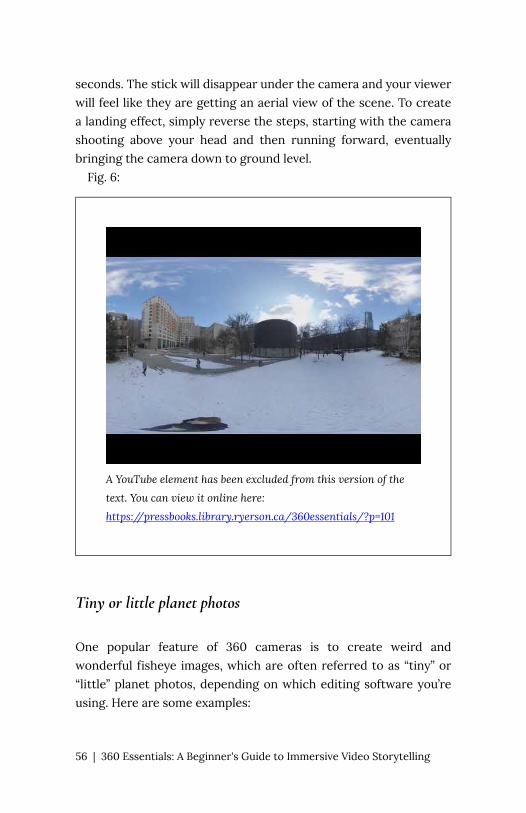
seconds. The stick will disappear under the camera and your viewer will feel like they are getting an aerial view of the scene. To create a landing effect, simply reverse the steps, starting with the camera shooting above your head and then running forward, eventually bringing the camera down to ground level.
Fig. 6:
A YouTube element has been excluded from this version of the
text. You can view it online here:
https://pressbooks.library.ryerson.ca/360essentials/?p=101
Tiny or little planet photos
One popular feature of 360 cameras is to create weird and wonderful fisheye images, which are often referred to as “tiny” or “little” planet photos, depending on which editing software you’re using. Here are some examples:
56 | 360 Essentials: A Beginner's Guide to Immersive Video Storytelling

Fig. 7 Adrian Ma, Ryerson University, CC BY 4.0
Chapter 3: A Guide to Shooting in 360 | 57
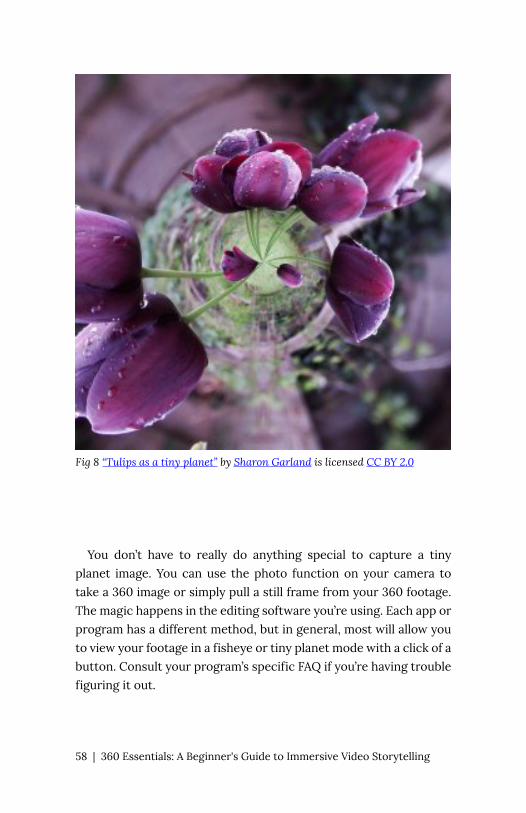
Fig 8 “Tulips as a tiny planet” by Sharon Garland is licensed CC BY 2.0
You don’t have to really do anything special to capture a tiny
planet image. You can use the photo function on your camera to take a 360 image or simply pull a still frame from your 360 footage. The magic happens in the editing software you’re using. Each app or program has a different method, but in general, most will allow you to view your footage in a fisheye or tiny planet mode with a click of a button. Consult your program’s specific FAQ if you’re having trouble figuring it out.
58 | 360 Essentials: A Beginner's Guide to Immersive Video Storytelling
Here are a few useful tips you can apply to taking tiny planet photos:
• Experiment with multiple camera positions. Even small changes in your 360 camera orientation can produce very different results. So when you’re out there shooting with producing tiny planet content in mind, always grab a few variations of the shot so you can see how they turn out when you apply the effect later on
• If you have a tiny planet image where the bulk of the image’s details are loaded onto one side of the photo, try to keep the details at the top of the photo instead of the bottom.
BEST PRACTICES FOR SHOOTING IN 360
While there are many other kinds of 360 shots you can try, the shots we’ve discussed are the building blocks of many 360 video projects. Here are some general tips to help you shoot high quality video.
1. Remember that 360 cameras record in every direction. Being aware of your environment and what your viewers could be seeing at all possible vantage points is important. As much as possible, we want to give people visually dynamic scenes to explore. Watch out for obstructions and uninteresting things, like plain walls. If you can reposition your camera to capture your environment in a more interesting manner, then try to do so.
2. Unless you’re going for a very specific perspective, we advise placing the camera at eye-level to your subject or in a scene. If you place your camera too low, say right on the floor, it can make for a very awkward experience for the viewer who
Chapter 3: A Guide to Shooting in 360 | 59
watches the footage later, especially in a headset. Feel free to experiment with higher and lower angles, but understand that most individuals expect to see the world from eye-level. Be aware that sudden changes in levels (i.e. going from eye-level in one scene to floor-level in another) can be a jarring viewing experience and take people out of that precious feeling of immersion.
3. The monopod is your best friend for stability – use it! As mentioned in the gear guide (Chapter 2), not all monopods are created equal. You want one that is fairly rigid and reaches a decent height for shooting. Some people find that a regular light stand (with the proper screw mount on top) works nicely.
4. Hold each shot longer than you would when shooting traditional video. Your pacing with a 360 story will be slower so people have time to look around in your images unlike traditional shooting where you cut faster. To be safe, shoot about one minute of each scene and be sure to leave “padding” (extra recording time) at the beginning and ending of your shots for transitions. You have to shoot wisely with 360 video because if you only have 30 minutes of battery life (assuming you don’t have a second battery), and if you shoot one minute per shot, that means you only have 30 shots! So shoot wisely, friends.
5. Don’t rotate, aim or fuss with the camera once you start recording a scene. Set the camera direction and leave it. Since you are recording omnidirectionally, the audience has control of which way they look. This is especially true if you are doing a walking shot. This also means, don’t follow any action that might be happening, say someone walking through the shot. Keep the camera steady. Remember, it’s recording everything in every direction!
6. If you are using a selfie stick make sure that is it is straight up and down and not angled out as you would normally use a selfie stick. If the selfie stick isn’t completely straight, parts of it could stick outside of the camera’s blind spot show up in the
60 | 360 Essentials: A Beginner's Guide to Immersive Video Storytelling
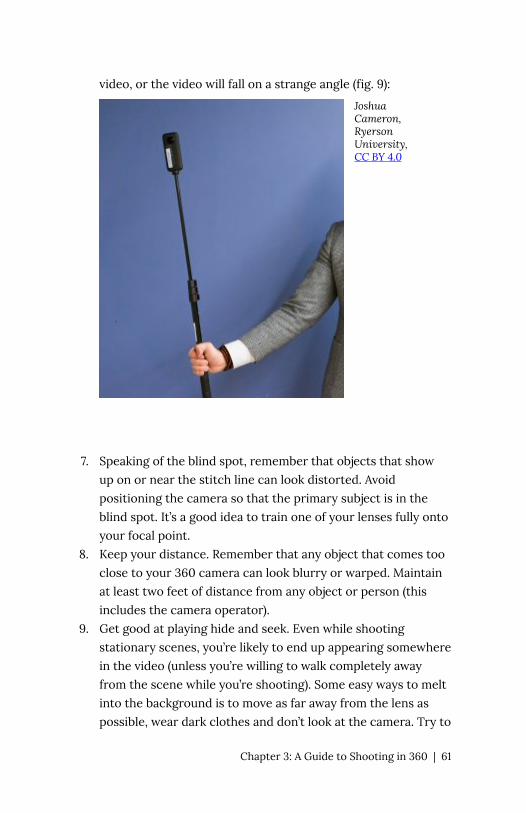
Joshua Cameron, Ryerson University, CC BY 4.0
video, or the video will fall on a strange angle (fig. 9):
7. Speaking of the blind spot, remember that objects that show up on or near the stitch line can look distorted. Avoid positioning the camera so that the primary subject is in the blind spot. It’s a good idea to train one of your lenses fully onto your focal point.
8. Keep your distance. Remember that any object that comes too close to your 360 camera can look blurry or warped. Maintain at least two feet of distance from any object or person (this includes the camera operator).
9. Get good at playing hide and seek. Even while shooting stationary scenes, you’re likely to end up appearing somewhere in the video (unless you’re willing to walk completely away from the scene while you’re shooting). Some easy ways to melt into the background is to move as far away from the lens as possible, wear dark clothes and don’t look at the camera. Try to
Chapter 3: A Guide to Shooting in 360 | 61
blend in with the environment. 10. Most 360 cameras come with smartphone apps that allow you
to control camera settings and preview your footage. Use your apps to help make adjustments in between shots and to monitor the action.
11. Not only will a smartphone show you what you are recording but perhaps more importantly you can use it to start and stop recordings. This means you can set up the shot, move well out of the scene and then press record. By doing this you will avoid getting footage that has you in it running back and forth starting and stopping the camera. This will save you battery life and make the video clip files just a bit smaller, which will be appreciated when you go to edit.
12. Be proactive with your subject or main character. Shooting in 360 is a different set up than traditional recording and you may have to be more active in directing your subjects on where to stand or move. If you’re capturing a performance, you would be wise to have the subject perform their routine a couple of times so that you’re aware of how they will occupy the space around the camera.
13. Watch out for rain, water and dust on the lenses. The lenses in 360 cameras are extremely delicate. Any small particles on the lens can drastically distort your footage.
14. Ambient sound in the shot is also important in 360 video. If the sound is coming from one side – say a door closing – then, like in real life, people will turn to look at it. Use this sound to your advantage and make sure when you are recording video you and your crew DO NOT TALK. Make sure everyone knows you are recording so the crew should move further away from the camera so they are not dominant in the shot and they should STAY SILENT.
15. Look for good lighting. If possible, shoot in locations that can offer even, natural light. Lighting is especially critical if you are doing interviews with people. You will also find that many 360 cameras do not do well under low light which makes lighting
62 | 360 Essentials: A Beginner's Guide to Immersive Video Storytelling

even more important. Using artificial lights for 360 is difficult but not impossible, and shooting pro Henry Stuart offers some excellent tips here.
TL;DR:
SOME KEY SUGGESTIONS
◻ Where possible, use even natural light. In some cases, this
might mean asking your subject to go outside (if you were interviewing them for example). ◻ Use practical lights were possible. A practical light is a light that
is organic to the shot, like a desk lamp, or a table lamp. Practical lighting is used in professional productions all the time. You might need to replace the bulb in the lamp with a brighter, or dimmer (usually) bulb, so that it does not overpower the scene. Remember, don’t place anything too close to the camera or it will make it look larger. The further away, the more something blends in. ◻ Creatively use a camera mounted light. You will also find
creators on YouTube who have adapted various ways to light 360 footage. Typically the light is placed above the camera in the stitch line. Thin lights can work depending on the camera. One note of caution – different lights have different colour temperatures (some look red, others look blue), so be careful not to mix your lighting sources – say outside light and your own artificial light ◻ If you are shooting in a room with a window, place the
stitchline towards the window. This will help create an even exposure between the two lenses.
Chapter 3: A Guide to Shooting in 360 | 63

4. Chapter 4: 360 Storytelling Approaches
In this chapter we’ll discuss different strategies and treatments to tell 360 stories and gain insight from several acclaimed filmmakers that specialize in immersive video.
Telling Stories From Every Angle
One of the thrilling aspects of 360 video from a storyteller’s perspective is how “real” the format and production can feel. When creating video for standard TV or film content, producers can employ a variety of shooting and editing techniques to help propel the story forward. They can reshoot a scene multiple times, splicing together the best shots to create the perfect version of it. They can use sequences or a series of quick cuts to convey action. They can use lighting or post-production tricks to ramp up the drama. In short, producers of traditional video have the ability to easily shape the story and narrative into whatever they wish.
Capturing 360 video is a much different process and the end product is a much different experience. In general, 360 video creators don’t incorporate sequences because everything is essentially a wide angle shot. Remember, even if there is a specific character or action or portion of a scene you’d like your viewer to focus on, the nature of 360 video means giving the viewer some agency to choose where they look and how they engage with the piece. Quick cuts also may not work well because you want to give people some time to explore a scene and it can be a physically jarring sensation if one is watching through a headset to suddenly
64 | Chapter 4: 360 StorytellingApproaches
jump from shot to shot. Rather, your best course of action is to capture the scene as it is, the best you can. You may get the opportunity to shoot multiple takes, in which case, you would pick the best result.
This is why planning your shoot ahead of time is so vital in creating good 360 video content. By all means, if you witness something amazing happening and you want to capture it, pull out your 360 camera and get filming! But given the various challenges of shooting 360 video (limited battery life of cameras, massive file sizes, image stability), it’s in your best interests to really understand what you’re shooting and how best to do it. Jessica Lauretti, a filmmaker, creative director and VR documentary innovator, refers to this as “staging.”
“One of the questions that people ask about when they first watch a 360 video is ‘Where’s the close up?’” Lauretti says. “There’s no closeup in 360, unless the actor or subject walks up to the camera. That’s a close up. It’s the reverse way in which filming creates feelings and emotions, and pacing, and timing, with cinematography and editing. The reverse is true in 360 where the subject matter has to create all that. The camera is just there, it’s an observer of whatever is happening. You have to plan and stage out what the subject matter is going to be, and what they’re going to do and how they’re going to interact with the camera. Imagine that camera on the tripod is the person watching the piece. You’re creating a stage around them.”
We really love that idea — you should be creating a stage around your viewer. And how does one do that? Well, the starting point should always be trying to answer this essential question: what perspective are you trying to show?
When we watch this video, are we (the audience) meant to be…
• A spectator or witness? • An active participant in the action? • Seeing the world from the eyes of a central character? • Some combination of perspectives?
Chapter 4: 360 Storytelling Approaches | 65
Journalist and filmmaker Marie-Espérance Cerda, who has experimented with 360 video and virtual reality to shed light on Toronto’s accessible housing issues, says identifying which perspective to take is based on understanding “what kind of experience you want to give to the user.”
“If you want to put them in the heat of the action, or give a fly on the wall perspective, or a character’s perspective, those are key elements to figure out. That determines a lot about how you’re going to shoot it. For a disembodied experience of going around a house, people can feel like they were in someone’s home without being a formal guest, which would have been different if you give the experience of living in someone’s home. The difference would be in placing the camera in different positions and creating a different narrative.”
If you refer back to Chapter 3, there are lots of useful tips on shooting 360 video and positioning your camera, but it’s important to remember that to tell an effective story, having a consistent perspective framing your video can make a big difference. Unexpected and/or unexplained shifts in perspective can be jarring for your viewer — imagine watching a 360 video where you’re in a jet plane cockpit getting a sense of what it’s like to be a pilot but the next scene suddenly cuts to a shot from a camera mounted on the exterior of the plane and, the next thing you know, you’re somehow floating in the sky. If your video involves including multiple perspectives, be conscious of how those transitions happen and sequencing your scenes together in a way that feels comfortable for viewers.
WHAT KINDS OF SCENES WORK WELL FOR 360 VIDEO?
In order to better figure out which perspective to take, it helps to understand what kind of scenes work well for 360 video. There are
66 | 360 Essentials: A Beginner's Guide to Immersive Video Storytelling
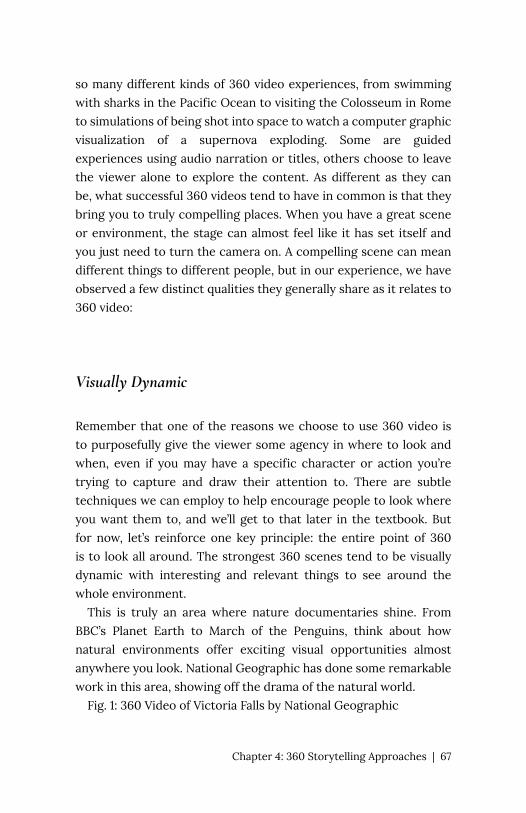
so many different kinds of 360 video experiences, from swimming with sharks in the Pacific Ocean to visiting the Colosseum in Rome to simulations of being shot into space to watch a computer graphic visualization of a supernova exploding. Some are guided experiences using audio narration or titles, others choose to leave the viewer alone to explore the content. As different as they can be, what successful 360 videos tend to have in common is that they bring you to truly compelling places. When you have a great scene or environment, the stage can almost feel like it has set itself and you just need to turn the camera on. A compelling scene can mean different things to different people, but in our experience, we have observed a few distinct qualities they generally share as it relates to 360 video:
Visually Dynamic
Remember that one of the reasons we choose to use 360 video is to purposefully give the viewer some agency in where to look and when, even if you may have a specific character or action you’re trying to capture and draw their attention to. There are subtle techniques we can employ to help encourage people to look where you want them to, and we’ll get to that later in the textbook. But for now, let’s reinforce one key principle: the entire point of 360 is to look all around. The strongest 360 scenes tend to be visually dynamic with interesting and relevant things to see around the whole environment.
This is truly an area where nature documentaries shine. From BBC’s Planet Earth to March of the Penguins, think about how natural environments offer exciting visual opportunities almost anywhere you look. National Geographic has done some remarkable work in this area, showing off the drama of the natural world.
Fig. 1: 360 Video of Victoria Falls by National Geographic
Chapter 4: 360 Storytelling Approaches | 67
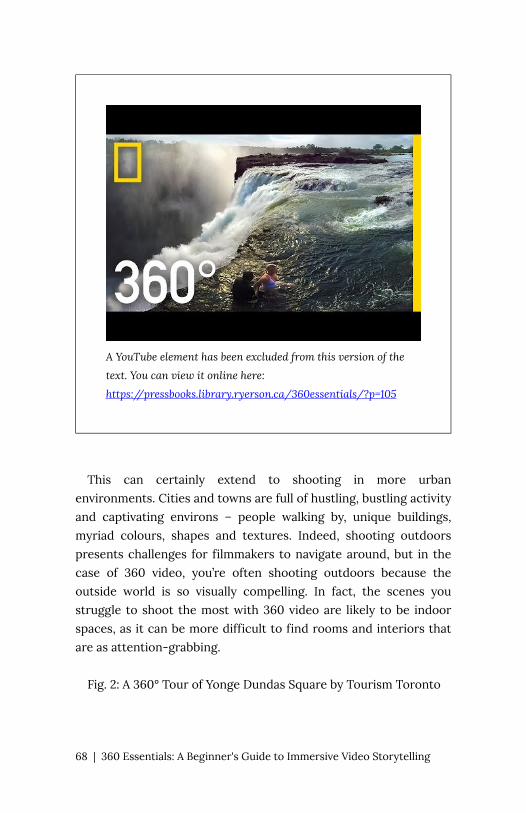
A YouTube element has been excluded from this version of the
text. You can view it online here:
https://pressbooks.library.ryerson.ca/360essentials/?p=105
This can certainly extend to shooting in more urban
environments. Cities and towns are full of hustling, bustling activity and captivating environs – people walking by, unique buildings, myriad colours, shapes and textures. Indeed, shooting outdoors presents challenges for filmmakers to navigate around, but in the case of 360 video, you’re often shooting outdoors because the outside world is so visually compelling. In fact, the scenes you struggle to shoot the most with 360 video are likely to be indoor spaces, as it can be more difficult to find rooms and interiors that are as attention-grabbing.
Fig. 2: A 360° Tour of Yonge Dundas Square by Tourism Toronto
68 | 360 Essentials: A Beginner's Guide to Immersive Video Storytelling
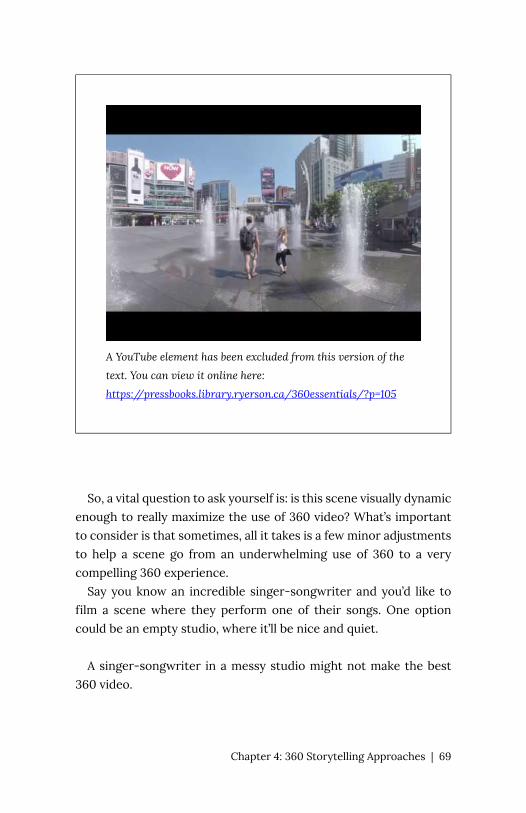
A YouTube element has been excluded from this version of the
text. You can view it online here:
https://pressbooks.library.ryerson.ca/360essentials/?p=105
So, a vital question to ask yourself is: is this scene visually dynamic
enough to really maximize the use of 360 video? What’s important to consider is that sometimes, all it takes is a few minor adjustments to help a scene go from an underwhelming use of 360 to a very compelling 360 experience.
Say you know an incredible singer-songwriter and you’d like to film a scene where they perform one of their songs. One option could be an empty studio, where it’ll be nice and quiet.
A singer-songwriter in a messy studio might not make the best
360 video.
Chapter 4: 360 Storytelling Approaches | 69
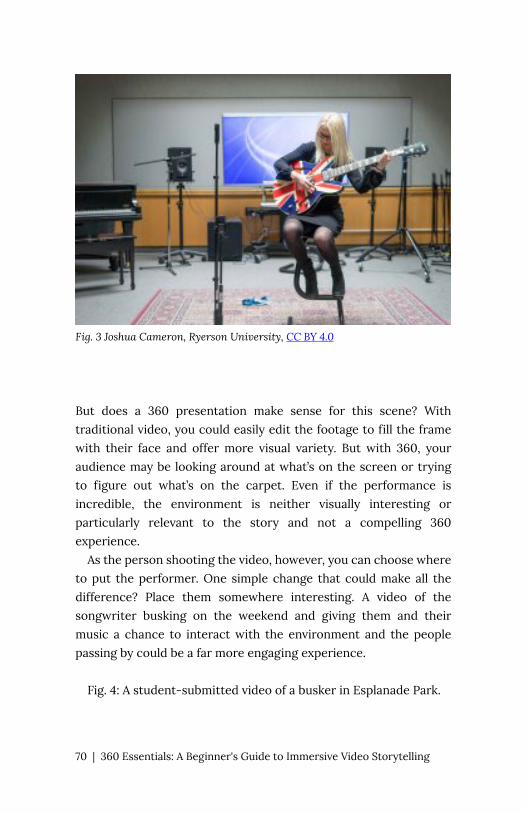
Fig. 3 Joshua Cameron, Ryerson University, CC BY 4.0
But does a 360 presentation make sense for this scene? With traditional video, you could easily edit the footage to fill the frame with their face and offer more visual variety. But with 360, your audience may be looking around at what’s on the screen or trying to figure out what’s on the carpet. Even if the performance is incredible, the environment is neither visually interesting or particularly relevant to the story and not a compelling 360 experience.
As the person shooting the video, however, you can choose where to put the performer. One simple change that could make all the difference? Place them somewhere interesting. A video of the songwriter busking on the weekend and giving them and their music a chance to interact with the environment and the people passing by could be a far more engaging experience.
Fig. 4: A student-submitted video of a busker in Esplanade Park.
70 | 360 Essentials: A Beginner's Guide to Immersive Video Storytelling
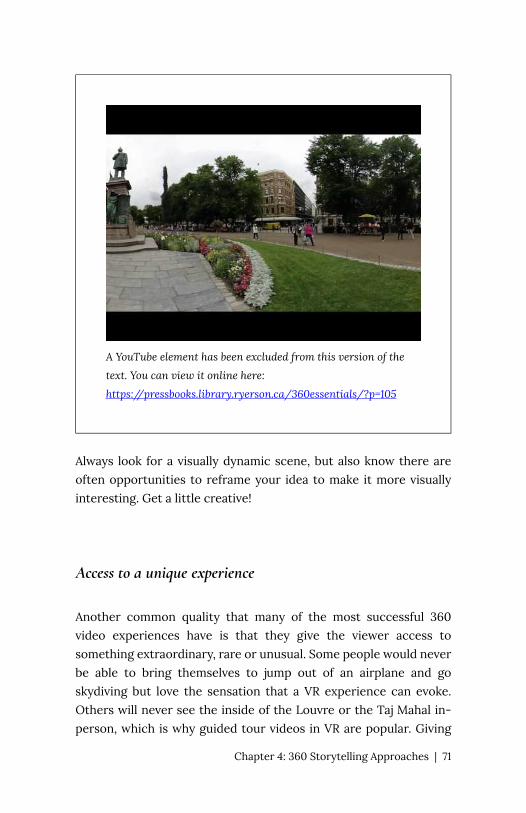
A YouTube element has been excluded from this version of the
text. You can view it online here:
https://pressbooks.library.ryerson.ca/360essentials/?p=105
Always look for a visually dynamic scene, but also know there are often opportunities to reframe your idea to make it more visually interesting. Get a little creative!
Access to a unique experience
Another common quality that many of the most successful 360 video experiences have is that they give the viewer access to something extraordinary, rare or unusual. Some people would never be able to bring themselves to jump out of an airplane and go skydiving but love the sensation that a VR experience can evoke. Others will never see the inside of the Louvre or the Taj Mahal in-person, which is why guided tour videos in VR are popular. Giving
Chapter 4: 360 Storytelling Approaches | 71

viewers a taste of something they would not otherwise likely experience firsthand is a good starting point when Robert Hernandez thinks about what makes for the best kinds of 360 video content.
“For me, the baseline is, a good story is a good story no matter the platform,” Hernandez says. “For me, it’s got to be a compelling story that uses the space around it. And for that, I kind of like the low hanging fruit is giving me access to things that I normally couldn’t get access to. So 360 into a location that I couldn’t go to, or access with a person where I can hold presence with them that is difficult for me to connect with in real life.”
There are some wonderful examples of 360 videos that can offer people experiences they would otherwise find difficult to have.
RYOT Studios is one of the world’s leaders in producing incredibly cinematic 360/VR documentaries. One of their most stunning examples is from their Tales from the Edge series in which they follow American skydiver and BASE jumper Jeb Corliss as he glides through the Italian alps in a wingsuit.
Fig. 5: GoPro’s BASE Jumping with Jeb Corliss
72 | 360 Essentials: A Beginner's Guide to Immersive Video Storytelling
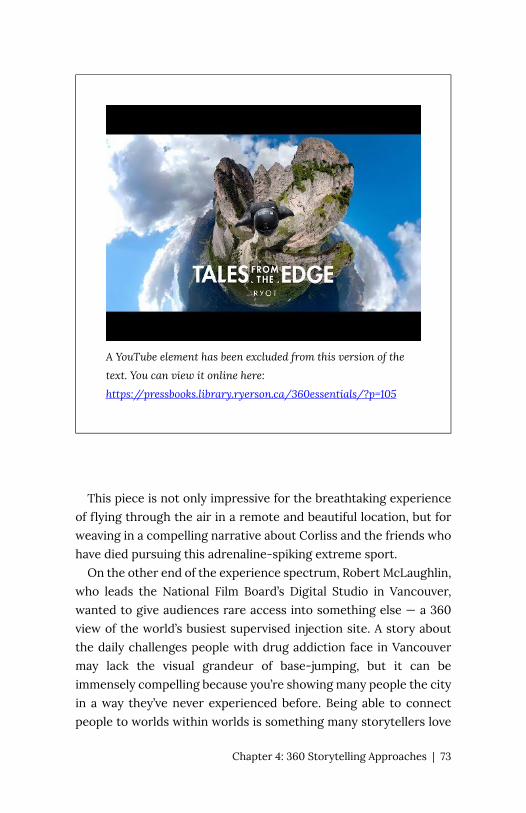
A YouTube element has been excluded from this version of the
text. You can view it online here:
https://pressbooks.library.ryerson.ca/360essentials/?p=105
This piece is not only impressive for the breathtaking experience
of flying through the air in a remote and beautiful location, but for weaving in a compelling narrative about Corliss and the friends who have died pursuing this adrenaline-spiking extreme sport.
On the other end of the experience spectrum, Robert McLaughlin, who leads the National Film Board’s Digital Studio in Vancouver, wanted to give audiences rare access into something else — a 360 view of the world’s busiest supervised injection site. A story about the daily challenges people with drug addiction face in Vancouver may lack the visual grandeur of base-jumping, but it can be immensely compelling because you’re showing many people the city in a way they’ve never experienced before. Being able to connect people to worlds within worlds is something many storytellers love
Chapter 4: 360 Storytelling Approaches | 73
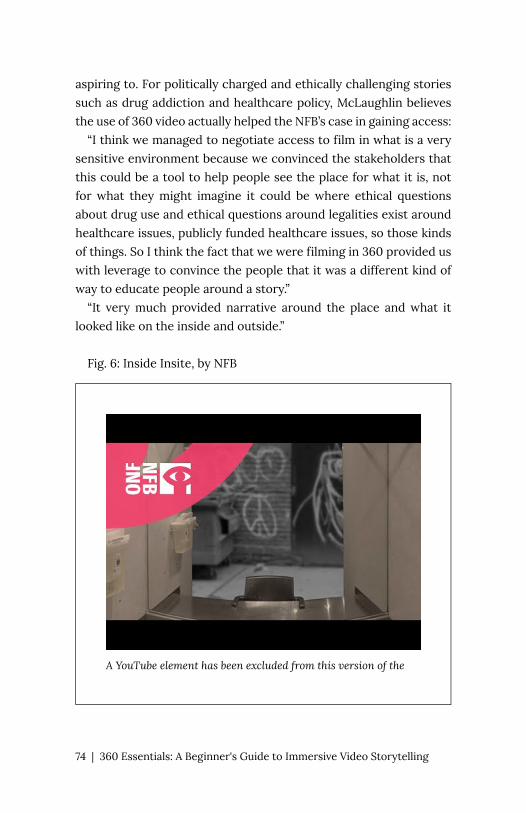
aspiring to. For politically charged and ethically challenging stories such as drug addiction and healthcare policy, McLaughlin believes the use of 360 video actually helped the NFB’s case in gaining access:
“I think we managed to negotiate access to film in what is a very sensitive environment because we convinced the stakeholders that this could be a tool to help people see the place for what it is, not for what they might imagine it could be where ethical questions about drug use and ethical questions around legalities exist around healthcare issues, publicly funded healthcare issues, so those kinds of things. So I think the fact that we were filming in 360 provided us with leverage to convince the people that it was a different kind of way to educate people around a story.”
“It very much provided narrative around the place and what it looked like on the inside and outside.”
Fig. 6: Inside Insite, by NFB
A YouTube element has been excluded from this version of the
74 | 360 Essentials: A Beginner's Guide to Immersive Video Storytelling
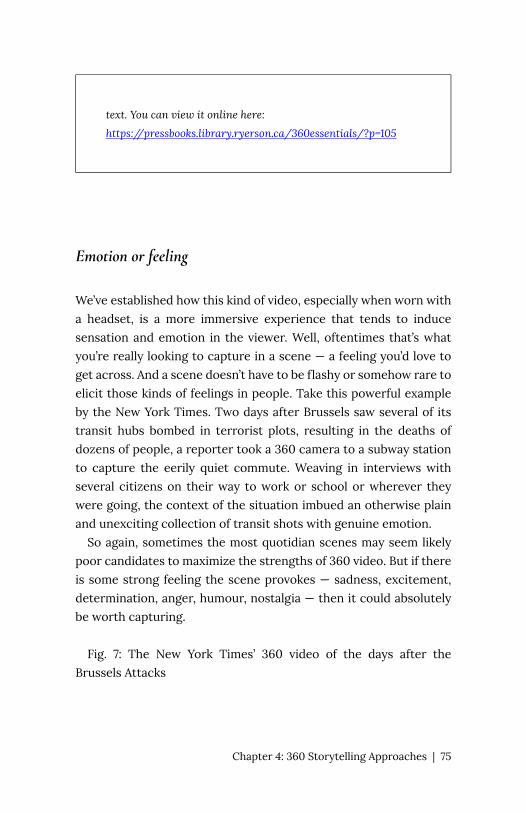
text. You can view it online here:
https://pressbooks.library.ryerson.ca/360essentials/?p=105
Emotion or feeling
We’ve established how this kind of video, especially when worn with a headset, is a more immersive experience that tends to induce sensation and emotion in the viewer. Well, oftentimes that’s what you’re really looking to capture in a scene — a feeling you’d love to get across. And a scene doesn’t have to be flashy or somehow rare to elicit those kinds of feelings in people. Take this powerful example by the New York Times. Two days after Brussels saw several of its transit hubs bombed in terrorist plots, resulting in the deaths of dozens of people, a reporter took a 360 camera to a subway station to capture the eerily quiet commute. Weaving in interviews with several citizens on their way to work or school or wherever they were going, the context of the situation imbued an otherwise plain and unexciting collection of transit shots with genuine emotion.
So again, sometimes the most quotidian scenes may seem likely poor candidates to maximize the strengths of 360 video. But if there is some strong feeling the scene provokes — sadness, excitement, determination, anger, humour, nostalgia — then it could absolutely be worth capturing.
Fig. 7: The New York Times’ 360 video of the days after the
Brussels Attacks
Chapter 4: 360 Storytelling Approaches | 75

A YouTube element has been excluded from this version of the
text. You can view it online here:
https://pressbooks.library.ryerson.ca/360essentials/?p=105
DIFFERENT WAYS OF FRAMING YOUR STORY
So perhaps you’ve identified a scene that is either visually dynamic or offers special access to somewhere interesting, or a combination of both. And maybe you’ve figured out which perspective you want to take when you capture the scene. But now you need to figure out another critical aspect to your storytelling approach: what kind of story are you trying to tell? 360 and VR video is still in its infancy and we’re seeing exciting new storytelling perspectives emerge all the time. But there are several popular approaches to perspective
76 | 360 Essentials: A Beginner's Guide to Immersive Video Storytelling

we’ve observed that can help give your content the focused narrative or flow a 360 video requires. Here’s a description of some different approaches than have been used to frame scenes. Keep in mind that your video may incorporate a combination of these kinds of approaches.
The event or moment
One of the most straightforward and popular kinds of 360 video content is to simply capture a live performance, event or particular experience, giving the viewer the perspective of being right in the middle of the action and experiencing it for themselves. You may choose to include audio narration elements or additional context through text captions, but more often than not, content creators that are capturing events like concerts, dance recitals or fashion shows prefer to present the video without commentary to preserve the immersive feeling as much as possible. This works particularly well when the scene can easily speak for itself and be understood without needing additional context. This type of treatment also works well for longer scenes that have lots of visual interest and natural progression built in. Some examples include:
Fig. 8: MTV’s 360 video of (good ‘ol Canadian) Shawn Mendes
performing his hit song “Mercy”
Chapter 4: 360 Storytelling Approaches | 77
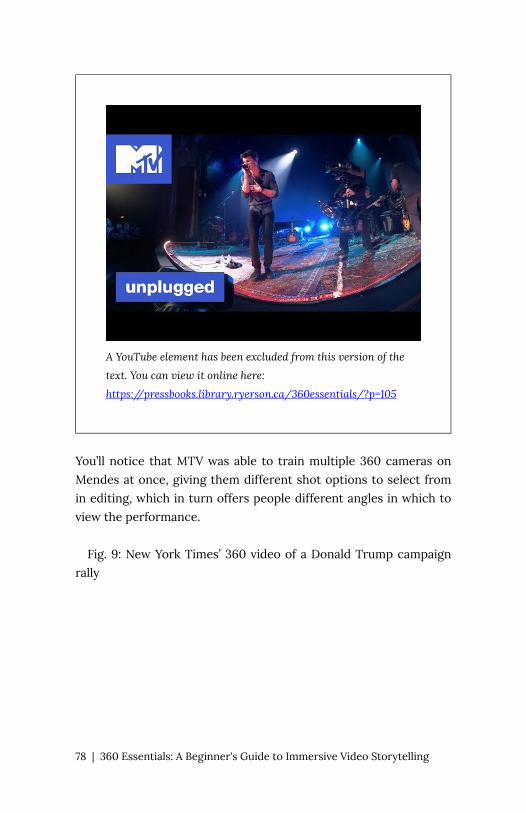
A YouTube element has been excluded from this version of the
text. You can view it online here:
https://pressbooks.library.ryerson.ca/360essentials/?p=105
You’ll notice that MTV was able to train multiple 360 cameras on Mendes at once, giving them different shot options to select from in editing, which in turn offers people different angles in which to view the performance.
Fig. 9: New York Times’ 360 video of a Donald Trump campaign
rally
78 | 360 Essentials: A Beginner's Guide to Immersive Video Storytelling
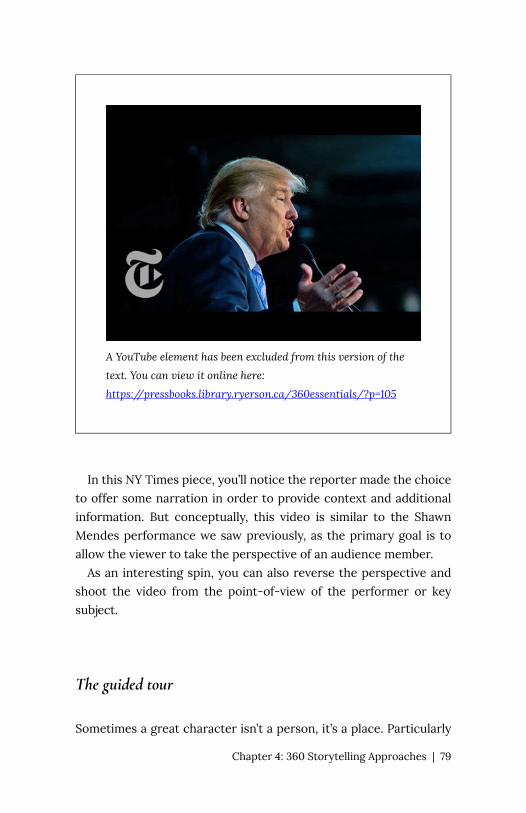
A YouTube element has been excluded from this version of the
text. You can view it online here:
https://pressbooks.library.ryerson.ca/360essentials/?p=105
In this NY Times piece, you’ll notice the reporter made the choice
to offer some narration in order to provide context and additional information. But conceptually, this video is similar to the Shawn Mendes performance we saw previously, as the primary goal is to allow the viewer to take the perspective of an audience member.
As an interesting spin, you can also reverse the perspective and shoot the video from the point-of-view of the performer or key subject.
The guided tour
Sometimes a great character isn’t a person, it’s a place. Particularly
Chapter 4: 360 Storytelling Approaches | 79
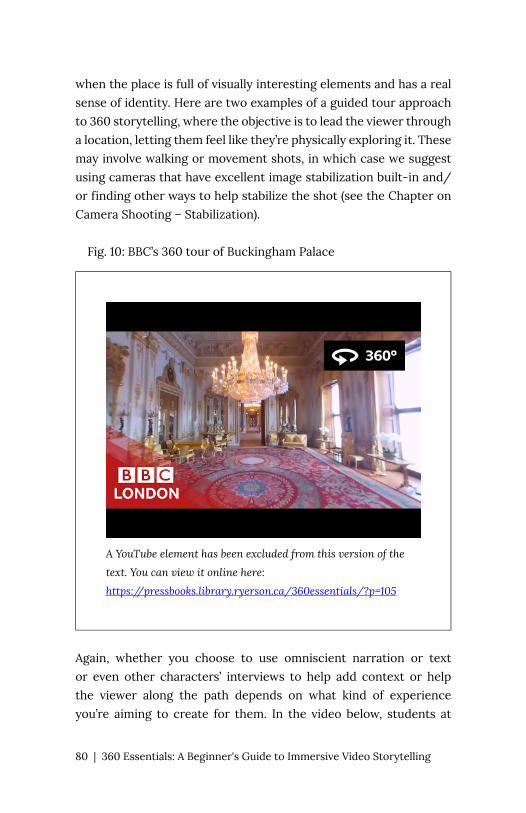
when the place is full of visually interesting elements and has a real sense of identity. Here are two examples of a guided tour approach to 360 storytelling, where the objective is to lead the viewer through a location, letting them feel like they’re physically exploring it. These may involve walking or movement shots, in which case we suggest using cameras that have excellent image stabilization built-in and/or finding other ways to help stabilize the shot (see the Chapter on Camera Shooting – Stabilization).
Fig. 10: BBC’s 360 tour of Buckingham Palace
A YouTube element has been excluded from this version of the
text. You can view it online here:
https://pressbooks.library.ryerson.ca/360essentials/?p=105
Again, whether you choose to use omniscient narration or text or even other characters’ interviews to help add context or help the viewer along the path depends on what kind of experience you’re aiming to create for them. In the video below, students at
80 | 360 Essentials: A Beginner's Guide to Immersive Video Storytelling
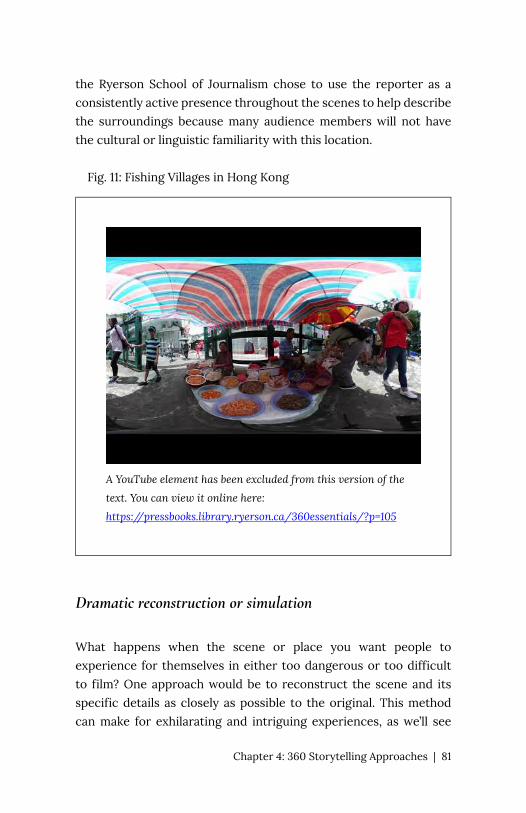
the Ryerson School of Journalism chose to use the reporter as a consistently active presence throughout the scenes to help describe the surroundings because many audience members will not have the cultural or linguistic familiarity with this location.
Fig. 11: Fishing Villages in Hong Kong
A YouTube element has been excluded from this version of the
text. You can view it online here:
https://pressbooks.library.ryerson.ca/360essentials/?p=105
Dramatic reconstruction or simulation
What happens when the scene or place you want people to experience for themselves in either too dangerous or too difficult to film? One approach would be to reconstruct the scene and its specific details as closely as possible to the original. This method can make for exhilarating and intriguing experiences, as we’ll see
Chapter 4: 360 Storytelling Approaches | 81
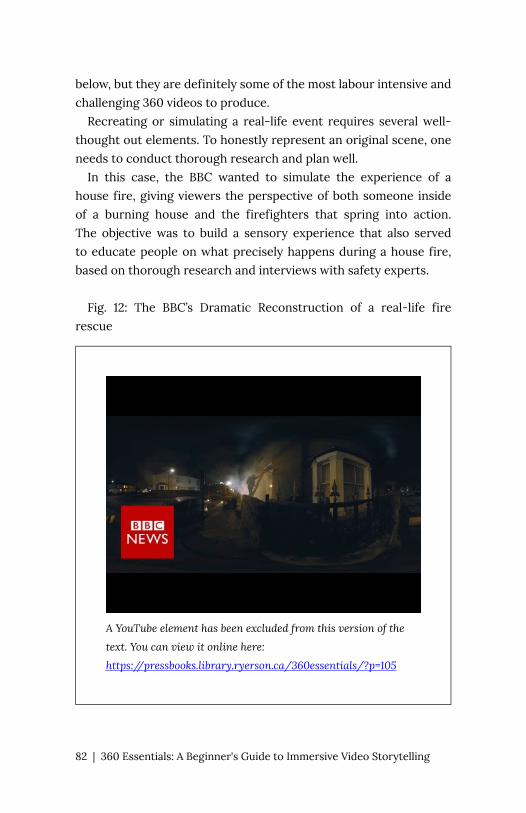
below, but they are definitely some of the most labour intensive and challenging 360 videos to produce.
Recreating or simulating a real-life event requires several well-thought out elements. To honestly represent an original scene, one needs to conduct thorough research and plan well.
In this case, the BBC wanted to simulate the experience of a house fire, giving viewers the perspective of both someone inside of a burning house and the firefighters that spring into action. The objective was to build a sensory experience that also served to educate people on what precisely happens during a house fire, based on thorough research and interviews with safety experts.
Fig. 12: The BBC’s Dramatic Reconstruction of a real-life fire
rescue
A YouTube element has been excluded from this version of the
text. You can view it online here:
https://pressbooks.library.ryerson.ca/360essentials/?p=105
82 | 360 Essentials: A Beginner's Guide to Immersive Video Storytelling
In a post for the BBC’s Research and Development blog, editors
Zillah Watson and filmmaker Peter Boyd Maclean explained some of the challenges of creating this piece.
“We experimented with putting the camera on the face of the firefighter to get his point of view and make the viewer feel in the moment. But we couldn’t make this work, because sudden movement that you are not in control of as a viewer is confusing at best, and at worst creates motion sickness. However we did use a POV (point of view) shot to show the fireman going up the stairs – we used a short shot and slowed it down to avoid nausea.”
For the safety of the film crew, the producers chose to create the scene using special effects in post-production rather than setting an actual house on fire.
“To create the fire effects we filmed multiple shots, for example on the stairs in a real house – clean, with smoke and with the firefighter. We then re-shot the scene at the Fire Service College in Gloucestershire, where we could add the fire effects safely. We used a fire special effects team with a gas controlled fire which burned on different areas on the stairs so we could composite the scene later. The final film had over 500 layers of effects.”
Fig. 13: “The Party”, a visual experience of what Autism might feel
like, by The Guardian
Chapter 4: 360 Storytelling Approaches | 83
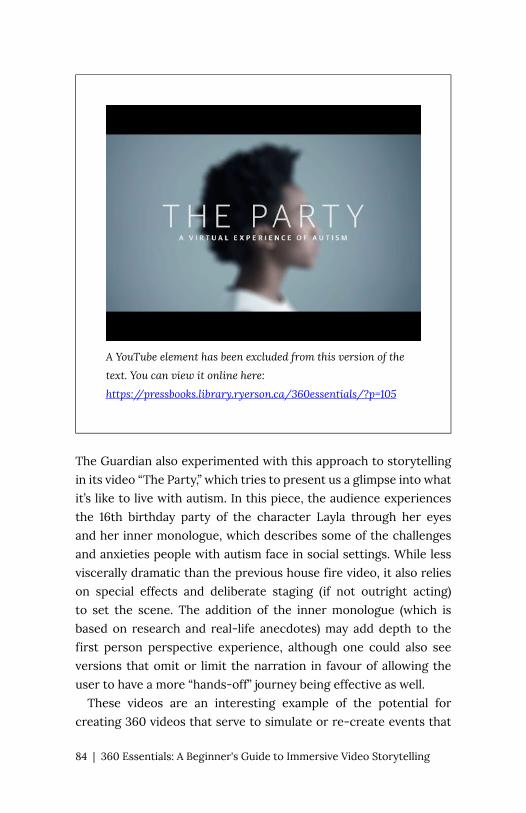
A YouTube element has been excluded from this version of the
text. You can view it online here:
https://pressbooks.library.ryerson.ca/360essentials/?p=105
The Guardian also experimented with this approach to storytelling in its video “The Party,” which tries to present us a glimpse into what it’s like to live with autism. In this piece, the audience experiences the 16th birthday party of the character Layla through her eyes and her inner monologue, which describes some of the challenges and anxieties people with autism face in social settings. While less viscerally dramatic than the previous house fire video, it also relies on special effects and deliberate staging (if not outright acting) to set the scene. The addition of the inner monologue (which is based on research and real-life anecdotes) may add depth to the first person perspective experience, although one could also see versions that omit or limit the narration in favour of allowing the user to have a more “hands-off” journey being effective as well.
These videos are an interesting example of the potential for creating 360 videos that serve to simulate or re-create events that
84 | 360 Essentials: A Beginner's Guide to Immersive Video Storytelling
happen in real-life, but that the producers did not capture in real-time. What’s also important to know is that, at the beginning of the video, the producers of the BBC fire video identify this piece as a “dramatic reconstruction of a real-life event.” Given how real watching this video on a headset could feel, one could easily mistake this as real-time footage. And especially considering the significant use of post-production effects and the elaborate staging of the shoot, it is in the interests of transparency that the public knows elements of these experiences are fictional. (See the chapter on Ethics of 360)
The profile
If you have a genuinely fascinating character (or collection of characters) and your goal is to offer more insight into their lives, then putting them at the heart of your 360 story can be very effective. In this type of approach, we are spectators getting a close look as someone goes about their life, tagging along as they do their work or show us their home and describe their experiences to us.
Fig. 13: VR Gorilla’s profile on Amref Flying Doctors
Chapter 4: 360 Storytelling Approaches | 85

A YouTube element has been excluded from this version of the
text. You can view it online here:
https://pressbooks.library.ryerson.ca/360essentials/?p=105
We suppose that one could try having the central character wear
a 360 camera on their head to film a first person perspective, if the goal was to show their experiences through “their eyes” as much as possible. We’ve seen this attempted especially with scenarios like extreme sports or the previously mentioned dramatic reconstructions. But filming first person perspective 360 can be quite tricky to do well, requiring additional considerations into stabilization, staging and camera positioning. We would suggest for beginners wanting to shoot a profile story to stick to keeping the lens on the character. It generally makes for stronger storytelling as well.
We mentioned previously that your video may incorporate a combination of different approaches to framing scenes. The key is to understand that each scene should be conceptualized with some
86 | 360 Essentials: A Beginner's Guide to Immersive Video Storytelling
specific purpose or outcome. Remember, the nature of 360 footage is that each scene is meant to be played out. So there are a couple of important questions to consider as you prepare to shoot:
• What am I really trying to show with the whole video? • What am I really trying to show with each individual scene and
how do they connect together?
In the case of the Brussels commute video, what are you really trying to show with the whole video? That the attack has left people shaken up, but life must go on and so the citizens will continue using the subway. That is the overall focus and narrative. Each individual scene connects together to help you tell that story.
TL;DR:
• Before you start shooting your story, it’s important to figure out what perspective you’re taking and then to set up your staging to achieve that perspective.
• Certain kinds of scenes work very well for 360 video, particularly scenes that are:
◦ Visually dynamic ◦ Offer the viewer access to a rare or unique experience ◦ Emotional or provoke feeling
• There are many different approaches to 360 storytelling, some popular ways to frame your story include:
◦ Giving your audience a virtual front row ticket to an event, performance or moment
◦ Leading your viewer on a guided tour of a special or interesting place
◦ Reconstructing or simulating something that has already
Chapter 4: 360 Storytelling Approaches | 87

happened ◦ Focusing your video around a central character and
creating a profile story • Your 360 video piece may also involve several types of scenes
and approaches. The key, however, is understanding and figuring out a) the overall focus of your project and b) how each scene connects together to achieve this.
88 | 360 Essentials: A Beginner's Guide to Immersive Video Storytelling
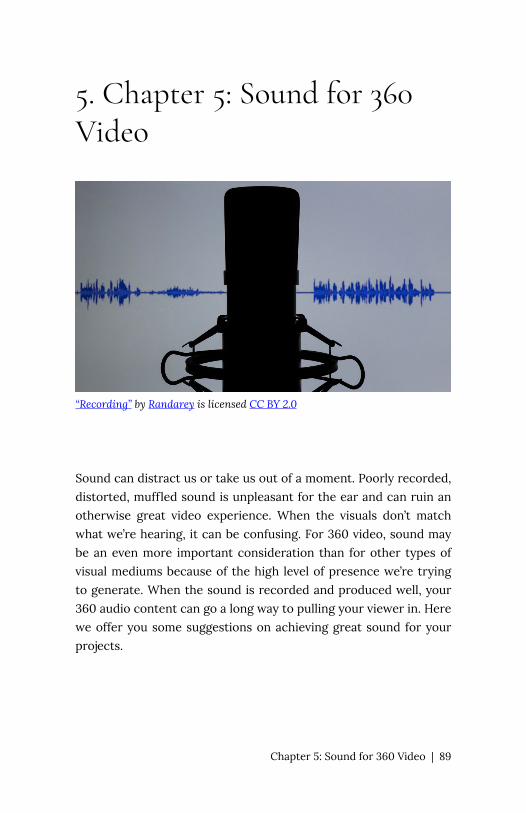
5. Chapter 5: Sound for 360 Video
“Recording” by Randarey is licensed CC BY 2.0
Sound can distract us or take us out of a moment. Poorly recorded, distorted, muffled sound is unpleasant for the ear and can ruin an otherwise great video experience. When the visuals don’t match what we’re hearing, it can be confusing. For 360 video, sound may be an even more important consideration than for other types of visual mediums because of the high level of presence we’re trying to generate. When the sound is recorded and produced well, your 360 audio content can go a long way to pulling your viewer in. Here we offer you some suggestions on achieving great sound for your projects.
Chapter 5: Sound for 360 Video | 89
The different types of audio formats
Without getting too technical for a beginner’s guide, when discussing audio, we’re usually referring to the five most common ways to record and listen to sound playback. There’s mono sound, which is recorded with one microphone and gives you one channel of audio (hence the use of term “mono,” which is Greek word for “alone” or “single”) You’re probably pretty familiar with stereo sound, which is recorded by spacing two microphones apart onto two channels (left ear and right ear). This is the most widely used format in the modern era.
Then, there’s a special kind of stereo recording called binaural audio. Like stereo, this is made by using two microphones, but the microphones are positioned on a dummy or a special configuration to better mimic how human ears are positioned. This helps to recreate the natural way we experience sound, with certain sounds registering at different volumes depending on their position of origin. The differences in binaural sound can be heard while using headphones and sounds more dynamic and realistic. This is where we start to get into the realm of “3D sound,” which has become something of an umbrella term for several immersive recording formats, including binaural.
The BBC has a video on YouTube that demonstrates how binaural sound works:
90 | 360 Essentials: A Beginner's Guide to Immersive Video Storytelling
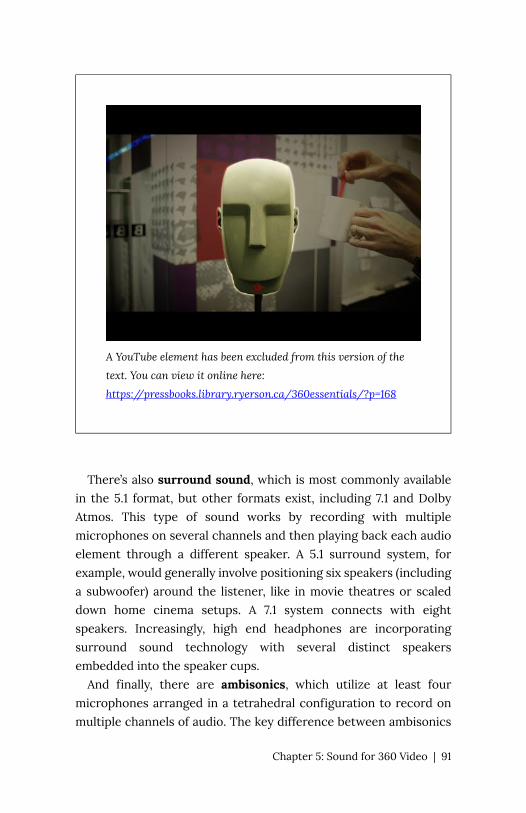
A YouTube element has been excluded from this version of the
text. You can view it online here:
https://pressbooks.library.ryerson.ca/360essentials/?p=168
There’s also surround sound, which is most commonly available
in the 5.1 format, but other formats exist, including 7.1 and Dolby Atmos. This type of sound works by recording with multiple microphones on several channels and then playing back each audio element through a different speaker. A 5.1 surround system, for example, would generally involve positioning six speakers (including a subwoofer) around the listener, like in movie theatres or scaled down home cinema setups. A 7.1 system connects with eight speakers. Increasingly, high end headphones are incorporating surround sound technology with several distinct speakers embedded into the speaker cups.
And finally, there are ambisonics, which utilize at least four microphones arranged in a tetrahedral configuration to record on multiple channels of audio. The key difference between ambisonics
Chapter 5: Sound for 360 Video | 91
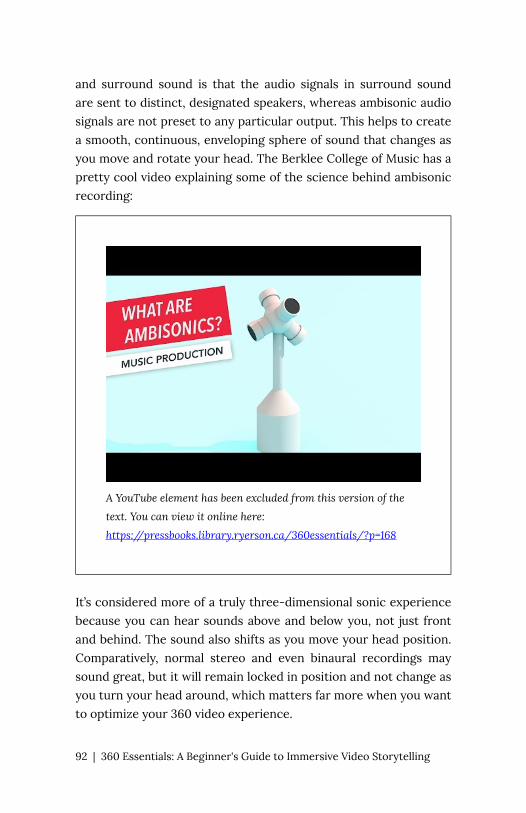
and surround sound is that the audio signals in surround sound are sent to distinct, designated speakers, whereas ambisonic audio signals are not preset to any particular output. This helps to create a smooth, continuous, enveloping sphere of sound that changes as you move and rotate your head. The Berklee College of Music has a pretty cool video explaining some of the science behind ambisonic recording:
A YouTube element has been excluded from this version of the
text. You can view it online here:
https://pressbooks.library.ryerson.ca/360essentials/?p=168
It’s considered more of a truly three-dimensional sonic experience because you can hear sounds above and below you, not just front and behind. The sound also shifts as you move your head position. Comparatively, normal stereo and even binaural recordings may sound great, but it will remain locked in position and not change as you turn your head around, which matters far more when you want to optimize your 360 video experience.
92 | 360 Essentials: A Beginner's Guide to Immersive Video Storytelling
Many of the higher end 360 cameras, like the Insta360 Pro series or the Ricoh Theta V, do have binaural or ambisonic audio recording capabilities built-in to the device. However, most of the entry-level 360 action camera models feature only stereo microphones. It’s a more expensive and complicated feature that has yet to be incorporated as a universal requirement for 360 cameras (although we expect it soon will, much like 4K resolution).
There are, however, several ways for you to record surround sound for your 360 videos without having this kind of audio tech built-in to your camera.
RECORDING “3D” AUDIO FOR 360
If you truly wish to have a “3D” effect for your audio (and you have some cash left to spend), the most straightforward solution is to purchase a recording device specifically intended for 360. There are several options depending on your price point.
On the more affordable end of the cost scale, the Zoom H2n Handy Recorder is a very popular option among 360 filmmakers on a tight budget who want to take their sound up a level. It’ll run you a little more than $200 CAD, but offers five integrated microphones and several recording modes, including 2 and 4-channel surround sound. It’s compact and portable and ideal for taking out on the road.
Zoom also sells the H3-VR Handy Recorder that was specifically designed to capture sound binaural or ambisonic sound for 360 video. It features a four-way ambisonic microphone setup that automatically decodes your sound files for quick transfer and use for your 360/VR videos. This will currently run you about $500 CAD. The additional features of being able to livestream 3D audio and convert your sound files to 5.1 surround sound make this a particularly versatile microphone at a relatively affordable price.
Chapter 5: Sound for 360 Video | 93
3Dio is a binaural audio recording company that makes a whole line of microphones for hobbyists and professionals-alike. The company’s devices feature two microphones tucked within two plastic ears, which really help you visualize what the listener is hearing during recording. Its line of Free Space microphones are solid choices for the intermediate 360 filmmaker, offering high quality binaural recording for under $800 CAD.
On the higher end of the 3D audio spectrum, Rode’s SoundField NT-SF1 ambisonic microphone is a professional-level device that’ll cost around $1,300 CAD. It’s a sturdy, well-constructed and powerful microphone that captures crystal clear, cinematic quality sound.
So is there a clear winner among these different choices for 360 sound? It can really depend. For basic level 360 video, where a good portion of viewers may be watching on a computer and listening through desk speakers, a combination of carefully captured camera audio (perhaps reinforced by audio recorded through a separate external sound recorder) can get the job done. At the moment, many of the most popular 360 videos on platforms like YouTube and Facebook don’t feature 3D audio (although this is likely to change with the rapid improvements to devices and softwares). In which case, we can offer some straightforward and simple tips to help you record the best audio you can without any other special equipment (see below).
If your interest is pursuing more professional-level 360 video content or potentially gaming experiences, then expanding into binaural audio, surround sound and ambisonic recording will be important. Some audio technicians believe that binaural audio is inferior to ambisonic sound because a true 6DoF virtual reality experience should have the sound rotate with the viewer. Others feel that binaural is just fine, especially for 3DoF experiences where the user has a fixed position anyways. For this reason, the Zoom N3-VR Handy Recorder could be a solid compromise, giving you the ability to record multiple formats of 3D sound without breaking the bank too much.
94 | 360 Essentials: A Beginner's Guide to Immersive Video Storytelling
Tips on recording with your spatial audio device
If you end up using a spatial audio device, follow the instructions and recommendations from the manufacturer on how to best use it. But there are a few suggestions we have to help you get the most even, clean audio you can for your 360 video.
In general, you want to place your recorder as close to your 360 camera as possible. Remember, if the camera can be thought of as representing what the viewer sees, then the audio recorder can represent their ears.
Many filmmakers like to rig their audio recorder to the monopod so that it can sit above or below 360 camera. This is often done by attaching a small camera clamp (sometimes called a nanoclamp) with a threaded head onto the monopod. This works particularly well with larger professional cameras like the Kandau Obsidian or Insta360 Pro series, where the recorder has a better chance of remaining in the blindspot. With thinner cameras, you’ll have to experiment more with how you position your spatial device to see if you can hide it from view. As well, be sure to make sure your audio recorder isn’t actually touching the monopod or 360 camera or anything else, as this would assuredly block some of the sound capture and perhaps cause unwanted reverb effects.
Another common solution is to attach the spatial device to its own monopod and then situtate it below your camera. This can take some messing about, but the key thing is to, again, try to position your device so that it a) close to the camera to capture that “natural” way the audience would hear the sound and b) to keep out of the camera’s view. If another monopod isn’t available, some producers will sit the microphone at the bottom of the camera setup, however being able to elevate the device somehow will improve the recording immensely. Remember that objects can be masked or blurred out in post-production video editing programs like Premiere Pro, but we want to minimize this if we can.
As 360 cameras can be positioned in numerous ways, it’s important to make sure your audio is being recorded in a way that
Chapter 5: Sound for 360 Video | 95
matches the direction of the filming. Josh Gonsalves, a producer, director, 360 filmmaker and co-founder of VR company Contraverse has this advice:
“Make sure you’re pointing your camera in the right direction. Meaning, you need to know where true north is, so that it will match up with your spatial audio. You want to point the camera in the right direction, in the middle of the room, so the audience can see the whole thing. Many of these cameras have a viewfinder, so use that to find out where the centre is, and match up the audio recorder with that.”
Once you’ve captured your spatial audio, you can work with it much the same way you would with stereo audio files in a digital audio workstation (DAW) or video editing program., but you’ll most likely have to make some adjustments in a spatial audio studio software prior to that. Spatial audio editing could be an entire other guidebook and as this is a beginners’ guide, we won’t dive into specific editing techniques. But there are some excellent spatial audio programs one can use supported by plenty of freely available resources and tutorials. Please check our Additional Resources section for some suggestions.
Tips on getting clean audio for your 360 video with your camera’s built-in microphone
While spatial audio is exciting, powerful and highly recommended for anyone producing cinematic or professional 360/VR content, the typical 360 creator should be more concerned with maximizing the stereo sound built-in to most consumer-level 360 cameras. And even if all you can work with is stereo, there are still techniques you can employ using standard audio recording equipment to help bolster your 360 video’s sound. It may not be 3D, but striving to create a quality sonic experience for your content will really help its immersive qualities.
96 | 360 Essentials: A Beginner's Guide to Immersive Video Storytelling
As discussed elsewhere in this textbook is the idea that 360 technology works great for certain types of storytelling. Audio production is similar in that you should look (and listen) for good audio. A busy intersection, a morning with birds chirping, or a roaring river, all offer the possibility of not only good images for 360 but also great sound as well. When you are considering your story, don’t forget the sound as it can add so much to the experience. As a side note, having great sound also gives you the option to tell your story in podcast form using the sounds you collected.
1. Close your eyes and listen to your surroundings. Before you start recording it is a good idea to focus on the sound around you. Closing your eyes and listening is where this starts. Be aware of the sound. What do you hear when you just listen? Wearing a headset when you do this is also a great way to “listen as the camera listens”. Are there noises you don’t want or that will be distracting?
2. Eliminate Unwanted Sounds. As you listen you might hear sounds that are unwanted and in some cases you might be able to minimize or eliminate them altogether. Maybe you are in a room doing an interview and there is a window open so you hear unwanted street noises. Close the window. Or there might be a radio on with music playing. It is better to turn off that music (much easier to edit as well there is no potential copyright infringement). Or maybe there is a computer on with a loud fan. By listening to the room you can maximize the quality of your sound recordings. You might be tempted to “fix it in editing” but be aware that removing unwanted later on can be difficult or impossible, so do the best at the time of recording to only get the sounds you want.
3. Be Quiet When Recording. When you are recording you will need to make sure that you are silent. Yes, when you are shooting 360 you should be far enough away to be “out of the shot,” or at least not prominent, but voices carry. Make sure
Chapter 5: Sound for 360 Video | 97

everyone on your crew is also quiet. Let the sound of your surroundings be what is recorded. When recording interviews, with the exception of asking questions, the interviewer must be quiet when the subject is answering the question. In traditional interviewing it is annoying, but in 360 the person listening might take it as a false cue to turn and look at the interviewer.
4. Record extra ambient sound from your location. Always record much more sound than you think you need as this could be very useful in editing. Record at least one minute of ambient sound. Again, this is something that is useful in editing. You want to sound to match the pictures though, so make sure you also record good visuals at the same time.
5. Do a Sound Check. Record a snippet of audio and then play it back to see whether the sound is coming back clear and clean. This will allow you to catch any unexpected issues and make adjustments.
6. Use headphones (if possible!). If you only have earbud type headphones, then cup your hands and put them over your ears to try to better insulate the sound. Professional over the ear headphones are better.
7. Use an external stereo microphone. This leads us to our most important suggestion in this chapter: using some kind of external stereo microphone. This is a good compromise between diving into spatial audio recording and just using the built-in camera microphone and we highly recommend this if you’re unable to get your hands on a binaural or ambisonic microphone. Here are some of the reasons why you should use an external microphone:
▪ Using an external microphone will almost always give you much better sound. Yes, this will mean more expense in buying another piece of technology, but a good mic will be good for years. It is money well spent.
▪ External microphones allow you to put the
98 | 360 Essentials: A Beginner's Guide to Immersive Video Storytelling
microphone closer to the sound source. This generally means a stronger, clearer sound (remember, some distance between the subject and 360 camera is required to prevent distortion and blurriness). If a microphone is further away, it will sound more hollow and other environmental noises will be mixed in as well.
▪ Usually external microphones are better quality than the ones manufacturers build into their cameras. Many external microphones are made by companies that only make microphones, and who specialize in audio pickup technology. A good quality microphone is worth every penny.
▪ An external microphones allow you to pick the right mic for the situation you are recording. Sound recording is like carpentry – just as you need different tools for different tasks, so too you will need different mics for different scenarios. For example, an interview situation works best with a tie clip (also known as a lavalier or lav mic) because it puts the mic on the subject close to their mouth. A concert recording, for example, would require a different type of microphone. Having a variety of microphones will serve you well in your 360 productions.
▪ It gives you more ability to create immersive video experiences. Generally the microphones built into 360 cameras record the sound in every direction and, if it’s stereo recording, the audio will be locked in and won’t reflect shifts in environmental sounds as you rotate your head. As mentioned, an external audio recorder will allow you to get great sounds of interviews or specific ambient sound (traffic, a river sound, the sound of a crowd) but if it is not binaural or ambisonic sound, you are not getting the full 360 audio effect. For example, if you’re shooting a 360 video of a park
Chapter 5: Sound for 360 Video | 99
and there is a great fountain nearby, you could grab an isolated clip of that water sound. If your video’s starting orientation has this water sculpture on the left hand side, you can then add the water sound clip as an additional audio track with an emphasis on panning it left. You can do this with other sonic elements in the scene. This is most definitely not 3D as the sounds won’t actually track with how you rotate your head, but it can be a way to build a more robust soundscape for your video.
External stereo recording device options:
• There are numerous options for a portable audio recorder, with some being fairly inexpensive. Particularly with 360 video, we would suggest looking for a solid yet slim device, in order to give you more ability to tuck it under the camera and out of the video. Recorders like Tascam’s DR-05 and Zoom’s H1n models fit this bill and are reasonably priced.
• If you’re looking to move a step up, then we suggest the previously mentioned Zoom H2n will give you more flexibility (such as binaural audio and surround sound recording) for about $50 more.
• If you’re not in the market for a seperate portable recording device for audio, IK Multimedia manufactures several audio recording products in their “iRig” line that allow you to easily record directly into your smartphone, including microphones and battery-powered XLR adapters using the headphone jack (for those of you with headphone jackless iPhones, a lighting rod adapter can be used). The iRig products are compatible with pretty much any smartphone and any mobile audio recording apps (we’ll offer you a few suggestions in our Resources page), making them versatile, user-friendly and cost-effective options.
100 | 360 Essentials: A Beginner's Guide to Immersive Video Storytelling
• As we mentioned in the previous section about spatial audio devices, there are ways you can try to “hide” the recording devices below the 360 camera so it doesn’t show up in the shot
External microphones
If you end up purchasing an iRig XLR adapter, it’s good to know a little bit about XLR microphones. In general, XLR (which stands for External Line Return, in case you’re wondering) microphones have been the go-to standard for professional audio recording. You’ll probably recognize the familiar three-pin design of the connector. In terms of microphones, there are two primary types that are common for audio recording – dynamic and condenser microphones.
Having the ability to plug in an XLR connector means you have access to a wider range of pro level microphones. You might consider looking at used pro mics as well as these are cheaper and often well maintained.
Please note that different microphones offer different pick up patterns. In other words, some are great for picking up sound further away and some are more effective capturing sounds that are closer to the microphone. In traditional video production you will use different microphones for different situations. Even though 360 audio recording is different because you are trying to get immersive sound, it is helpful to understand the different kinds of microphones types.
A cardioid microphone is a directional microphone that has a heart shaped pickup pattern. This means the microphone is most sensitive in front. This microphone is good for street interviews but, due to the sound pickup pattern, it will mean you will have to move the mic back and forth if you want to record the reporter. Not
Chapter 5: Sound for 360 Video | 101
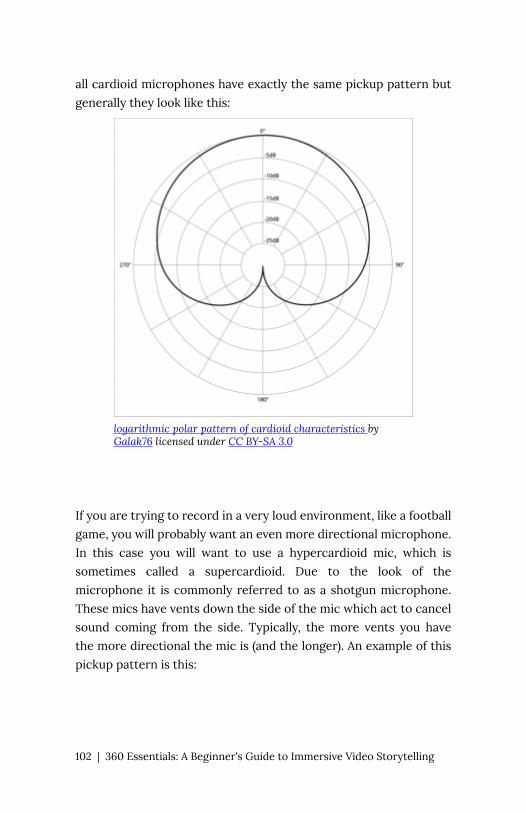
all cardioid microphones have exactly the same pickup pattern but generally they look like this:
logarithmic polar pattern of cardioid characteristics by Galak76 licensed under CC BY-SA 3.0
If you are trying to record in a very loud environment, like a football game, you will probably want an even more directional microphone. In this case you will want to use a hypercardioid mic, which is sometimes called a supercardioid. Due to the look of the microphone it is commonly referred to as a shotgun microphone. These mics have vents down the side of the mic which act to cancel sound coming from the side. Typically, the more vents you have the more directional the mic is (and the longer). An example of this pickup pattern is this:
102 | 360 Essentials: A Beginner's Guide to Immersive Video Storytelling
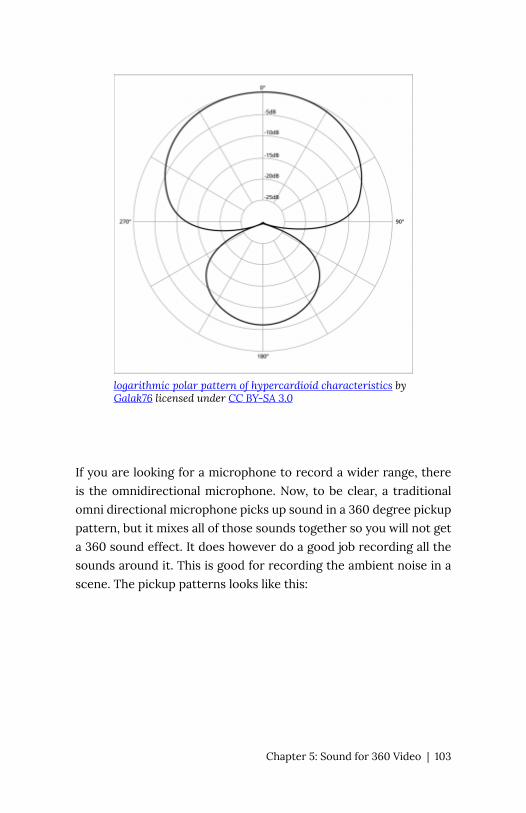
logarithmic polar pattern of hypercardioid characteristics by Galak76 licensed under CC BY-SA 3.0
If you are looking for a microphone to record a wider range, there is the omnidirectional microphone. Now, to be clear, a traditional omni directional microphone picks up sound in a 360 degree pickup pattern, but it mixes all of those sounds together so you will not get a 360 sound effect. It does however do a good job recording all the sounds around it. This is good for recording the ambient noise in a scene. The pickup patterns looks like this:
Chapter 5: Sound for 360 Video | 103
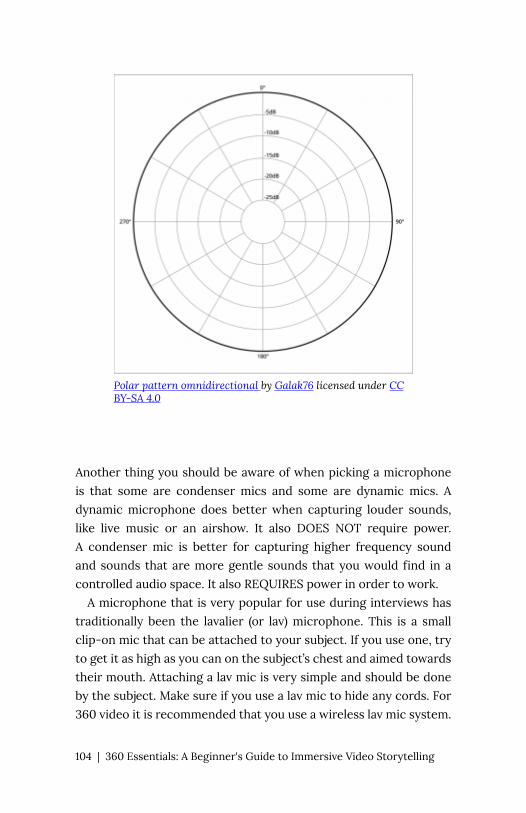
Polar pattern omnidirectional by Galak76 licensed under CC BY-SA 4.0
Another thing you should be aware of when picking a microphone is that some are condenser mics and some are dynamic mics. A dynamic microphone does better when capturing louder sounds, like live music or an airshow. It also DOES NOT require power. A condenser mic is better for capturing higher frequency sound and sounds that are more gentle sounds that you would find in a controlled audio space. It also REQUIRES power in order to work.
A microphone that is very popular for use during interviews has traditionally been the lavalier (or lav) microphone. This is a small clip-on mic that can be attached to your subject. If you use one, try to get it as high as you can on the subject’s chest and aimed towards their mouth. Attaching a lav mic is very simple and should be done by the subject. Make sure if you use a lav mic to hide any cords. For 360 video it is recommended that you use a wireless lav mic system.
104 | 360 Essentials: A Beginner's Guide to Immersive Video Storytelling
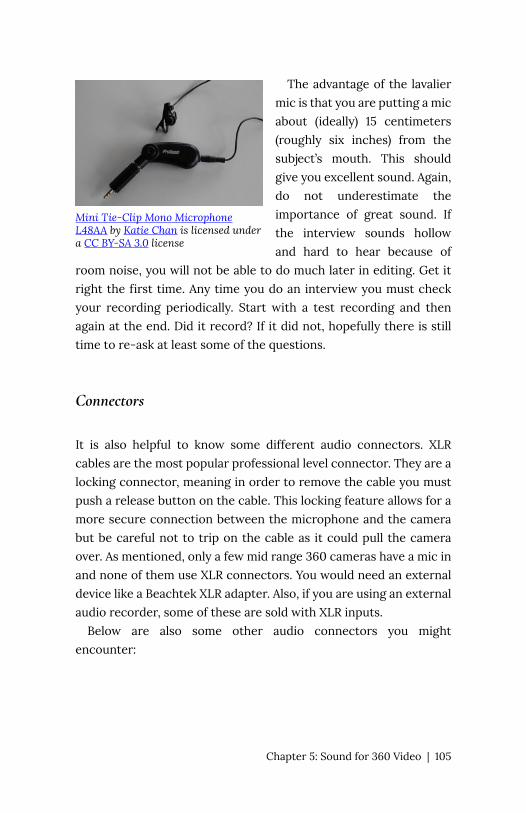
Mini Tie-Clip Mono Microphone L48AA by Katie Chan is licensed under a CC BY-SA 3.0 license
The advantage of the lavalier mic is that you are putting a mic about (ideally) 15 centimeters (roughly six inches) from the subject’s mouth. This should give you excellent sound. Again, do not underestimate the importance of great sound. If the interview sounds hollow and hard to hear because of
room noise, you will not be able to do much later in editing. Get it right the first time. Any time you do an interview you must check your recording periodically. Start with a test recording and then again at the end. Did it record? If it did not, hopefully there is still time to re-ask at least some of the questions.
Connectors
It is also helpful to know some different audio connectors. XLR cables are the most popular professional level connector. They are a locking connector, meaning in order to remove the cable you must push a release button on the cable. This locking feature allows for a more secure connection between the microphone and the camera but be careful not to trip on the cable as it could pull the camera over. As mentioned, only a few mid range 360 cameras have a mic in and none of them use XLR connectors. You would need an external device like a Beachtek XLR adapter. Also, if you are using an external audio recorder, some of these are sold with XLR inputs.
Below are also some other audio connectors you might encounter:
Chapter 5: Sound for 360 Video | 105
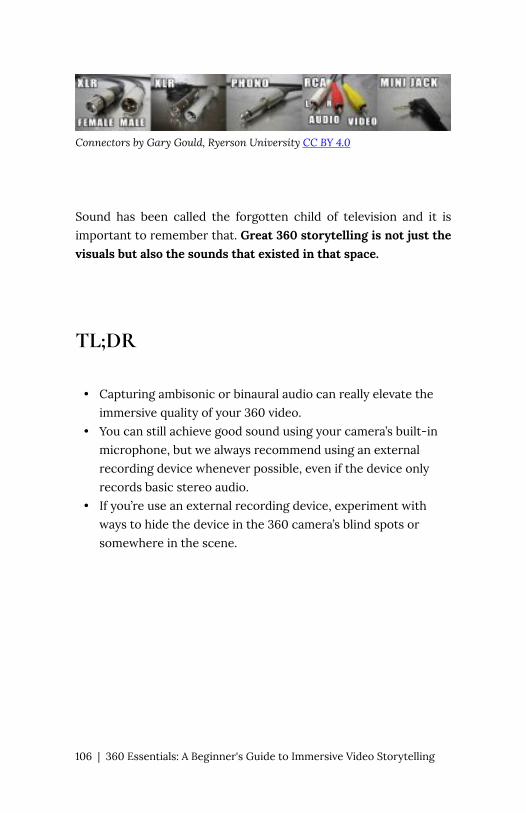
Connectors by Gary Gould, Ryerson University CC BY 4.0
Sound has been called the forgotten child of television and it is important to remember that. Great 360 storytelling is not just the visuals but also the sounds that existed in that space.
TL;DR
• Capturing ambisonic or binaural audio can really elevate the immersive quality of your 360 video.
• You can still achieve good sound using your camera’s built-in microphone, but we always recommend using an external recording device whenever possible, even if the device only records basic stereo audio.
• If you’re use an external recording device, experiment with ways to hide the device in the 360 camera’s blind spots or somewhere in the scene.
106 | 360 Essentials: A Beginner's Guide to Immersive Video Storytelling
6. Chapter 6: Editing Tips for 360 Video
In this chapter, we’ll go over some key suggestions to make sure you get the most out of your 360 video and some different programs you can use to put your content together.
Options for editing programs
There are several different options for 360 content creators — from free mobile apps to professional-level software — when it comes to editing and it is important to understand your needs in order to identify the platform that will best work for you. Are you producing fun holiday videos to post on social media or longer form 360 documentaries? Are you working with a high-end gaming computer or a pretty standard laptop? We’ve found that editing 360 footage, especially once you start working with 5.7K or higher files, can be quite burdensome for computers to handle. Editing a few clips here and there won’t likely give you a lot of trouble, however, if you’re getting into more advanced or professional 360 video work, you’re going to want to make sure your computer has the specs to handle the workload.
If you’re looking to do some serious desktop 360 video editing, please note that most of these manufacturers suggest running these programs on computers with more processing power. As you add more and more 360 clips to your editing program, low power computers will start to sputter and pause, making for a frustrating editing process. This is a good baseline to have:
Chapter 6: Editing Tips for 360Video | 107
• PC (Windows 7 or higher), Mac (macOS 10.11 or higher) • Most Intel/AMD processors within the last few years should be
fine • At least 16GB of RAM (this will help the programs and
processes run much more smoothly and quickly) • A powerful enough video graphics card for 4K video editing
and rendering (i.e. the AMD RX 500 series or Nvidia GeForce GTX series)
• A decent amount of hard drive space, at least 500 GB, and preferably as the faster and more efficient Solid State Drive. You’ll want to consider additional hard drive storage or purchase an external hard drive because 360 video files are so large and can accumulate quickly.
The company that manufactured your 360 camera and its native editing app will most likely offer ideal computer specs to maximize their product. When in doubt, go to the company’s website and their FAQs or production documentation.
In general, your camera will most likely have a native editing app to make basic cuts and create sequences. It’s best to start with that platform to help understand the ins and outs of your specific device. Below, we’ve included links to editing FAQs and editing program downloads for several of the most popular 360 camera apps on the market at the moment:
Insta360 CyberLink Action Director (for Samsung Gear) Ricoh Theta GoPro Fusion Studio Kandao Vuze VR Studio VIRB 360 (For Garmin cameras)
108 | 360 Essentials: A Beginner's Guide to Immersive Video Storytelling
MOBILE APPS FOR EDITING
There are several excellent mobile apps for 360 video editing (and most of them are absolutely free and have both iOS and Android versions!). Most of these apps will allow you to add straightforward effects like filters, text and music files to 360 photos and video. In general, the differences are in the user interface, so try them out and see which app you feel most comfortable using. One warning though: you’ll likely need a decent smartphone to handle the workload that comes with editing this type of content on a mobile device. At the very least, having adequate storage and memory will be key to being able to edit your content smoothly. Here are a few we recommend you check out:
VeeR VR Editor Collect V360
PROFESSIONAL PROGRAMS ($$$)
The final category of editing programs is the professional-level platforms that will cost you some money to purchase. But if you’re aspiring to produce higher level 360 content, going with a paid program is necessary to have access to the advanced features and editing flexibility needed for professional quality immersive videos. Here are some programs we’ve used before and would recommend:
Adobe Premiere Pro (Windows or Mac)
An industry-standard video editing platform, Premiere Pro is widely
Chapter 6: Editing Tips for 360 Video | 109
used by content producers for all types of video creation and has the muscle to handle 4K+ video work. In recent years, Adobe has added 360/VR audio and video editing features to the program. It’s smooth integration with other important Adobe programs, including Photoshop and After Effects, makes Premiere a strong option for 360 filmmakers wanting to add things like motion graphics, 3D effects and spatial audio to their videos. Especially when combined with these other Adobe products, Premiere is a real powerhouse program that can tackle nearly any kind of video project. This is definitely a pricer option, as a Premiere Pro subscription license typically costs about $40 CAD per month, while having access to the full Adobe Creative Cloud suite is about $70 per month (although students can apply for significant discounts).
Final Cut Pro X (Mac)
For Mac users, Final Cut is the chief rival to Premiere Pro, and it’s similarly feature-packed with most everything a producer needs to put together high quality video. Final Cut has a reputation for offering faster rendering, real time video effects and more stability than Premiere. It’s also more affordable than Premiere Pro, with a one time payment of about $400 CAD.
While Premiere Pro and Final Cut Pro represent two of the most widely used professional video editing programs, there are numerous alternatives that may not offer the some heavyweight horsepower, but come at a fraction of the cost, while readily meeting your needs.
110 | 360 Essentials: A Beginner's Guide to Immersive Video Storytelling
Avid Media Composer (Windows and Mac)
Another industry favourite editing platform with a solid suite for 360/VR editing features. An annual subscription for the full program will run you about $650 a year, but as an initial step, you can download a free version of their software to see whether it suits your needs.
Pinnacle Studio Ultimate (Windows)
An efficient and complete video editing toolbox for a one-time payment of about $130. This program gives you plenty of editing features, including more than 2000 different filters and effects and masking tools. The most recent editions have beefed up its 360 editing capabilities, allowing for better colour correction and cool effects like freeze framing. It maxes out at 4K resolution videos, however, so if you intend to work primarily with the 5K+ settings that the newer generation 360 cameras are offering, this program won’t likely cut it for you.
Molanis VR (Windows and Mac)
A flexible, multitrack video editing software that can be had for less than $100. Offers some cool 360 preset effects/filters and most of the essential editing features you’d want, but also tops out at 4K resolution videos.
Chapter 6: Editing Tips for 360 Video | 111
Editing tips
Regardless of whichever editing program (or programs) you’ll be using, there are a few specific techniques and fixes you can use to help optimize and polish your 360 video.
Colour correction
The modern, higher end 360 cameras generally capture colour quite vibrantly, but if you’re using an entry-level to mid-tier 360 camera, your video may benefit from some colour correction to enhance the look. This may particularly be true if you’re shooting at less than 5K resolution or shot a scene with challenging lighting conditions. There are a few basic adjustments you can make that can lead to a big improvement. Each program will tackle colour correction a bit differently and some may offer automatic adjustment options, but in general:
• Try giving the overall saturation a little boost to bring out the vibrancy and intensity of the colours in the scene.
• Adjust the contrast and brightness of your video to help mitigate shadowing, dark spots or to better define particular objects.
• Adjust the colour temperature and hues with the colour wheel to help make the scene richly coloured but also natural looking. Pay special attention to the colour tones of people’s faces or tree leaves so that you’re not taking the colour adjustments to extreme levels (unless that’s part of the idea).
• Your program may offer you colour gradient effects, like lens filters, which can be used to add some pop and pizzazz to your video.
• If you’re editing together multiple scenes shot in the same
112 | 360 Essentials: A Beginner's Guide to Immersive Video Storytelling
location, copy and save the colour correction settings to apply them to the other shots.
Sharpen
Most editing programs should offer you a method to sharpen your video. Again, this could be especially useful if you shot the video at a lower resolution. It just helps to add a bit more definition to your shot and helps details look a bit clearer and cleaner. Gradually increase the sharpening values until you reach that balance between well-defined and over-processed.
Denoise
Working with 360 cameras can be tricky at the best of times, and things like extreme lighting, flickering light sources and movement can contribute to blurring, graininess and what’s generally referred to as “noise” in the video. Denoising the video means to reduce some of these issues. If your video editor has a denoise feature, this could be a very useful fix.
Editing using proxies
Editing 360 files is an enormous drain on your computer and can cause your editing programs to sputter and freeze, especially if you’re working in a standard computer and not one with the pumped up processing power needed for gaming. One helpful tip
Chapter 6: Editing Tips for 360 Video | 113
would be to create proxies to edit with, which are essentially lower-quality versions of your high-quality footage. This reduces lag and the demands on your processing resources. If your editing program allows you to do this, we highly recommend you edit this way, particularly if your video involves cutting together multiple scenes. You should be able to find directions in your software’s FAQ resources; we’ve linked to a few here for some of the more popular programs.
Adobe Premiere Pro Final Cut Pro Avid Media Composer Pinnacle Studio Ultimate Molanis VR
Orienting your shot perspective
While an important aspect of 360 video is giving the viewer the choice to look where they wish to, something you may want to do as a 360 video producer is set your video to a particular starting orientation. We always recommend that when you’re shooting 360 video, try to imagine the camera is your audience member and you’re positioning the camera in a specific way so that the first thing they see is what you want them to see. But if you need to adjust the shot orientation in post-production, some editing programs will allow you to shift the direction (i.e. the audience’s point-of-view) of where the video starts. Each program handles it a bit differently, so we’ve linked to their FAQ resources.
Adobe Premiere Pro (360-degree panning) Final Cut Pro (re-orienting the perspective) Avid Media Composer Pinnacle Studio Ultimate (Rotate video)
114 | 360 Essentials: A Beginner's Guide to Immersive Video Storytelling
Monopod removal
Some filmmakers prefer to remove any evidence of there being a monopod to help with the immersive feeling while others may opt to leave it in. There are a few different techniques you could use to mask or hide the monopod in your video, although most of them are a bit tricky and may require the combined use of a few different programs.
Nadir logo
The most straightforward method to hide the monopod is to use a nadir logo. The nadir refers to the direction directly below someone or something – in this case, straight below the 360 camera. Most 360 camera softwares will give you an option to display a nadir logo. Sometimes this logo is a company logo, but often you can choose a colour (i.e. black or grey) and adjust the size of the circle. While it doesn’t look seamless, the use of the logo can effectively hide the monopod. Some programs allow you to upload your own graphic to use as the nadir image so if you were able to screen capture part of the scene or replicate the colours with another photo editing program (like Adobe Photoshop or Pixlr), that could certainly work.
ADOBE AFTER EFFECTS
If you have access to Adobe After Effects, they have a great tutorialon how to remove the monopod from your video and make it look totally seamless.
Chapter 6: Editing Tips for 360 Video | 115
MORE RESOURCES
360 video expert and blogger Mike Ty also has an excellent tutorial on additional methods of removing monopods on his website.
TL;DR:
• Most smartphone-based editing apps can handle some light trimming and adjustments, but you’ll need to have a capable computer to handle heavier production.
• If you’re able to use proxies while editing, that can save you lots of time.
• A few straightforward adjustments can make a big difference to the quality of your 360 video – look to tweak the sharpness, colour and noise.
116 | 360 Essentials: A Beginner's Guide to Immersive Video Storytelling
7. Chapter 7: The Ethics of 360 Video
New technologies will always introduce new ethical challenges and dilemmas to consider. In this chapter, we’ll address some of the potential issues you may have to address as a 360 storyteller.
Ethical questions
So, as you can probably tell from following this guidebook, we’re pretty excited about what one can accomplish creatively with 360 video technology. But it’s clear that as more news organizations, media producers, academics, marketing companies and even hobbyists of all stripes get out in the world shooting 360 video, there are numerous questions and concerns around this space. If you’re shooting 360 video in public, are you more likely to invade someone’s privacy? We know that viewing immersive video on a headset can lead to deeper feelings of empathy, but can this be a problematic experience for some? In this chapter, we’ll identify some of these potential issues and dilemmas and offer suggestions on how to address them, so that you can create 360 content with a more fulsome understanding of what the consequences could be.
Chapter 7: The Ethics of 360Video | 117
Ethical question #1: What are the guidelines regarding shooting 360 video in public?
An important question and one that may give you pause right off the bat. Let’s say that you’ve got your 360 camera and you’re shooting outside of a public building when someone passing by notices your camera, and then demands that you delete the footage because they didn’t consent to be in your shot. What do you do?
It goes without saying that the laws around capturing images or video in public depend heavily on where you are and different jurisdictions have different levels of permissibility. We suggest that, as a starting point, 360 shooters follow the same guidelines that people adhere to if they were taking photos and videos with, say, your smartphone camera or a DSLR in a public setting. We won’t go over every possible convention (and once again, this may differ depending on where you live), but here are some consistent principles:
• There is no law (at least in Canada) that prevents a member of the public from shooting video or taking photographs in a public place
• You are permitted to take photos and videos of people in public places, including children and police officers and can publish this content without their consent, although this can also be dependent on jurisdiction. Quebec, for example, has much more restrictive privacy laws than other provinces. Double check your local guidelines.
• Having stated this, there are some instances where filming a public location is legally prohibited due to security or sensitivity concerns, such as military bases and inside courthouses. Do a little research into what may or may not be permitted in locations like these
• To prevent someone from taking videos or videos in a public place is actually an infringement of that person’s rights as
118 | 360 Essentials: A Beginner's Guide to Immersive Video Storytelling
protected by the Charter of Rights and Freedoms, regardless of whether you’re working as a journalist or there in the capacity of a private citizen. For the most part, a security guard or police officer or member of the public cannot prevent you from shooting video at a public place, unless you are clearly obstructing their duties. Additionally, a police officer is not permitted to make you delete your footage or show you what you’ve captured
• If you happen to be shooting on private property (i.e. owned by an individual or company), you should comply with a police officer’s or owner’s request for you to move off the site or to public property (i.e. the street). But once you’re on public property again, you can resume shooting
• You’re allowed to shoot on public property provided that you’re not doing something illegal while doing so (i.e. jaywalking or breaking into facility)
• If you’re using a ton of gear or have positioned your equipment in a manner that is clearly obstructing members of the public of getting around, you may be asked to move. This is why, whenever possible, you should minimize the amount of your need to bring and plan your shoot so you’ll be minimally disruptive as possible
• Shooting inside a public location (i.e. a mall, a subway station) is generally permissible, however, remember that members of the public have the legal right to retain a reasonable amount of privacy. Shots of people lining up to enter a store or moving onto a train are generally fine, but leave the camera out of areas where people expect privacy (i.e. bathrooms, change rooms, hospital rooms).
Now, all of this also presupposes that what you’re shooting is for non-commercial purposes. If you have been contracted to shoot a wedding or promotional material for a company or a larger-scale film production, you’ll likely need to obtain a permit to shoot in public locations. It’s usually easy to find these applications by
Chapter 7: The Ethics of 360 Video | 119
searching your local city website. In some cases, there will be a permit fee involved and you would be wise to keep a copy of your authorized permit on you during the shoot.
If you’ve been taking photos and videos on the street as a hobby or are a professional, you’ll have some familiarity with these rules. But 360 video may require special considerations, given how much more detail you capture and how relatively new this technology is as it relates to the public’s comfort level and concerns about surveillance.
When someone takes a selfie or is using a video camera on a tripod in public, there are deliberate actions involved that is visible to people passing by. They’re accustomed to seeing us adjust the lenses and positioning the tripod and they know that some filming will be happening. However, a small 360 camera sitting inconspicuously on a park bench or mailbox could easily go undetected while gathering hours of footage in all directions. People that may have intentionally avoided being in the frame of a video camera had they the chance may be unaware they’re being recorded. The following are some suggestions for shooting 360 video in public:
Consider making it more obvious that you’re filming a 360
video
◦ The nature of 360 video endeavours us to try to blend in as much as possible, but shooting video in public spaces that could be part of a sensitive topic may warrant more of your considerations about respecting people’s privacy or at least making them aware of your actions. There may not be anything ostensibly sensitive about filming a walk through a city neighbourhood, but what if you were filming a documentary about poverty and much of your footage was to include shots of low-income housing and the people who live there? Shooting in locations where marginalized communities and more vulnerable
120 | 360 Essentials: A Beginner's Guide to Immersive Video Storytelling
populations have made their residential and social hubs (i.e. Gay villages, homeless shelters, ethnic neighbourhoods) should warrant more consideration, particularly given the history of media misrepresentation many groups have faced. We always encourage you to use monopod or selfie stick when shooting 360 video to maximize stabilization, but this also helps identify your camera in public and that a photo or video is being taken. If people see this and wish to avoid being in your shot, they’ll have more of an opportunity to avoid being filmed. Some filmmakers and videographers may post a small sign or two in the vicinity of the scene to make it more obvious and known that a video shoot is taking place. Details like tripods and signs can also be removed or obscured in post-production (if this is what you decide to do).
Be prepared to explain what you’re doing
◦ We advise transparency and to be honest about what you’re filming. People may be concerned about how the footage will be used, but often, people are just curious about the camera and what it does. Having an open conversation about the device and what you intend to do with the content will help assuage any concerns they are being spied on.
Be particularly considerate with people in close proximity
◦ If there is a subject or group of people that will occupy much of the frame and be quite prevalent and clearly identifiable in your video, consider approaching them to inform them what you’re filming, as they may not recognize you’re using a 360 camera and believe you’re just shooting the opposite side. This is especially if they will be
Chapter 7: The Ethics of 360 Video | 121
very clearly identifiable in your footage.
Always check your footage carefully before publishing it
◦ While you may have intended to capture a few specific details in your scene, you may have inadvertently captured someone at a particularly vulnerable or sensitive moment. Perhaps you’re thinking you’re getting a great shot of an art installation in a downtown square, but you’ve inadvertently captured someone changing their clothes by the hotel window next door. Ultimately, if the moment is relevant to your story and there is no legal requirement to get rid of it, you may decide to include it in your final cut. But it is important for you to be aware of what’s going on in your footage so you can make that decision.
Ethical question#2: What are the rules regarding shooting 360 video of people where they’re clearly identifiable?
Shooting 360 video for “crowd” or general scenery is one thing, but what happens when certain individuals appear very prominently in your footage? This may be by design (i.e. they are a principal character in your story) or may be unintentional (i.e. a stranger sitting across from your principal character while you’re interviewing them a restaurant unaware anything was being filmed). In the case of documentarians and filmmakers, they tend to seek anybody who appears prominently in their video to sign a waiver or consent form, particularly if the end product is intended for broadcast or publication. This often also applies if children are to
122 | 360 Essentials: A Beginner's Guide to Immersive Video Storytelling
be featured prominently in your video, as guardian permission is an advisable thing to have in written form.
If you’re a professional videographer, you’re likely accustomed to seeking permissions. This waiver form basically allows the content producer to use this person’s image in their materials and relinquishes their right to legally contest their inclusion in the footage or what you with that material. What makes 360 an interesting challenge in this regard is because you’re capturing video in all directions simultaneously, you may inadvertently include people in your footage that end up being clearly identifiable and prominent. Context can matter too. Filming scenes from a summer street festival is likely fairly innocuous and you may be able to take a more relaxed approach to securing waivers from people beyond your principal characters. But what if you were directing a documentary about drug addiction and your principal character was taking you to a part of town that’s notorious for drug dealing? For stories involving more sensitive topics, we definitely suggest more consideration for having waivers of the subjects featured in your video, although at some point, it becomes impractical to chase down every person. If you’re unable to secure waivers for everyone that is clearly identifiable in your footage, other strategies can be used, such as blurring the person’s face. But we’ll echo our earlier recommendation of making it somewhat obvious you’re filming a 360 video and giving people the opportunity to move away from the camera. And ultimately, if you’re not sure you need someone to sign a waiver, you may wish to seek the opinion of a legal expert in broadcast matters.
Ethical question #3: Am I describing my video as “real life”?
Given the nature of 360 video as a more immersive experience,
Chapter 7: The Ethics of 360 Video | 123
many kinds of 360 and virtual reality stories are framed and presented as accurately and authentically capturing real life scenes right as they’re unfolding. In reality, there is often a significant amount of manipulation and influence by the creator both technically and editorially that the audience may not realize has occurred. Consider, for example:
• 360 videos aim to put the viewer in the middle of the action with no camera or camera operator in sight. But obviously people are involved in capturing the video. Are you hiding in plain view, perhaps pretending to be a wandering member of the public, or are you clearly identifiable and purposefully part of the scene, perhaps as a tour guide?
• To shoot 360 videos well may require adjustments in the staging of the scene. These adjustments may range from minimal (i.e. lowering a window blind to improve lighting conditions) to more substantial (i.e. rearranging a room so that certain objects are more easily viewed). How much are you altering the physical environment of the scene?
• Filming a subject performing an action may require having them re-do the action multiple times if they flub their performance or if you’re having difficulty obtaining the optimal camera position to clearly capture the action. If your video involves multiple takes or rehearsals, how “real life” is it?
• 360 video may involve significant post-production. Are you removing things from the scene, such as scrubbing out traces of the camera tripod to create a more immersive feeling? Are you adding things to the scene, like computer-generated elements to spice up the scene (i.e. the CG flames in the BBC fire video we discussed earlier) or 3D objects to add more interactivity? How much of what people are seeing has been tinkered with editing?
These are just a few of the questions that 360 content creators grapple with. The answers depend a lot on the type of work you’re
124 | 360 Essentials: A Beginner's Guide to Immersive Video Storytelling
doing and for whom. Journalists may be held to a higher standard of transparency and factual accuracy by themselves and the public, whereas filmmakers and marketing content creators have much more creative latitude to finesse the production in order to tell the story they’re aiming to tell.
If you are a journalist, and you’re finding it challenging to understand where the line is, veteran investigative reporter and documentary director Robert Osborne has some advice. “The moment your influence starts to skew the image in some way, if it starts to change the editorial content, that’s pushing it too far in some way in my opinion. That’s when you’re creating reality, not capturing it.” With this is mind, Osborne says he’s ethically comfortable to move some garbage out of the way or tidy up a little so that the shot will look less cluttered and more focused on the story. He’ll direct his subjects a little if they need to pause or reset the camera to capture a scene clearly. But adding objects or props to the space where they were not before or having subjects behave in ways is where he gets uncomfortable because doing so is purposefully skewing the reality.
Ethical question #4: Headsets and VR can be physically uncomfortable for people
Two more ethical issues we’d like to explore relate to the use of headsets and experiencing virtual reality. As this is an introductory guidebook on 360 video and only touches upon virtual reality, we won’t get too deep into the weeds with these questions, but it’s important to acknowledge that there can be intended consequences to this technology.
The use of headsets (as you’ll remember, by definition, to experience virtual reality requires the immersion of a headset) to
Chapter 7: The Ethics of 360 Video | 125
watch these content can be problematic for people both physically and emotionally.
In terms of physical issues, many people find that watching 360 or VR content on a headset can lead to eye strain, nausea and headaches. Prolonged, uninterrupted use of headsets are not recommended, although the research is unclear whether there is a precise threshold people should be aware of. In general, people should take a break from the headset if they start experiencing discomfort. There are numerous physiological theories as to why this “virtual reality sickness” exists and what to do about it. The quality and stability of the visuals seems to have an effect, as content with lower frame rates, resolution and uneven lighting is more difficult to stomach. Latency issues (any delay between the movement of the user’s head with the corresponding change in visuals) can also induce motion sickness. VR designers have had some success in reducing these issues by developing more intuitive controls for VR experiences that help a person maintain their equilibrium. We expect more solutions in this area to come as VR technology and design continues to reach maturity. From a content creator perspective, you should be aware that what you’re filming may make people physically uncomfortable and reasonable considerations should be made in the filming and production of your content to minimize this. You may still want to use a sudden transition or a strobe light effect for that concert scene you shot, but always think about the person on the other end of this watching through a headset.
Ethical question #5: Is VR actually an empathy machine, and is that a good thing?
There is compelling research that suggests engaging with VR content can make people more empathetic, compared to other
126 | 360 Essentials: A Beginner's Guide to Immersive Video Storytelling

forms of communication. In 2017, researchers at Stanford University wanted to see whether people would become more empathetic about homelessness depending on the type of medium they were exposed, including VR. Some groups were asked to read narratives about homelessness while others played a two-dimensional scenario on a desktop computer. The group who an interactive VR simulation video about homelessness were more likely to “have enduring positive attitudes toward the homeless than people who did other tasks… the same people were also more likely to sign a petition in support of affordable housing.”
A YouTube element has been excluded from this version of the
text. You can view it online here:
https://pressbooks.library.ryerson.ca/360essentials/?p=143
Fig. 1: The Stanford University Virtual Human Interaction Lab’s research into the epidemic of homelessness
Chapter 7: The Ethics of 360 Video | 127
These findings echo similar conclusions made by researchers at the Tow Center for Digital Journalism. The idea of VR being the ultimate “empathy machine” has been championed by filmmakers and VR documentary pioneers like Nonny de la Pena and Chris Milk. But is VR really the empathy machine some purport it to be? Some critics, such as Harvard human rights lecturer Sam Gregory, wonders if VR experiences are “confusing immersion for empathy.” Santa Clara University Professor Erick Ramirez argues that VR can encourage greater feelings of sympathy, this is different than true empathy. True empathy requires one to try to understand emotions and perspective of another individual. As VR users, however, we’re more like spectators at a scene, bringing our own experiences and awareness into the mix.
“The best we can do with VR is to see what it might be like for us to experience some forms of temporary racial discrimination or of becoming homeless; and even in these cases, we should be careful to distinguish between realistic and gamified experiences of homelessness and racism. For all its potential, VR can’t show us what it’s like to be someone else … VR is an important tool, and research shows that it can radically affect the way we think about the world. But we shouldn’t be so quick to assume that it endows us with true, first-person, empathetic understanding.”
Whether or not VR can encourage true empathy, most researchers do agree that the immersive headset experience can significantly influence our attitudes and opinions, perhaps much more so than other forms of media. Could VR help spread misinformation and galvanize anti-social behaviour? Could exposing people to distressing or disturbing VR content lead to actual traumas? And as VR is increasingly used for therapeutic and mental health purposes, we expect a host of new ethical dilemmas to emerge. The consequences of all this is yet to be fully apparent.
For now, we think it’s important for anyone interested in 360 video and VR to understand that it can be a very powerful medium psychologically. What you show to people and how you frame it can have a significant influence on their perspectives. We love the idea
128 | 360 Essentials: A Beginner's Guide to Immersive Video Storytelling

of giving people the chance to walk in someone else’s shoes, but we should duly consider the how and the why.
TL;DR:
• While one is free to shoot 360 in public, be aware that passing citizens may have no idea they are being filmed and to check your footage over with care to not cause anyone unnecessary embarrassment.
• 360/VR storytelling can be ethically challenging, particularly if you’re framing your content as “real-life” experience – be mindful of the ways you’re finessing or manipulating a scene or experience.
• Be aware that your content could trigger negative feelings in someone, both physically and emotionally, and consider offering warnings or indications about what they may see in the video.
Chapter 7: The Ethics of 360 Video | 129
8. Chapter 8: Where Do We Go From Here?
So, if you’ve made it this far into this guidebook, you will have by now hopefully gained a better understanding of what 360 video is, how it’s produced and the different ways it can be employed to tell amazing stories. And hopefully you’ve picked up enough of our suggestions and ideas to help get you started.
But learning to shoot 360 video is just the tip of the iceberg in terms of virtual reality and immersive video experiences. If you’re interested in pursuing this technology further, there is so much more to explore and experiment with — more than this introductory guidebook can cover. In this chapter, we’ll offer some recommendations for next steps and additional resources, should you want to go deeper down this particular rabbit hole.
How can I make my content more immersive?
As we’ve discussed a few times in this book, 360 video is not technically virtual reality and is a much more limited experience. While what constitutes true virtual reality is hard to define, most media critics and producers would agree that the more realistic the virtual environment is and the more freedom to move and agency the user has, the more immersive the experience is. And in order to do that, one must look to the next stage, which is making your content more three-dimensional and interactive.
130 | Chapter 8: Where Do We GoFrom Here?

3D video
As you may recall, most consumer-facing 360 cameras shoot monoscopic video, which can be fantastic to look at but does not have any depth. Stereoscopic 360 footage, when viewed through a headset, can trick our eyes and brain into perceiving depth, which adds to the realism of the experience and is something that helps you take your content into the realm of being considered more truly virtual reality. We have a few suggestions to offer in terms of cameras that shoot 3D video, which represents the next level of 360 camera gear (and their much higher prices reflect this).
Stereoscopic cameras, in general, tend to be more expensive than their monoscopic counterparts. A relatively affordable way to get a stereoscopic camera is to check out the Insta360 EVO, which captures 360 video but also can record 3D at 180 degrees. Our research team has generally had great experiences with the equipment made by this company and believe they have emerged as a key industry leader in terms of both VR filmmaking hardware and software. One thing this company does really well is offer a strong product for nearly every consumer price point.
While you wouldn’t get the full spherical experience in 3D with this device, there’s a lot of interesting and engaging content you could create with 180 degrees field of vision. And for around $550, you’ll have a versatile 360 camera that’s pretty feature-packed for its price.
For around $800, another option is the Vuze VR camera, which is one of the more affordable 360 3D cameras on the market. They’re fairly portable and come in a variety of cool colours. But one of the reasons why it’s more affordable is that the resolution tops out at 4K/30FPS in 3D mode. For most projects, this should work fine, but this resolution falls a bit short of the professional-level.
Speaking of professional-level 3D cameras, there are several strong options. The Insta360 Pro series represents one of the company’s top lines and is aimed at advanced filmmakers and videographers. As of the writing of this guidebook, there are two
Chapter 8: Where Do We Go From Here? | 131
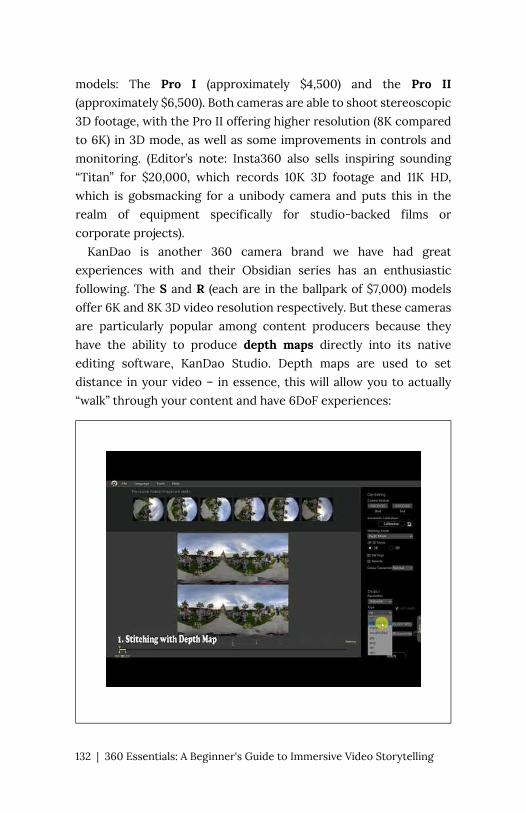
models: The Pro I (approximately $4,500) and the Pro II (approximately $6,500). Both cameras are able to shoot stereoscopic 3D footage, with the Pro II offering higher resolution (8K compared to 6K) in 3D mode, as well as some improvements in controls and monitoring. (Editor’s note: Insta360 also sells inspiring sounding “Titan” for $20,000, which records 10K 3D footage and 11K HD, which is gobsmacking for a unibody camera and puts this in the realm of equipment specifically for studio-backed films or corporate projects).
KanDao is another 360 camera brand we have had great experiences with and their Obsidian series has an enthusiastic following. The S and R (each are in the ballpark of $7,000) models offer 6K and 8K 3D video resolution respectively. But these cameras are particularly popular among content producers because they have the ability to produce depth maps directly into its native editing software, KanDao Studio. Depth maps are used to set distance in your video – in essence, this will allow you to actually “walk” through your content and have 6DoF experiences:
132 | 360 Essentials: A Beginner's Guide to Immersive Video Storytelling
A YouTube element has been excluded from this version of the
text. You can view it online here:
https://pressbooks.library.ryerson.ca/360essentials/?p=181
And what if you can’t quite afford a camera on this level, but want to create 3D video and/or 6DoF experiences? Well, if you have a monoscopic 360 camera, there are some options.
Programs like Matterport and Cupix are interesting and versatile platforms that quickly and easily convert your 360 2D photos into 3D content. It’s not a completely accurate 3D video because the program buildings a 3D model from a series of 2D stills, but it looks awesome and can be extremely useful in the right situation. Interest and use of these tools have been especially driven by real estate agents wanting to show ultra-realistic virtual tours to prospective clients, while needing a more affordable and mobile alternative to 3D scanning. There are a variety of pricing options as well, including a free plan that lets you create one 3D scan for no charge. Be aware though, Matterport supports a select number of 360 camera types, so double check yours is compatible (Cupix appears to be able to support most models). And while the potential creative applications for this kind of technology is intriguing, at this point, the results tend to favour showcasing environments without movement or characters since it relies on image sets and not actual video.
6DoF interaction and adding multimedia enhancements
For individuals interested in building actual 6DoF experiences with their video and would welcome the opportunity to learn more coding and design skills, the next step would be to look into gaming development engines. A gaming engine can help you compile your
Chapter 8: Where Do We Go From Here? | 133
360 assets into a 3D environment that can be viewed stereoscopically on a headset. You can also use these platforms to add interactive elements and gameplay to your project.
The two most popular game development platforms are Unityand Unreal Engine, which basically allow people to create their own 3D video games and immersive experiences. There are numerous tutorials online about how to get started. Both platforms are powerful, versatile and free to use, with extensive resources and online communities backing them. In general, Unity is often favoured as a program that is more accessible and beginner friendly, while Unreal is considered more of a high fidelity powerhouse and perhaps better utilized by more experienced developers. It may seem overwhelming to get started at first, but try your hand at both platforms. You may find this will really open up all sorts of creative doors for your 360 video ideas.
If you’re not up for figuring out game development, but still wish to add more interactivity to your 360 videos, there are a few other options (with more developing all the time):
1. ThingLink is an online tool that allows you to easily add hotspots, embedded content and other multimedia to 360 videos. There are various pricing options, including a more limited free version, but a professional subscription will run you about $25 a month.
2. Adobe Captivate is a relatively new tool launched by the digital publishing software giant. The program essentially allows you to upload 360 images and video and then easily add customizable overlay content, such as blurbs, audio or quizzes. It also offers live device preview, so you can test your content on a VR headset in real-time. Although primarily aimed at educators, the tool does offer unique potential for content producers of all kinds and it’s fairly straightforward to use, with no coding experience necessary. It’s definitely an investment, however, with a full retail price tag of about $1,500 CAD (if you’re a student or educator, it costs about a third as
134 | 360 Essentials: A Beginner's Guide to Immersive Video Storytelling
much). And while this tool can help make your 360 content a bit more interactive, it won’t turn your monoscopic video in a 3D environment.
3. Liquid Cinema is an exciting new VR authoring platform that allows you to add interesting features, including gaze-controlled events, picture-in-picture, hot spots, branched video, forced perspective and titles, quickly and easily. You basically upload your 360 video to its platform and then all the interactive elements are added and updated through their cloud-based system, which eliminates the need for you to render a new video. A non-enterprise subscription license costs about $65 a month.
We also highly recommend the following blogs and YouTube accounts to keep on top of 360/VR video trends, tools and techniques:
• Ben Claremont (YouTube vlogger, photographer and videographer specializing in 360 content. Offers fantastic tutorials on shooting and editing.)
• The 360 Guy (Lots of excellent camera reviews and 360 video tours)
• Immersive Shooter (Comprehensive blog filled with useful tips and industry news)
How will 360/VR storytelling continue to evolve?
We’re only just starting to see what is possible with this technology from a storytelling aspect, especially as other technologies, such as
Chapter 8: Where Do We Go From Here? | 135
widely available 5G wireless networks, exponentially increase the capacity to push things forward. Journalist Sarah Lashkmi believes that “VR is the first step into spatial storytelling — so I could also see VR as the beginning of stories moving into augmented reality, as well as volumetric video and location-based interactives. Once these kinds of stories become easier to create and produce, and combined with 5G connectivity, they will be easier to share and more people will have access.”
Contraverse co-founder Josh Gonsalves agrees that volumetric video will play a major role in the next generation of immersive video, especially as production costs come down. “On the technology advancement side, there’s going to be opportunities with tracking. If you stack two KanDao Obsidian cameras together, you can create depth and space, not just 360. With that, you’re not just creating 360 video anymore, you’re creating a 360 environment.”
When it comes to journalism and documentary storytelling, Gonsalves says the next generation of 360 videos could be so realistic and immersive that the experience of watching them could feel more like tapping into a memory rather than viewing a video.
“If you view 360 videos, you do experience it as a memory as if you were there. You recall it as if you were in the savanna. For you as the viewer, it’s a very singular thing, you watch a giraffe on the screen in front of us. You can view it as ‘I was in the savanna.’ That’s real visceral sense. We’re already seeing that now, but as more and more people start jumping into that space, you’ll see more unique pieces around that.”
360 visual artists Jonathan Qu and Kevin Li also concur that immersive video will continue to become more realistic and the opportunities (and challenges) will be developing new experiences to maximize this.
“[Video] games are going to have a heyday. VR is really going to shine with games, and it’s going to mesh with reality. In 360 storytelling, we’ll be focusing on how to tell the story — does the audience need to be in the story themselves, or are they a third
136 | 360 Essentials: A Beginner's Guide to Immersive Video Storytelling

party character? How will audiences interact with the experiences? If we look at different mediums, we look at what’s popular and what works. Anything that’s narrative driven, so far, we found has fallen flat. However, being on the water, being around sharks, experiencing driving — those experiences work beautifully. Journalism will fall between narrative and experience.”
So, dear reader, our final suggestion to you is to, in addition to developing and experimenting with new shooting and editing techniques, also continue expanding your storytelling ideas. Be bold! Try new approaches when it comes to narrative or perspectives. In this spirit, you may find that breaking the “rules” of 360 storytelling could lead to all sorts of exciting possibilities.
TL;DR
• 3D video is the next step you can take to create more immersive and realistic 360 experiences. And the good news is that more and more camera companies are building 3D/volumetric capabilities into their devices.
• Most of the examples we have covered in this guidebook are 3DoF 360 experiences; learning to create 6DoF environments using programs like Unity or Unreal will unlock all kinds of storytelling potential.
• Technological advancements, like 5G coverage, could lead to a slew of amazing developments for 360/VR and make the production and sharing process easier and more affordable than ever. We encourage you to keep experimenting with different approaches and ideas for 360 storytelling!
Chapter 8: Where Do We Go From Here? | 137
9. Chapter 9: Additional Resources
We go over some tools to help you shoot, edit and produce 360 content and basic virtual reality experiences in-depth in Chapter 6, but here’s a list of additional resources.
360 photo editing
Knightlab’s Scene VR: An easy-to-use tool to create slideshow galleries of 360 photos that can be viewed in headsets
Spatial/360 audio editing
Facebook 360 Spatial workstation: Free (for now at least!) audio workstation to create rotating, surround sound for 360 video and cinematic VR.
G’Audio Works: Powerful Mac-only digital workstation to create 3D sound using object-based placement. A solution for professionals.
The Ambisonic Toolkit: A set of useful plug-ins for editing spatial audio. Works particularly well with Reaper, a powerful digital audio workstation that is also fairly affordable.
NPR Training: A guide to recording spatial audio for 360-degree
138 | Chapter 9: AdditionalResources
video: A behind-the-scenes look at how NPR experimented with spatial audio for their immersive video projects
BBC Academy: Spatial Audio: Where Do I Start?: A fantastic resource compiled by BBC audio producers.
Premiere Pro and Final Cut Pro also have spatial audio editing functionality.
Developing more interactive or advanced 360/VR content
ThingLink: A user-friendly platform to add embeddable media elements to your 360 videos
Adobe Catalyst: Geared more towards educators, this program allows you to add interactive elements, such as quizzes and information hotspots to build more immersive learning content.
Liquid Cinema: Geared towards professional filmmakers and content developers for adding more interactivity and special features, including forced perspective, picture-in-picture and branched video, without needing to code.
Unity: An ultra-popular cross-platform gaming engine used to create 2D and 3D games, augmented reality and 6DoF virtual reality content. Has a massive asset store and resources to help get started.
Unreal: An extremely powerful 3D game development platform that has a smaller community of users than Unity, but excels at high fidelity visuals
Chapter 9: Additional Resources | 139
Spatial Audio
NPR Training: “A Beginner’s Guide to Spatial Audio in 360-degree Video” by Nick Michael
Your Detailed Guide to Spatial Audio for 360 Video Using Mostly Free Tools by No Film School
More resources and good reads
Canadian Journalists for Free Expression: Can you take a picture? A look at your right to photograph in Canada.
The 360 Guy: YouTube vlogger with lots of great tutorials and video tours.
Ben Claremont: One of the web’s leading expert’s on immersive shooting and editing.
360 Rumours: A leading 360 video website with the latest industry news and loads of useful tutorial content.
Online News Association’s Journalism 360 group: A global gathering of 360/immersive journalists and documentarians. Subscribe to their newsletter to keep on top of what’s happening in this space.
140 | 360 Essentials: A Beginner's Guide to Immersive Video Storytelling

10. Chapter 10: Bibliography
Information in this book was referenced from the following articles and websites:
Alsever, Jennifer. “Is Virtual Reality the Ultimate Empathy Machine?” Wired, Conde Nast, 10 Nov. 2015, www.wired.com/brandlab/2015/11/is-virtual-reality-the-ultimate-empathy-machine/.
“A Brief History of Panoramic Photography : Articles and Essays : Panoramic Photographs : Digital Collections : Library of Congress.” The Library of Congress, www.loc.gov/collections/panoramic-photographs/articles-and-essays/a-brief-history-of-panoramic-photography/.
Buckler, Grant. “Can You Take a Picture? A Look at Your Right to Photograph in Canada.” JSource, 24 Aug. 2017, j-source.ca/article/can-you-take-a-picture-a-look-at-your-right-to-photograph-in-canada/.
Chiu, Sherry. “How to Edit 360 Video in Adobe Premiere Pro CC.” Knight Lab Studio, Knight Lab, studio.knightlab.com/results/storytelling-layers-on-360-video/how-to-edit-360-video-in-premiere/.
The Cinematic VR Field Guide, Oculus, creator.oculus.com/learn/cinematic-vr-field-guide/.
“Circle-Vision 360° .” The Imagineering Disney Blog, 6 Oct. 2016, www.imagineeringdisney.com/blog/2016/10/6/future-matters-circle-vision-360.html.
Ford, Lily. “Virtual Reality, 19th Century Style: The History of the Panorama and Balloon View.” OpenLearn, The Open University, 13 Apr. 2017, www.open.edu/openlearn/history-the-arts/visual-art/virtual-reality-19th-century-style-the-history-the-panorama-and-balloon-view.
Forsythe, Glenn. “Audio Mixing for VR: The Beginners Guide to
Chapter 10: Bibliography | 141
Spatial Audio, 3D Sound and Ambisonics.” Sonicscoop.com, 5 Feb. 2018, sonicscoop.com/2018/02/05/audio-mixing-for-vr-the-beginners-guide-to-spatial-audio-3d-sound-and-ambisonics/.
“The Gettysburg Cyclorama.” National Parks Service, U.S. Department of the Interior, www.nps.gov/gett/learn/historyculture/gettysburg-cyclorama.htm.
“History.” · Spinner 360°, microsites.lomography.com/spinner-360/history/.
Kowalski, William. “Public Photography Is No Crime.” PEN Canada, 13 Sept. 2018, pencanada.ca/blog/public-photography-is-not-a-crime/.
Laws, Ana Luisa Sánchez, and Tormod Utne. “Ethics Guidelines for Immersive Journalism.” Frontiers in Robotics and AI, vol. 6, 2019, doi:10.3389/frobt.2019.00028.
Michael, Nick. “A Beginner’s Guide to Spatial Audio in 360-Degree Video.” NPR, NPR, 18 Dec. 2017, training.npr.org/2017/12/18/a-beginners-guide-to-spatial-audio-in-360-degree-video/.
Owen, Taylor, et al. “Virtual Reality Journalism.” Columbia Journalism Review, Tow Center for Digital Journalism, 11 Nov. 2015, www.cjr.org/tow_center_reports/virtual_reality_journalism.php.
Paura, Angelo. “The Ethical Challenges of Immersive Journalism.” MediaShift, 27 Feb. 2018, mediashift.org/2018/02/the-ethical-challenges-of-immersive-journalism/.
A Quick Guide to Degrees of Freedom in Virtual Reality. Kei Studios, 20 Feb. 2018, kei-studios.com/quick-guide-degrees-of-freedom-virtual-reality-vr/.
Ramirez, Erick. “It’s Dangerous to Think Virtual Reality Is an Empathy Machine – Erick Ramirez: Aeon Ideas.” Aeon, Aeon, 4 Aug. 2020, aeon.co/ideas/its-dangerous-to-think-virtual-reality-is-an-empathy-machine.
Redohl, Sarah. “16 Beginner Tips for Shooting 360-Degree Video.” Immersive Shooter, 11 Jan. 2019, www.immersiveshooter.com/2019/01/11/16-beginner-tips-for-shooting-360-degree-video/.
Robitszki, Dan. “Virtual Reality and Journalism Ethics: Where Are
142 | 360 Essentials: A Beginner's Guide to Immersive Video Storytelling
the Lines?” Undark Magazine, 20 Dec. 2019, undark.org/2017/09/27/virtual-reality-and-journalistic-ethics-where-are-the-lines/.
Shashkevich, Alex. “Virtual Reality Can Help Make People More Empathetic.” Stanford News, Stanford University, 15 Oct. 2018, news.stanford.edu/2018/10/17/virtual-reality-can-help-make-people-empathetic/.
Shukla, Umang, and Nikolas Wright. “Guide to Shooting 360° Video.” Knight Lab Studio, Knight Lab, studio.knightlab.com/results/storytelling-layers-on-360-video/guide-to-shooting-360-video/.
“Spatial Audio: Where Do I Start? – Academy Guides.” BBC Academy, BBC, www.bbc.com/academy-guides/spatial-audio-where-do-i-start.
Watson, Zillah. “Factual Storytelling in 360 Video.” BBC R&D, BBC, 11 Nov. 2016, www.bbc.co.uk/rd/blog/2016-11-360-video-factual-storytelling.
Chapter 10: Bibliography | 143
11. Chapter 11: Credits and Thanks
We would like to thank the following individuals and organizations for helping us to make this open educational resource project possible!
• Sally Wilson, Ann Ludbrook, Fangmin Wang and the amazing team at the Ryerson University Library/Collaboratory
• The Ryerson School of Journalism and FCAD • The students of the Ryerson School of Journalism’s “HK 360”
program • The numerous filmmakers, videographers and innovators we
interviewed for this project, including: Marie-Espérance Cerda, Robert Hernandez, Robert McLaughlin, Jessica Lauretti, Robert Osborne, Sarah Lashkmi, Josh Gonsalves, Jonathan Qu and Kevin Li. Thank you so much for your time and insights!
• Our wonderful research assistants Adam Chen and Stephanie Liu.
144 | Chapter 11: Credits and Thanks
Video References
Chapter 1
Discovery. (2016, March 22). Canyon Swing: Jump into the Unknown (360 Video) [Video]. YouTube. https://www.youtube.com/watch?v=tl6rVm9vx2g&feature=emb_logo
National Geographic. (2018, April 18). First-Ever 3D VR Filmed in Space | One Strange Rock [Video]. YouTube. https://www.youtube.com/watch?v=dwHBpykTloY&feature=emb_logo
Chapter 2
GoPro. (2017, September 28). GoPro: Meet Fusion and Relive Reality [Video]. YouTube. https://www.youtube.com/watch?v=GM_eDSIT71E&feature=emb_logo
Insta360. (2018, October 10). Insta360 ONE X – Introducing the Insta360 ONE X [Video]. YouTube. https://www.youtube.com/watch?v=UVrnYOFEBOA&feature=emb_logo
KanDao. (2017, August 30). Kandao Obsidian R/S Quick Start [Video]. YouTube. https://www.youtube.com/watch?v=htt-3sdbbwo&feature=emb_logo
Chapter 3
Hong Kong 360. (2018, September 24). Dai Pai Dongs in Hong Kong:
Video References | 145
Oi Man Sang’s Story [Video]. YouTube. https://www.youtube.com/watch?v=NVXDrvQSlf8&feature=emb_logo
Hong Kong 360. (2020, May 17). Dolly Shot — Example (360 Essentials) [Video]. YouTube. https://www.youtube.com/watch?v=E0dtYnjHvRA&feature=emb_logo
Hong Kong 360. (2020, May 17). Drone shot — Example (360 Essentials) [Video]. YouTube. https://www.youtube.com/watch?v=H2YCp-DFyDM&feature=emb_logo
Hong Kong 360. (2020, May 17). Follow shot — Example (360 Essentials) [Video]. YouTube. https://www.youtube.com/watch?v=HehxAcdbP2k&feature=emb_logo
Hong Kong 360. (2019, August 23). HK360: A Walk through Hong Kong’s Wet Markets [Video]. YouTube. https://www.youtube.com/watch?v=v7bBrCSXdrA&feature=emb_logo
Hong Kong 360. (2019, September 30). HK360: Continuing Traditions of Kung Fu in Hong Kong [Video]. YouTube. https://www.youtube.com/watch?v=DyE3LoHv7B8&feature=emb_logo
William Briscoe Photography. (2016, October 7). 360 VR Timelapse Footage of the Aurora Borealis over Kashwitna Lake, Alaska [Video]. YouTube. https://www.youtube.com/watch?v=ehJg_OlcjpE&feature=emb_logo
Chapter 4
BBC London. (2018, July 20). 360° Video: Buckingham Palace Tour – BBC London [Video]. YouTube. https://www.youtube.com/watch?v=FtGN2wK9g_s&feature=emb_logo
BBC News. (2016, December 4). Fire Rescue (360 Video) – BBC News [Video]. YouTube. https://www.youtube.com/watch?v=JGbf1y_WmAE&feature=emb_logo
Destination Toronto. (2017, July 10). A 360° Tour of Yonge Dundas Square | Tourism Toronto [Video]. YouTube.
146 | 360 Essentials: A Beginner's Guide to Immersive Video Storytelling

https://www.youtube.com/watch?v=k_3wW-0rDkA&feature=emb_logo
GoPro. (2019, January 9). GoPro x RYOT: Tales from the Edge in 4K VR | Jeb Corliss [Video]. YouTube. https://www.youtube.com/watch?v=szHgpgVzfMM&feature=emb_logo
Hong Kong 360. (2019, July 30). HK360: Disappearing Fishing Villages in Hong Kong [Video]. YouTube.https://www.youtube.com/watch?v=BX_CSujEp3g&feature=emb_logo
Lvl1 Productions. (2017, July 19). Street Musician 360 video [Video]. YouTube. https://www.youtube.com/watch?v=fM1uAG3MdnU&feature=emb_logo
MTV. (2017, September 10). Shawn Mendes 360° Performance of ‘Mercy’ | MTV Unplugged [Video]. YouTube. https://www.youtube.com/watch?v=jp33BDN01So&feature=emb_logo
National Geographic. (2016, December 6). 360° Victoria Falls – The Devil’s Pool | National Geographic [Video]. YouTube. https://www.youtube.com/watch?v=WsMjBMxpUTc&feature=emb_logo
NFB. (2019, August 2). Inside Insite – 360° [Video]. YouTube. https://www.youtube.com/watch?v=M_Ix8qU3oHM&feature=emb_logo
The Guardian. (2017, October 7). The Party: A Virtual Experience of Autism – 360 film [Video]. YouTube. https://www.youtube.com/watch?v=OtwOz1GVkDg&feature=emb_logo
The New York Times. (2016, March 24). A Quiet Commute After Brussels Attacks | 360 VR Video | The New York Times[Video]. YouTube. https://www.youtube.com/watch?v=KRWCr0rnuWw&feature=emb_logo
The New York Times. (2016, January 30). 360 VR: Donald Trump Rally | Election 2016 | The New York Times [Video]. YouTube. https://www.youtube.com/watch?v=5oDpMPv5RBs&feature=emb_logo
VR Gorilla – Virtual Reality & 360 Videos. (2019, May 16). Sereya: A New Maasai Way – VR Documentary – 6K 3D 360 Video [Video].
Video References | 147
YouTube. https://www.youtube.com/watch?v=aVfvHzAfQZg&feature=emb_logo
Chapter 5
BBC Click. (2016, April 22). Virtual Reality for Your Ears – Binaural Sound Demo (wear your headphones) – BBC Click[Video]. YouTube. https://www.youtube.com/watch?v=51za5u3LtEc&feature=emb_logo
Berklee Online. (2018, August 26). What Are Ambisonics? | 360° | VR | Spatial Audio Recording | Microphone | Berklee Online | Part 2/7 [Video]. YouTube. https://www.youtube.com/watch?v=-d1uT4QEA9k&feature=emb_logo
Chapter 7
Virtual Human Interaction Lab. (2017, March 3). Becoming Homeless: A Human Experience Official Trailer [Video]. YouTube. https://www.youtube.com/watch?v=OK2yJIcAhDE&feature=emb_logo
Chapter 8
KanDao. (2017, December 10). Introducing Depthmap Feature in Kandao Studio [Video]. YouTube. https://www.youtube.com/watch?v=ChNiMjbHmUI&feature=emb_logo
148 | 360 Essentials: A Beginner's Guide to Immersive Video Storytelling

Appendix
This is where you can add appendices or other back matter.
Appendix | 149