Embed Size (px)
Citation preview

3D Printed Star Trek CommunicatorCreated by Ruiz Brothers
Last updated on 2016-05-31 11:35:24 PM EDT

24466
88888
1010111111121313141415
172224242425252626272727272728
Guide Contents
Guide ContentsOverview
Real Star Trek CommunicatorAdafruit PartsTools and Supplies
Circuit DiagramElectronicsGround SplittersVibration MotorLithium Battery Charger
3D Printing3D Printed PartsSlicer SettingsCustomize The DesignFilament MaterialsTolerancesGenerating SupportsCover SupportsMinimize warpingSetting up dual colorsRemoving supports
CodeJust the Blinky CodeAssemble
Clean upSpeaker CoverSpeakerSIM CardMeasure wiresSpeaker wireMic ringMic SlotGround SplittersTin Flexy PCBsSolder ground SplittersButton pins
© Adafruit Industries https://learn.adafruit.com/3d-printed-star-trek-communicator Page 2 of 38

2929303132323233333434353536373738
Mounting LED to buttonsSolder buttonsButtons and LEDs Mounting PlateTranslucent ButtonsMouting plateLED PlacementVibration MotorSlide switchMounting the BatteryCircuit CompleteCable ManagementSnap case togetherAttaching the CoverTrim filamentMic GrillButton CoverComplete
© Adafruit Industries https://learn.adafruit.com/3d-printed-star-trek-communicator Page 3 of 38

Overview
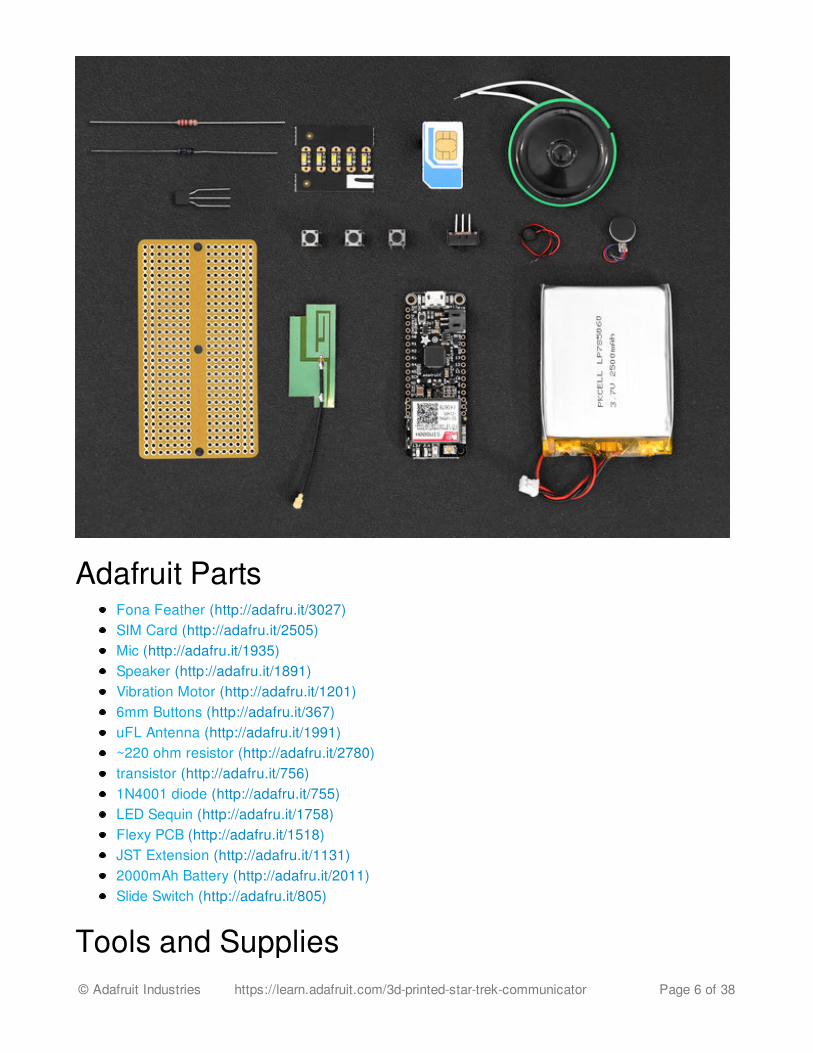
Real Star Trek CommunicatorMaking is the final frontier. These are the projects of Adafruit Industries. Its life long mission: to explorestrange new projects, to seek out new 3D printed forms and new circuitry, to boldly make what nomaker has made before.
Boldly go where no project has gone before with this real working Star Trek Communicator!
© Adafruit Industries https://learn.adafruit.com/3d-printed-star-trek-communicator Page 4 of 38

This prop is more than just a 'prop' - it can make real cell phone calls using the FONA Feather! Itfeatures a vibration motor, speaker and microphone mounted inside the case. You can customize thebuttons to call any number you want.
The 2500 mAh battery is rechargeable over USB and will provide several hours of energy.
It's never been easier to build your own cell phone!
© Adafruit Industries https://learn.adafruit.com/3d-printed-star-trek-communicator Page 5 of 38
Adafruit PartsFona Feather (http://adafru.it/3027)SIM Card (http://adafru.it/2505)Mic (http://adafru.it/1935)Speaker (http://adafru.it/1891)Vibration Motor (http://adafru.it/1201)6mm Buttons (http://adafru.it/367)uFL Antenna (http://adafru.it/1991)~220 ohm resistor (http://adafru.it/2780)transistor (http://adafru.it/756)1N4001 diode (http://adafru.it/755)LED Sequin (http://adafru.it/1758)Flexy PCB (http://adafru.it/1518)JST Extension (http://adafru.it/1131)2000mAh Battery (http://adafru.it/2011)Slide Switch (http://adafru.it/805)
Tools and Supplies© Adafruit Industries https://learn.adafruit.com/3d-printed-star-trek-communicator Page 6 of 38
Tools and Supplies3D Printer (http://adafru.it/doT) + Filament (http://adafru.it/2080)Soldering Iron (http://adafru.it/doU) + Solder (http://adafru.it/doU)30AWG Wire (http://adafru.it/2051)Helping Third Hands (http://adafru.it/291) / Panavise (http://adafru.it/151)Heat Shrink (http://adafru.it/1649)E6000 Glue / Mounting TackWire Stripper (http://adafru.it/527) / Cutters (http://adafru.it/152)Filing Tool / Hobby Knife
© Adafruit Industries https://learn.adafruit.com/3d-printed-star-trek-communicator Page 7 of 38

Circuit DiagramElectronicsFollow the circuit diagram below and reference the connections for wiring the circuit.
Ground SplittersUse a flex PCB to create the extra grounds needed for the buttons, LEDs and motor.
Cut two pieces from the ground railing on the flex PCB, one piece with 7 holes and one with 3 holes asshown.
Vibration MotorThe motor requires a resistor, diode and transistor to work, follow the diagram as shown.
Lithium Battery Charger
© Adafruit Industries https://learn.adafruit.com/3d-printed-star-trek-communicator Page 8 of 38

FONA Feather has a built-in USB battery charging circuit. Plug in a microUSB cable into the microUSBport on Fona to recharge the lipo battery using a USB adapter from a wall outlet or your computer.
© Adafruit Industries https://learn.adafruit.com/3d-printed-star-trek-communicator Page 9 of 38
3D Printing
Download Design
http://adafru.it/nDr
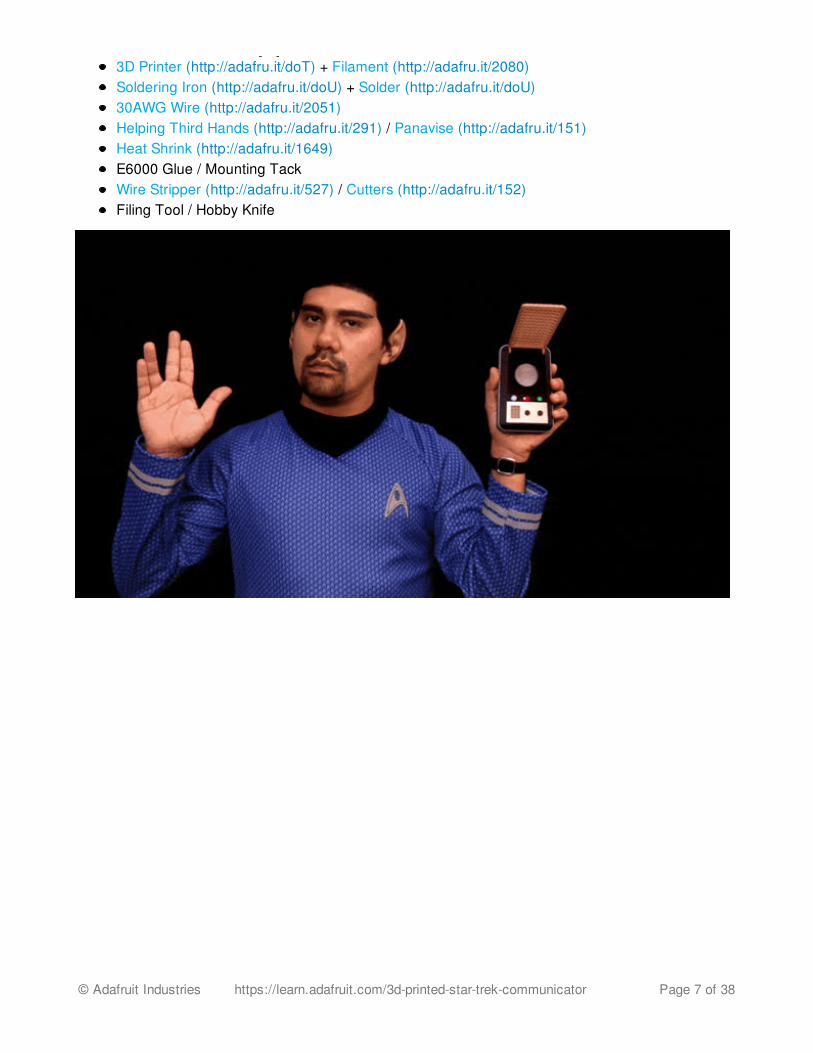
3D Printed PartsThe communicator is split into 12 different pieces. The two case parts snap fit together without anyscrews. The top case is printed in two colors by switching filament colors during the print. We pausedthe print at a height of 7.25mm, and then swapped colors to achive the dual color case.
The speaker grill and buttons snap fit into the slot holes. The mic grill is attached to the button coverwith a piece of a tape.
The case cover is held in place using a piece of filament to create the hinge.
Buttons are mounted underneath the top case with the button mounting plate.
The button cover was milled out of aluminium using a CNC, but you can easy print it in gray PLAmaterial.
© Adafruit Industries https://learn.adafruit.com/3d-printed-star-trek-communicator Page 10 of 38

Slicer SettingsTo slice the parts, we used Simplify3D. We recommend using the settings below or use them asreference. We 3D printed these parts on a Ultimaker 2+, Flashforge Creator Pro and the OthermillCNC. If you have Simplify3D, you can download our profiles below.
Customize The DesignThe parts where designed in Autodesk Fusion 360. The design is public and available to download indifferent formats. If you'd like to use a different CAD software package, you are free to import the filesand remix them.
Customize Design
http://adafru.it/nDs
Filament MaterialsWe recommend using PLA material to reduce wraping while 3D printing. The parts can be printed indifferent types of filament, such as ABS, PET or Nylon.
The push buttons are printed in Translucent PLA to allow the LEDs to show through.
ST-top-body.stl
ST-btm-body.stl 230c extruder50mm/s print speed
© Adafruit Industries https://learn.adafruit.com/3d-printed-star-trek-communicator Page 11 of 38

ST-cover.stl
ST-speaker.stl
ST-mic.stl
ST-btn-answer.stl(black buttons)
ST-btn-LED.stl (greenand blue buttons)
ST-btn-call.stl (redbutton)
ST-btn-holder.stl
ST-btn-panel.stl
120mm/s travel speed0.4mm Nozzle.44mm Extrusion width
The top body requires supports underneath.
Lay the button holder on it's side and addsupports underneath the standoffs.
The Button panel can be milled out ofaluminuim or printed in gray filament.
The top body takes about 3hours to print.
The bottom body takes around4 hours to print.
All of the other parts take lessthen 30 mins to print.
Use a .44mm extrusion width to closely match tolerances
TolerancesThe slots for the speaker, motor, buttons and slide switch may have tight tolerances. Test thetolerances by inserting all of components into each slot. If parts don't fit into the slots, you may need touse a craft knife or filing tool to loosen the area.
© Adafruit Industries https://learn.adafruit.com/3d-printed-star-trek-communicator Page 12 of 38

Generating SupportsThe top body case will need supports underneath the entire part of the case. We can optimze theprint by changing the default support pillar resolution to 8.00mm. Generate the supports andthen create additional pillars beneath all of the standoffs untill it looks like the picture above.
© Adafruit Industries https://learn.adafruit.com/3d-printed-star-trek-communicator Page 13 of 38

Cover SupportsLay the cover flat like shown and then generate supports to hold up the hinges like in the pictureabove.
© Adafruit Industries https://learn.adafruit.com/3d-printed-star-trek-communicator Page 14 of 38

Minimize warpingThe buttons are small and can easily warp if the hot end prints in the same area for too long. Werecommend printing two buttons at the same time with the fan speed set to 100% to eliminate anydeformation.
Setting up dual colors
© Adafruit Industries https://learn.adafruit.com/3d-printed-star-trek-communicator Page 15 of 38

Print in two colors by pausing the print at a height of 7.25mmand swap the colors from gray to black.
You can also do this inside of Simplify 3D by setting up twoprocesses.
Be careful when removing supports around the standoffs
Removing supports
© Adafruit Industries https://learn.adafruit.com/3d-printed-star-trek-communicator Page 16 of 38

Use flat plairs to help remove supports. Don't pull a large amount off as it could damage the standoffs.Carefully remove small chunks at a time.
© Adafruit Industries https://learn.adafruit.com/3d-printed-star-trek-communicator Page 17 of 38
CodeCopy and paste the code below into the Arduino IDE.
Edit the FRIENDPHONE line to any number you'd like the communicator to call.
If you just want blinky lights without any phone functionality, you can use the simple blinky code on thebottom of this page.
For a better understanding of how the code works, watch LadyAda's stream on coding thecomunicator.
#include "Adafruit_FONA.h"#include "pitches.h"
#define FONA_RX 9#define FONA_TX 8#define FONA_RST 4#define FONA_RI 7
#define BUZZER A3#define CALLBUTTON A0#define HANGUPBUTTON A1#define ANSWERBUTTON A2
#define FRIENDPHONE "5555555"
#define LED_PIN_RED 10#define LED_PIN_YELLOW 11#define LED_PIN_BLUE 12
#include <SoftwareSerial.h>SoftwareSerial fonaSS = SoftwareSerial(FONA_TX, FONA_RX);SoftwareSerial *fonaSerial = &fonaSS;
// Use this for FONA 800 and 808sAdafruit_FONA fona = Adafruit_FONA(FONA_RST);
// Update LEDs; call this as frequently as possible in loop & any while() delaysvoid animateLEDs() { uint32_t t = millis(); digitalWrite(LED_PIN_YELLOW, ((1 << ((t >> 8) & 0x7)) & 0b10100000) > 0); digitalWrite(LED_PIN_RED , ((t / 3) & 511) > 100); digitalWrite(LED_PIN_BLUE , ((t / 5) & 1023) > 800);}
© Adafruit Industries https://learn.adafruit.com/3d-printed-star-trek-communicator Page 18 of 38

int melody[] = { NOTE_G3, NOTE_F4, NOTE_F4, NOTE_E4, NOTE_D4, NOTE_C4, NOTE_B3, NOTE_AS3, NOTE_AS3, };int noteDurations[] = { 2, 2, 4, 4, 4, 4, 4, 2, 1}; void playTune() { // iterate over the notes of the melody: for (int thisNote = 0; thisNote < 9; thisNote++) { int noteDuration = 1000 / noteDurations[thisNote]; fona.print(F("AT+SIMTONE=1,")); fona.print(melody[thisNote]); fona.print(","); fona.print(noteDuration); fona.print(",0,"); fona.println(noteDuration); noteDuration *= 1.1; while (noteDuration > 0) { // if a button press comes in, bail! if ( (! digitalRead(HANGUPBUTTON)) || (! digitalRead(CALLBUTTON)) || (! digitalRead(ANSWERBUTTON))) { return; } delay(10); animateLEDs(); noteDuration -= 10; } }}
void setup() { pinMode(CALLBUTTON, INPUT_PULLUP); pinMode(HANGUPBUTTON, INPUT_PULLUP); pinMode(ANSWERBUTTON, INPUT_PULLUP); pinMode(BUZZER, OUTPUT); pinMode(FONA_RI, INPUT);
pinMode(FONA_RST, OUTPUT); digitalWrite(FONA_RST, LOW); delay(100); digitalWrite(FONA_RST, HIGH);
pinMode(LED_PIN_RED , OUTPUT); pinMode(LED_PIN_YELLOW, OUTPUT); pinMode(LED_PIN_BLUE , OUTPUT);
while (!Serial);
Serial.begin(115200); Serial.println(F("Star Trek Communicator")); Serial.println(F("Initializing....(May take 3 seconds)"));
© Adafruit Industries https://learn.adafruit.com/3d-printed-star-trek-communicator Page 19 of 38

fonaSerial->begin(4800); if (! fona.begin(*fonaSerial)) { Serial.println(F("Couldn't find FONA")); while (1); } Serial.println(F("FONA is OK")); while (1) { uint8_t n = fona.getNetworkStatus(); Serial.print(F("Network status ")); Serial.print(n); Serial.print(F(": ")); if (n == 0) Serial.println(F("Not registered")); if (n == 1) Serial.println(F("Registered (home)")); if (n == 2) Serial.println(F("Not registered (searching)")); if (n == 3) Serial.println(F("Denied")); if (n == 4) Serial.println(F("Unknown")); if (n == 5) Serial.println(F("Registered roaming"));
if (n == 1) break;
delay(500); }
fona.setAudio(FONA_EXTAUDIO); fona.setVolume(80); playTune();
Serial.println("Ready to call!");
fona.println(F("AT+CRSL=0")); // set to ~80 if you want jingle ringtone on}
void loop() { animateLEDs();
if (digitalRead(FONA_RI)) { digitalWrite(BUZZER, LOW); } else { Serial.println(F("Ring Ring")); digitalWrite(BUZZER, HIGH); playTune(); } if (! digitalRead(HANGUPBUTTON)) { delay(10); // debounce while (! digitalRead(HANGUPBUTTON)); // button is released!
© Adafruit Industries https://learn.adafruit.com/3d-printed-star-trek-communicator Page 20 of 38

Serial.println(F("Hanging up the phone!")); fona.hangUp(); }
if (! digitalRead(CALLBUTTON)) { delay(10); // debounce while (! digitalRead(CALLBUTTON)); // button is released!
if (fona.getCallStatus() != 0) { Serial.println(F("Not ready to call, bailing")); return; } Serial.print(F("Calling phone! ")); Serial.println(FRIENDPHONE); fona.callPhone(FRIENDPHONE); }
if (! digitalRead(ANSWERBUTTON)) { delay(10); // debounce while (! digitalRead(ANSWERBUTTON)); // button is released! Serial.println(F("Answering the phone!")); fona.pickUp(); }
}
/************************************************* * Public Constants *************************************************/
#define NOTE_B0 31#define NOTE_C1 33#define NOTE_CS1 35#define NOTE_D1 37#define NOTE_DS1 39#define NOTE_E1 41#define NOTE_F1 44#define NOTE_FS1 46#define NOTE_G1 49#define NOTE_GS1 52#define NOTE_A1 55#define NOTE_AS1 58#define NOTE_B1 62#define NOTE_C2 65#define NOTE_CS2 69
© Adafruit Industries https://learn.adafruit.com/3d-printed-star-trek-communicator Page 21 of 38

#define NOTE_D2 73#define NOTE_DS2 78#define NOTE_E2 82#define NOTE_F2 87#define NOTE_FS2 93#define NOTE_G2 98#define NOTE_GS2 104#define NOTE_A2 110#define NOTE_AS2 117#define NOTE_B2 123#define NOTE_C3 131#define NOTE_CS3 139#define NOTE_D3 147#define NOTE_DS3 156#define NOTE_E3 165#define NOTE_F3 175#define NOTE_FS3 185#define NOTE_G3 196#define NOTE_GS3 208#define NOTE_A3 220#define NOTE_AS3 233#define NOTE_B3 247#define NOTE_C4 262#define NOTE_CS4 277#define NOTE_D4 294#define NOTE_DS4 311#define NOTE_E4 330#define NOTE_F4 349#define NOTE_FS4 370#define NOTE_G4 392#define NOTE_GS4 415#define NOTE_A4 440#define NOTE_AS4 466#define NOTE_B4 494#define NOTE_C5 523#define NOTE_CS5 554#define NOTE_D5 587#define NOTE_DS5 622#define NOTE_E5 659#define NOTE_F5 698#define NOTE_FS5 740#define NOTE_G5 784#define NOTE_GS5 831#define NOTE_A5 880#define NOTE_AS5 932#define NOTE_B5 988#define NOTE_C6 1047#define NOTE_CS6 1109#define NOTE_D6 1175
© Adafruit Industries https://learn.adafruit.com/3d-printed-star-trek-communicator Page 22 of 38

#define NOTE_DS6 1245#define NOTE_E6 1319#define NOTE_F6 1397#define NOTE_FS6 1480#define NOTE_G6 1568#define NOTE_GS6 1661#define NOTE_A6 1760#define NOTE_AS6 1865#define NOTE_B6 1976#define NOTE_C7 2093#define NOTE_CS7 2217#define NOTE_D7 2349#define NOTE_DS7 2489#define NOTE_E7 2637#define NOTE_F7 2794#define NOTE_FS7 2960#define NOTE_G7 3136#define NOTE_GS7 3322#define NOTE_A7 3520#define NOTE_AS7 3729#define NOTE_B7 3951#define NOTE_C8 4186#define NOTE_CS8 4435#define NOTE_D8 4699#define NOTE_DS8 4978
Just the Blinky Code#define LED_PIN_RED 10#define LED_PIN_YELLOW 11#define LED_PIN_BLUE 12
void animateLEDs() { uint32_t t = millis(); digitalWrite(LED_PIN_YELLOW, ((1 << ((t >> 8) & 0x7)) & 0b10100000) > 0); digitalWrite(LED_PIN_RED , ((t / 3) & 511) > 100); digitalWrite(LED_PIN_BLUE , ((t / 5) & 1023) > 800);}
void setup() { // put your setup code here, to run once: pinMode(LED_PIN_RED , OUTPUT); pinMode(LED_PIN_YELLOW, OUTPUT); pinMode(LED_PIN_BLUE , OUTPUT);}
© Adafruit Industries https://learn.adafruit.com/3d-printed-star-trek-communicator Page 23 of 38

void loop() { // put your main code here, to run repeatedly: animateLEDs();}
© Adafruit Industries https://learn.adafruit.com/3d-printed-star-trek-communicator Page 24 of 38
Assemble
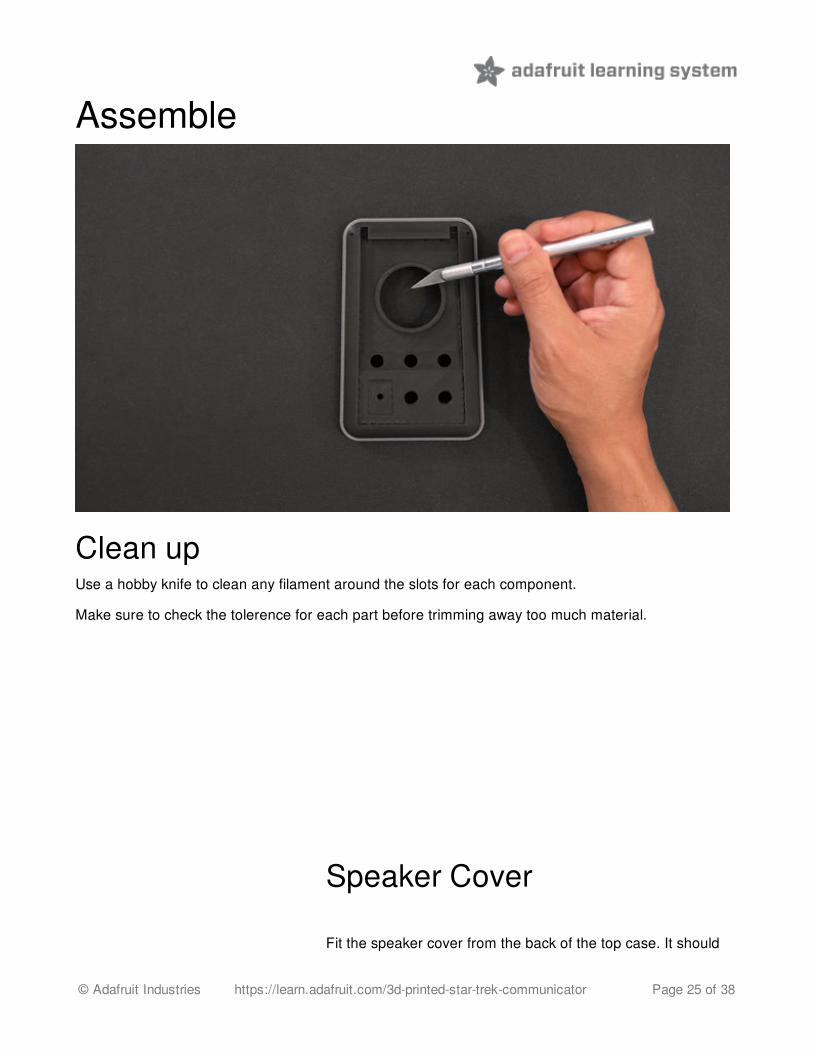
Clean upUse a hobby knife to clean any filament around the slots for each component.
Make sure to check the tolerence for each part before trimming away too much material.
Speaker Cover
Fit the speaker cover from the back of the top case. It should
© Adafruit Industries https://learn.adafruit.com/3d-printed-star-trek-communicator Page 25 of 38

have a tight tolerence so it can stay place.
Speaker
The speaker press fits inside the speaker slot as shown. Makesure to trim away any filament if it's too tight.
SIM CardA SIM card is required for making phone calls. The Ting SIM card can snap apart into standard, mini,micro and nano SIM sizes. Insert the SIM into the Fona with the SIM pins facing down.
© Adafruit Industries https://learn.adafruit.com/3d-printed-star-trek-communicator Page 26 of 38
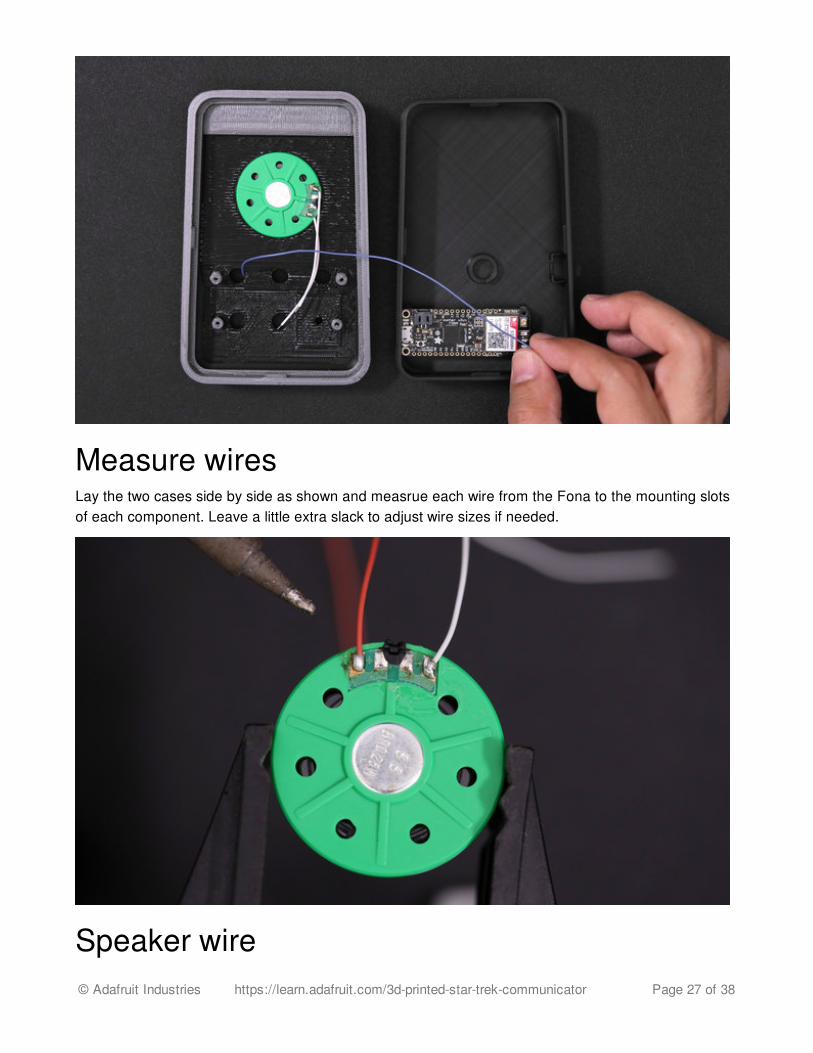
Measure wiresLay the two cases side by side as shown and measrue each wire from the Fona to the mounting slotsof each component. Leave a little extra slack to adjust wire sizes if needed.
Speaker wire© Adafruit Industries https://learn.adafruit.com/3d-printed-star-trek-communicator Page 27 of 38
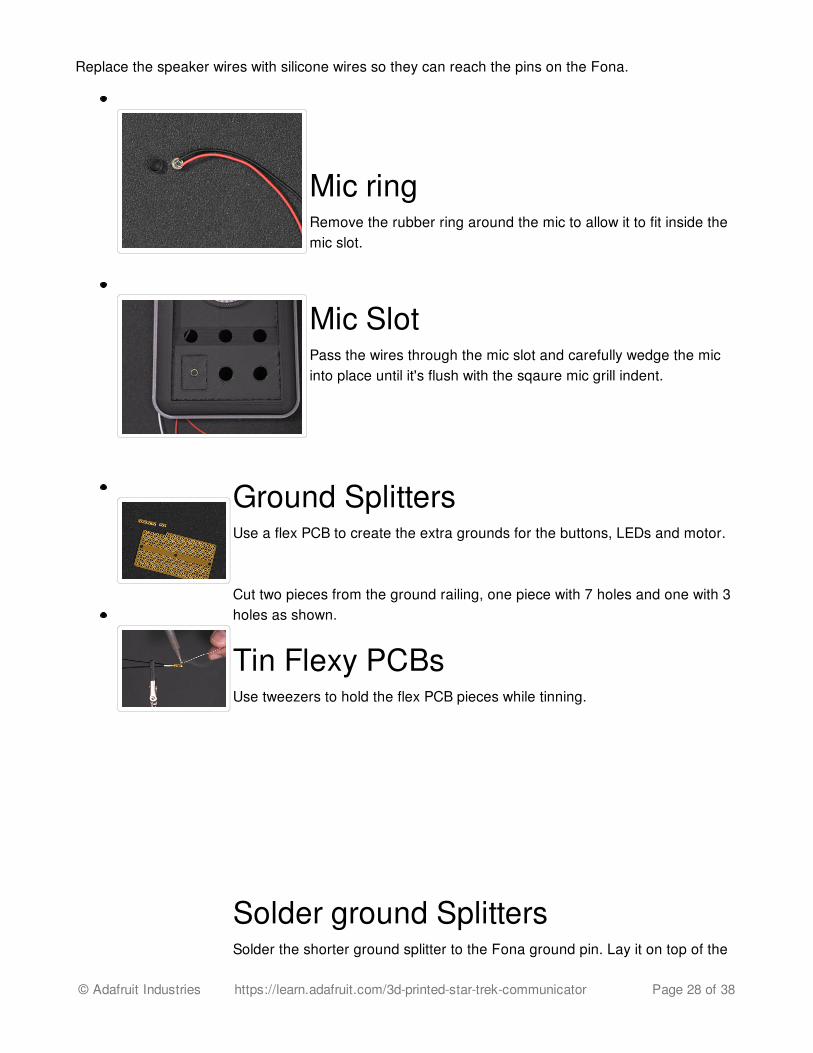
Speaker wireReplace the speaker wires with silicone wires so they can reach the pins on the Fona.
Mic ringRemove the rubber ring around the mic to allow it to fit inside themic slot.
Mic SlotPass the wires through the mic slot and carefully wedge the micinto place until it's flush with the sqaure mic grill indent.
Ground SplittersUse a flex PCB to create the extra grounds for the buttons, LEDs and motor.
Cut two pieces from the ground railing, one piece with 7 holes and one with 3holes as shown.
Tin Flexy PCBsUse tweezers to hold the flex PCB pieces while tinning.
Solder ground SplittersSolder the shorter ground splitter to the Fona ground pin. Lay it on top of the
© Adafruit Industries https://learn.adafruit.com/3d-printed-star-trek-communicator Page 28 of 38

ground pin and apply heat to solder in place. The two additional grounds willconnect the motor and the larger second ground splitter.
The larger 7 hole splitter will connect the LEDs and buttons.
Button pinsTo mount the buttons to the panel, we'll need to bend the pins stright out so they sit flush on themounting plate.
© Adafruit Industries https://learn.adafruit.com/3d-printed-star-trek-communicator Page 29 of 38
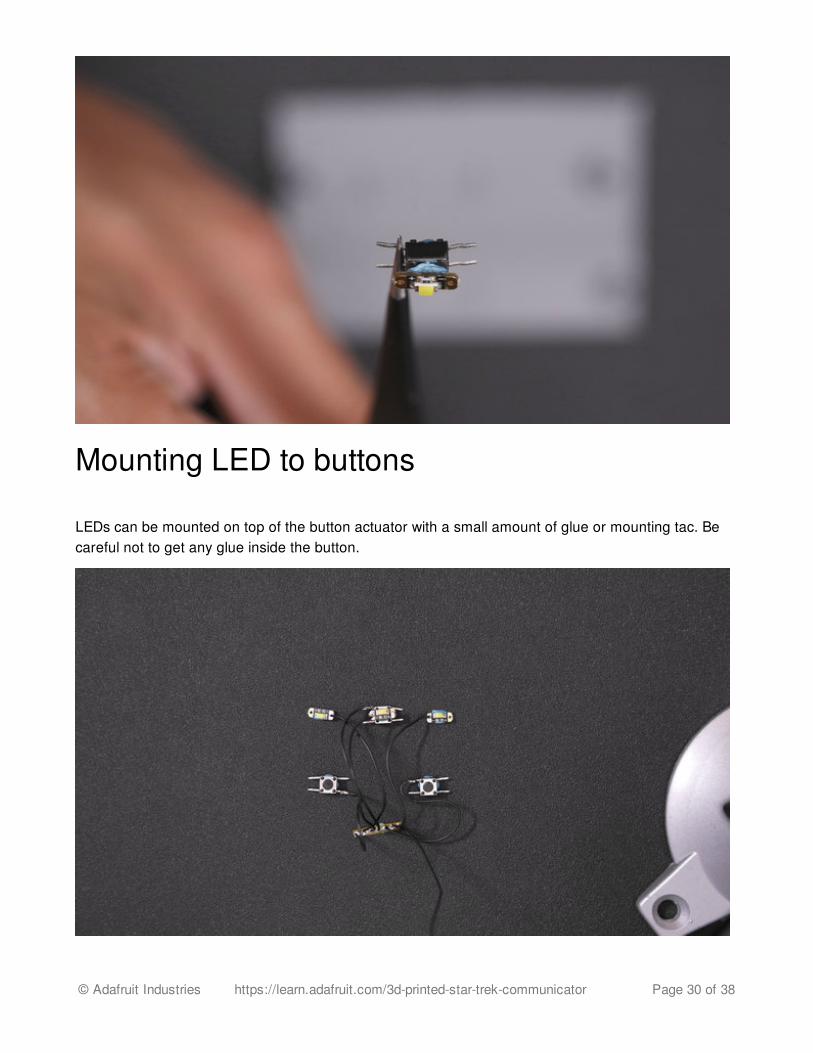
Mounting LED to buttons
LEDs can be mounted on top of the button actuator with a small amount of glue or mounting tac. Becareful not to get any glue inside the button.
© Adafruit Industries https://learn.adafruit.com/3d-printed-star-trek-communicator Page 30 of 38

Solder buttonsTin the button pins and wires before soldering them to each ground wire.
Buttons and LEDs Mounting Plate Align the buttons with the square grooves on the mounting plate.
Use tac to mount the LEDs to the plate.
© Adafruit Industries https://learn.adafruit.com/3d-printed-star-trek-communicator Page 31 of 38

Translucent ButtonsSlide the three color buttons through the top slot with the red button in the middle. The two blackbuttons mount in the bottom row.
© Adafruit Industries https://learn.adafruit.com/3d-printed-star-trek-communicator Page 32 of 38

Mouting plateAlign the standoffs on the mounting plate to the standoffs on the case. Use #2-56 screws to attach thebutton plate to the case.
LED Placement Make sure the LEDs are aligned and can equally diffuse each printed button. You can nudge them intoplace with a twezzer.
Vibration MotorThe motor requires a resistor, diode and transistor to work, follow the circuit as shown.
Measure wires, solder the parts together and then mount the motor in the circular slot on the case.
© Adafruit Industries https://learn.adafruit.com/3d-printed-star-trek-communicator Page 33 of 38
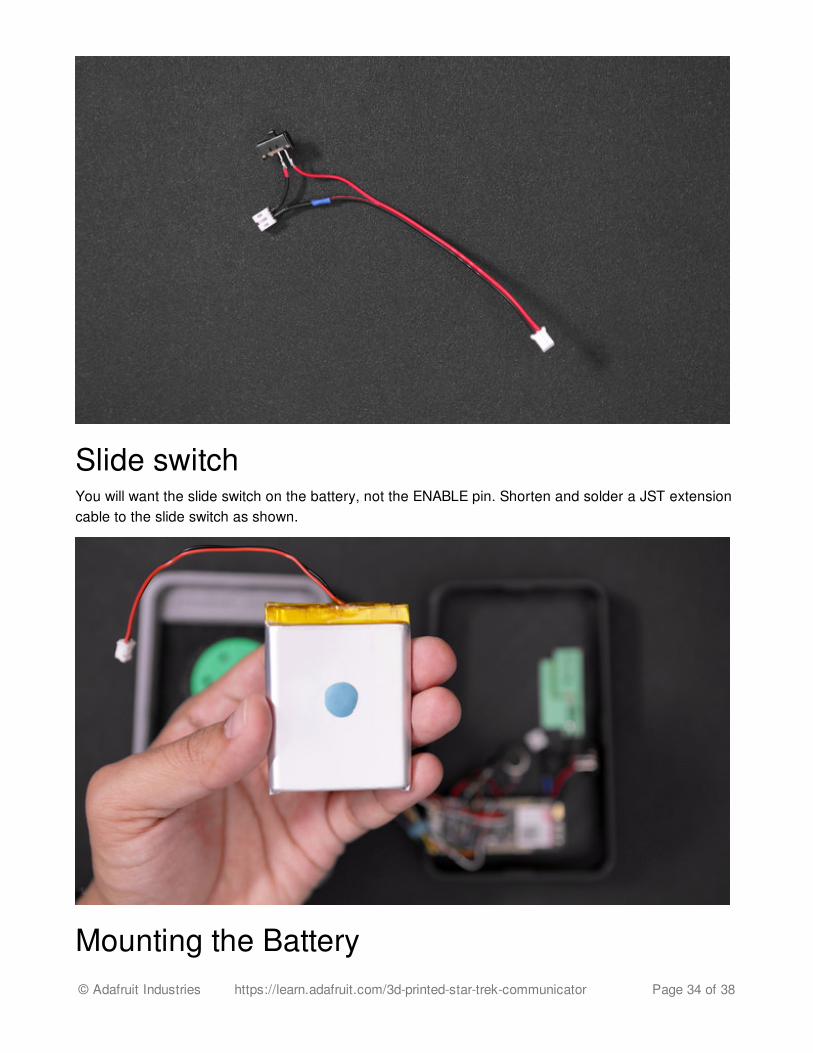
Slide switchYou will want the slide switch on the battery, not the ENABLE pin. Shorten and solder a JST extensioncable to the slide switch as shown.
Mounting the Battery© Adafruit Industries https://learn.adafruit.com/3d-printed-star-trek-communicator Page 34 of 38

Mounting the BatteryPosition the battery so the wires are close to the slide switch. Affix the battery to the case using doublestick tape or mounting tac.
Circuit CompleteMount the slide switch into slot and attach the uFL antenna to the Fona. Use tac to mount thevibration circuit next to the motor. You can apply tac to the transistor to keep it in place.
Cable ManagementBundle the button and LED wires with shrink tube or tape.
© Adafruit Industries https://learn.adafruit.com/3d-printed-star-trek-communicator Page 35 of 38

Snap case togetherThe two parts of the case snap fit together without any screws. Join one edge of the case and thenapply a small amount of force to snap the opposite side together.
Attaching the Cover© Adafruit Industries https://learn.adafruit.com/3d-printed-star-trek-communicator Page 36 of 38

Attaching the CoverThe cover hinge utilizes a piece of 1.75mm filament. Measure and cut a piece the length of the case.
Press the cover onto the case and then fit the filament through the holes in the case and the cover.
Trim filamentUse flush cutters to trim off the ends of the filament.
You can push the filament out with another piece of filament if you ever need to remove the cover.
© Adafruit Industries https://learn.adafruit.com/3d-printed-star-trek-communicator Page 37 of 38

Mic GrillUse a piece of tape to attach the microphone grill to the button cover. Cut a small piece and stick it tobackside of the button cover.
Button Cover© Adafruit Industries Last Updated: 2016-05-31 11:35:23 PM EDT Page 38 of 38

Button CoverAlign the two buttons through the cover and slide the button cover in at an angle. Apply a smallamount of force to snap fit the cover to the case.
CompleteYour real working communicator is now complete! Flip on the slide switch and make a test call.
Live long and prosper :)