Embed Size (px)
Citation preview
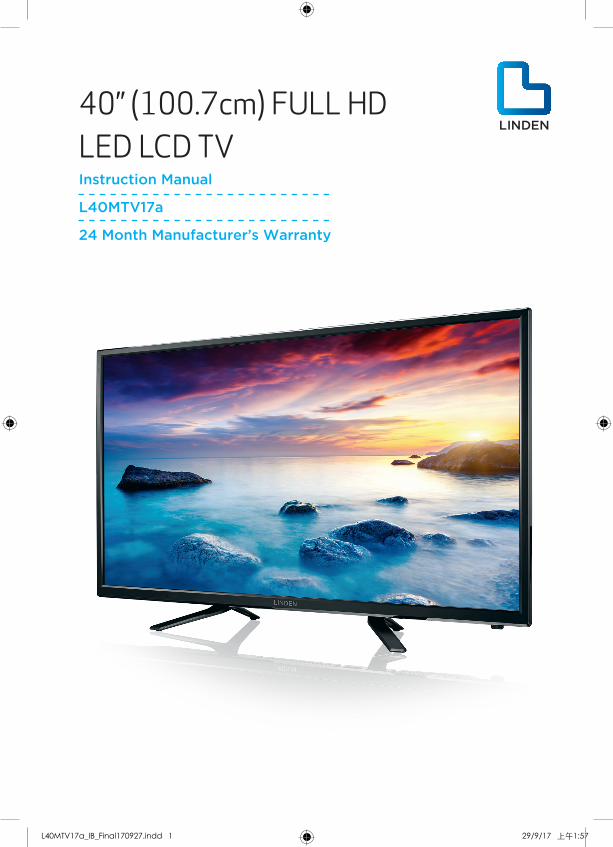
40” (100.7cm) FULL HD LED LCD TV Instruction Manual
L40MTV17a
24 Month Manufacturer’s Warranty
L40MTV17a_IB_Final170927.indd 1 29/9/17 上午1:57

L40MTV17a_IB_Final170927.indd 2 29/9/17 上午1:57
1
ContentGuide to the Television 2
Controls and Sockets 2Remote Control 3Installing Batteries in the Remote Control 3Teletext and Subtitles 4Getting Started 4
Caring for the Environment 5Responsible Disposal of the Packaging 5Responsible Disposal of Appliance 5
Safety Information and Warnings 6Symbols 6Important Safety Instructions 6
Item in the Box 8
Basic Set Up 9Setting up your TV 10Connect aerial and power 10Turn on TV 10
Advanced Connection Diagrams 11AV Input 11Earphone Output 11PC Input 12HDMI Input 12AUDIO Output 13USB Input 13
Advanced Features 14First time powering on the TV 14Channel Menu 15Picture Menu 17Sound Menu 18Time Menu 19Option Menu 19Lock Menu 22USB Source Menu 22EPG Menu (Electronic Program Guide) 22PVR Function 24Timeshift Function 26Digital Media Player (DMP) 27
Troubleshooting 29
Technical Specifications 30
L40MTV17a_IB_Final170927.indd 1 29/9/17 上午1:57
Guide to the Television
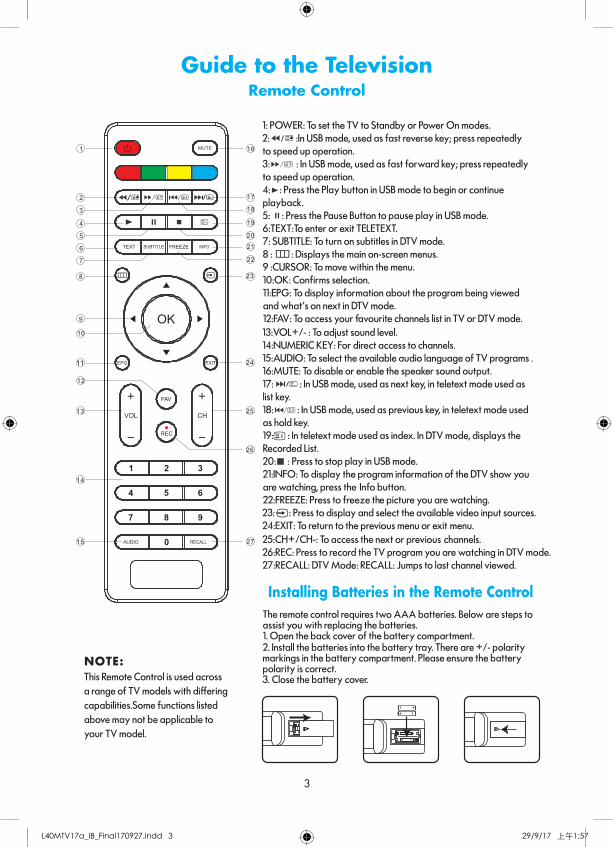
1: POWER: To set the TV to Standby or Power On modes.2: :In USB mode, used as fast reverse key; press repeatedly to speed up operation.3: : In USB mode, used as fast forward key; press repeatedly to speed up operation.4: : Press the Play button in USB mode to begin or continue playback. 5: : Press the Pause Button to pause play in USB mode. 6:TEXT:To enter or exit TELETEXT.7: SUBTITLE: To turn on subtitles in DTV mode.8 : : Displays the main on-screen menus. 9 :CURSOR: To move within the menu.10:OK: Confirms selection.11:EPG: To display information about the program being viewed and what's on next in DTV mode.12:FAV: To access your favourite channels list in TV or DTV mode.13:VOL+/- : To adjust sound level.14:NUMERIC KEY: For direct access to channels. 15:AUDIO: To select the available audio language of TV programs .16:MUTE: To disable or enable the speaker sound output.17: : In USB mode, used as next key, in teletext mode used as list key. 18: : In USB mode, used as previous key, in teletext mode used as hold key. 19: : In teletext mode used as index. In DTV mode, displays the Recorded List.20: : Press to stop play in USB mode.21:INFO: To display the program information of the DTV show you are watching, press the Info button.22:FREEZE: Press to freeze the picture you are watching.23: : Press to display and select the available video input sources. 24:EXIT: To return to the previous menu or exit menu.25:CH+/CH-: To access the next or previous channels.26:REC: Press to record the TV program you are watching in DTV mode.27:RECALL: DTV Mode: RECALL: Jumps to last channel viewed.
1
2
3
4
5
6
7
8
9
10
11
13
12
14
15
16
17
18
19
20
21
22
23
24
25
26
27
VOL CH
REC
FREEZE
Remote control battery installation
The remote control requires two AAA batteries. Below are steps to assist you with replacing the batteries. 1. Open the back cover of the battery compartment. 2. Install the batteries into the battery tray. There are +/- polarity markings in the battery compartment. Please ensure the battery polarity is correct. 3. Close the battery cover.
NOTE:
This Remote Control is used across
a range of TV models with differing
capabilities.Some functions listed
above may not be applicable to
your TV model.
3
Guide to the Television
2
Guide to the Television
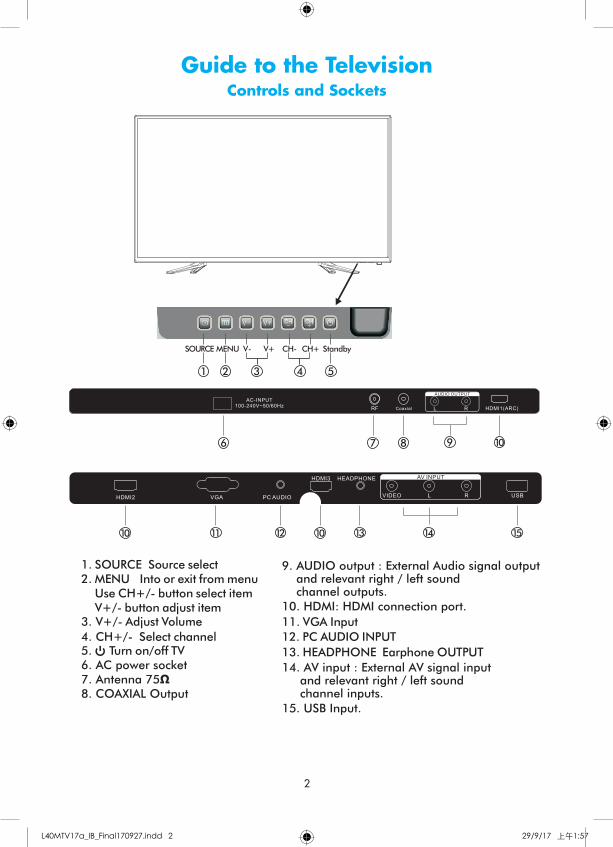
1. SOURCE Source select2. MENU Into or exit from menu
Use CH+/- button select item V+/- button adjust item
4. CH+/- Select channel
3. V+/- Adjust Volume
5. Turn on/off TV6. AC power socket7.
Antenna 75Ω
11. VGA Input
10. HDMI: HDMI connection port.
12. PC AUDIO INPUT
SOURCE MENU V- V+ CH- CH+ Standby
1 2 3 4 5
6 9 10
11 15
9. and relevant right / left sound channel outputs.
AUDIO output : External Audio signal output
13. HEADPHONE Earphone OUTPUT
15. USB Input.
HDMI2 VGA PC AUDIO
HDMI3 HEADPHONE
VIDEO L R USB
AV INPUT
AC-INPUT100-240V~50/60Hz
R F L R HDMI1(ARC)Coaxial
AUDIO OUTPUT
7 8
10 1012 13 14
14. and relevant right / left sound channel inputs.
AV input : External AV signal input
8.
COAXIAL Output
2
Controls and Sockets
L40MTV17a_IB_Final170927.indd 2 29/9/17 上午1:57
Guide to the Television
1: POWER: To set the TV to Standby or Power On modes.2: :In USB mode, used as fast reverse key; press repeatedly to speed up operation.3: : In USB mode, used as fast forward key; press repeatedly to speed up operation.4: : Press the Play button in USB mode to begin or continue playback. 5: : Press the Pause Button to pause play in USB mode. 6:TEXT:To enter or exit TELETEXT.7: SUBTITLE: To turn on subtitles in DTV mode.8 : : Displays the main on-screen menus. 9 :CURSOR: To move within the menu.10:OK: Confirms selection.11:EPG: To display information about the program being viewed and what's on next in DTV mode.12:FAV: To access your favourite channels list in TV or DTV mode.13:VOL+/- : To adjust sound level.14:NUMERIC KEY: For direct access to channels. 15:AUDIO: To select the available audio language of TV programs .16:MUTE: To disable or enable the speaker sound output.17: : In USB mode, used as next key, in teletext mode used as list key. 18: : In USB mode, used as previous key, in teletext mode used as hold key. 19: : In teletext mode used as index. In DTV mode, displays the Recorded List.20: : Press to stop play in USB mode.21:INFO: To display the program information of the DTV show you are watching, press the Info button.22:FREEZE: Press to freeze the picture you are watching.23: : Press to display and select the available video input sources. 24:EXIT: To return to the previous menu or exit menu.25:CH+/CH-: To access the next or previous channels.26:REC: Press to record the TV program you are watching in DTV mode.27:RECALL: DTV Mode: RECALL: Jumps to last channel viewed.
1
2
3
4
5
6
7
8
9
10
11
13
12
14
15
16
17
18
19
20
21
22
23
24
25
26
27
VOL CH
REC
FREEZE
Remote control battery installation
The remote control requires two AAA batteries. Below are steps to assist you with replacing the batteries. 1. Open the back cover of the battery compartment. 2. Install the batteries into the battery tray. There are +/- polarity markings in the battery compartment. Please ensure the battery polarity is correct. 3. Close the battery cover.
NOTE:
This Remote Control is used across
a range of TV models with differing
capabilities.Some functions listed
above may not be applicable to
your TV model.
3
Guide to the Television
2
Guide to the Television
1. SOURCE Source select2. MENU Into or exit from menu
Use CH+/- button select item V+/- button adjust item
4. CH+/- Select channel
3. V+/- Adjust Volume
5. Turn on/off TV6. AC power socket7.
Antenna 75Ω
11. VGA Input
10. HDMI: HDMI connection port.
12. PC AUDIO INPUT
SOURCE MENU V- V+ CH- CH+ Standby
1 2 3 4 5
6 9 10
11 15
9. and relevant right / left sound channel outputs.
AUDIO output : External Audio signal output
13. HEADPHONE Earphone OUTPUT
15. USB Input.
HDMI2 VGA PC AUDIO
HDMI3 HEADPHONE
VIDEO L R USB
AV INPUT
AC-INPUT100-240V~50/60Hz
R F L R HDMI1(ARC)Coaxial
AUDIO OUTPUT
7 8
10 1012 13 14
14. and relevant right / left sound channel inputs.
AV input : External AV signal input
8.
COAXIAL Output
3
Remote Control
Installing Batteries in the Remote Control
L40MTV17a_IB_Final170927.indd 3 29/9/17 上午1:57

Guide to the TelevisionTELETEXT and SUBTITLES
TEXT
DIRECT ACCESSTO THE ITEMS
Enter the number of the page required using the 0 to 9 up/down.Example: page 120, enter 120. The number is displayed top left, the counter turns and then the page is displayed. Repeat this operation to view another page. If the counter continues to search, this means that the page is not transmitted. Select another number.
Coloured buttons correspond to the colours at the bottom of the screen.The 4 coloured keys are used to access the items or corresponding pages. The coloured areas flash when the item or the page is not yet available.
SELECTING A PAGE
This is used to call or exit teletext modes during ATV reception. The summary appears with a list of items that can be accessed. Each item has a corresponding 3 digit page number. If the channel selected does not broadcast teletext, the indication 100 will be displayed and the screen will remain blank (in this case, press the CH+ or CH- buttons to check another text page,or else exit teletext and select another channel).
Teletext is an information system broadcast in certain countries which can be consulted like a newspaper. It may also offer access to subtitles for viewers with hearing problems or who are not familiar with the transmission language (Refer to your local TV guides or internet program lists to determine if Teletext is used in your area.)
SUBTITLEPress this button to select the available sub-title languages during DTV reception (if any), and to select Subtitle On or Off.
Once you have connected your TV antenna and other AV playback equipment (eg. CD, DVD, Blu-ray player) to the appropriate input sockets on the rear and side of the TV, you will need to be comfortable with selecting several basic operations before setting up your TV using the Menu system.
Firstly, the TV has two power modes – Standby and On. In Standby mode, the TV is powered up, but awaits a "power On" command from either the Remote Control or from the Standby push-button located on the lower right-hand side of the TV.
To switch the TV from off into Standby mode, activate the main On/Off rocker switch located at the bottom mid-right side of the TV, and wait for the Red power indicator on the bottom right of the TV to light up. Then, press the red power button on the Remote Control to fully activate the TV (ie. move from Standby to On mode). The power LED on the front of the TV will change from Red to a blank colour when the TV is fully powered up, and after approx 10 seconds the screen will become active and can be commanded using the Remote Control.
Getting started
Press : You will obtain :
4
Guide to the Television
4
Teletext and Subtitles
Getting Started
L40MTV17a_IB_Final170927.indd 4 29/9/17 上午1:57
TELETEXT and SUBTITLES
TEXT
DIRECT ACCESSTO THE ITEMS
Enter the number of the page required using the 0 to 9 up/down.Example: page 120, enter 120. The number is displayed top left, the counter turns and then the page is displayed. Repeat this operation to view another page. If the counter continues to search, this means that the page is not transmitted. Select another number.
Coloured buttons correspond to the colours at the bottom of the screen.The 4 coloured keys are used to access the items or corresponding pages. The coloured areas flash when the item or the page is not yet available.
SELECTING A PAGE
This is used to call or exit teletext modes during ATV reception. The summary appears with a list of items that can be accessed. Each item has a corresponding 3 digit page number. If the channel selected does not broadcast teletext, the indication 100 will be displayed and the screen will remain blank (in this case, press the CH+ or CH- buttons to check another text page,or else exit teletext and select another channel).
Teletext is an information system broadcast in certain countries which can be consulted like a newspaper. It may also offer access to subtitles for viewers with hearing problems or who are not familiar with the transmission language (Refer to your local TV guides or internet program lists to determine if Teletext is used in your area.)
SUBTITLEPress this button to select the available sub-title languages during DTV reception (if any), and to select Subtitle On or Off.
Once you have connected your TV antenna and other AV playback equipment (eg. CD, DVD, Blu-ray player) to the appropriate input sockets on the rear and side of the TV, you will need to be comfortable with selecting several basic operations before setting up your TV using the Menu system.
Firstly, the TV has two power modes – Standby and On. In Standby mode, the TV is powered up, but awaits a "power On" command from either the Remote Control or from the Standby push-button located on the lower right-hand side of the TV.
To switch the TV from off into Standby mode, activate the main On/Off rocker switch located at the bottom mid-right side of the TV, and wait for the Red power indicator on the bottom right of the TV to light up. Then, press the red power button on the Remote Control to fully activate the TV (ie. move from Standby to On mode). The power LED on the front of the TV will change from Red to a blank colour when the TV is fully powered up, and after approx 10 seconds the screen will become active and can be commanded using the Remote Control.
Getting started
Press : You will obtain :
4
Guide to the Television
5
Responsible Disposal of the PackagingThe packaging of your television has been selected from environmentally friendly materials and can usually be recycled. Please ensure these packing materials are disposed of correctly.Plastic wrapping can be a suffocation hazard for babies and young children, please ensure all packaging materials are out of reach and are safely disposed of. Please ensure they are offered for recycling rather than throwing these materials away.
Responsible Disposal of ApplianceAt the end of its working life, do not throw this television out with your household rubbish. An environmentally friendly method of disposal will ensure that valuable raw materials can be recovered and used again.Electrical and electronic appliances contain materials and substances which, if handled or disposed of incorrectly, could be potentially hazardous on the environment and human health.Observe any local regulations regarding the disposal of electrical consumer goods and dispose of it appropriately for recycling. Contact your local authorities for advice on recycling facilities in your area.The plug must be rendered useless and the cable cut off directly behind the appliance or the machine to prevent misuse.
Caring for the Environment
L40MTV17a_IB_Final170927.indd 5 29/9/17 上午1:57
Safety Information and Warnings
6
Safety Information and WarningsSymbols
The symbols used in this manual or on the back cover of the television set means:
Read this Instruction Manual before use
Enclosures contain dangerous voltages
Please refer to important operating and maintenance/servicing instructions that accompany the appliance
Important Safety InstructionsWhen using any electrical apparatus, always observer safety regulations and use basic safety precautions to reduce the risk of fire, electric shock, and/or personal injury including any of the following:
1. Read, keep and follow this Instruction Manual, ensuring to heed all warnings.2. Keep out of reach of young children. This television is not suitable for use by young children
or infirm persons without supervision. Young children must be supervised to ensure that they do not play with the television.
3. This television is not intended for use by persons (including young children) with reduced physical, sensory or mental capabilities, or lack of experience and knowledge, unless they are supervised or have been given instructions concerning the use of the television by a person who is responsible for their safety.
4. Ensure that the television is positioned in a stable location to avoid the risk of the television falling. Many injuries, particularly to children, can be avoided by taking simple precautions such as:
- Using a stable and appropriately sized television cabinet. Ensure its stability by using a television safety strap to attach the television to the cabinet.
- Use the stand which has been supplied with your television set. - Ensuring the television is not hanging over the edge of supporting furniture. - Not placing the television on tall furniture (e.g. cupboards, book cases etc.) without
anchoring both the furniture and the television to a suitable support. - Ensure that the television is placed directly on supporting furniture, avoiding placing fabric,
cloth or other materials between the television and the supporting furniture. - Educating children about the dangers of climbing on furniture to reach for the television and/
or its controls.5. WARNING! Do not insert any objects into any openings of the television.6. WARNING! Do not touch any moving parts of the television.7. WARNING! Do not use this television near water, or in an area exposed to water splashes
or dripping. To avoid the risk of fire or electric shock, do not expose this television to rain and/or moisture.
8. WARNING! Do not place objects filled with liquid, such as vases, on or above the television.9. DO NOT immerse in any liquid whilst in use or whilst cleaning. Clean only with a damp
cloth and dry with a dry towel. Do not use harsh abrasives as these may damage plastic parts.
10. DO NOT block ventilation openings. Keep away from curtains, newspapers and restricted areas. Install in accordance with specific manufacturer instructions. Always allow sufficient space around the television to avoid overheating.
11. DO NOT install near heat sources such as radiators, gas heaters, stoves or other apparatus (including amplifiers) that produce heat. Do not place the television in direct sunlight.
12. WARNING! Do not place naked flame sources, such as lit candles, on the television.13. WARNING! Connect to a suitable 100-240V ~ 50/60 Hz power supply only.14. Use the power cord with care - do not damage the power cord in any way. If the power cord
is damaged, it must be replaced by either the manufacturer, the manufacturer’s service agent or qualified service personnel. The power cord must be replaced only with an authorised replacement from an authorised service agent.
L40MTV17a_IB_Final170927.indd 6 29/9/17 上午1:58
Safety Information and Warnings
7
15. Only use attachments/accessories specified by the manufacturer.16. Unplug this television during lightning storms or when unused for long periods of time.17. Please consider the environment when disposing of any batteries.18. Refer all servicing to qualified personnel. Servicing is required when the apparatus has been
damaged in any way, such as when the power supply cord or plug is damaged, liquid has been spilled or objects have fallen into the apparatus, the apparatus has been exposed to rain or moisture, does not operate normally, or has been dropped.
19. WARNING! Do not use the television outdoors.20. For household use only; this television is not intended for commercial use.21. This television is intended to be used in household and similar applications such as;
- offices and other working environments; - farm houses; - by clients in hotels, motels, bed and breakfast and other residential type environments.
22. If this apparatus is to be used by a third party, please supply these instructions with it.23. No liability will be accepted for any personal injury or damage caused by failure to follow
these instructions.24. Danger of explosion if battery is incorrectly replaced. Replace only with the same or
equivalent type.25. Batteries (battery pack or batteries installed) shall not be exposed to excessive heat such as
sunshine, fire or the like.26. The mains plug is used as the disconnect device, the disconnect device shall remain readily
operable.
TO AVOID RISK OF ELECTRIC SHOCK, DO NOT REMOVE COVER (OR BACK).NO USER-SERVICEABLE PARTS INSIDE. REFER SERVICING TO QUALIFIEDSERVICE PERSONEL. DO NOT BLOCK THE VENTILATION SLOTS ON THEBACK-COVER.
RISK OF ELECTRIC SHOCKDO NOT OPEN
CAUTION
IMPORTANT INFORMATION
If a television is not positioned in a sufficiently stable location, it can be potentially hazardous due to falling. Many injuries, particularly to children, can be avoided by taking simple precautions such as:
• Using cabinets or stands recommended by the manufacturer of the television.
• Only using furniture that can safely support the television.
• Batteries (battery pack or batteries installed) shall not be exposed to excessive heat such as sunshine, fire or the like.
• Ensuring the television is not overhanging the edge of the supporting furniture.
• Not placing the television on tall furniture (for example, cupboards, or book cases) without anchoring both the furniture and the television to a suitable support.
• Not standing the television on a cloth or other materials placed between the television and supporting furniture.
• Educating children about the dangers of climbing on furniture to reach the television or its controls.
L40MTV17a_IB_Final170927.indd 7 29/9/17 上午1:58
8
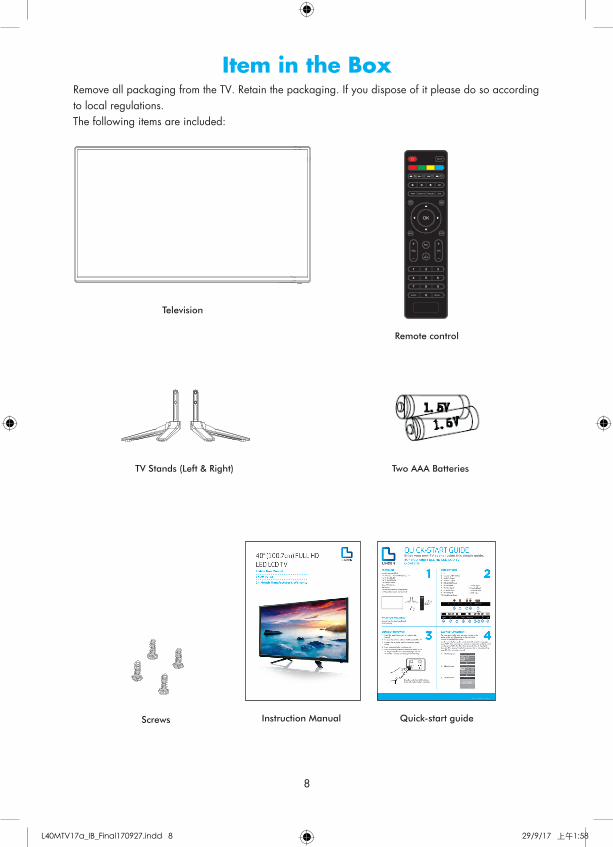
Items in the Box
Television
TV Stands (Left & Right)
Screws
Remote control
Two AAA Batteries
Instruction Manual Quick-start guide
VOL CH
REC
8
Item in the BoxRemove all packaging from the TV. Retain the packaging. If you dispose of it please do so according to local regulations.The following items are included:
L40MTV17a_IB_Final170927.indd 8 29/9/17 上午1:58
98
Items in the Box
Television
TV Stands (Left & Right)
Screws
Remote control
Two AAA Batteries
Instruction Manual Quick-start guide
VOL CH
REC
9
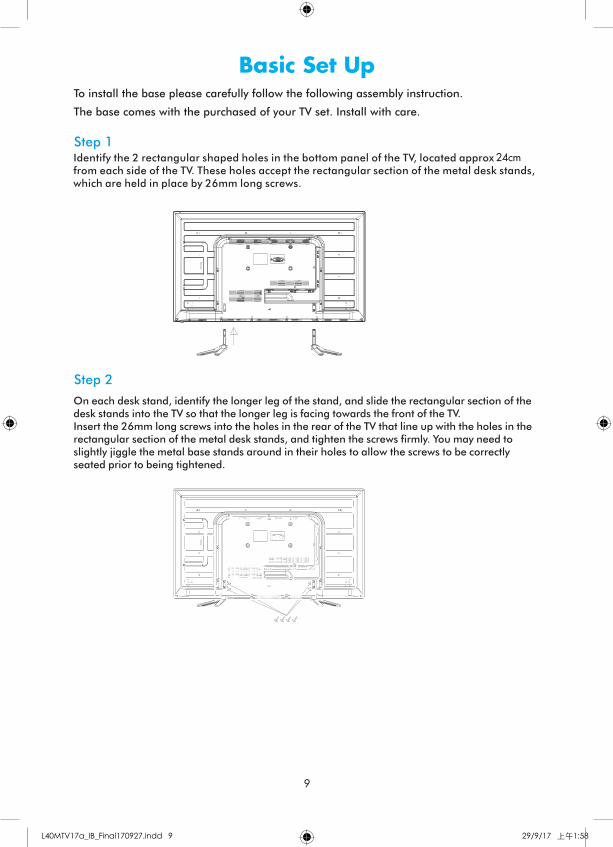
To install the base please carefully follow the following assembly instruction.
The base comes with the purchased of your TV set. Install with care.
Basic Set Up
Step 1Identify the 2 rectangular shaped holes in the bottom panel of the TV, located approx 27.5cm from each side of the TV. These holes accept the rectangular section of the metal desk stands, which are held in place by 26mm long screws.
Step 2
On each desk stand, identify the longer leg of the stand, and slide the rectangular section of the desk stands into the TV so that the longer leg is facing towards the front of the TV. Insert the 26mm long screws into the holes in the rear of the TV that line up with the holes in the rectangular section of the metal desk stands, and tighten the screws firmly. You may need to slightly jiggle the metal base stands around in their holes to allow the screws to be correctly seated prior to being tightened.
Basic Set Up
24cm
L40MTV17a_IB_Final170927.indd 9 29/9/17 上午1:58

Basic Set Up
10
3
10
Basic Set Up
Turn on TV
Setting up your TV
Ensure to put your TV in a firm place which
can bear the weight of the TV.
To avoid any danger, please do not expose
or place the TV near water, fire place
and / or heating apparatus.
(such as heaters, candles, strong lights)
Do not block the ventilation at the back
of the TV.
Connect antenna and power 1.Connect one end of the antenna
cable to the ANT 75 (Antenna socket)
in the rear of your television set. Plug
the other end of the Antenna Cable into
a desired antenna wall socket. (Note
Antenna cable not included)
2.Your TV is equipped with an external
power supply. Please connect the
provided power supply to the Television
set and into the desired AC power outlet.
3.Switch on the TV using the rocker switchon the bottom of the TV. (see below)
4.Press the Standby button on the remote control to turn on the power to the unit. The indication light will turn on to a blank colour and the TV screen will display first time setup menu.
NOTE If TV fail to turn on, check
power switch under front bottom
edge is turned on.
TV signal output
AC POWER socket
12
2
11
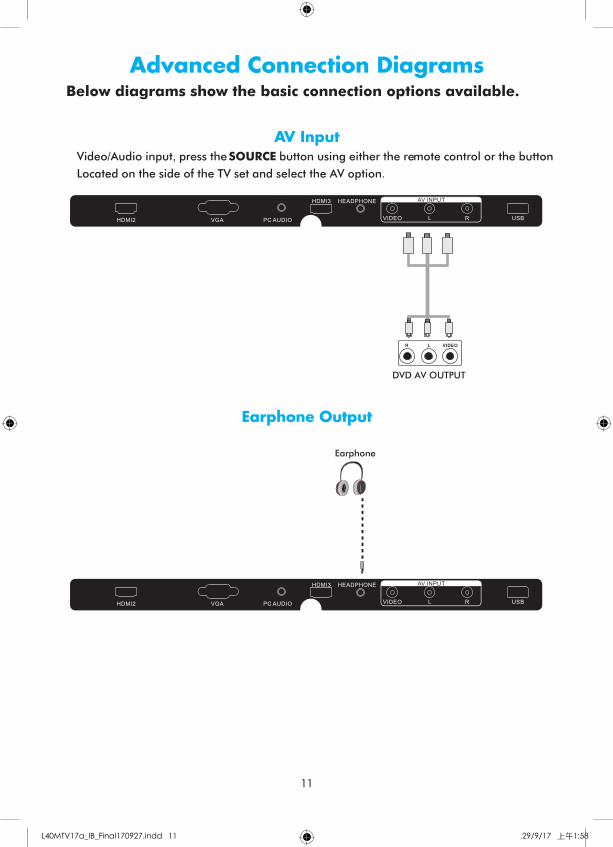
1.AV input
Video/Audio input, press the SOURCE button using either the remote control or the button
Located on the side of the TV set and select the AV option.
Advanced Connection Diagrams
Below diagrams show the basic connection options available.
DVD AV OUTPUT
Earphone
2. Earphone output
HDMI2 VGA PC AUDIO
HDMI3 HEADPHONE
VIDEO L R USB
AV INPUT
HDMI2 VGA PC AUDIO
HDMI3 HEADPHONE
VIDEO L R USB
AV INPUT
NOTE: To completely disconnect the mains power, please remove the mains plug from the AC power outlet.
Setting up your TV
Turn on TV3. Press the Standby button on the remote control to turn on the power to the unit. The indication light will turn on to a blank colour and the TV screen will display first time setup menu.
Connect aerial and power
L40MTV17a_IB_Final170927.indd 10 29/9/17 上午1:58
11
3
10
Basic Set Up
Turn on TV
Setting up your TV
Ensure to put your TV in a firm place which
can bear the weight of the TV.
To avoid any danger, please do not expose
or place the TV near water, fire place
and / or heating apparatus.
(such as heaters, candles, strong lights)
Do not block the ventilation at the back
of the TV.
Connect antenna and power 1.Connect one end of the antenna
cable to the ANT 75 (Antenna socket)
in the rear of your television set. Plug
the other end of the Antenna Cable into
a desired antenna wall socket. (Note
Antenna cable not included)
2.Your TV is equipped with an external
power supply. Please connect the
provided power supply to the Television
set and into the desired AC power outlet.
3.Switch on the TV using the rocker switchon the bottom of the TV. (see below)
4.Press the Standby button on the remote control to turn on the power to the unit. The indication light will turn on to a blank colour and the TV screen will display first time setup menu.
NOTE If TV fail to turn on, check
power switch under front bottom
edge is turned on.
TV signal output
AC POWER socket
12
2
11
1.AV input
Video/Audio input, press the SOURCE button using either the remote control or the button
Located on the side of the TV set and select the AV option.
Advanced Connection Diagrams
Below diagrams show the basic connection options available.
DVD AV OUTPUT
Earphone
2. Earphone output
HDMI2 VGA PC AUDIO
HDMI3 HEADPHONE
VIDEO L R USB
AV INPUT
HDMI2 VGA PC AUDIO
HDMI3 HEADPHONE
VIDEO L R USB
AV INPUT
AV Input
Earphone Output
Advanced Connection Diagrams
L40MTV17a_IB_Final170927.indd 11 29/9/17 上午1:58
Advanced Connection Diagrams
12
HDMI1 OUTPUT
12
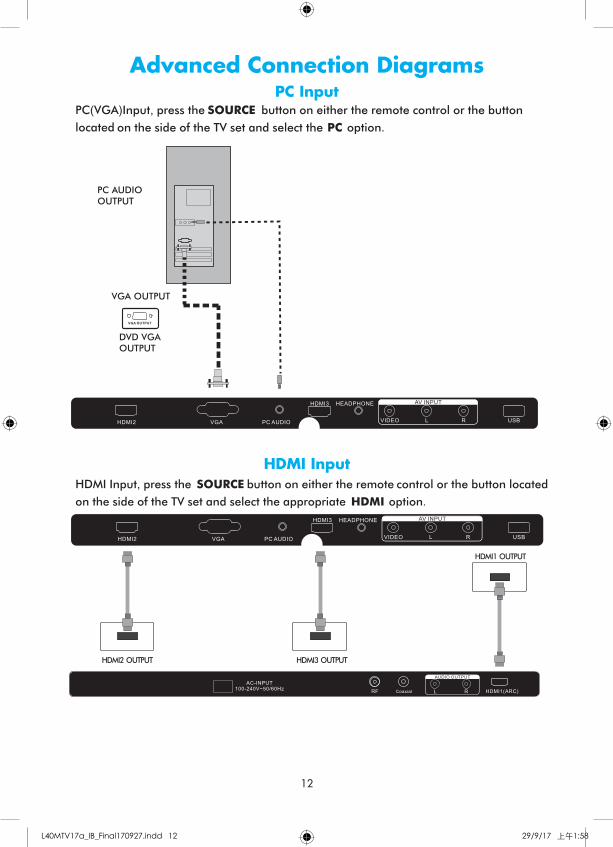
3.PC input
PC(VGA)Input, press the SOURCE button on either the remote control or the button
located on the side of the TV set and select the PC option.
4.HDMI input
HDMI Input, press the SOURCE button on either the remote control or the button located
on the side of the TV set and select the appropriate HDMI option.
Advanced Connection Diagrams
PC AUDIOOUTPUT
VGA OUTPUT
DVD VGAOUTPUT
HDMI2 OUTPUT HDMI3 OUTPUT
HDMI2 VGA PC AUDIO
HDMI3 HEADPHONE
VIDEO L R USB
AV INPUT
HDMI2 VGA PC AUDIO
HDMI3 HEADPHONE
VIDEO L R USB
AV INPUT
AC-INPUT100-240V~50/60Hz
R F L R HDMI1(ARC)Coaxial
AUDIO OUTPUT
13
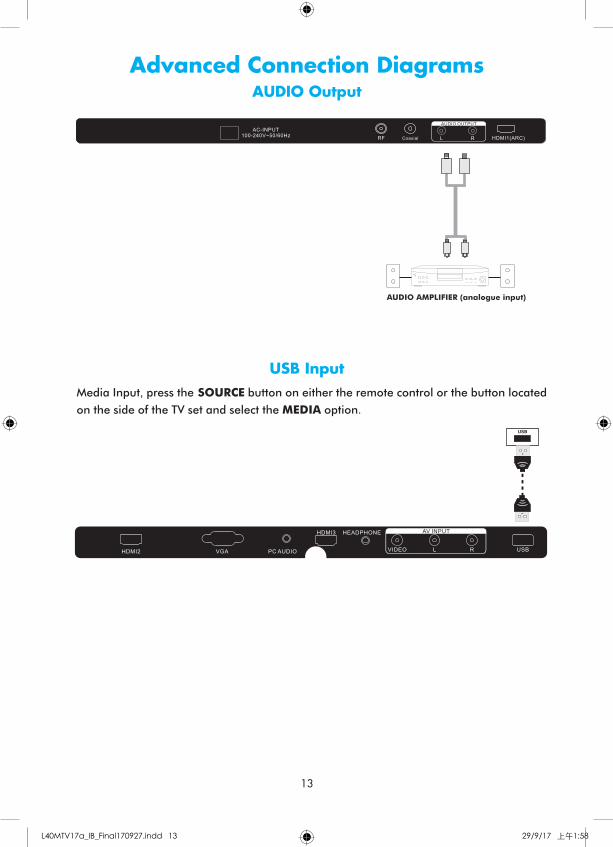
6.USB input
USB
Media Input, press the SOURCE button on either the remote control or the button located
on the side of the TV set and select the MEDIA option.
Advanced Connection Diagrams
5.AUDIO output
AC-INPUT100-240V~50/60Hz
R F L R HDMI1(ARC)Coaxial
AUDIO OUTPUT
HDMI2 VGA PC AUDIO
HDMI3 HEADPHONE
VIDEO L R USB
AV INPUT
AUDIO AMPLIFIER (analogue input)
PC Input
HDMI Input
L40MTV17a_IB_Final170927.indd 12 29/9/17 上午1:58
Advanced Connection Diagrams
13
HDMI1 OUTPUT
12
3.PC input
PC(VGA)Input, press the SOURCE button on either the remote control or the button
located on the side of the TV set and select the PC option.
4.HDMI input
HDMI Input, press the SOURCE button on either the remote control or the button located
on the side of the TV set and select the appropriate HDMI option.
Advanced Connection Diagrams
PC AUDIOOUTPUT
VGA OUTPUT
DVD VGAOUTPUT
HDMI2 OUTPUT HDMI3 OUTPUT
HDMI2 VGA PC AUDIO
HDMI3 HEADPHONE
VIDEO L R USB
AV INPUT
HDMI2 VGA PC AUDIO
HDMI3 HEADPHONE
VIDEO L R USB
AV INPUT
AC-INPUT100-240V~50/60Hz
R F L R HDMI1(ARC)Coaxial
AUDIO OUTPUT
13
6.USB input
USB
Media Input, press the SOURCE button on either the remote control or the button located
on the side of the TV set and select the MEDIA option.
Advanced Connection Diagrams
5.AUDIO output
AC-INPUT100-240V~50/60Hz
R F L R HDMI1(ARC)Coaxial
AUDIO OUTPUT
HDMI2 VGA PC AUDIO
HDMI3 HEADPHONE
VIDEO L R USB
AV INPUT
AUDIO AMPLIFIER (analogue input)
AUDIO Output
USB Input
L40MTV17a_IB_Final170927.indd 13 29/9/17 上午1:58
14
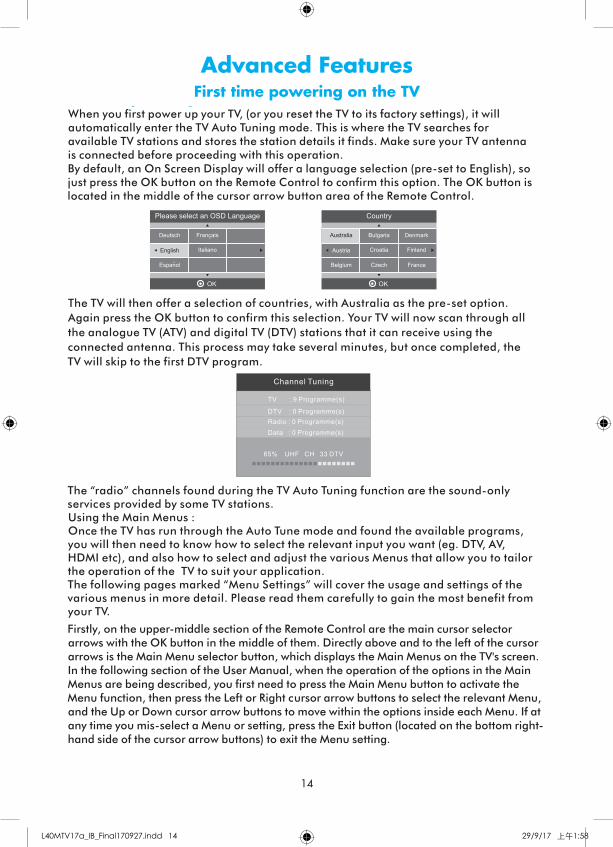
First time powering on the TV :When you first power up your TV, (or you reset the TV to its factory settings), it will automatically enter the TV Auto Tuning mode. This is where the TV searches for available TV stations and stores the station details it finds. Make sure your TV antenna is connected before proceeding with this operation.By default, an On Screen Display will offer a language selection (pre-set to English), so just press the OK button on the Remote Control to confirm this option. The OK button is located in the middle of the cursor arrow button area of the Remote Control.
Firstly, on the upper-middle section of the Remote Control are the main cursor selector arrows with the OK button in the middle of them. Directly above and to the left of the cursor arrows is the Main Menu selector button, which displays the Main Menus on the TV's screen. In the following section of the User Manual, when the operation of the options in the Main Menus are being described, you first need to press the Main Menu button to activate the Menu function, then press the Left or Right cursor arrow buttons to select the relevant Menu, and the Up or Down cursor arrow buttons to move within the options inside each Menu. If at any time you mis-select a Menu or setting, press the Exit button (located on the bottom right-hand side of the cursor arrow buttons) to exit the Menu setting.
Channel Tuning
65% UHF CH 33 DTV
TV : 9 Programme(s)
DTV : 0 Programme(s)
Radio : 0 Programme(s)
Data : 0 Programme(s)
The TV will then offer a selection of countries, with Australia as the pre-set option.
Again press the OK button to confirm this selection. Your TV will now scan through all
the analogue TV (ATV) and digital TV (DTV) stations that it can receive using the
connected antenna. This process may take several minutes, but once completed, the
TV will skip to the first DTV program.
The “radio” channels found during the TV Auto Tuning function are the sound-only services provided by some TV stations. Using the Main Menus :Once the TV has run through the Auto Tune mode and found the available programs, you will then need to know how to select the relevant input you want (eg. DTV, AV, HDMI etc), and also how to select and adjust the various Menus that allow you to tailor the operation of the TV to suit your application.The following pages marked “Menu Settings” will cover the usage and settings of the various menus in more detail. Please read them carefully to gain the most benefit from your TV.
Dansk
Deutsch
Hrvatski
Italiano
Please select an OSD Language
OK
Magyar
Nederlands
Norsk
PolskiEnglishCesky
E ka
Espanol~
Fran ais
Portugues
Pycck
Austria
Belgium
Country
OK
Australia
Croatia Finland Greece
LuxembourgCzech France Hungary
Bulgaria Denmark Germany Italy
14
Advanced Features
Ireland
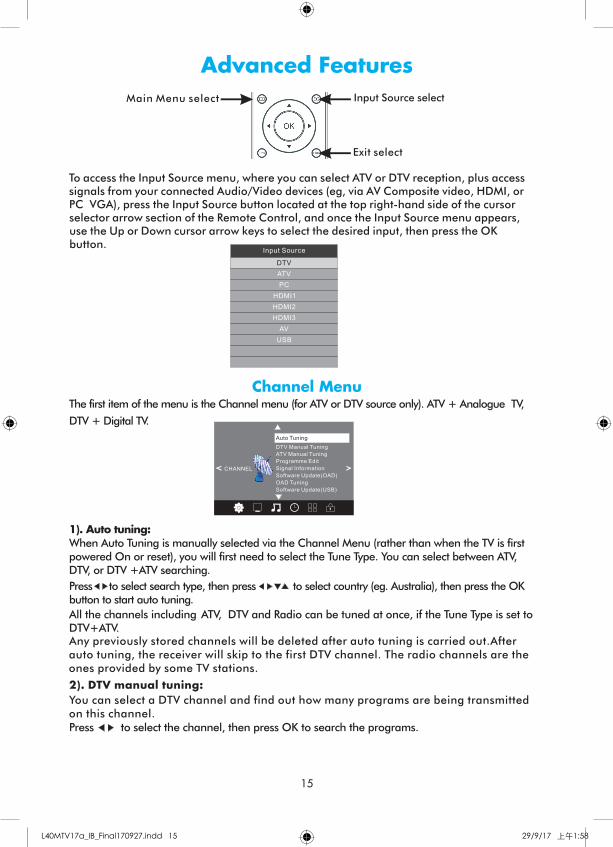
To access the Input Source menu, where you can select ATV or DTV reception, plus access signals from your connected Audio/Video devices (eg, via AV Composite video, HDMI, or PC VGA), press the Input Source button located at the top right-hand side of the cursor selector arrow section of the Remote Control, and once the Input Source menu appears, use the Up or Down cursor arrow keys to select the desired input, then press the OK button.
1.Channel menu
The first item of the menu is the Channel menu (for ATV or DTV source only). ATV + Analogue TV,
DTV + Digital TV.
2). DTV manual tuning:
Press to select the channel, then press OK to search the programs.
1). Auto tuning:
When Auto Tuning is manually selected via the Channel Menu (rather than when the TV is first powered On or reset), you will first need to select the Tune Type. You can select between ATV, DTV, or DTV +ATV searching.
ATV Manual Tuning
Programme Edit
Signal Information< >CHANNEL
Auto Tuning
DTV Manual Tuning
Software Update(USB)
Software Update(OAD)
OAD Tuning
Press to select search type, then press to select country (eg. Australia), then press the OK button to start auto tuning.
All the channels including ATV, DTV and Radio can be tuned at once, if the Tune Type is set to DTV+ATV.Any previously stored channels will be deleted after auto tuning is carried out.After auto tuning, the receiver will skip to the first DTV channel. The radio channels are the ones provided by some TV stations.
Input Source
DTV
ATV
PC
HDMI1
AV
HDMI2
HDMI3
USB
15
Advanced Features
You can select a DTV channel and find out how many programs are being transmittedon this channel.
Input Source selectMain Menu select
Exit select
English
Espanol
Please select an OSD Language
OK
FrançaisDeutsch
Italiano
~
Austria
Belgium Czech
Country
OK
BulgariaAustralia
Croatia
France
Denmark
Finland
First time powering on the TVAdvanced Features
L40MTV17a_IB_Final170927.indd 14 29/9/17 上午1:58
Advanced Features
15
First time powering on the TV :When you first power up your TV, (or you reset the TV to its factory settings), it will automatically enter the TV Auto Tuning mode. This is where the TV searches for available TV stations and stores the station details it finds. Make sure your TV antenna is connected before proceeding with this operation.By default, an On Screen Display will offer a language selection (pre-set to English), so just press the OK button on the Remote Control to confirm this option. The OK button is located in the middle of the cursor arrow button area of the Remote Control.
Firstly, on the upper-middle section of the Remote Control are the main cursor selector arrows with the OK button in the middle of them. Directly above and to the left of the cursor arrows is the Main Menu selector button, which displays the Main Menus on the TV's screen. In the following section of the User Manual, when the operation of the options in the Main Menus are being described, you first need to press the Main Menu button to activate the Menu function, then press the Left or Right cursor arrow buttons to select the relevant Menu, and the Up or Down cursor arrow buttons to move within the options inside each Menu. If at any time you mis-select a Menu or setting, press the Exit button (located on the bottom right-hand side of the cursor arrow buttons) to exit the Menu setting.
Channel Tuning
65% UHF CH 33 DTV
TV : 9 Programme(s)
DTV : 0 Programme(s)
Radio : 0 Programme(s)
Data : 0 Programme(s)
The TV will then offer a selection of countries, with Australia as the pre-set option.
Again press the OK button to confirm this selection. Your TV will now scan through all
the analogue TV (ATV) and digital TV (DTV) stations that it can receive using the
connected antenna. This process may take several minutes, but once completed, the
TV will skip to the first DTV program.
The “radio” channels found during the TV Auto Tuning function are the sound-only services provided by some TV stations. Using the Main Menus :Once the TV has run through the Auto Tune mode and found the available programs, you will then need to know how to select the relevant input you want (eg. DTV, AV, HDMI etc), and also how to select and adjust the various Menus that allow you to tailor the operation of the TV to suit your application.The following pages marked “Menu Settings” will cover the usage and settings of the various menus in more detail. Please read them carefully to gain the most benefit from your TV.
Dansk
Deutsch
Hrvatski
Italiano
Please select an OSD Language
OK
Magyar
Nederlands
Norsk
PolskiEnglishCesky
E ka
Espanol~
Fran ais
Portugues
Pycck
Austria
Belgium
Country
OK
Australia
Croatia Finland Greece
LuxembourgCzech France Hungary
Bulgaria Denmark Germany Italy
14
Advanced Features
Ireland
To access the Input Source menu, where you can select ATV or DTV reception, plus access signals from your connected Audio/Video devices (eg, via AV Composite video, HDMI, or PC VGA), press the Input Source button located at the top right-hand side of the cursor selector arrow section of the Remote Control, and once the Input Source menu appears, use the Up or Down cursor arrow keys to select the desired input, then press the OK button.
1.Channel menu
The first item of the menu is the Channel menu (for ATV or DTV source only). ATV + Analogue TV,
DTV + Digital TV.
2). DTV manual tuning:
Press to select the channel, then press OK to search the programs.
1). Auto tuning:
When Auto Tuning is manually selected via the Channel Menu (rather than when the TV is first powered On or reset), you will first need to select the Tune Type. You can select between ATV, DTV, or DTV +ATV searching.
ATV Manual Tuning
Programme Edit
Signal Information< >CHANNEL
Auto Tuning
DTV Manual Tuning
Software Update(USB)
Software Update(OAD)
OAD Tuning
Press to select search type, then press to select country (eg. Australia), then press the OK button to start auto tuning.
All the channels including ATV, DTV and Radio can be tuned at once, if the Tune Type is set to DTV+ATV.Any previously stored channels will be deleted after auto tuning is carried out.After auto tuning, the receiver will skip to the first DTV channel. The radio channels are the ones provided by some TV stations.
Input Source
DTV
ATV
PC
HDMI1
AV
HDMI2
HDMI3
USB
15
Advanced Features
You can select a DTV channel and find out how many programs are being transmittedon this channel.
Input Source selectMain Menu select
Exit select
Channel Menu
L40MTV17a_IB_Final170927.indd 15 29/9/17 上午1:58
Advanced Features
16
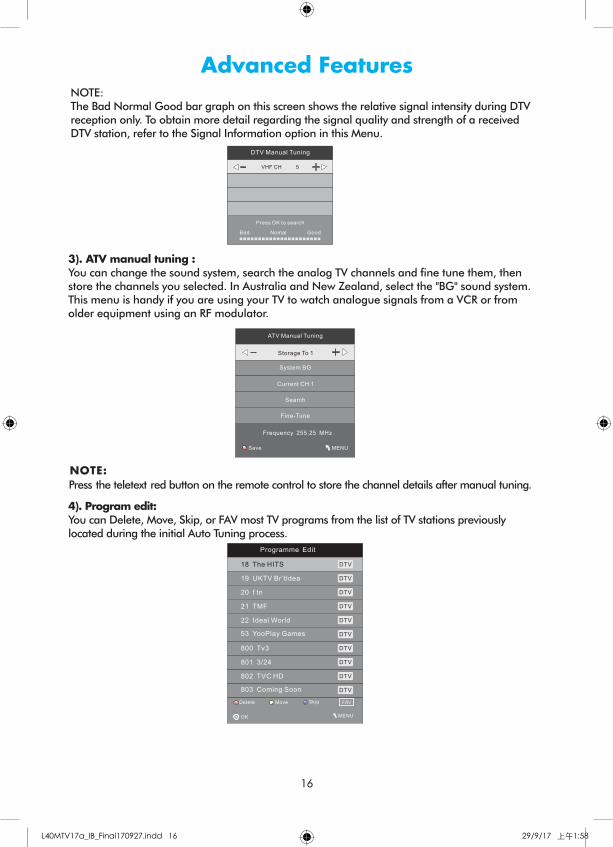
3). ATV manual tuning :
You can change the sound system, search the analog TV channels and fine tune them, then store the channels you selected. In Australia and New Zealand, select the "BG" sound system. This menu is handy if you are using your TV to watch analogue signals from a VCR or from older equipment using an RF modulator.
ATV Manual Tuning
Storage To 1
System BG
Current CH 1
Search
Fine-Tune
Frequency 255.25 MHz
Save MENU
_ +
NOTE:
Press the teletext red button on the remote control to store the channel details after manual tuning.
4). Program edit:
You can Delete, Move, Skip, or FAV most TV programs from the list of TV stations previously located during the initial Auto Tuning process.
FAV
16
Advanced Features
NOTE: The Bad Normal Good bar graph on this screen shows the relative signal intensity during DTV reception only. To obtain more detail regarding the signal quality and strength of a received DTV station, refer to the Signal Information option in this Menu.
DTV Manual Tuning
VHF CH 5_ +
Bad Nomal Good
Press OK to search
5). Signal Information: Displays the signal information in DTV (digital TV) mode only.
6). Software Update (OAD): This setting should be set to Off in Australia.
7). Software Update (USB):
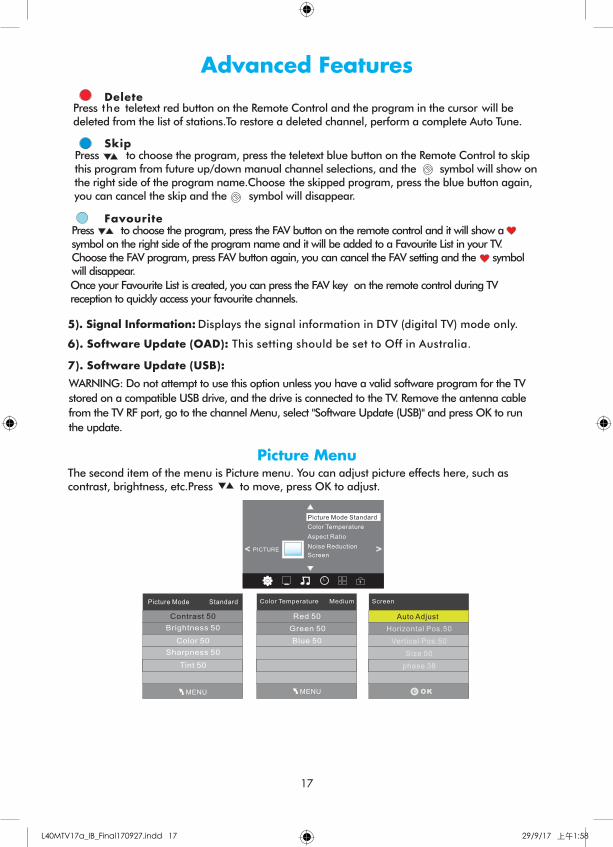
The second item of the menu is Picture menu. You can adjust picture effects here, such as contrast, brightness, etc.Press to move, press OK to adjust.
2. Picture menu
WARNING: Do not attempt to use this option unless you have a valid software program for the
stored on a compatible USB drive, and the drive is connected to the TV. Remove the antenna cable
from the TV RF port, go to the channel Menu, select "Software Update (USB)" and press OK to run
the update.
TV
Color Temperature
Aspect Ratio
Noise Reduction
Screen
Picture Mode Standard
< >PICTURE
MENU
Picture Mode Standard
Contrast 50
Brightness 50
Color 50
Sharpness 50
Tint 50
Color Temperature Medium
Red 50
Green 50
Blue 50
MENU
Screen
Auto Adjust
Horizontal Pos.50
Vertical Pos.50
Size 50
phase 38
OK
17
Advanced Features
Press to choose the program, press the teletext blue button on the Remote Control to skip this program from future up/down manual channel selections, and the symbol will show on the right side of the program name.Choose the skipped program, press the blue button again, you can cancel the skip and the symbol will disappear.
Delete Press the teletext red button on the Remote Control and the program in the cursor will be deleted from the list of stations.To restore a deleted channel, perform a complete Auto Tune.
FavouritePress to choose the program, press the FAV button on the remote control and it will show a symbol on the right side of the program name and it will be added to a Favourite List in your TV. Choose the FAV program, press FAV button again, you can cancel the FAV setting and the symbolwill disappear.
Once your Favourite List is created, you can press the FAV key on the remote control during TV reception to quickly access your favourite channels.
Skip
L40MTV17a_IB_Final170927.indd 16 29/9/17 上午1:58
Advanced Features
17
3). ATV manual tuning :
You can change the sound system, search the analog TV channels and fine tune them, then store the channels you selected. In Australia and New Zealand, select the "BG" sound system. This menu is handy if you are using your TV to watch analogue signals from a VCR or from older equipment using an RF modulator.
ATV Manual Tuning
Storage To 1
System BG
Current CH 1
Search
Fine-Tune
Frequency 255.25 MHz
Save MENU
_ +
NOTE:
Press the teletext red button on the remote control to store the channel details after manual tuning.
4). Program edit:
You can Delete, Move, Skip, or FAV most TV programs from the list of TV stations previously located during the initial Auto Tuning process.
FAV
16
Advanced Features
NOTE: The Bad Normal Good bar graph on this screen shows the relative signal intensity during DTV reception only. To obtain more detail regarding the signal quality and strength of a received DTV station, refer to the Signal Information option in this Menu.
DTV Manual Tuning
VHF CH 5_ +
Bad Nomal Good
Press OK to search
5). Signal Information: Displays the signal information in DTV (digital TV) mode only.
6). Software Update (OAD): This setting should be set to Off in Australia.
7). Software Update (USB):
The second item of the menu is Picture menu. You can adjust picture effects here, such as contrast, brightness, etc.Press to move, press OK to adjust.
2. Picture menu
WARNING: Do not attempt to use this option unless you have a valid software program for the
stored on a compatible USB drive, and the drive is connected to the TV. Remove the antenna cable
from the TV RF port, go to the channel Menu, select "Software Update (USB)" and press OK to run
the update.
TV
Color Temperature
Aspect Ratio
Noise Reduction
Screen
Picture Mode Standard
< >PICTURE
MENU
Picture Mode Standard
Contrast 50
Brightness 50
Color 50
Sharpness 50
Tint 50
Color Temperature Medium
Red 50
Green 50
Blue 50
MENU
Screen
Auto Adjust
Horizontal Pos.50
Vertical Pos.50
Size 50
phase 38
OK
17
Advanced Features
Press to choose the program, press the teletext blue button on the Remote Control to skip this program from future up/down manual channel selections, and the symbol will show on the right side of the program name.Choose the skipped program, press the blue button again, you can cancel the skip and the symbol will disappear.
Delete Press the teletext red button on the Remote Control and the program in the cursor will be deleted from the list of stations.To restore a deleted channel, perform a complete Auto Tune.
FavouritePress to choose the program, press the FAV button on the remote control and it will show a symbol on the right side of the program name and it will be added to a Favourite List in your TV. Choose the FAV program, press FAV button again, you can cancel the FAV setting and the symbolwill disappear.
Once your Favourite List is created, you can press the FAV key on the remote control during TV reception to quickly access your favourite channels.
Skip
Picture Menu
L40MTV17a_IB_Final170927.indd 17 29/9/17 上午1:58
Advanced Features
18
1. Picture mode:
Press OK Key enter Pcitrue mode Select Menu.Press adjust Picture mode.Under User mode,
press can adjust constrast,brightness,color,sharpness.etc.
The Tint option is available in NTSC system countries only.
2. Color temperature:
Press OK Key enter color temperature Select Menu. press adjust olor temperature. Under
User mode press can adjust Red ,Green,Blue.
3. Aspect ratio:
Press OK Key enter Aspect Ratio Select Menu. And press adjust Aspect Ratio.
The Aspect Ratio option allows you to select either Auto, or manually select 4:3, 16:9, Zoom1,
Zoom2 or Just Scan screen ratios. For general use leave this setting in the Auto position.
4. Noise reduction:
Press OK Key enter Noise Reduction Select Menu. And press adjust Noise Reduction. The
Noise Reduction option is for use in areas using ATV (analogue) transmissions.
5. Screen:
Press OK Key enter Screen Menu. And press adjust H.POS,V.POS,etc. The Screen option
is only available once the Input Source is set to PC and a compatible signal is present on the
VGA input socket. Once selected, you can adjust the horizontal and vertical screen position,
size and phase or select an Auto Adjust mode.
< >
BalanceAuto Volume
Sound Mode Standard
SOUNDSurround SoundSPDIF Mode
3.Sound menu
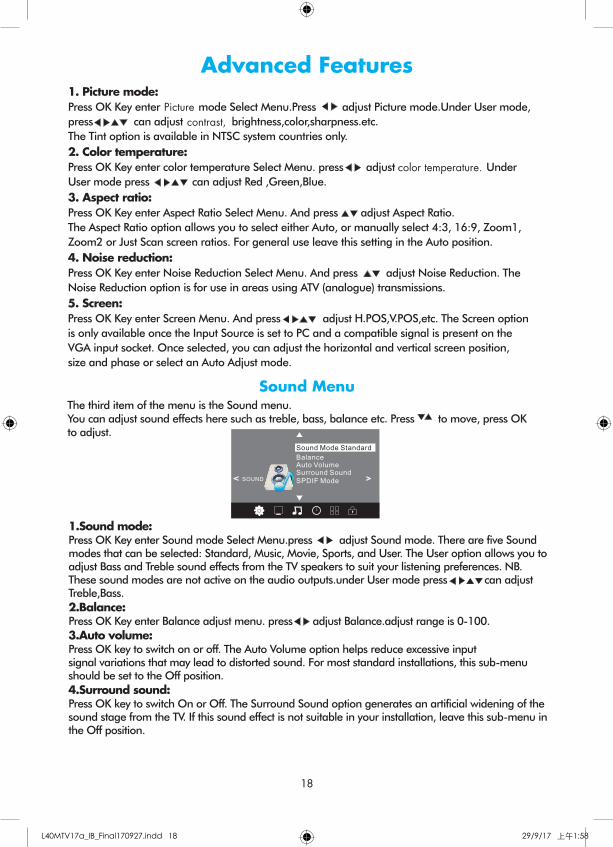
The third item of the menu is the Sound menu.You can adjust sound effects here such as treble, bass, balance etc. Press to move, press OK to adjust.
1.Sound mode:Press OK Key enter Sound mode Select Menu.press adjust Sound mode. There are five Sound modes that can be selected: Standard, Music, Movie, Sports, and User. The User option allows you to adjust Bass and Treble sound effects from the TV speakers to suit your listening preferences. NB. These sound modes are not active on the audio outputs.under User mode press can adjust Treble,Bass.
2.Balance:Press OK Key enter Balance adjust menu. press adjust Balance.adjust range is 0-100.
3.Auto volume:Press OK key to switch on or off. The Auto Volume option helps reduce excessive input signal variations that may lead to distorted sound. For most standard installations, this sub-menu should be set to the Off position.
4.Surround sound:Press OK key to switch On or Off. The Surround Sound option generates an artificial widening of the sound stage from the TV. If this sound effect is not suitable in your installation, leave this sub-menu in the Off position.
18
Advanced Features
4. Time zone:Press OK Key enter Time Zone Select Menu. And press adjust Time Zone. The Time Zone setting of the TV is initially set using data from local Digital TV stations. You can manually adjust the time zone in the TV if required (eg. for locations where DTV signals are not available).
5.Option menu
To enter the Option menu, press MENU button and then press or buttons to select the Option
Menu. Once in Option Menu, press or buttons to select the settings you wish to adjust. Press
MENU button to return to the Main Menu.
< >
OSD Language English
OPTION
Audio Languages Subtitle LanguagesHearing ImpairedPVR File SystemRestore Factory DefaultHDMI CEC
HDMI CEC
Device list
HDMI CEC Off
HDMI ARC Off
Auto Standby Off
MENU
19
Advanced Features
4.Time menu
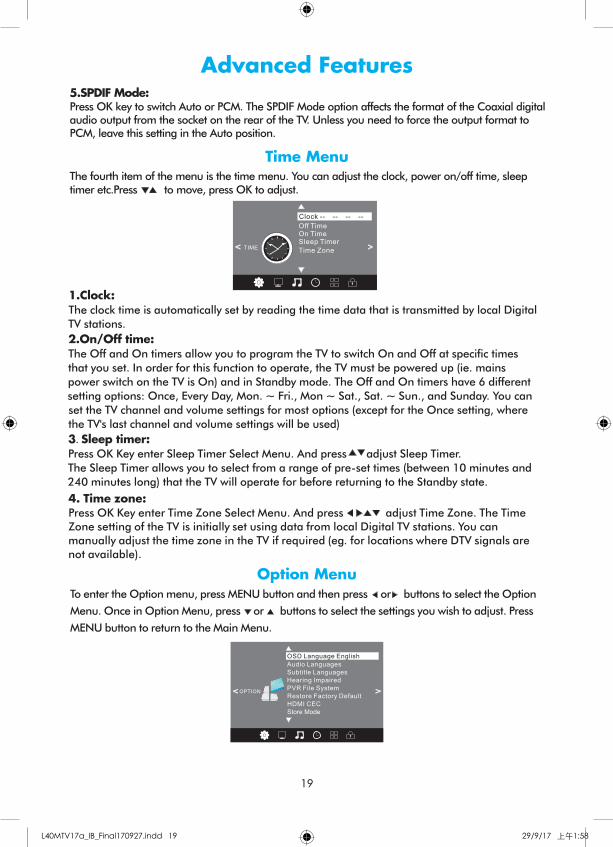
The fourth item of the menu is the time menu. You can adjust the clock, power on/off time, sleeptimer etc.Press to move, press OK to adjust.
Off TimeOn TimeSleep TimerTime Zone
Clock -- -- -- --
TIME< >
1.Clock:
The clock time is automatically set by reading the time data that is transmitted by local Digital TV stations.
2.On/Off time:
The Off and On timers allow you to program the TV to switch On and Off at specific times that you set. In order for this function to operate, the TV must be powered up (ie. mains power switch on the TV is On) and in Standby mode. The Off and On timers have 6 different setting options: Once, Every Day, Mon. ~ Fri., Mon ~ Sat., Sat. ~ Sun., and Sunday. You can set the TV channel and volume settings for most options (except for the Once setting, where the TV's last channel and volume settings will be used)
3.Sleep timer:
Press OK Key enter Sleep Timer Select Menu. And press adjust Sleep Timer. The Sleep Timer allows you to select from a range of pre-set times (between 10 minutes and 240 minutes long) that the TV will operate for before returning to the Standby state.
5.SPDIF Mode:Press OK key to switch Auto or PCM. The SPDIF Mode option affects the format of the Coaxial digital audio output from the socket on the rear of the TV. Unless you need to force the output format to PCM, leave this setting in the Auto position.
Picturecontrast,
color temperature.
Sound Menu
L40MTV17a_IB_Final170927.indd 18 29/9/17 上午1:58
Advanced Features
19
1. Picture mode:
Press OK Key enter Pcitrue mode Select Menu.Press adjust Picture mode.Under User mode,
press can adjust constrast,brightness,color,sharpness.etc.
The Tint option is available in NTSC system countries only.
2. Color temperature:
Press OK Key enter color temperature Select Menu. press adjust olor temperature. Under
User mode press can adjust Red ,Green,Blue.
3. Aspect ratio:
Press OK Key enter Aspect Ratio Select Menu. And press adjust Aspect Ratio.
The Aspect Ratio option allows you to select either Auto, or manually select 4:3, 16:9, Zoom1,
Zoom2 or Just Scan screen ratios. For general use leave this setting in the Auto position.
4. Noise reduction:
Press OK Key enter Noise Reduction Select Menu. And press adjust Noise Reduction. The
Noise Reduction option is for use in areas using ATV (analogue) transmissions.
5. Screen:
Press OK Key enter Screen Menu. And press adjust H.POS,V.POS,etc. The Screen option
is only available once the Input Source is set to PC and a compatible signal is present on the
VGA input socket. Once selected, you can adjust the horizontal and vertical screen position,
size and phase or select an Auto Adjust mode.
< >
BalanceAuto Volume
Sound Mode Standard
SOUNDSurround SoundSPDIF Mode
3.Sound menu
The third item of the menu is the Sound menu.You can adjust sound effects here such as treble, bass, balance etc. Press to move, press OK to adjust.
1.Sound mode:Press OK Key enter Sound mode Select Menu.press adjust Sound mode. There are five Sound modes that can be selected: Standard, Music, Movie, Sports, and User. The User option allows you to adjust Bass and Treble sound effects from the TV speakers to suit your listening preferences. NB. These sound modes are not active on the audio outputs.under User mode press can adjust Treble,Bass.
2.Balance:Press OK Key enter Balance adjust menu. press adjust Balance.adjust range is 0-100.
3.Auto volume:Press OK key to switch on or off. The Auto Volume option helps reduce excessive input signal variations that may lead to distorted sound. For most standard installations, this sub-menu should be set to the Off position.
4.Surround sound:Press OK key to switch On or Off. The Surround Sound option generates an artificial widening of the sound stage from the TV. If this sound effect is not suitable in your installation, leave this sub-menu in the Off position.
18
Advanced Features
4. Time zone:Press OK Key enter Time Zone Select Menu. And press adjust Time Zone. The Time Zone setting of the TV is initially set using data from local Digital TV stations. You can manually adjust the time zone in the TV if required (eg. for locations where DTV signals are not available).
5.Option menu
To enter the Option menu, press MENU button and then press or buttons to select the Option
Menu. Once in Option Menu, press or buttons to select the settings you wish to adjust. Press
MENU button to return to the Main Menu.
< >
OSD Language English
OPTION
Audio Languages Subtitle LanguagesHearing ImpairedPVR File SystemRestore Factory DefaultHDMI CEC
HDMI CEC
Device list
HDMI CEC Off
HDMI ARC Off
Auto Standby Off
MENU
19
Advanced Features
4.Time menu
The fourth item of the menu is the time menu. You can adjust the clock, power on/off time, sleeptimer etc.Press to move, press OK to adjust.
Off TimeOn TimeSleep TimerTime Zone
Clock -- -- -- --
TIME< >
1.Clock:
The clock time is automatically set by reading the time data that is transmitted by local Digital TV stations.
2.On/Off time:
The Off and On timers allow you to program the TV to switch On and Off at specific times that you set. In order for this function to operate, the TV must be powered up (ie. mains power switch on the TV is On) and in Standby mode. The Off and On timers have 6 different setting options: Once, Every Day, Mon. ~ Fri., Mon ~ Sat., Sat. ~ Sun., and Sunday. You can set the TV channel and volume settings for most options (except for the Once setting, where the TV's last channel and volume settings will be used)
3.Sleep timer:
Press OK Key enter Sleep Timer Select Menu. And press adjust Sleep Timer. The Sleep Timer allows you to select from a range of pre-set times (between 10 minutes and 240 minutes long) that the TV will operate for before returning to the Standby state.
5.SPDIF Mode:Press OK key to switch Auto or PCM. The SPDIF Mode option affects the format of the Coaxial digital audio output from the socket on the rear of the TV. Unless you need to force the output format to PCM, leave this setting in the Auto position.
Option Menu
< >
OSD Language English
OPTION
Audio Languages Subtitle LanguagesHearing ImpairedPVR File SystemRestore Factory DefaultHStore Mode
DMI CEC
Time Menu
L40MTV17a_IB_Final170927.indd 19 29/9/17 上午1:58
Advanced Features
20
1. OSD Language:Allows you to select the language used in the various TV menus from a wide selection.At the initial setup stage of the TV, the default language is English, and it is recommended that this setting is not changed unless you are fluent in any new language chosen.
2. Audio / Subtitle Languages:Relate to DTV reception only. Some TV channels transmit their audio or subtitles in more than one language, and if this is known in advance, you can select this alternative language. At the initial setup stage, the default language is English, and it is recommended that this setting is not changed unless you are fluent in any new language chosen.
3. Hearing Impaired:This will show information for the hearing-impaired in some programmes.
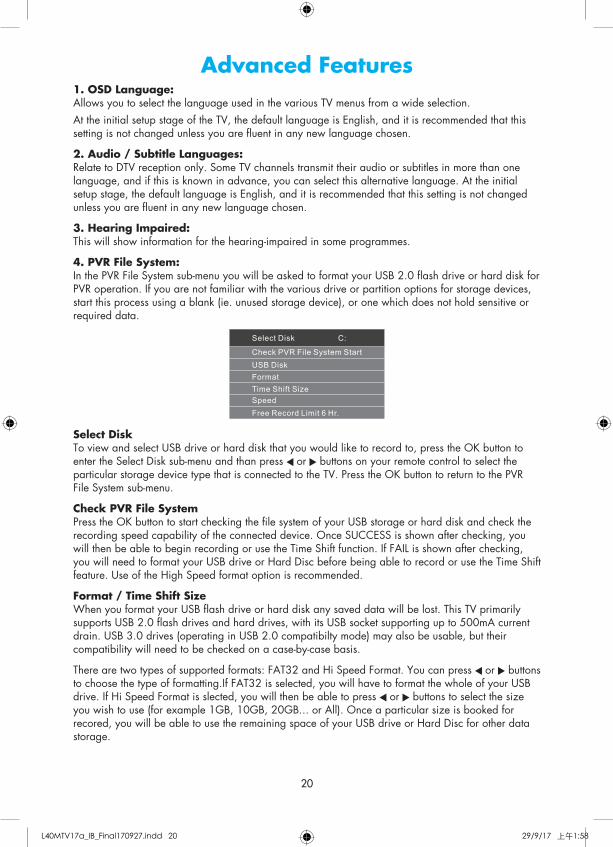
4. PVR File System:In the PVR File System sub-menu you will be asked to format your USB 2.0 flash drive or hard disk for PVR operation. If you are not familiar with the various drive or partition options for storage devices, start this process using a blank (ie. unused storage device), or one which does not hold sensitive or required data.
Check PVR File System Start
USB Disk
Format
Time Shift Size
Speed
Free Record Limit 6 Hr.
Select Disk C:
Select DiskTo view and select USB drive or hard disk that you would like to record to, press the OK button to enter the Select Disk sub-menu and than press or buttons on your remote control to select the particular storage device type that is connected to the TV. Press the OK button to return to the PVR File System sub-menu.
Check PVR File SystemPress the OK button to start checking the file system of your USB storage or hard disk and check the recording speed capability of the connected device. Once SUCCESS is shown after checking, you will then be able to begin recording or use the Time Shift function. If FAIL is shown after checking, you will need to format your USB drive or Hard Disc before being able to record or use the Time Shift feature. Use of the High Speed format option is recommended.
Format / Time Shift SizeWhen you format your USB flash drive or hard disk any saved data will be lost. This TV primarily supports USB 2.0 flash drives and hard drives, with its USB socket supporting up to 500mA current drain. USB 3.0 drives (operating in USB 2.0 compatibilty mode) may also be usable, but their compatibility will need to be checked on a case-by-case basis.
There are two types of supported formats: FAT32 and Hi Speed Format. You can press or buttons to choose the type of formatting.If FAT32 is selected, you will have to format the whole of your USB drive. If Hi Speed Format is slected, you will then be able to press or buttons to select the size you wish to use (for example 1GB, 10GB, 20GB... or All). Once a particular size is booked for recored, you will be able to use the remaining space of your USB drive or Hard Disc for other data storage.
L40MTV17a_IB_Final170927.indd 20 29/9/17 上午1:58
Advanced Features
21
WARNING: Please note no matter which size is booked for recording, all the data in the allocated partition of the hard disk will be lost after formatting. During Hi-Speed formatting of some USB drives, you may need to select a smaller Time Shift size than the maximum capacity of the drive, as some storage capacity is used in the PVR set-up process.
SpeedThis will show the spported speed of recording, and whether your storage device can support HD DTV recording. Speed above 5,500kb/s are usually more successful when recording HDTV material.
Record LimitThis will show the approximate time you will be able to record on to your USB drive or hard disk.
5. Restore Factory Default:If you wish to reset your TV, please select the Restore Factory Default option, this will clear all settings.
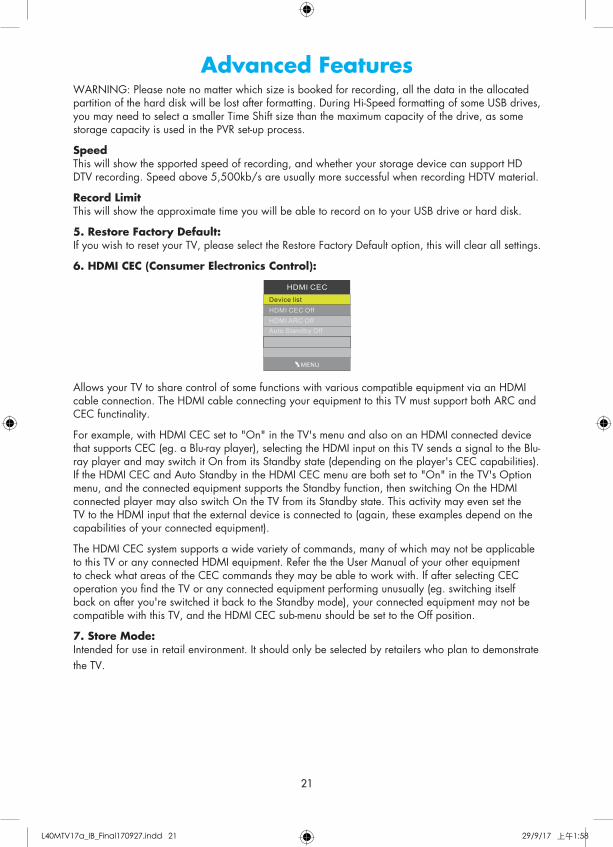
6. HDMI CEC (Consumer Electronics Control):
HDMI CEC
Device list
HDMI CEC Off
HDMI ARC Off
Auto Standby Off
MENU
Allows your TV to share control of some functions with various compatible equipment via an HDMI cable connection. The HDMI cable connecting your equipment to this TV must support both ARC and CEC functinality.
For example, with HDMI CEC set to "On" in the TV's menu and also on an HDMI connected device that supports CEC (eg. a Blu-ray player), selecting the HDMI input on this TV sends a signal to the Blu-ray player and may switch it On from its Standby state (depending on the player's CEC capabilities). If the HDMI CEC and Auto Standby in the HDMI CEC menu are both set to "On" in the TV's Option menu, and the connected equipment supports the Standby function, then switching On the HDMI connected player may also switch On the TV from its Standby state. This activity may even set the TV to the HDMI input that the external device is connected to (again, these examples depend on the capabilities of your connected equipment).
The HDMI CEC system supports a wide variety of commands, many of which may not be applicable to this TV or any connected HDMI equipment. Refer the the User Manual of your other equipment to check what areas of the CEC commands they may be able to work with. If after selecting CEC operation you find the TV or any connected equipment performing unusually (eg. switching itself back on after you're switched it back to the Standby mode), your connected equipment may not be compatible with this TV, and the HDMI CEC sub-menu should be set to the Off position.
7. Store Mode:Intended for use in retail environment. It should only be selected by retailers who plan to demonstrate the TV.
L40MTV17a_IB_Final170927.indd 21 29/9/17 上午1:58
Advanced Features
22
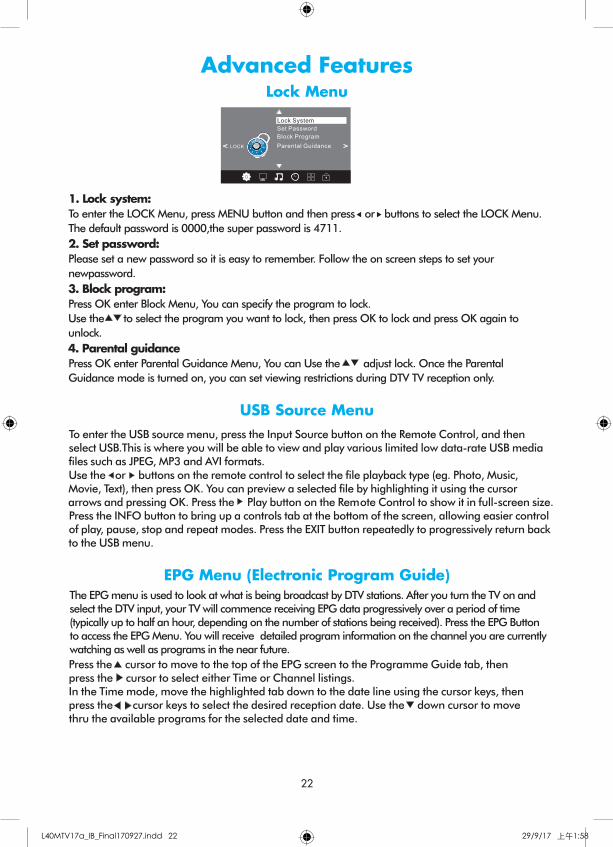
1. Lock system:
To enter the LOCK Menu, press MENU button and then press or buttons to select the LOCK Menu.
The default password is 0000,the super password is 4711.
2. Set password:
Please set a new password so it is easy to remember. Follow the on screen steps to set your
newpassword.
3. Block program:
Press OK enter Block Menu, You can specify the program to lock.
Use the to select the program you want to lock, then press OK to lock and press OK again to
unlock.
4. Parental guidance
Press OK enter Parental Guidance Menu, You can Use the adjust lock. Once the Parental
Guidance mode is turned on, you can set viewing restrictions during DTV TV reception only.
22
Advanced Features
7. USB source
To enter the USB source menu, press the Input Source button on the Remote Control, and then select USB.This is where you will be able to view and play various limited low data-rate USB media files such as JPEG, MP3 and AVI formats.Use the or buttons on the remote control to select the file playback type (eg. Photo, Music, Movie, Text), then press OK. You can preview a selected file by highlighting it using the cursor arrows and pressing OK. Press the Play button on the Remote Control to show it in full-screen size. Press the INFO button to bring up a controls tab at the bottom of the screen, allowing easier control of play, pause, stop and repeat modes. Press the EXIT button repeatedly to progressively return back to the USB menu.
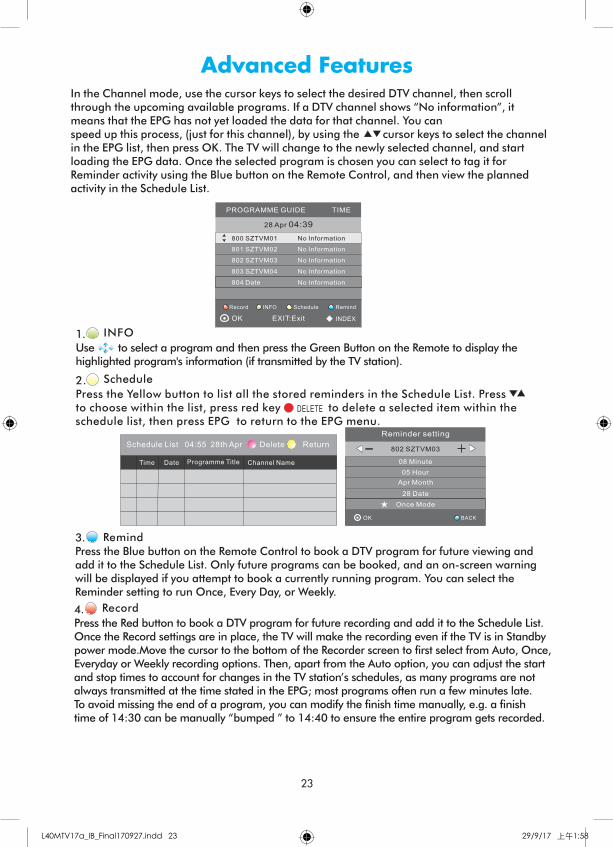
8.EPG menu (Electronic Program Guide)
The EPG menu is used to look at what is being broadcast by DTV stations. After you turn the TV on and select the DTV input, your TV will commence receiving EPG data progressively over a period of time(typically up to half an hour, depending on the number of stations being received). Press the EPG Button to access the EPG Menu. You will receive detailed program information on the channel you are currentlywatching as well as programs in the near future.
Press the cursor to move to the top of the EPG screen to the Programme Guide tab, then press the cursor to select either Time or Channel listings.In the Time mode, move the highlighted tab down to the date line using the cursor keys, then press the cursor keys to select the desired reception date. Use the down cursor to move thru the available programs for the selected date and time.
Set Password
Lock System
LOCK< >
Block Program
Parental Guidance
6.Lock menu In the Channel mode, use the cursor keys to select the desired DTV channel, then scroll through the upcoming available programs. If a DTV channel shows “No information”, it means that the EPG has not yet loaded the data for that channel. You can speed up this process, (just for this channel), by using the cursor keys to select the channel in the EPG list, then press OK. The TV will change to the newly selected channel, and start loading the EPG data. Once the selected program is chosen you can select to tag it for Reminder activity using the Blue button on the Remote Control, and then view the planned activity in the Schedule List.
3. Press the Blue button on the Remote Control to book a DTV program for future viewing and add it to the Schedule List. Only future programs can be booked, and an on-screen warning will be displayed if you attempt to book a currently running program. You can select the Reminder setting to run Once, Every Day, or Weekly.
Remind
2. Press the Yellow button to list all the stored reminders in the Schedule List. Press to choose within the list, press red key to delete a selected item within the schedule list, then press EPG to return to the EPG menu.
Schedule
DELETE
1. Use to select a program and then press the Green Button on the Remote to display the highlighted program's information (if transmitted by the TV station).
INFO
Schedule List 04:55 28th Apr Delete
Time Date Programme Title Channel Name
802 SZTVM03
08 Minute
05 Hour
Apr Month
28 Date
Once Mode
Reminder setting
BACKOK
_ +
28 Apr 04:39
800 SZTVM01 No Information
801 SZTVM02
802 SZTVM03
803 SZTVM04
804 Date
No Information
No Information
No Information
No Information
PROGRAMME GUIDE TIME
ScheduleINFO Remind
OK INDEX
Record
4. Press the Red button to book a DTV program for future recording and add it to the Schedule List. Once the Record settings are in place, the TV will make the recording even if the TV is in Standby power mode.Move the cursor to the bottom of the Recorder screen to first select from Auto, Once, Everyday or Weekly recording options. Then, apart from the Auto option, you can adjust the start and stop times to account for changes in the TV station’s schedules, as many programs are not always transmitted at the time stated in the EPG; most programs often run a few minutes late. To avoid missing the end of a program, you can modify the finish time manually, e.g. a finish time of 14:30 can be manually “bumped ” to 14:40 to ensure the entire program gets recorded.
Record
23
Advanced Features
Return
EXIT:Exit
Lock Menu
USB Source Menu
EPG Menu (Electronic Program Guide)
L40MTV17a_IB_Final170927.indd 22 29/9/17 上午1:58
Advanced Features
23
1. Lock system:
To enter the LOCK Menu, press MENU button and then press or buttons to select the LOCK Menu.
The default password is 0000,the super password is 4711.
2. Set password:
Please set a new password so it is easy to remember. Follow the on screen steps to set your
newpassword.
3. Block program:
Press OK enter Block Menu, You can specify the program to lock.
Use the to select the program you want to lock, then press OK to lock and press OK again to
unlock.
4. Parental guidance
Press OK enter Parental Guidance Menu, You can Use the adjust lock. Once the Parental
Guidance mode is turned on, you can set viewing restrictions during DTV TV reception only.
22
Advanced Features
7. USB source
To enter the USB source menu, press the Input Source button on the Remote Control, and then select USB.This is where you will be able to view and play various limited low data-rate USB media files such as JPEG, MP3 and AVI formats.Use the or buttons on the remote control to select the file playback type (eg. Photo, Music, Movie, Text), then press OK. You can preview a selected file by highlighting it using the cursor arrows and pressing OK. Press the Play button on the Remote Control to show it in full-screen size. Press the INFO button to bring up a controls tab at the bottom of the screen, allowing easier control of play, pause, stop and repeat modes. Press the EXIT button repeatedly to progressively return back to the USB menu.
8.EPG menu (Electronic Program Guide)
The EPG menu is used to look at what is being broadcast by DTV stations. After you turn the TV on and select the DTV input, your TV will commence receiving EPG data progressively over a period of time(typically up to half an hour, depending on the number of stations being received). Press the EPG Button to access the EPG Menu. You will receive detailed program information on the channel you are currentlywatching as well as programs in the near future.
Press the cursor to move to the top of the EPG screen to the Programme Guide tab, then press the cursor to select either Time or Channel listings.In the Time mode, move the highlighted tab down to the date line using the cursor keys, then press the cursor keys to select the desired reception date. Use the down cursor to move thru the available programs for the selected date and time.
Set Password
Lock System
LOCK< >
Block Program
Parental Guidance
6.Lock menu In the Channel mode, use the cursor keys to select the desired DTV channel, then scroll through the upcoming available programs. If a DTV channel shows “No information”, it means that the EPG has not yet loaded the data for that channel. You can speed up this process, (just for this channel), by using the cursor keys to select the channel in the EPG list, then press OK. The TV will change to the newly selected channel, and start loading the EPG data. Once the selected program is chosen you can select to tag it for Reminder activity using the Blue button on the Remote Control, and then view the planned activity in the Schedule List.
3. Press the Blue button on the Remote Control to book a DTV program for future viewing and add it to the Schedule List. Only future programs can be booked, and an on-screen warning will be displayed if you attempt to book a currently running program. You can select the Reminder setting to run Once, Every Day, or Weekly.
Remind
2. Press the Yellow button to list all the stored reminders in the Schedule List. Press to choose within the list, press red key to delete a selected item within the schedule list, then press EPG to return to the EPG menu.
Schedule
DELETE
1. Use to select a program and then press the Green Button on the Remote to display the highlighted program's information (if transmitted by the TV station).
INFO
Schedule List 04:55 28th Apr Delete
Time Date Programme Title Channel Name
802 SZTVM03
08 Minute
05 Hour
Apr Month
28 Date
Once Mode
Reminder setting
BACKOK
_ +
28 Apr 04:39
800 SZTVM01 No Information
801 SZTVM02
802 SZTVM03
803 SZTVM04
804 Date
No Information
No Information
No Information
No Information
PROGRAMME GUIDE TIME
ScheduleINFO Remind
OK INDEX
Record
4. Press the Red button to book a DTV program for future recording and add it to the Schedule List. Once the Record settings are in place, the TV will make the recording even if the TV is in Standby power mode.Move the cursor to the bottom of the Recorder screen to first select from Auto, Once, Everyday or Weekly recording options. Then, apart from the Auto option, you can adjust the start and stop times to account for changes in the TV station’s schedules, as many programs are not always transmitted at the time stated in the EPG; most programs often run a few minutes late. To avoid missing the end of a program, you can modify the finish time manually, e.g. a finish time of 14:30 can be manually “bumped ” to 14:40 to ensure the entire program gets recorded.
Record
23
Advanced Features
Return
EXIT:Exit
L40MTV17a_IB_Final170927.indd 23 29/9/17 上午1:58
Advanced Features
24
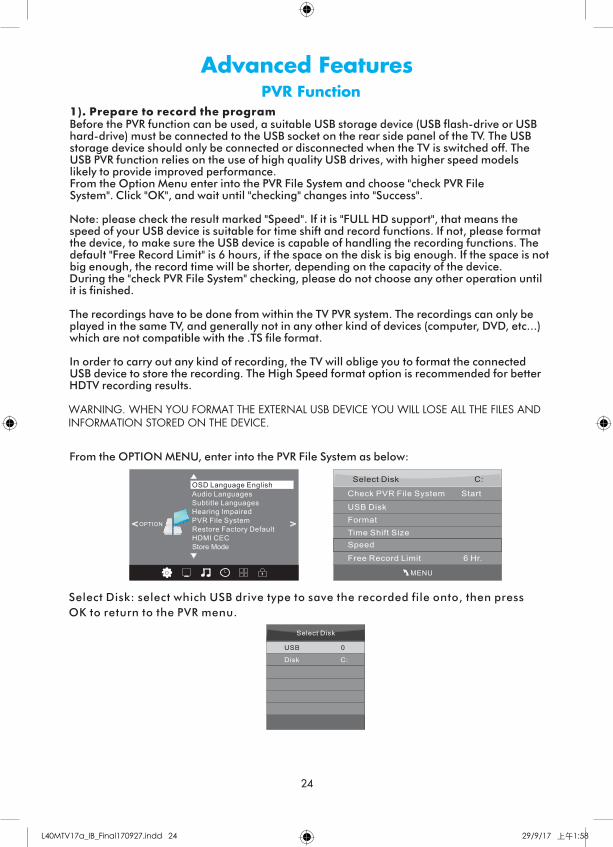
9. PVR function
1). Prepare to record the programBefore the PVR function can be used, a suitable USB storage device (USB flash-drive or USB hard-drive) must be connected to the USB socket on the rear side panel of the TV. The USB storage device should only be connected or disconnected when the TV is switched off. The USB PVR function relies on the use of high quality USB drives, with higher speed models likely to provide improved performance. From the Option Menu enter into the PVR File System and choose "check PVR File System". Click "OK", and wait until "checking" changes into "Success".
Note: please check the result marked "Speed". If it is "FULL HD support", that means the speed of your USB device is suitable for time shift and record functions. If not, please format the device, to make sure the USB device is capable of handling the recording functions. The default "Free Record Limit" is 6 hours, if the space on the disk is big enough. If the space is not big enough, the record time will be shorter, depending on the capacity of the device. During the "check PVR File System" checking, please do not choose any other operation until it is finished.
The recordings have to be done from within the TV PVR system. The recordings can only be played in the same TV, and generally not in any other kind of devices (computer, DVD, etc...) which are not compatible with the .TS file format.
In order to carry out any kind of recording, the TV will oblige you to format the connected USB device to store the recording. The High Speed format option is recommended for better HDTV recording results.
WARNING. WHEN YOU FORMAT THE EXTERNAL USB DEVICE YOU WILL LOSE ALL THE FILES AND INFORMATION STORED ON THE DEVICE.
From the OPTION MENU, enter into the PVR File System as below:
Select Disk
USB 0
Disk C:
MENU
Check PVR File System Start
USB Disk
Format
Time Shift Size
Speed
Free Record Limit 6 Hr.
Select Disk C:
< >
OSD Language English
OPTION
Audio Languages Subtitle LanguagesHearing ImpairedPVR File SystemRestore Factory DefaultHDMI CEC
24
Advanced Features
Select Disk: select which USB drive type to save the recorded file onto, then press
OK to return to the PVR menu.
Warning! All data will be lost.
Start Exit
Format disk
Format disk
Do not unplug USB device.
Formatting,please wait
Format disk
MENU
Check PVR File System Checking
Free Record Limit 6 Hr.
Select Disk C:
USB Disk Pass
Format Pass
Time Shift Size All
Speed Checking
MENU
Check PVR File System SUCCESS
Free Record Limit 6 Hr.
Select Disk C:
USB Disk Pass
Format Pass
Time Shift Size All
Speed HD support 2048 KB/s
Time Shift Size
Time Shift Disk Size 512 MB
SB 14 Mins
HD 4 Mins
Check PVR File System: checks if the PVR File System set up will work with your USB device or not.Format: Refer to the details on formatting on page 21 before using this option for the first time. Once you have selected the type of formatting of your USB storage device, your TV will show various progress screens (see below).
When the Format process has finished, you can then use the “Check PVR File System” option to show the speed ability of your USB storage device. Press EXIT to return to the TV mode.
If you selected the "Hi Speed FS" format mode, you can then change the Time Shift memory size. Remember to set the Time Shift size to be smaller than the capacity of your USB storage device, or the Speed test may report an error.
2). Recording a DTV programWhen viewing a DTV program, press the "●REC" button on the remote control and the record control tab will pop up and the PVR will commence recording. Click the “●REC" button again and the record control tab will disappear while the "REC" icon will remain on the top left of the screen. It will disappear when you click the "stop" button on the remote control, and the PVR will finish recording.PVR recording of DTV programs can also be accessed thru the EPG, and future recordings can be accessed using the Schedule List option. Refer to the EPG Menu section on page 22.
3). Playing back the recording
In the USB drive, the recorded program will be saved in the folder "_MSTPVR" on the device. To play
back the.TS format files, use the DMP (Digital Media Player) function as shown on page 27, and select
Movie as the type of file to play back. Alternatively, press the Index button on the Remote Control to
display the Recorded List, which shows the name of recorded DTV material on the attached USB drive.
The order of the recordings can be selected by repeatedly pressing the Index button to view in
Program, Channel, or Time order.
25
Advanced Features
PVR Function
WARNING. WHEN YOU FORMAT THE EXTERNAL USB DEVICE YOU WILL LOSE ALL THE FILES AND INFORMATION STORED ON THE DEVICE.
< >
OSD Language English
OPTION
Audio Languages Subtitle LanguagesHearing ImpairedPVR File SystemRestore Factory DefaultHStore Mode
DMI CEC
L40MTV17a_IB_Final170927.indd 24 29/9/17 上午1:58
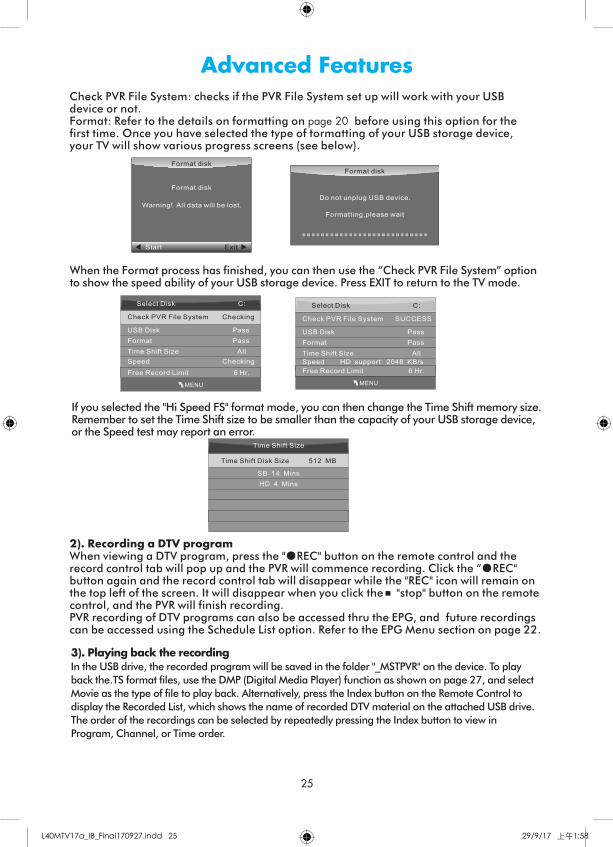
Advanced Features
25
9. PVR function
1). Prepare to record the programBefore the PVR function can be used, a suitable USB storage device (USB flash-drive or USB hard-drive) must be connected to the USB socket on the rear side panel of the TV. The USB storage device should only be connected or disconnected when the TV is switched off. The USB PVR function relies on the use of high quality USB drives, with higher speed models likely to provide improved performance. From the Option Menu enter into the PVR File System and choose "check PVR File System". Click "OK", and wait until "checking" changes into "Success".
Note: please check the result marked "Speed". If it is "FULL HD support", that means the speed of your USB device is suitable for time shift and record functions. If not, please format the device, to make sure the USB device is capable of handling the recording functions. The default "Free Record Limit" is 6 hours, if the space on the disk is big enough. If the space is not big enough, the record time will be shorter, depending on the capacity of the device. During the "check PVR File System" checking, please do not choose any other operation until it is finished.
The recordings have to be done from within the TV PVR system. The recordings can only be played in the same TV, and generally not in any other kind of devices (computer, DVD, etc...) which are not compatible with the .TS file format.
In order to carry out any kind of recording, the TV will oblige you to format the connected USB device to store the recording. The High Speed format option is recommended for better HDTV recording results.
WARNING. WHEN YOU FORMAT THE EXTERNAL USB DEVICE YOU WILL LOSE ALL THE FILES AND INFORMATION STORED ON THE DEVICE.
From the OPTION MENU, enter into the PVR File System as below:
Select Disk
USB 0
Disk C:
MENU
Check PVR File System Start
USB Disk
Format
Time Shift Size
Speed
Free Record Limit 6 Hr.
Select Disk C:
< >
OSD Language English
OPTION
Audio Languages Subtitle LanguagesHearing ImpairedPVR File SystemRestore Factory DefaultHDMI CEC
24
Advanced Features
Select Disk: select which USB drive type to save the recorded file onto, then press
OK to return to the PVR menu.
Warning! All data will be lost.
Start Exit
Format disk
Format disk
Do not unplug USB device.
Formatting,please wait
Format disk
MENU
Check PVR File System Checking
Free Record Limit 6 Hr.
Select Disk C:
USB Disk Pass
Format Pass
Time Shift Size All
Speed Checking
MENU
Check PVR File System SUCCESS
Free Record Limit 6 Hr.
Select Disk C:
USB Disk Pass
Format Pass
Time Shift Size All
Speed HD support 2048 KB/s
Time Shift Size
Time Shift Disk Size 512 MB
SB 14 Mins
HD 4 Mins
Check PVR File System: checks if the PVR File System set up will work with your USB device or not.Format: Refer to the details on formatting on page 21 before using this option for the first time. Once you have selected the type of formatting of your USB storage device, your TV will show various progress screens (see below).
When the Format process has finished, you can then use the “Check PVR File System” option to show the speed ability of your USB storage device. Press EXIT to return to the TV mode.
If you selected the "Hi Speed FS" format mode, you can then change the Time Shift memory size. Remember to set the Time Shift size to be smaller than the capacity of your USB storage device, or the Speed test may report an error.
2). Recording a DTV programWhen viewing a DTV program, press the "●REC" button on the remote control and the record control tab will pop up and the PVR will commence recording. Click the “●REC" button again and the record control tab will disappear while the "REC" icon will remain on the top left of the screen. It will disappear when you click the "stop" button on the remote control, and the PVR will finish recording.PVR recording of DTV programs can also be accessed thru the EPG, and future recordings can be accessed using the Schedule List option. Refer to the EPG Menu section on page 22.
3). Playing back the recording
In the USB drive, the recorded program will be saved in the folder "_MSTPVR" on the device. To play
back the.TS format files, use the DMP (Digital Media Player) function as shown on page 27, and select
Movie as the type of file to play back. Alternatively, press the Index button on the Remote Control to
display the Recorded List, which shows the name of recorded DTV material on the attached USB drive.
The order of the recordings can be selected by repeatedly pressing the Index button to view in
Program, Channel, or Time order.
25
Advanced Features
page 20
L40MTV17a_IB_Final170927.indd 25 29/9/17 上午1:58
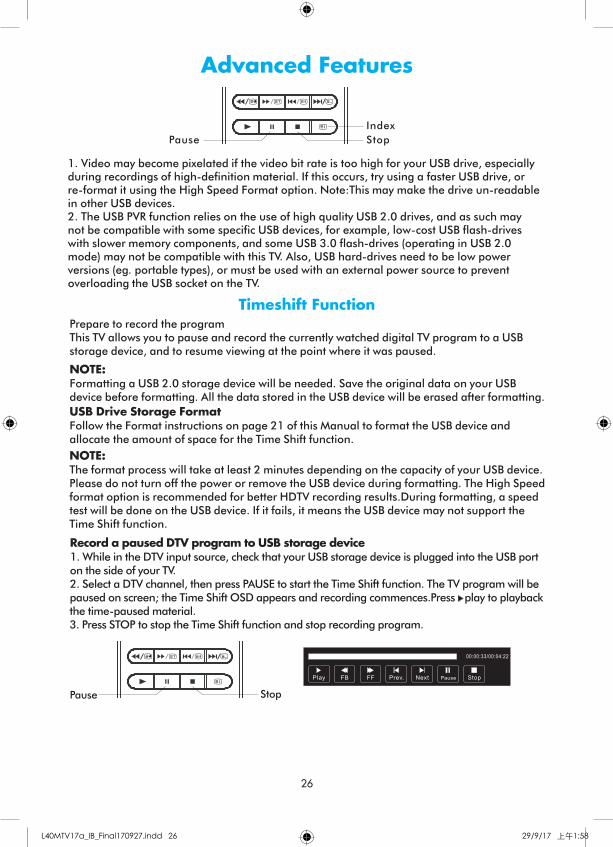
Advanced Features
26
Prepare to record the programThis TV allows you to pause and record the currently watched digital TV program to a USB storage device, and to resume viewing at the point where it was paused.
1. Video may become pixelated if the video bit rate is too high for your USB drive, especially during recordings of high-definition material. If this occurs, try using a faster USB drive, or re-format it using the High Speed Format option. Note:This may make the drive un-readable in other USB devices.2. The USB PVR function relies on the use of high quality USB 2.0 drives, and as such may not be compatible with some specific USB devices, for example, low-cost USB flash-drives with slower memory components, and some USB 3.0 flash-drives (operating in USB 2.0 mode) may not be compatible with this TV. Also, USB hard-drives need to be low power versions (eg. portable types), or must be used with an external power source to prevent overloading the USB socket on the TV.
FF Prev. NextFB Pause
00:00:33/00:04:22
Play Stop
Record a paused DTV program to USB storage device1. While in the DTV input source, check that your USB storage device is plugged into the USB port on the side of your TV.2. Select a DTV channel, then press PAUSE to start the Time Shift function. The TV program will be paused on screen; the Time Shift OSD appears and recording commences.Press play to playback the time-paused material.3. Press STOP to stop the Time Shift function and stop recording program.
Pause Stop
26
Advanced Features
Pause Stop
Index
10. Timeshift function
NOTE:Formatting a USB 2.0 storage device will be needed. Save the original data on your USBdevice before formatting. All the data stored in the USB device will be erased after formatting.
USB Drive Storage FormatFollow the Format instructions on page 21 of this Manual to format the USB device and allocate the amount of space for the Time Shift function.
NOTE:The format process will take at least 2 minutes depending on the capacity of your USB device. Please do not turn off the power or remove the USB device during formatting. The High Speed format option is recommended for better HDTV recording results.During formatting, a speed test will be done on the USB device. If it fails, it means the USB device may not support the Time Shift function.
Press the cursor buttons to select the correct disk and press OK to display the media files and folder list or press EXIT to return to the media type selection menu. Once you have selected the required media type and drive details, you can view the various files and folders on screen.
Return C
1/1
Please make sure that the USB device is plugged in the slot. There are four media types that can be selected, such as Photo, Music, Movie, and Text. Select the type of media item by pressing , press OK button to enter the disk selection menu.
PHOTO MUSIC MOVIE TEXT
USB 2.0
11. Digital Media Player (DMP)
To play and view limited types of low data-rate USB media files (such as JPEG, MP3, or AVI formats), use the USB Source that is accessible from the Input button on the Remote Control. For playback of high data-rate media files the use of an external Media Player (not supplied) will be required.
Sample1.ts Sample2.ts
Return
Movies
1/1
Sample3.ts Sample4.ts
Resolution: 688x412AudioTrack: 1/2Subtitle: 1/1Program: 1/5Size: 511457 KBytes
Sample1.ts
27
Advanced Features
1.Video may become pixelated during recording when the Video bit rate capability of your USB device is too low. If this occurs, try using a higher speed USB drive or reformat the drive using the High Speedformat option.2.The USB Timeshift function relies on the use of high quality USB 2.0 drives, and as such may not be compatible with some specific USB devices.
NOTE:
Please do not unplug the USB storage device when the Time Shift function is activated, as damage to the recorded file or the USB storage device may occur. Approximately 4GB of memory buffers about 30-40 minutes of DTV material.
Timeshift Function
L40MTV17a_IB_Final170927.indd 26 29/9/17 上午1:58
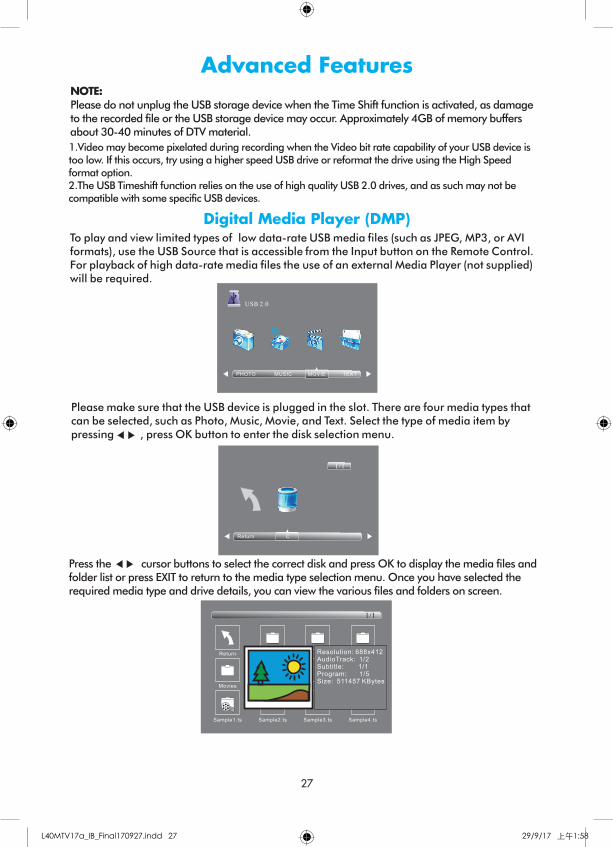
Advanced Features
27
Prepare to record the programThis TV allows you to pause and record the currently watched digital TV program to a USB storage device, and to resume viewing at the point where it was paused.
1. Video may become pixelated if the video bit rate is too high for your USB drive, especially during recordings of high-definition material. If this occurs, try using a faster USB drive, or re-format it using the High Speed Format option. Note:This may make the drive un-readable in other USB devices.2. The USB PVR function relies on the use of high quality USB 2.0 drives, and as such may not be compatible with some specific USB devices, for example, low-cost USB flash-drives with slower memory components, and some USB 3.0 flash-drives (operating in USB 2.0 mode) may not be compatible with this TV. Also, USB hard-drives need to be low power versions (eg. portable types), or must be used with an external power source to prevent overloading the USB socket on the TV.
FF Prev. NextFB Pause
00:00:33/00:04:22
Play Stop
Record a paused DTV program to USB storage device1. While in the DTV input source, check that your USB storage device is plugged into the USB port on the side of your TV.2. Select a DTV channel, then press PAUSE to start the Time Shift function. The TV program will be paused on screen; the Time Shift OSD appears and recording commences.Press play to playback the time-paused material.3. Press STOP to stop the Time Shift function and stop recording program.
Pause Stop
26
Advanced Features
Pause Stop
Index
10. Timeshift function
NOTE:Formatting a USB 2.0 storage device will be needed. Save the original data on your USBdevice before formatting. All the data stored in the USB device will be erased after formatting.
USB Drive Storage FormatFollow the Format instructions on page 21 of this Manual to format the USB device and allocate the amount of space for the Time Shift function.
NOTE:The format process will take at least 2 minutes depending on the capacity of your USB device. Please do not turn off the power or remove the USB device during formatting. The High Speed format option is recommended for better HDTV recording results.During formatting, a speed test will be done on the USB device. If it fails, it means the USB device may not support the Time Shift function.
Press the cursor buttons to select the correct disk and press OK to display the media files and folder list or press EXIT to return to the media type selection menu. Once you have selected the required media type and drive details, you can view the various files and folders on screen.
Return C
1/1
Please make sure that the USB device is plugged in the slot. There are four media types that can be selected, such as Photo, Music, Movie, and Text. Select the type of media item by pressing , press OK button to enter the disk selection menu.
PHOTO MUSIC MOVIE TEXT
USB 2.0
11. Digital Media Player (DMP)
To play and view limited types of low data-rate USB media files (such as JPEG, MP3, or AVI formats), use the USB Source that is accessible from the Input button on the Remote Control. For playback of high data-rate media files the use of an external Media Player (not supplied) will be required.
Sample1.ts Sample2.ts
Return
Movies
1/1
Sample3.ts Sample4.ts
Resolution: 688x412AudioTrack: 1/2Subtitle: 1/1Program: 1/5Size: 511457 KBytes
Sample1.ts
27
Advanced Features
1.Video may become pixelated during recording when the Video bit rate capability of your USB device is too low. If this occurs, try using a higher speed USB drive or reformat the drive using the High Speedformat option.2.The USB Timeshift function relies on the use of high quality USB 2.0 drives, and as such may not be compatible with some specific USB devices.
NOTE:
Please do not unplug the USB storage device when the Time Shift function is activated, as damage to the recorded file or the USB storage device may occur. Approximately 4GB of memory buffers about 30-40 minutes of DTV material.
Digital Media Player (DMP)
L40MTV17a_IB_Final170927.indd 27 29/9/17 上午1:58
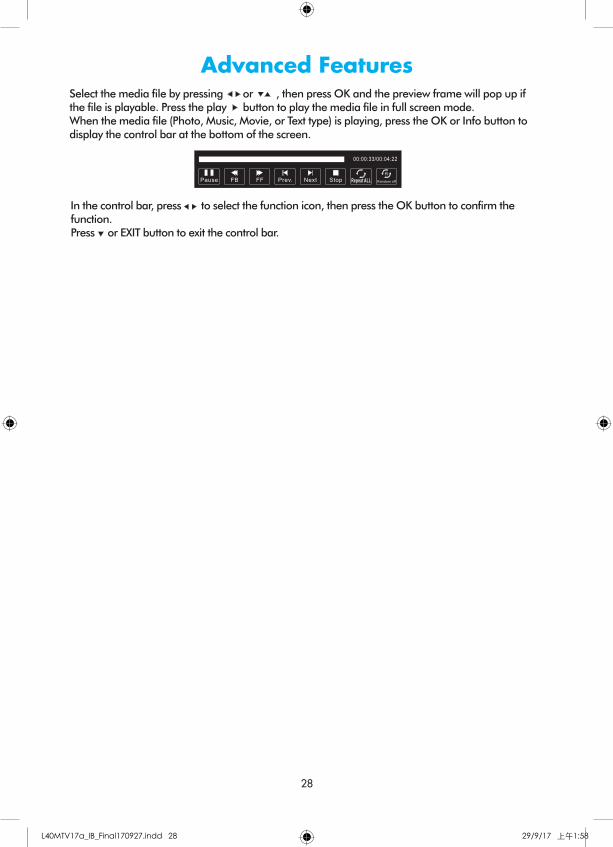
Advanced Features
28
28
Advanced Features
Select the media file by pressing or , then press OK and the preview frame will pop up if the file is playable. Press the play button to play the media file in full screen mode. When the media file (Photo, Music, Movie, or Text type) is playing, press the OK or Info button to display the control bar at the bottom of the screen.
Pause FF Prev. NextFB Stop Repeat ALL
00:00:33/00:04:22
Random off
R
In the control bar, press to select the function icon, then press the OK button to confirm the function. Press or EXIT button to exit the control bar.
L40MTV17a_IB_Final170927.indd 28 29/9/17 上午1:58
29
28
Advanced Features
Select the media file by pressing or , then press OK and the preview frame will pop up if the file is playable. Press the play button to play the media file in full screen mode. When the media file (Photo, Music, Movie, or Text type) is playing, press the OK or Info button to display the control bar at the bottom of the screen.
Pause FF Prev. NextFB Stop Repeat ALL
00:00:33/00:04:22
Random off
R
In the control bar, press to select the function icon, then press the OK button to confirm the function. Press or EXIT button to exit the control bar.
No power Please check if the AC power cable is connected to the TV unit and switched on at the socket outlet. If the TV still does not operate check the socket outlet has power by trying another appliance in the socket.Check the rocker switch under the front panel is switched on.
Cannot receive signal properly Double or Phantom imaging may occur in high buildings or when surrrounded by mountains. Please; – Consult Television provider; or – Manually change the direction of external
antennaIf you are using an indoor antenna receiving a signal will be more difficult. Proceed to adjust and move antenna until desired picture is shown. If image does not change, you have to use external antenna.
No picture Check the antenna at the back of the TV is connected properly. Try to select other channels to check whether it is the TV or just the channel itself. Ensure the TV is tuned corectly.
Video is working, but have no audio Try increasing the volume on your remote control. Double check that mute function on your remote has not been selected. Press Mute button to resume sound.
The TV has no response with remote Operate the remote directly facing the sensor on the front of the TV. Please check that the batteries polarity are installed correctly. Please try using a new set of batteries. The TV will shift to STANDBY if no response from the remote in a few minutes.
No video in (PC MODE) Please check if the display cable connected to the VGA is correct. Please check that the cord is not damaged nor is there a bend in the cable.
Lost parental lock code Master Code: 4711 Use the master code to unlock the TV if the parental lock code is lost.
Troubleshooting
L40MTV17a_IB_Final170927.indd 29 29/9/17 上午1:58
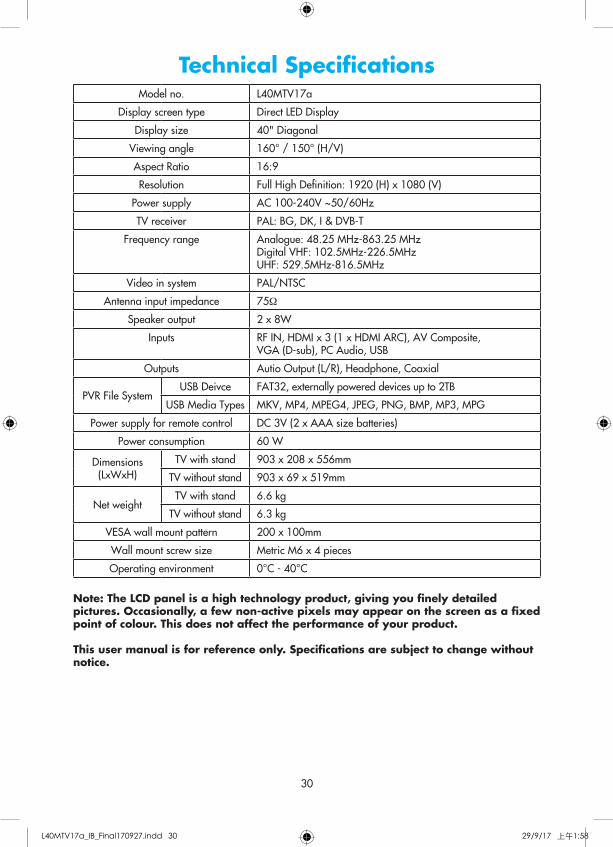
30
Model no. L40MTV17a
Display screen type Direct LED Display
Display size 40" Diagonal
Viewing angle 160° / 150° (H/V)
Aspect Ratio 16:9
Resolution Full High Definition: 1920 (H) x 1080 (V)
Power supply AC 100-240V ~50/60Hz
TV receiver PAL: BG, DK, I & DVB-T
Frequency range Analogue: 48.25 MHz-863.25 MHzDigital VHF: 102.5MHz-226.5MHzUHF: 529.5MHz-816.5MHz
Video in system PAL/NTSC
Antenna input impedance 75Ω
Speaker output 2 x 8W
Inputs RF IN, HDMI x 3 (1 x HDMI ARC), AV Composite,VGA (D-sub), PC Audio, USB
Outputs Autio Output (L/R), Headphone, Coaxial
PVR File SystemUSB Deivce FAT32, externally powered devices up to 2TB
USB Media Types MKV, MP4, MPEG4, JPEG, PNG, BMP, MP3, MPG
Power supply for remote control DC 3V (2 x AAA size batteries)
Power consumption 60 W
Dimensions(LxWxH)
TV with stand 903 x 208 x 556mm
TV without stand 903 x 69 x 519mm
Net weightTV with stand 6.6 kg
TV without stand 6.3 kg
VESA wall mount pattern 200 x 100mm
Wall mount screw size Metric M6 x 4 pieces
Operating environment 0°C - 40°C
Note: The LCD panel is a high technology product, giving you finely detailed pictures. Occasionally, a few non-active pixels may appear on the screen as a fixed point of colour. This does not affect the performance of your product.
This user manual is for reference only. Specifications are subject to change without notice.
Technical Specifications
L40MTV17a_IB_Final170927.indd 30 29/9/17 上午1:58

L40MTV17a_IB_Final170927.indd 31 29/9/17 上午1:58

L40MTV17a_IB_Final170927.indd 32 29/9/17 上午1:58

L40MTV17a_IB_Final170927.indd 33 29/9/17 上午1:58
(IB-L40MTV17a-170927V1)
While every effort has been made in the preparation of this instruction manual, the publishers cannot be held responsible for the accuracy of the information contained herein or any consequences arising from it.
Distributed by:M.E.W. (Australia) Pty Ltd,15 Vaughan St, Essendon Fields, VIC 3041ACN 152 719 036Customer care: Aus-1300 530 [email protected]
L40MTV17a_IB_Final170927.indd 34 29/9/17 上午1:58