Embed Size (px)
Citation preview

4120ECSECURITY SYSTEM
USER’S MANUAL
N4861V4 9/92
TABLE OF CONTENTSlNTRoDucTloN ..... .. . . . . .. . .. . . .. . . . . . . .. . . . . .. . . . .. . . . . .. . . .. . .. . . . .. . . .. . .. . . . . . . . . .. .. ... ...3
FIRE AND BURGLARY PROTECTION .. .. .. . . . . . .. .. . . . . . . . .. .. . . . . .. . . . .. . . . . . . . . . .. . . ...4
ENTRY/EXITDELAYS . .. .. . . . . . . .. . . . . . . . . . . . . . . . . . . .. . . . . . . . . . . . .. . . . . . . .. . . . . . . . . . . . .. .. .. . . . .
SECURllY CODES .... . . . . . . . . . . . . . . . . . . . .. . . . . . . . . . . . . . .. . . . . . . . .. . . . . . . .. . . . . . . . . . . . .. . . .. ...5
DURESS CODE ..... .. . .. .. . . . . . . .. . . . .. . . .. .. . . . . . . .. . . .. . . .. . . . . . . .. . . .. . .. . ... . . . .. . . . .. .. . ....5
FUNCTIONSOFTHECONSOLE .. ... . . . . . .. . .. . . . . .. . . .. . . . . . . . . . . . . .. . . . . . . .. . . . . . .. . . .. . . . 6
DlsmMING mEsYswM ANDslLENclNG AMRMs . .. .. . . . . . . . . . . .. . . . . . . . . . .. . ...8
cHIMEmE .. .. .. . . . . . . . . . . . . . . . .. . . . . . . . . . . . . . . . . . . . . . . . . . . .. .. . . . . .. .. . . . . . . . . . . . . . . . . . .. . ....8
CHECKING FOROPEN ZONES . ... . .. . . . . .. . . . . . . . .. . . . .. . . .. .. . . . . . . . . . . . . . .. .. . . . . . .. . . . . . 9
Bypassing PRoEcTloN zoNEs . .... . . . . . . . .. . . . . . . . . ..<.. .. . . . . . . . . . . . .. .. . . . . . . . .. ...9
ARMINGPERIMEIERONLY(STAY/lNSTANT) . .. . . .. . . . . . . . . . . . . . . .. . . . . . . . .. . . . . . . ...10
ARMINGALLPROTECTION (AWAYMIMXIMUM) . .. .. .. . . . . . . . . . . . . .. . . . . . . . . . . . . . . . ...11
PANlc KEYs . .... . . . . . . . . . . . . . . . .. . . . . .. .. . . . . . .. . . . . . . . . . . . . . . . . . . . . . . . . . .. . . . . . .. . . .. . . .. . . . ...l2
TESTINGTHESYSTEM ... .. . . . . . . . . . . . . . . . . . . . .. . . . .. . . . . . . . . . . . . . . . . . .. . . . . .. . . . . . .. . . . . . ...13
mouBLEmNDmloNs .. ... . . . .. . . . . . . . .. . . . . . . . . . . . . . .. . . . . . . .. . . . . . . . . . . . .. . . . . . .. . . . . . . ..l4
FIRE ALARM SYSTEM ..... .. . .. . .. . . .. . ... . .. .. . .. .. .. . .. ... . .. . .. . .. .. .. . .. .. .. .. ... . .. . . ....l5
NATIONAL FIRE PROTECTION ASSN. RECOMMENDATIONS .....................16
Emergency Evacuation .. .. .. . . . . . . . .. . . .. . . . . .. . .. . . . . . . . . . . . . . . . . . .. .. . . . .. . . . . .. . . ..l7
SUMMARY OF AUDIBLE NOTIFICATIONS ...... ..... ..... . ......... ....... ... ...........l8
PRoEcTDN zoNEs LlsT .. .. . . . . . . .. . . . . . . . . . . . . . .. . . . .. . . . . . . . . . . . . . . . .. . . . . . . . .. . . . . .. ..l9
QUICK GUIDE TO SYSTEM Functions ......... ... ..... .... .. ..... ..... .......... ......l9
EMERGENCYPHONENUMBERS .. .. . . . . . . . . . . . . . . . . . . . . . . . . . . . . . . . . . . . . . . . . . . . . . . . . . . .. ..2O
OWNER’SINSURANCE PREMIUMCREDIT REQUESTFORM .. .. . .. . . . . . . . . . . .. ...21
GLOSS~Y .. .. . . . . . . .. . . . . . . . . . . . . . . . .. . . . . . . . . . . . . . . . .. . . . . . . . .. . . . . . . . . . . . .. . . .. . . . . . . . . .. . ...23
FCCSTATEMENT . .. .. . . . . . . . . . . . . . . . . . . . . . .. . . . . . .. . . . . . . . . .. . . . . . . . . . . . . . .. . . . .. . . . . .. . . . . . ...25w
~ELIMITATONS OF WISAMRM SYSEM .. ... . . . . . . . . .. .. . . . .. . . . . . . . .. . . . . . . . . ...26
-2-
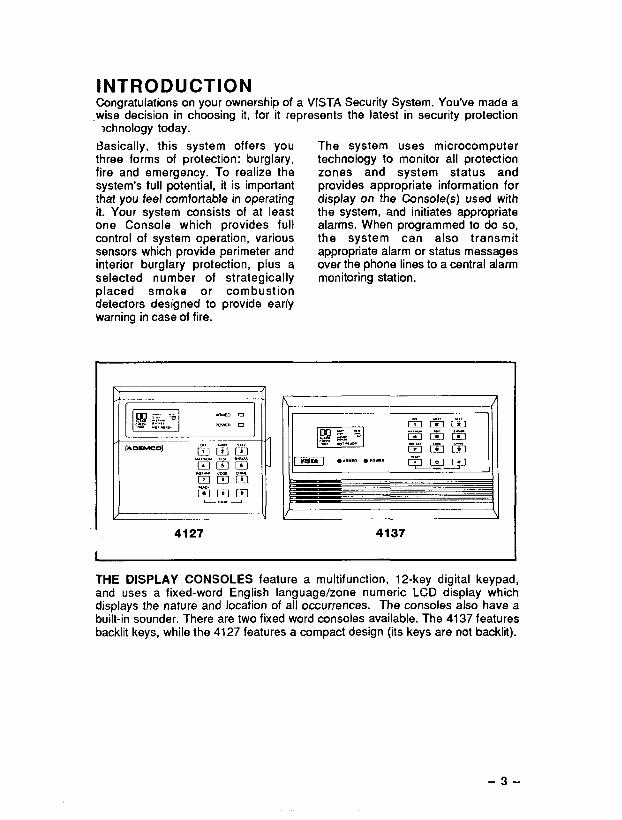
INTRODUCTIONCongratulations on your ownership of a VISTA Security System. You’ve made awise decision in choosing it, for it represents the latest in security protection~chnology today.
Basically, this system offers youthree forms of protection: burglary,fire and emergency. To realize thesystem’s full potential, it is importantthat you feel comfortable in operatingit. Your system consists of at leastone Console which provides fullcontrol of system operation, varioussensors which provide perimeter andinterior burglary protection, plus aselected number of strategicallyplaced smoke or combustiondetectors designed to provide earlywarning in case of fire.
The system uses microcomputertechnology to monitor all protectionzones and system status andprovides appropriate information fordisplay on the Console(s) used withthe system, and initiates appropriatealarms. When programmed to do so,the system can also transmitappropriate alarm or status messagesover the phone lines to a central alarmmonitoring station.
P.
ItiEr=Tr@aEiibiEq EI1313W,..s m,, 9,?.ss
Eimm.,.. Cc.x m
ImmmEimm
L.. J
v4127 4137
THE DISPLAY CONSOLES feature a multifunction, 12-key digital keypad,and uses a fixed-word English language/zone numeric LCD display whichdisplays the nature and location of all occurrences. The consoles also have abuilt-in sounder. There are two fixed word consoles available. The 4137 featuresbacklit keys, while the 4127 features a compact design (its keys are not backlit).
–3-
FIRE & BURGLARY PROTECTiONOne or more sensing devices will havebeen assigned by the installer of youralarm system to each of the variousprotection zones in your system(although not every zone may havebeen used). For example, the sensingdevice on your Entry/Exit door mayhave been assigned to zone 01,sensing devices on windows in themaster bedroom to zone 02, and so on.These numbers will appear on thedisplay when the respective zone isfaulted.
The fire protection portion of yoursecurity system (if used) is always onand will sound an alarm if a firecondition is detected. Refer to theFIRE ALARM SYSTEM section forimportant information concerning fireprotection, smoke detectors andplanning emergency exit routes fromyour house.
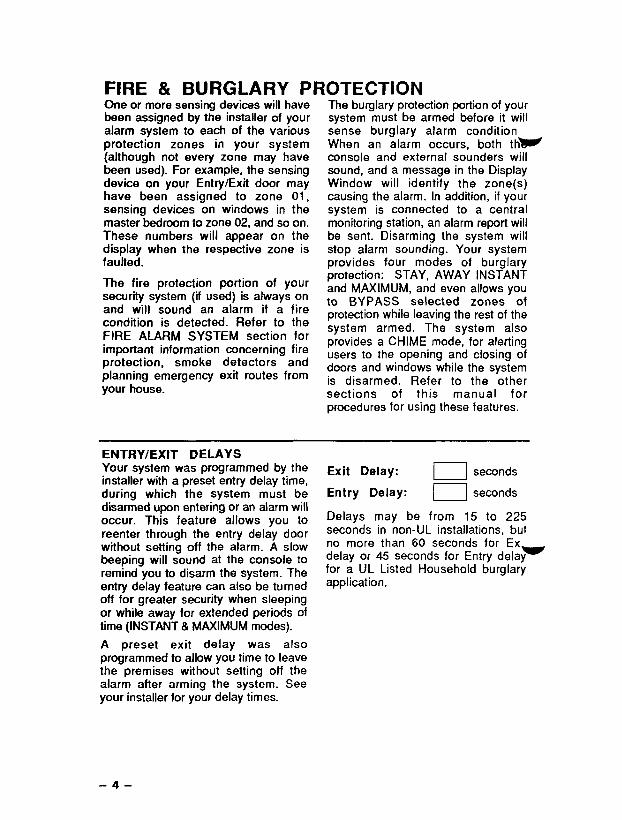
ENTRY/EXIT DELAYSYour system was programmed by theinstaller with a preset entry delay time,during which the system must bedisarmed upon entering or an alarm willoccur. This feature allows you toreenter through the entry delay doorwithout setting off the alarm. A slowbeeping will sound at the console toremind you to disarm the system. Theentry delay feature can also be turnedoff for greater security when sleepingor while away for extended periods oftime (INSTANT & MAXIMUM modes).
A preset exit delay was alsoprogrammed to allow you time to leavethe premises without setting off thealarm after arming the system. Seeyour installer for your delay times.
The burglary protection portion of yoursystem must be armed before it willsense burglary alarm conditionWhen an alarm occurs, both th~console and external sounders willsound, and a message in the DisplayWindow will identify the zone(s)causing the alarm. In addition, if yoursystem is connected to a centralmonitoring station, an alarm report willbe sent. Disarming the system willstop alarm sounding. Your systemprovides four modes of burglaryprotection: STAY, AWAY INSTANTand MAXIMUM, and even allows youto BYPASS selected zones ofprotection while leaving the rest of thesystem armed. The system alsoprovides a CHIME mode, for alertingusers to the opening and closing ofdoors and windows while the systemis disarmed. Refer to the othersections of this manual forprocedures for using these features.
Exit Delay: o seconds
Entry Delay: o seconds
Delays may be from 15 to 225seconds in non-UL installations, butno more than 60 seconds for Exdelay or 45 seconds for Entry delay-for a UL Listed Household burglaryapplication.
-4–
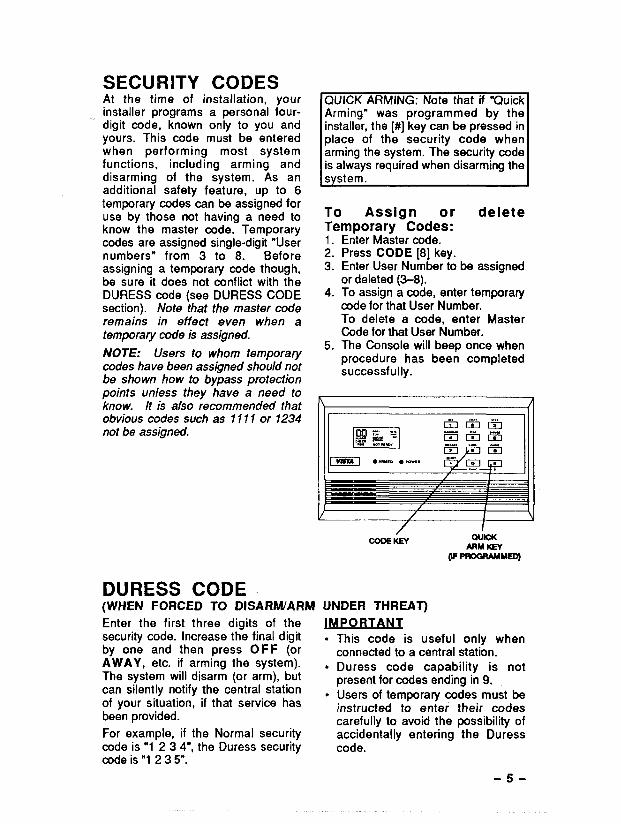
SECURITY CODESAt the time of installation, yourinstaller programs a personal four-digit code, known only to you andyours. This code must be enteredwhen performing most systemfunctions, including arming anddisarming of the system. As anadditional safety feature, up to 6temporary codes can be assigned foruse by those not having a need toknow the master code. Temporarycodes are assigned single-digit “Usernumbers” from 3 to 8. Beforeassigning a temporary code though,be sure it does not conflict with theDURESS code (see DURESS CODEsection). Note that the master coderemains in effect even when atemporary code is assigned.
NOTE: Users to whom temporarycodes have been assigned should notbe shown how to bypass protectionpoints unless they have a need toknow. It is also recommended thatobvious codes such as 1111 or 1234not be assigned.
QUICK ARMING: Note that if “QuickArming” was programmed by theinstaller, the [#] key can be pressed inplace of the security code whenarming the system. The security codeis always required when disarming the
To Assign or deieteTemDorarv Codes:
i3.
4.
5.
E;ter Ma;ter code.Press CODE [8] key.Enter User Number to be assignedor deleted (3-8).To assign a code, enter temporarycode for that User Number.To delete a code, enter MasterCode for that User Number.The Console will beep once whenprocedure has been completedsuccessfully.
/ I
il}
/ I/ 1
/ Iu
coosik QLicxAJIMXEY
(lF PROGR#MME~
DURESS CODE(WHEN FORCED TO DLSARM/ARM UNDER THREAT)
Enter the first three digits of thesecurity code. Increase the final digitby one and then press OFF (orAWAY, etc. if arming the system).The system will disarm (or arm), butcan silently notify the central stationof your situation, if that service hasbeen provided.
For example, if the Normal securitycode is”1 23 4“, the Duress securitycode is”1 23 5“.
IMPORTANT
● This code is useful only whenconnected to a central station.
● Duress code capability is notpresent for codes ending in 9.
● Users of tempxaty codes must beinstructed to enter their codescarefully to avoid the possibility ofaccidentally entering the Duresscode.
-5-
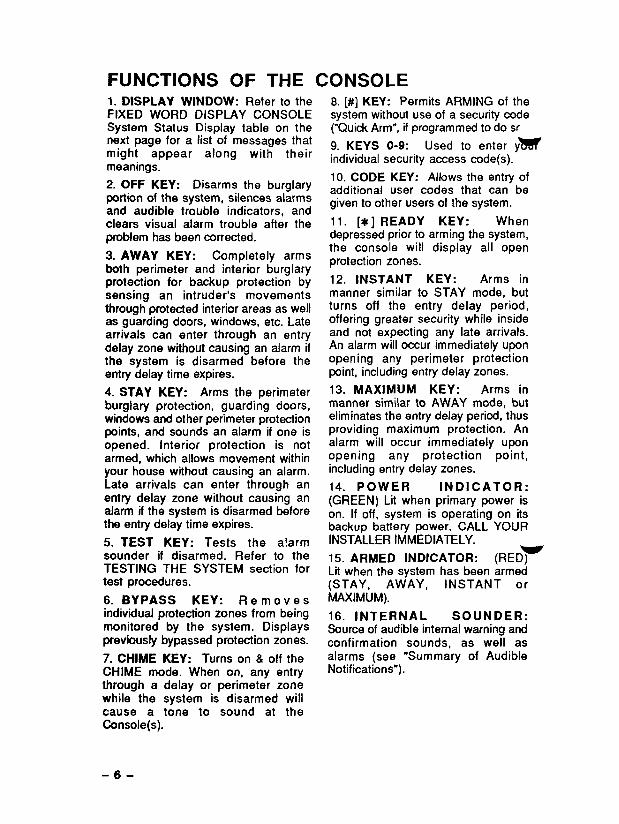
FUNCTIONS OF THE CONSOLE1. DISPLAY WINDOW: Refer to theFIXED WORD DISPLAY CONSOLESystem Status Display table on thenext page for a list of messages thatmight appear along with theirmeanings.
2. OFF KEY: Disarms the burglaryportion of the system, silences alarmsand audible trouble indicators, andclears visual alarm trouble after theproblem has been corrected.
3. AWAY KEY: Completely armsboth perimeter and interior burglaryprotection for backup protection bysensing an intruder’s movementsthrough protected interior areas as wellas guarding doors, windows, etc. Latearrivals can enter through an entrydelay zone without causing an alarm ifthe system is disarmed before theentry delay time expires.
4. STAY KEY: Arms the perimeterburglary protection, guarding doors,windows and other perimeter protectionpoints, and sounds an alarm if one isopened. Interior protection is notarmed, which allows movement withinyour house without causing an alarm.Late arrivals can enter through anentry delay zone without causing analarm if the system is disarmed beforethe entry delay time expires.
5. TEST KEY: Tests the a!armsounder if disarmed. Refer to theTESTING THE SYSTEM section fortest procedures.
6. BYPASS KEY: Re m evesindividual protection zones from beingmonitored by the system. Displayspreviously bypassed protection zones.
7. CHIME KEY: Turns on & off theCHIME mode. When on, any entrythrough a delay or perimeter zonewhile the system is disarmed willcause a tone to sound at theConsole.
8. [#] KEY: Permits ARMING of thesystem without use of a security code(“Quick Arm”, if programmed to do sc
9. KEYS O-9: Used to enter y~individual security access code(s).
10. CODE KEY: Allows the entry ofadditional user codes that can begiven to other users of the system.
11. [*] READY KEY: Whendepressed prior to arming the system,the console will display all openprotection zones.
12. INSTANT KEY: Arms inmanner similar to STAY mode, butturns off the entry delay period,offering greater security while insideand not expecting any late arrivals,An alarm will occur immediately uponopening any perimeter protectionpoint, including entry delay zones.
13. MAXIMUM KEY: Arms inmanner similar to AWAY mode, buteliminates the entry delay period, thusproviding maximum protection. Analarm will occur immediately uponopening any protection point,including entry delay zones.
14. POWER INDICATOR:(GREEN) Lit when primary power ison. If off, system is operating on itsbackuD batterv oower. CALL YOURINSTALLER IMMEDIATELY.
15. ARMED INDICATOR: (RED~Lit when the system has been armed(STAY, AWAY, INSTANT orMAXIMUM).
16. INTERNAL SOUNDER:Source of audible internal warning andconfirmation sounds, as well asalarms (see “Summary of AudibleNotifications”).
-6-
\ / /\ \ /
I \ -. .. .. .... /
IIIm p“”‘--”--‘ ‘= ‘
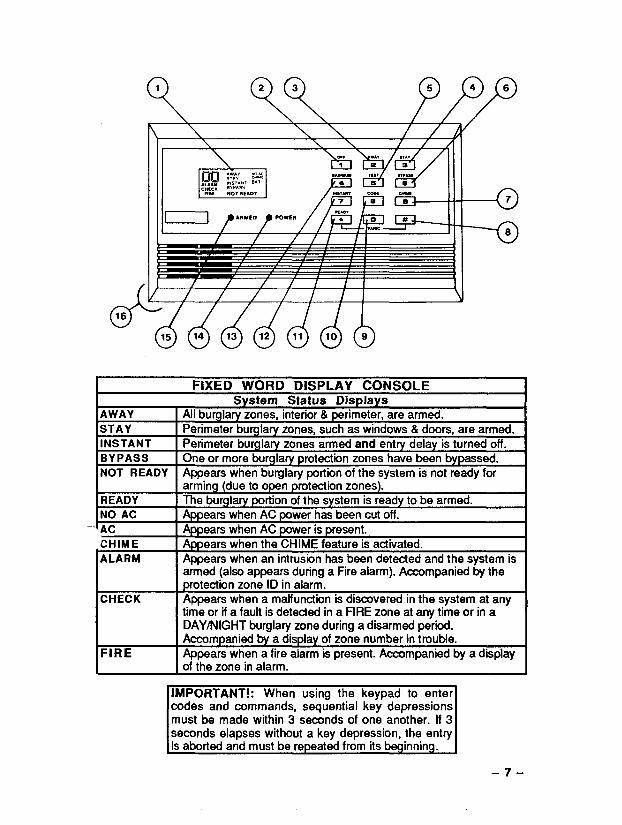
FIXED WORD DISPLAY CONSOLESystem Status Displays
AWAY All burglary zones, interior & perimeter, are armed.STAY Perimeter burglaty zones, such as windows & doors, are armed.INSTANT Perimeter burglary zones armed and entry delay is turned off.BYPASS One or more burglary protection zones have been bypassed.NOT READY Appears when burglary portion of the system is not ready for
arming (due to open protection zones).READY The burglary POrtion of the system is readyNO AC Appears when AC power has been cut off.
‘ AC Appears when AC power is present.CHIME Aooears when the CHIME
El
to be armed.
_ feature is activated.-ARM Appears when an intrusion has been detected and the system is
armed (also appears during a Fire alarm). Accompanied by theprotection zone ID in alarm.
CHECK Appears when a malfunction is discovered in the system at anytime or if a fault is detected in a FIRE zone at any time or in aDAY~lGHT burglaty zone during a disarmed period.Accompanied by a display of zone number in trouble.
FIRE Appears when a fire alarm is present. Accompanied by a displayof the zone in alarm.
~
IMPORTANT!: When using the keypad to entercodes and commands, sequential key depressionsmust be made within 3 seconds of one another If 3seconds elapses without a key depression, the entryis abortad and must be re eated from its b innin .
-7-
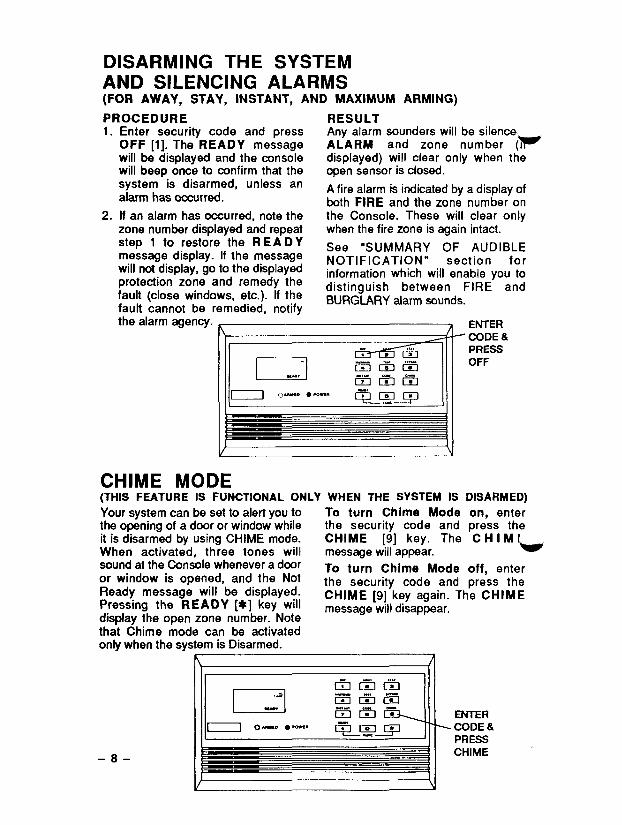
DISARMING THE SYSTEMAND SILENCING ALARMS(FOFi AWAY, STAY, INSTANT, AND MAXIMUM ARMING)
PROCEDURE RESULT1.
2.
Enter security code and press Any alarm sounders will be silenceOFF [1]. The READY message ALARM and zone number (~will be displayed and the console displayed) will clear only when thewill beep once to confirm that the open sensor is closed.system is disarmed, unless an A fire alarm is indicated by a display ofalarm has occurred. both FIRE and the zone number onIf an alarm has occurred, note the the Console. These will clear onlyzone number displayed and repeat when the fire zone is again intact. -step 1 to restore the READYmessage display. If the message
See “SUMMARY OF AUDIBLENOTIFICATION” section for
will not display, go tot he displayedprotection zone and remedy the
information which will enable you to
fault (close windows, etc.). If thedistinguish between FIRE and
fault cannot be remedied, notifyBURGIARY alarm sounds.
the alarm agency. ~~ ENTER
CHIME MODE(THIS FEATURE IS FUNCTIONAL ONLY WHEN THE SYSTEM IS
Your system can be set to alert you to To turn Chime Modethe opening of a door or window while the security code andit is disarmed by using CHIME mode. CHIME [9] key. TheWhen activated, three tones will message will appear.
PRESSOFF
DISARMED)
on, enterpress theCHIM
L
sound at the Console whenever a door To turn Chime Mode off, enteror window is opened, and the NotReady message will be displayed.
the security code and press the
Pressing the READY [*] key willCHIME [9] key again. The CHIME
display the open zone number. Notemessage will disappear.
that Chime mode can be activatedonly when the system is Disarmed.
h a
-8-
L ,
cdla&leifiiaixlrala~ ENTER
m 0-” ● ’-- qm> -- ‘ CODE &PRESS
1
CHIME
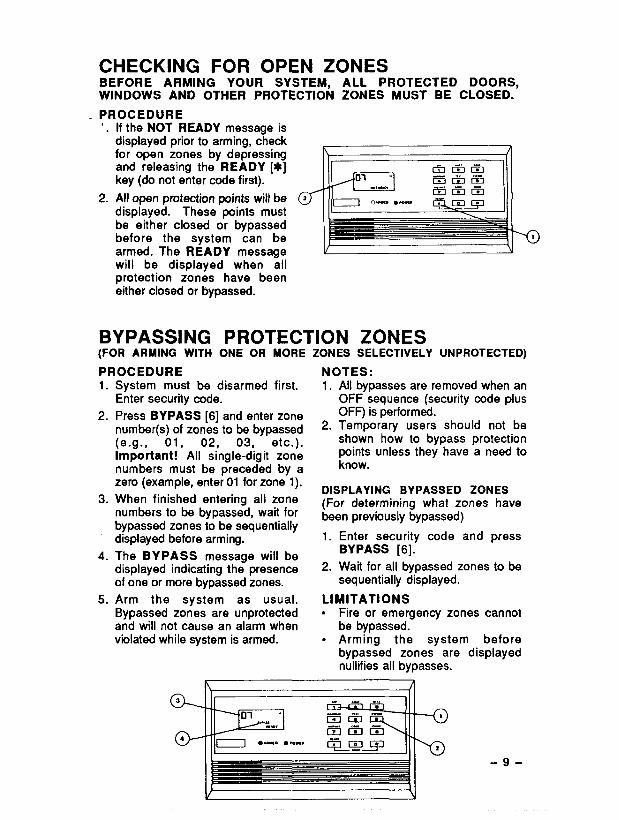
CHECKING FOR OPEN ZONESBEFORE ARMING YOUR SYSTEM, ALL PROTECTED DOORS,WINDOWS AND OTHER PROTECTION ZONES MUST BE CLOSED.
PROCEDURElftheNOT READY messageisdisplayed priorto arming, checkfor open zones by depressingand releasing the READY [*]key (do not enter code first).
All open protection points will bedisplayed. These” pints mustbe either closed or bypassedbefore the system can bearmed. The READY messagewill be displayed when allprotection zones have beeneither closed or bypassed.
BYPASSING PROTECTION ZONES(FOR ARMING WITH ONE OR MORE ZONES SELECTIVELY UNPROTECTED)
PROCEDURE1.
2.
3.
4.
5.
System must be disarmed first.Enter security code.
Press BYPASS [6] and enter zonenumber(s) of zones to be bypassed(e.g., 01, 02, 03, etc.).Important! All single-digit zonenumbers must be preceded by azero (example, enter 01 for zone 1).
When finished entering all zonenumbers to be bypassed, wait forbypassed zones to be sequentiallydisplayed before arming.
The BYPASS message will bedisplayed indicating the presenceof one or more bypassed zones.
Arm the system as usual.Bypassed zones are unprotectedand will not cause an alarm whenviolated while system is armed.
NOTES:1. All bypasses are removed when an
OFF sequence (security code plusOFF) is performed.
2. Temporary users should not beshown how to bypass protectionpoints unless they have a need toknow.
DISPLAYING BYPASSED ZONES(For determining what zones havebeen previously bypassed)
1. Enter security code and pressBYPASS [6].
2. Wait for all bypassed zones to besequentially displayed.
LIMITATIONS● Fire or emergency zones cannot
be bypassed.● Arming the system before
bypassed zones are displayednullifies all bypasses.
A\ /
–-@Elicata
U ● - ● -. qi_rmg-9-
ARMING PERIMETER ONLYSTAY: STAYING HOME, EXPECTING LATE ARRIVALSINSTANT: STAYING HOME, NO LATE ARRIVALS EXPECTED
PROCEDURE1. Enter the security code when the 3. The armed state message will ~
READY message is displayed. displayed, accompanied by three
2. Press the STAY [3] or INSTANT beeps from the Console. Exit delay
[71 key, depending on arming mode begins. Perimeter protection is in
desired. effect immediately, except entrydelay zone if STAY key ispressed.
STAY KEY RESULTArms sensors guarding doors andwindows, with entry delay on. Latearrivals can enter through the entrydelay zone door and disarm thesystem within the entry delay periodwithout causing an alarm. See yourinstaller for actual delay times set foryour system. Alarms will occurinstantly when any exterior protectionpoint is violated, except the entrydelay zone door, which will activate analarm if the system is not disarmedwithin the entry delay period. Interiorprotection points are disarmed topermit freedom of movementthroughout the interior.
–lo-
INSTANT KEY RESULTArms sensors guarding doors a-windows, with entry delay off. Alarmswill occur instantly when any exteriorprotection point is violated, includingthe entry delay zone door. Interiorprotection points are disarmed topermit freedom of movementthroughout the interior.
ARMING ALL PROTECTIONAWAY: NO ONE STAYING HOMEMAXIMUM: NO ONE STAYING HOME, MAXIMUM SECURITY
=ROCEDURE,. Enter the security code when the 3. The armed state message will be
READY message is displayed. displayed, accompanied by two
2. Press the A W A Y [2] or beeps from the Console. Exit
MAXIMUM [4] key, depending on delay begins [if programmed, a
arming mode desired. slow beeping will sound throughoutthe exit delay period]. Completesystem protection is in effectimmediately, except entry delayzone if AWAY key is pressed.
\ /
\ ●
� ✎ ✎
-mm - .
mlamD AnMCO● POWm qmq
&WAY KEY RESULTArms all perimeter and interiorsensors, with entry delay on. You mayexit during the exit delay period andreenter through the entry delay zonedoor (and disarm the system withinthe entry delay period) withoutcausing an alarm. See your installerfor actual delay times set for yoursystem. Alarms will occur instantlywhen any protection point, interior orexterior, is violated, except the entrydelay zone door if AWAY keypressed, which will activate an alarm ifthe system is not disarmed within theentry delay period.
MAXIMUM KEY RESULTArms all perimeter and interiorsensors, with entry delay off. Youmay exit during the exit delay period,BUT alarms will trigger instantly uponreentering, or when any protectionpoint, interior or exterior, is violated.This mode is suggested when thepremises will be vacant for extendedperiods of time such as vacations,etc., or when retiring for the night andno one will be moving throughprotected interior areas.
-11-
PANIC KEYS(FOR MANUALLY ACTIVATING SILENT AND/oR AUDIBLE ALARMS)
There are two possible combinations ofpaired keys that are installerprogrammable emergency functions.See your installer for the functions thathave been programmed for theseemergency key pairs. Typicalfunctions that might be programmedare Silent Police, Audible Police,Personal Emergency, and Fire.
To use a Panic function,simpiy press both keys of theassigned pair at the same timeand hold down for at /east twoseconds.
Active Panic Functions:KEY[*]+[q:
(displayed es zone W)
KPf[q + [3]:(displayedaszone%)
A
RESULTIf programmed for silent emergency byour installer, and the system ~connected to a central alarmmonitoring station, the control will senda silent alarm signal to the centralstation, but there will be no audiblealarms or visual displays. Ifprogrammed for audible emergency byyour installer, a loud, steady alarm willsound at your console and at anyexternal sounders that may beconnected.
A personal emergency alarm will notifythe central station (if connected) andwill sound at consoles, but not atexternal belis or sirens.
A fire alarm will send a fire alarmmessage to the centrai station and willuniquely sound external bells andsirens.
-12–
TESTING THE SYSTE(TO BE CONDUCTED WEEKL
1. Disarm the system.
Enter security code and press theTEST [5] key.
3. The external sounder shouldsound for3 seconds and then turnoff . If the sounder does notsound, it may be due to dialercommunication activity. Wait afew minutes and try again. If thesounder still does not sound, CALLFOR SERVICE IMMEDIATELY.
4. Turn the Test mode off by enteringthe security code and preesingOFF.
ARMED SYSTEM TESTImportant! A message will be sentto the central alarm monitoring station(if the system is so connected) duringthe following tests. Notify them that atest will be in progress.Note: A display of FC on yourconsole indicates a failure of thesystem to communicate with the alarmmonitoring station .
M.Y)
2.
3.
Check the keypad-initiated panicalarms, as indicated on page 12,by pressing keys [*]& [#], and [#]& [3]. If the system has beenprogrammed for audibleemergency, the console will emit aloud, steady alarm sound.
When [*] and [#] are pressed,flLtl RM* and “99” will bedisplayed.When [#] and [3] are pressed,RLfl RM* and “96’ will bedisplayed.
●tlLRRM and/or FIRE may bedisplayed on the consoles.
If a certain set of keys has beenprogrammed for silent panic,there will be no alarms ordisplays; however, a silentmessage will be sent to thealarm monitoring station if thesystem has been so connected.
Disarm the system (security codeplus OFF).
1. Arm the system and fault each 4. Notify the alarm monitoring station
zone (open and close each(if connected to one) that all tests
protected doors or window). are finished and verify results with
Silence the alarm sounder(s) eachthem.
time by entering your ~ecuritycode and pressing OFF. Checkthat Entry/Exit delay zonesprovide the assigned delay times(see page 4).
13 -
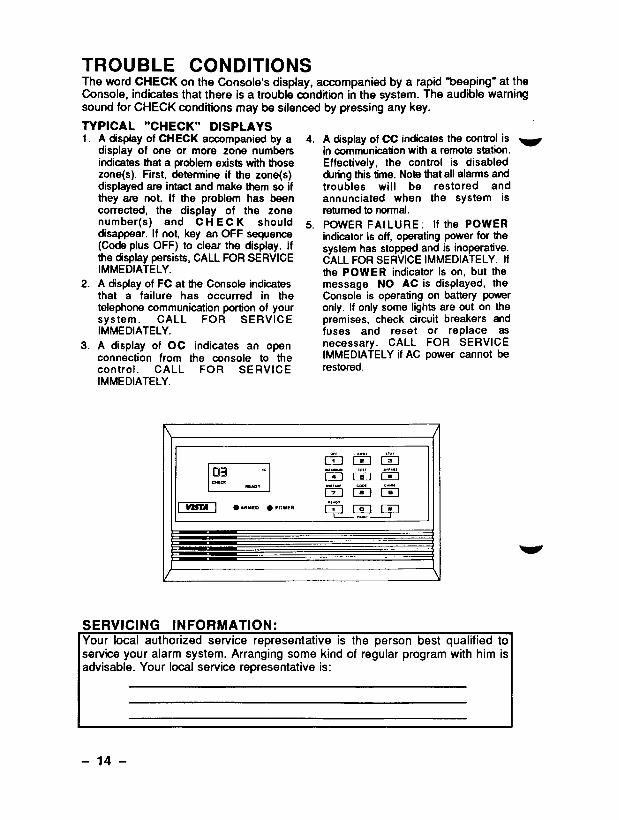
TROUBLE CONDITIONSThe word CHECK on the Console’s display, accompanied by a rapid “beeping” at theconsole, indicates that there is a trouble condition in the system. The audible warningsound for CHECK conditions may be silenced by pressing-any key.
1.
2.
3.
TYPICAL “CHECK” DISPLAYSA disolay of CHECK accompanied bv a 4. A disolav of CC indicates the control isdisplay hf one or more zone num6ersindicates that a problem exists with thosezone(s), First, determine if the zone(s)displayed are intact and make them so ifthey are not. If the problem has beencorrected, the display of the zonenumber(s) and CH EC K shoulddisappear. If not, key an OFF sequence(Code plus OFF) to clear the display. Ifthe display persists, CALL FOR SERVICEIMMEDIATELY.A display of FC at the Console indicatesthat a failure has occurred in thetelephone communication portion of yoursystem. CALL FOR SERVICEIMMEDIATELY.
A display of OC indicates an openconnection from the console to the
in cor’nm’unicationwith a remote station.Effectively, the control is disabledduring this time. Note that all alarms andtroubles will be restored andannunciated when the system isreturned to normal.
5. POWER FAILURE: If the POWERindicator is off, operating power for thesystem has stopped and is inoperative.CALL FOR SERVICE IMMEDIATELY. Ifthe POWER indicator is on, but themessage NO AC is displayed, theConsole is operating on battery poweronly. If only some Ights are out on thepremises, check circuit breakers andfuses and reset or replace asnecessary. CALL FOR SERVICEIMMEDIATELY if AC power cannot be
control. CALL FOR SERVICE restored.
IMMEDIATELY.
SERVICING INFORMATION:Your local authorized service representative is the person best qualified toservice your alarm system. Arranging some kind of regular program with him isadvisable. Your local service representative is:
-14-
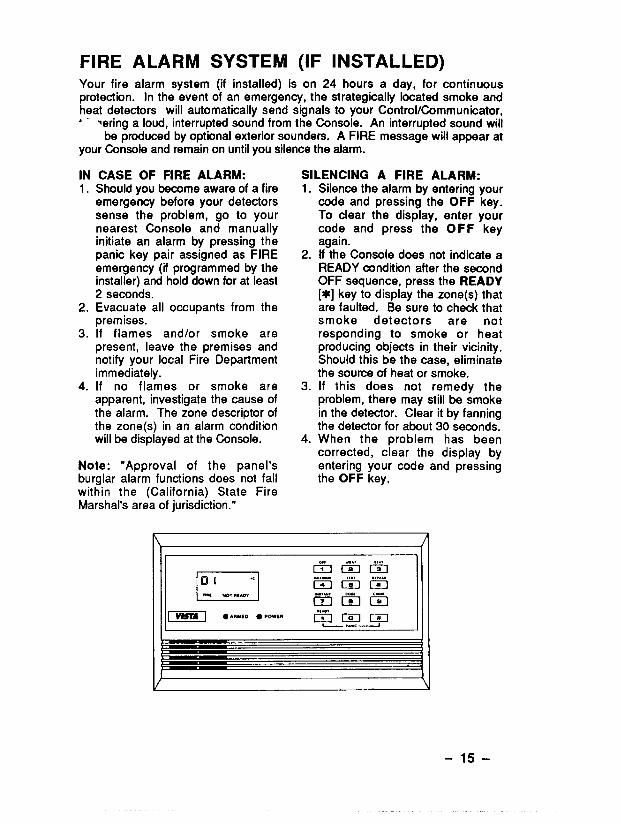
FIRE ALARM SYSTEM (IF INSTALLED)Your fire alarm system (if installed) is on 24 hours a day, for continuousprotection. In the event of an emergency, the strategically located smoke andheat detectors will automatically send sgnals to your Control/Communicator,“ - ~ering a loud, interrupted sound from the Console. An interrupted sound will
be produced by optional exterior sounders. A FIRE message will appear atyour tinsole and remain on until you silence the alarm.
IN1.
2.
3.
4.
CASE OF FIRE ALARM:Should you become aware of a fireemergency before your detectorssense the problem, go to yournearest Console and manuallyinitiate an alarm by pressing thepanic key pair assigned as FIREemergency (if programmed by theinstaller) and hold down for at least2 seconds.Evacuate all occupants from thepremises.If flames and/or smoke arepresent, leave the premises andnotify your local Fire Departmentimmediately.If no flames or smoke areapparent, investigate the cause ofthe alarm. The zone descriptor ofthe zone(s) in an alarm conditionwill be displayed at the Console.
Note: “Approval of the panel’sburglar alarm functions does not fallwithin the (California) State FireMarshal’s area of jurisdiction.”
SILENCING A FIRE ALARM:1.
2.
3.
4.
Silence the alarm by entering yourcode and pressing the OFF key.To clear the display, enter yourcode and press the O F F keyagain.If the Console does not indicate aREADY condition after the secondOFF sequence, press the READY[*] key to display the zone(s) thatare faulted. Be sure to check thatsmoke detectors are notresponding to smoke or heatproducing objects in their vicinity.Should this be the case, eliminatethe source of heat or smoke.If this does not remedy theproblem, there may still be smokein the detector. Clear it by fanningthe detector for about 30 seconds.When the problem has beencorrected, clear the display byentering your code and pressingthe OFF key.
h I
Illln=n●..”,0.,..,”,,-,m_l_m I
-15-
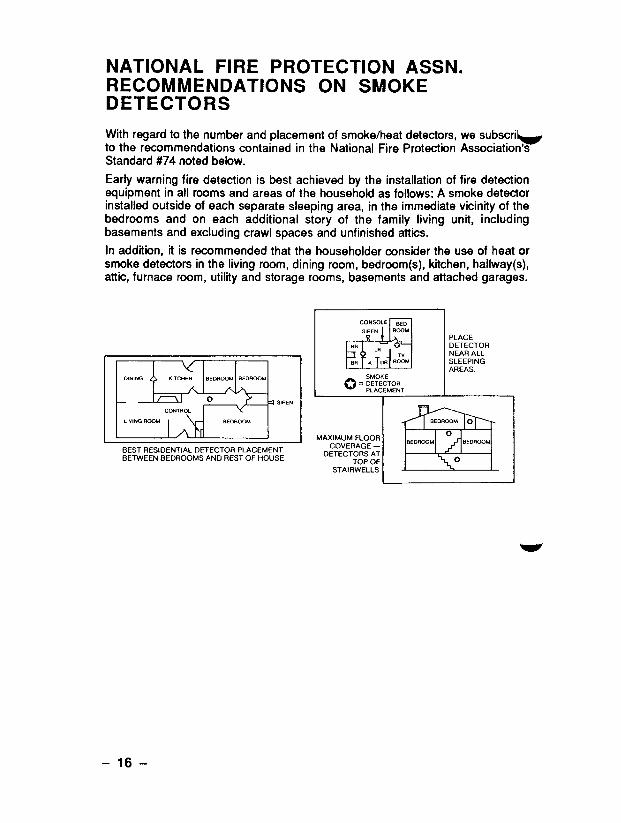
NATIONAL FIRE PROTECTION ASSN.RECOMMENDATIONS ON SMOKEDETECTORS
With regard to the number and placement of smoke/heat detectors, we subscri~to the recommendations contained in the National Fire Protection Association’sStandard #74 noted below.
Early warning fire detection is best achieved by the installation of fire detectionequipment in all rooms and areas of the household as follows: A smoke detectorinstalled outside of each separate sleeping area, in the immediate vicinity of thebedrooms and on each additional story of the family living unit, includingbasements and excluding crawl spaces and unfinished attics.
In addition, it is recommended that the householder consider the use of heat orsmoke detectors in the living room, dining room, bedroom(s), kitchen, hallway(s),attic, furnace room, utility and storage rooms, basements and attached garages.
YDIN(NGd > KITCHEN mm
Af--d o a SIREN
CCNTFOL ‘i—LIVINGRCC+l BEDRcOM
ABEST RESIDENTIAL DETECTOR PLACEMENTBETWEEN BEDROOMS AND REST OF HOUSE
I CONSOLE ~
dWREN F03M
PLACEm ,R o DETECTOR
NEAR ALLm II ~R w. SLEEPING
AREAS
I fJ = %%,PLACEMENT I
I!!ii!2BEDRGOM,0
MAXIMUM FLOORo
COVERAGE – “E””m” “o”-DETECTORS AT
TOP OF o
STAIRWELLS
-16-
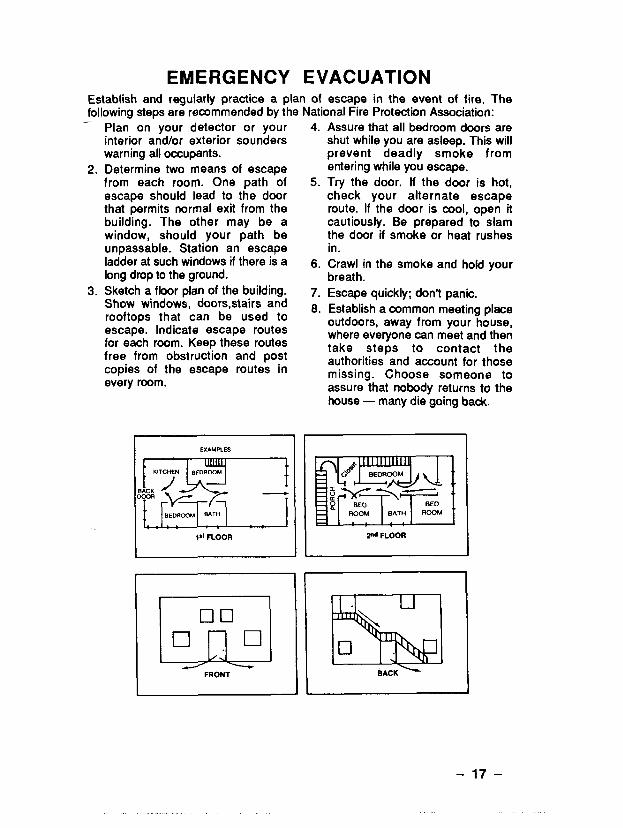
EMERGENCY EVACUATIONEstablish and regularly practice a plan of escape in the event of fire. Thefollowing steps are recommended by the National Fire Protection Association:—
2.
3.
Plan on your detector or yourinterior and/or exterior sounderswarning all occupants.
Determine two means of escapefrom each room. One path ofescape should lead to the doorthat permits normal exit from thebuilding. The other may be awindow, should your path beunpassable. Station an escapeladder at such windows if there is along drop to the ground.
Sketch a floor plan of the building.Show windows, doors, stairs androoftops that can be used toescape. Indicate escape routesfor each room. Keep these routesfree from obstruction and postcopies of the escape routes inevery room.
4.
5.
6.
7.
8.
Assure that all bedroom doors areshut while you are asleep. This willprevent deadly smoke fromentering while you escape.
Try the door. If the door is hot,check your alternate escaperoute. If the door is cool, open itcautiously. Be prepared to slamthe door if smoke or heat rushesin.
Crawl in the smoke and hold yourbreath.
Escape quickly; don’t panic.
Establish a common meeting placeoutdoors, away from your h~use,where everyone can meet and thentake steps to contact theauthorities and account for thosemissing. Choose someone toassure that nobody returns to thehouse — many die going back,
EXAMPLES
m
‘m
@FLOOR I
Ld❑ ID
❑ 0FRONT
L I
.ROOM BATH
I
ROOM T- FLOOR
m“\0.
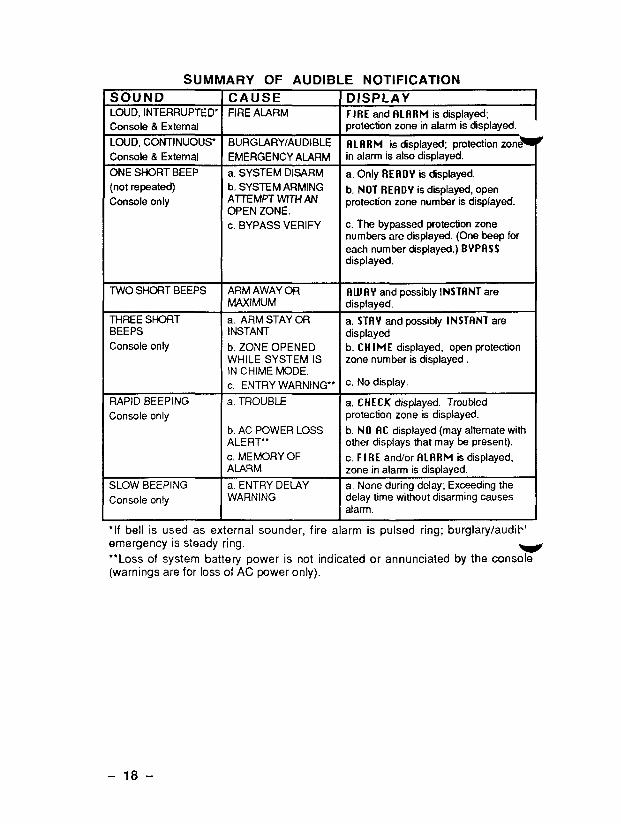
SUMMARY OF AUDIBLE NOTIFICATION
SOUNDLOUD, INTERRUPTED
Console & External
LOUD, CONTINUOUS
Console K External
ONE SHORT BEEP
(not repeated)
Console only
TWO SHORT BEEPS
THREE SHORTBEEPS
Console only
RAPID BEEPINGConsole only
SLOW BEEPING
Console only
CAUSEFIRE ALARM
BURGURY/AUDIBLE
EMERGENCY ALARM
a. SYSTEM DISARM
b. SYSTEM ARMINGAlTEMPT WITHANOPEN ZONE.
c. BYPASS VERIFY
ARM AWAY ORMAXIMUM
a. ARM STAY ORINSTANT
b. ZONE OPENEDWHILE SYSTEM ISIN CHIME MODE.
c. ENTRY WARNING**
a, TROUBLE
b. AC POWER LOSSALER~’
c. MEMORYOFAIARM
a. ENTRYDEIJIYWARNING
DISPLAYFlllE and RLflRM is displayed; Iprotection zone in alarm”is displayed. -
RLFIRM is displayed; protection zone~in alarm is also dkdaved.. .a. Only REFiDVis displayed.
b. NOT RE13DYis displayed, openprotection zone number is displayed.
c. The bypassed protection zonenumbers are displayed. (One beep foreach number displayed.) BYPFISSdisplayed.
RUJRY and possibly lNSTFiNT aredis.riaved.
a. STfl Y and possibly INST13NTaredisplayed
b. CHIME displayed, open protectionzone number is displayed.
c. No display.
a. CHECK displayed. Troubledprotection zone is displayed.
b. NO RC displayed (may alternate withother displays that may be present).
c. FIRE and/or FILRRM is displayed;zone in alarm is displayed.
a. None during delay; Exceeding thedelay time without disarming causesalarm.
‘If bell is used as external sounder, fire alarm is pulsed ring; burglary /audib’emergency is steady ring,
●*Loss of system battery power is not indicated or annunciated by the console(warnings are for loss of AC power only).
-18-

PROTECTION ZONES LISTOne or more sensing devices will have been assigned by the installer of youralarm system to each of the various protection zones in your system (although
. not every zone may have been used). For example, the sensing device on yourntry/Exit door may have been assigned to zone 01, sensing devices on
~indows in the master bedroom to zone 02, and so on.
ID numbers 01-08 represent sensor/detector protection points. ID number 96and/or 99 represent “Panic” alarm codes assigned by the installer.
For your convenience, a chart has been provided which may be used to recordthe specific protection points that have been assigned to each zone in yoursystem. Your installer will assist you in recording this information.
PROTECTION POINT DESCRIPTIONS
ID DESCRIPTION
1
2
3
4
5
6
7
8
96
99
QUICK GUIDE TO ALARM SYSTEM FUNCTIONSIFUNCTION
kheck Zones
Arm System
k
Disarm System
Bypass zones
Chime Mcde
Test Mode
PROCEDURE
Press [*]
Enter codePress arming key desired(AWAY.STAY.INSTANT,MAXIMUMl
Enter code
Press OFF [11
Enter code,Press BYPASS [6]Enter zone numbers to bebypassed (use 2digit entries)
Enter codePress CHIME [9]
Enter code & press TEST [5]
COMMENTS
To view faulted zones whensvstem not readv..Arms system in modeselected.
Disarms system and
silences alarms.
Bypassed zones areunprotected and will notcause an alarm if violated.
Console will sound if doorsor windows are violatedwhile system disarmed.
Sounds alarm sounder.
-19-
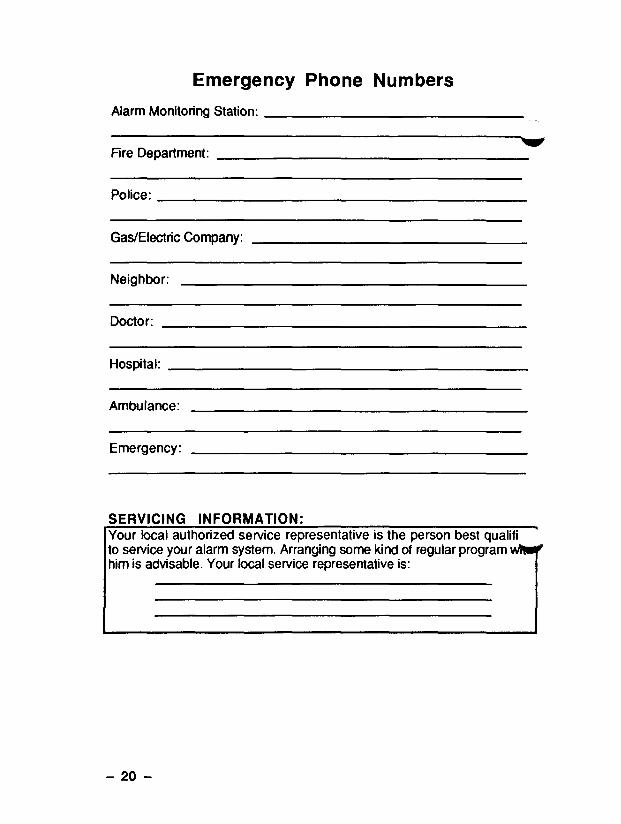
Emergency Phone Numbers
Alarm Monitoring Station:
Fire Department:
Gas/Electric Company:
Neighbor:
Doctor:
Hospital:
Ambulance:
Emergency:
SERVICING INFORMATION:Your local authorized service representative is the person best qualifi -to service your alarm system. Arranging some kind of regular program wl!uhim is advisable. Your local service representative is:
-20-
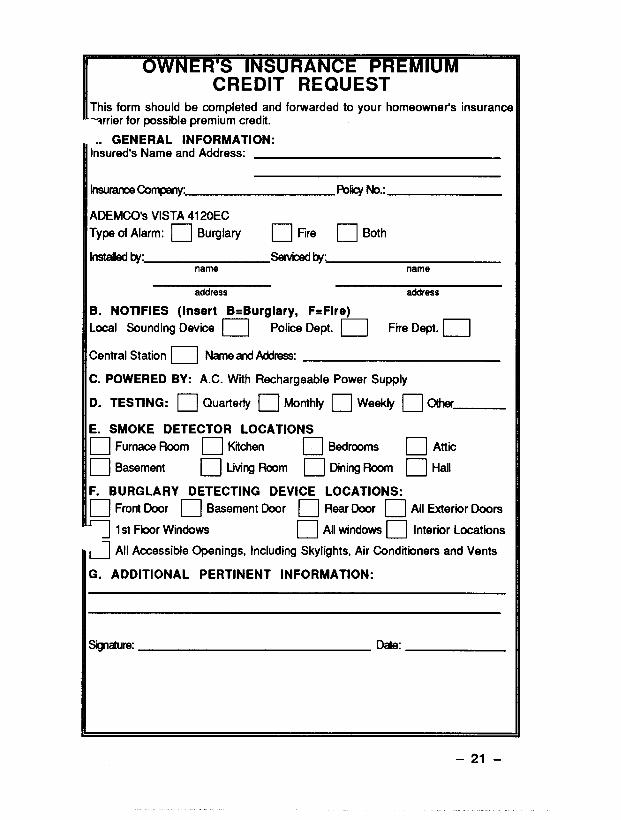
CREDIT REQUESTThis form should be completed and forwarded to your homeowner’s insurance‘=wrier for possible premium credit.
.. GENERAL INFORMATION:Insured’s Name and Address:
InsuranceCompany I%lic.yNo.:
ADEMCO’S VISTA4120EC
Type of Alarm: ❑ Burglary ❑ Fire ❑ Both
Instanadby Setvicd byname name
address addresa
B. NOTIFIES (Insert B= Burglary, F= Fire)
Local Sounding Device D Police Dept. D Fire Dept. D
Central Station U Name and Address
C. POWERED BY: A.C. With Rechargeable Power Supply
D. TESTING: ❑ Quarterly ❑ Monthly ❑ Weekly ❑ Other
E. SMOKE DETECTOR LOCATIONS
❑ Furnace Room ❑ Kitchen ❑ Bedrooms ❑ Attic
❑ Basement ❑ Living Room ❑ Dining Room ❑ Hall
F. BURGLARY DETECTING DEVICE LOCATIONS:
❑ Front Door ❑ Basement Door ❑ Rear Door ❑ All Exterior Doors
~ 1st Floor Windows ❑ All windows ❑ Interior Locations
~ All Accessible Openings, Including Skylights, Air Conditioners and Vents
G. ADDITIONAL PERTINENT INFORMATION:
3igrraura Date

Complete the reverse side of this form, detach frommanual and forward to your homeowner’s insurance w
earner for possible premium credit.
-22-
GLOSSARYThe following glossary of terms are used throughout the manual.
RM/DISARM: “Armed” simplymeans that the burglary portion ofyour system is turned ON and is in astate of readiness. “Disarmed” meansthat the burglary system is turnedOFF, and must be rearmed to becomeoperational. However, even in a“disarmed” state, “emergency” and“fire” portions of your system are stilloperat”mrral.
KEYPAD: This is the area on yourConsole containing numberedpushbuttons similar to those ontelephones or calculators. Thesekeys control the arming or disarmingof the system, and perform otherfunctions which were previouslydescribed in this manual.
ZONE: A specific area of protection.
BYPASS: To disarm a specific areaof burglary protection while leavingother areaa armed.
DELAY ZONE: An area ofprotection containing doors mostfrequently used to enter or exit(typically, a front door, back door, ordoor from the garage into thebuilding). The delay zone allowssufficient time for authorized entry orexit without causing an alarm. Consultyour installer for the entry and exitdelay times that have been set foryour system during installation.
DAY/NIGHT ZONE: An area ofprotection whose violation causes atrouble indication during the disarmed(DAY) mode and an alarm during thearmed (NIGHT) mode.
-23-
CANADIAN DEPARTMENT OFCOMMUNICATIONS (DOC) STATEMENT
NOTICEI
The Canadian Department of Communications label identifies certified equipment. This certifice
means that the equipment meets certain telecommunications network protective, operational a
safety requirements. The Departmentdoesnot guaranteethe equipment will operateto the user’ssatisfaction.
Before installing this equipmen[,usersshouldensuredtat it is permissibleto be mnnectedto thefacilitiesof the localtelecommunicationscompany.The equipment must also be installed using en
acceptableMSthodof conrwakm.Insomecases,thecompany’s inside wiring aasoaated with a singleIirw individual service may be extended by means of certified connector assembly (telephone
extension cord). The wstomer should be awere that compliance with the a!mve conditions may not
prevent degradation of service in mme situations.
Repairs to certified equipment should be made by an authorized Canadianmaintenancefacilitydesignatedby the supplier.Any repairs or alterations made by the user to this equipment, or
equipment malfunctions, may give the telecommunications company cause to request the user to
disconnea the equipment.
Users should ensure for their own protecdon that the electrical ground connecdons of the power utility,
telephone lines and internal metallic water pipe system, if present, are connected together. This
precaudon may be particularly important in rural areas.
Caution: User should not attempt to make such connections themselves, but should contact theappropriate eiectrk inspecdon authority, or electriaerr, es appropriate.
The Loed Nu mber (LN) assigned to each terminal device denotes the percentage of the total Ioed’to
be connected to a te!qhcme loop which is used by the device, to prevent overloading. Tlms termination
on a loop may mnsist of any combination of devices subject onfy to the requirement that the total of
the Loed Numbers of all the devices does not exceed lcO.
I AVIS IL%tiquette du ministrbre des Communications du Canada identifieIe mat6riel homologu~. CetteMquette cede que Ie mak%iel est conforme A certeines normes de protecticm, d’exploitation et de
s6curit6 des n%eaux de t616cmmmunications. Le ministbre n’assure toutefois pas que Ie matt%iel
fmdonnere ~ la satisfaction de I’utilisateur.
Avent d’insteller ca mat6riil, I’utiiisateur doit s’assurer qu’il est permis de Ie racmrder aux installations
de I’entreprise locale de t&%ommunication. Le mak$riel doit 6galement &re instal16 en suivartt une
m6thod acceptde de raczmrdemenl. Dens certeins cas, Ies fits int&ieurs de I’entrepriee utilis6s pour
un service individual a Iigne unique peuvent i%re prolongt% au moyen dln dispositif homobgud de
raccordement (cordon prolongateur K@honique interne), L’abonne ne do it pas oublier qu’il est
possible qua la conformit6 eux conditions 6nonc6es a-dessus n’empbchent pas la dc$gradatior
service par certeirtes situations. Actuellement, Ies enterprises de t614communication ne permet
1
pas qua I’on raccorde Ieur mat6riel aux jacks dabonn6s, sauf dens Ies cea preds pr6vus par Ies tam
pefdculiers de oes entrepriaes.
Les m$perations de mat4rk4 homologu6 doivent &re effectkes pas un centre dentretierr Canadianauthoris6 d&.ign4 par Ie fournisseur. La mmpagnie de t.4irkammunicetions peut demander ~Miliseteur de d6brancher un eppareil ~ la suite de reparations ou de modifications effecnkes perhMisateur ou ~ cause de meuveis fonctionnement.
Pour se prnpre protection, I’utilisateur doit s“essurer que tous Ies fils de mise &la terre de la source
d’energie t$lectrique, des Iignes t616phoniques et des canalisations deau m6telliques, s“il y en a, sentreccod$s ensemble. Cette pkeution est particulibrement importente clansIes r~tons rurales.
Averiiasament: LUtilisateur ne dcdt pas tenter de faire ces raccordements lui-m6me; ii doit avoir
racours A un service dinspecdon des installations 4ectriques, ou ~ un t$bctriuan, selon Ie cas.
,.~lC) assign6 ~ dtaque dispositif terminal pour twiter toute surcharge indique !e
pourcentage de la charge totate qui peut &re raccorde6 A un circuit 16Mphonique boud6 utilis6 per m
dispoeitif. La termineison du circuit bouc16 peut &re constitw$e de n’importe quelle combinaison de
disfmeitifs, pourvu que la somme des indices de tkarge de I’ensemble des dispositifs ne d6pease pas
lCK).
-24-
1“FEDERAL COMMUNICATIONS COMMISSION(FCC) STATEMENT” I
is equipment has been test-ed to FCC requirements and has been found~cceptable for use. The FCC requires the following statement for yourinformation:
This equipment generates and uses radio frequency energy and if not installedand used properly, that is, in strict accordance with the manufacturer’sinstructions, may cause interference to radio and television reception. It hasbeen type tested and found to comply with the limits for a Class B computingdevice in accordance with the specifications in Part 15 of FCC Rules, which aredesigned to provide reasonable protection against such interference in aresidential installation. However, there is no guarantee that interference will notoccur in a particular installation. If this equipment does cause interference toradio or television reception, which can be determined by turning the equipmentoff and on, the user is encouraged to try to correct the interference by one or1more of the following measures:
● If using an indoor antenna, have a qualky outdoor antenna installed.
● Reorient the receiving antenna until interference is reduced or eliminated.
● Move the receiver away from the controlkommunicator.
● Move the antenna leads away from any wire runs to the controlkommunicator.
● Plug the controlkommunicator into a different outlet so that it and the receiverare on different branch circuits.
If necessary, the user should consult the dealer or an experiencedradio/television technician for additional suggestions.
The user or installer may find the following booklet prepared by the FederalCommunications Commission helpful: “Interference Handbook”
This booklet is available from the U.S. Government Printing Office, Washington,DC 20402.
LThe user shall not make any changes or modifications to the equipment unlessIIthorized by the Installation Instructions or User’s Manual. Unauthorized
anges or modifications could void the user’s authority to operate theequipment.
I
IN THE EVENT OF TELEPHONE OPERATIONAL PROBLEMSIn the event of telephone operational problems, disconnect the control byremoving the plug from the RJ31 X (CA38A in Canada) wall jack. We recommendthat your certified installer demonstrate disconnecting the phones on installationof the system. Do not disconnect the phone connection inside thecontrolkommunicator. Doing so will result in the loss of your phone lines. tf theregular phone works correctly after the control/corn municator has beendisconnected from the phone lines, the control/mmmunicator has a problem andshould be returned for repair. If upon disconnection of the controkommunicator,there is still a problem on the line, notify the telephone company that they have aproblem and request prompt repair service. The user may not under anycircumstances (in or out of warranty) attempt any service or repairs to thesystem. It must be returned to the factory or an authorized service agency for allrepairs.
-25-
-- ‘w’””’”~THE LIMITATIONS OF THIS ALARM SYSTEMWhile this system is an advanced design security system, it does not of’~uaranteed protection against burglary or fire or other emergency. Any ala-system, whether commercial or residential, is subject to compromise or failure to~arn for a variety of reasons. For example:I Intruders may gain access through unprotected openings or have the
technical sophistication to bypass an alarm sensor or disconnect an alarmwarning device.
I Intrusion detectors (e.g. passive infrared detectors), smoke detectors, andmany other sensing devices will not work without power. Battety operateddevices will not work without batteries, with dead batteries, or if the batteriesare not put in properly. Devices powered solely by AC will not work if their ACpower supply is cut off for any reason, however briefly.Signals sent by wireless transmitters may be blocked or reflected by metalbefore they reach the alarm receiver. Even if the signal path has been recentlychecked during a weekly test, blockage can occur if a metal object is movedinto the path.A user may not be able to reach a panic or emergency button quickly enough.While smoke detectors have played a key role in reducing residential firedeaths in the United States, they may not activate or provide early warning fora variety of reasons in as many as 357. of all fires, according to data publishedby the Federal Emergency Management Agency. Some of the reasons smokedetectors used in conjunction with this System may not work are as follows.Smoke detectors may have been improperly installed and positioned. Smokedetectors may not sense fires that start where smoke cannot reach thedetectors, such as in chimneys, in walls, or roofs, or on the other side ofclosed dmxs. Smoke detectors also may not sense a fire on another level of aresidence or building. A second floor detector, for example, may not sense afirst floor or basement fire. Moreover, smoke detectors have sensinglimitations. No smoke detector can sense every kind of fire every time. Ingeneral, detectors may not always warn about fires caused by carelessnessand safety hazards like smokirm in bed, violent extiosions. esca~ina aas,improper ‘storage of flammabl; materials, overloaded electrical ci~c~; “‘children playing with matches, or arson. Depending upon the nature of the hand/or the locations of the smoke detectors, the detector, even if it operatesas anticipated, may not provide sufficient warning to allow all occupants toescape in time to prevent injury or death.Passive Infrared Motion Detectors can only detect intrusion within thedesgned ranges as diagramed in their installation manual. Passive InfraredDetectors do not provide volumetric area protection. They do create multiplebeams of protection, and intrusion can only be detected in unobstructed areascovered by those beams. They cannot detect motion or intrusion that takesplace behind walls, ceilings, floors, closed doors, glass partitions, glassdoors, or windows. Mechanical tampering, masking, painting or spraying of anymaterial on the mirrors, windows or any part of the optical system can reducetheir detection ability. Passive Infrared Detectors sense changes intemperature; however, as the ambient temperature of protected areaapproaches the temperature range of 90° to 150°F, the detection performancecan decrease.
26 –
v
I WARNING!THE LIMITATIONS OF THIS ALARM SYSTEM
J_ (continued)Alarm warning devices such as sirens, bells or horns may not alert people orwake up sleepers if they are located on the other side of closed or partly opendoore. If warning devices sound on a different level of the residence from thebedrooms, then they are less likely to waken or alert people inside thebedrooms. Even persons who are awake may not hear the warning if the alarmis muffled from a stereo, radio, air conditioner or other appliance, or by passingtraffic. Finally, alarm warning devices, however loud, may not warn hearing-impaired people or waken deep sleepers.
c Telephone lines needed to transmit alarm signals from a premises to a centralmonitoring station may be out of service or temporarily out of service.Telephone lines are also subject to compromise by sophisticated intruders.
● Even if the system responds to the emergency as intended, however,occupants may have insufficient time to protect themselves from theemergency situation. In the case of a monitored alarm system, authorities maynot respond appropriately.
c This equipment, like other electrical devices, is subject to component failure.Even though this equipment is designed to last as long as 10 years, theelectronic components could fail at any time.
The most common cause of an alarm system not functioning when an intrusion orfire occurs is inadequate maintenance. This alarm system should be testedweekly to make sure all sensors and transmitters are working properly.Installing an alarm system may make one eligible for lower insurance rates, butan alarm system is not a substitute for insurance. Homeowners, property ownersand renters should continue to act prudently in protecting themselves andcontinue to insure their lives and property.We continue to develop new and improved protection devices. Users of alarmsystems owe it to themselves and their loved ones to learn about thesedevelopments.
-27-

ADEMCO ONE YEAR LIMITED WARRANTY
Alarm Device Manufacturing Company, a Division of Pittway Corporation, and ksdivisions, subsidiaries and affiliates (“Seller”), 165 Eileen Way, Syosset, NewYork 11791, warrants its security equipment (the “product”) to be free fromdefects in materials and workmanship for one year from date of originalpurchase, under normal use and service. Seller’s obligation is limited to repairi~mor replacing, at its option, free of charge for parts, labor, or transportation, zproduct proven to be defective in materials or workmanship under normal use a~service. Seller shall have no obligation under this warranty or otherwise if theproduct is altered or improperly repaired or serviced by anyone other than theSeller. In case of defect, contact the security professional who installed andmaintains your security equipment or the Seller for product repair.
This one year Limited Warranty is in lieu of all other express warranties,oblations or liabilities. THERE ARE NO EXPRESS WARRANTIES, WHICHEXTEND BEYOND THE FACE HEREOF. ANY IMPLIED WARRANTIES,OBLIGATIONS OR LIABILITIES MADE BY SELLER IN CONNECTION WITH THISPRODUCT, INCLUDING ANY IMPLIED WARRAN~ OF MERCHANTABILITY, ORFITNESS FOR A PARTICULAR PURPOSE OR OTHERWISE, ARE LIMITED INDURATION TO A PERIOD OF ONE YEAR FROM THE DATE OF ORIGINALPURCHASE. ANY ACTION FOR BREACH OF ANY WARRANIY, INCLUDING BUTNOT LIMITED TO ANY IMPLIED WARRANTY OF MERCHANTABILITY, MUST BEBROUGHT WITHIN 12 MONTHS FROM DATE OF ORIGINAL PURCHASE. IN NOCASE SHALL SELLER BE LIABLE TO ANYONE FOR ANY CONSEQUENTIAL ORINCIDENTAL DAMAGES FOR BREACH OF THIS OR ANY OTHER WARRANTY,EXPRESS OR IMPLIED, OR UPON ANY OTHER BASIS OF LIABILITYWHATSOEVER, EVEN IF THE LOSS OR DAMAGE IS CAUSED BY THESELLER’S OWN NEGLIGENCE OR FAULT. Some states do not allow limitation onhow long an implied warranty lasts or the exclusion or limitation of incidental orconsequential damages, so the above limitation or exclusion may not apply toyou.
Seller does not represent that the product may not be compromised orcircumvented; that the product will prevent any personal injury or property lossby burglary, robbery, fire or otherwise; or that the product will in all cases provideadequate warning or protection. Buyer understands that a properly installed andmaintained alarm may only reduce the risk of a burglary, robbery, fire or otherevents occurring without providing an alarm, but it is not insurance or a guaran-tee that such will not occur or that there will be no personal injury or property kas a result. CONSEQUENTLY, SELLER SHALL HAVE NO LIABILITY FOR A
1
PERSONAL INJURY, PROPERTY DAMAGE OR OTHER LOSS BASED ON ACLAIM THE PRODUCT FAILED TO (WE WARNING. HOWEVER, IF SELLER ISHELD LIABLE, WHETHER DIRECTLY OR INDIRECTLY, FOR ANY LOSS ORDAMAGE ARISING UNDER THIS LIMITED WARRANTY OR OTHERWISE,REGARDLESS OF CAUSE OR ORIGIN, SELLER’S MAXIMUM LIABILIW SHALLNOT IN ANY CASE EXCEED THE PURCHASE PRICE OF THE PRODUCT, WHICHSHALL BE lHE COMPLETE AND EXCLUSIVE REMEDY AGAINST SELLER. Thiswarranty gives you specific legal rights, and you may also have other rightswhich vary from state to state. No increase or alteration, written or verbal, to thiswarranty is authorized.
(hDEMCOJALARM DEVICE MANUFACTURING CO.
A DWBiUN W PMWAV CCFWOfWTON
166 Eileen Way, Syosset, New York 11791
N4861V4 9/92 CopyrlghW 1990 PMWAY CORPORATION


![2GIG GC3 Security & Automation System User Guide ...Title 2GIG GC3 Security & Automation System User Guide [10004670 x01] Author Nortek Security & Control LLC Subject GC3, 2GIG, user](https://img.pdfslide.net/doc/110x75/60e987b562ab43170a568715/2gig-gc3-security-automation-system-user-guide-title-2gig-gc3-security.jpg)